Knowledge base
1000 FAQs, 500 tutorials and instructional videos. Here, there are only solutions!
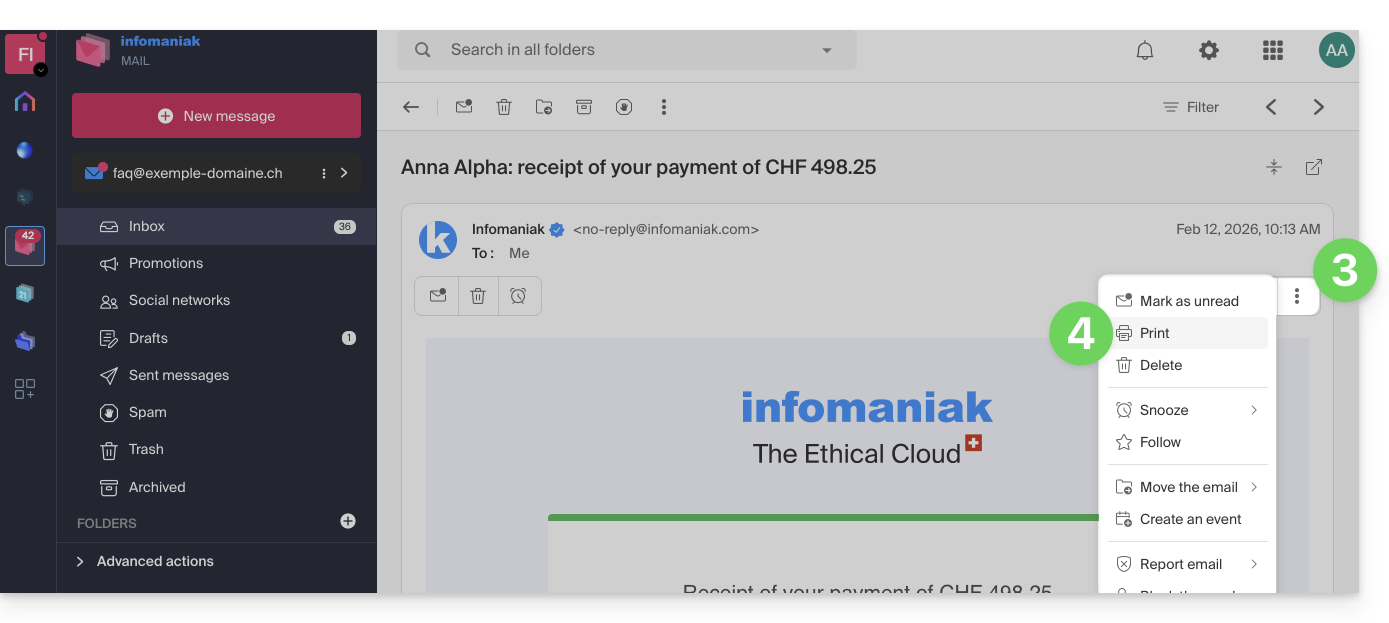
This guide for the Web app Mail Infomaniak (online service ksuite.infomaniak.com/mail) or the mobile app Infomaniak Mail (application for iOS/Android smartphone or tablet) explains how to print an email to obtain a paper printout (or better: PDF) of your message and not the interface itself.
Print an email…
… from the Web Mail Infomaniak app
To do this:
- Click here to access the Web app Mail Infomaniak (online service ksuite.infomaniak.com/mail).
- View the email to be printed.
- Click the action menu ⋮ at the top of your message.
- Click on Print:
… from the mobile app Infomaniak Mail
To do this:
- Open the mobile app Infomaniak Mail (application for iOS/Android smartphone or tablet).
- View the email to be printed.
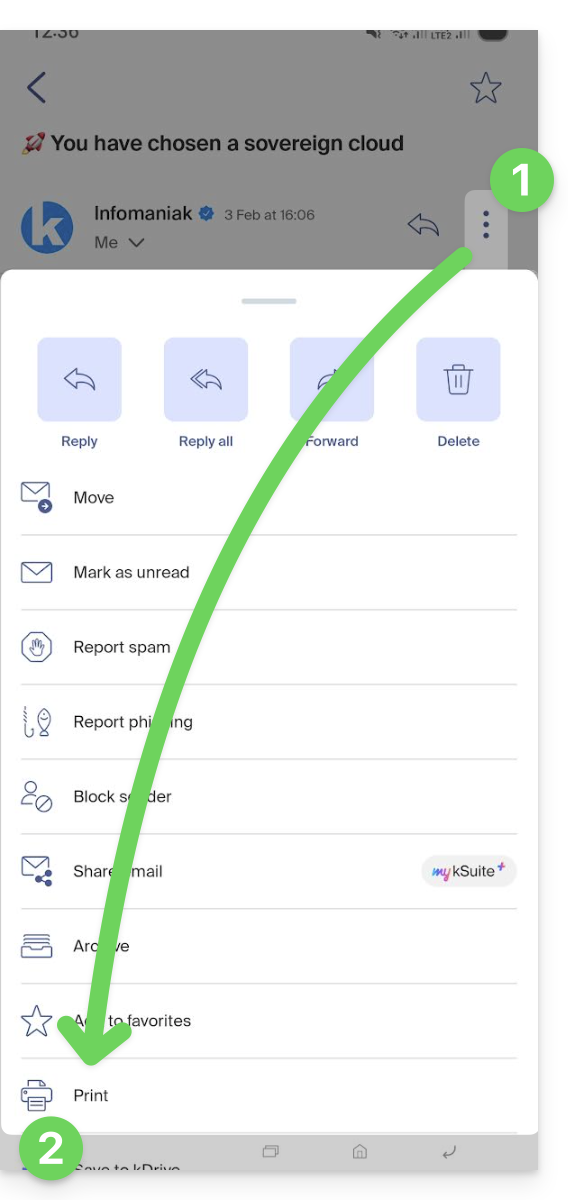
- Press the action menu ⋮ at the top right of the message.
- Press Print:
Link to this FAQ:
Has this FAQ been helpful?
This guide explains how to terminate a partnership between a Client and a Partner as part of the Infomaniak Partner Program.
Stop the partnership...
... as a Client
To do this:
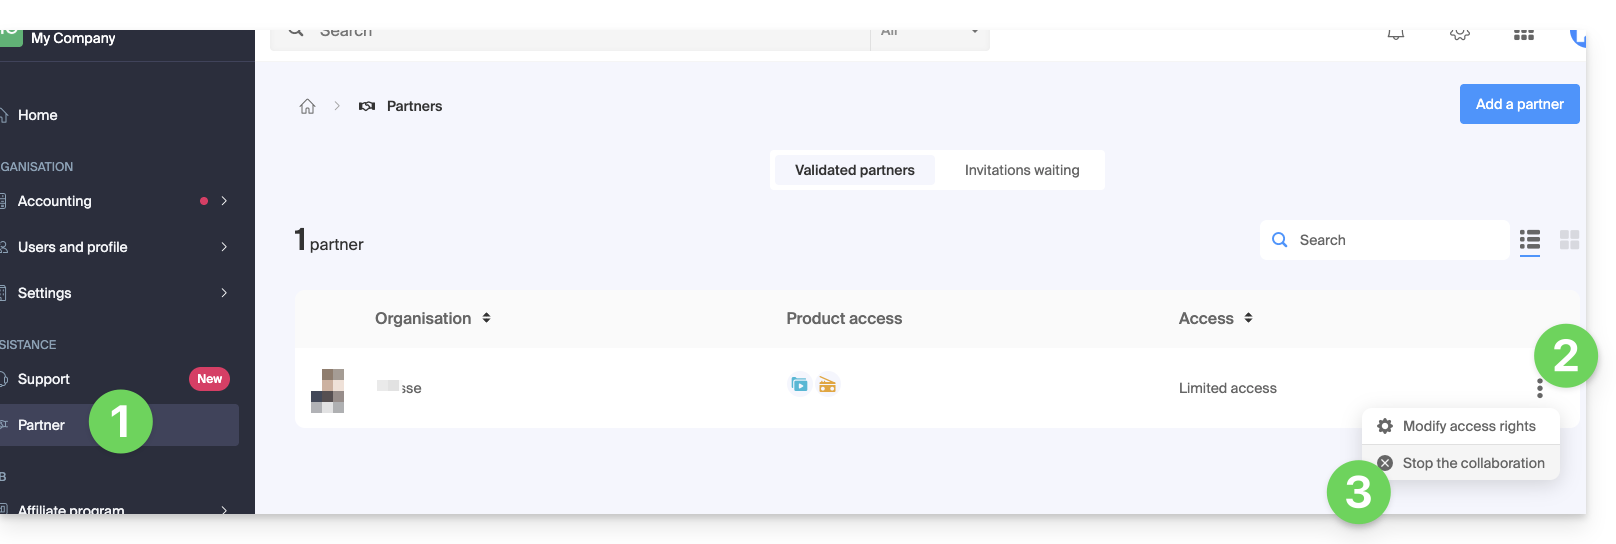
- Click here to access the management of your partnerships on the Infomaniak Manager (need help?).
- Click on the action menu ⋮ to the right of the Partner concerned in the table that appears.
- Click on Stop the collaboration:
- Confirm the removal of the Partner for the first time.
- Definitely validate by entering the Infomaniak account password.
- The partnership has been successfully terminated.
... as a Partner
To do this:
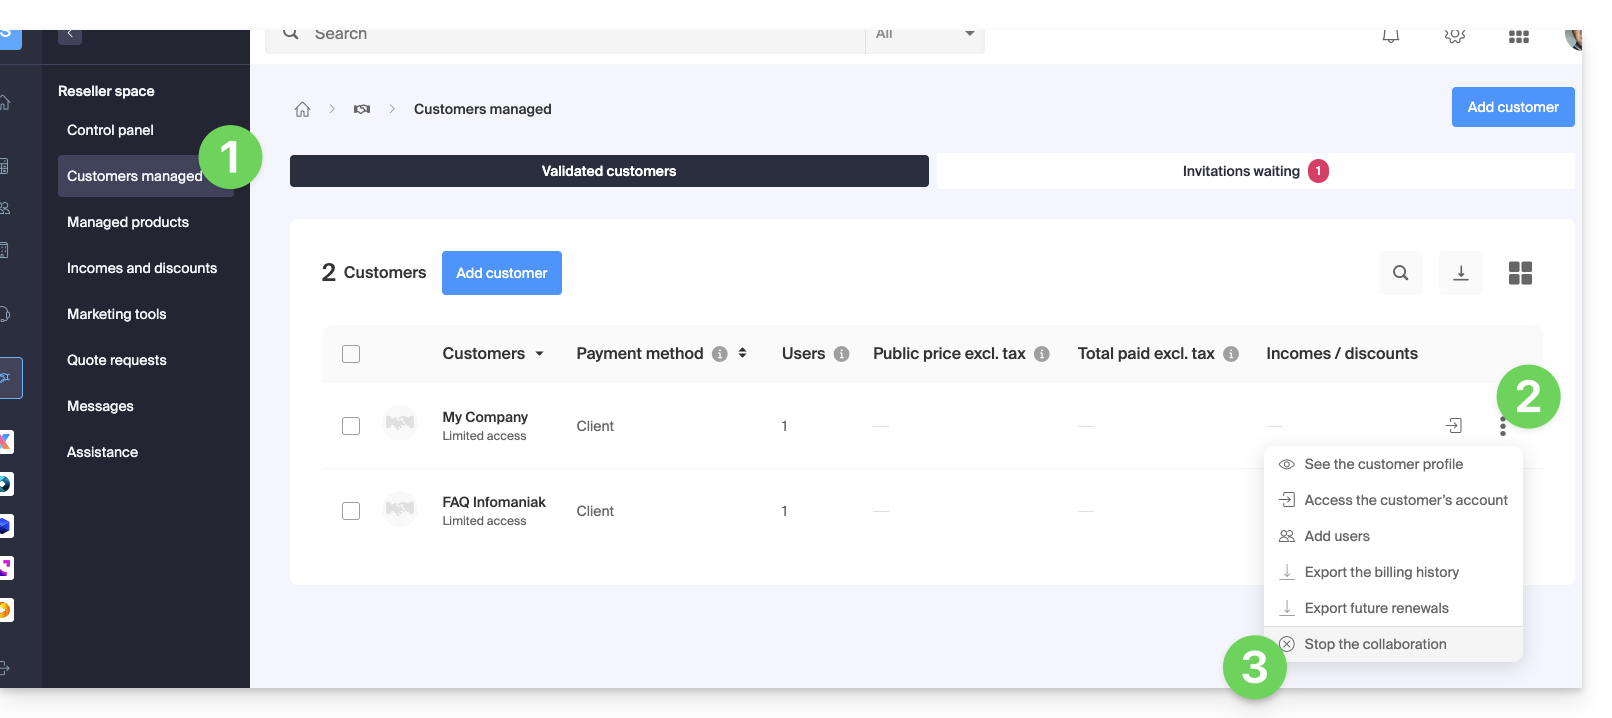
- Click here to access your Managed Clients on the Reseller Space of the Infomaniak Manager (need help?).
- Click on the action menu ⋮ to the right of the Client concerned in the table that appears.
- Click on Stop the collaboration:
- Confirm the removal of the Client for the first time.
- Definitely validate by entering the Infomaniak account password.
- The partnership has been successfully terminated.
Link to this FAQ:
Has this FAQ been helpful?
This guide concerns the Drupal module "Infomaniak_Connect" which allows users to log in to your Drupal site (whether hosted by Infomaniak or not) using their Infomaniak credentials.
Preamble
- Allowing login via an Infomaniak account on your Drupal site enables your visitors to comment, register for courses, or access any member-exclusive content with a single click, without needing to create a new account.
- This saves them time and is a safer method for you, as you don't have to manage additional passwords.
- The operation of this external module is identical to the options "Log in with Google", "Log in with Facebook" or "Log in with Apple"; it uses the standard protocols OAuth2 and OpenID Connect to enable single sign-on (SSO).
A. Create an application with Auth Infomaniak
To do this:
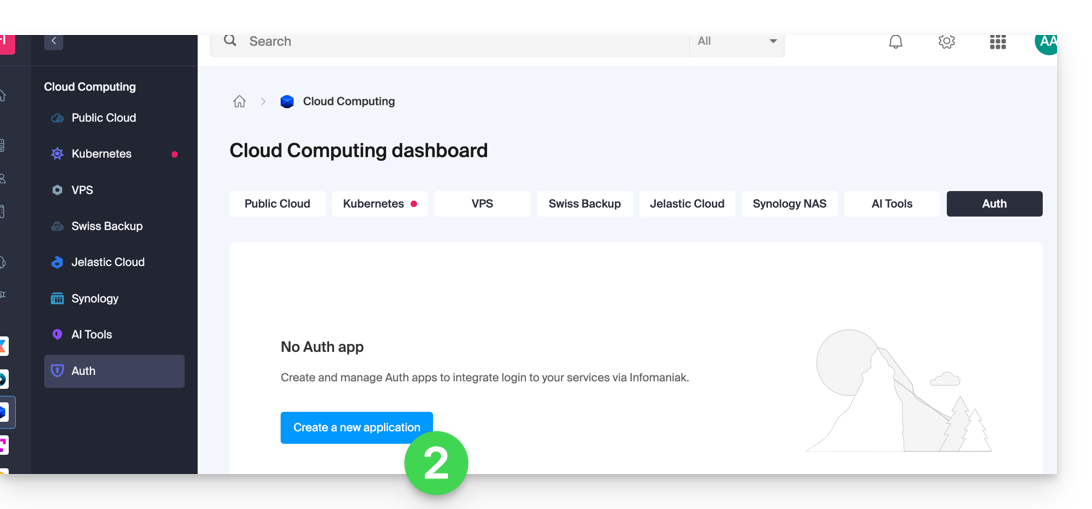
- Click here to access the management of your product Auth on the Infomaniak Manager (need help?).
- Click the button to Create a new application:
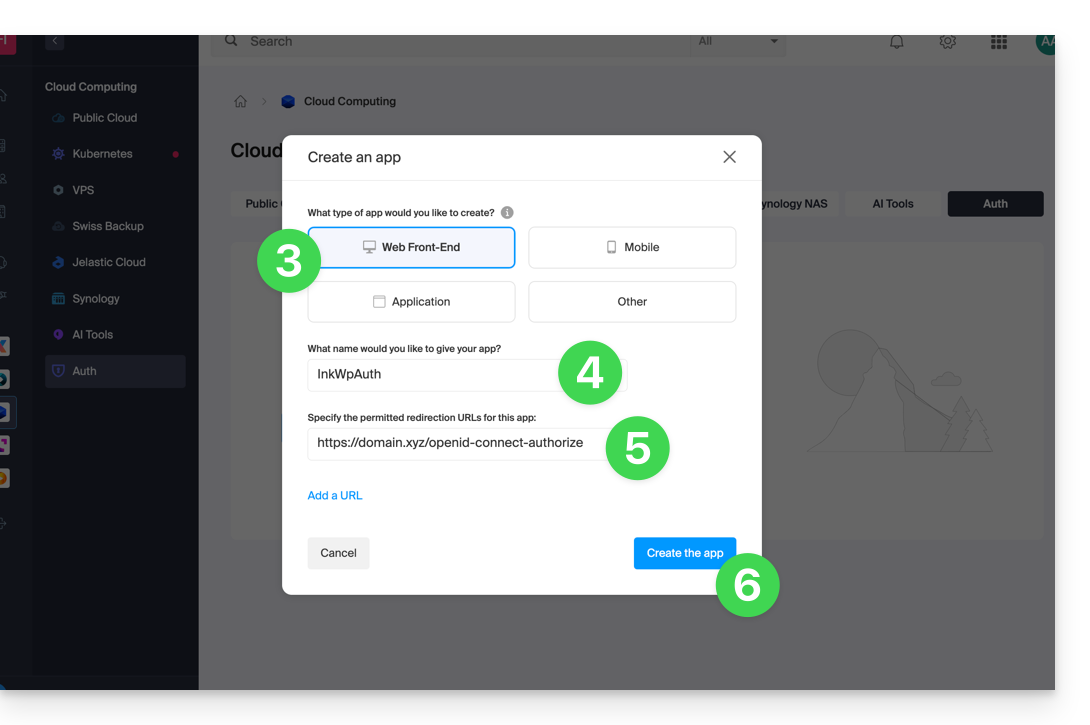
- Choose the type "Web Front-End".
- Give a name to your application.
- In the URL field, specify the domain name corresponding to your Drupal site followed by
/openid-connect-authorize(refer to the GitHub documentation if necessary). - Click the button to complete the app creation:
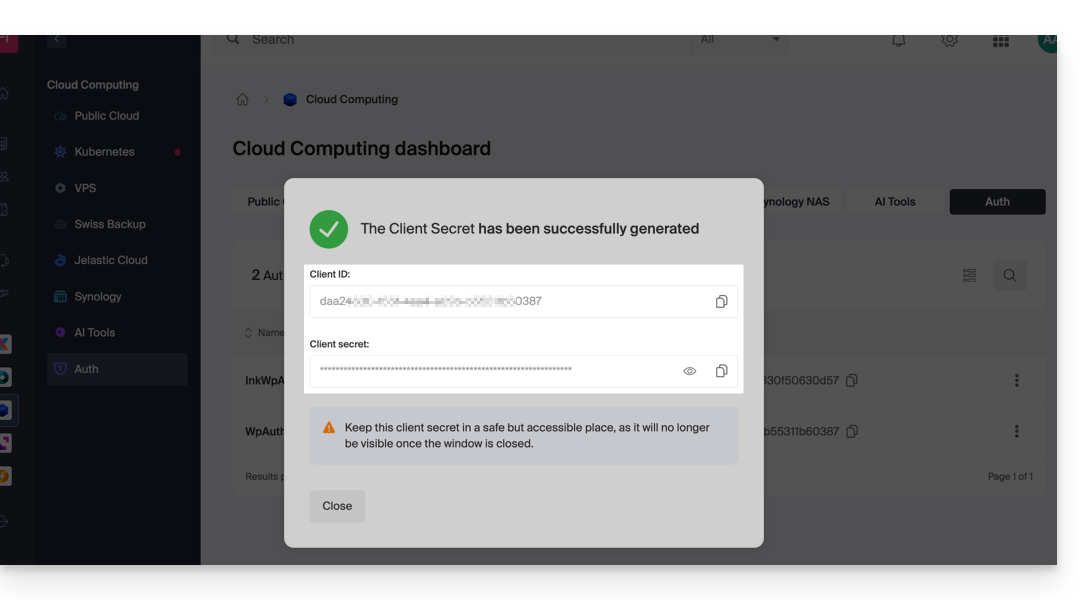
- Carefully note the 2 pieces of information obtained when finalizing your OAuth2 application:
B. Configure the Drupal extension
In SSH, deploy Composer if necessary to retrieve the openid_connect and infomaniak_connect extensions. To do this:
- You may need to edit the composer.json file as the version of
openid_connectis not yet considered stable. Add: "minimum-stability": "dev", "prefer-stable": true- The SSH commands for installing the 2 extensions are here:
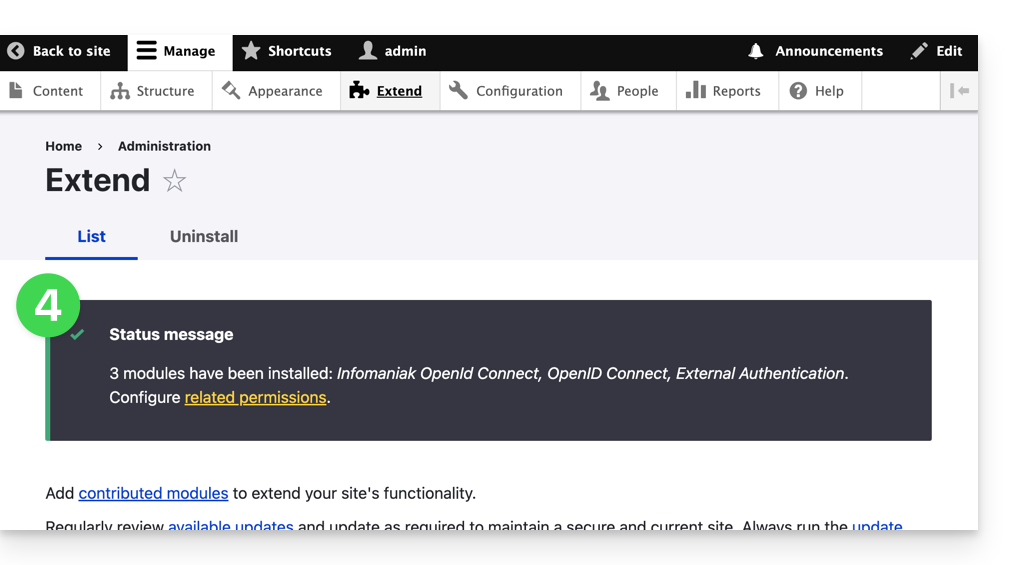
Then, on Drupal:
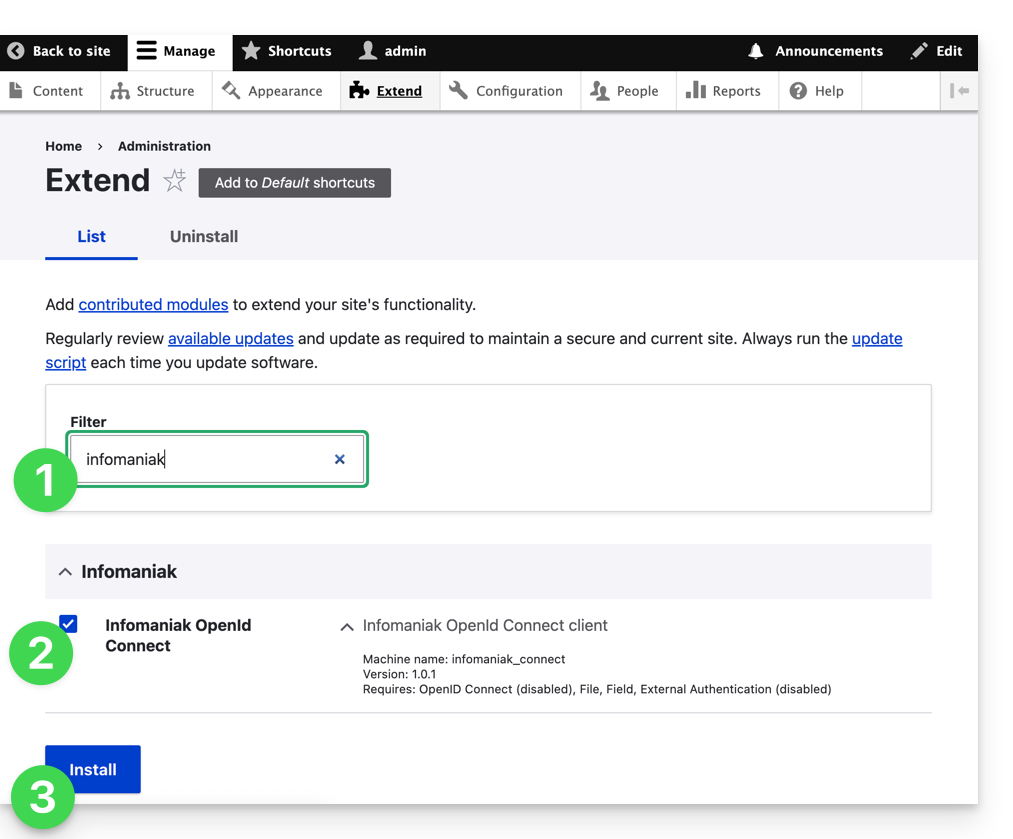
- Search for the Infomaniak module among your pre-installed modules.
- Select it.
- Click the Install button:
- The installation of dependencies will proceed:
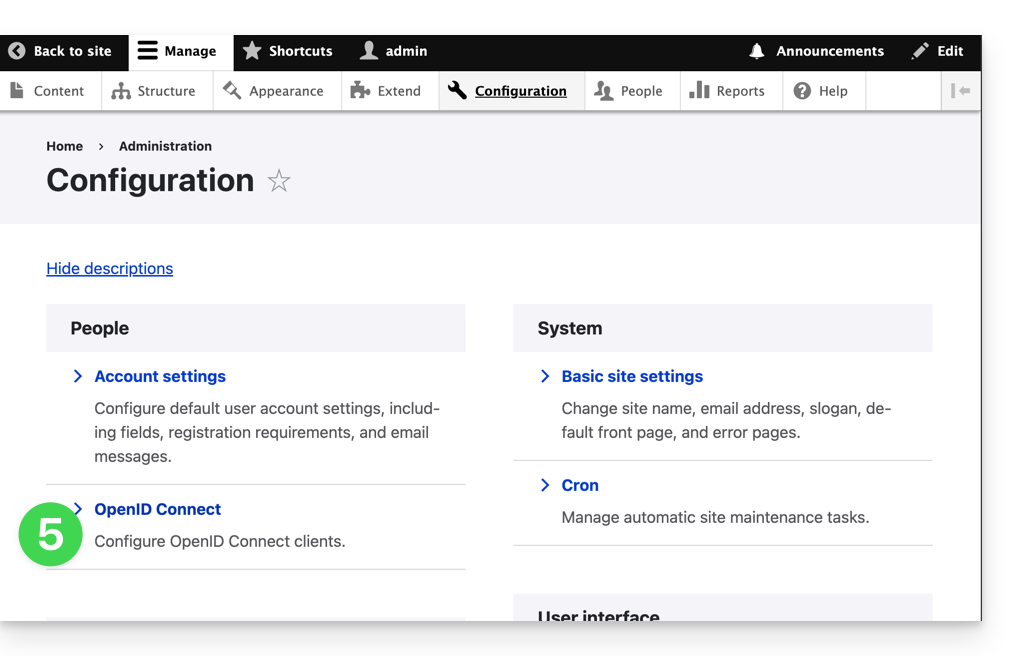
- Under Configuration, click to set up the OpenID connection:
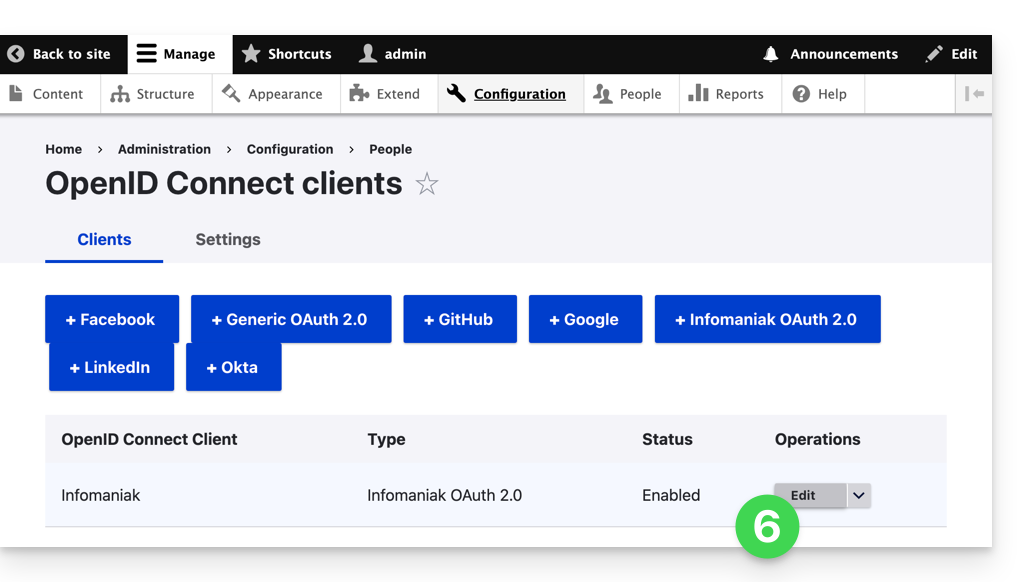
- Click the edit button:
- The only fields to fill in are Client ID and Client Secret and come from the information obtained in point A above:
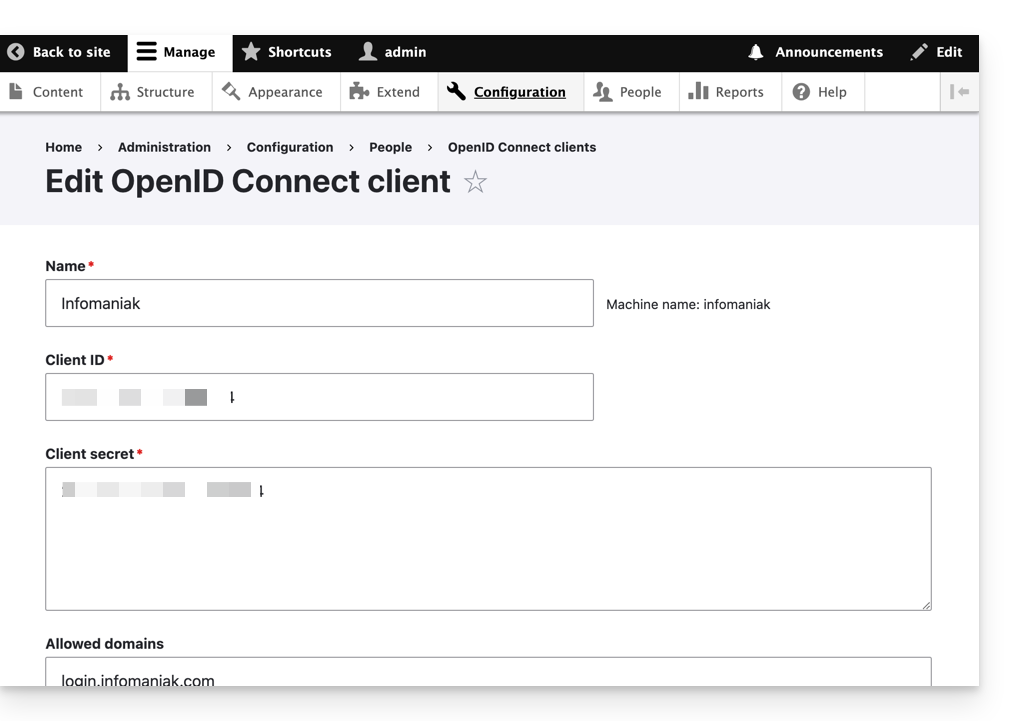
- Do not forget to save the changes made to the extension settings.
- In the Settings tab, you can choose the display type for your login page; do not forget to save:

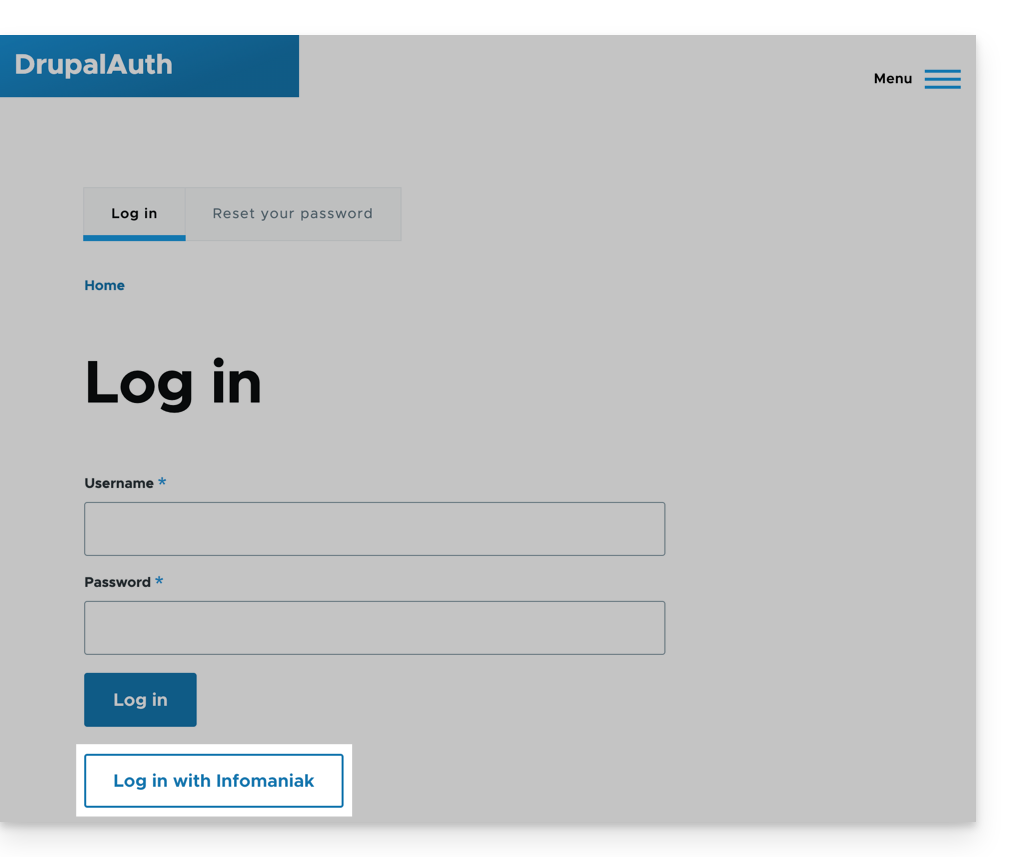
- An additional button, for logging in with an Infomaniak identifier, is now visible on your login page intended for users:
Link to this FAQ:
Has this FAQ been helpful?
This guide explains how to renew or restore a domain name registered with Infomaniak.
Preamble
- You are automatically notified by email (at the address you provided) when one of your domain names is about to expire.
- If this domain name is not renewed before its expiration date, it enters a redemption period during which it can still be recovered/restored.
- The restoration fees and the duration of the redemption period are variable depending on the extension concerned.
- Once the redemption period has elapsed, the domain name is free and can be reserved again by anyone.
- If your domain is important for your activities, Renewal Warranty offers you the assurance of never losing it: Infomaniak will do everything in its power to ensure that you keep it even if you do not provide timely updates at its expiration.
Renew a domain name before expiration
The renewal of one or more domain names is done exactly the same way as any other Infomaniak service renewal. Refer to this other guide if you are looking for information on how to renew the product in question.
Restore a domain name after expiration
To restore a domain during its redemption period:
- Click here to access the management of your product on the Infomaniak Manager (need help?).
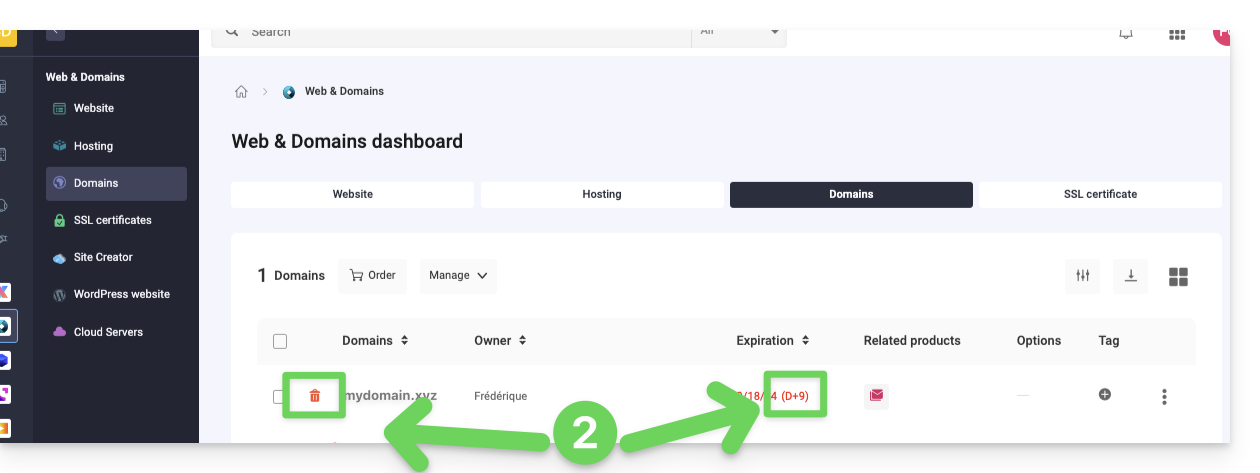
- An expired domain is indicated as such:
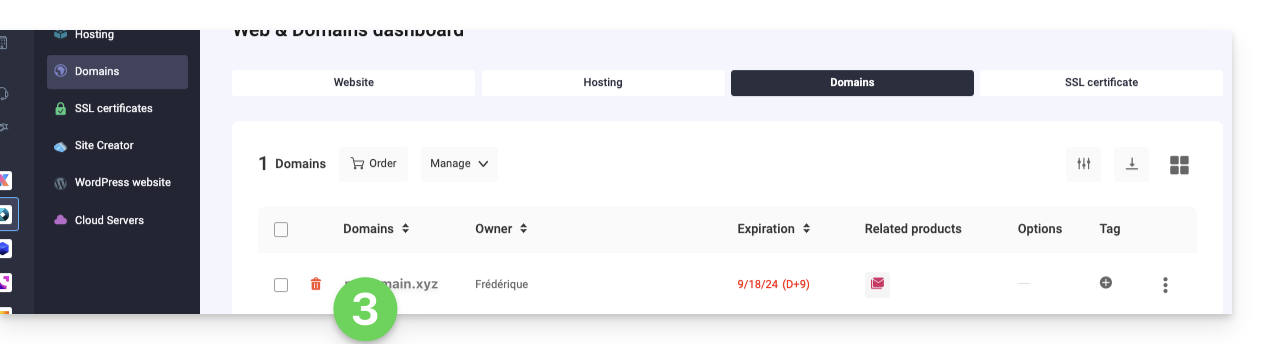
- Click directly on the name assigned to the product concerned:
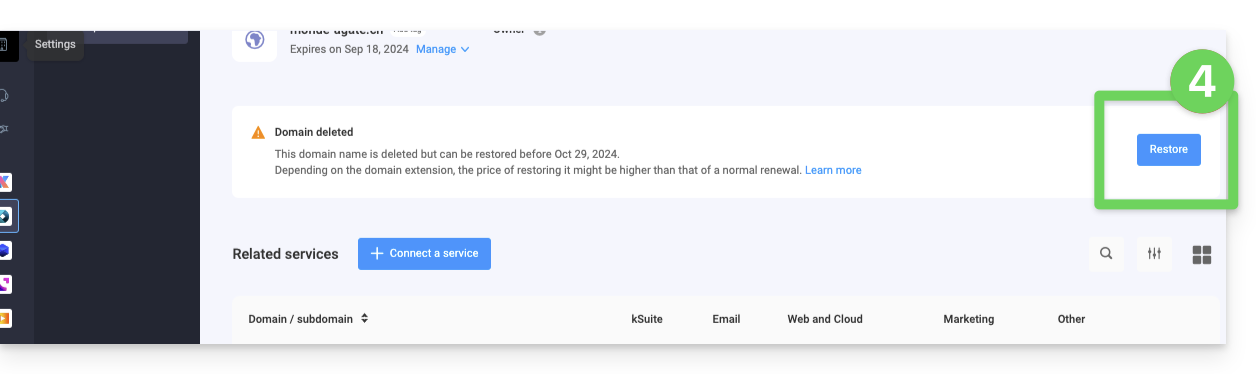
- Click the Restore button:
- Follow the restoration steps to the end.
Resolve an issue
What to do if the domain does not seem visible in your account?
- Check that you are logged in with the correct user account, and that you are displaying the correct Organization if you are affiliated with multiple entities.
- Consult the DOMAIN section of the Manager and not in a section of billed or renewable products.
- Repurchase the domain name if it has not been reserved since.
Link to this FAQ:
Has this FAQ been helpful?
With Domain Privacy, Infomaniak allows you to preserve the confidentiality of your personal information (name, email address, postal address, and phone number) and effectively protect you against SPAM.
Preamble
- ICANN-accredited registrars are required to publish the owner's contact information of a domain in the public WHOIS directory, which lists all registered domains and primarily serves to:
- check the availability of domain names
- verify trademark infringements
- contact the owner of a domain in case of a legal issue
- For customers concerned about the confidentiality of their personal data and who do not wish to publicly display their email address, phone number, and postal address in the WHOIS directory, Domain Privacy allows you to mask these real coordinates
- Thanks to this protection, WHOIS searches for your domain do not return your personal information, but the information of the partner Domain Privacy Trustee SA:
- You are protected against SPAM: marketing companies and individuals cannot use your personal data.
- You remain the full owner of your domain.
- It remains possible to contact you via a secure form that protects your identity.
- Discover the domain name extensions supported by Domain Privacy
Activate Domain Privacy on an existing domain
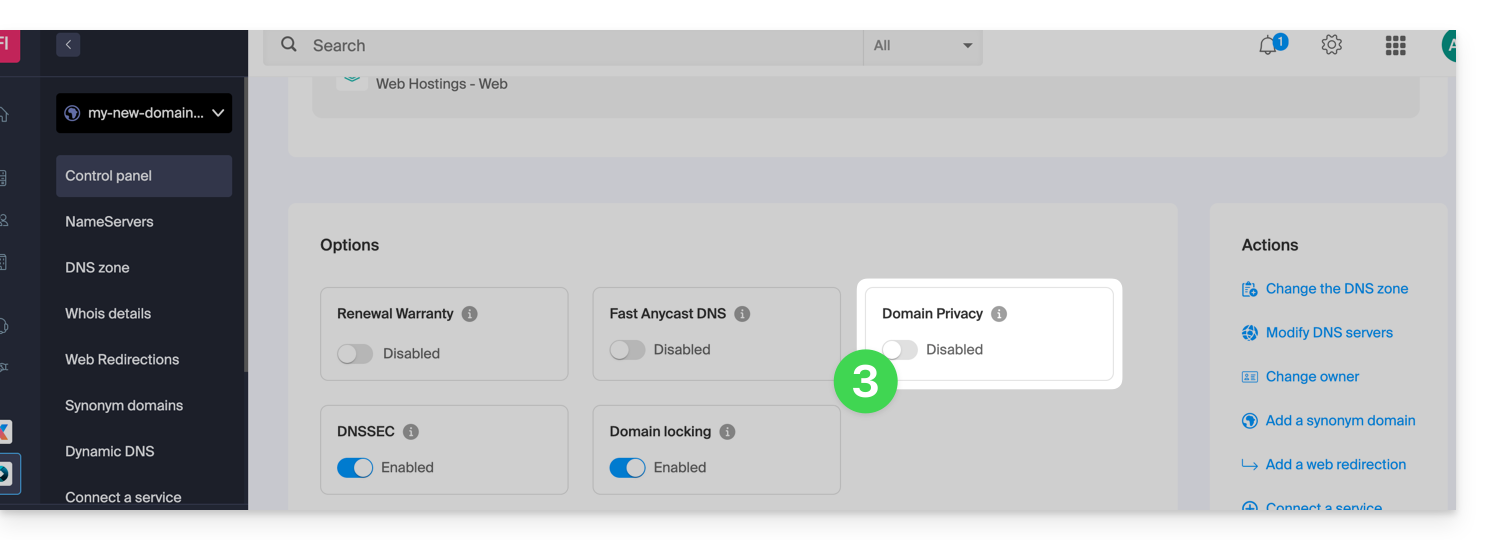
Domain Privacy is activated in a few seconds:
- Click here to access the management of your product on the Infomaniak Manager (need help?).
- Click directly on the name assigned to the product concerned.
- Activate Domain Privacy from the dashboard:
Infomaniak also offers the possibility to guarantee the renewal of your domains with Renewal Warranty: this guarantee is intended to ensure that you do not lose domains that are important for the smooth running of your activities.
Link to this FAQ:
Has this FAQ been helpful?
This guide explains how to find out the operating system version of the server for your Web Hosting.
Preamble
- Even if Debian or a package seems outdated, the displayed versions do not present any vulnerabilities:
- Infomaniak keeps them up to date via regular internal patches on all components and systems used.
- The versions are chosen for their stability and then strengthened by security measures that standard tests do not detect.
- If you or your clients identify a vulnerability in an Infomaniak product, please submit a POC. Although rare, these cases are handled quickly.
- Data security is the responsibility of the user: Infomaniak cannot be held responsible for poor management or use of access credentials.
What OS on my site?
To find out the version:
- Log in to the server via SSH (need help?).
Run the following command:
lsb_release -aYou will get information of this type:
Distributor ID: Debian
Description: Debian GNU/Linux 7.9 (wheezy)
Release: 7.9
Codename: wheezy
Link to this FAQ:
Has this FAQ been helpful?
The easiest way to manage your contacts / address books is to use the Infomaniak Contacts web app (online service ksuite.infomaniak.com/contacts).
This interface offers many advantages:
- No software to install or configure.
- Share address books with other users.
- Saved permanently.
- Synchronize your contacts across devices.
- Secure and respects your privacy, hosted in Switzerland by a neutral and independent company.
How to get started with Infomaniak Contacts?
Whether it's on kSuite or the Mail app, it is essential to log in with your Infomaniak account identifier and its password. This will not work by directly entering a hosted email address that is not an Infomaniak account. Understand the difference
- Click here to access the Infomaniak Contacts web app (online service ksuite.infomaniak.com/contacts).
What do you want to do?
- Synchronize contacts & calendars on all your devices
- Manage contacts
- Manage duplicates
- Import contacts
- Export contacts
- Group contacts
- Copy or move contacts
- Restore contacts
- Share an address book
A question or feedback?
- Contact Infomaniak support
- Click here to share feedback or a suggestion on an Infomaniak product
Link to this FAQ:
Has this FAQ been helpful?
This guide explains how to perform a ticket exchange as a visitor via the Infomaniak Ticketing tool.
Preamble
- If you have chosen the wrong date or tickets, this operation will allow you to exchange them and order new tickets on the ticketing platform.
Provide the tickets to be exchanged
To do this:
- Go to the organizer's ticketing platform, as when ordering the tickets.
- Scroll down the page and click on the Exchange tickets button:

- On the new window, enter the email address used during the booking, and the number(s) of your tickets, then click on Validate:

- Click on Exchange more tickets or Order tickets to proceed to the next step.
Order the new tickets
To do this:
- Proceed as with a normal ticket order, by choosing the new event and date, as well as the number of tickets to order.
- When validating the basket, the exchanged tickets will be indicated as credits at the top of the page:

- Complete the order, and if necessary, settle the basket balance.
You cannot have a positive balance at this stage: the new order must have an amount equal to or greater than the total of the exchanged tickets. For refunds, you must contact the event organizer only.
Link to this FAQ:
Has this FAQ been helpful?
This guide explains how to change the color of events related to your calendars/agendas in the Infomaniak Web app Calendar (online service ksuite.infomaniak.com/calendar). You can also globally customize the period displayed in them.
Set certain default settings
To do this:
- Click here to access the Infomaniak Web app Calendar (online service ksuite.infomaniak.com/calendar).
- Click on the Settings icon at the top right.
- Click on Customization.
- Refer to this other guide regarding the default calendar element.
- Settings such as the default event duration or the working hours to display on the calendar will notably improve the use of the appointment scheduling assistant:
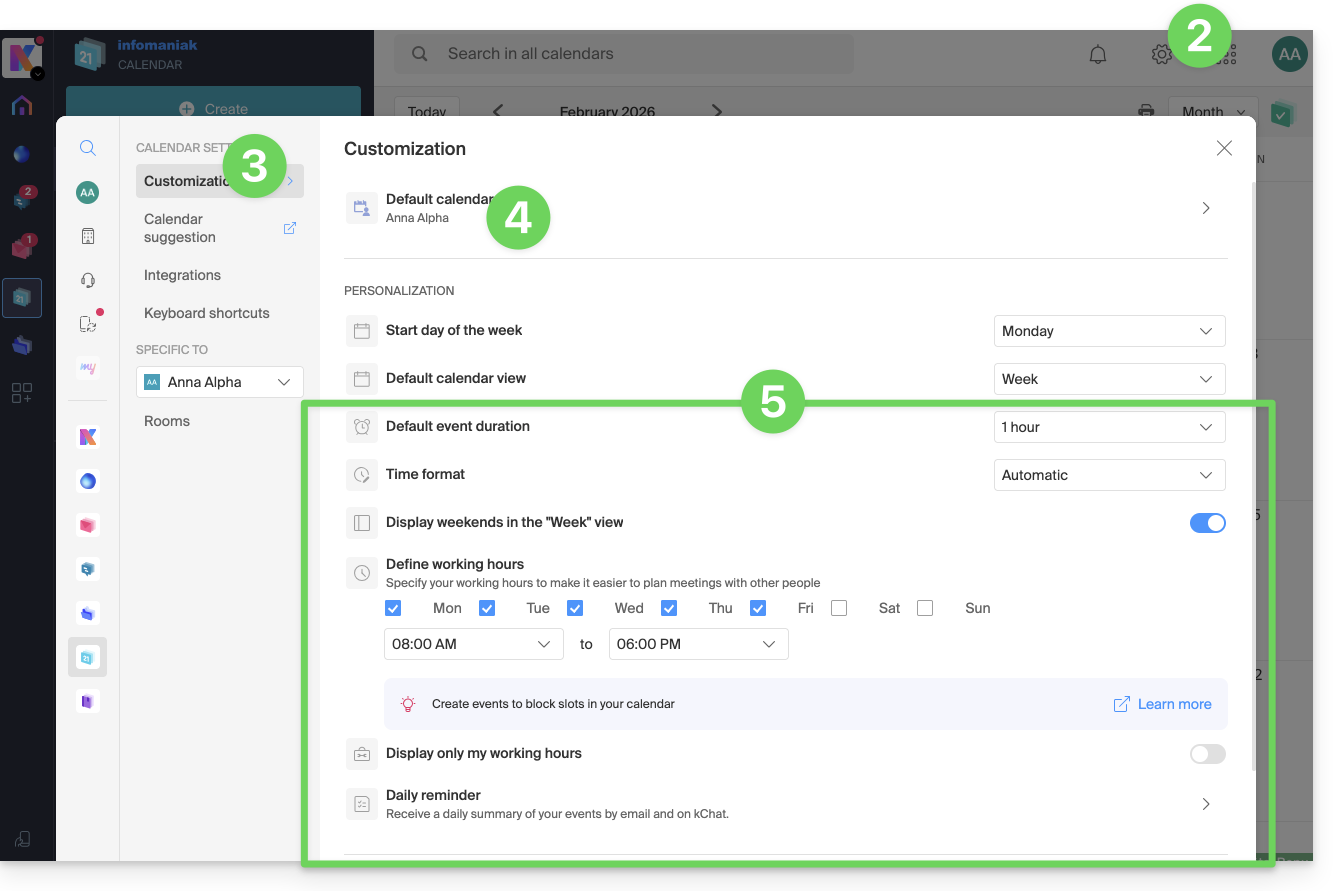
- Refer to this other guide for the first menu item and to this other guide for the second:
Set the color of a calendar/agenda
To do this:
- Click here to access the Infomaniak Web app Calendar (online service ksuite.infomaniak.com/calendar).
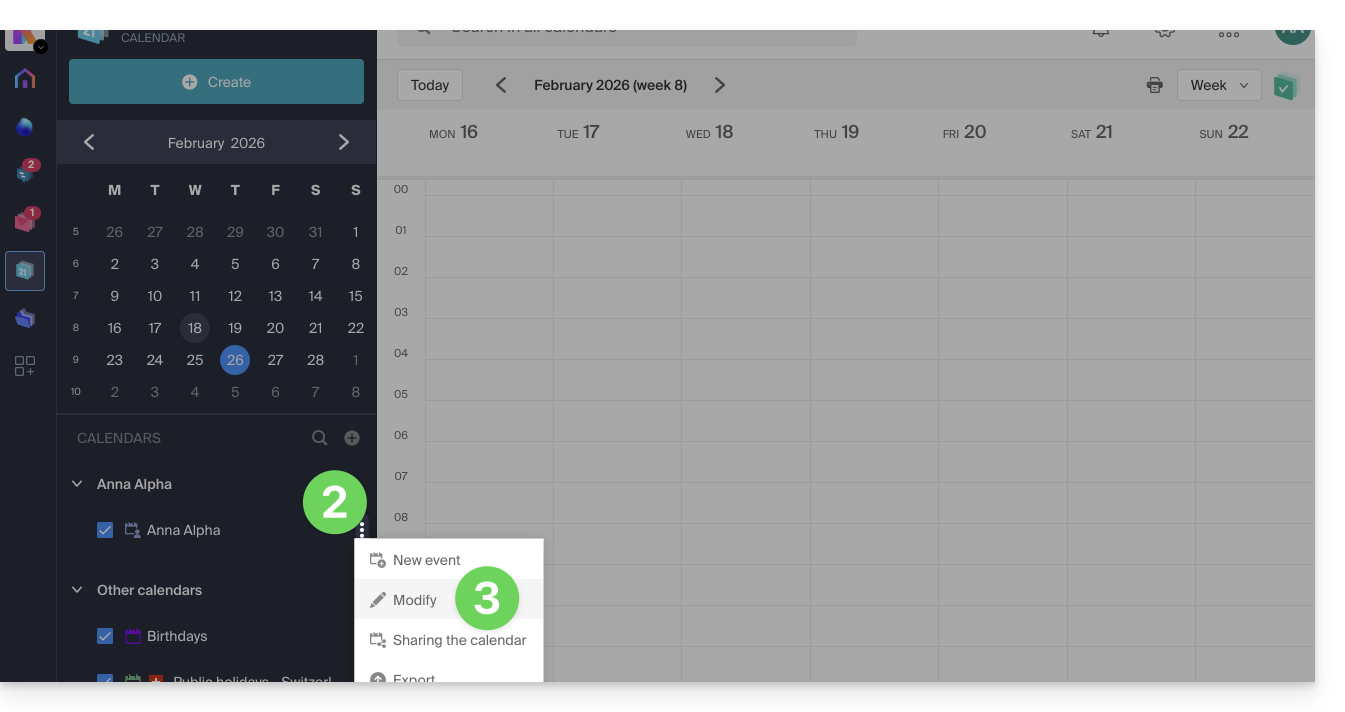
- Click on the action menu ⋮ to the right of the calendar in question.
- Click on Edit:
- Choose the desired color.
- Click the button to Validate:
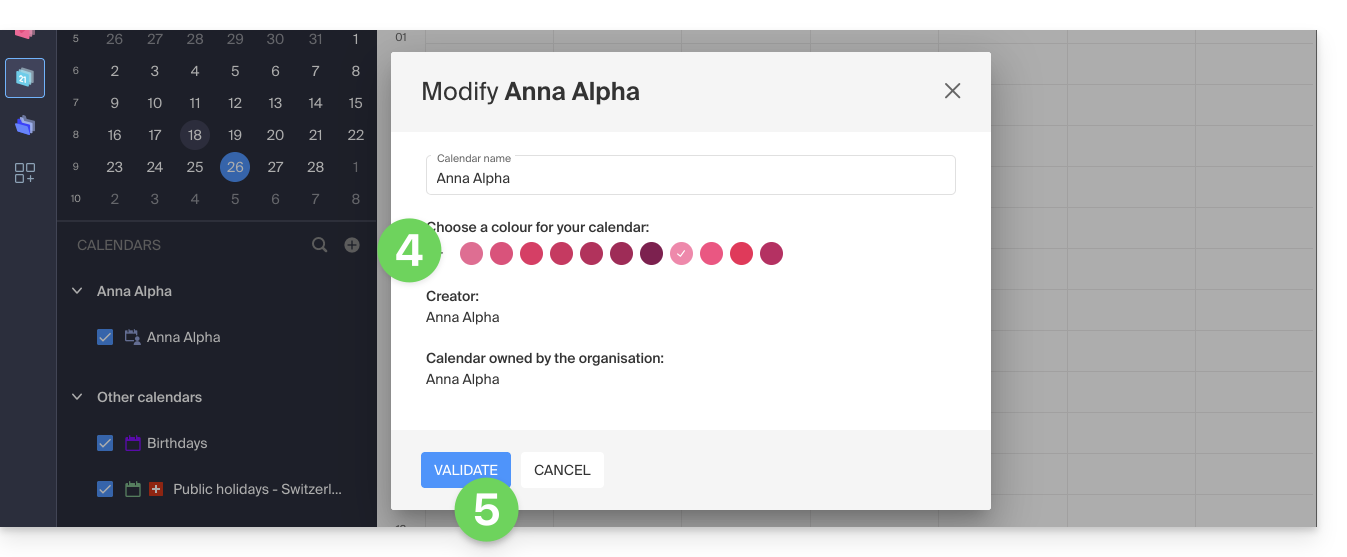
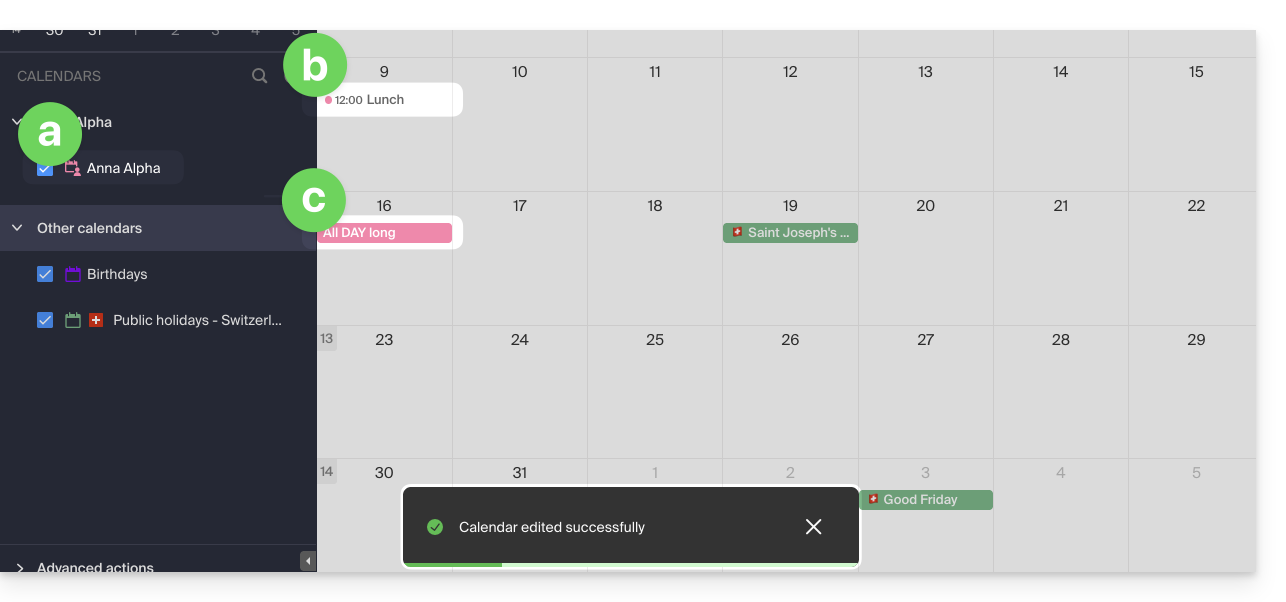
- The specified color will then be visible:
- at the level of the Calendar name,
- for fixed-time events in the monthly view,
- for all-day events in the monthly view,
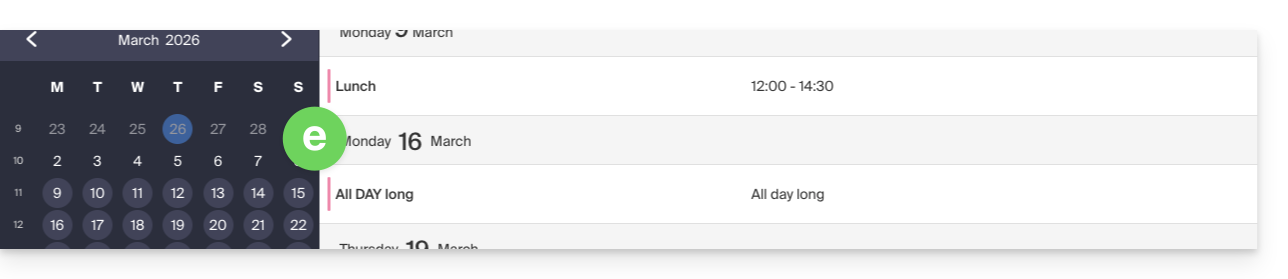
- in the daily view:

- in Schedule view:
etc.
Set the color of an event
To manually change the color of a specific event, which will override the calendar's color:
- Click here to access the Infomaniak Web app Calendar (online service ksuite.infomaniak.com/calendar).
- Create an event and choose its color, or click on an existing event and then on the pencil icon ✎ to edit the details, including its color:
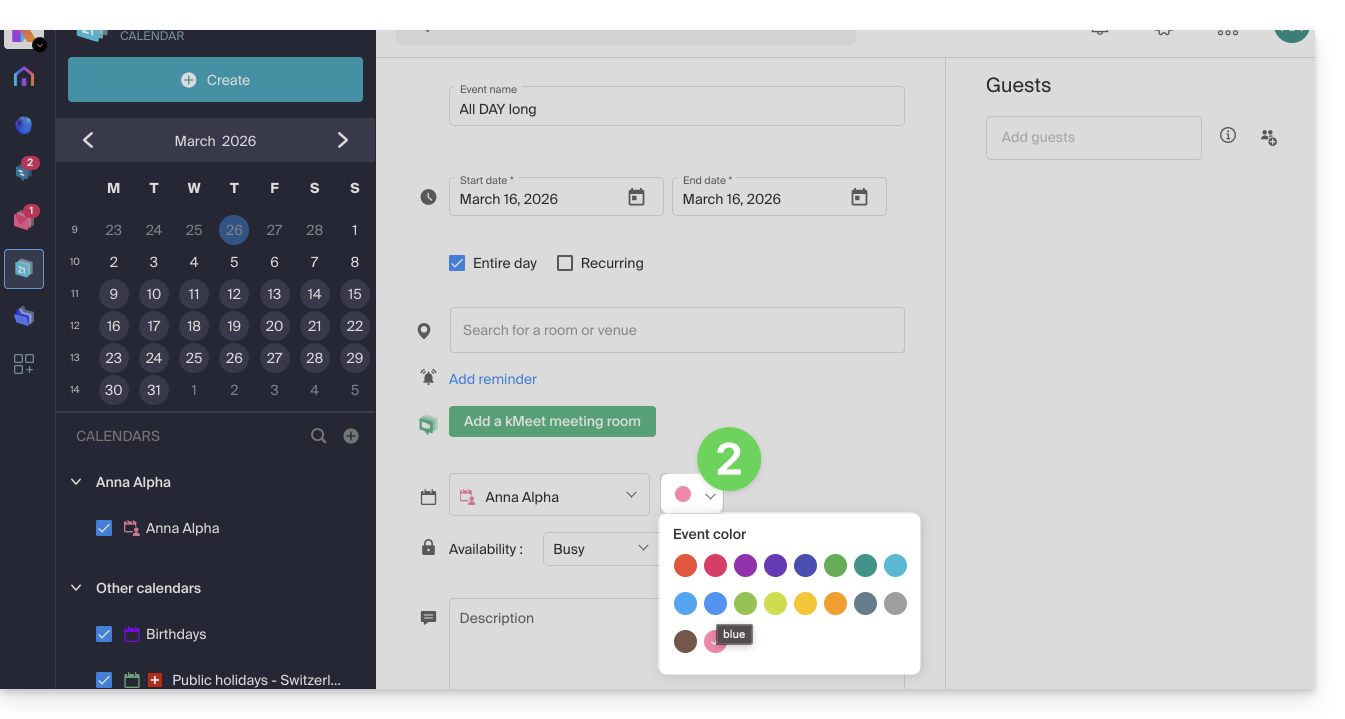
- Confirm at the bottom of the page.
- The specified color will then be visible on the event itself:
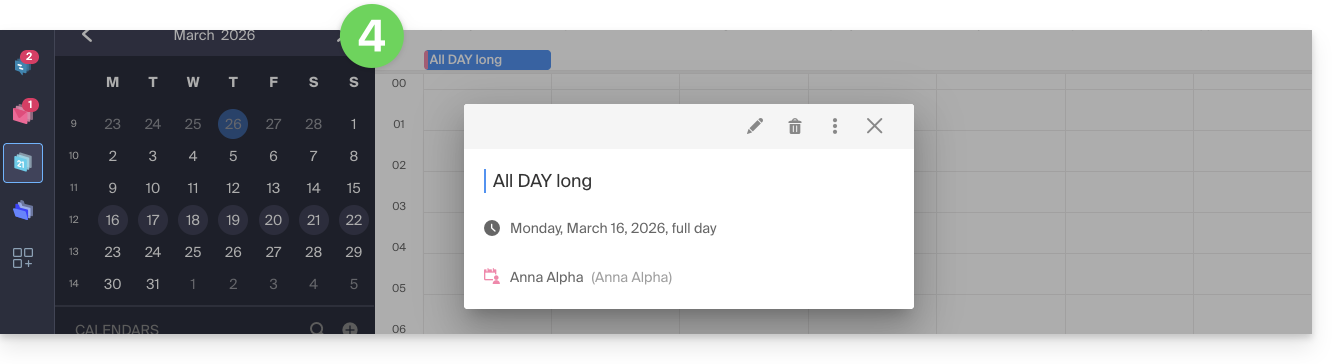
Customize the displayed period
To do this:
- Click here to access the Infomaniak Web app Calendar (online service ksuite.infomaniak.com/calendar).
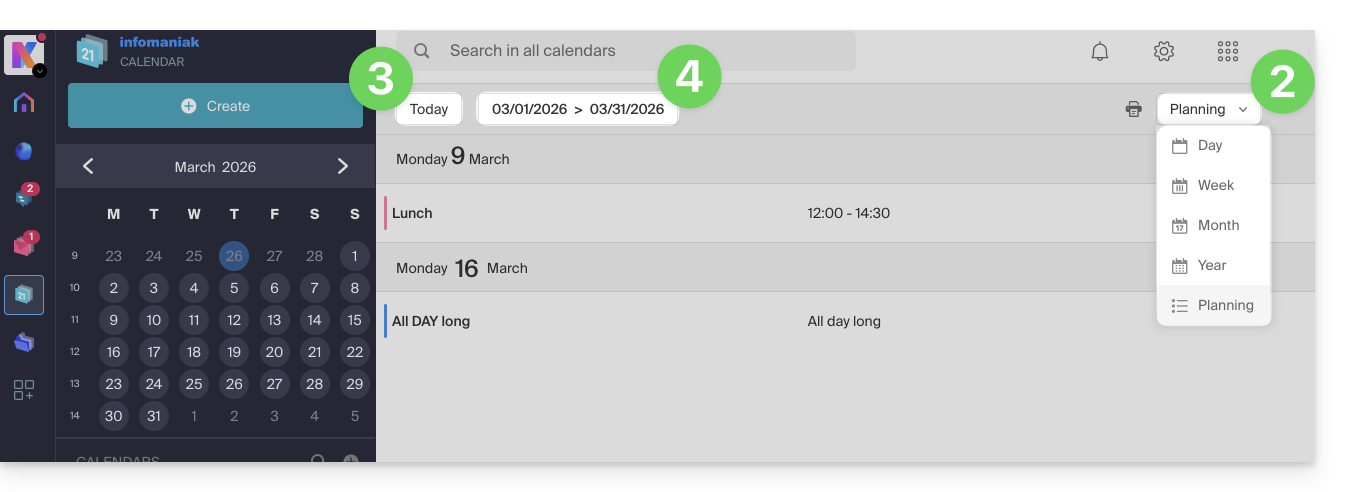
- Choose to display the agenda by: Day, Week, Month, Year or in Schedule view.
- At any time, click on Today to reset the current view.
- In Schedule view, you can choose the period to display ("this week", "next month", etc.):
Link to this FAQ:
Has this FAQ been helpful?
Thank you for choosing Infomaniak and kChat as your communication solution between you, your loved ones or your company! These guides will help you organize your channels, users, conversations and more!
Introduction
- Multiplatform, kChat is the instant messaging of kSuite that allows you to exchange, share and coordinate your teams securely from…
- … your web browser
- … your iOS / Android device
- … your macOS / Windows / Linux computer
- Download the kChat app on your devices!
- It is not possible to change the location of the
kchat-desktopfolder on your hard drive. - The content of the discussions, photos, videos, is stored online on Infomaniak's secure servers.
- The storage size is that of the kSuite.
- It is not possible to change the location of the
What do you want to do?
- Set up kChat
- Manage users
- Manage a channel
- Manage a conversation
- React to messages
- Manage kChat notifications
- Format messages and insert images
- Send a voice message and its automatic transcription
- Translate the content of a message on the Infomaniak kChat app
A question or feedback?
- In case of a problem, please consult the knowledge base before contacting support.
- Click here to share feedback or a suggestion about an Infomaniak product.
Link to this FAQ:
Has this FAQ been helpful?
Thank you for entrusting Infomaniak with the management of your services, hoping you enjoyed using them.
Preamble
- For most products, confirm the cancellation request by email, otherwise no data will be deleted.
- Outstanding and out-of-package fees remain due.
- A cancellation confirmation is sent to any other administrators of the Organization.
- Backups will be irrevocably deleted upon cancellation, making any restoration impossible.
Which product/service do you wish to delete?
Collaborative Tools
Web & Domains
Cloud Computing
Events & Marketing
Streaming
Close your Infomaniak account or delete one of your Organizations.
Do not hesitate to share your personal experience with Infomaniak. Feedback from satisfied and less satisfied customers is useful and helps improve the quality of services and propose solutions tailored to needs!
Link to this FAQ:
Has this FAQ been helpful?
This guide allows you to quickly discover the essential features of Euria, the artificial intelligence at your disposal within my kSuite, particularly powerful as a conversational agent on the kChat app.
Preamble
- Euria can help you perform all kinds of calculations, translations, provide information on various subjects, and answer your questions.
- Refer to this other guide regarding the model used and the responsibilities of each party.
- As soon as a new user is added, they receive a welcome message from Euria.
- Refer to this other guide regarding the possibilities of AI summaries on kChat.
Add Euria to kChat contacts
The bots currently available on kChat are already in your contacts.
If you do not see them yet, click in the left sidebar of kChat…
- … on the channel search (bots also appear as channels)
- … or on the + icon next to Direct Messages to search for the bot
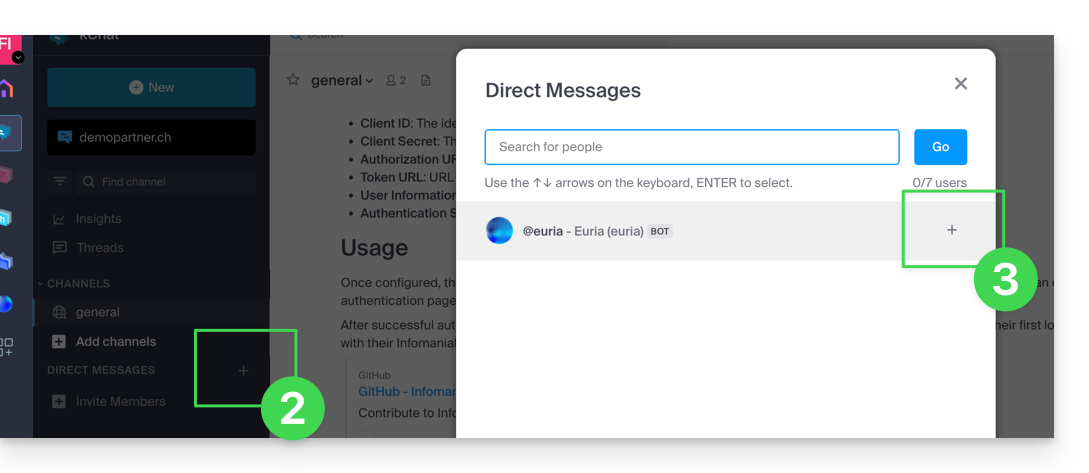
- Add the bots indicated as such with the label [bot] or search for the term bot or chat.
Do not create a group conversation between the bots and yourself as it will not work. You need to create a private discussion channel between each bot individually and yourself.
Then simply write to them as if you were conversing with an acquaintance: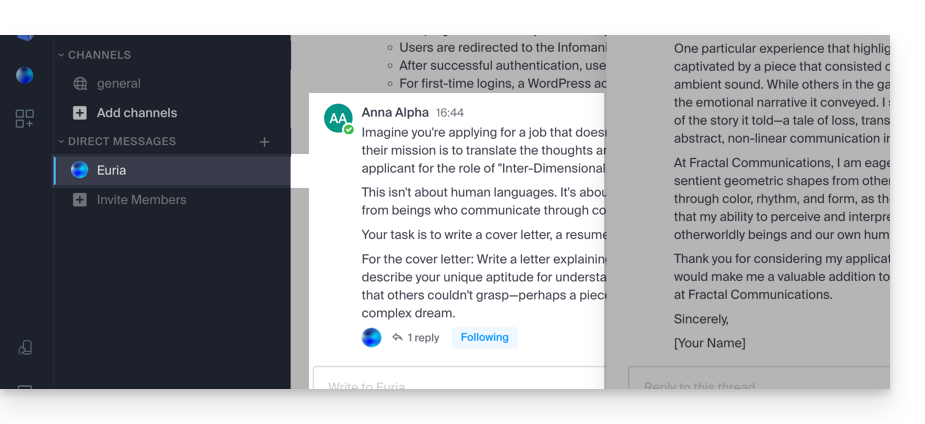
Link to this FAQ:
Has this FAQ been helpful?
This guide details the creation of a GIT repository both on your Web Hosting and on your Managed Cloud Server.
Preamble
- GIT and GitHub are available by default on the two aforementioned supports.
- If needed, local partners referenced by Infomaniak can handle these procedures: launch a free call for tenders; they handle everything, freeing you from technical details — also discover the role of the host.
Creating the GIT repository
Setup on the server:
- the GIT repository is in
/git_depot - the site is in the folder
/web/[project](in your FTP server)
Commands to enter:
cd
mkdir git_depot
cd git_depot/
git init --bare [projet].git
cd [projet].git
git update-server-info
Sending the local repository to the server
To do on the local machine:
git init
git remote add origin ssh://user@[xxxxx].ftp.infomaniak.com:/home/clients/[123456789]/git_depot/[projet].git
git status
git add .
git commit -a -m "init"
git push --set-upstream origin master
git push
Cloning the site to the server directory
To do on the server:
cd
cd web
rm -r [projet]/
git clone /home/clients/[123465789]/git_depot/[projet].git [projet]/
Link to this FAQ:
Has this FAQ been helpful?
This guide details how to restore an Apple macOS computer using Acronis on Swiss Backup, the backup solution in an independent Swiss cloud.
Prerequisites
- The Acronis application must be installed on the computer on which you want to perform the restoration; use the same credentials as those used to save the machine when registering the agent:
- Click here to access the Acronis Console with the credentials obtained after adding the device (need help?).
- Click on the user icon at the top right.
- Click on Downloads:
- Choose the client suitable for your macOS machine:
Create a bootable USB key
To do this:
- Insert a blank USB key of at least 4 GB into your computer (be careful: the data on the key will be deleted).
- Open the Rescue Media Builder application from the Applications folder of the Finder on your macOS. This application has been automatically installed with the Acronis application.
- Check the detected USB key and click on Create Media.
Start the restore procedure
To do this:
- Restart the macOS computer with the bootable USB key.
- Depending on the macOS version, press and hold a key on the keyboard (refer to this Apple guide to know which one) during the restart.
- If necessary, click on the bootable USB key to start from it.
Configure and start the restoration
To do this:
- Select your key on Rescue Media Builder:
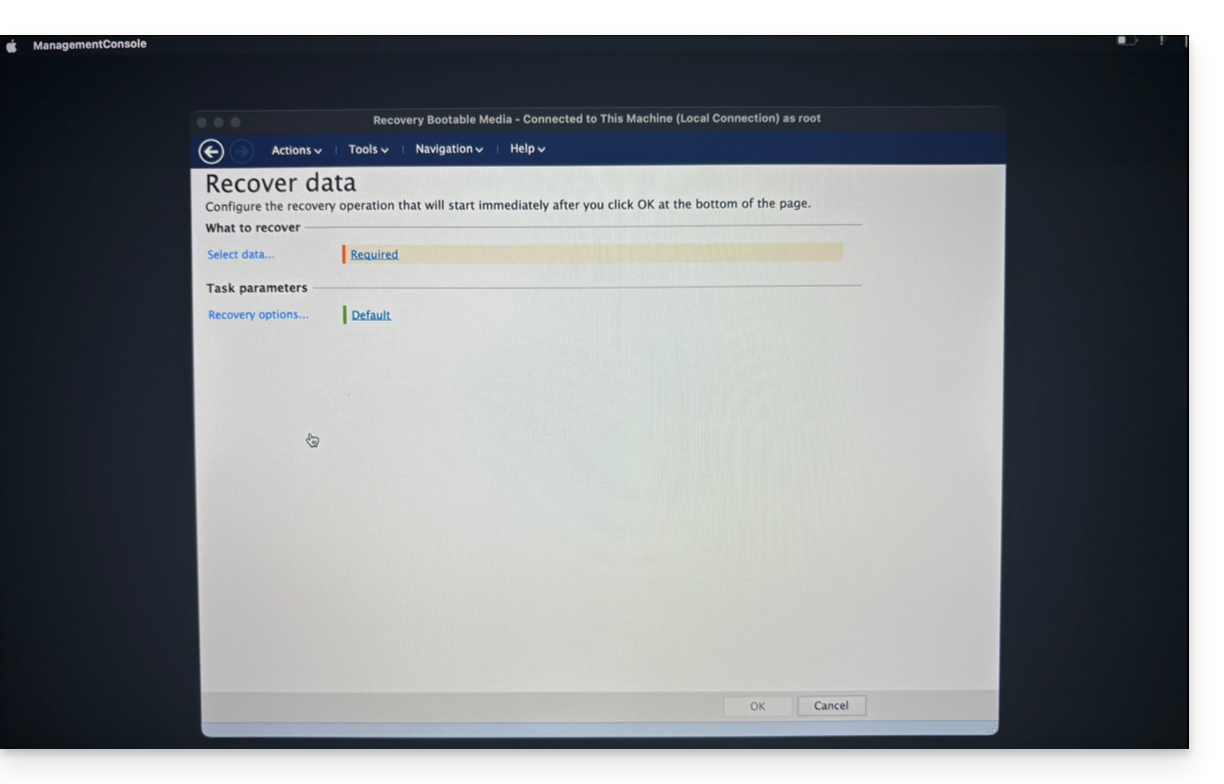
- Click on Recovery Boot Media:
- Click on Recover:
- Click on Select data:
- … then on Browse:

- and select Cloud Storage; then click on the Log in button:

- Use the device credentials to authenticate:

- Choose the macOS machine to restore, then click on OK to start the restoration:

- If you chose to encrypt your backups, you will be asked for the backup password:

- In the upper part of the screen, select the available backup you want to restore:

- Once the backup is selected, you can select the type of item to restore in the lower part of the screen, as well as those you want to restore; it is recommended to select the type Volumes and to restore all available Volumes, in order to restore all of your hard drive(s)... then start the restoration with the OK button:

- The restoration is then started, you can follow the progress via the Progress tab:

Once at 100% the macOS machine will restart several times in a row (this is normal) until the entire procedure is complete.
Link to this FAQ:
Has this FAQ been helpful?
This guide helps resolve an issue with statuses (OK, in progress, etc.) that may occur with the files and folders in the kDrive tree in Windows Explorer, in case these indications no longer match reality.
Resolve the issue of incorrect statuses
The problem is visible in the kDrive log as follows:
20240616_2008_kDrive.log:2024-06-16 20:19:01:349 [I] (6732) socketlistener.cpp:46 - Sending SocketAPI message --> STATUS:OK:D:\kDrive\Photos\Personnal\2024\06_June\0616_Bern\HP7A6181.JPG to 0000025197E46A60The application sends the correct file status to the explorer, for example, the status sent here is OK, the status icon displayed should be the green circle, but the displayed status does not match:
Restart Windows Explorer
To do this:
- Access the task manager by pressing
ctrl shift + esc. - In the task manager, search for Windows Explorer.
- Right-click on it and click on End Task.
- In the upper left corner of the task manager, click on File.
- Click on Run a new task.
- Type:
explorer.exe. - Press Enter.
Check and repair system integrity
To do this:
- Open the command prompt with administrator access.
- Type each command below and wait for the analysis to complete:
SFC /scannow
DISM /Online /Cleanup-Image /CheckHealth
DISM /Online /Cleanup-Image /ScanHealth
DISM /Online /Cleanup-Image /RestoreHealth
Link to this FAQ:
Has this FAQ been helpful?
This guide explains how to benefit from new versions of PHP, MySQL, and many other packages by migrating a Cloud Server to new Infomaniak infrastructure.
Migration procedure
By migrating your data to the new Cloud infrastructure, you increase the performance and reliability of your sites, which will have access to the latest technologies:
- Click here to access the management of your product on the Infomaniak Manager (need help?).
- Click directly on the name assigned to the product concerned.
- Click the blue button in the box "Upgrade your Cloud Server" (or Manage):

The migration is free and takes place in 3 steps:
- Infomaniak provides a state-of-the-art Cloud Server with the same characteristics as the current one, at the same price and same commitment period.
- You have one month to move your hosting to the new Cloud Server provided (see below).
- Once your hosting is moved to the new server, cancel the old Cloud Server.
Regarding step 2...
When moving hosting from one Cloud Server to another:
- FTP access and databases do not change.
- Only the supported versions of PHP and MariaDB, as well as the server's IPv4 and IPv6 addresses, change at the hosting level.
- Hostnames (hostnames) do not change and are automatically updated to point to the new IP addresses.
Link to this FAQ:
Has this FAQ been helpful?
This guide concerns the synchronization of servers via the NTP (Network Time Protocol) and the configuration of the timezone on Infomaniak servers.
Precise server synchronization via NTP
Infomaniak servers are all synchronized via the NTP protocol. The company provides its own public-accessible stratum-1 NTP servers for flexible use.
To integrate these servers into your settings, use the following entry: pool.ntp.infomaniak.ch.
The default timezone configuration is in UTC. However, PHP functions are designed to take into account different timezones depending on specific needs.
To adjust the timezone in your PHP scripts, use the function date_default_timezone_set('UTC').
MySQL: temporal specifics
The Infomaniak infrastructure supports features for working with temporal data accurately and efficiently, taking into account timezones, which is crucial for many modern applications:
- MySQL uses a timezone database to store and manage timezone information.
- The
mysql.time_zonetable contains timezone data, including time offset information, timezone names, etc. - The CONVERT_TZ function is used to convert a time from one timezone to another in MySQL with the following syntax:
CONVERT_TZ(dt, from_tz, to_tz), where:dtis the date/time to convert.from_tzis the source timezone.to_tzis the target timezone.
- Example:
CONVERT_TZ('2024-05-14 12:00:00', 'UTC', 'America/New_York')will convert the time 12:00:00 UTC to local time in New York.
Link to this FAQ:
Has this FAQ been helpful?
The easiest way to manage your calendars / agendas is to use the Infomaniak Web app Calendar (online service ksuite.infomaniak.com/calendar).
This interface offers many advantages:
- No software to install or configure.
- Share calendars with other users.
- Saved permanently.
- Synchronize calendars (+ tasks) between devices.
- Attachment / kDrive.
- Secures and respects your privacy, hosted in Switzerland by a neutral and independent company.
How to start Calendar Infomaniak?
Whether on kSuite or the Mail app, it is essential to log in with your Infomaniak account identifier and its password. This will not work by directly entering a hosted email address that is not an Infomaniak account. Understand the difference
- Click here to access the Infomaniak Web app Calendar (online service ksuite.infomaniak.com/calendar).
What do you want to do?
- Synchronize calendars on all your devices
- Customize the app's display
- Display public holidays
- Create a task
- Create a unique event
- Create a recurring event
- Create an event reminder
- Schedule a meeting
- Schedule a meeting from the Web app Mail
- Manage room bookings
- Print a calendar
- Import a calendar
- Import tasks
- Export a calendar
- Share a calendar
- Share a calendar publicly
- Restore deleted events
- Add an attachment to an event
- Set a default calendar on the app
- Create a desktop app (from the Web Calendar app for example) from Chrome
A question or feedback?
- Contact Infomaniak support
- Click here to share feedback or a suggestion on an Infomaniak product
Link to this FAQ:
Has this FAQ been helpful?
The easiest way to manage your emails is to use the Web app Mail Infomaniak (online service ksuite.infomaniak.com/mail).
A mobile app (Infomaniak Mail, application for iOS / Android smartphone or tablet) is available here!
This interface offers many advantages:
- No software to install or configure.
- Share mail with other users.
- Unified management of all your Infomaniak email addresses.
- Professional anti-spam and antivirus filter on incoming and outgoing mail.
- Automatic sorting of incoming messages (filters).
- Sending large attachments.
- Saved permanently.
- kDrive sharing.
- Secure and respects your privacy, hosted in Switzerland by a neutral and independent company.
How to start Mail Infomaniak?
Whether on ksuite.infomaniak.com/mail or the Infomaniak Mail app, it is essential to log in with your Infomaniak account identifier and its password. This will not work by entering an email address and its password directly. Understand the difference
- Click here to access the Web app Mail Infomaniak (online service ksuite.infomaniak.com/mail).
- If necessary, attach the email addresses to be managed with Mail Infomaniak.
What do you want to do next?
Link to this FAQ:
Has this FAQ been helpful?
The mobile app Infomaniak kSync is a free solution offered by Infomaniak that allows you to synchronize contacts, calendars/agendas and tasks of your Android mobile devices (Samsung, Huawei, Google Pixel, etc.) with the tools offered by Infomaniak:
- ksuite.infomaniak.com/contacts for managing contacts / address books
- ksuite.infomaniak.com/calendar for managing calendars / agendas
Preamble
- Configuring mail synchronization does not mean that contacts & calendars will also be synchronized!
- Email is synchronized via the IMAP protocol, while your contacts & calendars can be synchronized with the CardDAV and CalDAV protocols.
- And to facilitate this synchronization on Android devices, it is recommended to install kSync.
- On iOS (iPhone, iPad, etc.) use an Apple profile, to download from the configuration assistant.
- Microsoft has its own format that is not directly compatible with CardDAV and CalDAV; therefore, it is not possible on the Outlook mobile app to synchronize contacts & calendars with Infomaniak (PS: a paid and untested solution exists here).
- To synchronize Outlook on computer refer to this other guide.
What do you want to do?
- Download and install kSync on Android device
- Configure kSync
- Use kSync to synchronize Google Calendar
- Add a new address book or calendar from kSync
- Synchronize tasks between Infomaniak Mail and your Android devices
- Force kSync synchronization
- Generate a specific password in case of two-factor authentication enabled
Link to this FAQ:
Has this FAQ been helpful?