Knowledge base
1000 FAQs, 500 tutorials and instructional videos. Here, there are only solutions!
This guide explains how to connect the Apple Mail desktop app on macOS (MacBook Pro, Neo, etc.) to an email address hosted by Infomaniak.
Introduction
- Instead of the manual configuration below, it is recommended to use the .mobileconfig configuration profiles provided by Apple (❓: help).
Manually add the email address to the application
Prerequisites
- Create the email address (❓: help my kSuite | Mail Service/kSuite).
- Create a device password (❓: help my kSuite | Mail/kSuite Service).
- Verify that the domain is configured correctly (❓: help).
To configure the email application:
- Open the application.
- If you have already configured an address, click on the Mail menu and then Add account:
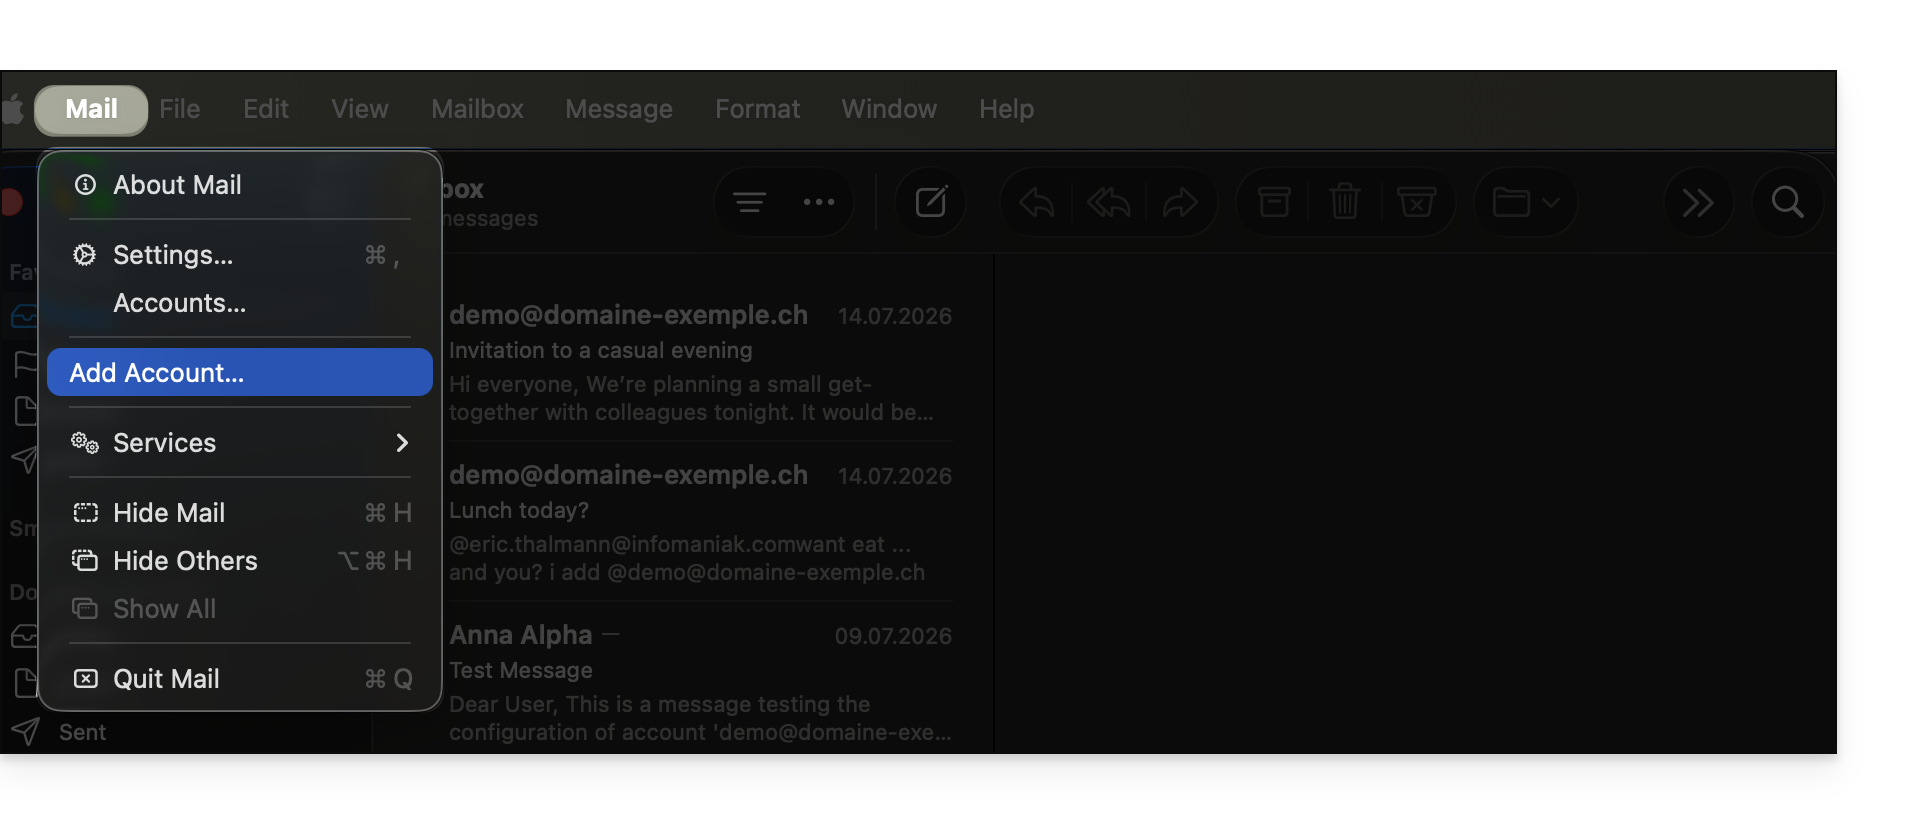
- If you have already configured an address, click on the Mail menu and then Add account:
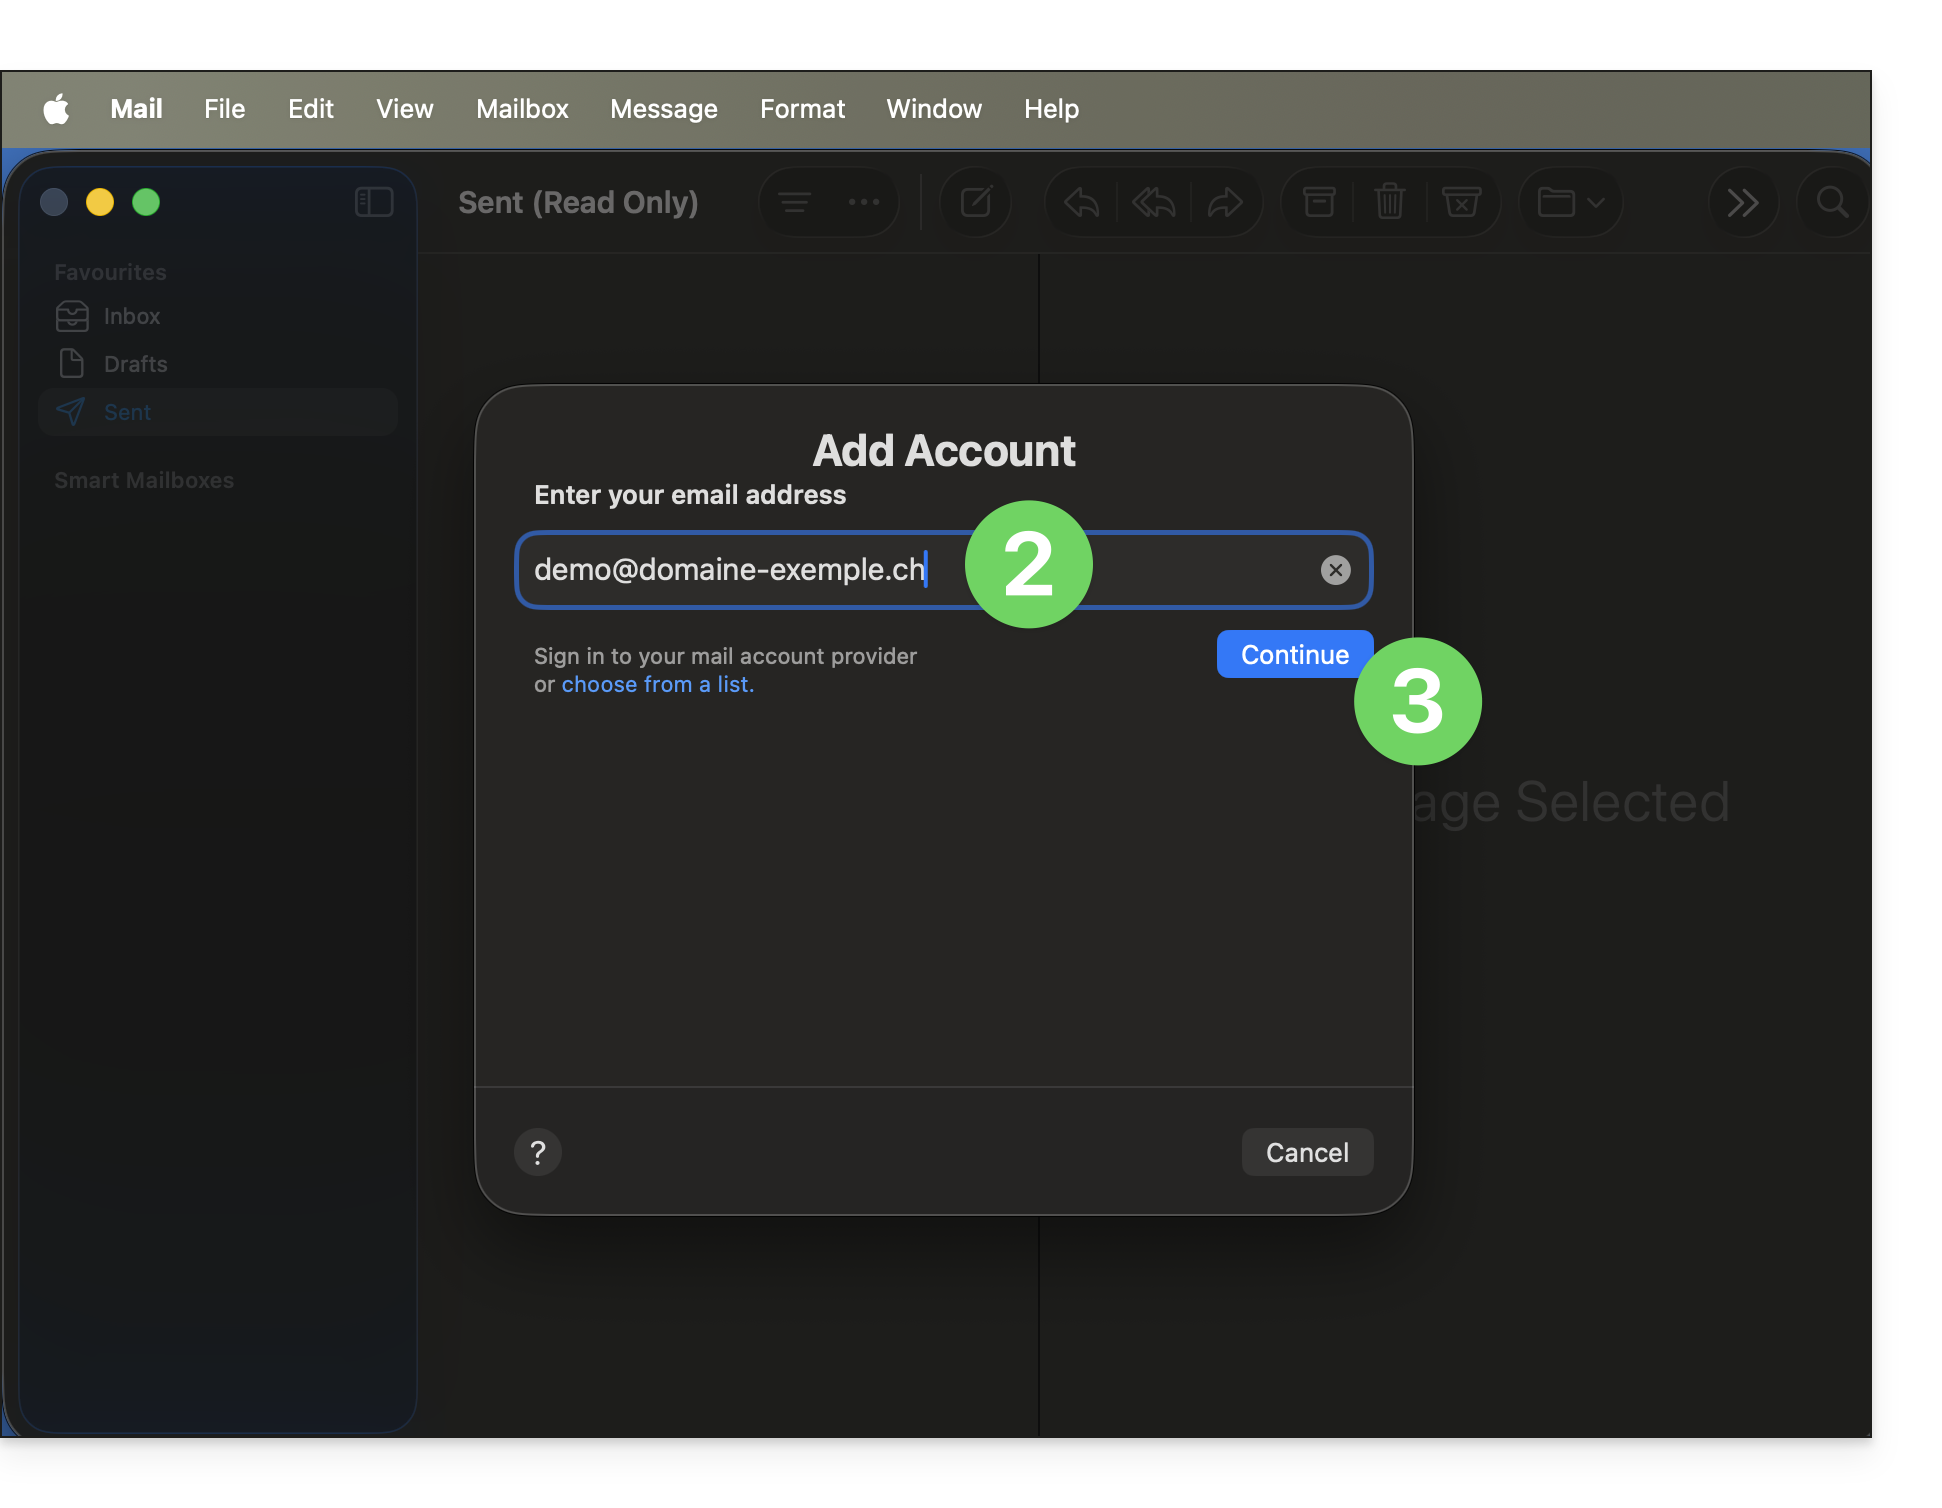
- Enter the email address to associate.
- Click on Continue:
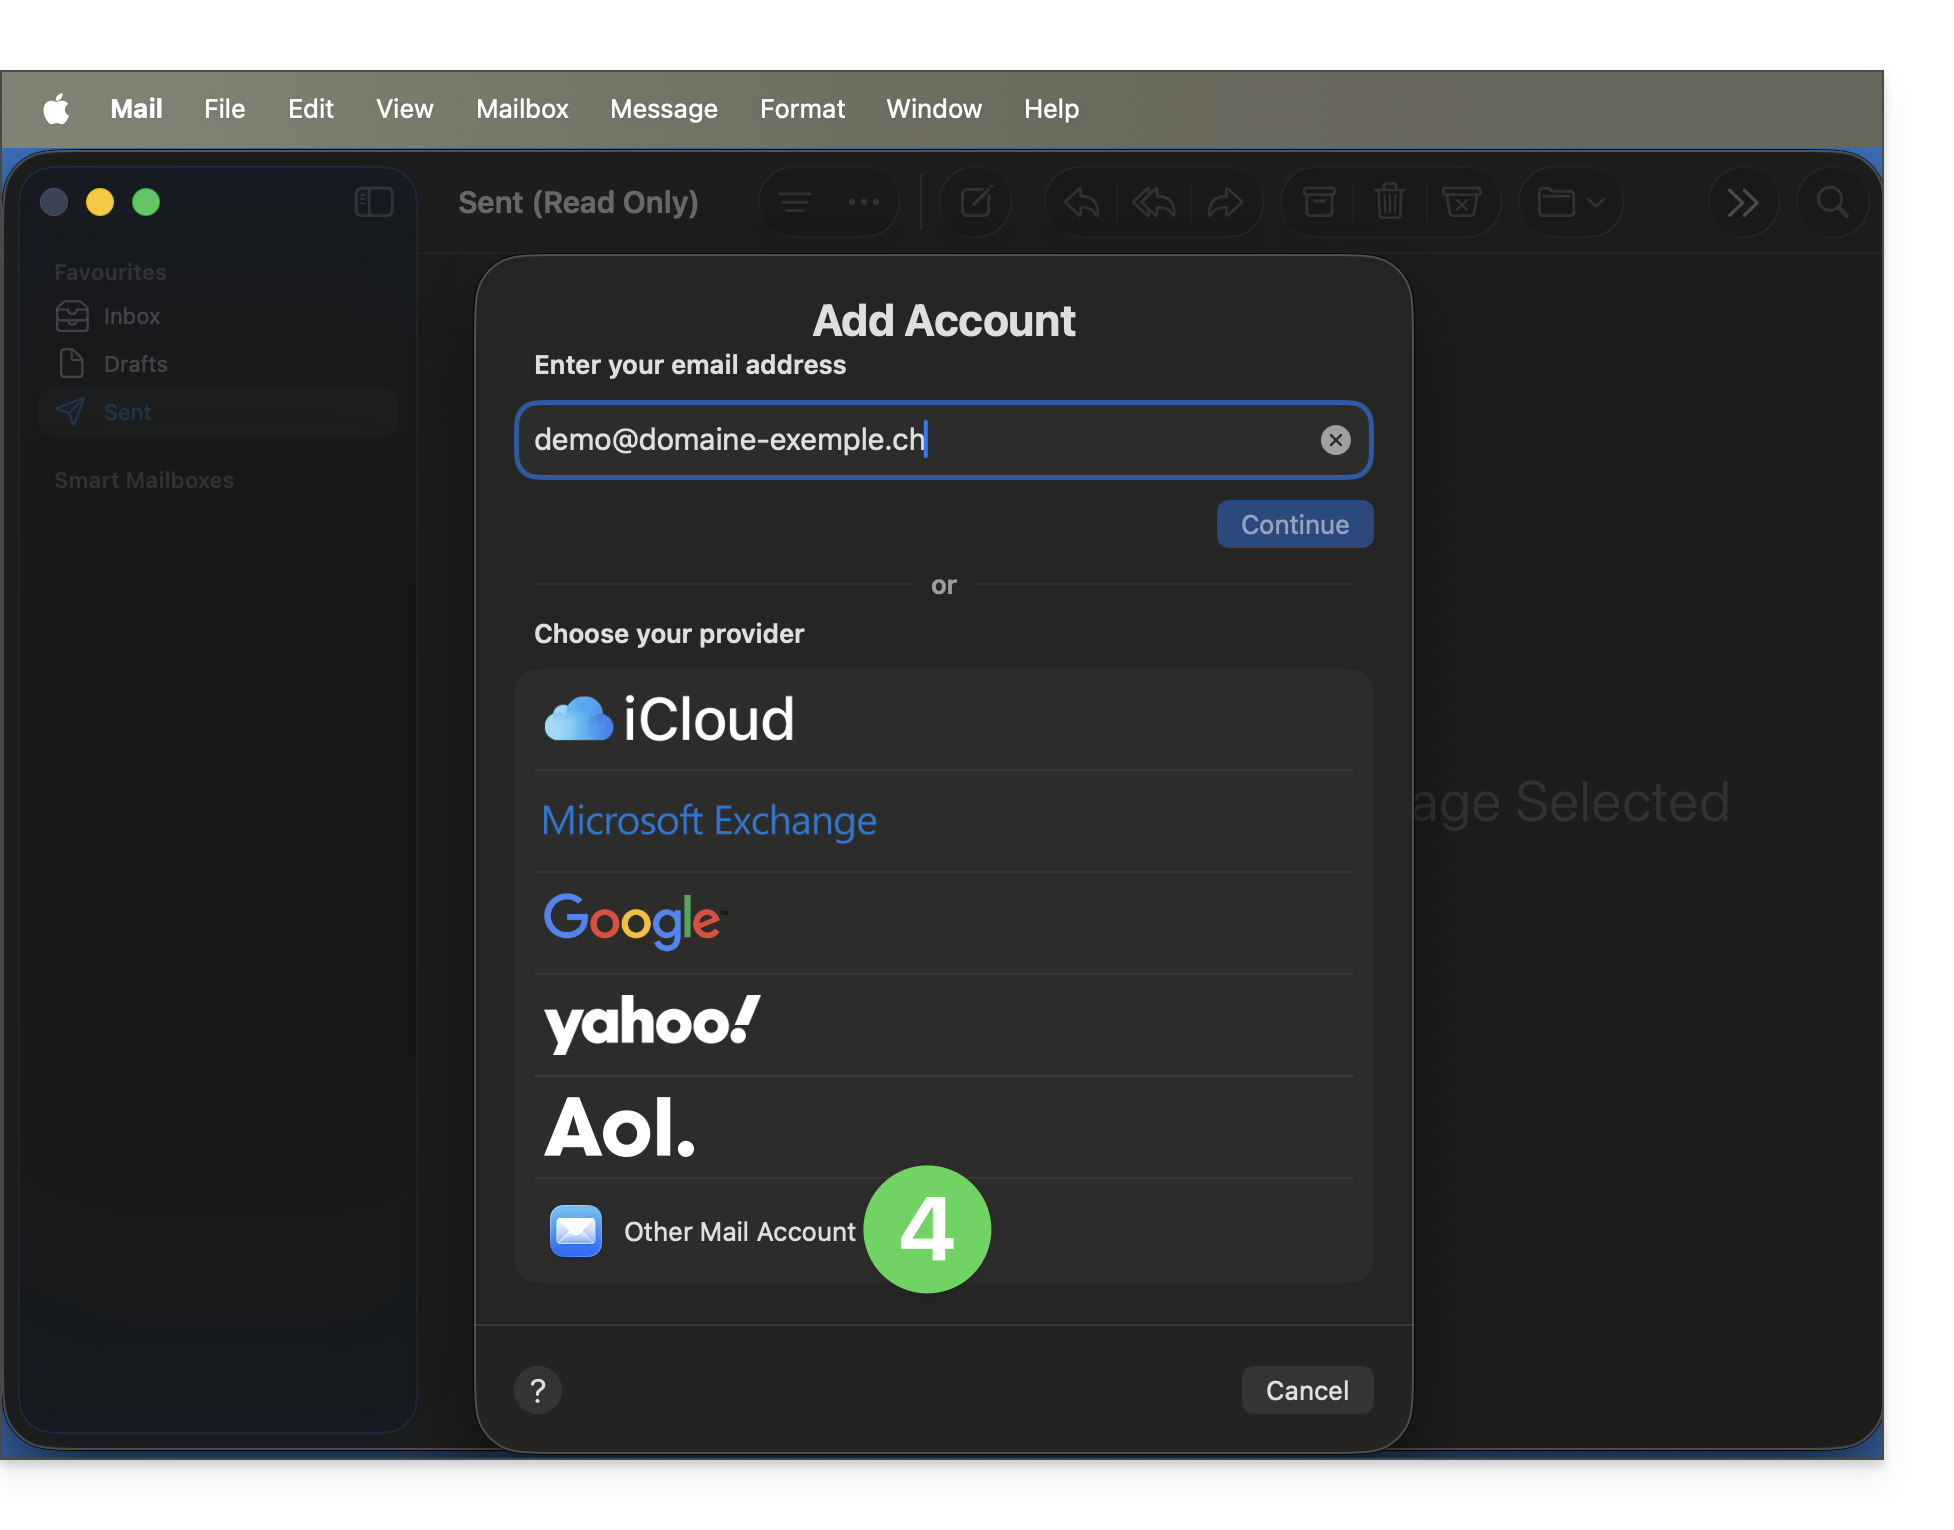
- Click on Other account:
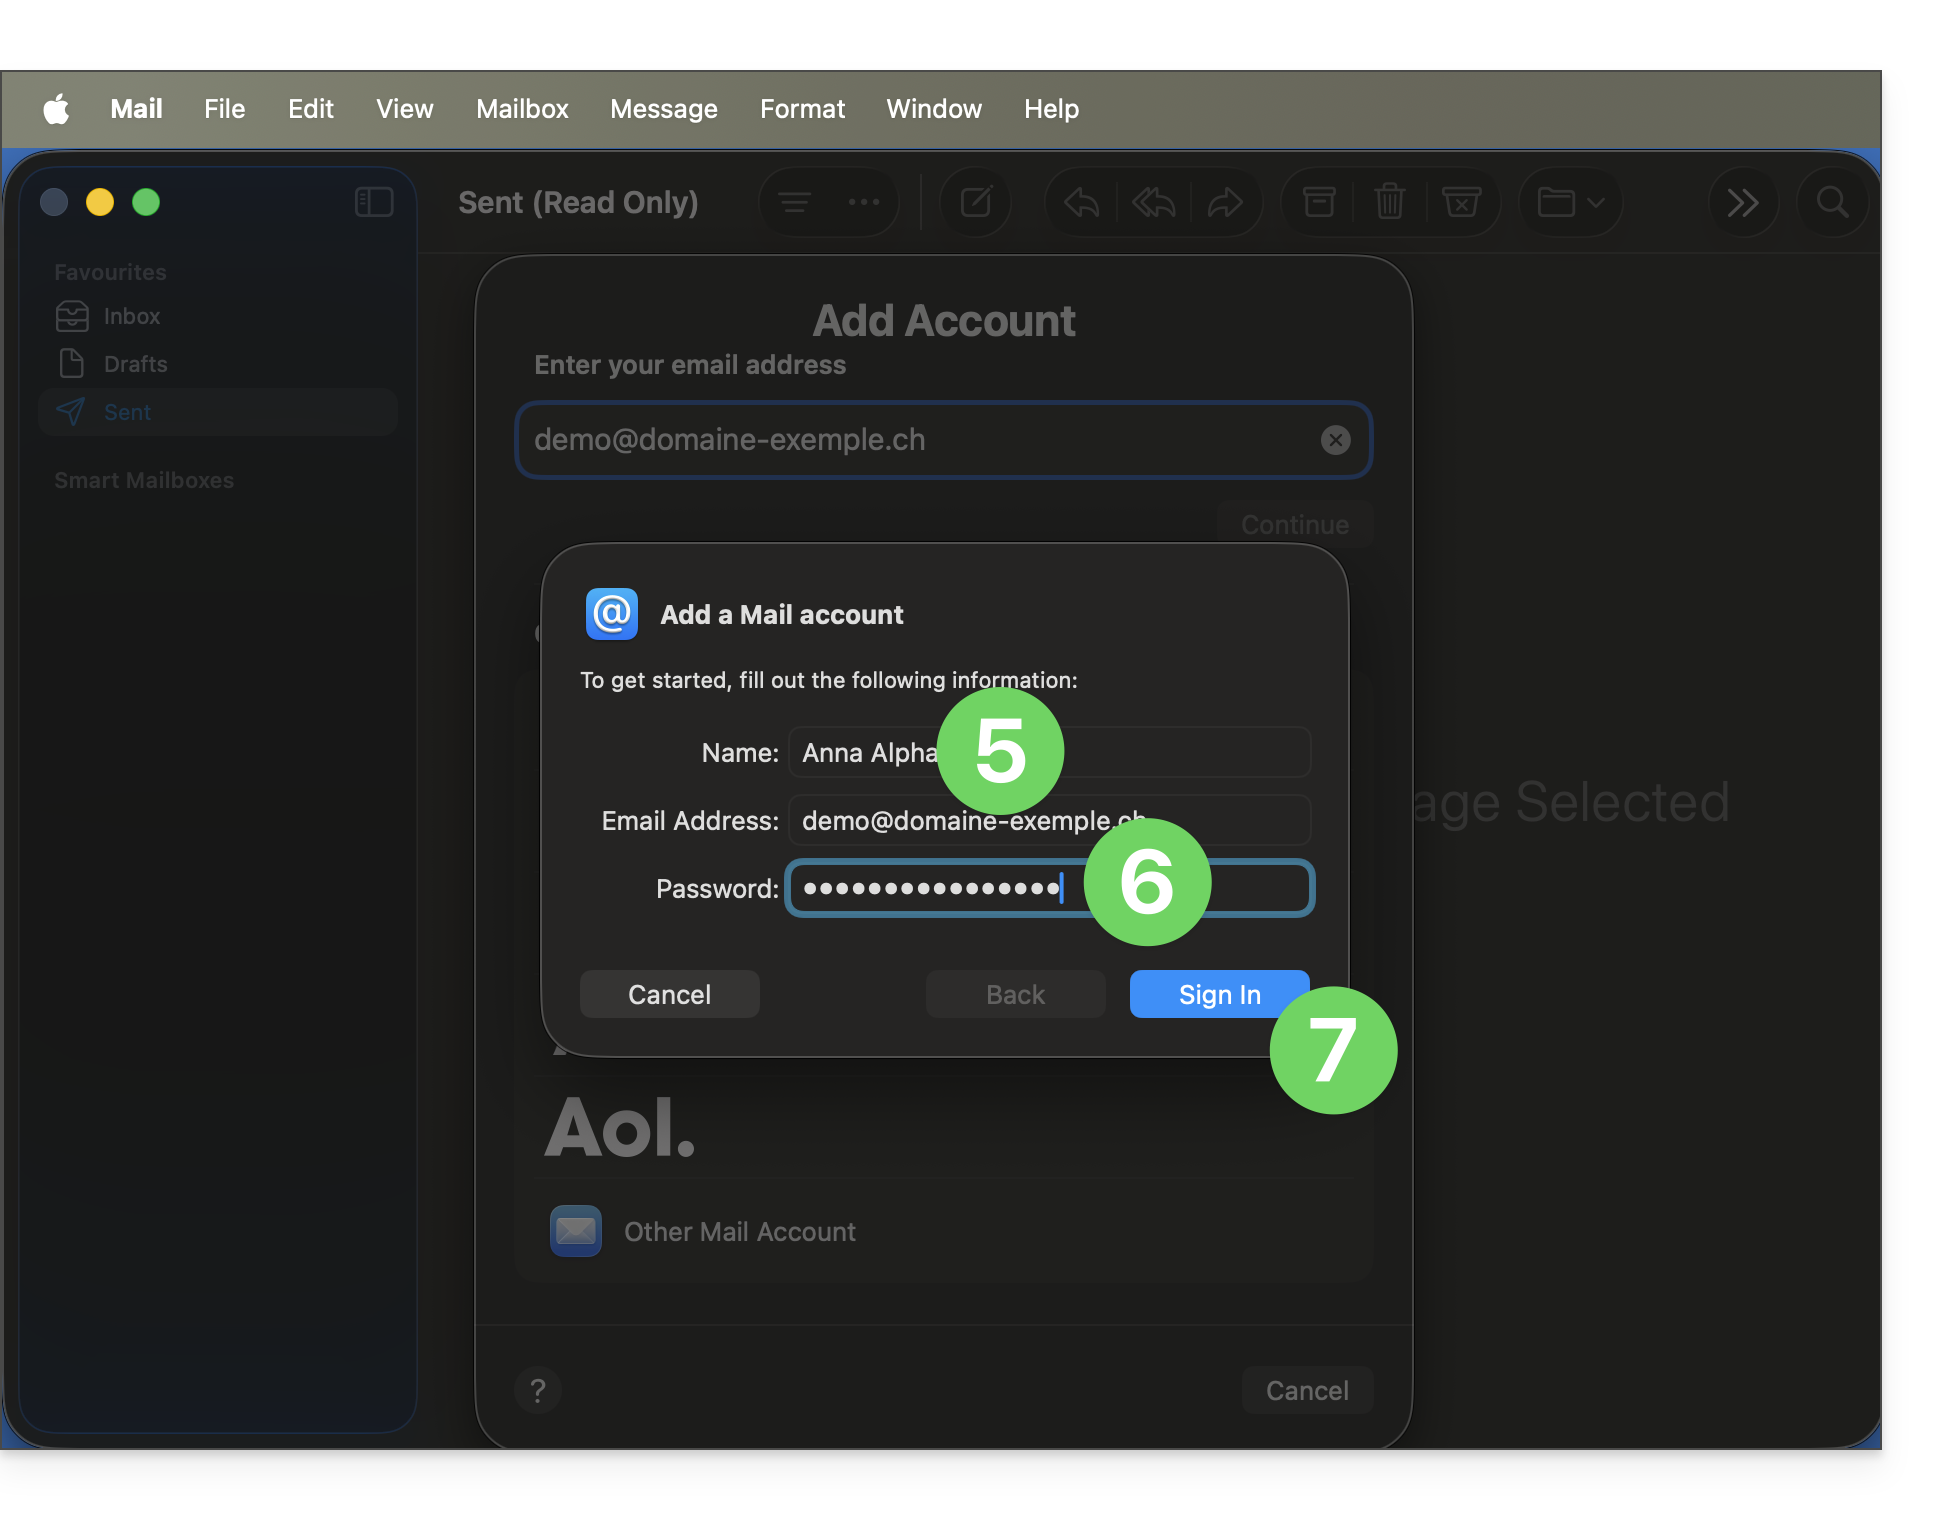
- Enter the account name.
- Paste the password for the email address generated in the Infomaniak Manager (❓: help).
- Click the Connect button:
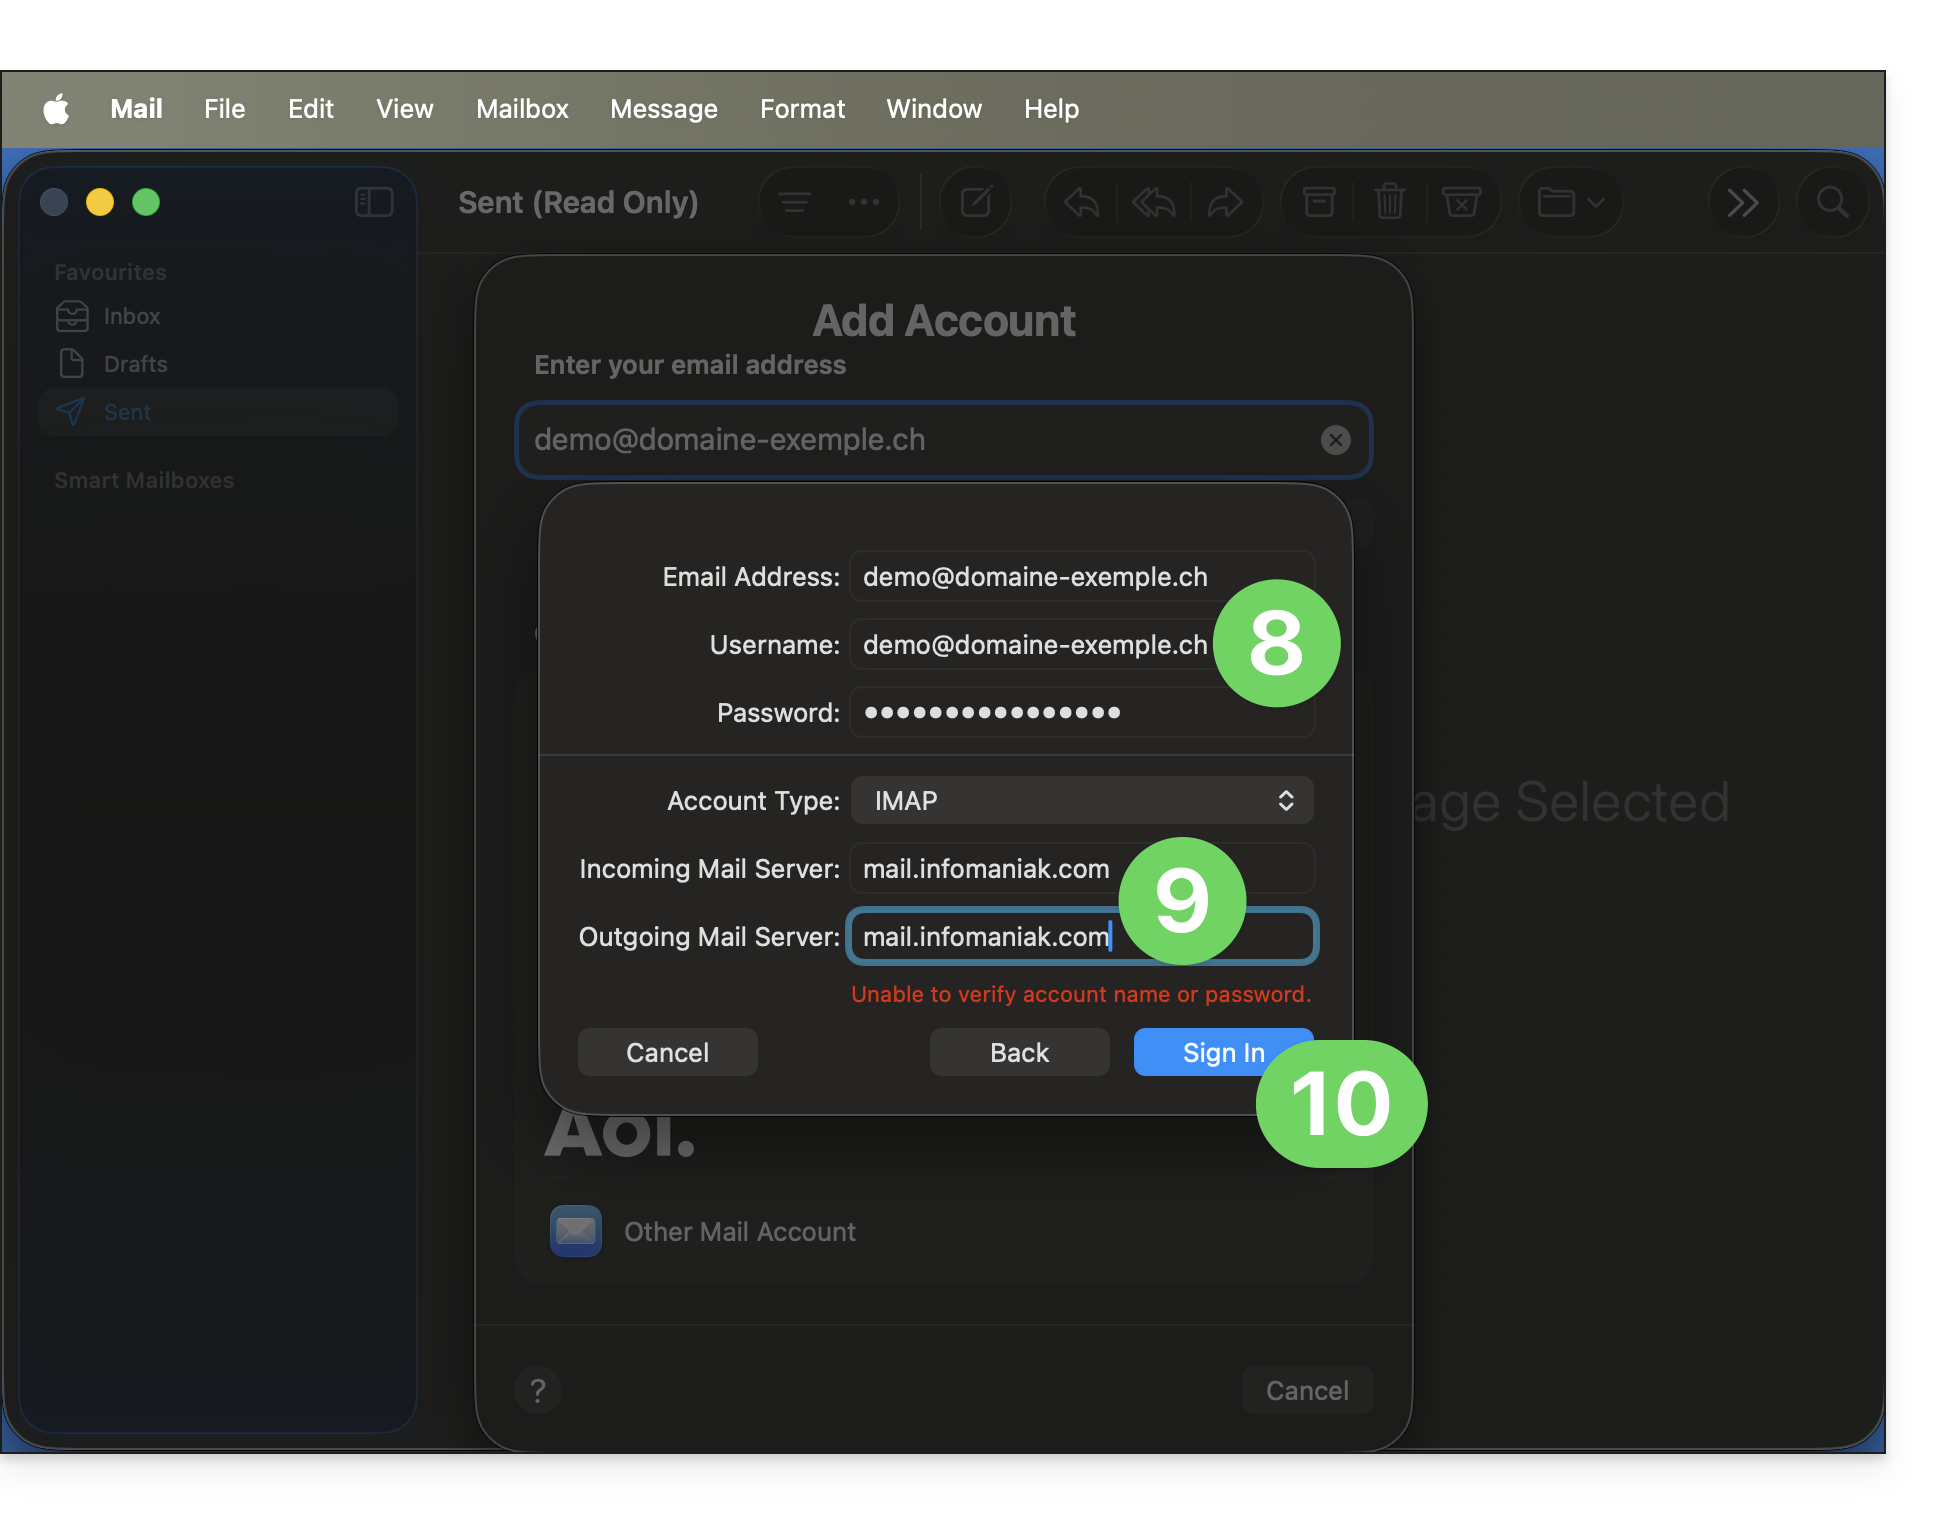
- Check and complete any missing information (❓: help).
- Check and complete any missing information (❓: help).
- The red indication is normal because, at this stage, the application has not yet received the correct information about your account.
- Click on Log in:
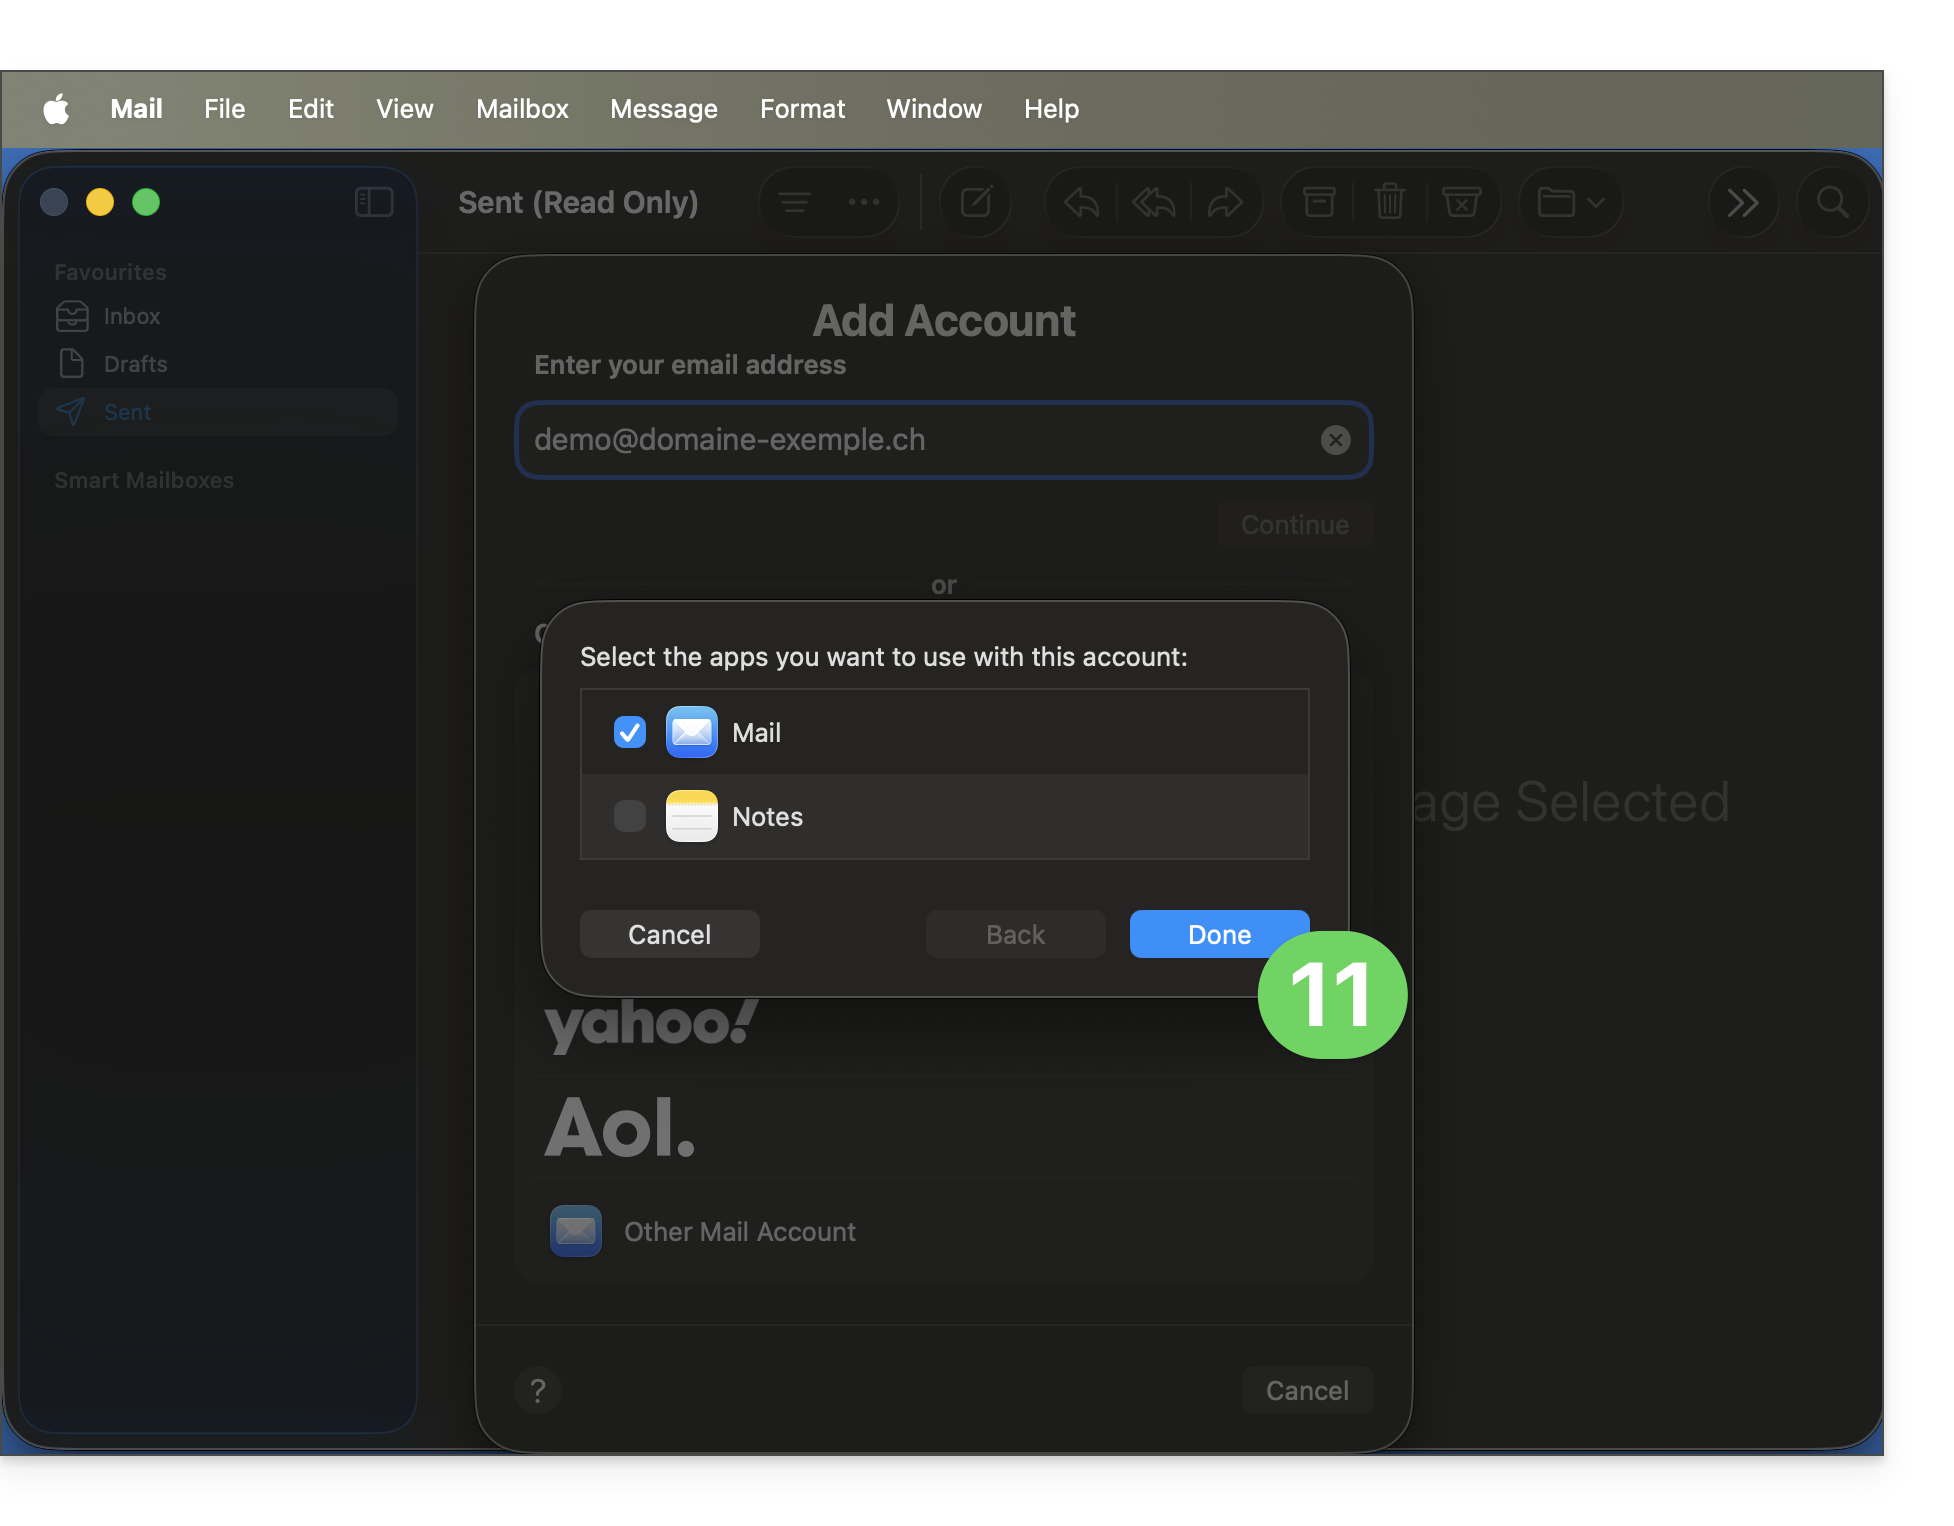
- Tap the button to confirm:
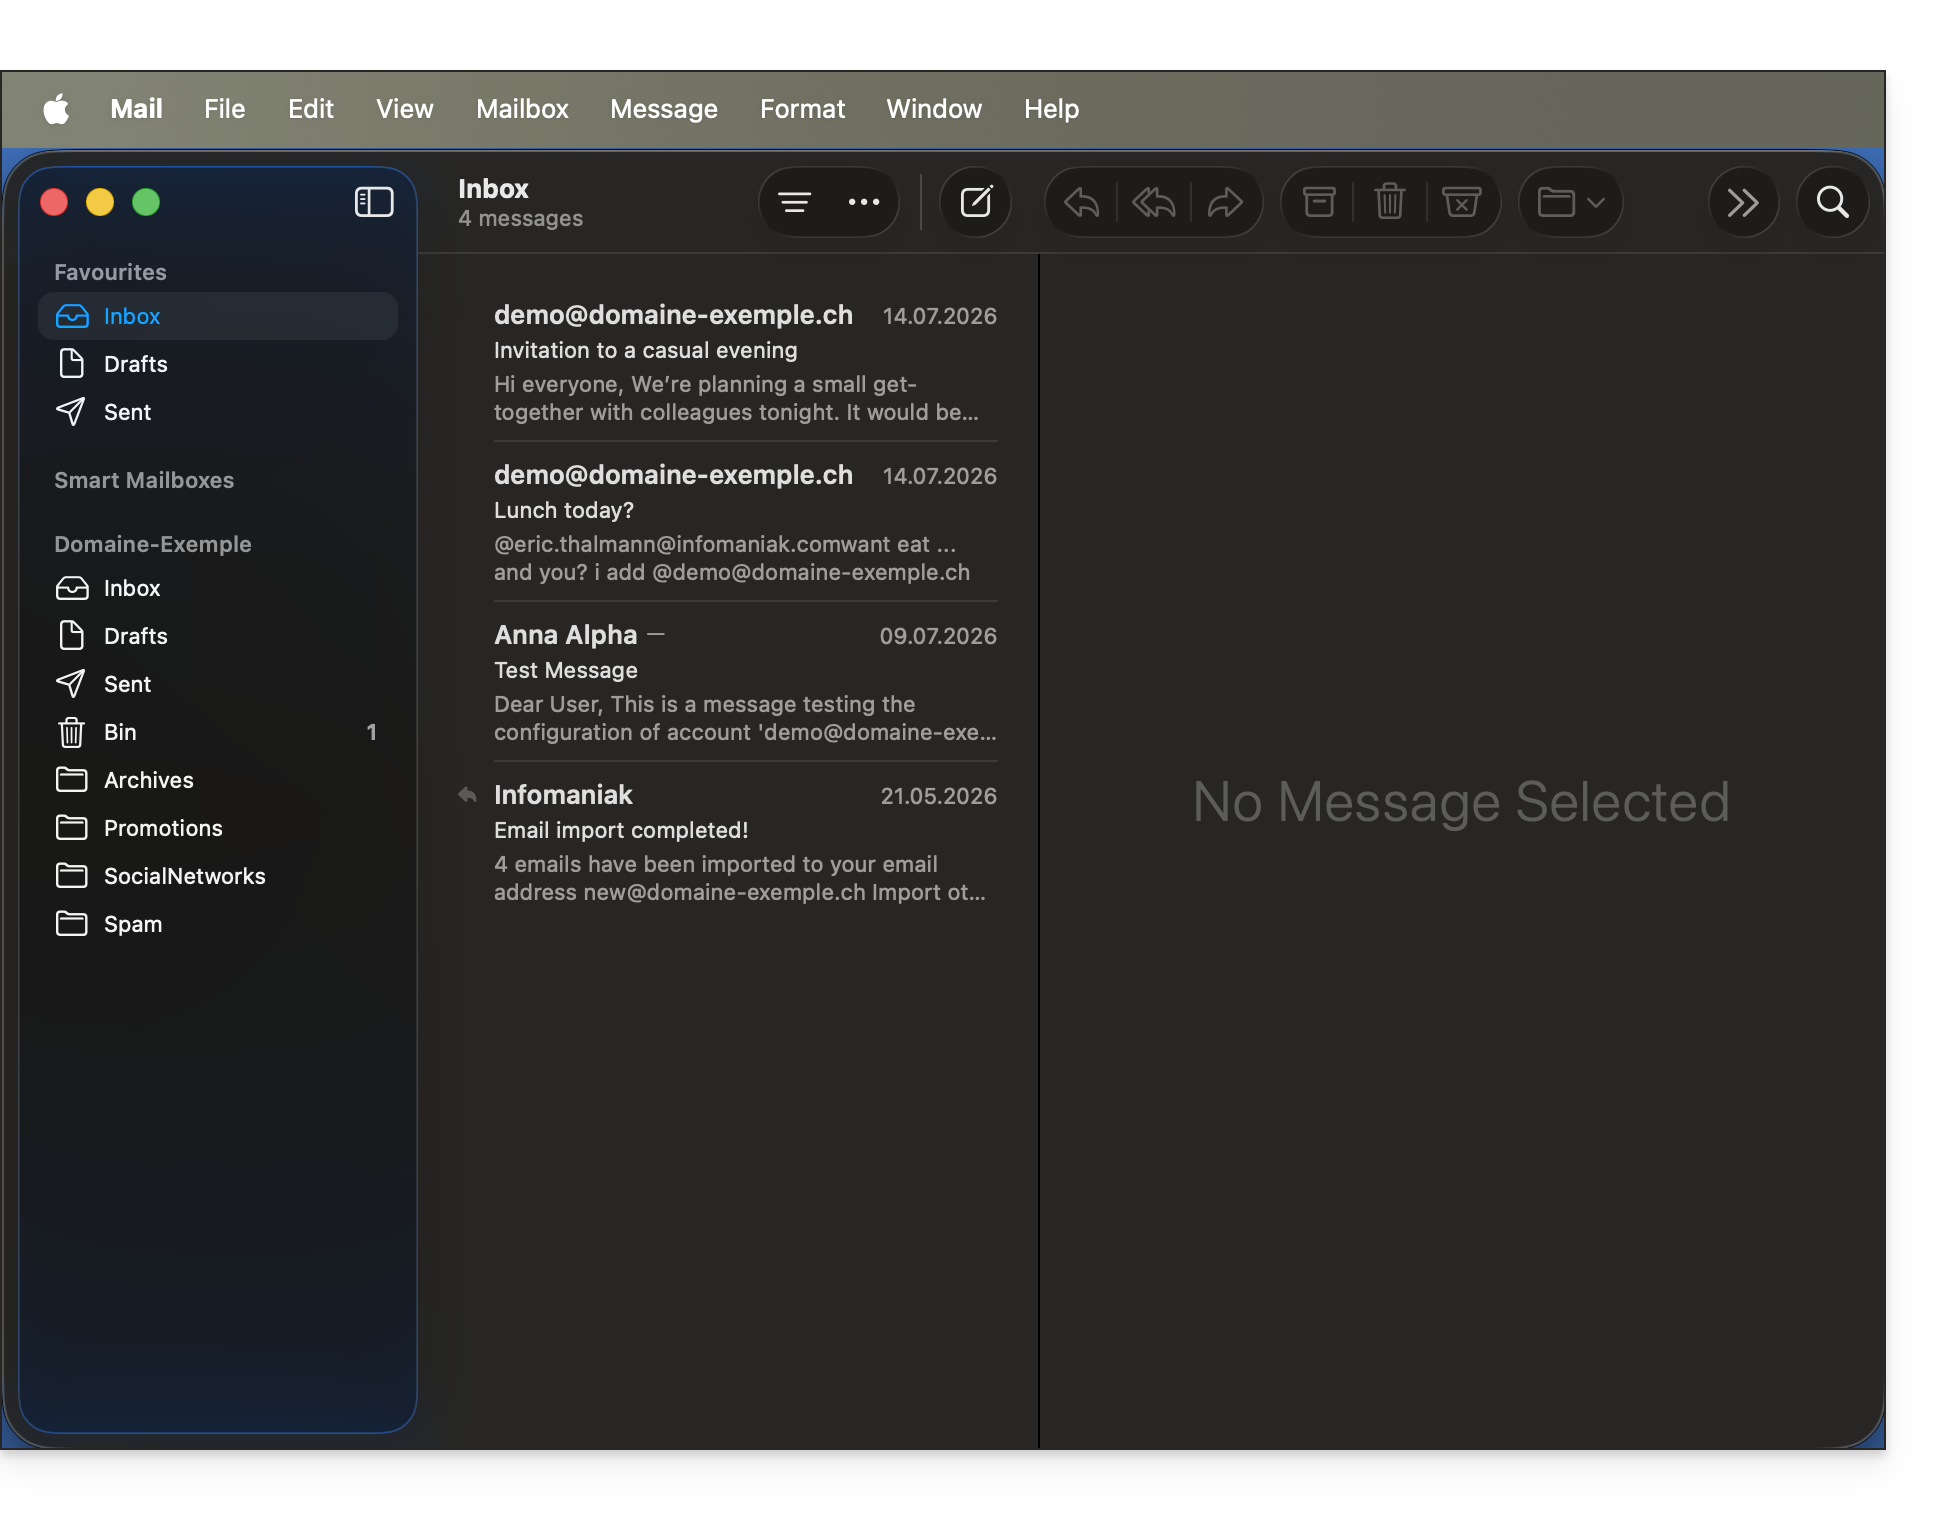
- Your email address is now configured in the application:
Recommended settings
- Incoming IMAP server =
mail.infomaniak.com - IMAP port =
993(with SSL) - Outgoing SMTP server =
mail.infomaniak.com - SMTP port & encryption protocol and command/method to activate this protocol:
587+ STARTTLS - Username = the complete email address (❓: help)
- Password = the password generated for the email address you want to access (❓: help my kSuite | Mail Service/kSuite).
- Mandatory authentication for sending emails:
- Activate it in the SMTP settings of your application.
- Check "use the same settings as the incoming server" or, depending on the software/email clients, enter a username (i.e., the complete email address) and the generated password.
Refer to this other guide if you are looking for information about other compatible email ports and protocols (SSL / TLS, for example).
In case of a problem
There is no need to contact Infomaniak Support if your email address works correctly outside the application. The most common error concerns the use of an incorrect password. The tool provided within Apple Mail can indicate this: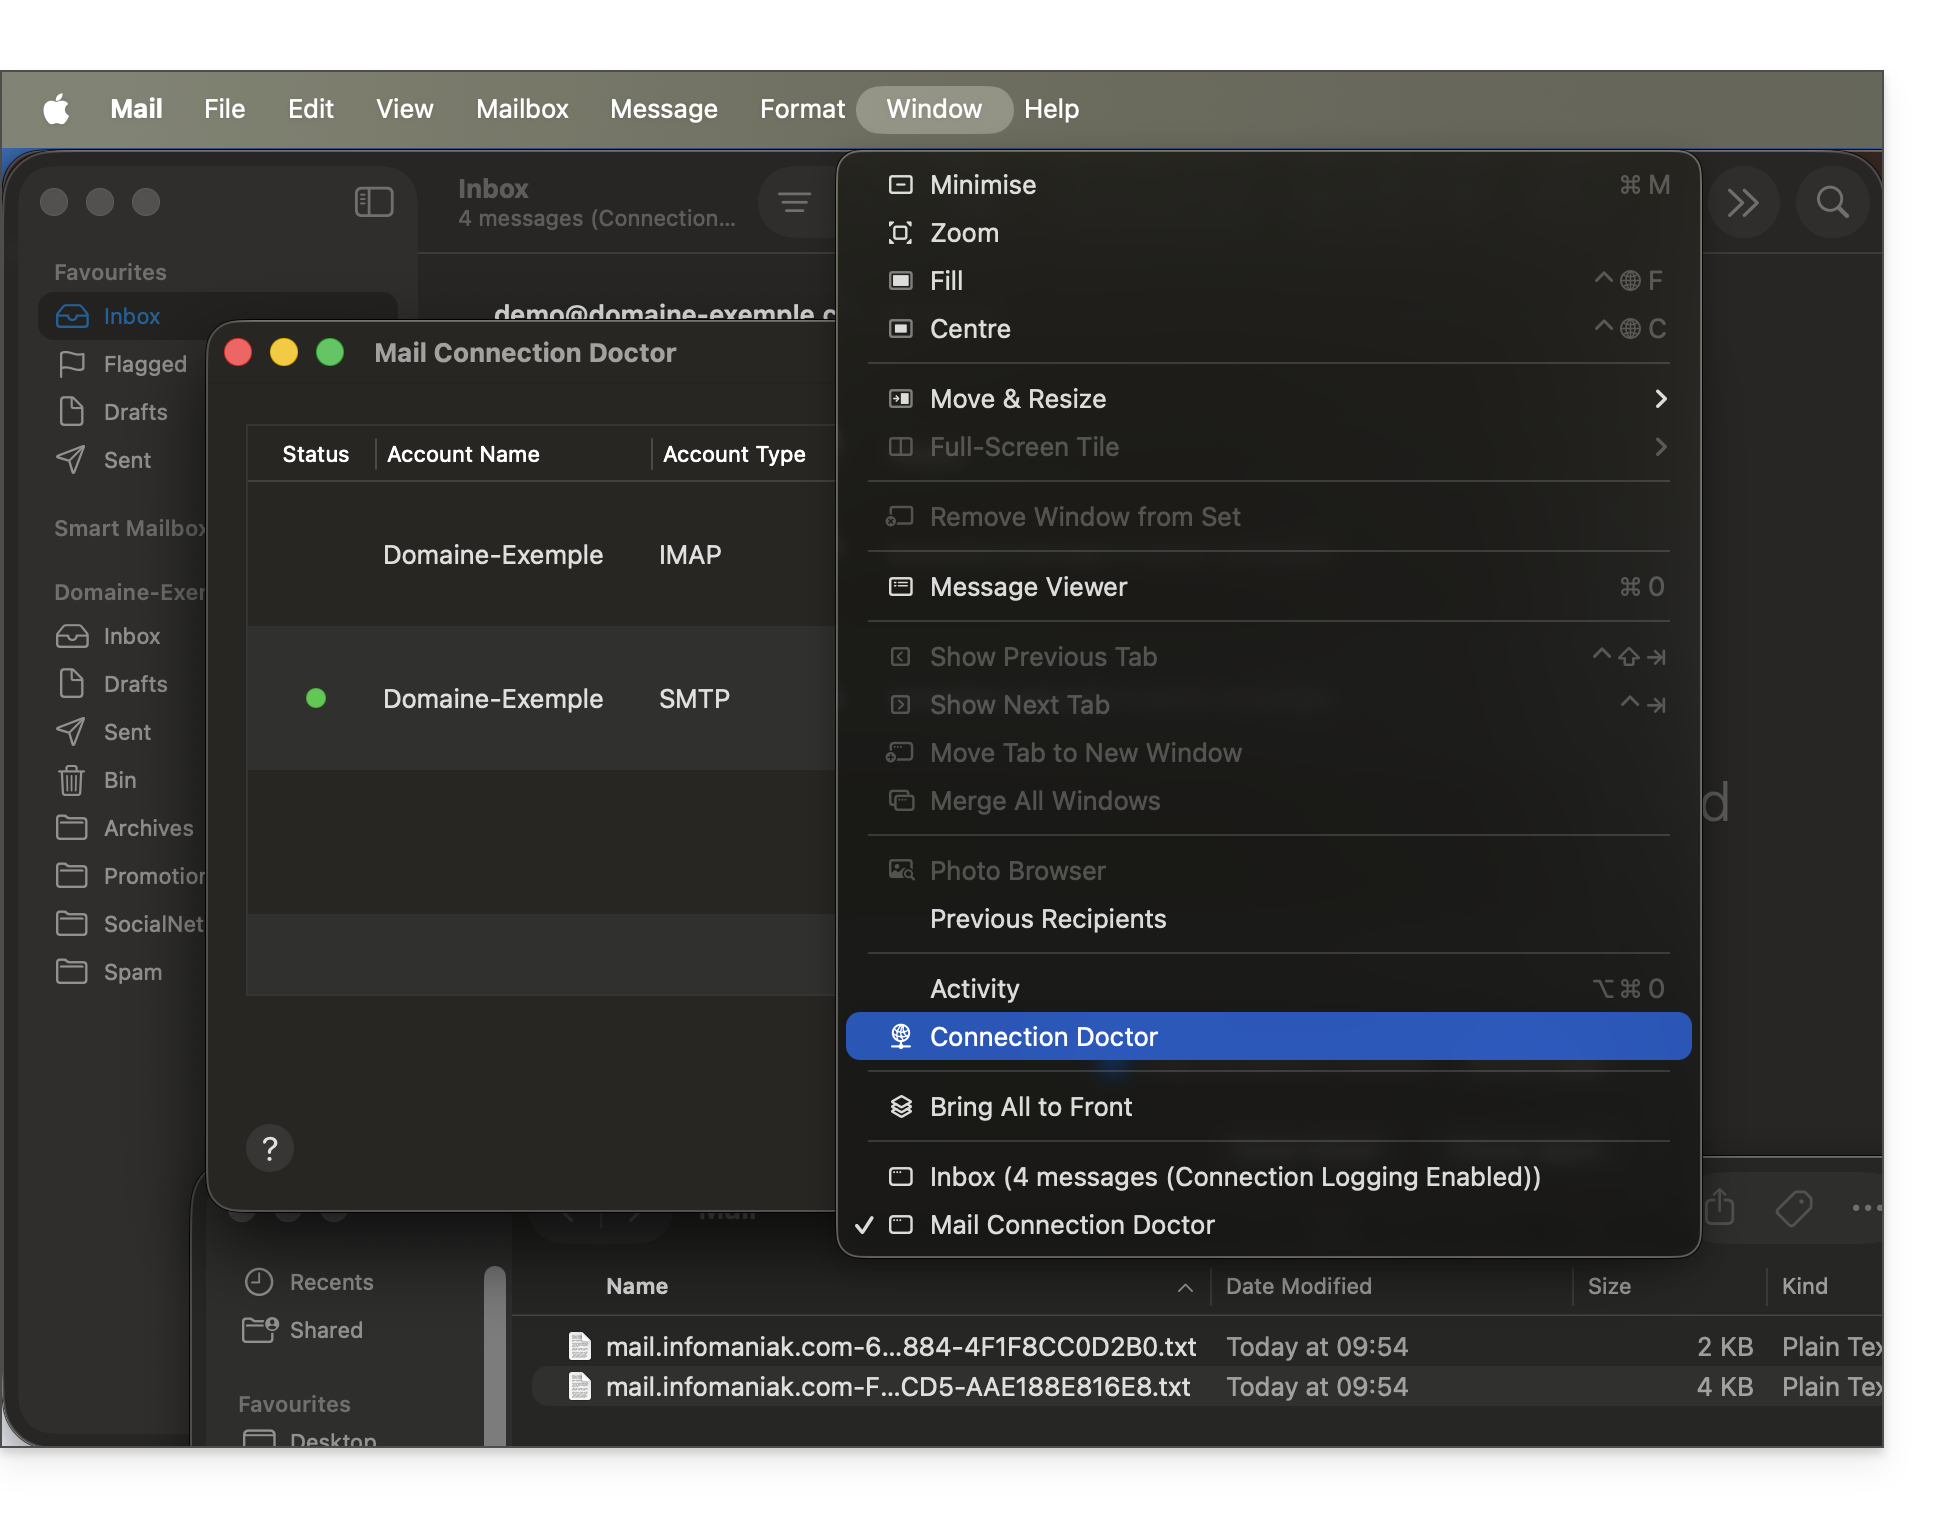
Create a new password from the Mail service (❓: help) and restart the configuration of your account in the email application.
The troubleshooting guides help you resolve any potential issues:
- Remove any existing Apple configuration profiles (❓: help) related to your Infomaniak email before restarting the configuration.
- Consult the solutions provided in this other guide regarding email in general.
If your Apple Mail is no longer working after a change of email password, please refer to this other guide.
Link to this FAQ: https://faq.infomaniak.com/2442
Has this FAQ been helpful?
This guide details how to manually back up data using the MSP360 (formerly CloudBerry macOS) application via the S3 Compatible protocol on Swiss Backup, the backup solution in a Swiss independent cloud.
Introduction
- You can also use FileZilla (SFTP): refer to this other guide.
Configure MSP360/CloudBerry
Prerequisites
- Have an Swiss Backup Infomaniak account with available device quota (minimum 1) for a Cloud backup.
- Add 1 device of type Cloud to obtain the S3 Compatible settings.
- Download and install MSP360 (macOS).
To configure a new backup:
- Go to Settings:

- Choose an S3 Compatible storage from the list below:

- Enter the information according to your device's specific details (refer to this other guide):

Display Name: the name of this storage space in the application.AccessKeyandSecretKey: the access keys generated from the email received from Infomaniak after creating the storage space.Endpoint(or server URL):https://s3.swiss-backup02.infomaniak.com- The value of "bucket" remains at its default setting.
- Confirm by clicking OK.
Link to this FAQ: https://faq.infomaniak.com/2550
Has this FAQ been helpful?
This guide explains how to add an attachment from kDrive to an event in a calendar using the Infomaniak Calendar web app (online service ksuite.infomaniak.com/calendar).
Introduction
- Some software or applications also allow you to add an attachment, and in this case, if you synchronize the calendar with your solution, the attached file can be up to a maximum size of 64 KB.
Add a kDrive attachment
When you create a new event on the Infomaniak Calendar web app (online service ksuite.infomaniak.com/calendar), you can add one or more attachments (links to files in kDrive):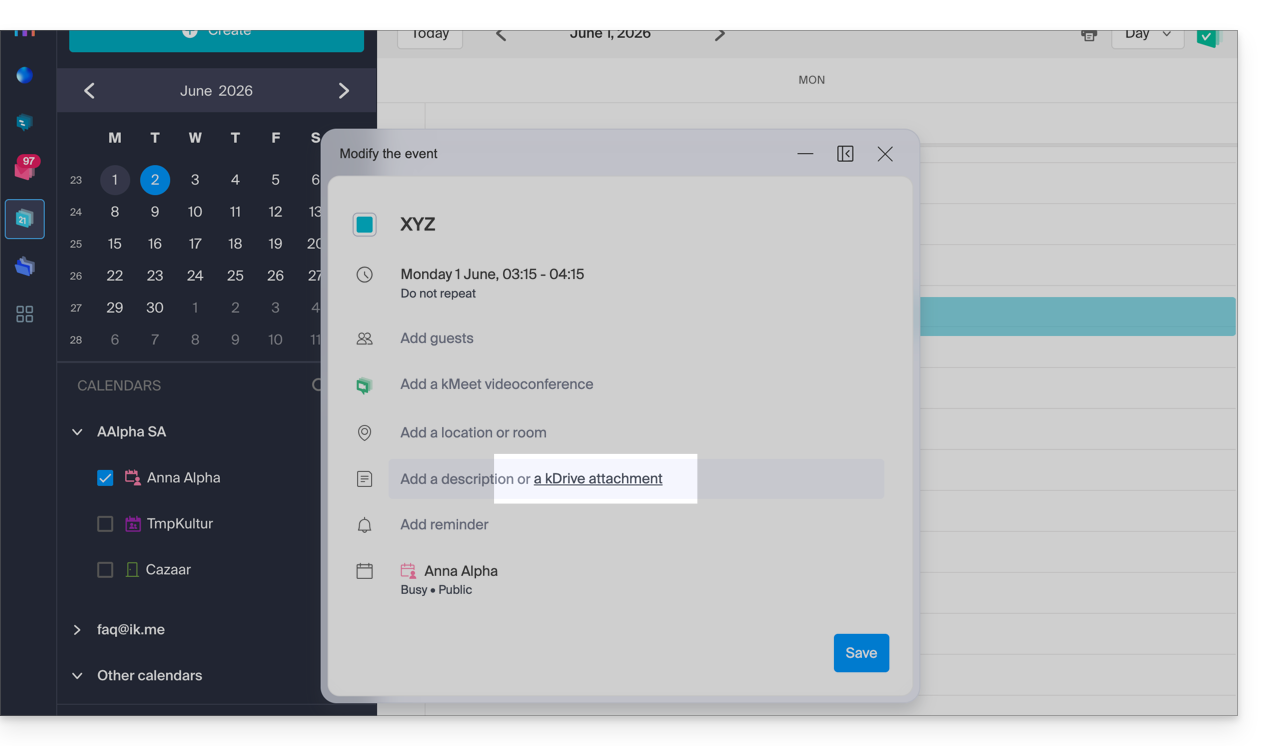
Then, click on the “Insert a kDrive link” link, and you will access kDrive directly from the Calendar event creation window: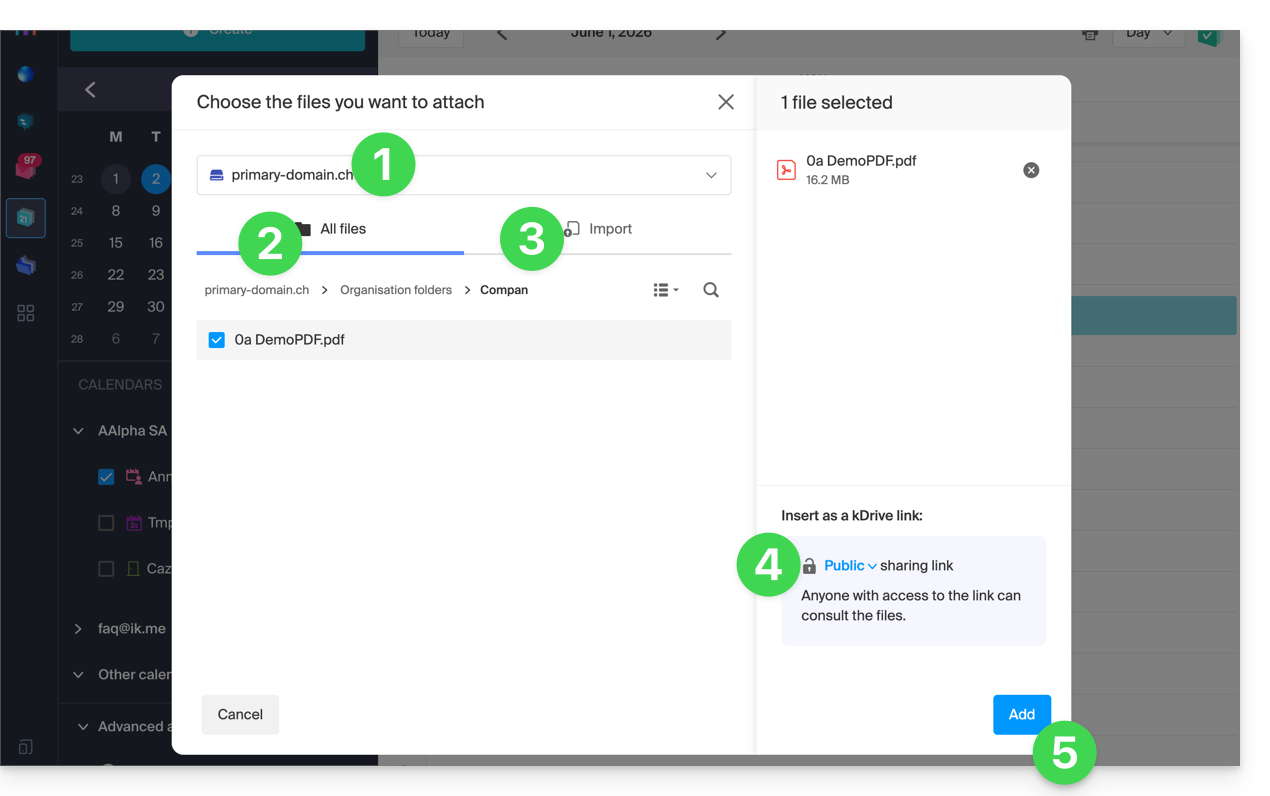
- Select kDrive if necessary.
- Browse and select the files to add to the event.
- Otherwise, import new documents that will be stored on kDrive.
- Once selected, choose whether their link should be:
- a public link (everyone can access it)
- a restricted link (only people with access can access it)
- Click on Add.
Whether the event is recurring or not, you can add files that will be shared with those who view the event in the calendar: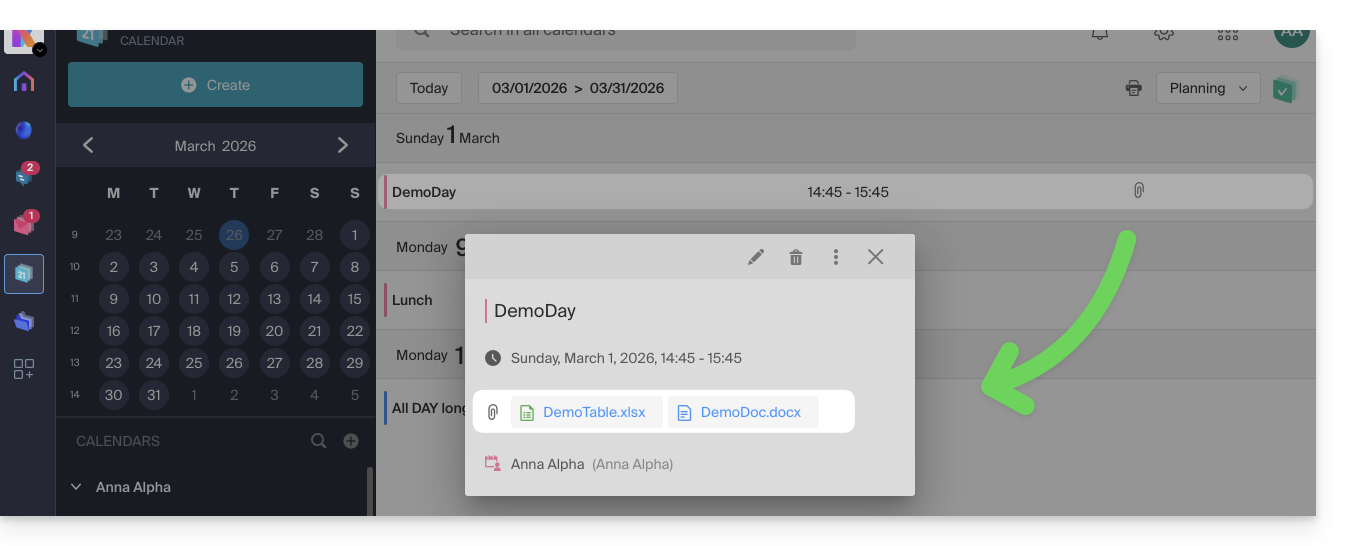
Guests who view the event details via a synchronized application, Outlook, Gmail, and others, will see the links in the description (as is the case for the possible kMeet link, for example, if a video conference is planned for the event).
Link to this FAQ: https://faq.infomaniak.com/1673
Has this FAQ been helpful?
This guide details the Lite Sync option in the desktop app kDrive v3.x (desktop application for Windows). The Lite Sync option is also available on macOS.
Introduction
- The Lite Sync feature saves space by virtually storing your kDrive files on your computer, only downloading them when necessary.
- Files are always accessible from the kDrive web app (online service ksuite.infomaniak.com/kdrive), but locally they are present in a "dehydrated" form, requiring a loading time to be fully accessible.
- This allows you to view, complete, and synchronize the content of kDrive without saturating the hard drive.
- The Lite Sync option always applies:
- to a specific kDrive (in the case where you synchronize several on the application).
- and to the entirety of the kDrive (or the entirety of an advanced synchronization).
- and via a specific kDrive app (another user of the same kDrive can make a different Lite Sync choice than you).
- If you encounter any issues, please refer to this other guide for more information.
Enable Lite Sync
Prerequisites & Scope of Use for Lite Sync
- Windows OS version ≥ 10 (21H2) — not available with Linux
- 64-bit processor (ARM64 compatible)
- File storage system using NTFS (FAT32 excluded)
The Lite Sync option can be enabled during the installation of version 3.x of the application (you will be prompted) or later:
- If necessary, click on the chevron in the notification area of your computer (at the bottom right on Windows, near the clock) to access the kDrive icon, as Windows hides application icons.
- Left-click on the app icon.
- Click on the action menu ⋮ to the right of the kDrive window.
- Select kDrive Settings.
- Click on the action menu ⋮ to the right of the current synchronization and the cloud symbol:
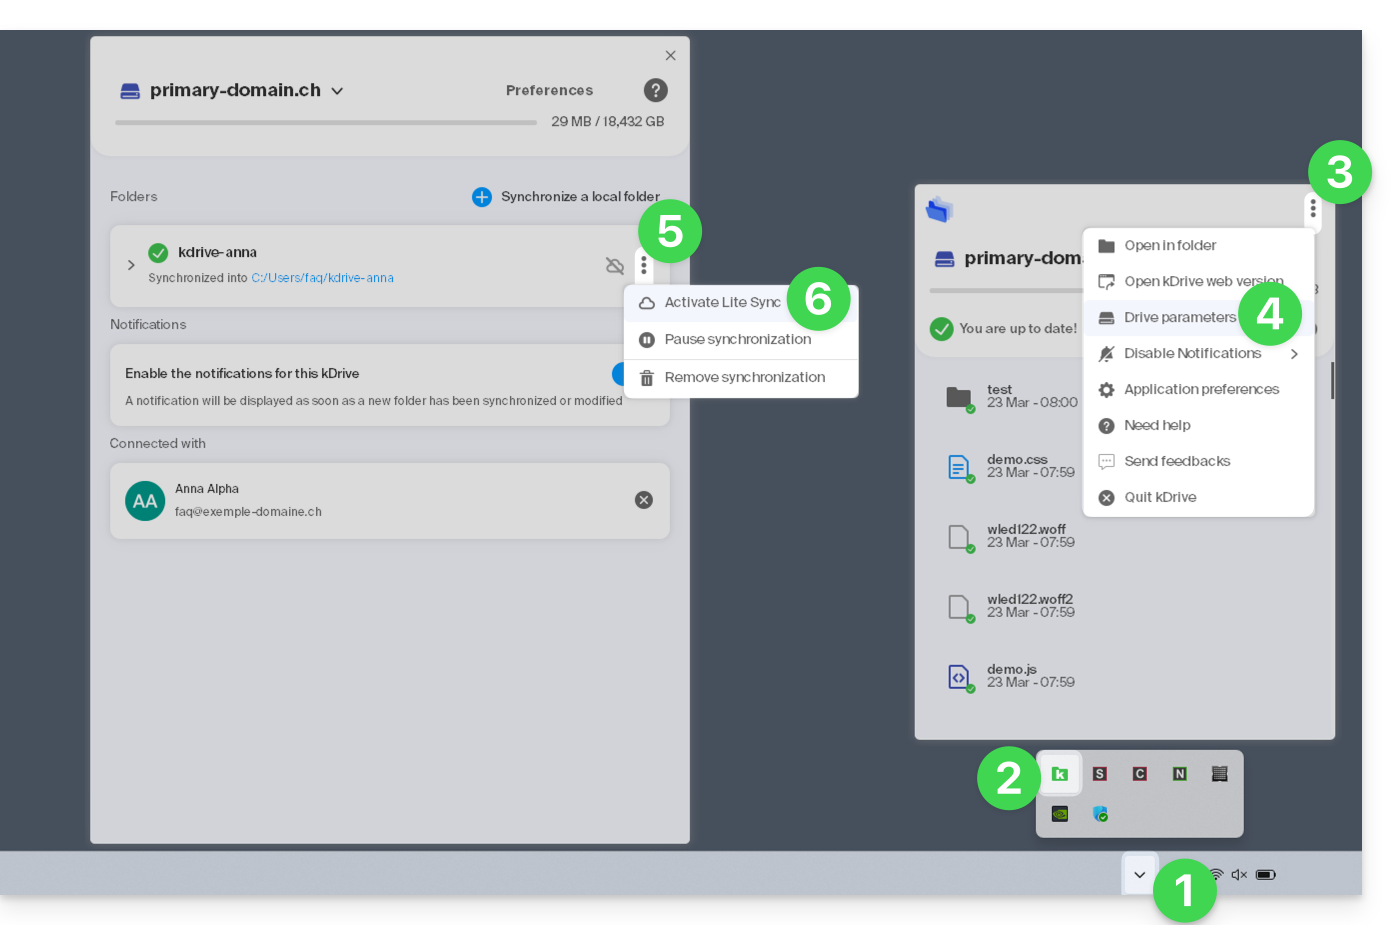
- Click on the menu item:
- If the cloud icon is crossed out, you can enable Lite Sync because it was not yet active (confirm).
- In the same place, you can disable Lite Sync if the cloud icon is not crossed out (see also at the end of this guide).
- Confirm the operation and wait for the message confirming the end of the operation.
Actions on synchronized data on the disk
Always keep on this device
Once Lite Sync is enabled (and the data on the disk becomes “virtual”), you can still make a folder and its subfolders, or only one or more files, available locally:
- In Windows File Explorer, navigate to a folder synchronized with kDrive and right-click.
- Select the Always keep on this device option under kDrive:
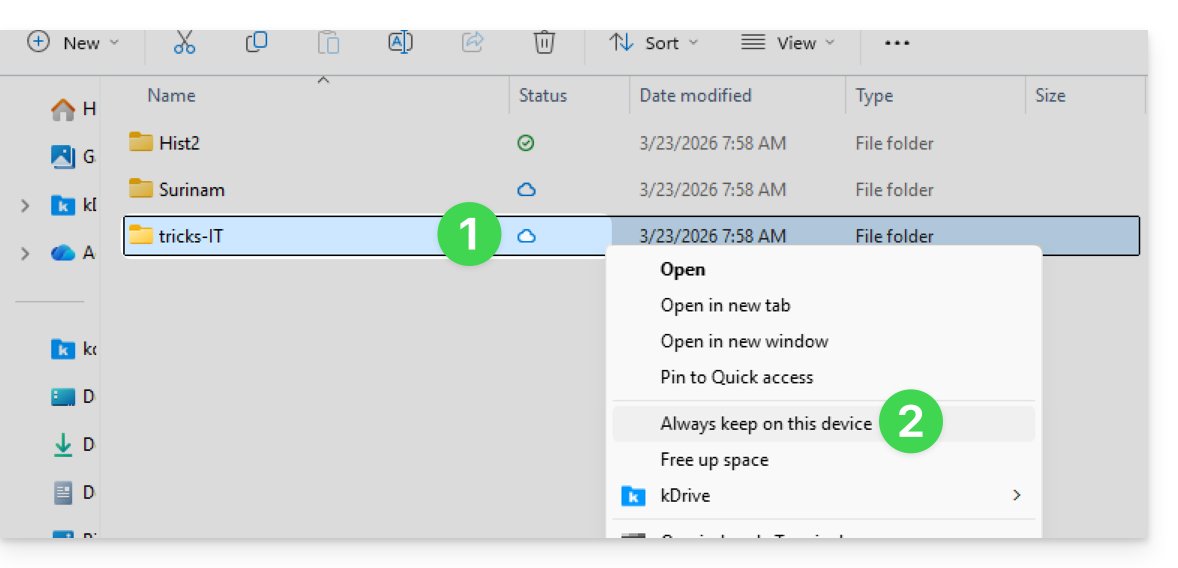
- The symbol visible on the icon of the files in question will change to indicate that the file is no longer "in the cloud" but is physically present on your disk.
Free up space
Conversely, once Lite Sync is activated, you can free up space, file by file or within a folder and its subfolders.
Please note: "free up space" is not applied by default to new files or folders added locally.
- From the Windows File Explorer, right-click on the folder or file in question.
- Select the Free up space option under kDrive:
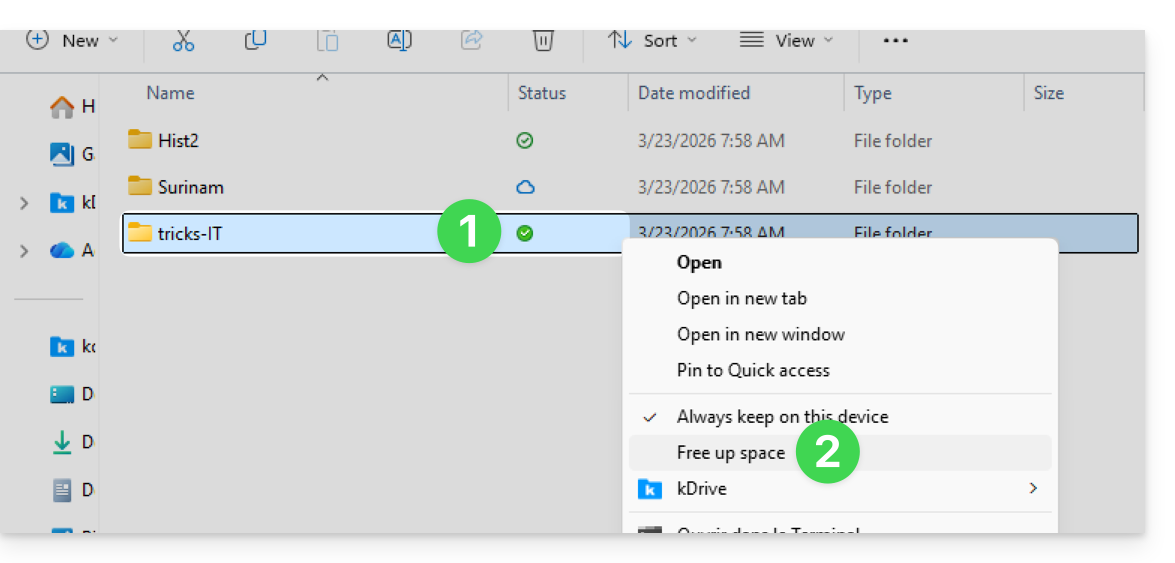
- The symbol visible on the icon of the files/folders concerned will change to indicate that the data is “in the cloud” and is no longer fully present on your disk:
- The Free up space action will free up storage space on your computer.
- The files will remain visible but will no longer be accessible without an internet connection.
Example of use (storage space required)
If you activate Lite Sync, the space used (900 GB for example) on the Infomaniak server will be freed up on your hard drive, but the reverse is also true (for example, 900 GB of free space is required on your hard drive if you activate the Lite Sync option later).
Therefore, it is recommended to keep the initial choice of whether or not to activate Lite Sync, and not to change it midway.
"Dehydration" of files
As explained in the introduction, a dehydrated file is a kDrive file whose complete version is not present on the hard drive; instead, a 1 KB "shortcut" is displayed. This is normal behavior when Lite Sync is enabled.
In some cases (for example, if you copy files from your hard drive while Lite Sync is enabled, and then start a new synchronization to a new kDrive), the application will block the import of this type of file. To resolve these errors, you can download the complete file from the web app kDrive (online service ksuite.infomaniak.com/kdrive).
Here are the status icons used in Windows Explorer and their explanations:
| Status Icons | Description |
|---|---|
| |
| |
| File temporarily downloaded by Windows (may be released by the OS). | |
| The progress circle indicates an action in progress or pending. | |
| Synchronization issue or Lite Sync (contact support). |
Disable the Lite Sync option
To do this, follow the steps at the top of this guide. When disabling LiteSync via the kDrive Settings, two scenarios may occur depending on the remaining space on the storage device of the device being used:
- If there is enough space on your computer, a message confirming the deactivation will appear; simply click Continue.
- If there is not enough space on your computer, a message will indicate the amount of space needed to disable Lite Sync; your kDrive synchronization will be paused until you free up space or select the files to synchronize.
Link to this FAQ: https://faq.infomaniak.com/2562
Has this FAQ been helpful?
This guide explains how to troubleshoot errors related to the Lite Sync Windows extension in the desktop application kDrive v3.x.
Check if the extension is present
Before performing any operations, make sure that the extension is properly registered with the system:
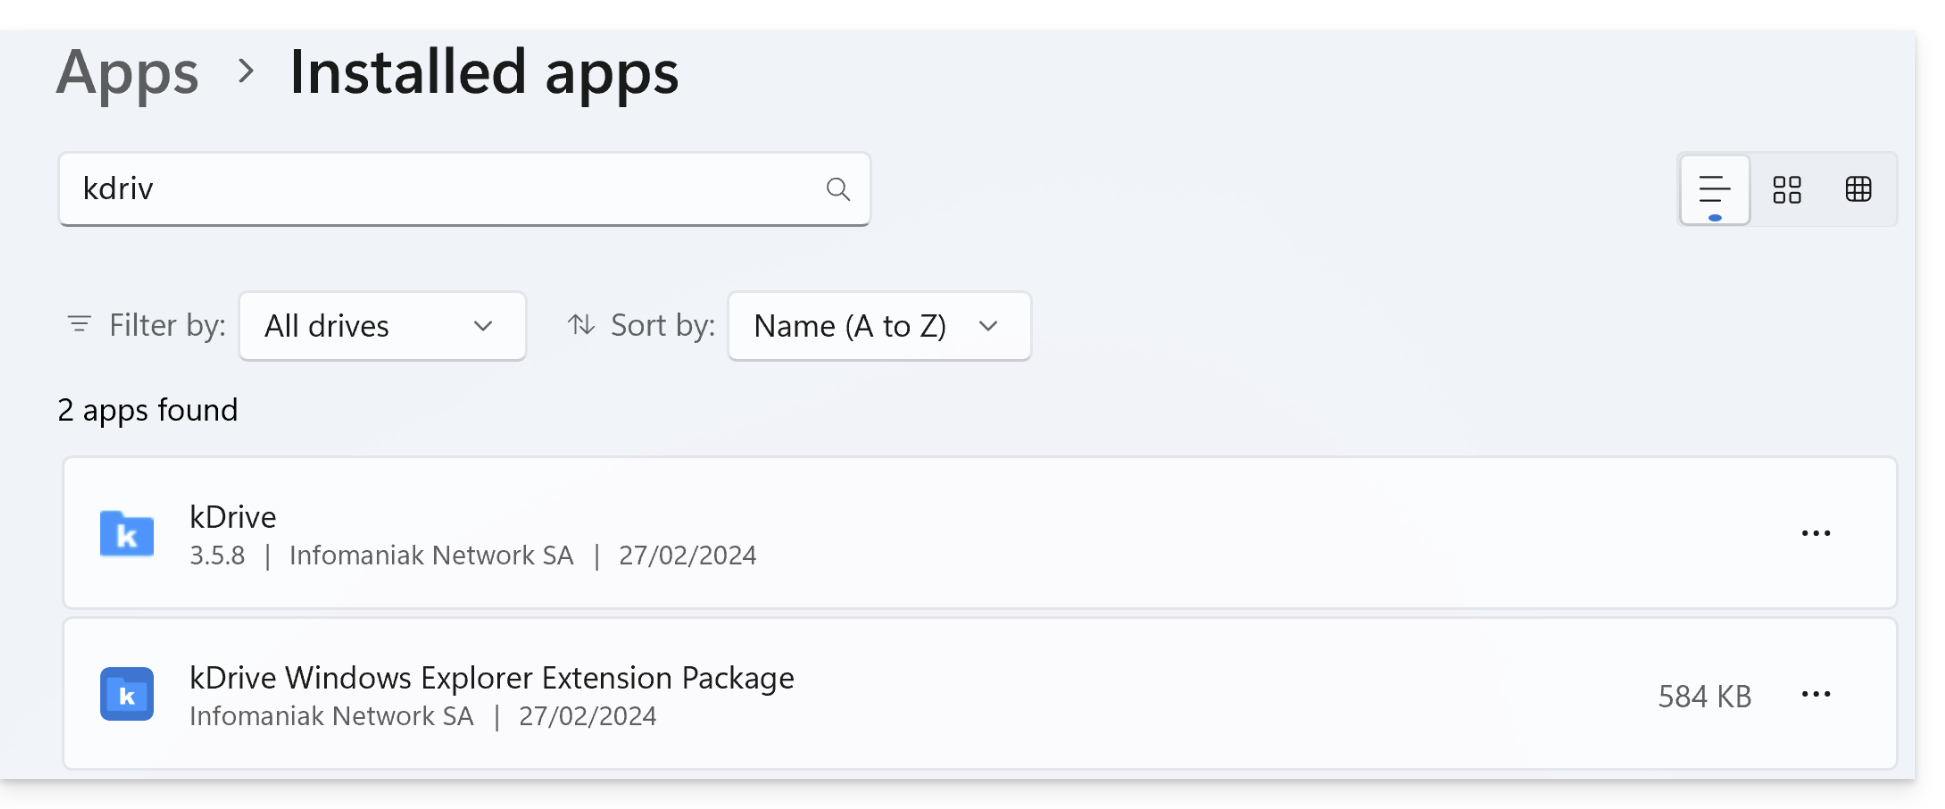
- Open the Settings in Windows.
- Go to the Applications section, then Installed applications.
- In the search bar, type "kDrive".
- Make sure that the kDrive Windows Explorer Extension Package appears in the list:
Error of type "Unable to start Lite Sync"
This error usually occurs when the Windows Explorer extension is missing or corrupted.
Manually reinstalling the extension
If the extension does not appear or is not working, you can install it manually without reinstalling kDrive:
- Close the kDrive application completely (make sure it is no longer in the notification area).
- Open your file explorer and navigate to the following folder:
C:\Programs\kDrive\shellext\AppX\ - Double-click the following file:
FileExplorerExtensionPackage_3.8.1.0_x64_arm64.msixbundle - A specific installation wizard for the extension will open. Follow the steps.
- Restart your computer to complete the integration.
If the problem persists
If, despite manual installation, the LiteSync option remains unavailable:
- Antivirus: check that your security software is not blocking processes located in
C:\Programs\kDrive\. - Conflicts: Some other cloud services (like OneDrive) may sometimes conflict with kDrive's icon extensions.
- Logs: If necessary, send the kDrive logs (in Debug mode) to Infomaniak support.
Link to this FAQ: https://faq.infomaniak.com/2804
Has this FAQ been helpful?
This guide explains how to update the password for a mail address on your device after you have changed it from an Infomaniak Mail Service.
Introduction
- You can also consult the official Apple help on this topic.
Apple Mail (macOS)
To access the password settings (refer to the complete guide if needed):
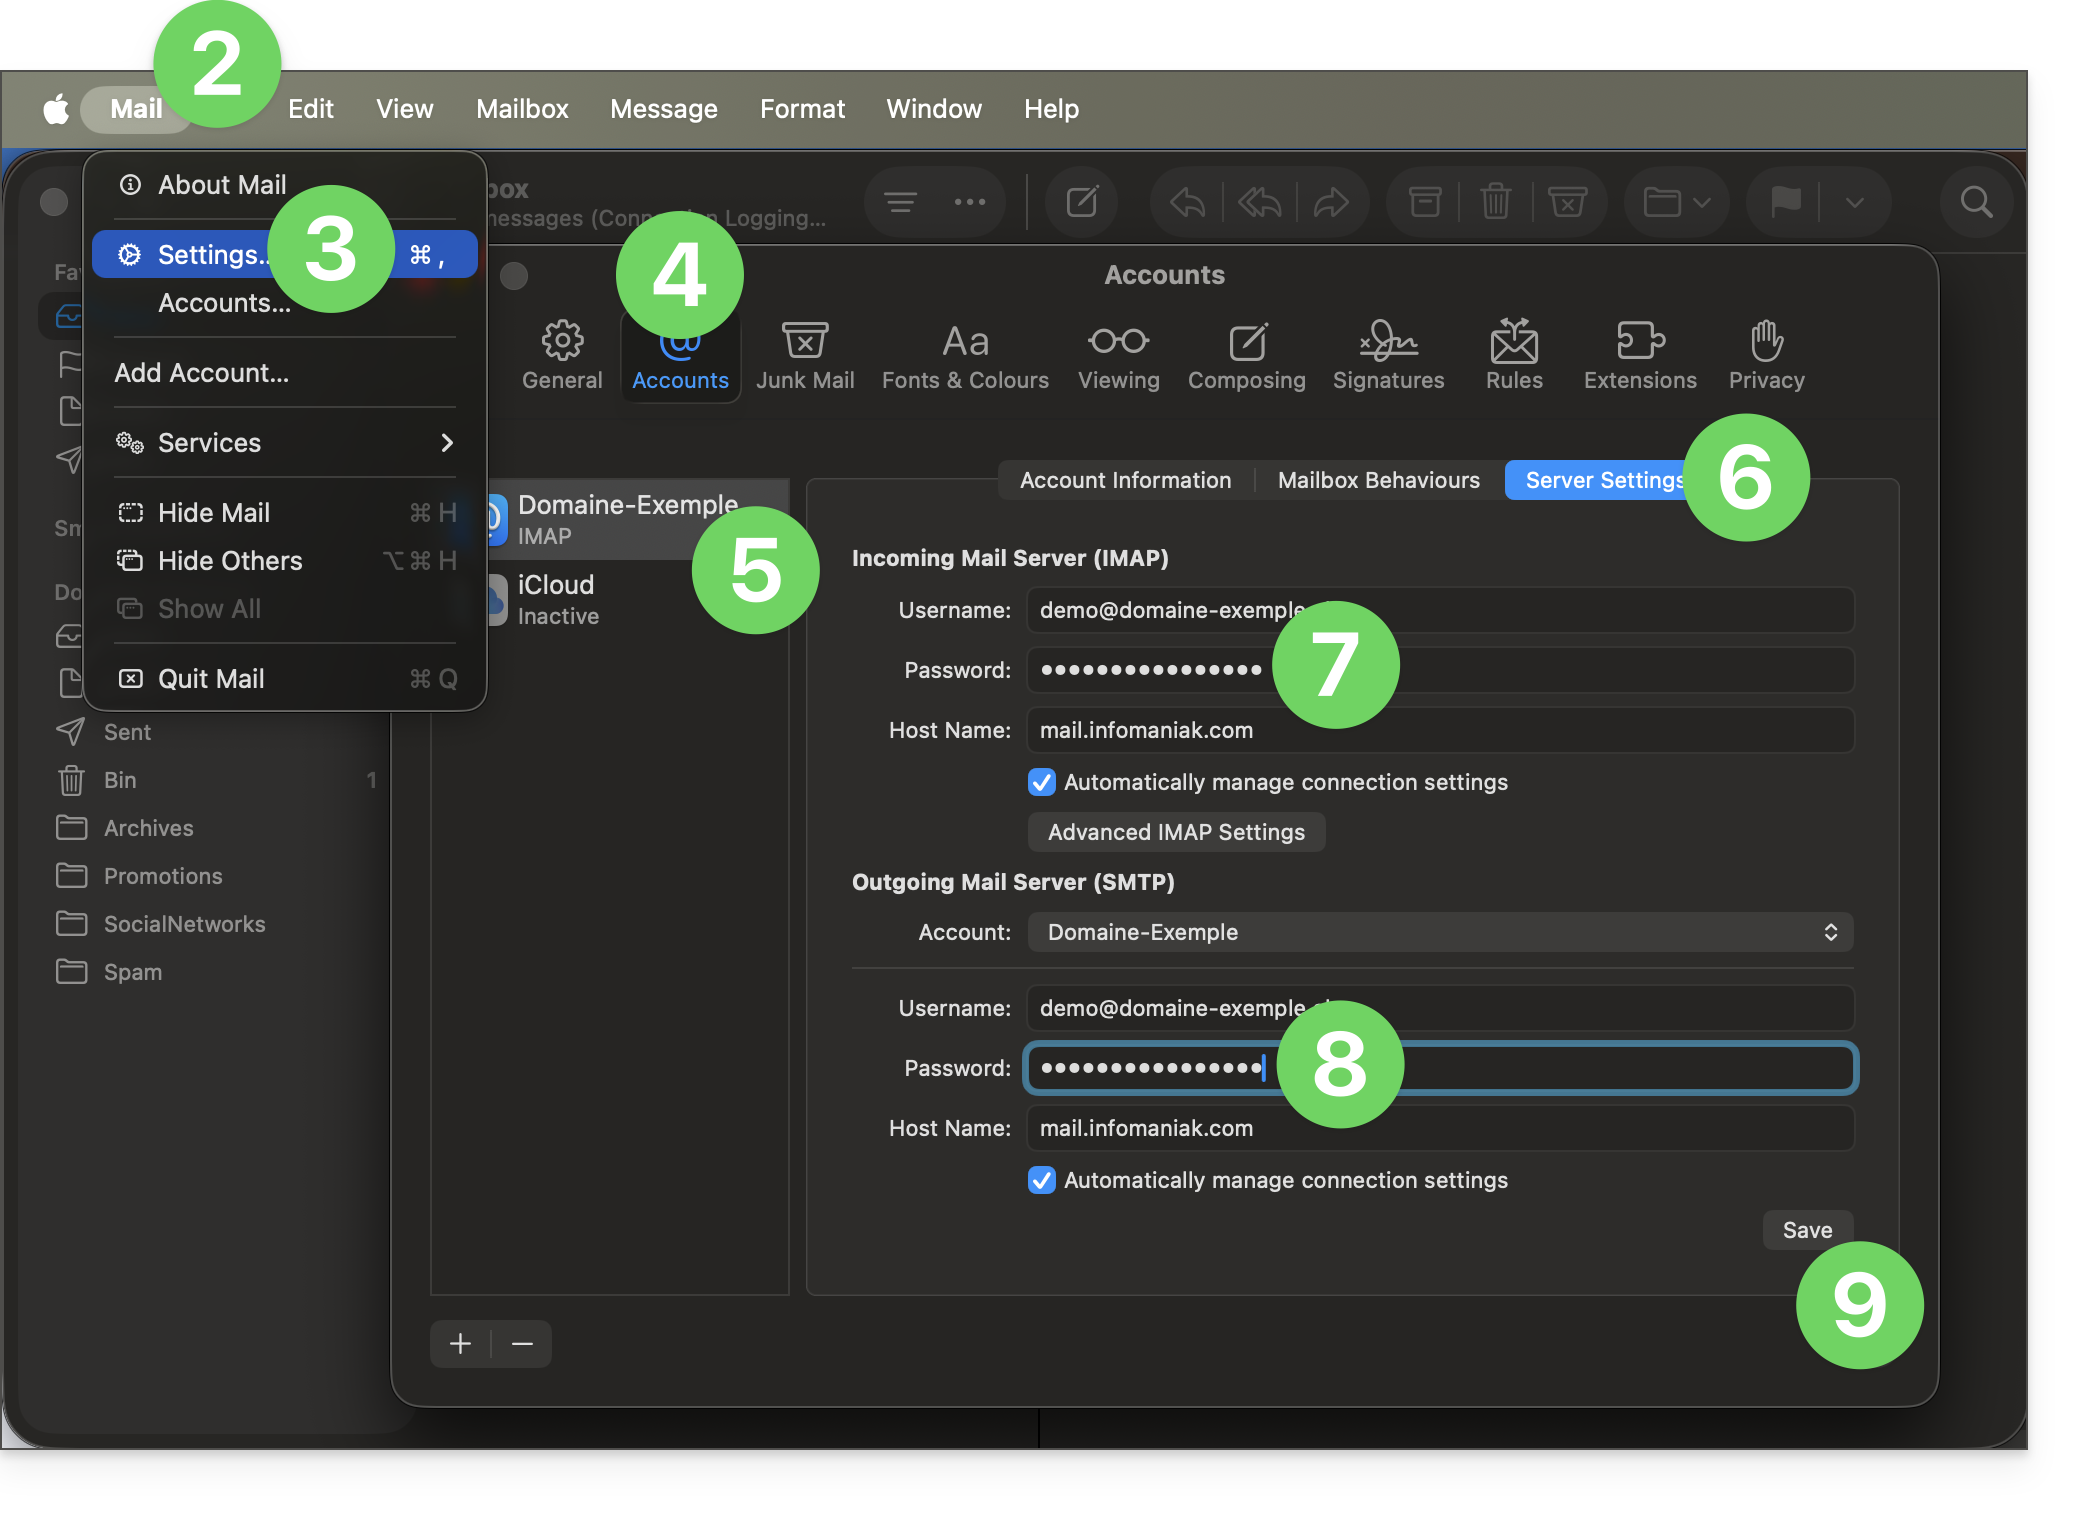
- Open the Mail application.
- Click on the Mail menu at the top left.
- Click on Settings.
- Click on Accounts.
- Make sure the relevant account is selected.
- Click on the Server Settings tab.
- Enter the IMAP password.
- Enter the SMTP password, then check the other settings, such as the port number, etc.
- Click the Save button:
iOS (iPhone, iPad, etc.)
Here's how to access the password settings (refer to the complete guide if needed):
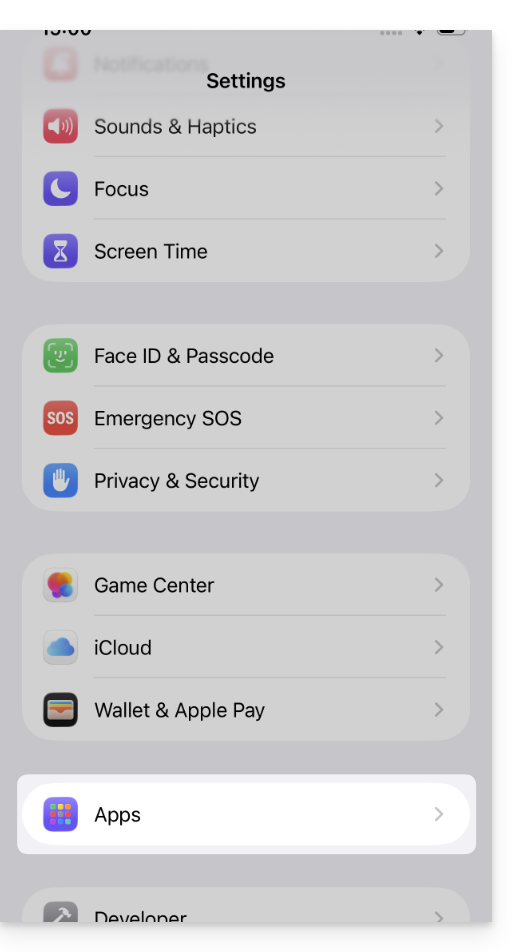
- Open the Settings app on your iPhone and tap Apps:
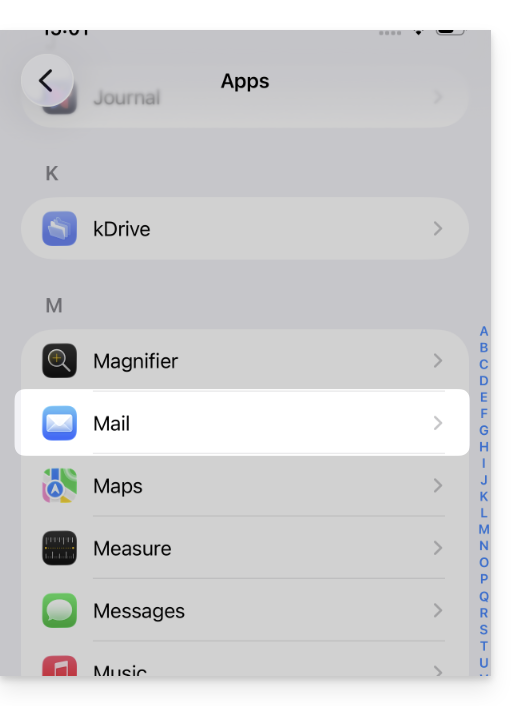
- In Apps, tap Mail:
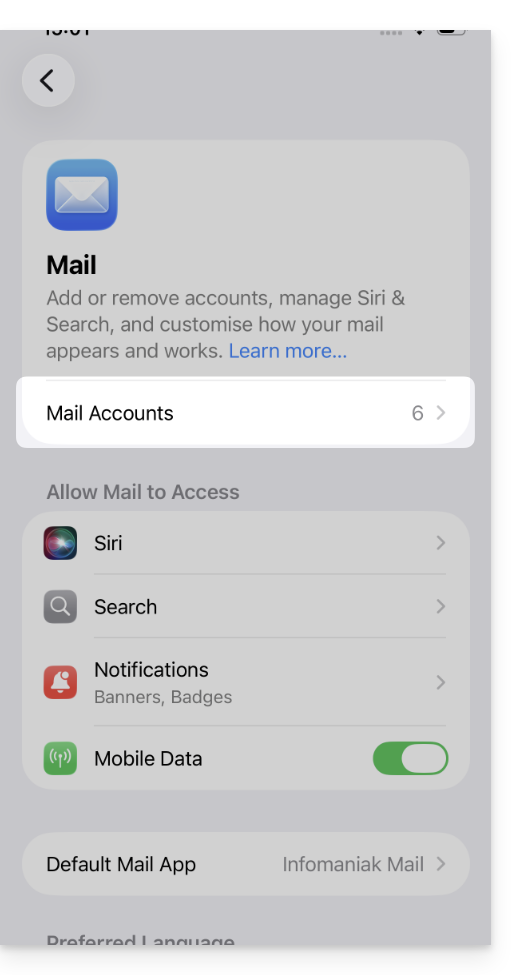
- Tap Mail Accounts:
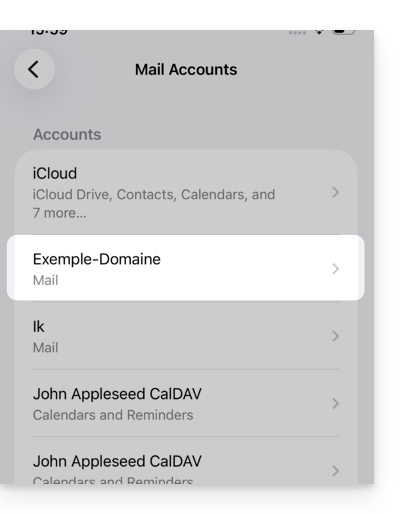
- Tap the account associated with your Infomaniak email address:
- Tap on Account settings:
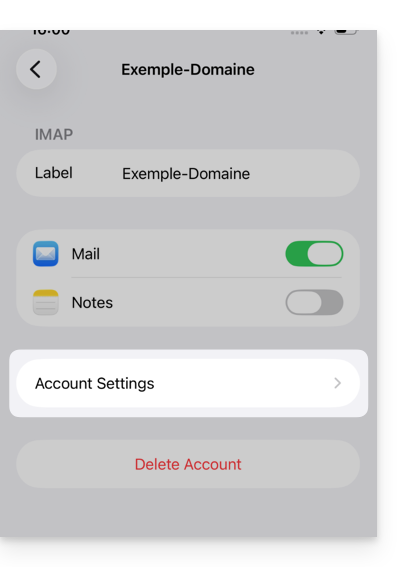
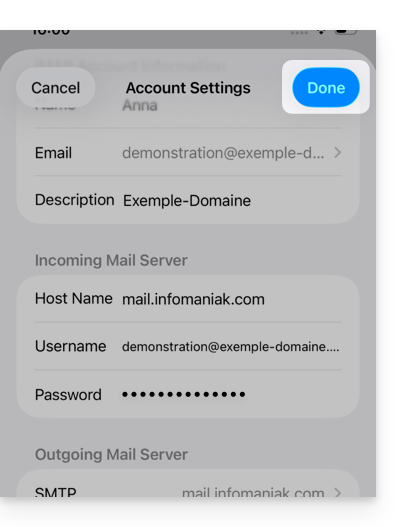
- Update the password in the Incoming Server section.
- Tap on the SMTP server in the Outgoing Server section to update the password or resolve an issue with a missing SMTP server, for example:
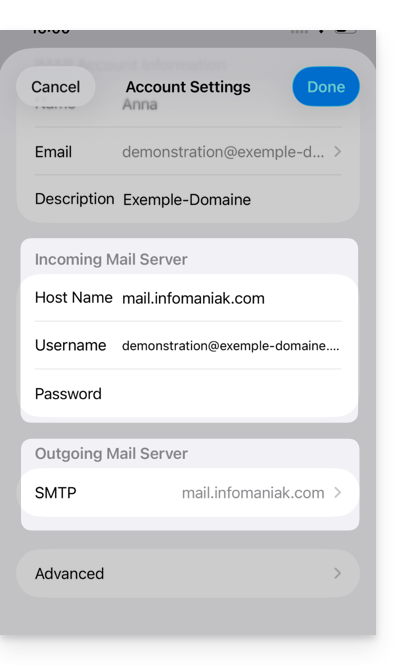
- Tap on the server associated with your Infomaniak email address (or if it is missing, tap on Add a server below and configure it according to these instructions):
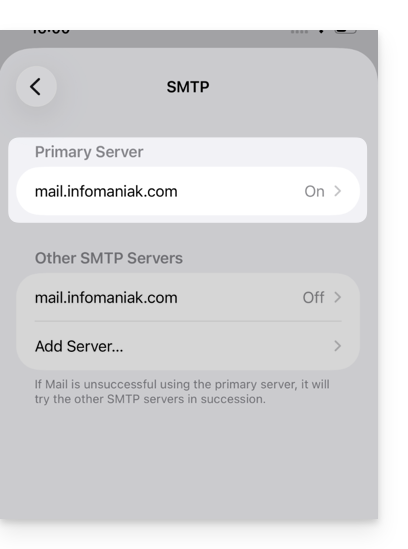
- Tap ON to enable the SMTP server if necessary.
- Update the password and verify all settings, including password authentication.
- Click Confirm in the top right corner:
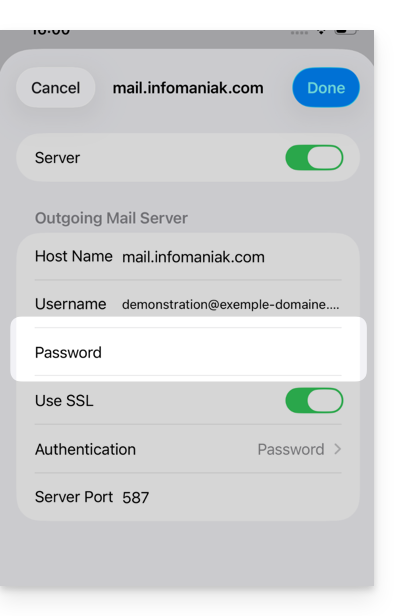
- The SMTP account is now correctly activated:
Link to this FAQ: https://faq.infomaniak.com/2556
Has this FAQ been helpful?
This guide presents the Calendar and Calendly modules for Infomaniak's Site Creator.
Calendar Module
Start by logging in to the Infomaniak Manager with your credentials (user with the necessary rights for the product in question):
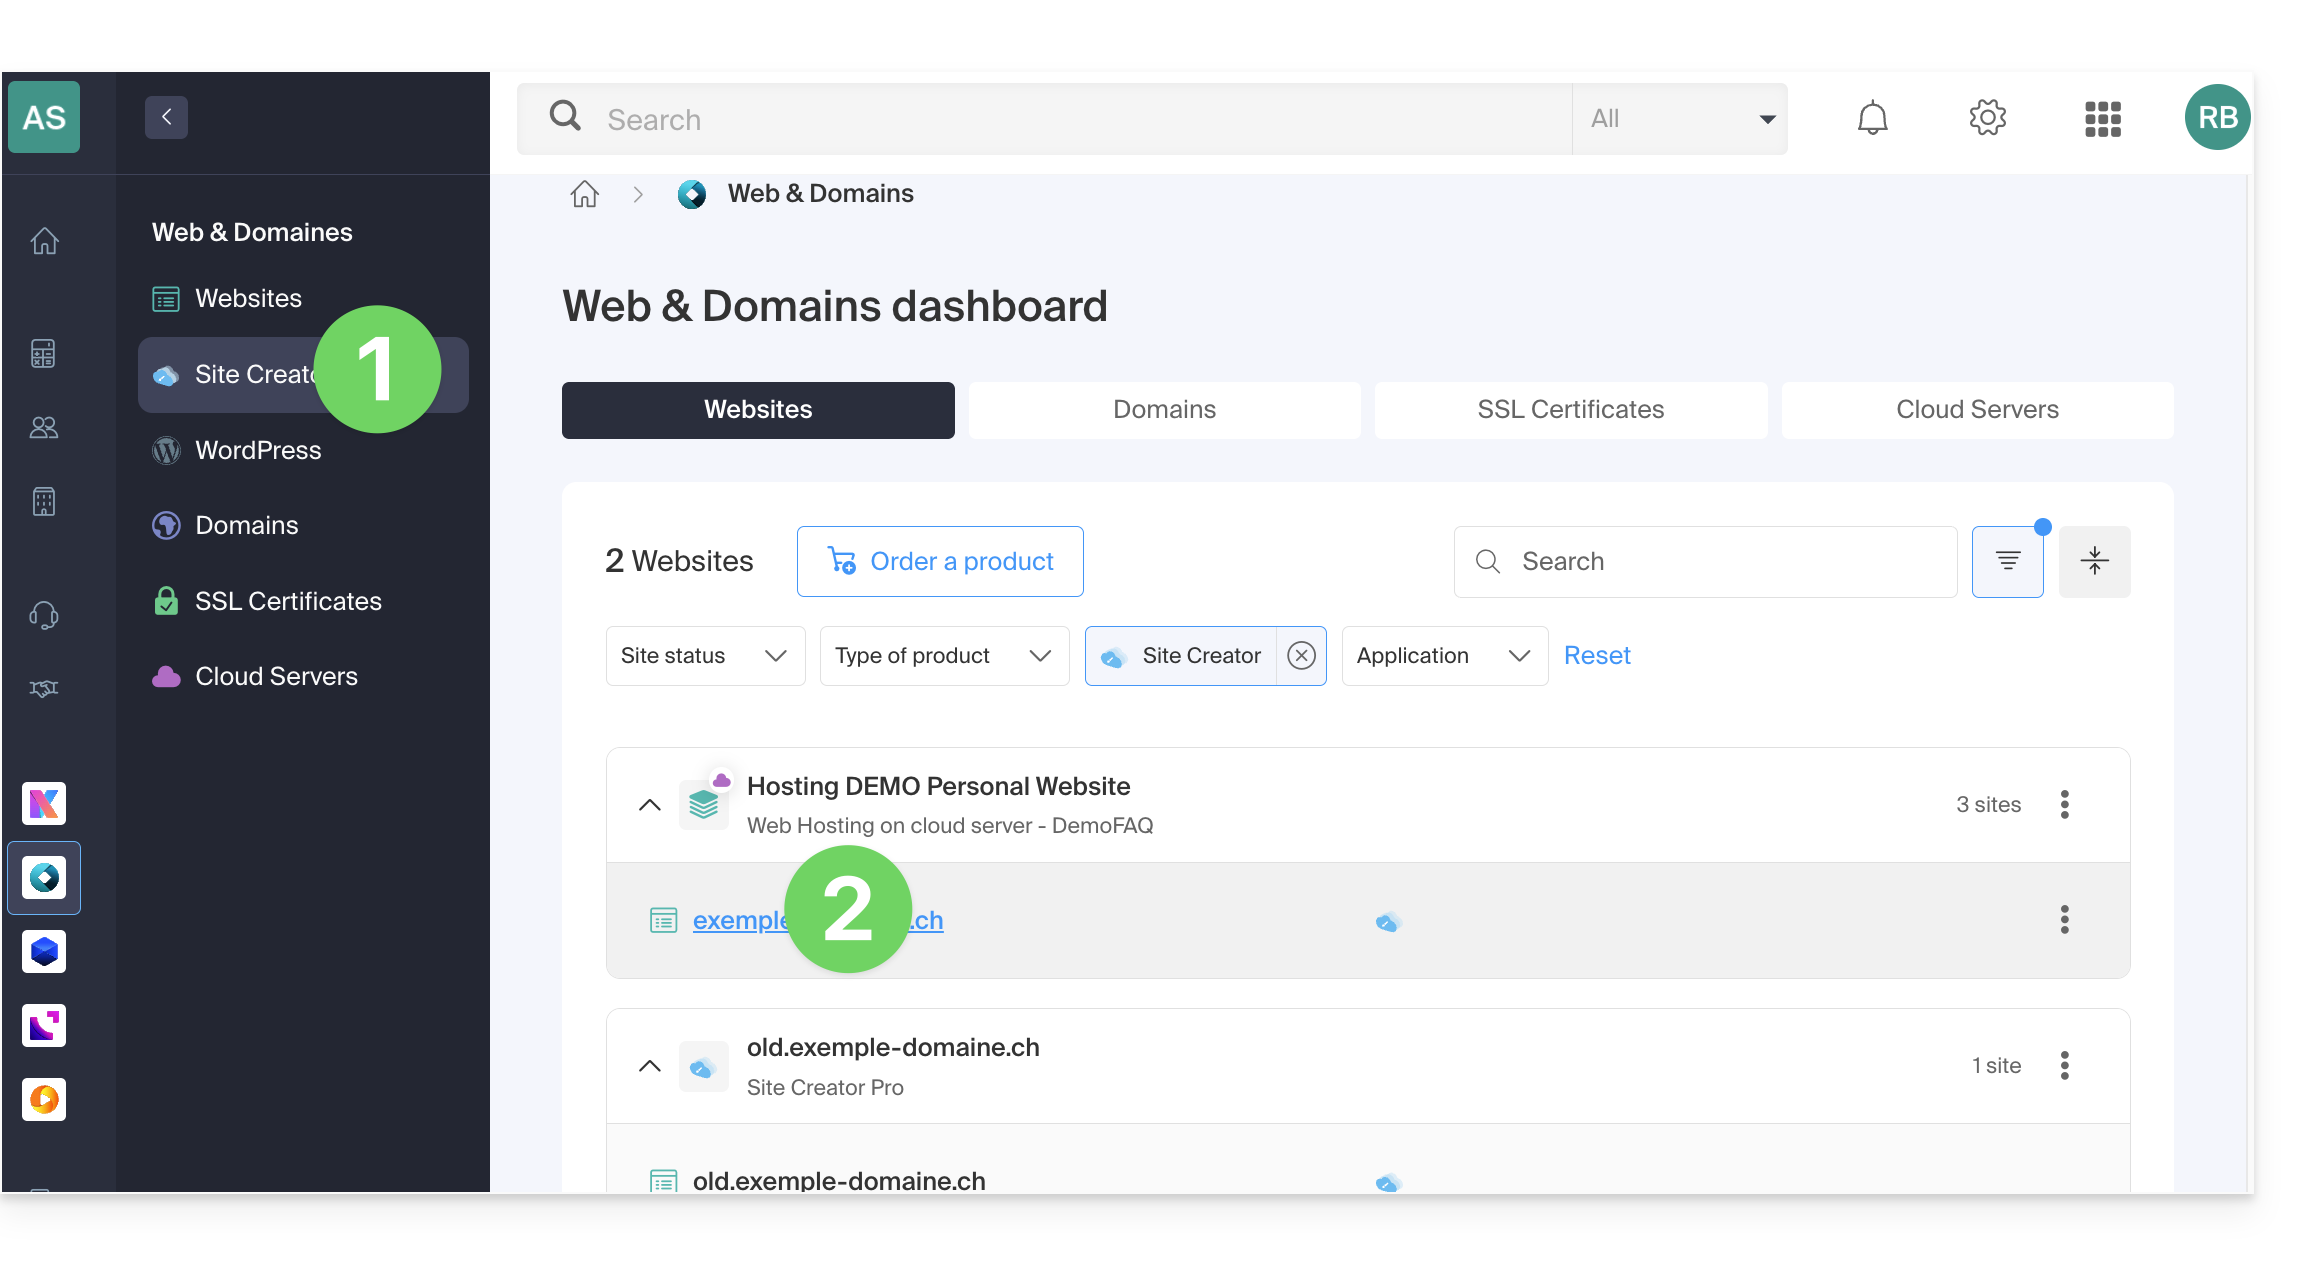
- Click here to access the hosting & site management section (filtered to display only Site Creator).
- If nothing is displayed, you may not be in the Organization to which your site is linked (❓: help).
- Click on the name of the Site Creator in question:
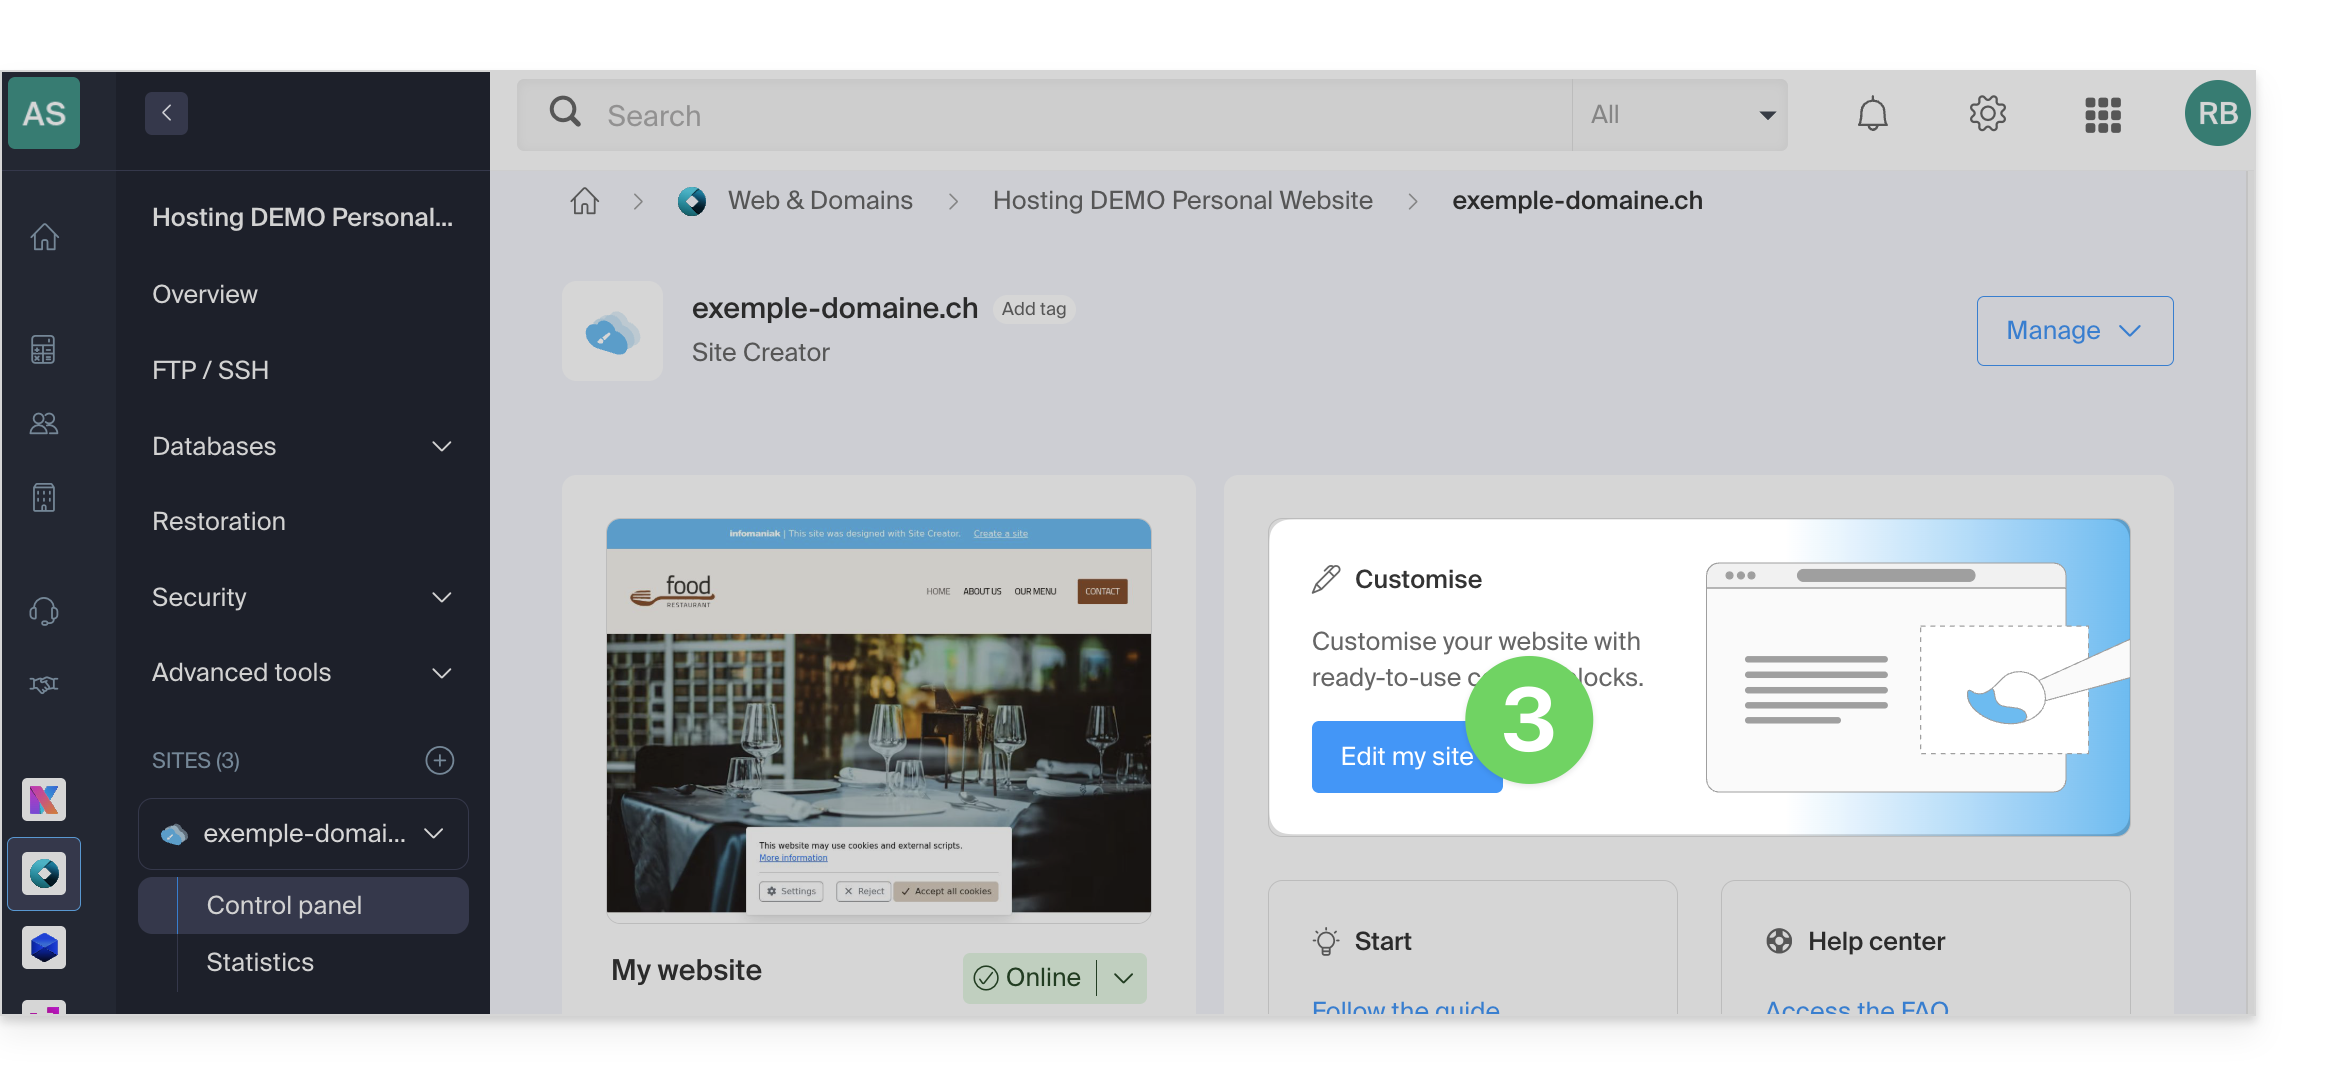
- Click on the button to edit your site:
Once in Site Creator:
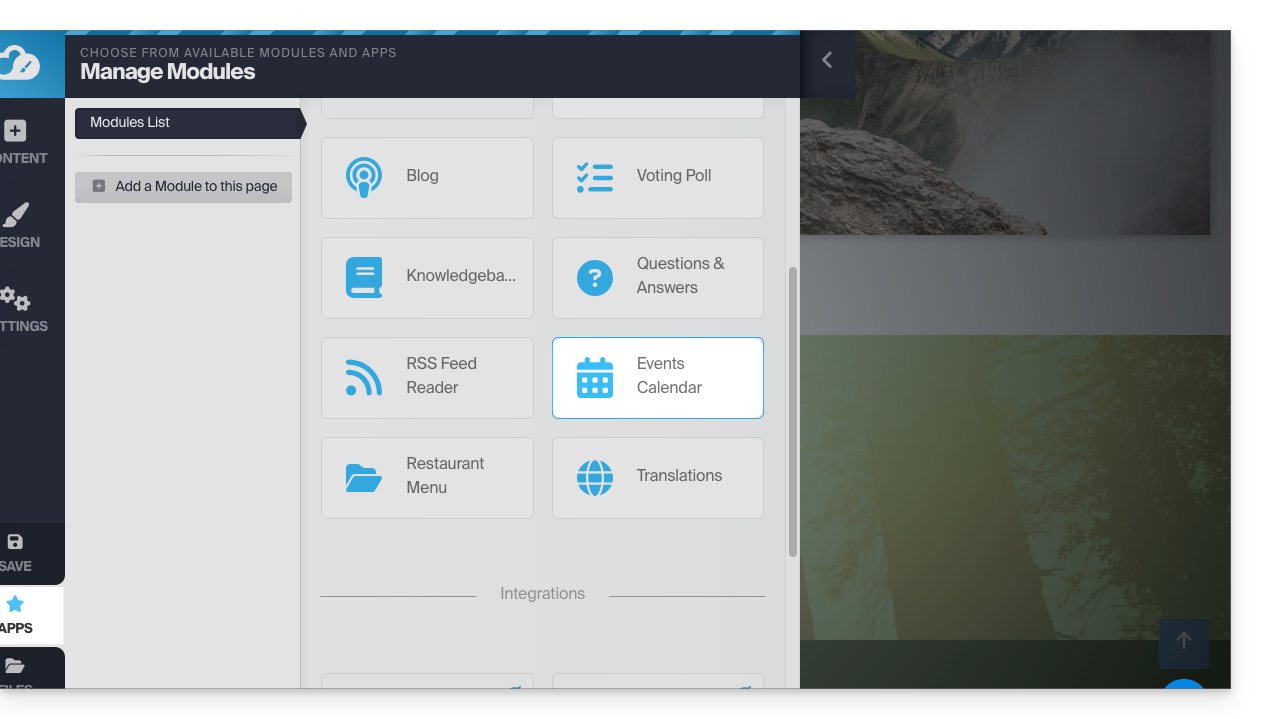
- Click on the Applications button in the left-hand menu.
- Click on Calendar:
Add events related to your activity that you want to display on your website in a dynamic way: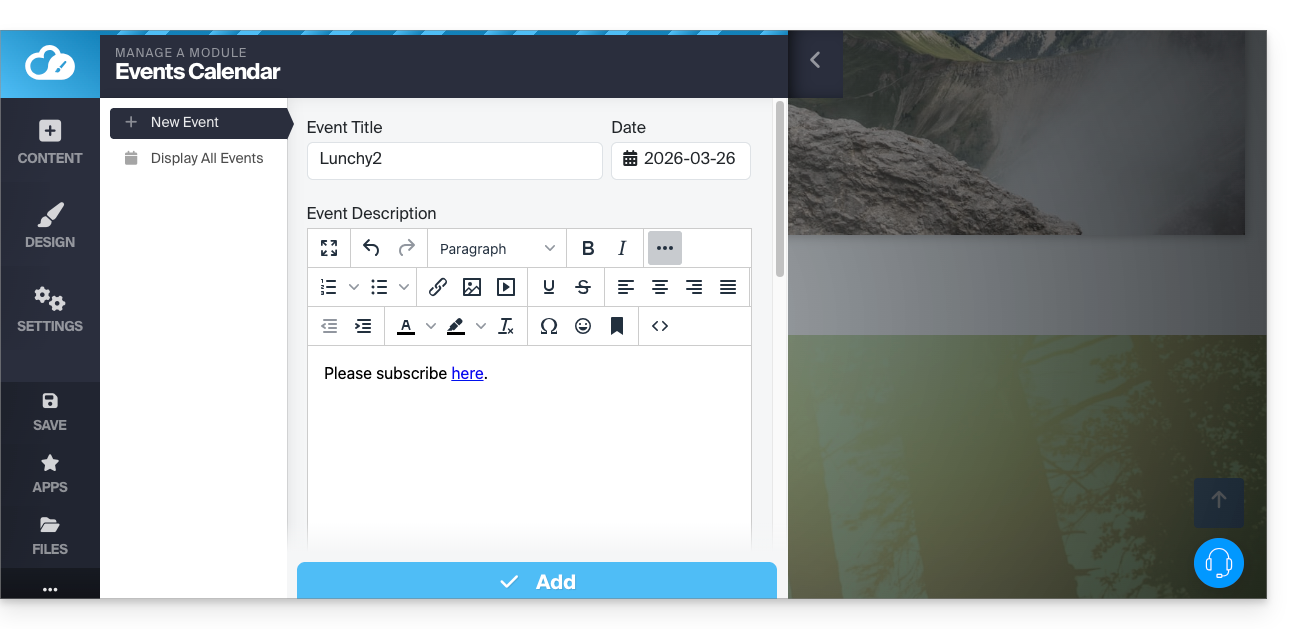
Once you have added a few events, you can view them on the calendar in the same place: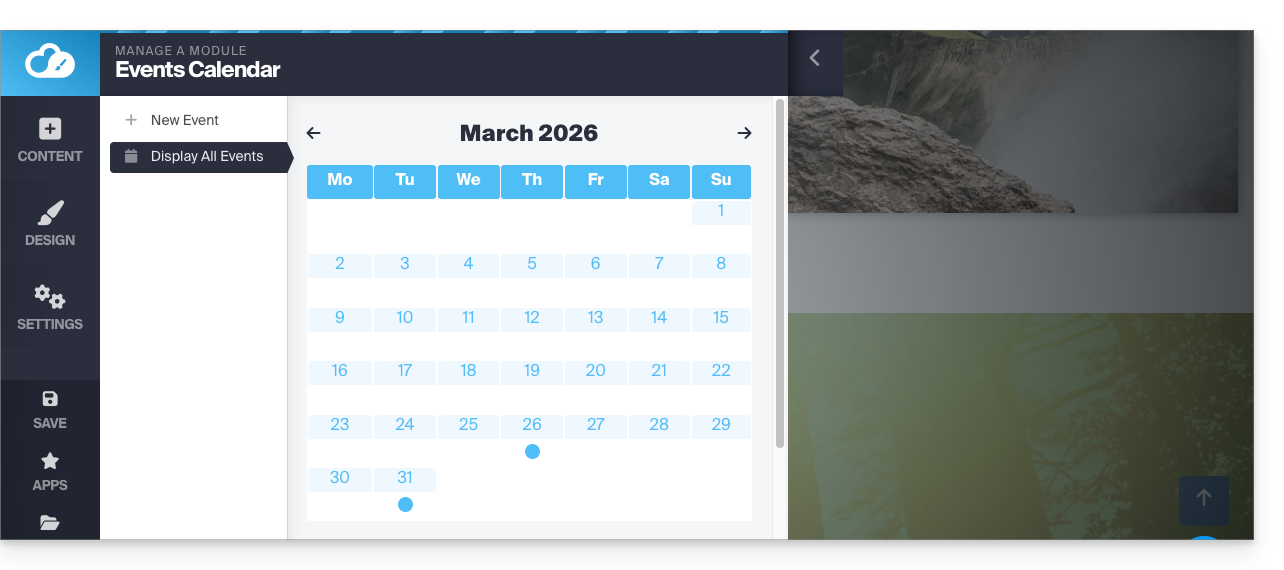
Then, insert the Calendar module in the desired location on your site: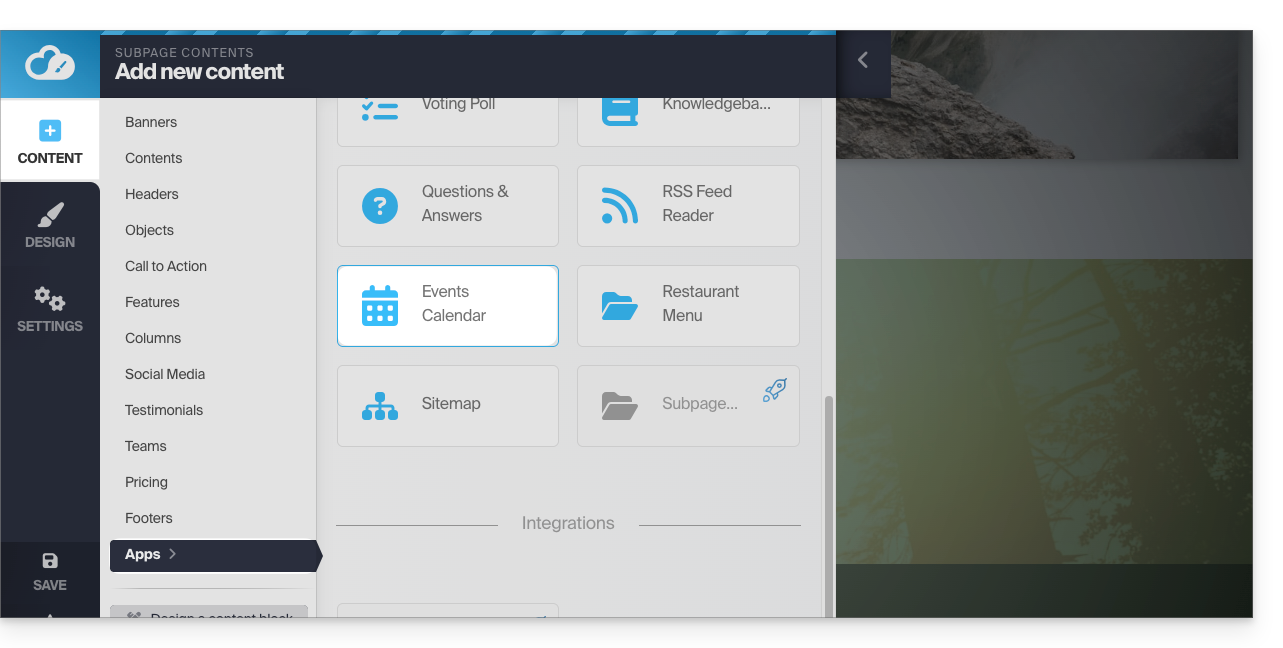
Your visitors will be able to see the scheduled events, including when you modify them in your calendar: 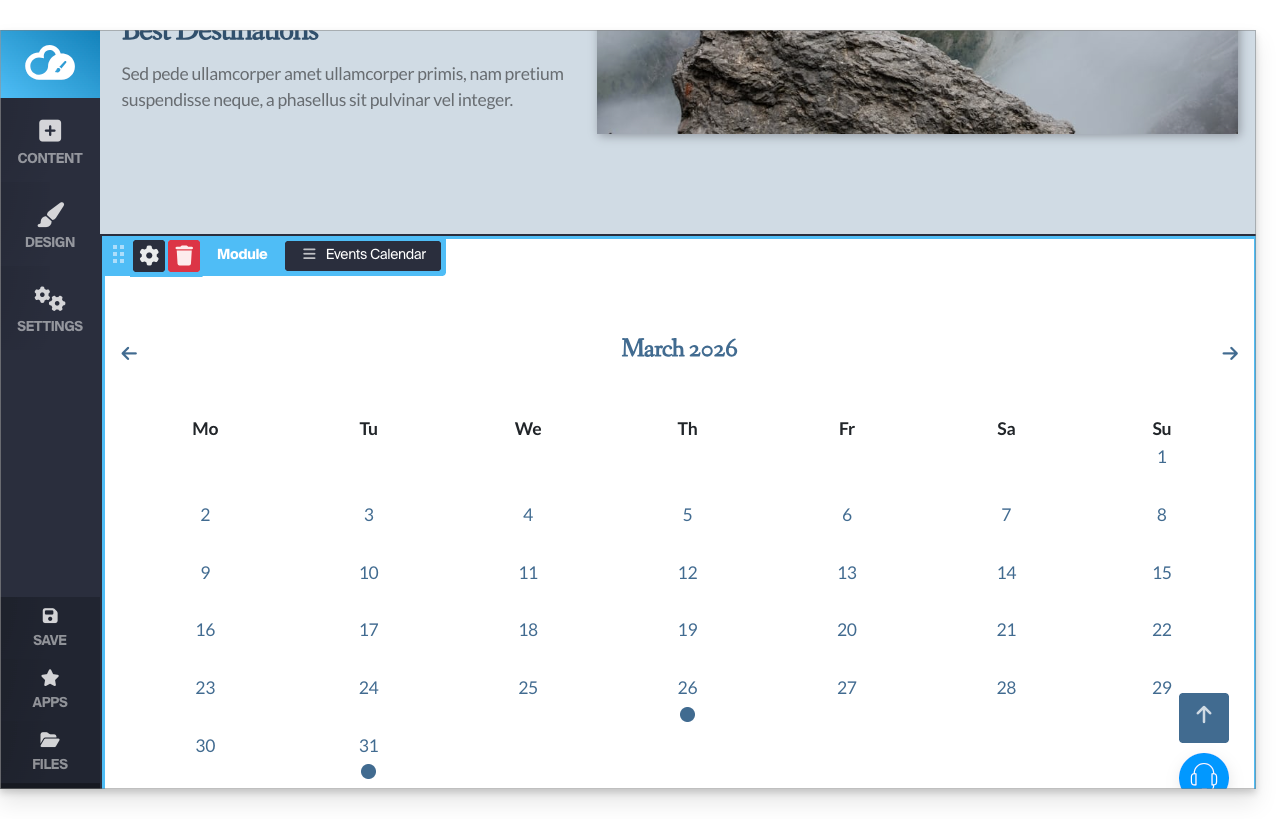
Calendly Module
✘ UNAVAILABLE with
Site Creator Free / Lite
This integration is possible if you have an account on the external Calendly service.
From Site Creator:
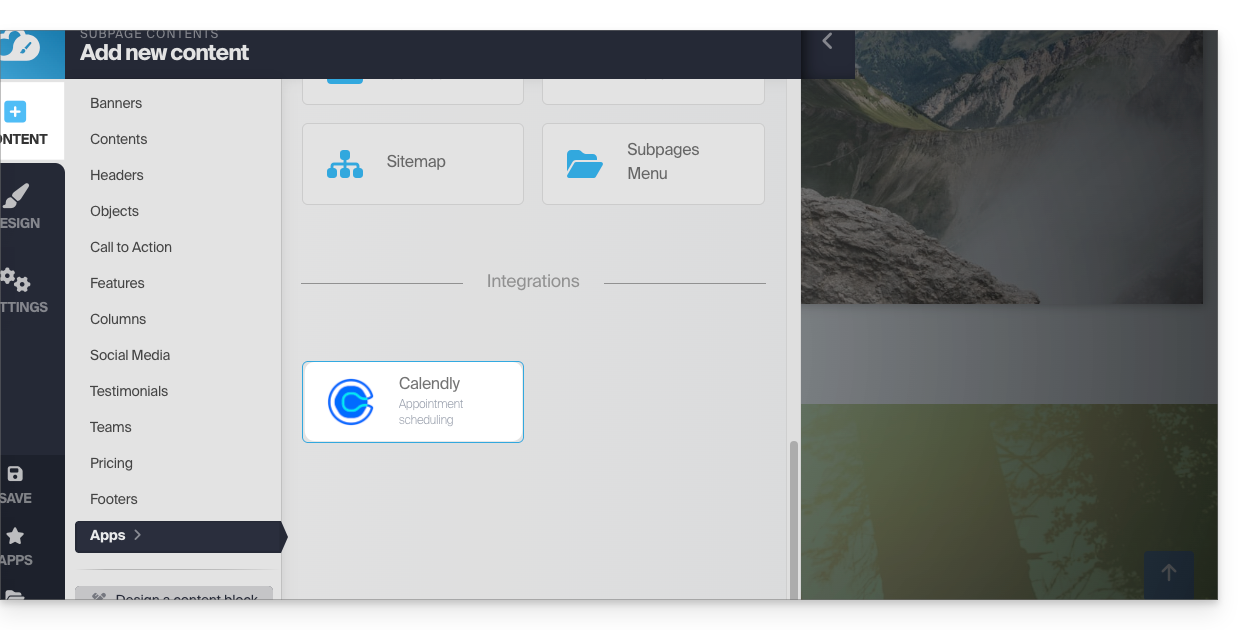
- Click on the Content button in the left-hand menu.
- Click on Apps in the left-hand menu.
- Click on Calendly to insert the module:
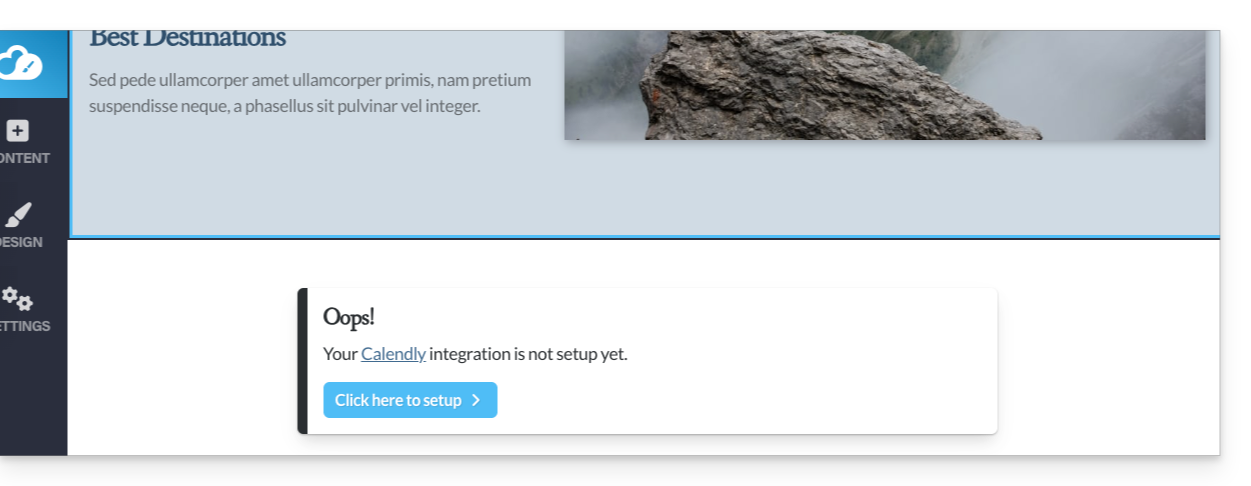
- Click to configure the application with the information related to your Calendly account:
Then, insert the Calendly module in the desired location on your site to access your Calendly information: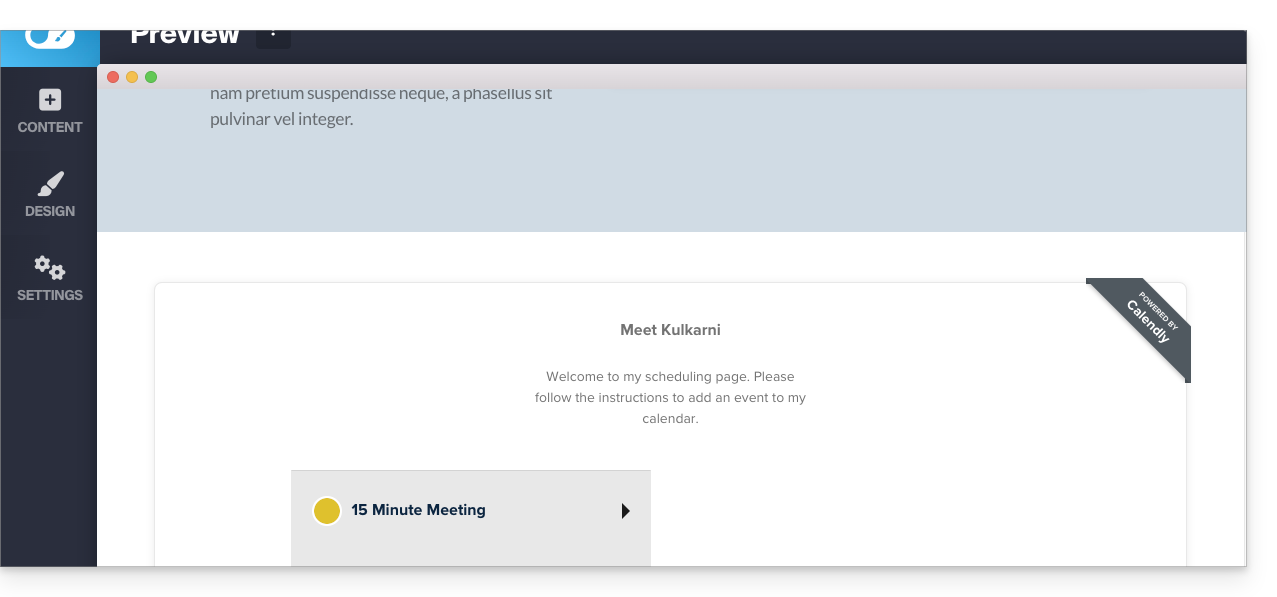
Link to this FAQ: https://faq.infomaniak.com/2578
Has this FAQ been helpful?
This guide explains how to obtain and install an application on your computer from certain Infomaniak interfaces, such as the kSuite interface or those that allow you to directly manage your calendars or your address books.
Introduction
- A Progressive Web App (PWA) is an application designed for the web and offering an experience similar to that of a native application.
- PWAs are fast, accessible directly from your browser, and can offer features such as offline operation or sending notifications.
- Installing a PWA allows you to create an independent application on your computer, without going through a traditional store.
Install a progressive web app (PWA)
To download the PWA app (example here with Mail Infomaniak), depending on the browser used:
- Click here to access the Calendar Infomaniak web app.
- Once the page has loaded, check for the installation icon in the browser's address bar (often represented by a screen with a “+”):
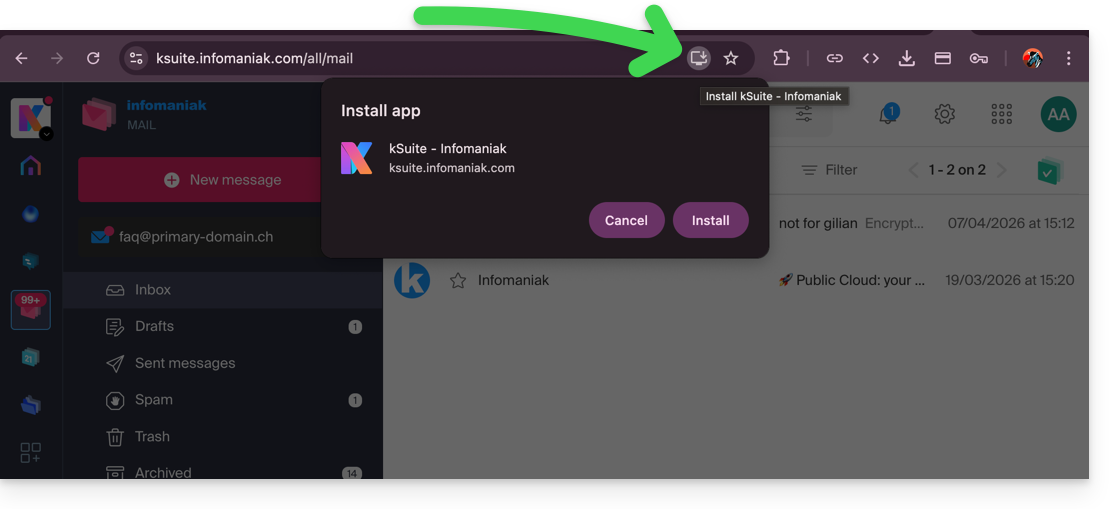
- Google Chrome / Chromium :
Click on the installation icon in the address bar, or open the ⋮ menu and click on Install [application name]. - Microsoft Edge :
Click on the Applications icon in the address bar or open the ⋯ menu, then select Applications > Install this site as an application. - Mozilla Firefox :
The installation of PWAs is not fully supported natively. However, it is possible to use alternative solutions (extensions or shortcuts) to simulate similar behavior. - Safari (macOS) :
From recent versions of macOS, open the File menu and click on Add to Dock to create a web application.
- Google Chrome / Chromium :
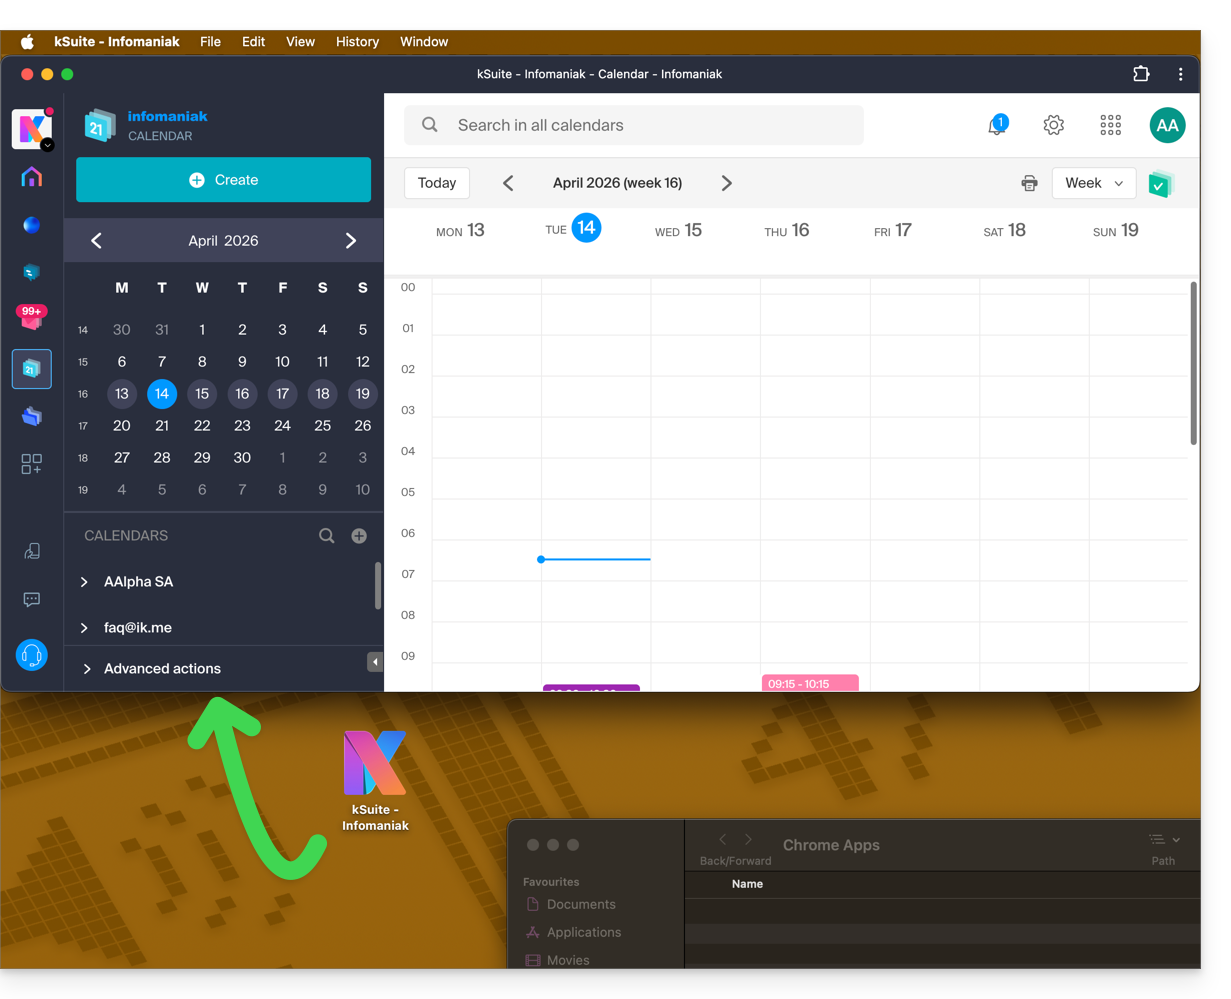
- The app is then available on your computer (example here with Calendar Infomaniak) and allows you to open the data while being completely independent of the browser:
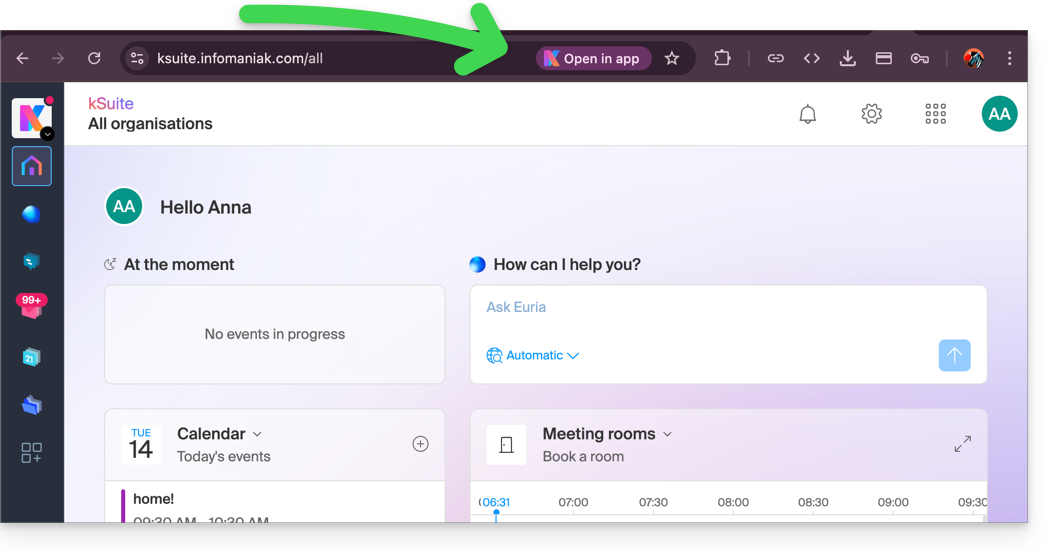
- When the app is detected on your computer, you can easily return to the app from the browser when you are on other Infomaniak pages (example here with a kSuite user space):
Remove the Infomaniak “PWA” app
To remove this local application system:
- Open the application you previously installed.
- Click on the action menu ⋮ or ⋯, depending on your browser.
- Select Uninstall or Remove app.
- Confirm the removal if necessary.
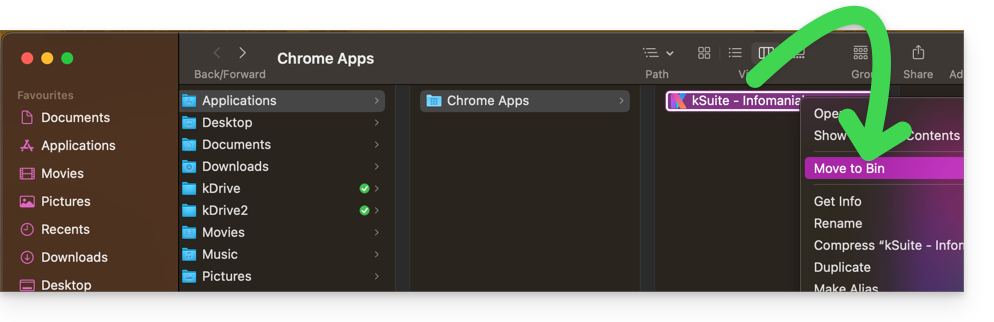
- You can also delete the application directly from your operating system (like any other application) or move the icon to the trash:
Link to this FAQ: https://faq.infomaniak.com/2872
Has this FAQ been helpful?
This guide concerns kSync, which allows you to create a new calendar or a new address book directly from an Android device.
Create a calendar or address book from the app
To do this:
- Open the kSync mobile app on your Android device.
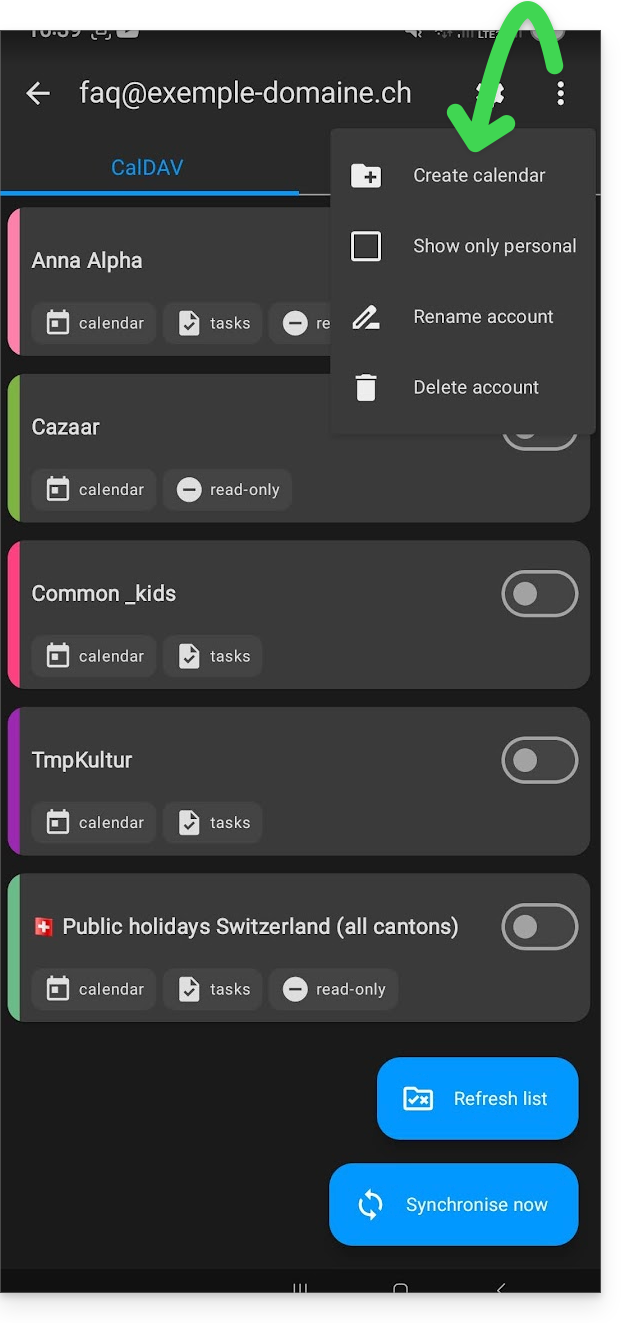
- Once logged in, click on the action menu ⋮ located in the top right corner.
- Tap on Create a new address book / Calendar:
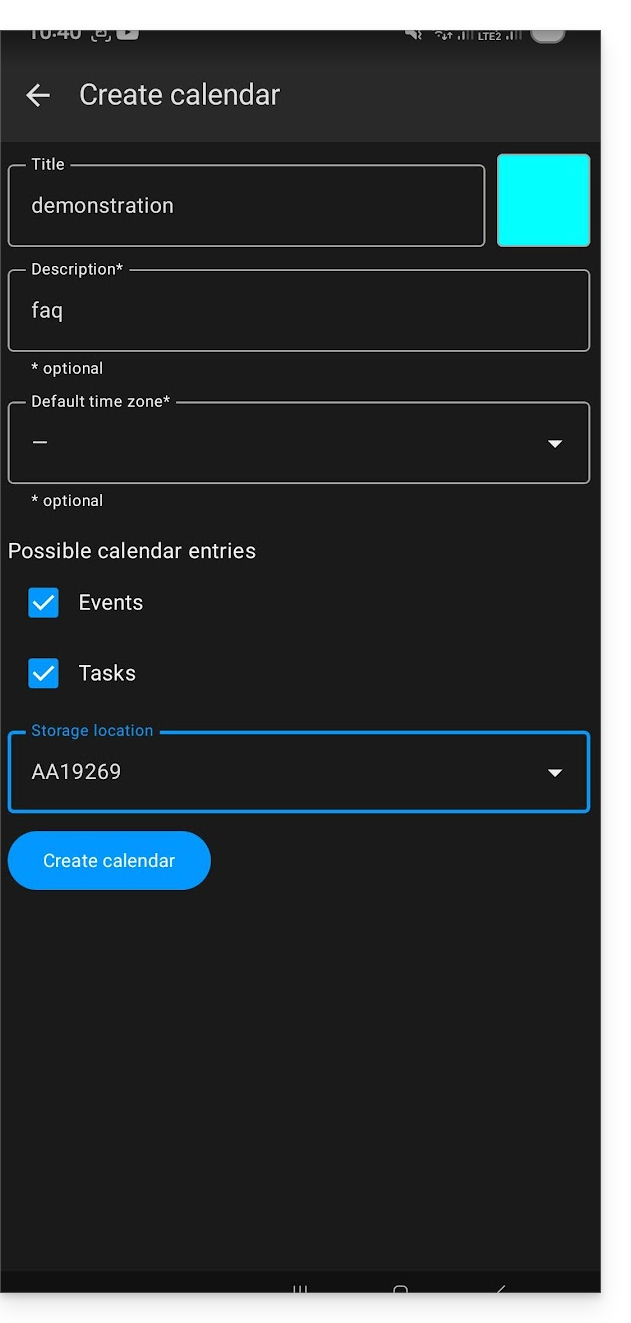
- Enter the name of the notebook or agenda and a color.
- Click on Create:
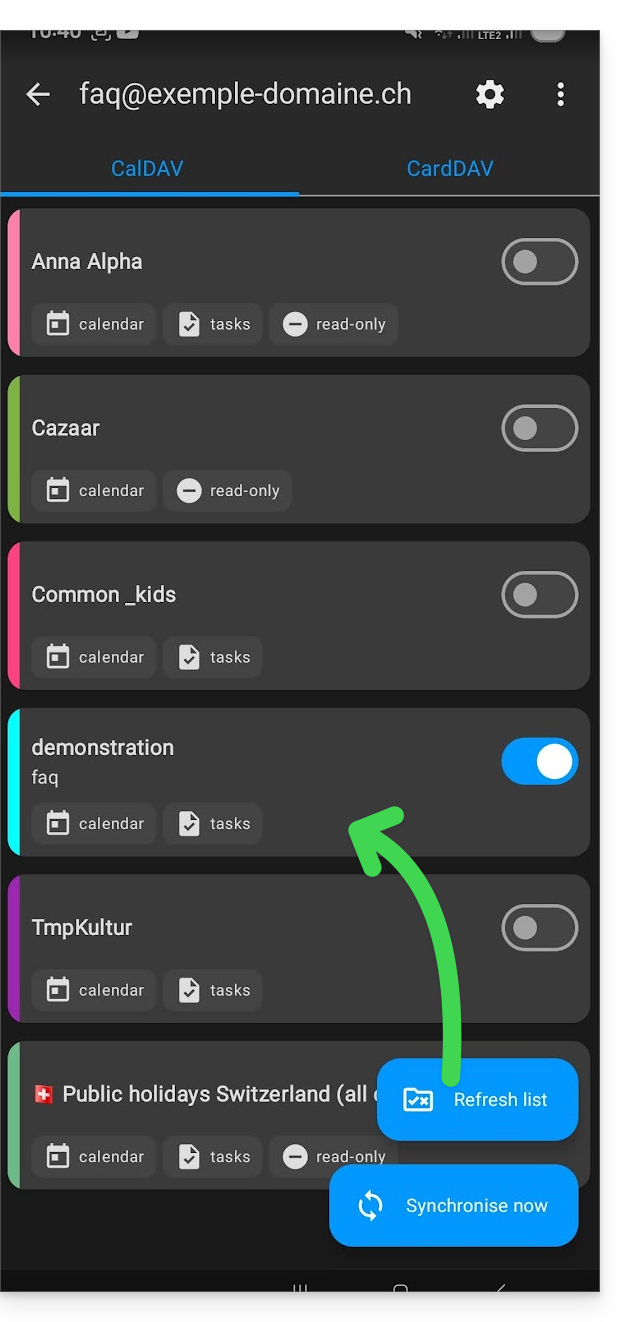
- If necessary, click the icon to refresh the list; your new item will appear in the list after a few seconds:
Your service will then be synchronized with the corresponding web app, here Calendar Infomaniak (online service ksuite.infomaniak.com/calendar):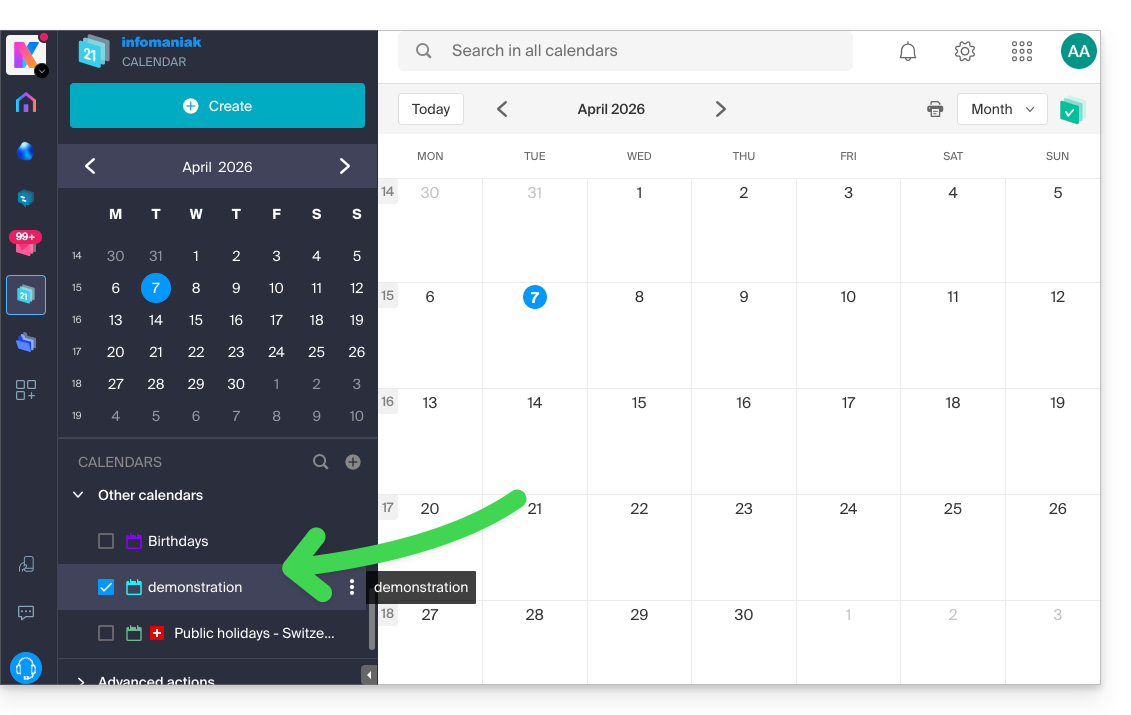
Link to this FAQ: https://faq.infomaniak.com/2299
Has this FAQ been helpful?
Are you no longer able to send or receive emails? Are you experiencing synchronization errors with your contacts & calendars? Follow the instructions in this guide to delete the problematic accounts and reconfigure them correctly.
Introduction
- Only follow these instructions to delete a mail account configured in IMAP (and not in POP3). Learn more
Delete the email address
To do this:
- Open Thunderbird.
- Right-click on the email address you want to delete and select Settings.
- Go to Account Management.
- Select Delete account and click Delete
- Refer to this other guide to properly reconfigure the email address
Delete contacts (in CardBook)
Now everything is integrated into Thunderbird, but if you still have an older version (which you should definitely update):
- Open Thunderbird.
- In CardBook, select the contact profile to delete.
- Click on the menu button with three horizontal lines ☰ in the top left corner of the interface, then click on Address Book and Delete Address Book.
- Confirm by clicking on OK.
- Refer to this other guide to reconfigure synchronization.
Delete the calendar (in Lightning)
Now everything is integrated into Thunderbird, but if you still have an older version (which you will need to update):
- Open Thunderbird.
- In Lightning, select the calendar profile you want to delete.
- Right-click on the calendar and select Unsubscribe from calendar.
- Confirm by clicking OK.
- Refer to this other guide to reconfigure synchronization.
Link to this FAQ: https://faq.infomaniak.com/2444
Has this FAQ been helpful?
Thank you for choosing my kSuite to manage your emails, back up your data, and share it securely.
These guides will help you set up your emails, use kDrive, change your plan, and much more.
my kSuite & my kSuite+
- Compare the free and paid versions
- Differences between my kSuite and kSuite (Standard, Pro, Enterprise)
- Explanations about the interfaces available to you
Free Email (ik.me, etik.com, ikmail.com)
Getting Started
- Forward your emails to Infomaniak
- Sync your emails across all your devices
- Import your old emails
- Sync contacts and calendars
- Import your contacts
- Import your calendars
Advanced features
- Customize the Webmail interface
- Manage/Modify passwords
- Add a signature
- Configure an automatic reply
- Use keyboard shortcuts
- View sending limits
- Manage storage space
- Create an address with a custom domain
Free Cloud (kDrive)
Getting started
Advanced features
Other services
- Organize a video conference with kMeet
- Share sensitive data with kPaste
- Send large files with SwissTransfer
- Consequences of deleting an account
Have a question or feedback?
- If you encounter any issues, please consult the knowledge base before contacting support.
- Click here to share feedback or suggestions about an Infomaniak product.
Requests related to free services are handled with limited priority.To benefit from telephone support, choose a Domains, Web Hosting, Backup, Storage, Marketing, Event or Multimedia offer.
To close your “my kSuite”, please refer to this other guide.
Link to this FAQ: https://faq.infomaniak.com/2479
Has this FAQ been helpful?
This guide explains how to receive event reminders from the Infomaniak Web app Calendar (online service ksuite.infomaniak.com/calendar) on a messaging system like kChat, so you can be notified in the chat thread of your choice when an event is approaching.
Introduction
- The kSuite Free plan is limited to 1 webhook.
Link the kChat webhook to Calendar
Prerequisites
- Create an incoming webhook on the kChat app to obtain a URL of the type
https://your-server-kchat.xyz/hooks/xxx-key-generated-xxx: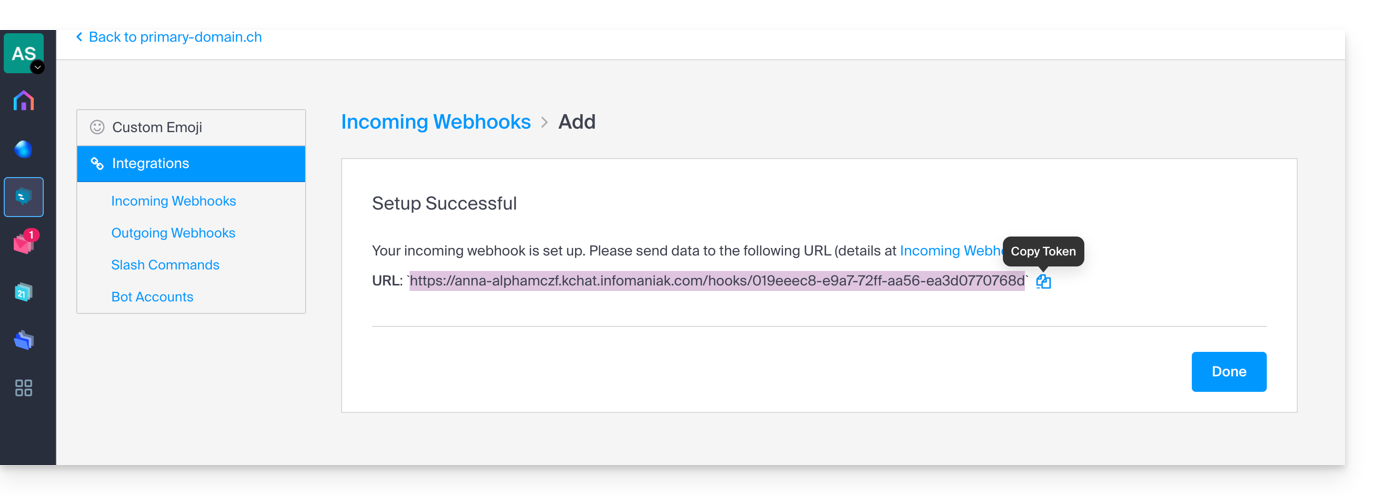
Next, to add the webhook for your chat system to the Calendar app:
- Click here to access the Infomaniak web Calendar app (online service ksuite.infomaniak.com/calendar).
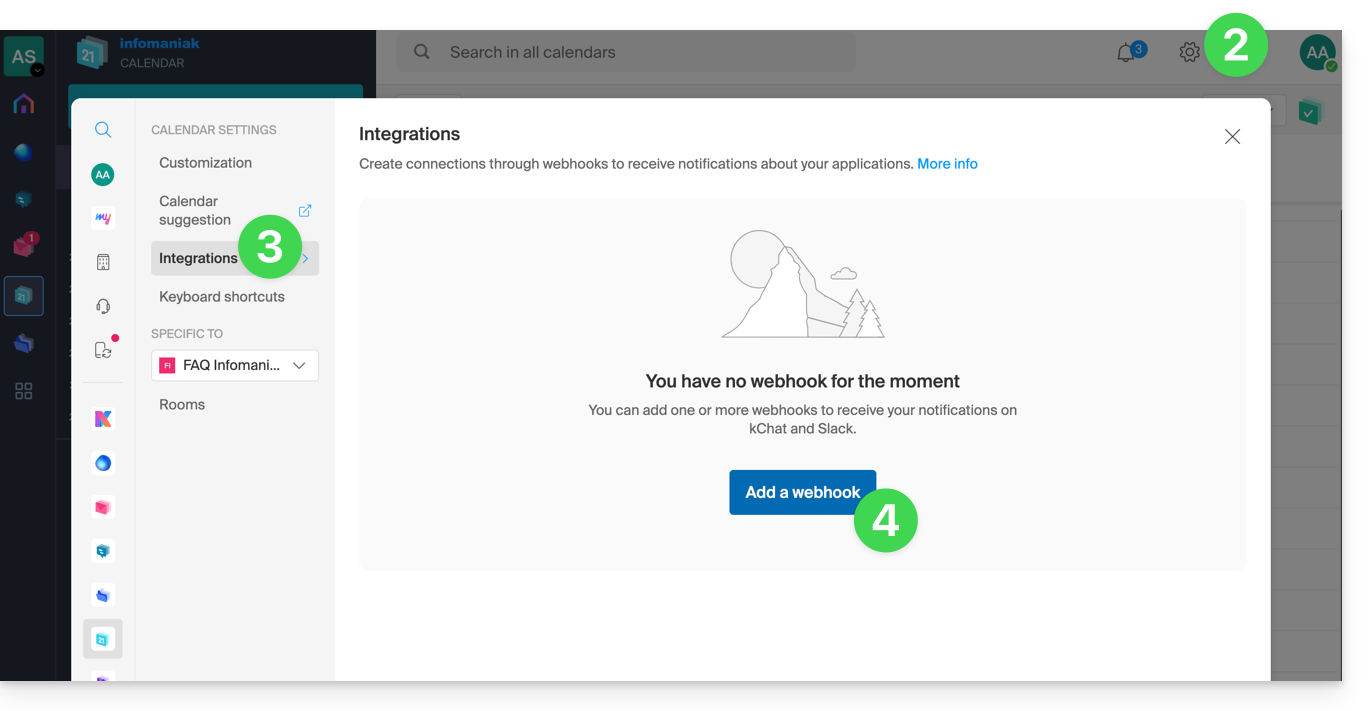
- Click on Settings in the top right corner.
- Click on Integrations in the left-hand menu.
- Click on the Add a webhook button:
- Define:
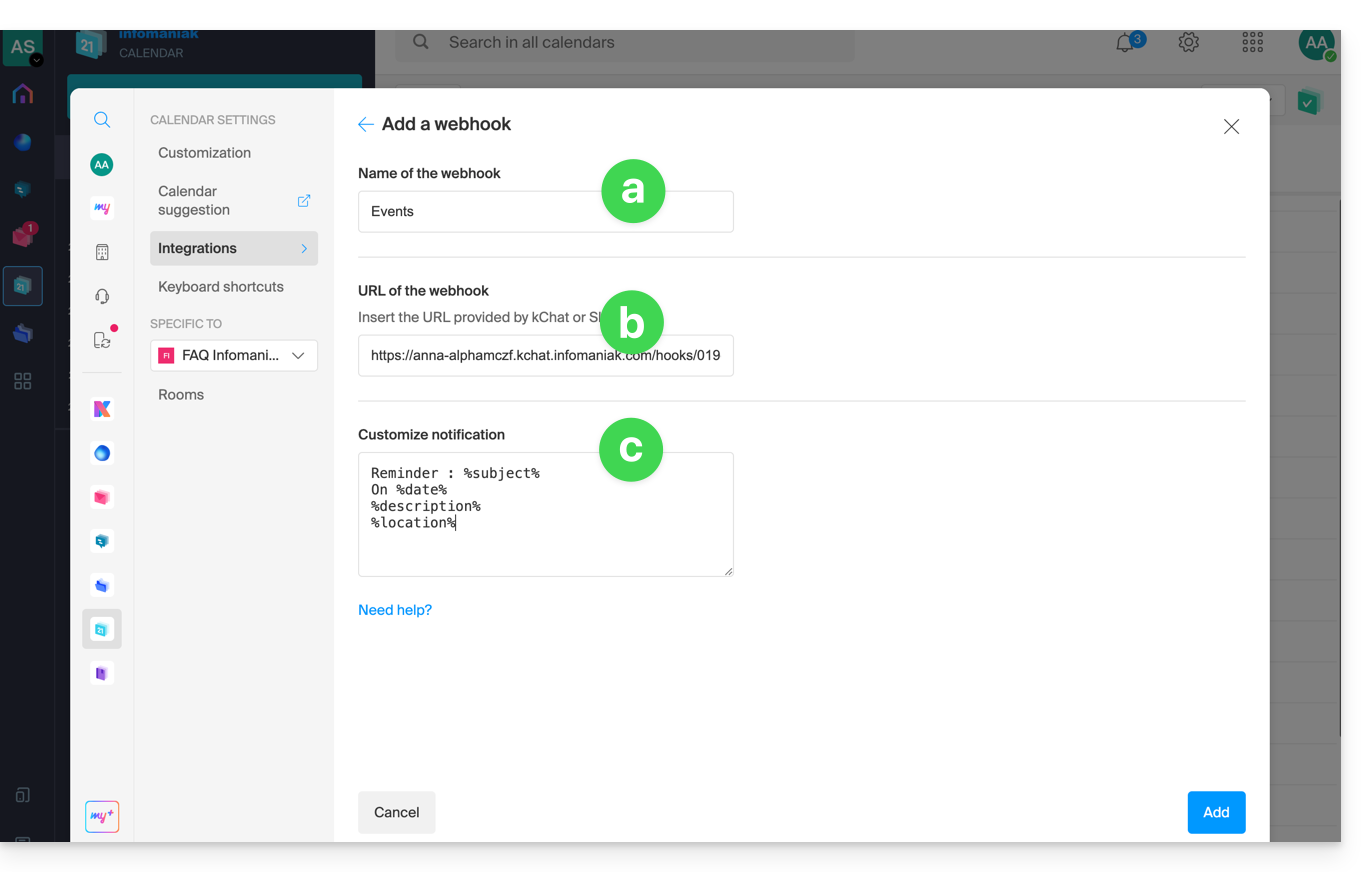
- A name to easily identify the webhook when adding reminders.
- The webhook URL (obtained from your chat system).
- The elements (automatically taken from your event and/or added manually here) and their layout in the message that will be sent:
- Insert %subject% to include the event subject.
- Insert %date% to include the event date.
- Insert %description% to include the event description.
- Insert %location% to include the event location, if applicable.
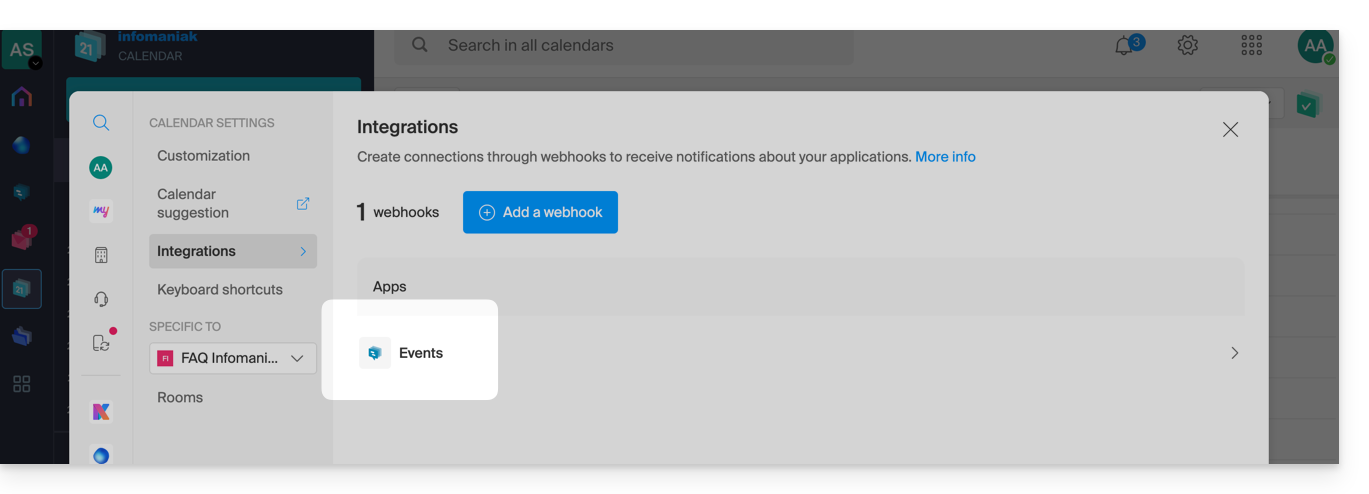
- Click the button to Add the configured item and see it created:
Create an event with chat reminder
Now that Calendar is linked to your messaging system account, you can choose to be notified in a chat when you add a reminder to an event:
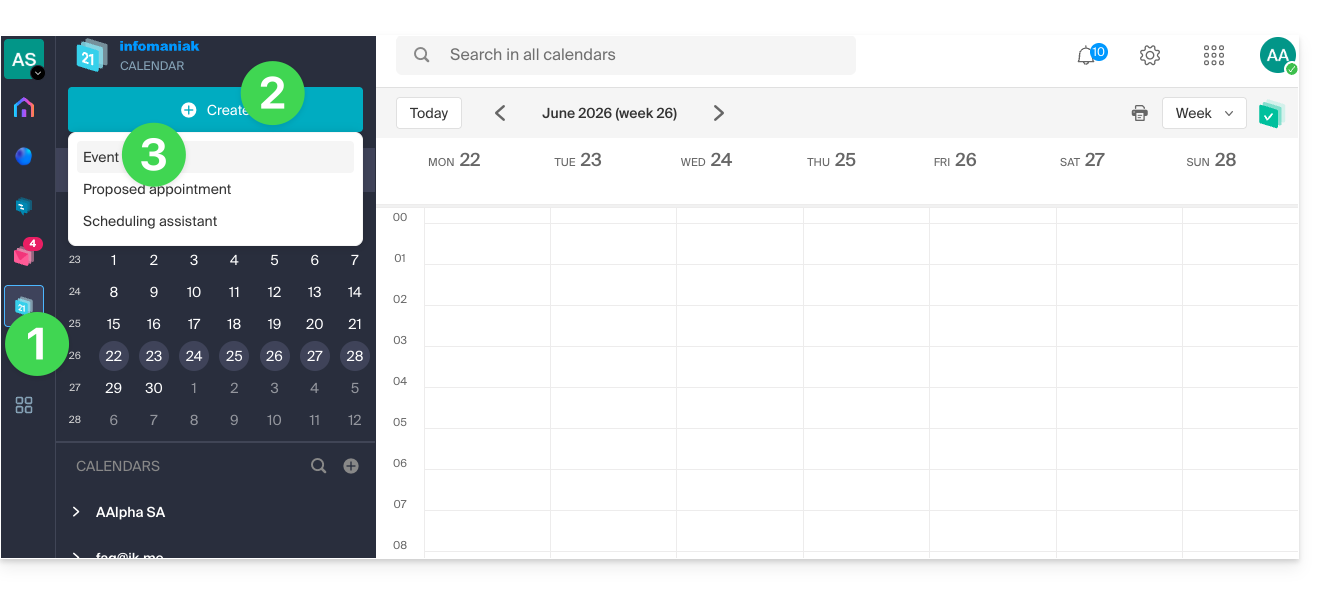
- Click here to access the Infomaniak Calendar web app (online service ksuite.infomaniak.com/calendar).
- Click the Create button in the top left corner.
- Click on Event:
- You can also click on an existing event in the calendar to edit it.
- Enter the event details.
- Click on Add reminder to configure it:
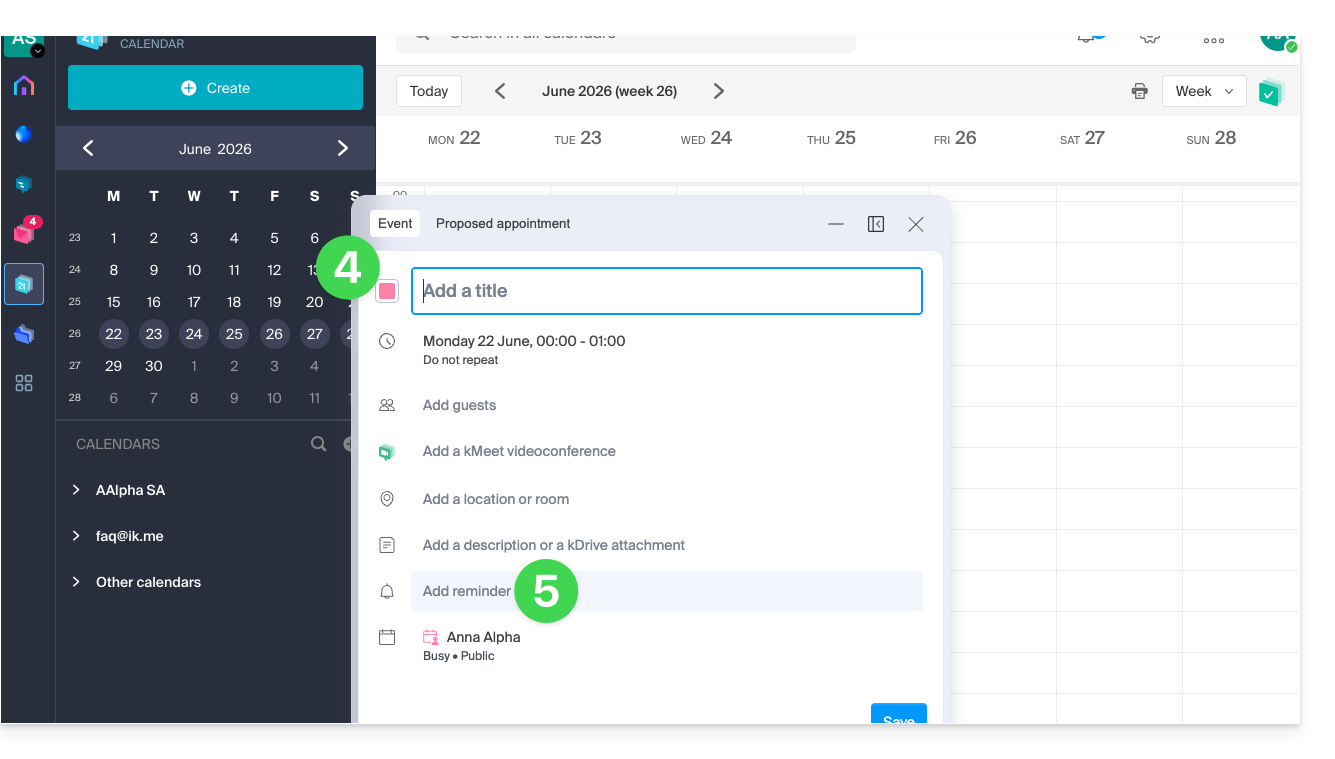
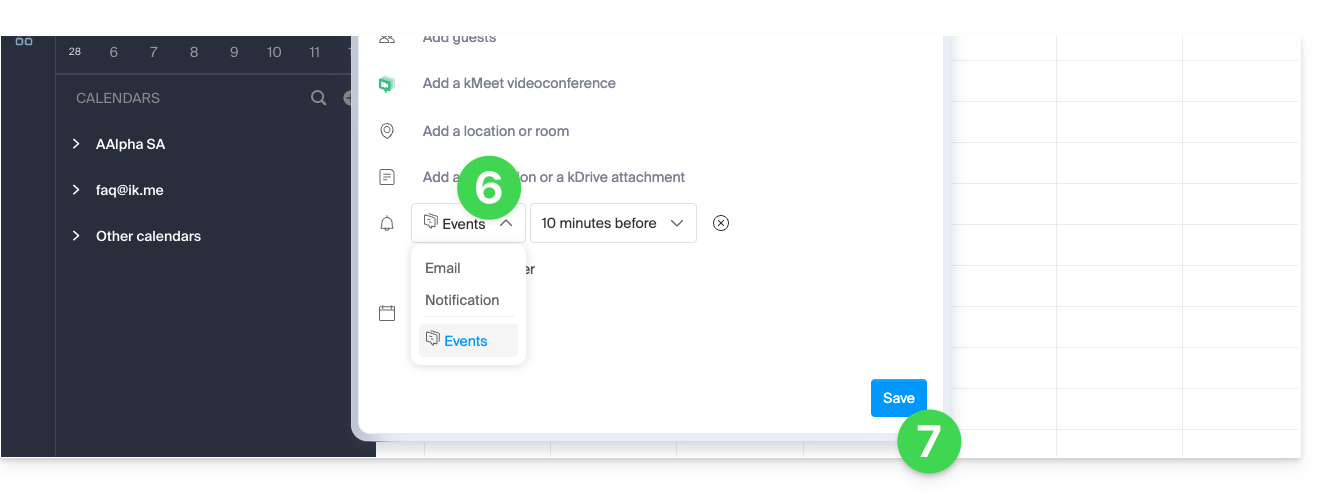
- In the dropdown menu for reminder types, select the webhook you configured (according to the name given in step 5a above).
- Save the event at the bottom of the page:
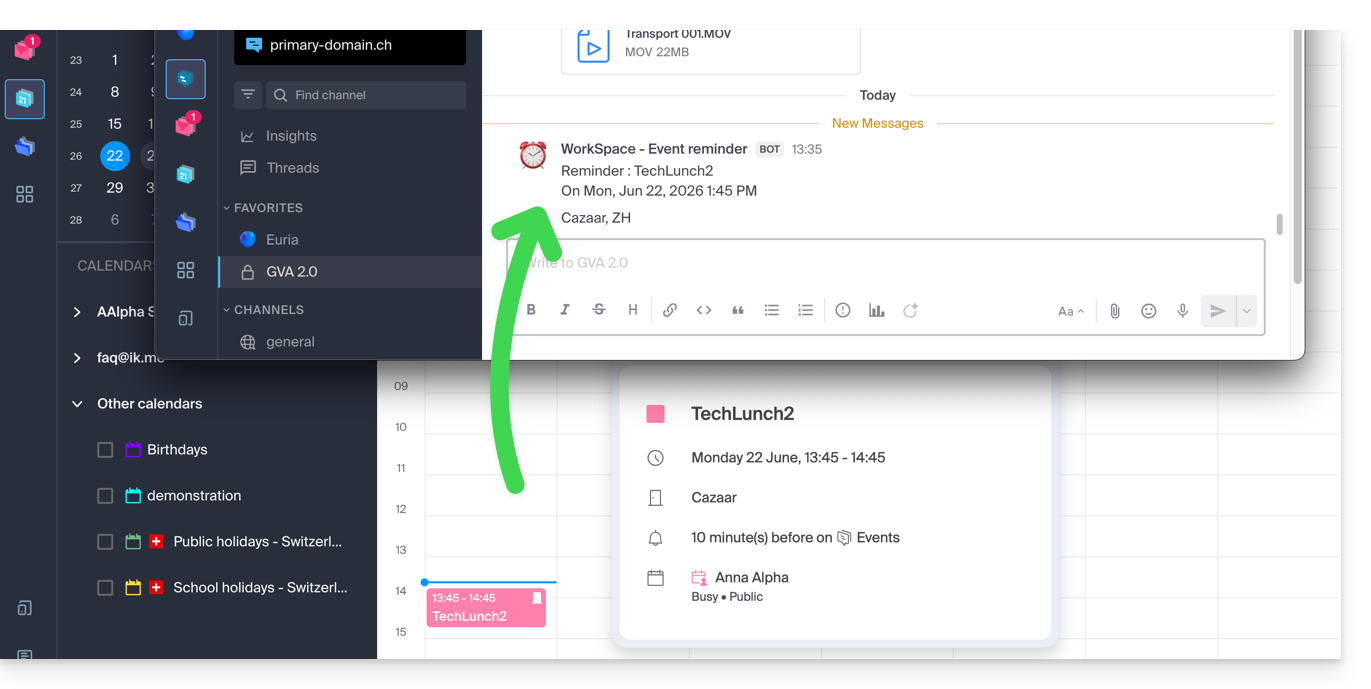
- When the reminder time arrives, a message (in the format configured in point 5c above) is sent to the event's recipient on the channel configured in the webhook (see prerequisites):
And on other messaging systems?
Slack
- Click here to access the Slack WebHooks.
- Choose the discussion thread where your reminders will appear (e.g. @slackbot or #general):
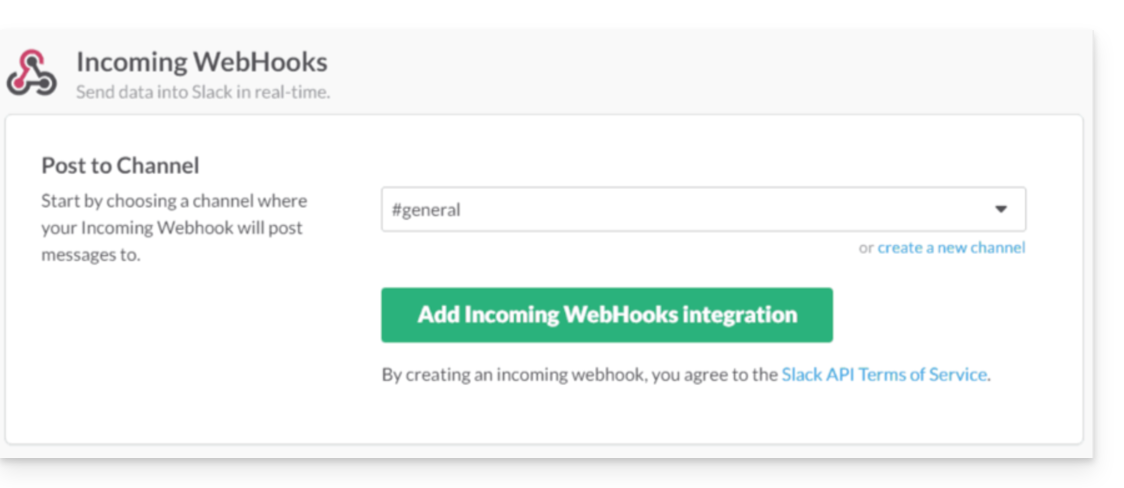
- Save to obtain the webhook URL.
Create additional webhooks to define reminders in other threads.
You can freely use Slack's formatting options in your notifications. Example in French:
N'oubliez pas de %subject% pour le %date%.
À prendre avec le jour J : %description%.
Lieu de l'event : %location%
Link to this FAQ: https://faq.infomaniak.com/2244
Has this FAQ been helpful?
This guide details how to get started with Swiss Backup (an open-source backup solution compatible with Openstack Swift, S3, SFTP, etc.), the backup solution in a Swiss independent cloud.
Introduction
- The free Cloud backup allows you to back up your computer using one of the following methods:
- The 3 guides above show how to add a device for each of these 3 backup types.
- It is not possible to use all 3 protocols at the same time; one must be chosen when creating the slot.
- To remove a device, please refer to this other guide.
- For information on the main connection settings, please refer to this other guide.
Specific guides
Below are detailed guides:
| Data saved | Tool / OS | Protocol |
|---|---|---|
| files, folders | CyberDuck | Swift |
| files, folders | CyberDuck | SFTP |
| files, folders | CyberDuck | S3 |
| files, folders | Filezilla | SFTP |
| files, folders | MSP360 (formerly CloudBerry) | S3 |
| files, folders | MSP360 (formerly CloudBerry) | S3 |
| WordPress | UpdraftPlus | S3 |
| Nextcloud | Swift | |
| Qnap NAS | rClone / HBS | Swift |
| Synology NAS | Hyper Backup | Swift |
| Synology NAS | Cloud Sync | Swift |
| Jelastic Cloud | Swift | |
| web hosting | Restic | Swift |
| macOS / Windows / Linux | Duplicati | Swift |
| Linux server | rClone | Swift |
| Mountain Duck | Swift |
Link to this FAQ: https://faq.infomaniak.com/2543
Has this FAQ been helpful?
This guide explains how to obtain your email address(es) from the Swiss hosting provider Infomaniak.
Introduction
- With the exception of certain free offers (❓: help), an email address with Infomaniak is always created within a Mail Service.
- This Mail Service is based on a personalized domain name which must exist and be configured for the email to function.
- Example: if you want the address
jean.dupont@domain.xyz, you need to:- Own the domain name “
domain.xyz”. - Obtain a Mail service for “
domain.xyz”. - Create the email address “
jean.dupont”.
- Own the domain name “
- All of this is offered and requested during the ordering process on infomaniak.com, preceded by the mandatory creation of a user account (for which you will need to provide your personal email address, or an existing address in any case).
- If your domain name is already registered with an external registrar, you may need to enter the correct MX record (❓: help) in the DNS zone.
Order email addresses for a custom domain
Before or after your registration:
- Consult this other guide to choose the email plan that best suits your needs and follow the instructions to start using the services.
- Once the Mail service has been ordered, you can create the email addresses and then, if necessary, the associated passwords.
Once the Mail service is activated
- Create your email addresses (❓: help).
- Configure your emails on your computer and devices (❓: help).
- Sync your contacts & calendars across your devices (❓: help).
- Migrate your content (❓: help), including content from another provider.
Add an Additional Mail Service
To add a new Mail Service (in order to obtain new addresses on a different domain):
- Click here to access the Mail Service management in your Infomaniak Manager (❓: help).
- Click on the Order button above the table that appears:
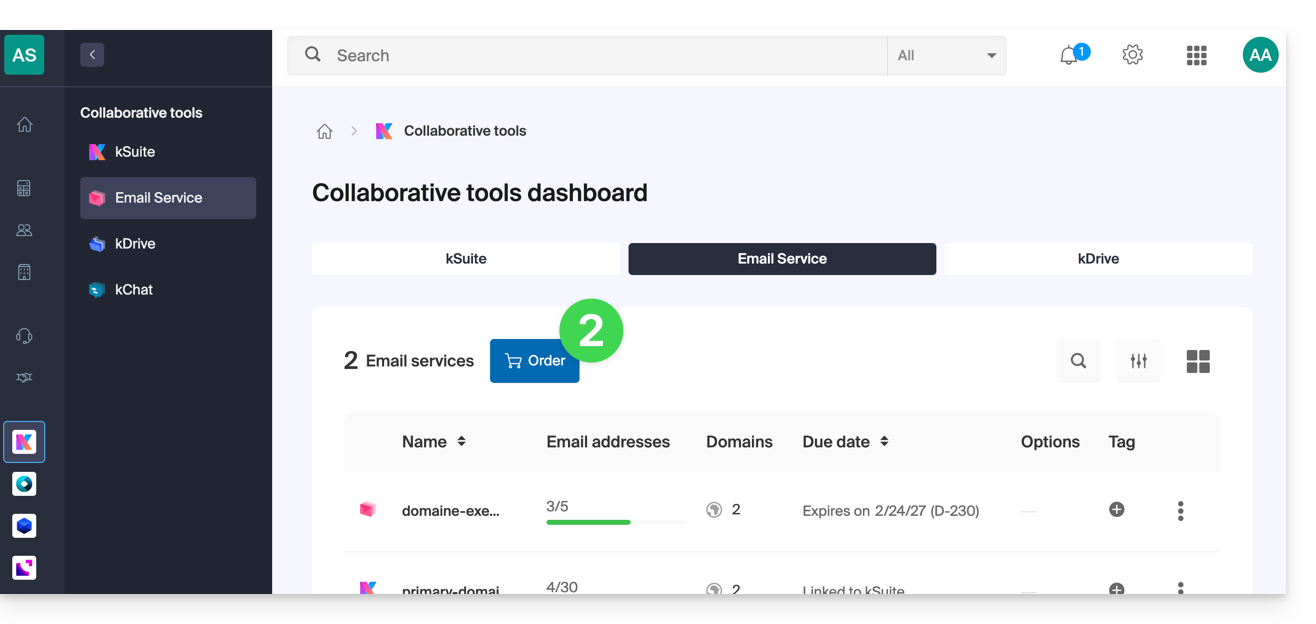
Increase the number of available email addresses on an existing Mail service
To increase the quota of available addresses if necessary, please refer to this other guide.
Link to this FAQ: https://faq.infomaniak.com/1944
Has this FAQ been helpful?
The Infomaniak kSync mobile app is a free solution offered by Infomaniak that allows you to synchronize contacts, calendars, and tasks from your Android mobile devices (Samsung, Huawei, Google Pixel, etc.) with the tools provided by Infomaniak:
- ksuite.infomaniak.com/contacts for managing contacts / address books
- ksuite.infomaniak.com/calendar for managing calendars
Introduction
- Configuring synchronization at the email level does not mean that contacts & calendars will also be synchronized!
- Email is synchronized via the IMAP protocol, while your contacts & calendars can be synchronized using the CardDAV and CalDAV protocols.
- To facilitate this synchronization on Android devices, it is recommended to install kSync.
- On iOS (iPhone, iPad, etc.), use an Apple profile, which can be downloaded from the configuration assistant.
- Microsoft has its own format that is not directly compatible with CardDAV and CalDAV; therefore, it is not possible on the Outlook mobile app to synchronize contacts and calendars with Infomaniak (PS: a paid and untested solution exists here).
- To synchronize Outlook on your computer, please refer to this other guide.
What would you like to do?
- Download and install kSync on your Android device
- Configure kSync
- Use kSync to synchronize Google Calendar
- Add a new address book or calendar from kSync
- Synchronize tasks between Mail Infomaniak and your Android devices
- Force kSync synchronization
- Generate a specific password if two-factor authentication is enabled
Link to this FAQ: https://faq.infomaniak.com/2302
Has this FAQ been helpful?
This guide details how to get started with Swiss Backup (Acronis backup), the backup solution in a Swiss independent cloud.
Configuration
- Activate the Acronis account to add a new device
- Swiss Backup login information
- Manage Acronis users
- Modify user quotas
- Modify the frequency of Acronis backups
- Limit the resources used by Acronis
- Enable two-factor authentication
- Manage Acronis notifications and alerts
- Modify the Acronis language
- Resolve a Gatekeeper error on macOS
- Resolve an Acronis registration error
- Resolve a connection error
- Immutable storage in Swiss Backup
Usage examples
- Back up Windows
- Back up macOS (Acronis Agent (Apple M1/M2...) / uninstall Acronis Agent (macOS))
- Back up Linux (Acronis Agent (AlmaLinux 9))
- Back up an Android mobile (Samsung, Huawei, OnePlus, etc.)
- Back up an iOS mobile (iPhone, iPad, etc.)
- Back up Microsoft 365
- Back up Google Workspace
- Restore specific files and folders
- Restore a Mac completely
- Restore a PC (Windows) completely
- Restore a Swiss Backup backup to a virtual machine
- Troubleshoot Acronis backup deletion issues
Link to this FAQ: https://faq.infomaniak.com/2286
Has this FAQ been helpful?
Thank you for entrusting Infomaniak with the management of your Synology NAS storage server. This guide will help you quickly use the essential functions of your new product.
Introduction
- In case of a problem, Infomaniak support can only answer questions concerning the hardware part of the Synology storage servers.
- For questions related to the use of DSM (operating system), please consult Synology's help directly; (learn more).
Manage your Synology
- What can you do with a Synology NAS?
- 10 methods to secure access to your Synology NAS
- Data security for Synology NAS devices
- Restart and reset a Synology NAS
- Run a speed test on a Synology NAS
Back up your data
- Install an SSL certificate from Let's Encrypt on a Synology NAS
- Configure a Synology NAS with Time Machine
and also…
- Back up Synology with Cloud Sync on Swiss Backup (Swift)
- Back up Synology with Hyper Backup on Swiss Backup (Swift)
Extend Functionality
- Link a domain name to Synology Infomaniak
- Create a custom MX record (for a Synology NAS, for example)
- Configure DynDNS with a Synology NAS
- Create a private network between servers
- Synology NAS High Availability in a data center in Switzerland
and also…
Click here to share feedback or a suggestion about an Infomaniak product.
Link to this FAQ: https://faq.infomaniak.com/2005
Has this FAQ been helpful?