Knowledge base
1000 FAQs, 500 tutorials and instructional videos. Here, there are only solutions!
This guide provides basic instructions for creating and using a .htaccess and .user.ini file with an Infomaniak Web Hosting account.
Introduction
- A
.htaccessfile is placed in the root directory of a website and allows you to configure the Apache HTTP server.- As a decentralized configuration file, it offers significant flexibility to adjust the server's behavior according to the specific needs of the site.
- This file allows you to define URL rewrite rules, impose access restrictions, manage HTTP errors, and even customize security aspects such as disabling the display of files/folders.
- It also facilitates the implementation of redirects and aliases, providing precise control over the organization and accessibility of the site.
- A
.user.inifile allows you to customize the PHP directives for the folder (and its subfolders) in which it is located.- By acting at the PHP interpreter level, this file allows you to define specific configurations for a given folder and its subdirectories.
- Thanks to its clear syntax, it offers the possibility of modifying various parameters such as memory limit, script execution time, error handling, and other PHP-related directives.
- This granular approach allows developers to finely customize the behavior of PHP according to the specific requirements of each section of the site.
Create a file…
… .htaccess
- Connect to your hosting account via FTP or SSH.
- At the root of the website in question, create a new file and name it as follows:
.htaccess. - Enter the desired directives in the file; refer to this other guide, for example.
… .user.ini
- Connect to your hosting via FTP or SSH.
- In the desired location, create a new file and name it as follows:
.user.ini. - Enter the desired PHP configuration settings in the file.
Modifying the .user.ini file takes several minutes to take effect.
Link to this FAQ: https://faq.infomaniak.com/2210
Has this FAQ been helpful?
This guide concerns IonCube Loader, a PHP module that allows you to decode PHP scripts that have been encoded with IonCube Encoder.
Introduction
- IonCube encoding is used to protect the source code of an application and prevent its modification or illegal distribution.
- By using IonCube Loader, website owners can guarantee the security of their code and content while enabling secure and easy distribution of their applications.
Using ionCube Loader
With a shared hosting plan, it is no longer offered. You can check this from the dashboard:
- Click here to access the hosting & website management section in your Infomaniak Manager (❓: help).
- Click on the name of the website in question.
- Click on Manage advanced settings:
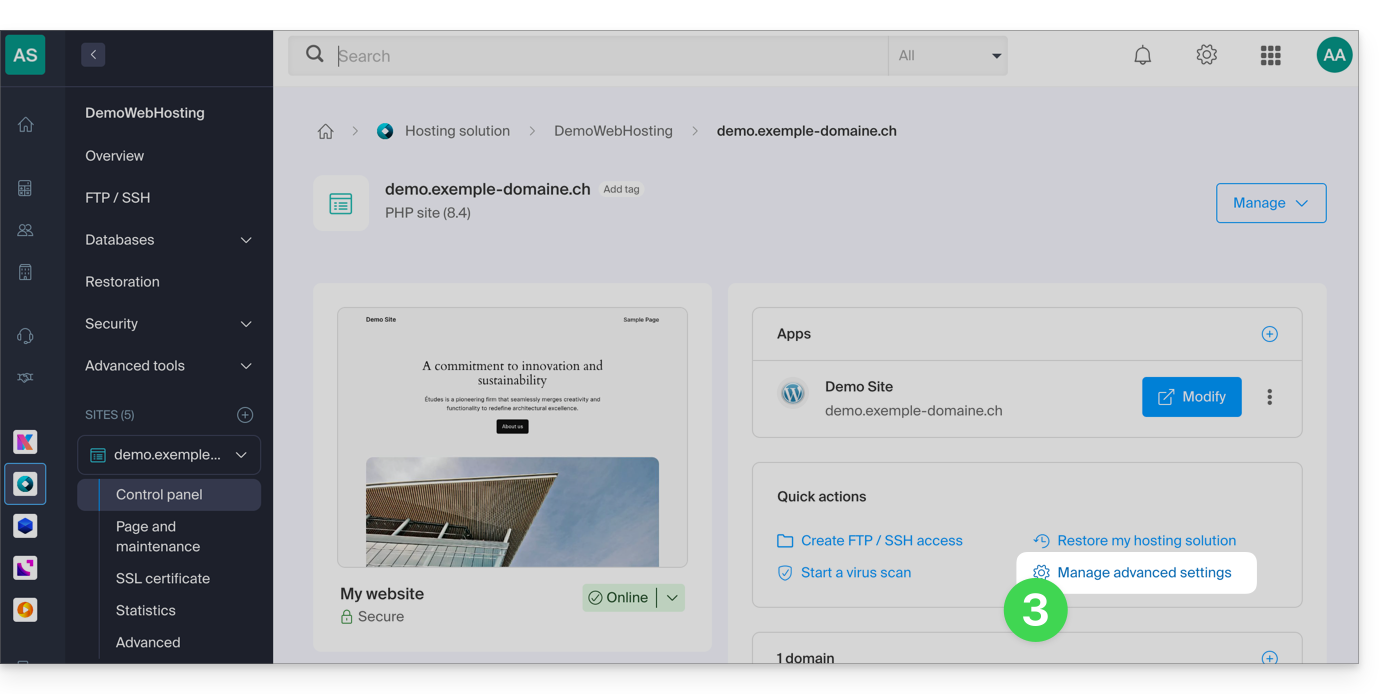
- Click on the PHP Extensions tab.
- Click on ionCube Loader (if present in the list) to view the details:
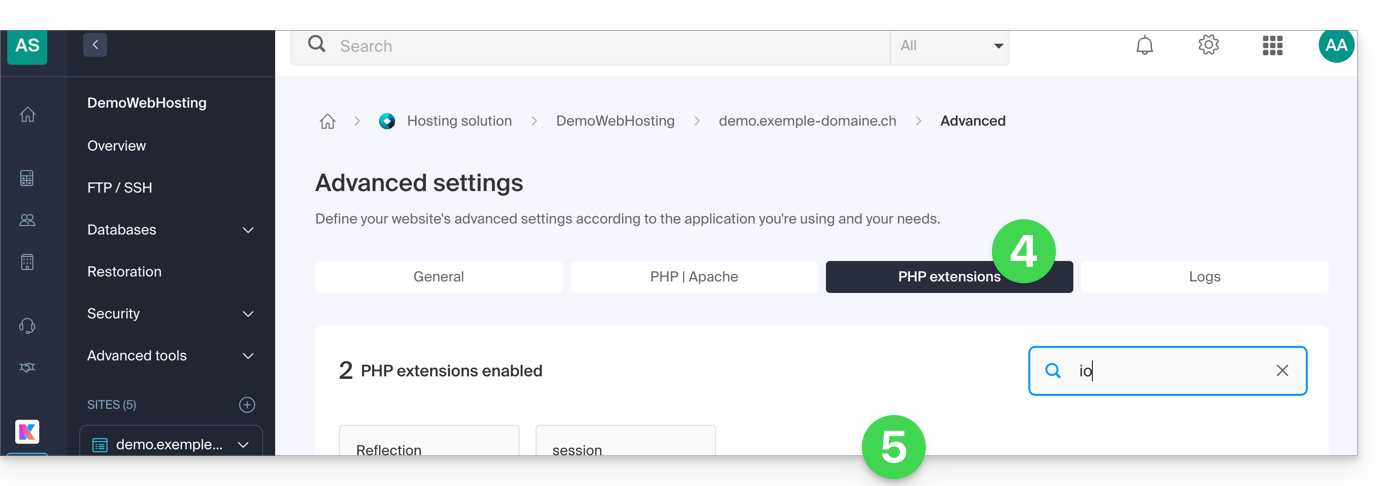
- In this case, you should consider a Cloud Server.
Link to this FAQ: https://faq.infomaniak.com/285
Has this FAQ been helpful?
This guide details how to send emails from a website hosted by Infomaniak using the PHP mail() function, which is disabled by default.
Introduction
- Infomaniak strongly advises against using the PHP mail() function to send emails from your applications:
- Emails will be considered "unauthenticated" and will therefore be subject to limits.
- Their deliverability will be affected, which may harm your website.
- It is strongly recommended to use an authenticated SMTP sending methodfor sending emails from your applications; Infomaniak offers a dedicated service for this purpose.
Specify the sending address
To ensure that messages are sent correctly from your CMS/web application (and to avoid errors such as Could not instantiate mail function or sender mismatch), it is necessary to specify a valid address in the site settings on the Infomaniak platform:
- Click here to access the hosting & site management section in your Infomaniak Manager (❓: help).
- Click on the name of the website in question.
- Click on Manage advanced settings:
- From the General tab, enter an existing email address in the Sender Email field.
- Click the blue Save button:
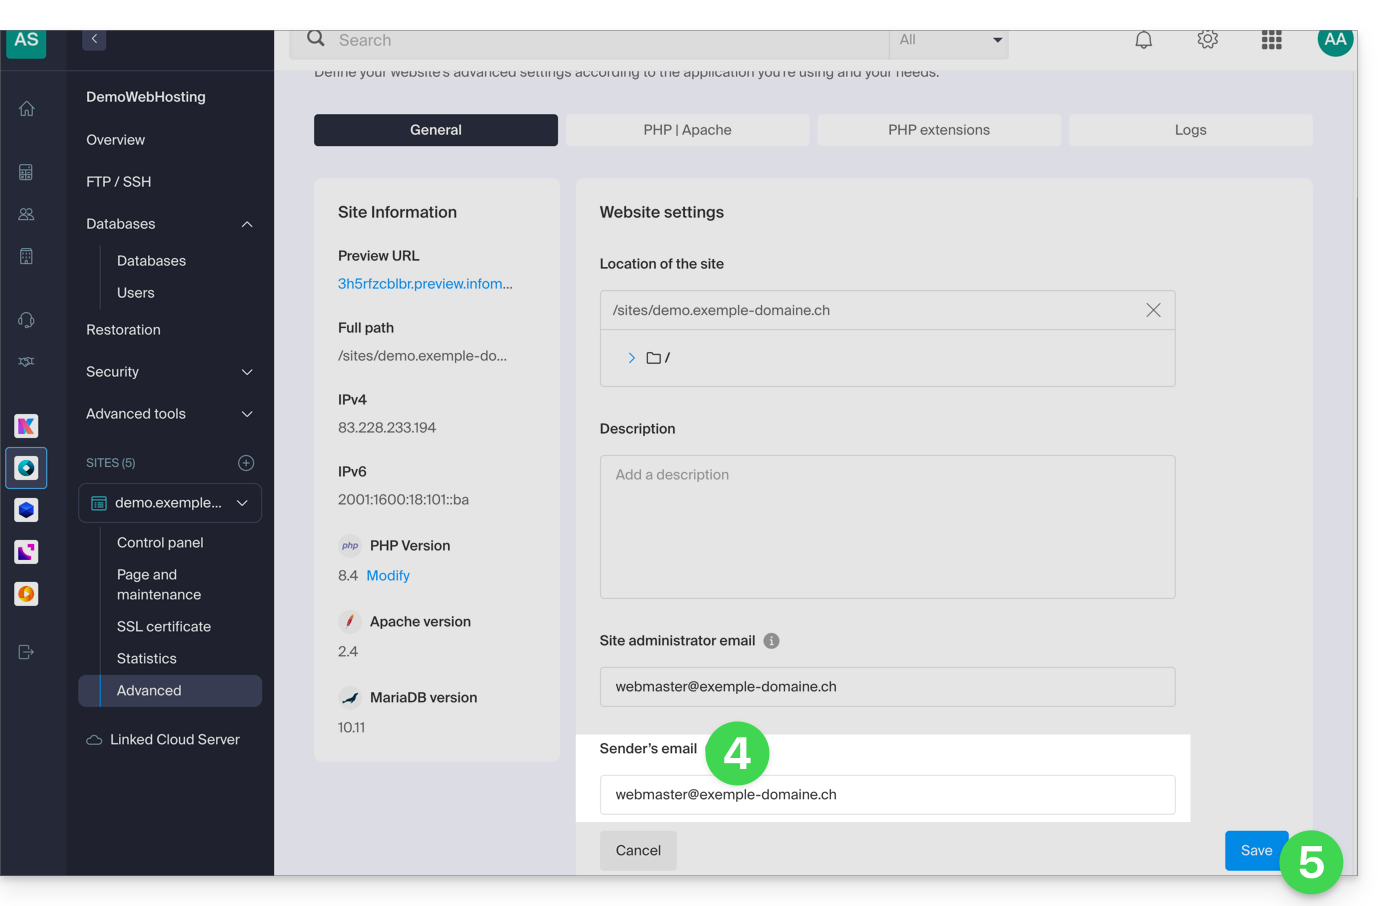
Re-enable the mail function
If you still want to use the PHP mail function, you will need to enable it for each of the websites on your Web Hosting account:
- Click here to access the hosting & website management section in your Infomaniak Manager (❓: help).
- Click on the name of the website in question.
- Click on Manage advanced settings:
- Click on the PHP / Apache tab:
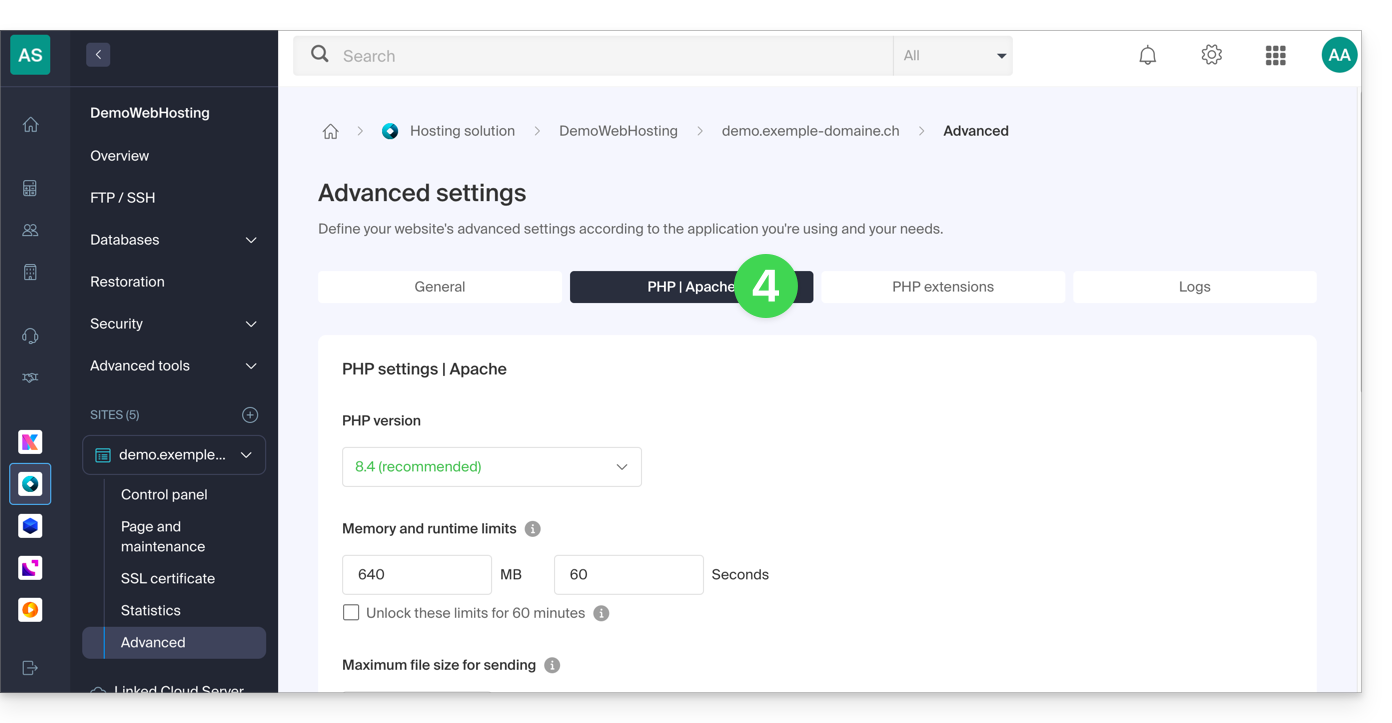
- Enable the mail function:
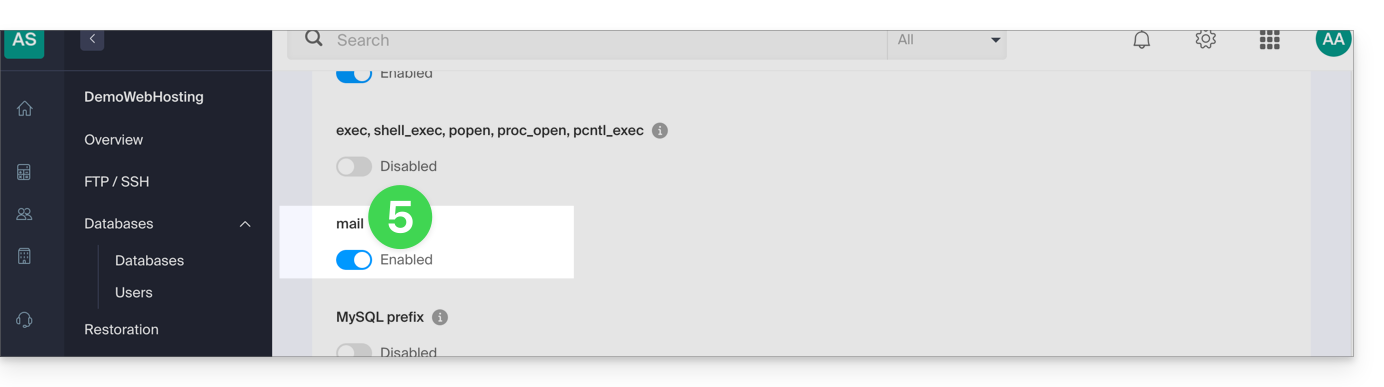
- Click the Save button at the bottom of the page to apply the changes.
PHP mail() examples…
… on WordPress
Configure the sending of the default contact form included with the Divi Builder:
- Log in to the WordPress administration panel.
- Go to the Divi editor of the page containing the contact form.
- Click on Settings to configure the Divi contact form:

- Under EMAIL, enter the email address that will receive the form submissions and save:

- By default, when a visitor uses the form to contact you, you will receive an email from
mail@le-nom-de-votre-site, and if you reply, the recipient will automatically be the email address provided by the visitor when filling out the contact form.
… on Prestashop
Enter the advanced settings of Prestashop:
- Specify the SMTP mode.
- Enter
localhostas the server. - Enter port
25. - Do not specify a username or password.

… on Joomla
Configure sending emails via PHPmail (not recommended) in Joomla:
- Log in to the administration panel of your Joomla site.
- Go to Configuration then Server.
- Do NOT enter anything in the Website Email field:
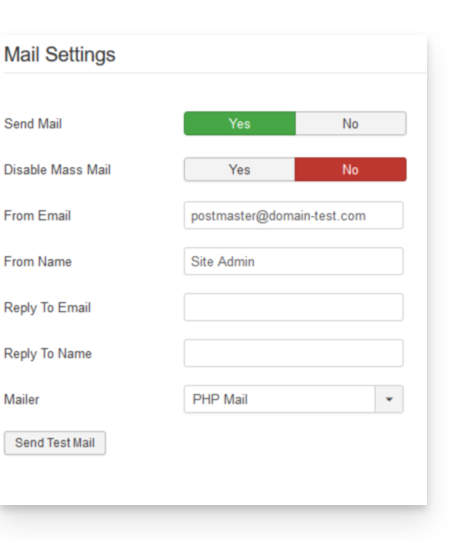
Unfortunately, this prevents any sending tests via the corresponding button, but it will work if you configure a contact form on your website. Click Save once the field is left blank.
PHP mail() function reply address
When sending an email using the PHP mail() function, the return-path will be set as root@h2web3.infomaniak.ch, for example. However, the Reply-To: header present in your form's code allows you to specify a valid reply address.
Link to this FAQ: https://faq.infomaniak.com/2150
Has this FAQ been helpful?
This guide explains how to connect to an external database from a Cloud Server.
Introduction
- It is possible to connect to MySQL via SSL (whether external or not) - this should be specified when establishing the connection.
- The MySQL port
3306is closed by default - to open it, please refer to this other guide. - Infomaniak does not install
PDO_DBLIB.
Install PHP_PDO_ODBC
Prerequisites
- You must have the PHP Extensions menu in the Infomaniak Manager, under the Cloud Server section (if not, you will need to upgrade your Cloud Server).
You can install the PHP_PDO_ODBC extension from the PHP Extensions menu of your Cloud Server:
- Click here to access the management interface for your product on the Infomaniak Manager (need help?).
- Click directly on the name assigned to the product in question.
- Click on PHP Extensions in the left-hand menu.
- Click on the blue Install an extension button.
- Choose the
PHP_PDO_ODBCextension. - Confirm the installation.
Configure the connector
The driver configuration is already defined in /etc/odbcinst.ini:
[FreeTDS]
Description = MS SQL database access with Free TDS Driver
Driver = /usr/lib/x86_64-linux-gnu/odbc/libtdsodbc.so
Setup = /usr/lib/x86_64-linux-gnu/odbc/libtdsS.so
There is no need to redefine it statically in the .odbc.ini or in the user's home directory ~~/.odbc.ini, or even dynamically in the PHP code.
For example, with the FreeTDS driver defined beforehand, the driver version must also be specified at the end of the pdo object declaration:
$con = new PDO('odbc:Driver=FreeTDS;Server=__SERVER IP__;Port=3306;DATABASE=__DATABASE NAME__;UID=__USERNAME__;PWD=__PASSWORD__;TDS_Version=8.0');Link to this FAQ: https://faq.infomaniak.com/895
Has this FAQ been helpful?
This guide concerns Laravel, an open-source web framework written in PHP that follows the model-view-controller (MVC) principle. Please also refer to their documentation.
Prerequisites
- Have a Shared Web Hosting or Cloud Server with the latest MySQL/MariaDB.
- Website running on PHP 8.2.
- Create an SSH access.
- Create a database.
Installing Laravel 11
To do this:
- Connect to the server via SSH (need help?).
- Navigate to the website directory by running the command “cd path-to-website” (e.g.
cd sites/laravel.domain.xyz). - Create a new project by running the command
composer create-project laravel/laravel example-app. - Edit the
.envfile at the root of the hosting to update the connection settings for the new database:- DB_CONNECTION=mysql
- DB_HOST=xxxx.myd.infomaniak.com
- DB_PORT=3306
- DB_DATABASE= the name of the MySQL database (xxxx_newbdd)
- DB_USERNAME= the MySQL user with the rights to this database
- DB_PASSWORD= its password
- Navigate to the project directory and deploy via SSH:
cd example-appphp artisan migrate - Modify the target directory to point to the "public" subdirectory of the project, here
/sites/laravel.domain.xyz/example-app/public.
Link to this FAQ: https://faq.infomaniak.com/2119
Has this FAQ been helpful?
This guide explains how to increase the max_children value on Cloud Server to increase the number of simultaneous PHP processes that can be used by your site. This will be very useful for resolving issues with infinite page loading on your site.
Introduction
- By default, on all hosting plans, the
max_childrenlimit is set to 20.- While it is possible to increase this value from the Infomaniak Manager, the
max_childrenlimit is automatically adjusted based on your Cloud Server configuration. - To increase this limit on shared hosting, migrate to a Cloud Server.
- While it is possible to increase this value from the Infomaniak Manager, the
- To understand how to calculate the most appropriate
max_childrenvalue, refer to this article.
Increase the max_children value
Prerequisites
- Make sure you have enough resources on the Cloud server.
- Ensure that all of the Cloud server's resources are not being used; if they are fully utilized, increasing the
max_childrenvalue will have no effect (Modify Cloud Server Resources). - Check the resource monitoring for your server. If the resources of your server are reached, it will be necessarycheck the optimization of your processes and website before considering increasing the
max_childrenvalue. - Check the PHP error logs in the
/ik-logsdirectory (master process PHP logs - file name: php-fpm.log) to see if the "max_children" limit has been exceeded... example of an error:[05-Jul-2024 09:08:58] WARNING: [pool www.infomaniak.ch] server reached max_children setting (20), consider raising it
To access the management of the PHP / Apache settings for the site for which you need to increase the max_children value on a Cloud Server, please refer to this other guide.
You will be able to…
- … choose a new value for
max_children: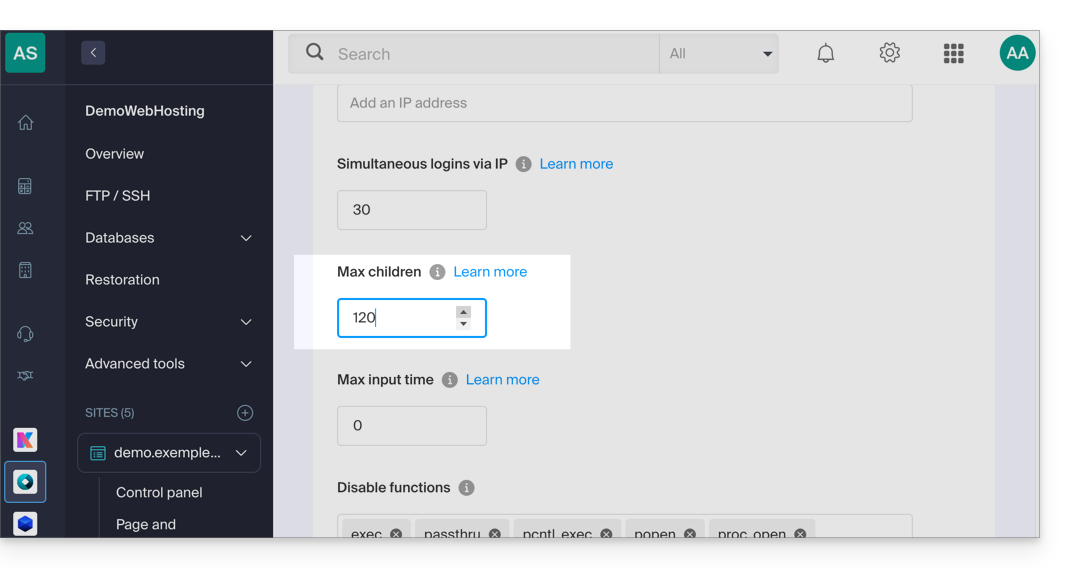
Don't forget to save the changes at the bottom of the page.
Limits based on the server
Limit the max_children based on the Cloud Server's resources:
| Cloud Server Configuration | max_children |
|---|---|
| 2 CPU / 6 GB RAM | 20 |
| 4 CPU / 12 GB RAM | 40 |
| 6 CPU / 18 GB RAM | 60 |
| 8 CPU / 24 GB RAM | 80 |
| 12 CPU / 36 GB RAM | 120 |
| 16 CPU / 48 GB RAM | 160 |
| 24 CPU / 72 GB RAM | 240 |
| 32 CPU / 96 or 128 GB RAM | 320 |
Link to this FAQ: https://faq.infomaniak.com/1270
Has this FAQ been helpful?
This technical guide details the resource limits for Infomaniak Web Hosting; it is essential to distinguish between real time (clock time) and processing time (CPU time) to understand the cause of script interruptions.
1. MySQL connection time (I/O)
Limit: 30 seconds (actual time)
This limit corresponds to the absolute time elapsed, measured "as the clock ticks". It concerns the communication between PHP and the database server (MySQL/MariaDB).
As soon as a connection is opened, the database server allocates a maximum of 30 seconds to receive the request, execute it, and return the results. If this time limit is exceeded (often due to a poorly optimized SQL query), the MySQL server abruptly terminates the connection. This usually generates the MySQL server has gone away error.
2. PHP processing time (CPU)
Limit: 10 seconds CPU
This limit applies exclusively to the processing power consumed by the web server to execute PHP code.
It is crucial to note that the waiting time does not count. When PHP is waiting for a response from the database, it is paused and consumes almost no CPU time. Therefore, a script will only be interrupted by the web server if it performs intensive calculations (complex loops, cryptography, file processing) for more than 10 seconds cumulatively.
Interaction of the two limits
To ensure the application's stability, each operation must simultaneously meet these two distinct constraints:
- The application has a total of 30 seconds to interact with the database (network latency + SQL execution).
- The application has 10 seconds of pure processing time to handle the received data.
Example of valid operation: a script that waits 25 seconds for a complex response from MySQL (I/O) and then processes the result for 2 seconds (CPU) will work perfectly, as it has not exceeded either of the individual quotas, even though the total time is 27 seconds.
Link to this FAQ: https://faq.infomaniak.com/481
Has this FAQ been helpful?
This guide concerns Redis, a PHP module for Infomaniak Cloud Server.
Introduction
Redisis used with PHP to accelerate performance by serving as a cache for temporary data and for managing user sessions, thereby improving the efficiency of web applications.Redisalso enables the implementation of queuing systems and the temporary storage of data for asynchronous tasks or statistics.
Install Redis
Redis can be installed from Fast Installer, the applications available in just a few clicks on Cloud Server:
- After installation,
Redisis accessible via the IP/portlocalhost:6379or127.0.0.1:6379. - The password for
Redismust be between 15 and 99 characters (inclusive).
Link to this FAQ: https://faq.infomaniak.com/2113
Has this FAQ been helpful?
This guide explains how to modify the value of the PHP directive include_path.
Modify the include_path
Like any other PHP setting, include_path is defined in the .user.ini file.
Here is an example of a path to use in your .user.ini file:
- The dot (
.) at the beginning allows the current directory to be included in the search. - Le point (
.) au début permet de conserver le répertoire courant dans la recherche. - The colon (
:) is used as a separator between the different folders.
Refer to this other guide about phpinfo to verify that your new directive has been taken into account (it may take a few minutes for the change to appear).
Although this method is still functional, using Composer's autoloader is now the preferred solution for managing includes.
Link to this FAQ: https://faq.infomaniak.com/1108
Has this FAQ been helpful?
This guide explains how to disable or configure HSTS for a website.
Introduction
- When HSTS is enabled for a website, the server instructs the website visitor (if their browser, such as Brave, Chrome, Edge, Firefox, Opera, Safari, etc., is compatible) to replace all insecure links with secure links.
- Example:
http://www.domain.xyz.com/one/page/is automatically replaced withhttps://www.domain.xyz/one/page/. - After enabling an SSL certificate on a website, HSTS is configured as follows:
max-age=16000000.
Disable HSTS…
… with a CMS (WordPress, Joomla, etc.)
Include the following line in all pages generated by the CMS:
header( 'Strict-Transport-Security: max-age=0;' );For WordPress, you can, for example, add this directive to the functions.php file of your theme:
add_action( 'send_headers', 'add_header_xua' );
function add_header_xua() {
header( 'Strict-Transport-Security: max-age=0;' );
}
More details about WordPress
… with a PHP site
Include the following line in all PHP pages:
header( 'Strict-Transport-Security: max-age=0;' );To do this without having to modify each PHP page of a website, you can use the auto_prepend_file directive in the .user.ini file of the website in question:
auto_prepend_file=/home/clients/xxxx/web/hsts_disable.php... with the following hsts_disable.php file:
header( 'Strict-Transport-Security: max-age=0;' );
… with a website containing static content (no PHP)
Include this header in a .htaccess file:
# BEGIN DISABLE HSTS
<IfModule mod_headers.c>
Header always set Strict-Transport-Security "max-age=0; includeSubDomains;"
</IfModule>
# END DISABLE HSTS
Customize HSTS
The default value can be modified in your website's PHP files using the following directive:
header( 'Strict-Transport-Security: max-age=X; includeSubdomains; preload' );(X being the desired number of seconds).
Enable HSTS for all hosted subdomains
includeSubDomains; is enabled by default, and as its name suggests, it includes subdomains in "Strict Transport Security".
When a visitor accesses an insecure subdomain, the browser will automatically redirect to HTTPS and trigger a security error.
If this behavior is not desired, you should remove this header.
Clear the browser's HSTS cache…
… on Chrome
- In Chrome, type
chrome://net-internals/#hsts. - Enter the domain name in the text field in the "Delete domain security policies" section.
- Click the Delete button.
- Enter the domain name in the text field in the "Query HSTS" section.
- Click the Query button.
- The response should be "
Not found".
… on Safari
- With Safari, start by closing the browser.
- Delete the
~/Library/Cookies/HSTS.plistfile. - Reopen Safari.
… on Firefox
- With Firefox, close all tabs.
- Open the Firefox menu and click on History / Show History.
- Find the page for which you want to remove the HSTS preferences.
- Right-click on one of its entries.
- Choose Forget this site.
Link to this FAQ: https://faq.infomaniak.com/2133
Has this FAQ been helpful?
This guide details the software libraries that can be used to manipulate the PDF format and that are compatible with the various web hosting offers from Infomaniak.
Introduction
- The
PDFPHP extensions allow you, among other things, to generate a PDF from dynamic data, for example, to create custom invoices.
PDF and Cloud Server
On Cloud Server, you can install apps like PDFtk…
- The PHP class
FPDFis supported. PDFlibfrom Apryse is no longer offered on the latest Managed Cloud Servers because thePHP_PDFextension has become a paid service. If you purchase it, you will need to install it on Cloud VPS / VPS Lite or Public Cloud.
On shared hosting, ImageMagick is active and supports the EPDF, PDF, and PDFA formats.
Link to this FAQ: https://faq.infomaniak.com/1925
Has this FAQ been helpful?
This guide is intended for developers and webmasters who are experiencing display issues with special characters (e.g., accents, Arabic characters, Chinese characters, emojis, etc.) on a website or in a database hosted by Infomaniak.
Introduction
- Common causes of incorrectly displayed characters that appear instead of special characters or emojis like
??:- PHP connection in
utf8instead ofutf8mb4 - MySQL table or column in
latin1orutf8instead ofutf8mb4 - SQL file encoded differently from the import setting
- Incorrectly encoded HTML/CSS/JS files
- Missing or incorrect charset declaration on the HTML, PHP, or HTTP side
- PHP connection in
- Common solutions:
- Use
utf8mb4everywhere: database, connections, tables, columns, files, headers - Validate the encoding of all files and dumps
- Test the display of emojis, accents, and other multilingual characters
- Use
- Also, refer to this other guide to force a different encoding when connecting to a MySQL database.
Use a text editor that supports saving in UTF-8 without BOM (Visual Studio Code, Sublime Text, Notepad++...).
1. Use UTF-8 or UTF-8MB4 everywhere
MySQL's utf8 encoding does not support 4-byte characters, such as emojis. These will be displayed as ??. Therefore, you should use utf8mb4, which is a true, complete implementation of UTF-8.
2. HTML – Correct encoding declaration
In the <head> of your HTML pages:
<meta charset="UTF-8">Also, make sure that the CSS/JS files are saved in UTF-8 (without BOM).
3. PHP – Force UTF-8 or UTF-8MB4
a) HTTP Headers
header('Content-Type: text/html; charset=utf-8');b) MySQL Connection (MySQL API)
$connection = mysql_connect($host, $user, $pass);
mysql_set_charset('utf8mb4', $connection);
c) PDO Connection
 $dsn = "mysql:host=localhost;dbname=ma_base;charset=utf8mb4";
$pdo = new PDO($dsn, $user, $pass, [
    PDO::ATTR_ERRMODE => PDO::ERRMODE_EXCEPTION
]);
4. MySQL Database
a) Configuration in phpMyAdmin
- The database, tables, and columns must be in
utf8mb4_unicode_ciorutf8mb4_general_ci. - In the Operations tab, choose
utf8mb4_unicode_cifor the collation.
b) Useful SQL commands
ALTER DATABASE ma_base CHARACTER SET = utf8mb4 COLLATE = utf8mb4_unicode_ci;
ALTER TABLE ma_table CONVERT TO CHARACTER SET utf8mb4 COLLATE utf8mb4_unicode_ci;
c) After PHP connection
mysqli_query($conn, "SET NAMES 'utf8mb4'");
mysqli_query($conn, "SET CHARACTER SET 'utf8mb4'");
5. .user.ini / .htaccess file
To force server-side encoding (Apache):
AddDefaultCharset utf-8
Header set Content-Type "text/html; charset=utf-8"
# Pour PHP
php_value default_charset UTF-8
php_value mbstring.internal_encoding UTF-8
6. Import / export of SQL dumps
Errors such as é becoming ? or an emoji ☺ becoming ?? often stem from an encoding mismatch.
Check the encoding of the SQL file before importing. Use iconv if necessary:
iconv -f ISO-8859-1 -t UTF-8 dump.sql > dump_utf8.sqlIn phpMyAdmin, specify the import encoding (e.g. UTF-8, UTF-8MB4 or latin1) according to the file.
Link to this FAQ: https://faq.infomaniak.com/1124
Has this FAQ been helpful?
This guide explains how to manage Memcached, and in particular, how to check if this in-memory caching system is working correctly on your managed Cloud Server.
Prerequisites
- Install Memcached on a managed Cloud Server.
Check that Memcached is running
To verify that Memcached is working correctly:
Copy the following code into a PHP file (connect to the local memcache server):
$fp = fsockopen("localhost", 11211); if ($fp) { // on demande les stats fwrite($fp, "stats\n"); while (!feof($fp)) { $buf = rtrim(fgets($fp)); if (preg_match('/^STAT curr_items ([0-9]+)$/', $buf, $matches)) { // le nombre d'items stockes print $matches[1] . PHP_EOL; } elseif (preg_match('/(END|ERROR)/', $buf)) { // fin des stats break; } } fclose($fp); } else { print "Error: cannot connect to local memcached server: $!" . PHP_EOL; }- Upload the PHP file to your hosting.
- Run the PHP file.
The script returns the number of items cached in the server's memory.
Enable Memcached on…
… Prestashop
The native integration of Memcached in the Prestashop application simplifies its configuration. To enable it:
- Access your Prestashop administration area.
- Go to the Advanced Parameters tab.
- Select Performance.
- Choose Yes from the dropdown menu under Use cache in the Caching section.
- Select CacheMemcached.
- Add a server by providing the required information, such as:
- the IP address:
127.0.0.1 - the port:
11211 - the weight:
1
- the IP address:
You can check the information by clicking the "Test Server" button before saving it at the bottom of the "Caching" section.
Once this step is completed, your PrestaShop application is ready to use Memcached to cache certain API calls, database calls, and objects.
Link to this FAQ: https://faq.infomaniak.com/2233
Has this FAQ been helpful?
This guide explains how to modify an existing Web Hosting plan, for example, to host additional websites if the maximum number of websites allowed has been reached, or to obtain a more recent hosting solution to benefit from the latest versions of PHP & MySQL.
Order additional websites, disk space, or IP addresses
To access the Web Hosting configuration tool:
- Click here to access the hosting & website management section in your Infomaniak Manager (❓: help).
- Click on the action menu ⋮ located to the right of the relevant hosting.
- Click on Modify offer.
- Increase the values you wish to modify.
- Click on the Next button to proceed to payment for the changes made to the hosting:
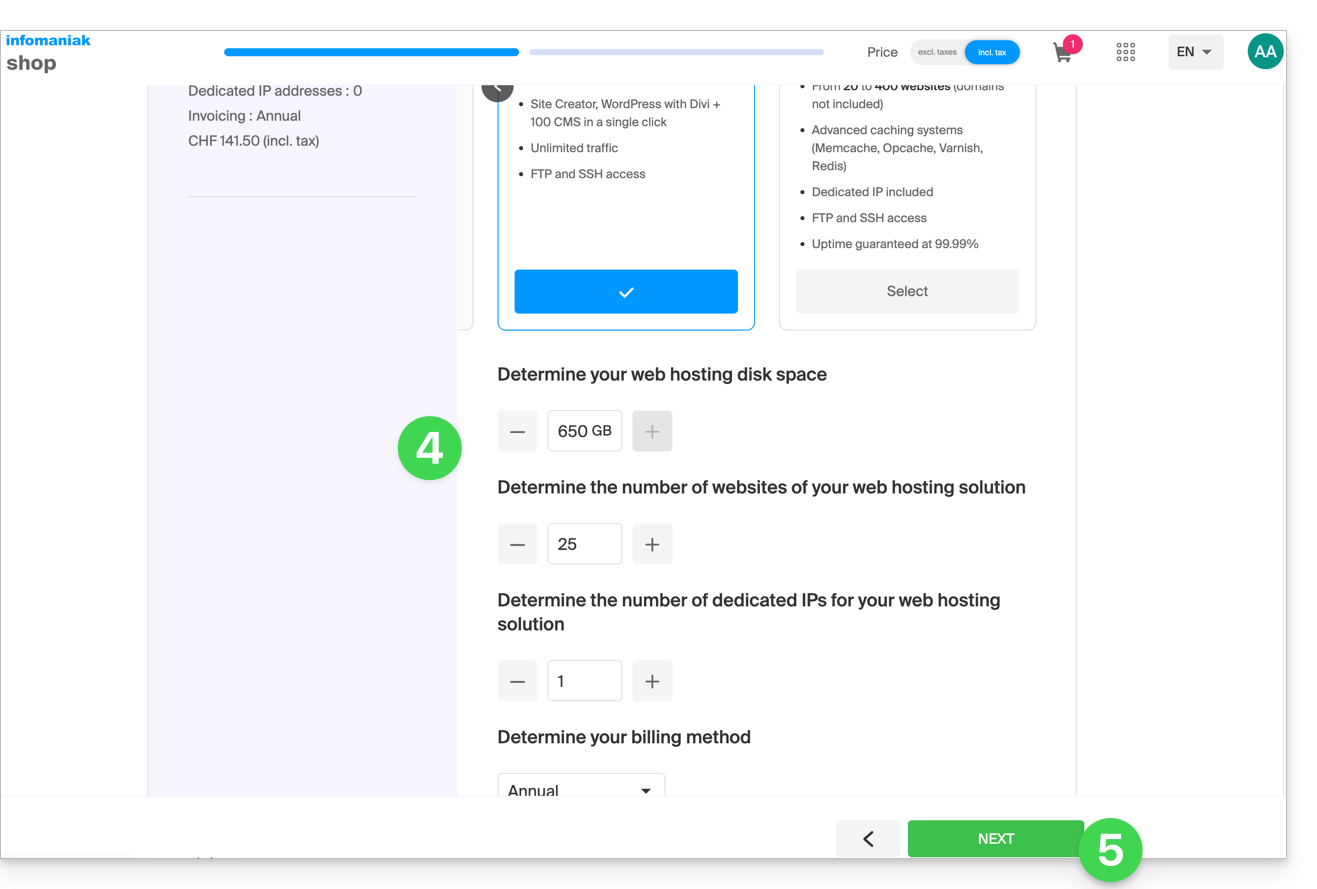
Switch to a more recent server
To obtain a hosting solution on a more recent server and thus benefit from the latest versions of PHP & MySQL, you can either…
- … refer to this other guide and follow the procedure described in it to the very end:
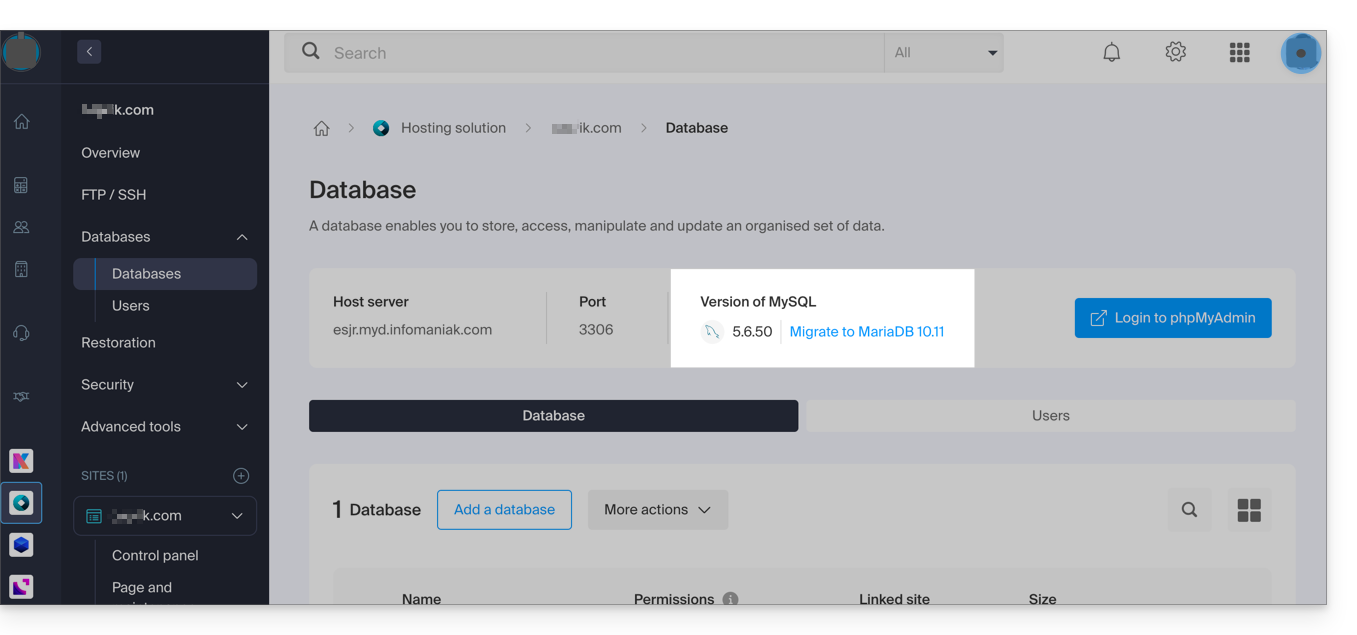
- … refer to this other guide and follow the procedure described in it up to step 4, then click the button to update:
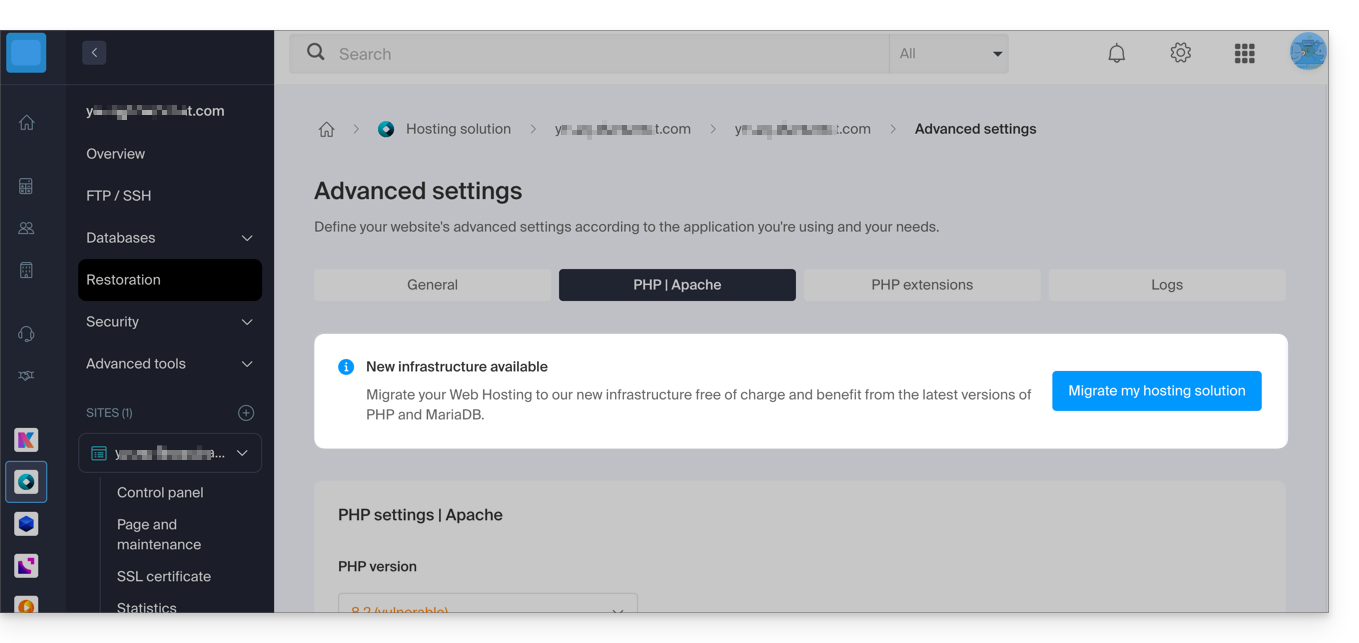
If no information banner is displayed, it means you already have a recent hosting plan.
Link to this FAQ: https://faq.infomaniak.com/626
Has this FAQ been helpful?
This guide concerns the Apache mod_auth_mysql module, which enables user authentication and access authorization via a MySQL database.
With shared hosting
The mod_auth_mysql module is not available with shared hosting plans; consider a Cloud Server or use PHP scripts and sessions.
Link to this FAQ: https://faq.infomaniak.com/363
Has this FAQ been helpful?
This guide explains how to benefit from new versions of PHP, MySQL, and many other packages by migrating a Cloud Server to a new Infomaniak infrastructure.
Introduction
- The migration is free and takes place in 3 steps:
- Infomaniak provides a next-generation Cloud Server with the same features as the current one, at the same price and with the same commitment period.
- You have one month to move your hosting to the new Cloud Server provided (see below).
- Once your hosting has been moved to the new server, cancel the old Cloud Server.
- FTP access and databases remain unchanged.
- Only the supported versions of PHP and MariaDB, as well as the server's IPv4 and IPv6 addresses, will change for hosting.
- The hostnames will not change and are automatically updated to point to the new IP addresses.
- During this operation, the statistics are reset.
Migration procedure
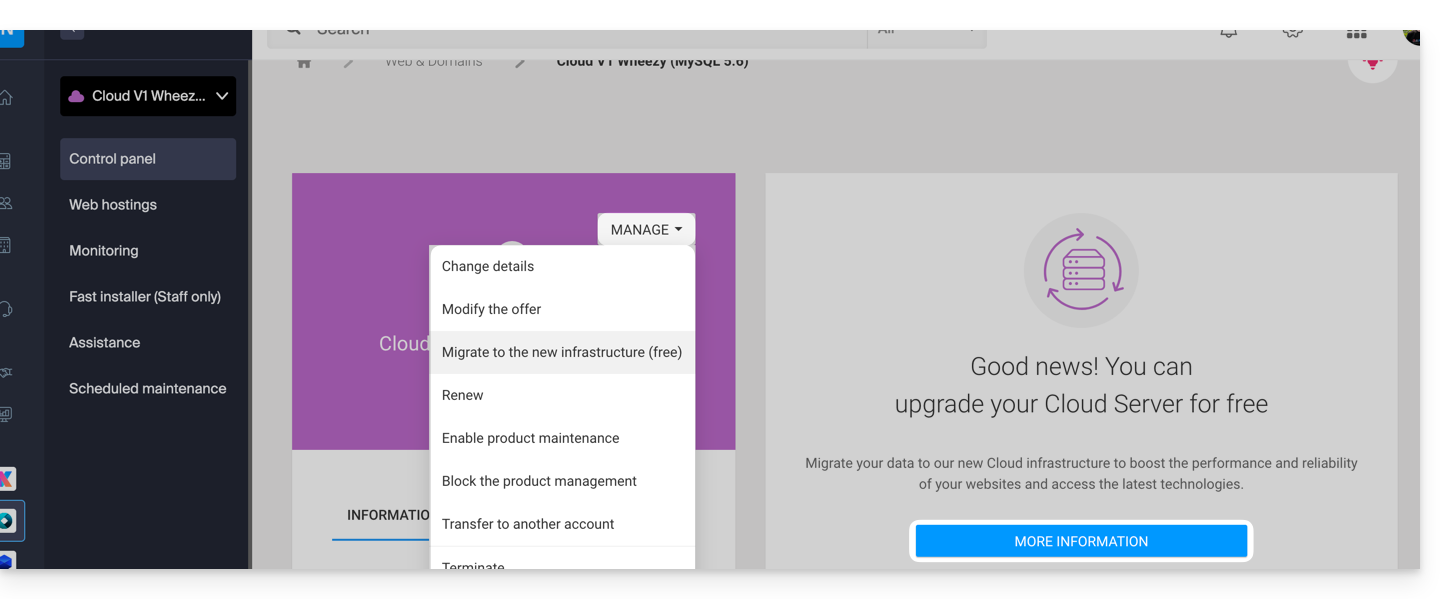
By migrating your data to the new Cloud infrastructure, you increase the performance and reliability of your websites, which will have access to the latest technologies:
- Click here to access the management of your product on the Infomaniak Manager (need help?).
- Click directly on the name assigned to the product in question.
- Click on the blue button in the "Upgrade your Cloud Server" box (or on Manage):
Link to this FAQ: https://faq.infomaniak.com/2813
Has this FAQ been helpful?
This guide concerns ImageMagick, a powerful software suite for image manipulation, available on Infomaniak's Web Hosting and Cloud Servers.
Simplified installation: To install ImageMagick or its extensions, it is recommended to use Fast Installer from your Manager.
ImageMagick and image manipulation solutions
Several tools are available to process your images (resizing, conversion, watermarks):
- ImageMagick (CLI): the main suite that can be used via the command line (via SSH); the modern command is
magick, but the old syntaxconvertis still available. - PHP extension
imagick: this is the most common solution for websites (WordPress, etc.); it allows you to use ImageMagick directly in your PHP scripts. - GD Library: a lighter alternative, often pre-installed, ideal for simple operations (thumbnails, text on images).
- PerlMagick: a dedicated interface for Perl scripts to access ImageMagick features.
Paths and Commands
On Infomaniak infrastructure, ImageMagick is installed by default. The executables are located in the following directory:
/usr/bin/Here are the main commands available:
| Command | Primary use |
|---|---|
magick (or convert) | Convert, resize, and transform images. |
identify | Get the metadata of a file (format, size, etc.). |
mogrify | Apply a modification directly to the original file. |
composite | Overlay multiple images (e.g., add a watermark logo). |
To test for the presence of the Perl module Image::Magick, you can use the following command:
perl -e 'use Image::Magick; print "Installed\n"';Link to this FAQ: https://faq.infomaniak.com/322
Has this FAQ been helpful?
This guide explains how ModSecurity works, how to configure it, and how to manage it on Infomaniak servers.
Introduction
- ModSecurity (
mod_secure) is available and enabled by default on Infomaniak servers:- All HTTP requests will be subject to the security rules defined by ModSecurity.
- The
uploadprogressPHP extension is not available on Infomaniak servers, as PHP is used in its FPM version.
- It is not possible to disable ModSecurity on Infomaniak servers:
- The setting is global to the server where your site is hosted, which means that all defined security rules will be applied to your site.
In case of a problem
Language error (code 403)
If the error message ModSecurity: Access denied with code 403 (phase 2). Operator EQ matched 0 at REQUEST_HEADERS. (...) appears regarding ModSecurity, you should check that a default language is properly configured in a browser such as Brave, Chrome, Edge, Firefox, Opera, Safari, etc. This error can sometimes be caused by incorrectly configured language settings in the browser.
"Request body larger than configured limit" warning
If you see messages regarding the Request body larger than configured limit error or warning, please note that this is only a warning – the request still goes through and is not blocked. This configuration is specific to certain older hosting generations (of the jessie type) and allows all requests to pass through to the server without impacting your visitors.
Link to this FAQ: https://faq.infomaniak.com/2098
Has this FAQ been helpful?
This guide explains how to resolve an issue when importing a .csv file into a MySQL table. The proposed alternative is to read the CSV file line by line using PHP and insert the data into the MySQL database.
"LOAD DATA LOCAL INFILE" function disabled
The LOAD DATA LOCAL INFILE function allows you to import a CSV file directly into a MySQL table. However, this feature is often exploited by attackers to gain unauthorized access to websites hosted on servers that allow it.
To prevent any security risks and protect customer data, Infomaniak has disabled the LOAD DATA LOCAL INFILE function. Users who import their CSV files via phpMyAdmin (without checking the “CSV via LOAD DATA” option) are not affected.
Here is an alternative method for importing data in CSV format into a MySQL table. The example below shows how to properly handle errors when opening the CSV file and inserting data into the database.
This script uses mysqli to connect to the database and prepared statements to insert the data. This ensures better security, optimal compatibility with recent versions of PHP, and simple integration into your project, whether in an existing script or a new file located in the /web directory:
$fileName = "data.csv";

// Connect to MySQL database using mysqli
$link = new mysqli("localhost", "username", "password", "database");

// Check database connection
if ($link->connect_error) {
   die("Connection failed: " . $link->connect_error);
}

// Open the CSV file for reading
if (($handle = fopen($fileName, "r")) !== FALSE) {

   // Read each line of the CSV file
   while (($data = fgetcsv($handle, 1000, ";")) !== FALSE) {

       // Prepare the SQL query dynamically
       $query = "INSERT INTO `test` VALUES (" . str_repeat('?,', count($data) - 1) . "?)";
       $stmt = $link->prepare($query);

       // Check if query preparation was successful
       if ($stmt === FALSE) {
           die("Query preparation failed: " . $link->error);
       }

       // Bind parameters (assuming all columns are strings)
       $types = str_repeat('s', count($data));
       $stmt->bind_param($types, ...$data);

       // Execute the query
       if (!$stmt->execute()) {
           die("Query execution failed: " . $stmt->error);
       }

       // Close the statement
       $stmt->close();
   }

   // Close the CSV file
   fclose($handle);

} else {
   echo "Error: unable to open the file.\n";
   exit(1);
}

// Close the database connection
$link->close();
?>
Get help
Unfortunately, it is impossible to specify exactly where in the script these lines of code should be inserted.
If this method causes problems (for example, when importing multiple CSV files simultaneously without any error messages), the structure of the tables or the indexing of the fields may be the cause. In this case, contact your webmaster for verification.
Also, consult the official PHP documentation regarding the fgetcsv() function.
Link to this FAQ: https://faq.infomaniak.com/1312
Has this FAQ been helpful?
This guide covers synchronizing servers via the NTP (Network Time Protocol) and configuring the timezone on Infomaniak servers.
Accurate server synchronization via NTP
Infomaniak's servers are all synchronized via the NTP protocol. The company provides its own stratum-1 NTP servers, which are publicly accessible for flexible use.
To integrate these servers into your settings, use the following entry: pool.ntp.infomaniak.ch.
The default timezone setting is UTC. However, PHP functions are designed to take different timezones into account based on specific needs.
To adjust the timezone in your PHP scripts, use the date_default_timezone_set('UTC') function.
MySQL: Temporal Specificities
The Infomaniak infrastructure supports features that allow you to work with temporal data in a precise and efficient manner, taking time zones into account, which is crucial for many modern applications:
- MySQL uses a time zone database to store and manage time zone information.
- The
mysql.time_zonetable contains time zone data, including information on time offsets, time zone names, etc. - The
CONVERT_TZfunction is used to convert a time from one time zone to another in MySQL, using the following syntax:CONVERT_TZ(dt, from_tz, to_tz), where:dtis the date/time to be converted.from_tzis the source time zone.to_tzis the target time zone.
- Example:
CONVERT_TZ('2024-05-14 12:00:00', 'UTC', 'America/New_York')will convert the time 12:00:00 UTC to the local time in New York.
Link to this FAQ: https://faq.infomaniak.com/487
Has this FAQ been helpful?