Knowledge base
1000 FAQs, 500 tutorials and instructional videos. Here, there are only solutions!
This guide details the specifics related to managing MongoDB on your Managed Cloud Server, particularly regarding the version lifecycle.
Preamble
- Any new installation of the application deploys MongoDB version 7.0 (or higher) by default.
Upgrading from version 6 to 7
It is not possible to perform an automatic update (upgrade) from version 6 to version 7 directly from your interface.
Two solutions are available to you:
- Order a new Cloud Server: it will natively have version 7, and you can then migrate your data to it.
- Reinstall the application: uninstall and then reinstall MongoDB on the current server.
Uninstalling the application deletes all of your MongoDB data. Additionally, it will no longer be possible to reinstall version 6 after this operation.
Backups and responsibility
As an administrator, the management and integrity of your data are entirely your responsibility.
Before any manipulation (especially reinstallation):
- Perform your own backups and exports (dump) of your databases.
- Plan for the manual import of your data once the new version is active.
Link to this FAQ:
Has this FAQ been helpful?
This guide details the essential measures to protect your WordPress site against spam and automated malicious content.
Preamble
- A site without protection is an easy target for
spambots(robots) that use comments to spread fraudulent links. - Without protection, every form (contact, booking, voting) can be hijacked to send mass emails from your server.
- Spam degrades your user experience, harms the reputation of your domain (email blacklisting) and can saturate the resources of your hosting.
1. Master the comment system
By default, WordPress is configured to allow comments. To limit abuse, refer to the WordPress codex.
Disabling comments in the general settings only affects future articles. For already published articles, a bulk modification or the use of a dedicated extension is necessary.
If you want to keep interactions, you can restrict comments to logged-in users only via the discussion settings page.
2. Use automatic protection tools
To block robots without harming the experience of your visitors, two main technologies exist: the captcha (visual test) and the honeypot (invisible trap for humans but detected by robots).
Solution included with Infomaniak
If you have installed WordPress via Infomaniak's automatic installation tool, the WP Armour – Honeypot Anti Spam extension is already activated. It natively protects the most common forms:
WP Comments&WP RegistrationContact Form 7,Elementor Forms,Divi Contact FormWooCommerce Reviews,BBPress,Gravity Forms
Recommended alternatives
- Akismet Anti-Spam: Developed by
Automattic, it is a very effective reference, although paid for commercial sites. - The Anti-Spam Sentinel: A complete extension and very well rated by the French-speaking community.
- Contact Form 7 Honeypot: A specific module if you only use the
Contact Form 7extension.
The role of the host
Beyond the security of your site, Infomaniak deploys protections at the server level. To learn more, refer to the article on combating malicious emails as well as the FAQ on the security tools provided.
Link to this FAQ:
Has this FAQ been helpful?
This guide explains how to report spam or declare a false positive if spam messages slip through the cracks in an Infomaniak Mail Service, or conversely if a valid email has been inadvertently classified as spam; you can intervene in a few clicks.
Report spam
Prerequisites
- Check that the spam filter is active.
Next, to automatically move an email from your inbox that has evaded the anti-spam filter to the Spam folder:
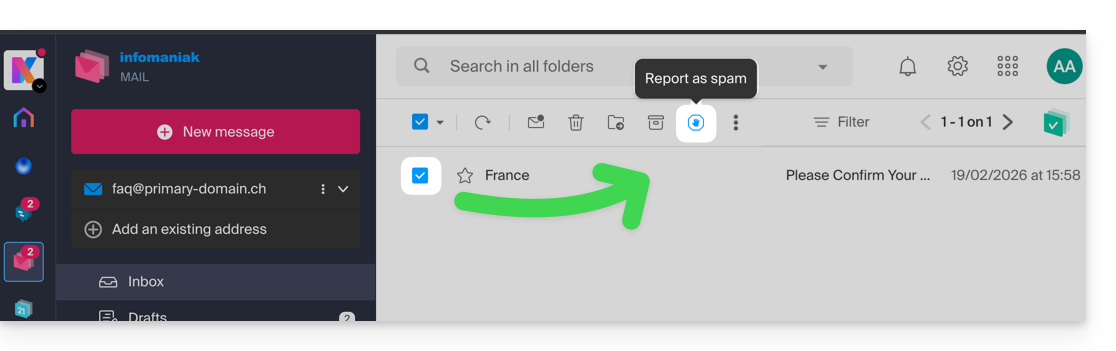
- Click here to access the Infomaniak Mail Web app (online service ksuite.infomaniak.com/mail).
- Select the message in the inbox and then click on the Spam icon in the toolbar:
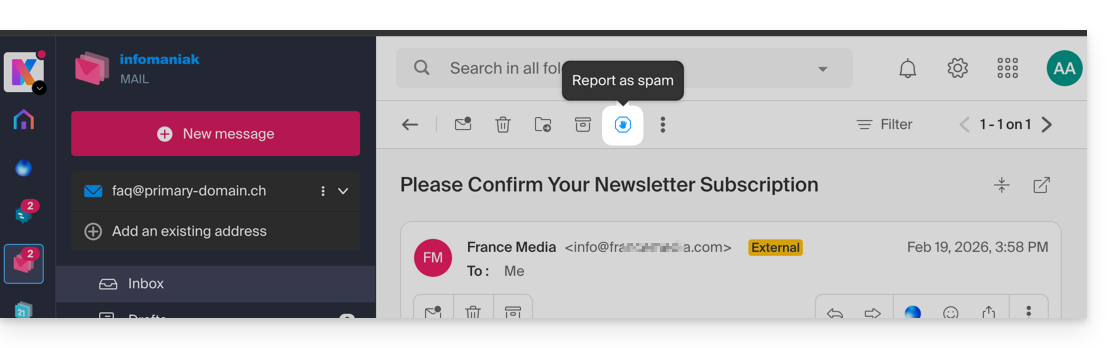
- You can also open it and declare it as Spam later:
- Another option: open it and click on the action menu ⋮ on the right:
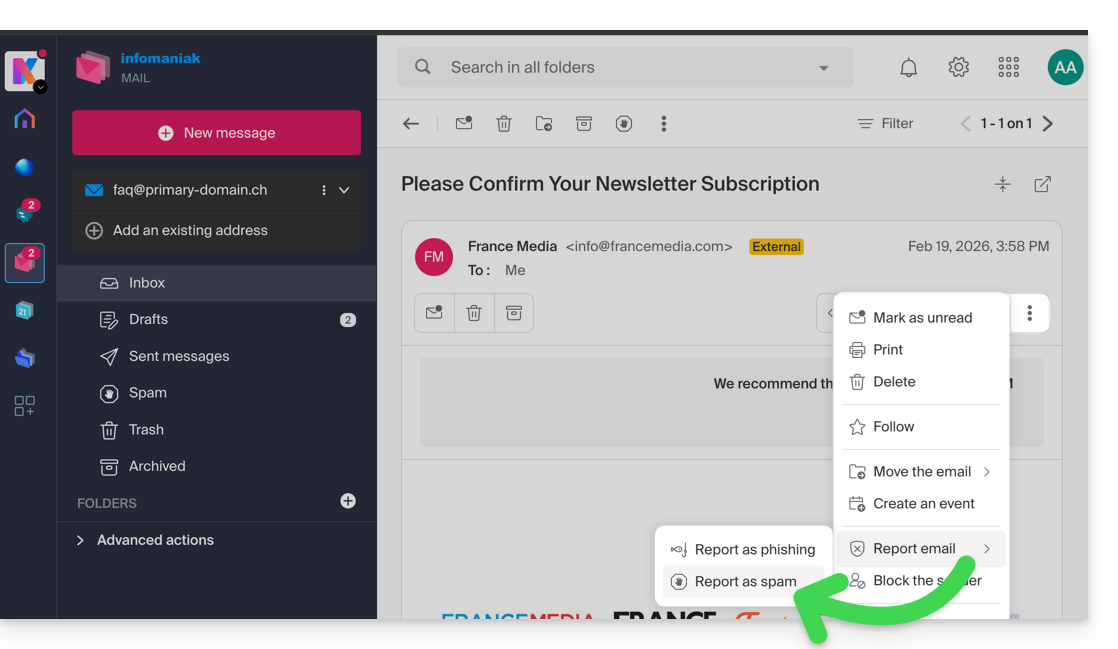
Once you have clicked on Report as spam:
- The email is moved to the Spam folder (or to the manually defined folder)
- The sender's address is added to the blocked users list
- The filter is refined for better handling over time.
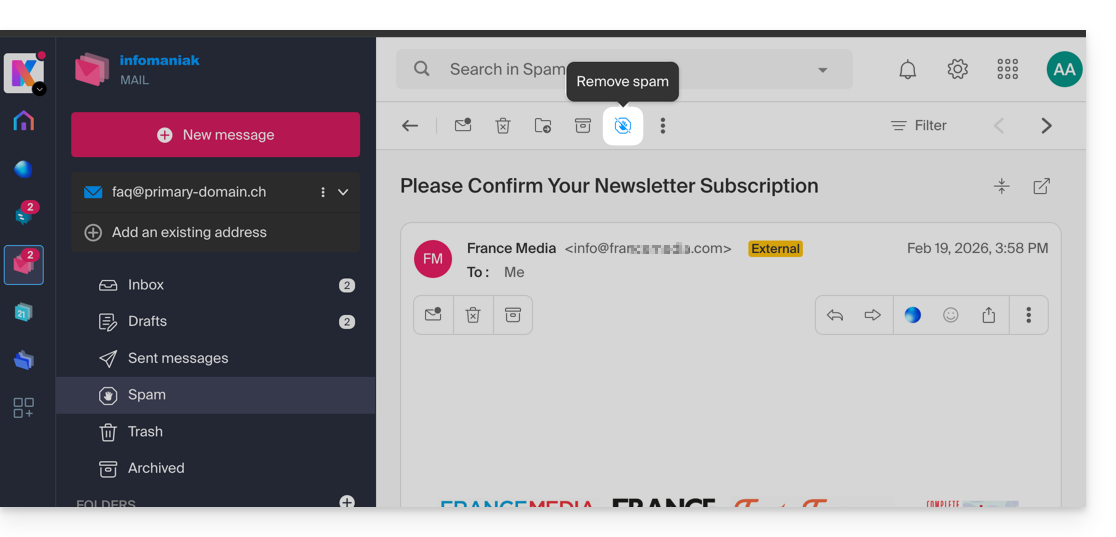
Declare a false positive
Conversely, if you act on an email falsely considered as spam (false positive) by clicking on the "This is not spam" icon:
- The email is moved to the inbox...
- The sender's address is added to the list of authorized users...
- This also affects the filter and its criteria.
Link to this FAQ:
Has this FAQ been helpful?
This guide details the specific rules to follow when using a password containing the “dollar” character $ to send an email via the Infomaniak SMTP in a script (PowerShell, Python, etc.).
Preamble
- If you encounter an authentication error (e.g.,
auth failed,invalid login or password) when sending an email via SMTP, even though the password is correct and works in software like Outlook, the issue may be due to the handling of the$character in your script or configuration file. - To ensure reliable execution of your SMTP scripts, it is strongly recommended to avoid any special characters with syntactic significance, particularly
$, in passwords used in scripts and configuration files. - The problem may also occur when connecting to databases.
Rules to follow
The character $ is a special symbol in many languages and environments. When used in a password in a script or configuration file, it may be mistakenly interpreted as a variable or control character.
Here are common cases where you should not use the character $ in a password:
- PowerShell:
$is used to declare variables. A password containing$can cause syntax errors or be truncated. - Bash / Shell (Linux):
$is also a variable prefix. It can trigger unexpected substitutions. - YAML files (e.g., Home Assistant, GitHub Actions, Docker Compose):
$can be interpreted as an environment variable. - Files
.env,.ini, or other configuration files: tools that read these files may attempt to interpret the variables. - Commands or URLs with authentication: a password containing
$may be incorrectly encoded or fail during parsing.
To correct or prevent this type of error:
- Avoid using the character
$in passwords intended for use in scripts or automated systems. - If you must use it, always properly enclose the password string according to the language:
- In PowerShell: use single quotes
'password$Test'if possible. - In Python: ensure the string is properly enclosed in single or double quotes, without interpretation.
- In Bash: escape the
$with a backslash\$.
- In PowerShell: use single quotes
Link to this FAQ:
Has this FAQ been helpful?
This guide explains what you need to determine as a website visitor if you encounter a 403 error to resolve this issue.
What is the 403 error?
The HTTP 403 error code generally means that access to a resource is denied to the client by the server.
In what case does this error occur?
The user is not authenticated: the server requires the user to identify themselves to access the resource. This can be the case for private pages requiring authentication, for example.
The user is authenticated but does not have the necessary permissions: the server recognizes the user but does not authorize them to access the requested resource due to permission or role restrictions. This cause of 403 error may be an incorrect permission issue on a folder or file. For a folder, the error message is of type "403 Forbidden", for a file, "failed to open stream: Permission denied". In this case, you must verify that the permissions of your folders/files are correct, i.e., a minimum of 644 for a file and 755 for a folder. Refer to this other guide.
The user's IP address is blocked or restricted: the server may block access to a specific IP address for security reasons, protection against attacks... Refer to this other guide.
The requested resource does not exist on the server: in this case, the server returns a 403 error instead of a 404 error to avoid disclosing confidential information. If you are simply trying to access your homepage or a part of your site by indicating an address of type www.domain.xyz or www.domain.xyz/folder/ make sure there is a homepage named "index.html or .htm or .php" placed in the correct location (at the root of your FTP space, in the /web directory, or in the /folder/ directory). Refer to this other guide.
Additionally, check that there are no uppercase letters in the file name; all file or folder names present must be in lowercase, without accents or spaces.
Script-related error: if you were running a script, filling out a form, uploading a file online, and you get this type of message:
Accès interdit!
Vous n'avez pas le droit d'accéder à l'objet demandé.
Soit celui-ci est protégé, soit il ne peut être lu par le serveur.
Si vous pensez qu'il s'agit d'une erreur du serveur, veuillez contacter le gestionnaire du site.
Error 403
the cause may be a filter that prevents the unwanted use of scripts by spammers. Indeed, the Infomaniak antivirus blocks the uploading of files via scripts or via FTP. This concretely means that when a hacker sends a file identified as a virus via a form, an insecure script, or via FTP, its installation is directly blocked, the file is not uploaded to the server, and the upload generates a 403 error.
In case of a false positive, contact Infomaniak support by providing the URL of the page where you encounter this error message to precisely diagnose the origin of the problem.
However, there are many other cases in which you might receive a "403 forbidden" message and for very diverse reasons (PHP, perl, mod_security, .htaccess scripts, ...).
Link to this FAQ:
Has this FAQ been helpful?
This guide helps resolve issues with special characters (accents, emojis, etc.) that do not display correctly or appear as symbols like ??, often due to incorrect encoding when connecting to MySQL.
Preamble
- By default, MySQL uses
UTF-8. - Recent MySQL servers are generally configured to use
UTF-8orUTF-8MB4by default.- This is suitable for most cases, especially for international languages and emojis.
- Also, refer to this other guide to learn how to avoid encoding issues with non-European characters and emojis in your developments.
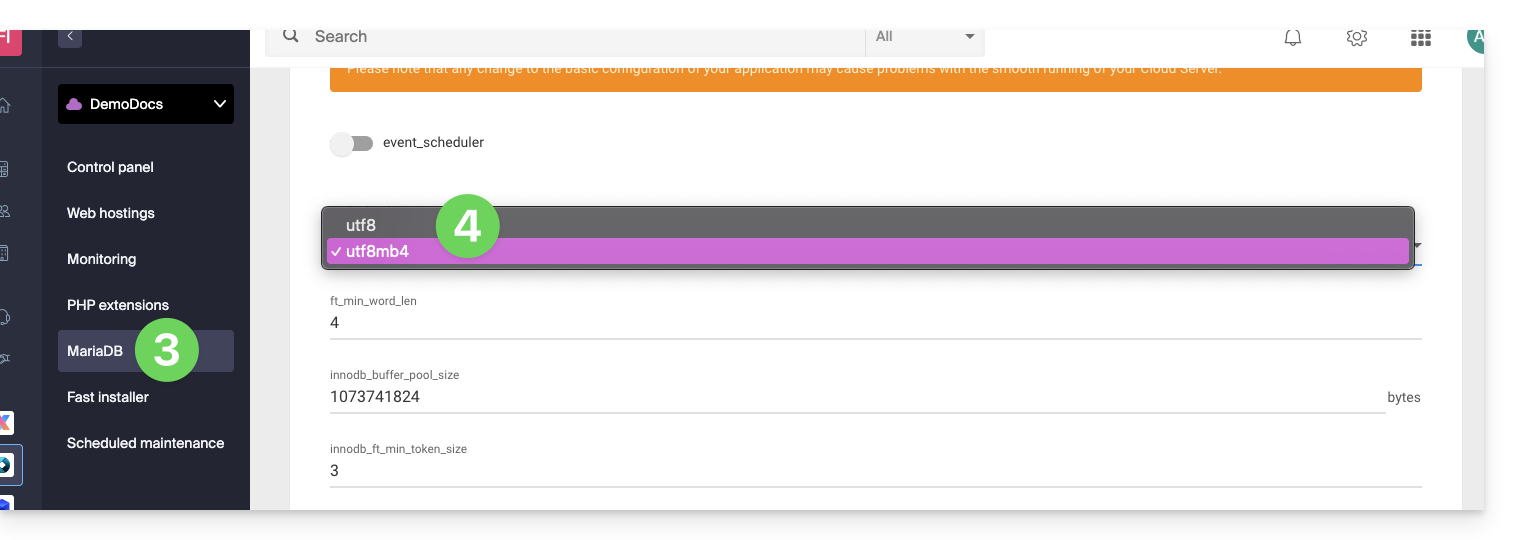
Set the default MySQL / MariaDB charset (Cloud Server)
With an Infomaniak Cloud Server, you can set the default charset (utf8 or utf8mb4):
- Click here to access the management of your product on the Infomaniak Manager (need help?).
- Click directly on the name assigned to the product concerned.
- Click on MariaDB in the left sidebar.
- Choose the default charset:
- If you have not yet migrated to MariaDB, the principle is the same.
- Save your changes at the bottom of the page.
Force a specific encoding (latin1 for example)
If you need to work with a database in latin1 (ISO-8859-1), you must explicitly align the encoding when connecting, depending on your environment.
On current offers, place the following code in a user.ini file located at the root of your hosting:
mysql.connect_charset = "latin1"
mysqli.connect_charset = "latin1"
pdo_mysql.connect_charset = "latin1"
or in PHP (MySQL API):
mysql_query("SET CHARACTER SET latin1");On older hosting plans, force the MySQL connection to latin1 via the .htaccess file located at the root of your hosting:
php_value mysql.connect_charset latin1
php_value mysqli.connect_charset latin1
php_value pdo_mysql.connect_charset latin1
Link to this FAQ:
Has this FAQ been helpful?
This guide concerns MySQL/MariaDB and, more specifically, index and query analysis with Web Hosting.
Slowlog for long queries
The MySQL slowlog is enabled on all MySQL servers and groups queries that take more than 5 seconds* to execute. If your queries are well-structured, you will never see these files. Otherwise, check them regularly to correct any issues and ensure your site functions properly.
Contact Infomaniak support in writing to obtain them (except for older v1 hosting plans - old formula), which can be directly accessed from the Web FTP, one level above /web in the /logs directory.
What about logs?
No MySQL log is created (apart from slowlogs) because the MySQL servers could not handle the load of millions of logs being recorded simultaneously. If needed, Infomaniak can activate this MySQL log for 5 minutes to allow you to analyze it with EXPLAIN and determine useful indexes, for example. To do this, contact Infomaniak support in writing.
* elapsed time. Regarding locks, the documentation provides the following clarification: "The time to acquire the initial locks is not counted as execution time."
Link to this FAQ:
Has this FAQ been helpful?
This guide explains how to suspend the administrative management of a product so that no user of the Organization can use it within the Infomaniak Manager. It is also possible to block a user of your Organization, without deleting them.
Preamble
- By blocking the management of a product:
- Only administrators and the legal representative will be able to unblock it.
- Users with limited rights (collaborators and clients) who have access to this product will no longer be able to manage it.
- An email is sent to the users of the Organization.
Block a product
Prerequisites
- Be an Administrator or Legal Representative within the Organization (users with limited rights (collaborators and clients) who have access to this product will not be able to do so).
To block or unblock certain products for the entire Organization:
- Click here to access product management in the Infomaniak Manager (need help?).
- Access the service you wish to block.
- Click on the action menu ⋮ located to the right of the item in question.
- Click on Block product management:
- Example 1, Cloud Server:

- Example 2, domain name:
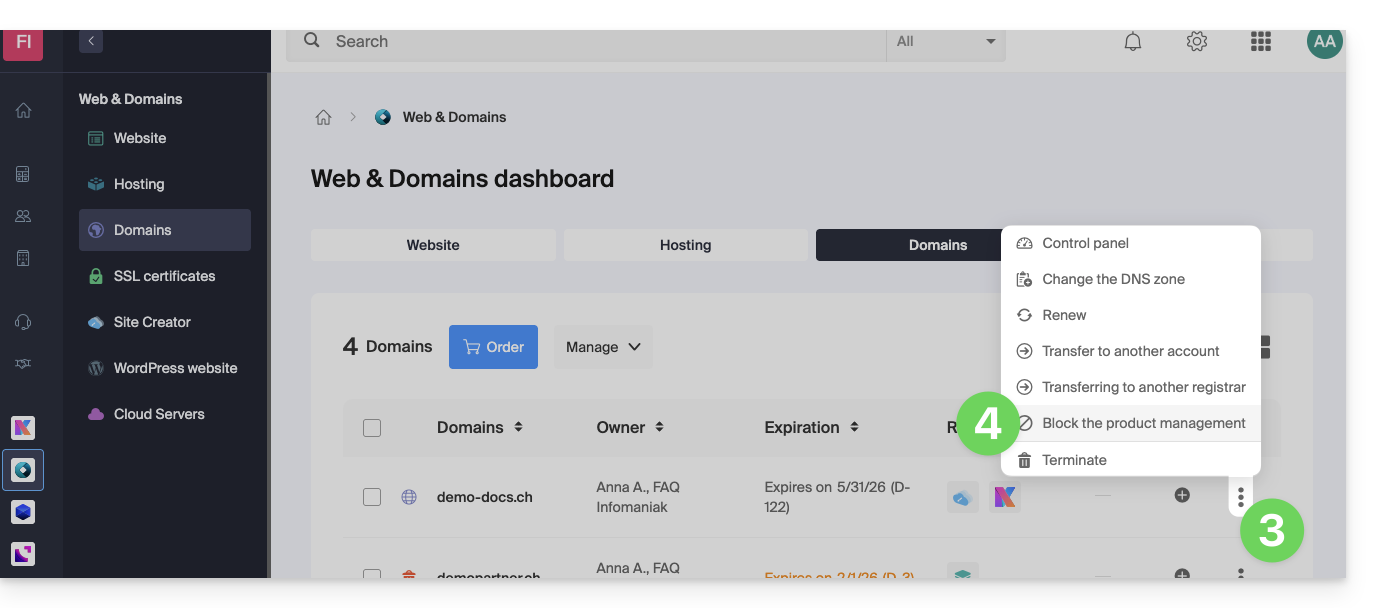
- Example 1, Cloud Server:
- Confirm the suspension.
Suspend emails
A Mail Service cannot be blocked in the way indicated above, but it can be put into maintenance.
Prerequisites
- Be an administrator or legal representative; users with limited rights (collaborators and clients) who have access to this product will not be able to do so.
To suspend email addresses:
- Click here to access the management of your product in the Infomaniak Manager (need help?).
- Click directly on the name assigned to the product in question.
- Click on Manage.
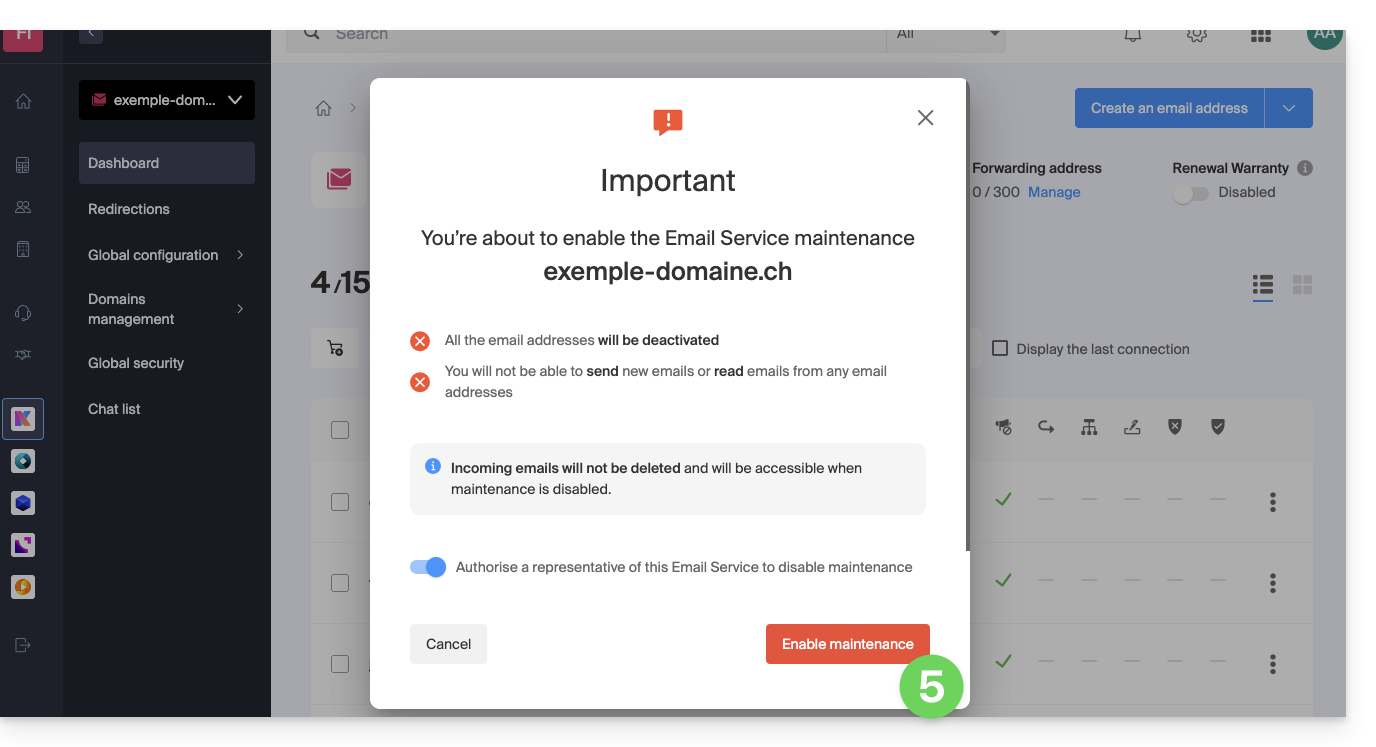
- Click on Enable maintenance:
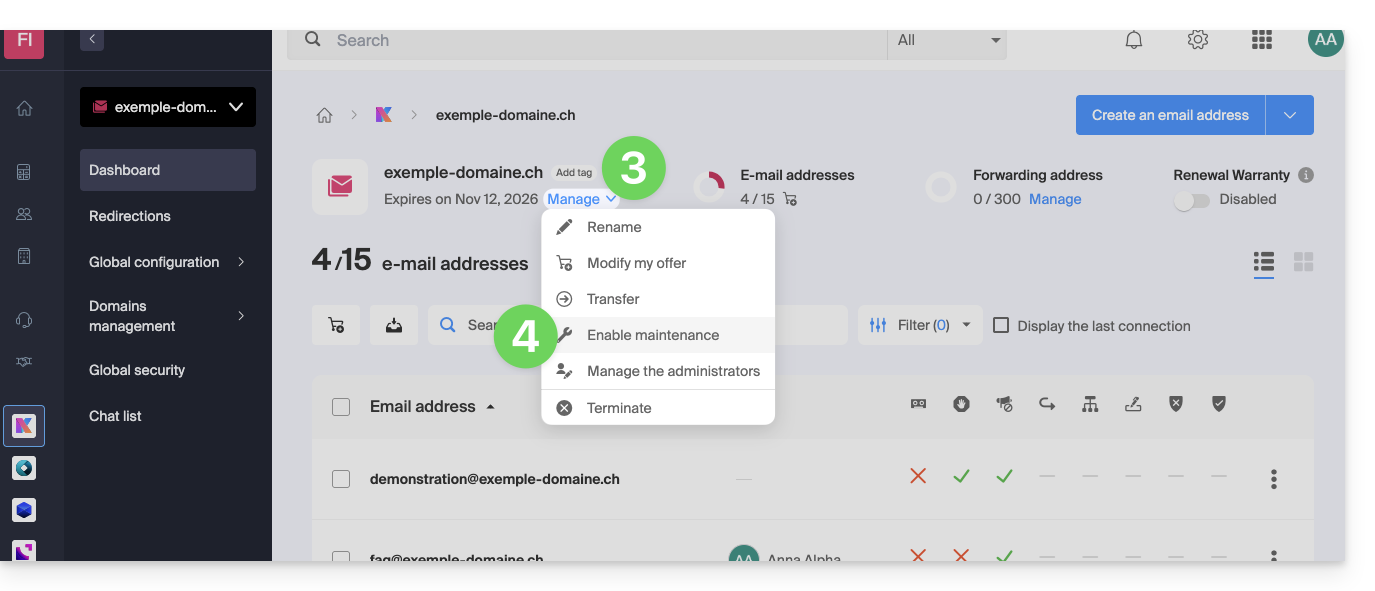
- Confirm by clicking the red button to suspend the use of email addresses (reception is not interrupted but consultation is impossible):
Block an Organization user
To quickly block an Organization user in case of a security incident, log in to manage your users as an Administrator or Legal Representative of the Organization:
- Click here to access user management on the Infomaniak Manager (need help?).
- Click on the user in question:
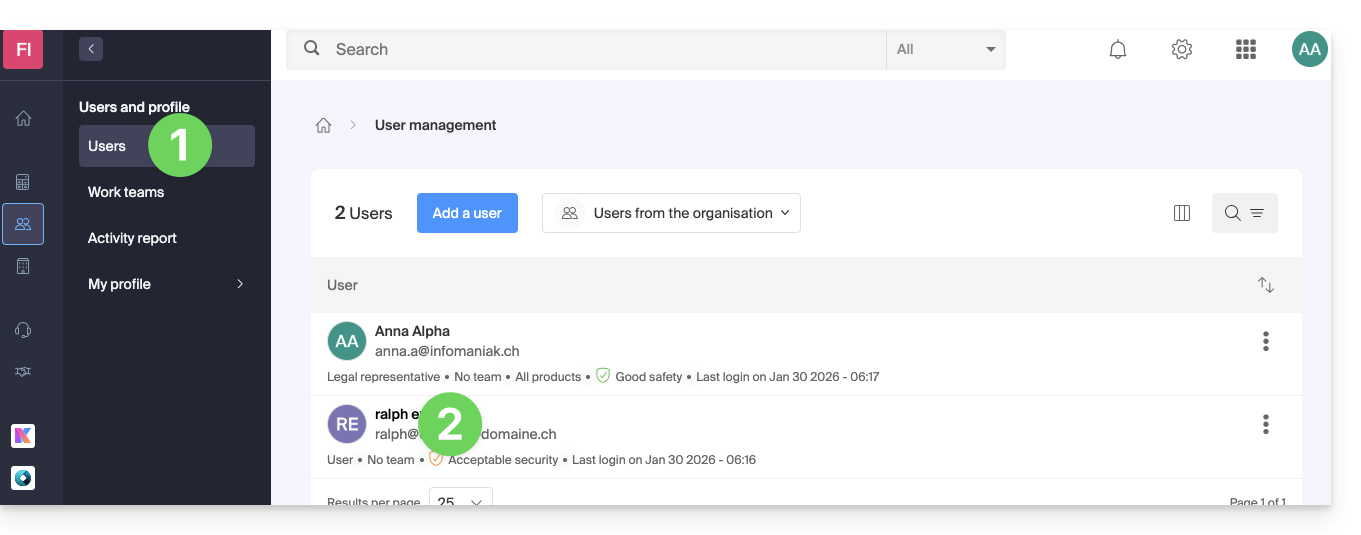
- From the Manage button at the top of the page, you can remove the user from the Organization (which also removes their various product management access).
- Further down, you can more finely manage the products to which the user should have access:
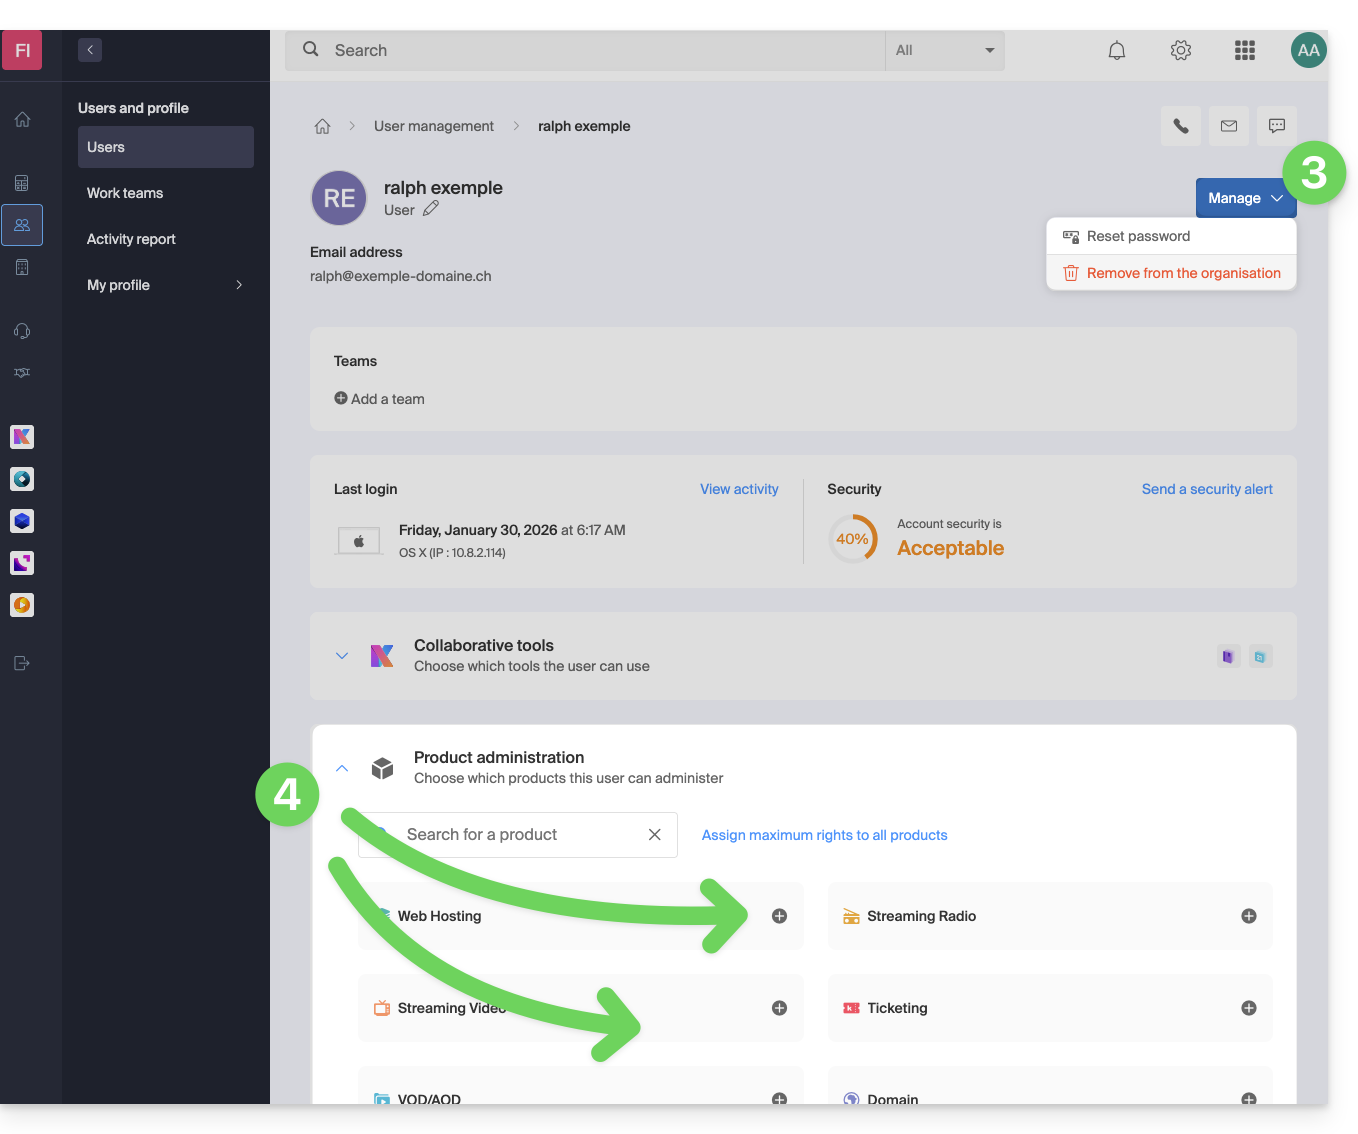
Thus, critical services, such as the Manager interface, of your Organization, the Web app kDrive and the Web app Mail may become inaccessible to them.
Depending on the situation, also refer to these links to block other services such as messaging (IMAP / SMTP) or Web services.
To not block the user yourself but to indicate a procedure for them to follow to secure their account, refer to this other guide.
Link to this FAQ:
Has this FAQ been helpful?
This guide details the Infomaniak Managed Cloud Server offer and the Infomaniak VPS offer intended for different uses.
Preamble
- Infomaniak offers two advanced hosting solutions:
- the Managed Cloud Server, which allows you to create multiple hosts (FTP/SSH spaces) on which you add your sites (Apache vhosts),
- and the VPS (Virtual Private Server), which offers complete administrative freedom and meets different needs.
Managed Cloud Server
The Cloud Server allows you to exceed the limits of shared hosting. You can create and distribute your sites as you wish, define the root directory of each site, and adjust parameters such as memory_limit and max_execution_time.
Integrated tools are provided: cronjobs, Site Creator, simplified installation of WordPress, access and error logs (logs). It is also possible to add specific Apache modules or install a caching system.
The software environment is managed by Infomaniak (FastCGI, PHP-FPM). You do not have complete freedom to configure the server (no arbitrary software installation), but certain specific programs can be installed.
VPS (unmanaged)
The VPS gives you full control over the server, but it is your responsibility. Infomaniak manages the hardware and installs the version of Linux or Windows chosen at the time of ordering. No software intervention is performed by Infomaniak: you administer the system, install, and configure the software.
You can restart the server via the Infomaniak Manager. A snapshot system is available (excluding VPS Lite offer).
Video content and alternatives
If your project mainly involves a large volume of videos, it is often preferable to separate video streaming from the main hosting. Associated with shared hosting, the Infomaniak VOD/AOD space allows you to efficiently store and stream videos, support load increases, and obtain detailed viewing statistics.
Migration between Cloud Server and VPS
There is no automatic migration solution between a Managed Cloud Server and a VPS. To switch from one offer to another, you need to cancel the product you no longer use and order the new offer. Infomaniak refunds, upon request, any new server if the cancellation occurs within 30 days of the order.
Link to this FAQ:
Has this FAQ been helpful?
The BIMI (Brand Indicators for Message Identification) standard, brand indicators for message identification) allows companies to incorporate their logo into the emails they send.
Preamble
- Infomaniak applications (and other companies around the globe - read the in case of problem chapter below) are compatible with BIMI and will display the logos next to the received emails.
- Infomaniak Mail Services allow you to configure your email with your logo; the benefits are numerous:
- increased trust: recipients can visually identify your emails, thus reducing the risk of phishing.
- brand reinforcement: a well-visible logo in inboxes reinforces brand awareness.
- better deliverability: emails compliant with DMARC have a better chance of reaching the main inbox.
1. Create a logo
Create a logo in SVG (Scalable Vector Graphics) format. This format is required as it ensures optimal quality regardless of the device or display size.
To be imported on the Infomaniak interface (read below) it must not exceed 10 Mo, but it can also be hosted on a publicly accessible secure server and you will simply need to indicate its URL for the BIMI DNS registration.
2. Obtain the VMC certificate
A verified logo certification (VMC) is required; it certifies that you are the legitimate owner of the logo. You can obtain this certification from recognized certification authorities such as DigiCert and Entrust.
When your VMC certificate is issued, you receive a PEM file containing the entity certificate. This PEM file includes your logo in SVG format as well as the VMC.
3. Add the logo to the Mail Service
Prerequisites
- All the Global Security indicators of your Mail Service must be green (SPF + DKIM + DMARC)!
To access the Mail Service and set the logo of your company:
- Click here to access the management of your Mail Service on the Infomaniak Manager (need help?).
- Click directly on the name assigned to the Mail Service concerned.
- Click on Global Security in the left sidebar menu.
- Click on the Create button (in the BIMI section):
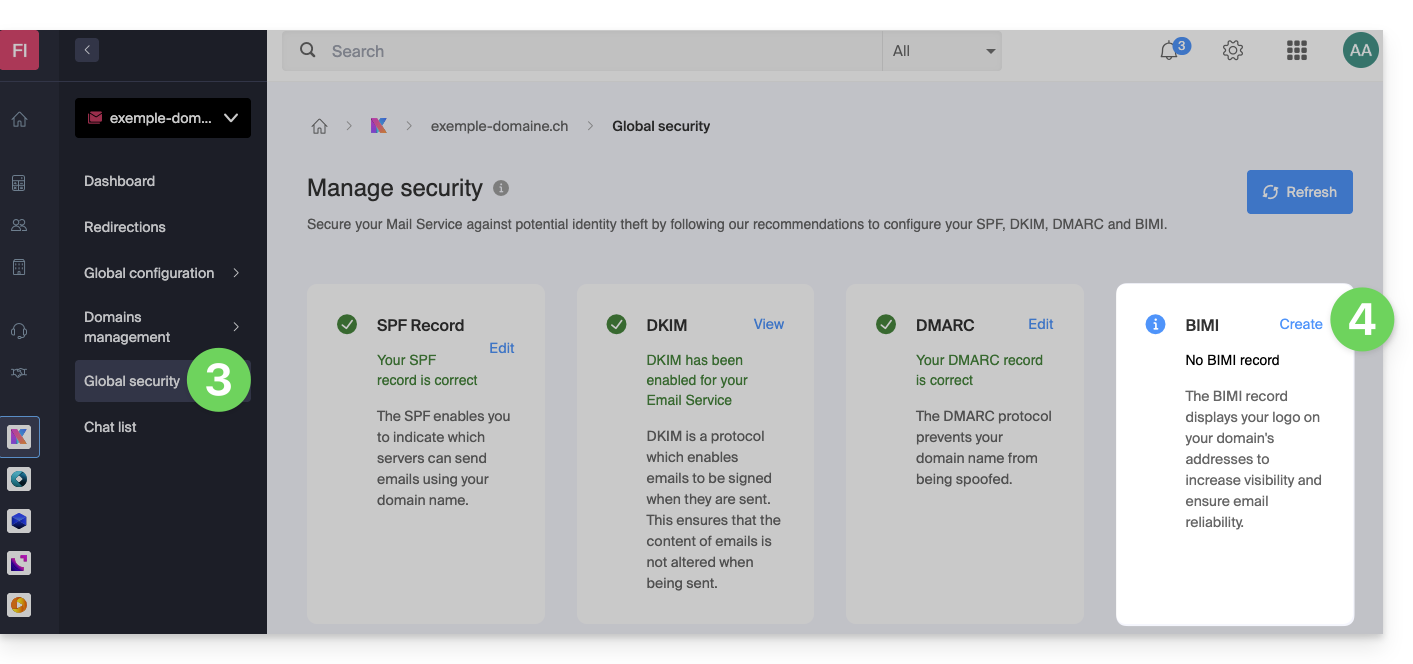
- Fill in the requested information from the documents received (see chapter 2 above) and do not forget to save.
In case of a problem
- If the Create button in the BIMI box remains gray, make sure to check the informative messages: DMARC may exist but not be at the required rejection percentage, so adjust the parameters according to the indications.
- When there are multiple domains linked to the Mail Service, you must ensure that you have a certificate on each linked domain if you want BIMI on them.
- Note that Apple Mail supports BIMI, unlike Microsoft Outlook, Thunderbird and the Mail app from Samsung which have not yet fully adopted it.
Disable BIMI
To disable BIMI, simply go to the domain name management page linked to the Mail Service and delete the corresponding TXT record.
Link to this FAQ:
Has this FAQ been helpful?
This guide explains how to change the management password for WordPress or any other Web Application (Joomla, Drupal, Typo3, PrestaShop, ownCloud, etc.) installed via the Infomaniak tools included in the paid Web Hosting offers.
Preamble
- Some applications also allow changing the user password directly from their dedicated interface:
- Example: WordPress (manage users, names, passwords, roles, etc.).
Change the password of a Web App
To change the password to access the administration panel of your web application, perform the following actions:
- Click here to access the management of your site on the Infomaniak Manager (need help?).
- Click directly on the name assigned to the site concerned:
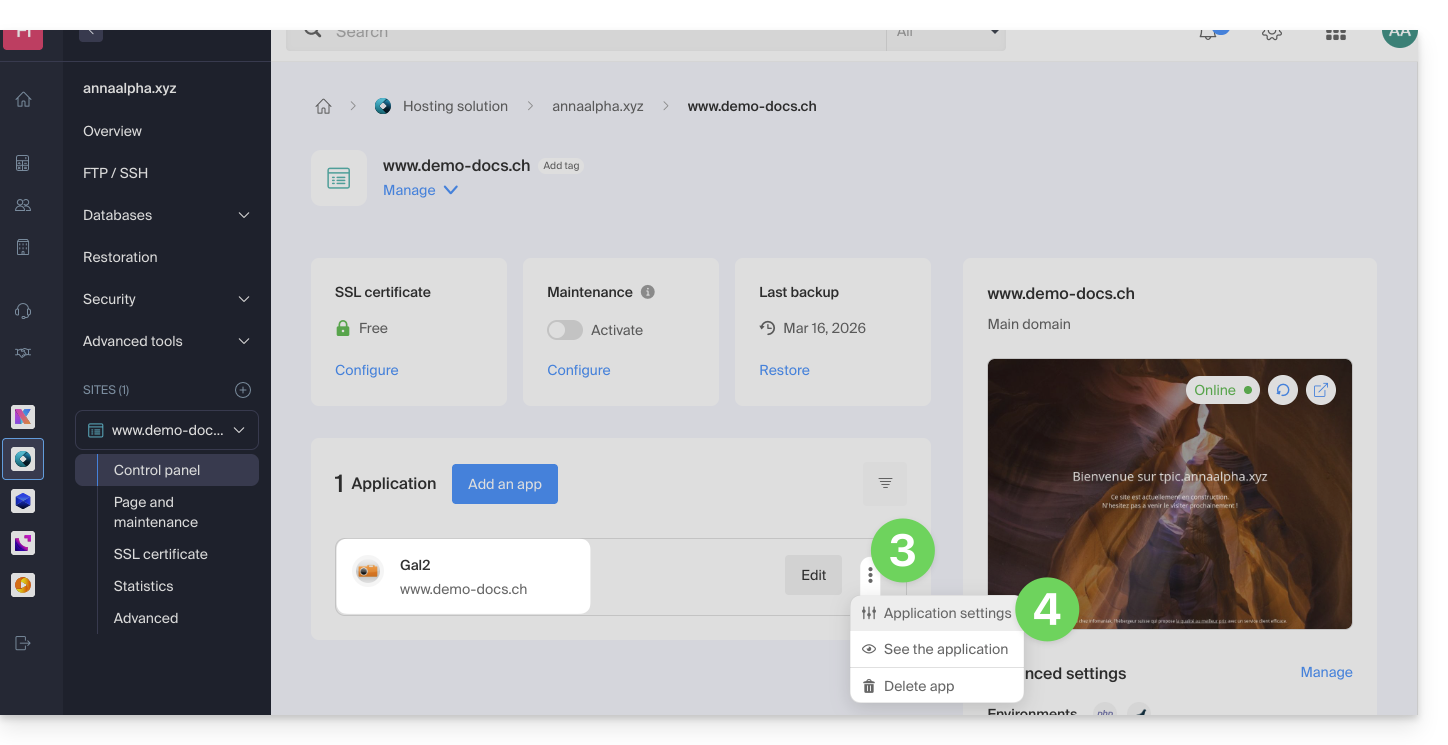
- Click on the action menu ⋮ located to the right of the Web Application concerned.
- Click on Settings of the application:
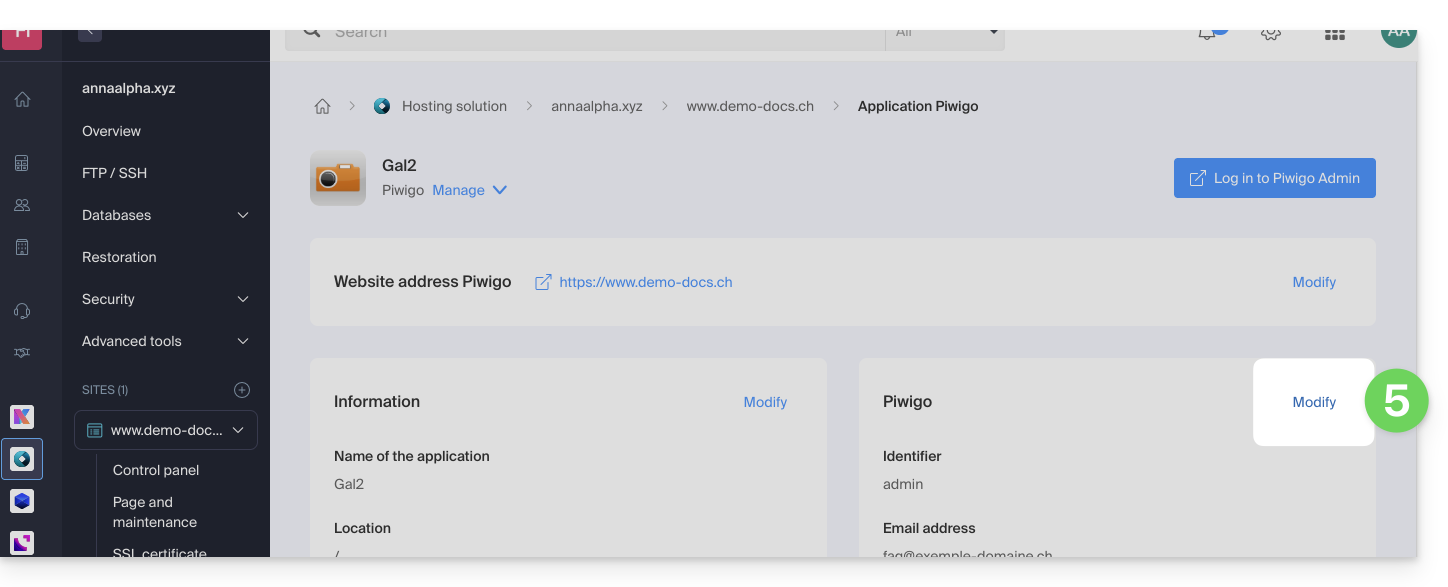
- Click on Modify to the right of the Application:
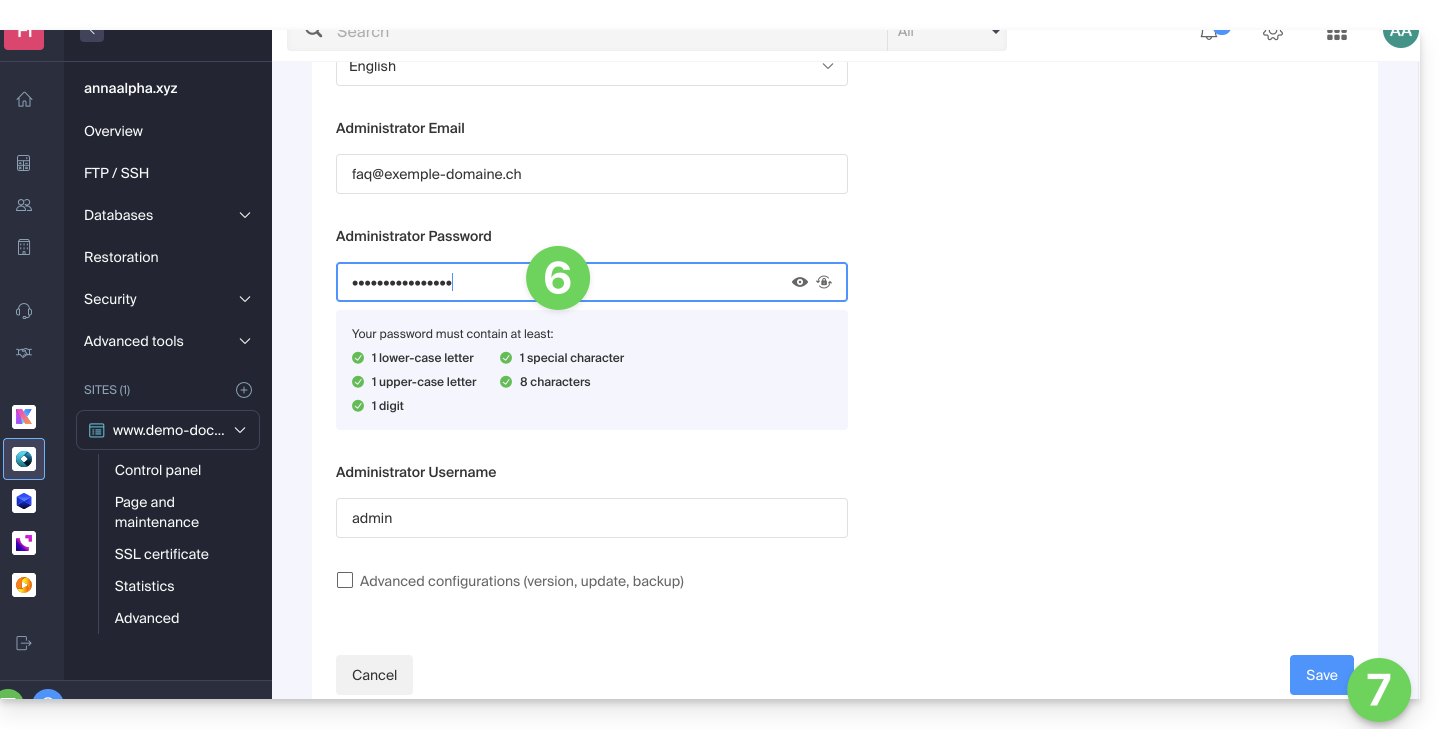
- Under Password enter the new password (for the connection with the identifier indicated above).
- Click on the Save button at the bottom of the page:
Link to this FAQ:
Has this FAQ been helpful?
This guide explains what spamtrap email addresses are.
Preamble
- A spamtrap, also known as a honeypot, is a tool used to detect and catch spammers.
- It is essentially an email address or a system that is created with the purpose of attracting unwanted messages, such as spam.
How a Spamtrap Address Works
A spamtrap address works by attracting spam and identifying the senders of unwanted messages. Here's how this can happen:
- An email address is created specifically to act as a spam trap; it is usually configured not to receive legitimate communication.
- The spamtrap address is hidden or obscured so that it is not visible to legitimate users, but only to spammers; this can be done by placing it on hidden web pages, in forums inaccessible to the public, or by making it invisible to humans (e.g., using white text on a white background).
- Spammers use automated techniques to extract email addresses from various sources, such as websites, forums, social networks, or stolen address lists; during this process, they may inadvertently or intentionally include spamtraps in their lists.
- When a spammer sends a message to a spamtrap address, it is captured and recorded; since the address is not used for legitimate communication, any email received is considered unwanted.
- When a spamtrap receives spam, it triggers an alert for email service providers like Infomaniak; they can then identify the spammer by examining the message headers or the information related to the source IP address.
- Once a spammer is identified through a spamtrap address, measures can be taken to block or filter their unwanted messages; Infomaniak can add the spammer's IP address to a blacklist, implement stricter anti-spam filters, or take other actions to protect their users.
Link to this FAQ:
Has this FAQ been helpful?
This guide details how to work on a WordPress site with a development environment.
Preamble
- The process can be used at the beginning of a staging process, i.e., the creation of a new version of your live website in a development or test environment:
- This allows website owners to test features, security updates, plugins, themes, WordPress updates, and content changes without risking disruptions or issues on the live site.
- Once the tests have been conducted and the changes have been validated on the staging copy, it is possible to deploy them to production (on the live site) using automated deployment tools or by making the changes manually.
Simple method
To install and prepare a new WordPress site with the Infomaniak installer without overwriting your current website:
1. Install WordPress in a second location
Refer to this other guide to create the new site (in parallel with the old site domain.xyz) by assigning it a domain name in the form new.domain.xyz, for example, and installing WordPress via Web Applications (Infomaniak WordPress installer).
At this stage, the main site (domain.xyz) remains untouched, and you can work peacefully on the new site new.domain.xyz. Both work in parallel.
2. Replace the old site with the new one
Once the new site is complete, you can delete the first site to reuse its domain name on the new one:
- Delete the old site to make the domain name available and reuse it.
- Add domain.xyz as an alias for
new.domain.xyz. - Reverse the alias with the main domain.
- Remove (unlink/delete)
new.domain.xyzwhich has become an alias. - As a precaution, check the main URL of the WordPress site via the Web Applications dashboard on the Infomaniak Manager to ensure it corresponds to the new name and not to the subdomain you had chosen.
Advanced method
To work on an existing WordPress site without modifying its public version, it is recommended to proceed in 3 steps:
- Duplicate the existing site
- Work on your copy afterwards
- Modify the target directory of the production site to the directory of the production environment and modify the URLs of the pre-production site according to the domain name of the production site using a WordPress extension or via phpMyAdmin.
1. Duplicate the site to a second location
- Refer to this other guide to create the new site (in parallel with the old site
domain.xyz) by assigning it a domain name in the formnew.domain.xyzfor example and installing WordPress via Web Applications (Infomaniak WordPress installer). - Copy your existing site and paste it onto the newly created second WordPress site using a WordPress extension.
2. Edit the duplicated site
- At this stage, the main site (
domain.xyz) remains untouched and you can work peacefully on the new sitenew.domain.xyz. Both work in parallel. - It is recommended to install a WordPress extension (there are dozens available) dedicated to putting the second site into maintenance mode.
- If you modify the structure of your site and the URLs of your articles/pages will change, you can use a free extension like Redirection to automatically create redirects. This will prevent your visitors from encountering 404 pages while search engines reindex your site or if external sites link to your site.
3. Replace the target
- Once you have completed the redesign of your site, all you have to do is modify the target directory of the production site to the directory of the production environment and modify the URLs of the pre-production site according to the domain name of the production site using an extension.
- If you are using a caching extension like WP-Rocket, W3 Total Cache, or WP Super Cache, it will be necessary to completely clear all the cache or even deactivate and then reactivate the plugin.
- If you continued to modify your production site while redesigning your site, it will be necessary to retrieve your modifications (articles, media, pages, etc.).
- After the usual checks (missing images, incorrect links, etc.), all you have to do is deactivate the maintenance mode of your site and admire the result.
Link to this FAQ:
Has this FAQ been helpful?
This guide explains how to order a DNS zone from Infomaniak.
Preamble
- Having the DNS zone with Infomaniak is useful if your domain name is registered elsewhere (third-party provider/registrar) and you want to easily link this domain with Infomaniak products.
- Indeed, it is not enough to own a site
domain.xyzwith Infomaniak and to indicate the 2 Infomaniak DNS addresses with the domain name registrar (if it is not Infomaniak) for the site to display when you typedomain.xyzin a browser. - You must add a DNS zone in the same place as the hosting to make the site work easily.
- This will also be particularly useful if the service provider managing your domain name does not offer DNS zone management.
Order a DNS zone
To do this:
- Click here to access the Infomaniak domain Shop.
- Start a search with the name of the domain registered elsewhere.
- Click on the action menu ⋮ located to the right of the result obtained.
- Select Order a DNS zone:
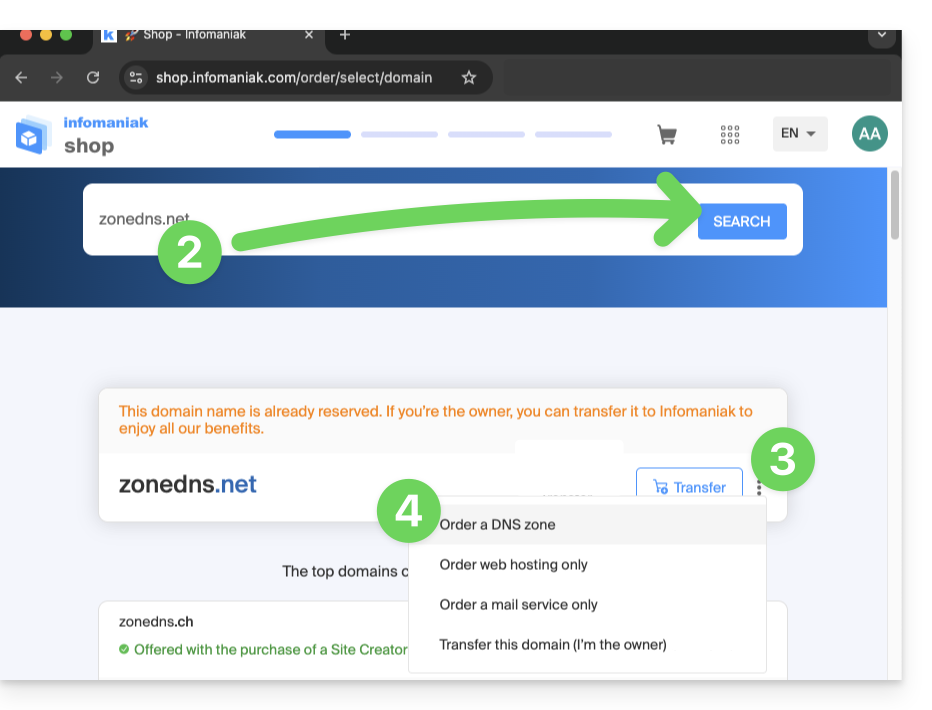
- Complete the purchase.
- Once added to your Manager, the zone can be edited.
Link to this FAQ:
Has this FAQ been helpful?
This guide details the software libraries that allow you to manipulate the PDF format and are compatible with the various Infomaniak web hosting offers.
Preamble
- PHP
PDFextensions, among other things, allow you to generate a PDF from dynamic data to create customized invoices, for example.
PDF and Cloud Server
On a Cloud Server, you can install apps such as PDFtk …
- The PHP class
FPDFis supported. PDFlibfrom the publisher Apryse is no longer offered on the most recent Cloud Servers because thePHP_PDFextension has become paid. If you obtain it, you will need to install it on Cloud VPS / Lite VPS or Public Cloud.
On shared hosting, ImageMagick is active and supports the EPDF, PDF and PDFA formats.
Link to this FAQ:
Has this FAQ been helpful?
This guide explains how to view and download Apache logs from Web Hosting, which are useful for analyzing PHP errors or diagnosing certain application behaviors.
Introduction
- Access and error logs are kept for at least 7 days.
- Once the retention period has expired, older entries cannot be restored, even upon request.
- You can also find these files directly on the server via SSH/FTP in the
ik-logsfolder at the root of your hosting.
Accessing access and error logs
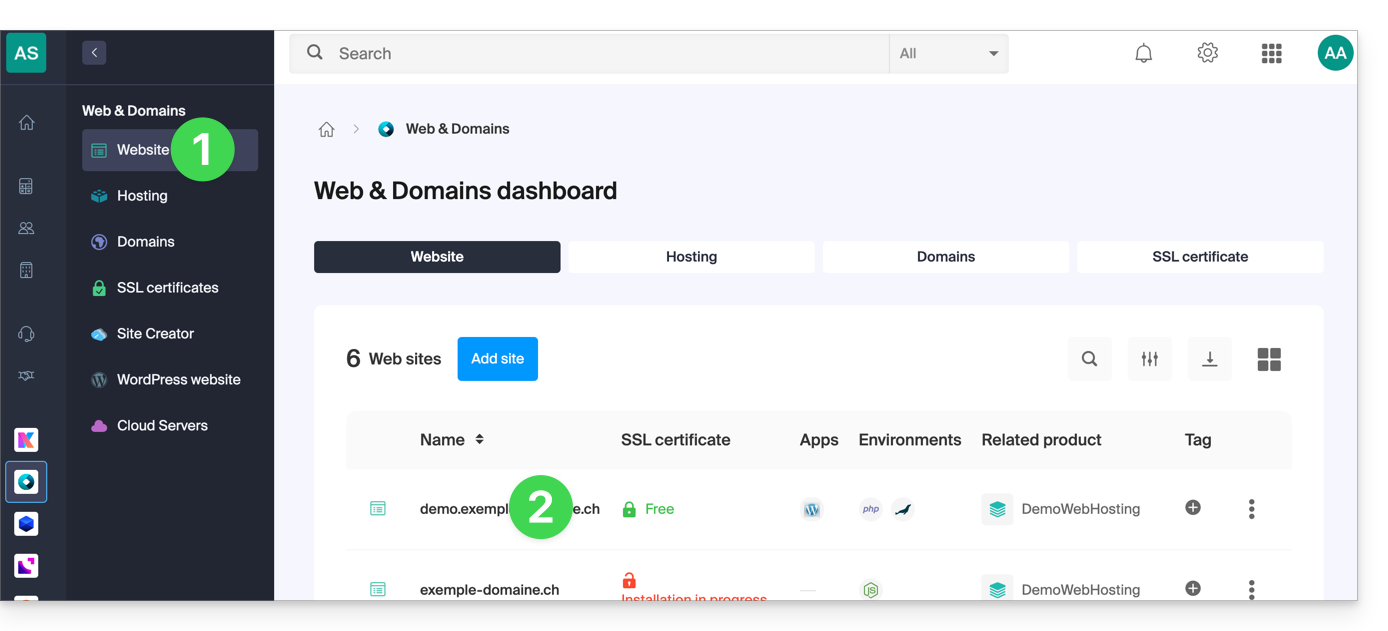
To view these logs:
- Click here to access your site management on the Infomaniak Manager (need help?).
- Click directly on the name assigned to the site concerned:
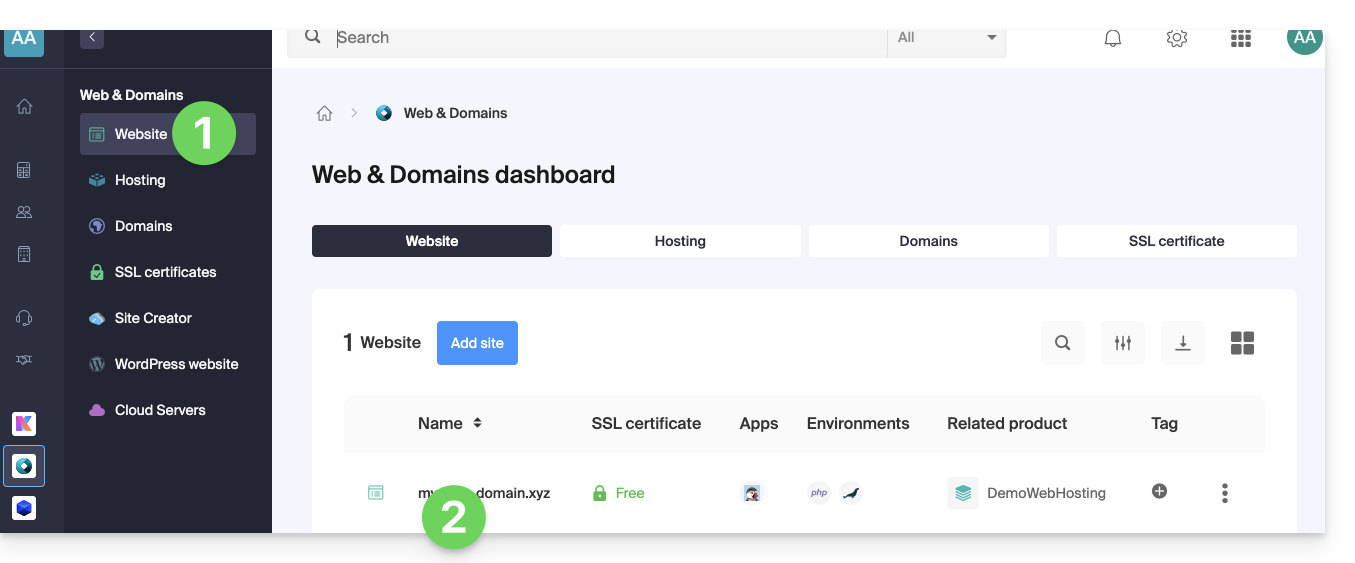
- Click on Advanced in the left sidebar.
- Click on Logs in the left sidebar.
- Click on Errors or Access to display the error log or access log.
- Choose a period if necessary.
- Click on the icon to see the details.
- Click on Send by email to immediately receive all entries by email to your user address.
- Click to export the data in
.logformat: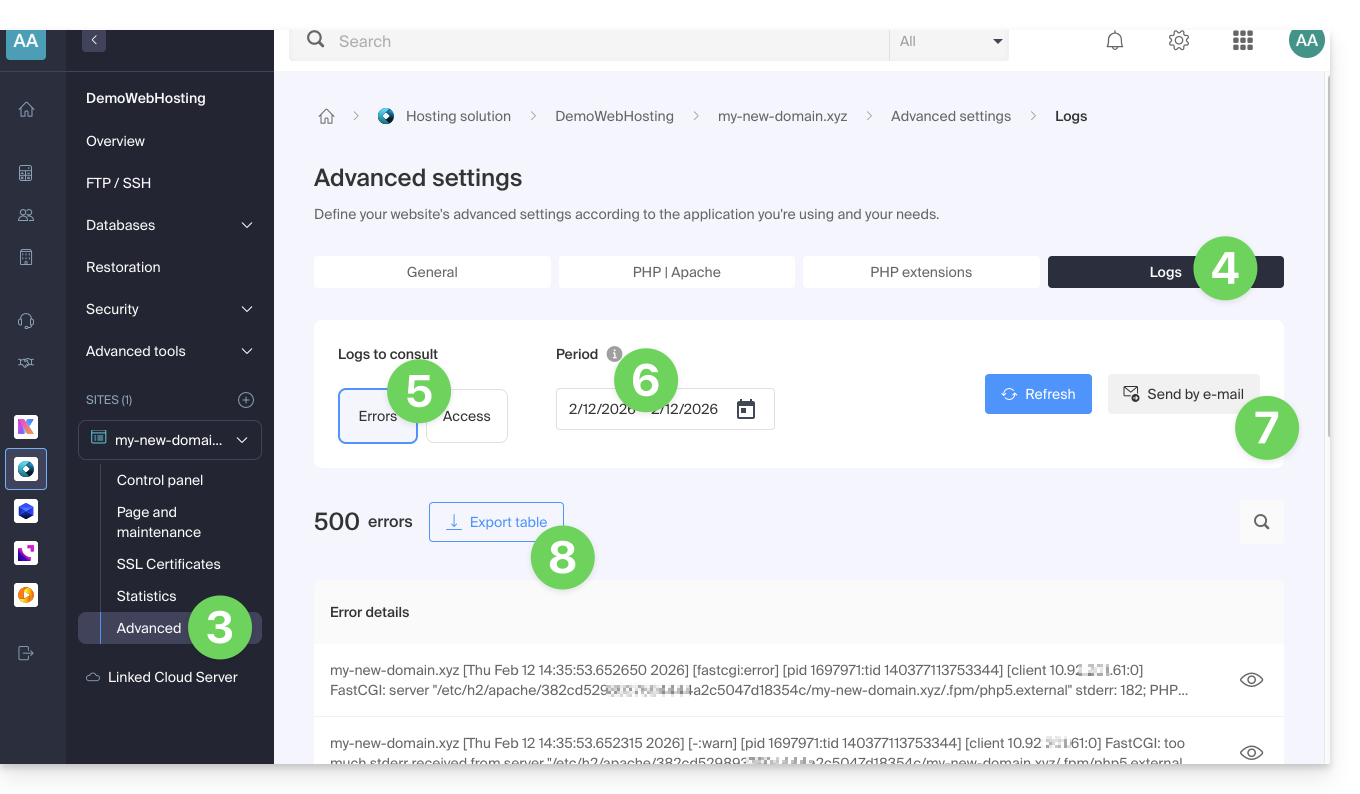
Identify the most active IP addresses in the access logs
To do this, connect to the server via SSH (need help?).
The line to execute in SSH is as follows:
cat ik-logs/access.log | awk '{ print $2}' | sort -n | uniq -c | sort -n | tail -n 20Link to this FAQ:
Has this FAQ been helpful?
This guide explains how to modify the server configuration of a site on Web Hosting Infomaniak.
Preamble
- Apache is the HTTP server.
- It is configured with a
.htaccessfile placed at the root of the website.
- It is configured with a
- PHP is a programming language used to create dynamic web pages via an HTTP server.
- It is possible to customize PHP directives with a
.user.inifile, which will be effective in the folders and subfolders of the location of the .user.ini file.
- It is possible to customize PHP directives with a
- Refer to this other guide regarding the creation of .htaccess & .user.ini files.
Modify the server configuration of a site…
… via the Manager
To modify the PHP configuration and most of the parameters (max_input_vars, allow_url_fopen, memory_limit, post_max_size + upload_max_filesize, etc.):
- Click here to access the management of your site on the Infomaniak Manager (need help?).
- Click directly on the name assigned to the site concerned:
- Click on Manage advanced settings:
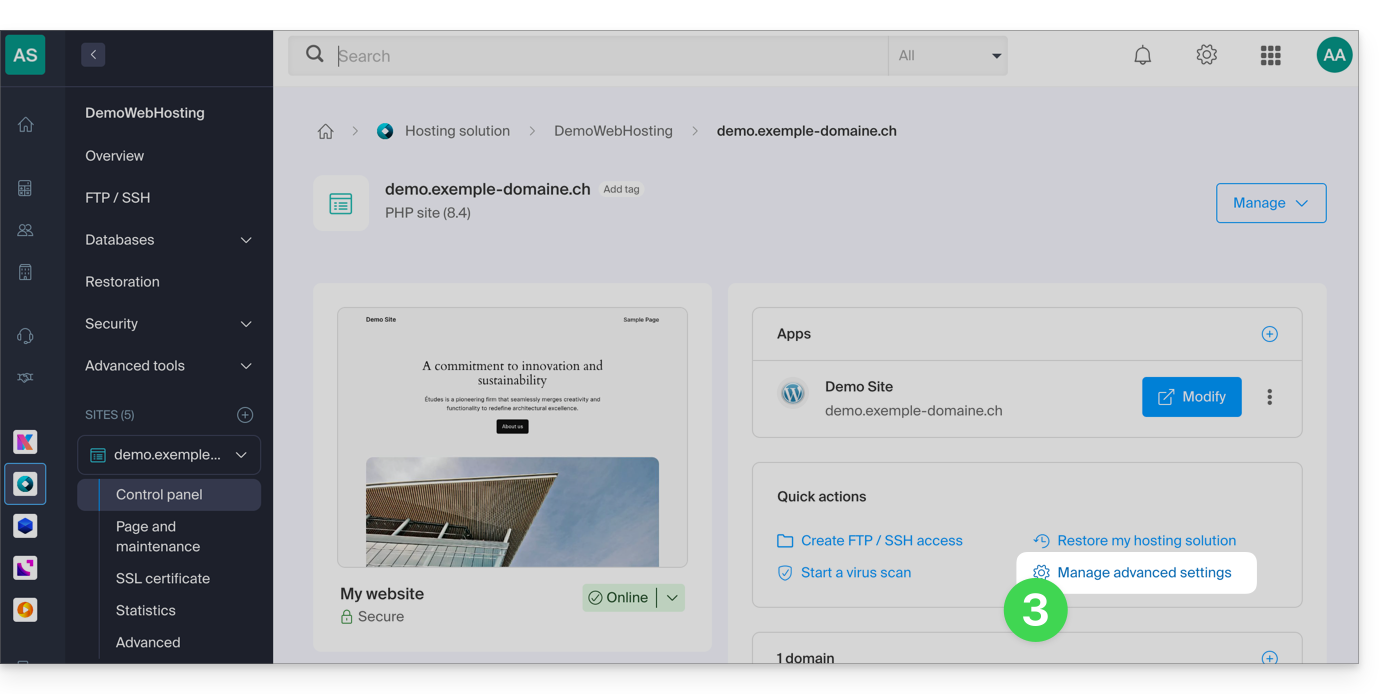
- Click on the different tabs General, PHP / Apache and PHP Extensions to make the desired adjustments:
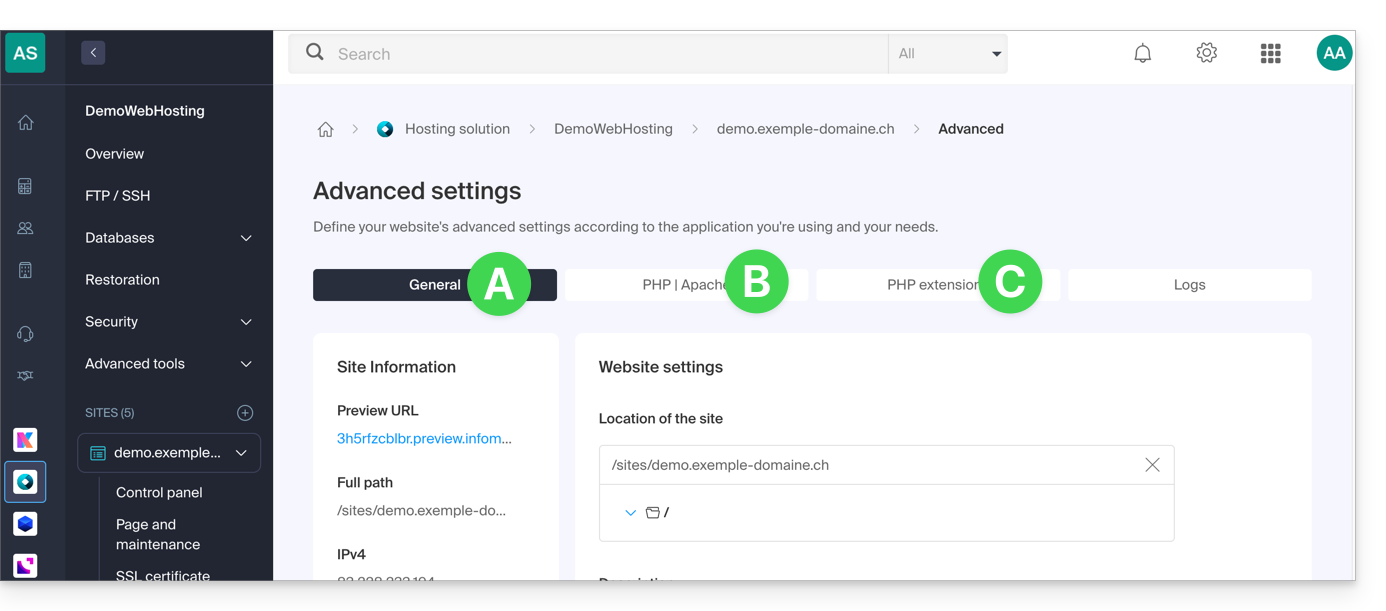
- Refer to this other guide if you are looking for information about limit values and the possibilities of unlocking these.
- If necessary, refer to this other guide regarding the fourth tab.
Do not forget to save the changes at the bottom of the page.
… via the .user.ini file
For PHP directives that are not present on the Manager side, it is necessary to define the desired values in the .user.ini file, for example:
max_file_uploads = 20The list of existing directives can be found on the official PHP website but the elements with the indication PHP_INI_SYSTEM in the Modifiable column as well as max_input_time, memory_limit and mysqli.default_socket are not usable.
… in CLI
To customize PHP directives when executing scripts in command line (CLI) or in CRON tasks, it is necessary to specify the desired values in a .user.ini file.
Then, to apply these configurations, the PHP executable is used with the -c option followed by the path to the .user.ini file.
For example, to modify the memory limit available for PHP to 1024M, you can create or modify the .user.ini file using the following command:
echo 'memory_limit = 1024M' > .user.iniThis command writes the memory_limit directive with the value 1024M in the .user.ini file.
Then, when running a PHP script from the command line or in a CRON task, use the PHP command with the -c option to specify the .user.ini file containing the custom configurations.
The following example enables allow_url_fopen for the WP CLI tool (allows, among other things, retrieving extensions):
php -d allow_url_fopen=On ~/bin/wp package install trepmal/wp-revisions-cliphp: the PHP executable-d allow_url_fopen=On: the-doption allows setting a PHP configuration directive (allow_url_fopen) with the valueOn~/bin/wp: path to the WP CLI executablepackage install trepmal/wp-revisions-cli: the specific command to install the WP CLI packagetrepmal/wp-revisions-cli
This ensures that the allow_url_fopen option is enabled during the execution of the specified WP CLI command. Enabling allow_url_fopen may be necessary for certain operations that involve opening remote URLs, such as downloading extensions or packages. Make sure this option is enabled securely and in accordance with best security practices.
Link to this FAQ:
Has this FAQ been helpful?
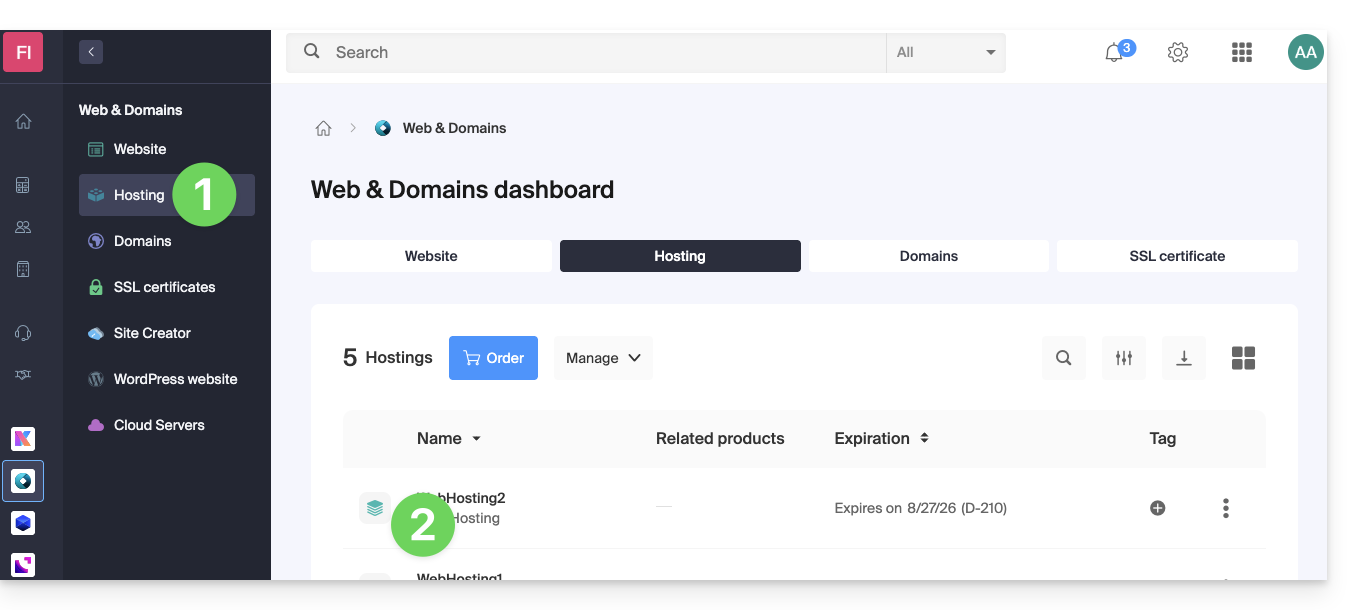
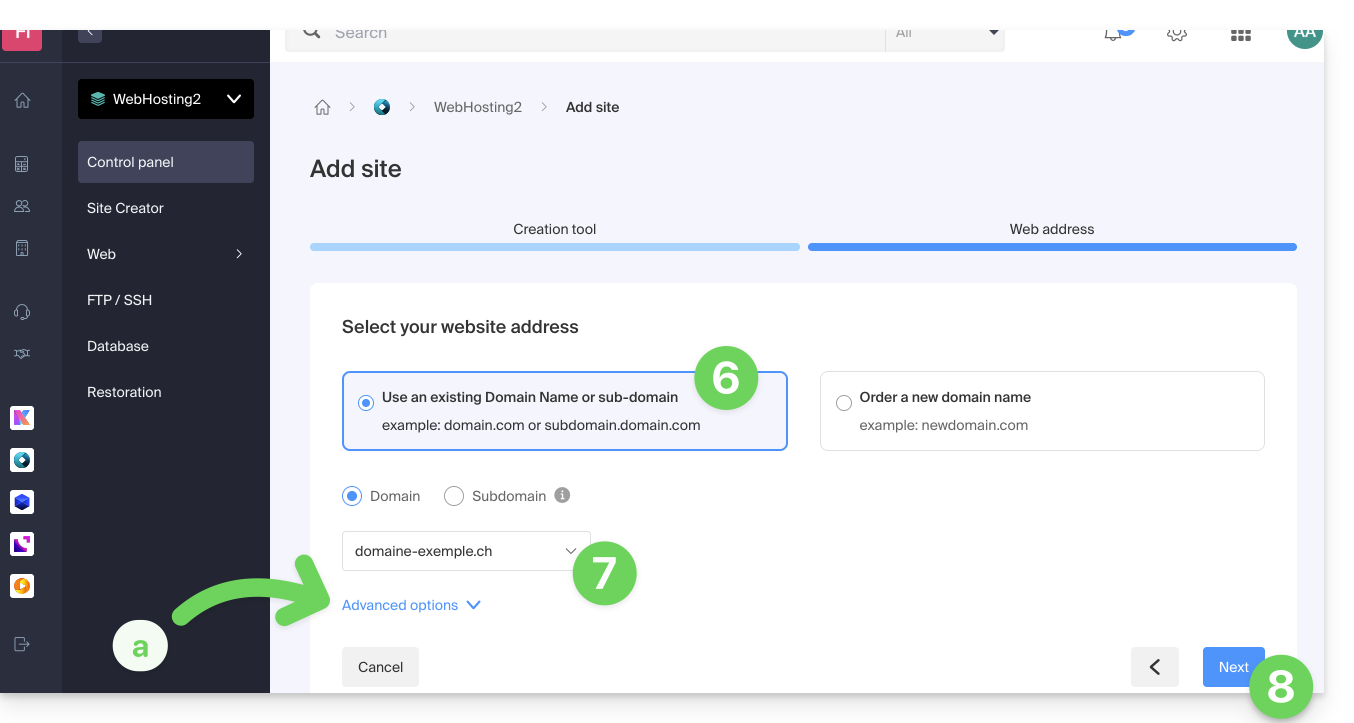
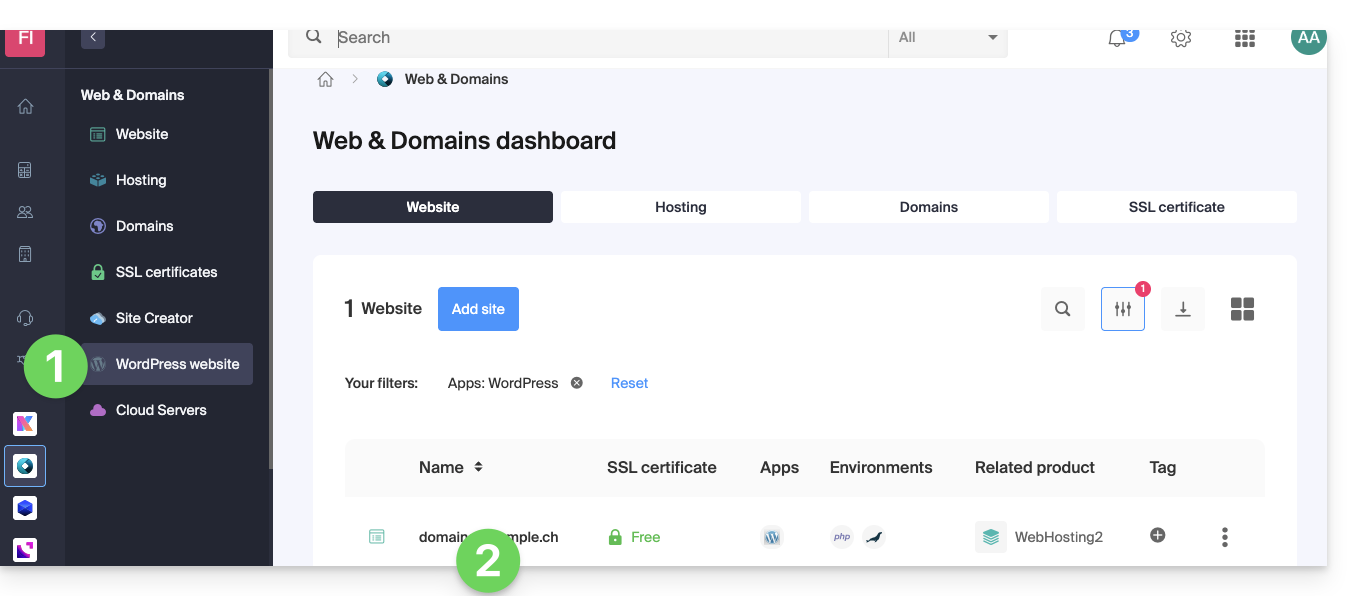
This guide explains how to install a new Infomaniak WordPress site included in the paid Web Hosting offers. You will find 2 different ways to create a WordPress site as well as explanations about uninstallation.
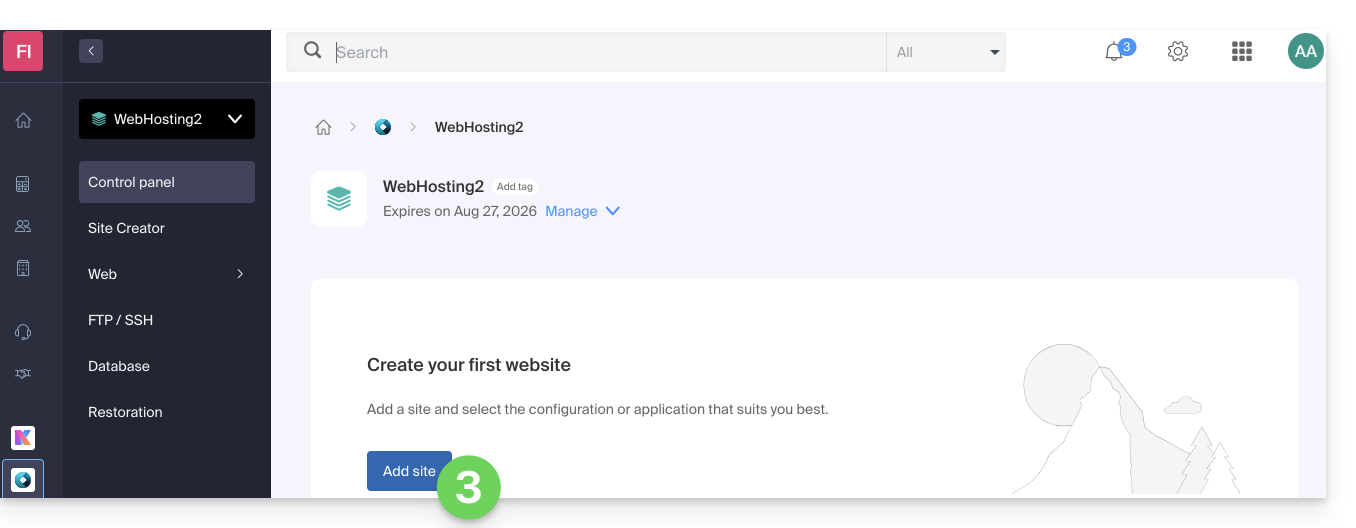
Create a WordPress site on an existing hosting
To access Web Hosting and add a new site by installing WordPress at the same time:
- Click here to access the management of your hosting on the Infomaniak Manager (need help?).
- Click directly on the name assigned to the hosting in question:
- Click the button to add a site:
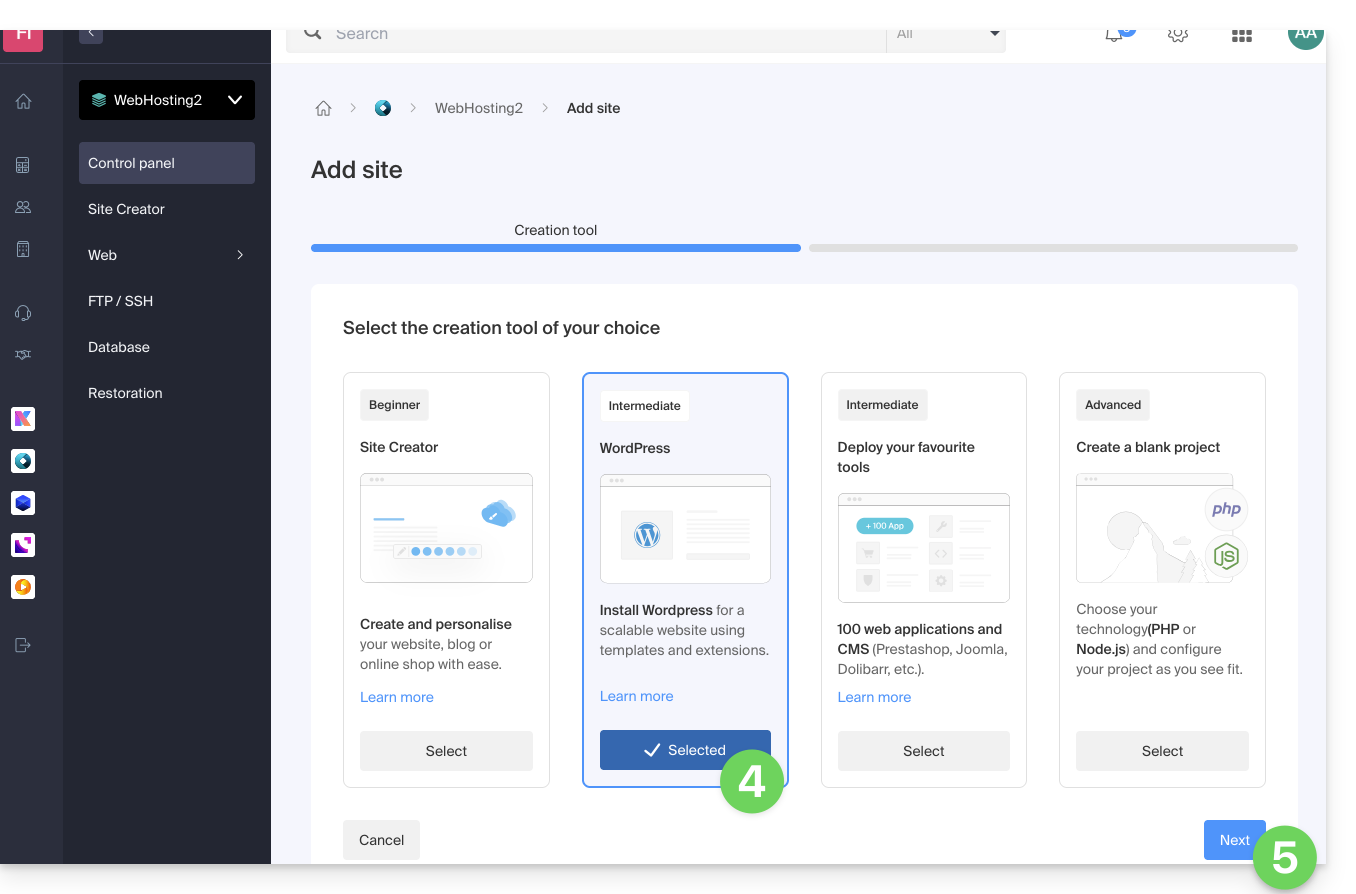
- Choose to install WordPress.
- Click the Next button:
- Click the button to use a domain name already present in your Organization (or on the other button if you need to order a new domain first).
- Select the domain name from your already acquired domains.
- The advanced options allow you to choose a custom location on the hosting server, and an older version of PHP.
- Click the Next button:
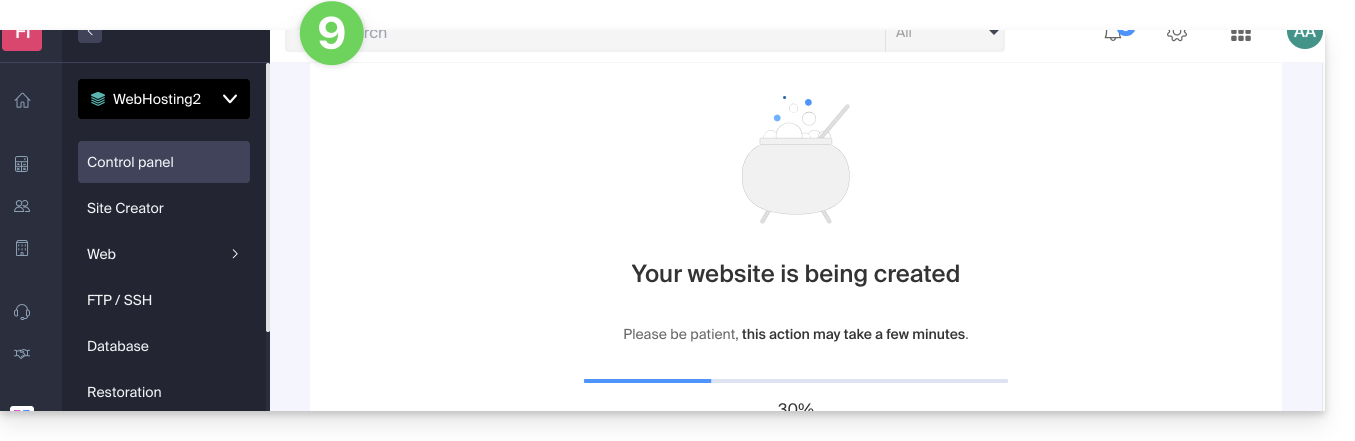
- Wait a few minutes for the site to be created on the hosting:
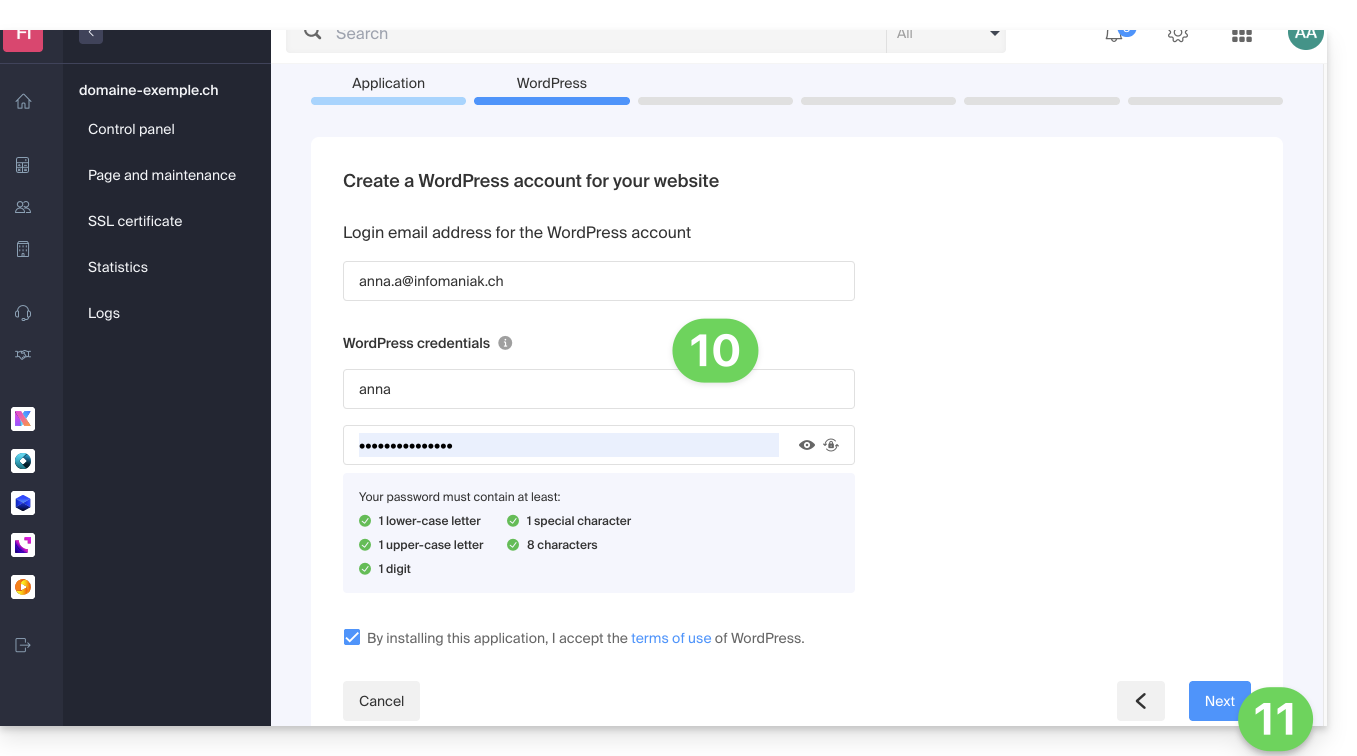
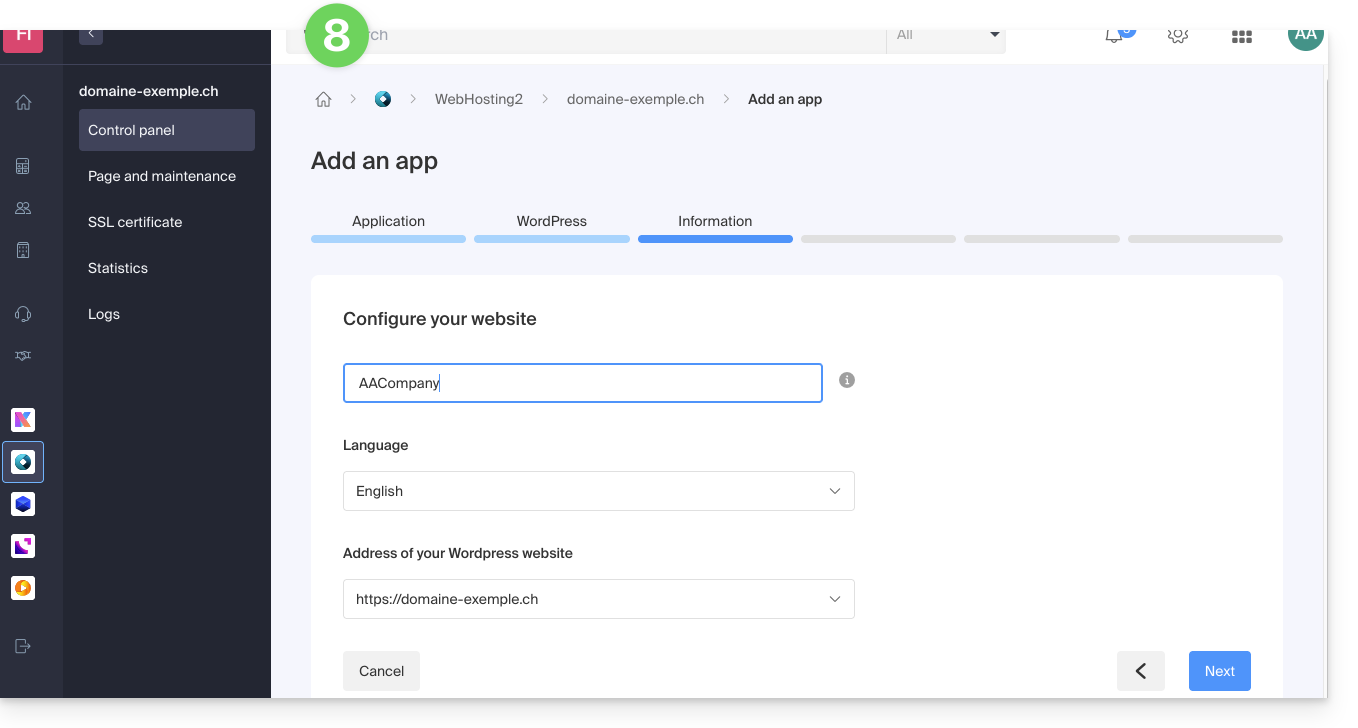
- Enter the requested information, it will be used to log in to the WordPress dashboard (it is possible to modify this information at any time after installation).
- Click the Next button:
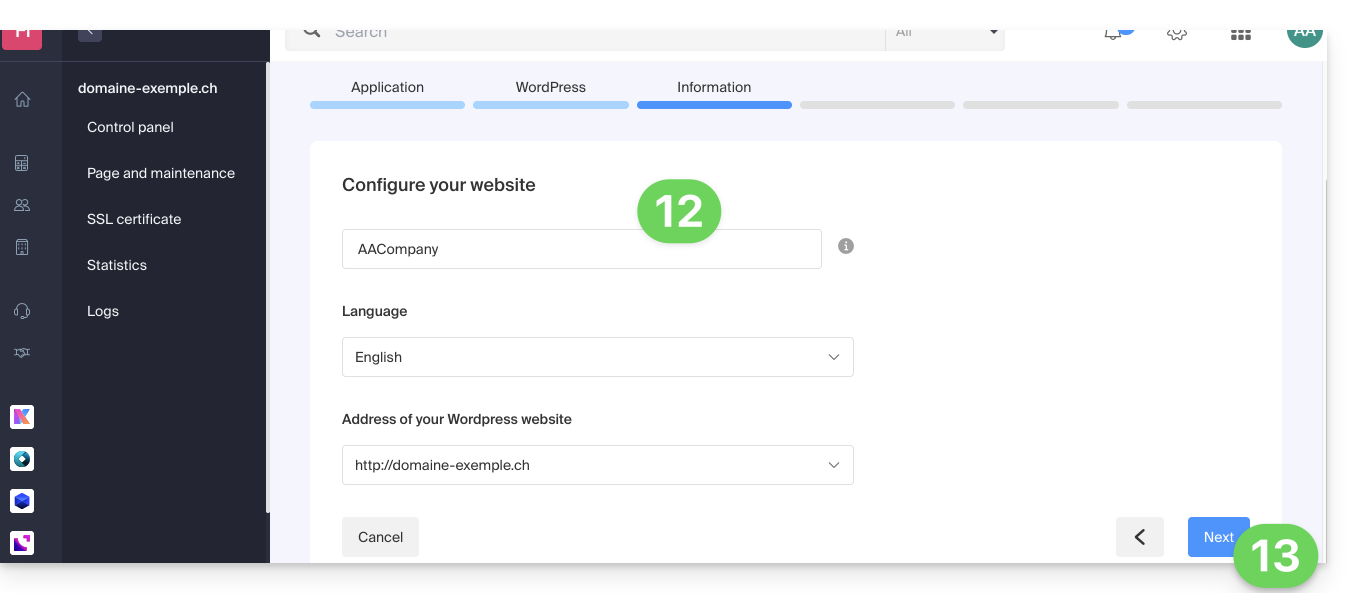
- Enter the information related to your site (it is possible to modify this information at any time after installation).
- Click the Next button:
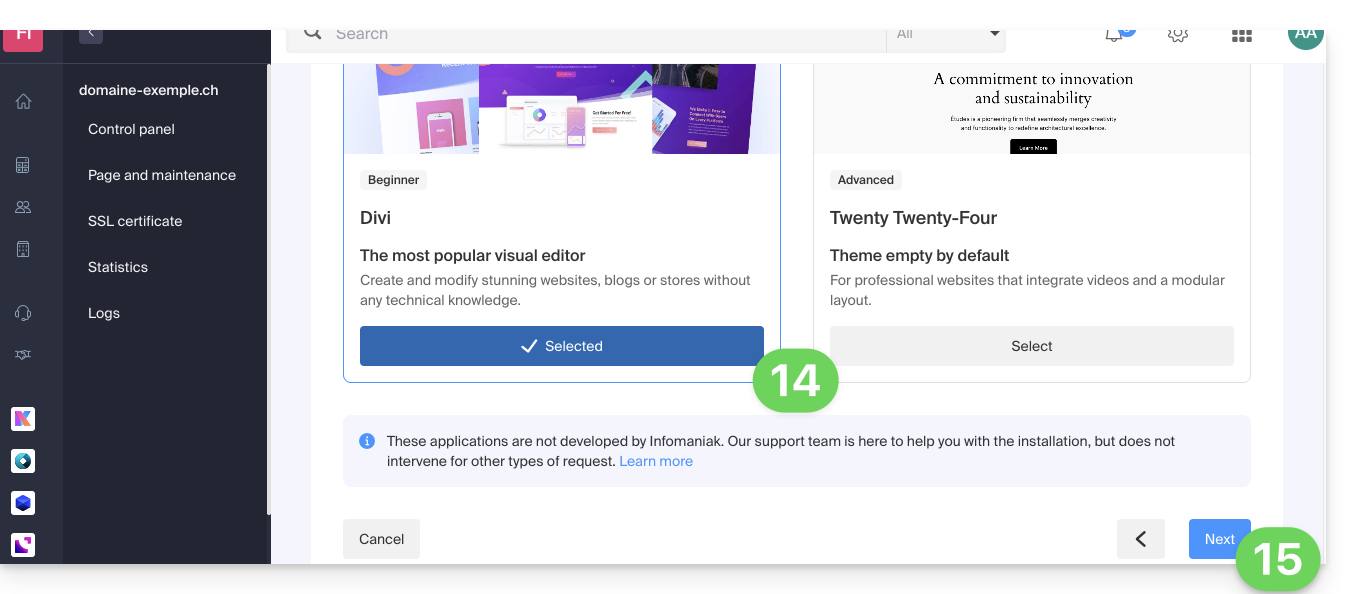
- Choose between the Divi theme and the official theme of the latest WordPress version (it is possible to modify this information at any time after installation).
- Click Next:
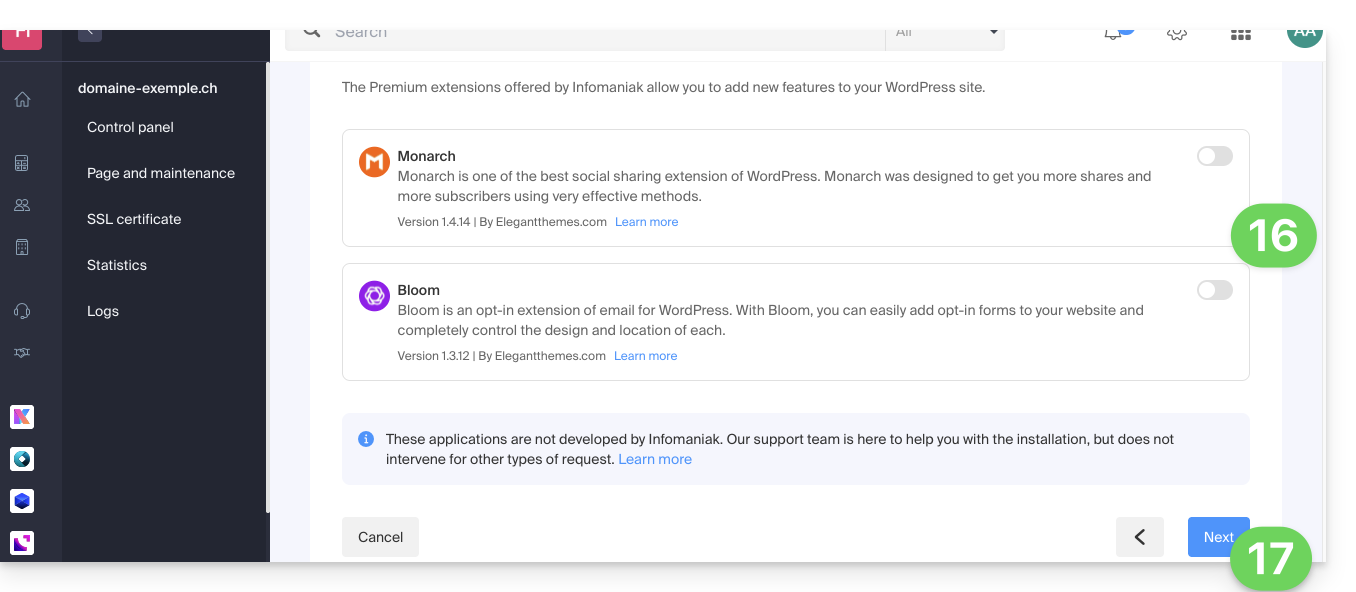
- Choose to install or not two Premium extensions offered with your subscription: Monarch and Bloom.
- Click on Next:
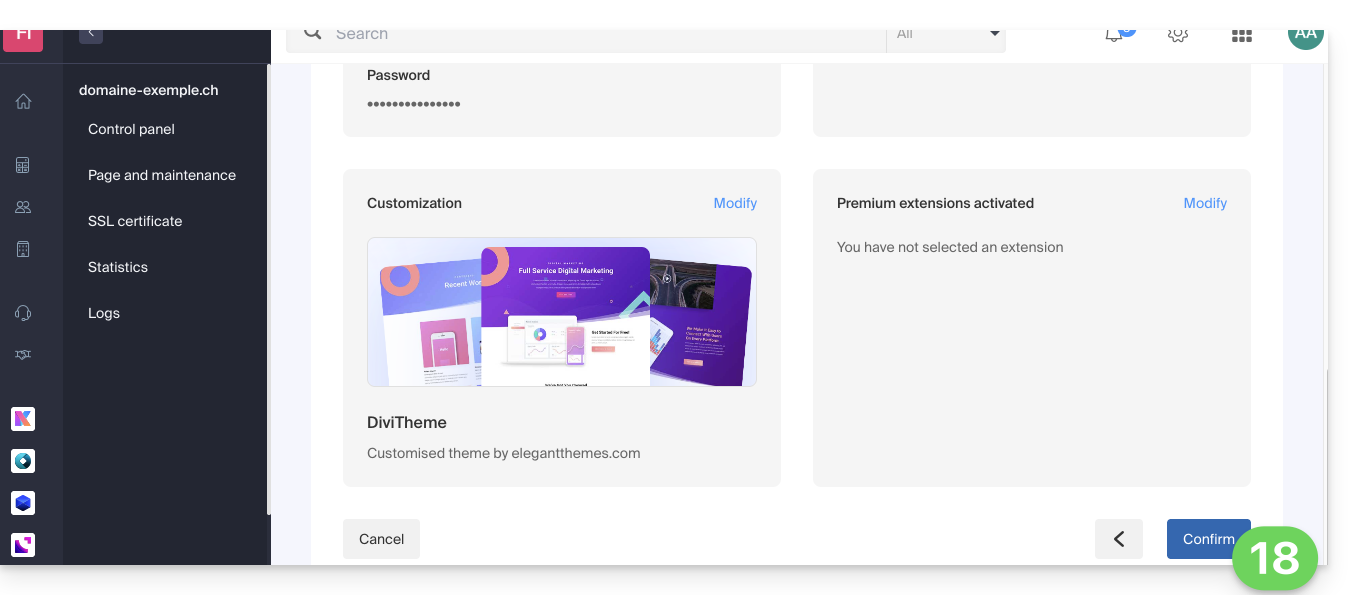
- Confirm the installation from the summary page:
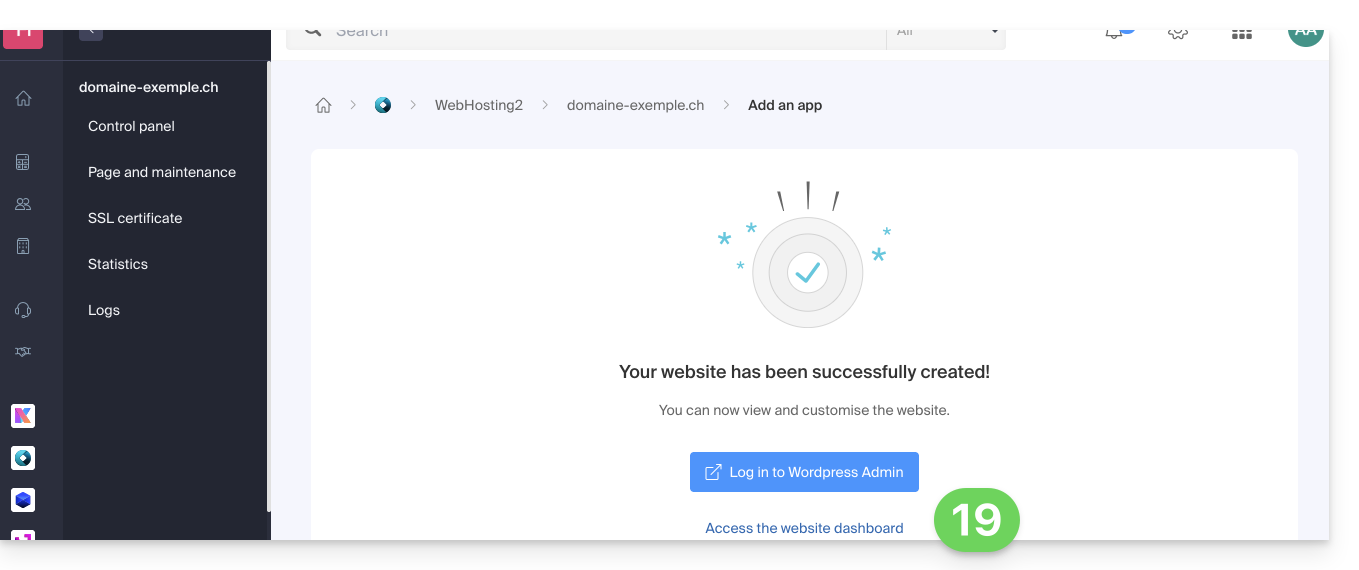
- You can then log in to the WordPress dashboard or return to the Infomaniak site management:
Install WordPress on an existing blank site
To access the existing blank site on the hosting and install WordPress:
- Click here to access the management of your site on the Infomaniak Manager (need help?).
- Click directly on the name assigned to the site concerned:
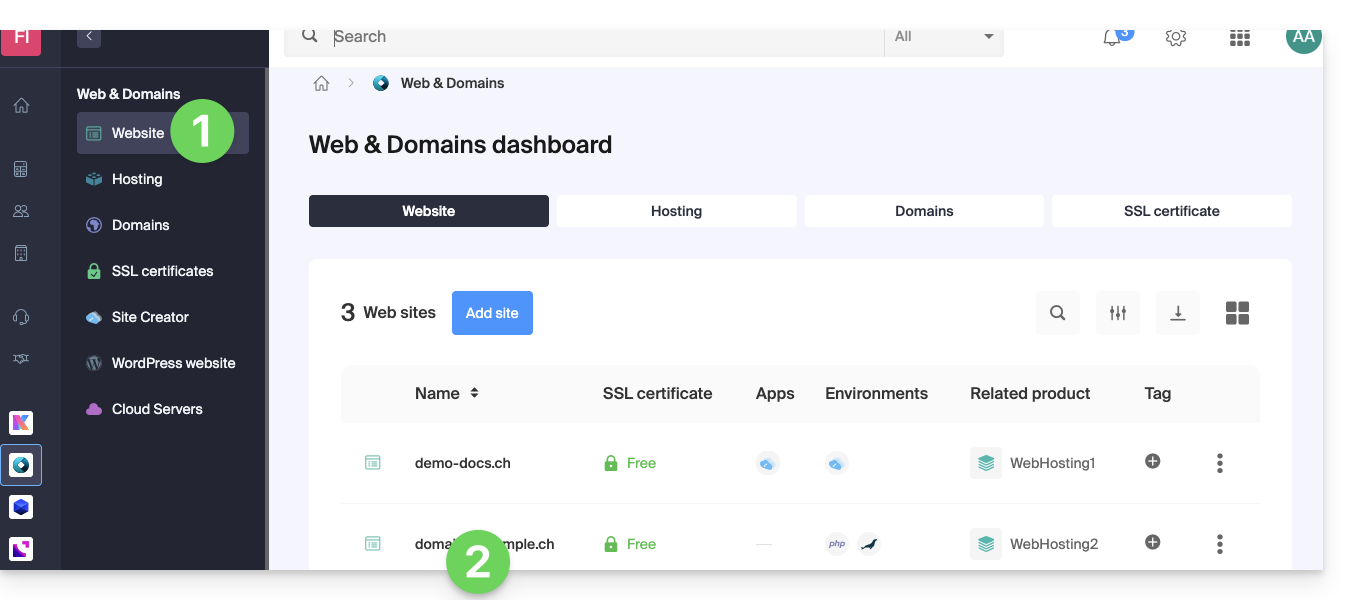
- Click the button to add an application:
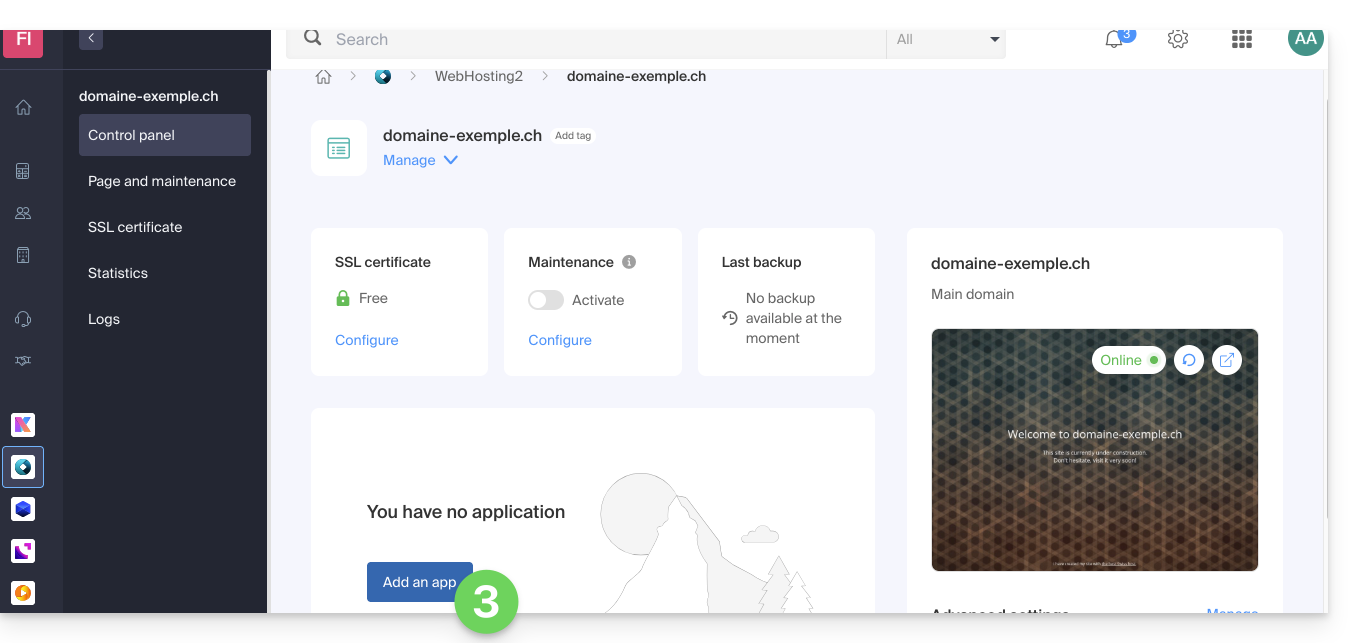
- Choose to install WordPress:
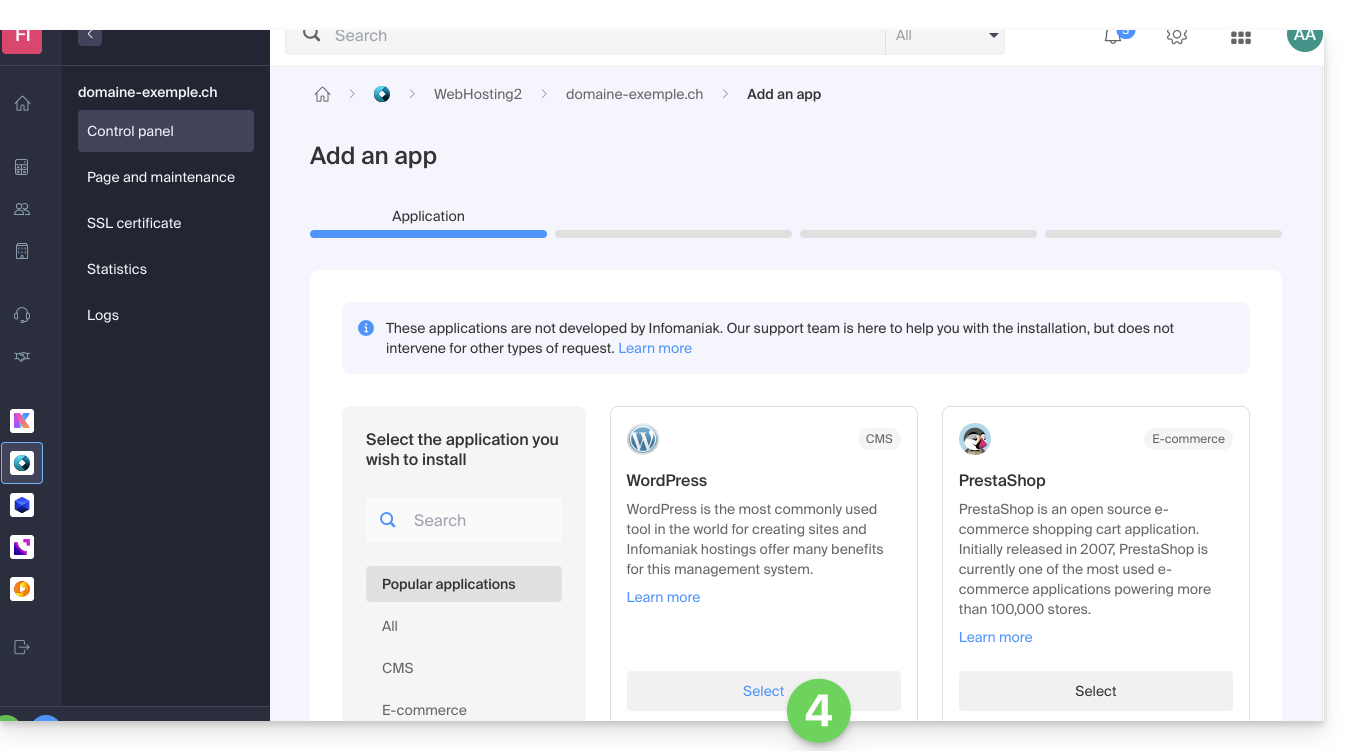
- Click the Next button at the bottom of the page.
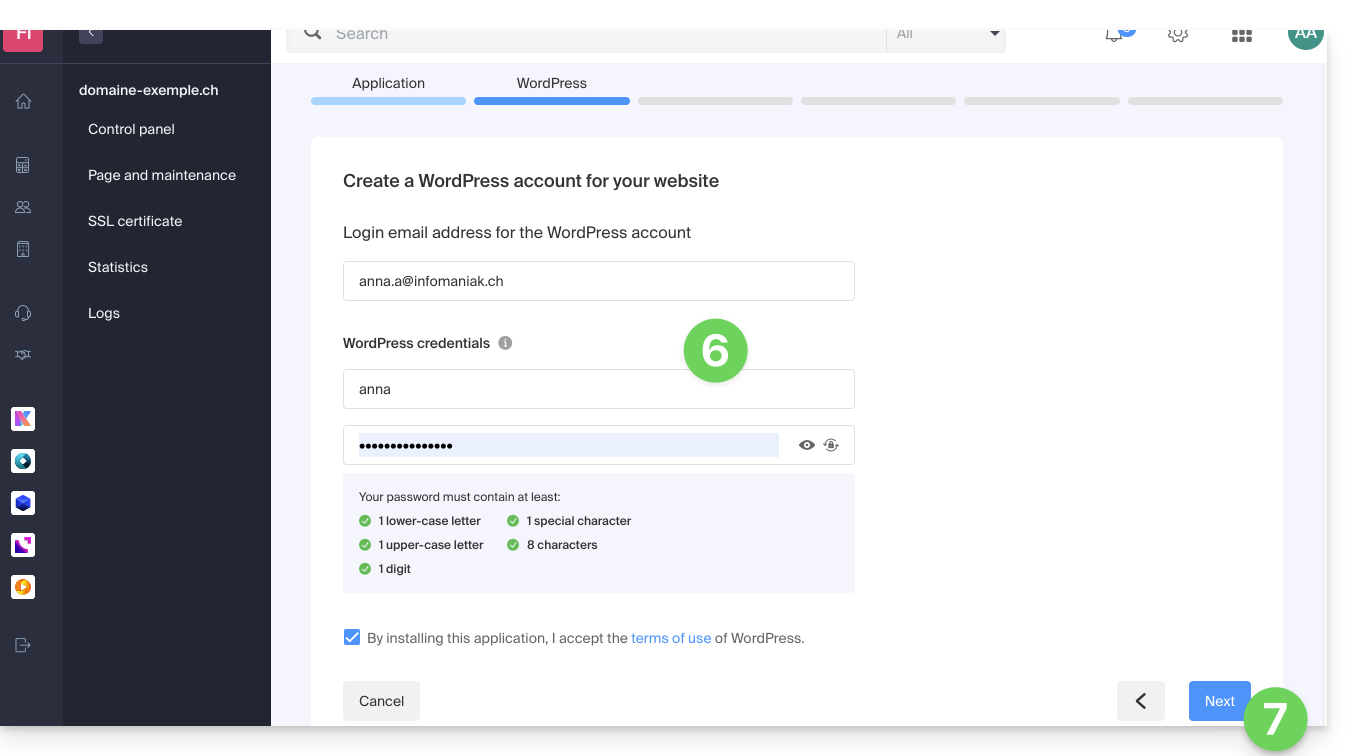
- Enter the requested information, it will be used to log in to the WordPress dashboard (it is possible to modify this information at any time after installation).
- Click the Next button:
- Continue as from point 12 of the previous chapter above.
Uninstall Infomaniak WordPress
You can delete a WordPress site:
- by completely removing the website from the hosting (and keeping or not the WordPress data, databases, etc.)
- by keeping the website on the hosting but removing the WordPress app…
Option 1
- Click here to access the management of your WordPress site on the Infomaniak Manager (need help?).
- Click on the action menu ⋮ located to the right of the item concerned.
- Click on Unlink the site:
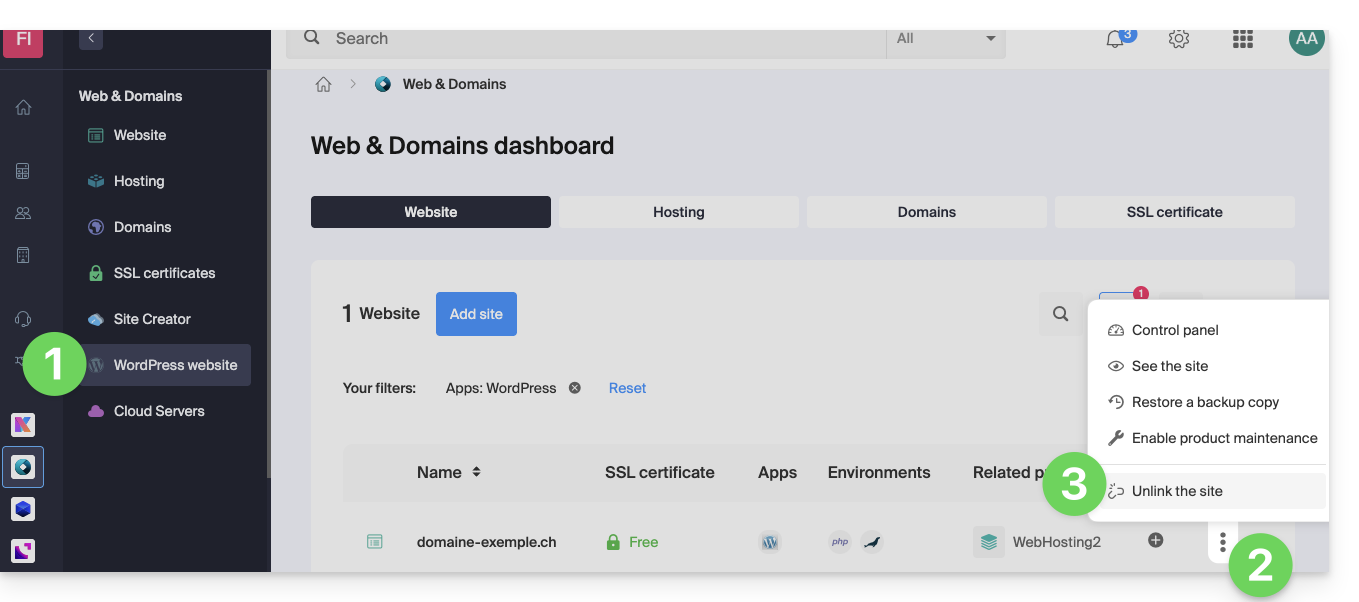
- Choose whether you want to delete everything or keep a trace of the WordPress data on the hosting server anyway:
- If you check the box, there will be nothing left in the Manager (except backups):
and nothing left on the server: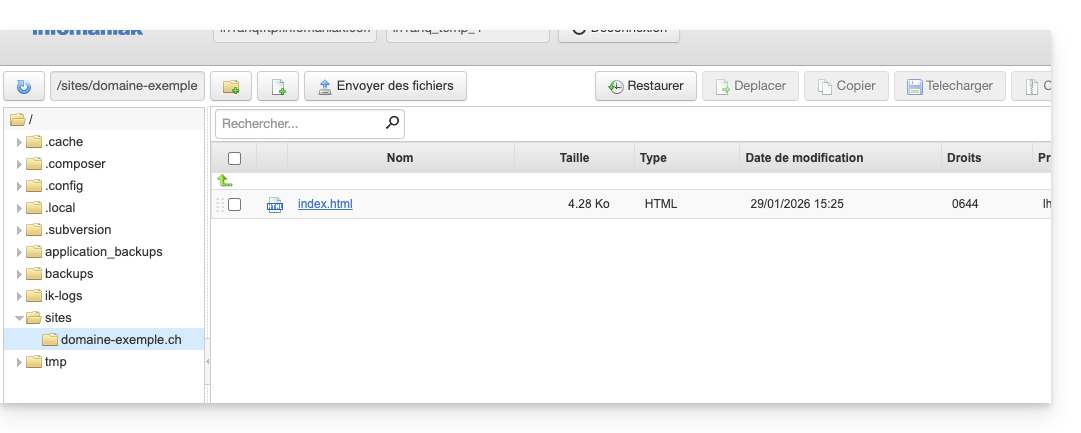
- If you do not check the box, there will be nothing left in the Manager (except backups):
but the WordPress files will still be accessible on the server: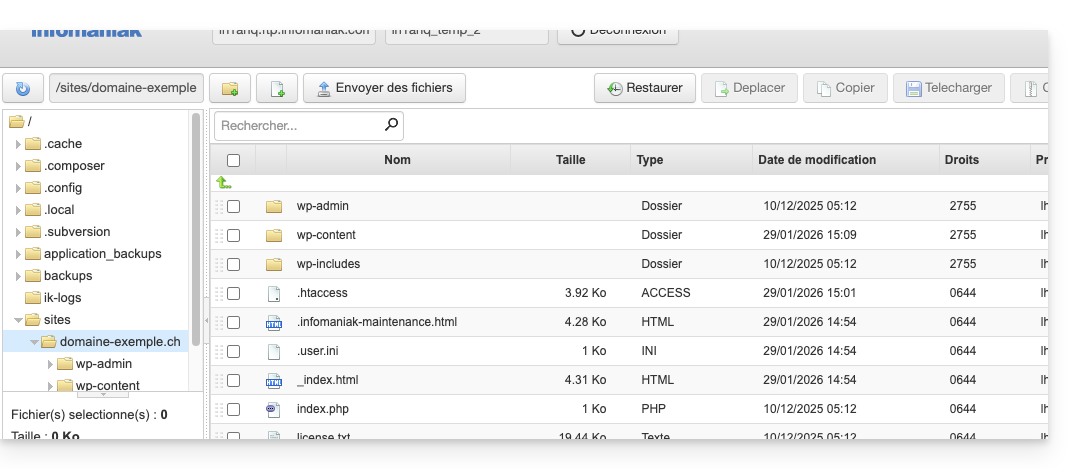
And you will get an error if you later try to reinstall a new WordPress site in the same place with the same domain name: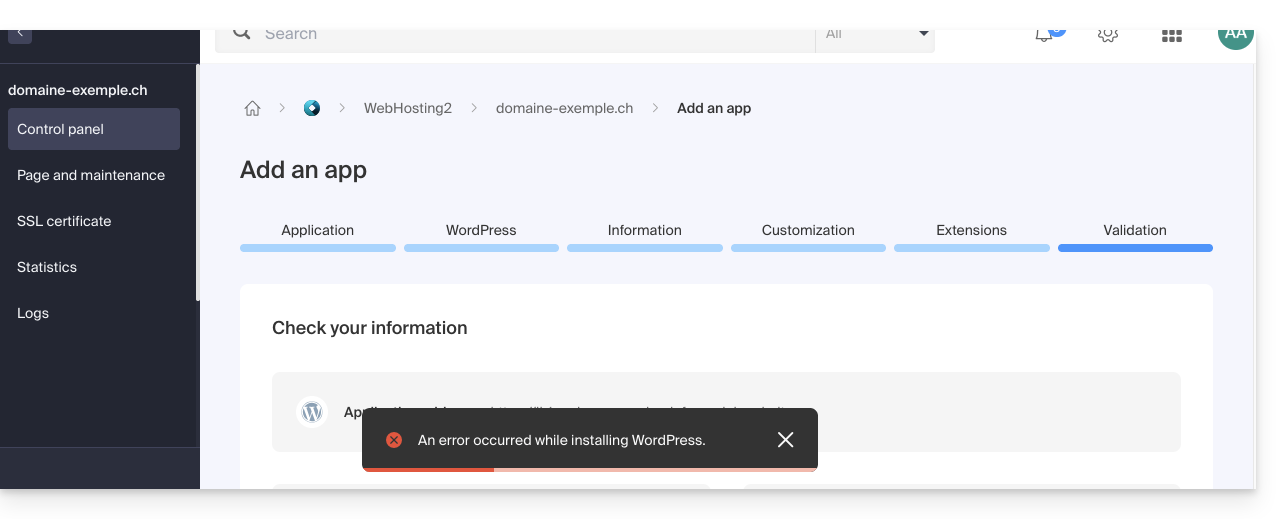
- If you check the box, there will be nothing left in the Manager (except backups):
- Confirm the deletion.
- Click to delete and wait.
Option 2
- Click here to access the management of your WordPress site on the Infomaniak Manager (need help?).
- Click directly on the name assigned to the site in question:
- Click on the action menu ⋮ located to the right of the item concerned.
- Click on Delete the app:
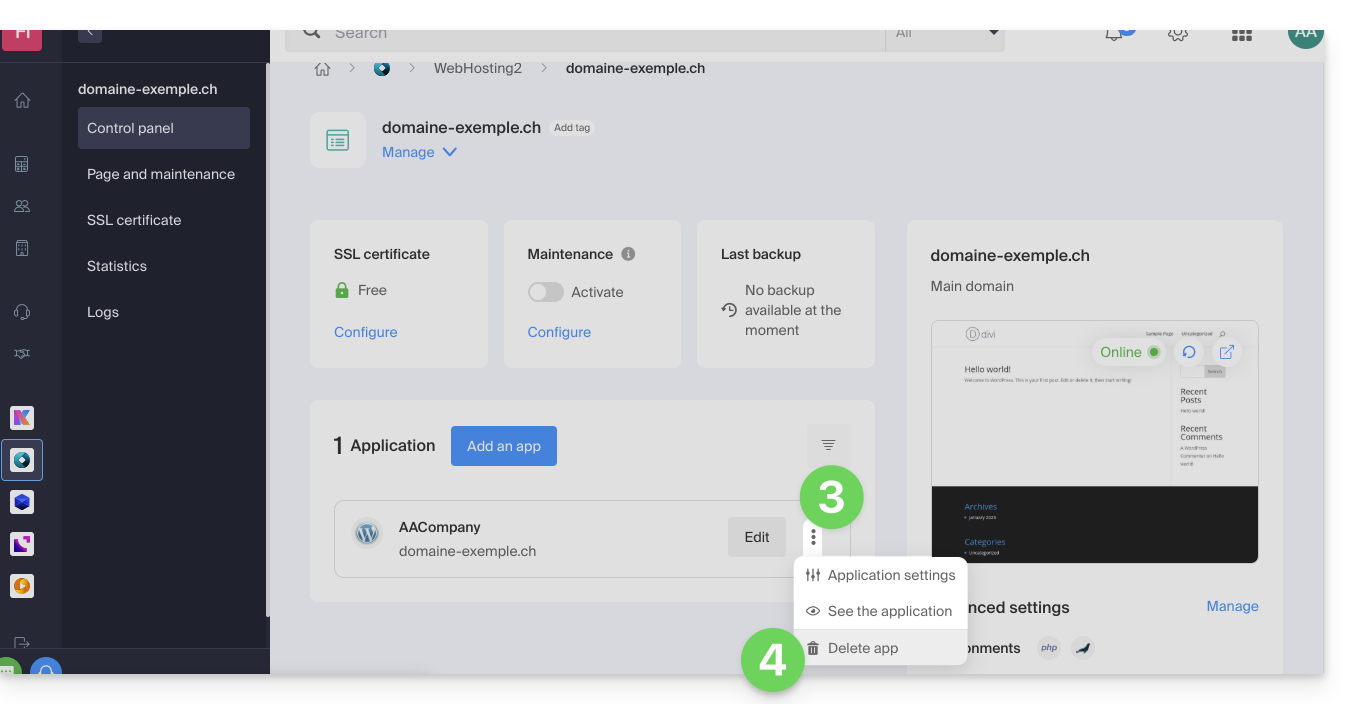
- Confirm the deletion and wait, your hosting will still contain a site but without an installed application:

Learn more
Link to this FAQ:
Has this FAQ been helpful?
This guide explains how to disable all extensions installed on your WordPress on a Web Hosting.
Preamble
- Disabling WordPress extensions allows you to quickly identify if one of them is causing an issue on your site, and thus draw the necessary conclusions to fix it.
- If you encounter a problem with third-party software, contact its publisher or a Partner and consult the support policy as well as article 11.9 of the Infomaniak Terms of Service.
Quickly disable WP extensions
To disable all WordPress extensions:
- Connect to the server via FTP (need help?).
- Go to the site location (folder corresponding to your WordPress site).
- Rename
/wp-content/pluginsto/wp-content/_pluginsfor example.- To disable a specific extension, rename
/wp-content/plugins/PluginNameto/wp-content/plugins/_PluginNamefor example.
- To disable a specific extension, rename
Link to this FAQ:
Has this FAQ been helpful?
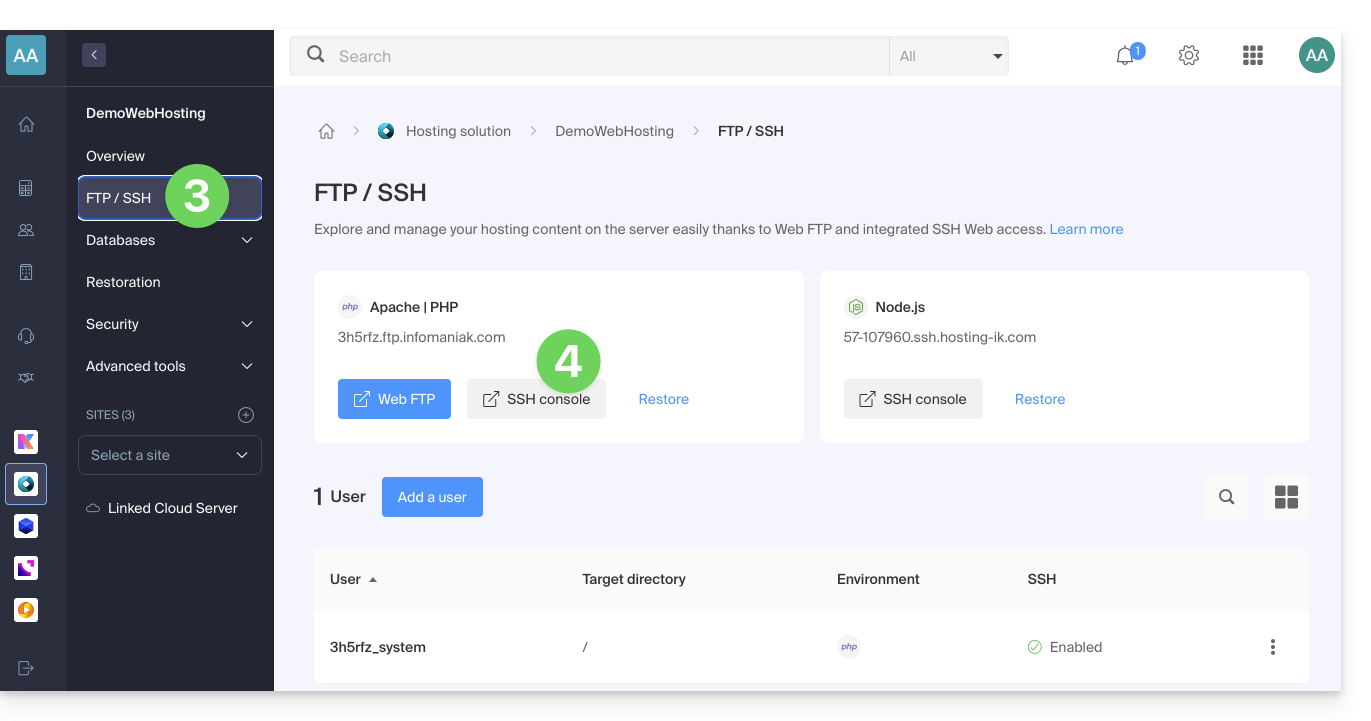
This guide explains how to connect via SSH to a Web Hosting or a Cloud Server.
Connect via SSH…
… via a Web Browser
- Click here to access the management of your hosting on the Infomaniak Manager (need help?).
- Click directly on the name assigned to the hosting concerned:
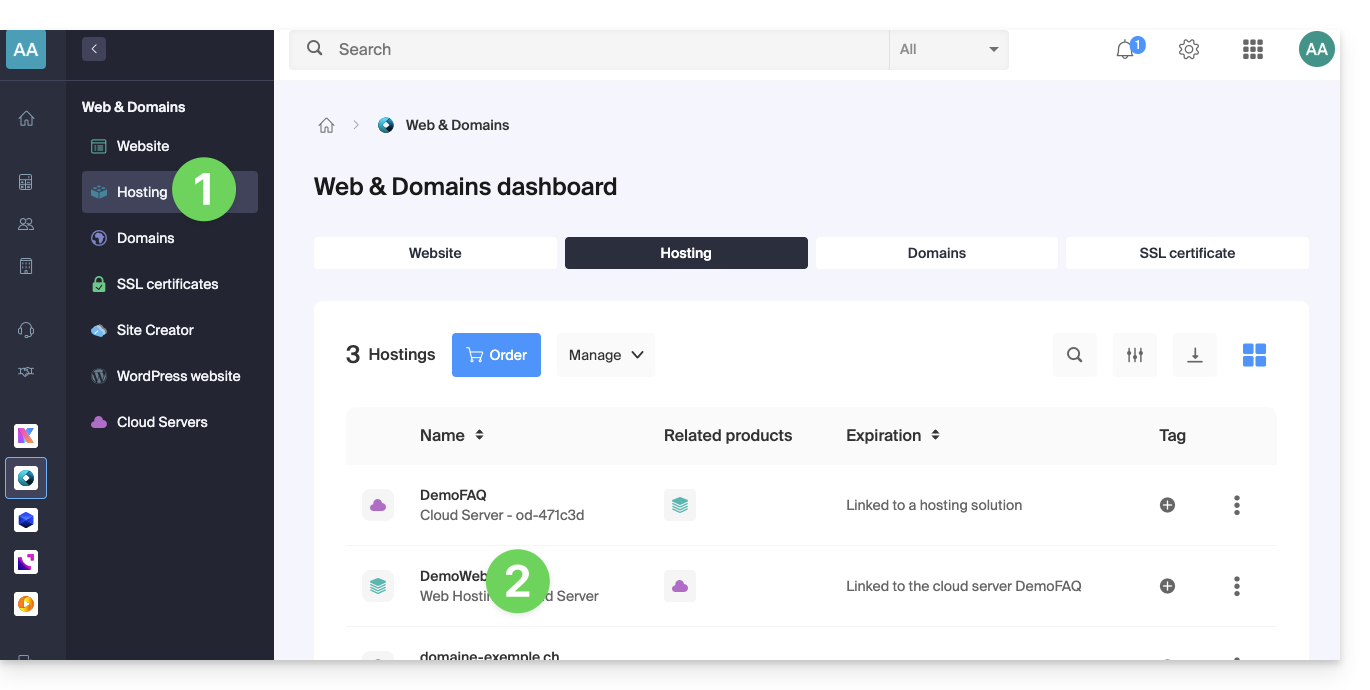
- Click on FTP / SSH in the left sidebar menu.
- Click on the SSH Console button:
… via the terminal or an application
To connect via SSH, use the following commands from a Terminal type application (command-line interface, CLI / Command Line Interface) on your device, for example:
- Terminal (application already integrated with macOS and Linux)
- PuTTY (Windows)
- Windows 10 SSH Client (help in French / in English)
Then enter the following command:
ssh username@serverusernamebeing the username of the FTP accountserverbeing the host server (e.g. xxxx.ftp.infomaniak.com)
To know which command is available and the path to use, run the command "whereis":
$ whereis mysql
mysql: /opt/mysql/bin/mysql
Link to this FAQ:
Has this FAQ been helpful?