Knowledge base
1000 FAQs, 500 tutorials and instructional videos. Here, there are only solutions!
This guide explains how to import a MySQL/MariaDB database on an Infomaniak Web Hosting.
Import a database
To import a database on Infomaniak:
- Click here to access the management of your product on the Infomaniak Manager (need help?).
- Click directly on the name assigned to the product in question.
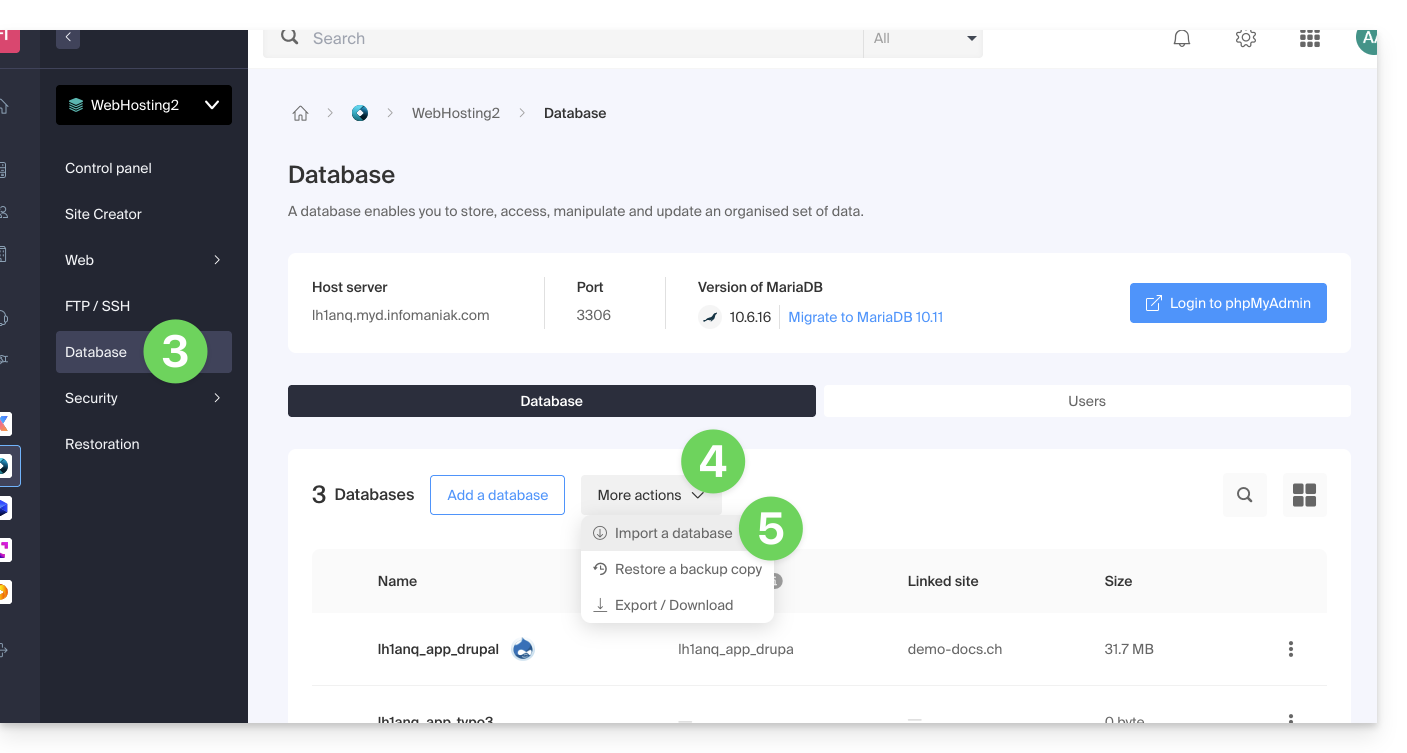
- Click on Databases in the left sidebar menu.
- Click on the “More actions” button/menu for more choices.
- Choose Import a database:
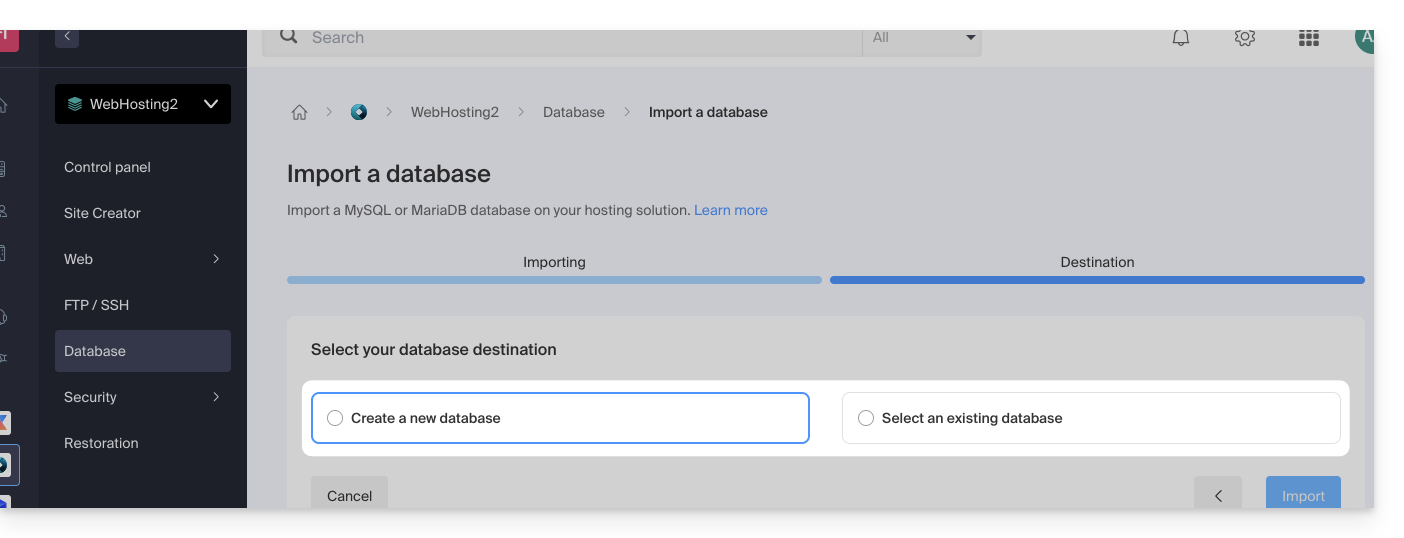
- Follow the assistant to the end.
You will then have the choice…
- … to send your database directly (
sql,gz,bz2,zip, 300 Mo max) from your computer - … to select the file to import from your hosting after uploading it to the server via FTP
- … to choose a backup from those that are done automatically

… then also choose:
- import data into a new database (creation)
- import into an existing database (replacement/overwrite)
Warning: a MySQL/MariaDB import following an export requires an action on your part if you use TRIGGERS/VIEWS: refer to this other guide!
Alternative method (SSH - for advanced users)
Prerequisites
- Have the
.sqlfile of the database to import. - Have created a new blank database.
- Have a user who has all rights on the database.
- Have an FTP + SSH account.
To import via SSH:
- Send the database to import via FTP to your hosting.
- Open an SSH terminal/console,
- From a
Terminaltype application (command line interface,CLI / Command Line Interface) on your device, for example the application PuTTY (to download and install on Windows) or Terminal (installed by default on macOS), run and adapt the following command: ssh ftp-user@adresse-du-serveur- replace
ftp-userwith the FTP + SSH account username (for exampleabcd_user) - replace
adresse-du-serveurwith the web server address of your hosting
- replace
- Enter the FTP + SSH account password.
Enter and adapt the following command:
mysql --verbose -u db-user -p db-name -h db-host < path- replace
db-userwith the database username (for exampleabcd_user) - replace
db-namewith the database name (for exampleabcd_sample) - replace
db-hostwith the MySQL server of your hosting - replace
pathwith the path where you sent the database in step 1 of this procedure (if you have a single website stored in the default location, the path would be for example~/web/test.sql)
- replace
- Wait during the import (this can take several minutes depending on the size).
Link to this FAQ:
Has this FAQ been helpful?
This guide explains how to add a new domain name to a Web site Infomaniak.
Preamble
- When you add a new domain name to a website, it is referred to as a linked domain but also as an alias.
- In this case, an alias domain is an additional domain name, also linked to an existing site.
- For the website
domain.xyzto be reachable with a completely different domain name such asprivate.abcfor example, you need to addprivate.abcas an alias to the website. - Second example, for the site
domain.xyzto also be reachable withwww.domain.xyz, you need to add it as an alias to the domaindomain.xyz. In this example,domain.xyzis the parent site of the aliaswww.domain.xyz. Generally, the aliaswwwis already added automatically and present…
- For the website
Adding an alias to an existing site
Prerequisites
- If the domain name (intended to become an alias) or its DNS zone is managed by Infomaniak, everything is OK. If not:
- The A record of the domain name must point to Infomaniak.
- To simplify, you can delegate the management of the domain to Infomaniak.
- It is also necessary that the future alias is not already one, in which case it will be necessary to unlink it from the current site beforehand (same if synonym).
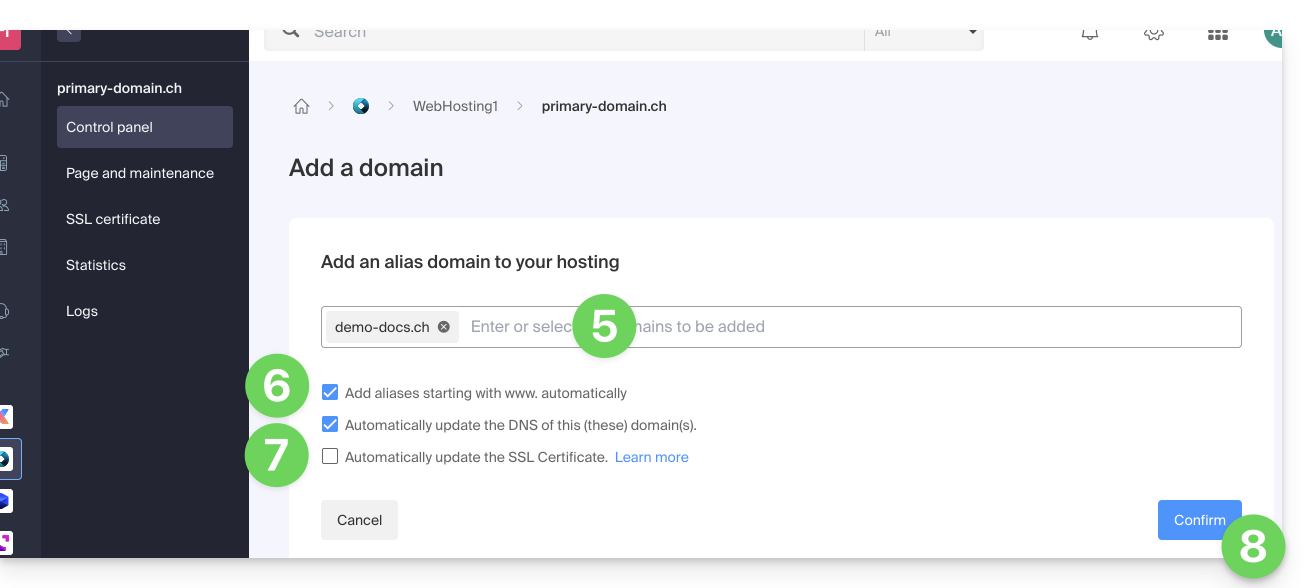
To add an additional domain that will be linked to your website:
- Click here to access the management of your product on the Infomaniak Manager (need help?).
- Click directly on the name assigned to the product concerned:
- Then click on the chevron to expand the Domains section of this site.
- Click on the Add a domain button:
- Enter the domain name(s) to be added, separating them with the Enter key.
- If the alias or its DNS zone is managed by Infomaniak, it is possible to automatically update the DNS entries. In the opposite case, make any necessary changes with your registrar or transfer the management of the domain name to Infomaniak.
- If you have an SSL certificate such as Let's Encrypt, for example, you can request to update it here to include the new names.
- Click on Validate to complete the procedure:
To set the alias as the main domain, refer to this other guide.
Link to this FAQ:
Has this FAQ been helpful?
This guide details the technical and administrative aspects of hosting multiple websites on the same platform.
Technically
A hosting includes different websites. It is therefore possible to add multiple websites to a hosting (multi-site / multi-domain management). In this case, the resources of the hosting (disk space, databases, script execution time and memory, etc.) are shared among the different websites of the hosting.
The base Cloud Server plan contains a certain number of hostings (for example 5) and a higher number of websites (for example 20). In this example, this means that you can create 20 websites (with 20 different domain names/subdomains) that you can organize freely on your 5 hostings.
Administratively
At the Organization level on the Infomaniak Manager, management and access rights cannot be assigned to a specific website on a hosting. A user that you add to the Organization cannot have a right limited to a single site; they will always access the entire hosting.
At the server data level, however, it is possible to create an FTP user restricted to a specific folder (in this case, it will need to be limited to the folder where the site is located).
Limited management of one site among others on the same hosting can also be considered directly within the tool used for the site (WordPress user management for example).
Link to this FAQ:
Has this FAQ been helpful?
This guide explains how to access MySQL/MariaDB backups and restore a specific database from an Infomaniak hosting.
Restore a specific database
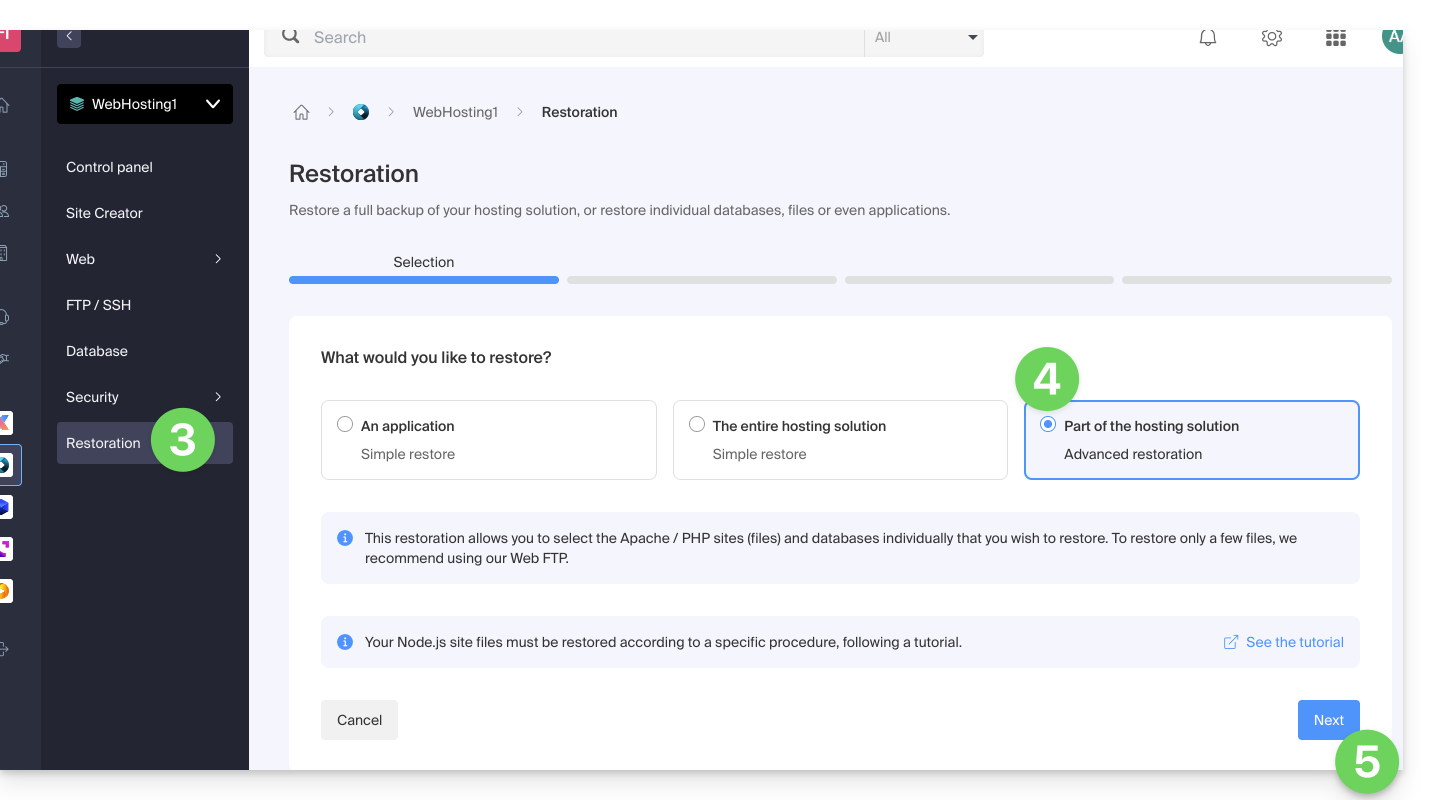
To access Web hosting:
- Click here to access the management of your product in the Infomaniak Manager (need help?).
- Click directly on the name assigned to the corresponding product.
- Click on Restore in the left sidebar menu.
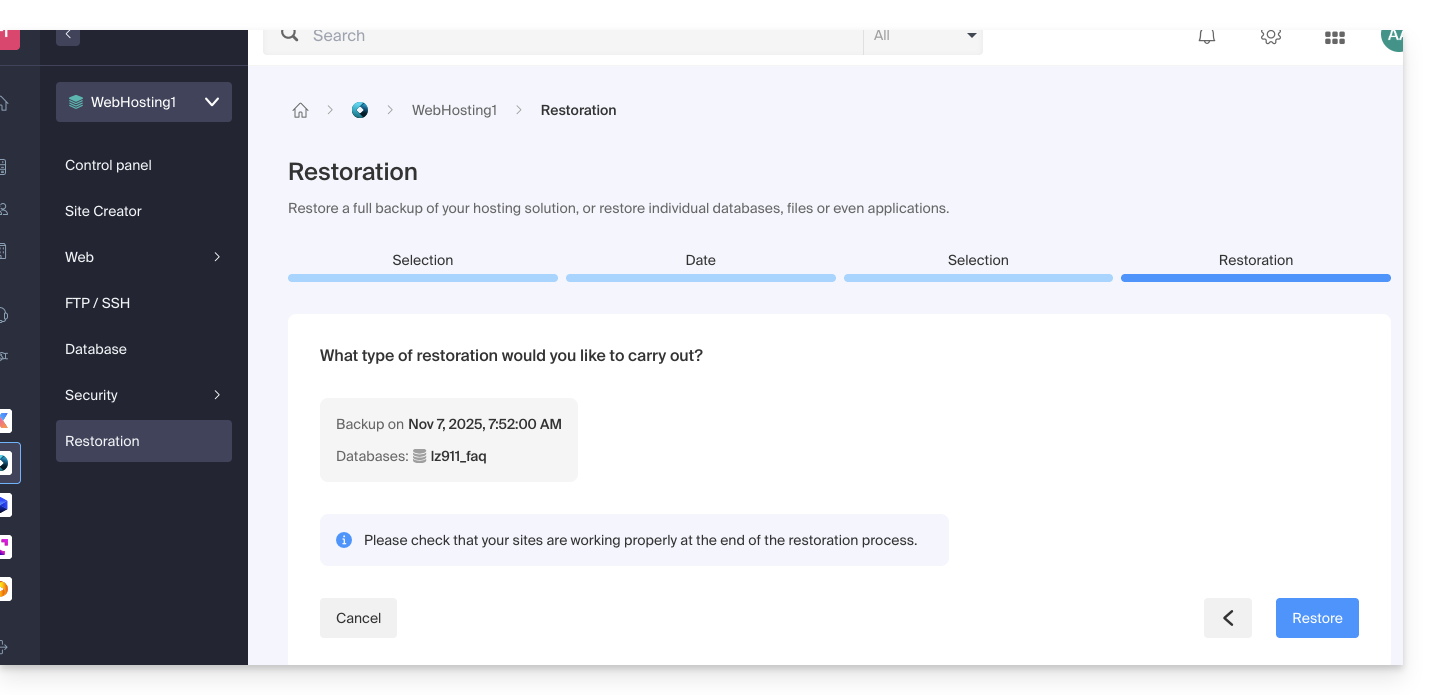
- Choose the type “Advanced Restore” which allows you to choose the databases to restore.
- Click the Next button:
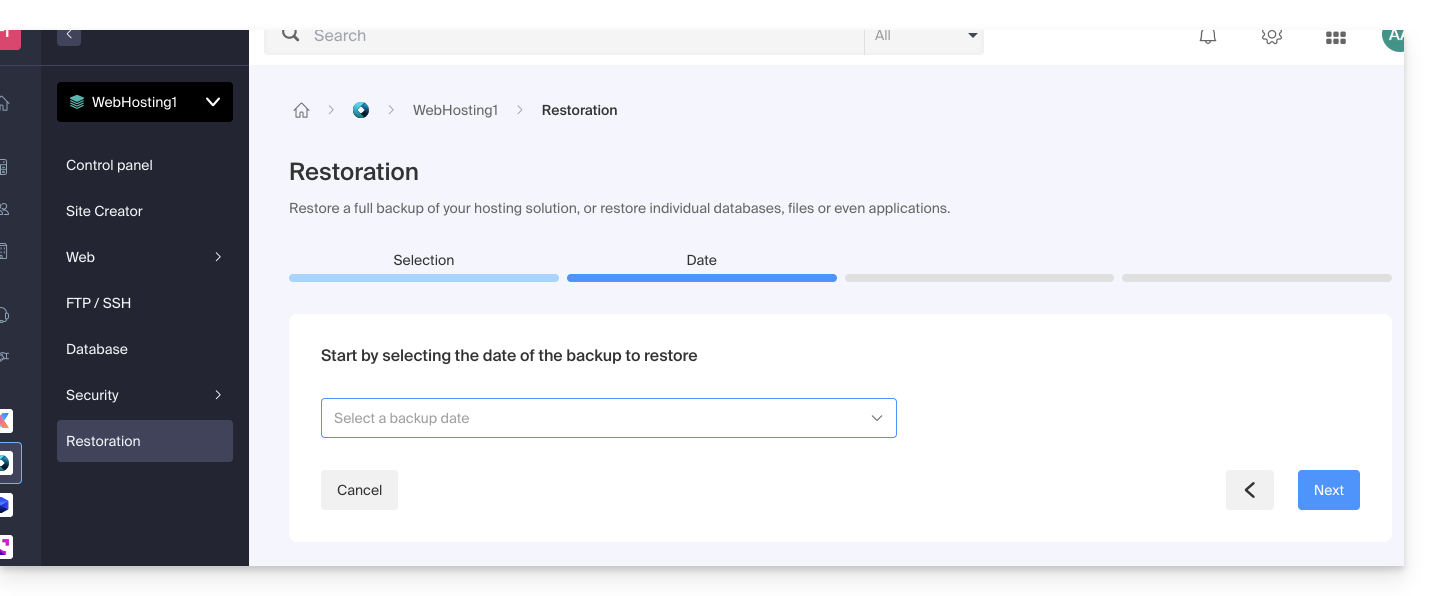
- Choose the desired restore date and click the Next button:
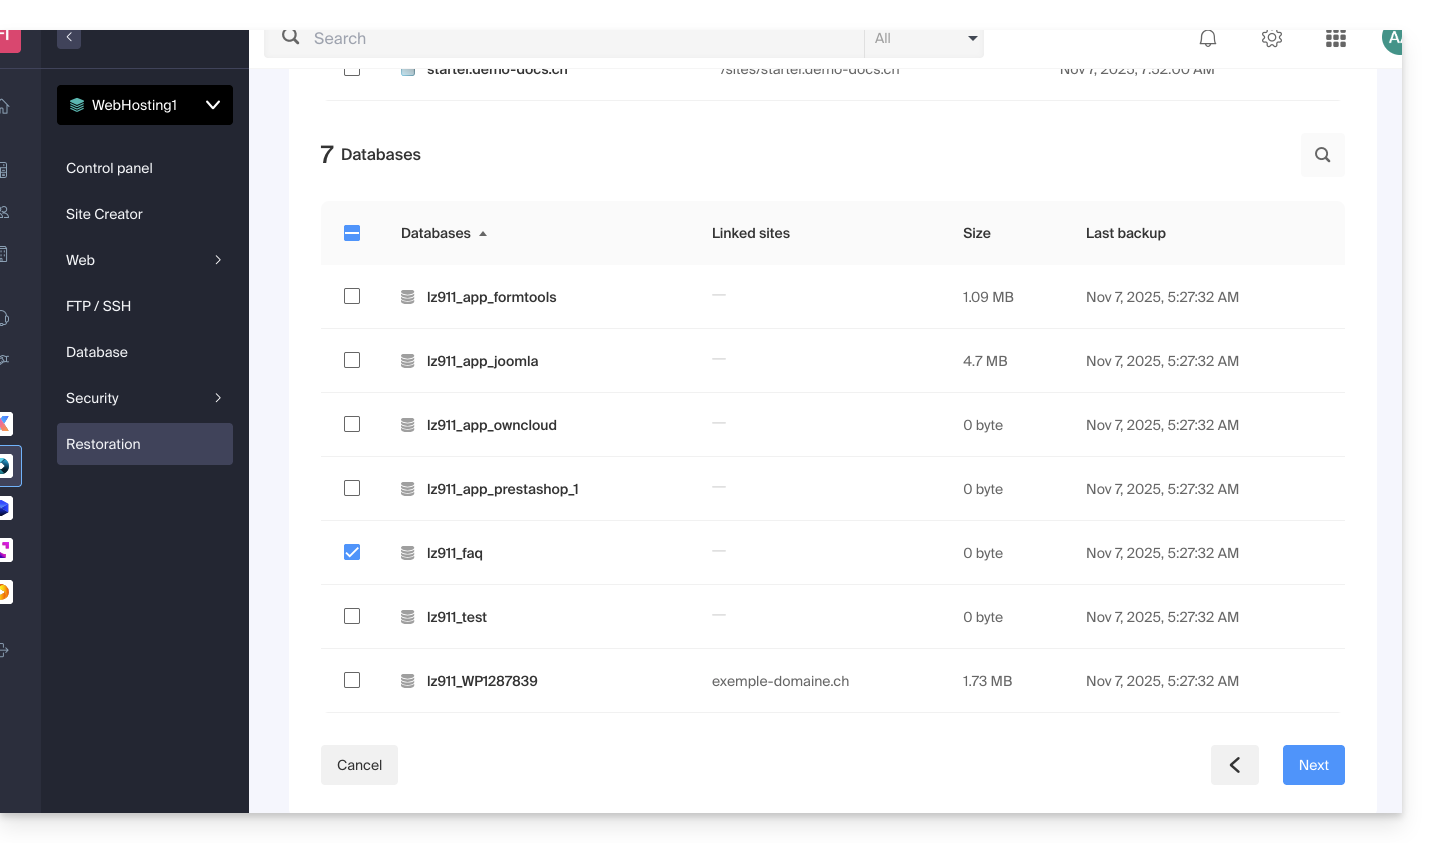
- In the Databases section, choose the database(s) to restore (closest date indicated on the right) and click the Next button:
- Choose (if offered) how to re-import the content and click the Restore button:
- Confirm the re-import method and its implications:
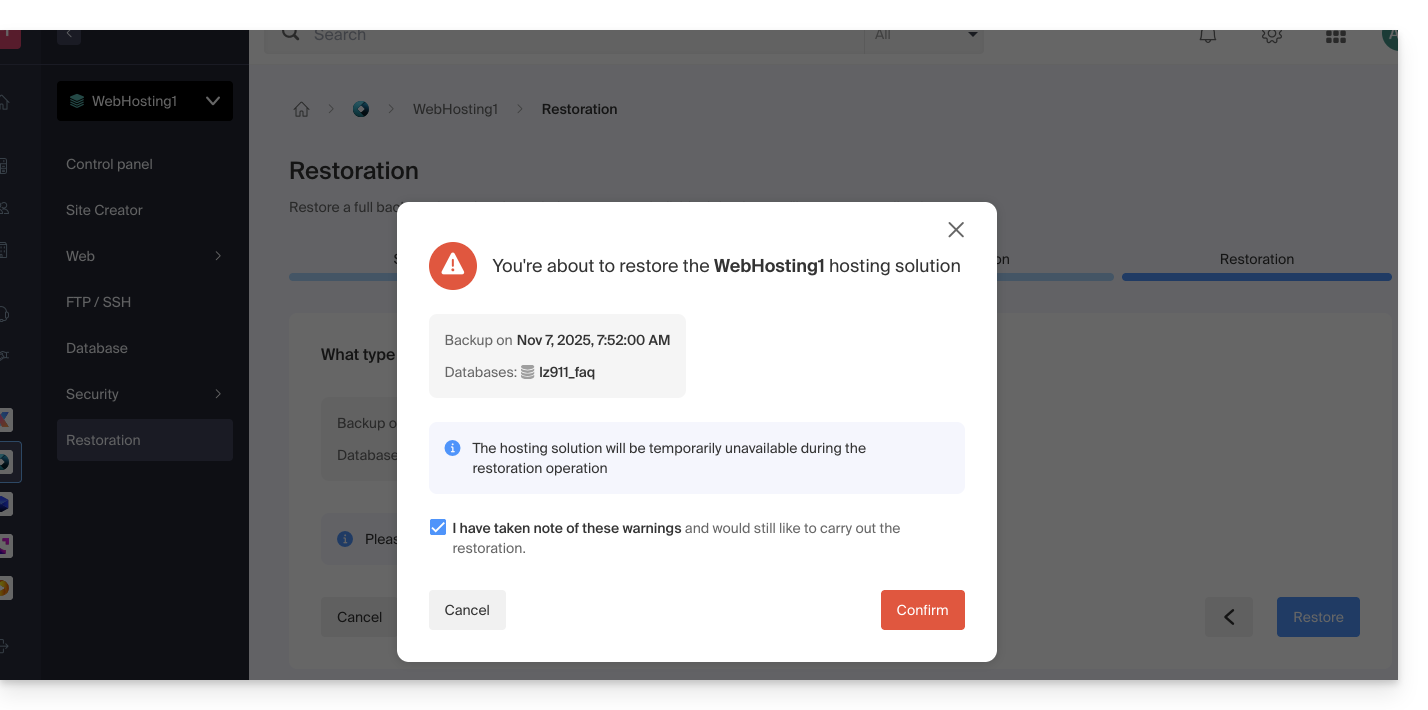
- You will receive an email when the operation is complete.
Link to this FAQ:
Has this FAQ been helpful?
This guide explains how to redirect all visitors to a secure HTTPS (SSL) version of a website hosted on Infomaniak's Web Hosting.
Introduction
- This redirection is generally automatic with a standard configuration and installation.
Manual Redirection via .htaccess File
Prerequisites
- You must have a valid and functional SSL certificate for the Infomaniak website.
Next, modify or add the following 3 lines to the .htaccess file of the website in question to ensure that all its visitors are automatically redirected to its secure HTTPS version:
RewriteEngine on
RewriteCond %{HTTPS} off
RewriteRule (.*) https://domain.xyz/$1 [R=301,L]
Replace domain.xyz with your domain name and the appropriate extension (.com, .fr, .ch, etc.).
If you encounter any issues, replace the second line of the code above with RewriteCond %{HTTP:X-Forwarded-Proto} !https.
With a CMS
Most web applications, such as WordPress and Joomla, have extensions/plugins that automatically redirect visitors to the secure HTTPS version of a website.
WordPress
If you are using a content management system (CMS) like WordPress to create your website, it is recommended to install an extension to perform this redirection:
- Back up the website's files and database as a precaution.
- Install the Really Simple SSL extension or a similar one from the WordPress console and activate it.
- Visitors are now automatically redirected to the https version of the site.
Joomla
Replace domain.xyz with your domain name and the appropriate extension (.com, .fr, .ch, etc.).
Find the line
var $live_site ='';in the Joomla configuration file (
configuration.php) on the server.Replace it with
var $live_site = 'https://www.domain.xyz';Add three lines to your
.htaccessfile on the server:RewriteEngine On RewriteCond %{HTTPS} OFF RewriteRule (.*) https://%{HTTP_HOST}%{REQUEST_URI}- Open the Joomla administration panel in "System - Configuration".
- Click on the "Server" tab and, under "Force SSL", choose "Administration and site".
- Save, and visitors will now be automatically redirected to the https version of the site.
Prestashop
- Go to the general settings in the Prestashop back office to enable SSL:
- < v1.7 click on "Preferences" then on "General"
- > v1.7 click on "Shop Parameters" then on "General"
- Activate the "Enable SSL" toggle switch to "YES".
- Click on "Save".
- In the same place, activate the "Enable SSL on all pages" toggle switch to "YES".
- Click on "Save".
If a security padlock does not appear in the browser or a warning is displayed, the issue may be with the template or modules, as they are sometimes not fully compatible with SSL. Your Prestashop may then be loading elements (images, .css or .js files, fonts, etc.) in "http" when they should now be loaded in "https".
Drupal
Please refer to this article (in English) which explains how to switch a Drupal site from http to https.
Alternative solutions
Replace domain.xyz with your domain name and the appropriate extension (.com, .fr, .ch, etc.).
In your .htaccess file, to force the site URL to be https:// but without www:
RewriteEngine On
RewriteCond %{HTTPS} off [OR]
RewriteCond %{HTTP_HOST} ^www. [NC]
RewriteRule (.*) https://domain.xyz/$1 [R=301,L]
In the case of a redirection loop, adapt the code above as follows:
RewriteEngine on
RewriteCond %{HTTP:X-Forwarded-Proto} !https [OR]
RewriteCond %{HTTP_HOST} ^www. [NC]
RewriteRule (.*) https://domain.xyz/$1 [R=301,L]
In your .htaccess file, to force the redirection with www:
with subdomains:
RewriteEngine On
RewriteCond %{HTTPS} off [OR]
RewriteCond %{HTTP_HOST} !^www. [NC]
RewriteRule (.*) https://www.domain.xyz/$1 [R=301,L]
In the case of a redirection loop, adapt the code above as follows:
RewriteEngine on
RewriteCond %{HTTP:X-Forwarded-Proto} !https [OR]
RewriteCond %{HTTP_HOST} !^www. [NC]
RewriteRule (.*) https://www.domain.xyz/$1 [R=301,L]
and without subdomains:
RewriteEngine on
RewriteCond %{HTTPS} off [OR]
RewriteCond %{HTTP_HOST} ^domain.xyz [NC]
RewriteRule (.*) https://www.domain.xyz/$1 [R=301,L]
In the case of a redirection loop, adapt the code above as follows:
RewriteEngine on
RewriteCond %{HTTP:X-Forwarded-Proto} !https [OR]
RewriteCond %{HTTP_HOST} ^domain.xyz [NC]
RewriteRule (.*) https://www.domain.xyz/$1 [R=301,L]
Common errors after an https redirection
To resolve common issues that may occur after redirecting your website to its secure https version, please refer to this other guide.
Link to this FAQ:
Has this FAQ been helpful?
Supervisor is not offered directly because systemd is recommended, better integrated with Debian, and available in Fast installer.
If you still need to install it, contact Infomaniak support in writing.
Link to this FAQ:
Has this FAQ been helpful?
This guide explains how to install a new Web Application (Joomla, Drupal, Typo3, PrestaShop, etc.) in a few clicks on paid Web Hosting offers.
Prerequisites
- Have an Infomaniak Web Hosting (order if necessary).
- Add a blank website to the Infomaniak hosting.
Specific guides
Refer to these guides if you are concerned with the specific installation of:
Refer to this other guide regarding additional technologies that can be installed in a few clicks but on Cloud Server only.
Guides for any other Web Application
To access Web Hosting and install a Web Application:
- Click here to access the management of your product on the Infomaniak Manager (need help?).
- Click directly on the name assigned to the product concerned.
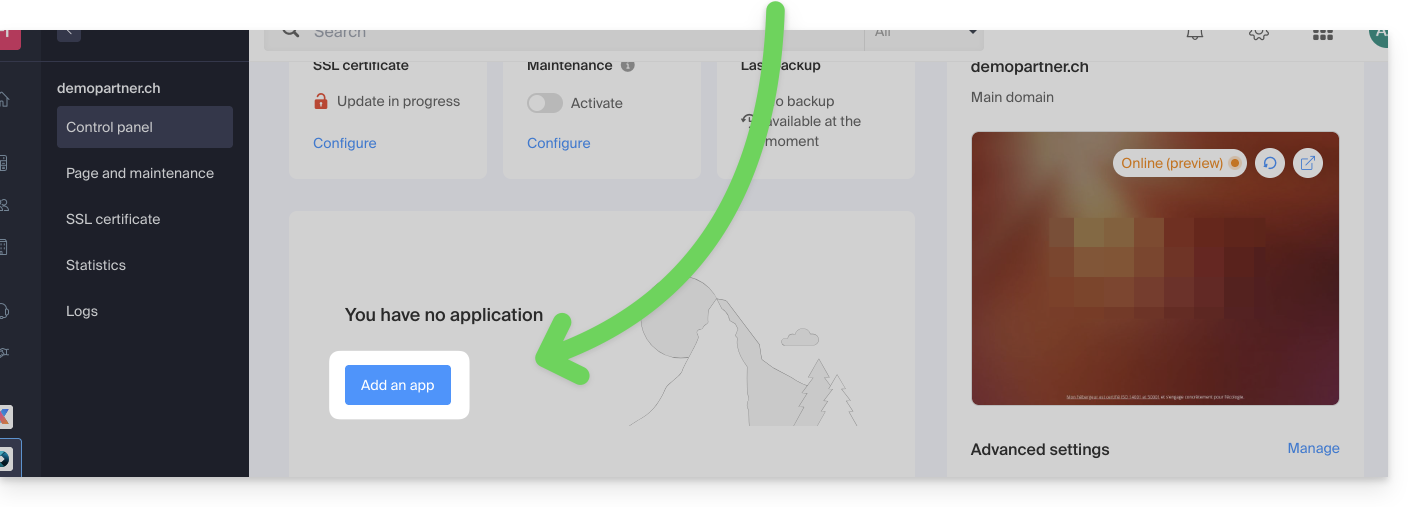
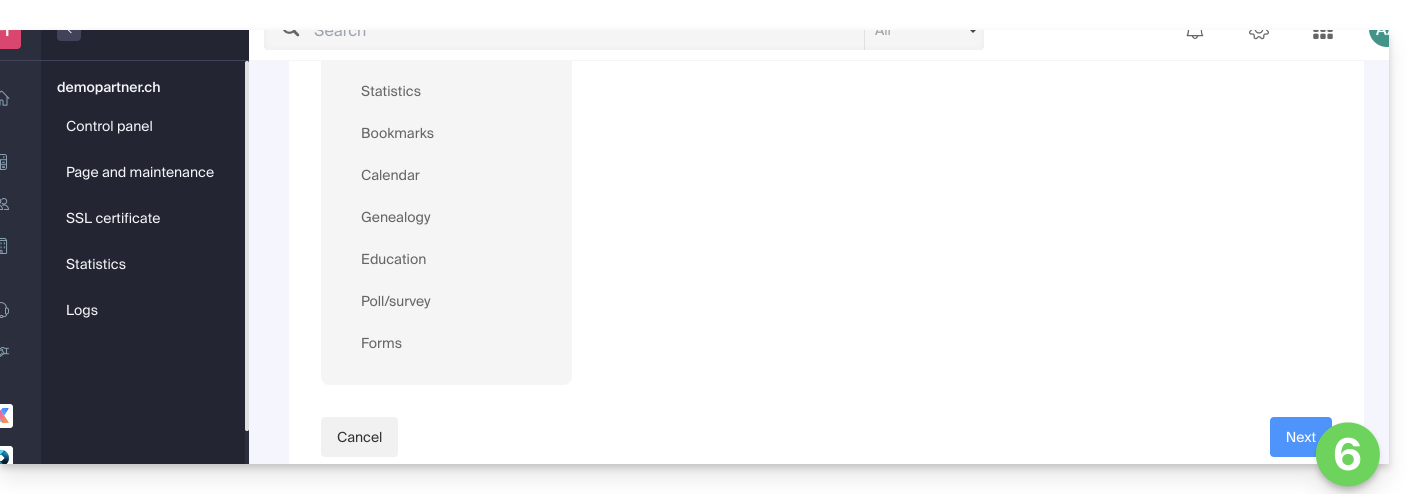
- Click on the button Add an app:
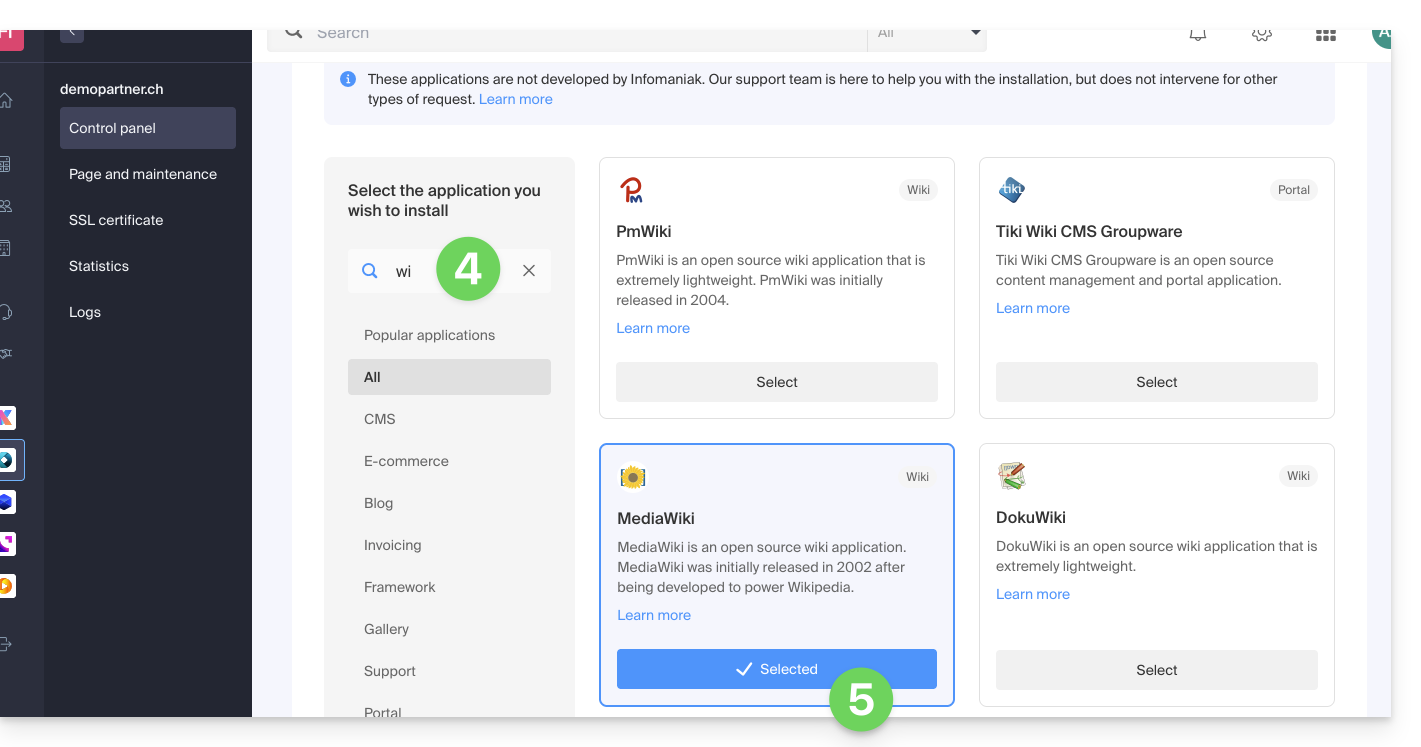
- Choose the desired application (if necessary, filter and search).
- Click on Select:
- Click on Next at the bottom of the page:
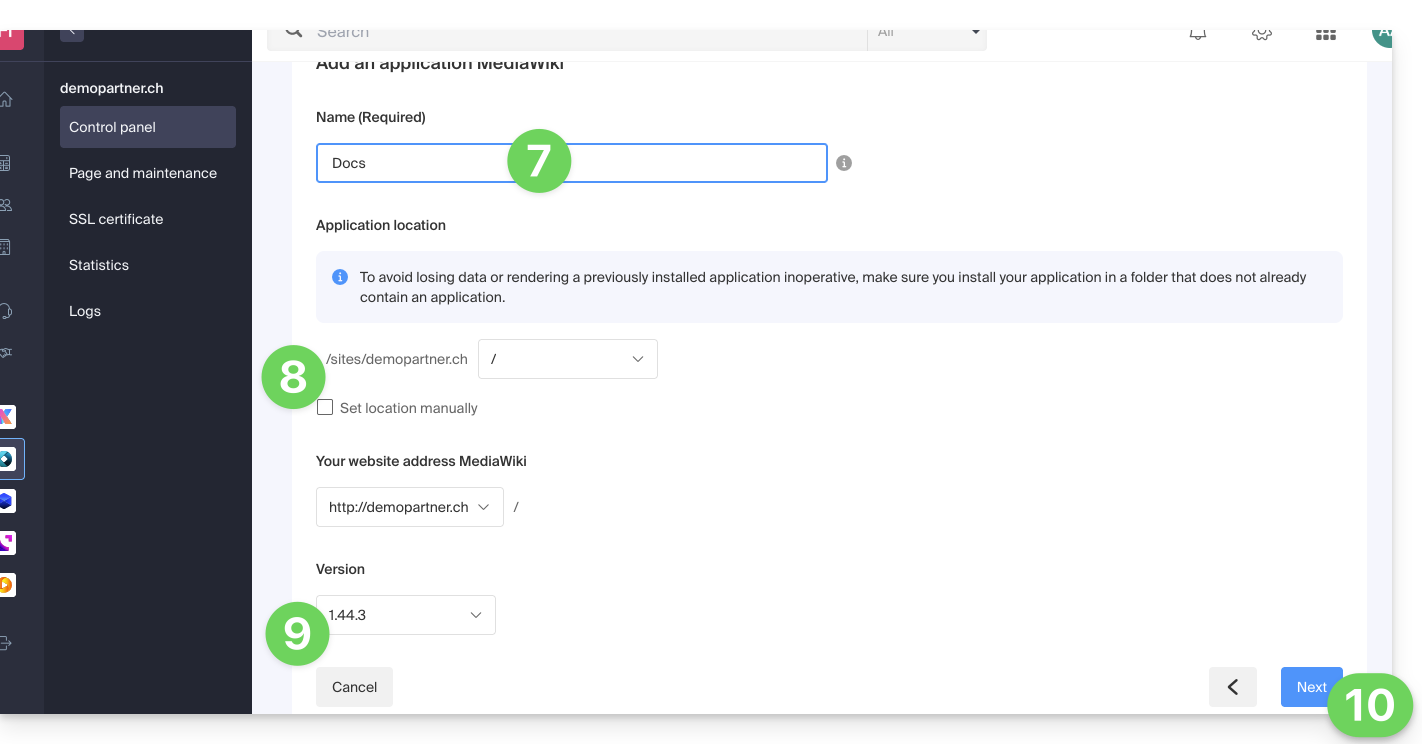
- Enter a name.
- Leave the default location or choose to install the app in a new folder that you can create using an icon visible to the right of point 8 in the image.
- Optionally, choose to install an older version if necessary.
- Click on Next:
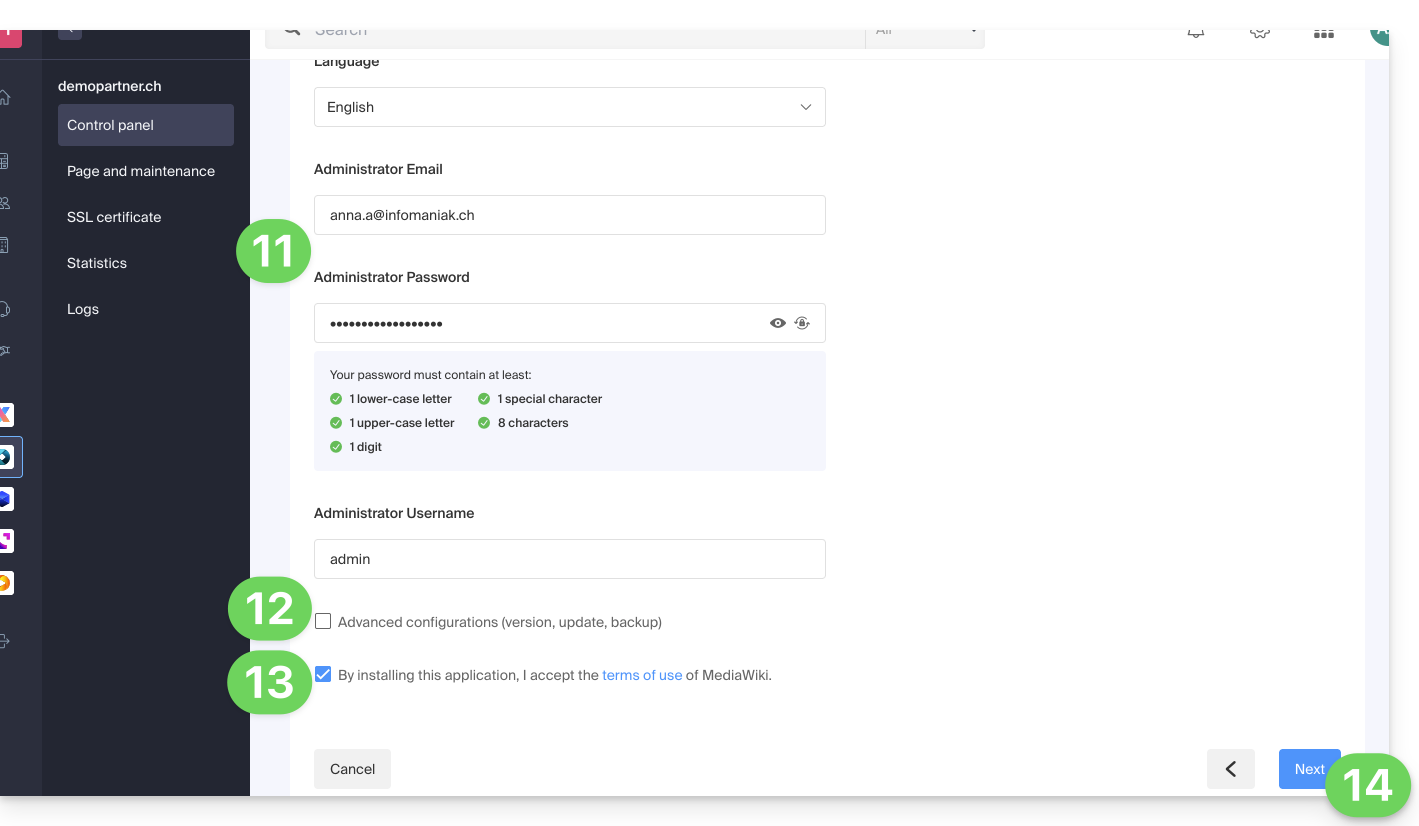
- Set up username and password.
- Specify certain advanced settings if necessary (backup type in particular).
- Read and accept the terms of use of the selected app.
- Click on Next:
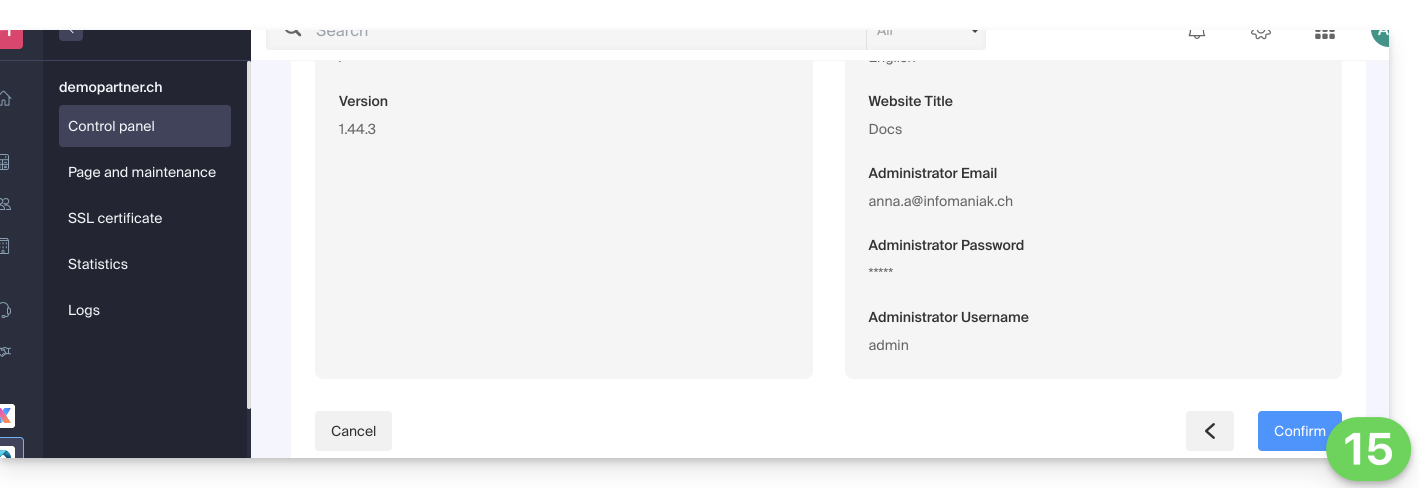
- Confirm the installation of the application in the next step and wait:
- Take note of any error messages on the screen if, for example, the selected installation folder is not empty or if the PHP version of the site on which you are attempting the installation is not compatible.
Uninstall a Web Application
To access Web Hosting and uninstall the previously installed application:
- Click here to access the management of your product on the Infomaniak Manager (need help?).
- Click directly on the name assigned to the product concerned.
- Click on the action menu ⋮ located to the right of the application to be uninstalled.
- Click on the trash can icon to delete the application:
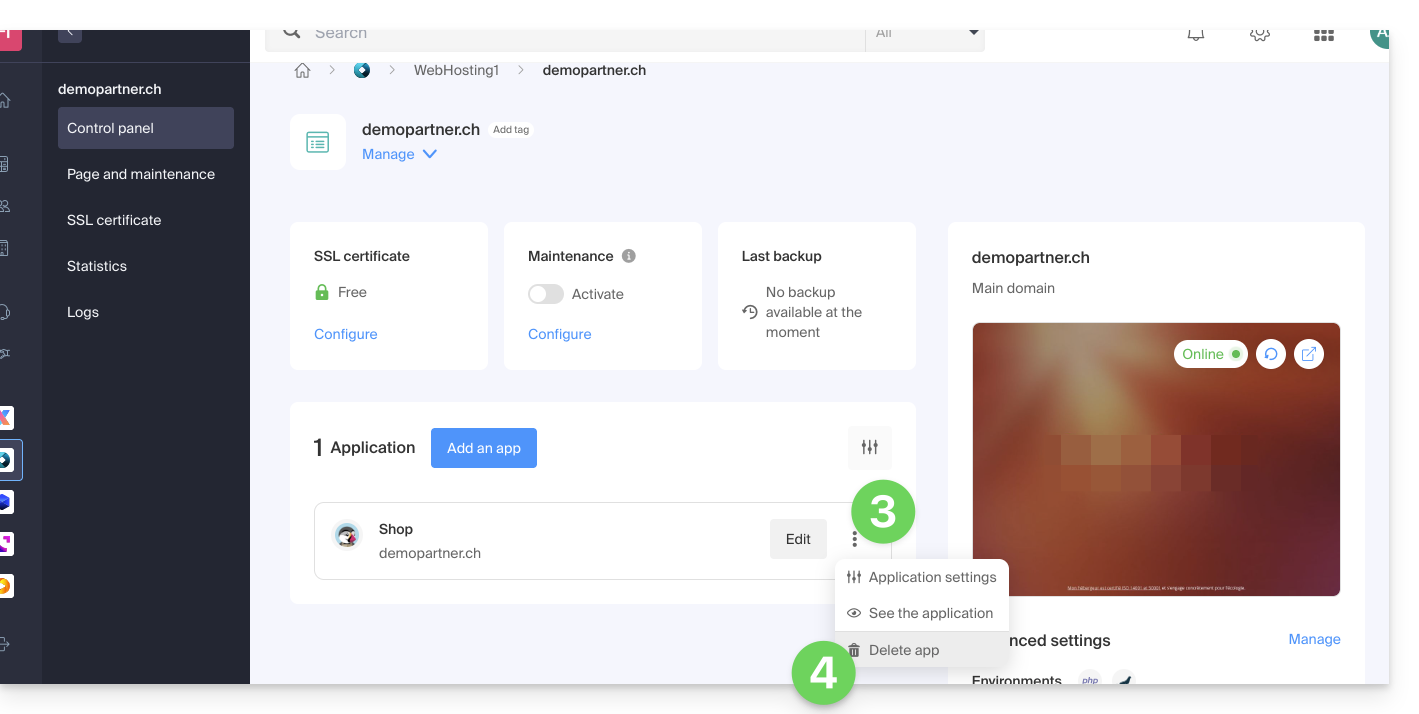
- Confirm the deletion.
Conversely, you can also remove an entire site without deleting the application itself; simply do not check the following box when deleting the site: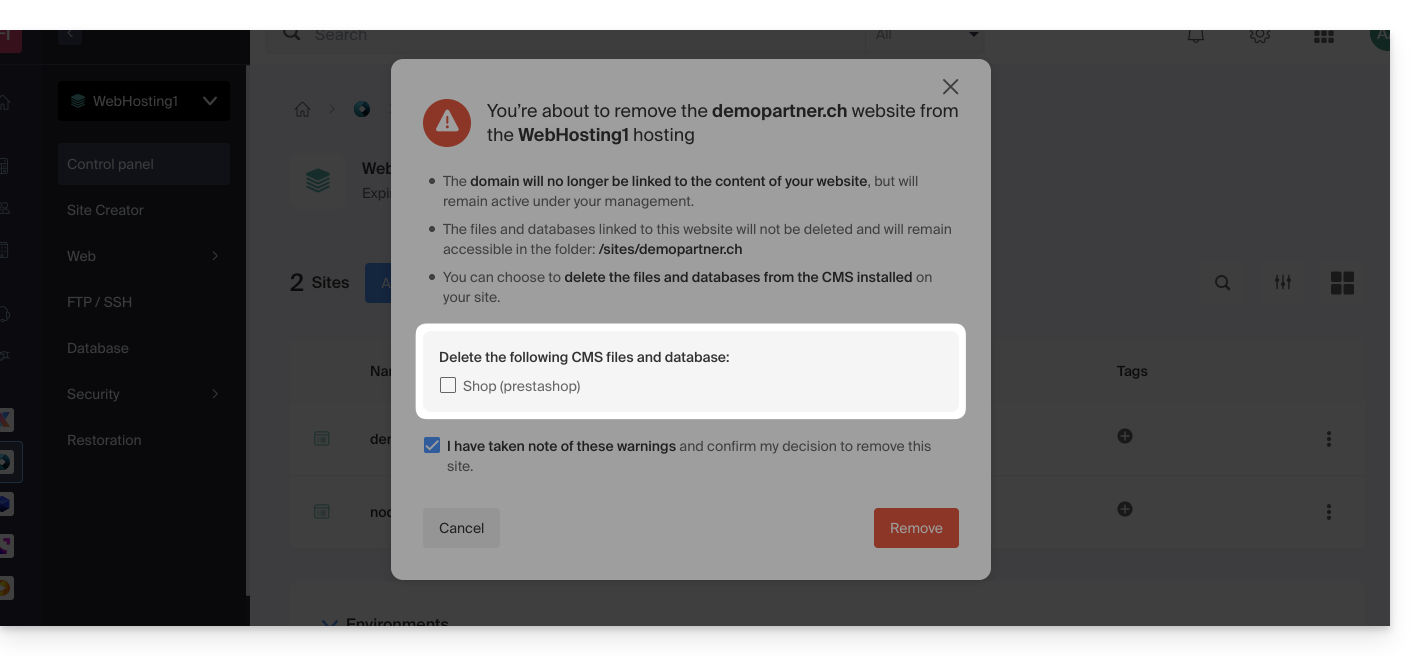
Learn More
Link to this FAQ:
Has this FAQ been helpful?
This guide explains how to add a MySQL/MariaDB database, create or modify users, and how to find all the necessary parameters to configure your scripts and CMS on a Web Hosting.
Manage databases
To access the database management page of your hosting:
- Click here to access your hosting management on the Infomaniak Manager (need help?).
- Click directly on the name assigned to the hosting concerned.
- Click on Databases (or MariaDB if necessary) in the left sidebar to access the Databases and Users menu:
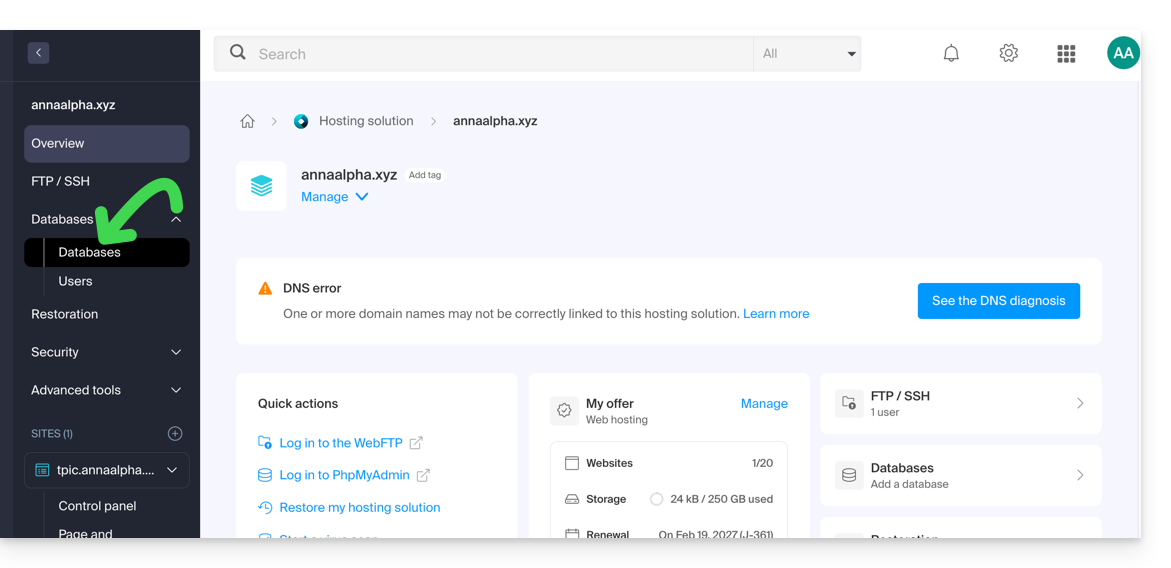
Databases
Under the Databases tab you can: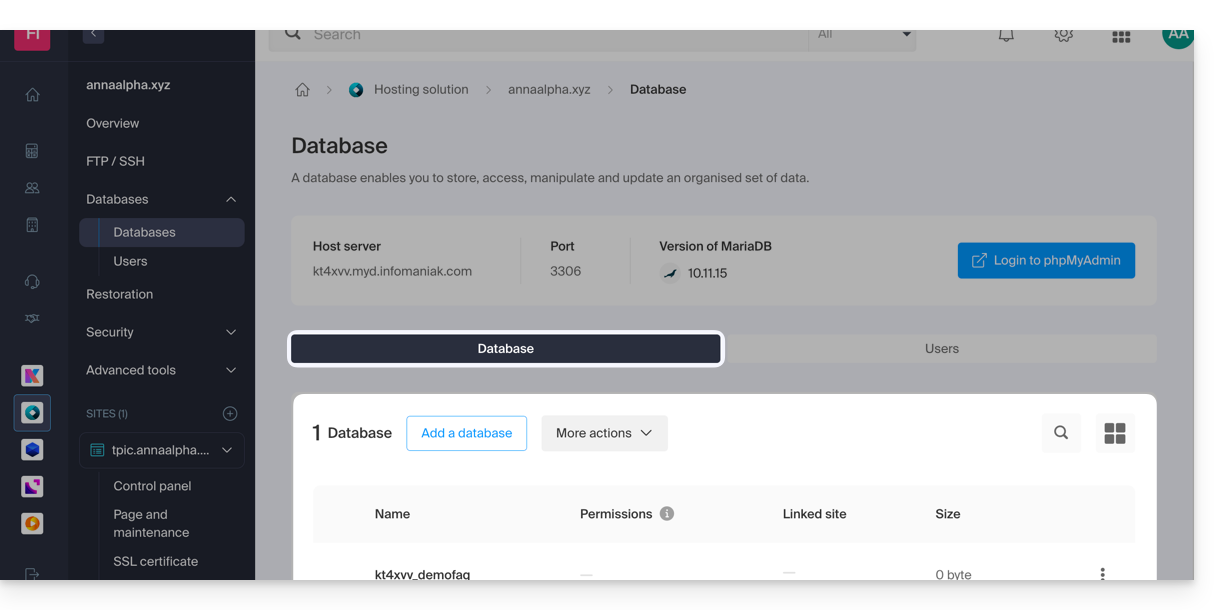
- Create a MySQL/MariaDB database by clicking on the Add a database button.
- Import, export or restore a MySQL database by clicking on the dropdown to the right of the Add button.
Users
Under the Users tab you can: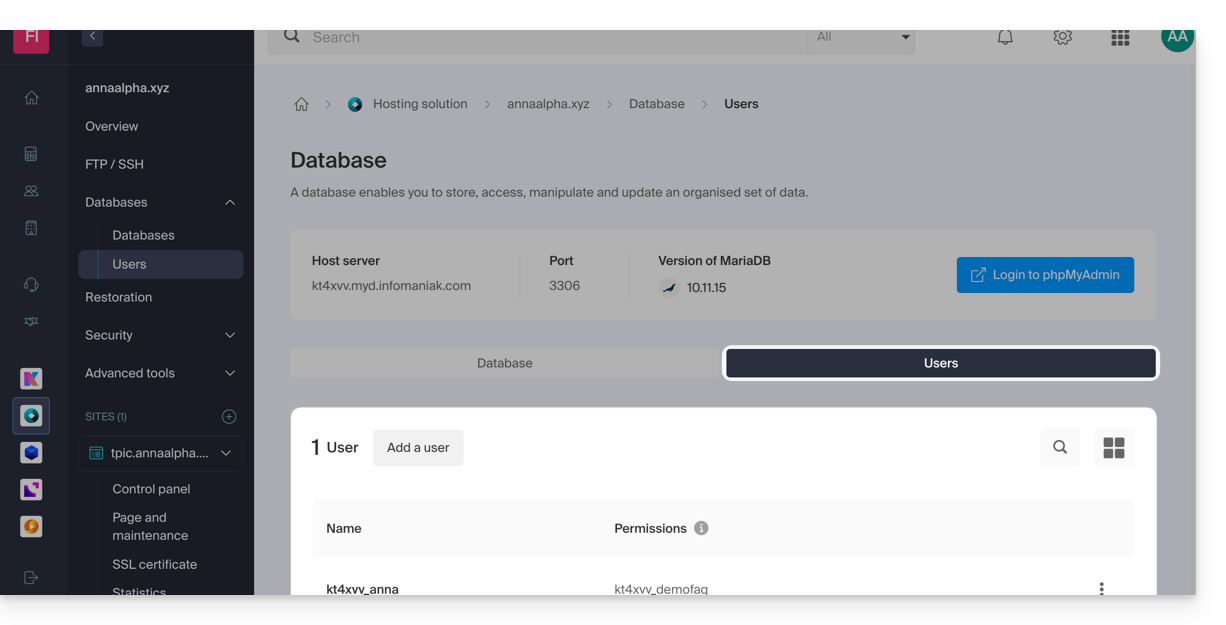
- Create a MySQL/MariaDB database user by clicking on the Add a user button.
Configuration information
This is also where you will find the required information to configure CMS or Web applications:
- The name of a database (e.g.
XXXX_dbname) - The username of a database (e.g.
XXXX_username) - The password of the username of a database (the one you chose when creating the MySQL/MariaDB user to reset if you forgot it)
- The MySQL/MariaDB server of the databases / the hostname (e.g.
XXXX.myd.infomaniak.com) with its version (5.7 for example)
User rights, shared servers & Cloud
- With read permissions: “SELECT”
- With write permissions: “INSERT, UPDATE, DELETE, CREATE TEMPORARY TABLES, LOCK TABLES”
- With admin permissions: “CREATE, DROP, INDEX, ALTER, CREATE VIEW, SHOW VIEW, REFERENCES”
- + “CREATE ROUTINE, ALTER ROUTINE, EXECUTE, TRIGGER, EVENT” on Cloud Server only (see this other guide on this subject)
- With no permissions: the user will not see the database appear in phpMyAdmin
Web application databases
- See this other guide on WordPress.
- See this other guide on Joomla.
Link to this FAQ:
Has this FAQ been helpful?
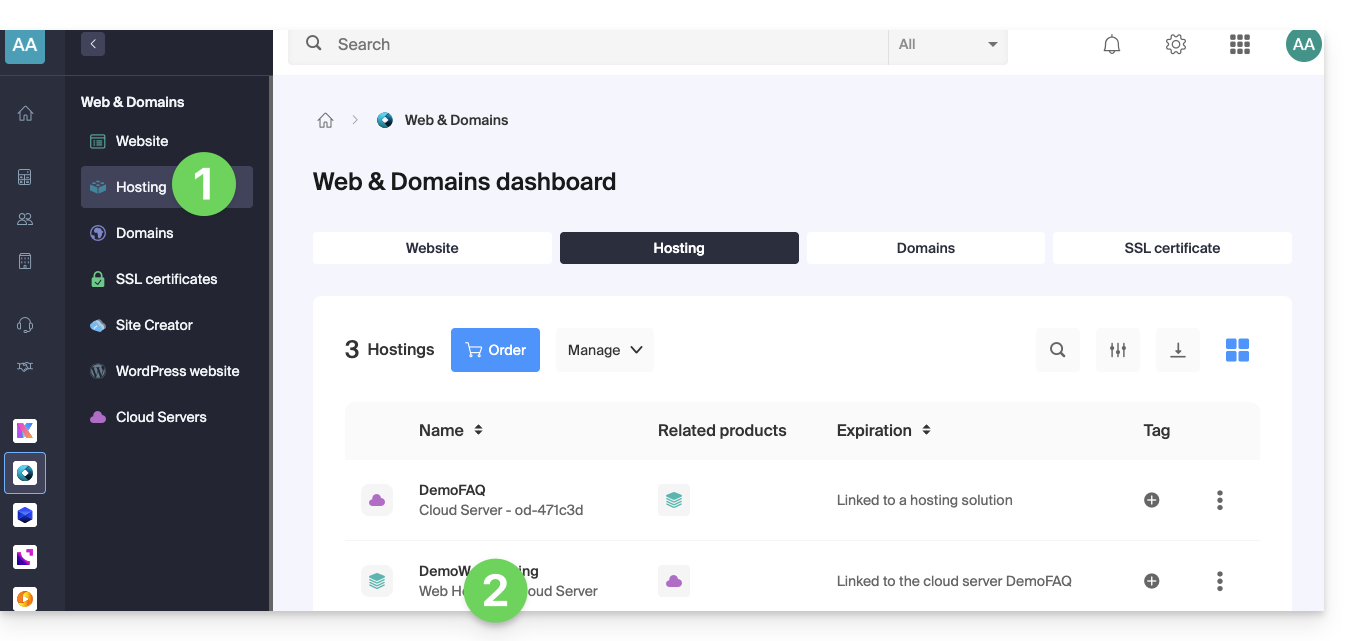
This guide explains how to manage the content of a Web hosting by accessing the server, particularly via the FTP protocol or through command line (CLI) securely using SSH.
Preamble
- To easily and quickly manage the files of your Web hosting without having to install an application or enter FTP credentials, use Web FTP from your Infomaniak Manager (it allows, among other things, CHOWN and file compression/decompression
zip). - When creating a website via Apache/PHP hosting, an FTP/SSH/SFTP user is automatically created; you can create additional FTP accounts.
- However, in the case of a Node.js site, no SSH/SFTP user is automatically created; it is necessary to manually create a user with SSH/SFTP rights to access your Node.js environment.
- Regarding the protocols supported by Infomaniak (FTP, SFTP, etc.) depending on your hosting offer (Starter, Node.js, etc.), refer to this other guide.
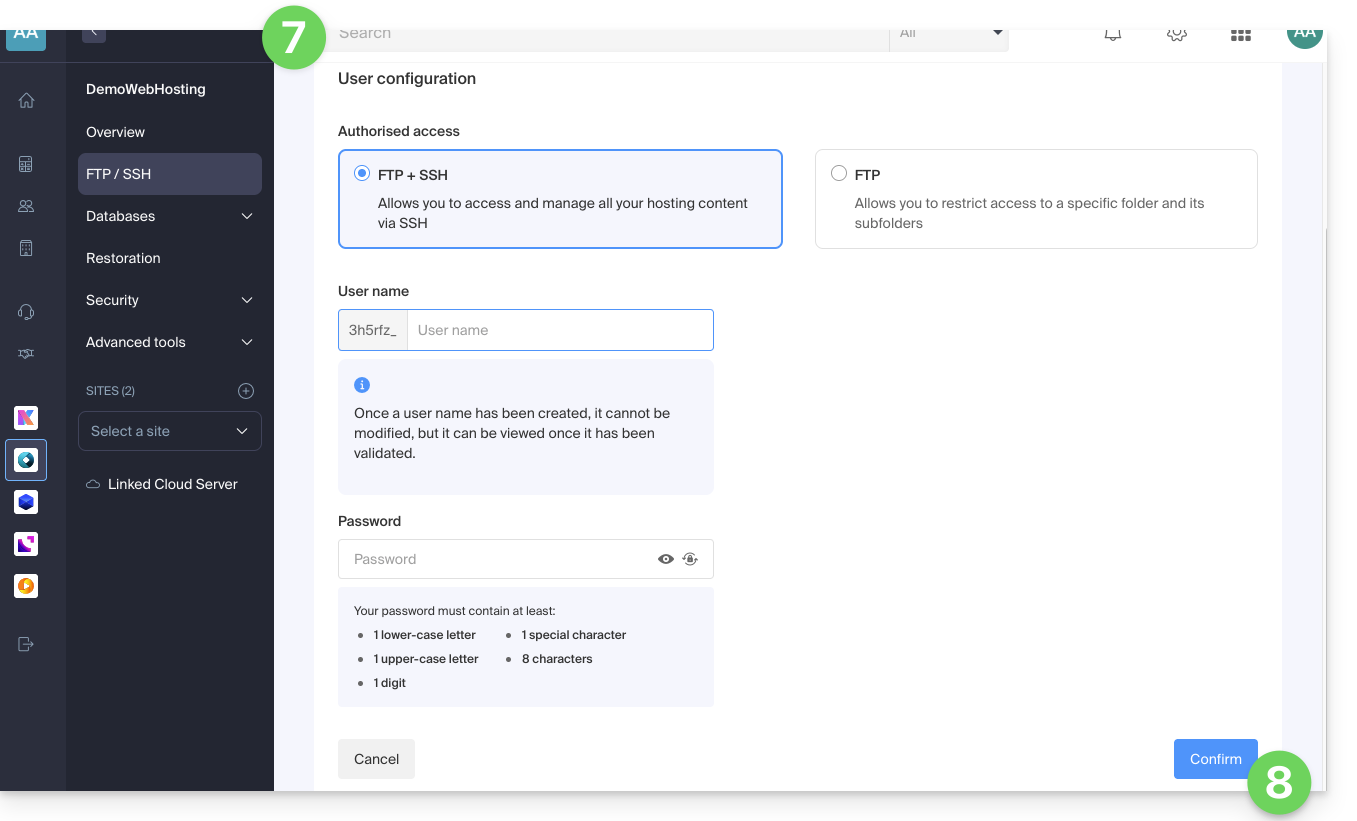
Create an FTP account
To access Websites to manage the FTP part:
- Click here to access the management of your hosting on the Infomaniak Manager (need help?).
- Click directly on the name assigned to the hosting in question:
- Click on FTP / SSH in the left sidebar.
- Then either you click on the Add button to create a new FTP/SSH account…
- or you click on the action menu ⋮ to the right of an existing account to change its password, or delete it:
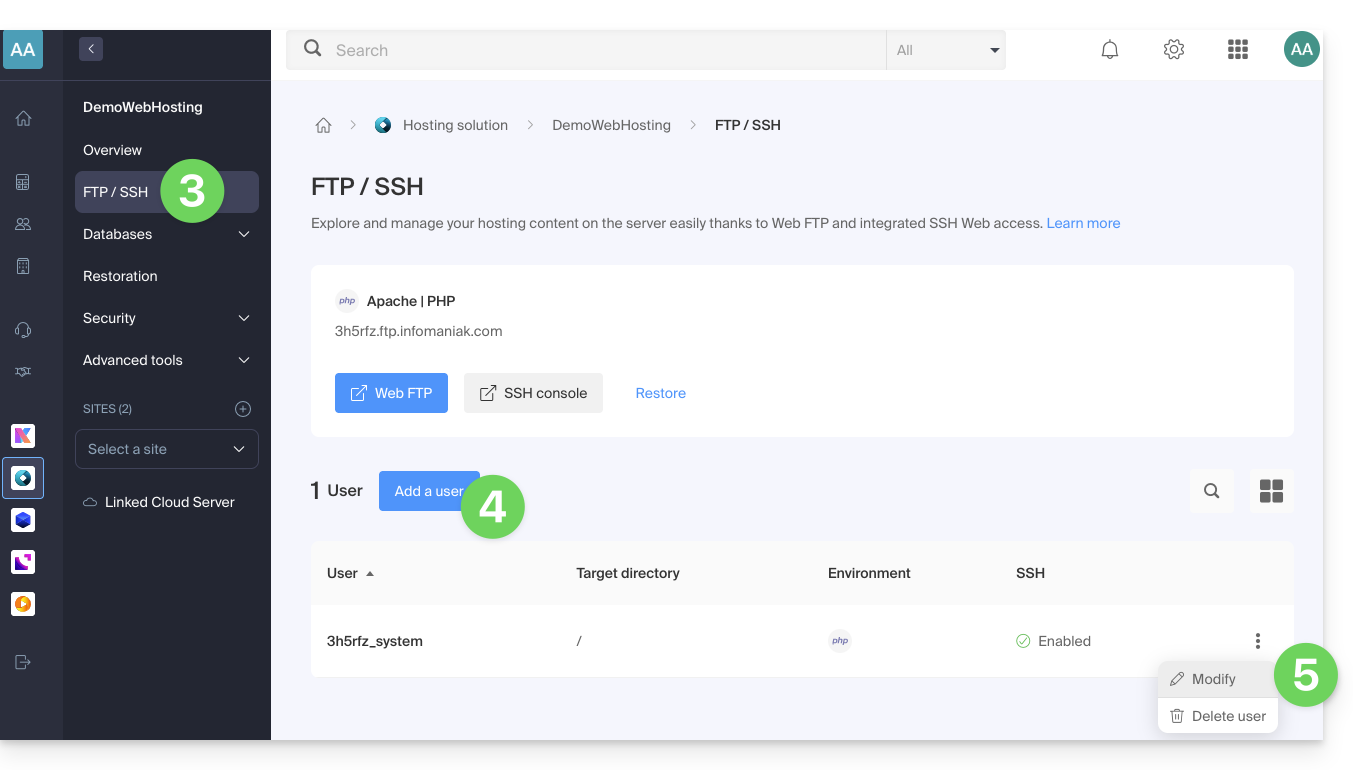
- If you have a node.js site on your hosting, you need to choose the desired environment for creating a new FTP/SSH account:
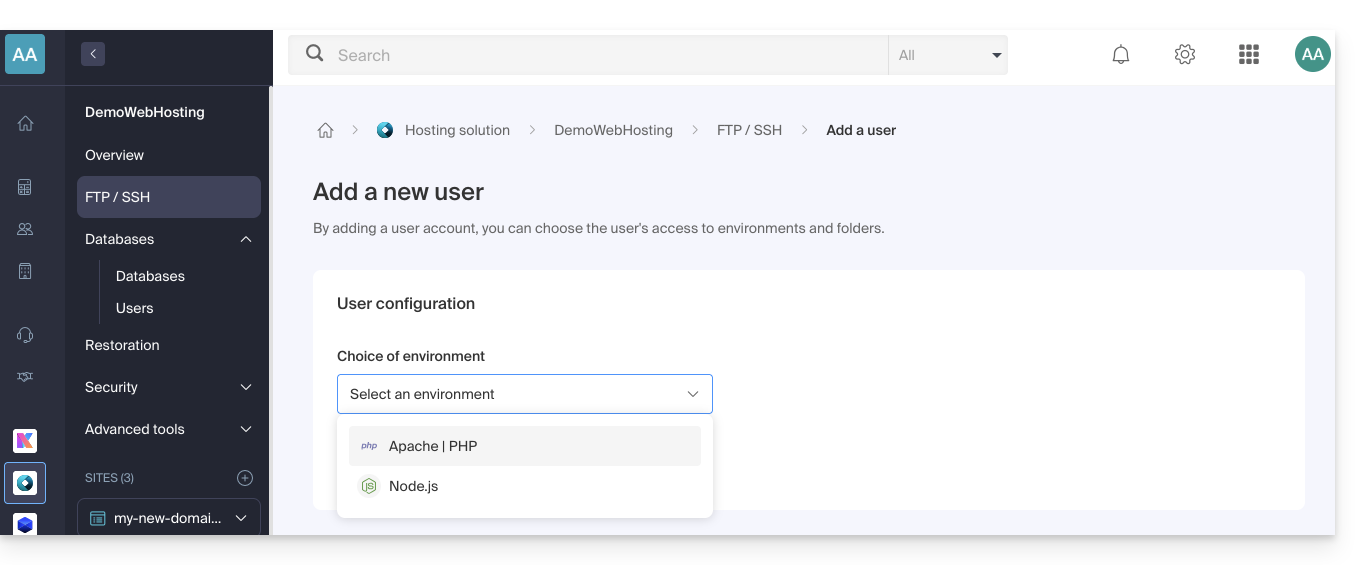
- Then enter the desired information:
- An FTP + SSH account gives the user in question access to all the content of a hosting and allows them to manage it via FTP/SFTP and SSH.
- An FTP account allows you to restrict a user's access to a folder and its subfolders; if you manage multiple sites on the same hosting, this allows you to distribute site management among multiple webmasters, for example.
- Click the button at the bottom of the page to Confirm the creation of the account:
Configure an FTP software/client
Using an FTP software/client like Filezilla or CyberDuck, manage files actually via FTP without limit (possibilities of background work, resumption of transfers after disconnection, bandwidth limitation, etc.).
Refer to this other guide if you are looking for information about configuring an FTP software/client.
Link to this FAQ:
Has this FAQ been helpful?
This guide explains how to migrate an old Infomaniak hosting (old 60 GB formula) to the current offer.
Preamble
- The current Infomaniak hostings are much more performant, flexible, and secure than before.
- In all cases, your current site remains visible to your visitors during the migration:
- You decide, within a month, when you want to definitively switch to the version of the website that will have been copied or rebuilt on the new servers.
- During this operation, the statistics are reset.
Migrate an old hosting to the current offer
Access the old-generation Web hosting:
- Click here to access the management of your product on the Infomaniak Manager (need help?).
- Click on the action menu ⋮ located to the right of the item concerned.
- Click on Change Offer.
- If you do not see the "Change Offer" button, make sure you are logged in with an account that has billing rights.
Then carefully follow the guide adapted to your situation:
- Keep your current site (recommended)
- Erase the content of your hosting and create a new site (ideal to start from scratch)
- Keep your current site and switch to a Cloud Server
Link to this FAQ:
Has this FAQ been helpful?
This guide explains how to add an additional website to an existing Infomaniak hosting plan.
Preamble
- The hosting can be on a shared web hosting plan or on an Infomaniak Cloud Server.
- The additional site can be either:
- a second domain name (for example.
domain2.xyz), - or a subdomain (for example.
abc.domain.xyz) of a domain name that you already own.
- a second domain name (for example.
- In this multisite/multidomain management (virtual host), the total disk space and resources of your hosting are shared between your sites/subdomains.
Access site management
Prerequisites
- If the 20 site slots offered in the Web hosting are already in use, order additional sites.
To access a web hosting plan and add a site:
- Click here to access the management of your products in the Infomaniak Manager (need help?).
- Click directly on the name assigned to the product in question.
- Click the blue button Add:

- Choose the optional content for the new site (A) or other specific installation, blank space, advanced technologies (Node.js for example) (B):
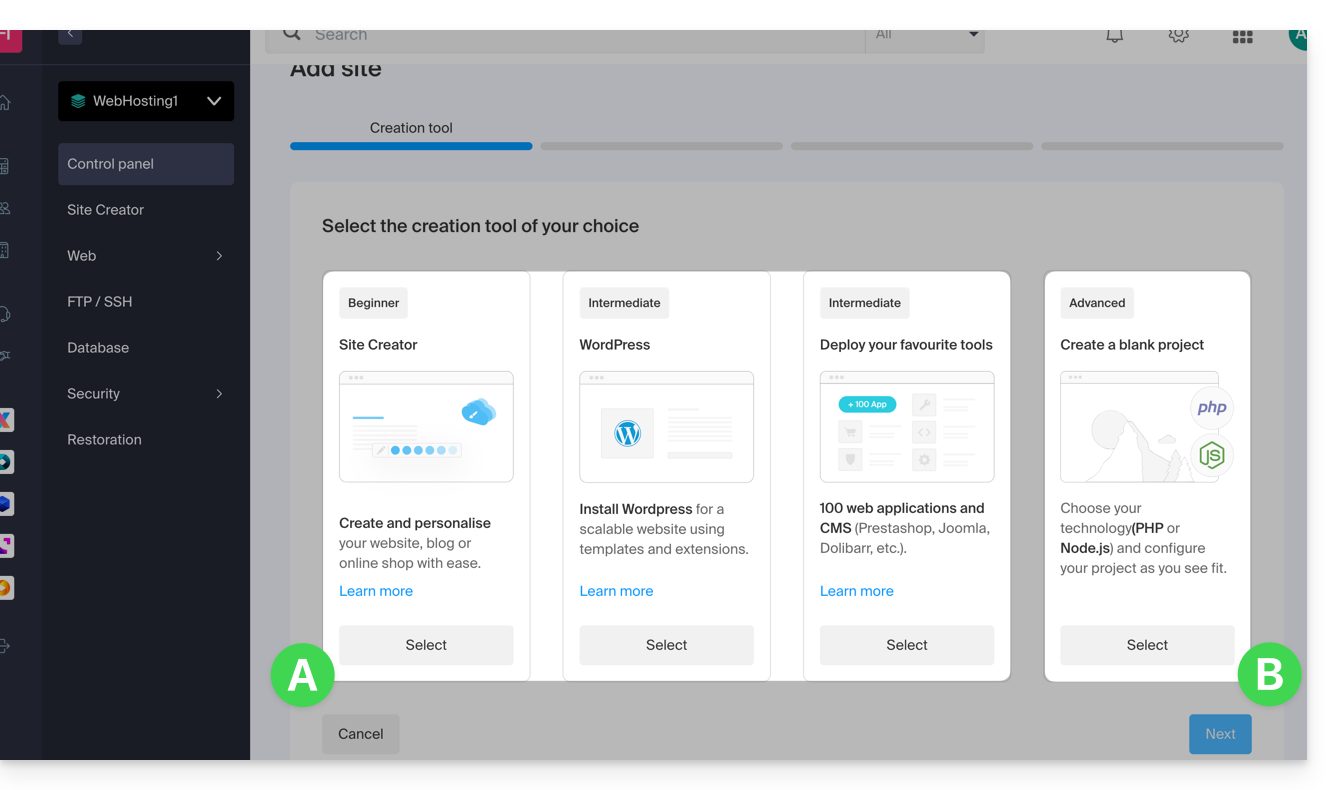
- Click on Next.
- Choose the type of domain to assign to this new site:
- an already acquired domain name
- a subdomain created from an already acquired domain name
- a domain name still available and to order
- Enter the domain name (
domain2.xyz, for example) or the subdomain.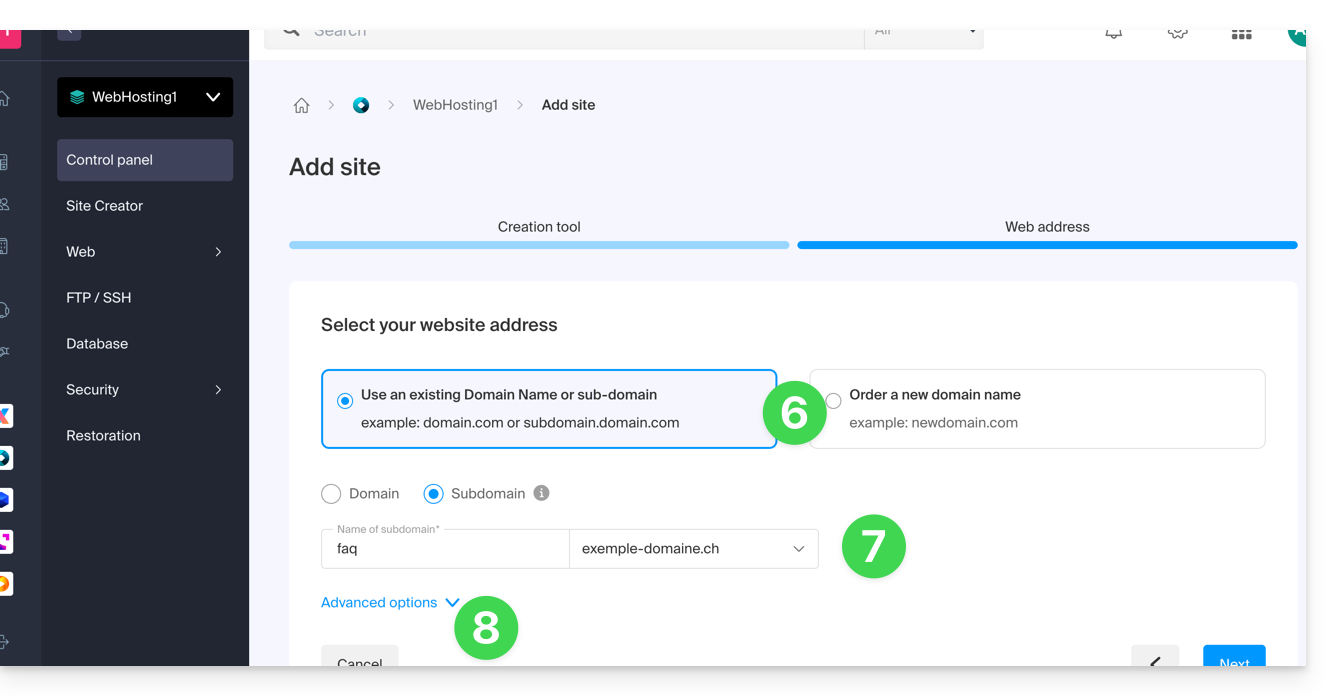
- Choose the optional advanced options, including:
- By default, the new site is added to the directory
/sites/domain2.xyzon your FTP server. - To manually set another directory, check Set location manually and indicate the path and name.
- Create a new folder if necessary:

- By default, the new site is added to the directory
- Click on Continue.
If it's a subdomain or if the domain name or its DNS zone is managed by Infomaniak, it is possible to automatically update the existing DNS entries. Otherwise, make the necessary changes with your registrar or transfer the management of the domain name to Infomaniak.
Link to this FAQ:
Has this FAQ been helpful?
This guide explains how to switch from one Organisation to another from your Infomaniak Manager when you belong to multiple Organisations.
Introduction
- Since you opened your account with Infomaniak, you have been a member of at least one Organisation.
- If you were the only one and it wasn't an invitation, an Organisation was created in your name and you automatically became its legal representative.
- Otherwise, you belong to the Organisation that invited you (to join its kSuite, to manage a product, etc.).
- You can leave Organisations.
- It is perfectly possible to have access to multiple Organisations from the same login credentials and to quickly switch between them.
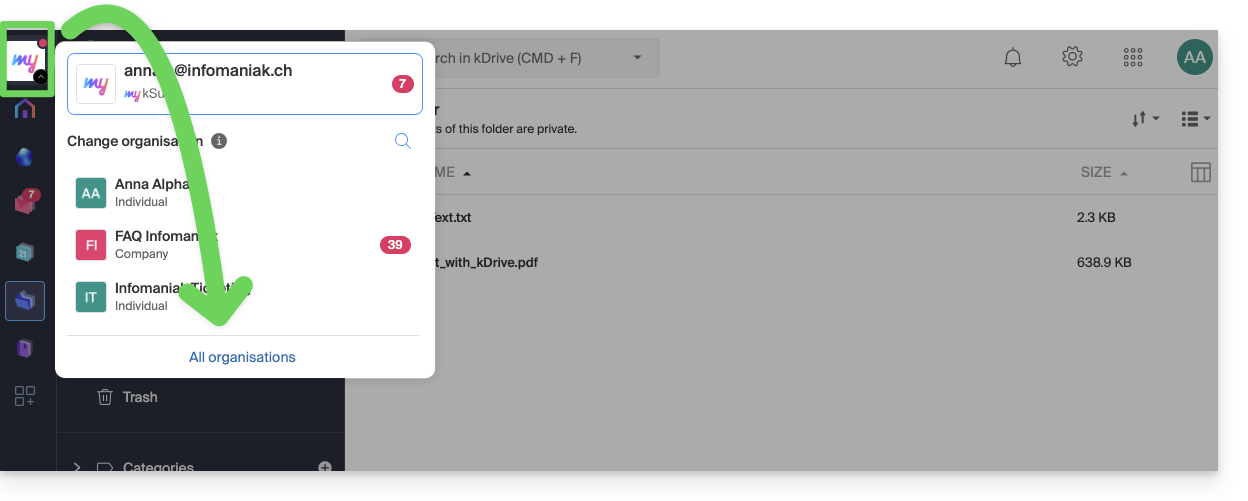
Switch to one of the other Organisations
To switch to another Organisation among those to which you belong:
- Click here to access the management of your products (Infomaniak Manager).
- Click on the chevron at the top left of the Manager interface.
- Click on the Organisation you want to access (or display them all to access all the kDrive / email addresses to which you are linked).
- The change of Organisation is immediate, you are automatically switched:
Link to this FAQ:
Has this FAQ been helpful?
This guide explains how to find out the operating system version of the server for your Web Hosting.
Preamble
- Even if Debian or a package seems outdated, the displayed versions do not present any vulnerabilities:
- Infomaniak keeps them up to date via regular internal patches on all components and systems used.
- The versions are chosen for their stability and then strengthened by security measures that standard tests do not detect.
- If you or your clients identify a vulnerability in an Infomaniak product, please submit a POC. Although rare, these cases are handled quickly.
- Data security is the responsibility of the user: Infomaniak cannot be held responsible for poor management or use of access credentials.
What OS on my site?
To find out the version:
- Log in to the server via SSH (need help?).
Run the following command:
lsb_release -aYou will get information of this type:
Distributor ID: Debian
Description: Debian GNU/Linux 7.9 (wheezy)
Release: 7.9
Codename: wheezy
Link to this FAQ:
Has this FAQ been helpful?
This guide explains how to remove an alias domain from an Infomaniak Web Hosting. The main domain name of the site will then no longer be linked to any other domain name.
This allows you to create a new Web Hosting or distinct site for the domain name thus unlinked.
Prerequisites
- Have dissociated the synonym domain name from the main domain name if there was an association before.
Remove the alias domain
To remove an alias domain from your site:
- Click here to access the management of your site on the Infomaniak Manager (need help?).
- Click directly on the name assigned to the site concerned:
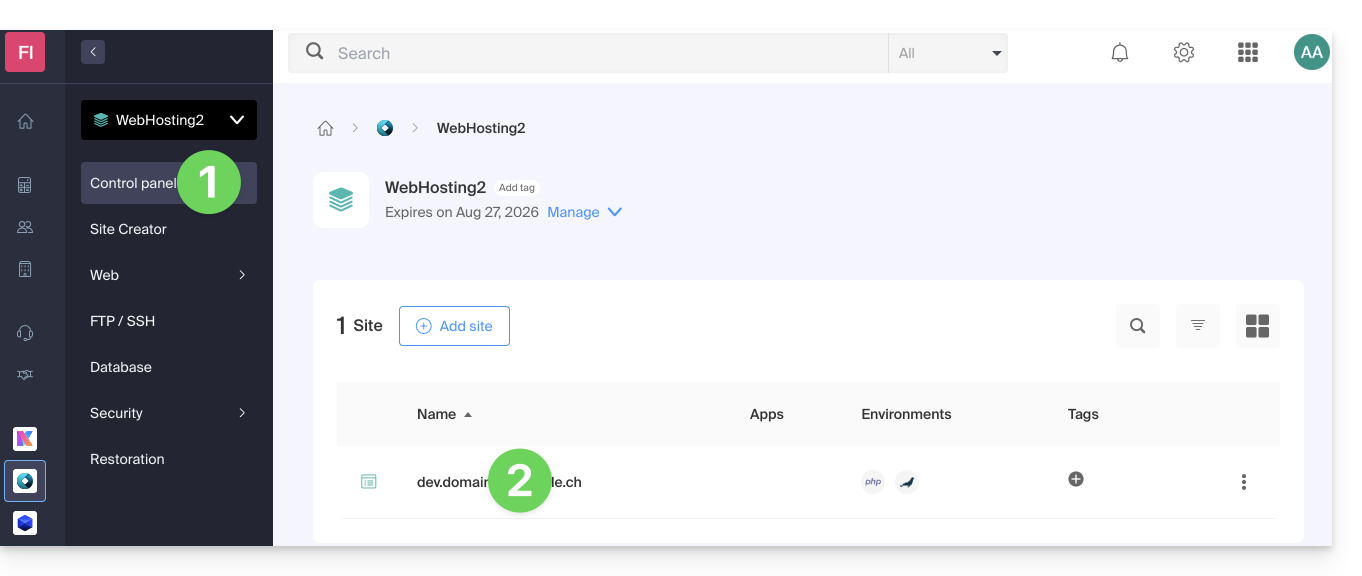
- Click on the chevron to expand the Domains section of this site.
- Click on the action menu ⋮ to the right of the domain to be removed.
- Choose Unlink:
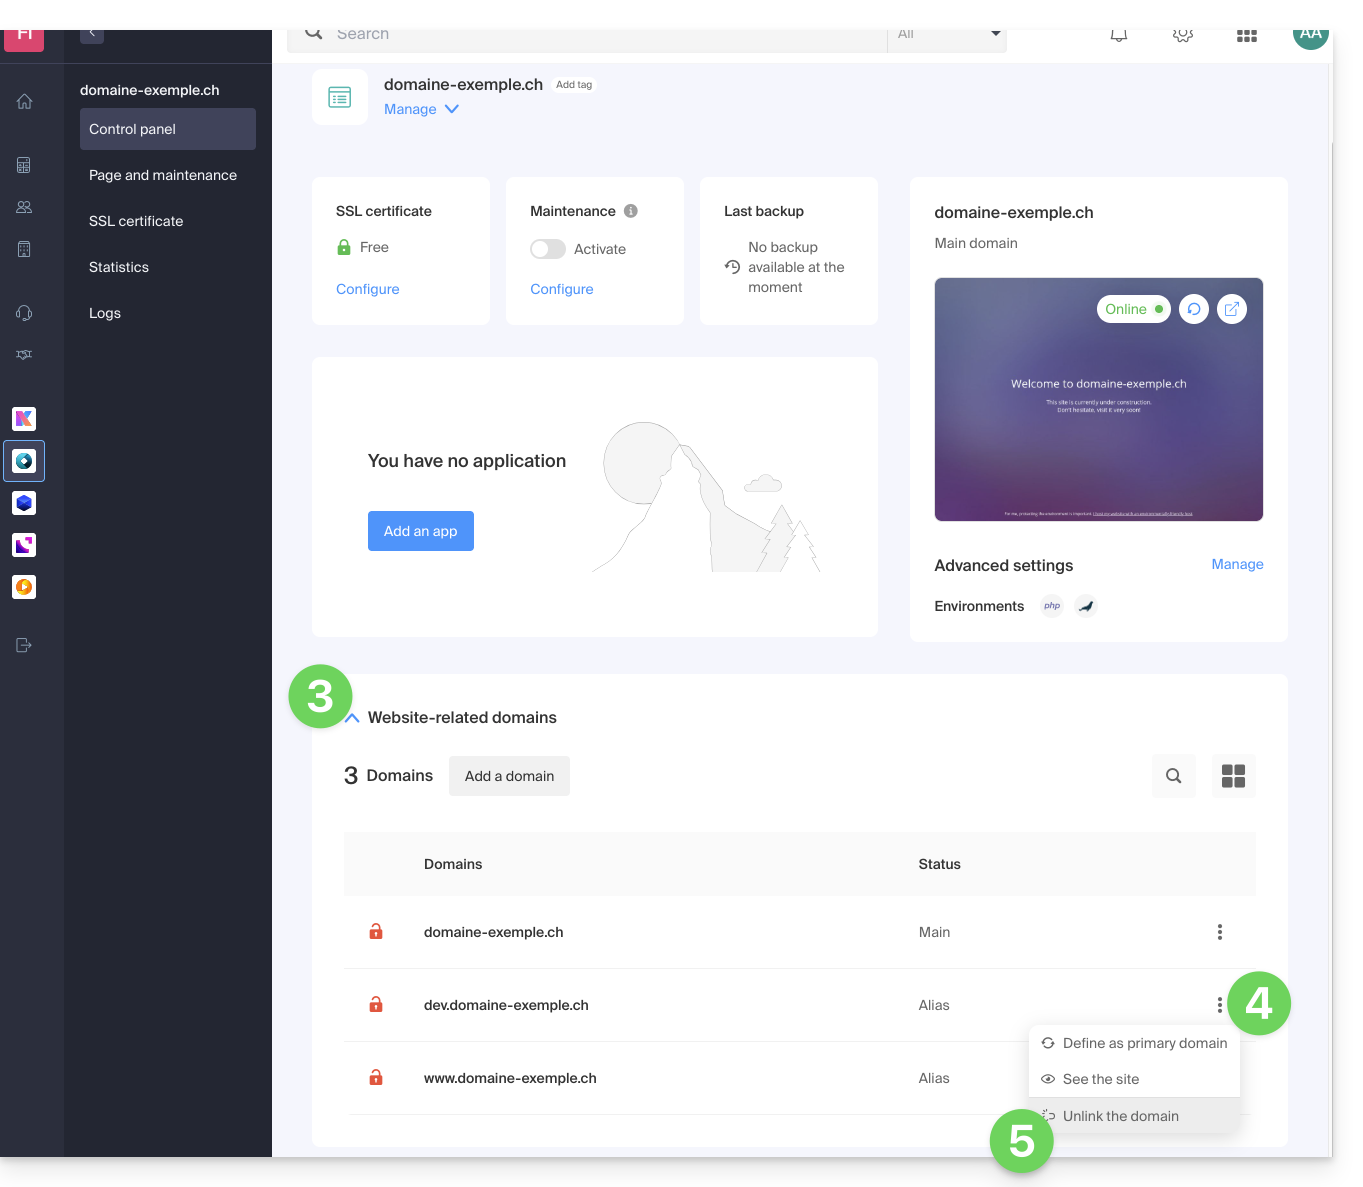
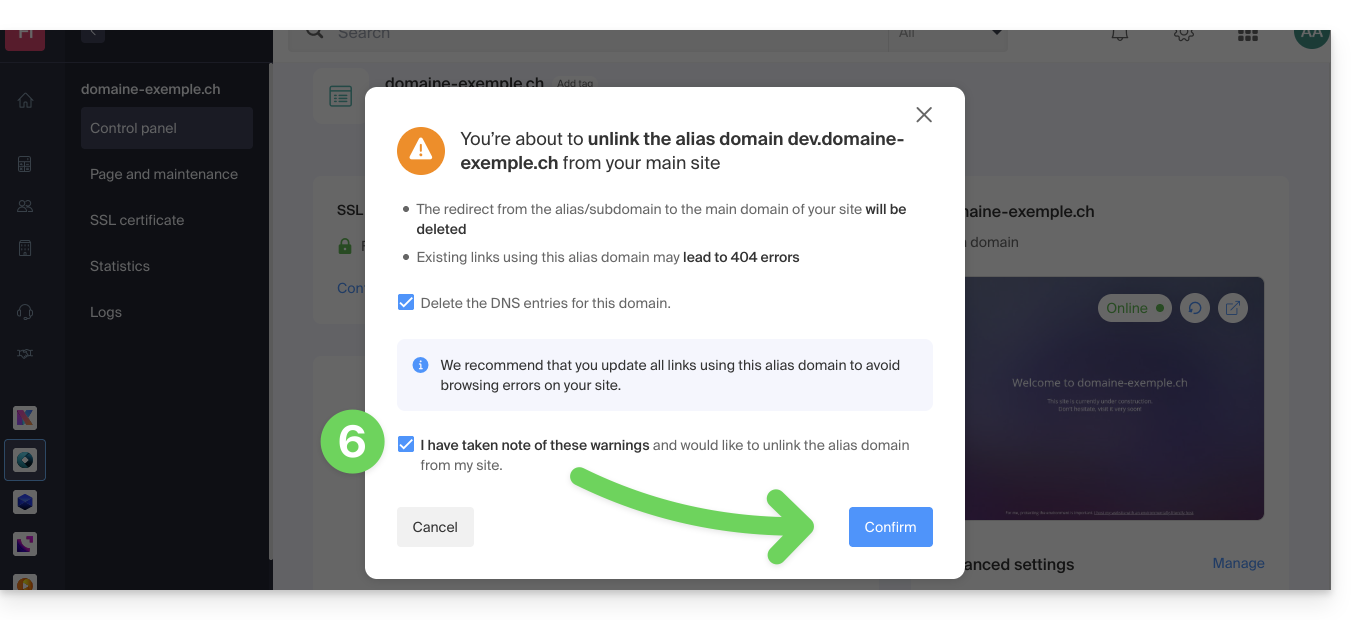
Confirm the deletion of the alias:
- If necessary, you can choose to delete the DNS records related to the domain…
Link to this FAQ:
Has this FAQ been helpful?
This guide explains how to add a synonym domain to a domain name.
Preamble
- A synonym domain is a domain name that can serve as a secondary name for another domain.
- When a synonym domain is added, it automatically inherits the content of the DNS zone of the main domain (including
MX,A, etc. records), as well as its Web and Mail hosting. - Alternatively, you can also add a (domain) alias to a website or add a (domain) alias to a Mail Service.
Add a synonym domain to a domain
Prerequisites
- The domain name of the future synonym or the management of its DNS zone…
- … must be reserved with Infomaniak,
- … must be configured with the Infomaniak DNS,
- … must not be linked to any product yet.
- The domain name on which the synonym will be placed…
- … must not be associated with the Infomaniak Newsletter product.
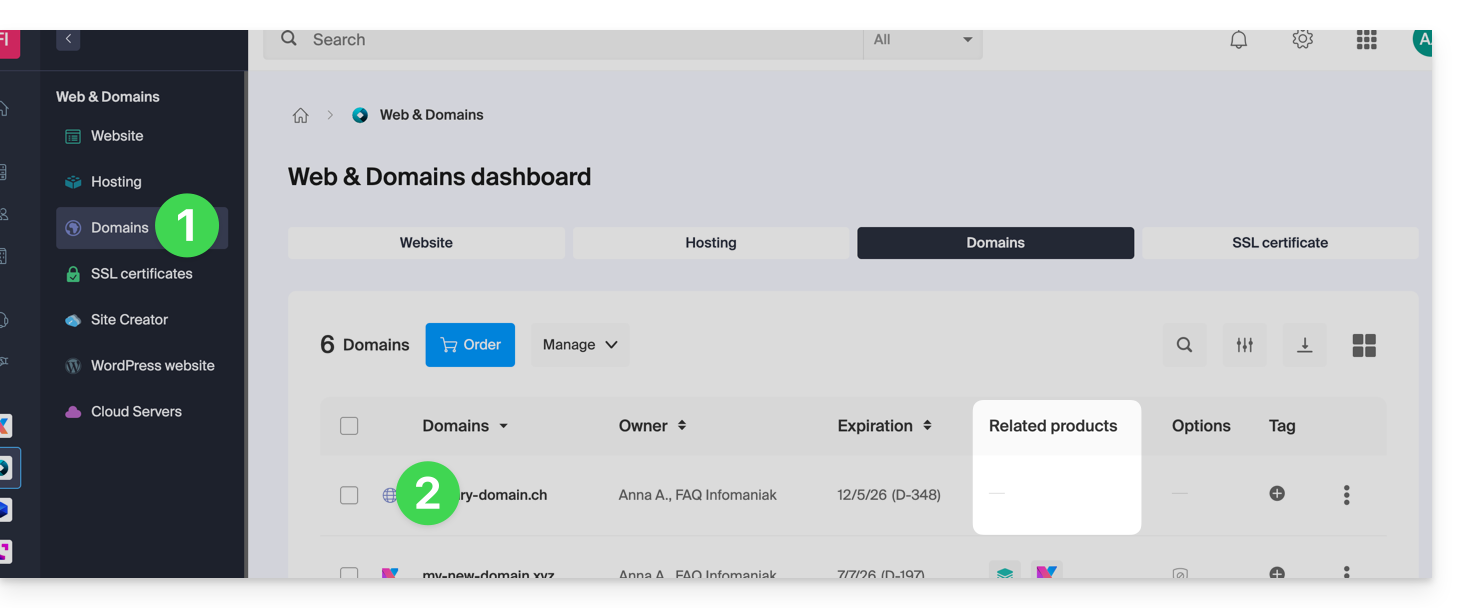
To access your domain names:
- Click here to access the management of your product on the Infomaniak Manager (need help?).
- Click directly on the name assigned to the product in question.
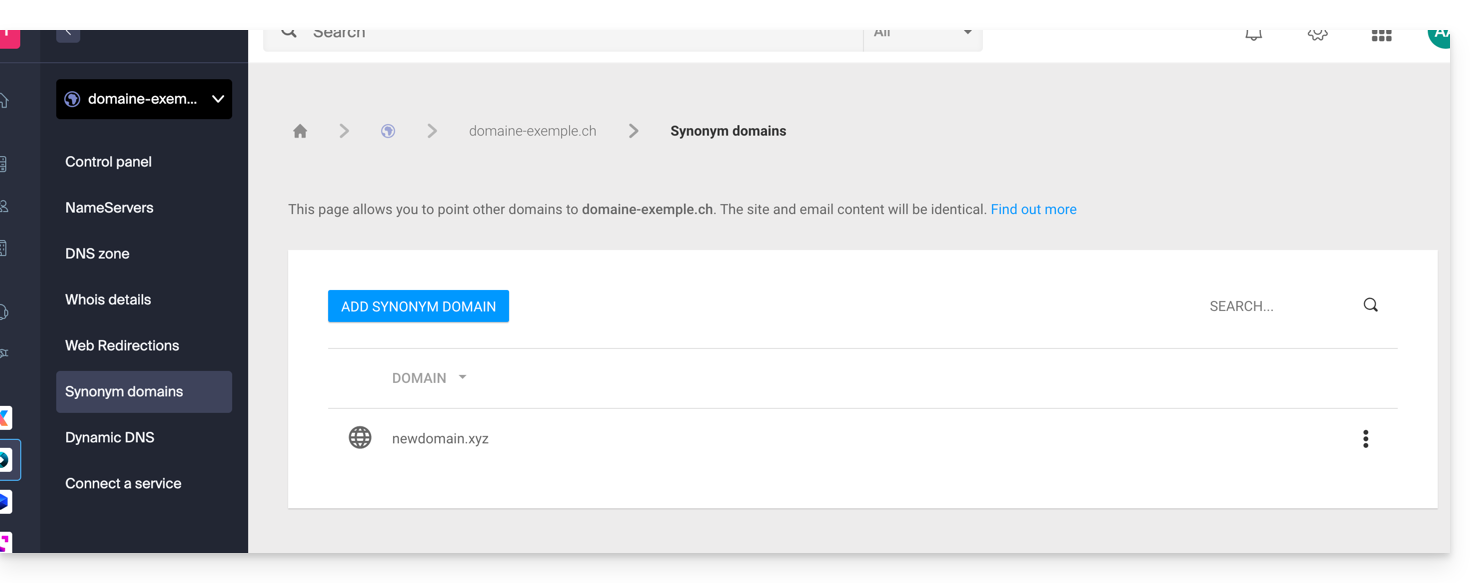
- Click on Synonym Domains in the left sidebar.
- Choose to add a synonym.
- Click on Next:
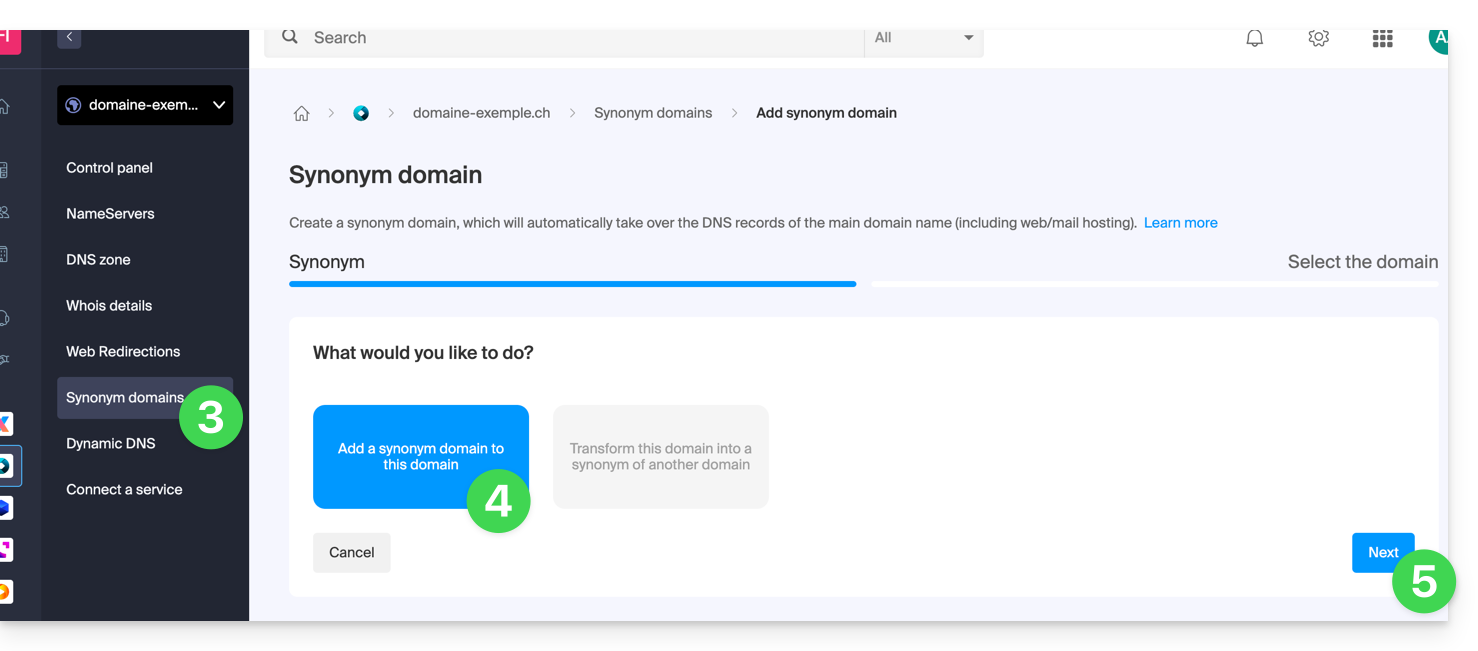
- Choose an existing domain in the current Organization, or order a new domain in advance.
- Click the button to Confirm:

- That's it:
Refer to this other guide if you are looking for information to dissociate a synonym domain name.
Link to this FAQ:
Has this FAQ been helpful?
This guide explains how, after purchasing a domain name from Infomaniak, to obtain for free an Email Service + Web Hosting.
Preamble
- For each domain name registered or transferred to Infomaniak, you can benefit from free:
- an email address that gives you access to the Infomaniak Mail app
- and a 10 MB Web space for a basic page.
- It is also possible to have a free Email Service while having a paid Web offer, or vice versa.
- Instead of a Starter type Email Service, there is also kSuite.
Activate the Starter Mail + Web offer
Prerequisites
- Own a domain name with Infomaniak (a DNS zone is not enough).
- Depending on the type (Mail or Web) desired, not to have an existing corresponding product already associated with the domain name and this in any existing Infomaniak Organization.
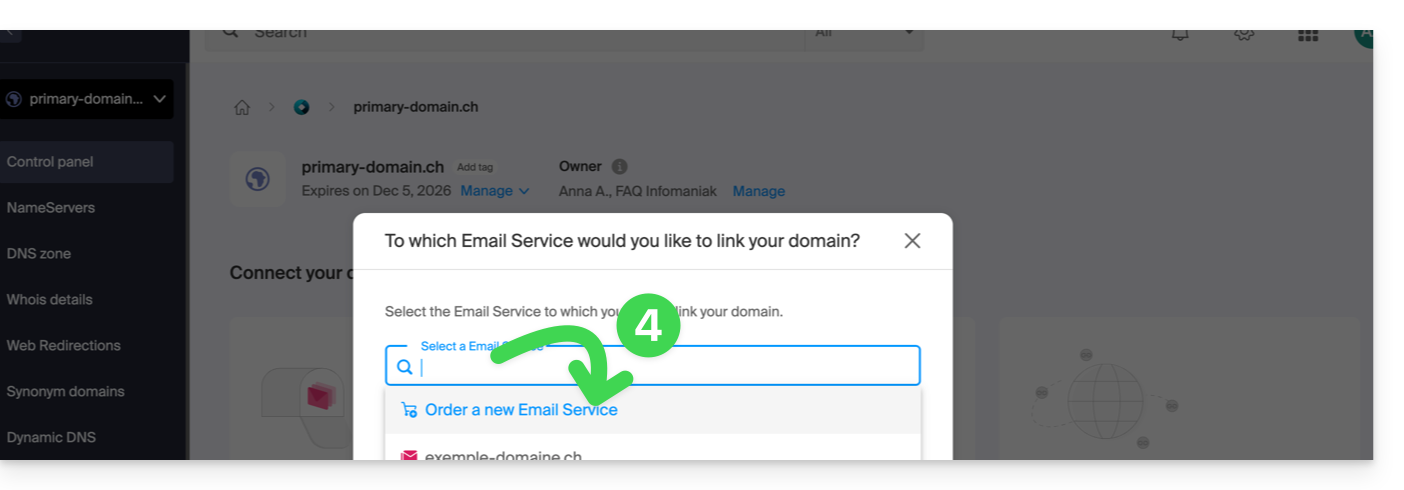
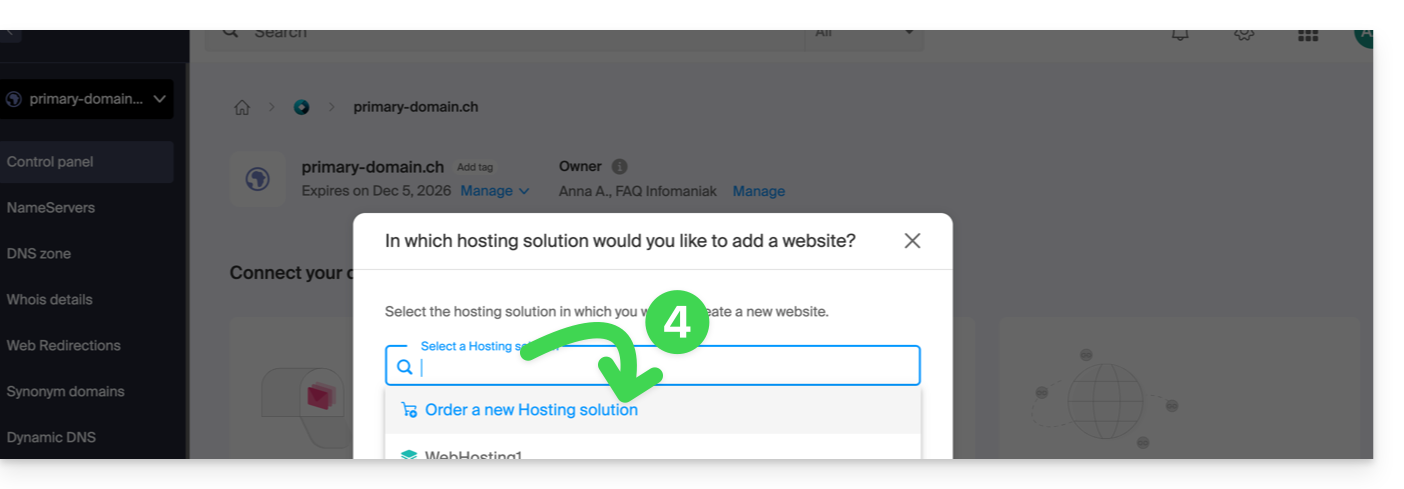
To order a Starter Email Service and Starter Web Hosting included with each domain:
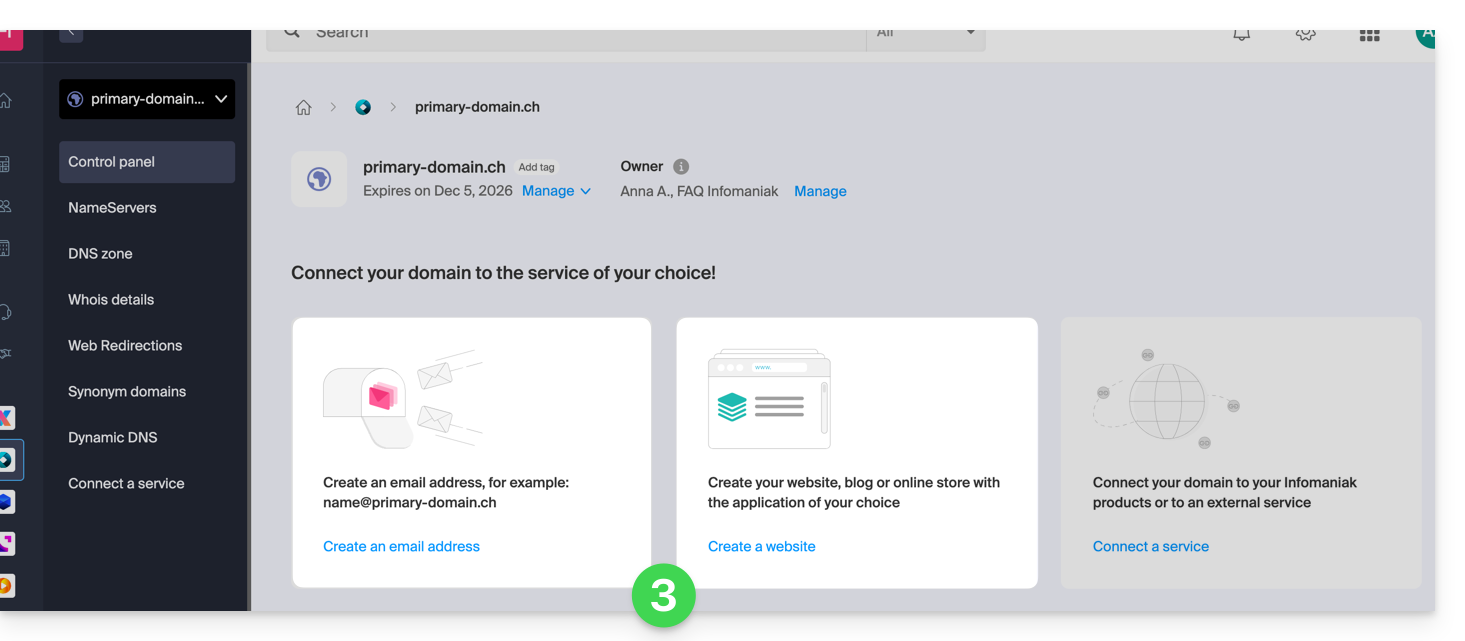
- Click here to access the management of your product on the Infomaniak Manager (need help?).
- Click directly on the name assigned to the product concerned:
- It is necessary that no product is linked at the moment to the domain (visible in the column of linked products).
- Click on one or the other of the shortcuts to Connect a service (mail or web):
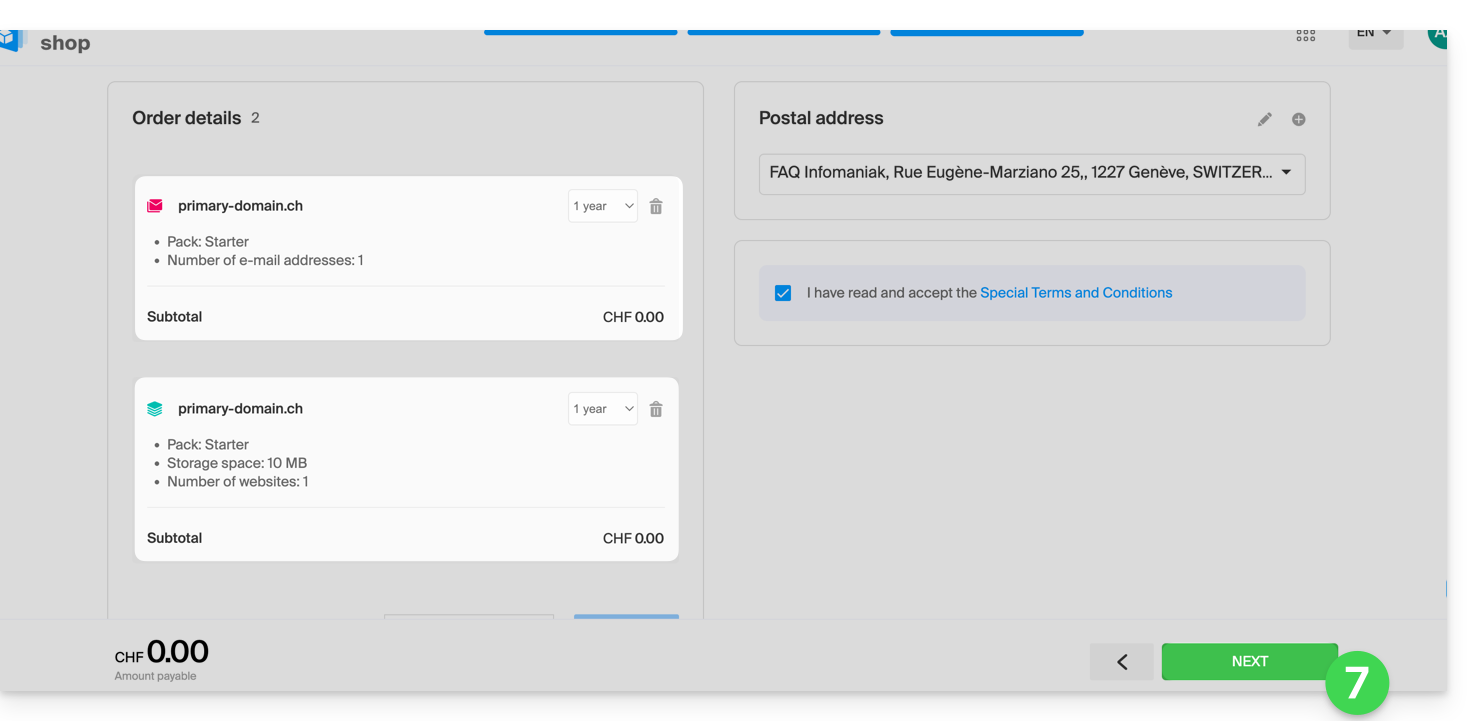
- In both cases, click on Order …:
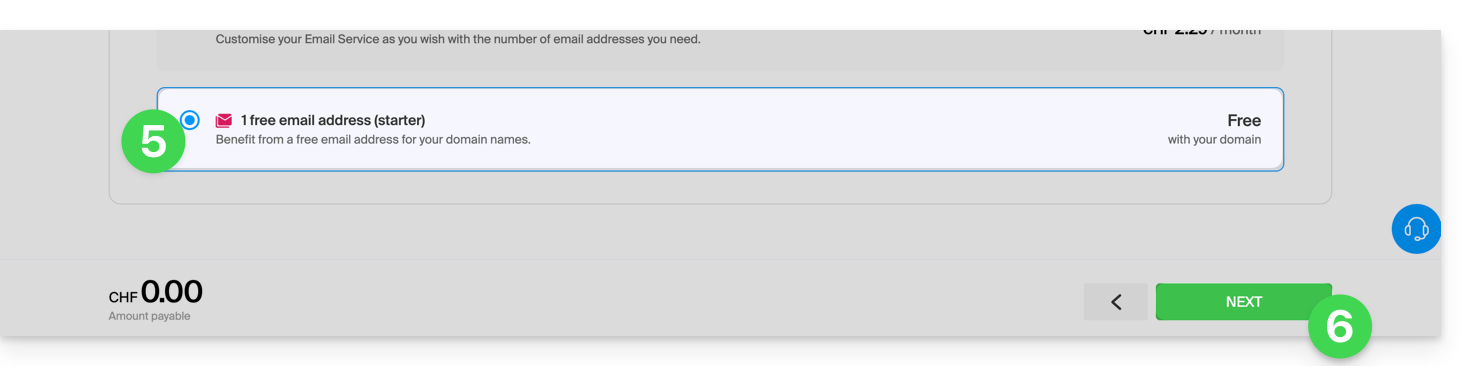
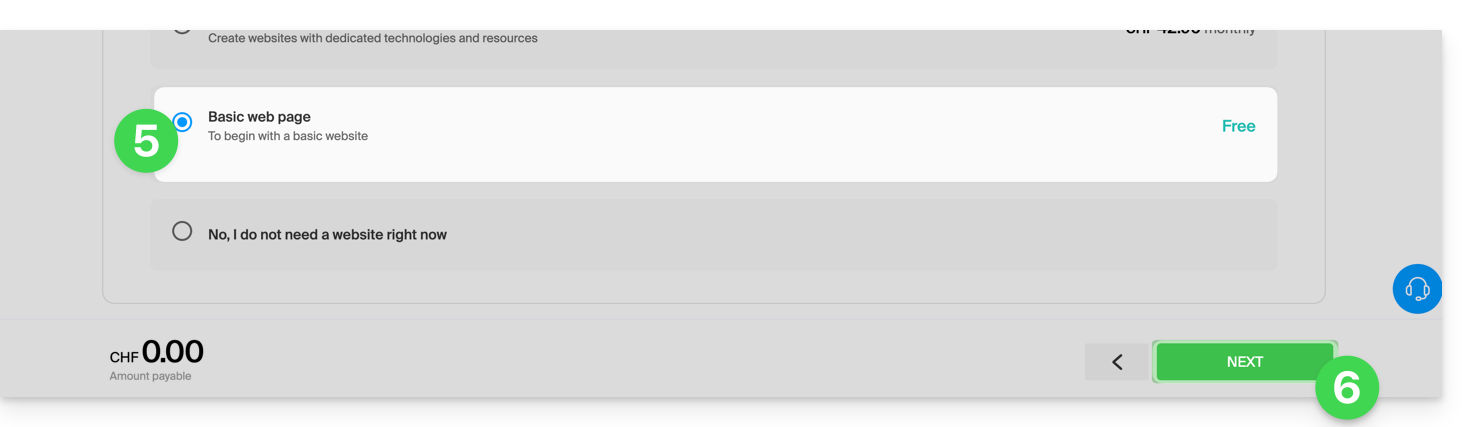
- You will be able to choose the corresponding free service (mail or web) and the next step will offer you to choose the other (mail or web) if desired.
- Click at the bottom of the page to continue:
- Finalize the order:
- Return to your Infomaniak Manager to discover and use your new products:
Using your Starter products
- Create the desired email address on your Mail Starter Service.
- To use the 10 MB Web space and create a basic web page on your Web Starter Hosting, use:
- the page editor
- or the Web FTP on the Manager to manage your HTML pages
- or any FTP software/client with the classic FTP protocol
Evolving a Starter offer
- Modify a Mail offer (click here).
- Modify a Web offer (click here).
In case of a problem with a Starter hosting
A Starter type Web hosting does not offer IPv6. Be careful with AAAA records in the DNS zone of the domain name concerned which can in particular prevent you from activating SSL; also refer to this other guide.
Link to this FAQ:
Has this FAQ been helpful?
Thank you for trusting Infomaniak with the hosting of your website.
Preamble
- A web hosting is a storage space available on a computer, also called a "server", connected to the Internet and managed by a web host, Infomaniak.
- This storage space, made available to professionals and individuals, is used to install websites or other types of tools (CRM, extranet, intranet...) that need to be accessible via the Internet.
- These guides allow you to quickly use the essential functions of your new product, your web hosting, which can accommodate multiple websites.
Where to start?
- Create a WordPress website
- Build the site with Site Creator
- Install a web application (ownCloud, Joomla, Typo3, Drupal, phpBB, Simple Machines Forum, Magento, Prestashop, …)
- Manage your FTP accounts/users
- Manage and publish files on your hosting via Web FTP
- Manage your MySQL databases
- Add a site or subdomain to your hosting (multi-sites/multi-domains) including a Node.js site
- Link another domain name to an existing website (domain alias)
- Preview your site even if your domain name does not yet point to Infomaniak's servers
IMPORTANT: the domain name…
A web hosting, to be visible to the public on the Internet, must be associated with a domain name!
Your domain name is not managed by Infomaniak? Or it is in a different Organization than that of your web hosting? Then refer to this other guide to configure the DNS or the "A records" to link the domain name to your web hosting.
In case of a problem
To resolve an issue, please consult the Web Hosting Knowledge Base before contacting Infomaniak support.
Click here to share feedback or a suggestion about an Infomaniak product.
Link to this FAQ:
Has this FAQ been helpful?
This guide explains how to enable the compression of your resources (CSS, HTML, JSON, JS) to speed up the loading of your Web Hosting.
Preamble
- By compressing your files, you reduce their size by up to 70%, which decreases the transfer time to your visitors' browsers.
- Display speed is a major criterion for search engines like Google.
- The Infomaniak Manager handles the modification of your
.htaccessand.user.inifiles.- A backup copy is automatically created for security.
- The modification may take up to 5 minutes to propagate across the entire infrastructure.
Enable Gzip / Brotli compression
The procedure via the Manager activates the most efficient compression algorithms supported by your browser (Gzip or Brotli) :
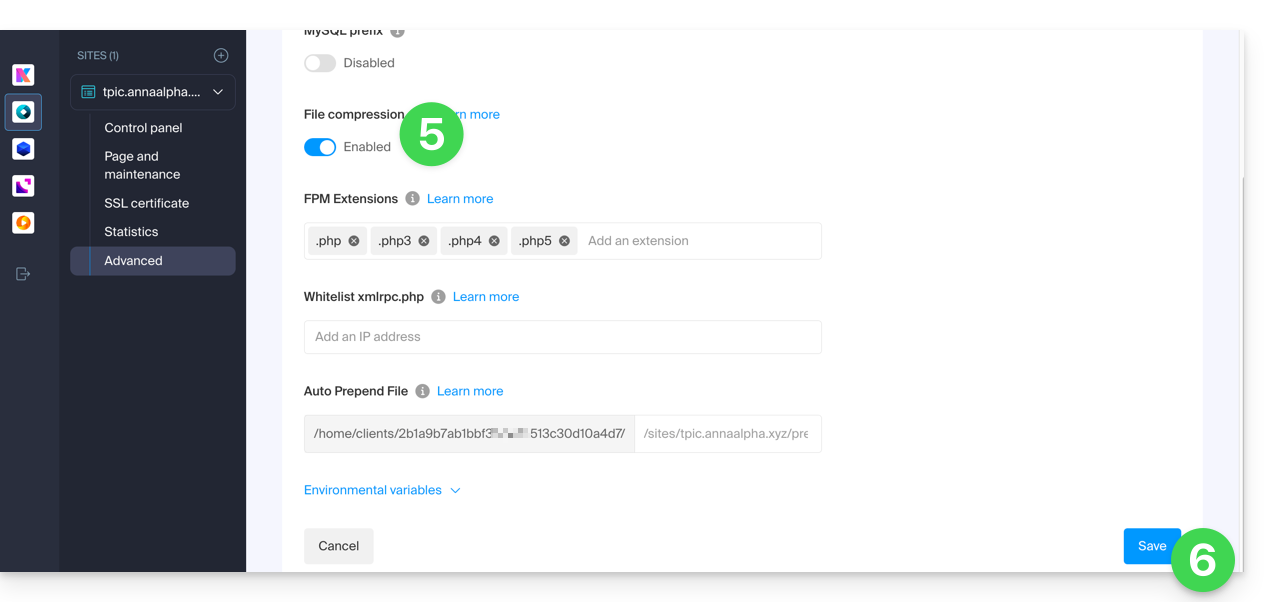
- Click here to access the management of your site on the Infomaniak Manager (need help?).
- Click directly on the name assigned to the site in question.
- Click on Advanced in the left sidebar.
- Click on the Apache tab:
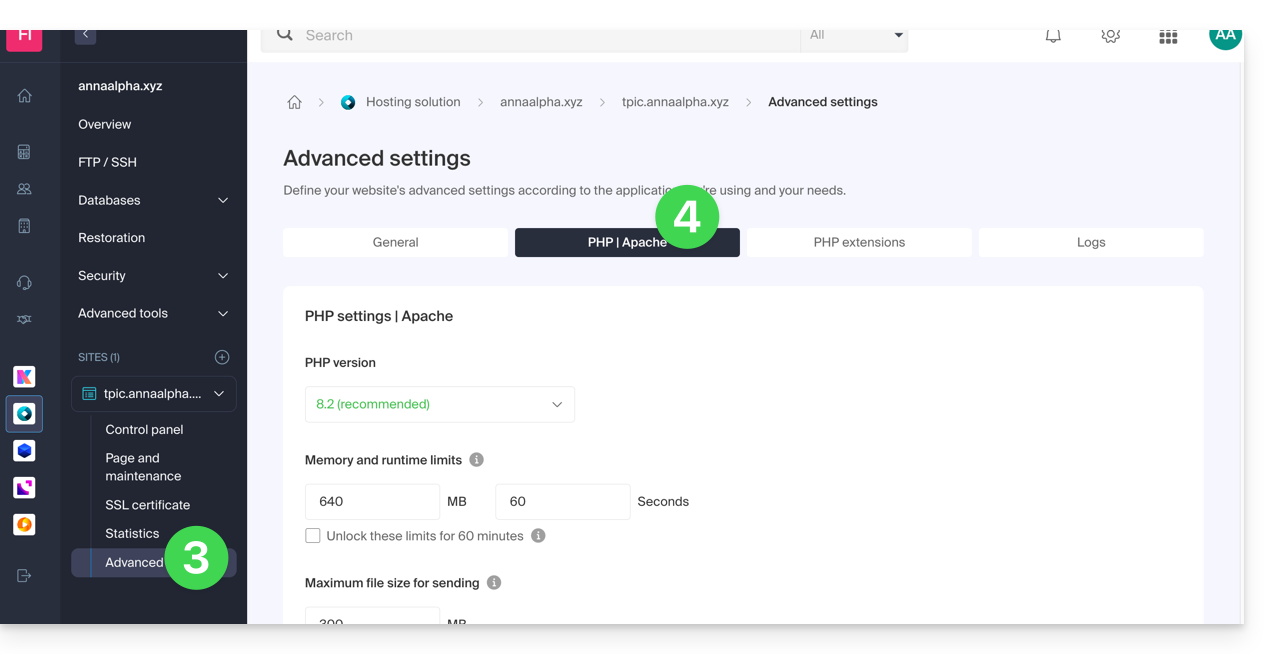
- Enable the File compression option.
- Click on Save at the bottom of the page:
Check if the compression header is active
Once activated, your server will send an HTTP header Content-Encoding: gzip (or br for Brotli). You can test your site with these tools:
- Google PageSpeed Insights (recommended for a complete analysis).
- GiftOfSpeed Gzip/Brotli Test (modern and fast tool).
- Browser Inspector: press
F12> Network tab > Click on your page > Check the response headers.
Link to this FAQ:
Has this FAQ been helpful?
This guide presents the use of MySQL on Infomaniak hosting, particularly the operation of stored procedures.
Preamble
- “Stored procedures” and “stored routines” are not available on a shared web hosting.
Understanding stored procedures and routines
If stored procedures are essential to your project and you are currently using shared hosting, it is advisable to consider a VPS or a dedicated server, which offer more control and resources.
Stored procedures are an effective way to automate tasks and integrate business logic directly into the database. This results in more performant and easier-to-maintain applications.
On a Cloud Server, as soon as the user has administrator rights on the relevant MySQL database, they have the necessary permissions to execute SQL instructions, including the EXECUTE command, used to launch stored procedures already present in the database.
The user also has the required privileges to create new stored procedures. Creating a stored procedure is done via specific SQL syntax defining the instructions to execute, followed by its recording in the database.
Example
DELIMITER //
CREATE PROCEDURE GetUserCount()
BEGIN
    SELECT COUNT(*) AS total_users FROM users;
    -- Returns the total number of users in the table
END //
DELIMITER ;

-- Execute the stored procedure
CALL GetUserCount();
Link to this FAQ:
Has this FAQ been helpful?
This guide explains how to modify the URL of your website from the WordPress app installed on your Web Hosting Infomaniak (only in the case where you have installed WordPress via the dedicated tools offered by Infomaniak).
This allows you to assign a different domain name to your WordPress site.
Prerequisites
- The domain name you wish to use must first be added as an alias to the main domain on the site in question.
Modify the address of a WordPress site
To change the address of the site created with Infomaniak WordPress to another domain name that already appears in the same Organization:
- Click here to access the management of your WordPress site on the Infomaniak Manager (need help?).
- If your site does not appear here, it means it was not installed via Infomaniak tools… refer to the official documentation.
- Click directly on the name assigned to the product in question:
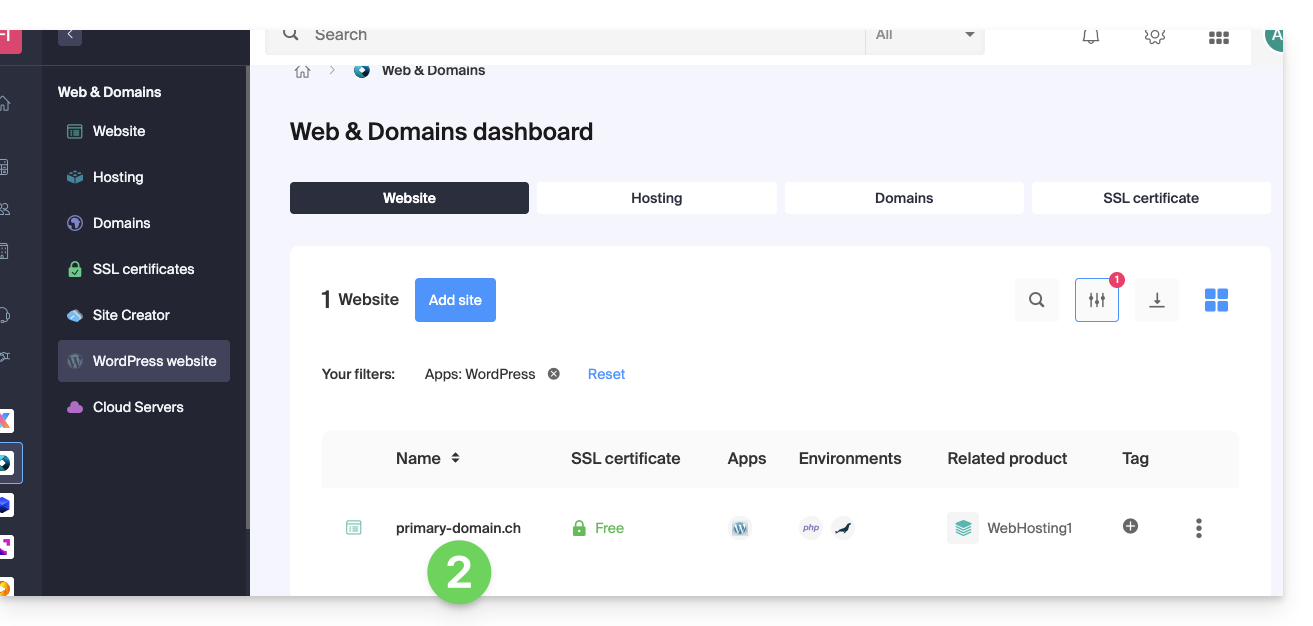
- Click on the action menu ⋮ located to the right of the Web Application in question.
- Click on Settings of the application:

- Click on Edit to the right of the WordPress:
- Under Site URL, select the desired web address from the drop-down menu:
- If you have not followed the prerequisites above, the desired domain will not appear even if it is registered in the same Organization.
- If you have added the domain as an alias to the site, the desired domain will appear and you can select it to replace the previous domain.
- Click on the Save button:

Domain… .preview.infomaniak.website?
Among the URLs present in the drop-down menu, the preview URL allows you to access your WordPress site in case the domain name of the site is not yet correctly configured to point to your WordPress app.
Link to this FAQ:
Has this FAQ been helpful?