Knowledge base
1000 FAQs, 500 tutorials and instructional videos. Here, there are only solutions!
This guide explains the operation of the blacklist (blacklisted) in the desktop app kDrive (macOS / Windows / Linux) and in which cases certain local files or folders are no longer taken into account for synchronization.
Preamble
- A file or folder placed on the blacklist by the application has a suffix in its name of the form
_blacklisted.- This means that the application ignores this item during synchronization operations and are therefore not transferred to kDrive Web.
- This mark remains active as long as the cause of the block has not been corrected.
- If an excluded folder cannot be deleted locally, it may be automatically added to the blacklist.
- In this case, you can either delete it manually, or reactivate its synchronization in the application settings.
- Once the problem is resolved (for example after deleting a duplicate, correcting permissions, or reactivating an excluded folder), simply remove the suffix
_blacklistedfrom the name of the item to have it taken into account in the synchronization again. - These mechanisms ensure the stability of the synchronization process and prevent repeated errors related to inaccessible, duplicate, or system-incompatible files.
Examples of blacklisting
In some cases, a local item may be blacklisted:
- Dehydrated placeholder (Lite Sync only): a placeholder file (not fully downloaded) is added to the blacklist to prevent it from being sent to kDrive Web.
- Already existing creation on the remote drive: if the creation of a file or folder fails because an identical item already exists on kDrive Web, the local item is marked as blacklisted.
- Insufficient server-side permissions: when a file or folder is created locally but the back-end refuses to propagate it (for example in Common documents), the local item is blacklisted.
- Folder excluded from synchronization: if a folder has been unchecked in the kDrive desktop interface, the application attempts to delete it locally if it is still present. If this fails, it is blacklisted.
A blacklist may also occur due to incompatible file names: characters such as the tilde ~, the slash /, the backslash \, certain system files such as System Volume Information or certain temporary or technical extensions (.idlk, .parms.db, .directory, ._*, etc.) (other examples).
Rename these items before restarting the synchronization.
Correct an item blacklisted
To recognize them:
- Identification: the suffix
_blacklistedin the name of the file or folder indicates that the item is ignored by the synchronization. - Resolution: correct the cause of the block (for example access rights, an existing duplicate on kDrive Web, an exclusion parameter, or a placeholder status), then rename the item to remove
_blacklistedif you want it to be synchronized again.
To avoid them:
- Check your access rights before creating or modifying files in shared spaces, organization folders, or Common documents.
- Avoid duplicates when creating or moving files between your computer and kDrive Web.
- Do not uncheck a folder in the desktop application if you continue to add items to it locally.
- With Lite Sync, download the file completely before modifying it instead of working on a dehydrated placeholder.
Link to this FAQ:
Has this FAQ been helpful?
This guide details the Statistics section available online to managers of a kDrive.
✘ UNAVAILABLE with
my kSuite (ik.me, etik.com, ikmail.com)
Free kSuite: statistics for the last 7 days only
Access kDrive stats
To display the page that details the various statistics of your kDrive:
- Click here to access the Infomaniak kDrive Web app (online service ksuite.infomaniak.com/kdrive).
- Click on kDrive Management in the left sidebar.
- Click on Statistics.
- Choose the type of statistics to view:
Customize the display
Each screen of these statistics (Share links, Activities on kDrive, etc.) includes icons and buttons: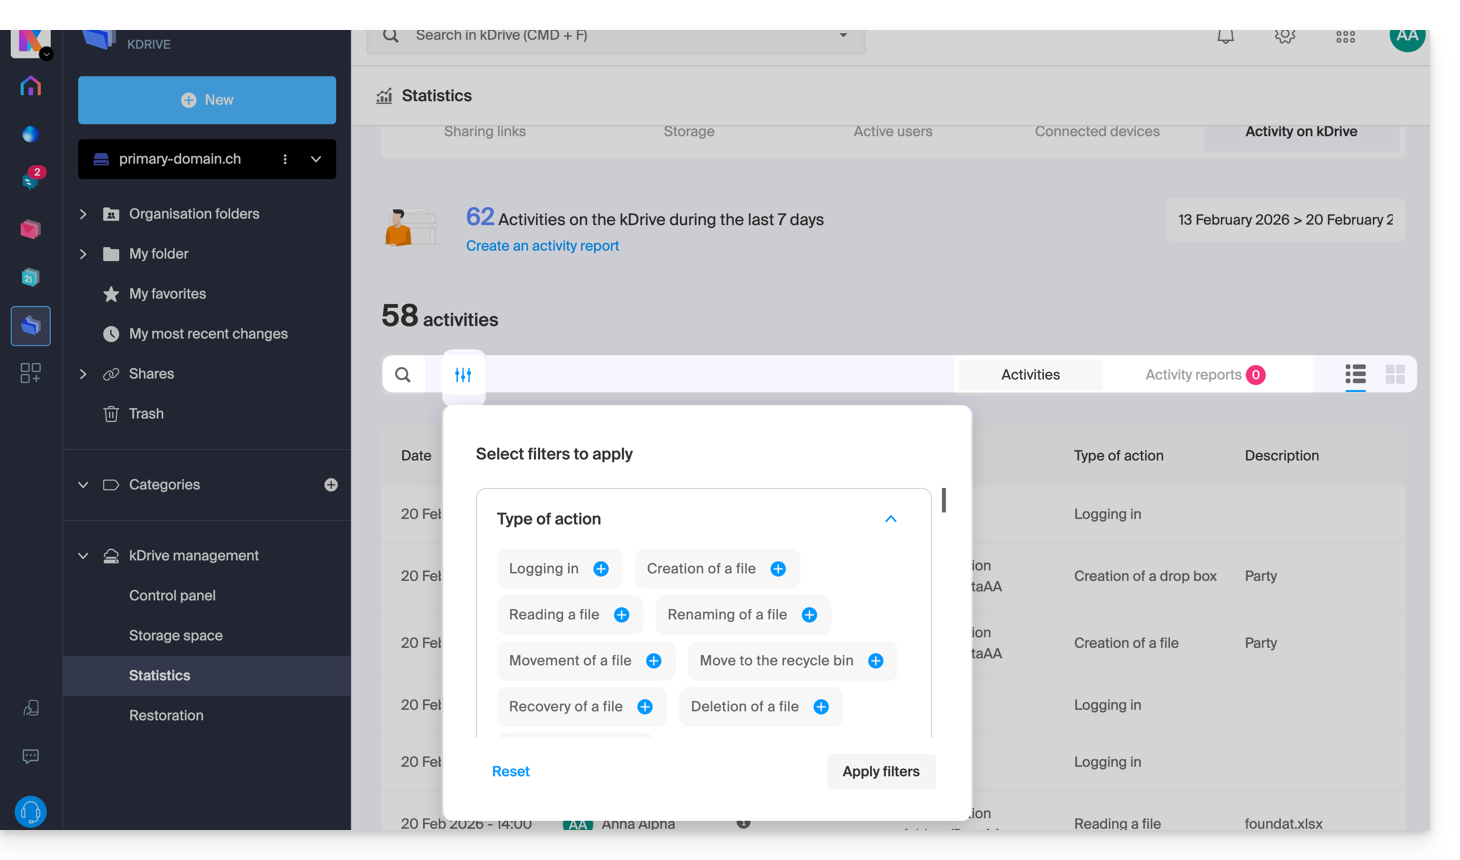
Clicking on them allows you to:
- launch a search for a term
- download a CSV file (format
.csv) with the data obtained (read below) - filter elements based on, for example, users, or views counted on files as well as the type of sharing (with or without password and expiration date)
1. Share link stats
Share links created are listed in the left sidebar of the kDrive Web interface, but this statistics screen allows you to know the views on a file over a given period.
2. Storage stats
This screen, updated every hour, allows you to know the space used by the different users, the total space, etc.
3. Active users
This screen shows the sessions recently opened (or over the filtered period) by the users of your kDrive and their operating system.
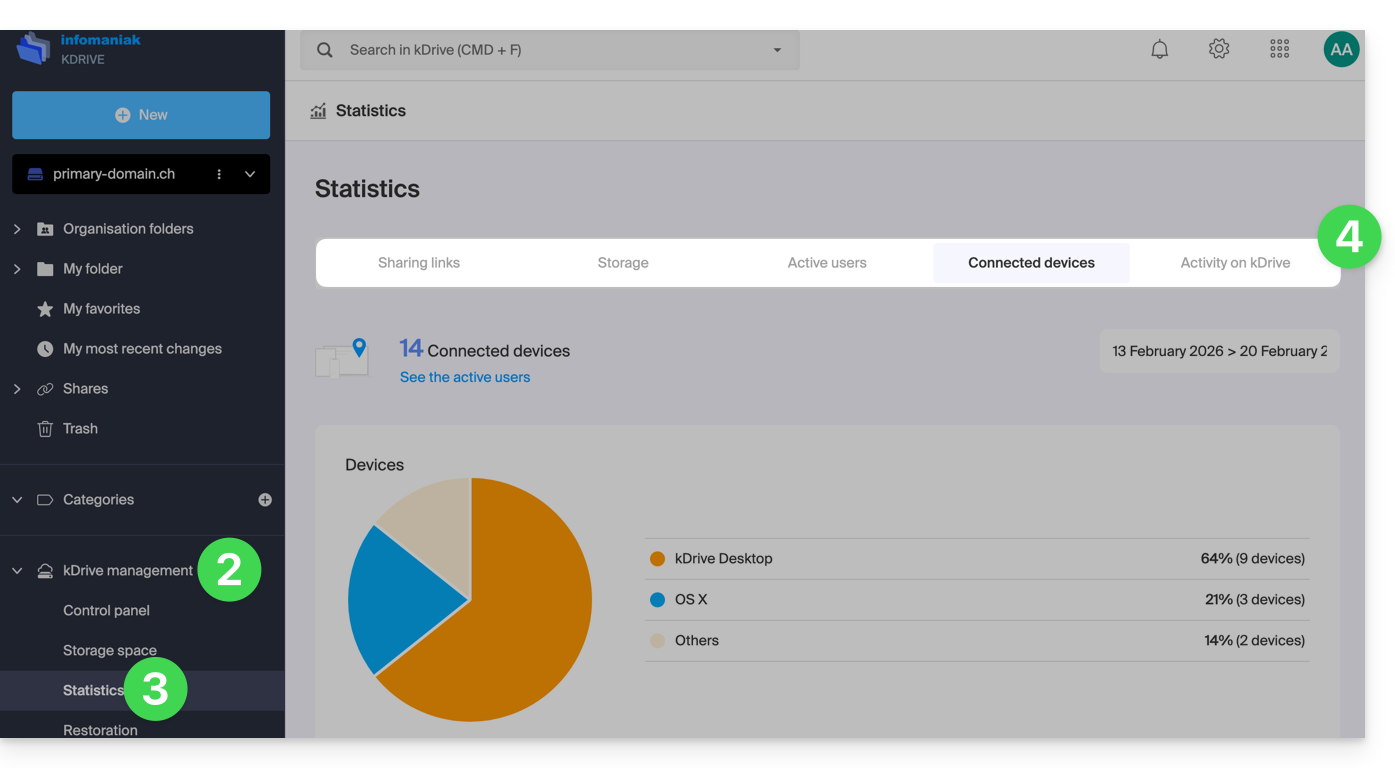
4. Connected devices
This screen details the operating systems of devices connected to your kDrive with their percentage representation: Windows X% (X devices); same for macOS, Linux, Android, etc.
5. Activity on kDrive
If you have any doubts about who did what on your shared space, file update, move to trash, etc., this screen allows you to know minute by minute what happened.
Create an activity report
With this information, it is possible to create activity reports thanks to the ad hoc link at the top of the table, covering one or more users and focused on one or more actions. You will receive this report by email within a few minutes and can download it in CSV format. Note that the hours mentioned may be in UTC 0 format.
Link to this FAQ:
Has this FAQ been helpful?
This guide explains how to check and update the version of the desktop app kDrive (desktop application on macOS / Windows / Linux).
Accessing the installed version information…
… on macOS / Windows / Linux
To identify the version number of the kDrive application:
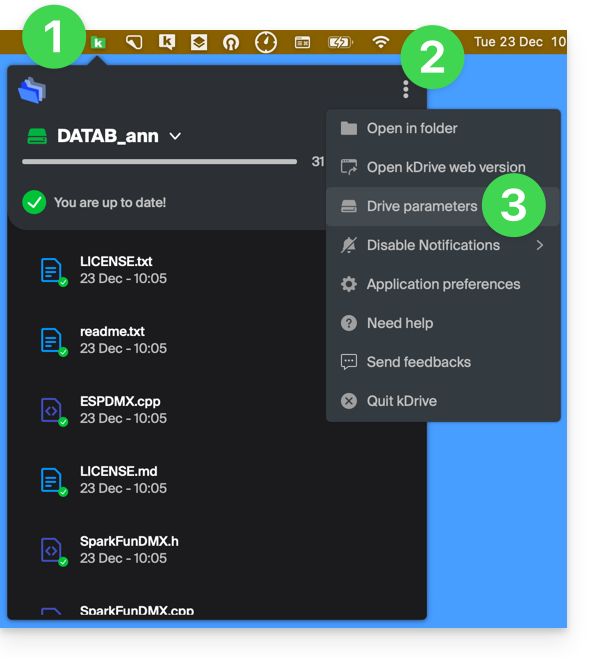
- Left-click on the kDrive desktop app icon in your computer's notification area (top right on macOS, bottom right on Windows, and double-left-click in the taskbar on Linux).
- Click on the ⋮ icon in the top right corner of the application and then on Preferences:
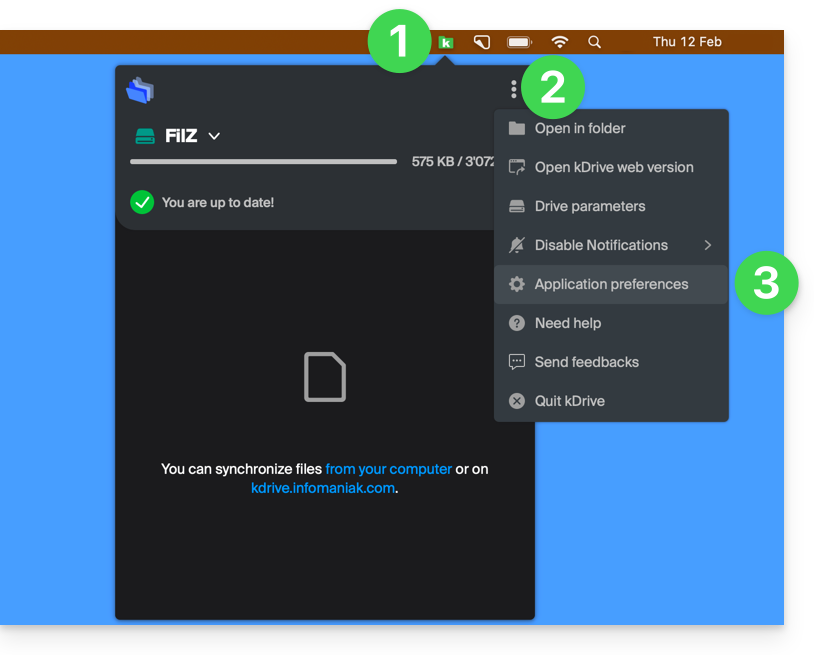
or directly on Preferences if the kDrive window is already open: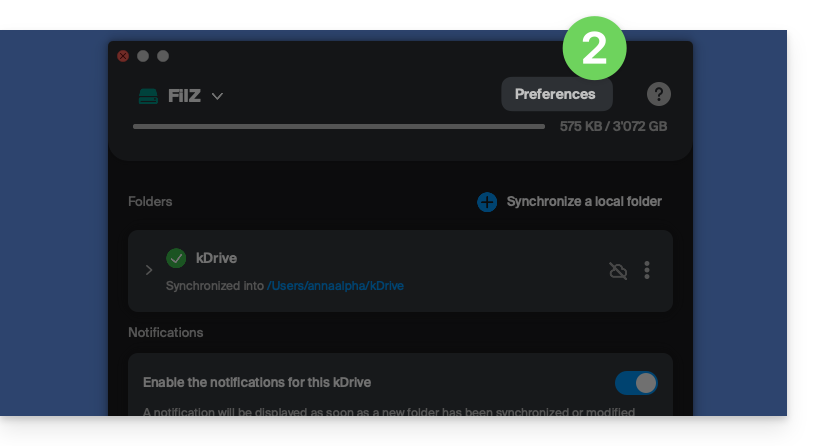
- Scroll to the bottom, and under the Version category, you will find the version currently installed on your computer:
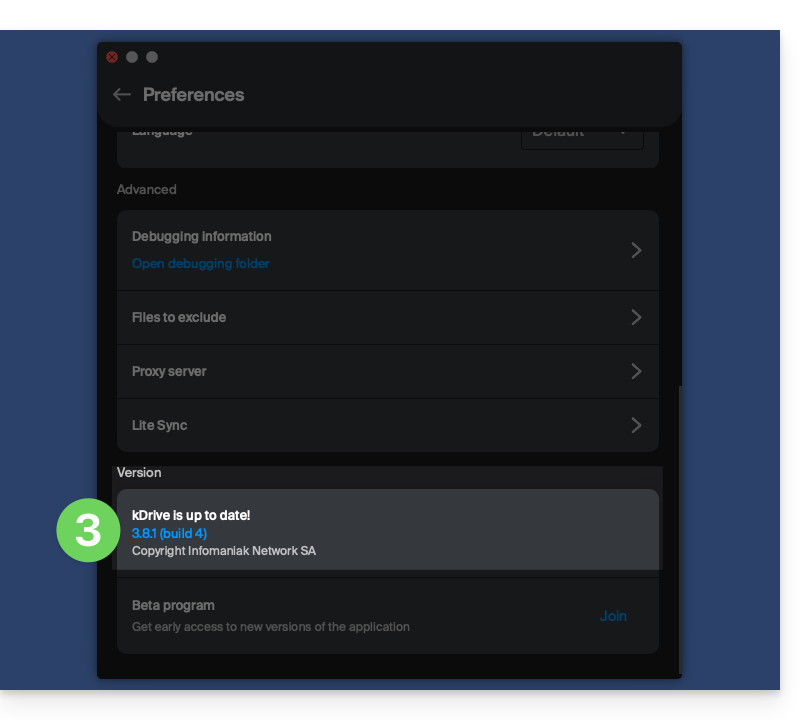
Updating the installed version
… on macOS / Windows
With each new version of the kDrive application offered by Infomaniak, a message will appear when you first open the software after restarting it, or a few minutes later if it has not been restarted, offering the option to install the update automatically.
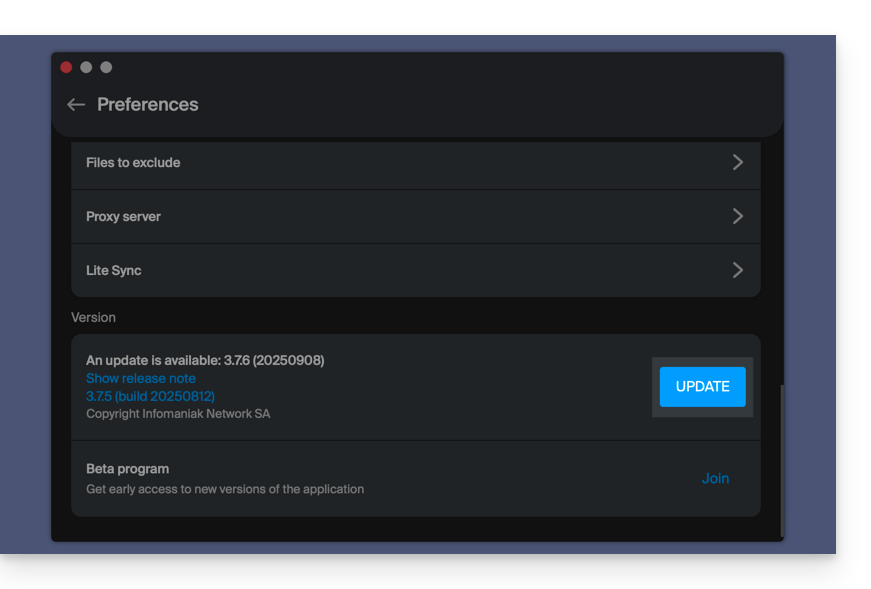
If this is not the case:
- Follow the steps above and click on the button displayed to install the update:
If the button is missing or the app version is too old:
- Download the latest version from the official page (the latest version number is displayed in the file name):
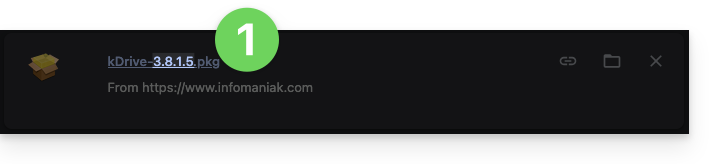
- If this version number is newer than your current version, let the download complete.
- In the meantime, uninstall your application without touching the folder containing your synchronized files, and especially without moving it.
- Install the newly downloaded version.
Link to this FAQ:
Has this FAQ been helpful?
This guide details the Lite Sync option of the desktop app kDrive (desktop application on macOS). The Lite Sync option is also available on Windows.
Preamble
- The Lite Sync feature saves space by virtually storing your kDrive files on your computer, downloading them only when necessary.
- The files are always accessible from the Web app kDrive (online service ksuite.infomaniak.com/kdrive) but locally they are present in a "dehydrated" way, requiring a loading time to be fully accessible.
- This allows you to view, complete, and synchronize the content of kDrive without saturating the hard drive.
- The Lite Sync option always acts:
- on a specific kDrive (in the case where you synchronize several on the application).
- and on the entirety of the kDrive (or the entirety of an advanced synchronization).
- and via a specific kDrive app (another user of the same kDrive can make a different Lite Sync choice from yours).
- In case of a problem, consult this other guide on the subject.
Enable the Lite Sync option
Prerequisites & scope of use of Lite Sync
- macOS version ≥ 10.15 — not available with Linux
- File storage system under NTFS / APFS (FAT32 excluded)
The Lite Sync option can be enabled during the installation of the application (this is offered to you) or subsequently:
- Perform a left-click on the app icon in the notification area of your computer (top right on macOS).
- Click on the action menu ⋮ to the right of the kDrive window.
- Select kDrive Settings:
- Click on the action menu ⋮ to the right of the current synchronization and the cloud symbol:
- If the cloud is crossed out, you can enable Lite Sync as it was not yet active:

- In the same place you can disable Lite Sync if the cloud was not crossed out (also read at the end of this guide):

- If the cloud is crossed out, you can enable Lite Sync as it was not yet active:
Actions on data synchronized on the disk
Always keep on this device
Once Lite Sync is activated (and thus the data on the disk has become “virtual”), you can still make available locally a folder and its subfolders or only one or more files:
- From the macOS Finder, go to a folder synchronized with kDrive and right-click.
- Select the option Always keep available locally under kDrive:
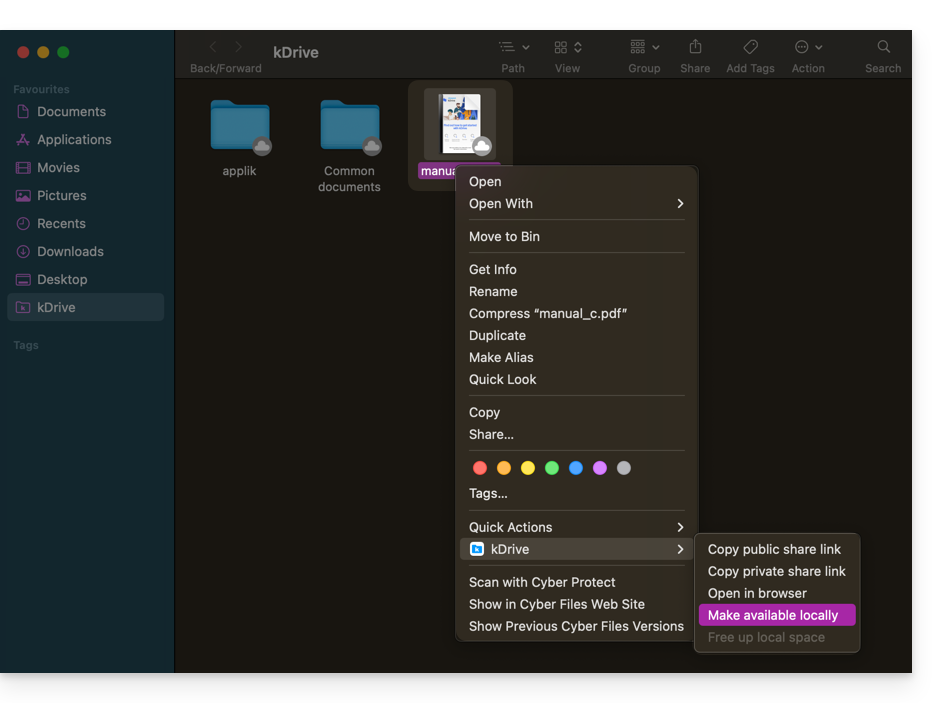
- The symbol visible on the icon of the files concerned will change to indicate that the file is no longer "in the cloud" but fully present on your disk:

Free up space
Conversely, once Lite Sync is activated, you can free up space, file by file or in a folder and its subfolders.
Attention: "free up space" is not applied by default to new files or folders added locally.
- From the macOS Finder, go to a folder synchronized with kDrive and right-click.
- Select the option free up local space under kDrive:
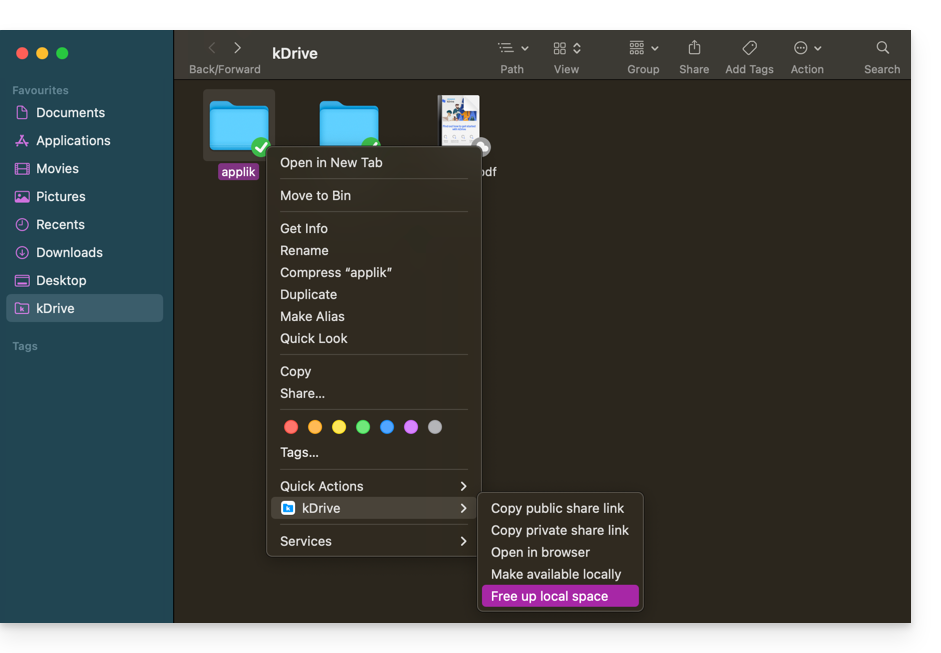
- The symbol visible on the icon of the files/folders concerned will change to indicate that the data is “in the cloud” and no longer fully present on your disk:

- The action Free up space will free up storage space on your computer.
- The files will remain visible but will no longer be accessible without an internet connection.
Example of use (required storage space)
If you activate Lite Sync, the space occupied (900 GB for example) on the Infomaniak server will be freed up on your hard drive, but the opposite is also true (for example, 900 GB of free space required on your hard drive if the Lite Sync option is activated along the way).
Therefore, it is recommended to keep the initial choice of activating or not activating Lite Sync, and not to change it along the way.
File "dehydration"
As explained in the preamble, a dehydrated file is a kDrive file whose complete version is not present on the hard drive and instead a 1 KB "shortcut" is displayed, which is normal behavior when Lite Sync is activated.
In some cases (for example, if you copy the files from your hard drive while Lite Sync is activated, and then start a new synchronization to a new kDrive) the application will block the import of this type of file. To resolve these errors, you can download the complete file from the kDrive Web app (online service ksuite.infomaniak.com/kdrive).
Here are the status icons that are used and their explanations:
| Status icons | Description |
|---|---|
| |
| |
| kDrive encounters a synchronization conflict with the file/folder. | |
| An error occurred during the transfer of the file/folder and it was interrupted. | |
| The progress circle indicates a download in progress. |
Disable the Lite Sync option
To do this, follow the steps at the top of this guide (point 4.b in particular). When disabling LiteSync, two scenarios may occur depending on the remaining space on your device's storage:
- If there is sufficient space on your computer, a message confirming the deactivation is displayed; simply click on Continue.
- If there is not enough space on your computer, a message will indicate the missing space to allow the deactivation of Lite Sync; the synchronization of your kDrive will be paused until you select the files to synchronize on your computer.
Link to this FAQ:
Has this FAQ been helpful?
This guide explains how to add and customize the categories for your documents, to organize and classify your documents in the kDrive Infomaniak web app (online service ksuite.infomaniak.com/kdrive) and the kDrive mobile app (application for iOS/Android smartphones or tablets).
Introduction
- A category (or several at the same time) can be assigned to kDrive files and folders.
- Assigning a category is different from defining a color, which can also be assigned to folders and displayed in the web and mobile apps (only available with paid kDrive plans).
- However, there will be no synchronization of colors between a kDrive folder synchronized by the desktop app on macOS, and the web or mobile app:

- However, there will be no synchronization of colors between a kDrive folder synchronized by the desktop app on macOS, and the web or mobile app:
Adding a category to a document…
Prerequisites
- The user must have sufficient rights, including at the level of category management permissions.
… in the kDrive Infomaniak web app
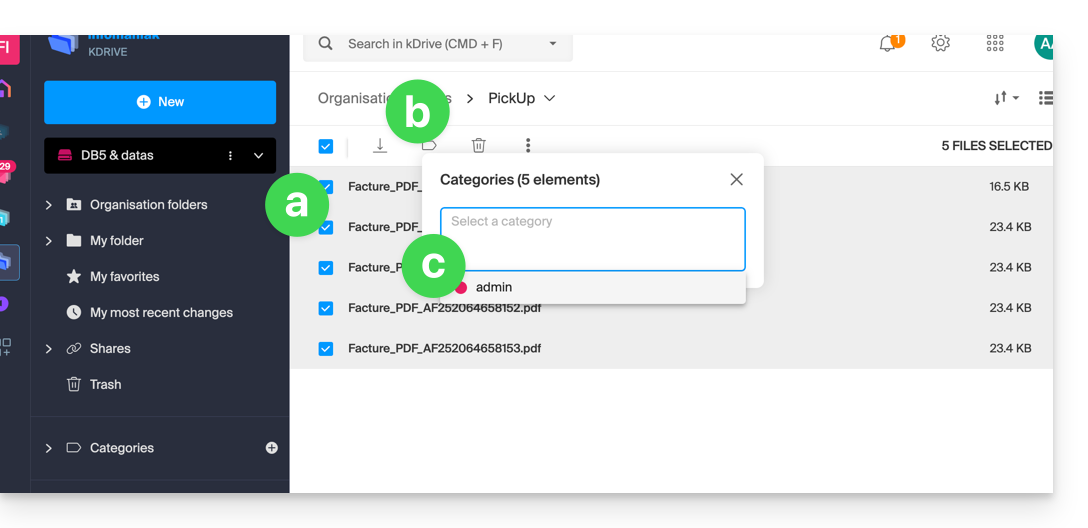
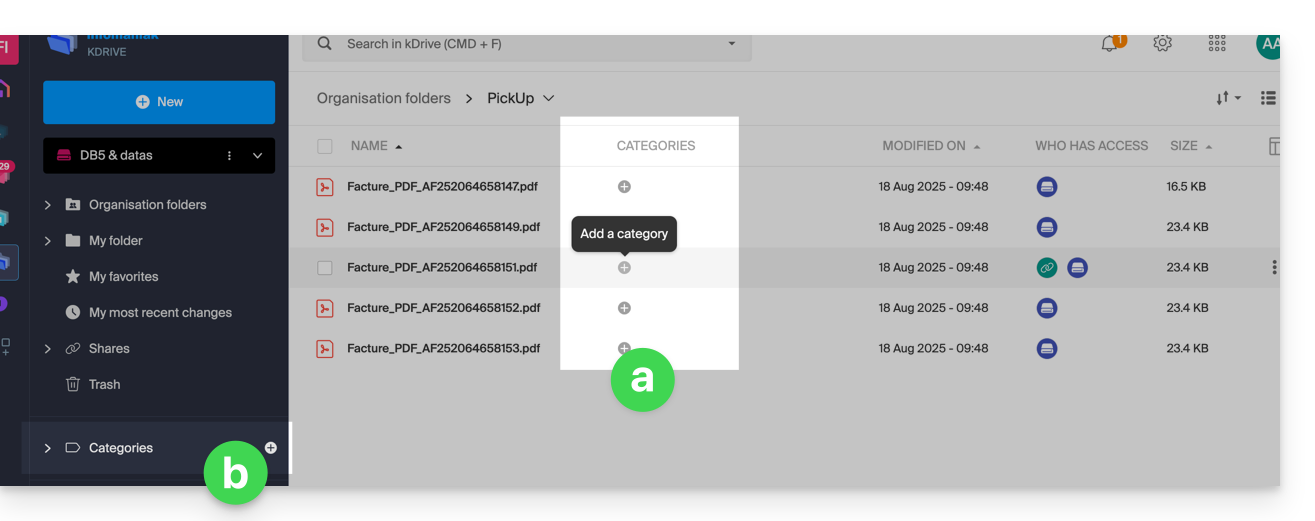
To assign a category to a file or folder in kDrive:
- Click here to access the kDrive Infomaniak web app (online service ksuite.infomaniak.com/kdrive).
- The kDrive file structure is displayed in the left-hand menu:
- Select the file(s).
- Click on the tag icon at the top of the table.
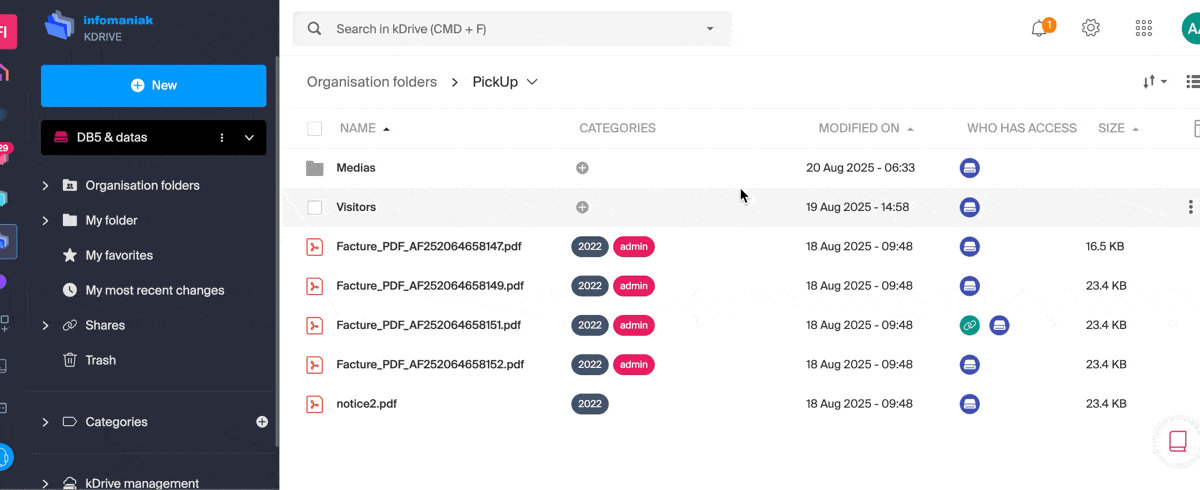
- Click on the category in which the file(s) should be classified:
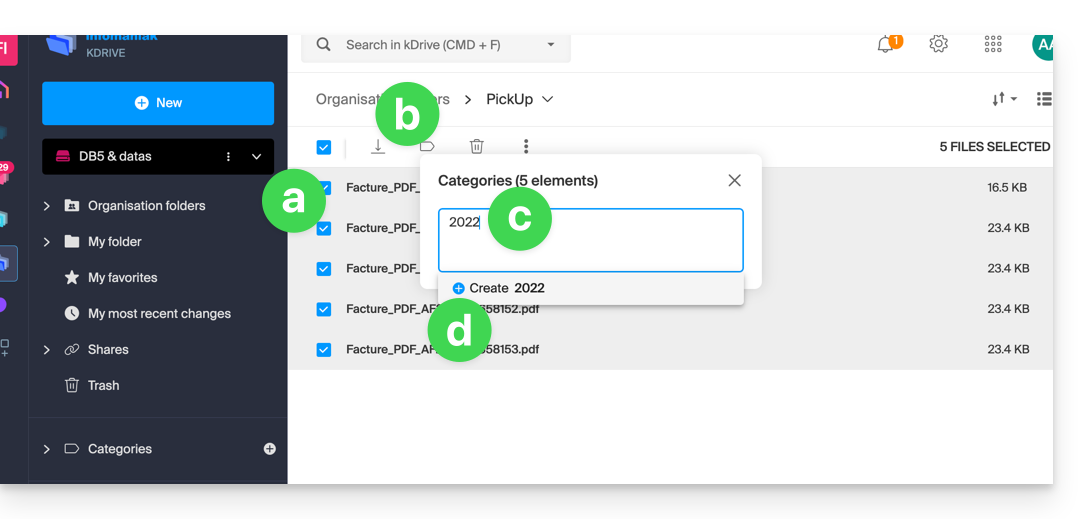
- You can also create a new category with the name of your choice:
- Select the file(s).
- Click on the tag icon at the top of the table.
- Enter the name of the category in which the file(s) should be classified.
- Click on the icon to create your category and be able to select it:
- You can also click on…
- … the icon in the CATEGORIES column of your file (the window must be large enough).
- … the icon in the left-hand menu:
…. on the kDrive mobile app
To assign a category to a kDrive file:
- Tap on the action menu ⋮ located to the right of the item in question.
- Tap on Manage categories.
- Tap on the desired category(ies).
- Return to the content using the back arrow at the top left:

Sort your documents by category on…
… on the Infomaniak kDrive web app
To display only the files in your kDrive that belong to a specific category:
Link to this FAQ:
Has this FAQ been helpful?
This guide details the in-app purchase function of the kDrive application for iOS.
Purchasing a kDrive subscription via the iOS app
You can subscribe to a kDrive Solo or Team subscription directly from the iOS app via the Apple App Store.
This feature comes with changes in the management of your subscription and billing for this product.
From the moment you choose to use in-app purchases…
- … Your kDrive subscription will be handled directly by Apple (only the billing part, data hosting remains the responsibility of Infomaniak).
- Infomaniak can no longer provide support for the billing part of kDrive; you will need to contact Apple support directly.
To understand billing and subscription management with Apple, refer to the following official Apple guides:
- Billing and subscriptions
- App billing
- View your purchase history in the App Store
- Know what you've been charged for
In summary
Managed by Infomaniak
- Hosting of your data
- Technical support kDrive
Managed by Apple
- Administrative support related to your kDrive subscription
- Invoice and payment method
Link to this FAQ:
Has this FAQ been helpful?
This guide helps you resolve connection errors on Infomaniak mobile applications (kDrive, Euria, SwissTransfer, Mail) when the security message "your device is not recognized as safe" appears on Android.
Connection issues "Your device is not recognized as safe"
This blockage is related to Google's security protocols (Google Play Integrity API). Infomaniak uses these standards to ensure that data is not accessed on a device whose security could be compromised.
This usually occurs in the following cases:
- Use of an unofficial operating system (Custom ROM / LineageOS).
- Rooted device or unlocked bootloader.
- Android version too old or not certified by Google.
- Certain smartphone models (e.g.: Huawei without official Google services).
Immediate workaround
If your device is healthy but the message persists, you can bypass the blockage by forcing a new manual authentication:
- On the application login screen, click on the down arrow/chevron icon next to your account or avatar.
- Select the option "Log in with another account" (even if it is the same account).
- Enter your credentials manually (Infomaniak email address and password).
This method allows you to ignore the previous connection token and validate access via a new secure session.
Link to this FAQ:
Has this FAQ been helpful?
This guide explains how to transfer files from an iPhone to an kDrive Infomaniak.
Prerequisites
- Have a kDrive or kSuite subscription.
- Install the mobile app kDrive (app for iOS smartphone or tablet).
Manually send data to kDrive iOS (iPhone, iPad)
To do this:
- Select the data you want to share on kDrive.
- Click on the iPhone share icon:
- Choose kDrive from the options offered:
- Select the kDrive and the save location - if this does not suit you, tap on it to change the storage folder:
- Choose another folder or create a new folder:
- Determine the type of folder to create (shared folder with kDrive users or personal & private folder):
- Name the folder, choose the possible shared access, then press the blue button to create the folder:
- Tap on the newly created folder to select it as the location:
- Create a possible subfolder in it or validate the chosen location with the blue button:
- Press the blue button to start sending your files to kDrive:
- It is possible to follow the progress of the transfer to kDrive:
- The upload takes place in the background:
Once the files are uploaded, you will find them on all devices connected to kDrive…
- … instantly on the Web app kDrive (online service ksuite.infomaniak.com/kdrive).
- … after downloading the list of these new files to the devices where the desktop app kDrive (desktop application on macOS / Windows / Linux) is installed.
Link to this FAQ:
Has this FAQ been helpful?
This guide explains how to resolve errors related to the Lite Sync Windows extension on the desktop application kDrive.
Check for the presence of the extension
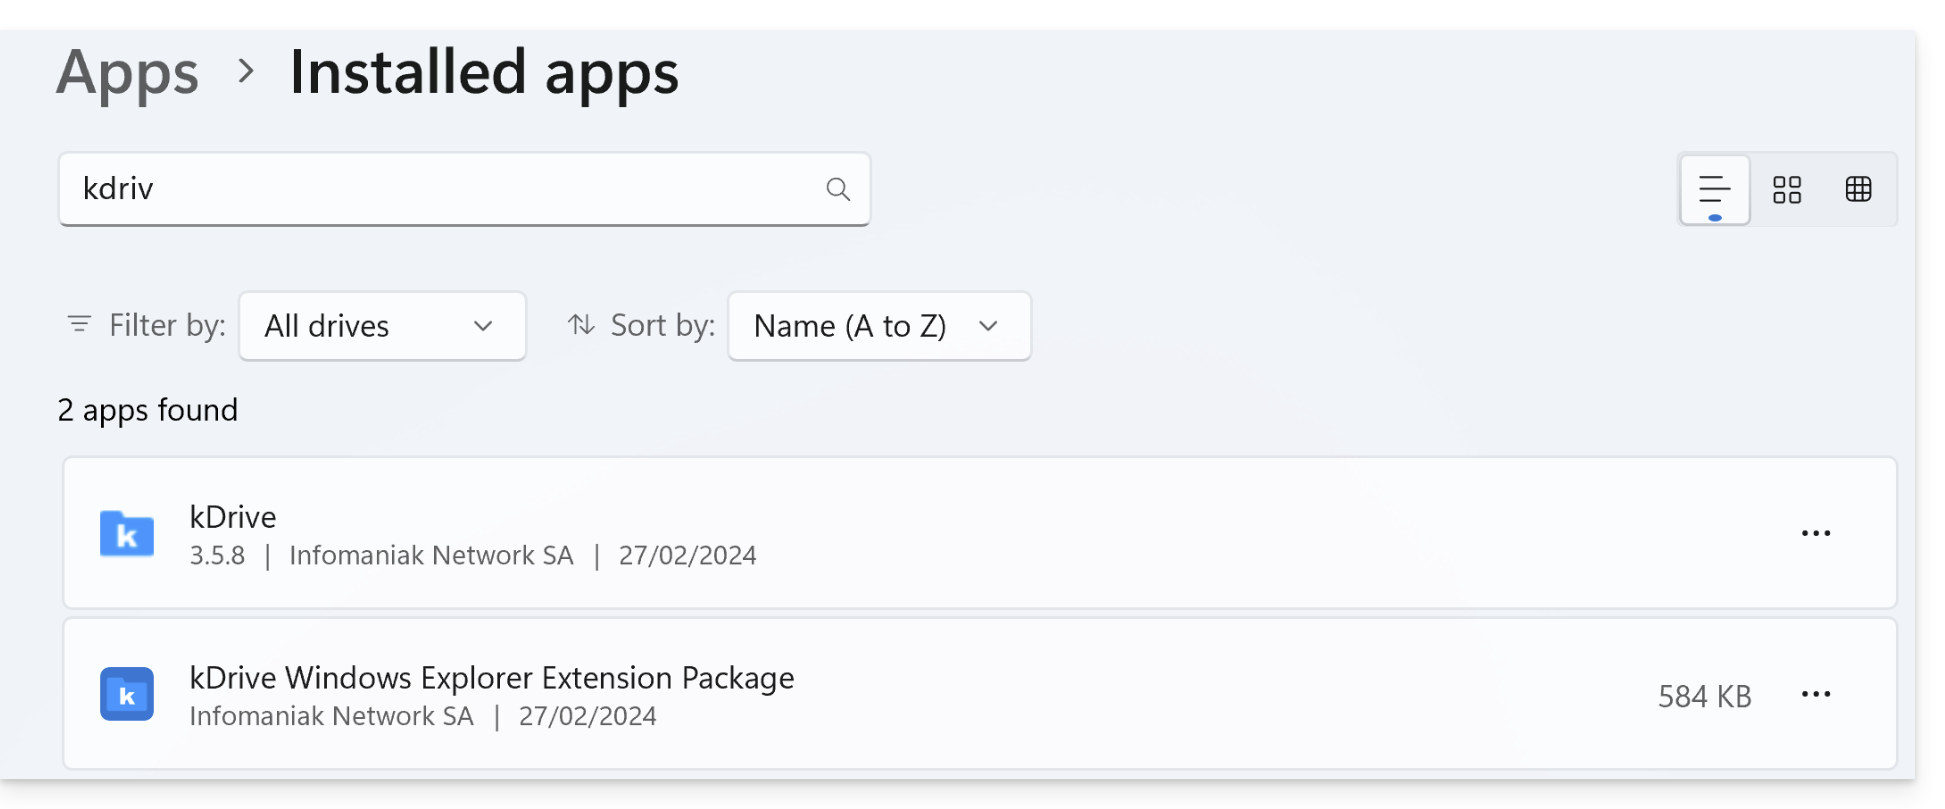
Before performing any operations, make sure the extension is registered by the system:
- Open the Settings of Windows.
- Go to the Apps section, then Installed apps.
- In the search bar, type "kDrive".
- Check that the item kDrive Windows Explorer Extension Package appears in the list:
Error of type "Unable to start Lite Sync"
This error usually occurs when the Windows Explorer extension is missing or corrupted.
Manual reinstallation of the extension
If the extension does not appear or does not work, you can install it manually without reinstalling all of kDrive:
- Close the kDrive application completely (check that it is no longer in the notification area).
- Open your file explorer and go to the folder:
C:\Programs\kDrive\shellext\AppX\ - Double-click on the file:
FileExplorerExtensionPackage_3.8.1.0_x64_arm64.msixbundle - A specific installation assistant for the extension will open. Follow the steps.
- Restart your computer to validate the integration.
If the problem persists
If, despite the manual installation, the LiteSync option remains unavailable:
- Antivirus: Check that your security software is not blocking the processes located in
C:\Programs\kDrive\. - Conflicts: Other cloud services (such as OneDrive) can sometimes conflict with kDrive icon extensions.
- Logs: If necessary, send the kDrive logs (in Debug mode) to Infomaniak support.
Link to this FAQ:
Has this FAQ been helpful?
This guide explains how to resolve certain errors Lite Sync macOS that may occur with the desktop app kDrive (desktop application on macOS).
Synchronization lockout 1/10
Check if macOS permissions are enabled for kDrive and Lite Sync extensions:
- Open macOS settings.
- Under General, click on Opening and extensions.
- Scroll down to the indication Endpoint Security Extensions :: kDrive LiteSync Extension:
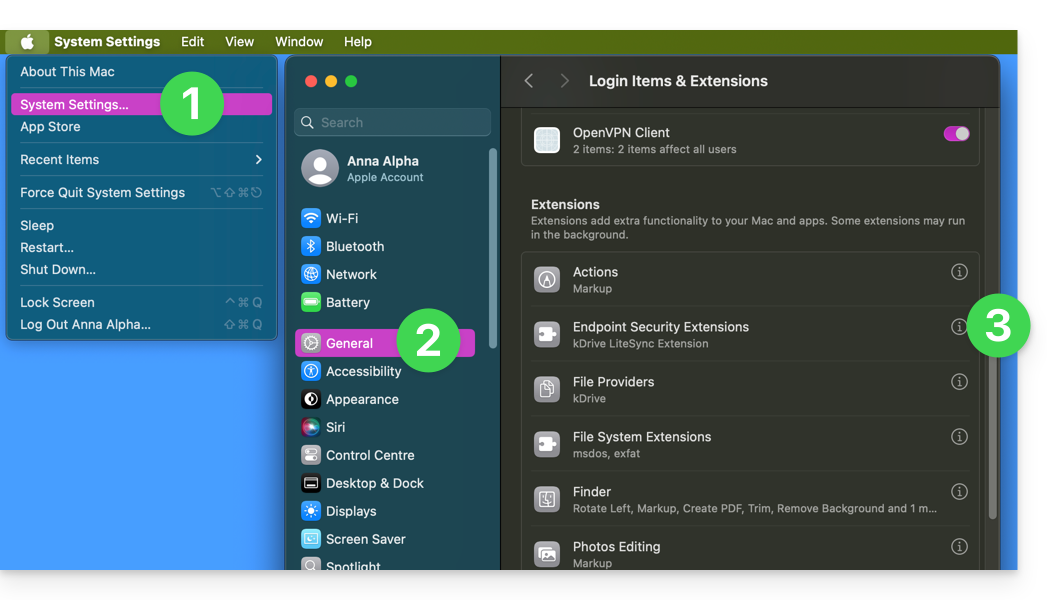
- Check that permissions are enabled and validate at the bottom:
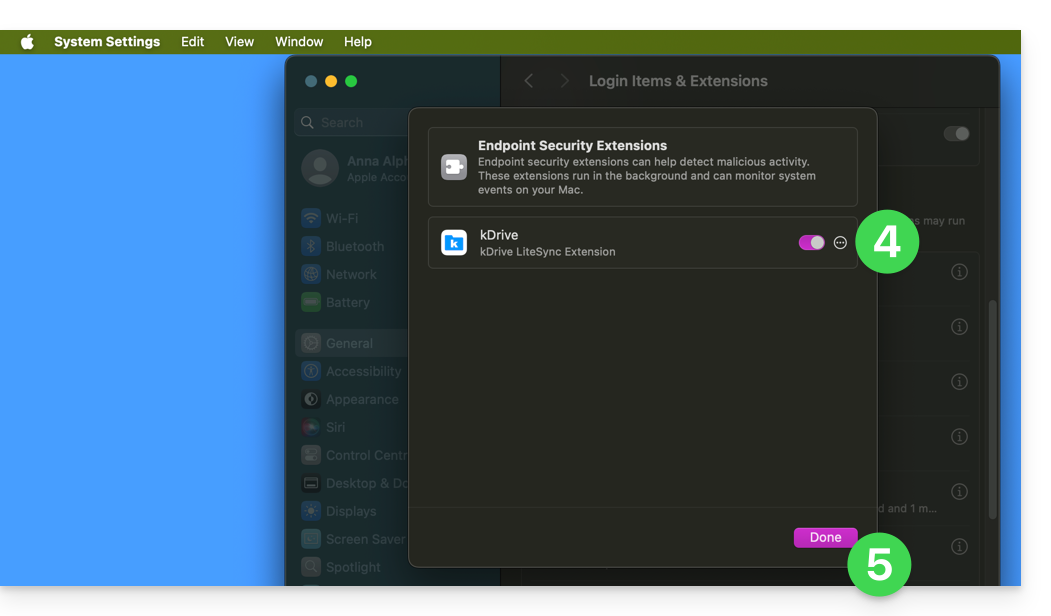
Take the opportunity to review the other elements related to kDrive to ensure that everything is enabled.
Error of type "Unable to start Lite Sync plugin"
To correct an error of type "Unable to start Lite Sync plugin" that usually occurs when the Lite Sync extension has disappeared or does not have the necessary permissions…
... check the presence of the extension
From an application of type Terminal (command line interface, CLI / Command Line Interface) on a macOS device:
% systemextensionsctl listThe result is similar to:
1 extension(s)
--- com.apple.system_extension.endpoint_security
enabled active teamID bundleID (version) name [state]
* * 864VDCS2QY com.infomaniak.drive.desktopclient.LiteSyncExt (3.5.0/1) kDrive LiteSync Extension [activated enabled]
If the command result does not mention "kDrive LiteSync Extension", the extension is not present:
- Delete the synchronization and add it again.
If the command result does not have the status [activated enabled]:
- Authorize the extension in the System Settings / Privacy and Security.
... check the extension's permissions
In the System Settings / Privacy and Security / Full Disk Access of the macOS device: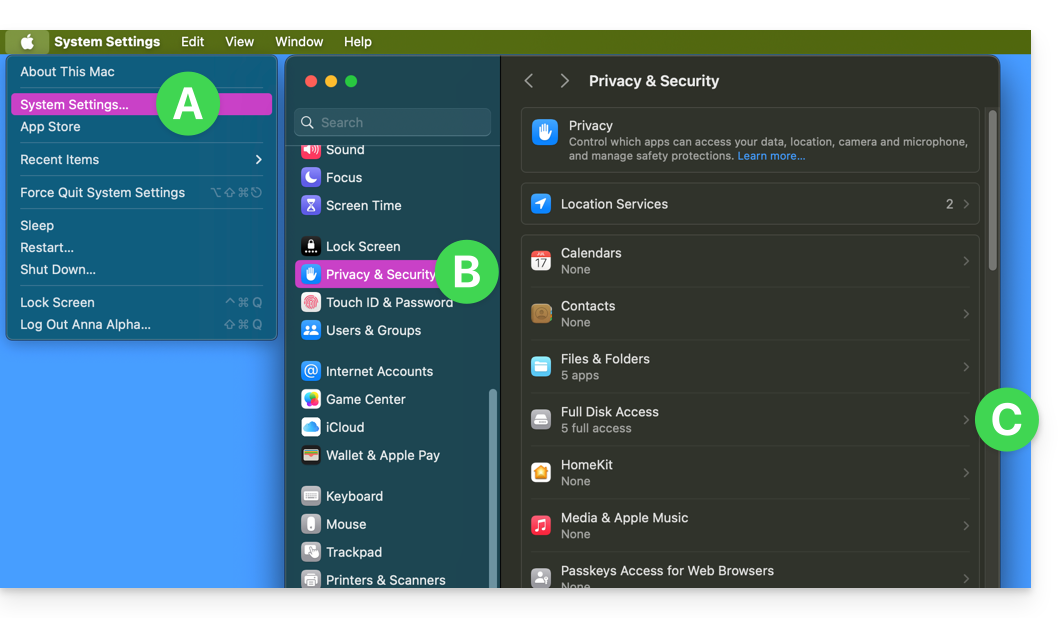
Grant full access to kDrive and the Lite Sync extensions: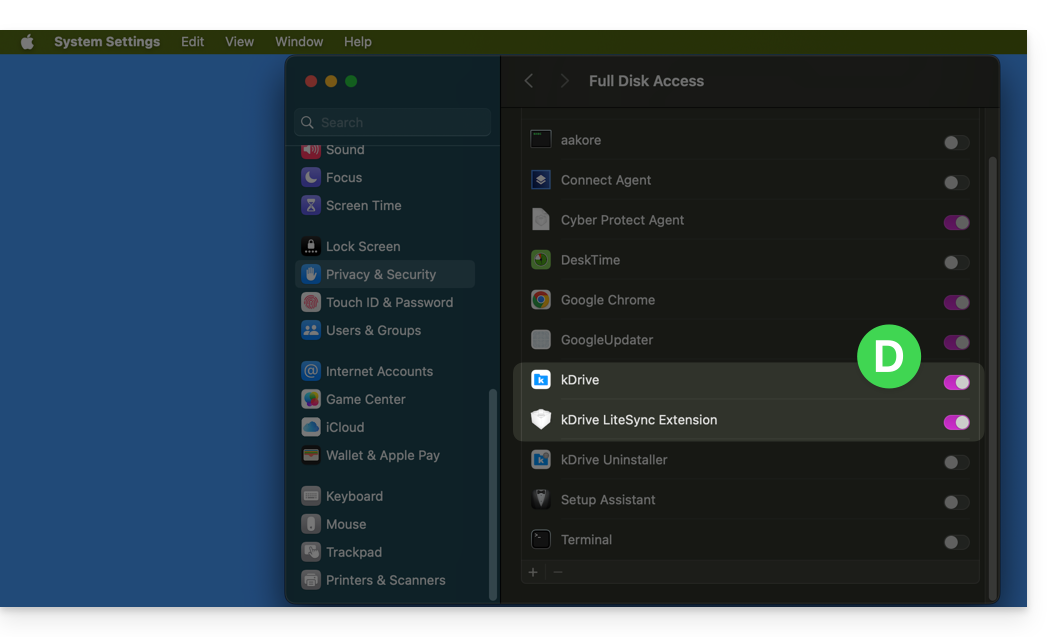
...check the extension's functionality
From a Terminal:
% ps -ef | grep LiteSyncExtThe result is similar to:
0 7434 1 0 1:02 ?? 0:25.42 /Library/SystemExtensions/6035BDE4-B7D6-477E-A6AB-C2281E3C7752/com.infomaniak.drive.desktopclient.LiteSyncExt.systemextension/Contents/MacOS/com.infomaniak.drive.desktopclient.LiteSyncExtIf the extension does not appear to be working, try the following actions:
- Restart the app.
- Reboot the Mac.
- Remove/add the sync.
- Uninstall/reinstall the app.
If it is still not OK
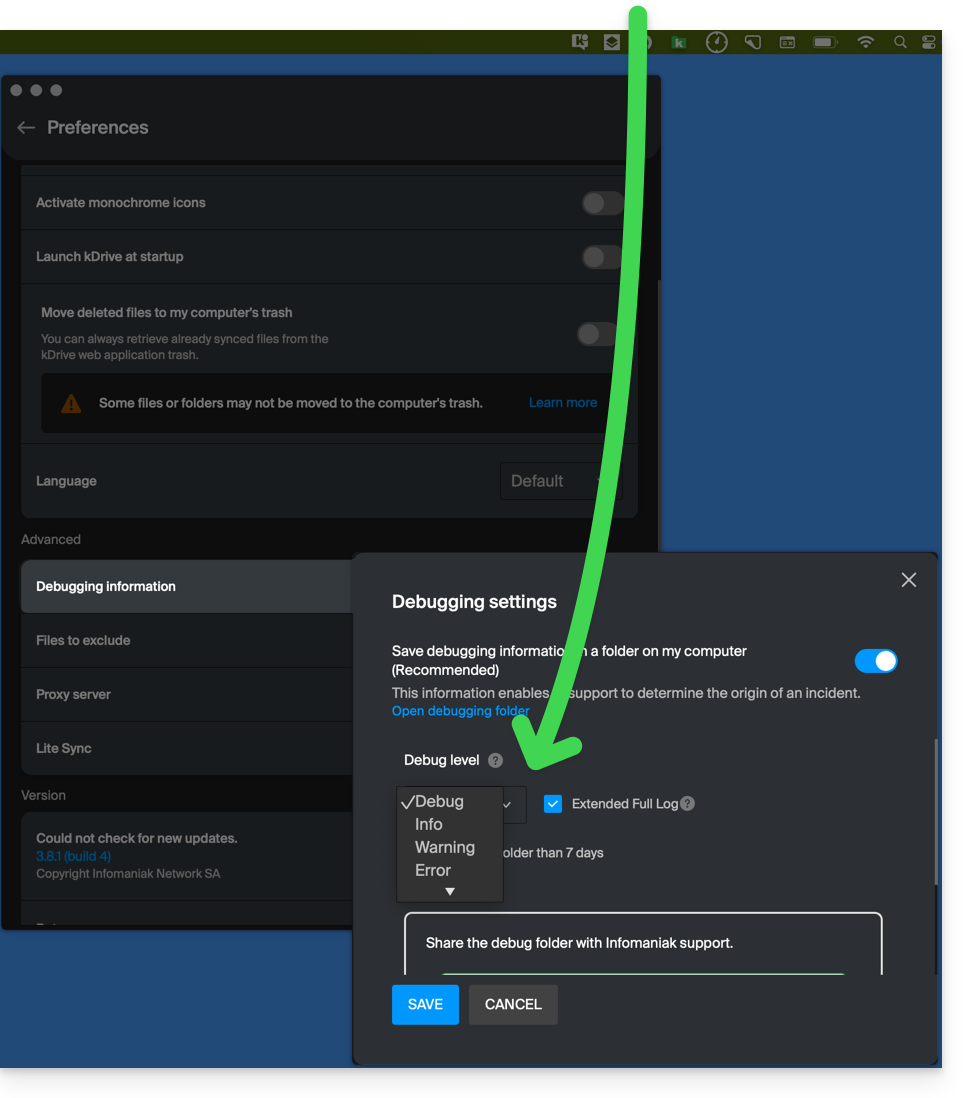
- Request the kDrive logs (level Debug):
- Check in the Console if there is a blockage report on the date of the last app startup and if so, send them to Infomaniak:

Retrieve the kDrive messages in the Console:
- Quit the app.
- In the Console, select the Mac, filter on
[KD], click on Start:
- Launch the app.
- Click in the list of messages, select them (Ctrl+A), copy them (Ctrl+C) and send them to Infomaniak.
Link to this FAQ:
Has this FAQ been helpful?
This guide explains how to change the local location used by the desktop app kDrive (desktop application on macOS / Windows / Linux) in order to, for example, store the synchronized data on a different hard drive when the first drive chosen no longer has enough space.
Introduction
- Indeed, if the Lite Sync option is not enabled, all the existing data on the web app kDrive (online service ksuite.infomaniak.com/kdrive) is also present locally on the synchronized device and takes up storage space.
- As the volume of data can be very large, you may need to store the data on a different hard drive than the one initially chosen.
- Never move a folder used for kDrive synchronization (
/kdrive,/kdrive2, etc.) either when the kDrive application is open or when it is closed or uninstalled in order to be reinstalled.- If everything is synchronized, you must delete the folder and recreate it as explained below.
- If you proceed differently by using a folder that already contains your data, you expose yourself to file conflicts.
Change the local directory used by kDrive
To define a new folder for kDrive synchronization when the first folder chosen initially should no longer be used, follow this procedure:
- Make sure all your data is synchronised and that it exists and is visible in the kDrive web app (online service at ksuite.infomaniak.com/kdrive).
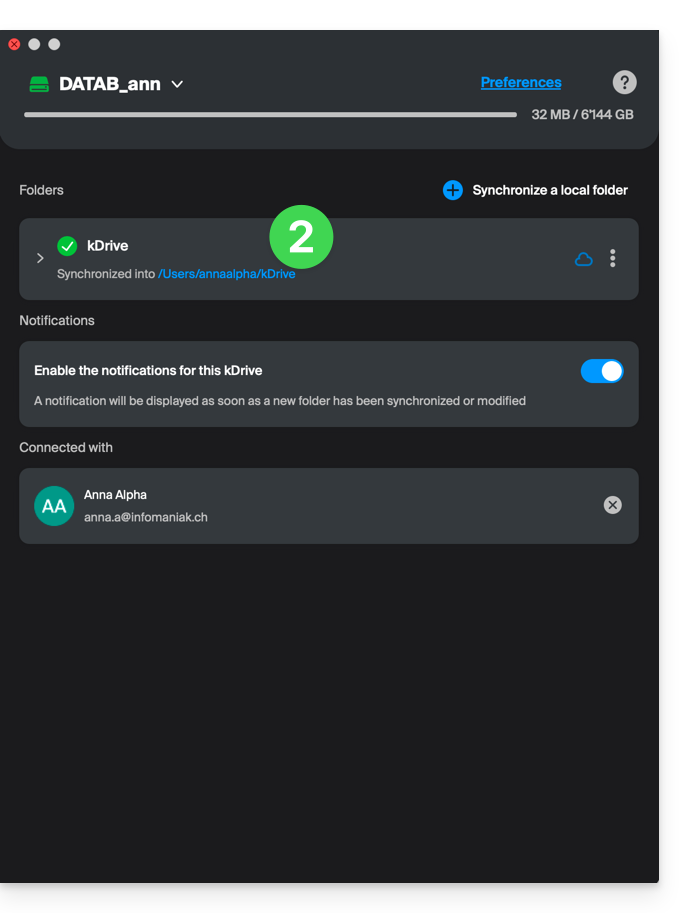
- If necessary, locate the folder currently used by the kDrive desktop app (click on Drive Settings from the application, then click on the blue URL displayed under Folders to open the local folder and identify its location):
- Quit the kDrive desktop app on the device where you want to change the folder used:
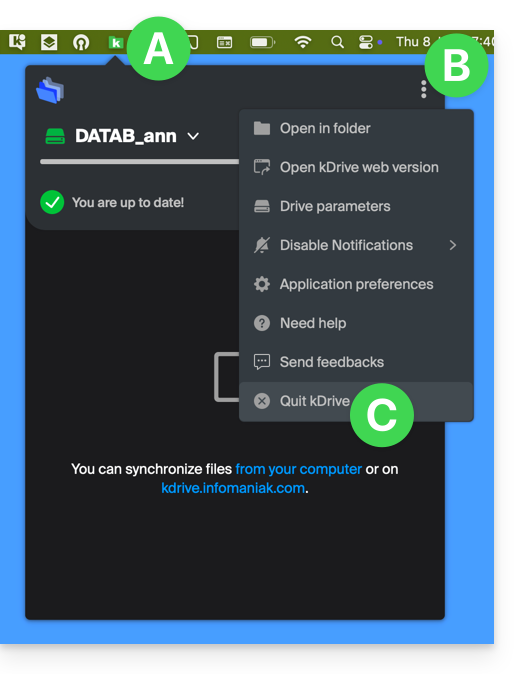
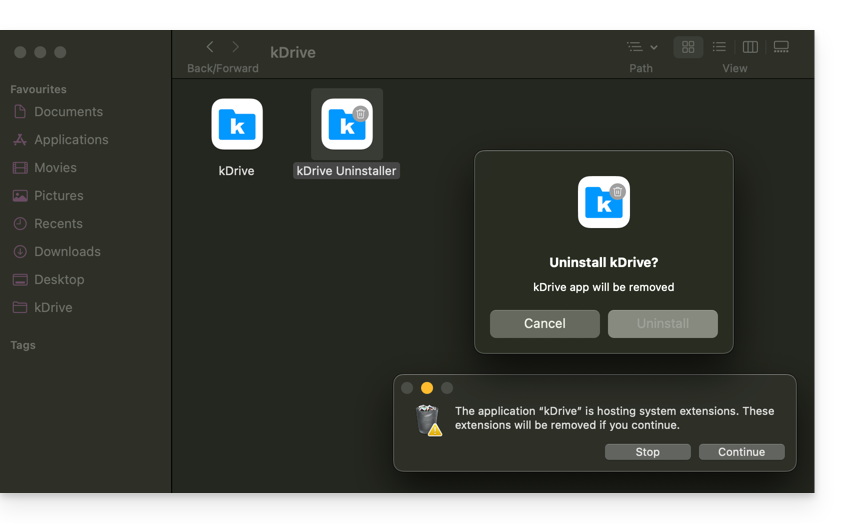
- Completely uninstall the kDrive desktop app by deleting all configuration/settings data, etc. – on macOS, use the kDrive Uninstaller in the Applications/kDrive folder):
- Delete the
kDrivefolder (orkDrive2, etc. located in step 2). - Reinstall the kDrive desktop app, and when you connect to your Infomaniak account, click on the pencil ✎ icon at the folder selection step:
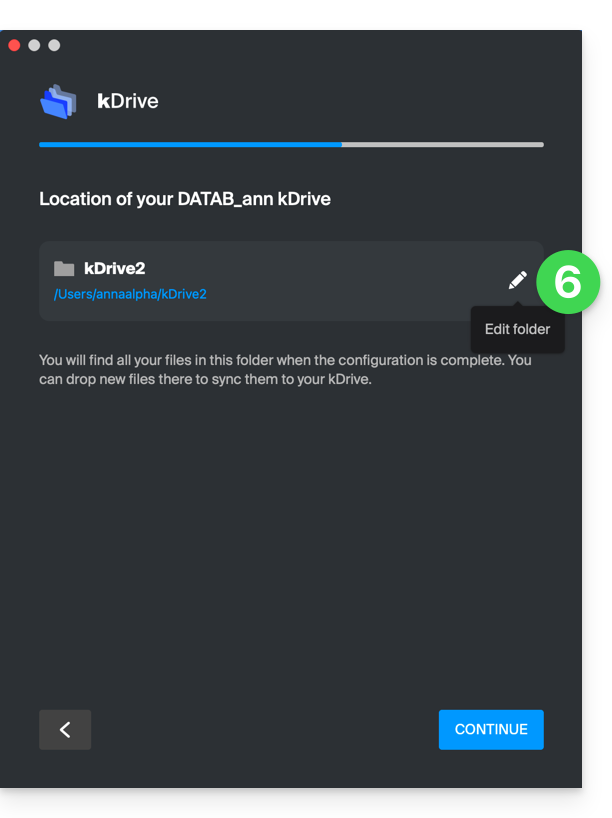
- Choose the new hard drive as the location for the new folder (name it as you wish):
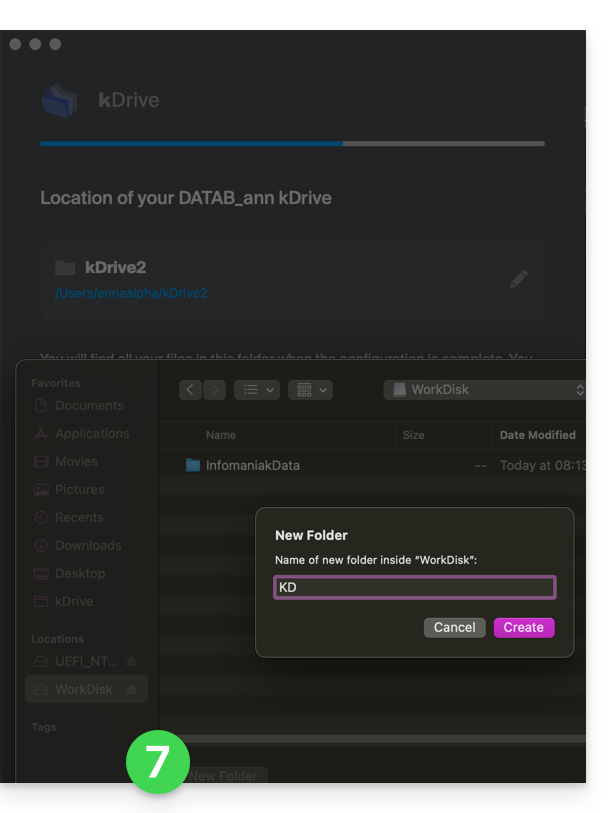
- Complete the configuration:
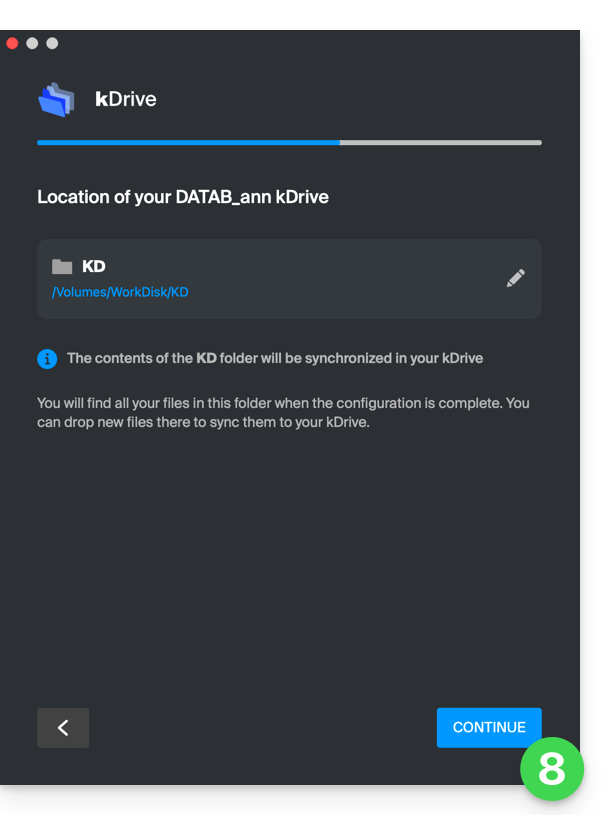
- The download of the kDrive data stored on Infomaniak servers will begin and continue entirely in the background.
- Refer to this other guide to download only specific folders.
Link to this FAQ:
Has this FAQ been helpful?
This guide explains how Infomaniak kDrive shares are displayed depending on the type of share and the application used (Web or Desktop), including internal shares (between users of the same kDrive) and external shares (to users outside kDrive).
Preamble
- Internal shares (between users of the same kDrive, point A below) can be synchronized on the desktop app.
- Shared folders appear in a “Shared” folder on the desktop application and can be enabled/disabled in the synchronization settings.
- Do not move or rename the “Shared” folders locally — this can break the synchronization.
- External shares (to users outside kDrive, point B below) cannot be synchronized on the desktop app.
A. Internal shares (between users of the same kDrive)
It is possible to share files or folders from your personal folder with other users of your kDrive, without going through the Organization Folders (shared folders). This allows you to precisely control access to your private data.
Steps to share a folder/file internally
- In the kDrive web interface, one of the kDrive users right-clicks on their folder or file to share:
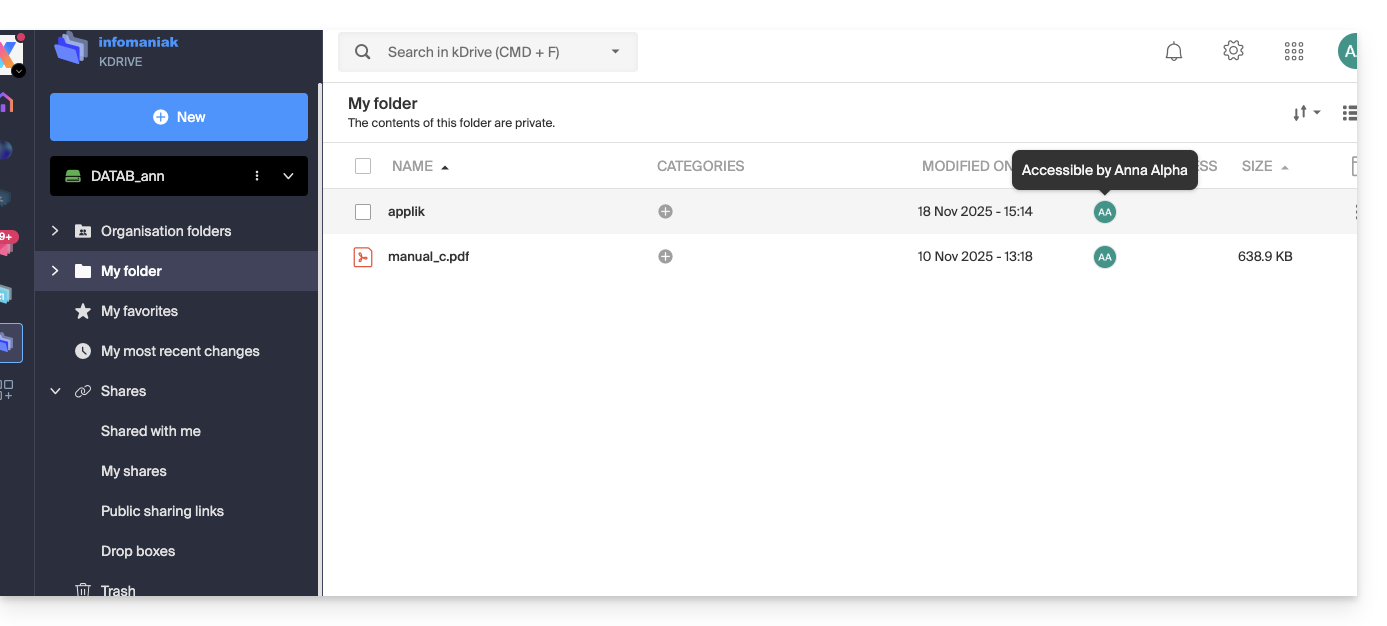
- Select “Share the folder”:
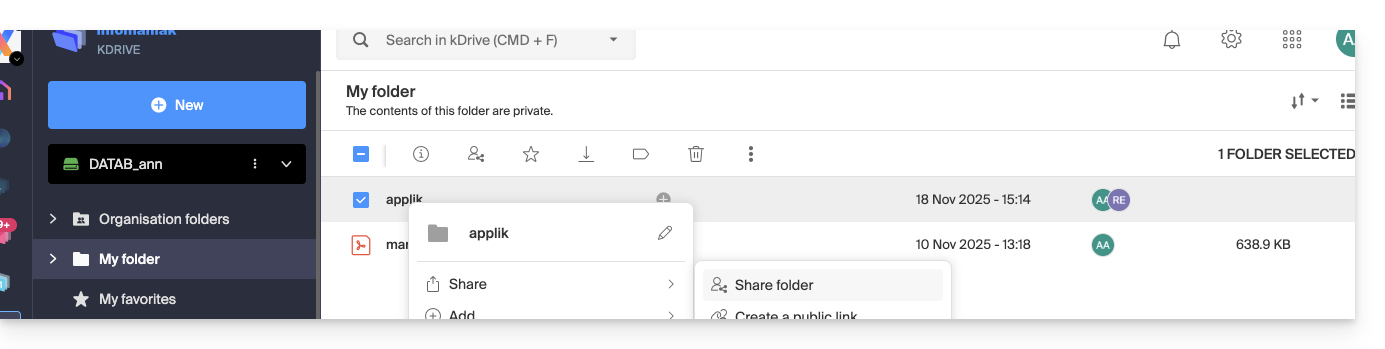
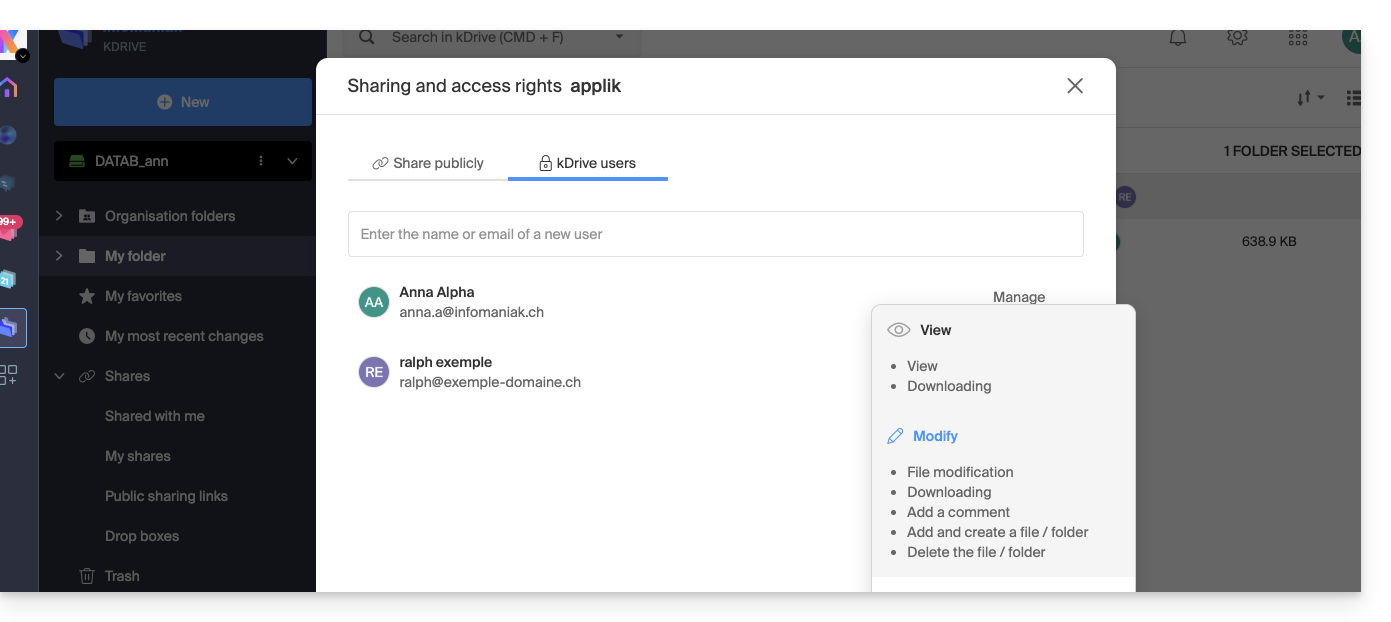
- In the “kDrive Users” tab, enter the name of another user of the same kDrive:
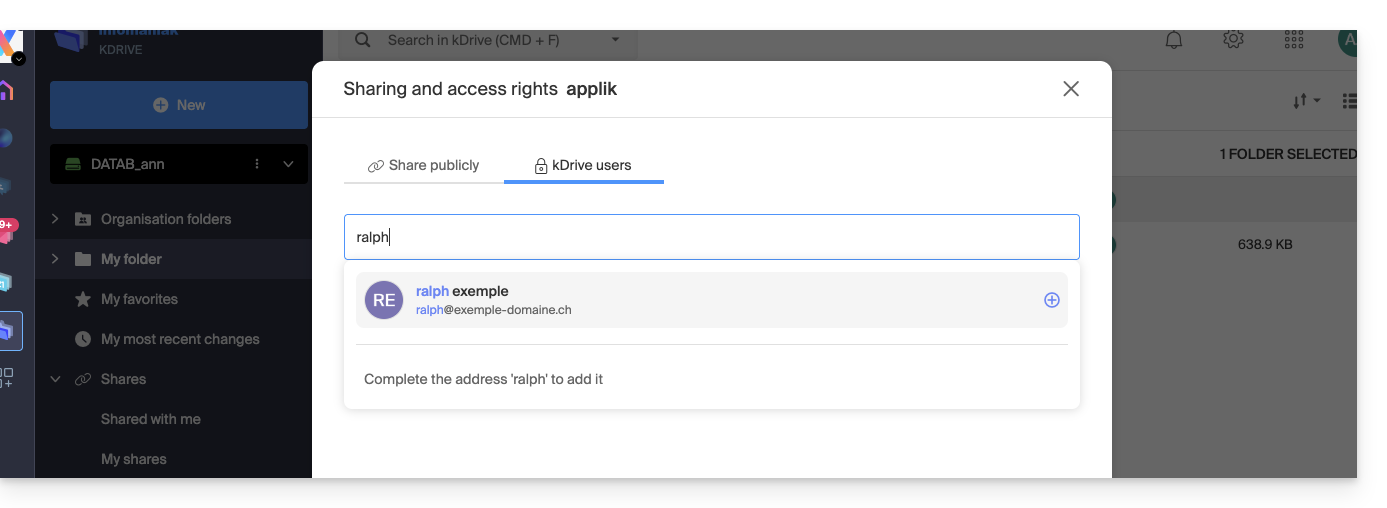
- Choose the permissions:
- Close the sharing window.
Behavior in the desktop app
When an internal share is made as above, a folder named “Shared” automatically appears in the local tree structure of the desktop application for the user concerned, here on macOS: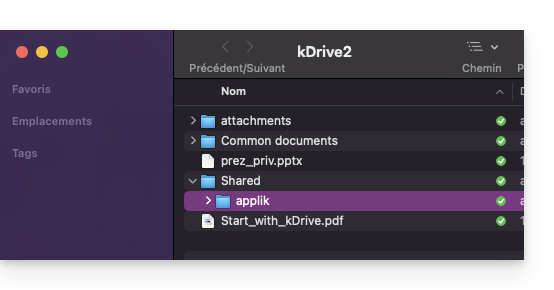
This folder contains all shared items and will therefore be synchronized with any subsequent changes made by the user who shared their data.
You can enable or disable the synchronization of this folder from the desktop application settings, by clicking on the chevron next to the name of the synchronization folder (kDrive2 in the example below) to expand the tree structure of the synchronized files, and by deselecting the “Shared” folder (do not forget to validate the change):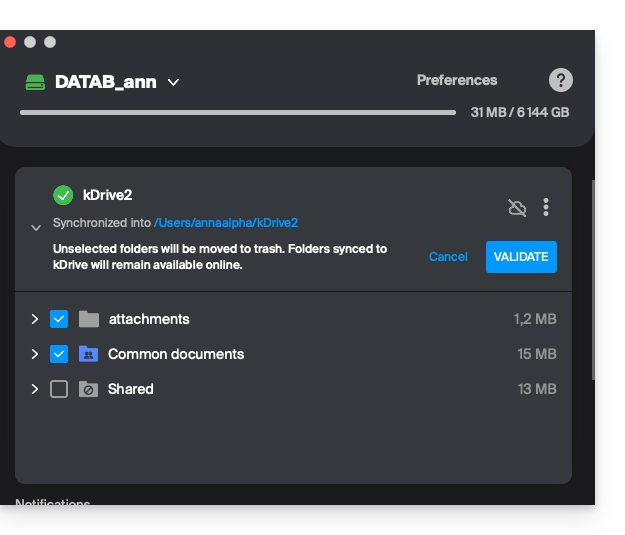
B. External shares (to users outside the concerned kDrive)
You can also share files or folders with people who are not part of your kDrive. These shares are called external shares.
Warning: The external user must have an Infomaniak account (free or paid) to access the share. This is not a public link accessible to anyone.
Steps to share a folder/file externally
- In the kDrive web interface, one of the kDrive users performs a right-click on the folder or file to be shared (for example, a subfolder of an already shared folder (at point A above) will be shared, this has no impact).
- Select “Share the folder”:
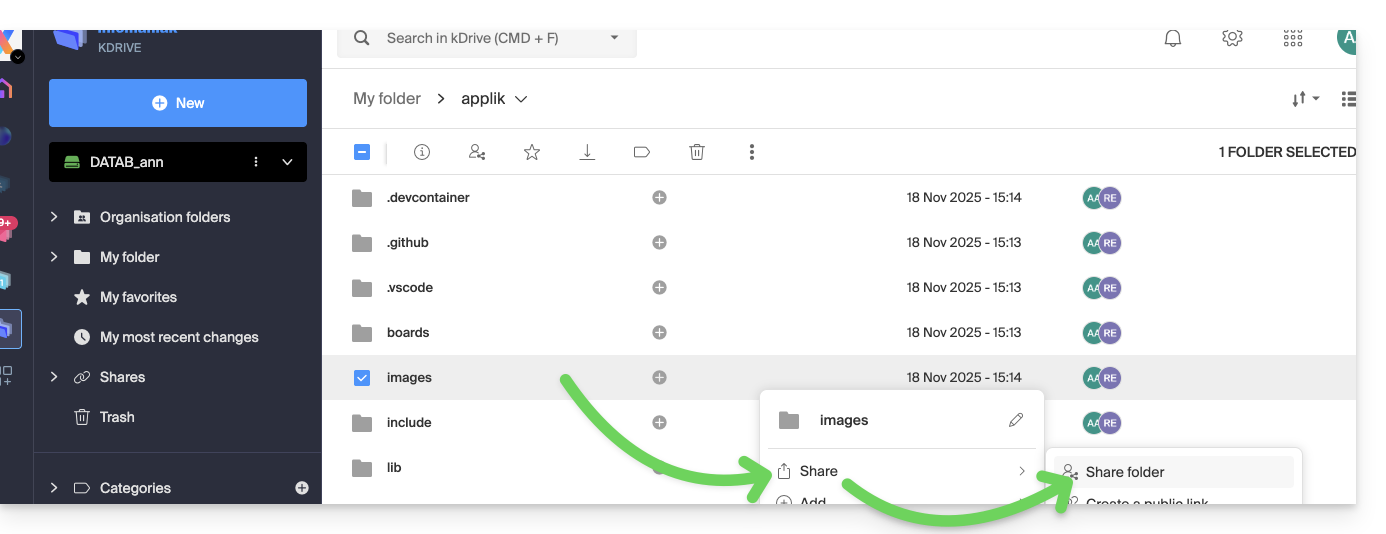
- In the “kDrive Users” tab, enter the email address of the external person (
faq@ik.mein this example):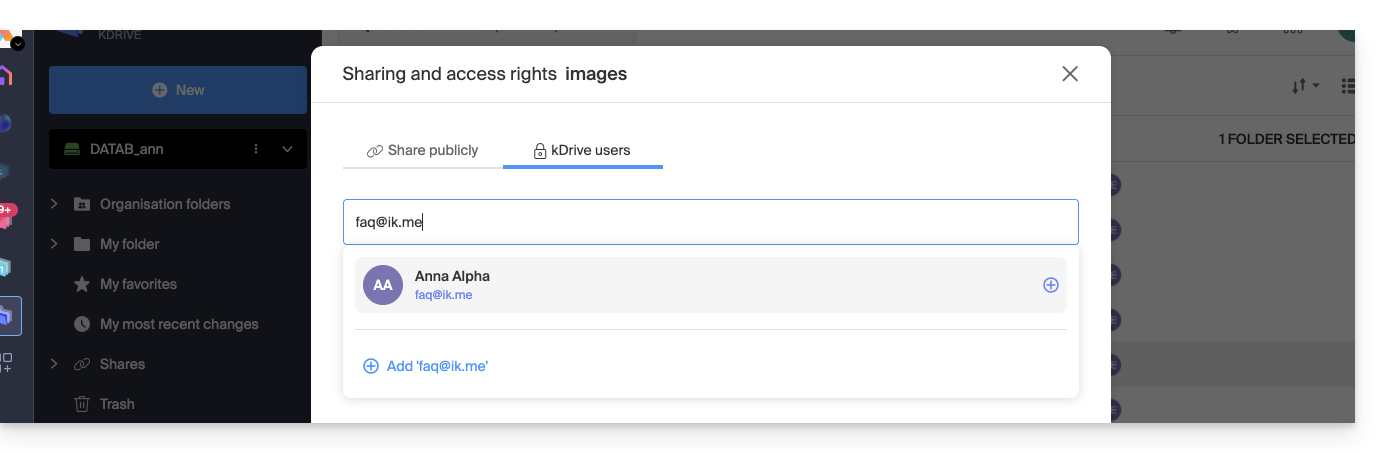
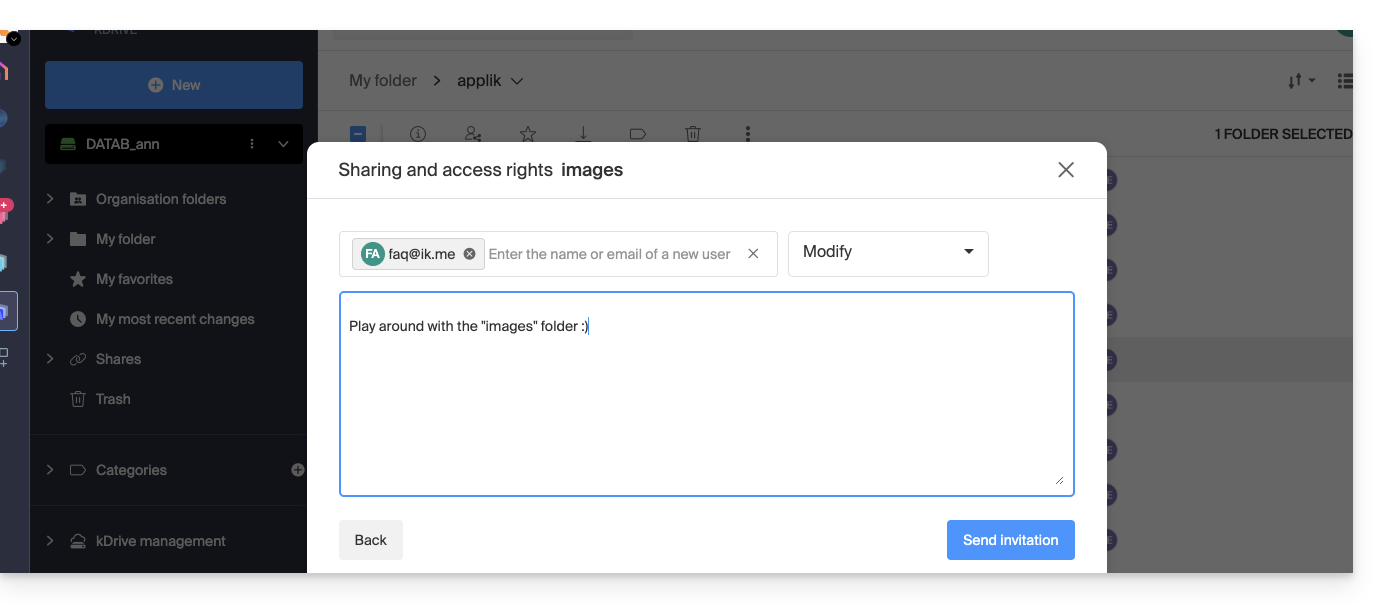
- Click on the email address to add it, choose the permissions of the user and an optional message, then click on the button at the bottom right:
- Select “External User” and click on the button at the bottom right to send the invitation:
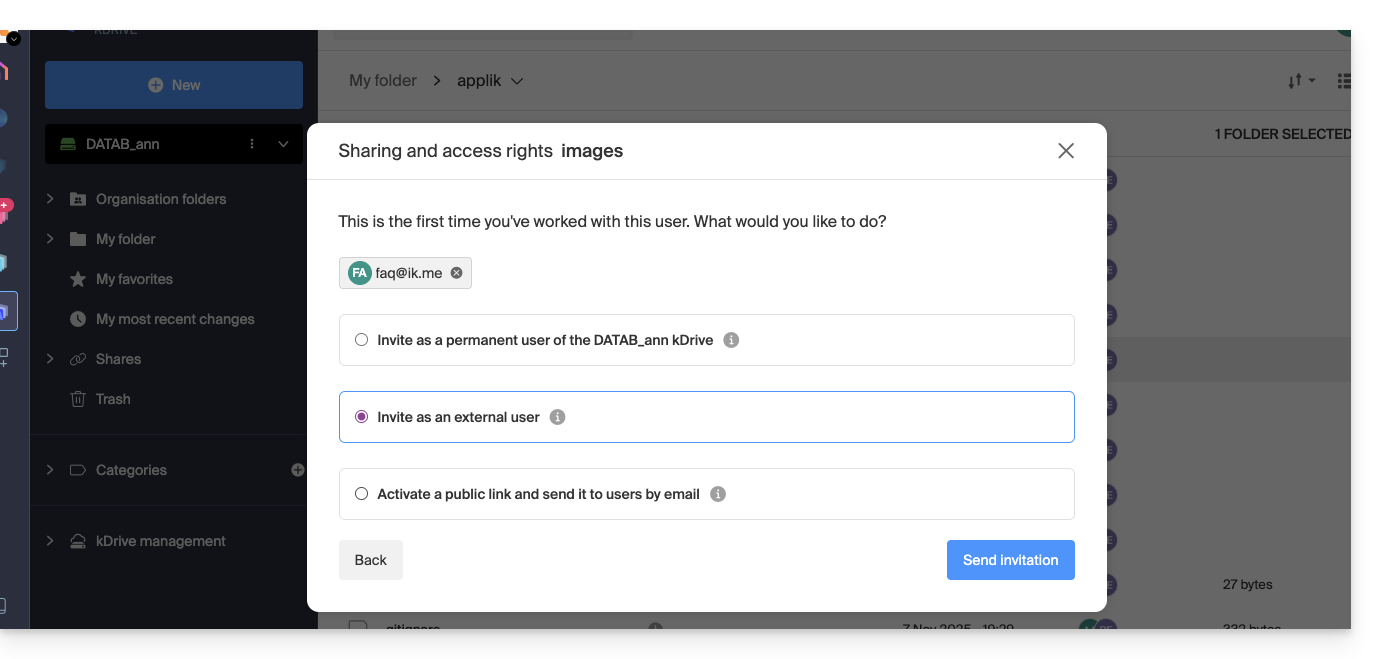
- Close the sharing window.
Behavior in the Web (and desktop) app
As long as the user does not check their emails, nothing will happen, kDrive will not appear to them, neither on the Web app nor the desktop app:
The user faq@ik.me must therefore check their emails: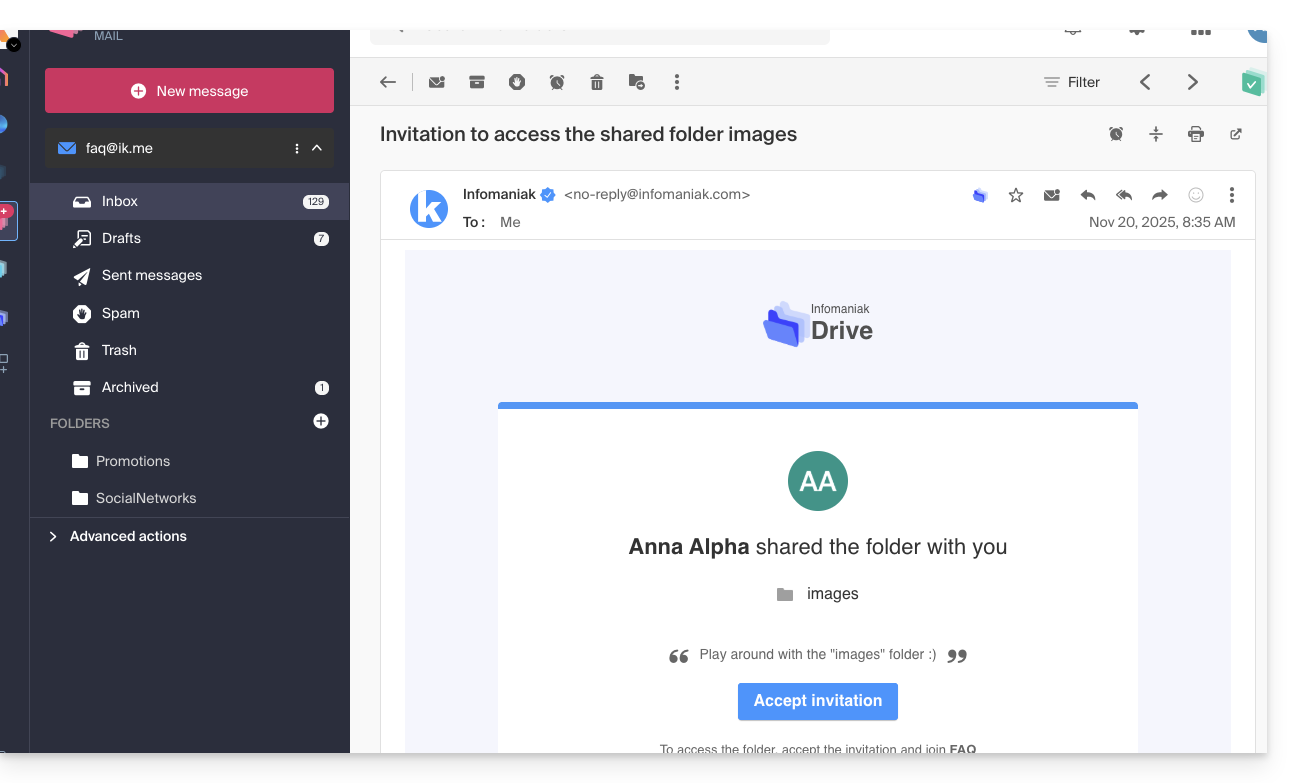
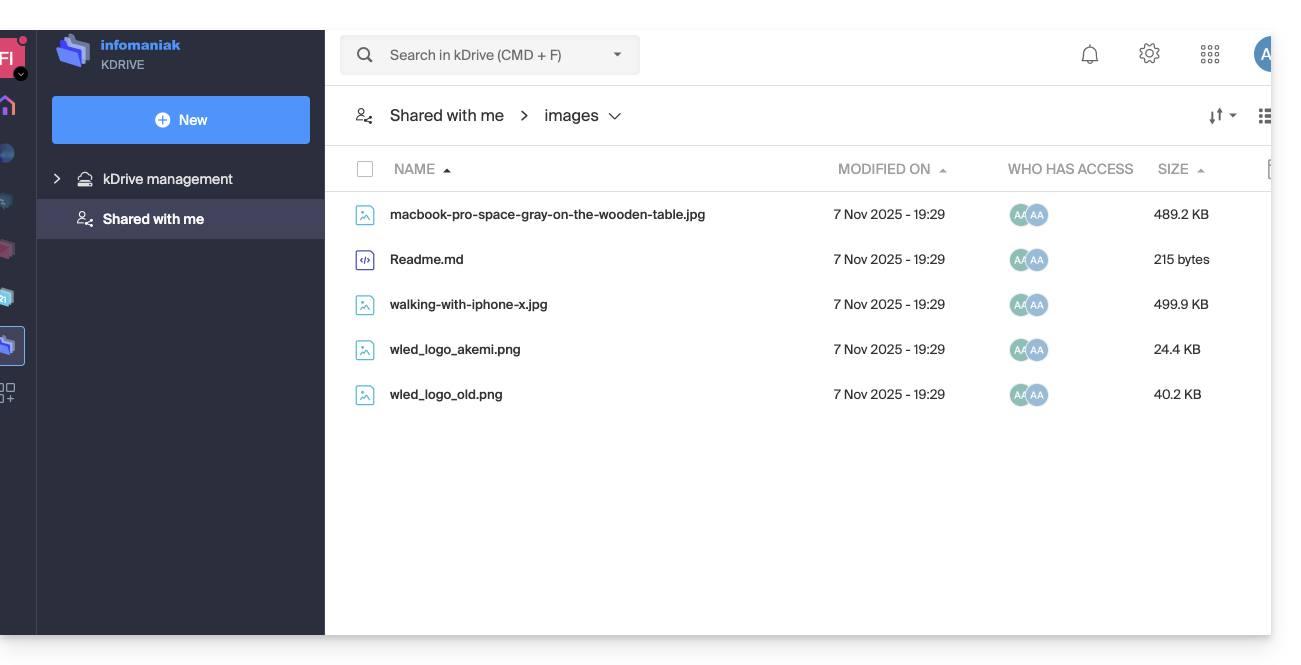
Once the sharing is accepted:
- The user is redirected to the shared data page in a restricted kDrive:
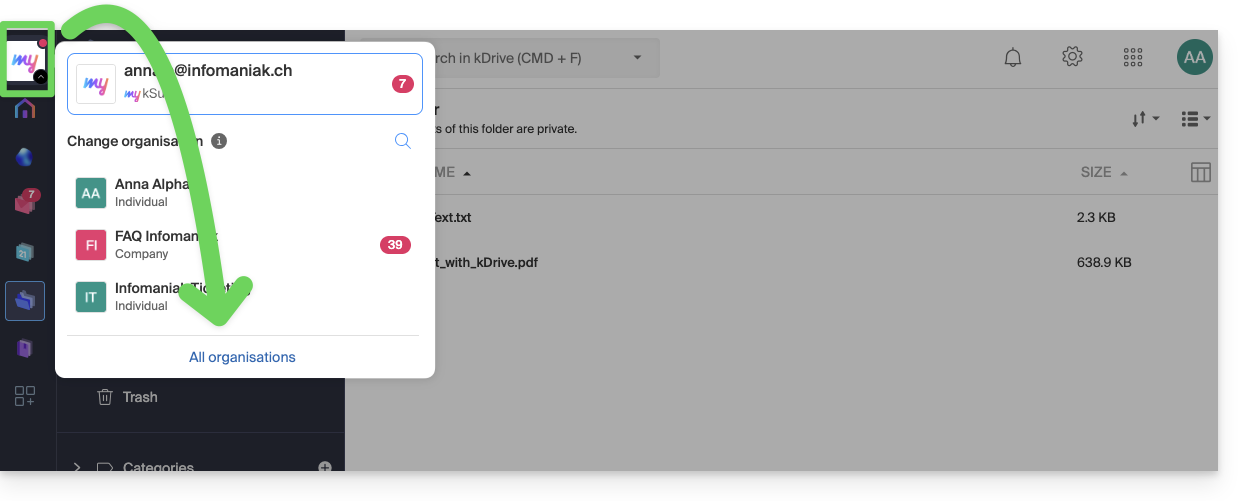
- To find them later, it may be necessary to first display “All Organizations” to make the share reappear, as it is not necessarily linked to the kDrives of Organizations already accessible to the user:
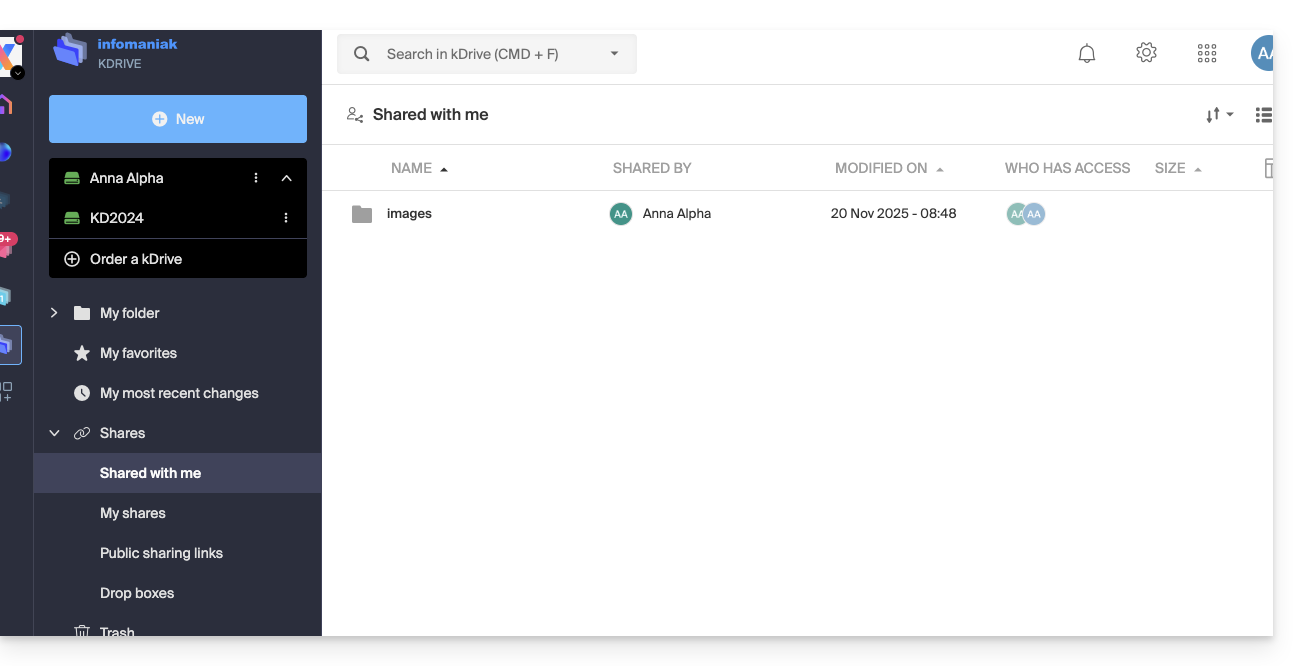
- Then, the shared data will be visible in the “Shared with me” item:
These external shares are NOT synchronizable via the desktop app. No “Shared” folder appears locally for these shares.
The external user accesses the files only via the kDrive web interface (after logging into their Infomaniak account).
This ensures the security of data shared with third parties while limiting the synchronization load on local workstations.
Link to this FAQ:
Has this FAQ been helpful?
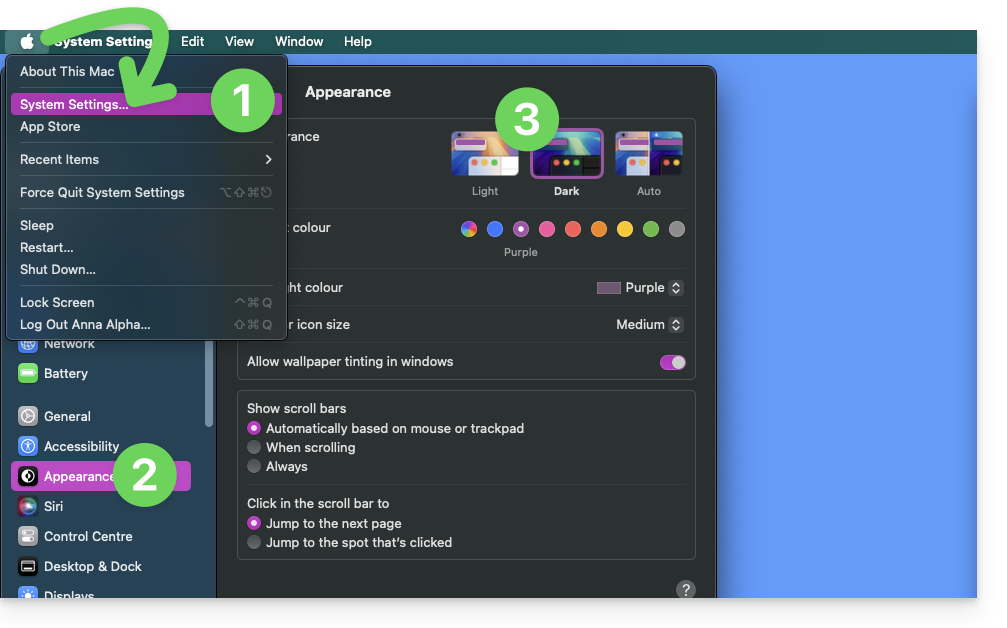
Infomaniak tools, such as the Web Mail app (online service at ksuite.infomaniak.com/mail) or the Calendar, Contacts, kSuite interfaces, can be displayed in light mode or dark mode, including based on the settings of your current operating system:
Enable manual mode
To manually choose a dark or light display, without relying on any different display setting on the operating system:
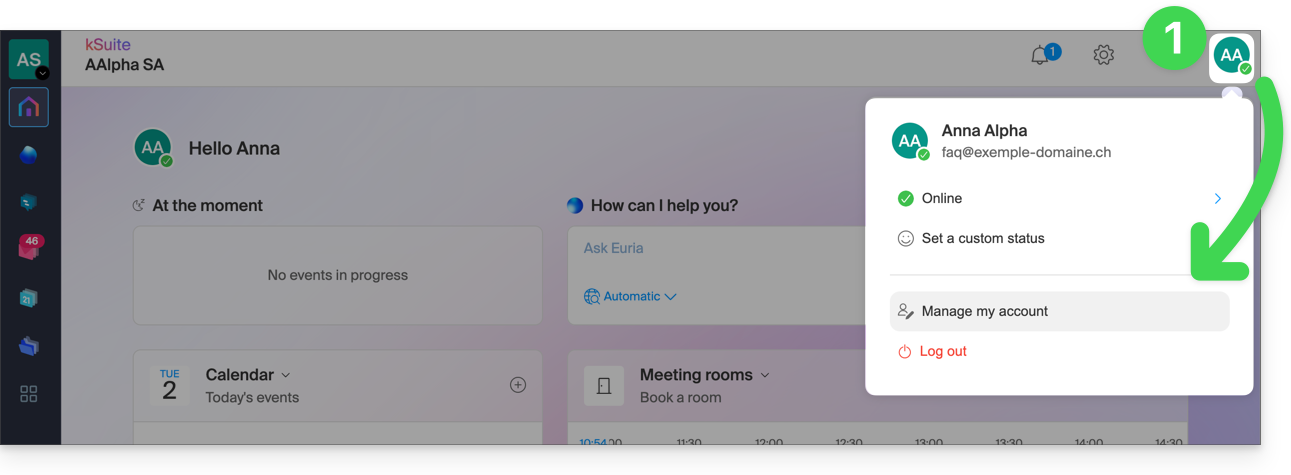
- Click here (or on the badge with your initials / avatar in the top right corner of the Infomaniak Manager) to "Manage my account":
- Then, click on Appearance in the left-hand menu.
- Click on Light to apply light mode:
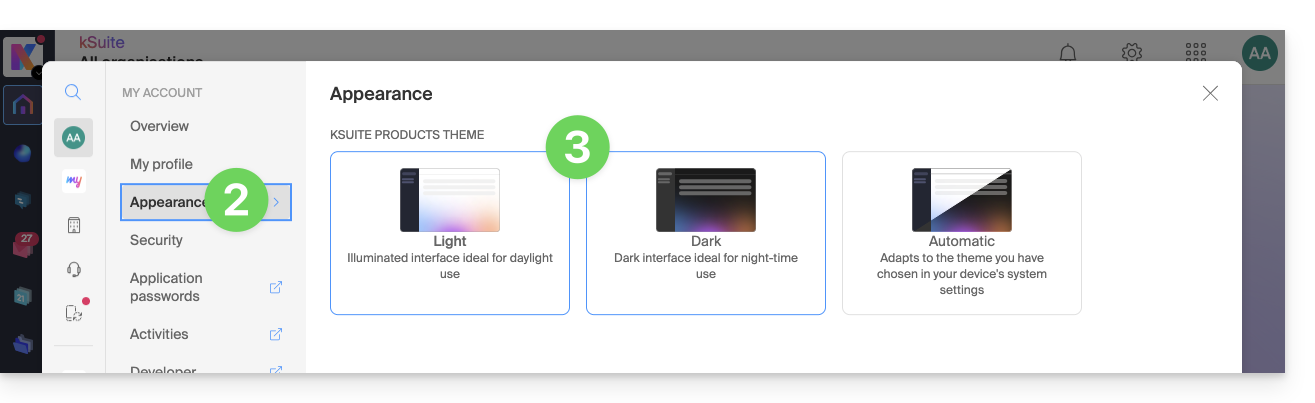
- Click on Dark to enable dark mode.
Enable automatic mode
Automatic mode is based on your operating system settings (macOS / Windows...):
- Click here or on the badge with your initials / avatar in the top right corner of the Infomaniak Manager to "Manage my account":
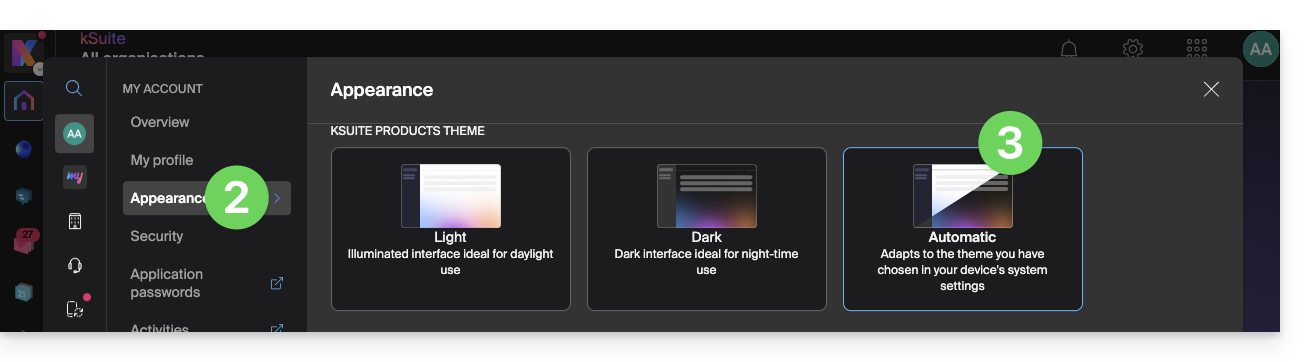
- Click on Appearance in the left-hand menu.
- Click on Automatic mode:
Then, if you want to change the light or dark theme of your computer, so that the automatic mode of the Manager takes your preferences into account…
… on macOS
- Click on System Preferences…
- Click on Appearance.
- Choose the desired mode on the right:
… on Windows
- In the Start menu, open Settings > Personalization.
- Select Colors, then Choose your mode:
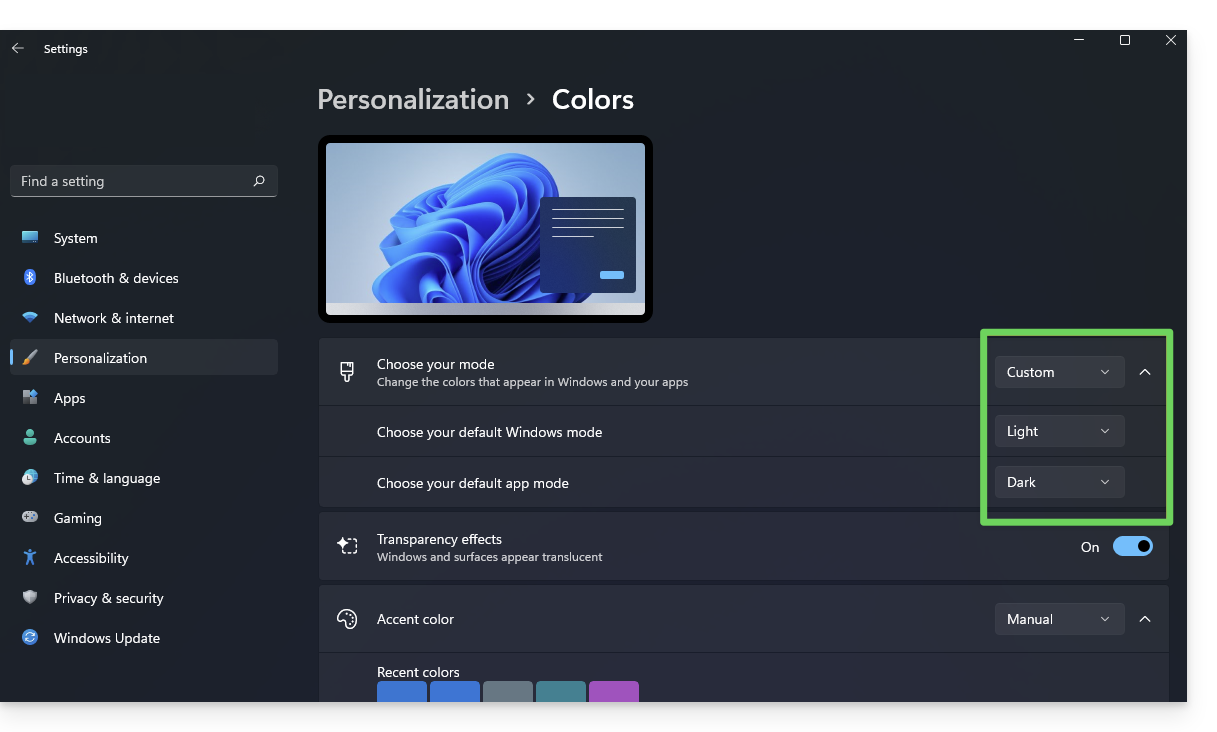
- You can choose between Light, Dark, or Custom.
- If you select Custom, you will be able to choose a default Windows mode and a different default application mode.
And on mobile?
The dark theme is enabled on mobile devices for Infomaniak login and account creation pages; it automatically adapts to the mobile system's preferences, providing a consistent visual experience between mobile applications and login/account creation.
Link to this FAQ:
Has this FAQ been helpful?
This guide explains how to exclude files and folders from a kDrive synchronization on your computer, and which file types are already excluded by default.
Manage kDrive excluded files
To do this:
- Left-click on the desktop app icon in the notification area of your computer (top right on macOS, bottom right on Windows and a double left-click in the taskbar on Linux).
- Click on the action menu ⋮ at the top right in the application.
- Click on Preferences:

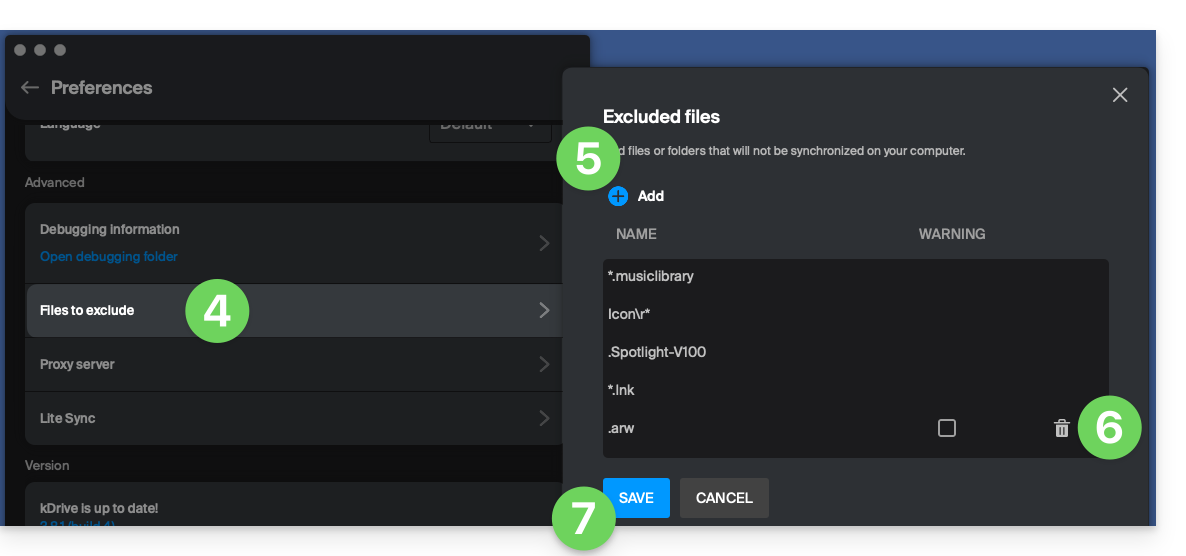
- Click on Files to exclude (in the Advanced section).
- To add files to exclude, click on the icon Add then enter the name.
- To exclude a collection of files, specify for example
*.bak(asterisk "wildcard" preceding the file extension concerned). - If you add the name of a folder, it will no longer be synchronized, including its contents, subfolders, etc.
- To exclude a collection of files, specify for example
- To remove files/folders that you had added to exclude from synchronization, click on the Trash icon Delete all the way to the right of the line concerned.
- It is possible to hide synchronization warning messages for excluded files by checking the box to the right of the excluded file.
- Click on the blue button Save:
The files that are excluded by default (items in the list that cannot be deleted) vary depending on the OS and are excluded because they represent synchronization error risks.
Link to this FAQ:
Has this FAQ been helpful?
This guide details some of the basic operations that can be easily performed with data on kDrive Infomaniak.
Add a file / folder
On the kDrive web app
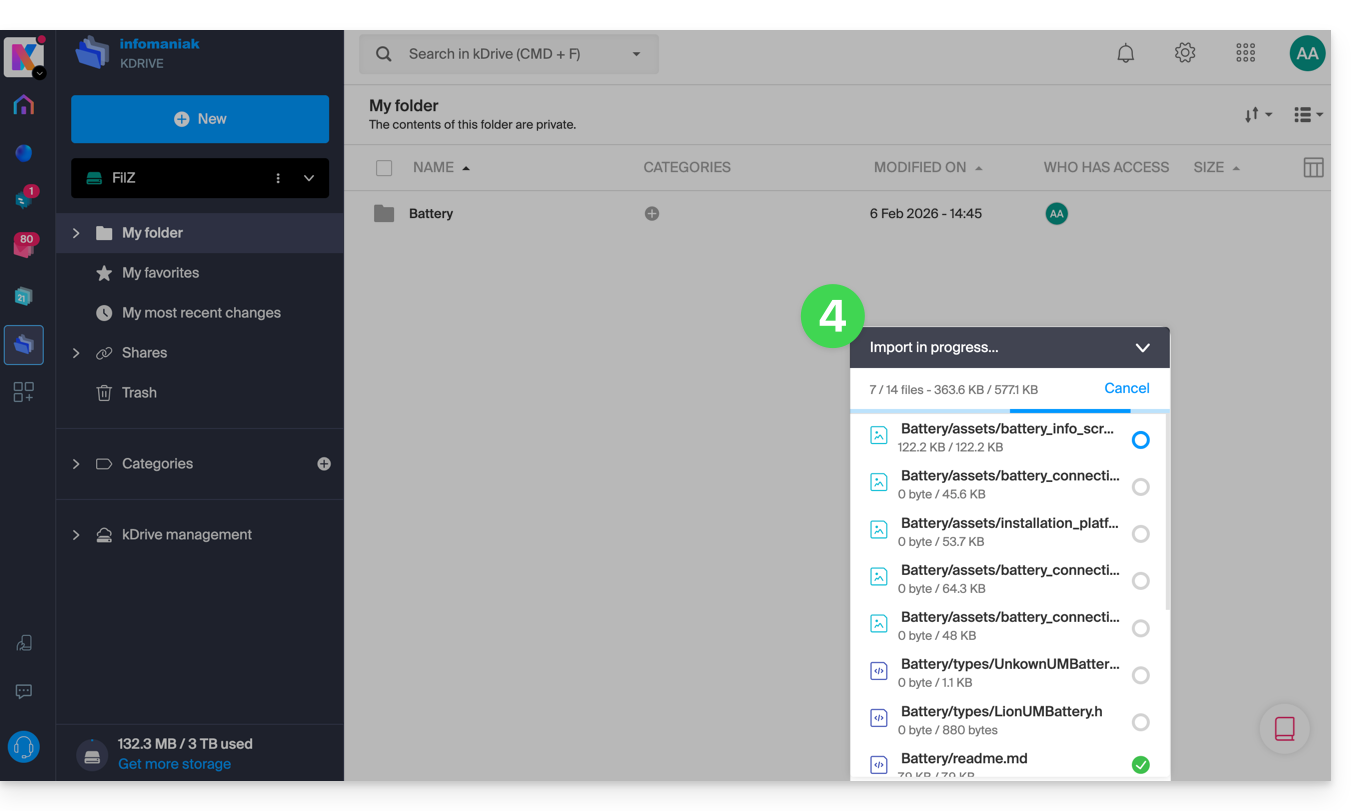
To add a file or folder to kDrive Infomaniak:
- Click here to access the kDrive Infomaniak web app (online service ksuite.infomaniak.com/kdrive).
- Click the New button to send a folder:
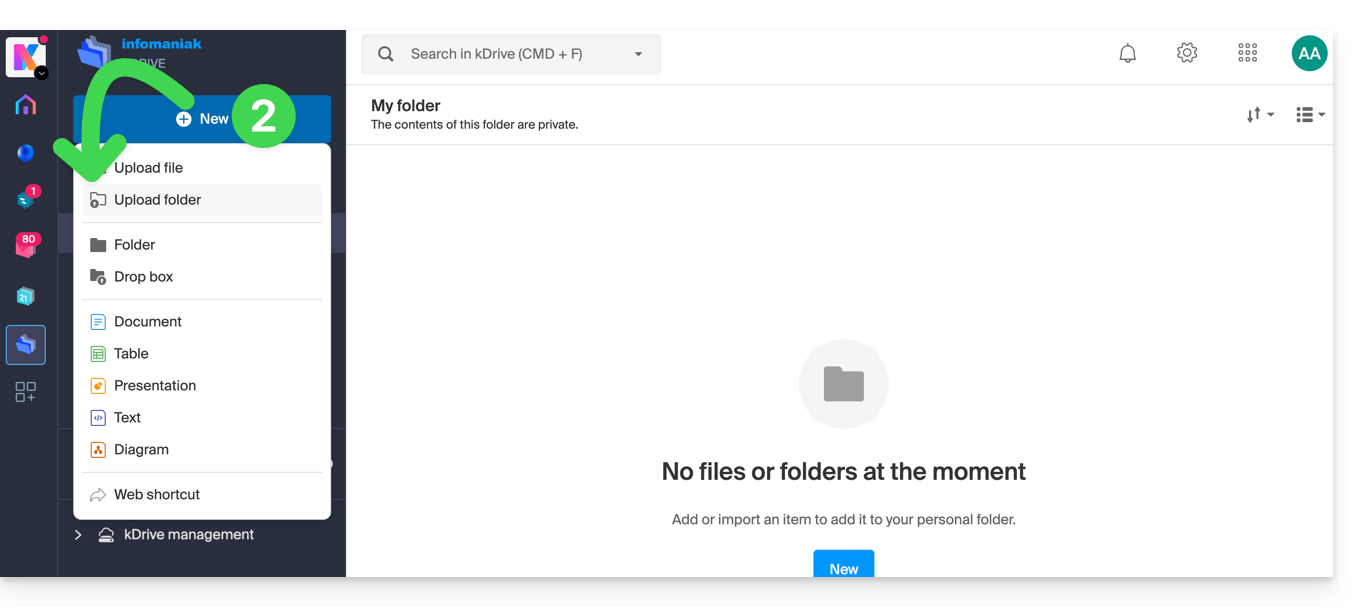
- Select the folder to upload to kDrive:
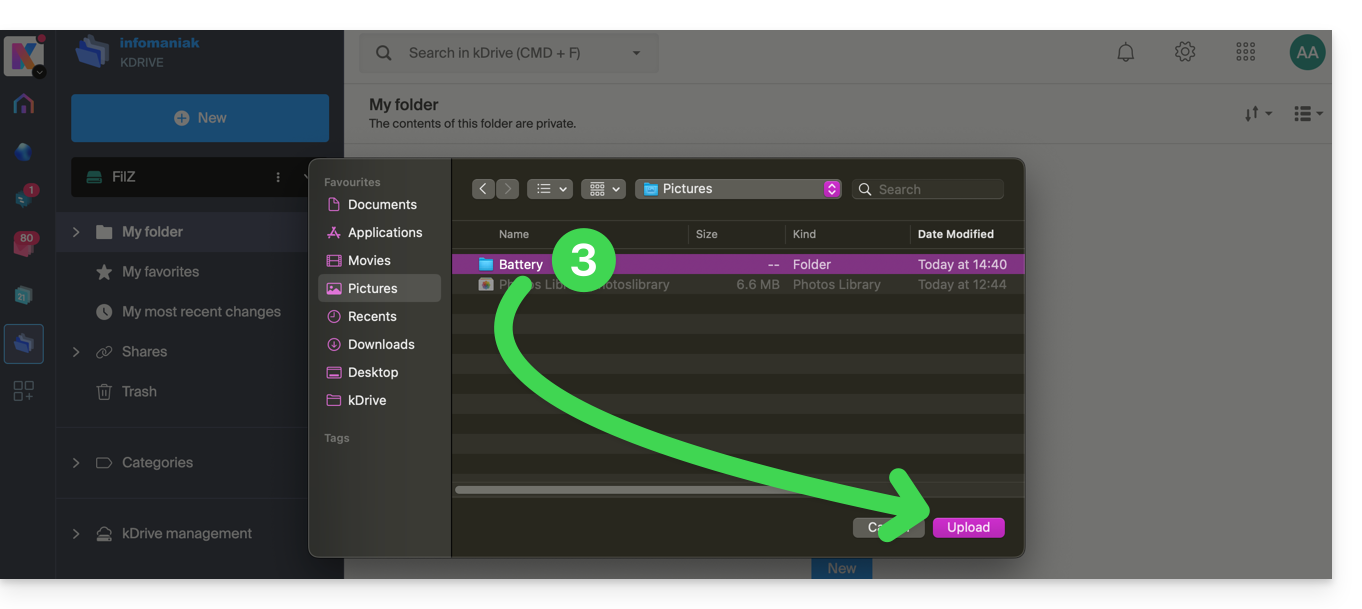
- The folder and its contents are sent to kDrive Infomaniak; wait until the import is indicated as complete:
The data will be synchronized with the different solutions connected to the same kDrive, for example:
- The mobile app kDrive (application for iOS / Android smartphone or tablet):
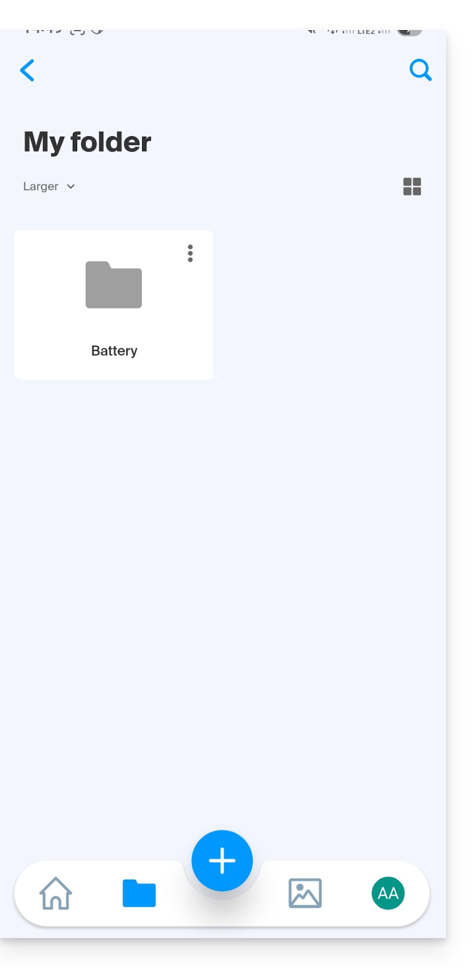
- And the desktop app kDrive (desktop application on macOS / Windows / Linux)…
And if, like in the example above, your computer does not display anything new in the folder corresponding to kDrive (no synchronization), refer to this other guide to explore some possible solutions to the problem.
Rename a file / folder
On the kDrive web app
To rename a file or folder on kDrive Infomaniak:
- Click here to access the kDrive Infomaniak web app (online service ksuite.infomaniak.com/kdrive).
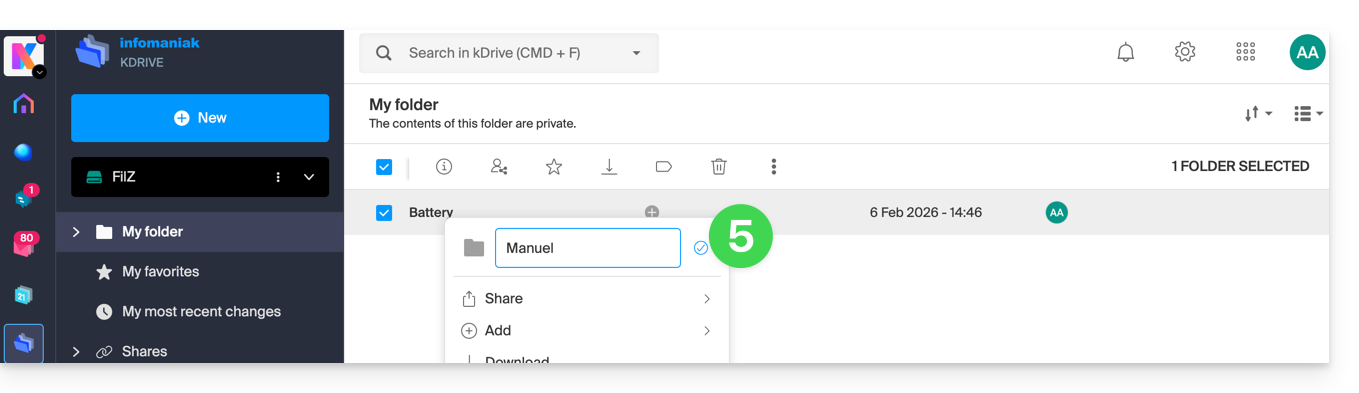
- Select a file to rename and right-click.
- You can also click on the name of a folder in the top bar.
- Click on the pencil icon:
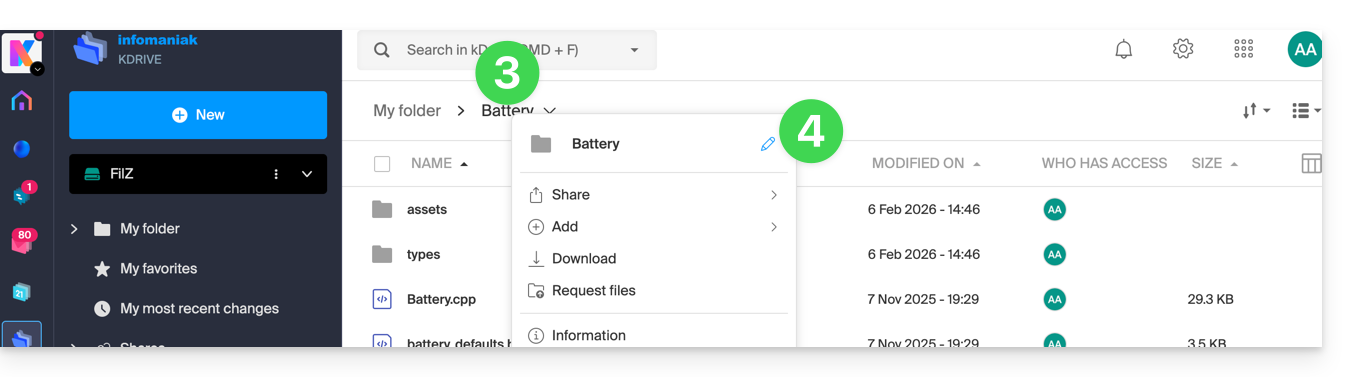
- Enter the new name and validate with the ENTER key or click on the validation icon:
The new name is synchronized with the different solutions connected to the same kDrive, for example the mobile app kDrive (requires refreshing the interface if you are already in the folder in question) and the desktop app kDrive (desktop application on macOS / Windows / Linux):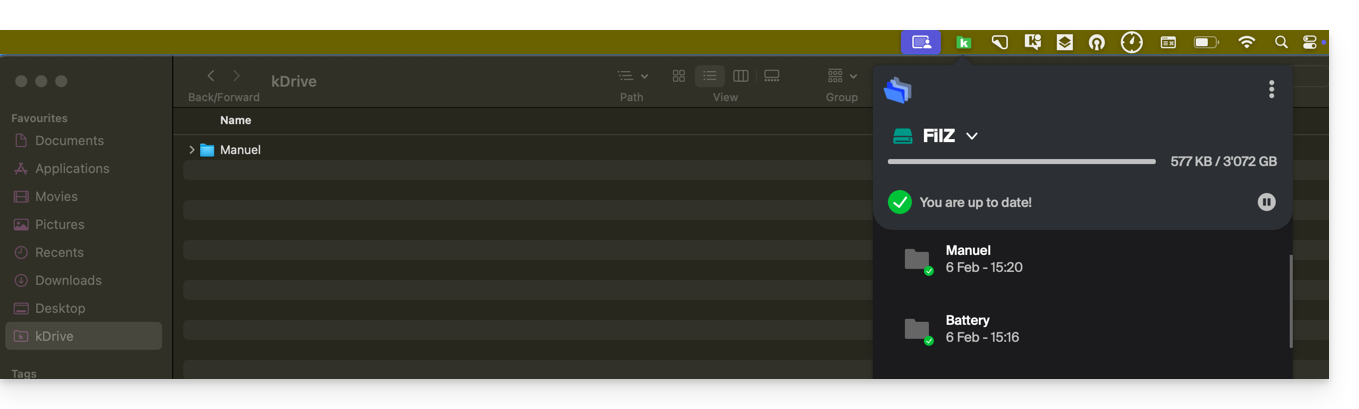
Favorite / follow a file
On the kDrive web app
To favorite a file or folder in the Web app kDrive Infomaniak (online service ksuite.infomaniak.com/kdrive) :
- Click here to access the kDrive Infomaniak web app (online service ksuite.infomaniak.com/kdrive).
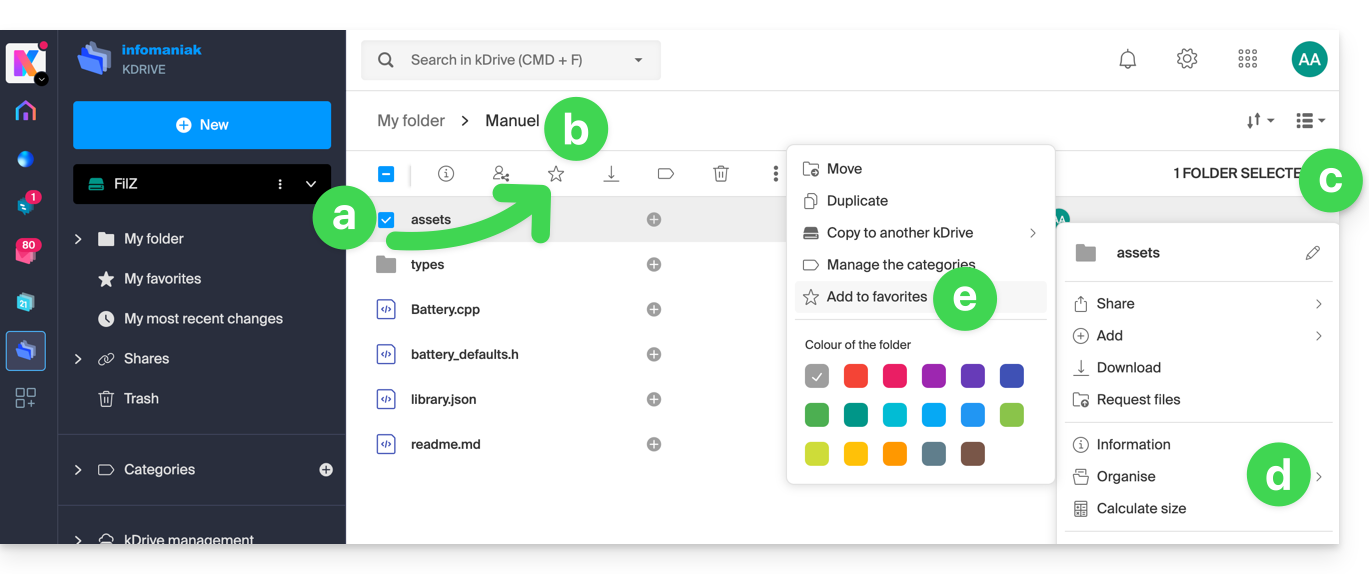
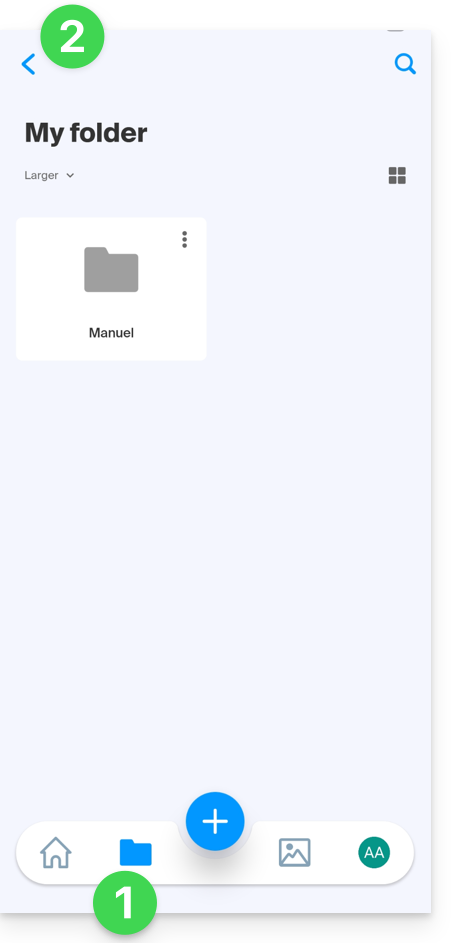
- There are several ways to favorite an item:
- Select a file to set as a favorite.
- Click on the icon ☆ in the top bar.
- You can also click on the action menu ⋮ located to the right of the item in question.
- Choose Organize.
- Click on Add to favorites:
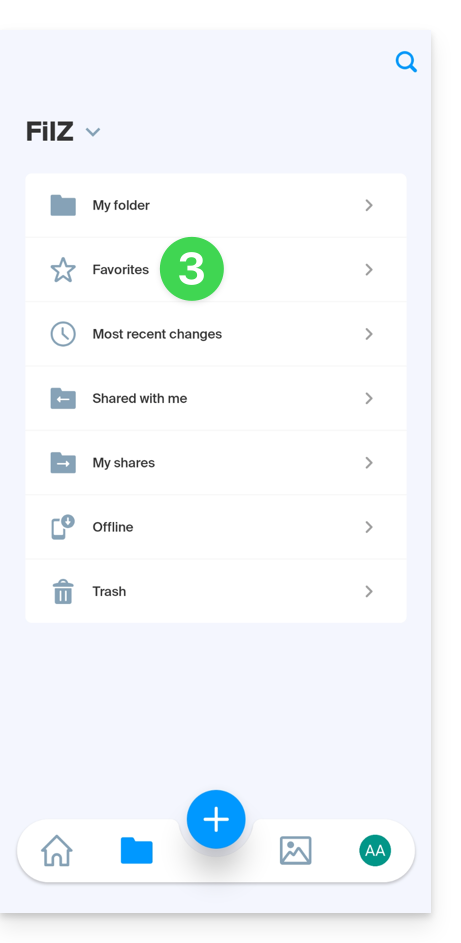
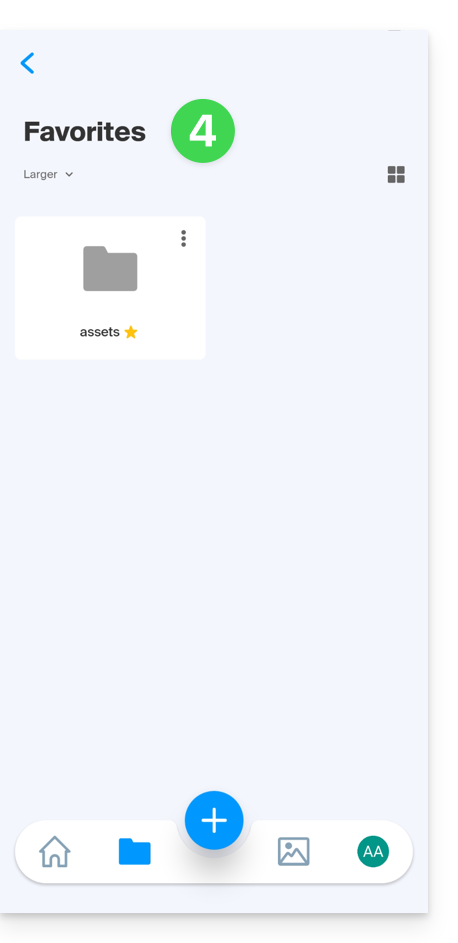
- A yellow star appears to represent favorite files/folders; they are then all visible from the My Favorites menu in the left sidebar:

Favorites are synchronized with the different solutions connected to the same kDrive, for example the mobile app kDrive (application for iOS / Android smartphone or tablet):
- The Favorites menu is found under the Folders icon at the bottom…
- … but it is sometimes necessary to first go back if you were already browsing a folder:
- Then click on Favorites:
- Synchronized favorites are displayed:
On the desktop app kDrive (desktop application on macOS / Windows / Linux) there is no favorites system; no particular distinction will be made for your files placed as favorites on other supports.
Unzip an archive
This feature for .zip files is planned but is not yet available at the moment.
Link to this FAQ:
Has this FAQ been helpful?
This guide explains how to edit a file in PDF format on the Web app kDrive (online service ksuite.infomaniak.com/kdrive).
✘ UNAVAILABLE with
my kSuite free
my kSuite (ik.me, etik.com, ikmail.com)
Preamble
- The Web app kDrive natively integrates an editor that allows you to modify a PDF document online.
- Your files are never analyzed and are exclusively stored in Switzerland.
- Refer to this other guide if you are looking for information on editing other file formats.
Edit a PDF file
To access kDrive and edit the PDF document:
- Click here to access the Web app kDrive (online service ksuite.infomaniak.com/kdrive).
- Click on the concerned PDF document to open it:
- Click on the Edit button at the top of the document to access the file editor:
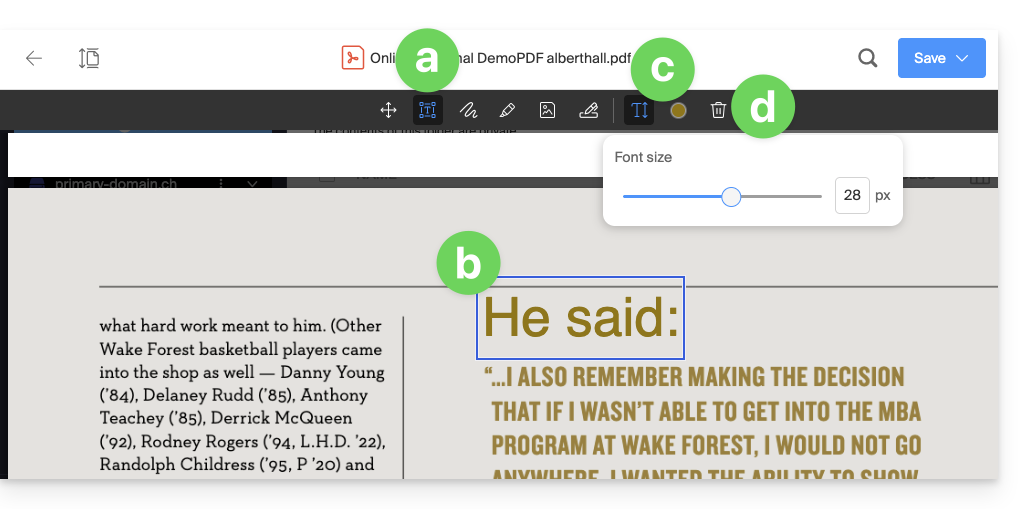
- To add text at the location, size, and color of your choice using the PDF editor:
- Click on the TEXT button in the toolbar.
- Click on the page and enter text as desired.
- Then click on the buttons that have appeared to adjust the text size or color.
- Click on the Trash button to delete your selected text blocks:
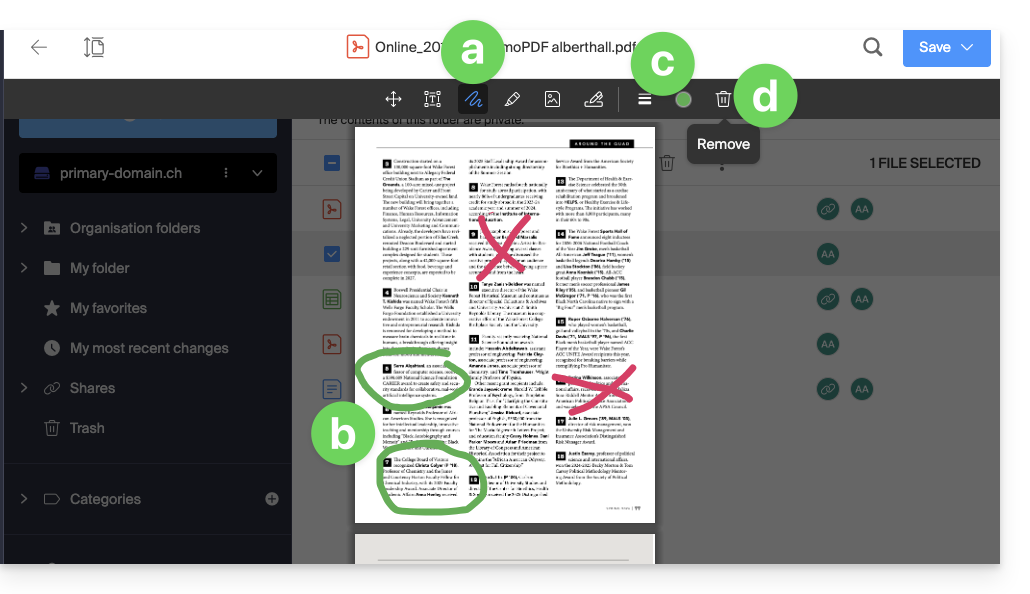
- To draw at the location, size, and color of your choice using the PDF editor:
- Click on the DRAW button in the toolbar.
- Click on the page and draw as desired.
- Then click on the buttons that have appeared to adjust the size or color of the lines.
- Click on the Trash button to delete your selected lines:
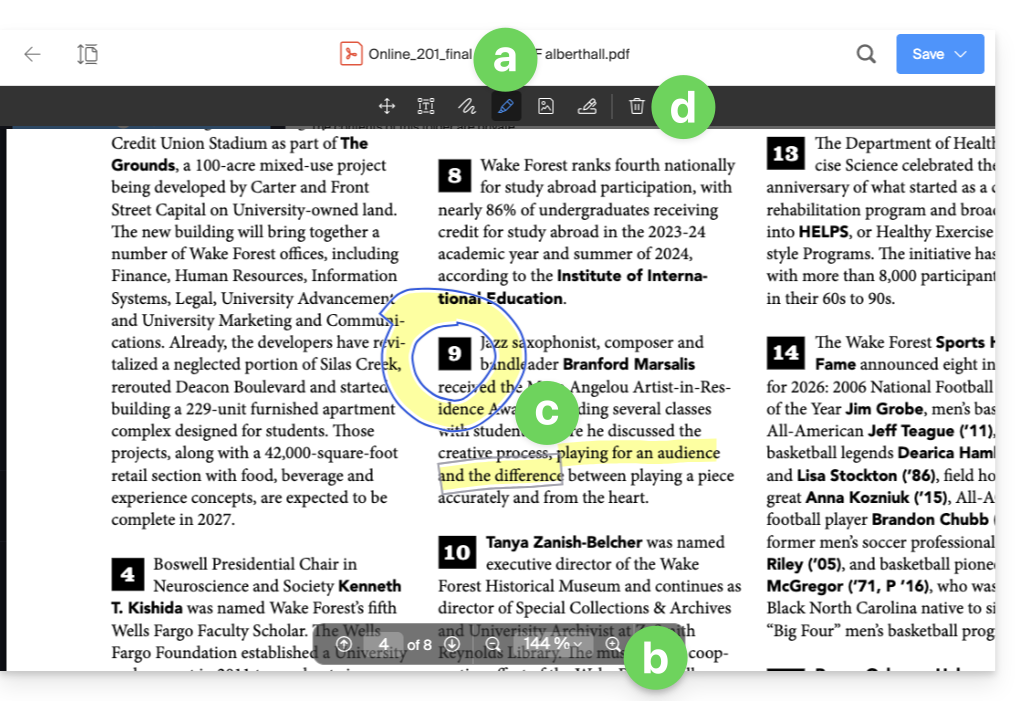
- To highlight text using the PDF editor:
- Click on the PENCIL button in the toolbar.
- Zoom in on the display size if necessary with the zoom tools at the bottom of the screen.
- Highlight your text as desired.
- Click on the Trash button to delete the selected highlights:
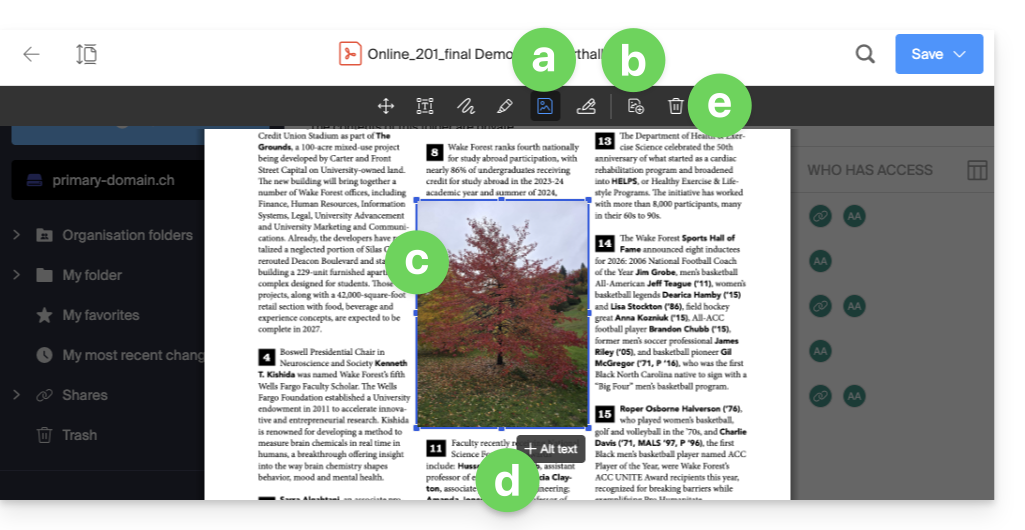
- To insert an image using the PDF editor:
- Click on the IMAGE button in the toolbar.
- Then click on the button that has appeared to import an image from your device.
- Place and resize the image as desired.
- Add alternative text (optional).
- Click on the Trash button to delete the inserted image:
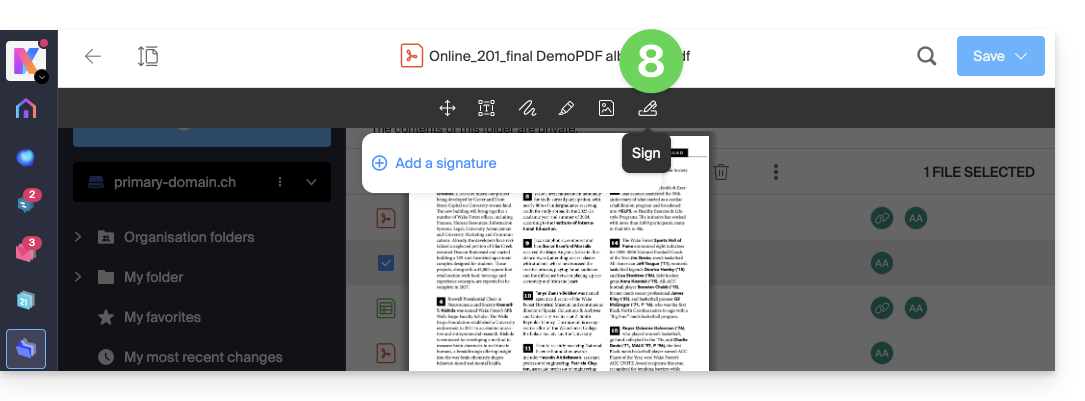
- To create a signature and then sign documents: refer to this other guide on the subject:
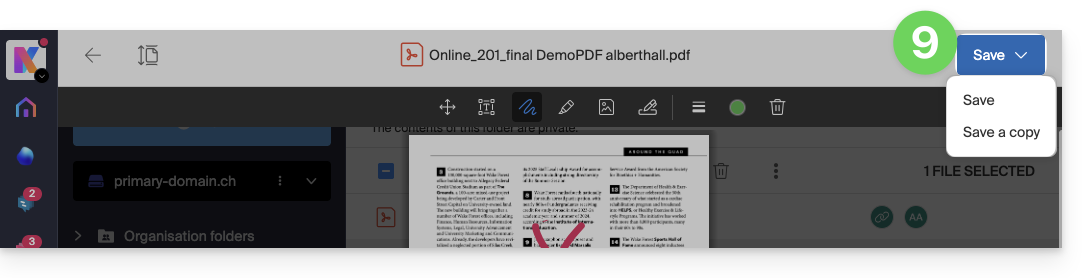
- Once finished, save the changes and choose whether to create a copy of the modified document or overwrite the existing file:
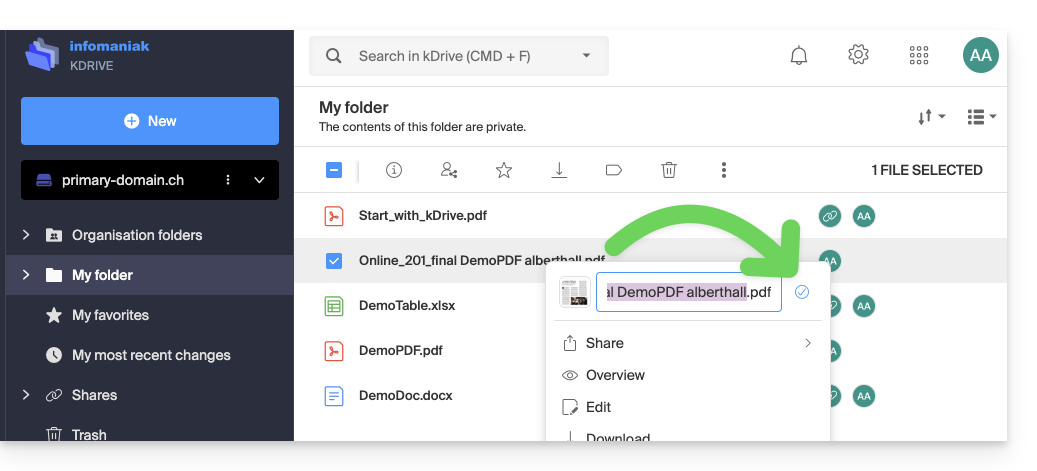
Rename a file (PDF or other)
It is possible to rename any file:
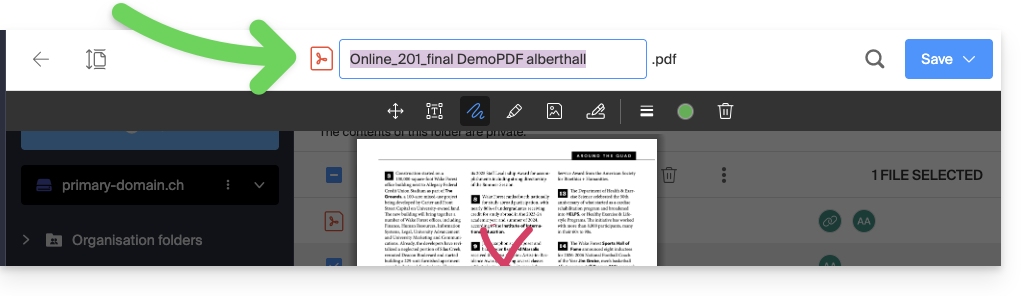
- from the editor or file preview, by double-clicking on the document name:
- from the preview, by clicking on the action menu ⋮ then on the Pencil icon:
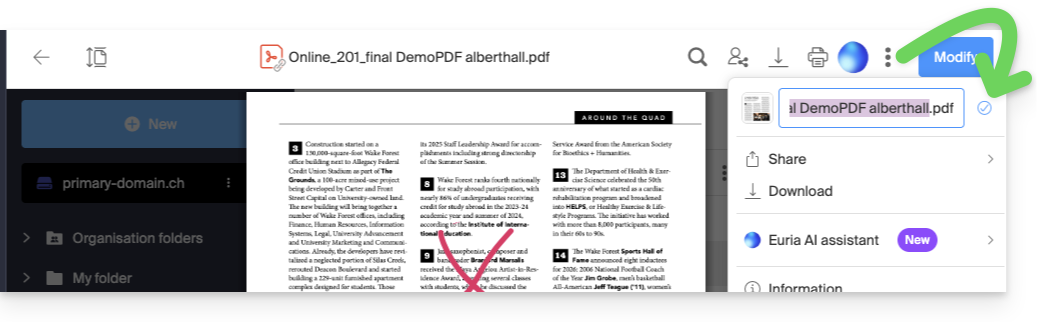
- from the kDrive tree, by clicking on the action menu ⋮ located to the right of the concerned element (or by right-clicking) then on the Pencil icon:
Link to this FAQ:
Has this FAQ been helpful?
This guide will help you test whether the synchronization of kDrive is working correctly on your device.
Introduction
- For synchronization between your devices to work when your data on kDrive is updated (new file, edited document, etc.), it is obviously necessary that:
- the kDrive app is open,
- the app is up-to-date and functional,
- you are logged in with the correct Infomaniak account.
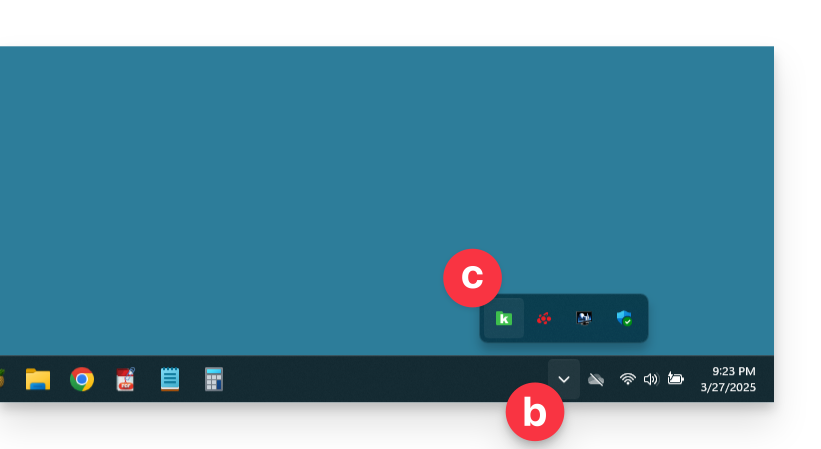
Check if the kDrive app is running in the background
On Windows
To see if the kDrive app is running on a computer with the Windows operating system, you need to find the kDrive icon (a folder, in gray, green, or red) in the notification area.
- If necessary, open the kDrive software installed on your computer:
- Click on the Start menu to open it.
- Search for
kdrive. - The search result should display the kDrive app (if not, reinstall the application).
- Open the kDrive app by clicking on Open or Run as administrator:

- The app icon must be visible in the notification area of your computer, at the bottom right on Windows.
- If it isn't there:
- Locate the small arrow (or chevron) that indicates hidden icons:

- Click on this arrow to expand the notification area.
- The hidden icons will then appear, allowing you to view the desired application:
- You can also check the notification area customization settings in the Windows system settings.
- Locate the small arrow (or chevron) that indicates hidden icons:
- Click on the icon to access the settings and information for your kDrive synchronization:

On macOS
If your computer doesn't display anything new in the folder corresponding to kDrive (no synchronization):
- Check if you see the app icon in the notification area of your computer (top right on macOS, bottom right on Windows, and a double left-click in the taskbar on Linux).
- If it is absent but you remember having installed the kDrive application on your computer, it is possible that it is simply not open, so search for it and launch it:
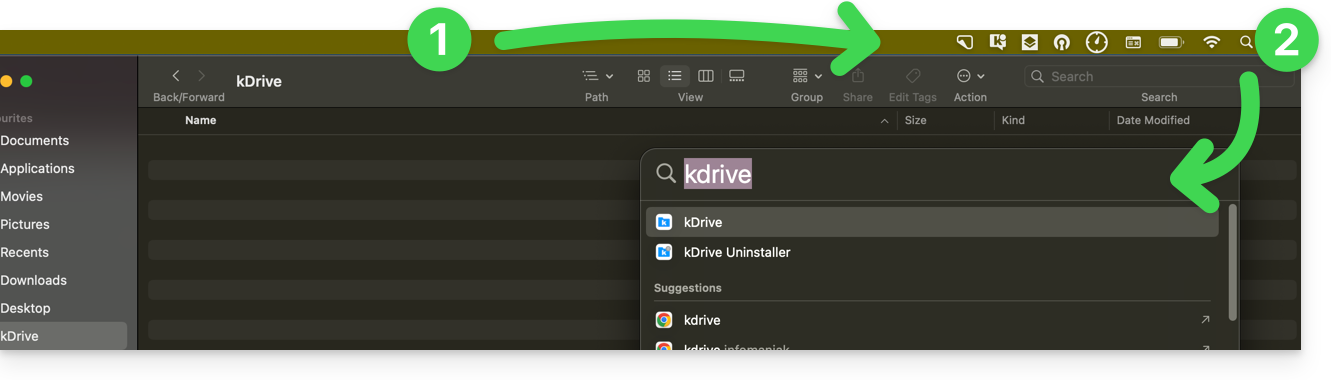
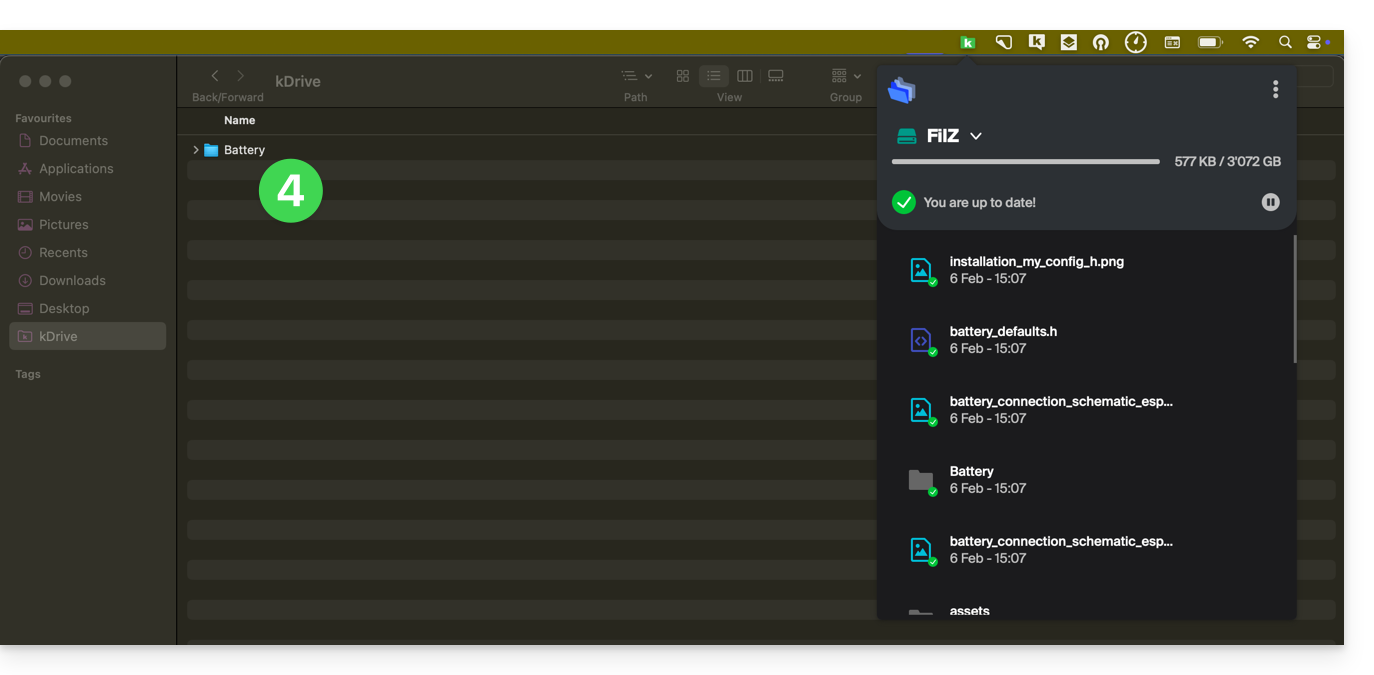
- Once opened (and after completing the reconnection to your Infomaniak account if necessary), the kDrive icon appears:
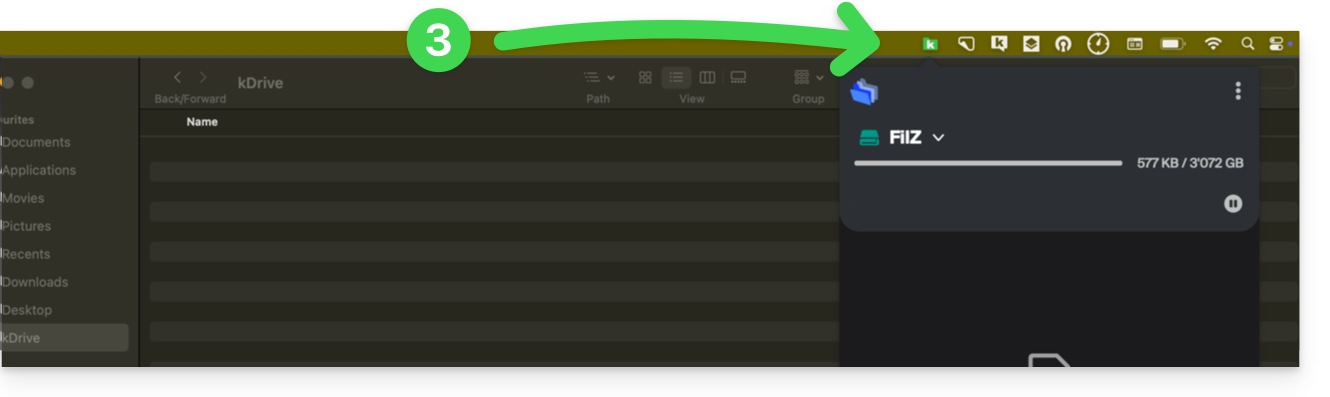
- A few seconds later, synchronization takes place in both directions:
On Android
When you import large files or multiple files into kDrive, it may take several minutes. To ensure data import, the kDrive mobile app needs to be able to continue this task when you close the application or open another one. The automatic photo backup function in kDrive may also be disrupted if the app cannot run in the background.
Due to the power management policy on some devices from certain manufacturers (especially Chinese ones), applications that are not on their whitelist may be automatically stopped, which prevents certain tasks from working properly.
It is possible to work around this problem by following the instructions available in English on the don't kill my app website at dontkillmyapp.com:
Don't see your phone's brand? It probably means your phone isn't having any issues.
Link to this FAQ:
Has this FAQ been helpful?