Knowledge base
1000 FAQs, 500 tutorials and instructional videos. Here, there are only solutions!
This guide explains how to view your monthly statements (within the Infomaniak ticketing system), print the corresponding accounting documents, configure your bank account to receive your payments, and, if necessary, request an exceptional advance payment.
Introduction
- At the beginning of each month, the Infomaniak ticketing system generates a report summarizing the online sales from the previous month.
- This report takes into account all sales made, less any applicable commissions.
- The net amount is automatically transferred to your bank account during the first week of the month, regardless of the event status.
Add and select a bank account
Before any payment is made, you must specify a bank account from the Infomaniak Payments menu in the Accounting section of your ticketing system.
Once the account has been added, you must select it at the top of the page in the Settings dropdown menu.
Warning: For security reasons, a bank account that has already been used for a payment (amount different from 0 in the Invoices column) can no longer be modified.
View and print an invoice
To view or download a monthly statement in PDF format:
- Click here to access the management interface for your product in the Infomaniak Manager (need help?).
- Click directly on the name assigned to the relevant ticketing system.
- Click on Accounting in the left-hand menu.
- In the Processed and archived payments section, select the desired report (overall or detailed).
- Click on Print or Download PDF.
Printing the statement is only possible when the monthly period has been archived.
Request a down payment
If needed, you can request an advance payment (maximum once per week and until the 25th of the month):
- Processing time: the request will be processed within 2 business days.
- Fees: a CHF 5 administrative fee applies.
- Condition: advance payment requests are suspended 5 days before the end of the month.
Link to this FAQ: https://faq.infomaniak.com/1331
Has this FAQ been helpful?
This guide explains how to set up donations (as part of the Infomaniak ticketing system).
Introduction
- By offering donations, you provide customers with the opportunity to support your organization or event.
- Online donations will be subject to a commission to cover banking fees.
- Donation campaigns can have the status active or inactive, but will remain visible in all cases at the checkout, along with the gift cards.
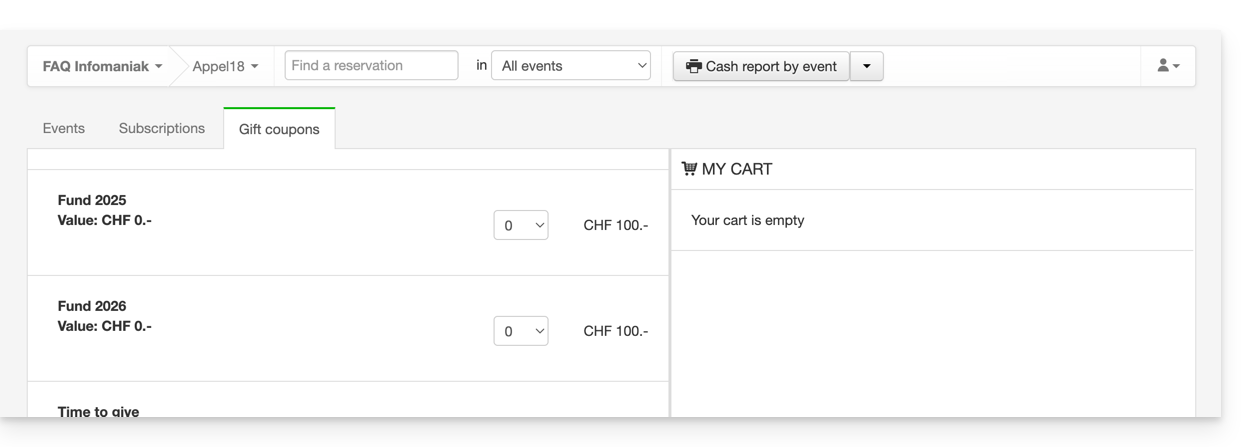
Setting up donations
To do this:
- Click here to access the management interface for your product in the Infomaniak Manager (need help?).
- Click directly on the name assigned to the ticketing system for the event.
- Click on Schedule in the left-hand menu.
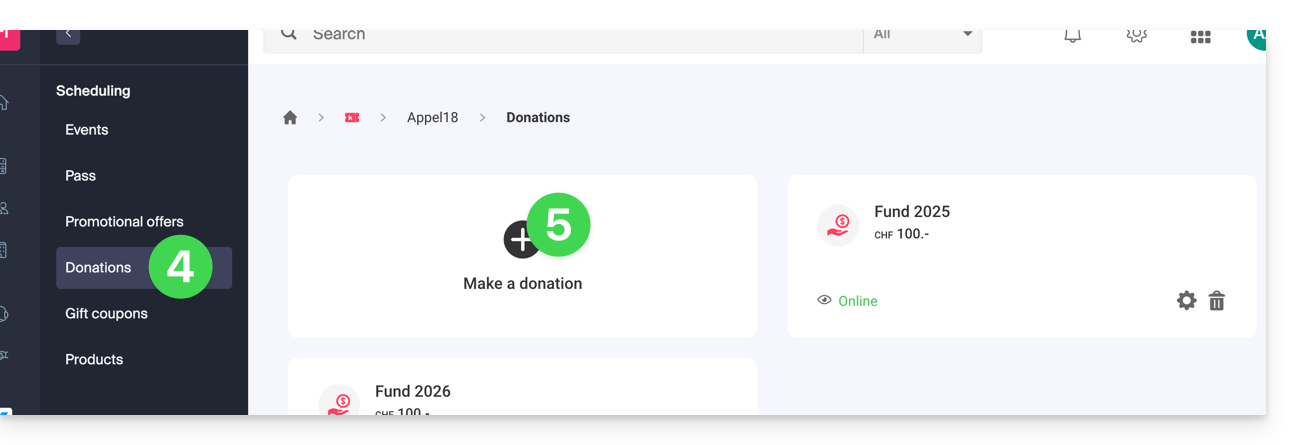
- Click on Donations in the left-hand menu.
- Click on Add a donation:
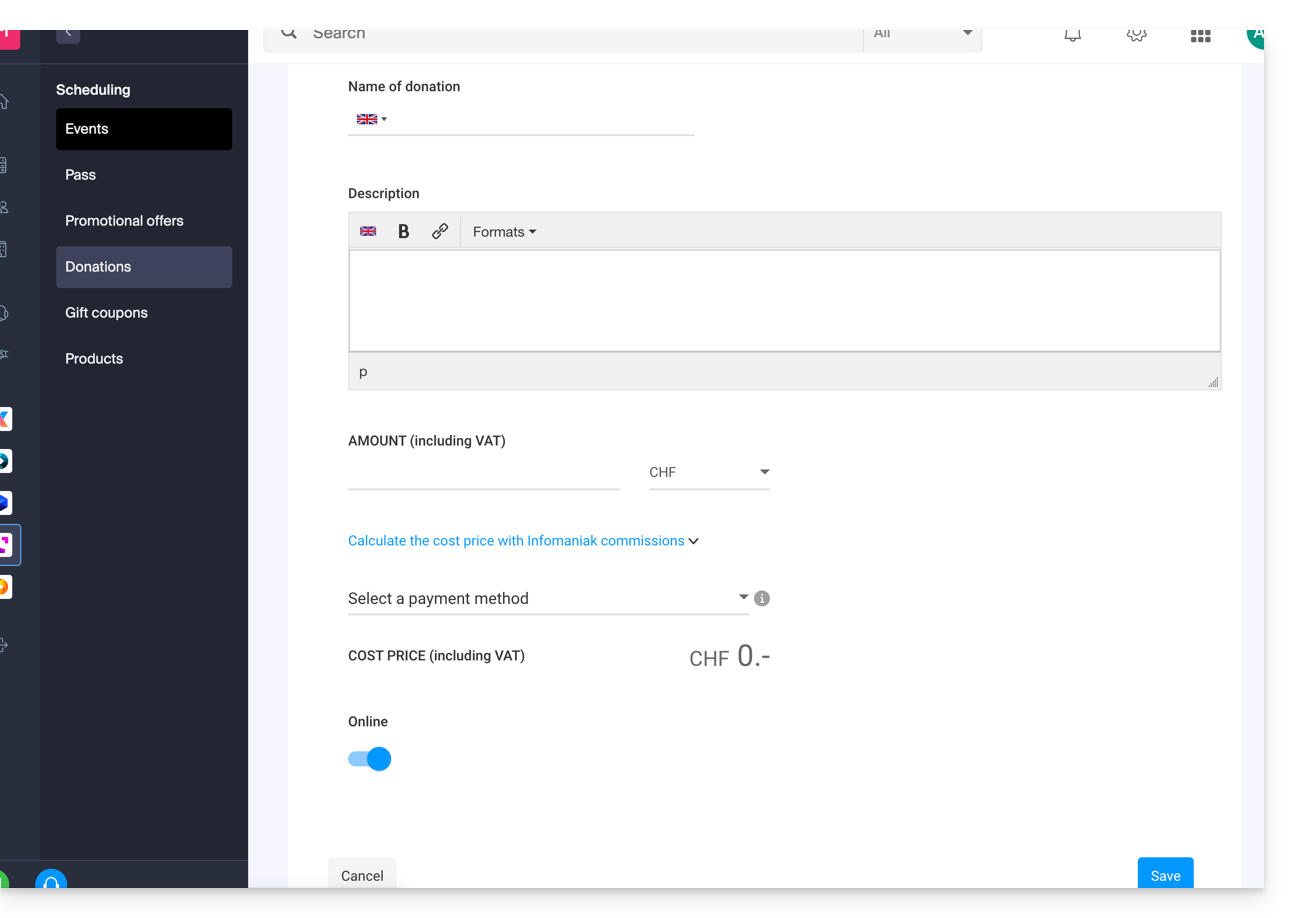
- Fill in the fields in the wizard, then click the Save button at the bottom of the page:
Link to this FAQ: https://faq.infomaniak.com/1367
Has this FAQ been helpful?
This guide details the integration tool for your ticketing system (as part of the Infomaniak ticketing system) to best promote your events.
Introduction
- You only need a few clicks to configure all the options for your online store and publish it to start making sales.
- No need to update links for each season or edition of your event: keep the same link and simply update the content within it.
If you have them, your old ticketing URLs will continue to work and will automatically redirect to your new online store. However, it is recommended to migrate to this new tool for any new season or edition of your events.
Manage the presentation of your online events
To access the online ticketing options:
- Click here to access the management of your product on the Infomaniak Manager (need help?).
- Click directly on the name of the ticket office in question.
- Click on Ticket Office Portal in the left-hand menu:
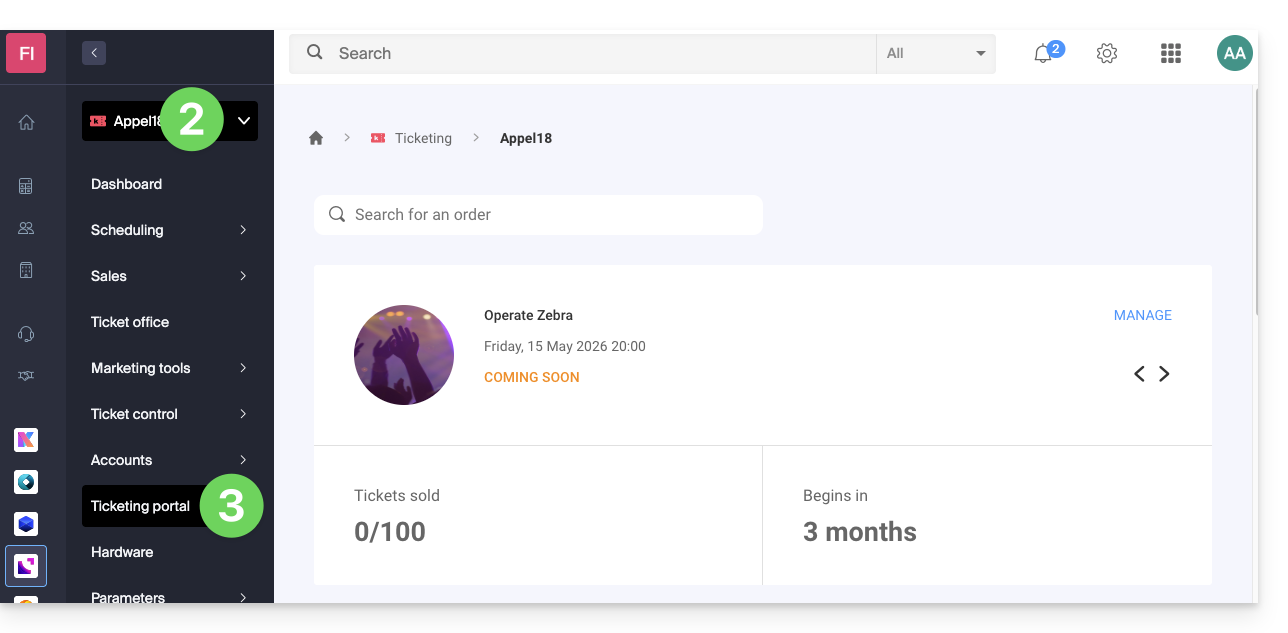
- Click on Online Store in the left-hand menu:
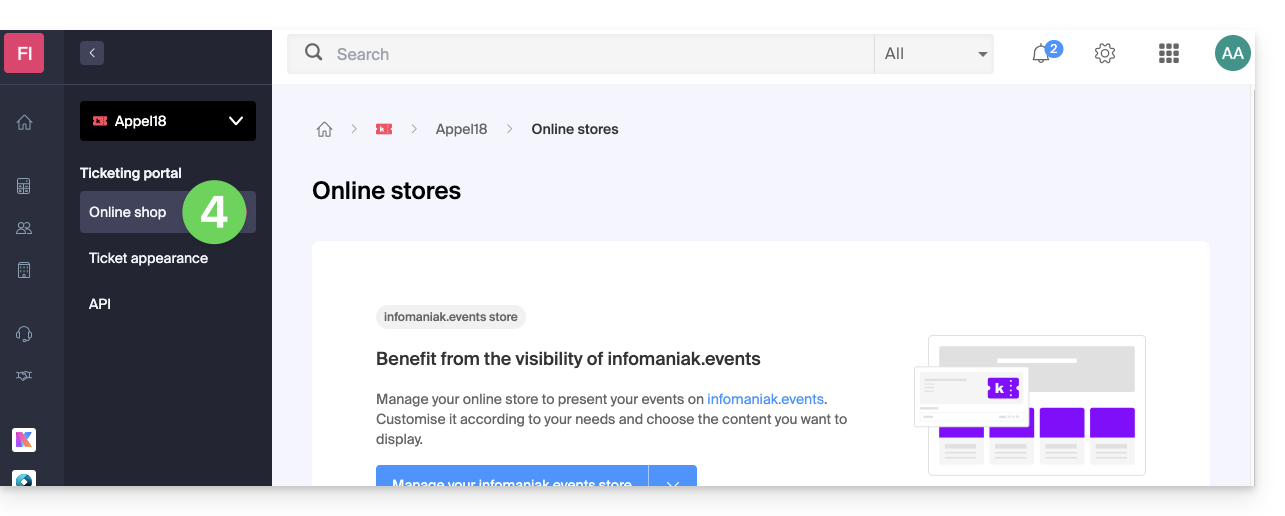
You will be taken to the online store page of the Ticketing Portal: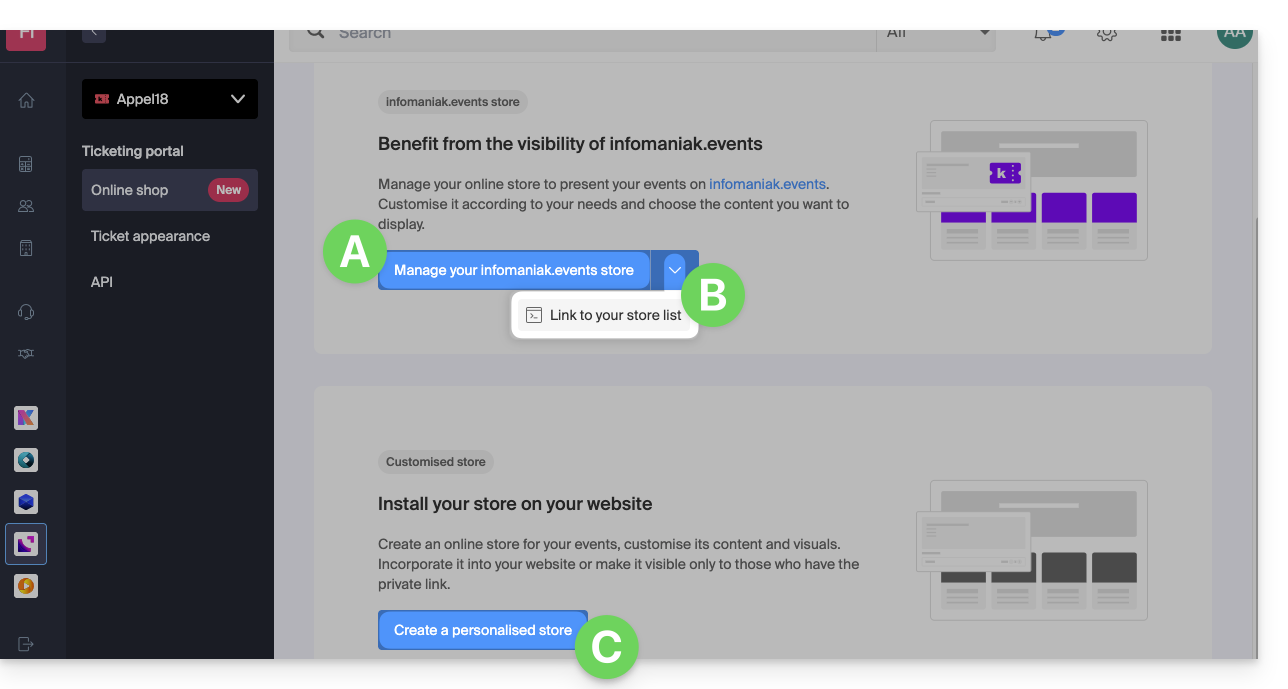
A. Create a store visible on infomaniak.events
- Make your events visible in the Infomaniak event portal search.
- Allow traditional search engines to index your events.
- Customize the appearance of your ticketing platform's main storefront.
B. Combine your multiple ticketing systems
- Access a page that brings together all of your Organization's "infomaniak.events" stores.
C. Create a custom store
- Create stores tailored to your specific needs (e.g., for integration on your pages).
- Add HTML/JavaScript or CSS scripts (for advanced users/developers).
Link to this FAQ: https://faq.infomaniak.com/1563
Has this FAQ been helpful?
This guide explains how to process sales from an organizer account, as well as on-site sales (within the Infomaniak ticketing system). For example, if you want to print free tickets, invitations, VIP tickets, or paid tickets, you can place an order from the point of sale and generate these tickets.
Accessing the point of sale
To do this:
- Click here to access the management interface for your product on the Infomaniak Manager (need help?).
- Click directly on the name assigned to the ticket office for the event.
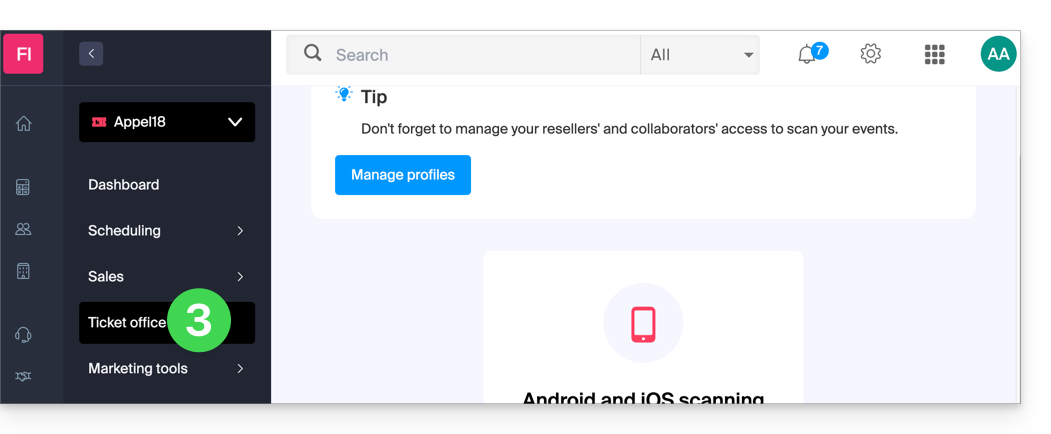
- Click on Ticket Office in the left-hand menu:
Create a new order from the control panel
To do this:
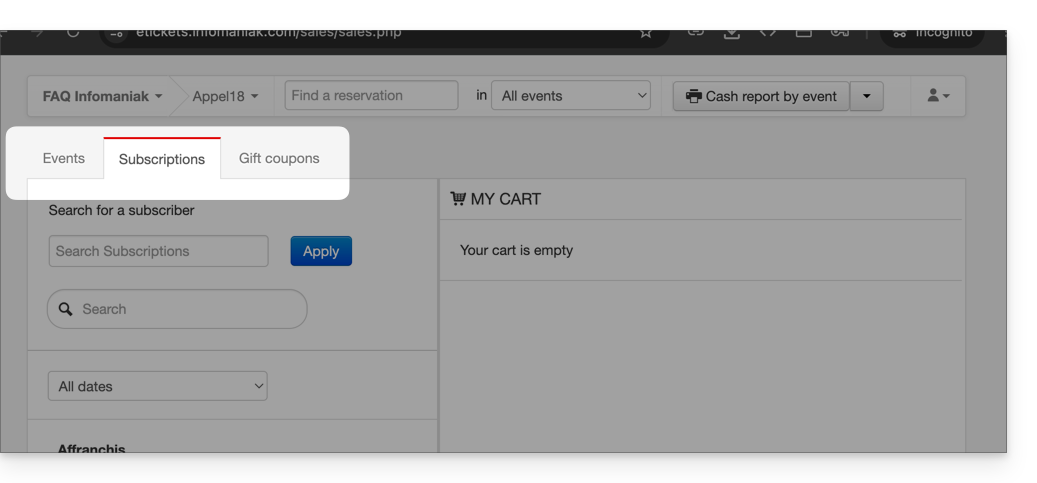
- Choose whether the sale concerns an event, a pass, or a gift voucher:
- Choose the desired event or item, as well as the number of tickets to add to the cart:
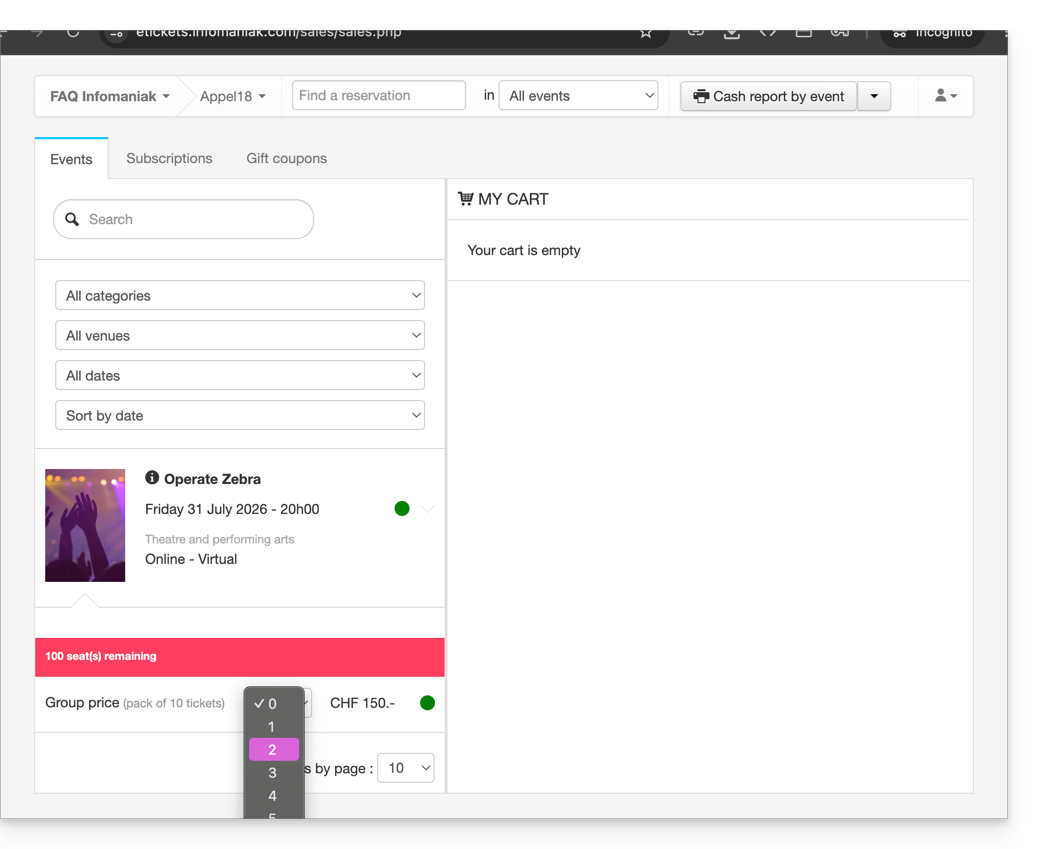
- Define the settings in the shopping cart, such as the seating arrangement, form information per price, and the use of a promotional code or gift voucher:
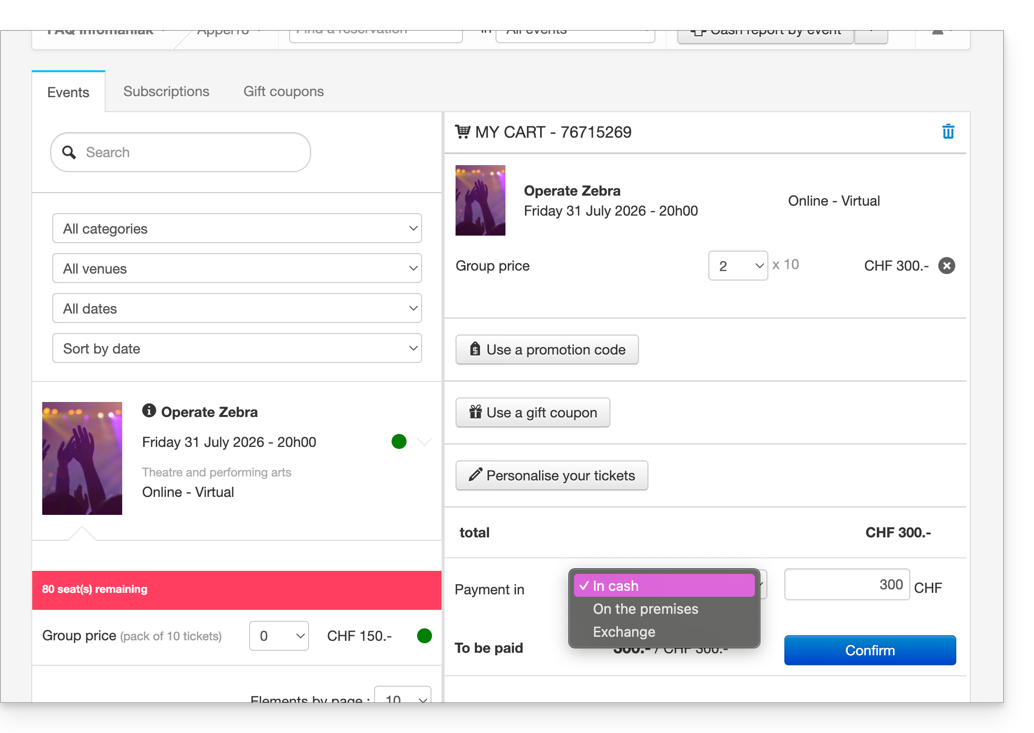
- It is possible to customize the information displayed on the tickets to be printed at this time.
- Define a payment method; for a free ticket, such as for an invitation, you must choose the Free/Invitation payment method.
- Once the information has been entered, Validate the order.
Associate the order with a customer
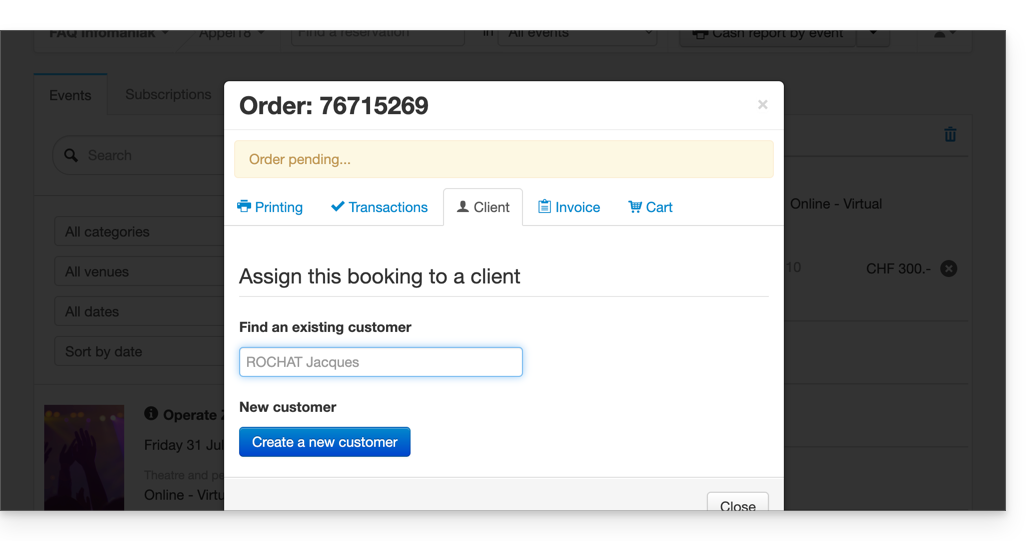
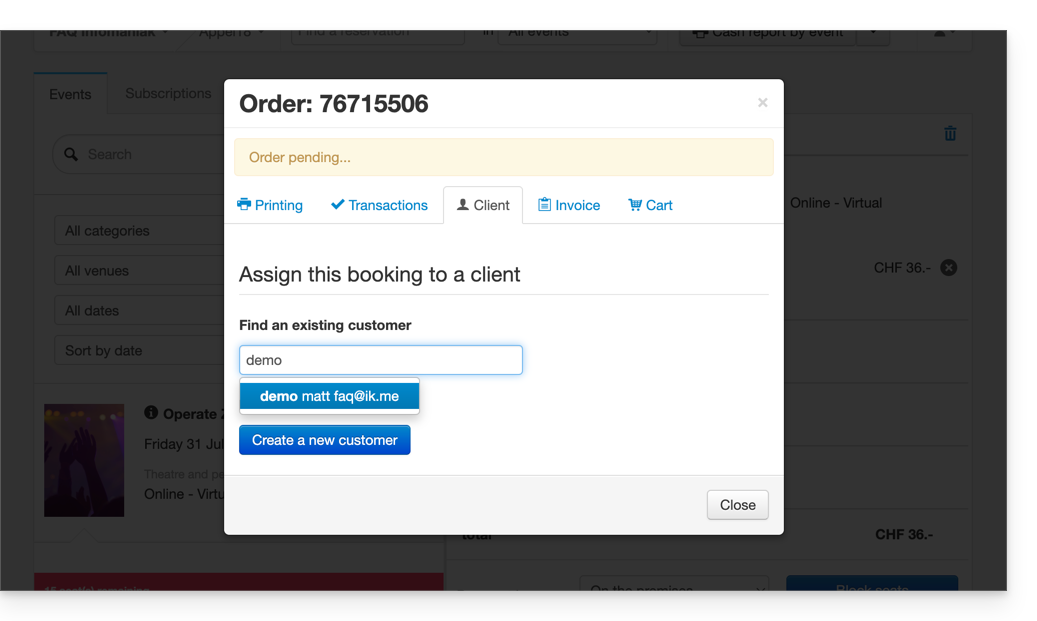
In the checkout, assigning an order to a customer is optional. It is therefore necessary to provide this information if you wish to be able to find an order using the customer's name or email address, send the tickets by email, or display the customer's first and last name on the ticket.
To do this, click on the Client tab and search for an existing client or create a new client record.
If the sale concerns a pass, and an email address is associated with the pass, the client will be suggested directly.
Print or send the tickets
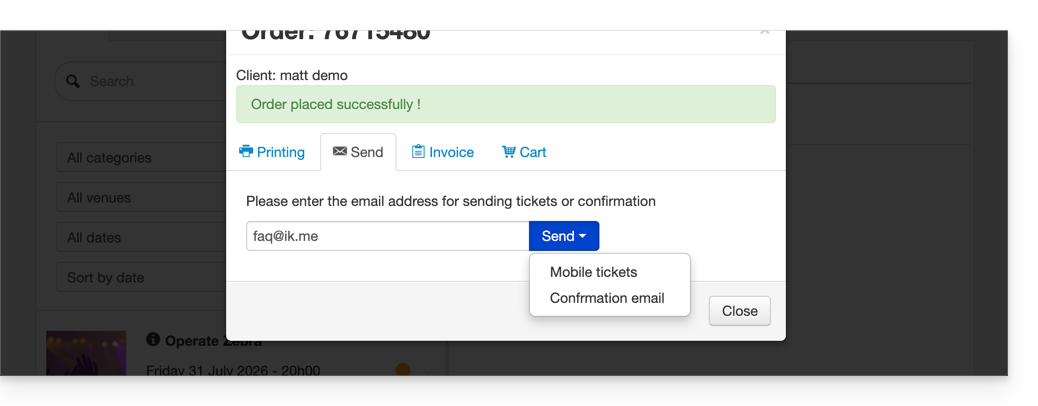
You can print or send the tickets by email. To do this, go to the corresponding tab and choose the type of printing or email sending.
Other uses for the ticket office
The ticket office can also be used for other important operations, such as exchanging tickets or validating reservations; please refer to this other guide.
Link to this FAQ: https://faq.infomaniak.com/1574
Has this FAQ been helpful?
This guide explains how to add users as resellers so they can sell tickets for your events (as part of the Infomaniak ticketing system).
Introduction
- If you have points of sale, partners, or simply cash registers at the entrance to the event, you can give them reseller access.
- This will allow you to grant them sales rights from the ticket office.
Add a reseller
To do this:
- Click here to access user management in the Infomaniak Manager (need help?).
- Click on the Add user button at the top:
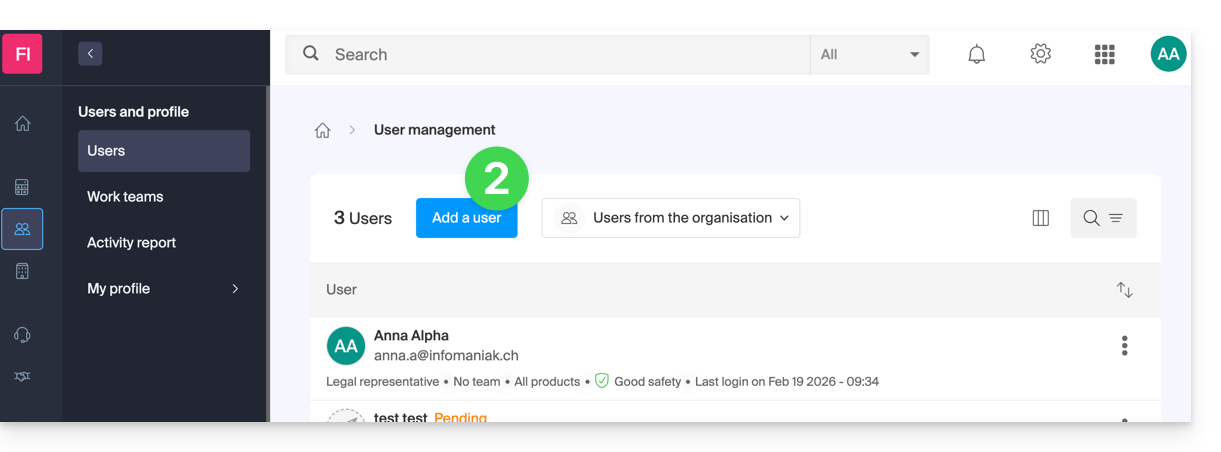
- Enter the user's details.
- Select User as the role:
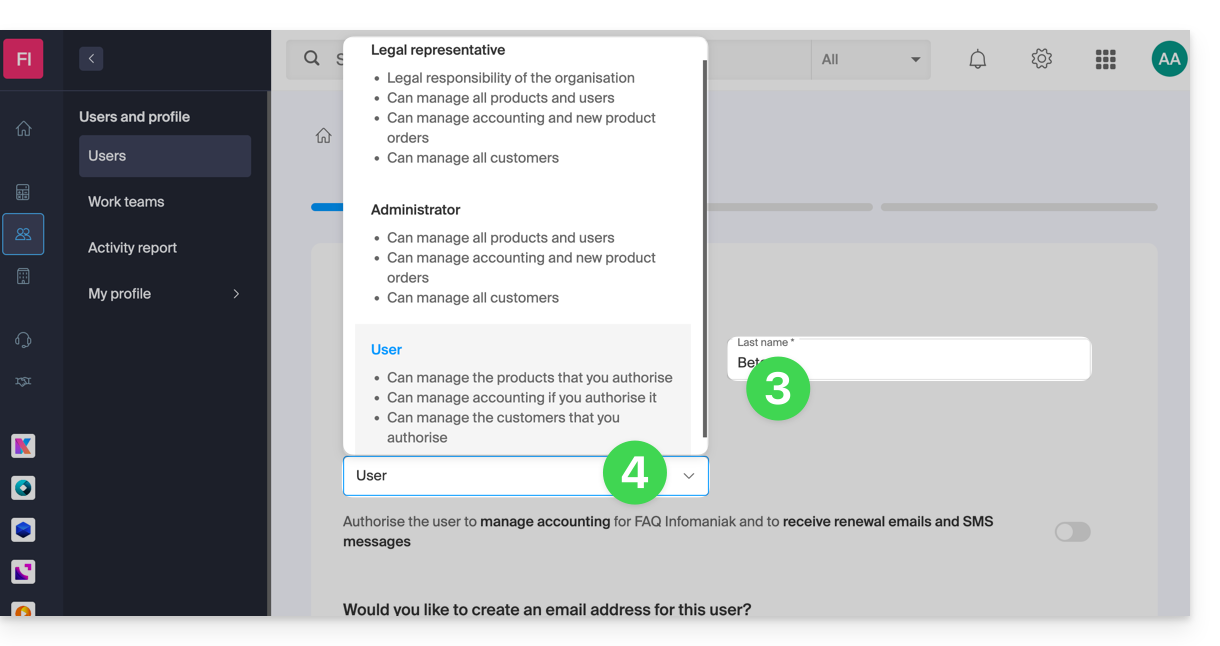
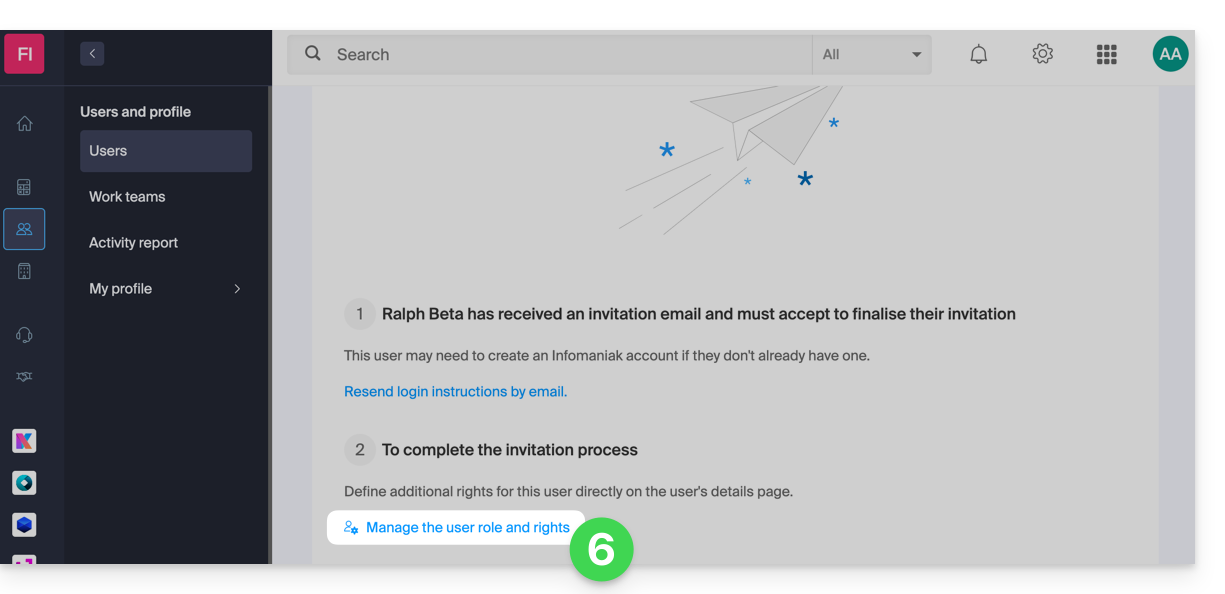
- Proceed to the next step (selecting a workgroup, if applicable) and complete the invitation.
- Click to choose the access permissions for the products:
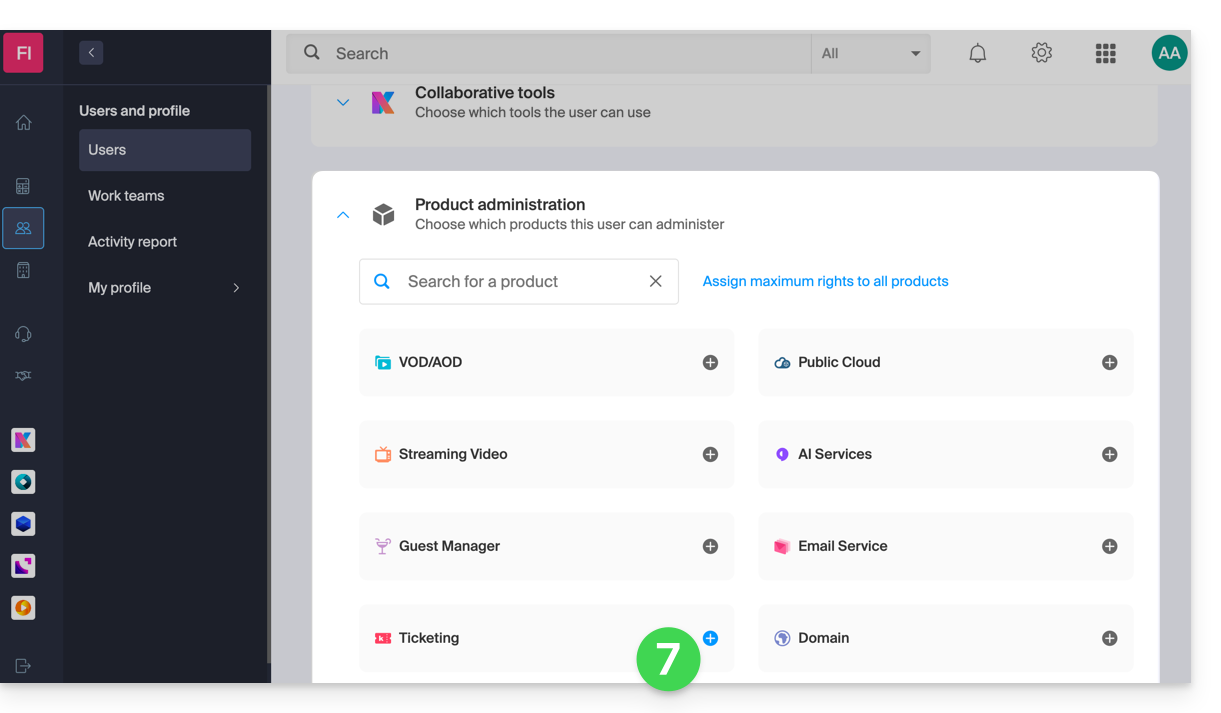
- Expand the product administration section and click on Ticketing:
- A side panel will open – select the boxes to grant access to the relevant ticketing systems:
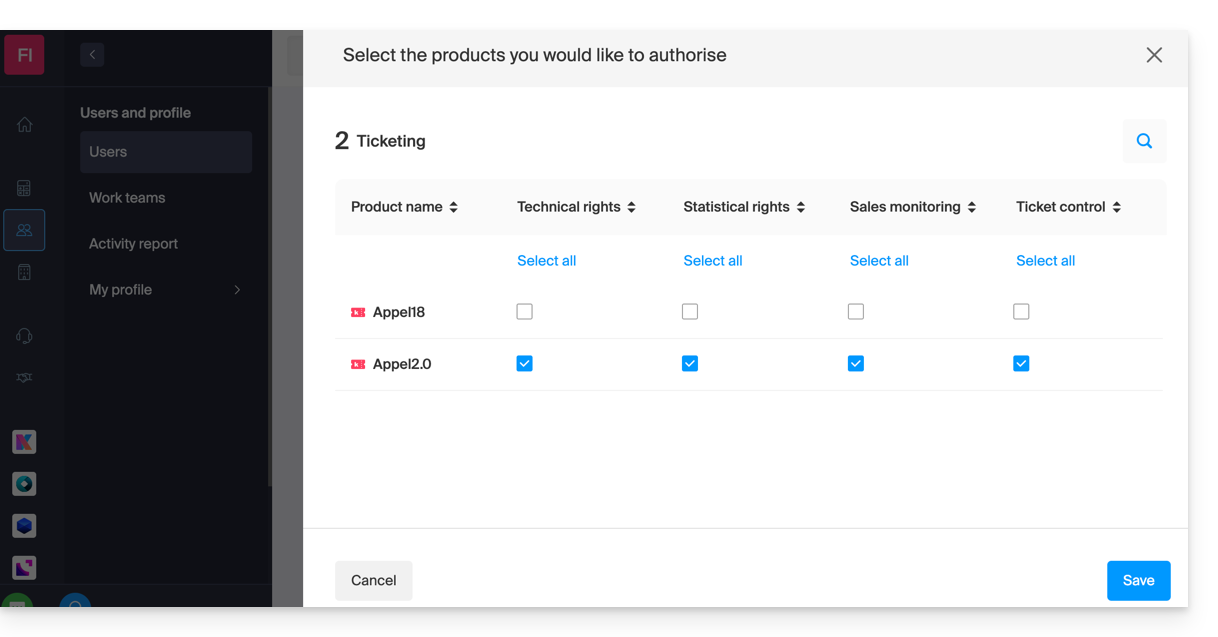
- Save your selection.
Details of user rights and access
1. Administrators
- Account owner (legally responsible for the account)
- Group administrator
- Billing administrator
- Accounting
2. Users
- Administrative — no rights assigned
3. Technical
- Programming Management
- Customers
- Mailing
- Customer export
- Promotional code (code generation)
- Shop/ticket design
- Ticketing integration
- Settings
4. Statistics
- Sales details
5. Ticket validation
- Ticket validation
6. Ticket sales
- Ticket sales
- Sales outlets
- Customers (excluding Mailing, export, and promo code management)
- Membership card management
7. Staff Management
- Staff
Next step
You can now create profiles to specify reseller access permissions…
Link to this FAQ: https://faq.infomaniak.com/1581
Has this FAQ been helpful?
Here are the different ticket formats available for on-site sales (as part of the Infomaniak ticketing system).
Printing with a thermal printer
- Show Format: 82 x 203.2 mm

- Cinema Format: 101.6 x 76.2 mm

Using digital tickets
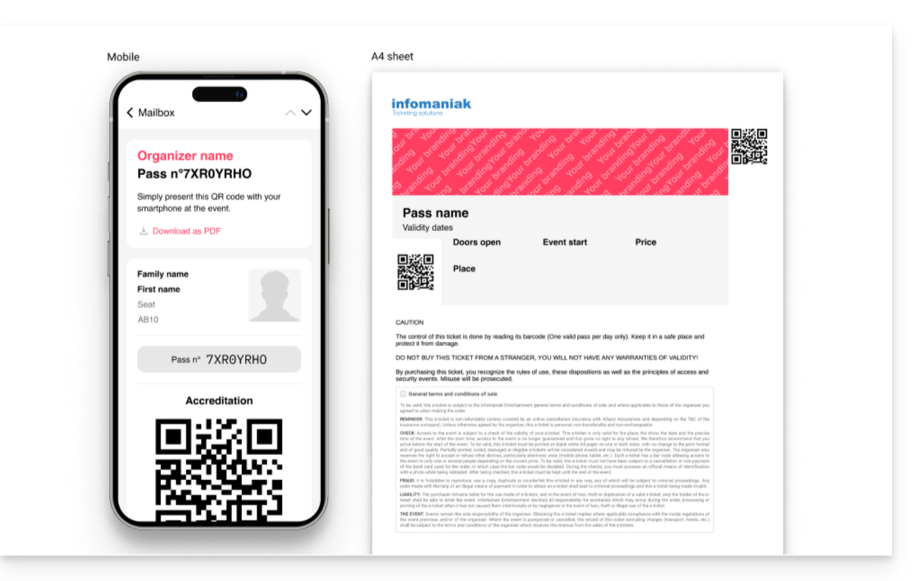
You can also send the digital tickets directly to the customer's email address.
- To do this, simply link a customer profile when finalizing the order:
- Then, the option to send tickets will appear directly in the order confirmation window:
Link to this FAQ: https://faq.infomaniak.com/1583
Has this FAQ been helpful?
This guide provides a checklist of important points to verify before launching a ticket sale (as part of the Infomaniak ticketing system) to best promote your events to the public.
Go through the checklist
Here is a list of the most important elements to check before publishing a ticketing system for your event.
The ticketing system must be visible (point 7b below) to perform the checks related to visibility in the shop. It can be visible and in test mode (point 7a) to prevent it from being published publicly.
- Has a bank account been added in the Accounting > Infomaniak Payments menu?
- Has the integration link been retrieved and integrated?
- Note: the integration link has its own settings that allow you to show/hide events in the "Content" submenu.
- Make sure that the events you are interested in are set to "Active" (only if the "manually choose the items to display" setting is enabled).
- Are the Prices, Zones, and Events set to Visible mode? To check:
- Event: Settings > Event > green/orange/red text with an eye symbol below the event.
- Zone: Settings > Event > Pricing > eye symbol to the right of each zone.
- Prices: as with the zones, but open the zones to view the prices they contain.
- Are the desired payment methods (Sales > Payment methods) enabled?
- Is the organizer's information up to date (Settings > Ticketing settings > Organizer contact information)?
- An email address is required, and a reachable phone number is strongly recommended.
- Is the VAT defined correctly?
- Are the passes/subscriptions okay? (Schedule > Passes)
- Do they include all the events they provide access to?
- Are their capacities and prices correct?
- Are they visible in the store? (eye symbol to the left of each pass in the list)
- In the Settings > Ticketing Settings menu:
- Disable test/demo mode.
- Enable ticketing.
Also, refer to the getting started guide to gain a better understanding of the possibilities offered by your ticketing tool.
Link to this FAQ: https://faq.infomaniak.com/1585
Has this FAQ been helpful?
This guide explains how to modify the access rights to products for a user in your Organization on the Infomaniak Manager.
Introduction
- Since you opened your account with Infomaniak, you have been part of at least one Organization (❓: help).
- If you were the only user and it wasn't an invitation, an Organization was created in your name, and you automatically become its legal representative.
- Otherwise, you belong to the Organization that invited you (to join its kSuite, to manage a product, etc.).
- It is possible to change a user's role within your Organization (❓: help).
- You can then define whether a user…
- … is part of your Organization and whether they should become:
- Legal Representative
- Administrator
- Collaborator (this section is detailed below…)
- … is external to your Organization (limited rights):
- External users are not included in calendar and address book sharing with the entire Organization.
- … is part of your Organization and whether they should become:
Who can access what…
Prerequisites
- First, switch to the desired Organization if you cannot find the expected list of users (❓: help).
- Be at least an Administrator of the Organization (❓: help).
- Haveadded a user as a collaborator (❓: help).
The guide below explains how to manage access to products for collaborators and external users. Indeed, a legal representative or an Administrator always has access to all existing products within the Organization, as displayed in the Infomaniak Manager.
To modify a user's product access within the Organization:
- Click here to access user management in the Infomaniak Manager (❓: help).
- Click on the action menu ⋮ located to the right of the user in question.
- Click on Modify product access:
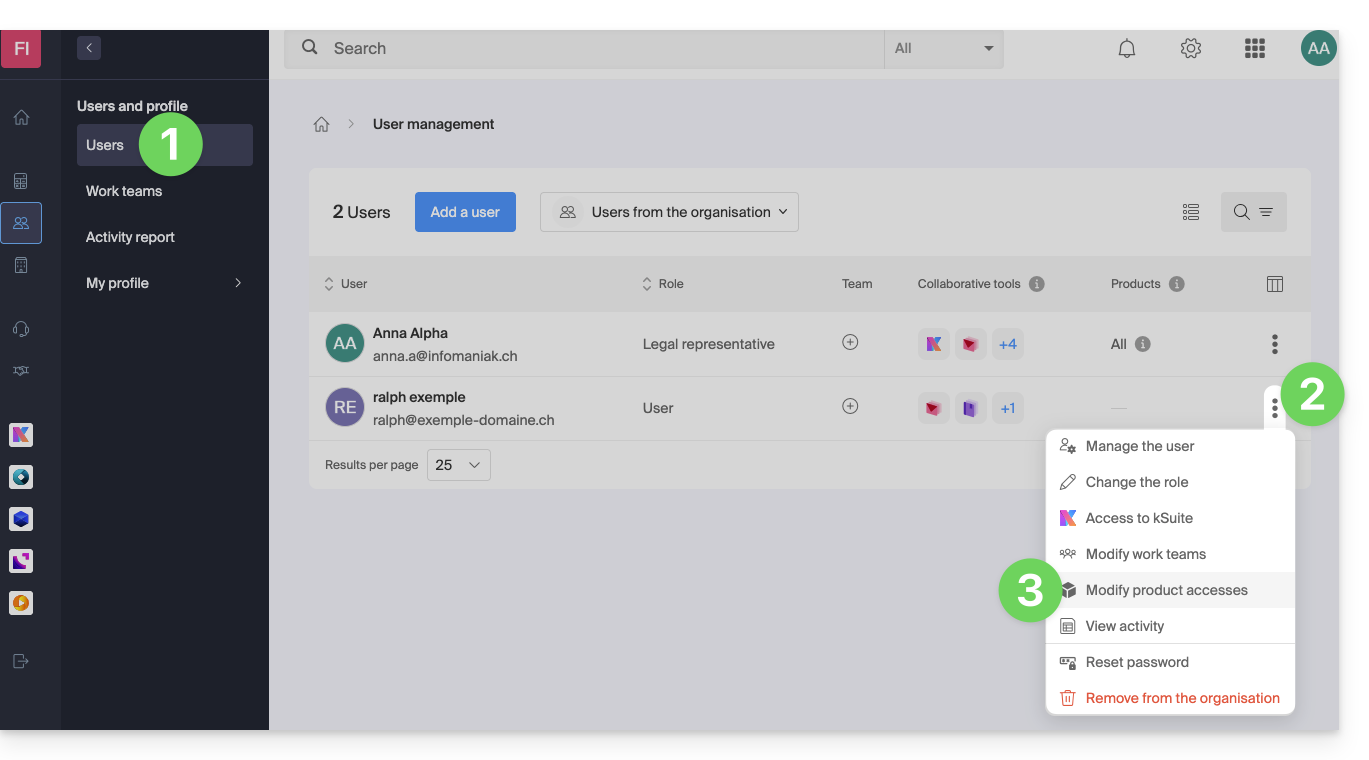
- You can grant access to everything with maximum permissions in one click.
- Otherwise, click on the product category you want to grant access to.
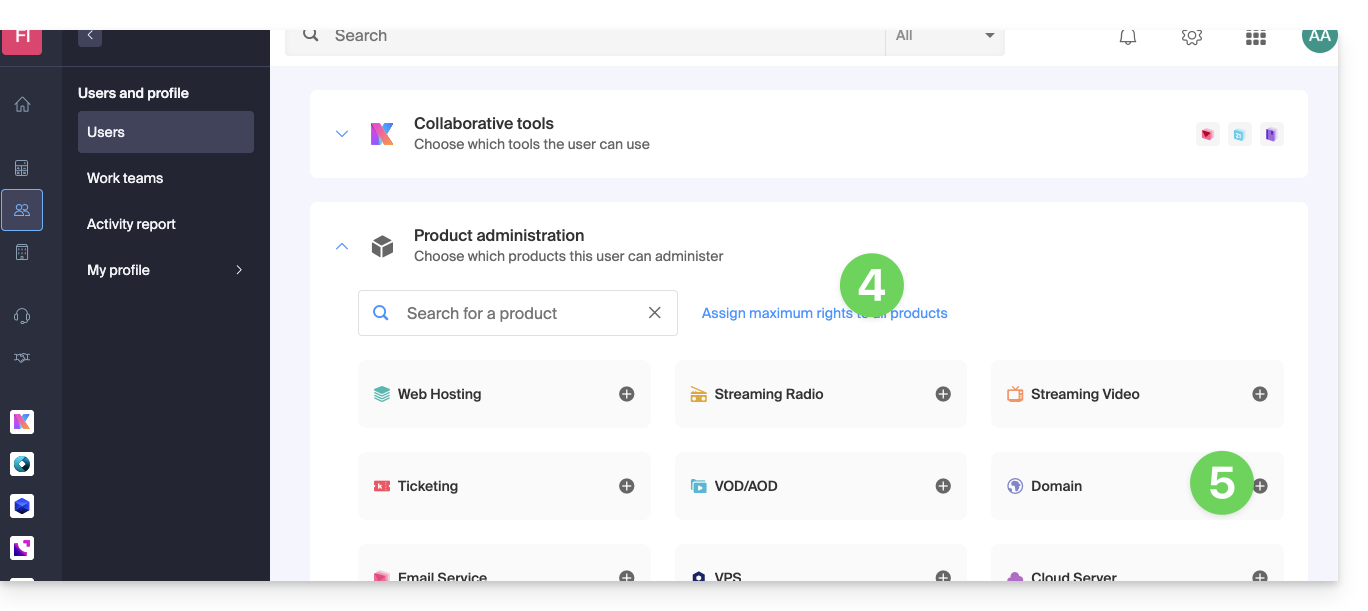
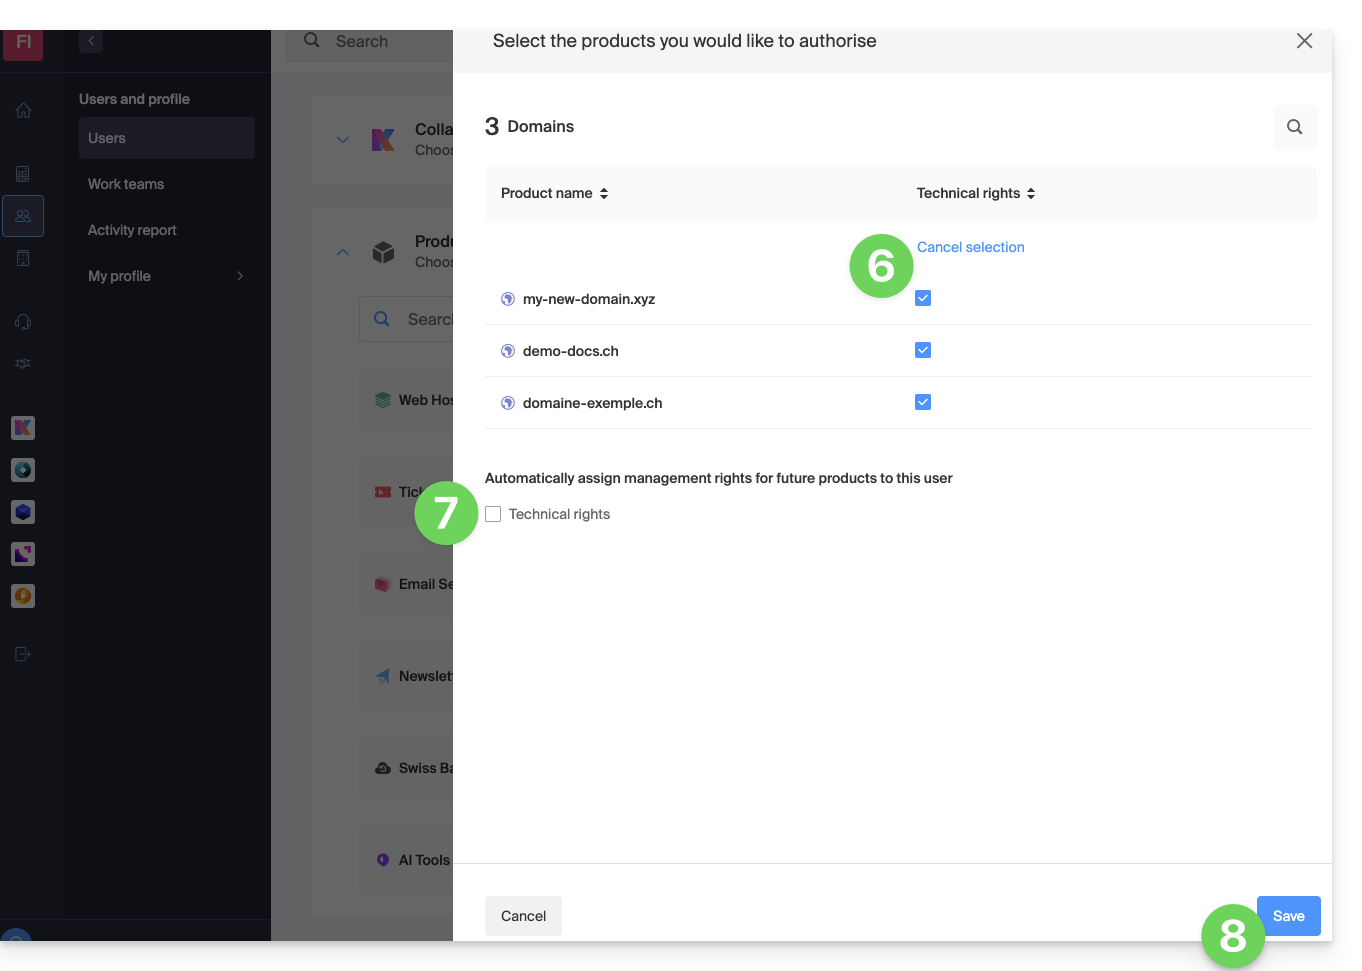
- Select the product(s) you need.
- If you have selected multiple products, decide whether a future additional product should automatically be visible to the user (and with what type of permissions❓: help).
- Click the Save button:
- Permissions are granted immediately.
- Click on the pencil ✎ icon to modify the permissions:
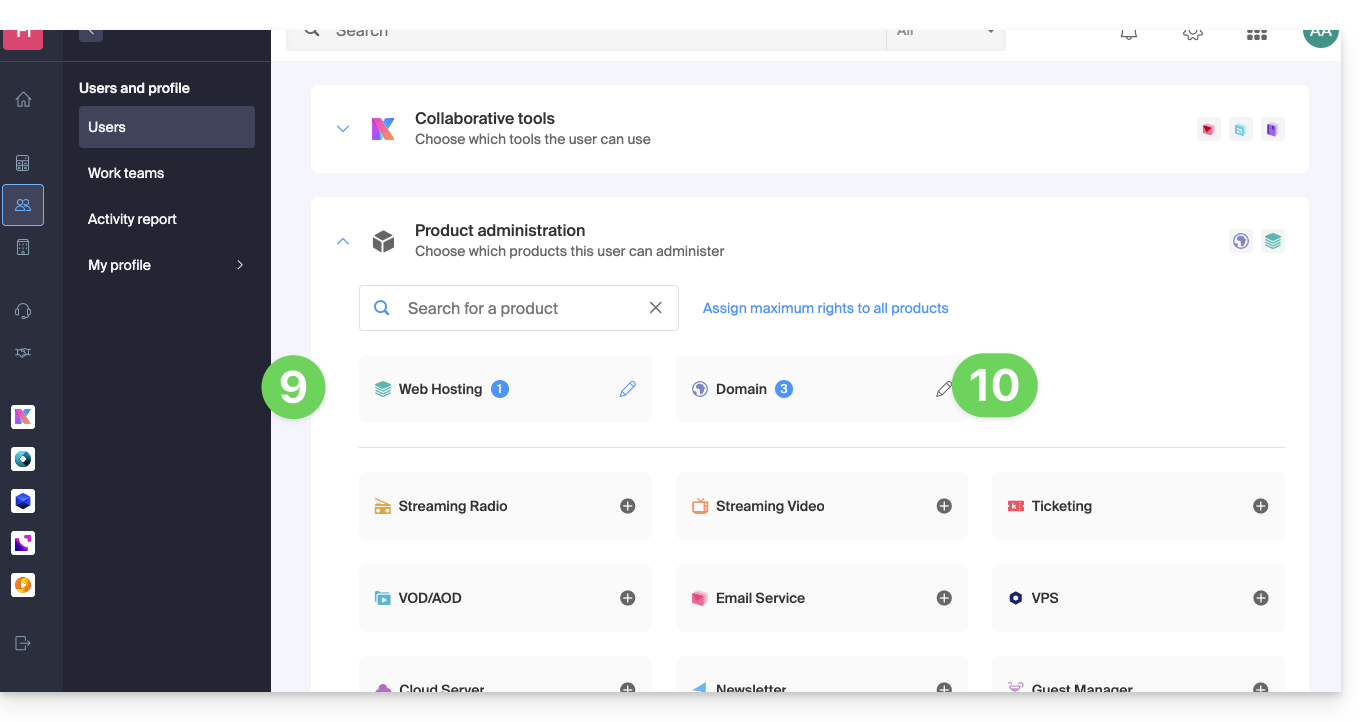
- If you need to grant access to multiple products, start again from step 5.
Using the service / Managing the service
Please note that in the product table, it is important to distinguish between access to the products (e.g., kDrive within kSuite) and access to product management: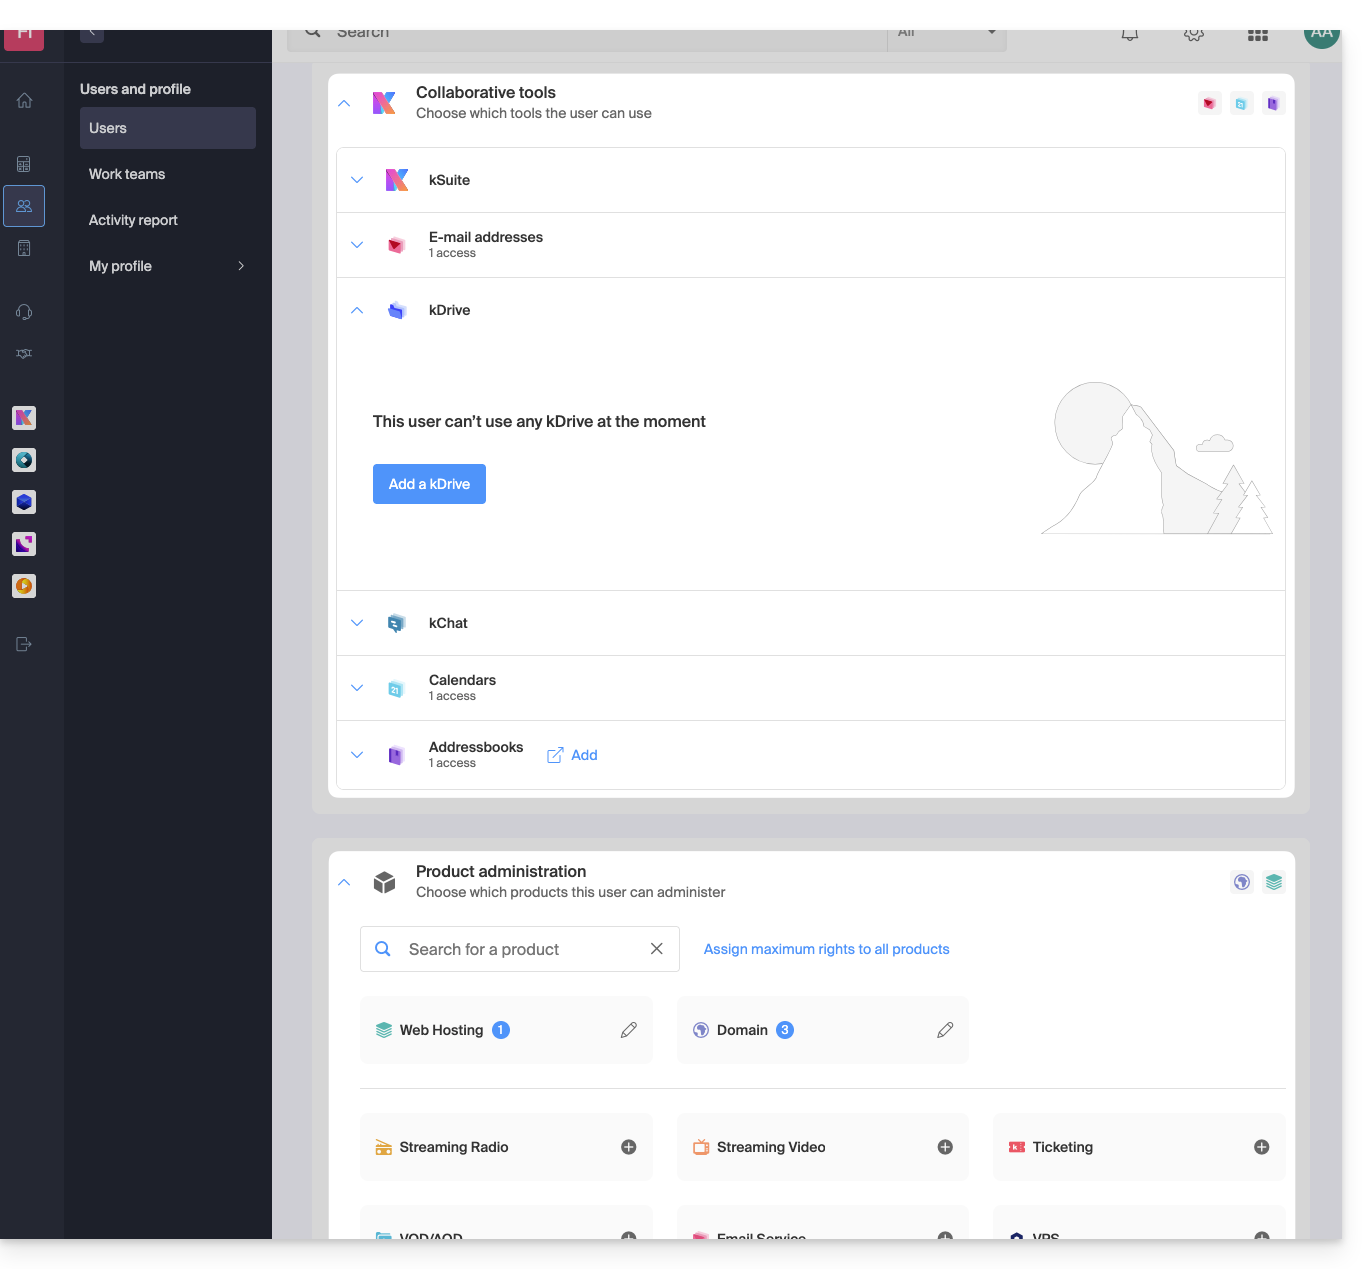
It is possible to authorize a user to use kDrive (e.g., create a PDF) without granting them management rights for the kDrive service (they will not be able to change the plan, invite a new user, cancel, etc.).
Technical rights / Statistical rights
With certain services like kDrive, it is possible to grant a collaborator TECHNICAL and/or STATISTICAL rights (adds access to the dashboard, sharing links, storage statistics, active users, connected devices, activity on the kDrive):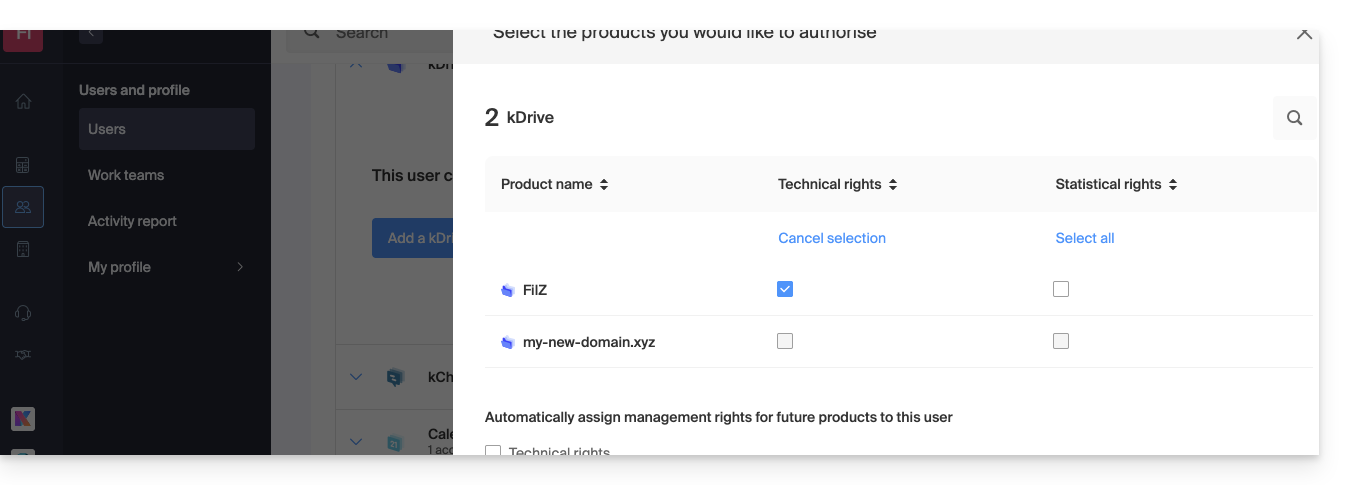
Other services, such as domain names, do not have a STATISTICS section: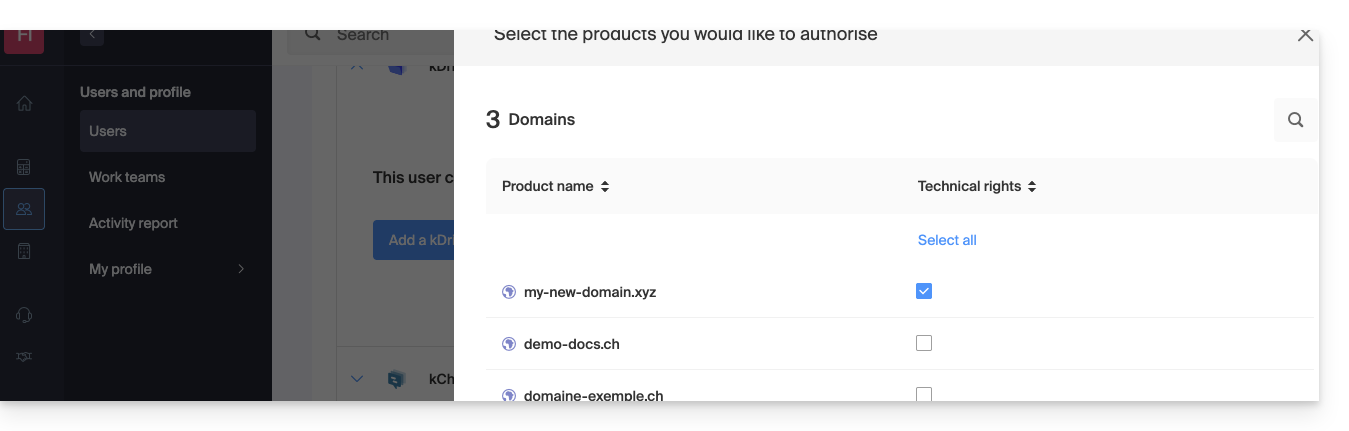
Some specific services, such as ticketing, allow for even more detailed permissions: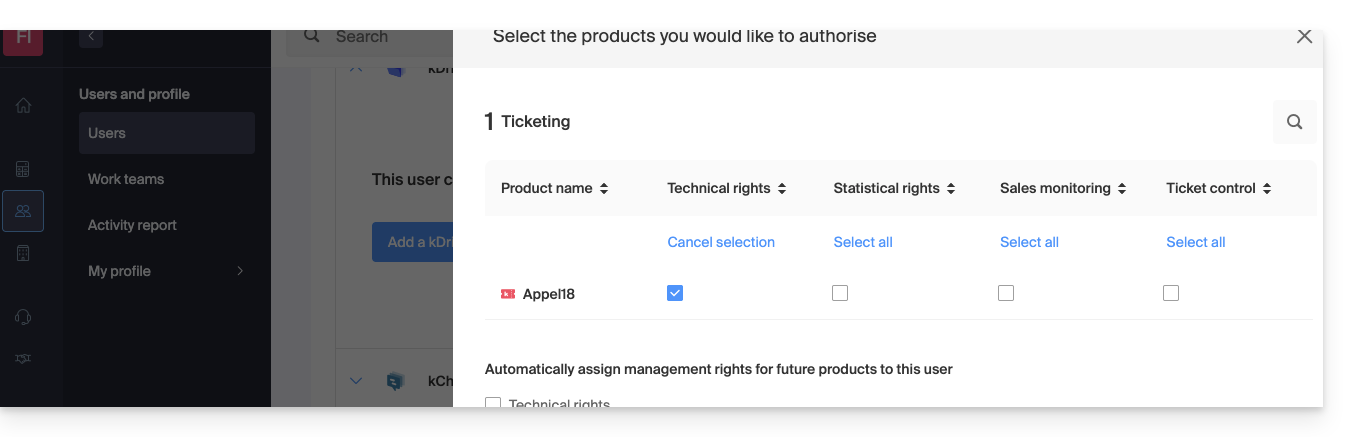
Easy Access: Groups
To simplify the process of adding access rights to a product within your Organization, there are Groups (❓: help). These allow you to create teams that are linked to Infomaniak products with the desired rights, which is very useful for granting a new member of your Organization access to the products they will need in their daily work.
Link to this FAQ: https://faq.infomaniak.com/1610
Has this FAQ been helpful?
This guide explains how to duplicate an event, within the Infomaniak ticketing system, either as a one-time event or as a recurring event.
Introduction
- If necessary, please refer to this other guide regarding the duplication of an event on a second ticketing system.
Duplicate an event
To duplicate an event, season, or previous edition, for example:
- Click here to access the management interface for your product in the Infomaniak Manager (need help?).
- Click directly on the name assigned to the event listing containing the event you want to duplicate.
- Click on Scheduling in the left-hand menu.
- Click on Events in the left-hand menu.
- Click on the action menu ⋮ located to the right of the event to be duplicated.
- Click on Duplicate:

- In the window that opens, choose whether to duplicate the event once or recurrently (multiple times):
- Recurrent duplication allows you to duplicate the event throughout the period by selecting the days (Monday to Sunday) on which you want the event to be duplicated.
- If necessary, specify the new name of the event, the new dates, and any other display settings for your event.
- Click on Confirm to start the duplication.
Once the duplication is complete, refresh the page and then determine whether the events should be visible to customers or hidden from customers and/or resellers, or complete for customers and/or resellers. You can also duplicate the seats in the case of numbered rooms.
Link to this FAQ: https://faq.infomaniak.com/1627
Has this FAQ been helpful?
This guide explains how to import tickets generated by another provider or external reseller for your event into the Infomaniak ticketing system.
Prerequisites
- Importing third-party tickets requires that the event has already been created in your Infomaniak ticketing system.
- You also need a list of tickets in a CSV file, including the barcode field that will be printed on the ticket.
Accessing the import options
To do this:
- Click here to access the management of your product in the Infomaniak Manager (need help?).
- Click directly on the name assigned to the ticketing system for the event.
- Click on Ticket Management in the left-hand menu.
- Click on Import Distributor in the left-hand menu:
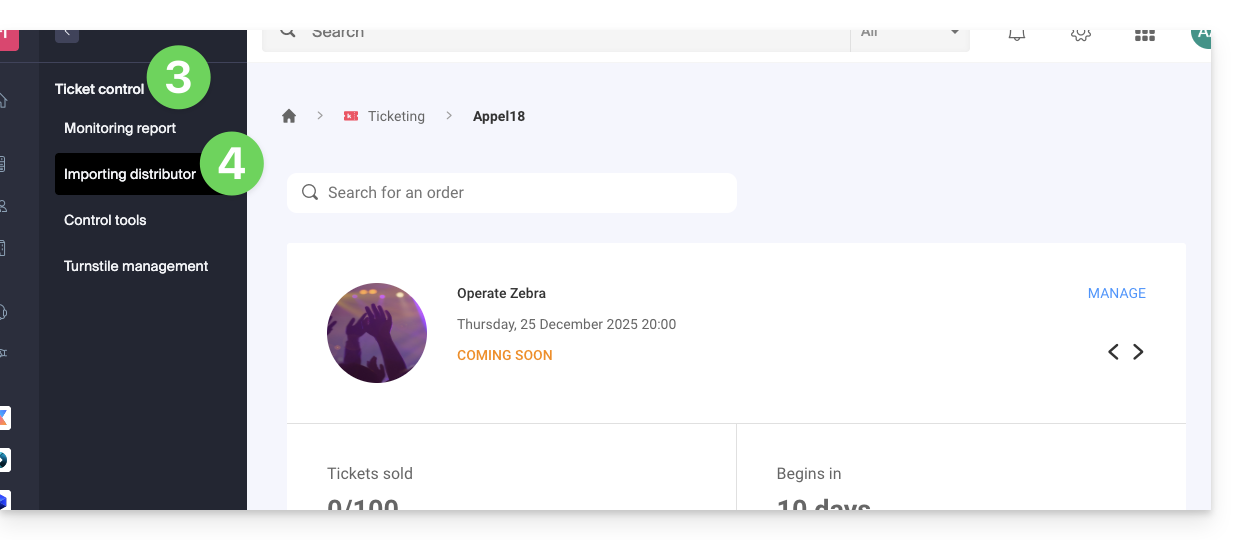
Import the CSV file
To do this:
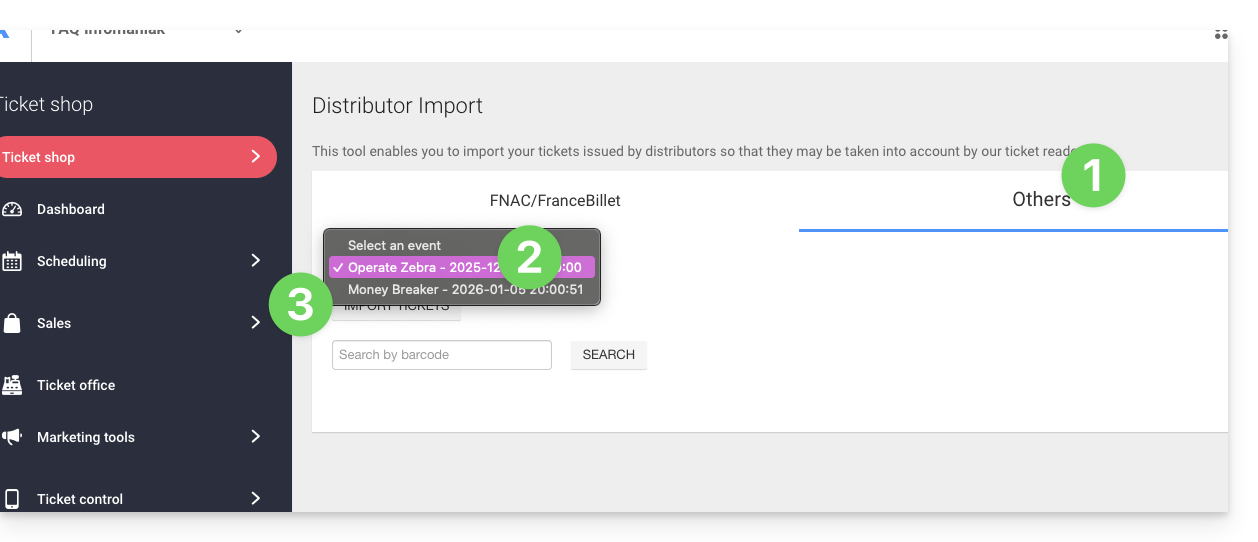
- Click on the FNAC/FranceBillet or Other tab, depending on the reseller.
- Choose an event for which to import tickets.
- Click on Import tickets:
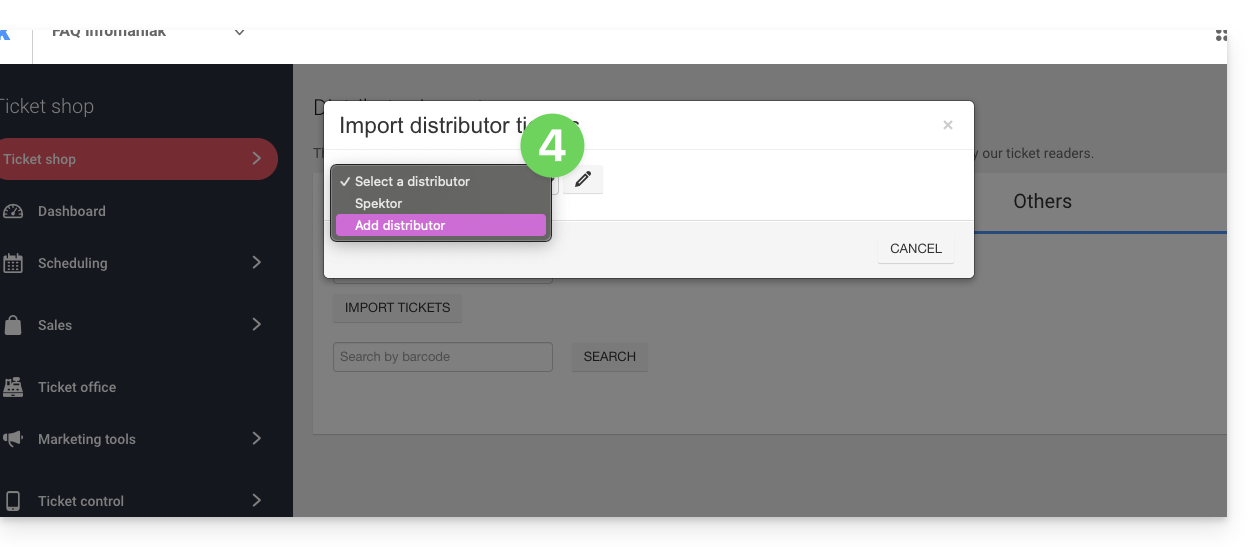
- Choose an existing distributor from the drop-down menu, or create one:
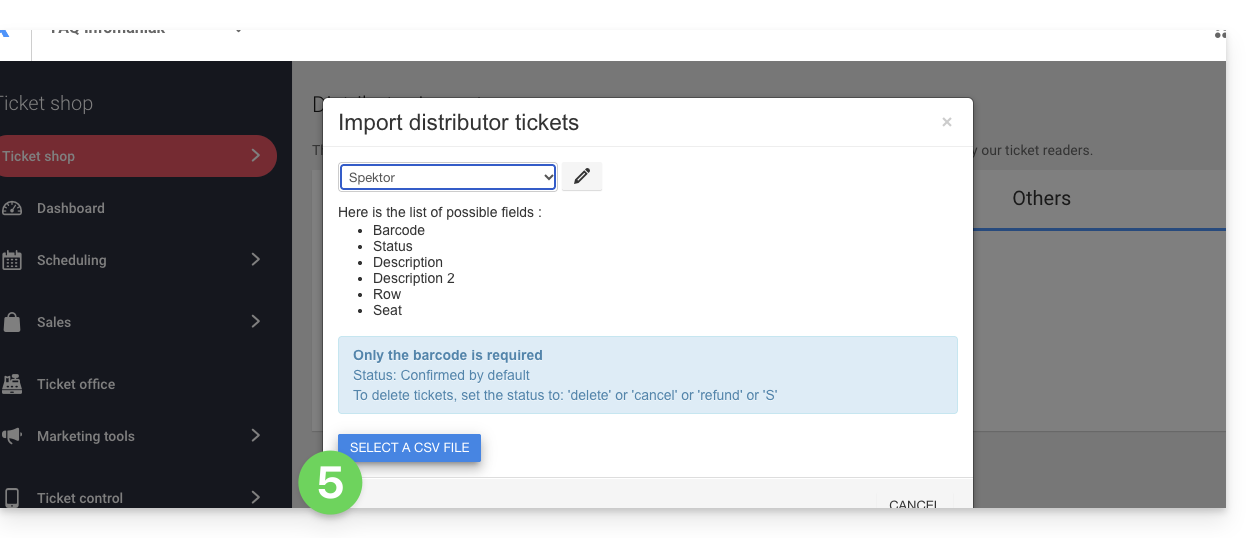
- Click on the Choose a CSV file button and upload the CSV file provided by the distributor:
- Select the rows to import. Warning:
- Check the first and last rows of the imported data.
- These may contain headers or blank lines that could cause an error during import.
- Use the options at the top of the page to define the number of first and last rows to ignore:

- Match the columns to the information to be imported.
- The ticket barcode is the only mandatory field.
- If you are importing tickets from another Infomaniak ticketing system, select column 8, which contains the QR code (in the format 2000000000A^0^100000000):

- Check the imported information and validate:
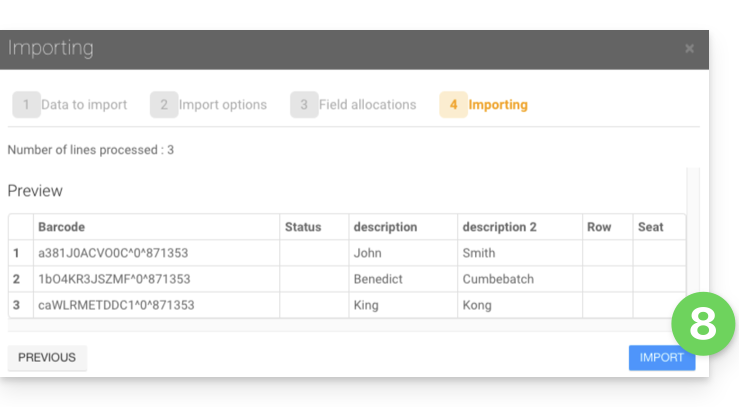
- The imported tickets will appear in a table at the bottom of the page:
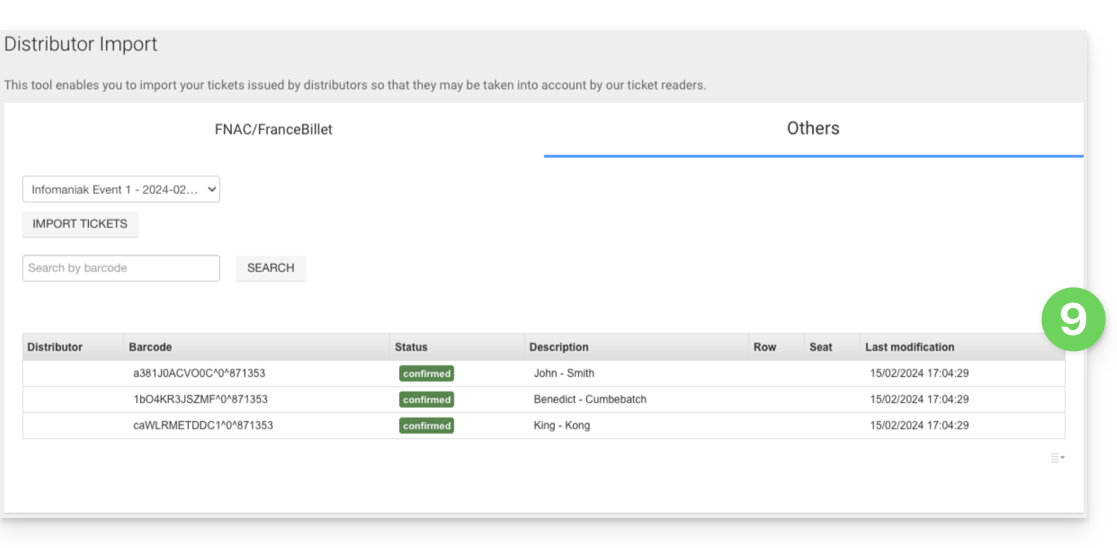
Managing Imported Tickets
Once the tickets have been imported, they can be scanned using the ticket control application (available on iOS and Android).
They will also be counted in the FNAC or Other column in the control report tool, which is available from the left-hand menu: Ticket Control, Control Report:
Link to this FAQ: https://faq.infomaniak.com/1705
Has this FAQ been helpful?
This guide explains how commissions are applied to your sales (within the Infomaniak ticketing system).
Free tickets
Infomaniak does not charge any commission on the sale of free tickets.
- If the price of your tickets is CHF 0 or € 0, you will not pay anything on the sale of these tickets.
- Please note: it is the value of the ticket that counts, not the payment method.
- A paid ticket validated with the free/invitation payment method is therefore not considered a free ticket.
- To create a free pricing plan for your guests, please refer to this other guide.
Paid tickets
Infomaniak’s fees for paid tickets are made up of 3 parts:
- A fixed fee that remains constant regardless of the ticket price or payment method.
- A percentage-based commission on the ticket price, applied to all online sales.
- Bank fees for online transactions, which vary depending on the payment method used.
| Online sales | In-store sales | |||||||||
|---|---|---|---|---|---|---|---|---|---|---|
| Total fee | ||||||||||
| Bank charges (variable depending on the payment method) | ||||||||||
| Infomaniak Commission (percentage of the ticket price) | Total Commission | |||||||||
| Infomaniak Commission (fixed) | Infomaniak Commission (fixed) | |||||||||
For the complete list of commission rates, please refer to the pricing page on the sales page.
How are commissions paid?
- Infomaniak commissions will be calculated automatically when the monthly statement is generated.
- They will be deducted from the monthly sales amount if the balance is sufficient.
- An invoice will be sent to you if the balance is insufficient.
Link to this FAQ: https://faq.infomaniak.com/1746
Has this FAQ been helpful?
This guide explains how to use the group pricing feature (within the Infomaniak ticketing system).
Introduction
- This pricing allows visitors to purchase multiple tickets in a single click.
- This option is particularly useful for families, school groups, or special group offers.
- Although the buyer makes only one purchase, the group rate combines several tickets into a single purchase.
- Several tickets will therefore be issued, and each member of the group can then present their own ticket at the event.
Manage the bundled pricing for your event
To do this:
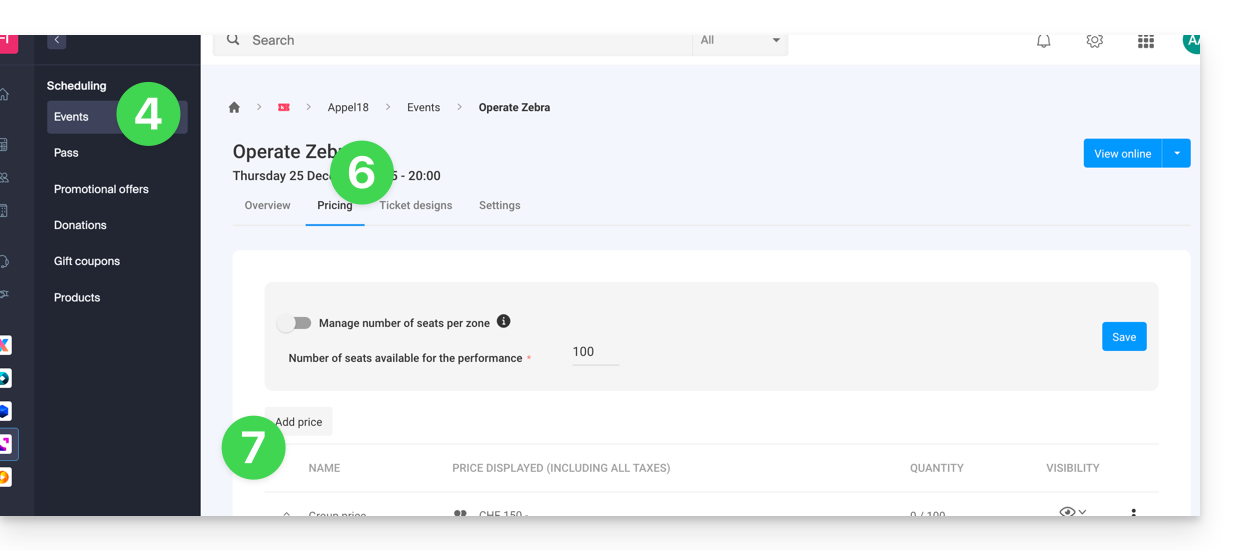
- Click here to access the management of your product in the Infomaniak Manager (need help?).
- Click directly on the name assigned to the ticketing system for the event.
- Click on Scheduling in the left-hand menu.
- Click on Events in the left-hand menu.
- Click directly on the event name.
- Then, click on the Pricing tab.
- Click on Add a price:
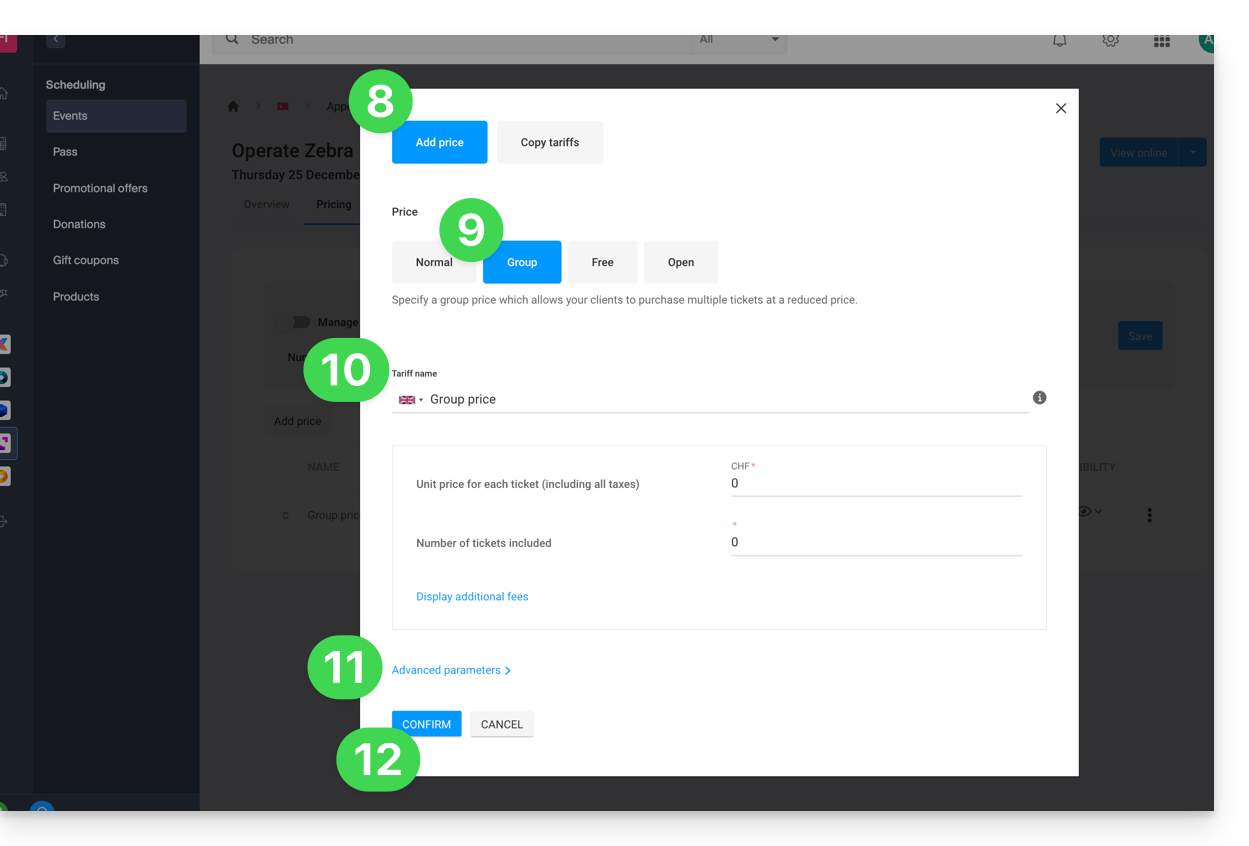
- Choose to Add a price.
- Choose the group rate.
- Specify:
- the name
- the number of tickets included in the rate
- the price of each individual ticket (the price of the group rate will be equal to the individual price multiplied by the number of tickets)
- Enable any available advanced settings.
- Click Confirm:
The display of pricing varies depending on the type of event: for a multi-date event, it is managed via an action menu on the "Edit" button, while for a single-date event, it appears directly in the "Pricing" tab at the top of the page.
Link to this FAQ: https://faq.infomaniak.com/2533
Has this FAQ been helpful?
This guide explains how to create events with multiple dates (within the Infomaniak ticketing system).
Create a multi-date event
To do this:
- Click here to access your product management interface in the Infomaniak Manager (need help?).
- Click directly on the name of the relevant ticketing system.
- Click on Programming in the left-hand menu.
- Click on Events in the left-hand menu.
- Click on the Add event button.
- In the Date and Location step, you can select the Multiple occurrences option:
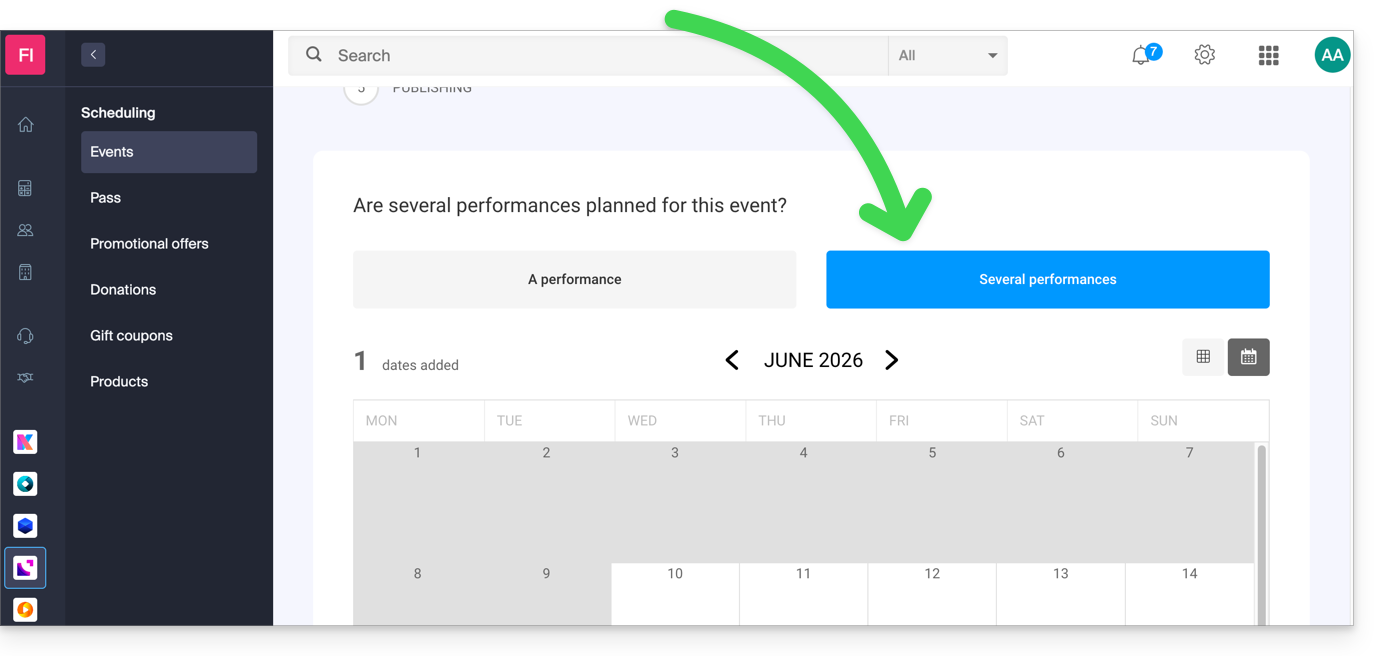
- An interface displaying a calendar appears; choose the start date of the event.
- You can specify whether the event lasts for several days, weeks, or months, or whether it recurs several times in the same day:
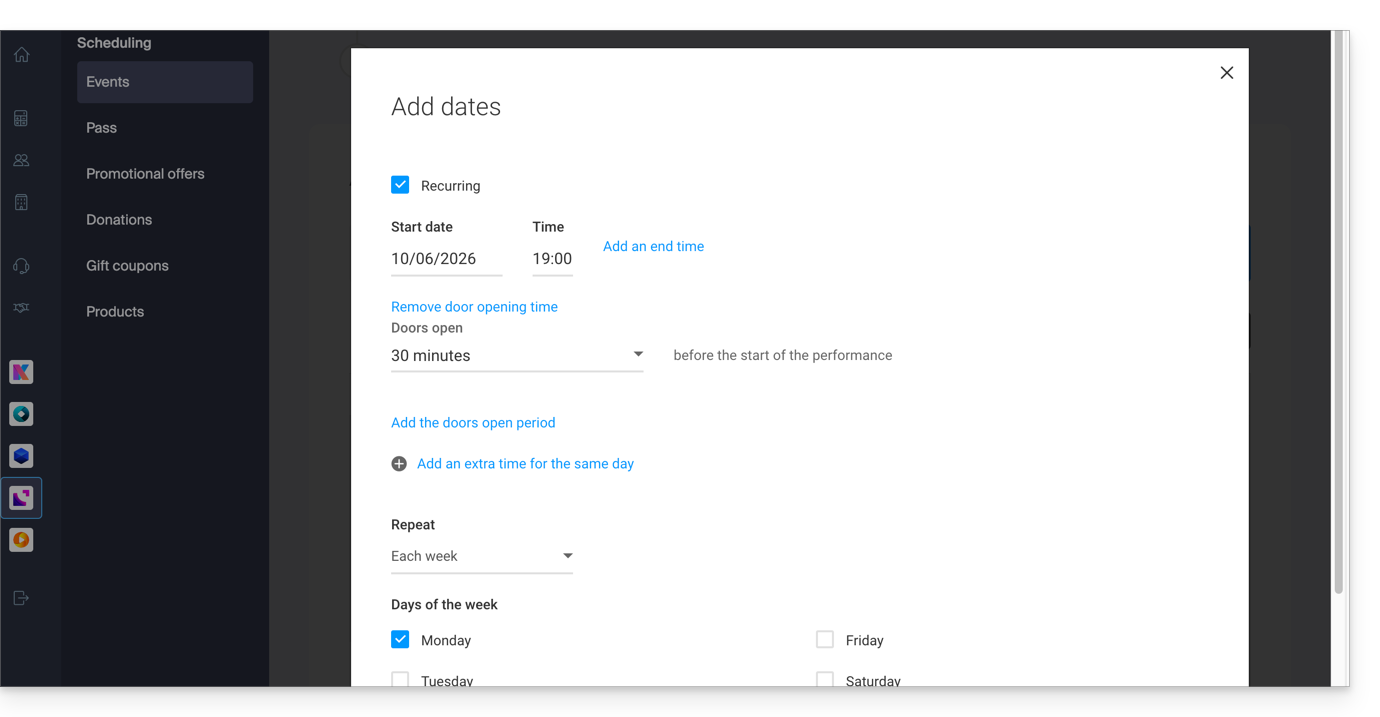
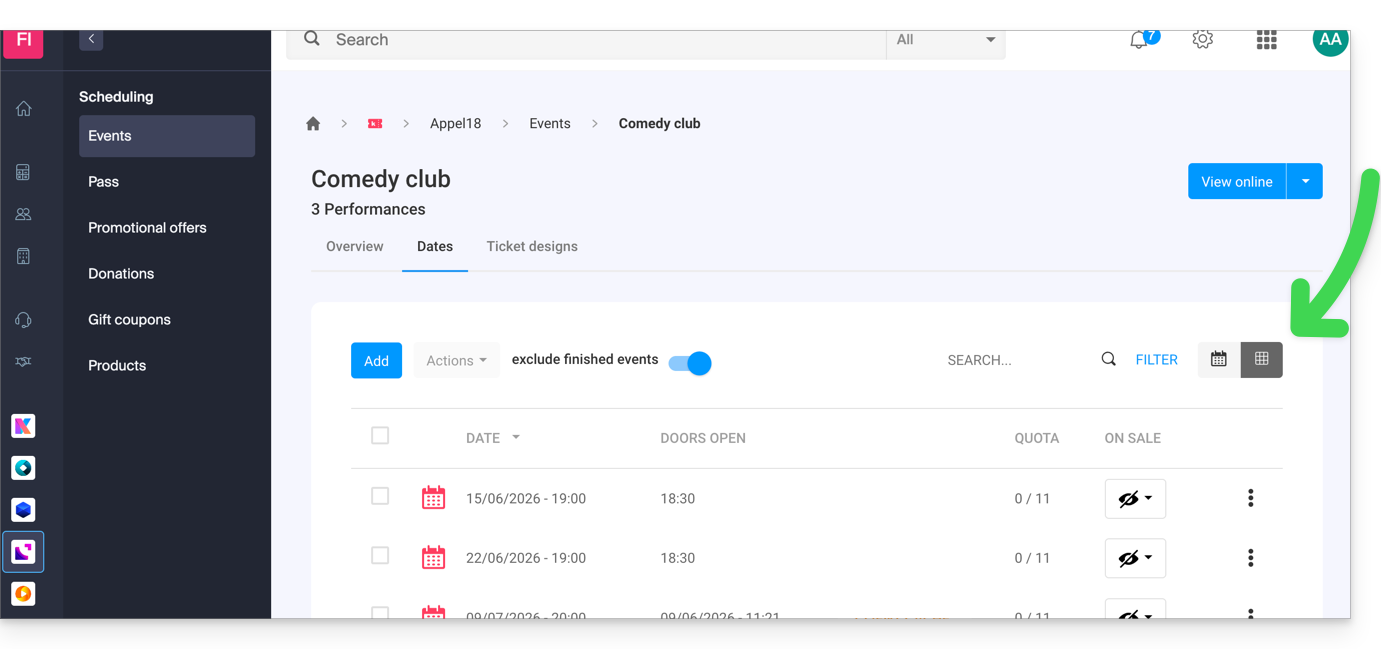
- Once the event is created and open for sale, you can track the progress of orders for each date using a List view:
Link to this FAQ: https://faq.infomaniak.com/2574
Has this FAQ been helpful?
This guide explains how the payment deadline before order cancellation works (within the Infomaniak ticketing system).
Prerequisites
- This feature is only offered for orders using the ‘Invoice payment’ payment method.
- By default, the due date is 30 days after the order. A reminder will be automatically sent 10 days and 20 days after the order date. On the 30th day, the order will be cancelled, and an email will be sent to the customer to inform them of the cancellation of their order.
Configure the order cancellation deadline
When tickets for one of your events are purchased using the ‘Invoice payment’ payment method, you can configure a rule to set a deadline before the order is automatically cancelled.
- Click here to access the management interface for your product in the Infomaniak Manager (need help?).
- Click directly on the name assigned to the ticketing system for the event.
- Click on Sales in the left-hand menu.
- Click on Payment methods in the left-hand menu.
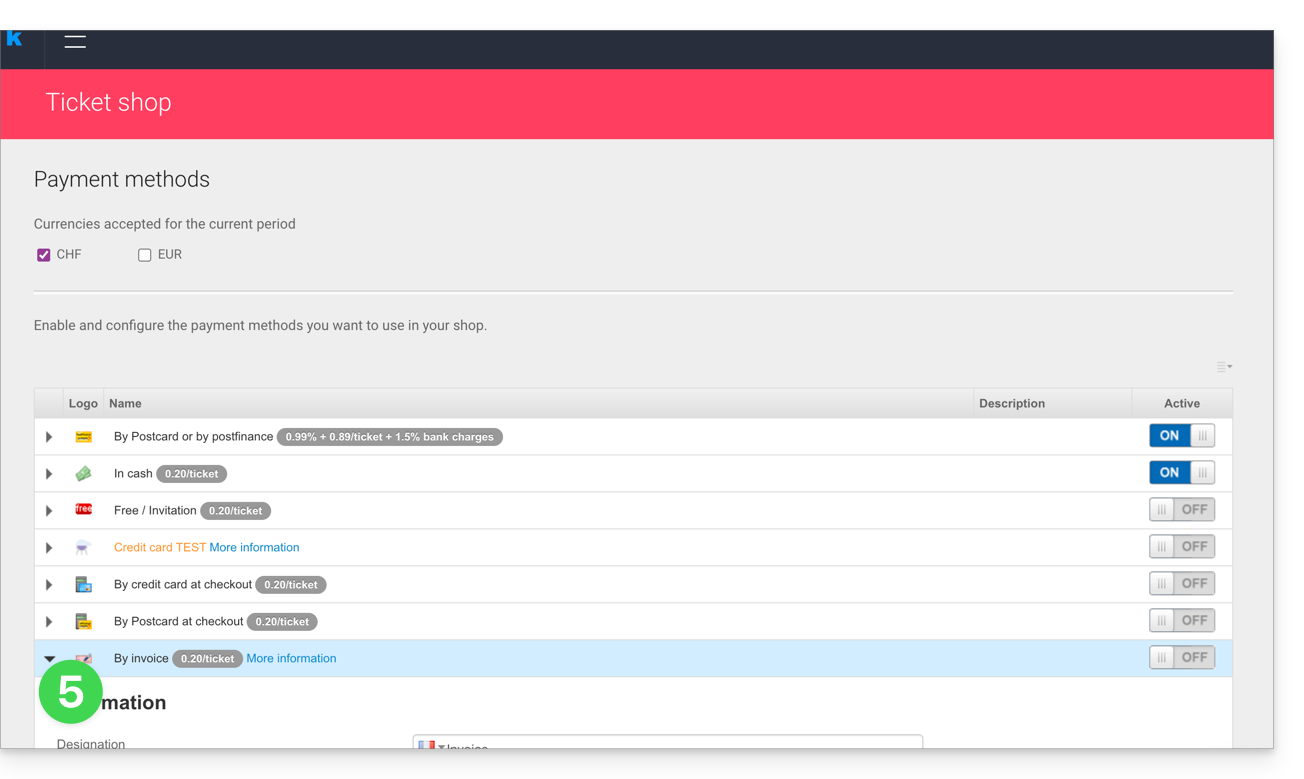
- Click on the ⏵ icon to expand the settings for the “Invoice” item:
- Define the availability period for this payment method, the number of days before a payment request is sent to the customer again, and the number of reminders:
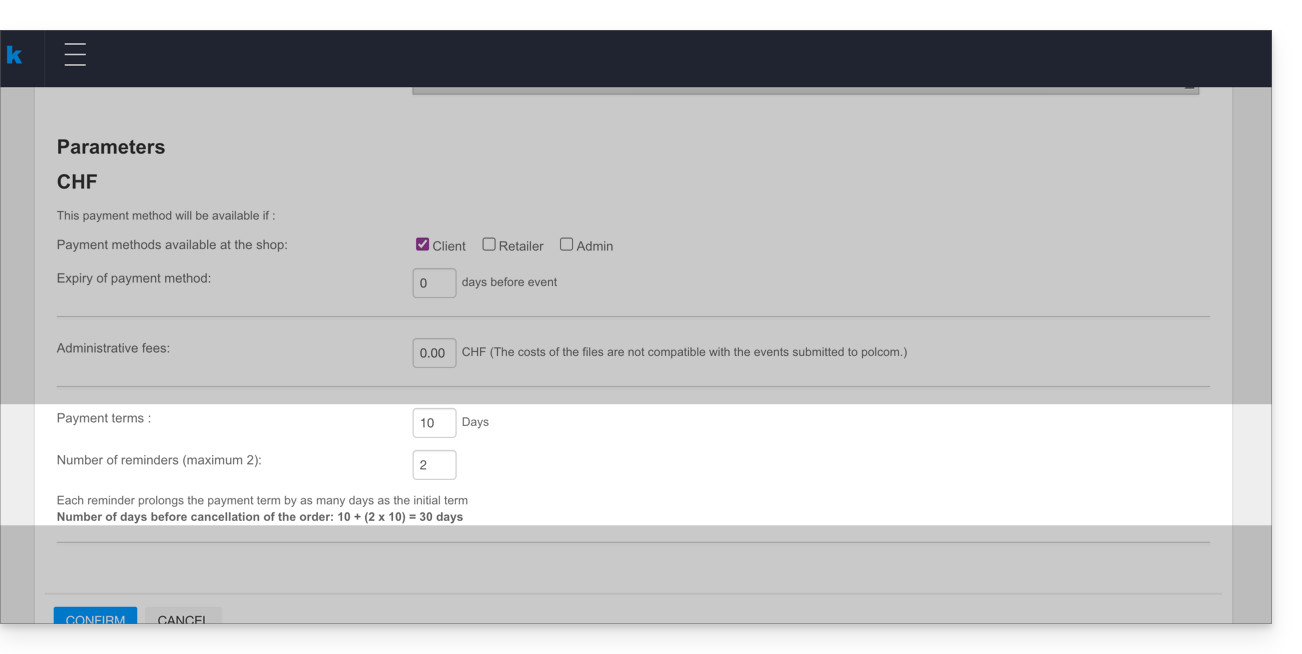
Each reminder extends the payment deadline by the same number of days as the initial deadline. The order is automatically cancelled at the end of the reminder period, which is calculated as follows:
- Number of days before the first reminder + (number of reminders multiplied by the number of days before the first reminder).
- In the example above, this results in: 5 + (2x5) = 15, meaning the cancellation will take effect 15 days after the first reminder.
Link to this FAQ: https://faq.infomaniak.com/2597
Has this FAQ been helpful?
This guide explains how to set up invoice payments (within the Infomaniak ticketing system).
Introduction
- This payment method will allow your customers to pay for their order later.
- Regardless of the payment method, you will be the one to receive the money.You will therefore need to manually validate the order.
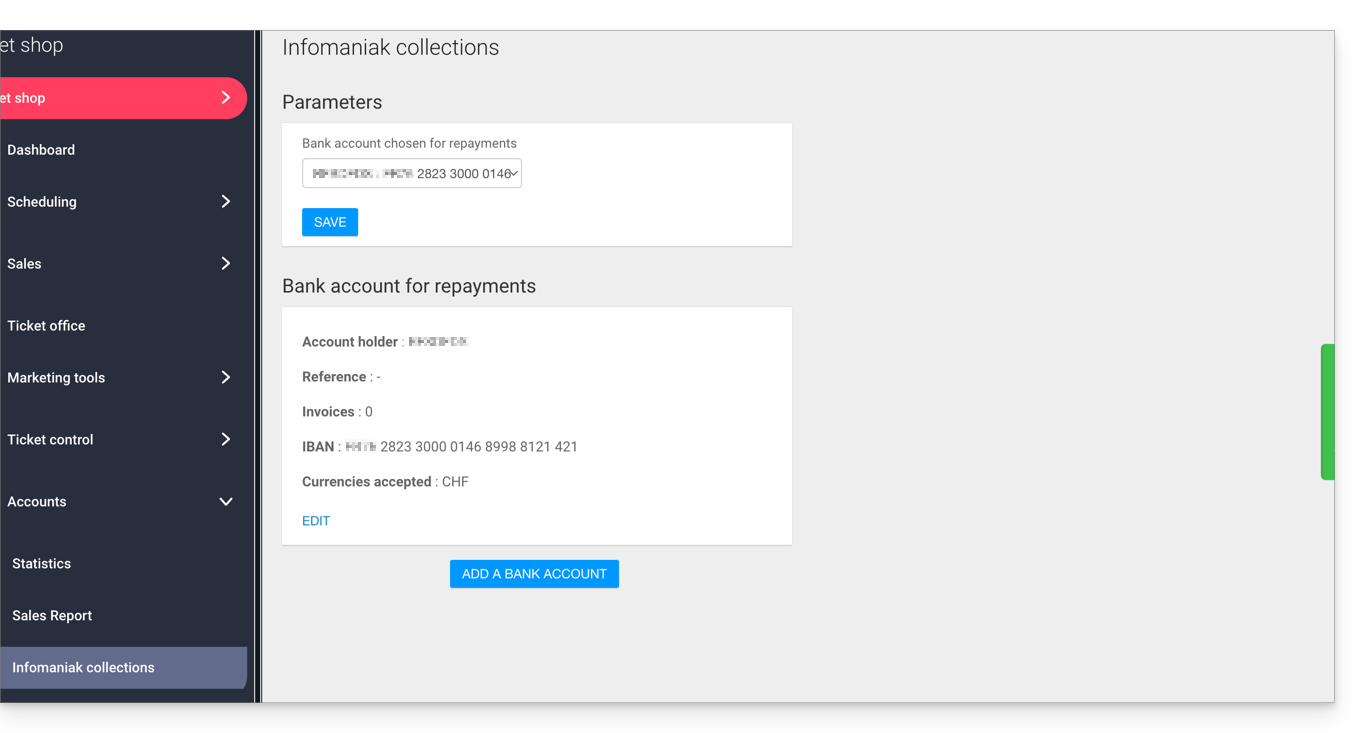
- In the case of a bank transfer, the payment will be directly credited to the account details (RIB/IBAN) configured in your billing area under Accounting, then Infomaniak Payments in the left-hand menu:
- This payment method is subject to a fixed fee of 0.20 per ticket (see pricing).
Enable the payment method in the Ticketing system
To do this:
- Click here to access the management of your product in the Infomaniak Manager (need help?).
- Click directly on the name assigned to the ticketing system for the event.
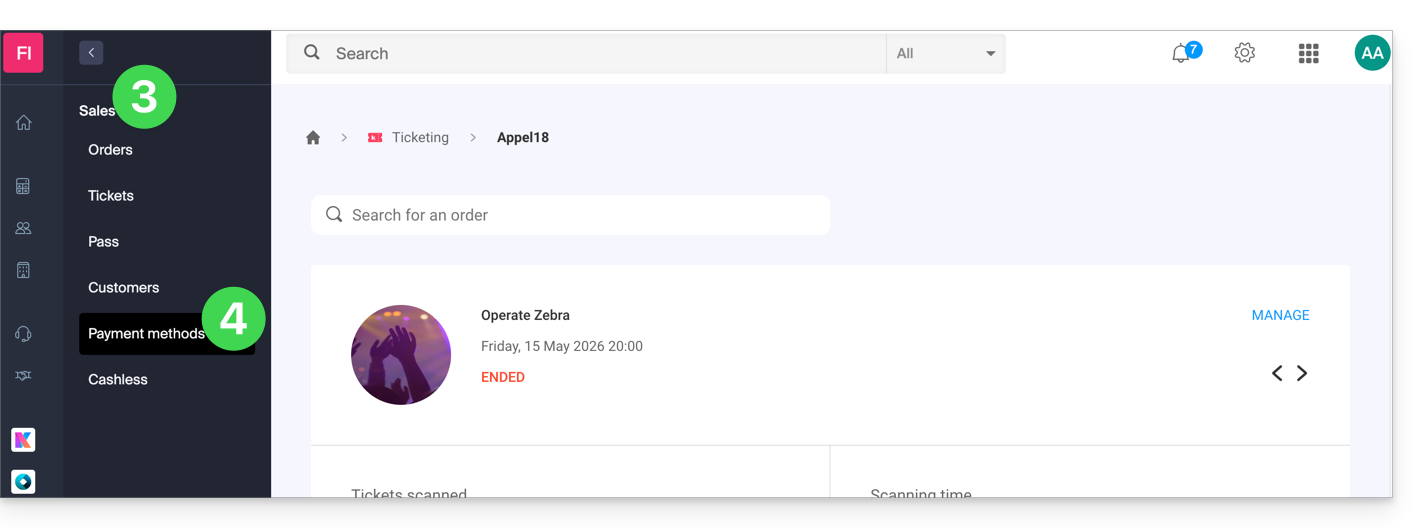
- Click on Sales in the left-hand menu.
- Click on Payment methods in the left-hand menu:
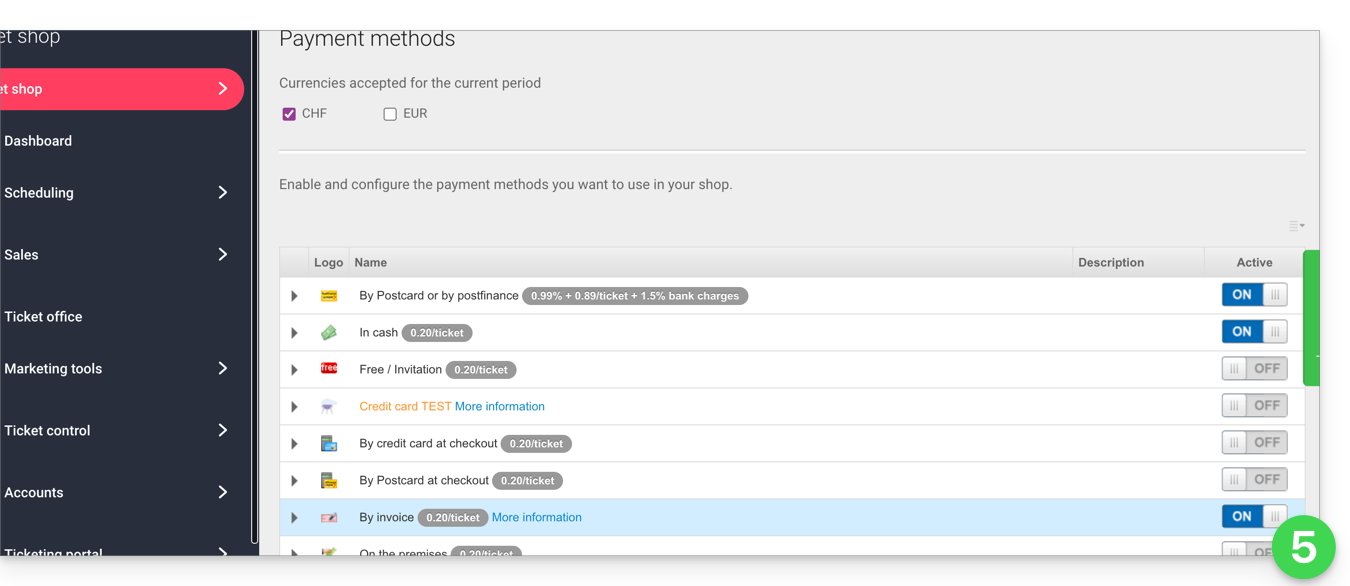
- Set the toggle switch to ON to the right of the Invoice item:
Configure the method
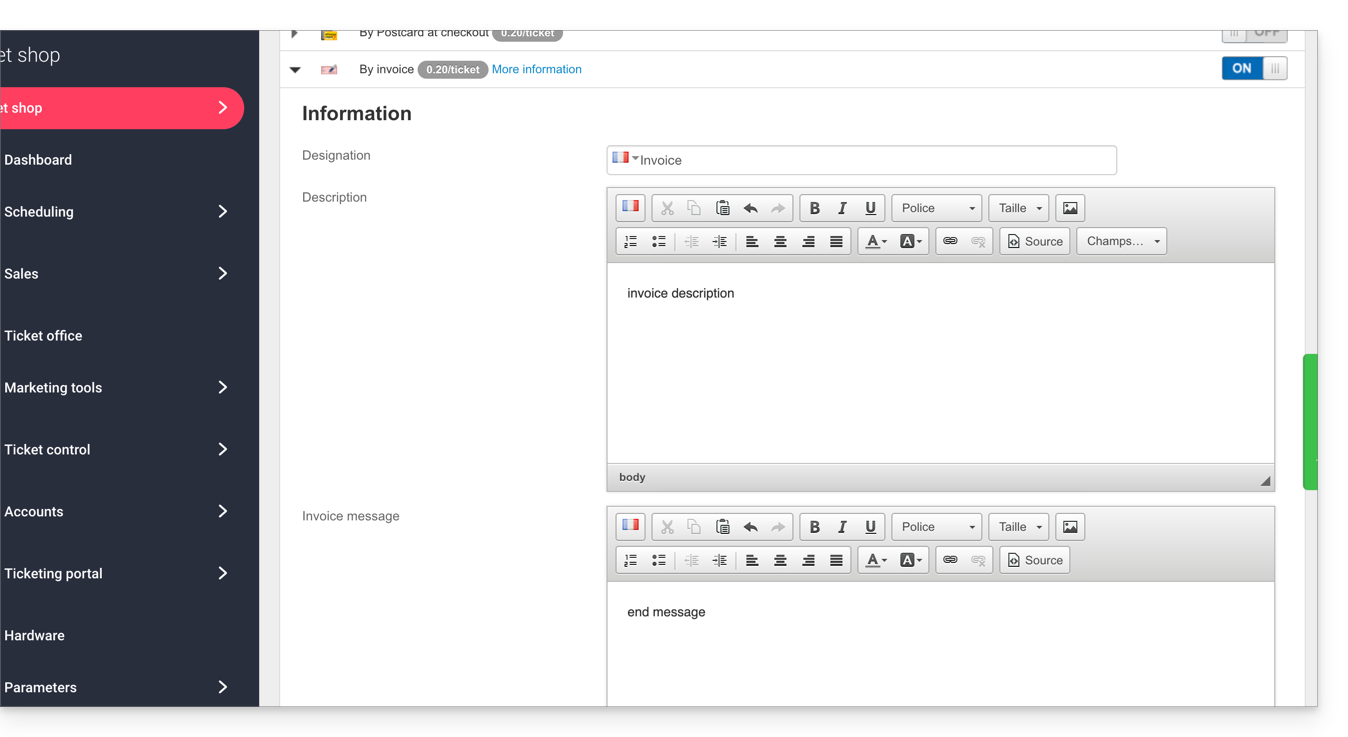
Click on the arrow to the left of the Invoice payment method:
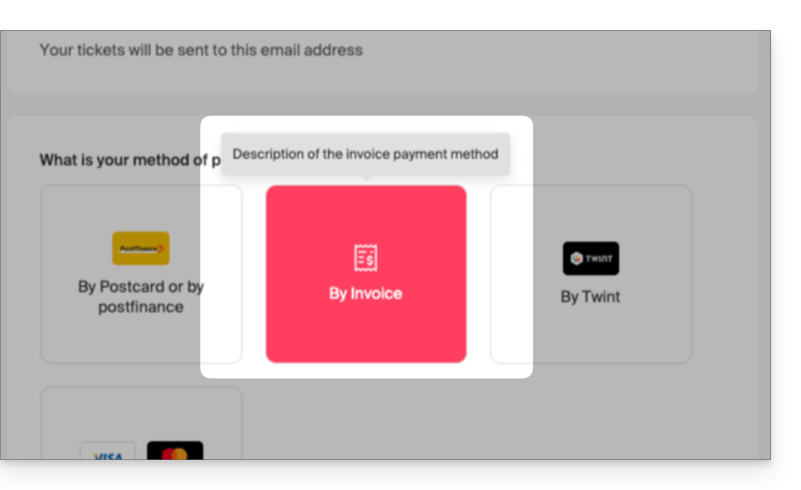
- The first section allows you to define the name of this payment method, add a description, and add a message to the end of the generated document:
- Here is a sample result:
Customizing the invoice payment method
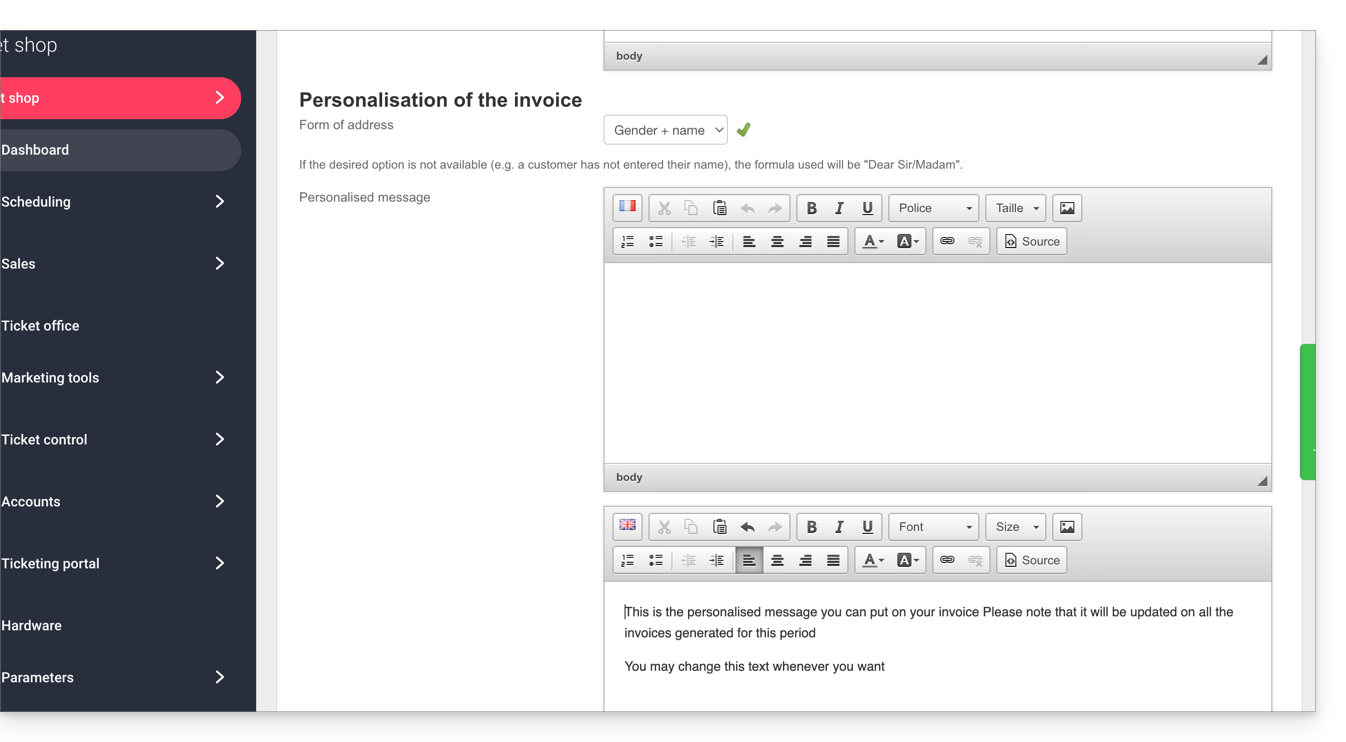
You can customize the invoice to address it to the customer and include a personalized message:
- If you want to address the invoice directly to the customer, in the form Mr. Smith, please ensure that the customer records have the Title and Name fields filled in and completed:
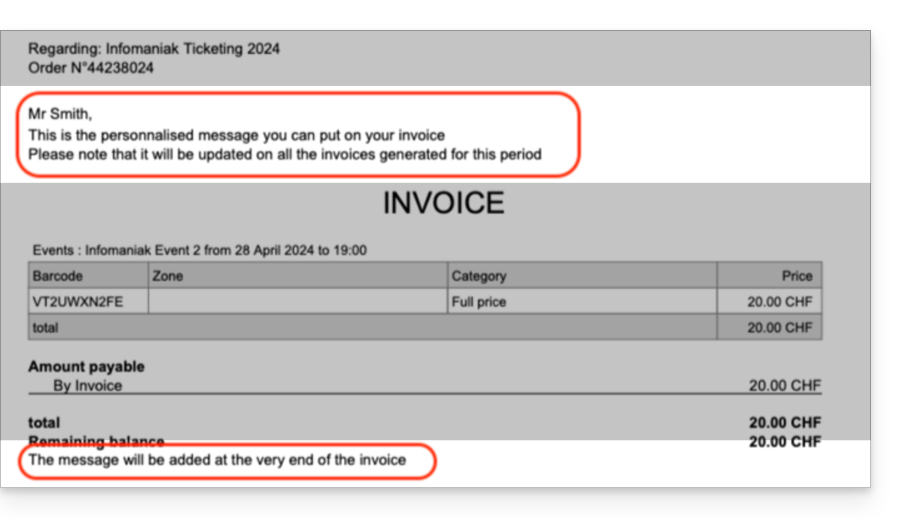
- Here is a sample result:
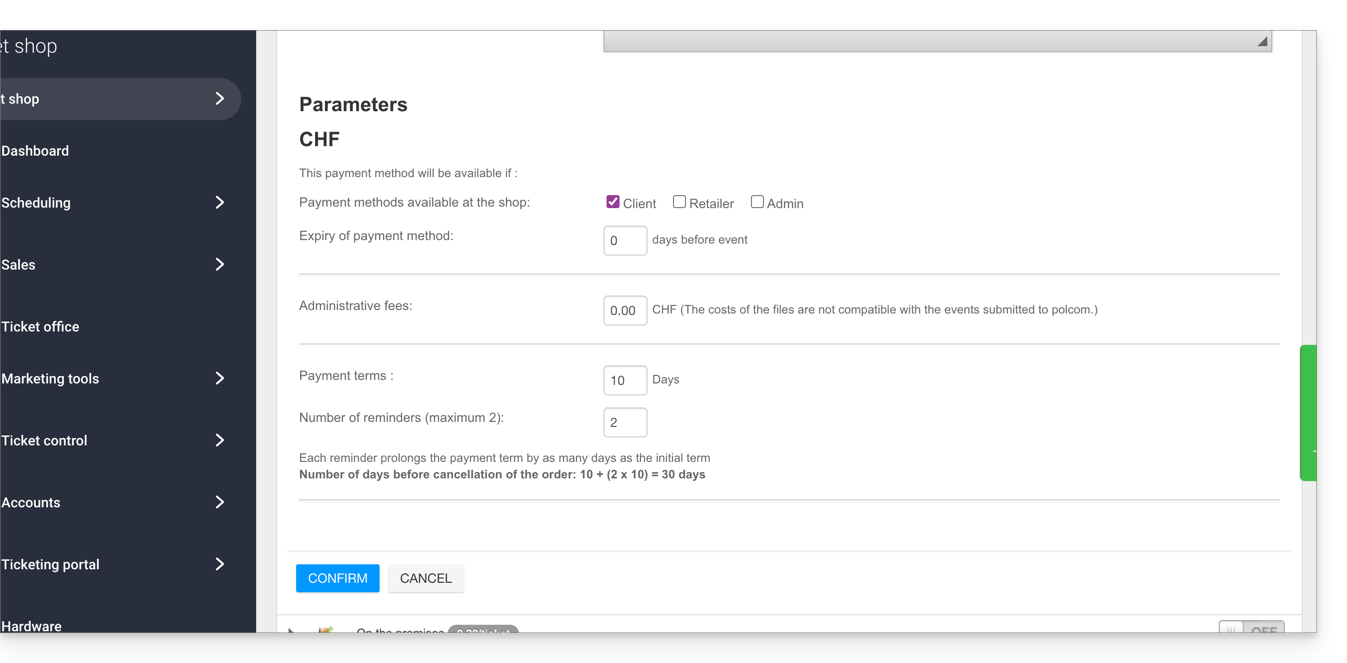
The following settings allow you to manage the use of this payment method:
- The ability to choose the availability of this payment method:
- customer: for online orders by visitors
- reseller and administrator: for the web and mobile interface
- The ability to define an expiration date for using this payment method when placing an order.
- It will always be possible to pay an invoice generated before the expiration date, but it will no longer be possible to choose this payment method when placing orders during the period indicated in this field.
- Add processing fees to cover the management costs of this payment method.
Manage payment due dates for Invoices
To ensure that slots are not blocked indefinitely by this payment method, you can define a payment deadline. Please refer to this other guide if you are looking for information on the number of days before each reminder and the number of reminders.
Validating an order awaiting payment
There are several ways to validate a payment method:
From the Infomaniak Manager
- Click here to access the management of your product in the Infomaniak Manager (need help?).
- Click directly on the name assigned to the ticketing system for the event.
- Click on Sales in the left-hand menu.
- Click on Orders in the left-hand menu.
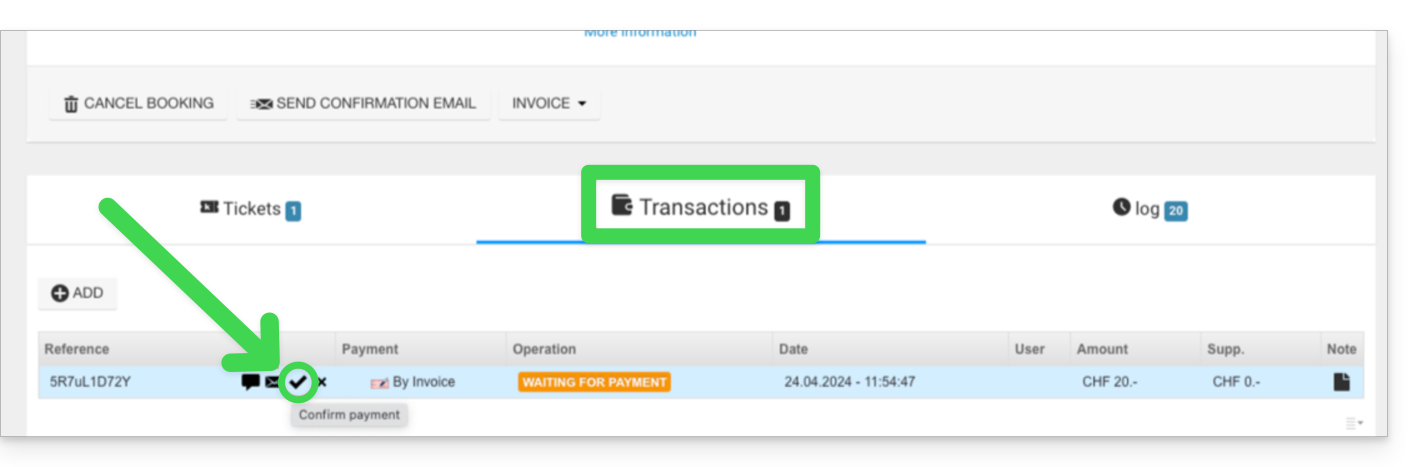
- Click on an order awaiting payment.
- Click on the Transactions tab, hover over the unpaid invoice payment, and click on the Validate icon:
Via the Web Control Panel
- Log in to the Web Control Panel.
- Start a search for pending payment orders by:
- Order number
- Customer name
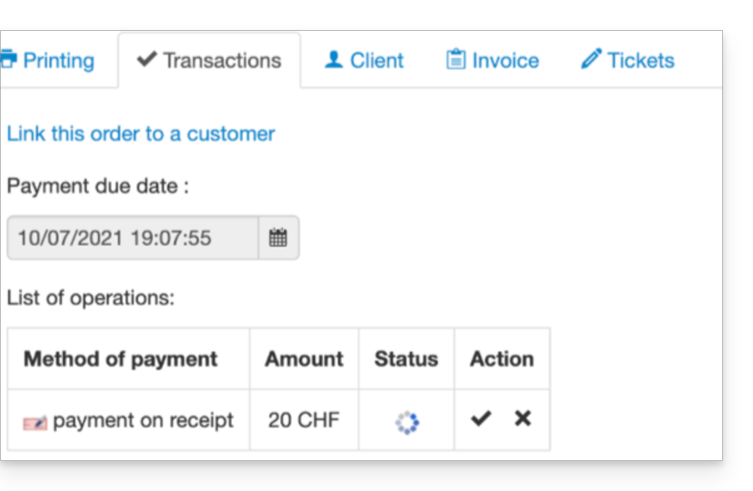
- Click on the pending payment order.
- Go to the Transaction tab and click on the Validate icon:
From the Mobile App
- Log in to the Mobile Portal.
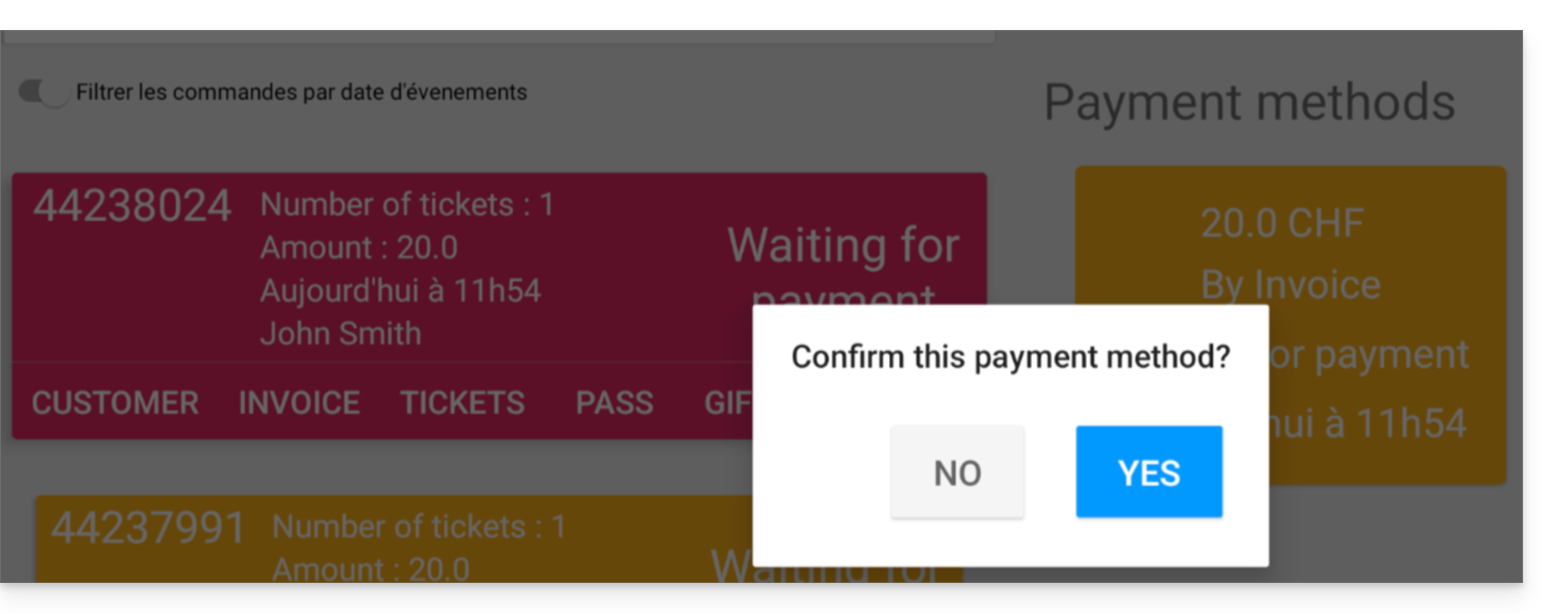
- Start a search for pending payment orders.
- From the list of payment methods, choose the one to validate and select Confirm:
Link to this FAQ: https://faq.infomaniak.com/2609
Has this FAQ been helpful?
This guide explains how to set up the Exchange payment method (as part of the Infomaniak ticketing system).
Introduction
- This payment method will allow your customers to exchange the tickets they have for new tickets.
Activate the payment method in the Ticketing system
To do this:
- Click here to access the management interface for your product in the Infomaniak Manager (need help?).
- Click directly on the name assigned to the ticketing system for the event.
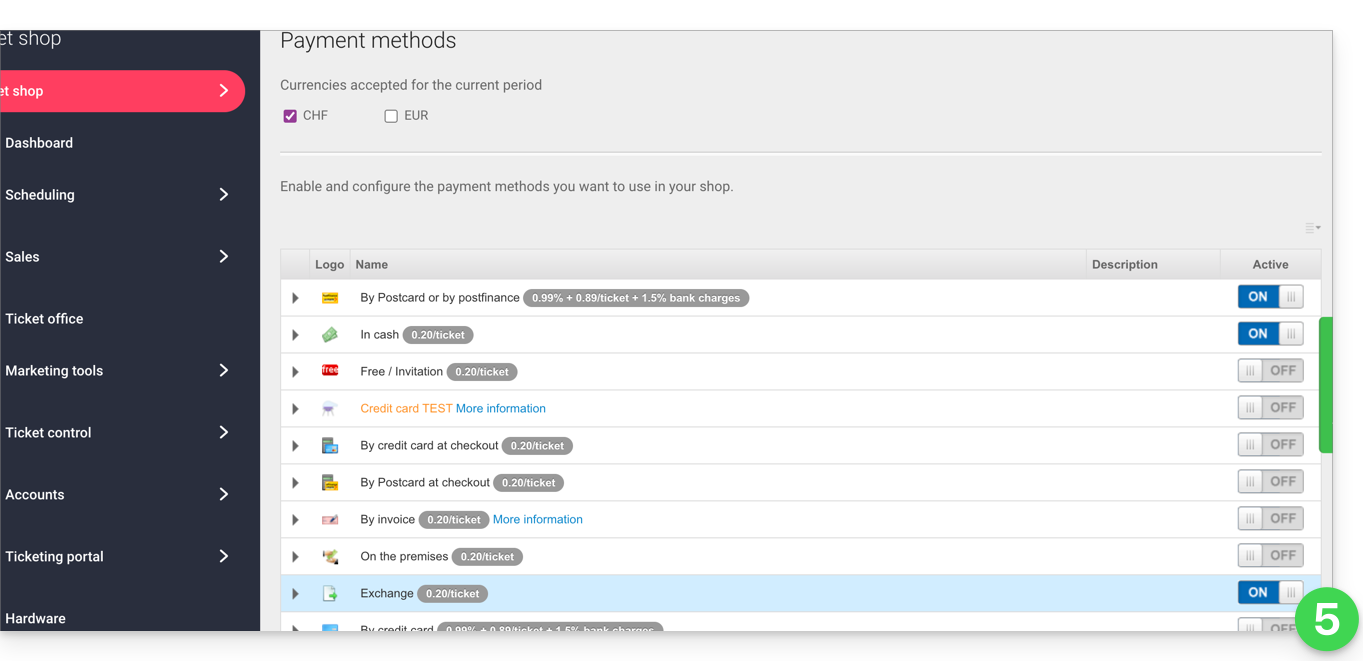
- Click on Sales in the left-hand menu.
- Click on Payment methods in the left-hand menu:
- Switch the toggle switch to ON to the right of the Exchange item:
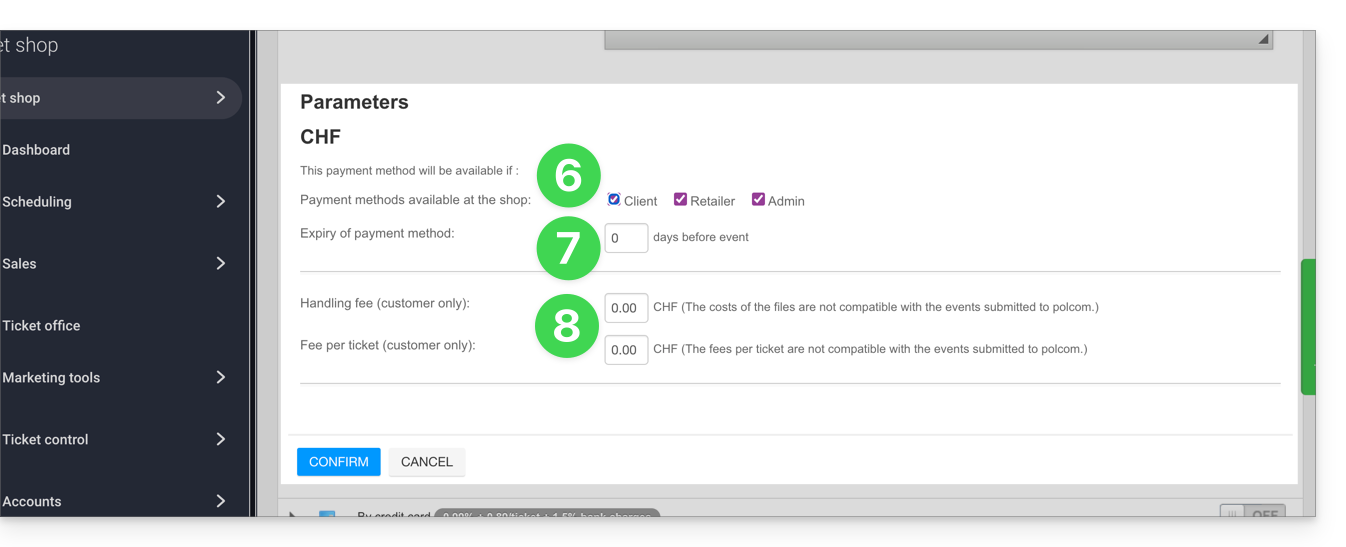
- Click on the arrow to the left of the Exchange mode and then check the client box to enable this option for clients on the online ticketing system; they will then be able to make exchanges directly from your online ticketing system.
- Define the number of days before the event from which the client will no longer be able to exchange a ticket.
- This value prevents customers from changing tickets on the online ticketing system too close to the event date.
- Then, specify the fees associated with this operation, which the customer will have to pay to exchange the tickets:
Once the option is enabled, your customers will find the option to exchange tickets at the bottom of the ticketing page.
Link to this FAQ: https://faq.infomaniak.com/2633
Has this FAQ been helpful?
This guide explains how to connect the Zapier management tool to the Infomaniak ticketing system.
Introduction
- Depending on the volume of customers and/or events you manage, you may need to subscribe to a paid plan for Zapier and/or your CRM.
- Infomaniak cannot be held responsible for these costs.
- For further assistance, contact the support for the software you are using or a partner.
Establishing the connection with Infomaniak Ticketing
To do this:
- Click here to access Zapier.com.
- Create an account if necessary.
- Create a new Zap (need help?).
- When choosing the applications to use, type Infomaniak Ticketing in the search bar and select the option.
- When Zapier asks you to log in, use the credentials and password of the Infomaniak account linked to the Ticketing system.
Link to this FAQ: https://faq.infomaniak.com/2634
Has this FAQ been helpful?
This guide explains how to perform a ticket exchange as a visitor using the Infomaniak Ticketing tool.
Introduction
- If you have selected the wrong date or tickets, this process will allow you to exchange them and order new tickets.
Enter the details of the tickets to be exchanged
To do this:
- Go to the organizer's ticketing platform, as you did when ordering the tickets.
- Scroll to the bottom of the page and click the Exchange tickets button:

- In the new window, enter the email address used when making the reservation, and your ticket number(s), then click Confirm:

- Click on Purchase more tickets or Order tickets to proceed to the next step.
Order new tickets
To do this:
- Proceed as with a normal ticket order, selecting the new event and date, as well as the number of tickets to order.
- When validating the shopping cart, the exchanged tickets will be displayed as credits at the top of the page:

- Complete the order, and if necessary, pay the remaining balance of the shopping cart.
You cannot have a positive balance at this stage: the new order must have an amount equal to or greater than the total value of the tickets exchanged. For refunds, you must contact the event organizer only.
Link to this FAQ: https://faq.infomaniak.com/2635
Has this FAQ been helpful?
This guide explains how to install an IDP PVC badge printer to print passes (as part of the Infomaniak ticketing system).
Introduction
- Badge printers are designed to work with both the mobile point-of-sale system on a tablet and the online ticketing system on your computer.
- They can be connected to your local network or directly to a computer via a USB cable.
- These printers are designed to print only on PVC cards in CR80 format; any other use or printing format should be avoided.
Setup and connection
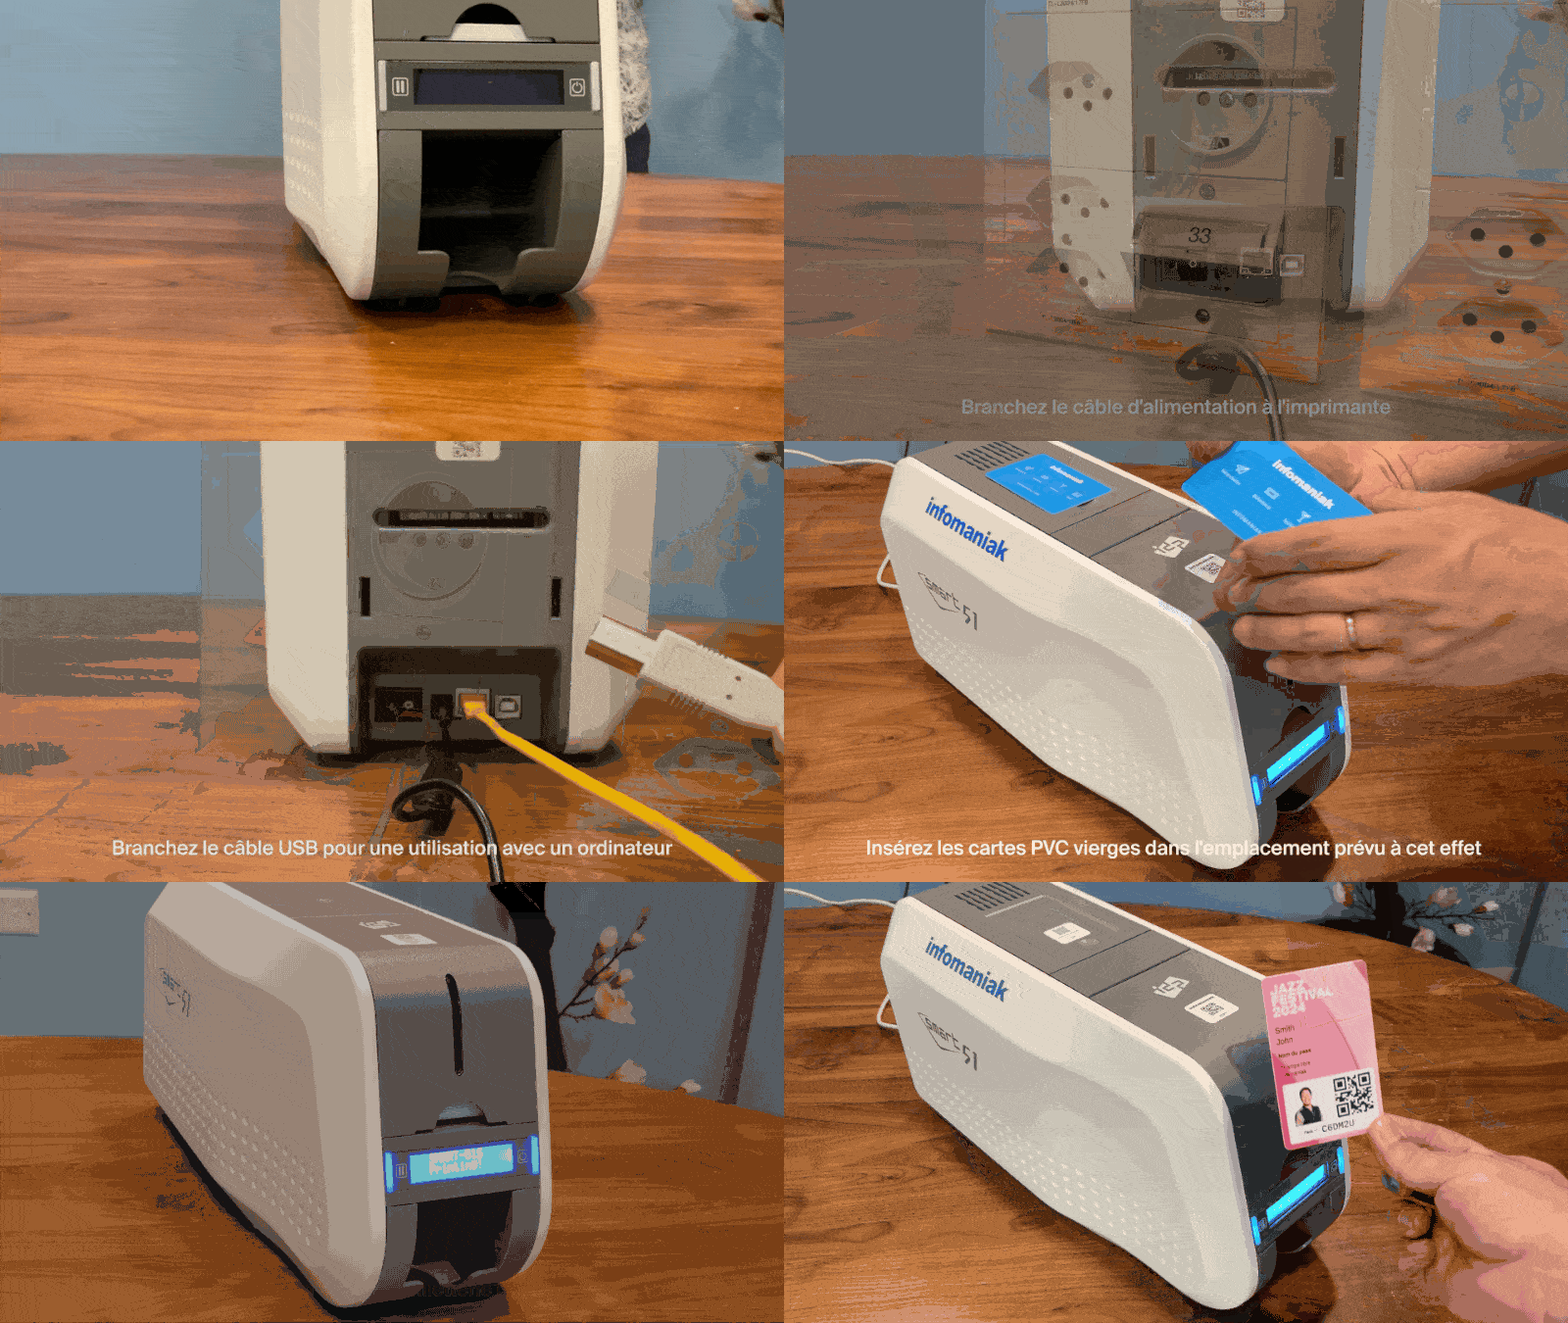
- Plug the power cable into the back of the printer and connect it to a power outlet.
- Connect the printer according to the desired usage mode:
- Network usage: plug the network cable (RJ45) into the printer and connect it to your network port.
- Computer usage (USB): plug the USB cable into the back of the printer and connect the other end to your computer.
- Open the loading tray and insert the blank PVC cards into the designated slot.
- Start a test print from the ticketing system or mobile terminal to verify proper operation.
User guides and maintenance
- Printing a pass from a computer
- Printing passes from the tablet (mobile kiosk)
- How to replace the printer ribbon
Learn more
Link to this FAQ: https://faq.infomaniak.com/2644
Has this FAQ been helpful?
This guide explains how to set up and use your sales pack with the Zebra printer for event and cinema tickets (as part of the Infomaniak ticketing system).
Installation and setup of the sales pack
Connecting the devices
- Plug in the power adapter for the Samsung TabS tablet.
- Plug in the Zebra printer's power supply.
- Plug in the Wi-Fi or 4G terminal and ensure it is connected to the other devices.
- Make sure the tablet is connected to the Infomaniak network.
Setting up the printer
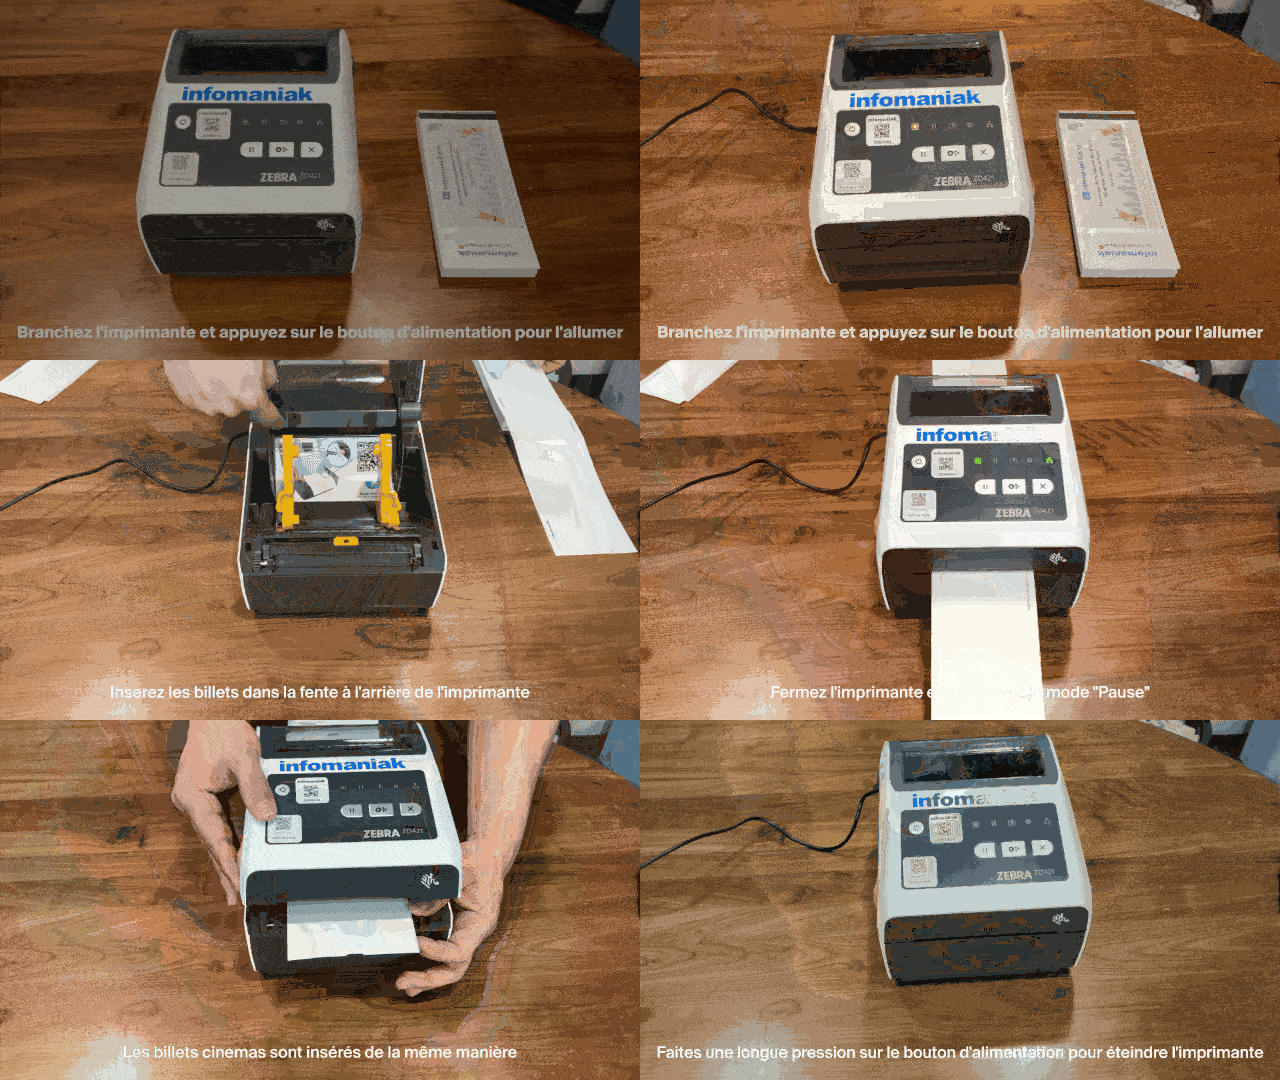
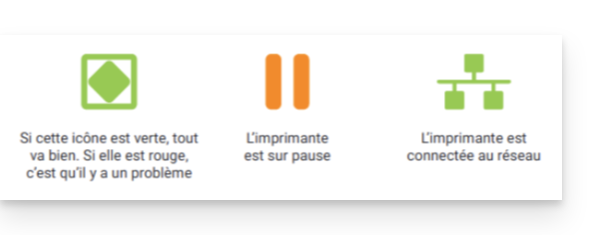
- Connect the printer and press the power button to turn it on, then wait until both indicator lights turn green.
- Open the printer using the opening latches located on the sides:


Insert the tickets into the slot at the back of the printer:
- Event tickets: make sure the detachable tab is positioned towards the back of the printer. Take the Infomaniak logos into account: the first one comes out on the left, the second on the right (the ticket should be facing the right way when it comes out).
- Movie tickets: they are inserted in the same way.


- Close the printer and then press the "Pause" button to disable pause mode. The printer is ready to use:
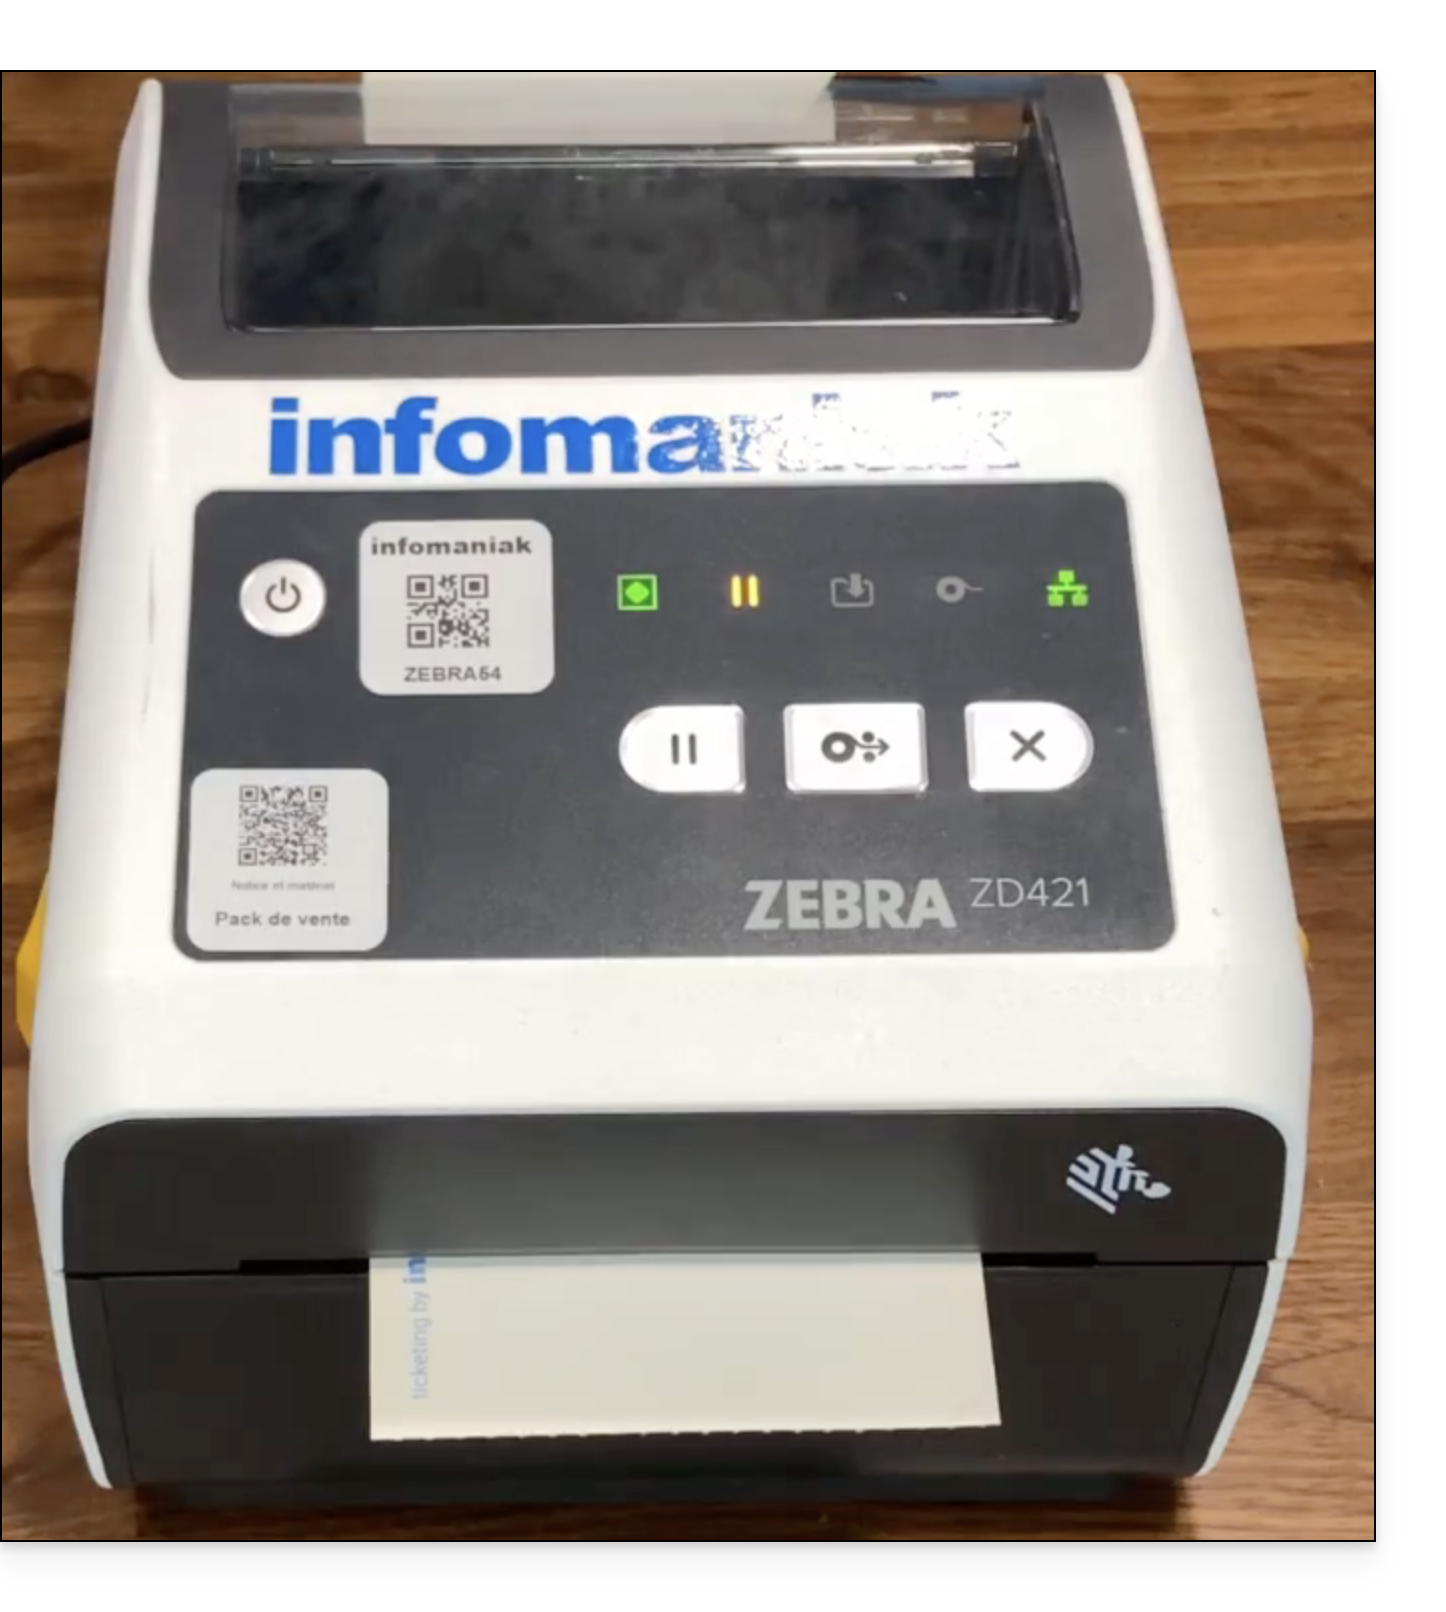
- To turn off the printer, press and hold the power button.
Printing tickets with the printer
Format Verification
The printers are already configured for the ordered ticket format. If necessary, you can check the configuration by opening the menu in the upper left corner and going to Options. The Cinema ticket format option should only be enabled if the tickets will use this format (see below regarding calibration when changing the format).
Printing a ticket
To start printing, log in to the ticketing account from the tablet using the Infomaniak account username and password. The tablet will automatically connect to the ticket counter interface.
- Perform a “test” print or use a command in the “Command” menu.
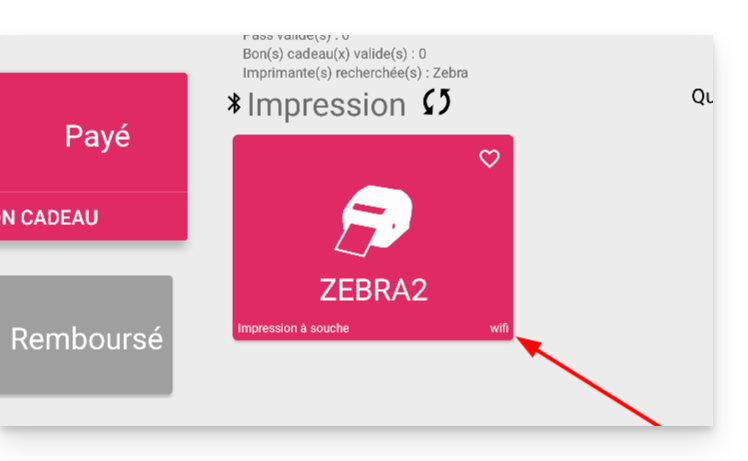
- The printer should appear (ZEBRAXX) on the right side of the tablet.
- Tap the printer icon to start printing:
Configure the correct ticket on the printer
This section only applies to users who ordered tickets before July 2024…
Since July 2024, Infomaniak has been providing tickets with new separators in the form of a notch. If you still have older types of tickets, please watch the animation below to configure your tickets correctly:
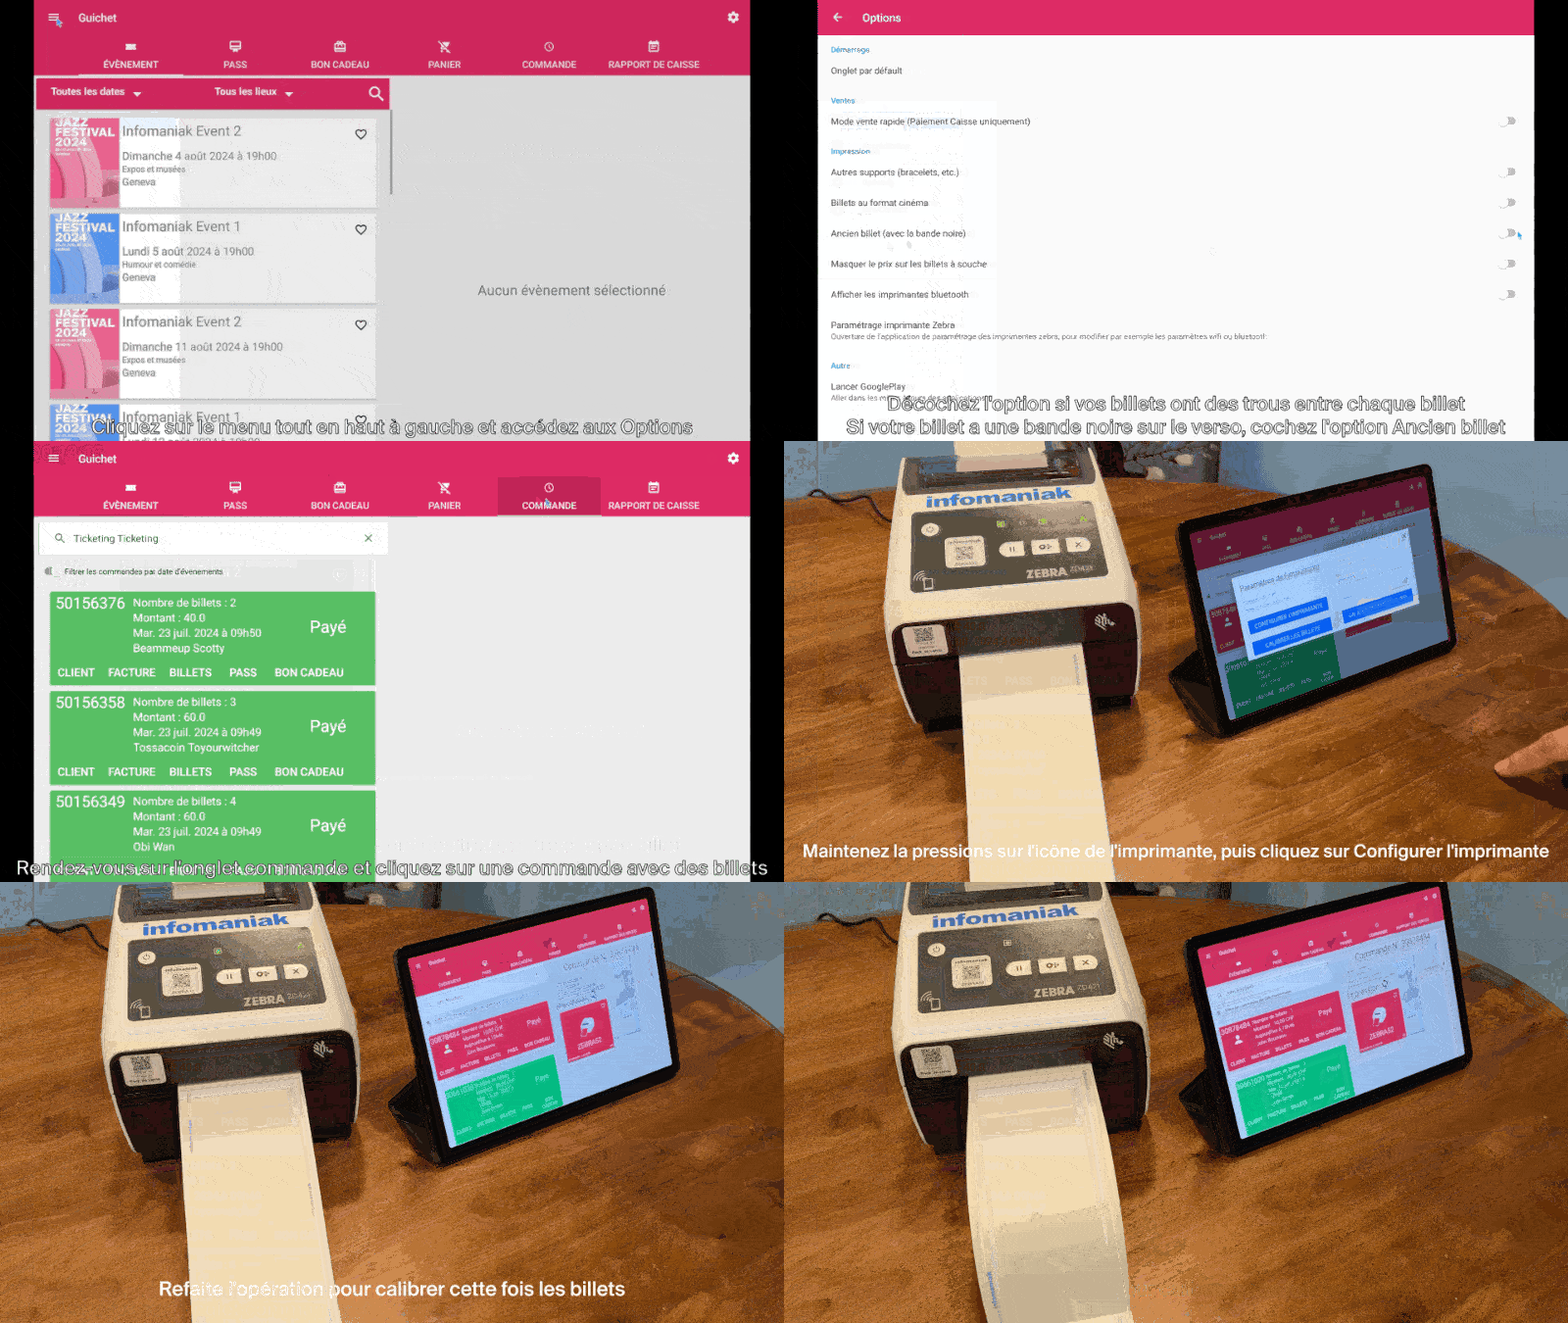
Learn more
Link to this FAQ: https://faq.infomaniak.com/2645
Has this FAQ been helpful?