Base de conhecimento
1000 perguntas frequentes, 500 tutoriais e vídeos explicativos. Aqui, você encontra apenas soluções!
Este guia detalha as possíveis interações entre o Site Creator da Infomaniak e as redes sociais.
Especifique as URLs dos seus diferentes perfis de redes sociais
Pré-requisitos
- Aceder ao Site Creator:
- Clique aqui para aceder à gestão do seu produto no Manager Infomaniak (precisa de ajuda?).
- Clique diretamente no nome atribuído ao Site Creator em questão.
- Clique no botão Editar o meu site para iniciar o editor:
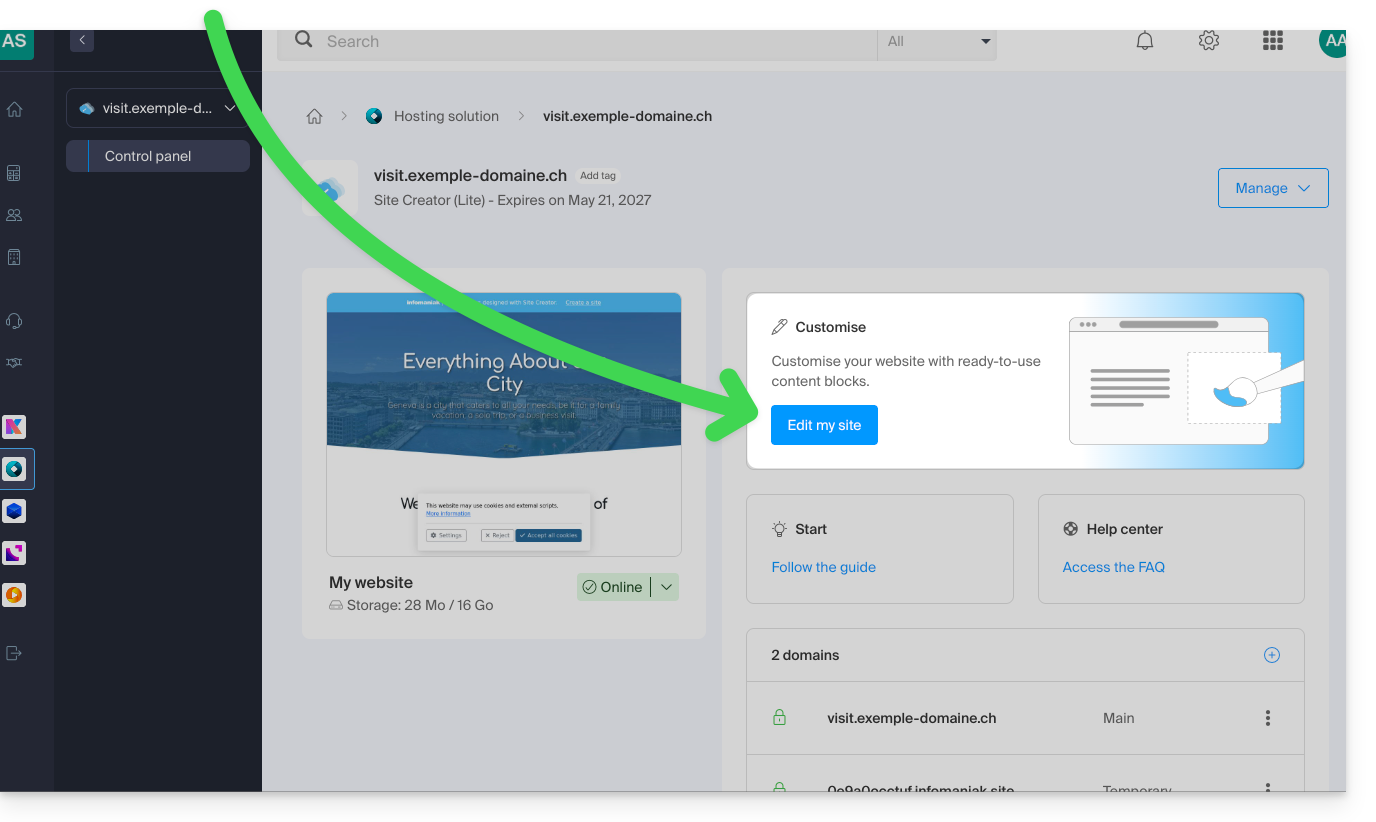
Para permitir que os visitantes cliquem nos links das suas redes sociais:
- Clique no botão Configurações no menu lateral esquerdo.
- Clique em Redes sociais.
- Indique os endereços dos seus diferentes perfis de redes sociais (TikTok, Instagram, etc.), incluindo um número de telefone e um endereço de e-mail, se desejar.
- Salve as alterações na parte inferior da página:
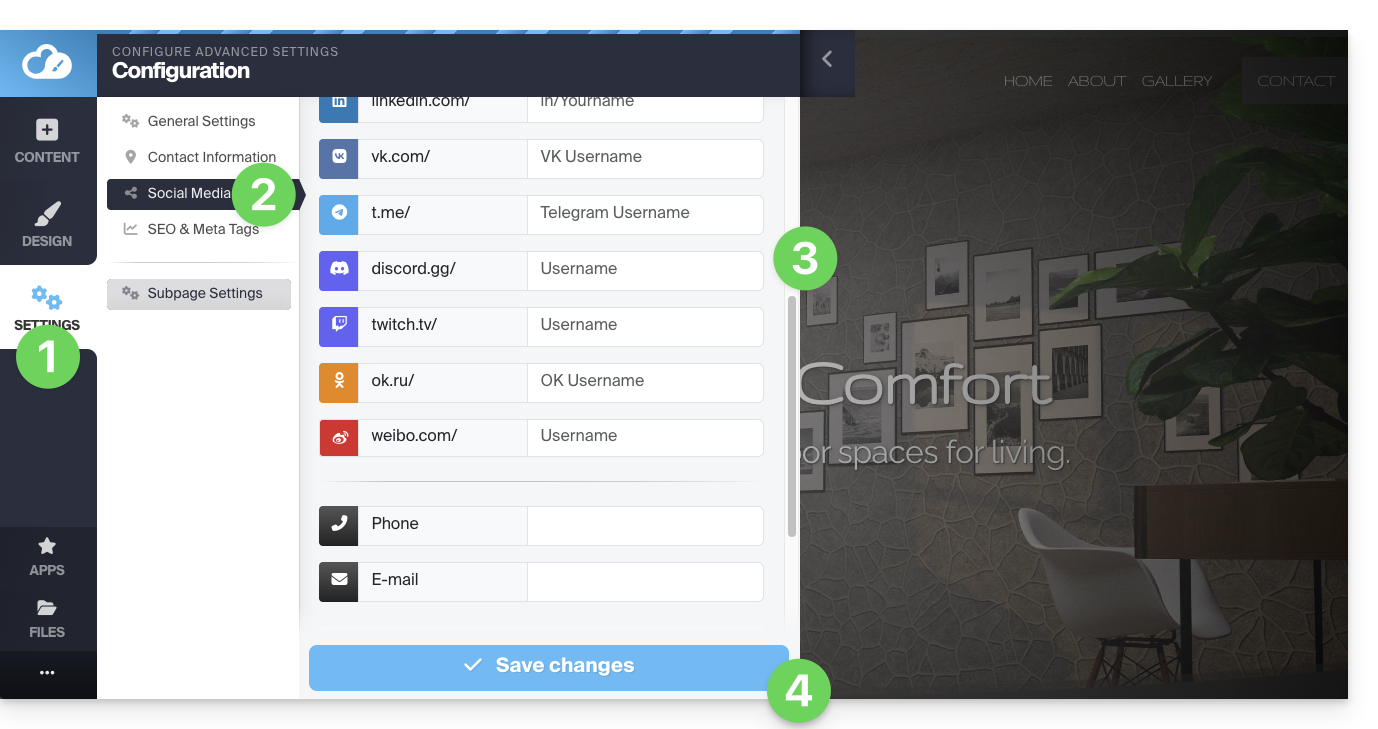
Adicionar os ícones dos seus perfis
Adicione ícones das suas redes sociais no rodapé ou no cabeçalho do seu site:
- Clique no botão Configurações no menu lateral esquerdo.
- Clique em Redes sociais.
Na parte inferior, você pode especificar onde deseja que os ícones correspondentes aos perfis que você preencheu anteriormente sejam exibidos: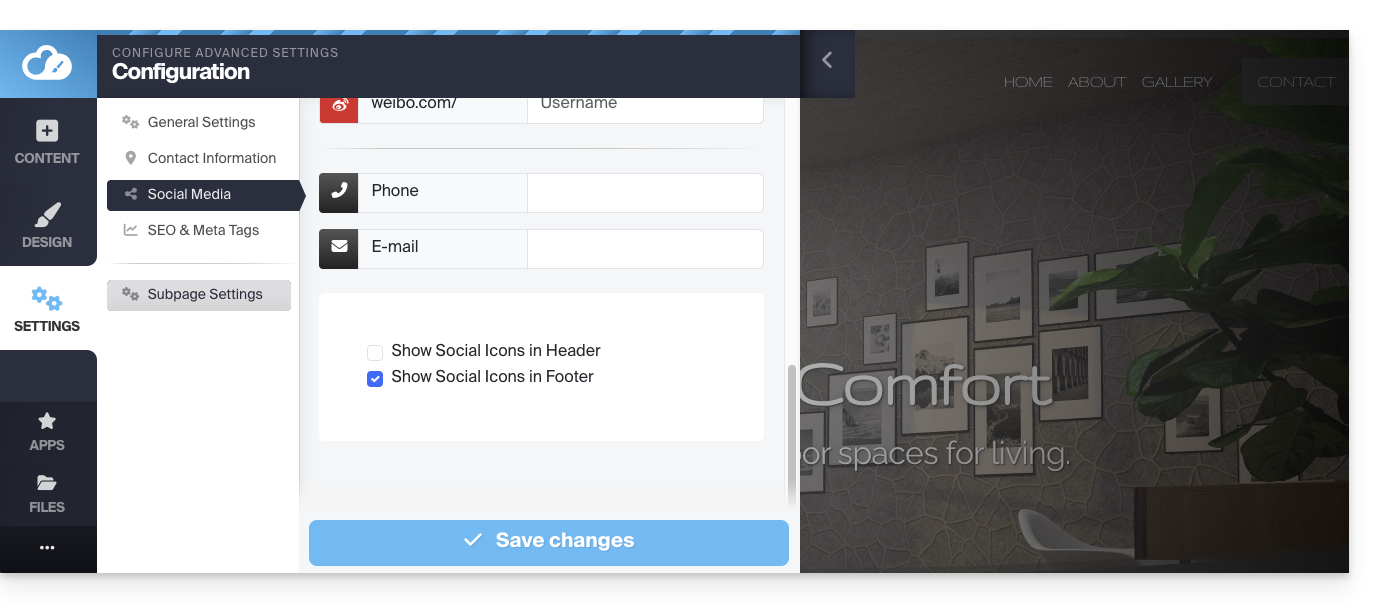
Salve as alterações na parte inferior da página.
Adicionar um bloco de compartilhamento social
Entre os blocos que pode adicionar a uma página, um dos primeiros oferece uma linha de botões que permite aos visitantes subscreverem facilmente as suas diferentes redes sociais: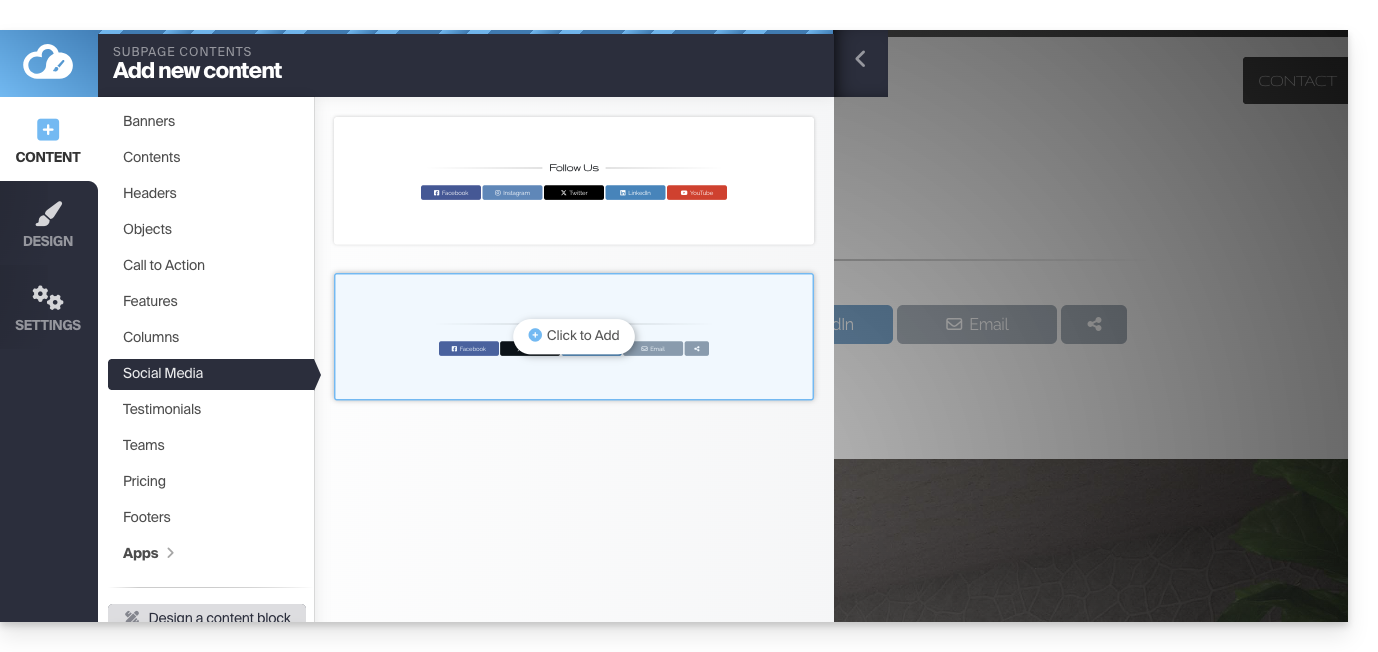
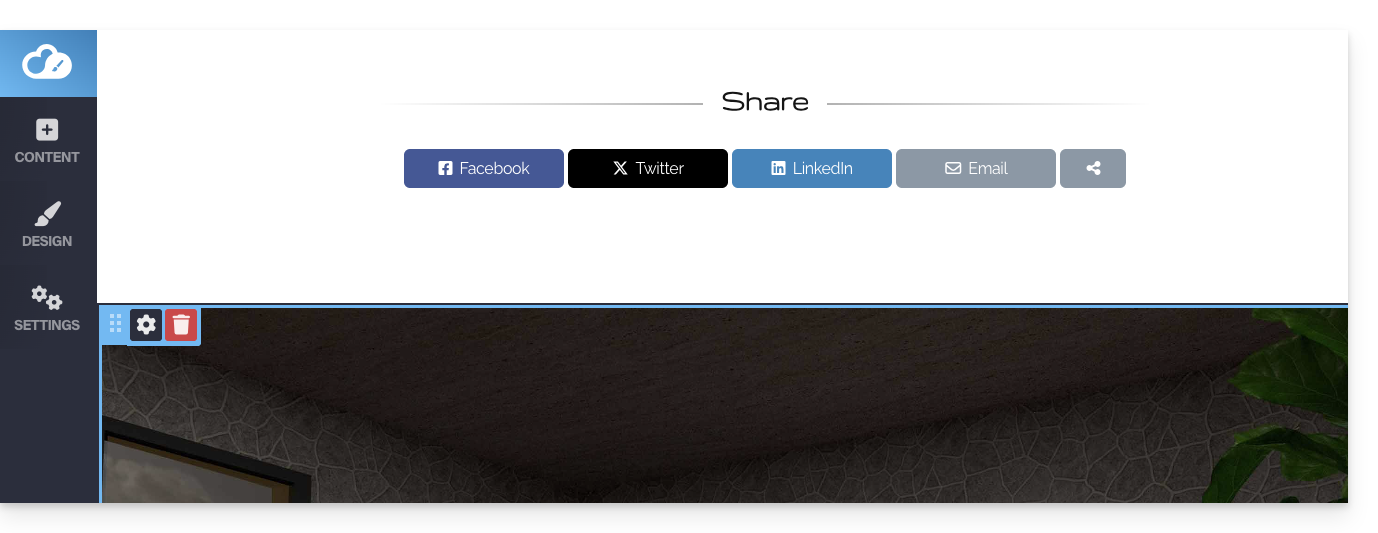
Um segundo tipo de bloco oferece uma linha de botões que permite aos visitantes partilhar a página nas principais redes sociais:
Obter o código QR do site
Para obter o código QR do seu site:
- Clique no botão Configurações no menu lateral esquerdo.
- Clique no ícone de código QR no topo:
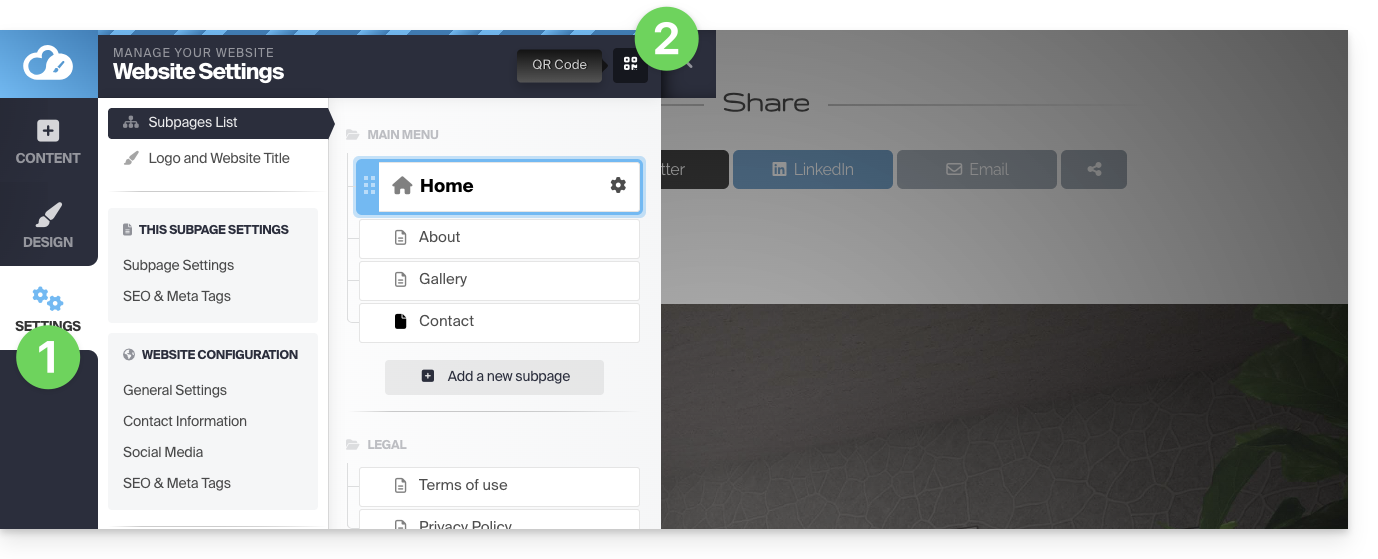
Você poderá baixar o código QR correspondente ao endereço da página inicial do seu site. Assim, um usuário que escanear seu código QR poderá acessar facilmente o seu site.
Alterar a imagem OG para compartilhamento em redes sociais
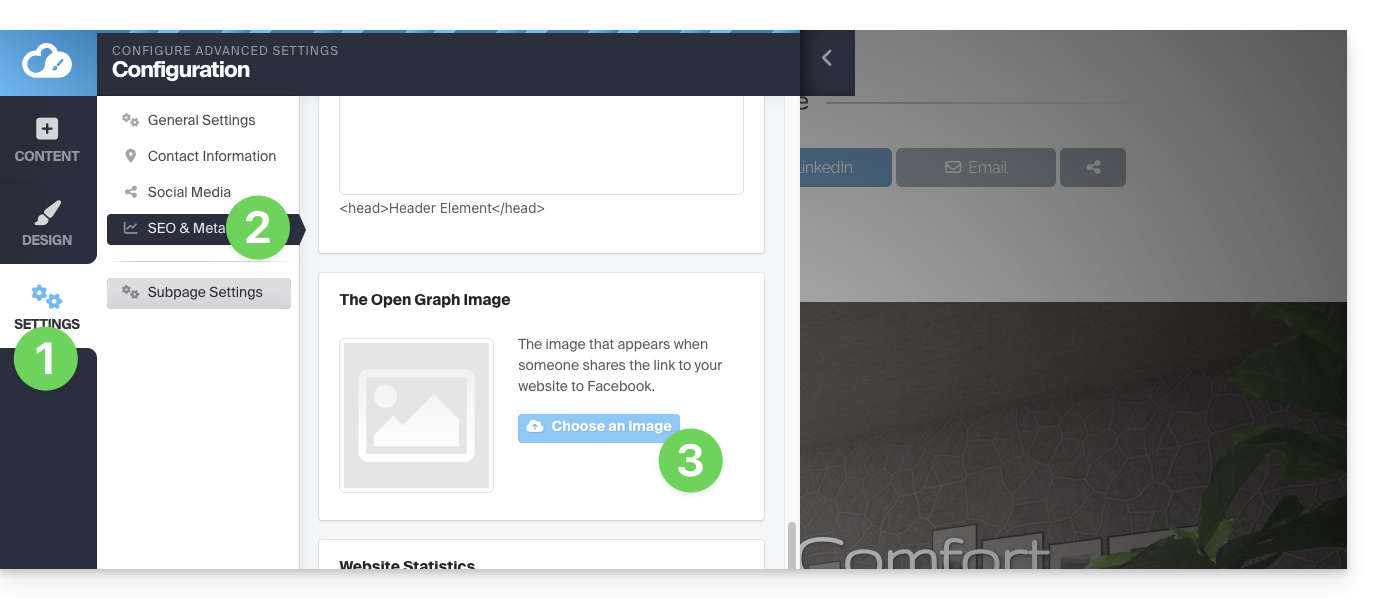
Ao partilhar um link para o seu site na rede social, uma miniatura (Og:image para imagem OpenGraph) é frequentemente associada automaticamente:
- Clique no botão Definições no menu lateral esquerdo
- Clique em SEO e metadados em Configurações gerais.
- Role para baixo até Open Graph e escolha a imagem:
Link para esta FAQ: https://faq.infomaniak.com/2712
Esta seção de perguntas frequentes foi útil?
Este guia explica como alterar o idioma da interface do Site Creator Infomaniak e como gerenciar as traduções das suas páginas.
Pré-requisitos
- Aceder ao Site Creator:
- Clique aqui para aceder à gestão do seu produto no Manager Infomaniak (precisa de ajuda?).
- Clique diretamente no nome atribuído ao Site Creator em questão.
- Clique no botão Editar o meu site para iniciar o editor:
Alterar o idioma da interface
Para alterar o idioma do Site Creator:
- Clique no botão Configurações no menu lateral esquerdo.
- Clique em Configurações gerais.
- Altere o idioma do Site Creator:
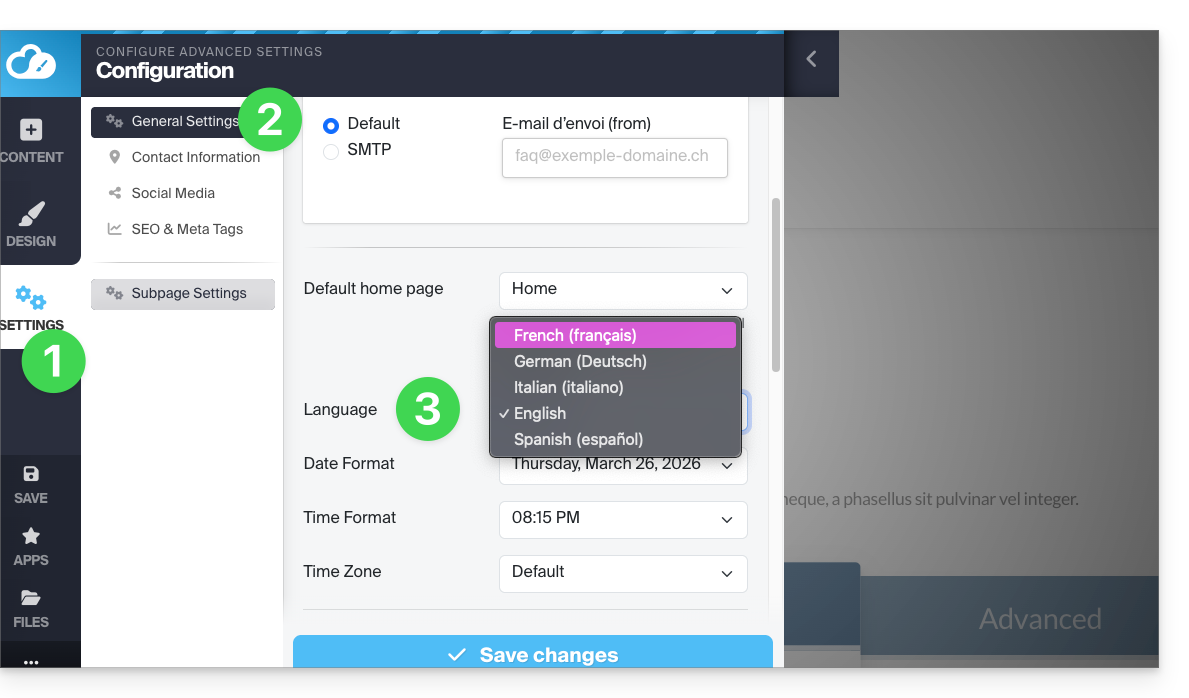
Um menu suspenso permite alterar o idioma da interface do editor Site Creator (isso também traduzirá alguns elementos acessíveis ao visitante, como o botão Pesquisar da barra de pesquisa, etc.); as opções são alemão, francês, espanhol, italiano e inglês.
Não se esqueça de salvar suas alterações na parte inferior da página.
Ofereça seu site em vários idiomas
Traduções automáticas e em tempo real de todas as suas páginas
Para ativar a tradução automática do seu site:
- Clique no botão Aplicações no menu lateral esquerdo.
- Clique no módulo Traduções:
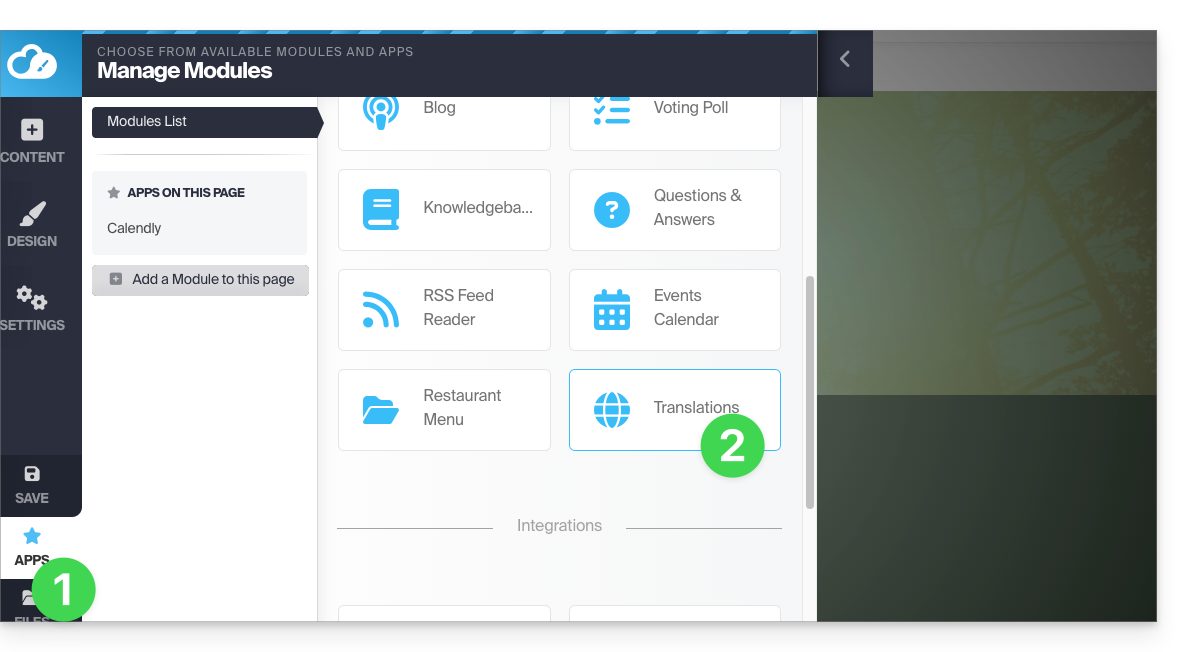
Pode adicionar ou remover os idiomas nos quais o seu site será apresentado ao visitante: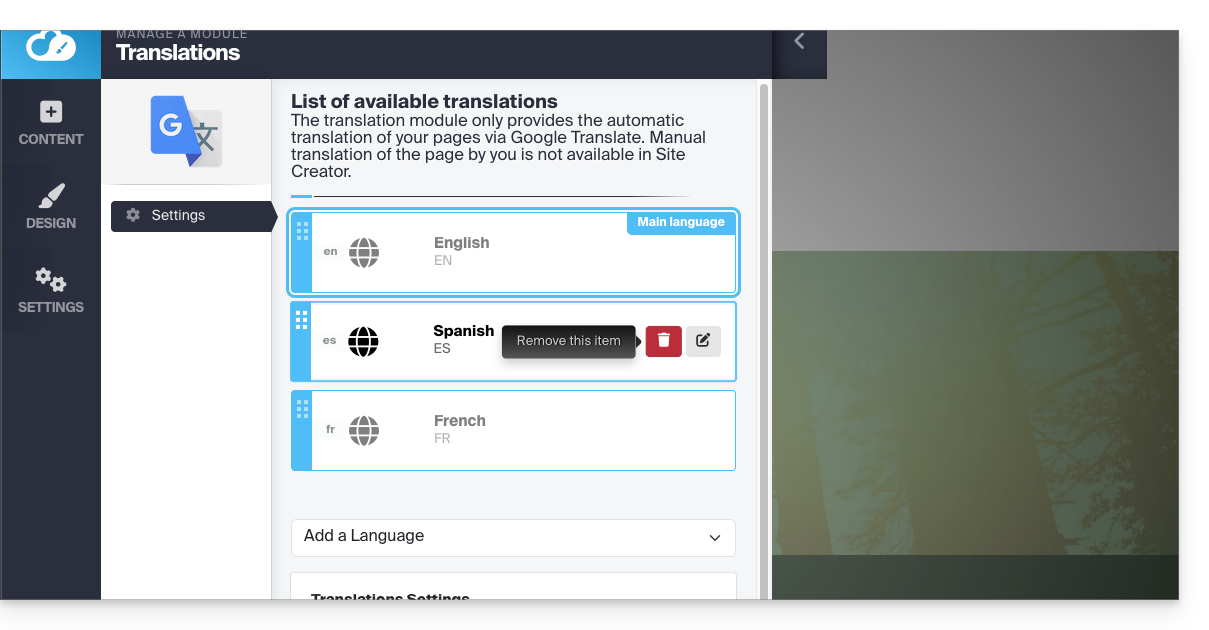
Com o mouse, mova os idiomas para a ordem desejada, o que afetará o menu suspenso de seleção de idioma (veja abaixo).
Este menu pode ser ativado na parte inferior da página de configuração do módulo de tradução: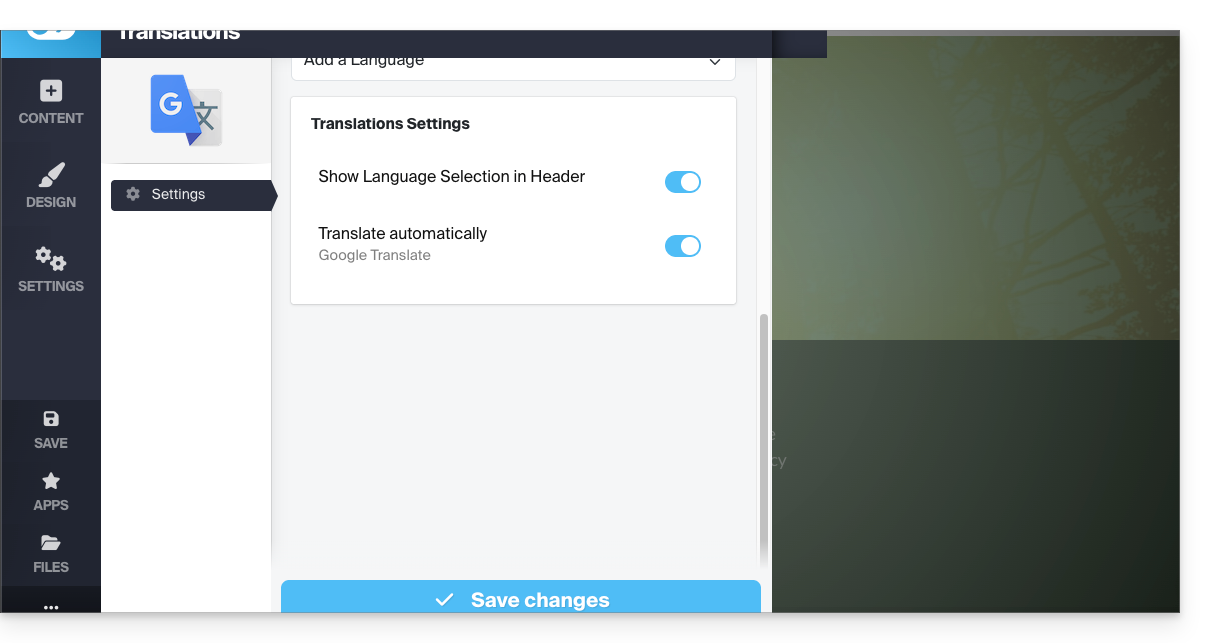
Portanto, depois de determinar e organizar os idiomas na parte superior (não se esqueça de salvar suas alterações na parte inferior da página), ative o menu para oferecer ao visitante a opção de escolher o idioma por meio de um menu suspenso na parte superior da página: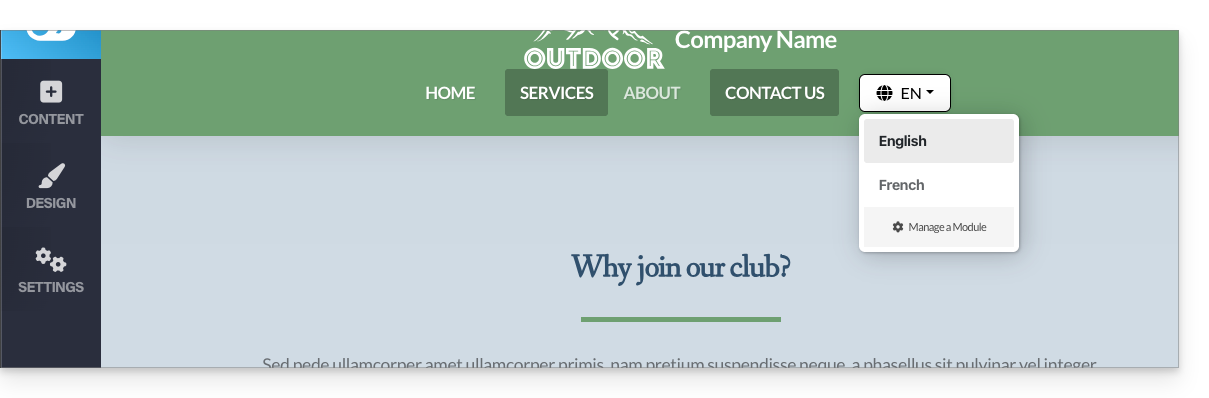
Página traduzida manualmente
É possível oferecer uma página (única, por idioma) preparada manualmente, para a qual o visitante será redirecionado quando selecionar um idioma diferente do idioma principal através do menu suspenso de seleção de idiomas (veja acima).
Para isso, é preciso editar o idioma desejado clicando no ícone lápis ✎ e, em seguida, clicando no segundo botão de rádio ao lado do campo que permite especificar a URL da sua página traduzida: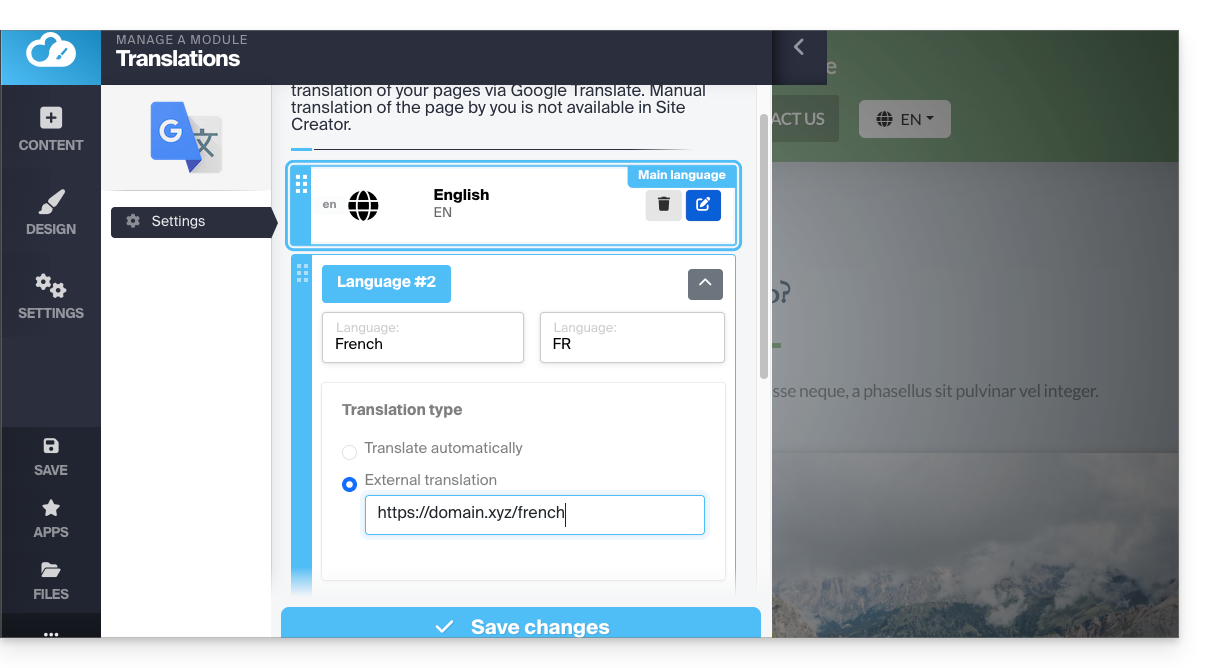
Portanto, é possível redigir antecipadamente uma página por idioma. Para finalizar, o ideal é ocultar este tipo de página do seu menu principal: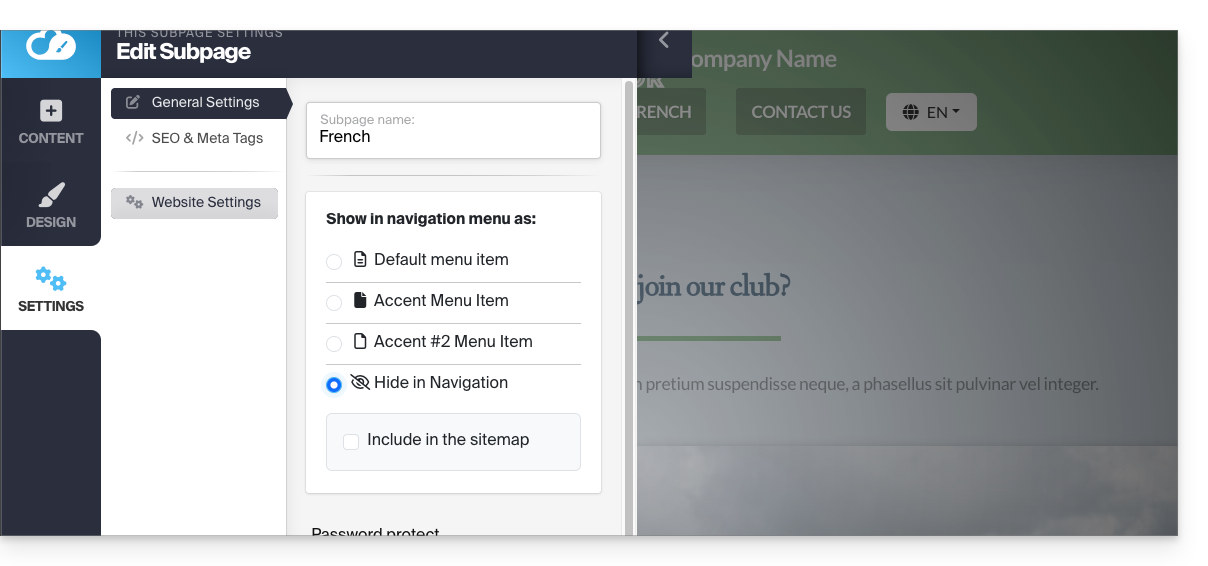
Link para esta FAQ: https://faq.infomaniak.com/2713
Esta seção de perguntas frequentes foi útil?
Este guia destina-se aos utilizadores da ferramenta Site Creator da Infomaniak que desejam permitir que os visitantes efetuem uma pesquisa de texto no conteúdo do site.
Pré-requisitos
- Aceder ao Site Creator:
- Clique aqui para aceder à gestão do seu produto no Manager Infomaniak (precisa de ajuda?).
- Clique diretamente no nome atribuído ao Site Creator em questão.
- Clique no botão Editar o meu site para iniciar o editor:
Adicionar uma barra de pesquisa ao Site Creator
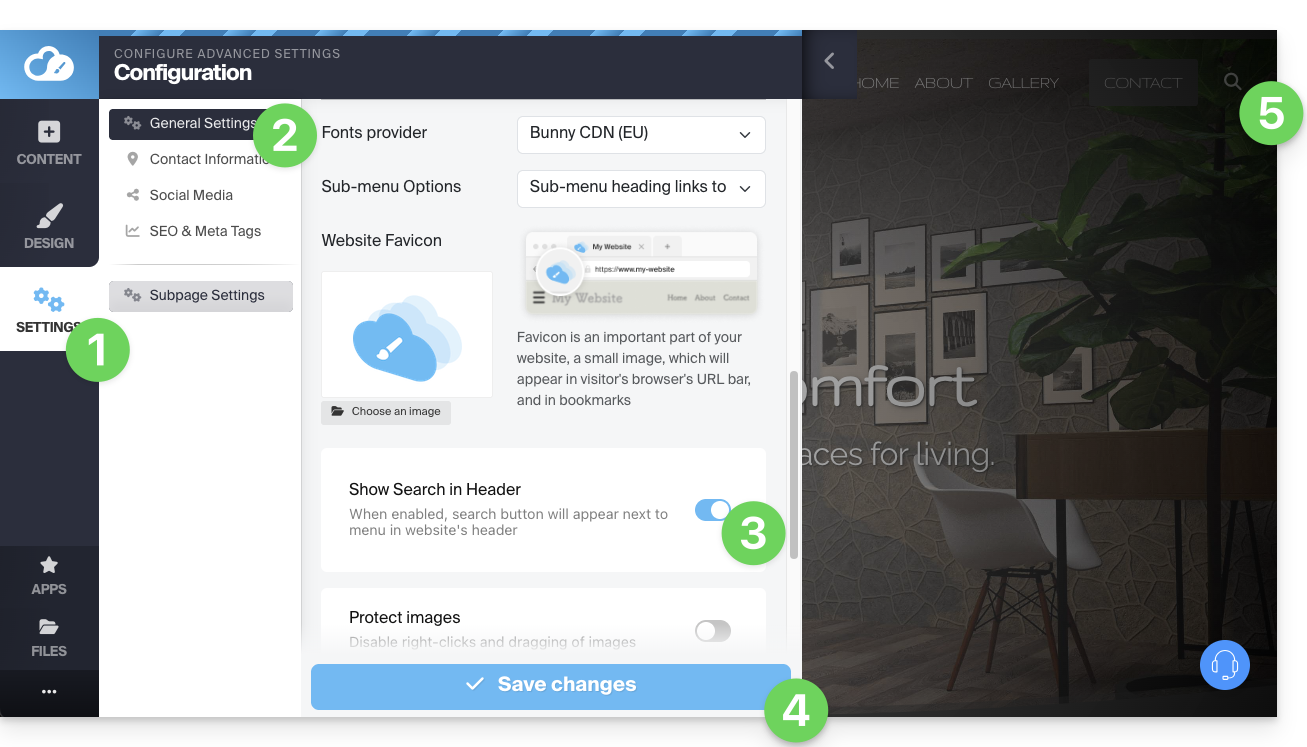
Para permitir que os visitantes pesquisem conteúdo no seu site criado com o Site Creator, é necessário ativar a barra de pesquisa:
- Clique no botão Configurações no menu lateral esquerdo.
- Clique em Configurações gerais.
- Ative a opção de pesquisa.
- Salve as alterações na parte inferior da página.
- Visualize a nova localização da pesquisa na sua página inicial:
- Um ícone de lupa será adicionado no cabeçalho do seu site e a barra de pesquisa aparecerá ao clicar nele:
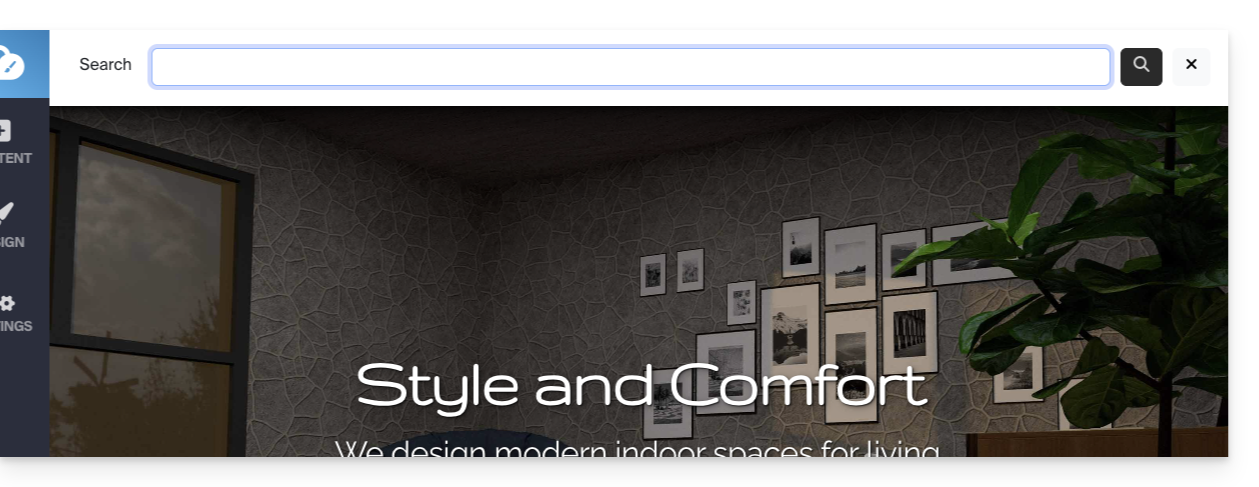
- Um ícone de lupa será adicionado no cabeçalho do seu site e a barra de pesquisa aparecerá ao clicar nele:
Link para esta FAQ: https://faq.infomaniak.com/2714
Esta seção de perguntas frequentes foi útil?
Este guia explica como personalizar o código fonte, modificar o CSS ou alterar a parte HEAD ou BODY de um site criado com o Site Creator da Infomaniak.
Pré-requisitos
- Aceder ao Site Creator:
- Clique aqui para aceder à gestão do seu produto no Manager Infomaniak (precisa de ajuda?).
- Clique diretamente no nome atribuído ao Site Creator em questão.
- Clique no botão Editar o meu site para iniciar o editor:
Adicionar código personalizado
Depois de acessar o Site Creator:
- Clique em Design no menu lateral esquerdo.
- Clique em Mais configurações.
- Clique em Código personalizado na parte inferior:
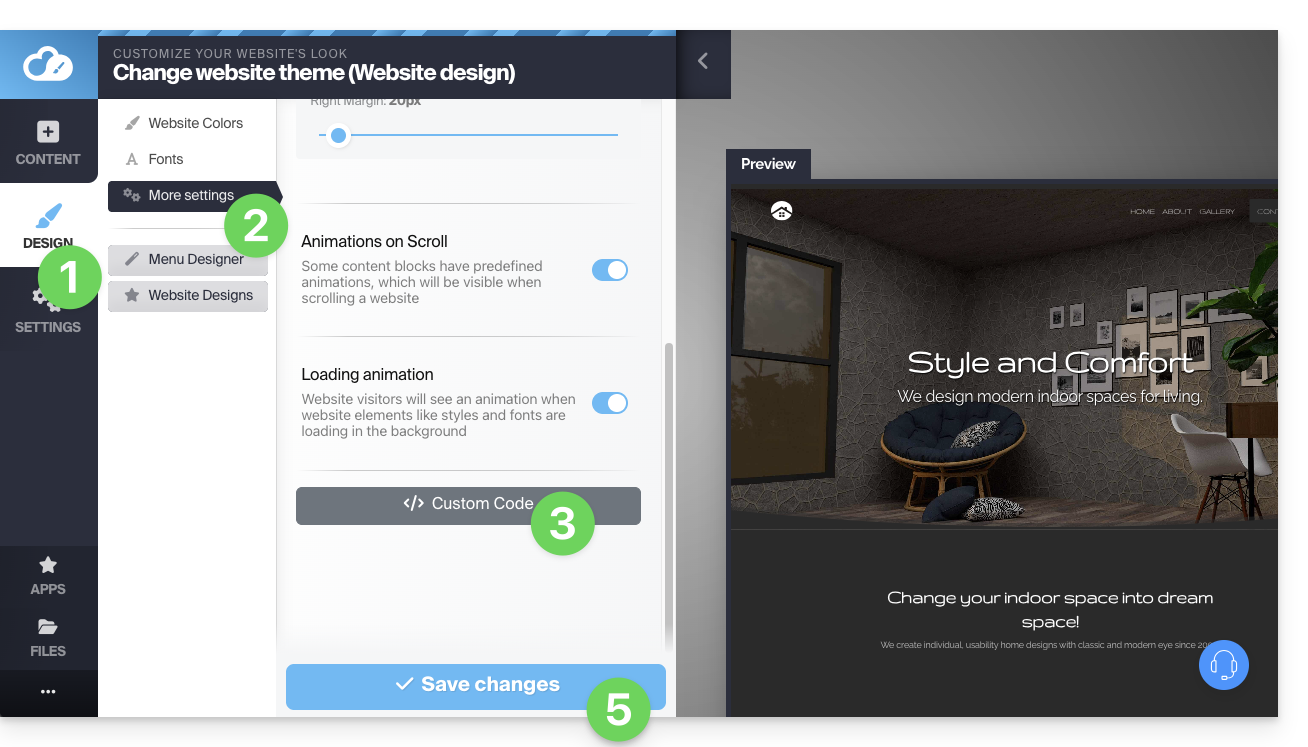
- Insira código HTML, JavaScript (com suas tags script) ou CSS personalizado (com suas tags style) – veja abaixo alguns exemplos.
- Salve as alterações na parte inferior da página.
Metadados em HEAD e BODY
Para adicionar código JavaScript ou qualquer outro código na parte HEAD ou BODY do código-fonte do seu site:
- Clique em Configurações no menu lateral esquerdo.
- Clique em SEO e Metadados na seção Configuração do site:
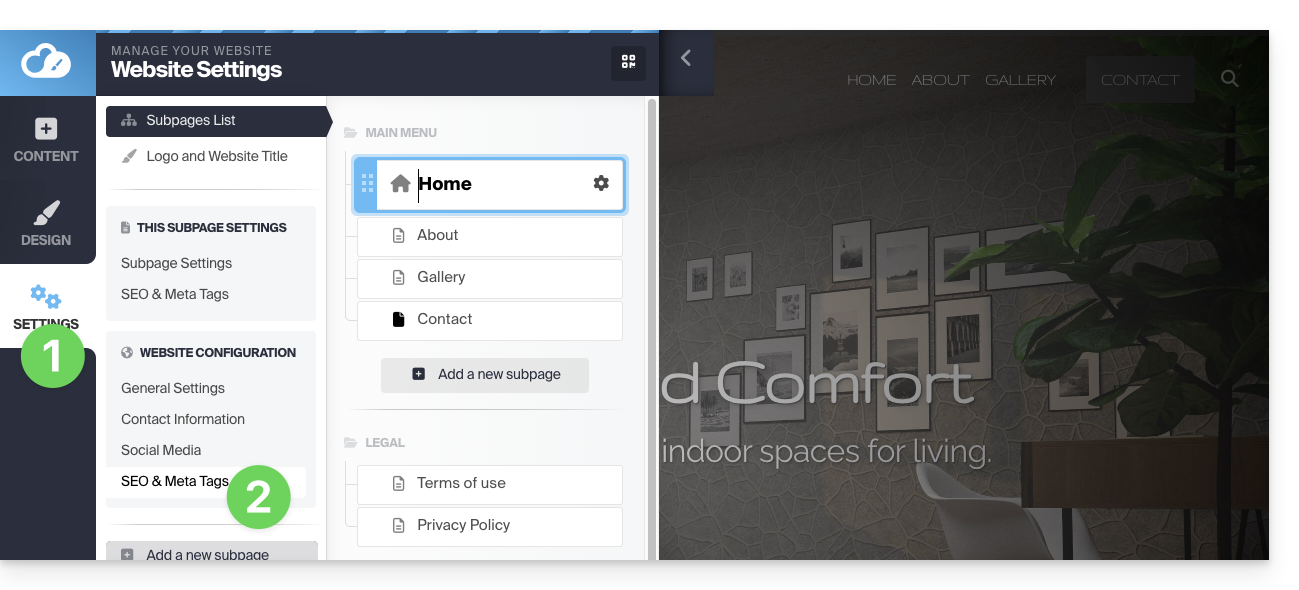
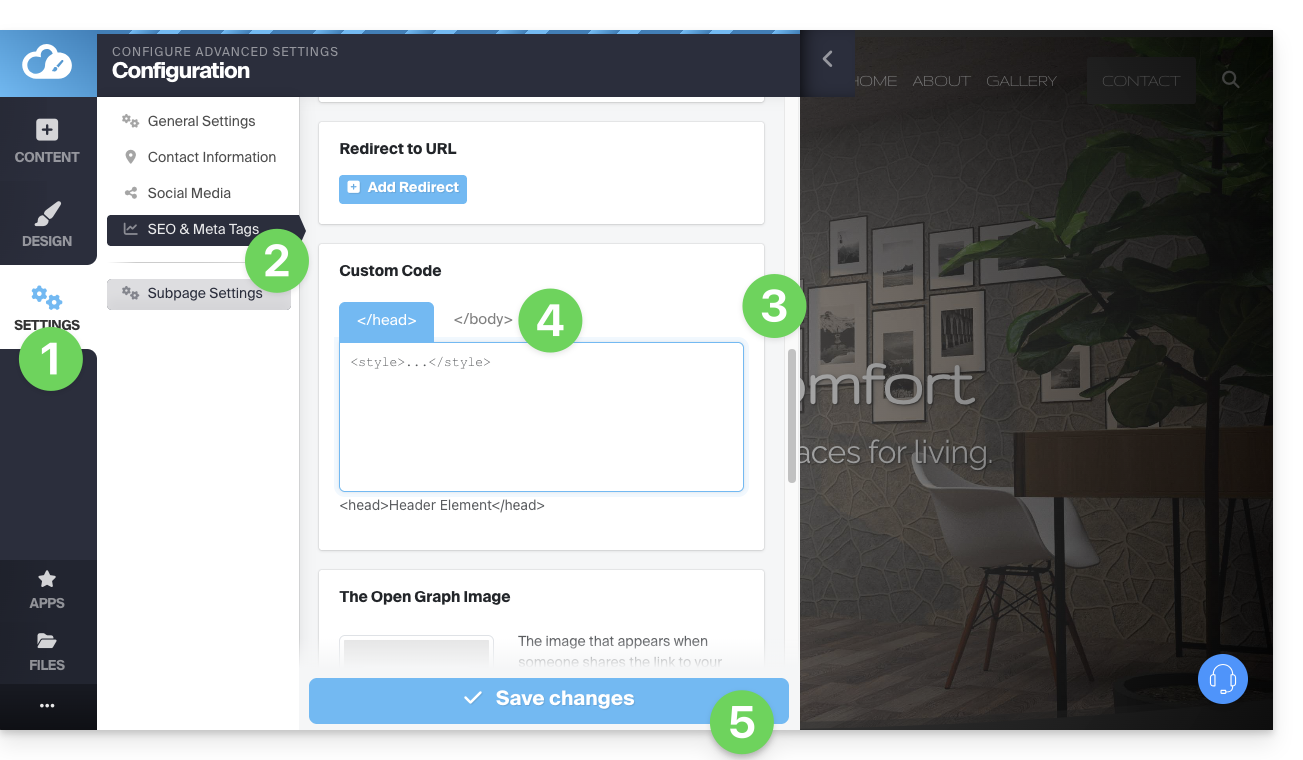
- Desça até à secção Código personalizado.
- Escolha adicionar o código antes ou depois das secções HEAD ou BODY.
- Salve as alterações na parte inferior da página:
Exemplos de personalização CSS
Estes exemplos permitem iniciar a personalização avançada das páginas do site. No entanto, existe o risco de, dependendo das modificações efetuadas, não conseguir aceder ao editor, o que o obrigará a começar tudo de novo.
Recomenda-se vivamente não inserir tags do tipo html, head ou body, pois estas podem entrar em conflito com o código fonte da própria aplicação.
Personalizar o fundo da página do site
Para definir a imagem de sua preferência (que deve ser carregada na biblioteca de arquivos) como fundo da página e personalizar sua exibição:
- Vá para o ponto 3, visível na primeira imagem no topo deste guia.
- Insira o código
<style>para indicar que deseja modificar o código CSS. - em seguida,
body {para indicar que você deseja modificar o corpo da página e as "{" para abrir o espaço onde as instruções podem ser inseridas, - em seguida,
background-image: url("../data/files/fond01.jpg");com o caminho e o nome exatos da imagem carregada na biblioteca, sem esquecer o ponto e vírgula para poder inserir o comando seguinte. background-repeat: repeat;para repetir a imagem inserida.background-attachment: fixed;para que a imagem de fundo permaneça fixa, mesmo que o visitante role a página para baixo ou para cima para ler o conteúdo.}para fechar o espaço de inserção aberto anteriormente.</style>para indicar que o código termina aqui.
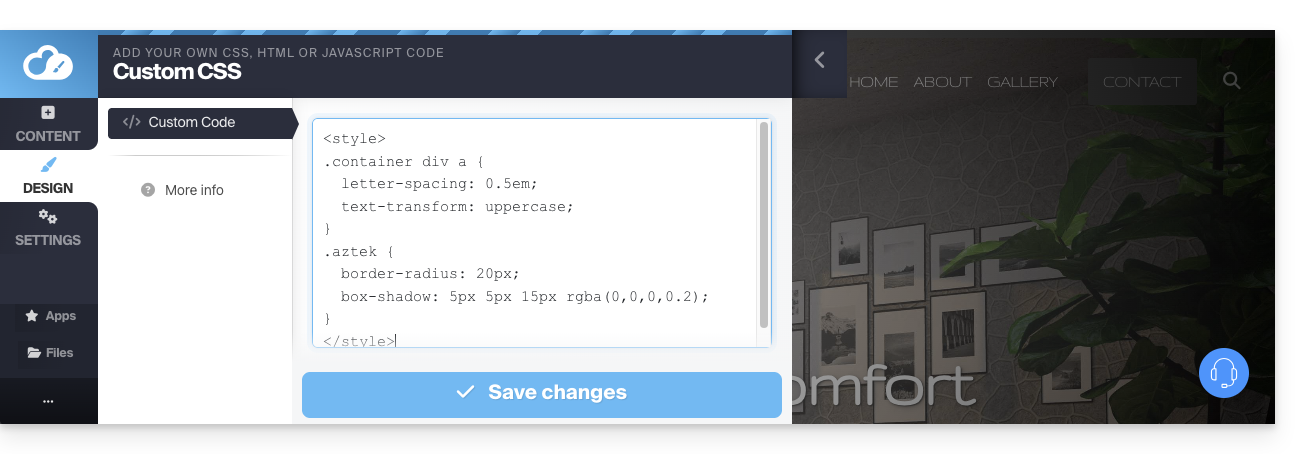
Aumentar o espaçamento entre as letras de todos os links do site
Para aumentar (consideravelmente) o espaçamento entre as letras nas palavras clicáveis (links):
- Vá para o ponto 3, visível na primeira imagem no topo deste guia.
- Insira o código (se ainda não estiver presente)
<style>para indicar que deseja modificar o código CSS. - em seguida,
.container div a {para indicar que você deseja modificar os blocos da página e, mais especificamente, os links ("a") e o "{" para abrir o espaço onde você pode inserir os comandos; - em seguida,
letter-spacing:1em;, diminuindo o valor (0.9em, por exemplo), sem esquecer o ponto e vírgula para poder inserir o comando seguinte ou finalizar. }para fechar o espaço de inserção aberto anteriormente.</style>para indicar que o código termina aqui.
Consulte estes outros exemplos de código CSS para inserir no seu site.
Link para esta FAQ: https://faq.infomaniak.com/2716
Esta seção de perguntas frequentes foi útil?
Este guia aborda as “Aplicações” (ou “módulos”, “extensões”) disponíveis no Site Creator Infomaniak dependendo da versão que você possui, para criar um site institucional, um blog ou uma loja online 100% personalizável, sem nenhum conhecimento técnico.
Diferentes Aplicações
Além dos blocos de conteúdo que oferecem diferentes layouts pré-definidos, você também pode inserir blocos na forma de módulos, cada um com uma função específica:
- Vídeo
- Leitor de áudio
- Carrossel de imagens / apresentação de slides
- Download de arquivo
- Localização no mapa
- Enquete
- Base de conhecimento
- Perguntas e respostas
- Calendário
- Calendly
- Menu de subpáginas
- Mapa do site
- Adicionar ao Google
- Código HTML personalizado
- Formulário de contato
- Blog
- Loja
- Leitor de feeds RSS
- Menu de restaurante
- Google Analytics
Inserir um módulo numa página
Para inserir um módulo:
- Clique aqui para acessar a gestão do seu produto no Manager Infomaniak (precisa de ajuda?).
- Clique diretamente no nome atribuído ao Site Creator em questão.
- Clique no botão Editar meu site para iniciar o editor:
Depois de acessar o Site Creator:
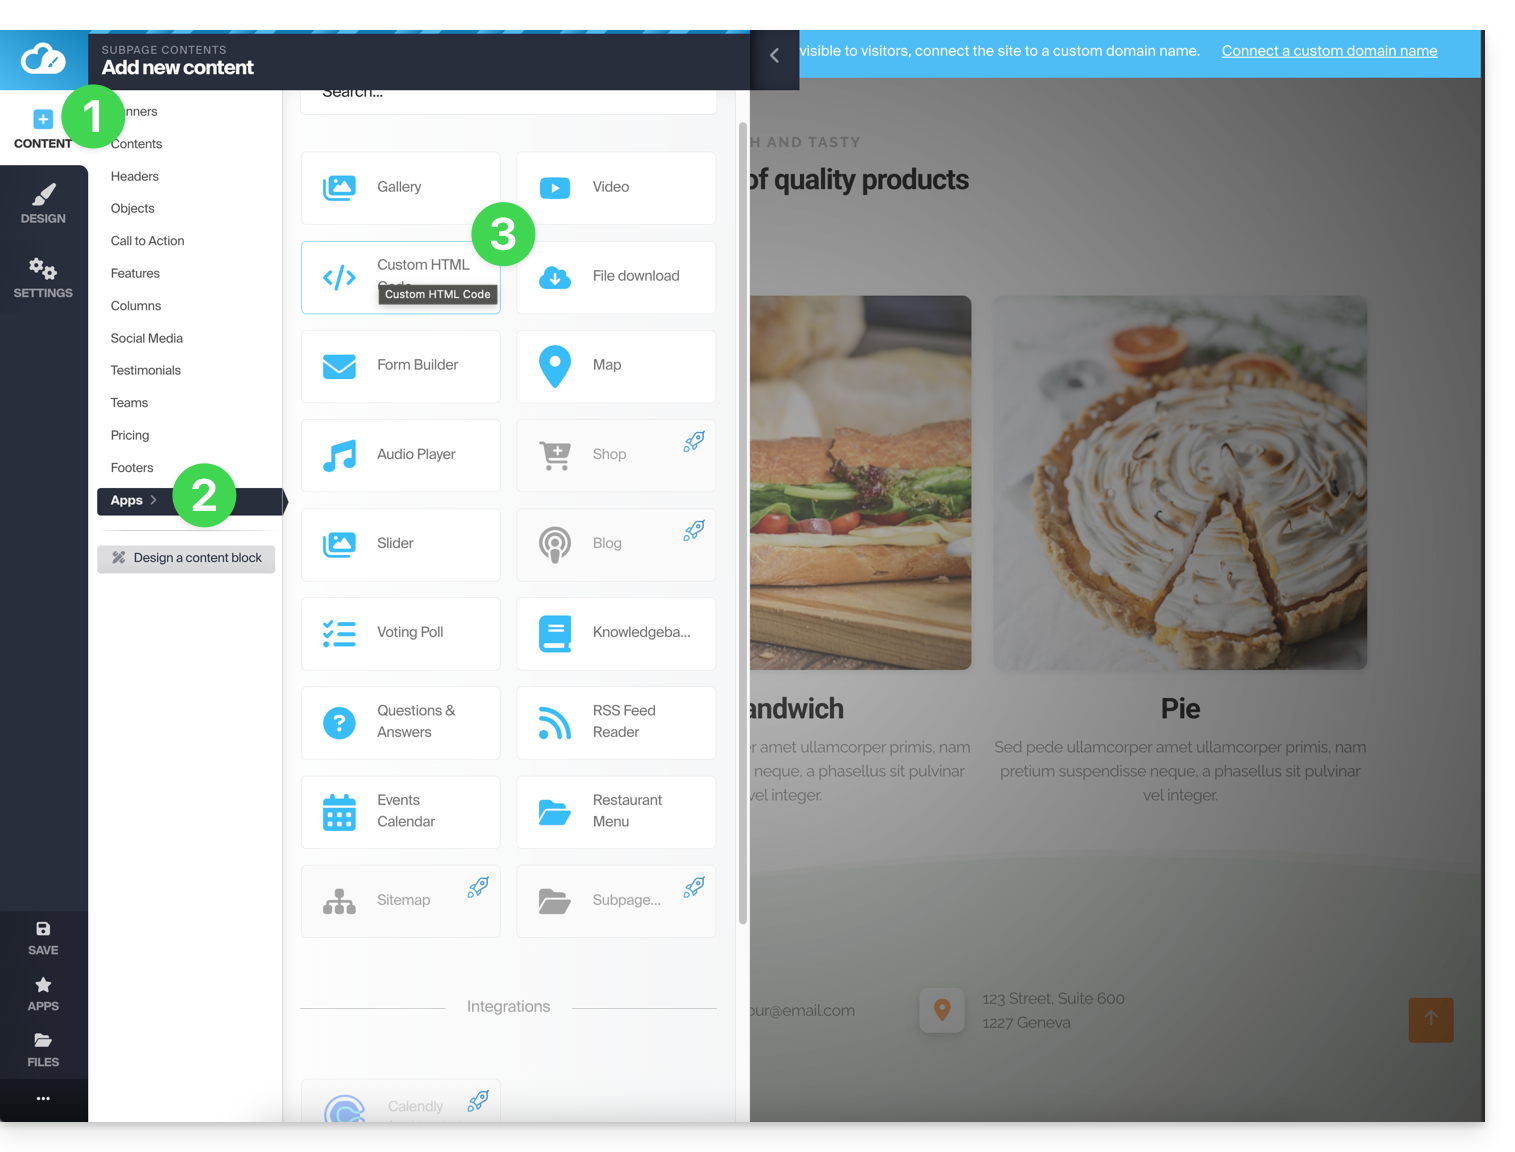
- Clique no botão Conteúdo no menu lateral esquerdo.
- Clique em Aplicações na parte inferior e o conteúdo disponível será exibido à direita.
- Clique em uma dessas aplicações para inseri-la na página:
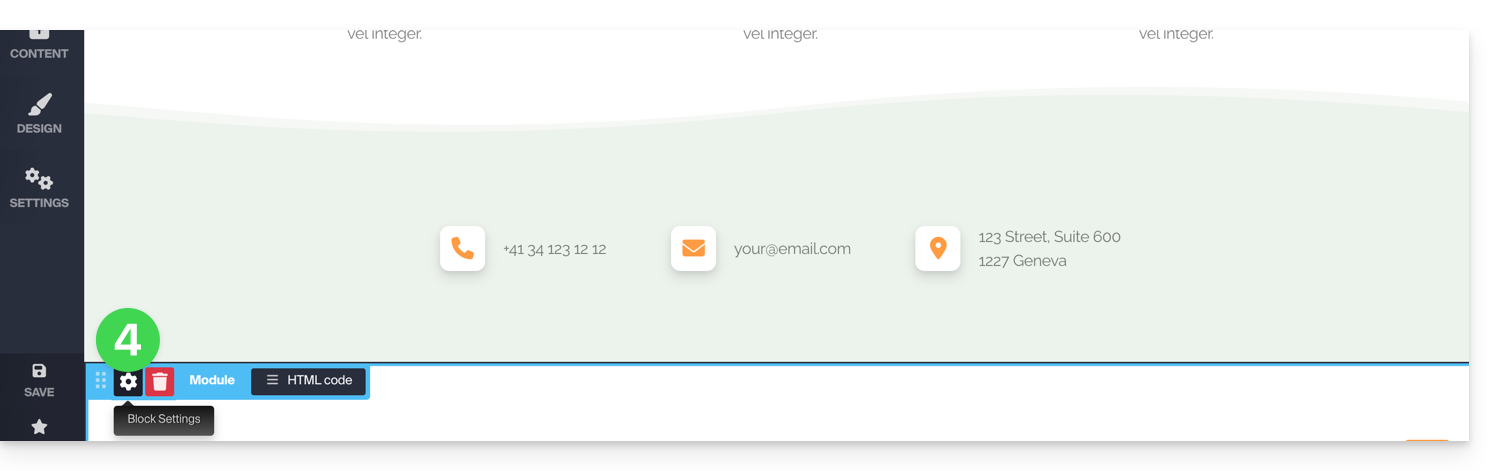
- Depois de inserido, passe o cursor sobre o módulo (ou sobre o próprio bloco, dependendo do módulo) para aceder às suas definições:
Módulo múltiplo ou módulo desaparecido
Se você excluir um dos seus módulos (como o módulo para criar uma pesquisa) já configurado e quiser reverter, clique em Cancelar imediatamente:
ou
Você também pode reinserir o módulo, que deverá retornar com as configurações anteriores.
Não é possível inserir vários módulos do mesmo tipo para personalizá-los de forma independente.
Outras integrações e widgets
Clique no botão APLICAÇÕES na barra lateral esquerda do Site Creator:
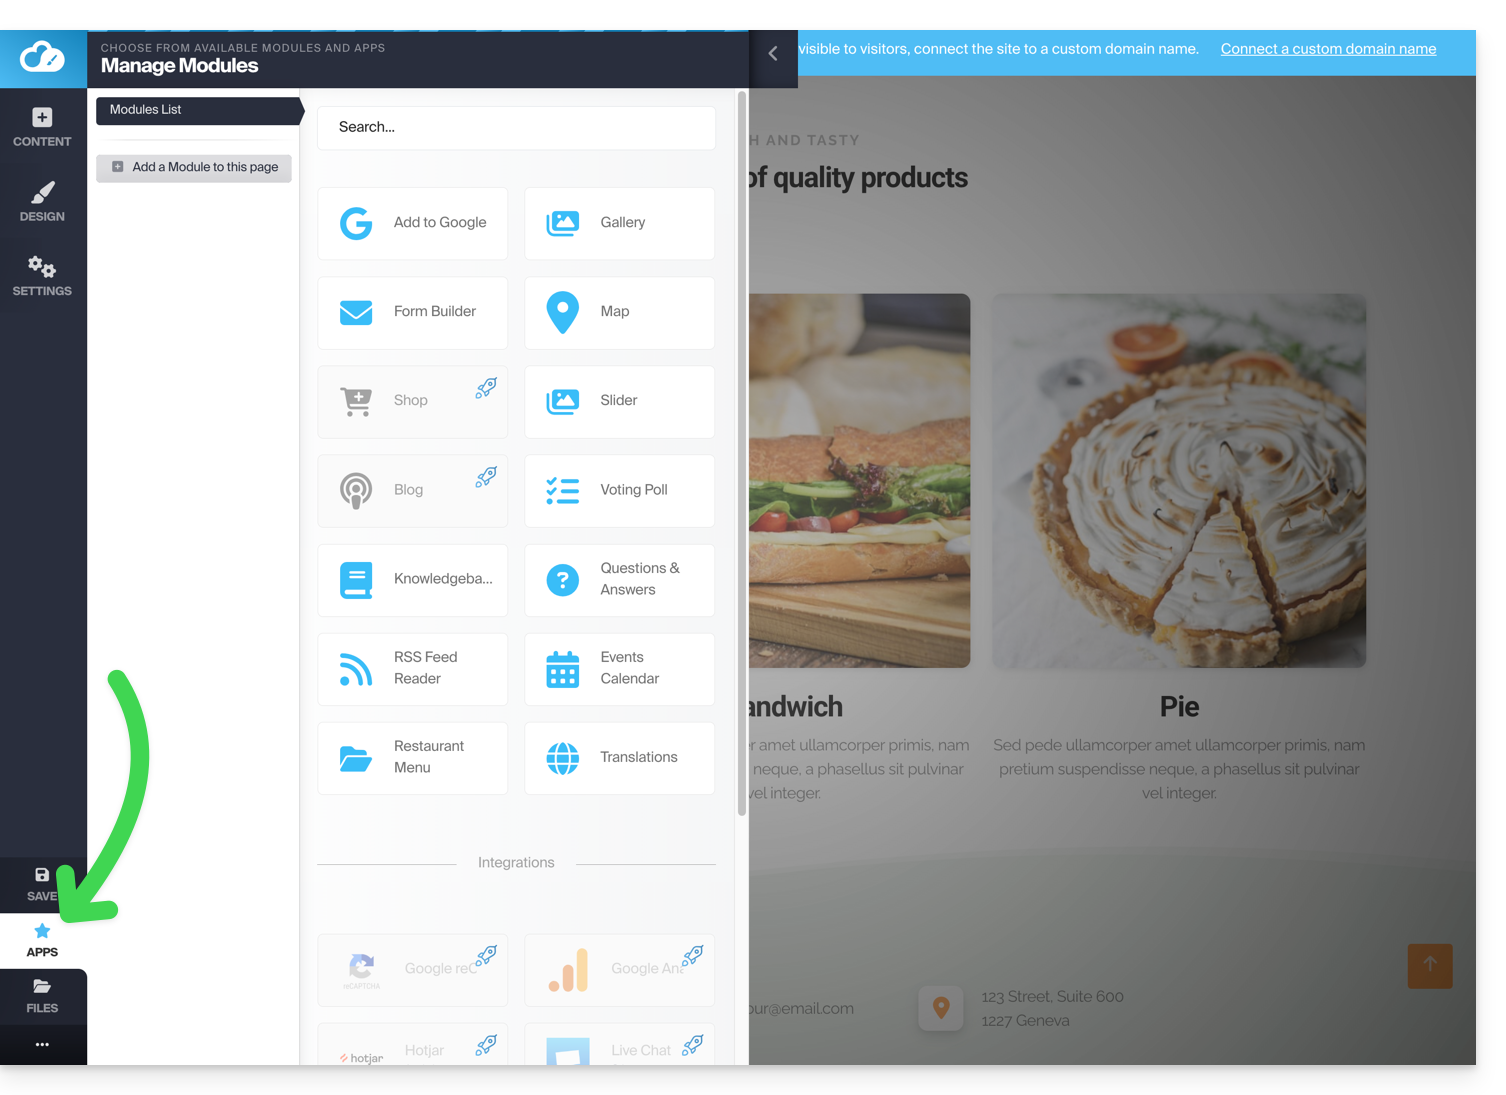
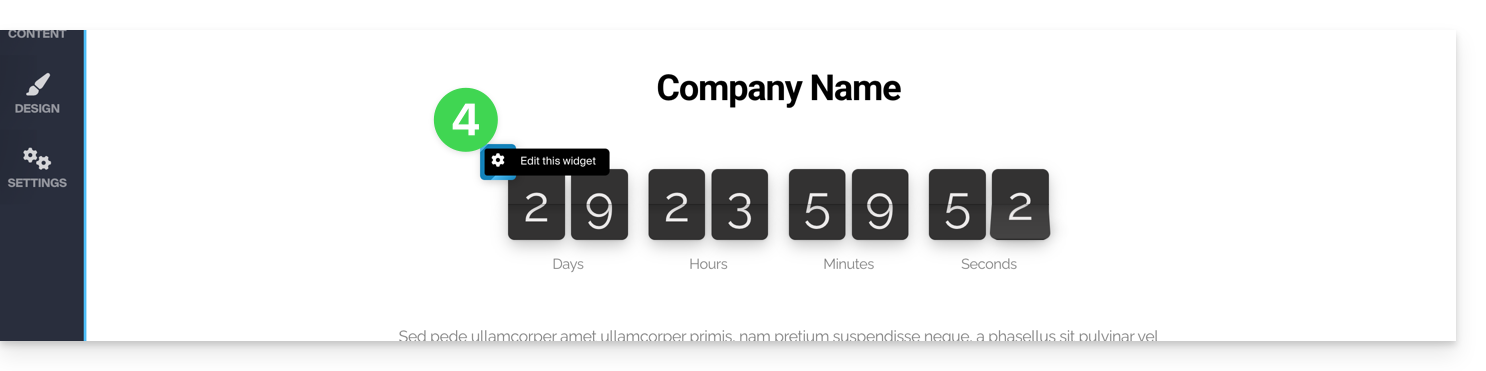
Para adicionar um contador que permita exibir uma contagem regressiva:
- No menu lateral esquerdo, clique no botão Conteúdo.
- Clique em Objetos na lista e o conteúdo disponível será exibido à direita.
- Clique em um desses objetos para inseri-lo na página:
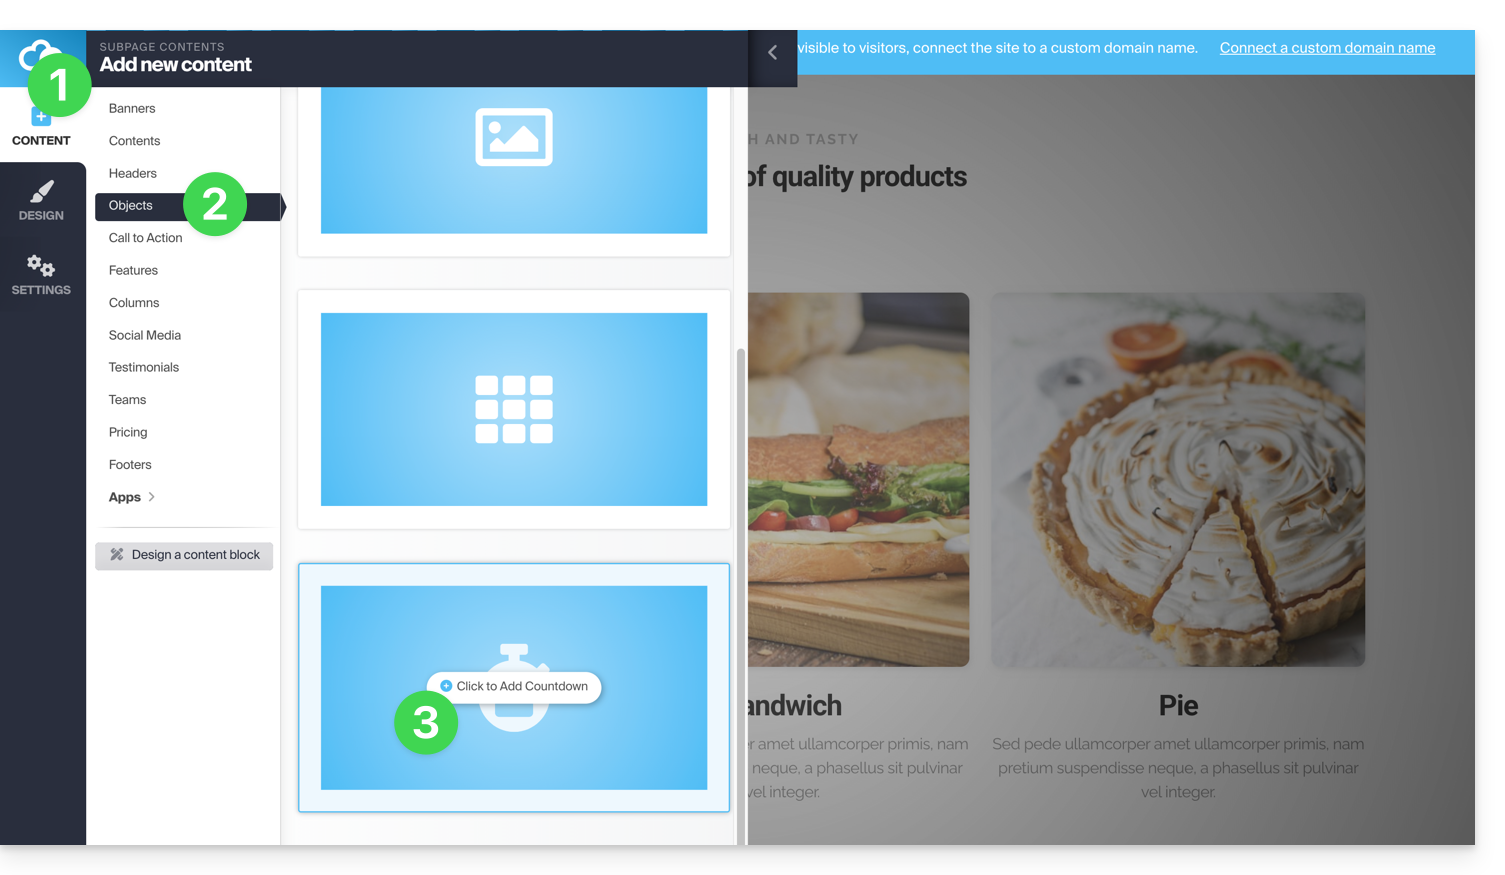
- Depois de inserido, passe o cursor sobre o módulo para aceder às suas definições:
Link para esta FAQ: https://faq.infomaniak.com/2717
Esta seção de perguntas frequentes foi útil?
Este guia explica como adicionar e personalizar um botão na sua página Site Creator Infomaniak, incluindo um botão fixo que permite retornar ao topo da página.
Pré-requisitos
- Aceder ao Site Creator:
- Clique aqui para aceder à gestão do seu produto no Manager Infomaniak (precisa de ajuda?).
- Clique diretamente no nome atribuído ao Site Creator em questão.
- Clique no botão Editar o meu site para iniciar o editor:
Adicionar um link na forma de botão
Para adicionar um botão (que direciona para o URL de sua escolha ao ser clicado):
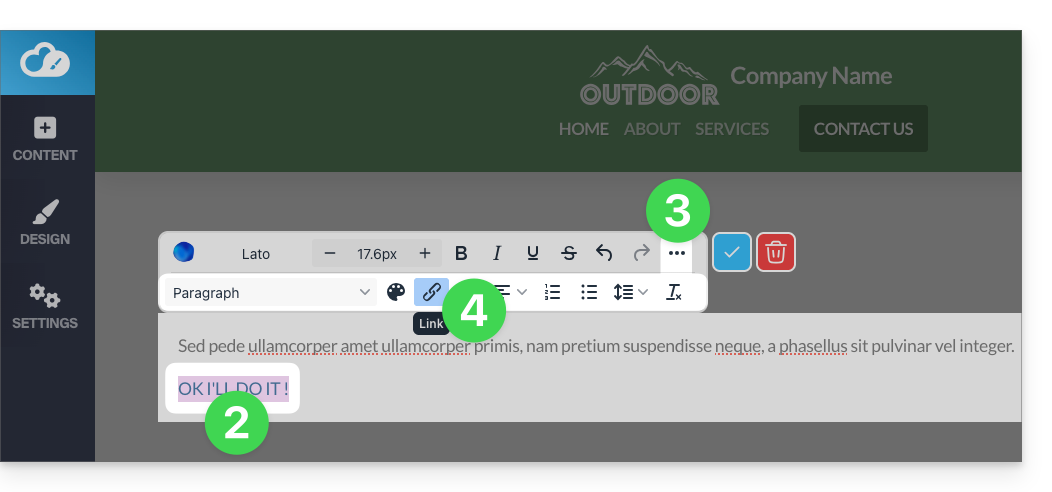
- Escreva o texto do botão.
- Selecione o texto.
- Toque nos pontos ••• à direita da barra de ferramentas para acessar as opções adicionais.
- Clique, em seguida, no ícone de elo para abrir a seção que permitirá especificar o tipo de link e as opções associadas:
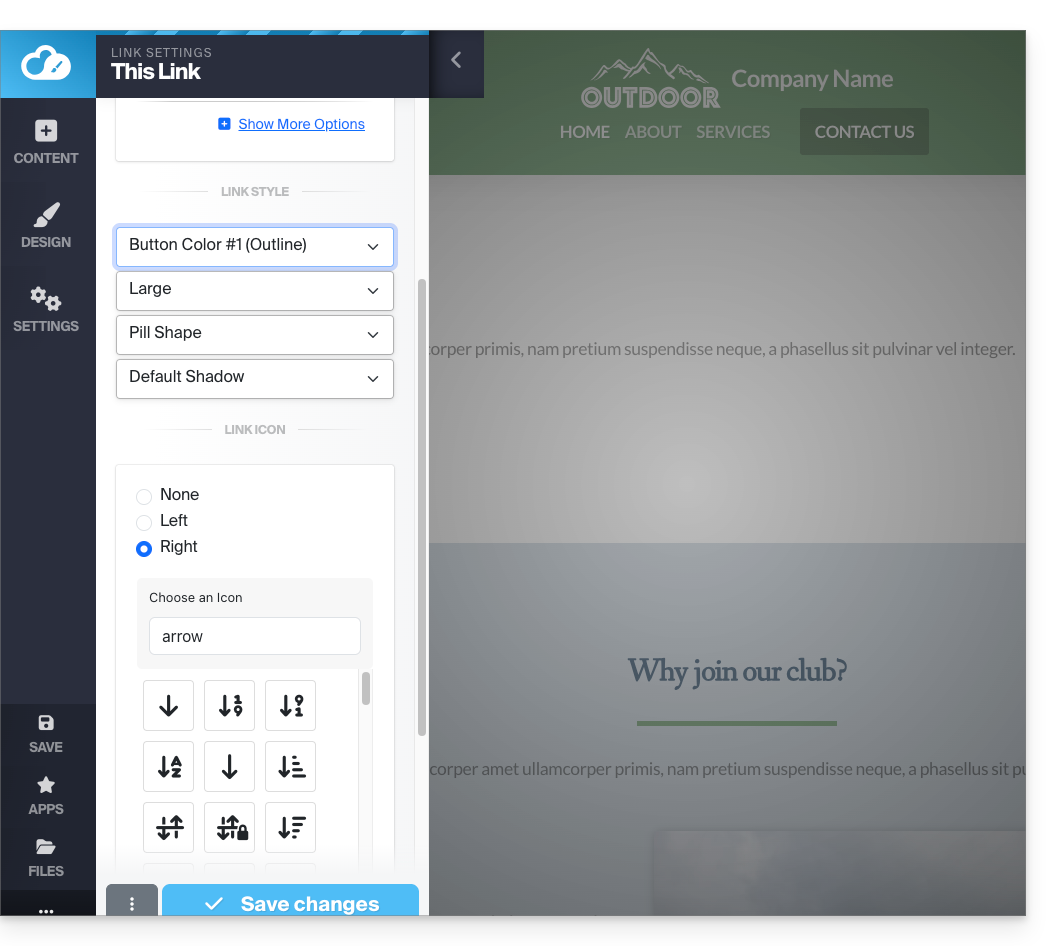
- Configure a página de destino e a aparência do botão.
- Salve as alterações na parte inferior da guia:
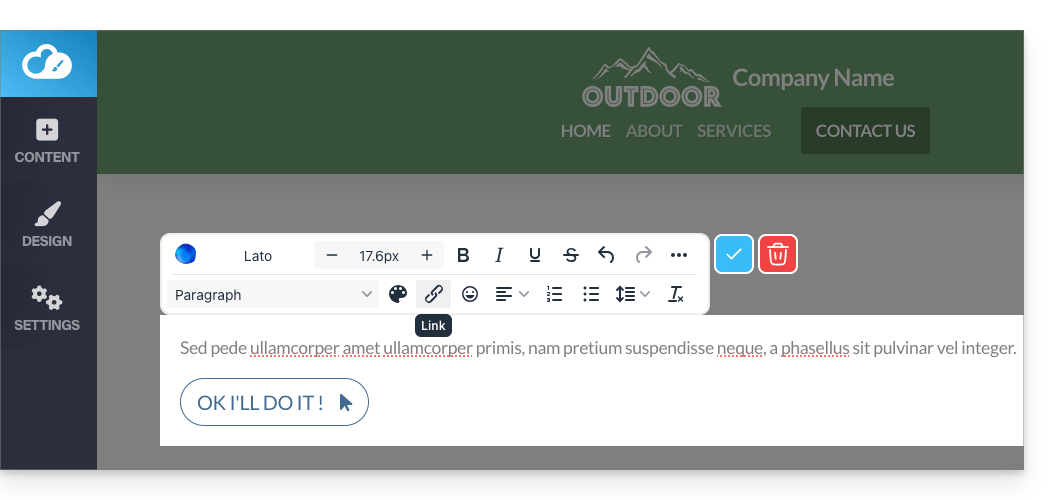
- Visualize o botão na sua página.
- Clique no botão para retornar ao editor, se necessário:
Adicionar um botão “Voltar ao topo”
Para adicionar e personalizar um botão que leve o visitante de volta ao topo da sua página do Site Creator assim que a página for rolada:
- Clique no botão Design no menu lateral esquerdo.
- Clique em Mais configurações.
- Ative a opção para exibir o botão de retorno na parte superior.
- Ajuste o espaçamento a partir da margem direita.
- Salve as alterações na parte inferior da página:
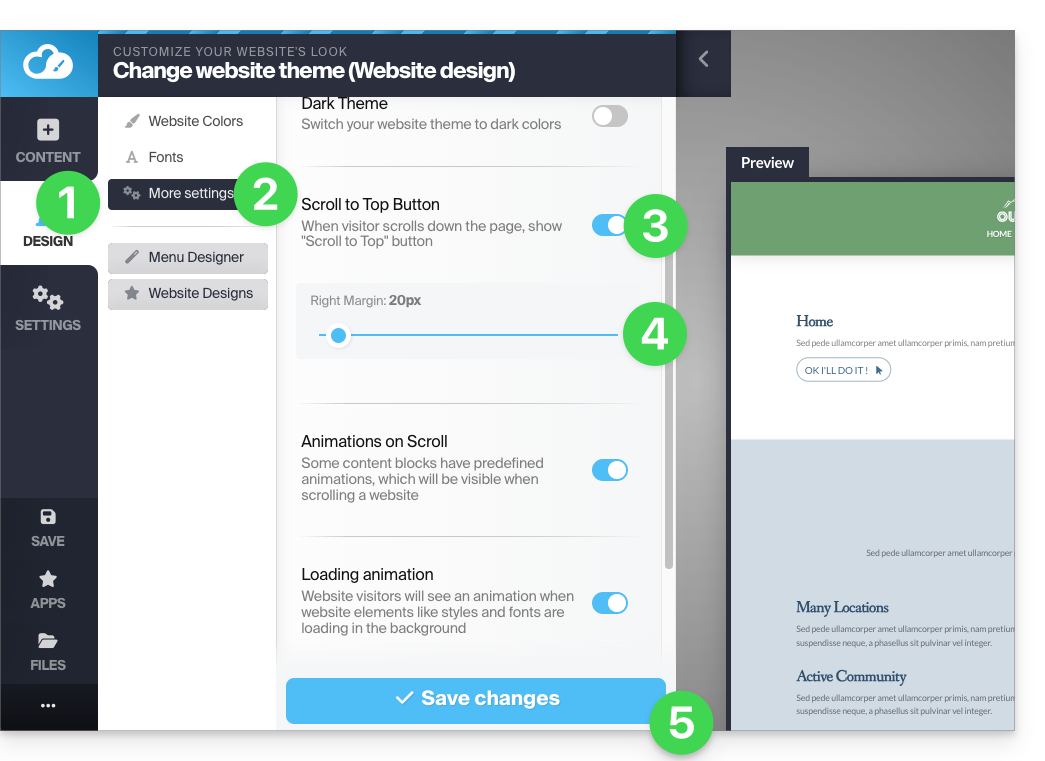
Atualize a página, se necessário, para visualizar a alteração: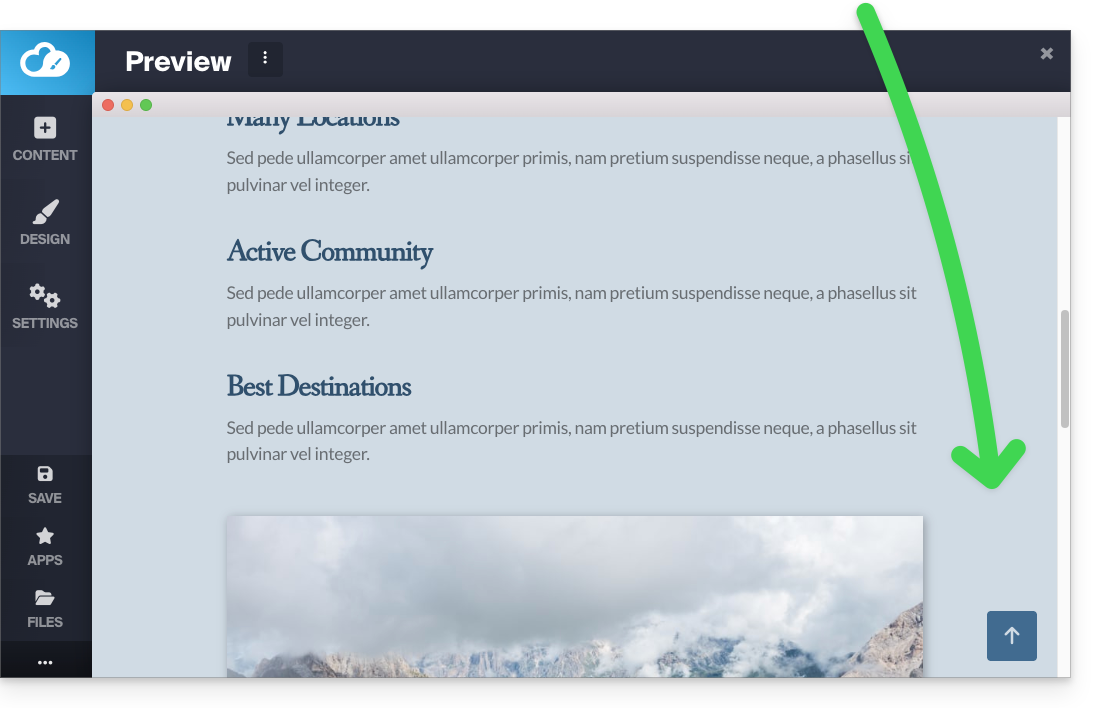
Consulte este outro guia sobre uma solução alternativa.
Link para esta FAQ: https://faq.infomaniak.com/2718
Esta seção de perguntas frequentes foi útil?
Este guia ajuda você a personalizar um site criado com o Site Creator da Infomaniak.
Para personalizar a página inicial ou os tipos de página do seu site, consulte este outro guia.
Pré-requisitos
- Aceder ao Site Creator:
- Clique aqui para aceder à gestão do seu produto no Manager Infomaniak (precisa de ajuda?).
- Clique diretamente no nome atribuído ao Site Creator em questão.
- Clique no botão Editar o meu site para iniciar o editor:
Alterar as cores do site
Para gerir os temas, cores e fontes no Site Creator:
- Clique no botão Design no menu lateral esquerdo.
- Clique em Cores do site:
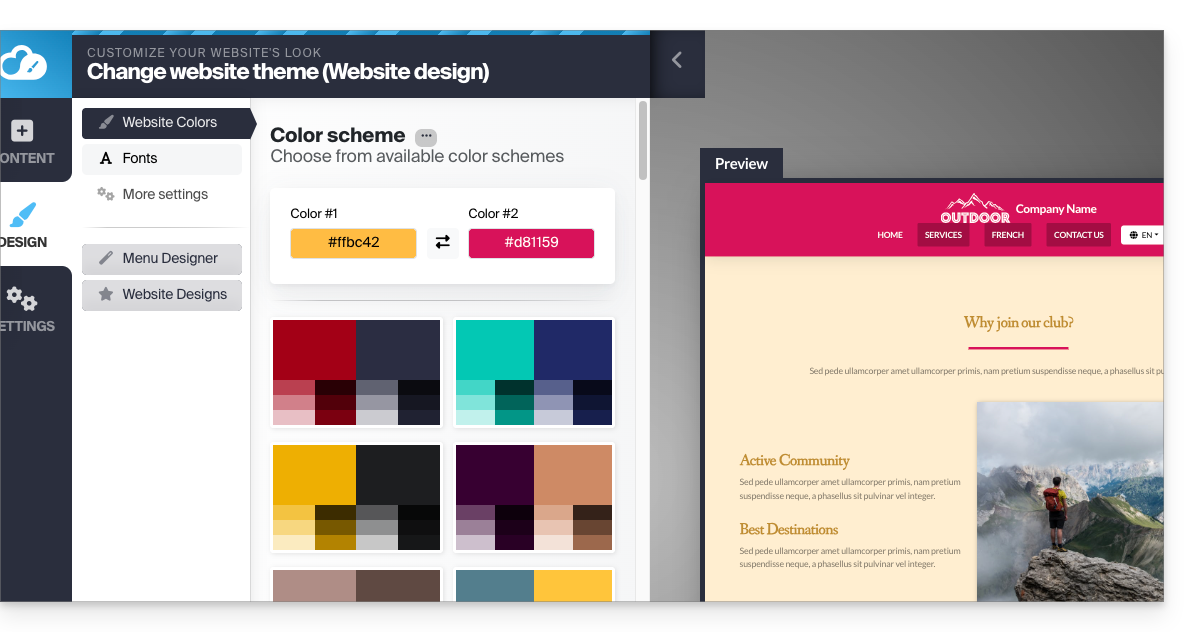
Pode escolher entre as paletas de cores disponíveis ou criar o seu próprio conjunto de cores personalizado.
Abaixo, existem configurações mais específicas, onde pode especificar a quais elementos uma cor deve ser aplicada: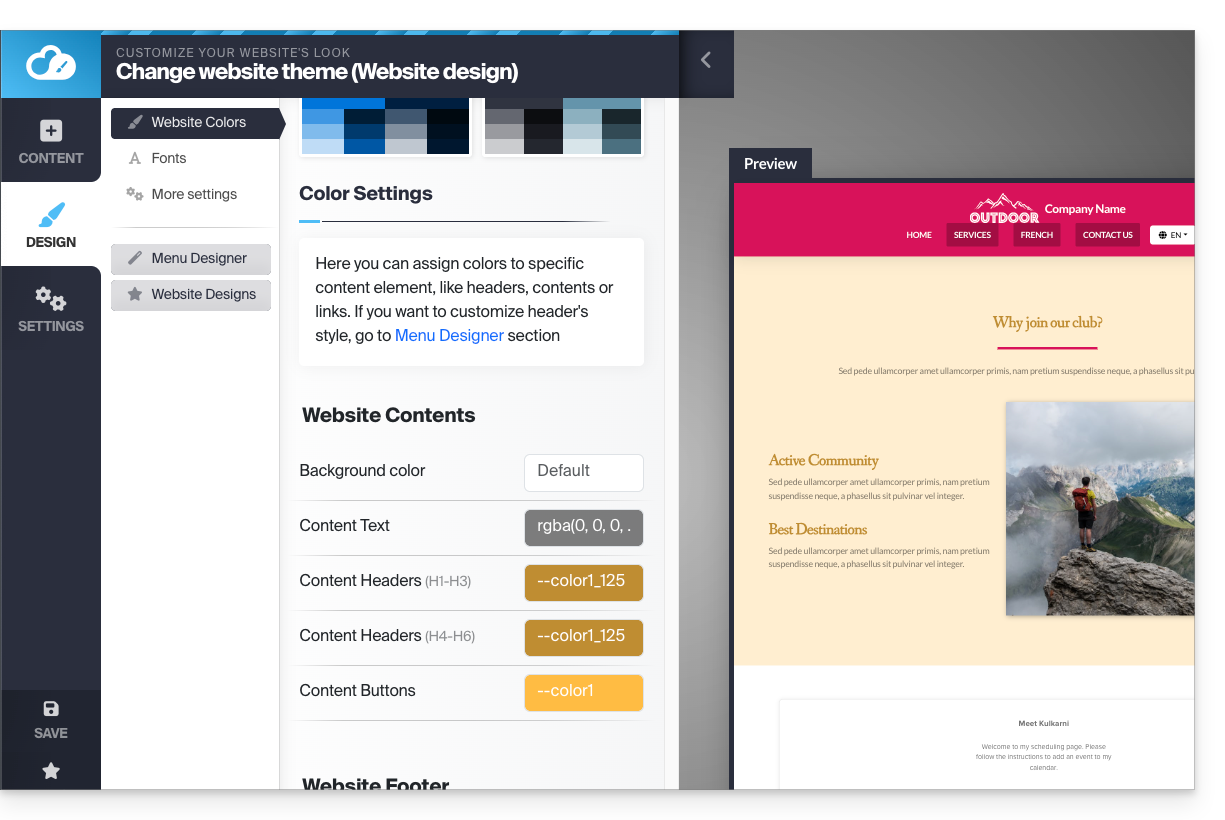
Gerenciar o fundo (imagem/cor) dos blocos
Na página de edição do seu site, passe o mouse sobre um bloco e clique no ícone de engrenagem para acessar as configurações: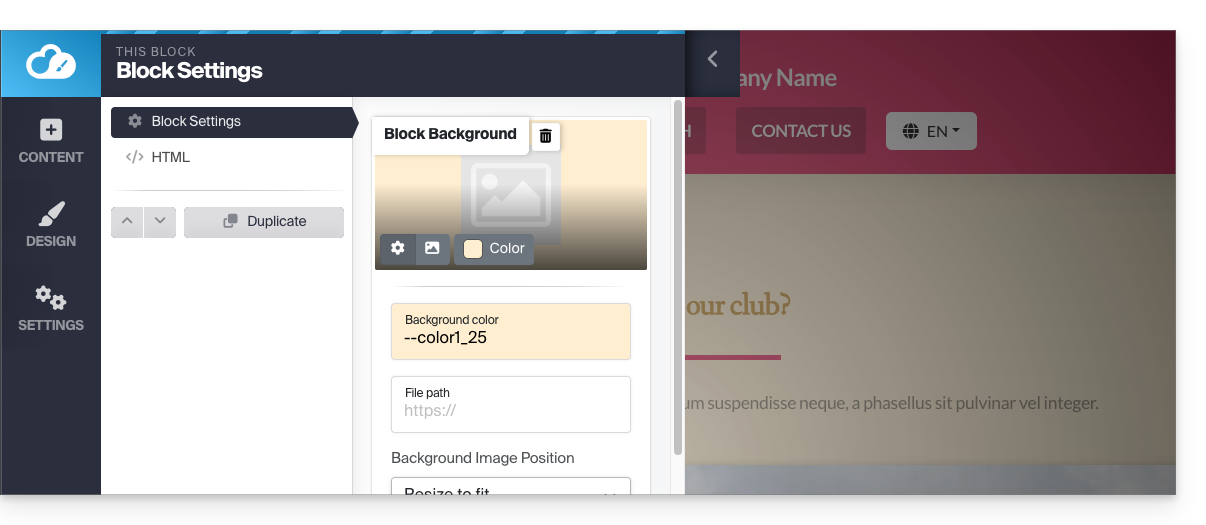
Carregar um modelo de site
Pode alterar o design completo do seu site alterando o tema e decidindo o que deve ser substituído ou não no site atual durante a alteração:
- Clique no botão Design no menu lateral esquerdo.
- Clique em Escolha do tema:
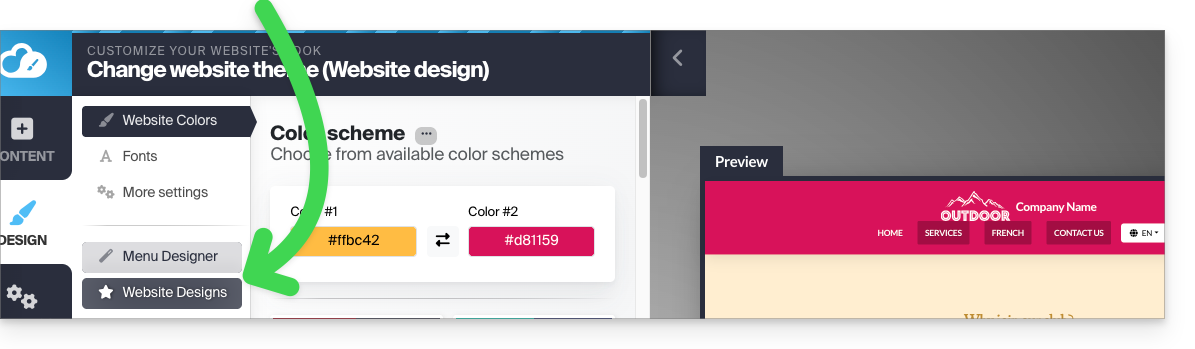
É aqui que pode escolher entre os temas de sites disponíveis: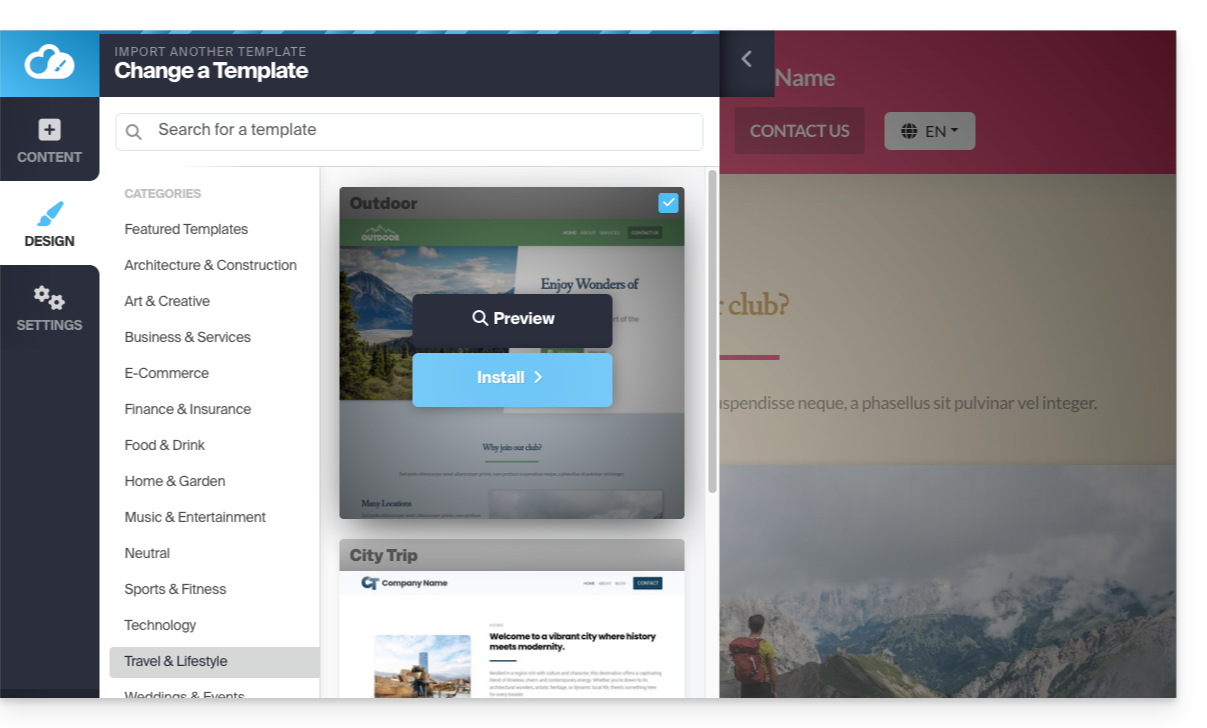
Quando encontrar o seu novo tema, clique em Instalar e, em seguida, poderá escolher as partes do novo modelo que deseja importar (por predefinição, apenas as cores, fontes ou estilo do menu) para evitar que o conteúdo do seu site seja substituído.
Se o seu site for novo, pode escolher mais opções durante a importação.
Alterar as fontes do site
Para isso:
- Clique no botão Design no menu lateral esquerdo.
- Clique em Fontes:
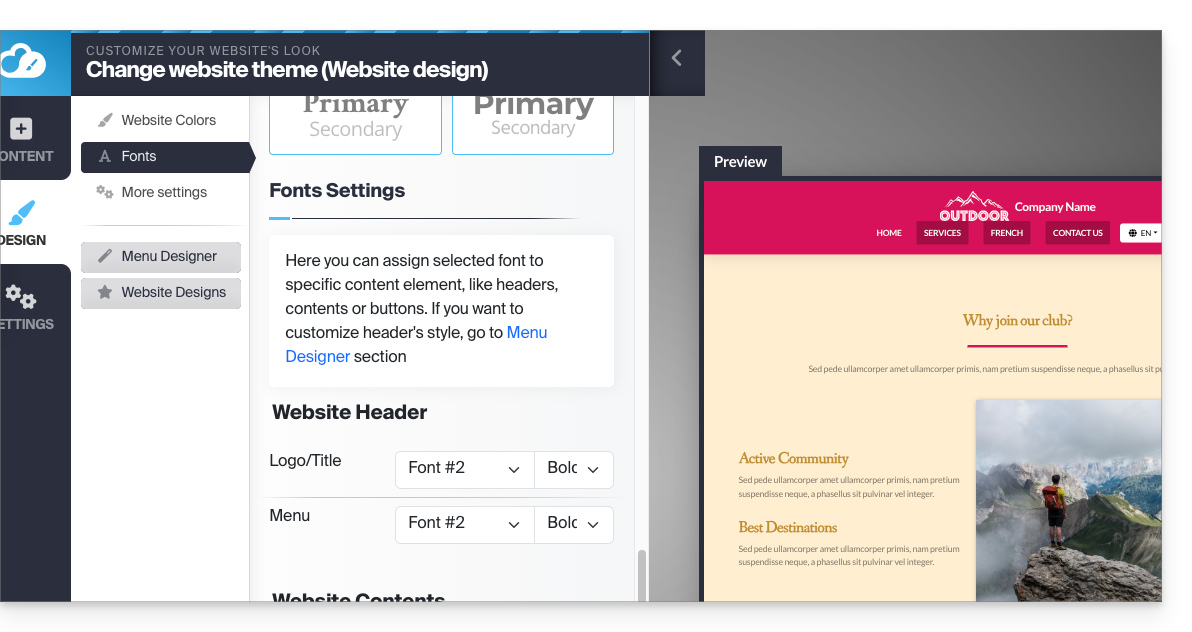
Pode alterar facilmente as fontes principais do site. A primeira fonte é utilizada para os títulos e a segunda fonte para o conteúdo.
Abaixo, existem configurações mais específicas, onde pode especificar a quais elementos uma fonte deve ser aplicada.
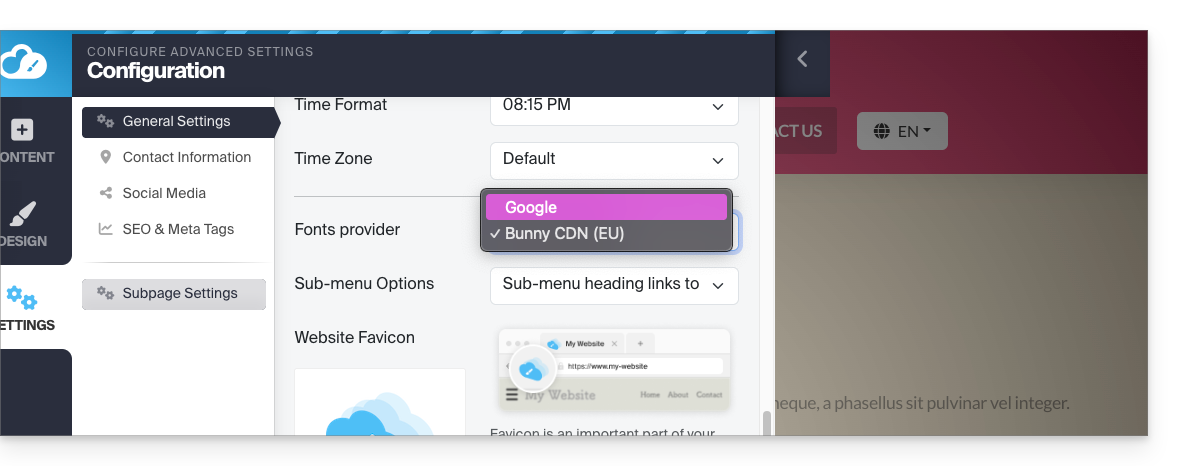
Não é possível importar ou adicionar uma fonte personalizada.mas pode alterar o fornecedor (a lista de fontes será a mesma) por questões de privacidade, por exemplo:
- Clique em Configurações no menu lateral esquerdo.
- Clique em Configurações gerais
- Escolha o fornecedor das fontes:
Resolver um problema de texto ausente/invisível
Se você perceber que seu bloco de texto desapareceu ou está invisível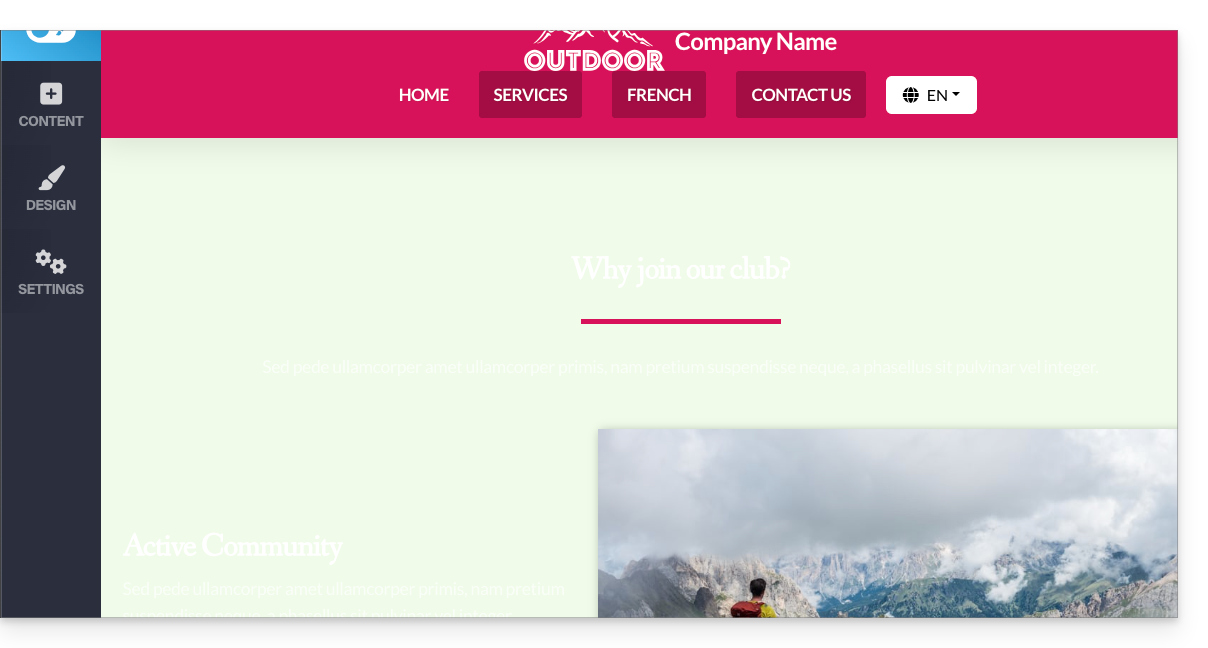
, selecione todo o conteúdo do site (ctrl + a ou cmd + a no Mac); se você vir que o seu conteúdo está lá, isso provavelmente significa que as configurações do bloco estão definidas para um fundo escuro: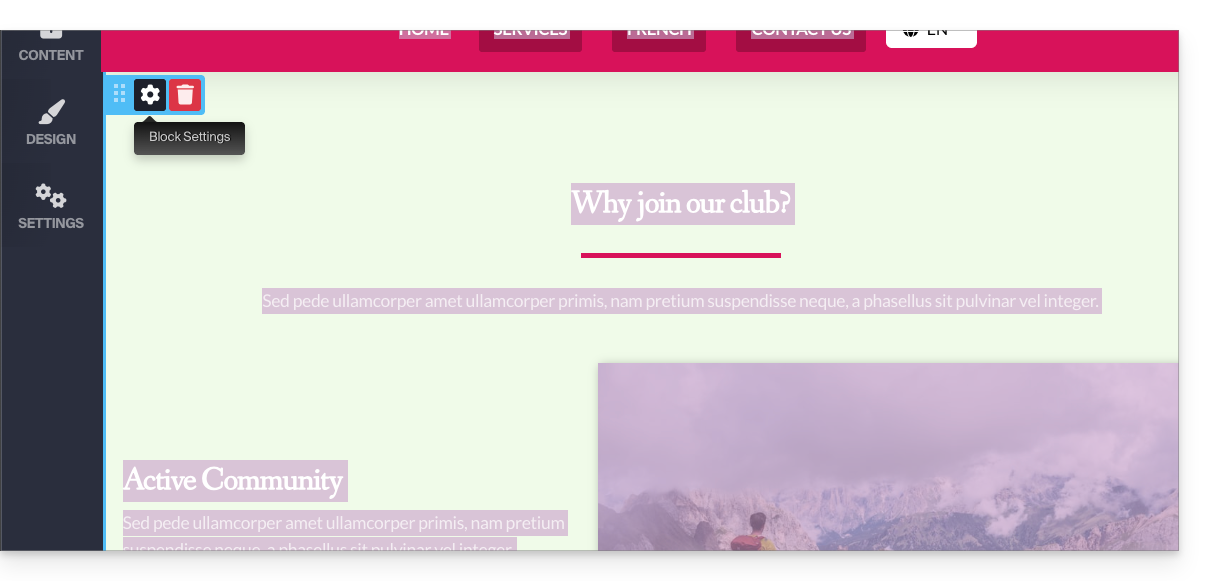
Nesse caso, vá para as configurações do bloco e certifique-se de que a opção "Fundo escuro" não esteja marcada. Isso deve resolver o problema: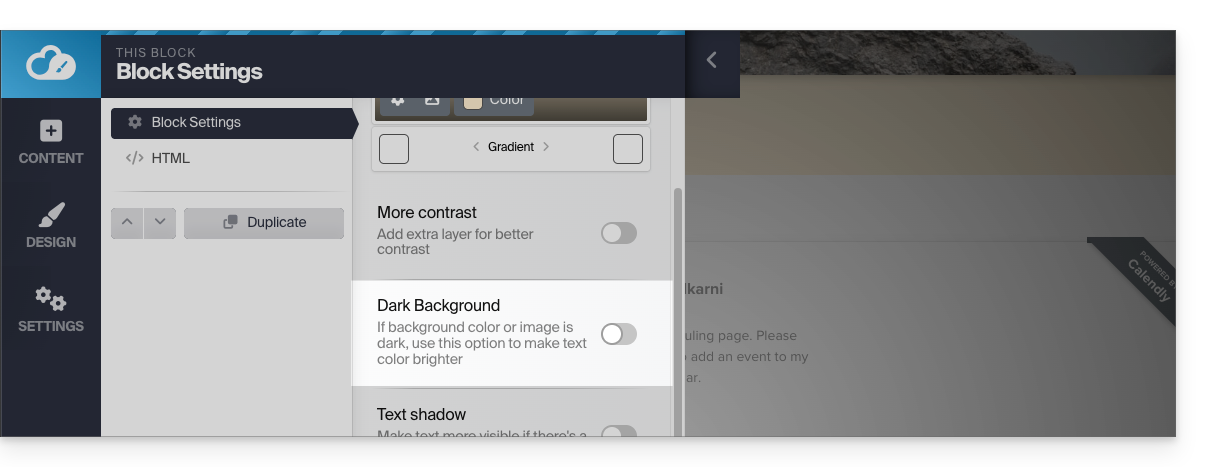
Link para esta FAQ: https://faq.infomaniak.com/2719
Esta seção de perguntas frequentes foi útil?
Este guia explica como gerenciar a parte do logotipo, cabeçalho e rodapé em Site Creator Infomaniak.
Pré-requisitos
- Aceder ao Site Creator:
- Clique aqui para aceder à gestão do seu produto no Manager Infomaniak (precisa de ajuda?).
- Clique diretamente no nome atribuído ao Site Creator em questão.
- Clique no botão Editar o meu site para iniciar o editor:
Adicionar um logótipo ao site
Depois de acessar o Site Creator:
- Clique no botão Configurações na barra lateral esquerda.
- Clique em Logotipo/título.
- Carregue uma imagem e escolha se o nome do site também deve ser exibido ao lado.
- Salve as alterações:
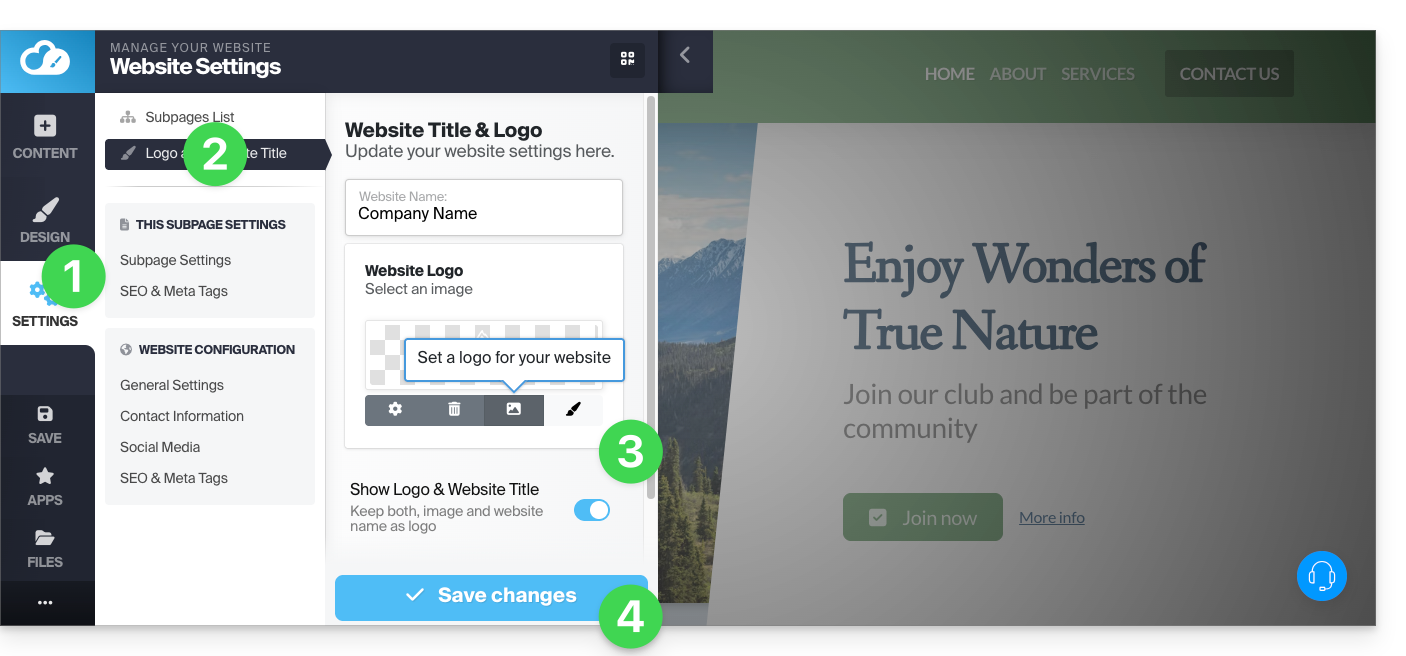
Configurações do logotipo
- Clique no botão Design na barra lateral esquerda.
- Clique em Editor de Menu.
- Clique em Título/logotipo.
- Em seguida, ajuste os espaçamentos e as cores.
- Salve as alterações:
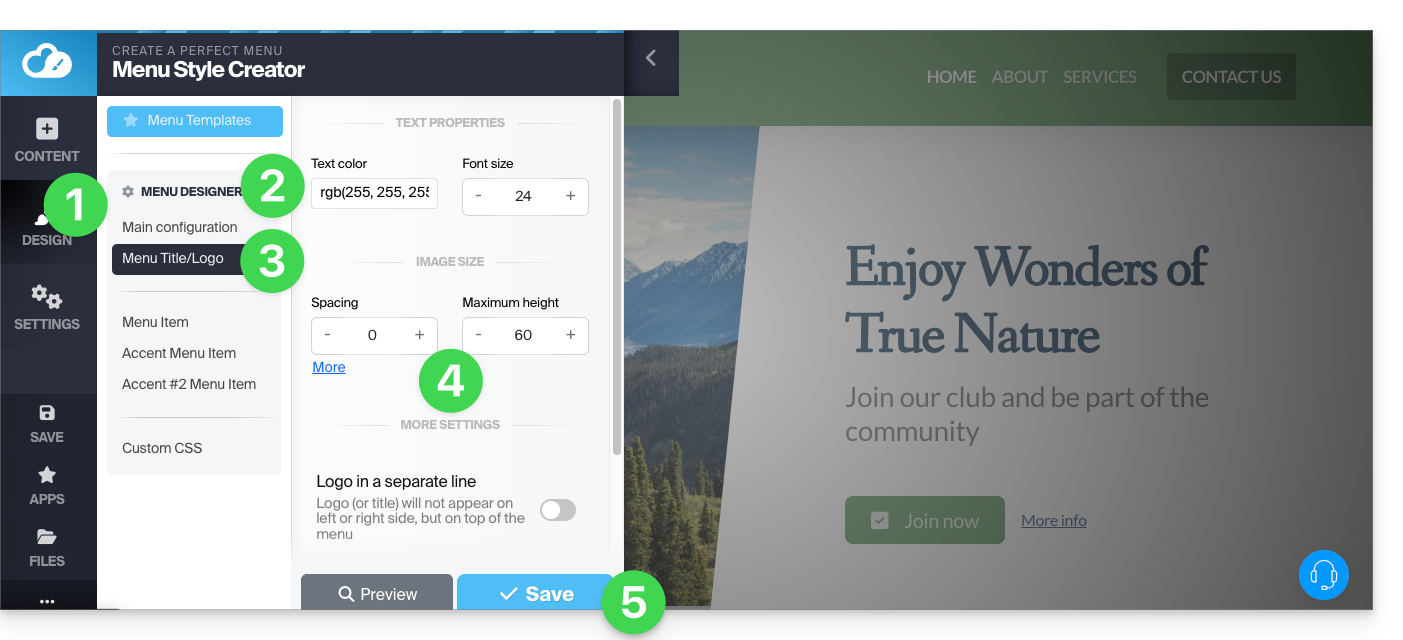
Exibição do logotipo no centro
No mesmo local indicado acima (você também pode acessá-lo passando o mouse sobre o cabeçalho e seu logotipo),ative a opção para exibir o logotipo em uma linha separada, o que centralizará o logotipo do site: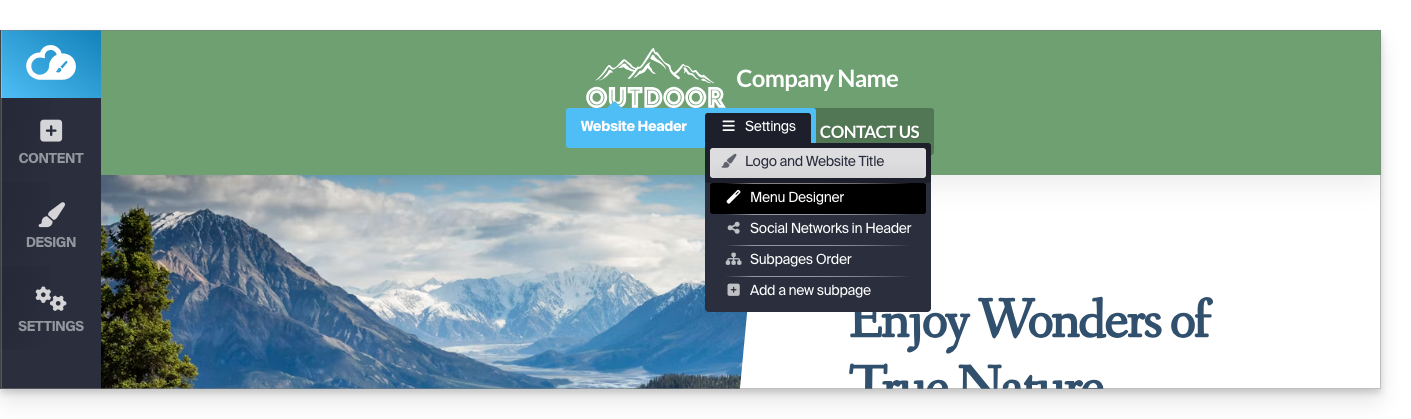
Ocultar o logotipo (e o cabeçalho e o rodapé)
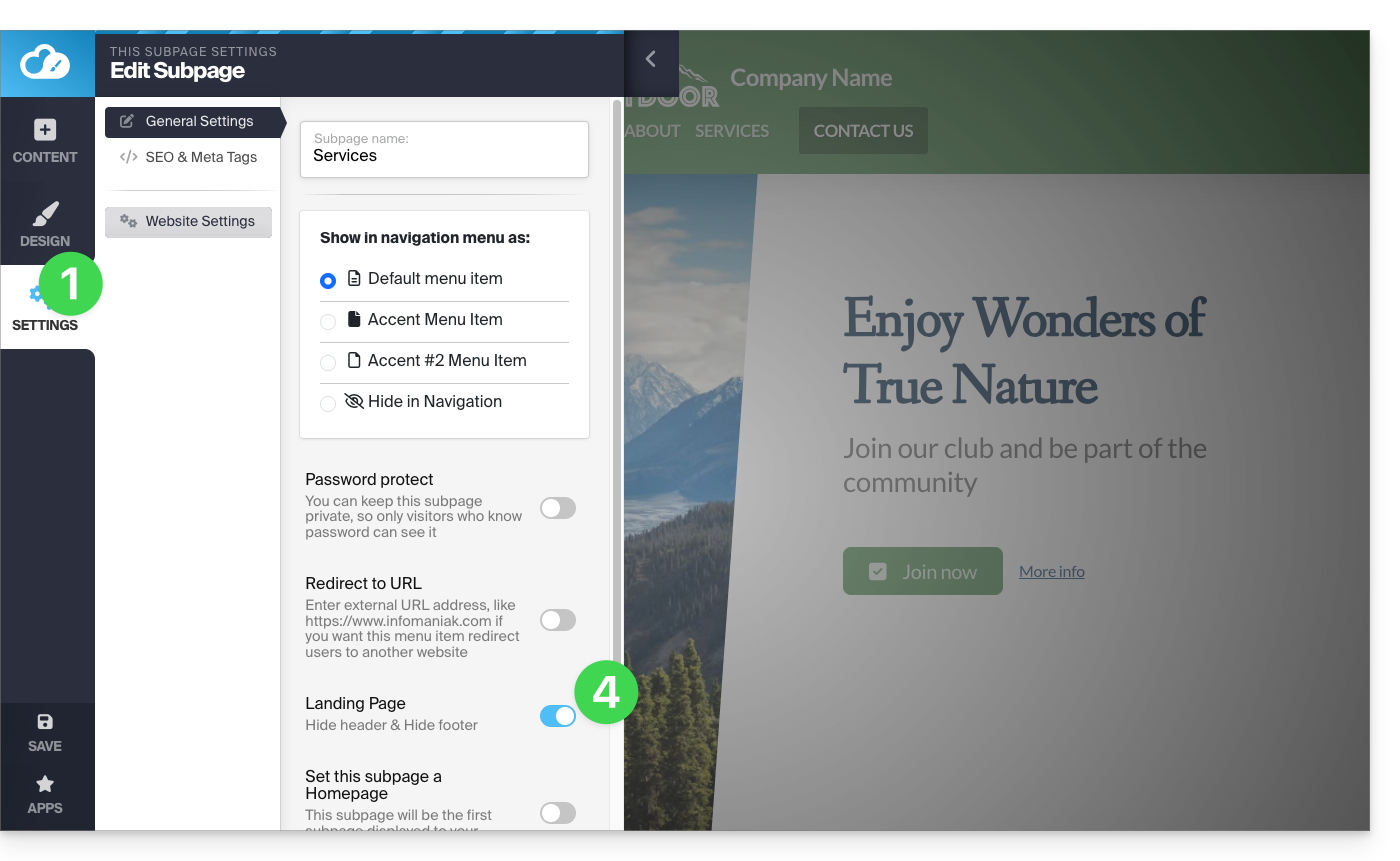
Para criar uma página sem logotipo, que não terá nem cabeçalho (e, portanto, nenhum menu exibido) nem rodapé, é preciso defini-la como Página inicial (ou seja, "Página de destino"; atenção, isso não altera a ordem das páginas) através de um botão que se encontra aqui:
- Clique no botão Configurações na barra lateral esquerda.
- Clique em Lista de páginas.
- Passe o cursor sobre uma página na árvore existente e clique no ícone de engrenagem que aparece ao passar o cursor.
- Ative a opção na parte inferior "Página inicial" para ocultar cabeçalhos e rodapés:
Link para esta FAQ: https://faq.infomaniak.com/2720
Esta seção de perguntas frequentes foi útil?
Este guia explica como modificar alguns detalhes de um site criado com o Site Creator da Infomaniak.
Pré-requisitos
- Aceder ao Site Creator:
- Clique aqui para aceder à gestão do seu produto no Manager Infomaniak (precisa de ajuda?).
- Clique diretamente no nome atribuído ao Site Creator em questão.
- Clique no botão Editar o meu site para iniciar o editor:
Alterar o nome do site
Clique no botão Configurações na barra lateral esquerda e, em seguida, em Título do site: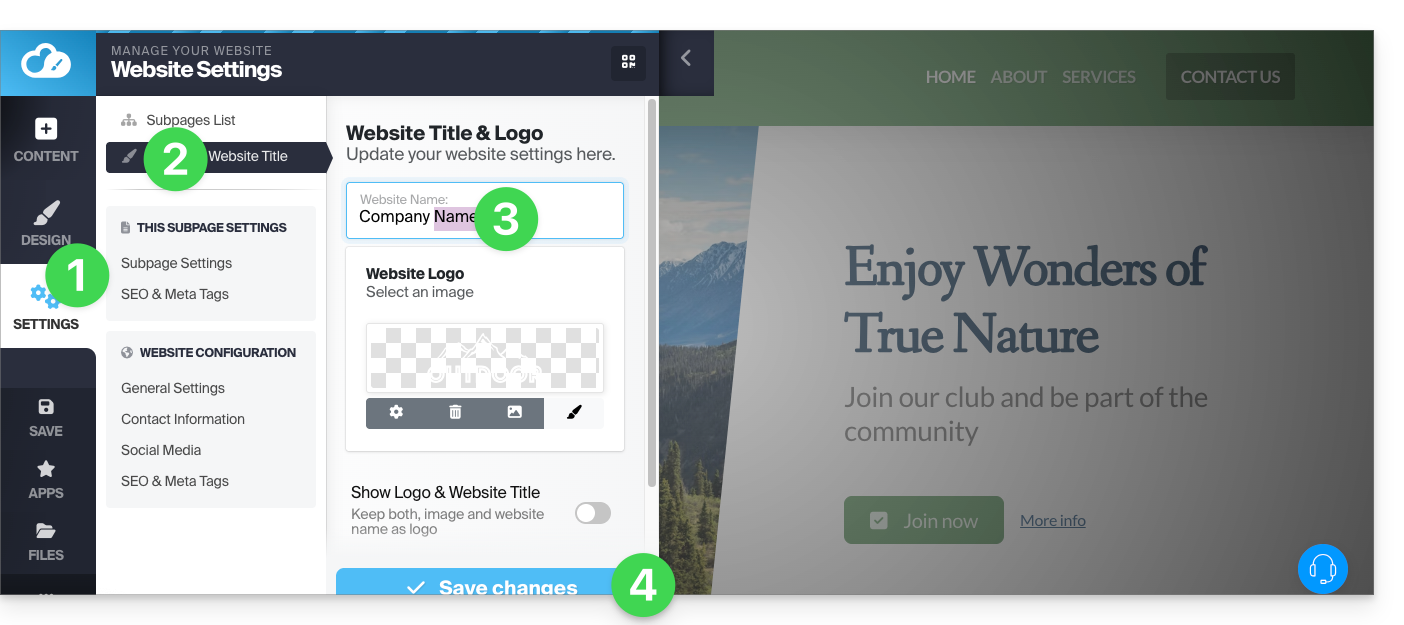
Dados da empresa
Clique no botão Configurações na barra lateral esquerda e, em seguida, em Informações de contato, em Configuração do site: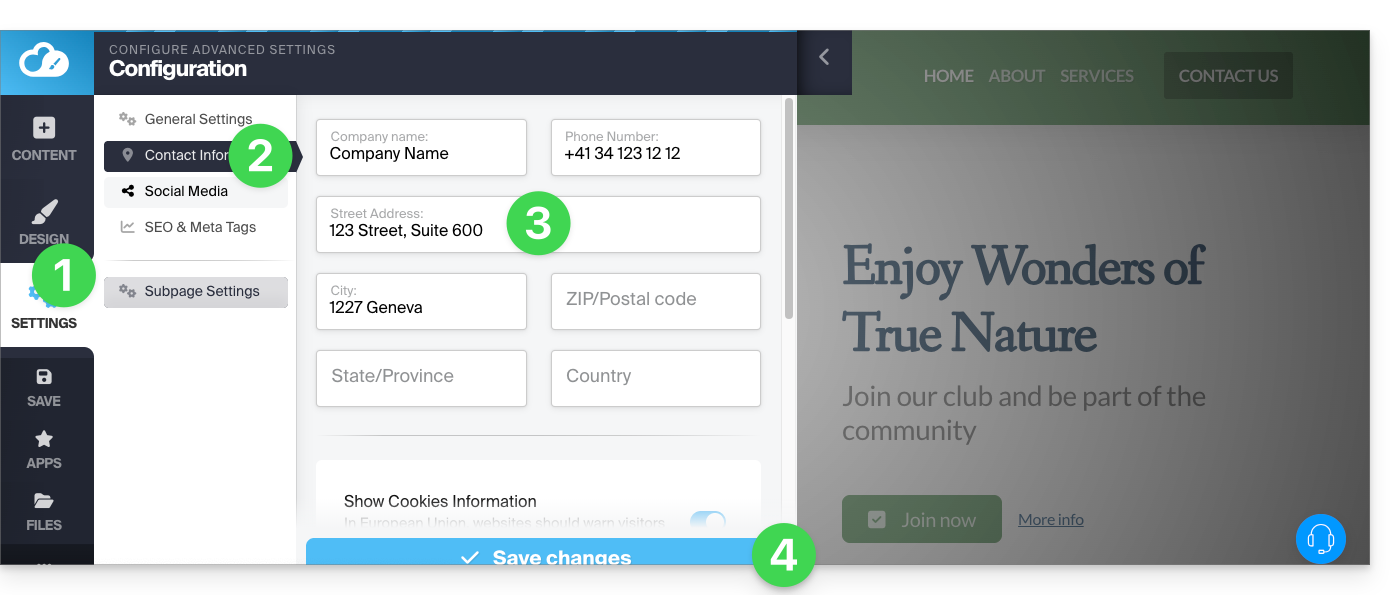
Link para esta FAQ: https://faq.infomaniak.com/2721
Esta seção de perguntas frequentes foi útil?
Este guia aborda a configuração, no Site Creator da Infomaniak, do ícone exibido na barra de favoritos de um navegador web, o favicon.
Introdução
- Os formatos recomendados pela Microsoft para os seus navegadores são
16 x 16,32 x 32e48 x 48. - A Apple, por sua vez, recomenda que a dimensão do favicon seja de
180 x 180.
Definir o favicon no Site Creator
Pré-requisitos
- Aceder ao Site Creator:
- Clique aqui para aceder à gestão do seu produto no Manager Infomaniak (precisa de ajuda?).
- Clique diretamente no nome atribuído ao Site Creator em questão.
- Clique no botão Editar o meu site para iniciar o editor:
Para definir um novo favicon:
- Clique no botão Configurações no menu lateral esquerdo.
- Clique em Configurações gerais:
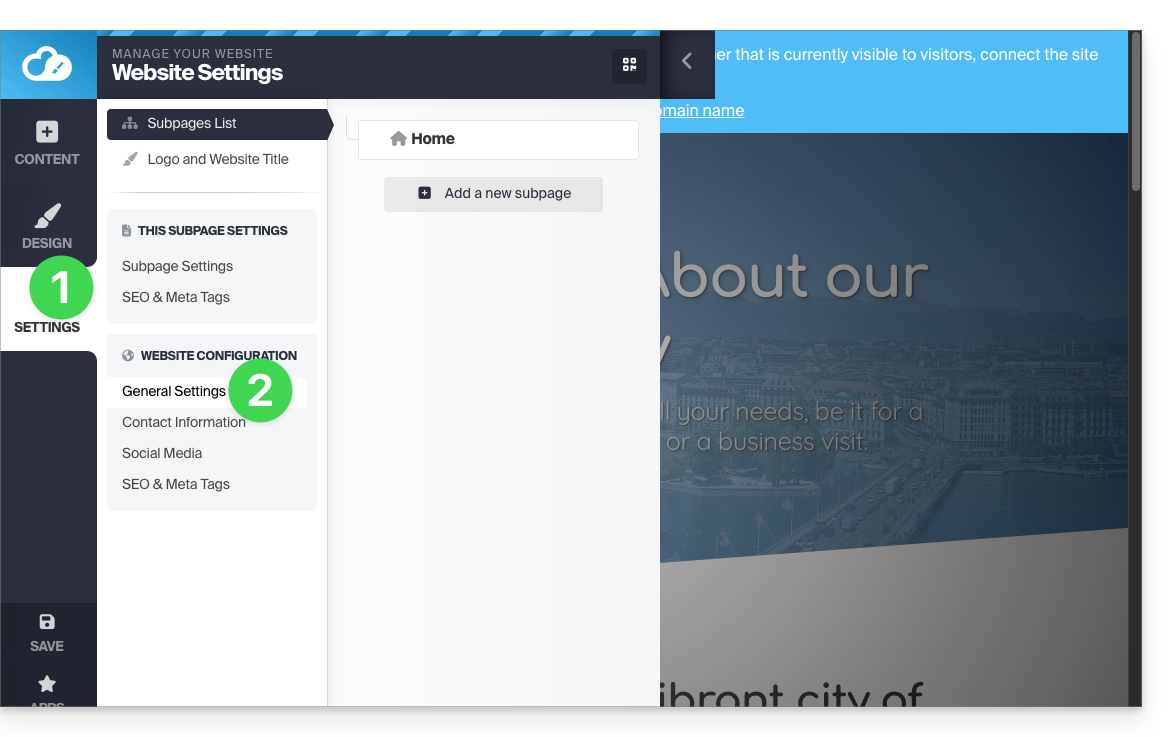
- Role para baixo até à secção Favicon e clique para escolher uma imagem:
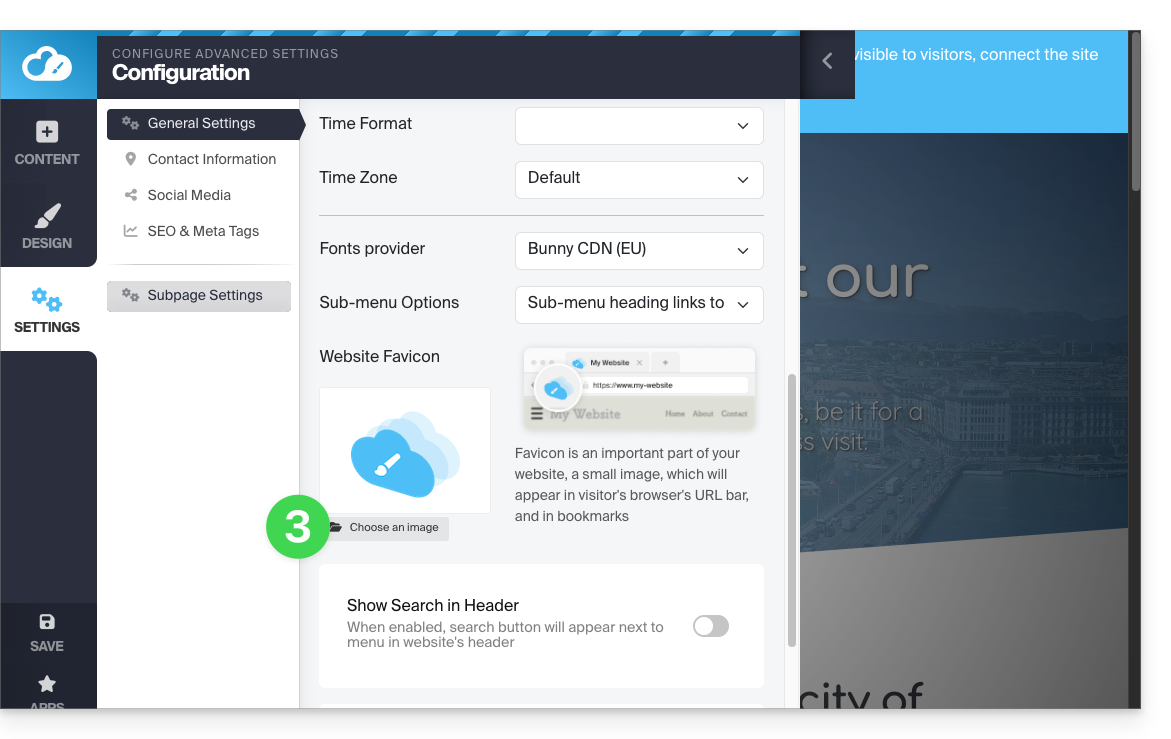
- Importe/selecione o favicon no seu disco rígido:
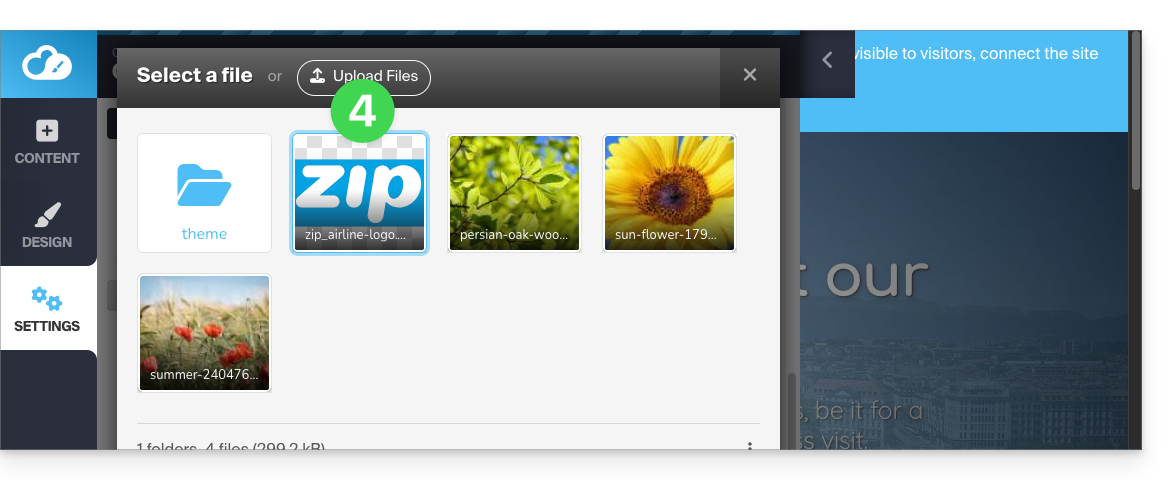
- Salve as alterações na parte inferior da página:
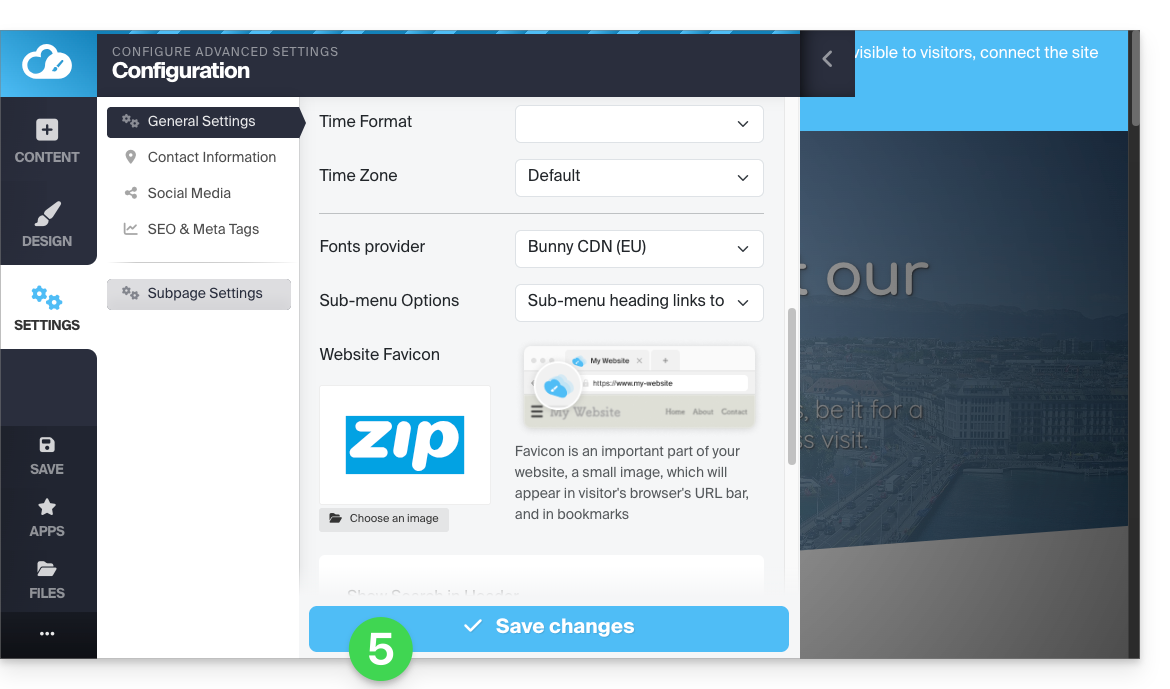
- Visualize o resultado no seu navegador (se necessário, numa nova janela em modo de navegação privada, por exemplo):
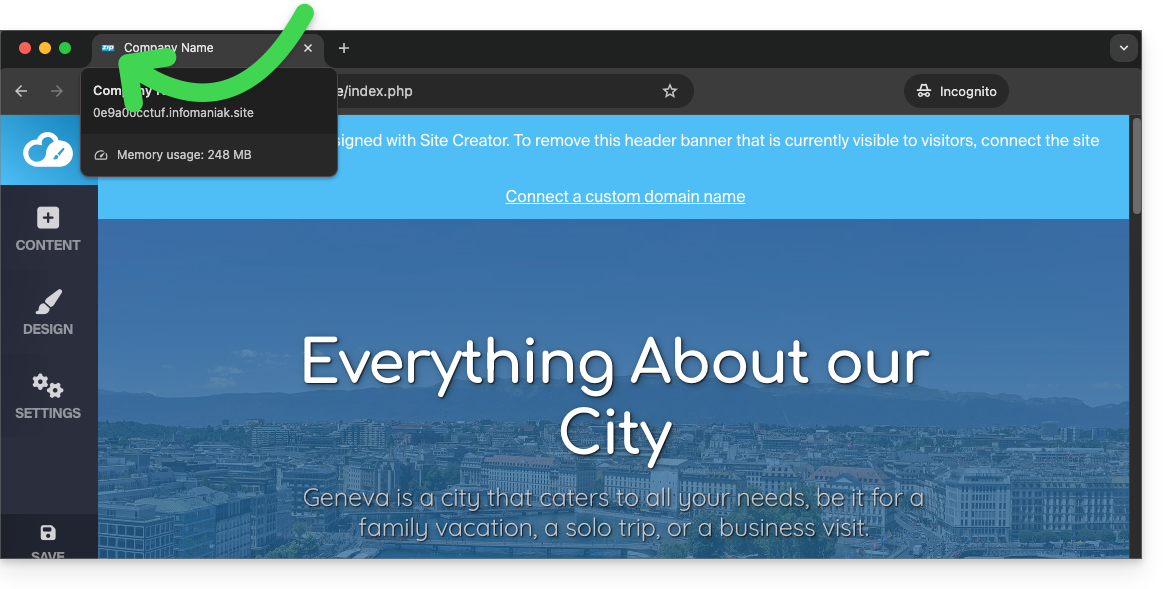
Link para esta FAQ: https://faq.infomaniak.com/2723
Esta seção de perguntas frequentes foi útil?
Este guia explica como adicionar e configurar um formulário de contacto no seu site criado com o Site Creator da Infomaniak.
Criar um formulário de contacto personalizado
Pré-requisitos
- Aceder ao Site Creator:
- Clique aqui para aceder à gestão do seu produto no Manager Infomaniak (precisa de ajuda?).
- Clique diretamente no nome atribuído ao Site Creator em questão.
- Clique no botão Editar o meu site para iniciar o editor:
Você pode criar um ou mais formulários para que seus visitantes possam escrever uma mensagem, inscrever-se em uma atividade ou, em resumo, preencher qualquer tipo de formulário online, com ou sem anexos:
- Clique no botão Conteúdo no menu lateral esquerdo.
- Clique em Aplicações na parte inferior da lista.
- Clique em Criador de formulários:
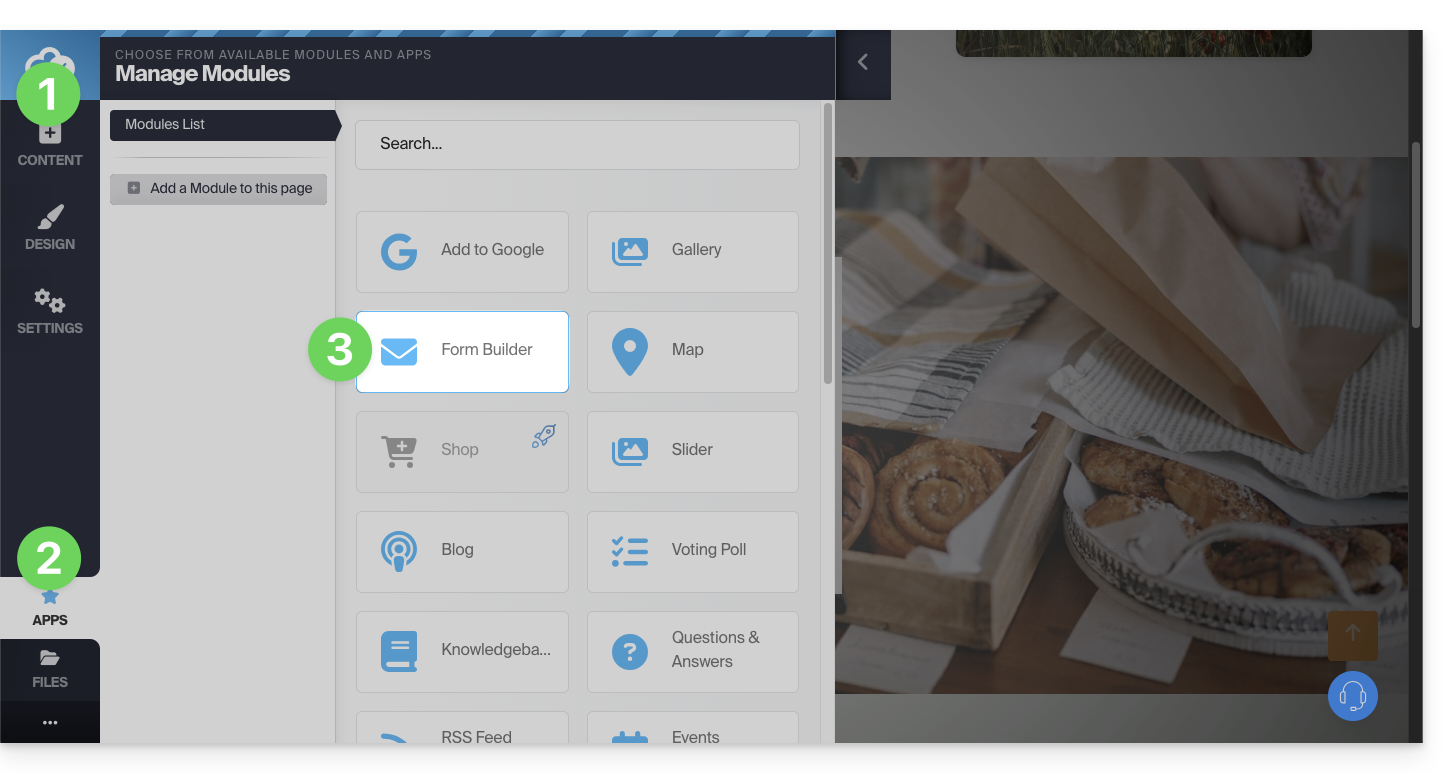
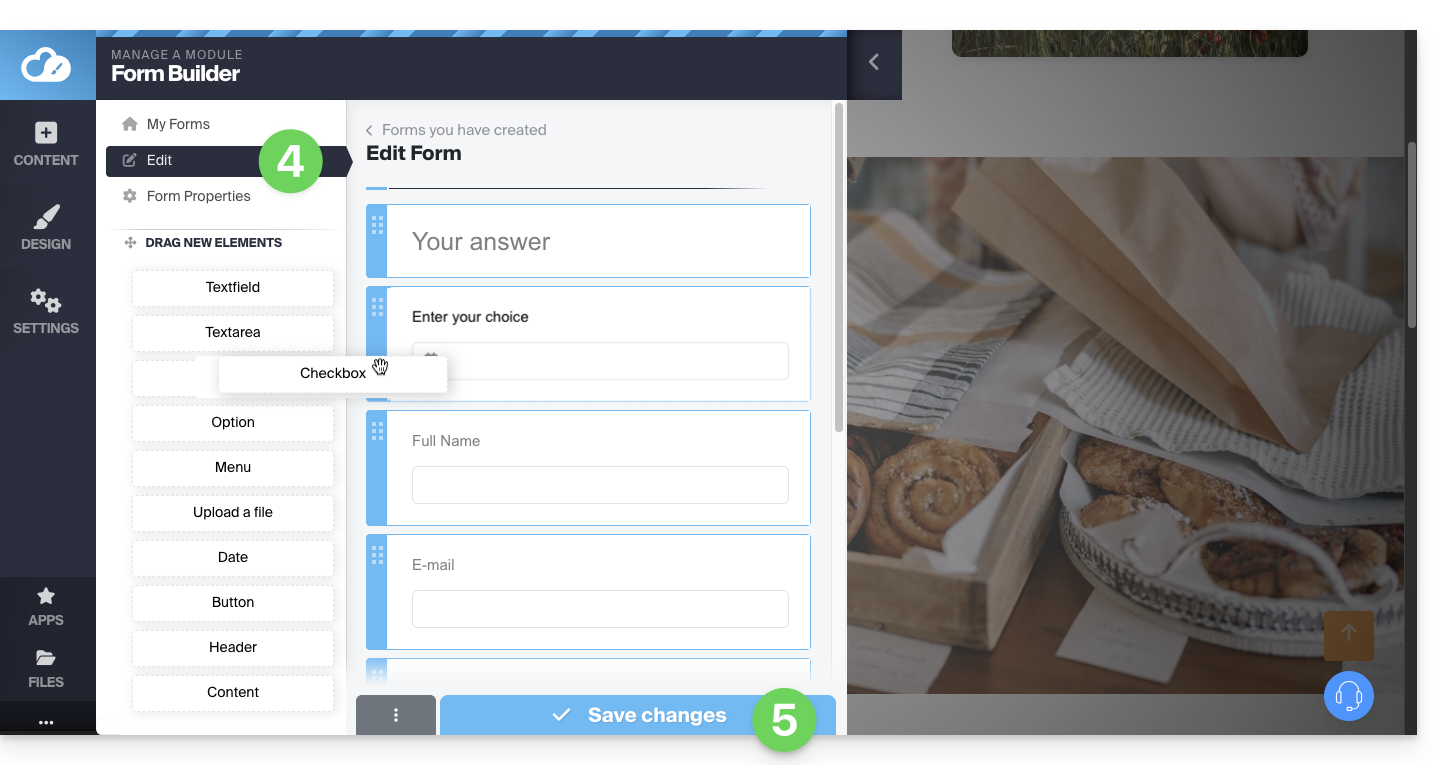
- Crie seu formulário usando os elementos à esquerda.
- Salve na parte inferior da página:
Depois de criar o primeiro formulário, pode inseri-lo clicando em no local desejado e selecionando-o: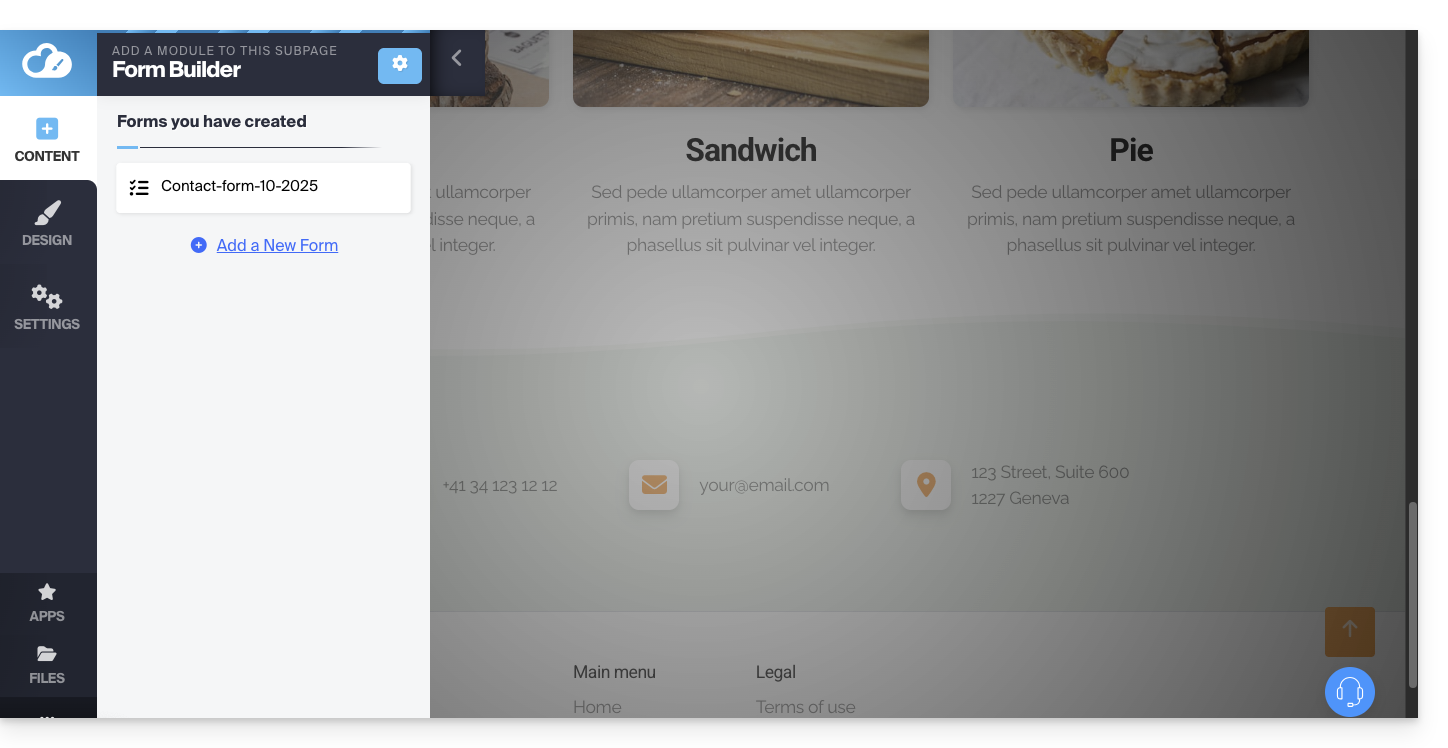
O formulário criado será inserido na sua página: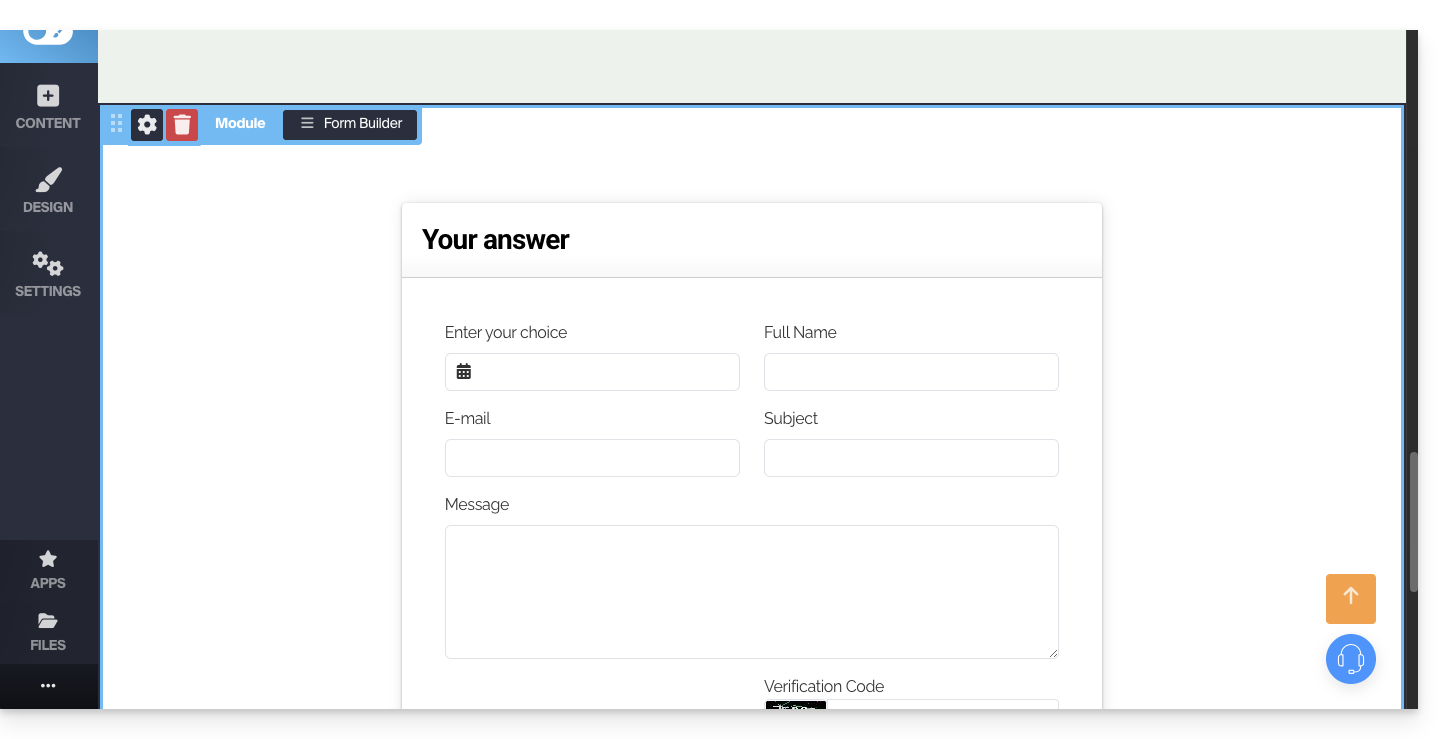
Configurações do formulário de contato
Você pode personalizar a mensagem de agradecimento, a página de redirecionamento após o envio (se houver), o endereço de e-mail utilizado e adicionar um captcha (recomendado), entre outras opções.
Para isso, passe o cursor sobre o módulo para acessar suas configurações: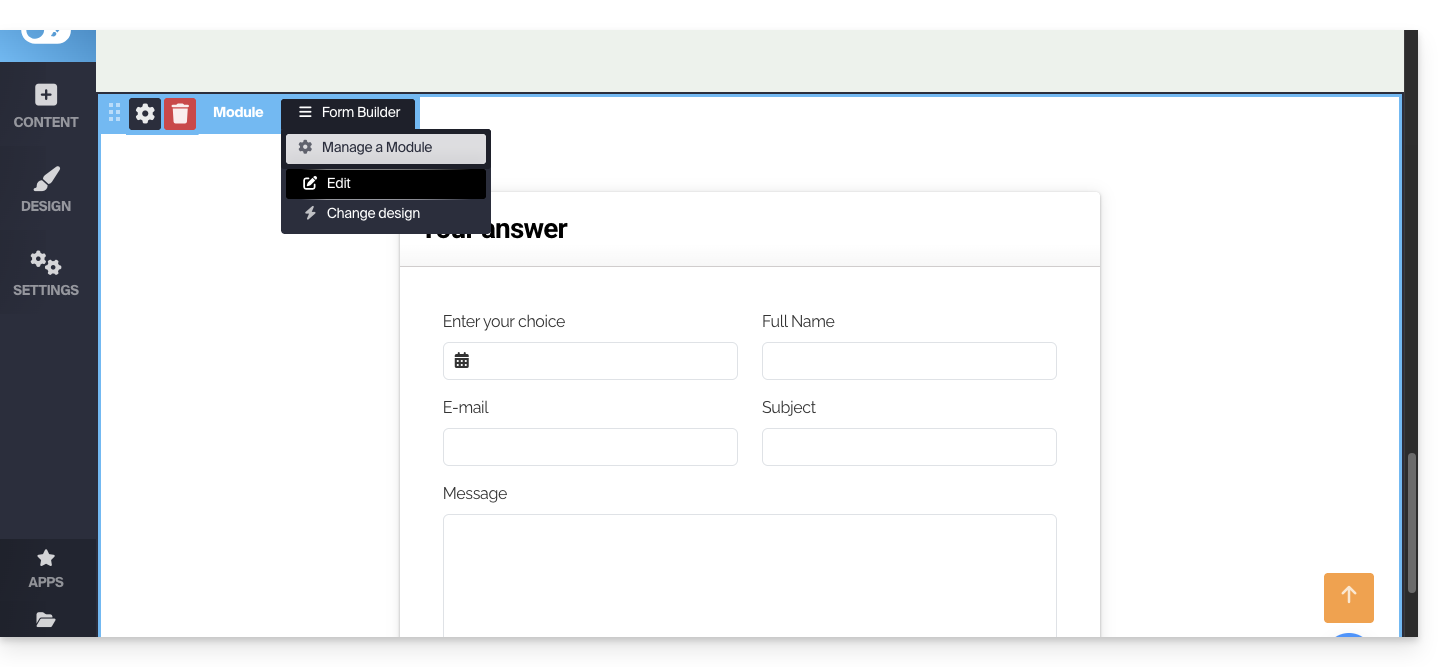
Se necessário, clique no formulário que deseja editar e, em seguida, em Propriedades do formulário: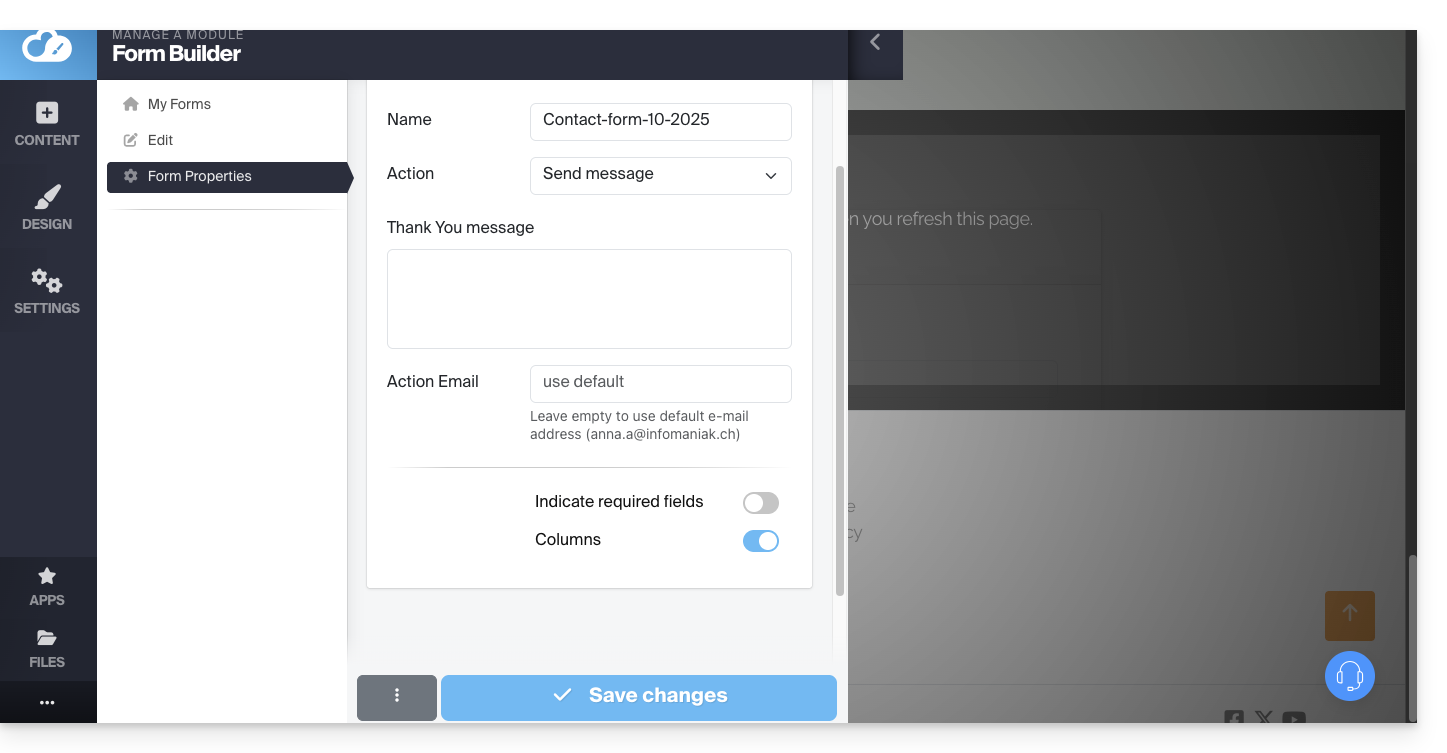
Recomenda-se alterar o método de envio predefinido.
Também pode eliminar o formulário criado para que este deixe de ser proposto:
Note que também é possível inserir um formulário de inscrição na newsletter da Infomaniakno Site Creator.
Link para esta FAQ: https://faq.infomaniak.com/2724
Esta seção de perguntas frequentes foi útil?
Este guia explica como criar galerias com as suas fotos no Site Creator da Infomaniak.
Criar uma galeria de fotos
Pré-requisitos
- Aceder ao Site Creator:
- Clique aqui para aceder à gestão do seu produto no Manager Infomaniak (precisa de ajuda?).
- Clique diretamente no nome atribuído ao Site Creator em questão.
- Clique no botão Editar o meu site para iniciar o editor:
Dentro do Site Creator:
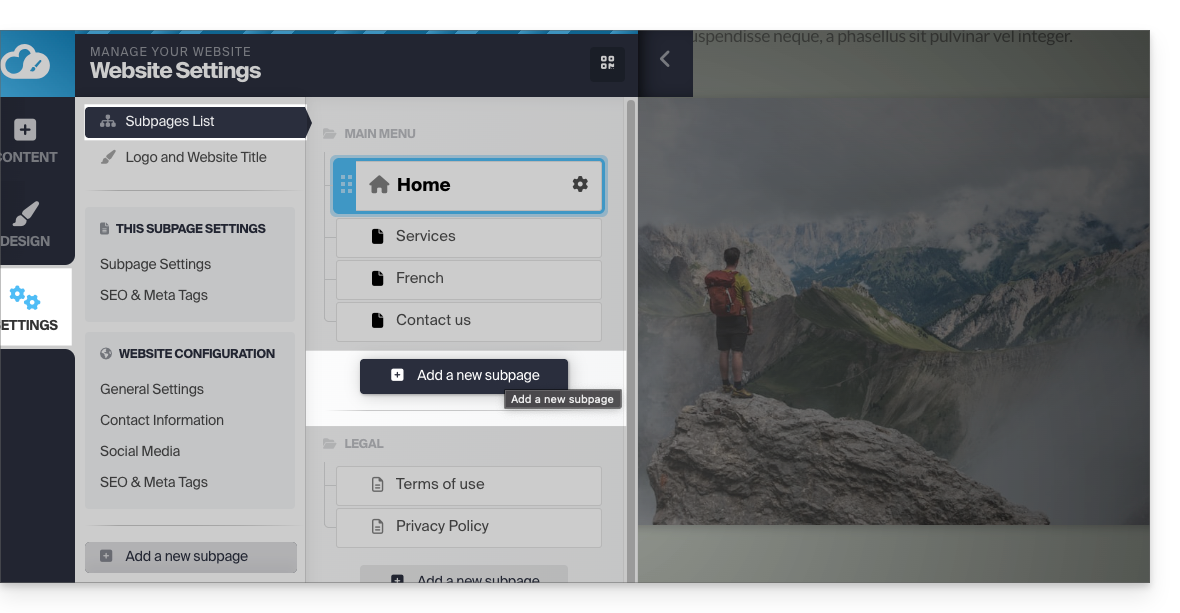
- Clique no botão Configurações no menu lateral esquerdo; a lista das suas páginas será exibida.
- Clique no botão Adicionar página abaixo da estrutura existente:
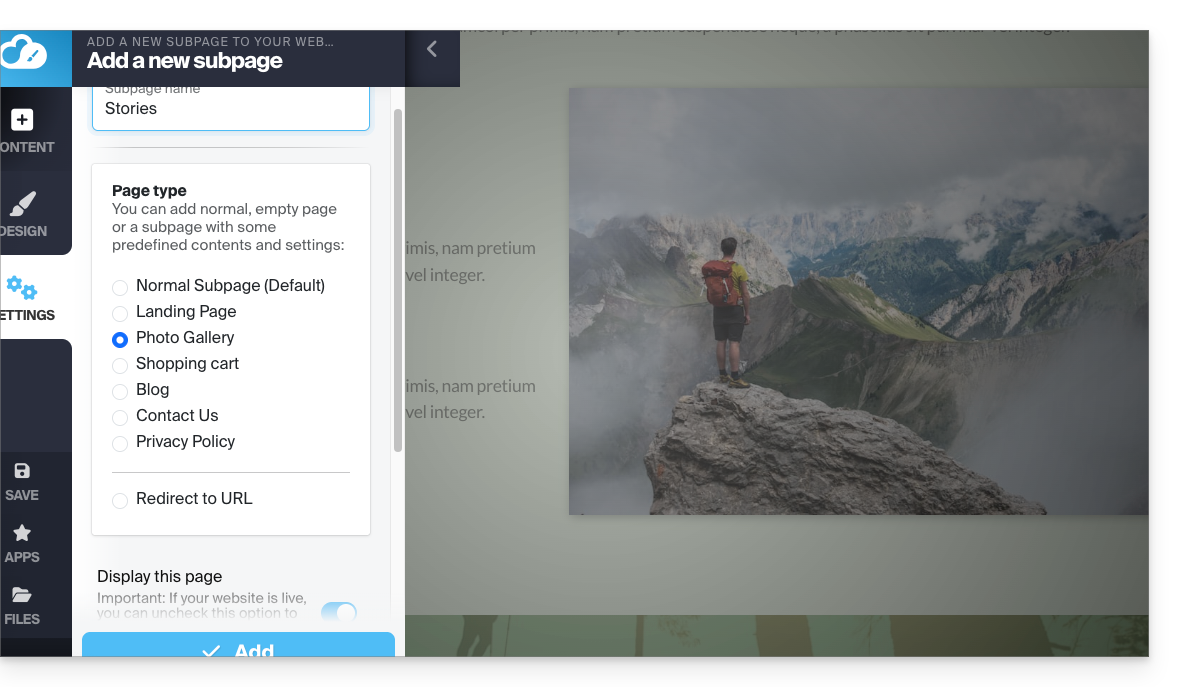
- Ative a opção Mostrar mais opções para escolher o tipo de página GALERIA DE FOTOS:
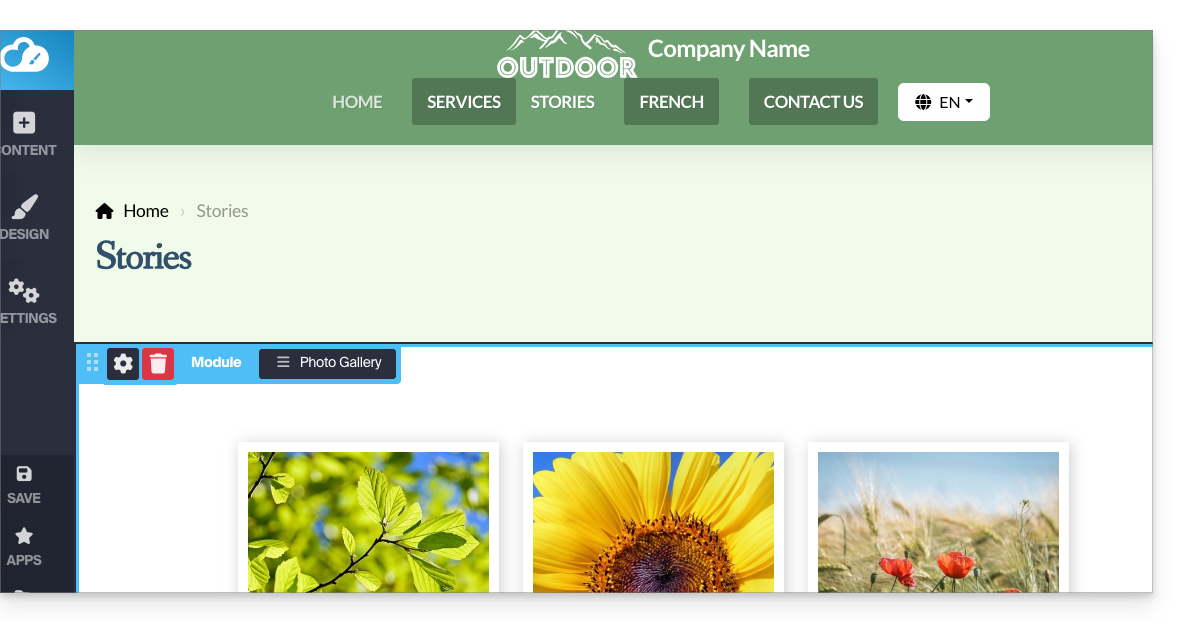
- Valide, a nova página com o módulo de galeria de fotos é exibida na tela:
Configurar a galeria de fotos
Para isso:
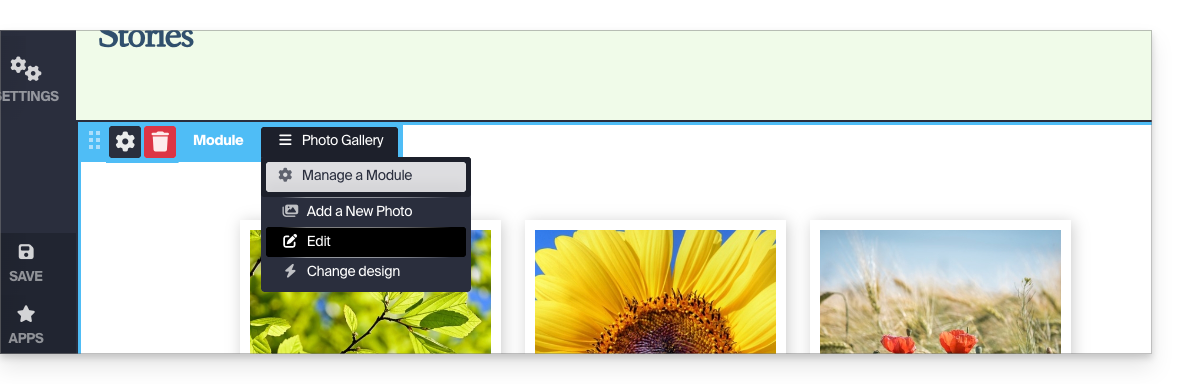
- Passe o cursor sobre o módulo para acessar as configurações da galeria.
- Clique em Editar:
Álbuns de fotos
Pode criar galerias de fotos adicionais para os seus diferentes álbuns: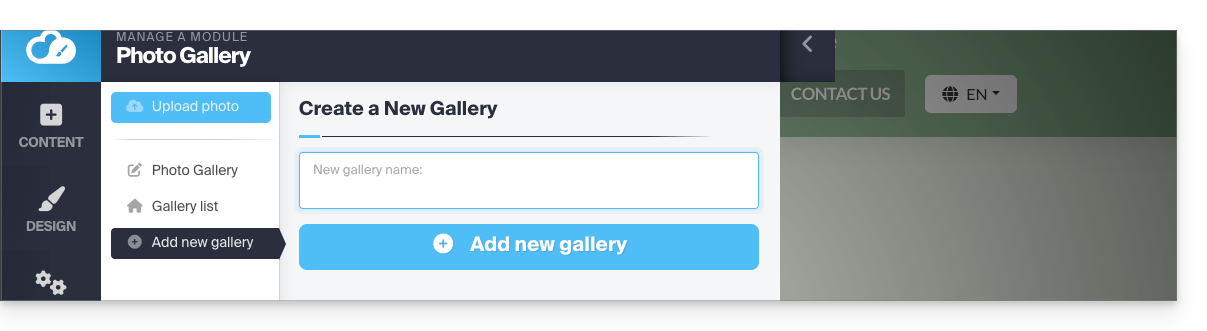
Alterar a ordem das fotos
Quando a sua galeria é criada, cada nova foto que carrega a partir do seu computador é adicionada ao final da lista de fotos. Pode alterar facilmente esta ordem arrastando as fotos com o rato quando edita uma galeria: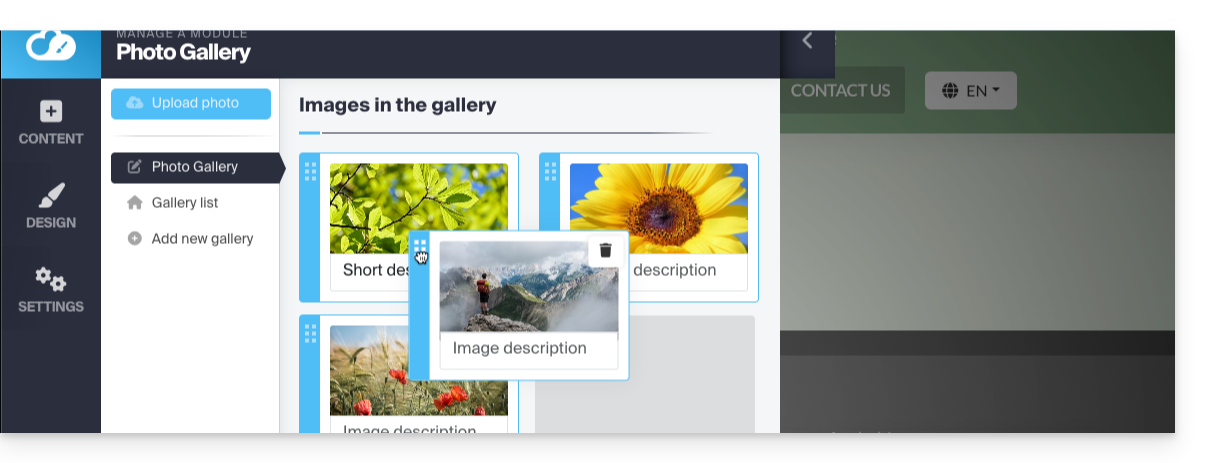
Além disso, pode adicionar uma descrição a qualquer uma das suas fotos. Embaixo de cada imagem, notará o campo "Descrição da imagem". Comece a digitar a sua descrição e pressione o botão verde para guardar as alterações: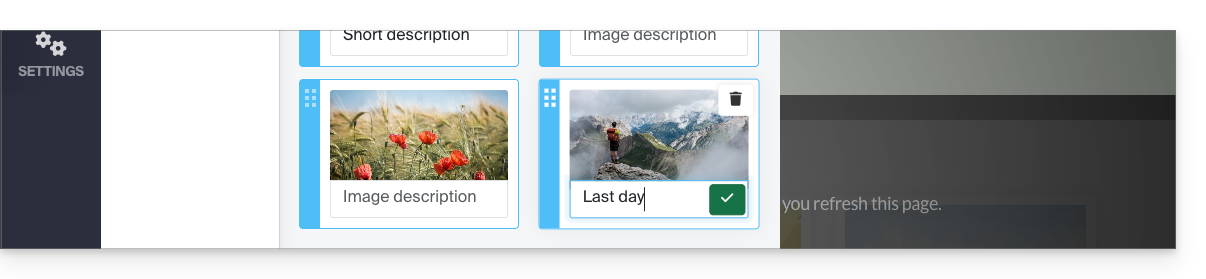
Adicionar um widget de apresentação de imagens
Para configurar um ou mais widgets de apresentação dinâmica, nos quais uma ou mais fotos deslizarão lateralmente (sem qualquer relação com as galerias de fotos descritas acima):
- Clique no botão Aplicações no menu lateral esquerdo.
- Clique em Slider:
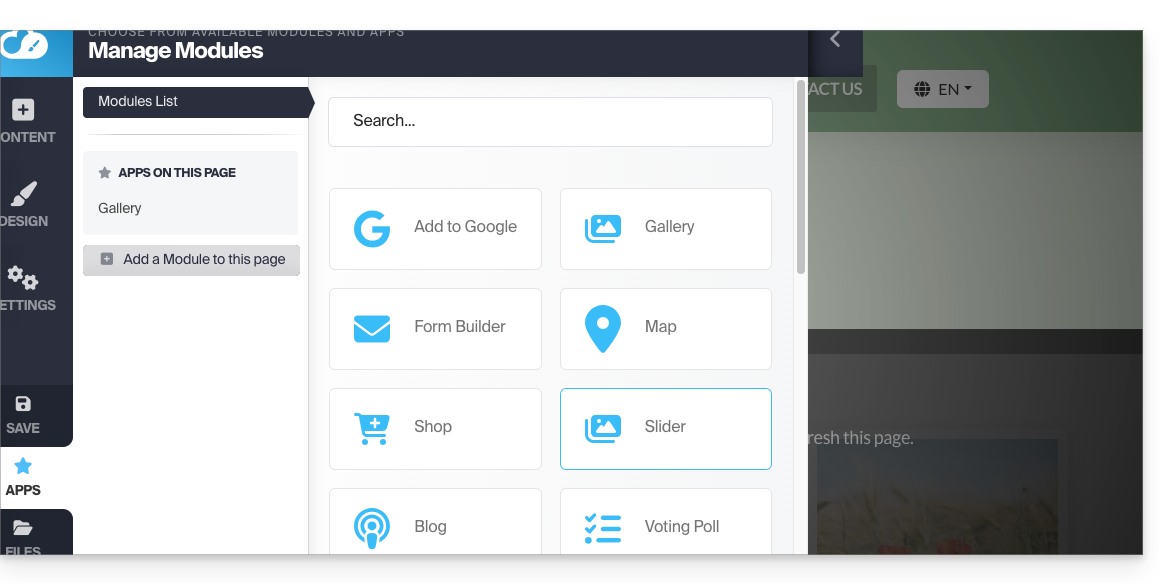
- Configure o widget de acordo com as suas preferências.
- Insira o widget configurado no local desejado, clicando em Conteúdo e, em seguida, em Apps, e escolha Slider:
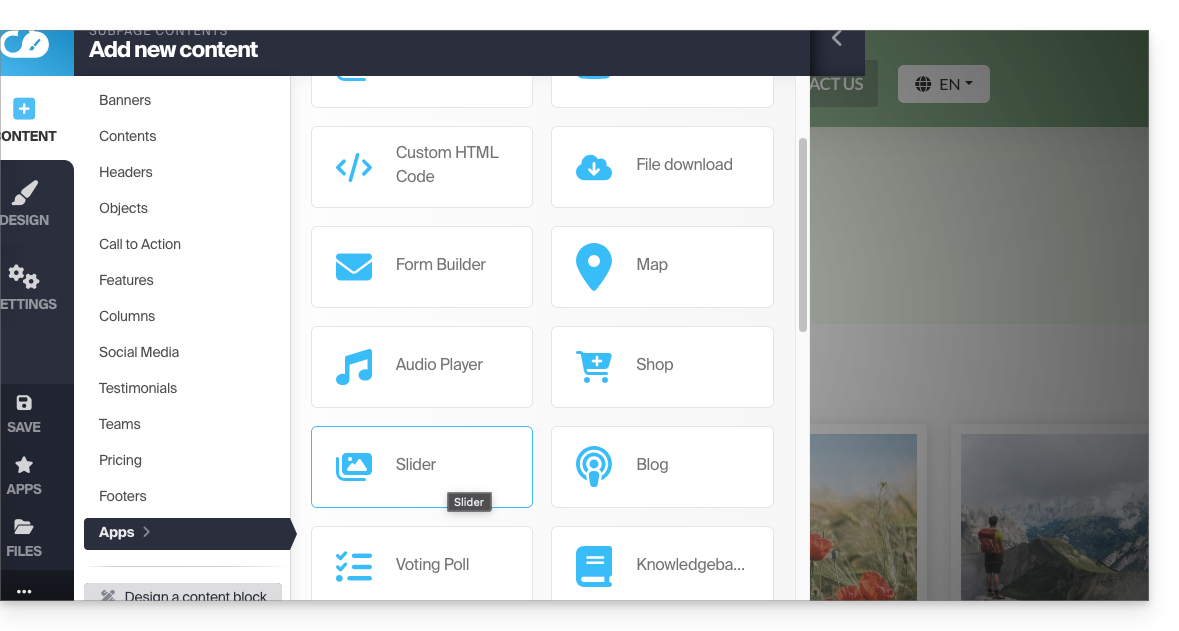
- Selecione o slider criado para inseri-lo na página:
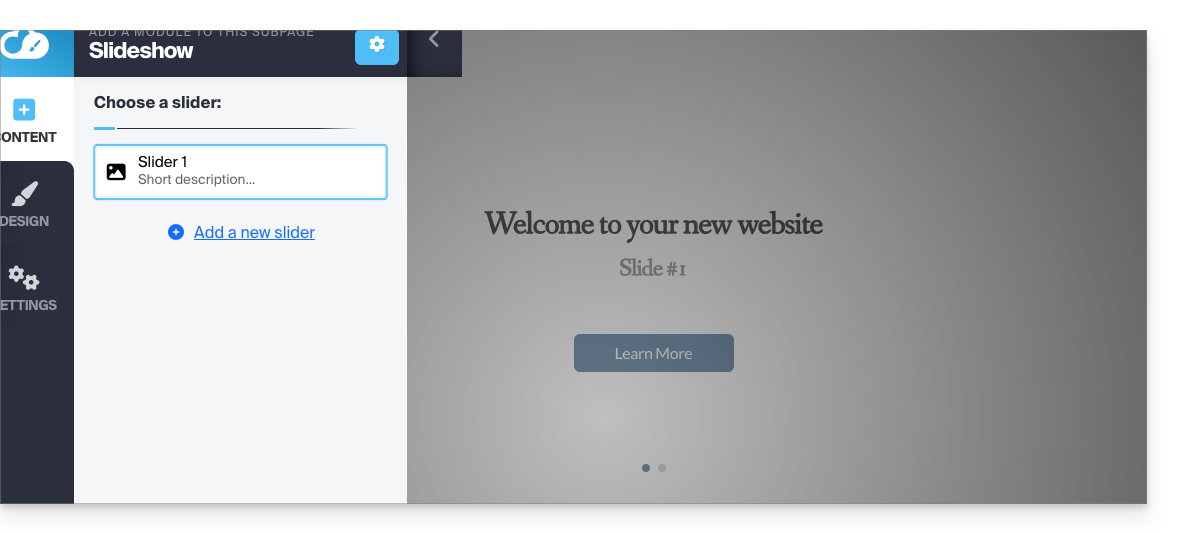
Link para esta FAQ: https://faq.infomaniak.com/2725
Esta seção de perguntas frequentes foi útil?
Este guia explica como adicionar e configurar um módulo de blog no seu site criado com o Site Creator da Infomaniak.
Introdução
- Não existe uma funcionalidade que permita a gestão de múltiplos utilizadores na secção Blog (nem no Site Creator).
- Vários utilizadores da mesma Organização, com acesso ao Site Creator (através da sua autorização de acesso ao alojamento web), poderão publicar no blog, mas a identidade do autor permanecerá a mesma para todos.
- É possível obter ajuda da inteligência artificial Euria, como acontece nas demais páginas do Site Creator.
- Consulte este outro guia sobre o modelo utilizado pelo assistente de redação e as responsabilidades de cada um.
Começar um blog no Site Creator
Pré-requisitos
- Aceder ao Site Creator:
- Clique aqui para aceder à gestão do seu produto no Manager Infomaniak (precisa de ajuda?).
- Clique diretamente no nome atribuído ao Site Creator em questão.
- Clique no botão Editar o meu site para iniciar o editor:
Dentro do Site Creator, na página onde deseja inserir os seus futuros artigos de blog:
- Clique no botão + localizado abaixo de um bloco já inserido:
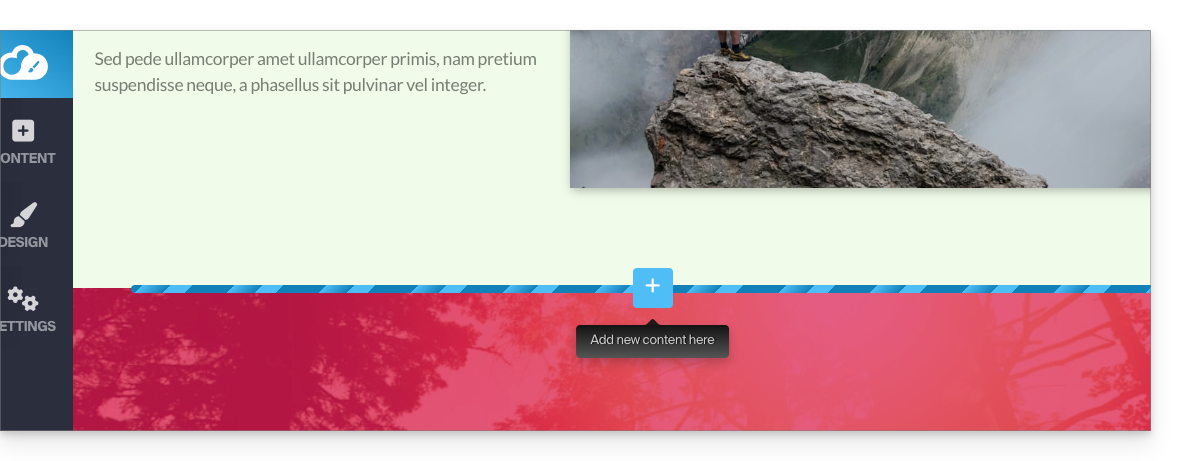
- Clique em Aplicações (na guia Conteúdo que se abriu quando clicou para adicionar o bloco visual).
- Clique no módulo Blog:
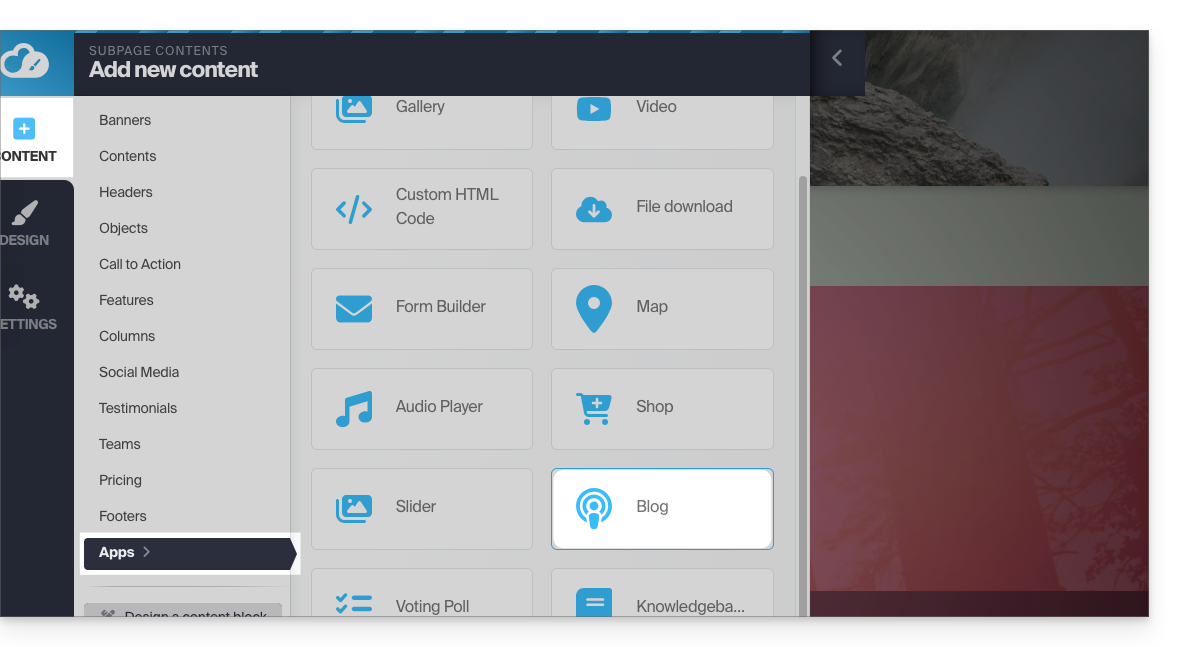
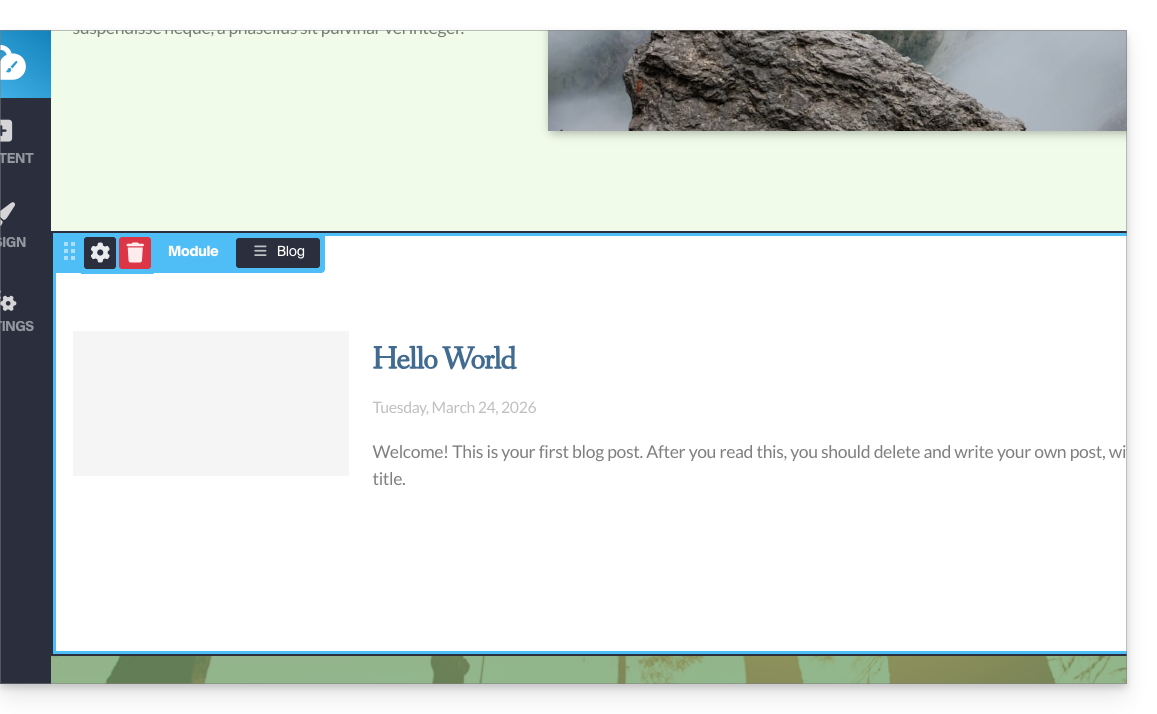
- Se esta for a primeira vez que insere este módulo, verá o seguinte bloco visual com um exemplo do primeiro artigo publicado (vá para o ponto 4 abaixo):
- Se já testou o módulo Blog anteriormente e o removeu das suas páginas, verá o seguinte:
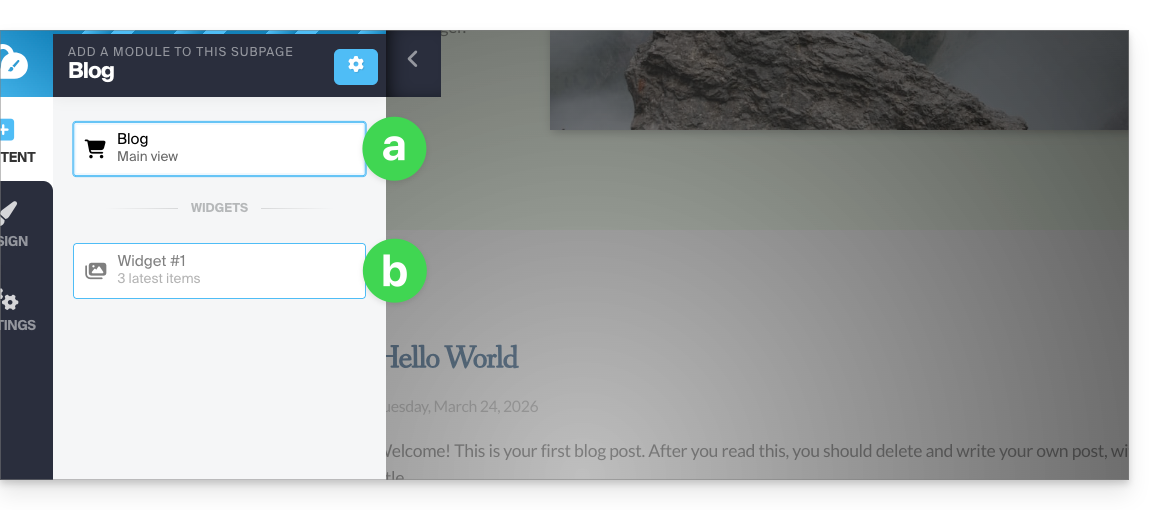
- Clique na primeira opção para inserir o bloco principal.
- Clique na segunda opção para exibir um bloco com os 3 últimos artigos publicadosapenas se já tiver um bloco principal inserido noutro local do site.
- Se esta for a primeira vez que insere este módulo, verá o seguinte bloco visual com um exemplo do primeiro artigo publicado (vá para o ponto 4 abaixo):
- Depois de inserir o módulo Blog, passe o cursor sobre o bloco e clique no botão de menu com três linhas horizontais ☰ Blog e, em seguida, em Novo artigo para inserir um artigo em branco:
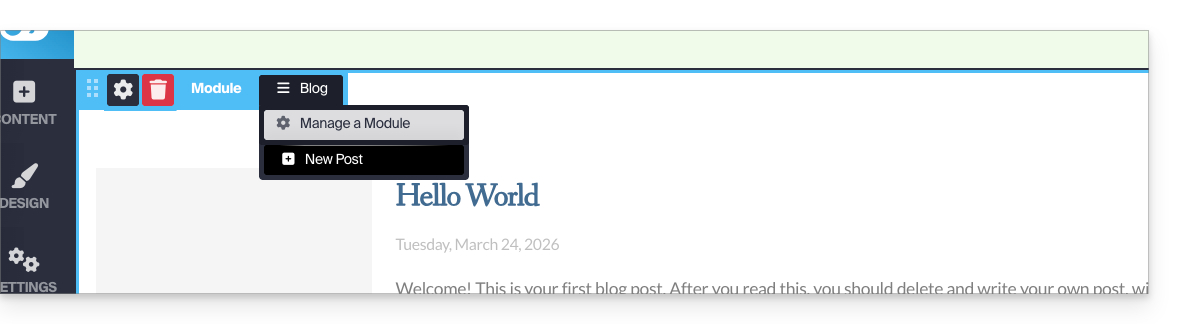
Publicar conteúdo utilizando inteligência artificial
Para redigir conteúdo e, se necessário, aprimorar seus textos:
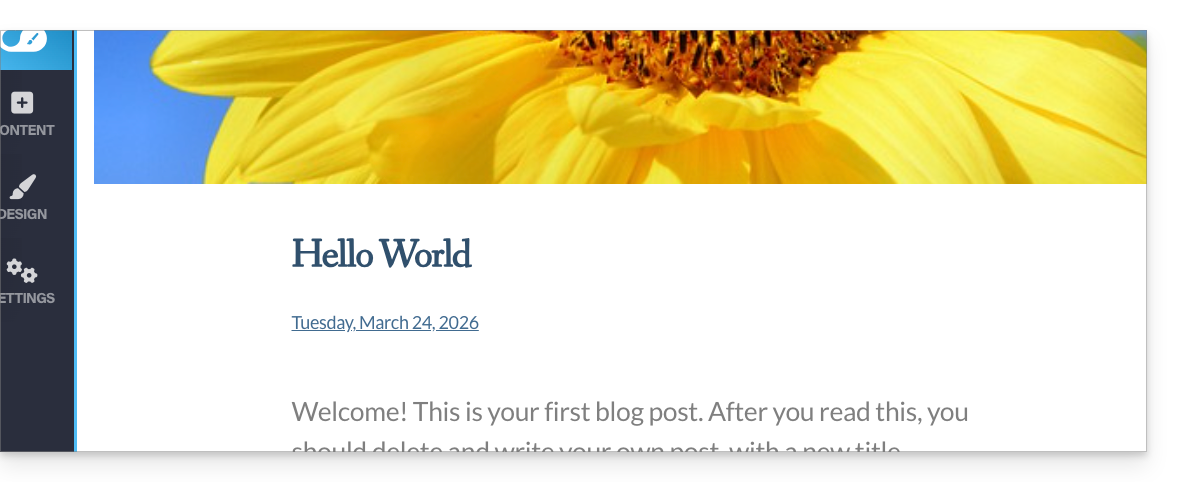
- Escolha uma imagem para o banner, insira um título, um subtítulo opcional e o corpo do artigo com diferentes formatações:
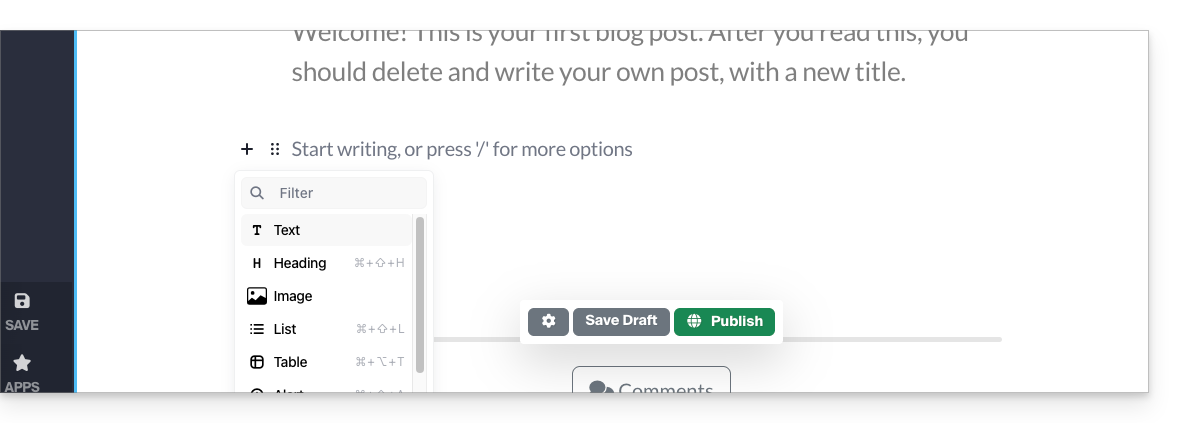
- Pressione o sinal + ao lado do texto do artigo ou a tecla Tab do seu teclado:
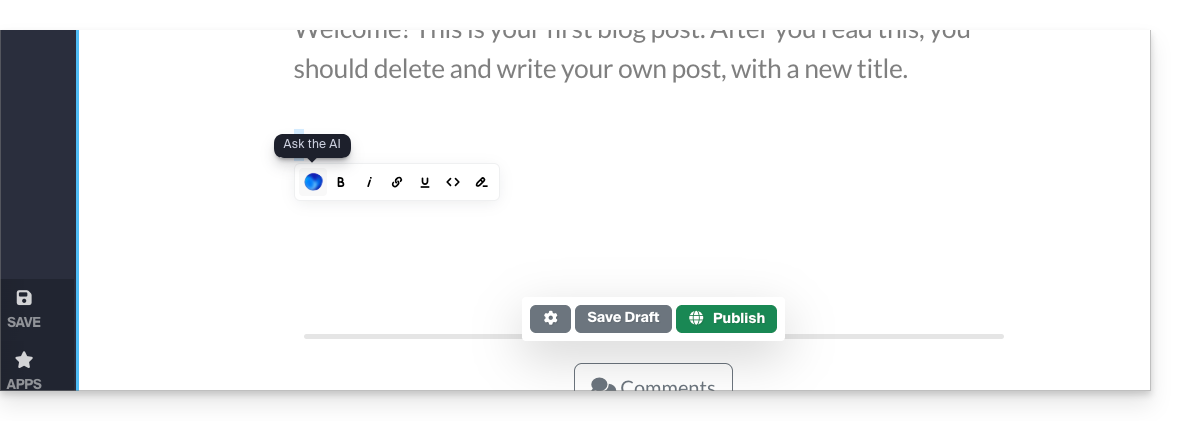
- Selecione o conteúdo e clique nele para exibir uma barra de ferramentas de formatação de texto.
- A partir desta barra de ferramentas, aceda às funcionalidades oferecidas pela IA (tradução, reformulação, correção, etc.):
- Publique clicando no botão Publicar (ou guarde o rascunho para mais tarde).
Editar o blog
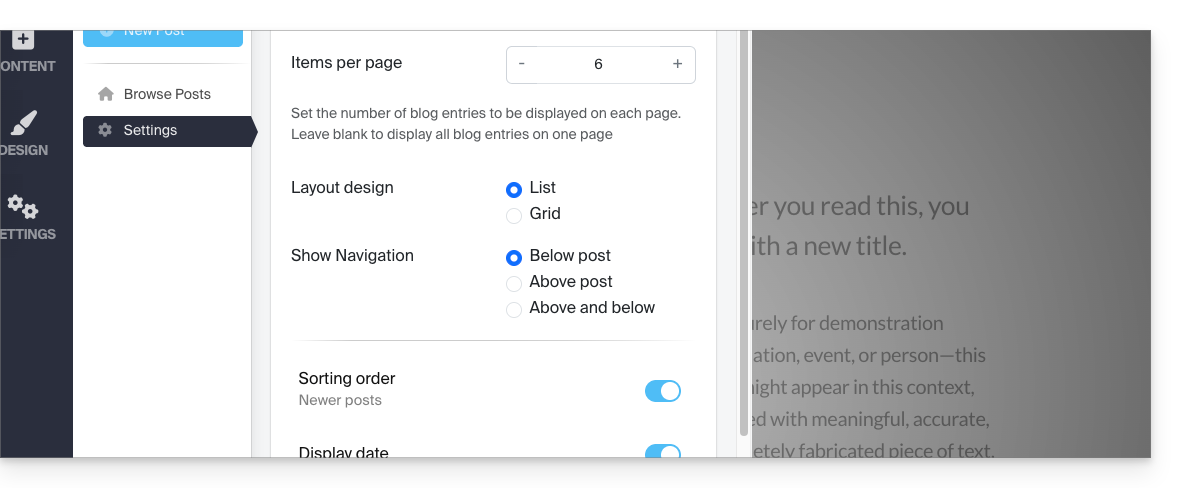
Para ativar os comentários, as notificações por e-mail, o layout em formato de lista e a ordenação dos mesmos, etc.:
- Clique em Aplicações no menu lateral esquerdo.
- Clique em Blog.
- Clique em Configurações e ajuste suas preferências, não se esquecendo de salvar na parte inferior da página:
Editar artigos do blog
Onde quer que esteja enquanto edita o seu site, basta ir ao menu Aplicações no canto inferior esquerdo e, em seguida, clicar em Blog: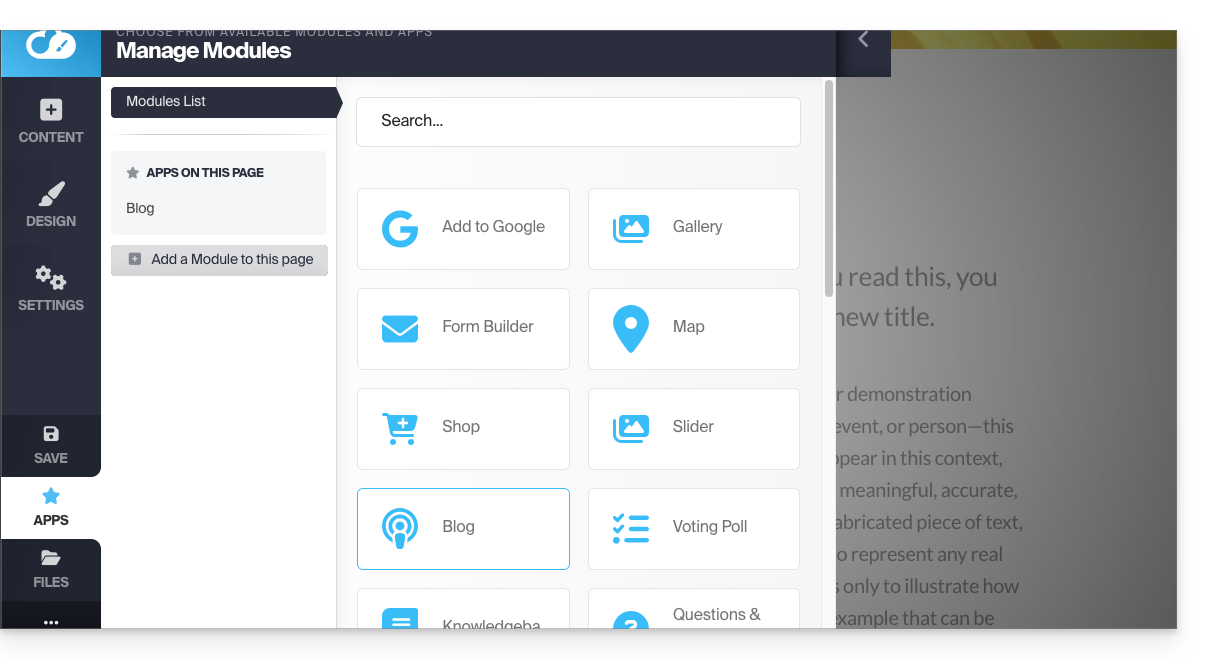
Para editar o conteúdo do seu artigo, clique em Gerir artigos no menu lateral esquerdo, passe o cursor sobre o artigo e clique no ícone de lápis ✎: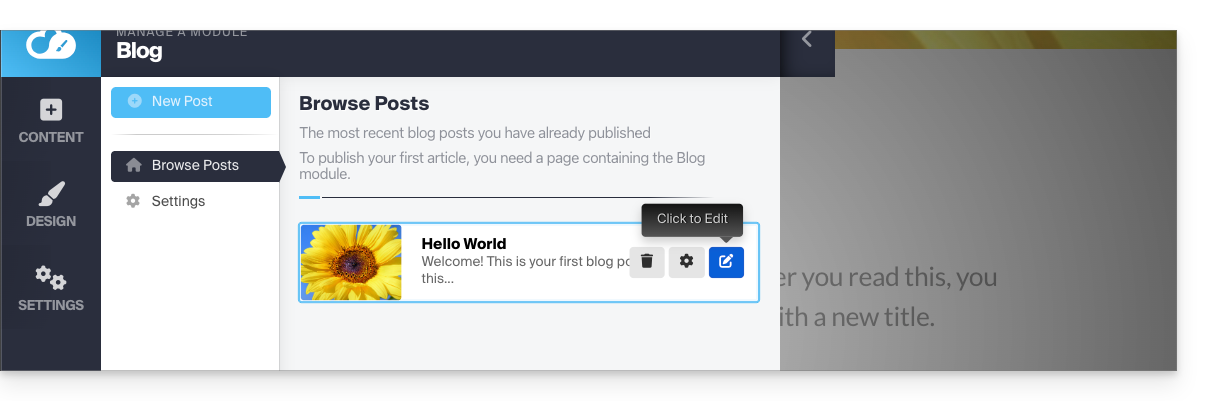
Para configurar um dos itens (veja abaixo), passe o cursor sobre ele e clique no ícone de engrenagem: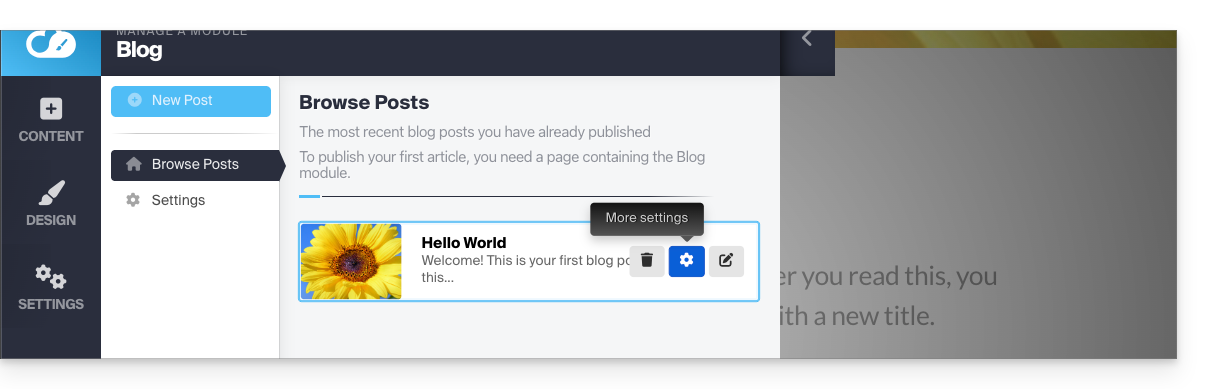
Etiquetar, arquivar ou definir a data de expiração de um item
Um artigo de blog pode desaparecer da sua lista de artigos, seja atribuindo-lhe uma data de validade, seja arquivando-o imediatamente. Também é possível adicionar uma etiqueta que será clicável para o visitante e facilitará a navegação entre os artigos: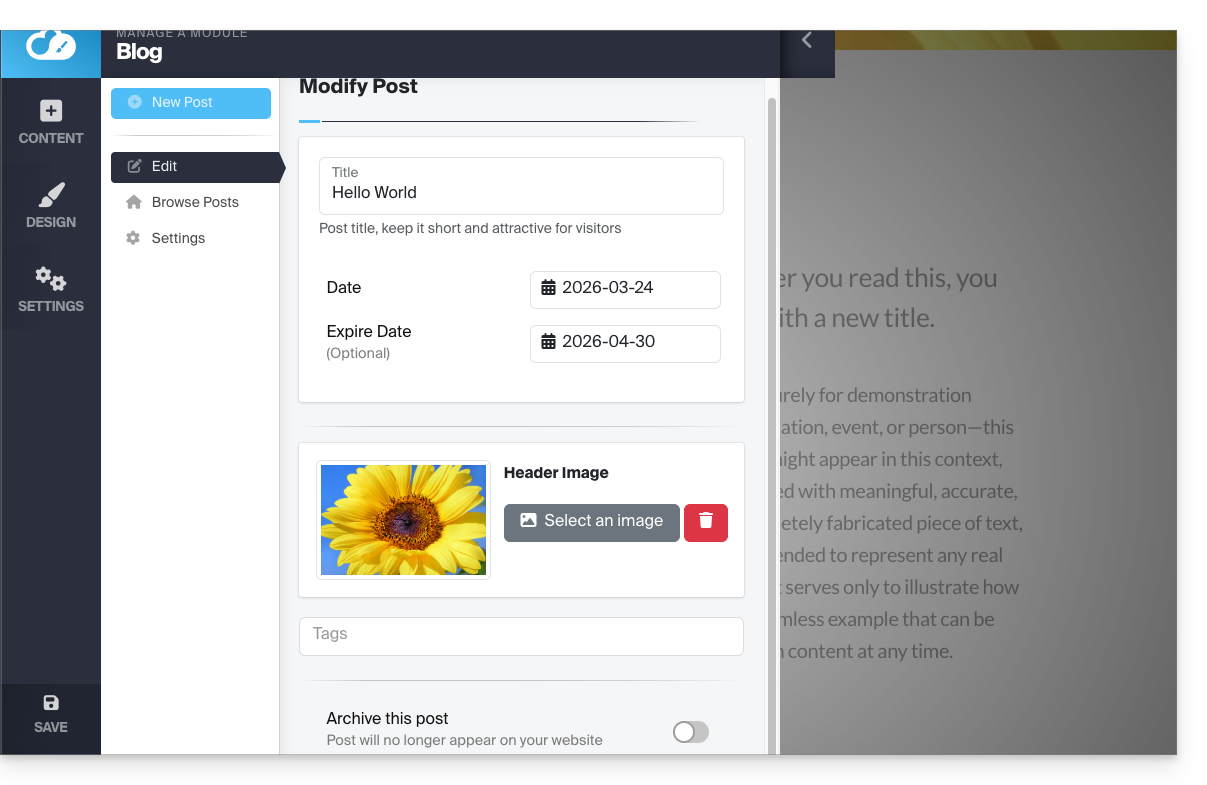
Não se esqueça de guardar as alterações na parte inferior da página.
Data dos artigos
Por padrão, os novos artigos do blog serão adicionados com a data de "hoje", mas é possível modificá-la:
- Passe o cursor sobre o link da data e clique nele (diretamente no artigo):
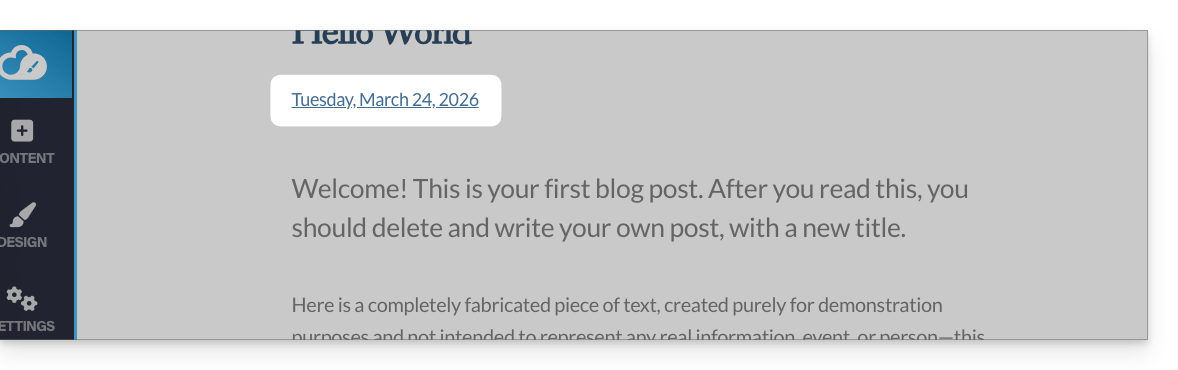
- Escolha uma nova data.
Link para esta FAQ: https://faq.infomaniak.com/2726
Esta seção de perguntas frequentes foi útil?
Este guia para o Site Creator da Infomaniak aborda o tema dos cookies do navegador.
Introdução
- Por padrão, quando o seu site é novo, nenhum cookie deve ser armazenado nos dispositivos dos seus visitantes e não há funcionalidades de rastreamento para anúncios ou marketing.
- Como administrador do site, alguns dados são armazenados nos seus próprios cookies (como as informações que indicam que você é um administrador do site).
- Se adicionar aplicações/módulos integrados ao seu site, poderão ser utilizados cookies; por exemplo, com o Formulário de pesquisa: se adicionar um módulo de pesquisa ao seu site, este utilizará cookies quando o visitante do site votar (para lembrar que já votou).
Notificação para o visitante
Pré-requisitos
- Aceder ao Site Creator:
- Clique aqui para aceder à gestão do seu produto no Manager Infomaniak (precisa de ajuda?).
- Clique diretamente no nome atribuído ao Site Creator em questão.
- Clique no botão Editar o meu site para iniciar o editor:
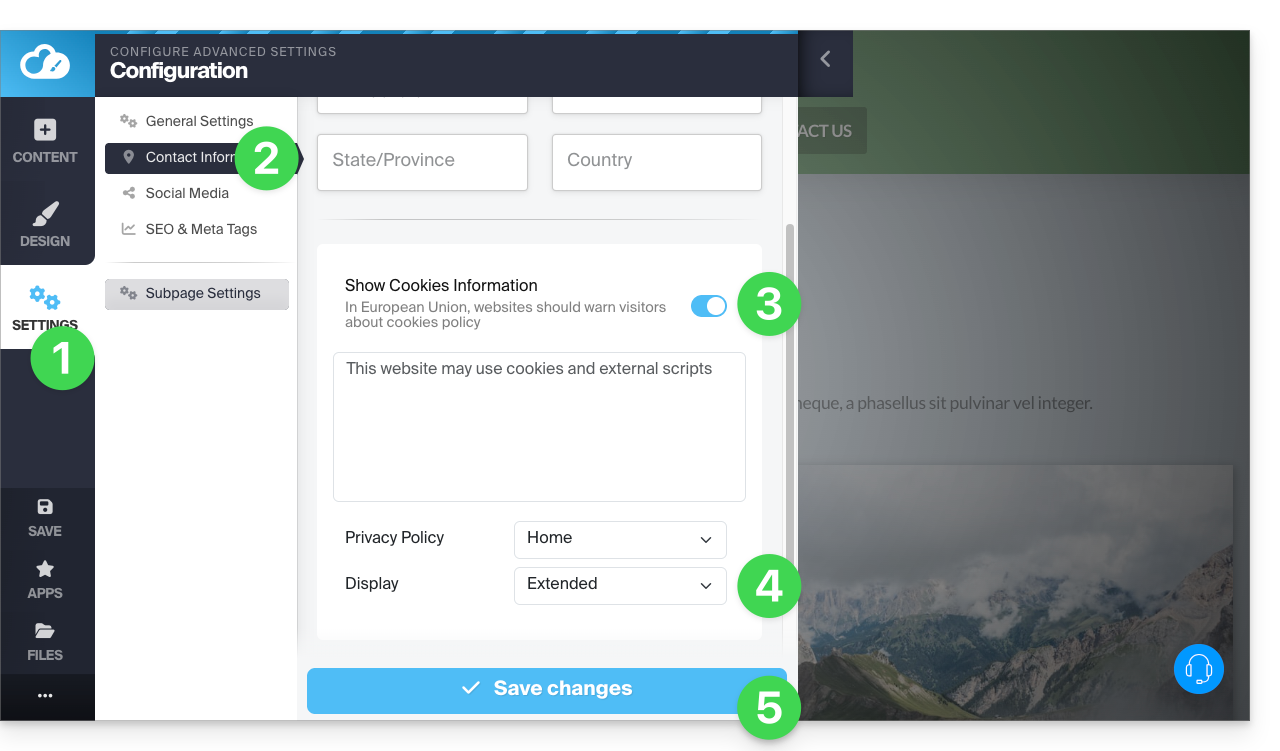
Pode ativar uma mensagem de consentimento para cookies que será exibida em uma pequena janela pop-up na parte inferior da telapara todos os novos visitantes do seu site:
- Clique no botão Configurações no menu lateral esquerdo.
- Clique em Dados de contato em Configuração do site.
- Ative a opção de informações sobre cookies para configurar a breve mensagem e o URL para informações adicionais.
- Defina o tipo de visualização, expandida ou não (veja mais abaixo).
- Salve as alterações na parte inferior da página:
Configurações adicionais
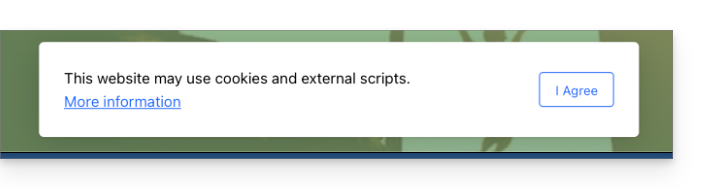
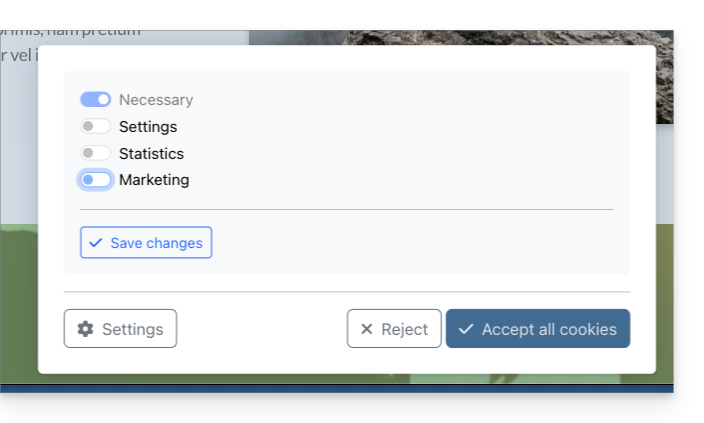
A mensagem de consentimento pode ser configurada por padrão ou de forma mais detalhada, ao clicar em Exibir. O resultado obtido é o seguinte:
- padrão:
- ampliado:
Link para esta FAQ: https://faq.infomaniak.com/2727
Esta seção de perguntas frequentes foi útil?
Este guia explica como evitar publicar diretamente as modificações em uma página do Site Creator da Infomaniak.
Introdução
- O modo rascunho permite não publicar as seguintes modificações:
- adição de um novo bloco de conteúdo através do menu Conteúdo
- modificações visuais ou textuais de um bloco de conteúdo
- remoção de um bloco de conteúdo
- O modo rascunho não se aplica a:
- alterações globais de design, através do menu Design (cores, fontes…)
- modificações de conteúdos relacionados com aplicações (perguntas/respostas, comércio eletrónico…)
- modificações das configurações globais, através do menu Configurações (páginas, idiomas…)
- subpáginas da página que está a despublicar
1. Fazer backup sem publicar
Pré-requisitos
- Aceder ao Site Creator:
- Clique aqui para aceder à gestão do seu produto no Manager Infomaniak (precisa de ajuda?).
- Clique diretamente no nome atribuído ao Site Creator em questão.
- Clique no botão Editar o meu site para iniciar o editor:
Pode colocar uma página no modo rascunho para efetuar alterações de texto ou outras alterações no conteúdo de uma página que não serão visíveis em tempo real, até ao momento em que decidir colocar o site novamente no modo de publicação em tempo real:
- Clique no botão ... localizado na parte inferior do menu lateral esquerdo para expandir as opções de publicação e visualização.
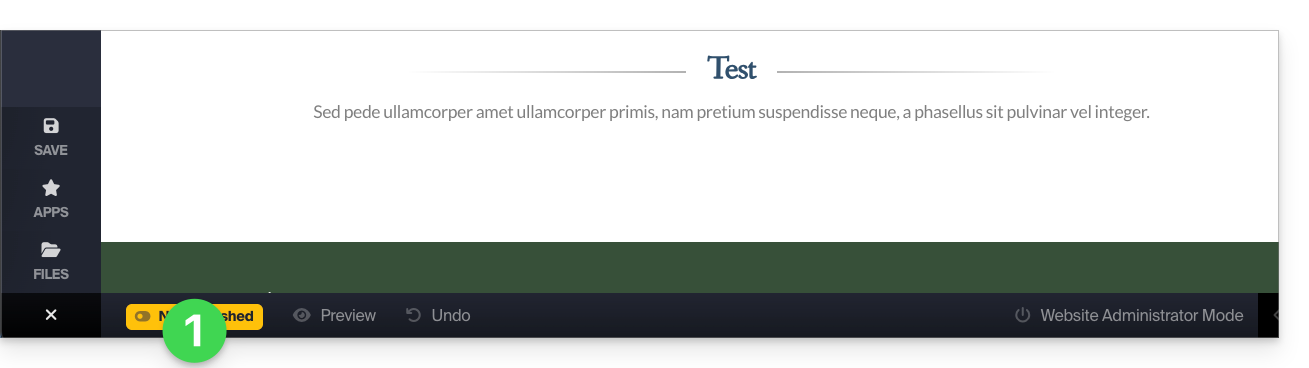
- Clique em Ao Vivo para alternar para o modo Não Publicado:
- Agora, o modo amarelo exibido na parte inferior indica que todas as suas modificações (apenas nesta página) não serão exibidas em tempo real (ao contrário do modo Em tempo real / Live), pois não serão publicadas automaticamente:

- As modificações serão salvas em um rascunho, mesmo que você saia da página ou do editor…
- No modo rascunho, você pode trabalhar na página, adicionar texto, salvá-lo, sair, retornar para continuar editando, e esse trabalho não será publicado até que você decida explicitamente (veja mais abaixo):
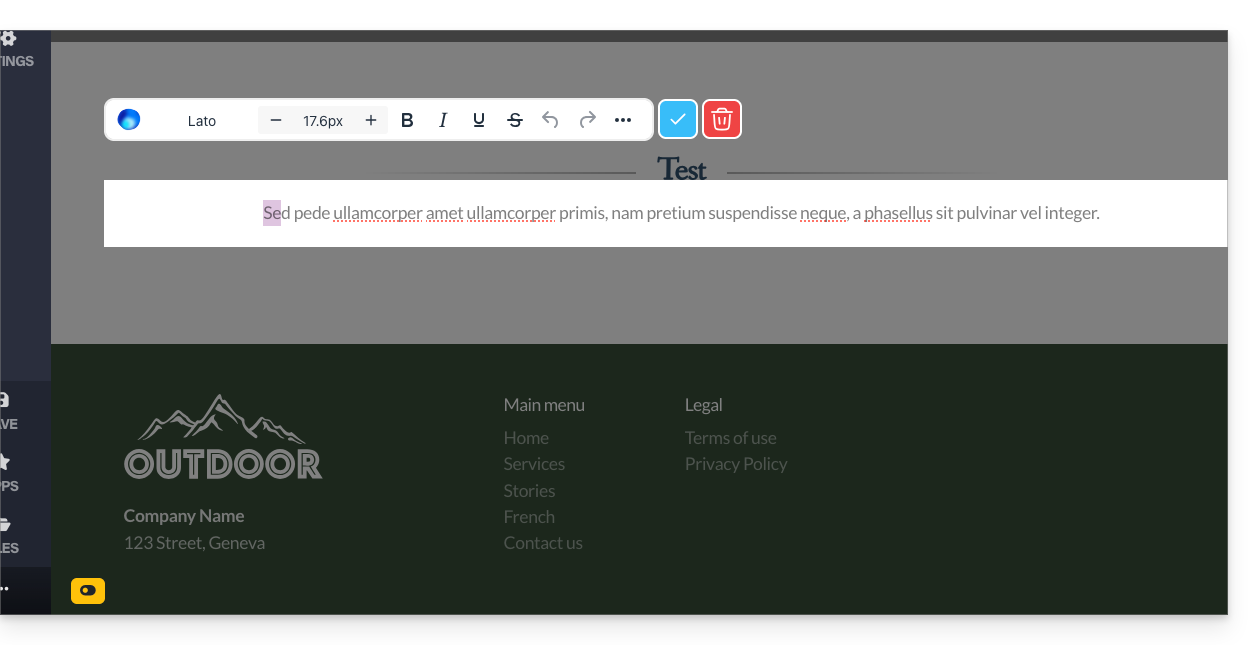
- Dependendo das modificações feitas (adição de um bloco de conteúdo, por exemplo), lembre-se de editar o texto para validar suas alterações e salvá-las.
- Para verificar e confirmar que suas modificações em andamento não estão sendo publicadas gradualmente, basta acessar o endereço do seu site a partir de outra página do navegador, no modo anônimo, por exemplo.
2. Publicar as alterações ou eliminar o rascunho
Pode sair do modo Rascunho para voltar a publicar instantaneamente:
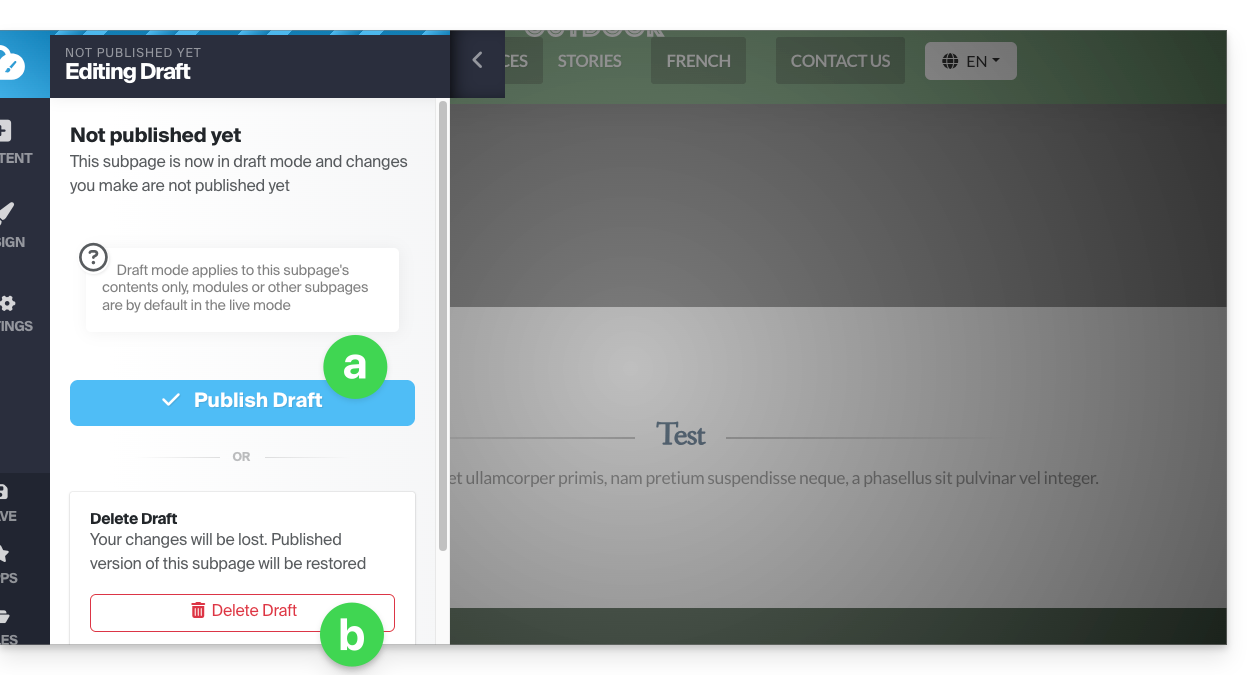
- Quando o modo Não publicado estiver ativo, clique no botão amarelo do modo Não publicado para exibir um painel de configuração:
- O painel de configuração é aberto para que você possa:
- publicar suas alterações,
- ou excluir o rascunho atual e retornar ao estado inicial da página:
Exemplo
- Com o modo Em direto (visível na parte inferior do ecrã), uma modificação é exibida imediatamente aos visitantes da página.
- Com o modo Não publicado / rascunho (identificável por um símbolo amarelo na parte inferior das páginas que estão neste modo), suas modificações não são visíveis em tempo real.
- Saia da página para trabalhar em outra página; o modo retorna ao modo padrão, ou seja, o modo Em tempo real, pois a página não é a mesma e o modo se aplica apenas às páginas selecionadas.
- Volte à página que estava em modo de rascunho; um símbolo na parte inferior da página indica sempre que o modo de rascunho está ativado.
- Clique nele para escolher entre publicar ou eliminar as alterações e restaurar a página ao estado em que se encontrava antes das suas modificações no modo de rascunho.
Link para esta FAQ: https://faq.infomaniak.com/2728
Esta seção de perguntas frequentes foi útil?
Este guia detalha o uso de mídia no Site Creator da Infomaniak.
Note que também é possível inserir outros elementos, como por exemplo um formulário de inscrição na newsletter Infomaniak.
Pré-requisitos
- Aceder ao Site Creator:
- Clique aqui para aceder à gestão do seu produto no Manager Infomaniak (precisa de ajuda?).
- Clique diretamente no nome atribuído ao Site Creator em questão.
- Clique no botão Editar o meu site para iniciar o editor:
Adicionar uma imagem
Os arquivos de mídia são gerenciados na biblioteca de arquivos:
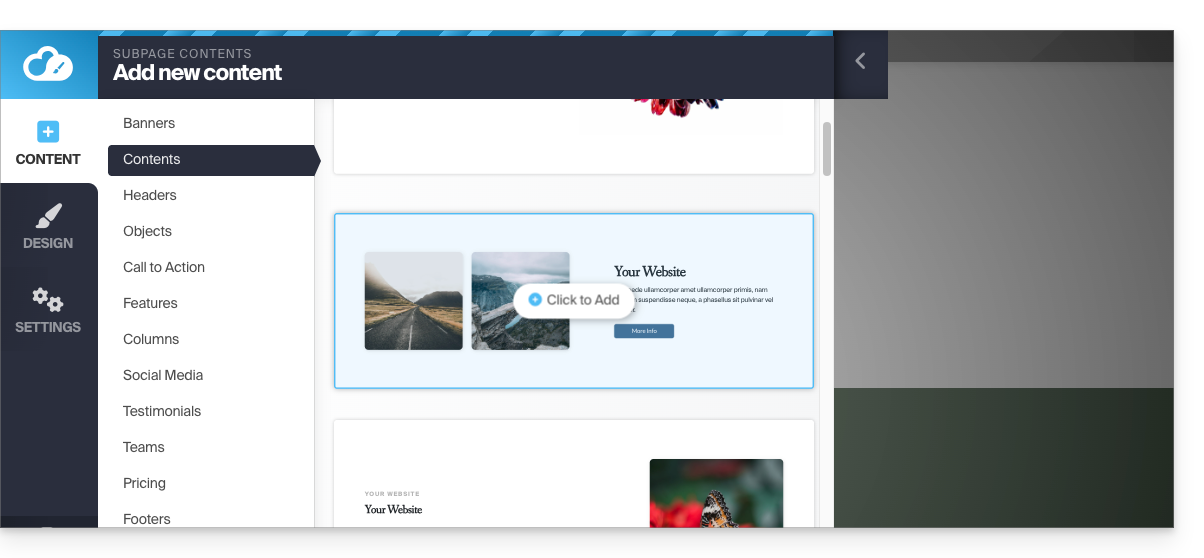
- Adicione um novo bloco de conteúdo:
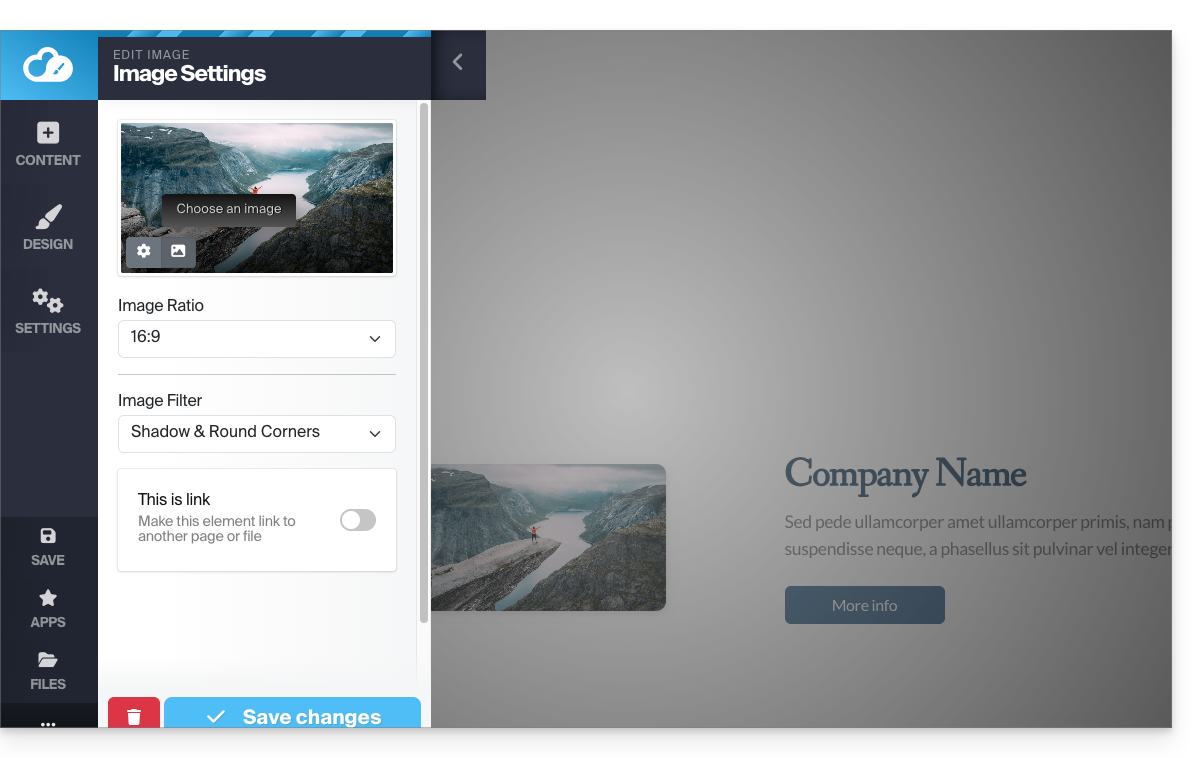
- Os arquivos multimídia podem ser substituídos ou complementados:
Além disso:
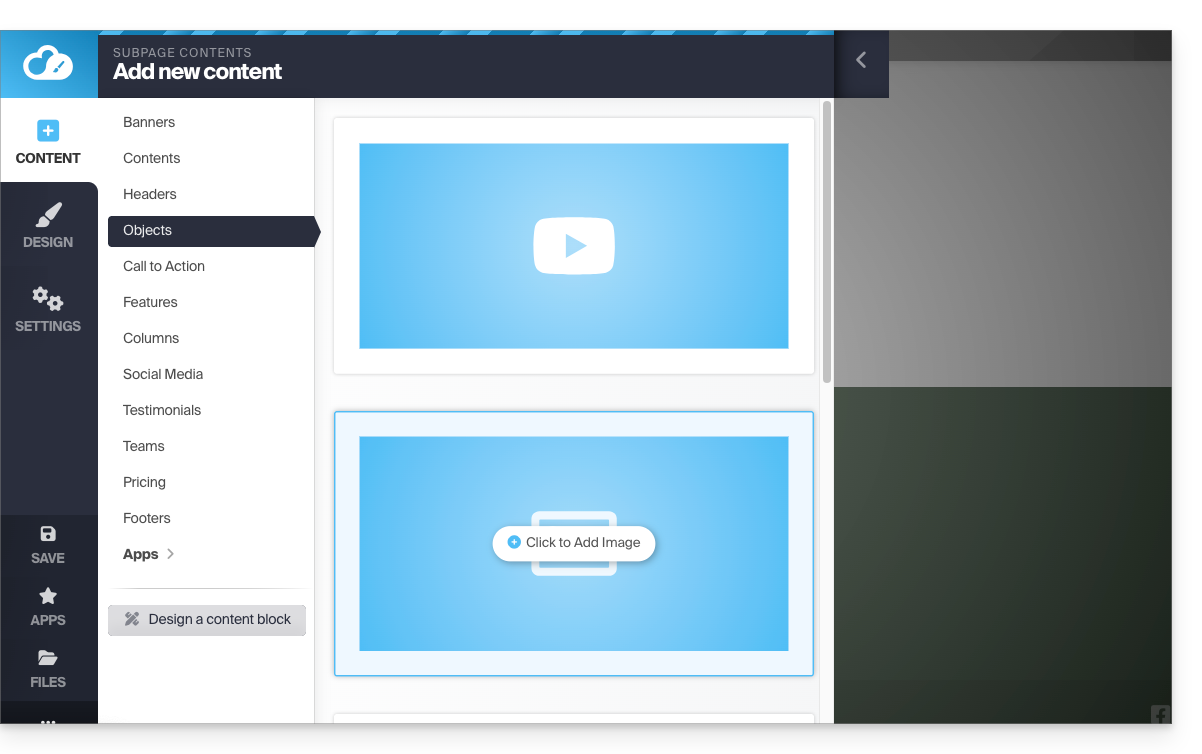
- Clique no botão Conteúdo no menu lateral esquerdo.
- Clique em Objetos na lista para inserir uma imagem.
- Clique no bloco IMAGEM à direita:
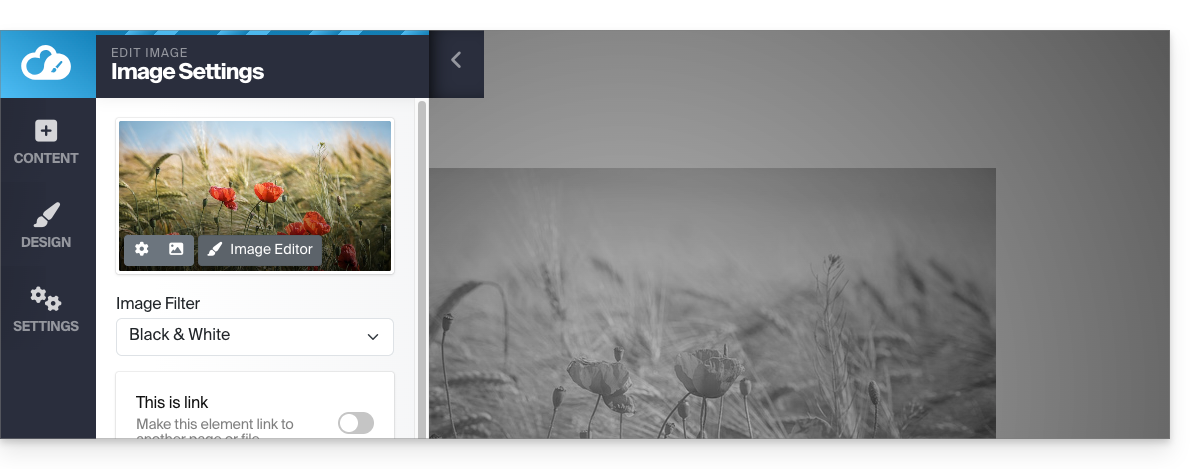
- Depois de adicionar a imagem, você também pode transformá-la em um link clicável ou alterar seu tamanho no editor de imagem:
Você também pode adicionar imagens como um módulo de Galeria de fotos.
Alterar imagem
Para substituir uma imagem inserida, que manterá as características da imagem anterior:
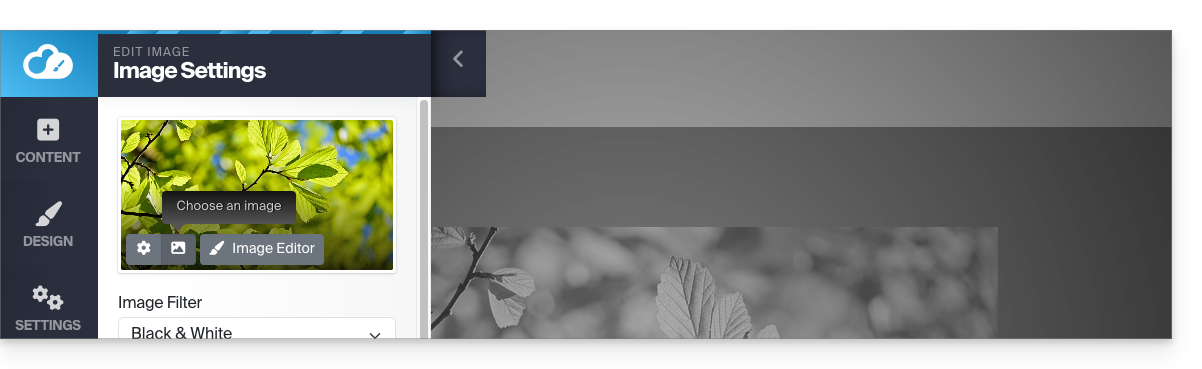
- Clique em uma imagem para editá-la.
- Clique no botão do tipo Moldura de foto na miniatura da imagem para poder selecionar uma nova imagem que substituirá a anterior:
Adicionar um vídeo
Para adicionar um vídeo:
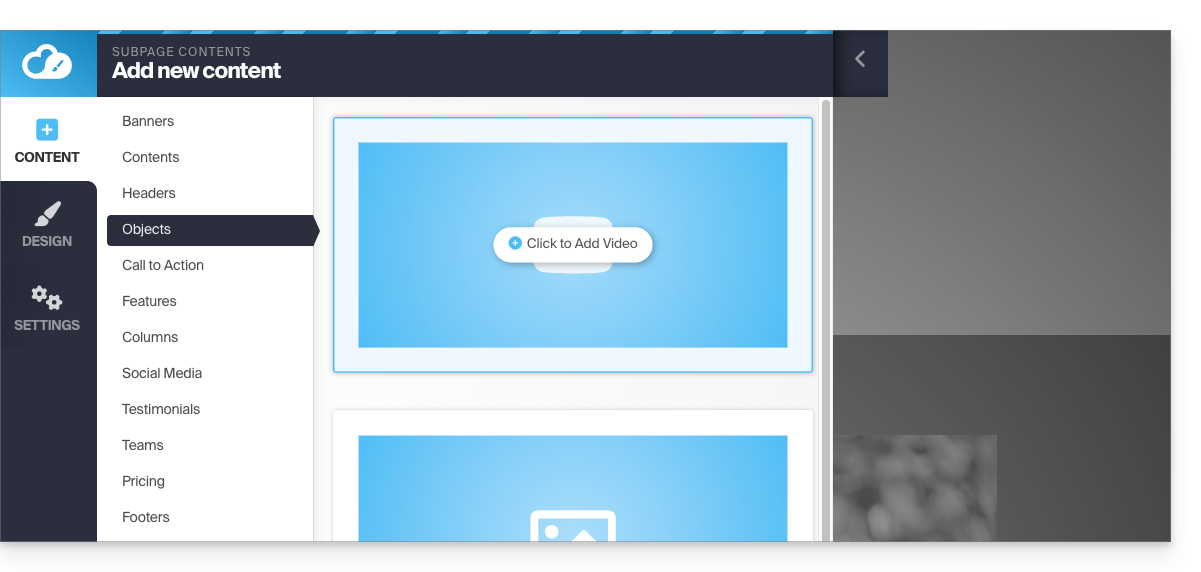
- Clique no botão Conteúdo no menu lateral esquerdo.
- Clique em Objetos na lista.
- Clique no bloco VÍDEO à direita para inserir um vídeo em tela cheia:
Você também pode aplicar um link em uma imagem usando um vídeo do YouTube como URL: isso criará automaticamente um ícone do tipo PLAY que, ao ser clicado, abrirá o vídeo em uma janela do tipo lightbox.
Adicionar um arquivo de áudio
Para adicionar um arquivo de áudio:
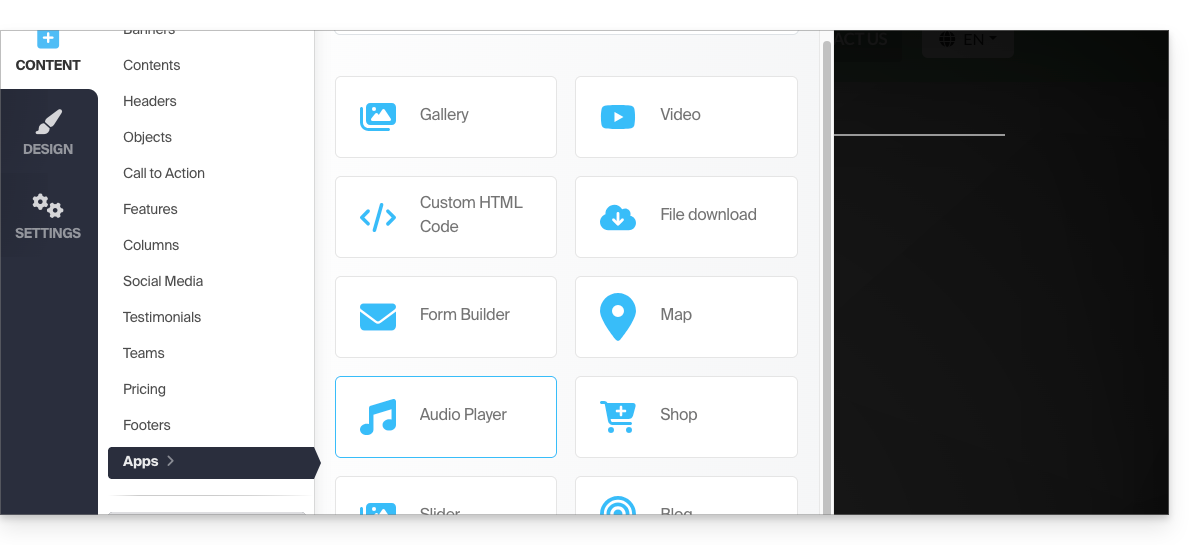
- Clique no botão Conteúdo no menu lateral esquerdo.
- Clique em Aplicações na parte inferior.
- O conteúdo disponível é exibido à direita.
- Clique no reprodutor de áudio para inseri-lo na página e escolher os arquivos:
Você pode personalizá-lo de forma avançada através da edição HTML.
Adicionar um arquivo para download
Para disponibilizar facilmente um arquivo para download:
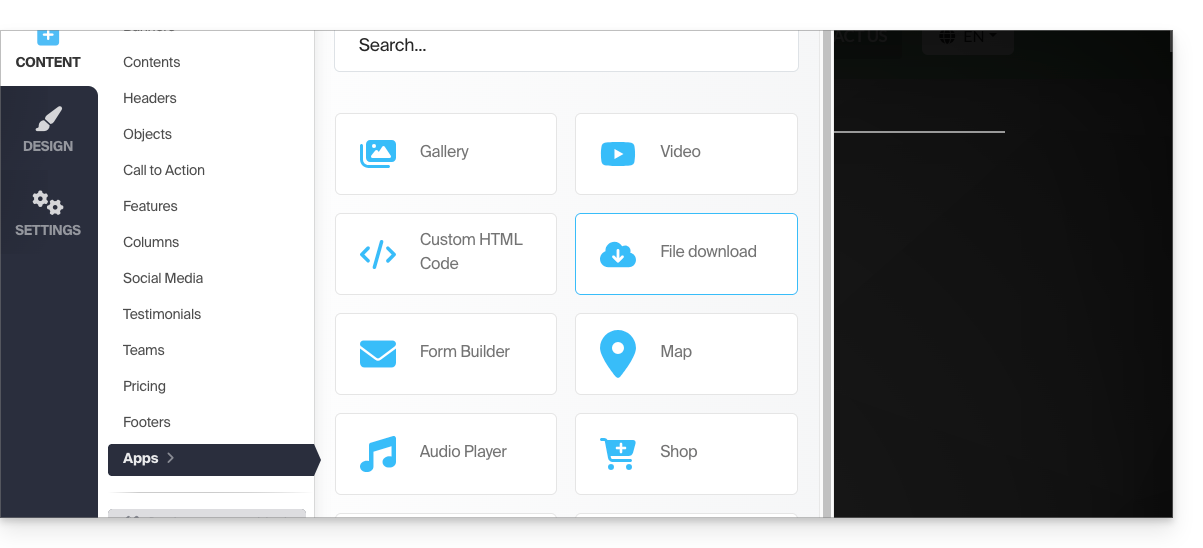
- Clique no botão Conteúdo no menu lateral esquerdo.
- Clique em Aplicações na parte inferior.
- O conteúdo disponível é exibido à direita.
- Clique no widget Download de arquivo para inseri-lo na página:
- Selecione na biblioteca o arquivo que poderá ser baixado pelos seus visitantes.
Link para esta FAQ: https://faq.infomaniak.com/2729
Esta seção de perguntas frequentes foi útil?
Este tutorial apresenta a criação de menus de navegação para o seu site criado com o Site Creator da Infomaniak, bem como a sua composição, estilos e configurações.
Pré-requisitos
- Aceder ao Site Creator:
- Clique aqui para aceder à gestão do seu produto no Manager Infomaniak (precisa de ajuda?).
- Clique diretamente no nome atribuído ao Site Creator em questão.
- Clique no botão Editar o meu site para iniciar o editor:
Os diferentes menus de navegação
As diferentes páginas que compõem o seu site podem ser acessíveis dentro de um ou vários menus de navegação:
- Clique no botão Configurações no menu lateral esquerdo.
- Por defeito, a lista das suas páginas aparece, organizada em 2 categorias principais: MENU PRINCIPAL e LEGAL:
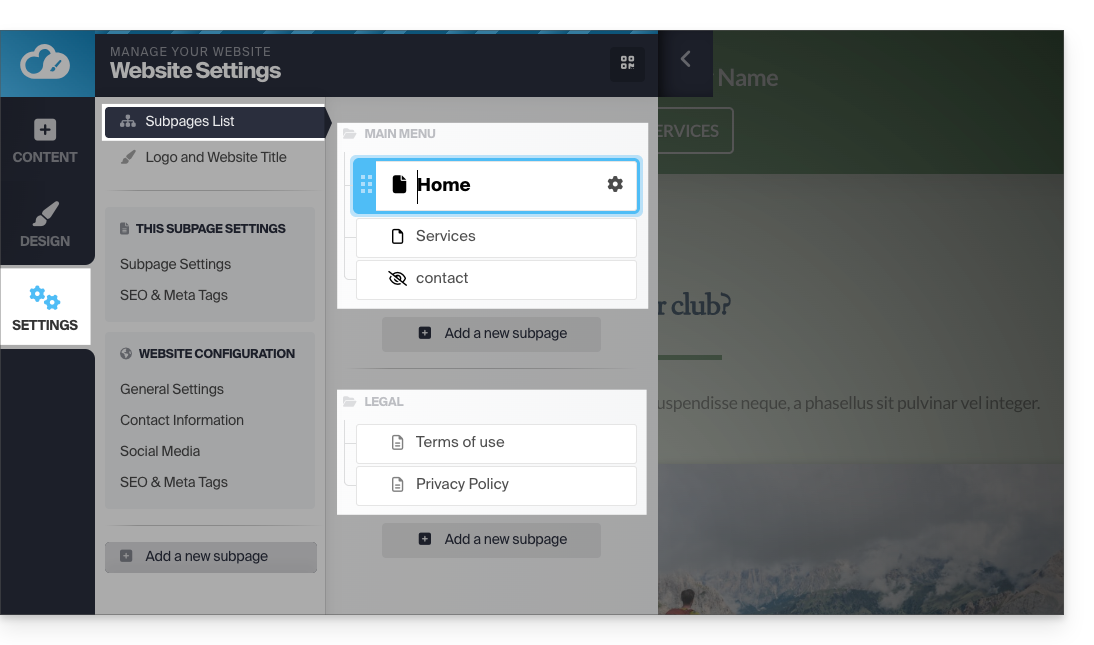
Mas pode adicionar vários.
Estes menus, com as páginas que contêm, são depois utilizados em diferentes partes do seu site, dependendo do tema escolhido:
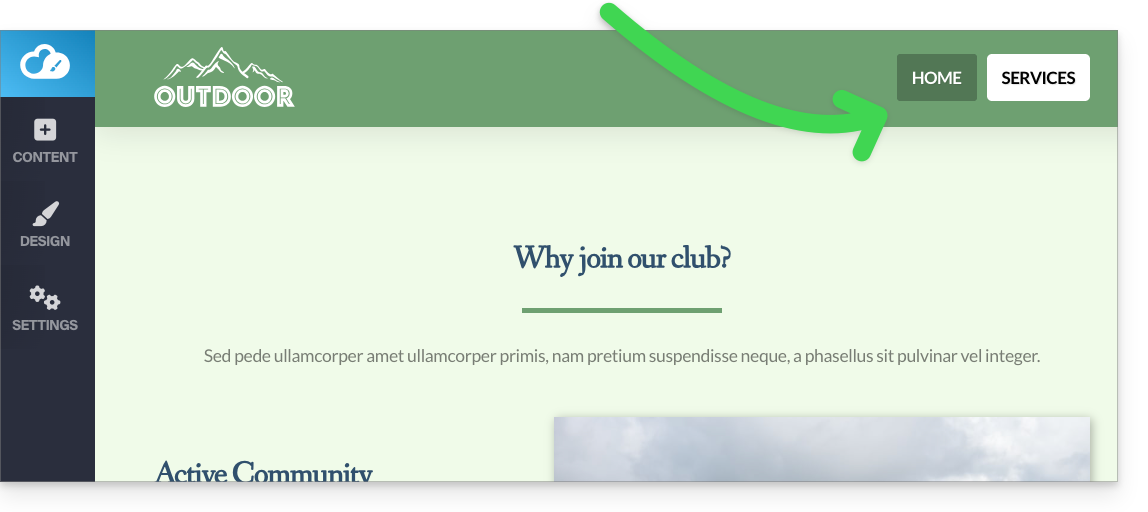
- Normalmente, encontrará o menu principal colocado no topo da página:
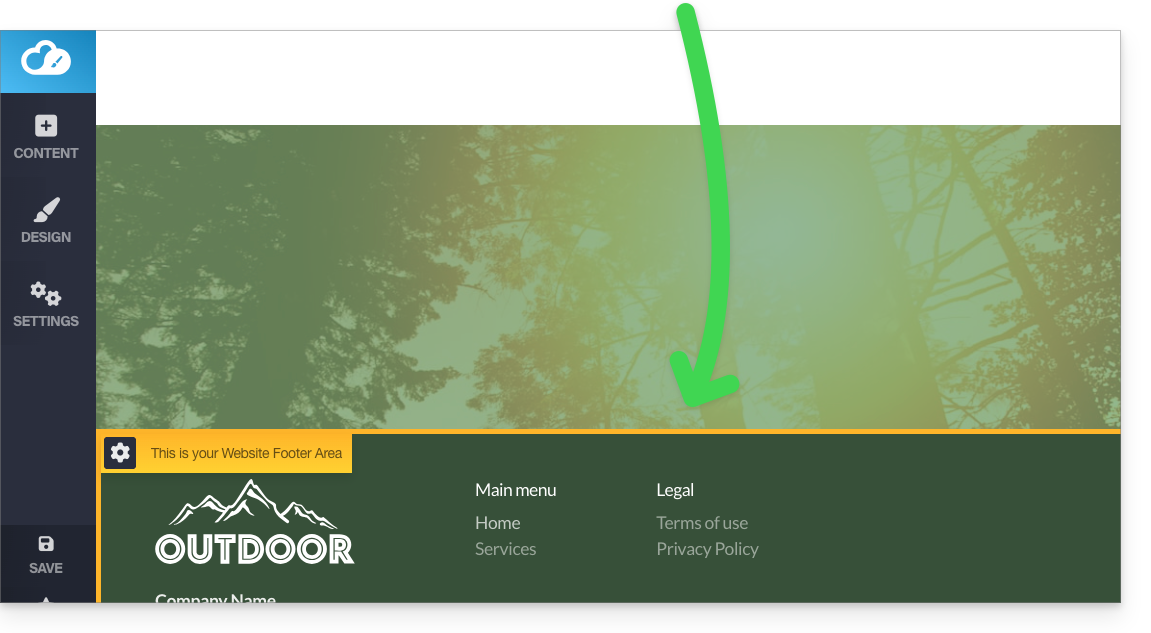
- e os outros menus serão automaticamente exibidos no rodapé:
Gerenciar os menus
Adicionar um novo menu
Para isso:
- Clique no botão Configurações no menu lateral esquerdo.
- Passe o mouse sobre um título de menu na árvore existente.
- Clique no ícone "+" que aparece ao passar o mouse:
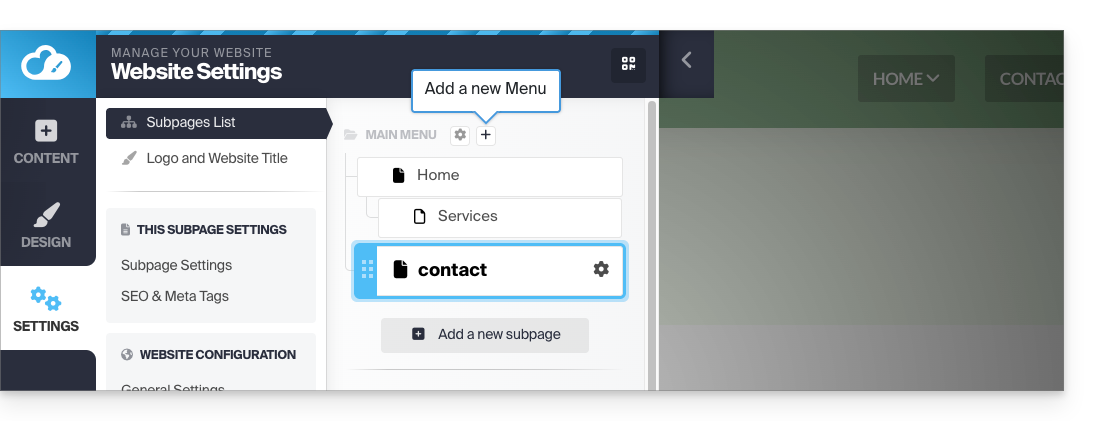
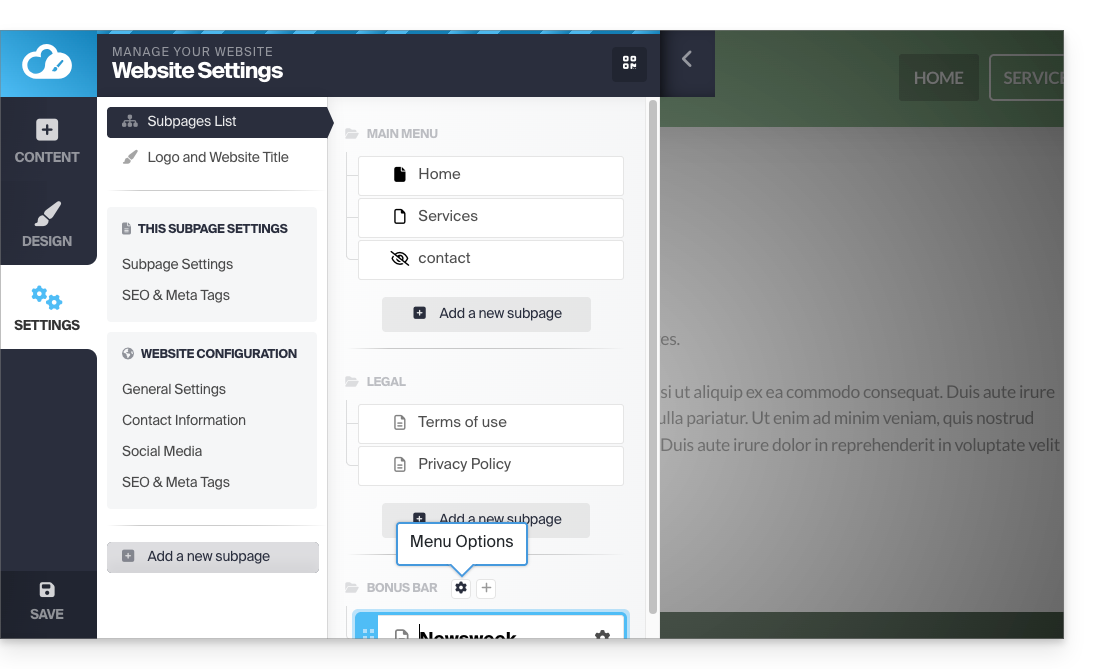
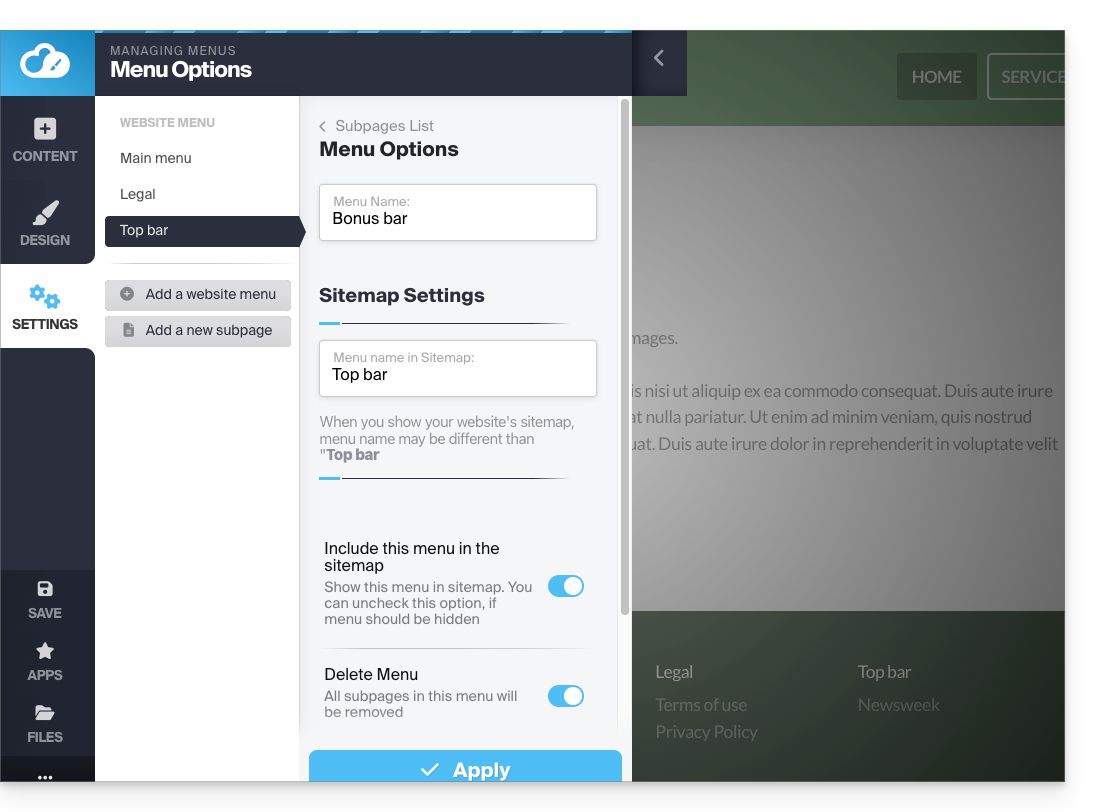
Você poderá gerenciar a exibição do menu no mapa do site ou removê-lo (juntamente com todas as suas páginas):
- Clique no botão Configurações no menu lateral esquerdo.
- Passe o mouse sobre um título de menu na árvore existente e clique no ícone de engrenagem que aparece ao passar o mouse:
- Escolha as configurações desejadas e valide na parte inferior da página:
Consulte este outro guia para não exibir nenhum menu.
Criar um subitem em um menu
Para isso:
- Clique no botão Configurações no menu lateral esquerdo.
- A lista de suas páginas será exibida.
- Com o mouse, mova uma página ligeiramente para a direita, abaixo de outra página:
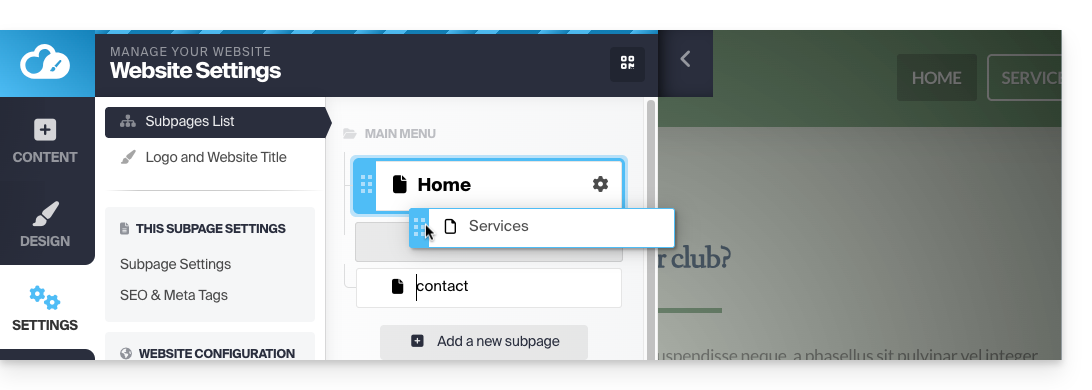
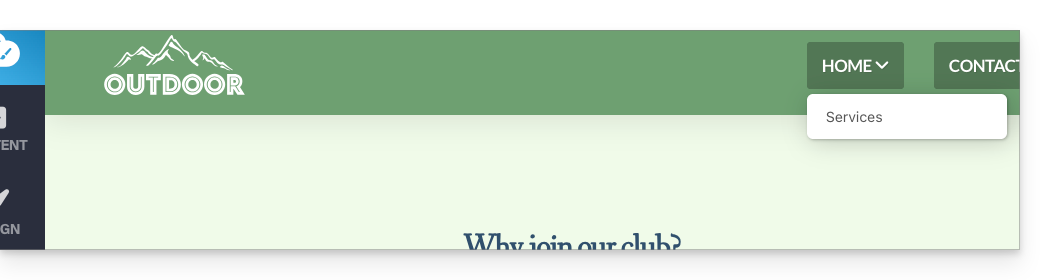
- Ela se tornará uma subpágina e seu menu no site poderá exibir a estrutura de árvore criada:
- Consulte também a dica abaixo…
- Ela se tornará uma subpágina e seu menu no site poderá exibir a estrutura de árvore criada:
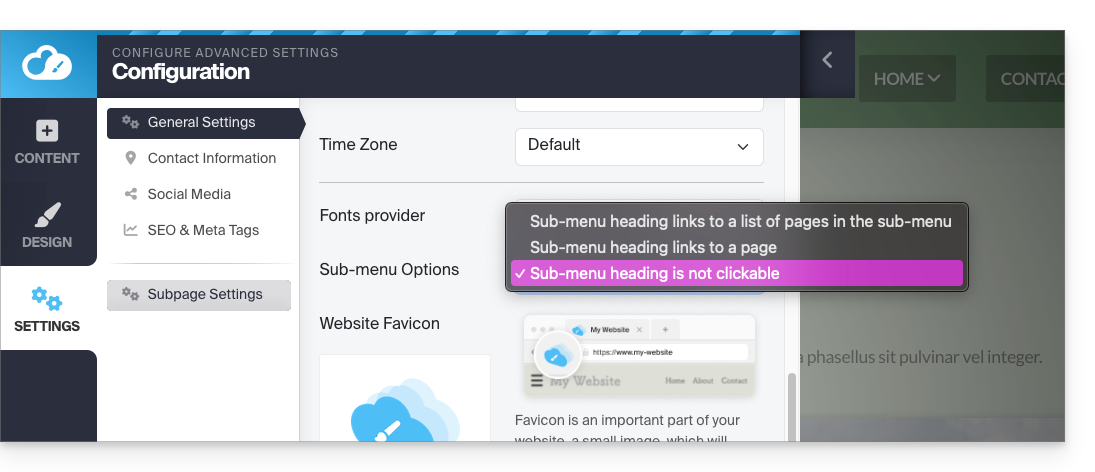
Título do menu não clicável
Se necessário, escolha não tornar o primeiro elemento de um menu clicável, quando este tiver elementos de submenu (como configurado acima):
Atenção: alterar este parâmetro, quando o elemento Início do seu menu tiver um submenu, desativa a possibilidade de editar o site a partir da página inicial quando você visualizar a página.
- Clique no botão Configurações no menu lateral esquerdo.
- Clique em Configurações gerais para modificar esta configuração em Opções de submenu:
Elemento de menu contendo um link para outro site
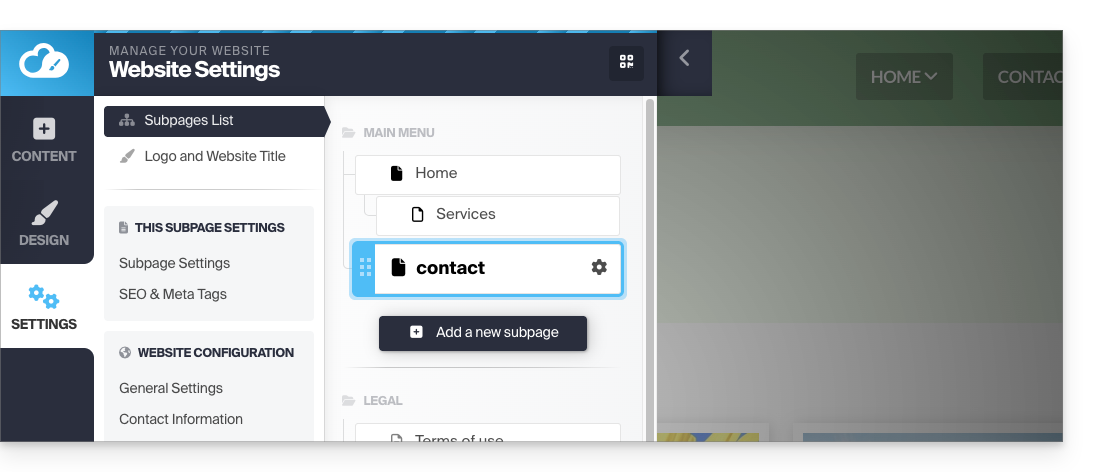
Para isso:
- Clique no botão Configurações no menu lateral esquerdo.
- A lista de suas páginas aparece.
- Clique no botão Adicionar uma página abaixo da estrutura existente:
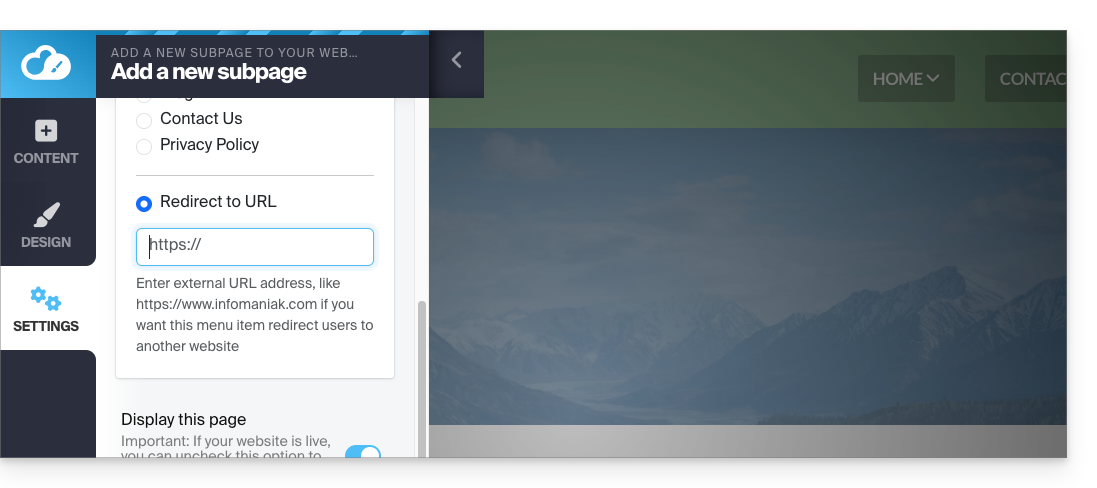
- Insira um nome da página e clique em Mostrar mais opções.
- Escolha o redirecionamento de URL para especificar o destino ao clicar:
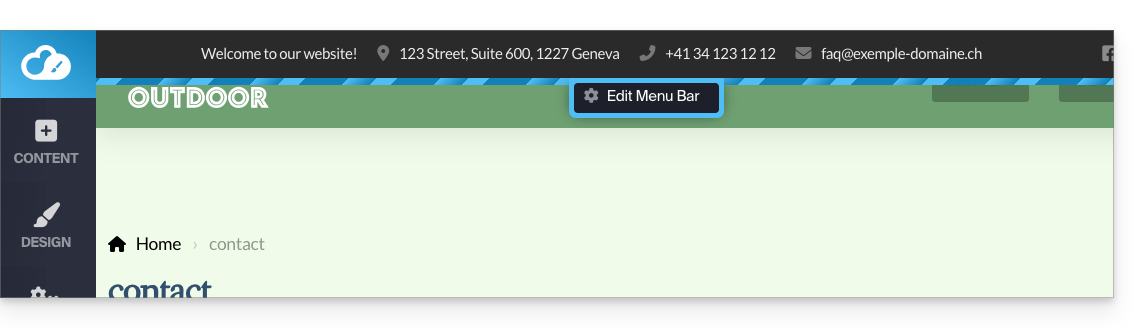
Menu superior adicional
Para exibir uma "barra de menu" no topo da sua página:
- Clique no botão Design no menu lateral esquerdo.
- Clique em Mais configurações.
- Ative a Barra de menu do cabeçalho:
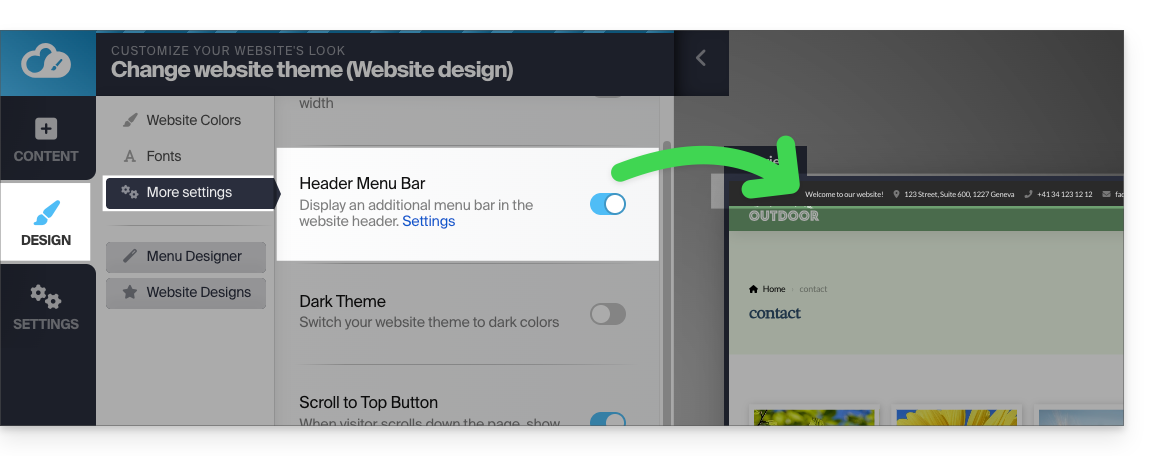
- Depois de ativada, você pode personalizá-la através do link Configurações no mesmo local:
Estilos de menu
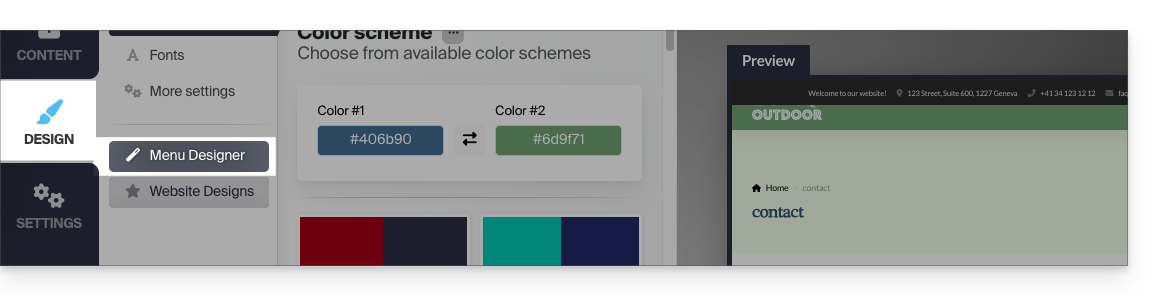
Para gerenciar os diferentes estilos de menu:
- Clique no botão Design no menu lateral esquerdo.
- Clique em Editor de menu:
- Em seguida, clique em Configuração:
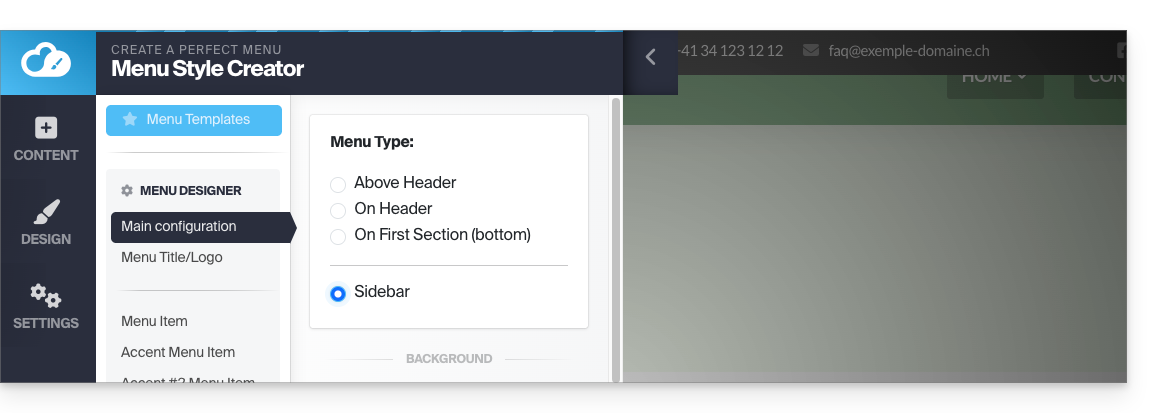
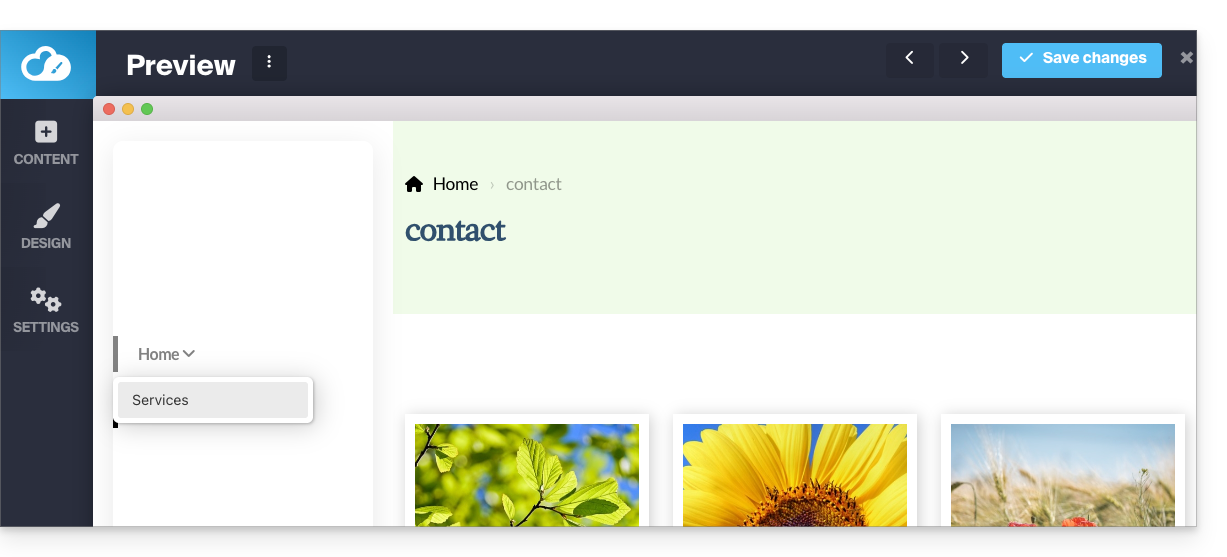
- Você poderá, por exemplo, decidir a localização dos seus menus (à esquerda da página ou no topo, fixo ou móvel, tipo "menu hambúrguer ☰" à direita ou normal, etc.):
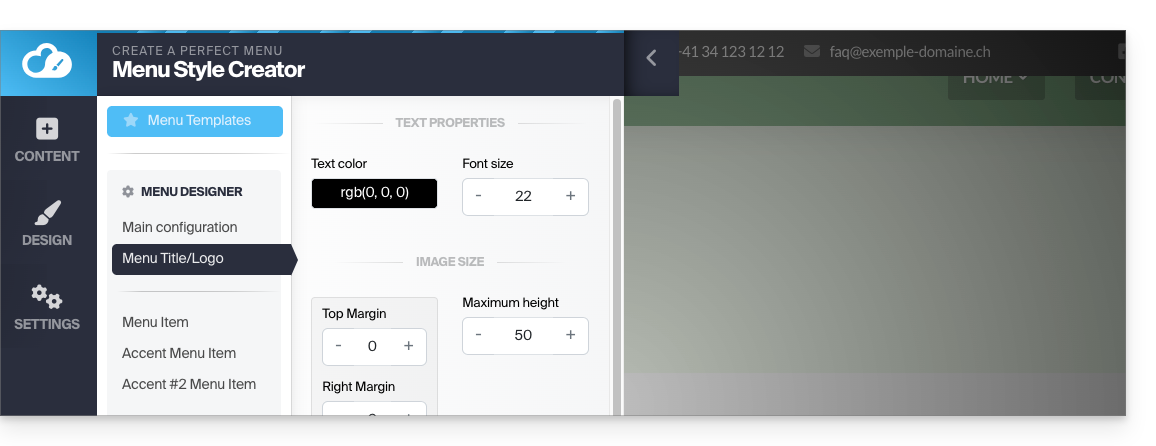
Alterar a cor do menu "hambúrguer" (☰)
Se este botão de menu com três linhas horizontais ☰ aparecer, por exemplo, branco sobre branco em um dispositivo móvel:
- Clique no botão Design no menu lateral esquerdo.
- Clique em Editor de menu.
- Clique em Título do menu / logótipo.
- Ajuste a cor do texto:
Adotar um novo tema de menu
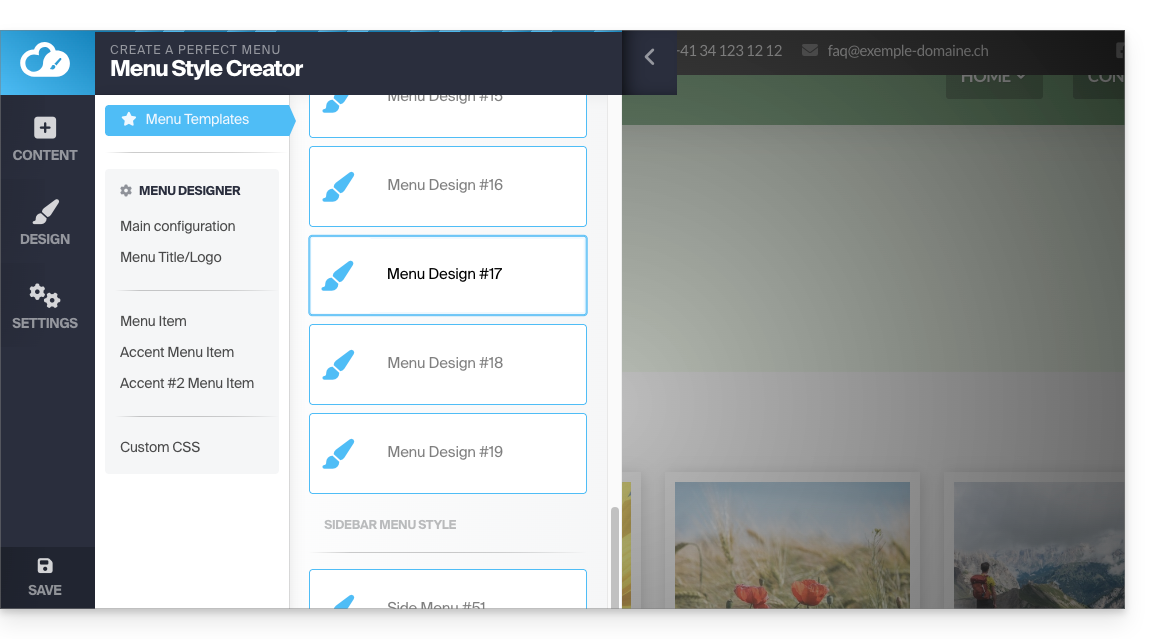
Altere completamente o estilo predefinido através dos temas no topo do submenu:
- Clique em Modelos de menu (sempre em Design, depois em Editor de menu):
Menu fixo
A maioria dos menus propostos irá mover-se com o conteúdo da página.
- O menu desaparece quando se desce na página:
- Pode definir um menu que deve estar sempre fixo na parte superior (com diferentes opções visuais):
Para ativar ou desativar o menu fixo:
- Clique em Design.
- Clique em Editor de menu.
- Clique em Configuração principal.
- Escolha No cabeçalho na caixa Tipo de menu.
- O botão de alternância (toggle switch) Fixo no topo aparece mais abaixo e pode ativá-lo.
- Clique em Guardar:
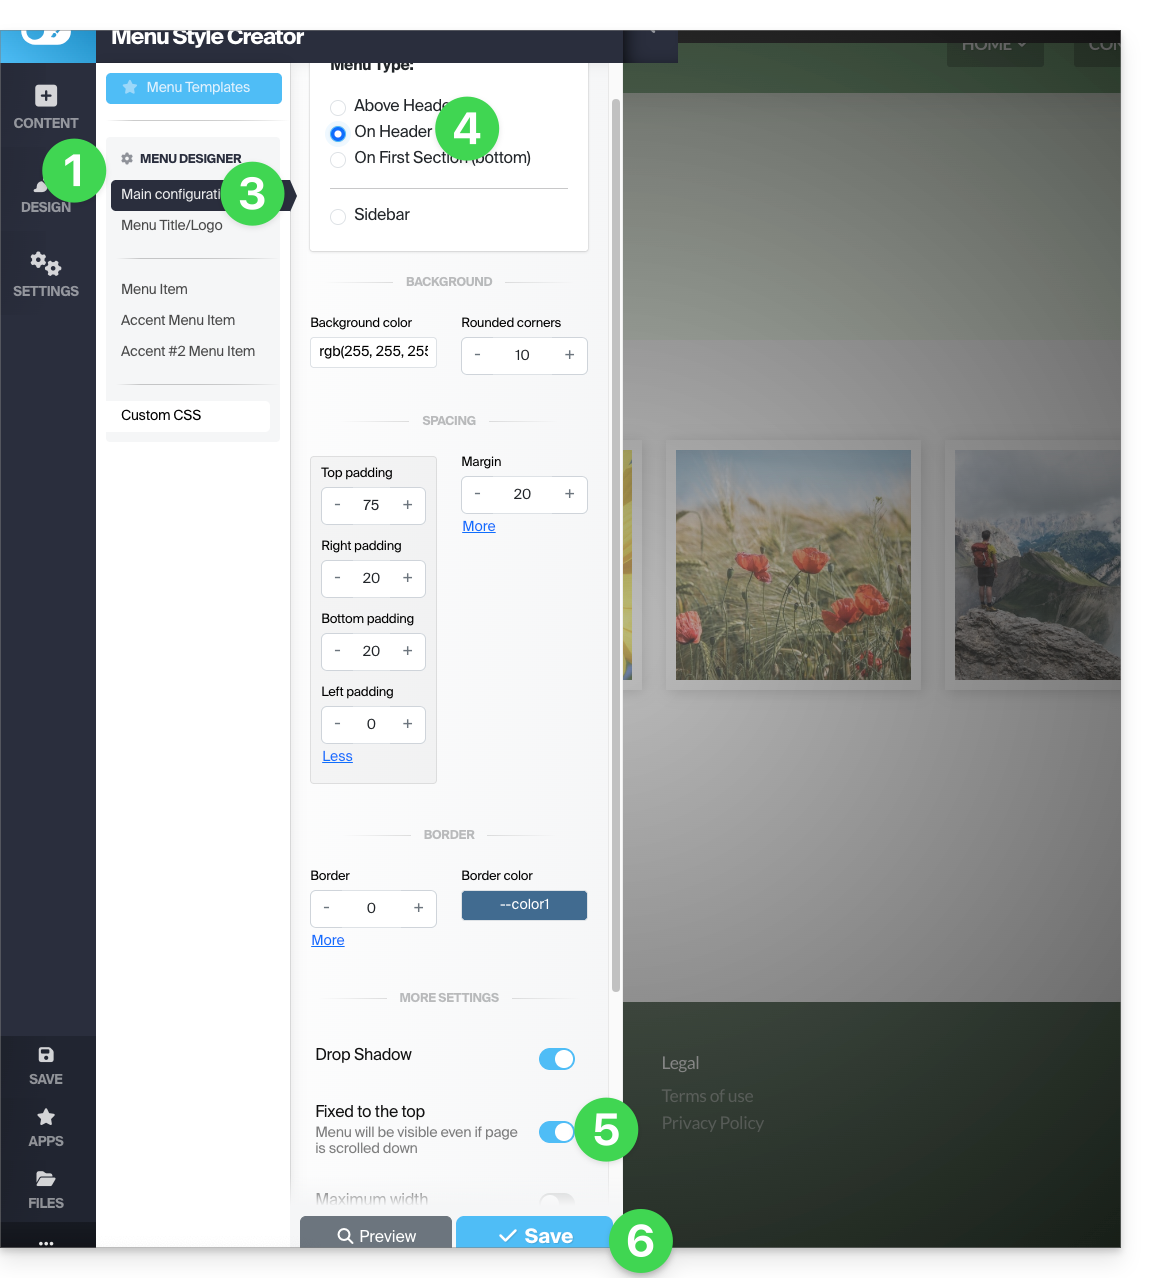
Alguns modelos de menu (como o #3 e o #16) aplicam diretamente as configurações ideais para um menu fixo.
Inserir seus menus no corpo da página
Um módulo Menu de subpáginas permite a inserção de seus menus e submenus em qualquer lugar da sua página:
- Adicione o elemento a partir das Apps:
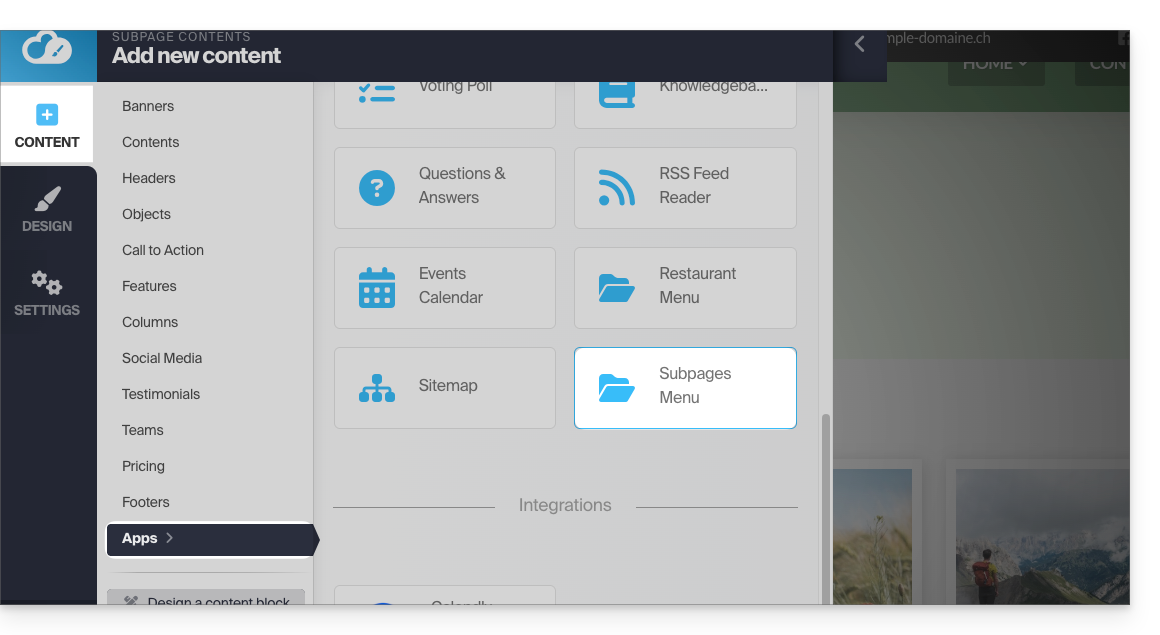
O módulo mapa do site exibe todos os menus e todas as suas páginas em um único bloco.
Definir a URL da página
Por padrão, se o nome da sua página for Contato, a URL para acessá-la será www.dominio.xyz/contato.
Se, posteriormente, você alterar o nome da página para Olá, a URL será www.dominio.xyz/ola.
Para definir a URL personalizada da página em que você está:
- Clique no botão Configurações no menu lateral esquerdo.
- Clique em SEO e Metadados (em Configurações desta subpágina).
- O primeiro campo na parte superior permite definir o endereço da página. Qualquer espaço será transformado em um hífen e caracteres especiais, acentos, símbolos, etc., devem ser evitados:
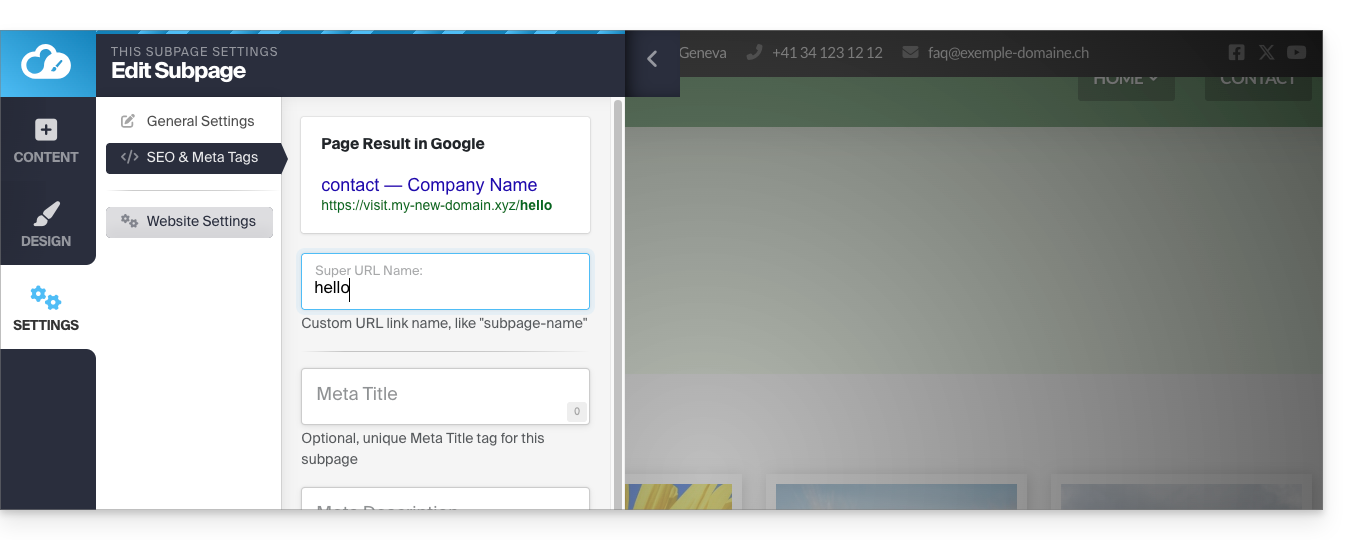
Se alterações de URL forem registradas durante a criação do site e um menu já contiver um link para a página em questão, ele será adaptado dinamicamente.
Link para esta FAQ: https://faq.infomaniak.com/2730
Esta seção de perguntas frequentes foi útil?
Este guia aborda a função de anulação no Site Creator da Infomaniak.
Introdução
- Não é possível realizar cópias de segurança ou restaurações a partir do painel de controlo Infomaniak.
- Por exemplo, se eliminar um bloco de conteúdo e quiser restaurá-lo, pode desfazer até às 20 últimas operações no Site Creator.
Cancelar uma operação
Pré-requisitos
- Aceder ao Site Creator:
- Clique aqui para aceder à gestão do seu produto no Manager Infomaniak (precisa de ajuda?).
- Clique diretamente no nome atribuído ao Site Creator em questão.
- Clique no botão Editar o meu site para iniciar o editor:
Depois de estar no Site Creator:
- Clique no botão … localizado na parte inferior do menu lateral esquerdo do Site Creator para expandir as opções de cancelamento.
- Clique em Cancelar e confirme a restauração (as setas ao lado permitem "navegar" entre as últimas cópias de segurança):
Link para esta FAQ: https://faq.infomaniak.com/2731
Esta seção de perguntas frequentes foi útil?
Este guia explica como colocar temporariamente um site criado com o Site Creator Infomaniak fora do ar.
Introdução
- Visibilidade pública: a página de manutenção será exibida apenas para os seus visitantes!
- Nenhuma tradução está disponível no momento; a página de manutenção será exibida apenas em francês.
- Acesso de administrador: ao permanecer conectado ao editor, você mantém acesso total ao seu site para visualizá-lo e modificá-lo através do Site Creator.
Colocar o Site Creator em manutenção
Para desativar temporariamente o Site Creator:
- Clique aqui para acessar o gerenciamento do seu site no painel de controle Infomaniak (precisa de ajuda?).
- Clique diretamente no nome atribuído ao site em questão:
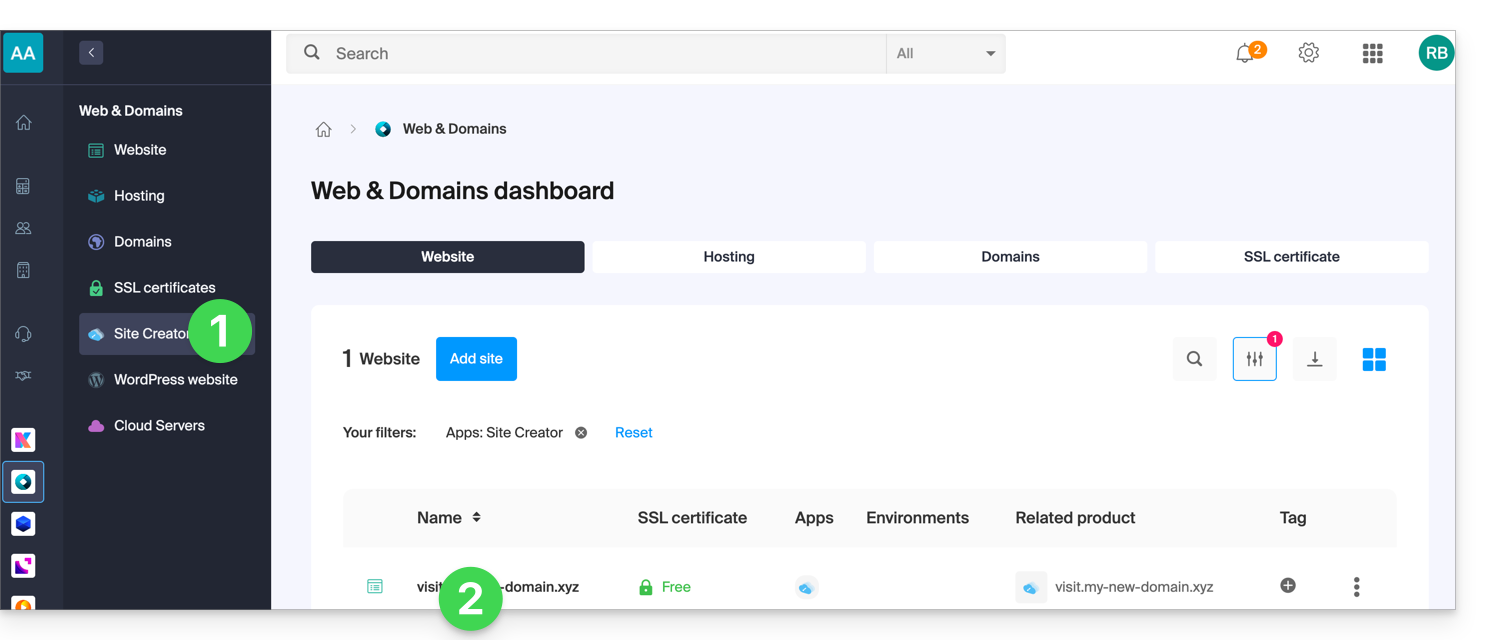
- Clique em Gerenciar na parte superior da página.
- Clique em Ativar a manutenção:
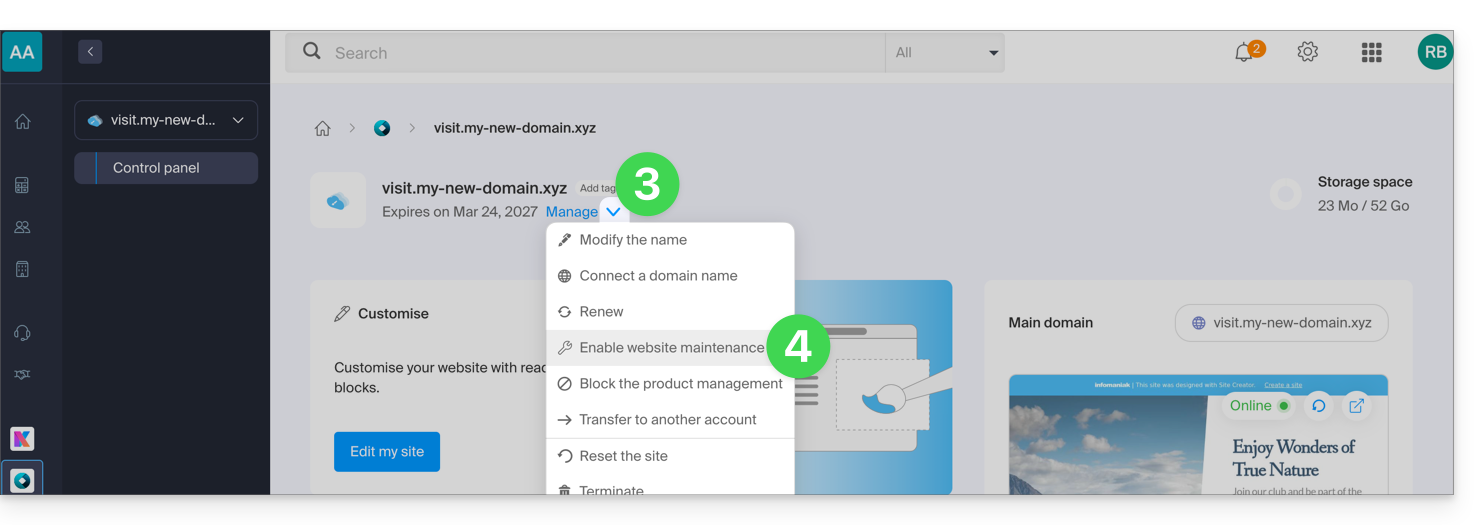
- Confirme a operação.
Desativar a página de manutenção
Para colocar o site novamente online para os seus visitantes:
- Repita a operação acima. O menu permite desativar o modo de manutenção:
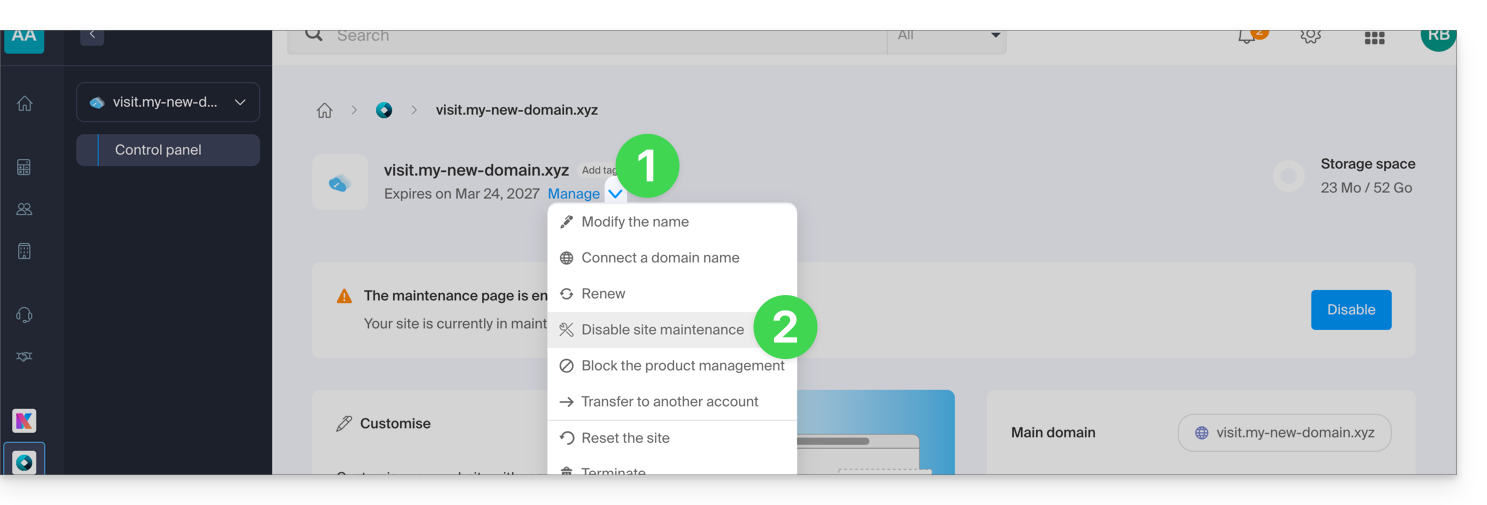
Você também pode desativar a manutenção na página de gerenciamento e no bloco de visualização do seu site: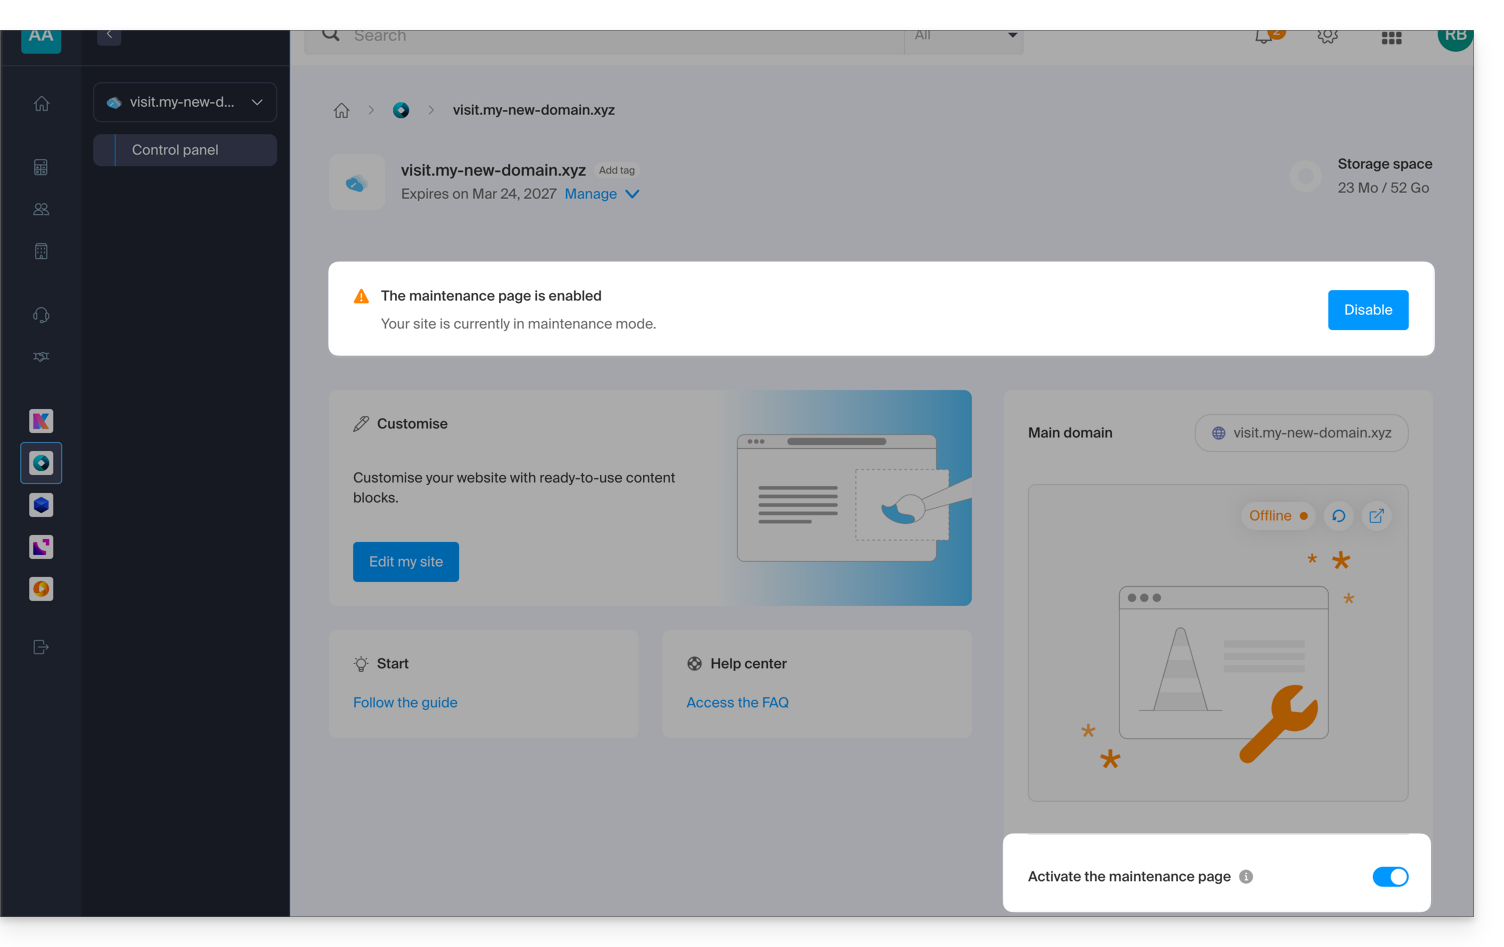
Link para esta FAQ: https://faq.infomaniak.com/2735
Esta seção de perguntas frequentes foi útil?
Este guia explica como conectar um site criado com o Site Creator da Infomaniak a um nome de domínio.
Pré-requisitos
- A oferta Site Creator Free permite acessar o site por meio de um nome de domínio no formato
123xyz.infomaniak.site…- Para conectar um nome de domínio personalizado, é necessário, previamente, migrar para uma oferta superior:
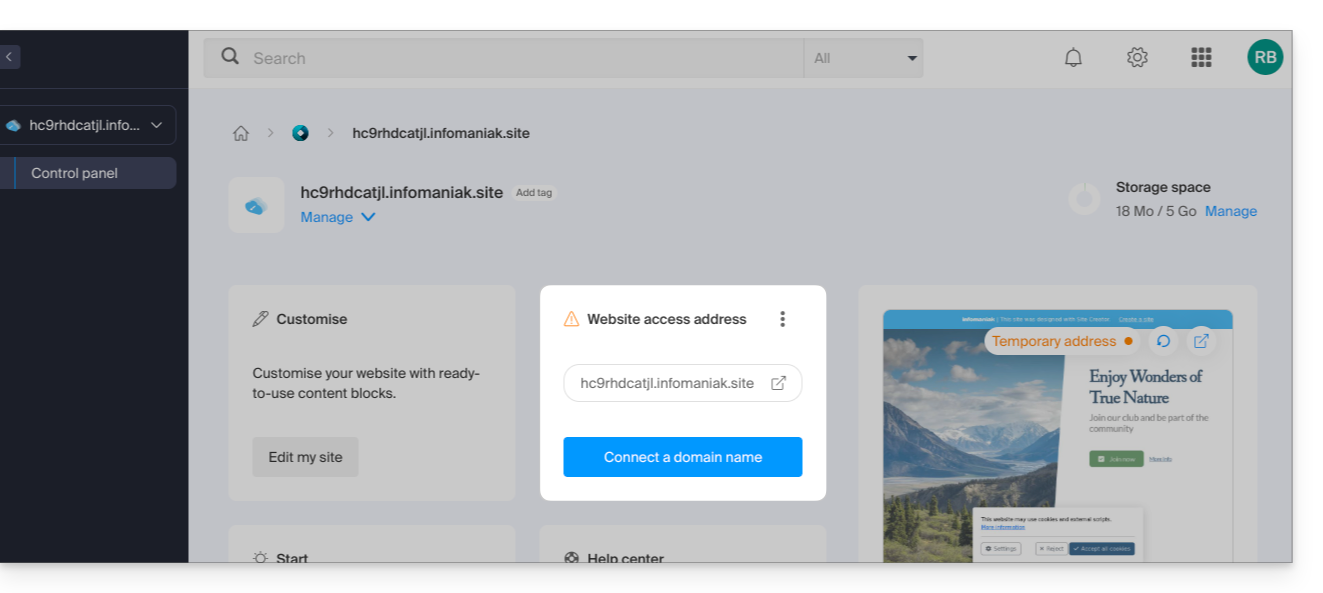
- Para conectar um nome de domínio personalizado, é necessário, previamente, migrar para uma oferta superior:
- As ofertas Site Creator Lite e Pro oferecem um nome de domínio gratuito por 1 ano entre as extensões
.ch,.com,.fr,.org,.co.uk,.be,.de,.eu,.it,.es - Se desejar usar um domínio existente, este deverá estar na mesma Organização.
Conectar o Site Creator a um nome de domínio
Para conectar o Site Creator (Lite ou Pro) a um nome de domínio:
- Clique aqui para acessar o gerenciamento do seu site no Manager Infomaniak (precisa de ajuda?).
- Clique diretamente no nome atribuído ao site em questão.
- Clique em Conectar meu site a um domínio para iniciar o assistente de configuração:
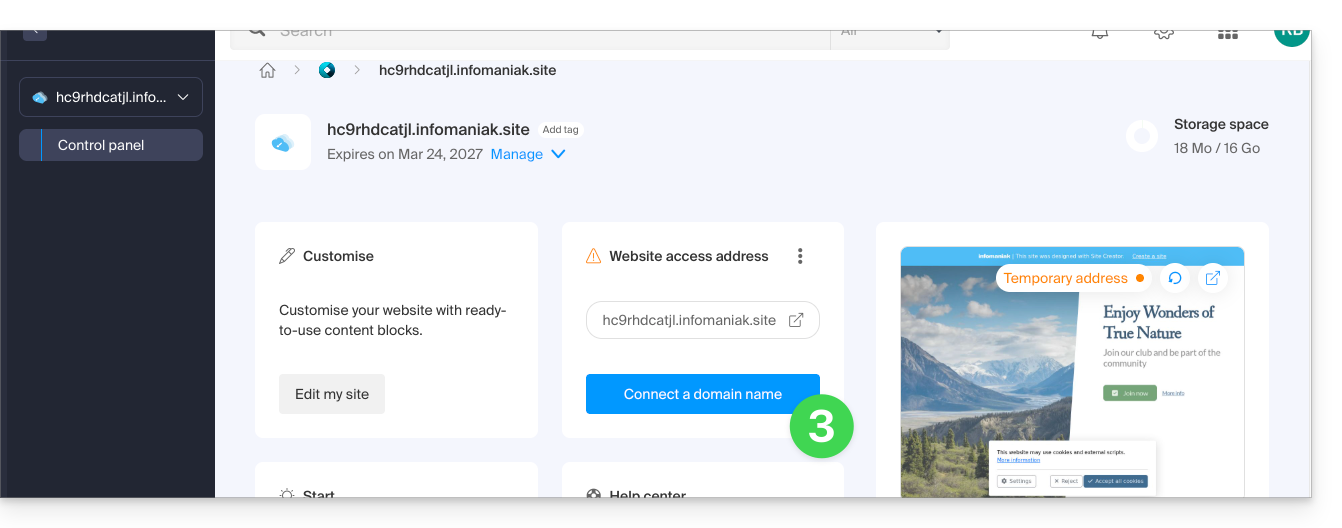
- O assistente oferece a opção de criar um novo nome de domínio ou usar um nome já existente:
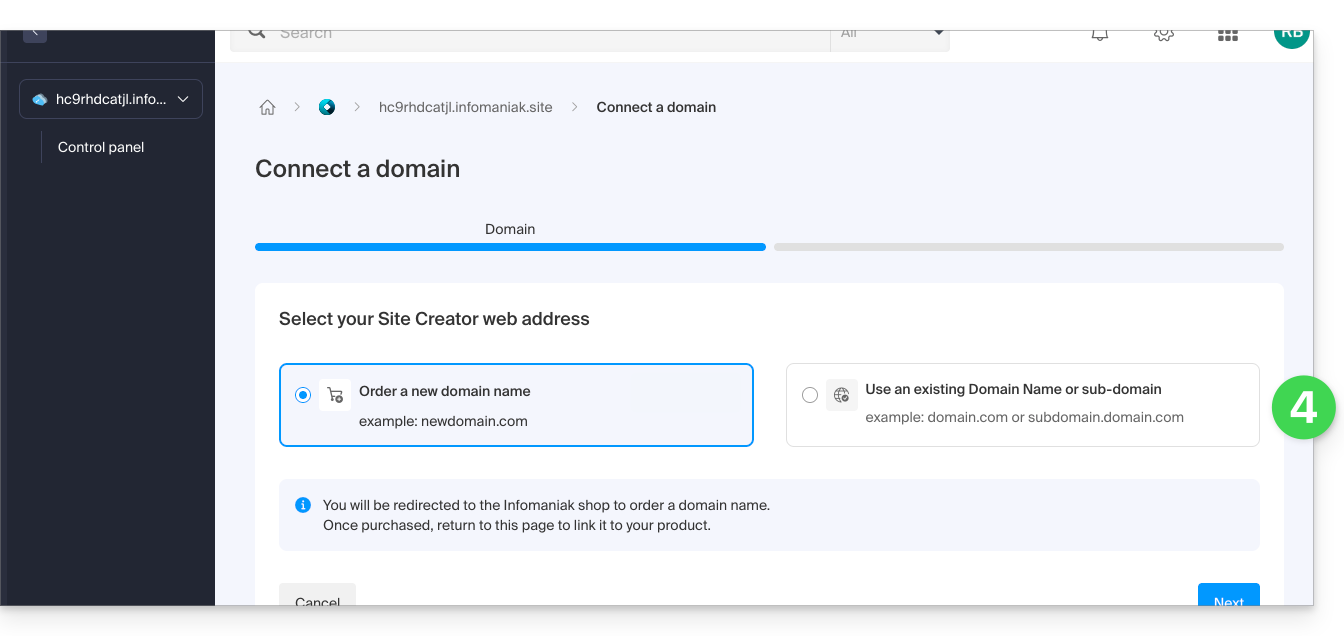
- Se você criar um novo nome de domínio neste momento, será necessário retornar a este assistente de configuração após a conclusão do pedido.
- Se você optar por associar um domínio existente à sua organização, o assistente exibirá a lista de domínios e um subdomínio poderá ser criado:
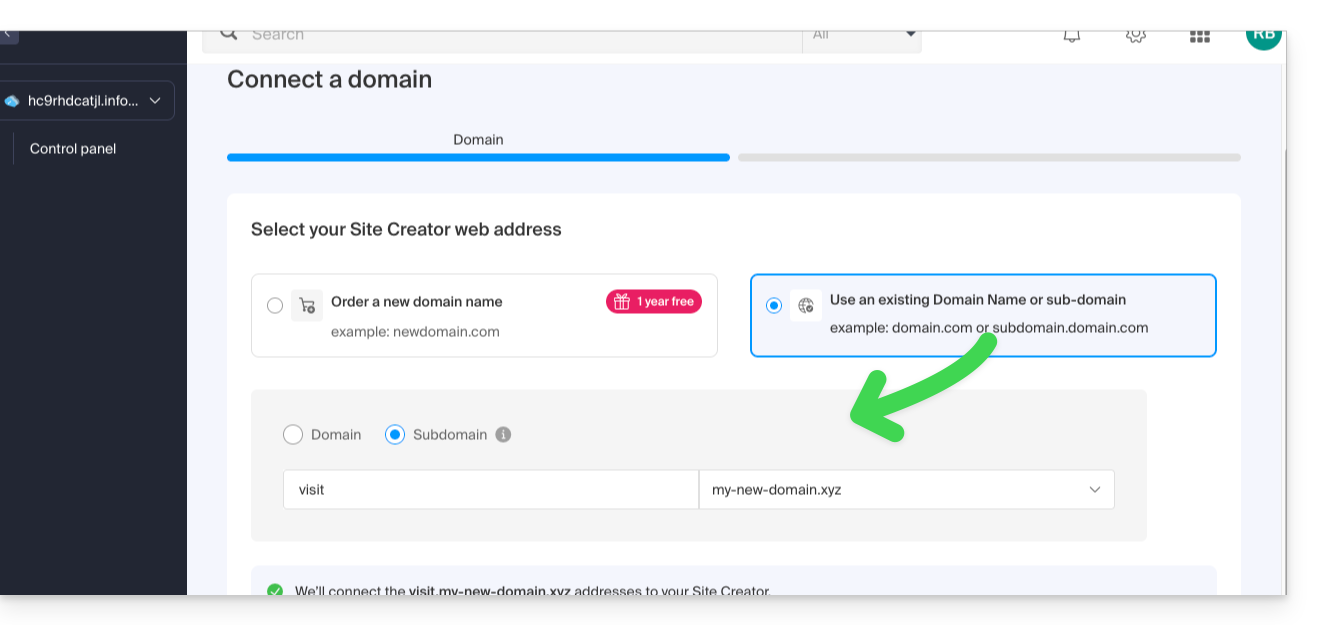
- Clique no botão Seguinte.
- Verifique o endereço escolhido e clique no botão para Confirmar:
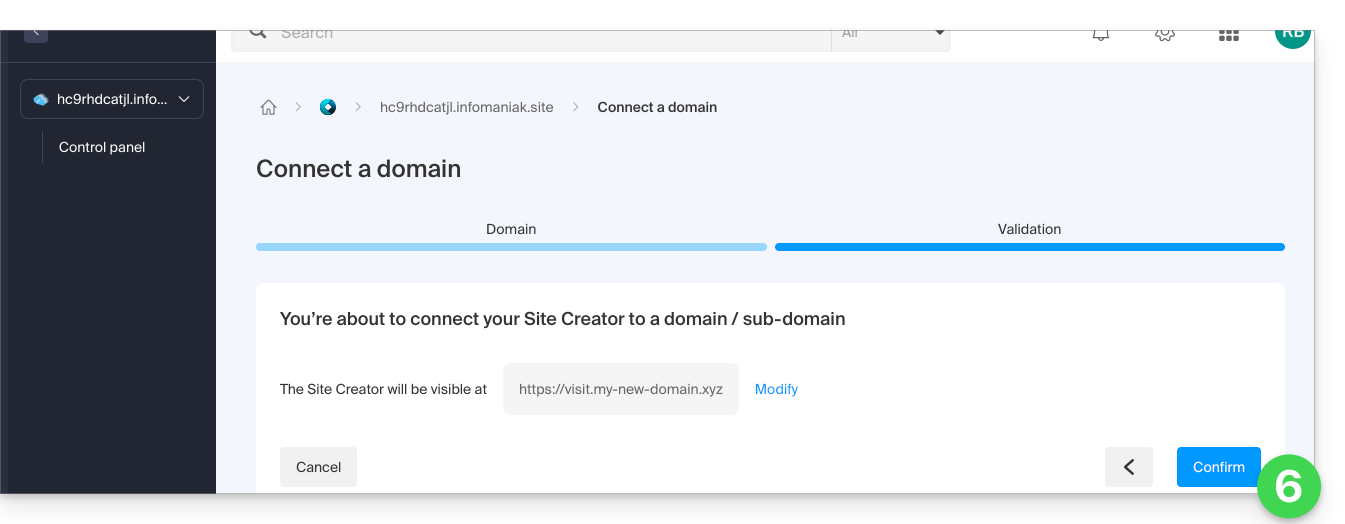
Alguns nomes de domínio não podem ser conectados ao Site Creator; o assistente informará sobre eventuais problemas. Consulte este outro guia para entender e resolver esses problemas.
Gerenciar o(s) nome(s) de domínio do Site Creator
Para gerenciar o(s) nome(s) de domínio utilizado(s) com o Site Creator:
- Clique aqui para acessar o gerenciamento do seu site no painel de controle Infomaniak (precisa de ajuda?).
- Clique diretamente no nome atribuído ao site em questão.
Na parte superior da página, são exibidas eventuais mensagens sobre problemas relacionados ao Site Creator e aos domínios.
Mais abaixo, você pode gerenciar seus domínios, caso os tenha. Clique na seta para baixo , se necessário: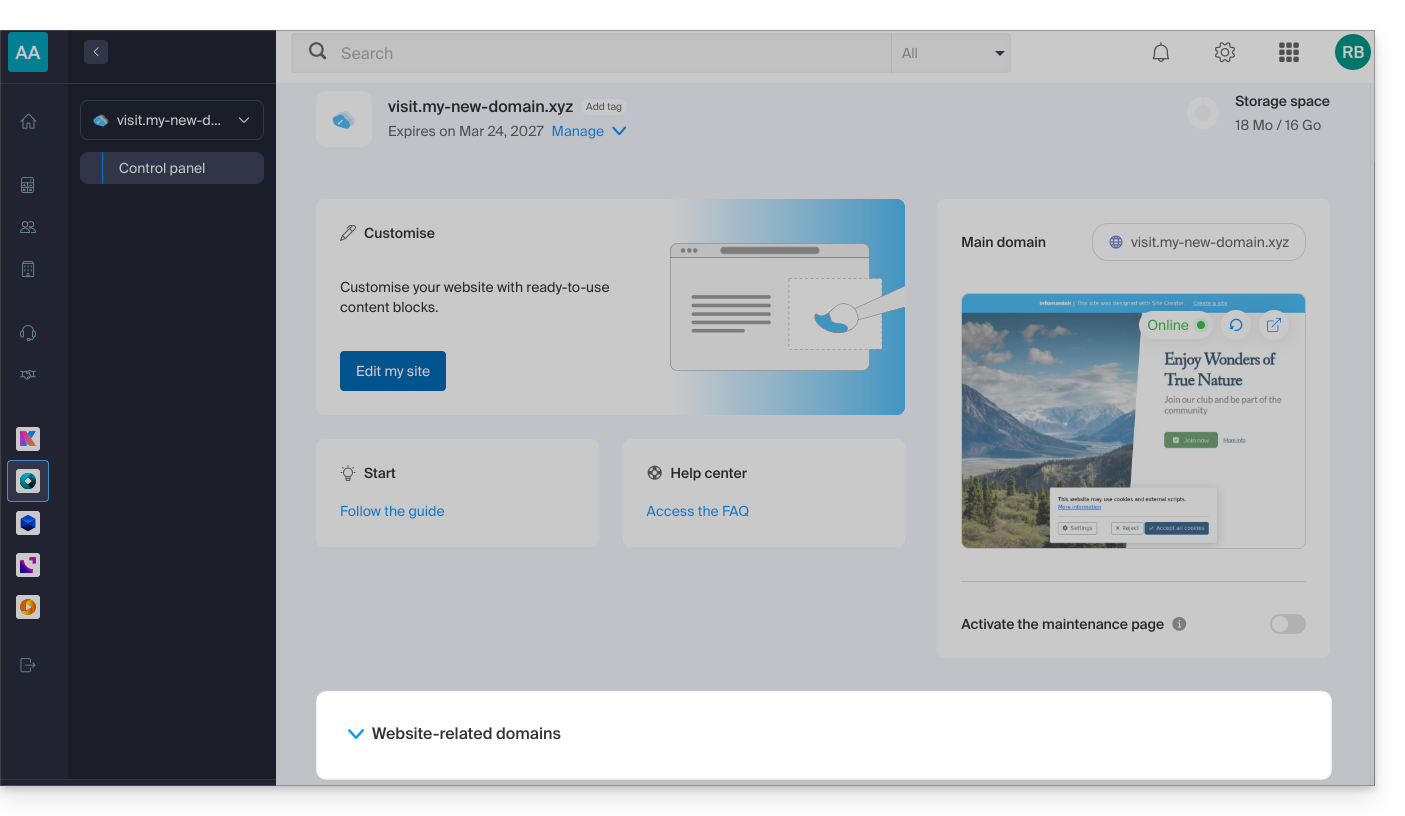
Domínio temporário, endereço provisório, URL de visualização…
Vários nomes de domínio podem ser associados ao Site Creator, removidos ou trocados e invertidos, se necessário.
Clique no menu de ação ⋮ à direita do domínio em questão: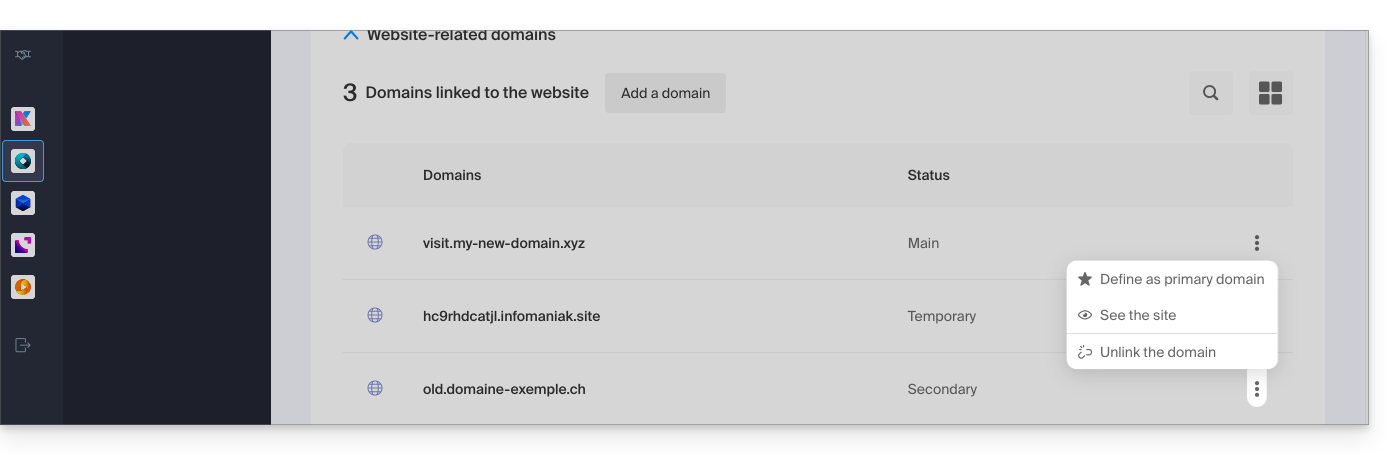
Por outro lado, a URL de visualização, do tipo 123xyz.infomaniak.site e distinta na lista de domínios do Site Creator, nunca poderá ser eliminada para garantir o bom funcionamento do seu site.
Link para esta FAQ: https://faq.infomaniak.com/2736
Esta seção de perguntas frequentes foi útil?