Base de conhecimento
1000 perguntas frequentes, 500 tutoriais e vídeos explicativos. Aqui, você encontra apenas soluções!
Este guia explica como inserir um feed RSS externo em uma página do Site Creator da Infomaniak.
O Site Creator não oferece feeds RSS para serem integrados externamente, inclusive com seu módulo Blog.
Exibir um feed RSS (externo) no Site Creator
Pré-requisitos
- Aceder ao Site Creator:
- Clique aqui para aceder à gestão do seu produto no Manager Infomaniak (precisa de ajuda?).
- Clique diretamente no nome atribuído ao Site Creator em questão.
- Clique no botão Editar o meu site para iniciar o editor:
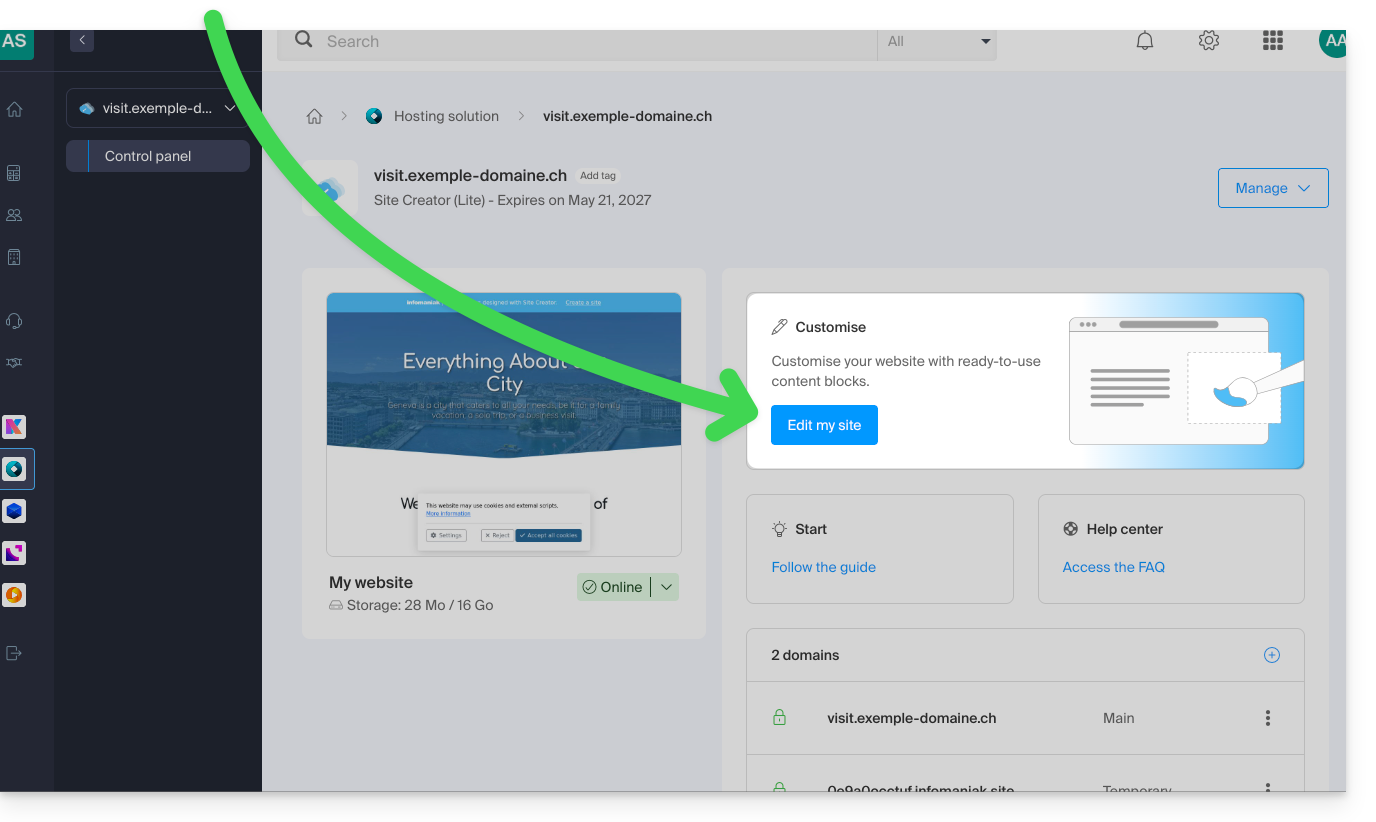
Depois de estar no Site Creator, na página onde pretende inserir os seus futuros artigos de blog:
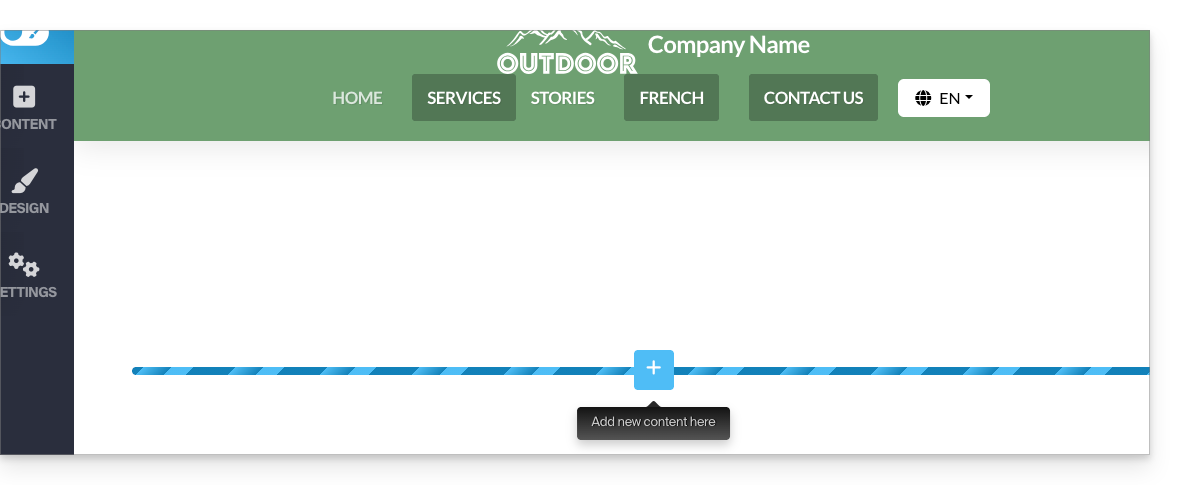
- Clique no botão + localizado abaixo de um bloco já inserido:
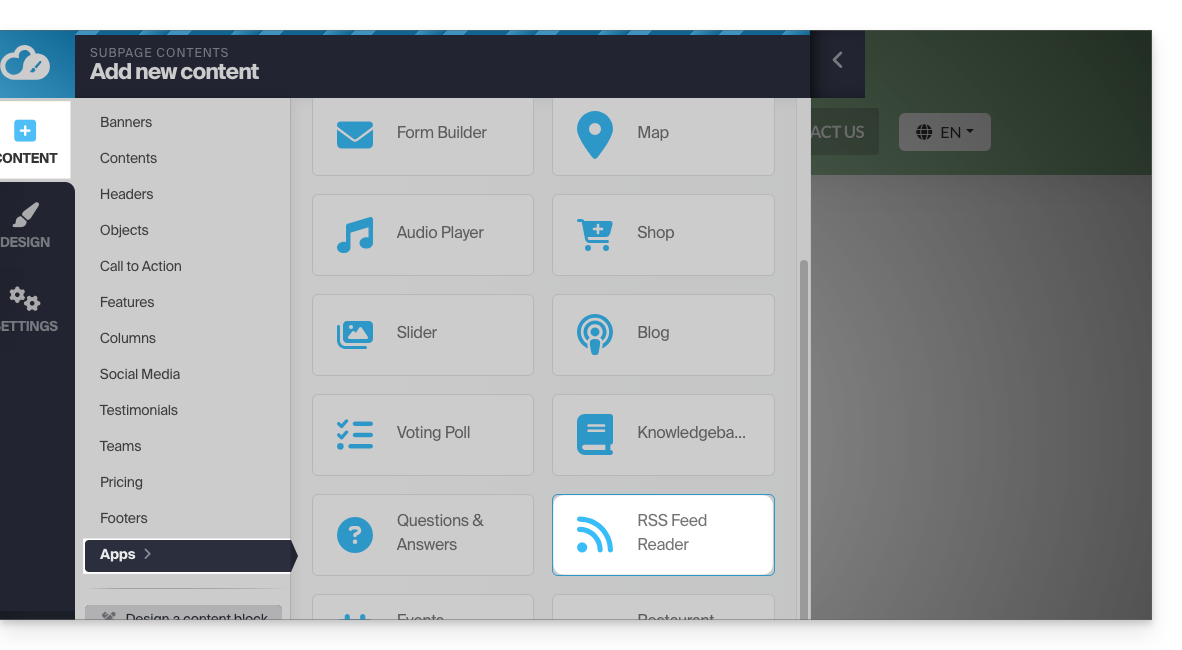
- Clique em Aplicações (na aba Conteúdo que se abriu quando você clicou para adicionar o bloco visual).
- Clique no módulo RSS Feed:
- Clique para adicionar um novo canal:
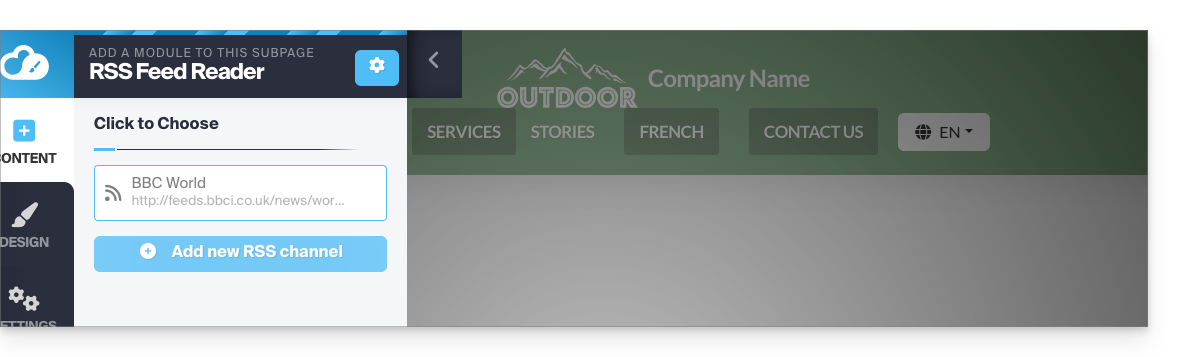
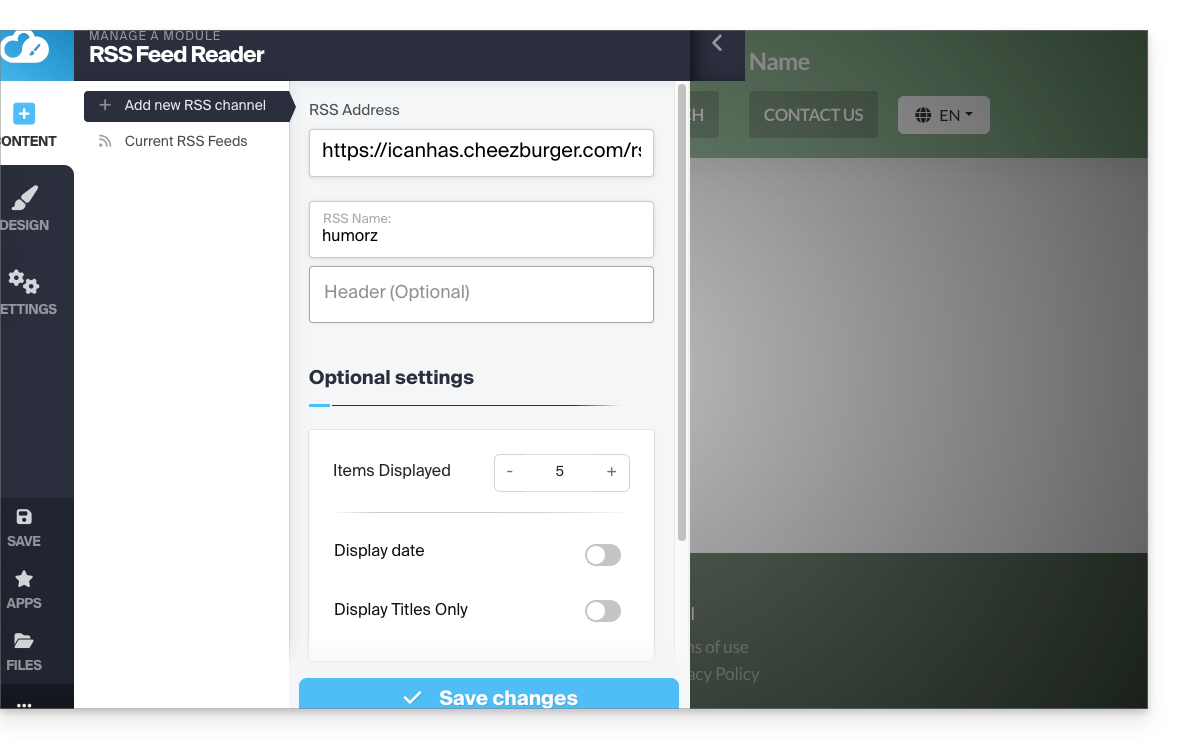
- Insira os detalhes do feed desejado e salve:
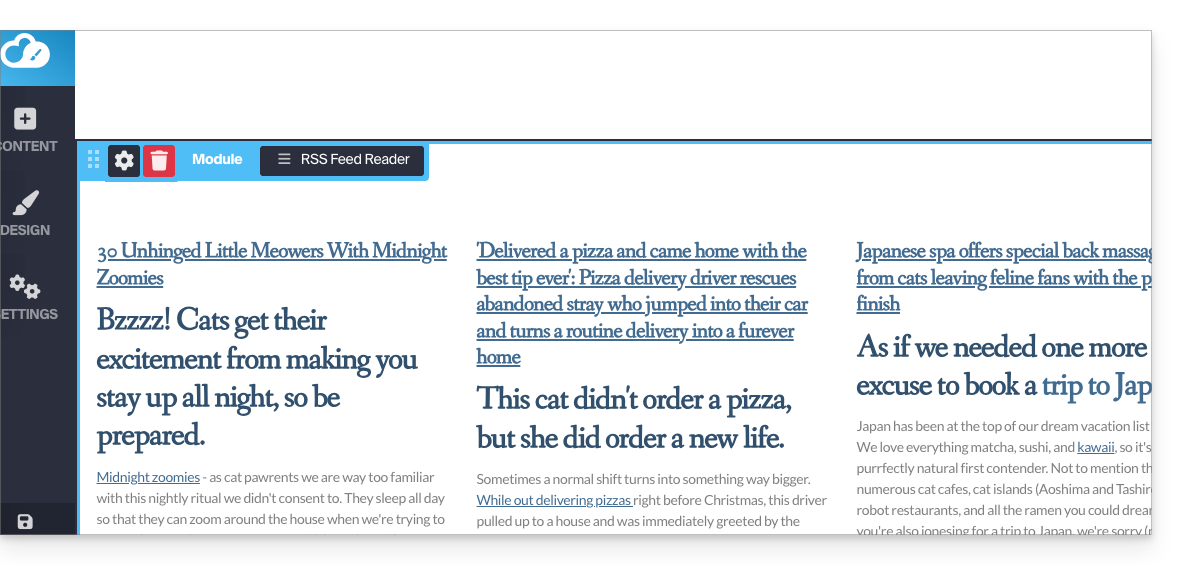
- O feed dinâmico será integrado à sua página e será atualizado automaticamente à medida que novas publicações forem adicionadas:
Link para esta FAQ: https://faq.infomaniak.com/2793
Esta seção de perguntas frequentes foi útil?
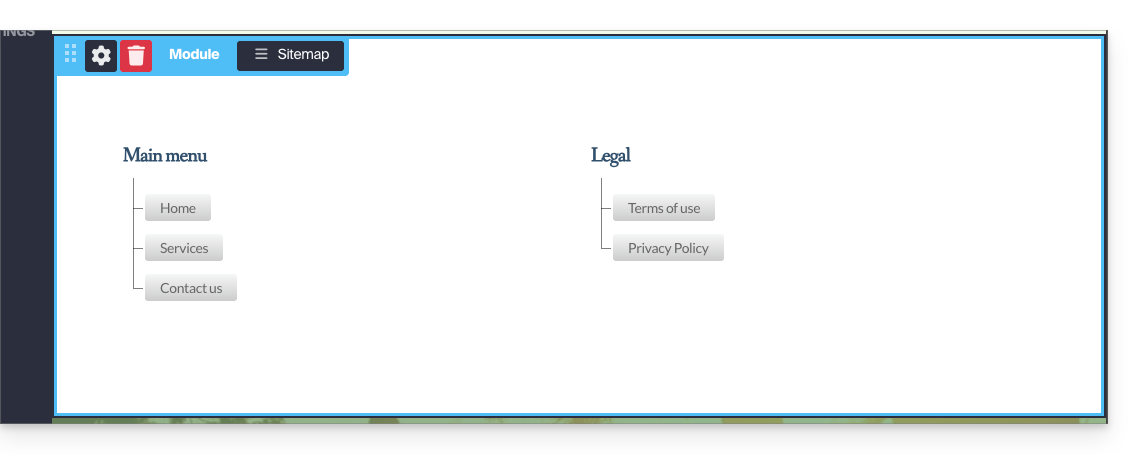
O módulo Mapa do site permiteexibir no seu site a estrutura de todo o conteúdo do seu Site Creator: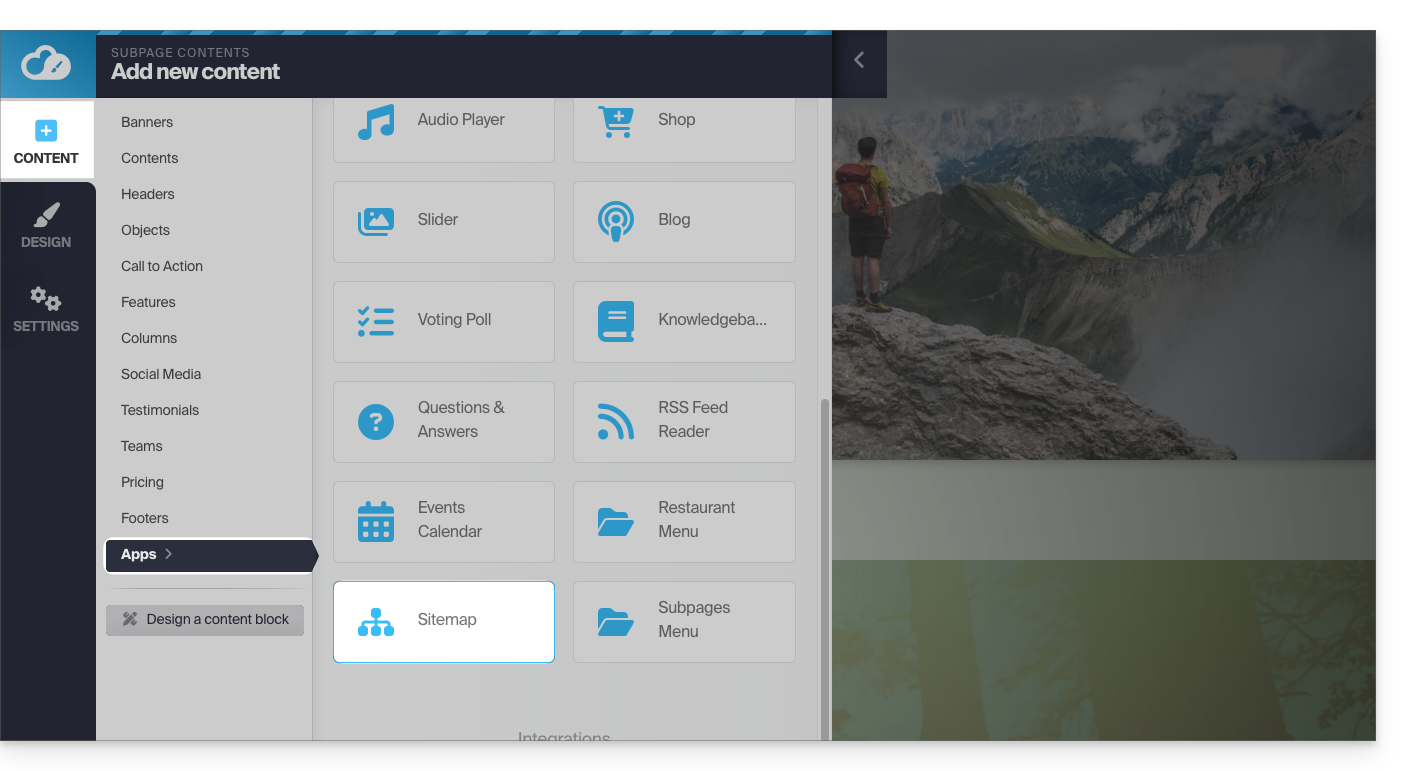
- O mapa do site não incluirá as suas páginas ocultas:
Não se esqueça de submeter o mapa do site ao Google.
Link para esta FAQ: https://faq.infomaniak.com/2818
Esta seção de perguntas frequentes foi útil?
Este guia trata do Site Creator e da possibilidade de criar links para âncoras.
Introdução
- Uma âncora em design web é um link de hipertexto que aponta para uma posição específica em uma página web, seja na mesma página ou em uma página diferente.
- Quando um usuário clica em um link de âncora, ele é redirecionado para o local especificado (em princípio, uma indicação invisível colocada no código-fonte) da página.
- As âncoras são úteis para permitir que os usuários naveguem rapidamente para seções específicas de uma página da web ou até mesmo de outra página.
- Elas melhoram a experiência do usuário, fornecendo uma maneira eficaz de encontrar e acessar informações precisas.
Exemplo de âncora
Uma âncora está localizada (de forma invisível) no final da FAQ. Ela é nomeada "end", portanto, o seguinte link contém simplesmente o destino #end e, sem mais indicações, um navegador da web procurará esse termo no código da página em que você está e direcionará o usuário para lá: clique aqui para acessá-lo!
Criar este tipo de link no Site Creator
Normalmente, para criar uma âncora em HTML, o procedimento é o seguinte:
- Identifique o local na sua página onde deseja criar uma âncora (seção de texto, imagem ou qualquer outro elemento).
- Utilize a tag
<a>com o atributohrefpara especificar o destino da âncora:- se o destino estiver na mesma página, utilize simplesmente o ID do elemento (veja o ponto 3 abaixo)
<a href="#chapter1">Ir para o capítulo 1</a> - se o destino estiver numa página diferente, especifique o URL completo da página, seguido do ID do elemento de destino (veja o ponto 3 abaixo)
<a href="page2.html#chapter1">Ir para o capítulo 1 na página 2</a>
- se o destino estiver na mesma página, utilize simplesmente o ID do elemento (veja o ponto 3 abaixo)
- Na seção da sua página onde deseja que os usuários sejam redirecionados, adicione um elemento com o ID correspondente:
<div id="chapter1"> </div>
Quando os usuários clicarem no link "Ir para o capítulo 1", a página rolará automaticamente até a seção com o ID "chapter1". Se o destino estiver em outra página, eles serão redirecionados para essa página e a âncora funcionará da mesma forma.
Com o Site Creator, o ponto 3 acima não é "livre": cada bloco já possui seu ID (ou hashtag) que deverá ser indicado (ou modificado previamente – veja o ponto 3 abaixo) para que um link aponte para ele.
Encontrar a referência do bloco de destino
Acesse o Site Creator:
- Clique aqui para acessar o gerenciamento do seu produto no Manager Infomaniak (precisa de ajuda?).
- Clique diretamente no nome atribuído ao Site Creator em questão.
- Clique no botão Editar meu site para iniciar o editor:
Depois de acessar o Site Creator:
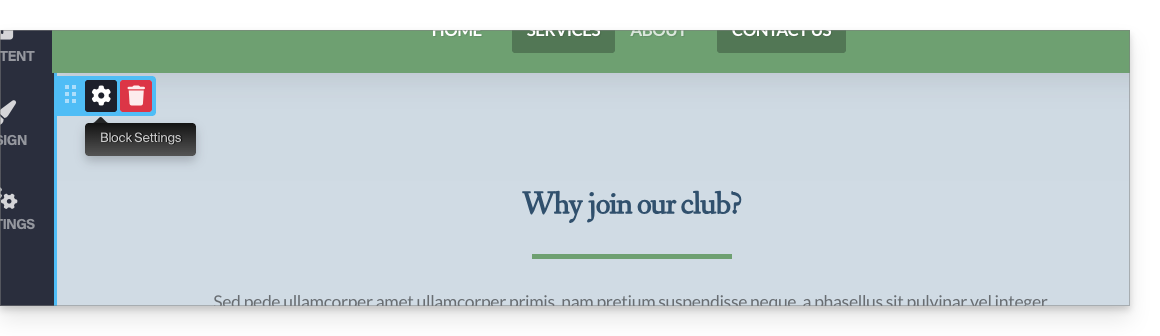
- Passe o mouse sobre o bloco de conteúdo que deseja modificar e clique no ícone de engrenagem:
- Role para baixo nas configurações até encontrar o ID do bloco em questão:
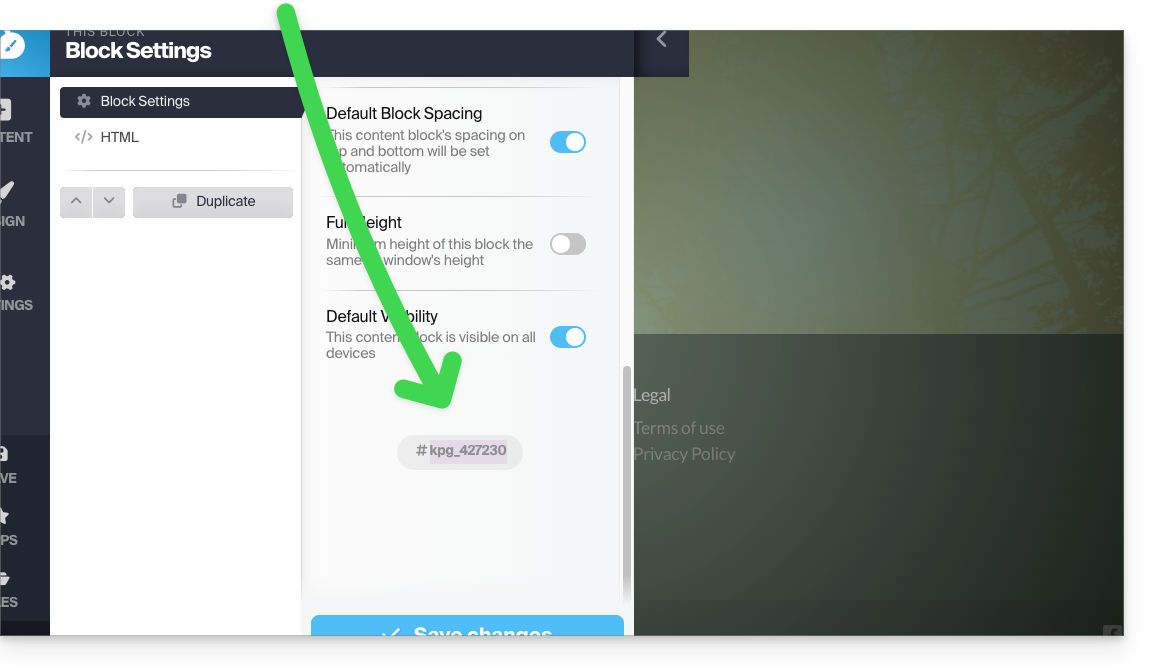
- Um clique duplo no campo que indica o ID permite especificar um título personalizado em vez do ID aleatório:

Criar um link para a referência do bloco
Para adicionar um link em um texto no Site Creator, com destino ao bloco localizado mais abaixo na mesma página:
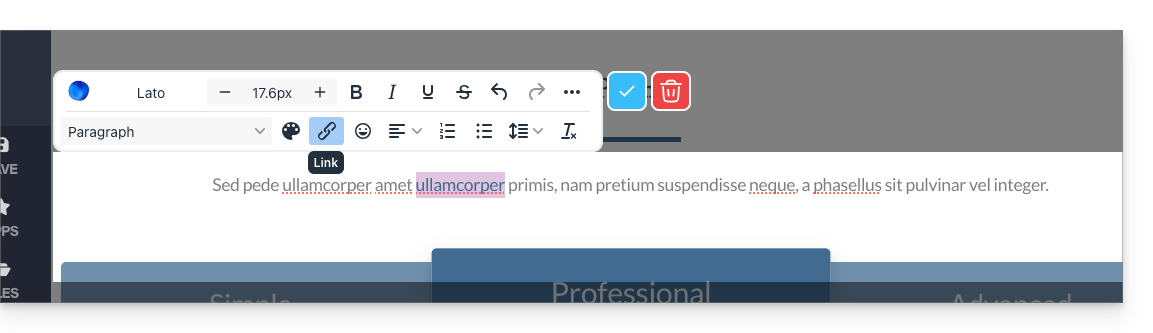
- Selecione um texto.
- Clique, em seguida, no ícone de link:
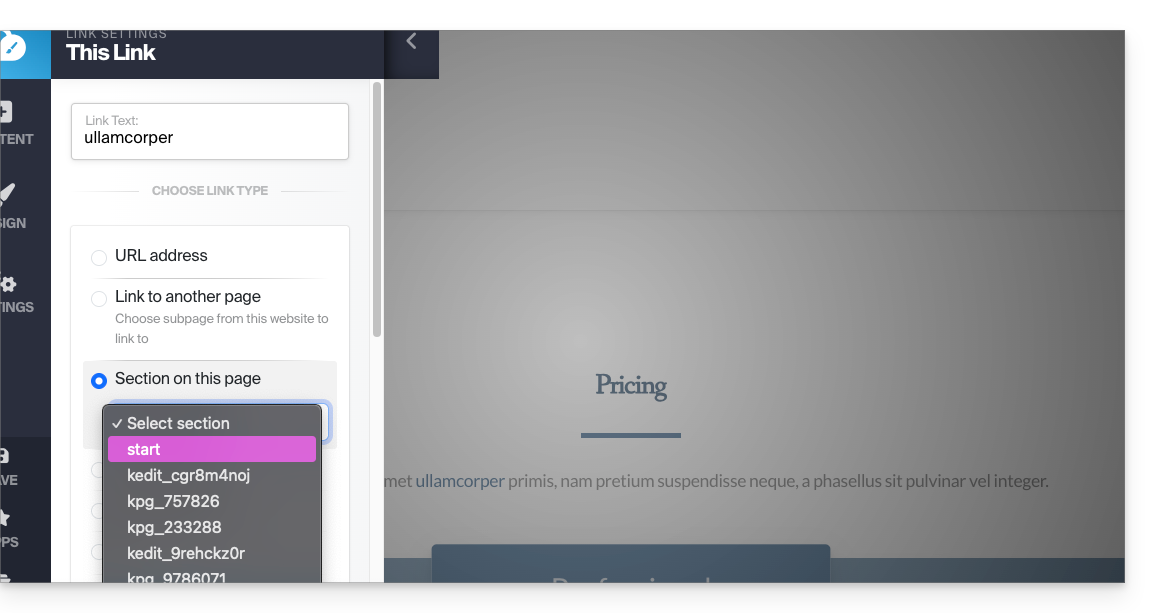
- Nas opções avançadas, escolha o tipo "Seção" para criar um link para uma parte da mesma página, selecionando a referência do bloco obtida acima:
Outras possibilidades:- Inserir o link com o sinal de cerquilha (link para a mesma página):
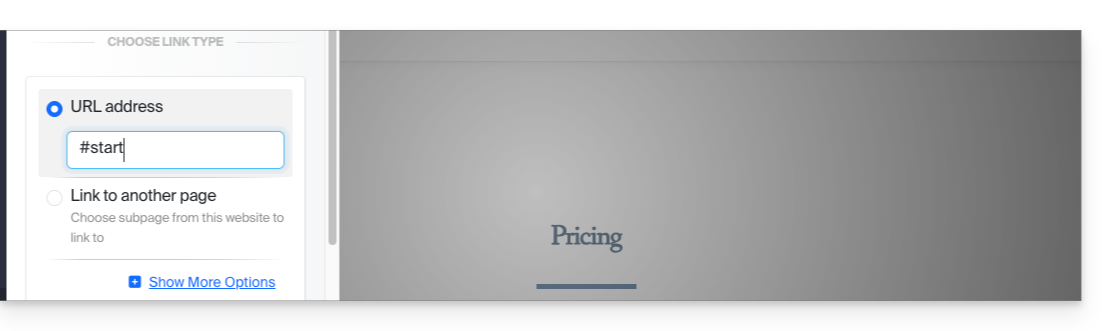
- Inserir o nome da página seguido do ID (útil se você colocar o link para outra página do site):
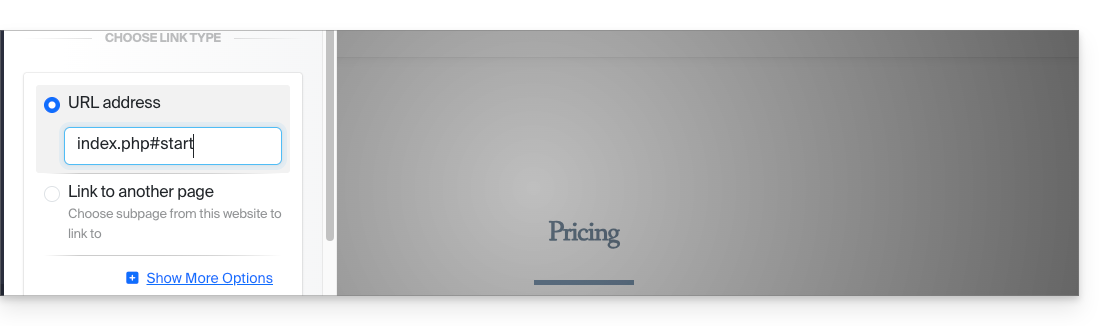
- Inserir o link com o sinal de cerquilha (link para a mesma página):
FIM DA PÁGINA (e âncora colocada neste elemento) - clique aqui para voltar à âncora localizada no início da página…
Link para esta FAQ: https://faq.infomaniak.com/2837
Esta seção de perguntas frequentes foi útil?
Este guia explica como personalizar e configurar o módulo de loja online do Site Creator.
Configurar uma loja no Site Creator
Pré-requisitos
- Aceder ao Site Creator:
- Clique aqui para aceder à gestão do seu produto no Manager Infomaniak (precisa de ajuda?).
- Clique diretamente no nome atribuído ao Site Creator em questão.
- Clique no botão Editar o meu site para iniciar o editor:
Para gerenciar as configurações gerais do sistema de e-commerce (moeda, impostos, etc.) após adicionar o módulo:
- Passe o mouse sobre o módulo da loja adicionado na sua página.
- Clique em Configuração.
Após acessar Configuração, vários submenus são exibidos no lado esquerdo, permitindo configurar outros parâmetros:
⚠️ Todos os valores inseridos devem estar no formato americano (EUA), com um ponto para os decimais, ou seja, XX.XX
Métodos de pagamento
Stripe e Mollie são fornecedores externos de serviços de pagamento e cobram taxas por cada transação. Essas taxas são independentes dos serviços da Infomaniak. Recomenda-se consultar as políticas de preços de cada um desses fornecedores para obter mais informações sobre as taxas aplicáveis.
Para utilizar os serviços da Stripe e da Mollie, é necessário ter um número de SIRET na França ou um IDE na Suíça. Além disso, é preciso ter uma empresa válida registrada no registro comercial do seu país para poder utilizar os serviços da Stripe e da Mollie.
Métodos de entrega
Pode criar vários métodos de envio:
Estas opções serão apresentadas durante a validação do carrinho de compras do cliente:
Entre os parâmetros para criar um método de envio:
- preços (+ a partir de qual valor o envio é gratuito)
- países permitidos
- custos de envio de acordo com o peso
- prazos de envio

Correio Eletrónico
Quatro mensagens estão predefinidas e não podem ser eliminadas. Elas permitem abranger toda a comunicação por e-mail relacionada com um pedido, tanto para o cliente quanto para o gestor da loja.
É possível personalizar as mensagens existentes e adicionar novas (e, posteriormente, remover essas mensagens adicionais, se necessário):
- Escolher o momento em que o e-mail deve ser enviado (ou simplesmente desativar a mensagem para mantê-la sem utilizá-la):
- e-mail de novo pedido (para notificá-lo)
- e-mail de pedido processado (personalizável)
- comprovante de entrega em formato PDF (personalizável)
- fatura também gerada e disponível em formato PDF na sua conta Stripe/Paypal/Mollie
- É possível inserir variáveis em cada um dos campos, a fim de personalizar ao máximo os textos, utilizando os elementos contidos no comando e as informações fornecidas pelo comprador:
Página inicial da loja
- Exibição das categorias de produtos, caso existam
- Apresentação de produtos aleatórios
- etc.
Gestão de produtos
Para gerenciar os produtos, adicionar ou remover:
- Passe o mouse sobre o módulo no canto superior esquerdo.
- Clique em Produtos.
Encontre os 3 primeiros produtos de exemplo:
Reorganize seus produtos movendo-os com o mouse.
Clique em um produto para ajustar seus detalhes, bem como a categoria em que ele deve estar (veja mais informações abaixo). Você pode, por exemplo:
- criar atributos (cor, por exemplo) para oferecer o mesmo produto em várias versões/preços
- definir se o produto deve ser digital (virtual), por exemplo, um PDF, um ZIP ou um MP3, e, portanto, baixável após a compra
Na parte inferior da edição da sua ficha de produto, procure outros produtos da sua lista para os vincular e oferecê-los ao visitante.
Na parte inferior da janela de edição de um produto, escolha ocultar o produto aos seus visitantes, se necessário.
Para finalizar e retornar à lista de produtos, salve as alterações usando o botão localizado na parte inferior.
Excluir ou duplicar um produto
Na página de edição de um produto, clique no menu de ações, na parte inferior, ao lado do botão de salvamento, para escolher se deseja excluir ou duplicar o produto.
Gestão de estoque / inventário
Neste mesmo menu de ações, gerencie o estoque diretamente na lista de seus produtos (para editar o estoque em massa).
Mas cada ficha de produto permite editar o estoque e também inserir o SKU (unidade de gestão de estoque) e seu código de barras (ISBN).
Categorias de produtos
Os seus produtos podem ser organizados em Categorias e subcategorias, que serão exibidas de acordo com o design do seu site.
Clique no submenu Categorias, à esquerda do painel de administração da loja, em Produtos.
Defina uma imagem para ilustrar sua categoria.
Oculte, se necessário, uma categoria (isso não oculta os produtos que ela contém).
Código promocional
Um código promocional permite aplicar um desconto (em % ou em moeda) a um pedido.
Clique no submenu Código promocional, no lado esquerdo do painel de administração da loja, em Produtos.
Pode especificar:
- a sua data de validade
- o seu valor mínimo, se aplicável
- o seu nome ("Desconto especial de Natal", por exemplo)
- sua forma ("JOYEUXNOEL")
Exportar a lista dos seus produtos
Exporte a lista dos seus produtos para um arquivo CSV (formato .csv) através do menu de ações localizado no canto superior direito da lista dos seus produtos.
Gestão de pedidos
Para gerir os pedidos efetuados e em curso:
- Passe o cursor sobre o módulo no canto superior esquerdo.
- Clique em Configuração.
- Clique no submenu Pedidos, no lado esquerdo do painel de administração da loja.
Exportar a lista dos seus pedidos
Exporte a lista dos seus pedidos para um ficheiro CSV (formato .csv) através do botão Descarregar, localizado à direita da barra de pesquisa de pedidos.
Gestão de clientes
Para gerenciar os clientes (um cliente fornece informações pessoais ao fazer um pedido):
- Passe o mouse sobre o módulo no canto superior esquerdo.
- Clique em Configuração.
- Clique no submenu Clientes, no lado esquerdo do painel de administração da loja.
Exportar a lista dos seus clientes
Exporte a lista dos seus clientes para um arquivo CSV (formato .csv) usando o botão Download, localizado à direita da barra de pesquisa de clientes.
Link para esta FAQ: https://faq.infomaniak.com/2842
Esta seção de perguntas frequentes foi útil?
Este guia detalha os limites do Site Creator da Infomaniak.
Limites do Site Creator
Acesse a descrição das ofertas Site Creator Free, Lite e Propara comparar os limites de acordo com o plano que você possui.
Em resumo, o Site Creator está disponível…
- … com cada plano de hospedagem web pago (a oferta é equivalente a um Site Creator Pro, sem o nome de domínio incluso)
- … ou de forma independente (standalone, disponível em 3 versões: Free, Lite e Pro) e, neste caso, não requer nenhuma outra oferta específica.
Conteúdo
- O número máximo de páginas que pode criar, indicado na página de vendas, inclui as eventuais páginas legais, caso as utilize.
- Com a versão Pro, não há limite para o número de páginas ou artigos da loja que podem ser adicionados no Site Creator.
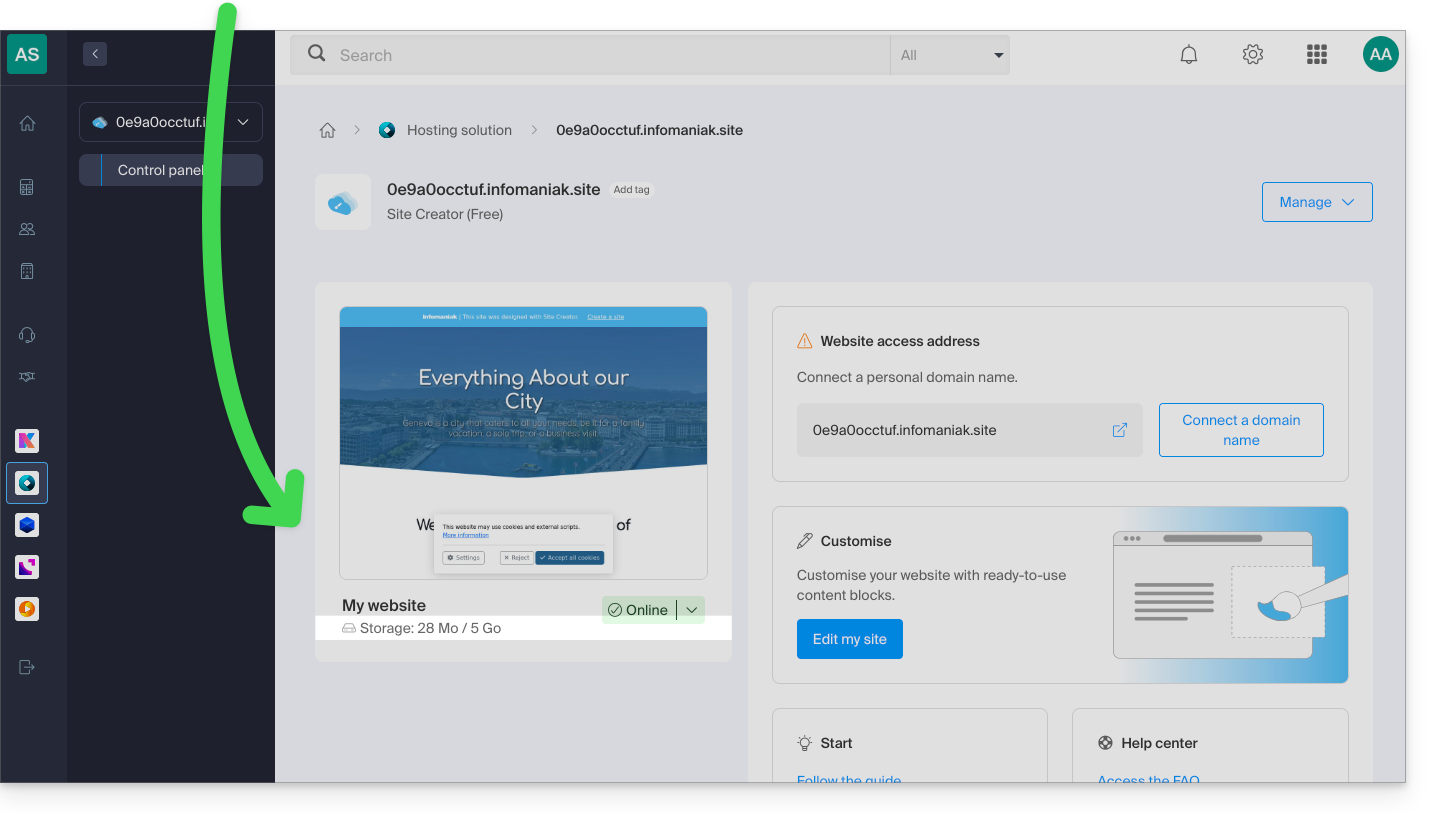
- O espaço de disco disponível restante, de acordo com o plano que você possui, é especificado no seu painel de controle:
Gerenciamento FTP
- Você não pode acessar os arquivos do seu site no servidor, nem por FTP nem por qualquer outro meio que não seja o gerenciador disponibilizado no painel de controle Infomaniak.
Exportação do site
- Não é possível importar ou exportar o site (para outro provedor de hospedagem ou outro servidor, por exemplo).
- Os temas ou módulos não podem ser exportados nem importados.
Compatibilidade de um tema/extensão WordPress e Site Creator
WordPress e Site Creator são duas ferramentas de criação de sites totalmente diferentes einfelizmente não é possível usar os componentes de uma com a outra.
Link para esta FAQ: https://faq.infomaniak.com/2860
Esta seção de perguntas frequentes foi útil?
Este guia permite redirecionar os visitantes que chegam a páginas inexistentes (antigas páginas de um site anterior, por exemplo) caso o seu site seja atualmente gerido com o Site Creator da Infomaniak.
Pré-requisitos
- Conhecer o endereço web (URL) da página que deixou de existir.
- Aceder ao Site Creator:
- Clique aqui para aceder à gestão do seu produto no Manager Infomaniak (precisa de ajuda?).
- Clique diretamente no nome atribuído ao Site Creator em questão.
- Clique no botão Editar o meu site para iniciar o editor:
Redirecione os visitantes para a nova página do Site Creator
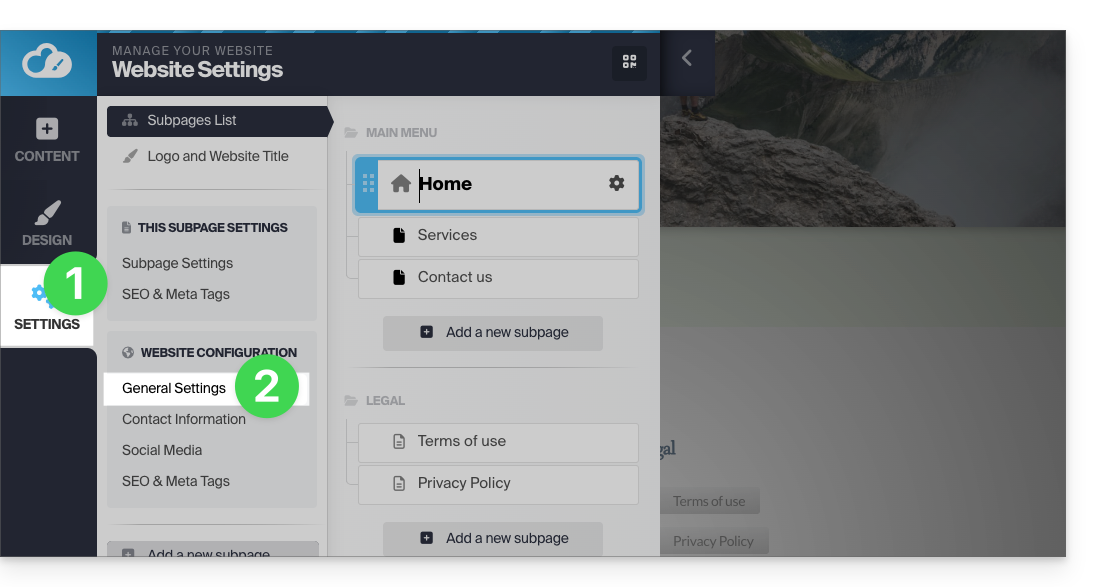
No menu lateral esquerdo do Site Creator:
- Clique em Configurações.
- Clique em Configurações gerais:
- Clique em SEO e Meta Tags.
- Clique em Adicionar uma redireção:
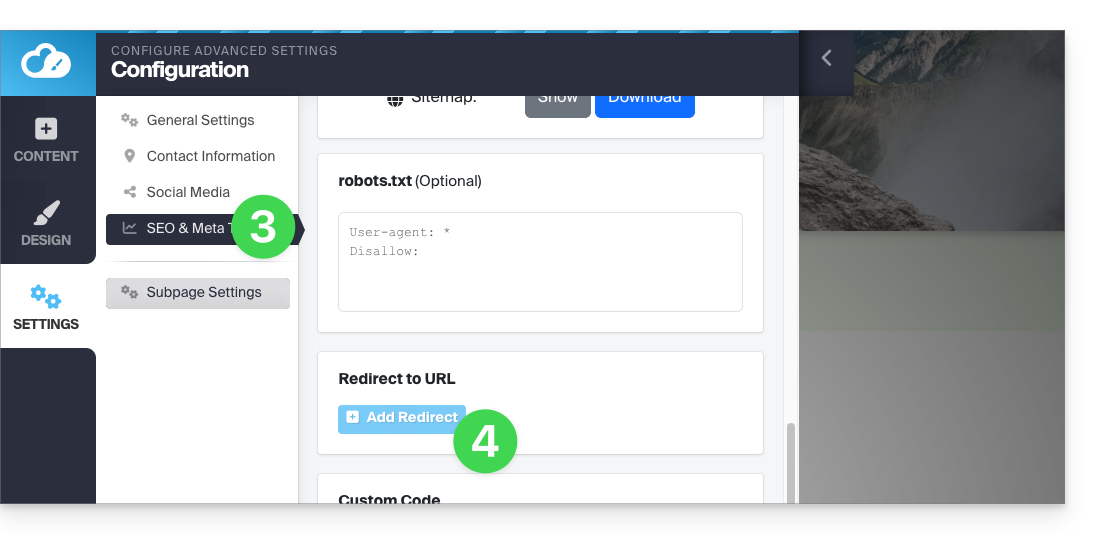
- Insira o endereço da página antiga (sem o nome do seu site) em Redirecionamento.
- Insira o endereço da nova página (ou
/para redirecionar o visitante para a raiz do seu site, ou seja, a página inicial). - Faça o backup com o botão azul na parte inferior da página:
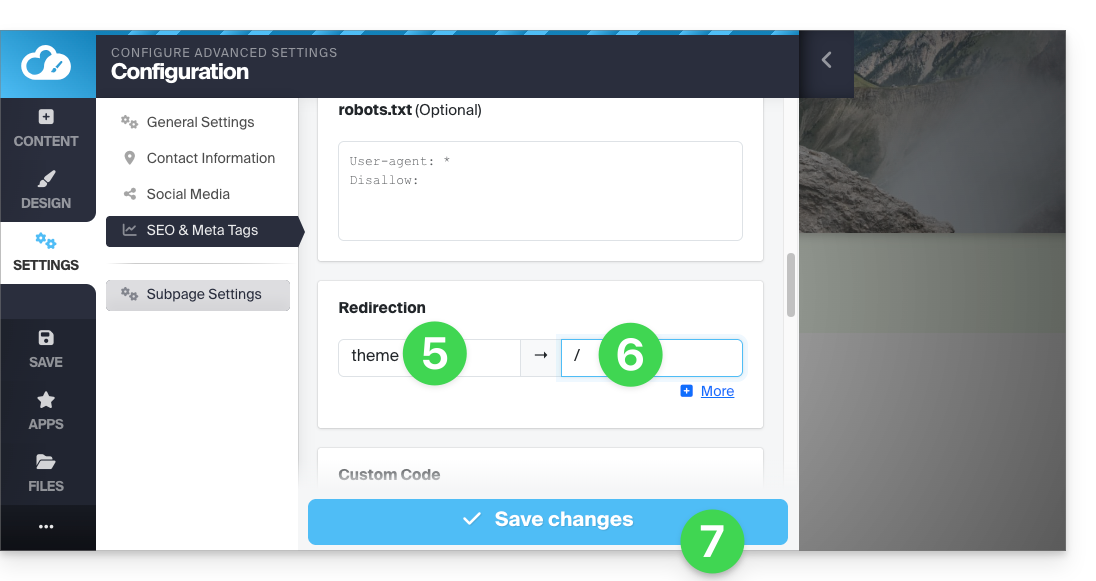
Por exemplo:
- O seu site anterior continha uma página de contacto no endereço
domainxyz.com/company/contact.html. - Atualmente, a sua página de contacto encontra-se em
domainxyz.com/about. - Você deve, portanto, inserir
company/contact.htmlno campo da esquerda… - … e
aboutno campo da direita, para que os visitantes que ainda acessarem o endereço antigo (devido a um referenciamento desatualizado ou a um clique em um favorito, por exemplo) sejam automaticamente redirecionados para a nova página.
Um método alternativo consiste em adicionar uma nova página ao Site Creator com o nome da sua antiga página e, em seguida, especificar um redirecionamento para a URL desejada e torná-la invisível usando o botão de alternância (toggle switch) localizado abaixo do campo de redirecionamento: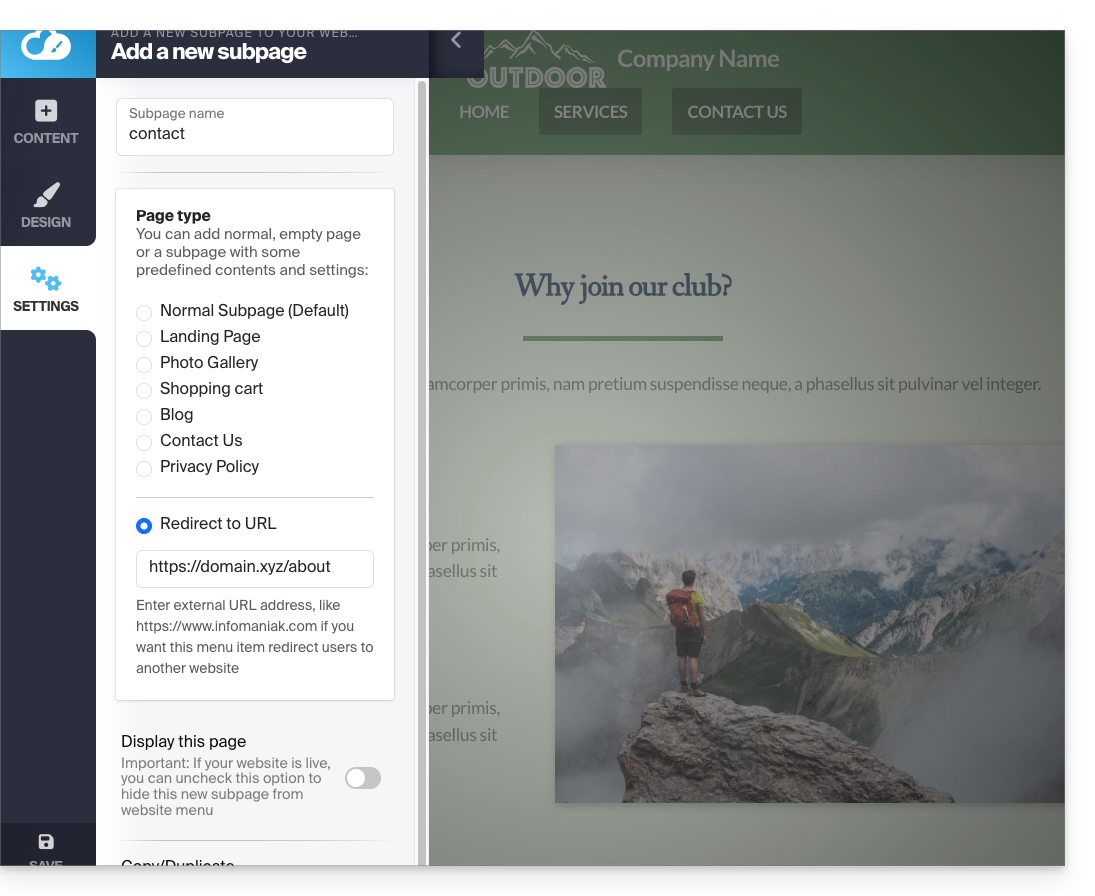
Link para esta FAQ: https://faq.infomaniak.com/2875
Esta seção de perguntas frequentes foi útil?
Este guia aborda a gestão dos formulários que permitem a inscrição na Newsletter que você gerencia na Infomaniak.
Pré-requisitos
- Ter acesso ao produto Newsletter.
- Ter criado pelo menos um formulário de inscrição.
Copiar o código necessário para integrar o formulário
Para aceder aos formulários da sua newsletter e obter o código de integração:
- Clique aqui para acessar o gerenciamento do seu produto no painel de controle Infomaniak (precisa de ajuda?).
- Clique diretamente no nome de domínio atribuído ao produto em questão.
- Clique em Formulários no menu lateral esquerdo.
- Clique no menu de ação ⋮ à direita do item correspondente na tabela exibida.
- Clique em Código de incorporação:
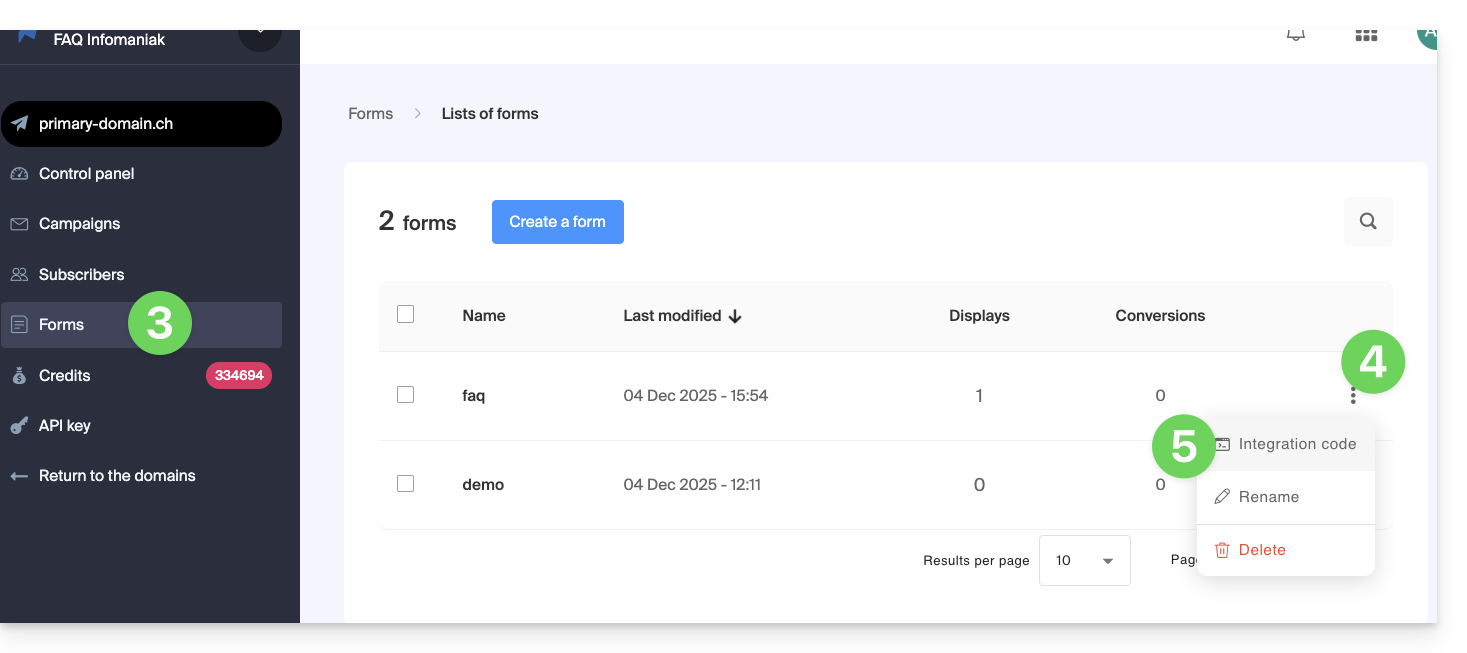
- Escolha entre o separador JAVASCRIPT e HTML para obter um dos dois tipos de código, útil para inserir o seu formulário nas suas páginas, e clique no botão azul para copiar o código para a área de transferência:
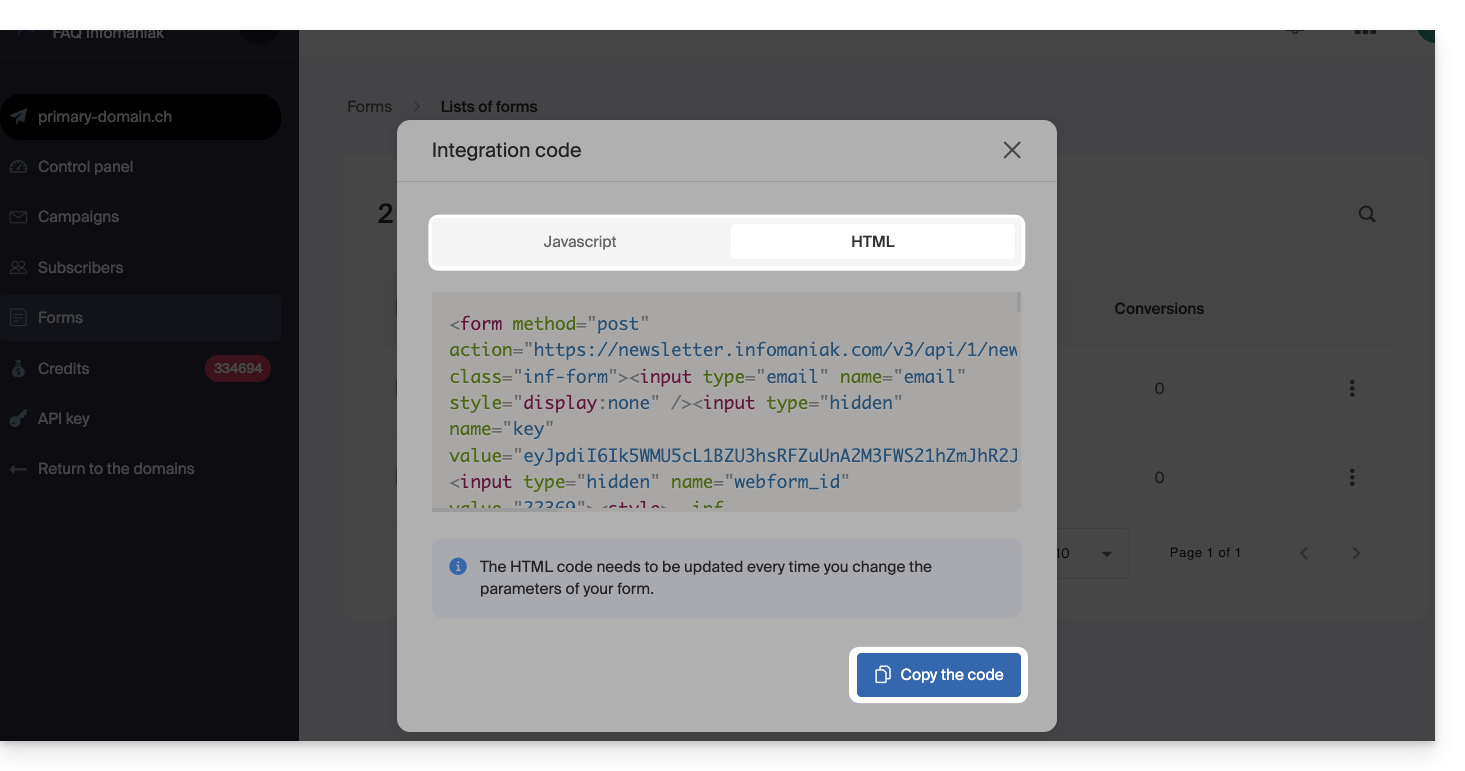
O código HTML precisa ser atualizado sempre que você alterar as configurações do seu formulário (portanto, será necessário reinserir o código HTML em caso de alterações no editor do formulário de inscrição).
Inserir o formulário num site…
Pode inserir o mesmo formulário em diferentes locais. Também pode criar vários formulários (para preencher diferentes grupos de contactos, por exemplo). Obviamente, uma newsletter é enviada apenas uma vez por contacto, mesmo que este esteja presente em diferentes listas/grupos:
… com o WordPress
- Insira um novo bloco HTML no local desejado:
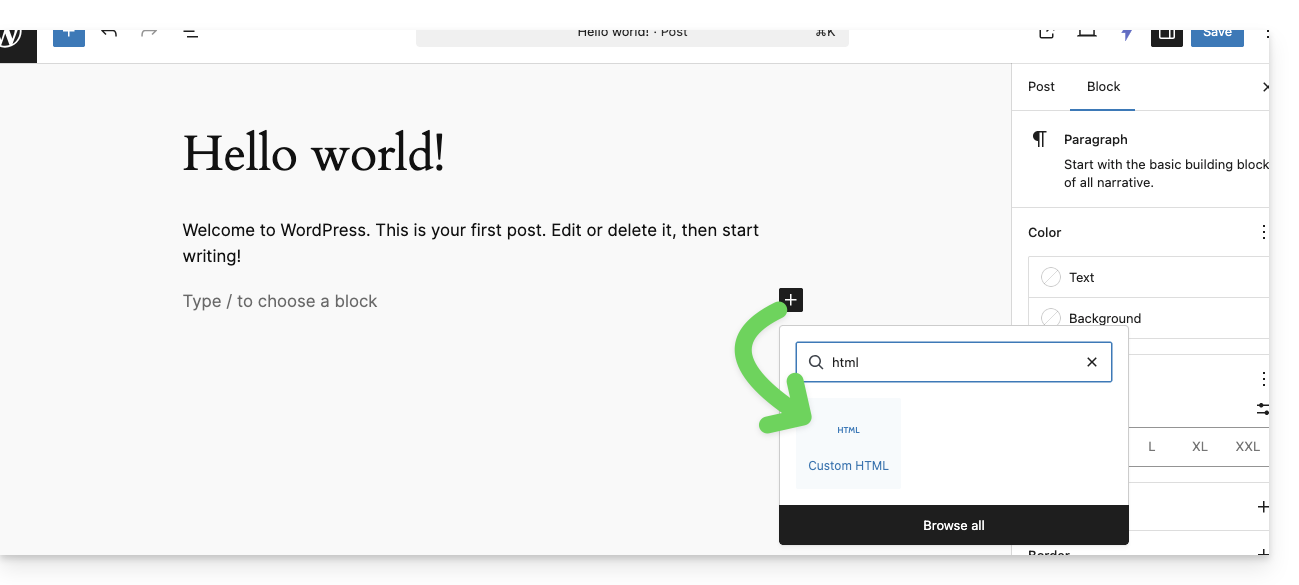
- Cole o código HTML ou JAVASCRIPT obtido no passo 6 acima e salve:
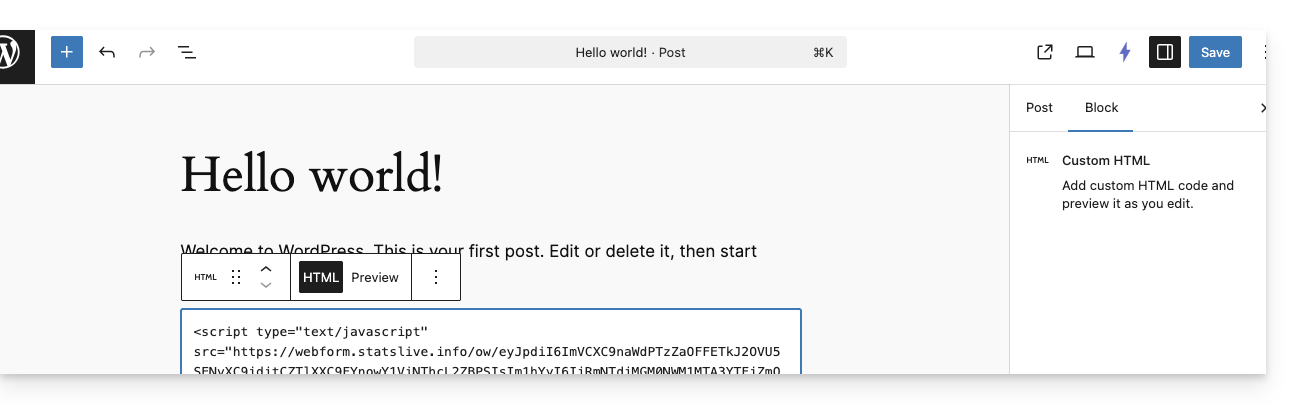
- O formulário configurado anteriormente será exibido no seu site:
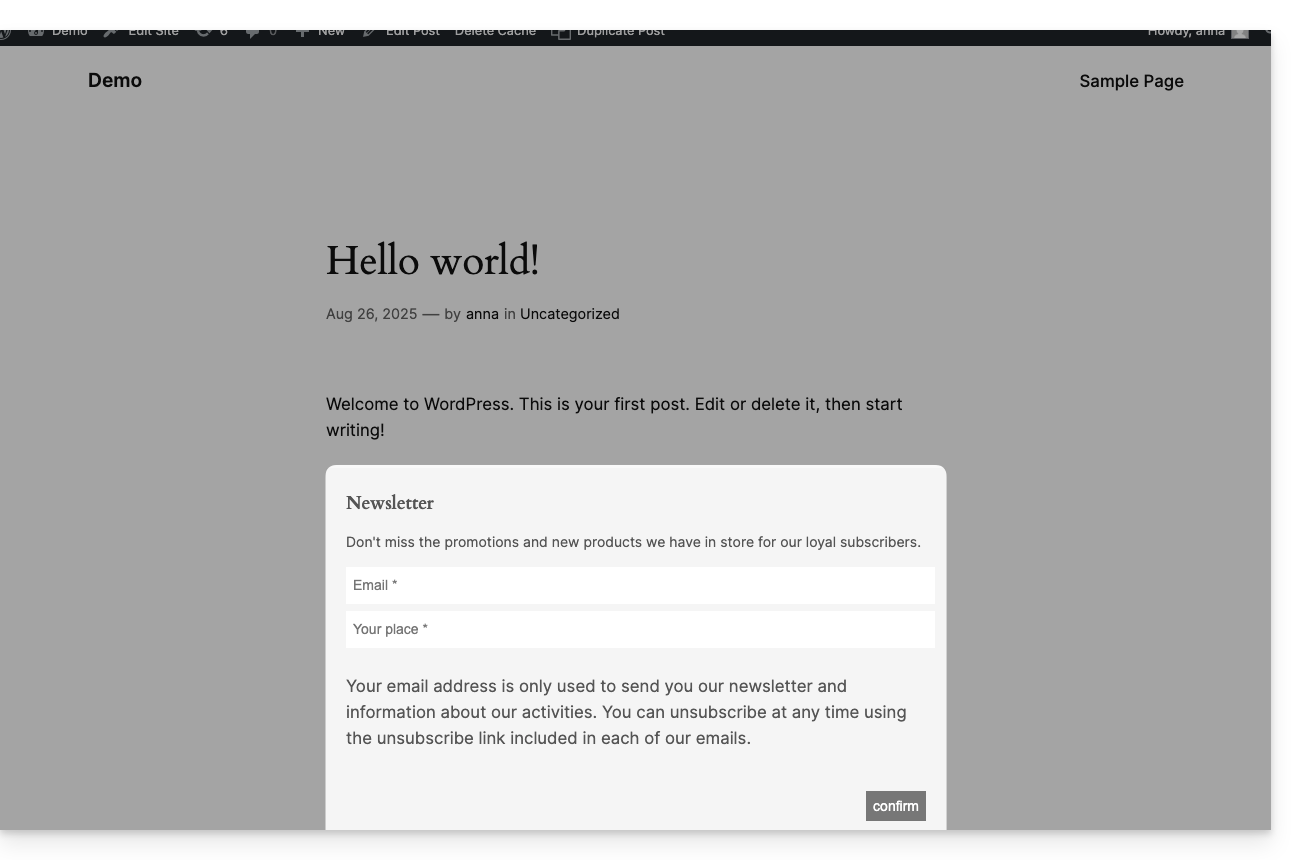
… com o Site Creator Infomaniak
- Passe o cursor sobre o local desejado na página para exibir um botão MAIS, que permite adicionar um bloco:
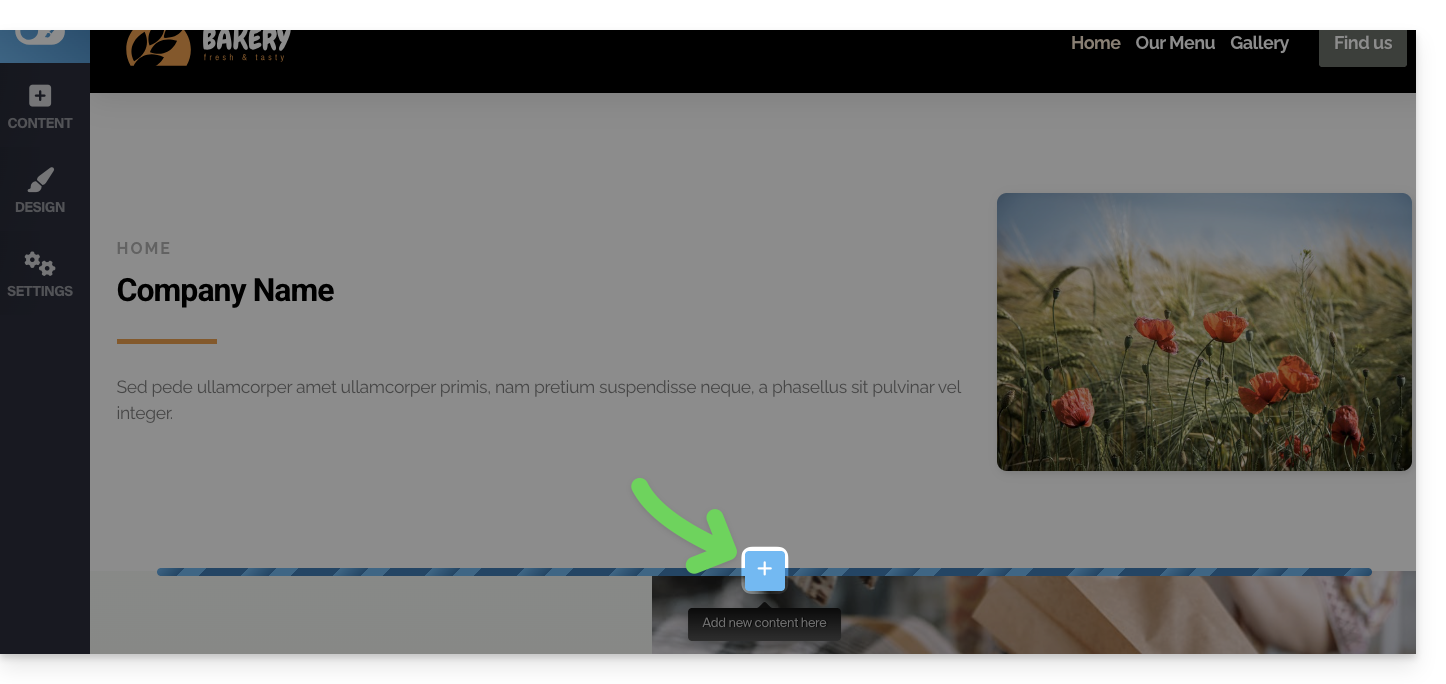
- Clique no botão MAIS para escolher um bloco de código HTML personalizado:
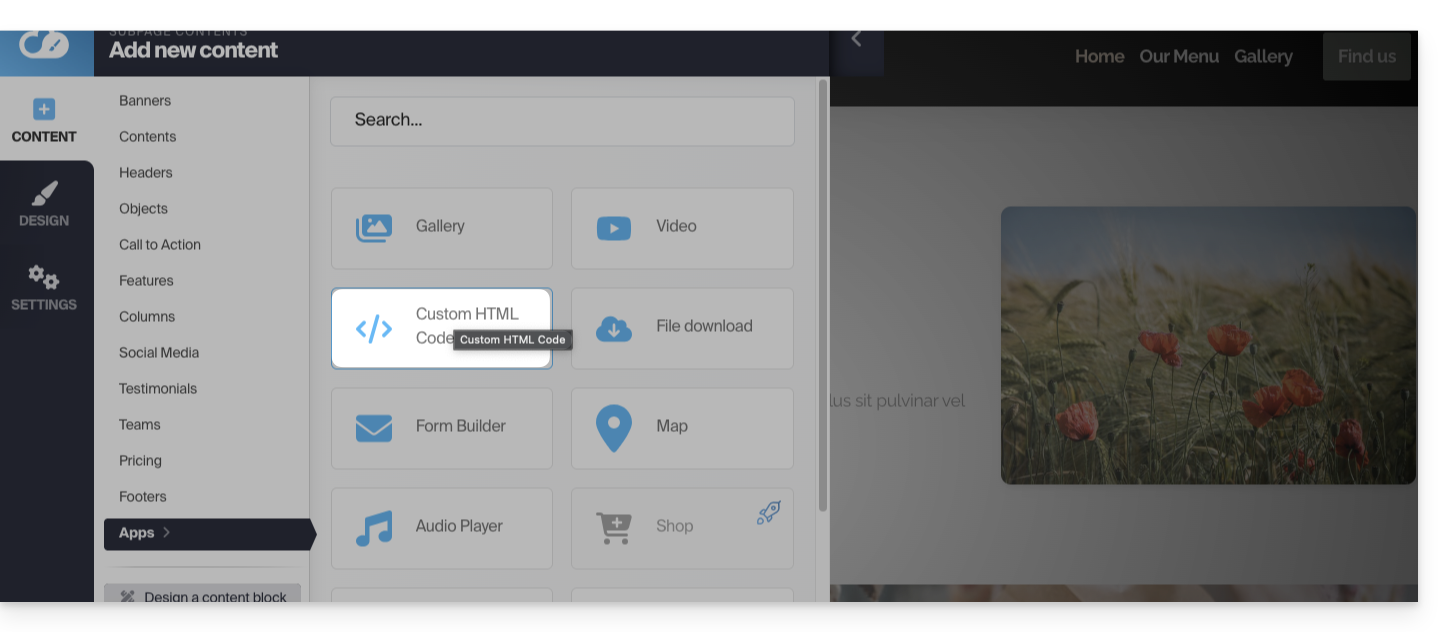
- Cole o código HTML ou JAVASCRIPT obtido no passo 6 acima e clique no botão para Continuar:
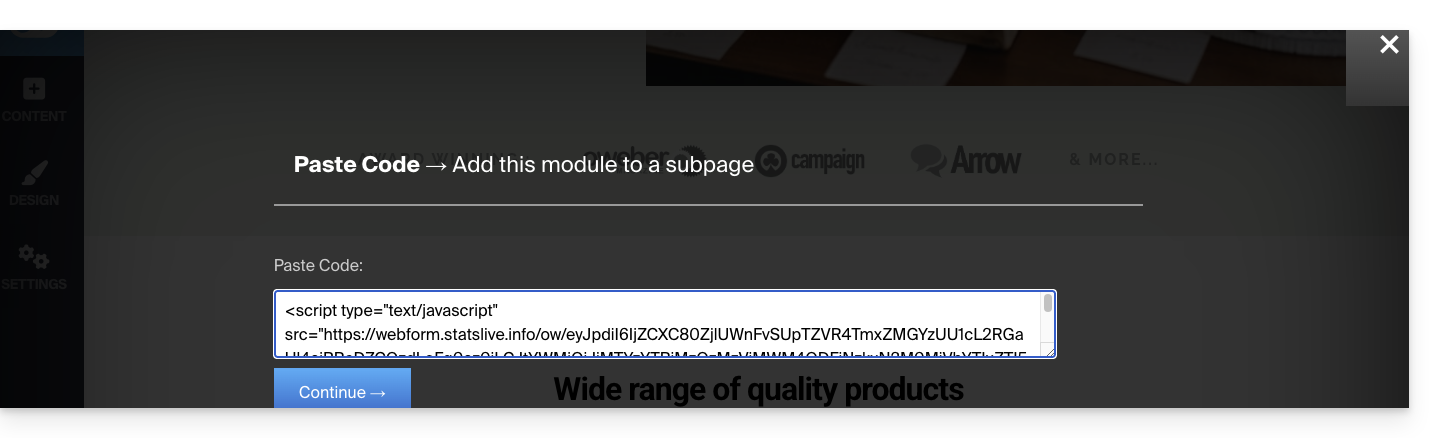
- O formulário é exibido em pré-visualização na sua página de edição e será exibido para os seus visitantes:
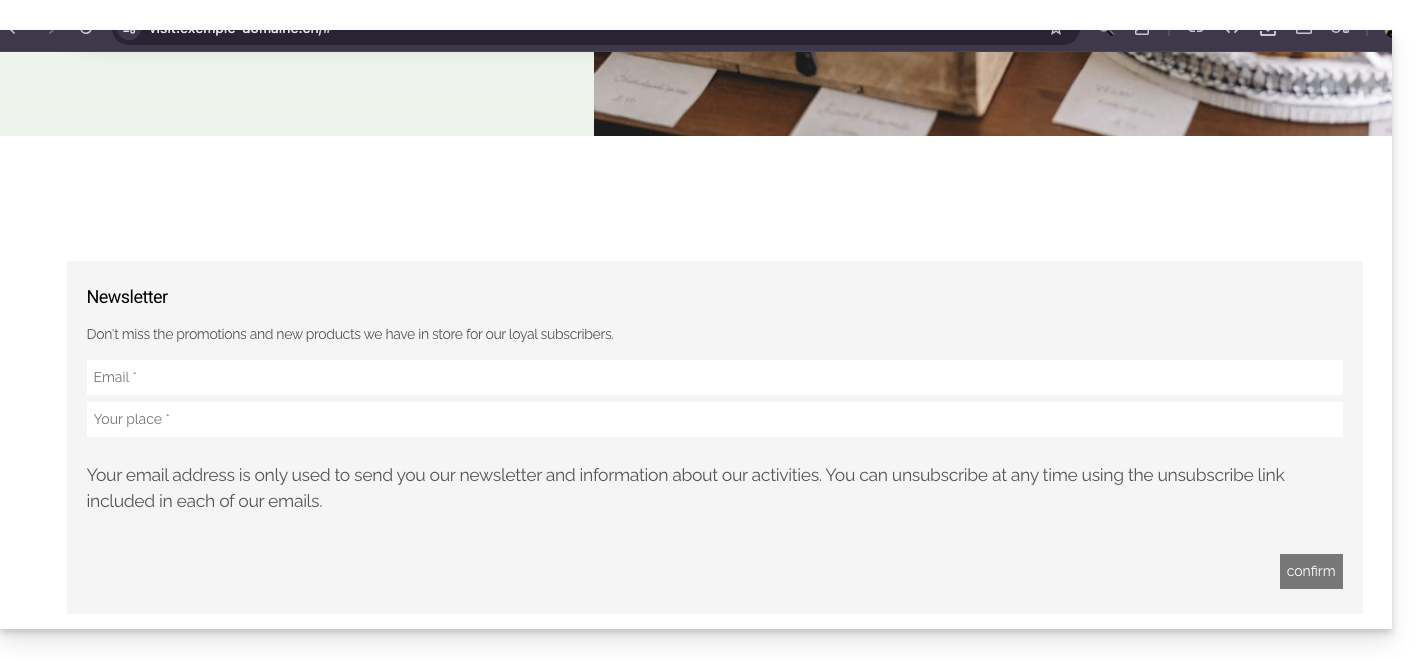
Link para esta FAQ: https://faq.infomaniak.com/2878
Esta seção de perguntas frequentes foi útil?