Knowledge base
1000 FAQs, 500 tutorials and instructional videos. Here, there are only solutions!
This guide explains how to check the storage space of your free Infomaniak mail offer and how to free up space.
Preamble
- The storage space for my kSuite emails is limited to a maximum of 20 GB (paid Mail Infomaniak offers (my kSuite+ included) have unlimited disk space).
- If you reach this limit, you will no longer be able to receive new emails, and you will need to free up space in this case.
Display the total storage space used
To do this:
- Click here to access the Infomaniak Mail Web app (online service ksuite.infomaniak.com/mail).
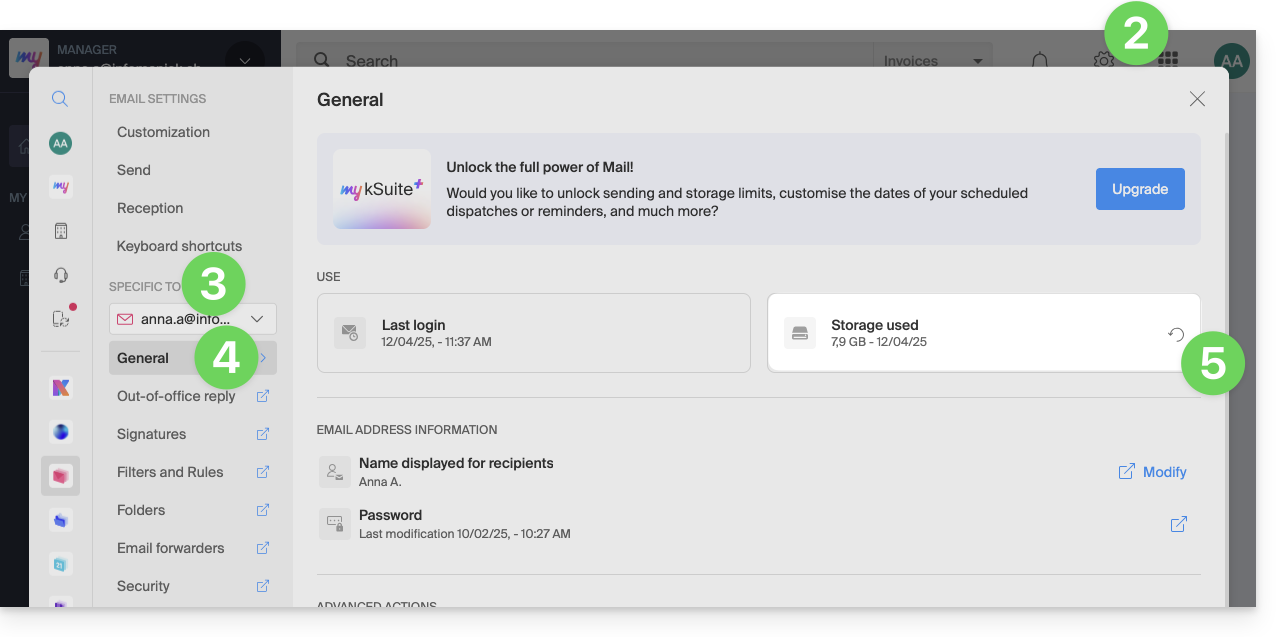
- Click on the Settings icon at the top right.
- Check or select the email address concerned in the dropdown menu of the left sidebar.
- Click on General below.
- Click the button to refresh the disk space:
Free up storage space
When your mailbox is full, it is crucial to free up space to continue receiving messages. Here are some effective solutions to achieve this:
1. Delete non-essential emails
- Search for the largest messages. Delete messages with unnecessary attachments or download them to your computer before deleting the emails.
- Sort your emails by date and delete those that are too old or that you no longer need.
- After deleting emails, do not forget to empty the trash to actually free up space.
- Unsubscribe from newsletters and mailing lists that you no longer read to avoid receiving unnecessary emails in the future.
2. Use an email management application
- There are applications like Clean Email, Unroll.me, or Mailstrom that can help you quickly and efficiently clean up your inbox (be careful, however, with the terms of use and confidentiality of these applications).
3. Increase storage capacity
- Paid Infomaniak Mail offers (including my kSuite+) come with unlimited disk space.
Link to this FAQ:
Has this FAQ been helpful?
This guide explains how to set up the Infomaniak ticketing system by configuring a store whose public version will be published on the infomaniak.events portal.
Preamble
- The Infomaniak.events portal brings together events and activities both local and internationally renowned headliners.
A simple and quick online tool
To access the online ticketing options:
- Click here to access the management of your product on the Infomaniak Manager (need help?).
- Click directly on the name of the ticketing concerned.
- Click on Ticketing Portal in the left sidebar menu.
- Click on Online Store in the left sidebar menu.
- Click on the Manage your store button:

Configure and publish the store
Personalize your online store with a custom image, your own colors, and by choosing the content of your store. You have two tabs available:
- The first tab allows you to customize the display settings of your online store:
- Customize the ticketing here, change the colors, add an image, etc.
Formats:1000 x 1414px, vertical image, and custom image:2500 x 1000px - The changes are directly visible in real-time:

- Customize the order of each category and click on the action menu ⋮ located to the right of the item concerned to rename them if necessary.
- Advanced settings allow you to define the payment methods available in the store and to activate and customize the message displayed when there are no tickets for sale:

- Customize the ticketing here, change the colors, add an image, etc.
- The second tab allows you to define the content that will be displayed, such as events, passes, or gift vouchers:
- Decide on this tab what will be available for sale in your store.
- If you do not need to manage each item, you can of course simply choose the first option to display all content.
- You can also choose to limit the display of events based on a specific location.
- Or choose each content individually.

Once configured, your main store will be directly published on the infomaniak.events portal if you leave the option enabled.
Do not publish on Infomaniak.events
If you do not want the event to be published on the infomaniak.events portal, enable the option at the bottom of the first tab to keep the store private:
- This is useful for personal events, such as birthdays or weddings, or events whose ticket sales should not be available to the general public, such as specialized conferences.
Retrieve the integration links
Once your event is published, it will be published directly on infomaniak.events so that all visitors can directly buy tickets.
You can also place a link directly on your website, share it on social media, or retrieve it to generate a QR code for your posters: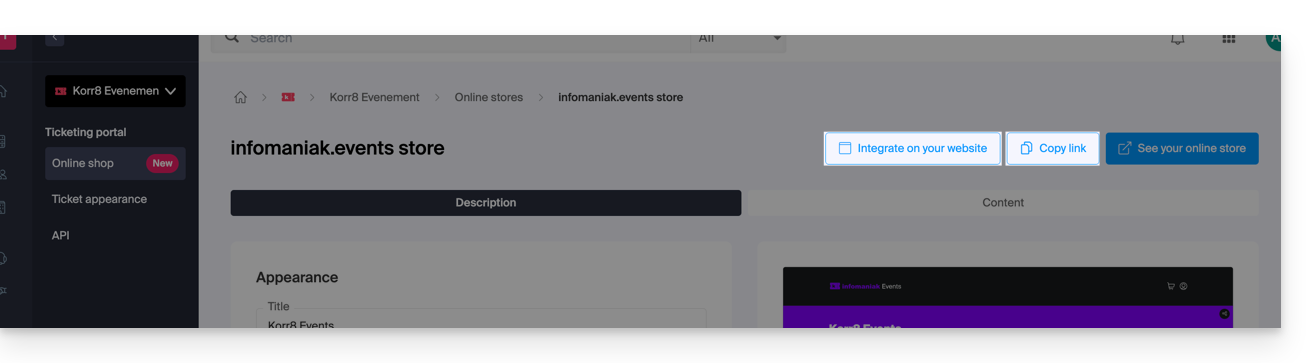
Display only the checkout tunnel
The buttons in the top right of your store page also allow you to retrieve the script link for integration on your site:
An option forces the visitor to stay on an event until the end of their order (once the option is enabled, the shopping cart is no longer shared between different events and the checkout tunnel leads the customer to the payment page without allowing them to purchase other tickets from the rest of your events).
Advanced integration
If you want multiple custom links, or to inject HTML, JS code, or use an external CSS, you will need to use a custom store. Refer to this other guide on the subject.
Link to this FAQ:
Has this FAQ been helpful?
This guide concerns YAZ, a software library used to implement the Z39.50 protocol, an information retrieval protocol that allows communication between different library management systems (LMS) such as PMB, widely used in France.
Infomaniak for efficient library management
On Infomaniak Web Hosting, PMB is supported and YAZ is enabled by default.
However, if you encounter errors such as Call to undefined function yaz_connect() it will be necessary to open ports via the Manager. Port 210 is the standard port used for Z39.50 communications, but do not hesitate to consult the documentation of your applications.
For old Infomaniak hosting plans, consider changing your offer.
Link to this FAQ:
Has this FAQ been helpful?
This guide explains how to restrict access to Infomaniak's Video Streaming streams based on the IP addresses of visitors/viewers.
Restrict access to broadcasts by IP addresses
To do this:
- Click here to access the management of your product on the Infomaniak Manager (need help?).
- Click directly on the name assigned to the product in question.
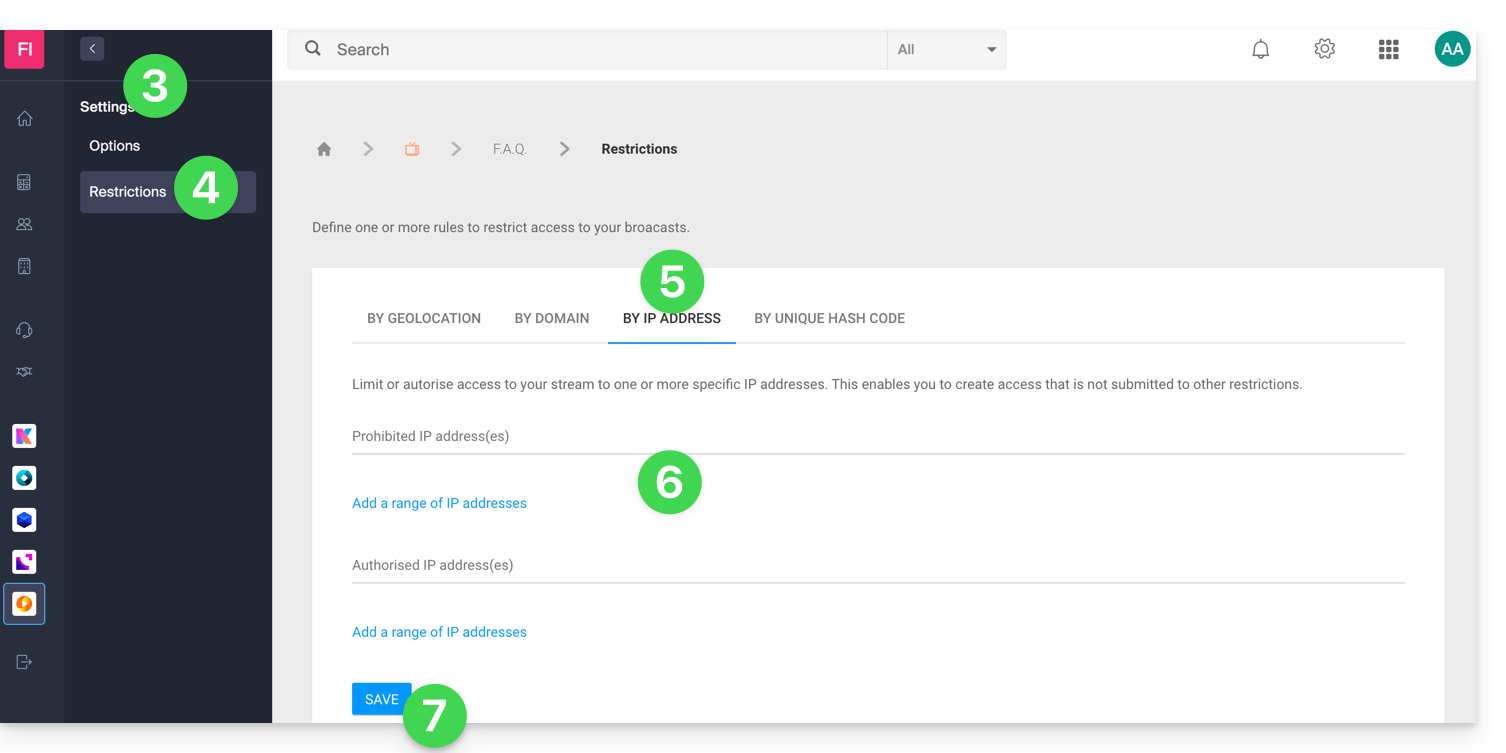
- Click on Settings in the left sidebar.
- Click on Restrictions in the left sidebar.
- Click on the IP address restriction tab.
- Define the IP addresses (or IP ranges) that should be specifically allowed or blocked.
- Click on the Save button:
Refer to this other guide to customize the replacement image offered to blocked viewers.
Link to this FAQ:
Has this FAQ been helpful?
This guide explains how to schedule a daily, weekly, or monthly Swiss Backup with Acronis.
Also refer to the Acronis documentation on this subject.
Modify the frequency of Acronis backups
To do this:
- Click here to access the Acronis Console with the credentials obtained after adding the device (need help?).
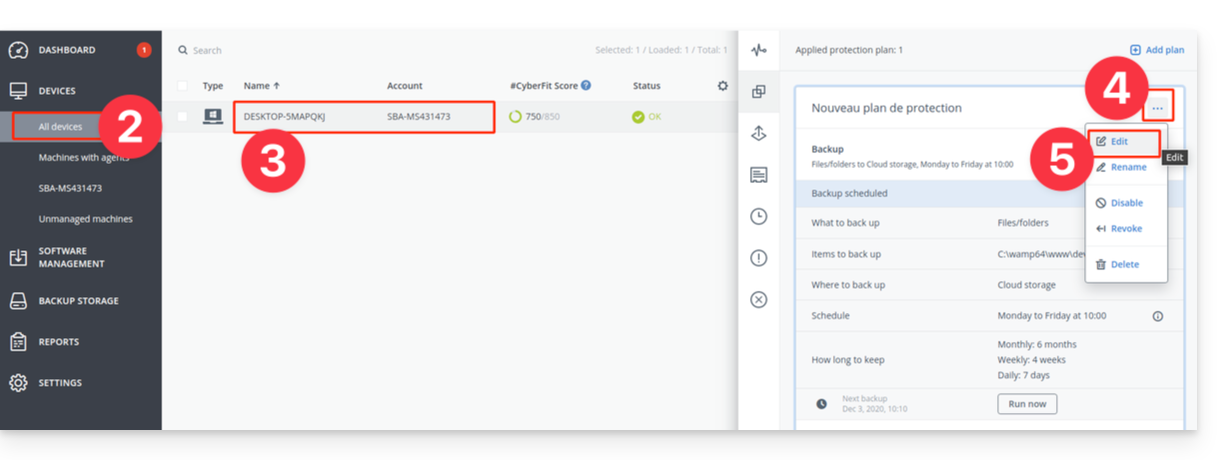
- Click on the All devices menu in the left sidebar.
- Click on the device in question.
- Click on the 3-dot action menu on the Protection plan that appears on the right.
- Click on Edit:
- Customize the Protection plan according to your needs.
- Once all changes have been made, click on the Save button in the upper right corner of your Protection plan.
Link to this FAQ:
Has this FAQ been helpful?
This guide explains how to register a domain name with Infomaniak.
Preamble
- With a new domain name or additional domain name, many possibilities open up to you, including access to free services, such as:
- You will also be able to:
- use your existing Mail Service or Website but with a different spelling,
- host a website here or with a third-party host,
- etc.
Order a first domain name
To do this:
- If necessary, create an Infomaniak account.
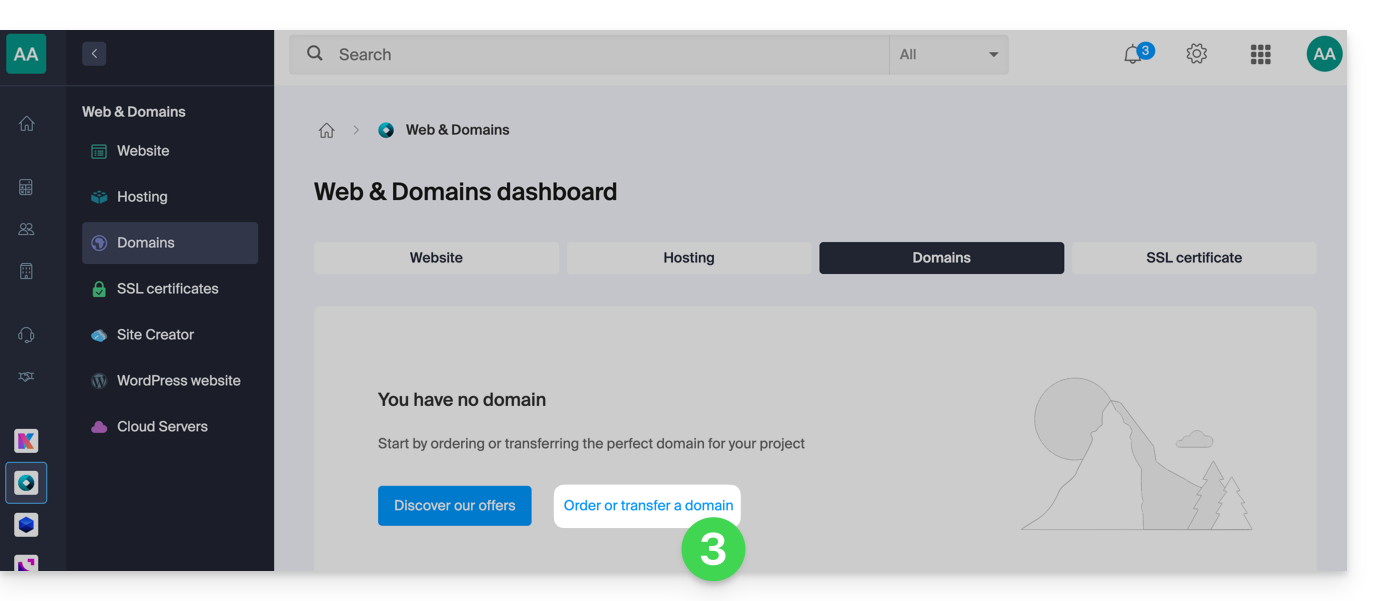
- Click here to access domain management on the Infomaniak Manager.
- Click to open the Shop:
- If necessary, select the Organization in which to order your domain:
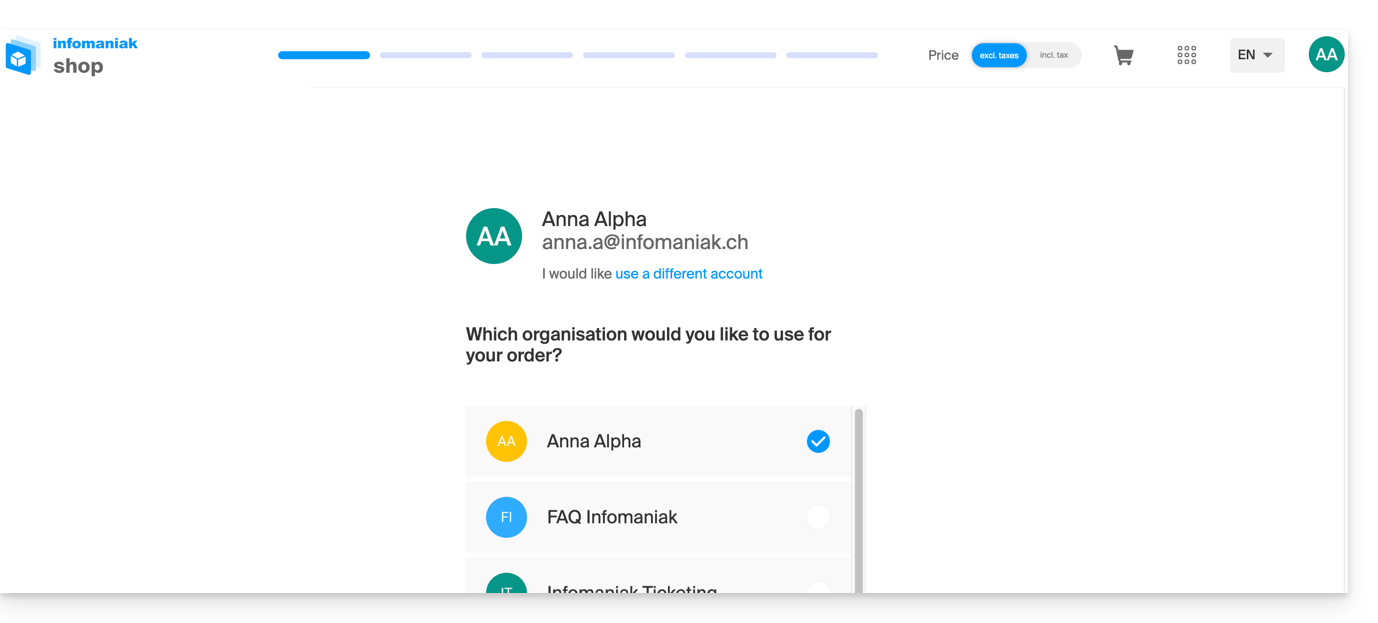
- If necessary, select the Organization in which to order your domain:
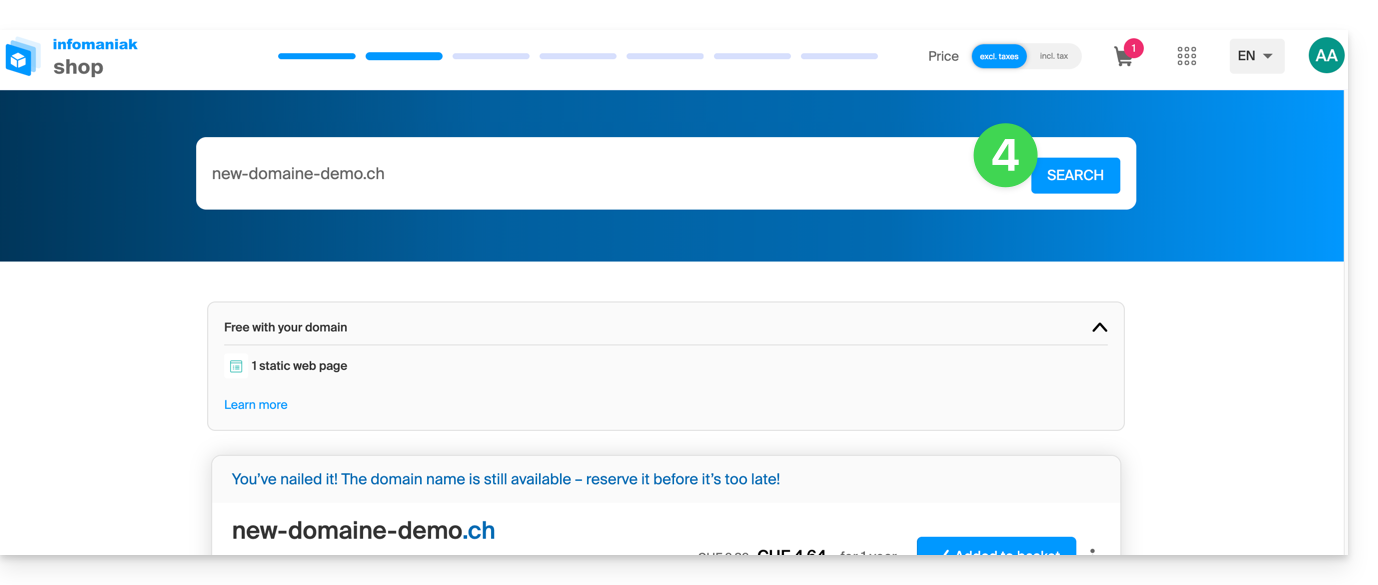
- Once in the Shop, enter the domain name to register and search for it:
- Check or uncheck the additional options and extensions offered and click Next to proceed.
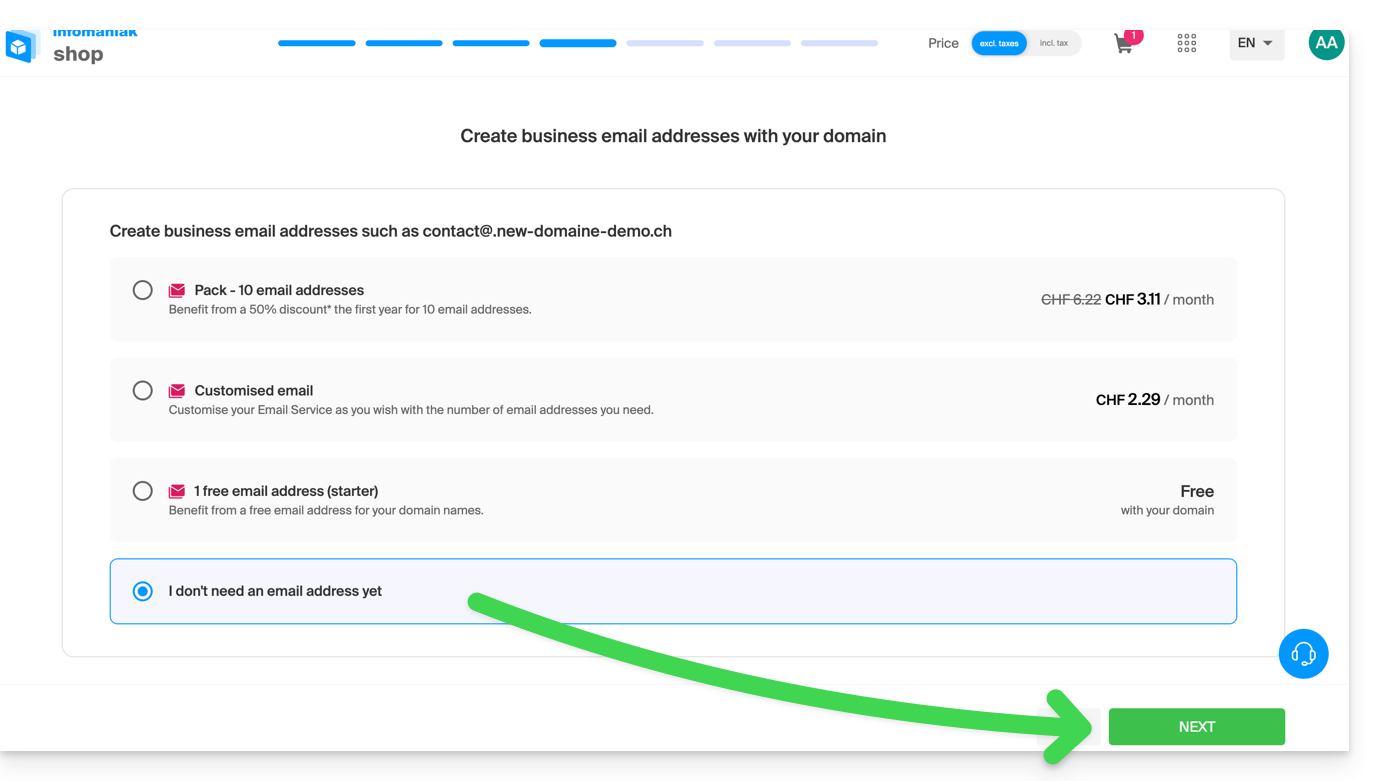
- Choose the desired options as you go through the pages, such as the possible Mail Service associated with the domain name:
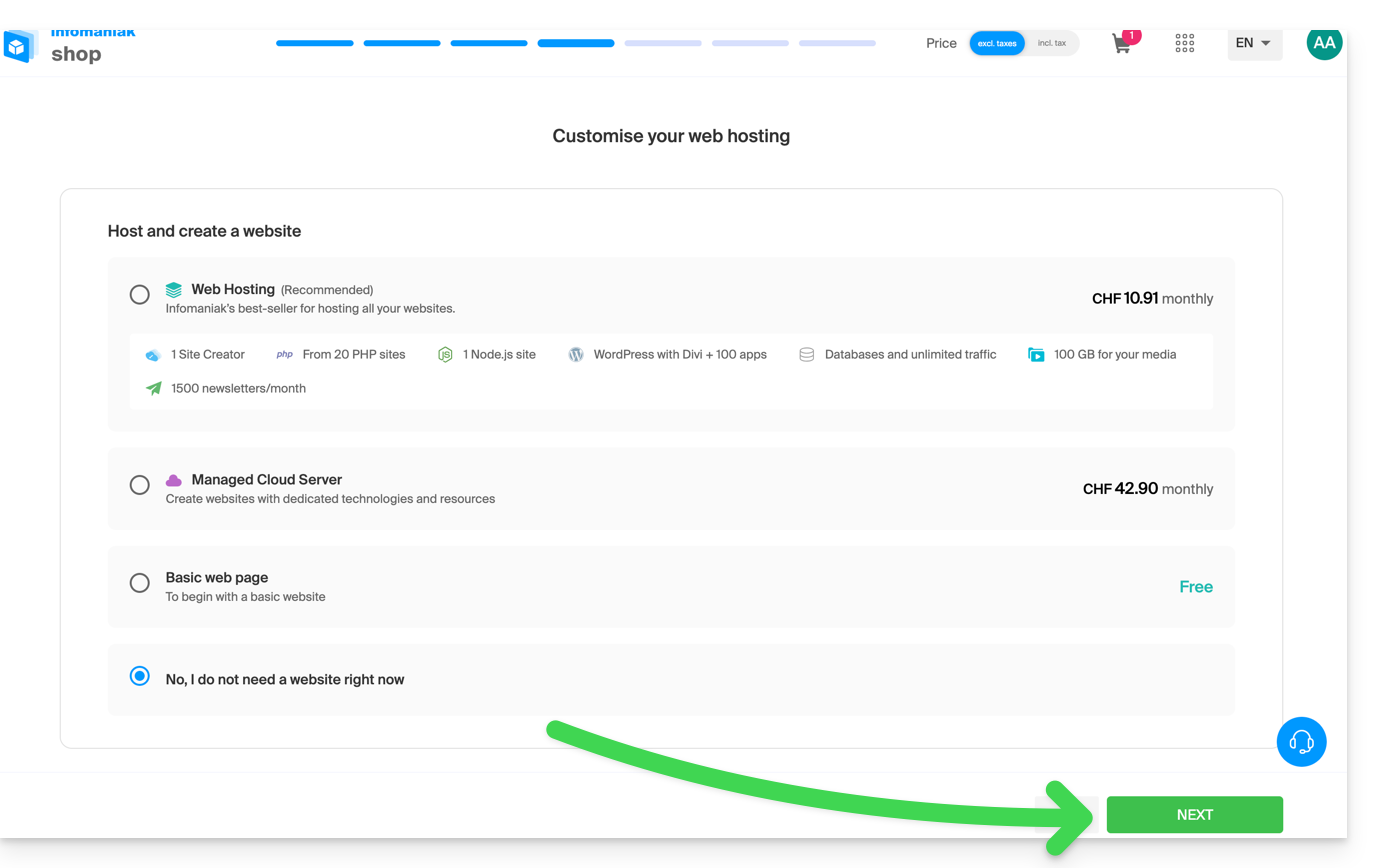
- Choose the desired options as you go through the pages, such as the possible Web hosting associated with the domain name:
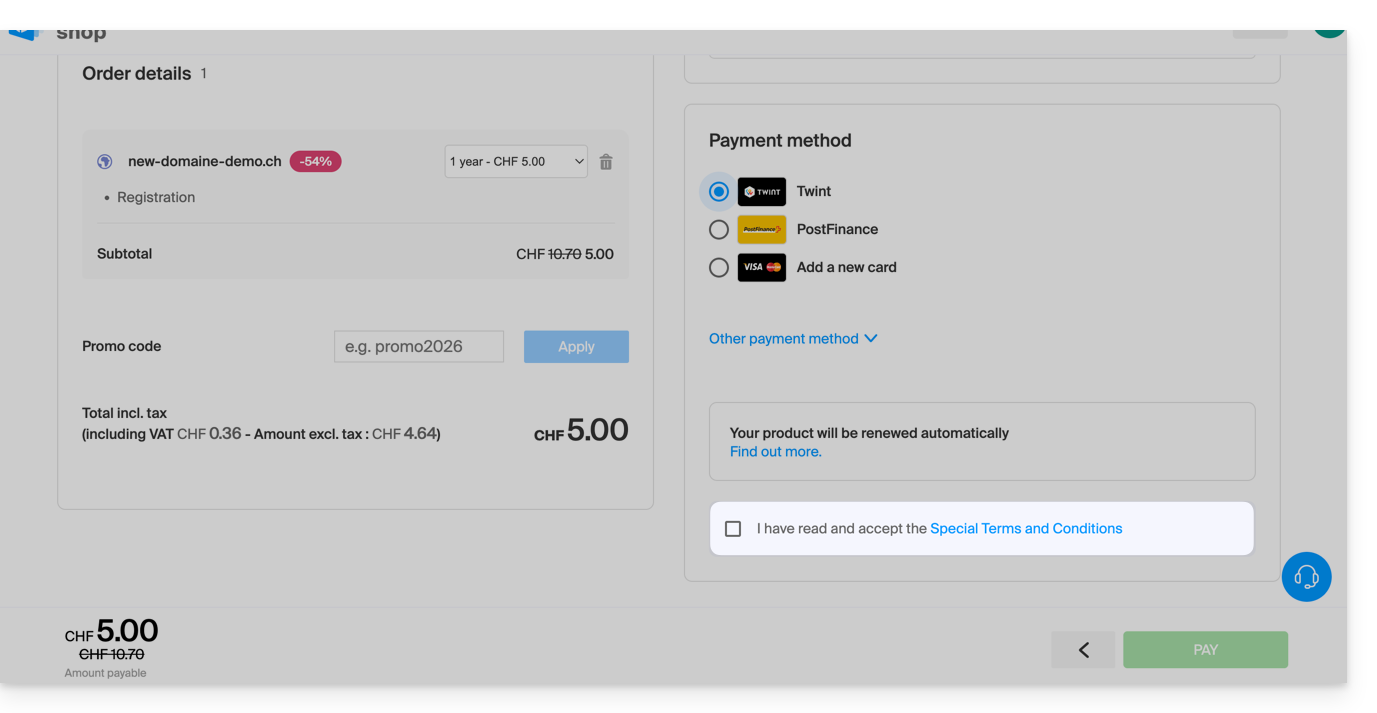
- Enter the details related to the domain name.
- Complete the purchase without forgetting to read and accept the Terms (the box may require scrolling down the page first):
Once ordered, wait a few hours for the setup (and schematically the propagation of your domain name with Internet Service Providers (ISPs) around the world).
Order an additional domain name
To do this:
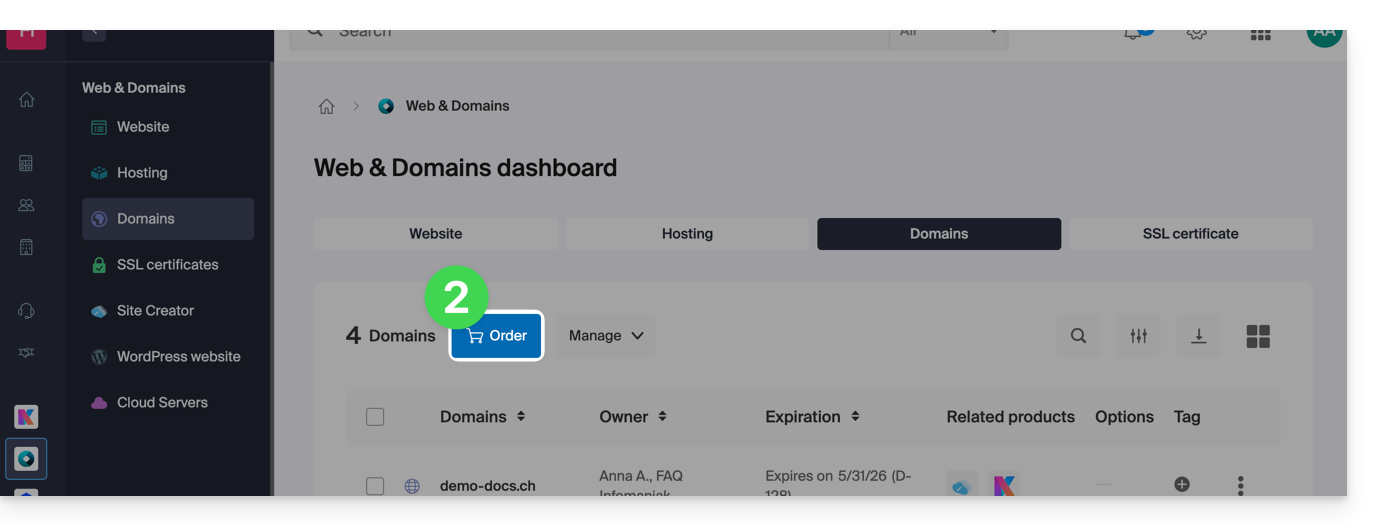
- Click here to access the management of your product on the Infomaniak Manager (need help?).
- Click on the button to Order an additional domain:
- Follow the first guide above from step 4.
Check the availability of a domain name
Refer to this other page which allows you to quickly check if a domain is available for registration or not.
There are at least 3 main indications:
- Available — in this case, it's good, you can reserve it.
- Transferable — you must own it with another provider to transfer it to Infomaniak.
- Unavailable — it will unfortunately not be possible to order it as long as it is not abandoned by its current owner.
Link to this FAQ:
Has this FAQ been helpful?
This guide explains how to activate and use the "test" payment mode (as part of the Infomaniak ticketing system) that allows you to make orders without using your credit card.
Preamble
- This test payment mode allows you to make payments on the online ticketing system as your customers do with a test bank card.
- This creates a real reservation with real tickets, but a commission of 0.99% of the ticket price + 0.89 CHF (or EUR).
- This payment mode is only visible when you are logged into the shop with an administrator account and it is linked to a customer record (see prerequisites below).
Activate the "Test Credit Card" payment mode
Prerequisites
- Add the email address to the customer database, in case the administrator's address is not yet registered as a customer:
- Click here to access the management of your product on the Infomaniak Manager (need help?).
- Click directly on the name assigned to the ticketing concerned by the event.
- Click on Sales in the left sidebar.
- Click on Customers in the left sidebar menu.
- Click on Add a customer and fill in the fields:

Then:
- Click here to access the management of your product on the Infomaniak Manager (need help?).
- Click directly on the name assigned to the ticketing concerned by the event.
- Click on Sales in the left sidebar.
- Click on Payment Methods in the left sidebar:

- Toggle the switch to ON to the right of the test credit card item:

Use the card to place test orders
To do this:
- Go to the online ticket office.
- Log in to the ticket office using an email address of an administrator of the ticket office account:

- Place an order, and when choosing the payment method, select the Test Credit Card.
- Enter the following information when ordering:
- Code:
4242 4242 4242 4242 - CVV:
100 - Expiration date:
01/32or any future date - 3D-Secure password:
Checkout1!(specified directly in the field to fill out)
- Code:
- Complete the order…
Don't forget to cancel orders from the Sales - Orders menu once your tests are complete!
Link to this FAQ:
Has this FAQ been helpful?
This guide explains how to increase or decrease the space allocated to a device backed up with Swiss Backup, which is particularly useful when you receive an email informing you that you no longer have enough free space to perform your backups.
Modify quotas for user devices
To do this:
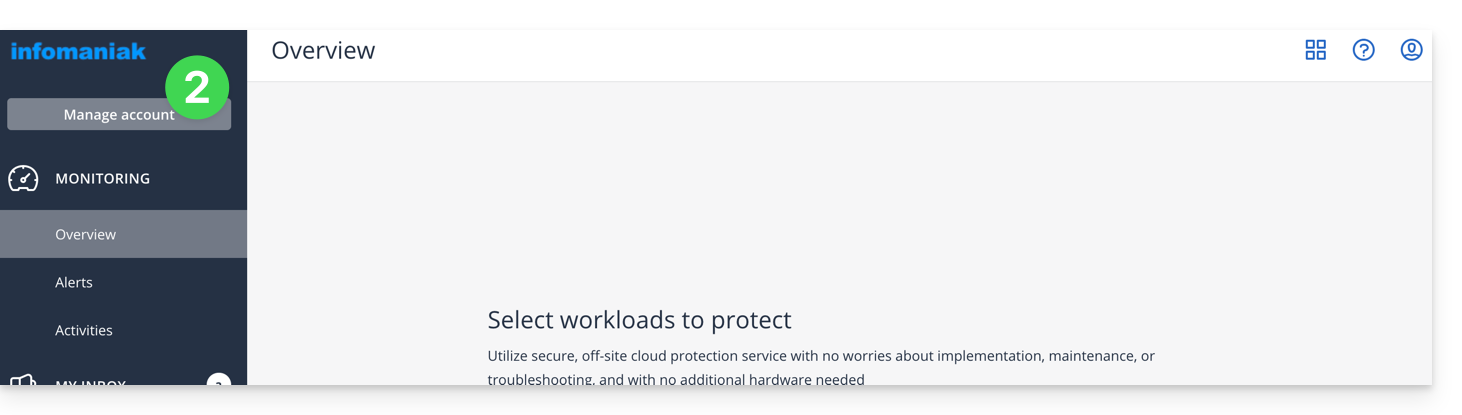
- Click here to access the Acronis Console with the credentials obtained after adding the device (need help?).
- Click on Manage account in the left sidebar:
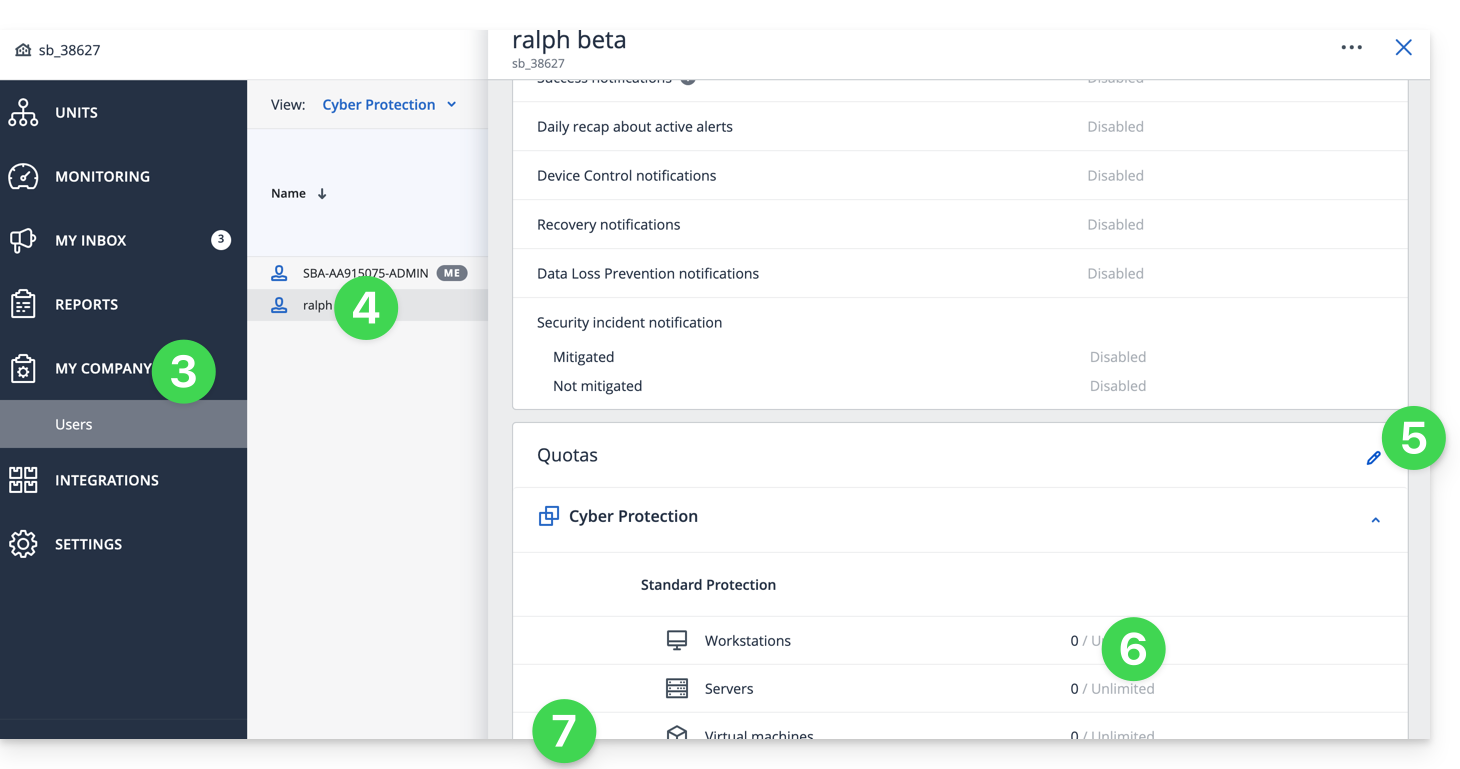
- Click on Company Directors.
- Click on the user concerned under Users.
- Click on the pencil in the QUOTAS rectangle on the right.
- Click directly on the disk space to edit the desired values.
- Validate with the button at the bottom of the section:
Link to this FAQ:
Has this FAQ been helpful?
This guide explains how to transfer the audio streams present on one of your Streaming Radio Infomaniak to another of your radios, present in the same Organization.
Refer to this other guide to transfer all streams from a Streaming Radio to a new owner.
Transfer audio streams
To do this:
- Click here to access the management of your product on the Infomaniak Manager (need help?).
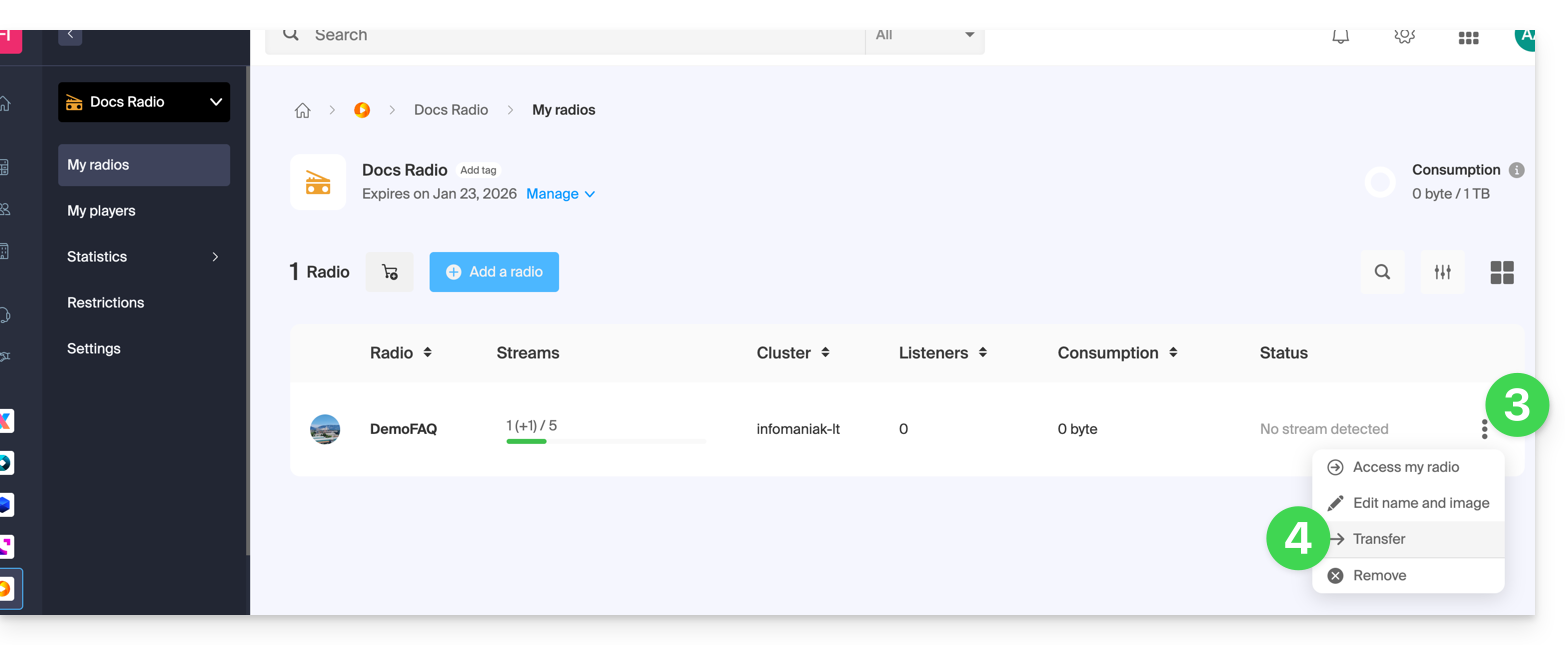
- Click directly on the name assigned to the product concerned.
- Click on the action menu ⋮ located to the right of the item concerned.
- Choose Transfer:
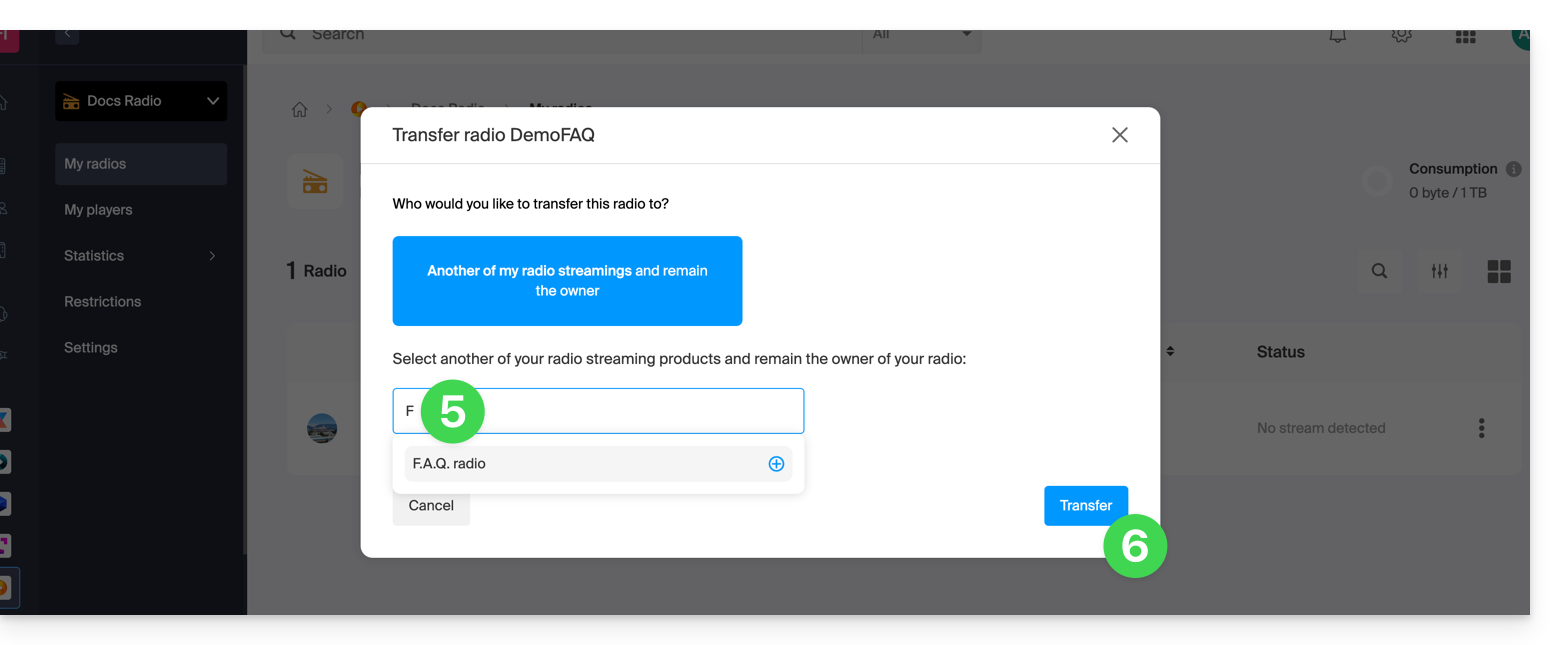
- Search for and validate the name of the other radio that you own in the same Organization.
- Validate the transfer:
Refresh the Manager pages if necessary to update the displayed information.
Link to this FAQ:
Has this FAQ been helpful?
This guide explains how to connect the Zapier management tool to the Infomaniak ticketing system.
Preamble
- Depending on the volume of customers and/or events you manage, you may need to subscribe to a paid plan for Zapier and/or your CRM.
- Infomaniak cannot be held responsible for these costs.
- For additional help, contact the support of the software used or a partner.
Establish the connection with Infomaniak Ticketing
To do this:
- Click here to access Zapier.com.
- Create an account if necessary.
- Create a new Zap (need help?).
- When choosing the applications to use, type Infomaniak Ticketing in the search bar and select the option.
- When Zapier asks you to log in, use the credentials and password of the Infomaniak account linked to the Ticketing.
Link to this FAQ:
Has this FAQ been helpful?
This guide explains how to add tickets to your passes, ticket packs, and subscriptions (within the framework of the Infomaniak ticketing system).
Prerequisites
- Obtain the pass or subscription code.
- This information is provided in the confirmation email received upon ordering, or on your customer account.
- Go to the event organizer's ticketing page.
Add tickets to the pass
To do this:
- Click on the Subscribers Access button at the top right:

- Enter the code of your pass or subscription in the indicated field and click on Next:

- Select the tickets to add to the pass by clicking on the button and confirm your choice by clicking on Add to Cart:

- Continue with the ordering process.
You will receive a confirmation email for this new order at the indicated address.
Link to this FAQ:
Has this FAQ been helpful?
This guide explains how to authorize Infomaniak Support to access your online products and more specifically their content, and provide useful details when requesting assistance.
Preamble
- Infomaniak Support may ask you to grant temporary access to part of your content.
- This access is strictly limited to the analysis context and is used solely to identify the source of the problem encountered.
- It saves time in diagnosing by avoiding unnecessary back and forth.
- In accordance with Infomaniak's privacy policy, your data will never be used for other purposes.
Authorize Support to access a type of content
To authorize Infomaniak to access a specific part of your services (authorizing access to content never opens access to others; each authorization is specific and independent):
- Click here to access the management of accesses on the Infomaniak Manager.
- Click on the toggle switch to authorize access to the content of…
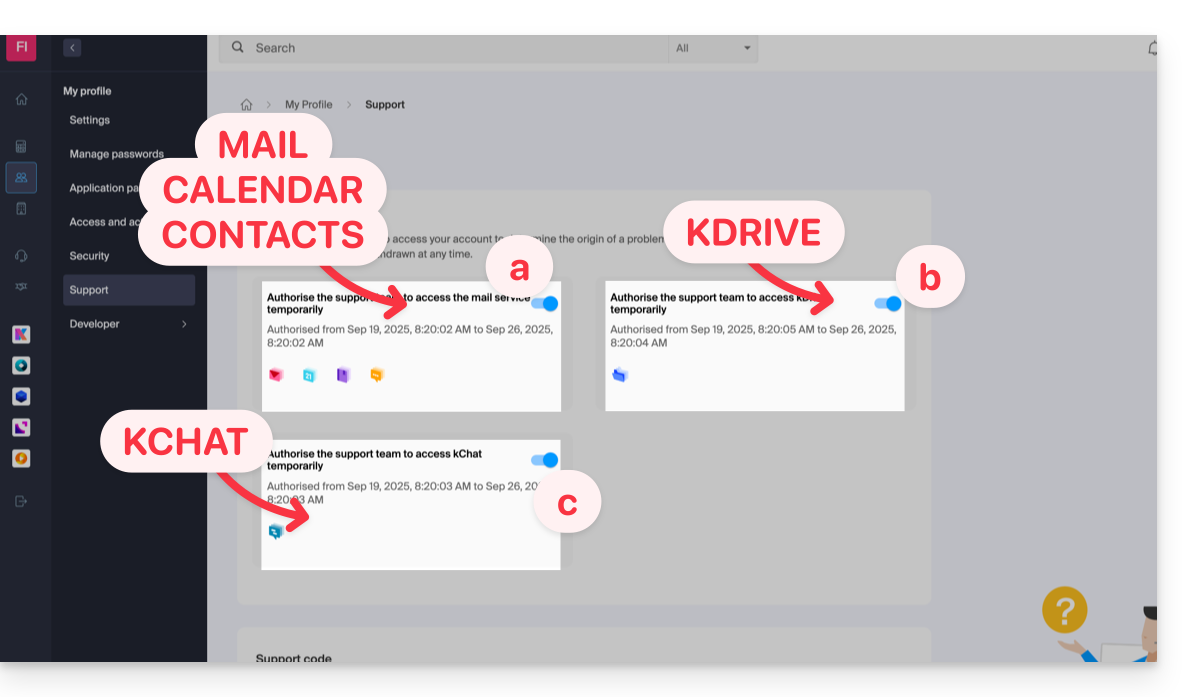
- … email addresses linked to the Web Mail app Infomaniak (online service ksuite.infomaniak.com/mail).
- … folders among the kDrive(s) existing in the Organizations of which the current user is a part.
- … discussions among the kChat product(s) existing in the Organizations of which the current user is a part.
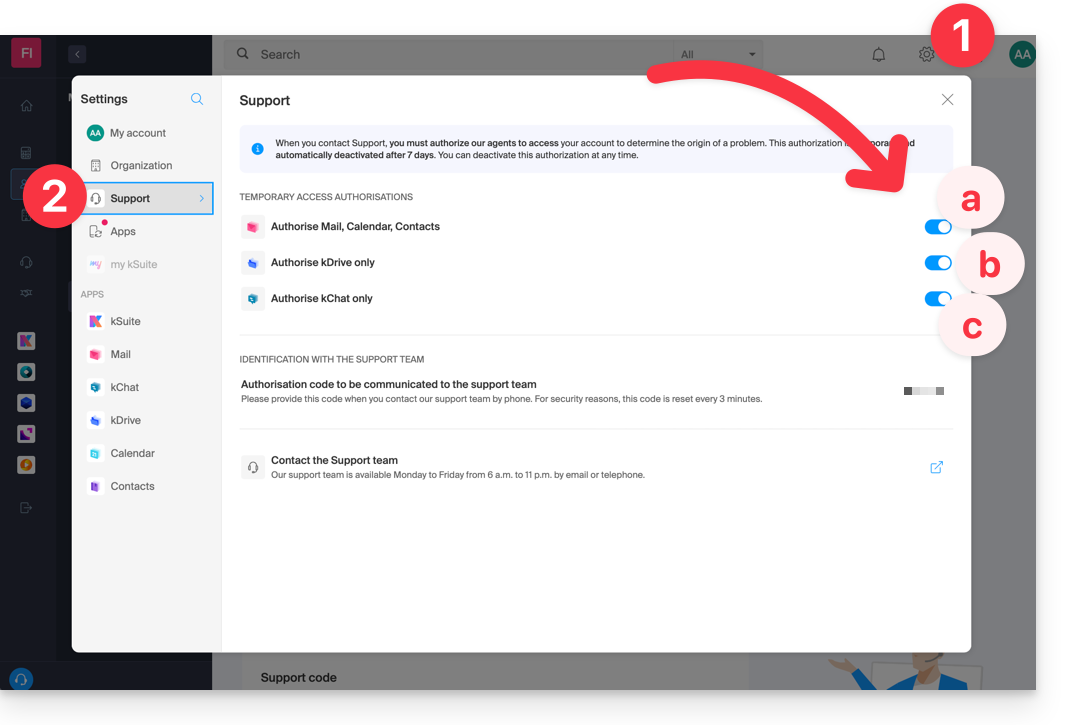
With my kSuite+, you can also do this by clicking here or proceed as follows to get there:
- Click on the Settings icon at the top right of your my kSuite+ window.
- Click on Support in the left sidebar:
Who can access it?
- Only Infomaniak employees handling your support request directly.
- Access is only from Infomaniak's controlled facilities.
Duration and control of access
- You can revoke this access at any time.
- Otherwise, it expires automatically after 7 days.
You can also share a single specific email very easily.
Taking screenshots…
… on Windows
Microsoft provides a software pre-installed for screenshots. But to do it manually:
- Display what you want/need to send on the screen.
- Press the PRINTSCREEN key on your keyboard (or
PRTSCR,IMPR. ECRAN, etc.) once. - In Microsoft Word (or similar), do "Edit" -> "Paste" to place your image on the page.
- Save your file.
- Repeat the operation from step 1 to step 5 as many times as the number of desired screenshots.
… on macOS
- Press the keys "
CMD" + "shift" (the hollow arrow up — shift) + the key "3". - Each press on these keys creates an image file on your computer's desktop.
… on iOS (iPhone, iPad...)
- Press the buttons "
Power" + "Home" (the only two physical buttons) simultaneously. - Retrieve the screenshots in the "Photos" app on your device.
… on Android (e.g., Samsung, LG, or Huawei)
- Press the "Volume Down" key (on the side) and the lock key simultaneously.
- The captured image is automatically saved in a Screenshots folder in the gallery.
Windows Popup
To copy-paste an error message present in a Windows popup as text, simply press the CTRL + C key on your keyboard to copy the message to the clipboard. You can then paste it (CTRL + V) into the body of the message you send us.
Browser Javascript console…
… on Windows
Chrome, Firefox and Safari: enter the key combination CTRL + SHIFT + i
Internet Explorer and Edge: press the F12 key
… on macOS
Chrome: enter the key combination ⌘ + ⌥ + J
Safari: enter the key combination ⌘ + ⌥ + C
- Then, click on the crossed-out circle icon or similar to reset the log.
- Display the page of your site affected by the issue.
- The console tab displays JavaScript errors and missing online resources.
Link to this FAQ:
Has this FAQ been helpful?
This guide explains how the Infomaniak service administration interface named Manager https://manager.infomaniak.com works.
Preamble
- The Manager is the Infomaniak interface that allows you to manage your various Infomaniak products, such as domain names, hosting, as well as the administrative, billing part, etc.
Ordering a product = creating an account
If you do not yet have any products with Infomaniak, during the ordering process, you will be invited to create an account (with a login identifier) and an Organization is automatically created on this occasion.
For an individual, the name of the Organization will generally be composed of their first and last name, while for a company, it is generally the name or the company's legal name.
Once the Organization is created by this first user, it is possible…
1. Other users can have…
- … all rights and therefore be administrator of the Organization
- … limited rights (access to specific products)
- … with or without billing rights
2. Other Organizations can…
- … contain other products unrelated to other Organizations
- … have their own users who will not have access to other Organizations
The concept of Organization is particularly interesting for people who need to manage multiple products for different clients. Imagine, for example, that a webmaster is required to administer the products of 3 different companies, each having its own Organization containing their respective products. By adding the webmaster or the partner as an administrator of their Organization, the latter can easily switch from one account (Organization) to another to manage the different products of the 3 companies without having to log in and out each time. Indeed, they will use a unique login identifier.
Navigate and access your products
There are several ways to access your products, for example, the list of your hostings (where your sites are located), once you are logged in.
Can't find your products?
If you are on an interface where your hosting products are not displayed, you are probably on my kSuite; click on the icon at the top right of the interface to switch between the my kSuite apps (Mail for example) and the Manager:
If you still can't find them, check the currently displayed Organization...
Navigate within the Infomaniak Manager
You can navigate using the left sidebar by clicking on Web and Domain then on Hosting:

You can also click in the center of the homepage on Hosting (under Web and Domain):

Another way is available in the FAQs: simply click on the link (example) indicated in the guide to go directly to the type of product concerned.
All you have to do is click on the name assigned to your product (for example domain.xyz when you arrive on the page for managing your domain names).
View the online tutorial
Click on the icon at the bottom right to get the visual guide again, presenting you with the main sections of the Manager:
Resolve a problem on the Manager
Unable to log in?
Refer to this other guide.
Is the product you are looking for grayed out or invisible?
You are probably not in the correct Organization or user account if your usual products are not visible. Check and change the Organization (if your user allows it) or log in again to a completely different user account.
A mouse click does not load the desired page?
Do not click in the product selection boxes otherwise nothing will happen (except for the selection for a possible batch operation) but directly on the name assigned to the product concerned:
Is the desired operation not possible or grayed out?
Your user may no longer have sufficient rights within the Organization. Try to find out more with this other guide (or this one if it concerns actions at the email level).
Link to this FAQ:
Has this FAQ been helpful?
This guide explains how to restrict access to Infomaniak's Video Streaming streams to your own site only.
This protection does not prevent the integration of a stream via an HTML iframe tag. Use the unique hash protection for a higher level of security.
Restrict access to broadcasts to a domain
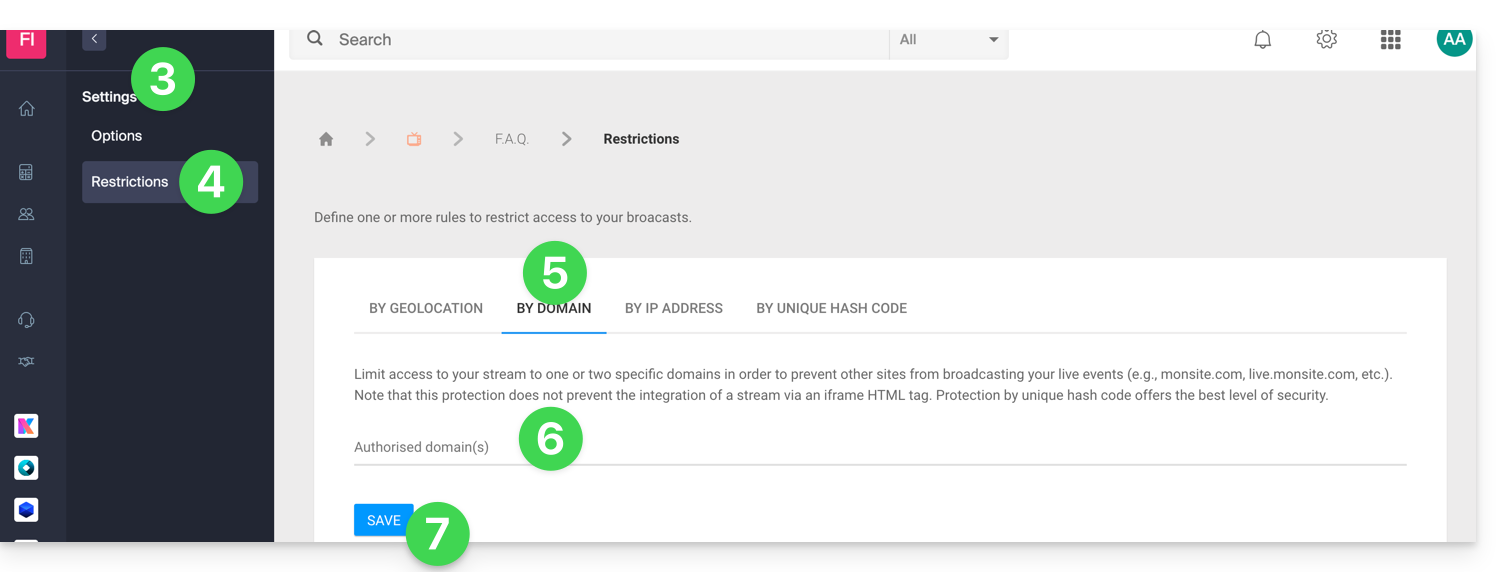
To do this:
- Click here to access the management of your product on the Infomaniak Manager (need help?).
- Click directly on the name assigned to the product in question.
- Click on Settings in the left sidebar.
- Click on Restrictions in the left sidebar.
- Click on the Domain Restriction tab.
- Define the sites that should be specifically authorized to load the stream.
- Click on the Save button:
Refer to this other guide to customize the replacement image offered to blocked viewers.
Link to this FAQ:
Has this FAQ been helpful?
This guide explains how to retrieve specific files or folders/directories from a backup created with Acronis and Swiss Backup, Infomaniak's Swiss backup solution.
Preamble
- The online view from the Acronis console allows you to view a file or folder with a maximum size of 100MB; beyond that, it is imperative to download the file or folder in order to view it.
- Also refer to the Acronis documentation on this subject.
Restore specific data
To do this:
- Click here to access the Acronis Console with the credentials obtained after adding the device (need help?).
- Click on the device concerned from the All devices menu on the left.
- Click on Restore from the menu that appears on the right.
- Click on Restore files / folders.
- Select the files to restore.
- Click on Restore.
Link to this FAQ:
Has this FAQ been helpful?
This guide concerns kSync which allows you to directly create a new calendar or a new address book from an Android device.
Create a calendar or address book from the app
To do this:
- Open the mobile app kSync on the Android device.
- Once logged in, click on the action menu ⋮ located at the top right.
- Press Create a new address book / Calendar.
- Enter the name of the address book or calendar and a color.
- Uncheck the box Notes / Journal:

- Click on Create at the top of the interface.
If necessary, click on the icon to refresh the list, your new item appears in the list:
Your service will then be synchronized with the corresponding web app, here Calendar Infomaniak (online service ksuite.infomaniak.com/calendar):
Link to this FAQ:
Has this FAQ been helpful?
This guide explains how to use the chat feature using the chat integrated into kMeet, the ethical free video conferencing solution by Infomaniak.
Start the chat between participants
To do this:
- Launch the kMeet app.
- Create or join a meeting room.
- Click on the message bubble icon in the toolbar to Open/Close the chat and chat from a left sidebar.
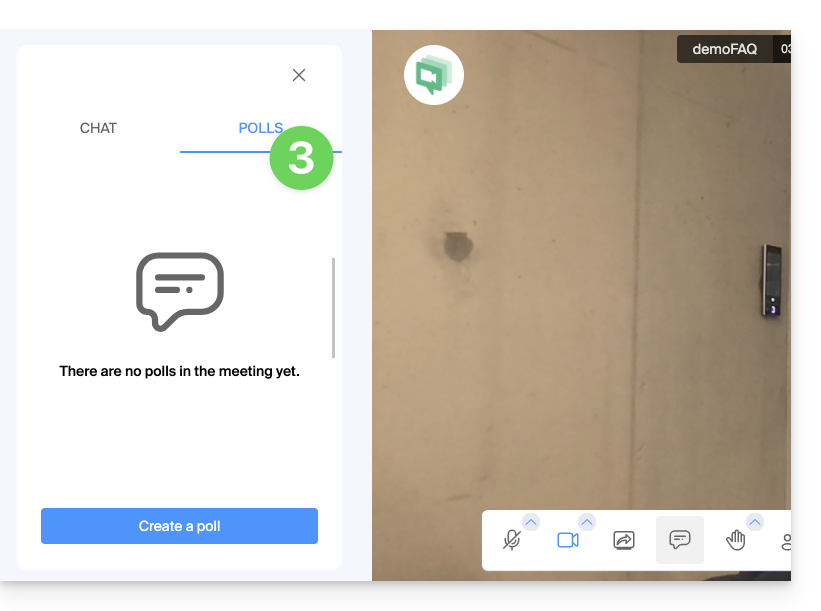
- Close the chat/poll sidebar if necessary:

- Close the chat/poll sidebar if necessary:
React live, create a poll
- The chat supports the use of Emojis.
- It is also possible to:
- request the floor via the hand icon (Raise/Lower hand)
- react with visual (and audible) emoji and GIF — they will appear in the conversation space
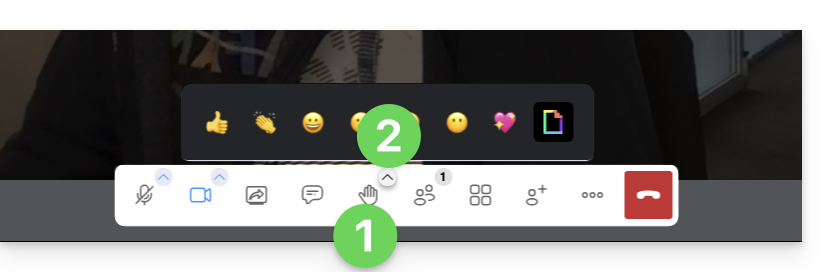
- create a poll among the participants (click on the Polls tab in the chat sidebar):
Link to this FAQ:
Has this FAQ been helpful?
This guide explains how to install the Acronis Backup Agent for Swiss Backup on Apple Macs equipped with M1, M2... processors using an ARM architecture instead of the usual x86 architecture.
Refer to this other guide if you are looking for information about uninstallation.
Install the specific ARM Acronis Agent
To access the Acronis management interface:
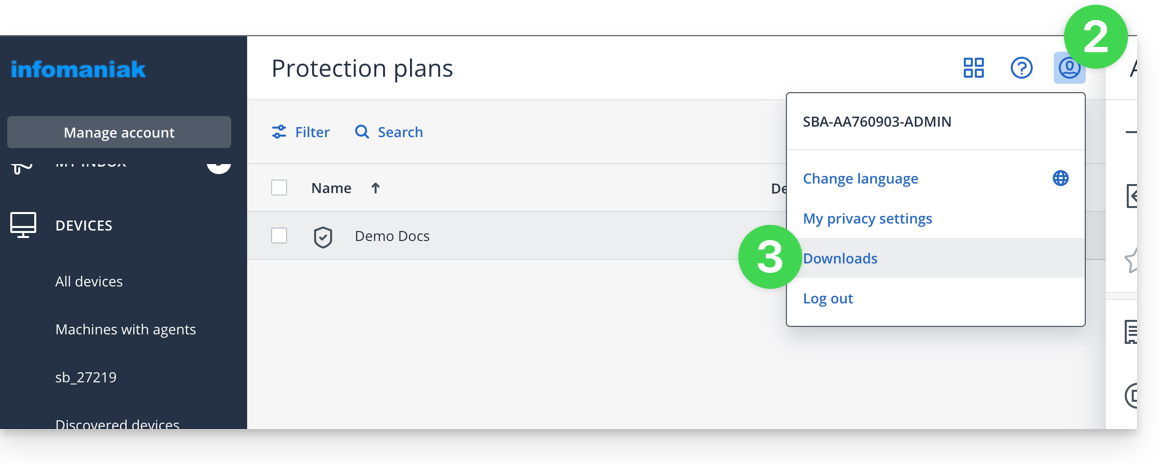
- Click here to access the Acronis Console with the credentials obtained after adding the device (need help?).
- Click on the user icon at the top right.
- Click on Downloads:
- Choose the client suitable for your machine:
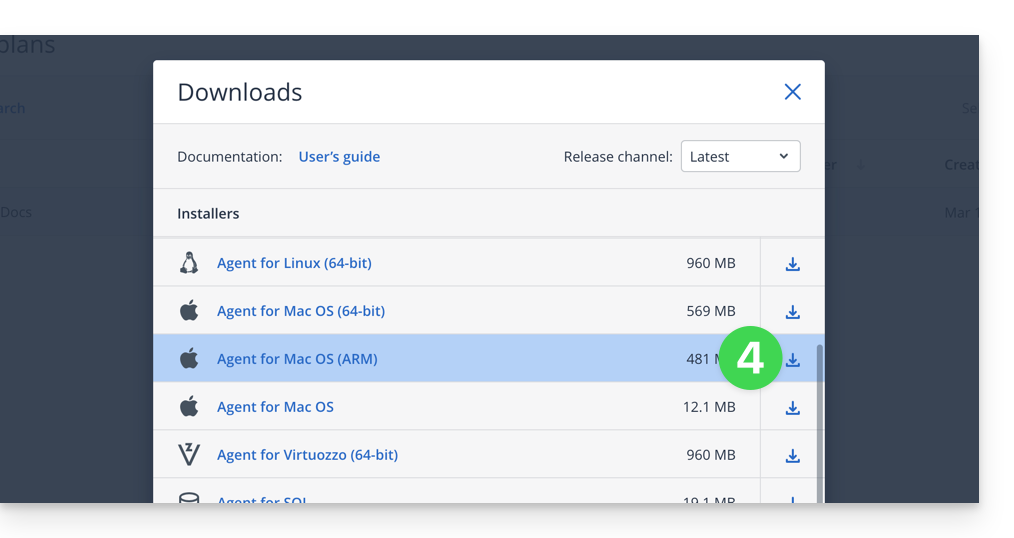
Warning
If you take the version available from the left sidebar, it will not be compatible:
- Do not follow this method below as the version obtained will not be the correct one (Intel version):
Link to this FAQ:
Has this FAQ been helpful?
This guide explains how to select the folders that need to be synchronized between the desktop app kDrive (desktop application on macOS / Windows / Linux) and kDrive Infomaniak.
Prerequisites
- Have a kDrive / kSuite offer.
- Have the kDrive application on the device to be synchronized.
- Check the parameter regarding the limitation of synchronization of large folders.
Choose the kDrive folders to synchronize
To access the settings of the kDrive application on your computer:
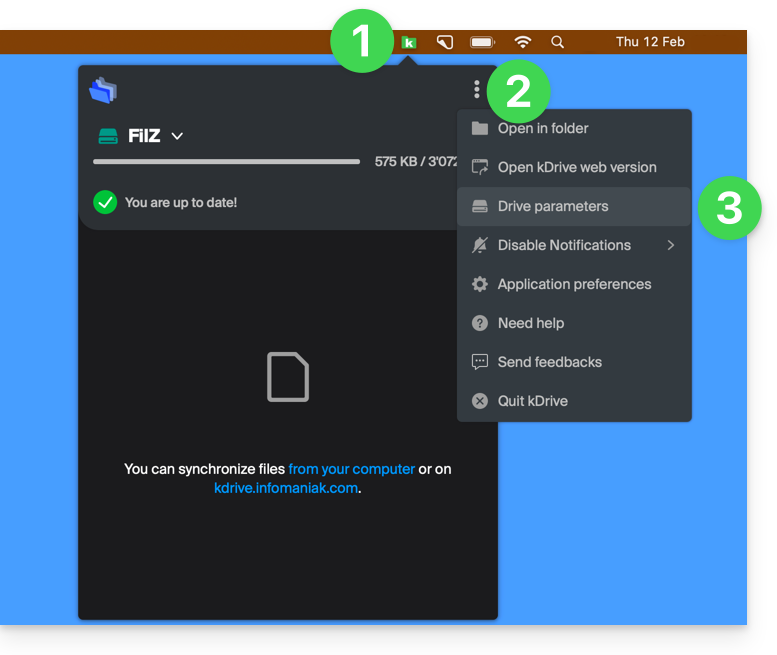
- Left-click on the desktop app icon in the notification area of your computer (top right on macOS, bottom right on Windows and double left-click in the taskbar on Linux).
- Click on the action menu ⋮ to the right on the window that appears.
- Click on kDrive Settings:
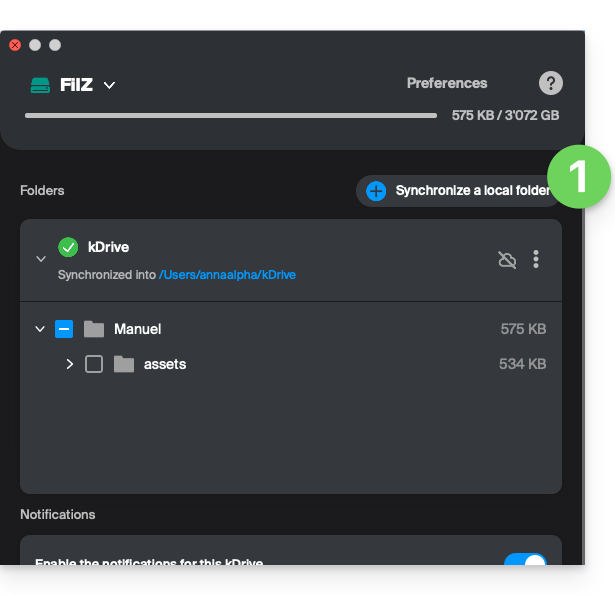
- Click on the chevron to the left of your synchronization name to expand the list of folders.
- Expand the contents of the listed folders if necessary and check/uncheck the folders to synchronize with your computer.
- Click on the blue Validate button:

Warning
- When deselecting a folder from the list, a message next to the button (point 6 above) warns you that this folder will be moved to your computer's recycle bin.
- This is the folder that was in your kDrive hierarchy on your computer.
- The kDrive folders on the online version accessible via a web browser will not be affected, but you must ensure, before the operation, that the folder in question was indeed synchronized and fully present on this online version (especially if you had just placed it within your synchronized directory).
- In case of doubt, also make sure that your computer does not instantly delete items that are too large when they are placed in the recycle bin, due to the size of the Windows recycle bin for example:

Add a local folder for advanced synchronization
To do this:
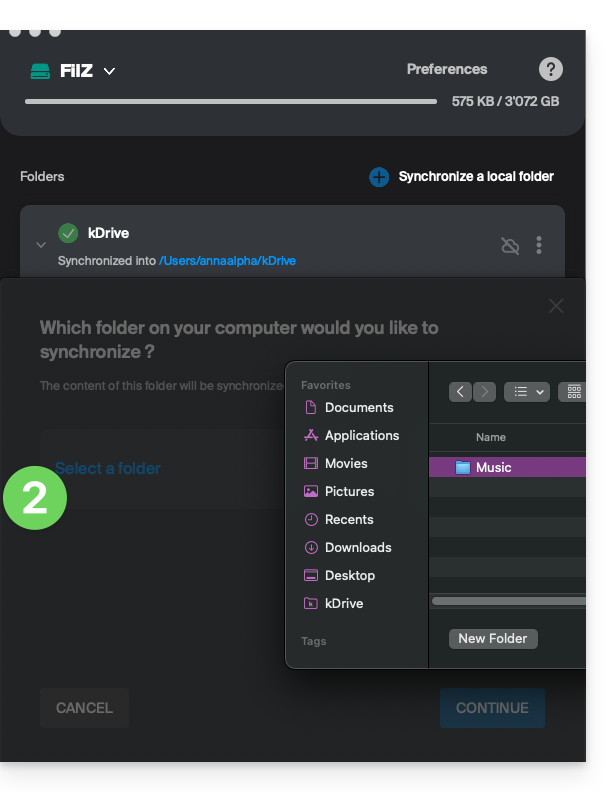
- In the same place accessible according to the procedure above, click on Synchronize a local folder :
- … which will allow you to synchronize one or more new folder(s) from your hard drive with the location of your choice on kDrive:
Stop and remove a synchronization
To do this:
- In the same place accessible according to the procedure above, click on the icon ⋮ all the way to the right:
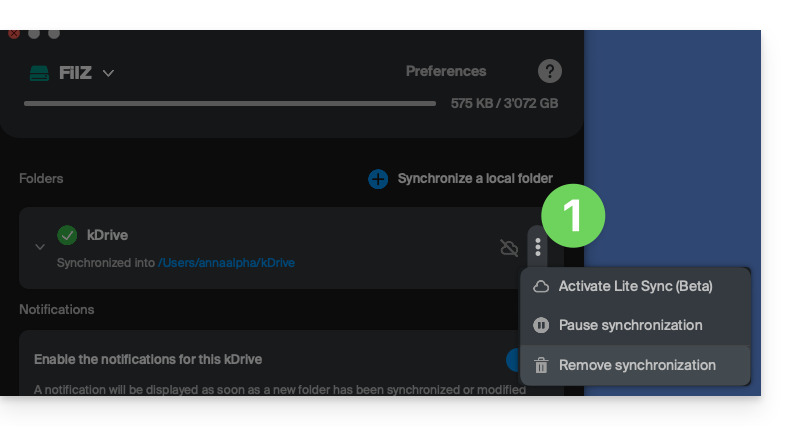
- … which will allow you to:
- Enable Lite Sync
- Pause the synchronization
- Delete the synchronization (only from your device, with no impact on your kDrive) - refer to this other guide.
Link to this FAQ:
Has this FAQ been helpful?
This guide explains how to set up donations (as part of the Infomaniak ticketing system).
Preamble
- By offering donations, you give customers the opportunity to support your organization or event.
- Online donations will have a commission applied related to banking fees.
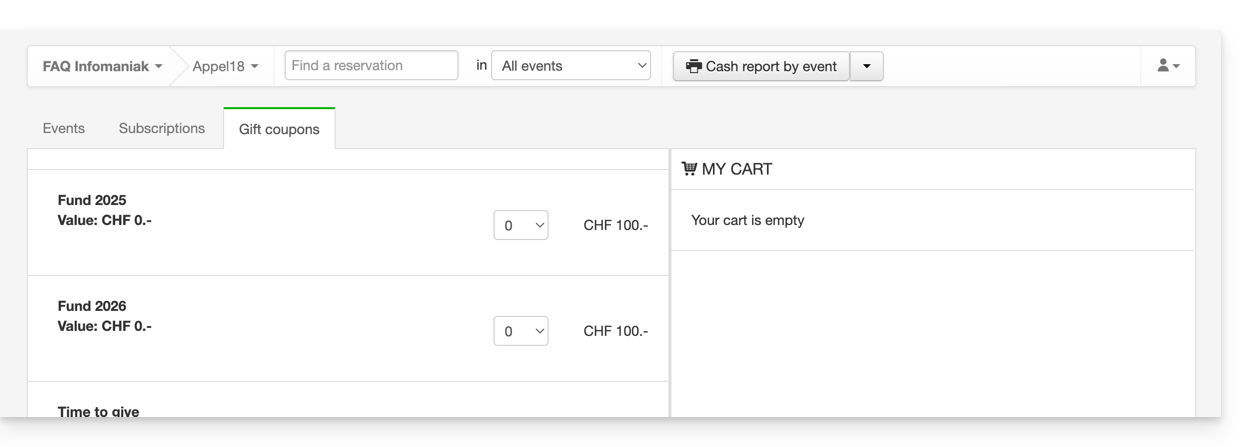
- Donation campaigns can have the status active or inactive but will remain visible in all cases at the ticket office, with gift vouchers
Setting up donations
To do this:
- Click here to access the management of your product on the Infomaniak Manager (need help?).
- Click directly on the name assigned to the ticketing concerned by the event.
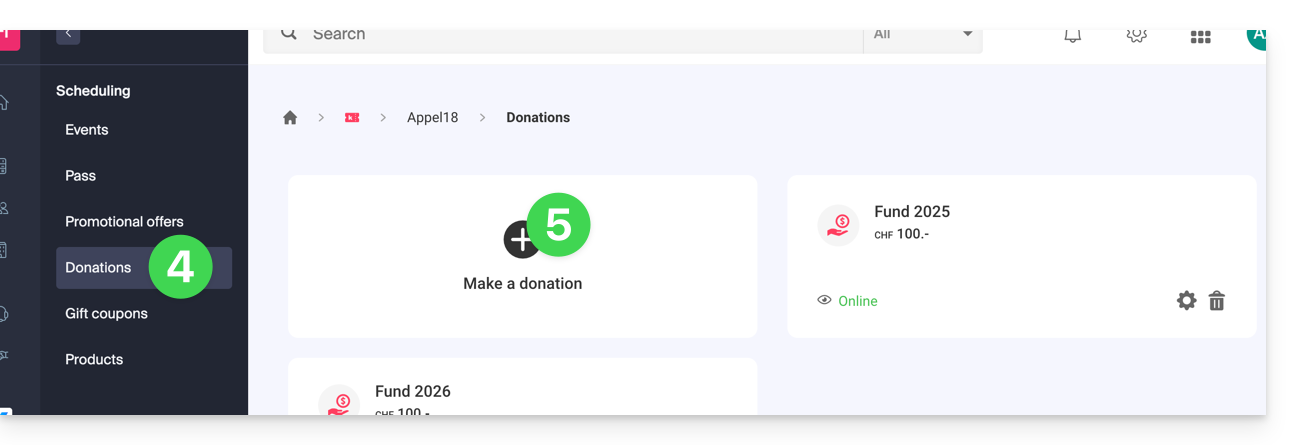
- Click on Programming in the left sidebar menu.
- Click on Donations in the left sidebar menu.
- Click on Add a donation:
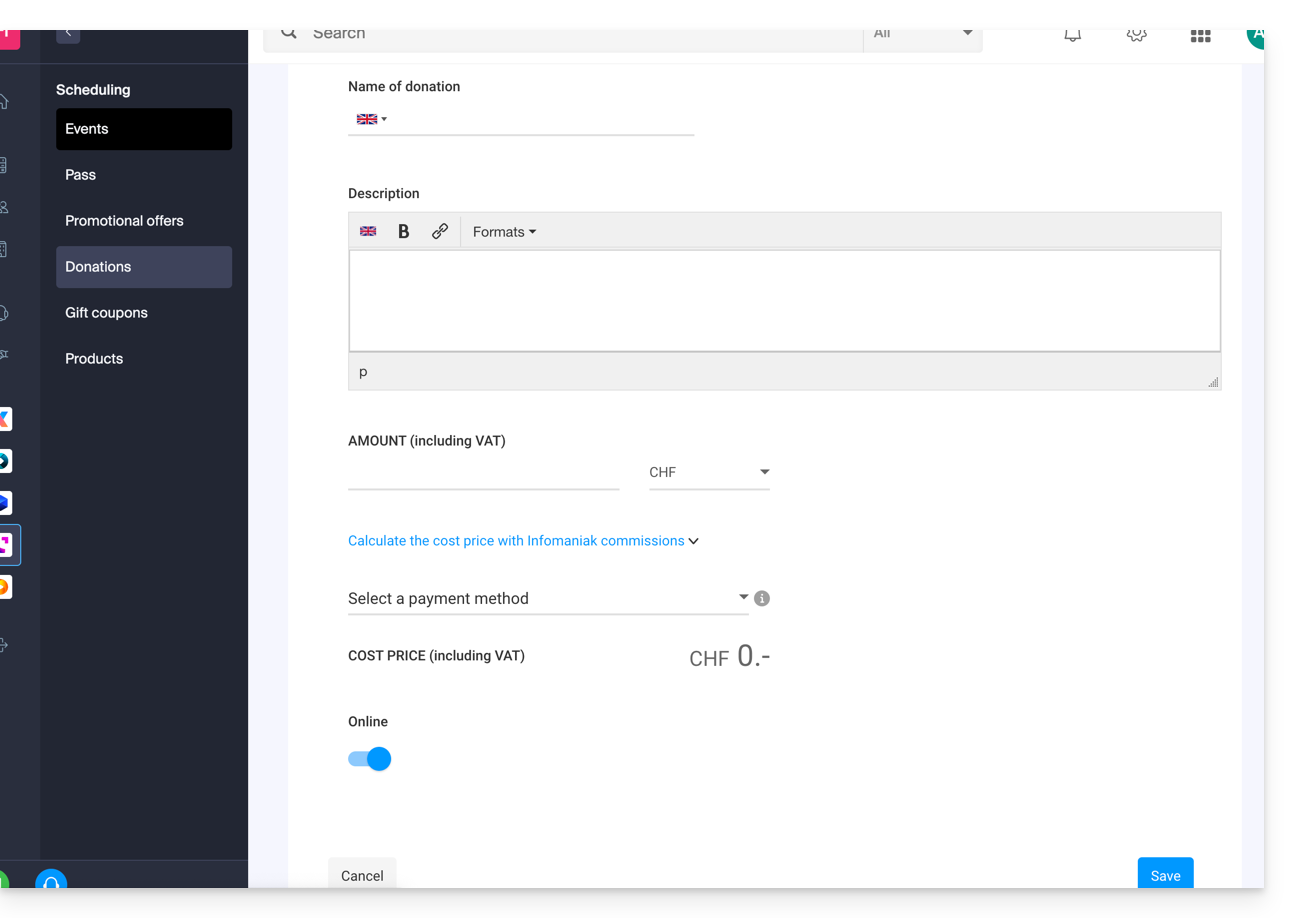
- Fill in the fields in the assistant, then click on the Save button at the bottom of the page:
Link to this FAQ:
Has this FAQ been helpful?