Knowledge base
1000 FAQs, 500 tutorials and instructional videos. Here, there are only solutions!
This guide explains how to transfer your domain name from another provider to Infomaniak. You remain the owner of your domain name and manage it easily and cost-effectively.
Prerequisites
- Check that the domain name is transferable according to certain criteria:
- domain created or already transferred for at least 60 days
- valid email addresses (owner's contact details, admin/tech contacts)
- unlocked domain
- Securely note the different records (A / MX / TXT, etc.) contained in your domain if you will keep other services after the transfer than those of Infomaniak.
- This involves transferring a domain name that you own with a provider other than Infomaniak, so that the future management of this domain is handled by Infomaniak.
- This is not an internal transfer from one holder to another and the code to obtain is not a code for an internal transfer with your current provider.
- Instead, obtain the authorization code.
- The terms "
EPP", "AuthCode", "AuthInfo", "transfer code" and "authorization code" all refer to alphanumeric sequences specific to the domain whose main purpose is to verify the owner's authorization before a transfer between Registrars.
- Here are some specific guides to help you if your current Registrar is:
Transfer the domain to Infomaniak
Once the prerequisites above have been validated:
- Order the domain name to be transferred from Infomaniak.
- Enter the authorization code (see prerequisites above) when prompted during the order process.
- Review the DNS chapter below and, if necessary:
- Run a DNS diagnostic to verify the Domain <-> Infomaniak Services link.
- Run a Mail diagnostic (SPF, DKIM...) to avoid any sending or receiving issues.
Batch transfer of multiple domains
Once the prerequisites above have been validated:
- Order the domain names in one go via this Infomaniak transfer assistant.
- Specify the domain names and authorization codes or import a CSV file (format
.csvor.xlsx) with the list of domains and their authorization codes (in 2 columns and up to 300 rows).
Transfer duration, administrative delays
The time it takes to transfer a domain name is influenced by two factors:
- The conditions of the registry of the extension; for
.FR, Afnic sets a transfer period of up to 8 days; refer to the specifics of the extensions that concern you from this page (under Frequently Asked Questions by first clicking on the extension concerned). - The conditions of the Registrar you wish to leave; the latter has the possibility to object to the transfer during the transfer period defined by the registry; it can also automatically accept the transfer and speed it up.
Note that a DNS update (see below) can take up to 24 hours.
DNS configuration (before, during, after)
- Before the transfer, your domain name is linked to various services (Mail, Web...) through its DNS.
- While the transfer is in progress, you will no longer be able to modify the DNS configuration until the transfer is complete.
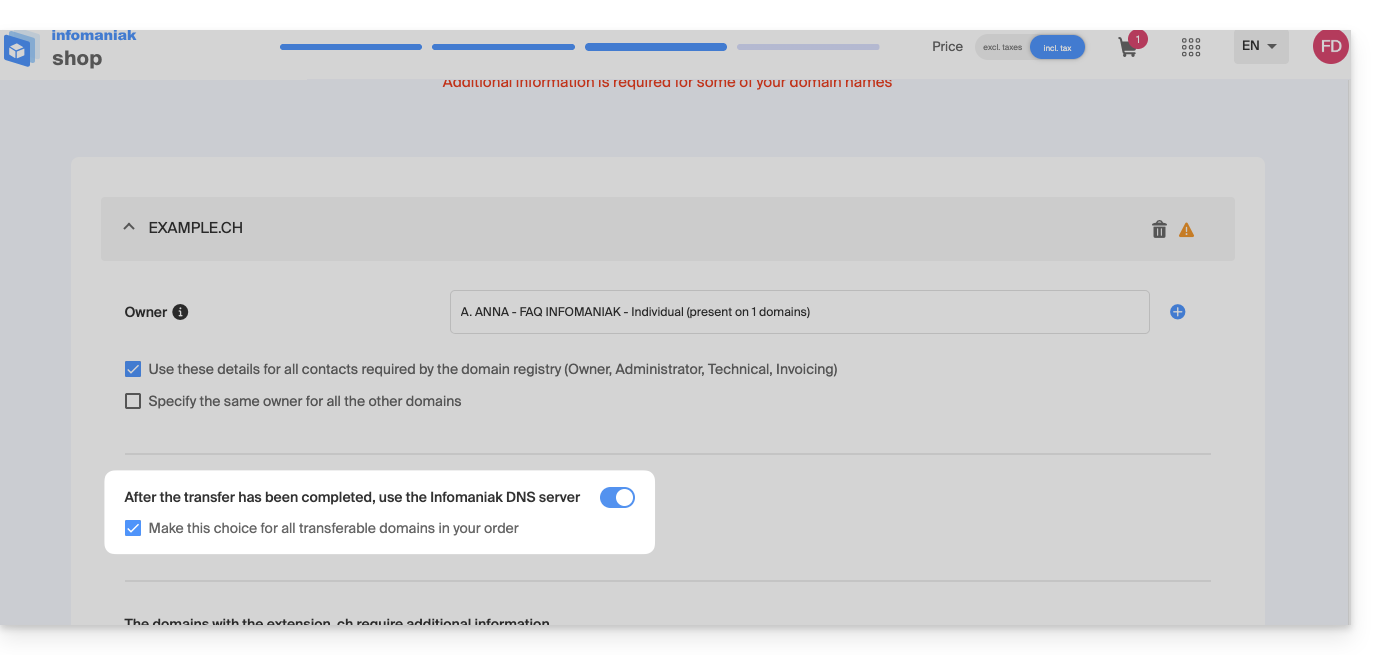
- As it can sometimes be difficult to know when this occurs, you can decide in advance what DNS configuration to apply (also possible during batch transfer):
For example:
- Your domain name
domain.xyzhas the DNSns1.monregistrar.comandns2.monregistrar.comand you will only be working with Infomaniak for everything related to email, web hosting, etc…- …then you don't need to do anything except choose our DNS when prompted during the transfer (same if it already has DNS such as ns11.infomaniak.com and ns12.infomaniak.com).
- …then you don't need to do anything except choose our DNS when prompted during the transfer (same if it already has DNS such as ns11.infomaniak.com and ns12.infomaniak.com).
- Your domain name
domain.xyzcurrently has the DNSns1.monregistrar.comandns2.monregistrar.comand you are only moving the domain name while continuing to work with different services other than Infomaniak…- …then carefully note the information contained in your current DNS zone (A records, CNAME, etc.) because Infomaniak cannot guarantee that your current DNS zone will persist where it is currently located (check with your current registrar) and choose not to use Infomaniak DNS.
- …then carefully note the information contained in your current DNS zone (A records, CNAME, etc.) because Infomaniak cannot guarantee that your current DNS zone will persist where it is currently located (check with your current registrar) and choose not to use Infomaniak DNS.
- And if you don't know which DNS your domain name is currently using…
- …query it via https://infomaniak.com/whois or another WHOIS service.
- …query it via https://infomaniak.com/whois or another WHOIS service.
- If your domain name
domain.xyzalready has DNS such asns11.infomaniak.comandns12.infomaniak.combefore transfer…- …then you don't need to do anything except choose our DNS when prompted during the transfer.
Do you want to transfer services such as your websites or email addresses? Refer to this other guide.
If you are stuck at a specific step, do not hesitate to contact Infomaniak support to get the help you need to continue the process.
Link to this FAQ:
Has this FAQ been helpful?
This guide explains how to access via a domain name to Swisscom Internet Box connected to the Internet with a dynamic IP.
Prerequisites
- Have a Box that allows configuring a custom dynamic DNS provider.
- A Dynamic DNS must have been created on the domain in question.
Link Swisscom Internet Box to a domain name
To do this:
- Log in to the Swisscom Box administration interface (
http://192.168.1.1for example). - Activate the expert view (toggle button at the bottom left).
- Click on Network.
- Click on the DynDNS tab.
- Check the box to Enable DynDNS.
- Choose the provider
Infomaniakfrom the drop-down menu. - Fill in the following fields:
- Hostname: the URL configured in the Manager when adding the Dynamic DNS
- Username: the identifier defined in the Manager when adding the Dynamic DNS
- Password: the password defined in the Manager when adding the Dynamic DNS
If the box indicates that port redirection is not possible because you do not have a public IP address, contact Swisscom so that they disable the CGnat. Refer to this guide to learn more.
Link to this FAQ:
Has this FAQ been helpful?
This guide explains how to access a Sunrise Internet Box connected to the Internet with a dynamic IP via a domain name.
Prerequisites
- Have a Box that allows configuring a custom dynamic DNS provider.
- A Dynamic DNS must have been created on the domain in question.
Link a Sunrise Internet Box to a domain name
There are different models of Sunrise Internet Box. Here is an example:
- Log in to the Sunrise Box administration interface (
http://192.168.1.1for example). - Activate expert mode (button at the top right).
- Go to DynDNS (top left):

- Click on the DynDNS tab.
- Activate the Dynamic DNS client.
- Choose the provider “Custom”:

- Fill in the following fields:
- Username = the identifier defined in the Manager when adding the Dynamic DNS
- Password = the password defined in the Manager when adding the Dynamic DNS
- Hostname = the URL configured in the Manager when adding the Dynamic DNS
- Below, fill in the following fields:

- Server:
infomaniak.com - Port:
443 - Request (to copy-paste as is):
https://infomaniak.com/nic/update?hostname=[DOMAIN]&myip=[IP]&username=[USERNAME]&password=[PASSWORD] - Update interval (seconds):
300 - Retry interval (seconds):
30 - Max attempts:
3
- Server:
The interface may be presented in this form but the principle remains the same: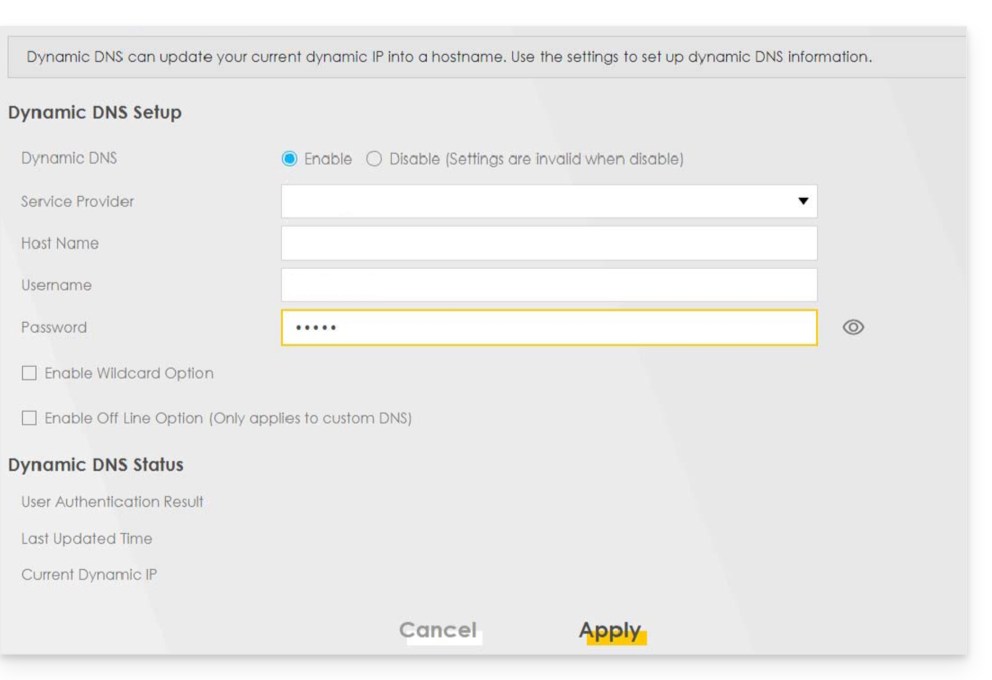
Other routers
It is the same principle for an Omada SDN solution from TP-Link; the Update-URL is https://infomaniak.com/nic/update?hostname=[DOMAIN]&myip=[IP]&username=[USERNAME]&password=[PASSWORD]:
And for other models (type Zyxel USG Flex or ax7501-B1 for example) fill in the fields using the data below:
- Enable DDNS Profile : enable
- DDNS Type :
User custom - HTTPS : enable
- Username : the identifier defined in the Manager Infomaniak when adding the Dynamic DNS (help)
- Password : the password defined in the Manager Infomaniak when adding the Dynamic DNS (help)
- Domain Name : host name with the domain
- Primary Binding Address > Interface : any
- Backup Binding Address > Interface : none
- DYNDNS Server : infomaniak.com
- URL (to copy-paste as is) : /nic/update?password=password(point 5 above)&username=username(point 4 above)&hostname=DomainName
- example
/nic/update?password=abcd1234&username=admin&hostname=abc.domain.xyz
- example
Link to this FAQ:
Has this FAQ been helpful?
This guide explains how to add or modify an MX record in the DNS zone of a domain name managed from the Infomaniak Manager.
Introduction
- An MX record indicates to mail servers which server/provider to forward messages addressed to your domain name to.
- Changes made in the Infomaniak Manager are only taken into account if the domain name uses the corresponding DNS zone.
- Any DNS addition/modification may take up to 48 hours to propagate; during this period, some messages may still be routed according to the old configuration.
MX for Infomaniak Mail
Infomaniak automatically configures the necessary MX record when the domain name and Mail Service are created in the same Organization in the Infomaniak Manager.
If your configuration requires manually adding the MX record to route incoming messages to Infomaniak, enter the following values:
- Host / Source: leave this field blank to apply the record to the main domain
- Target:
mta-gw.infomaniak.ch - Priority:
5
The target must be entered as a hostname, without https://, without an email address, and without any additional path.
Variant specific to certain DNS interfaces
Some interfaces, including Gandi's, require a period at the end of the target to indicate that it is a fully qualified hostname. In this case, enter:
mta-gw.infomaniak.ch.
If another MX record is used or if multiple MX records are configured, Infomaniak cannot guarantee that messages will be received correctly.
Modify the DNS zone
To add an MX record to the DNS zone:
- Click here to access the domain management section in the Infomaniak Manager (need help?).
- Click directly on the name assigned to the domain in question.
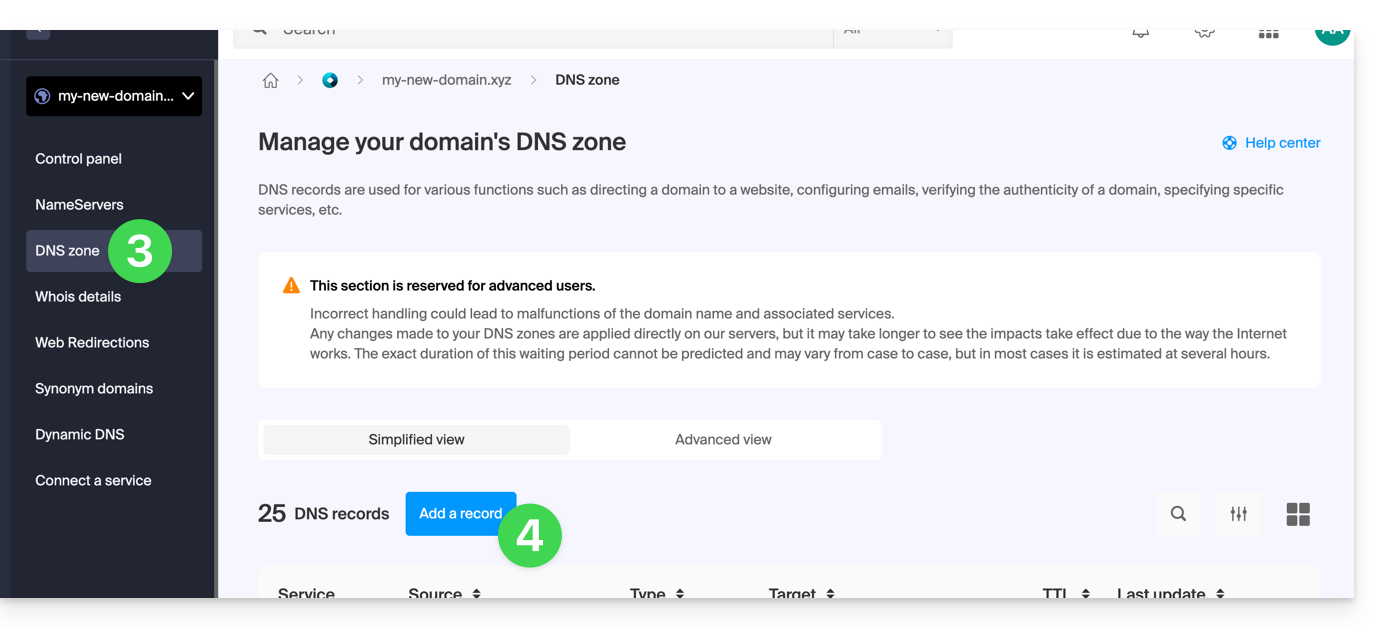
- Click on DNS Zone in the left-hand menu.
- Click on the button to add a record:
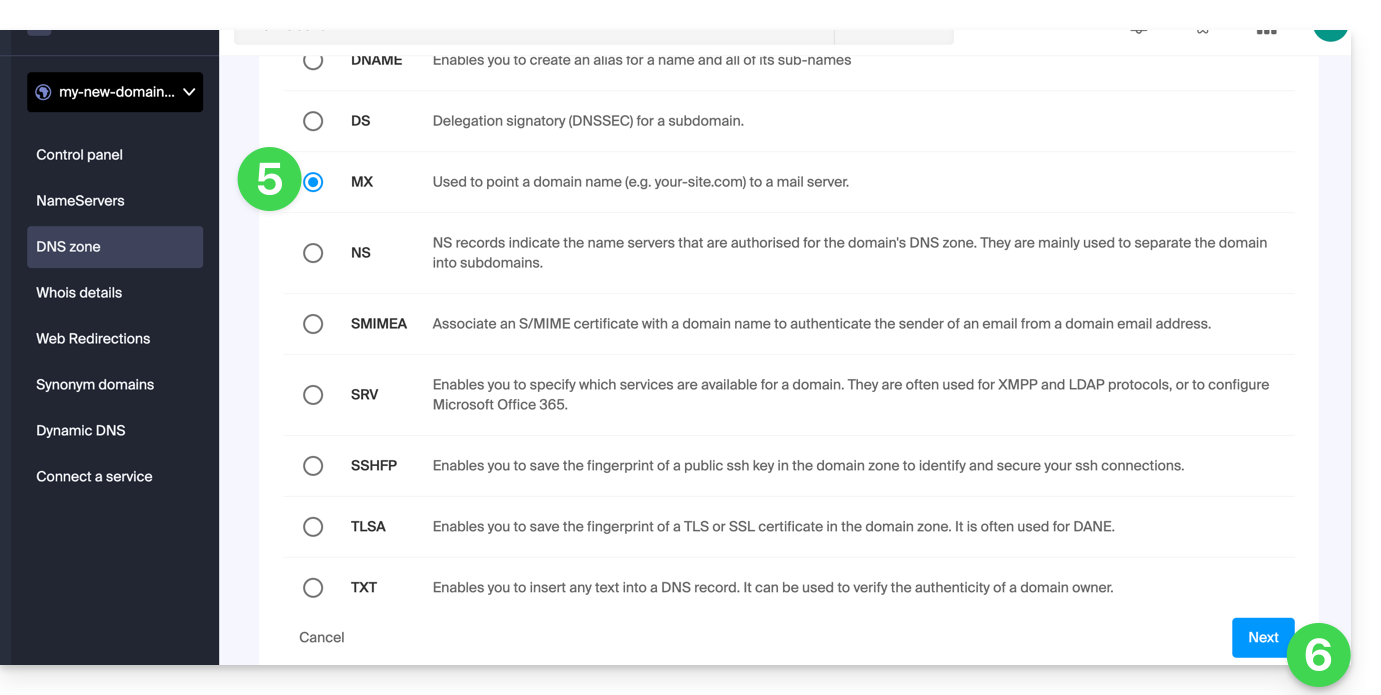
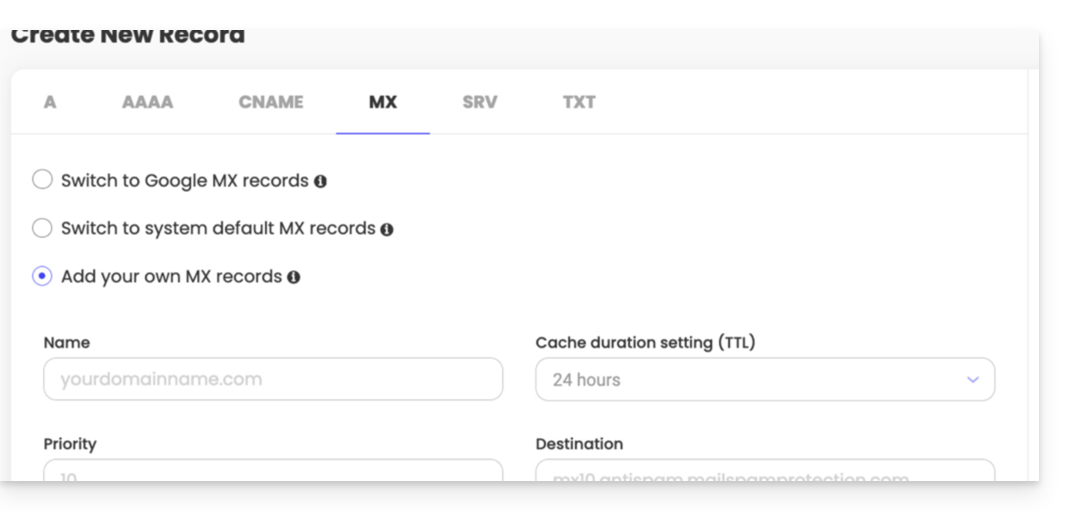
- Select the MX record type.
- Click on the Next button:
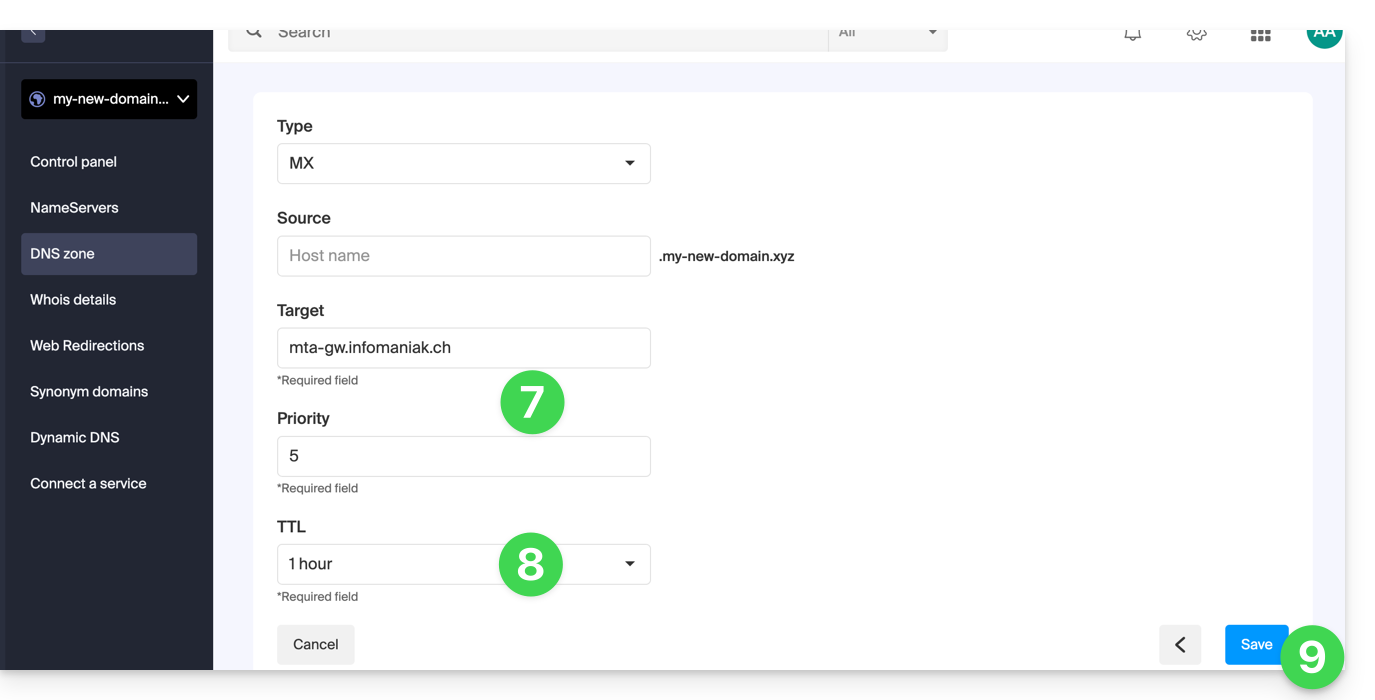
- Enter the required values:
- for the main domain's email, leave the Host or Source field blank
- enter the email server name provided by the provider in the Target field
- enter the priority indicated by the provider
- Keep the default value for TTL, unless otherwise specified by your email provider.
- Click on the Save button:
Once registered, the MX record will appear in the DNS zone table: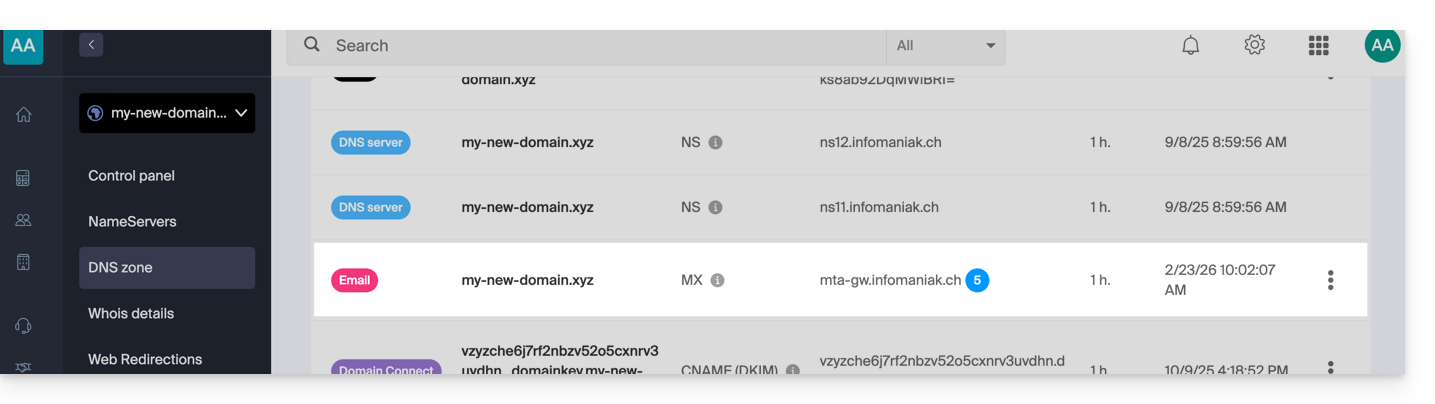
To send messages using Infomaniak's email service, the domain name must also have a correctly configured SPF record.
Learn more
Link to this FAQ:
Has this FAQ been helpful?
This guide explains how to access a NAS Qnap connected to the Internet with a dynamic IP address via a domain name.
Prerequisites
- Have a NAS Qnap connected to the Internet with a dynamic IP address.
- A Dynamic DNS must have been created on the domain in question.
Link a NAS Qnap to a domain name
To do this:
- Open the NAS Qnap management interface.
- Go to Network & Virtual Switch:

- Click on Add under Access Services > DDNS:

- Enter the following information:

- DDNS Server: Custom
- Profile Name:
Infomaniak(or whatever you want) - Username: the identifier defined in the Manager when adding the Dynamic DNS
- Password: the password defined in the Manager when adding the Dynamic DNS
- Hostname: the URL configured in the Manager when adding the Dynamic DNS
- URL:
https://infomaniak.com/nic/update?hostname=%HOST%&myip=%IP%
- Click on Apply.
From this point on, the dynamic IP address of your NAS will be automatically synchronized with your domain name.
Link to this FAQ:
Has this FAQ been helpful?
This guide explains how to access your Jeedom home automation box (which is behind a dynamic IP address provided by your ISP) with a domain name at Infomaniak via the free DynDNS option.
Preamble
- The integration you install acts as a messenger: it constantly monitors the IP address of your local network.
- As soon as it detects that your ISP has changed your IP, it instantly sends a signal to Infomaniak.
- Infomaniak then updates your domain name (e.g.:
jee.domain.xyz) so that it points to the new IP address.
Link Jeedom to a domain name
Prerequisites
- Have a Jeedom installation (e.g., on a Raspberry Pi 5) connected to the Internet with a dynamic IP address.
- A dynamic DNS must have been created on the domain in question.
Next:
- Install the official and free DynDNS plugin on your Jeedom application from the Market.
- Activate the plugin as usual.
- Configure a new device by selecting Infomaniak from the list of services:
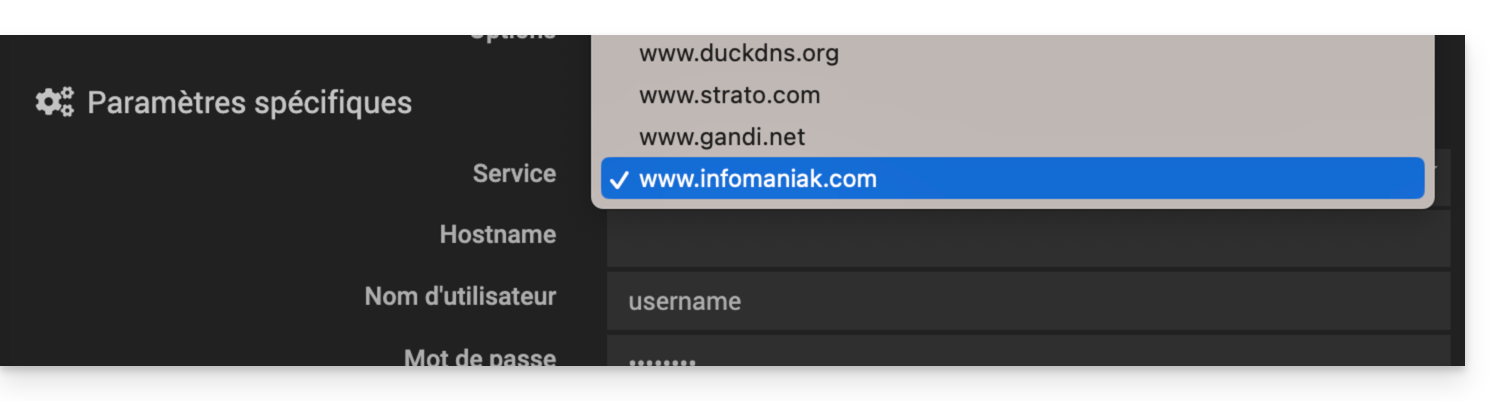
- Hostname: the URL configured in the Manager when adding the Dynamic DNS
- Username: the identifier defined in the Manager when adding the Dynamic DNS
- Password: the password defined in the Manager when adding the Dynamic DNS
Jeedom will check the external IP every 15 minutes. If it has changed, the DNS will be updated. Thus, your domain name will always point to your home automation installation, even if your ISP changes your public IP address.
Also refer to the official plugin documentation.
Link to this FAQ:
Has this FAQ been helpful?
This guide explains how to add or modify one or more A and AAAA type records in the DNS zone (of a domain name) managed on the Manager Infomaniak.
Preamble
- This type of record allows a domain name to point to a static IP address (usually a server), type A for an IPv4 and AAAA for IPv6.
- This is the method generally used to redirect your domain name to the IP address of the web server on which your website is hosted. Moreover, this type of pointing is used automatically to link your domain name with your website if they are in the same place and in the same Infomaniak Organization.
- You should only modify this type of record if you have a particular configuration to set up (e.g., pointing a subdomain to an external application).
Modify the DNS zone
To manage this type of record in a DNS zone:
- Click here to access the management of your domain on the Infomaniak Manager (need help?).
- Click directly on the name assigned to the domain in question.
- Click on DNS Zone in the left sidebar.
- Click the button to add a record:
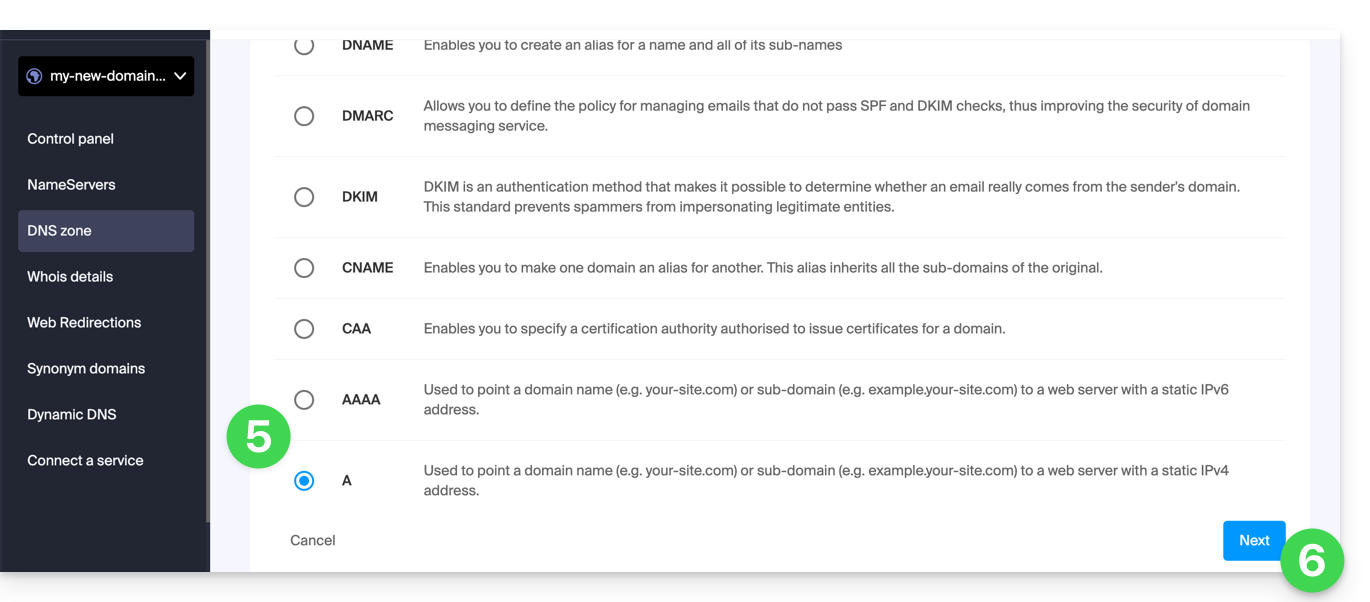
- Click the A or AAAA radio button to add a record.
- Click the Next button:
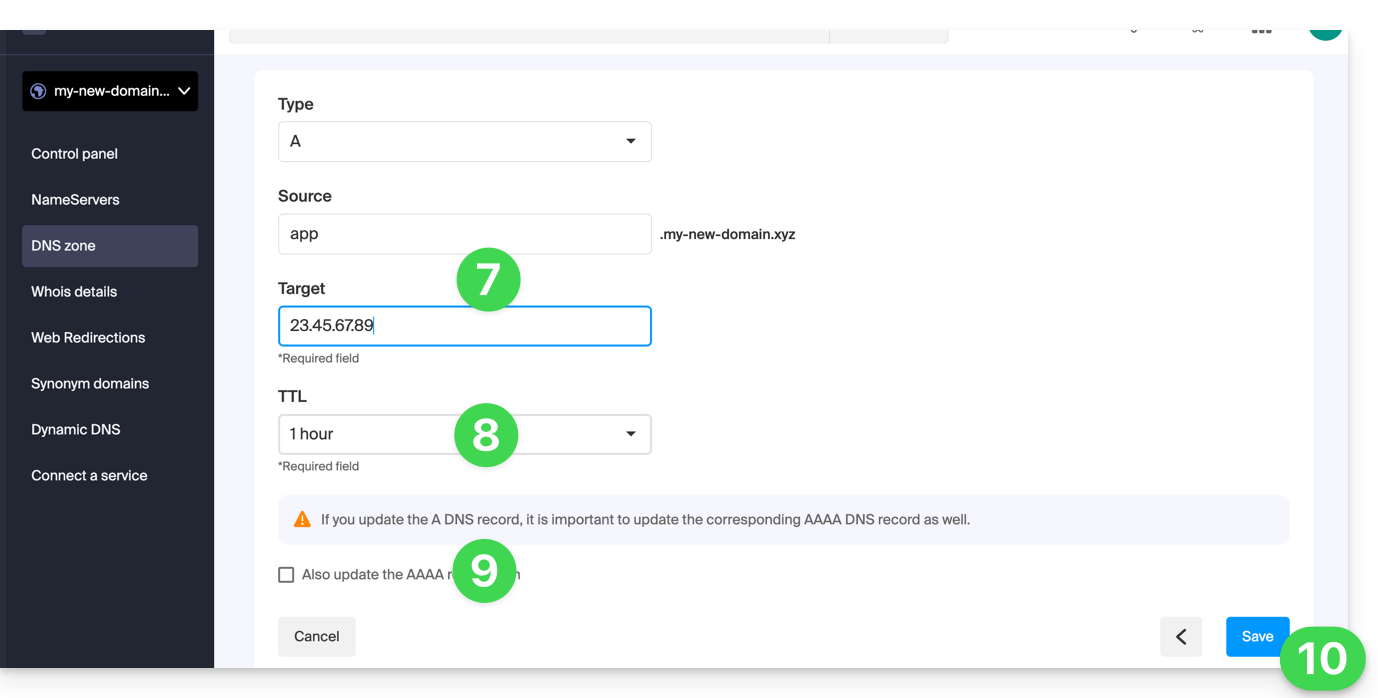
- Enter the values necessary for your DNS zone.
- Leave the default value for the TTL.
- If necessary, you can request the adjustment of the AAAA record by checking the box, which will allow you to indicate an IPv6 at the same time.
- Click the Save button:
Link to this FAQ:
Has this FAQ been helpful?
You are directed to this page because you have a web redirection on your domain that is misconfigured. Infomaniak is unable to identify the correct path of this redirection, so you are redirected to this page to help you correct this situation.
DNS zone verification
To restore the functionality of your redirection, you must first remove traces of an old misconfigured redirection:
- Access your DNS zone.
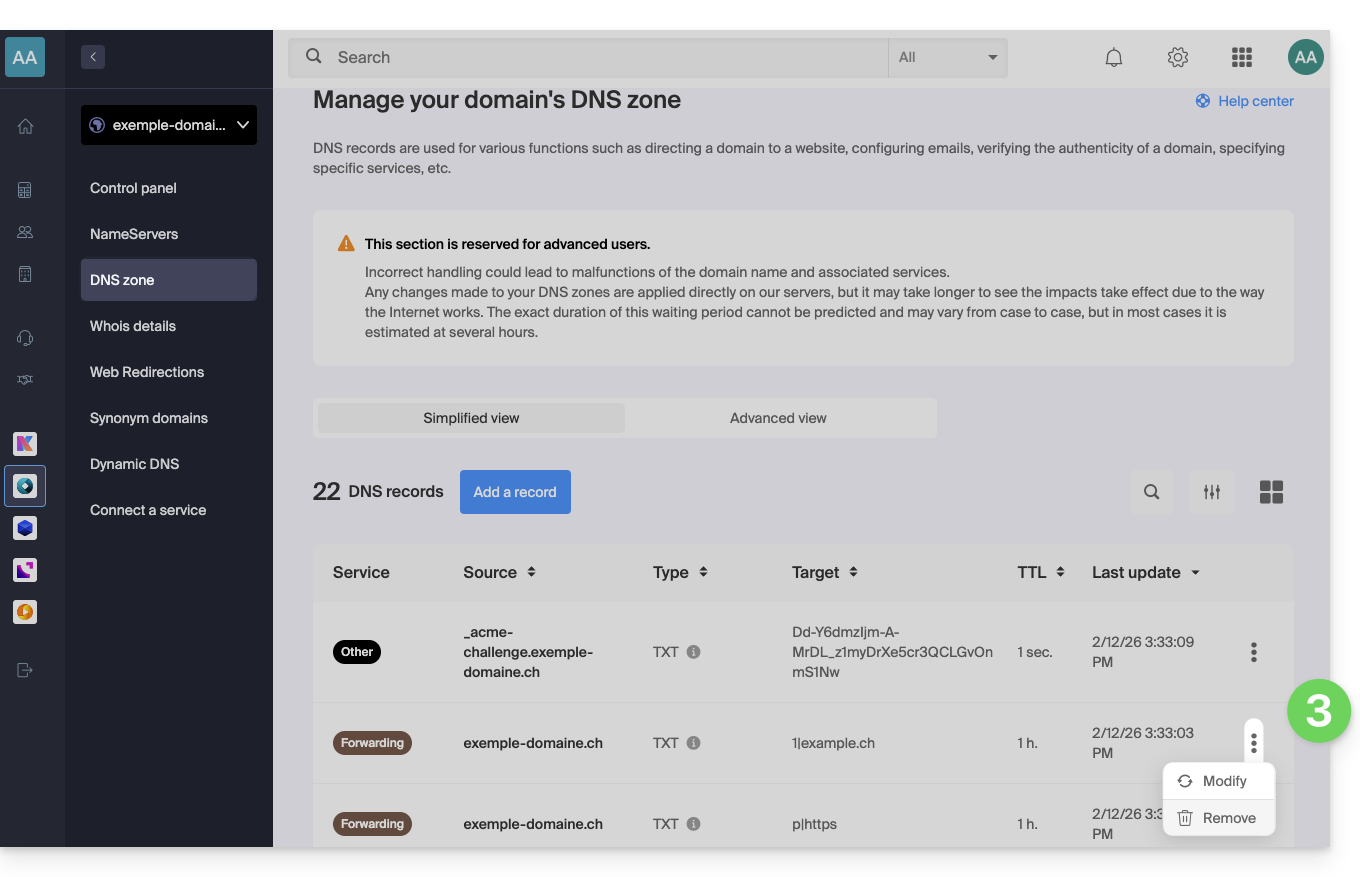
- Delete the relevant records (see the list below) that correspond to your redirection.
- Click on the ⋮ icon to the right of the DNS entry and select Delete:
- You probably won't find all the records listed, that's perfectly normal.
- Any addition/modification can take up to 48 hours to propagate.
- Recreate the web redirection.
List of records to check and delete
DNS records can be of type:
Aand pointing toxx.xx.xx.xx(only digits)AAAAand pointing to an IPxxxx:xxxx:x:x::x(digits and letters)TXTwhose string resembles “(number)|(URL)”- for example
1|infomaniak.comif your redirection points to infomaniak.com
- for example
TXTwhose string resembles “(letter)|(text)”- for example
t|Text,d|Textork|Text
- for example
Link to this FAQ:
Has this FAQ been helpful?
This guide details the different statuses that a domain name can have.
Common statuses
"Active" or "OK"
The domain name is declared in the DNS, the domain name is active and unlocked. All administrative and/or technical operations are possible.
"Registrar-Lock / Registry-Lock" or "clientTransferProhibited"
The domain name is declared in the DNS. The domain name is active and locked to protect it, especially against unauthorized transfer requests.
Statuses that require an operation or observation
"Registrar-Hold / Registry-Hold"
This status is set when the domain has expired (not renewed). The only possible operation is then renewal. Administrative and/or technical operations are not possible.
"RedemptionPeriod"
This status occurs if the domain has not been renewed. Refer to this other guide if you are looking for information on this subject.
"PendingRestore"
This status appears during a restoration request. The registrar has 7 days to communicate all necessary information to the registry for its restoration.
"PendingDelete"
This status follows the status RedemptionPeriod after 30 days if no restoration request has been made. The name will be deleted during a 15-day period before becoming public.
In the case of a .fr domain extension
"Active" (Active)
The domain name is declared in the DNS (fully operational).
"Frozen" (Frozen)
The domain name is declared in the DNS but no administrative and/or technical operation is possible. Possible causes: see article 6.1 of the charter of the AFNIC.
"Locked"
The domain name is no longer declared in the DNS; it is no longer functional and no administrative and/or technical operation is possible. Possible causes: see article 6.2 of the AFNIC charter.
Link to this FAQ:
Has this FAQ been helpful?
This guide explains which DKIM to add to secure Infomaniak messaging if it revolves around a domain name whose DNS is that of Cloudflare.
Preamble
- If you manage your emails at Infomaniak, as well as the associated domain name, but the DNS management is with Cloudflare, then you need to add the DKIM on the Cloudflare interface.
Add a DKIM on Cloudflare
Prerequisites
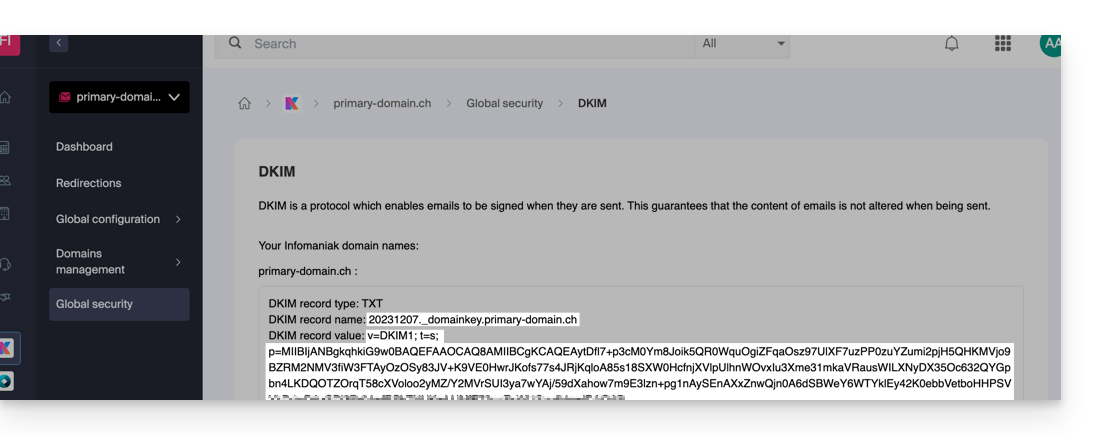
- Refer to this other guide to allow you to display the DKIM corresponding to your Infomaniak messaging.
- Display the DKIM to be able to copy-paste it. Example:
Follow the procedure below to correctly activate DKIM, thus improving the security and deliverability of emails for the domain in question:
- Click here to access your Cloudflare account.
- Select the domain in question.
- In the DNS section, search for and delete any NS records for "
_domainkey" pointing to Infomaniak. - Click on the Add a record (
Add record) button to open the input form. - Fill in the fields using the data obtained from the Infomaniak Manager, respecting the standard configuration for a TXT type DKIM record:
| Cloudflare Field | Value to Enter | Important Notes |
|---|---|---|
| Type | TXT (text) | Choose the standard type for DKIM keys. |
| Name (Host) | The DKIM selector (e.g. 20240112) | Enter only the selector as Cloudflare automatically adds the domain name and the suffix ._domainkey for you. Refer to the Cloudflare documentation if necessary. |
| Content (Value) | The public key (the long string) | Paste the entire DKIM public key provided (what comes after p=) |
| TTL | Auto | Leave the default value for optimal management by Cloudflare. |
Make sure the Proxy Status (cloud) is set to DNS Only (grayed out) for email authentication records.
Save and Propagation
After carefully verifying the accuracy of the Selector and Public Key, click the Save button. This validates the addition of your DKIM record in the Cloudflare DNS zone.
Any DNS addition/modification can take up to 48 hours to propagate.
Once the waiting period has elapsed, you can use online verification tools to confirm that the DKIM record is published and valid. This validation ensures that your Infomaniak emails will be properly signed and their deliverability will be optimal.
Link to this FAQ:
Has this FAQ been helpful?
This guide explains how to add or modify one or more CNAME and DNAME type records in the DNS zone (of a domain name) managed on the Manager Infomaniak.
Preamble
- The
CNAMErecord type allows a subdomain to point to a website address.- This is the method generally used to make the
wwwsubdomain work with your site, or to redirect a subdomain to a folder on the web server where your website is hosted.
- This is the method generally used to make the
- The
DNAMErecord type for "delegation name" is particularly useful when reorganizing domains or for smooth transitions of part of your infrastructure to another, while preserving the hierarchical structure of subdomains.- A
DNAMEcreates an alias for an entire domain and all its subdomains.
- A
- Unlike the
CNAMEwhich only applies to a single specific host name, theDNAMEautomatically redirects all subdomains. Example:- A
DNAMEforabc.site1.compointing tosite2.comwill automatically linkxyz.abc.site1.comtoxyz.site2.com,new.login.abc.site1.comtonew.login.site2.com, and so on.
- A
- ⚠ A
DNAMErecord cannot be used at the root zone level of a domain (likesite1.comdirectly). It is generally used on a subdomain. If you want to redirect the main domain itself, you will need to use other types of records such as anA,AAAAorCNAME(with some restrictions for the latter).
Modify the DNS zone
To manage this type of record in a DNS zone:
- Click here to access the management of your domain on the Infomaniak Manager (need help?).
- Click directly on the name assigned to the domain in question.
- Click on DNS zone in the left sidebar.
- Click the button to add a record:
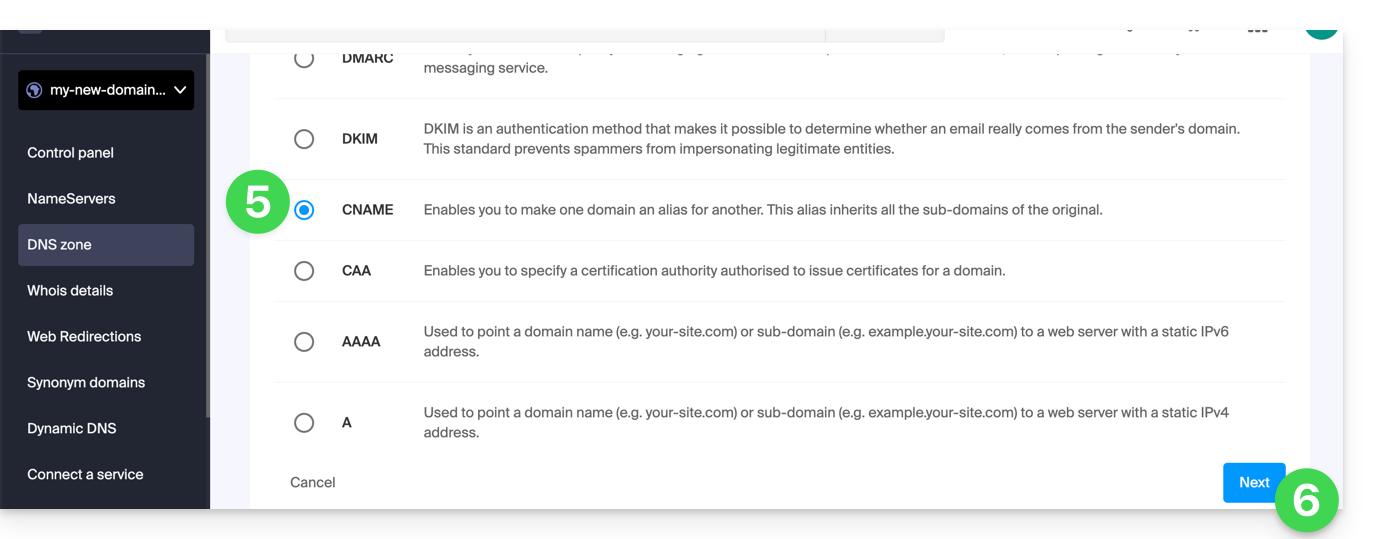
- Click the radio button corresponding to add a record.
- Click the Next button:
- Enter the values necessary for your DNS zone.
- Leave the default value for TTL.
- Click the Save button:
Link to this FAQ:
Has this FAQ been helpful?
This guide explains how to add or modify one or more CAA records in the DNS zone (of a domain name) managed on the Manager Infomaniak.
Preamble
- A CAA record allows you to specify a certification authority authorized to issue certificates for a domain.
Add a CAA
To manage this type of record in a DNS zone:
- Click here to access the management of your domain on the Infomaniak Manager (need help?).
- Click directly on the name assigned to the domain concerned.
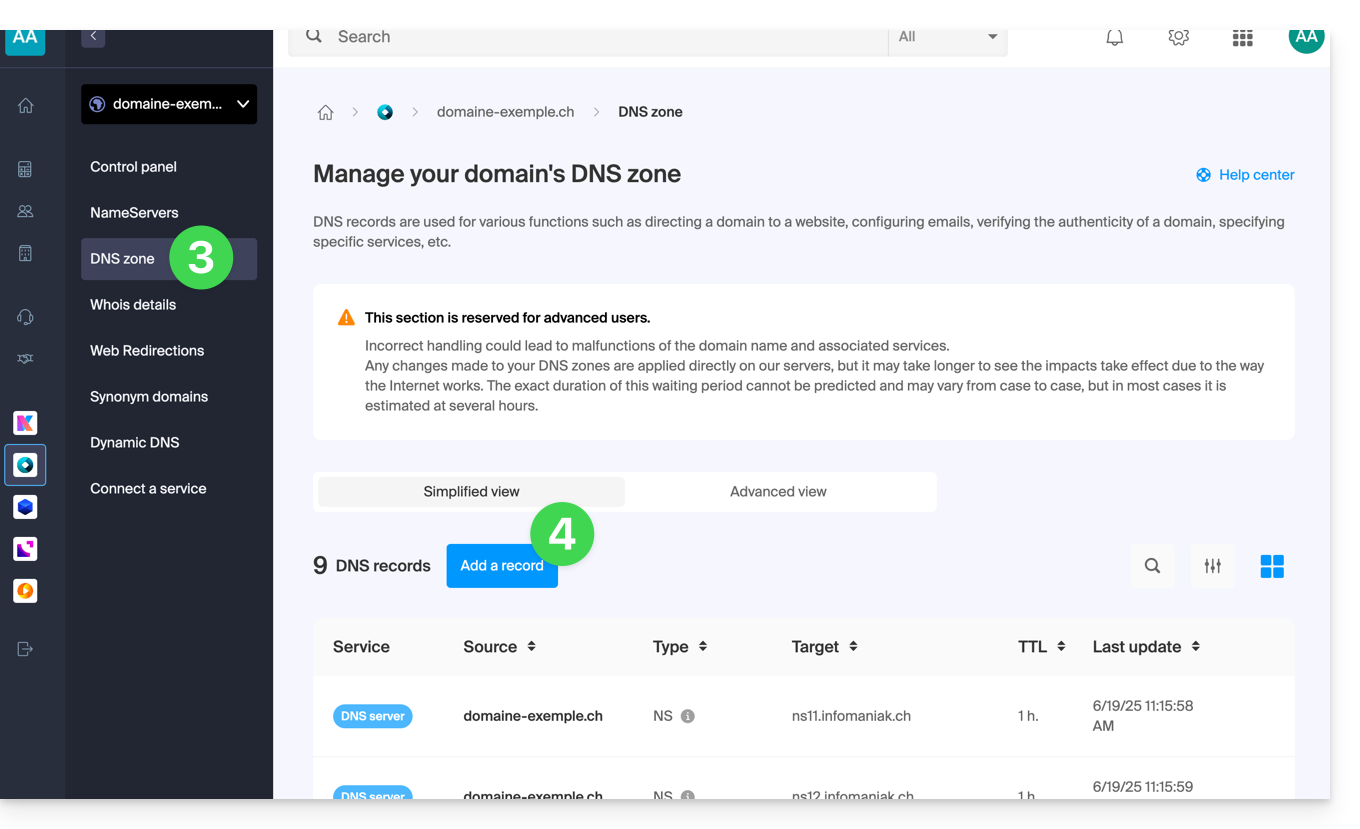
- Click on DNS Zone in the left sidebar.
- Click the button to add a record:
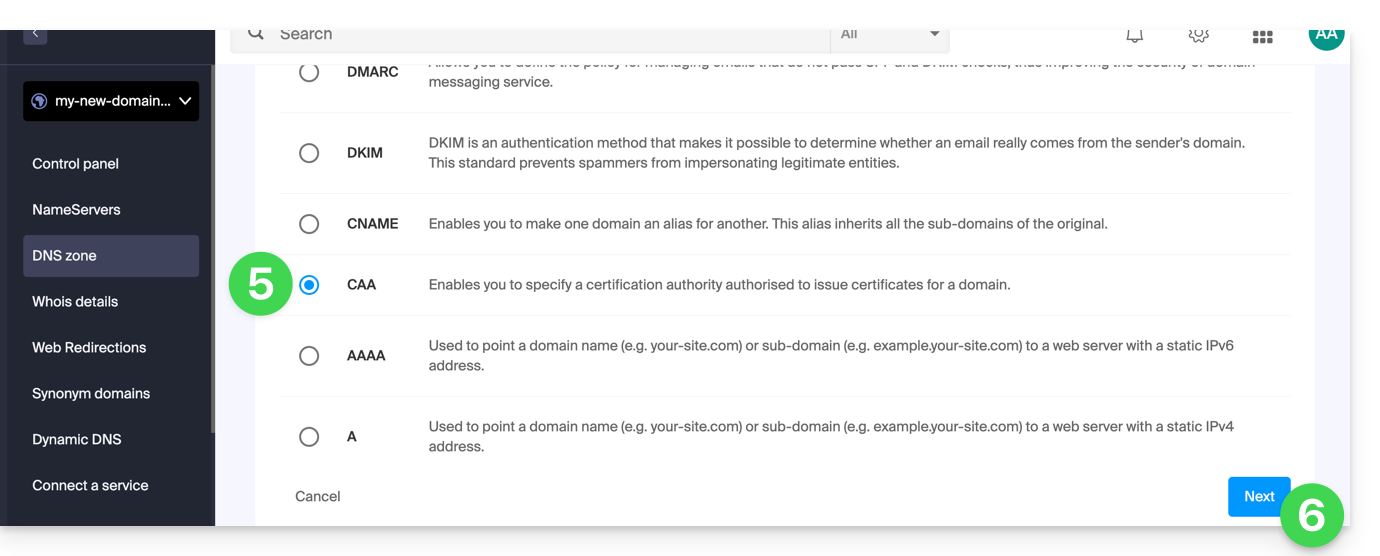
- Click on the radio button CAA to add a record.
- Click on the Next button:
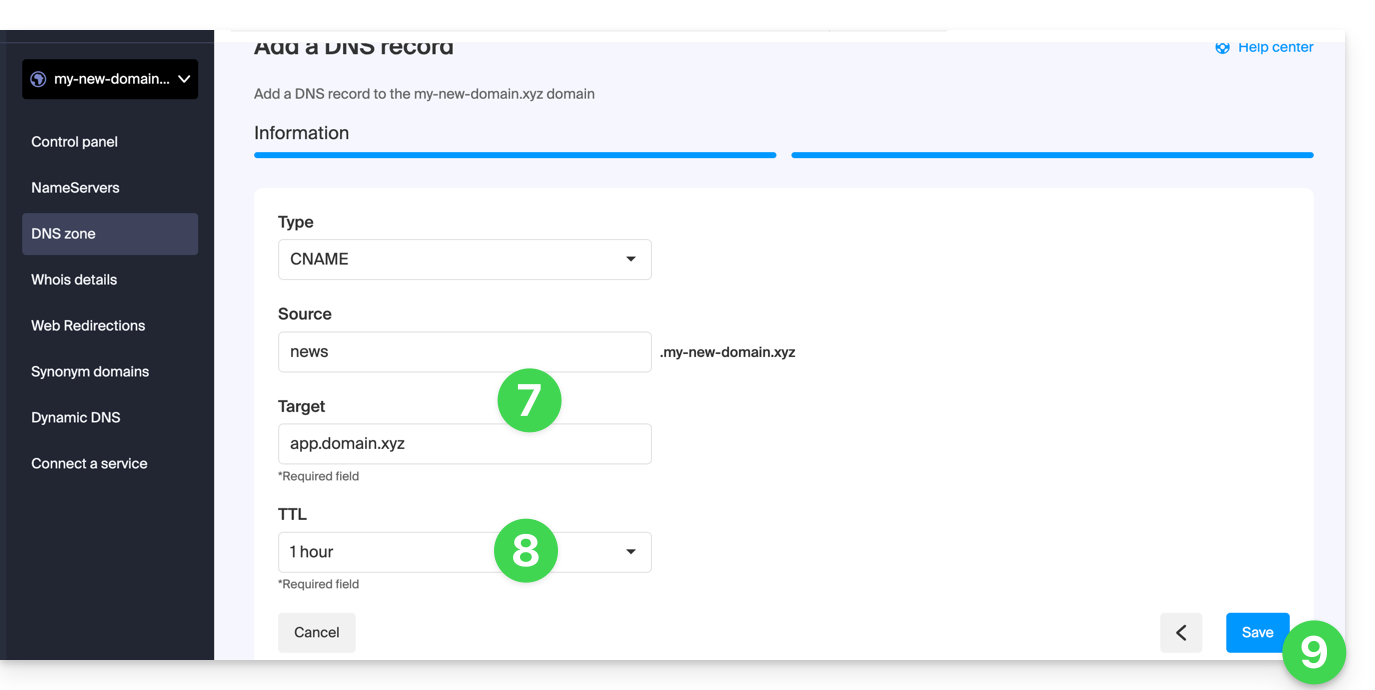
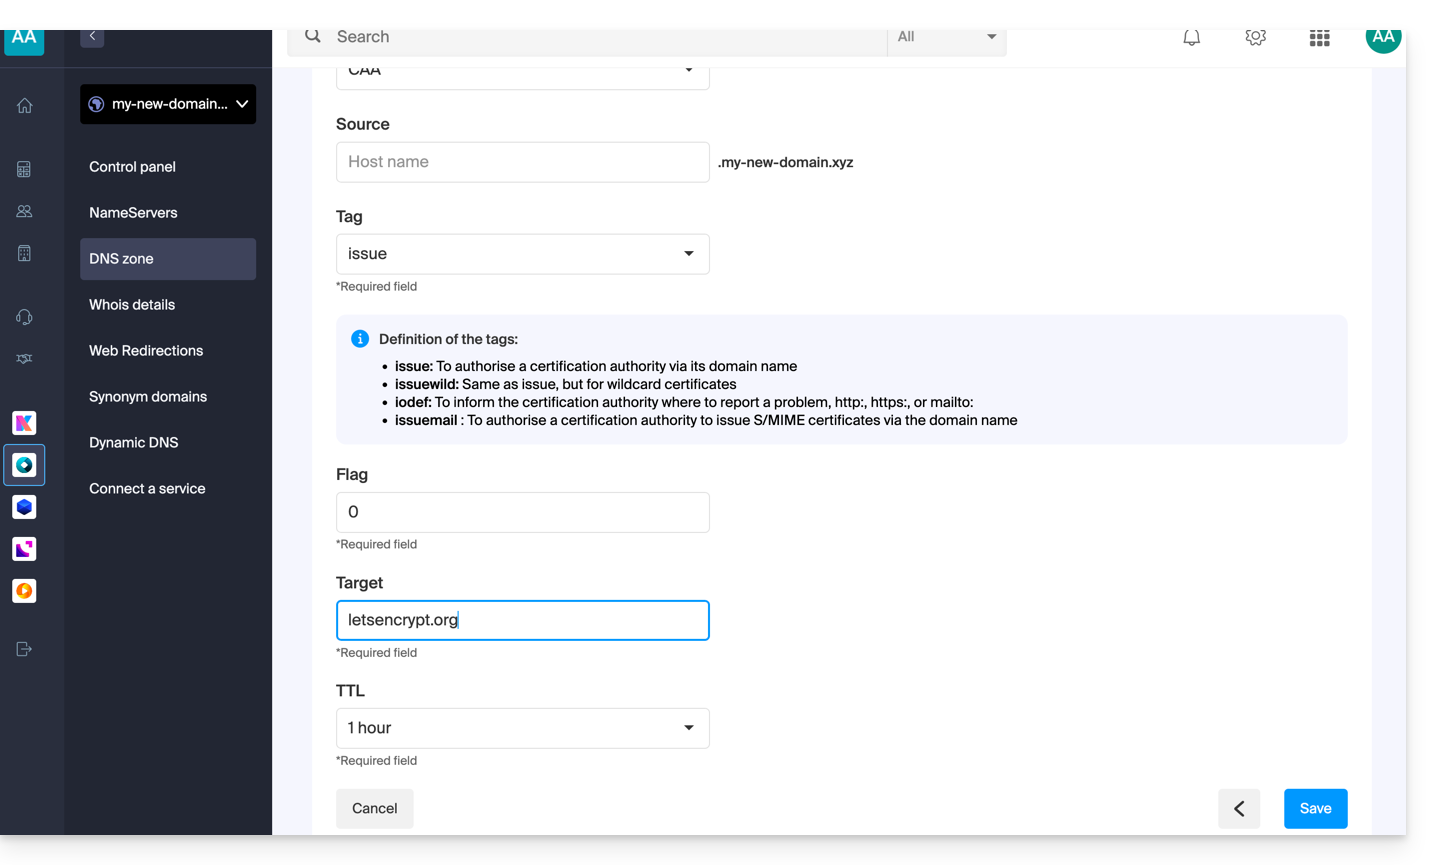
- Enter the CAA values required for your DNS zone: if you are validating an SSL certificate, refer to the information below.
- Save your information by clicking on the button at the bottom of the page.
Adding CAA to validate an SSL certificate...
... Sectigo
In the case of an SSL certificate validation Sectigo, follow the generic guide but specifically enter the following data:
- Choose “Issue for certification authority”.
- Enter the flag:
0. - Specify
sectigo.com.
... Let's Encrypt
In the case of a Let's Encrypt SSL certificate validation, follow the generic guide but specifically enter the following data:
- Choose “Issue for certification authority”.
- Enter the flag:
0. - Specify
letsencrypt.org.
Link to this FAQ:
Has this FAQ been helpful?
This guide explains how to link a domain name managed by Infomaniak to a Google Sites offer.
Introduction
- A website created on Google cannot be exported to be hosted on third-party servers, such as Infomaniak's servers.
- It is therefore recommended to create the website directly with Infomaniak using Site Creator or WordPress.
Associate Google Sites with the Infomaniak domain name
To configure your domain in Google Sites:
- Create or prepare your site on Google Sites.
- In the Google Sites settings, go to the "Use a custom domain" option.
- Add your custom domain.
Google will then ask you to verify your domain via DNS records (delete any old A and CNAME records associated with it if necessary, then add the new ones):
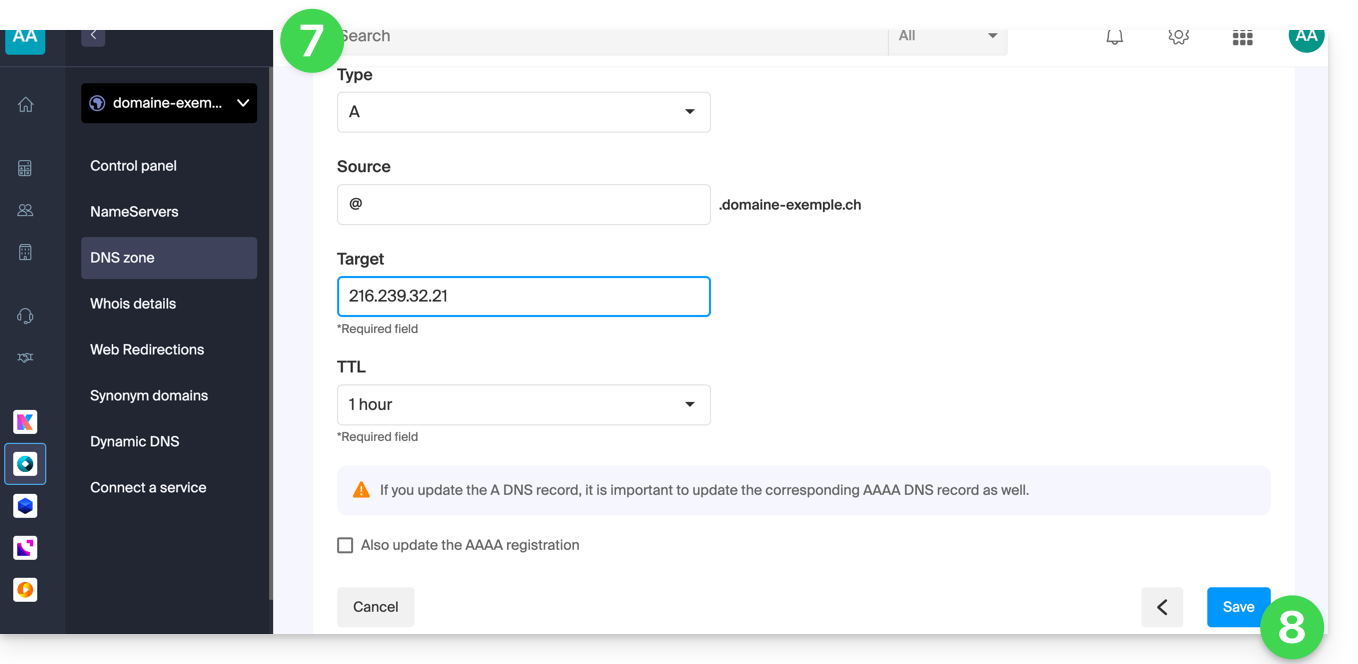
A Records
To achieve the result requested by Google, for example, 4 different IP addresses…
- Host:
@points to:216.239.32.21 - Host:
@points to:216.239.34.21 - Host:
@points to:216.239.36.21 - Host:
@points to:216.239.38.21
… create the "A" type records with these IP addresses as the target:
- Click here to access the management of your domain in the Infomaniak Manager (need help?).
- Click directly on the name assigned to the domain in question.
- Click on DNS Zone in the left-hand menu.
- Click on the blue Add entry button:
- Choose the A record type.
- Click on Next:
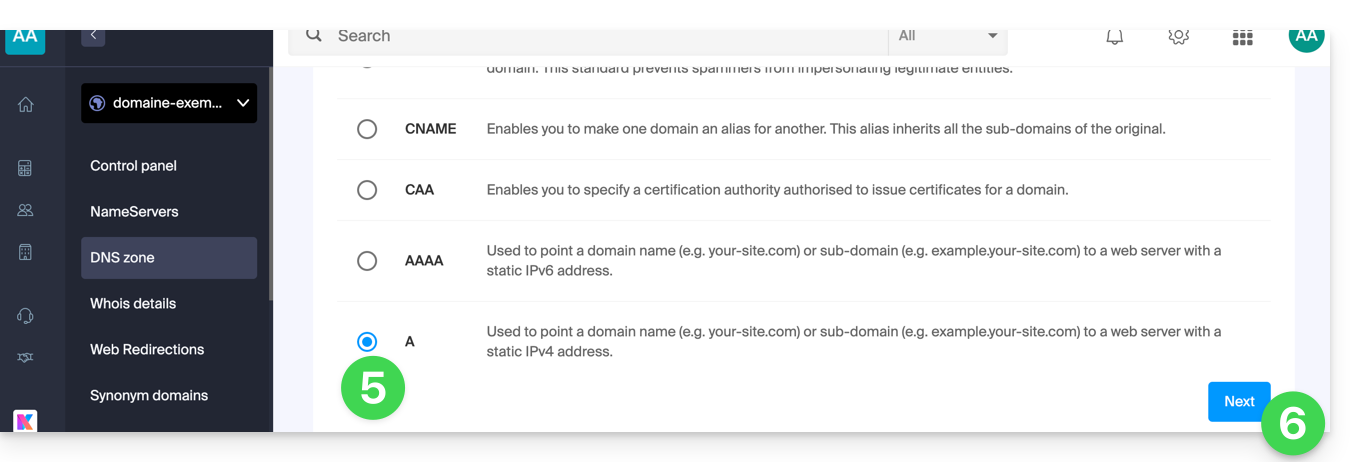
- Fill in the various fields according to your information.
- Save the changes:
- Repeat from step 4 if you have multiple records to add.
CNAME record
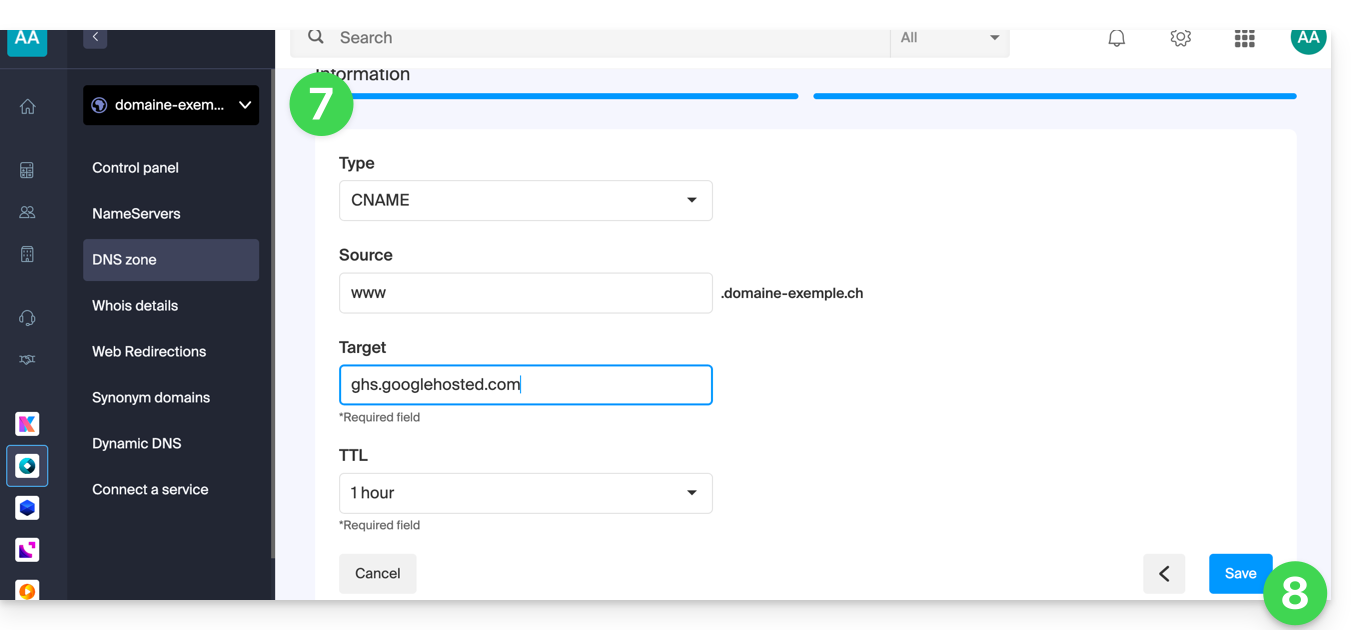
In order to achieve the result requested by Google, create a CNAME record with these values:
- Host:
www - Points to:
ghs.googlehosted.com
To do this:
- Click here to access the management of your domain in the Infomaniak Manager (need help?).
- Click directly on the name assigned to the domain in question.
- Click on DNS Zone in the left-hand menu.
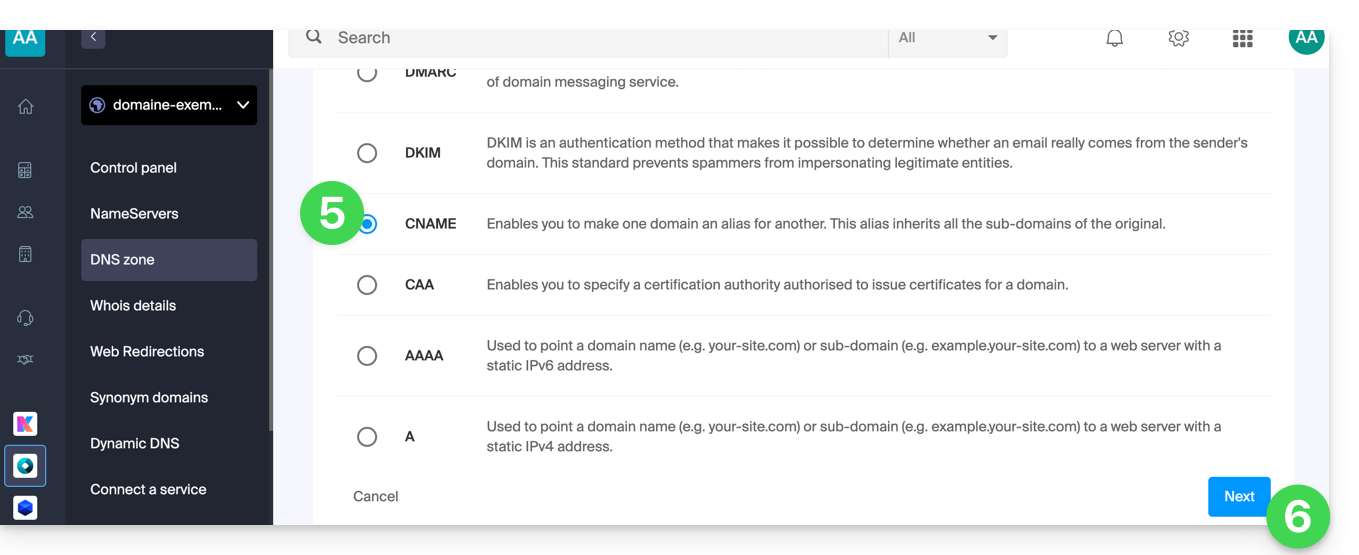
- Click on the blue Add entry button:
- Choose the CNAME record type.
- Click on Next:
- Fill in the various fields with your information.
- Save the changes you made:
Verify your domain (Google Site Verification)
After configuring the DNS records, return to Google Sites to complete the verification. This may take up to 24 hours due to DNS propagation.
Final validation
Once the changes have propagated, your site should work with the custom domain. If you encounter any problems, check the DNS records or contact Google.
Link to this FAQ:
Has this FAQ been helpful?
This guide explains how to add an ANAME record in the DNS zone (of a domain name) managed on the Infomaniak Manager.
Preamble
- The
ANAMErecord type allows you to point the root of a domain to another address, similar to a CNAME record but without having to specify a source xyz preceding the domain (xyz.domain.com for example). - It is therefore not a real DNS record as such and it is not listed in the list of records that can be selected when editing the DNS zone.
- However, since it is a kind of alias, see below the method to follow to set up an
ANAME.
Create an ANAME
Creating an ANAME is equivalent to creating a CNAME directly at the root of the domain, and this is not possible.
If you are sure of what you are doing, you can follow this method to create the equivalent of an ANAME:
- Create a web redirection from the Manager of the domain root (root) to the www.
- Add a CNAME entry working with www to the target of your choice.
Link to this FAQ:
Has this FAQ been helpful?
This guide explains how to link your Shopify site to the Mail Service managed by Infomaniak.
If your domain name is managed with Infomaniak, you can configure it so that only Web traffic points to Shopify (refer to this other guide for more information).
⚠️ Important
It is strongly discouraged to use Shopify as a domain name manager if you want to use the Infomaniak Mail Service.
- Shopify imposes a technical limit of 255 characters on DNS records.
- This prevents you from correctly adding the Infomaniak DKIM key, which is essential to guarantee the deliverability and security of your emails.
- Shopify does not allow you to modify the name servers (NS).
- You cannot therefore delegate the management of the DNS zone to Infomaniak, which prevents the complete and compliant implementation of your mail service.
- In practice, this means that you risk problems sending or receiving emails, as well as a degradation of your domain's reputation (emails marked as spam, unauthenticated, etc.).
For all these reasons, using a Shopify domain is not recommended with the Infomaniak mail service.
The best solution is to transfer your domain name to Infomaniak. You will then benefit from complete and optimized DNS management, perfectly compatible with Infomaniak's messaging services.
If needed, call the technical support of the provider in question so that they can help you set up the information specified below; Infomaniak will not be able to help you further:
- Paste the MX record for Infomaniak:
- In order for the email to work correctly and for email traffic to be routed properly, the Infomaniak MX record must be entered in your Shopify account:
- Refer to this other guide for the steps to follow.
- Save the changes.
- Any DNS addition/modification may take up to 48 hours to propagate.
- Paste the SPF record for Infomaniak using a TXT record:
- SPF is a verification method that ensures that an email is sent by the sender it claims to be, which helps to combat spam and fraudulent emails.
- It is essential to add the Infomaniak SPF record
v=spf1 include:spf.infomaniak.ch -allin your Shopify interface. - To do this, follow the steps detailed in this other guide.
- Any DNS addition/modification may take up to 48 hours to propagate.
- Also, check for the presence of a DKIM record if you are still experiencing sending issues.
- Unfortunately, it seems that Shopify is not updating to meet current standards regarding DKIM entries, which prevents you from configuring the entry provided by Infomaniak. According to these messages, Shopify's customer service has been aware of this issue for several months. If your domain name or its DNS zone is hosted with them, it is recommended that you transfer it to Infomaniak as described above.
Link to this FAQ:
Has this FAQ been helpful?
This guide explains how to link an external website (hosted by a turnkey website creation service, for example) to your Infomaniak email.
This will be useful if, for example, your webmaster has modified the technical information (DNS) of your domain name to direct it to your external website, and this has interrupted your email service.
Prerequisites
- Your domain name has the DNS records corresponding to the provider of your external web service (because it is in this provider's DNS zone that you will make the changes).
- Note the Infomaniak MX record
mta-gw.infomaniak.chor sometimesmta-gw.infomaniak.ch.(presence of a final period). - Note the Infomaniak SPF record
v=spf1 include:spf.infomaniak.ch -all. - Note the Infomaniak DKIM record.
- Understand that any DNS addition/modification may take up to 48 hours to propagate.
Specific guides
Click on the link corresponding to the website provider:
- Wix
- Wordpress.com
- Shopify
- Jimdo (Guide A | Guide B)
Guide for any other web provider
In general, you need to find the section on your web hosting provider's dashboard where you can add the technical information (the 3 items listed in the prerequisites above) required to enable Infomaniak's email service while ensuring that your domain name directs all traffic to this web hosting provider:
- Infomaniak's MX record.
- SPF is a verification method that ensures an email is sent by the claimed sender, helping to combat spam and fraudulent emails; this is often added as a TXT record.
- Having a DKIM record is now essential for the optimal functioning of your Infomaniak email service.
Link to this FAQ:
Has this FAQ been helpful?
This guide is intended for users who wish to manage Glue records (or "glue records") at Infomaniak.
Preamble
- Glue records are crucial for linking a domain name to its associated name servers, by providing the IP addresses of these servers directly.
- For example, for the domain
domain.xyz, the glue records specify the name servers (ns1.domain.xyzandns2.domain.xyz) as well as their IP addresses (192.0.2.10and192.0.2.11).
- For example, for the domain
- This speeds up DNS resolution, allowing browsers and online services to find your site faster and more efficiently.
- Warning: adding an NS does not automatically add it to the DNS zone: it is necessary to manually update the DNS zone of your domain!
Create Glue records...
... via "A record"
This method involves creating an A record (address) for ns1.domain.xyz pointing to the IP of the NS. This will have the effect of registering the IP with the registry. You will then be able to add ns1.domain.xyz which will be recognized and redirected to the correct NS.
domain.xyz. 3600 IN NS ns1.domain.xyz.domain.xyz. 3600 IN NS ns2.domain.xyz.
ns1.domain.xyz. 3600 IN A 192.0.2.10ns2.domain.xyz. 3600 IN A 192.0.2.11
... via "Glue records" button
This way of doing things allows you to create, but also modify, existing Glue records:
- Click here to access the management of your product on the Infomaniak Manager (need help?).
- Click directly on the name assigned to the product concerned.
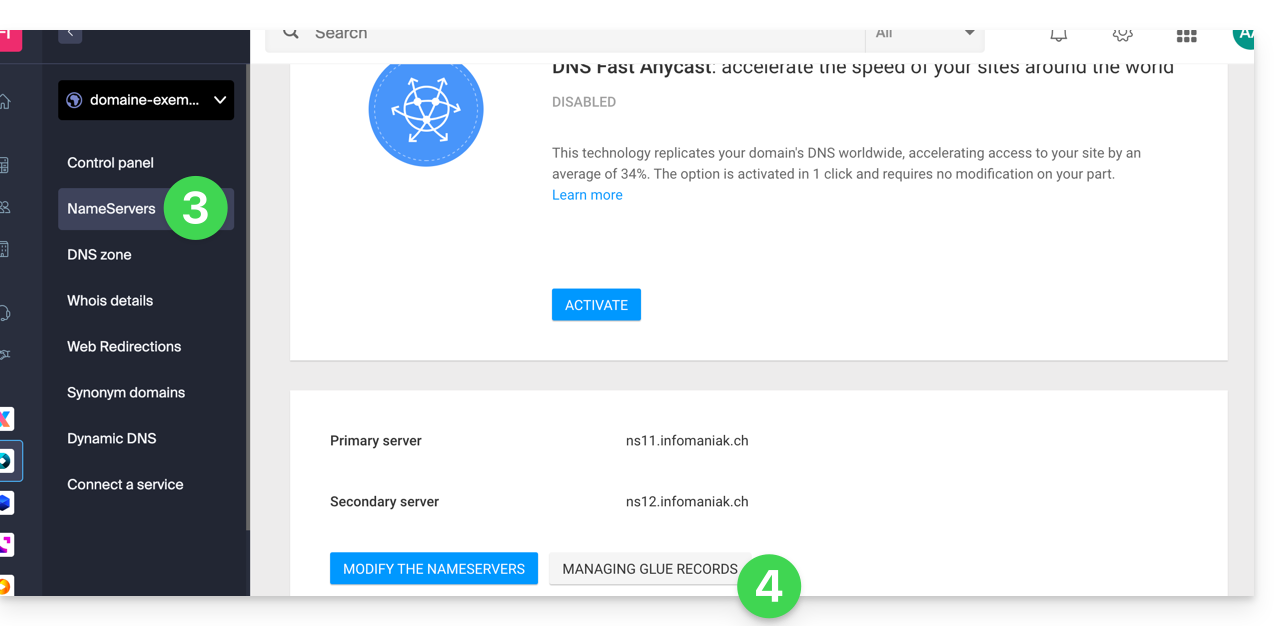
- Click on DNS Servers in the left sidebar.
- Click on the Manage glue records button:
- Click on the Add a server button:
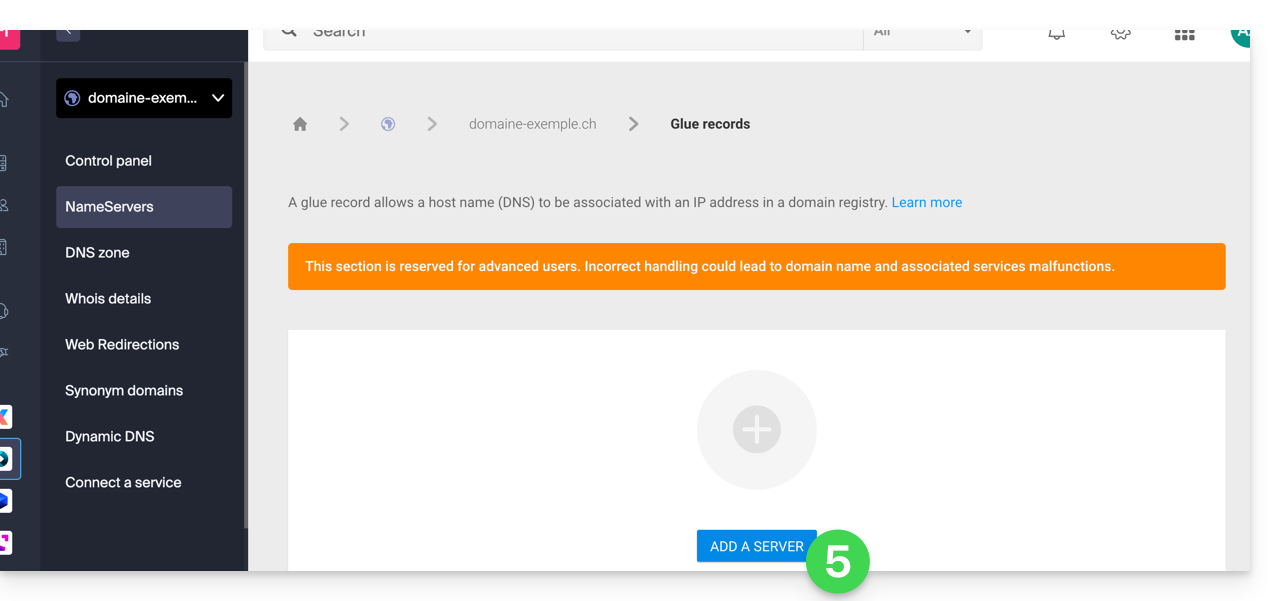
- Enter the name of the server to be added as well as its IP address.
- Click on the Validate button.
Link to this FAQ:
Has this FAQ been helpful?
This guide explains how to add or modify one or more SPF records in a DNS zone (of a domain name) managed in the Infomaniak Manager.
Introduction
- If your domain name is registered with Infomaniak, your email is managed by Infomaniak, but your website is hosted with another provider (Wix, for example), you are probably managing the DNS zone (and therefore the SPF) with that other provider: please refer to this other guide for more information.
Understanding SPF records
The SPF (Sender Policy Framework) record type is a standard for verifying the sender's domain name in an email and aims to reduce SPAM. It is used to indicate which server is authorized or not to send emails for a domain. If the SPF check fails for an email, it means that the email was not sent from an authorized server/IP address by the domain administrator. The email is then considered spam.
Strict SPF -all: rejecting unauthorized emails
Infomaniak automatically installs this type of record when creating an Email Service on your domain (strict SPF):
v=spf1 include:spf.infomaniak.ch -allThus, the recipient server of the email you send will evaluate that any email not coming from Infomaniak servers will be rejected. This prevents malicious individuals from spoofing email addresses from your domain.
Soft SPF ?all: tolerance for some emails
You can choose to modify the SPF to a more flexible model:
v=spf1 include:spf.infomaniak.ch ?allIn this case, the recipient server of the email you are sending will evaluate, according to its own rules, whether it accepts emails not originating from Infomaniak servers.
In summary:
?: the receiving server accepts the message even if the sender is not listed in the SPF~: the receiving server generally accepts the message if it is not listed in the SPF but identifies it as suspicious-: the receiving server rejects the message if it is not listed in the SPF (recommended)
Add an SPF via a TXT record
There are 2 ways to manage SPF.
If you have a Mail service with Infomaniak, the easiest way is to go to the Global Security tool to manage the SPF: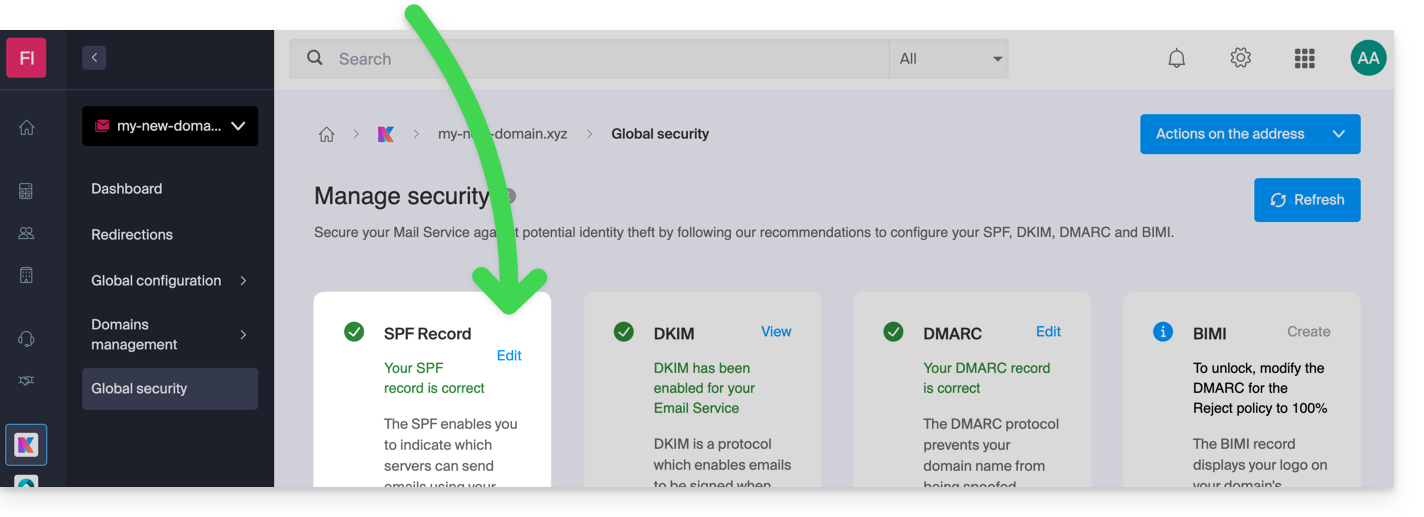
But since the SPF record is a type of DNS record of type TXT, you can also manage it from the DNS zone of the domain name:
- Click here to access the management of your domain on the Infomaniak Manager (need help?).
- Click directly on the name assigned to the domain in question.
- Click on DNS Zone in the left-hand menu.
- Check in the table that there is not already a TXT record with a value mentioning SPF, as shown here:
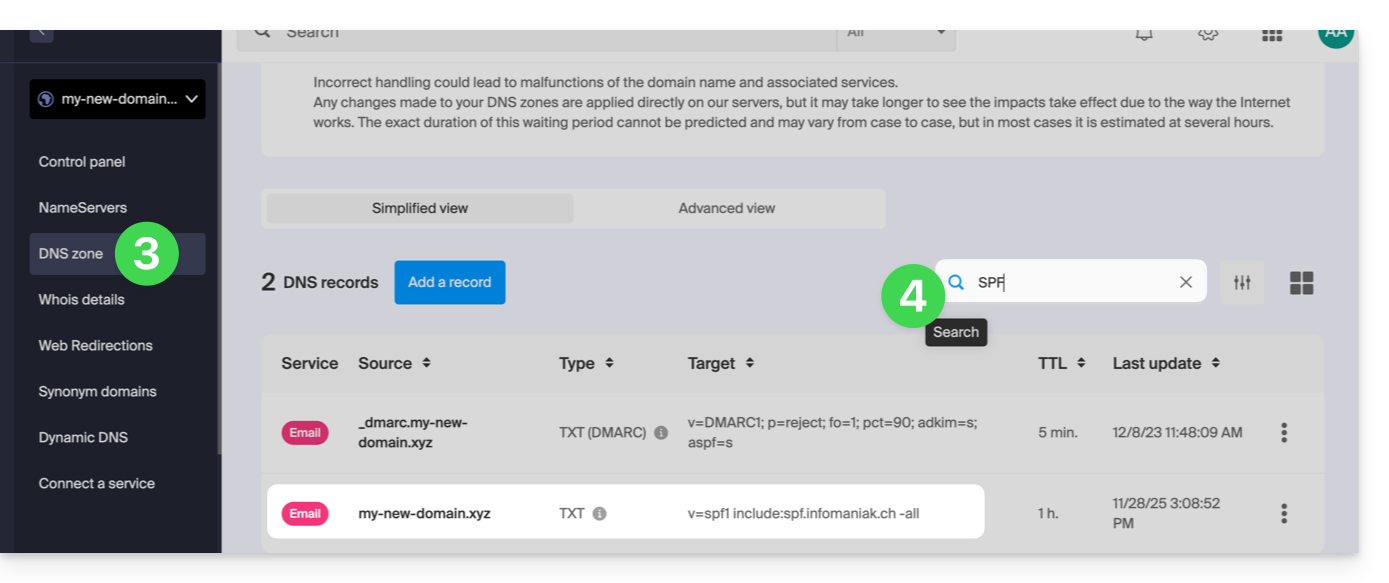
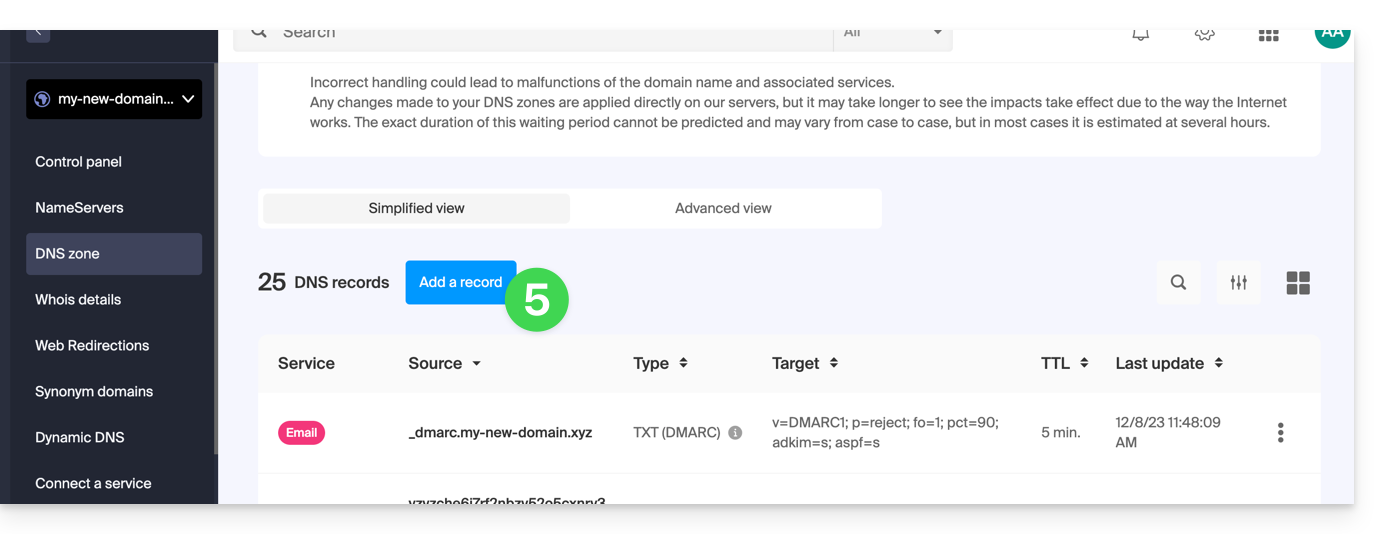
- Click the button to add a record (you will receive an error if you try to add a TXT record with an SPF value when one already exists in the zone):
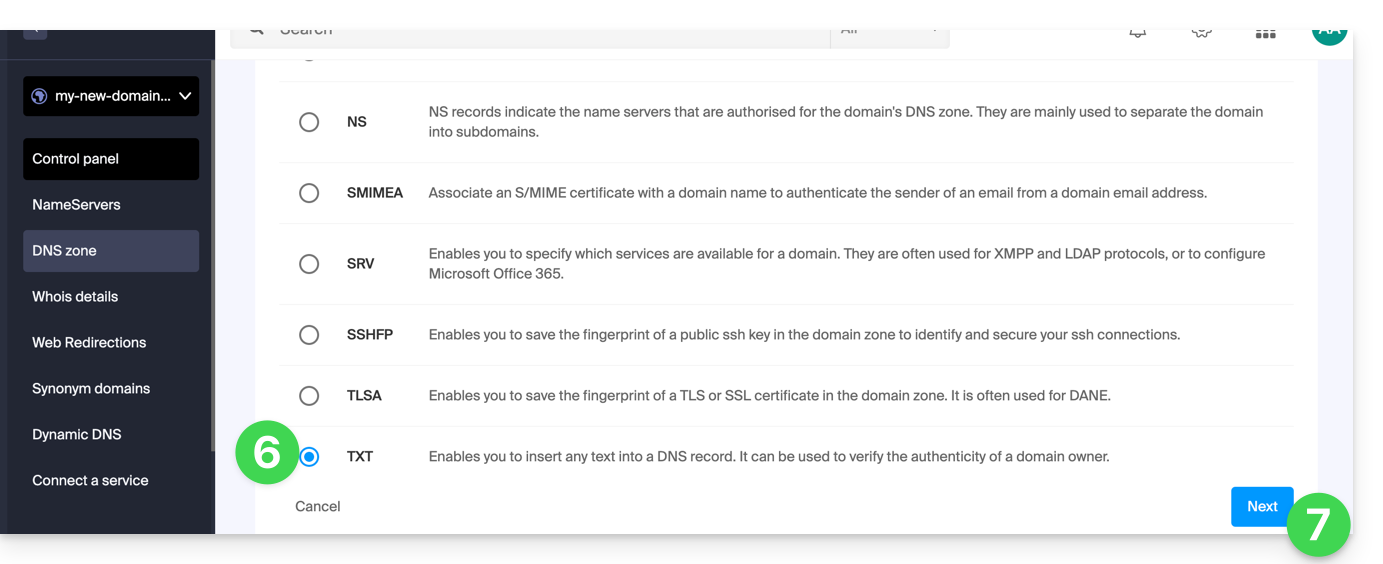
- Click the TXT radio button to add a record.
- Click the Next button:
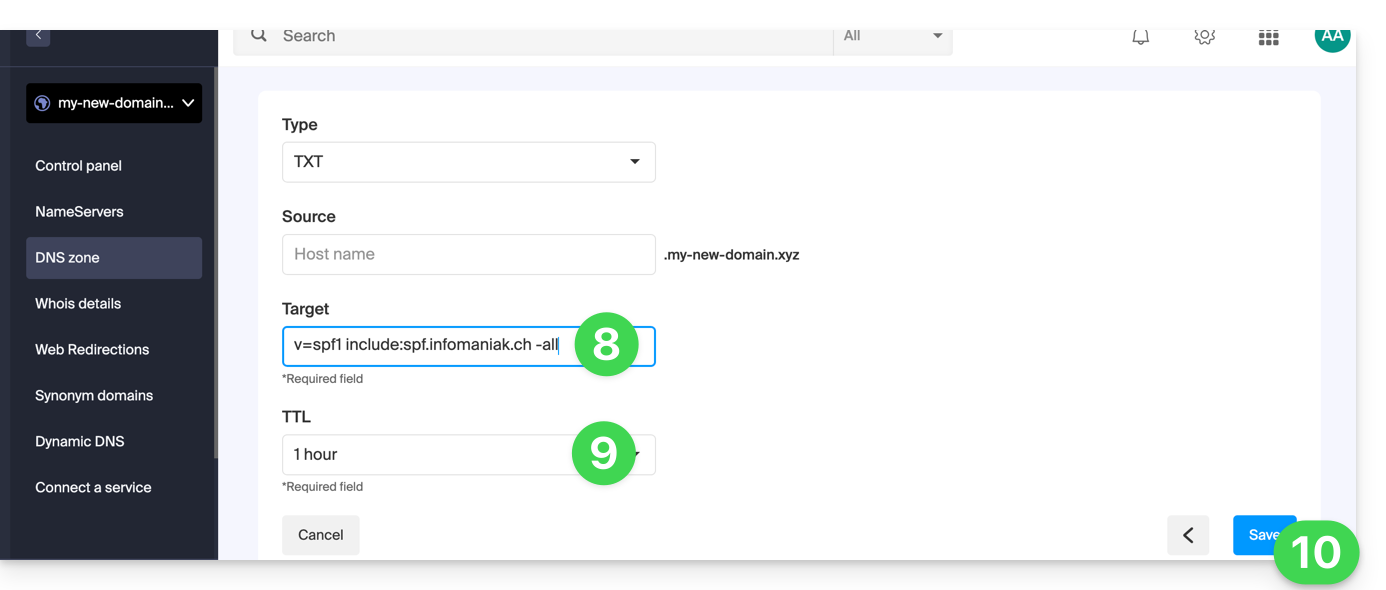
- Enter the SPF value required for your DNS zone.
- Leave the default value for the TTL.
- Click the Save button:
Adding Multiple SPF Records
If you use other email providers in addition to Infomaniak, you need to obtain their SPF records and then merge them with Infomaniak's SPF record using a specific syntax.
Having multiple separate SPF records will cause errors. It is essential to combine multiple SPF records into a single TXT record!
Example of 3 SPF records to merge:
- Infomaniak's:
v=spf1 include:spf.infomaniak.ch -all - Two secondary providers:
v=spf1 include:the-second-domain.xyz ?allv=spf1 include:the-other-domain.xyz ~all
... the final SPF record to be inserted into your DNS zone should be in the following format:
v=spf1 include:spf.infomaniak.ch include:the-second-domain.xyz include:the-other-domain.xyz -allRemove any other SPF entries from the DNS zone of your domain! Any DNS addition/modification may take up to 48 hours to propagate.
Limits on the Number of SPF Records
Multiple SPF records are limited to a maximum of 10 inclusions.
The Infomaniak SPF record generally already includes 4 entries:
include:relay.mail.infomaniak.chinclude:app.mail.infomaniak.chinclude:newsletter.infomaniak.cominclude:amazonses.com
Check the SPF record(s)
The Global Security tool in the Infomaniak Manager allows you to easily check and correct any problematic records.
If you encounter a problem, it is recommended to analyze your domain name on MxToolbox to check if your SPF record contains syntax errors, too many inclusions, or other issues that could lead to an error: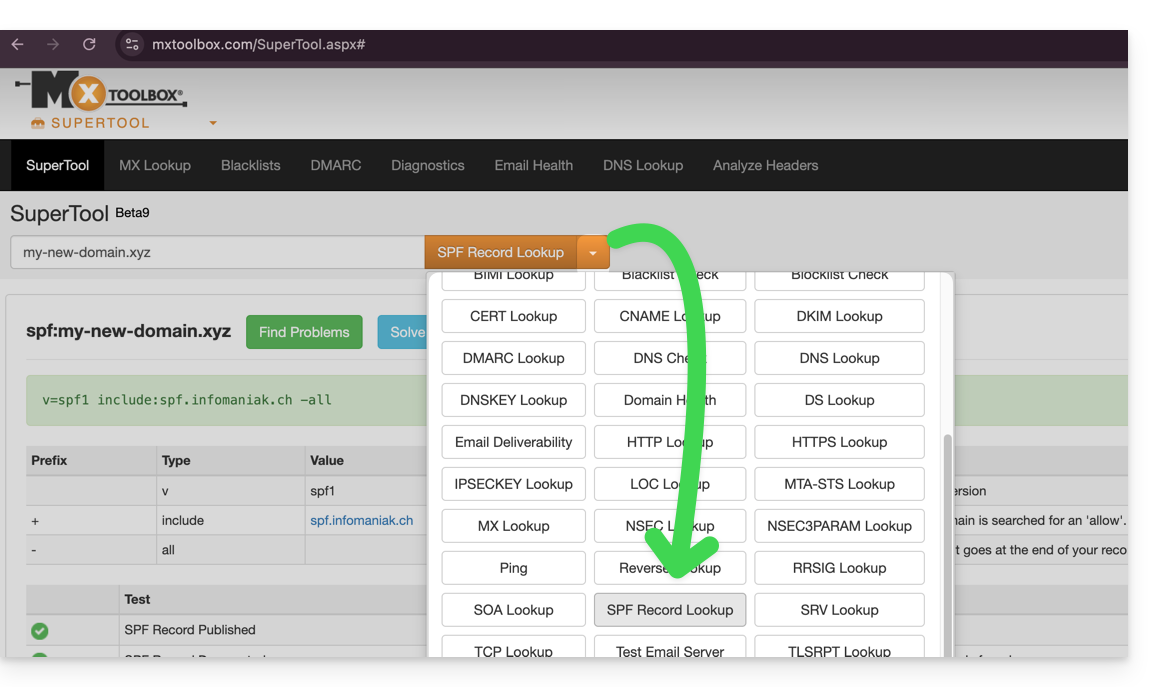
… or directly at https://mxtoolbox.com/spf.aspx.
Link to this FAQ:
Has this FAQ been helpful?
This guide explains how to access a Synology NAS connected to the Internet with a dynamic IP address from Infomaniak via a domain name.
Prerequisites
- Have a Synology NAS connected to the Internet with a dynamic IP address.
- A Dynamic DNS must have been created on the domain in question.
Link a Synology NAS to a domain name
1. Add Infomaniak as a service provider
- Open the Synology NAS management interface (DSM).
- Go to the Control Panel.
- Click on External Access (under the Connectivity section).
- Click the Customize button (under the DDNS tab):
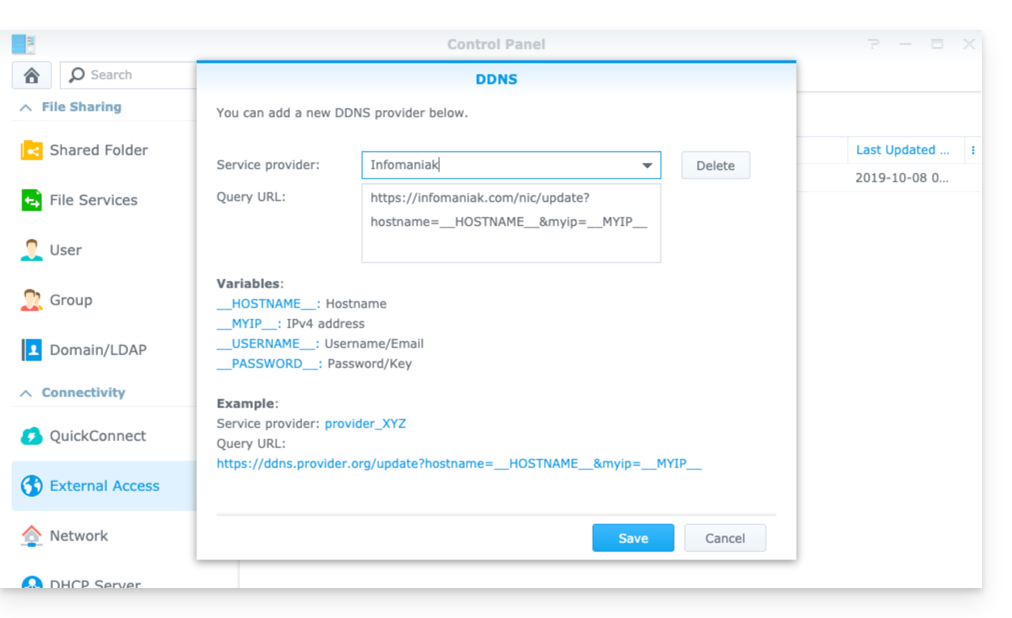
- Service provider:
Infomaniak - Query URL:
https://infomaniak.com/nic/update?hostname=__HOSTNAME__&myip=__MYIP__ - Click on Save.
2. Add the Dynamic DNS to Synology
Now that Infomaniak has been added as a service provider:
- Open the Synology NAS management interface (DSM).
- Go to the Control Panel.
- Click on External Access (under the Connectivity section).
- Click the Add button:
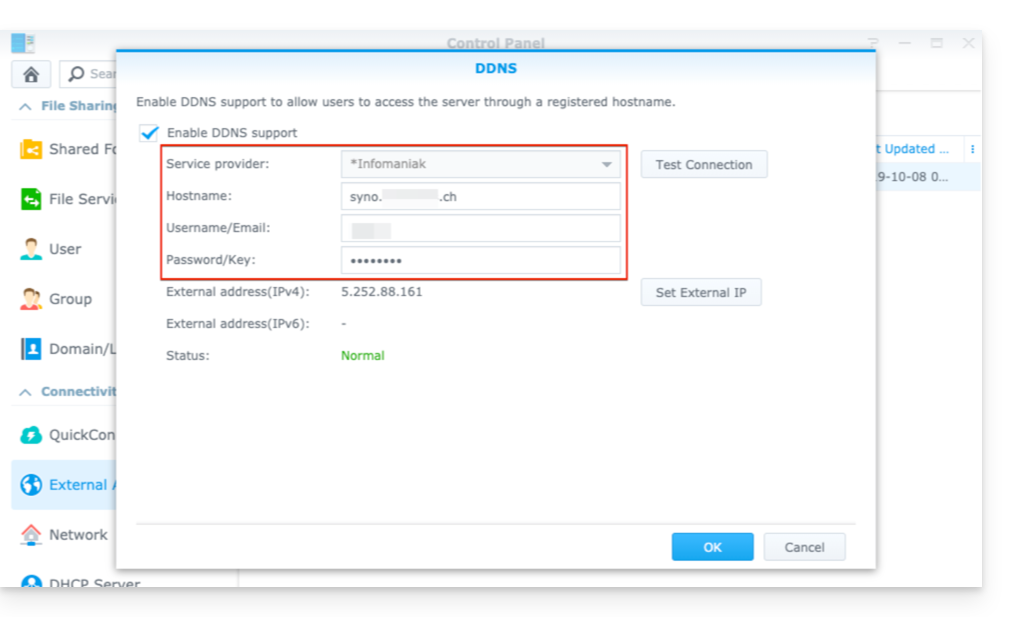
- Service provider:
Infomaniak(the profile created in the previous step) - Hostname:
the URLconfigured in the Manager when adding the Dynamic DNS - Username:
the identifierdefined in the Manager when adding the Dynamic DNS - Password:
the passworddefined in the Manager when adding the Dynamic DNS
From this stage on, the dynamic IP address of your Synology NAS will be automatically synchronized with your domain name.
3. NAT configuration for Synology DDNS
To make your NAS accessible from the outside, you need to configure its NAT. By default, Synology NAS uses ports 5000 and 5001.
You can access your NAS using the following syntax: http://your-domain:5000 or https://your-domain:5001.
Refer to the official Synology documentation for more information.
4. Configuration of a “Reverse Proxy”
If you do not want to specify ports :5000 or :5001 in your URLs, you can configure a Reverse Proxy from your Synology NAS, and thus redirect the URLs to port 443 for port 5001 and port 80 for port 5000 (official Synology documentation for this configuration).
Link to this FAQ:
Has this FAQ been helpful?
This guide explains how to activate a CDN to optimize an Infomaniak Web Hosting.
Preamble
- CDN stands for "Content Delivery Network" in English, which translates to "Content Distribution Network" in French.
- A CDN stores a copy of your site's content (images, videos, CSS/JS files) on multiple geographically dispersed servers.
- When a user accesses your site, the CDN provides this content from the server closest to their location, thus reducing loading times:
- Your site loads faster for visitors, which can reduce the bounce rate and improve the user experience.
- By distributing the content, the CDN reduces the load on your main server, improving its performance and availability.
- Some CDNs offer security features such as protection against DDoS attacks and data security.
Setting up a CDN
To use a CDN, you will generally need to make adjustments at the configuration level of your domain name, specifically at the DNS records level. This will direct the traffic of your website to the CDN's network of servers. Therefore, in general:
- Create an account on the website of your chosen CDN and add your site to it.
- Modify the DNS zone of your domain name according to the instructions provided by the CDN.
- Test your site to ensure the CDN is working correctly.
Cloudflare-specific guide
For customers who want to optimize their site against the overload caused by the intensive passage of bots, using a CDN like Cloudflare is often recommended. The Cloudflare CDN allows you to optimize the performance and security of a website with features such as:
- caching of a site's static content
- minification of HTML, CSS, and Javascript code
- basic anti-DDoS protection
- etc.
To set up Cloudflare:
- If necessary, create an account with Cloudflare.
- Add the domain name of the site in question.
- Report all DNS zone records of the domain in question to Cloudflare (A, MX, TXT, NS records, etc.).
- On the Infomaniak Manager, modify the DNS of the domain in question with the DNS servers indicated by Cloudflare.
- Configure DKIM and DNSSEC if necessary.
- Any DNS addition/modification can take up to 48 hours to propagate.
Note: mod_cloudflare is enabled by default on all paid web hostings.
Enable Cloudflare Rate Limiting
By default, Cloudflare simply acts as an intermediary between the site and Infomaniak, forwarding all requests to the Infomaniak servers. Thus, during traffic spikes or attacks, requests still reach the origin server, but with Cloudflare IP addresses, making it difficult to manage mitigation on a shared server.
Setting up "rate limiting" rules in Cloudflare's application firewall is now an effective solution offered. This feature limits the number of requests sent to the server, blocking aggressive scans and protecting the server from excessive overloads.
And also…
… Amazon CloudFront
If you already use AWS services, CloudFront is easy to set up. Create a distribution, configure the settings, and link it to your site.
… Fastly
Sign up on Fastly, configure your service by adding your site and setting the cache parameters. Fastly offers advanced configuration options.
Link to this FAQ:
Has this FAQ been helpful?