Knowledge base
1000 FAQs, 500 tutorials and instructional videos. Here, there are only solutions!
This guide explains how to transfer data (Web, Mail, Domain, and even Cloud) currently hosted elsewhere to Infomaniak. You will, of course, remain the owner of your data, without any loss or interruption!
Introduction
- By consolidating your domain names, websites, and email addresses with Infomaniak, you simplify the management of your invoices and services.
- Furthermore, the link between your domains will be automatically established with your website and email address.
- This means you won't need to manually configure the DNS settings for your domains with another registrar.
Specific Guides
Click on the link corresponding to your current hosting provider:
- Swisscom: complete guide for migrating Web, Mail, and domain name data
Guides for Any Other Hosting Provider
To avoid interrupting your website and emails and prevent data loss when importing your existing data, migrate your services in the order indicated:
Import Web data (any PHP, HTML, etc. website)
- For WordPress specifically, please refer to this other guide…
- For WordPress specifically, please refer to this other guide…
Copy Mail data (addresses and content of mailboxes, etc.) to kSuite or a simple Mail Service
Transfer the domain name (domain management, DNS zone, etc.)
You can also transfer other types of data to Infomaniak servers:
- Dropbox, Google Drive, etc. content: refer to this other guide
- Data on Synology or QNAP NAS: refer to this other guide
Link to this FAQ:
Has this FAQ been helpful?
This guide is for you if you encounter the error The web host does not exist when visiting the address of a site on an Infomaniak Web Hosting.
Preamble
- This type of error usually occurs because your domain name is not correctly linked to your site (your domain name is probably pointing to the wrong IP address or is misconfigured).
- Example: a domain
abc.xyzthat is misconfigured and would point to an IPv4 Starter hosting and to a shared hosting in IPv6…
- Example: a domain
Resolve a Domain - Website Linking Issue
To get your site back online:
- Check the DNS zone of your domain name, especially its A records.
- Correct them if necessary by entering the IP address of your hosting.
- Any DNS addition/modification can take up to 48 hours to propagate.
To do this, the easiest way is to use the Infomaniak DNS Diagnostic Tool to automatically correct the pointing, by previously grouping the products in the same Organization if necessary.
Link to this FAQ:
Has this FAQ been helpful?
This guide is for owners of a domain name on the Infomaniak infrastructure who encounter a DMARC issue when using certain Google tools such as Meet or Calendar.
Resolve a DMARC error
To make your domain name configuration (with a DMARC policy of type reject) compatible with the use of certain Google services, it is necessary to add a corresponding SPF record:
- Before:
v=spf1 include:spf.infomaniak.ch -all - After:
v=spf1 include:spf.infomaniak.ch include:_spf.google.com -all
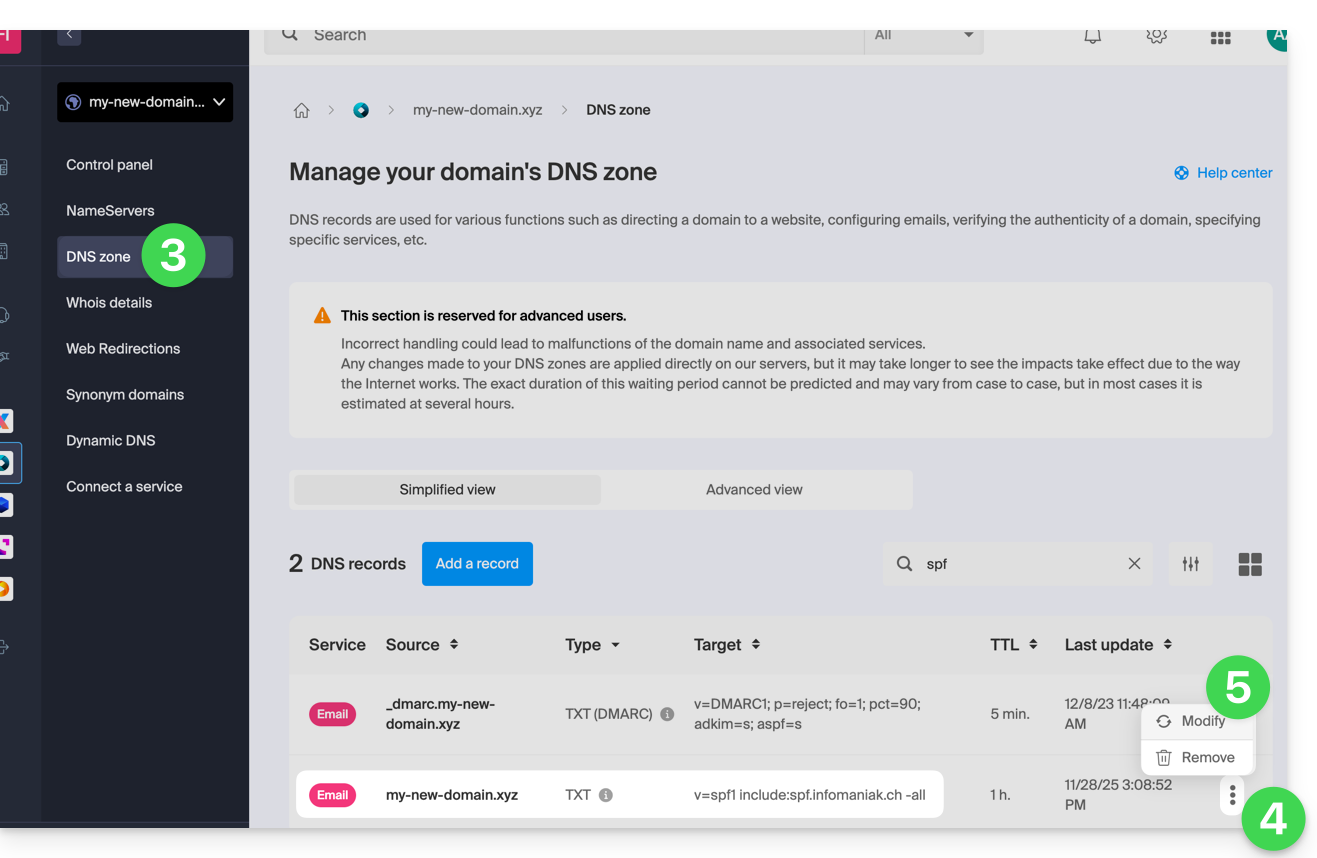
To edit the SPF currently configured in the DNS zone of your domain name:
- Click here to access the management of your product on the Infomaniak Manager (need help?).
- Click directly on the name assigned to the product concerned.
- Click on DNS Zone in the left sidebar.
- Click on the action menu ⋮ located to the right of the TXT type record containing the value of the SPF concerned.
- Click on Modify:
- Edit the field by adding on the same line
include:_spf.google.comafter the existing Infomaniak include, and this before the final-all. - Click on the Save button:
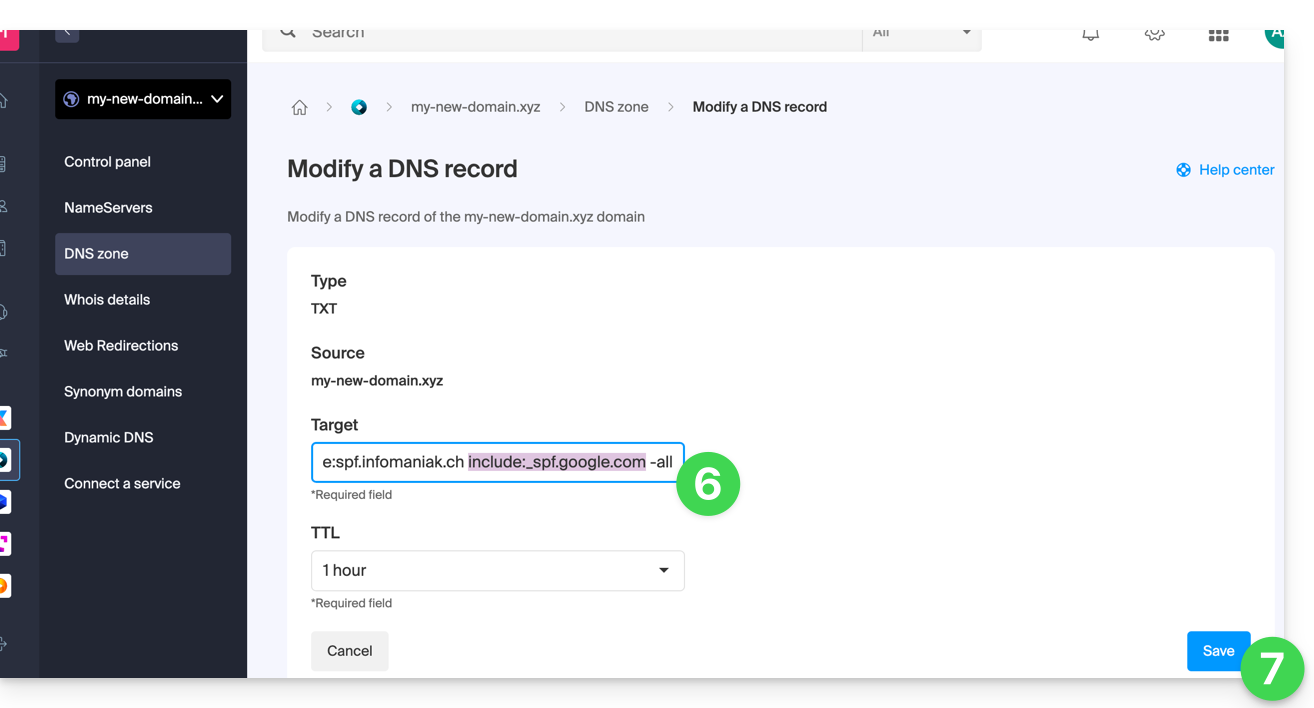
Any DNS addition/modification can take up to 48 hours to propagate.
Refer to this Google documentation if you are looking for information on configuring Google's SPF.
Link to this FAQ:
Has this FAQ been helpful?
This guide explains how to link a domain name managed by Infomaniak to a Wix hosting offer.
Preamble
- A site created on Wix cannot be exported so that its content is hosted on third-party servers, such as those of Infomaniak for example.
- It is therefore recommended to create the site directly with Infomaniak with the help of Site Creator or WordPress.
Associate Wix with the domain name at Infomaniak
Prerequisites
- Obtain the 2 DNS provided by Wix (e.g.
ns0.wixdns.netandns1.wixdns.net).
To link a site on Wix with a domain name at Infomaniak:
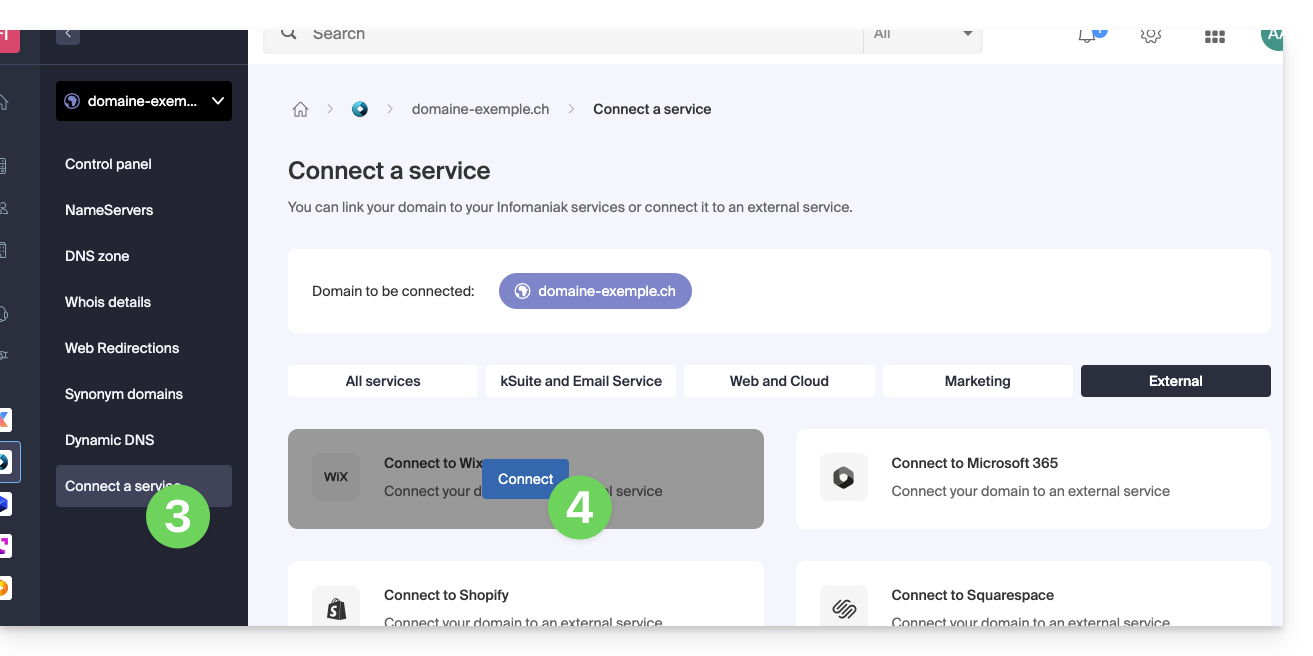
- Click here to access the management of your domain on the Infomaniak Manager (need help?).
- Click directly on the name assigned to the domain in question.
- Click on Connect a service in the left sidebar menu.
- Click the blue Connect button on the WIX tile:
- Enter the 2 Wix DNS (see the prerequisite above).
- Click the Next button:
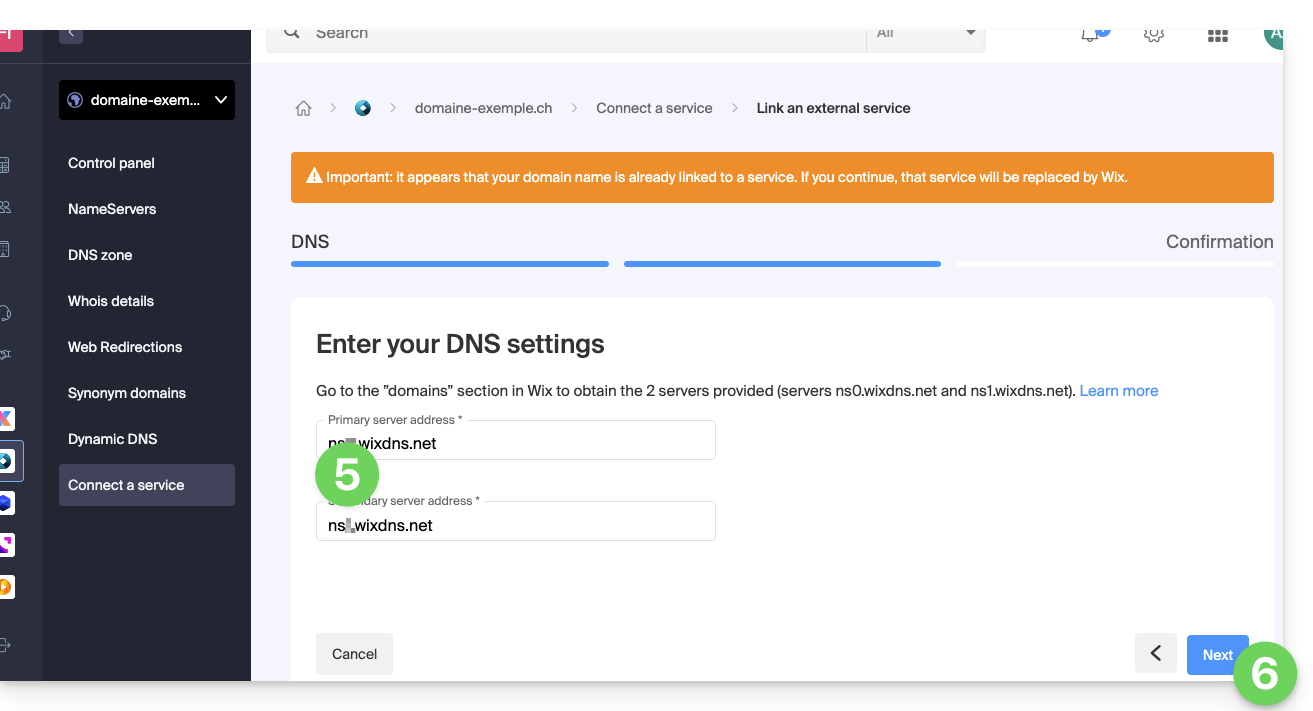
Your domain name will point to the Wix servers a few hours later, and all web & mail traffic will now go to Wix.
If necessary, you must therefore specify to Wix that the email is managed by Infomaniak (refer to this other guide on this subject).
Link to this FAQ:
Has this FAQ been helpful?
This guide explains how to connect an domain name managed with Infomaniak to an external service.
Specific guides
Click on the link corresponding to the external service you wish to connect to your domain name registered with Infomaniak:
- Wix
- Shopify
- Google Sites
- dynamic devices such as a NAS, an Internet box, or smart home devices, etc.
Guide for any other external service
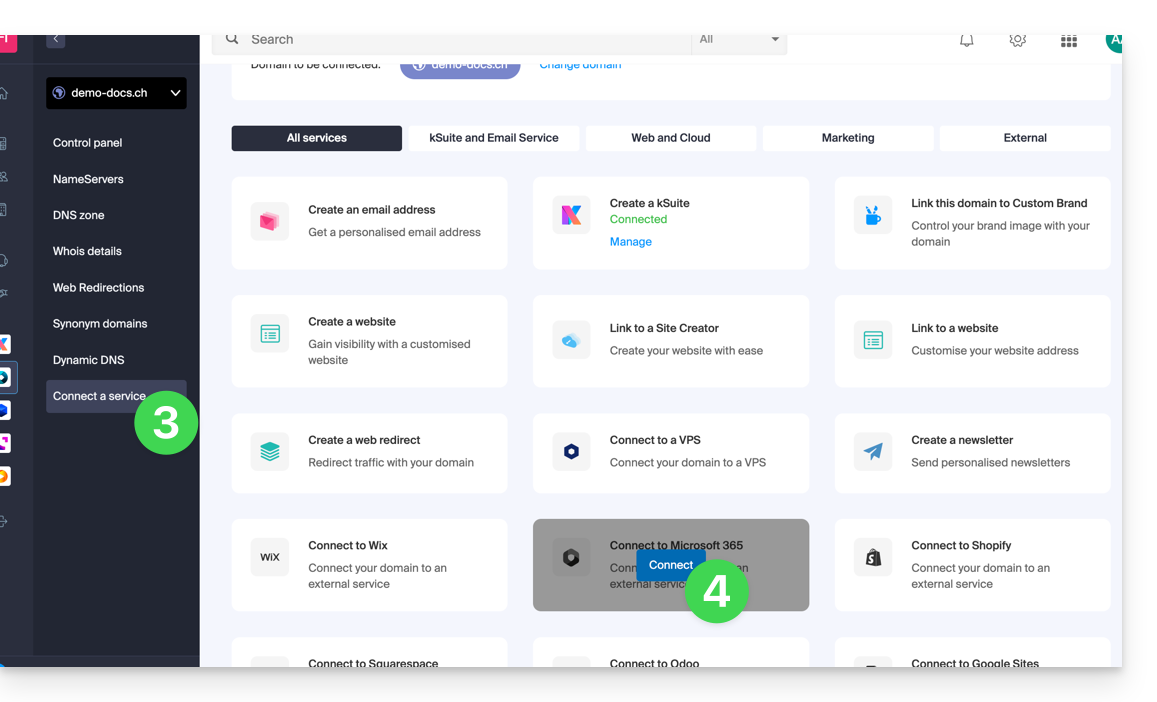
To connect your domain name to any other external service such as Odoo, Microsoft 365, Squarespace, follow the procedures below:
- Click here to access the management of your product on the Infomaniak Manager (need help?)
- Click directly on the name assigned to the product concerned.
- Click on Connect a service in the left sidebar menu.
- Click on the blue Connect button on the tile corresponding to your external service and follow the procedure:
If the external service you wish to connect is not in the list, you will need to manually modify some technical information about your domain name:
- Refer to this other guide to modify all DNS records if this is what you have been asked to do…
- … or this other guide if you only need to modify specific DNS records (for example, the MX record type if you need to link your domain to an external mail service).
Link to this FAQ:
Has this FAQ been helpful?
This guide explains how to redirect a domain name directly to another or how to automatically send visitors to your website to another page address (internal or external URL).
Preamble
- To redirect traffic, you will need to act…
- … either on the domain name itself (it must be hosted by Infomaniak and its DNS must also be those of Infomaniak),
- … or on the code present in your pages (page .htaccess, homepage, etc.) if you have a website.
Act on the domain name
via Web Redirection Tool
The tool available on the Manager allows you to act simply on the domain name (or subdomain) in order to redirect it to the Internet address of your choice.
via DNS modifications or A record
Change the DNS of the domain name or modify its A/AAAA records allows you to direct web traffic to another provider.
Act on the code of the pages…
… via HTML code to insert
Insert this line of code between the <head> and </head> tags of your homepage (usually named index.html):
<meta http-equiv="refresh" content="5;url=INSERT-HERE-NEW-URL">Replace 5 with the desired wait time in seconds (0 for it to happen immediately).
The search engine Google indicates that it is preferable to use a 301 server-side redirect (read below). The W3C also advises against using it.
… via PHP code to insert
If the site page has a .php extension, insert this header function call at the very top of the file:
header("refresh: 5; url=INSERT-HERE-NEW-PAGE-URL");… via .htaccess file
To redirect all traffic targeting your site (regardless of the page called) to another address, insert this in the .htaccess file at the root of your site:
RewriteEngine On
RewriteRule ^(.*)$ INSERT-HERE-NEW-URL/$1 [R=301]
To target the page that needs to be redirected:
Redirect permanent /ancienne_page.html insérer ici adresse URL de destinationRedirectpermanent, Redirect permanent and Redirect 301 are equivalent commands.
Here is another example of redirecting a sub-section to the home page (this directive has the advantage of working with "deep links" unlike a permanent redirect):
RewriteEngine on
RewriteRule "old/path/url "/" [L]
Refer to this other guide on this subject.
Link to this FAQ:
Has this FAQ been helpful?
This guide helps you if you receive error mails that mention SPF when you write to gmail, microsoft, or similar addresses.
Are all your services with Infomaniak?
The Global Security tool informs you of any configuration inconsistency regarding your Infomaniak Mail Service.
Are some of your services elsewhere?
To resolve an email sending issue when your email is managed by Infomaniak and your website is with another provider (like Wix for example) and in this situation the DNS zone of the domain name is managed elsewhere, refer to this other guide.
Link to this FAQ:
Has this FAQ been helpful?
Thank you for entrusting the management of your domain names to Infomaniak.
This guide allows you to quickly use the essential functions of your new product.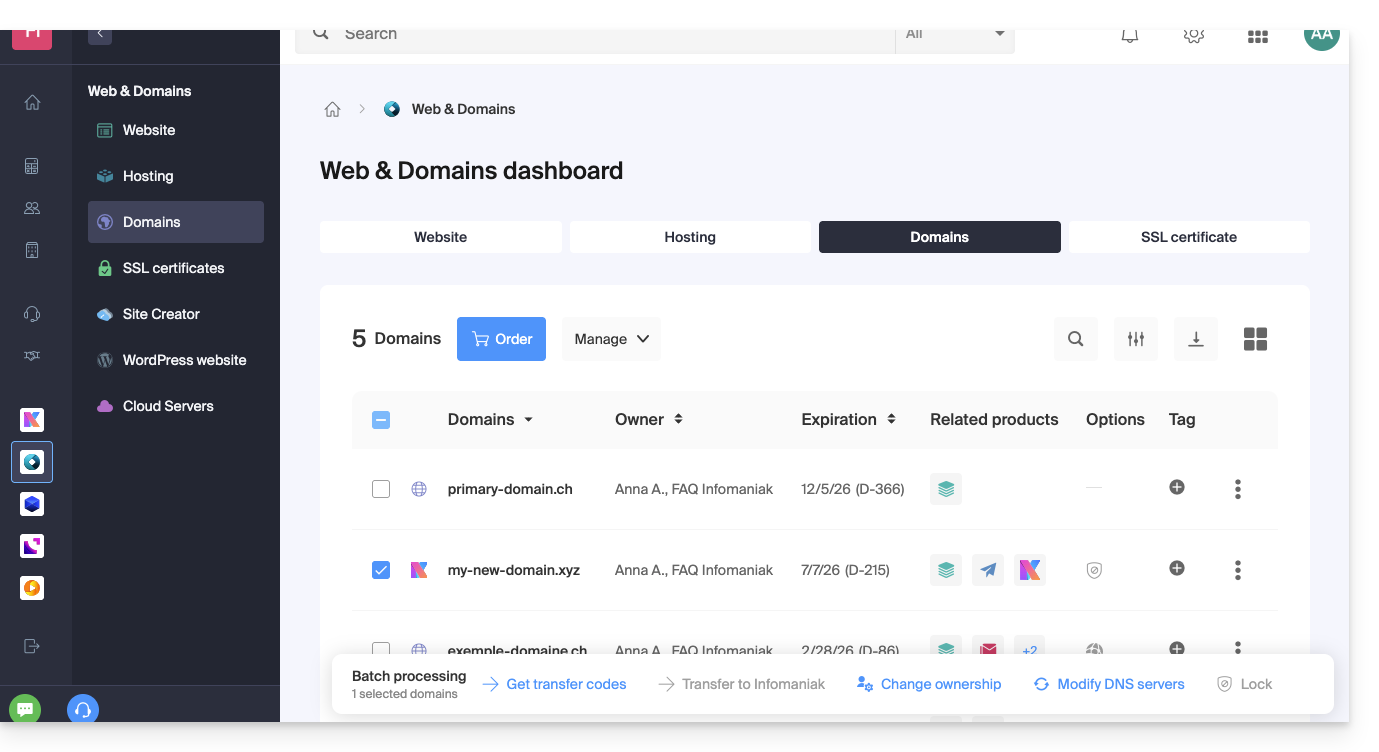
Some important guides
Administrative
- Protect your personal information in the WHOIS
- Protect your domain from theft and loss
- Modify the domain name coordinates
- Who owns a domain name?
- Use the free services (mail and Web 10 Mo) linked to a domain managed by Infomaniak
- Transfer another domain name to Infomaniak
Technical
- Edit the records (A, MX, Web, Mail, etc.) of a domain registered with Infomaniak to for example join a hosting not managed by Infomaniak
- Modify the DNS servers
- Redirect traffic
- Configure DynDNS
- Link a domain name to the Mail Service
- Link an additional domain name to the Mail Service
- Unlink a domain linked to the Mail Service
- Link a domain name to an Infomaniak Web Hosting
- Link an additional domain name to a website
- Unlink a domain linked to the website
- Link a domain name to the Infomaniak Synology NAS
- Link a domain name to Wix
- Link a domain name to Site Creator
- Link a domain name to the Newsletter
- Link an Infomaniak domain name to an external service
Otherwise, find the desired topic among the rest of the FAQs.
Click here to share feedback or a suggestion on an Infomaniak product.
Link to this FAQ:
Has this FAQ been helpful?
This guide helps you resolve configuration errors if you encounter difficulties linking your domain name to Site Creator.
Common issues and solutions
Identify the current status of your domain to apply the corresponding solution:
| Domain status | Recommended solution |
|---|---|
| Managed by another provider (external) | Order a DNS zone or transfer the domain to Infomaniak |
| Already associated with a site or defined as alias (synonym) | Delete the existing site or disassociate the domain |
| Currently using a dedicated IP address | Uninstall the dedicated IP |
| Protected by a SSL certificate (Self-signed, DV or EV) | Uninstall the certificate |
| Insufficient permissions on the hosting | Modify access rights |
Link to this FAQ:
Has this FAQ been helpful?
Thank you for trusting Infomaniak with the hosting of your website.
Preamble
- A web hosting is a storage space available on a computer, also called a "server", connected to the Internet and managed by a web host, Infomaniak.
- This storage space, made available to professionals and individuals, is used to install websites or other types of tools (CRM, extranet, intranet...) that need to be accessible via the Internet.
- These guides allow you to quickly use the essential functions of your new product, your web hosting, which can accommodate multiple websites.
Where to start?
- Create a WordPress website
- Build the site with Site Creator
- Install a web application (ownCloud, Joomla, Typo3, Drupal, phpBB, Simple Machines Forum, Magento, Prestashop, …)
- Manage your FTP accounts/users
- Manage and publish files on your hosting via Web FTP
- Manage your MySQL databases
- Add a site or subdomain to your hosting (multi-sites/multi-domains) including a Node.js site
- Link another domain name to an existing website (domain alias)
- Preview your site even if your domain name does not yet point to Infomaniak's servers
IMPORTANT: the domain name…
A web hosting, to be visible to the public on the Internet, must be associated with a domain name!
Your domain name is not managed by Infomaniak? Or it is in a different Organization than that of your web hosting? Then refer to this other guide to configure the DNS or the "A records" to link the domain name to your web hosting.
In case of a problem
To resolve an issue, please consult the Web Hosting Knowledge Base before contacting Infomaniak support.
Click here to share feedback or a suggestion about an Infomaniak product.
Link to this FAQ:
Has this FAQ been helpful?
This guide explains how to link a domain name to an Infomaniak Mail Service
If the domain name is…
… with Infomaniak, same Organization
If your domain name is registered with Infomaniak and is in the same user account or Organization as the mailbox, then there is nothing to do.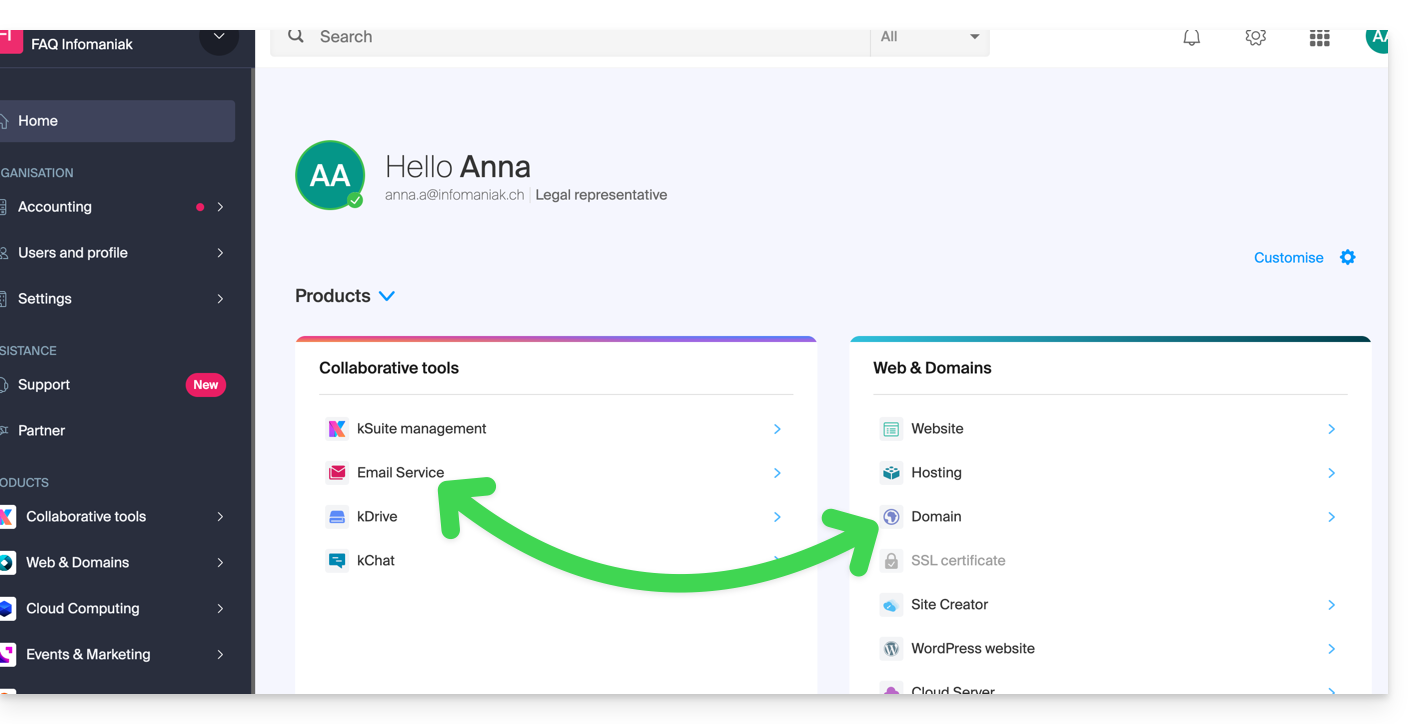
- Refer to this other guide to check and correct any potential configuration errors.
… with Infomaniak, different Organization
If your domain name is registered with Infomaniak but in a different user account or Organization, then:
- Edit its DNS zone by specifying Infomaniak's MX (+ SPF & DKIM).
- Any DNS addition/modification can take up to 48 hours to propagate.
OR
- Move it within the same Organization.
… with Infomaniak with external DNS
If your domain name has DNS that are not Infomaniak's, then:
- Edit the current DNS zone where it is located (if necessary, consult the help of the relevant provider) by specifying Infomaniak's MX (+ SPF & DKIM).
- Any DNS addition/modification can take up to 48 hours to propagate.
OR
- Change the current DNS and select the use of Infomaniak DNS.
- Any DNS addition/modification can take up to 48 hours to propagate.
- Refer to this other guide to check and correct any potential configuration errors.
… elsewhere with external DNS
If your domain name has DNS that are not Infomaniak's, then:
- Edit the current DNS zone where it is located (if necessary, refer to the help of the relevant provider) by specifying Infomaniak's MX (+ SPF & DKIM).
- Any DNS addition/modification can take up to 48 hours to propagate.
OR
- Change the current DNS (if necessary, refer to the help of the relevant provider) by specifying Infomaniak's (this implies having a DNS zone with Infomaniak.
- Any DNS addition/modification can take up to 48 hours to propagate.
- This DNS zone with Infomaniak will be configured correctly but refer to this other guide to check and correct any potential configuration errors.
… elsewhere but you are bringing it back
If your domain name is registered with another registrar and you want to transfer it to the same place as your Infomaniak mailbox, then:
- Transfer the domain name to Infomaniak (it will be configured correctly but refer to this other guide to check and correct any possible configuration errors).
Otherwise, consider ordering a new domain name if necessary.
Link to this FAQ:
Has this FAQ been helpful?
This guide explains how to link a domain name to an Infomaniak Web Hosting service.
Where is your domain name located?…
… At Infomaniak, same Organization
If your domain name is registered with Infomaniak and is in the same user account or organization as your email, then there is nothing to do.
- Refer to this other guide to check and correct any configuration errors.
… At Infomaniak, different Organization
If your domain name is registered with Infomaniak but in a different user account or Organization, then:
- Edit its DNS zone by specifying the website's IP address as an A record.
- Any DNS addition/modification may take up to 48 hours to propagate.
OU
- Move it within the same Organization.
… At Infomaniak with external DNS
If your domain name has DNS that is not Infomaniak's, then:
- Edit the current DNS zone where it is located (if necessary, consult the help documentation of the relevant provider) and specify the website's IP address in the form of an A record.
- Any DNS addition/modification may take up to 48 hours to propagate.
OU
- Change the current DNS settings and select the option to use Infomaniak's DNS servers.
- Any DNS addition/modification may take up to 48 hours to propagate.
- Refer to this other guide to check for and correct any configuration errors.
… Elsewhere with external DNS
If your domain name uses DNS servers other than Infomaniak's:
- Edit the current DNS zone where it is located (if necessary, consult the help documentation of the relevant provider) and specify the website's IP address in the form of an A record.
- Any DNS addition/modification may take up to 48 hours to propagate.
OU
- Change your current DNS settings (if necessary, consult the documentation provided by your registrar) and specify Infomaniak's DNS servers (this requires you to have a DNS zone with Infomaniak).
- Any DNS addition or modification may take up to 48 hours to propagate.
- This DNS zone with Infomaniak will be configured correctly, but please refer to this other guide to check for and correct any configuration errors.
… Elsewhere, but you are transferring it
If your domain name is registered with another registrar and you want to transfer it to the same location as your Infomaniak website, then:
- Transfer the domain name to Infomaniak (it will be configured correctly, but please refer to this other guide to check for and correct any configuration errors).
- If the domain name is intended to be an alias for your main website, you need to add the alias to your website.
Link to this FAQ:
Has this FAQ been helpful?
This guide explains how to easily set up a redirection of your domain name managed by Infomaniak.
Preamble
- A Web redirection allows you to redirect a domain name or subdomain to the Internet address of your choice.
- This procedure is only valid if the DNS of the domain is managed by Infomaniak and if Custom Brand is not activated.
- Any addition/modification may take up to 48 hours to propagate.
- If necessary, create a redirection of your domain with and without the www (
domain.xyzandwww.domain.xyz).
Redirect a domain to the URL of your choice
To do this:
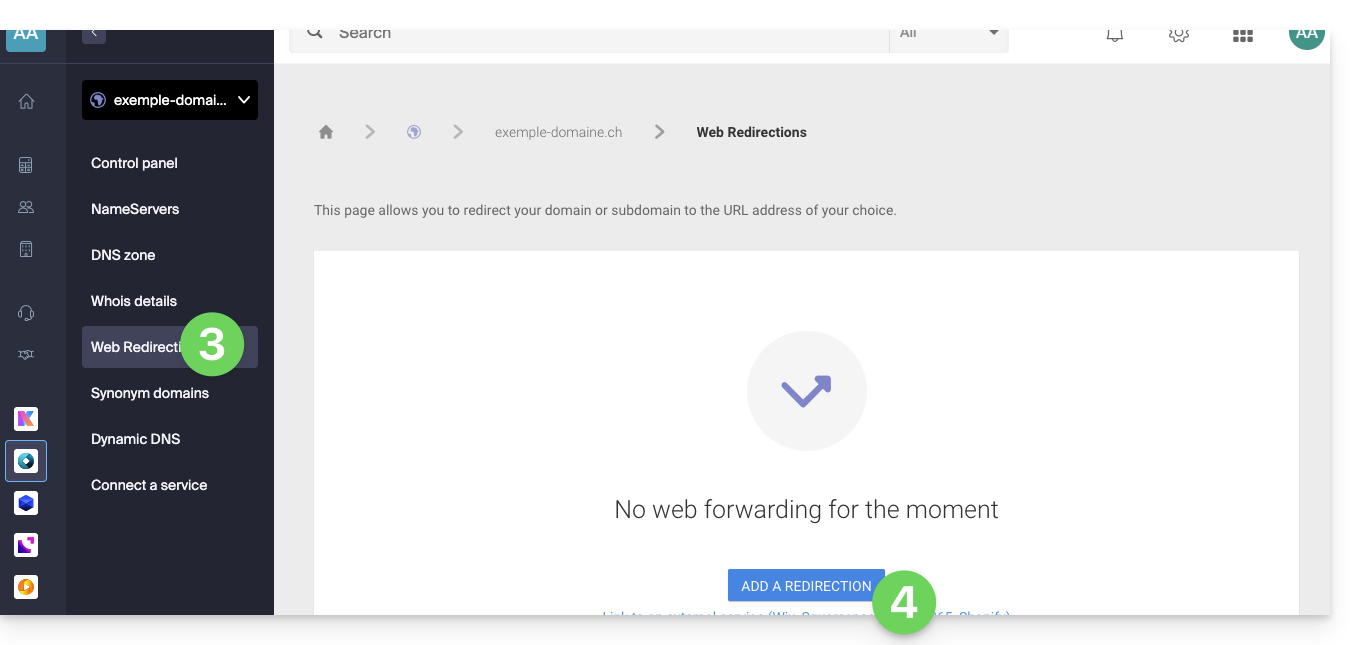
- Click here to access the management of your product on the Infomaniak Manager (need help?).
- Click directly on the name assigned to the product concerned.
- Click on Web Redirections in the left sidebar.
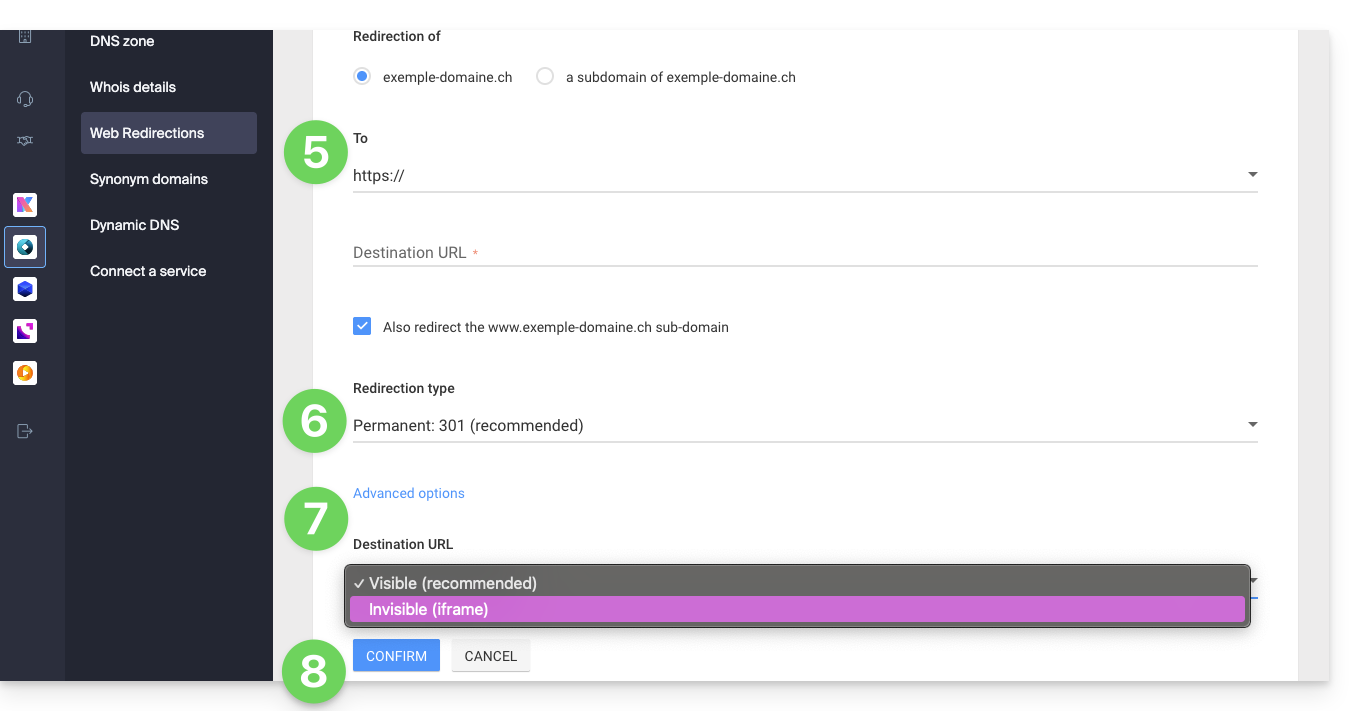
- Click on the Add a redirection button:
- Enter the destination address (under To).
- Choose between a 301 or 302 type redirection.
- The advanced options allow you to specify a redirection in the form of an iframe (invisible, but not recommended).
- Click on the button to Confirm:
Link to this FAQ:
Has this FAQ been helpful?
This guide explains how to link a domain name to the kSuite offer from Infomaniak.
Manage the kSuite domain
To get started:
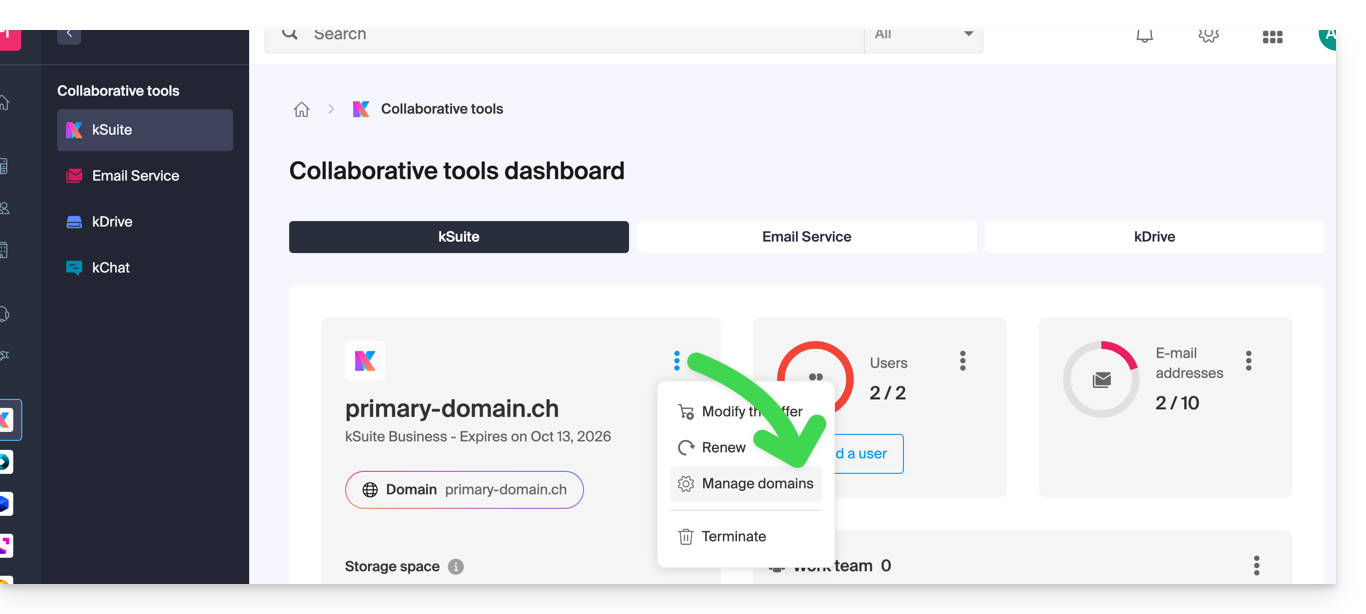
- Click here to access the kSuite management interface in the Infomaniak Manager (need help?).
- If a domain is already linked, you can manage it by clicking on the action menu ⋮ to the right of the kSuite name, then Manage domains:
- If no domain is yet linked, you can add one by clicking on the button:
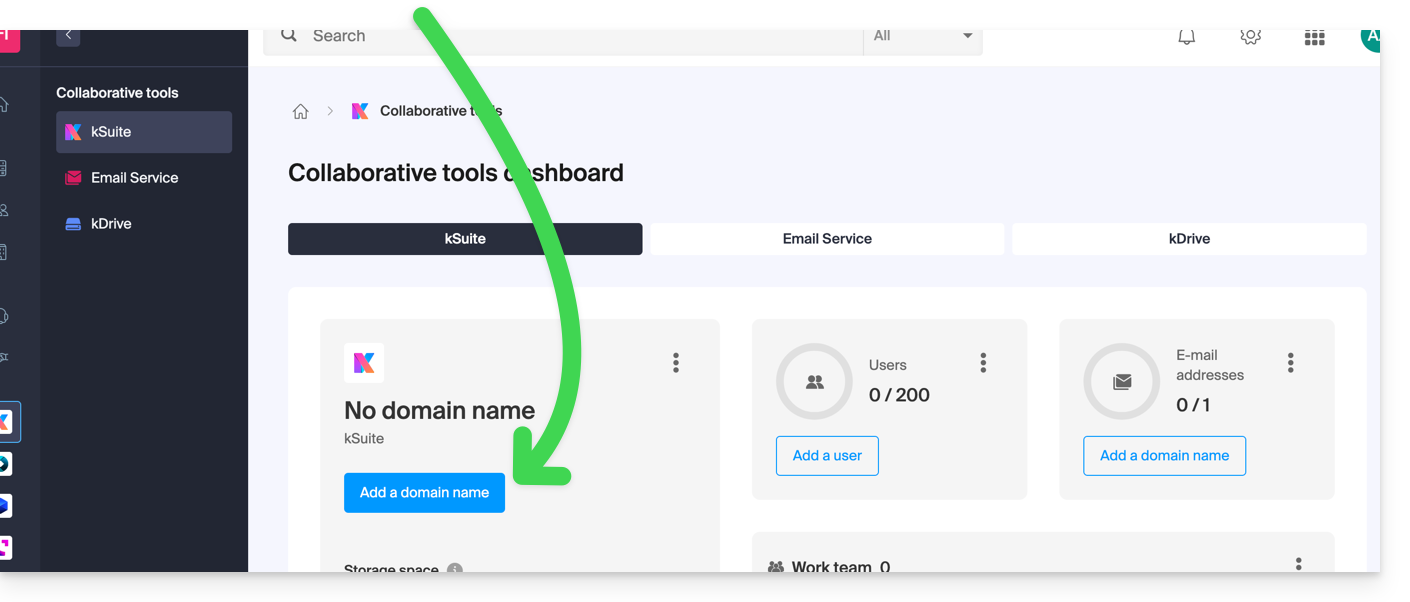
- Click on the button to add a domain:
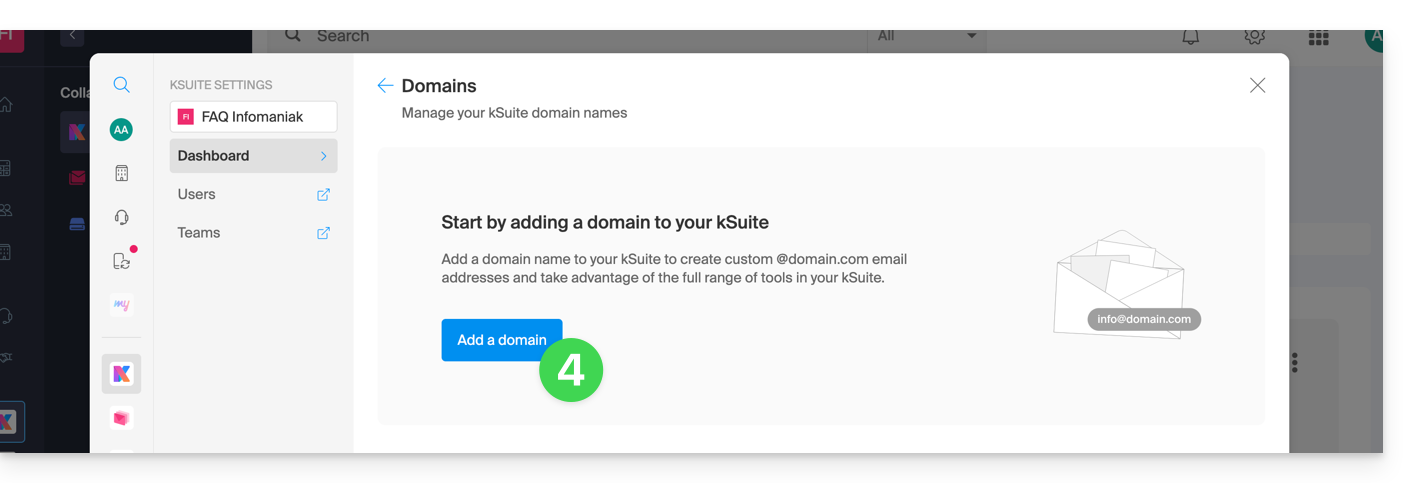
- Choose the domain to associate from among those in your Organization (still available, i.e., not yet associated with any service), or enter an external domain name:
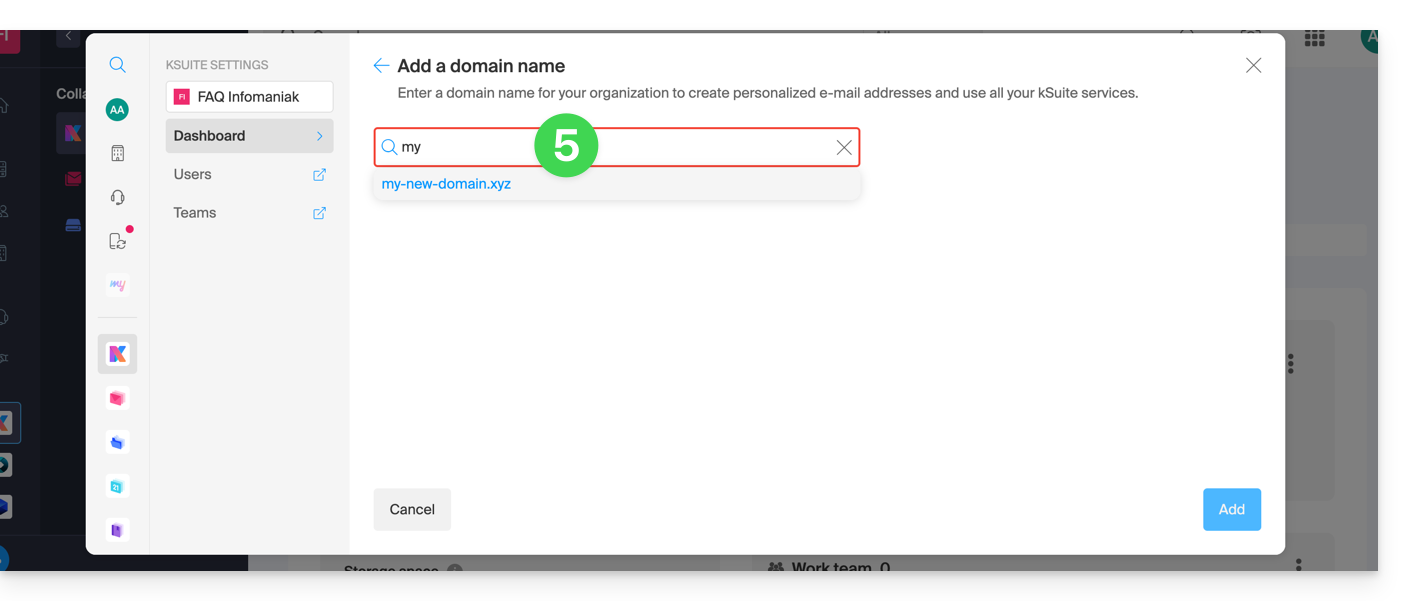
- Depending on the status of your domain (also see the information below), you may need to perform some preliminary steps…
- … or even purchase a domain if necessary:
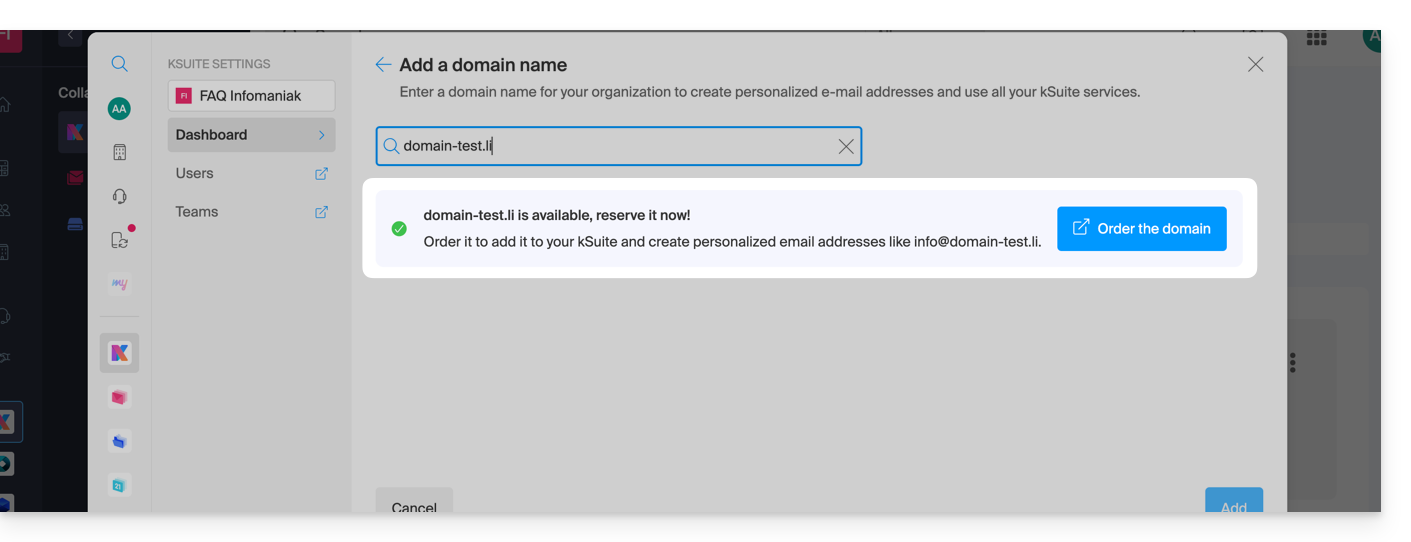
- Depending on the status of your domain (also see the information below), you may need to perform some preliminary steps…
If the domain name is located…
… with Infomaniak, same Organization
If your domain name is registered with Infomaniak and is in the same user account or Organization as your email, then there is nothing to do.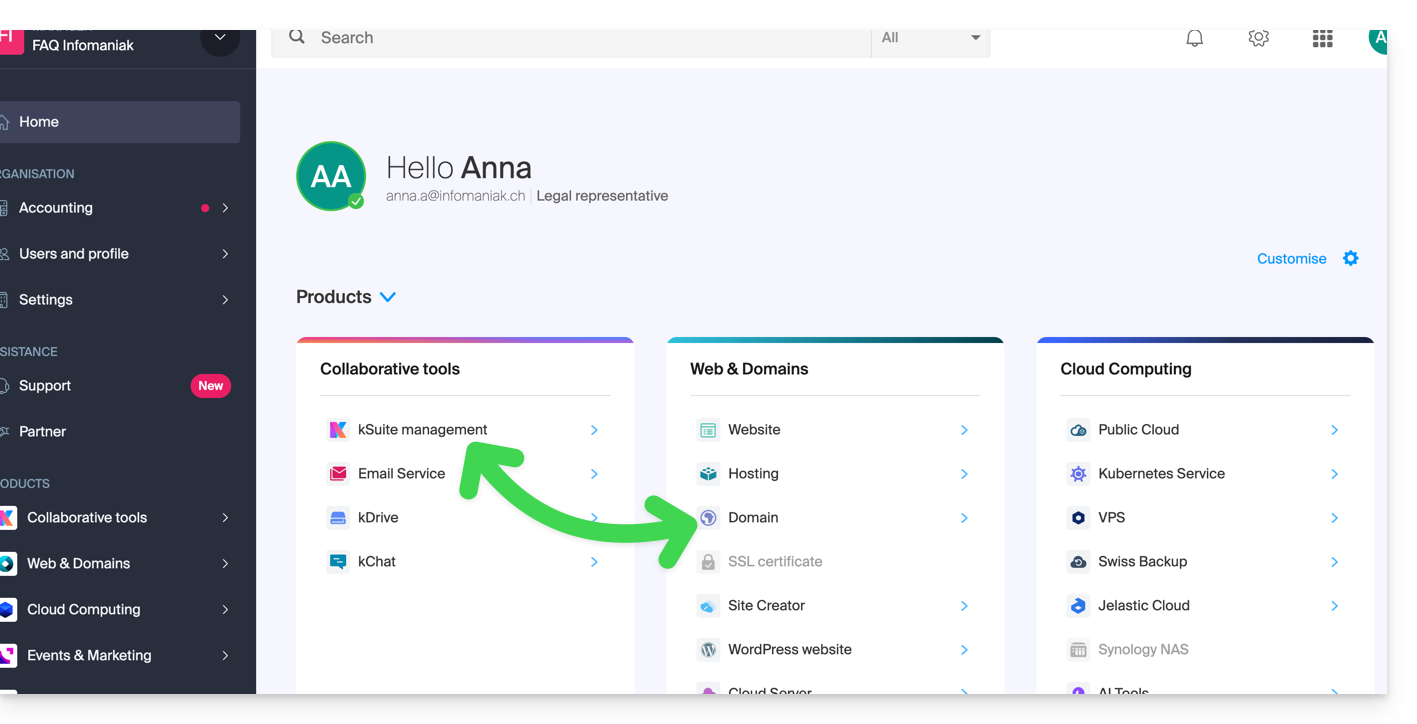
Simply add it to your kSuite: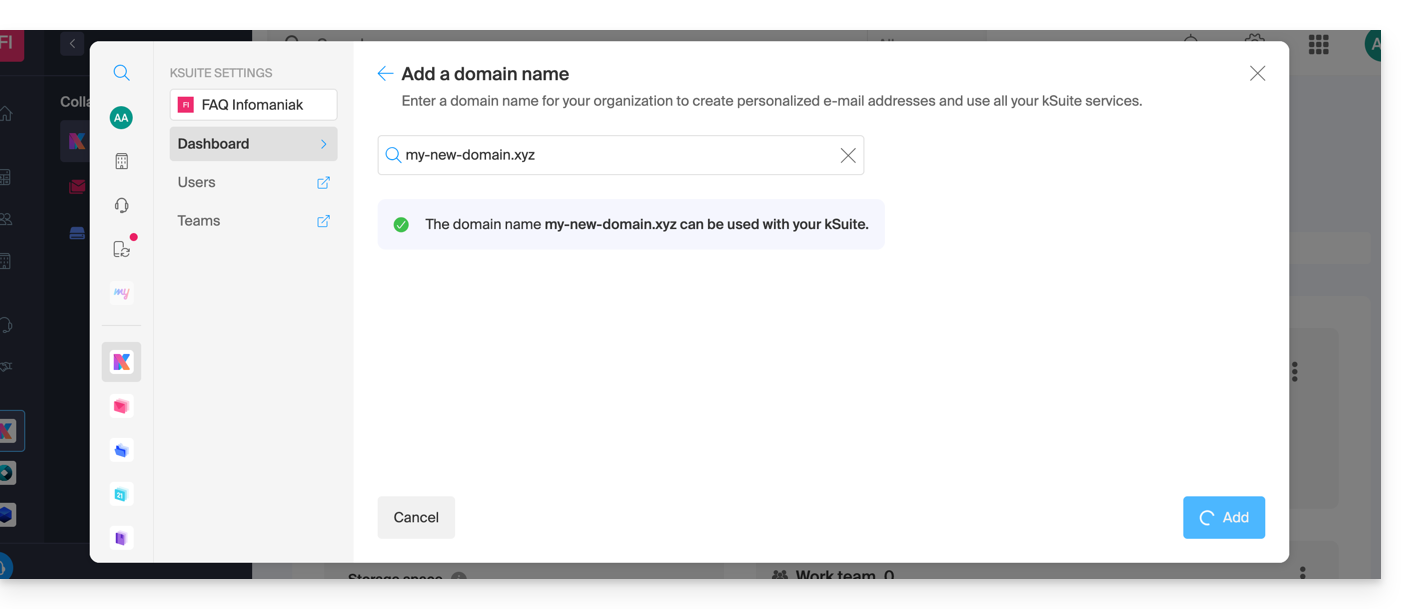
The domain will then be added and visible on the dashboard: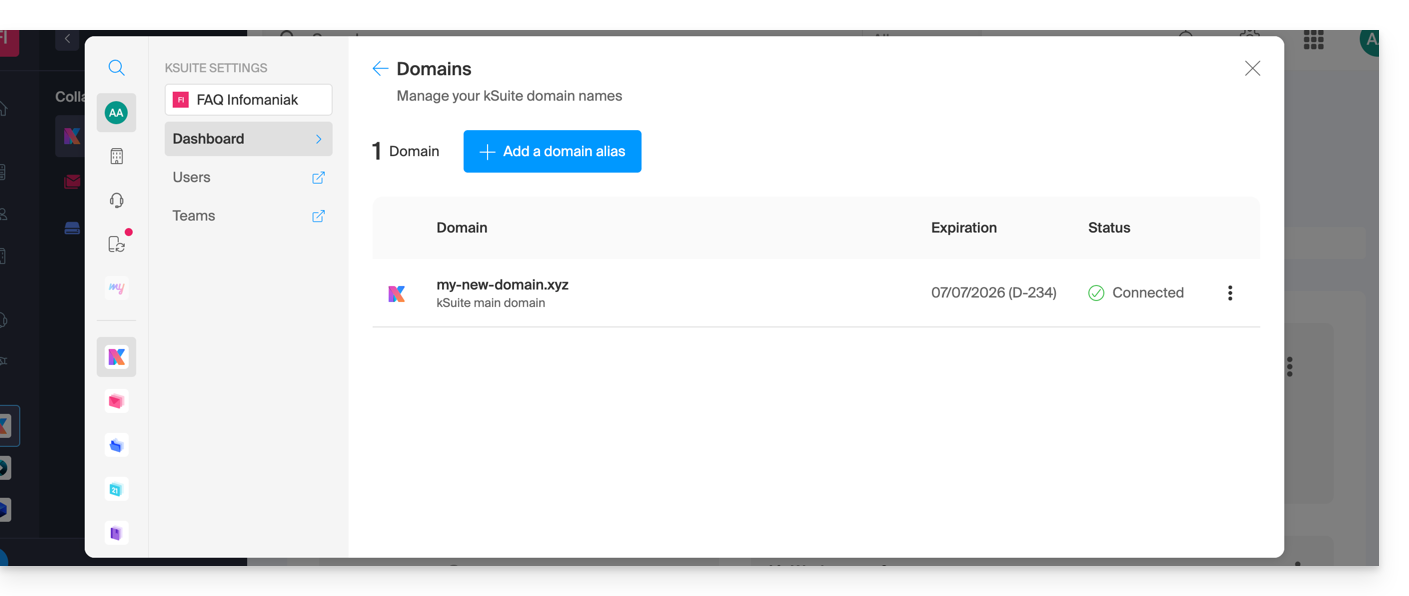
- Refer to this other guide to check and correct any configuration errors.
... with Infomaniak, same Organization and already linked to a Mail Service or kDrive
No problem, you can transform your existing products into a kSuite.
… with Infomaniak, different Organization
If your domain name is registered with Infomaniak but in a different user account or Organisation, then:
- Edit its DNS zone by specifying Infomaniak's MX record (+ SPF & DKIM).
- Any DNS addition/modification may take up to 48 hours to propagate.
OU
- Move it within the same Organisation.
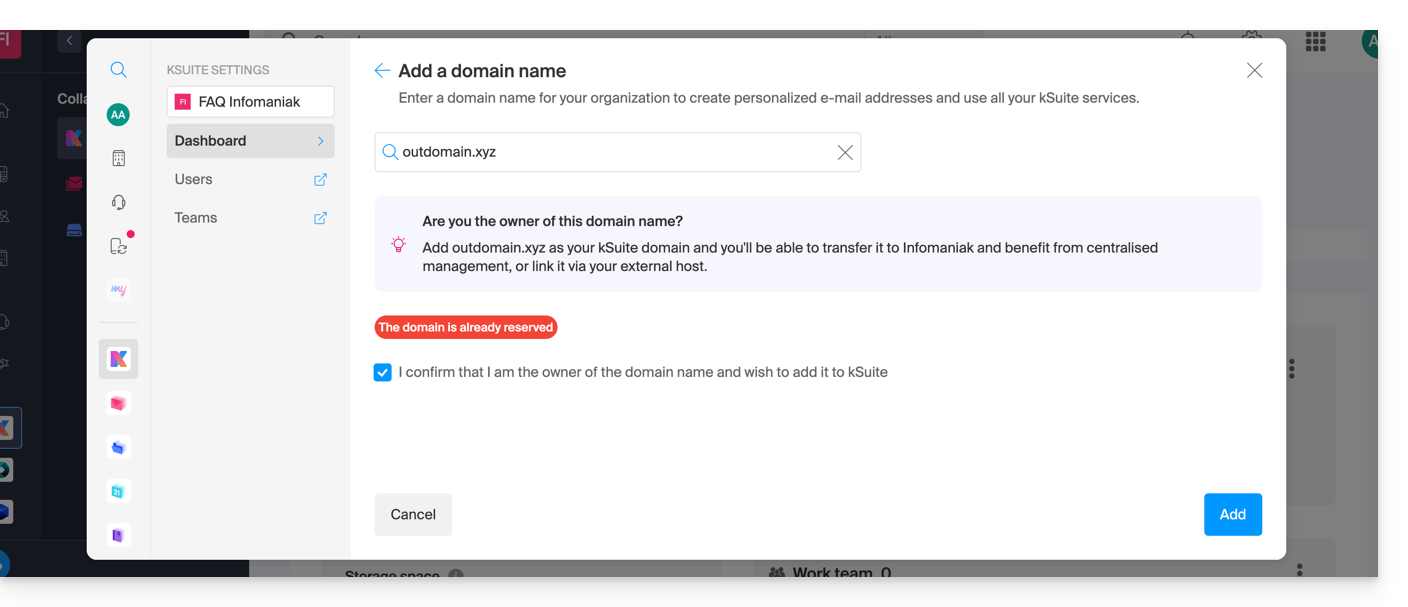
In general, a message will notify you of this situation: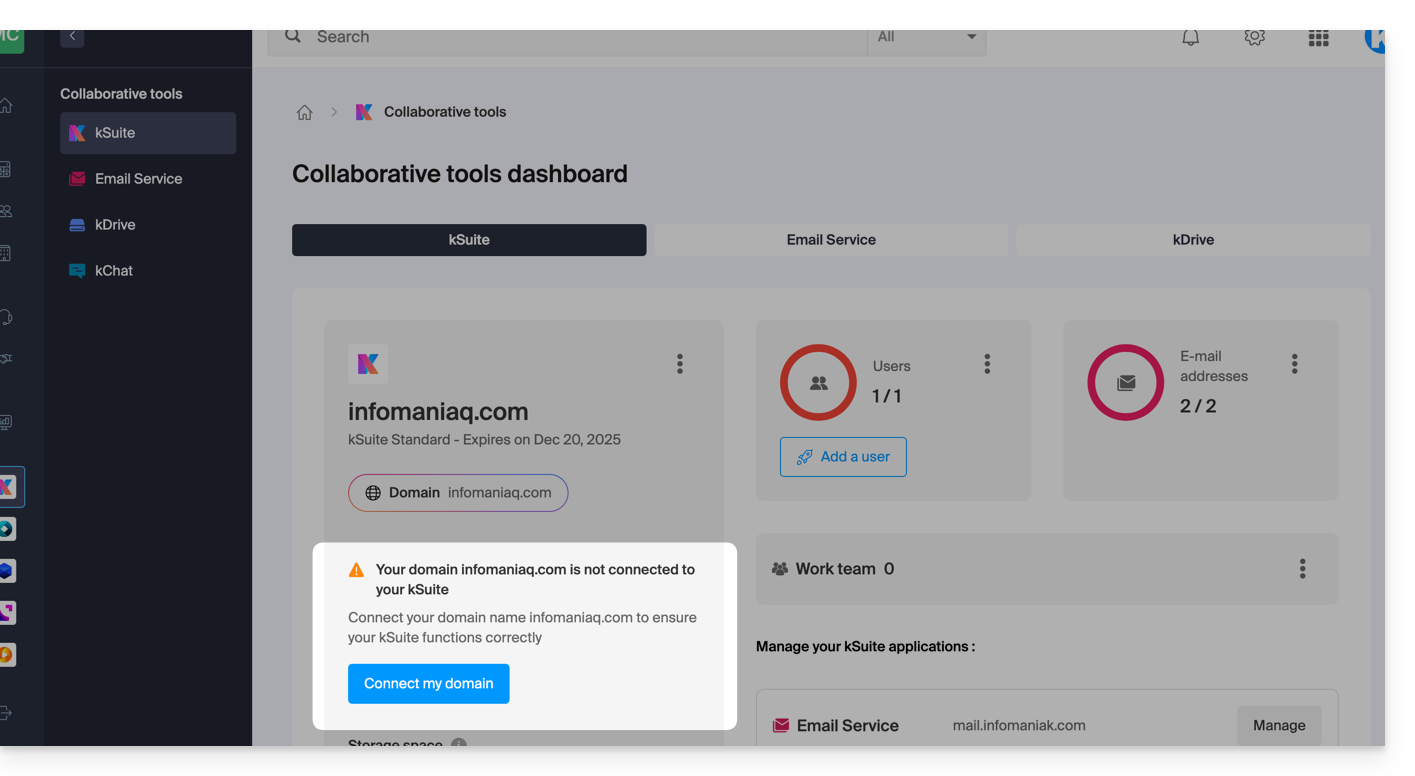
… and the technical information, which you should enter where the domain is located, will be provided: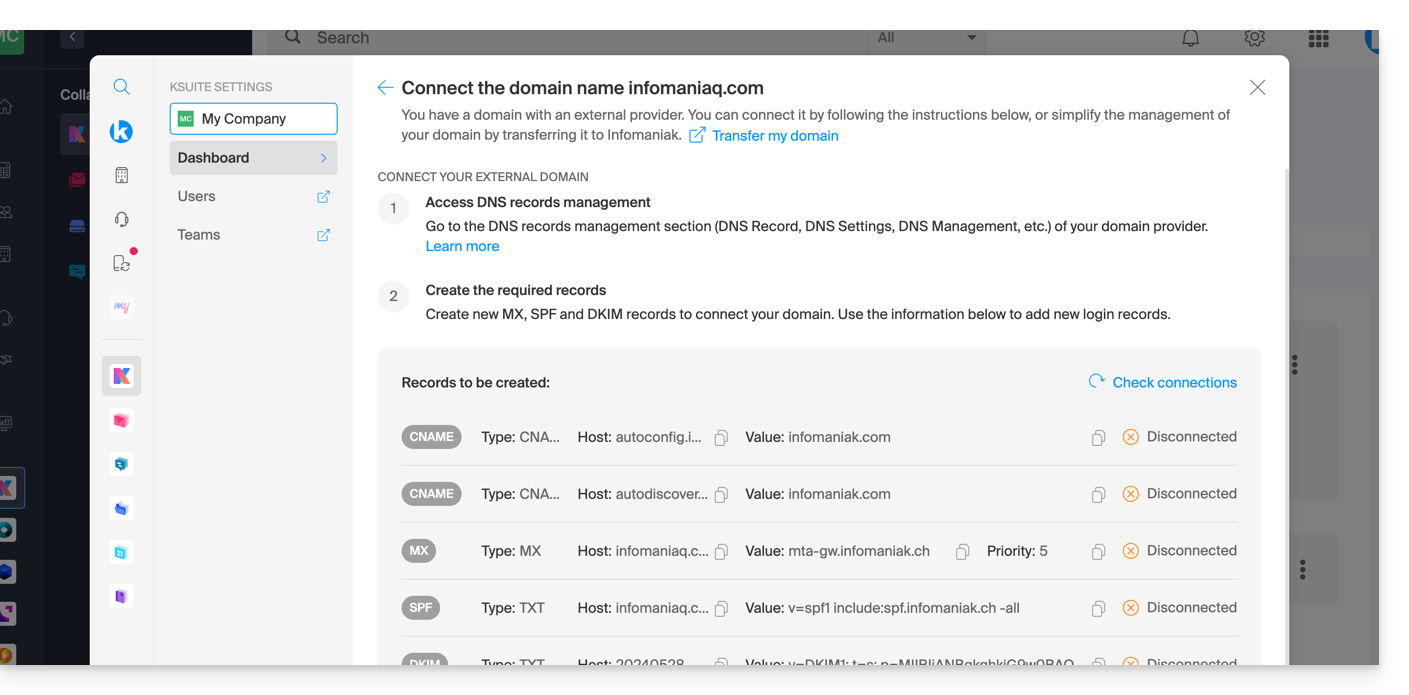
… with Infomaniak, using external DNS
If your domain name uses DNS that is not Infomaniak's, then:
- Edit the current DNS zone where it is located (if necessary, consult the help documentation of the provider in question) by specifying Infomaniak's MX record (+ SPF & DKIM).
- Any DNS addition/modification may take up to 48 hours to propagate.
OU
- Change the current DNS settings and select the option to use Infomaniak's DNS servers.
- Any DNS addition or modification may take up to 48 hours to propagate.
- Refer to this other guide to check and correct any potential configuration errors.
You will be notified (see the images above).
… elsewhere with external DNS
If your domain name is registered with another registrar and uses DNS servers that are not Infomaniak's, then:
- Edit the current DNS zone where it is located (if necessary, consult the help documentation of the provider in question) and specify Infomaniak's MX record (+ SPF & DKIM).
- Any DNS addition or modification may take up to 48 hours to propagate.
OU
- Change the current DNS servers (if necessary, consult the help documentation of the provider in question) to Infomaniak's DNS servers (this requires you to have a DNS zone with Infomaniak).
- Any DNS addition or modification may take up to 48 hours to propagate.
- This DNS zone with Infomaniak will be configured correctly, but refer to this other guide to check and correct any potential configuration errors.
You will be notified (see the images above).
… elsewhere, but you can bring it back
If your domain name is registered with another registrar and you want to move it to the same location as your Infomaniak email, then:
- Transfer the domain name to Infomaniak (it will be configured correctly, but please refer to this other guide to check and correct any potential configuration errors).
Otherwise, consider ordering a new domain name if necessary.
Link to this FAQ:
Has this FAQ been helpful?
This guide explains how to set up a zone delegation for a subdomain.
Prerequisites
- Have a domain name with Infomaniak or at least a DNS zone.
- Understand:
- the operation of a domain and a DNS zone before modifying the latter.
- that the DNS zone presented here is valid and used only if the server names are those of Infomaniak.
- that any DNS addition/modification can take up to 48 hours to propagate.
Set up a zone delegation
To do this:
- Click here to access the management of your product on the Infomaniak Manager (need help?).
- Click directly on the name assigned to the product concerned.
- Click on DNS zone in the left sidebar.
- Click on the Advanced view tab.
- Click on the + button:
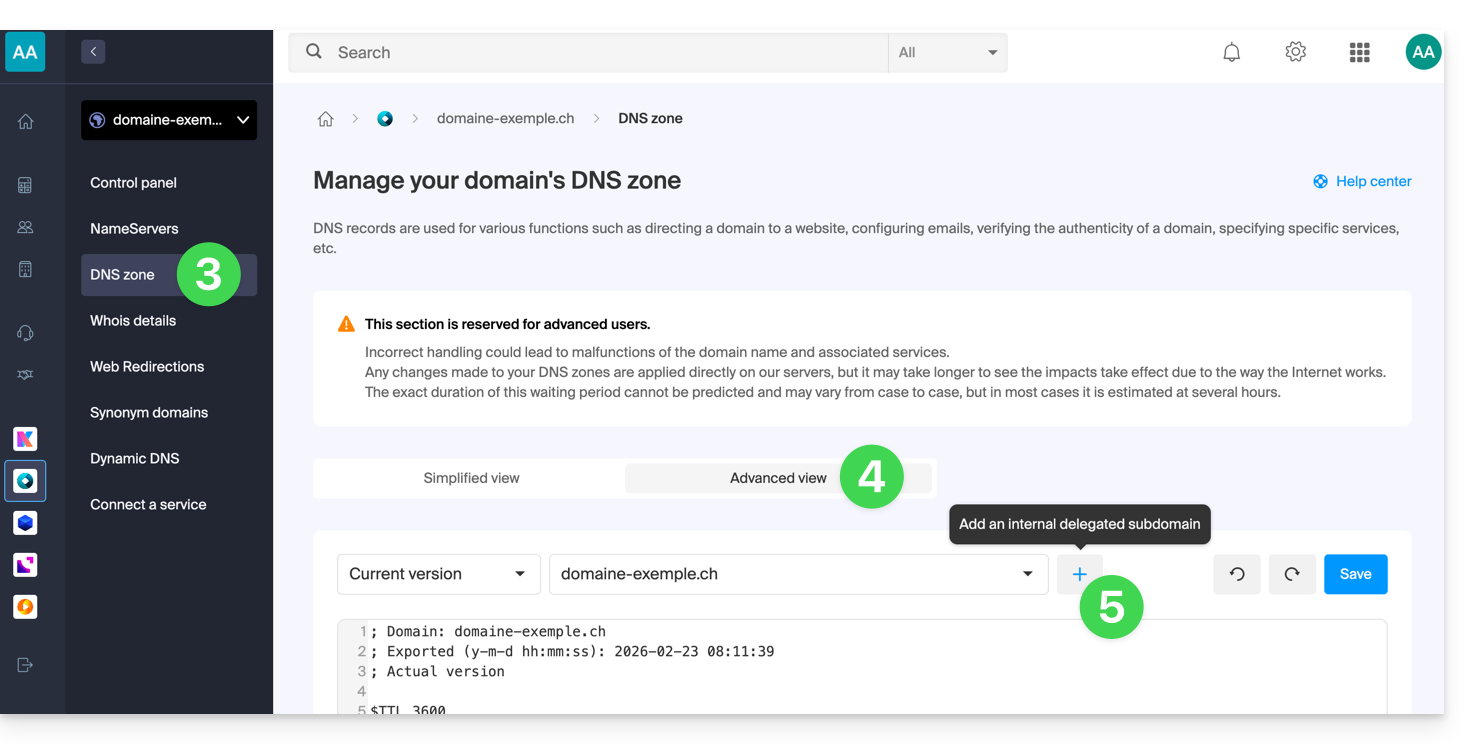
- Enter the desired subdomain (for example
testto gettest.domain.xyz) - It is now possible to edit the DNS zone of the delegated subdomain.
Link to this FAQ:
Has this FAQ been helpful?
This guide explains how to access a Fritzbox connected to the Internet with a dynamic IP via a domain name.
Prerequisites
- Have a Box that allows you to configure a custom dynamic DNS provider.
- A Dynamic DNS must have been created on the domain in question.
Link a Fritz!Box to a domain name
To do this:
- Open the Fritzbox management interface by activating the Advanced mode if necessary.
- Go to Internet then Access Authorization.
- Click on the Dynamic DNS tab:
- Choose the provider: “Custom”.
- Fill in the following fields:
- Update URL (as displayed below, or by replacing
ipaddrwithip6addrif you want Fritzbox to replace the "placeholder" with the IPv6 address instead of the IPv4):https://infomaniak.com/nic/update?system=dyndns&hostname=<domain>&myip=<ipaddr> - Domain name : the "URL" configured in the Manager when adding the Dynamic DNS
- Username : the "identifier" defined in the Manager when adding the Dynamic DNS
- Password : the "password" defined in the Manager when adding the Dynamic DNS
- Update URL (as displayed below, or by replacing
- Click on Apply to finish.
Link to this FAQ:
Has this FAQ been helpful?
This guide explains how to add or modify one or more TXT record entries in the DNS zone (of a domain name) managed on the Manager Infomaniak.
Preamble
- The
TXTrecord type allows you to insert readable text into the DNS zone of a domain name. - This is the method generally used to help prevent spam and to verify domain ownership (Google may ask you to do this before using some of their services: refer to this other guide for an example of adding a
TXTrecord to authenticate a domain).
Modify the DNS zone
To manage this type of record in a DNS zone:
- Click here to access your domain management on the Infomaniak Manager (need help?).
- Click directly on the name assigned to the domain in question.
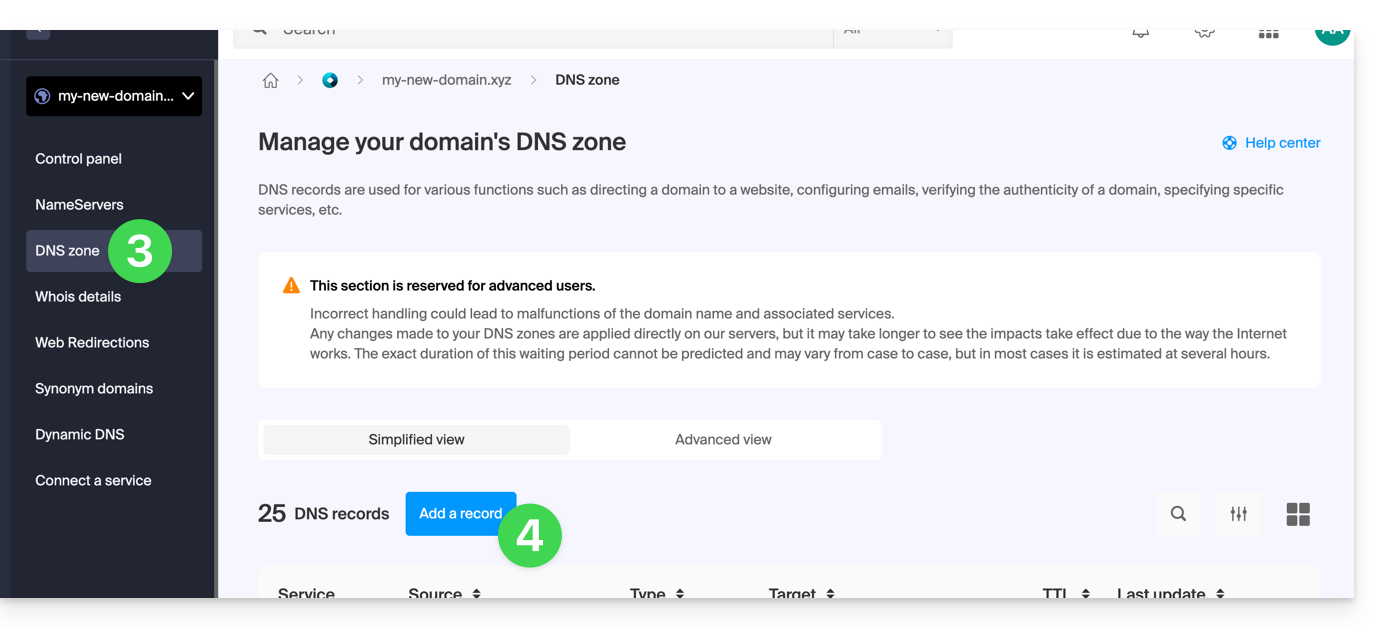
- Click on DNS zone in the left-hand menu.
- Click the button to add a record:
- Click on the radio button TXT to add a record.
- Click on the Next button:
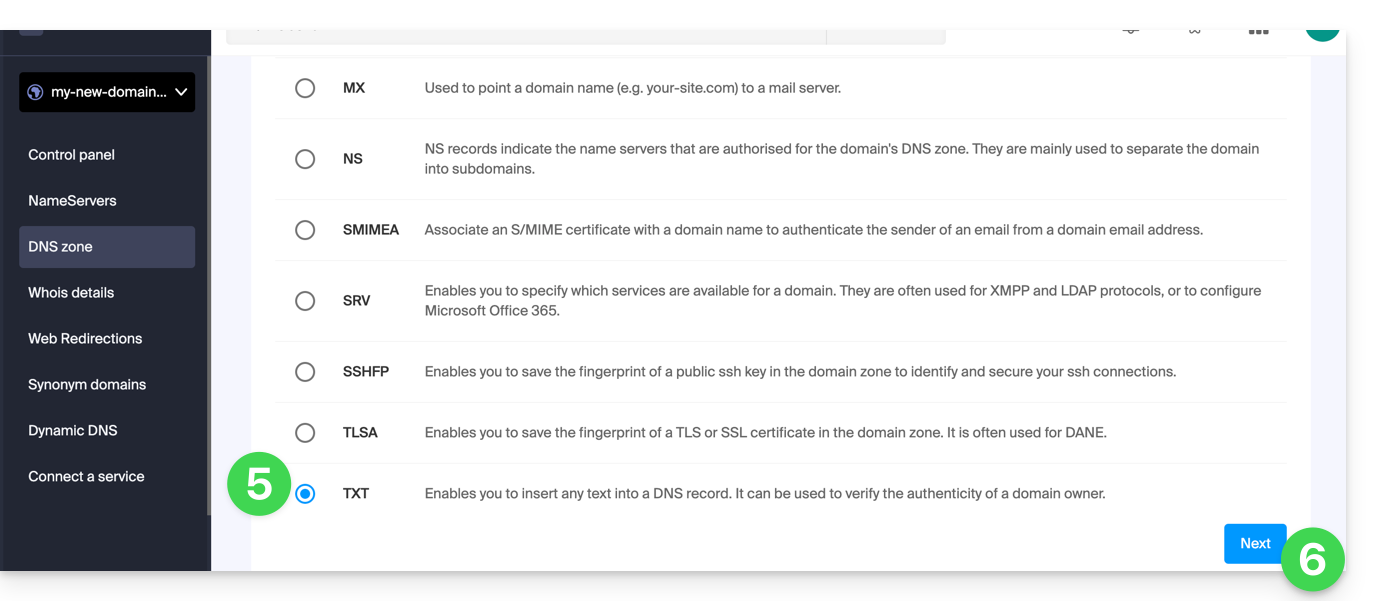
- Enter the TXT values required for your DNS zone.
- Leave the default value for the TTL.
- Click on the Save button:

Link to this FAQ:
Has this FAQ been helpful?
This guide explains how to add or modify one or more SRV type records in the DNS zone (of a domain name) managed on the Manager Infomaniak.
Preamble
- This type of record allows you to indicate which services are available for a domain.
- They are often used for XMPP, LDAP protocols or to configure Microsoft Office 365.
Modify the DNS zone
To manage this type of record in a DNS zone:
- Click here to access the management of your domain on the Infomaniak Manager (need help?).
- Click directly on the name assigned to the domain in question.
- Click on DNS zone in the left sidebar.
- Click the button to add a record:
- Click on the radio button SRV to add a record.
- Click on the Next button:
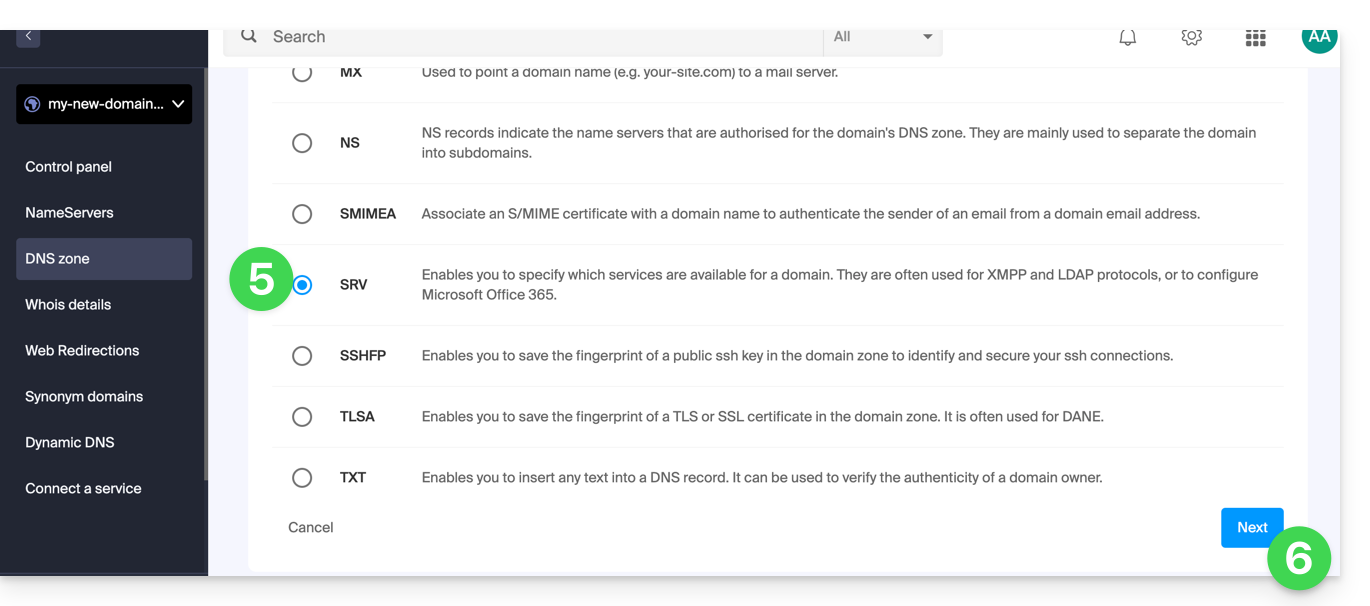
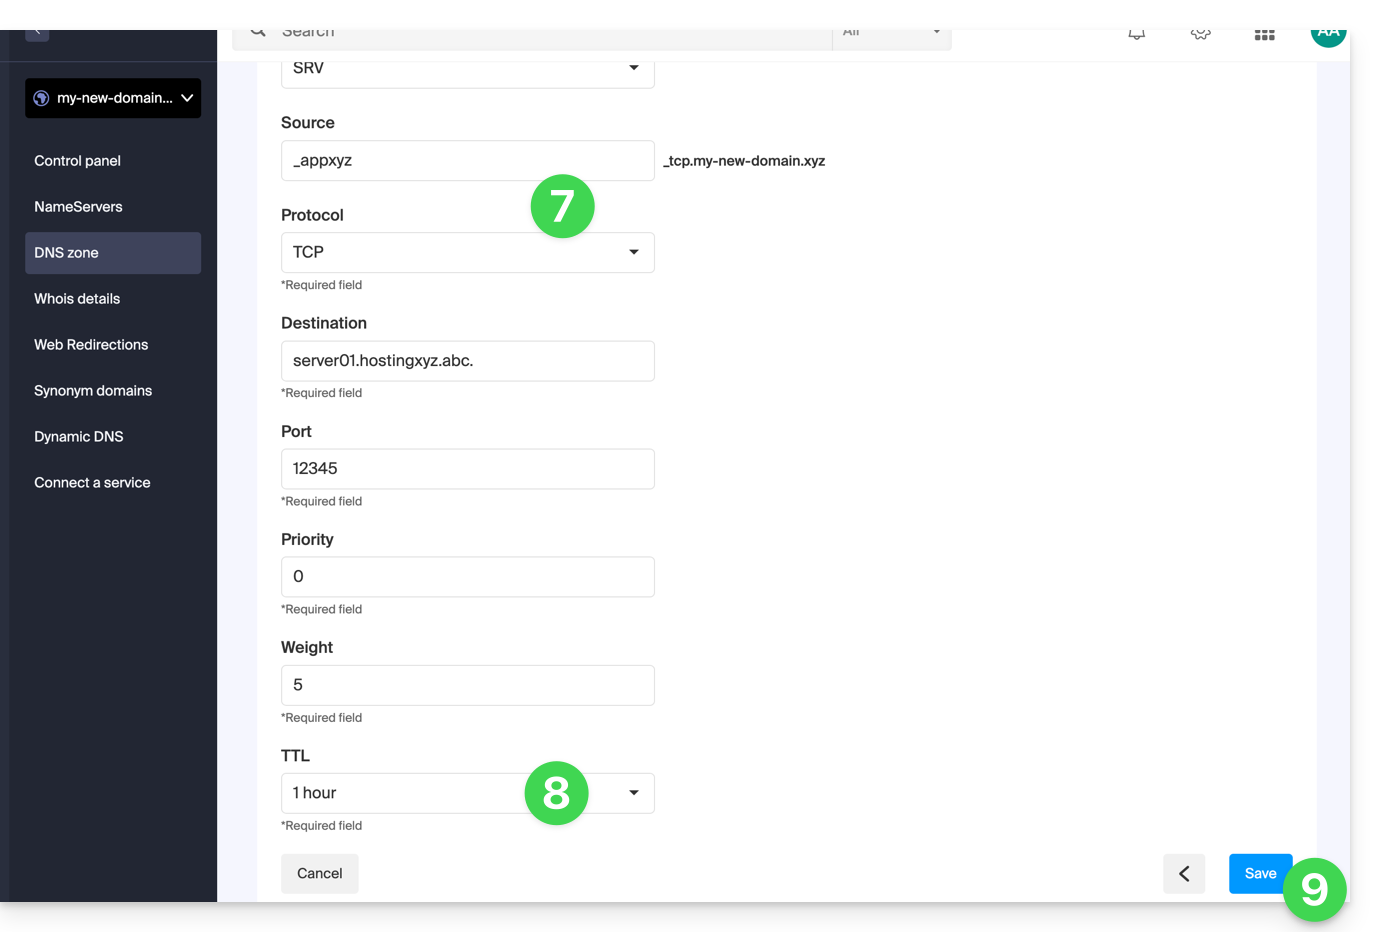
- Enter the values of the SRV required for your DNS zone (the
._tcp.domain…is already entered). - Leave the default value for the TTL.
- Click on the Save button:
Check the correct addition of the complete SRV in the records table: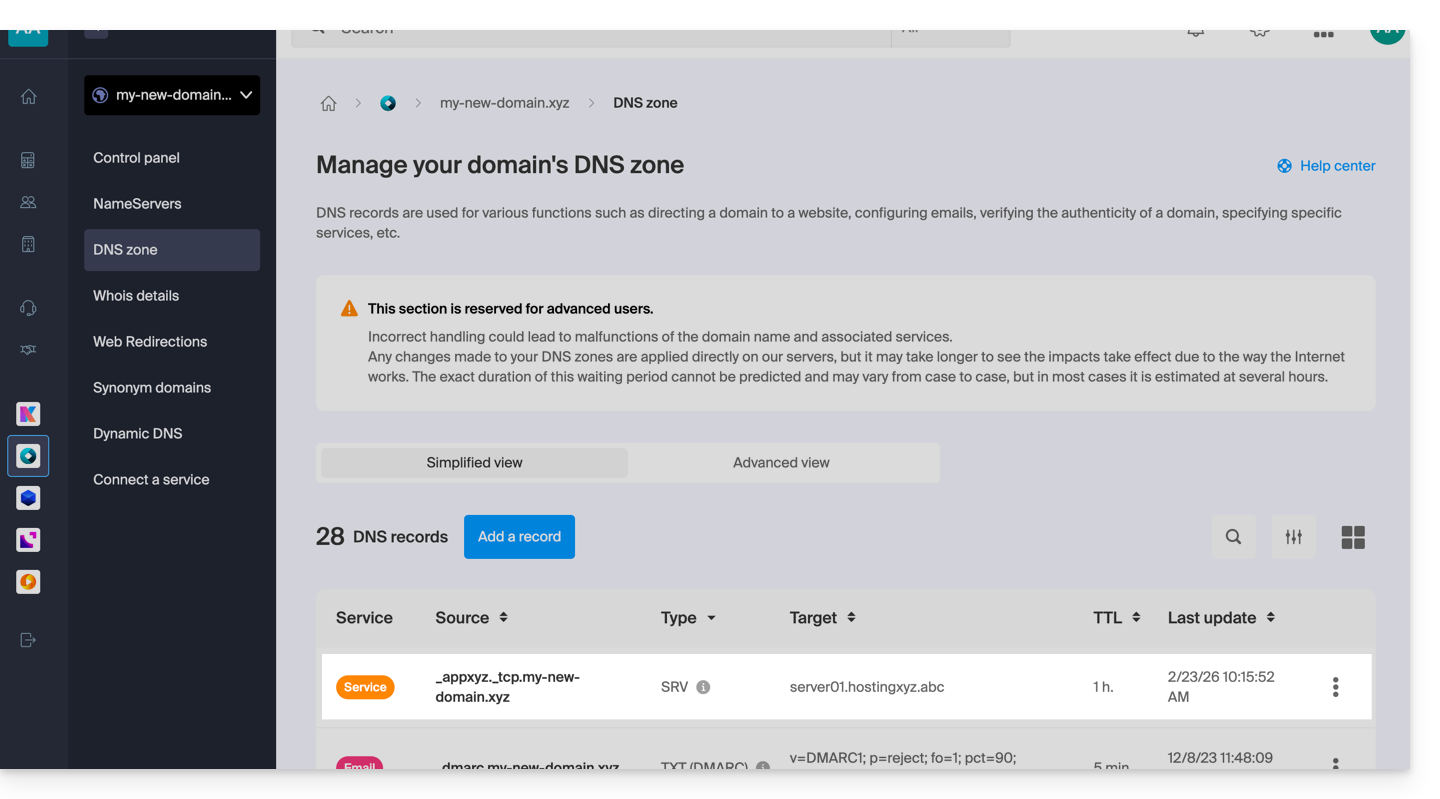
Link to this FAQ:
Has this FAQ been helpful?
This guide explains how to add or modify a DKIM record in a DNS zone (domain/subdomain) managed on the Infomaniak Manager.
Preamble
- The DKIM (Domain Keys Identified Mail) protocol authenticates your emails with a unique digital signature.
- It ensures that your messages have not been modified during transit and certifies the sender's identity, thus preventing spoofing by spammers.
- DKIM is enabled by default for all Mail Services whose DNS zone is managed at Infomaniak.
- All your emails are automatically signed, whether they are sent from the Infomaniak Mail app or the email software/client of your choice.
Check the DKIM record
If you have a Mail Service with Infomaniak, the simplest way is to go to the Global Security tool to easily verify and correct certain problematic records.
And when your domain name is managed elsewhere, you will find the DKIM record to add in the DNS zone: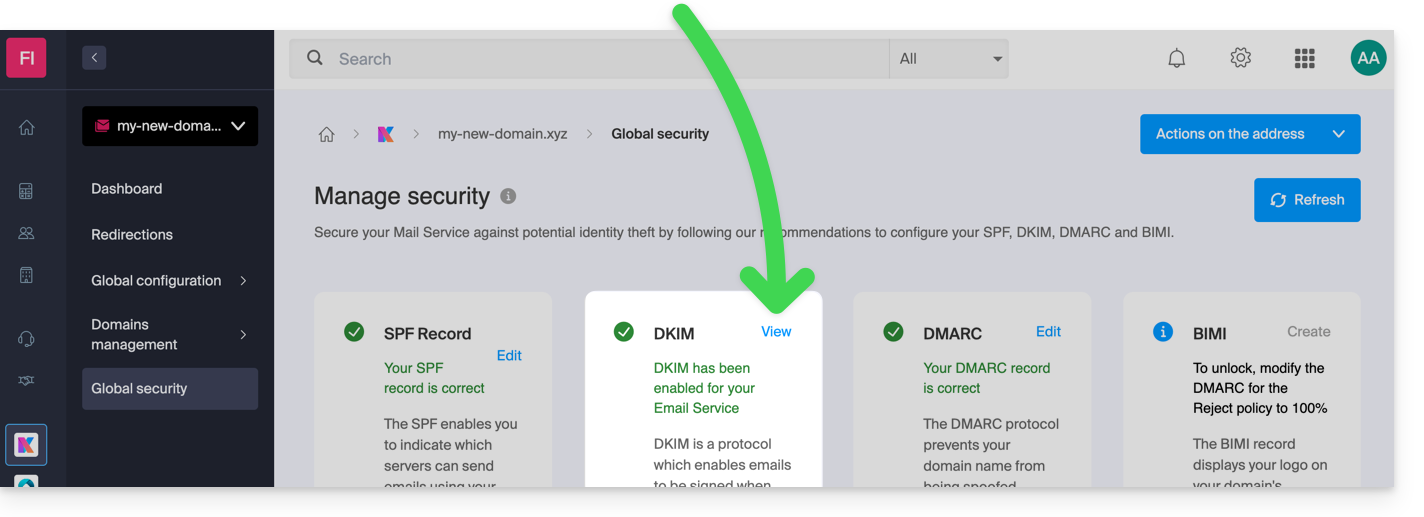
Manually modify the DNS zone (not recommended)
To manage this type of record in a DNS zone:
- Click here to access the management of your domain on the Infomaniak Manager (need help?).
- Click directly on the name assigned to the domain in question.
- Click on DNS Zone in the left sidebar.
- Click the button to add a record:
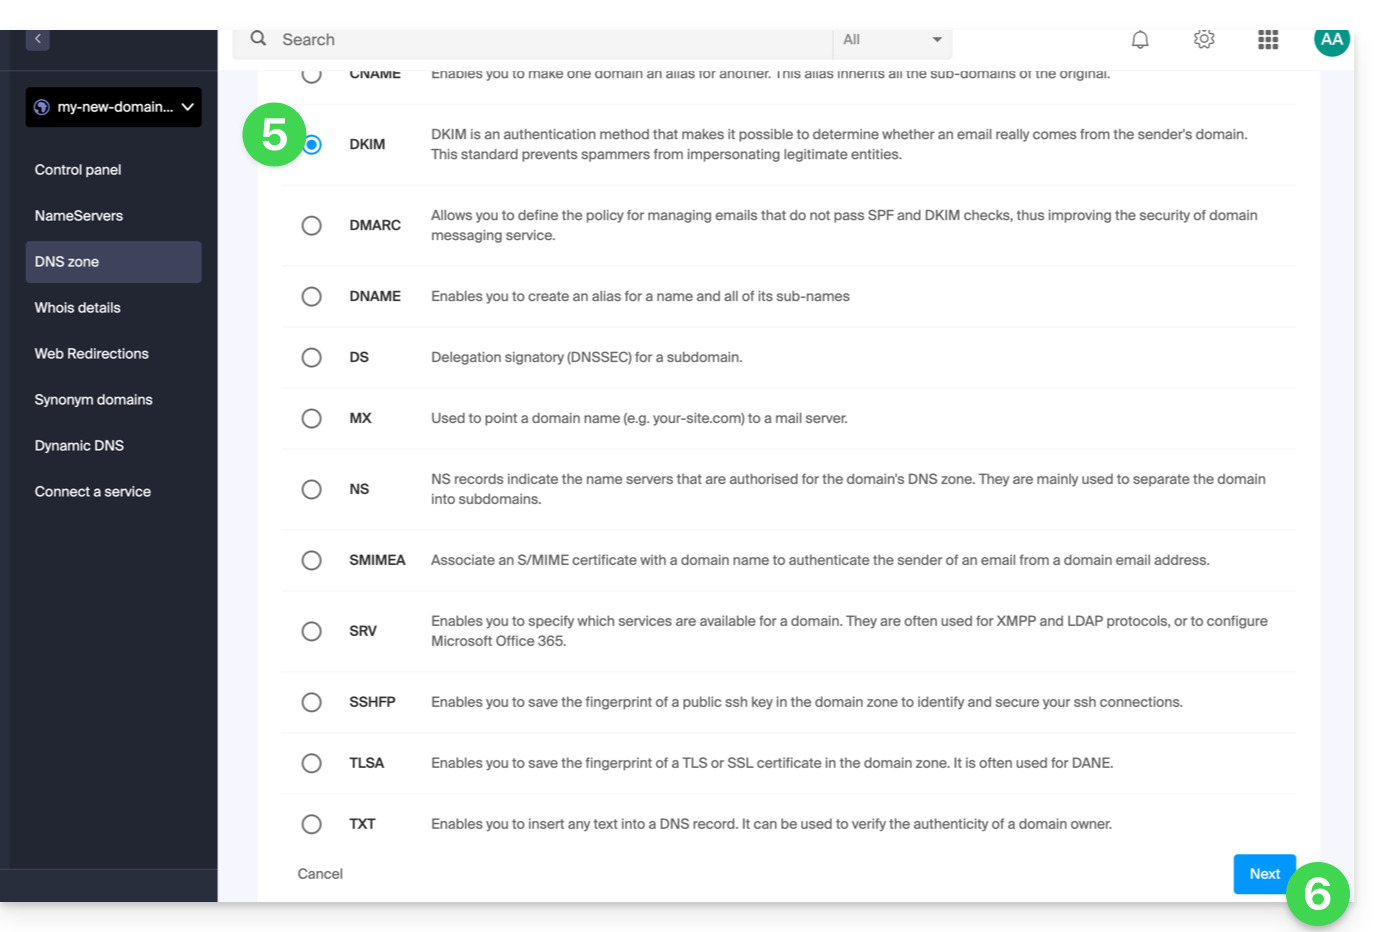
- Click the radio button DKIM to add a record.
- Click the Next button:
- Enter the DKIM values required for your DNS zone.
- Leave the default value for TTL.
- Click the Save button:

Add multiple DKIM
You can have multiple DKIM records on your domain/subdomain without limit, unlike DMARC or SPF, as long as your DNS host allows it.
If you use multiple third-party email providers, for example the ERP Odoo, it is necessary to add a DKIM for Odoo in addition to Infomaniak's.
Use unique DKIM selectors to avoid conflicts with existing records.
Link to this FAQ:
Has this FAQ been helpful?
This guide allows you to quickly use the essential functions of your new Cloud Server.
Install an application
- Create a WordPress website
- Install a web application (ownCloud, Joomla, Typo3, Drupal, phpBB, Simple Machines Forum, Magento, Prestashop, …)
- Install applications/technologies on Cloud Server (Fast Installer)
Configure the server
- Manage your MySQL databases
- Manage MySQL limits
- Manage your FTP accounts/users
- Manage and publish files on your hosting via FTP
- Modify resources and configuration
Manage sites and domains
If your domain name is not managed by Infomaniak or if your hosting is not managed in the same user account as your domain name, refer to this other guide to configure the DNS or records to link the domain name to your hosting. Also:
- Transfer a shared web hosting to a Cloud Server
- Add a site or subdomain to your hosting (multisite)
- Preview your site even if your domain name does not yet point to Infomaniak's servers
In case of a problem, access the knowledge base before contacting Infomaniak support.
Link to this FAQ:
Has this FAQ been helpful?