Knowledge base
1000 FAQs, 500 tutorials and instructional videos. Here, there are only solutions!
This guide explains how to connect the Apple Mail mobile app (for iOS smartphones or tablets) to an email address hosted by Infomaniak.
Preamble
- Instead of the manual configuration below, it is recommended to use the .mobileconfig configuration profiles offered by Apple or the Infomaniak Mail app (iOS) to benefit from a Push type update method.
- The various services offered by Infomaniak are all compatible with the corresponding standard protocols (IMAP/SMTP for email, for example), therefore if you encounter a problem with third-party software, contact its publisher or a Partner and consult the support policy as well as article 11.9 of the Infomaniak Terms of Service.
Manually add the email address to the application
Prerequisites
- Create the email address in my kSuite or a Mail Service / kSuite.
- Create a password for the email address for the device you are going to configure.
- Check that the Mail Service is configured optimally.
To configure the mail application:
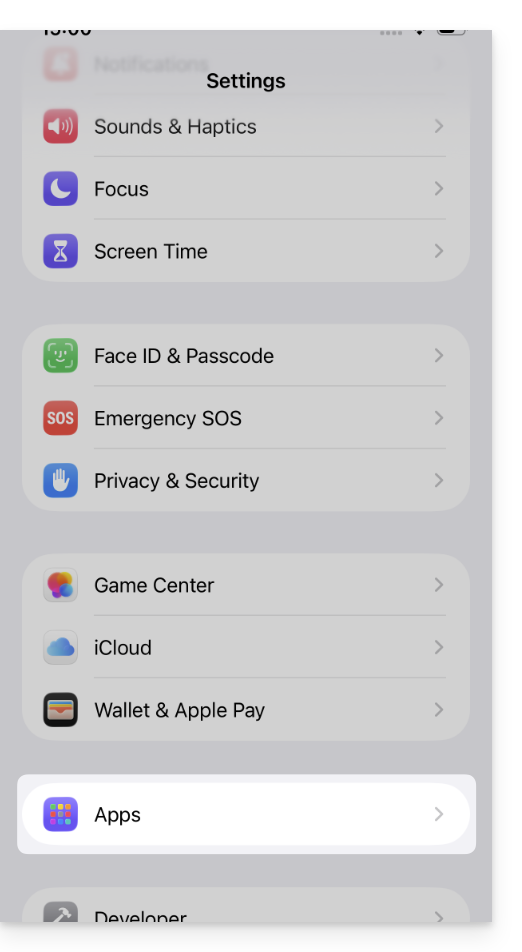
- Open the settings of the iPhone and tap Apps:
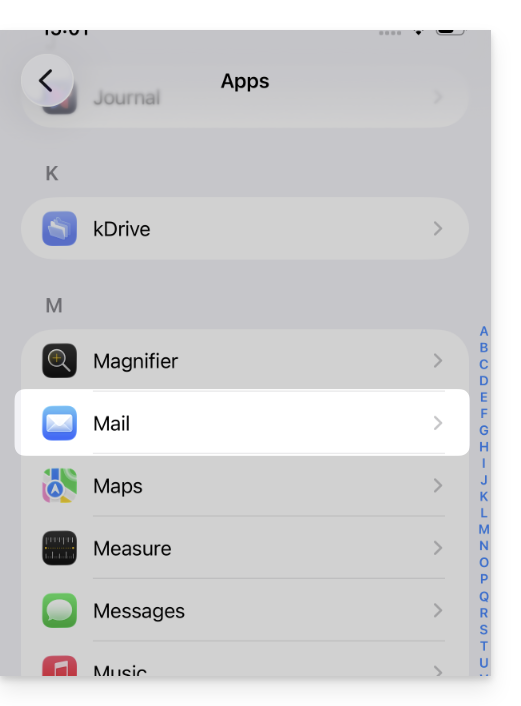
- In Apps, tap Mail:
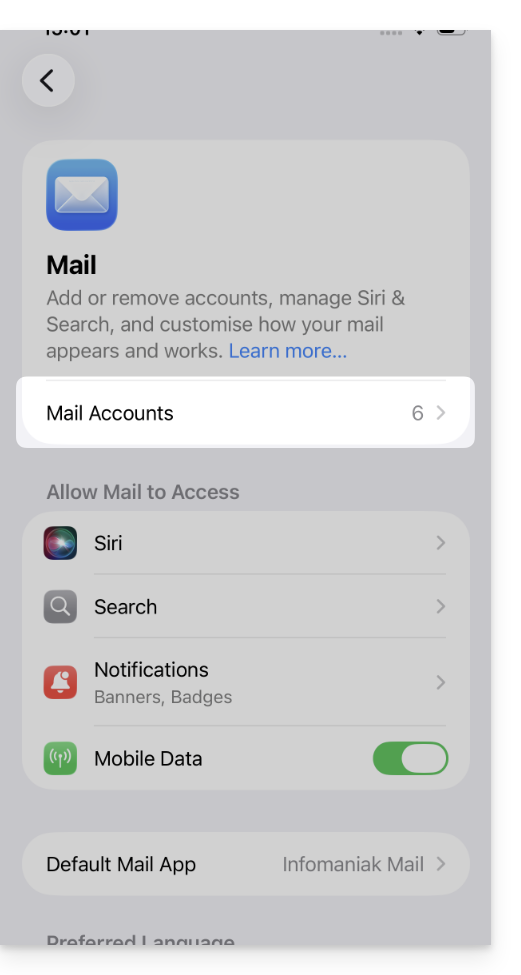
- Tap Mail Accounts:
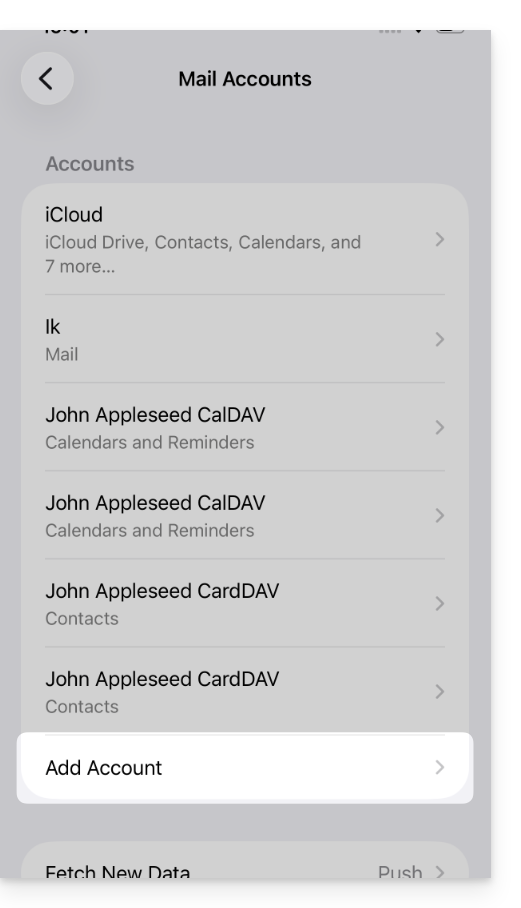
- Tap to add an account:
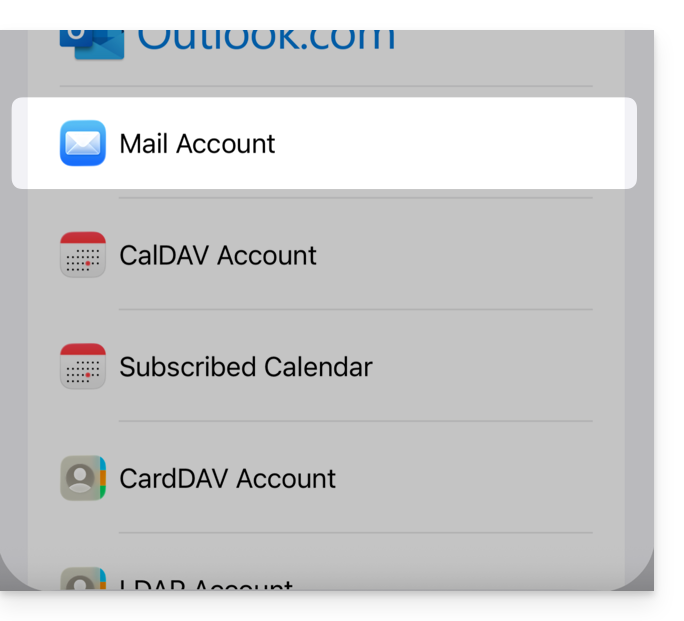
- Tap Other account:
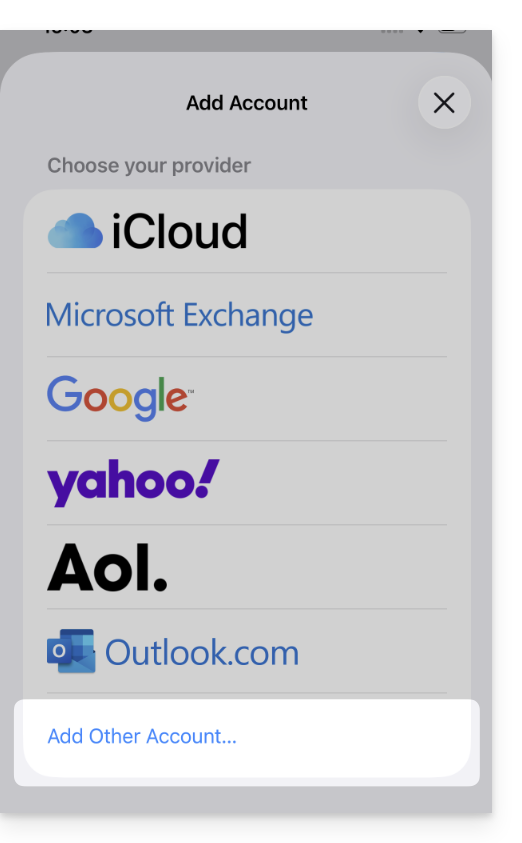
- Tap Mail Account:
- Enter the email address to attach:
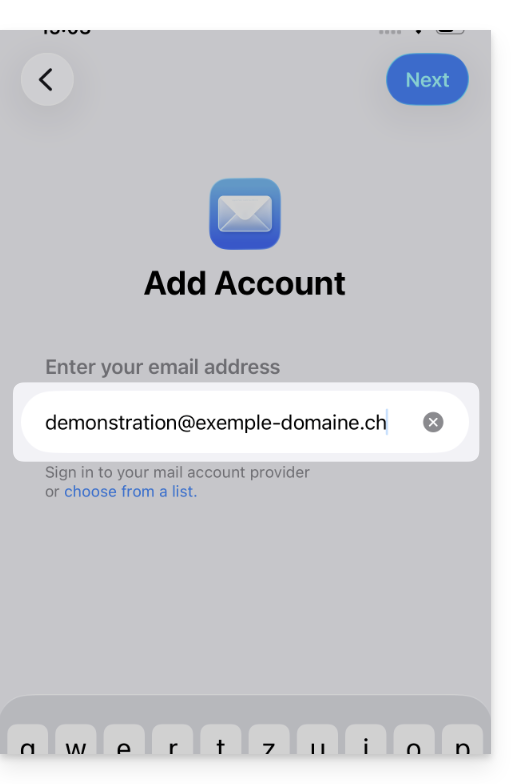
- Tap Next at the top right.
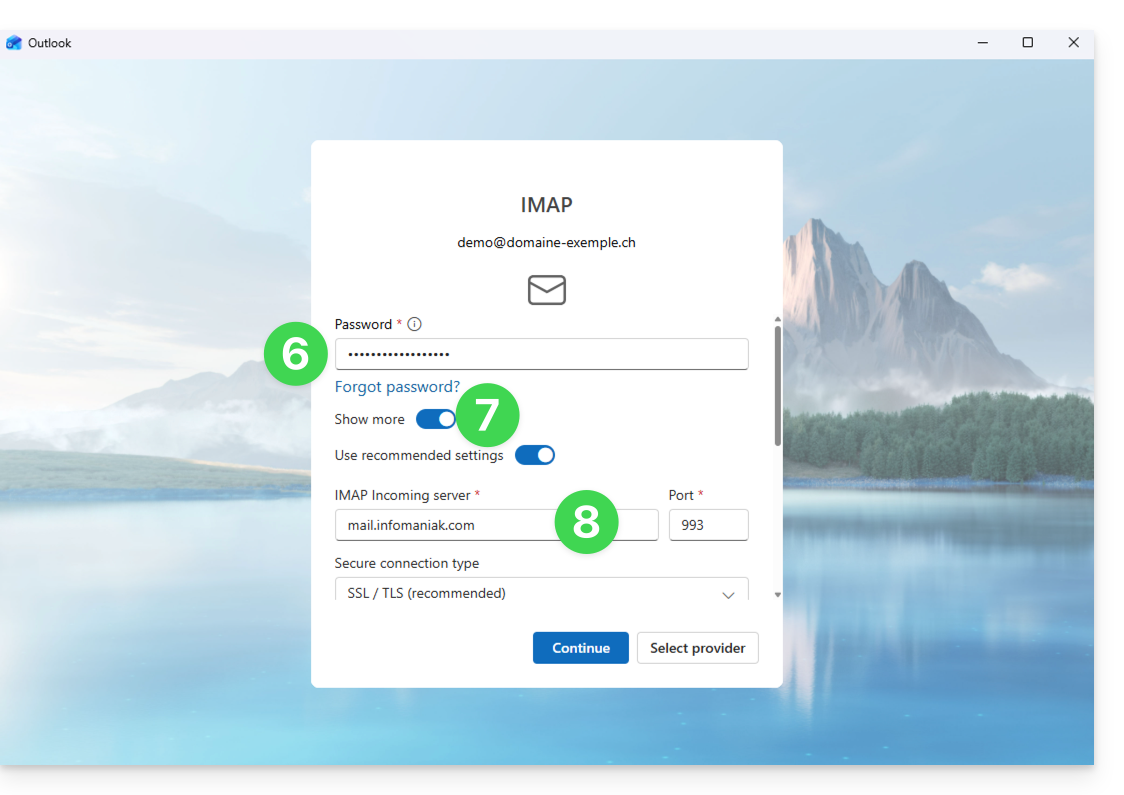
- The application mentions certain fields as being optional but they are not at all:
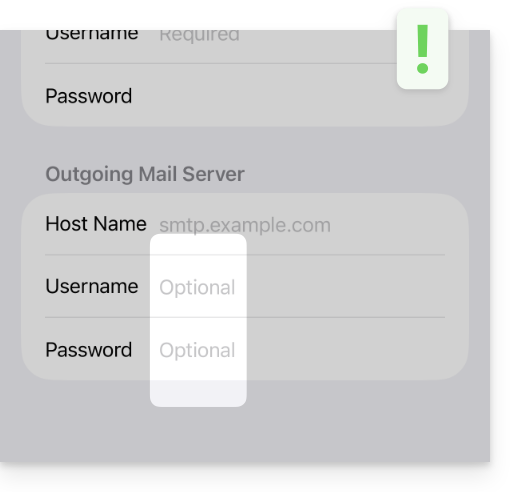
- Check and complete the missing information:
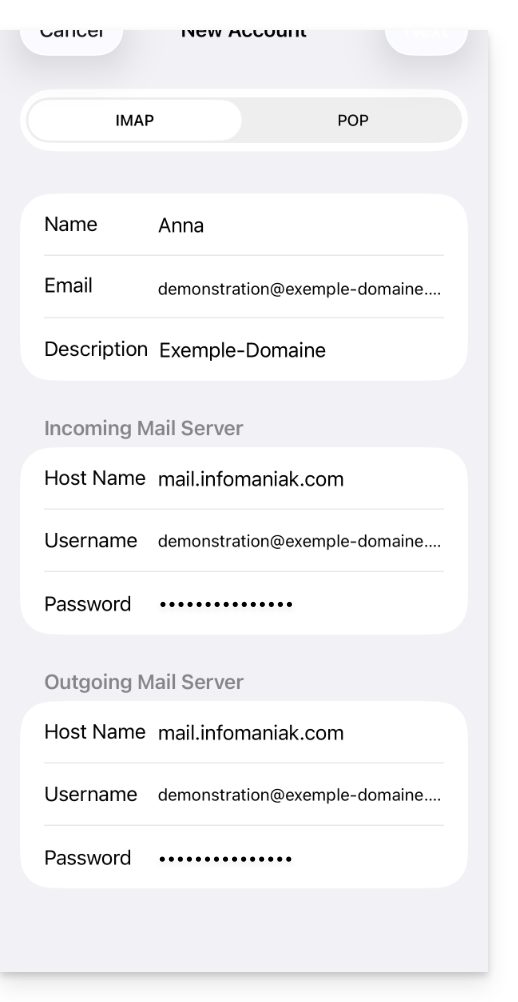
- Stay on the IMAP tab and click Next at the top right.
- Enable emails and save the configuration at the top right:
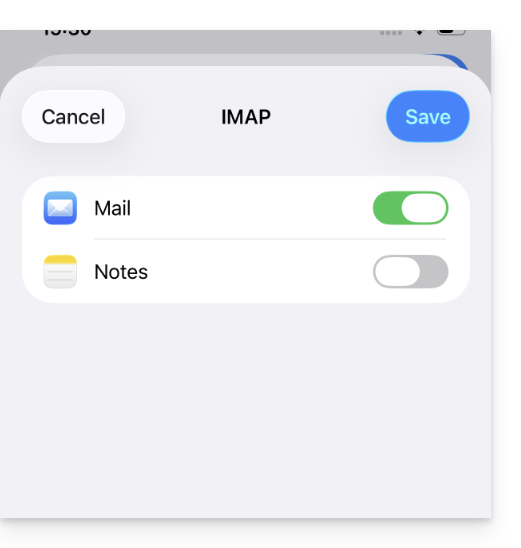
- Your email address is now configured in the application.
Recommended settings
- Incoming IMAP server =
mail.infomaniak.com - IMAP port =
993(with SSL) - Outgoing SMTP server =
mail.infomaniak.com - SMTP port & encryption protocol and command/method to activate this protocol:
587+ STARTTLS - Username = full & complete email address ( ? )
- Password = the one generated for the email address you want to view
- Authentication required for sending emails:
- It is activated in the SMTP settings of your application.
- Check "use the same parameters as the incoming server" or according to the software/email clients, re-enter a username (= full & complete email address) and the generated password.
Refer to this other guide if you are looking for information about other compatible messaging ports and protocols (SSL / TLS for example).
In case of a problem
Check that the Mail Service is configured optimally.
It is not necessary to contact Infomaniak Support if your email address works well outside the application. The most common error concerns the use of an incorrect password. The troubleshooting guides help you resolve any potential issues:
- Refer to the solutions given in this other guide regarding email in general.
- Delete any Apple configuration profiles linked to your Infomaniak email before restarting the configuration.
And if your Apple Mail no longer works at the sending level (disconnected or missing SMTP server for example) or after a change of email password, refer to this other guide.
Link to this FAQ:
Has this FAQ been helpful?
This guide explains how to regain access to Infomaniak tools (manager.infomaniak.com and Mail / ksuite.infomaniak.com) in case of forgetting your password or Infomaniak account login ID.
Preamble
- To log in within an Organization that manages one or more Infomaniak products, go to manager.infomaniak.com and enter the following information:
- A login email address (ID for the Infomaniak account).
- The password chosen during your registration.
- A additional code if 2FA (two-factor authentication) is enabled.
- If the platform login works and you are missing a password for one of your email addresses, refer to this other guide.
- If there is an issue displaying the login form, especially on a mobile device, refer to this other guide on the subject.
You have forgotten...
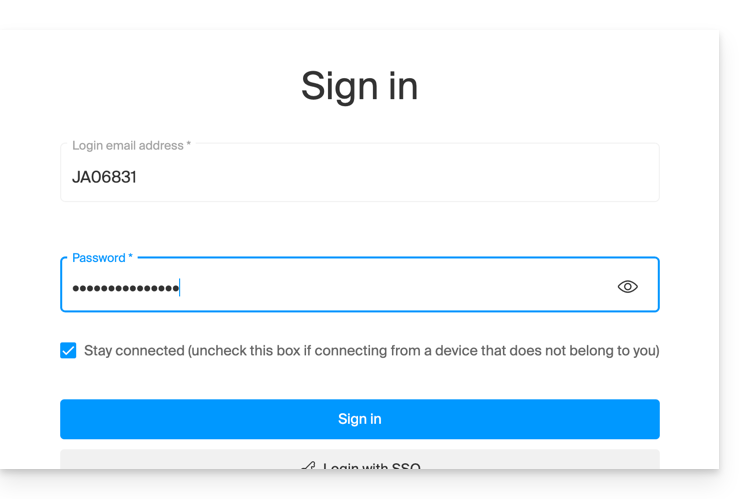
... the password for the Infomaniak account
If you have forgotten this password, follow the reset procedure:
- Click here to reset your password.
- Enter the login email address for your Infomaniak account
- Choose the desired recovery option or follow the identity verification procedure by clicking on “You do not have access to any option”.
... the login email address for the Infomaniak account
During your registration, you provided a phone number; it is possible to retrieve the login email address for the Infomaniak account using your phone number:
- Click here to retrieve your login email address for the Infomaniak account.
- Enter your mobile number.
- Enter (if necessary) your recovery email address.
Two scenarios are then possible:
- The system can identify your account: choose how to receive your Infomaniak account login ID.
- In the opposite case: follow the on-screen assistant to manually verify your identity or via kCheck:
And if the email address no longer exists…
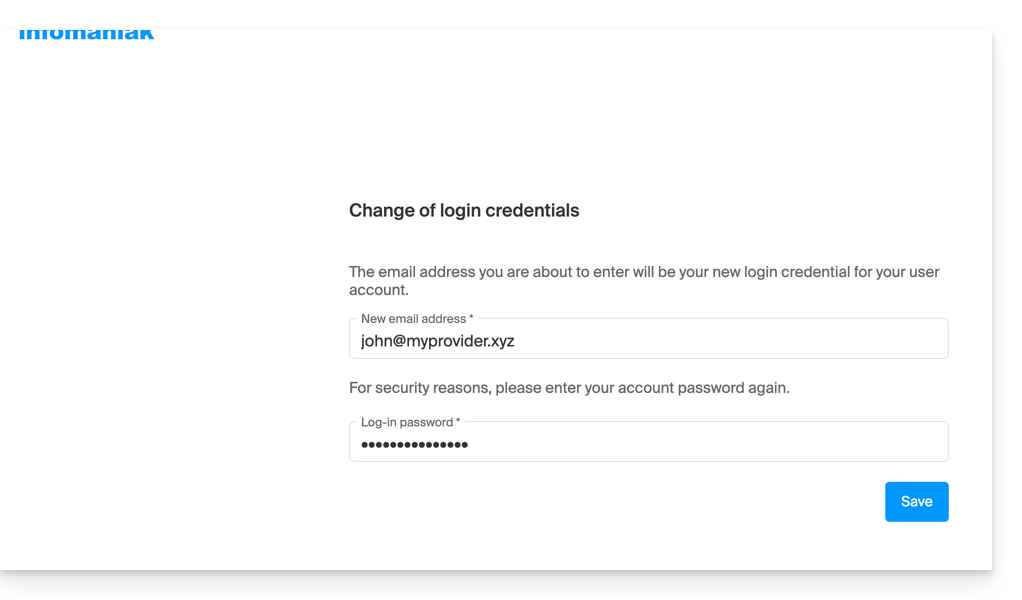
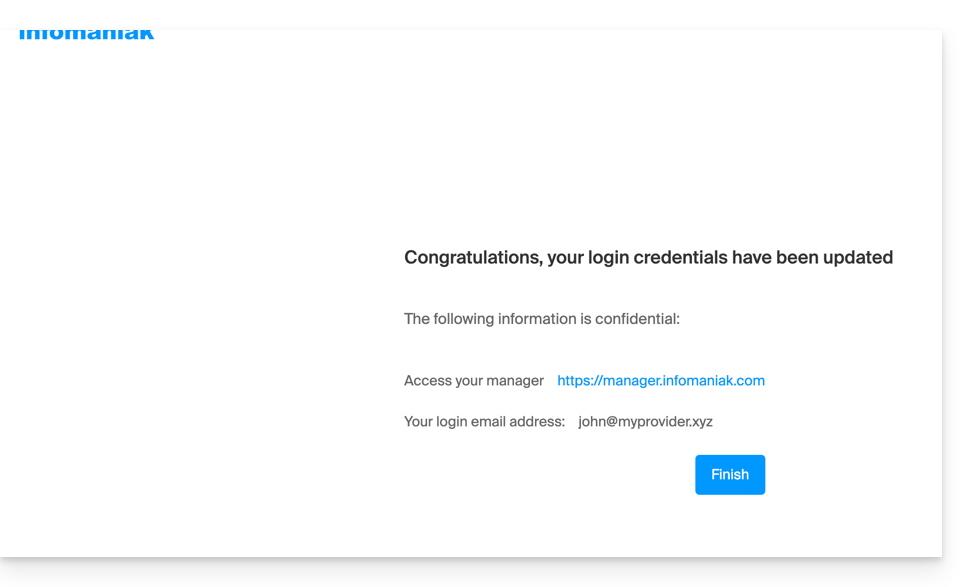
If you have an Infomaniak account for which the login ID is of the form toto123@yahoo.com, there is no problem if the email address toto123@yahoo.com is deleted or is no longer valid. You just need to log in one last time to the Infomaniak Manager with this ID toto123@yahoo.com and refer to this other guide to modify your Infomaniak account login email address.
However, if the email address used as an ID is hosted by Infomaniak (for example anna789@assoziation.ch) and an administrator deletes the email address in question or cancels the “assoziation.ch” Mail Service, the situation is different: you automatically receive an email on the secondary address and an SMS on the mobile phone number specified in your Infomaniak account: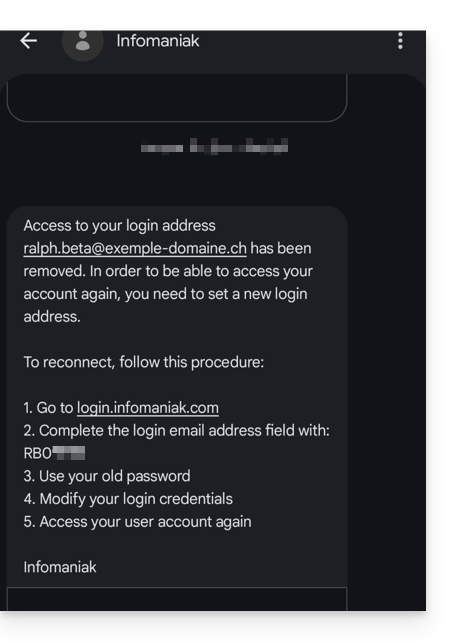
The situation can also occur in a specific case of mail service management.
To be able to access your Infomaniak account again now that access is no longer possible with the old email address, the Infomaniak account user must go to the address mentioned in the SMS:
- Click here to access the login page.
- Enter the username specified in the SMS (usually the initials of your account and a sequence of numbers).
- Enter the usual password (it has not changed):
- Enter the new requested information:
- You will be logged in to your account again:
Link to this FAQ:
Has this FAQ been helpful?
This guide concerns the mobile app kCheck (application for iOS/Android smartphone or tablet), created to simplify identity verification procedures and strengthen the security of your Infomaniak account.
Preamble
- For security reasons, to guarantee the identity of the person making a specific request to Infomaniak, an identity verification procedure may be triggered in the following cases (non-exhaustive list):
- forgetting an Infomaniak account password (user account)
- forgetting a login email address
- deactivation of double authentication (2FA)
- unlocking an Infomaniak account
- during the first transfer of revenue for the product Ticketing
- when ordering a product (suspicion of spam or fraud, brand name, etc.)
- This application allows you to securely transfer the requested items.
- Infomaniak respects your privacy: the information transmitted via the kCheck application will be kept until the complete processing of your file; it will in all cases be automatically deleted after 72 hours in case of non-processing of this request.
Start identity verification
Prerequisites
- A QR code or a link provided by Infomaniak.
- The mobile app kCheck installed on your device iOS (iPhone, etc.) or Android.
- An Internet connection on the mobile device.
You can then have your identity verified with kCheck:
- Launch the kCheck app on your mobile.
- Press Start.
- Press Scan a QR code.
- Point the QR code provided using the camera.
- Enter your mobile phone number.
- Enter the confirmation code received.
- Authorize geolocation (mandatory to continue the procedure).
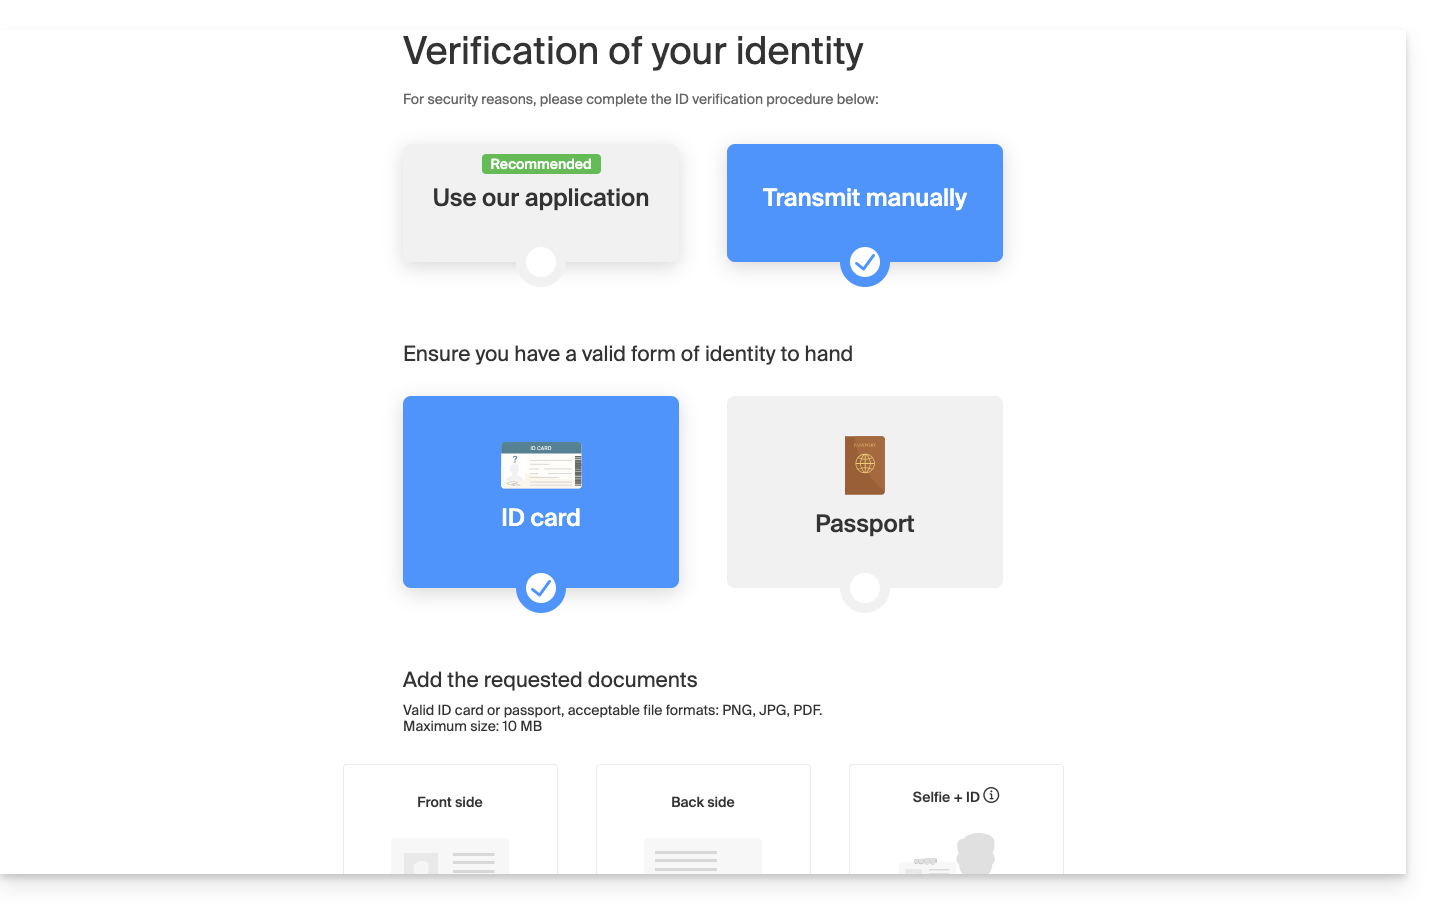
- Select the type of ID you have (ID card or passport).
- Follow the steps to photograph your ID.
- Take a selfie (of yourself) with your ID in your hand in front of you.
Your documents will then be securely transmitted to Infomaniak support. These requests are processed on a priority basis with an average response time of 2 hours during opening hours.
If your order is blocked...
For security reasons, some orders may be automatically blocked.
At the time of your order, an e-mail is sent to the email address connected to your Infomaniak Manager account. This email contains the procedure to unblock your order. If you do not find it, you can resend it from your Manager by clicking on Resend procedure from the red banner informing you of the blockage.
Prerequisites
- Open the email containing the unblocking procedure.
- The mobile app kCheck installed on your device iOS (iPhone, etc.) or Android.
- An Internet connection on the mobile device.
You can then start the unblocking procedure with kCheck:
- Launch the kCheck app on your mobile.
- Press Start.
- Press Scan a QR code.
- Scan the QR code present in the email.
- Follow the unblocking procedure to the end.
Special cases
- If there is no response from you within a 10-day period, the order is automatically canceled and the payment is fully refunded to the payment method used.
- In case you do not have a mobile device to follow this procedure, contact Infomaniak support.
Link to this FAQ:
Has this FAQ been helpful?
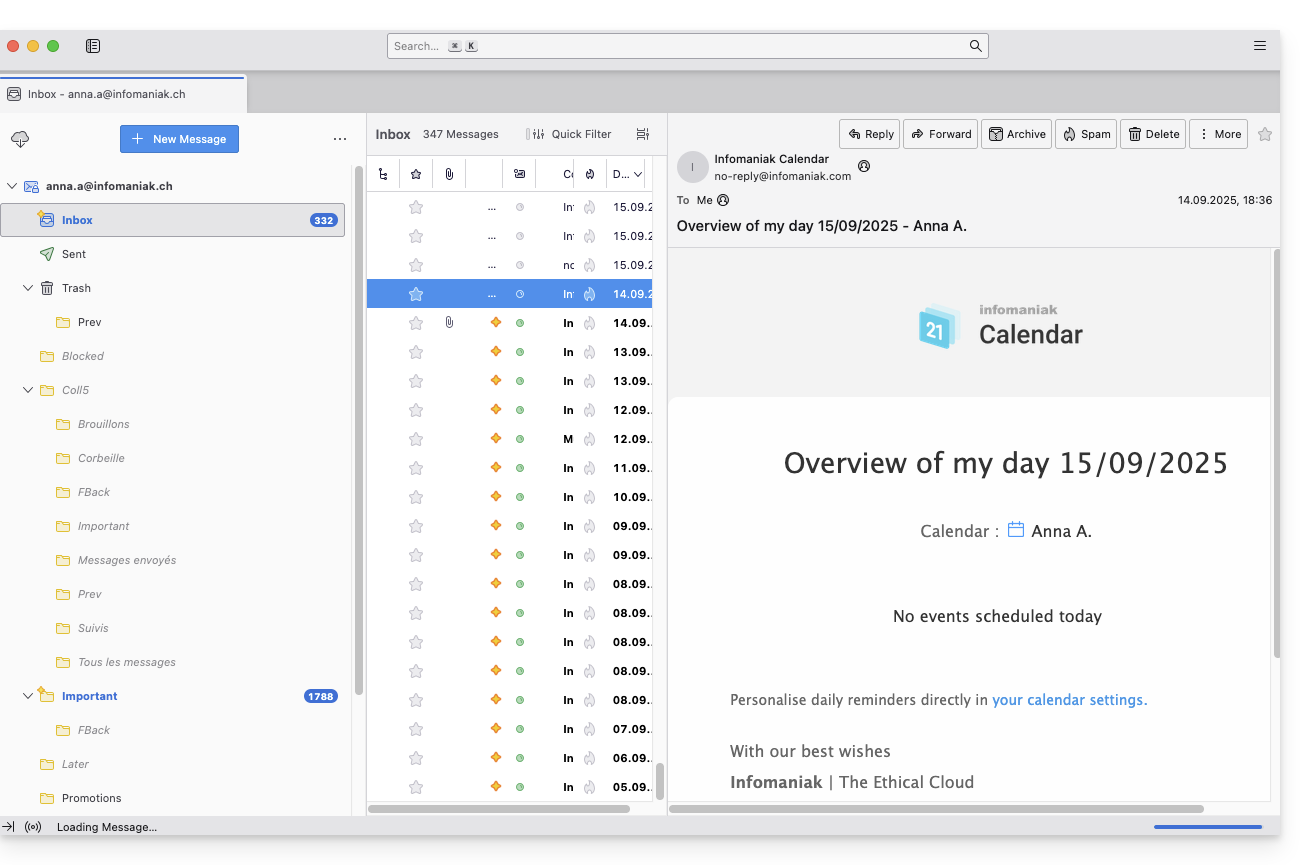
This guide explains how to access your emails hosted by Infomaniak.
Infomaniak Mail Guides
Click here to open the Infomaniak Assistant to configure synchronization on macOS, Windows, Linux, Android, iOS of common mail software/clients (Outlook, Microsoft 365, Thunderbird, Apple Mail, eM Client, etc.).
Use directly the mail in a web browser thanks to the Web app Mail Infomaniak (online service ksuite.infomaniak.com/mail) and/or download the mobile app Infomaniak Mail (application for iOS / Android smartphone or tablet).
Otherwise, here are manual procedures offered in the form of guides:
| OS | Application to synchronize |
|---|---|
| Outlook New / Microsoft 365 MSO / 2019 ( Windows) | |
| Outlook Microsoft 365 MSO ( macOS) | |
| Apple Mail (configuration profile macOS) | |
| Apple Mail (configuration profile iOS: iPhone, iPad, etc.) | |
| Mail ( Android: Huawei, Samsung, Sony, etc.) | |
| Outlook ( iOS + Android) | |
| Gmail ( iOS + Android) | |
| Mozilla Thunderbird |
For synchronization of your contacts & calendars refer to this other guide.
Recommended IMAP settings
Username = the complete & full email address (?)
Password = the one created/generated for the email address you want to access
Incoming IMAP server = mail.infomaniak.com
IMAP port = 993 (with SSL)
Recommended SMTP settings
Username = full & complete email address ( ? )
Password = the one created/generated for the email address you want to access
Outgoing SMTP server = mail.infomaniak.com
SMTP port & encryption protocol and command/method to activate this protocol:
- Prioritize the port
587+ STARTTLS: this is the official technical standard and the most compatible method with the majority of modern systems for authenticated submission. - Tolerate the port
465+ SSL/TLS only as a compatibility option or alternative, specifying that it is implicit encryption, but that 587 remains the recommended choice.
Authentication required to send emails:
- It is activated in the SMTP settings of your application.
- Check "use the same parameters as the incoming server" or depending on the software/email clients, enter a username (= full & complete email address) and its password.
In case of a problem
- POP3 protocol not recommended (POP server = mail.infomaniak.com and POP port = 995 with SSL).
- Refer to this other guide if you encounter errors, to check the essential points!
⚠️ The various services offered by Infomaniak are all compatible with the corresponding standard protocols (including IMAP/SMTP for email, WebDAV for sharing, S3/Swift for storage, etc.). Therefore, if you encounter a problem with third-party software, contact its publisher or a Partner and consult the support policy as well as section 11.9 of the Infomaniak Terms of Service.
- Refer to this other guide if you are looking for information about other compatible email ports and protocols.
Change an email password
Passwords for email addresses can be multiple, have nothing to do with your Infomaniak login password, and cannot be retrieved after their first display. You must therefore (re)create them as soon as you need them, specifying the device (computer, mobile, etc.) and/or the user concerned, in order to be able to distinctly manage the elements on the day you need to handle a specific connection.
Manage passwords:
- from the Manager on the Mail Service
- from the Infomaniak Web app Mail
Apply the new email password
If you have deleted an existing password to create a new one, you will need to update your applications & devices that were using this password. Refer to these specific guides:
- Apple Mail (macOS / iOS)
- Android Mail / Gmail (different versions)
- Microsoft Outlook (different versions)
- Mozilla Thunderbird
Are you not yet managing your emails with Infomaniak?
Link to this FAQ:
Has this FAQ been helpful?
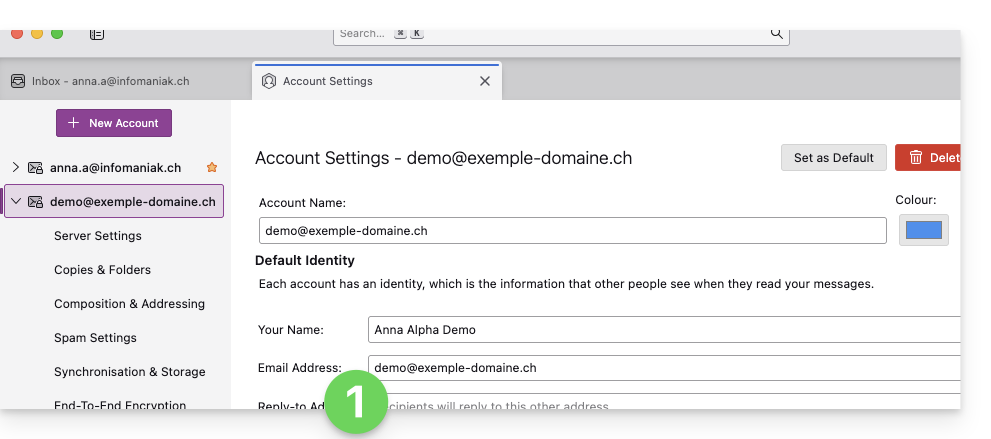
This guide explains how to connect the desktop app Microsoft 365 Outlook MSO (desktop application on Windows) to an email address hosted by Infomaniak.
Preamble
- The various services offered by Infomaniak are all compatible with the corresponding standard protocols (IMAP/SMTP for email, for example). Therefore, if you encounter a problem with third-party software, contact its publisher or a Partner and consult the support policy as well as section 11.9 of the Infomaniak Terms of Service.
Add the email address to the application
Prerequisites
- Create the email address in my kSuite or a Mail Service / kSuite.
- Create a password for the email address on the device you are going to configure.
- Check that the Mail Service is configured optimally.
To configure the email application:
- Open the application.
- Click on File.
- Click on Add an account.
- Enter the email address to be linked.
- Click on Connect.
- Choose IMAP:
- Check and complete the missing information.
- Click on Next.
- Enter the password for your email address.
- Your email address is now configured in the application.
Recommended settings
- Incoming IMAP server =
mail.infomaniak.com - IMAP port =
993(with SSL) - Outgoing SMTP server =
mail.infomaniak.com - SMTP port & encryption protocol and command/method to activate this protocol:
587+ STARTTLS - Username = the full & complete email address ( ? )
- Password = the one generated for the email address you want to access
- Authentication required to send emails:
- It is activated in the SMTP settings of your application.
- Check "use the same parameters as the incoming server" or, depending on the software/email clients, enter a username (= full & complete email address) and the generated password.
Refer to this other guide if you are looking for information about other compatible messaging ports and protocols (SSL / TLS for example).
In case of a problem
Check that the Mail Service is configured optimally.
It is not necessary to contact Infomaniak Support if your email address works well outside the application. The most common error concerns the use of an incorrect password. The troubleshooting guides help you resolve any potential issues:
- Refer to the solutions given in this other guide regarding email in general.
- This other guide is more specifically about Outlook.
… and if your Outlook no longer works since a change of email password, refer to this other guide.
Link to this FAQ:
Has this FAQ been helpful?
This guide explains how to connect the desktop app eM Client (desktop application on macOS / Windows) to an email address hosted by Infomaniak.
Preamble
- The various services offered by Infomaniak are all compatible with the corresponding standard protocols (IMAP/SMTP for email, for example), therefore if you encounter a problem with third-party software, contact its publisher or a Partner and consult the support policy as well as article 11.9 of the Infomaniak Terms of Service.
Add the email address to the application
Prerequisites
- Create the email address in my kSuite or a Mail Service / kSuite.
- Create a password for the email address on the device you are going to configure.
- Check that the Mail Service is configured optimally.
To configure the messaging application:
- Open the application and choose the desired mode, then click on Next:

- Enter the email address to be linked, then click on the Start button next to the field:

- Enter the email address password, then click on Continue next to the field:

- Check the box and click on Yes:

- Check and complete the missing information:

- Choose the desired mode, then click on Next:

- There you go, your email address is now configured in the application:

Recommended settings
- Incoming IMAP server =
mail.infomaniak.com - IMAP port =
993(with SSL) - Outgoing SMTP server =
mail.infomaniak.com - SMTP port & encryption protocol and command/method to activate this protocol:
587+ STARTTLS - Username = full & complete email address ( ? )
- Password = the one generated for the email address you want to access
- Authentication required for sending emails:
- It is activated in the SMTP settings of your application.
- Check "use the same parameters as the incoming server" or, depending on the software/email clients, enter a username (= full & complete email address) and the generated password.
Refer to this other guide if you are looking for information about other compatible email ports and protocols (SSL / TLS for example).
In case of problem
Check that the Mail Service is configured optimally.
It is not necessary to contact Infomaniak Support if your email address works well outside the application. The most common error concerns the use of an incorrect password. Refer to the solutions given in this other guide regarding email in general.
Link to this FAQ:
Has this FAQ been helpful?
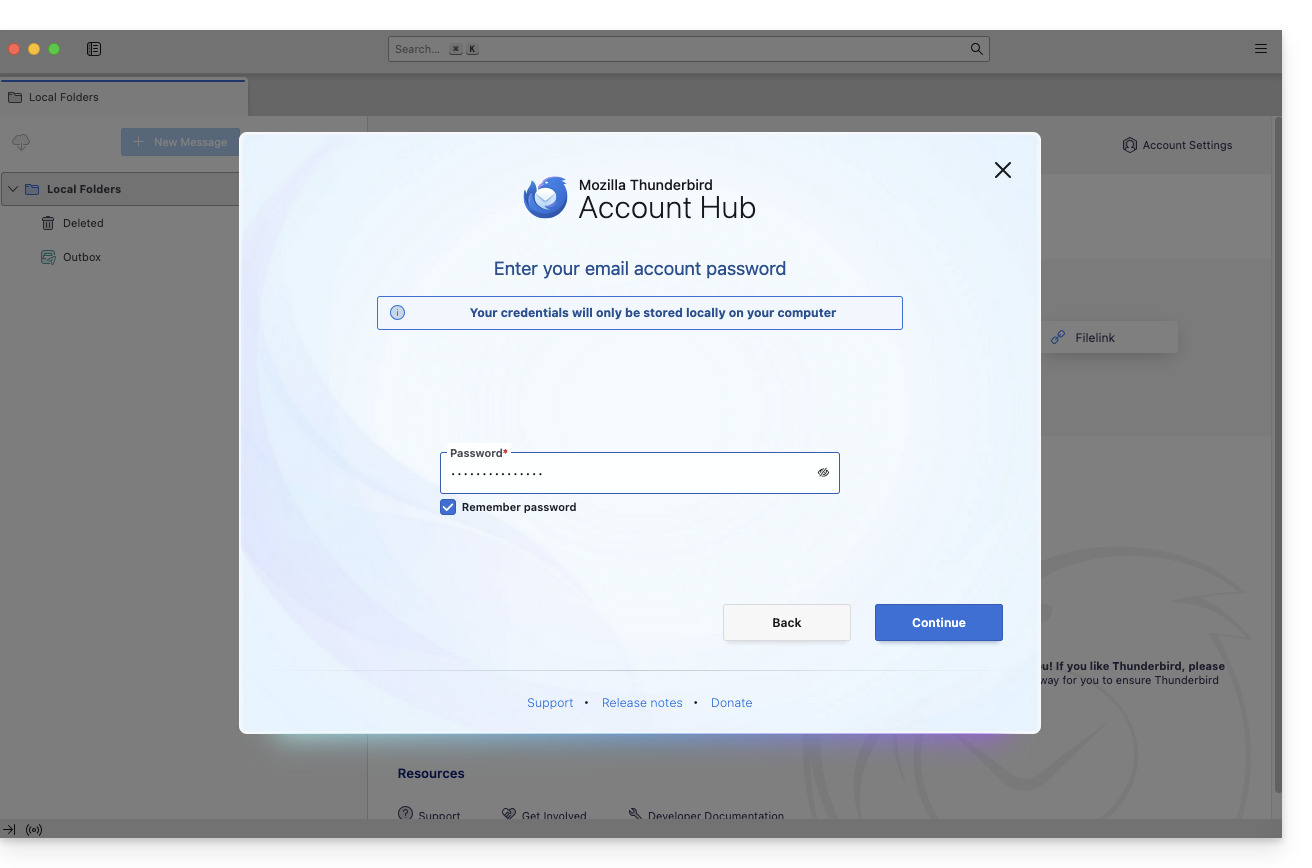
This guide explains how to connect the desktop app Thunderbird (desktop application on macOS / Windows / Linux) to an email address hosted by Infomaniak.
Preamble
- The various services offered by Infomaniak are all compatible with the corresponding standard protocols (IMAP/SMTP for email, for example), therefore if you encounter a problem with third-party software, contact its publisher or a Partner and consult the support policy as well as article 11.9 of the Infomaniak TOS.
Add the email address to the application
Prerequisites
- Create the email address in my kSuite or a Mail Service / kSuite.
- Create a password for the email address for the device you are going to configure.
- Check that the Mail Service is configured optimally.
To configure the email application:
- Download the latest version of Thunderbird.
- Open the application.
- Enter your account information and click on Continue:
- Stay in IMAP and click on Continue:
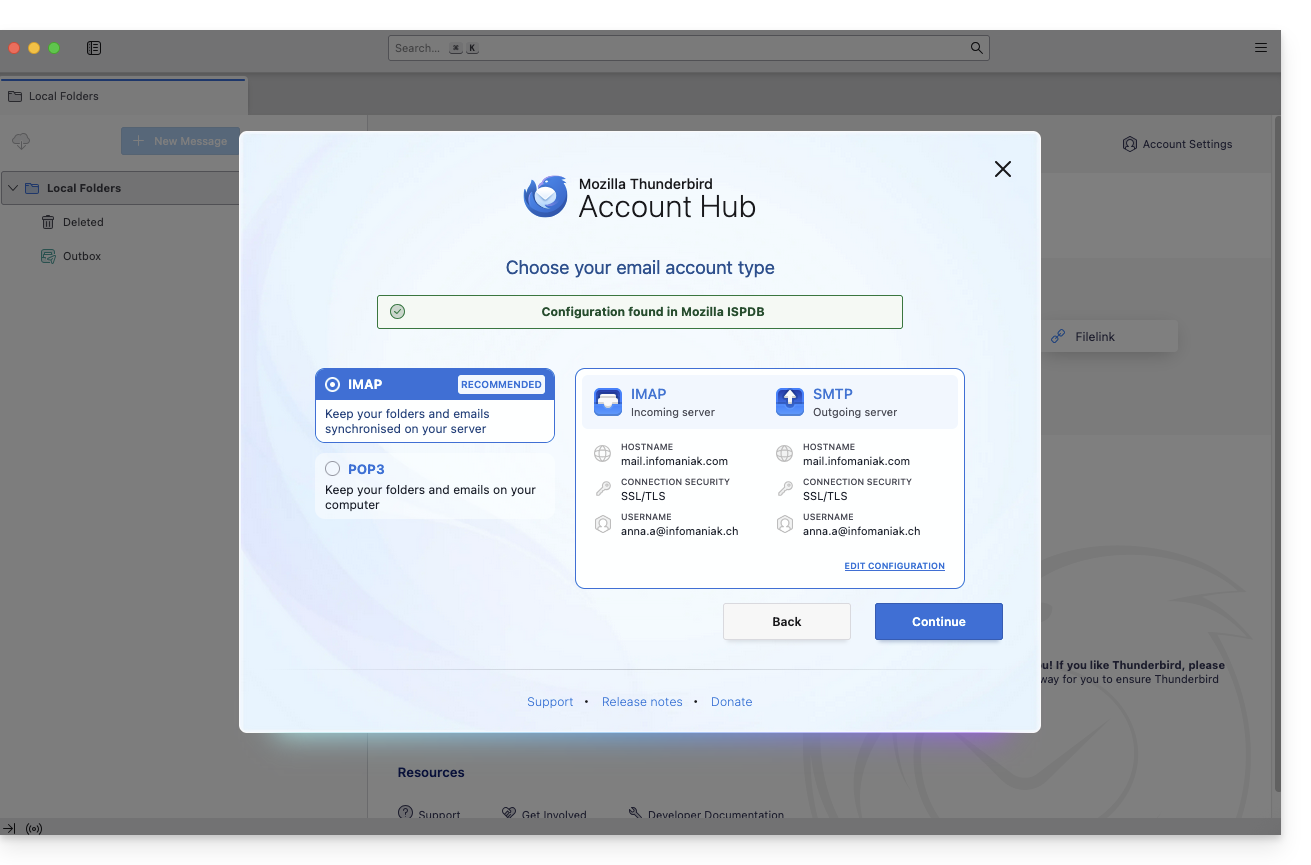
- Enter your password and click on Continue:
- Click on Continue:
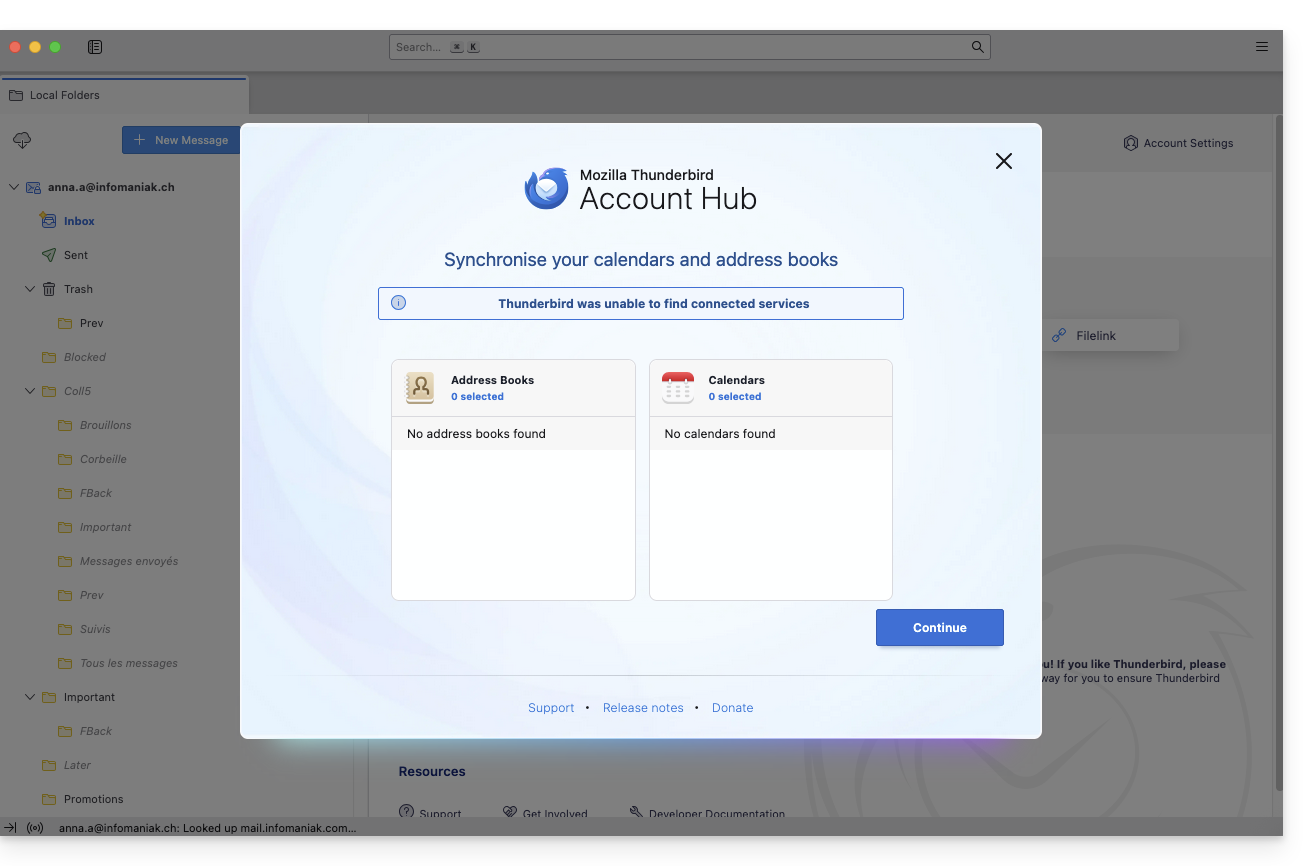
- The summary of your registration is displayed, click on Finish to add the address (or configure other services from there):
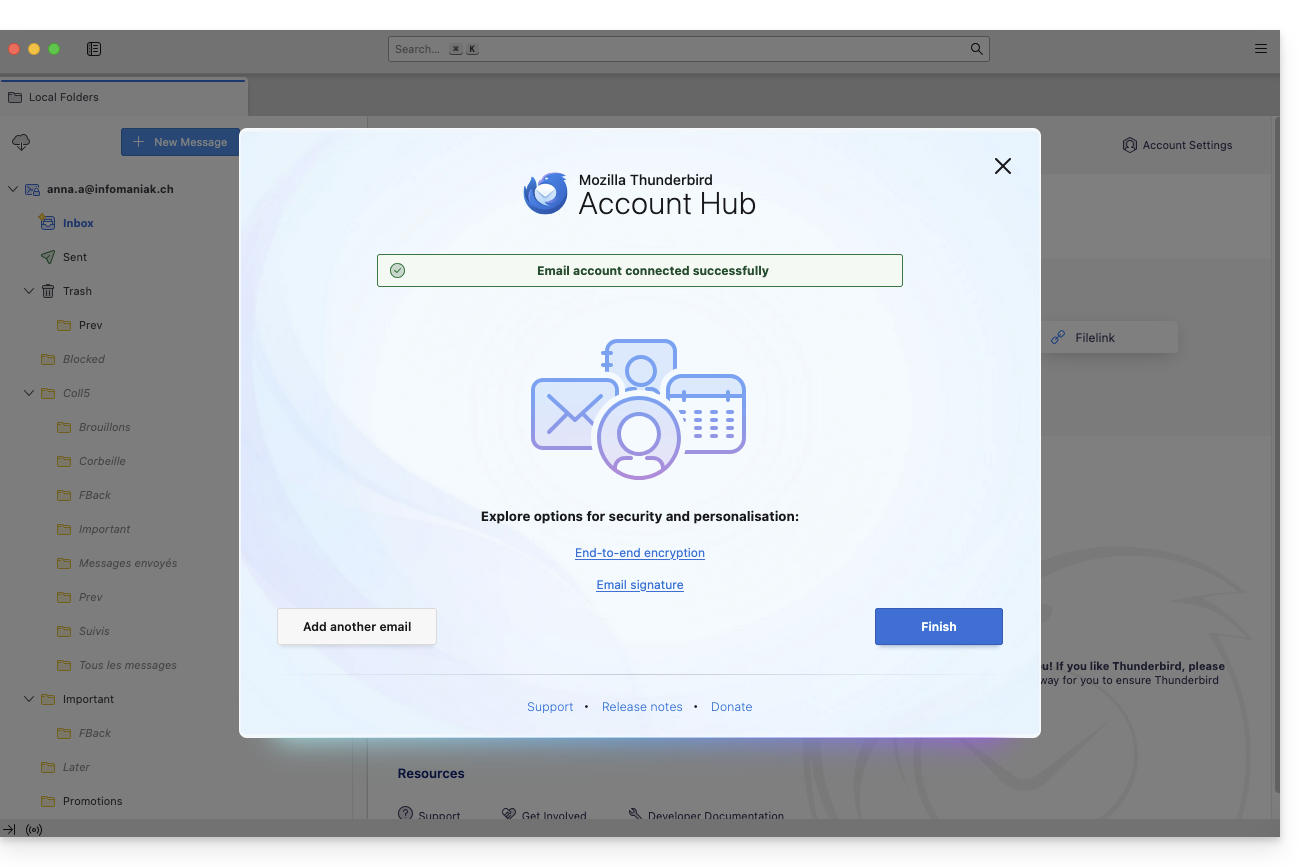
- There you go, your email address is now configured in the application:
Recommended settings
- Incoming IMAP server =
mail.infomaniak.com - IMAP port =
993(with SSL) - Outgoing SMTP server =
mail.infomaniak.com - SMTP port & encryption protocol and command/method to activate this protocol:
587+ STARTTLS - Username = full & complete email address ( ? )
- Password = the one generated for the email address you want to check
- Authentication required to send emails:
- It is activated in the SMTP settings of your application.
- Check "use the same parameters as the incoming server" or depending on the software/email clients, enter a username (= full & complete email address) and the generated password.
Refer to this other guide if you are looking for information about other mail ports and protocols compatible (SSL / TLS for example).
In case of problem
Check that the Mail Service is configured optimally.
It is not necessary to contact Infomaniak Support if your email address works well outside the application. The most common error concerns the use of an incorrect password. The troubleshooting guides help you resolve any potential issues:
- Refer to the solutions given in this other guide regarding email in general.
- This other guide is more specifically about Thunderbird.
… and if Thunderbird no longer works since a change of email password, refer to this other guide.
Link to this FAQ:
Has this FAQ been helpful?
This guide explains how to connect the native Android messaging app to an email address hosted by Infomaniak.
Preamble
- Instead of the manual configuration below, it is recommended to use the app Infomaniak Mail (Android).
- The various services offered by Infomaniak are all compatible with the corresponding standard protocols (IMAP/SMTP for email, for example), therefore if you encounter a problem with third-party software, contact its publisher or a Partner and consult the support policy as well as article 11.9 of the Infomaniak Terms of Service.
Manually add the email address to the application
Prerequisites
- Create the email address in my kSuite or a Mail Service / kSuite.
- Create a password for the email address on the device you are going to configure.
- Check that the Mail Service is configured optimally.
To configure the messaging app:
- Open the native messaging app on your device.
- Click on Add an account.
- Select Other as the email type.
- Enter your email address.
- Select the Personal IMAP type.
- Check and complete the missing information.
- Complete the procedure.
- Your email address is now configured in the app on your device.
Recommended settings
- Incoming IMAP server =
mail.infomaniak.com - IMAP port =
993(with SSL) - Outgoing SMTP server =
mail.infomaniak.com - SMTP port & encryption protocol and command/method to activate this protocol:
587+ STARTTLS - Username = full & complete email address ( ? )
- Password = the one generated for the email address you want to access
- Authentication required for sending emails:
- It is activated in the SMTP settings of your application.
- Check "use the same parameters as the incoming server" or, depending on the software/email clients, enter a username (= full & complete email address) and the generated password.
Refer to this other guide if you are looking for information about other compatible messaging ports and protocols (SSL / TLS for example).
In case of a problem
Check that the Mail Service is configured optimally.
There is no need to contact Infomaniak Support if your email address works well outside the application. The most common error concerns the use of an incorrect password. The troubleshooting guides help you resolve any potential issues:
- Refer to the solutions provided in this other guide regarding email in general
- … and if your application no longer works at the sending level (disconnected or missing SMTP server, for example) or after changing your email password, refer to this other guide.
Link to this FAQ:
Has this FAQ been helpful?
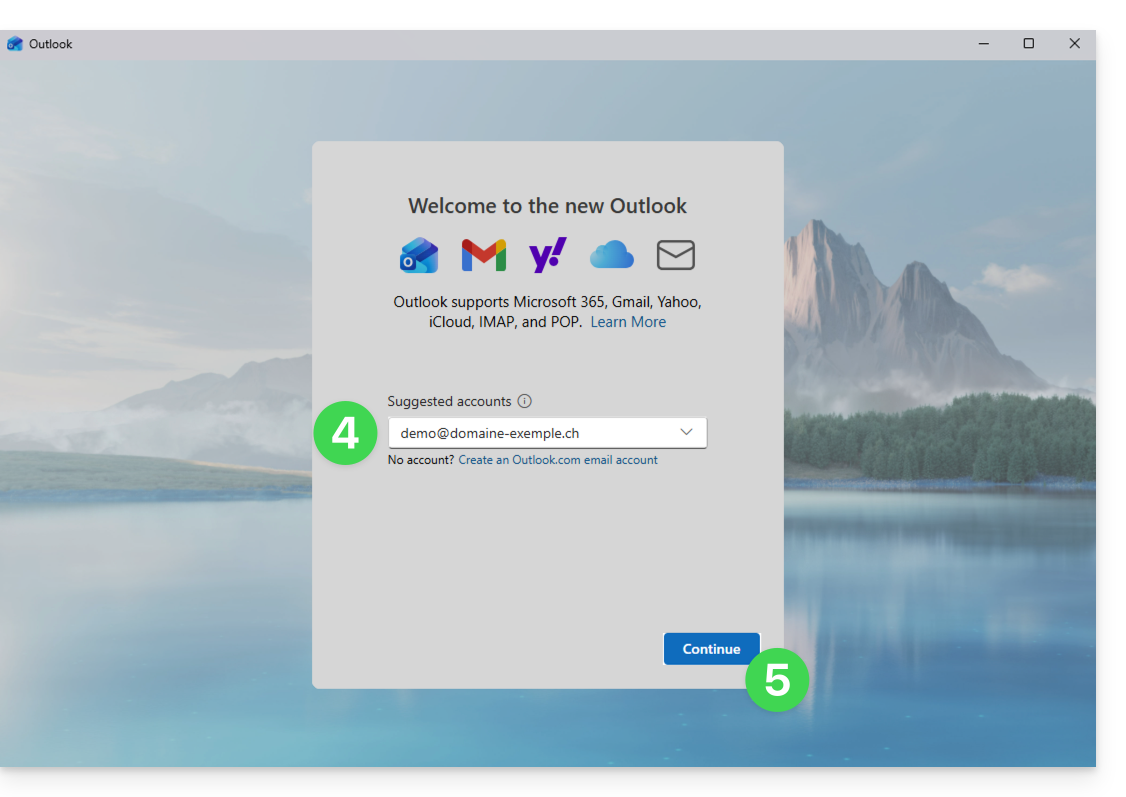
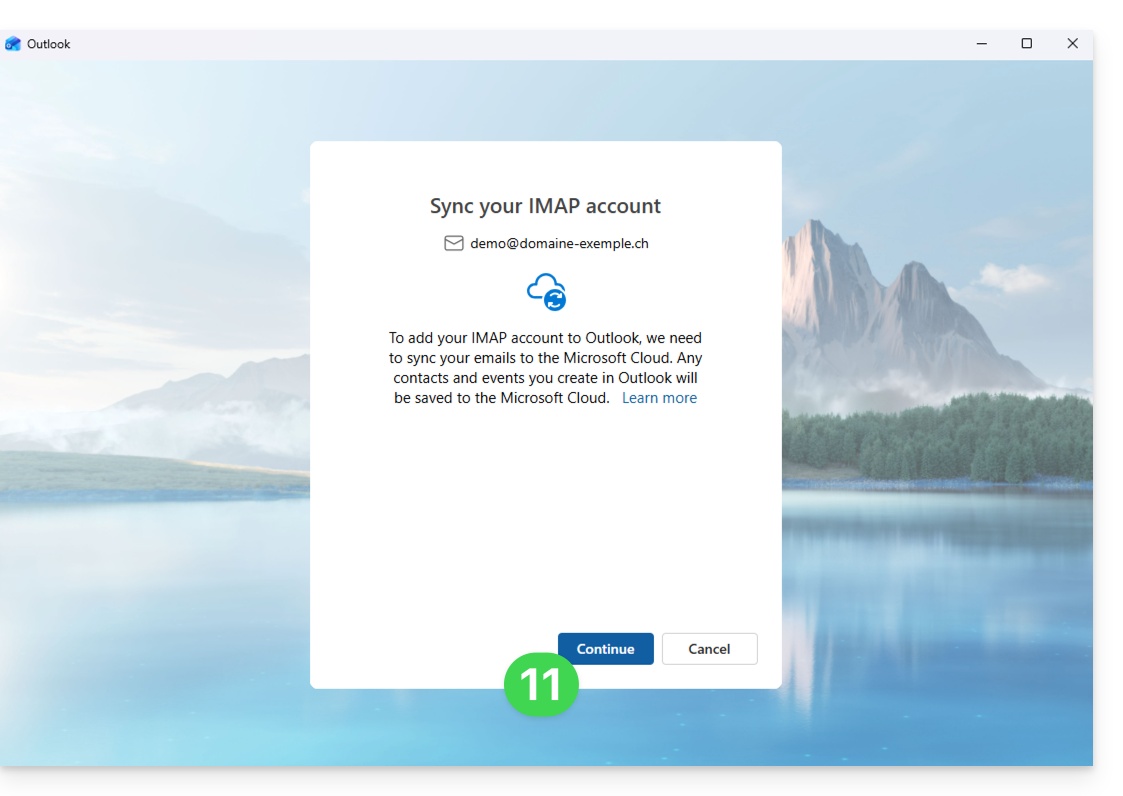
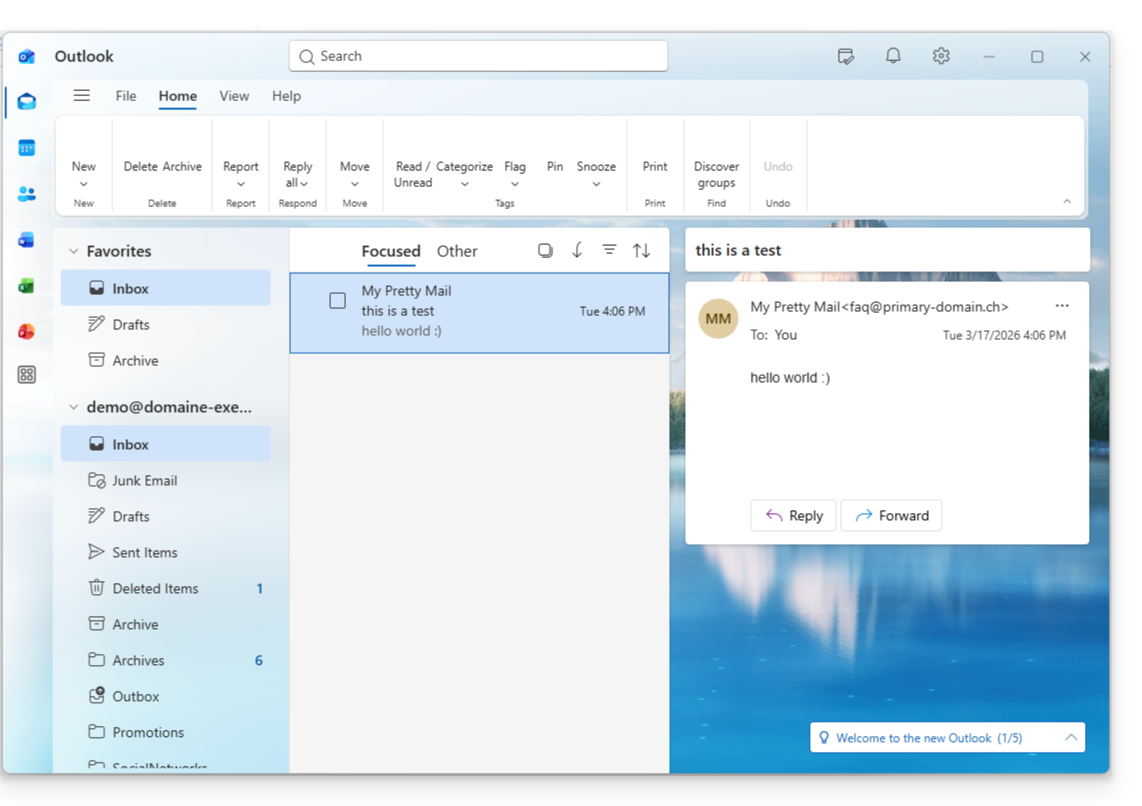
This guide explains how to connect the desktop app New Outlook (desktop application on Windows, replacing Windows Mail) to an email address hosted by Infomaniak.
Preamble
- Although the emails themselves remain stored on the Infomaniak server, the experience in New Outlook is very integrated with the Microsoft cloud:
- Some information from your account may be used by Microsoft for centralized management and better synchronization experience.
- If you wish to have total and local control over your emails, consider using third-party email software/clients (such as Thunderbird for example) that allow for more direct storage.
- The various services offered by Infomaniak are all compatible with the corresponding standard protocols (IMAP/SMTP for email, for example), therefore if you encounter a problem with third-party software, contact its publisher or a Partner and consult the support policy as well as article 11.9 of the Infomaniak Terms of Service.
Add the email address to the application
Prerequisites
- Create the email address within my kSuite or a Mail Service / kSuite.
- Create a password for the email address for the device you are going to configure.
- Check that the Mail Service is configured optimally.
The password created for the email address must meet the criteria detailed at the bottom of this guide.
To configure the email application:
- Open the application.
- If necessary, click on the gear icon in the top right (otherwise, skip to step 4).
- Click on Add an account:

- Enter the email address to be linked.
- Click on Continue:
- Enter the email address password.
- Click on the See more button.
- Scroll down the page with the elevator, then check and complete the missing information.
- Click on Continue:

- Take note of and go through the different Microsoft information windows:
- There you go, your email address is now configured in the application:
Recommended settings
- Incoming IMAP server =
mail.infomaniak.com - IMAP port =
993(with SSL) - Outgoing SMTP server =
mail.infomaniak.com - SMTP port & encryption protocol and command/method to activate this protocol:
587+ STARTTLS - Username = the complete & full email address ( ? )
- Password = the one generated for the email address you want to access (it must meet the criteria detailed at the bottom of this guide)
- Authentication required for sending emails:
- It is activated in the SMTP settings of your application.
- Check "use the same settings as the incoming server" or, depending on the software/email clients, enter a username (= complete & full email address) and the generated password.
Refer to this other guide if you are looking for information about other mail ports and protocols compatible (SSL / TLS for example).
In case of problem
Check that the Mail Service is configured optimally.
Create a new password by letting it be generated randomly but also by checking that it meets these criteria imposed by Microsoft:
| Allowed characters |
|
| Forbidden characters |
|
| Password length | 16 characters MAXIMUM |
The troubleshooting guides help you resolve any issues:
- Refer to the solutions provided in this other guide regarding email in general.
- This other guide is more specifically about Outlook.
… and if your Outlook is no longer working since a change in your email password, refer to this other guide.
Link to this FAQ:
Has this FAQ been helpful?
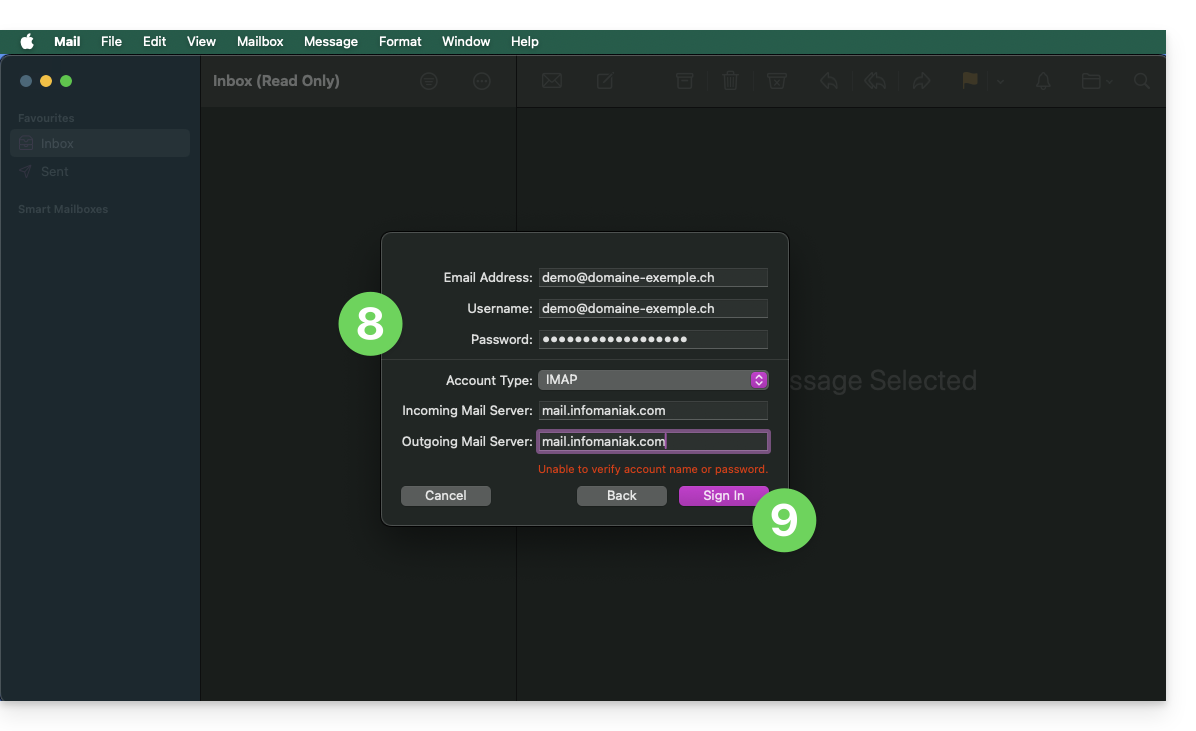
This guide explains how to connect the desktop app Apple Mail (desktop application on macOS) to an email address hosted by Infomaniak.
Preamble
- Instead of the manual configuration below, it is recommended to use the .mobileconfig configuration profiles offered by Apple.
- The various services offered by Infomaniak are all compatible with the corresponding standard protocols (IMAP/SMTP for email, for example), therefore if you encounter a problem with third-party software, contact its publisher or a Partner and consult the support policy as well as article 11.9 of the Infomaniak Terms of Service.
Manually add the email address to the application
Prerequisites
- Create the email address in my kSuite or a Mail Service / kSuite.
- Create a password for the email address for the device you are going to configure.
- Check that the Mail Service is configured optimally.
To configure the email application:
- Open the application.
- If you have already configured an address, click on the Mail menu then Add an account:
- If you have already configured an address, click on the Mail menu then Add an account:
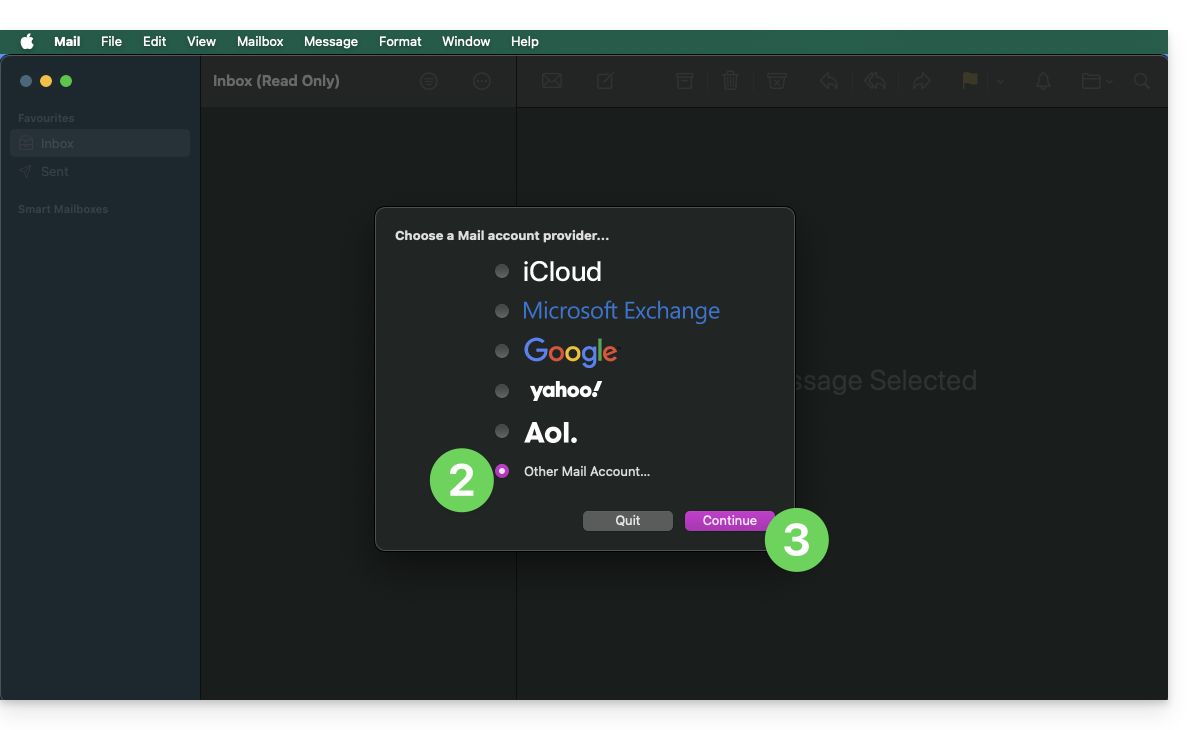
- Click on Other account.
- Click on Continue:
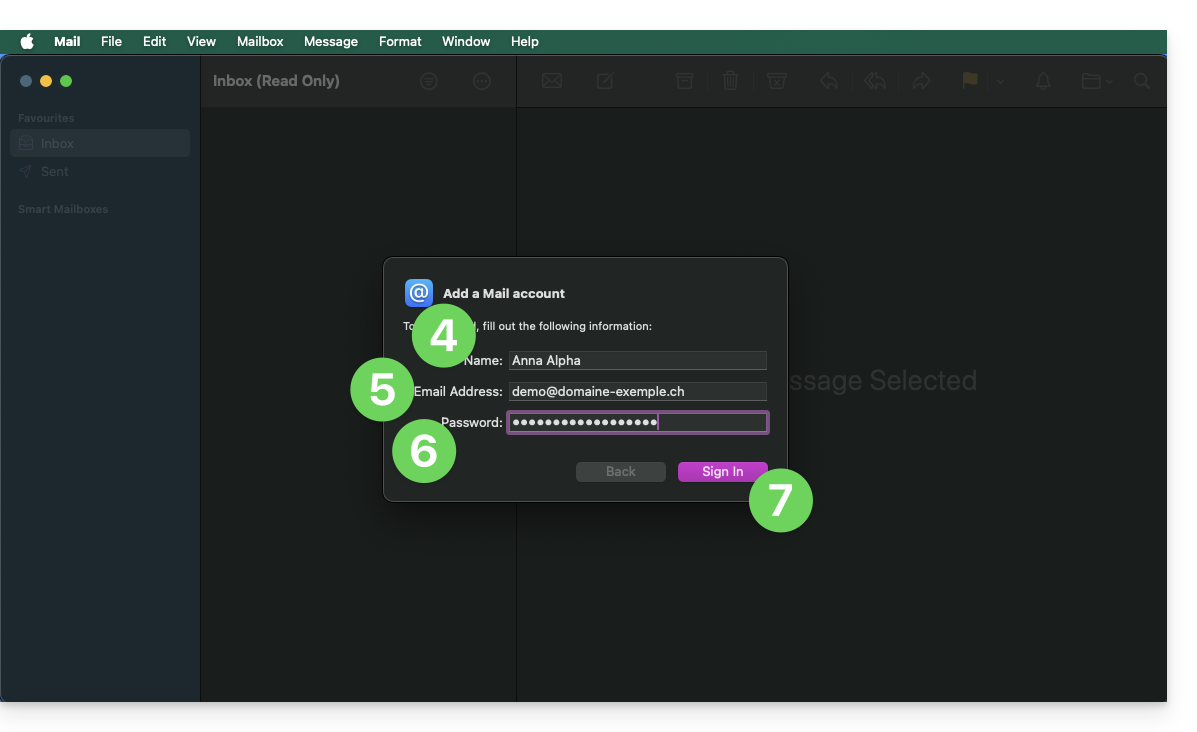
- Enter the account name.
- Enter the email address to be linked.
- Paste the email address password generated on the Infomaniak Manager.
- Click on the blue Log in button:
- Check and complete the missing information.
- Click on Log in:
- Press the button to validate:
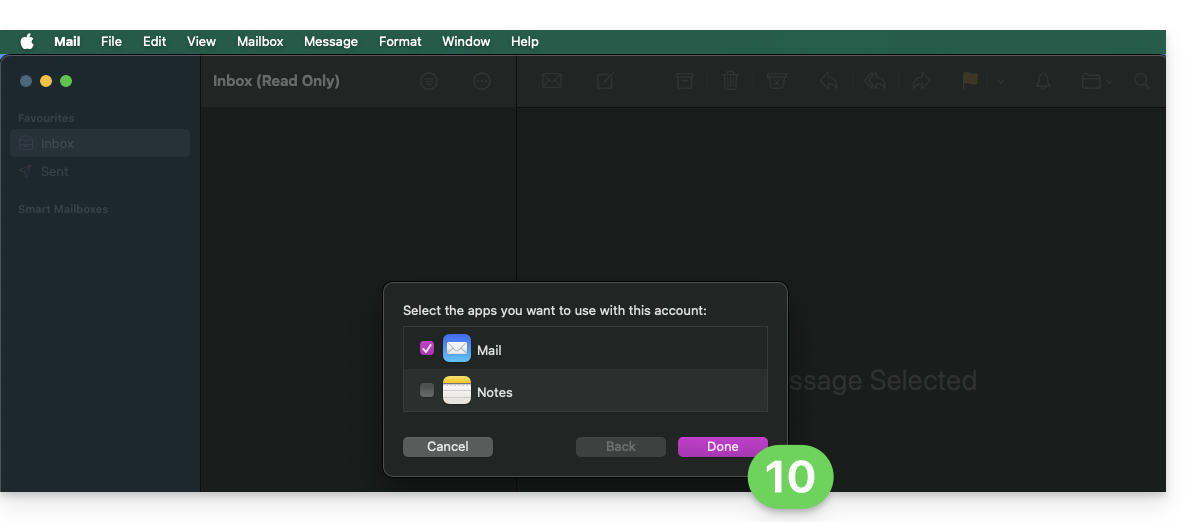
- There you go, your email address is now configured in the application:

Recommended settings
- Incoming IMAP server =
mail.infomaniak.com - IMAP port =
993(with SSL) - Outgoing SMTP server =
mail.infomaniak.com - SMTP port & encryption protocol and command/method to activate this protocol:
587+ STARTTLS - Username = full & complete email address ( ? )
- Password = the one generated for the email address you want to access
- Authentication required for sending emails:
- It is activated in the SMTP settings of your application.
- Check "use the same parameters as the incoming server" or depending on the software/email clients, re-enter a username (= full & complete email address) and the generated password.
Refer to this other guide if you are looking for information about other compatible email ports and protocols (SSL / TLS for example).
In case of a problem
There is no need to contact Infomaniak Support if your email address works well outside the application. The most common error concerns the use of an incorrect password. The tool offered within Apple Mail can indicate this to you: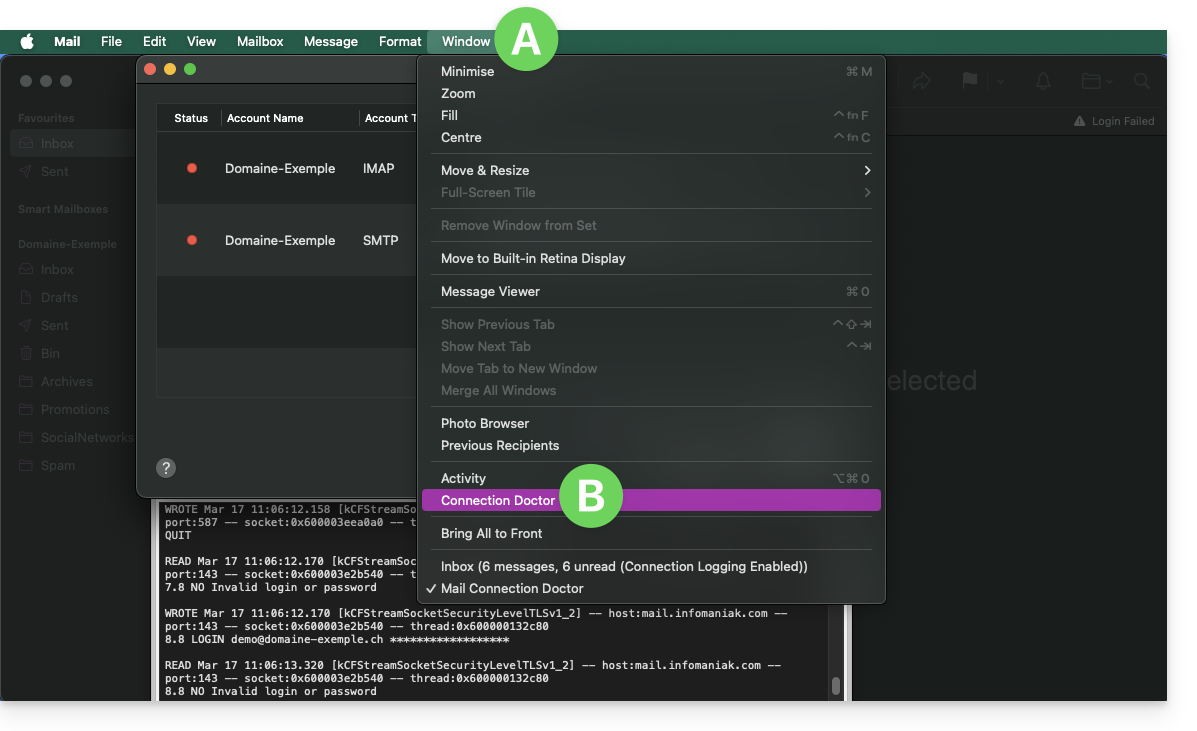
Create a new password from the Mail Service and reconfigure your account on the email application.
The troubleshooting guides help you resolve any potential issues:
- Refer to the solutions provided in this other guide regarding email in general.
- Delete any Apple configuration profiles linked to your Infomaniak email before reconfiguring.
And if your Apple Mail no longer works since a change of email password, refer to this other guide.
Link to this FAQ:
Has this FAQ been helpful?
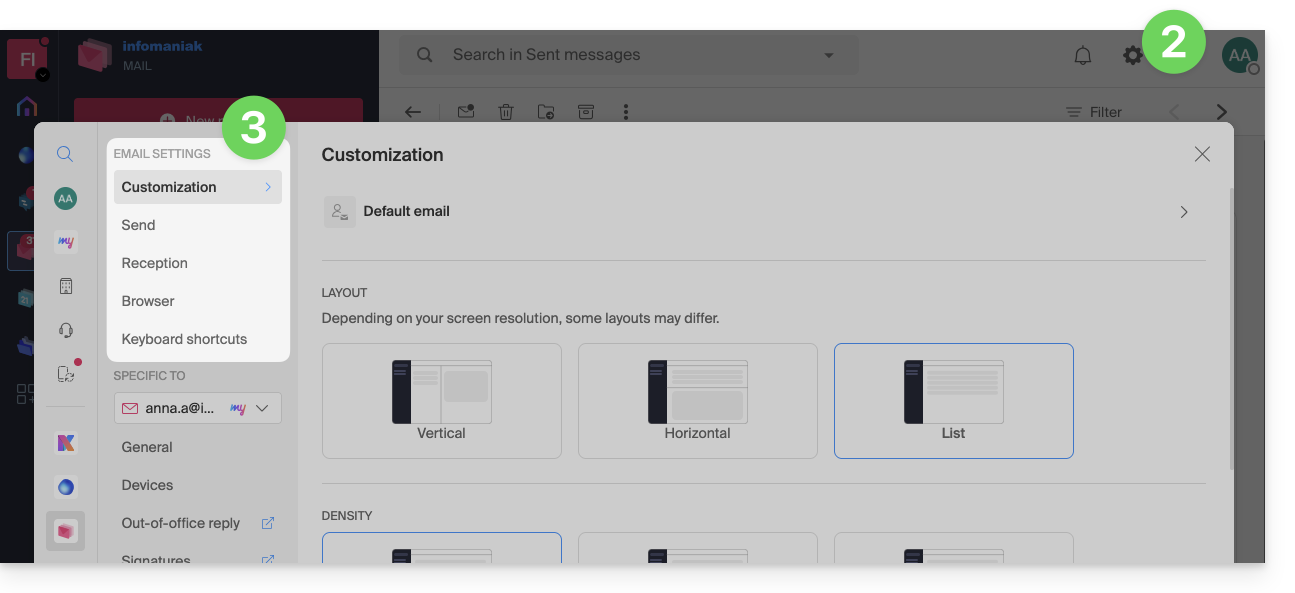
This guide explains how to configure and customize the global display of the Infomaniak Web app Mail (online service ksuite.infomaniak.com/mail) using various options.
Preamble
- The general settings affect all email addresses currently attached to your account on the Mail app.
- They are specific to your user only and do not affect other users (of the same Organization, for example).
- The same email address retrieved on the Mail app of another user will have its own settings independently of yours.
Accessing general settings
To do this:
- Click here to access the Infomaniak Web app Mail (online service ksuite.infomaniak.com/mail).
- Click on the Settings icon at the top right of the interface.
- Navigate through the different generic menus on the left:
To manage the light/dark theme of the interface: refer to this other guide on the subject.
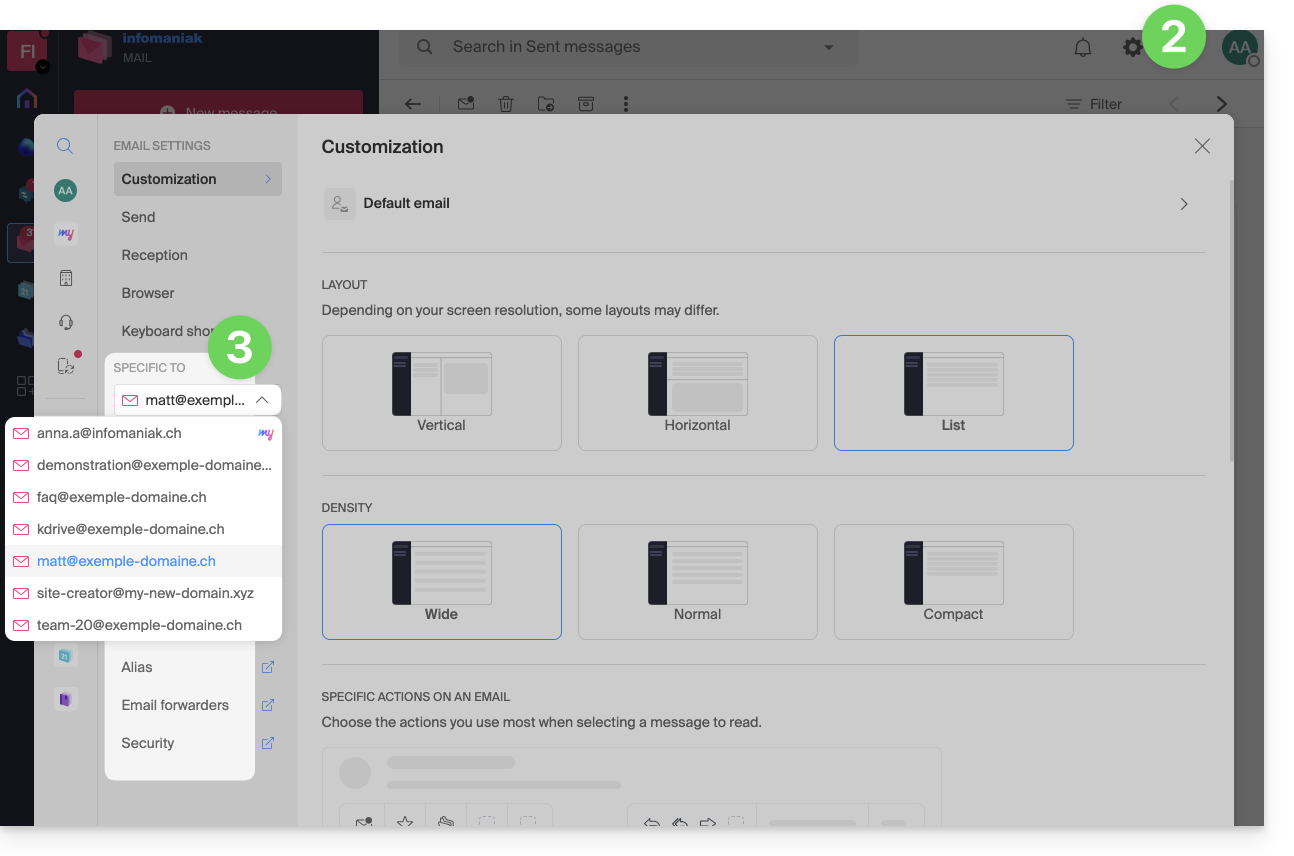
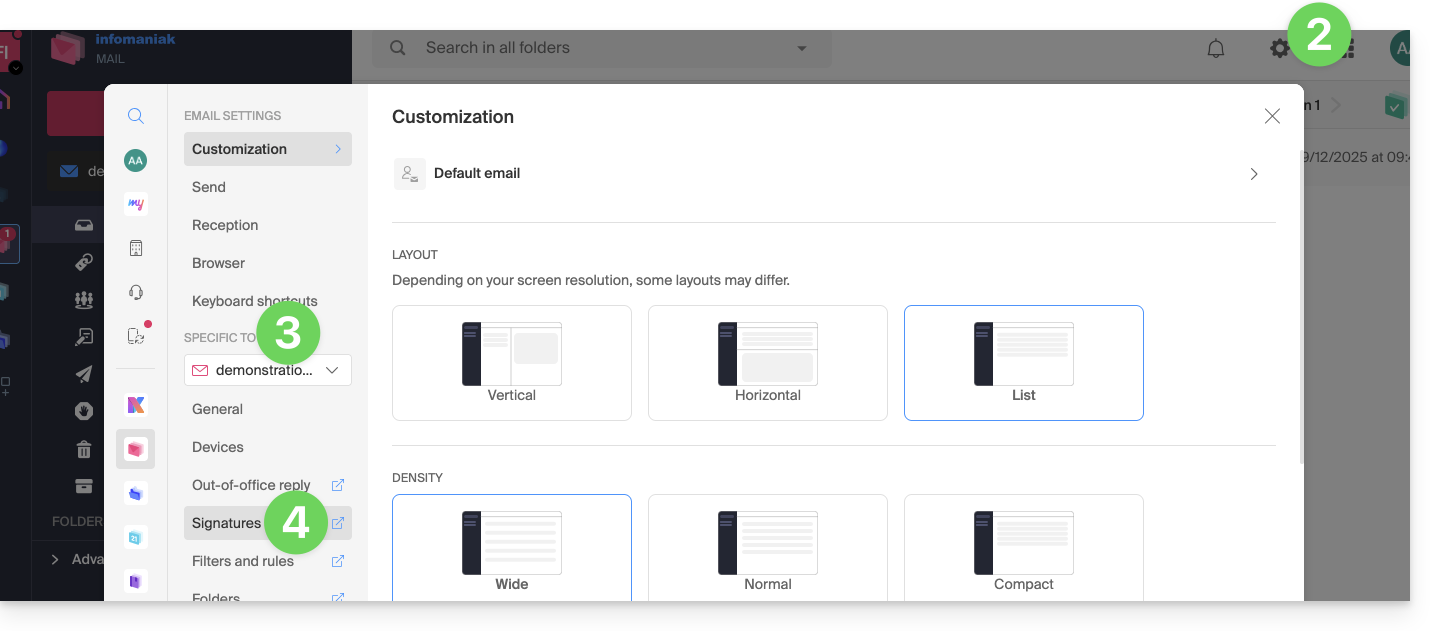
Customization: default email address
This section allows you to choose which email address, among all your attached addresses, should be considered the main one, and open by default when accessing the Infomaniak Web app Mail (online service ksuite.infomaniak.com/mail):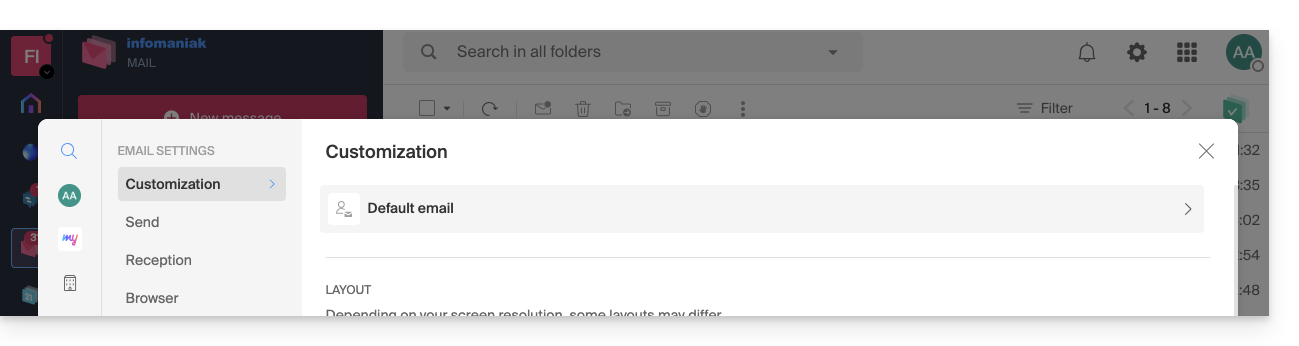
Customization: modify the display density of your inbox
You can change the presentation of your inbox so that it is divided into several parts displaying your emails, or simply in a list version. The density choice allows you to tighten or space out your emails:
Customization: manage the buttons visible on the page of an email
This section allows you to choose the icons that should be displayed on the email reading window, allowing you to take quick action rather than through the dropdown menu: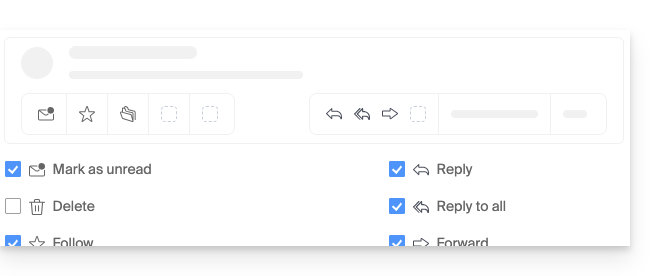
- Mark as unread
- Delete
- Follow
- Translate
- Remind me later
- Organize an event
- Report as spam
- Download to kDrive
- Archive
- Reply
- Reply to all
- Forward
- Reply on kChat
Customization: manage the buttons visible when hovering over an email list
This section allows you to choose the icons that should be displayed when you hover over an email in a list (e-mails in the inbox for example):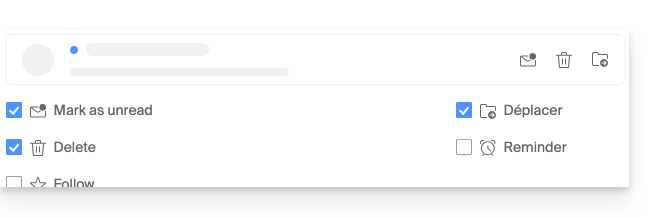
- Mark as unread
- Delete
- Follow
- Move
- Remind me later
Customization: manage the buttons visible when text is selected
This section allows you to choose the actions visible when text is selected:
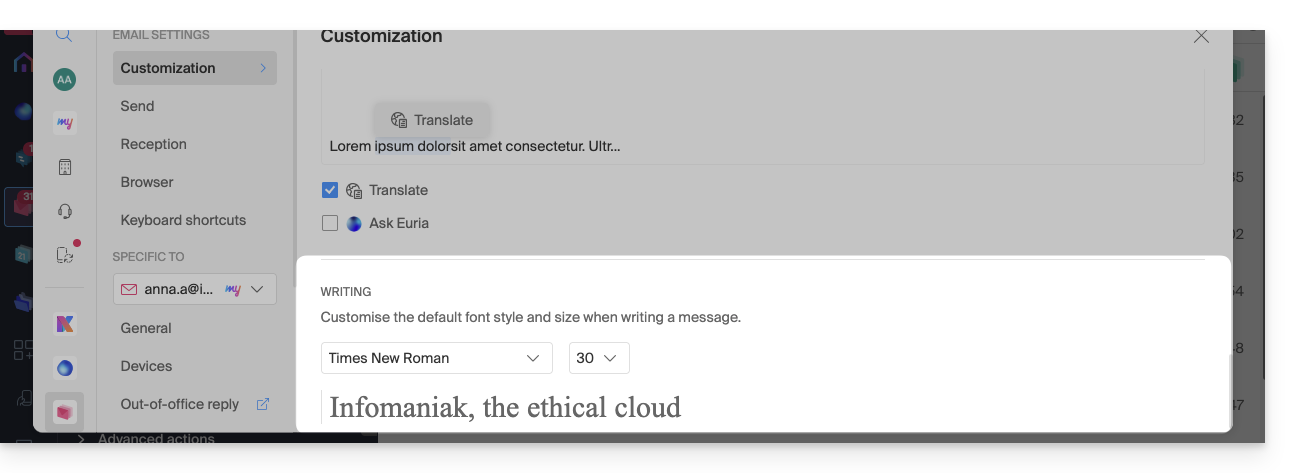
Customization: set the default font for all your new messages
- Choose the desired font, as well as the text size, for all new messages to be written:
Sending: cancellation delay
Sending: transfer emails in the body of the message or as an attachment
Sending: include the original message when replying
Sending: always write in a full-screen window
Activate the toggle switch to the right of the item “Compose emails in full screen” to always write in a large window instead of the usual bottom right inset.
Sending: request a read receipt
Sending: include a preview of website links
To enable or disable a link preview (a feature that automatically generates a visual box (with title, description, and image) when you insert a URL into an email), toggle the switch to the right of the “Include website link previews” element.
Once enabled, here is the result when drafting content with a URL:
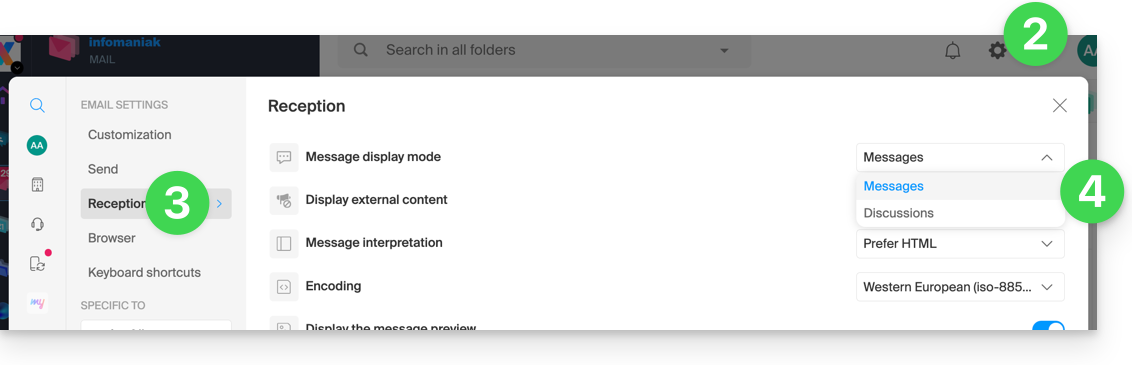
Inbox: Message display mode
This mode allows you to group your emails by subjects/senders, i.e., group the received emails based on the discussion topic, making the inbox display lighter and easier to follow messages from different conversation participants:
- Click here to access the Infomaniak Web app Mail (online service ksuite.infomaniak.com/mail).
- Click on the Settings icon at the top right of the interface.
- Click on Inbox in the left sidebar.
- Choose a Message display mode:
When the Conversations mode is not enabled, you read your emails one by one:
When it is enabled, you read the different messages in the same window chronologically, one below the other:
In your inbox, you can directly see the number of emails contained in a single discussion:
Inbox: Display external content
This section allows you to choose whether to automatically display all external content present in an incoming email you are reading, or whether you prefer to hide it and only display it on demand: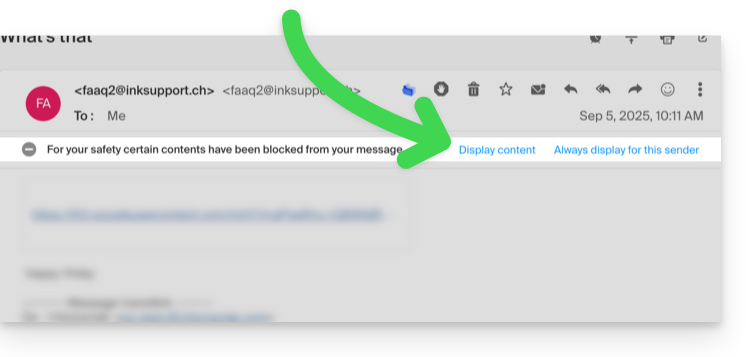
Inbox: Message interpretation
This section allows you to define the display priority of a received message: either in its simplified version as plain text, or in its enriched version as HTML (this setting only applies when both formats are present in the email; if only one version is available, it will be displayed by default).
Inbox: Encoding
This section allows you to modify the encoding of received messages (it is recommended to leave Unicode (utf-8)).
Inbox: Show message preview
This section allows you to display or hide the first few words contained in the email in all message lists (e.g., inbox). Example with preview enabled, the beginning of the message is visible on the same line next to its subject:
If the preview is hidden, only the subject of each email is displayed:
Note for users of the Infomaniak Newsletter service: you can manage the content that will be displayed when the preview is enabled, using the information to be completed as indicated in point 1.4 of this other guide.
Inbox: Mark an email as read…
This section allows you to choose after how much reading time a message should be considered as read (immediately, after 3 seconds, or 5, or 20, or never).
Inbox: When a message is archived or deleted…
This section allows you to choose the action to be taken after archiving or deleting an email: open the next message, or the previous one, or return to the message list.
Reception: number of emails displayed on a single page
Choose the number of items to display to increase or decrease the number of emails displayed on a single page, up to 200 items maximum.
Browser: set Infomaniak as the default mail client
Browser: email address on new tab
Browser: message reception notification
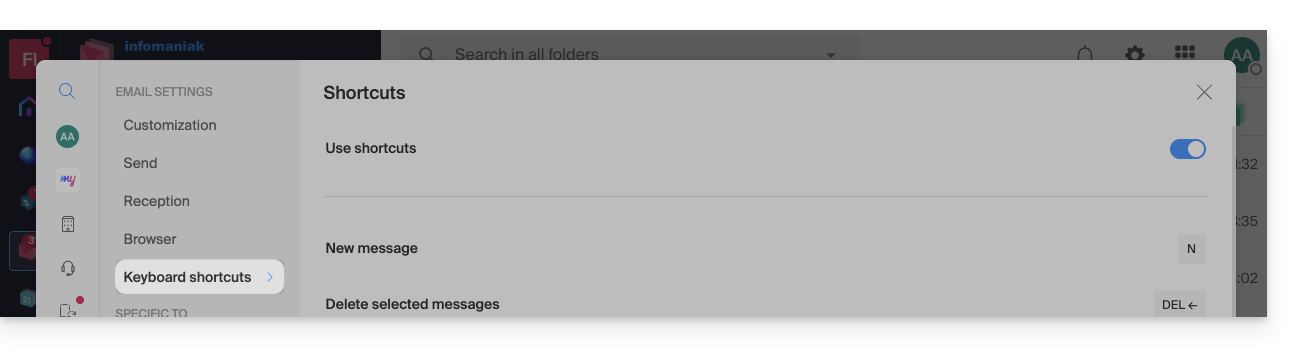
Keyboard shortcuts
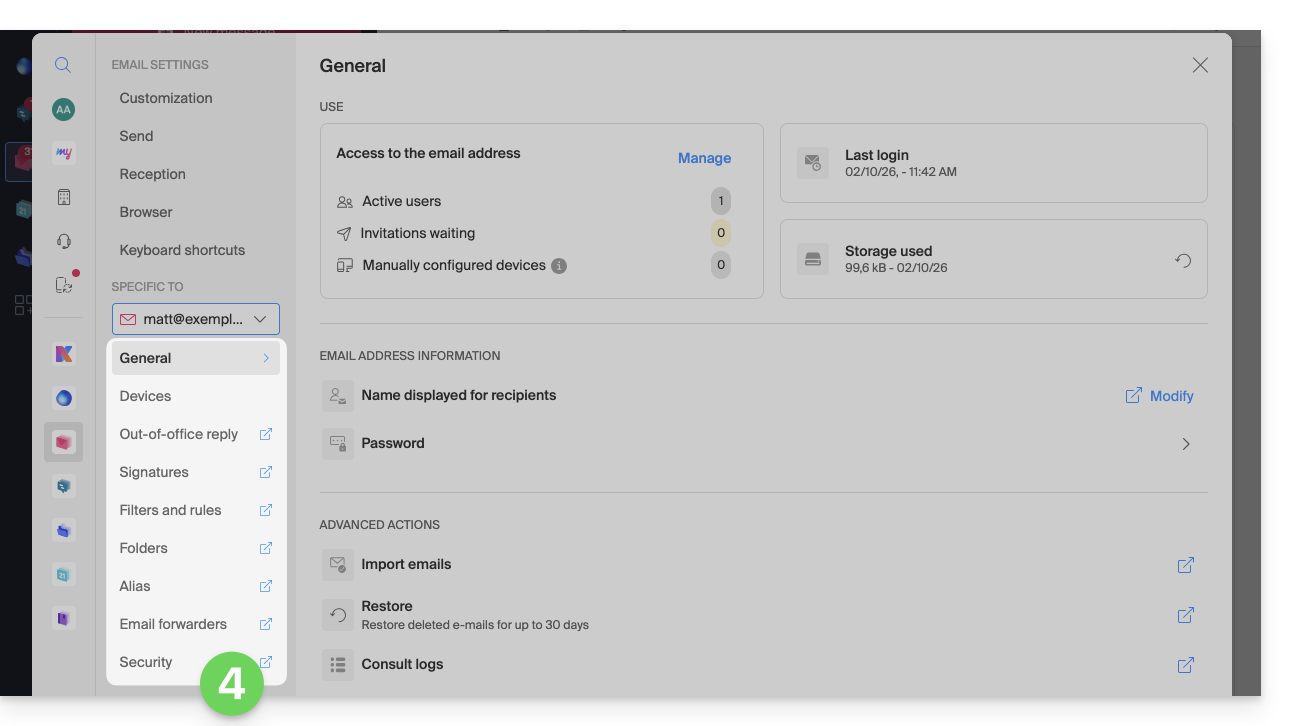
Modify the parameters specific to email addresses
To access the signature, alias, etc. parameters specifically concerning each of your Infomaniak email addresses:
- Click here to access the Infomaniak Web app Mail (online service ksuite.infomaniak.com/mail).
- Click on the Settings icon at the top right of the interface.
- Check or select the email address concerned in the dropdown menu of the left sidebar:
- Click on the different elements of the secondary left sidebar menu to configure your email address:
Do not hesitate to browse the FAQ to find the corresponding guides.
Link to this FAQ:
Has this FAQ been helpful?
This guide explains how to check the storage space of your free Infomaniak mail offer and how to free up space.
Preamble
- The storage space for my kSuite emails is limited to a maximum of 20 GB (paid Mail Infomaniak offers (my kSuite+ included) have unlimited disk space).
- If you reach this limit, you will no longer be able to receive new emails, and you will need to free up space in this case.
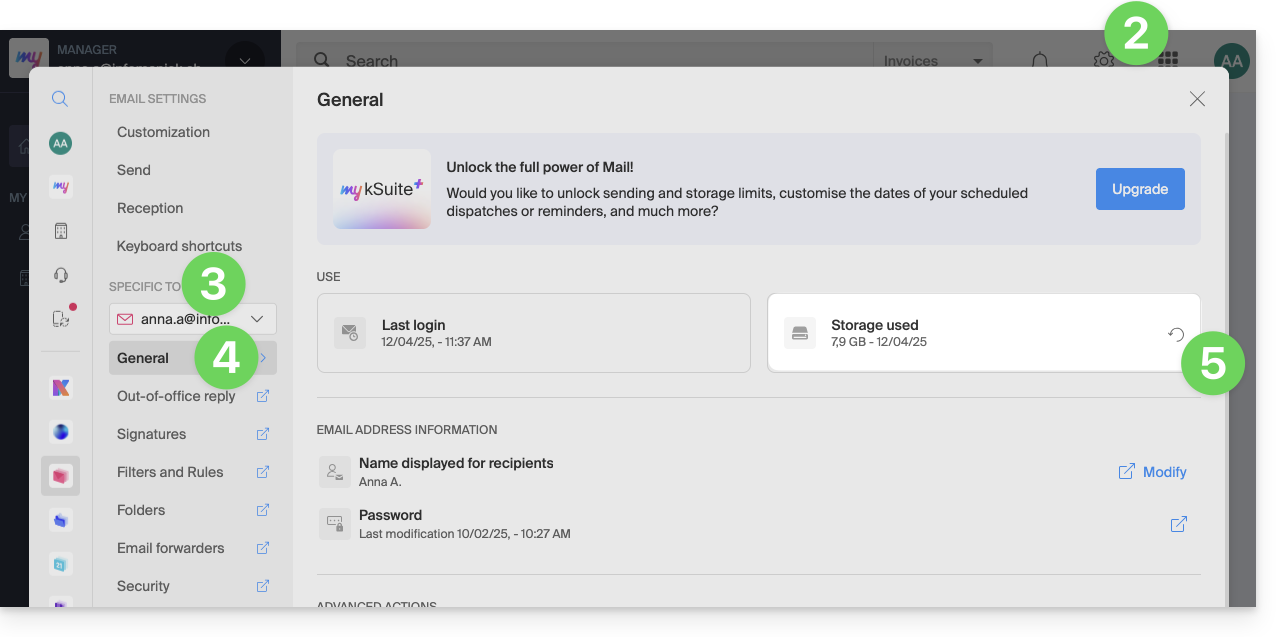
Display the total storage space used
To do this:
- Click here to access the Infomaniak Mail Web app (online service ksuite.infomaniak.com/mail).
- Click on the Settings icon at the top right.
- Check or select the email address concerned in the dropdown menu of the left sidebar.
- Click on General below.
- Click the button to refresh the disk space:
Free up storage space
When your mailbox is full, it is crucial to free up space to continue receiving messages. Here are some effective solutions to achieve this:
1. Delete non-essential emails
- Search for the largest messages. Delete messages with unnecessary attachments or download them to your computer before deleting the emails.
- Sort your emails by date and delete those that are too old or that you no longer need.
- After deleting emails, do not forget to empty the trash to actually free up space.
- Unsubscribe from newsletters and mailing lists that you no longer read to avoid receiving unnecessary emails in the future.
2. Use an email management application
- There are applications like Clean Email, Unroll.me, or Mailstrom that can help you quickly and efficiently clean up your inbox (be careful, however, with the terms of use and confidentiality of these applications).
3. Increase storage capacity
- Paid Infomaniak Mail offers (including my kSuite+) come with unlimited disk space.
Link to this FAQ:
Has this FAQ been helpful?
This guide details the limitations specific to the my kSuite offer and the advantages of the my kSuite+ offer.
my kSuite limits only
The my kSuite offer imposes certain limits that my kSuite+ does not…
Mail, contacts & calendars
- Disk space limited to 20 GB of storage for emails.
- No advanced mode in message sorting rules.
- "my kSuite" signature imposed.
- No email sharing link.
- 1 address book, 1 calendar.
- Backup retention (30 days) of emails; retrievable by changing the offer.
kDrive
- 1 kDrive drop box.
- 25 kDrive sharing links (and without duration settings, password…).
- Retention of previous versions of your files: 30 versions over 30 days (60 over 120 days for my kSuite+, some of which are permanent).
- 30-day trash (60 for my kSuite+).
- No statistics.
- No editing/signing of PDF files.
Limitation of my kSuite & my kSuite+ offers
Click on the links below to find out the details:
- Offer limited to one address per account (linked to a European phone number).
- Obligation to indicate a valid mobile phone number to confirm registration.
- Limited number of daily email sends, email redirections and unique recipients per message.
- No possibility to create aliases for your email.
- No customizable email signature.
- Email hold and scheduled sending: restricted features (no customization) on my kSuite and customizable with my kSuite+.
- 15 GB of Cloud storage with my kSuite, 1/2/6/12 TB with my kSuite+.
- Registration only possible for individuals residing in OECD member countries (official list), including:
- Germany
- Australia
- Austria
- Belgium
- Canada
- Chile
- Colombia
- South Korea
- Costa Rica
- Denmark
- Spain
- Estonia
- United States
- Finland
- France
- Greece
- Guadeloupe
- French Guiana
- Hungary
- Ireland
- Iceland
- Israel
- Italy
- Japan
- Latvia
- Lithuania
- Luxembourg
- Martinique
- Mayotte
- Mexico
- Monaco
- New Caledonia
- New Zealand
- Norway
- Netherlands
- Poland
- French Polynesia
- Portugal
- Czech Republic
- Réunion
- United Kingdom
- Saint Barthélemy
- Saint Martin
- Saint Pierre and Miquelon
- Slovakia
- Slovenia
- Sweden
- Switzerland
- French Southern Territories
- Turkey
- Wallis and Futuna
my kSuite+ offer
The my kSuite+ offer allows you to send more messages per day to a larger number of unique recipients at once.
To help you identify the my kSuite / kSuite offer most suited to your needs, refer to this other guide.
For sending emails to a large number of recipients, there is a Newsletter tool.
Link to this FAQ:
Has this FAQ been helpful?
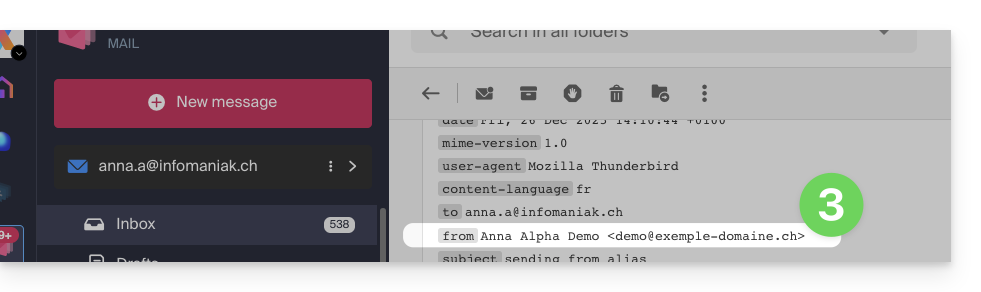
This guide explains how to set up a sending and reply address different from the email address used on the Infomaniak platform.
✘ UNAVAILABLE with
my kSuite / my kSuite+ (ik.me, etik.com, ikmail.com)
Preamble
- This is useful for working with one of your email aliases or synonymous domains.
- This will work with the Infomaniak Mail Web app (online service ksuite.infomaniak.com/mail) as well as with most email software/clients.
- However, be aware: there is no link between the settings entered in the Signature section of Infomaniak Mail and email software/clients.
- Each email software/client has its own settings, and you can, for example, define a different reply address within each of the respective tools (read at the bottom of this guide).
Set up the sending address on the Infomaniak Web Mail app
Prerequisites
- The secondary email address that can be used must have been added as:
- … either an email alias (example:
aa@instead ofanna.alpha@) but special aliases excluded: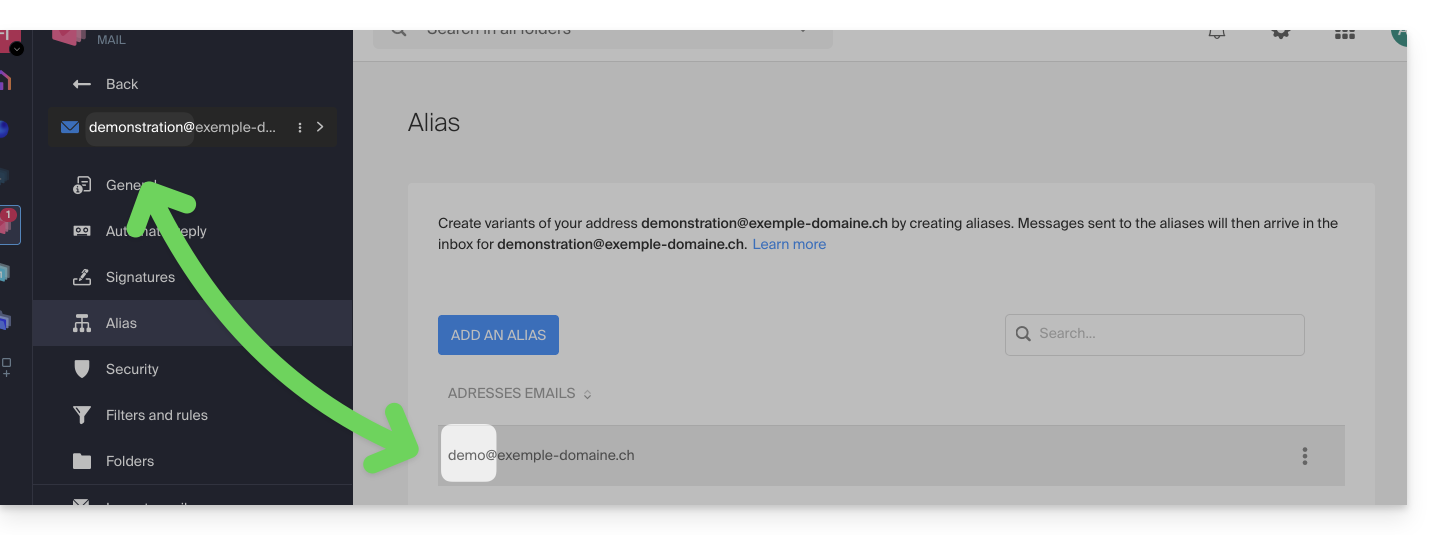
- … or synonymous domains (example:
@short-dom.xyzinstead of@my-super-long-domain.xyz).
- … either an email alias (example:
To access the sending address options:
- Click here to access the Infomaniak Mail Web app (online service ksuite.infomaniak.com/mail).
- Click on the Settings icon at the top right of the interface.
- Check or select the email address concerned in the dropdown menu of the left sidebar.
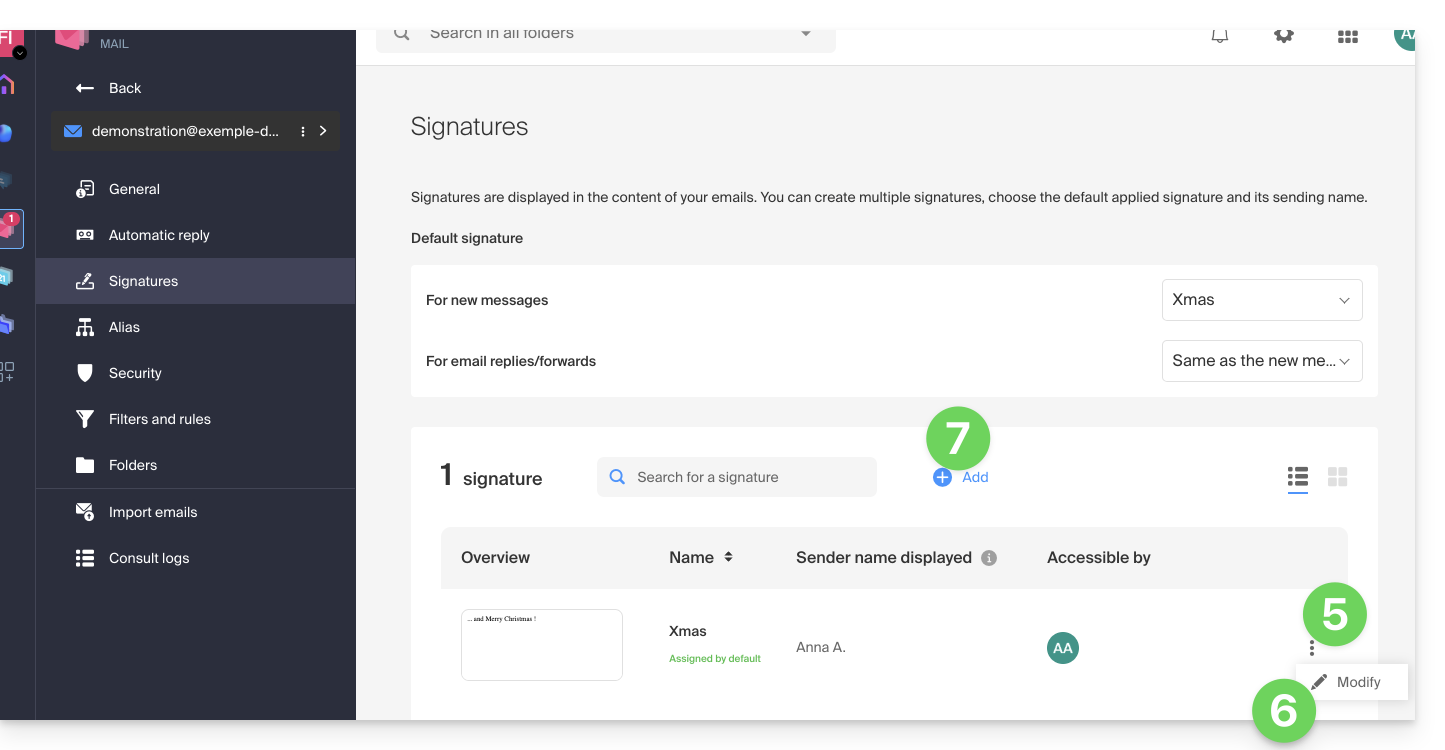
- Click on Signatures:
- Click on the action menu ⋮ to the right of the current signature.
- Click on the pencil icon ✎ to edit the current signature.
- OR ELSE create a new signature:
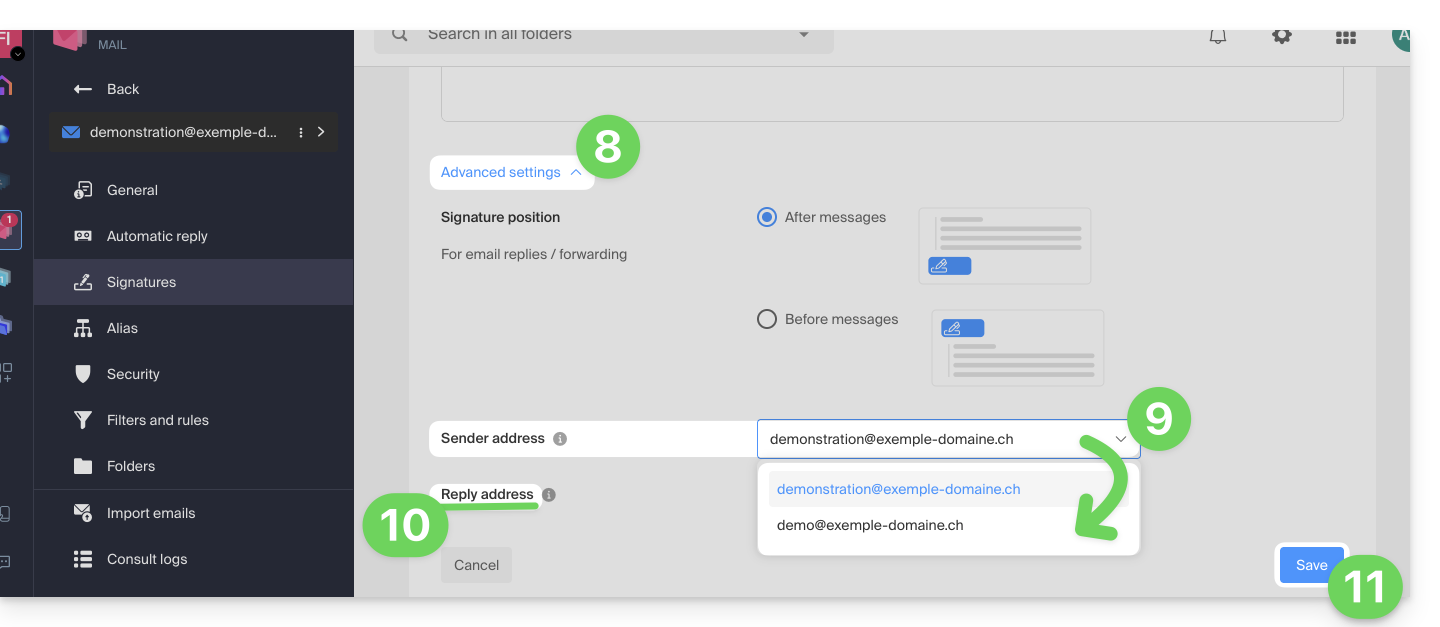
- Click on the chevron to expand the Advanced Settings section at the bottom of the page.
- The sending address allows, if proposed, to define the address that will be mentioned as the sender in the inbox of your recipients.
- The reply address allows you to receive future replies to your emails (return-path) to a different address (among the choices specified in the prerequisites above)…
- …and if you write a message in response to a reply received on this alias, the signature allowing sending with this alternative identity will be applied instead of the default signature.
- Confirm with the Save button (if this button remains grayed out, make sure all fields are filled in, especially the full name field):
- Write a new message by selecting the corresponding signature:
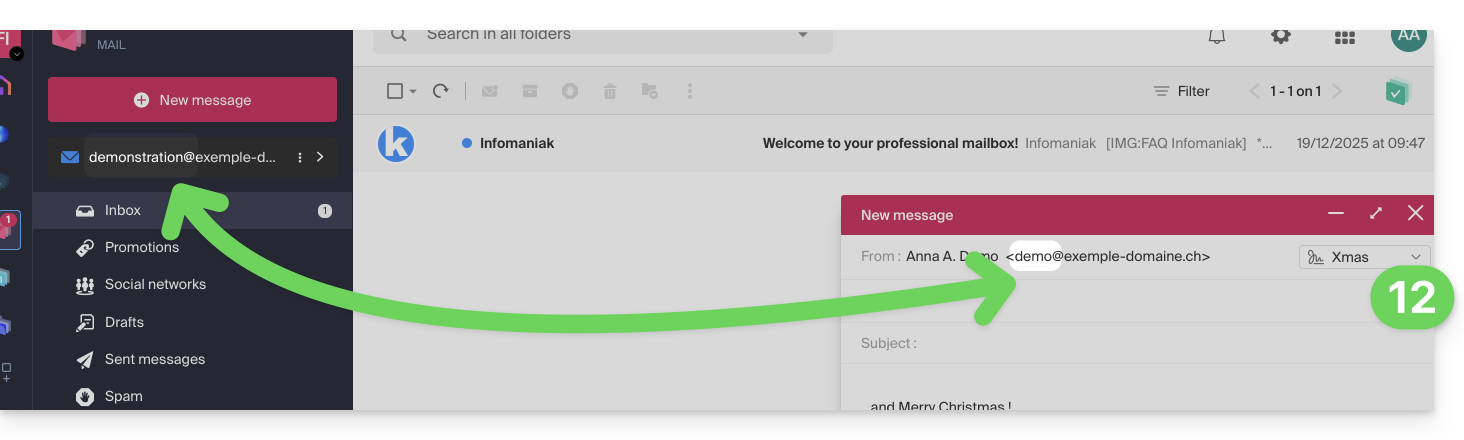
In the example above, the sending address was changed, but not the reply address. This results in the expected outcome for the recipient (it is sufficient to check the headers of the received message to prove it).
Now add the same secondary address in an email software/client, the effect will be the same.
Configure the sending address on an email software/client
Prerequisites
- The secondary email address that can be used must have been added as:
- …or email alias (example:
aa@instead ofanna.alpha@) including special aliases. - … or synonymous domains (example:
@short-dom.xyzinstead of@my-super-long-domain.xyz).
- …or email alias (example:
It is possible to configure an email software/client with any existing email address, even if it exists as an alias in your Mail Service. The sending will be the same as with an address defined as the "main" email.
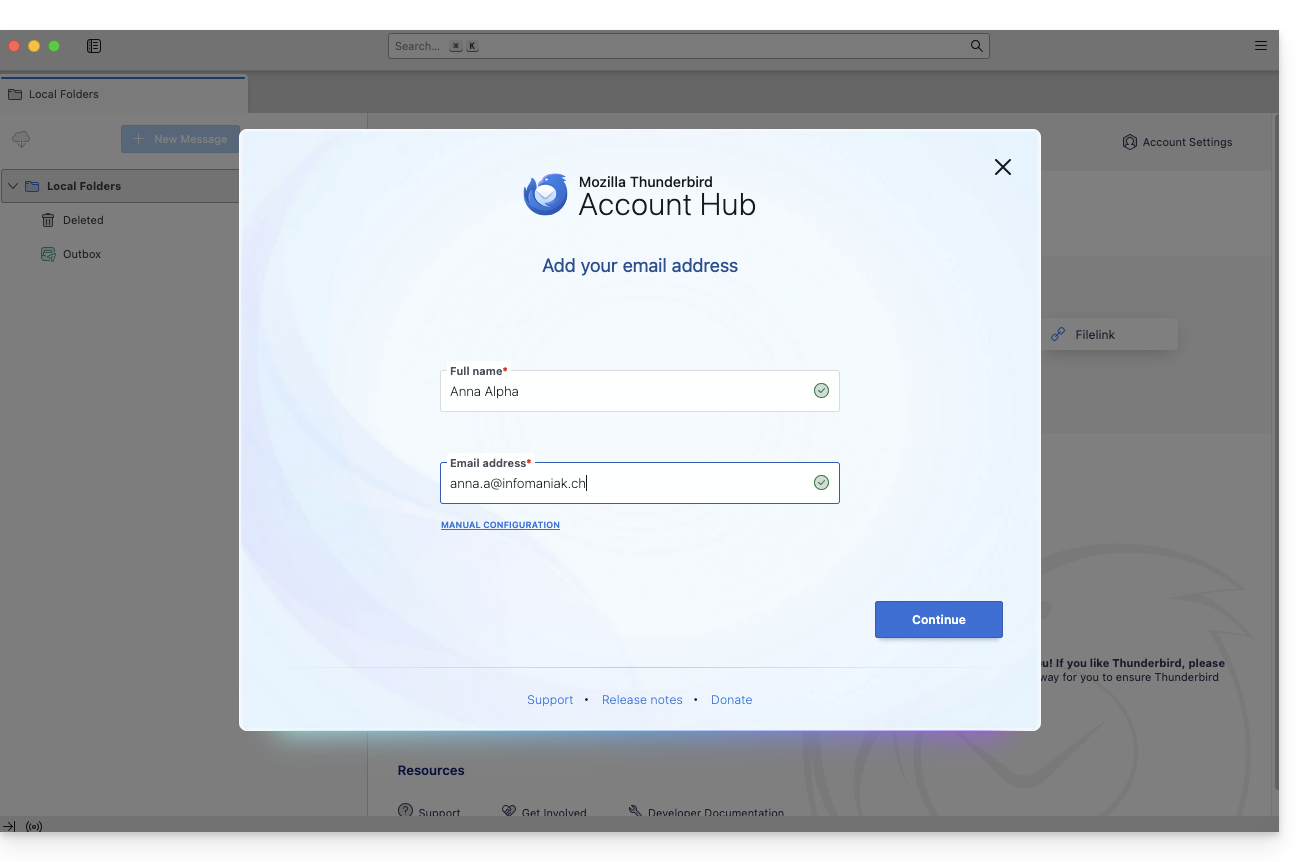
Example in the Thunderbird software:
- Add an account with the correct email parameters related to the alias:
- Write a new message from the email software/client.
- Once received, the message is correctly described, even in its headers, as being sent from an address that you know is an alias:
Link to this FAQ:
Has this FAQ been helpful?
This guide provides the most common IMAP server addresses. These can be used to perform the copy of the content of your old email addresses to your Infomaniak email address.
Important note: For Gmail, Yahoo, Outlook, and iCloud, you generally need to generate an "App Password" in the security settings of your original account to authorize the copy.
If necessary, do not hesitate to contact your previous email provider to ask for the exact mail server to enter.
IMAP Server Addresses
| Provider | IMAP Hostname / Server |
|---|---|
| 1&1 (IONOS) | imap.ionos.fr |
| 9 Business | imap.9business.fr |
| 9 Telecom / Neuf | imap.neuf.fr |
| Alice | imap.aliceadsl.fr |
| Altern.org | imap.altern.org |
| AOL | imap.aol.com |
| Apple (iCloud / me.com) | imap.mail.me.com |
| Bouygues Telecom (Bbox) | imap4.bbox.fr |
| Caramail / GMX | imap.gmx.com |
| Cegetel | imap.cegetel.net |
| Club Internet | imap.club-internet.fr |
| Free | imap.free.fr |
| Freesurf | imap.freesurf.fr |
| Gmail (Google) | imap.gmail.com |
| Hotmail / Outlook / MSN | outlook.office365.com |
| La Poste | imap.laposte.net |
| Mailo (ex-NetCourrier) | imap.mailo.com |
| Noos | imap.noos.fr |
| Numericable | imap.numericable.fr |
| o2switch | nom-du-serveur.o2switch.net (consult your welcome email) |
| Online.net | imap.online.net |
| Orange / Wanadoo | imap.orange.fr |
| OVH (Shared) | ssl0.ovh.net |
| OVH (Pro / Exchange) | pro1.mail.ovh.net (or ex.mail.ovh.net) |
| Proton Mail | direct copy is not possible |
| SFR | imap.sfr.fr |
| Skynet (Belgacom / Proximus) | imap.proximus.be |
| Tele2 | imap.tele2.com |
| Telenet | imap.telenet.be |
| Videotron | imap.videotron.ca |
| Yahoo Mail | imap.mail.yahoo.com |
Link to this FAQ:
Has this FAQ been helpful?
This guide explains how to reply to an email visible on the Mail Infomaniak web app (online service ksuite.infomaniak.com/mail) by sending the reply directly in the kChat web app (online service ksuite.infomaniak.com/kchat) or the desktop app, in the form of a private message to the email sender.
Preamble
- This feature allows you to reply to an email directly in kChat, with a reminder of the original message to facilitate understanding.
- It aims to streamline collaboration by allowing you to react quickly to an email without leaving the kSuite environment.
- It reduces the back and forth between classic messaging and the collaborative workspace.
Send a reply to an email via kChat
Prerequisites
- The button providing access to the feature will only appear in the case of an email received from a sender linked to the kSuite, and this within the same Organization as the user who wishes to reply.
- To display a shortcut to this feature as in the first point 3 below, refer to this other guide.
When you have received an email from a colleague and you want to reply directly on kChat:
- Click here to access the Mail Infomaniak web app (online service ksuite.infomaniak.com/mail).
- Open the message to be replied to by kChat.
- Click on the kChat icon in the email toolbar:
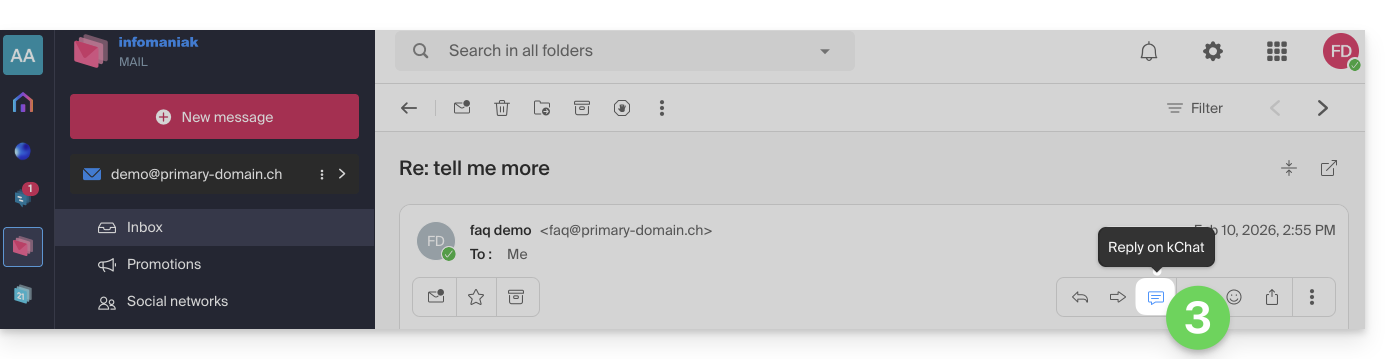
- It is also possible to click on a button below the message:
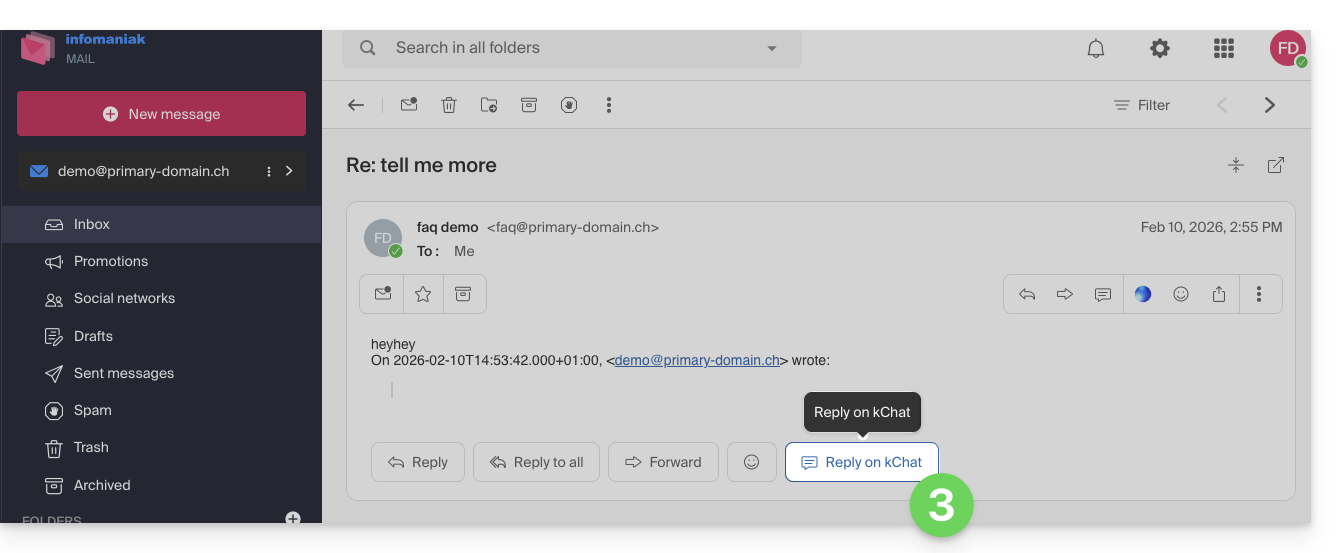
- It is also possible to click on a button below the message:
- Compose your kChat message, format it if necessary, and click on the Send button at the bottom right:
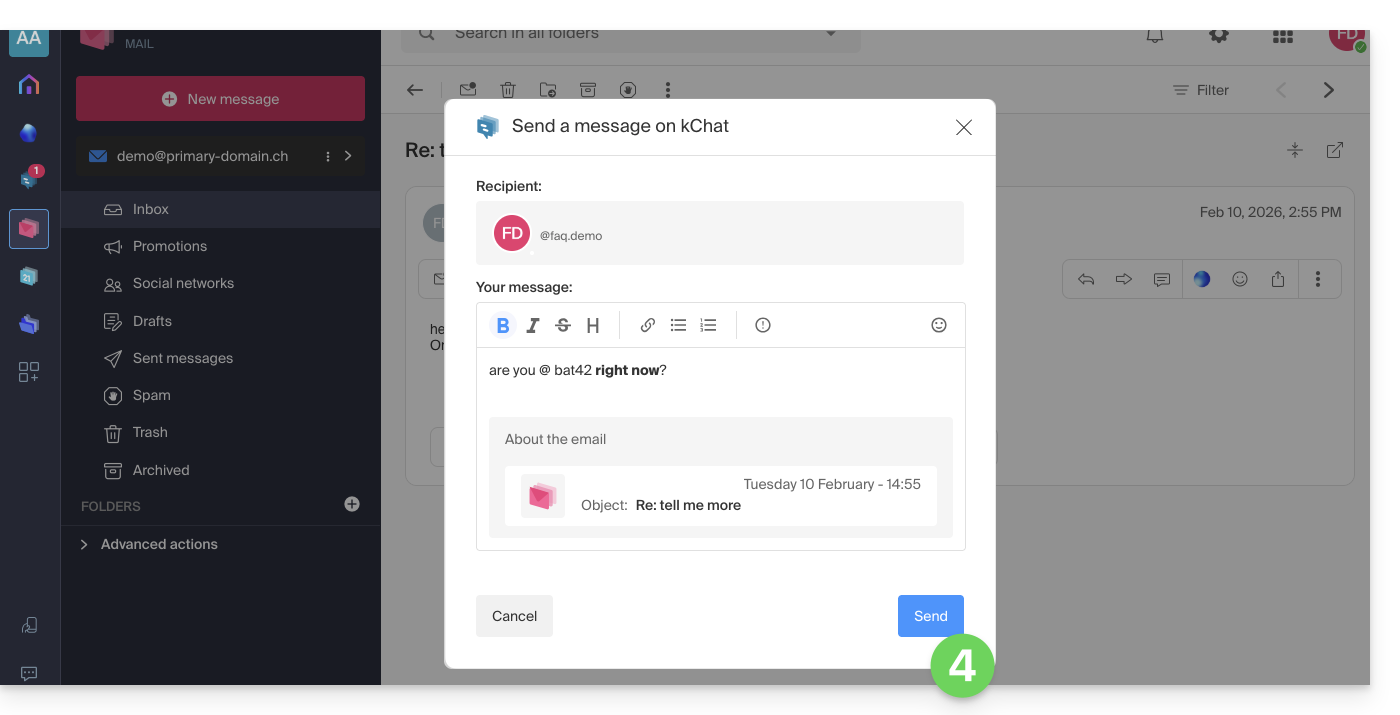
- Your correspondent receives the message on kChat accompanied by a box representing the original email (date & time, subject):
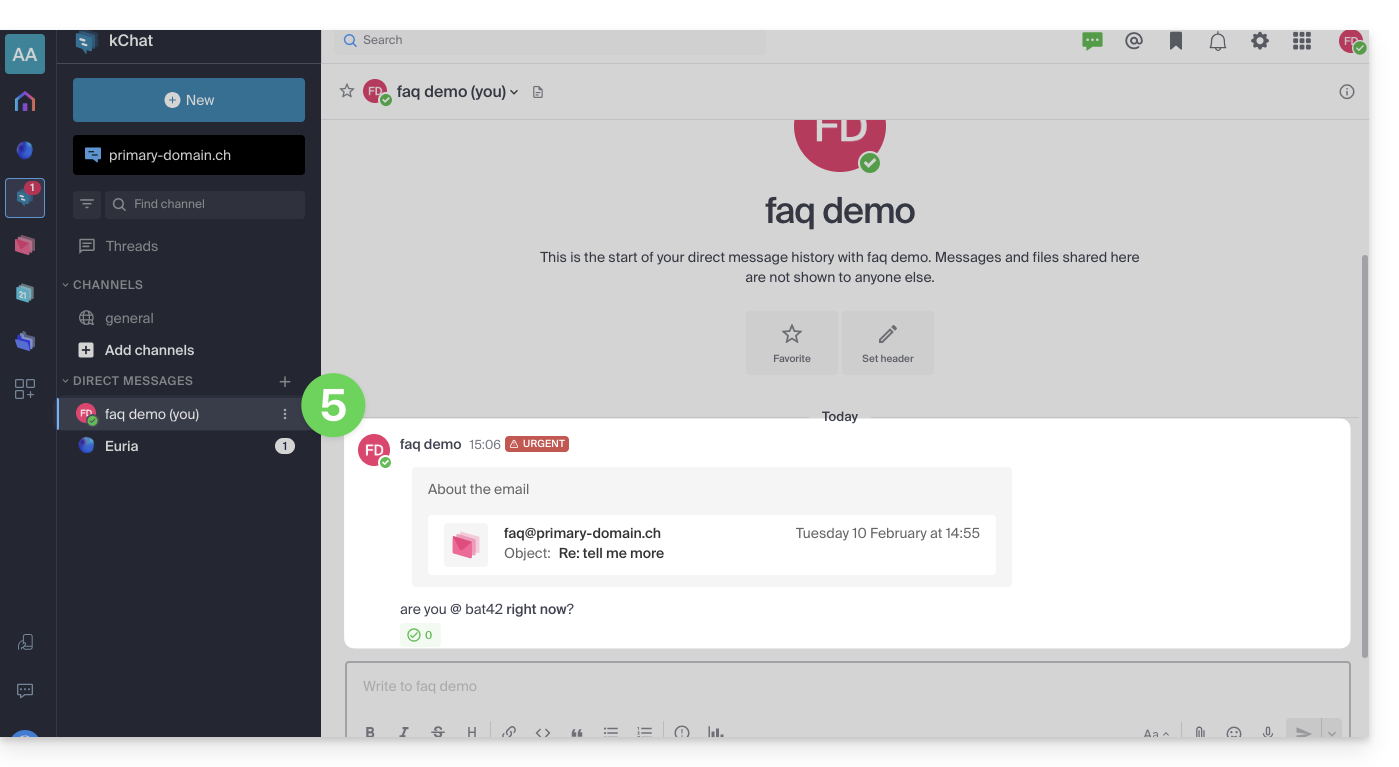
You can access this message on kChat (in the thread of private messages exchanged with your correspondent as above) but also:
- in an information banner on the email conversation,
- in the send confirmation message:

Link to this FAQ:
Has this FAQ been helpful?
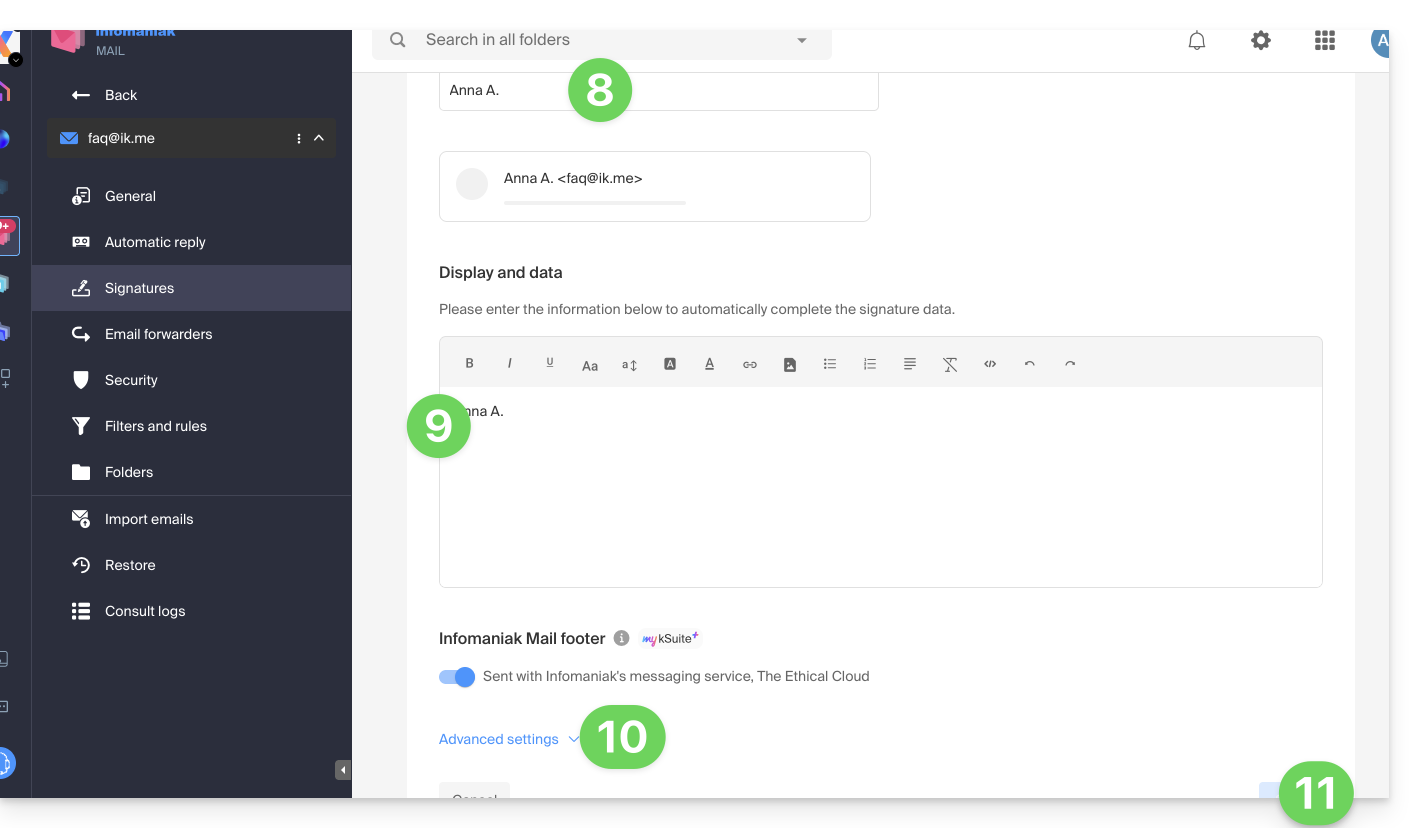
This guide details the Signature section present in the emails you send from the Infomaniak Web app Mail (online service ksuite.infomaniak.com/mail) of my kSuite.
Preamble
- It is not possible to remove the automatic addition of the Infomaniak mention in the lower part of your my kSuite emails.
- It is possible to delete the Infomaniak mention automatically inserted when drafting a new message.
- It is also possible to add your contact details or any indication of your choice in the signature that is automatically inserted with each new message.
- If necessary, my kSuite+ offers more flexibility.
Manage email signatures
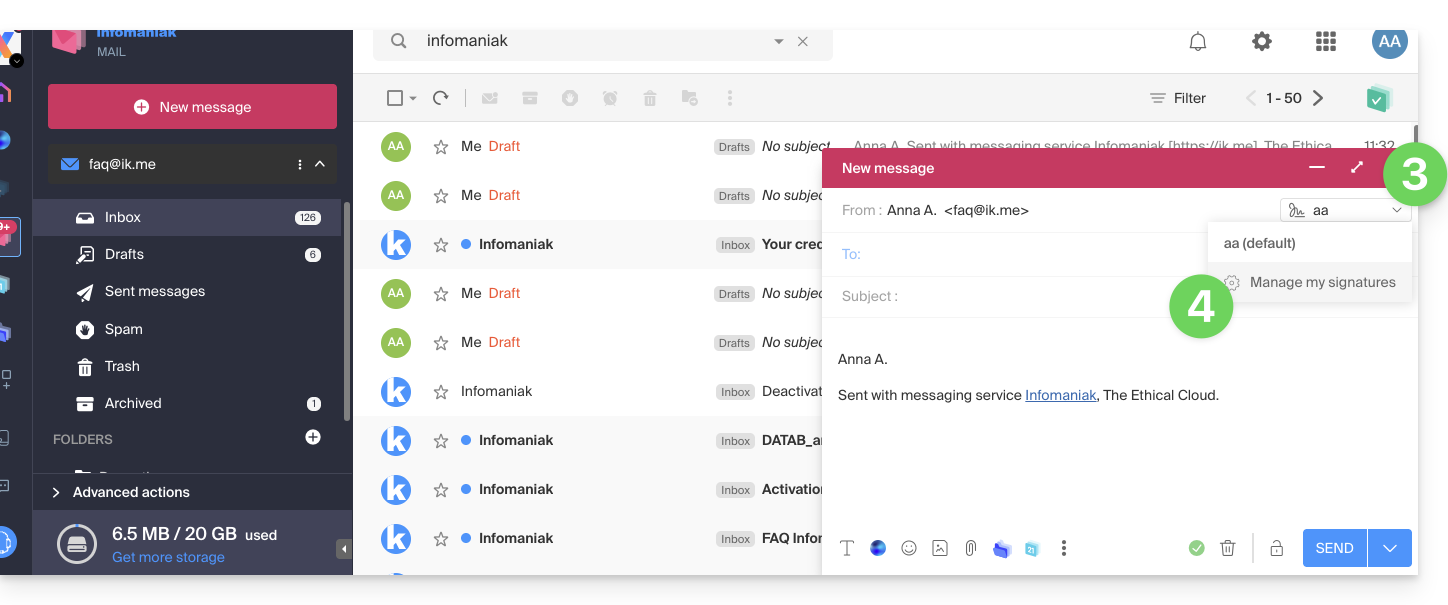
To add your name or any indication above the Infomaniak mention present at the bottom of each of your messages:
- Click here to access the Infomaniak Web app Mail (online service ksuite.infomaniak.com/mail).
- Click on New message, the composition window opens with an integrated pre-written signature that cannot be removed or modified without a change in the offer (my kSuite+).
- Click on the chevron to the right of the signature selection menu.
- Click on Manage my signatures:
- Click on the action menu ⋮ located to the right of the signature in question.
- Click on Edit:
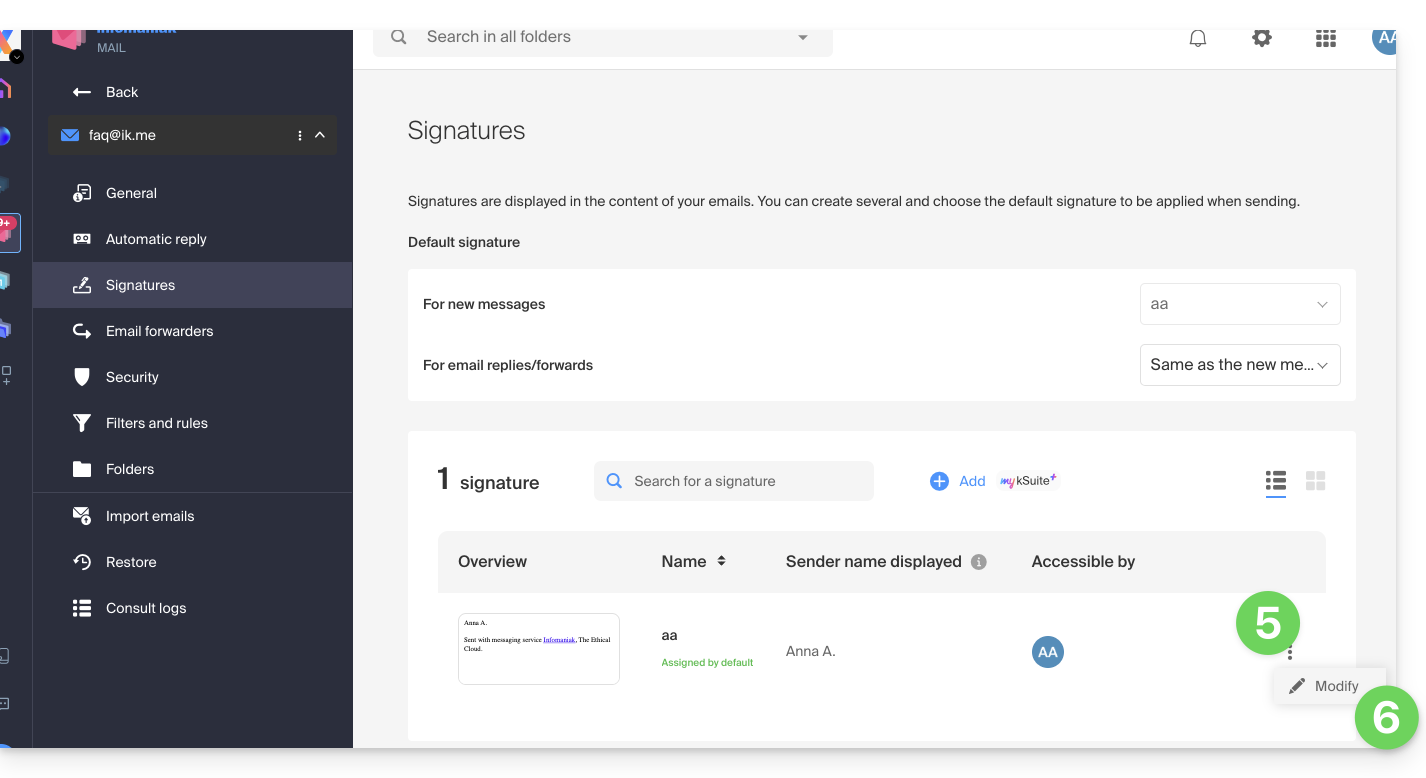
- Enter a name for your custom signature.
- Enter the name you want to display for your message when it reaches the inbox of your correspondents.
- Enter the content of your signature (formatted text, image, etc.).
- Manage advanced settings if necessary (signature position).
- Click on the button to save:
There you go, every new message you draft will contain your new signature in addition to the mandatory Infomaniak mention, and you can remove it if necessary by hovering over it: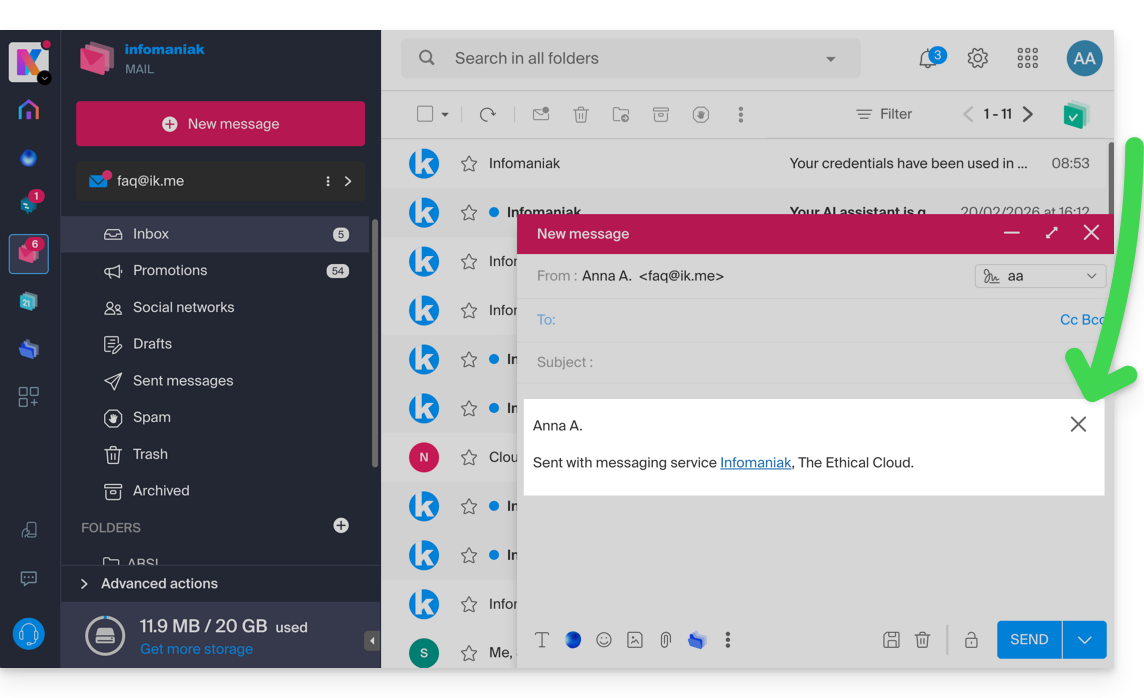
Link to this FAQ:
Has this FAQ been helpful?
This guide explains how to quickly schedule a meeting between multiple users from the Infomaniak Web app Mail (online service ksuite.infomaniak.com/mail).
Create an event from an email
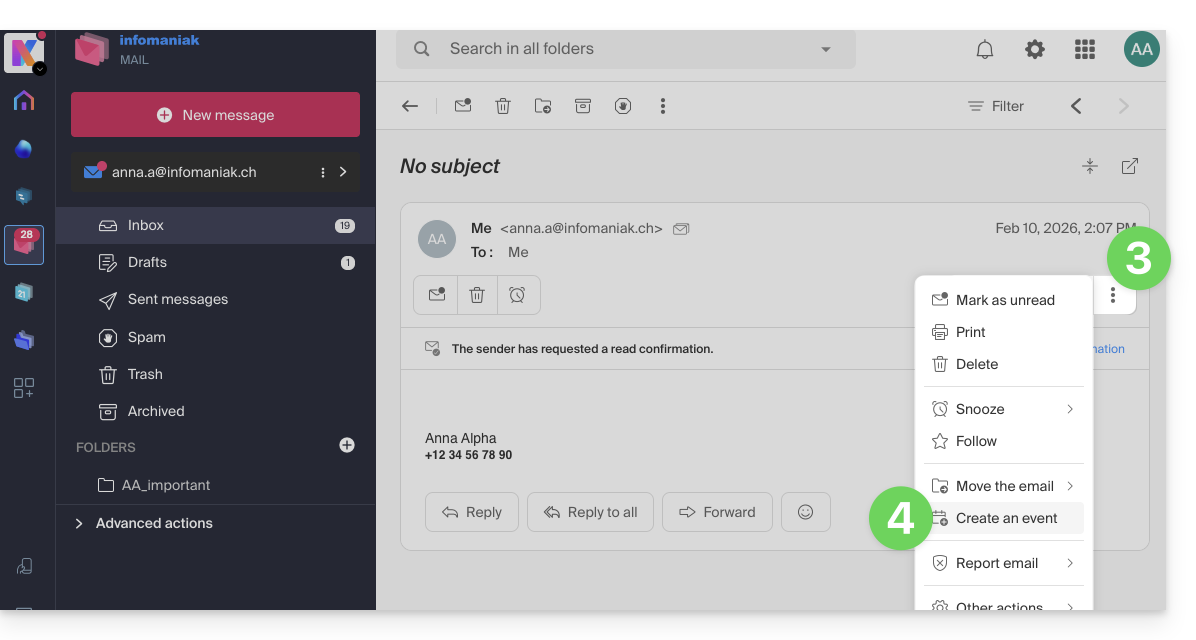
To start the scheduling assistant:
- Click here to access the Infomaniak Web app Mail (online service ksuite.infomaniak.com/mail).
- Open the message from the sender (or the discussion between multiple participants) with whom you wish to organize a meeting / a joint event.
- Click on the icon ⋮ at the top right of the open message.
- Click on Create an event:
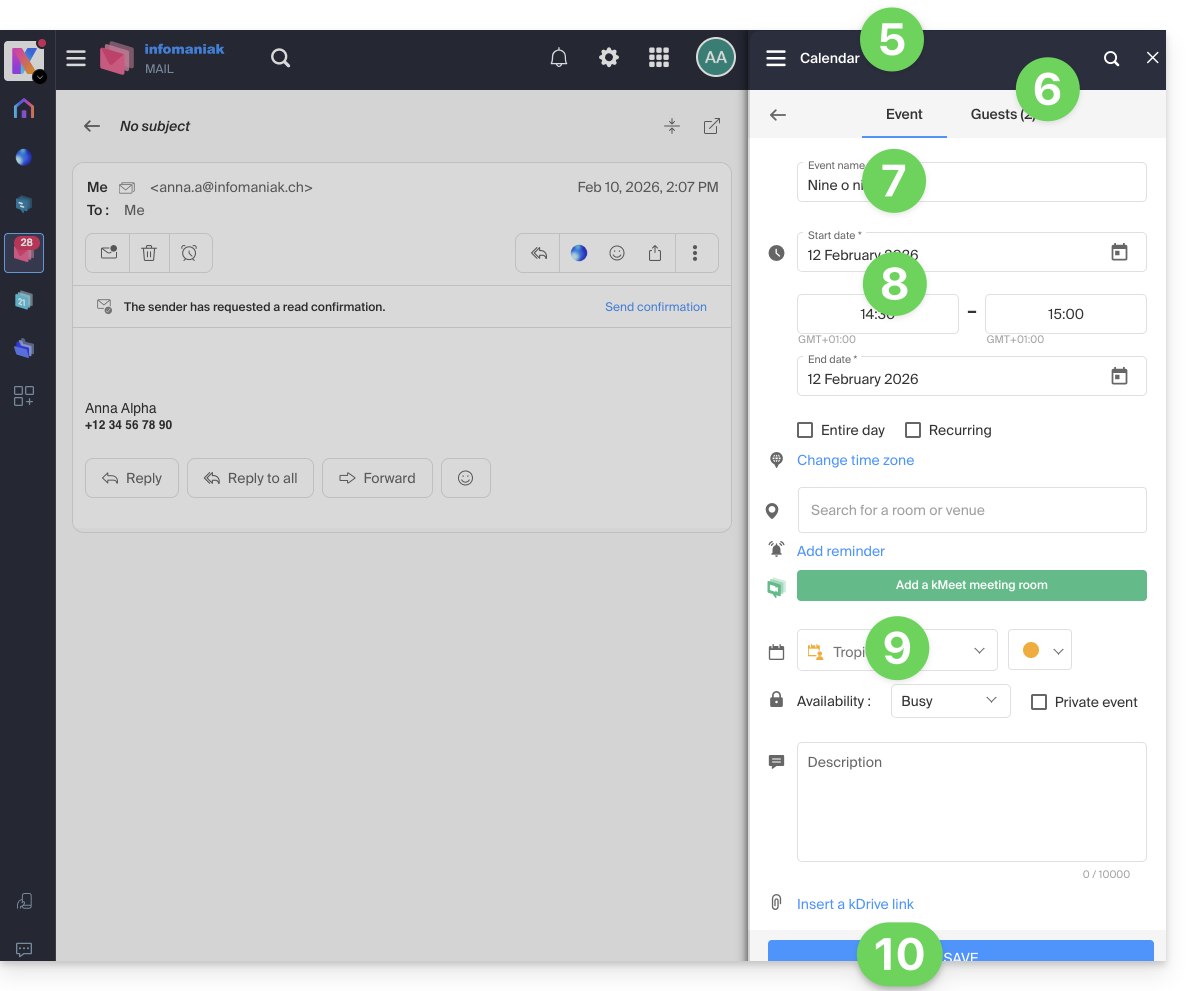
- The assistant of the Infomaniak app Calendar appears on the right of the screen.
- The participants in the discussion are automatically added from their email address and can be managed in the second tab.
- The title of the meeting is automatically generated from the subject of the email but it can be modified.
- The duration of the event (and its placement within the day) is automatically generated as close as possible to the present moment, but it can be modified, just like a possible room can be added below.
- Check or change the calendar used.
- Save the information to create the event and the invitations:
Link to this FAQ:
Has this FAQ been helpful?
This guide explains how to display the folders of your Infomaniak mailbox with a mail software/client, using the IMAP protocol.
Preamble
- The different generic folders are created by Mail Infomaniak upon the very first connection to the interface.
- It may therefore happen that some IMAP mail software/clients do not show any folders if no connection has been made beforehand on Mail.
- And if they are indeed present in Mail, it may still happen that some folders do not appear on your IMAP-configured mail software/client.
Force the synchronization of IMAP folders...
...on Microsoft Outlook
It may happen in some cases, after having configured an Infomaniak address in the Outlook mail software/client, that some folders do not appear. It is necessary in this case to check the synchronization with the subscription folders in Outlook:
- Start the Outlook software on your computer.
- Under your Infomaniak mail address, without selecting it first, right-click on the inbox folder.
- Select IMAP Folders in the menu that appears:

- If the IMAP Folders item is not present, deselect the address beforehand.
- If the IMAP Folders item is not present, deselect the address beforehand.
- Deactivate the option
When displaying the hierarchy in Outlook, show only the folders that are the subject of a subscriptionby unchecking the box: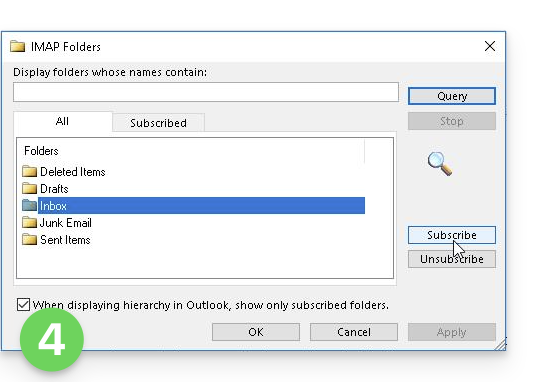
- Click on Apply.
The menu may with certain versions be found here: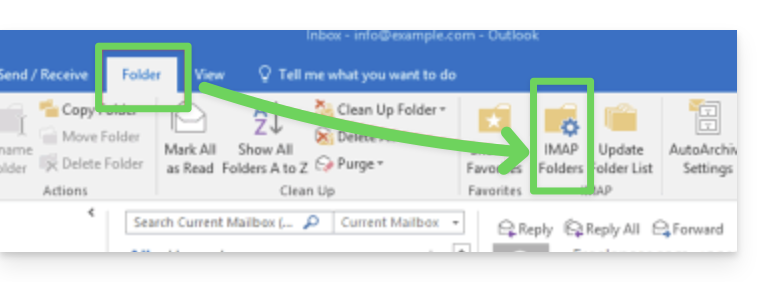
or here: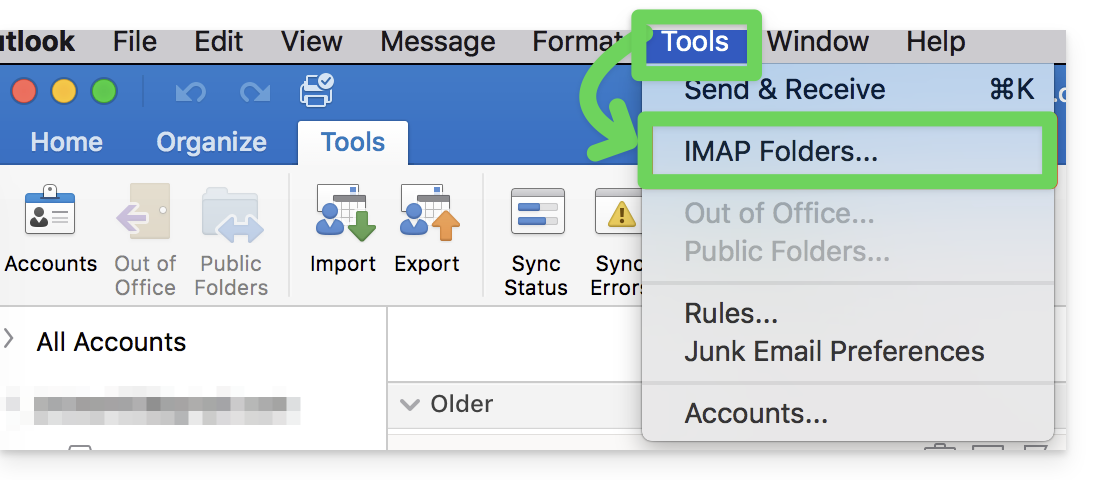
...on Thunderbird
It may happen in some cases, after having configured an Infomaniak address in the Thunderbird mail software/client, that some folders do not appear. It is necessary in this case to manually check these folders from the subscription menu of Thunderbird:
- Start the Thunderbird software on your computer.
- Right-click on the Infomaniak address concerned.
- Select the menu Subscribe:
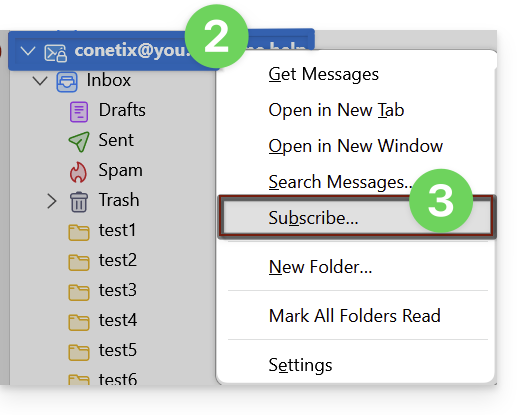
- Check the missing folders.
- Click on Ok to validate the selection.
... elsewhere
In your usual software/email client, find the designation "IMAP folders" and/or "subscribe", "IMAP subscription" etc.
Modify synchronized folders
Refer to this other guide to modify the location of certain generic folders.
Link to this FAQ:
Has this FAQ been helpful?
This guide explains how to redirect emails from a Gmail, Bluewin, Outlook, Proton, Yahoo, etc. address to your Infomaniak-managed email address.
Preamble
- By setting up automatic redirection of all incoming emails on your previous messaging system, you can immediately use your new Infomaniak email address while ensuring you don't miss any messages.
- By responding to your emails from your new Infomaniak address, your contacts will automatically use it to write to you in the future.
- You can also import the content from another Mail provider directly to your Infomaniak address.
- For additional help, contact the service provider where you want to activate message redirection.
Specific guides
Refer to the official guides based on your previous provider:
- Gmail
- iCloud
- Microsoft (Outlook / Hotmail / Live)
- Orange
- Proton Mail (note, requires a paid plan)
- Sunrise:
- Click here to log in to Sunrise Mail.
- Click on Inbox.
- Click on Settings => Manage Inbox.
- Enter the corresponding email address under 'Transfer'.
- Yahoo (note, requires Yahoo Mail Pro)
Bluewin
- Bluewin (see also below):
- Click here to log in to Bluewin.
- Click on Settings then Automatic forwarding.
- Click on Set up automatic forwarding.
- Follow the procedure to set up automatic redirection.
- Bluewin (alternative method):
- Click here to log in to MySwisscom.
- Click on the "More" menu then “Settings”:

- Then click on “Manage transfers”:

GMX
Click on these elements in order to set up a redirection rule from GMX:
Link to this FAQ:
Has this FAQ been helpful?