Knowledge base
1000 FAQs, 500 tutorials and instructional videos. Here, there are only solutions!
This guide explains the procedure for creating free entries for your guests (as part of the Infomaniak ticketing system).
Preamble
- The simplest way to create free entries for your guests is to create a free rate, which is not available online, but only from the ticket office.
- This allows you to generate completely free tickets for your shows.
Setting up the invitation rate
In order to create invitations, you must first include an invitation rate in the areas where you want to be able to create this type of entry.
- Click here to access the management of your product on the Infomaniak Manager (need help?).
- Click directly on the name assigned to the ticketing concerned by the event.
- Click on Programming in the left sidebar.
- Click on Events in the left sidebar.
- Click on the event concerned.
- Click on the Pricing tab.
- If the event has multiple dates, this section is replaced by “Dates” which opens a calendar.
- Click on the calendar date to join the pricing…
- Click on Add a rate:

- Add a free rate with the desired name:

- Once the rate is created, click on the visibility option and choose Hidden from customer or Hidden from customer and reseller:

Create the invitation ticket
To create the invitation ticket, go to the ticket office and proceed as a normal sale with the invitation rate:
Link to this FAQ:
Has this FAQ been helpful?
This guide explains how to use your bank's CAMT files to automatically validate orders paid by invoice (as part of the Infomaniak ticketing system).
Preamble
- If customers decide to pay an order by invoice, they receive an invoice directly with your bank details.
- You must therefore check if the payment has been received and manually validate the customer's order.
- The following procedure allows you to automate a large part of this procedure and you can thus simply validate the orders in a few clicks.
Import the CAMT file
Prerequisites
- Make sure you have indicated a QR-IBAN to generate QR Invoices.
- CAMT imports require the bank to record the information related to the order, and this information is only available if the customer uses the QR Invoice when paying the invoice.
- Please contact your bank to find out how you can retrieve a CAMT file (example of documentation).
Next:
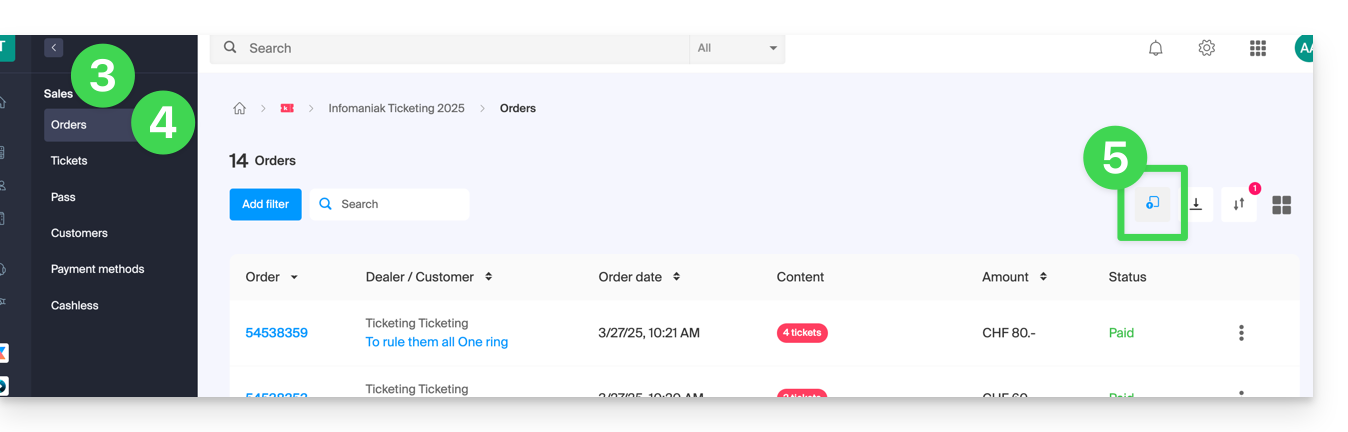
- Click here to access the management of your product on the Infomaniak Manager (need help?).
- Click directly on the name assigned to the ticketing concerned by the event.
- Click on Sales in the left sidebar menu.
- Click on Orders in the left sidebar menu.
- Click on the button at the top right:
- Import the CAMT file:

- Select the orders to validate:
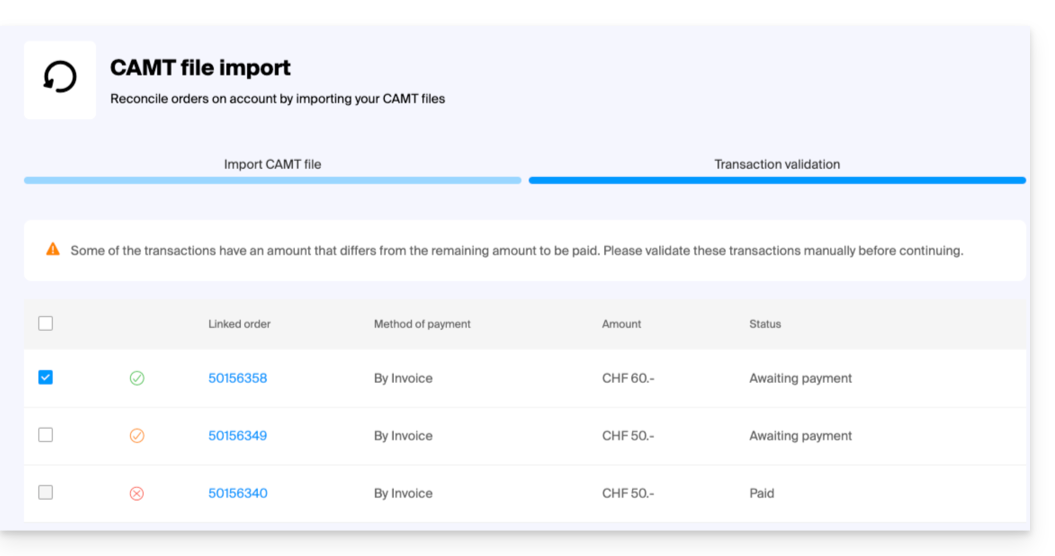
- The orders for which the payment corresponds to the invoice amount will be automatically selected.
- Orders with a partial payment can be manually validated, but will be recorded as complete in the ticketing system.
- Once the orders to validate are selected, click on Validate selected transactions.
- The orders are automatically set to validated:
Link to this FAQ:
Has this FAQ been helpful?
This guide explains the procedure to follow for creating events taking place in the city of Lausanne (as part of the Infomaniak ticketing system).
Preamble
- In accordance with the tax assessment decree of the municipality of Lausanne, a tax is levied on the price of admissions, paid seats and other supplements, notably on the occasion of society evenings, balls, fairs, concerts, conferences, musical, literary, artistic, sporting events, etc.
- The Infomaniak ticketing system is approved by the city of Lausanne and you can therefore create your ticketing for any event in the city of Lausanne.
- The tax rate is 14%.
- You will need to check with the city of Lausanne whether your event is taxable, non-taxable or exempt…
- The possibilities for exemption from this tax are exhaustively indicated in the tax assessment decree.
- If your event is subject to tax, note that the procedure will take several days and the waiting time may be extended depending on the number of pending requests.
- Please therefore take this waiting time into consideration for the launch of your ticketing!
Creating your event in Lausanne
Creation will generally be done in the same way as for any other event, but any information appearing on the ticket will no longer be modifiable once the validation request has been sent:
- The name of the event
- The date and time of the event (as well as the door opening hours)
- The location of the event
- Prices
- Ticket templates
Make sure these parameters are well defined before the validation request.
Validation request and awaiting the decision
When you set the location as being in the city of Lausanne…
…and once your event configuration is complete (you get the proposals below), you can submit the authorization request to the city of Lausanne.
Event status
Taxable events clearly indicate the status that will be updated as soon as your event is validated:
Sale of passes and subscriptions in Lausanne
It is possible to sell subscriptions or passes for events taking place in the municipality of Lausanne, subject to certain conditions:
- Non-negotiable: all events in the ticketing system must take place in the municipality of Lausanne and be subject to the entertainment tax.
- You need to create the pass, but leave it empty (do not add events to the pass).
- Contact Infomaniak support (by messaging only) with the list of events to be added to each pass. The operation will be completed within 7 days.
- No additional authorization from the city of Lausanne is required for this operation.
Link to this FAQ:
Has this FAQ been helpful?
This guide explains how to set up a validation system for passes or subscriptions (as part of the Infomaniak ticketing system).
Preamble
- This option allows you to create passes for which visitors must register, which you can validate before they can be used.
- This feature will be useful for any restricted access or where validation of the request must be done by the organizer.
- This can include accreditation requests, registrations for specialized courses requiring verification of certain documents, access to certain areas or events, etc.
Setting up the pass to validate
To do this:
- Click here to access the management of your product on the Infomaniak Manager (need help?).
- Click directly on the name assigned to the ticketing concerned by the event.
- Click on Programming in the left sidebar menu.
- Click on Passes in the left sidebar menu.
- Click on Add a pass:
- During the pass creation procedure, activate the Pass validity by setting Yes:
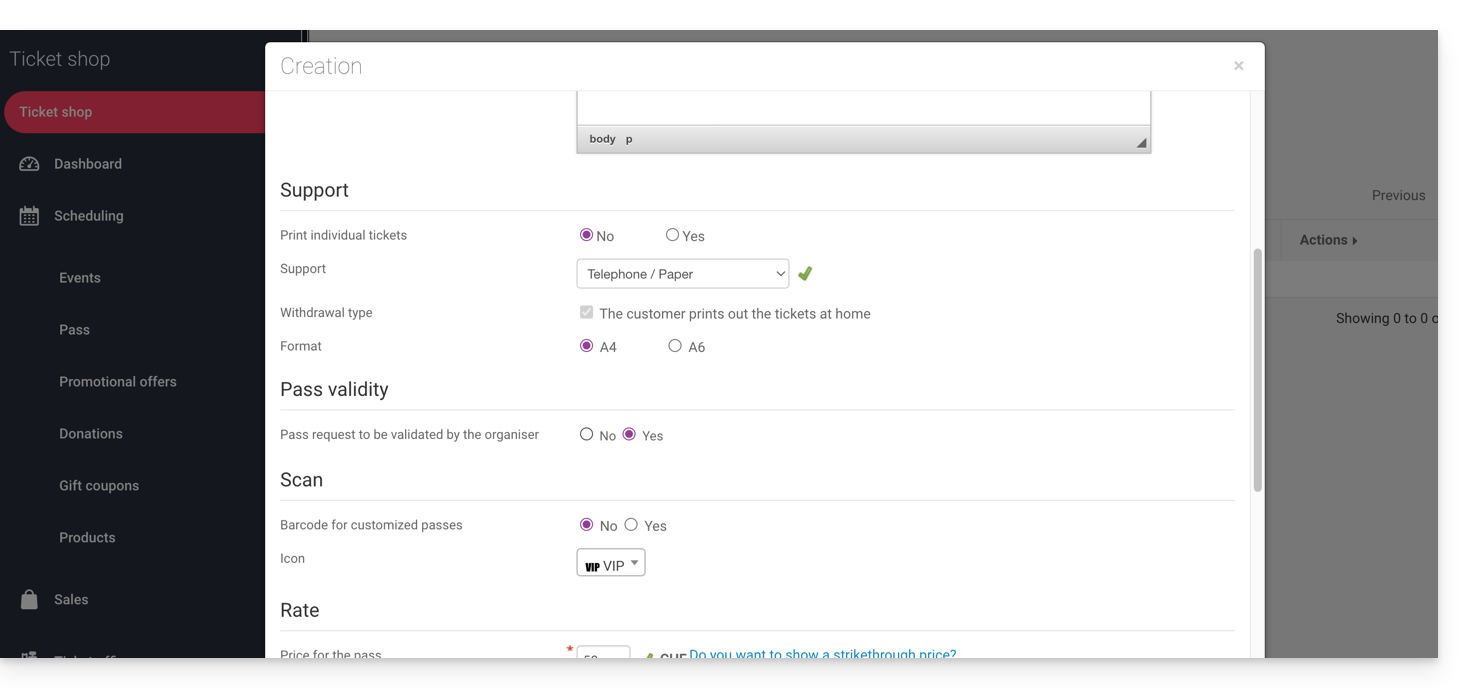
- This action will automatically set the necessary options for this feature, i.e., a free custom type pass with a minimum of 0 tickets.
Once the pass is created, click on it to set the information requested from the visitor: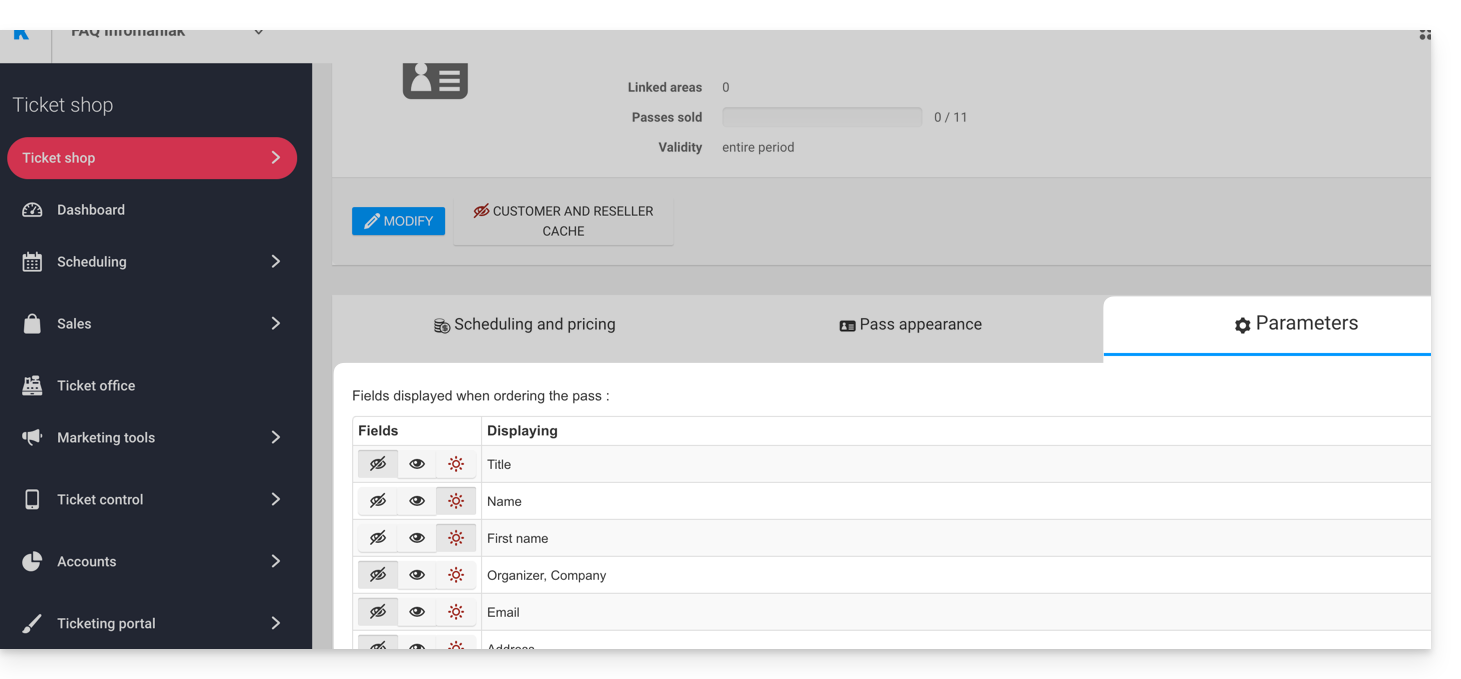
It is possible to make each field hidden , visible
, or mandatory
...
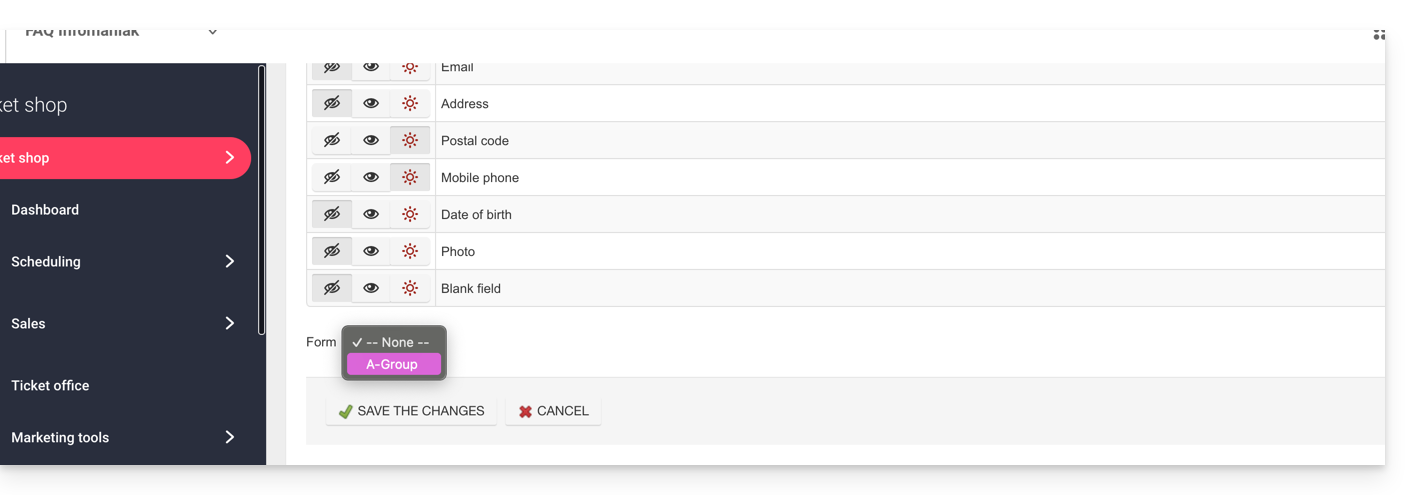
If more information or supporting documents are required, they can be added using the form function:
- Create a form per rate with the information requested from the visitor.
- Associate the form per rate with the pass:
Procedure for requesting a pass to validate
The visitor can order the pass like any other ordering procedure. Note a few differences:
- The terms used during the online procedure will mention validation requests instead of order.
- The visitor will receive a first e-mail confirming that their request has been taken into account and that they will receive news when their request is validated.
- The visitor will receive the pass in a confirmation e-mail when the pass is validated.
Procedure for validating a request
To validate a pass validation request from a visitor, you will need to go to the list of passes:
- Click here to access the management of your product on the Infomaniak Manager (need help?).
- Click directly on the name assigned to the ticketing concerned by the event.
- Click on Sales in the left sidebar menu.
- Click on Pass in the left sidebar menu.
If necessary, use the filter to display only the passes to validate and choose the desired pass category:
Verification before validation
Click on the passes to verify. All the information is on the pass page.
If additional fields have been added via a form, they will be in the Modify information section: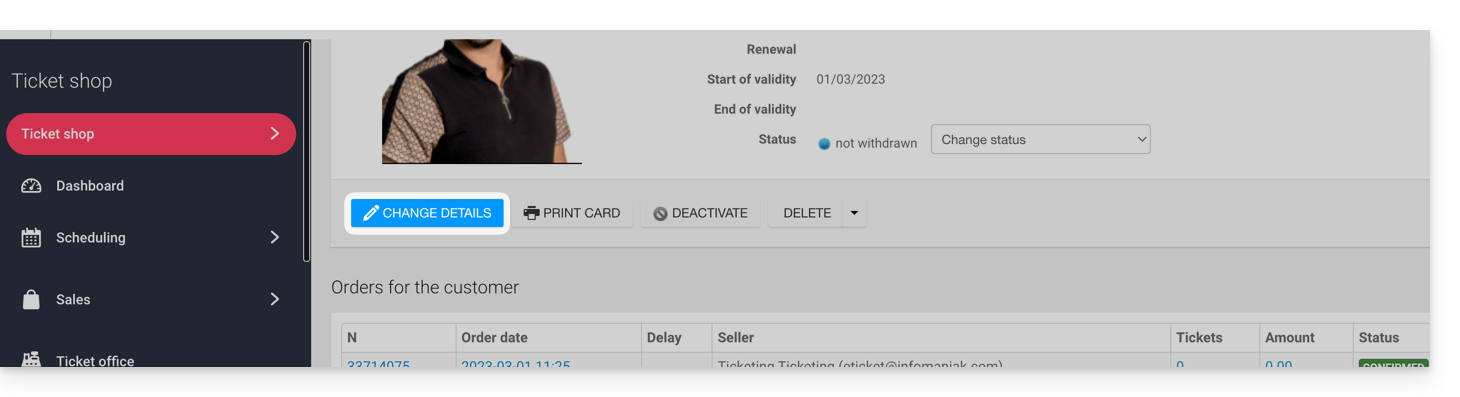
Example with files that the user has uploaded: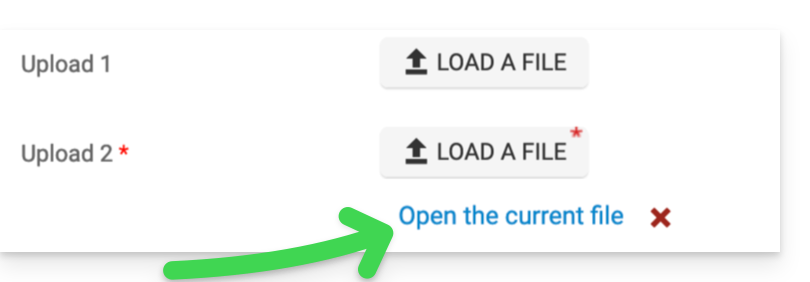
Modify the status
Change the status to Validated and Withdrawn or no, so that the pass is valid:
An e-mail will be automatically sent to the visitor with the information to fill out their pass with the tickets to be added.
In the case of a refusal, it is possible to send an e-mail to the visitor to invite them to change the information.
It is also possible to do this on the upstream page via a multiple selection, for example: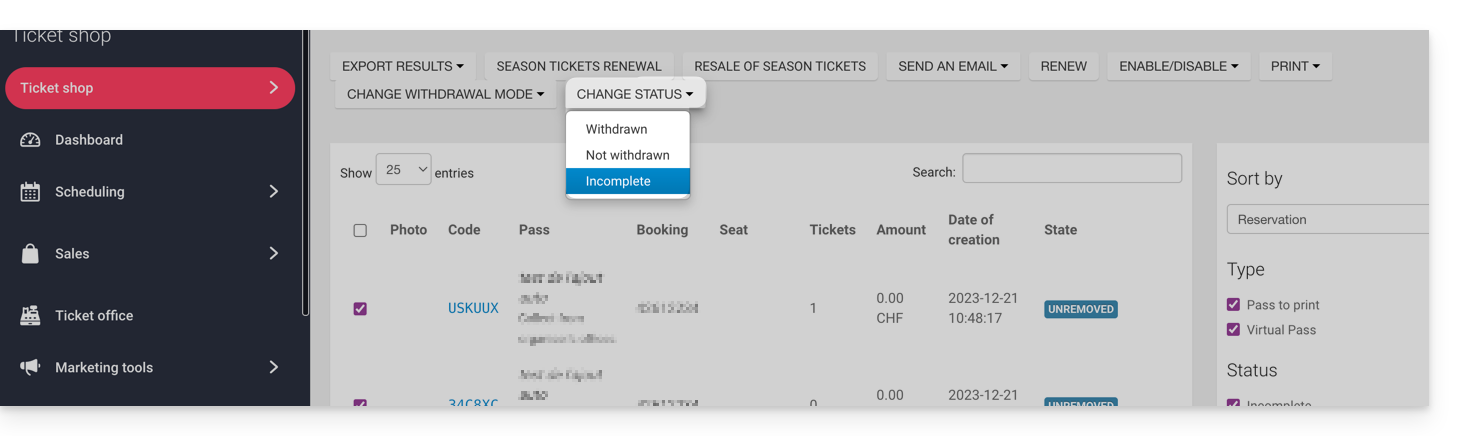
Link to this FAQ:
Has this FAQ been helpful?
This guide explains how to configure the appearance of a pass (as part of the Infomaniak ticketing system). These parameters will be available once step 1 is completed:
- Define the type during creation (subscription, ticket pack, etc.) as well as the basic information and parameters
- Associate events with passes
- Configure the visual and information related to the pass (below)
- Define and collect information from subscribers who will be linked to the passes
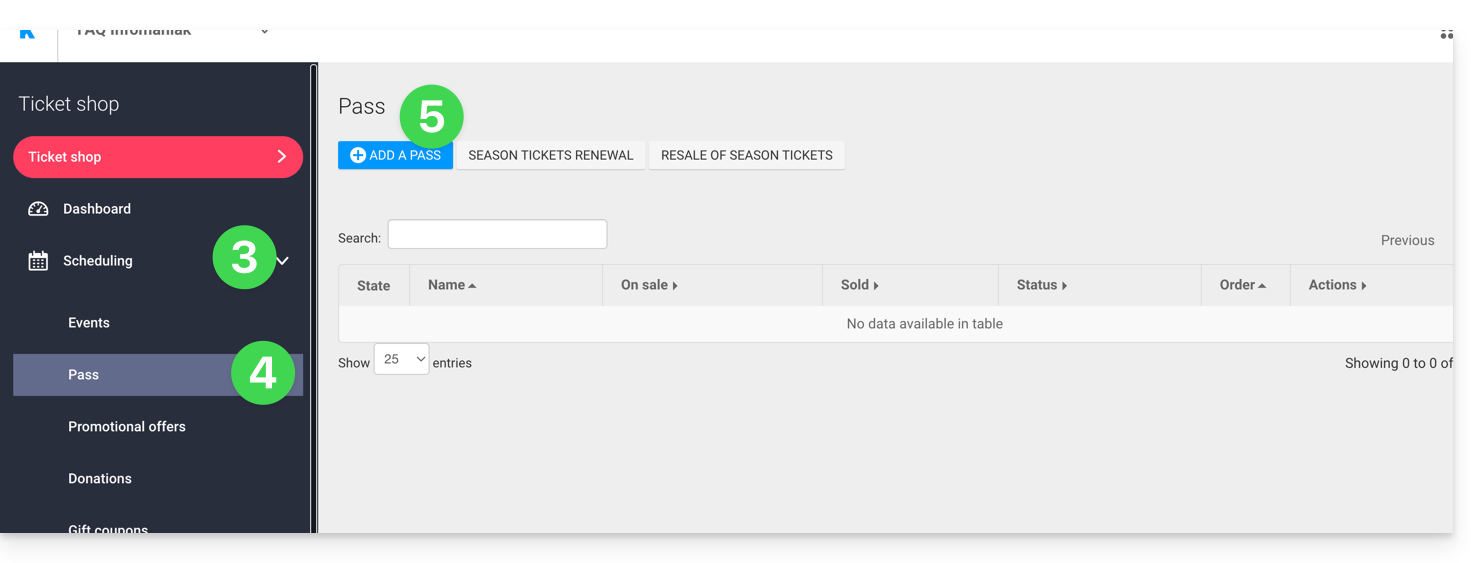
3. Set up a visual for the passes
To do this:
- Click here to access the management of your product on the Infomaniak Manager (need help?).
- Click directly on the name assigned to the ticketing concerned by the event.
- Click on Programming in the left sidebar menu.
- Click on Pass in the left sidebar menu.
- Click on the name of the pass concerned.
- Click on the tab Pass appearance:

For PVC format passes
PVC format passes have a format that allows visitors to use them in digital format on their phone and the organizer to print them on a PVC card using a printer available for rent: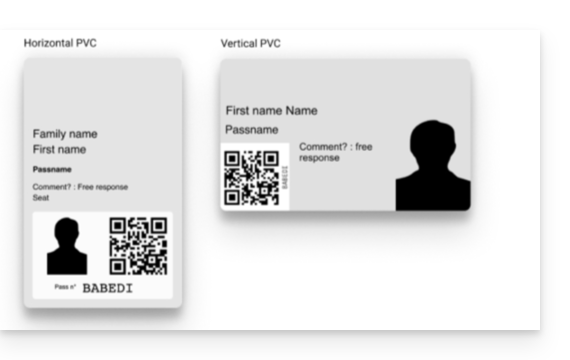
When selecting the visual, you will need to choose between vertical and horizontal mode. It will then be possible to choose the elements to display on the pass, as well as a background image:
For phone/paper format passes
For phone/paper formats, the visitor can use the digital version directly on their phone or choose to download the PDF version to print on an A4 sheet: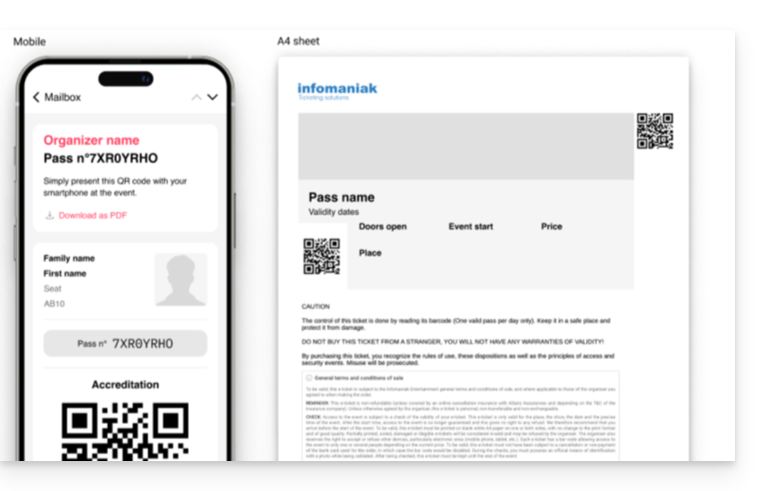
There will be no configuration to be done for the digital version, but it is possible to assign a ticket template. To configure a ticket visual, refer to this other guide.

The next step is to define and collect information from subscribers who will be linked to the passes.
Link to this FAQ:
Has this FAQ been helpful?
This feature allows subscribers who cannot attend one or more events during the season to sell the relevant tickets (included in their subscription) directly on the ticketing platform (within the framework of the Infomaniak ticketing system).
Preamble

- When a subscription holder cannot attend an event, they can put tickets up for resale from their pass menu.
- The resale of pass tickets only works for passes with numbered, fixed seats.
- The areas affected by the resale of pass tickets must have public prices (and not just pass prices).
- This ticket will be put back on sale on your ticketing platform and can be purchased by a new person following the normal ticket sales procedure.
- Revenue from resales can be, at the choice of the ticket holder:
- fully or partially refunded to the pass ticket owner-seller
- fully or partially credited to the account of the pass owner-seller
- converted into a donation for an association designated by the organizer
The refunds of resales to the subscription holder are the responsibility of the organizer.
Creating the pass ticket resale campaign
Prerequisites
Next:
- Click here to access the management of your product on the Infomaniak Manager (need help?).
- Click directly on the name assigned to the ticketing platform concerned by the event.
- Click on Programming in the left sidebar menu.
- Click on Pass in the left sidebar menu.
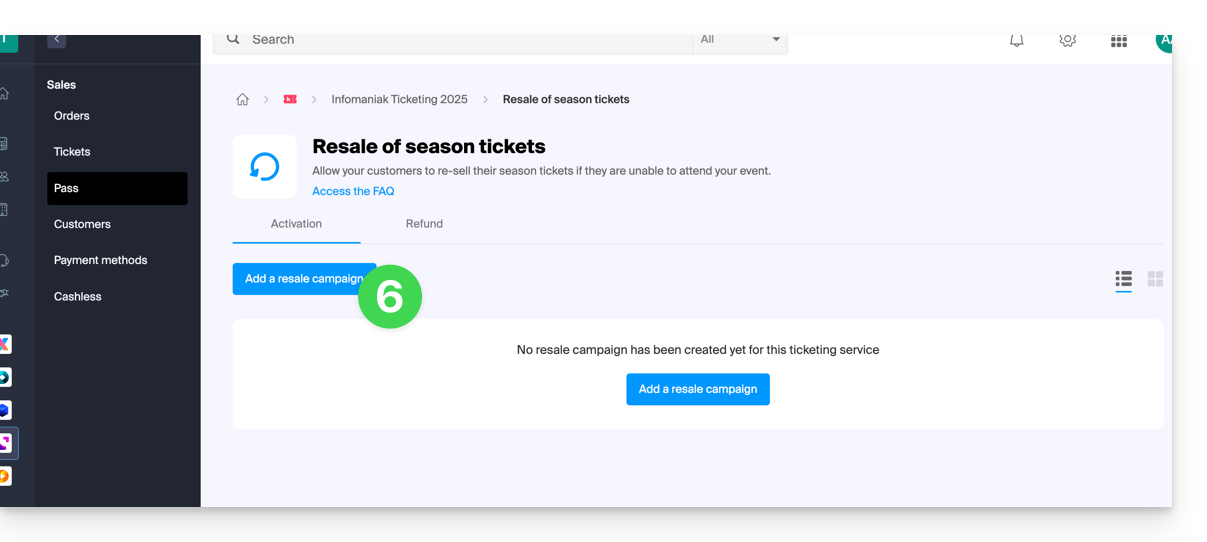
- Click on Subscription ticket resale:
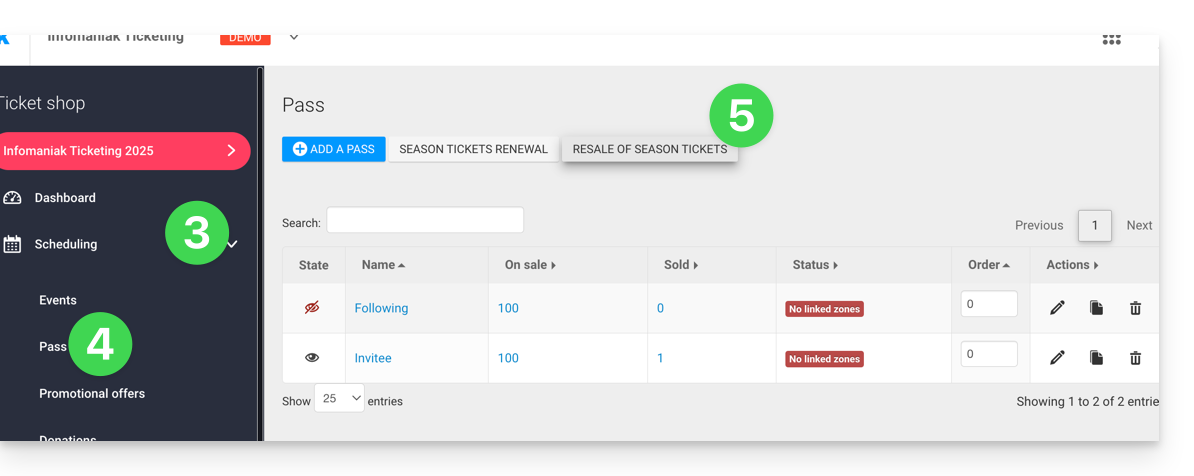
- Click on Add a resale campaign:
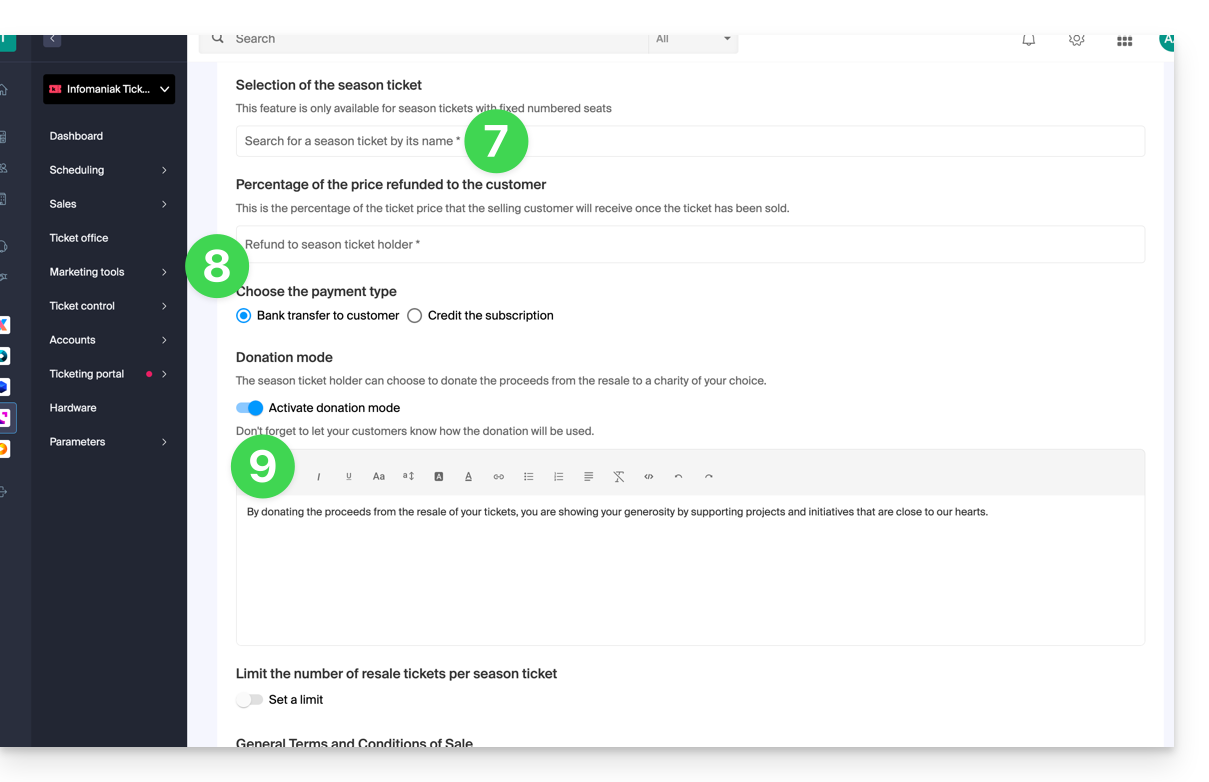
- Choose the pass for which to enable resales.
- Define the percentage of the resale price that will go to the subscription holder as well as the refund method:
- Bank transfer: the subscription holder will be invited to provide their bank details.
- Credit on the subscriber's pass to be reused for future purchases at the ticket office or for pass renewal.
- Define whether the subscriber can donate the amount to the organizer:
Procedure to be followed by the subscriber wishing to resell tickets
For customers wishing to resell their pass tickets, they must be provided with the link allowing them to access the resale page.
To do this, please generate the link to the desired ticket office, and add /pass-area at the end. Here is an example:
https://infomaniak.events/shop/abcABC4242I/pass-area
The subscriber can then follow this guide for managing their resales.
Tracking of ticket resales
The status of resales is viewable at any time from the Reimbursement tab: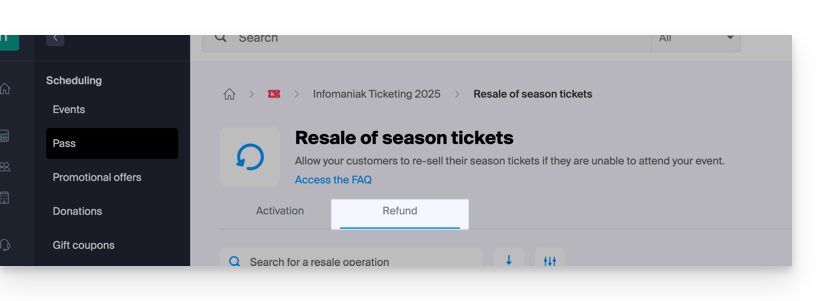
In the case of a bank reimbursement, the bank details are available directly in the action menu ⋮ located to the right of the concerned element:

Link to this FAQ:
Has this FAQ been helpful?
This guide explains how to renew your subscription directly online for the new season or edition of your subscription.
Access the subscription renewal page
The renewal is made available by the event organizer on the ticketing platform for the new season. Once there, click on the Renewal Subscriber button:
Enter the subscription number from the previous year
Renewal requires the subscription number to be renewed:
Select the new subscription
The selection of new subscriptions will be displayed. You will simply need to choose the desired subscription and continue with the purchase process:
Link to this FAQ:
Has this FAQ been helpful?
This guide explains how to put tickets from a pass up for resale (within the framework of the Infomaniak ticketing system).
Log in to the subscriber space
To do this:
- Use the link sent by the event organizer.
- Enter the email address and the code associated with the subscription to log in:

- Copy the code sent by email to validate access to the customer area:

- Enter the code received by email:

Put tickets up for resale
- Once logged in, in the quick actions column, click on Put tickets on sale:

- The overview screen displays the tickets available for sale.
- Check the event or events to put on sale:

- Choose how the refund will be processed. Depending on the options offered by the organizer, you will be able to choose from the following three options:
- Donate to the organizer
- Request a bank transfer
- Credit the amount to the subscription so that it can be reused for future purchases on the ticketing system

Management of tickets put up for sale
- The tickets put up for sale now appear on the overview screen:

- An email will inform you of the success or failure of the sale of a ticket.
- It will be possible to cancel the resale of a ticket at any time as long as it has not been resold.
The amount of the resale will depend on the price at which the ticket is resold. Only the event organizer can decide on the available refund methods.
Link to this FAQ:
Has this FAQ been helpful?
This guide explains how to view the sales report and use filters to highlight the necessary figures to track your sales and establish your accounting (within the framework of the Infomaniak ticketing system).
Access the sales report
To do this:
- Click here to access the management of your product on the Infomaniak Manager (need help?).
- Click directly on the name assigned to the ticketing concerned by the event.
- Click on Accounting in the left sidebar.
- Click on Sales Report:

Filtering and views for efficiency
The sales report offers a filter and saved views system that allows you to record and quickly retrieve the desired figures:
- By making good use of filters and saved views, you will no longer need to define search parameters for each of your consultations.
- The filters can be modified freely during each consultation, and if you wish to remember the new filters, simply save the filters or create a new view:

The different types of displays
It is possible to display the figures in several ways:
- Summary: Displays the overall figures by events or by sales channel without the details of each zone or pricing category. The second part displays the sales of global tickets
- Detailed: Allows you to display details by date, zone, and price. This is the display mode that allows you to see all the necessary accounting information.
- By pricing category: The display by pricing category allows you to have the figures grouped by prices. It is thus possible to retrieve figures for the desired categories for all events combined. It is thus used to identify, for example, the share of visitors who purchased full-price tickets, reduced-price tickets, or who went through subscriptions.

Add and modify filters
It is possible to add as many filters as necessary to refine the result of the sales report. To do this:
- Click on the blue Add a filter button.
- Select the desired type of filter and choose the elements to include or exclude.
Strict inclusion and exclusion allow you to display only the items that are fully affected by the filter.
In the example below, only orders paid 100% by credit card will appear. Therefore, any order that has been partially paid by credit card and another payment method will not appear on the list:
When applicable, it is possible to select all items in a list by clicking on the category:
The filter is added to the list of active filters:
To modify an active filter, click on it to display the menu.
Sales report views
By default, two views are available, each with its own display:
- Global view: has only one default filter, and thus allows you to see the global sales of the current month.
- Infomaniak Settlement: Displays only online transactions, allowing you to see the turnover corresponding to the statements sent each month with the payments:

Add, export and modify a view
To add a view with the selected filters, click on + Add a view in the list of views:
You will be able to name this new view:
To modify, export or delete a view, click on the dropdown to the right of the save button:
View sales report details
In detailed mode or by pricing category, you can find the details of each event, order, or price.
For example, you can see a quick breakdown of each line by hovering your pointer over the Amount of sales:
You can also view the exhaustive list of orders related to an event, a performance, or even a price by clicking on the action menu ⋮ located to the right of the item concerned:
To keep the sales report page open, it is recommended to open the orders page – accessible via this action – in a new tab.
Link to this FAQ:
Has this FAQ been helpful?
This guide explains how to associate products with tickets for your events on Infomaniak Ticketing.
To create products for sale on the ticketing platform, refer to this other guide.
Sale of products associated with tickets
There are two ways to link products and tickets:
- The purchase of the product requires the purchase of a ticket.
- The purchase of the ticket requires the mandatory purchase of the linked product.
1. The purchase of the product requires the mandatory purchase of a ticket
This type of link is configured from the first step of product creation by activating the option:
During the purchase process, adding the product to the cart will require the presence of a linked ticket or tickets already in the cart (5 tickets in the example below).
If the customer has already purchased tickets before, they can log in with their email address and choose the ticket(s) to which to associate the product:
The customer can then pick up their product using the QR code on their ticket.
2. The purchase of the ticket requires the mandatory purchase of the product
This type of link is configured in the final step of product creation (and requires that the option mentioned above has not been selected):
- Click on Add sales rules:

- Select the rates that will be associated with the sale of this product:

- Don't forget to complete the creation of your product.
During the ticket purchase process, these rates will offer the associated products, clearly indicating the additional cost at each step of the order:

Link to this FAQ:
Has this FAQ been helpful?
This guide explains how to configure the VAT rate (within the framework of the ticketing system Infomaniak).
Introduction
- If your Organization is subject to VAT, you will need to provide this information.
- In case of doubt, please contact your legal or financial representative, or inquire with the town hall of your municipality.
Setting the global VAT rate for ticketing
To do this:
- Click here to access your product management on the Infomaniak Manager (need help?).
- Click directly on the name assigned to the ticketing related to the event.
- Click on Settings in the left sidebar.
- Click on Ticketing Settings in the left sidebar.
- Check the box indicating that you are subject to VAT.
- Select the VAT rate from the dropdown menu.
- Specify your VAT number in the appropriate field:

- Save your changes at the bottom of the page.
Set specific VAT rates for a price
In the case where certain ticket prices have a different VAT rate than the global VAT, set it at the level of the rate in question:
- Click here to access your product management on the Infomaniak Manager (need help?).
- Click directly on the name assigned to the ticketing related to the event.
- Click on Programming in the left sidebar.
- Click on Events in the left sidebar.
- Click on the name of the event in question:

- Click on the pricing tab.
- Create or edit a price:

- Click on the Advanced settings.
- Check the box Modify VAT.
- Enter the VAT rate for this price, using the drop-down menu.
- Click the Confirm button to save:

Link to this FAQ:
Has this FAQ been helpful?
This guide explains how to help customers who may be stuck when using a credit card (as part of the Infomaniak ticketing system).
Ask customers for information
Infomaniak's online ticketing system allows customers to securely pay for their purchases with a credit card. For this reason, 3-D Secure authentication is mandatory for all credit and debit card payments.
Ask the customer what the issue is to try to resolve it. Here are some typical examples that may be encountered:
Blank window or page that appears
The ticketing system attempts to call up the customer's bank's 3D-Secure page. The blank page indicates that their card does not have the 3D-Secure option activated. The customer must contact their bank to request activation of this option.
Unable to make payment with credit card
Make sure the customer is using a VISA or MasterCard credit card. Some banks issue cards that are not on these networks. Infomaniak does not accept credit cards on the American Express network.
Authentication notification received, but unable to proceed
The customer will need to contact their bank or try with another card.
Credit card payment issue
You can obtain more information about this type of problem from the Infomaniak Manager.
Please find the order using the order number, email address, or any other customer-related information:
- Click here to access the management of your product on the Infomaniak Manager (need help?).
- Click directly on the name assigned to the ticketing system concerned by the event.
- Click on Sales in the left-hand side menu.
- Click on Order in the left-hand side menu.
- Search for the order using the information provided by the customer.
- Click on the order number:

- Click on the Transactions. tab
- Check the Notes of failed transactions:

Cases of incomplete transactions with notes
In the case illustrated above, it is a 3D-Secure double authentication failure, but the reasons can be varied. These notes are error messages transmitted by the customer's bank, and are often just an indication of the type of error.
Only the customer can obtain the details related to his error by contacting his bank.
Cases of non-existent transactions
If the Transactions tab indicates a 0 and has no items, the customer was unable to start the online payment process. Therefore, they should check if their card is a valid VISA or MasterCard.
Problem resolution
There are two ways to help the customer with credit card payment issues. They should either…
- … try with another credit card or another payment method,
- … contact their bank to resolve the issue with the card used.
For other cases
Please gather as much information as possible before contacting Infomaniak support who can conduct more in-depth investigations.
Link to this FAQ:
Has this FAQ been helpful?
This guide explains how to easily assign a customer to a pass when the latter has an address entered (within the framework of the Infomaniak ticketing system).
Prerequisites
- The customer record must exist with an associated email address.
- The pass must have an email address entered so that this feature can suggest customers to link.
- You must therefore make the option visible or mandatory in the pass configuration:

- You must therefore make the option visible or mandatory in the pass configuration:
Place the order by entering the email address
When adding passes to the cart, or once they are in the cart, please enter an email address. Multiple passes, each with their own email address, can be in the cart:
Only one customer can be linked to an order.

Once the pass is validated, on the Customer tab, an additional field will offer you the choice of customers to link to the order:
Link to this FAQ:
Has this FAQ been helpful?
This guide explains how to manage an event (within the framework of the Infomaniak ticketing system).
Access the event page
To do this:
- Click here to access the management of your product on the Infomaniak Manager (need help?).
- Click directly on the name assigned to the ticketing concerned by the event.
- Click on Programming in the left sidebar menu.
- Click on Event in the left sidebar menu.
- Click on the name of the event concerned:

The overview
The overview allows you to see an overall preview of your event: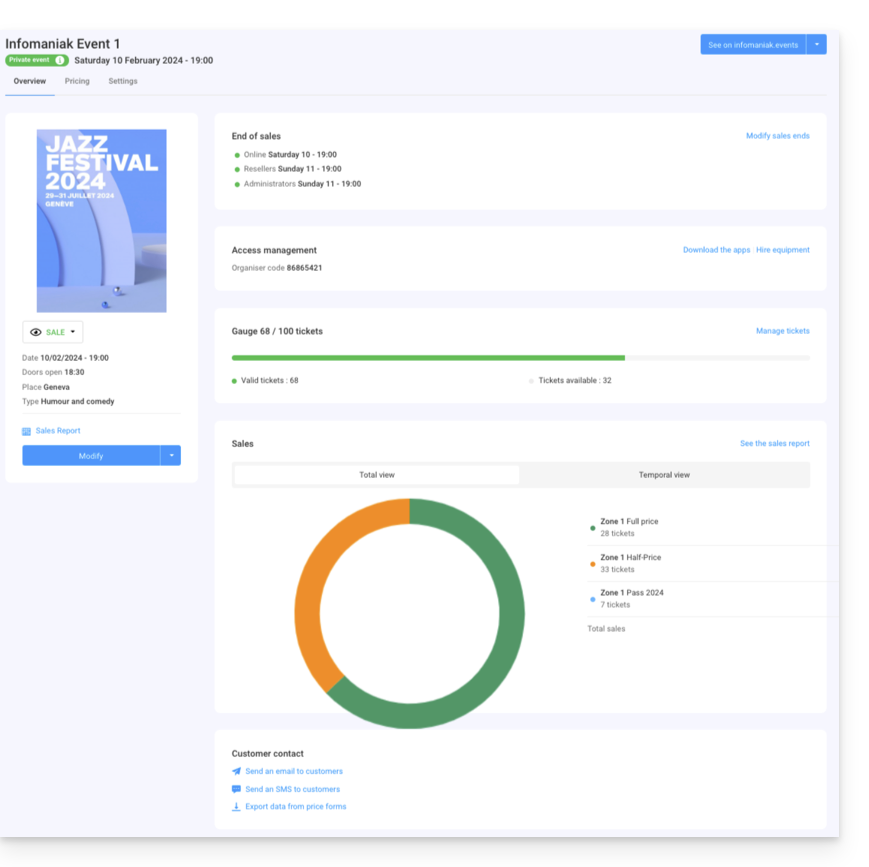
- On the left, the information and status of the event. You can change the visibility of the event, access the sales report, and make changes to the event:

- The end-of-sales information and access codes for ticket control are located at the top of the right column:

- A graph summarizing the number of tickets sold and revenue by rate allows you to track your sales:

- The options related to the event's customers are located at the bottom of the page. These allow you to contact customers who have purchased tickets for this event and export the results of the forms they may have filled out:

- The button at the top right allows you to view the online version of the event on your ticketing system and, if you decide to integrate the event on your site, access the integration options:

Differences in case of multi-date events
If your event has multiple performances, the information will be broken down according to the page you are viewing. You will find:
- On the main page, the general information and parameters applicable to all dates.
- On the pages for each date or performance, you will find the information for that date or performance.
Manage rates, ticket templates, and sales closing times
You can switch to these options in the tabs at the top of the event page:
Link to this FAQ:
Has this FAQ been helpful?
This guide explains how to use and customize digital tickets, adapted for mobile devices, as part of the Infomaniak ticketing system.
Preamble
- When placing an order, visitors receive a digital ticket by email, with the option, for both ecological and practical reasons, to download a PDF version or save it to the Wallet.
- If you have configured Print@home tickets, it is possible to reuse the event parameters for mobile tickets:
- The name of the event
- The location and date
- The opening hours (if activated)
- The first and last name of each ticket holder
- The event poster
- Customers can save their tickets on mobile devices, either on Apple Wallet (downloading the
pass.pkpassand opening it in the iOS “Wallet” app from Apple) or on Google Wallet (Android):
Configuration of your mobile tickets
Prerequisites
- You will need to create an event to access the mobile ticket visual options.
Then:
- Click here to access the management of your product on the Infomaniak Manager (need help?).
- Click directly on the name assigned to the ticketing concerned by the event.
- Click on Programming in the left sidebar menu.
- Click on Events in the left sidebar menu.
- Click directly on the name of the event.
- Click on the Ticket Templates tab:

A preview is displayed on the left side of the screen while the mobile ticket settings are displayed on the right…
A. Customization of the image and promotional texts
You can enable options to add an image and/or informative text. Each change will be reflected in the preview:
B. Display options
The display options give you access to the basic information that will appear on the ticket:
Don't forget to click on Save each time you modify these settings.
C. Allow ticket customization on the online store
By enabling this setting, an additional button on the online store will allow the user to customize their ticket:
By clicking on it, the user can choose the type of field to add:
And whether the price should be displayed or not:
Link to this FAQ:
Has this FAQ been helpful?
This guide explains how to add event tickets, passes and gift vouchers to the mobile box office (within the framework of the ticketing system Infomaniak).
Preamble
- For an overview of the mobile ticket office, refer to this other guide.
2. Add items to the cart
From the Event, Pass or Gift Certificate tabs, you can select the items to add to the cart. Depending on the item, the procedure will vary slightly.
At any time, you can click on one of the tabs **Event, Pass or Gift Certificates** to select other items to add to the cart.
Event ticket sales
- Select the event, date, or performance you want from the left column.
- Choose the quantity of tickets to add to the cart using the + and - icons for the desired prices.
- Click on Add to Cart to proceed:

Pass sales
The pass page is divided into 2 parts. The left column allows you to generate new passes. The right column allows you to manage existing passes:
- Select the pass to generate on the left column.
- Enter the subscriber's information.
- Once the pass is in the cart, you can add tickets for associated events for passes with selectable events:


Sale of gift voucher
As for gift cards, they are listed for you. You just need to select the cards to add to your cart:
Next steps
- Manage and validate the mobile kiosk cart
- Print tickets and manage orders from the mobile kiosk
- Send the cash report (Coming Soon)
- Mobile counter settings (Coming soon)
Link to this FAQ:
Has this FAQ been helpful?
This guide explains how to manage and modify the contents of the cart for your direct ticket sales on the mobile kiosk (within the framework of the ticketing system Infomaniak).
Preamble
- For an overview of the mobile ticket office, refer to this other guide.
3. Manage and modify the cart content
The cart content is located on the left side of the screen in the Cart tab, and you can modify it at any time by performing the following actions:
- Add additional items: You can add tickets, subscriptions, or gift vouchers at any time by selecting the desired tab.
- Modify the quantity of items: For tickets and gift vouchers, you can modify the quantity of items in the cart by using the numbers that indicate the quantities:

- Modify the content of a pass with selectable tickets: If the pass content requires ticket selection, you can view the tickets already on the pass and add tickets by clicking on the relevant menus

- Delete items from the cart: By clicking on the Trash icon next to the cart items, you can delete these items. Warning: If you have taken an existing reservation from the orders, this operation will modify the order.

- Empty the cart : You can also empty the cart by clicking on the blue trash can at the bottom of the page

For reservations: If you wish to remove an item from a reservation, please use the Trash icon. If you wish to remove items while keeping the original order, prefer the reservation splitting method.
Using a promotional code
If the customer has a promotional code, or if you want to apply a promotional code to them, you can click on the % icon on the right side of your screen:
Validate the cart
Once the cart is filled with all the desired items, you can choose the payment method that the visitor wants to use to validate the cart and place the order.
To do this, you have, on the right side of the screen, the payment methods available to you at the ticket office. To modify the available payment methods, please refer to the guide on this subject:
In the case where the cash payment method is chosen, it is possible to enter the amount given by the customer and the change to be given will be indicated on the order validation pop-up:
Next steps
- Print tickets and manage orders from the mobile kiosk
- Send the cash report (Coming Soon)
- The mobile ticket office settings (Coming Soon)
Link to this FAQ:
Has this FAQ been helpful?
This guide explains how to manage orders and print tickets from the mobile ticket office (as part of the ticketing system Infomaniak).
Preamble
- For an overview of the mobile ticket office, refer to this other guide.
4. Printing orders
To do this:
- Select the order to print.
- If you are in the sales process and have just validated an order, it will be selected by default when you reach this step.
- Click on the desired printer to print the ticket(s):

- In the case of a pass, the mobile ticket office will indicate the available badge printers:

Print a receipt with the ticket
You can print a receipt for the order by activating the option on the right of the prints. The receipt will be printed at the end of the tickets:
Search for an order and filter the order list
It is possible to filter the list of orders or perform a specific search. The search field allows you to use all information related to the order, such as the name, email address, order number, etc.
You can also filter orders by event date.

Manage orders
Each order has options allowing you to manage it more precisely:
- Add or modify the order's client:

- Send by email the invoice, the tickets or the confirmation email, or print the receipt:

- Manage tickets individually, either to print a selection of tickets, or, for reservations, split the reservation:

- If the order contains passes, access the pass options:

- If the order contains gift certificates, display them and copy the code to the clipboard:

Next steps
- Send the cash report (Coming Soon)
- The mobile ticket office settings (Coming Soon)
Link to this FAQ:
Has this FAQ been helpful?
This guide describes the differences between the Infomaniak Ticketing tool and the Guest Manager.
What type of event are you organizing?
- If you are organizing a one-time private event, such as a birthday party, a general assembly, or a graduation with a well-defined guest list, use the Guest Manager.
- This tool allows you to create an event, invite the people of your choice, and track their registrations and attendance.
- On the other hand, the Ticketing tool is better suited for events open to the public or those for which anyone with the link can purchase tickets.
| Infomaniak Ticketing | Guest Manager | |
|---|---|---|
| Issues tickets | ✔ | ✔ |
| Named tickets | ✗ Optional | ✔ |
| Possibility of paid tickets | ✔ | ✗ |
| Requires a known list of guests | ✗ Guests are not chosen | ✔ Recipient email addresses are mandatory |
| Purchase possible by anyone with a link | ✔ | ✗ No link is generated; everything is done by email |
| Only guests can respond to the invitation | ✗ | ✔ |
| Tickets for multiple events | ✔ | ✗ |
| Possibility to propose multiple dates | ✔ | ✗ |
| Form to fill out | ✔ | ✔ |
| Registration tracking feature | ✗ You can retrieve the list of customers | ✔ |
| Creates a link for ticket purchase | ✔ | ✗ |
| Sends a direct invitation to pick up tickets | ✗ | ✔ |
Link to this FAQ:
Has this FAQ been helpful?
This guide explains how to duplicate an event from one ticket office to another within the framework of the Infomaniak ticketing system.
Preamble
- The duplicated event will take over all the information and parameters of the event except for the information relating to the general parameters of the ticket office and dates.
- Please check all the information that requires manual updating.
- If necessary, refer to this other guide regarding the duplication (unique or recurring) of an event on the same ticket office.
Duplicate an event
Prerequisites
To duplicate an event from one of your ticket offices to another, you need to go to the one from which you want to duplicate the events, previous season or edition for example:
- Click here to access the management of your product on the Infomaniak Manager (need help?).
- Click directly on the name assigned to the ticket office on which the event to be duplicated is located:
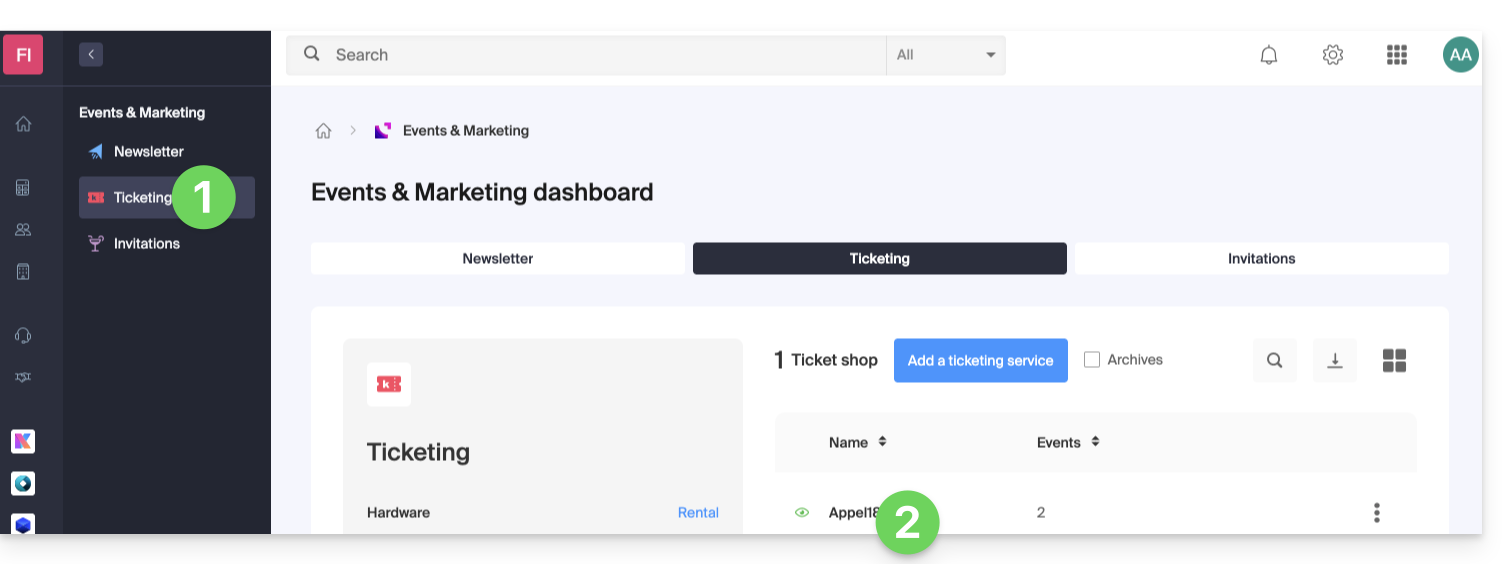
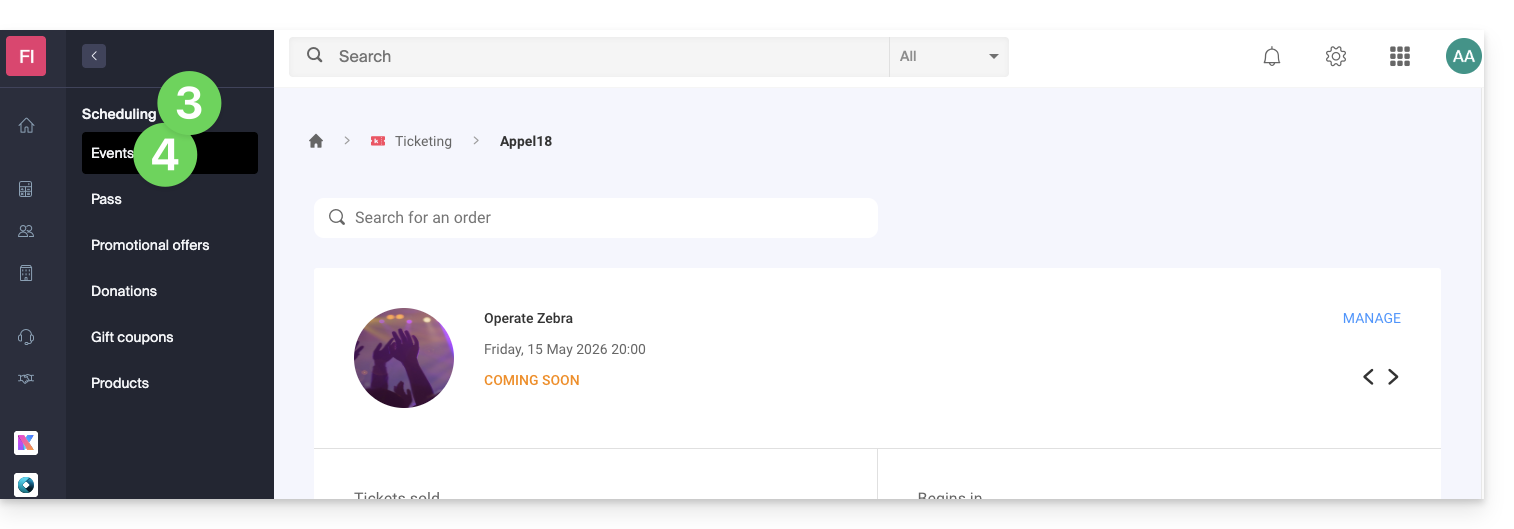
- Click on Programming in the left sidebar.
- Click on Events in the left sidebar:
- Click on the action menu ⋮ located to the right of the event to be duplicated.
- Click on Duplicate:
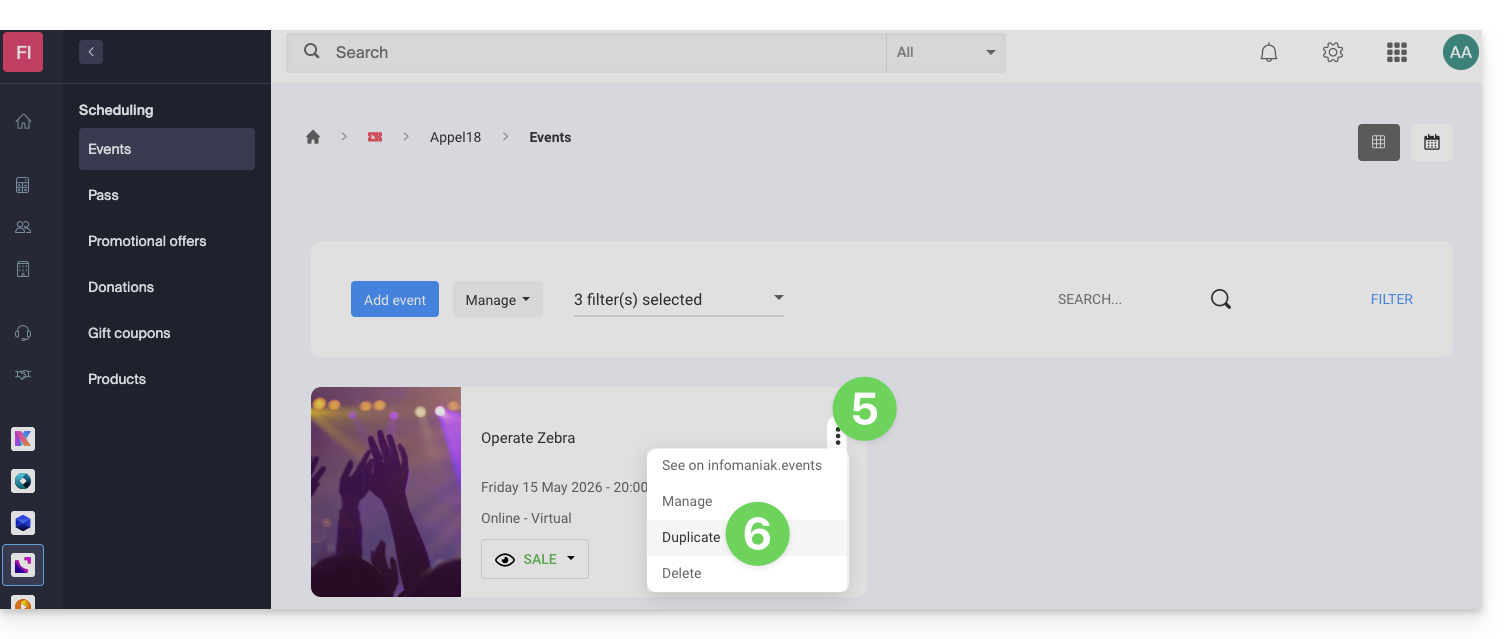
- On the modal that opens, activate the Duplicate to another ticket office option and choose which one:

- If necessary, indicate the new name of the event, the new dates and the other parameters of the representations of your event.
- Click on Confirm to start the duplication.
Link to this FAQ:
Has this FAQ been helpful?