Knowledge base
1000 FAQs, 500 tutorials and instructional videos. Here, there are only solutions!
This guide details the Auto DJ feature of Infomaniak's Streaming Radio service, which allows you to create a live radio station that broadcasts 24/7 using your own audio content (music, shows, podcasts, jingles, etc.) that you have previously uploaded to your storage space.
Introduction
- The Auto DJ uses the files stored in your Infomaniak AOD (Audio on Demand) space to create a linear stream.
- You can use this same space for your on-demand file storage needs.
- You organize your media, create your playlists, and schedule their broadcast via an intuitive calendar interface.
- This ensures continuous broadcasting without requiring an encoder to be active at all times.
Enable Auto DJ
Prerequisites
- You must have at least the right to manage the VOD/AOD service “autodj” and the related Radio Streaming (❓: help).
- To manage Auto DJ via API, the token created for managing the radio must include the following scopes:
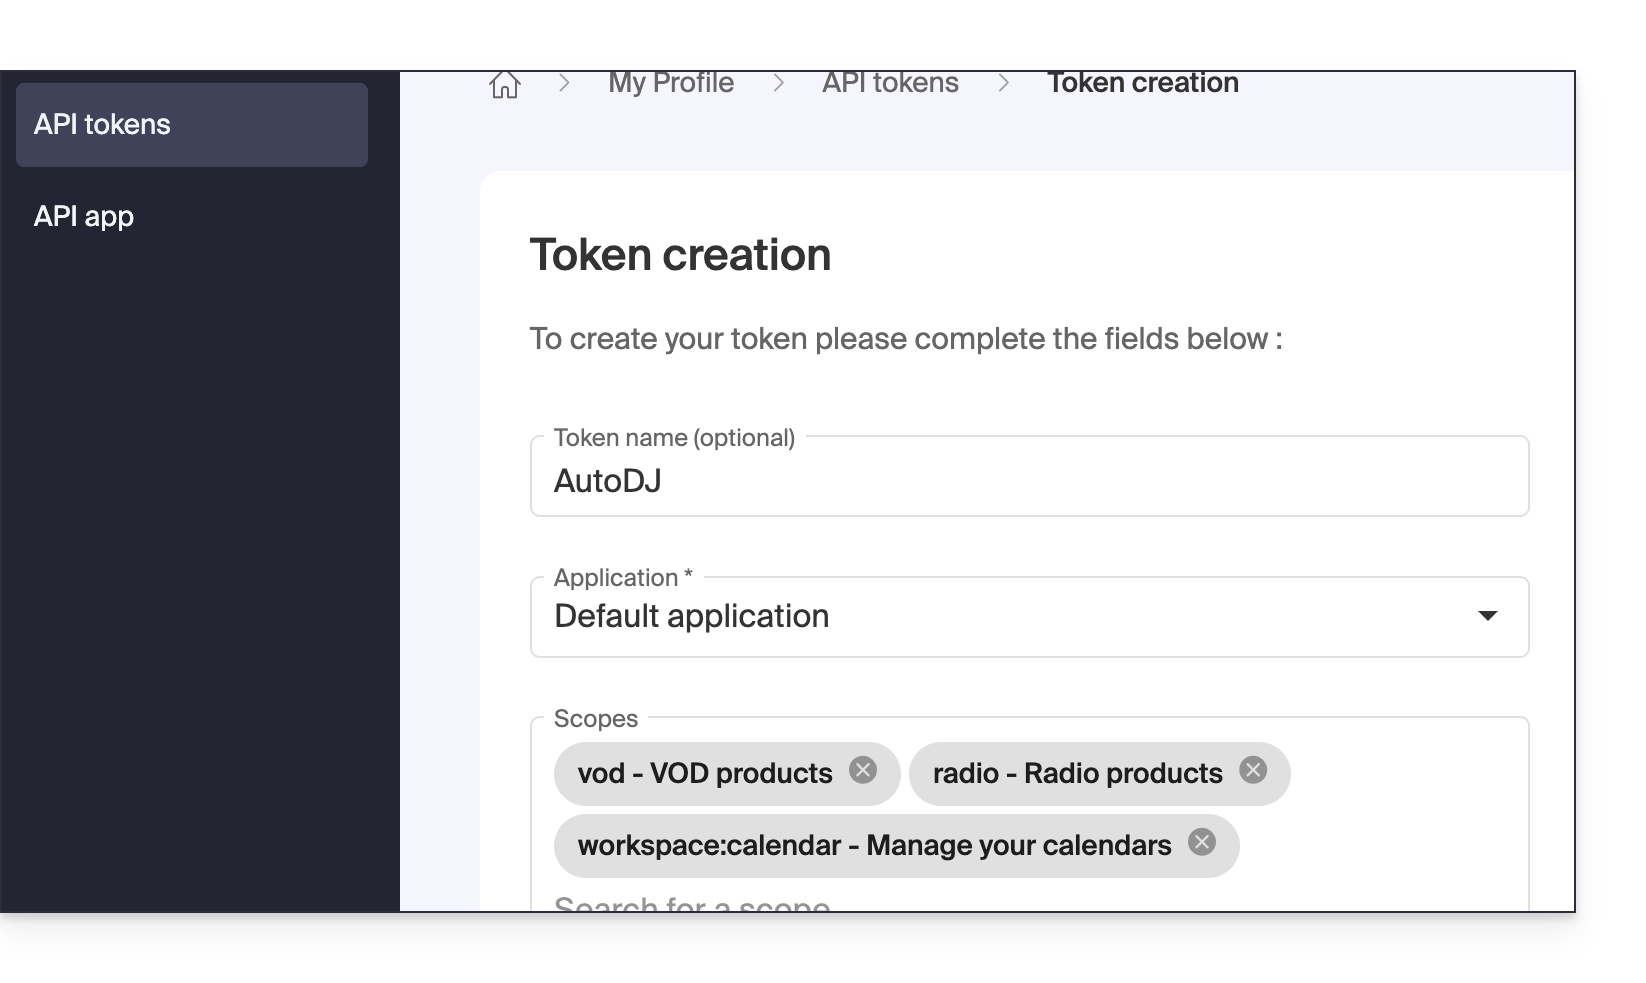
vodradioworkspace:calendar
To activate and start Auto DJ:
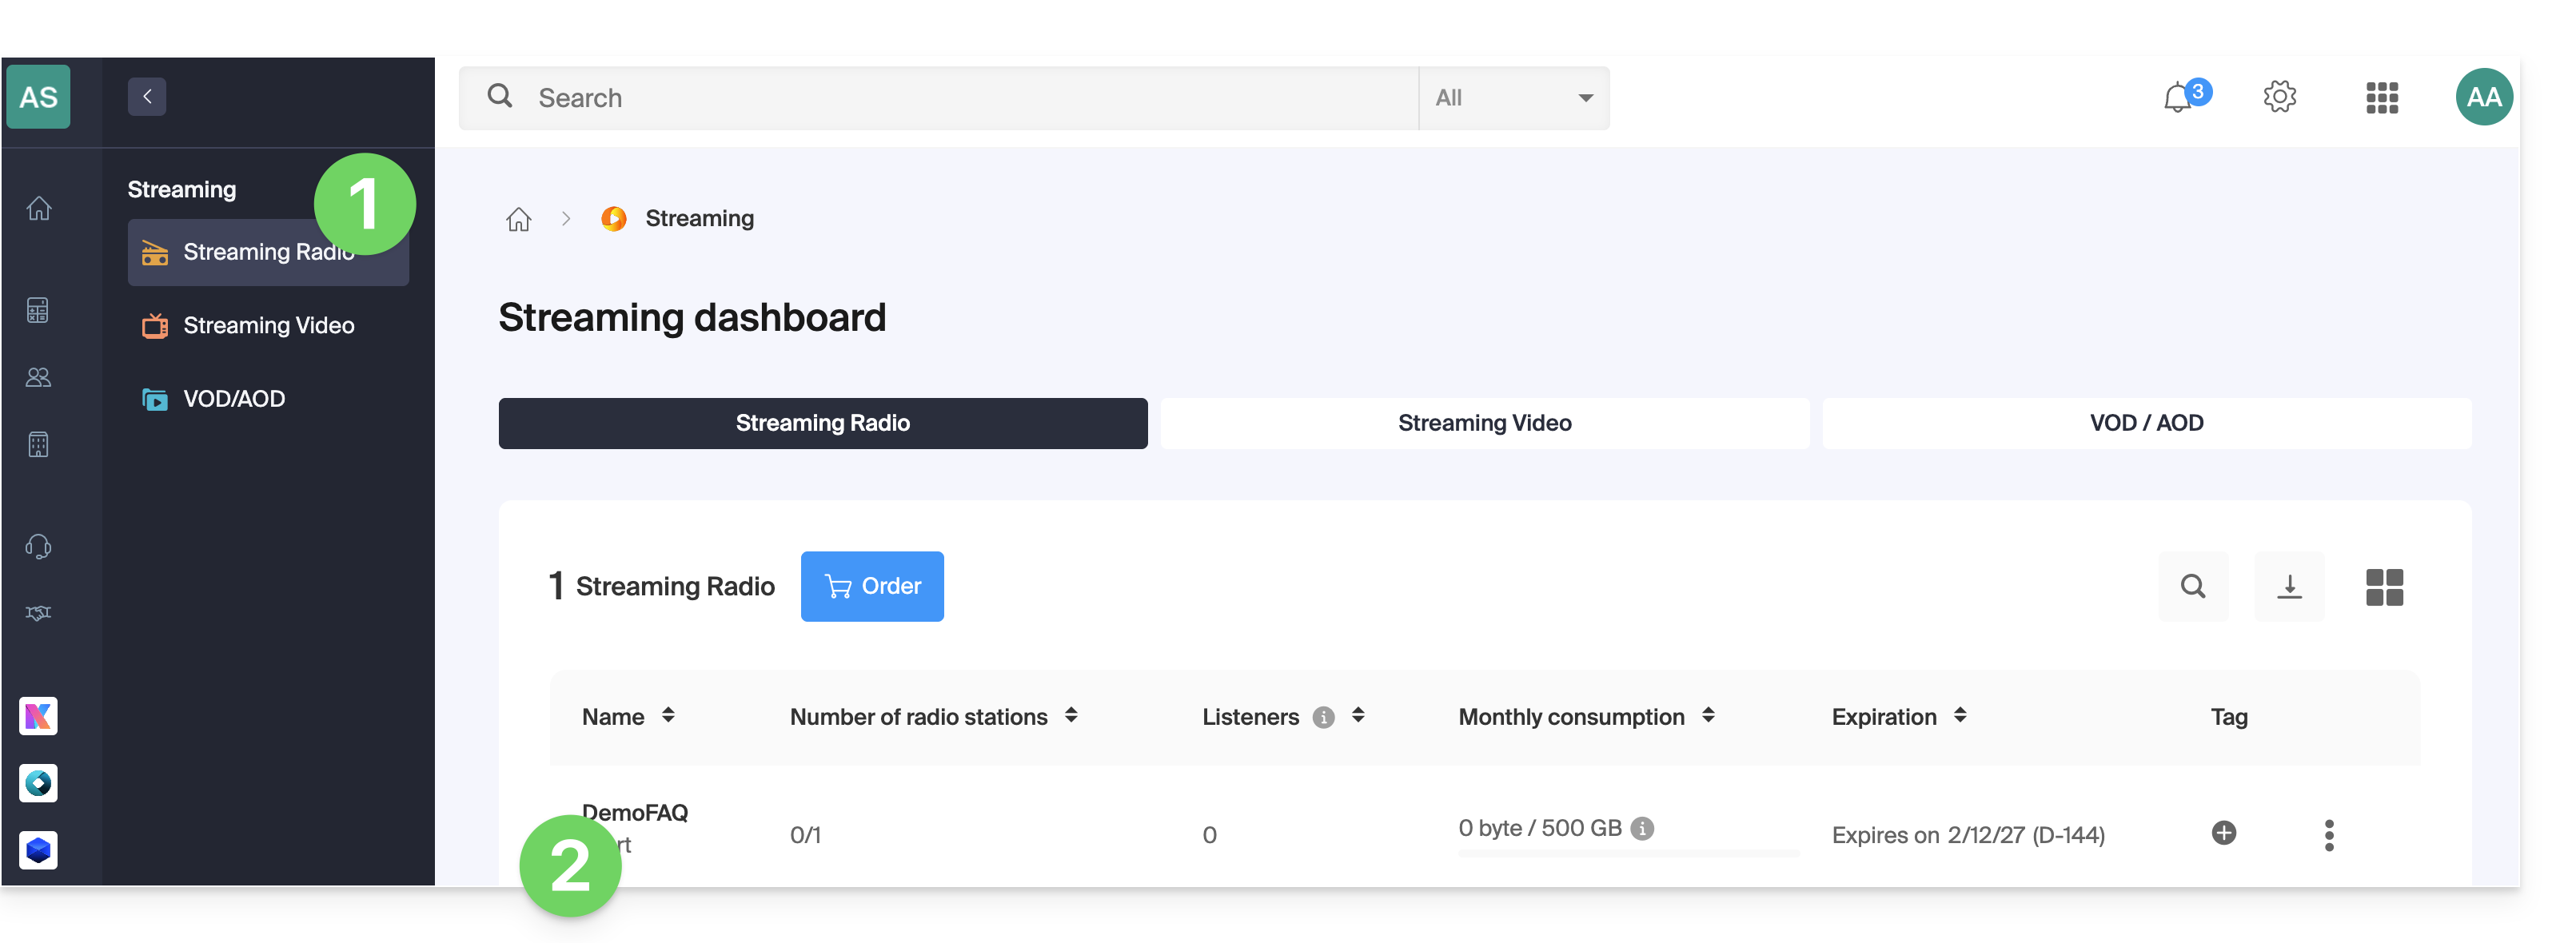
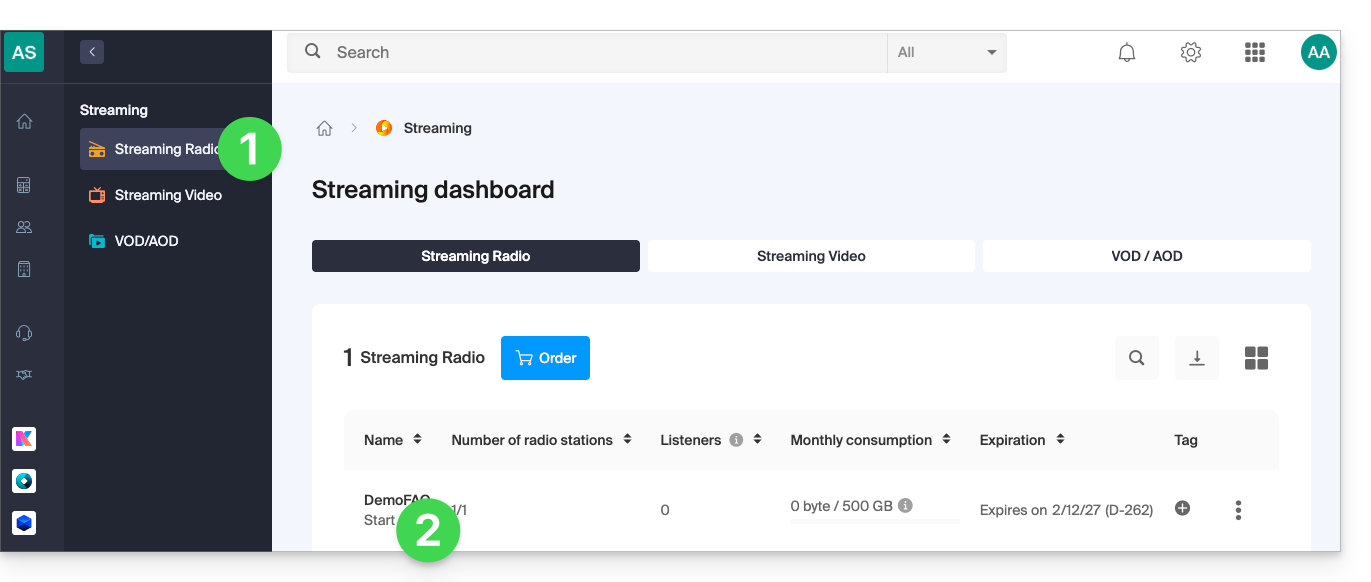
- Click here to access the management of your Streaming Radio in the Infomaniak Manager (need help?).
- Click directly on the name assigned to the Streaming Radio in question:
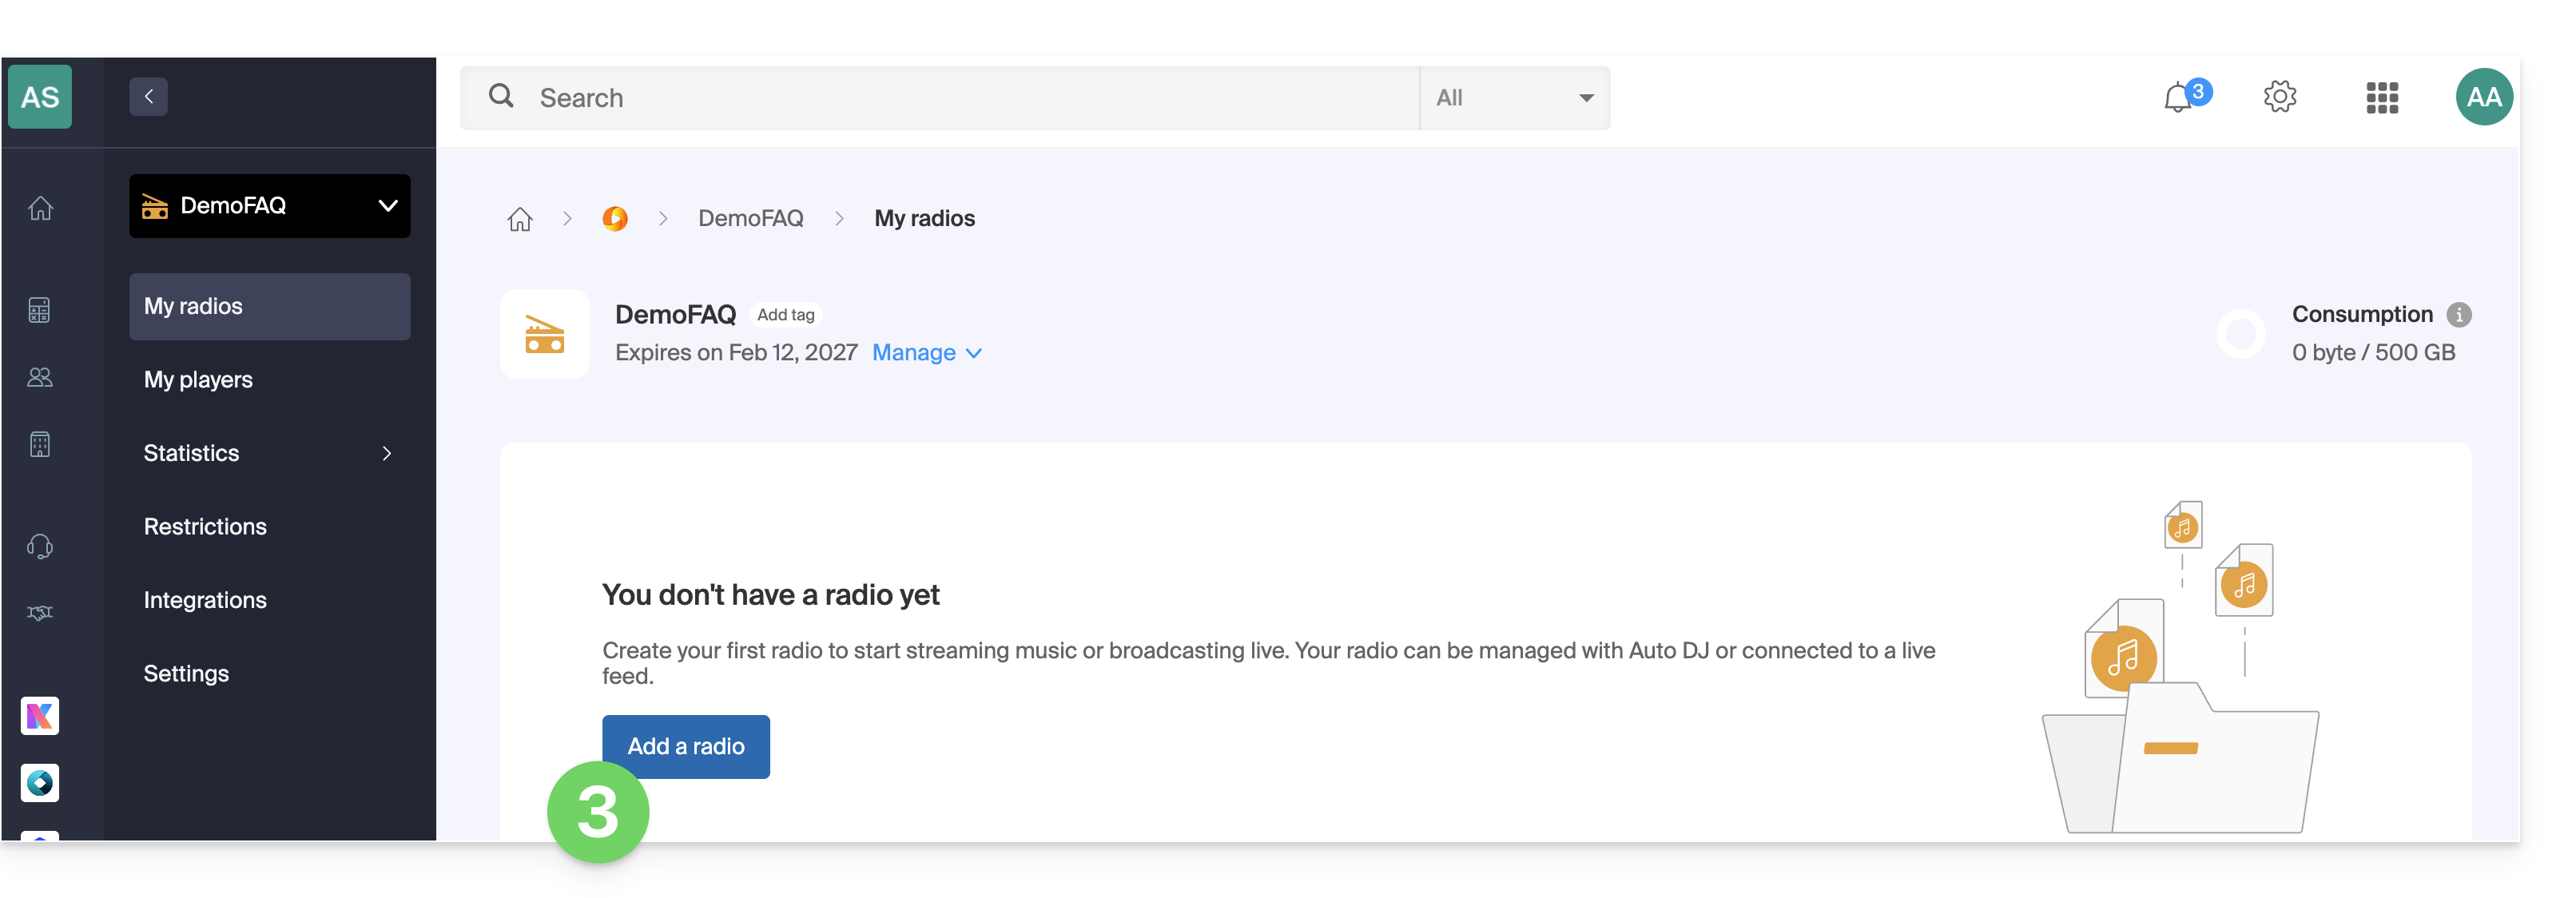
- If you already have a radio configured, click on its name and go to step 8; otherwise, add a new radio:
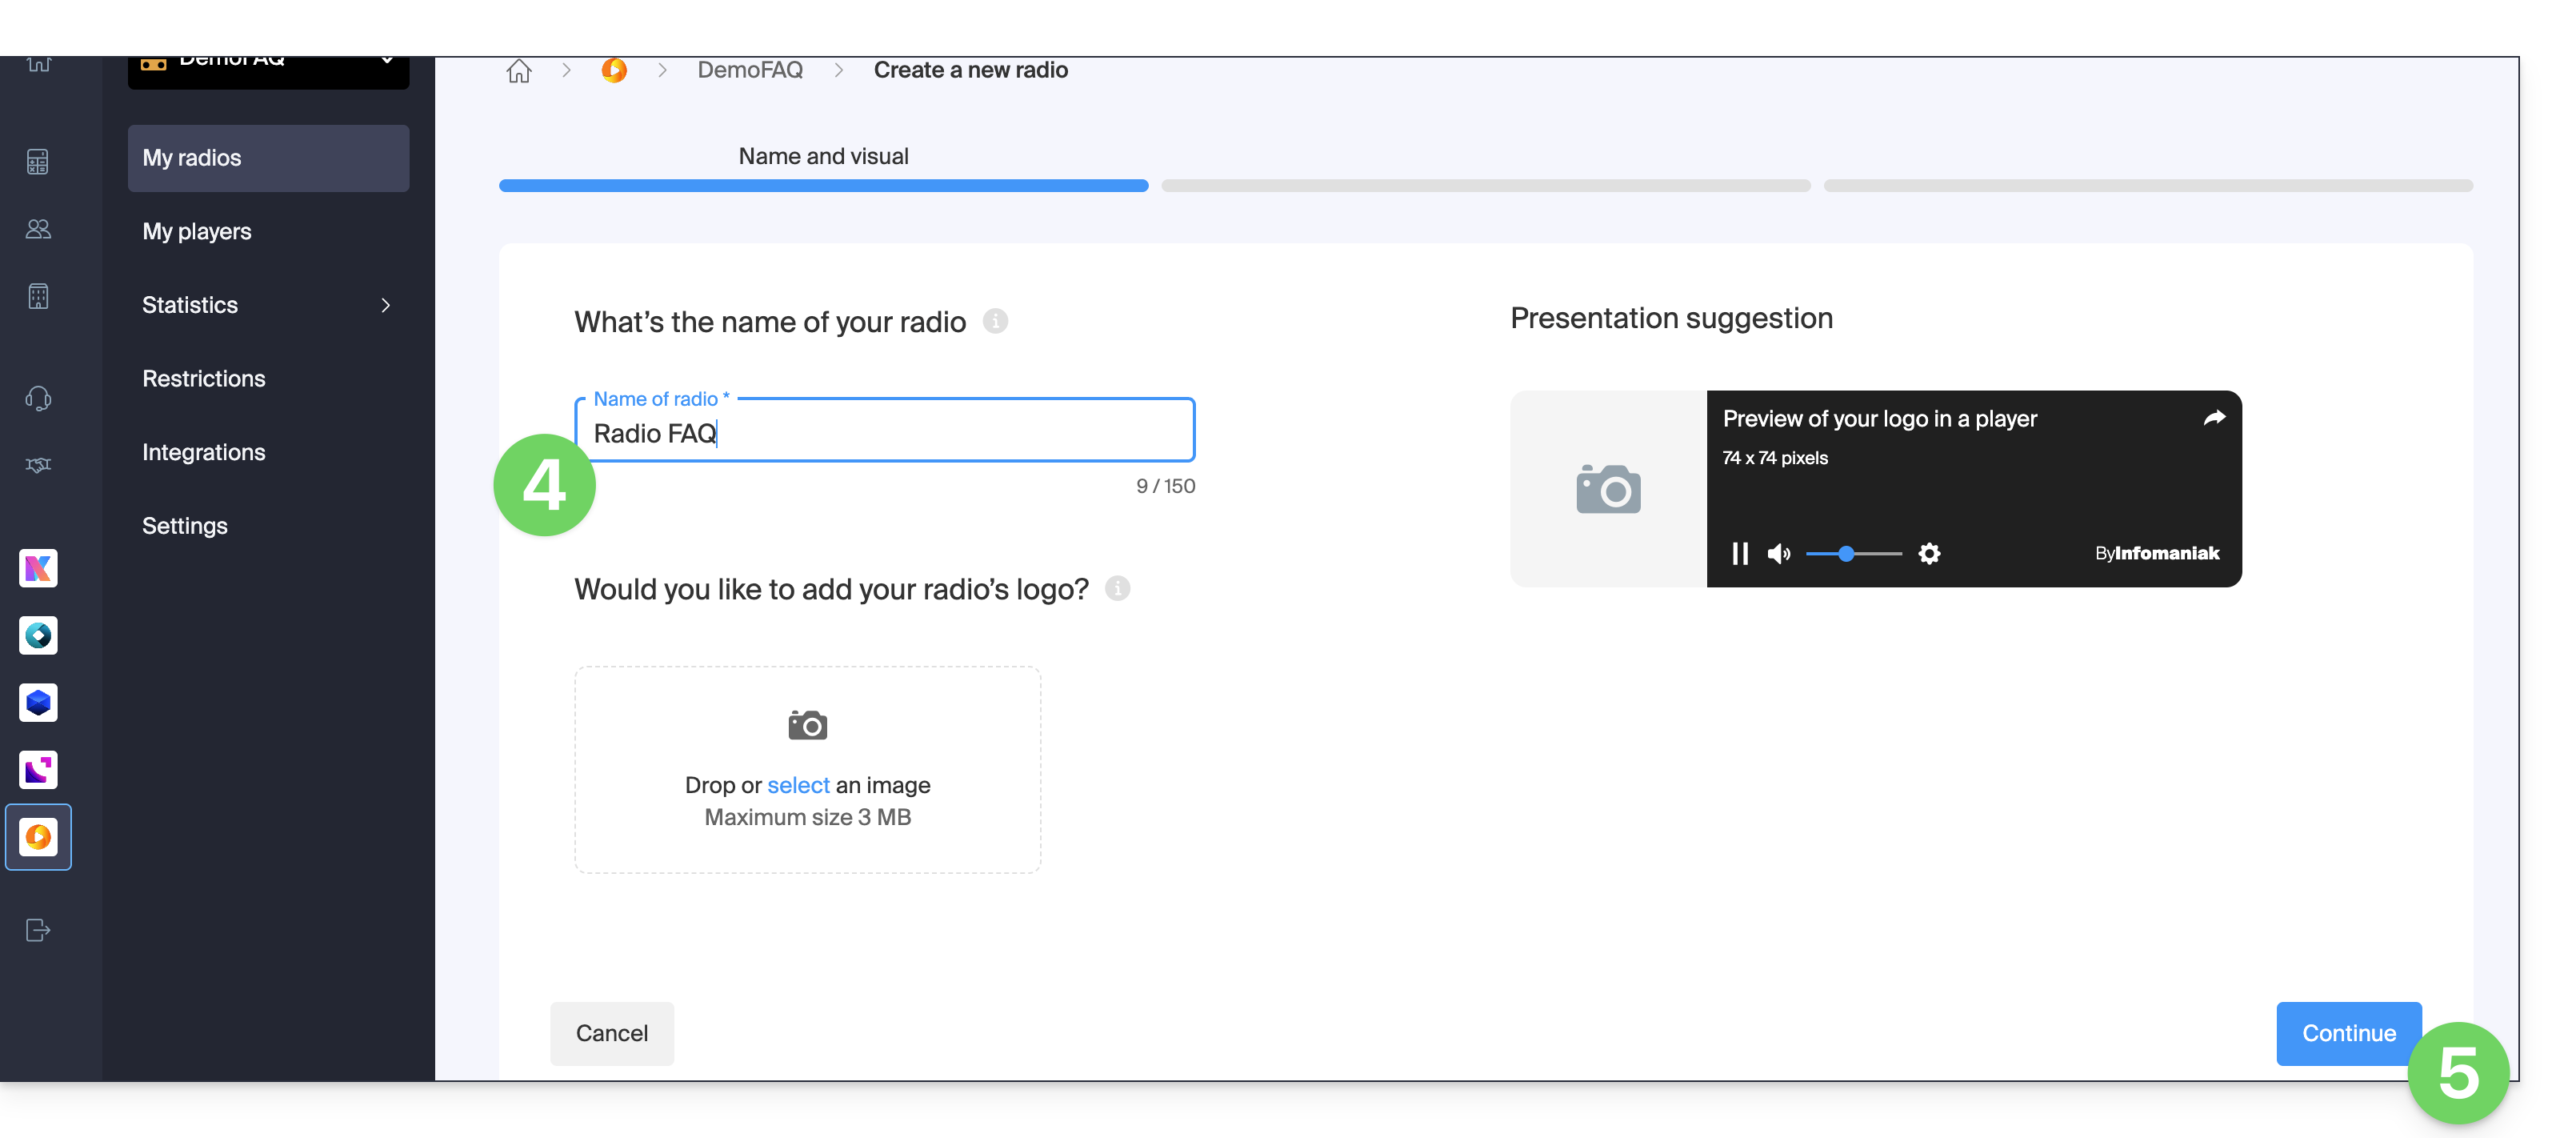
- Give the radio a name and an optional visual.
- Click Continue:
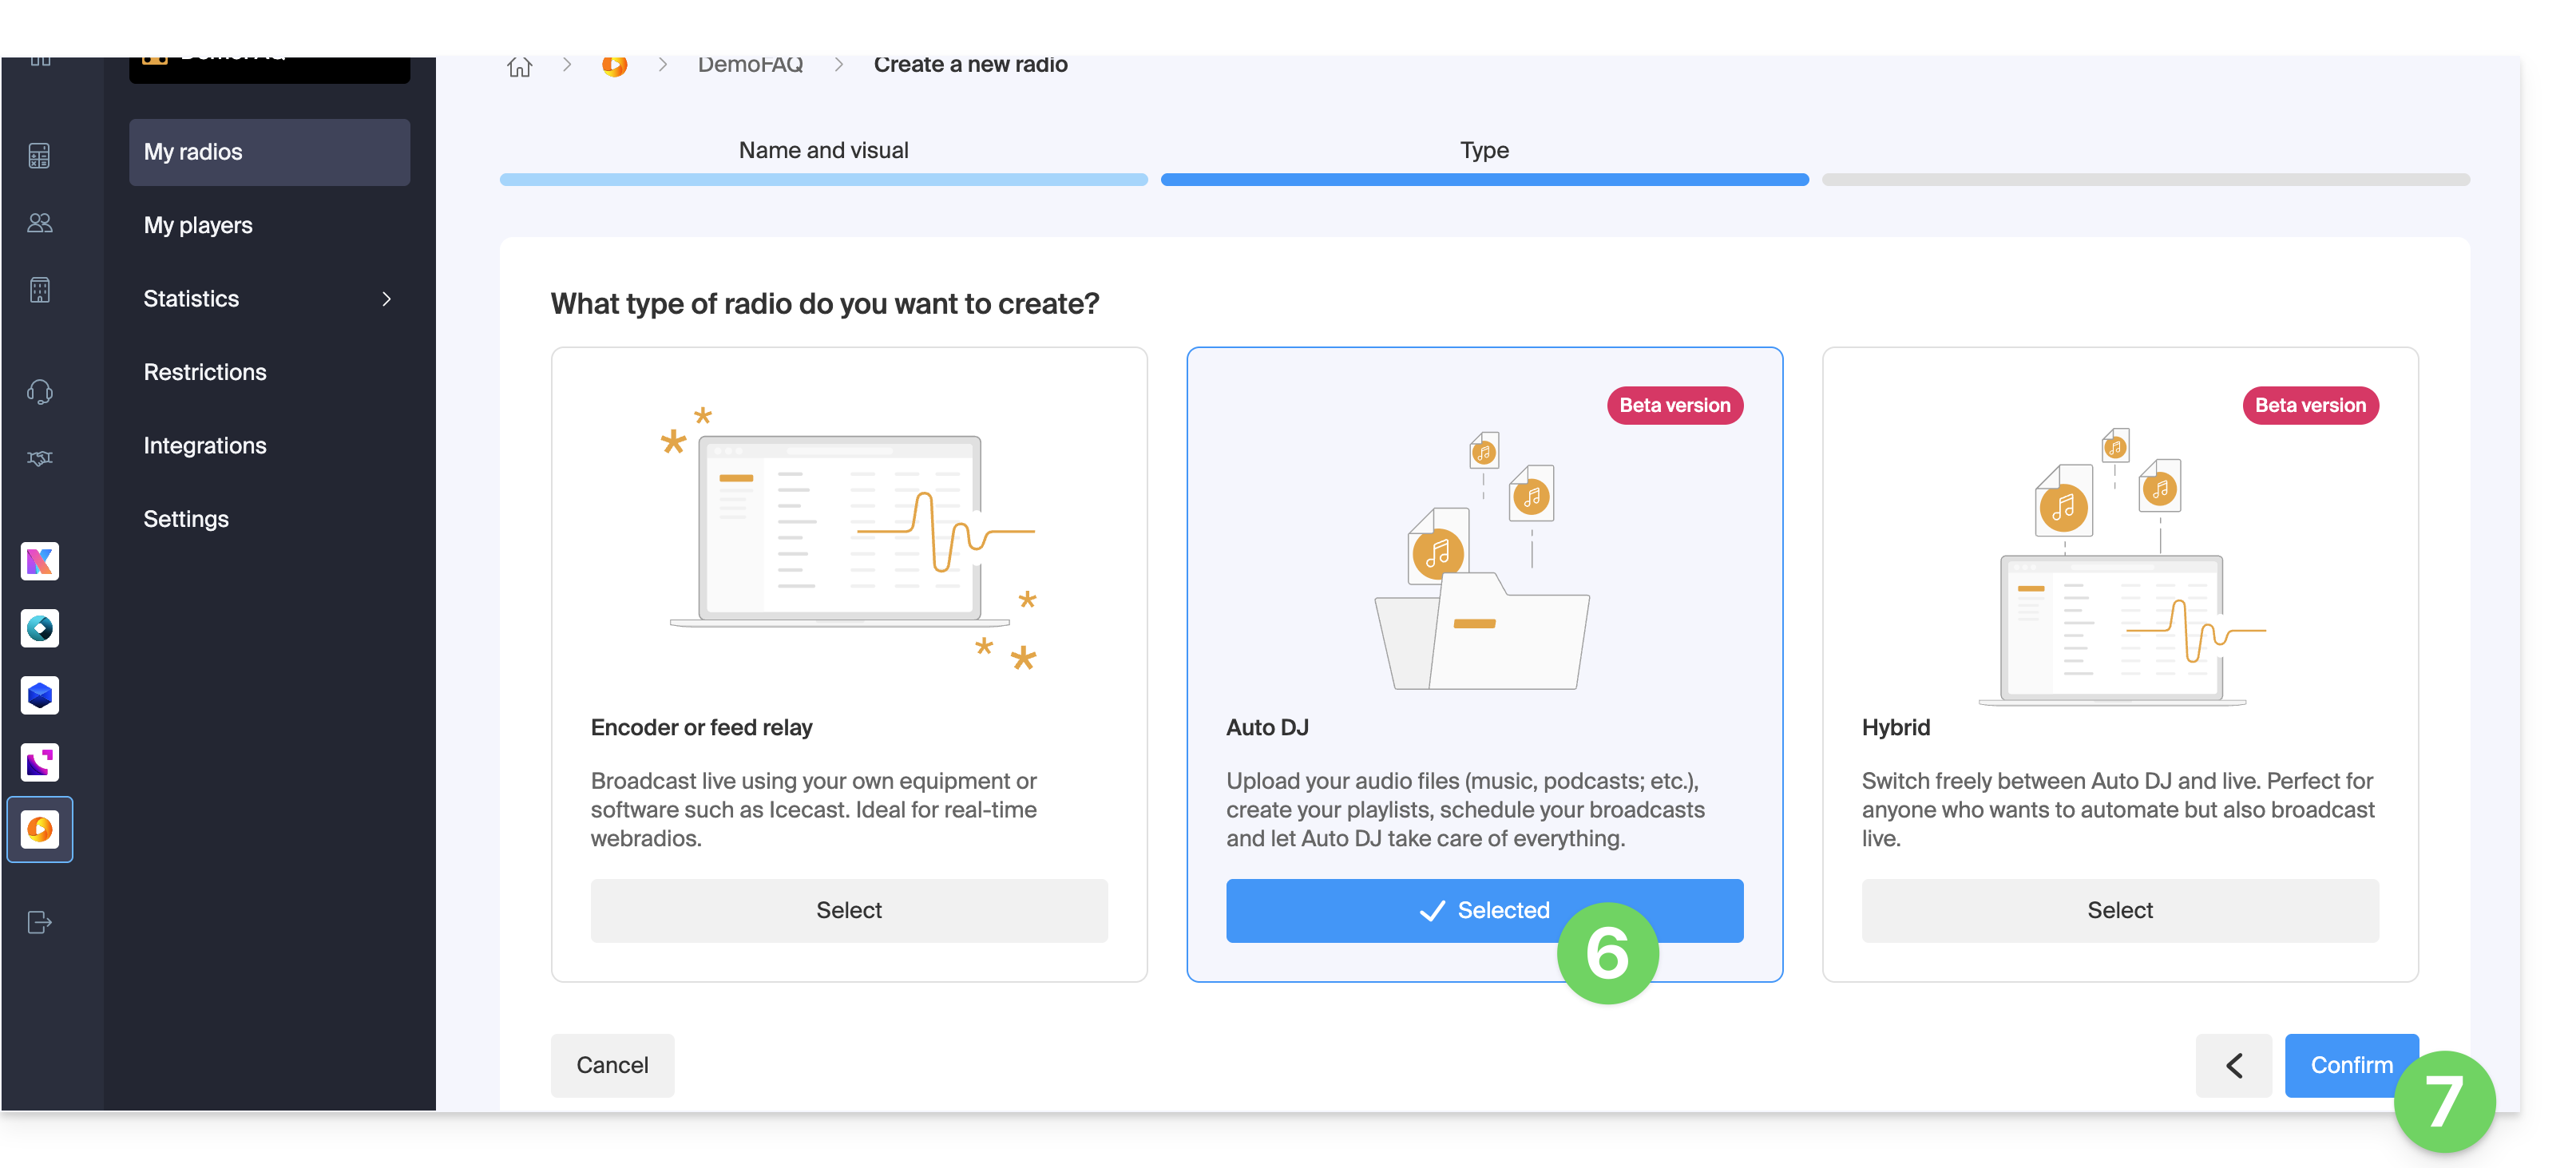
- Select Auto DJ.
- Click to Confirm and proceed to step 11:
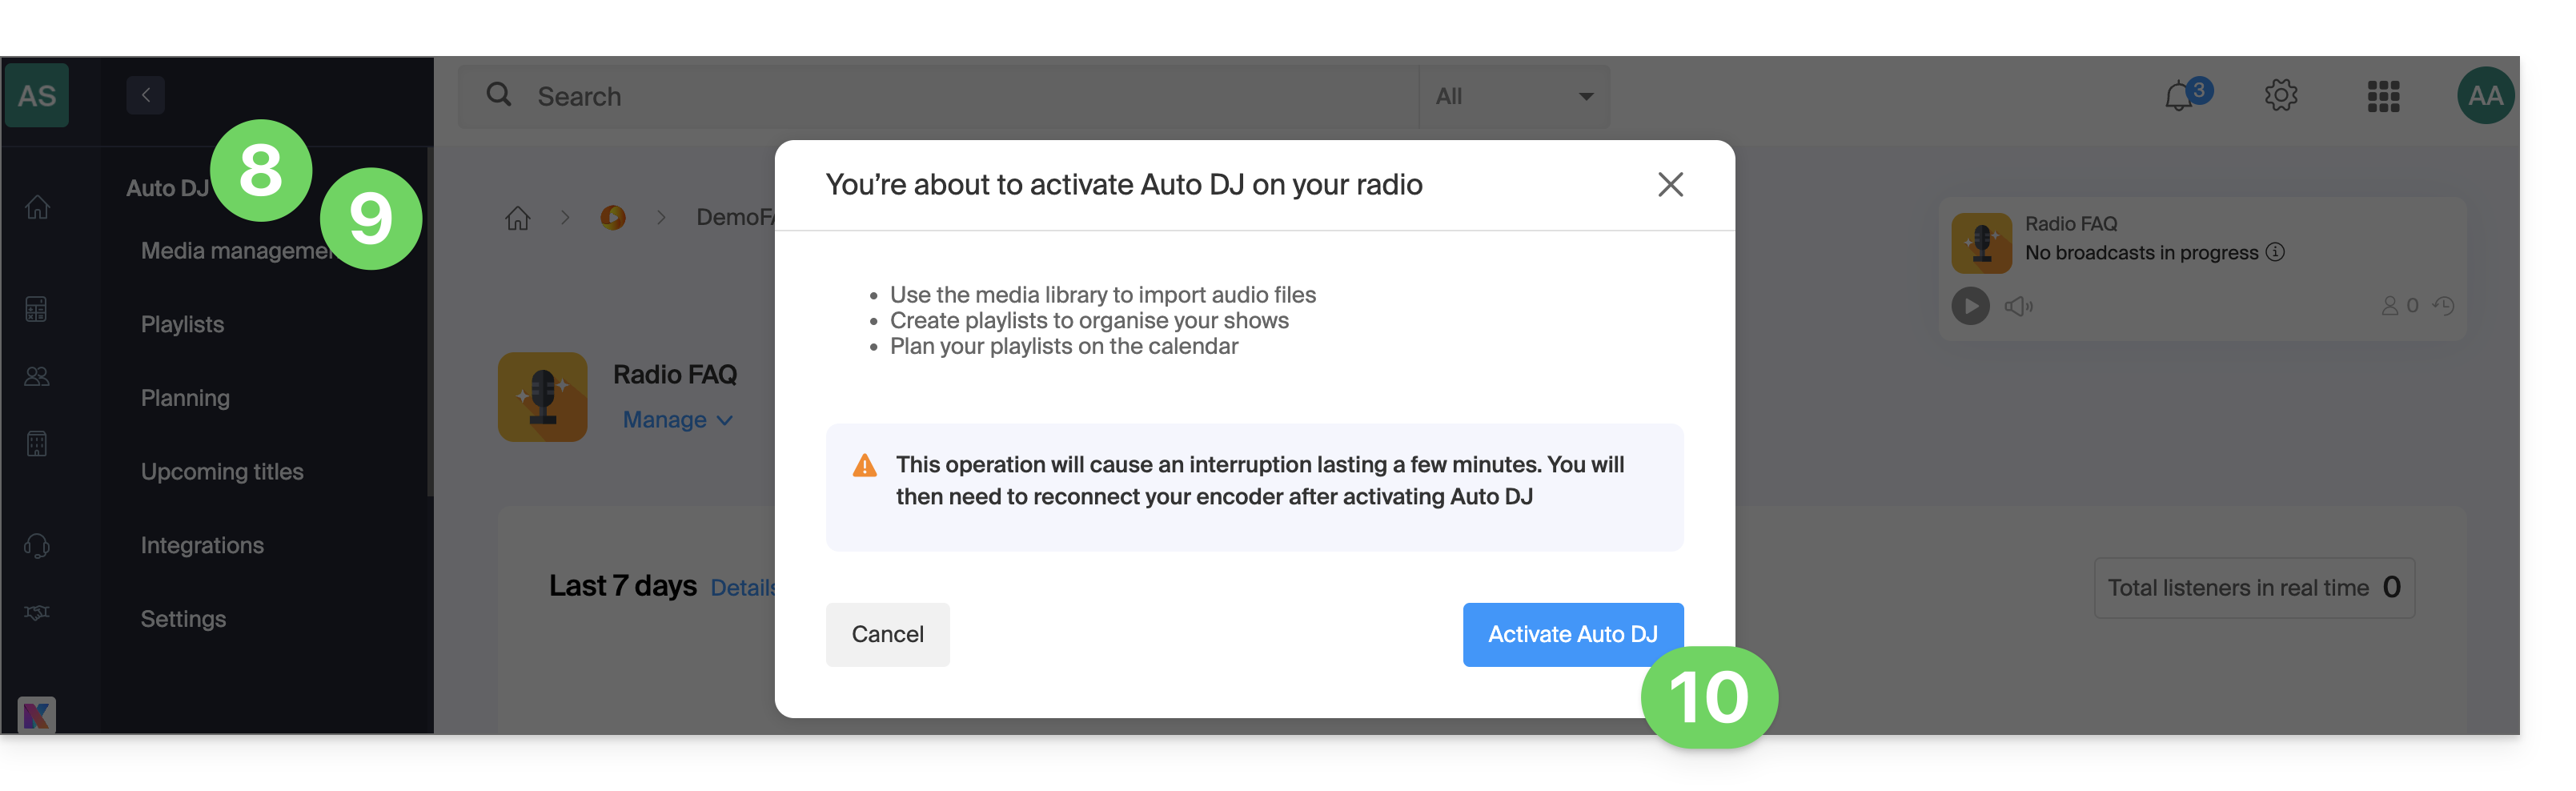
- Click on Auto DJ in the left-hand menu.
- Click on Media Management in the left-hand menu.
- Read the warnings and click to enable Auto DJ:
- Select the AOD space to use if you have multiple spaces.
- Auto DJ is now enabled and linked to your AOD space for your audio files:
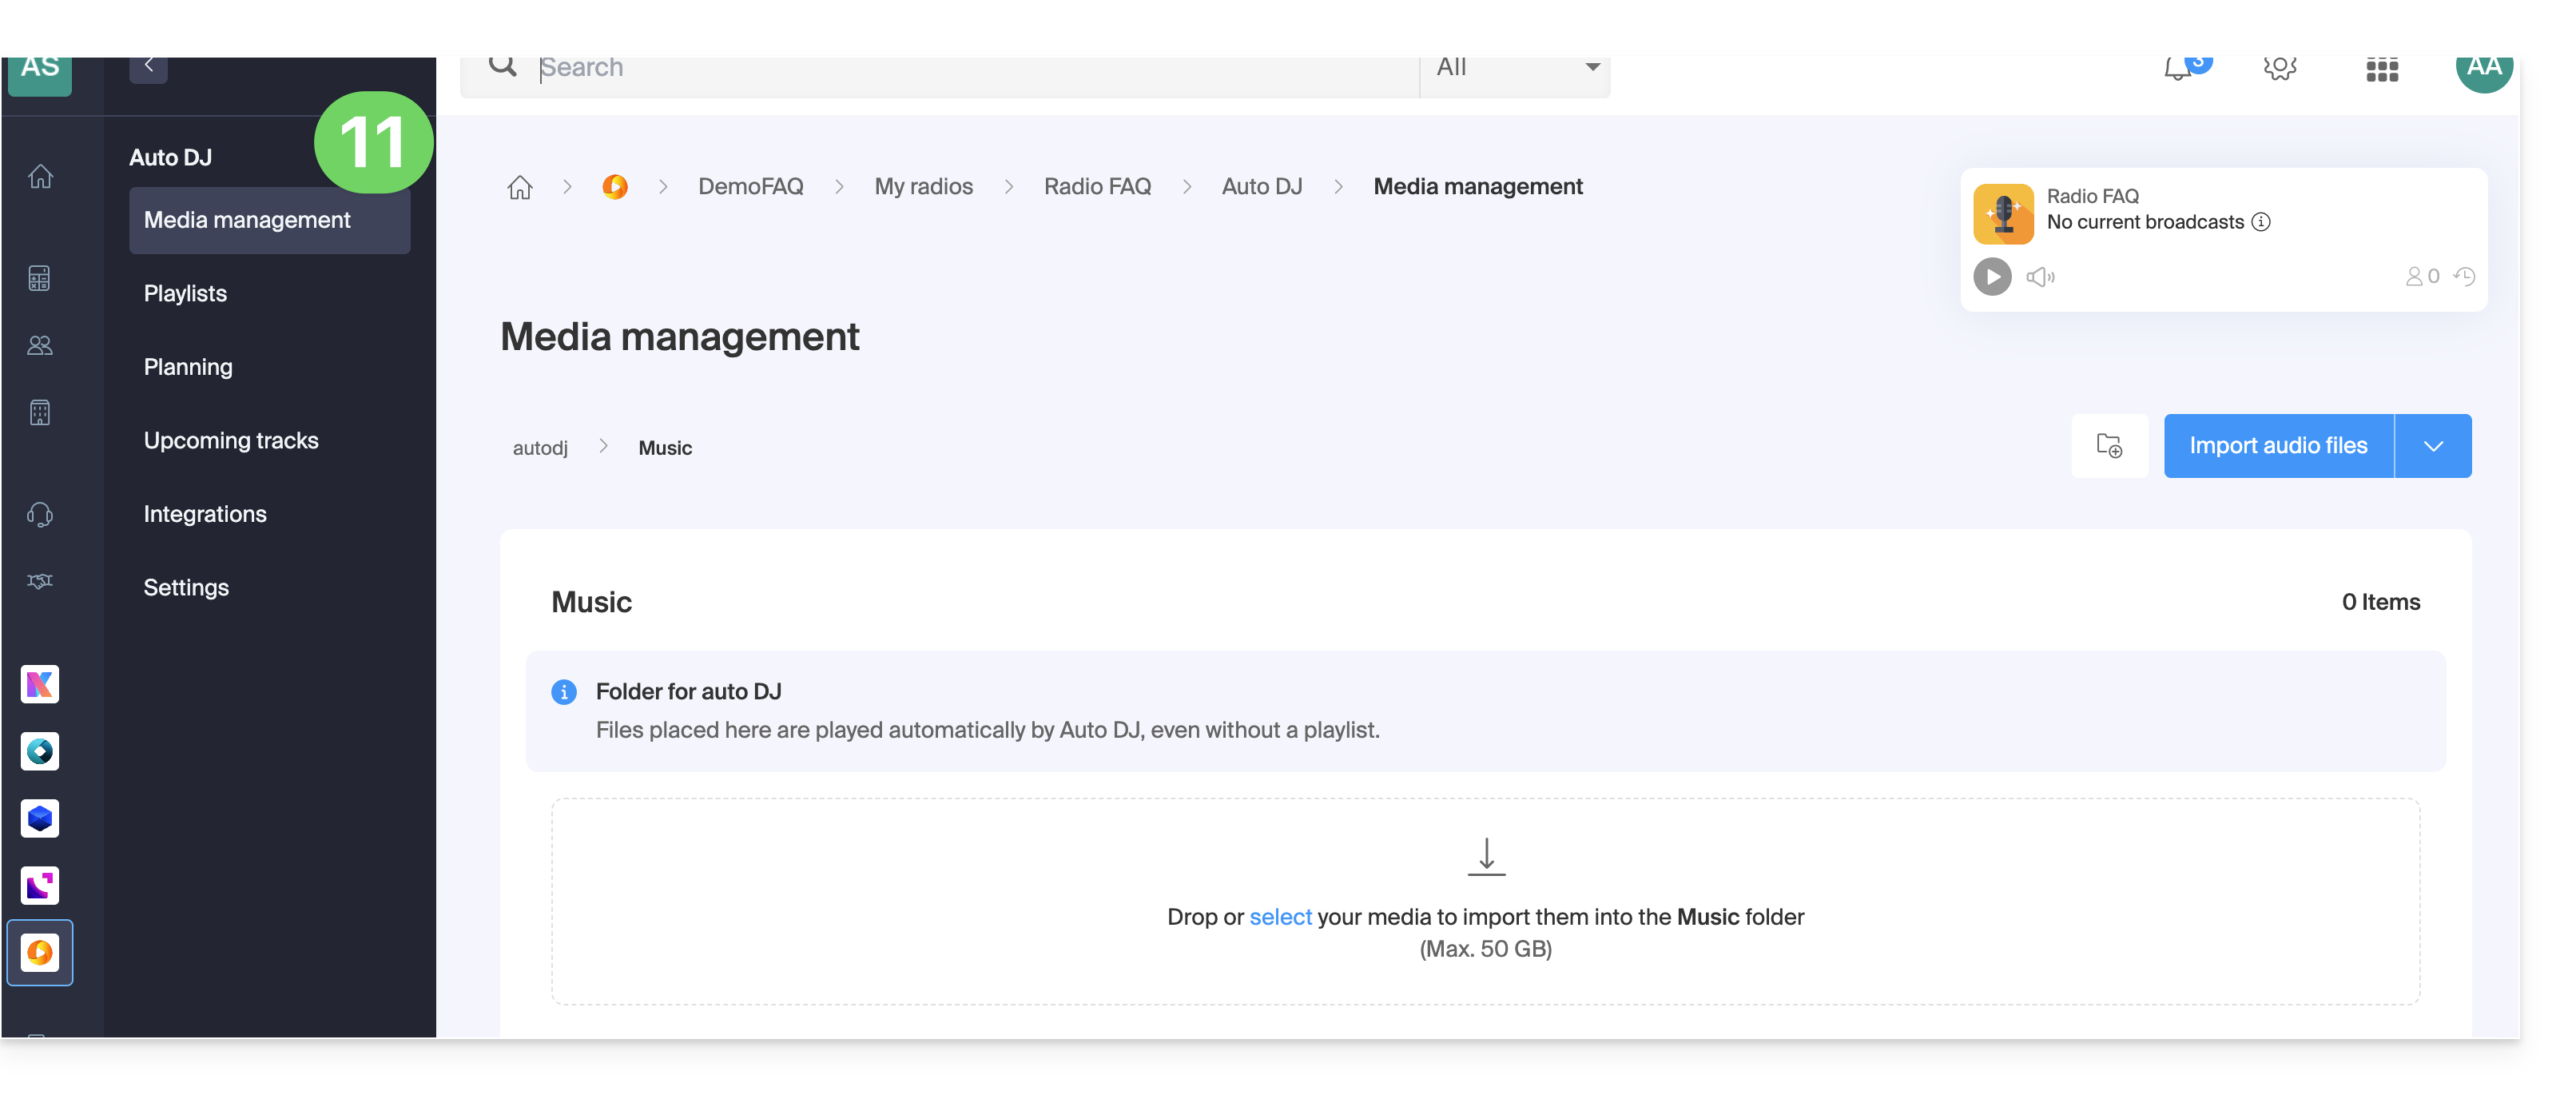
Refer to this other guide to organize and broadcast your audio files.
Link to this FAQ: https://faq.infomaniak.com/185
Has this FAQ been helpful?
A Player (i.e., an audio stream player) is essential for your Streaming Radio stations on Infomaniak when you want to broadcast them to your listeners and internet users.
Prerequisites
- Add at least 1 Radio and 1 audio stream.
Create an audio player
To create a Player and offer the audio stream to your users:
- Click here to access the management interface for your product on the Infomaniak Manager (need help?).
- Click directly on the name assigned to the product in question:
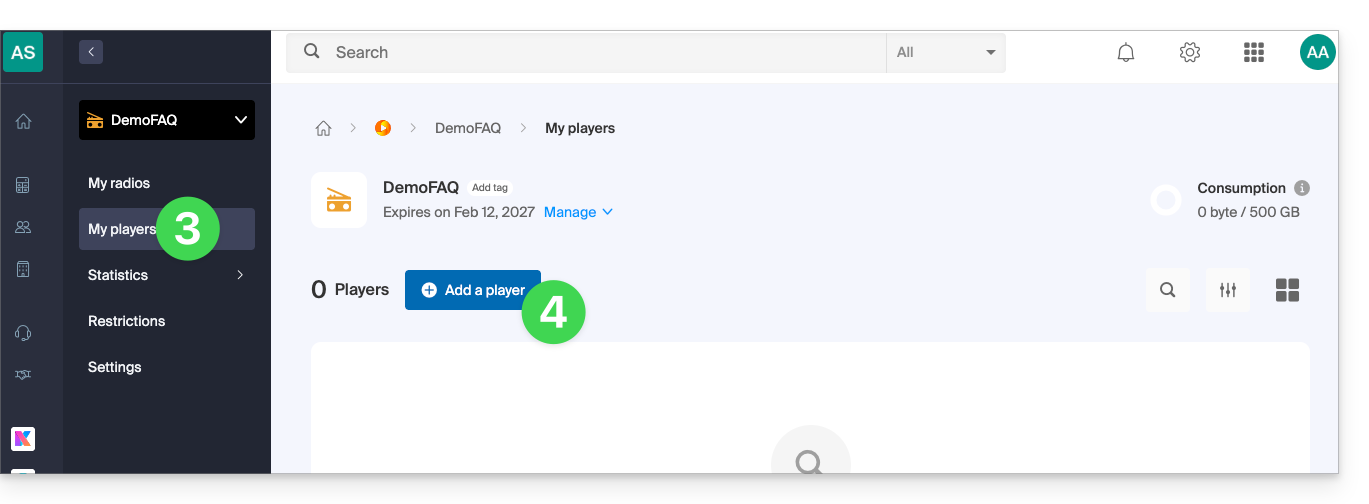
- Click on My players in the left-hand menu.
- Click the blue button to add an audio player:
- You can then choose between:
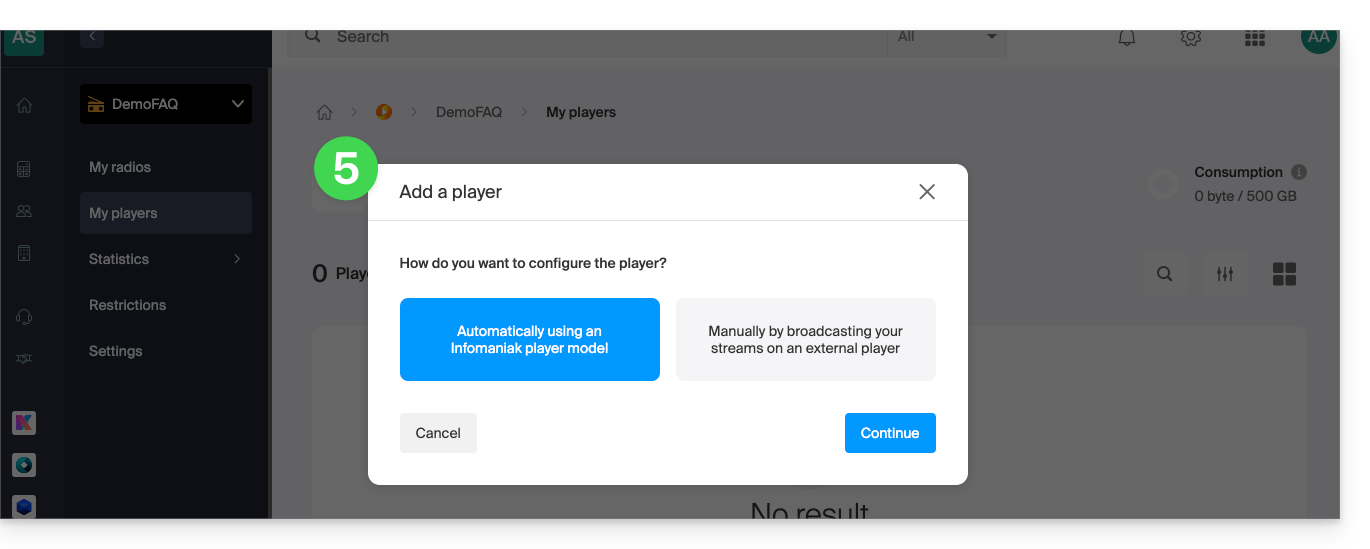
- automatic configuration
- use the information/URL provided for your browser, external player/app, or Android or iOS, if you have your own player or application…
Refer to this other guide about the additional configuration of radio players: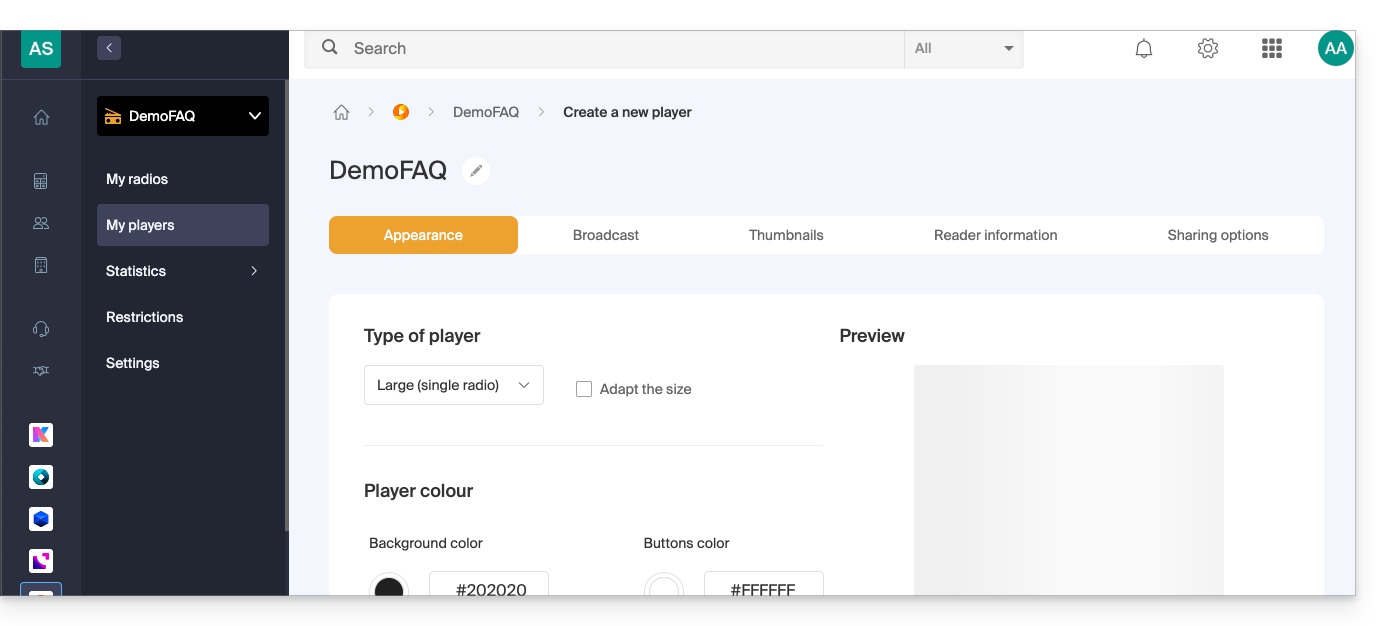
Link to this FAQ: https://faq.infomaniak.com/1325
Has this FAQ been helpful?
SpacialAudio SAM Cast is compatible with Infomaniak's Streaming Radio offer.
Link to this FAQ: https://faq.infomaniak.com/1330
Has this FAQ been helpful?
This guide explains how to remove an audio stream from your Streaming Radio, without deleting the entire product.
Delete a radio station
To access the Streaming service and delete one of its streams:
- Click here to access the management of your product on the Infomaniak Manager (need help?).
- Click directly on the name assigned to the product in question:
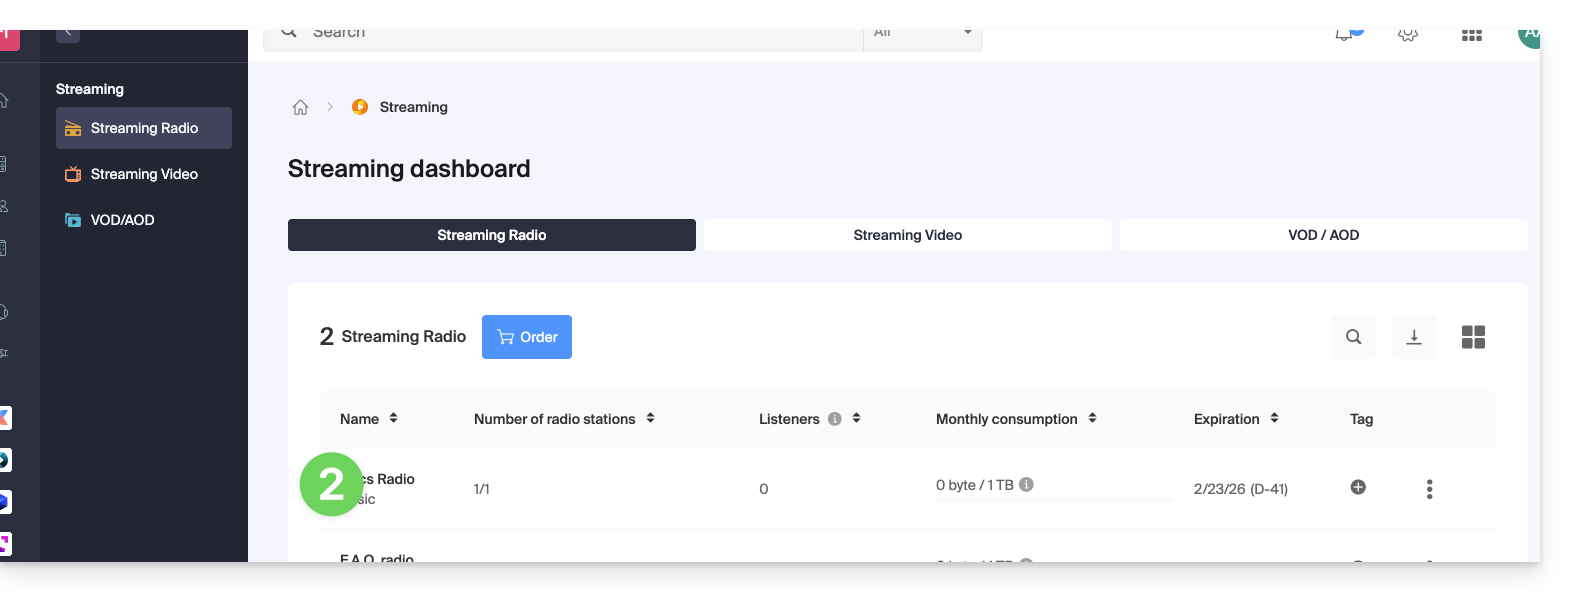
- Click on the name of the radio station in question:
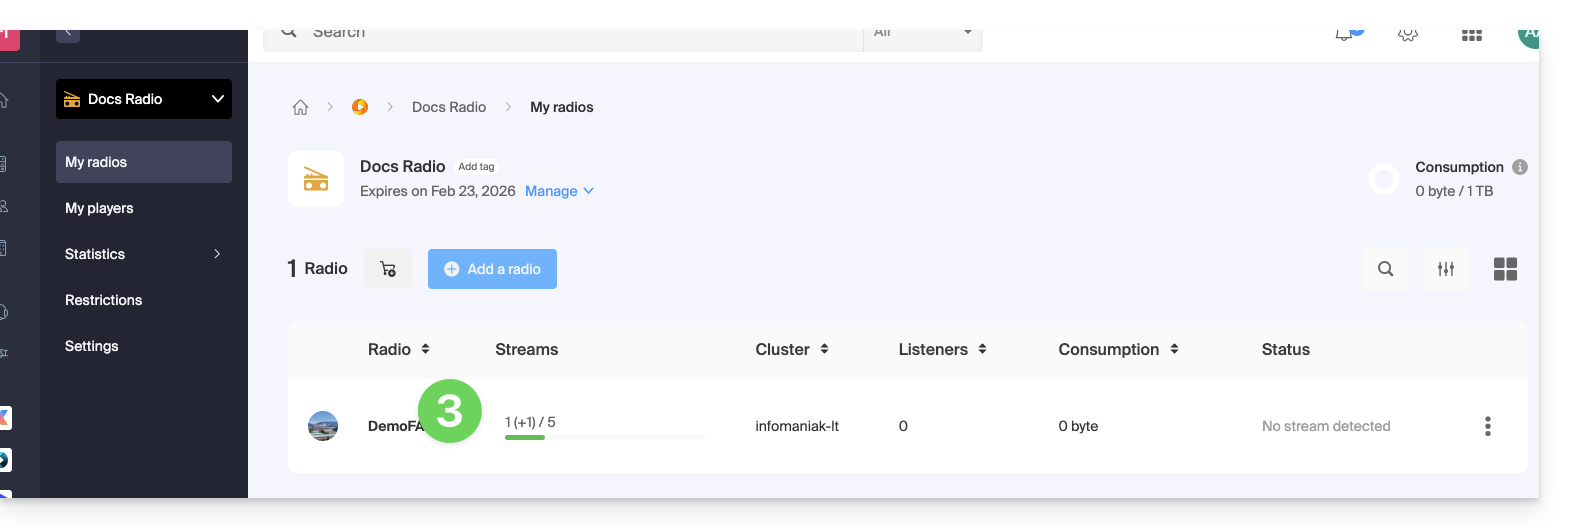
- Click on the action menu ⋮ located to the right of the item in question.
- Click on Delete:
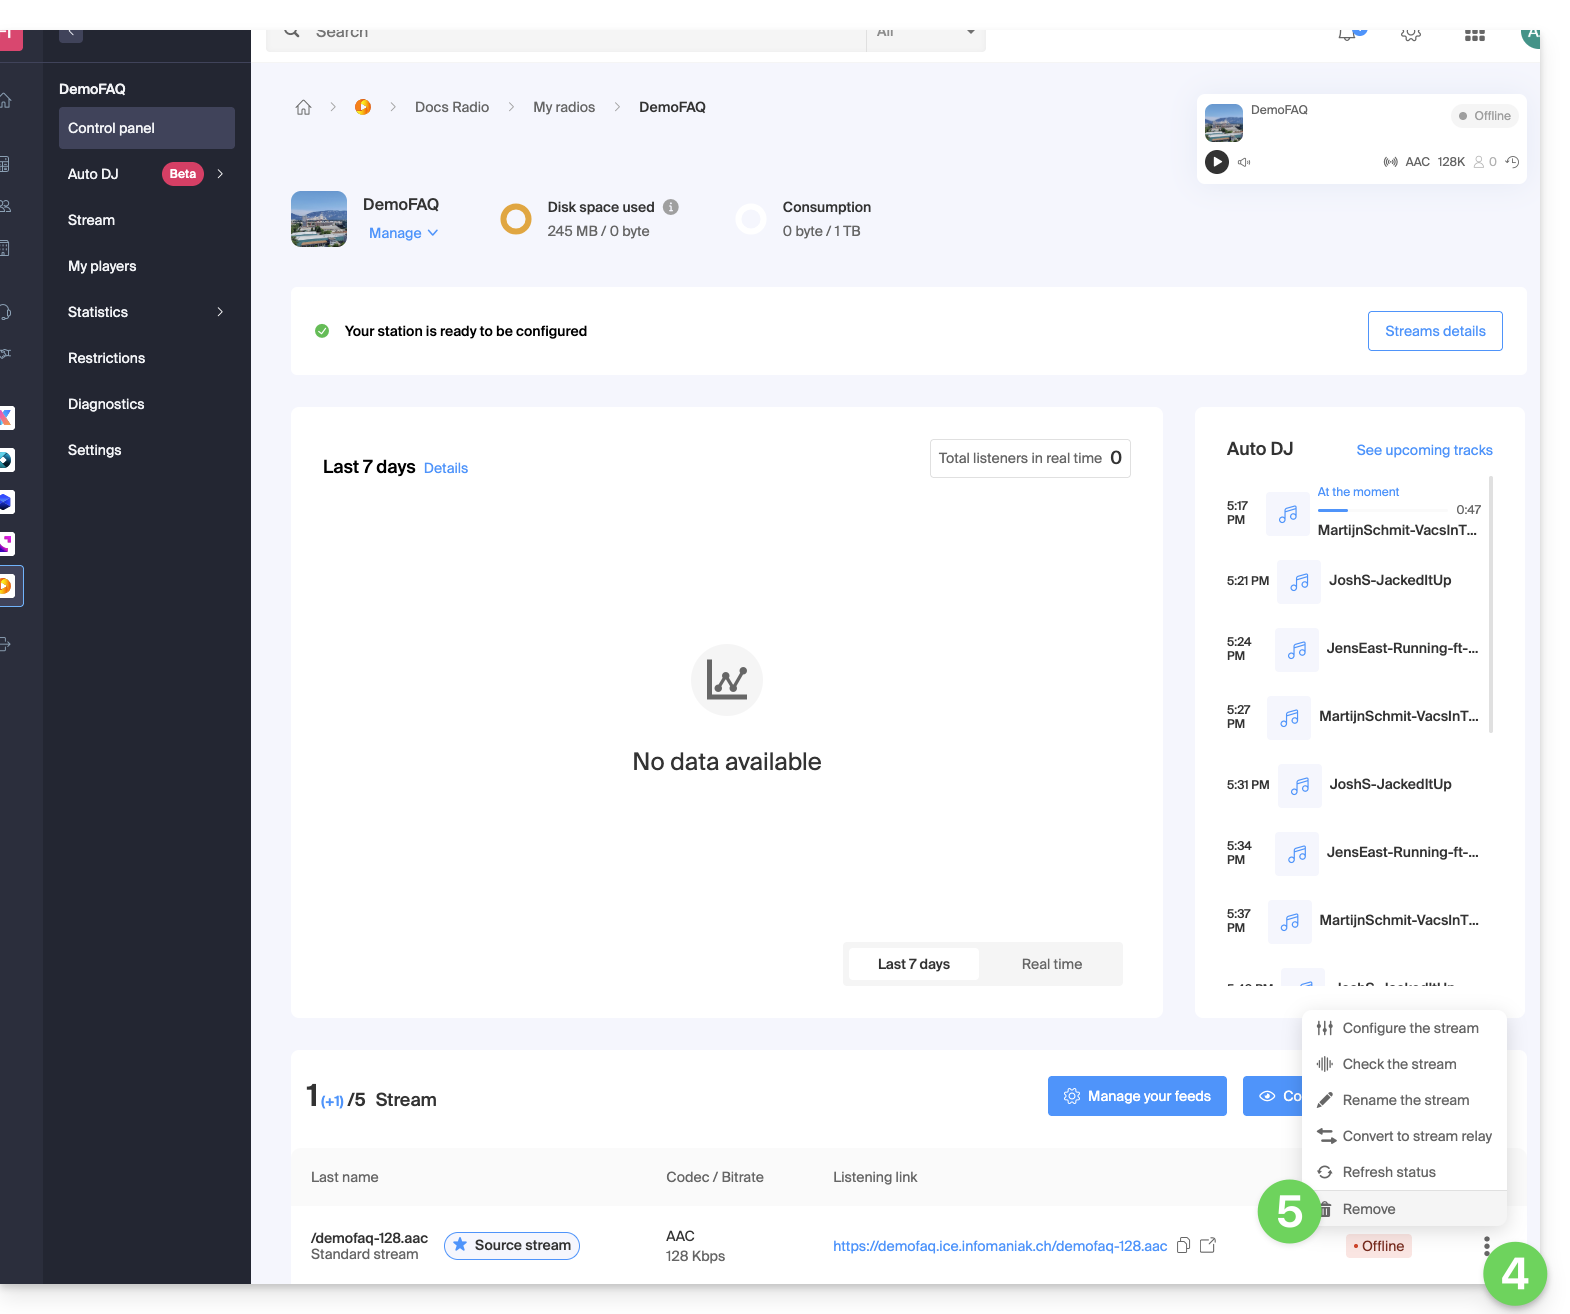
- Enter the name of the radio station to confirm the deletion.
Link to this FAQ: https://faq.infomaniak.com/1343
Has this FAQ been helpful?
This guide explains how to obtain and configure notifications when one or more Streaming Radio streams experience an outage (short and/or long duration).
Introduction
- Every minute, a script checks for outages and sends an email and creates an event only if the outage lasts for at least 5 minutes.
- It resends an email if the outage lasts more than 30 minutes.
- If the service is restored and an alert has been sent, a confirmation email is sent.
- All outages are logged and kept for 30 days, but you will not be notified in the event of a minor outage.
- For possible reasons for these outages, please refer to this other guide.
- All outages are recorded by the system and can be viewed in the events section of the Manager.
Email alert
To configure notifications:
- Click here to access the management interface for your product in the Infomaniak Manager (need help?).
- Click directly on the name assigned to the product in question:
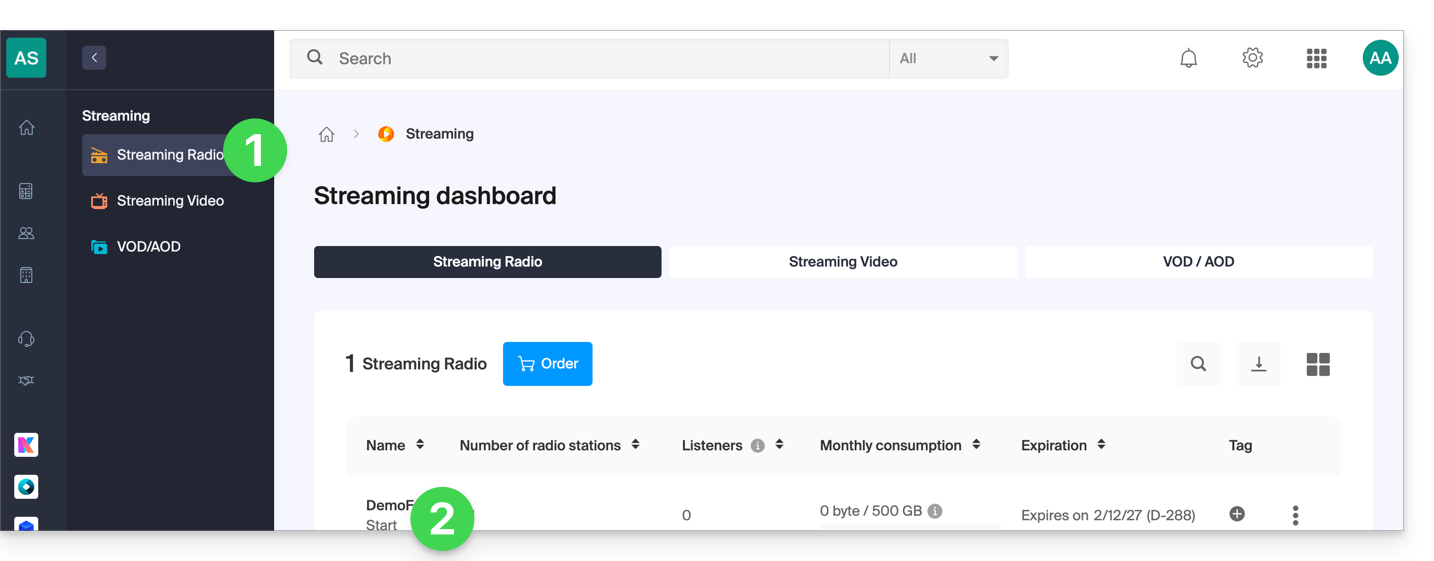
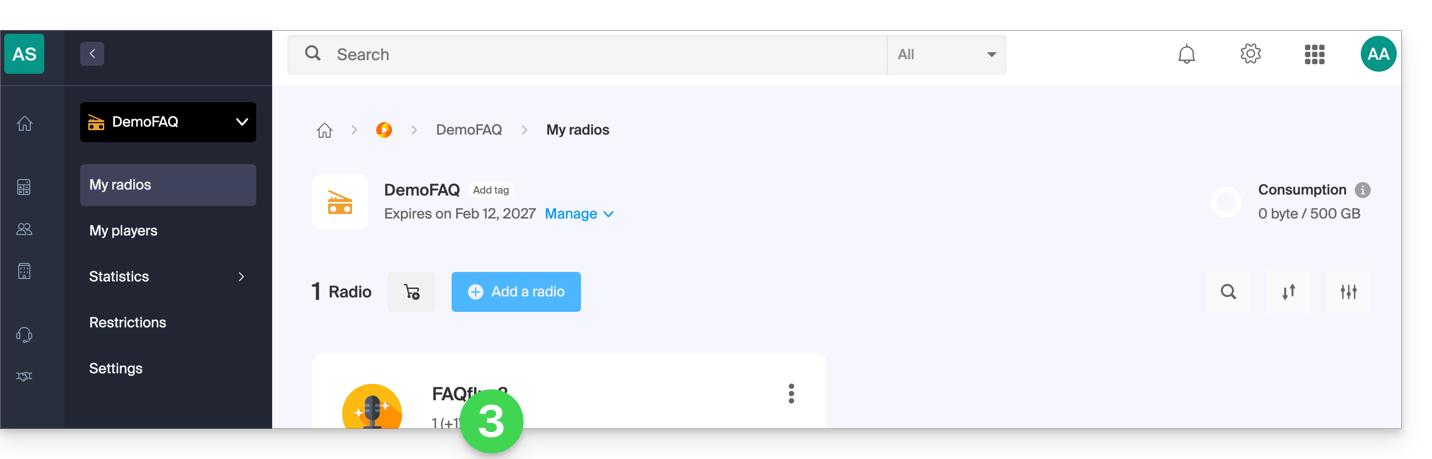
- Click on the name of the audio stream in question:
- Click on Settings in the left-hand menu.
- Click on the Notifications tab.
- Enable notifications using the toggle switch:
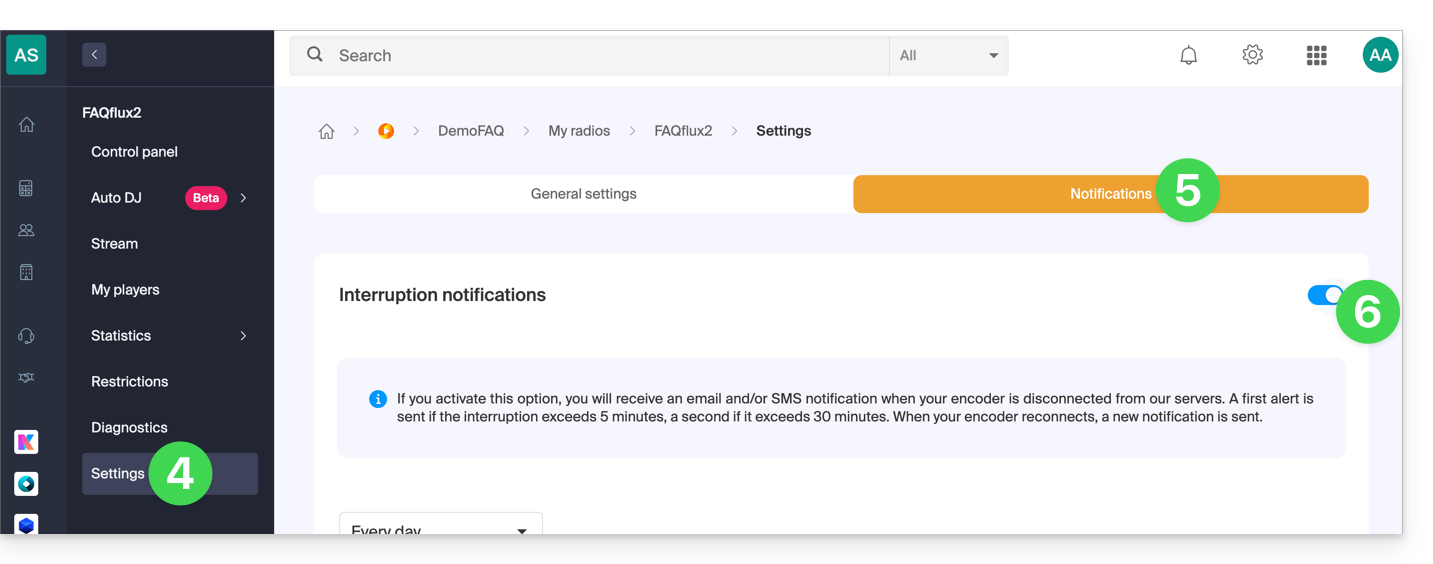
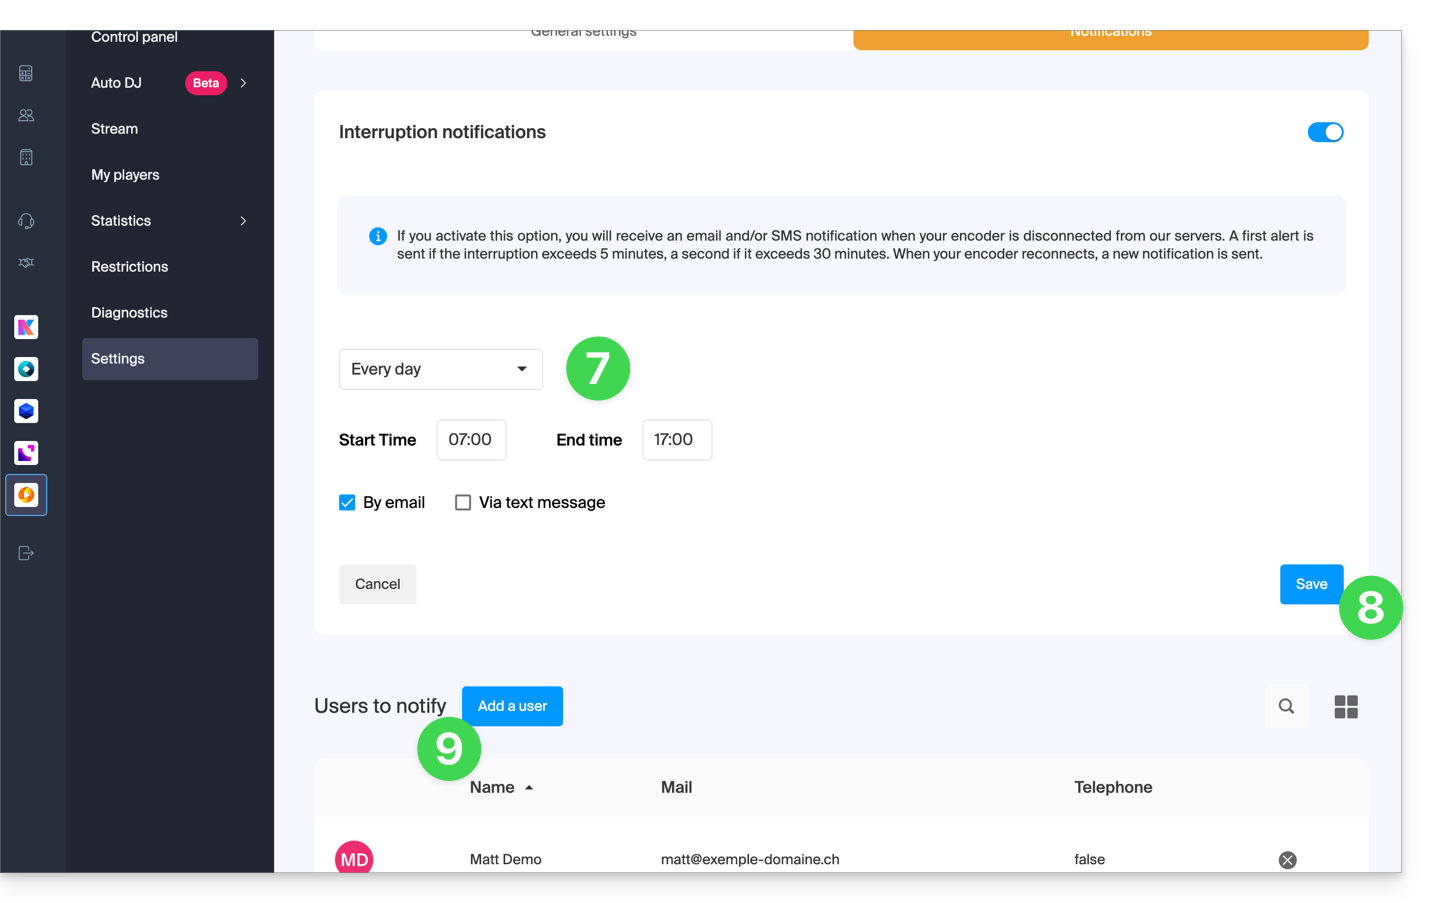
- Configure the monitoring schedule (days of the week / hours).
- Save your changes.
- Add the users in the Organization who should be notified by email or SMS (depending on the settings above):
Link to this FAQ: https://faq.infomaniak.com/1345
Has this FAQ been helpful?
This guide explains how to transmit the metadata for the radio stream sent from your radio streaming encoder.
Using the available URL
Simply make a GET request to a URL of the following type:
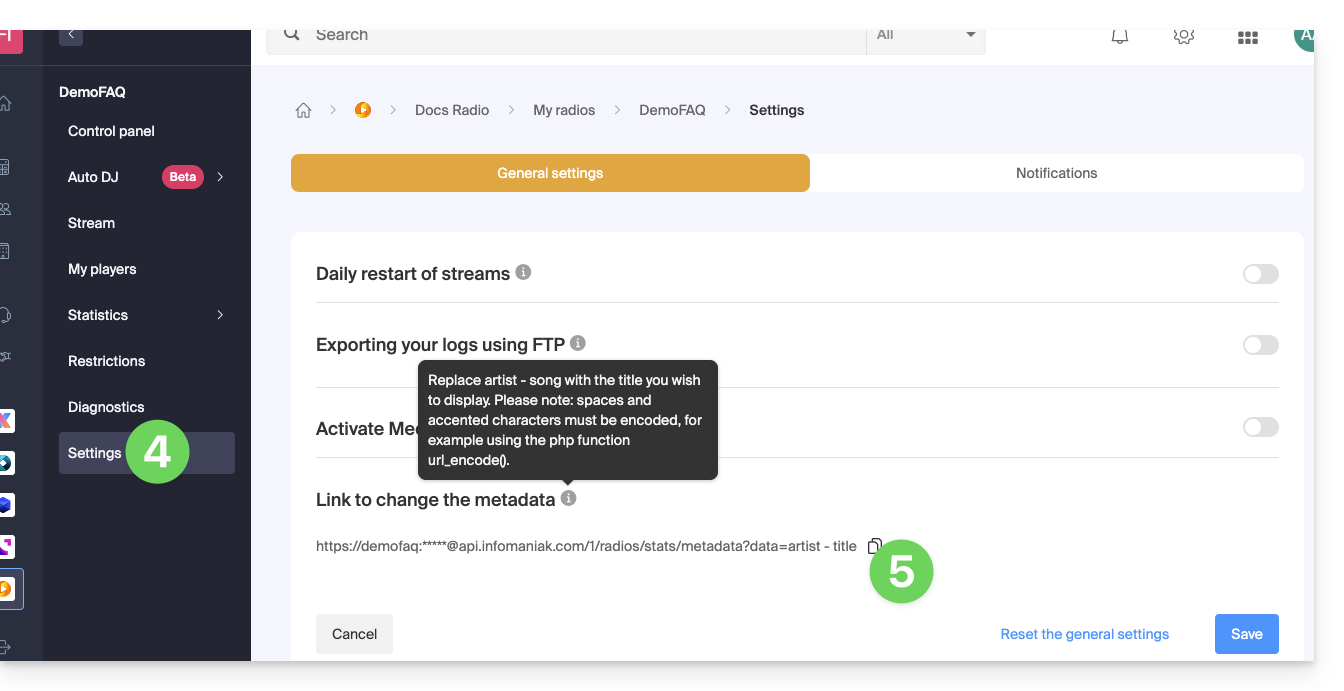
https://[flux]:[password]@api.infomaniak.com/1/radios/stats/metadata?data=artist - title
The complete URL is available in the administration interface:
- Click here to access your product management in the Infomaniak Manager (need help?).
- Click directly on the name assigned to the product in question.
- Click on the name of the audio stream in question.
- Click on Settings in the left-hand menu.
- Click on the button to copy the metadata link:
Learn more
For developers creating a player, there are libraries available that can retrieve and display the transmitted information, as the data is transmitted within the stream data. Another option is to retrieve the stream information directly on the server.
Link to this FAQ: https://faq.infomaniak.com/1357
Has this FAQ been helpful?
This guide will help you quickly use the essential functions of Infomaniak's Streaming Radio (or broadcast audio, live audio streaming… different terms used to describe the same technology: sending content in "live" or slightly delayed mode, allowing playback as it is broadcast).
Configure Radio Streams
- Add a Streaming Radio Feed
- Add an Audio Feed Relay
- Add a backup audio stream
- Configure an encoder (example with the Butt application))
- Create an audio player to stream the feed
- Delete a feed
To learn more…
- Use Auto DJ
- Secure an MP3/AAC or HLS stream with a unique key
- Secure an audio stream by GeoIP restriction
- View listening statistics
- Export Streaming Radio logs via FTP
- Export logs to ACPM (France)
- Export logs to Mediapulse (Switzerland)
- Troubleshoot a streaming issue
- Transfer the entire product | Transfer streams
Have a question or feedback?
- If you encounter any issues, please consult the knowledge base before contacting support.
- Click here to share feedback or a suggestion about an Infomaniak product.
Link to this FAQ: https://faq.infomaniak.com/1373
Has this FAQ been helpful?
This guide covers the audience and listening statistics for Streaming Radio, allowing you to view all information about listeners and the different audiences for your radio streams.
Introduction
- Refer to this other guide if you wish to process the raw logs yourself.
Access listening statistics
To access this information:
- Click here to access your product management interface on the Infomaniak Manager (need help?).
- Click directly on the name assigned to the product in question.
- Click on Statistics in the left-hand menu:
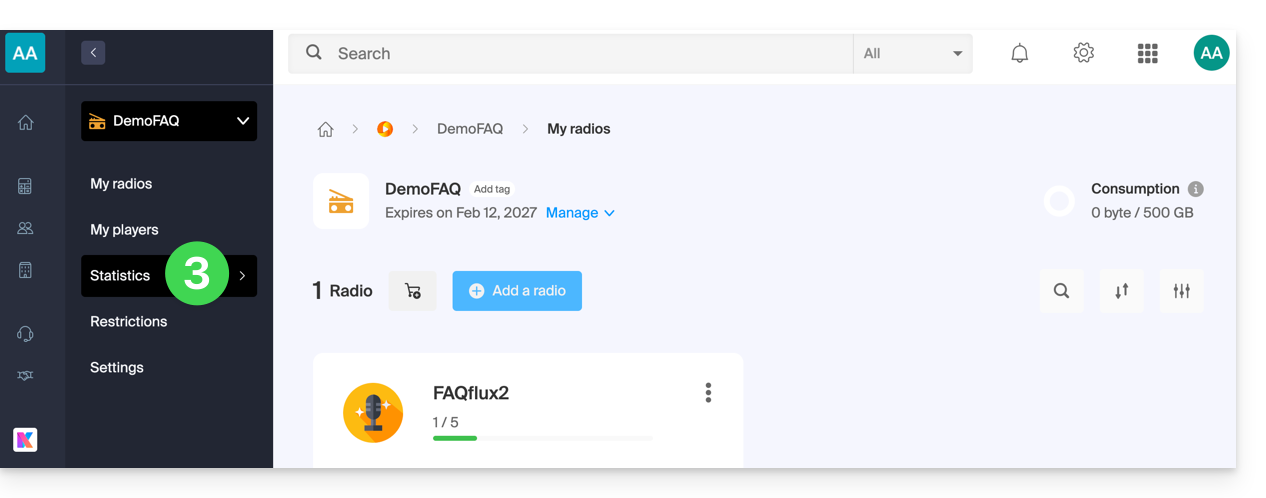
- Click on the various menus in the left-hand sidebar:
Overview

Real-time audience
- Refer to this other guide for more information.
Listeners

Listening time

Consumption

Geolocation

- Exporting to
.csvformat is possible:
- Exporting to
Players

Link to this FAQ: https://faq.infomaniak.com/1408
Has this FAQ been helpful?
This guide explains how to specify a backup audio stream for Infomaniak's Radio Streaming.
This way, if your primary stream becomes unavailable, the backup stream will automatically take over the broadcast.
Create a backup stream
To access the Radio Streaming service:
- Click here to access the management of your product in the Infomaniak Manager (need help?).
- Click directly on the name assigned to the product in question:
- Click on the name of the radio station in question:
- Click on the button to manage your streams:
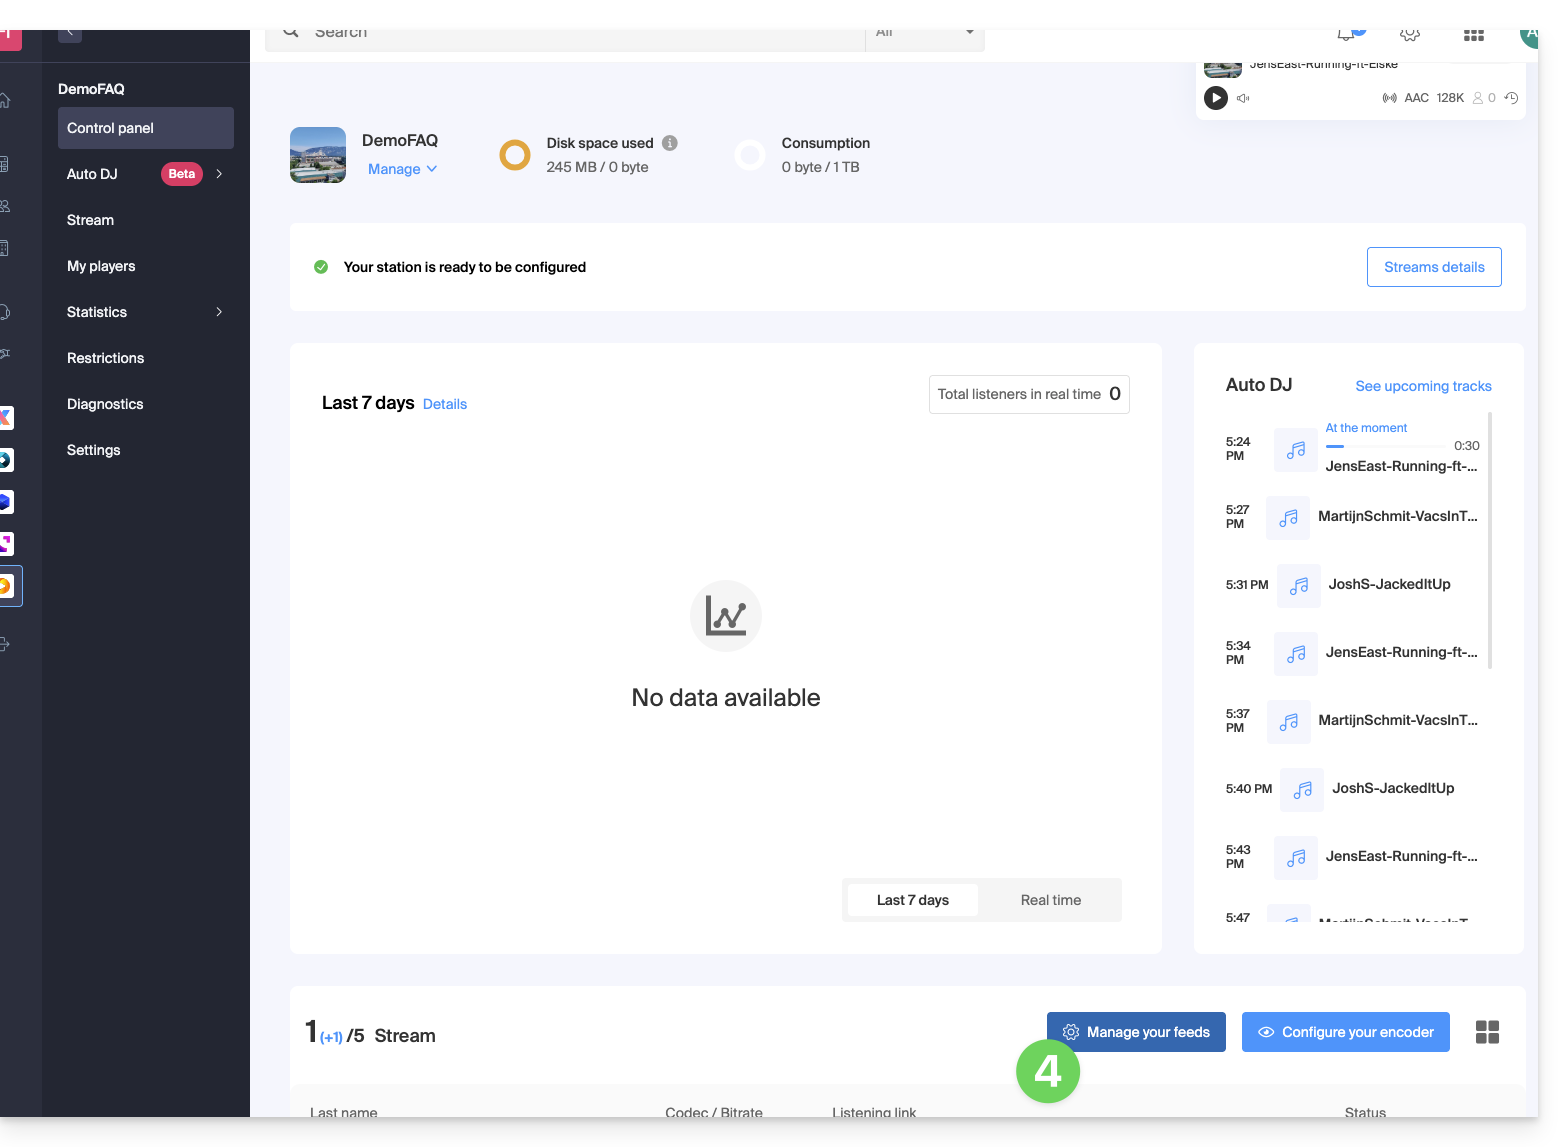
- Either:
- Add a stream to create a new stream and associate a backup stream with it,
- Configure an existing stream to enable the option:
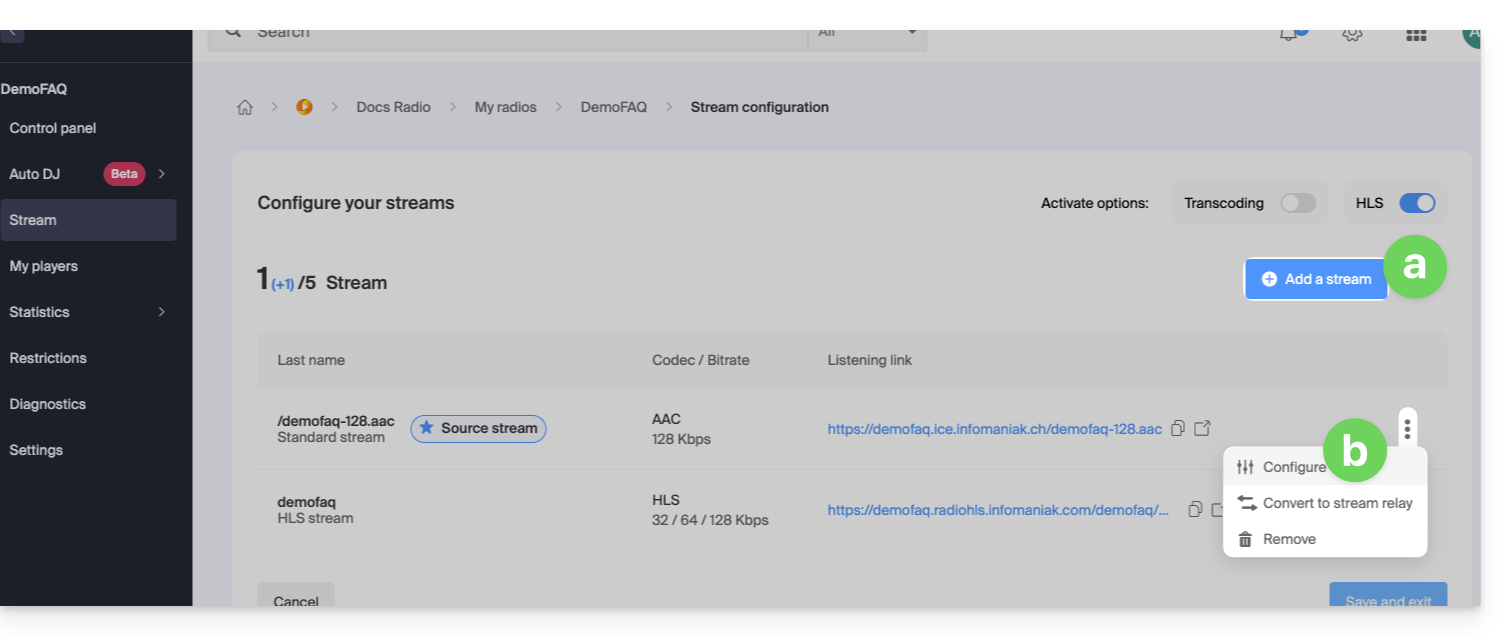
- Click on the toggle switch to enable the backup stream for your stream:
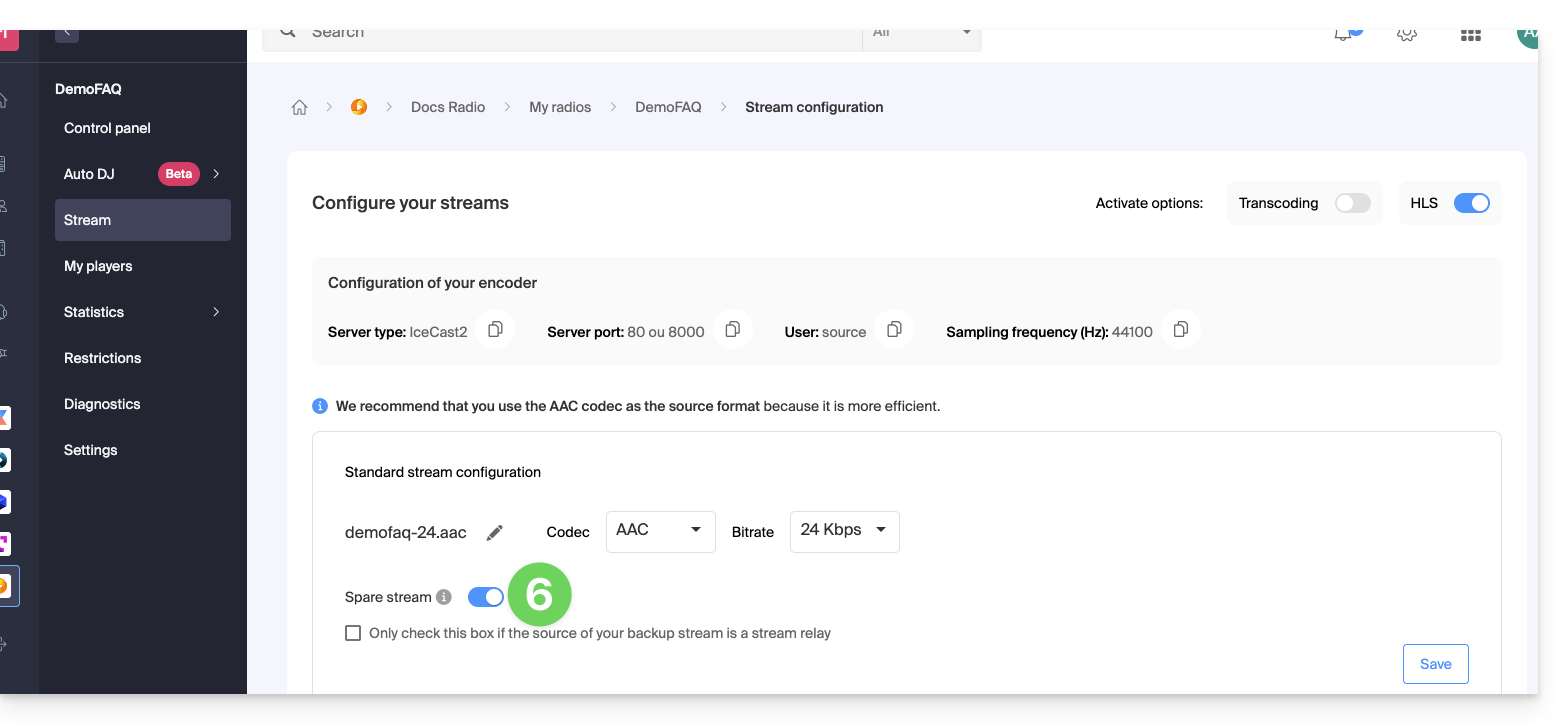
- Copy the information available to configure your backup encoder.
- Save the activation of the backup stream at the bottom right of the page.
- In the same location, you can define the backup stream as a stream relay to manually enter the parameters corresponding to the backup audio stream:
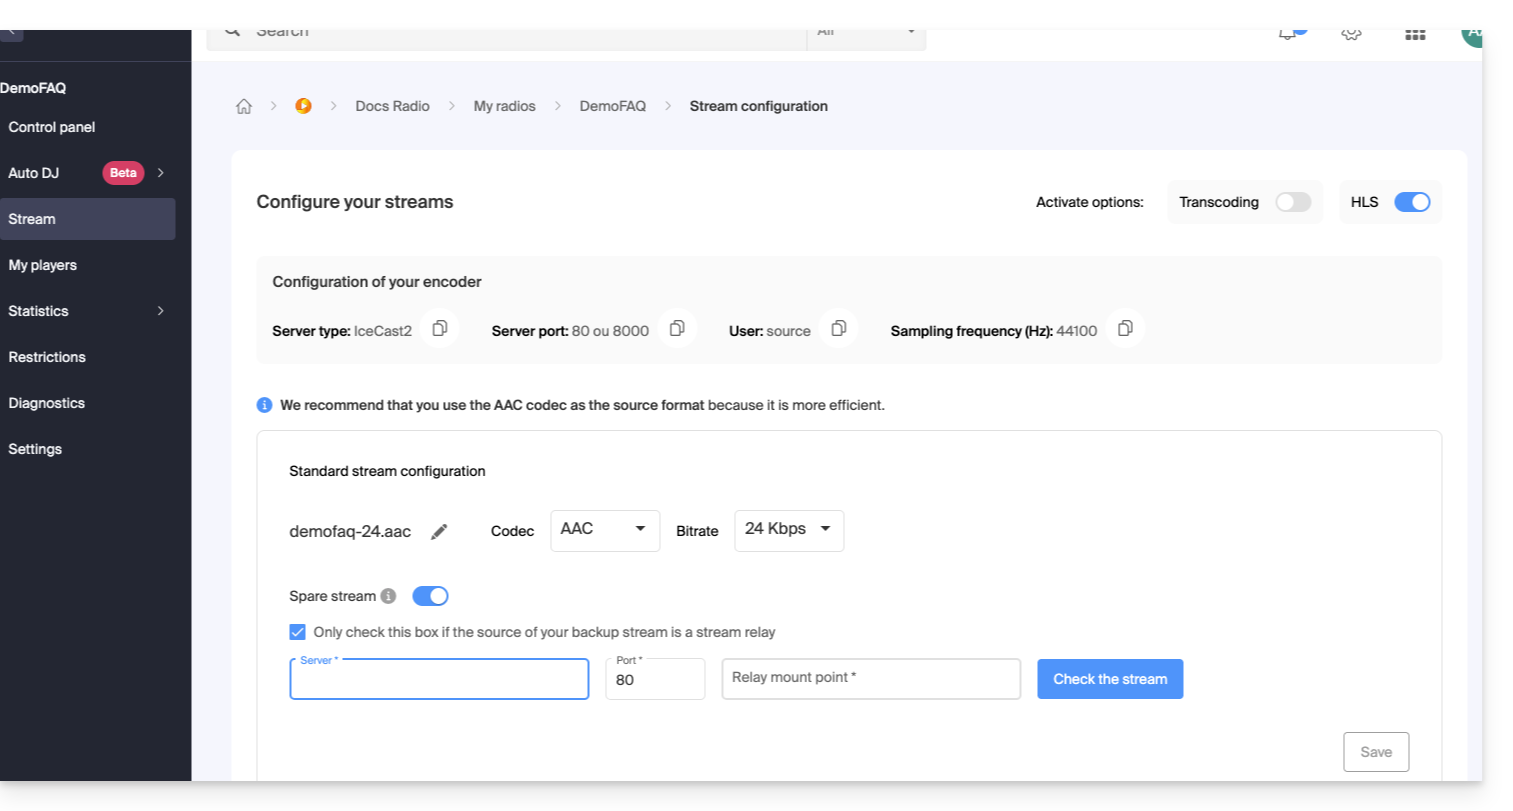
- In the same location, you can define the backup stream as a stream relay to manually enter the parameters corresponding to the backup audio stream:
Save the new information at the bottom right of the page.
Link to this FAQ: https://faq.infomaniak.com/1456
Has this FAQ been helpful?
This guide explains how to link a stream added to your Infomaniak Streaming Radio with your setup that will broadcast the desired content.
Introduction
- In general, Infomaniak is compatible with all the software listed here: https://www.icecast.org/apps/, but not all of them support AAC streaming, for example.
- An example configuration is provided below for the free, cross-platform application Butt.
- Learn more about Edcast (standalone version) / SpacialAudio SAM Cast… There is also (without a guide) StreamDiffusion / MB Recaster…
Get the login information
To find the information needed to configure your encoder:
- Click here to access the management interface for your product in the Infomaniak Manager (need help?).
- Click directly on the name assigned to the product in question:
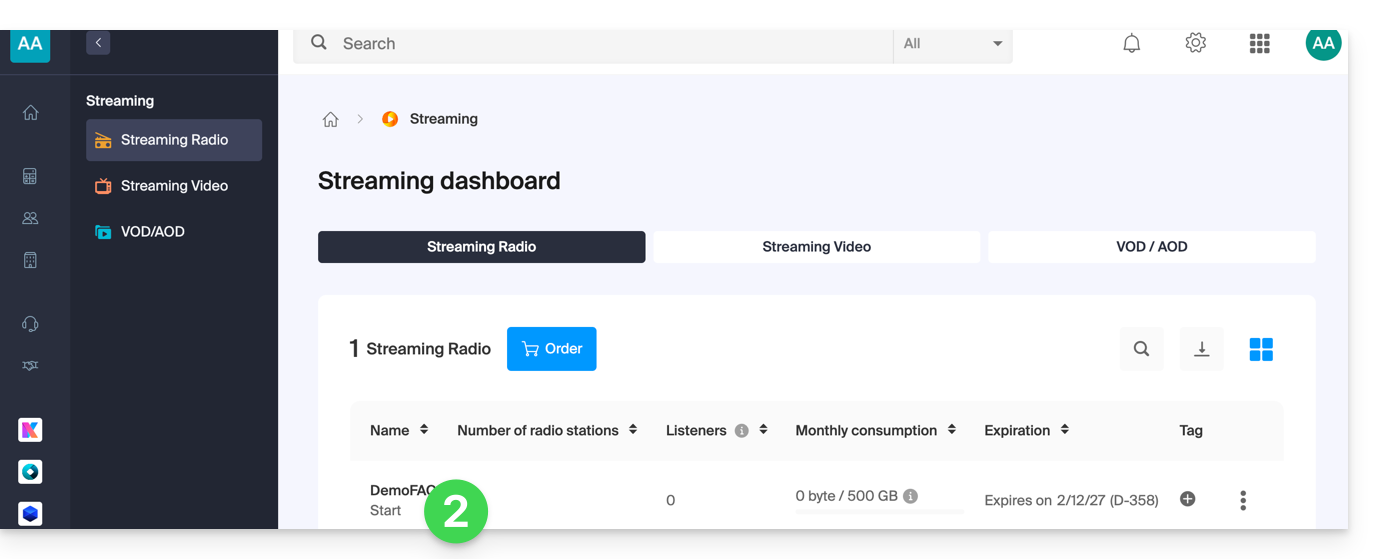
- Click on the name of the radio station in question:
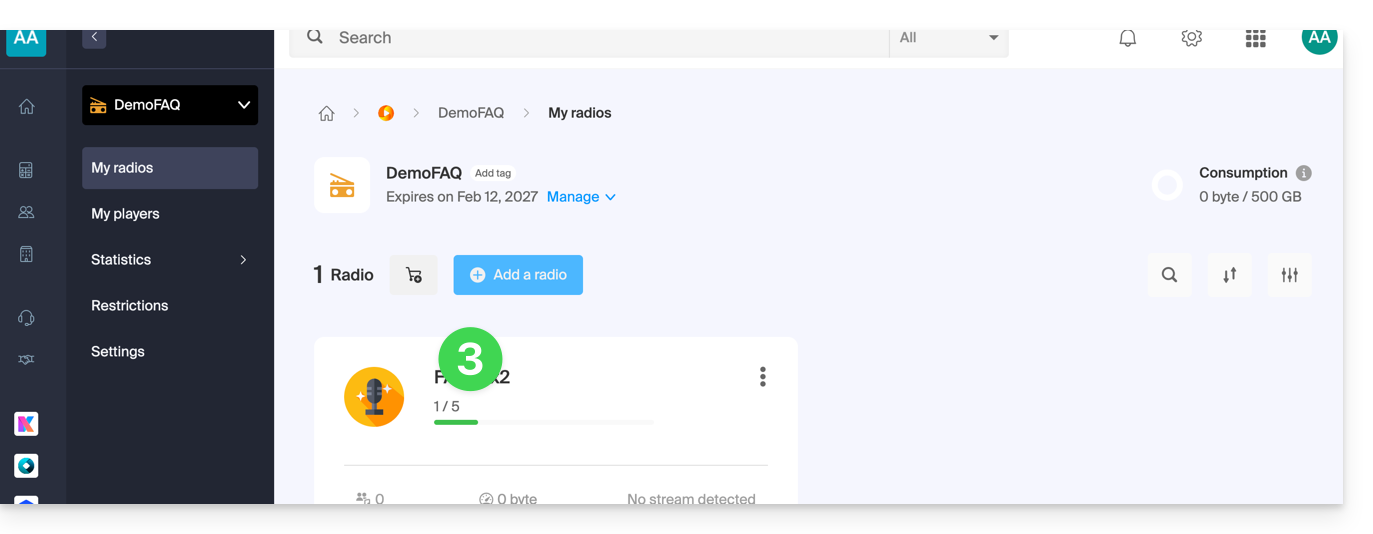
- Click on the name of the audio stream in question to view its details:
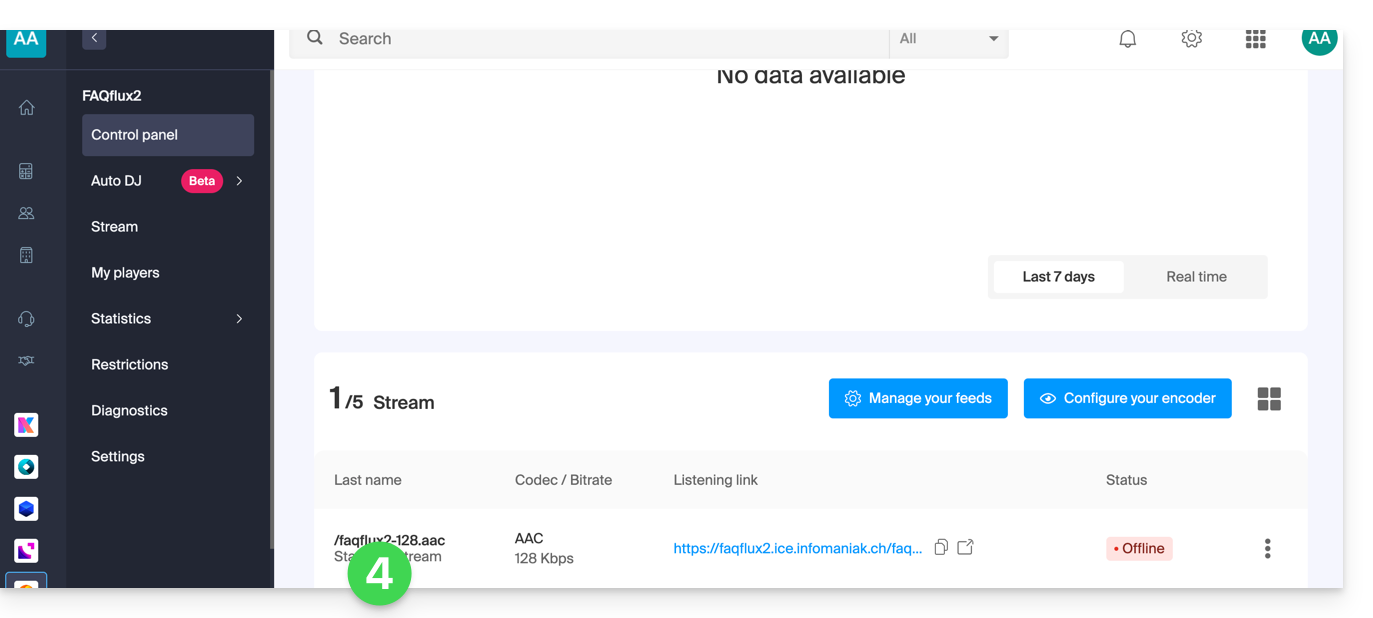
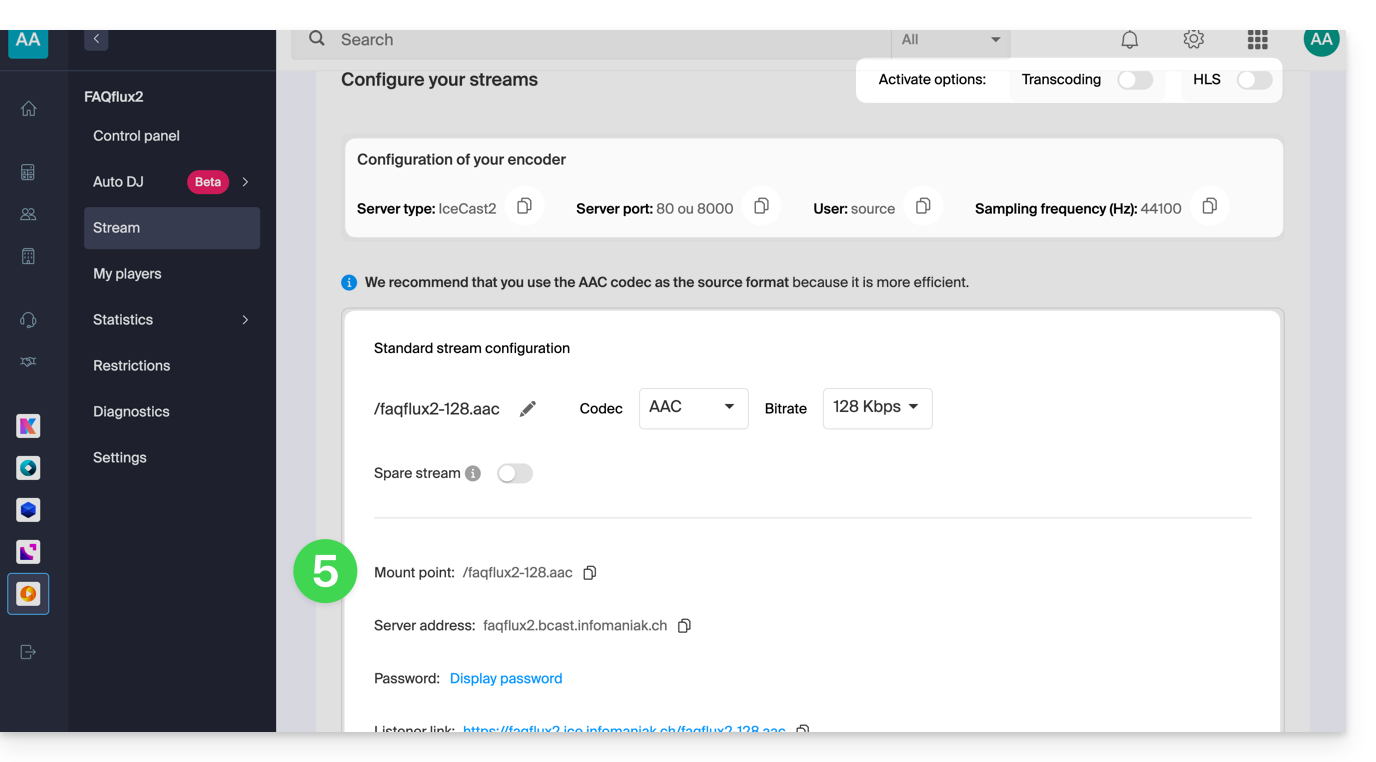
- The relevant information is displayed on the page:
Example of encoder configuration
You want to stream audio content from a computer. As specified in the preamble above, there are multiple software solutions available. Here is an example using the Butt tool, which is available, among other platforms, on macOS:
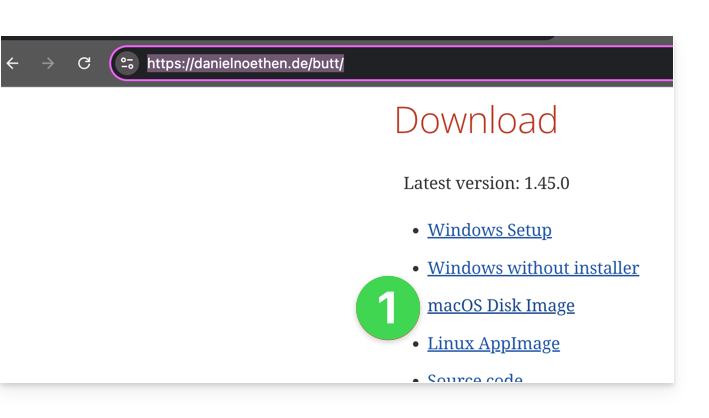
- Download Butt:
- Open the downloaded application on your computer.
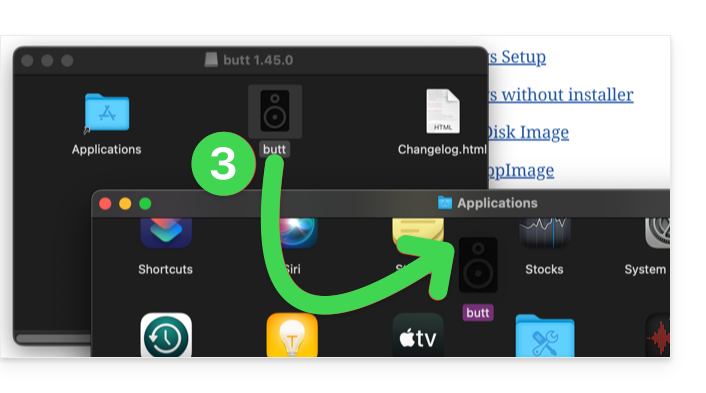
- Install the application:
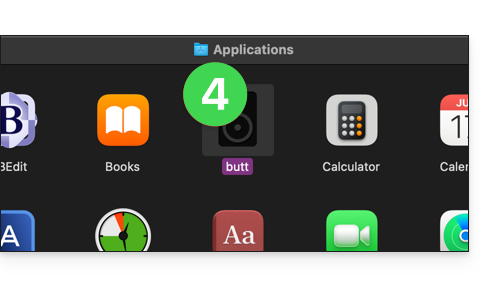
- Launch the application to use it:
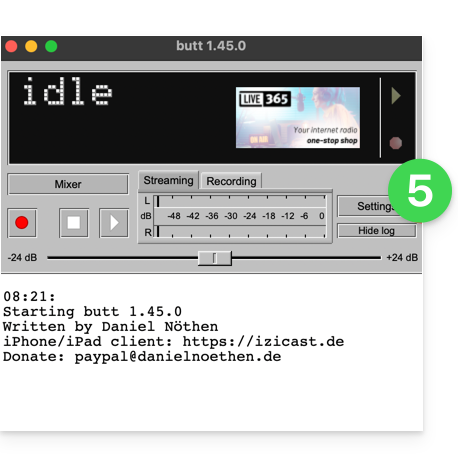
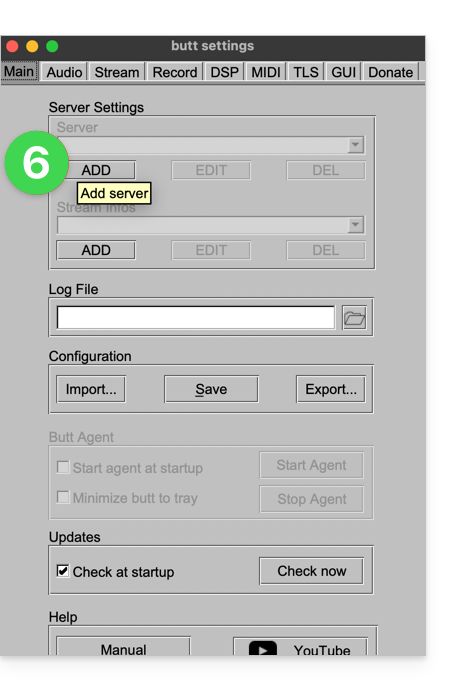
- Click on Settings:
- Click on Add a server:
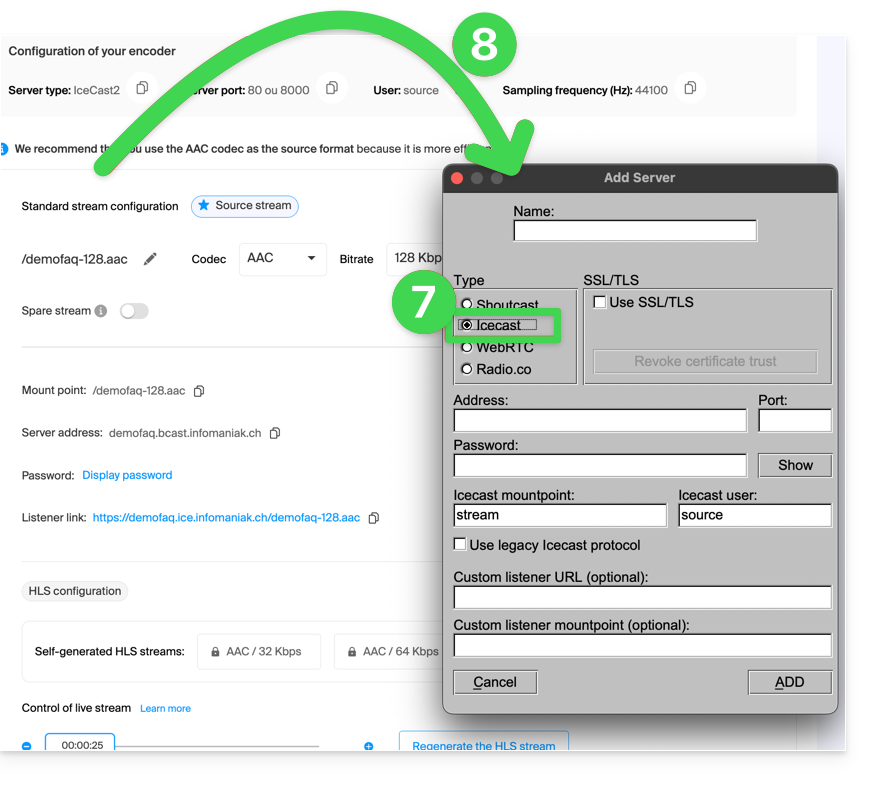
- Select the Icecast type.
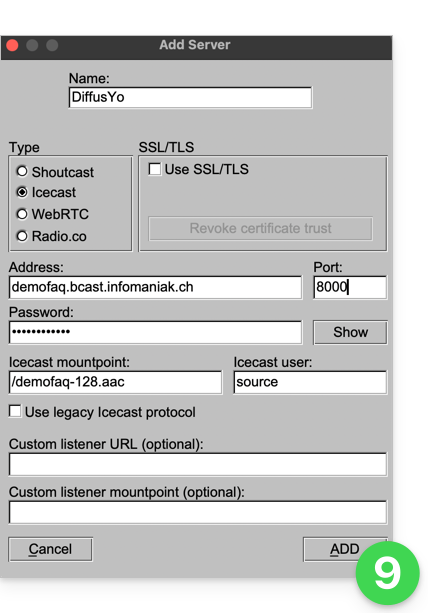
- Copy your stream information to the encoder (for the password, you will first need to enter your login password for the Manager, then the stream password will be copyable (and visible with the eye icon):
- Confirm your settings by clicking Add in the bottom right corner:
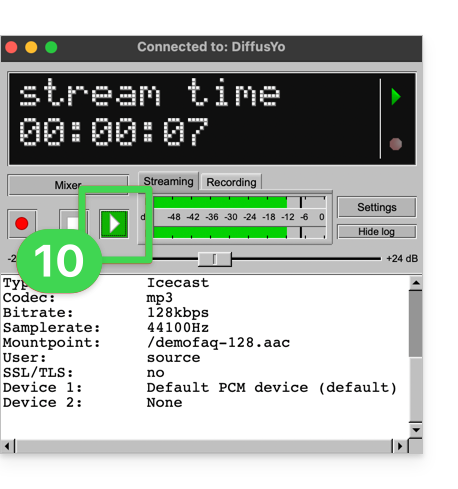
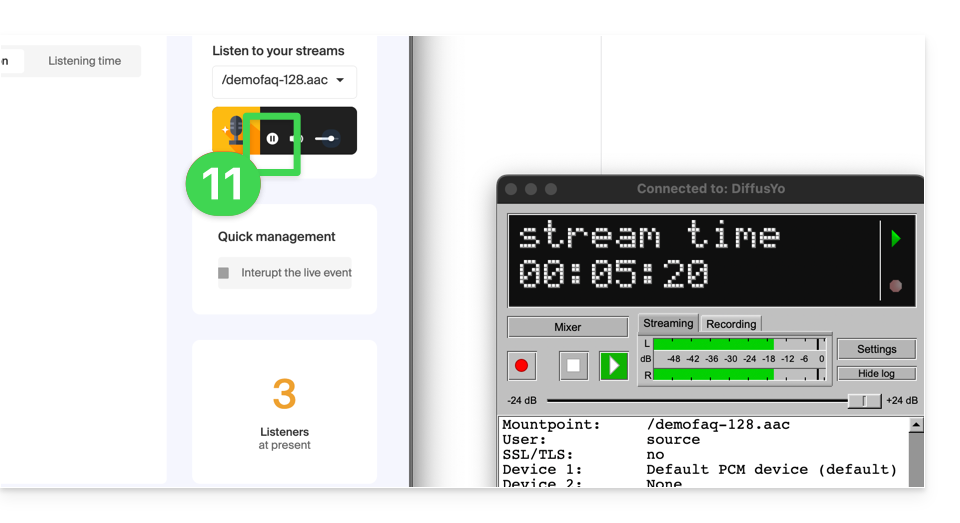
- Close the settings and click the Play button to start the broadcast:
- You can listen to your stream from the Infomaniak dashboard by starting the demo player:
Link to this FAQ: https://faq.infomaniak.com/1466
Has this FAQ been helpful?
This guide explains how to interpret the statistics for Infomaniak's Streaming Radio service, understand the distribution of your audience (differentiating between actual listens and automated traffic), the methods for counting listeners, and diagnose connection anomalies.
Introduction
- A detailed analysis of a traffic spike can be performed by downloading the connection files via the FTP logs.
- To block an unauthorized aggregator or unwanted connections, you can use the IP / GeoIP restrictions.
Listener count, aggregators, and bot detection
Types of listeners and listening duration
An listener refers to any person or robot that starts playing the stream for at least 1 second. Non-unique listeners count all of these sessions. Conversely, unique listeners are counted per distinct IP address. For example, two people connected to the same Wi-Fi network listening to the radio on separate devices count as a single unique listener, but as two non-unique listeners.
The filter for listeners listening for 30 seconds or more measures sessions exceeding this duration. This value identifies genuine listeners who take the time to listen to the content, allowing simple connection tests or brief openings to be excluded.
Impact of aggregators and robot behavior
A sudden increase in traffic often comes from a web radio aggregator or robots. Aggregators allow your radio to be broadcast to their audience while frequently sharing the same IP address, which generates a volume of non-unique listeners that is much higher than the number of unique listeners. As for robots, they almost never listen from different IP addresses, rarely exceed 30 seconds of listening time, and rarely change their user-agent.
Audience analysis and log verification via FTP
On the Audience Statistics page, you can isolate legitimate traffic by displaying only unique visitors + audience >= 30 seconds, which eliminates artificial spikes. To confirm the presence of bots, download your access logs via FTP: an IP address or user-agent that is absent from the logs before the spike and appears hundreds or thousands of times in a single day indicates automated behavior. However, be sure to check if these IP addresses correspond to known platforms such as the radio station's website or a reputable aggregator like Radio Garden.
Delivery disruptions and discrepancies between measurement tools
Causes of disruptions and outages
Malfunctions and abnormally high connection rates can originate from several levels of the network:
- Upstream, an interruption can result from the radio signal, a problem with the encoding server, or instability in the transmitting internet line.
- Incidents affecting the Icecast servers can occur in the middle of the chain.
- Downstream, the cause often lies with the listener, particularly in cases of insufficient bandwidth, saturated local lines, or an interruption to their internet connection.
In case of streaming instability, it is very useful to refer to the real-time listener statistics. Please note that it is impossible to investigate incidents that occurred several weeks or months ago.
Differences in counting between measurement tools
These audience statistics are quite specific: using three different analysis tools will systematically yield three distinct results. The discrepancies observed between your Infomaniak statistics and those of organizations like NetMetrix (WEMF) are explained by different calculation methods. NetMetrix bases its measurements directly on events within the player itself, which redefines the concept of a unique listener.
Link to this FAQ: https://faq.infomaniak.com/1486
Has this FAQ been helpful?
This guide explains how to modify a Streaming Radio plan, for example to increase the maximum monthly usage limit or the streaming quality (maximum bitrate)..
Modify existing plan
To modify your existing plans:
- Click here to access the management interface for your product in the Infomaniak Manager (need help?).
- Click directly on the name assigned to the product in question:
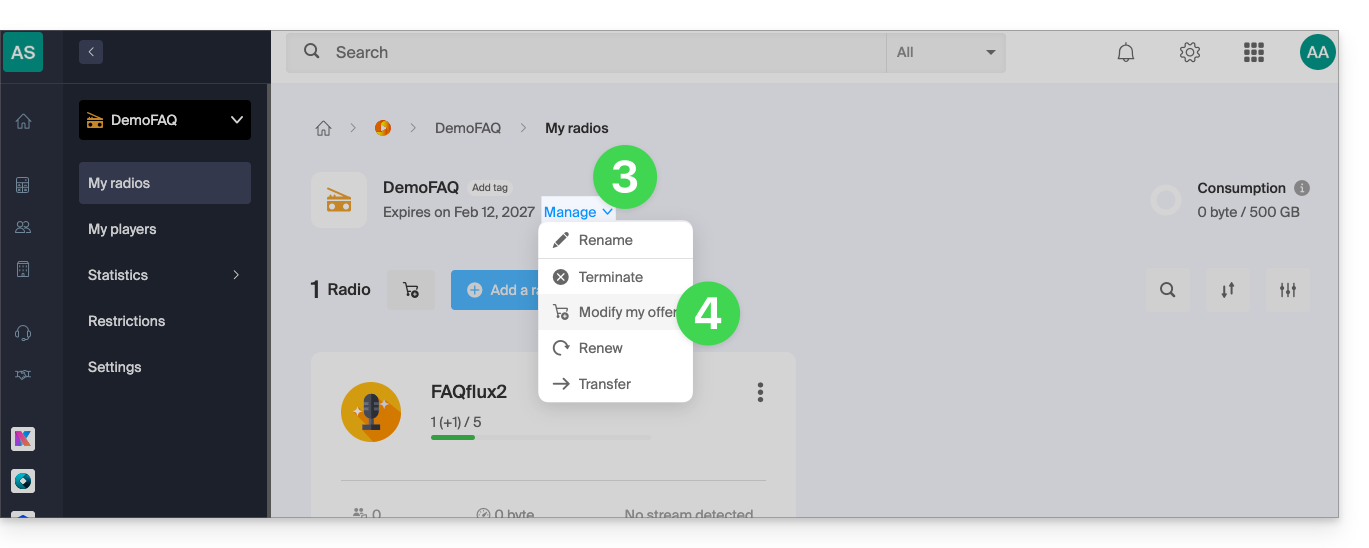
- Click on the chevron to manage the product.
- Click on Modify the plan in the drop-down menu:
- Navigate using the arrows if necessary and choose the new offer that best suits your needs:
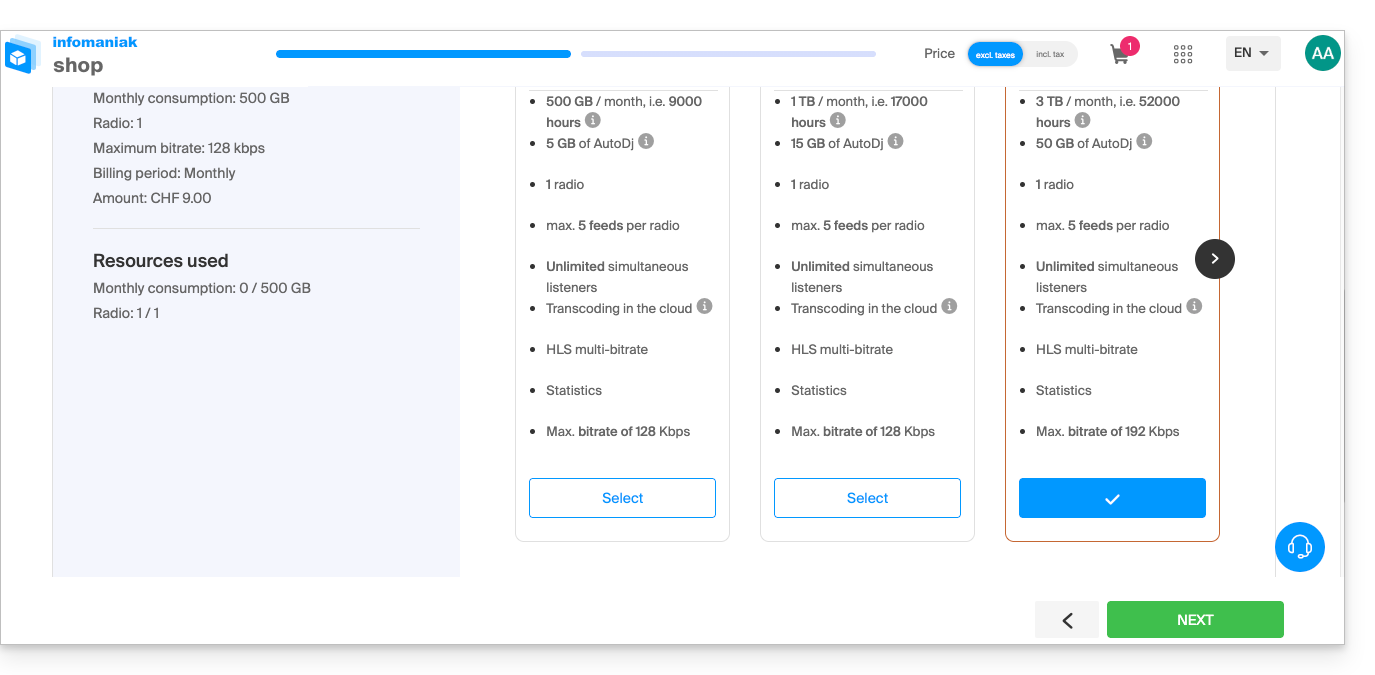
The change is made after payment, and a calculation of the fees is established on a pro rata basis for the remaining time until the initial due date.
Link to this FAQ: https://faq.infomaniak.com/1566
Has this FAQ been helpful?
This guide explains how to maintain control over your radio streams by enabling IP protection or geolocation, allowing you to decide, for example, whether a specific listener can listen to your radio station or not.
Introduction
- You can protect MP3/AAC or HLS streams independently of each other (the same applies to protection by token).
- Activating the restriction involves changing the stream configuration, which may take a few minutes to replicate on the servers.
Protect an audio stream by GeoIP
To do this, simply go to the restriction settings and enable protection on the stream you want to secure:
- Click here to access the management of your product on the Infomaniak Manager (need help?).
- Click directly on the name assigned to the product in question:
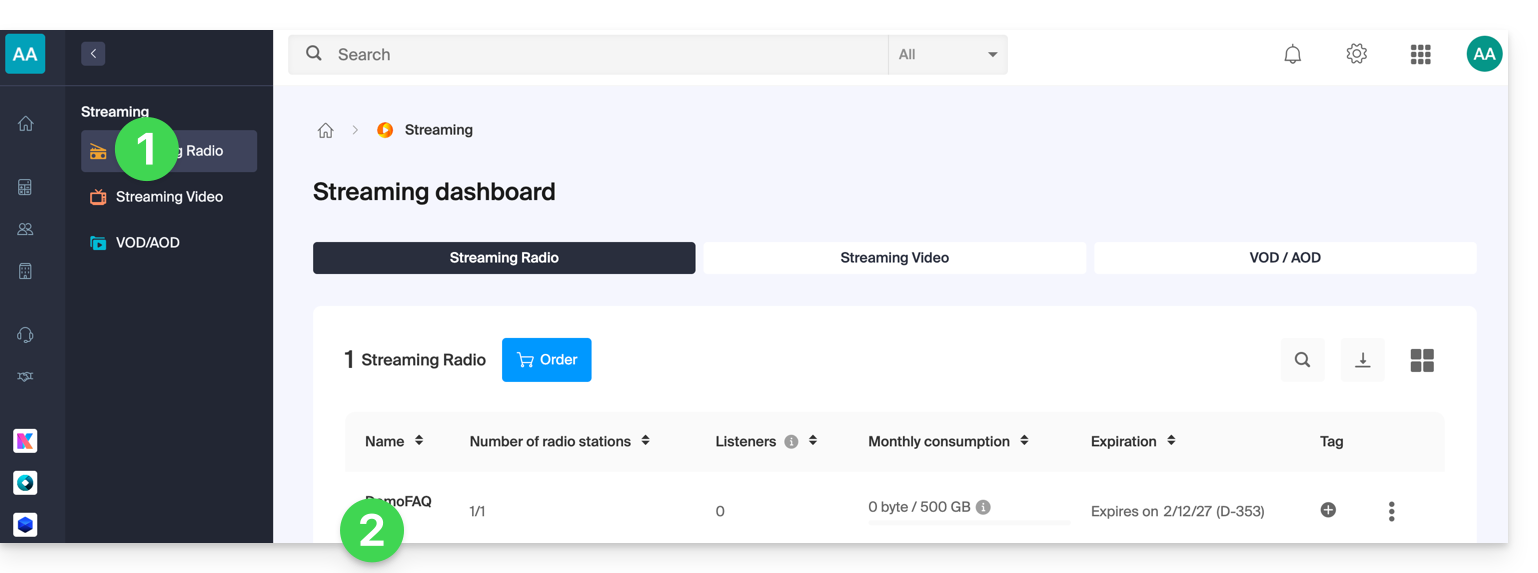
- Click:
- either on the name of the radio station:
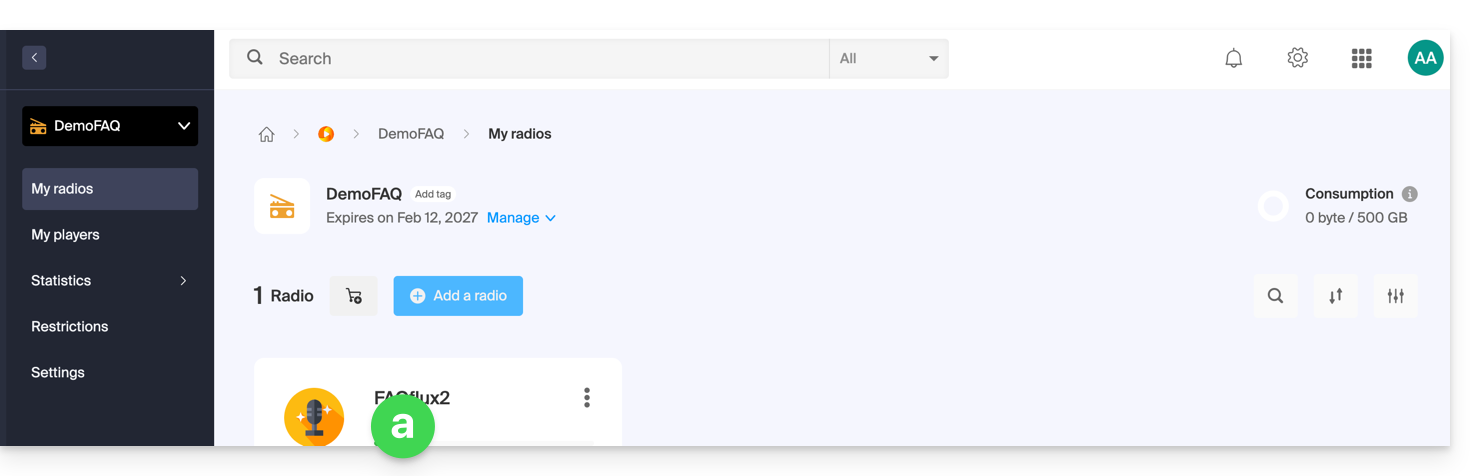
- or on Restrictions in the left-hand menu to apply restrictions to the entire product:
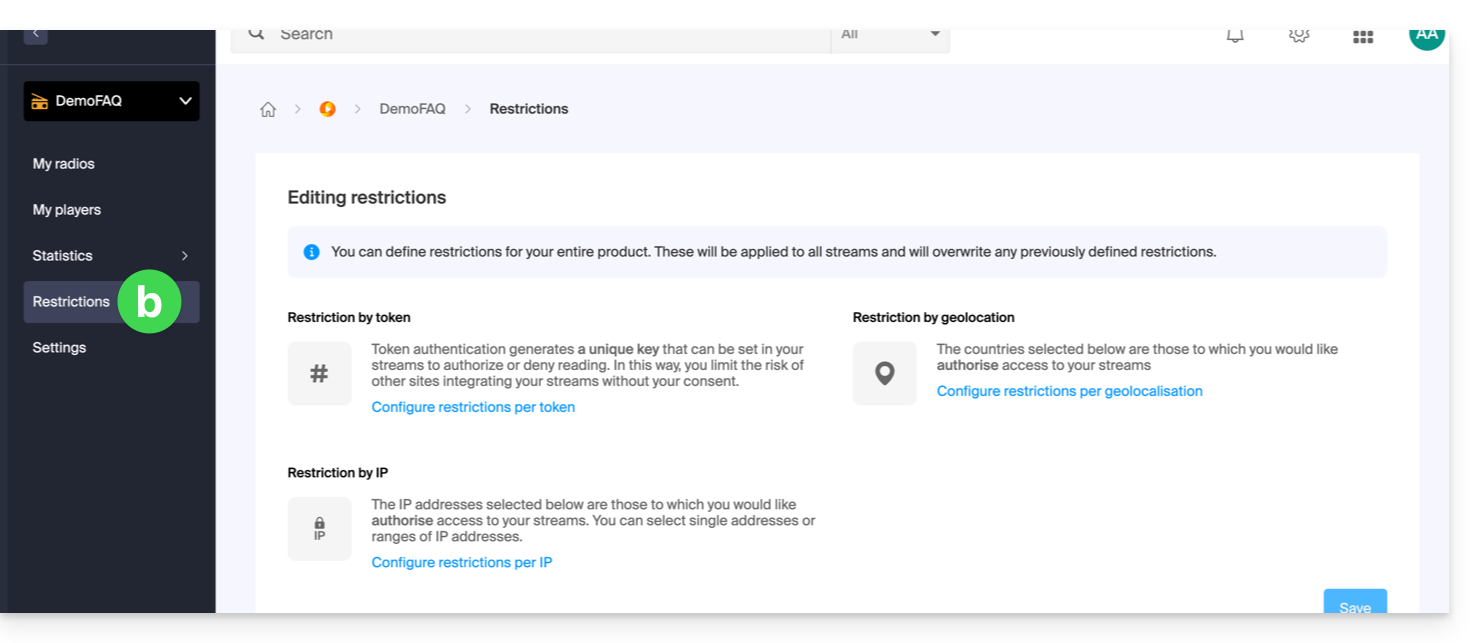
- either on the name of the radio station:
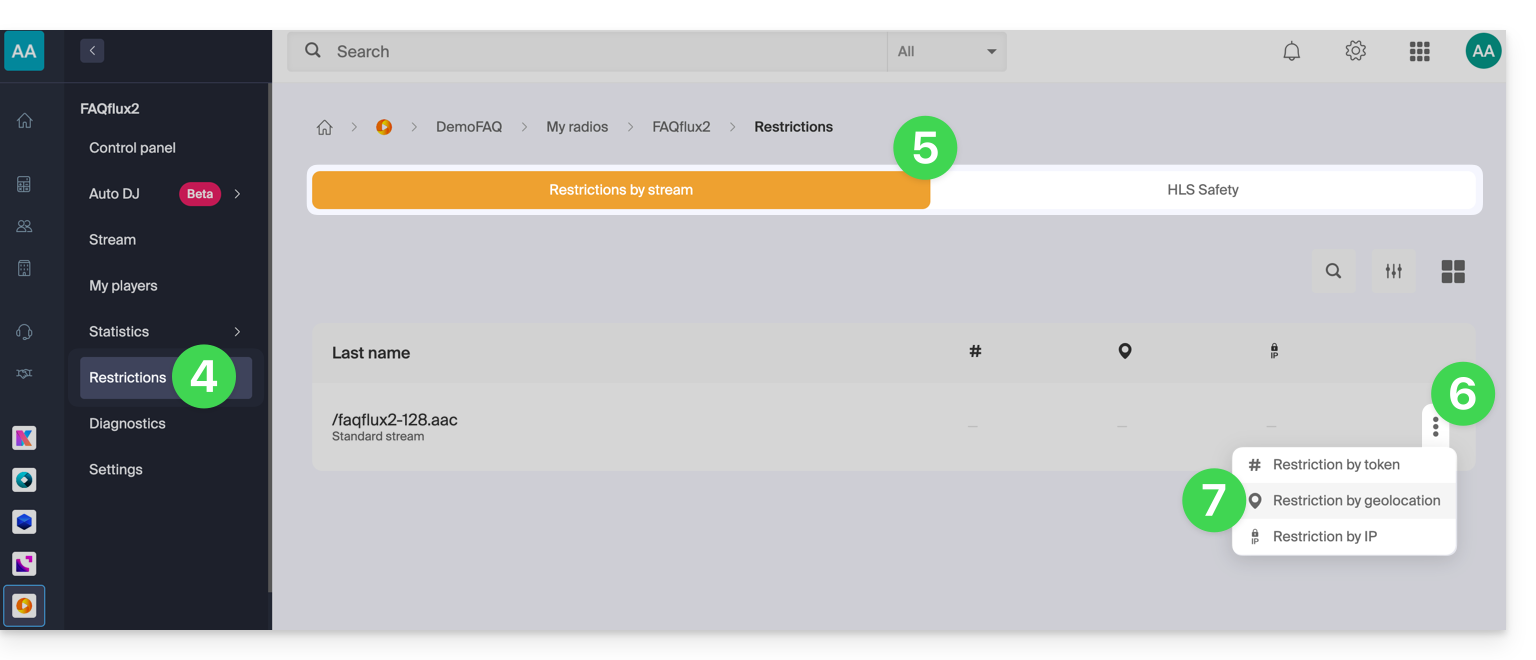
- When selecting
aabove, click on Restrictions in the left-hand menu. - Choose HLS if necessary.
- Click on the action menu ⋮ located to the right of the item in question.
- Click on Restriction by geolocation:
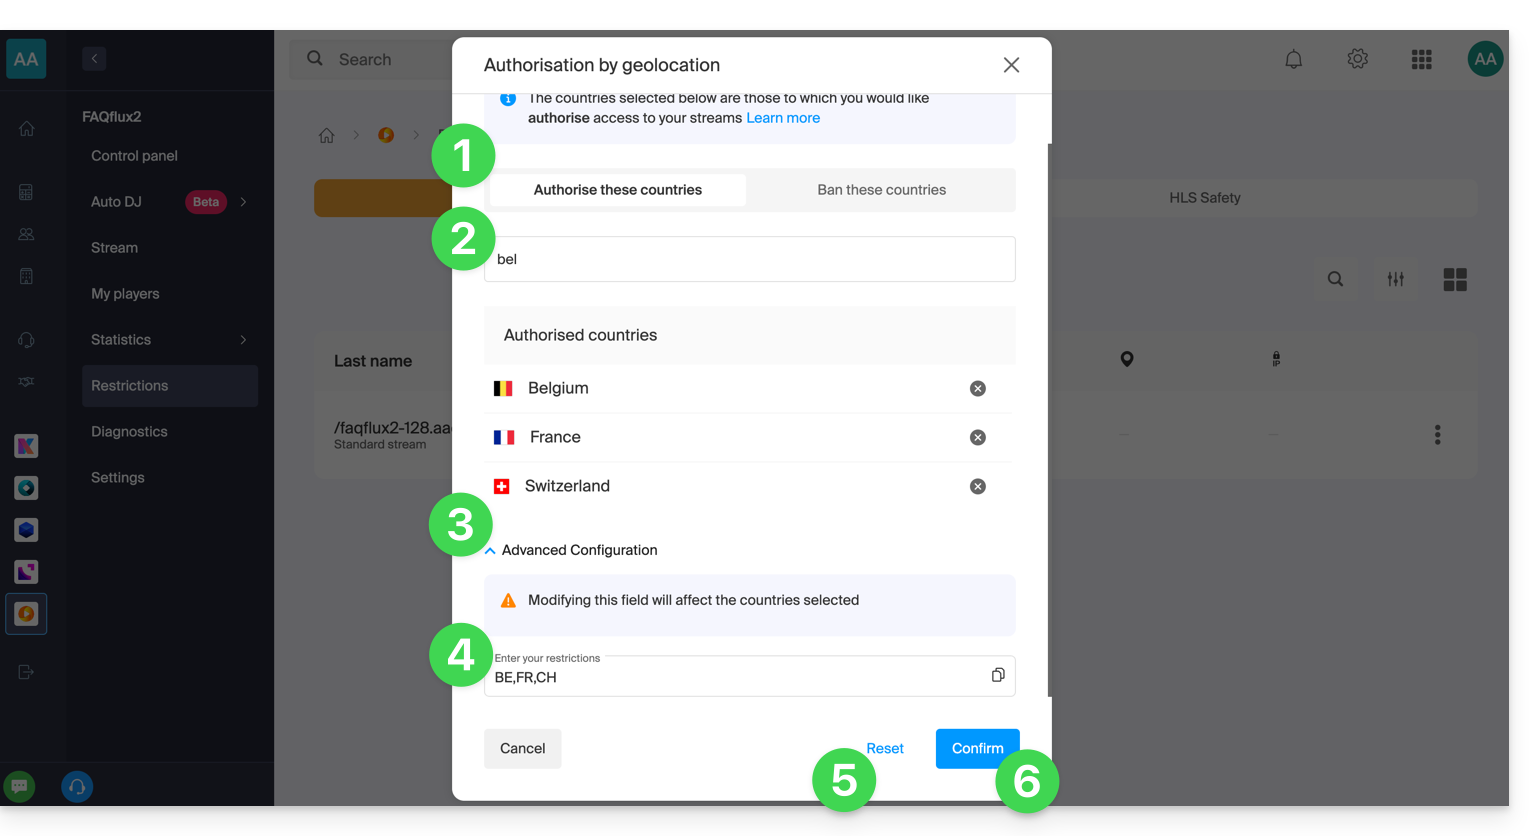
Then configure the restrictions:
- Choose whether the listed countries will be allowed or forbidden.
- Search for a country to add it to the list.
- Activate advanced configuration if necessary.
- Copy or paste a list of countries (useful for restricting other streams with a simple copy-paste).
- Click to remove all countries listed on the page.
- Click the blue button to save:
Protect an audio stream by IP
You can define an IP or a range of IPs as a list of allowed or forbidden IPs for accessing a stream.
If you only specify an allowed IP criterion, a geographical restriction must be in place. In this case, the goal is, for example, to forbid a country, but to allow a person from that country to access the stream: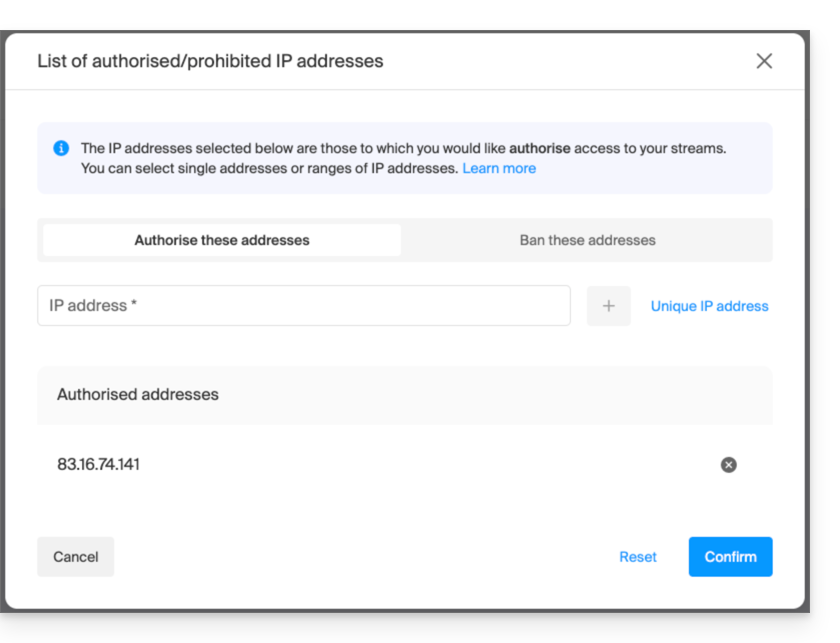
If you want to block access for everyone and only allow one or more specific IP addresses, you must explicitly block the range 0.0.0.0 → 255.255.255.255 (the global address range), and at the same time allow the IP address(es) for which you want to grant access: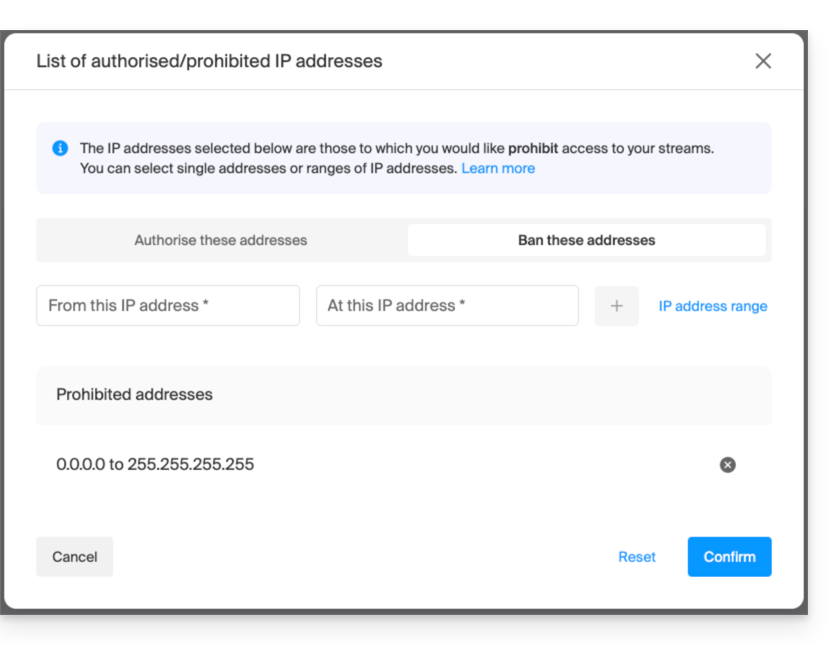
Link to this FAQ: https://faq.infomaniak.com/1588
Has this FAQ been helpful?
This guide explains how to create a stream relay on Infomaniak's Streaming Radio.
Create a stream relay
Prerequisites
- First, to create a standard stream, you need a radio encoder.
- The configuration settings provided at the end of the stream creation process allow you to configure your encoder.
- Once this is done, the stream will be sent from your encoder to Infomaniak's servers.
- Next, you have the option to specify the relay of any stream (e.g., any web radio).
- In this case, Infomaniak no longer receives the radio via an encoder connected to the master server but relays the stream broadcast by another server.
- If you create this stream relay, your stream is already available and accessible via a host address (domain name or IP address).
- This address must be specified in the Manager so that Infomaniak's servers can retrieve your stream.
- In the same place, you can activate the backup stream option.
- Thus, if your main stream becomes unavailable, the backup stream will automatically take over.
To access the radio streaming service:
- Click here to access the management interface for your product in the Infomaniak Manager (need help?).
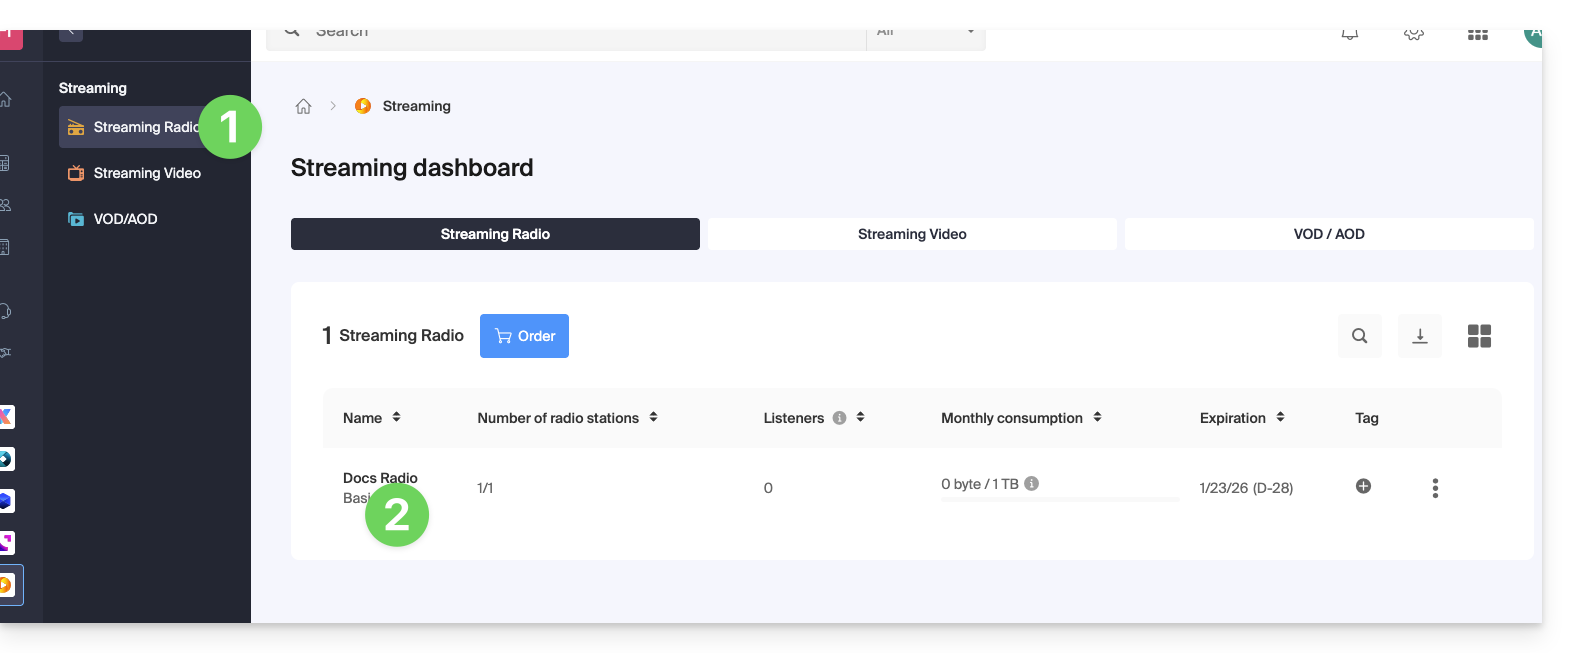
- Click directly on the name assigned to the product in question:
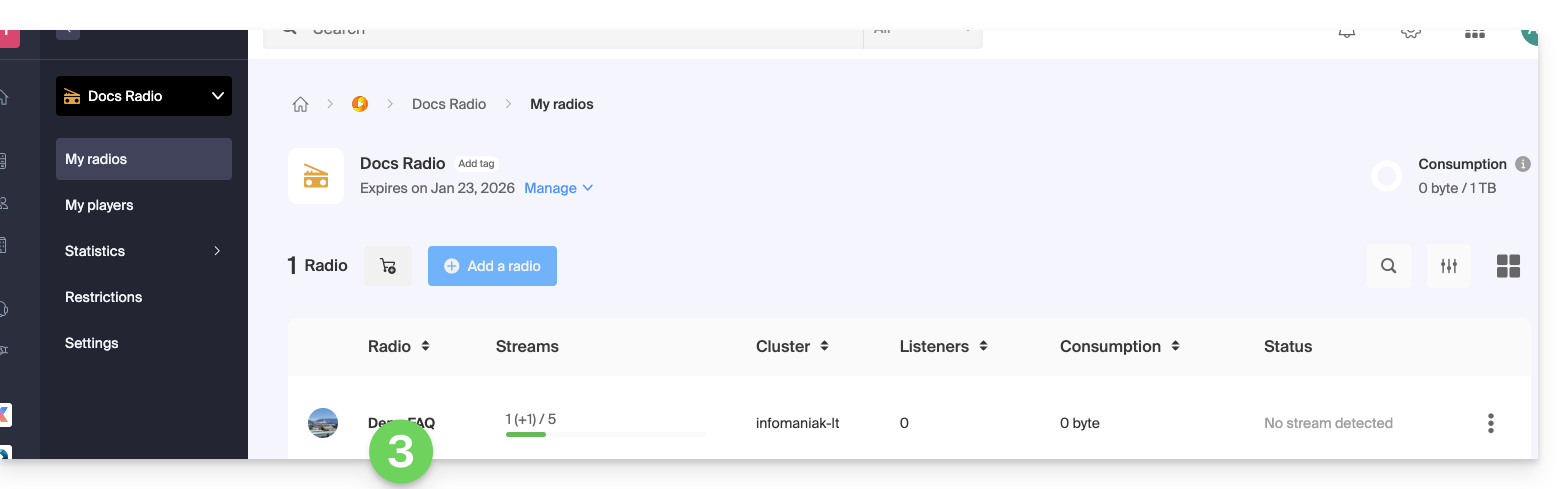
- Then, click on the name of the radio station:
- Click on the Configure Feeds button:
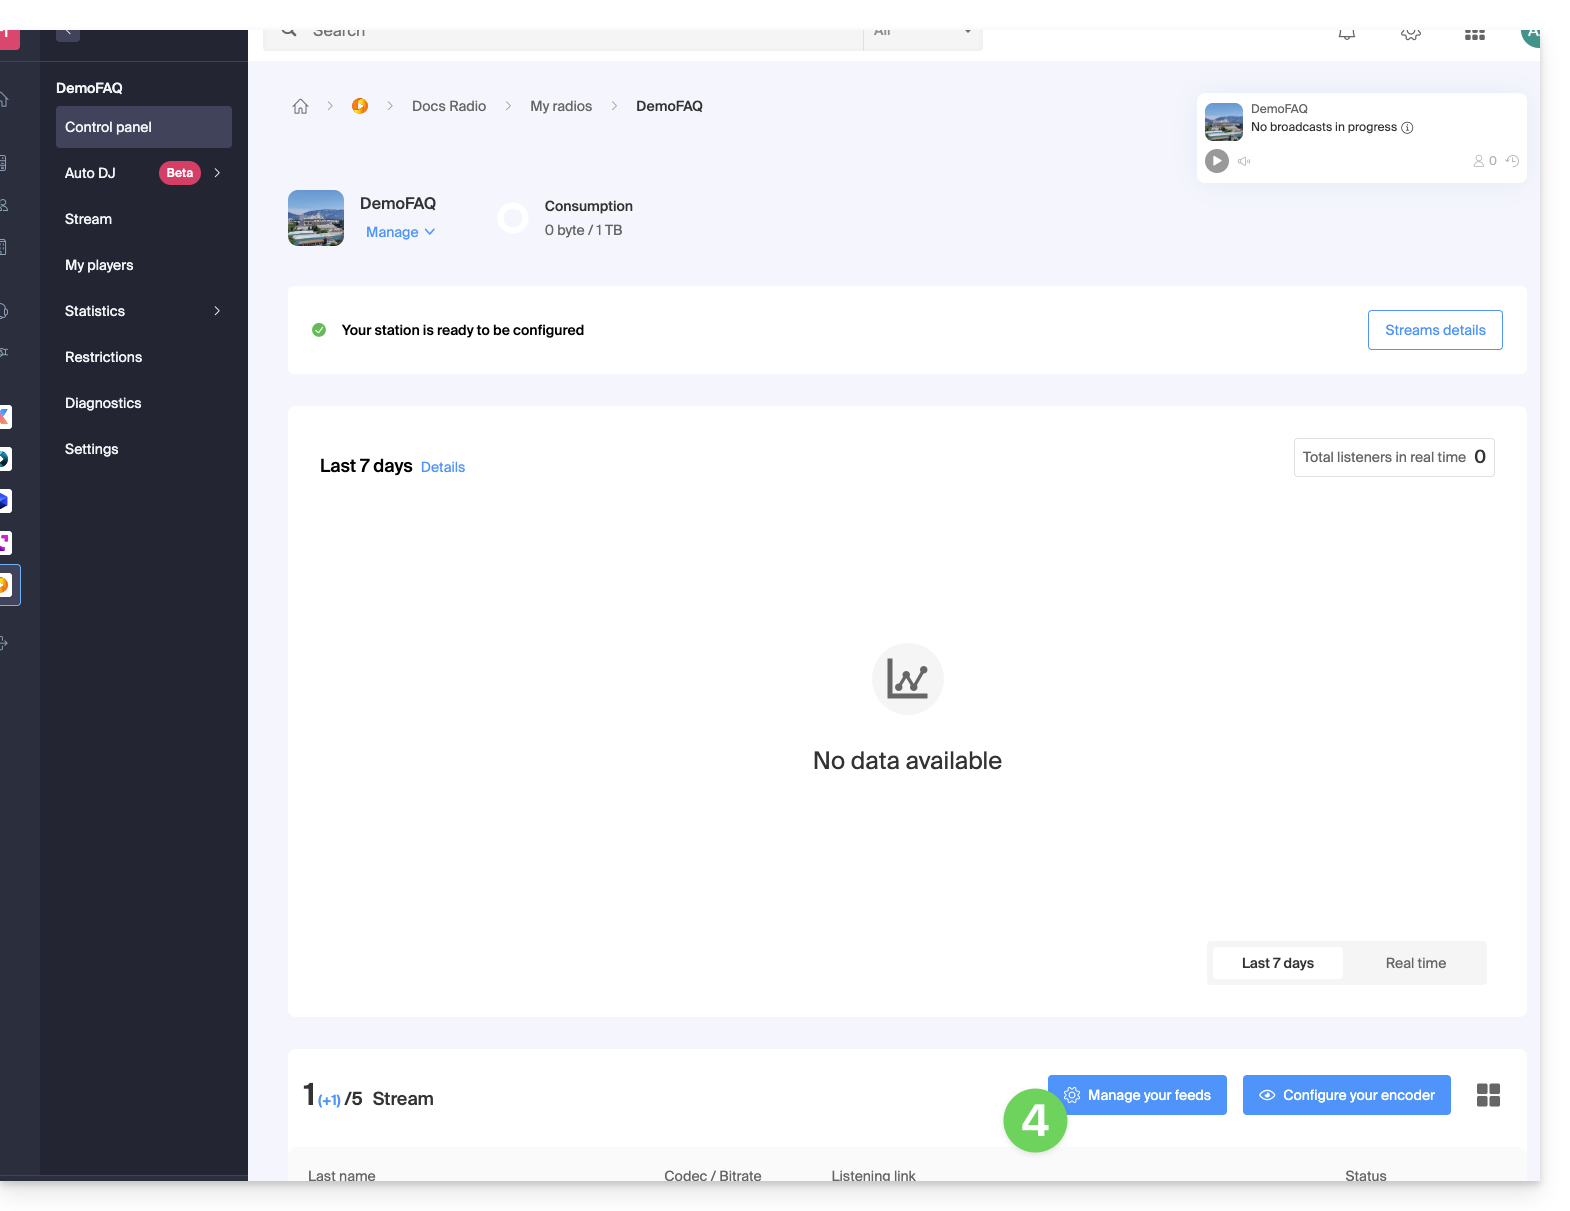
- Click on the Add Feed button:
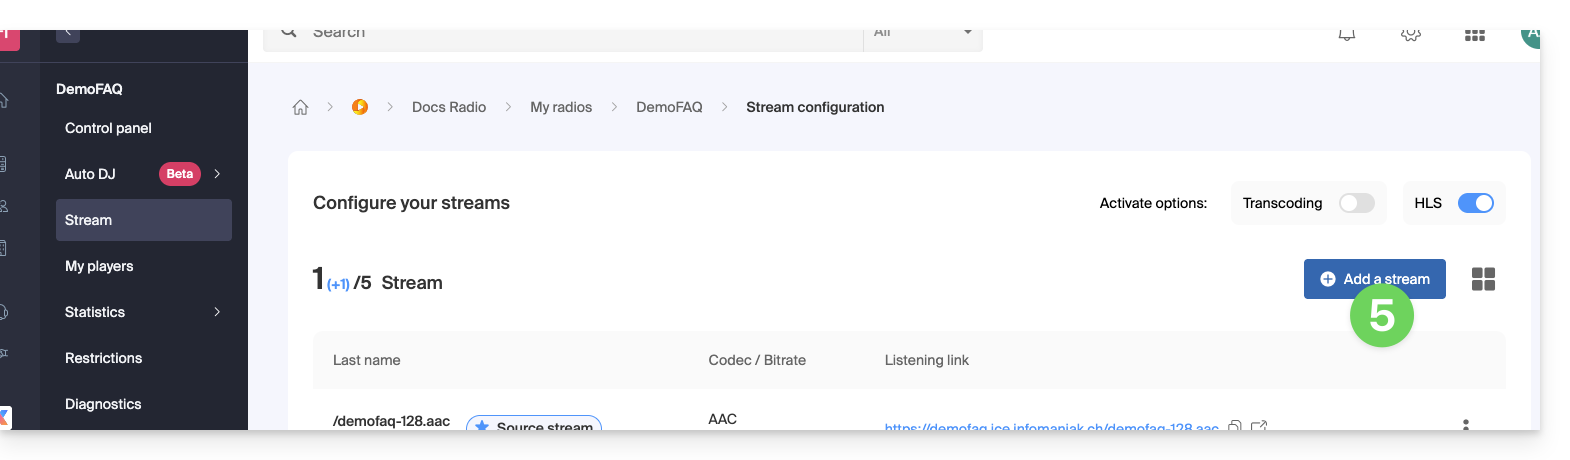
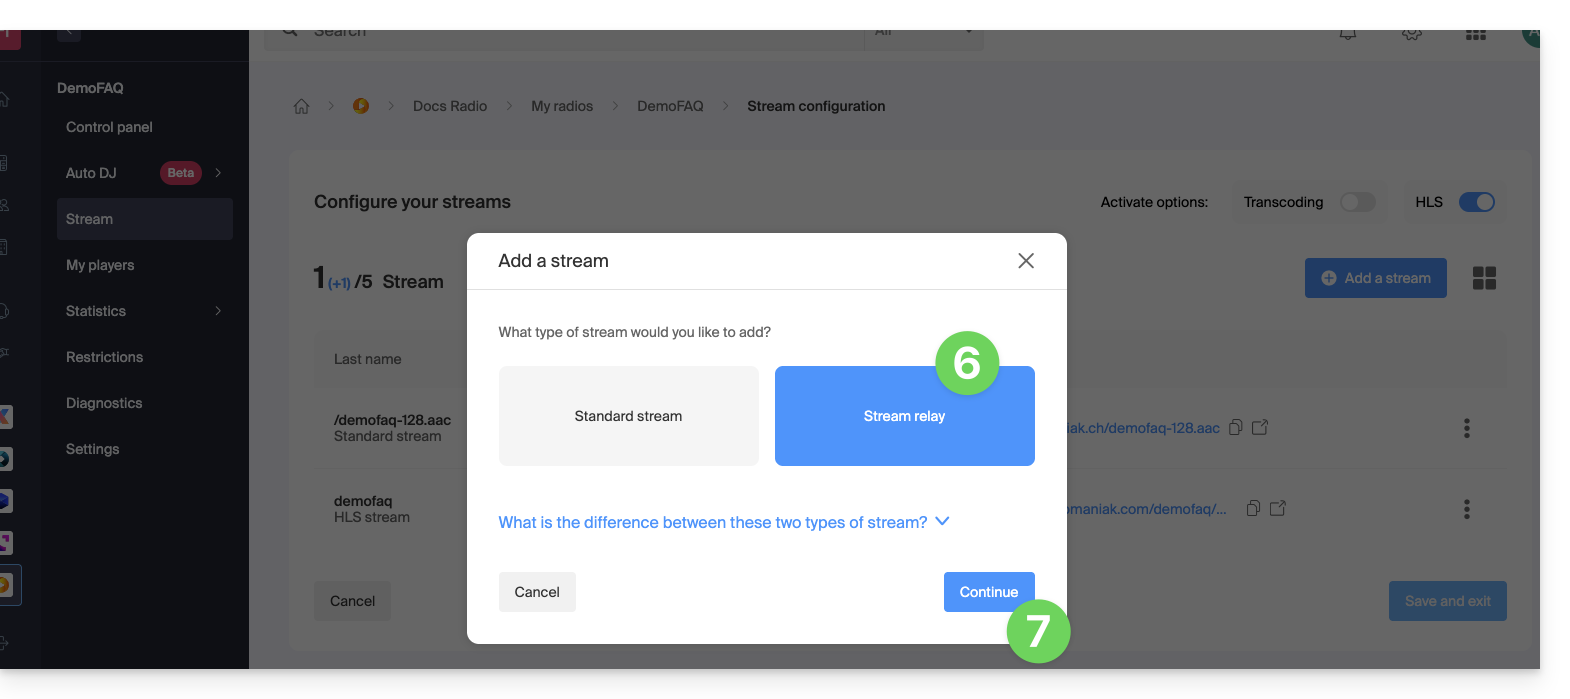
- Select Relay.
- Click the Continue button:
The configuration requires 3 fields:
- Server name
- port
- mount point
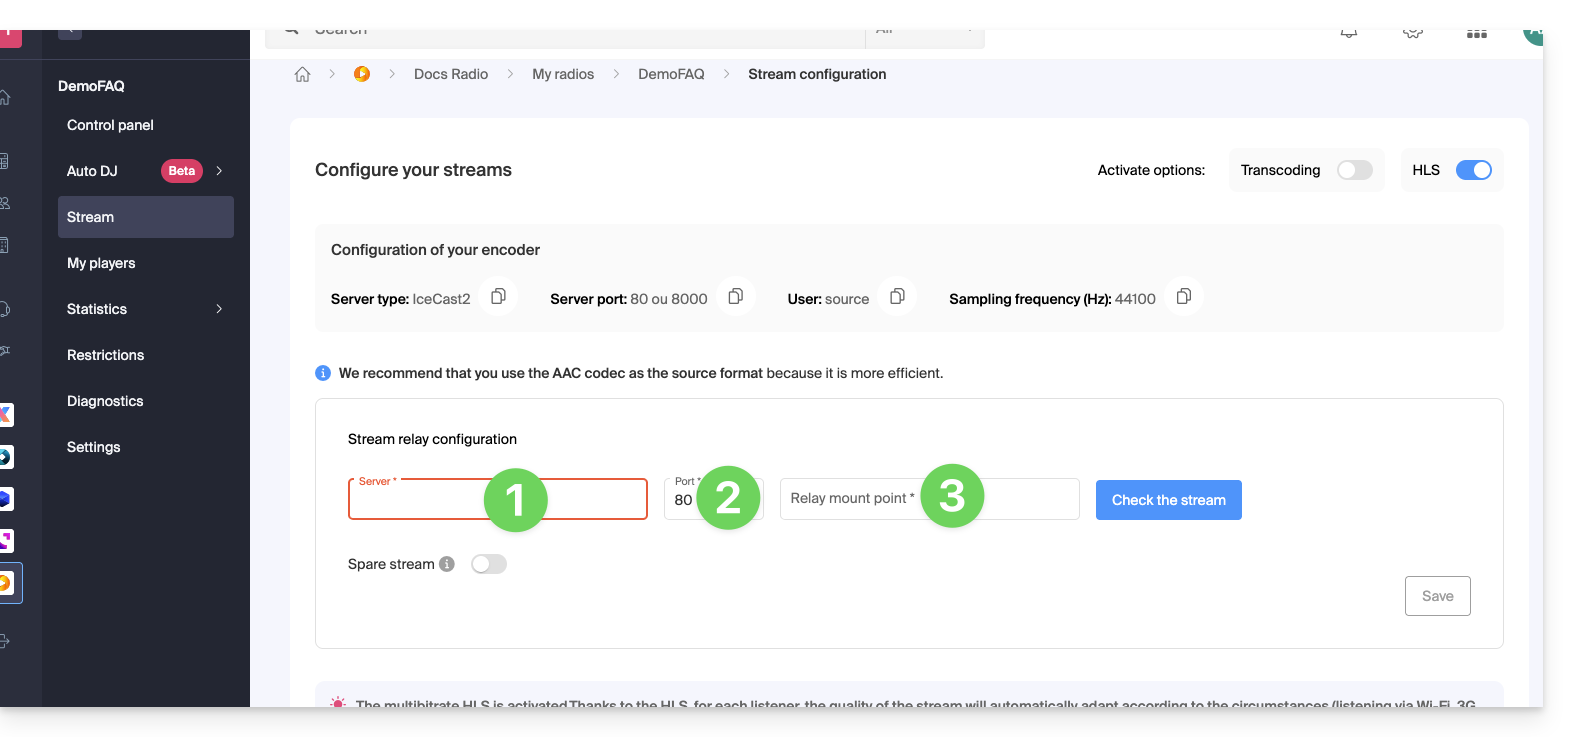
If the feed you need to relay is structured as follows: http://server.com:82/music.mp3, then indicate:
server.com82/music.mp3
That said, in some cases, the mount point field may be empty, and the extension may not be necessary. If there is no port in the URL with http, simply enter "80".
Click the blue button to validate the feed, then click Save in the bottom right corner.
You can also add a feed relay as a backup feed if you enable this option when adding a standard feed: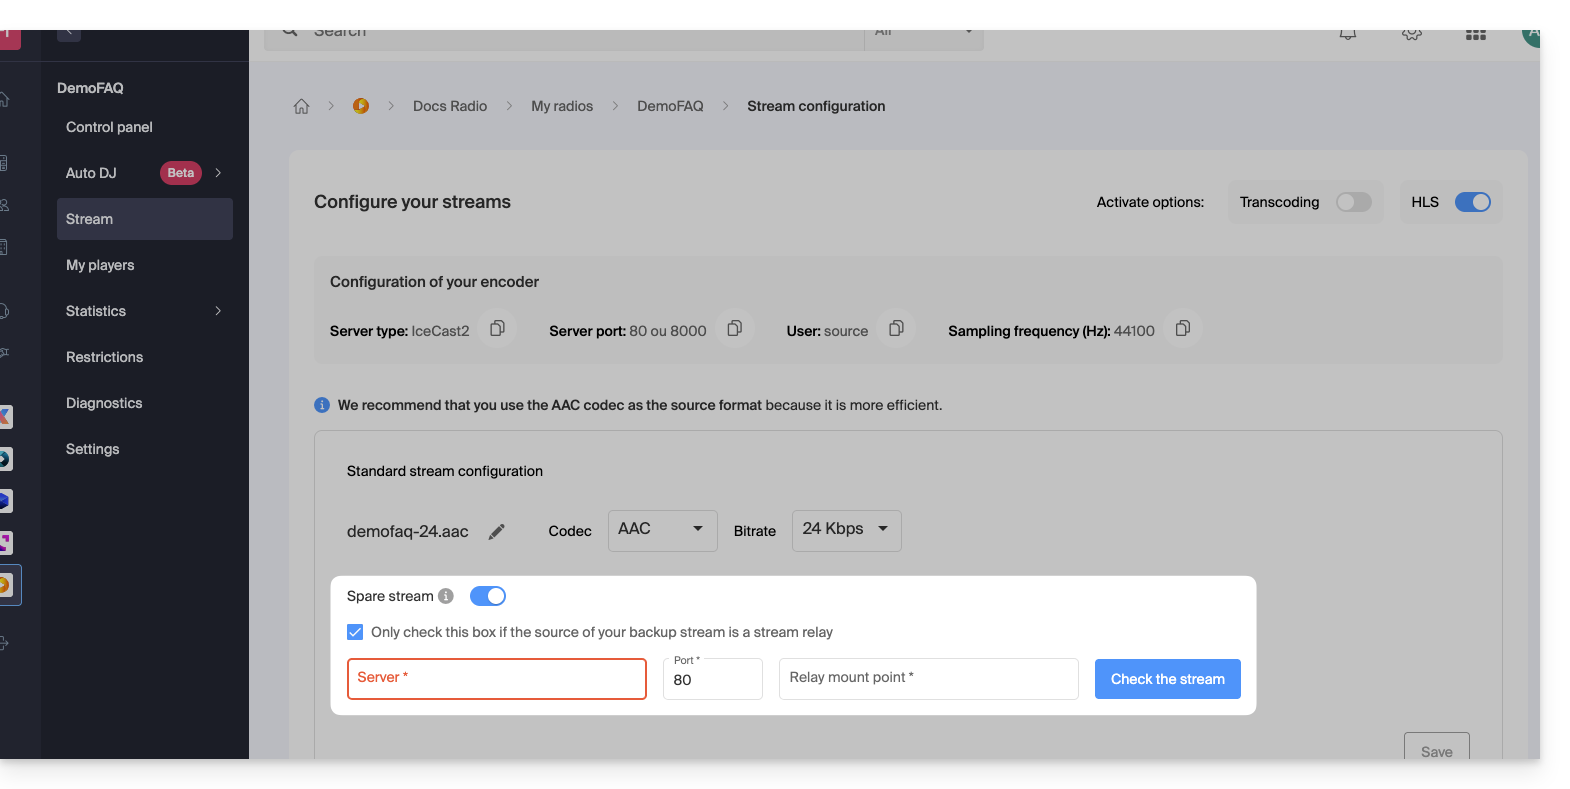
Link to this FAQ: https://faq.infomaniak.com/1658
Has this FAQ been helpful?
This guide explains how to prevent a Streaming Radio from requesting a password when connecting to the audio stream.
Restricted streams
If stream protection is enabled and the token is not generated or is generated incorrectly, the prompt (password request) will be visible. The same applies to users who do not meet the criteria for geographical restriction, which may have been enabled for the stream.
Less common: an outage
The receiving server is the server to which your encoder connects to broadcast your stream. The streaming servers connect to the receiving server and broadcast your stream to listeners. If the receiving server fails, another backup server takes over. This architecture ensures the broadcast of thousands of streams to tens of thousands of listeners, minimizing downtime.
In the event of a failure, Infomaniak is automatically notified and will strive to restore the situation as quickly as possible. If necessary, Infomaniak will send an email to all its radio clients informing them of the causes of the failure.
A failure of a single streaming server causes thousands of listeners to disconnect simultaneously, who then attempt to reconnect. This results in an overload and causes listeners to be prompted for their password. It is then necessary to try connecting again about thirty seconds later.
Generally, the situation returns to normal after a few minutes.
Link to this FAQ: https://faq.infomaniak.com/1690
Has this FAQ been helpful?
This guide will help you troubleshoot your Streaming Radio to identify the cause of any potential issues, such as disconnections, etc.
Introduction
- If you are broadcasting your FM radio, check that the capture card is working correctly.
- If you are broadcasting a web radio, make sure your broadcasting software is working correctly.
- Pay attention to the CPU load on your computer: make sure it is not overloaded, and ensure you have enough memory if you are performing operations in addition to encoding an AAC stream, which is very memory-intensive.
- It is possible that your Fiber/ADSL line is no longer able to handle the data being sent to the server.
- You must have an upload speed that is at least equal to the total amount of data being sent to the server (for example, a radio station sending a 128kbps stream + a 48kbps stream, which requires a minimum of 130 + 50 = 180kbps).
- Generally, radio stations dedicate a line exclusively to broadcasting audio streams in order to avoid any bandwidth saturation in the event of simultaneous sending, such as sending a large email with an attachment. This precaution ensures that the upload does not monopolize the bandwidth, which could lead to interruptions in the audio stream during listening.
- Your ISP may also cause a disruption on the line, even if it is minor, which will have the effect of cutting off the radio stream.
- If your encoder is configured to send metadata to the servers via a text file hosted by another provider, and that provider experiences disruptions, the stream may also be disrupted!
Analyze recent statistics
Statistics allow you to view any potential service interruptions. To access this information:
- Click here to access the management interface for your product in the Infomaniak Manager (need help?).
- Click directly on the name assigned to the product in question:
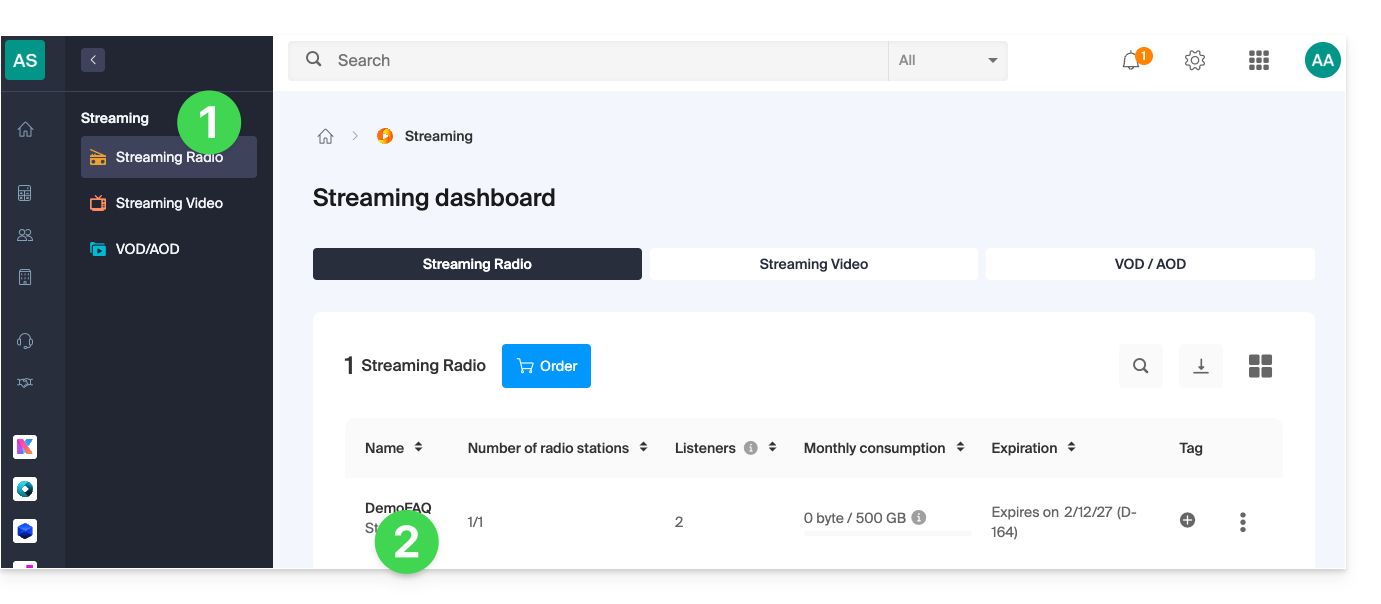
- Click on Statistics in the left-hand menu:
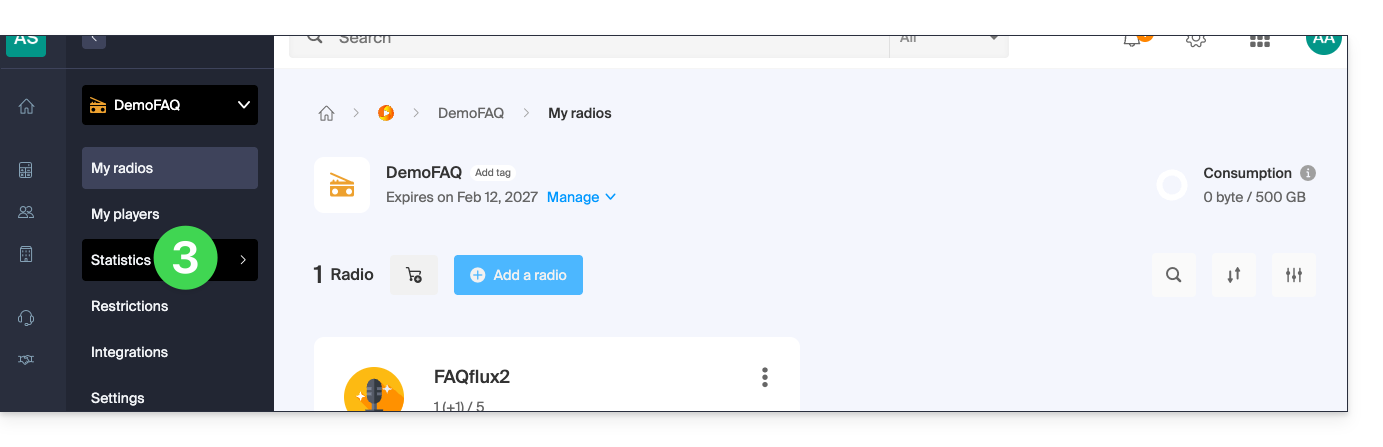
- The statistics are detailed in this other guide.
Check that the elements are working correctly
The radio diagnostics page allows you to access various information. To access these diagnostics:
- Click here to access the management of your product on the Infomaniak Manager (need help?).
- Click directly on the name assigned to the product in question:
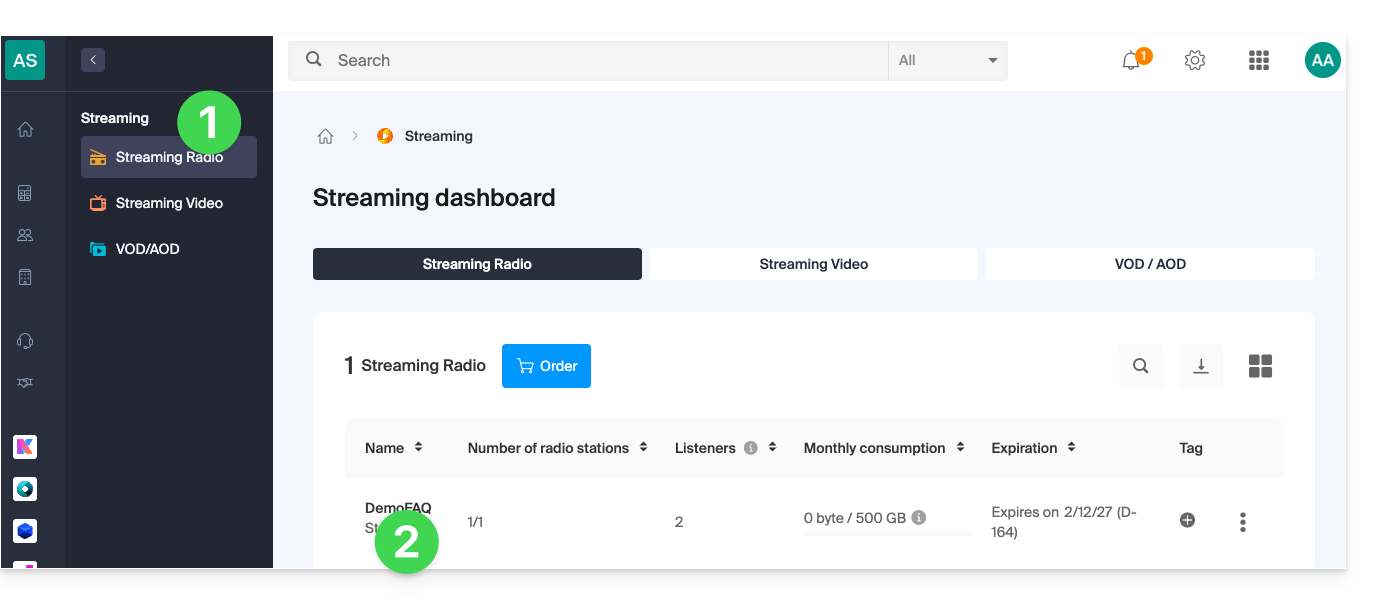
- Click on the name of the audio stream in question:
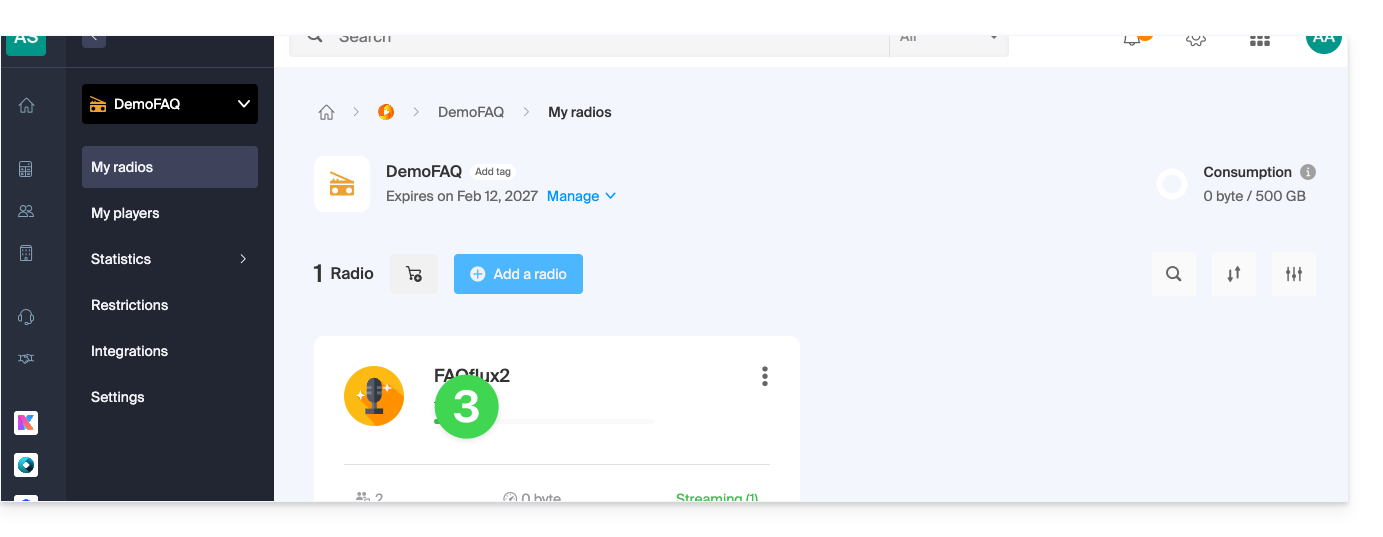
- Click on Diagnostics in the left-hand menu:
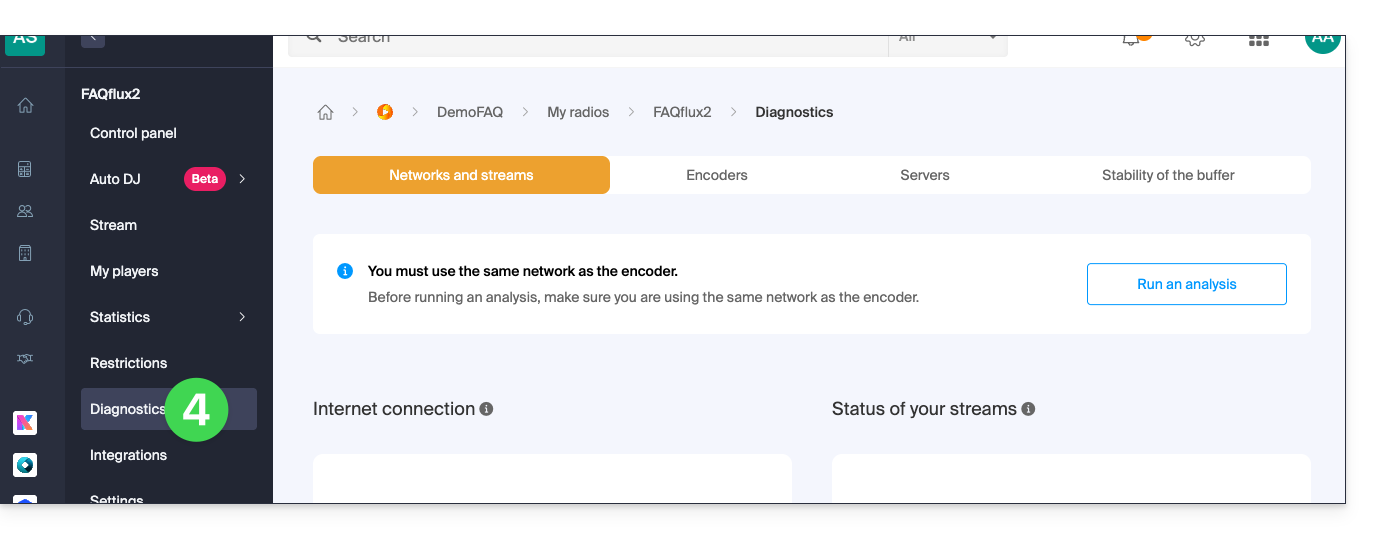
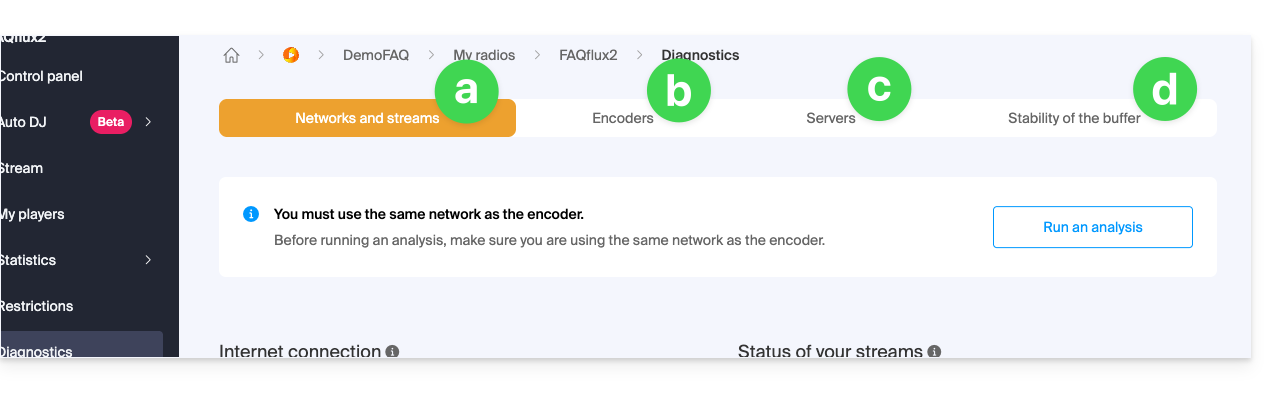
- The Network and Streams tab allows you to test the connection between your server and Infomaniak's infrastructure.
- The Encoders tab displays a history of encoder connections to analyze whether the streams were operational.
- The Servers tab provides information on the overall status of the network infrastructure to verify the proper functioning of the receiving and broadcasting servers.
- Please note that in the event of a general broadcast stream outage, Infomaniak is notified and intervenes immediately.
- The Buffer Stability tab is detailed in this other guide.
Link to this FAQ: https://faq.infomaniak.com/1691
Has this FAQ been helpful?
This guide provides information about the audio bitrates for Infomaniak radio streaming.
Test the audio bitrate
The connection test available in your Manager evaluates the connection between your server (the one you use to encode your streams) and the Infomaniak facilities located in Geneva, Switzerland.
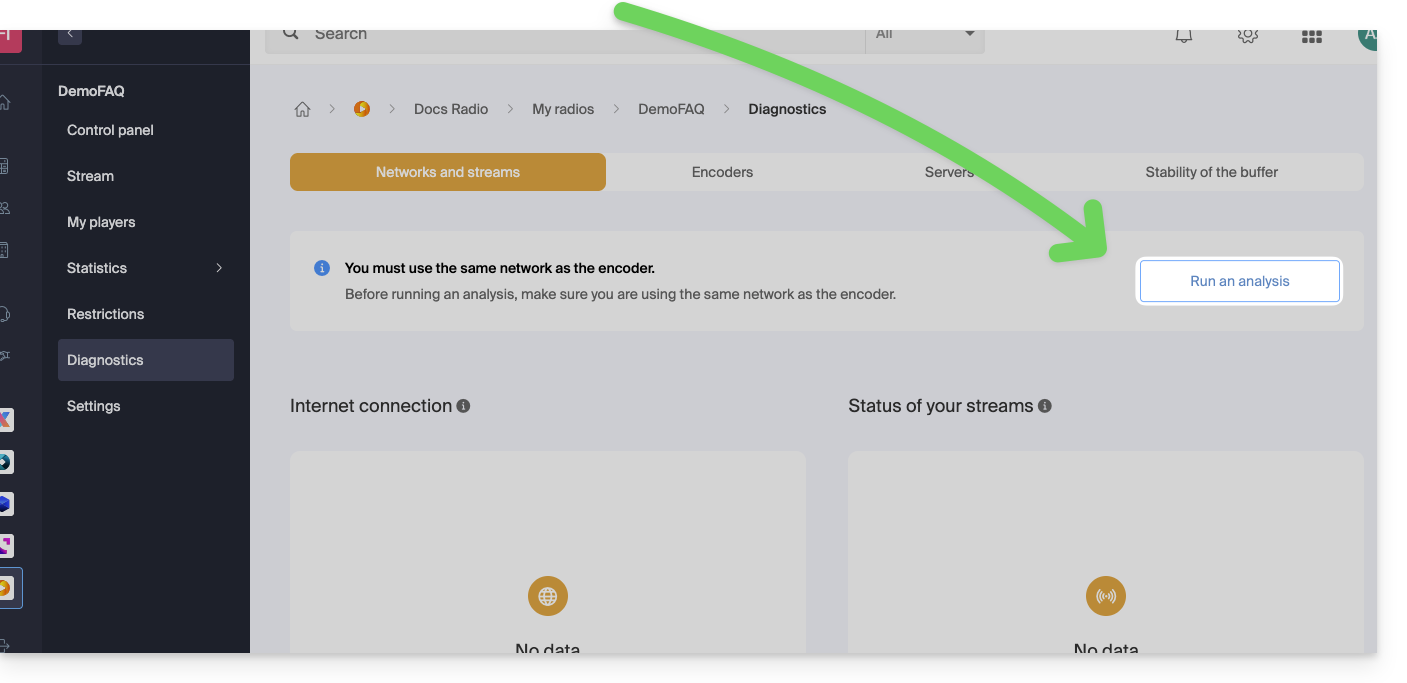
It measures the time required to send or receive data, as well as the response time. These measurements may fluctuate depending on network traffic. The test determines the required bandwidth, taking into account the available bandwidth. However, if other data transfers are in progress, the measured bandwidth may be lower than the theoretical bandwidth of your line.
If in doubt, note the test results at different times of the day, as well as the technical details of your connection and the number of computers sharing the line.
To stream a radio station without interruption, a quality Internet connection and sufficient bandwidth are necessary. The bandwidth should always guarantee a free bandwidth margin. If your connection is shared between the radio and other devices, the streaming quality may be affected.
A standard ADSL connection is usually sufficient, but for uninterrupted streaming, it is recommended to dedicate a connection to your radio and rent another for other uses. You can also ask your internet service provider to check the line quality and measure the actual bandwidth.
To detect any temporary congestion on your line, run a long-duration buffer test.
Link to this FAQ: https://faq.infomaniak.com/1694
Has this FAQ been helpful?
This guide concerns the buffering and latency of Streaming Radio. While latency is inevitable, proper buffer management can optimize your broadcasts while minimizing interruptions.
Introduction
- The buffer, or memory buffer, is a small memory area that must be filled before the Player starts playing the music from your live audio stream. It corresponds to a few seconds of sound. It is designed for a more comfortable listening experience, in order to avoid small interruptions in the stream being audible, which leads to choppy and unpleasant sound.
- The receiving and broadcasting servers are also equipped with buffers; real-time transmission is never instantaneous due to several technical factors:
- A latency of 3 to 4 seconds between the sound generation and its reception is normal.
- Players always buffer at least 1 to 2 seconds before starting playback.
- Icecast uses a 64K byte buffer by default, which is equivalent to approximately 4 seconds of streaming in mp3 128k.
- Encoding clients also have buffers to avoid interruptions.
- Reducing the size of the buffers can reduce latency, but this practice is risky.
- Since Internet connections do not guarantee a constant bandwidth, smaller buffers can lead to interruptions.
Analyze buffer stability
The diagnostic available in your Manager displays the amount of memory occupied by the buffer each second. If the stream is working correctly, the values should be stable: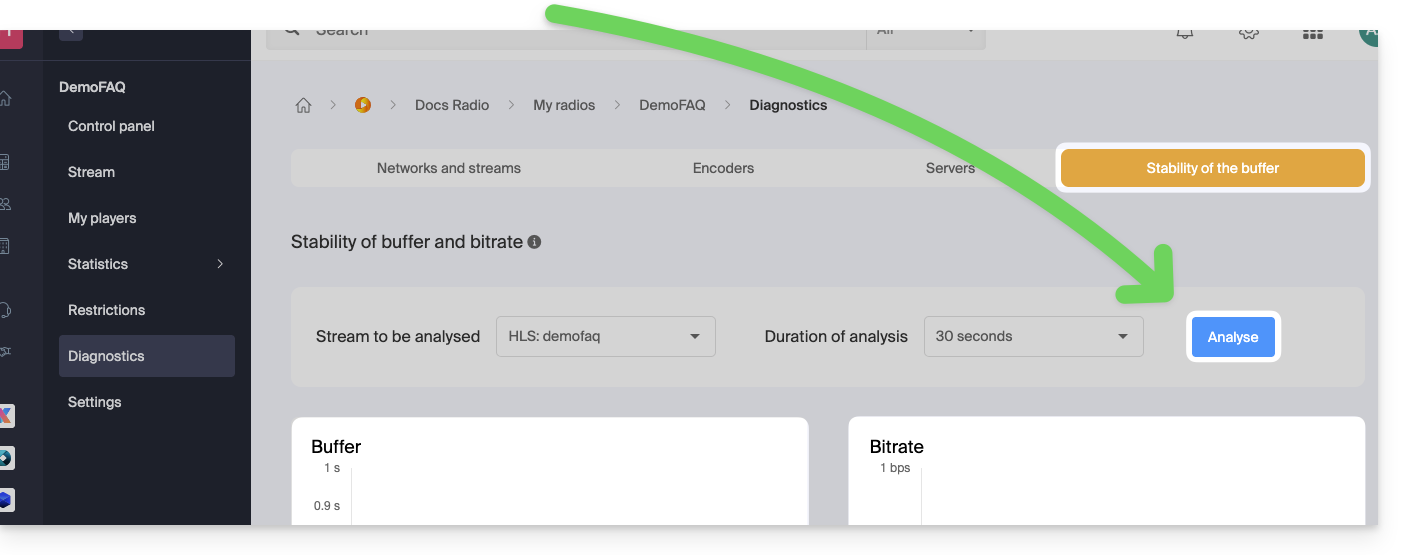
An unstable buffer indicates either poor connection quality or line saturation. Consult this other guide if you are looking for troubleshooting steps.
This test is also useful for detecting temporary saturation of an Internet connection. If the buffer is sometimes stable and sometimes unstable, it may be a sign that some users sharing the Internet connection are occasionally saturating the line, causing disruptions to your stream.
To verify this hypothesis, run a long-duration buffer test during peak usage hours and observe any potential disruptions.
Link to this FAQ: https://faq.infomaniak.com/1695
Has this FAQ been helpful?
This guide details the possibilities for monetizing listens to Streaming Radio and managing advertising for your streams.
Enable advertising for Streaming Radio
Prerequisites
- Contact one of the 2 approved advertising partners:
- Once the contract is established, ensure that the selected agency informs Infomaniak of the effective activation, if necessary.
- This step will allow the migration of the feeds to the corresponding cluster.
This will allow you to manage pre-roll and/or mid-roll ads directly from the ad network platform, completely independently.
Types of ad insertions
The type of advertising called in-stream pre-roll involves playing an ad just before the live audio stream starts. Specifically, the ad is triggered automatically when the listener clicks the Play button, before switching to the live program.
The pre-roll differs from a jingle: the former is an advertisement, while the latter is part of the station's branding or sonic identity.
Finally, the mid-roll – that is, the insertion of advertisements between two segments of a program – corresponds to the standard operating mode offered by the two partners mentioned above.
It is important to note that the post-roll (advertisement displayed after the content) is not applicable in the context of a live broadcast, since the latter does not have a defined end.
Technical requirements
When integrating in-stream pre-roll ads into a live radio stream, it is imperative to ensure a perfect match between the audio settings of the ad and the main stream:
- The bitrate and sampling rate must be identical to avoid any interruptions, latency, or desynchronization during the transition between the advertisement and the live stream.
- This requirement ensures smooth and stable broadcasting, which is essential for maintaining listening quality and service continuity in real time.
Link to this FAQ: https://faq.infomaniak.com/1831
Has this FAQ been helpful?
This guide concerns the listening data for Streaming Radio that can be exported to ACPM (formerly OJD Numérique).
Introduction
- ACPM, the Alliance for Media and Press Figures, is an independent organization in France that certifies data relating to the circulation, audience, and readership of media outlets.
- This data, recognized as the official benchmark, supports media and advertising market players in analyzing, comparing, and structuring their strategies.
- Governed by its bodies composed of media professionals, ACPM guarantees transparency, independence, and methodological rigor; it provides reliable certifications that are in line with the evolving media sector.
- You can also consult this other guide about a similar service designed for Switzerland.
Manage ACPM certification
Prerequisites
- The organization hosting the streaming service must be established with an address in France.
- To activate ACPM certification, please contact this service by email:
equipe-ojdnumerique@acpm.fr. - Once the agreement has been established with them, contact Infomaniak support providing the details of your ACPM and Infomaniak contract.
To manage the activation or deactivation of the service:
- Click here to access the management interface for your product in the Infomaniak Manager (need help?).
- Click directly on the name assigned to the product in question.
- Click on the name of the audio stream in question.
- Click on Settings in the left-hand menu.
- Enable or disable log export to ACPM using the toggle switch:

Link to this FAQ: https://faq.infomaniak.com/1851
Has this FAQ been helpful?