Knowledge base
1000 FAQs, 500 tutorials and instructional videos. Here, there are only solutions!
This guide explains how to properly configure a stream on the Infomaniak Streaming radio service.
Configure the broadcast of a radio stream
To access the radio streaming service:
- Click here to access the management interface for your product in the Infomaniak Manager (need help?).
- Click directly on the name assigned to the product in question.
- Click on the radio station name.
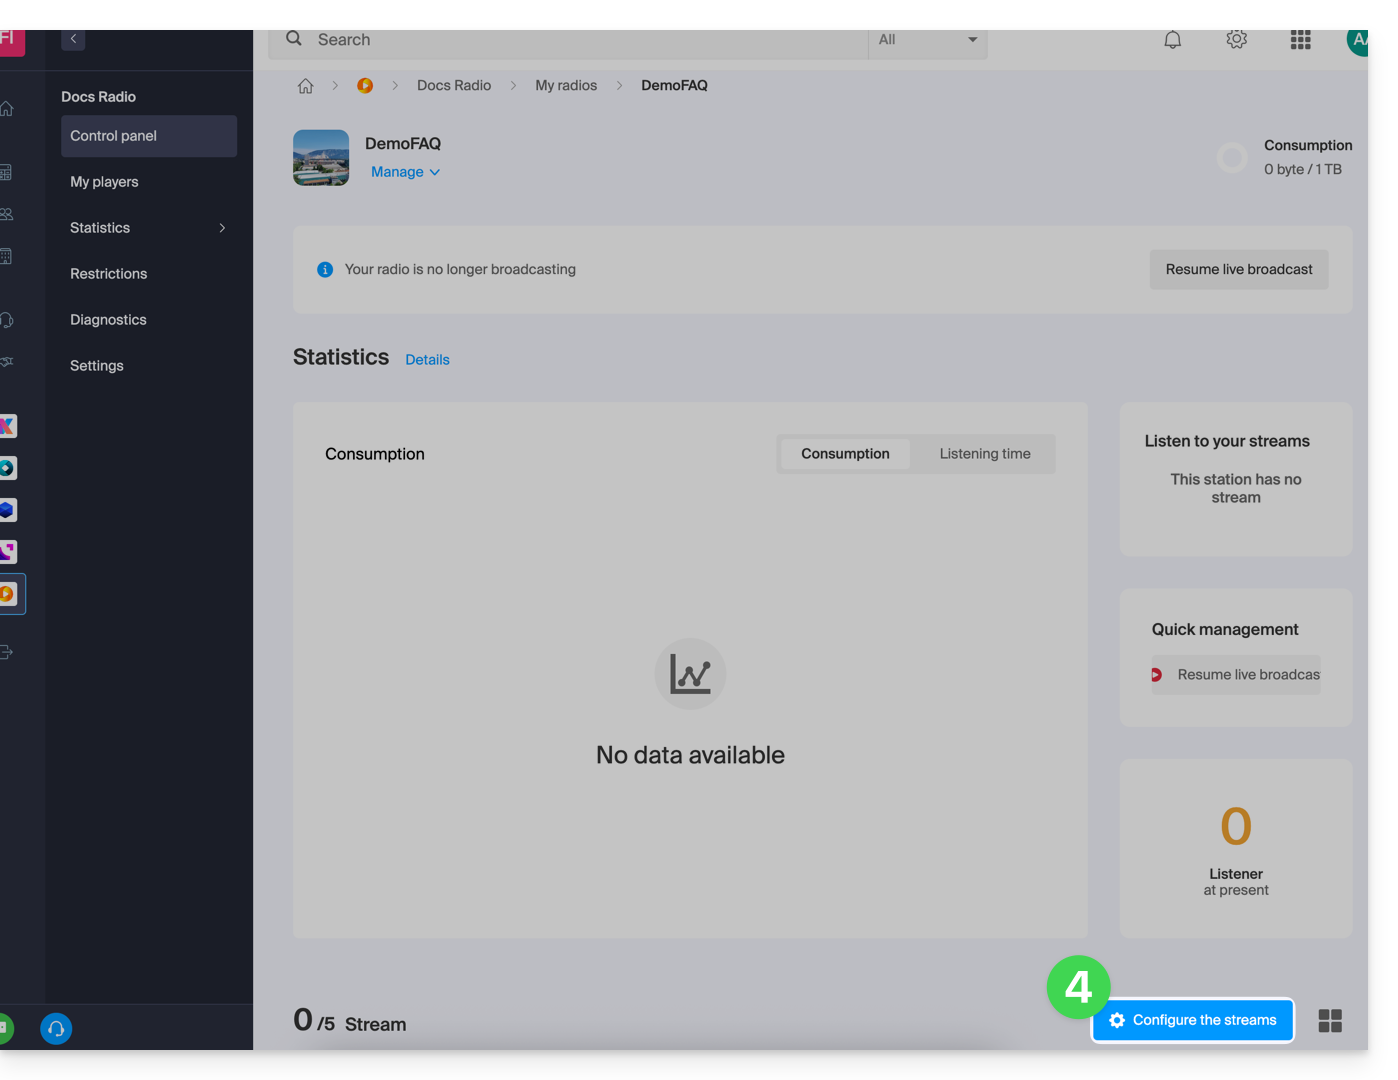
- Click on the Configure feeds button:
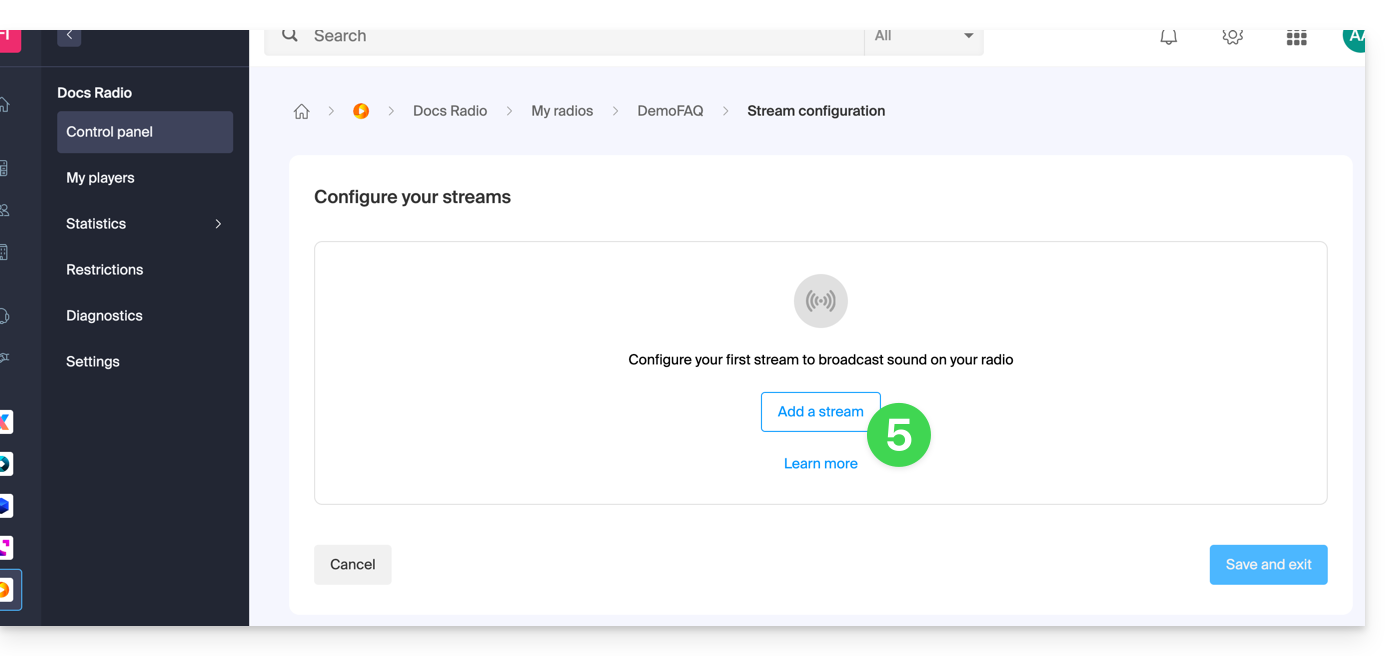
- Click on the Add feed button:
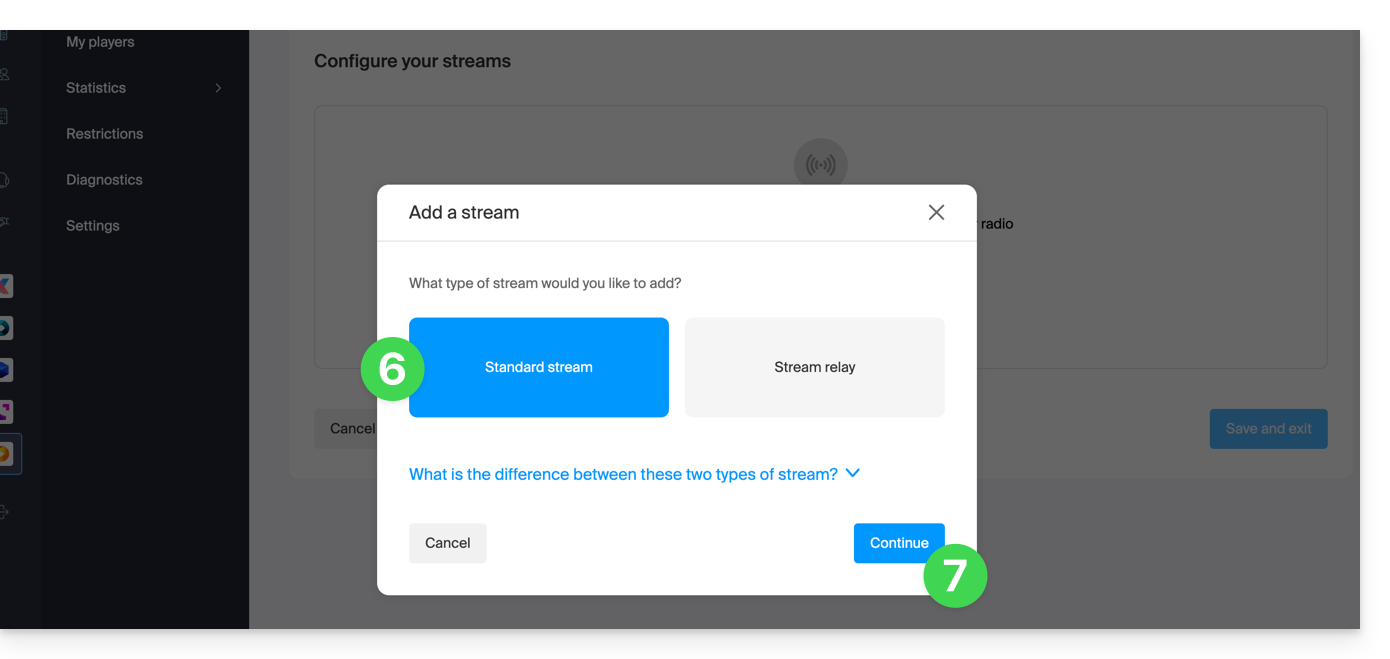
- Add a standard feed (refer to this other guide about feed relays).
- Click the button to Continue:
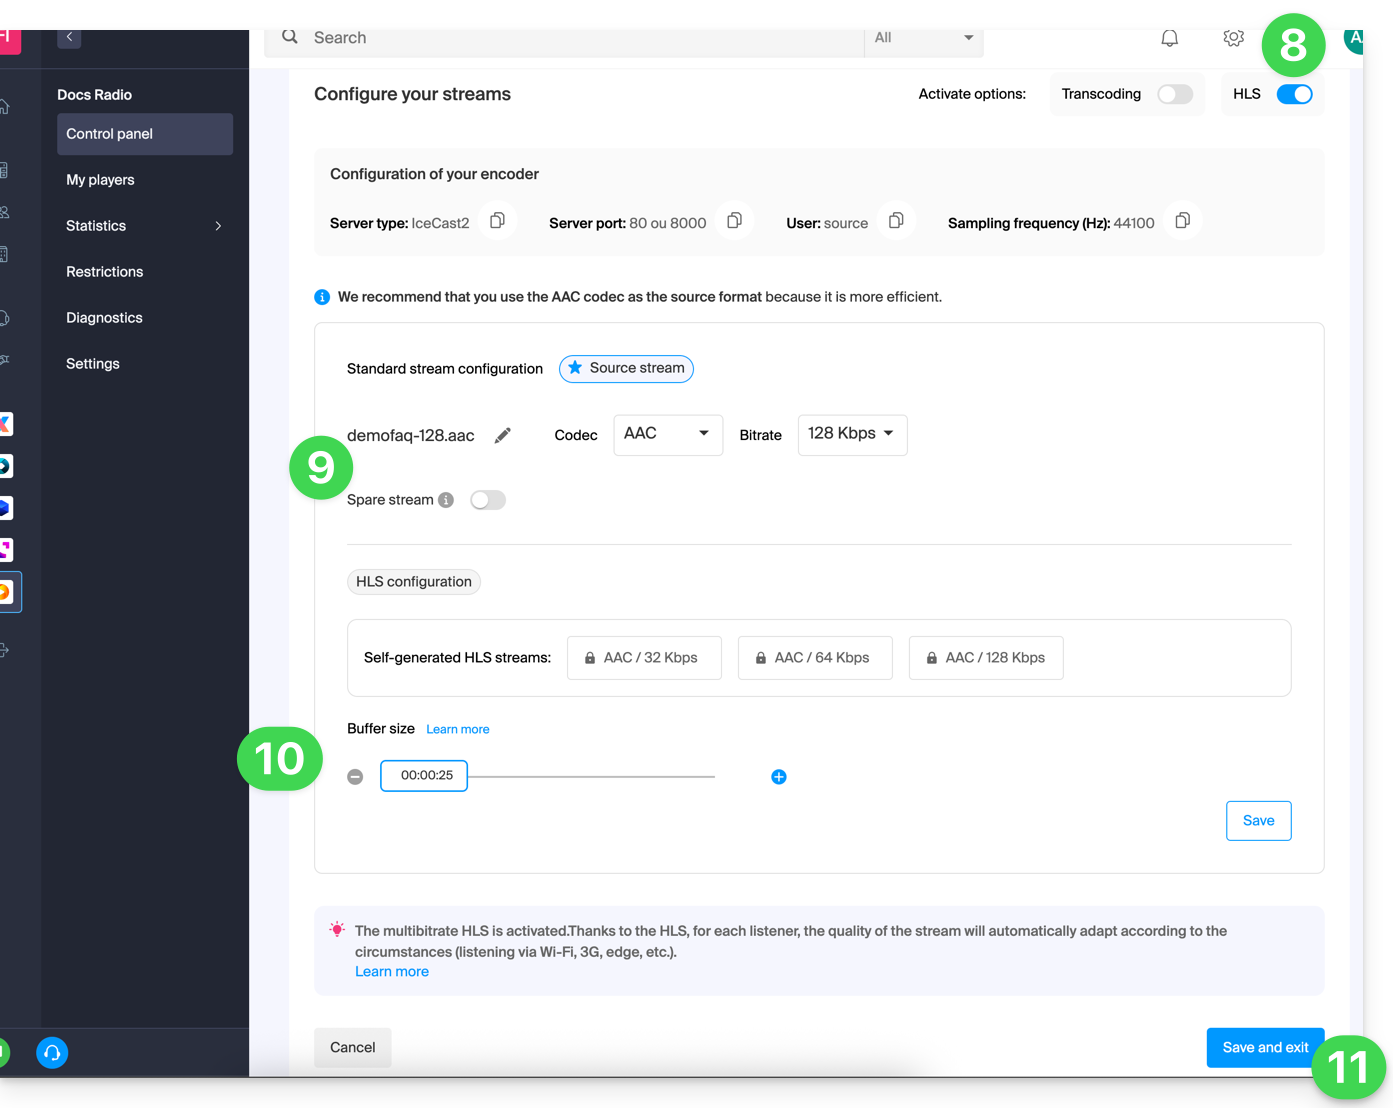
- Choose the desired options, including the ability to enable HLS, which will not be counted towards the total number of streams.
- Configure the desired quality and refer to this other guide if you are looking for information about the stream type.
- Adjust the buffer size if necessary (and remember to save if needed).
- Click the button to Save and exit:
You can now configure an application using the settings obtained at the end of this process.
Link to this FAQ: https://faq.infomaniak.com/2213
Has this FAQ been helpful?
This guide concerns the listening data from Streaming Radio that can be exported to Mediapulse.
Introduction
- Mediapulse, an independent organization in Switzerland, measures the audience reach of radio, television, and online platforms.
- This data, recognized as the official benchmark, helps the media and advertising market to analyze, compare, and structure their activities.
- Subject to DETEC supervision via OFCOM, Mediapulse ensures transparency, independence, and scientific rigor; it guarantees reliable measurements adapted to the evolution of media.
- You can export your radio logs to this service.
- You should also consult this other guide about a similar service, but intended for France.
Manage the Mediapulse certification
Prerequisites
- The organization in which the Streaming service is located must be established with an address in Switzerland.
- To activate Mediapulse certification, please contact this service by email:
info@mediapulse.ch. - Once the contract has been established with them, contact Infomaniak supportby providing the information related to your Mediapulse and Infomaniak contract.
To manage the activation or deactivation of the service:
- Click here to access the management interface for your product in the Infomaniak Manager (need help?).
- Click directly on the name assigned to the product in question.
- Click on the name of the audio stream in question.
- Click on Settings in the left-hand menu.
- Enable or disable log export to Mediapulse using the toggle switch:

Link to this FAQ: https://faq.infomaniak.com/2482
Has this FAQ been helpful?
This guide explains how to transfer audio streams from one of your Infomaniak Streaming Radio stations to another station within the same organization.
Refer to this other guide to transfer all streams from a Streaming Radio station to a new owner.
Transfer audio streams
To do this:
- Click here to access the management interface for your product in the Infomaniak Manager (need help?).
- Click directly on the name assigned to the product in question.
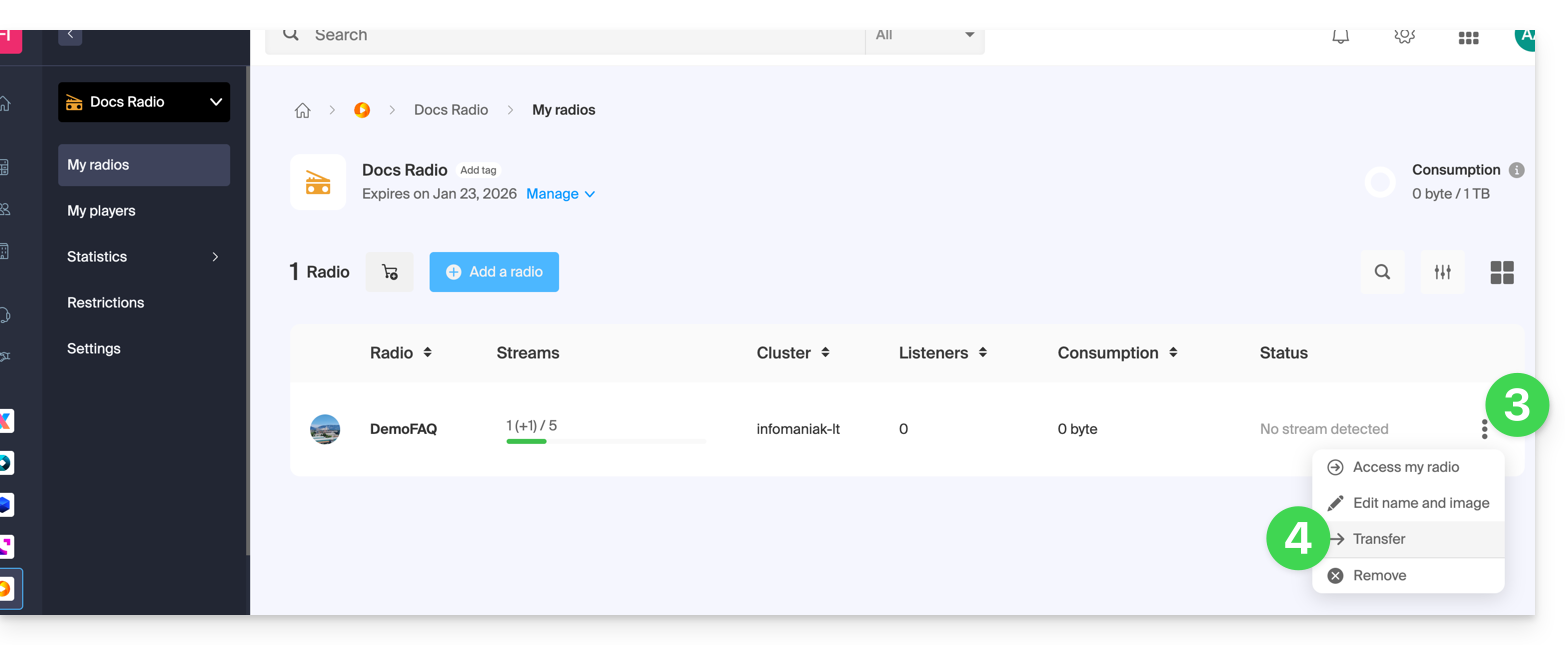
- Click on the action menu ⋮ located to the right of the item in question.
- Choose Transfer:
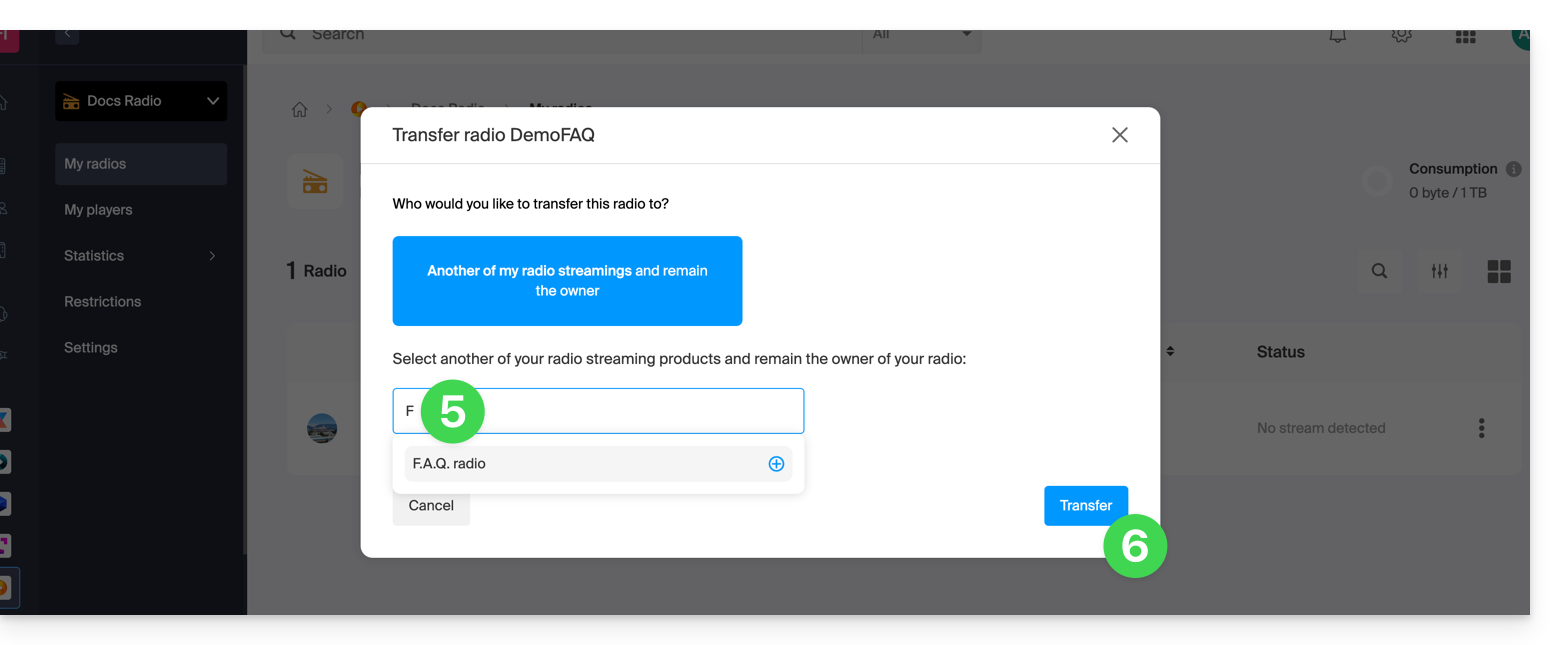
- Search for and confirm the name of the other radio you own within the same Organization.
- Confirm the transfer:
Refresh the Manager pages if necessary to update the displayed information.
Link to this FAQ: https://faq.infomaniak.com/2513
Has this FAQ been helpful?
This guide concerns live control (timeshift), which allows your listeners to pause, rewind, and then return to the live stream on your HLS streams, with a rewind depth of up to 2 hours.
Introduction
- Unlike Video Streaming Timeshift, there is no scheduling tool associated with Radio.
- Rewind/replay is disabled by default on the Player to give you control over public exposure.
Offer live control to listeners
Prerequisites
- Create or edit an HLS stream in your Radio Streaming product.
Then:
- When creating (or modifying) an HLS stream, set the Buffer between 00:00:25 and 02:00:00. This value, between 25 seconds and 2 hours, corresponds to the maximum duration for which listeners can rewind and pause the live stream before returning to the live broadcast. It determines the depth of live control. Examples:
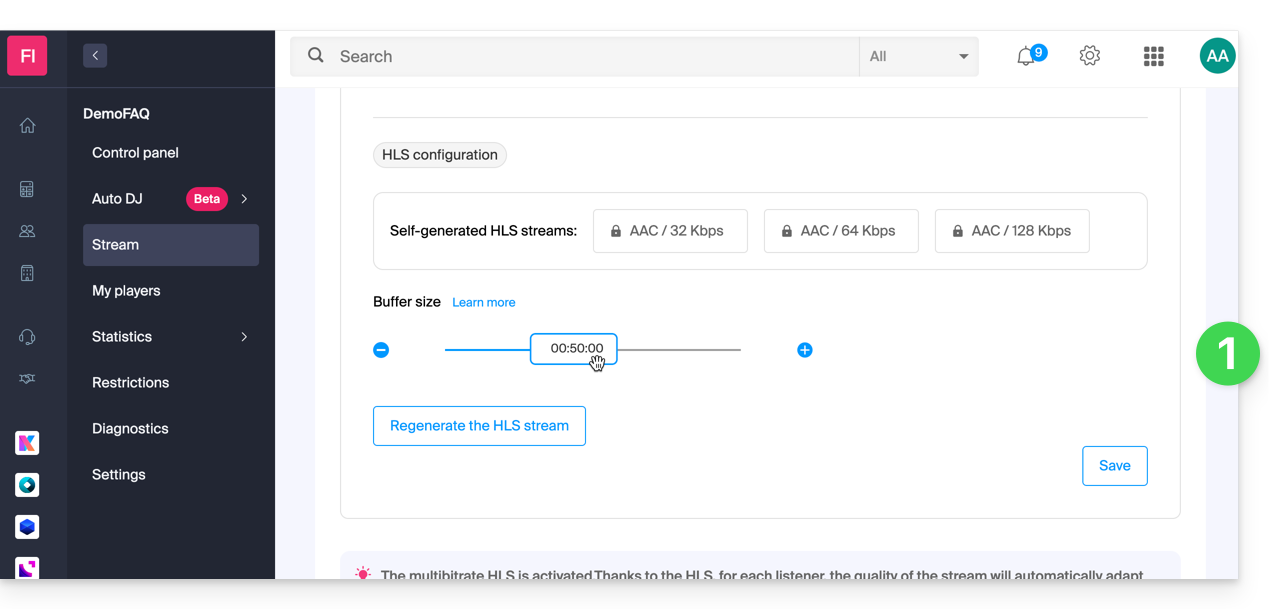
- 00:00:25 → 05:00: minimum tolerance for short pauses.
- 10:00 → 30:00: ideal for news/talk formats.
- 30:00 → 02:00:00: maximum comfort for music programs and events.
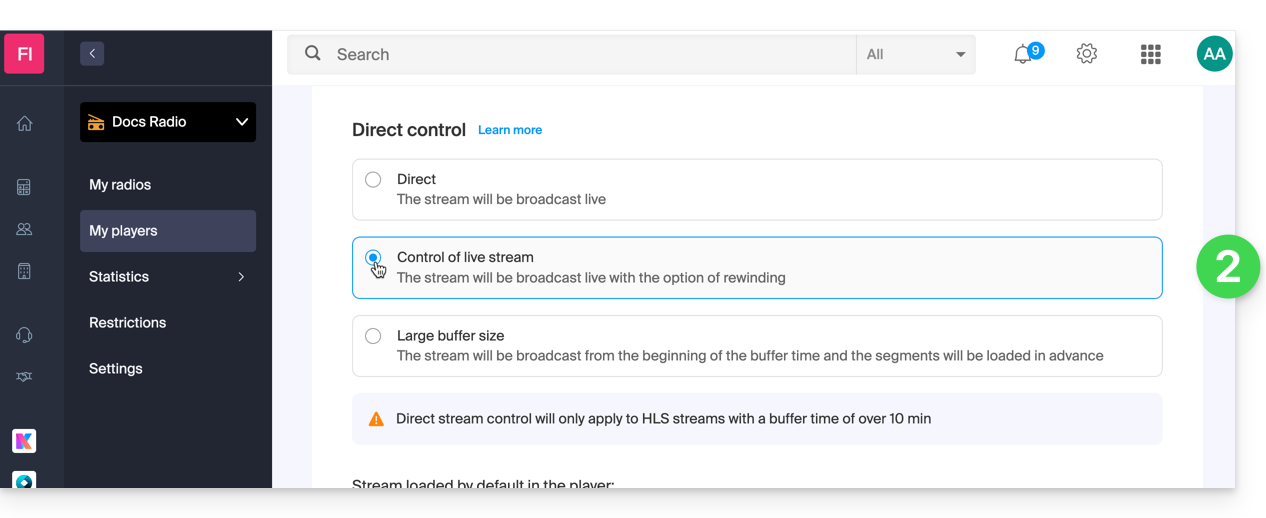
- Enable replay in your Player (refer to this other guide) if you want to offer it to listeners (disabled by default):
Link to this FAQ: https://faq.infomaniak.com/2789
Has this FAQ been helpful?
This guide introduces HLS, which segments your audio for reliable, compatible, and highly distributable HTTP streaming, ideal for mobile and large audiences.
What is HLS?
HLS (HTTP Live Streaming) is a streaming protocol that divides audio into small segments of a few seconds and publishes an .m3u8 manifest listing these segments. The Player downloads these segments via HTTP/HTTPS (ports 80/443), which facilitates caching, resuming after interruptions, and large-scale distribution.
On your Radio Streaming service, enabling HLS adds an additional stream. It has its own listening URL (HLS manifest) and can be selected and prioritized in the Infomaniak Player. The HLS stream coexists with your existing streams (e.g., MP3/AAC) without any service interruption.
Advantages for a radio stream
- Wide compatibility: native support on iOS/iPadOS (Safari) and broad support via modern HTML5 players and third-party applications.
- Scalability and performance: delivered via HTTP(S), easily distributed by CDNs and caches; better scalability than a single continuous stream.
- Robustness: in the event of brief interruptions, the player can retrieve the following segments and quickly resume; less susceptible to temporary losses.
- Network traversal: works on ports 80/443, generally better accepted by firewalls and corporate proxies than certain “ICY” streams.
- Simplified HTTPS: secure delivery without plugins or exotic protocols.
- Adaptive Bitrate (ABR): when multiple variants are offered, the player can automatically switch based on network quality to minimize interruptions on mobile devices.
- Flexible integration: a separate listening point allows you to expose HLS as the primary, secondary, or backup stream in your player.
Specific features and points to note
- Latency: HLS adds a latency of generally a few tens of seconds (related to the size of the segments and buffering). This is normal for this protocol.
- Compatible player required: use the Infomaniak player or a player/web SDK that supports
.m3u8manifests. - Heterogeneous environment: some older hardware receivers (web radios, IP car radios) only accept MP3/Icecast streams; keep their historical URLs in parallel.
- ABR condition: Adaptive bitrate is only effective if multiple profiles are published; otherwise, the HLS stream remains functional in a single quality.
Link to this FAQ: https://faq.infomaniak.com/2791
Has this FAQ been helpful?
This guide explains how to maintain control over your MP3/AAC or HLS Streaming Radio streams by enabling protection with a unique key (token), allowing you to decide, for example, whether a listener can listen to your radio station or not.
Introduction
- Each time you connect, you will send a request to the Infomaniak API, which will return a unique token with a limited and configurable lifespan.
- This token will authorize anyone who possesses it to access the stream during this period.
- You can protect an MP3/AAC or HLS stream independently of each other (the same applies to geolocation).
- Enabling the restriction involves a change to the stream configuration, which may take a few minutes to replicate across the servers.
Protect an audio stream with a unique key
To do this, simply go to the restriction settings and enable token protection for the stream you want to secure:
- Click here to access the management interface for your product in the Infomaniak Manager (need help?).
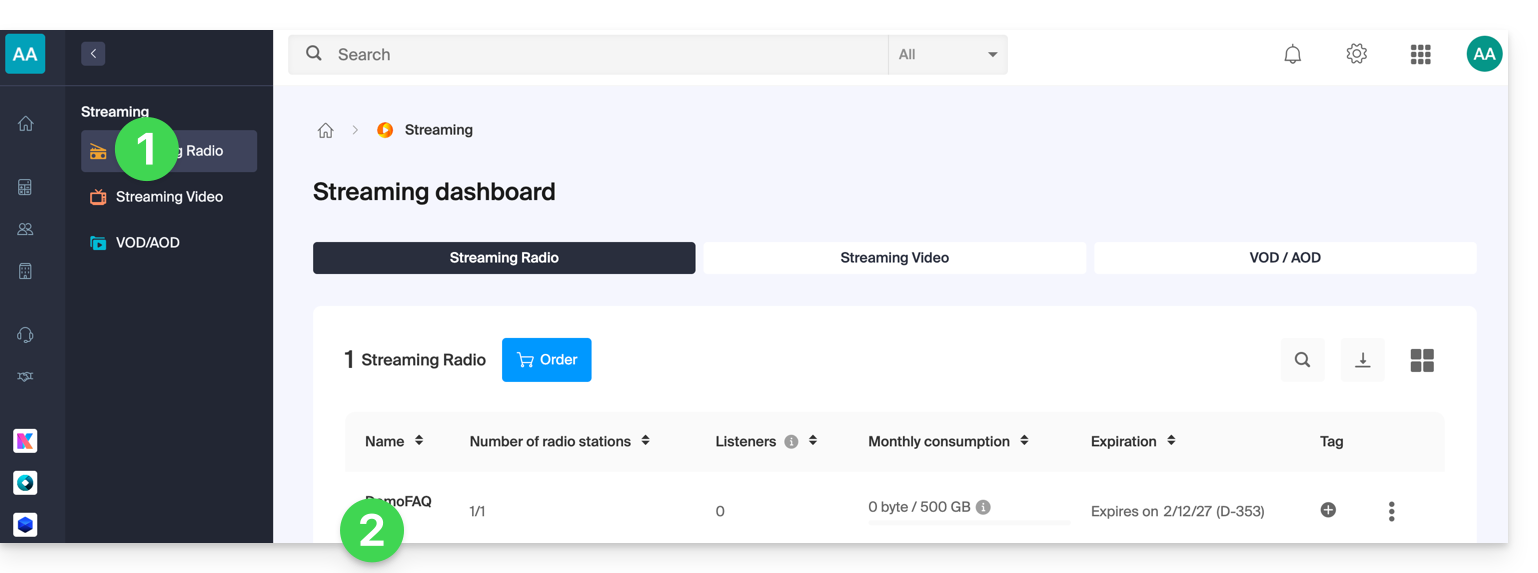
- Click directly on the name assigned to the product in question:
- Click:
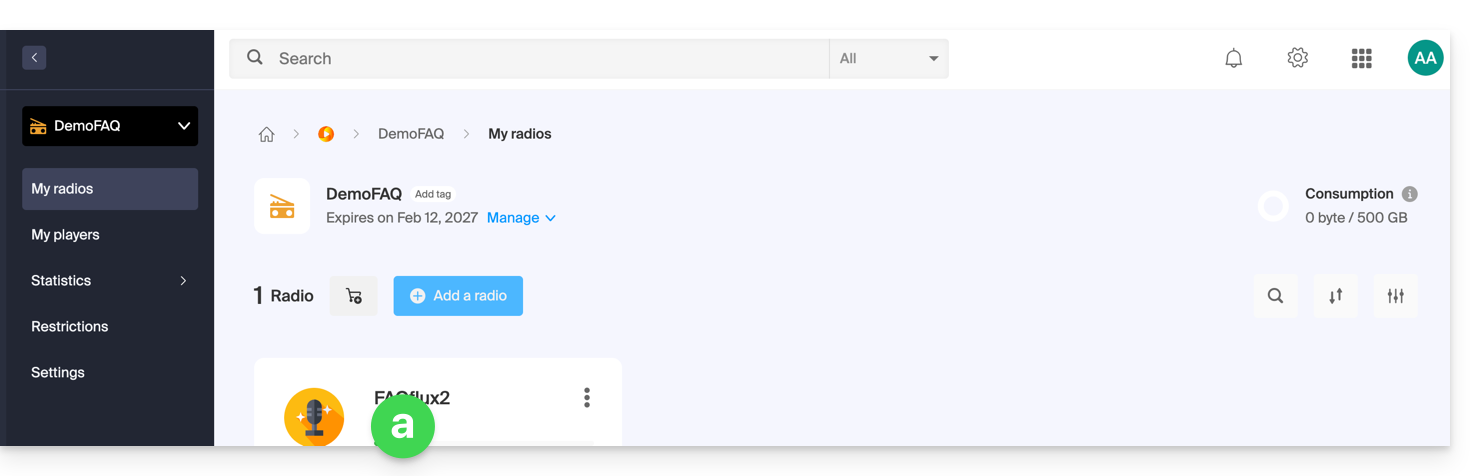
- either on the radio station name:
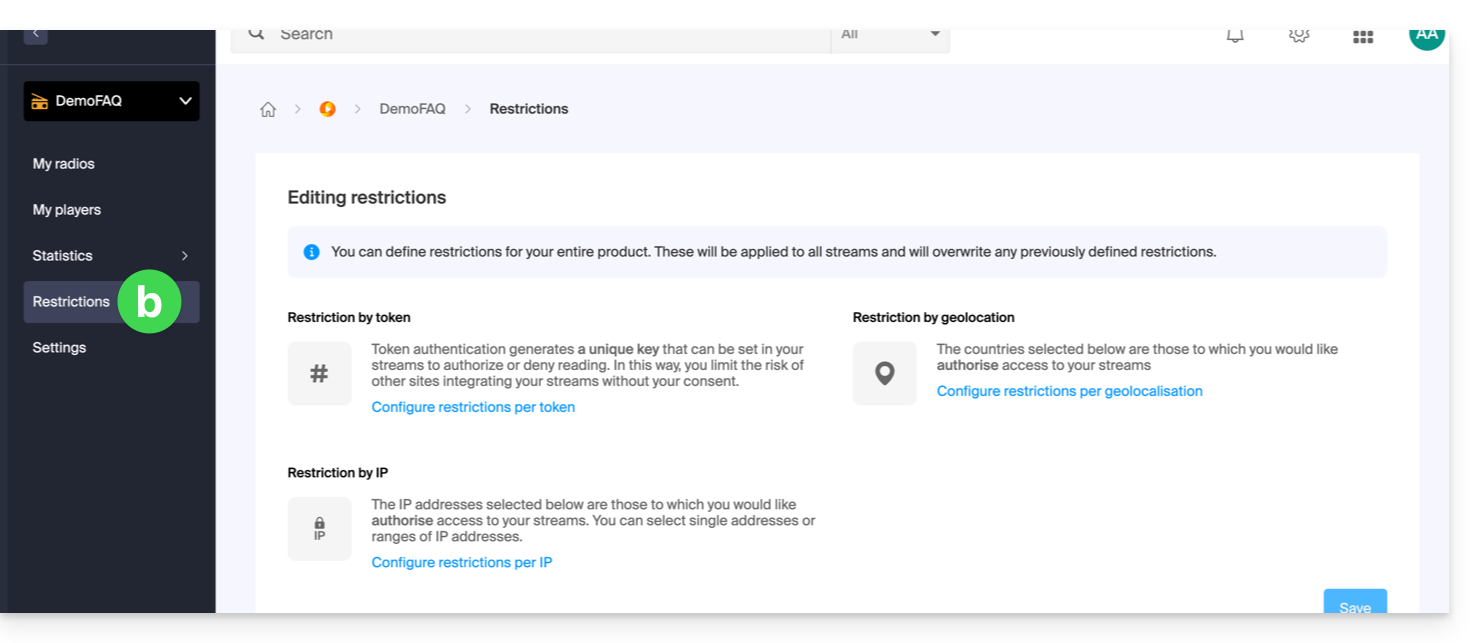
- or on Restrictions in the left-hand menu to apply restrictions to the entire product:
- either on the radio station name:
- When selecting
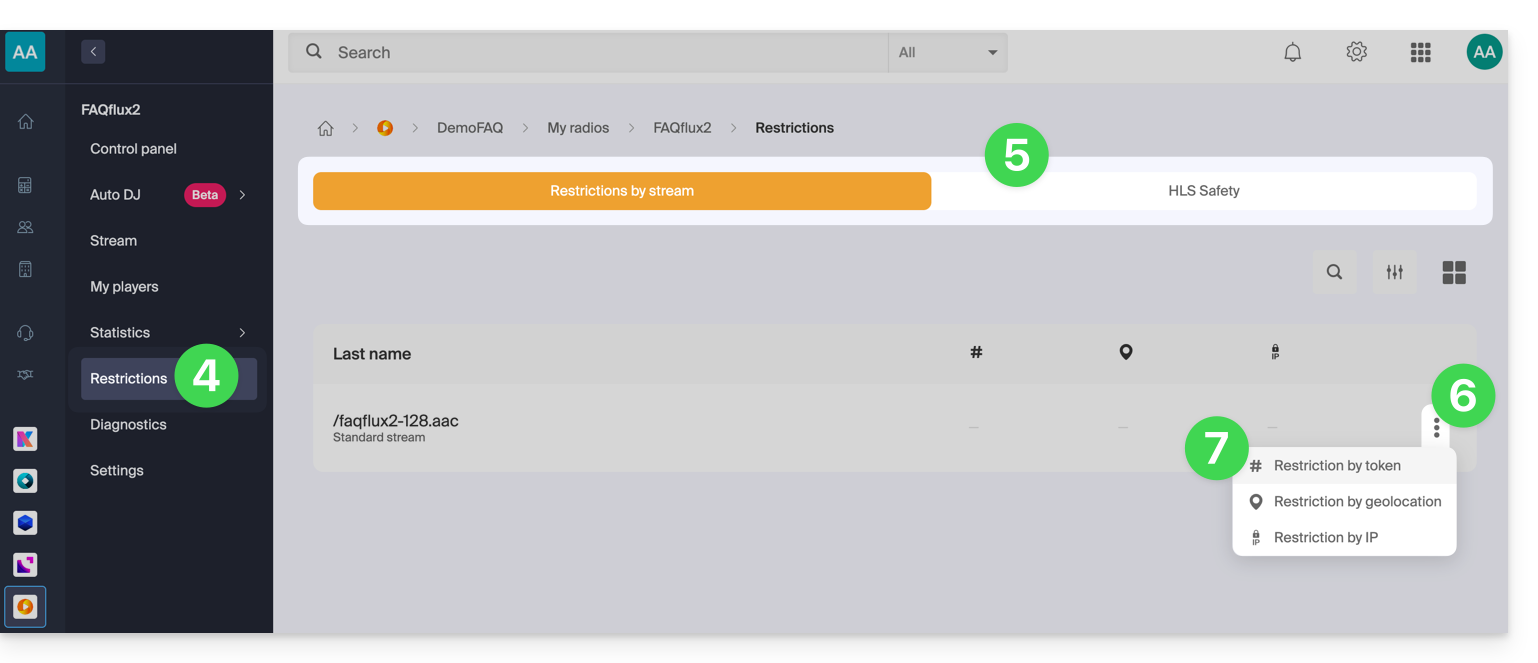
aabove, click on Restrictions in the left-hand menu. - Choose HLS if necessary.
- Click on the action menu ⋮ located to the right of the item in question.
- Click on Token restriction:
Then, activate the protection.
Please note that when you enable this option, access to the stream will be immediately blocked for new connections.Adjust your players to account for the restriction, as illustrated in the example below: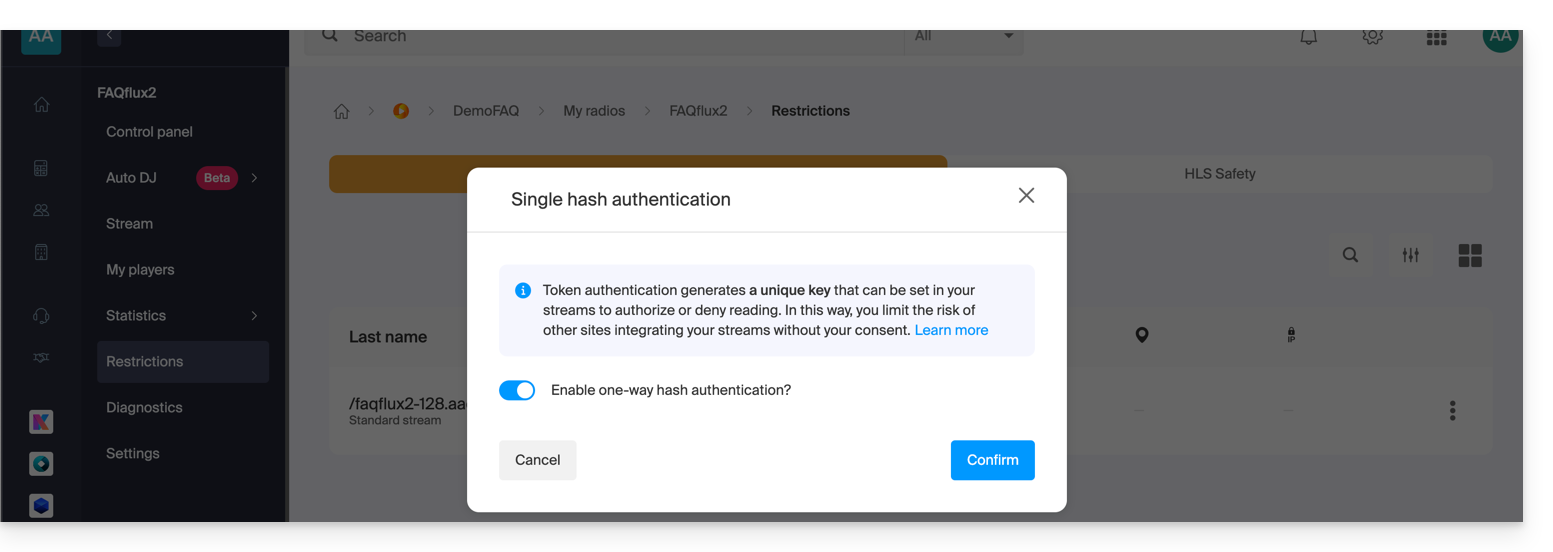
Create a Radio API token
To access the Radio API, you must first authenticate using an application token. This step only needs to be done once. To create this application token, please refer to this other guide.
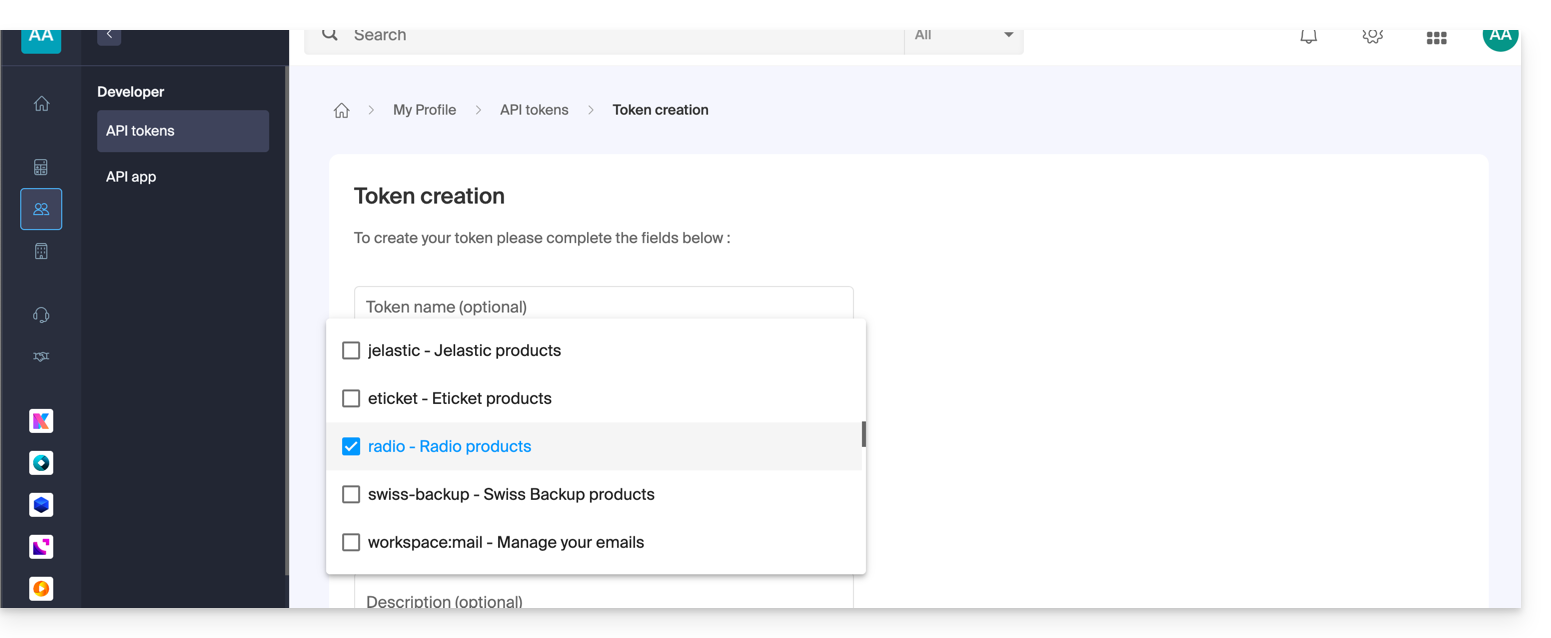
The scope is radio and the lifetime is unlimited to avoid having to regenerate a code regularly. Once the token is generated, copy it and paste it into the example below.
Example of use in PHP
For MP3/AAC or HLS, the code can be largely the same; only the URL called in the POST request changes in its format.
Paste the generated token below, replacing the one provided:
if (!defined('API_TOKEN')) {
     define('API_TOKEN', 'AYF5lSh3c7Xy5974Fs12RTkTThujT-L9R4Xk2ZfGyP6sV7QqJ1oC3jD8nFtKzIxUeMw5oNzR6');
}
/**
 * Fonction générique pour executer des requêtes cURL
 *
 * @param string $method Méthode HTTP (GET, POST, PUT, etc...)
 * @param string $url Url de l'api a requêter
 * @param array $headers Liste des en-têtes HTTP (l'autorisation doit être passée ici avec un ['Authorization: Bearer ']
 * @param array $payload Un tableau contenant les données pour créer un token
 * @return mixed
 */

function request(string $method, string $url, array $headers = [], array $payload = []): mixed{
    // prepare options array
    $opts = [
        CURLOPT_HTTPHEADER => $headers,
        CURLOPT_RETURNTRANSFER => true,
        CURLOPT_URL => $url,
        CURLOPT_CUSTOMREQUEST => strtoupper($method),
    ];

    // add payload if relevant
    if ($payload && $method !== 'GET') {
        $opts[CURLOPT_POSTFIELDS] = json_encode($payload);
    }
    $ch = curl_init();
    curl_setopt_array($ch, $opts);
    $result = curl_exec($ch);
    if(curl_errno($ch)){
        throw new Exception(curl_error($ch));
    }
    $data = json_decode($result, true);
    if ($data['result'] === 'error') {
        throw new Exception($data['error']['description'] ?? 'an error occured');

    }
    return $data['data'];
}
We will now create the token. The URL for creating the token is structured as follows:
- For an MP3 / AAC stream
POST {{URL_11}}Example: to protect https://newradiotest.ice.infomaniak.ch/newradiotest-128.aac, the route will be: https://api.infomaniak.com/1/radios/acl/streams/newradiotest-128.aac/token
- For an HLS stream
POST {{URL_14}}Example: to protect https://myradiostream.radiohls.infomaniak.com/myradiostream/manifest.m3u8, the route will be: https://api.infomaniak.com/1/radios/acl/hls_streams/myradiostream/token
Example: in the case of MP3/AAC, remember to adjust:
$token = request(
    'POST',
   '{{URL_17}}',
    // en-tête d'authorization
    [
        'Authorization: Bearer ' . API_TOKEN,
        'Content-Type: application/json',
    ],
    /**
     * payload pour créer le token, vous pouvez passer les valeurs suivantes
     * window     | 300               | optionnel | durée de validité du token (default: 5 minutes)
     */

    [
        'window' => 3600, // 1h validity
    ]
);
It is important to note that if this code is generated when the page loads, the listener will have "window" seconds to start playing the stream. After this delay, the token will expire, and the stream will no longer be able to start unless the page is reloaded. Depending on your needs and use case, it will be necessary to adjust this delay in the best possible way.
You will also need to replace the stream playback URL below with the one you want, while keeping the $token parameter at the end. Finally, we display the Player (here, a simple HTML5 tag, but you can of course add any overlay after that, with the token passed in the $_GET parameters of the URL).
$streamUrl = "{{URL_18}}";
echo "<audio controls=""><source src="$streamUrl"></audio>";
Link to this FAQ: https://faq.infomaniak.com/2792
Has this FAQ been helpful?
This guide covers the statistics for Streaming Radio, which allow you to view any potential stream interruptions.
Analyze recent statistics
To access this information:
- Click here to access the management interface for your product in the Infomaniak Manager (need help?).
- Click directly on the name assigned to the product in question:
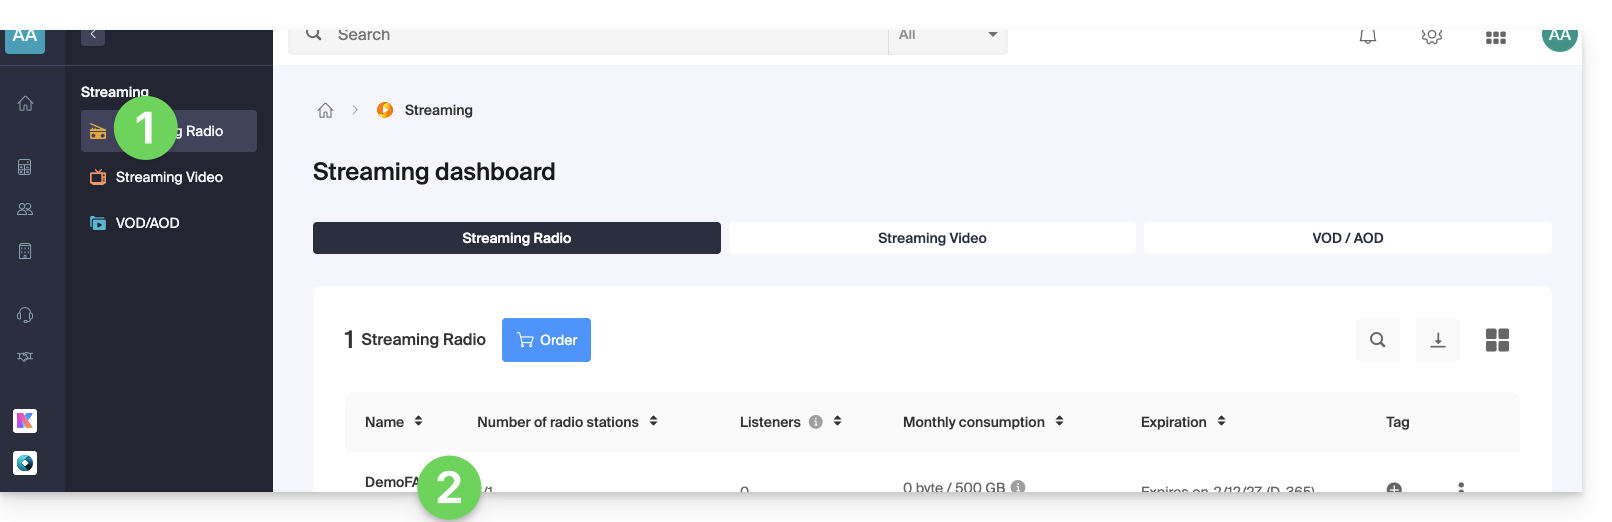
- Click on Statistics in the left-hand menu:
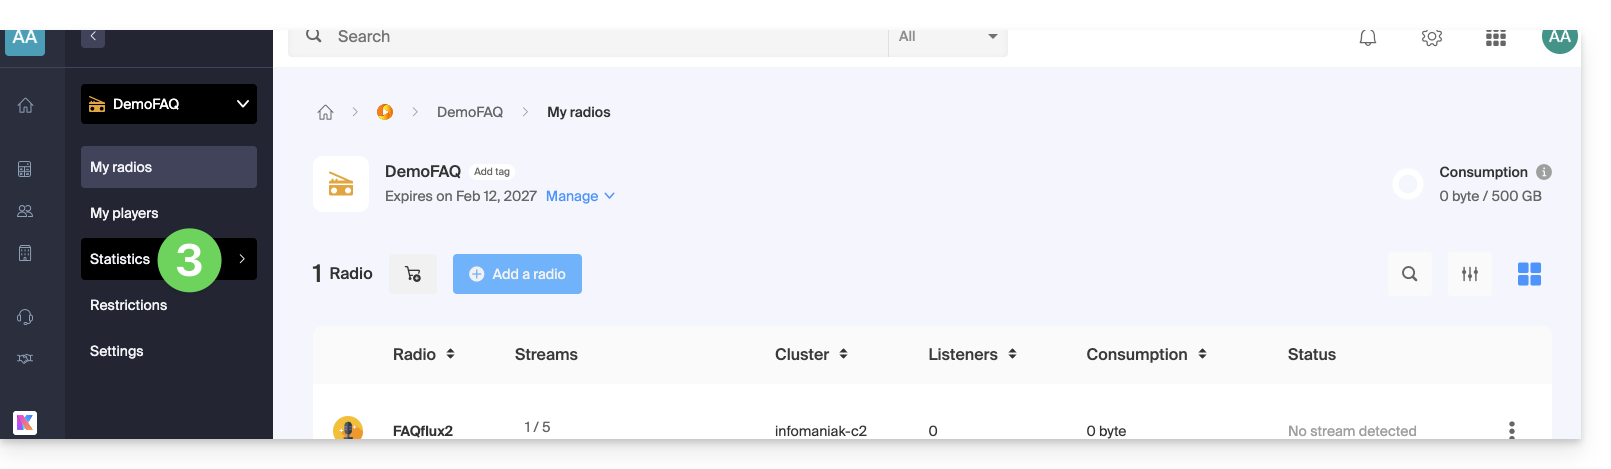
- Click on Real-time Audience in the left-hand menu.
- Choose a date to load the corresponding graph.
- Hover over any reported outages highlighted in color to view details:
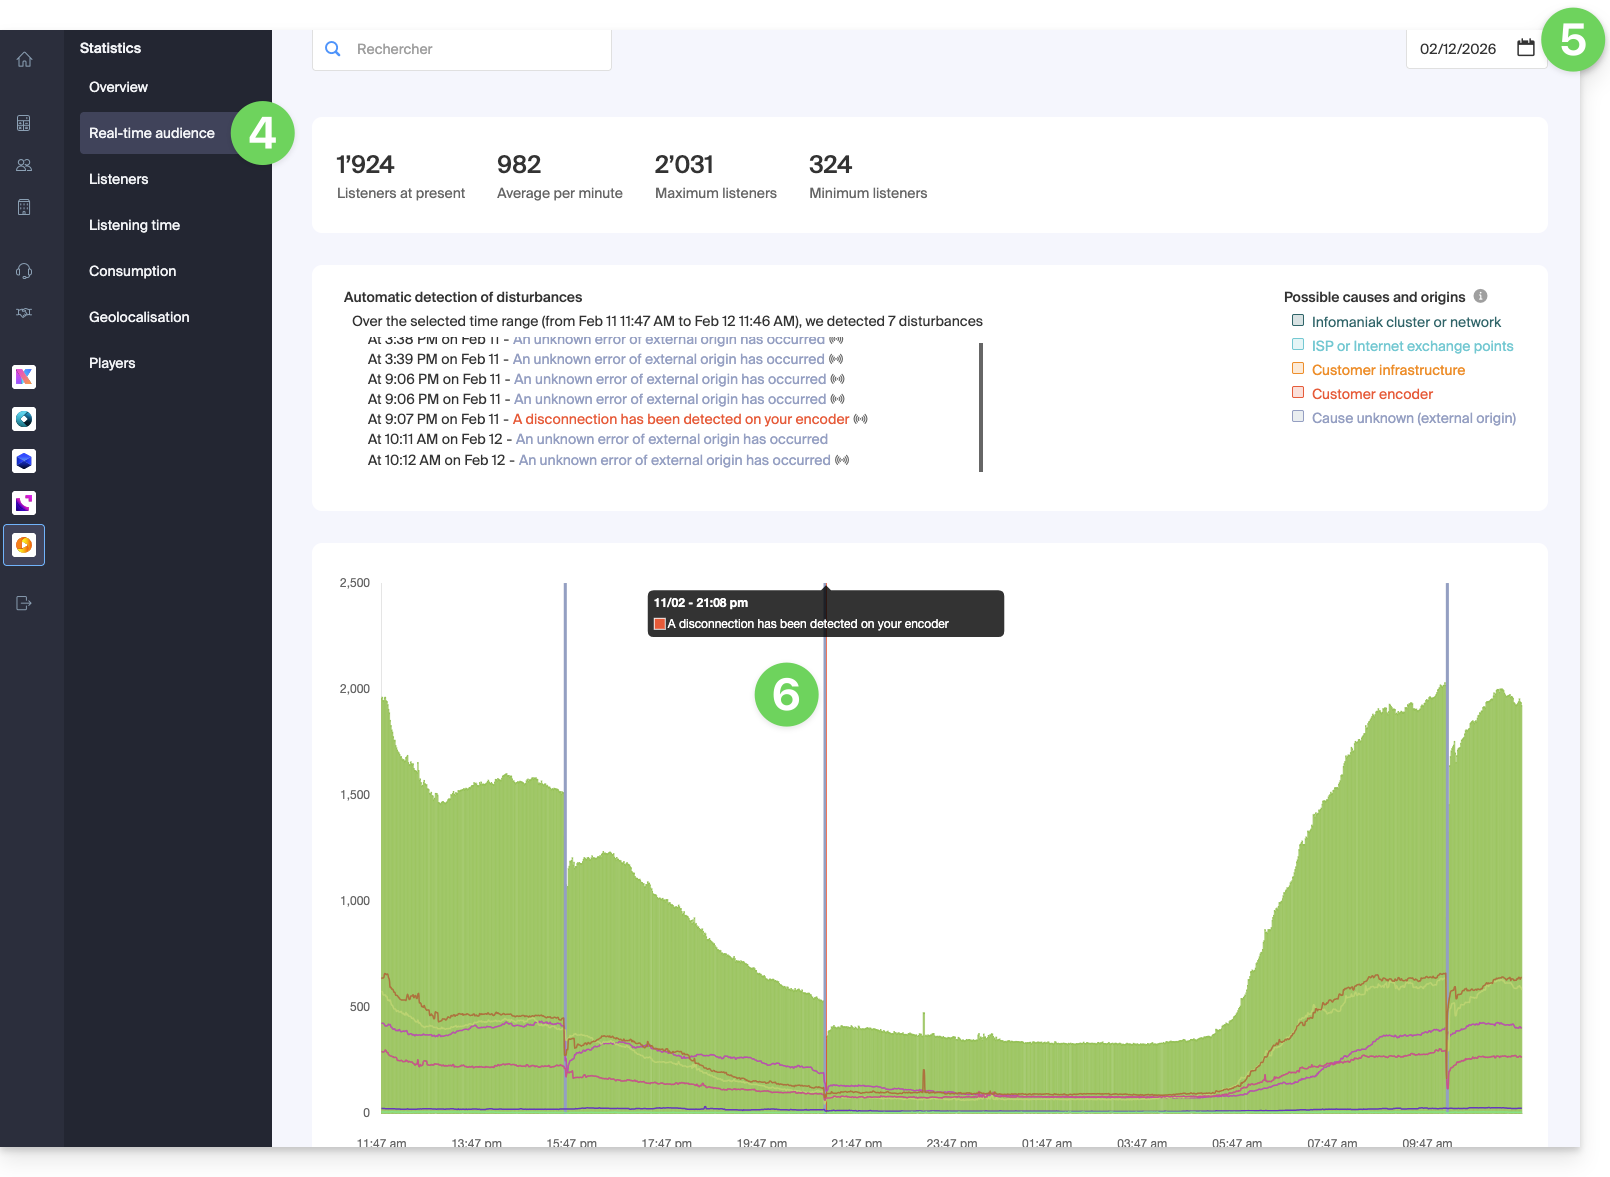
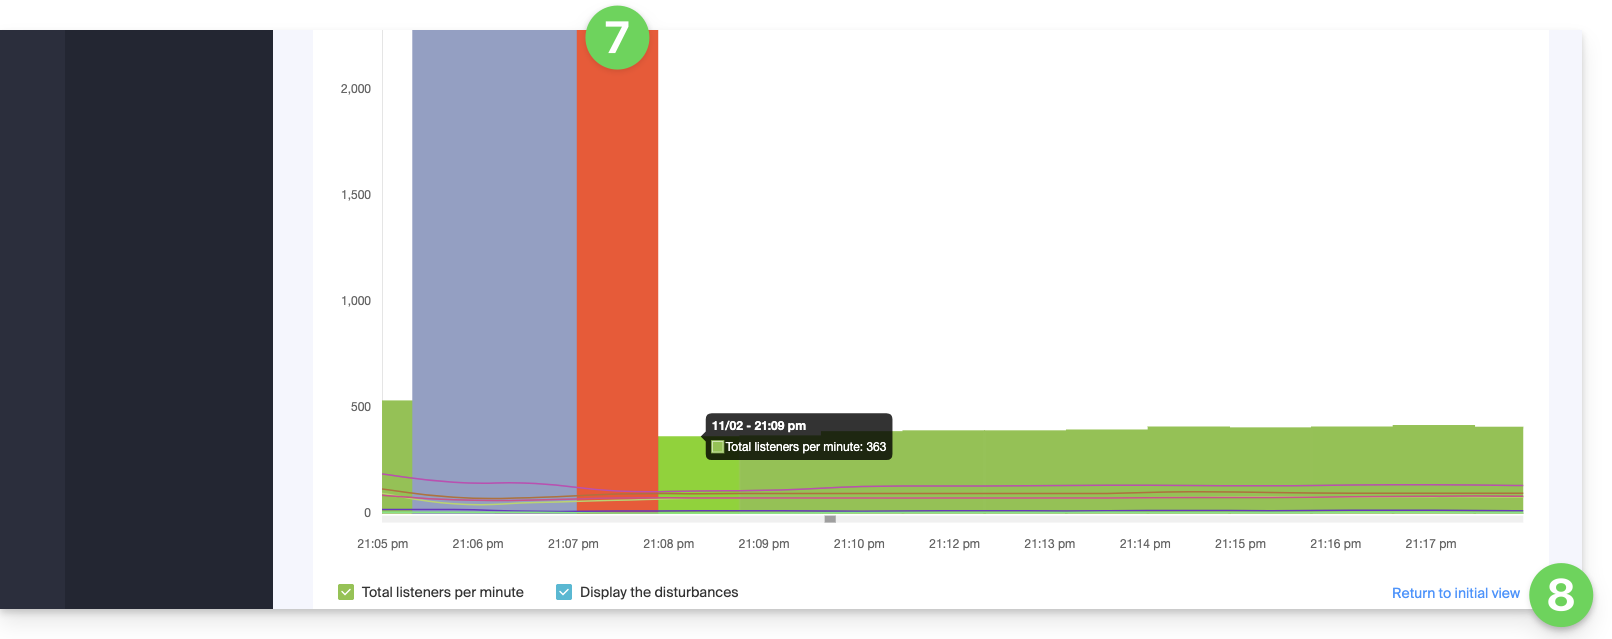
- Zoom in on the graph using the mouse wheel or by selecting the desired time period.
- You can return to the initial view by clicking in the bottom right corner:
Link to this FAQ: https://faq.infomaniak.com/2884
Has this FAQ been helpful?
This guide details the configuration of a Player for your Infomaniak Streaming Radio.
Prerequisites
Configure the Player Options
Once you have linked your stream to your Player and your Player is created:
- Click here to access the management of your product on the Infomaniak Manager (need help?).
- Click directly on the name assigned to the product in question.
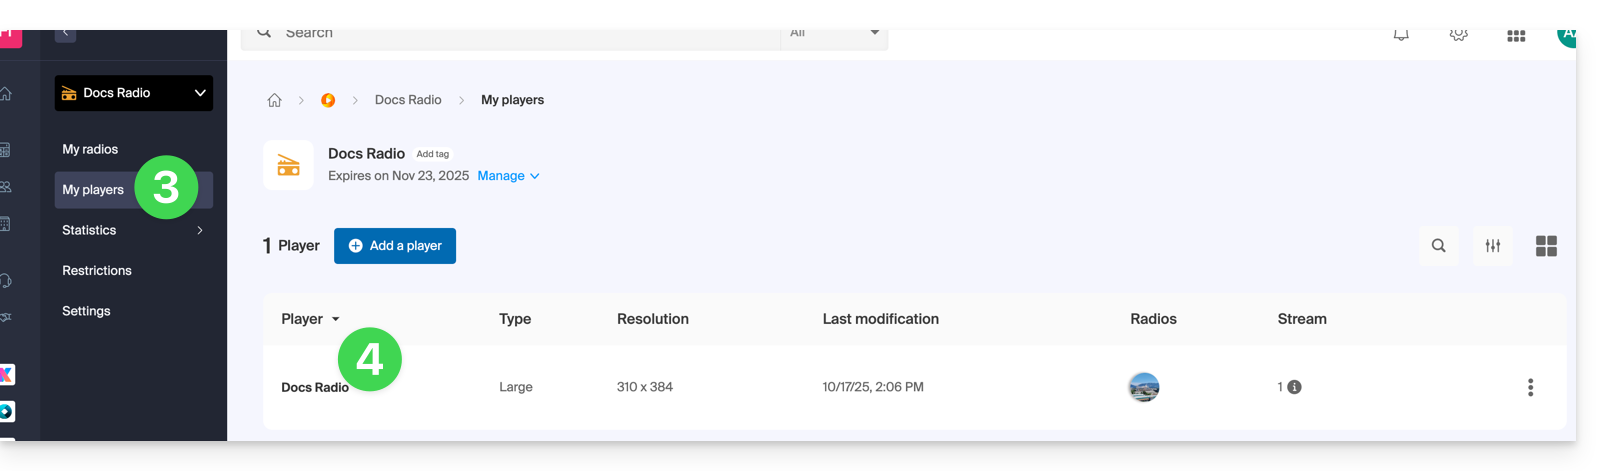
- Click on My players in the left-hand menu.
- Click on the name of the Player to configure (or add a new player by clicking on the button above):
1. Appearance tab
Here you can choose the player size (large, medium, mini, or multi-radio player) and its display percentage.
You can customize the colors of the background, buttons, and text: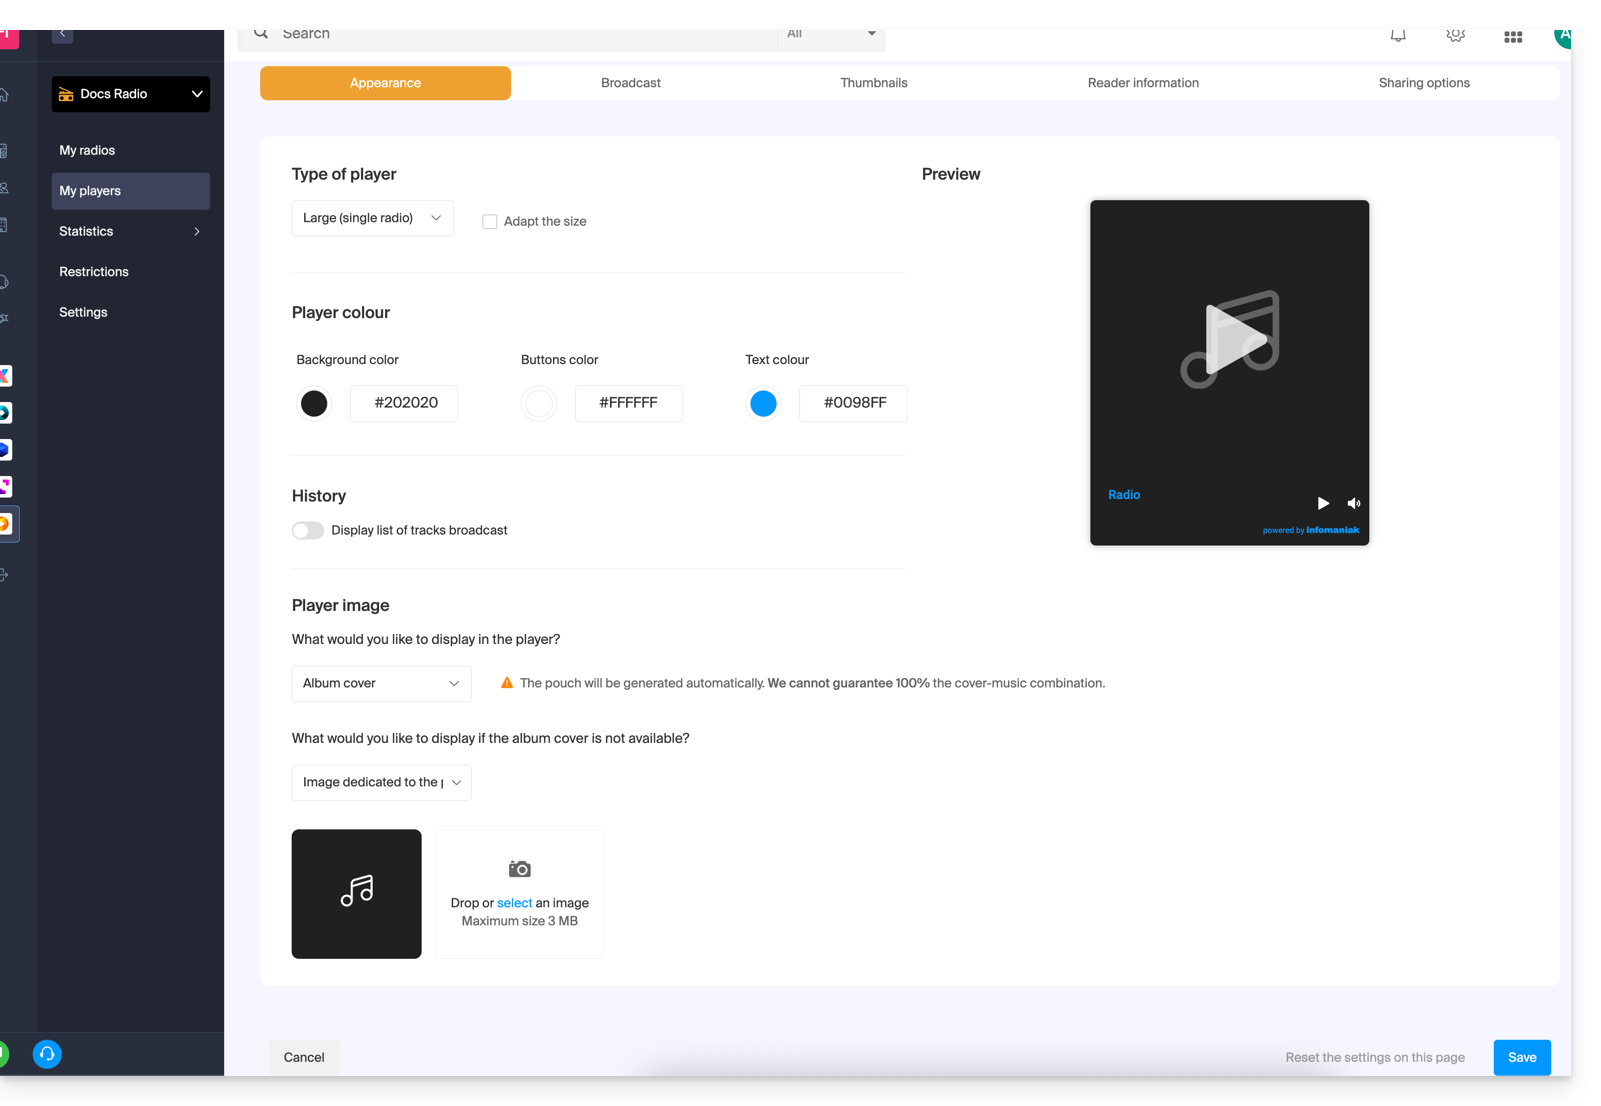
A toggle switch allows you to enable or disable the display of broadcast tracks, with or without their broadcast times:
- Refer to the details on this at the end of this guide.
The Player can display:
- an illustration representing the album cover, or a substitute image if it is not available,
- a fixed image (3 MB max.),
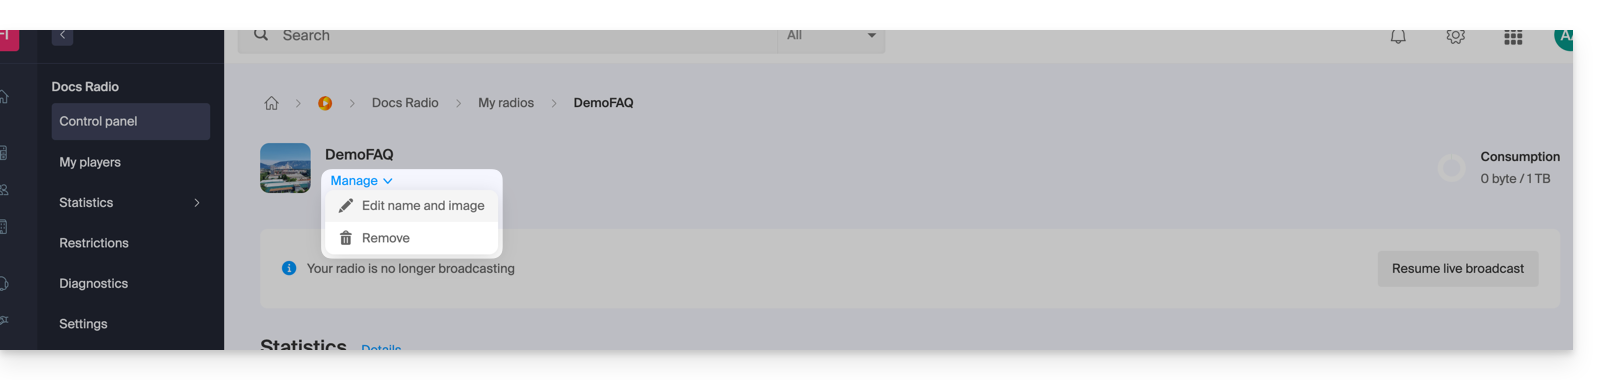
- your radio station's logo, which you can customize here:
- a visualization of the audio spectrum (Spectrogram / Spectrum).
2. Broadcast tab
This is where you can link your radio streams (HLS or not) to your Player, which you are currently configuring.
Please refer to this other guide for information on the options available for managing live broadcasts: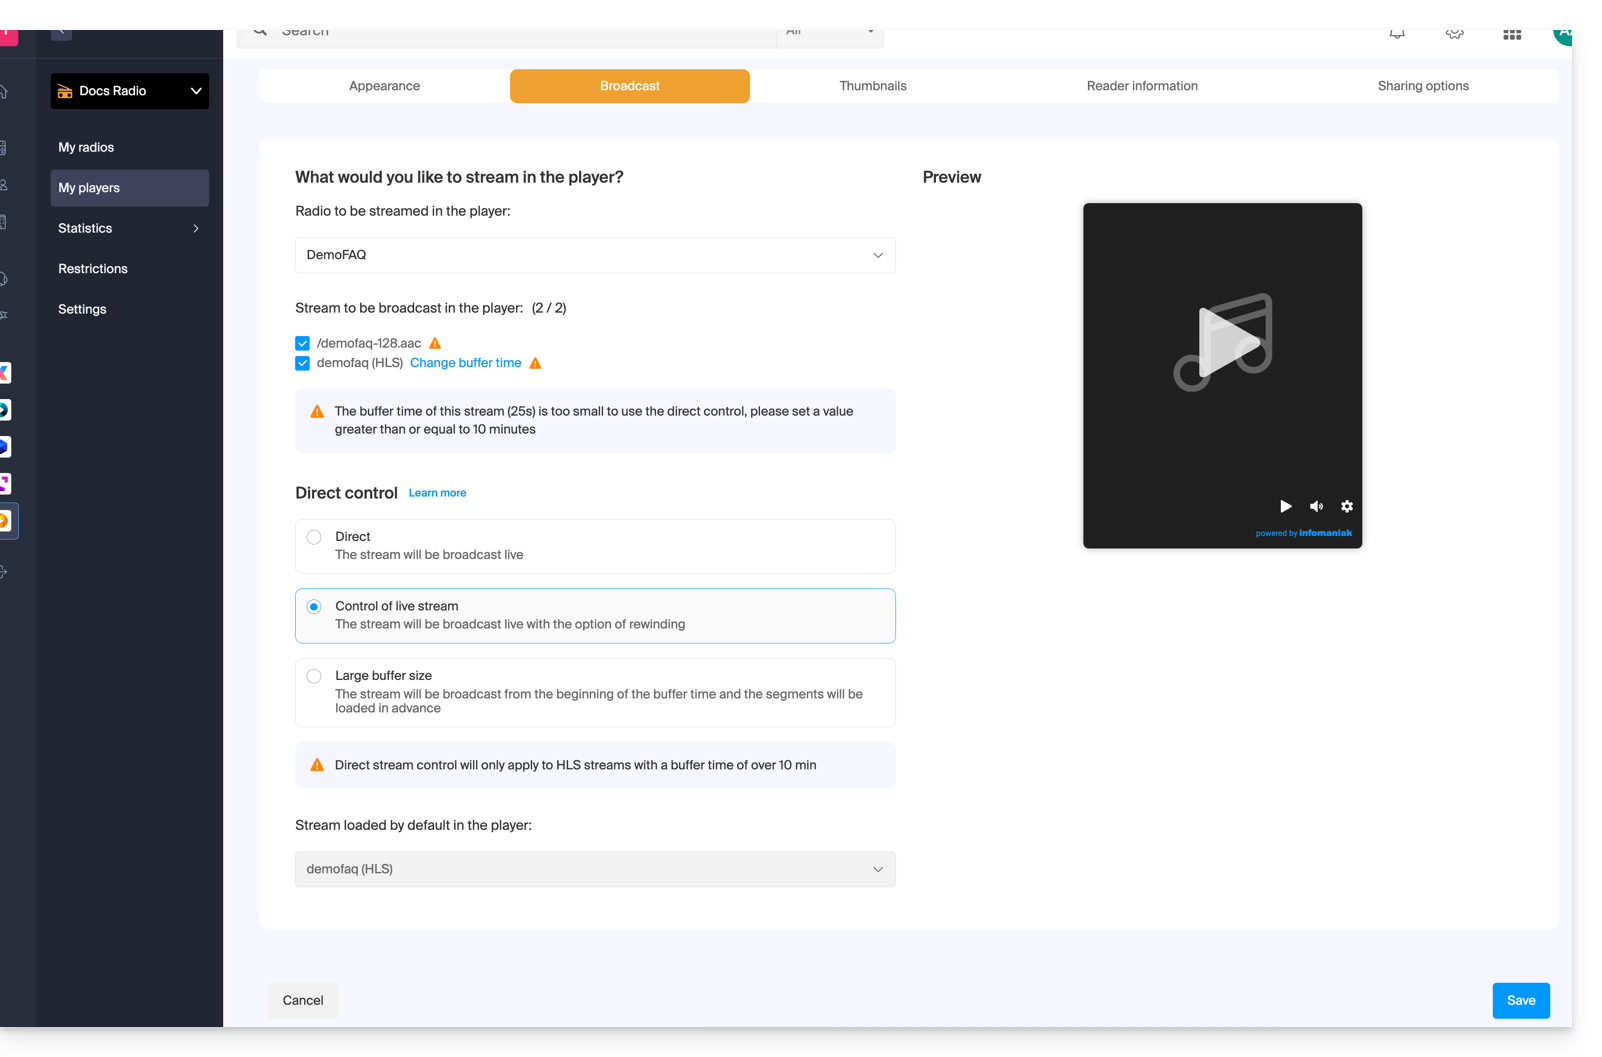
3. Thumbnails tab (media preview)
This is where you can modify the preview image (thumbnail) that is displayed on the Player when the media is loading, or unavailable/restricted: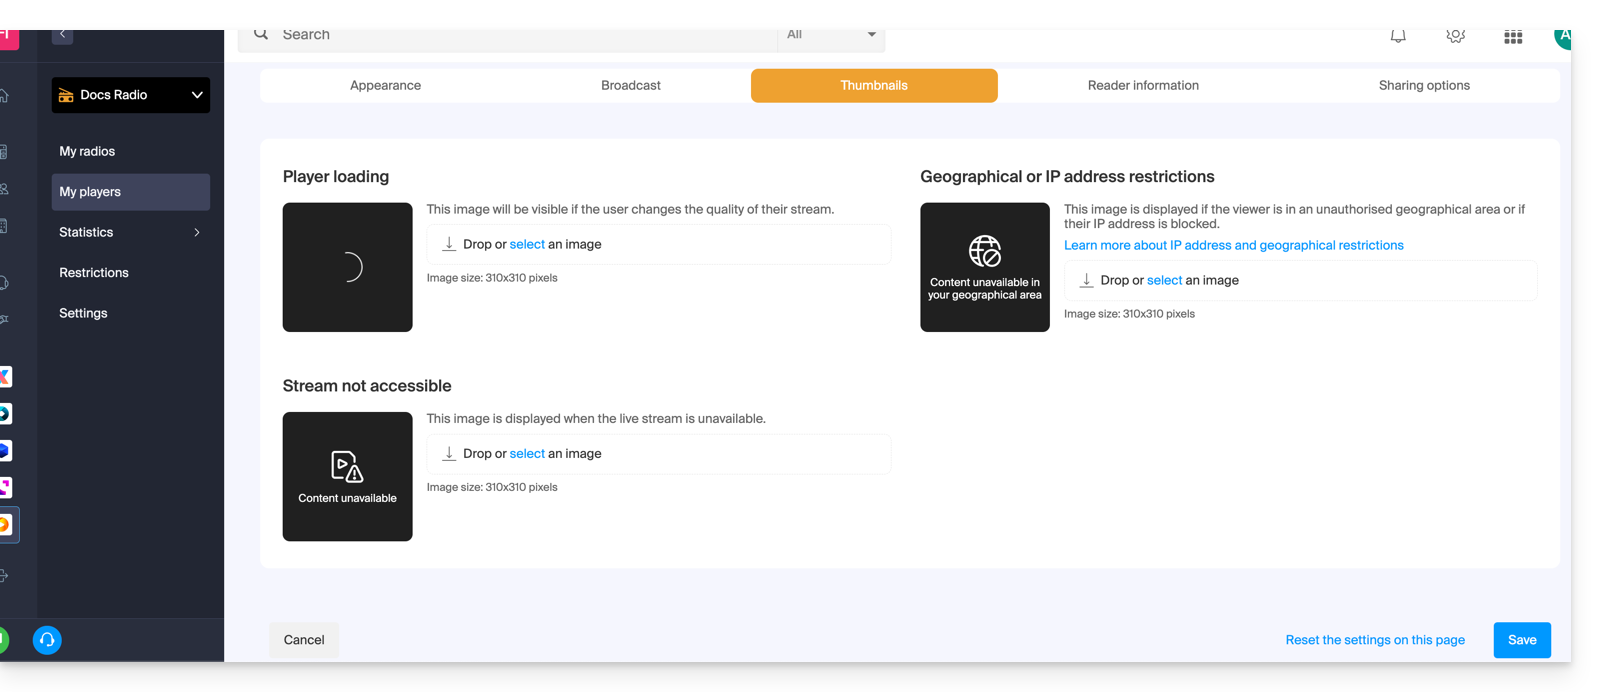
4. Player Information tab
This is where you can name your Player and decide whether to display or hide: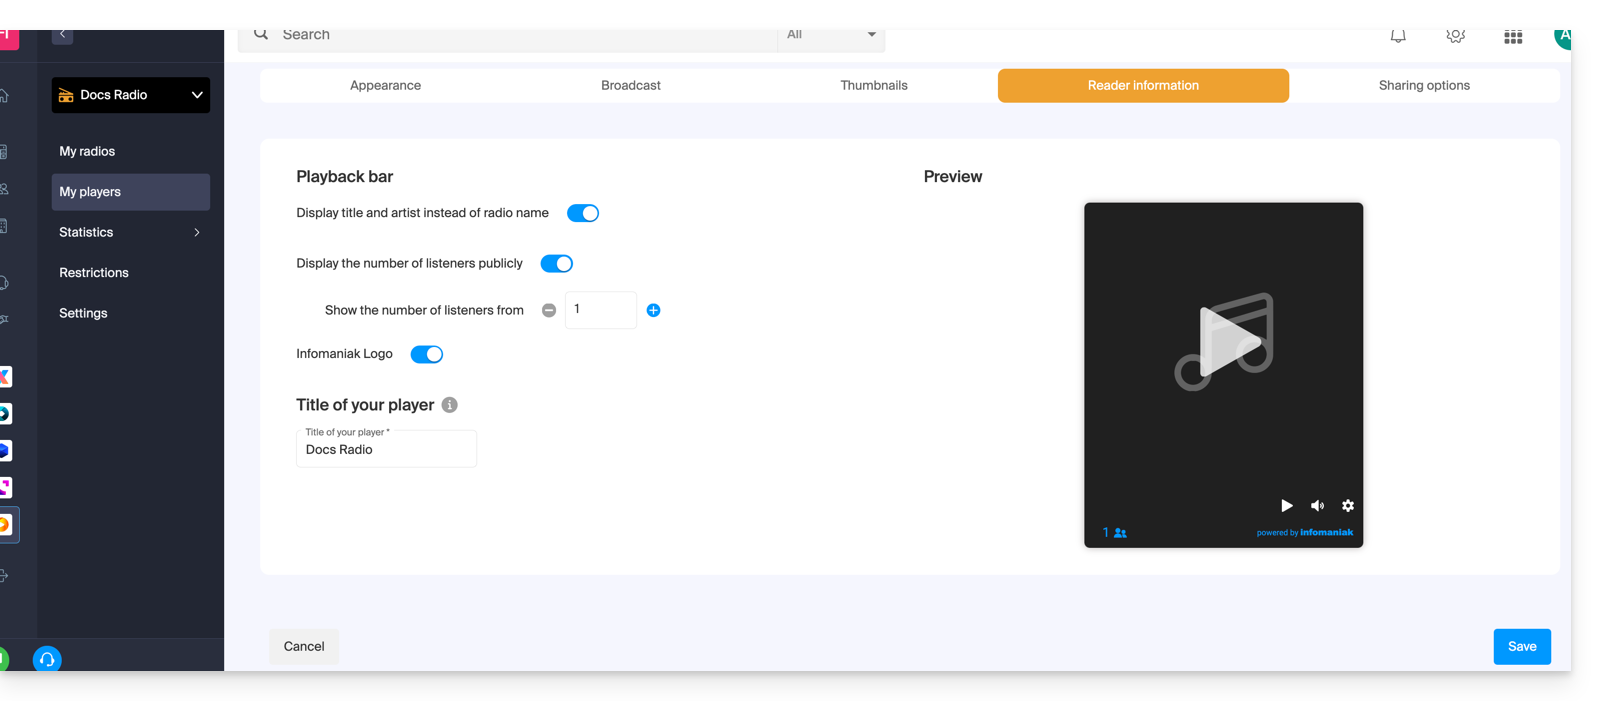
- the title and artist instead of the radio station's name,
- the number of listeners,
- the Infomaniak logo.
5. Sharing Options tab
A toggle switch allows you to enable or disable certain services such as Facebook: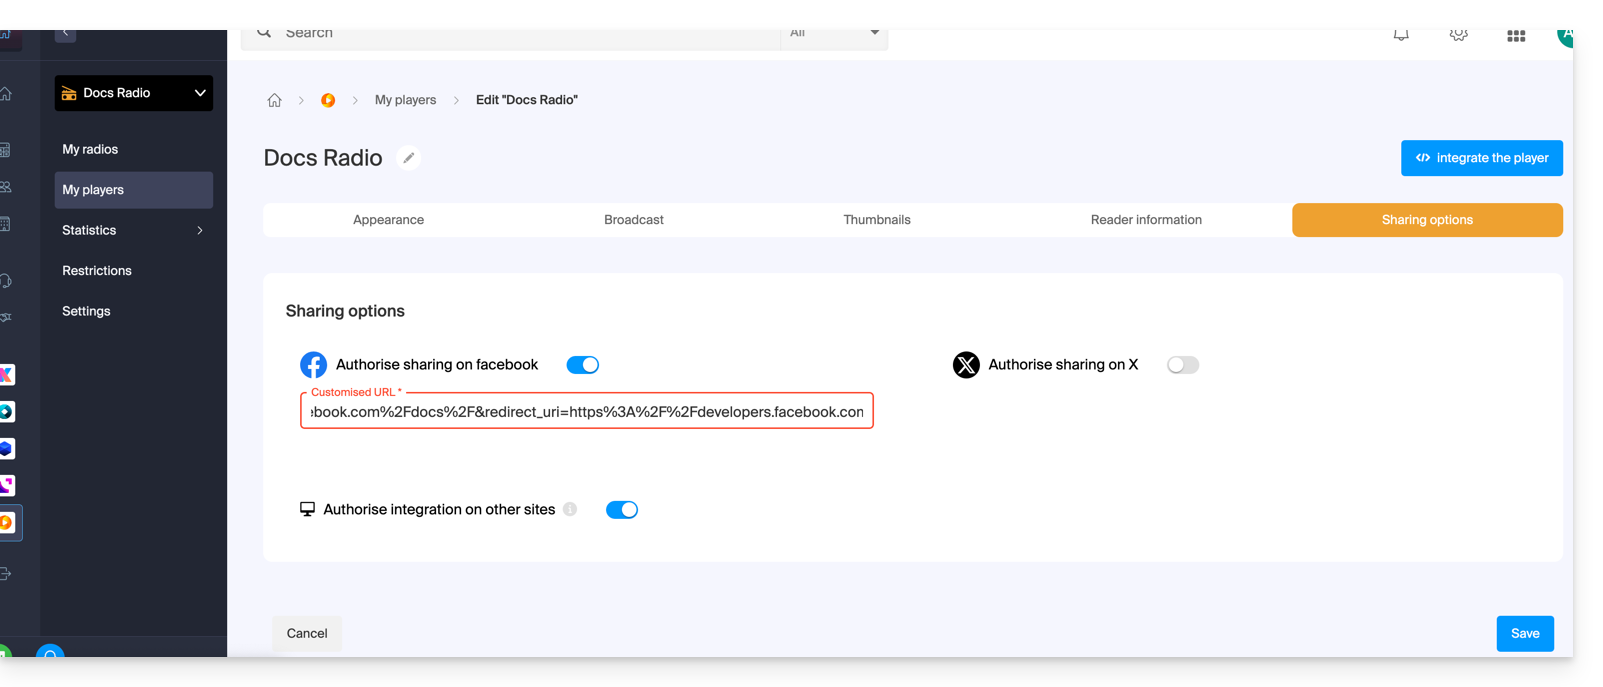
Once enabled, a sharing button for these services will be visible on your Player: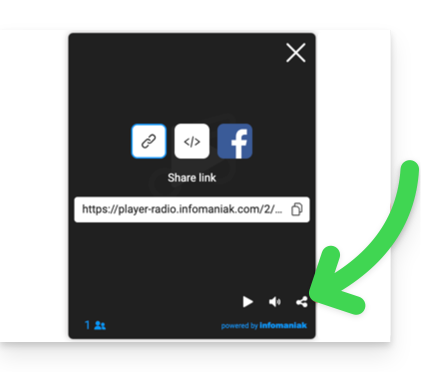
Details of the broadcast history (tab #1)
The broadcast history allows you to relisten to the music that was played (between 1 and 40 tracks) if your stream is of the HLS type (you can then define a buffer ranging from 25 seconds to 2 hours):
The rewind and relisten feature is not enabled by default: it remains optional in order to respect the restrictions of certain countries or radio stations. Once enabled, the radio station manager can choose which streams will be available for broadcast (see tab #2 above), while the listener can select the listening quality in the Player:
Position & intégration de l'historique de diffusion
The list can be viewed in several ways:
- directly below the Player,
- on the Player,
- or separately in the integration of your website…
Indeed, it is possible to display the history in a second iframe, separate from the main Player. Example of URL for the Player:https://player-radio.infomaniak.com/2/prod/super/7cbaa24a-3510-47a4-b41e-b99218bfd507
And for the history log:https://player-radio.infomaniak.com/2/prod/history
Both iframes must be embedded on the same page and communicate with each other to update the history or launch a previously broadcast track.
A second integration mode allows you to display an independent history log, without the main iframe. Simply add the Player ID to the URL:https://player-radio.infomaniak.com/2/prod/history/7cbaa24a-3510-47a4-b41e-b99218bfd507
This mode is suitable, for example, for users of another Player who wish to display only the history of tracks.
Link to this FAQ: https://faq.infomaniak.com/2888
Has this FAQ been helpful?