Knowledge base
1000 FAQs, 500 tutorials and instructional videos. Here, there are only solutions!
This guide explains how to customize the source code, modify the CSS, or change the HEAD or BODY section of a website created with Infomaniak Site Creator.
Prerequisites
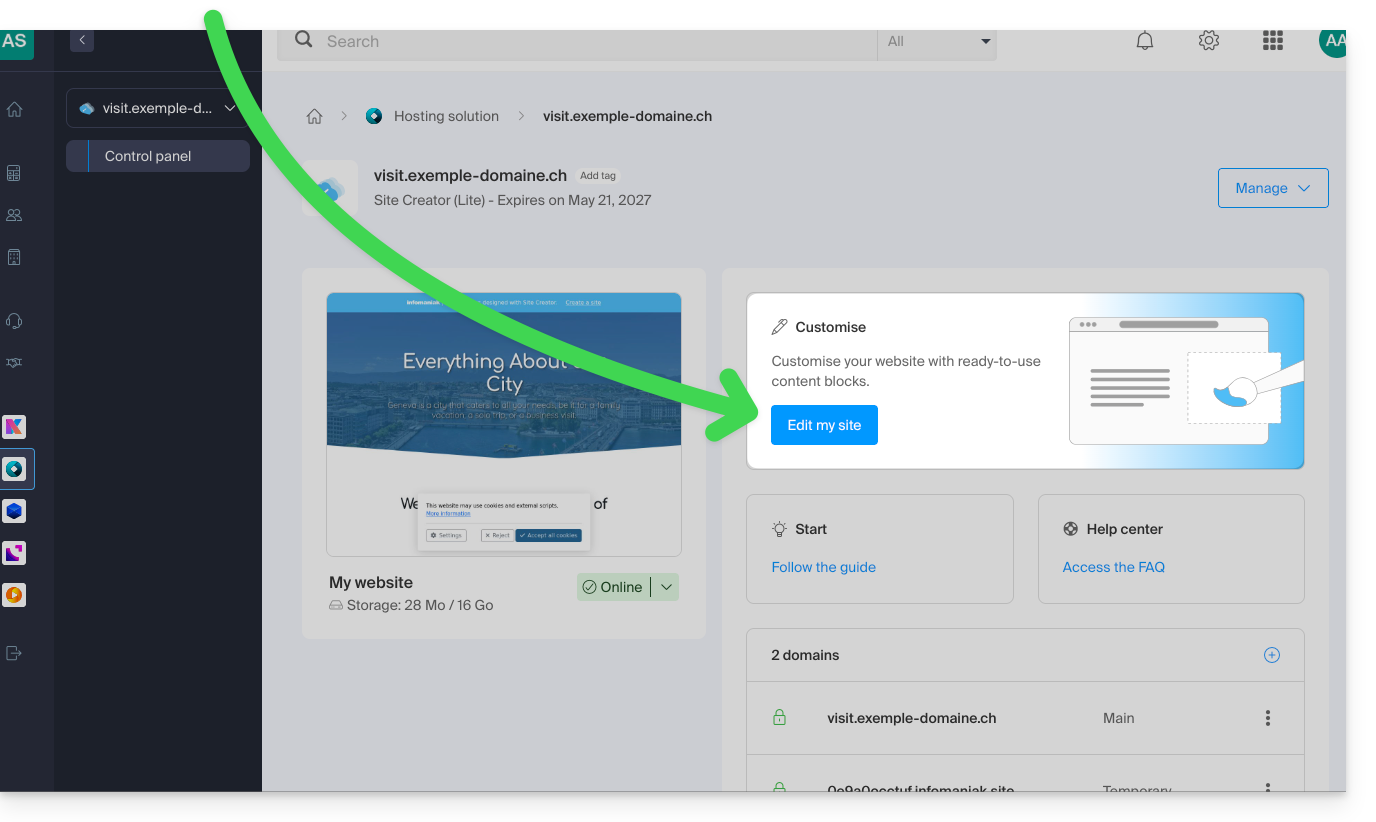
- Access Site Creator:
- Click here to access the management of your product on the Infomaniak Manager (need help?).
- Click directly on the name assigned to the Site Creator in question.
- Click on the Edit my site button to start the editor:
Add Custom Code
Once in Site Creator:
- Click on Design in the left-hand menu.
- Click on More settings.
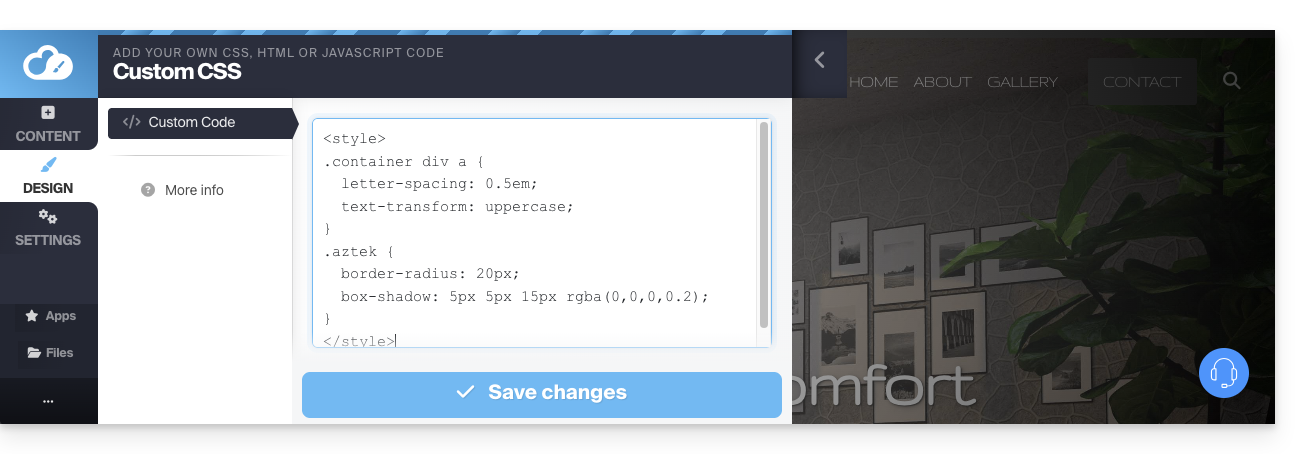
- Click on Custom code at the bottom:
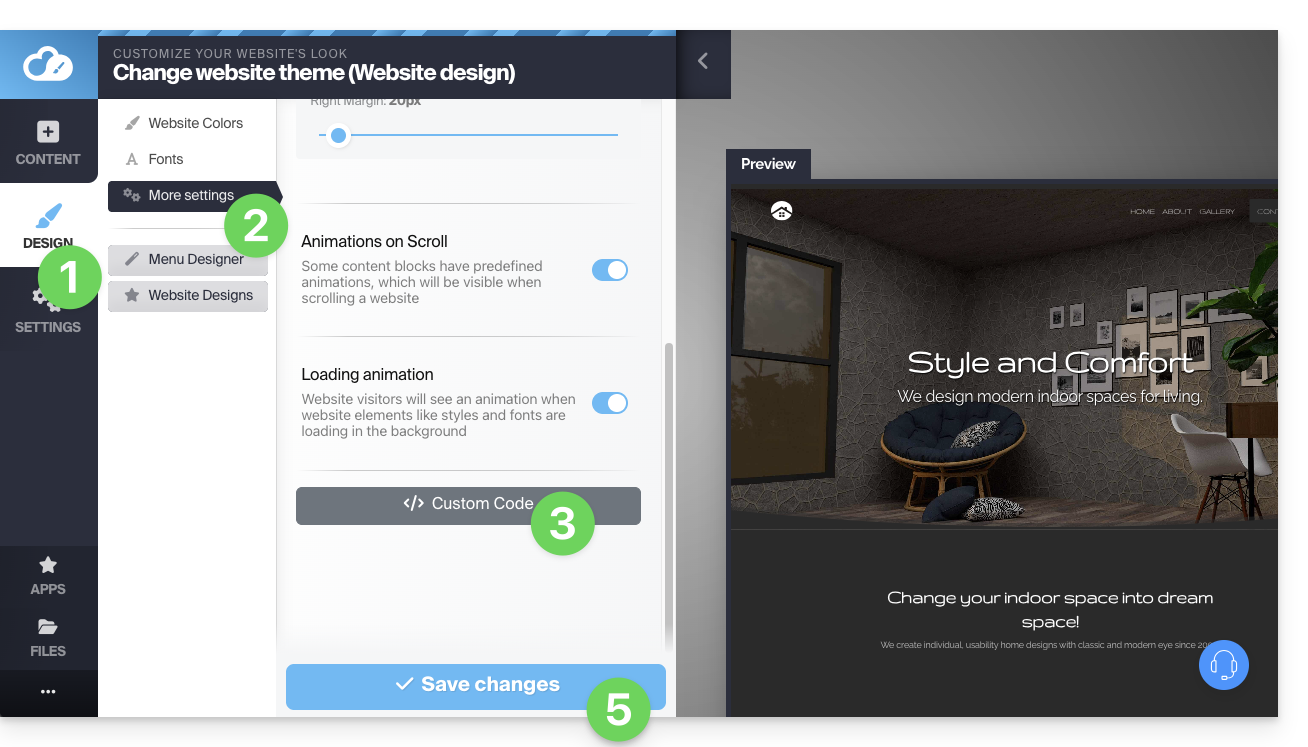
- Enter custom HTML, JavaScript (with its script tags), or CSS (with its style tags) - see below for some examples.
- Save the changes at the bottom of the page.
Metadata in HEAD & BODY
To add JavaScript code or any other code to the HEAD or BODY section of your site's source code:
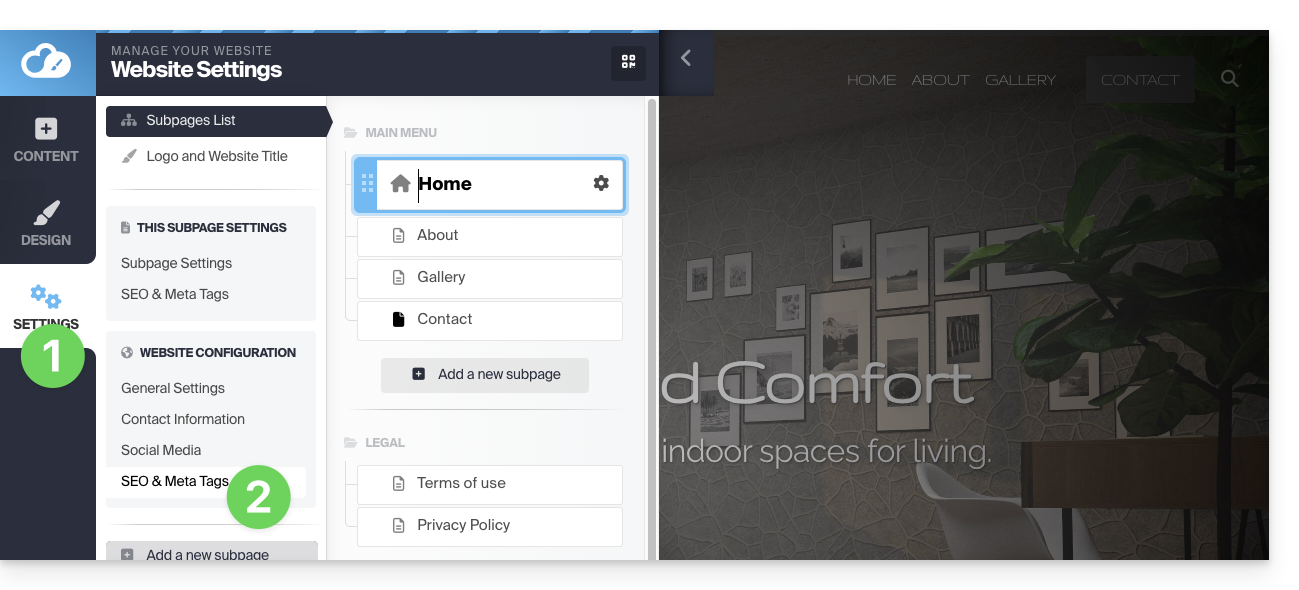
- Click on Settings in the left-hand menu.
- Click on SEO & Metadata in the Website Configuration section:
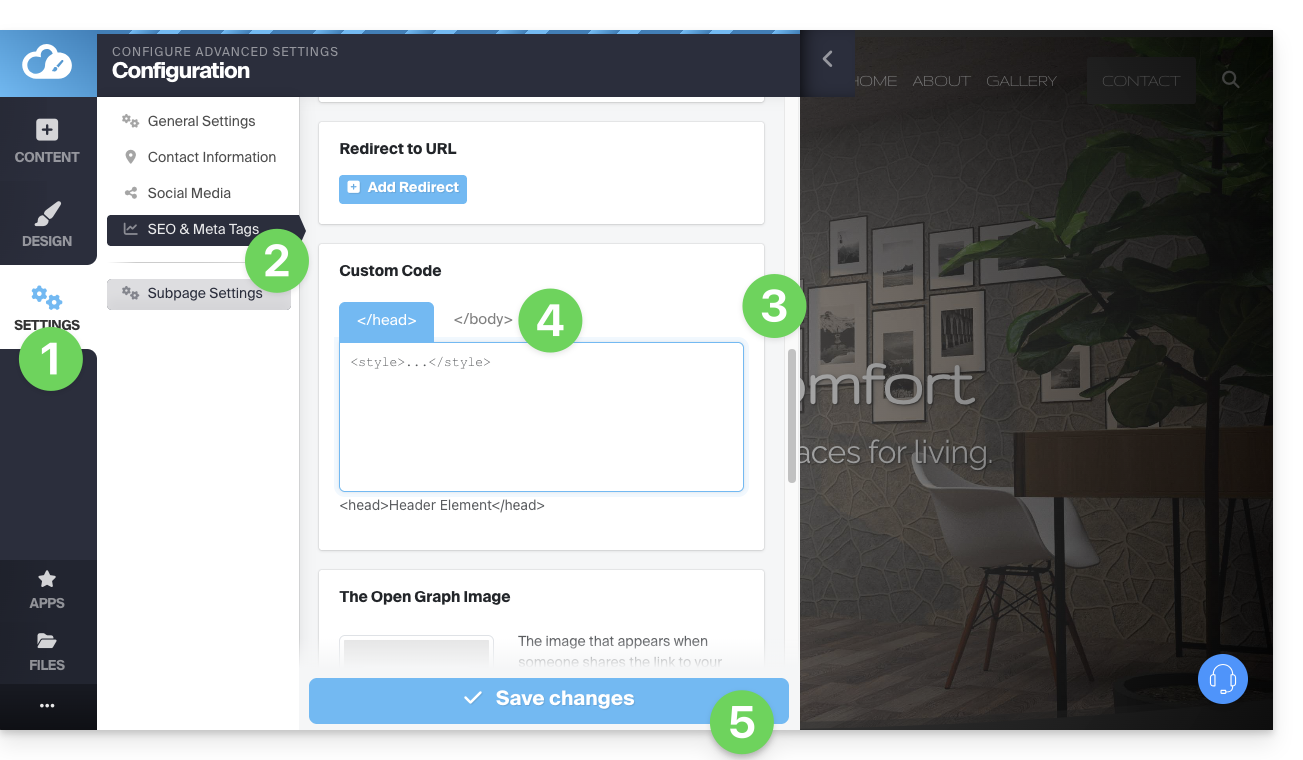
- Scroll down to Custom Code.
- Choose to add it under the HEAD or BODY tabs.
- Save the changes at the bottom of the page:
Examples of CSS Customization
These examples will help you get started with advanced customization of your website's pages. However, there is a risk that, depending on the changes you make, you may no longer be able to access the editor, which will force you to start over from scratch.
It is strongly recommended that you never insert tags such as html, head, or body, as these could conflict with the application's source code.
Customize the website background
To set your desired image (which you must upload to the file library) as the page background and customize its display:
- Go to step 3, as shown in the first image at the top of this guide.
- Insert the
<style>code to indicate that you want to modify the CSS code, - then
body {to indicate that you want to modify the page body, and the "{" to open the space where you can insert the commands, - then
background-image: url("../data/files/fond01.jpg");with the exact path and name of the image uploaded to the library, and don't forget the semicolon so you can insert the next command. background-repeat: repeat;to repeat the inserted image.background-attachment: fixed;so that the background image remains fixed even if the visitor scrolls the page up or down to read its content.}to close the previously opened insertion space.</style>to indicate that the code ends here.
Space out the letters of all the links on the site
To spread out (a lot) the letters between each other in the clickable words (links):
- Go to point 3, visible in the first image at the top of this guide.
- Insert the code (if not already present)
<style>to indicate that you want to modify the CSS code. - Then,
.container div a {to indicate that you want to modify the page blocks and, more specifically, the links ("a"), and the "{" to open the space where you can insert the commands. - Then,
letter-spacing:1em;by decreasing the value (0.9emfor example), without forgetting the semicolon to be able to insert the next command or finish. }to close the previously opened insertion space.</style>to indicate that the code ends here.
See these other CSS code examples to insert on your site.
Link to this FAQ:
Has this FAQ been helpful?
This guide concerns the "Applications" (or "modules," "extensions") available in Infomaniak Site Creator depending on the version you have, to create a showcase website, a blog, or an e-commerce store that is 100% customizable, without any technical knowledge.
Different Applications
In addition to the content blocks offering various pre-formatted layouts, you can also insert blocks in the form of modules, each with a specific function:
- Video
- Audio player
- Image slider / slideshow
- File download
- Location on map
- Poll
- Knowledge base
- Questions and answers
- Calendar
- Calendly
- Subpage menu
- Sitemap
- Add to Google
- Custom HTML code
- Contact form
- Blog
- Shop
- RSS feed reader
- Restaurant menu
Insert a module on a page
To insert a module:
- Click here to access the management of your product on the Infomaniak Manager (need help?).
- Click directly on the name assigned to the Site Creator in question.
- Click on the Edit my site button to start the editor:
Once in Site Creator:
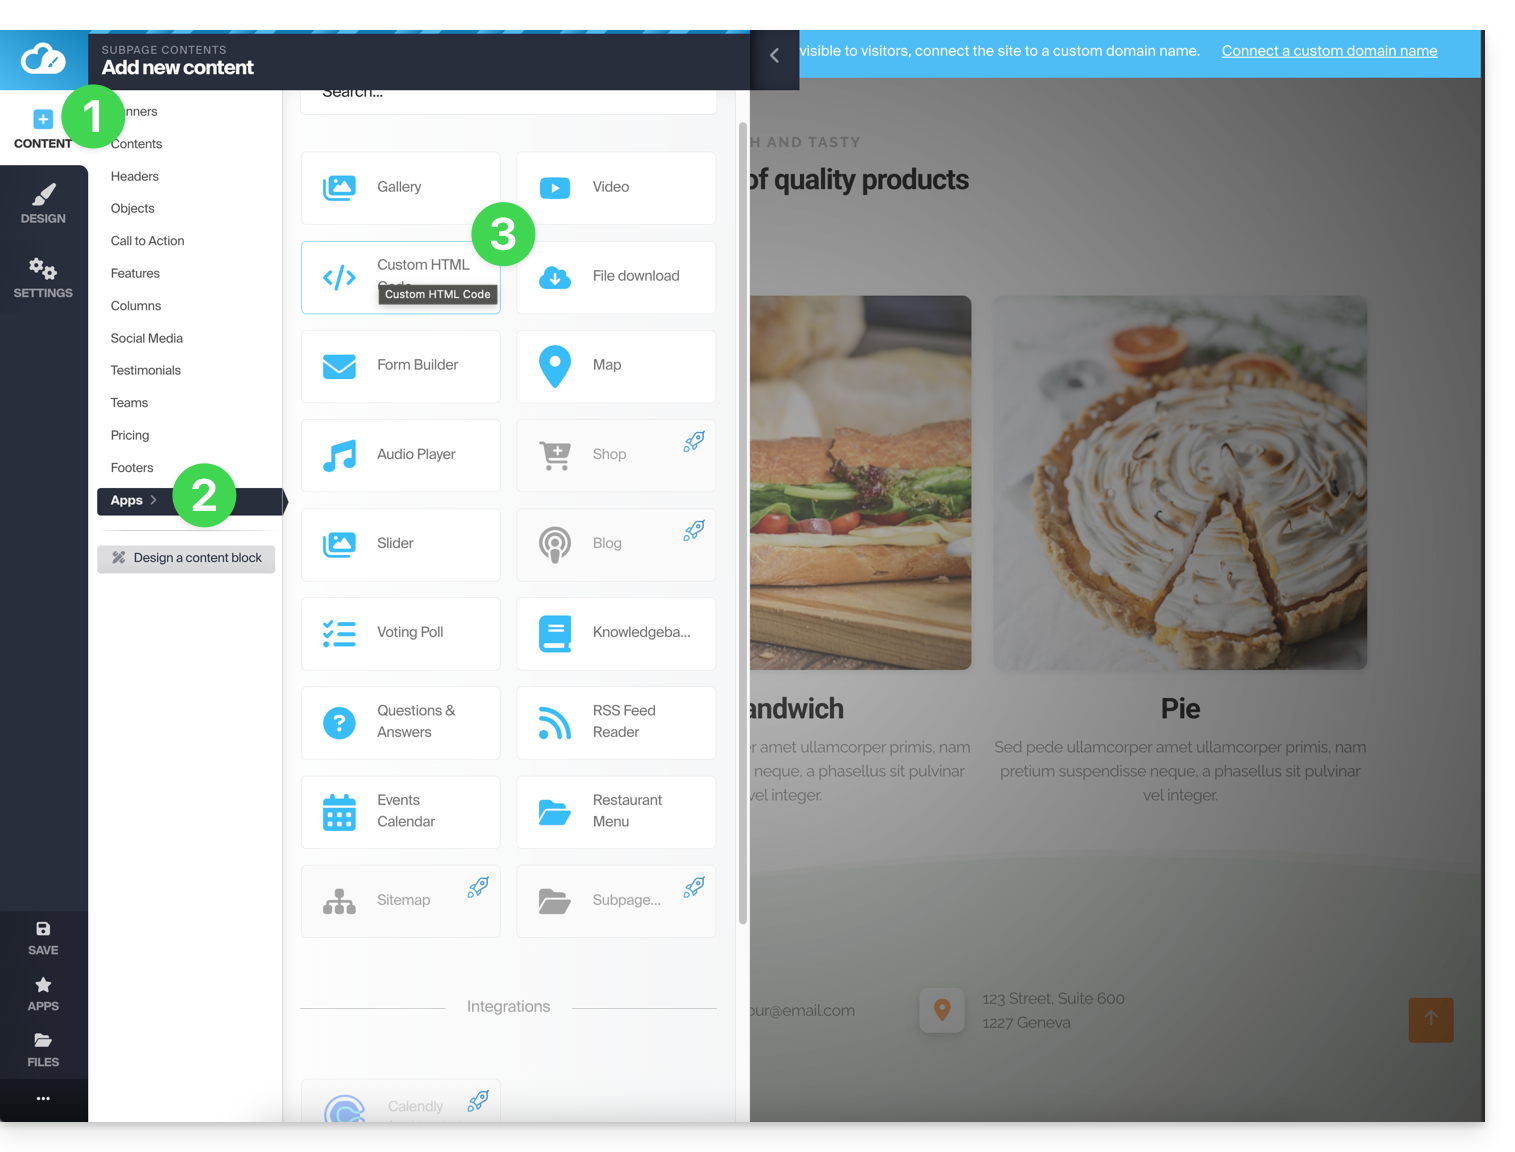
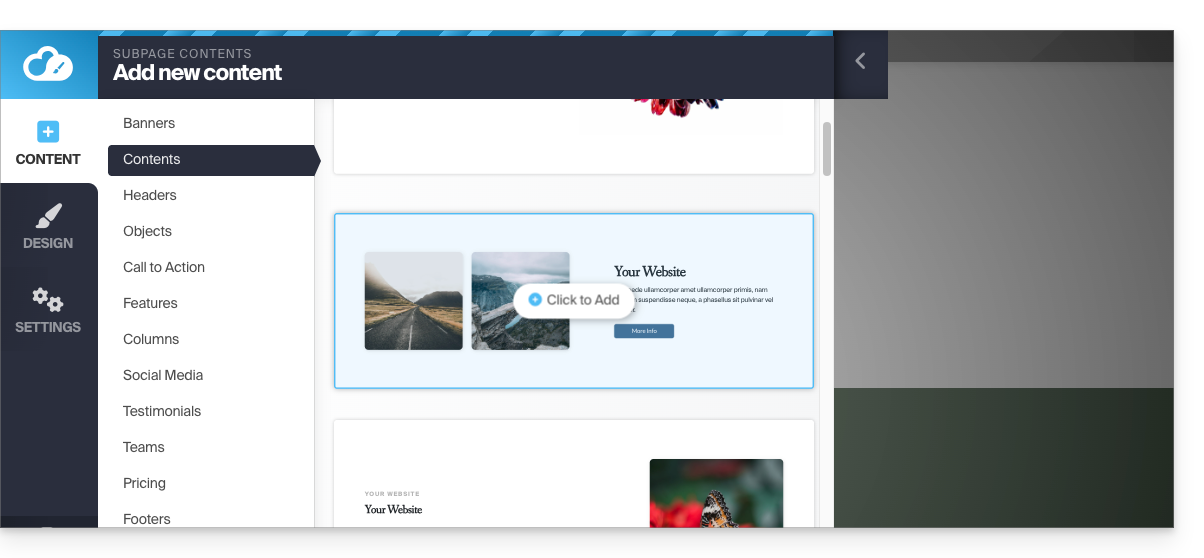
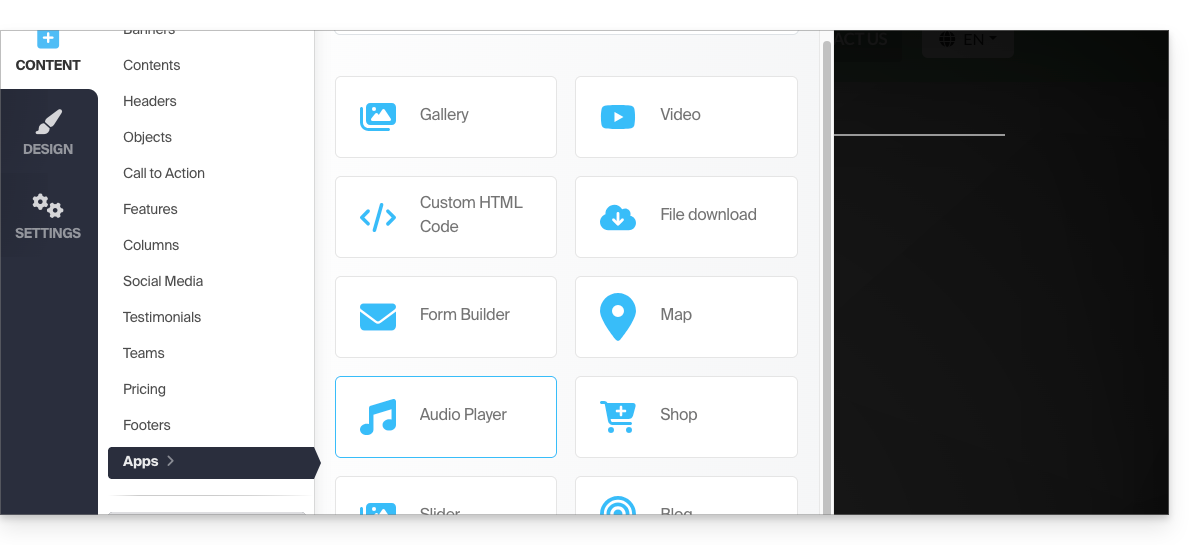
- Click on the Content button in the left-hand menu.
- Click on Applications at the bottom, and the available content will be displayed on the right.
- Click on one of these applications to insert it into the page:
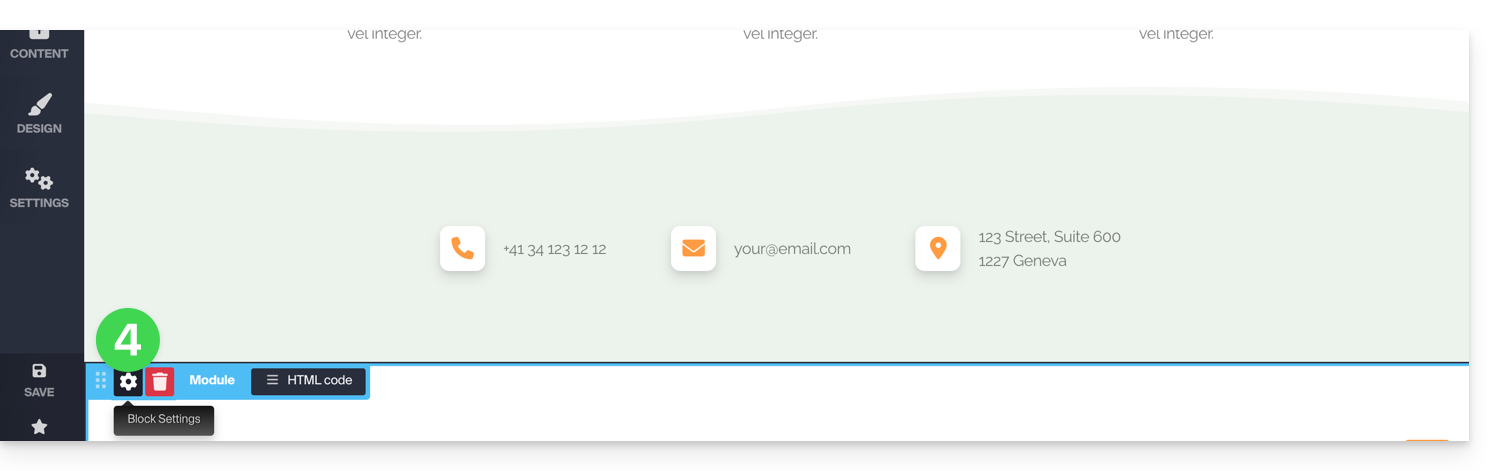
- Once inserted, hover over the module (or the block itself, depending on the module) to access its settings:
Multiple module or missing module
If you delete one of your modules (such as the one for creating a poll) that has already been configured and want to revert, press Undo immediately:
or
You can also reinsert the module, which should revert to its previous settings.
You cannot insert multiple modules of the same type to customize them independently of each other.
Other integrations & widgets
Click on the APPLICATIONS button in the left sidebar of Site Creator: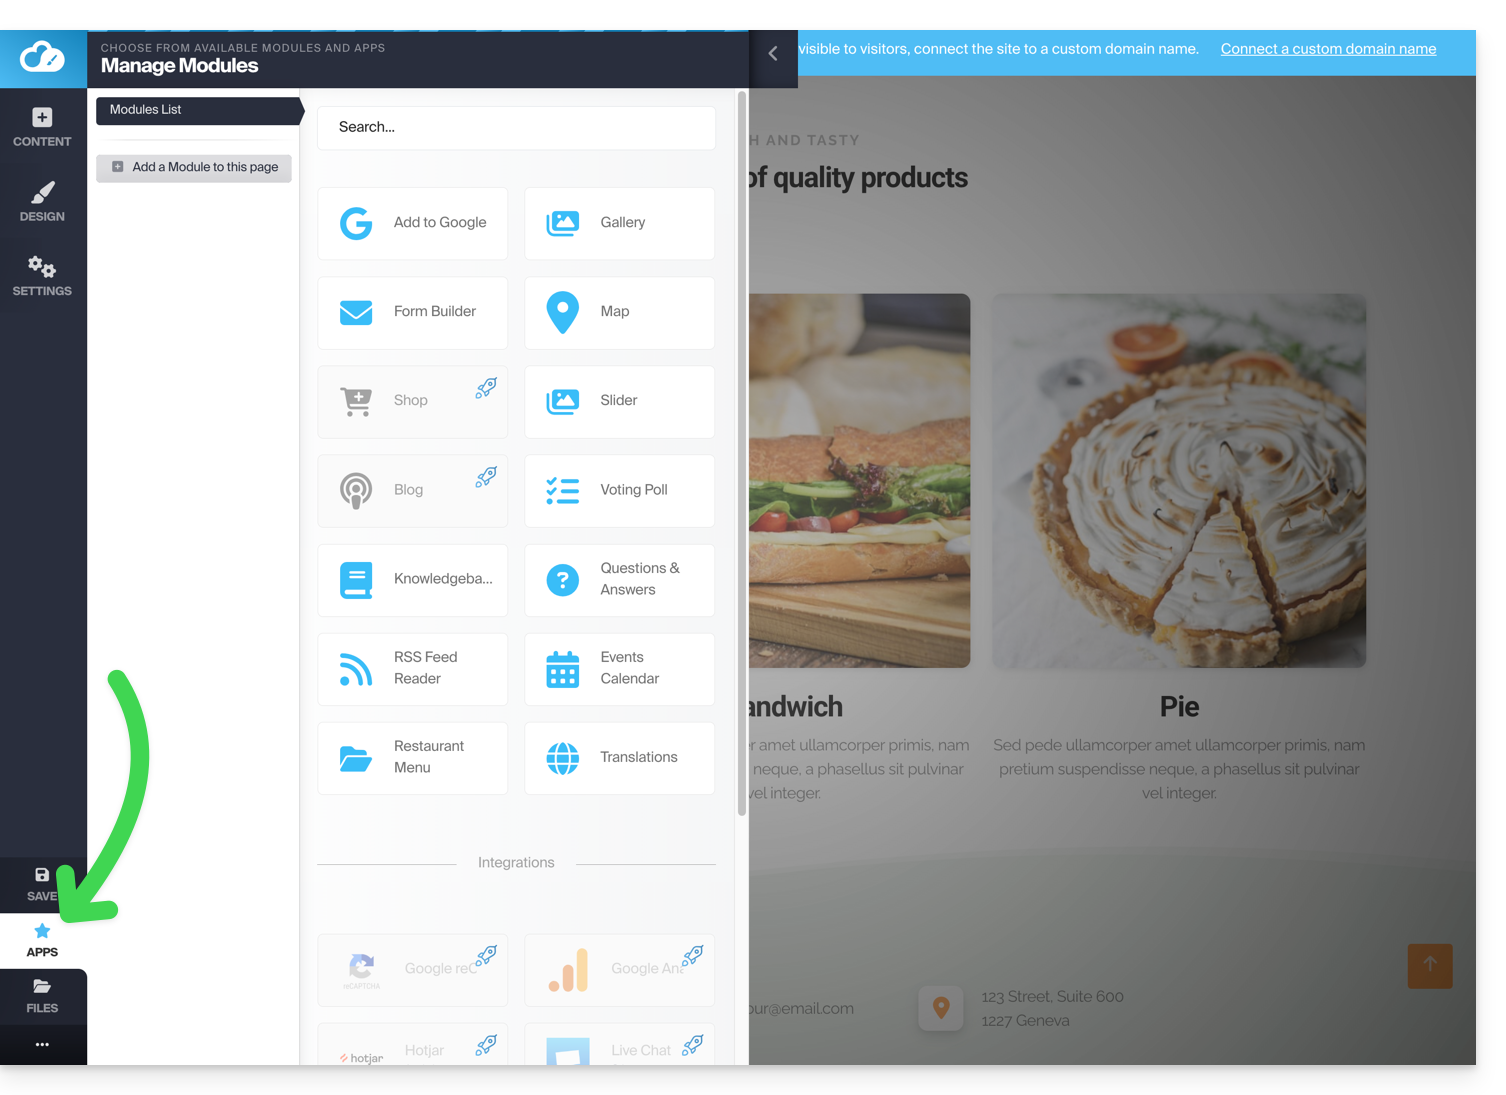
Example: inserting a countdown
To add a countdown timer:
- In the left sidebar menu, click the Content button.
- Click on Objects in the list, and the available content will be displayed on the right.
- Click on one of these objects to insert it on the page:
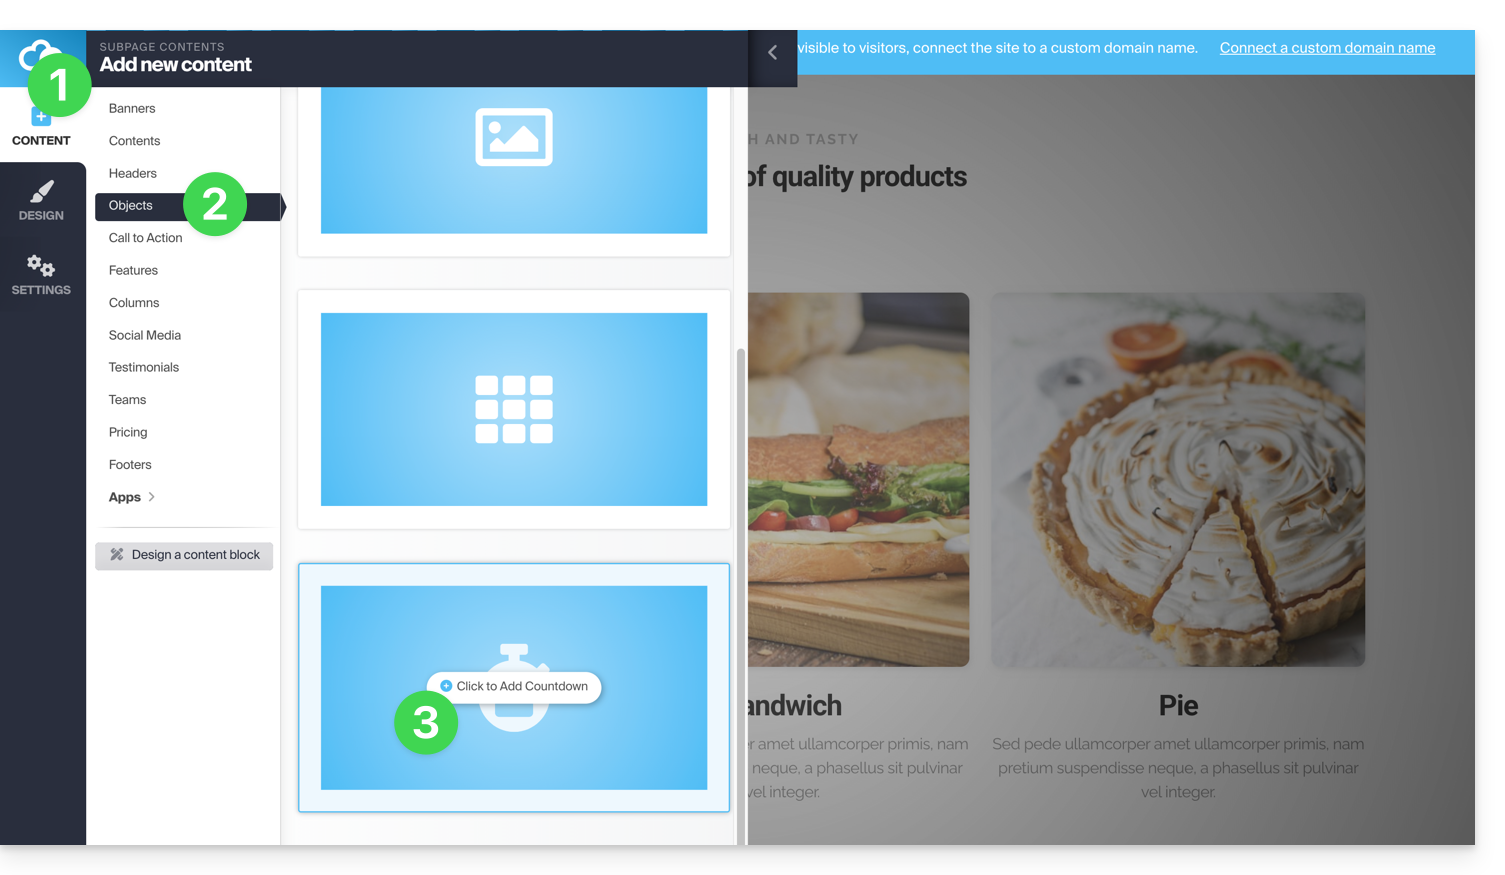
- Once inserted, hover over the module to access its settings:

Link to this FAQ:
Has this FAQ been helpful?
This guide explains how to add and customize a button on your Site Creator page, including a fixed button that allows you to return to the top of the page.
Prerequisites
- Access Site Creator:
- Click here to access the management of your product on the Infomaniak Manager (need help?).
- Click directly on the name assigned to the Site Creator in question.
- Click on the Edit my site button to start the editor:
Add a link in the form of a button
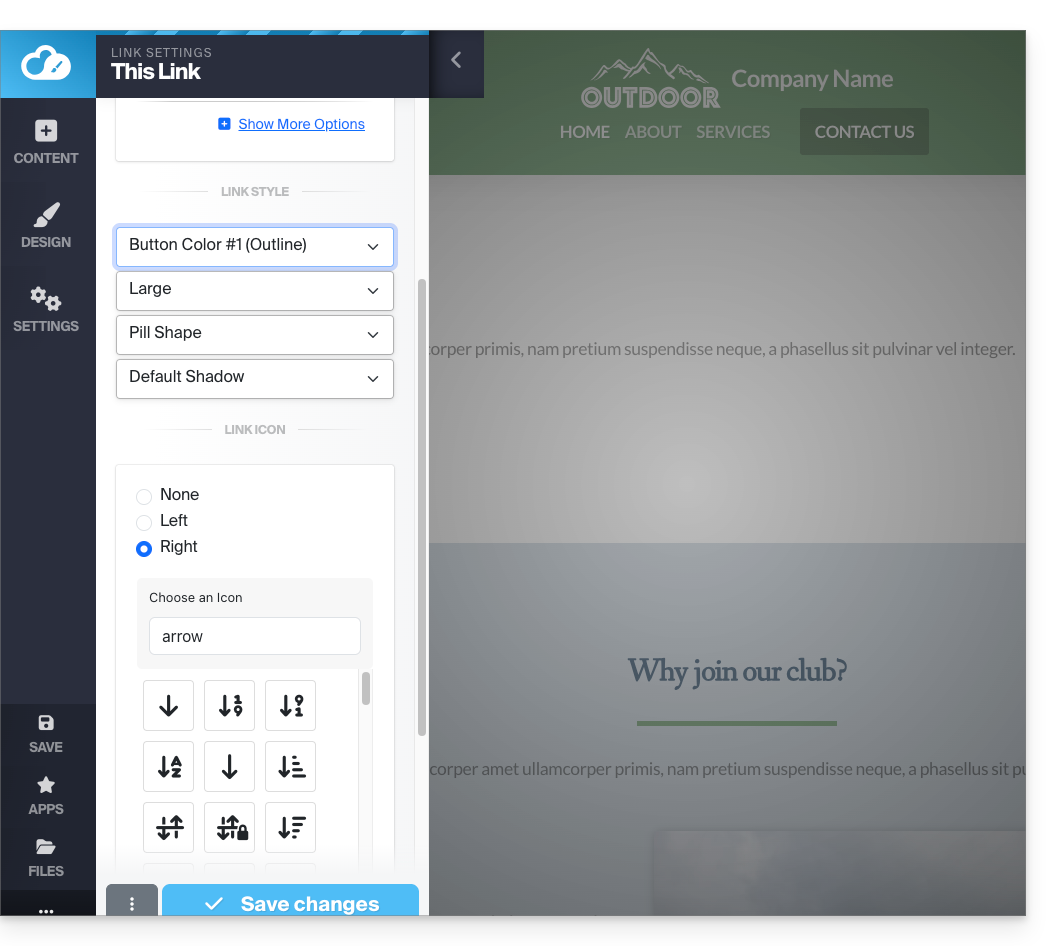
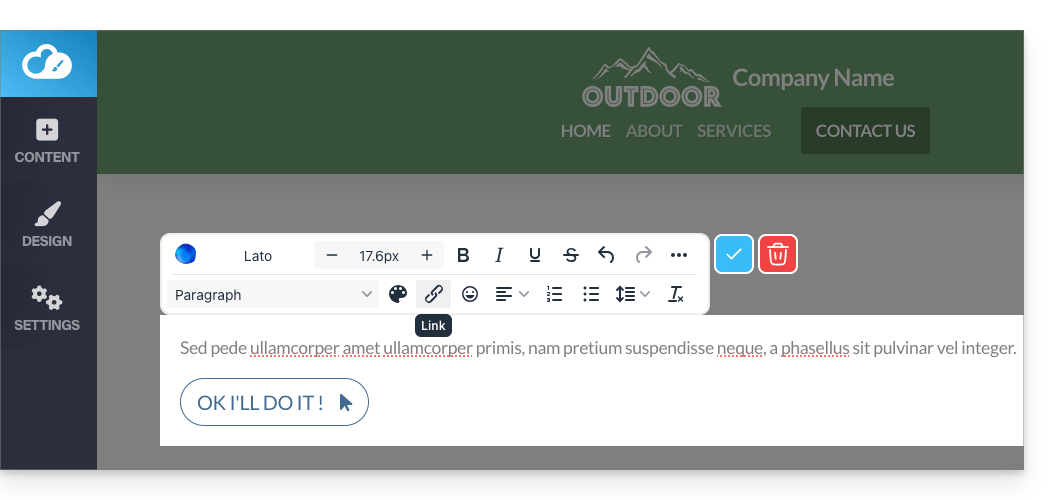
To add a button (which leads to the URL of your choice when clicked):
- Write the text for the button.
- Select the text.
- Press the ••• dots to the right of the toolbar to access additional options.
- Then click on the link icon to open the section that will allow you to specify the type of link and the associated options:

- Configure the destination page and the appearance of the button.
- Save the changes at the bottom of the tab:
- View the button on your page.
- Click the button to return to the editor if needed:
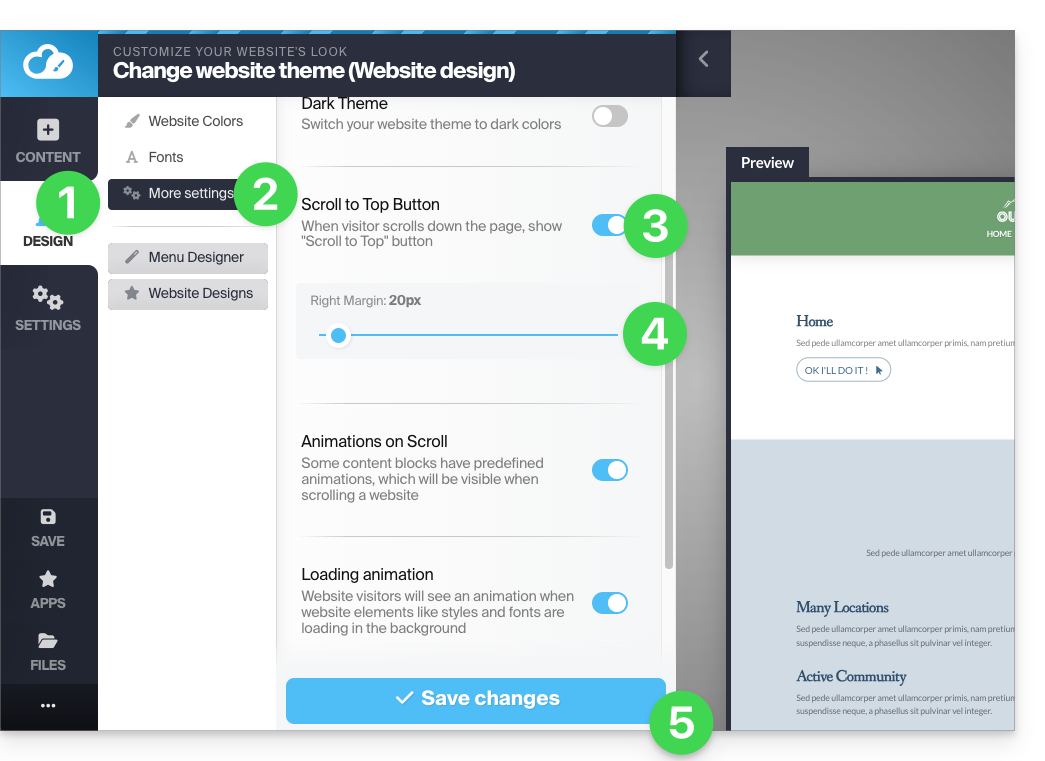
Add a “Back to top” button
To add and customize a button that takes the visitor back to the top of your Site Creator page as soon as the page scrolls:
- Click the Design button in the left-hand menu.
- Click More settings.
- Enable the option to display the back-to-top button.
- Adjust the spacing from the right edge.
- Save the changes at the bottom of the page:
Refresh the page if necessary to see the change: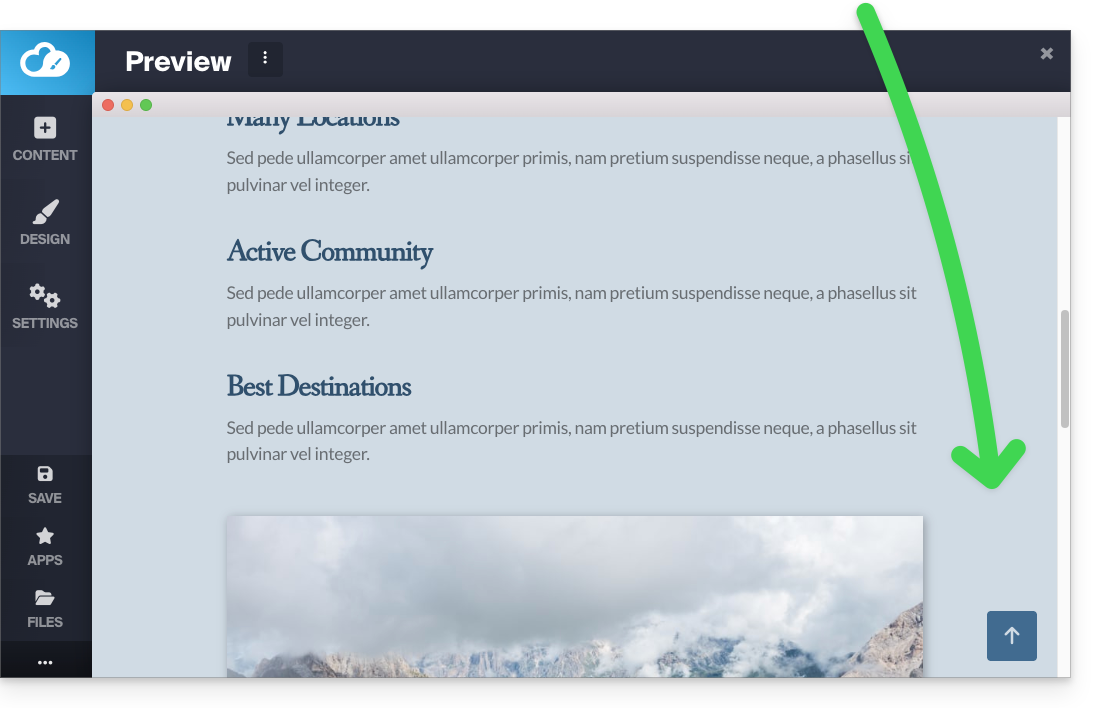
Refer to this other guide for an alternative solution.
Link to this FAQ:
Has this FAQ been helpful?
This guide helps you customize a website created with Infomaniak's Site Creator.
To customize the homepage or page types of your site, refer to this other guide.
Prerequisites
- Accessing Site Creator:
- Click here to access the management of your product on the Infomaniak Manager (need help?).
- Click directly on the name assigned to the Site Creator in question.
- Click on the Edit my site button to start the editor:
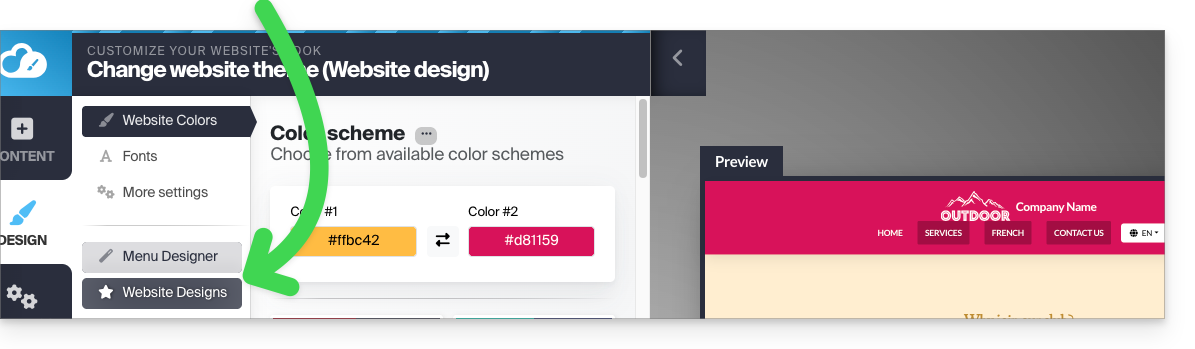
Changing the site colors
To manage themes, colors, and fonts in Site Creator:
- Click on the Design button in the left-hand menu.
- Click on Site Colors:
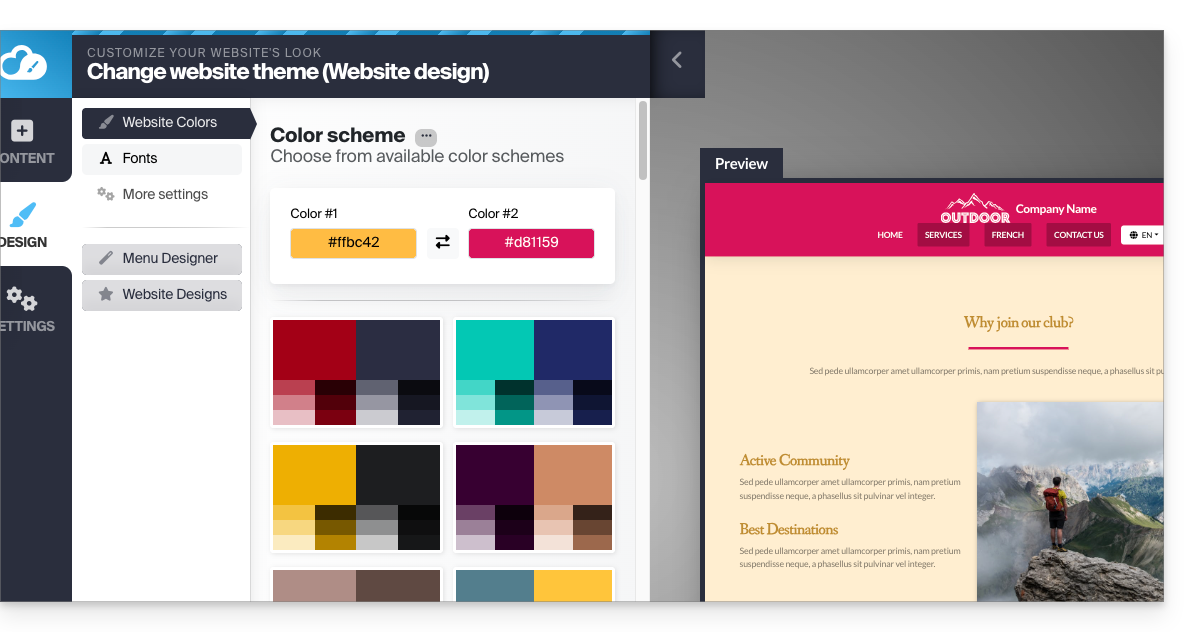
You can choose from the available color palettes or create your own custom color scheme.
Below, there are more specific settings where you can specify to which elements a color should be applied: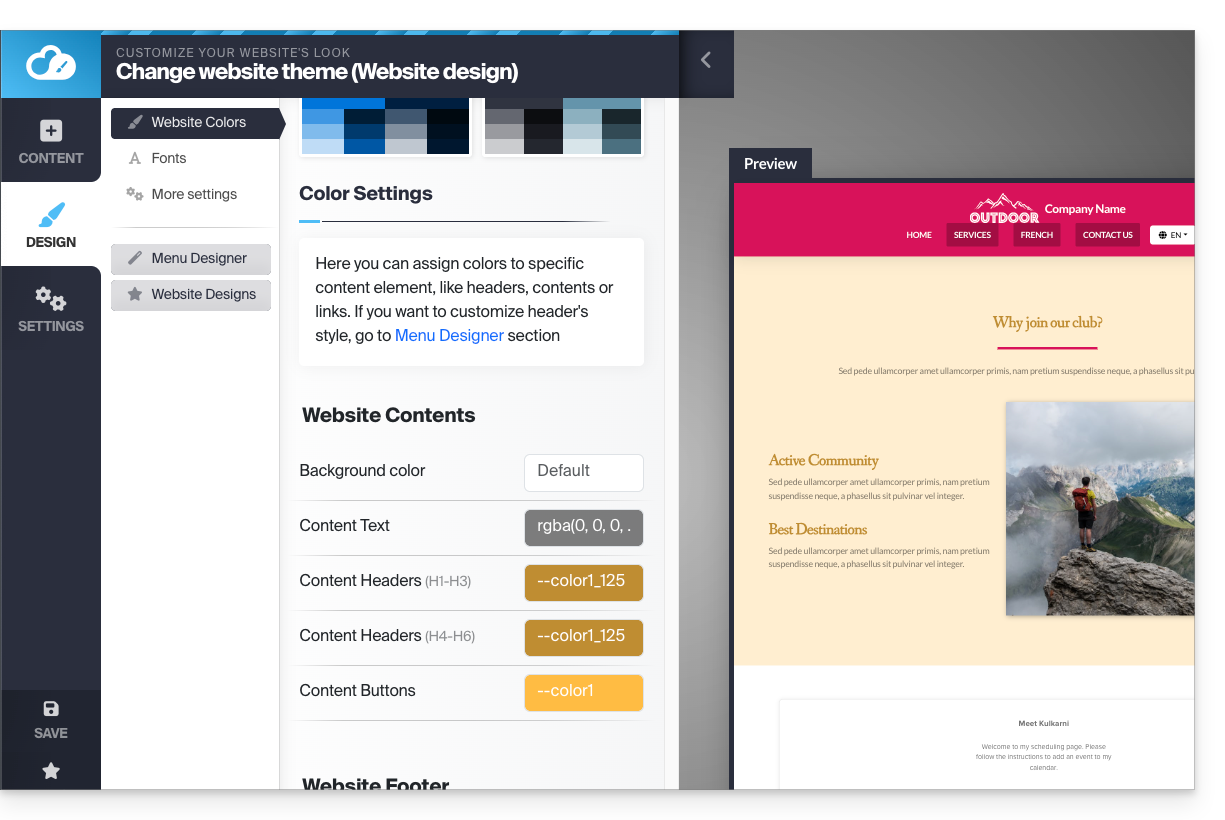
Managing the background (image / color) of blocks
On your website's edit page, hover over a block and click the gear icon to access the settings: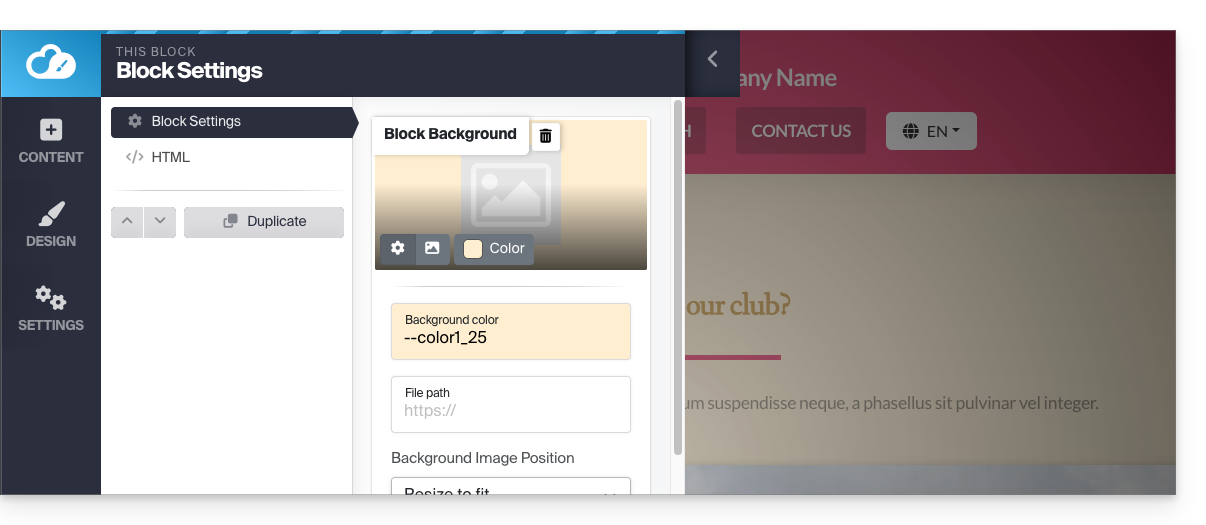
Load a Website Template
You can modify the complete design of your website by changing its theme, and by deciding what should be overwritten or not on the current site when making the change:
- Click the Design button in the left-hand menu.
- Click Theme Selection:
This is where you can choose from the available website themes: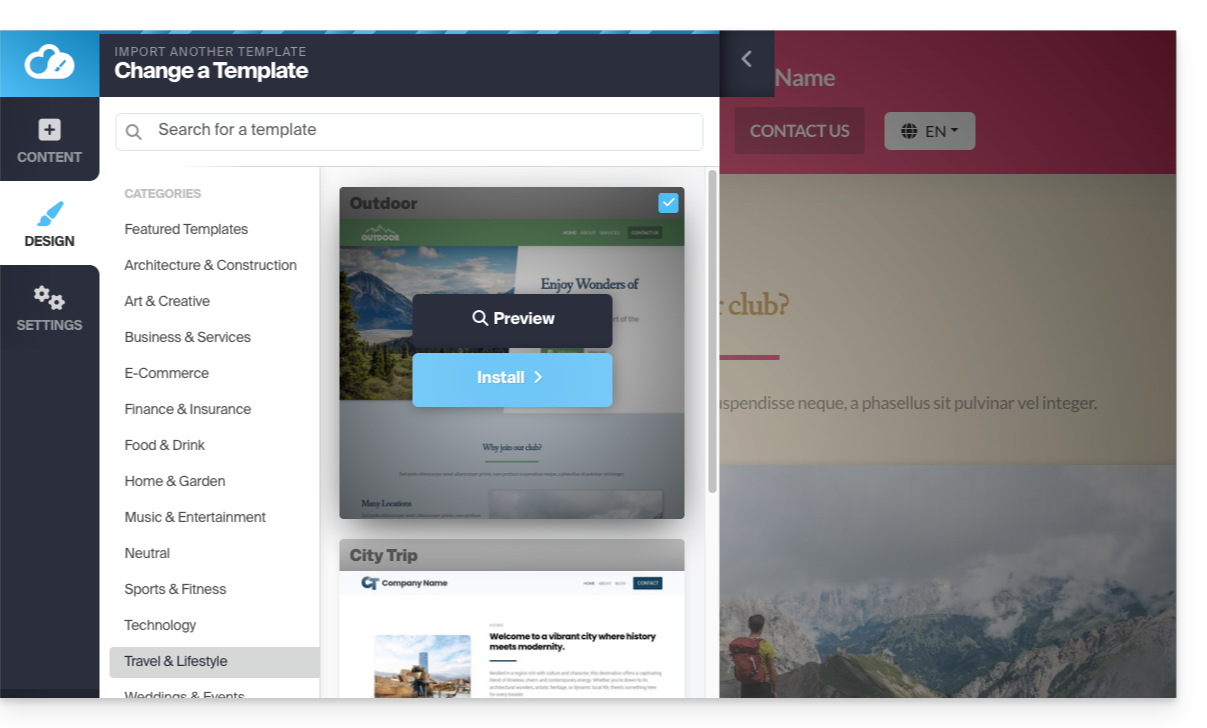
Once you have found your new theme, click Install, and then you can choose which parts of the new template you want to import (by default, only the colors, fonts, or menu style) to avoid overwriting the content of your website.
If your website is new, you can choose more options during import.
Change Website Fonts
To do this:
- Click the Design button in the left-hand menu.
- Click Fonts:
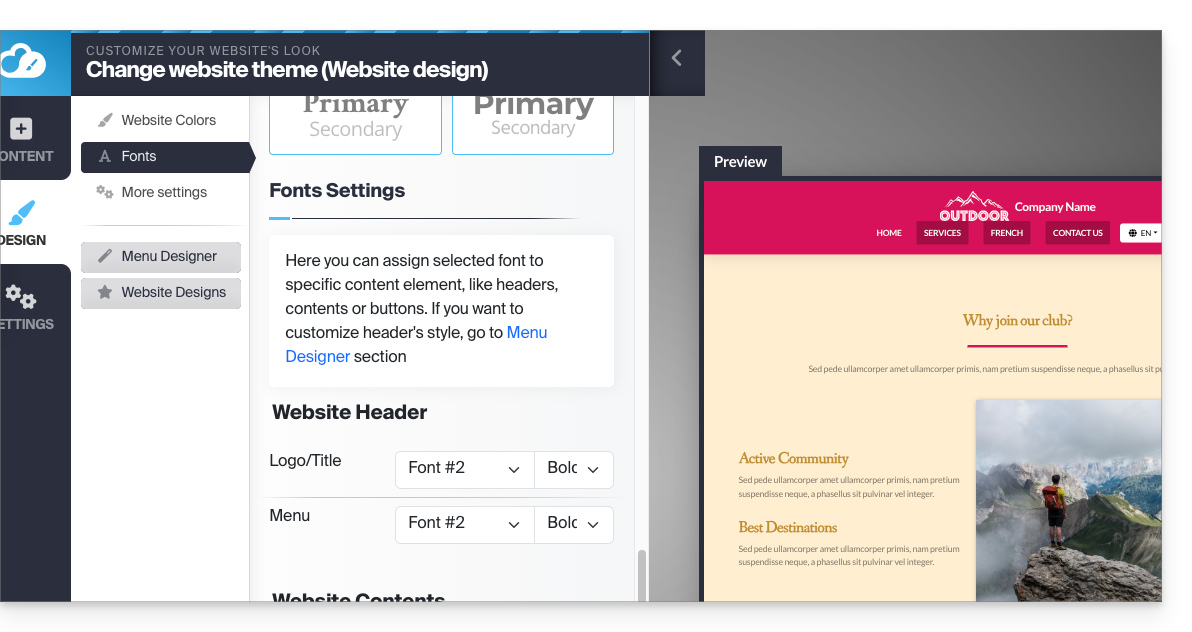
You can easily change the main fonts of the website; the first font is used for headings, and the second font is used for the content.
Below, there are more specific settings where you can specify to which elements a font should be applied.
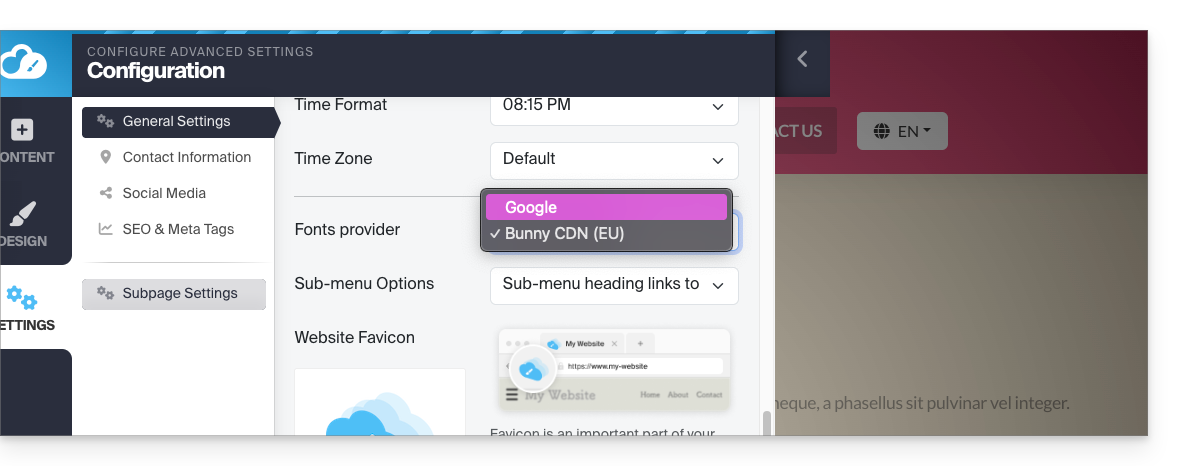
It is not possible to import or add a custom font, but you can change the provider (the font list will be the same) for privacy reasons, for example:
- Click on Settings in the left-hand menu.
- Click on General settings
- Choose the font provider:
Troubleshooting missing/invisible text
If you feel that your text block has disappeared or is invisible
then select all the content of the website (ctrl + a or cmd + a on Mac); if you see that your content is there, it probably means that the block settings are set to a dark background: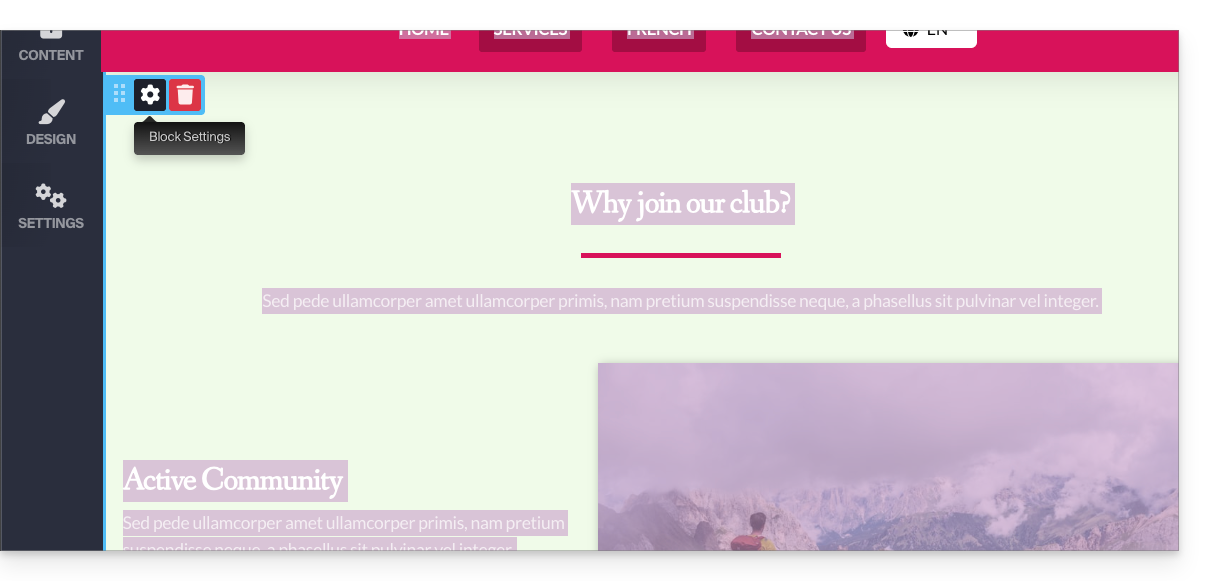
In this case, go to the block settings and make sure that the "Dark background" option is not checked. This should solve the problem: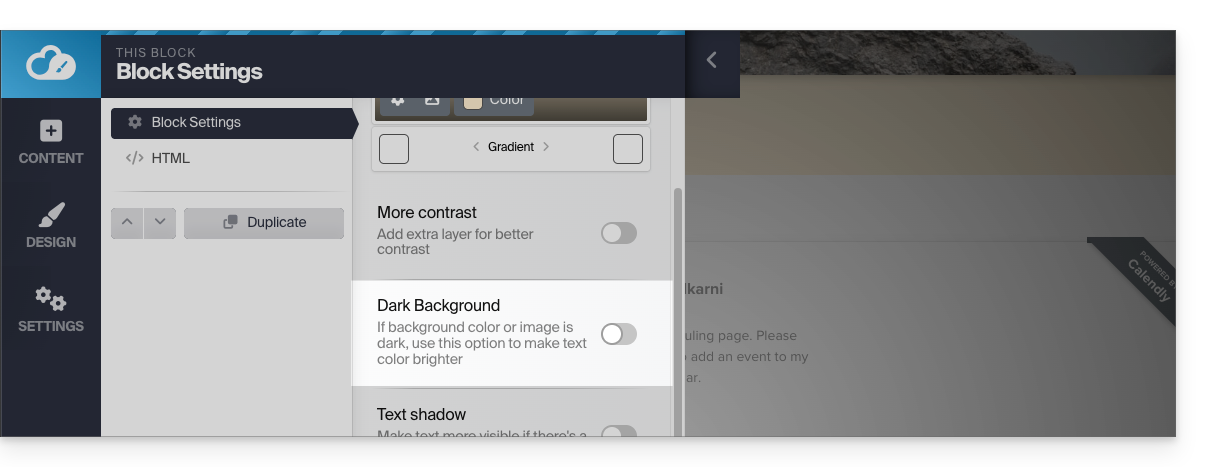
Link to this FAQ:
Has this FAQ been helpful?
This guide explains how to manage the logo, header, and footer in Infomaniak's Site Creator.
Prerequisites
- Access Site Creator:
- Click here to access the management of your product on the Infomaniak Manager (need help?).
- Click directly on the name assigned to the Site Creator in question.
- Click on the Edit my site button to start the editor:
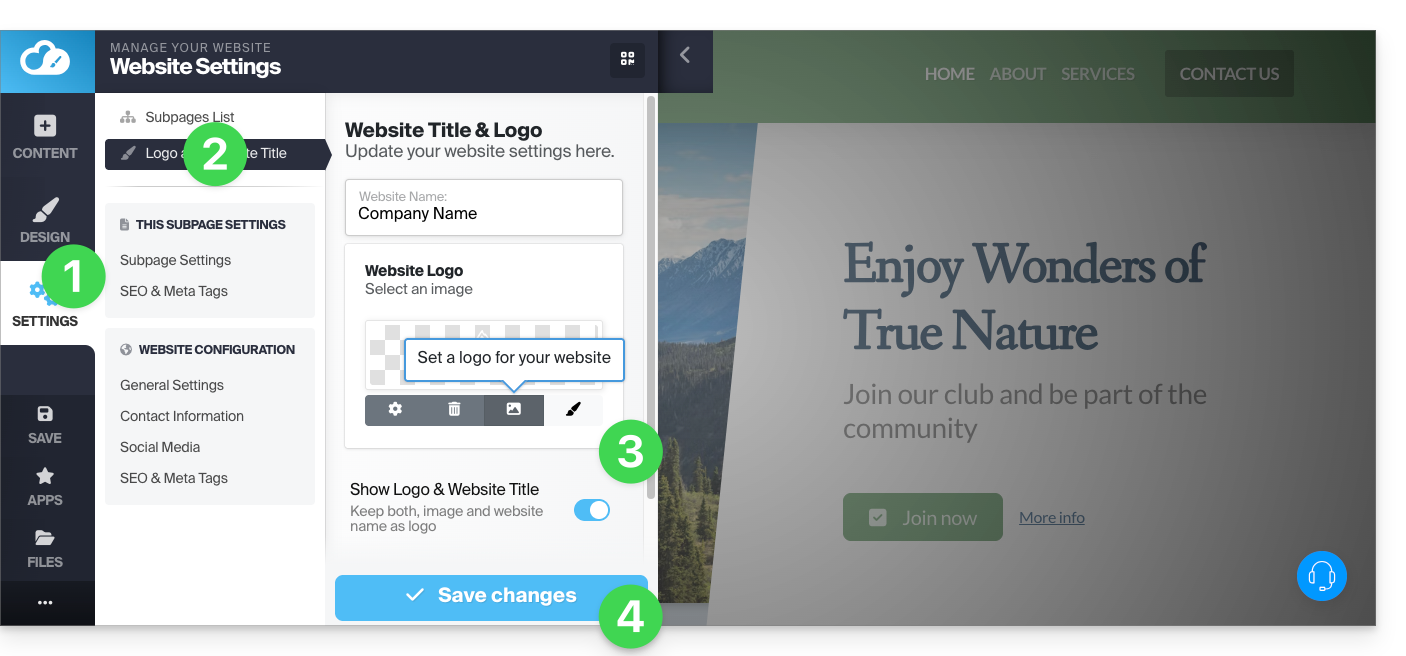
Add a website logo
Once in Site Creator:
- Click on the Settings button in the left sidebar.
- Click on Logo / title.
- Upload an image and choose whether the site name should also be displayed next to it.
- Save the changes:
Logo settings
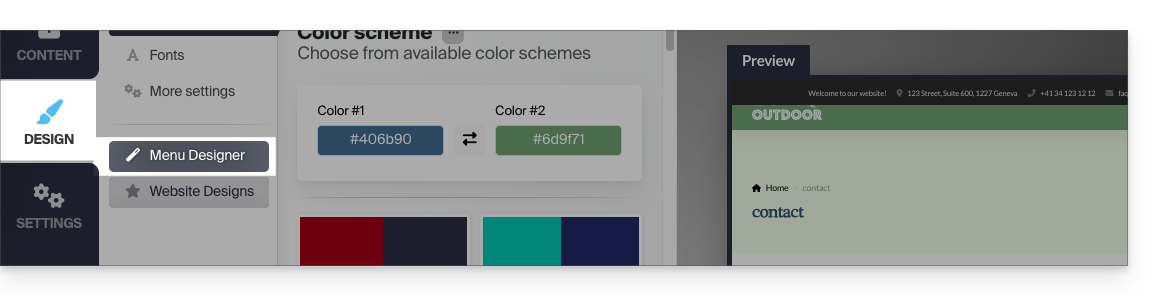
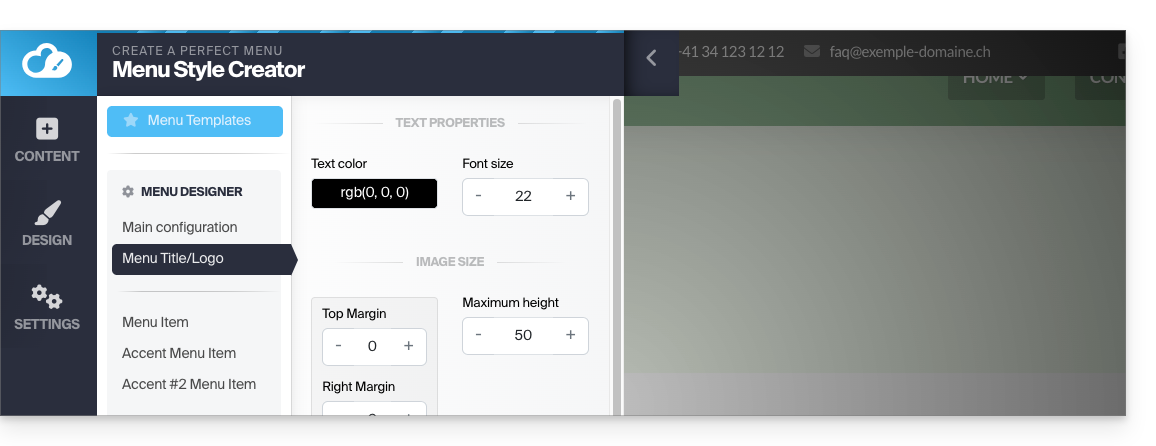
- Click on the Design button in the left sidebar.
- Click on Menu Designer.
- Click on Title/logo.
- Then adjust spacing and colors.
- Save the changes:
Display the logo in the center
In the same location as above (you can also access it by hovering over the header and its logo), activate the option to display the logo on a separate line, which will center the site's logo: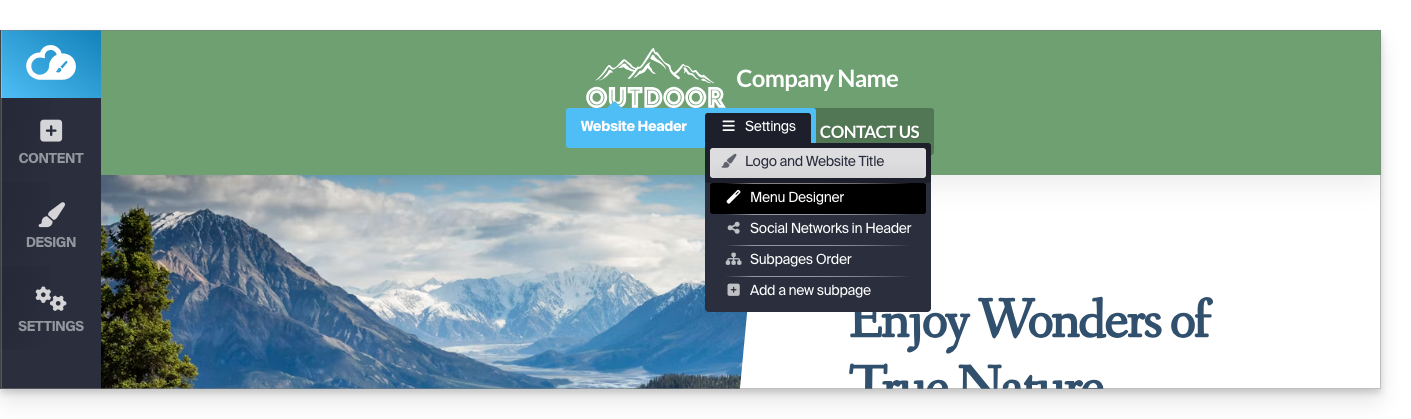
Hide the logo (+ header and footer)
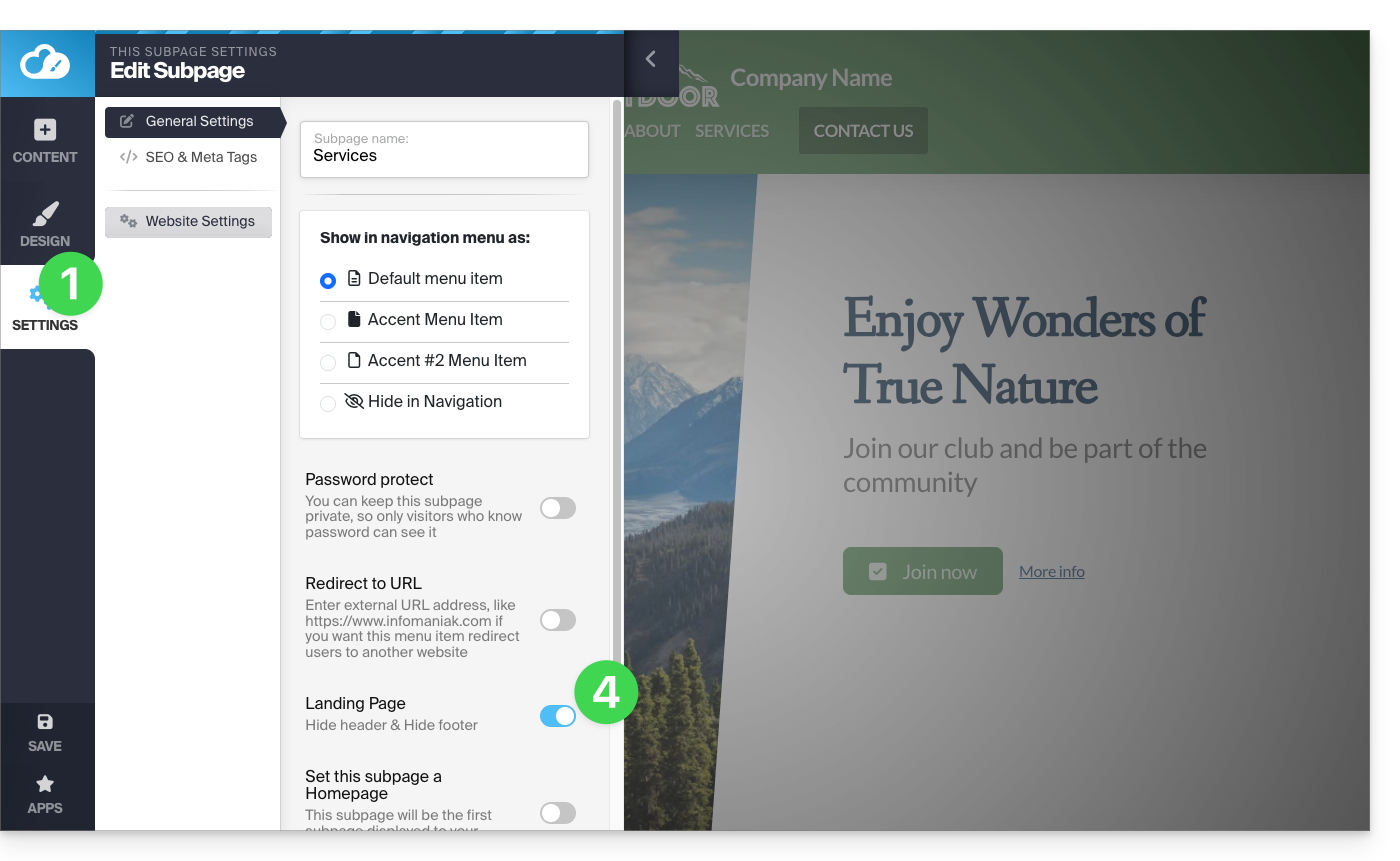
To create a page without a logo that will also have no header (and therefore no menu displayed) or footer, you need to define it as a Homepage (i.e., "Landing page"; note that this does not change the order of the pages) using a button located here:
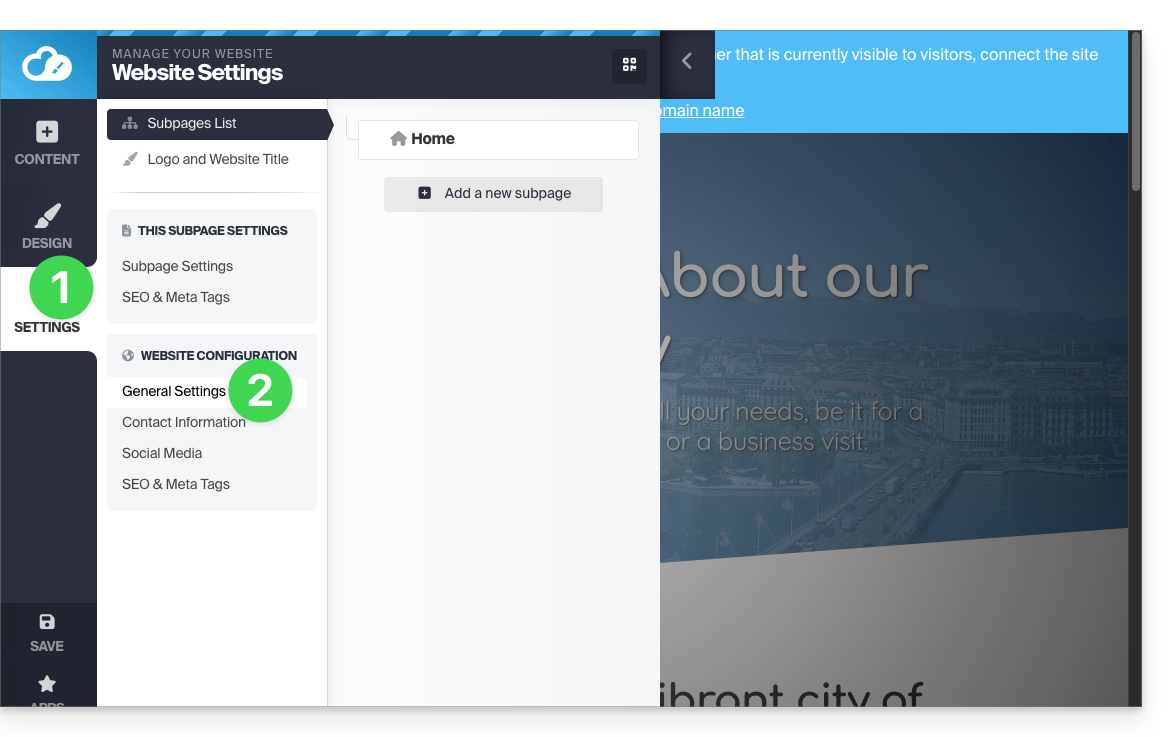
- Click on the Settings button in the left sidebar.
- Click on Page List.
- Hover over a page in the existing tree and click on the gear icon that appears on hover.
- Activate the "Homepage" option at the bottom to hide the header and footer:
Link to this FAQ:
Has this FAQ been helpful?
This guide explains how to modify certain details of a website created with Infomaniak's Site Creator.
Prerequisites
- Access Site Creator:
- Click here to access the management of your product on the Infomaniak Manager (need help?).
- Click directly on the name assigned to the Site Creator in question.
- Click on the Edit my site button to start the editor:
Change the website name
Click on the Settings button in the left sidebar, then on Site Title: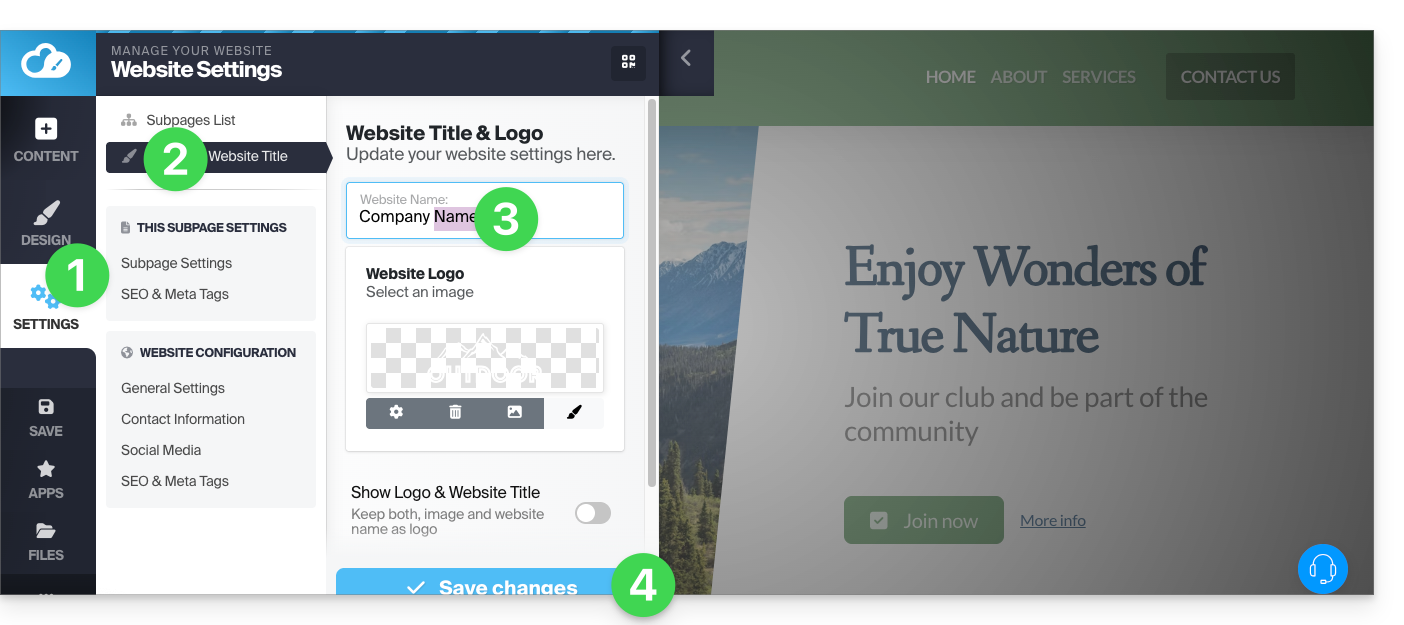
Company details
Click on the Settings button in the left sidebar, then on Contact details under Website configuration: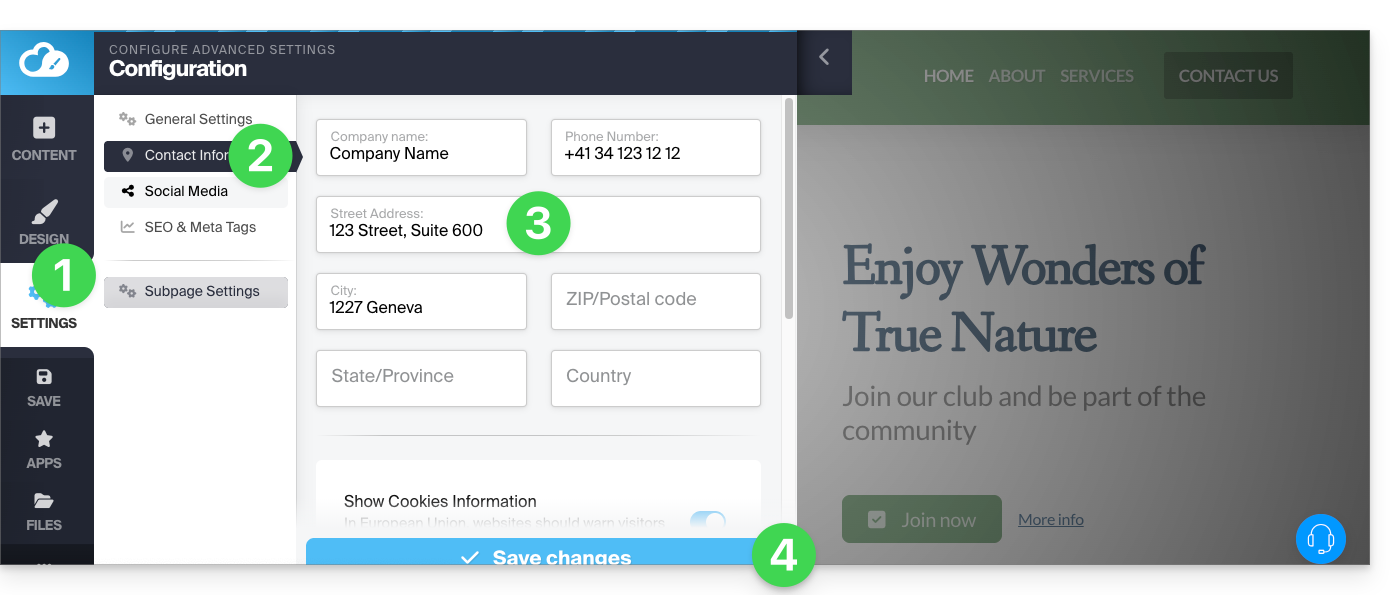
Link to this FAQ:
Has this FAQ been helpful?
WordPress and Site Creator are two completely different website creation tools and unfortunately, it is not possible to use the components of one with the other — Also refer to this other guide.
Link to this FAQ:
Has this FAQ been helpful?
This guide explains how to set up the icon displayed in the favorites bar of a web browser, the favicon, in Infomaniak's Site Creator.
Introduction
- Microsoft recommends the following formats for its browsers:
16 x 16,32 x 32, and48 x 48. - Apple, on the other hand, recommends that the favicon size be
180 x 180.
Define the Site Creator favicon
Prerequisites
- Access Site Creator:
- Click here to access the management of your product on the Infomaniak Manager (need help?).
- Click directly on the name assigned to the Site Creator in question.
- Click on the Edit my site button to start the editor:
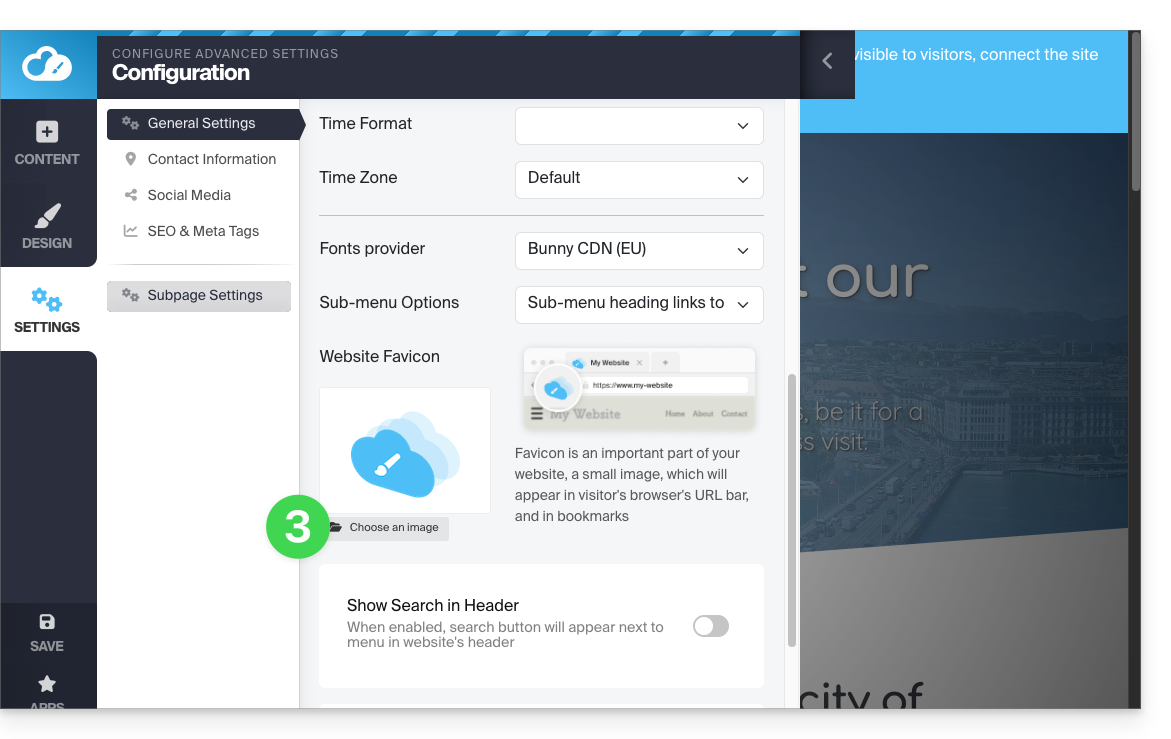
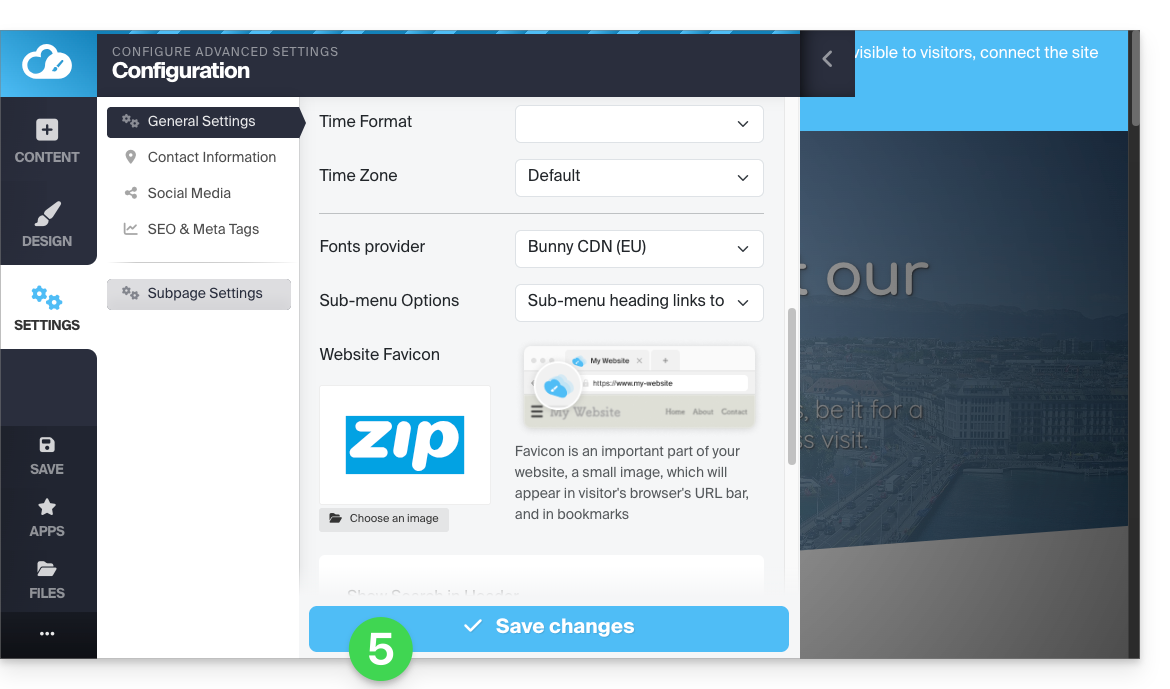
To define a new favicon:
- Click on the Settings button in the left-hand menu.
- Click on General settings:
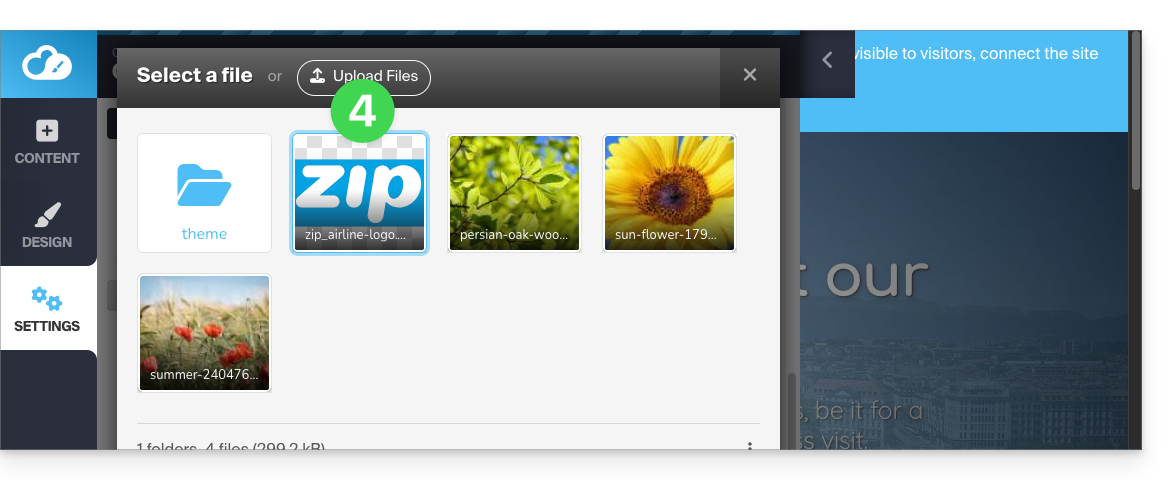
- Scroll down to the Favicon section and click to choose an image:
- Import/select the favicon from your hard drive:
- Save the changes at the bottom of the page:
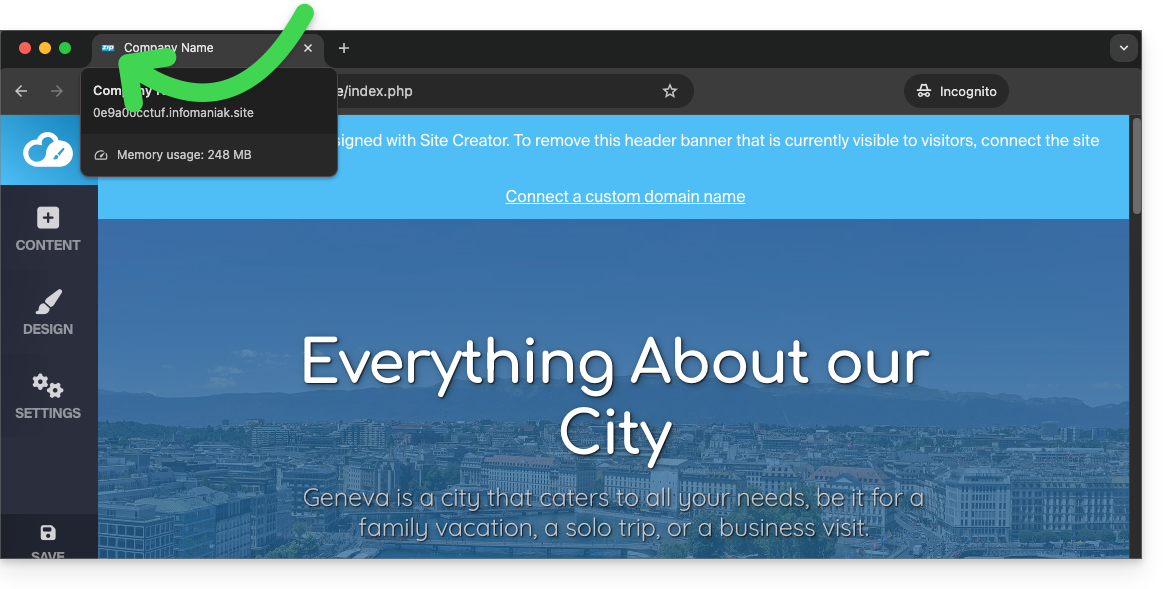
- Preview the result in your browser (if necessary, in a new private browsing window, for example):
Link to this FAQ:
Has this FAQ been helpful?
This guide explains how to add and configure a contact form on your website created with Infomaniak Site Creator.
Create a Custom Contact Form
Prerequisites
- Access Site Creator:
- Click here to access the management of your product on the Infomaniak Manager (need help?).
- Click directly on the name assigned to the Site Creator in question.
- Click on the Edit my site button to start the editor:
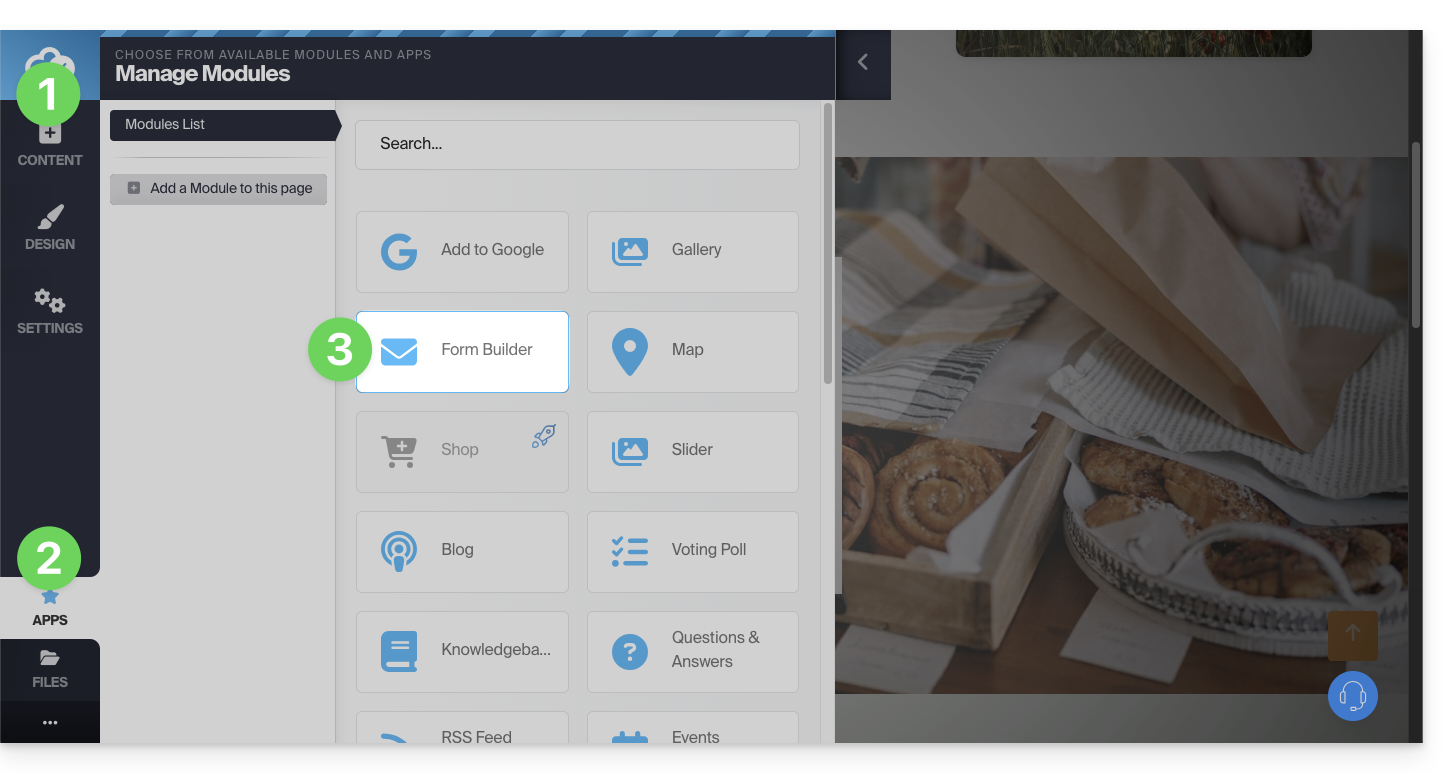
You can create one or more forms allowing your visitors to write a message, register for an activity, or fill out any kind of online form with or without attachments:
- Click on the Content button in the left-hand menu.
- Click on Applications at the bottom of the list.
- Click on Form Builder:
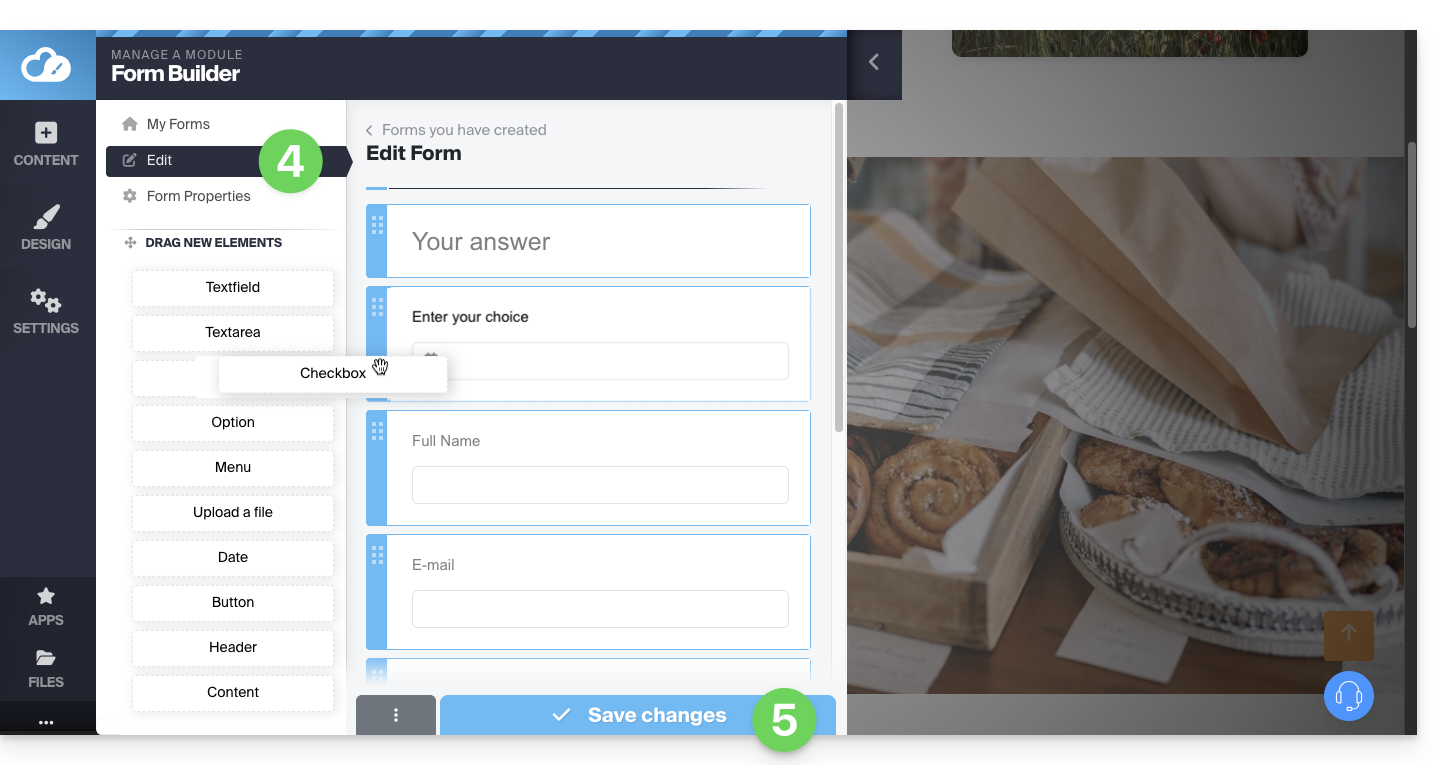
- Build your form using the elements on the left.
- Save at the bottom of the page:
Once the first form has been created, you can insert it by clicking on at the location of your choice and selecting it:
The created form will be inserted on your page: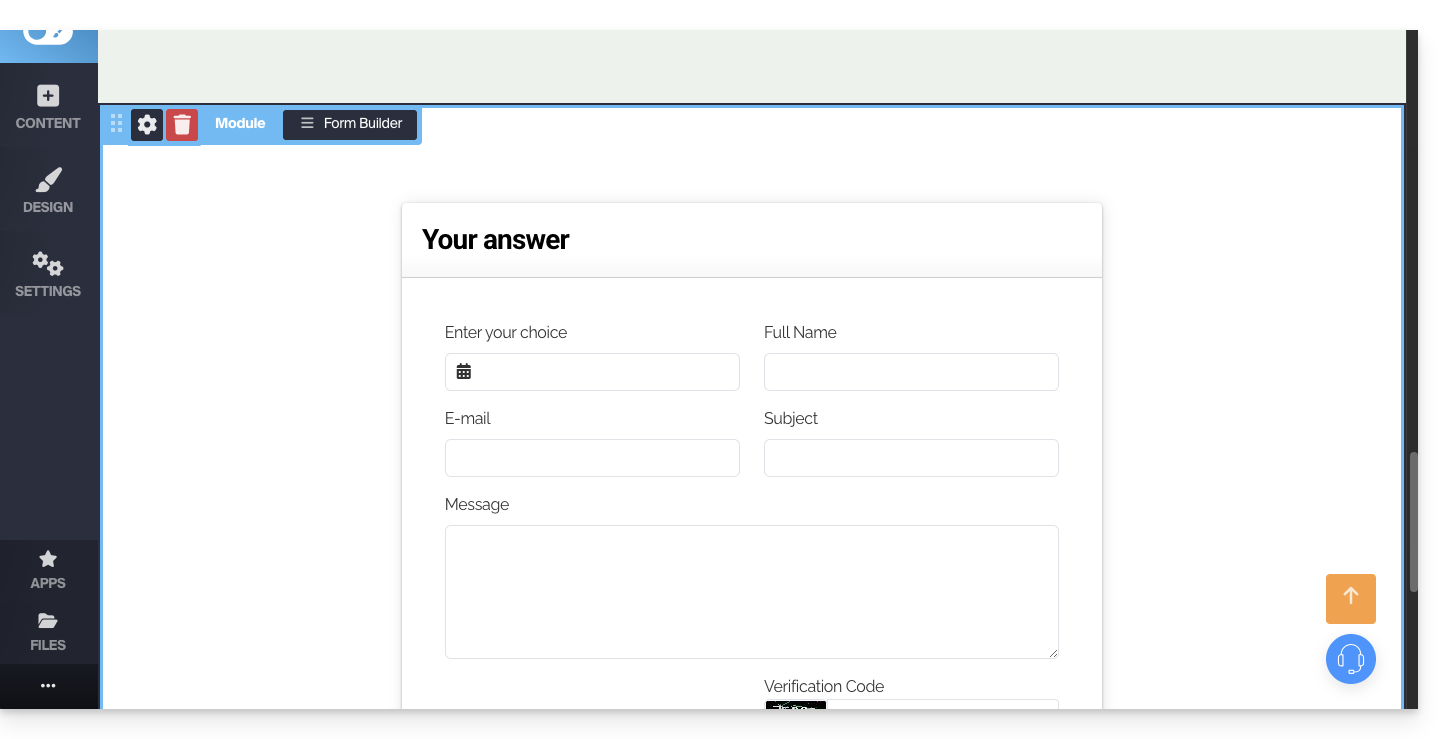
Contact Form Settings
You can customize the thank-you message, the optional redirection page after submission, the email address used, add a captcha (recommended), etc.
To do this, hover over the module to access its settings: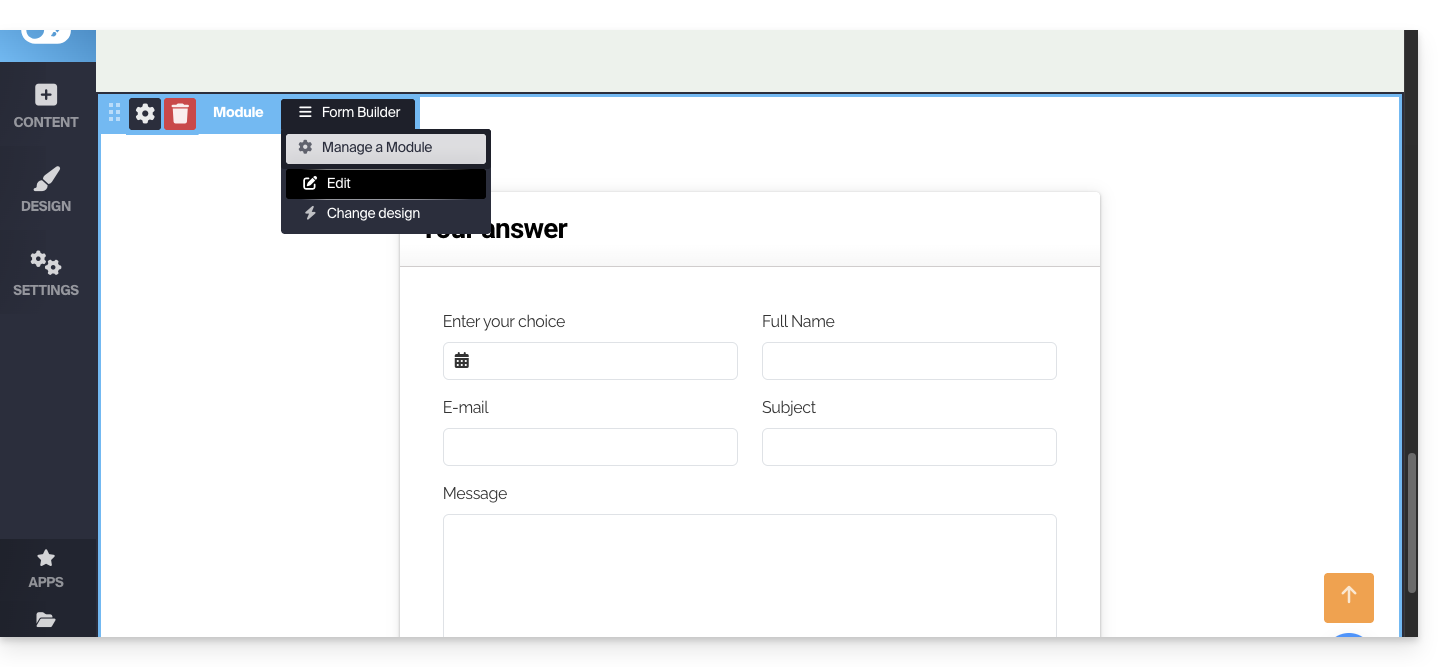
If necessary, click on the form you want to edit, then on Form Properties: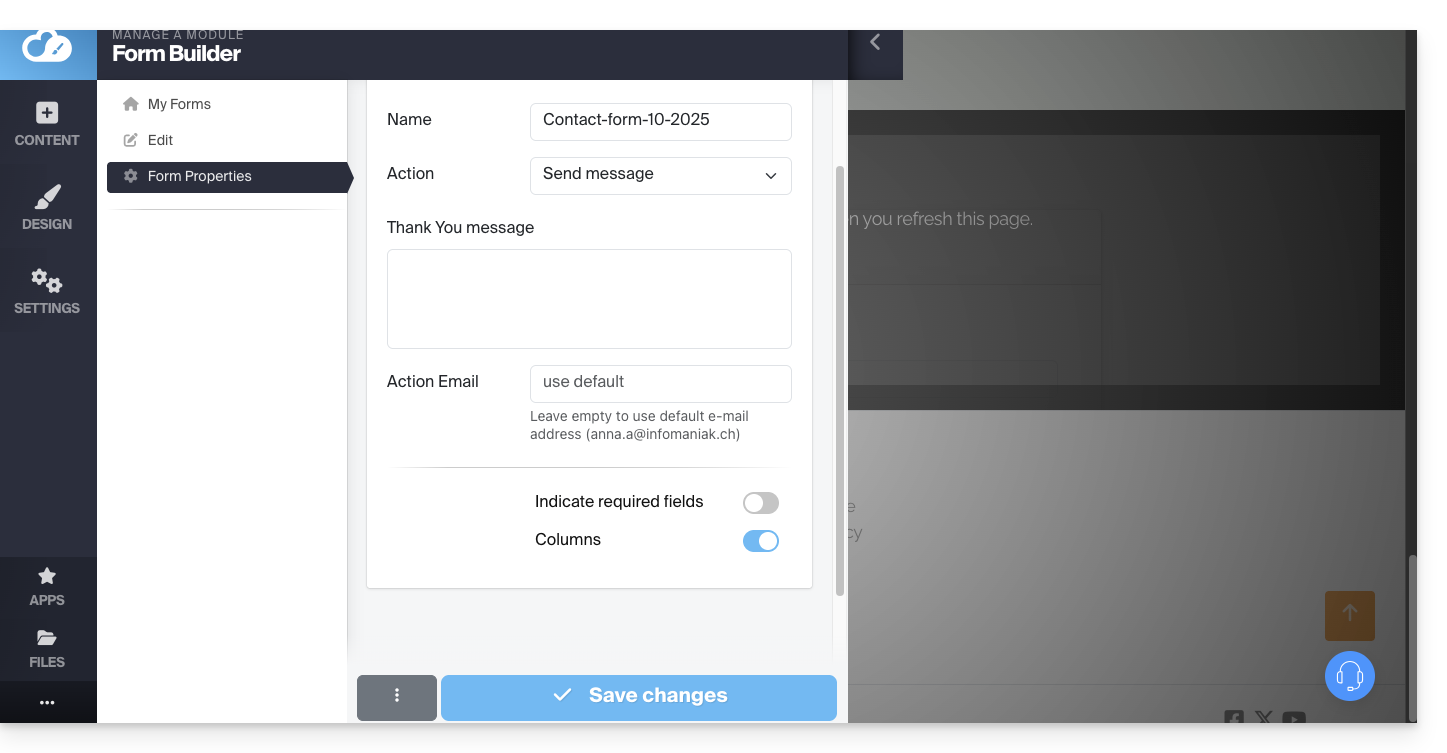
It is recommended to modify the default sending method.
You can also delete the created form so that it is no longer offered:
Note that it is also possible to insert an Infomaniak Newsletter subscription form on Site Creator.
Link to this FAQ:
Has this FAQ been helpful?
This guide explains how to create galleries with your photos in Infomaniak's Site Creator.
Create a photo gallery
Prerequisites
- Access Site Creator:
- Click here to access the management of your product on the Infomaniak Manager (need help?).
- Click directly on the name assigned to the Site Creator in question.
- Click on the Edit my site button to start the editor:
Once in Site Creator:
- Click on the Settings button in the left-hand menu; the list of your pages will appear.
- Click on the Add a page button below the existing tree:
- Activate Show more options to choose the page type PHOTO GALLERY:

- Validate; the new page with the photo gallery module will appear on the screen:
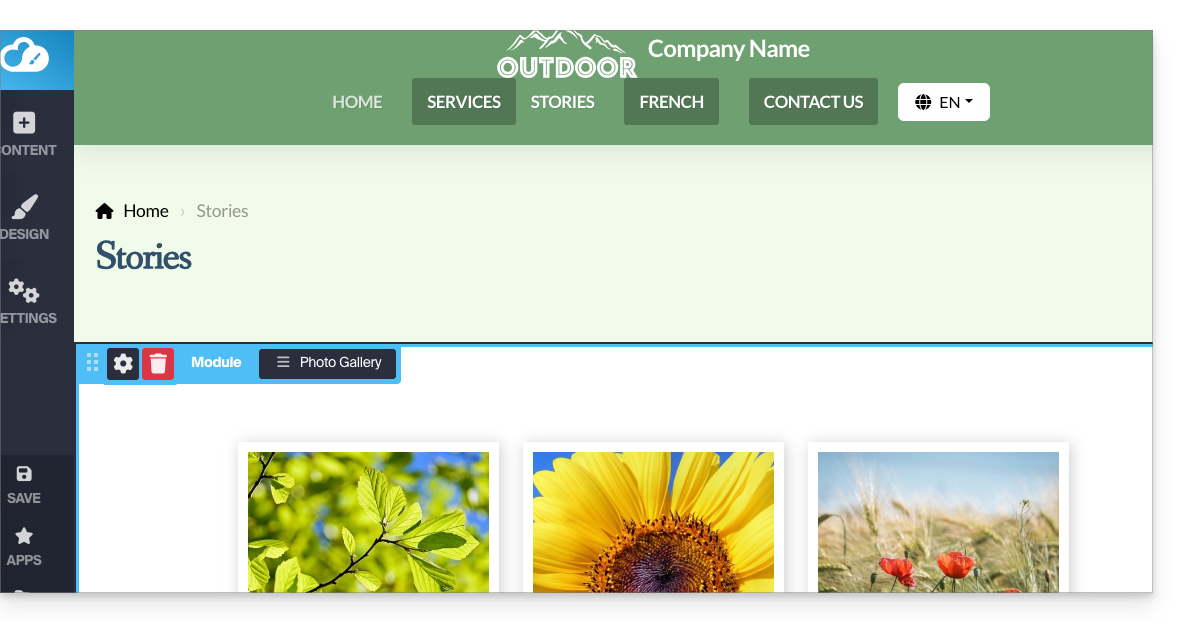
Configure the photo gallery
To do this:
- Hover over the module to access the gallery settings.
- Click on Edit:
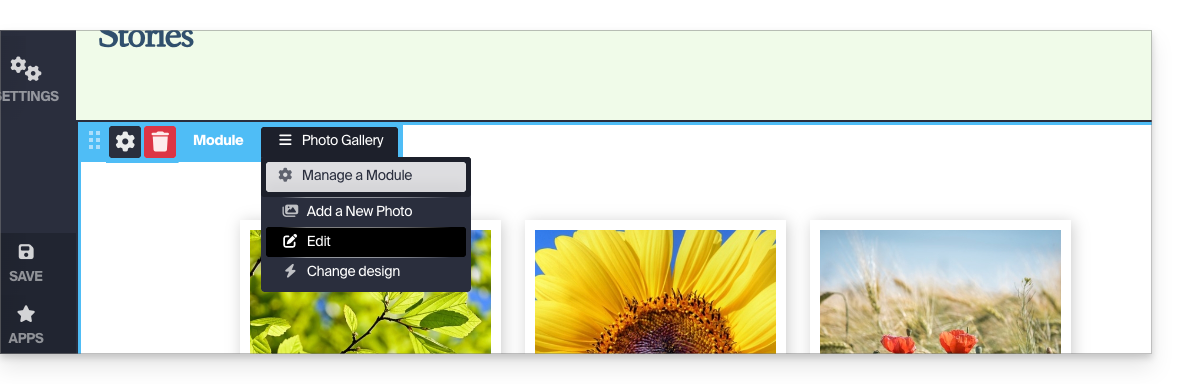
Photo albums
You can create additional photo galleries for your different albums: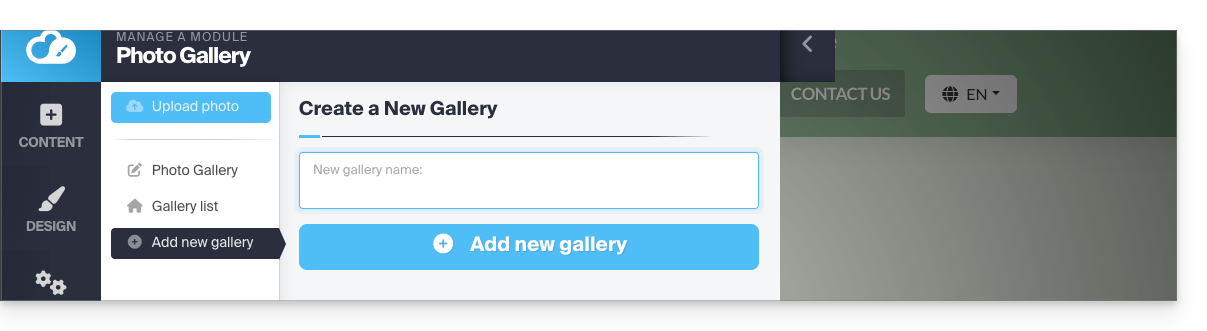
Change the order of photos
Once your gallery is created, each new photo you upload from your computer is added to the end of the photo list; you can easily change this order by dragging the photos with the mouse when editing a gallery: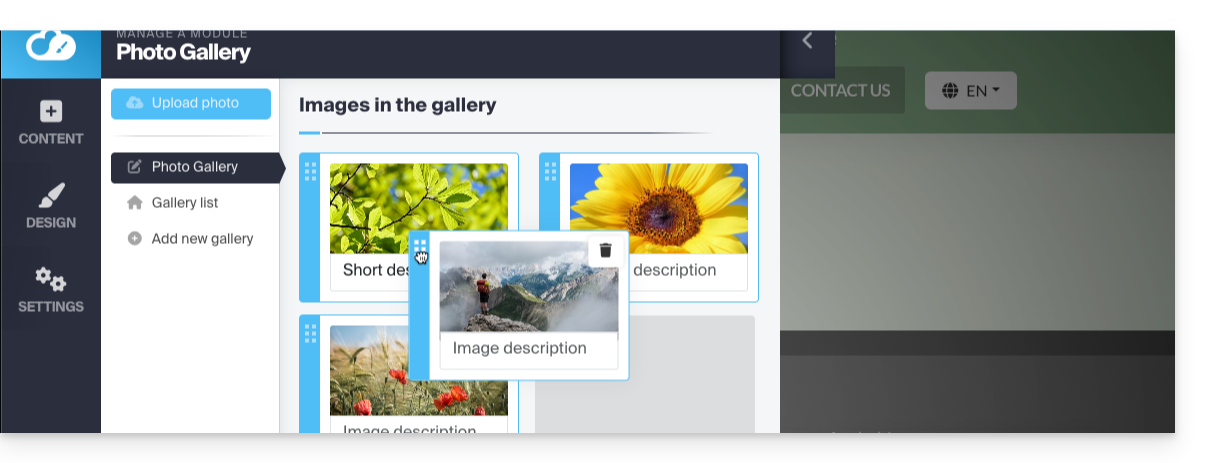
In addition, you can add a description to any of your photos; below each image, you will notice the "Image description" field. Start typing your description there and press the green button to save the changes: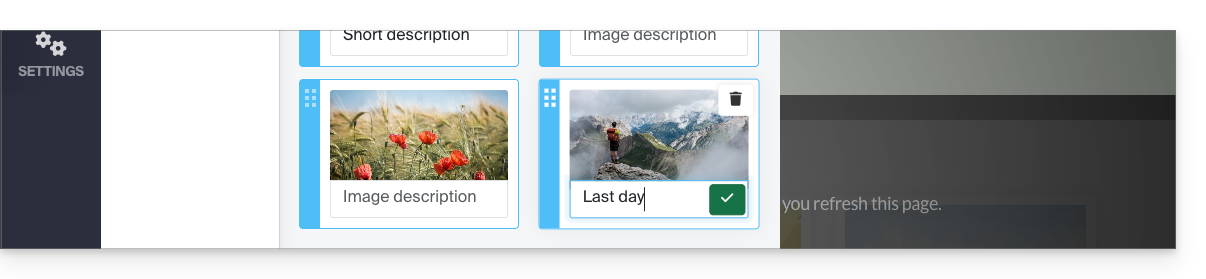
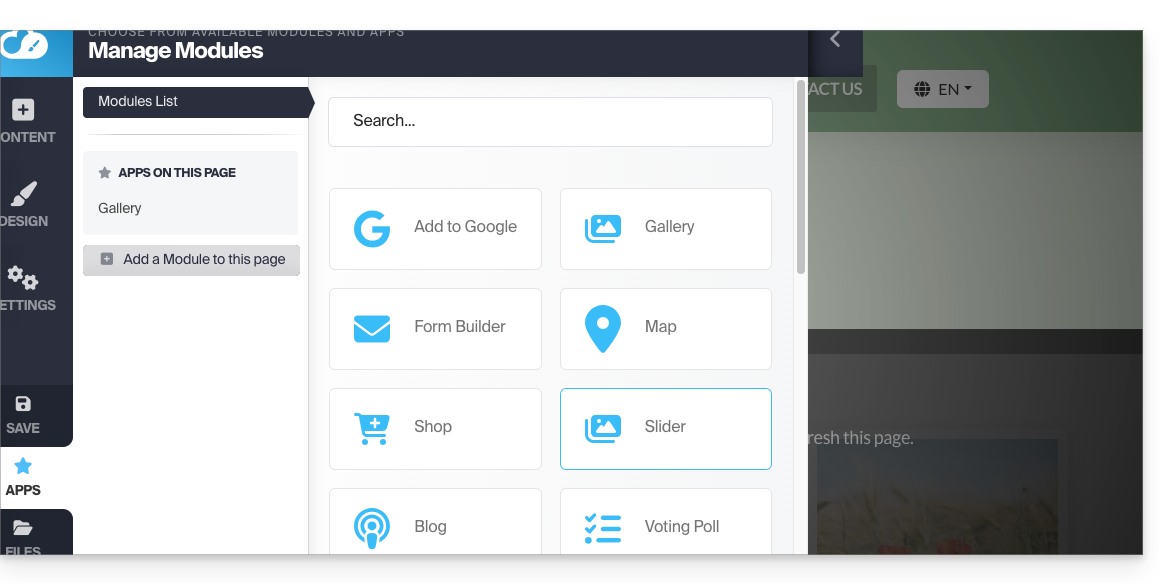
Add an image slideshow widget
To configure one or more dynamic Slider widgets, on which one or more photos will slide laterally (without any connection to the photo galleries described above):
- Click on the Applications button in the left-hand menu.
- Click on Slider:
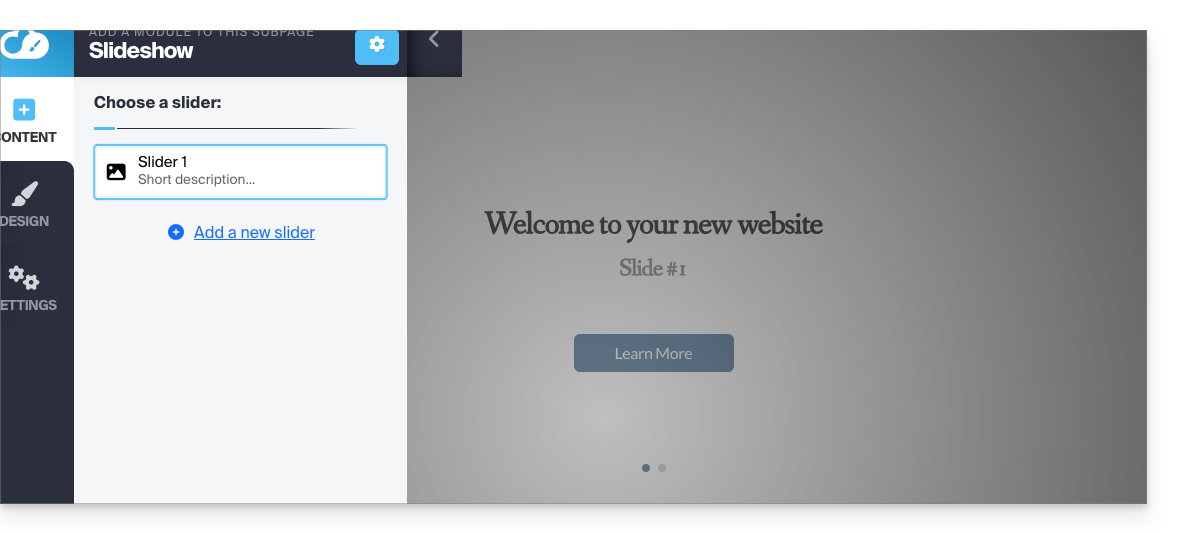
- Configure the widget according to your preferences.
- Insert the configured widget in the desired location by clicking on Content, then Apps, and choosing Slider:
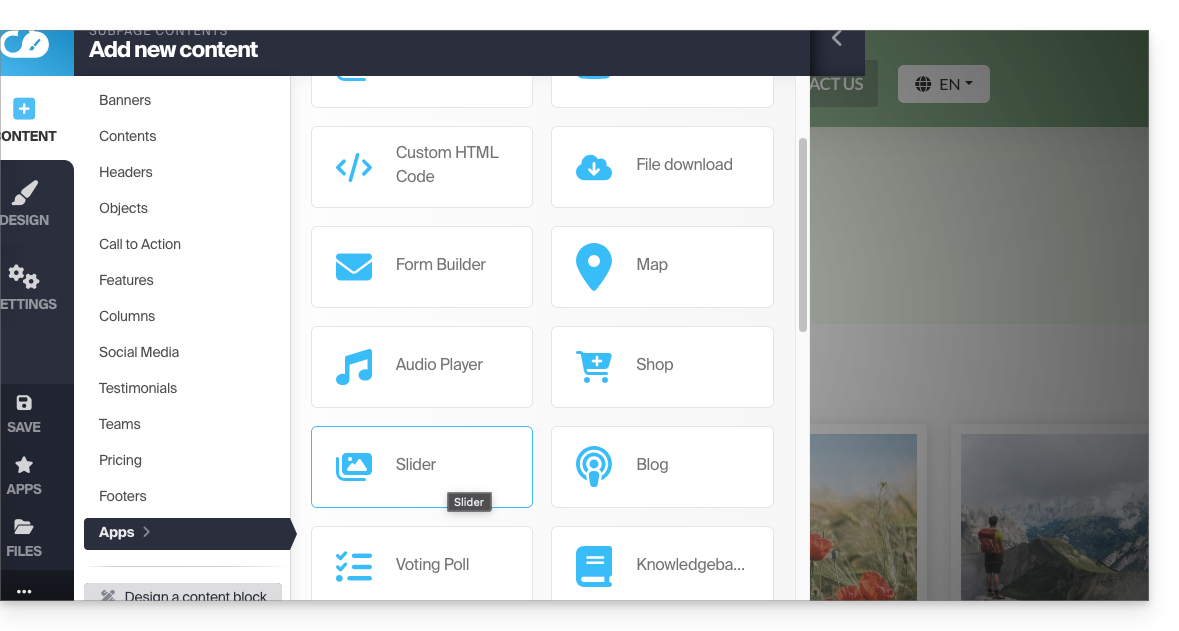
- Select the Slider you created to insert it on the page:
Link to this FAQ:
Has this FAQ been helpful?
This guide explains how to add and configure a blog module on your website created with Infomaniak Site Creator.
Introduction
- There is no functionality to manage multiple users on the Blog section (or on Site Creator).
- Several users from the same Organization who have access to Site Creator (via their web hosting access permission) can publish on the blog, but the author's identity will remain the same for all.
- It is possible to get help from the Euria artificial intelligence, as is the case on the rest of the Site Creator pages.
- Familiarize yourself with this other guide regarding the model used by the writing assistant and the responsibilities of each user.
Starting a blog on Site Creator
Prerequisites
- Access Site Creator:
- Click here to access the management of your product on the Infomaniak Manager (need help?).
- Click directly on the name assigned to the Site Creator in question.
- Click on the Edit my site button to start the editor:
Once in Site Creator, on the page where you want to insert your future blog posts:
- Click on the + button located below an already inserted block:
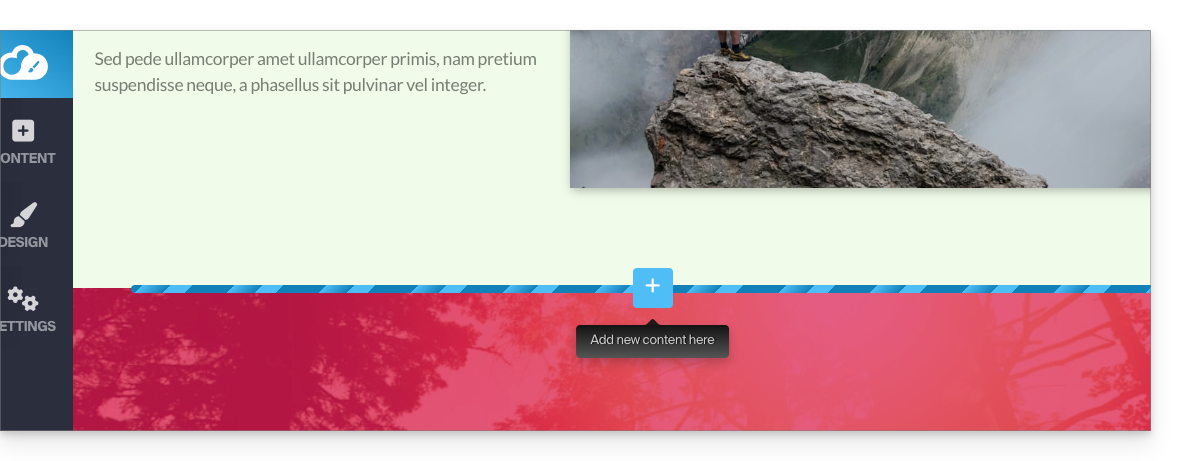
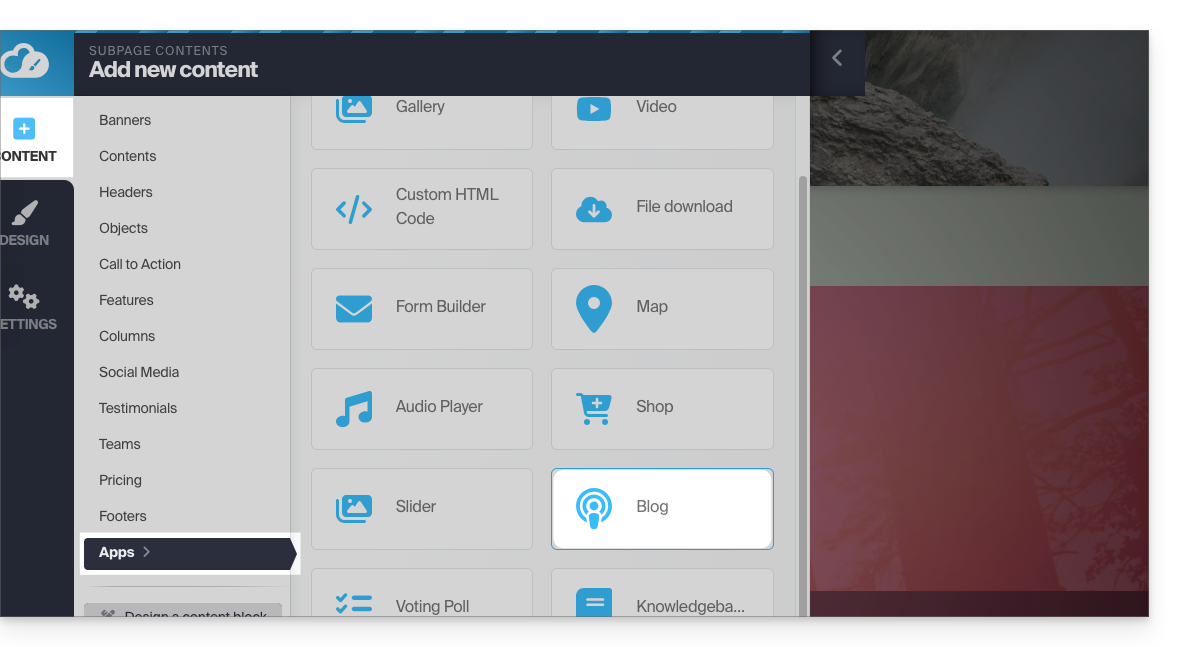
- Click on Applications (in the Content tab that opened when you clicked to add the visual block).
- Click on the Blog module:
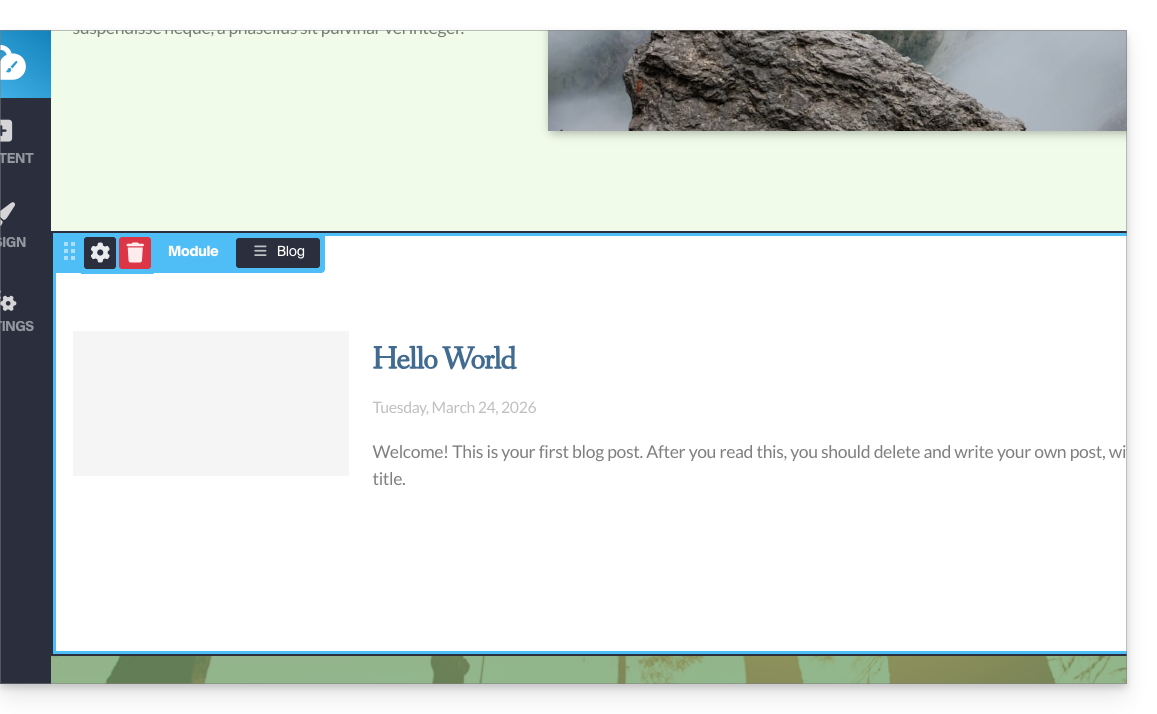
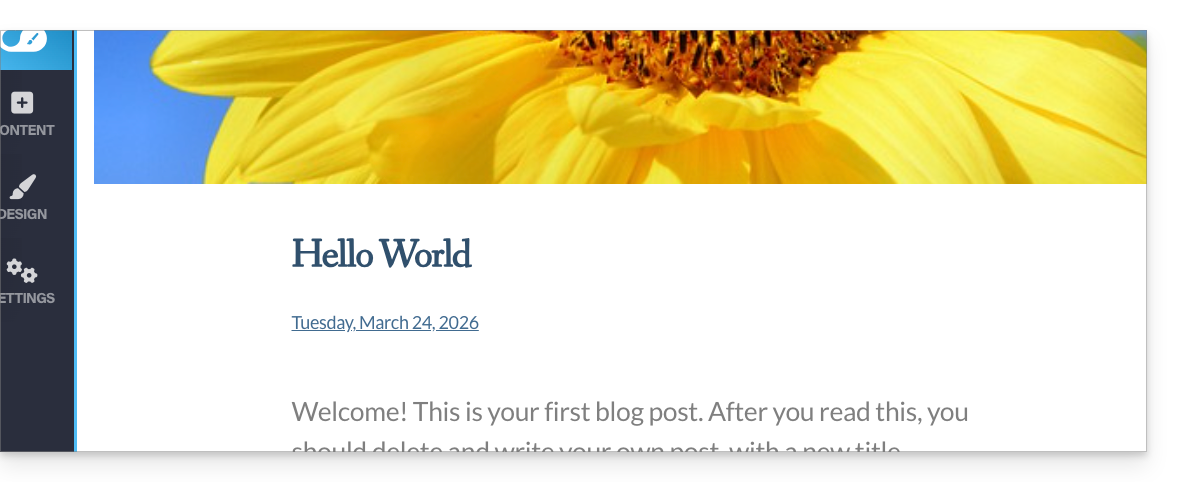
- If this is the first time you are inserting this module, you will get the following visual block with an example of the first published article (go to point 4 below):
- If you have already tested the Blog module before and removed it from your pages, you will get this:
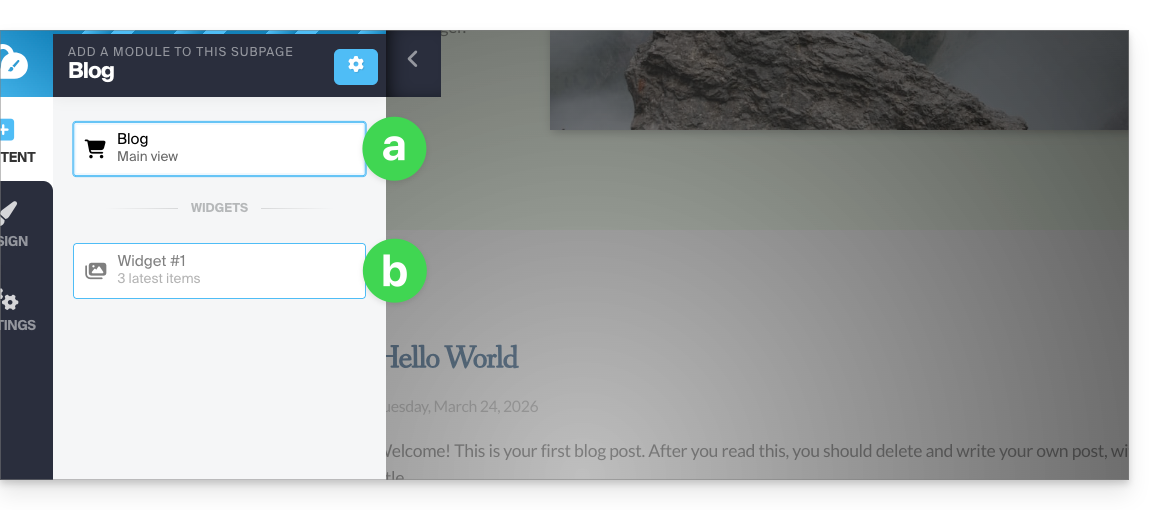
- Press the top option to insert the main block.
- Press the second option to display a block with the 3 most recent published articles only if you already have a main block inserted elsewhere on the site.
- If this is the first time you are inserting this module, you will get the following visual block with an example of the first published article (go to point 4 below):
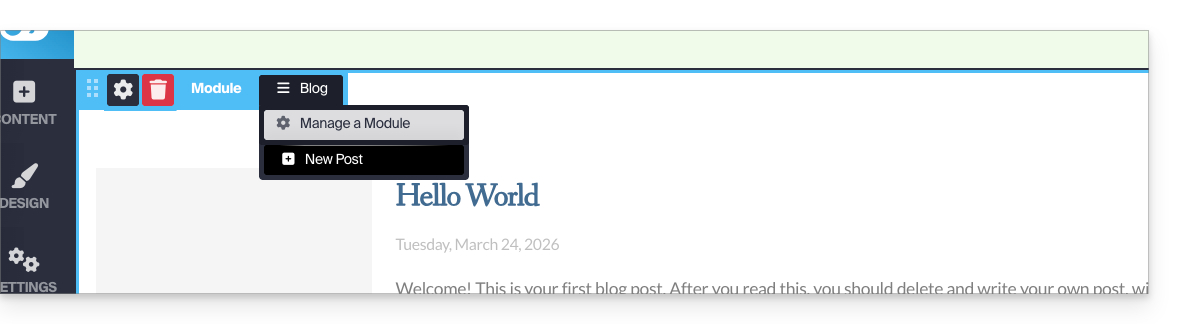
- Once the Blog module is inserted, hover over the block and click on the menu button with three horizontal lines ☰ Blog, then click on New article to insert a blank article:
Publish content using artificial intelligence
To write content and, if necessary, improve your drafts:
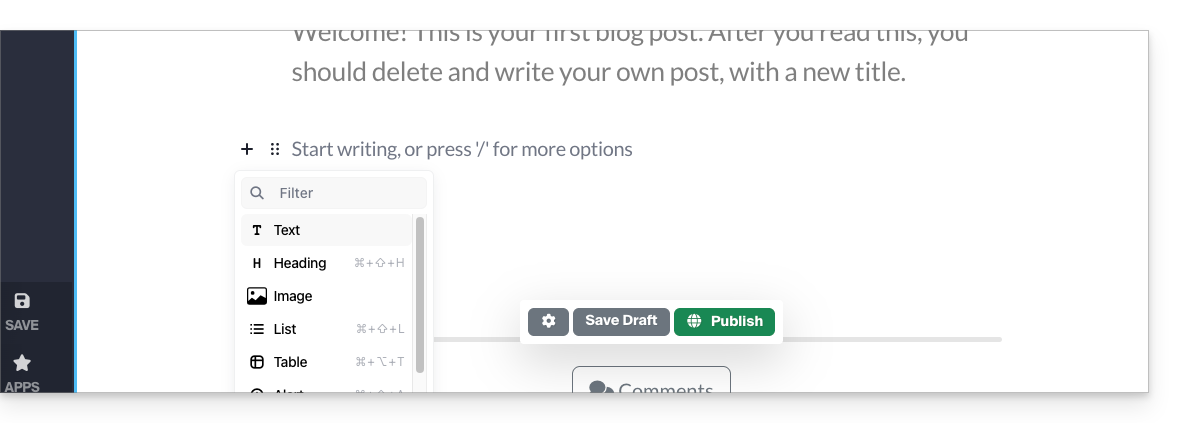
- Choose an image for the banner, enter a title, an optional subtitle, and the body of the article with different formatting options:
- Press the + sign next to the article text or use the Tab key on your keyboard:
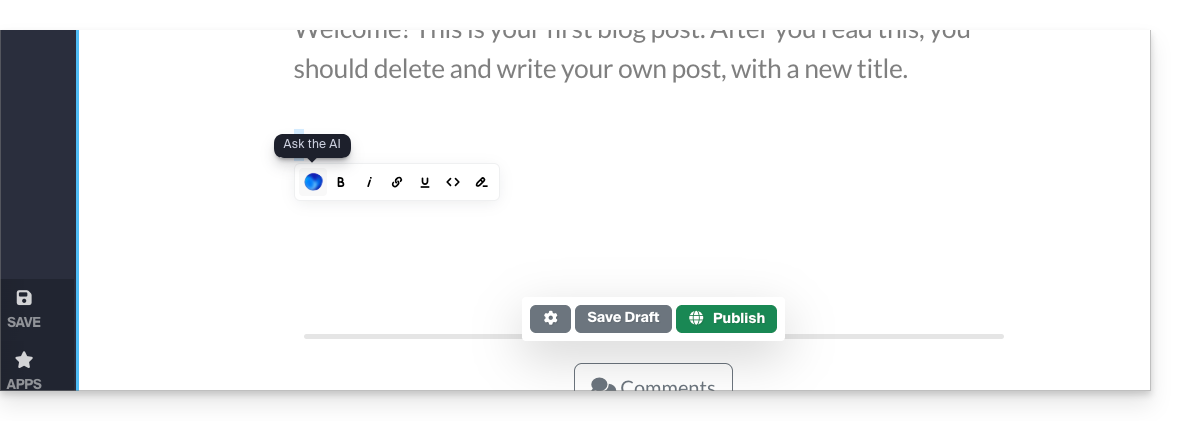
- Select the content and click on it to display a text formatting toolbar.
- From this toolbar, access the AI-powered features (translation, rewriting, correction, etc.):
- Publish by clicking the Publish button (or save the draft for later).
Edit the blog
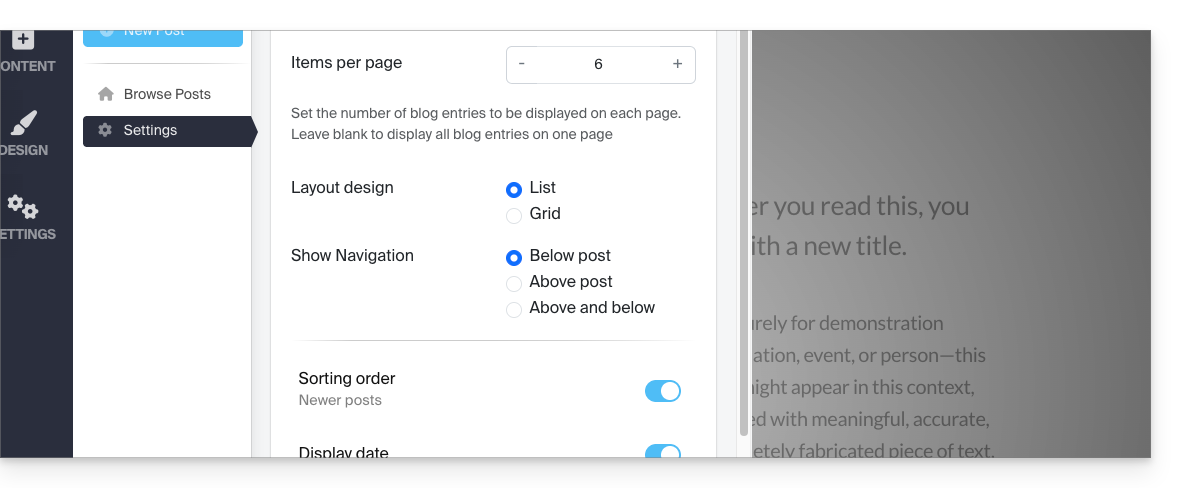
To enable comments, email notifications, list layout, and sorting, etc.:
- Click on Applications in the left-hand menu.
- Click on Blog.
- Click on Settings and adjust your preferences, remembering to save at the bottom of the page:
Edit blog posts
No matter where you are when editing your site, simply go to the Applications menu in the bottom left corner, then click on Blog: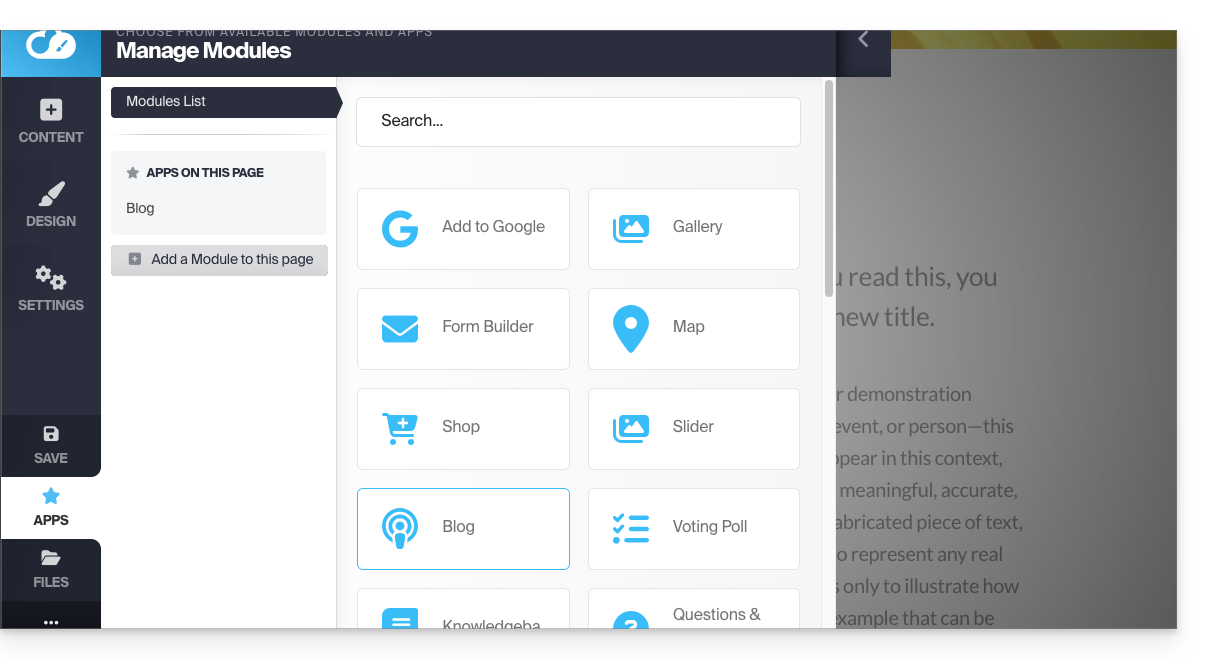
To edit the content of your article, click on Browse articles in the left-hand menu, hover over, and click on the pencil icon ✎: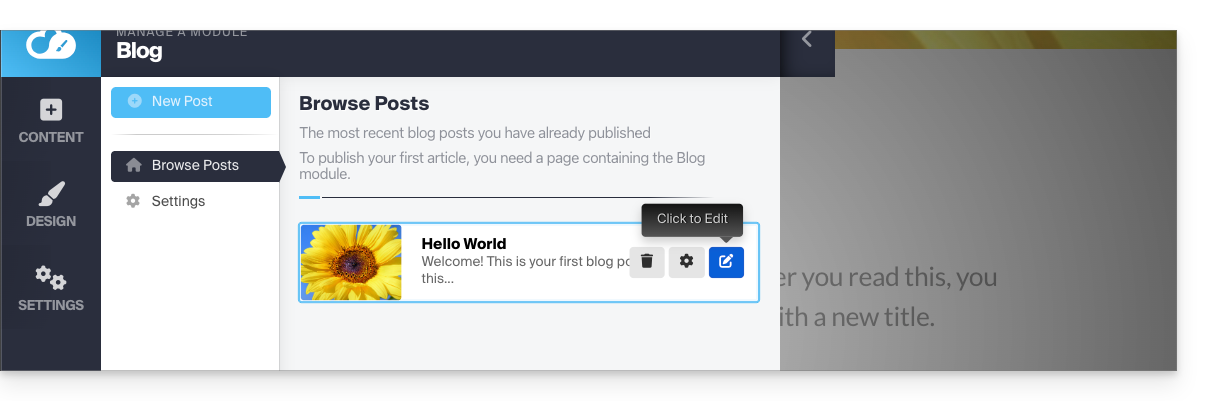
To configure (see below) one of the articles, hover over and click on the gear icon: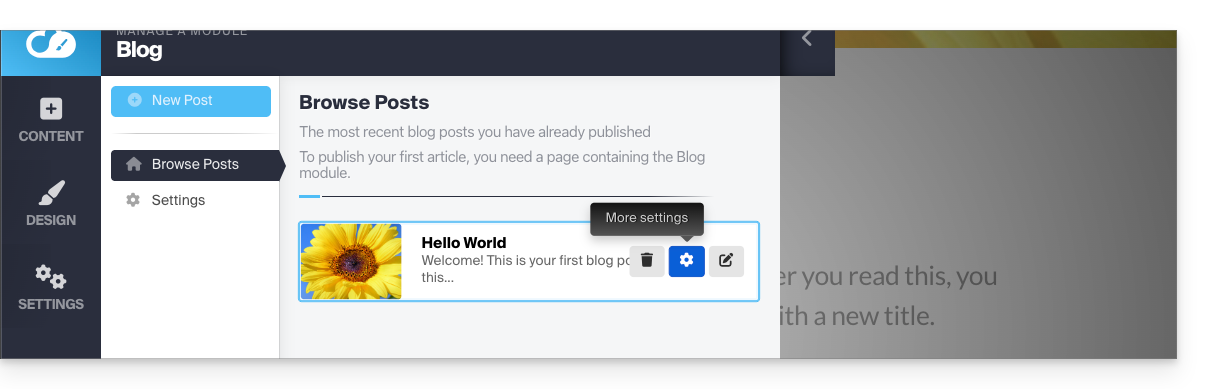
Tag, archive, or expire an article
A blog article can disappear from your list of articles either by giving it an expiration date or by archiving it immediately. It is also possible to add a tag that will be clickable for the visitor and will thus facilitate navigation within the posts:
Don't forget to save the changes at the bottom of the page.
Article date
By default, new blog articles will be added with the "today" date, but it is possible to change it:
- Hover over and click on the date link (directly on the article):

- Choose a new date.
Link to this FAQ:
Has this FAQ been helpful?
This guide for Infomaniak's Site Creator covers the topic of browser cookies.
Introduction
- By default, when your website is new, no cookies should be stored on your visitors' devices, and there are no tracking features for advertising or marketing.
- As a website administrator, some data is stored in your own cookies (such as information indicating that you are a website administrator).
- If you add applications/modules integrated into your website, cookies may be used; for example, with the Poll Form: if you add a poll module to your website, it will use cookies when the website visitor votes (to remember that they have already voted).
Notification for the visitor
Prerequisites
- Access Site Creator:
- Click here to access the management of your product on the Infomaniak Manager (need help?).
- Click directly on the name assigned to the Site Creator in question.
- Click on the Edit my site button to start the editor:
You can enable a cookie consent message that will appear in a small pop-up window at the bottom of the screen for all new visitors to your site:
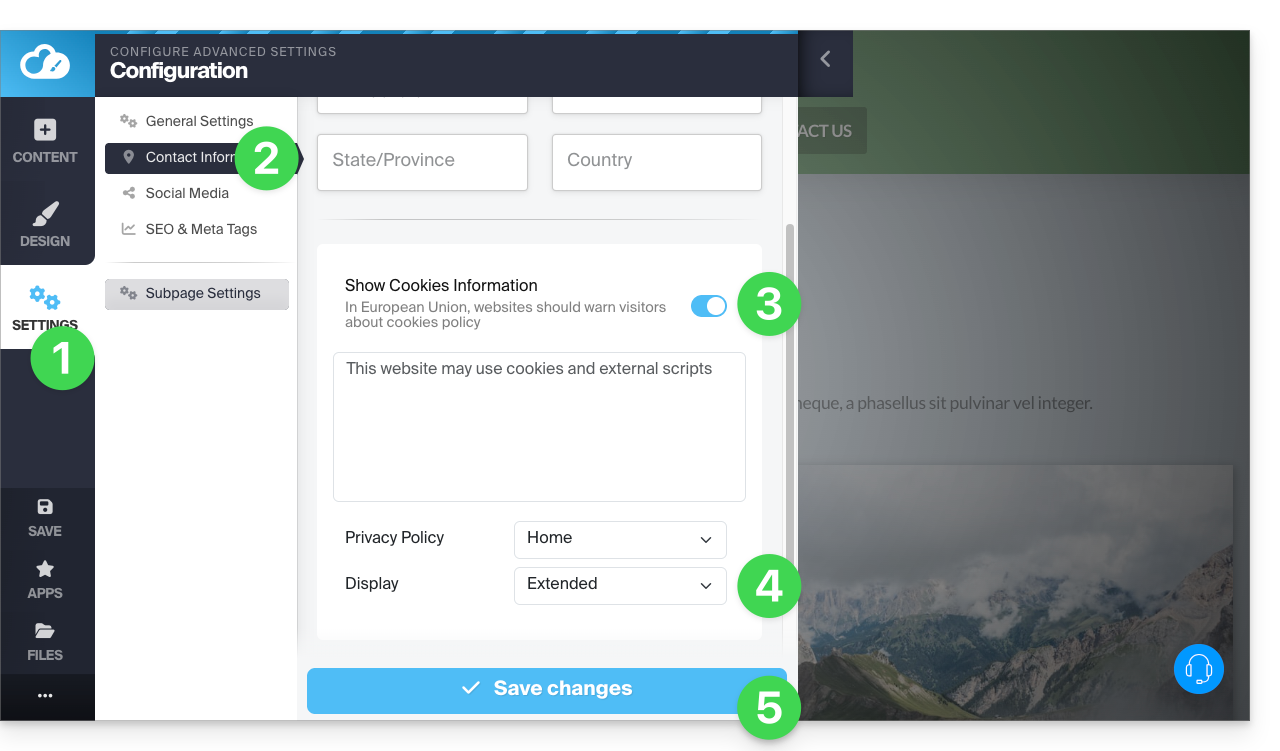
- Click on the Settings button in the left-hand menu.
- Click on Contact Information under Website Configuration.
- Enable the cookie information option to configure the brief message and the URL for additional information.
- Set the display type to expanded or not (see below).
- Save the changes at the bottom of the page:
Additional Settings
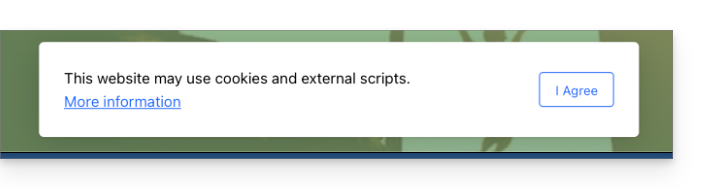
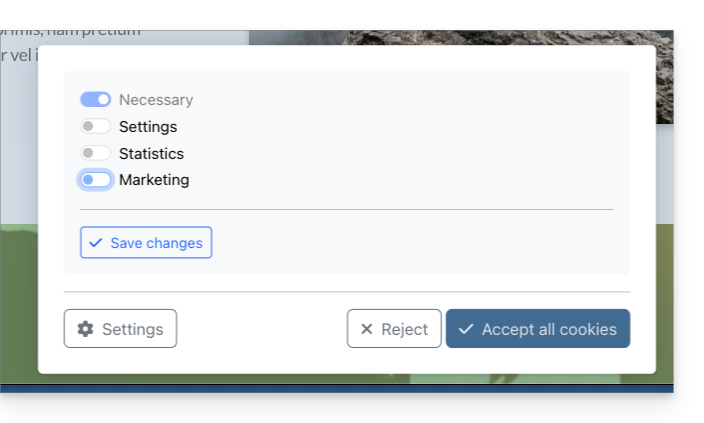
The consent message can be set to default or expanded when you click on Display. The result is as follows:
- default:
- expanded:
Link to this FAQ:
Has this FAQ been helpful?
This guide explains how to avoid directly publishing changes to a page in Infomaniak's Site Creator.
Introduction
- Draft mode prevents the following changes from being published:
- Adding a new content block via the Content menu.
- Making visual or textual changes to a content block.
- Deleting a content block.
- Draft mode does not apply to:
- Global design changes, via the Design menu (colors, fonts, etc.).
- Content changes related to applications (Q&A, e-commerce, etc.).
- Changes to global settings, via the Settings menu (Pages, languages, etc.).
- Subpages of the page you are unpublishing.
1. Save without publishing
Prerequisites
- Access Site Creator:
- Click here to access the management of your product on the Infomaniak Manager (need help?).
- Click directly on the name assigned to the Site Creator in question.
- Click on the Edit my site button to start the editor:
You can put a page into draft mode to make text or other content changes that will not be visible live, until you decide to switch the site back to direct publishing mode:
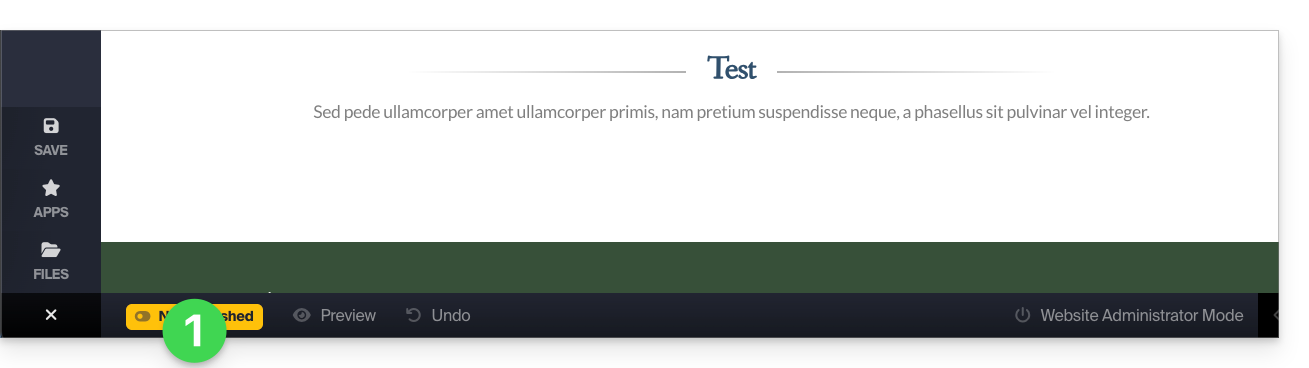
- Click on the ... button at the very bottom of the left-hand menu to expand the publishing and preview options.
- Click on Live to switch to Unpublished mode:
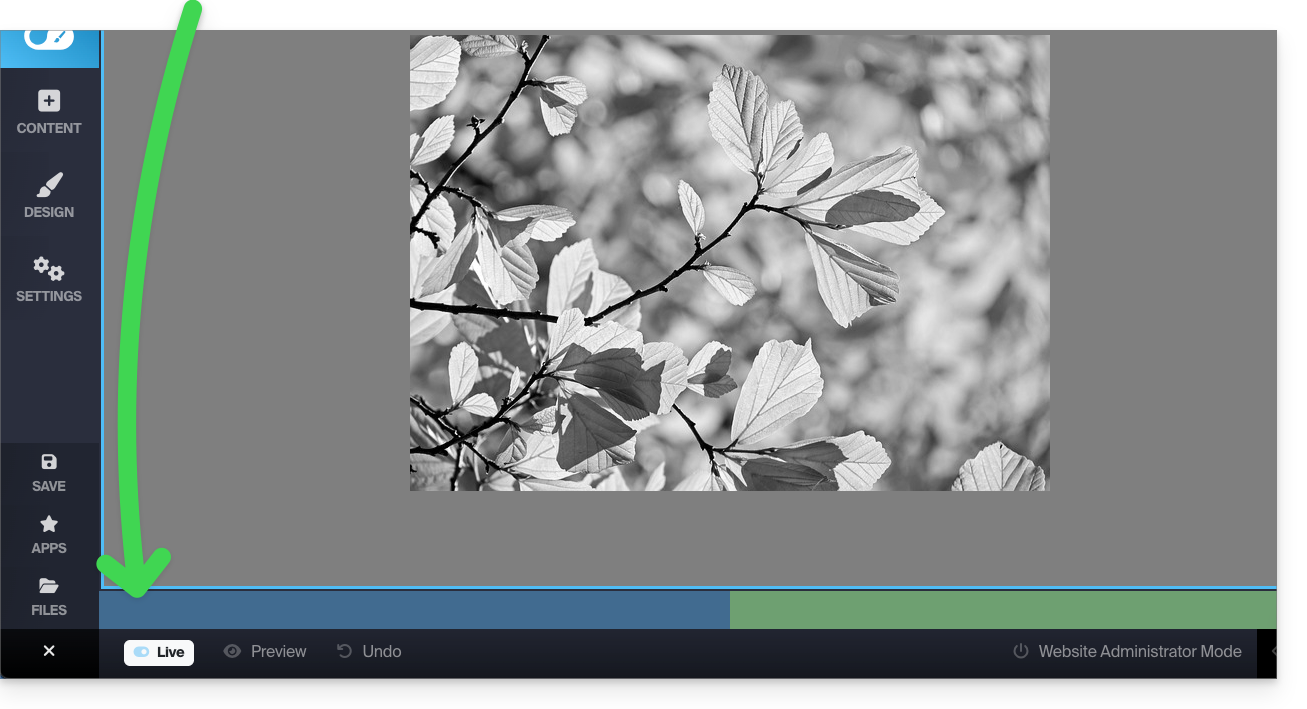
- Now, the yellow mode displayed at the bottom indicates that all your changes (on this page only) will not be visible in real time (unlike Live mode) because they will not be published automatically:

- Changes will be saved as a draft even if you leave the page or the editor…
- In draft mode, you can work on the page, add text, save it, leave, and come back to continue editing, and this work will not be published until you explicitly decide to (see below):
- Depending on the changes made (e.g., adding a content block), remember to edit the text to validate your changes and save them.
- To check and confirm that your current changes are not being published as you go, simply go to your site's address from another browser page in incognito mode, for example.
2. Publish the changes or delete the draft
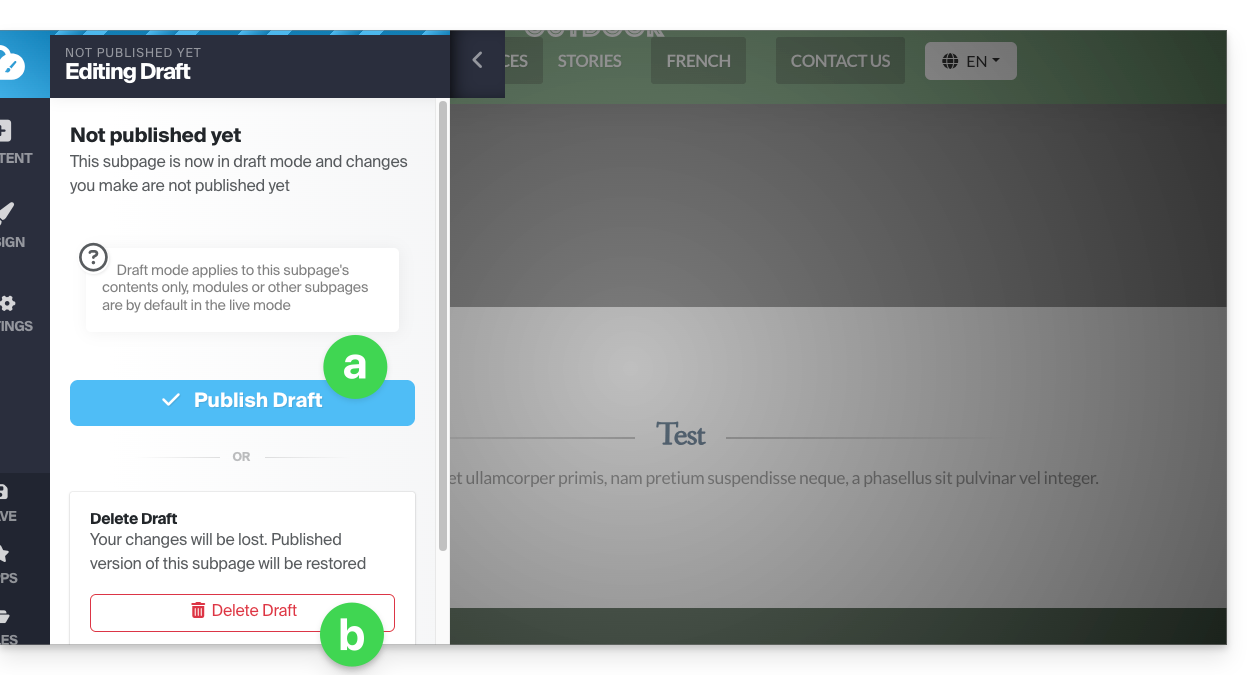
You can exit Draft mode to return to instant publishing:
- When Unpublished mode is active, click the yellow button in Unpublished mode to display a settings panel:
- The settings panel opens, allowing you to:
- publish your changes,
- or delete the current draft and return the page to its initial state:
Example
- With Live mode (visible at the bottom of the screen), any changes are immediately visible to visitors of the page.
- With Unpublished/Draft mode (identifiable by a yellow symbol at the bottom of pages in this mode), your changes are not visible in real time.
- Leave the page to work on another page; the mode reverts to the default mode, i.e., Live mode, because the page is different, and the mode only applies to the selected pages.
- Return to the page that was put into draft mode; a symbol at the bottom of the page always indicates that draft mode is active.
- Click on it to choose to publish or delete the changes and restore the page to how it was before your changes in draft mode.
Link to this FAQ:
Has this FAQ been helpful?
This guide details how to use media in Infomaniak's Site Creator.
Please note that it is also possible to insert other elements, such as an Infomaniak Newsletter signup form.
Prerequisites
- Access Site Creator:
- Click here to access the management of your product on the Infomaniak Manager (need help?).
- Click directly on the name assigned to the Site Creator in question.
- Click on the Edit my site button to start the editor:
Add an image
Media is managed in the file library:
- Add a new content block:
- The media can then be replaced or supplemented:
But also:
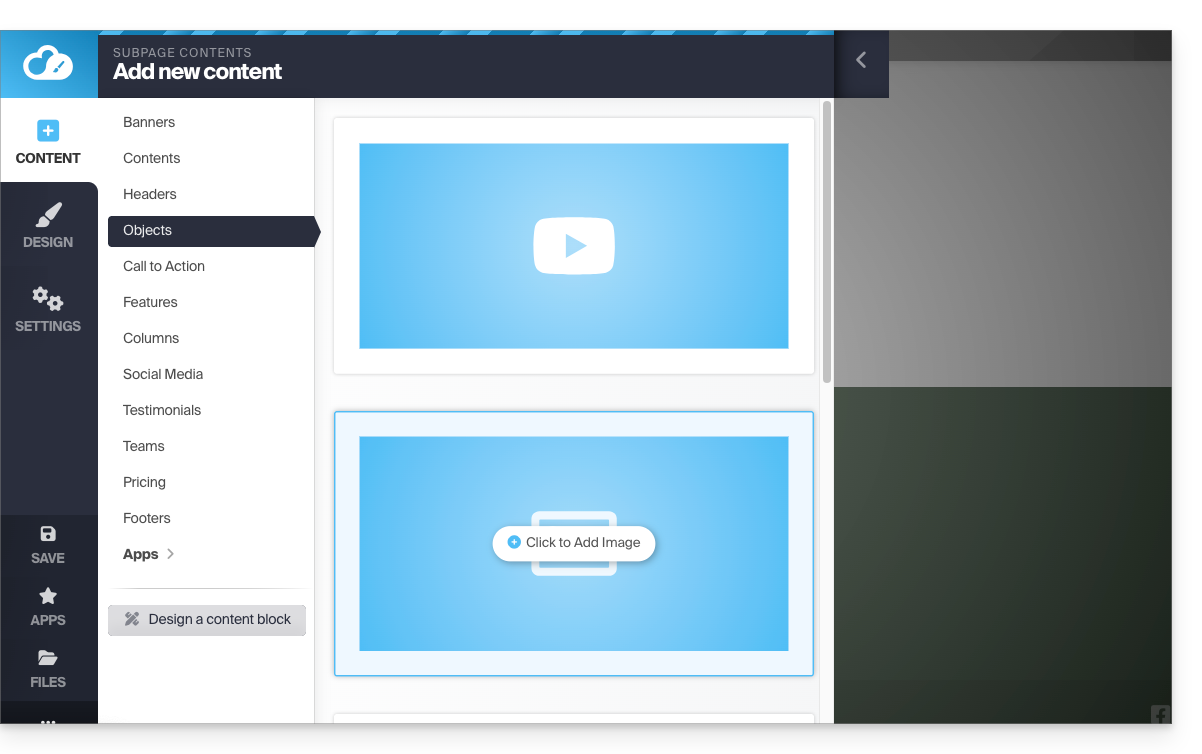
- Click on the Content button in the left-hand menu.
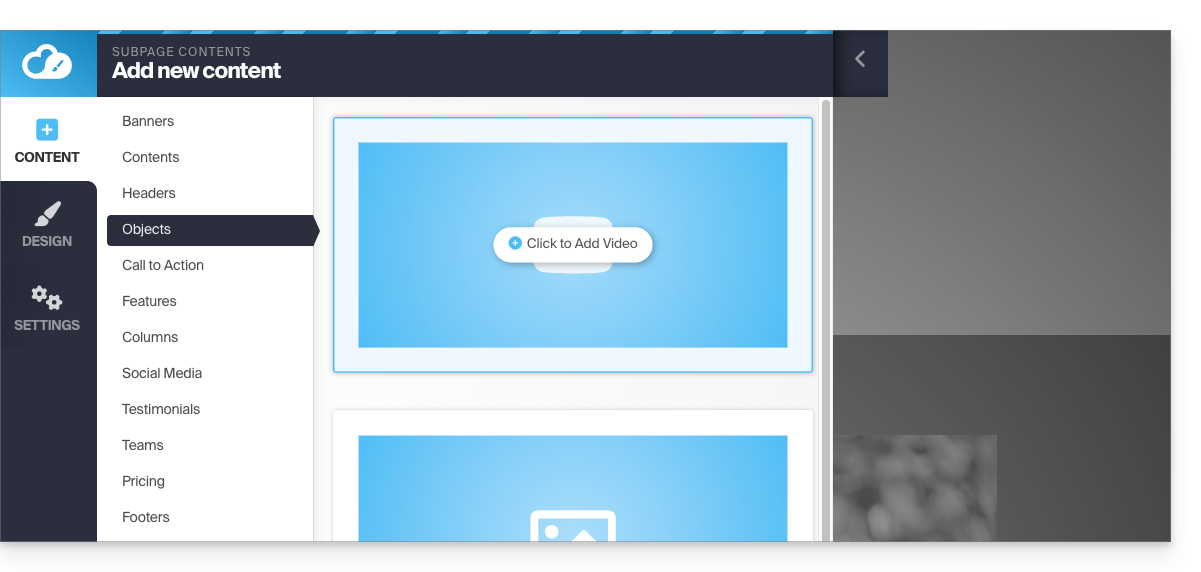
- Click on Objects in the list to insert a single image.
- Click on the IMAGE block on the right:
- Once the image is added, you can also make it a clickable link or change its size in the image editor:
You can also add images as a Photo Gallery module.
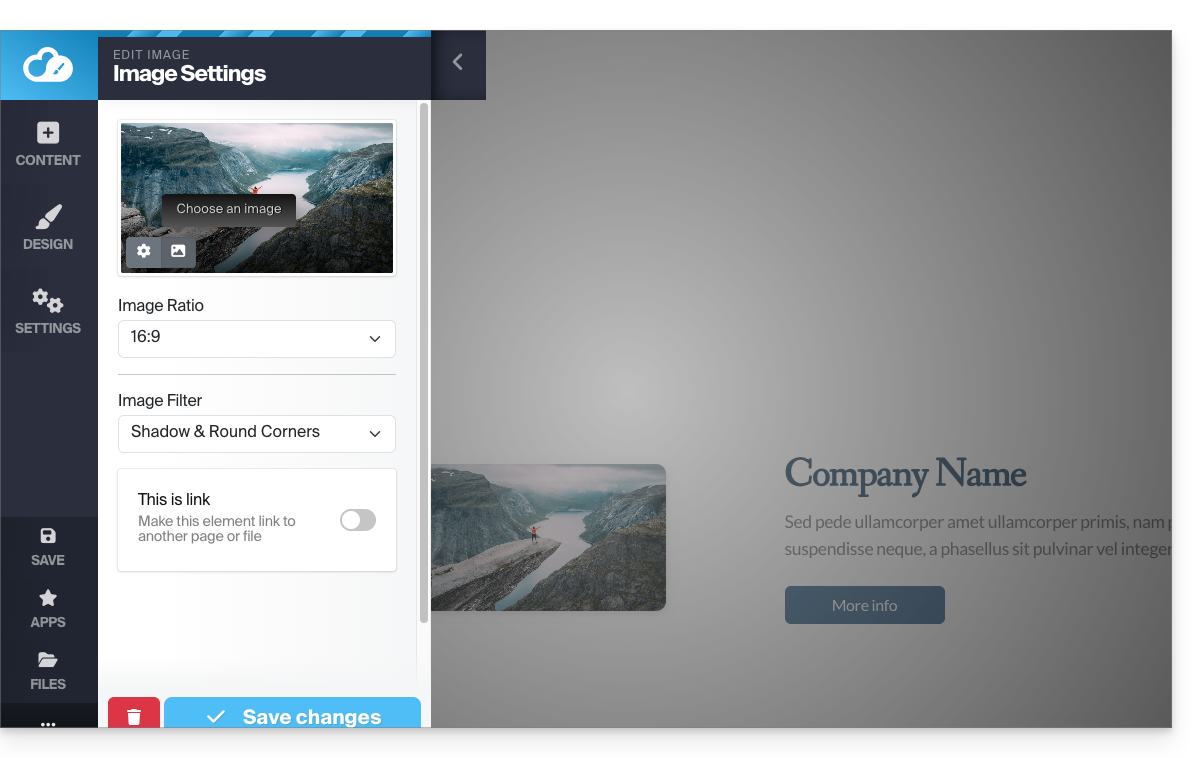
Change image
To replace an inserted image, which will retain the characteristics of the previous one:
- Click on an image to edit it.
- Click on the button of the type Photo Frame on the image thumbnail to be able to select a new image that will replace the previous one:
Add a video
To add a video:
- Click on the Content button in the left-hand menu.
- Click on Objects in the list.
- Click on the VIDEO block on the right to insert a video in full width:
You can also apply a link to an image using a YouTube video as the URL: this will automatically create a PLAY-type icon that, when clicked, will open the video in a lightbox-type window.
Add an audio file
To add a sound file:
- Click on the Content button in the left-hand menu.
- Click on Applications at the bottom.
- The available content is displayed on the right.
- Click on the audio player to insert it into the page and choose the files:
You can customize it further using the HTML editor.
Add a file to download
To easily offer a file for download:
- Click on the Content button in the left-hand menu.
- Click on Applications at the bottom.
- The available content is displayed on the right.
- Click on the File Download widget to insert it into the page:
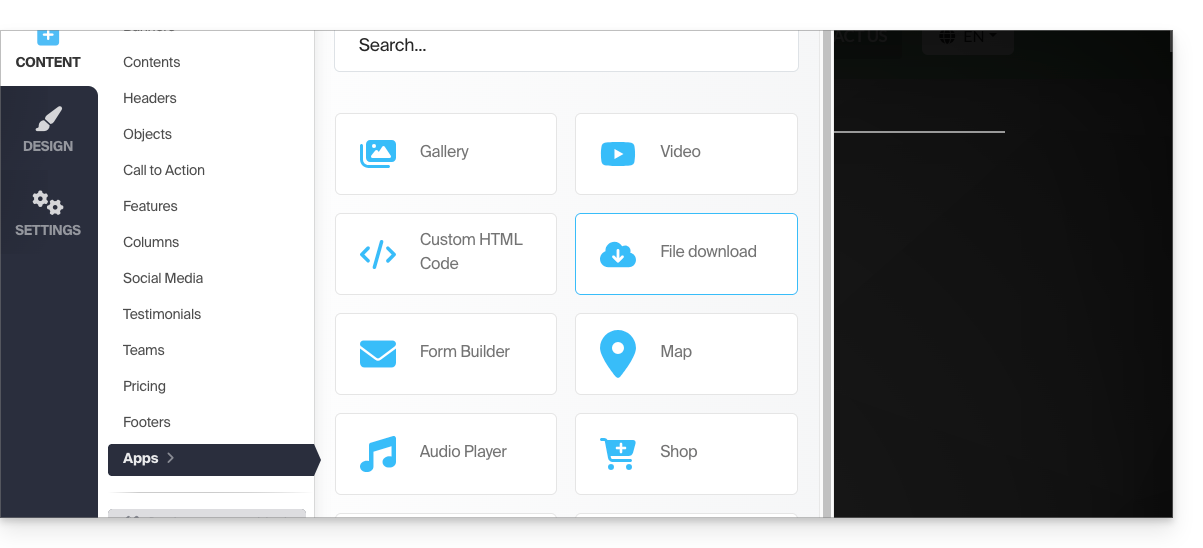
- Select the file from the library that your visitors will be able to download.
Link to this FAQ:
Has this FAQ been helpful?
This tutorial presents the creation of navigation menus for your site built with Site Creator Infomaniak, as well as their composition, styles, and parameters.
Prerequisites
- Access Site Creator:
- Click here to access the management of your product on the Infomaniak Manager (need help?).
- Click directly on the name assigned to the relevant Site Creator.
- Click the Edit my site button to launch the editor:

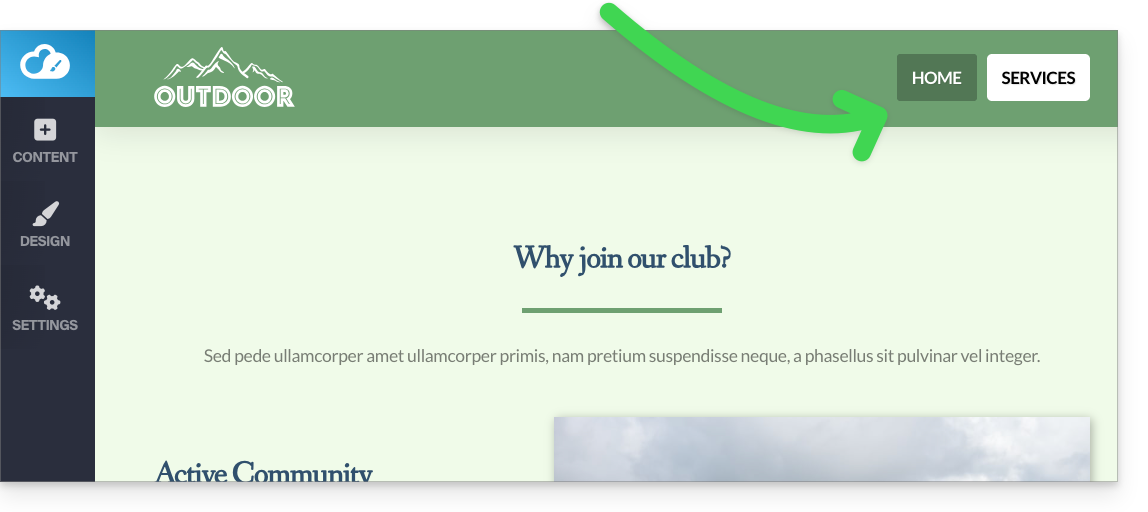
The different navigation menus
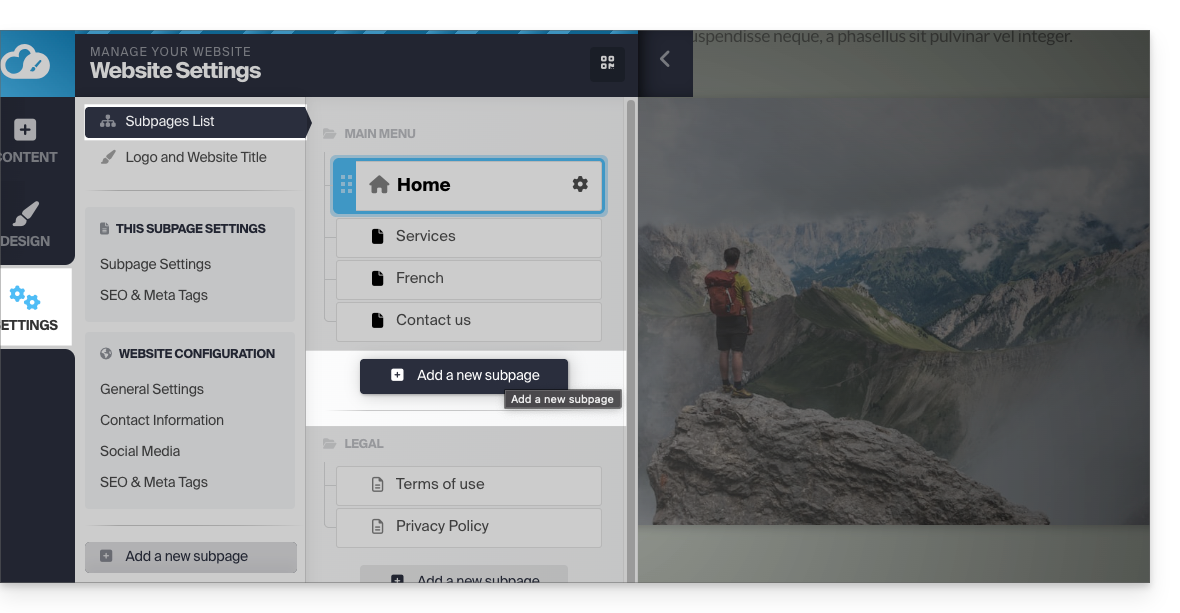
The different pages that make up your site can be accessible within one or more navigation menus:
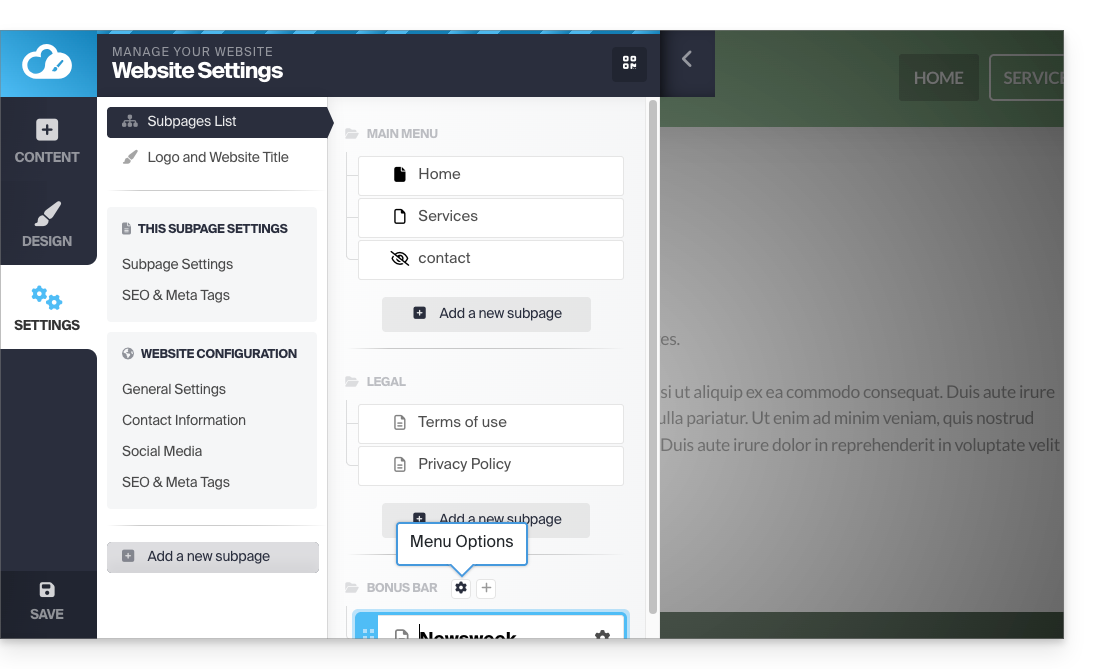
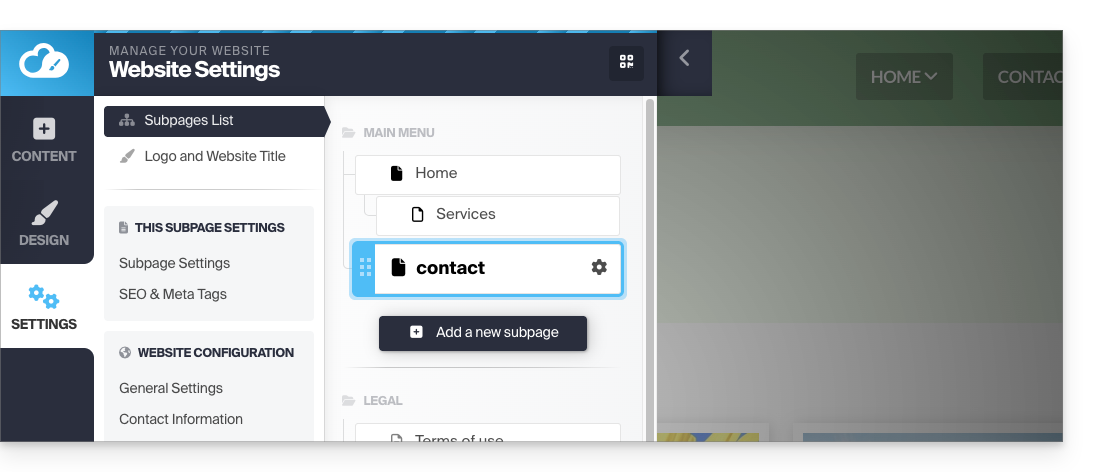
- Click the Settings button in the left sidebar.
- By default, the list of your pages appears, classified into 2 main sections: MAIN MENU and LEGAL:
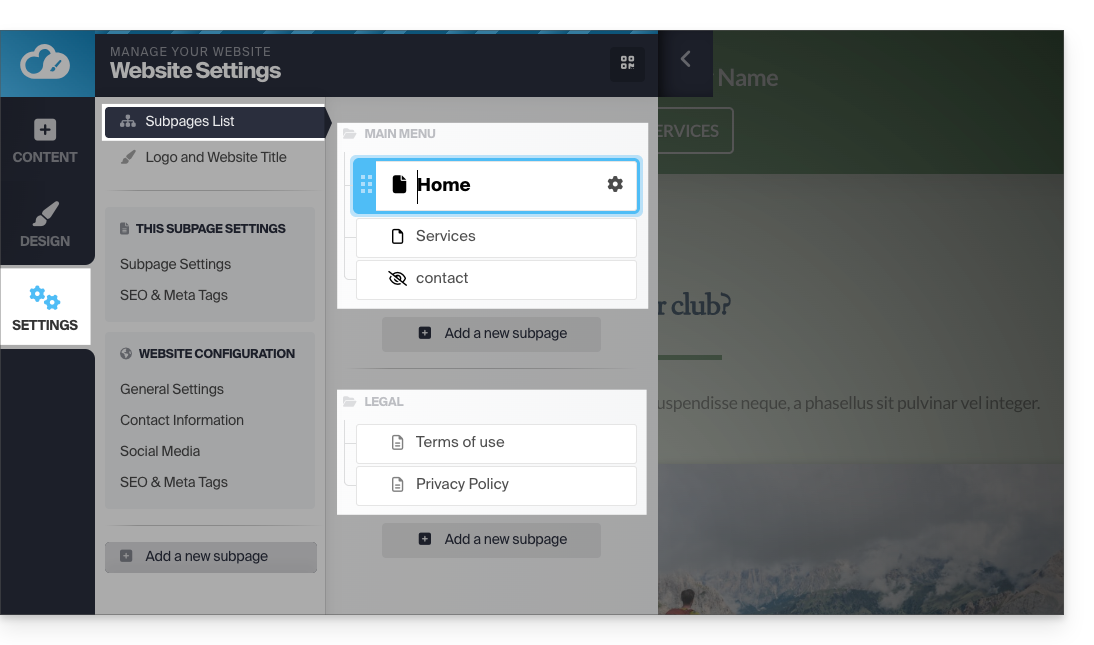
But you can add several more.
These menus with the pages they contain are then reused in different places on your site, depending on the chosen theme, among others:
- You will often find the main menu placed at the top of the page:
- and the other menus will be automatically proposed in the footer:

Manage menus
Add a new menu
To do this:
- Click the Settings button in the left sidebar.
- Hover over a menu title in the existing hierarchy.
- Click the "+" icon that appears on hover:

You can manage the presence of the menu in the site map or delete it (along with all its pages):
- Click the Settings button in the left sidebar.
- Hover over a menu title in the existing tree and click on the gear icon that appears on hover:
- Choose the desired settings and validate at the bottom of the page:

Refer to this other guide to not display any menu at all.
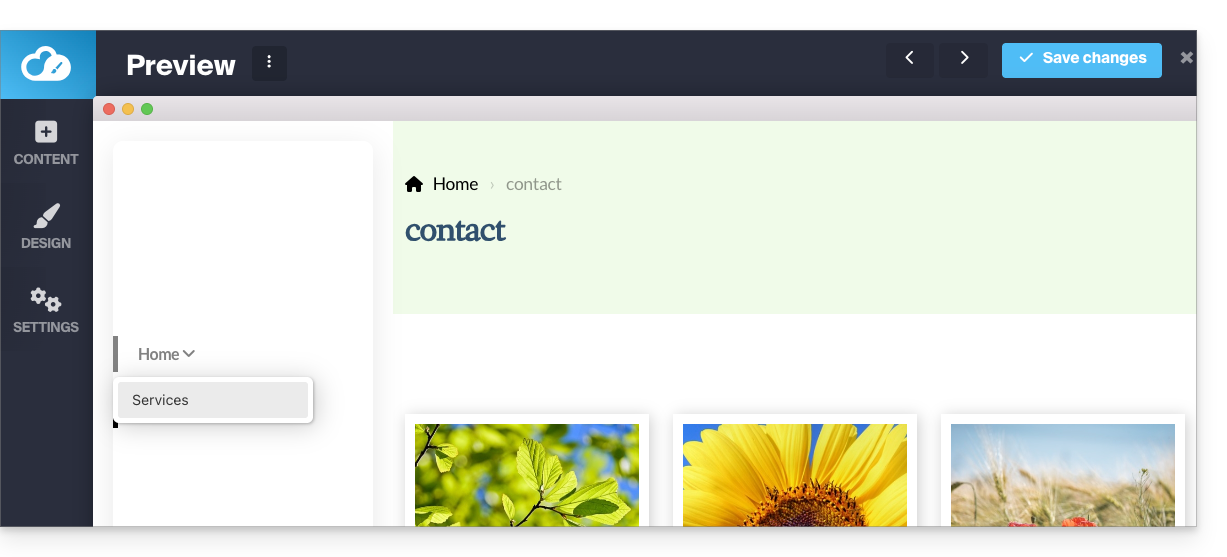
Create a sub-element in a menu
To do this:
- Click on the Settings button in the left sidebar.
- The list of your pages appears.
- With the mouse, move a page slightly to the right under another page:
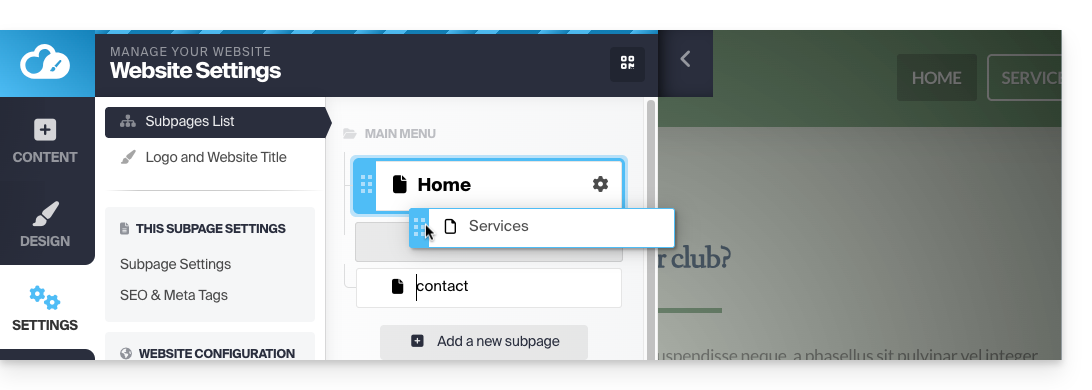
- It will become a sub-page and your site menu can display the created tree:

- Also refer to the tip below...
- It will become a sub-page and your site menu can display the created tree:
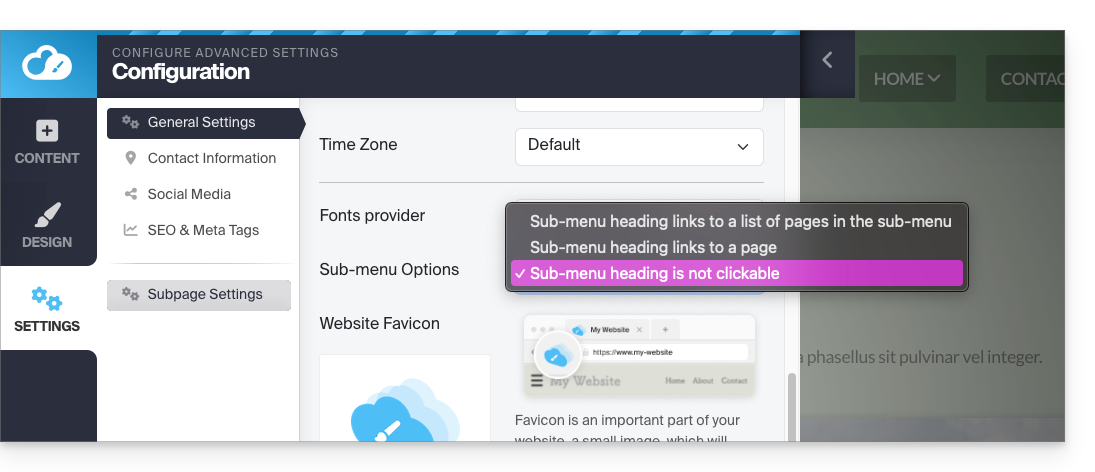
Non-clickable menu title
If necessary, choose not to make the very first element of a menu with sub-menu elements clickable (as configured above):
Note, changing this parameter, while the Home element of your menu has a sub-menu, disables the ability to edit the site from the home page when you display the page.
- Click the Settings button in the left sidebar.
- Click on General Settings to modify this setting under Sub-menu Options:
Menu element containing a link to another website
To do this:
- Click on the Settings button in the left sidebar.
- The list of your pages appears.
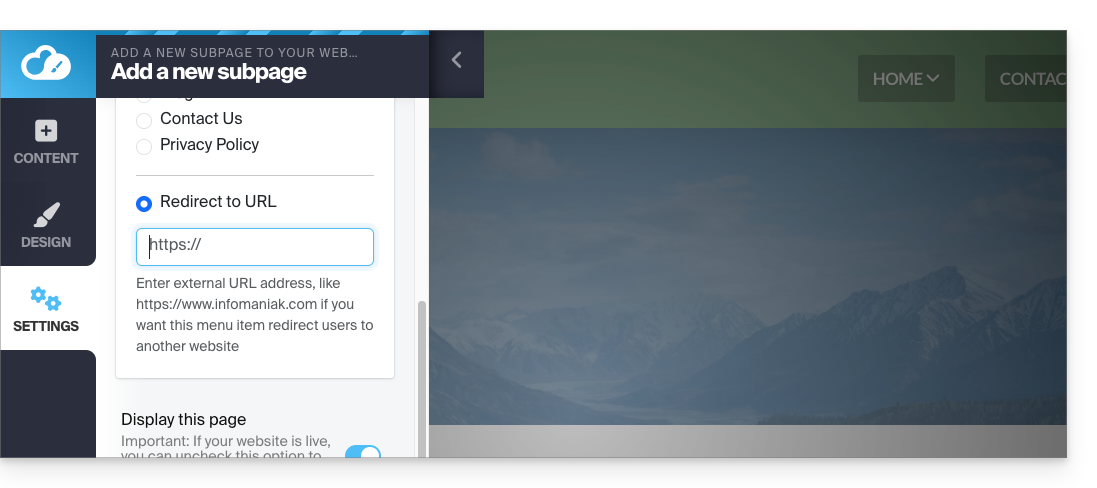
- Click on the Add a Page button below the existing tree:
- Enter a page name and click on Show more options.
- Choose the URL redirection to specify the destination upon clicking:
Additional top menu
To display a "menu bar" at the very top of your page:
- Click on the Design button in the left sidebar.
- Click on More settings.
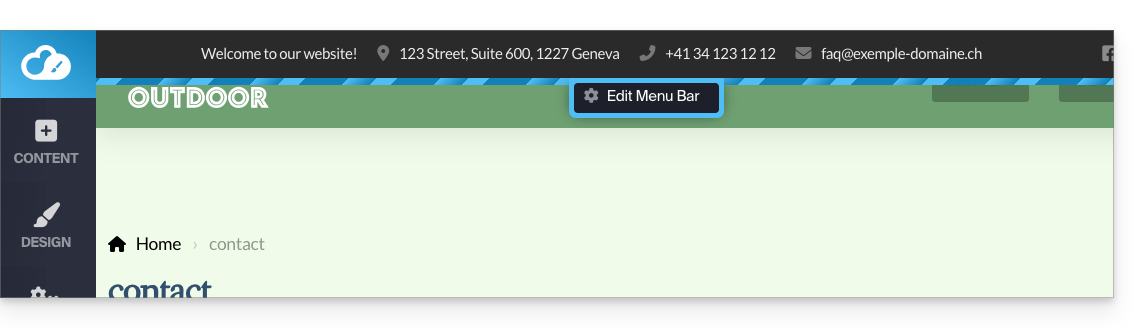
- Activate the Header Menu Bar:
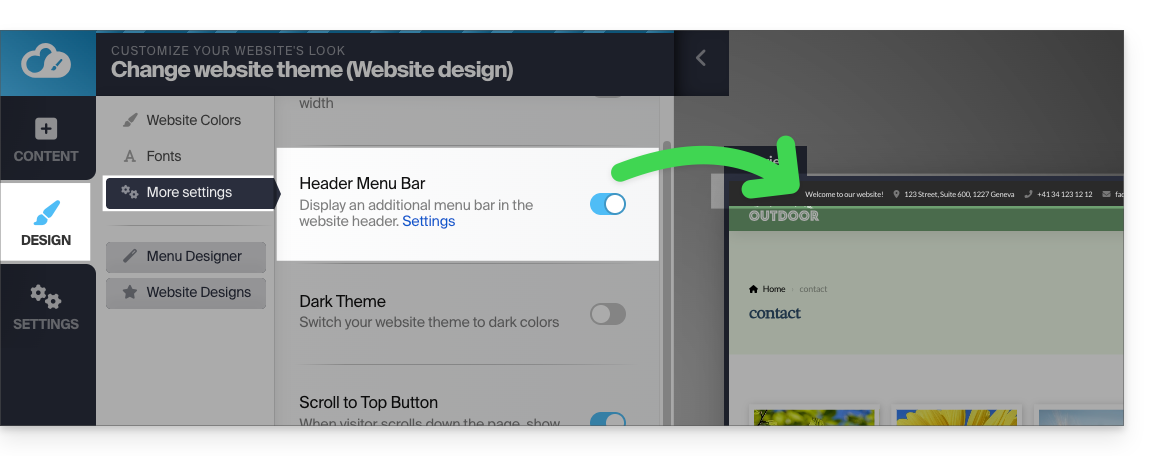
- Once activated, you can customize it using the Settings link in the same place:
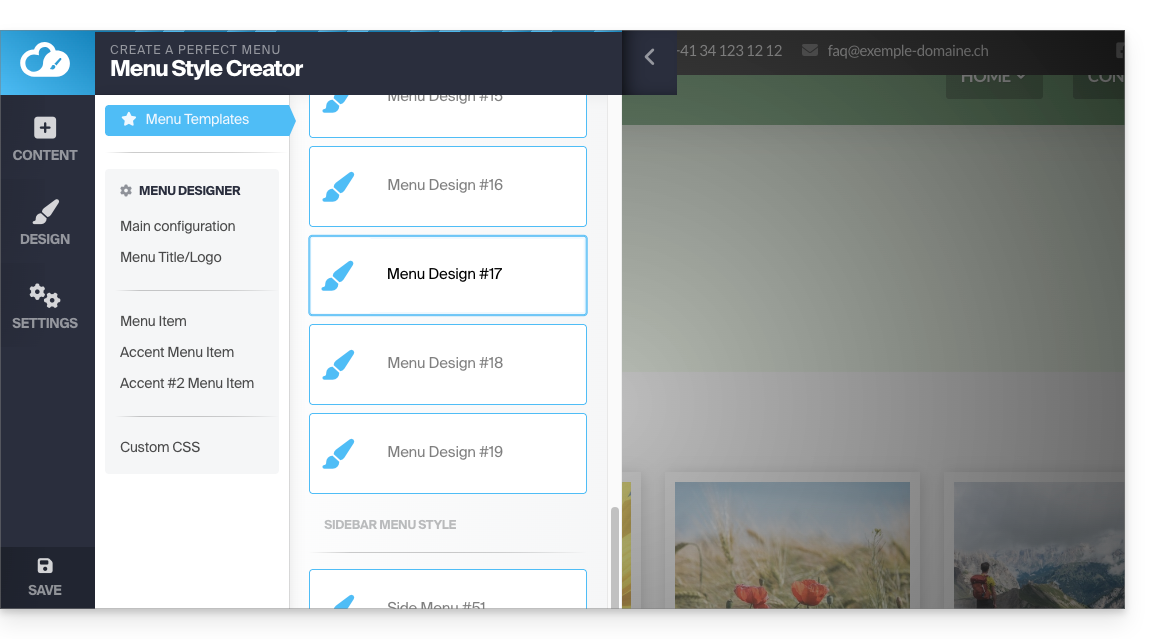
Menu styles
To manage the different menu styles:
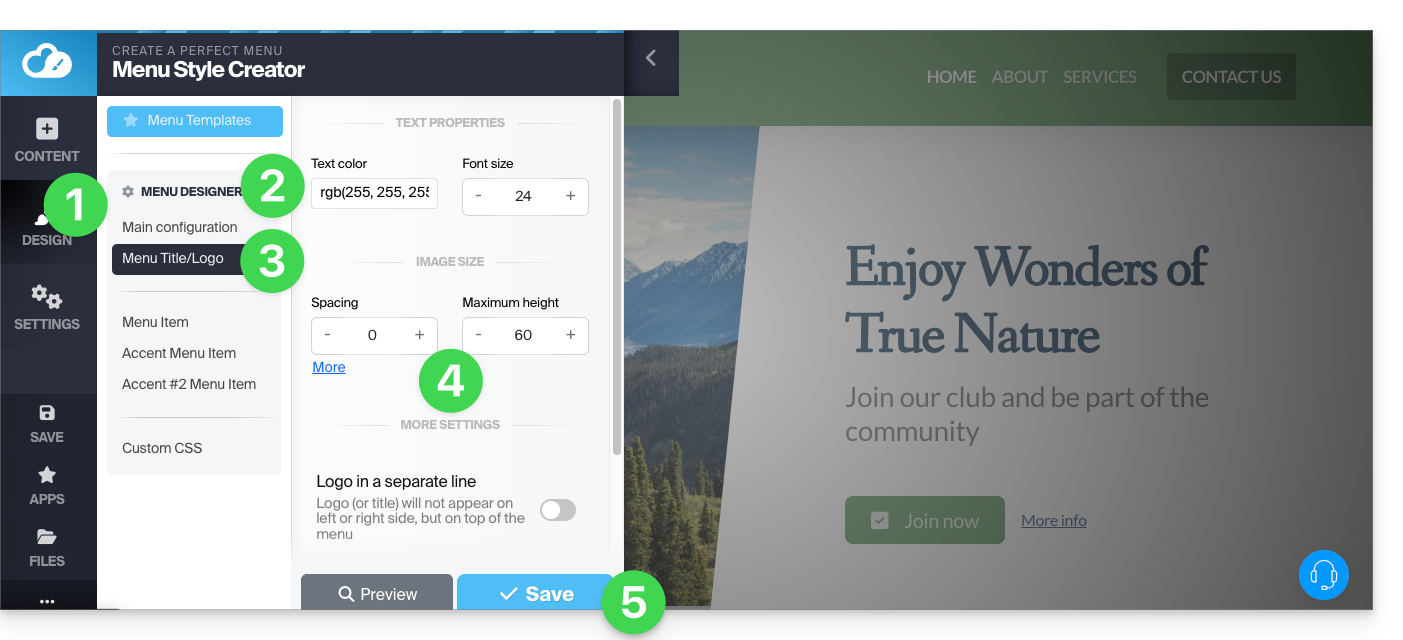
- Click on the Design button in the left sidebar.
- Click on Menu editor:
- Then on Configuration:
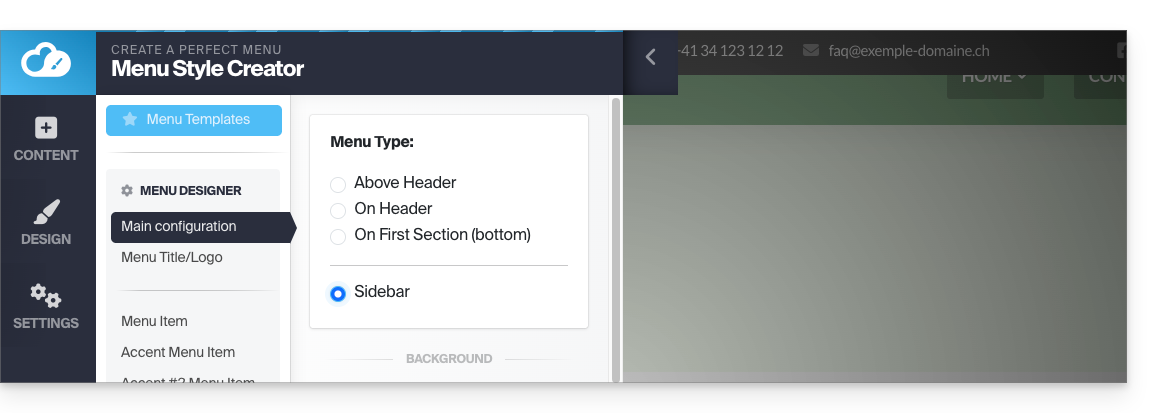
- You can decide on the location of your menus (on the left of the page or placed at the top, fixed or mobile, type "menu hamburger ☰" to the right or normal, etc.):
Change the color of the hamburger menu (☰)
If this three-line horizontal menu button ☰ appears, for example, white on white on a mobile device:
- Click on the Design button in the left sidebar.
- Click on Menu editor.
- Click on Menu title / logo.
- Adjust the text color:
Adopt a new menu theme
Completely change the predefined style thanks to the themes at the very top of the submenu:
- Click on Menu templates (always under Design, then Menu editor):
Fixed menu
Most of the menus offered will move with the content of the page.
- The menu disappears if you scroll down the page:
- You can define a menu that should always be fixed to the top edge (with different visual options):
To enable or disable the fixed menu:
- Click on Design.
- Click on Menu editor.
- Click on Main configuration.
- Choose In the header in the box Menu type.
- The toggle switch Pinned to the top appears lower and you can activate it.
- Click on Save:
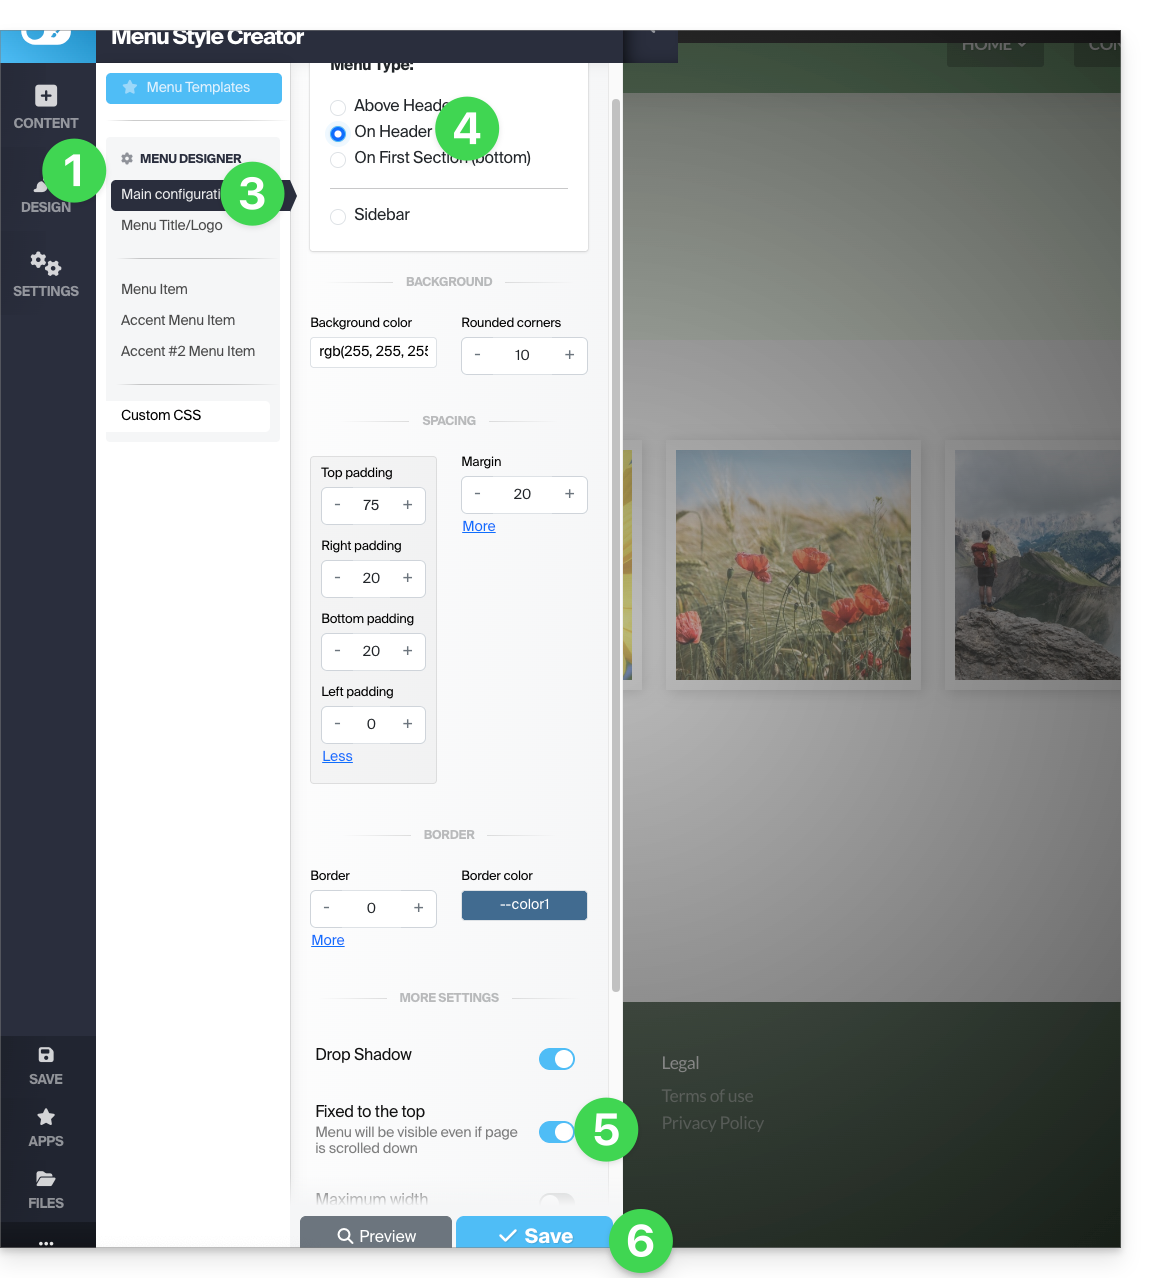
Some menu templates (such as #3 and #16) directly apply the optimal settings for a fixed menu.
Insert your menus into the body of the page
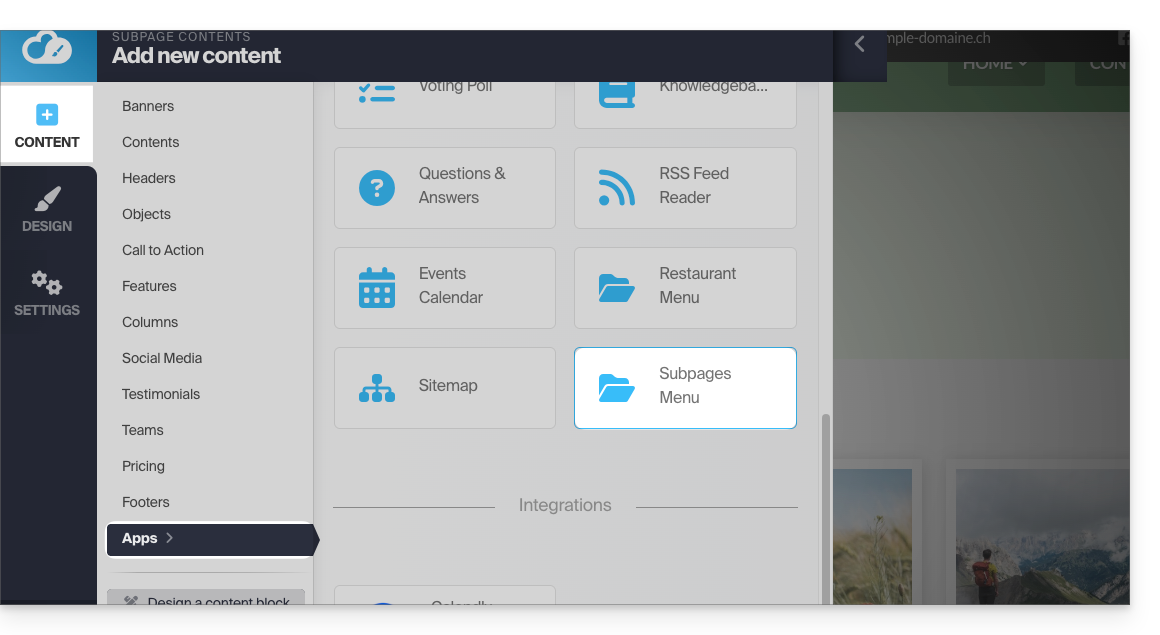
A module Subpage menu allows you to insert your menus and submenus anywhere on your page:
- Add the element from the Apps:
The site map module displays all your menus and pages in a single block.
Define the page URL
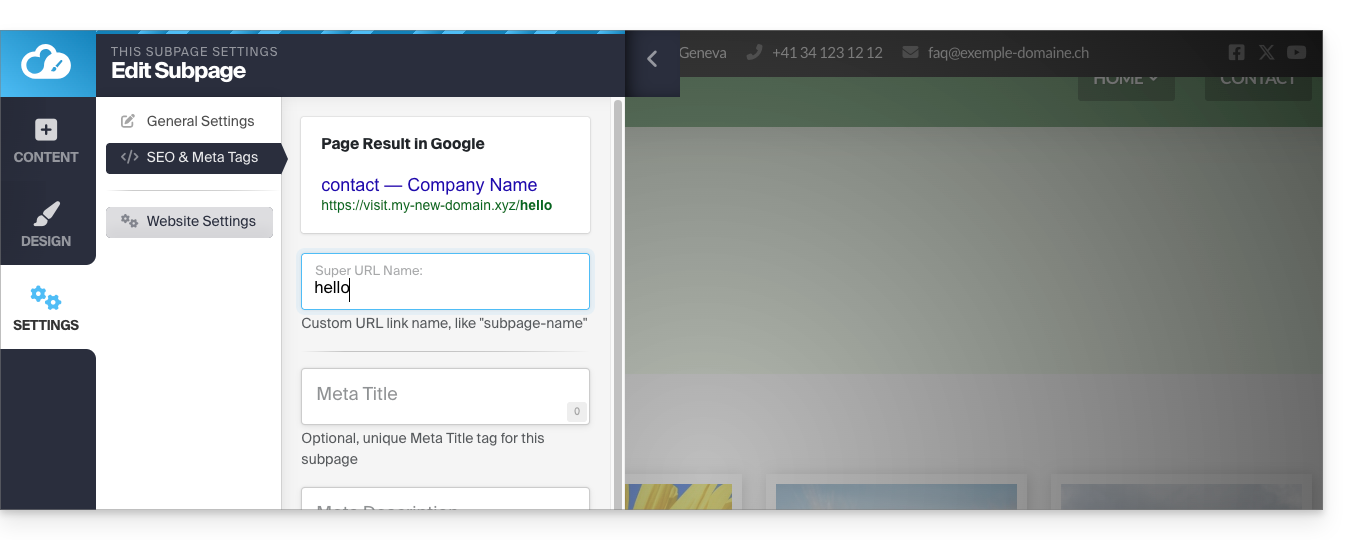
By default, if your page name is Contact then the URL to access it will be www.domain.xyz/contact.
If you later change the page name to Hello then the URL will be www.domain.xyz/hello.
To define the custom URL of the page you are on:
- Click the Settings button in the left sidebar.
- Click on SEO & Metadata (under Settings of this subpage).
- The first field at the top allows you to define the page address. Any space will be converted into a hyphen and special characters, accents, symbols, etc. should be avoided:
If URL changes are recorded during site creation while a menu already contains a link to the page in question, it will be dynamically adapted.
Link to this FAQ:
Has this FAQ been helpful?
This guide concerns the undo function in Infomaniak's Site Creator.
Introduction
- No backup/restore is possible from the Infomaniak Manager.
- If, for example, you delete a content block and want to restore it, you can undo up to the last 20 operations in Site Creator.
Undo an Operation
Prerequisites
- Access Site Creator:
- Click here to access the management of your product in the Infomaniak Manager (need help?).
- Click directly on the name assigned to the Site Creator in question.
- Click on the Edit my site button to start the editor:
Once in Site Creator:
- Click on the … button at the very bottom of the left-hand side menu in Site Creator to expand the undo options.
- Click on Undo and confirm the restoration (the arrows next to it allow you to "navigate" through the latest backups):
Link to this FAQ:
Has this FAQ been helpful?
This guide explains how to temporarily take an Infomaniak Site Creator site offline.
Preamble
- Public visibility: the maintenance page will only be displayed to your visitors!
- No translation is available at the moment; the maintenance page will be displayed only in French.
- Administrator access: by staying logged in to the editor, you retain full access to your site to view and modify it via Site Creator.
Put Site Creator in maintenance
To temporarily disable Site Creator:
- Click here to access the management of your site on the Infomaniak Manager (need help?).
- Click directly on the name assigned to the site concerned:
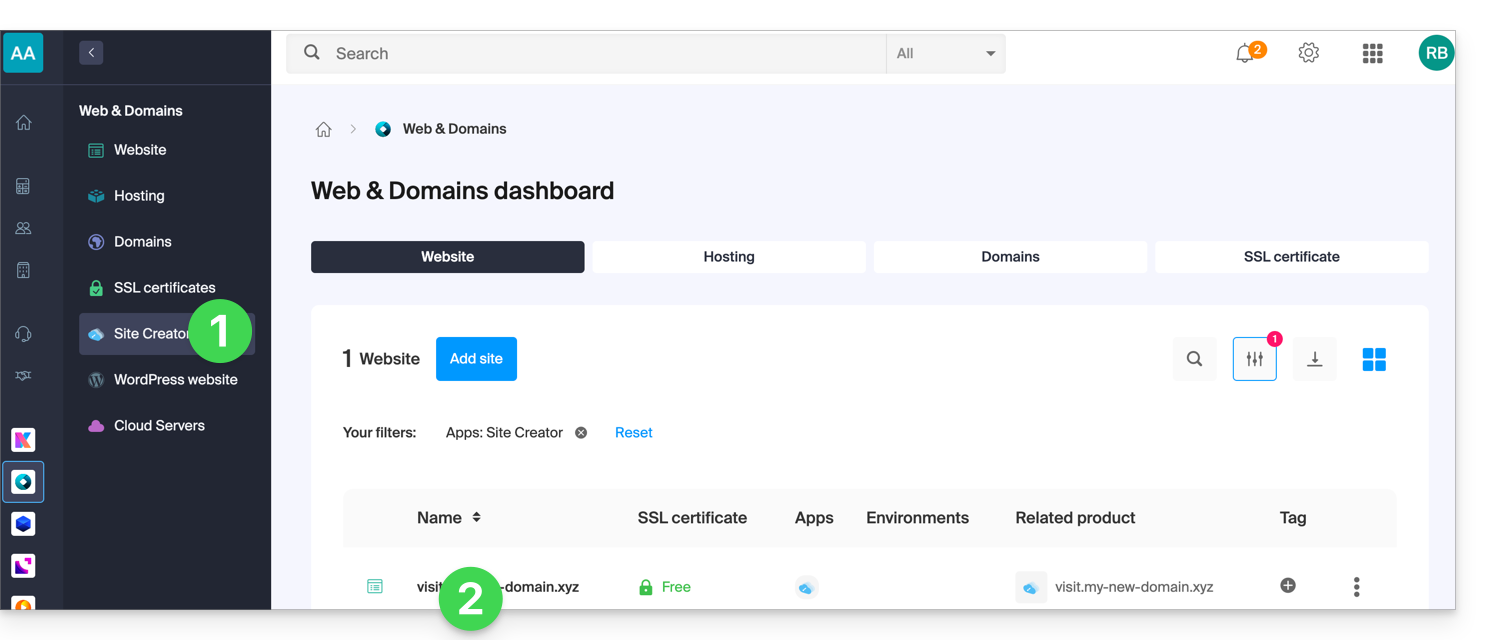
- Click on Manage at the top of the page.
- Click on Enable maintenance:
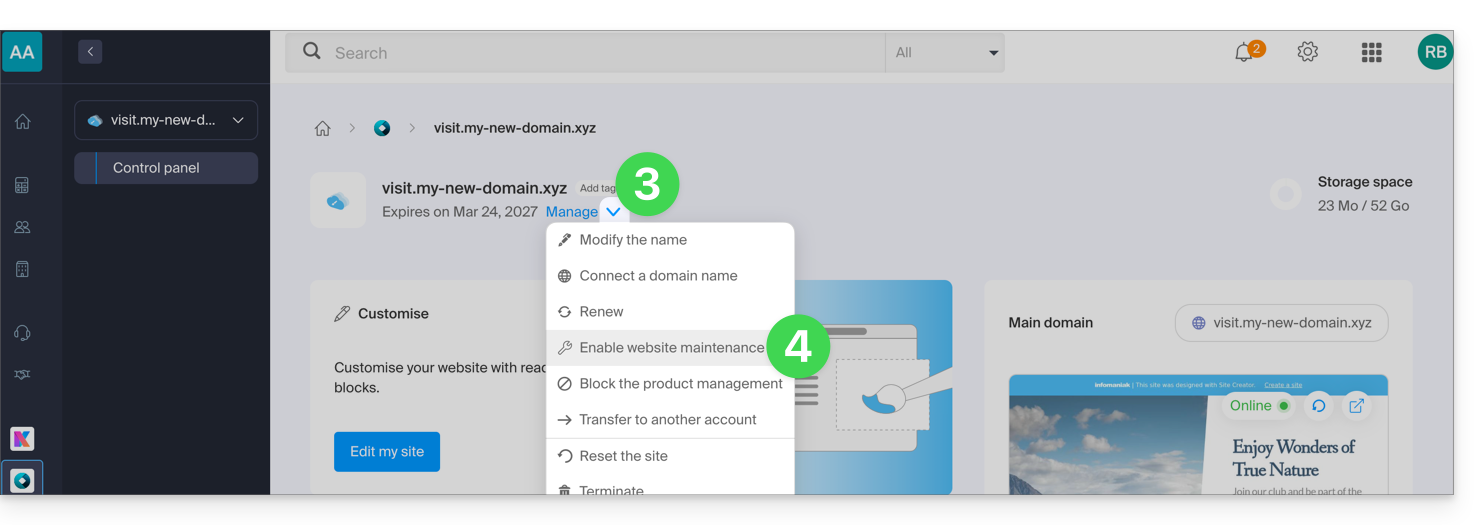
- Confirm the operation.
Disable the maintenance page
To bring the site back online for its visitors:
- Repeat the operation above, the menu allows you to disable maintenance:
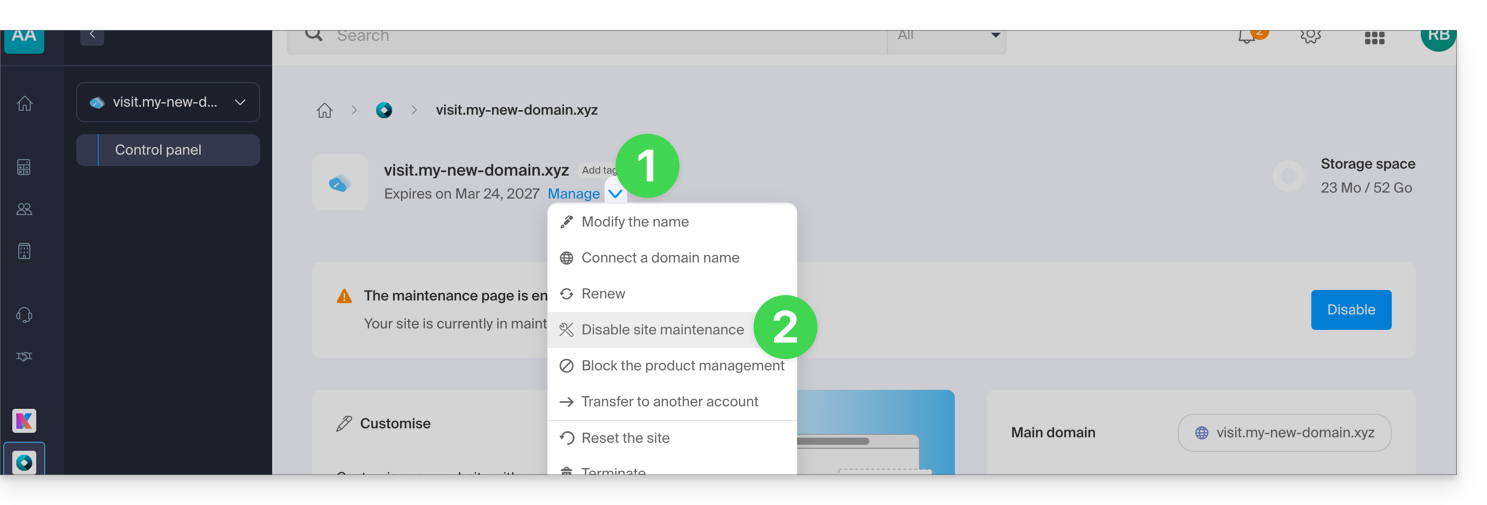
You can also disable maintenance from the management page and from the preview block of your site:
Link to this FAQ:
Has this FAQ been helpful?
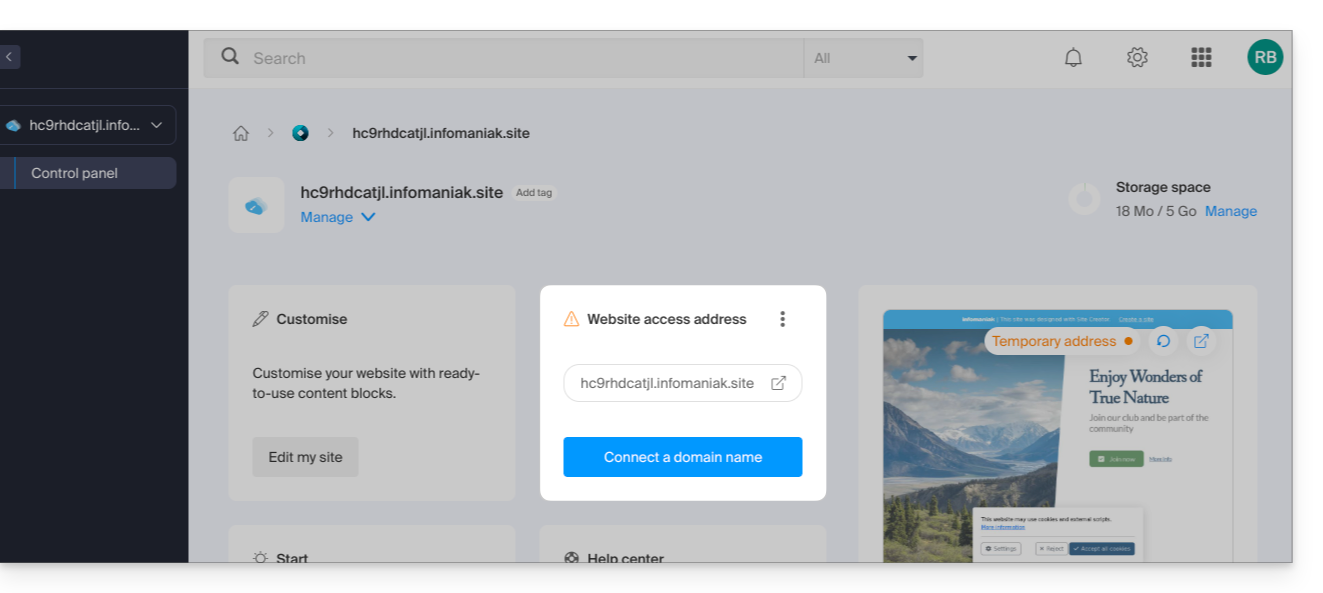
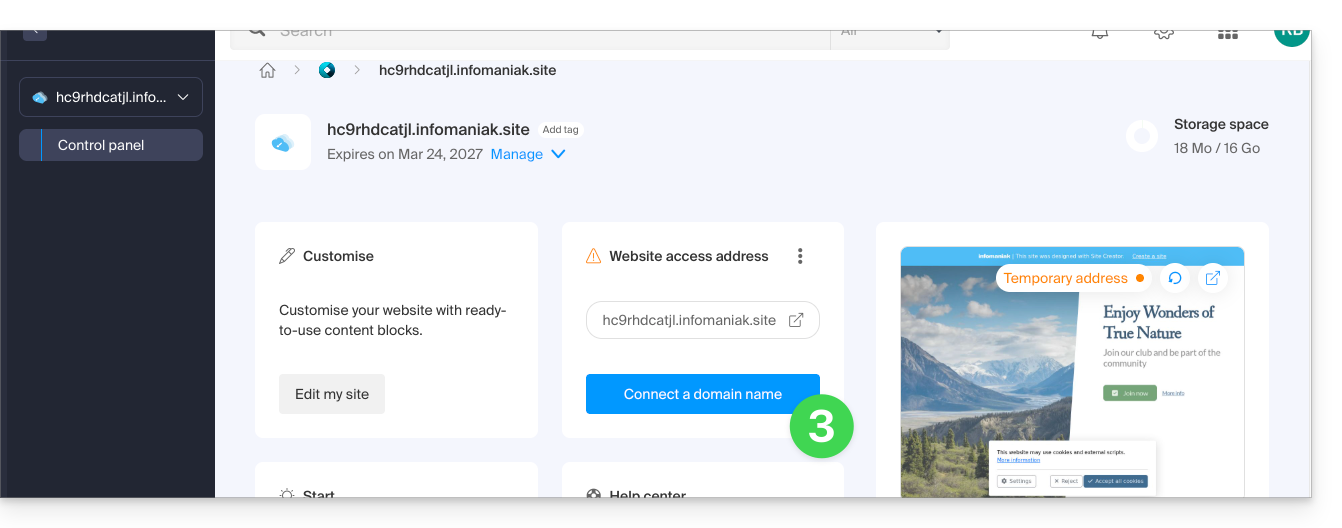
This guide explains how to connect a site created with Site Creator Infomaniak to a domain name.
Prerequisites
- The Site Creator Free offer allows access to the site via a domain name in the form
123xyz.infomaniak.site…- To connect a custom domain name, you must first upgrade to a higher offer:
- To connect a custom domain name, you must first upgrade to a higher offer:
- The Site Creator Lite and Pro offers include a free domain name for 1 year among the extensions
.ch,.com,.fr,.org,.co.uk,.be,.de,.eu,.it,.es - If you wish to use an existing domain, it must be in the same Organization.
Connect Site Creator to a domain name
To connect Site Creator (Lite or Pro) to a domain name:
- Click here to access the management of your site on the Infomaniak Manager (need help?).
- Click directly on the name assigned to the site in question.
- Click on Connect my site to a domain to start the configuration wizard:
- The wizard offers to create a new domain name or use an existing one:
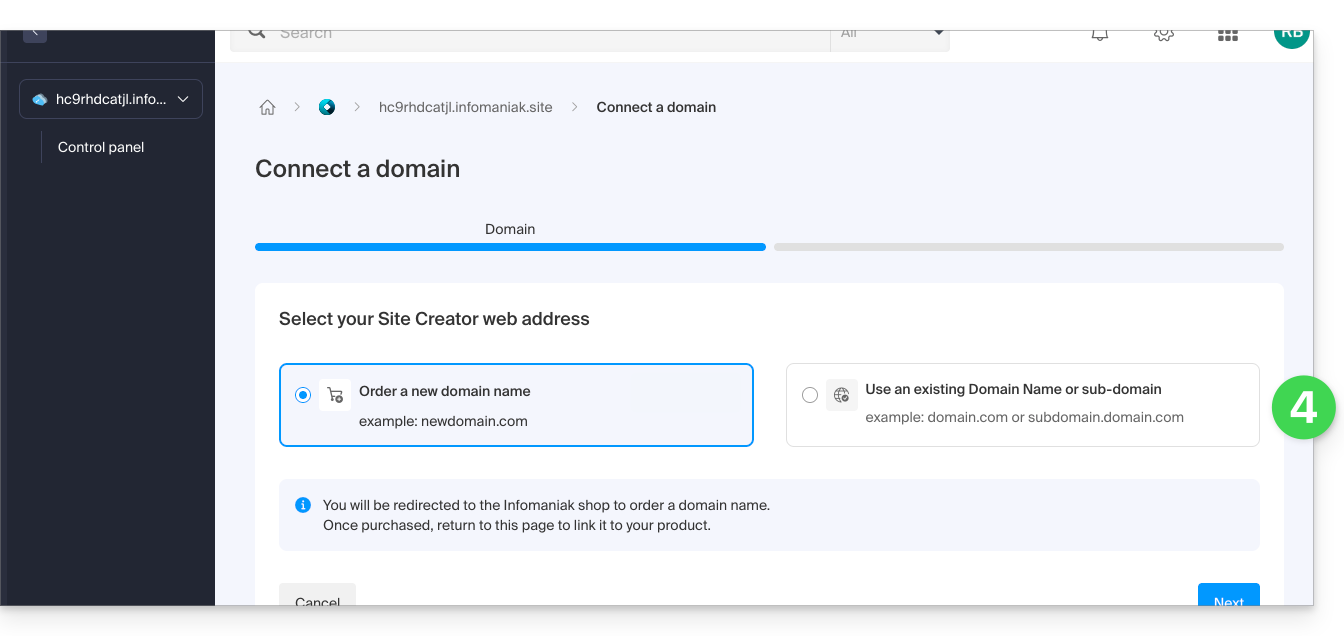
- If you create a new domain name at this time, you will need to return to this configuration wizard once the order is complete.
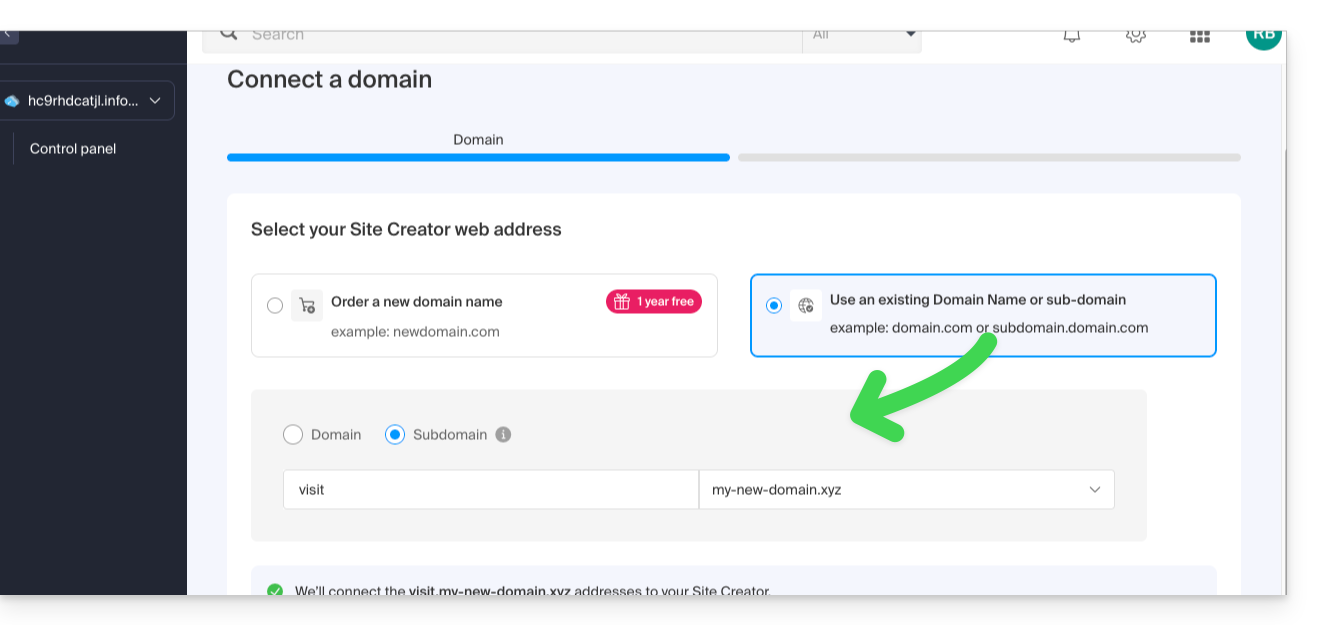
- If you choose to attach a domain from those existing in your Organization, the wizard offers a list of domains and a subdomain can be created at this time:
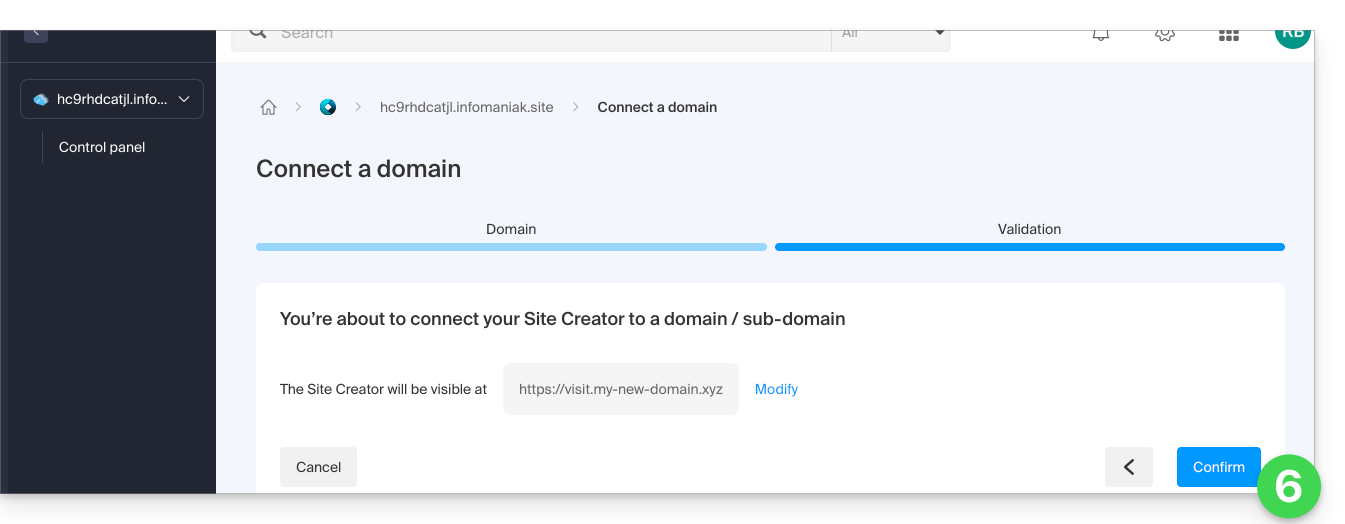
- Click the Next button.
- Check the selected address and then click the button to Confirm:
Some domain names cannot be connected to Site Creator; the wizard will notify you of any issues. Refer to this other guide to understand and resolve these issues.
Manage Site Creator domain name(s)
To manage the domain name(s) used with Site Creator:
- Click here to access the management of your site on the Infomaniak Manager (need help?).
- Click directly on the name assigned to the site in question.
At the top of the page, any messages regarding issues with Site Creator and domains are displayed.
Further down, you can manage your domains if there are any, click on the chevron if necessary: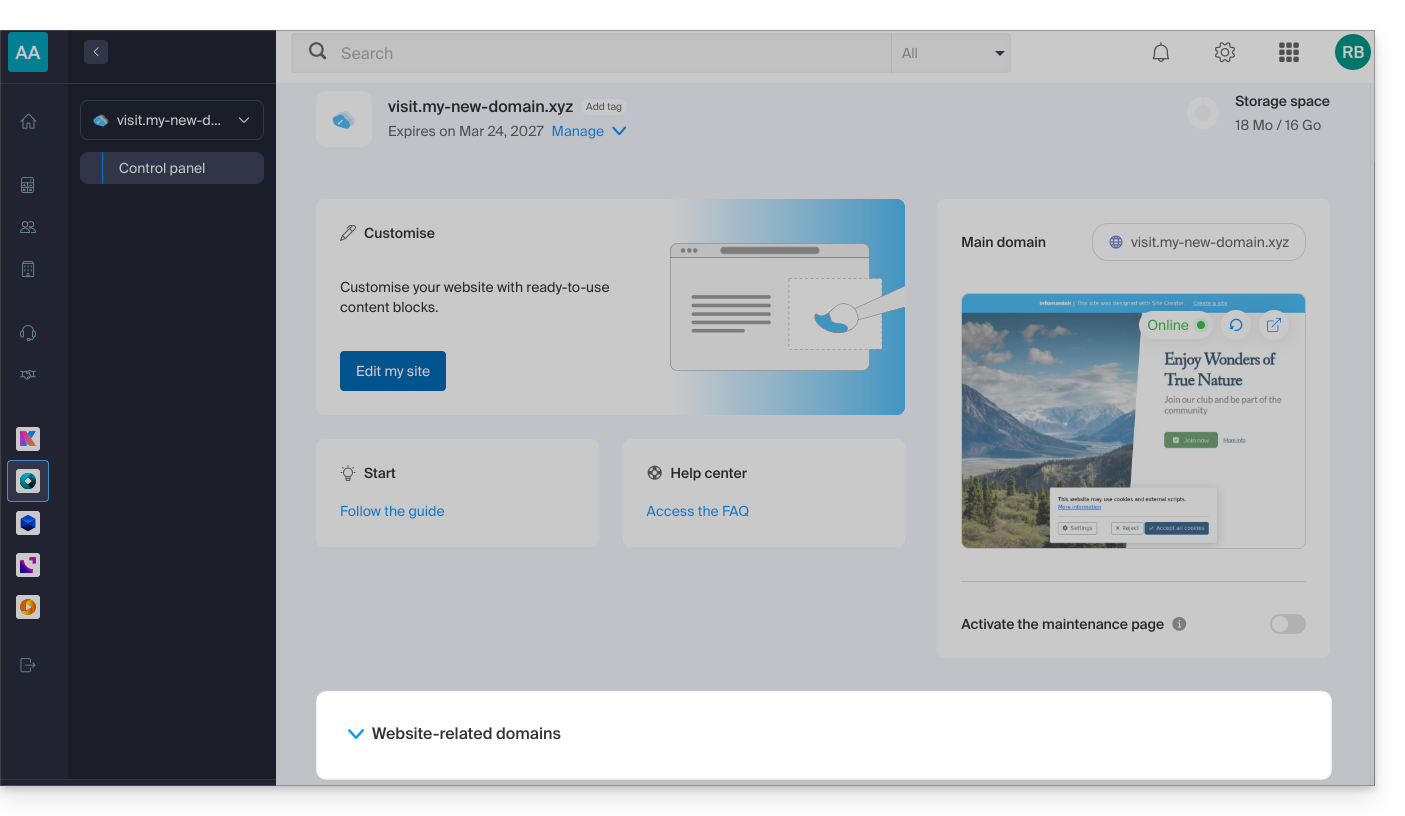
Temporary domain, provisional address, preview URL...
Multiple domain names can be linked to Site Creator, deleted, or swapped and reversed if necessary.
Click on the action menu ⋮ to the right of the domain in question: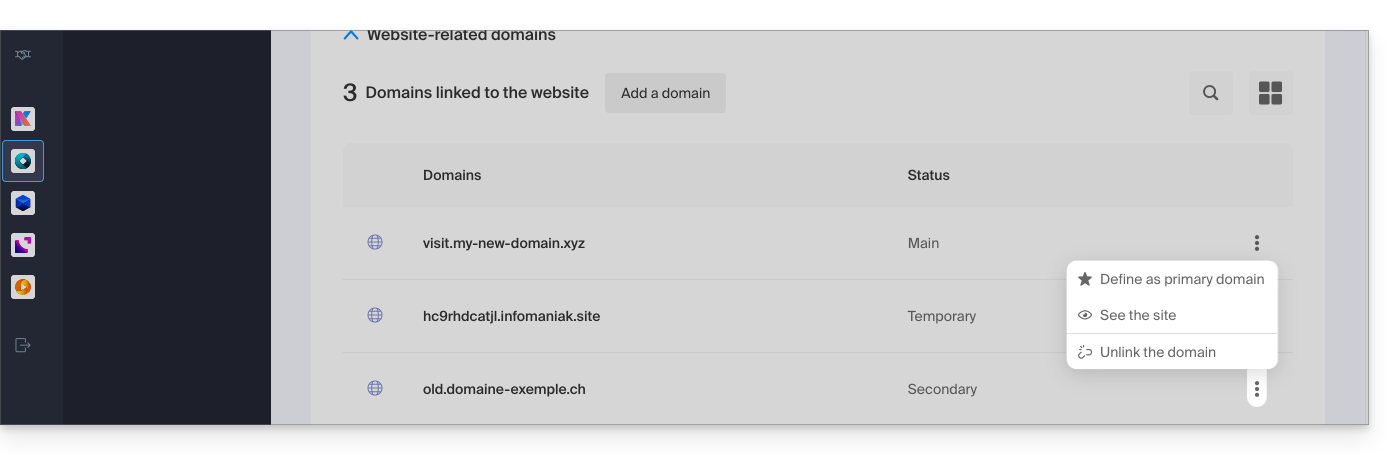
However, the preview URL, of type 123xyz.infomaniak.site and distinct in the list of Site Creator domains, cannot be deleted for the proper functioning of your site.
Link to this FAQ:
Has this FAQ been helpful?
This guide concerns Site Creator and the possibility of creating links to anchors.
Introduction
- An anchor in web design is a hyperlink that points to a specific position on a web page, whether it's on the same page or a different page.
- When a user clicks on an anchor link, they are redirected to the specified location (in principle, an invisible indication placed in the source code) of the page.
- Anchors are useful for allowing users to quickly navigate to specific sections of a web page or even another page.
- They improve the user experience by providing an efficient way to find and access precise information.
Anchor Example
An anchor is located (invisibly) at the end of the FAQ. It is named "end", therefore the following link simply contains the target #end and, without any other indication, a web browser will search for this term in the code of the page where you are and direct the user to it: click here to reach it!
Creating this type of link on Site Creator
Usually, to create an anchor in HTML, here's how to proceed:
- Identify the location on your page where you want to create an anchor (text section, image, or any other element).
- Use the
<a>tag with thehrefattribute to specify the anchor target:- if the target is on the same page, simply use the ID of the element (see point 3 below)
<a href="#chapter1">Go to chapter 1</a> - if the target is on another page, specify the full URL of the page, followed by the ID of the target element (see point 3 below)
<a href="page2.html#chapter1">Go to chapter 1 on page 2</a>
- if the target is on the same page, simply use the ID of the element (see point 3 below)
- In the section of your page where you want users to be redirected, add an element with the corresponding ID:
<div id="chapter1"> </div>
When users click on the "Go to chapter 1" link, the page will automatically scroll to the section with the ID "chapter1". If the target is on another page, they will be redirected to that page and the anchor will work in the same way.
With Site Creator, point 3 above is not "free": each block already has its ID (or hashtag) which you will need to specify (or modify beforehand - see point 3 below) in order to link to it.
Find the reference of the destination block
Access Site Creator:
- Click here to access the management of your product on the Infomaniak Manager (need help?).
- Click directly on the name assigned to the Site Creator in question.
- Click on the Edit my site button to start the editor:
Once in Site Creator:
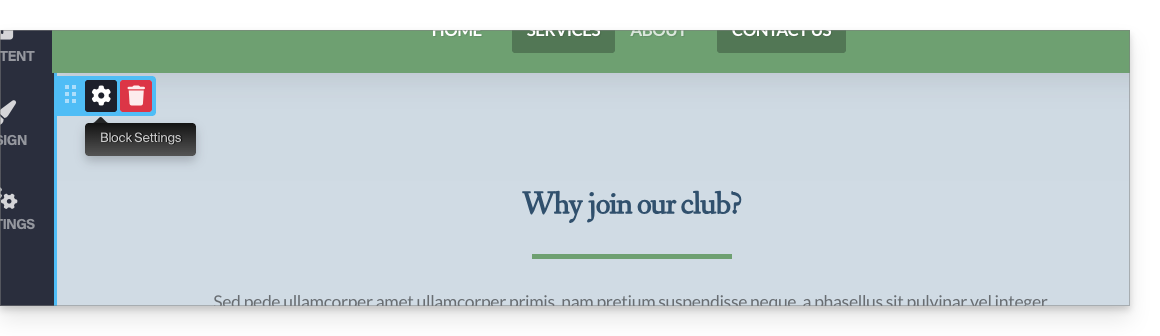
- Hover over the content block you want to modify and click on the gear icon:
- Scroll through the settings to the bottom to find the ID of the block:
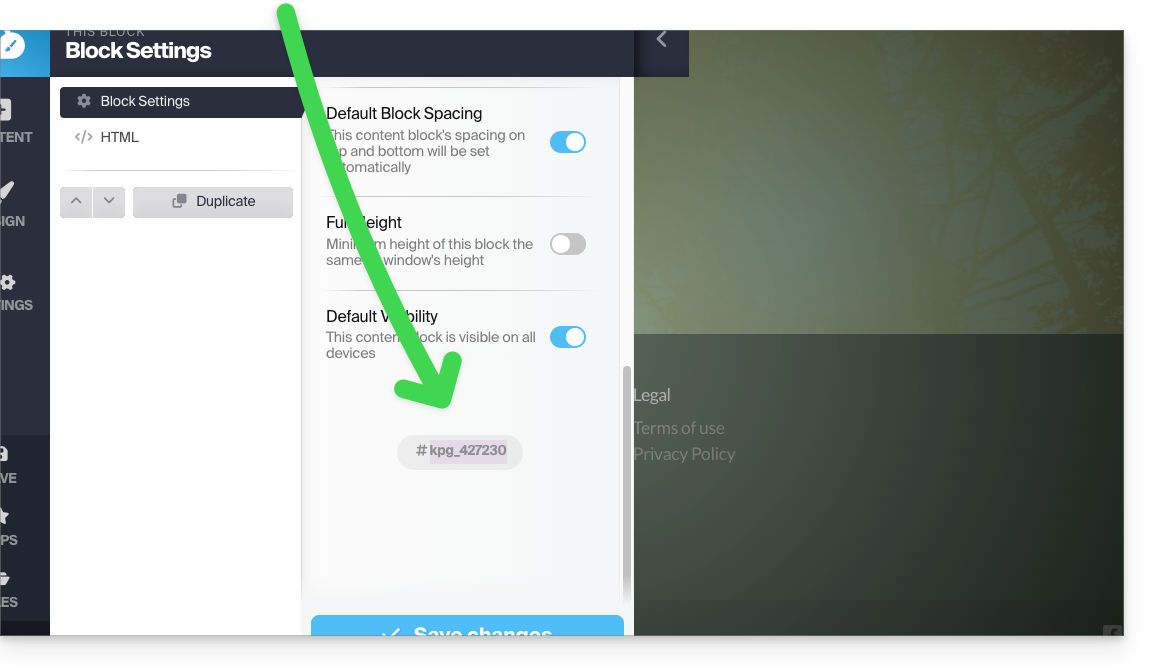
- Double-click on the field displaying the ID to specify your own title instead of the random ID:

Create a link to the block reference
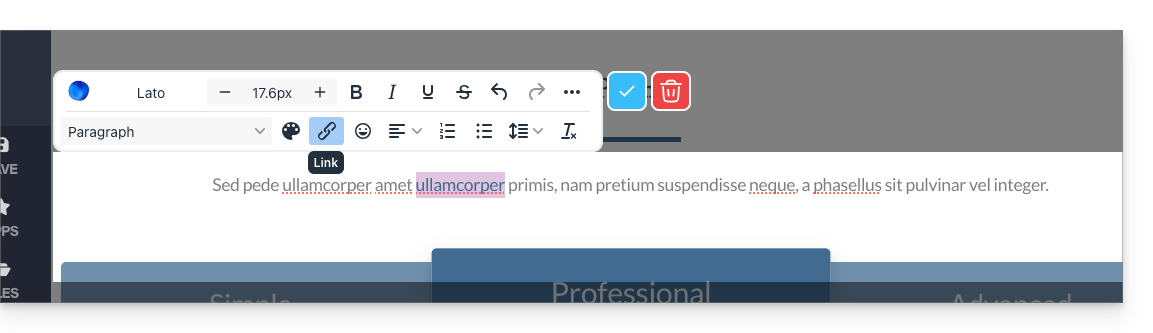
To add a link to text in Site Creator, with the destination being a block located further down on the same page:
- Select the text.
- Then, click on the link icon:
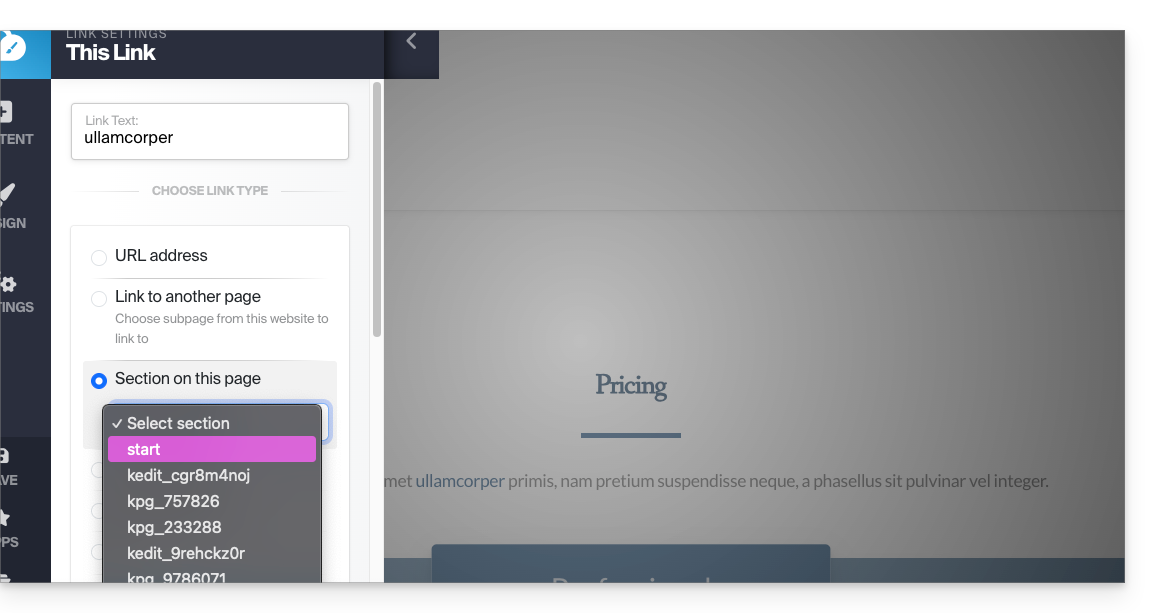
- In the advanced options, choose the "Section" type to create a link to a part of the same page by selecting the block reference obtained above:
Other possibilities:- Use the link with the hash symbol (link to the same page):
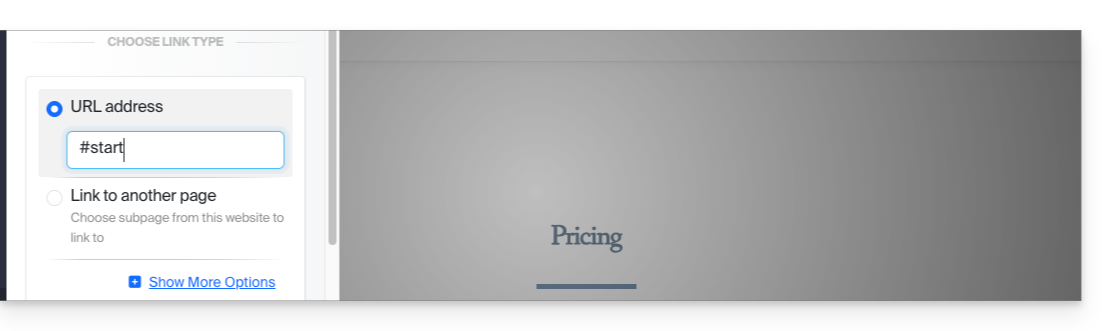
- Use the page name followed by the ID (useful if you are placing the link to another page on the site):
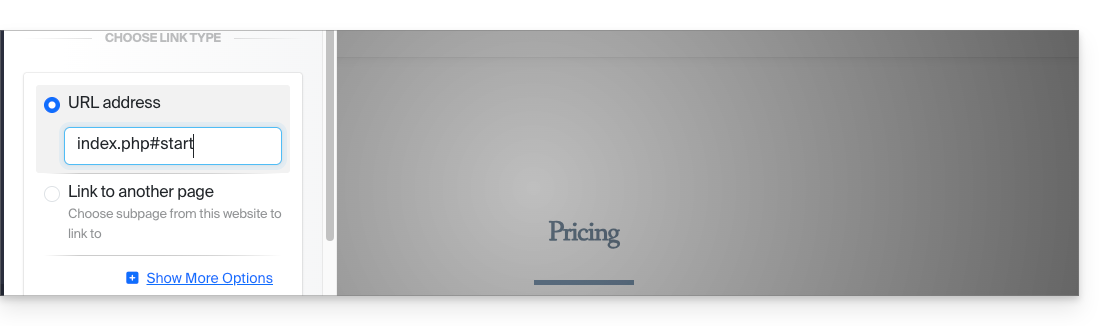
- Use the link with the hash symbol (link to the same page):
END OF PAGE (and anchor placed on this element) - click here to go back to the anchor located at the beginning of the page…
Link to this FAQ:
Has this FAQ been helpful?
This guide explains how to customize and configure the online store module in Site Creator.
Configuring a store in Site Creator
Prerequisites
- Access Site Creator:
- Click here to access the management of your product in the Infomaniak Manager (need help?).
- Click directly on the name assigned to the Site Creator in question.
- Click on the Edit my site button to start the editor:
To manage the general e-commerce system preferences (currency, taxes, etc.) once the module has been added:
- Hover over the store module added to your page.
- Click on Configuration.
Once in Configuration, several sub-menus appear on the left, allowing you to configure other parameters:
⚠️ All amounts entered are in US format with a period for decimals, i.e. XX.XX
Payment methods
Stripe and Mollie are external payment providers, and they charge fees for each purchase. These fees are independent of Infomaniak's services. It is recommended to consult the respective pricing policies of these providers for more information on the associated fees. To use the services of Stripe and Mollie, you must have a SIRET number in France or an IDE in Switzerland. In addition, you must have a valid company registered in the commercial register of your country to use the services of Stripe and Mollie.
Delivery Methods
You can create multiple shipping methods:
These will then be offered when the buyer confirms their order:
Among the parameters for creating a shipping method:
- prices (+ free shipping from what amount)
- allowed countries
- shipping costs based on weight
- delivery times

Messaging
Four messages are predefined and cannot be deleted. They cover all email communication related to an order, both for the customer and for the store manager.
It is possible to customize the existing messages and add new ones (and then delete these additional messages if necessary):
Pour utiliser les services de Stripe et Mollie, vous devez disposer d'un numéro de SIRET en France ou d'un IDE en Suisse. De plus, il est nécessaire d'avoir une entreprise valide enregistrée au registre des commerces de votre pays pour utiliser les services de Stripe et Mollie.
Modes de livraison
Vous pouvez créer plusieurs méthodes d'envoi:
Celles-ci seront ensuite proposées lors de la validation du panier de l'acheteur:
Parmi les paramètres pour créer une méthode d'envoi:
- tarifs (+ gratuité des frais de port à partir de quel montant)
- pays autorisés
- frais d'expédition selon poids
- délais d'envoi
Messagerie
Quatre messages sont prédéfinis et ne peuvent être supprimés. Ils permettent de couvrir l'ensemble de la communication par e-mail autour d'une commande, autant à destination du client que pour le gestionnaire de la boutique.
Il est possible de personnaliser les messages existants et d'en ajouter (puis de supprimer ces messages supplémentaires si nécessaire):
- Choose the time when the email should be sent (or simply disable the message to keep it without using it):
- new order email (to notify you)
- order processed email (customizable)
- delivery note in PDF format (customizable)
- invoice also generated and available in PDF format on your Stripe/Paypal/Mollie account
- Variables can be inserted into each field to customize the texts as much as possible using the elements contained in the order and the information provided by the buyer:
Shop homepage
- Display product categories if any
- Presentation of random products
- etc.
Product Management
To manage products, add or delete them:
- Hover over the module in the top left corner.
- Click on Products.
Find the first 3 example products:
Reorganize your products by moving them with the mouse.
Click on a product to set its details as well as the category it should be in (see below). You can, in particular:
- create attributes (e.g., color) to offer the same product in several versions/prices
- define whether the product should be digital (virtual), for example a PDF, ZIP or MP3, and therefore downloadable after purchase
At the bottom of the product sheet editing, find other products from your list in order to link them and offer them to the visitor.
At the very bottom of the product editing window, choose to hide the product from your visitors if necessary.
To finish and return to the product list, save the changes using the button at the very bottom.
Delete or duplicate a product
On the product editing page, click at the bottom on the action menu next to the save button to choose whether to delete the product or duplicate it.
Stock/Inventory Management
In the same action menu, manage the stock directly on the list of your products (to edit the stock in bulk).
But each product page allows you to edit the stock and also enter the SKU (stock keeping unit) and its barcode (ISBN).
Product Categories
Your products can be organized within Categories and subcategories, which will then be displayed according to the design of your site.
Click in the Categories submenu on the left of the store administration panel, under Products.
Define an image to illustrate your category.
Hide a category if necessary (this does not hide the products it contains).
Promo Code
A promo code allows you to grant a discount (in % or currency) on an order.
Click in the Promo Code submenu on the left of the store administration panel, under Products.
You can specify:
- its expiration date
- its possible minimum amount
- its name ("Special Christmas Discount" for example)
- its format ("JOYEUXNOEL")
Export the list of your products
Export the list of your products to a CSV file (.csv format) using the action menu located at the top right of the list of your products.
Order Management
To manage past and current orders:
- Hover over the module at the top left.
- Click on Configuration.
- Click in the Orders submenu on the left of the store administration panel.
Export the list of your orders
Export the list of your orders to a CSV file (.csv format) using the Download button located to the right of the order search bar.
Customer Management
To manage customers (a customer provides personal information during their order):
- Hover over the module in the top left corner.
- Click on Configuration.
- Click on Customers in the submenu on the left side of the store administration panel.
Export the list of your customers
Export the list of your customers to a CSV file (.csv format) using the Download button located to the right of the customer search bar.
Link to this FAQ:
Has this FAQ been helpful?