Knowledge base
1000 FAQs, 500 tutorials and instructional videos. Here, there are only solutions!
The easiest way to manage your emails is to use the Infomaniak Mail web app (online service at ksuite.infomaniak.com/mail).

This interface offers many advantages:
- No software to install or configure.
- Mail sharing with other users.
- Unified management of all your Infomaniak email addresses.
- Professional incoming and outgoing anti-spam and antivirus filter.
- Automatic sorting of incoming messages (filters).
- Sending large attachments.
- Permanently saved.
- kDrive sharing.
- Secure and respects your privacy, hosted in Switzerland by a neutral and independent company.
A mobile app (Infomaniak Mail, application for iOS/Android smartphones or tablets) is available here.
How to get started with Infomaniak Mail?
Whether on ksuite.infomaniak.com/mail or the Infomaniak Mail app, it is essential to log in with your Infomaniak account ID and password. This will NOT work if you enter an email address and password directly. Understand the difference
- Click here to access the Infomaniak Mail web app (online service at ksuite.infomaniak.com/mail).
- If necessary, associate the email addresses to be managed with Infomaniak Mail.
What would you like to do next?
Link to this FAQ:
Has this FAQ been helpful?
This guide explains how to transfer an Infomaniak product from one Organization to another.
Preamble
- You can move almost all products subscribed with Infomaniak to a different Infomaniak Manager interface than the one on which the product is currently located; this is therefore an internal transfer, from Organization to Organization.
- my kSuite cannot be transferred.
- The users who currently have access to the selected products will not be transferred (and therefore may no longer have access to the products).
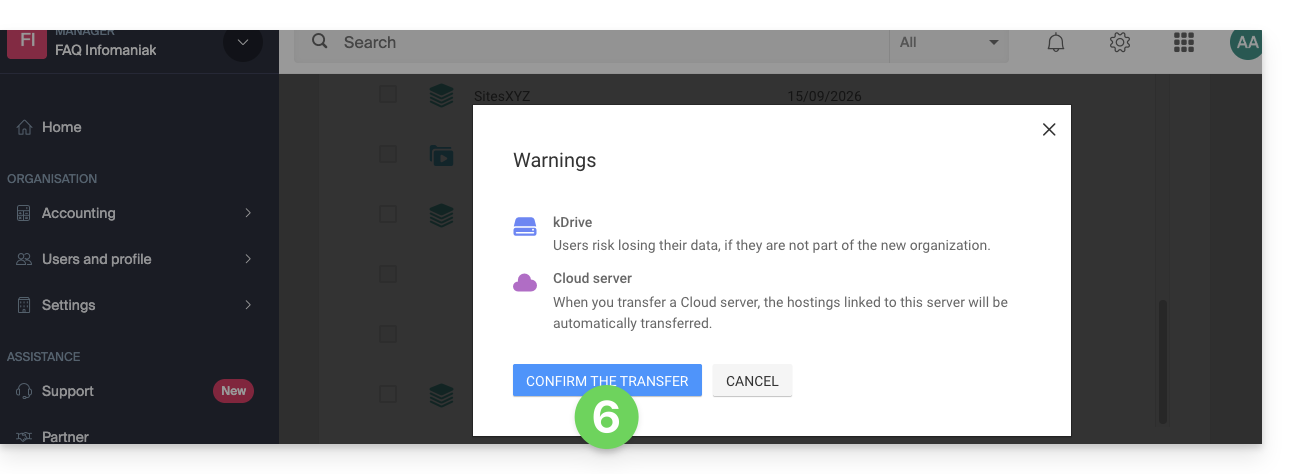
- Regarding kDrive: users who currently have access to kDrive will be integrated into the new Organization.
- They will retain their access, their kDrive permissions, but any management rights they may have over the product itself will be lost.
- Groups (formerly "work teams") are not moved either, rights managed via Groups are also lost.
- If your user has access to multiple Organizations it is even easier to send to one of them the product of your choice.
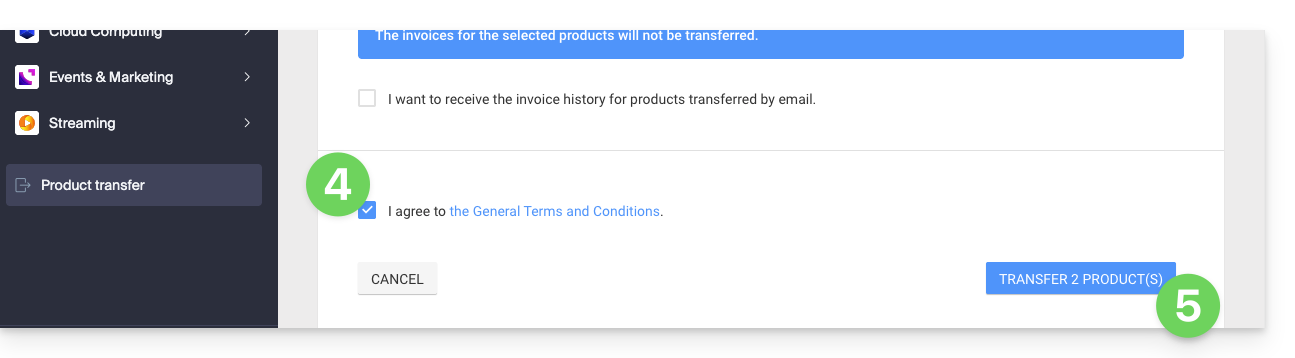
- The invoices of the selected products will not be transferred.
- This operation does not cause any interruption.
Generate a transfer link
Prerequisites
- Be Administrator or Legal Representative within the Organization.
To transfer a product:
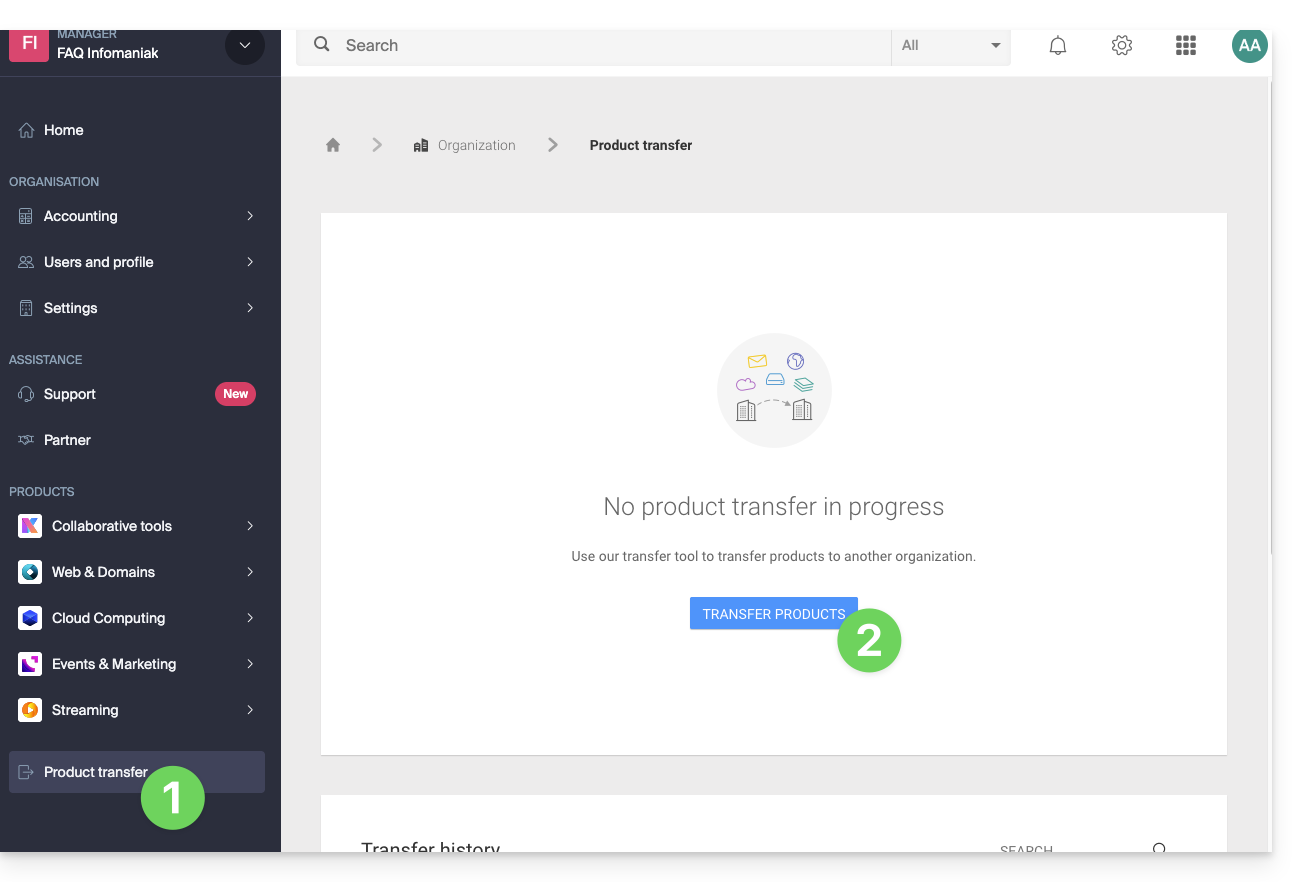
- Click here to access product transfers management on the Infomaniak Manager (need help?).
- Click on the Transfer products button:
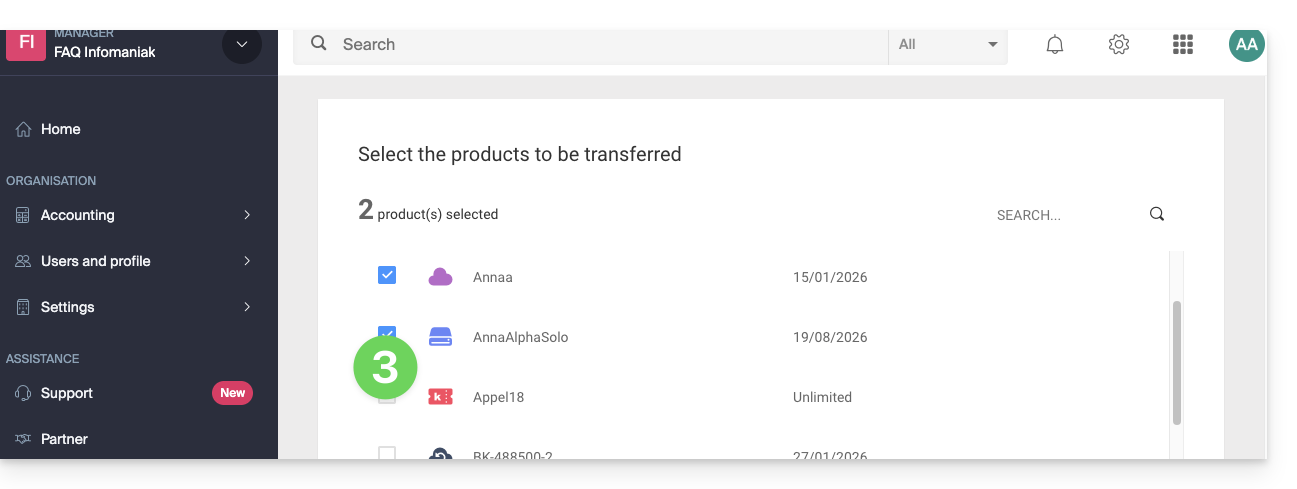
- Check the product(s) to be moved:
- Read and accept the general conditions.
- Click on the Transfer button:
- Read and validate any warnings:
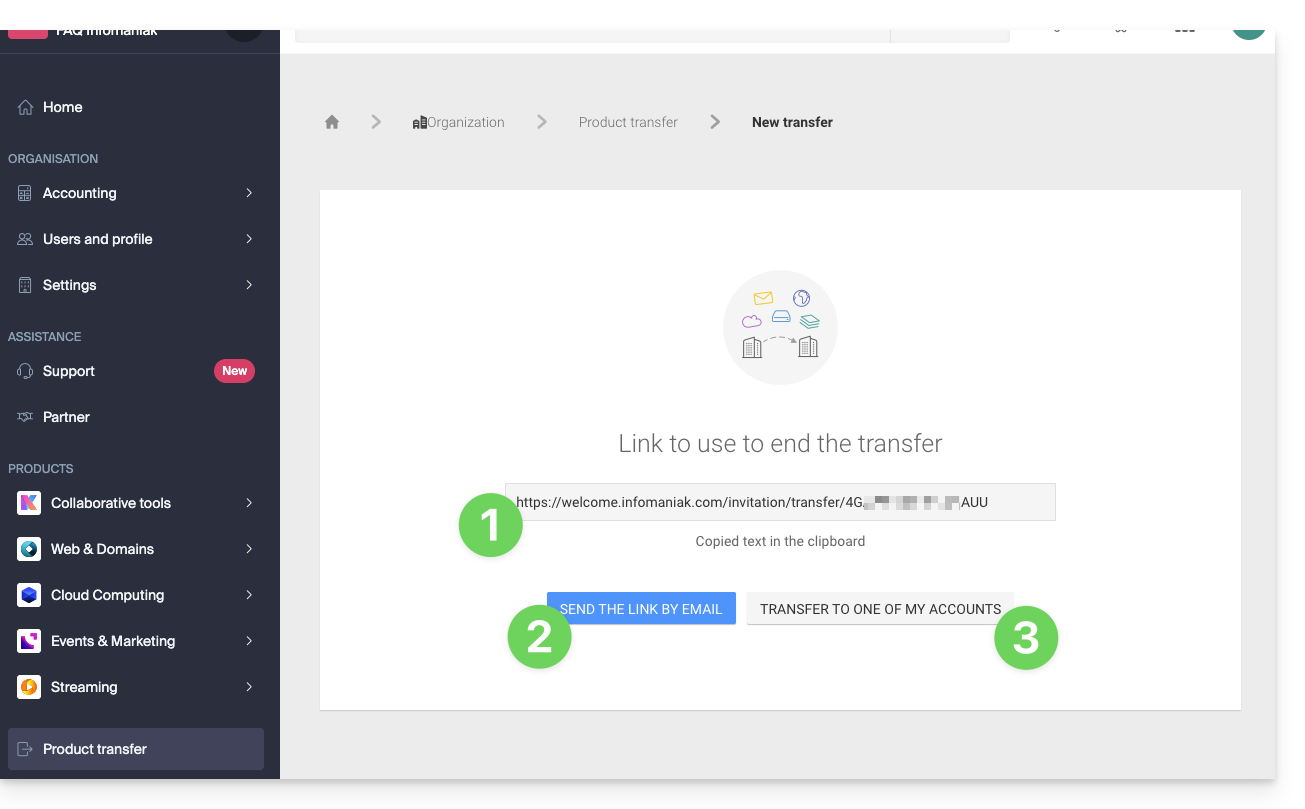
The transfer has started. Now, at your choice, you can:
- Copy the transfer link…
- or send it to the email address of your choice…
- or select directly one of the Organizations to which your user is attached, and the selected product will be transferred there:
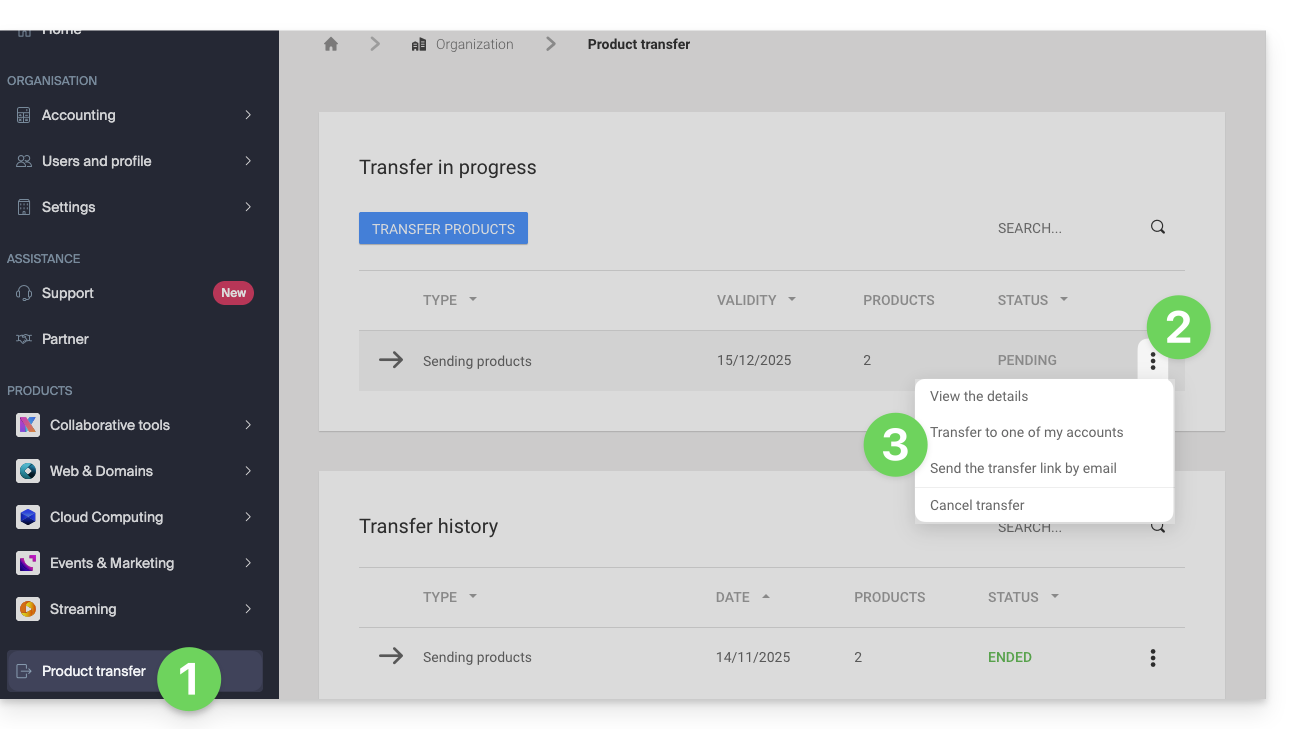
At any time you can return to the product transfer page to find the possibilities listed above:
Alternative method
In the case of one-off transfer, you can also go directly to the dashboard of the product concerned and click on Manage (example in the image below) however, since this menu is not always present, it is better to prioritize the first method above, which also allows bulk transfer: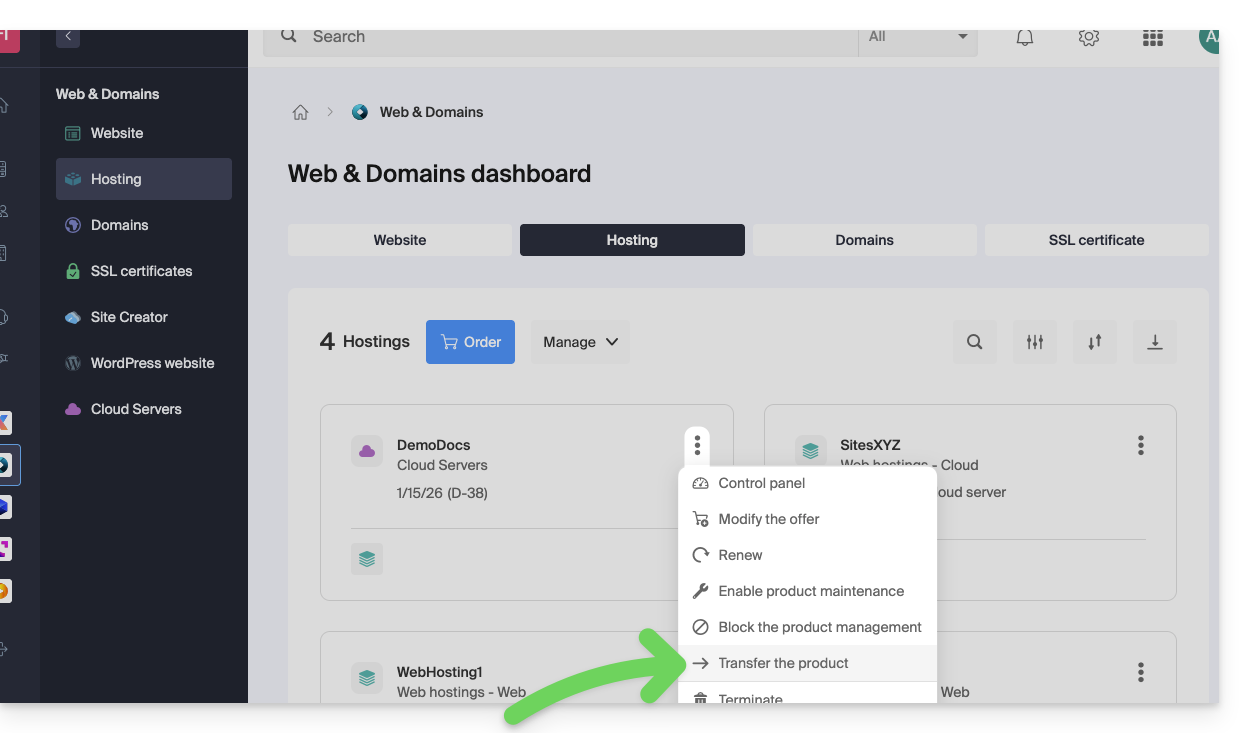
Refer to this other guide regarding Jelastic Cloud.
Receive the product
Once a product transfer has been started by a user…
1. Be on the Organization that must receive the product
- Click here to log in to the Manager on the Organization that must receive the product(s).
- The user specified when logging in to the Infomaniak account must have administrative rights.
- If necessary, you can create a new Organization to receive products.
2. Execute the obtained link
- Click on the link obtained in the first step above.
- You can also simply paste it into a browser while being logged in to the appropriate Infomaniak account.

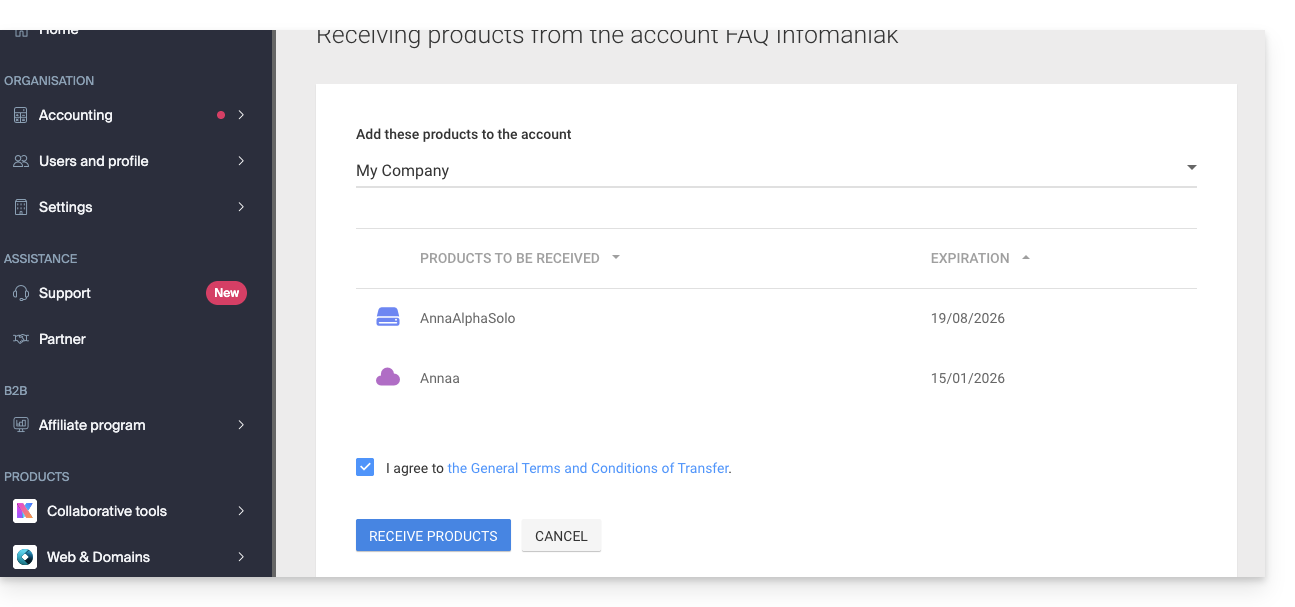
3. Validate the product transfer
- If necessary, choose the destination Organization using the drop-down menu.
- Read and accept the general conditions.
- Click the Receive the product button (if the button is not clickable, make sure you have selected the Organization):
Find transfers in progress or completed from the bottom icon on the left sidebar of the Infomaniak Manager: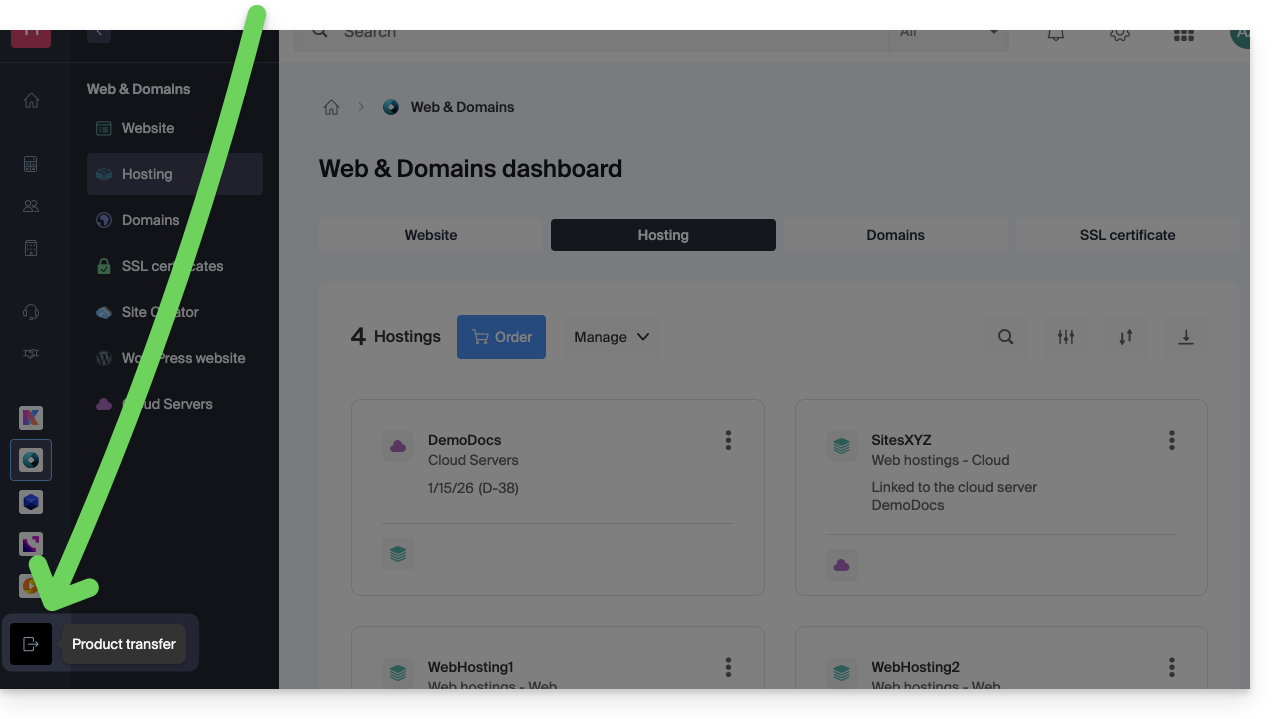
Link to this FAQ:
Has this FAQ been helpful?
This guide explains how to synchronise Microsoft Outlook* Windows contacts & calendars (only Office 365, 2024, 2021, 2019, 2016, 2013, 2010, 2007 versions) with the contacts & calendars hosted by Infomaniak, using an extension for Outlook available on caldavsynchronizer.org.
* The free versions of Outlook (New Outlook) and the macOS version cannot install an extension; they are therefore unfortunately incompatible with Infomaniak data!
Introduction
- There is a paid alternative for Windows, Evo Collaborator, which offers a pre-configured profile for Infomaniak.
Configure Outlook CalDav Synchronizer
Outlook CalDav Synchronizer allows you to synchronise contacts & calendars via CalDAV and CardDAV protocols, including multiple (non-shared) calendars:
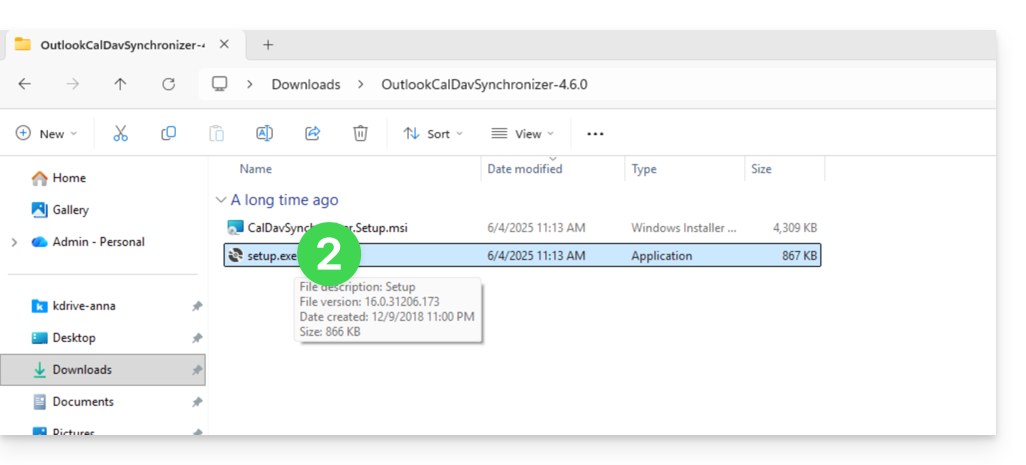
- Download CalDav Synchronizer for Outlook.
- Close Outlook and launch the installation of the plugin downloaded above:
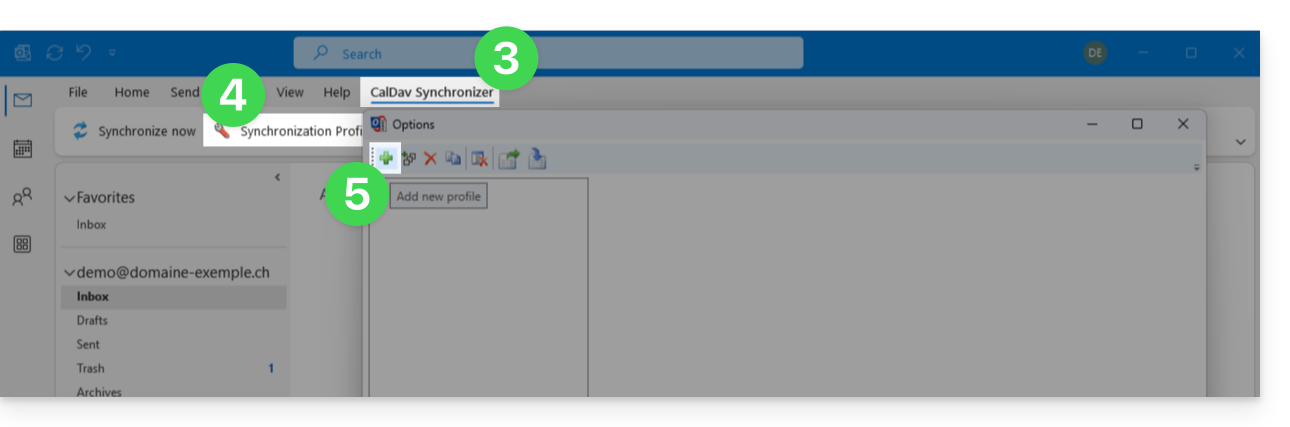
- Once the plugin is installed, open Outlook and click on the new CalDav Synchronizer tab.
- Click on Synchronisation Profiles.
- Click on the + icon to create a first profile (for the calendar or contacts – you will need to create a second profile later to synchronize both):
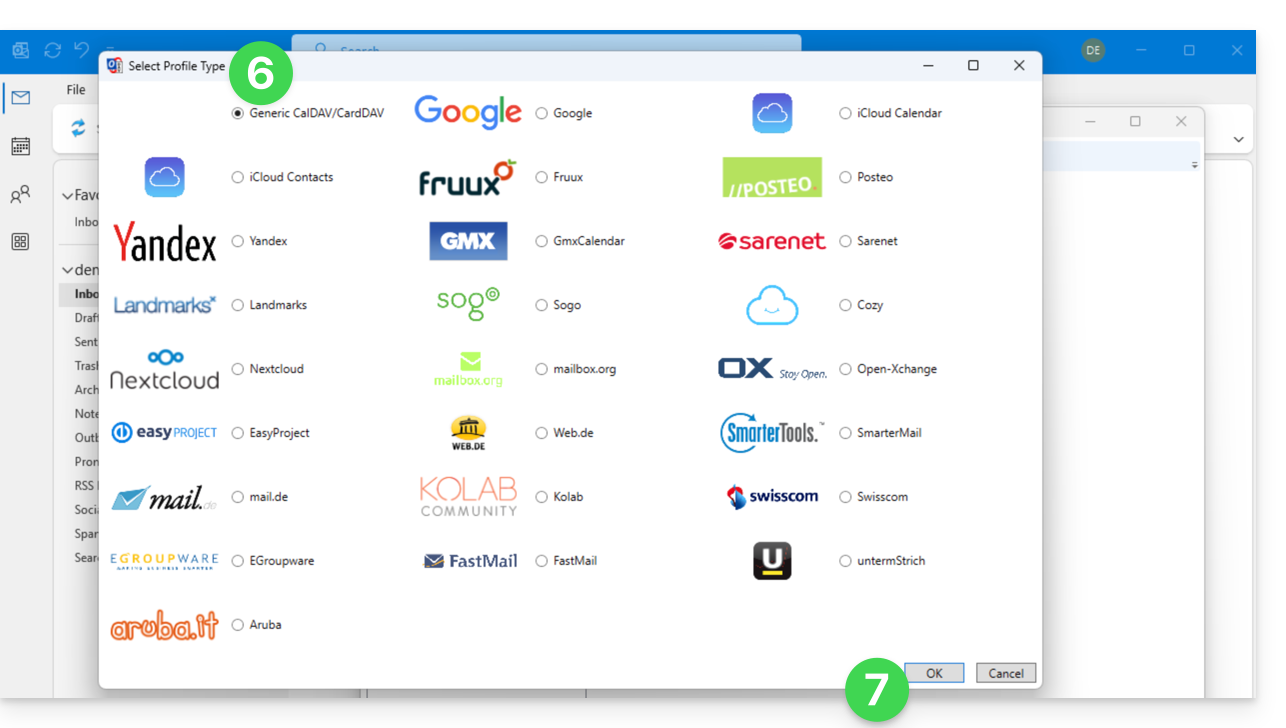
- Choose a generic profile type (first radio button).
- Click on the OK button:
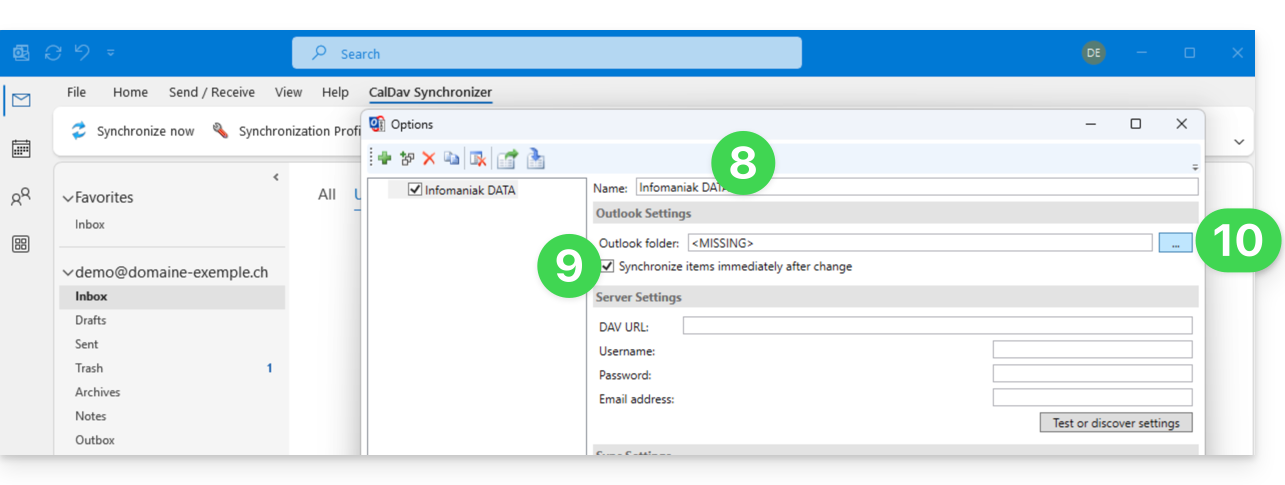
- Enter a profile name (e.g., the name of the Infomaniak calendar or address book you want to synchronize).
- Check the synchronization box.
- Click on the [ ▪ ▪ ▪ ] button:
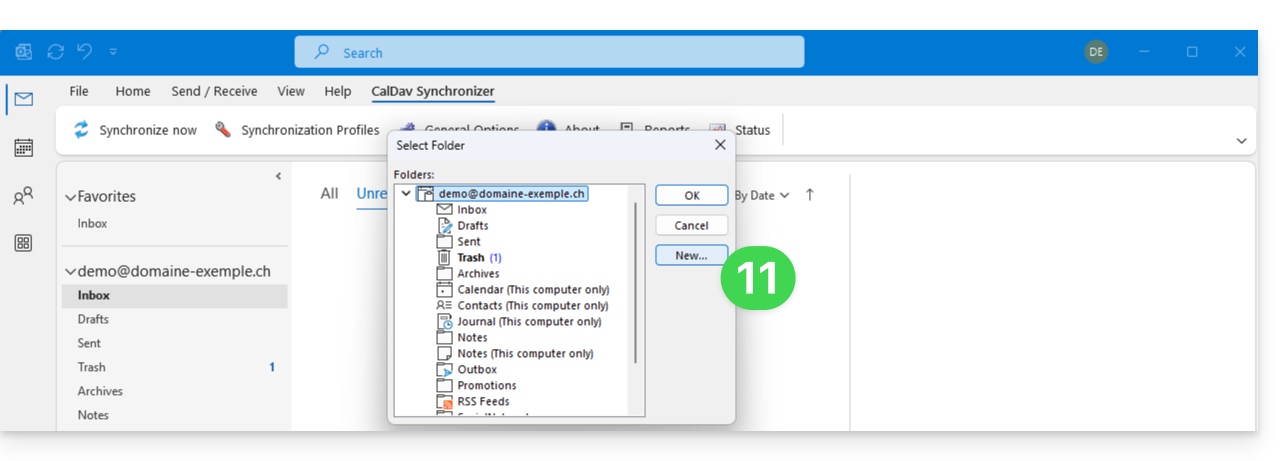
- Click on the New… button:
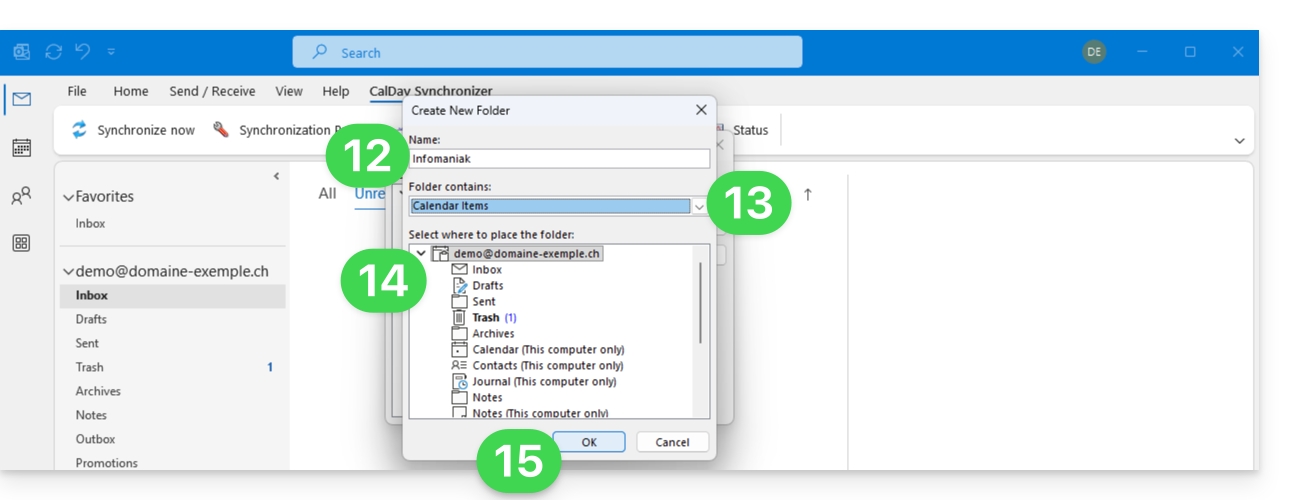
- Enter a name for the new folder.
- Choose the type of items the folder will contain (Calendar or Contacts).
- Click on the parent folder to create the folder within its structure.
- Confirm with the OK button:
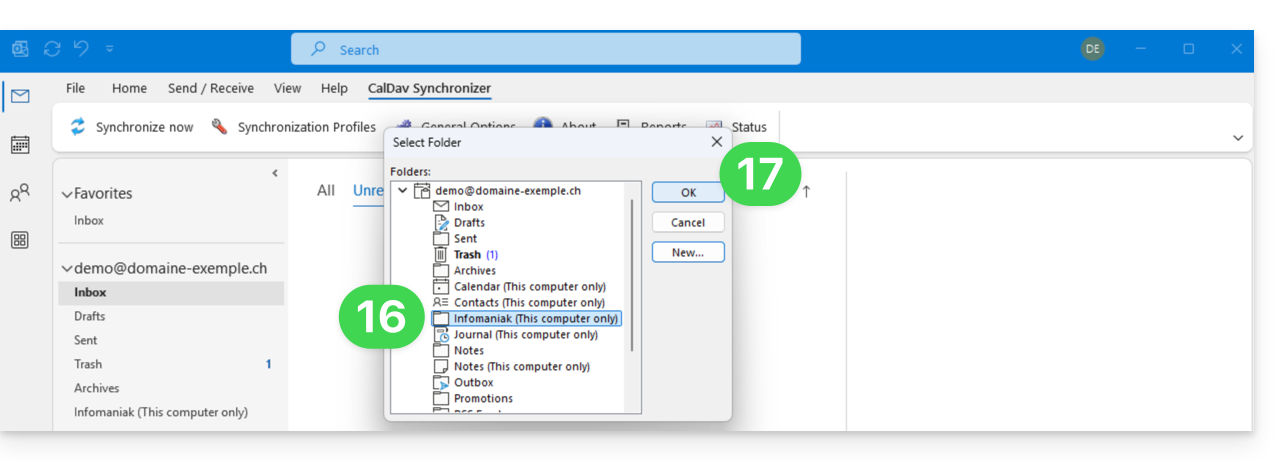
- Select the newly created folder from the list.
- Confirm with OK:
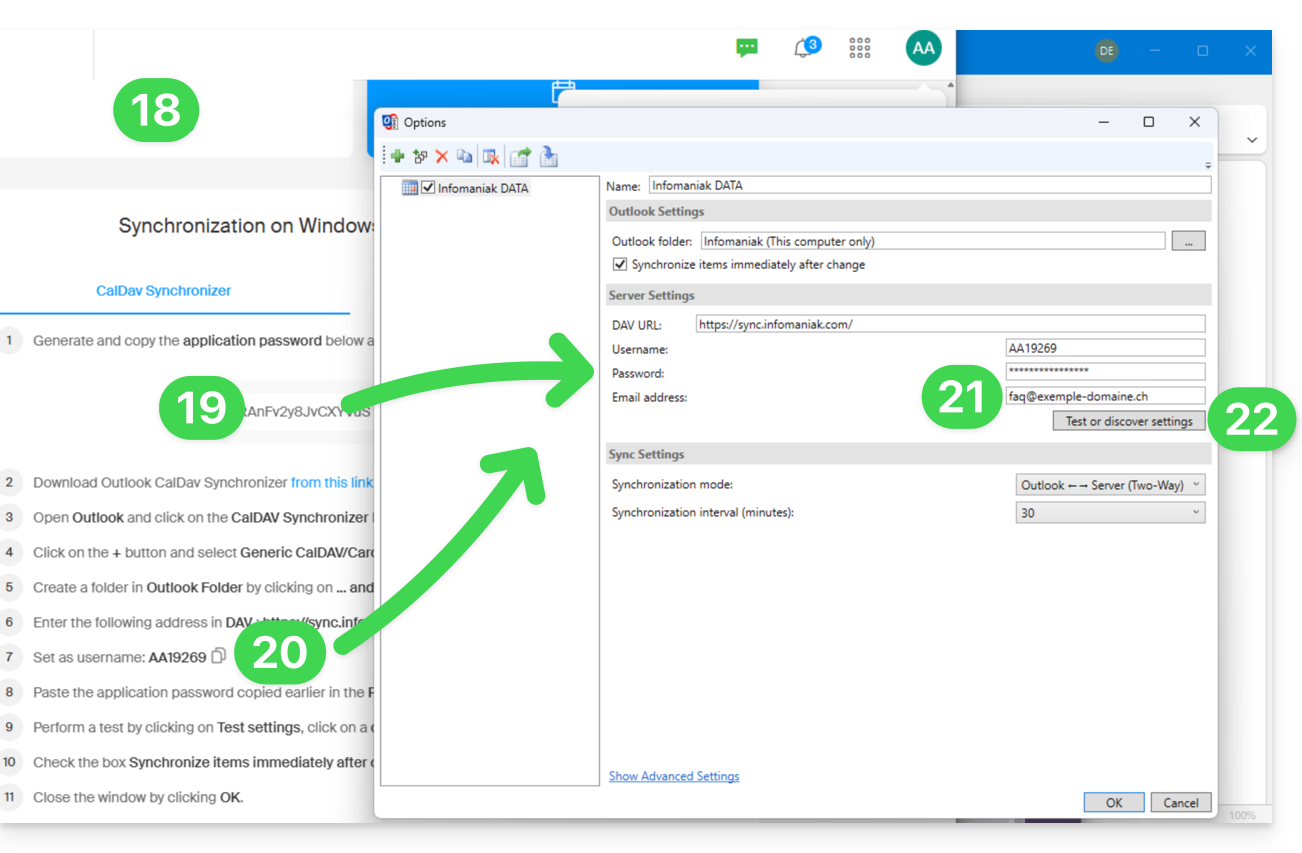
- Open the wizard https://config.infomaniak.com/ to obtain the information regarding synchronization with Outlook.
- Click the button to generate an application password (this allows you to bypass the 2FA for your user account for synchronization purposes only).
- Copy the information (password, URL, and username) obtained from config.infomaniak.com.
- Enter your email address, which is the address of your Infomaniak account.
- Click the button to Test the settings:
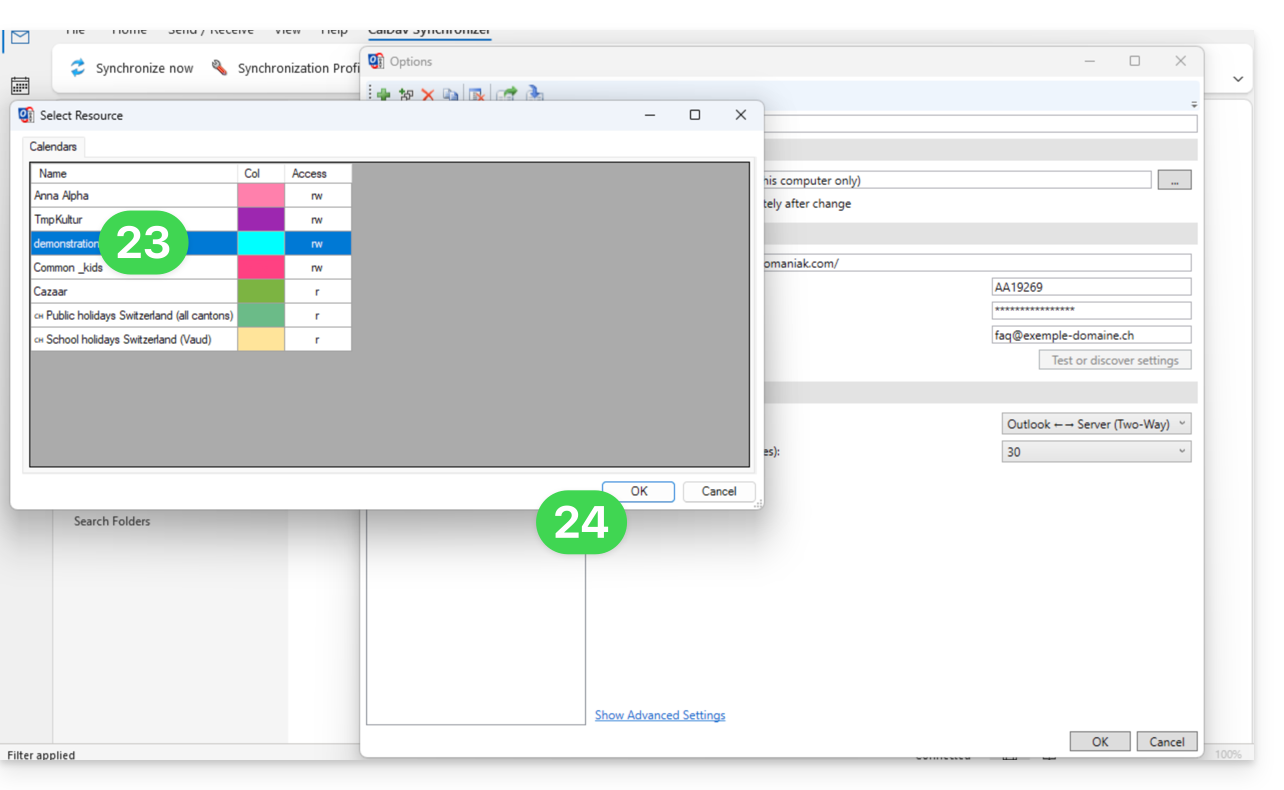
- In the window that opens, choose the Infomaniak calendar to synchronize.
- Click the OK button:
- Additional information may then appear automatically in some fields.
- Save a second profile if necessary (in this case, start again from step 5).
- Finish by clicking OK at the bottom right:
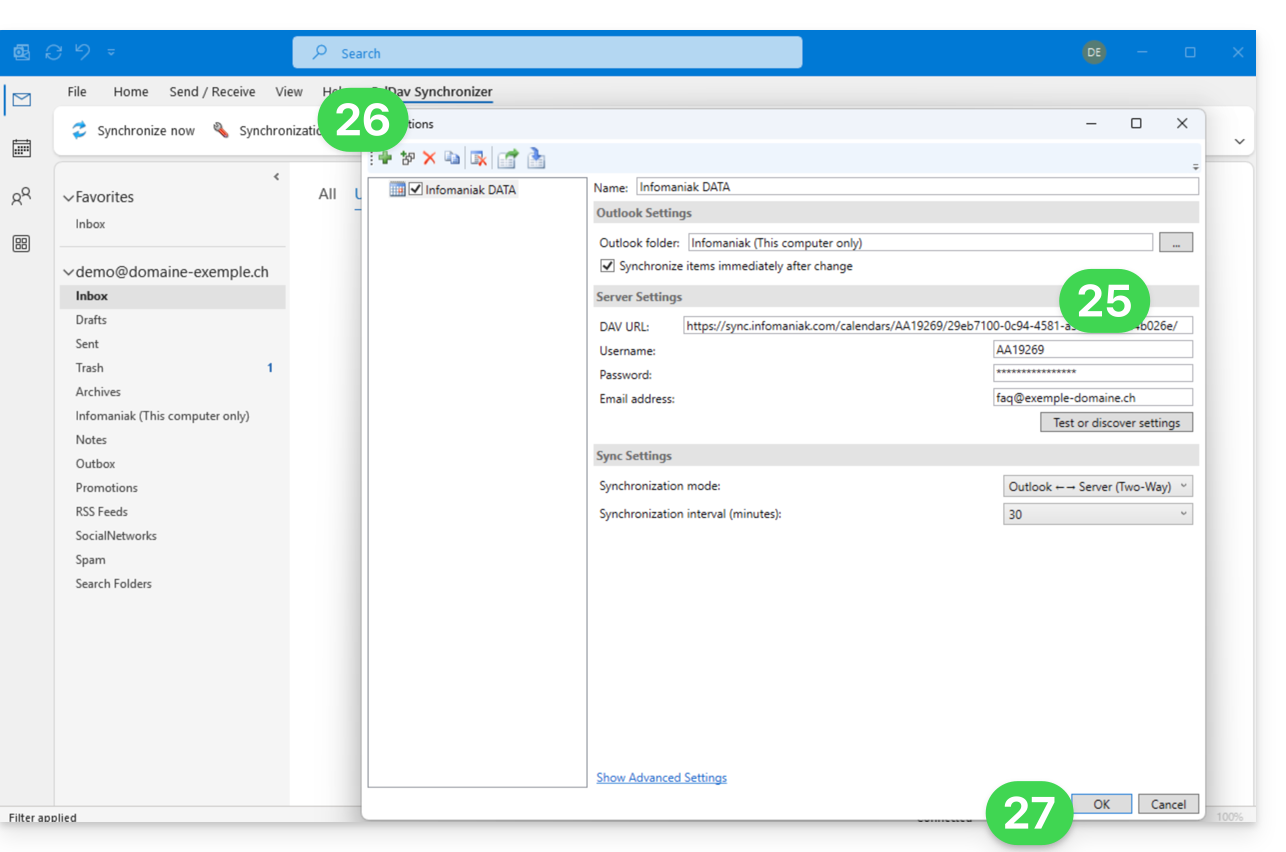
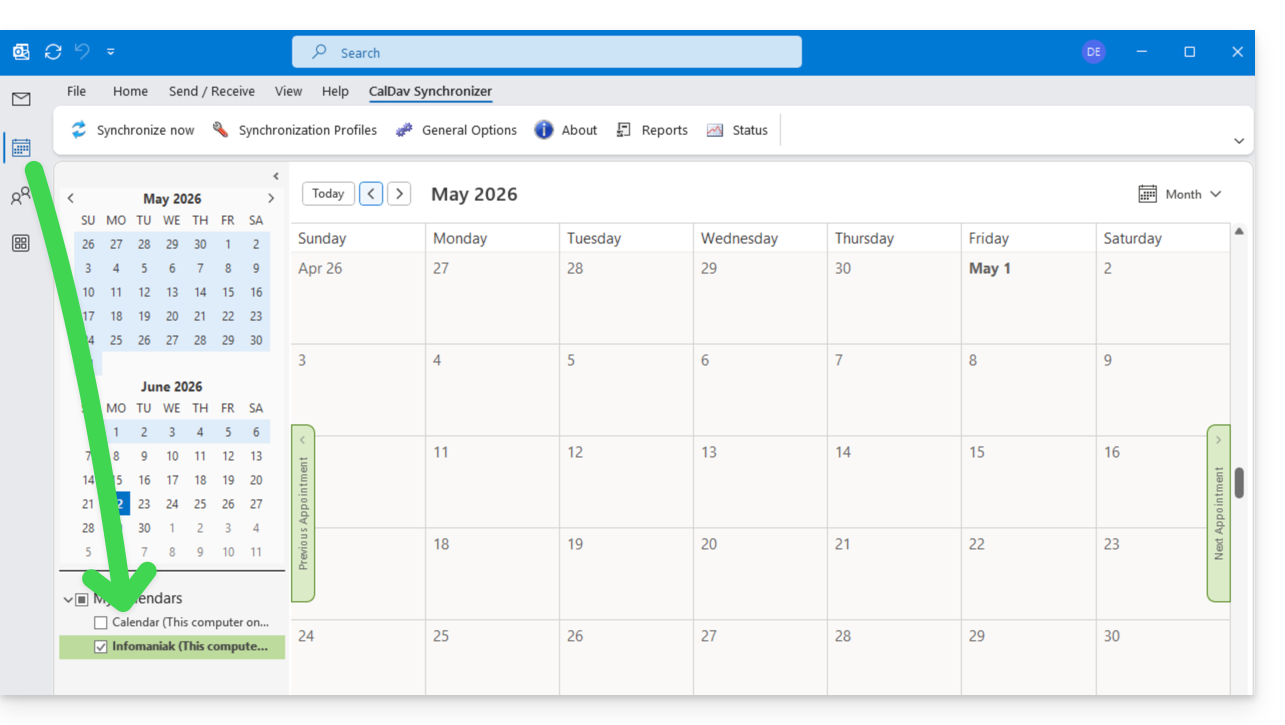
- A restart of Outlook may be required to update the added information, which will then be visible in the interface:
Resolving duplicate events
If you notice duplicate events in your Outlook calendar that are not duplicated on ksuite.infomaniak.com/calendar, apply these settings:
- Click to Show Advanced Settings.
- Click on Event Mapping Configuration.
- Check the box Use GlobalAppointmentID for UID attribute.
- Check the Cleanup duplicate events box.
- Save the changes by clicking the OK button:
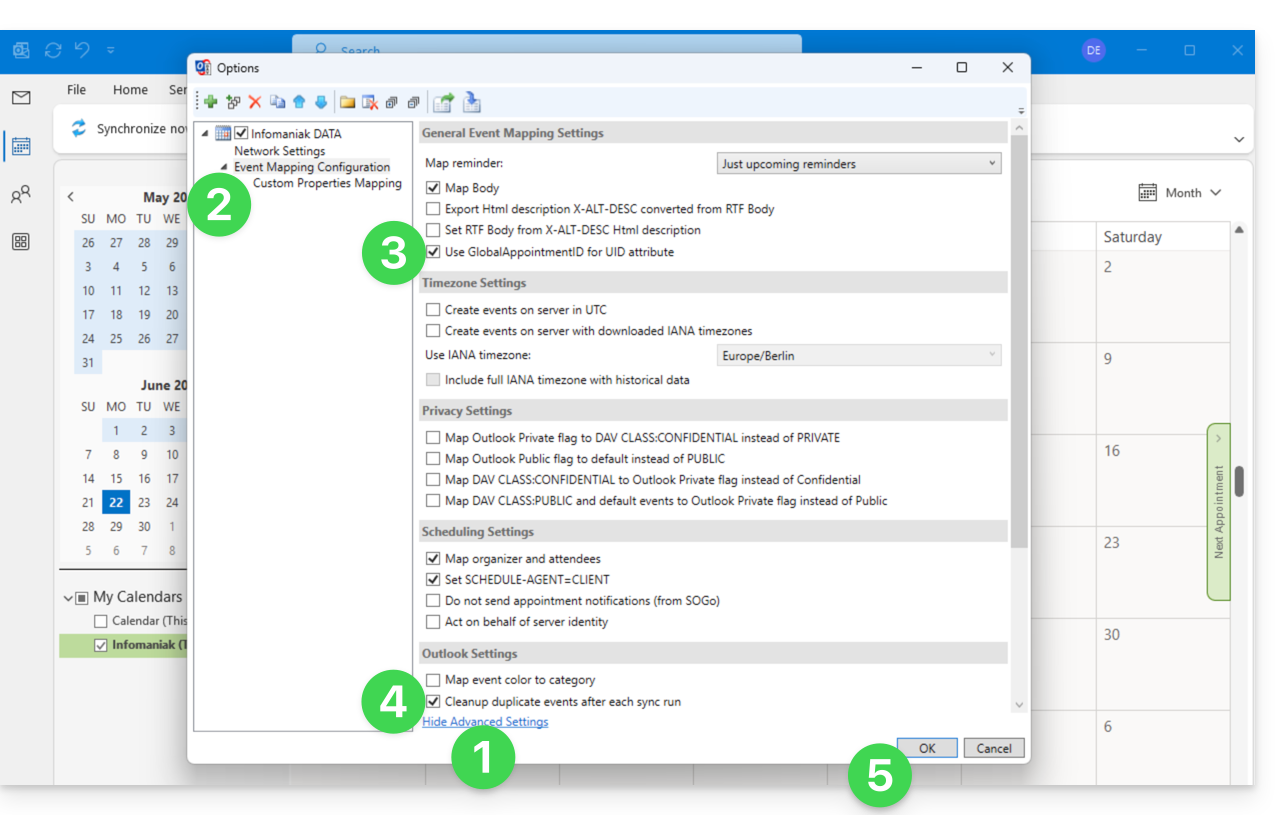
This removal of duplicate events, and therefore potentially duplicate invitations, may result in a notification of event rejection being sent to the organizer; however, this does not affect the participant's initial choice.
For advanced macOS users
There is an alternative for Outlook / Exchange on macOS, via the ews-caldav-sync Python script:
- Unlike an ICS file import provided by Outlook Web, which only includes the last few weeks of events, the script will import all calendar events, including recurring events, without importing tasks.
- Synchronization via this script is one-way, from Microsoft Exchange to the CalDAV server. It is recommended to run it at regular intervals.
Link to this FAQ:
Has this FAQ been helpful?
This guide explains how to configure the synchronisation of calendars and contacts Infomaniak with the desktop app Mozilla Thunderbird (desktop application on macOS / Windows / Linux).
Obtain the Advanced URL
Prerequisites
- Obtain your synchronisation information provided by the Infomaniak synchronisation assistant:
- account address:
https://sync.infomaniak.com - username: for example
AB12345 - application password if two-factor authentication is enabled or your Infomaniak account password if you have not enabled 2FA
- account address:
To obtain a more detailed synchronisation URL, generally required for synchronisation with Thunderbird:
- Open the Infomaniak synchronisation assistant.
- Click on the blue link Select a device:
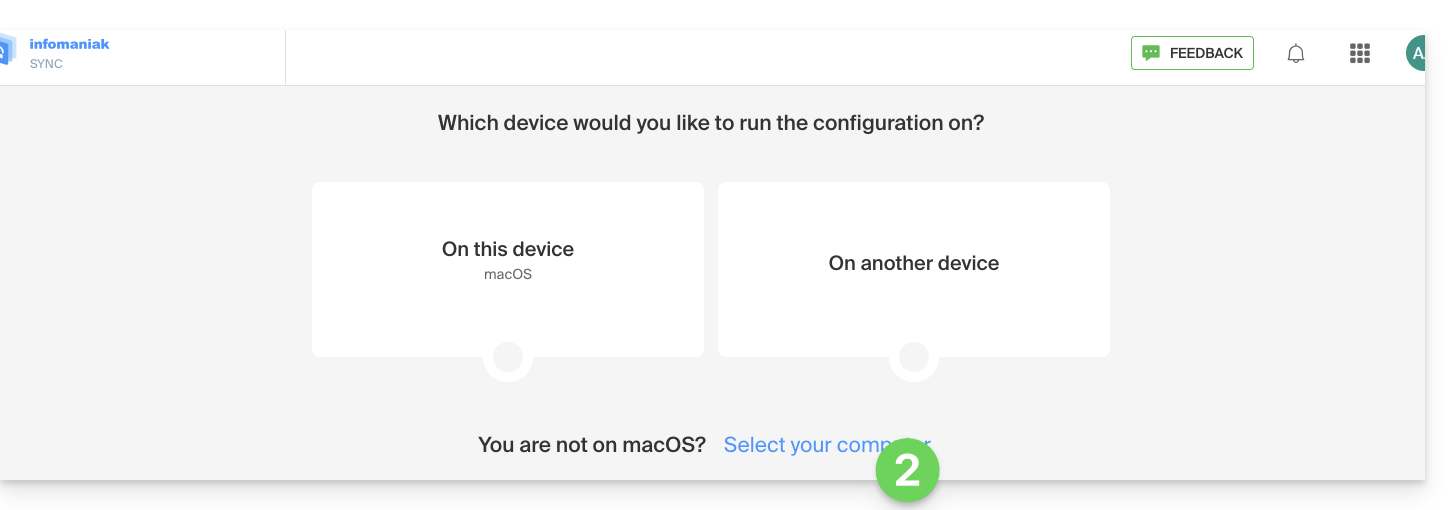
- Choose a GNU/Linux type synchronisation.
- Note the complete synchronisation URL displayed in step 4 of the assistant:

Synchronise Calendars and Address Books
Connect to an Address Book CardDAV
With the latest versions of Thunderbird, synchronizing your Infomaniak calendars and address books is offered to you immediately after configuring your email address within the software: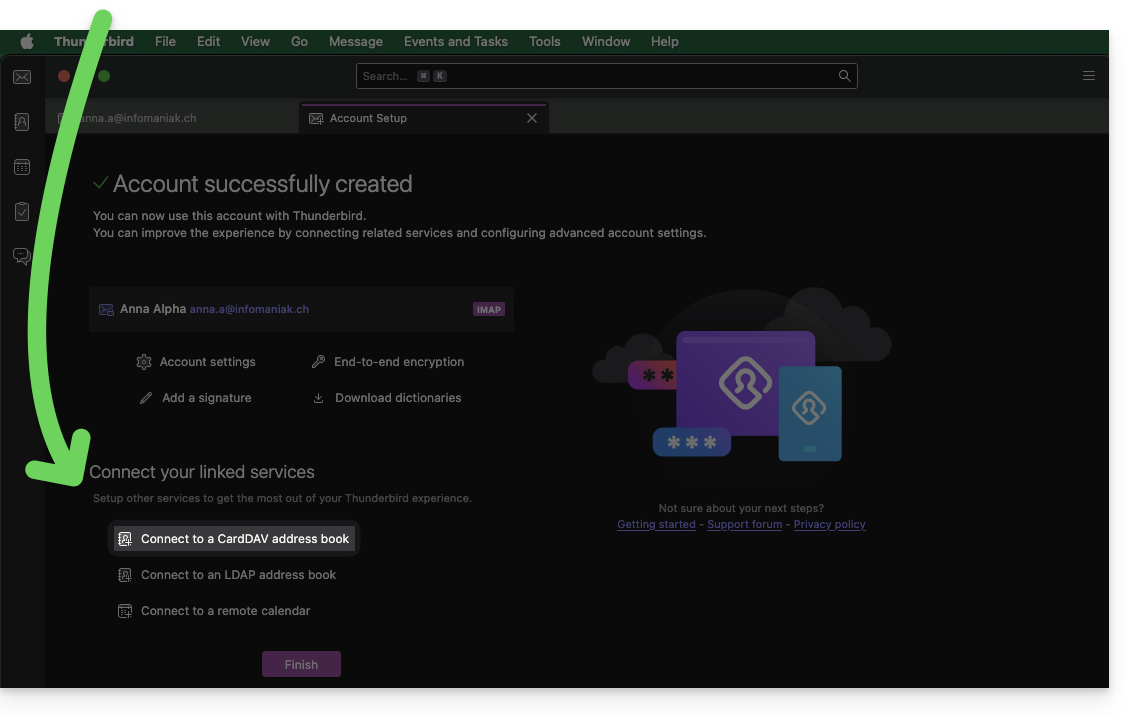
Click on it; the configuration starts:
- Enter your short username and the advanced URL (see above).
- Press Continue.
- Thunderbird then asks for the password (see above).
- Press OK:

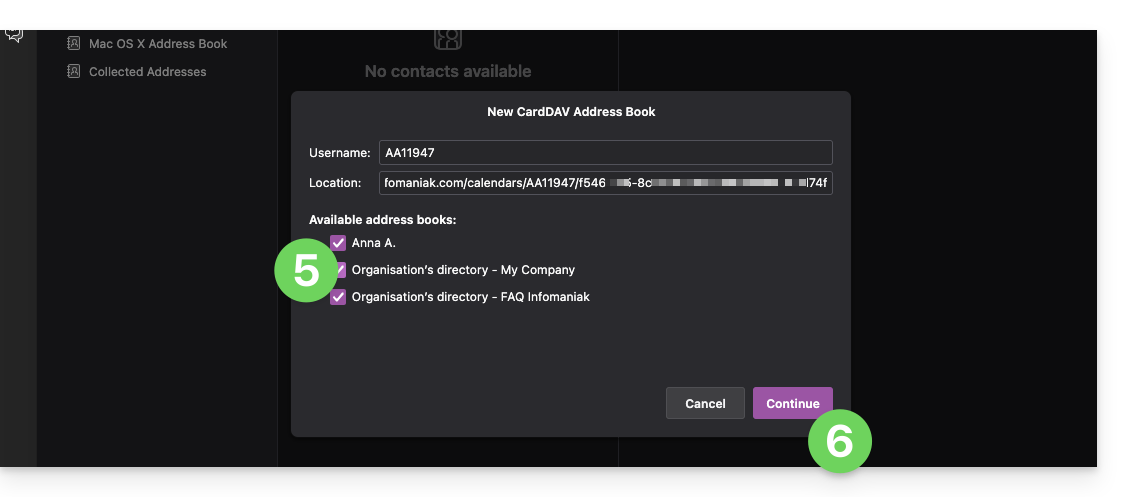
- Once authentication is successful, the application shows you the address books associated with your Infomaniak account; choose which ones to synchronize.
- Press Continue to finish:
Connecting to a remote calendar
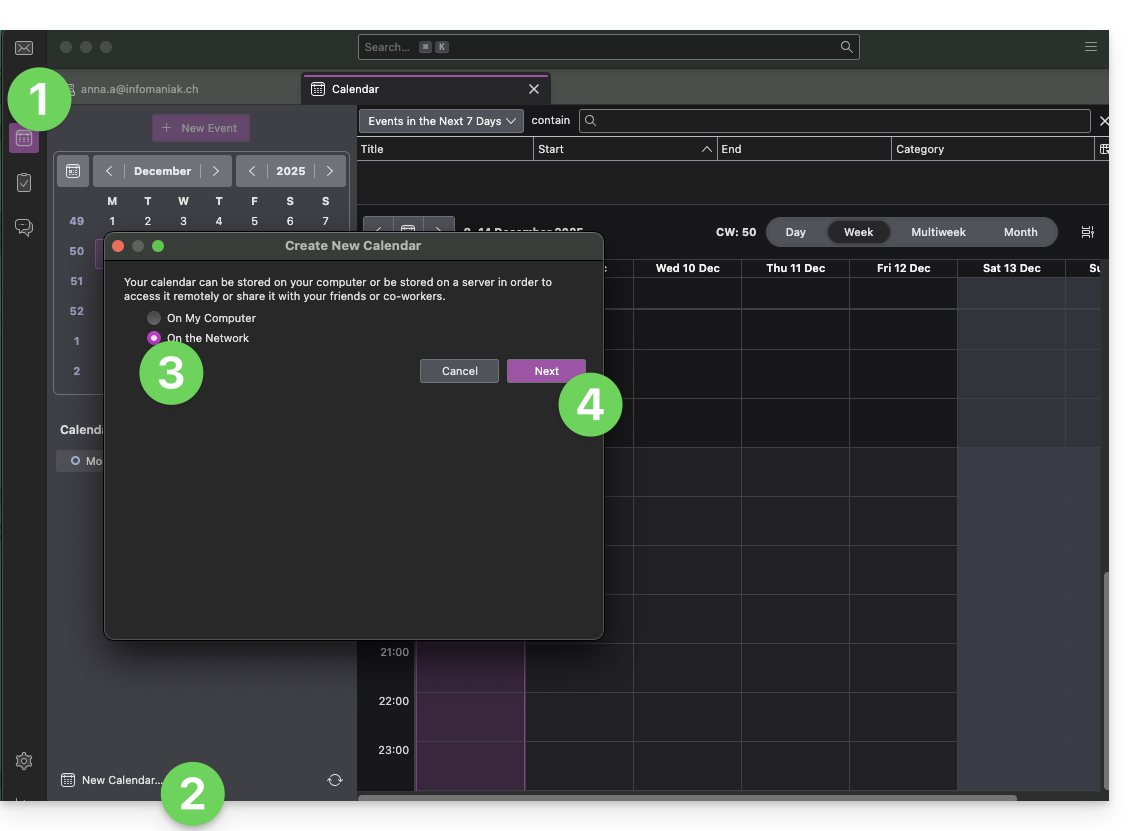
Add a new calendar in Thunderbird:
- If necessary, switch to Calendars.
- Click on New Calendar…
- Choose On the Network.
- Click on Next:
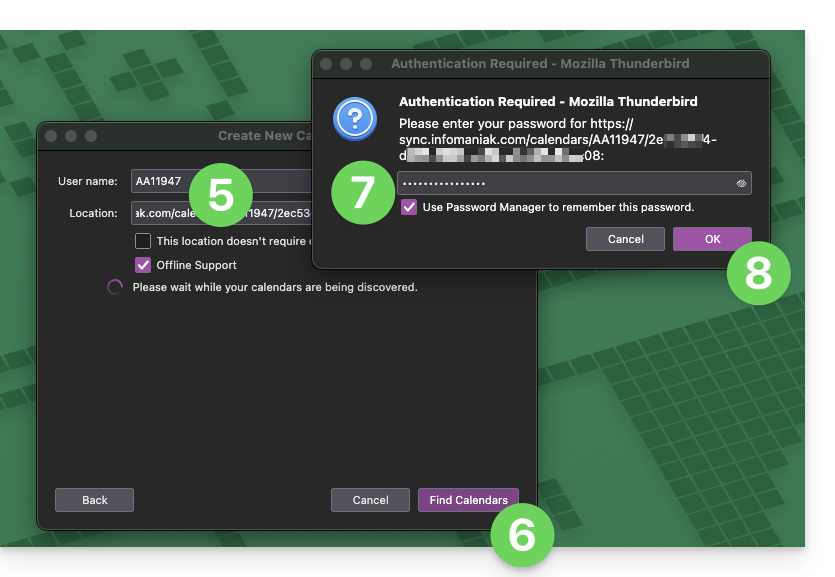
- Enter your short username and the advanced URL (see above).
- Press the button to find the associated Calendars.
- Thunderbird then asks for the password (see above).
- Tap OK:
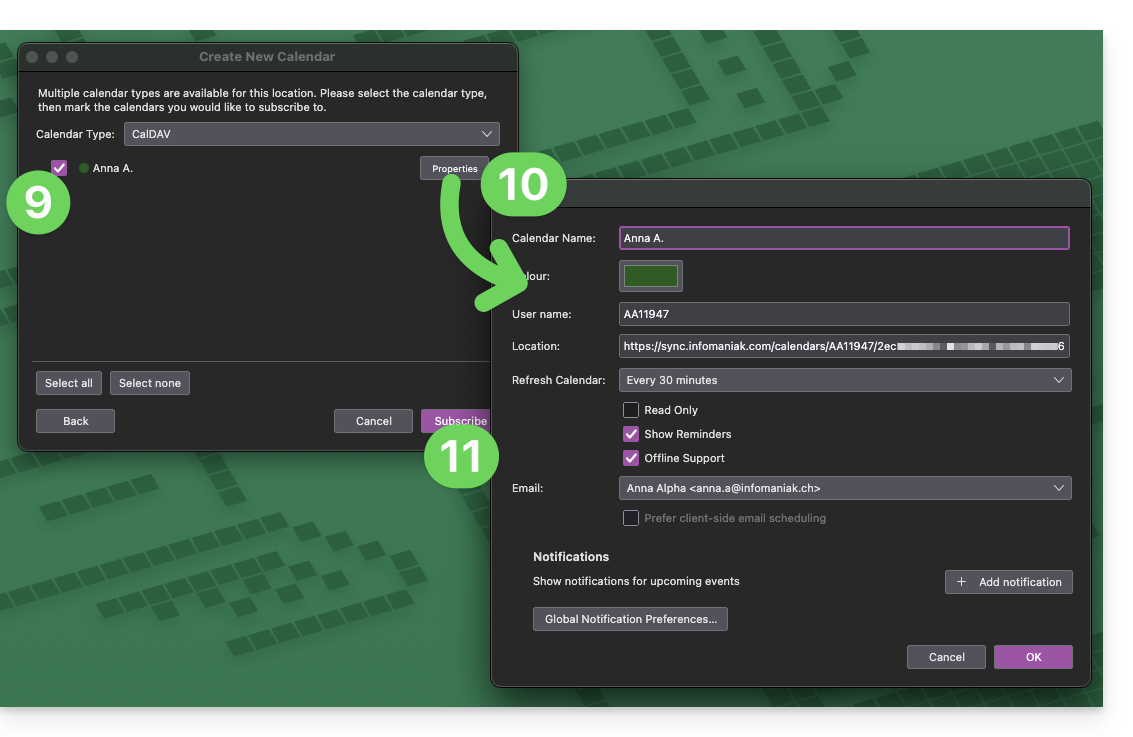
- Once authentication is complete, the application will display the calendars associated with your Infomaniak account; choose which ones to synchronize.
- If necessary, you can manage advanced properties for your calendars in Thunderbird.
- Tap the button to Subscribe and finish:
Refer to this other guide if you need to troubleshoot a configuration issue with Thunderbird (email, contacts, calendars)…
Link to this FAQ:
Has this FAQ been helpful?
This guide explains how to synchronize your eM Client contacts & calendars with the contacts & calendars hosted by Infomaniak.
Introduction
- Infomaniak contacts & calendars are linked to your Infomaniak account; when you log in to ksuite.infomaniak.com/contacts or /calendar, you will likely need to perform two-factor authentication (2FA) during login.
- In this case, an application password is required to establish synchronization between your device and Infomaniak tools.
- But don't worry, creating such a password is offered as part of the configuration wizard.
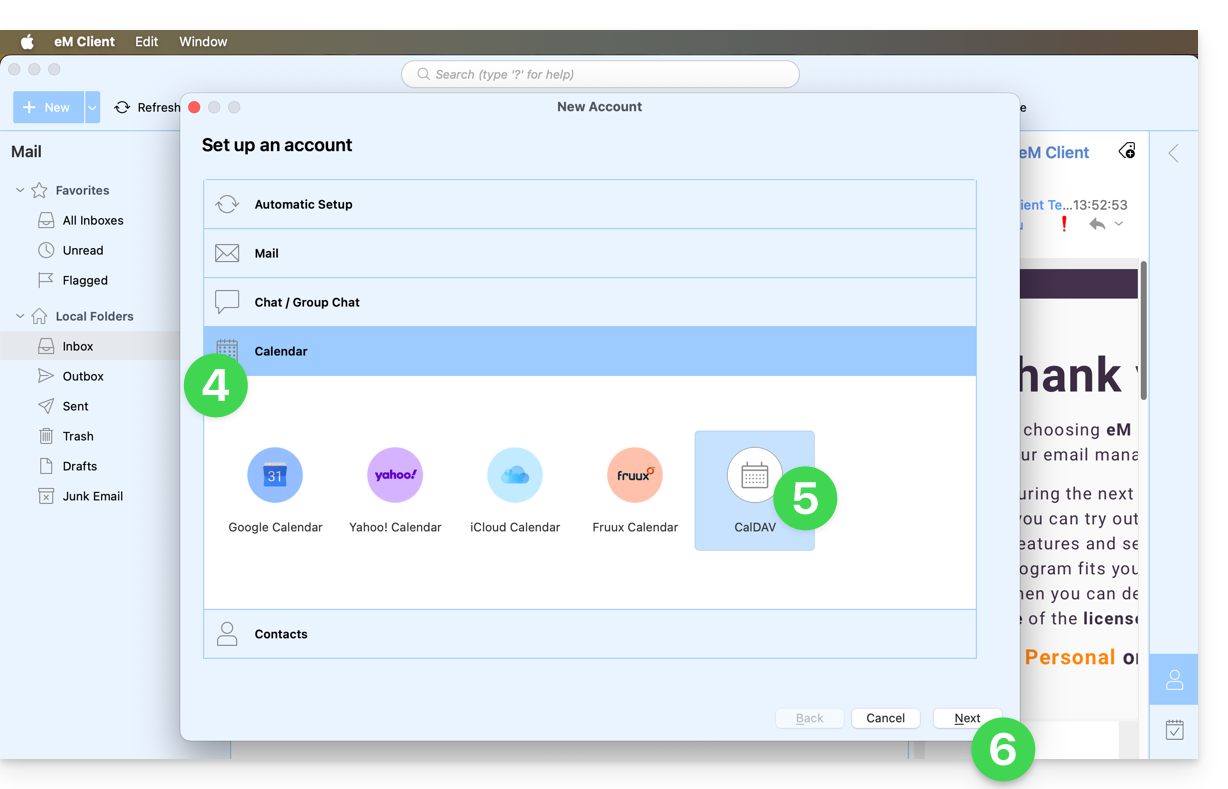
Synchronize contacts & calendars (eM Client 10 macOS)
Prerequisites
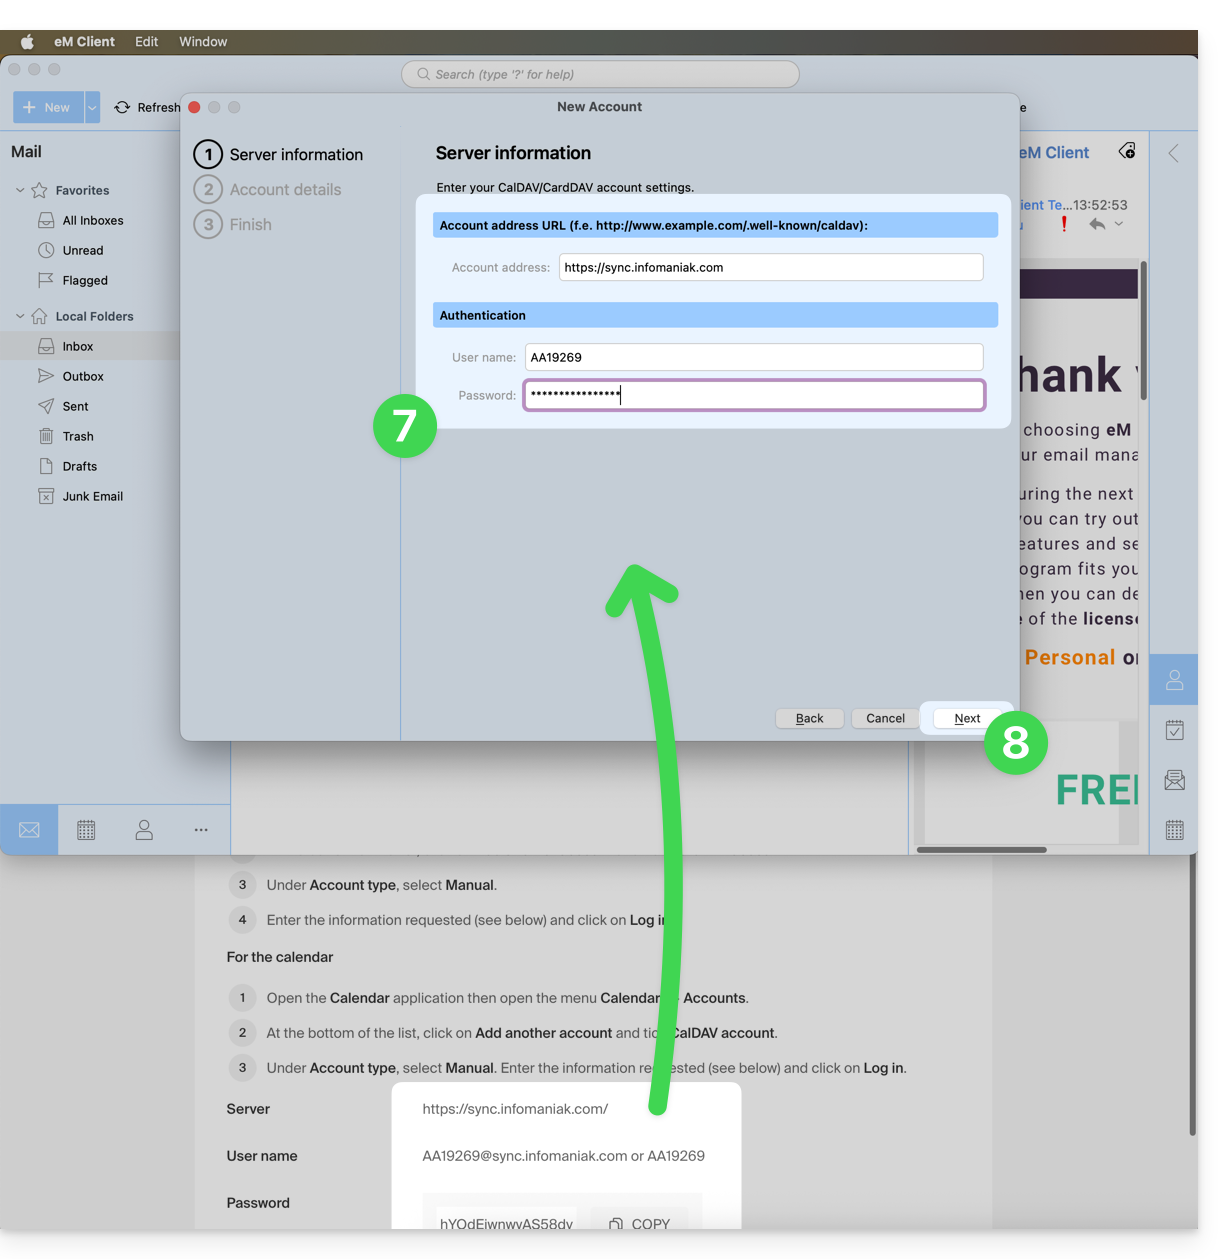
- Obtain your synchronization information provided by the Infomaniak synchronization wizard:
- account address:
https://sync.infomaniak.com - username: for example
AB12345 - application password if two-factor authentication is enabled or the password for your Infomaniak user account if you have not enabled 2FA
- account address:
Then:
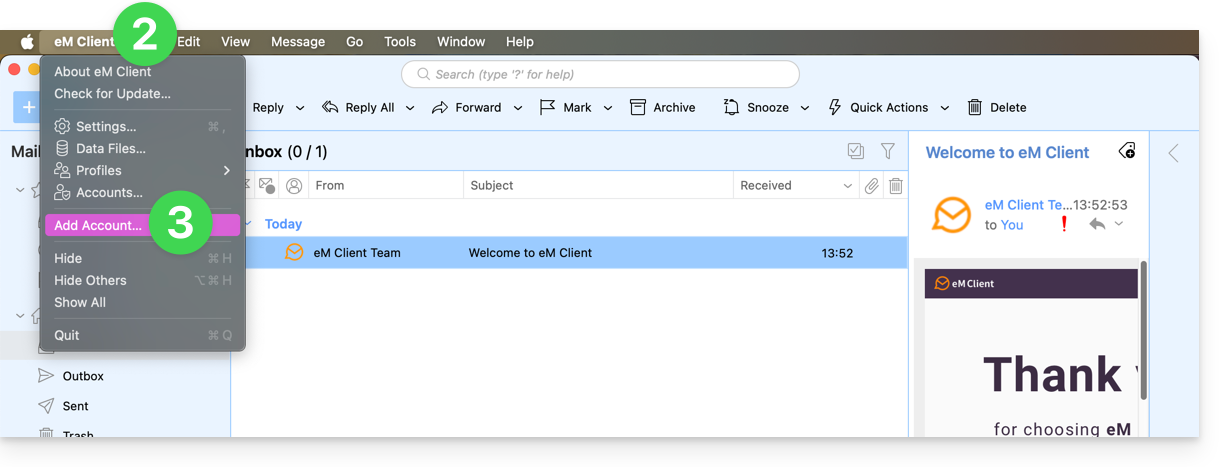
- Open eM Client.
- Click on the eM Client Menu.
- Click on Add account:
- Click on Calendar.
- Click on CalDAV.
- Click on Next:
- Enter the information obtained from the configuration wizard (see prerequisites).
- Click on Next:
- Choose a name for the account (e.g., infomaniak) and complete the process.
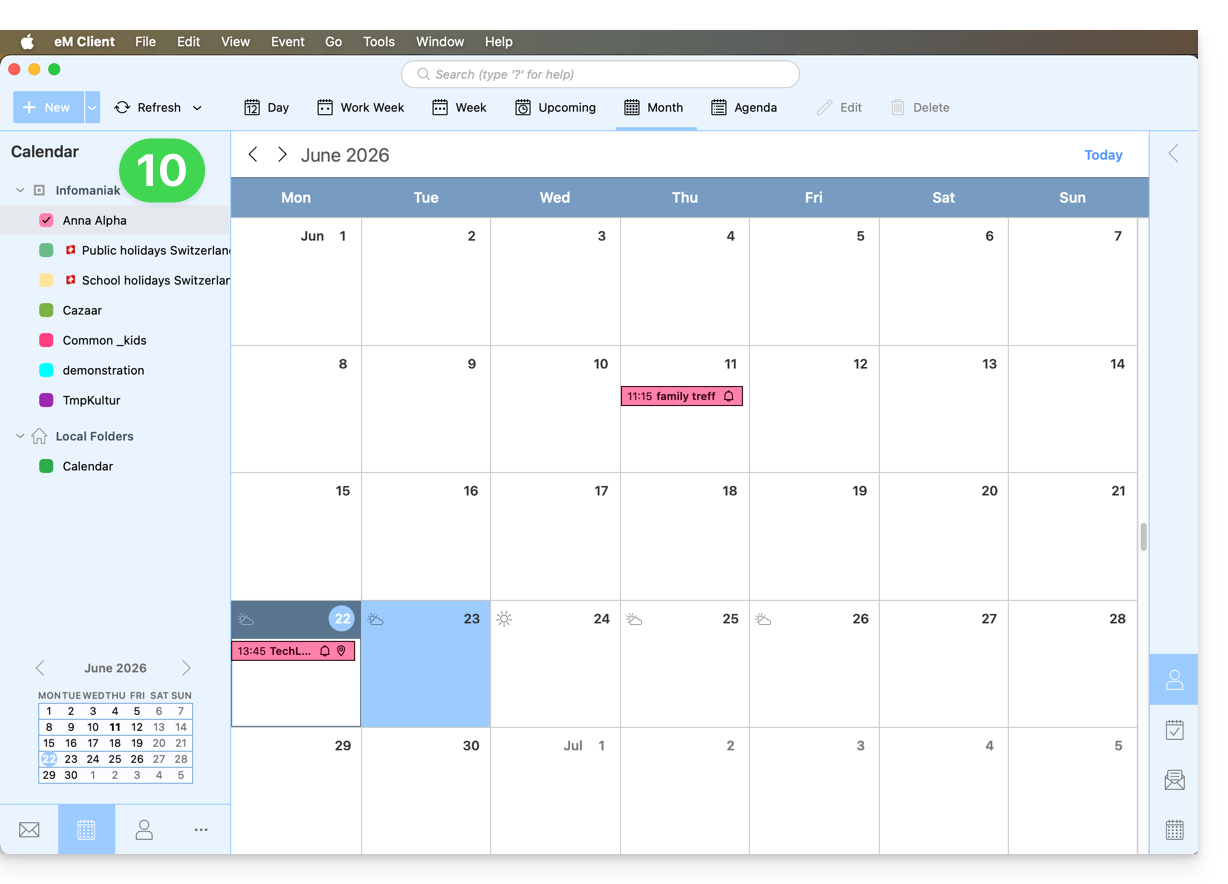
- The information retrieved and synchronized with Infomaniak will be displayed in the Calendar section:
You can start with the Contacts section if you wish, but in any case, a CalDAV procedure also configures CardDAV, and vice versa:
Link to this FAQ:
Has this FAQ been helpful?
This guide explains how to delete an email address from the Mail Service Infomaniak.
Delete one or more email addresses
Prerequisites
- Have a Mail Service on your Manager Infomaniak.
- Be Administrator or Legal Representative within the Organization.
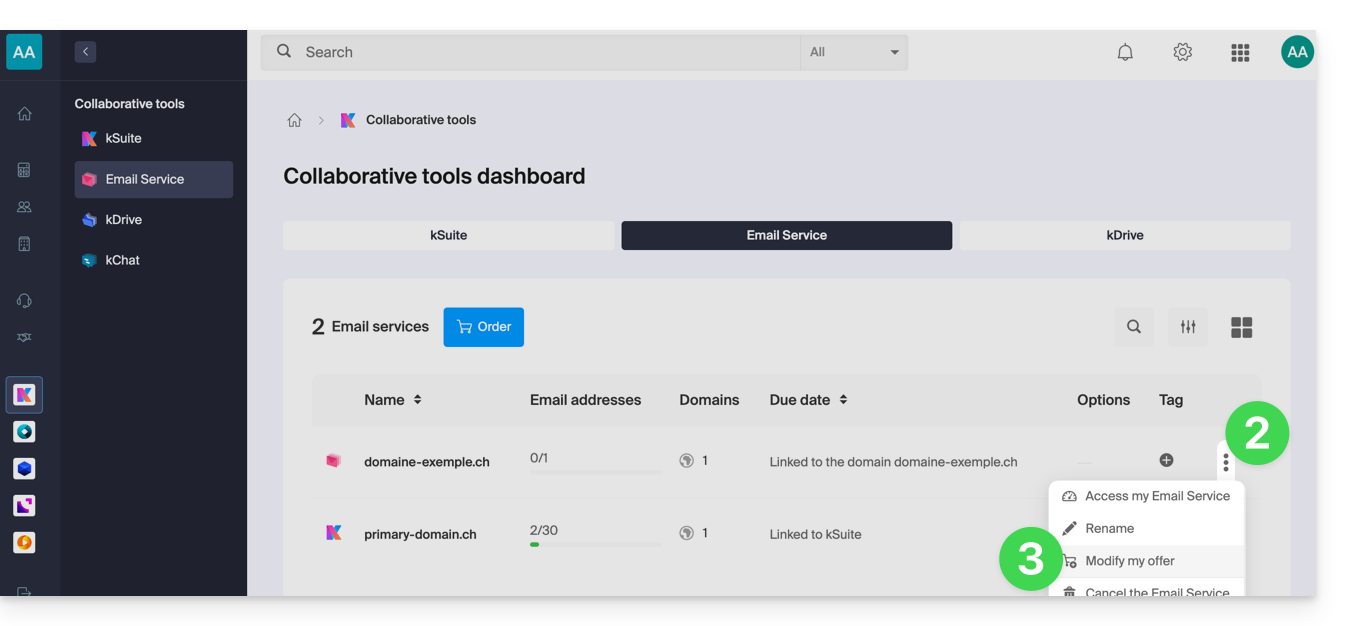
Removing an email address or terminating a user account is done through the Mail Service dashboard. This action will disconnect the associated services and requires special attention to the preservation of existing data. To remove an email address (its content will be permanently deleted):
- Click here to access the management of your Mail Service on the Infomaniak Manager (need help?).
- Click directly on the name assigned to the Mail Service concerned.
Once in front of the email address table: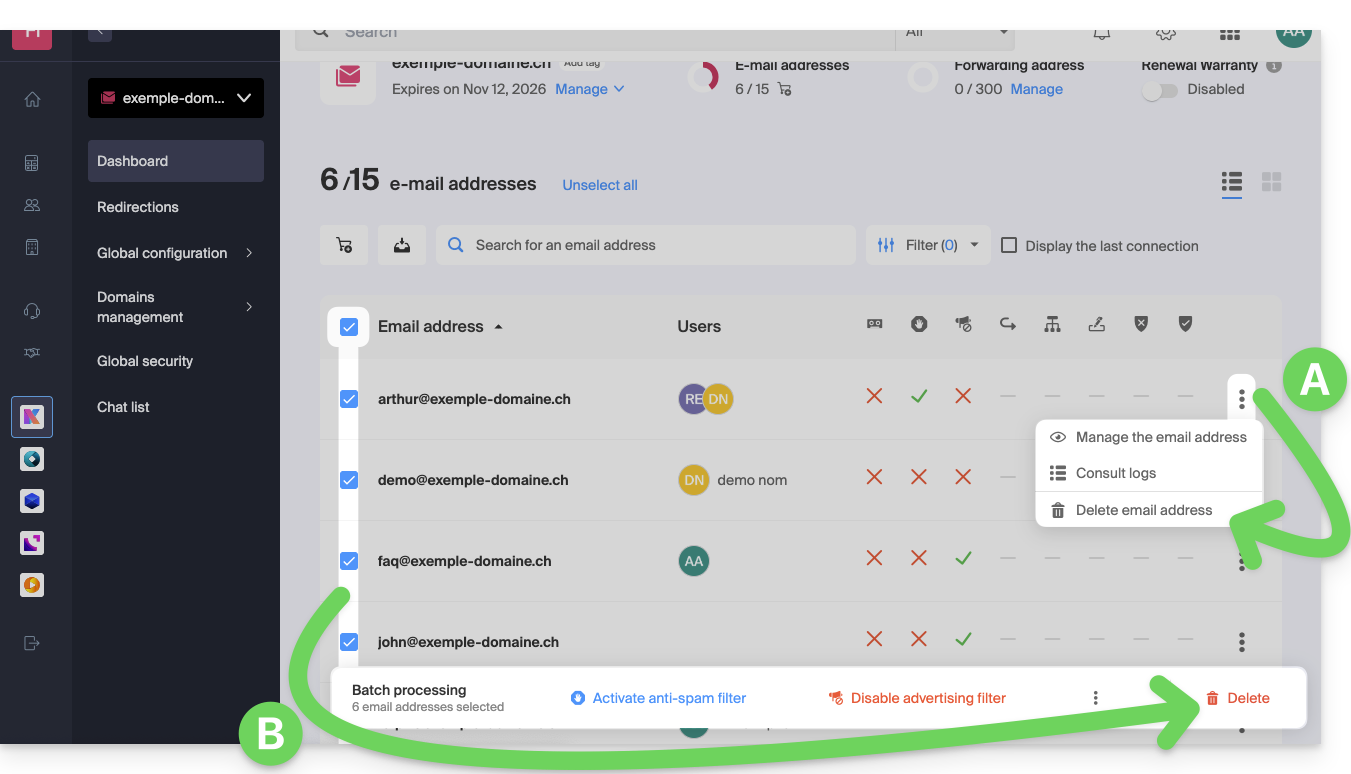
A. Delete one address at a time
- Click on the action menu ⋮ located to the right of the item concerned.
- Choose to delete the email address.
B. Delete multiple addresses at once
- Select the addresses to delete by checking the boxes to the left of the line.
- Click on Delete at the bottom of the screen.
Link to this FAQ:
Has this FAQ been helpful?
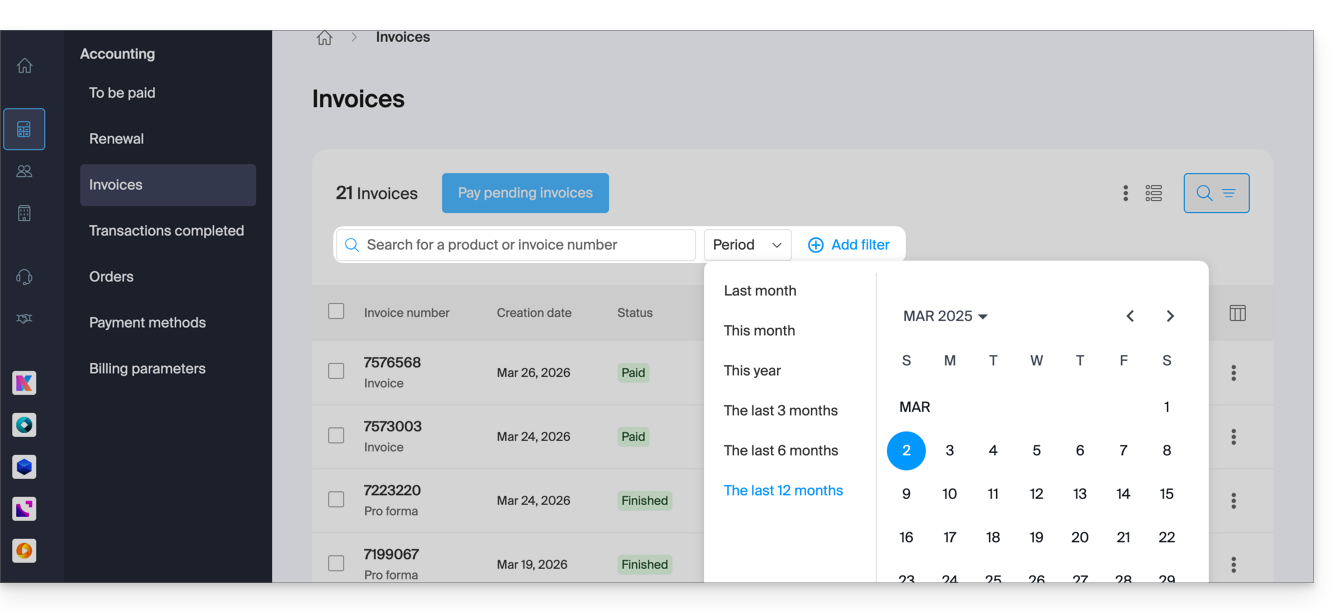
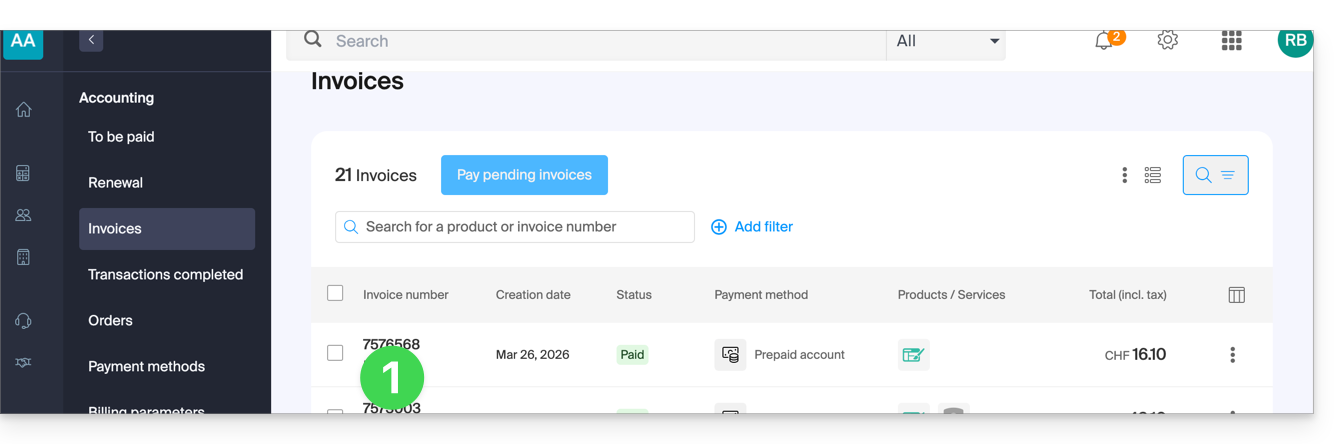
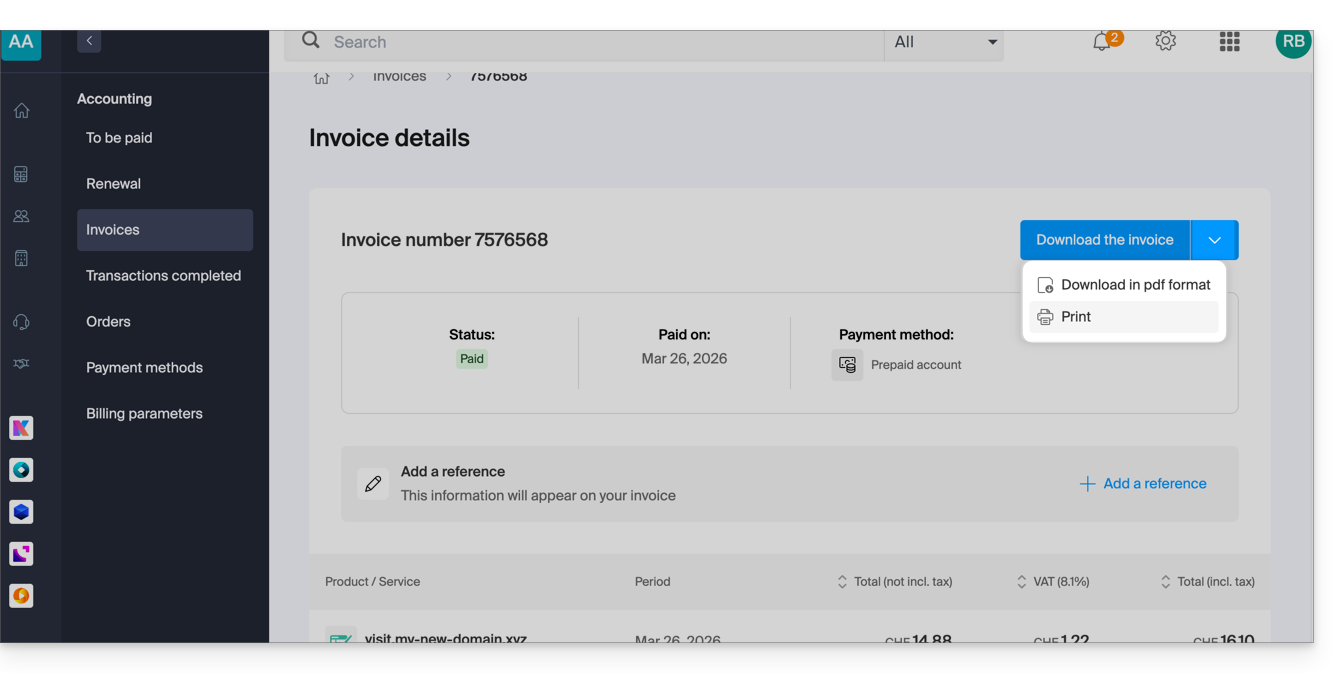
This guide provides instructions on how to obtain one or more Infomaniak invoices before and after payment, view, download, and print all or part of the billing document history for your accounting purposes.
Introduction
- Final invoices can only be printed after they have been paid.
- If necessary, a personalized message can be easily added to your billing documents: refer to this other guide.
Accessing the Invoice History
Prerequisites
You must be an Administrator or Legal Representative within the Organization…
- …or a standard user account but with the permission to manage accounting enabled:
To access the billing document page:
- Click here to access the invoice history in the Infomaniak Manager:
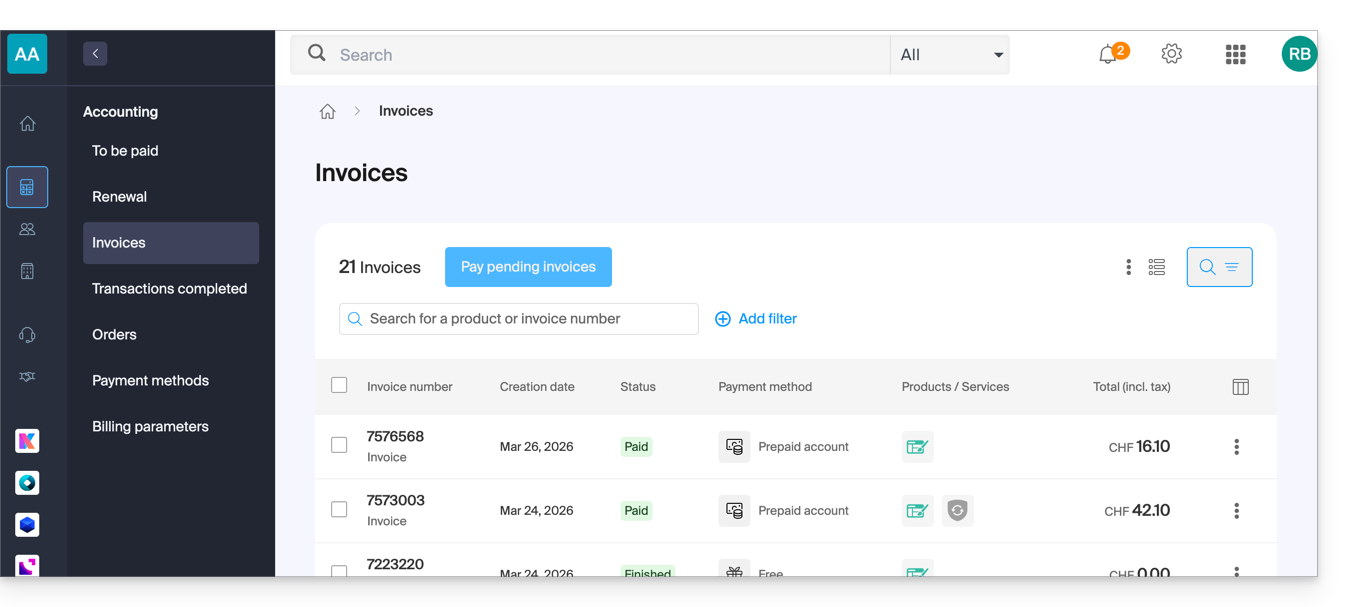
- The table automatically displays the most recent billing documents.
- The top section allows you to filter the documents based on the Paid, Reimbursed, etc. status and based on the desired period (start and end calendar):
Printing/Exporting a Billing Document
To view one of these documents in PDF format and then save it to your device or print it with your printer:
- On the same page, click on the invoice in question in the table that is displayed:
- Click on the Download button or on the chevron for other options:
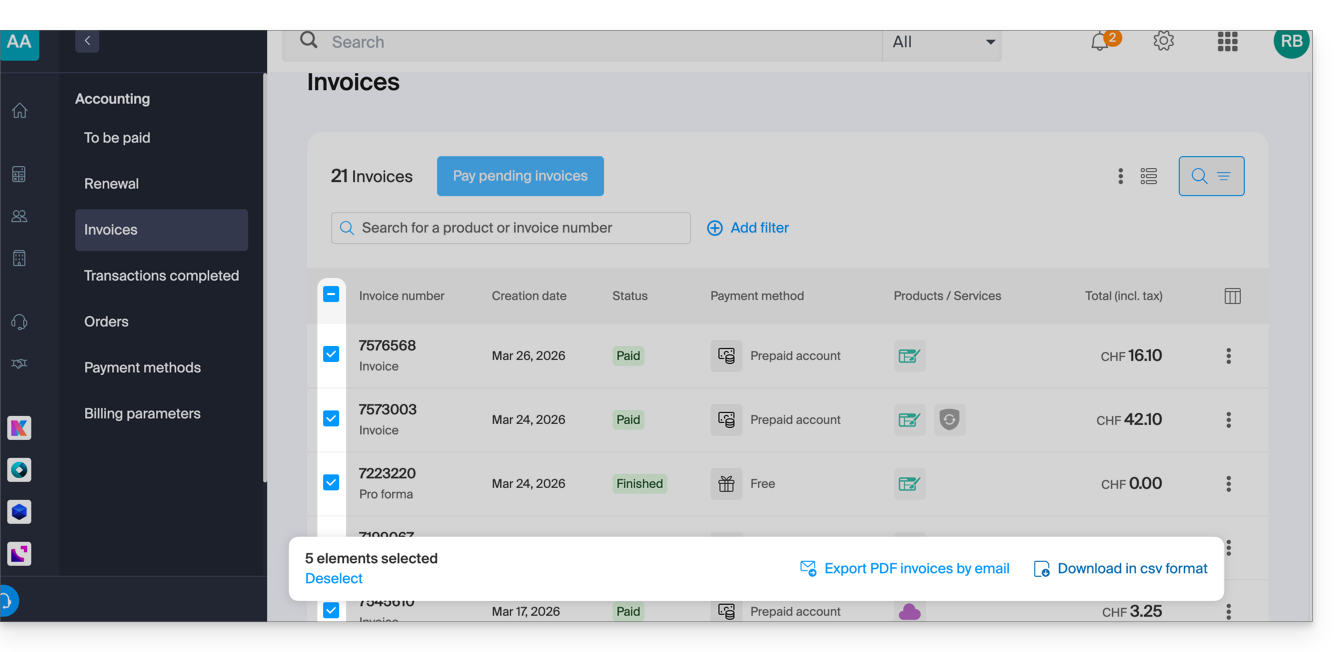
Export a set of billing documents
To download a set of documents in a CSV file in .csv format or receive them by email:
- On the same page, filter the documents according to the Paid, Reimbursed, etc. status and according to the desired period (start and end calendar).
- Click on the button at the bottom according to the desired export type:
Receive the (next) PDF invoice by email
To ensure that the invoice is always attached in PDF format with each renewal email:
- Click here to access the configuration / accounting page in the Infomaniak Manager (need help?).
- Access requires authentication with a user who has sufficient rights.
- On this page, enable or disable the addition of PDF invoices:

Your preferences are automatically saved as soon as a change is made on the page.
Print a Pro Forma Invoice
Pro Forma invoices do not have any legal, judicial, tax, or accounting value:
- Click here to access payment management in the Infomaniak Manager.
- Select the products concerned.
- Click on Generate a Pro Forma Invoice at the bottom of the table
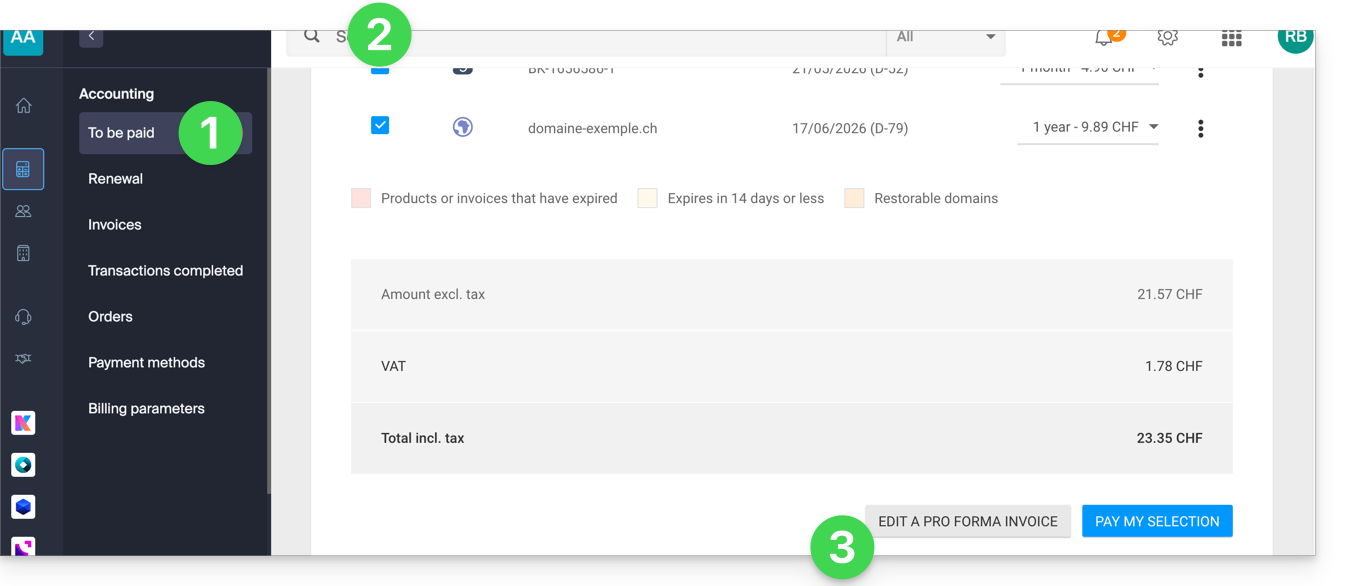
- Once displayed, you can then download the Pro Forma invoice.
Link to this FAQ:
Has this FAQ been helpful?
To help you identify the kSuite offer that best suits your needs, refer to this other guide.
The kSuite offer provided by Infomaniak does not include a web hosting service for a page or a website on the Internet.
It is of course possible to subscribe to an Infomaniak Web Hosting from the same user account and/or the same Organization and to build your website with the tool of your choice such as WordPress or Site Creator.
To help you identify the hosting offer that best suits your needs, refer to this other guide.
Link to this FAQ:
Has this FAQ been helpful?
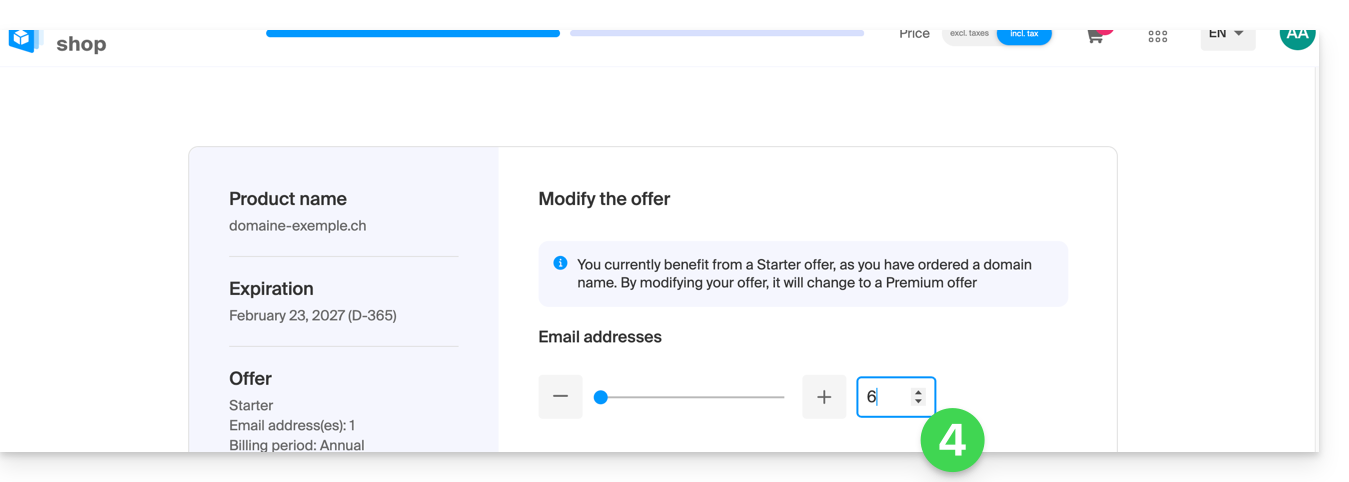
This guide explains how to upgrade a free Mail Starter plan to a more comprehensive and enhanced plan, such as the free or paid kSuite.
Introduction
- When you purchase a domain name from Infomaniak, you get 1 free email address and 10 MB of basic web space: this is the Starter plan.
- With a few clicks, you can upgrade these plans to unlock the limits and enjoy an enhanced experience.
- To help you identify the Mail plan that best suits your needs, please refer to this other guide.
Upgrade the Starter plan - Free Mail service
To upgrade the Starter plan:
- Click here to access the management of your product in the Infomaniak Manager (need help?).
- Click on the action menu ⋮ located to the right of the item in question.
- Click on Modify plan:
- Adjust, if necessary, the number of email addresses to add to the Mail service using the order wizard, which will guide you through the plan upgrade process:
Link to this FAQ:
Has this FAQ been helpful?
This guide concerns the Infomaniak chk.me service, a platform available with kSuite, designed to simplify the creation and sharing of short links and QR codes.
Introduction
- Chk.me is particularly useful for marketing professionals, event organizers, or anyone looking to effectively disseminate information via simplified links.
- This service not only allows you to shorten URLs to make them more manageable but also offers the ability to generate associated QR codes, thus facilitating access to websites, promotions, or online documents from physical media.
- To use Infomaniak Chk, creating an Infomaniak account is essential.
Shortened links and QR codes
⚠ Number of new items created per month:
| kSuite | free | 50 |
| Standard | 100 | |
| Business | 200 | |
| Enterprise | 500 | |
| my kSuite | 50 | |
| my kSuite+ | 50 |
Regardless of the plan you subscribe to, the validity period of a created link can be defined between 7 days, 30 days, 6 months, 1 year, and lifetime.
Link to this FAQ:
Has this FAQ been helpful?
This guide explains how to connect the desktop apps Contacts and Calendar on macOS (MacBook Pro, Neo…) with the contacts & calendars hosted by Infomaniak.
Introduction
- Your macOS computer will be automatically configured via .mobileconfig configuration profiles compatible with Apple, unlike a manual configuration.
- Infomaniak contacts & calendars are linked to your Infomaniak account; when you log in to ksuite.infomaniak.com/contacts or /calendar, you will likely need to perform two-factor authentication (2FA) during login.
- In this case, an application password is required to establish synchronization between your device and Infomaniak tools.
- But don't worry, creating such a password is offered as part of the configuration wizard.
Install a configuration profile
To do this:
- Click here to access the Infomaniak configuration tool (online service https://config.infomaniak.com) — log in if necessary to your Infomaniak account for the Organization where your services to be synchronized are managed.
- Choose to install the profile on this device.
- Choose to synchronize contacts & calendars.
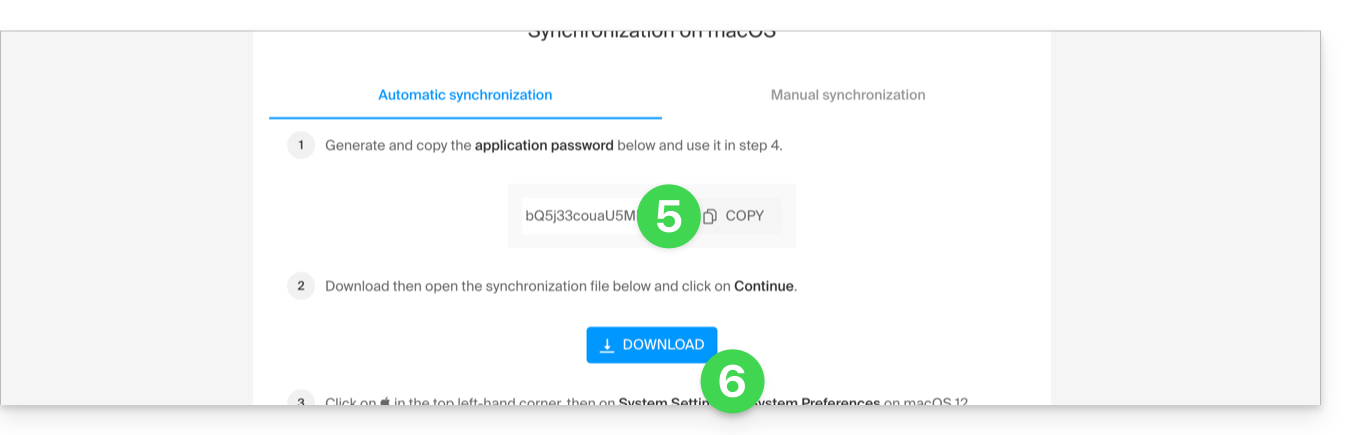
- Generate an application password dedicated to synchronization (in order to maintain the usual 2FA connection for your user account):
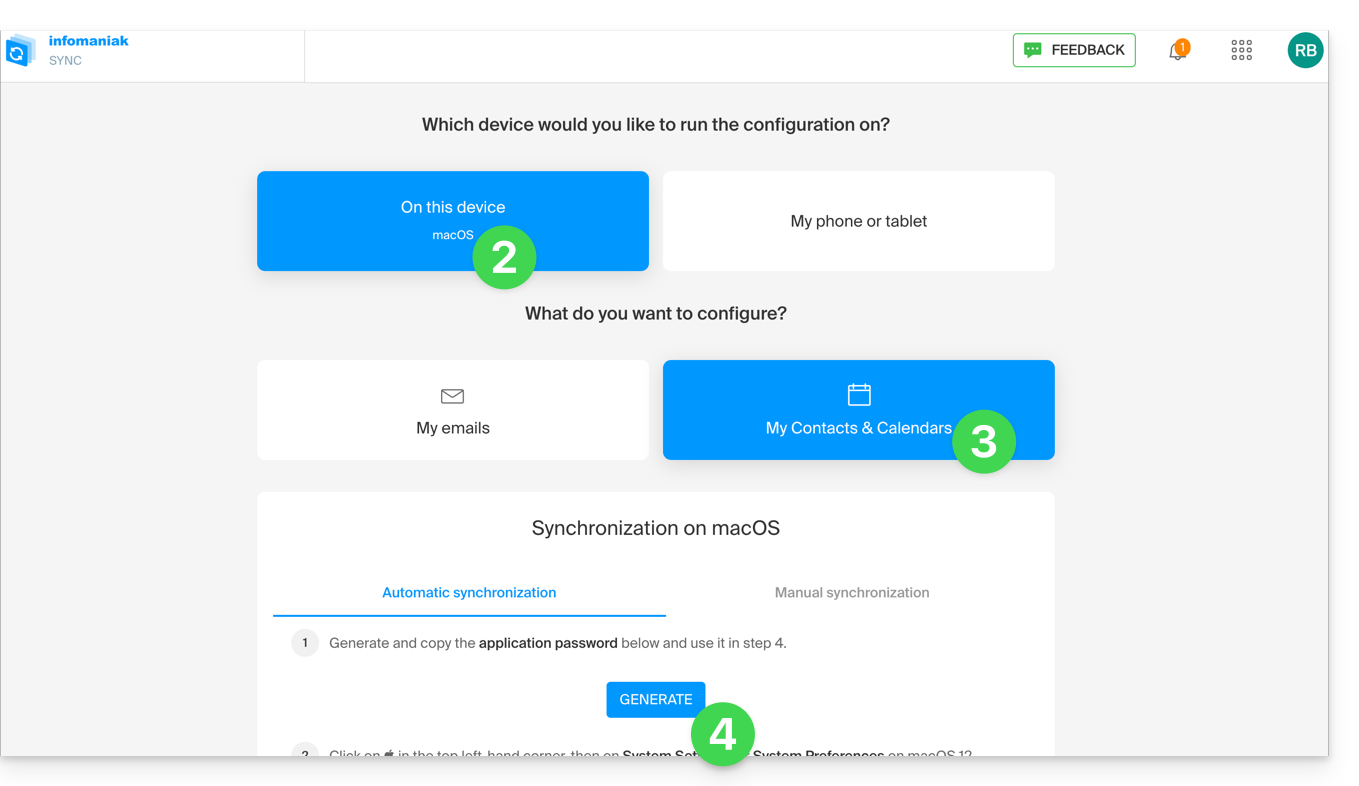
- Copy the generated application password (you will be prompted for it when installing the Apple profile).
- Download the Apple profile:
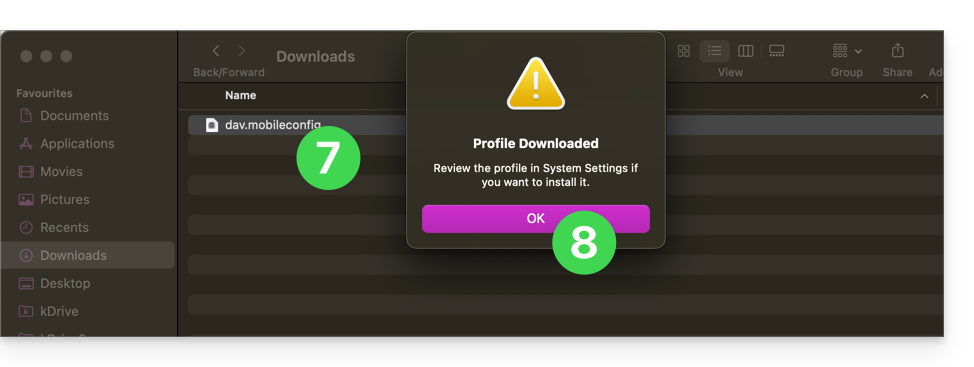
- Open this newly downloaded file on your hard drive.
- Click OK in the confirmation window:
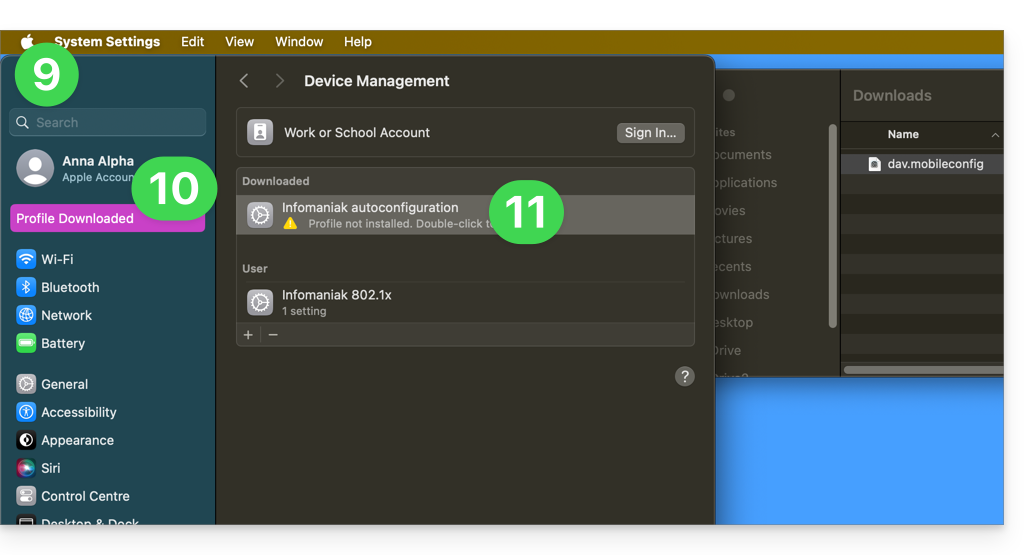
- Open the computer's System Settings.
- In principle, the new profile is indicated as such, and you need to click on this menu item…
- otherwise, click on General in the sidebar
- then click on Manage Device (for macOS Sequoia 15)
- if you have an older version or cannot find the profile, consult the official documentation, changing the version of your system at the top of the page if necessary…
- Double-click on the proposed profile:
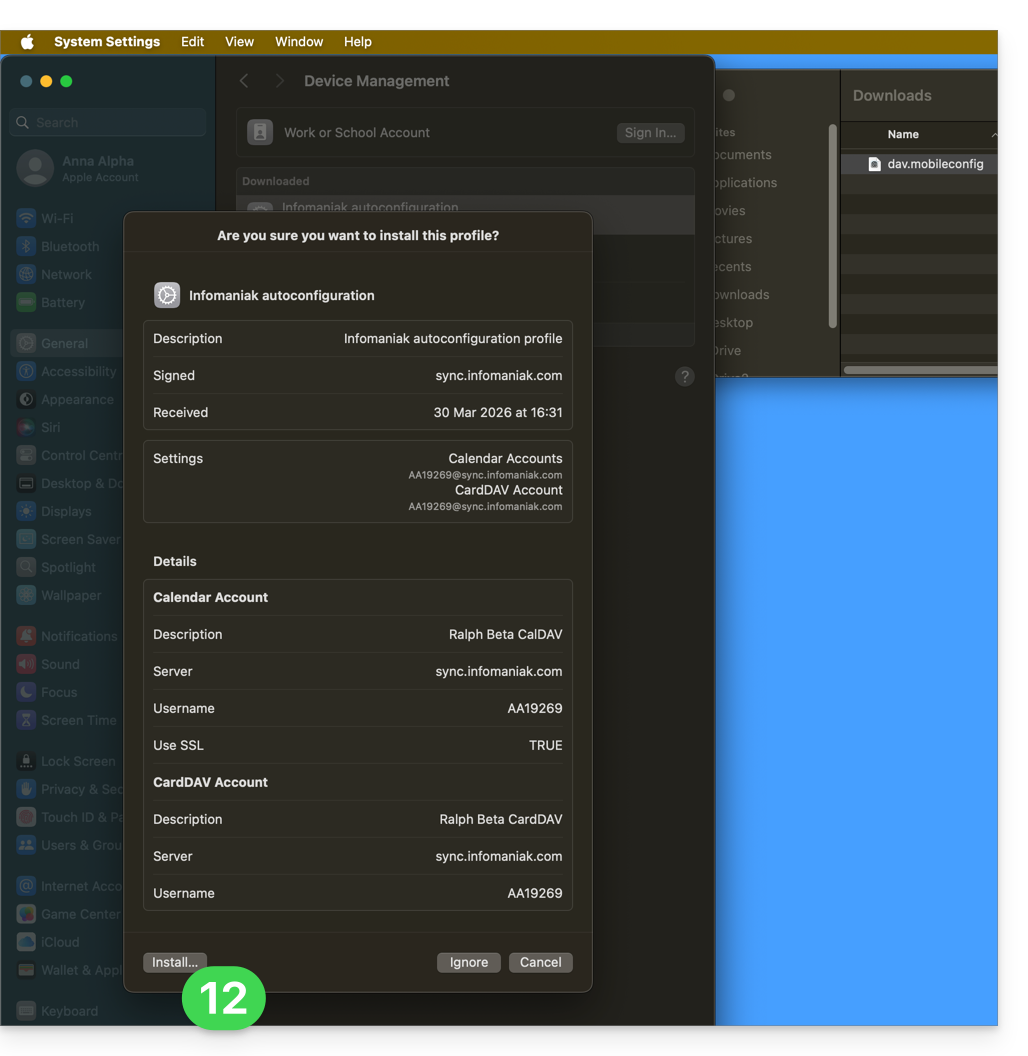
- Click Install:
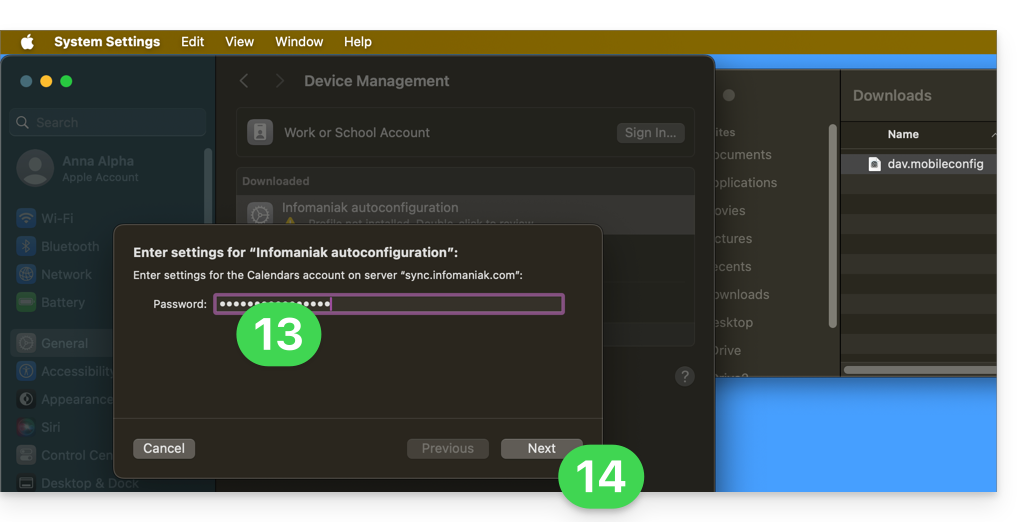
- Enter the application password obtained in step 5 above to connect to Calendars.
- Click on Next:
- Enter the password a second time (this time for Contacts) and click on Install to finish.
- That's it, you can now open your macOS Contacts and Calendar applications.
If your applications were already open, you need to restart them. You will then see the information added by the synchronization: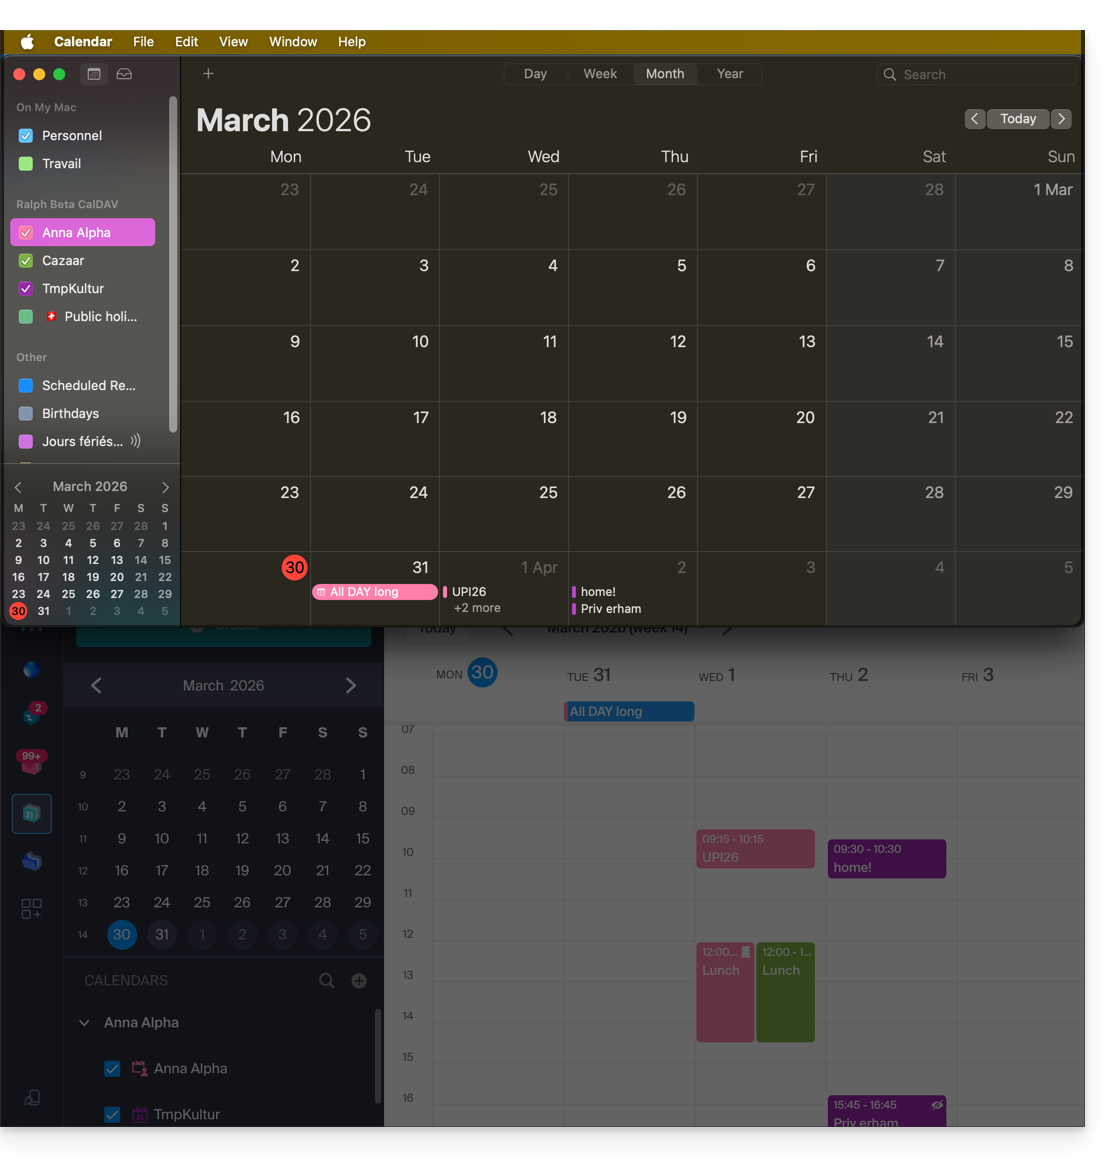
Synchronization specifics
Please refer to this other guide.
Delete an Apple profile
Please refer to the official documentation, and at the top of the page*, change the version of your system if necessary: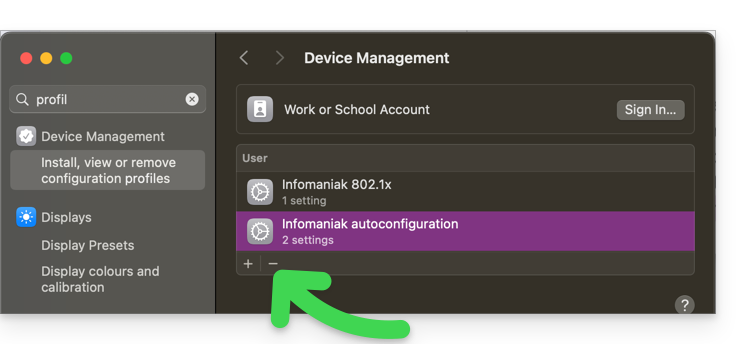
*Why is it necessary to choose the guide version that exactly matches your version of macOS / iOS? Apple introduces sometimes subtle changes with each new version of its system, for example, a path on iOS 15…
… becomes this on iOS 18…
Link to this FAQ:
Has this FAQ been helpful?
This guide explains how to modify certain language settings in the Manager and kSuite (Infomaniak Mail app, Calendar, Contacts, etc.).
Change the language of your Infomaniak account
To do this:
- Click here (or on the badge with your initials / avatar in the top right corner of the Infomaniak Manager) to "Manage my account":
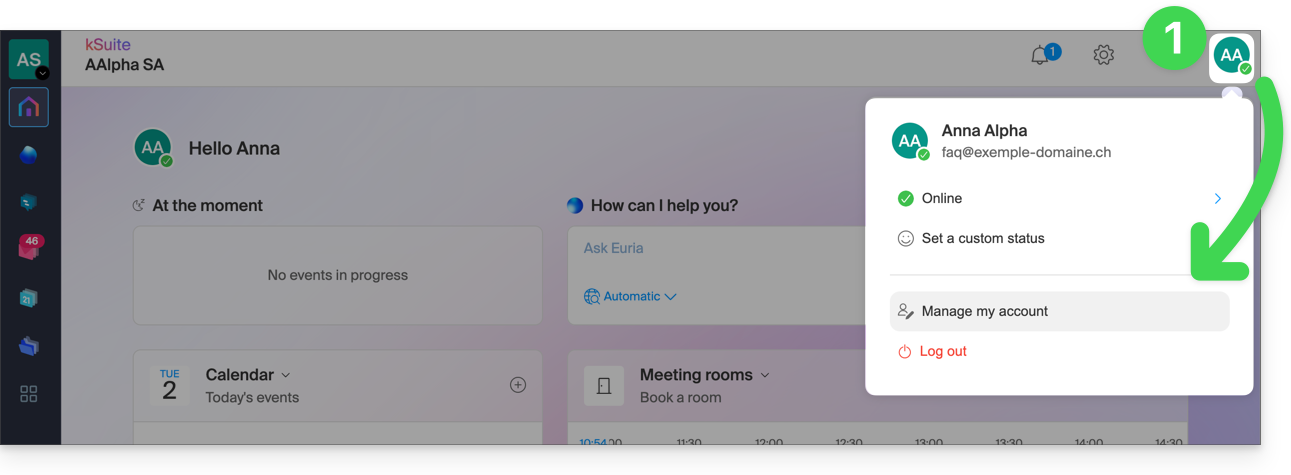
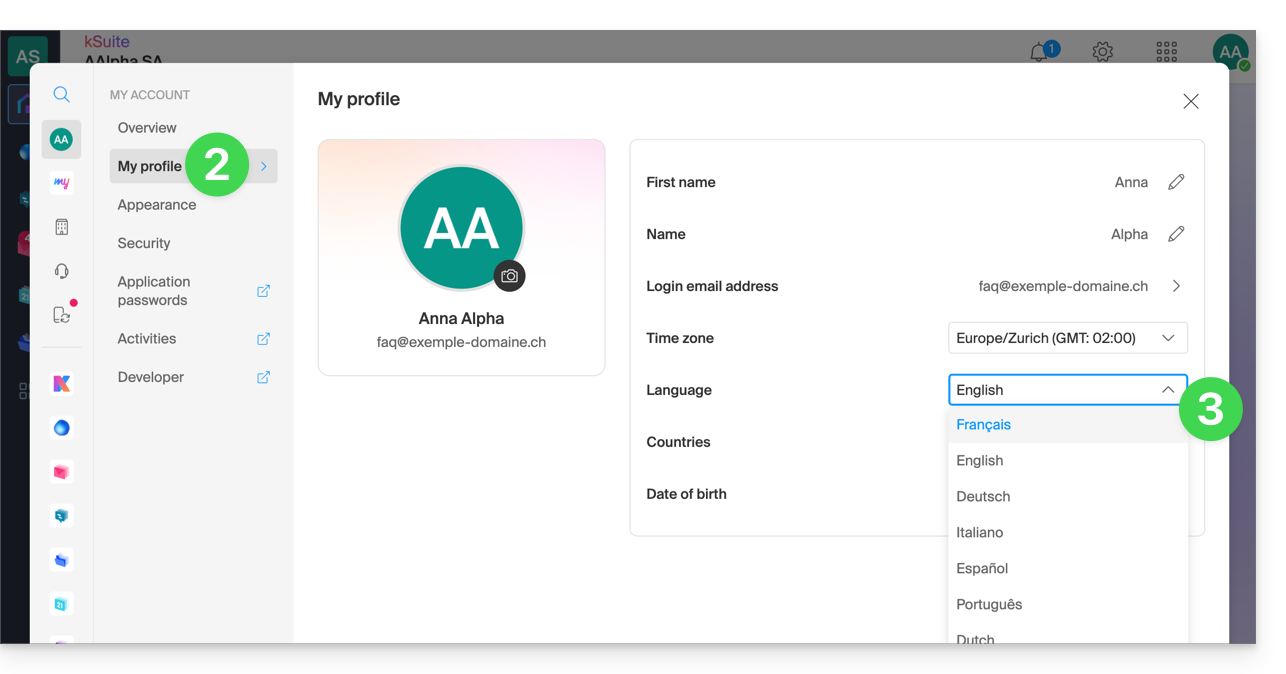
- Click on My profile in the left-hand menu.
- Click on the language dropdown menu to choose from French, English, German, Italian, Spanish, Portuguese, etc.:
Change the regional settings of your account
In the same place, you can set the time zone for your region / country: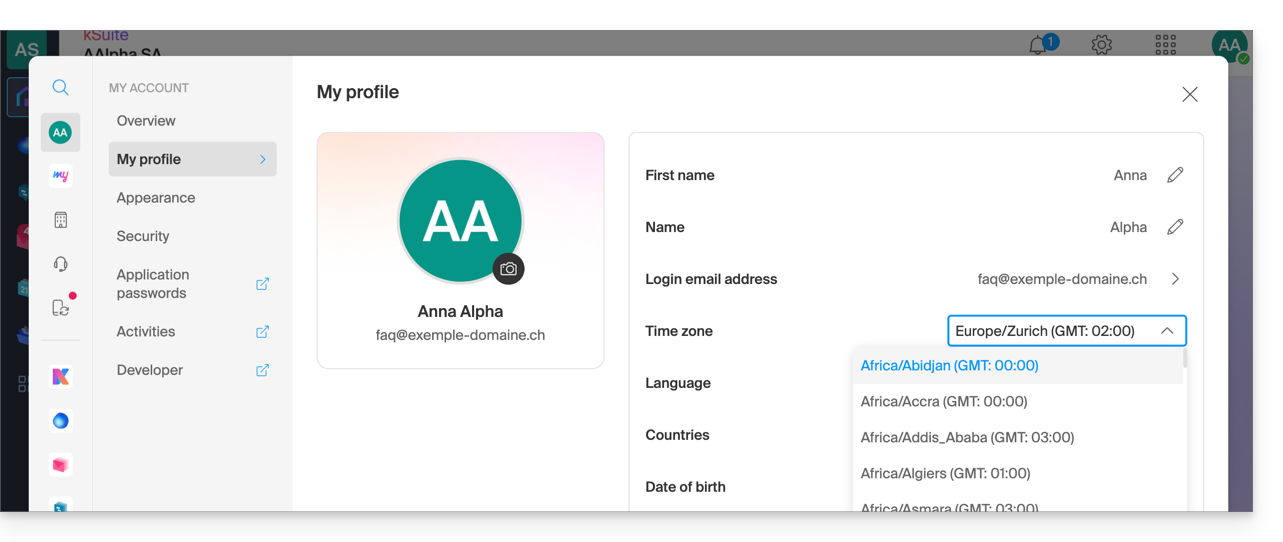
Link to this FAQ:
Has this FAQ been helpful?
This guide explains how to connect the desktop app Outlook 2016 (desktop application on Windows) to an email address hosted by Infomaniak.
Add the email address to the application
Prerequisites
- Create the email address within my kSuite or a Mail Service / kSuite.
- Create a password for the email address on the device you are going to configure.
- Check that the Mail Service is configured optimally.
To configure the email application:
- Open the application.
- Click on the File menu:
- Click on Account Settings.
- Click on Add or Remove Accounts:
- Click on New:
- Enter the email address to connect.
- Click on Advanced Options.
- Click on Manual Configuration.
- Click on the blue Connect button:
- Click on IMAP:
- Enter the password for the email address to connect.
- Click on the blue Connect button:
- Uncheck the additional configuration box for mobile device if necessary.
- Click on the blue Finish button:
- Click on Repair to correct some automatically added but incorrect information:
- Click on Advanced Options.
- Click on Manual Repair.
- Click on the blue Repair button:
- Check and complete the missing or incorrect information.
- Click on Outgoing Server:
- Check and complete the missing.
- Click on Next.
- Click on Finish:
- Click on Close:
- There you go, your email address is now correctly configured in the application:
Recommended settings
- Incoming IMAP server =
mail.infomaniak.com - IMAP port =
993(with SSL) - Outgoing SMTP server =
mail.infomaniak.com - SMTP port & encryption protocol and command/method to activate this protocol:
587+ STARTTLS - Username = full & complete email address ( ? )
- Password = the one generated for the email address you want to access
- Authentication required for sending emails:
- It is activated in the SMTP settings of your application.
- Check "use the same parameters as the incoming server" or according to the software/email clients, enter a username (= full & complete email address) and the generated password.
Refer to this other guide if you are looking for information about other mail ports and protocols compatible (SSL / TLS for example).
In case of a problem
Check that the Mail Service is configured optimally.
It is not necessary to contact Infomaniak Support if your email address works well outside the application. The most common error concerns the use of an incorrect password. The troubleshooting guides help you resolve any potential issues:
- Refer to the solutions given in this other guide regarding mail in general.
- This other guide is more specifically about Outlook.
… and if your Outlook no longer works since a change of mail password, refer to this other guide.
Link to this FAQ:
Has this FAQ been helpful?
This guide explains how to connect the desktop app Microsoft Outlook for Mac version 16.80 (desktop application on macOS) to an email address hosted by Infomaniak.
Introduction
- Rather than using the manual Outlook configuration below, it is recommended to use the Infomaniak Mail macOS app or even Apple Mail with the .mobileconfig configuration profiles provided by Apple.
Add the email address to the application
Prerequisites
- Create the email address within my kSuite or a Mail Service / kSuite.
- Create a password for the email address for the device you are going to configure.
- Verify that the Mail Service is configured optimally.
To configure the email application:
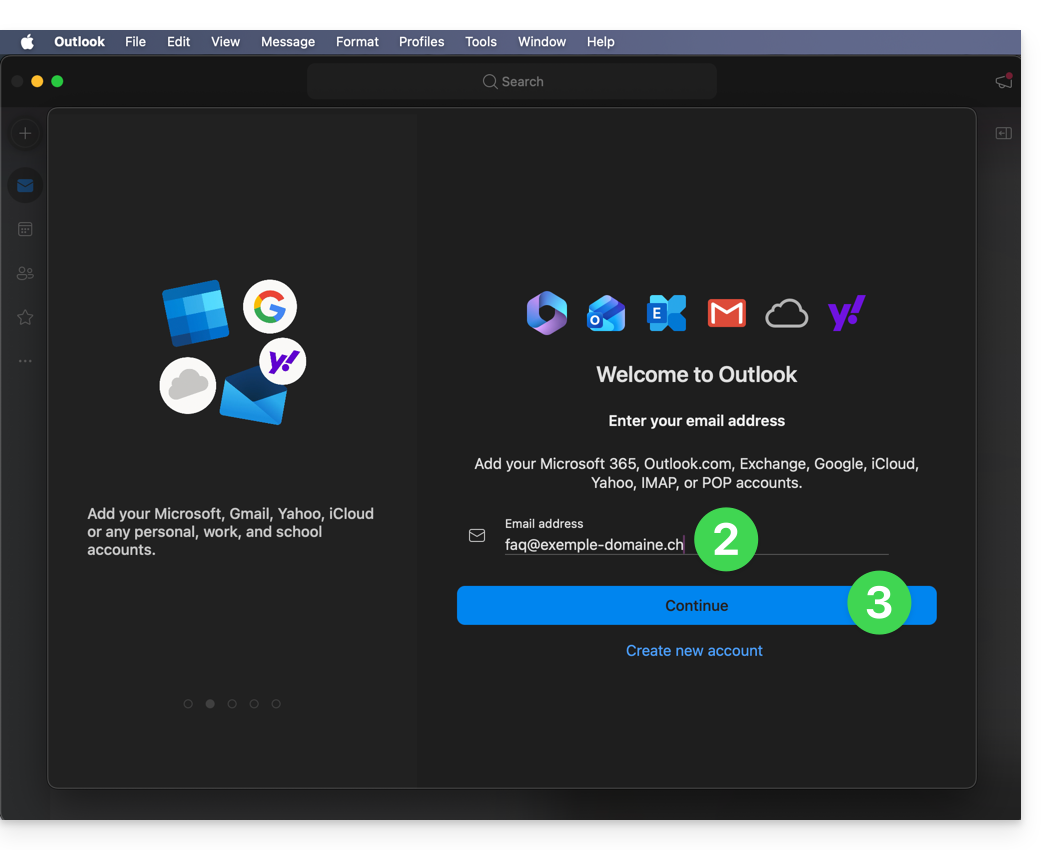
- Open the application.
- Enter the email address to be added.
- Click on Continue:
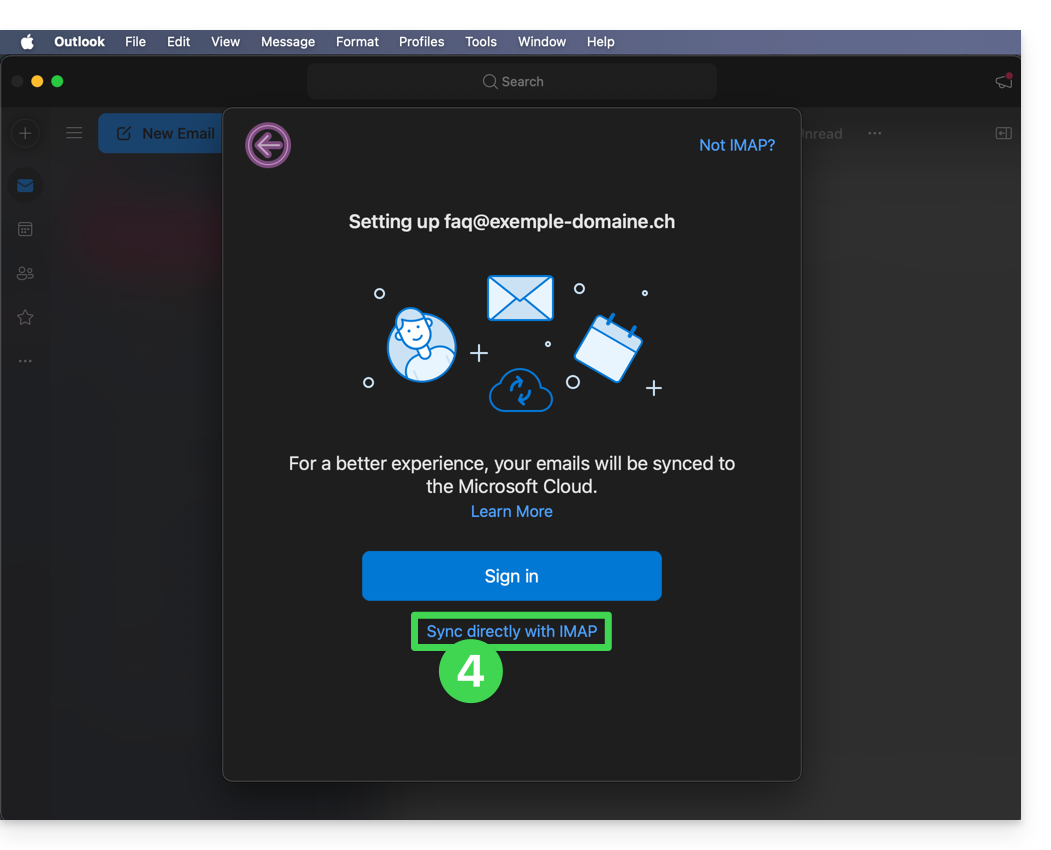
- Click on Synchronize with IMAP (without Microsoft Cloud):
- Check and complete the missing information.
- To do this, activate the toggle switch for displaying advanced settings.
- Click on Add account:

- Understand and go through the various Microsoft information windows:
- There you go, your email address is now configured in the application:
Recommended settings
- Incoming IMAP server =
mail.infomaniak.com - IMAP port =
993(with SSL) - Outgoing SMTP server =
mail.infomaniak.com - SMTP port & encryption protocol and command/method to enable this protocol:
587+ STARTTLS - Username = the complete email address (need help?)
- Password = the one generated for the email address you want to access
- Mandatory authentication for sending emails:
- Activate it in the SMTP settings of your application.
- Check "use the same settings as the incoming server" or, depending on the software/email client, re-enter a username (= complete email address) and the generated password.
Refer to this other guide if you are looking for information about other compatible email ports and protocols (SSL / TLS, for example).
In case of a problem
Check that the Mail Service is configured optimally.
It is not necessary to contact Infomaniak Support if your email address works fine outside the application. The most common error concerns the use of an incorrect password. The troubleshooting guides will help you resolve any potential issues:
- Refer to the solutions provided in this other guide regarding email in general.
- This other guide is specifically for Outlook.
… and if your Outlook is no longer working after a change of email password, refer to this other guide.
Link to this FAQ:
Has this FAQ been helpful?
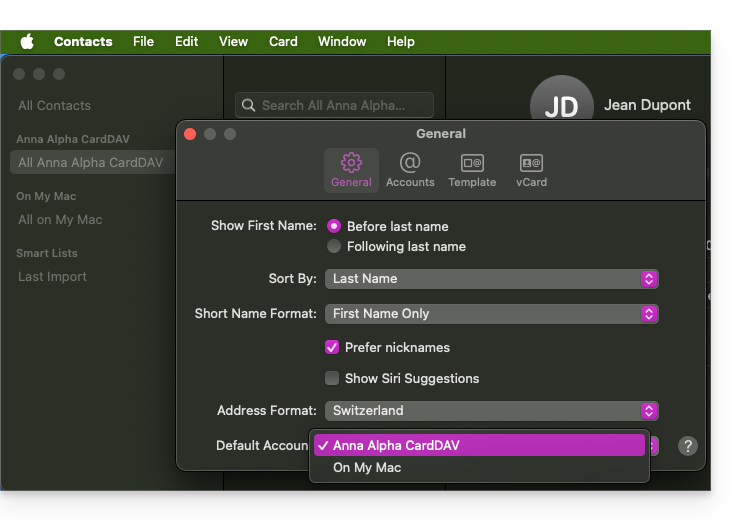
This guide details the specific features and limitations of synchronizing contacts and calendars with Infomaniak and native Apple applications (macOS and iOS), particularly for managing shared data.
Introduction
- Infomaniak-hosted contacts and calendars can be synchronized with native Apple applications:
Contacts: synchronizing address books
The CardDAV protocol does not allow you to individually select the items to be synchronized; all data from the account is retrieved by default.
- Before adding a synchronization:
- All existing contacts on the macOS device
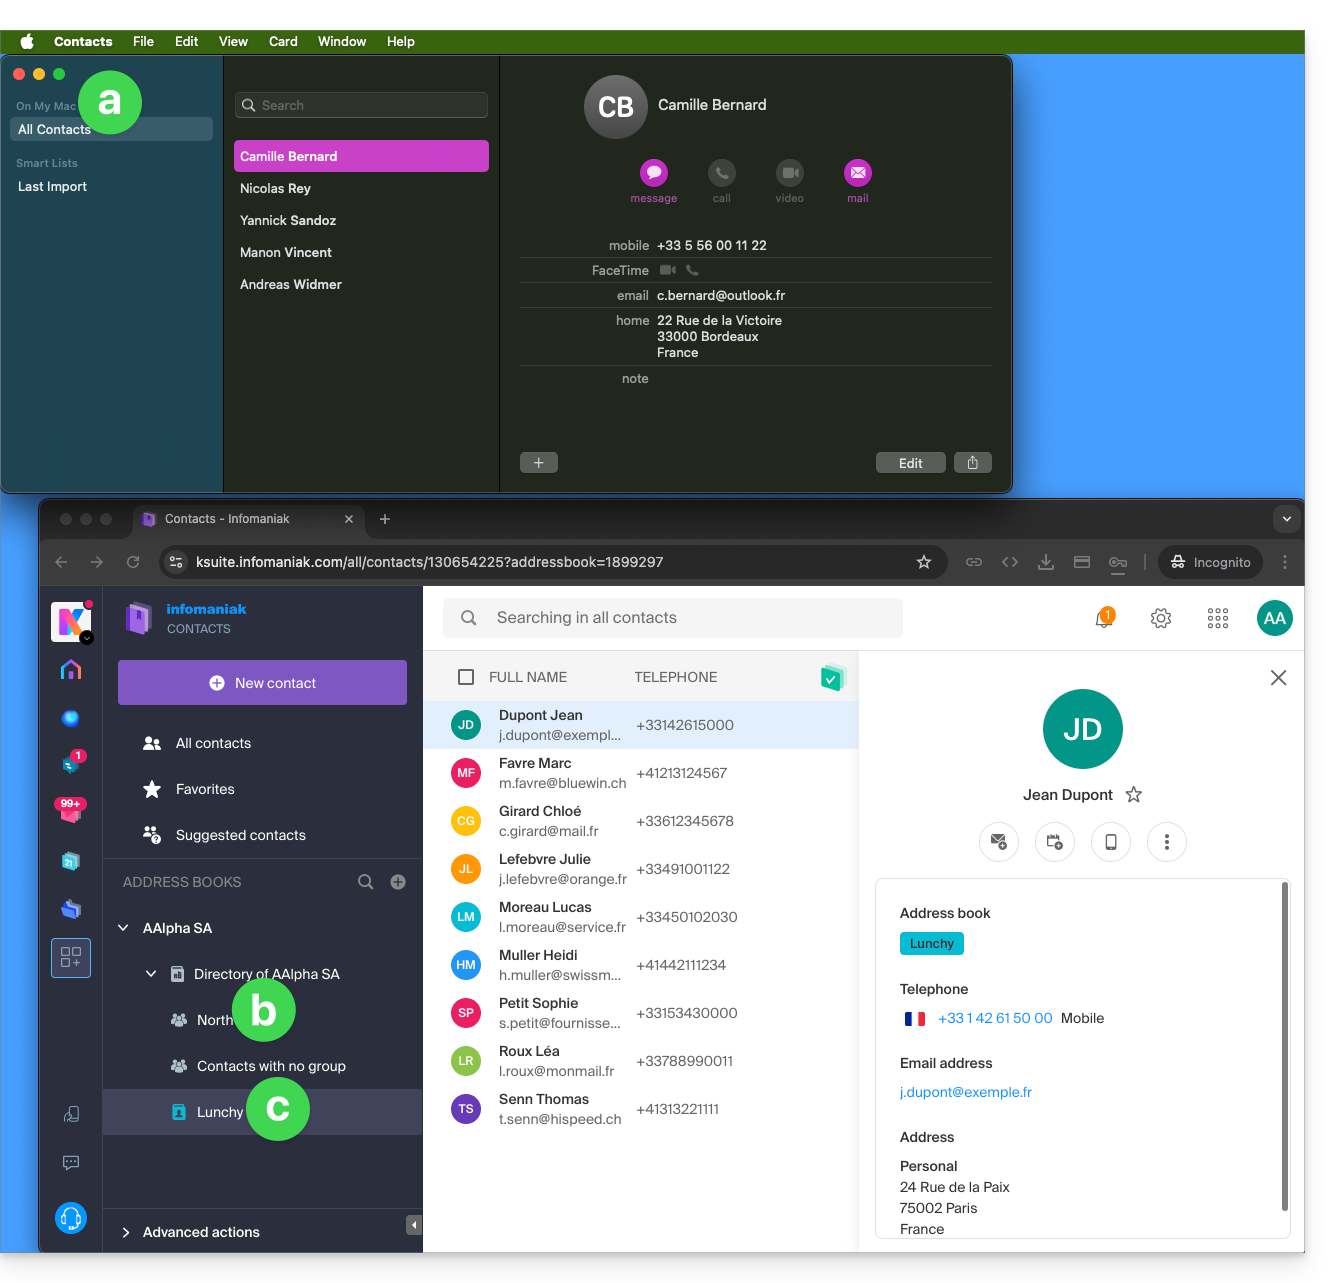
- Existing contacts in the Organization (named here AAlpha SA) of the Infomaniak user Anna Alpha, including the Organization directory, which contains a group called North (in this case, this is a “circle” automatically created after setting up a Group in the Manager).
- The user's address book is called Lunchy.
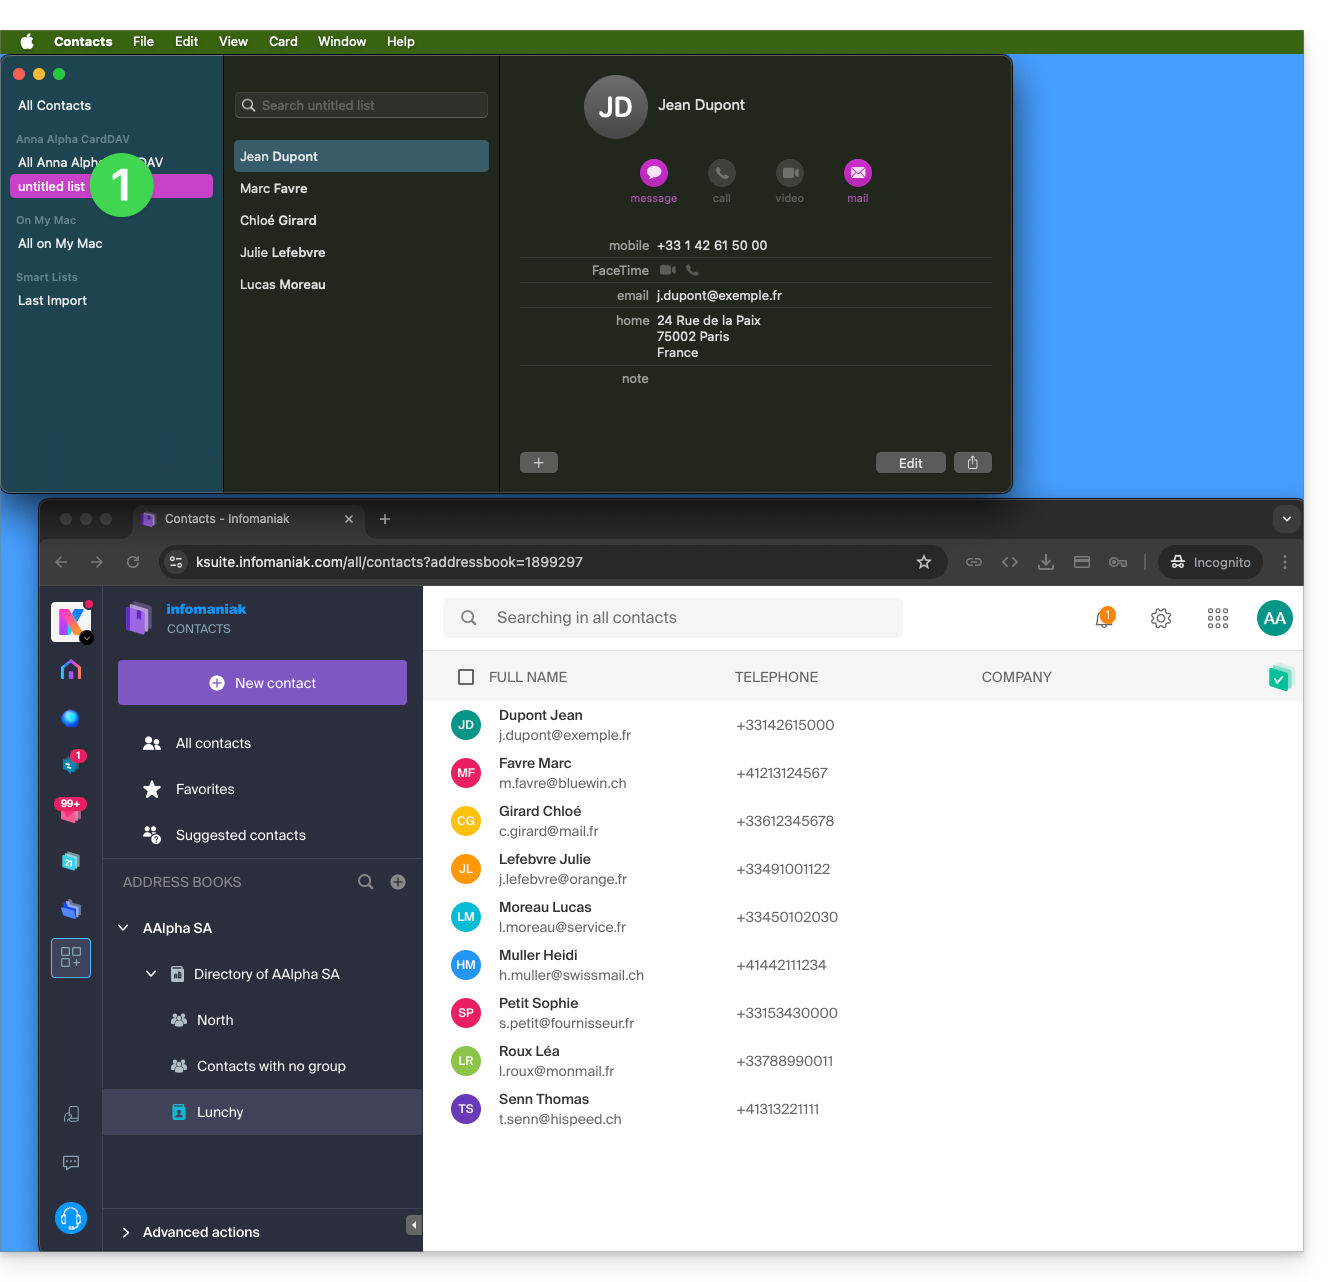
- After adding a macOS profile-based sync:
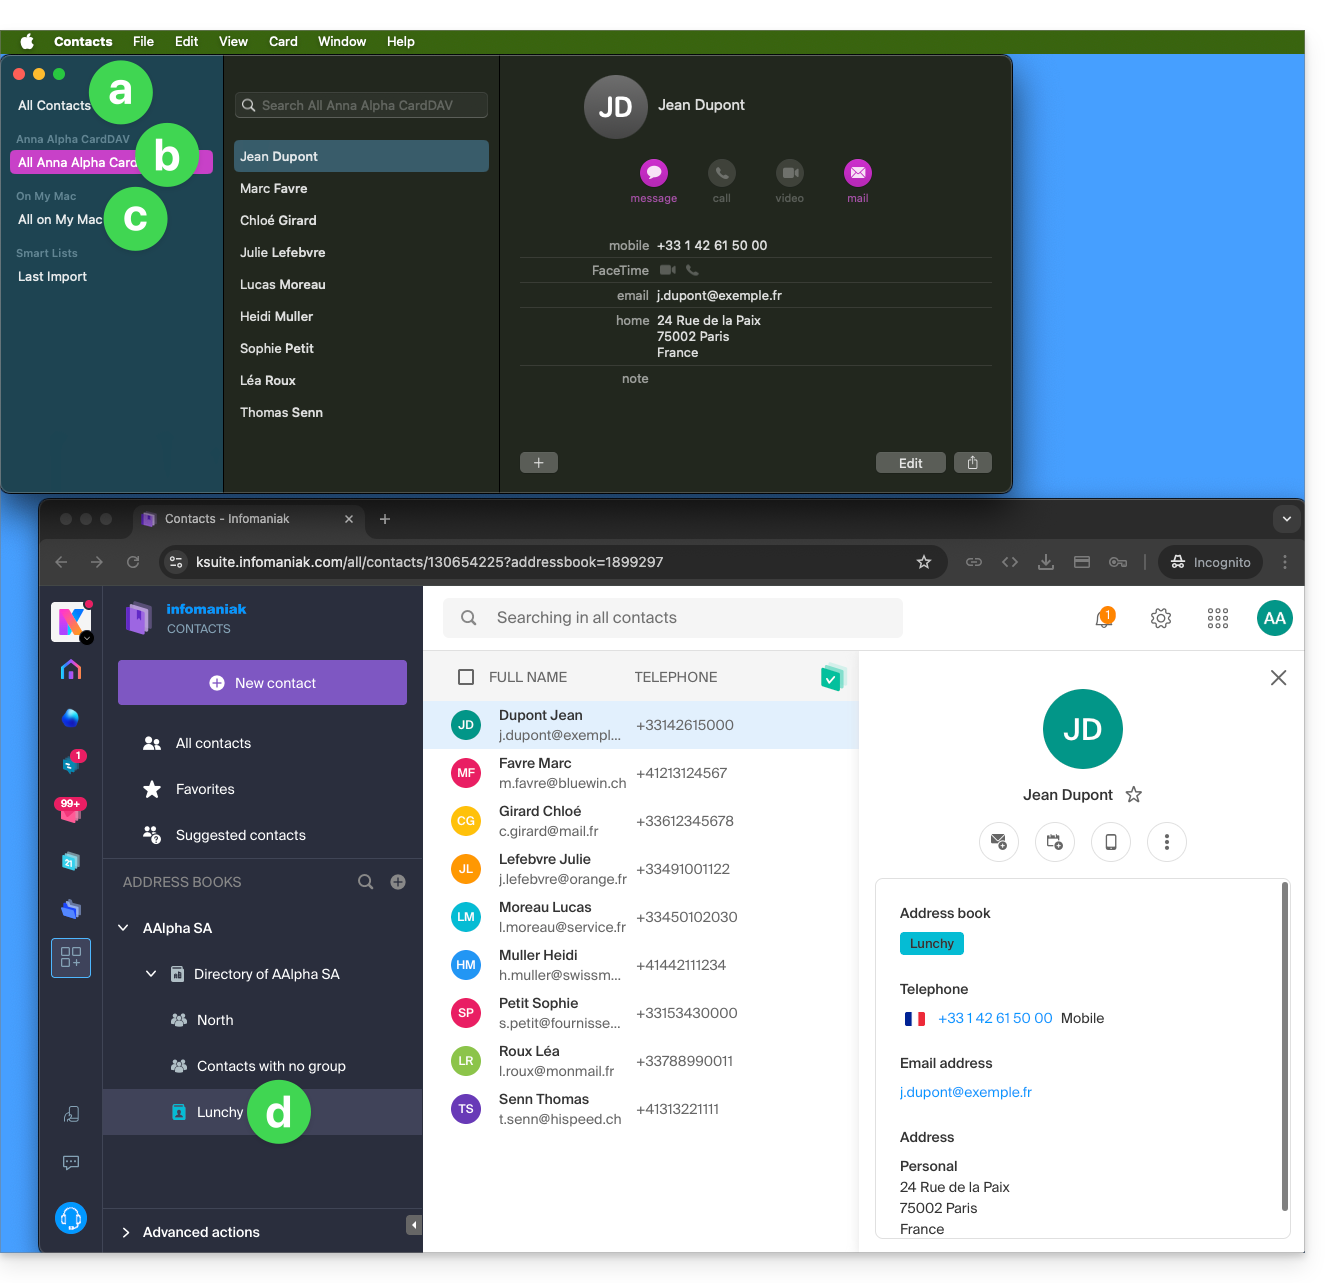
- All existing contacts on the macOS device (this displays the contacts that were already present, as well as the new contacts from the sync).
- Contacts from the sync (see point 2.d below).
- A downloaded profile contains the Infomaniak account user's name; this name will be used for the synced address book, which will be displayed on the Apple side.
- In the example below, the user's name is Anna Alpha and the address book name is Lunchy; this is the user name that will be displayed to describe the contacts on the Apple side.
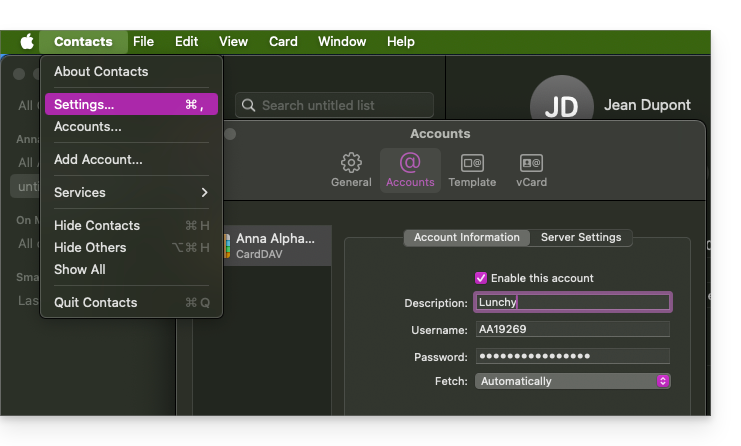
- You can change the sync name in the Account Information:
- Existing contacts on the macOS device (those from point 1.a above — they remain local on macOS and are not synced — you need to move them if necessary).
- You can change the address book used by default for future contacts created on your device:
- You can change the address book used by default for future contacts created on your device:
- The user's address book is called Lunchy here (equivalent to point 2.b above).
On iOS
New contacts created on iPhone are often saved locally ("On My iPhone"):
- It is necessary to change the default address book in the device settings so that they are synced to the Infomaniak server.
Groups and lists
Grouping contacts into folders or lists does not synchronize bidirectionally. The list system does not use actual folders but category tags, which makes it impossible to retrieve contact groups.
- Lists created on Apple devices are not reflected on the Infomaniak server (but the contacts within them are):
- Groups configured in the web interface are not displayed in the Apple Contacts app (but the contacts within them are):
- Tip: to delete a list created on the Apple side, select it and press the DELETE key on your keyboard.
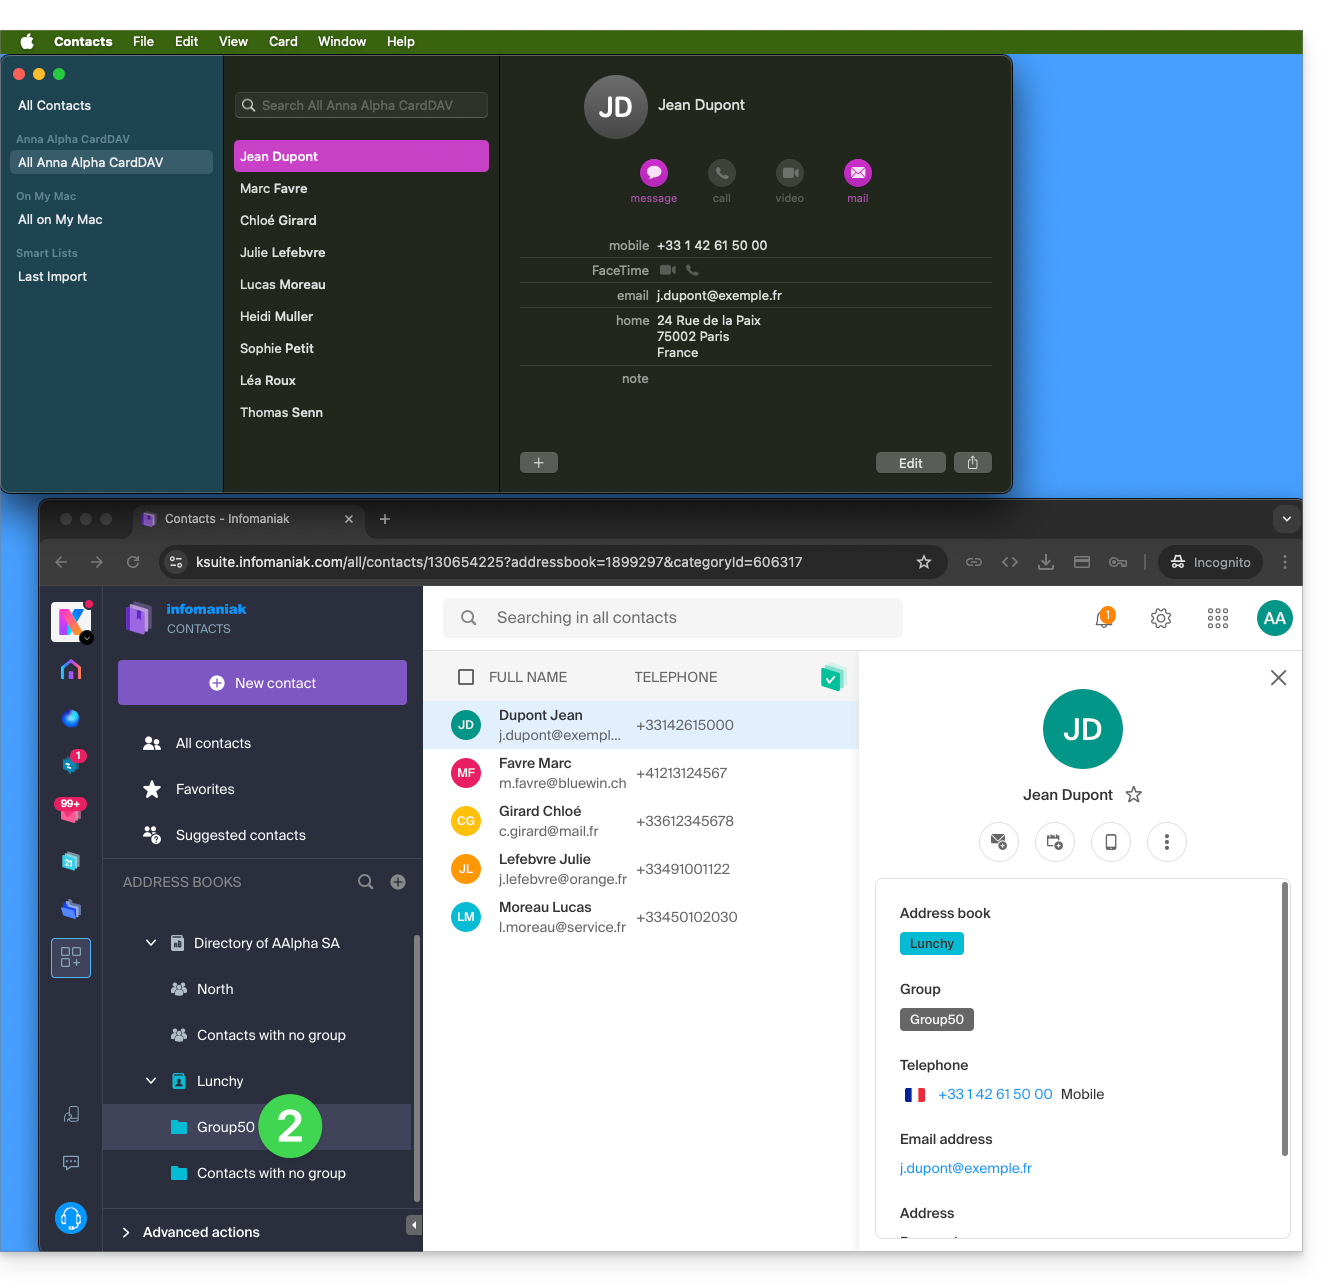
Additional address books
The Contacts app does not support multiple address books for the same account:
- Only the default address book is synchronized.
- To access all your address books, you need to use software like Thunderbird.
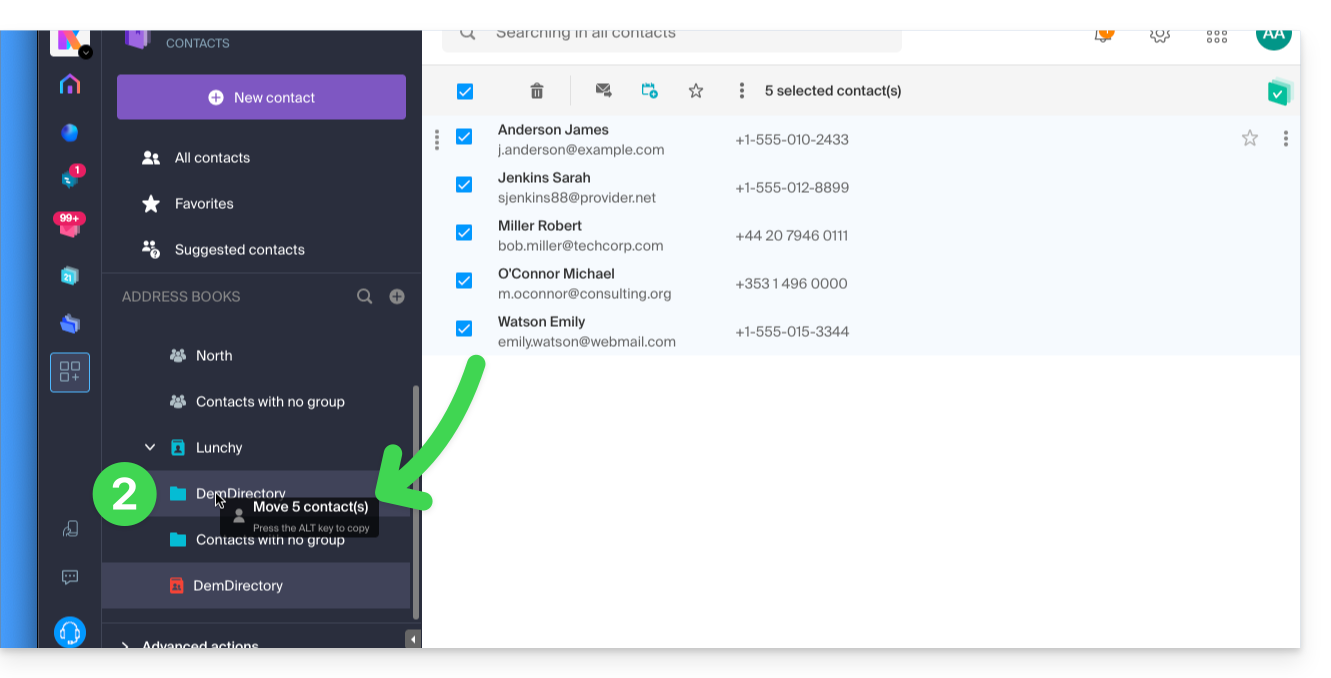
Example of a new address book on the Infomaniak side:
- The content of this second address book is not synchronized:
- A solution to organize yourself in a similar way could be to create a group in Lunchy and drag the 5 contacts into it:
Shared address books
A shared address book with another Infomaniak user will continue to be synchronized, including if contacts are added/edited via the sharing, as in this example of sharing with maximum permissions: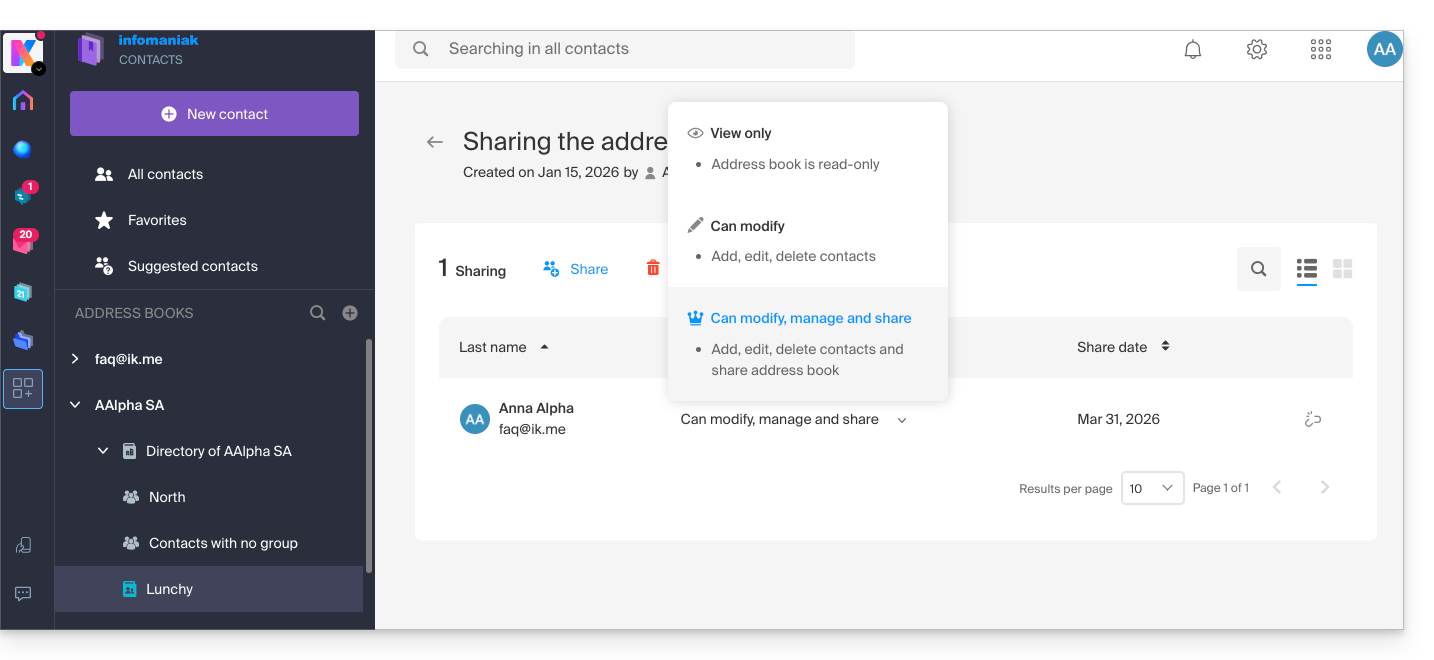
The reverse (receiving the contact sharing from another Infomaniak user) adds an additional address book. The synchronization of these additional contacts is therefore not possible (same rule as presented in the “Additional address books” section above).
Calendar: displaying shared calendars
The CalDAV protocol does not allow you to individually choose which items to synchronize; all data from the account is retrieved, including the calendars you share and those for which you have been granted access/modification rights: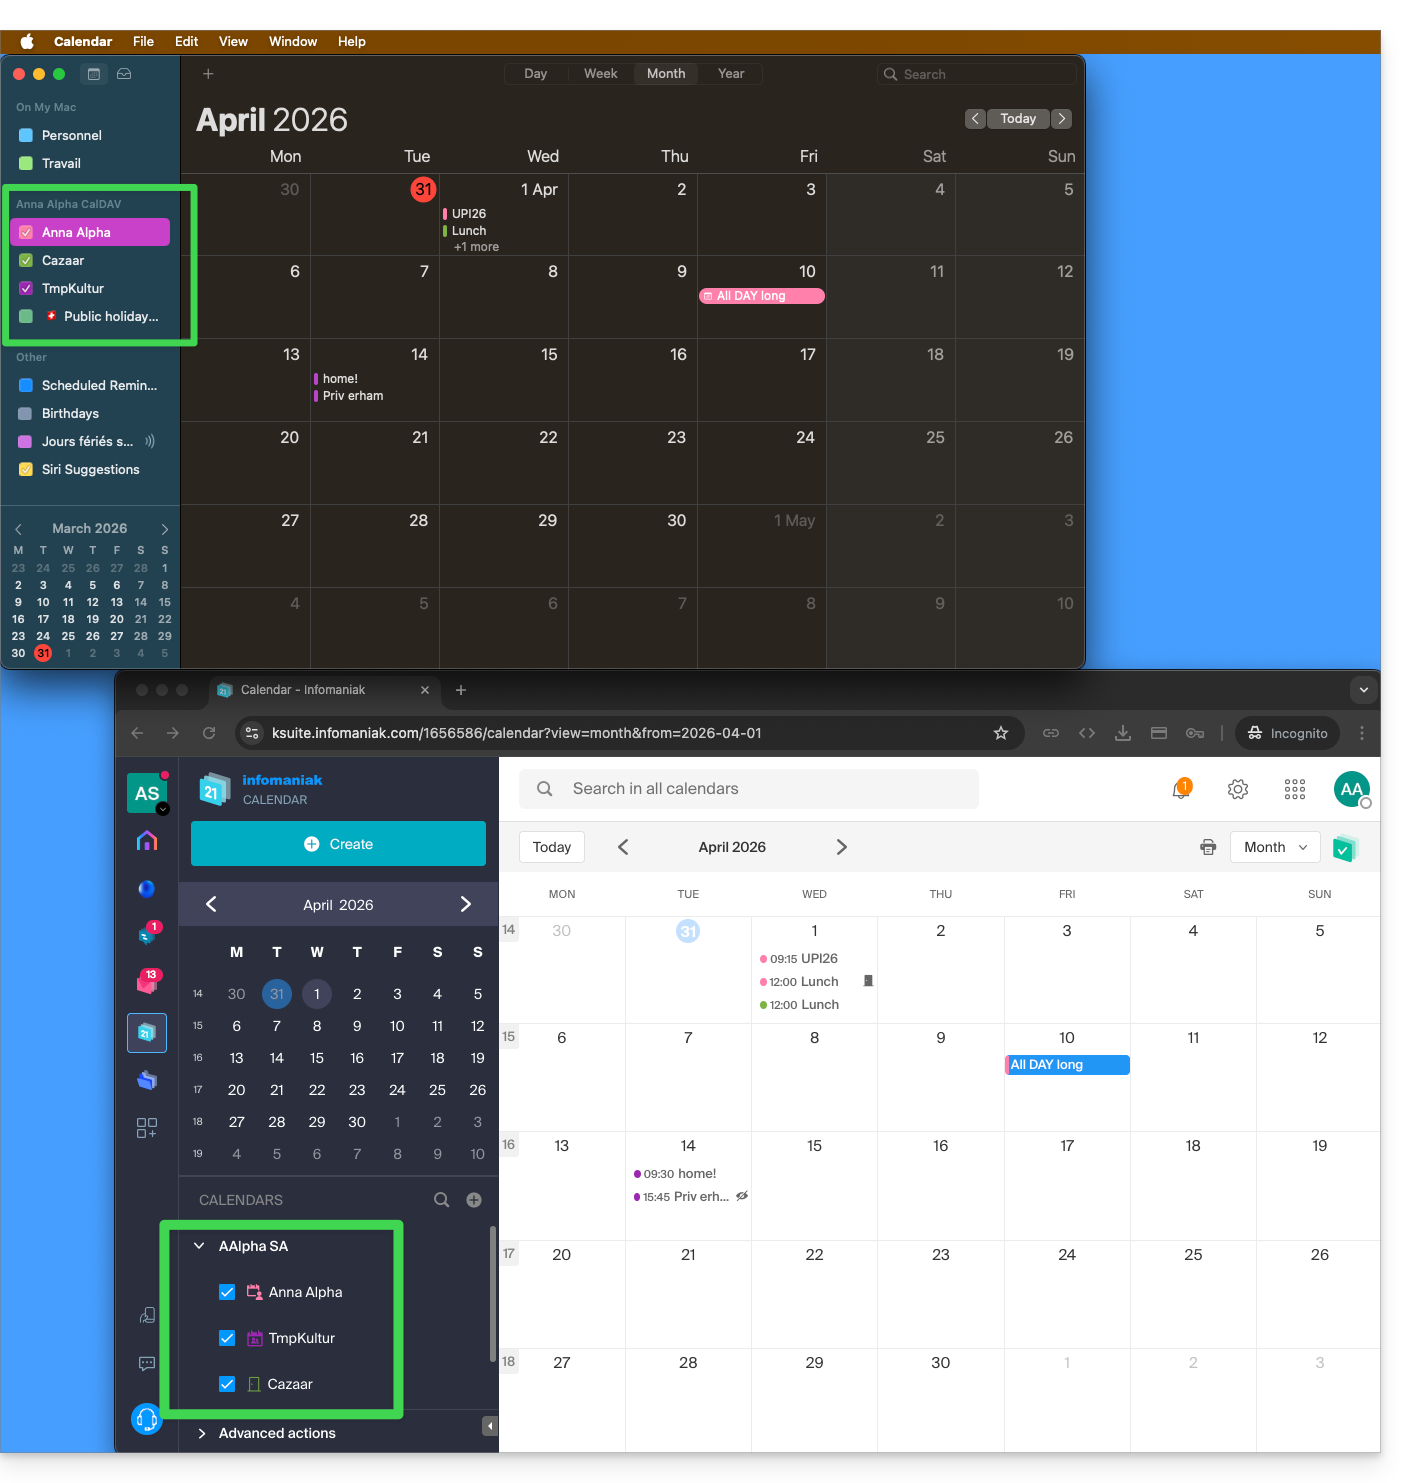
If only your personal calendar is displayed, then try this procedure to enable additional calendars:
On macOS
- Open iCal / Calendar.
- Go to the Calendar menu > Settings (or Preferences).
- Go to the Accounts tab.
- Select the Infomaniak account and click on the Delegation tab.
- Check the shared calendars to display.
On iOS
- Open iCal / Calendar.
- Tap the Calendars button at the bottom of the screen.
- Check the shared calendars in the list.
Notifications (iOS)
You can enable or disable alerts for each specific calendar by tapping the ⓘ icon to the right of its name: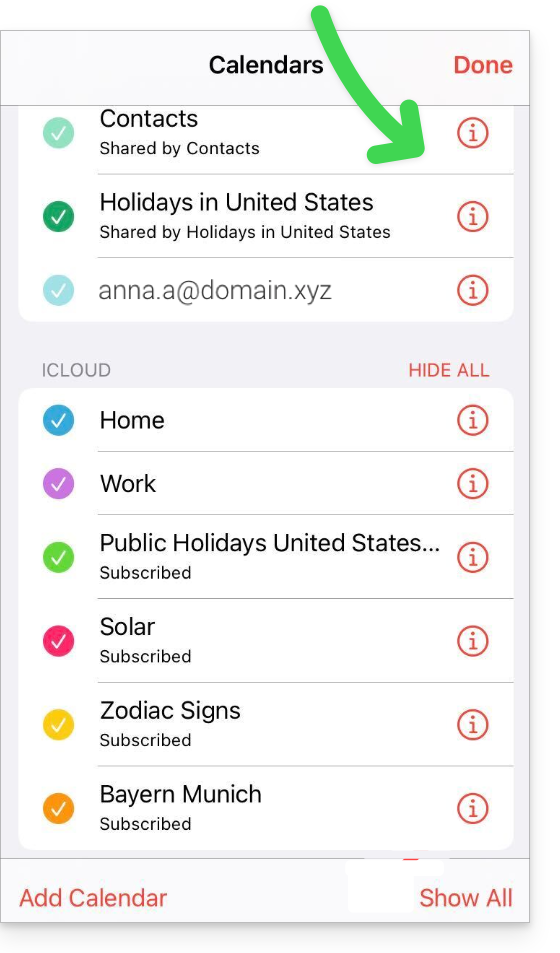
Link to this FAQ:
Has this FAQ been helpful?
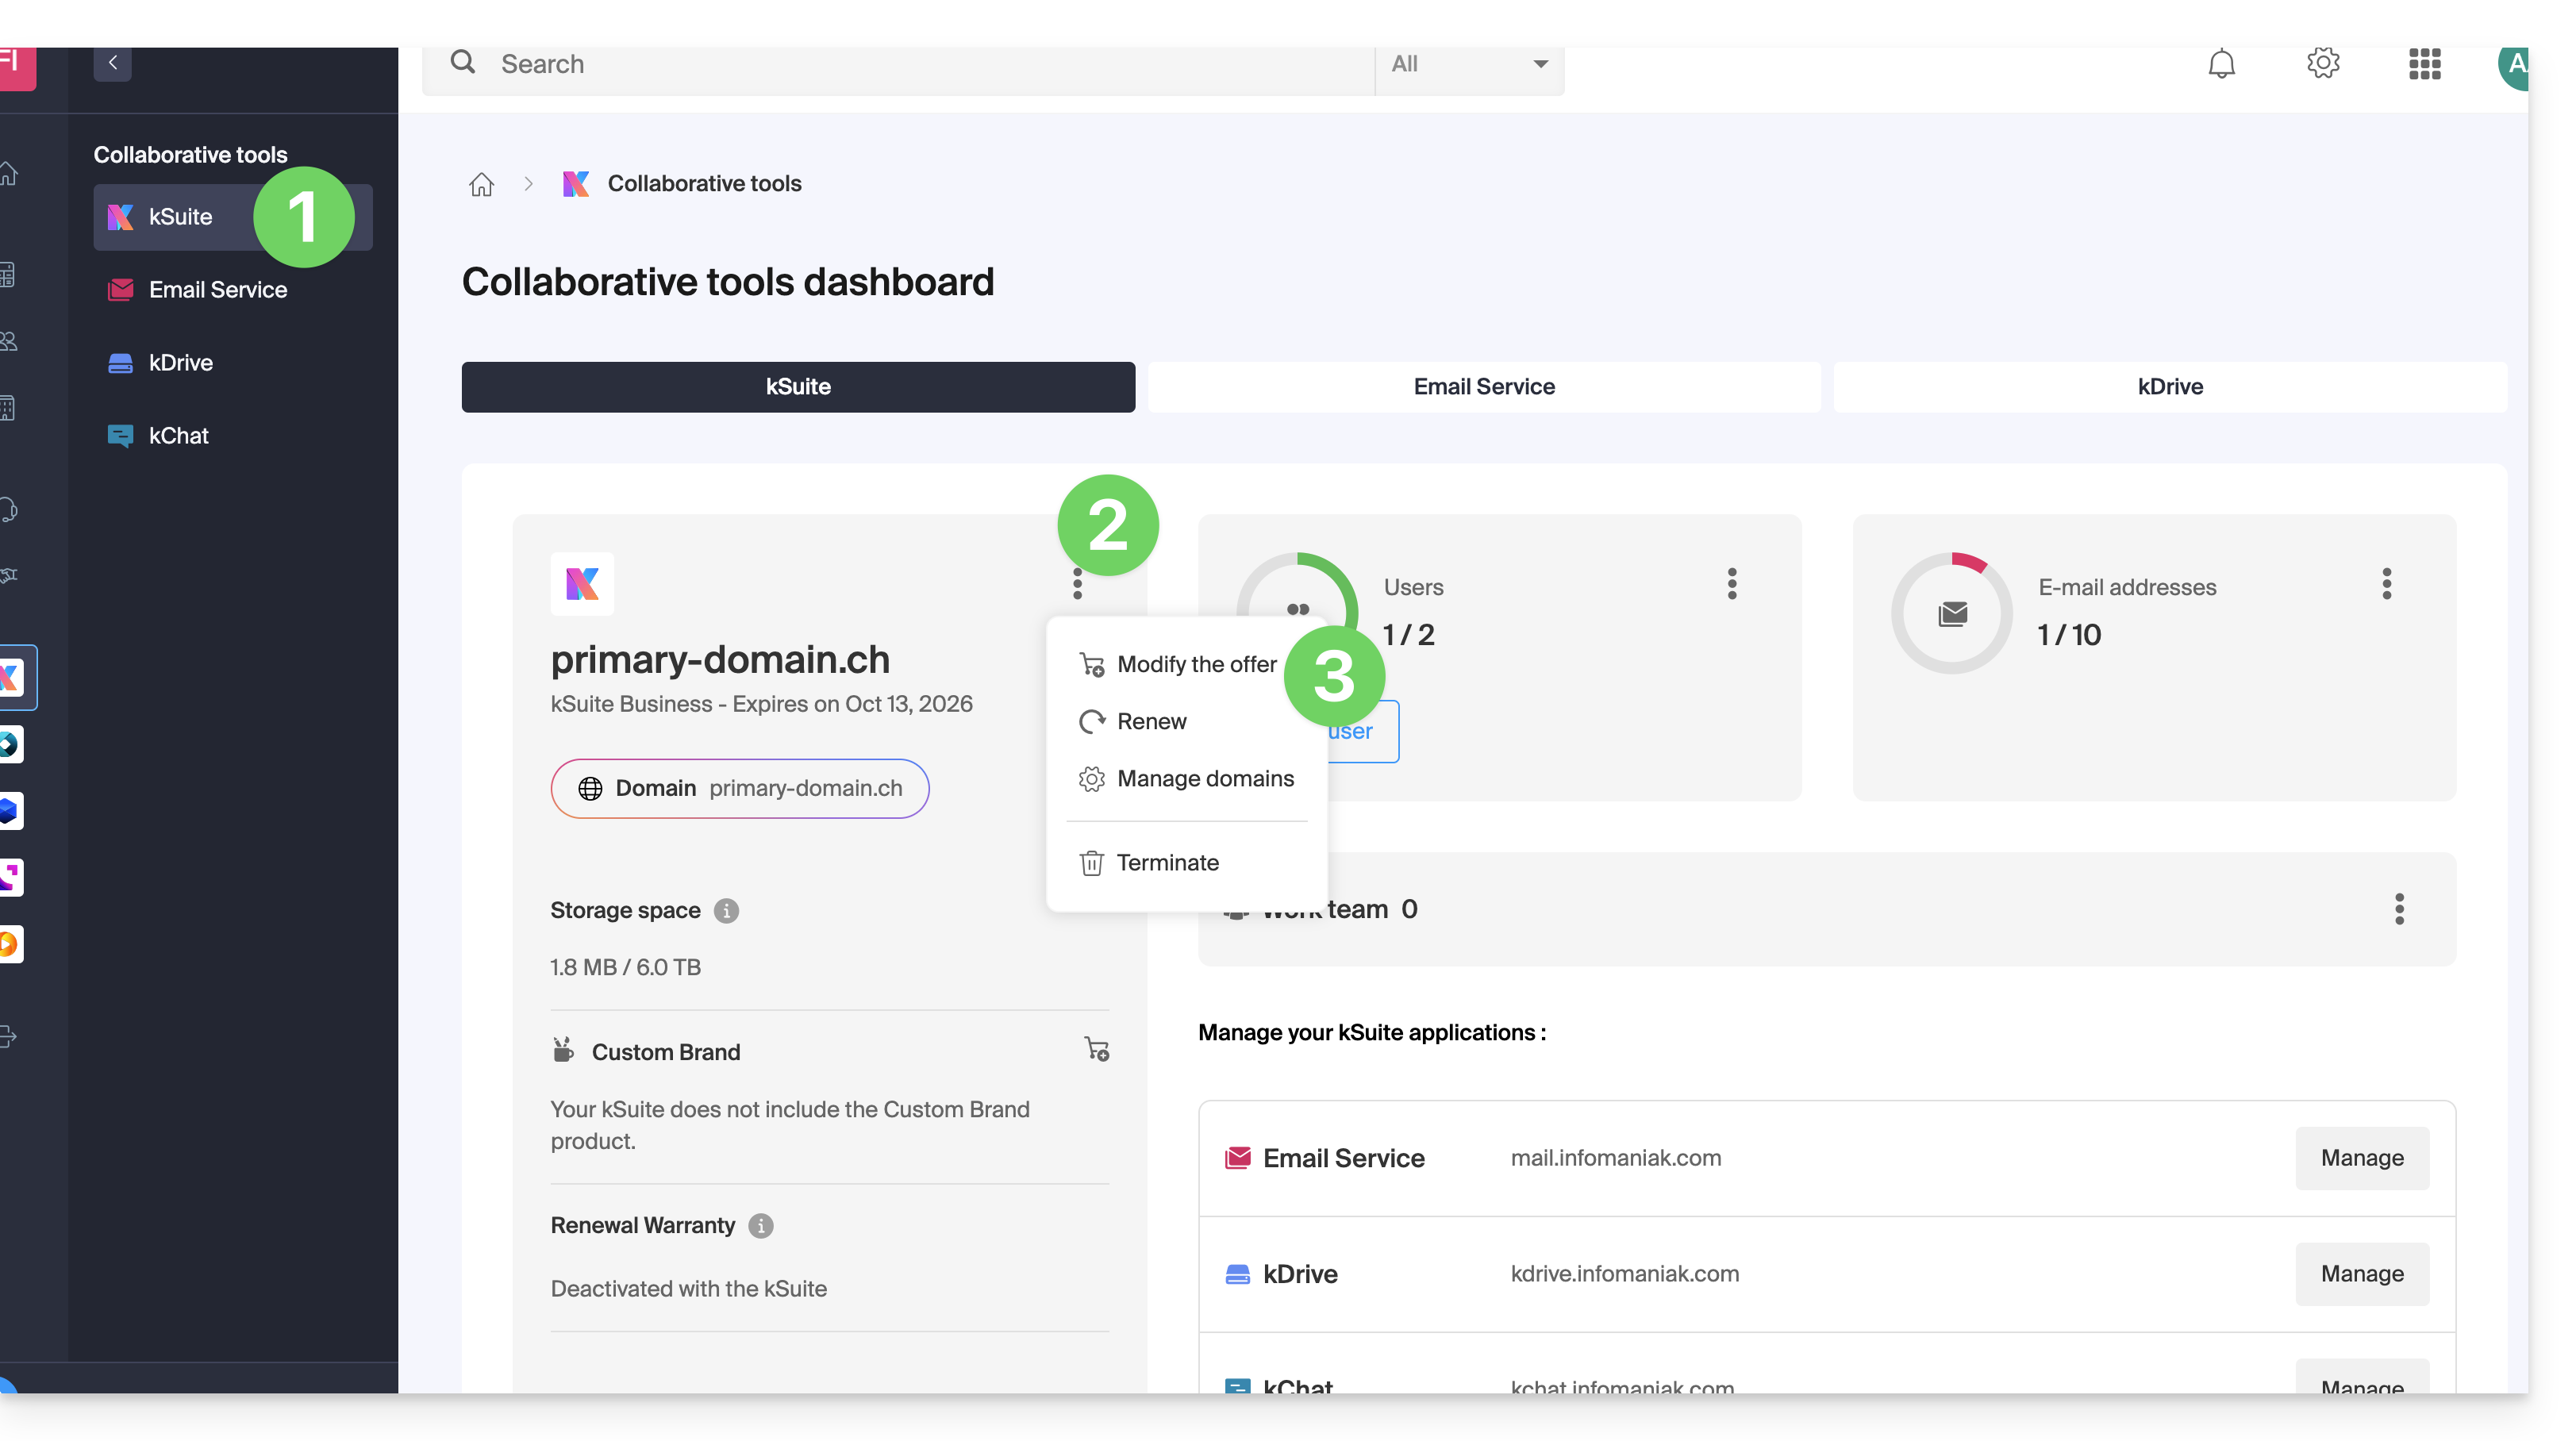
This guide explains how to modify the kSuite offer.
Preamble
- kSuite is a bundled offer that can be upgraded to a higher offer at any time (increase the number of users and the size of the disk space for data storage)
- It is not possible to subsequently change to a lower rate, nor to transfer kSuite to another Organization.
- The products included in kSuite cannot be moved or canceled independently of each other.
- To help you identify the kSuite offer best suited to your needs, refer to this other guide.
Modify the kSuite offer
To access the modification of the kSuite offer:
- Click here to access the management of your product on the Infomaniak Manager (need help?).
- Click on the action menu ⋮ to the right of the name of the kSuite.
- Click on Modify the offer:
Link to this FAQ:
Has this FAQ been helpful?
This guide explains how to create an Infomaniak account, i.e., your user account (customer account) that will then allow you to use Infomaniak services such as the Mail app or kDrive, order additional services, and be attached to one or more Organizations to collaborate effectively in the Infomaniak ecosystem.
Create a new Infomaniak account
To be able to order and manage Infomaniak products (including in the case where a user wants to transfer existing products to you) within one or more Organizations, it is necessary to create a first Infomaniak account with a completely new login identifier:
- Click here to sign up; you will need to enter a valid email address to receive the mandatory verification request.
- Fill out the requested information and complete the registration.
To simply obtain a my kSuite / my kSuite+ account (ik.me, etik.com, ikmail.com) click here to sign up.
Link to this FAQ:
Has this FAQ been helpful?
This guide explains how to receive event reminders from the Infomaniak Calendar web app (online service ksuite.infomaniak.com/calendar) on a messaging system like kChat, so you can be notified in the chat thread of your choice when an event is approaching.
⚠ Available with:
| kSuite | free | * |
| Standard | ||
| Business | ||
| Enterprise | ||
| my kSuite | ||
| my kSuite+ | ||
| Mail Service | Starter 1 address max. | |
| Premium 5 addresses min. |
* limited to 1 webhook
Prerequisites
- Create an inbound webhook on the kChat app to obtain a URL of the type
https://your-server-kchat.xyz/hooks/xxx-key-generated-xxx: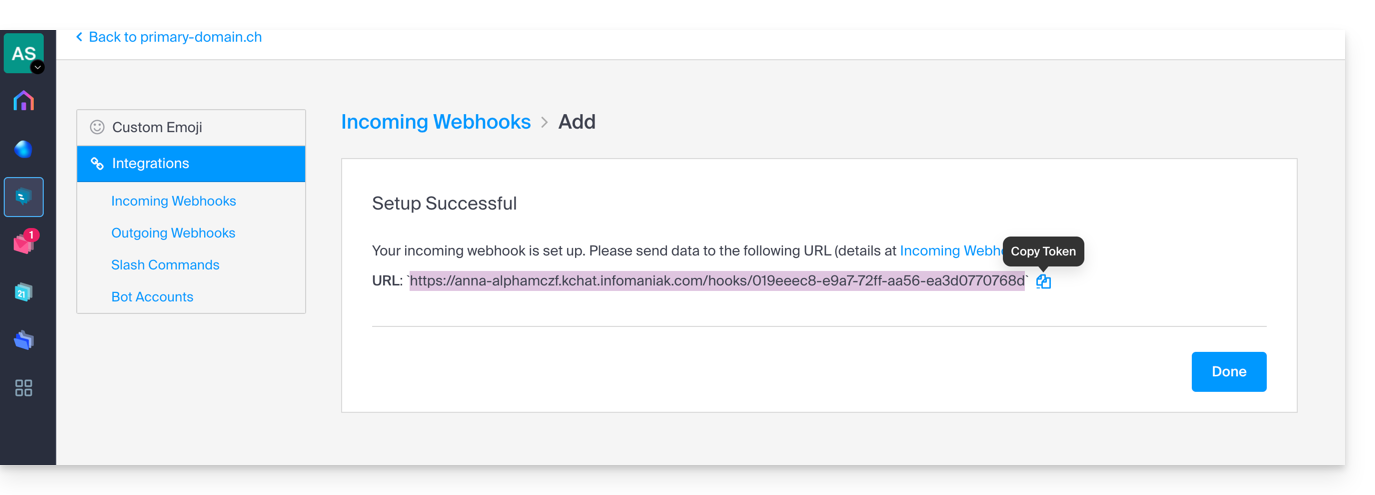
Link the kChat webhook to Calendar
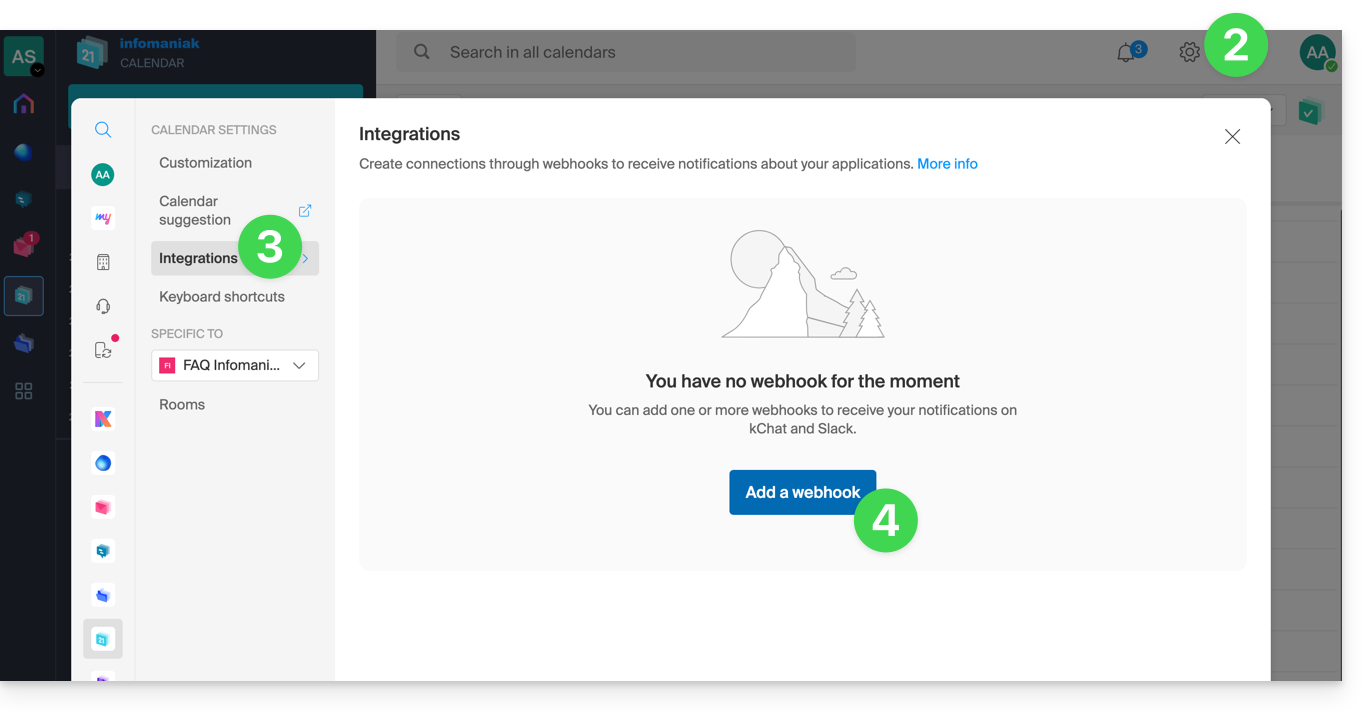
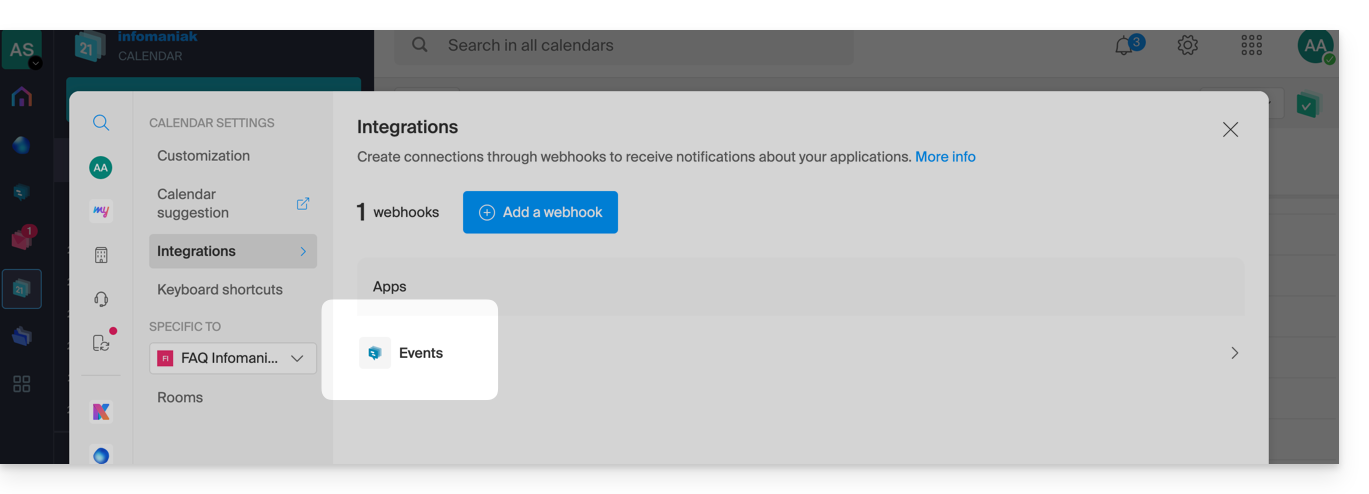
To add the webhook from your messaging system to the Calendar app:
- Click here to access the Infomaniak Calendar web app (online service ksuite.infomaniak.com/calendar).
- Click on the Settings icon in the top right corner.
- Click on Integrations in the left-hand menu.
- Click on the Add a webhook button:
- Define:
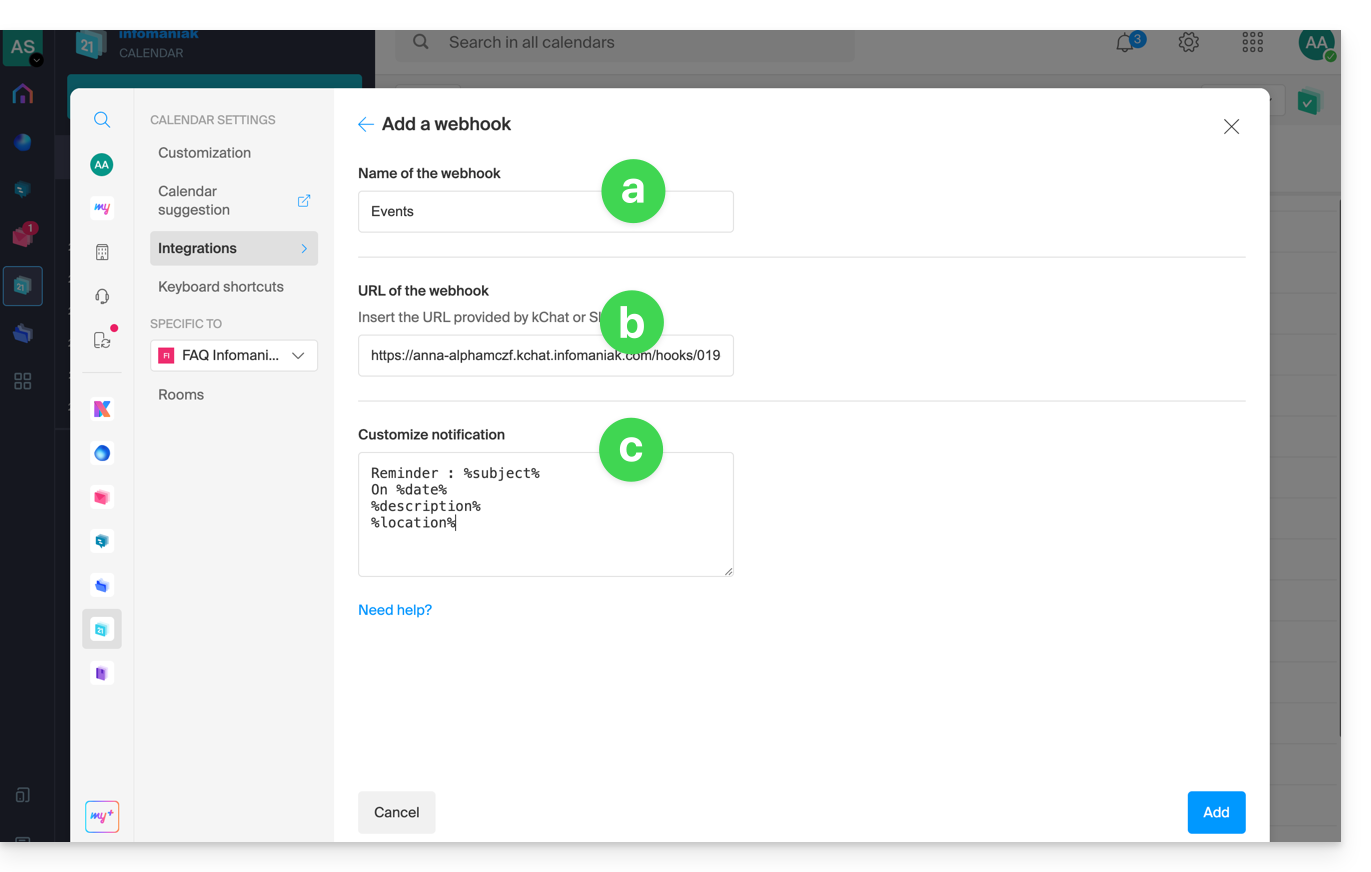
- A name to easily identify the Webhook when adding reminders.
- The webhook URL (obtained from your chat system).
- The elements (automatically taken from your event and/or added manually here) and their layout in the message that will be sent:
- Insert %subject% to include the event subject.
- Insert %date% to include the event date.
- Insert %description% to include the event description.
- Insert %location% to include the event location, if applicable.
- Click on the button to Add the configured element and see it now created:
Create an event with chat-based reminder
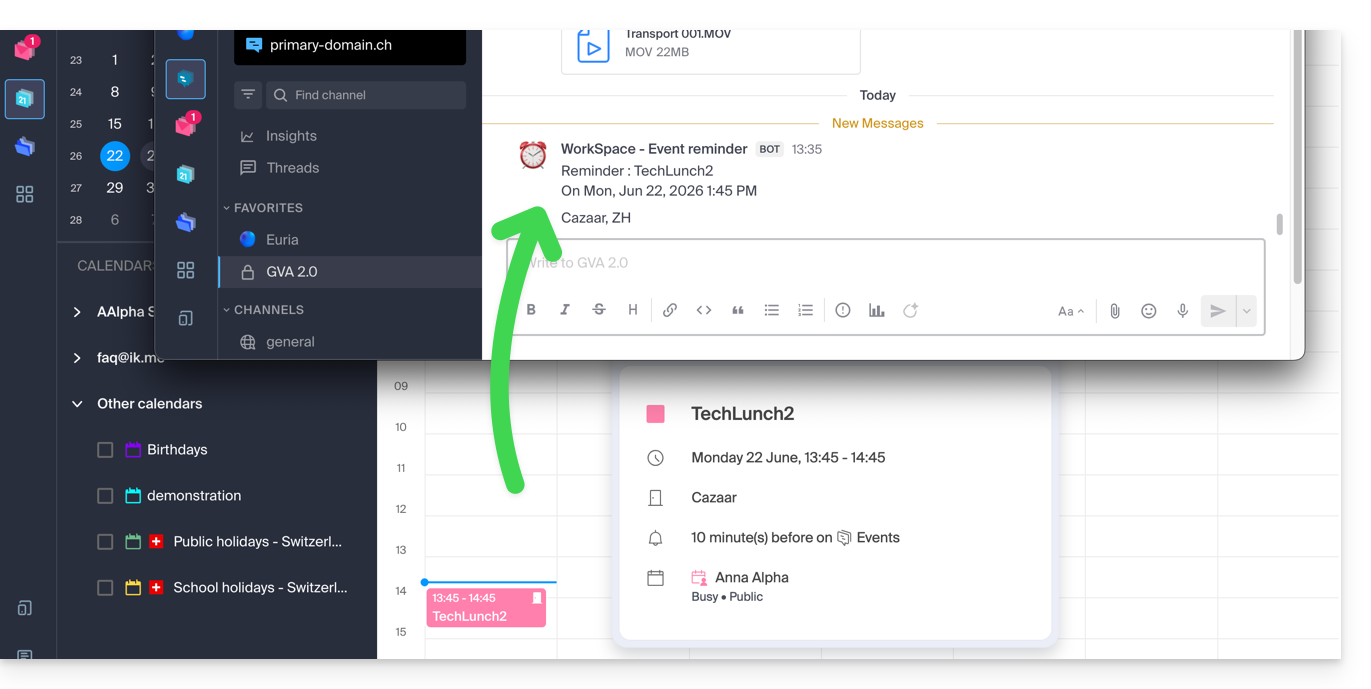
Now that Calendar is linked to your chat system account, you can choose to be notified in a chat when you add a reminder to an event:
- Click here to access the Infomaniak Calendar web app (online service ksuite.infomaniak.com/calendar).
- Click the Create button in the top left corner.
- Click on Event:
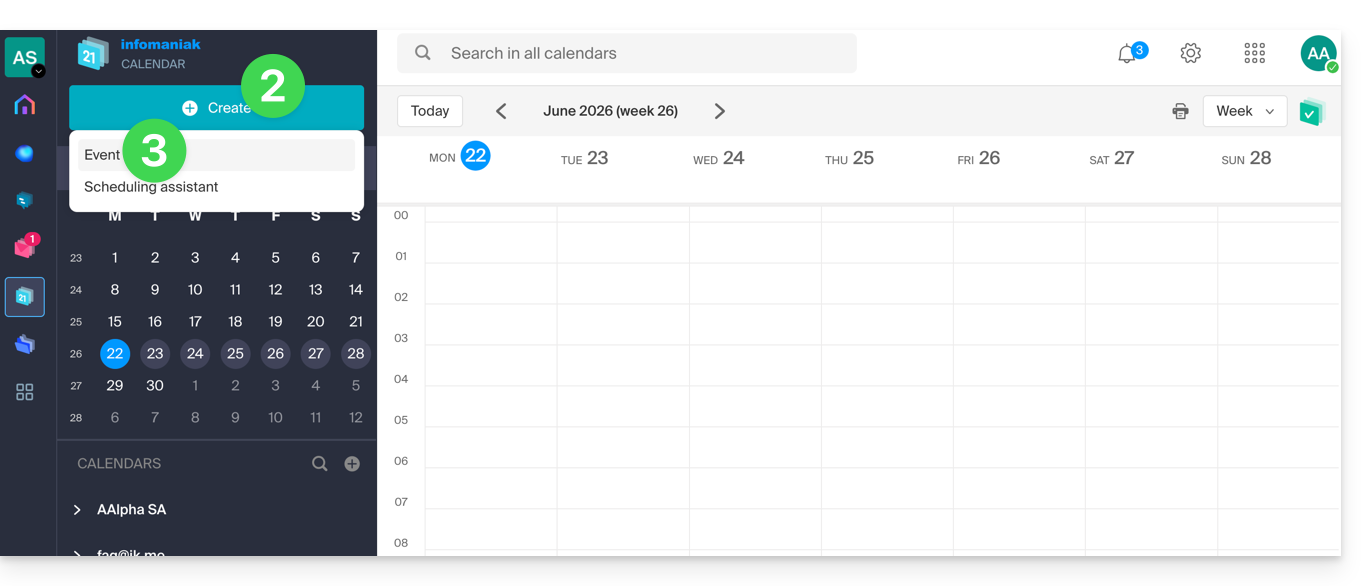
- You can also click on an existing event in the calendar to edit it.
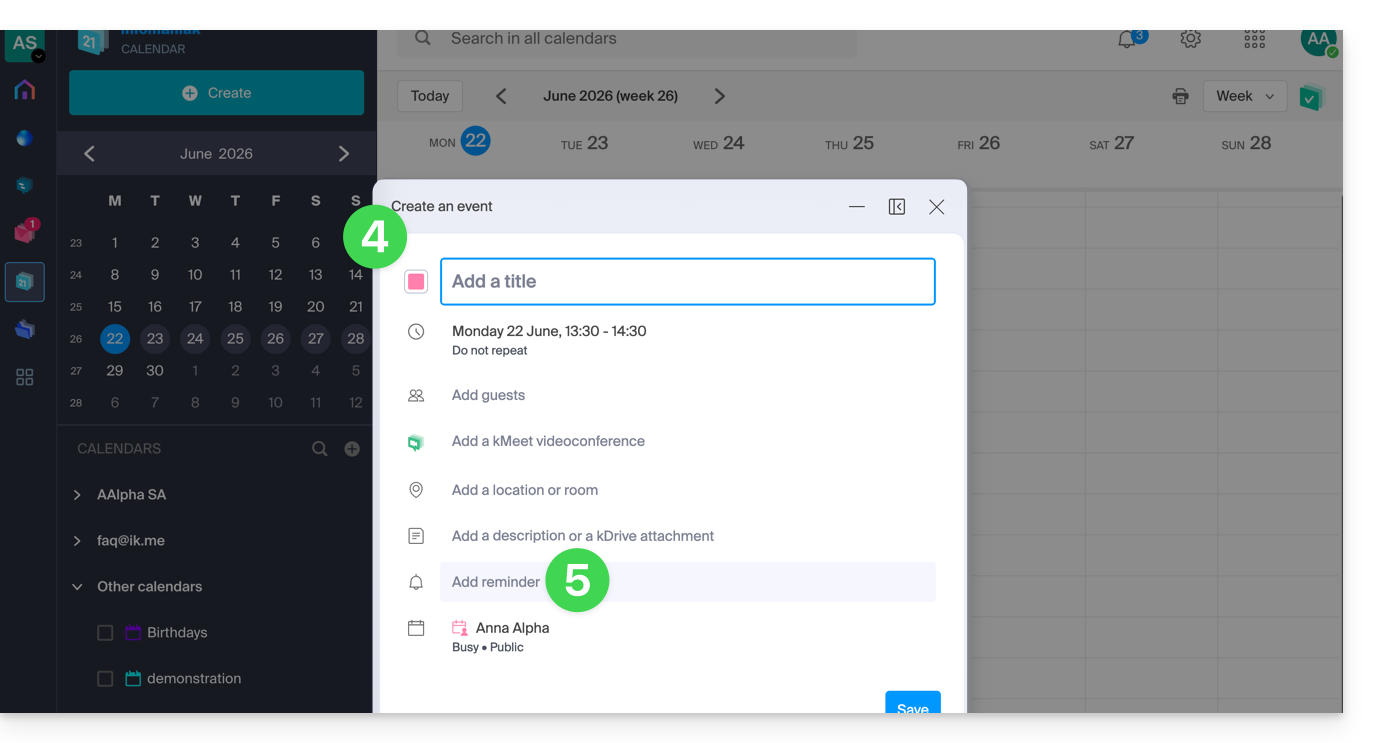
- Enter the event details.
- Click on Add a reminder to configure it:
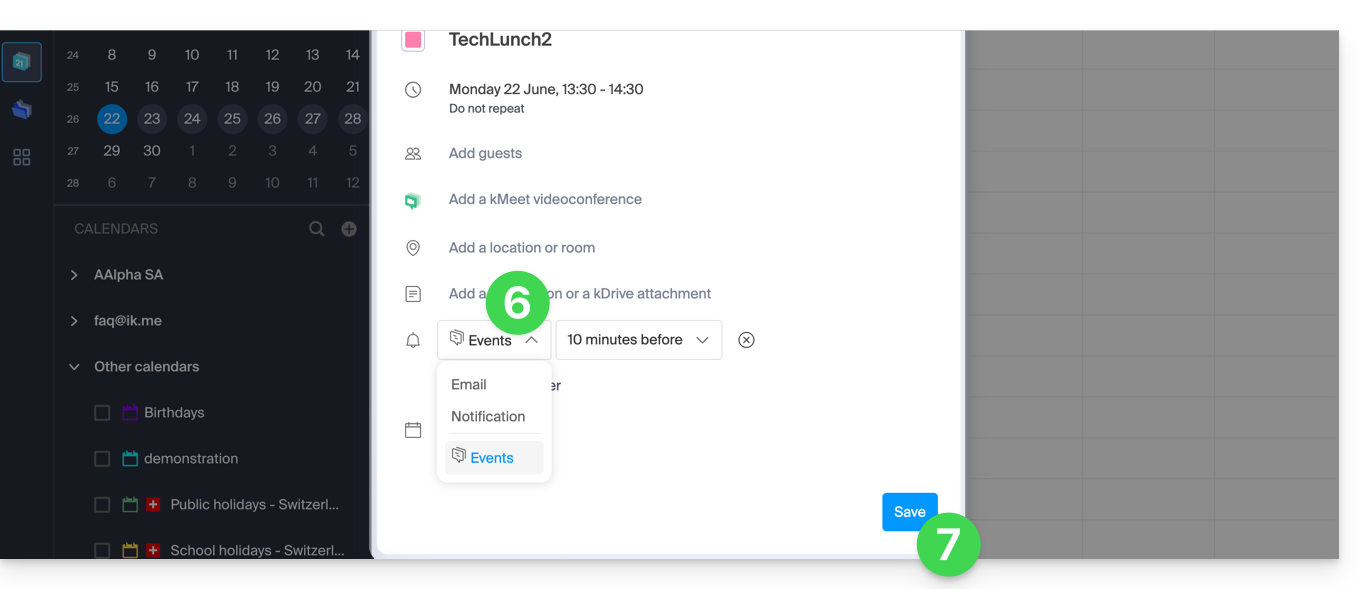
- In the reminder type dropdown menu, choose the webhook you configured (according to the name given in step 5a above).
- Save the event at the bottom of the page:
- When the reminder time arrives, a message (in the format configured in step 5c above) is sent to the specified channel (configured in the webhook - see prerequisites) regarding the event (here, on kChat):
And on other messaging systems?
Slack
- Click here to access the Slack WebHooks.
- Choose the channel where your reminders will appear (e.g., @slackbot or #general):
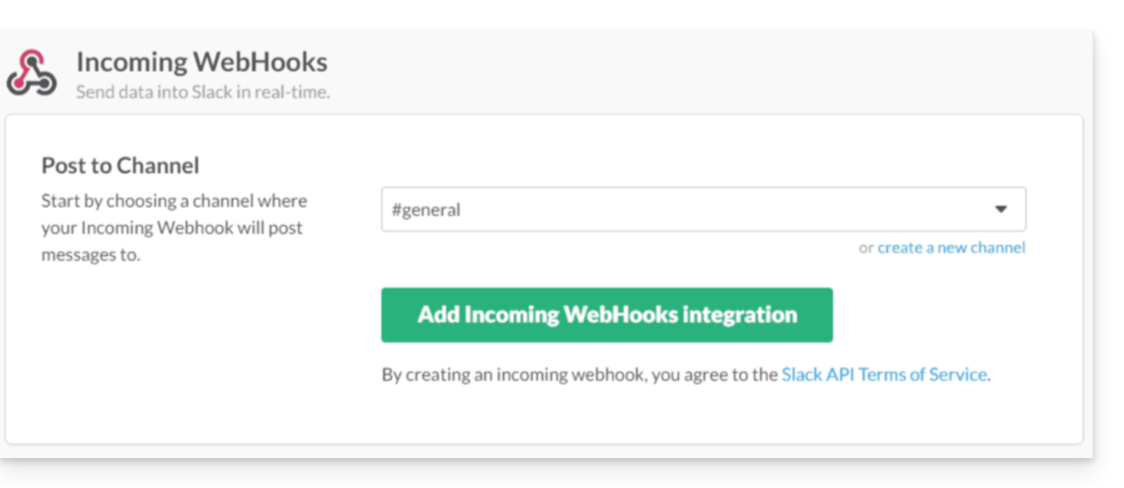
- Save to obtain the webhook URL.
Create other webhooks to set up reminders in other channels.
You can freely use Slack's formatting options in your notifications. Example in French:
N'oubliez pas de %subject% pour le %date%.
À prendre avec le jour J : %description%.
Lieu de l'évènement : %location%
Link to this FAQ:
Has this FAQ been helpful?
This guide explains how reminders and event alerts work in the Infomaniak Calendar web app (online service ksuite.infomaniak.com/calendar).
Adding a Reminder or Alert to an Event
To add a reminder to an event (e.g., an appointment):
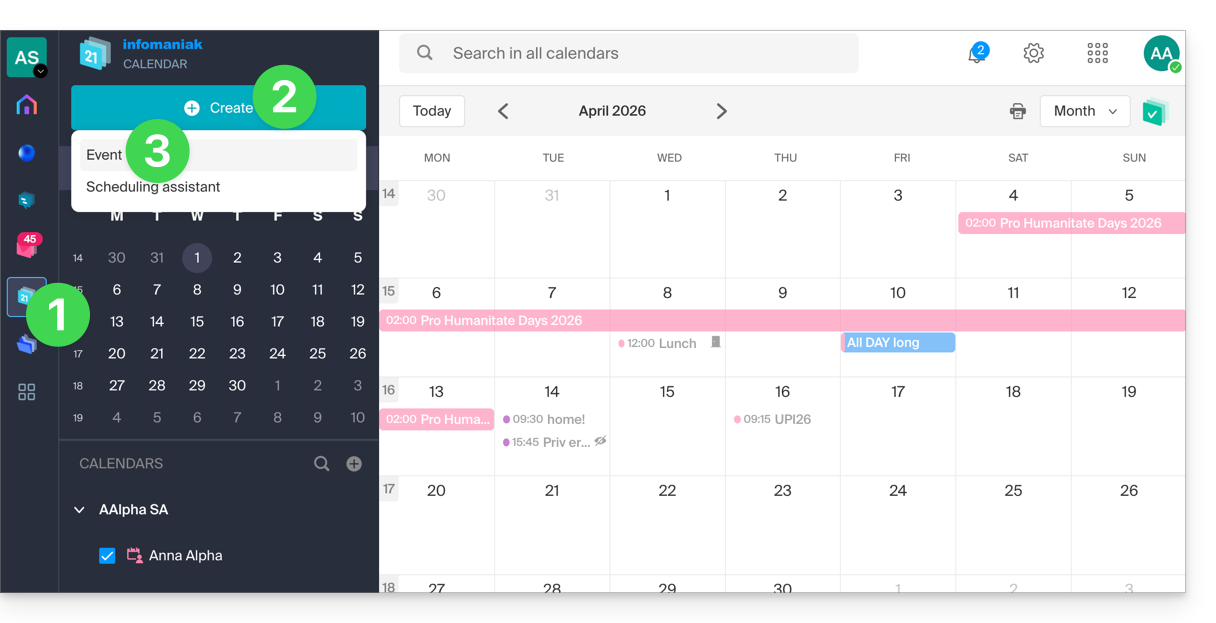
- Click here to access the Infomaniak Calendar web app (online service ksuite.infomaniak.com/calendar).
- Click the Create button in the upper left corner.
- Click on Event:
- You can also click on an existing event in the calendar to edit it.
- Click Add Reminder to configure it:
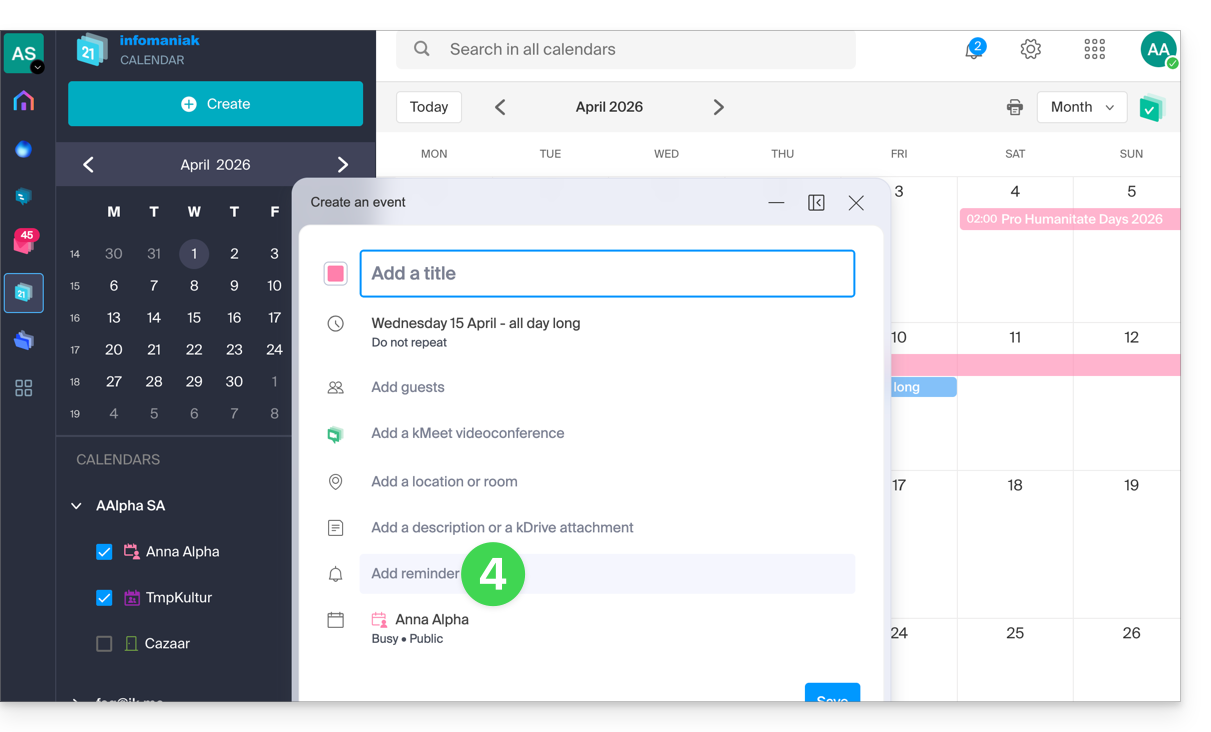
- To receive multiple notifications, you need to add multiple reminders (press ).
- Save the event at the bottom of the page:
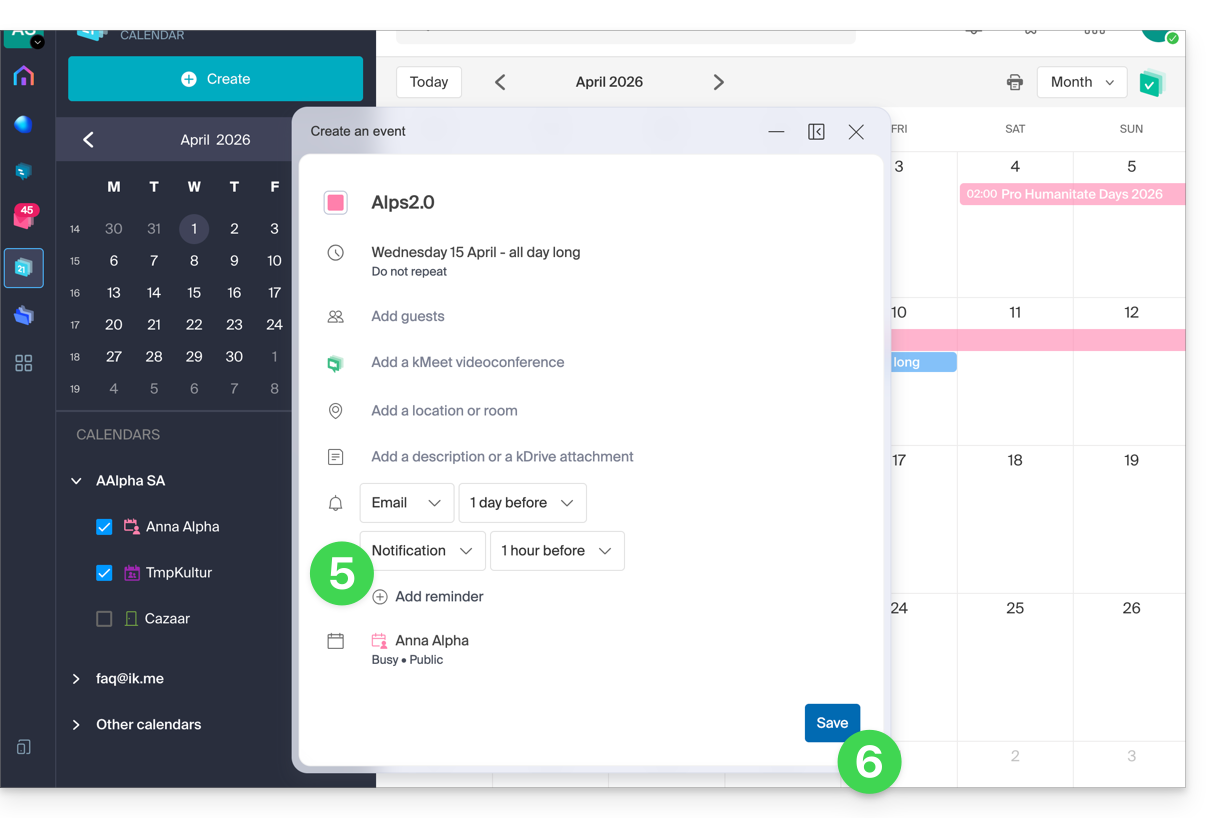
Types of Reminders
You can be notified through 3 different channels:
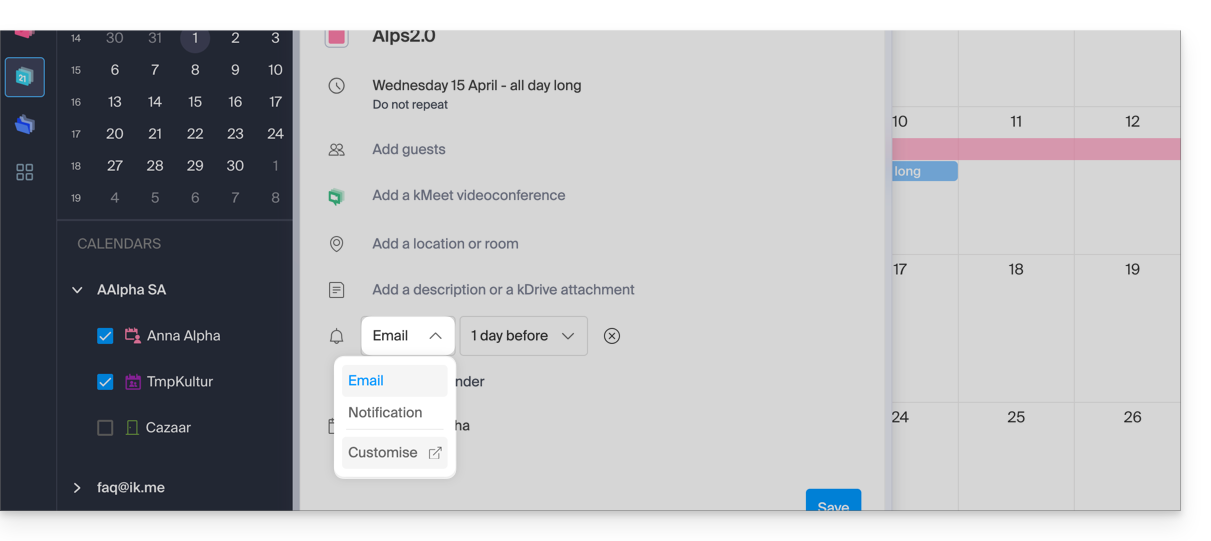
- Via email: the reminder will be sent by email at the chosen time.
- Via a browser notification: the reminder will be displayed through a notification managed by your web browser, provided that kSuite is connected; this is also the option to choose if you synchronize your calendar with your phone to receive an alert on your device.
- Via a chat system like kChat: the reminder will be sent to the chosen chat thread.
Any guests invited to an event will not be notified by the reminders.
Link to this FAQ:
Has this FAQ been helpful?
This guide explains how to download and use the mobile app Infomaniak kSync for Android devices (Samsung, Huawei, Google Pixel, etc.) that allows you to synchronize calendars & contacts between Android devices (with data stored at Infomaniak).
Preamble
- Once the kSync application is configured, the selected items are automatically synchronized with the Contacts and Calendar apps, which are installed by default on an Android device.
- Ability to display or hide your different Infomaniak address books and calendars directly in these apps.
- Any modification (addition, editing, deletion) made on the phone is reflected on the Infomaniak interface, and vice versa.
- Data updates occur continuously according to the configured synchronization interval.
- Refer to this other guide for an example of using kSync: synchronize an Infomaniak calendar with a Google calendar.
Configure kSync
Prerequisites
- Download the mobile app Infomaniak kSync (app for Android smartphone or tablet) here:

- The kSync application is also available on F-droid.
- Install kSync.
Then, launch the kSync app on your Android device, a step-by-step assistant will help you configure the application according to your needs:
- Decide if you want to synchronize tasks.
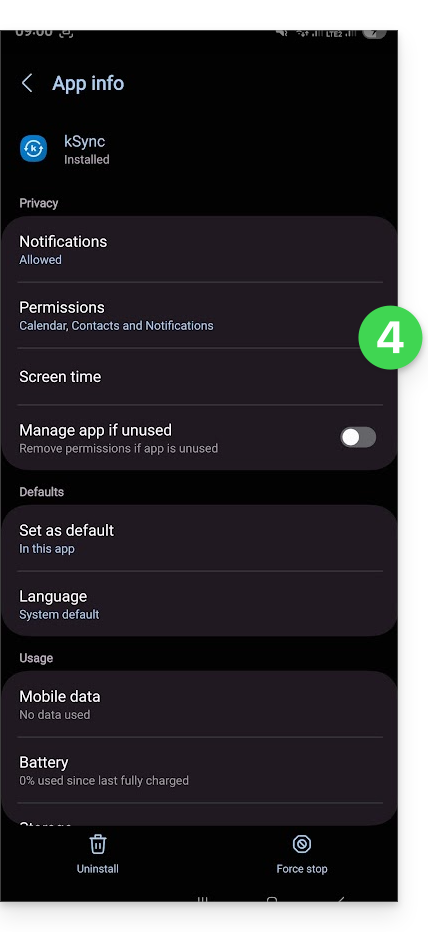
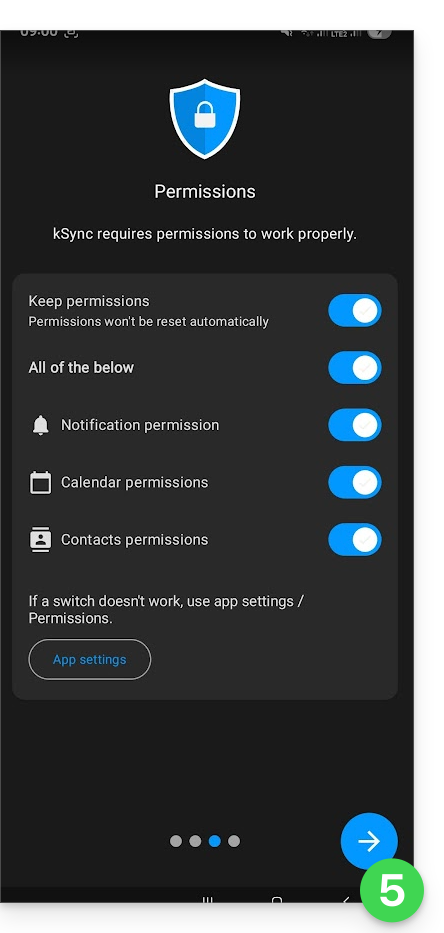
- Allow kSync to access the required items on the device, primarily the calendar.
- Allow the application to run in the background for better synchronization (uses more battery); settings are also possible within the app itself:
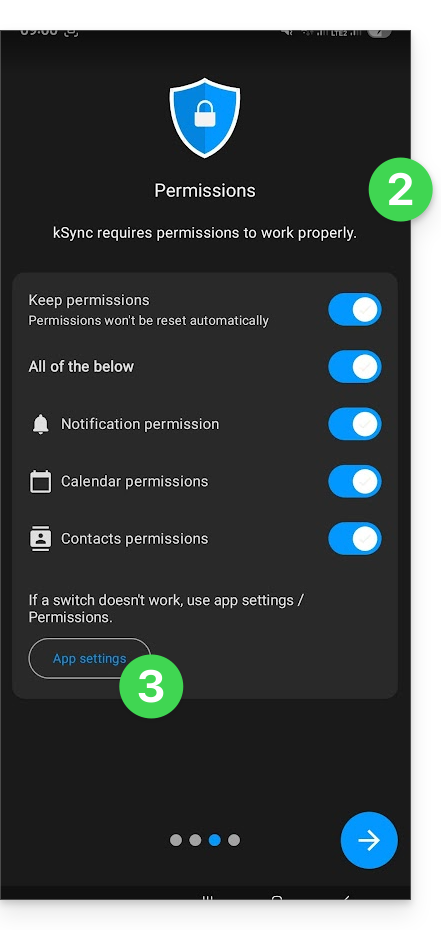
- The essential thing is to grant access rights to the services you need to synchronize:
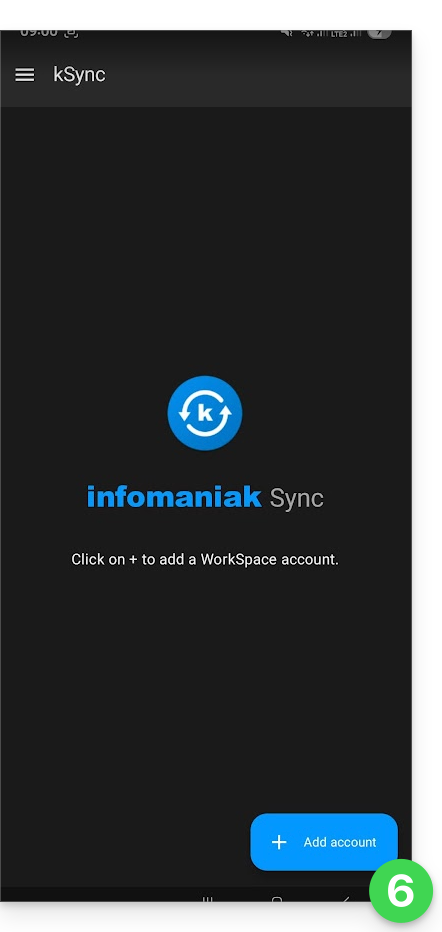
- Go back to the kSync app and continue the configuration:
- Tap to add an Infomaniak user account (the one you use to log in to your Infomaniak services):
- For example, on the Web app Calendar, the user menu at the top right informs you of the login email used.
- It is then possible to access the calendars of the Organization to which the current user is attached:
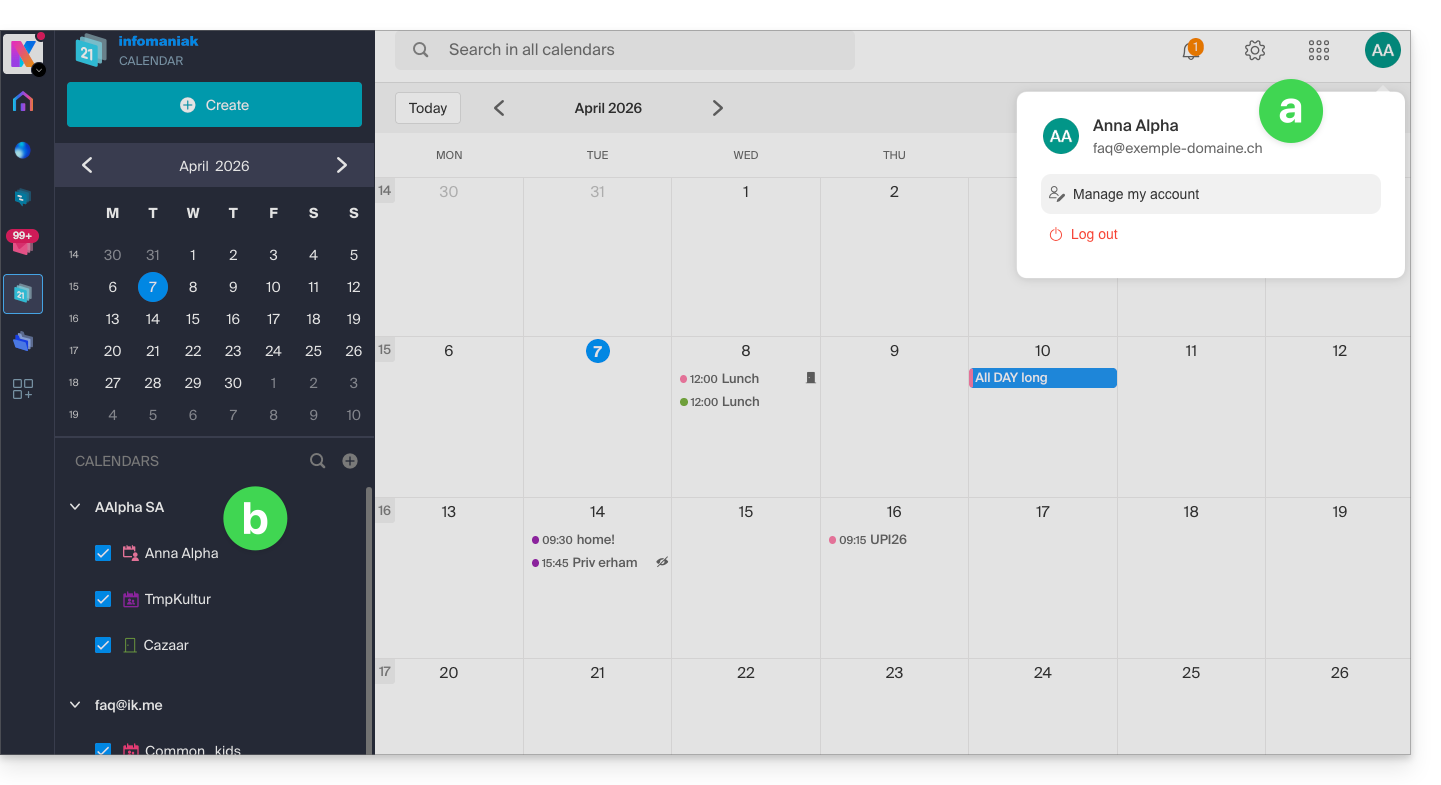
- These are the data that will be synchronized on your device when you log in to the same Infomaniak account on kSync...
- Enter your Infomaniak login credentials (see point a above).
- Tap the button to log in:
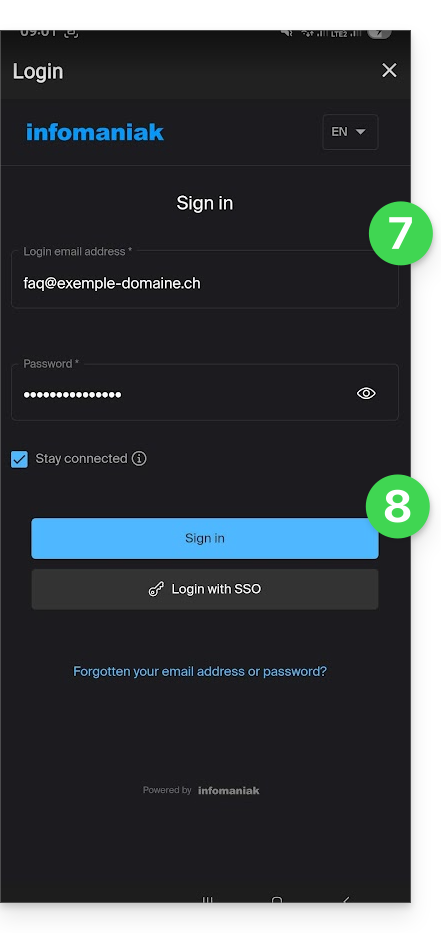
- Perform the double authentication steps as you do for your usual logins.
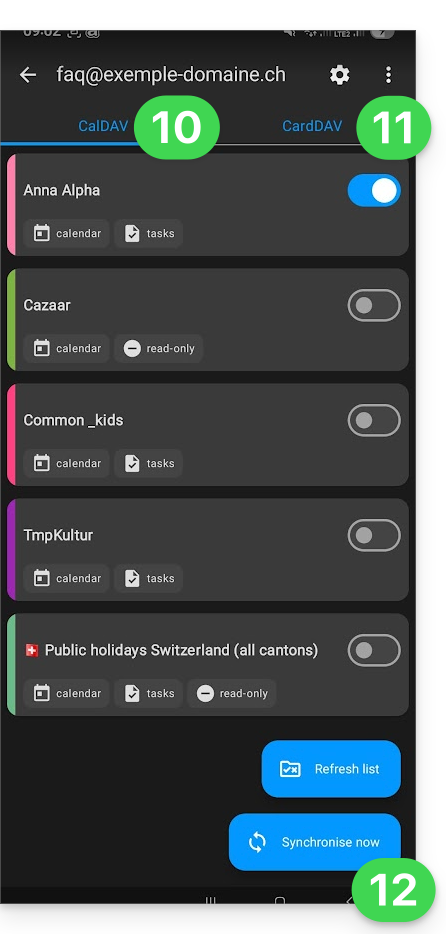
- Once logged in to kSync, under the Agendas CalDAV tab, choose the calendar(s) that should appear on your device.
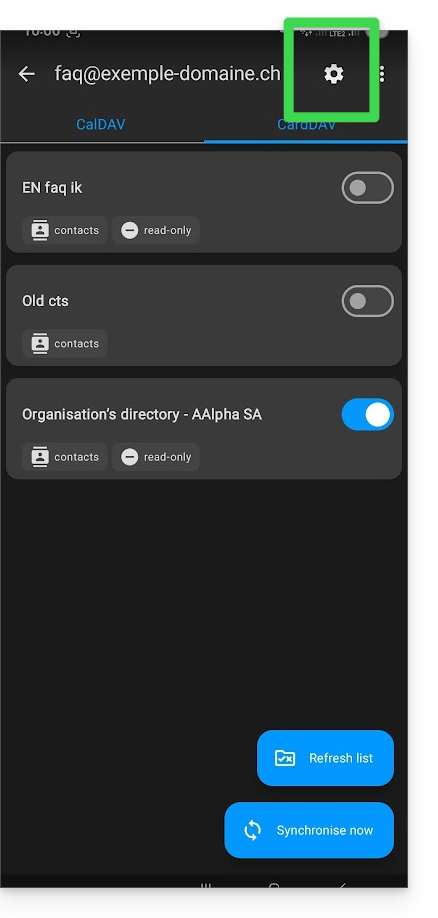
- Under the Address Books CardDAV tab, choose the address book(s) that should appear on your device.
- Start the synchronization with the button located at the bottom right:
kSync synchronization settings
Click on the Settings icon at the top right of the interface to adjust some important kSync settings:
- Synchronization interval: you can modify the frequency of synchronizations (15, 30, 60 minutes, etc.) for each type of information (address books, calendars, tasks).
- Synchronization only via WiFi (and if so, with which networks...).
- Limit the display of past events.
- Receive a notification for each event that does not have a specific reminder, with a notification delay defined in advance (in minutes).
- Display event colors and persistent synchronization of colors or not.
- Display contact groups.
You can also tap on the address books or calendar to configure certain elements:
- It is possible to force read-only via kSync, which means that the elements are synchronized but cannot be modified by the device.
- You can also delete a calendar or address book (excluding the Organization directory):

Rename/remove the Infomaniak account from kSync
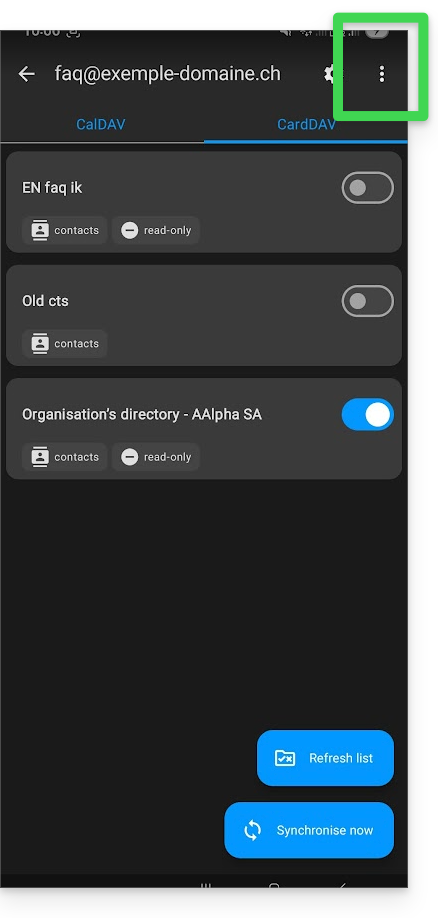
Tap on the action menu ⋮ located to the right of the account concerned:
- You can create a new address book or calendar.
- You can rename or delete the account linked to kSync:
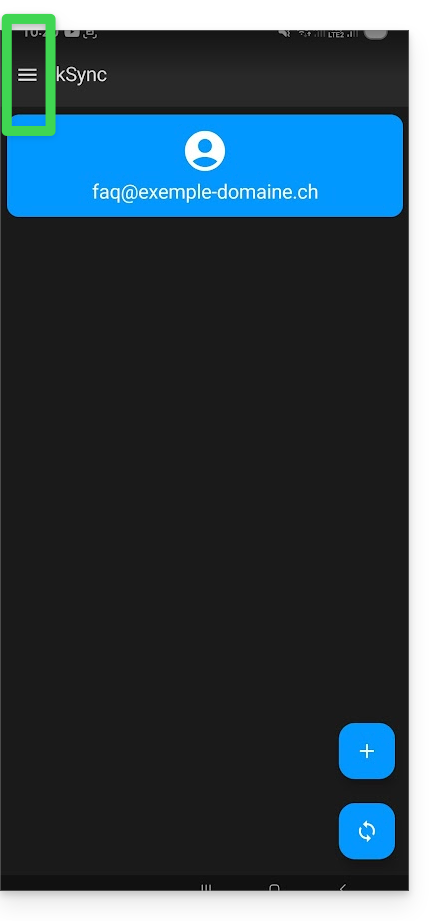
General settings of the kSync app
Press the back arrow at the top left of the screen to return to the home page.
- Then press the menu button with three horizontal lines ☰ and then the menu item “Settings”:
Link to this FAQ:
Has this FAQ been helpful?