Knowledge base
1000 FAQs, 500 tutorials and instructional videos. Here, there are only solutions!
This guide explains what DNSSEC is and how this protection enhances the security of Domains at Infomaniak and the traffic they generate.
Preamble
- Each URL corresponds to an IP address, and when an internet user enters the URL of your site in their web browser, they call on a DNS server whose role is to redirect them to the IP address that corresponds to the entered domain (technically, this is known as DNS resolution).
- When DNSSEC is not activated on your domain name, a malicious person could detect a flaw in a DNS server and modify the correspondence between your domain name and the IP address of your site with an IP address of their choice. In such a case, the internet user who enters the URL of your site would then be redirected to another website that does not correspond to the content of your website.
- DNSSEC allows securing the authenticity of the response provided by the DNS server and thus guarantees to internet users that they are viewing the website they actually want to see. If a hacker attempted to modify the IP address of your domain name in a DNS server protected by DNSSEC at the time of resolution, the latter would refuse their requests, as they would not be authenticated.
- DNSSEC is therefore an additional security measure to the SSL certificate of a site, by guaranteeing to the internet user that they are going to the site that corresponds to the entered URL, and the SSL certificate then intervenes to encrypt the exchanges between the internet user's web browser and the web server of the site they are visiting.
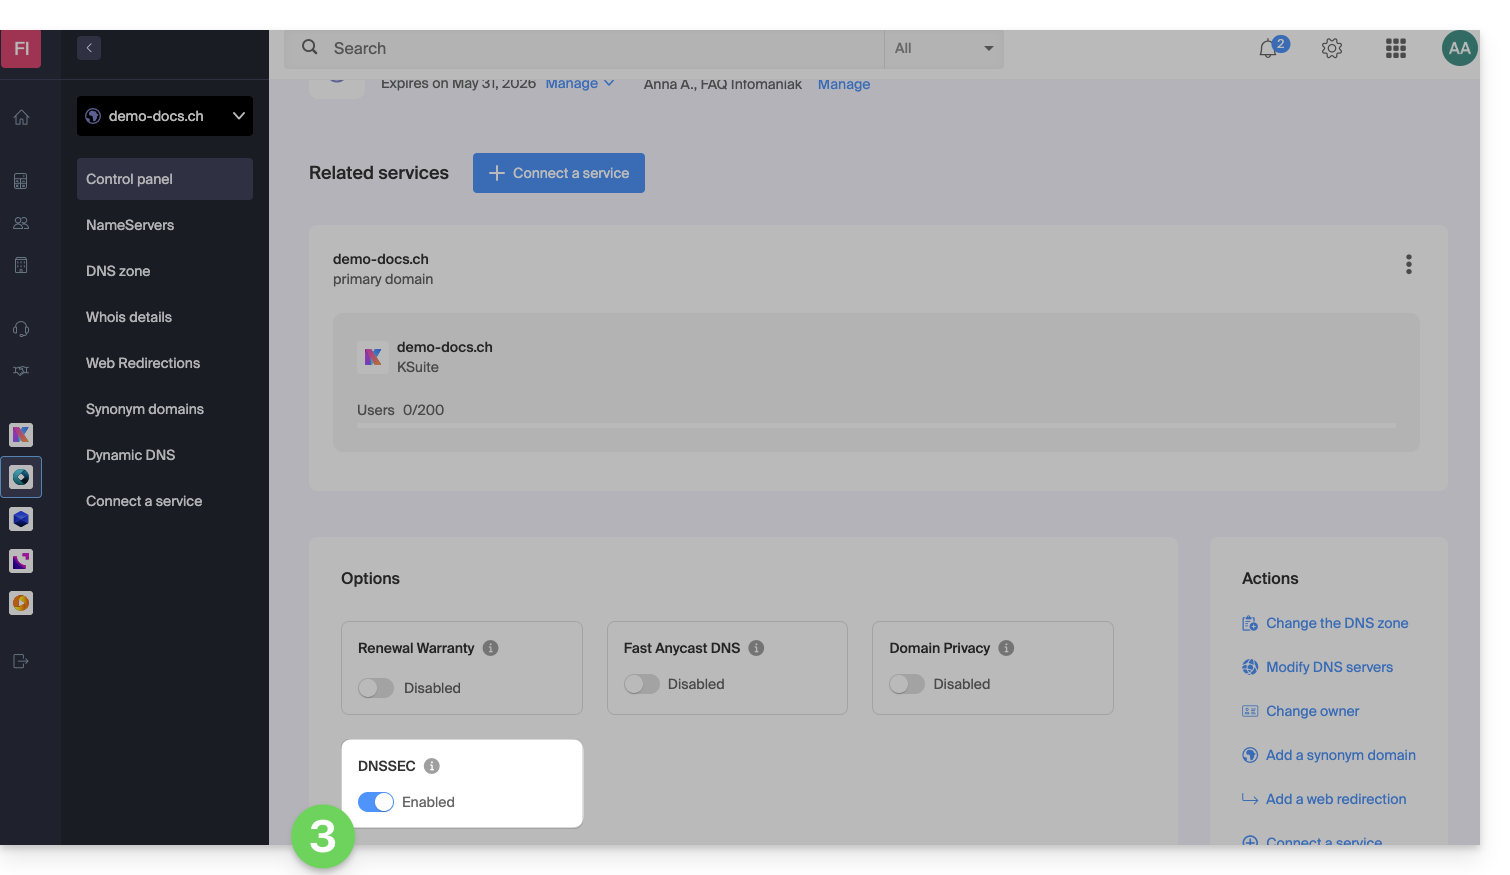
Activate or deactivate DNSSEC
To know the availability of DNSSEC for a specific domain, refer to the specifics of the extensions that concern you from this page (under Frequently Asked Questions by first clicking on the extension concerned).
DNSSEC is available and already activated upon purchase for the vast majority of domain name extensions.
If necessary, DNSSEC is activated in a few clicks on domain names fully managed at Infomaniak:
- Click here to access the management of your product on the Infomaniak Manager (need help?).
- Click directly on the name assigned to the product concerned.
- Activate or deactivate DNSSEC from the Dashboard of the domain:
If the DNS zone of your domain is managed by another registrar, it will be necessary to provide technical information provided by the latter. If the information provided is incorrect, your domain name will no longer be accessible. Therefore, it is recommended to transfer the complete management of your domain to Infomaniak before activating DNSSEC if you are not familiar with these manipulations.
Check if DNSSEC is activated
The propagation of DNSSEC to the registry may take several hours to be effective.
Enter the domain name to be checked on this analysis site.
Specific guide
Link to this FAQ:
Has this FAQ been helpful?
If your domain is important for your activity, then Renewal Warranty is the assurance of never losing it. As a leading registrar, Infomaniak is daily confronted with clients who have not been able to renew their domain on time. Their website and email addresses are no longer accessible, and this often represents significant damage to their activity.
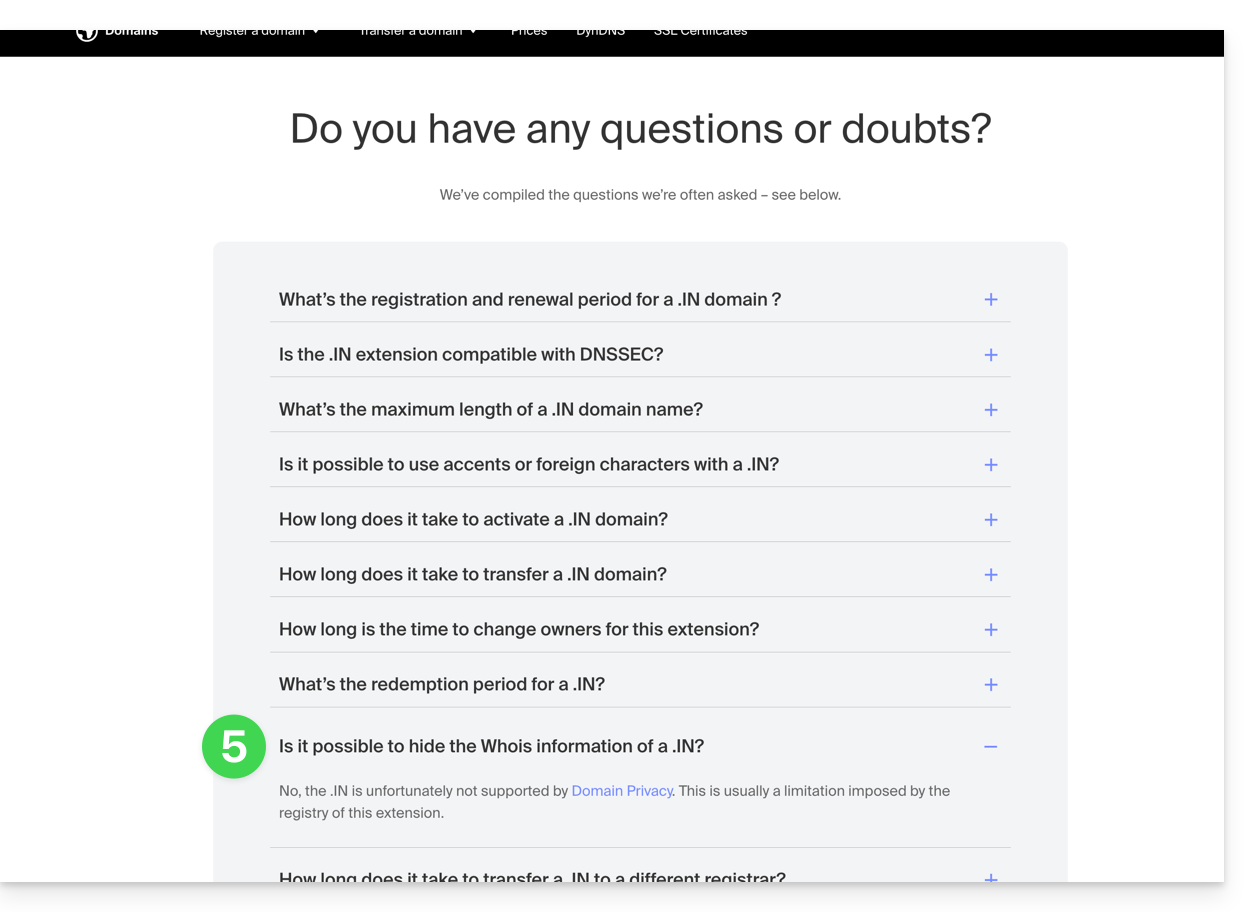
Infomaniak also offers the possibility to protect your personal information from the WHOIS with Domain Privacy.
It is easy and costly to lose a domain
A domain name is registered for a specific period after which it must be renewed to retain ownership. When a domain is not renewed, it enters a redemption period and then falls into the public domain awaiting a new buyer.
The redemption period is a grace period during which it is still possible to act to retain ownership of your domain. However, this last resort is fraught with consequences and incurs fees. In the best-case scenario, it results in the interruption of your website and email addresses for many hours, the time it takes to urgently remove your domain from redemption.
In the worst-case scenario, if there is no intention to reactivate the domain name, it is lost.
Renewal Warranty, the assurance of never losing a domain
With this guarantee, Infomaniak commits to renewing your domain if necessary (blocked payment method, renewal emails not received, prolonged absence, etc.) and will personally contact you by email, SMS, phone, and postal mail to ensure you keep it.
Renewal Warranty is a unique solution that protects you from the involuntary expiration of your domains. You remain the sole owner of your domains and are free to stop Renewal Warranty or cancel your domains whenever you decide.
Activate Renewal Warranty on an existing domain
Refer to this other guide to activate the option in a few clicks.
Link to this FAQ:
Has this FAQ been helpful?
With Domain Privacy, Infomaniak allows you to preserve the confidentiality of your personal information (name, email address, postal address, and phone number) and effectively protect yourself against SPAM.
Preamble
- Registrars accredited by ICANN are required to publish the owner's contact information of a domain in the public WHOIS directory, which lists all registered domains and primarily serves to:
- verify the availability of domain names
- verify trademark infringements
- contact the owner of a domain in case of a legal issue
- For customers concerned about the confidentiality of their personal data and who do not wish to publicly display their email address, phone number, and postal address in the WHOIS directory, Domain Privacy allows you to mask these real coordinates.
- Thanks to this protection, WHOIS searches for your domain do not return your personal information, but the information of the partner Domain Privacy Trustee SA:
- You are protected against SPAM: marketing companies and individuals cannot use your personal data.
- You remain the full owner of your domain.
- It remains possible to contact you via a secure form that protects your identity.
- Discover the domain name extensions supported by Domain Privacy
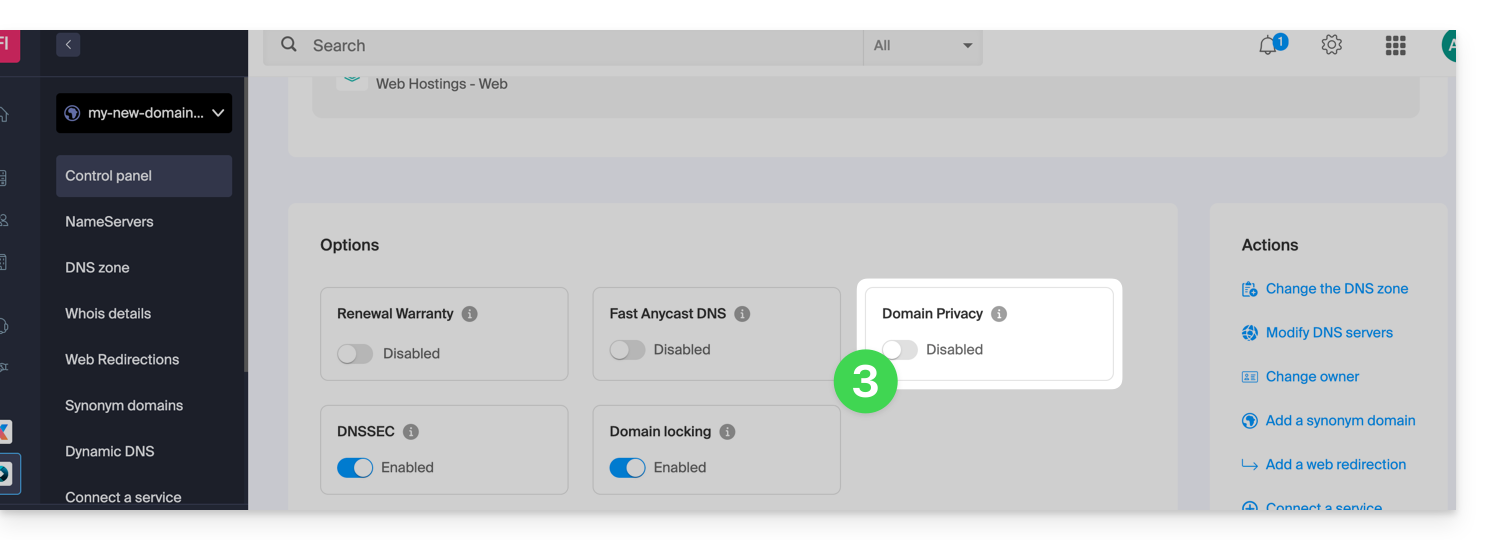
Activate Domain Privacy on an existing domain
Domain Privacy is activated in a few seconds:
- Click here to access the management of your product on the Infomaniak Manager (need help?).
- Click directly on the name assigned to the product concerned.
- Activate Domain Privacy from the dashboard:
Infomaniak also offers the possibility to guarantee the renewal of your domains with Renewal Warranty: this guarantee is intended to ensure that you do not lose domains that are important for the smooth running of your activities.
Link to this FAQ:
Has this FAQ been helpful?
This guide concerns domain names called Premium.
Introduction
- These domain names are designated by the registries as domains with high commercial potential for SEO or branding.
- The prices for these domains are set by their registry or their current owner and do not particularly depend on the extensions (
.com,.net, etc.). - A
.artdomain can cost less than 10 EUR, just as it can be purchased for more than 300 EUR. - Anyone can purchase a premium domain.
Identifying this type of domain
On the Infomaniak shop, premium domains are marked with a crown to distinguish them. Here is an example:
The 3 characteristics of a premium domain
- High commercial value
- Impactful and easy to remember
- High traffic potential
Why register a premium domain name?
- Renewal at the standard price: the price of a premium domain is high in the first year, but the cost of its renewal is generally the same as that of a standard domain.
- Easy transfer: the price of a premium domain generally includes the transfer of the domain and the change of ownership.
Link to this FAQ:
Has this FAQ been helpful?
This guide concerns Domain Privacy which protects the owner's details of a domain in the WHOIS directory, and more particularly the domain name extensions compatible with this service.
Preamble
- The possibility of masking or not the owner's details may vary depending on the extension.
- Most domain extensions are supported by Domain Privacy protection.
Extensions compatible with Domain Privacy
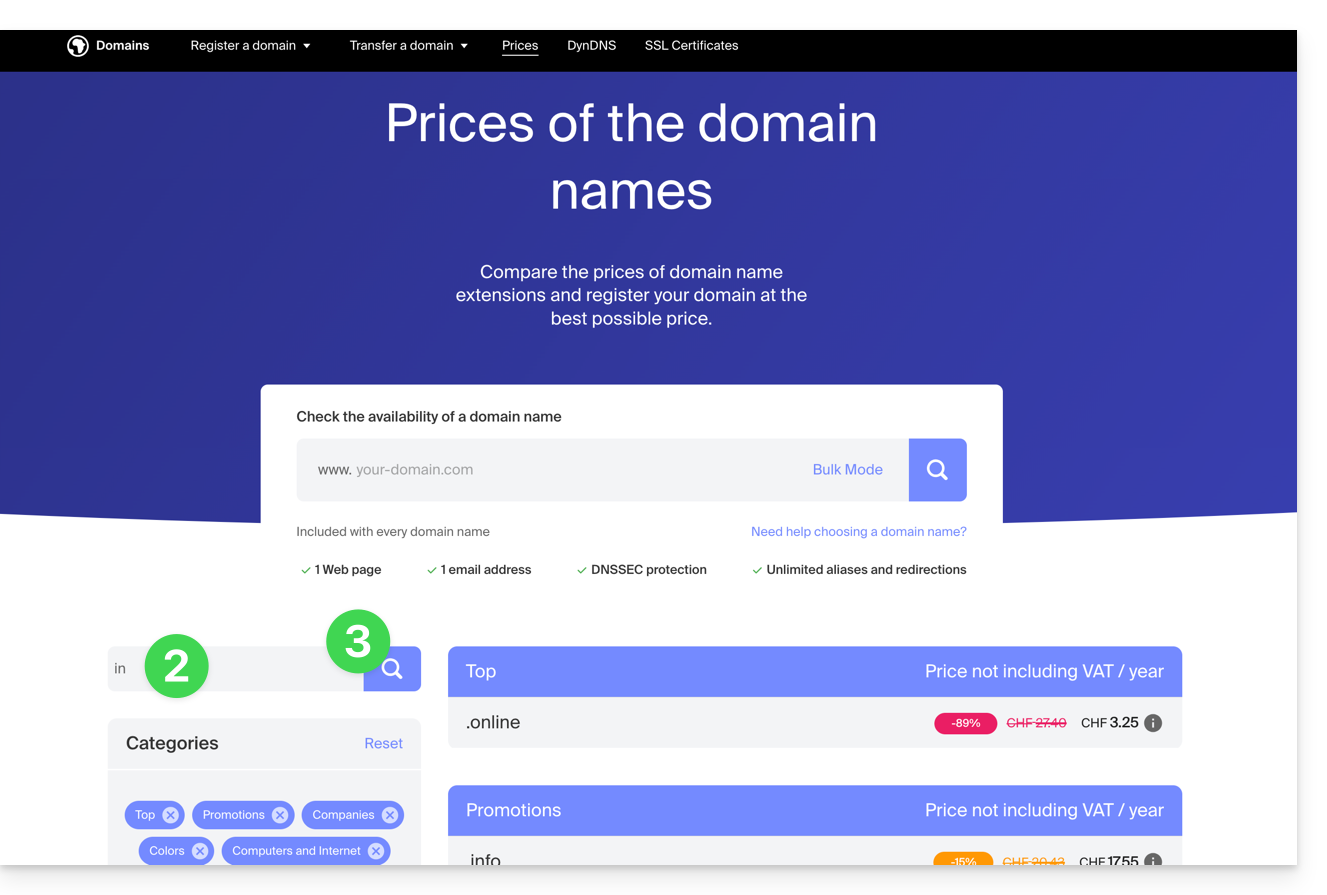
To be informed of the support or not depending on the extension that interests you:
- Go to this page.
- Specify the desired extension.
- Click on the magnifying glass icon to start the search:
- Click on the desired extension from the results displayed in the sidebar:
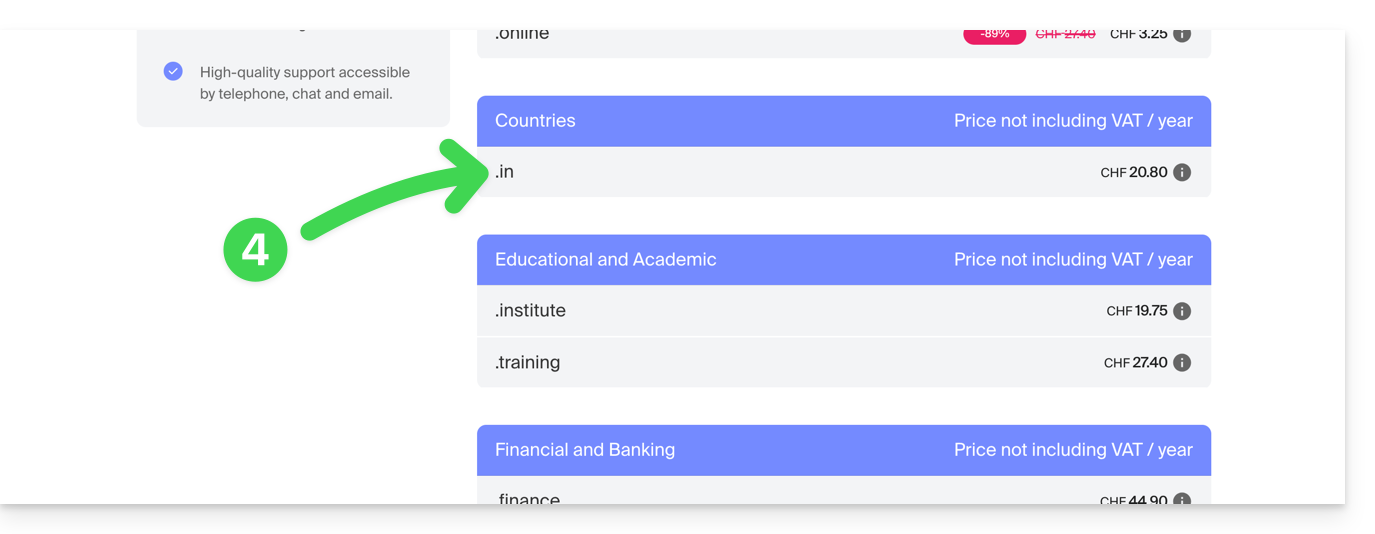
- Scroll down to the Frequently Asked Questions and read the required information:
Non-exhaustive list provided as an example:
ac
academy
accountant
accountants
actor
adult
aero
agency
airforce
apartments
archi
army
art
asia
associates
auction
audio
auto
band
bar
bargains
basketball
best
bet
bid
bike
bingo
bio
biz
black
blackfriday
blue
boutique
builders
business
cab
cafe
cam
camera
camp
capital
cards
care
careers
cars
cash
casino
cat
catering
center
ch
chat
cheap
christmas
church
city
claims
cleaning
click
clinic
clothing
cloud
club
co
coach
codes
coffee
college
com
com.co
community
company
computer
condos
construction
consulting
contractors
cool
country
credit
creditcard
cricket
cruises
cz
dance
date
dating
deals
degree
delivery
democrat
dental
desi
design
diamonds
diet
digital
direct
directory
discount
doctor
dog
domains
download
education
email
energy
engineer
engineering
enterprises
equipment
estate
events
exchange
expert
exposed
express
fail
faith
family
fans
farm
finance
financial
fish
fitness
flights
florist
flowers
fm
football
forsale
foundation
fr
frl
fund
furniture
futbol
gallery
game
games
gent
gift
gifts
gives
glass
global
gmbh
gold
golf
graphics
gratis
green
gripe
group
guide
guitars
guru
gy
haus
health
healthcare
help
hiphop
hiv
hockey
holdings
holiday
host
hosting
house
immo
immobilien
industries
info
ink
institute
insure
international
investments
io
irish
jetzt
jewelry
juegos
kaufen
kim
kitchen
land
lat
lease
legal
lgbt
li
life
lighting
limited
limo
link
live
loan
loans
lol
love
ltd
maison
management
market
marketing
me
media
memorial
mobi
moda
moe
money
mortgage
nagoya
name
navy
net
net.co
network
news
ninja
nom.co
onl
online
org
partners
parts
party
pet
photo
photography
photos
pics
pictures
pink
pizza
pl
place
plumbing
plus
poker
porn
press
pro
productions
promo
properties
property
protection
pub
pw
qpon
racing
recipes
red
rehab
reisen
rentals
repair
report
republican
rest
restaurant
review
reviews
rich
rip
rocks
run
saarland
sale
salon
sarl
school
schule
science
security
services
sex
sexy
sh
shiksha
shoes
shop
shopping
show
singles
site
ski
social
software
solar
solutions
space
storage
store
stream
studio
style
supplies
supply
support
surgery
systems
taipei
tattoo
tax
taxi
team
tech
technology
tennis
tf
theater
theatre
tienda
tips
tires
tk
tm
today
tokyo
tools
top
tours
town
toys
trade
training
tube
tv
university
uno
vacations
vegas
ventures
vet
viajes
video
villas
vin
vision
voyage
watch
webcam
website
whoswho
wiki
win
wine
works
world
ws
wtf
xyz
yokohama
zone
Link to this FAQ:
Has this FAQ been helpful?
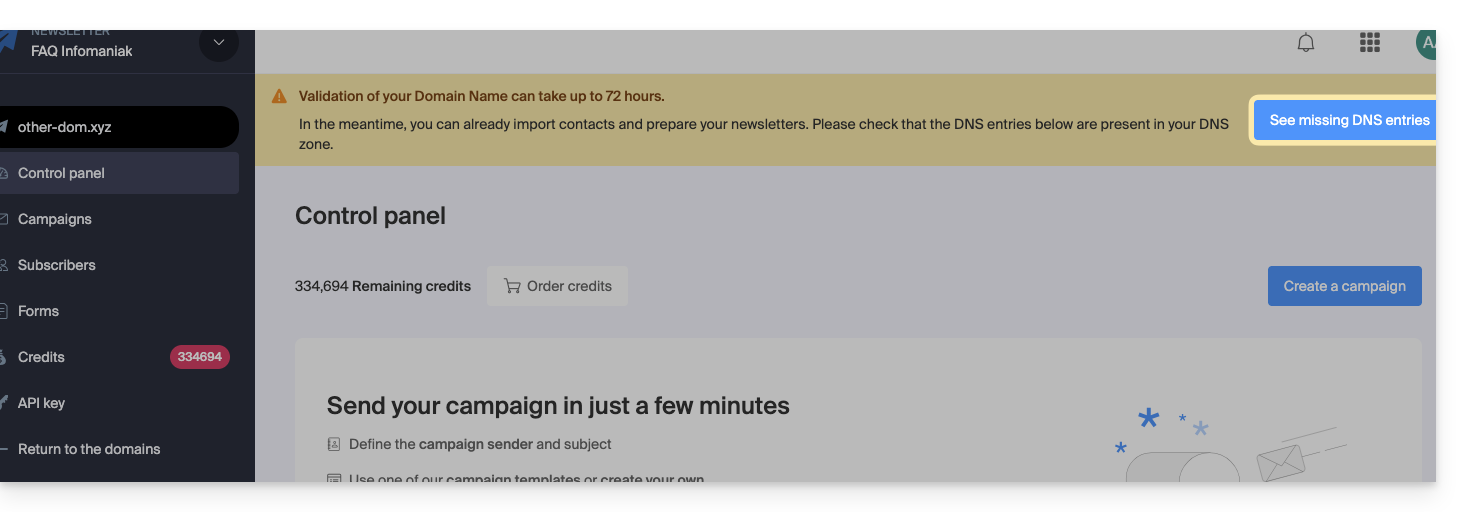
This guide explains how to use the Infomaniak Newsletter tool with an external domain name (not managed at Infomaniak).
Prerequisites
- The domain name must belong to you.
- Synonym domains and their main domain cannot be used to send newsletters.
- It is possible to configure your synonyms as aliases.
Link an external domain
To access the management of Newsletter sending domains:
- Click here to access the management of your product on the Infomaniak Manager (need help?).
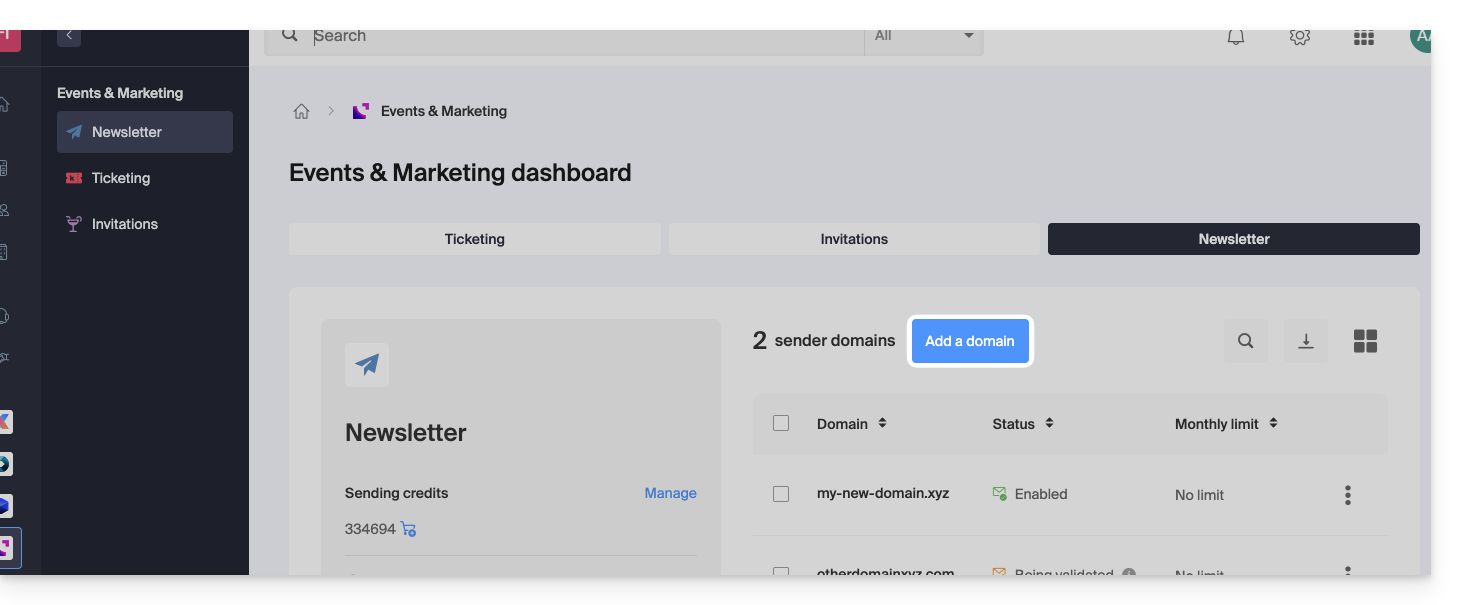
- If you already have a Newsletter, click on Add a domain:
- Otherwise, click on Start for free:
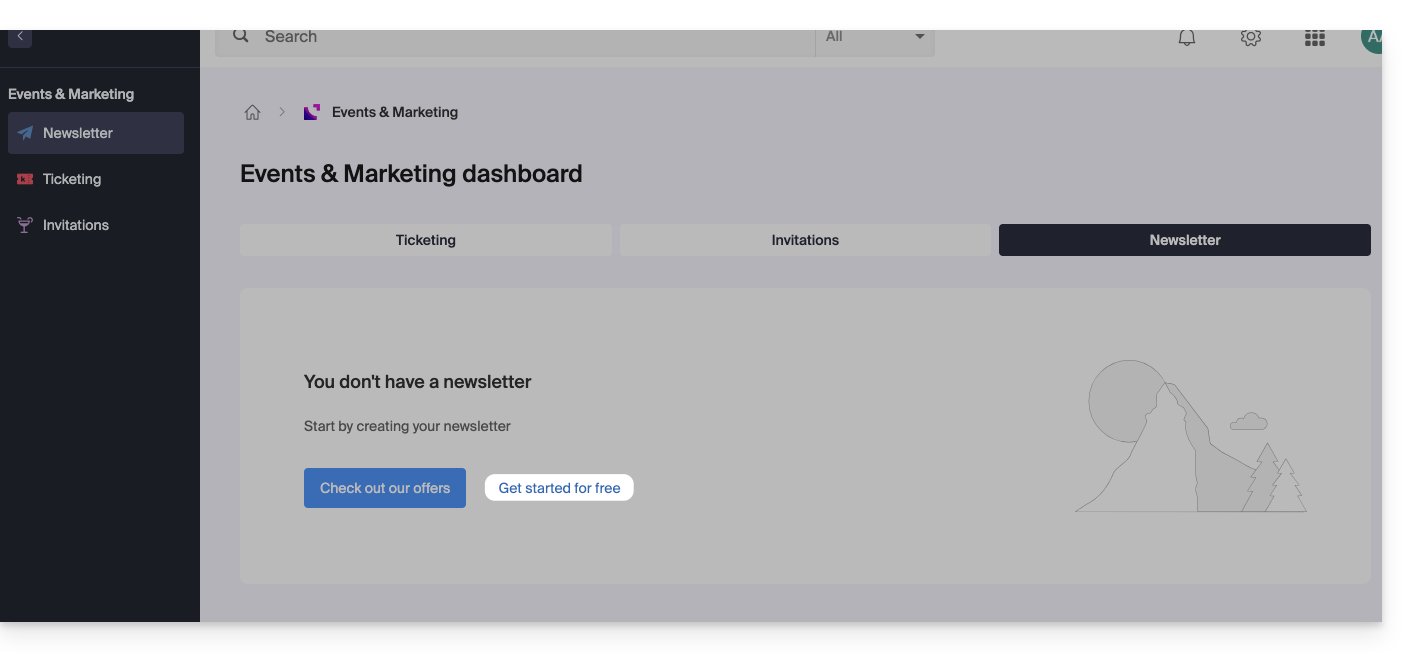
- Otherwise, click on Start for free:
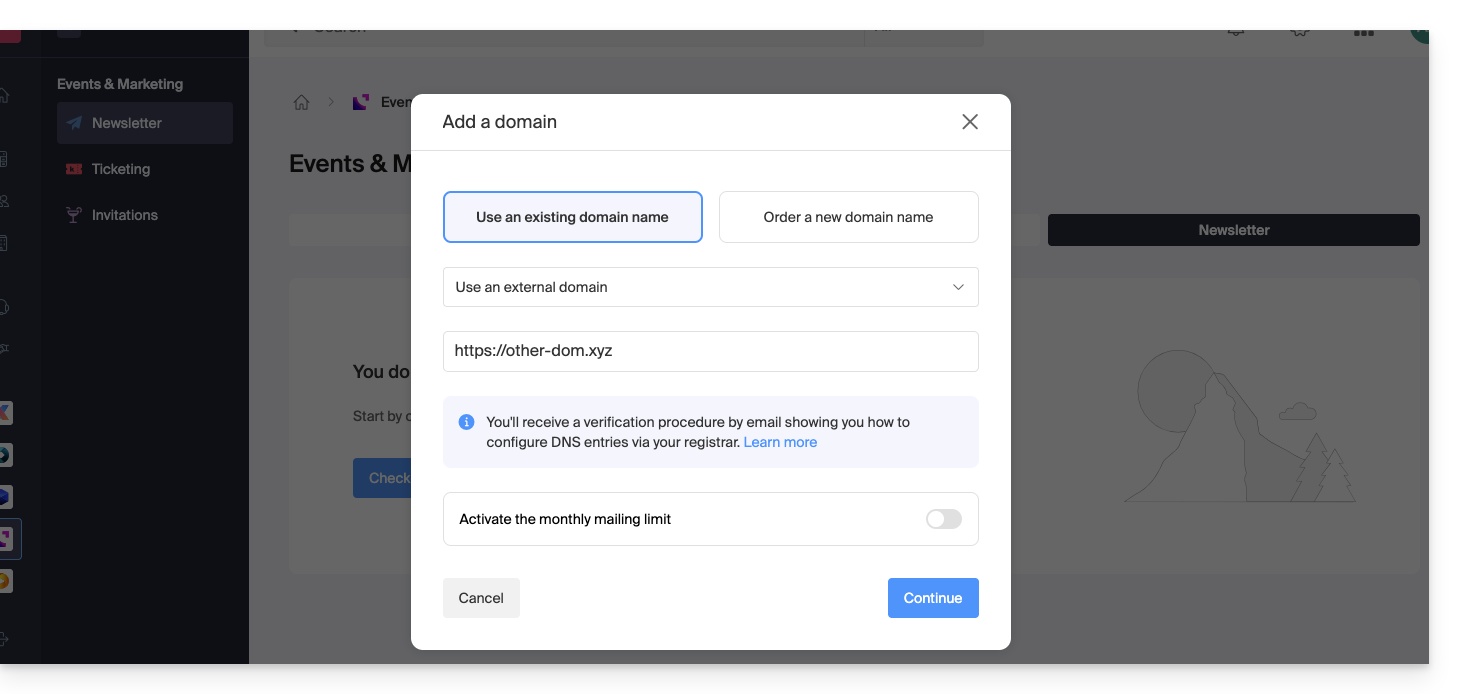
- Select Other domain from the dropdown menu before entering (or enter directly) the domain name with which you want to send newsletters.
- Choose a possible monthly limit.
- Click the button to Continue:
- Add the TXT / CNAME / DKIM records that you will receive by email and visible on the interface by clicking on the button:
Link to this FAQ:
Has this FAQ been helpful?
This guide introduces the Domain Status tool, which allows you to verify that the relationships between…
- DOMAIN NAME at Infomaniak
and
- WEB HOSTING at Infomaniak
… are correct, so that Web traffic is directed to the right place.
Preamble
- To verify, the tool checks the
A,CNAME, etc. records. - You will thus be able to detect and correct certain Web issues, especially if they are related to DNS (technical information that, in short, determines where such and such Web traffic should be directed) by acting at the level of your domain.
- Automatic correction is only possible when the domain name is present in the same Organization as the product to which it must be attached.
- If this is not the case, then the correction must be done manually.
Diagnose a DNS problem
To access the DNS diagnosis of your domain name:
- Click here to access the management of your product on the Infomaniak Manager (need help?).
- Click directly on the name assigned to the product concerned.
- Click on Web in the left sidebar (or on the possible indication to go directly to point 6):
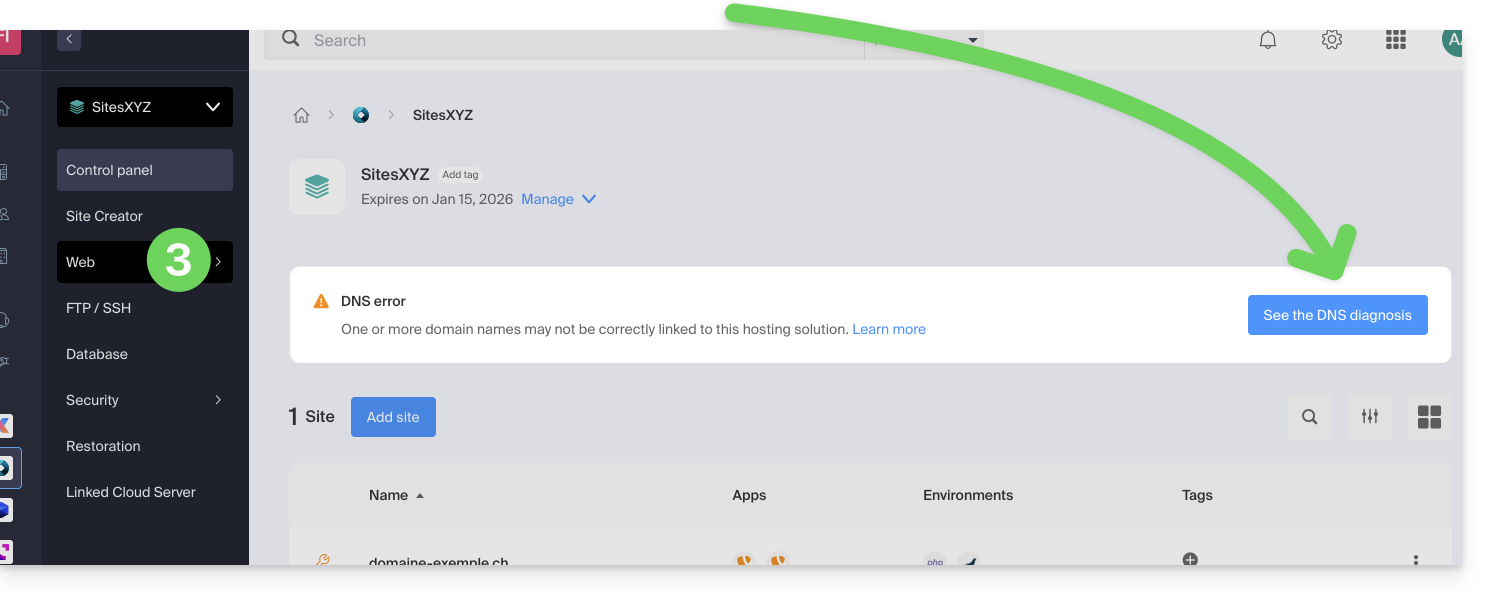
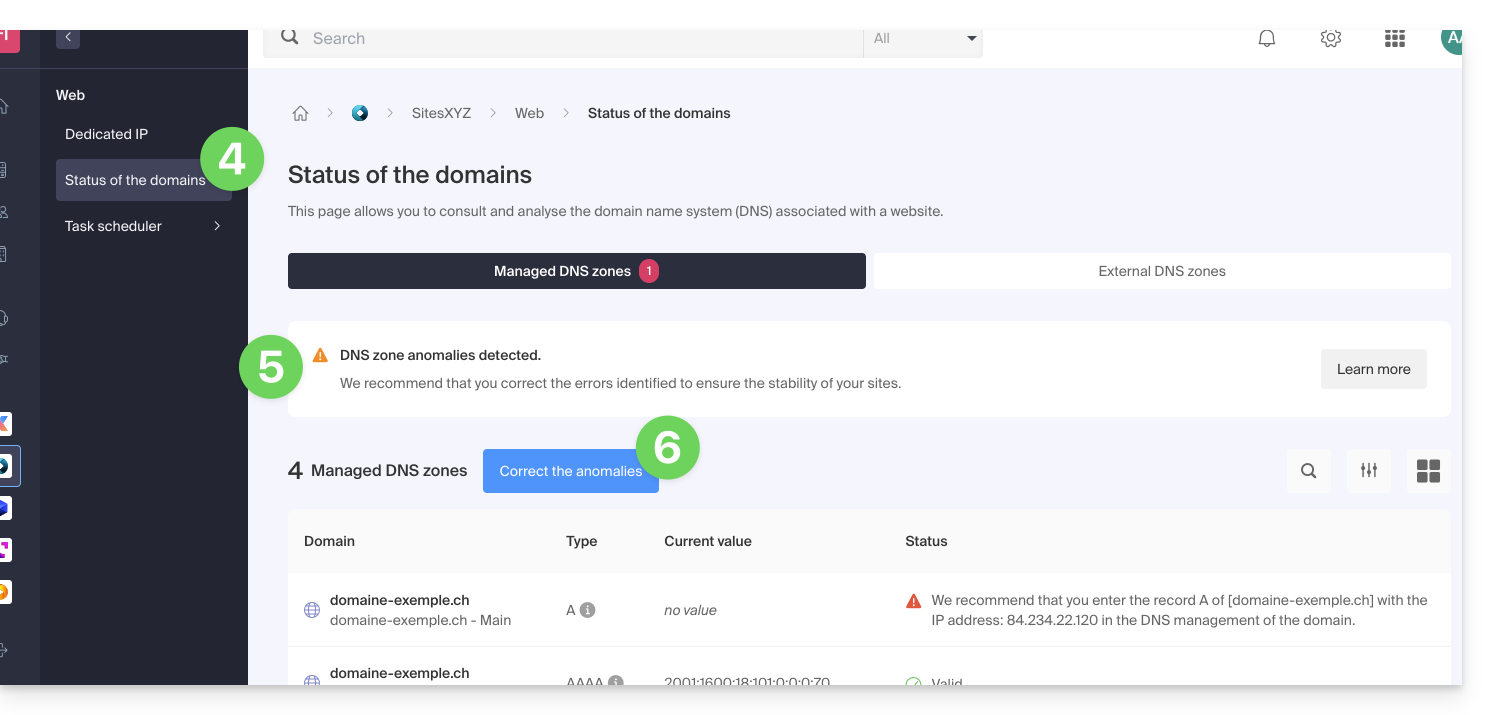
- Click on Domain Status in the left sidebar.
- If DNS issues are detected, the dashboard indicates it.
- Correct all errors at once by clicking on the button:
Refer to this other guide regarding the same automatic verification process but for Mail Services.
Link to this FAQ:
Has this FAQ been helpful?
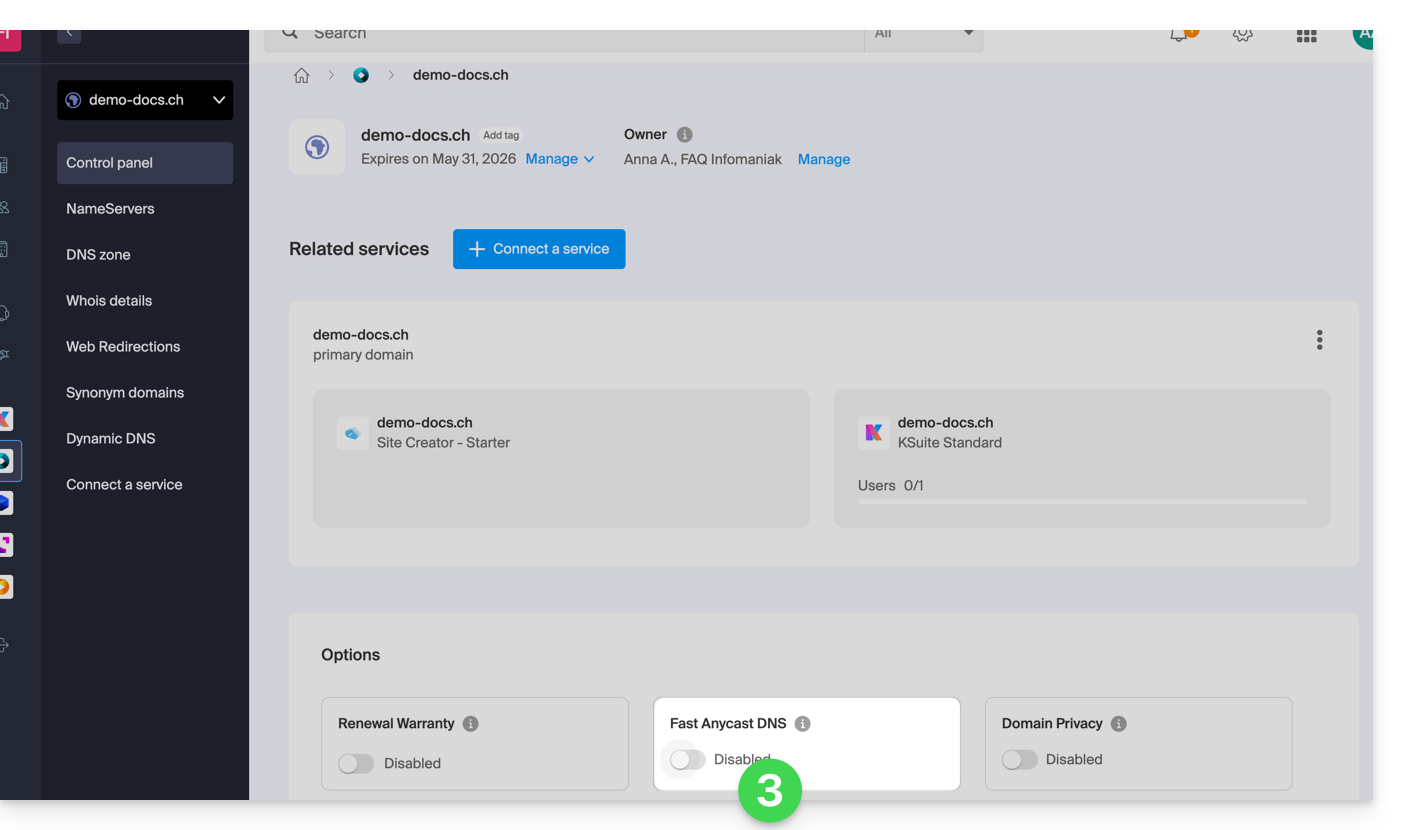
DNS Fast Anycast replicates the DNS of your domain around the world to reduce latency and increase the availability of your websites.
Preamble
- Thanks to DNS Fast Anycast, the DNS of your domain are replicated within several Points of Presence (POP) around the world (list below).
- No matter where your visitors are, they are redirected to the nearest DNS server to them, which on average speeds up by 34% (DNS resolution) the access speed to your site.
- Moreover, if one of your DNS servers were to become unavailable, the nearest server naturally takes over and your visitors can continue to access your site.
- The replication of your domain's DNS is automatic and no modification of your code is required.
Manage DNS Fast Anycast
Prerequisites
- DNS Fast Anycast is compatible with all websites, regardless of your host.
- All you need is a domain name managed at Infomaniak.
- Transfer the management of your domain to Infomaniak if necessary
- Refer to this other guide to manage external domains.
To access the DNS Fast Anycast option:
- Click here to access the management of your product on the Infomaniak Manager (need help?).
- Click directly on the name assigned to the product concerned.
- Enable or disable the DNS Fast Anycast toggle switch on the dashboard:
POP - 'Point of Presence'
By activating DNS Fast Anycast on your domain, your DNS will be automatically replicated in the following points of presence:
Network 1
New York, USA (2x)
Paris, France (2x)
Varsovie , Pologne (2x)
Dublin, Irlande (2x)
Singapour (2x)
Johannesburg, Afrique du Sud
Stockholm, Suède
Vienne , Autriche (2x)
Francfort, Allemagne (2x)
Londres, Royaume-Uni
Dallas, USA
Los Angeles, USA (3x)
Amsterdam, Pays-Bas
Sydney, Australie
Sāo Paulo, Brésil
Miami, USA (2x)
Network 2
Hong Kong, Chine
San José, USA
Dallas, USA
Reston, USA
Chicago, USA
Seattle, USA
Londres, Royaume-Uni
Francfort, Allemagne
Amsterdam, Pays-Bas
Vienne, Autriche
Toronto, Canada
Sydney, Australie
Sāo Paulo, Brésil
Johannesburg, Afrique du Sud
Miami, USA
The points of presence are distributed across two networks that are randomly used when one of your visitors accesses your website.
Link to this FAQ:
Has this FAQ been helpful?
This guide details the specifics of the .be domain extension (for Belgium), including the administrative steps to transfer the management of a .be domain to Infomaniak.
Preamble
- As with other extensions, but particularly for
.beit is very important to keep the WHOIS information of your domain name up to date to avoid any suspension by DNS.be! - The terms "
EPP", "AuthCode", "AuthInfo", "transfer code" and "authorization code" all refer to alphanumeric sequences specific to the domain whose main purpose is to verify the owner's authorization before a transfer between Registrars.
Transfer a .be domain to Infomaniak
.be domains are subject to a specific procedure for their authorization code (EPP code). If your previous registrar provided you with an authorization code, it is likely that this one is not valid. Indeed, to obtain the authorization code for a .be, you must either:
- click on "Get the authorization code" from the page asking for the code,
- or go to dnsbelgium.be and request the authorization code (EPP code).
You should absolutely not try to transfer the domain multiple times in a row with the wrong code otherwise you will block the domain as well as the transfer (Command failed; please contact support - domain locked) for several dozen hours without Infomaniak being able to do anything about it. You will have to wait before trying again with another code that must absolutely be the correct one.
Remove a .be from quarantine
Outside of a transfer period, and following outdated WHOIS information or suspicious use of your domain, it is possible that dnsbelgium.be the Belgian registry temporarily suspends this .be domain.
A usual WHOIS request will mention "NOT AVAILABLE" but you will get the actual status directly on their site, and in particular a release date before which you must absolutely follow one of the three possible outcomes:
- resolve the issue with DNSBelgium and transfer the domain to Infomaniak,
- resolve the issue with DNSBelgium and transfer the domain to another registrar (or to Infomaniak if the problem occurred with another registrar),
- ignore the problem and wait for this release date to try to re-register the domain (not recommended).
In the first two outcomes, you will need to obtain from DNSBelgium the end of quarantine as well as the authorization code. The operation of (re)registering the domain with Infomaniak is paid (around a hundred €/CHF) so it is important to keep the information up to date as the T&Cs specify.
Verification required
If you encounter this type of errors in the WHOIS, on your site, or via an e-mail report:
Verification required for domain.beThis site can't be reached Check if there is a typo in domain.be. DNS_PROBE_FINISHED_NXDOMAINWe only activate this domain name once the contact details of the domain name holder have been validated
... check and update your domain name information so that it works again.
Link to this FAQ:
Has this FAQ been helpful?
This guide details the procedure to modify the WHOIS details of the domain name holder, which you can apply to an entire batch of domains in your Organization with Infomaniak.
Change details in bulk
To modify the WHOIS details of multiple domain names at once:
- Click here to access the management of your domain on the Infomaniak Manager (need help?).
- Select the domains whose owner needs to be modified using the checkboxes.
- Click on Change owner at the bottom of the table:
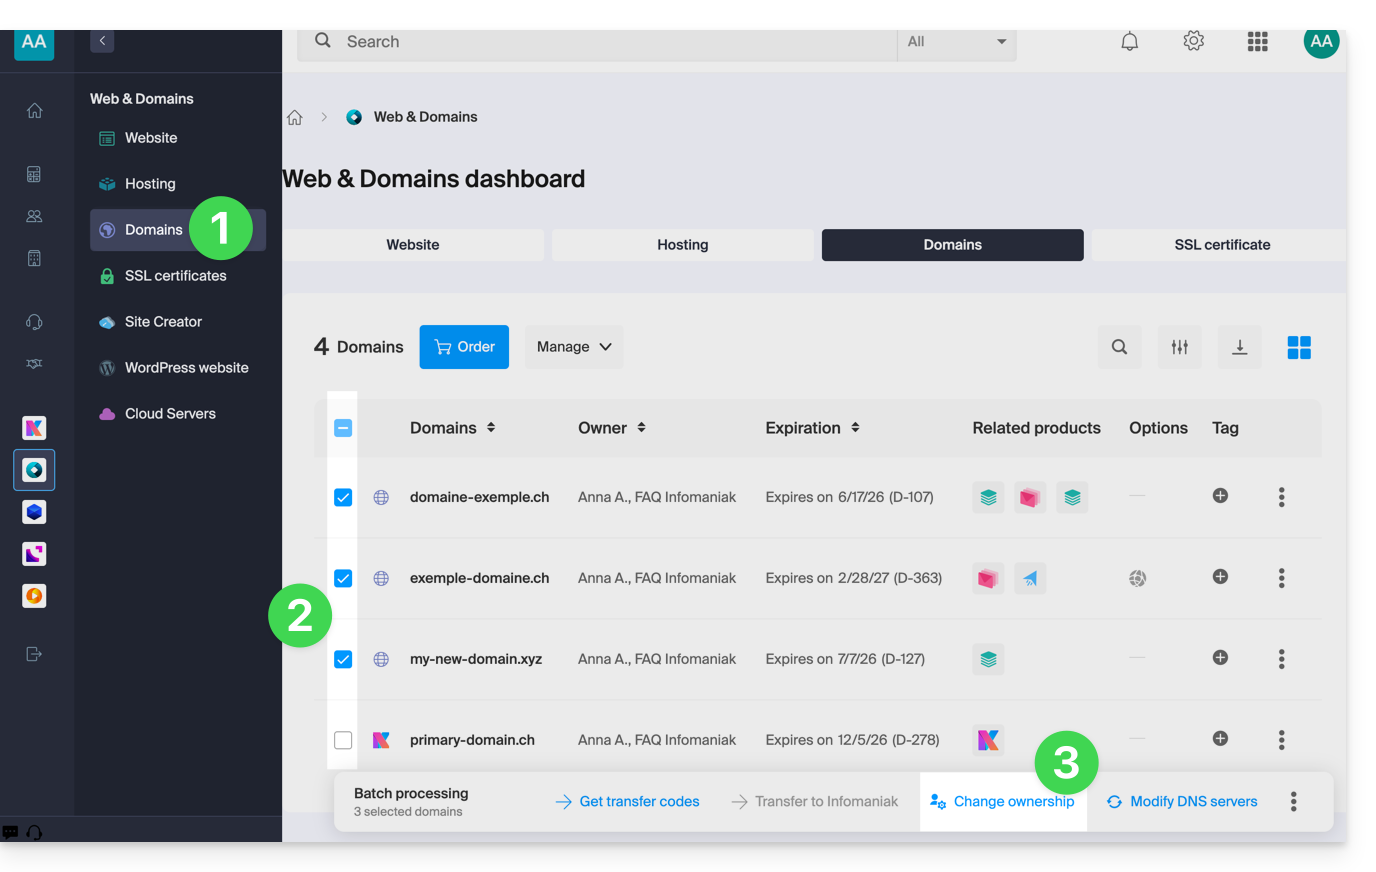
- Choose an existing contact card…
- … or click on the Add button to create an entirely new contact card.
- Check your selection as well as any potential modification fees in the box:
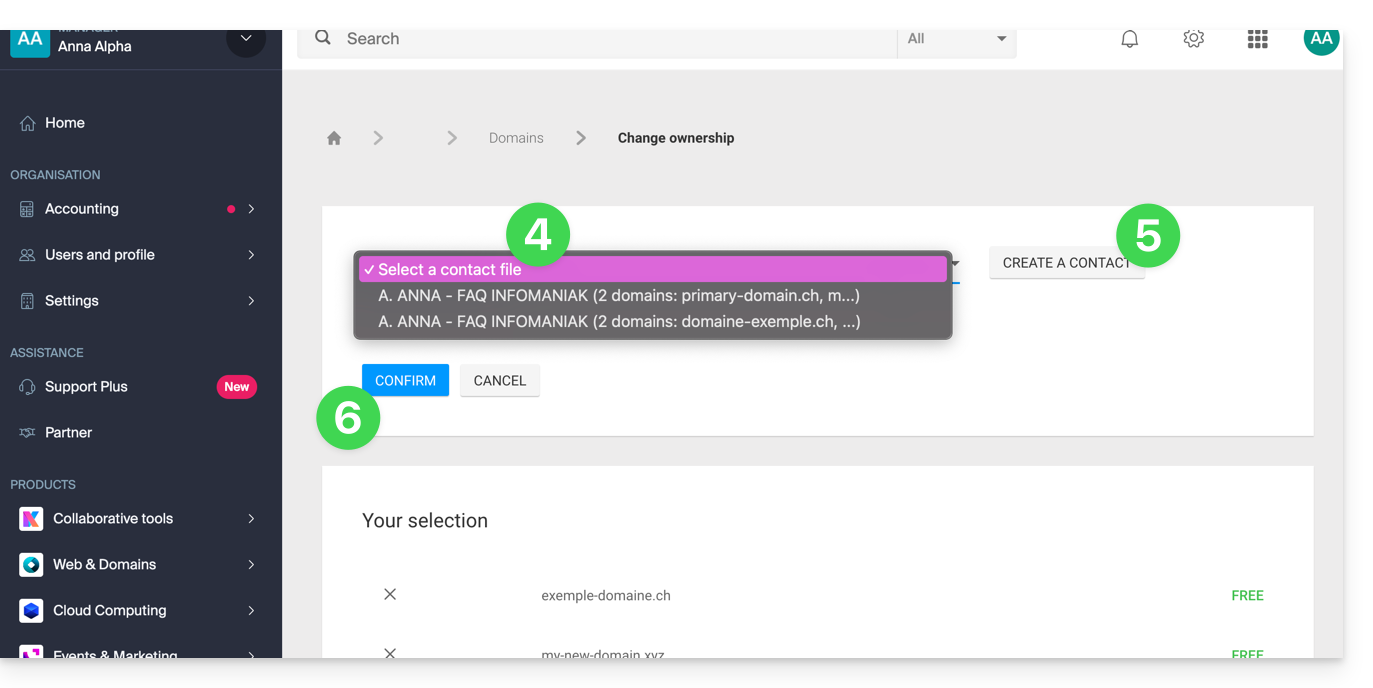
- Click on Confirm.
Link to this FAQ:
Has this FAQ been helpful?
This guide explains how to configure a dynamic DNS record (Dynamic DNS, DDNS) for a domain name whose DNS zone is managed by Infomaniak. This free alternative to Dyn and DynHost is very useful if you want to access devices connected to the Internet from outside, devices that have a dynamic IP address (e.g., a NAS, a surveillance camera, an Internet/home automation router/box, etc.).
Prerequisites
- The DNS zone of the domain name must be managed by Infomaniak.
- If necessary, transfer your domains to Infomaniak.
- Your device or application must support dynamic DNS records.
Specific guides
The following guides explain how to link a domain name with:
- … a Synology NAS
- … a Qnap NAS
- … Zyxel / Sunrise Internet Box / TP-Link solutions
- … a UniFI device
- … a Swisscom Internet Box
- … Fritzbox
- … Jeedom
- … Linux via ddclient
- … potentially anything using the API
Add a dynamic DNS
To create a dynamic DNS for your domain:
- Click here to access your domain management in the Infomaniak Manager (need help?).
- Click directly on the name of the domain in question.
- Click on Dynamic DNS in the left-hand menu.
- Click on the blue Add a Dynamic DNS button.
- Enter the required information:
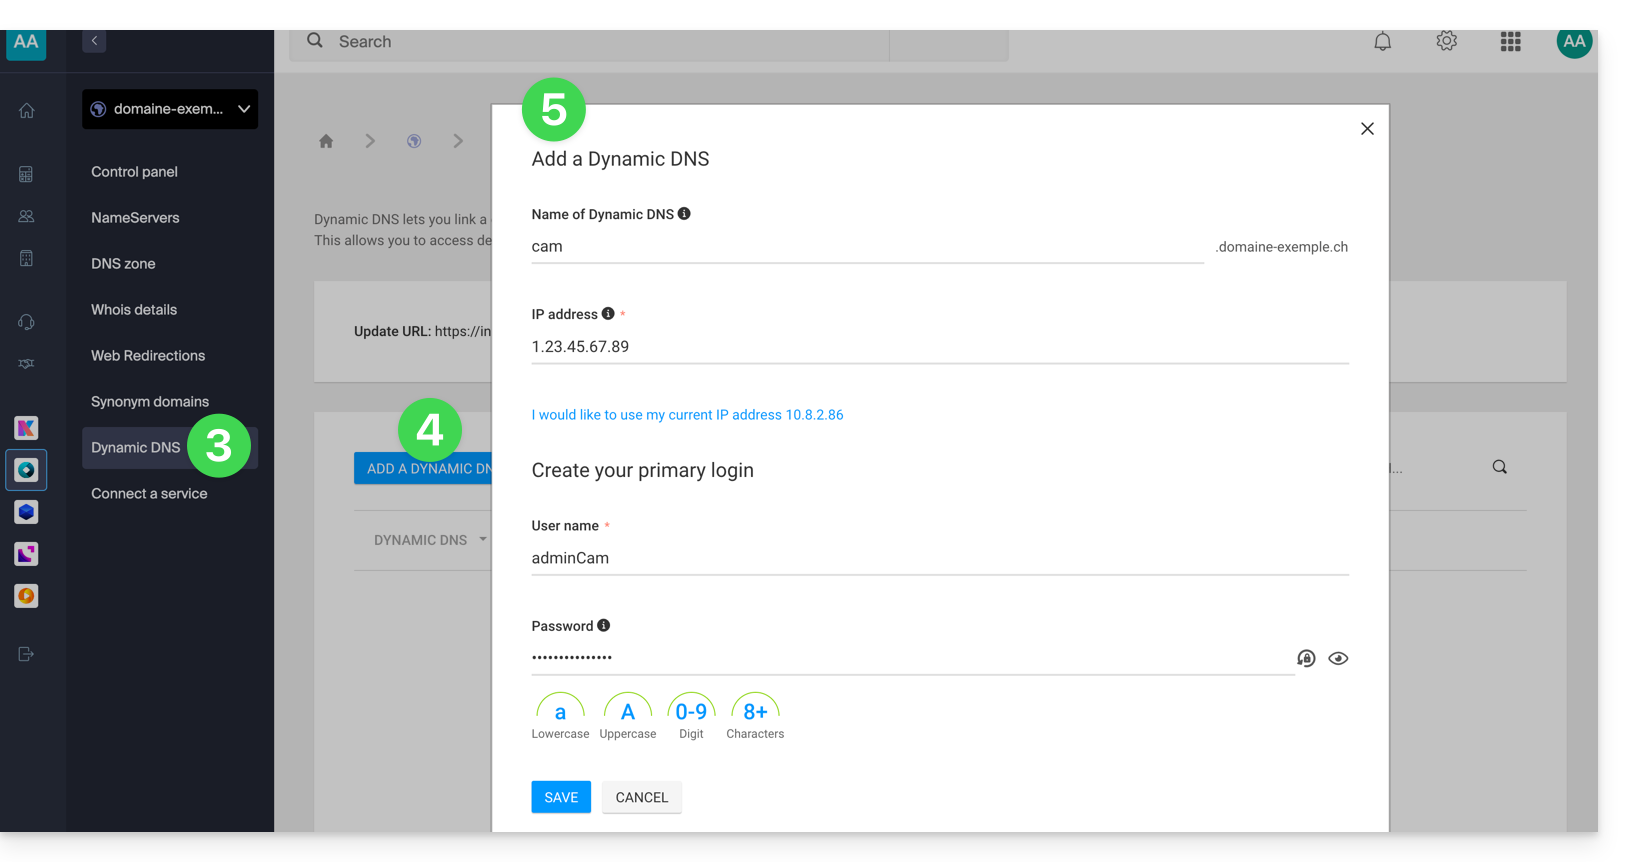
- Choose the desired subdomain or leave the Dynamic DNS Name field blank to use the main domain.
- Enter an IP address; this will then be dynamically updated by your device/app.
- Define an ID / password pair (uppercase, lowercase + numbers, no special characters); this must be entered in the configuration of your device/app.
Link to this FAQ:
Has this FAQ been helpful?
This guide explains how to access a Synology NAS connected to the Internet with a dynamic IP address from Infomaniak via a domain name.
Prerequisites
- Have a Synology NAS connected to the Internet with a dynamic IP address.
- A Dynamic DNS must have been created on the domain in question.
Link a Synology NAS to a domain name
1. Add Infomaniak as a service provider
- Open the Synology NAS management interface (DSM).
- Go to the Control Panel.
- Click on External Access (under the Connectivity section).
- Click the Customize button (under the DDNS tab):
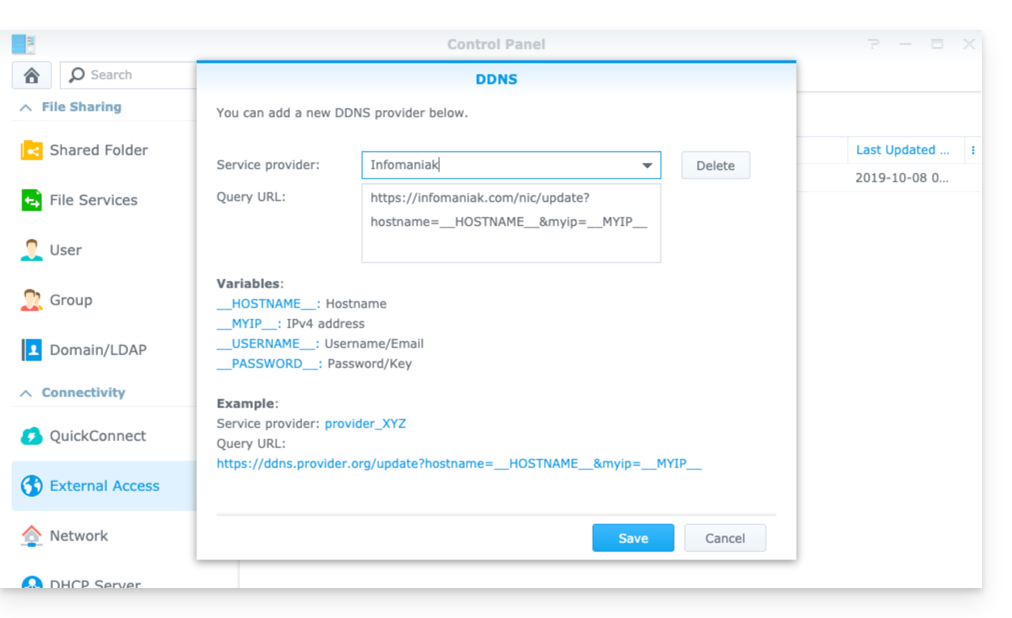
- Service provider:
Infomaniak - Query URL:
https://infomaniak.com/nic/update?hostname=__HOSTNAME__&myip=__MYIP__ - Click on Save.
2. Add the Dynamic DNS to Synology
Now that Infomaniak has been added as a service provider:
- Open the Synology NAS management interface (DSM).
- Go to the Control Panel.
- Click on External Access (under the Connectivity section).
- Click the Add button:
- Service provider:
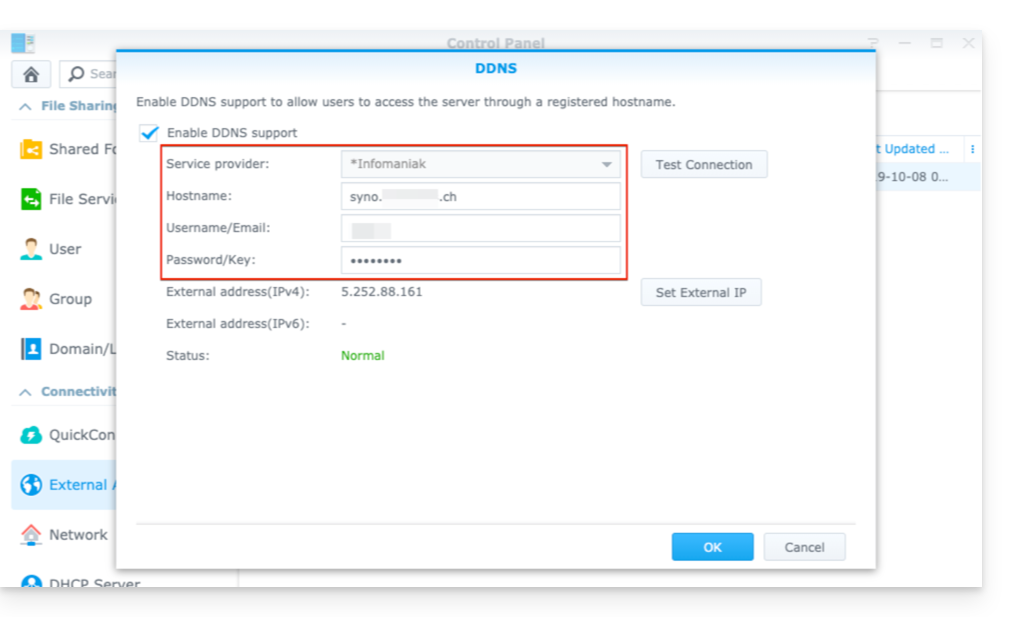
Infomaniak(the profile created in the previous step) - Hostname:
the URLconfigured in the Manager when adding the Dynamic DNS - Username:
the identifierdefined in the Manager when adding the Dynamic DNS - Password:
the passworddefined in the Manager when adding the Dynamic DNS
From this stage on, the dynamic IP address of your Synology NAS will be automatically synchronized with your domain name.
3. NAT configuration for Synology DDNS
To make your NAS accessible from the outside, you need to configure its NAT. By default, Synology NAS uses ports 5000 and 5001.
You can access your NAS using the following syntax: http://your-domain:5000 or https://your-domain:5001.
Refer to the official Synology documentation for more information.
4. Configuration of a “Reverse Proxy”
If you do not want to specify ports :5000 or :5001 in your URLs, you can configure a Reverse Proxy from your Synology NAS, and thus redirect the URLs to port 443 for port 5001 and port 80 for port 5000 (official Synology documentation for this configuration).
Link to this FAQ:
Has this FAQ been helpful?
This guide provides instructions for using the API to update your Infomaniak DynDNS (dynamic DNS) record.
Preamble
- Not specifying
myip(as per the examples below) will include the source IP of the request by default. - Make sure to connect an
IPv4or anIPv6depending on the type of record to update (AorAAAA). - It is recommended to not use special characters in the username and password.
Using the DynDNS API
Make a POST request (GET also allowed) to the following URL:
https://infomaniak.com/nic/update
The API requires the HTTPS protocol. Here is an example of a request:
https://username:password@infomaniak.com/nic/update?hostname=subdomain.yourdomain.com&myip=1.2.3.4This alternative request can also be used:
https://infomaniak.com/nic/update?hostname=subdomain.yourdomain.com&myip=1.2.3.4&username=XXX&password=XXXLink to this FAQ:
Has this FAQ been helpful?
This guide explains how to access a NAS Qnap connected to the Internet with a dynamic IP address via a domain name.
Prerequisites
- Have a NAS Qnap connected to the Internet with a dynamic IP address.
- A Dynamic DNS must have been created on the domain in question.
Link a NAS Qnap to a domain name
To do this:
- Open the NAS Qnap management interface.
- Go to Network & Virtual Switch:

- Click on Add under Access Services > DDNS:

- Enter the following information:

- DDNS Server: Custom
- Profile Name:
Infomaniak(or whatever you want) - Username: the identifier defined in the Manager when adding the Dynamic DNS
- Password: the password defined in the Manager when adding the Dynamic DNS
- Hostname: the URL configured in the Manager when adding the Dynamic DNS
- URL:
https://infomaniak.com/nic/update?hostname=%HOST%&myip=%IP%
- Click on Apply.
From this point on, the dynamic IP address of your NAS will be automatically synchronized with your domain name.
Link to this FAQ:
Has this FAQ been helpful?
This guide explains how to access a Sunrise Internet Box connected to the Internet with a dynamic IP via a domain name.
Prerequisites
- Have a Box that allows configuring a custom dynamic DNS provider.
- A Dynamic DNS must have been created on the domain in question.
Link a Sunrise Internet Box to a domain name
There are different models of Sunrise Internet Box. Here is an example:
- Log in to the Sunrise Box administration interface (
http://192.168.1.1for example). - Activate expert mode (button at the top right).
- Go to DynDNS (top left):

- Click on the DynDNS tab.
- Activate the Dynamic DNS client.
- Choose the provider “Custom”:

- Fill in the following fields:
- Username = the identifier defined in the Manager when adding the Dynamic DNS
- Password = the password defined in the Manager when adding the Dynamic DNS
- Hostname = the URL configured in the Manager when adding the Dynamic DNS
- Below, fill in the following fields:

- Server:
infomaniak.com - Port:
443 - Request (to copy-paste as is):
https://infomaniak.com/nic/update?hostname=[DOMAIN]&myip=[IP]&username=[USERNAME]&password=[PASSWORD] - Update interval (seconds):
300 - Retry interval (seconds):
30 - Max attempts:
3
- Server:
The interface may be presented in this form but the principle remains the same:
Other routers
It is the same principle for an Omada SDN solution from TP-Link; the Update-URL is https://infomaniak.com/nic/update?hostname=[DOMAIN]&myip=[IP]&username=[USERNAME]&password=[PASSWORD]:
And for other models (type Zyxel USG Flex or ax7501-B1 for example) fill in the fields using the data below:
- Enable DDNS Profile : enable
- DDNS Type :
User custom - HTTPS : enable
- Username : the identifier defined in the Manager Infomaniak when adding the Dynamic DNS (help)
- Password : the password defined in the Manager Infomaniak when adding the Dynamic DNS (help)
- Domain Name : host name with the domain
- Primary Binding Address > Interface : any
- Backup Binding Address > Interface : none
- DYNDNS Server : infomaniak.com
- URL (to copy-paste as is) : /nic/update?password=password(point 5 above)&username=username(point 4 above)&hostname=DomainName
- example
/nic/update?password=abcd1234&username=admin&hostname=abc.domain.xyz
- example
Link to this FAQ:
Has this FAQ been helpful?
This guide explains how to access a Fritzbox connected to the Internet with a dynamic IP via a domain name.
Prerequisites
- Have a Box that allows you to configure a custom dynamic DNS provider.
- A Dynamic DNS must have been created on the domain in question.
Link a Fritz!Box to a domain name
To do this:
- Open the Fritzbox management interface by activating the Advanced mode if necessary.
- Go to Internet then Access Authorization.
- Click on the Dynamic DNS tab:
- Choose the provider: “Custom”.
- Fill in the following fields:
- Update URL (as displayed below, or by replacing
ipaddrwithip6addrif you want Fritzbox to replace the "placeholder" with the IPv6 address instead of the IPv4):https://infomaniak.com/nic/update?system=dyndns&hostname=<domain>&myip=<ipaddr> - Domain name : the "URL" configured in the Manager when adding the Dynamic DNS
- Username : the "identifier" defined in the Manager when adding the Dynamic DNS
- Password : the "password" defined in the Manager when adding the Dynamic DNS
- Update URL (as displayed below, or by replacing
- Click on Apply to finish.
Link to this FAQ:
Has this FAQ been helpful?
This guide explains how to add or modify one or more TXT record entries in the DNS zone (of a domain name) managed on the Manager Infomaniak.
Preamble
- The
TXTrecord type allows you to insert readable text into the DNS zone of a domain name. - This is the method generally used to help prevent spam and to verify domain ownership (Google may ask you to do this before using some of their services: refer to this other guide for an example of adding a
TXTrecord to authenticate a domain).
Modify the DNS zone
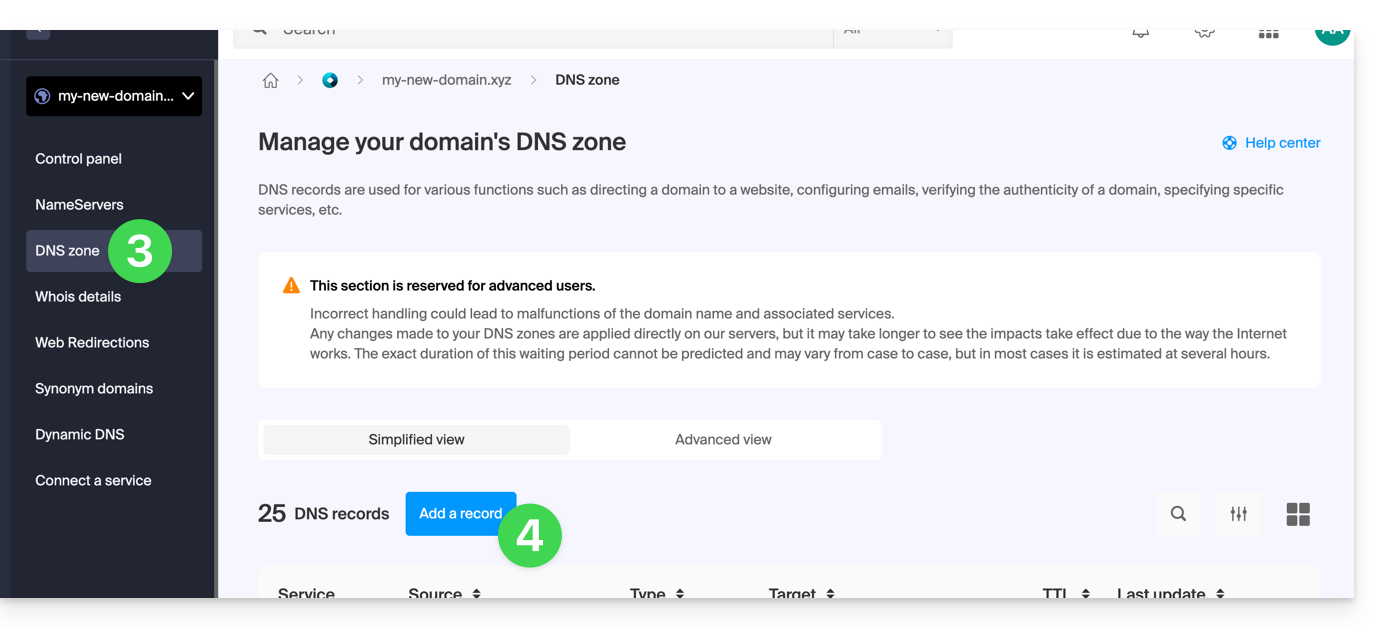
To manage this type of record in a DNS zone:
- Click here to access your domain management on the Infomaniak Manager (need help?).
- Click directly on the name assigned to the domain in question.
- Click on DNS zone in the left-hand menu.
- Click the button to add a record:
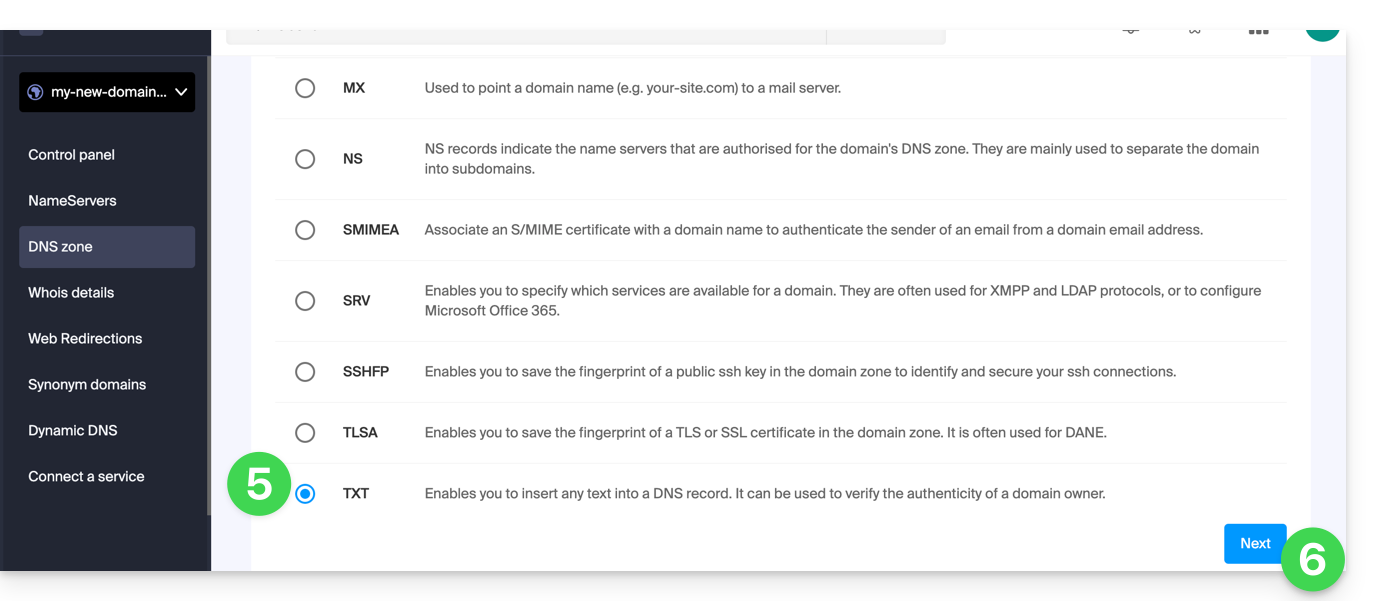
- Click on the radio button TXT to add a record.
- Click on the Next button:
- Enter the TXT values required for your DNS zone.
- Leave the default value for the TTL.
- Click on the Save button:

Link to this FAQ:
Has this FAQ been helpful?
This guide explains how to add an ANAME record in the DNS zone (of a domain name) managed on the Infomaniak Manager.
Preamble
- The
ANAMErecord type allows you to point the root of a domain to another address, similar to a CNAME record but without having to specify a source xyz preceding the domain (xyz.domain.com for example). - It is therefore not a real DNS record as such and it is not listed in the list of records that can be selected when editing the DNS zone.
- However, since it is a kind of alias, see below the method to follow to set up an
ANAME.
Create an ANAME
Creating an ANAME is equivalent to creating a CNAME directly at the root of the domain, and this is not possible.
If you are sure of what you are doing, you can follow this method to create the equivalent of an ANAME:
- Create a web redirection from the Manager of the domain root (root) to the www.
- Add a CNAME entry working with www to the target of your choice.
Link to this FAQ:
Has this FAQ been helpful?
This guide explains how to access via a domain name to Swisscom Internet Box connected to the Internet with a dynamic IP.
Prerequisites
- Have a Box that allows configuring a custom dynamic DNS provider.
- A Dynamic DNS must have been created on the domain in question.
Link Swisscom Internet Box to a domain name
To do this:
- Log in to the Swisscom Box administration interface (
http://192.168.1.1for example). - Activate the expert view (toggle button at the bottom left).
- Click on Network.
- Click on the DynDNS tab.
- Check the box to Enable DynDNS.
- Choose the provider
Infomaniakfrom the drop-down menu. - Fill in the following fields:
- Hostname: the URL configured in the Manager when adding the Dynamic DNS
- Username: the identifier defined in the Manager when adding the Dynamic DNS
- Password: the password defined in the Manager when adding the Dynamic DNS
If the box indicates that port redirection is not possible because you do not have a public IP address, contact Swisscom so that they disable the CGnat. Refer to this guide to learn more.
Link to this FAQ:
Has this FAQ been helpful?
This guide concerns domain names with the .es extension.
Change the owner of a .es domain
Once your owner change request has been made with Infomaniak, you will receive an email containing two codes necessary for the owner change with the registry https://www.red.es/es managing the domain names of the .es extension.
Log in to red.es
If you already have your credentials, log in directly at www.nic.es/sgnd/login.action.
Otherwise, here's how to get your credentials:
- Go to https://www.dominios.es/es and search for your domain name.
- Once your domain is selected, you will be redirected to the
Domain detailspage if the site is in English. - Retrieve your identifier (
Identifier) in theADMINISTRATIVE CONTACT PERSONsection. It is usually in the form1A4446A-ESNIC-F5. - Go to www.nic.es/sgnd/login.action and click on
Retrieve password. - Enter the identifier obtained to receive your password by email (the sending may take a few minutes).
- Then log in with your credentials.
Initiate the owner change
- Once logged in, select the
Domain Transfer Requestmenu. - Enter your domain name to display the current owner.
- In the
Identifierfield ofNew registrant, enter the owner code provided by Infomaniak. - In the
Identifierfield ofNew ACP(PCA in Spanish), enter the administrator code provided by Infomaniak. - Click on
Continue. - Add an identity verification document (passport or ID card) to validate the request with red.es.
Finalize the owner change
- The new administrator will receive an email from the registry to confirm the transfer.
- They must log in to the red.es interface with their credentials (administrator code received in the first email) before confirming the request.
- As before, they must add a document to verify their identity.
- In the
New registrant's conditions acceptanceform, enterKEY-SYSTEMSin theAccredited Registrarfield and do not change anything else to ensure the transfer goes smoothly. - A summary of the request will be displayed, confirming that the change of ownership has been completed.
Link to this FAQ:
Has this FAQ been helpful?