Knowledge base
1000 FAQs, 500 tutorials and instructional videos. Here, there are only solutions!
Infomaniak offers you the possibility of replacing Skype with its own solutions, whether for individual calls, remote meetings, or group discussions.
kMeet, the video conferencing solution for individuals & businesses
Despite its initial success, the Skype communication platform has seen its usage decline with the emergence of solutions that are better integrated into new collaborative practices.
One of the easiest ways to replace Skype is to adopt kMeet:
- Unlimited audio and video calls
- Access without registration (❓: help)
- Web, mobile, and desktop compatibility (❓: help)
- Integrated chat (❓: help) & reactions (emoticons, sounds)
- Screen sharing (❓: help) with drawing tools (❓: help), remote control (❓: help)
- Sub-committee rooms (❓: help) breakout rooms…
- Integration with the calendar, creation of a video call link (❓: help)
- Integration with kDrive for storing meeting recordings (❓: help)
- Integration with kChat for video calls (❓: help)
- Respect for privacy (❓: help): no advertising, hosting in Switzerland
- Security with AES-256 encryption (❓: help)
- Eco-friendly (❓: help) renewable energy, CO₂ compensation
Replace Skype with kMeet
The kMeet alternative to replace Skype can be implemented in several ways:
To start a private conversation between several people on the Internet, simply have one of them go to kMeet and then share the meeting link with the others. Here is the step-by-step procedure:
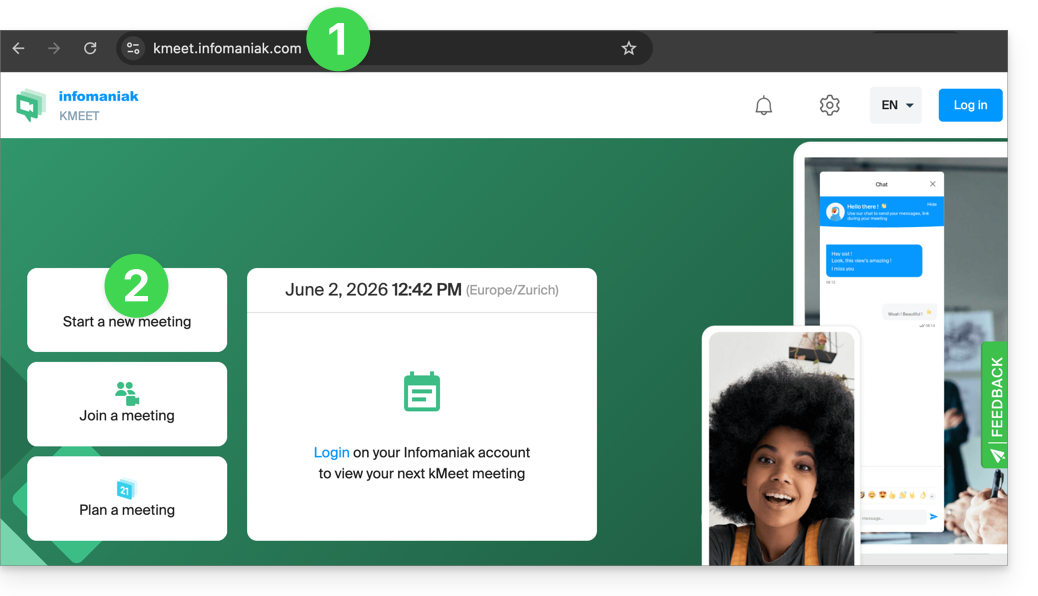
- Enter kmeet.infomaniak.com in a browser such as Brave, Chrome, Edge, Firefox, Opera, Safari….
- Start a meeting (❓: help):
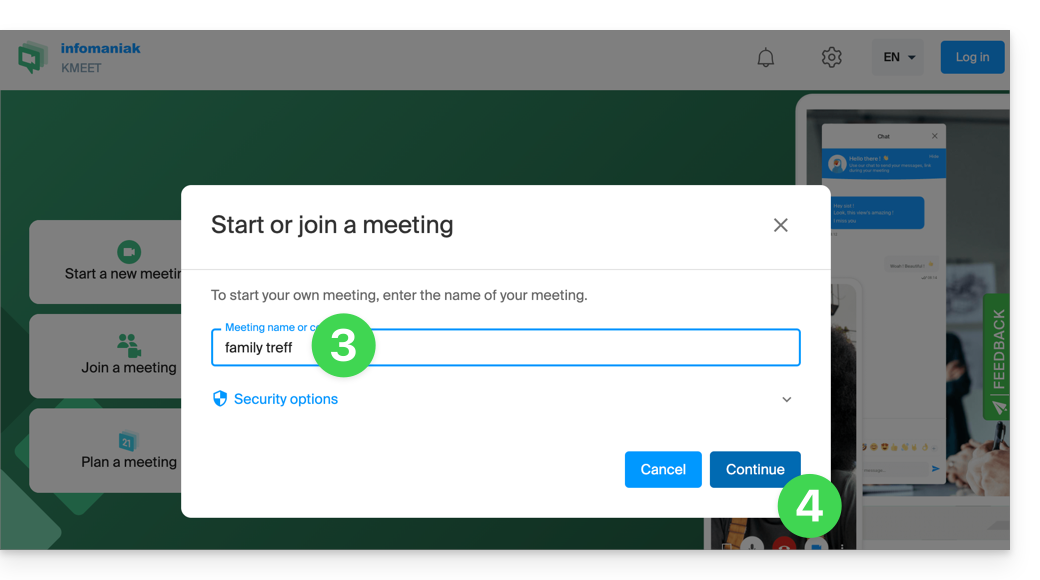
- Enter a name for the meeting, which will indicate to future participants the subject of the discussion they are joining.
- Click the button to Continue:
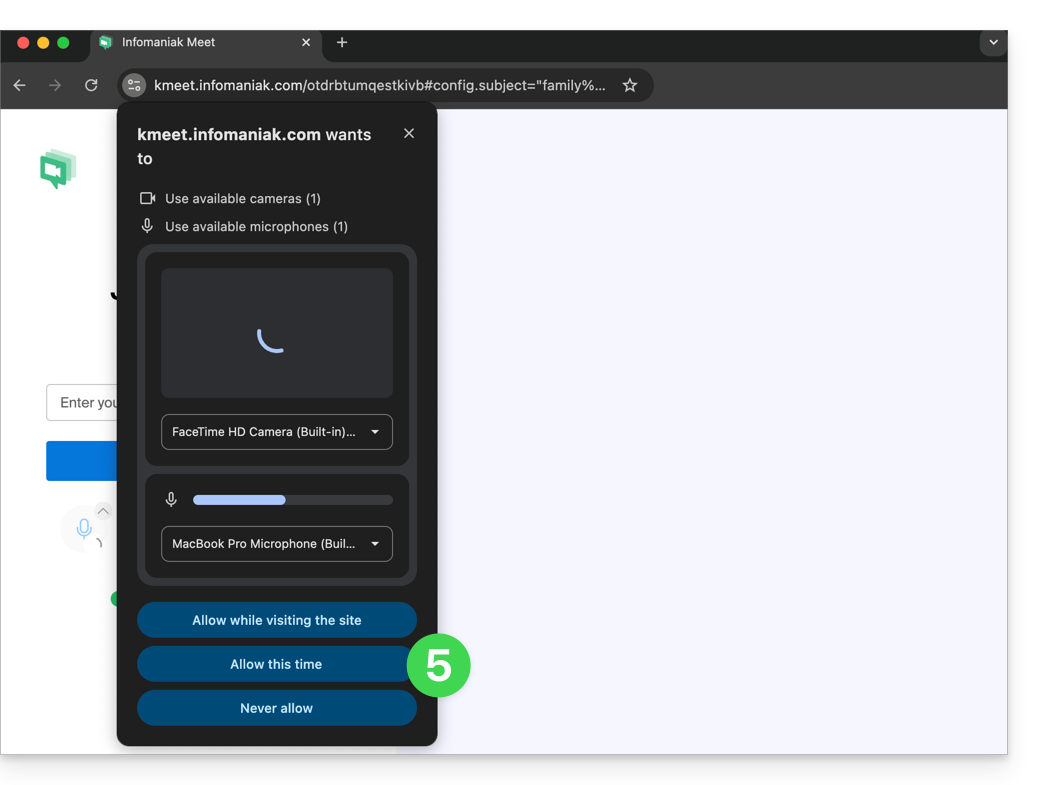
- Grant the necessary permissions to kMeet:
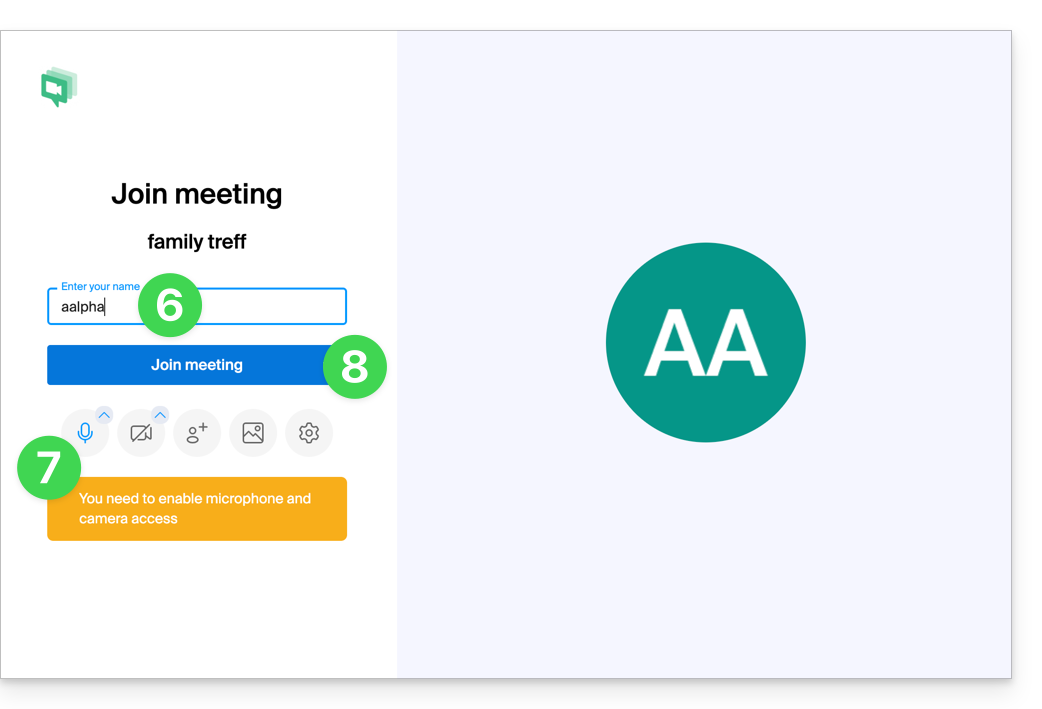
- Enter your name, which will be visible to other participants.
- Enable or disable any communication methods if they should not be used at this time.
- Click the button to join the virtual meeting room (as the first participant, since no one else has been invited yet):
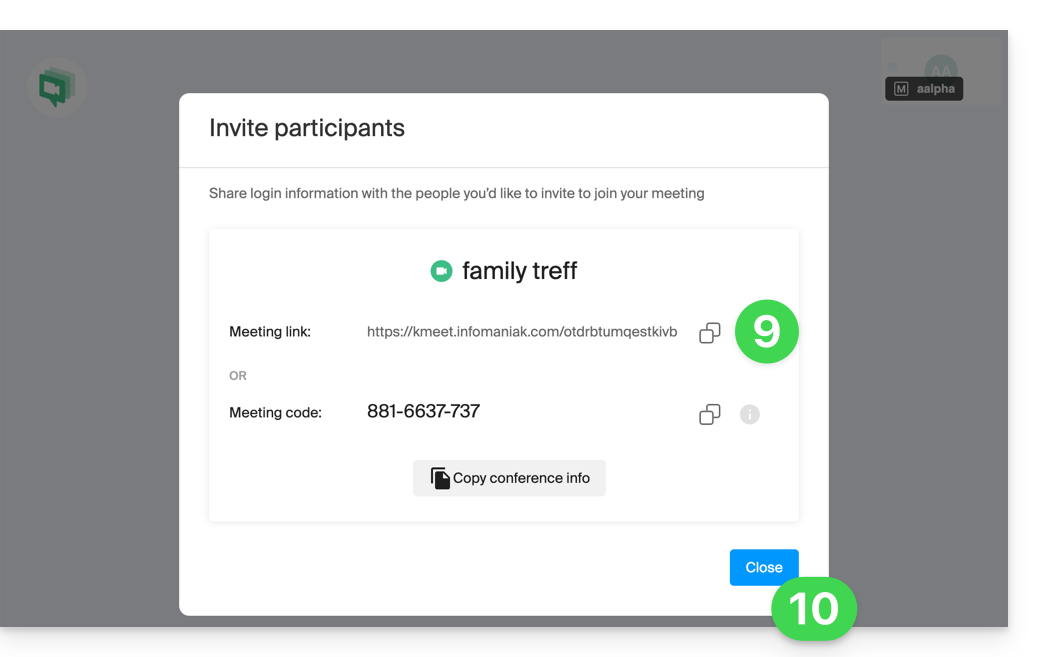
- Done, the room has been created and you can now copy the information about this session and send it to the contacts so they can join you (they will only need to click the link you send them).
- Close the information window so that you can all chat together:
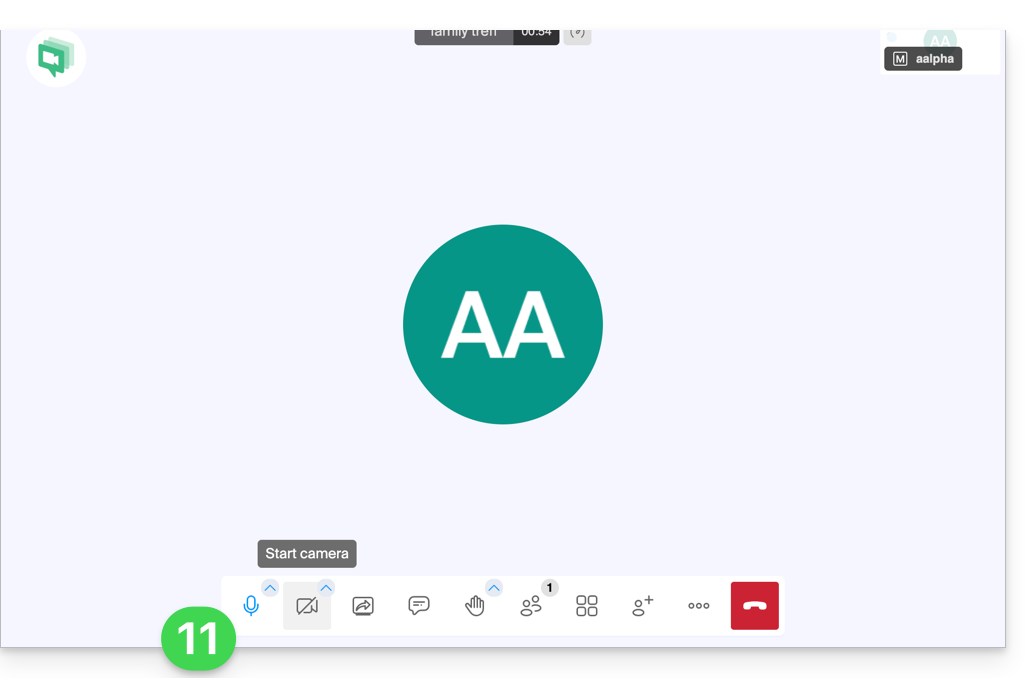
- The toolbar at the bottom of the screen allows you to enable or disable the microphone, camera, etc.:
To discover all the possibilities offered by kMeet, consult this other guide.
2. Scheduling and invitations with my kSuite
To work efficiently, kMeet can be directly linked to your professional calendar. This means that every time you create an event in your calendar…
- … a video conferencing link is automatically generated…
- … participants receive the invitation by email with all the information…
- … and on the day, they can join the meeting with one click, without registration or the need to install any software.
Benefit: you centralize meeting management, reduce forgotten appointments, and simplify organization, all from a single interface.
To implement this solution:
- Register for free to my kSuite (❓: help) to get a mail address, for example
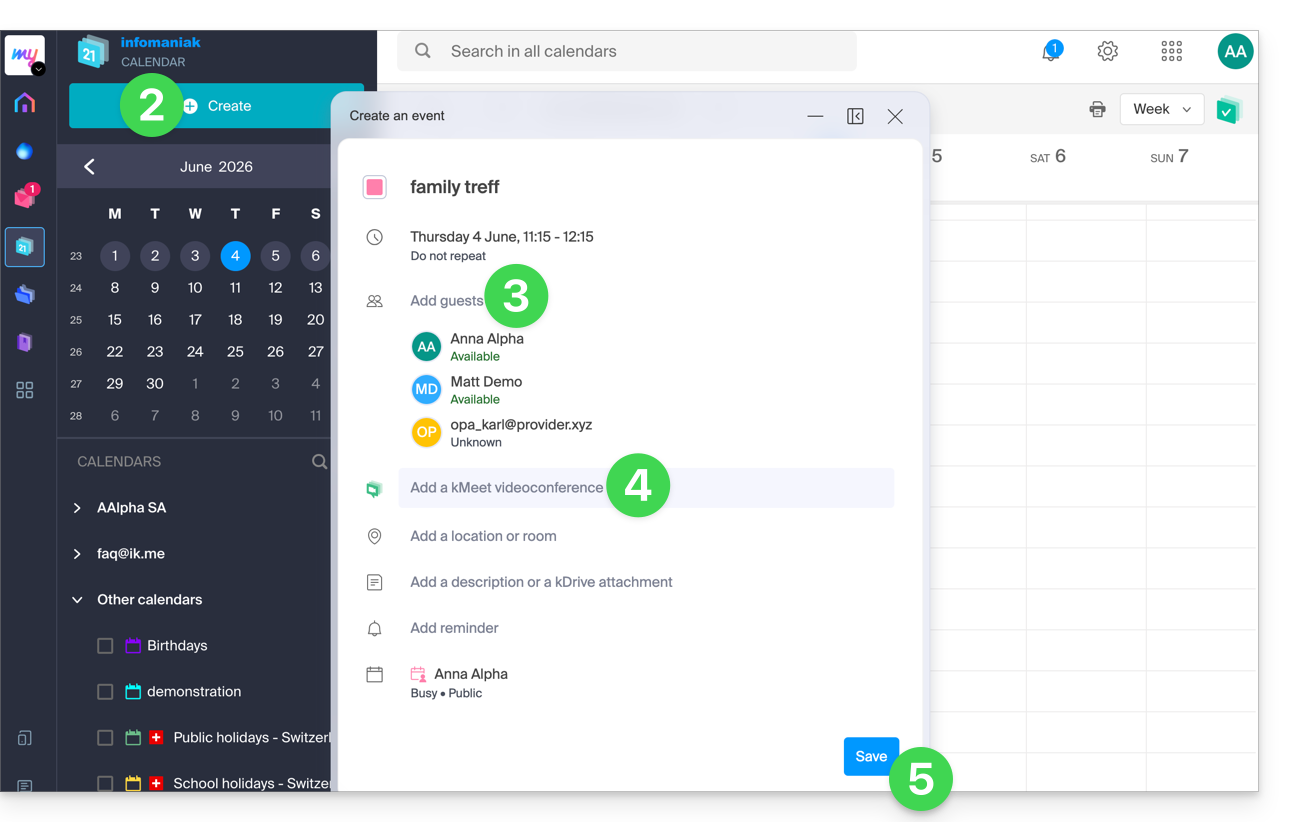
anna.alpha@ikmail.com, and, above all, access to Infomaniak services. - Log in to the calendar at ksuite.infomaniak.com/calendar, then create an event (❓: help) on the day of your choice.
- Add participants (❓: help) to the event, even if they are not Infomaniak customers.
- Click the green button to automatically generate a kMeet link that will be added to the event.
- Click the button to save your event:
- Answer YES to the prompt to send notifications to the guests.
- Invitations will then be automatically sent to participants via email, containing the clickable kMeet link that allows them to join the online discussion when the time comes:
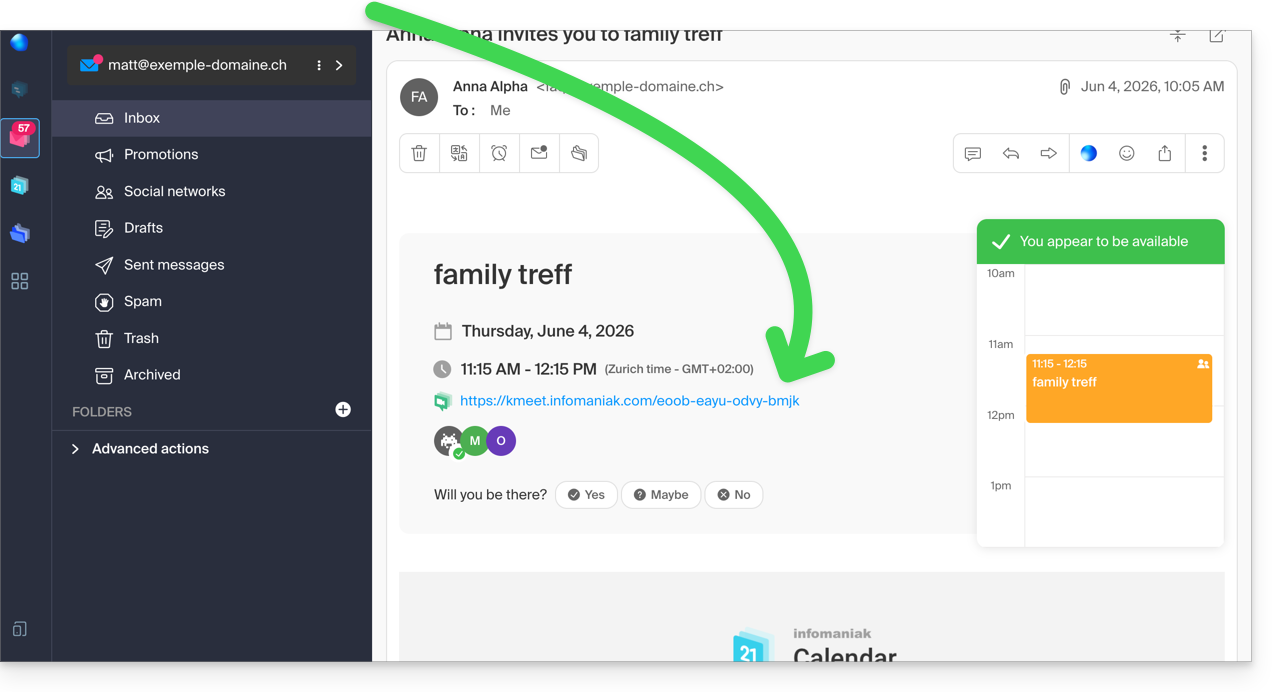
- The kMeet meeting link is also visible on the event in the calendar.
3. Call your contact the way you would with Skype
To start a conversation at any time with a contact that you have previously saved in your address book, both of you need to have kChat, which is available within the kSuite from Infomaniak. To set up this solution, which can also be extended to an entire group of contacts:
- Register for kSuite (❓: help) to gain access to the corresponding Infomaniak services.
- Configure users (❓: help) – these can even be external users (❓: help) – in kSuite.
- Install the kChat app (❓: help) or go to the URL https://ksuite.infomaniak.com/kchat
- A user can then be called via kChat, which will make the recipient's device ring:
- = browser if the kChat URL is open in it, or computer/mobile device if the kChat app is installed.
- See this other guide for more information on video conferencing calls on kChat.
- Your contact can then respond; the call will be made using kMeet technology within kChat or on the kMeet app if it is installed.
Link to this FAQ: https://faq.infomaniak.com/2890
Has this FAQ been helpful?
This guide addresses issues that may arise when using Infomaniak applications (such as kChat, kDrive, Infomaniak Authenticator, etc.) or tools (such as config.infomaniak.com, the Infomaniak Manager, etc.) with older / outdated / obsolete hardware (operating systems, browsers, devices, etc.).
Introduction
- For example, it will not be possible to comfortably access Infomaniak services with an iPhone 5s or 6 on iOS 12.
- It is therefore recommended to regularly update browsers and operating systems to benefit from the best possible experience with the Infomaniak infrastructure.
- Also, refer to this other guide, which focuses specifically on browsers such as Brave, Chrome, Edge, Firefox, Opera, Safari, and their components.
- Are you using the latest version of the Infomaniak app?
Update your OS, browser, etc.
Outdated systems or browsers can cause slowdowns, errors, or incorrect display. It is therefore best to use components that are regularly updated, as Infomaniak apps work optimally on updated systems and with recent hardware.
Example for kChat:
| kChat | Minimum requirement |
|---|---|
| Web app (browser) | Chrome 134+, Firefox 128+, Safari 17.4+, Edge 134+ |
| Mobile app (iOS) | iOS 15.1+ (iPhone 6s or later) |
| Mobile app (Android) | Android 7.0+ with updated Chrome |
| Desktop app (macOS) | macOS 12 (Monterey) or later |
| Desktop app (Windows) | Windows 10 or later |
| Desktop app (Linux) | Ubuntu 22.04 LTS or an equivalent supported distribution |
If you encounter any issues with your browser, try updating it or installing an alternative:
- Google Chrome
https://www.google.com/chrome/
(The site automatically detects the operating system and offers the latest version) - Mozilla Firefox
https://www.mozilla.org/firefox/new/
(Download and update page for Windows, macOS, and Linux) - Microsoft Edge
https://www.microsoft.com/edge
(The link offers automatic update or download, depending on the system) - Safari (macOS only)
https://support.apple.com/fr-fr/HT204416
(Safari updates are delivered through macOS system updates) - Opera
https://www.opera.com/fr/download
(Allows you to download the latest version for your system) - Brave
https://brave.com/download/
(Download page with automatic operating system detection)
Technologies Used by Infomaniak
Many web tools developed by Infomaniak use Angular. The need for up-to-date or recent hardware to run applications is not specific to Angular itself, but rather a general requirement for running any modern web application. Here are some reasons why up-to-date hardware is often necessary:
- Angular relies on advanced features of modern browsers, which are often absent or poorly managed in older versions.
- Recent browsers optimize JavaScript execution and graphics rendering, which improves the fluidity of Angular applications.
- Updated versions fix known vulnerabilities, reducing the risk of compromise.
- Modern browsers are more compliant with the latest HTML, CSS, and JavaScript specifications, ensuring better compatibility.
- Modern APIs (camera, geolocation, notifications, etc.) are only accessible via recent browsers, which are essential for interactive experiences.
Link to this FAQ: https://faq.infomaniak.com/1025
Has this FAQ been helpful?
This guide explains how to use zones in the pricing menu (as part of the Infomaniak ticketing system).
Introduction
- Each event can contain one or more zones, each with its own pricing.
- This allows you to group prices within each zone and manage each zone independently:
- Each zone can contain prices, each with its own ticket quantity.
- Each zone can be assigned to the seating plan or not.
- Each zone and each price can have its own online visibility.

Access the pricing menu
To do this:
- Click here to access the management of your product in the Infomaniak Manager (need help?).
- Click directly on the name assigned to the ticketing system for the event.
- Click on Scheduling in the left-hand menu.
- Click on Events in the left-hand menu.
- Click on the event in question.
- Click on the Pricing tab.
- If the event has multiple dates, this section is replaced by “Dates”, which opens a calendar.
- Click on the date in the calendar to access the pricing…
- Enable zone management.This option will be automatically enabled if a floor plan is assigned to the event.:

This menu is also available when creating an event.
Adding a zone and a price, managing the settings for each zone
Here are the important buttons for managing your zones and rates:
Link to this FAQ: https://faq.infomaniak.com/2777
Has this FAQ been helpful?
This guide explains how to manage application passwords from the Infomaniak Manager.
Introduction
An application password is not an device password - it will not allow you to synchronize an email address.
- Application passwords allow you to establish an authenticated connection between certain tools and services, even if two-factor authentication (2FA) is enabled.
- To synchronize, for example, your Infomaniak account's contacts and calendars with a mobile device or email software/client, follow the steps in the guide below to generate a new password specific to this application.
- It is possible to generate multiple specific passwords (e.g. 1 for contacts and 1 for calendars) or to use the same password for synchronizing both services.
Create an application password
To do this:
- Click here to access the application password management section in the Infomaniak Manager.
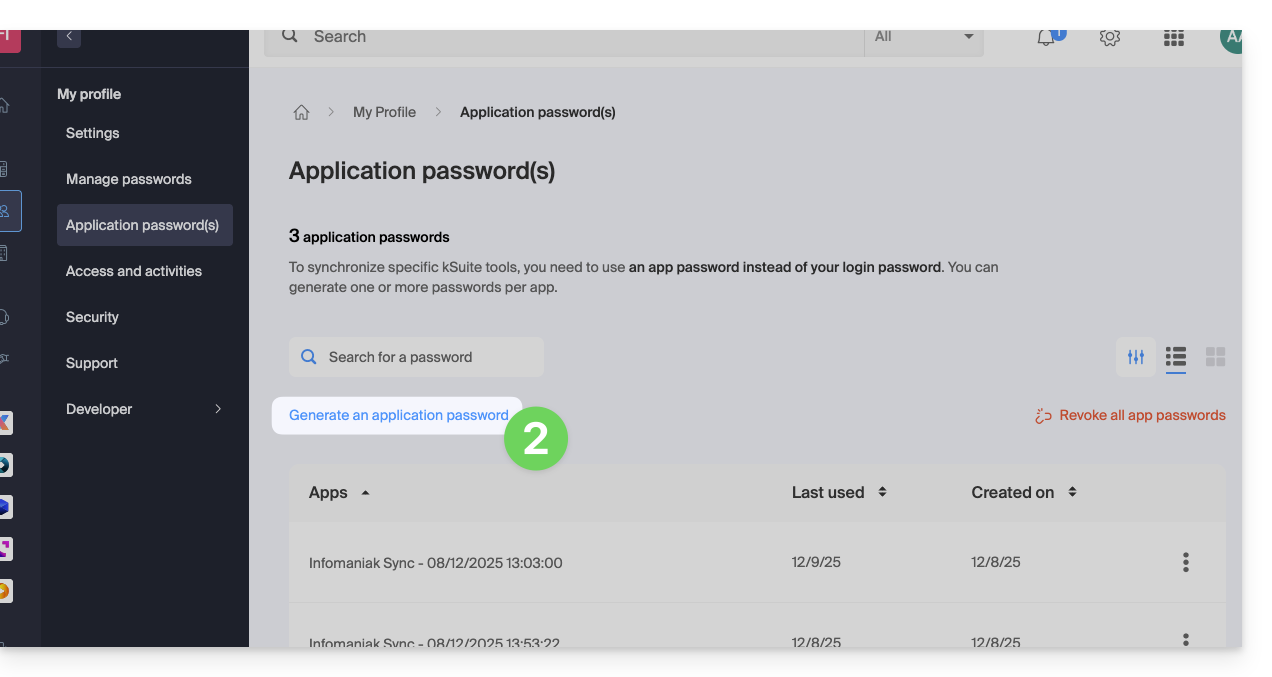
- Click on Generate an application password:
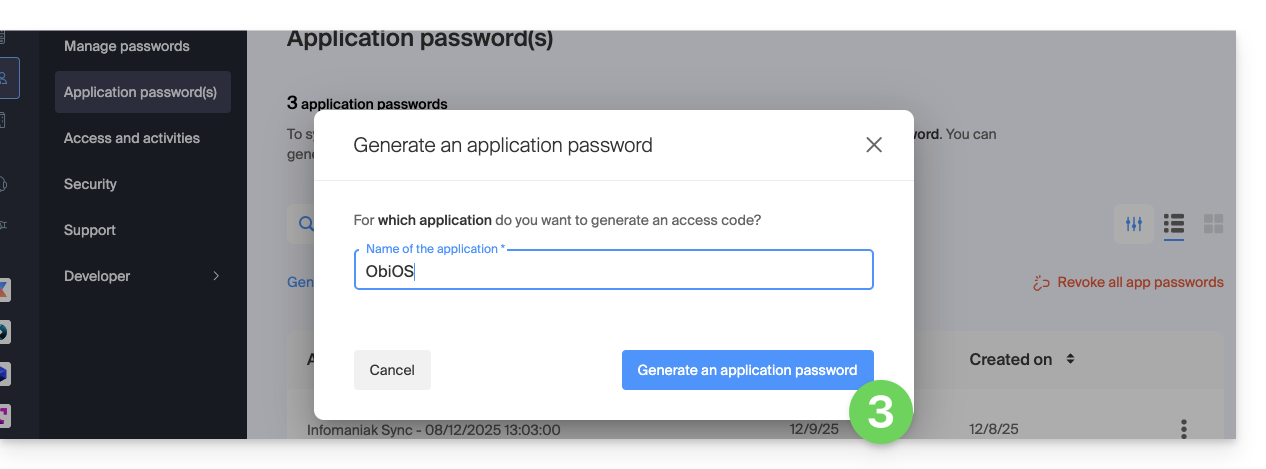
- Enter a name for the application password in the dialog box, then click on Generate an application password:
- Copy and save the generated application password in a safe but accessible location, it will no longer be accessible once the window is closed.
Revoke application passwords
In the same location, you can delete one or more application passwords when they are no longer needed:
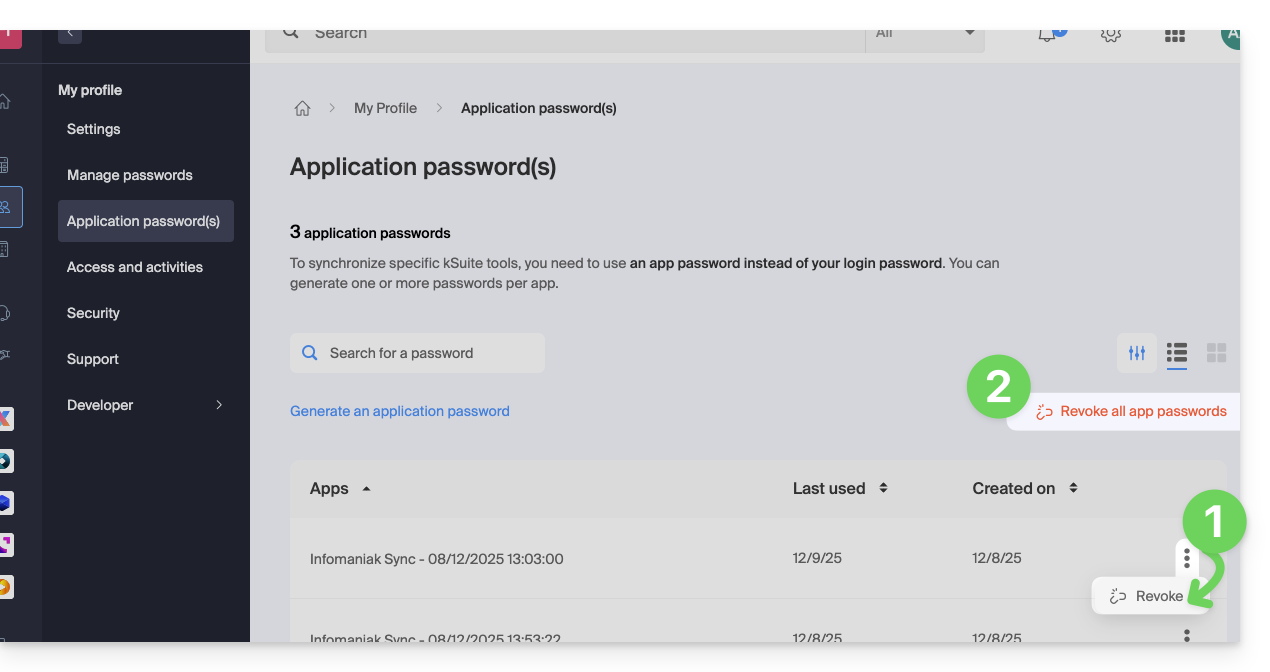
- Click on the action button ⋮ to the right of each password, then revoke them…
- or click on Revoke All at the top of the table:
Link to this FAQ: https://faq.infomaniak.com/2855
Has this FAQ been helpful?
This guide explains how to manually upload data (files, folders, etc.) from your computer to your kDrive without installing the kDrive Infomaniak application (application for iOS/Android smartphones or tablets, or desktop application for macOS/Windows/Linux).
Import to kDrive from the browser
To access kDrive:
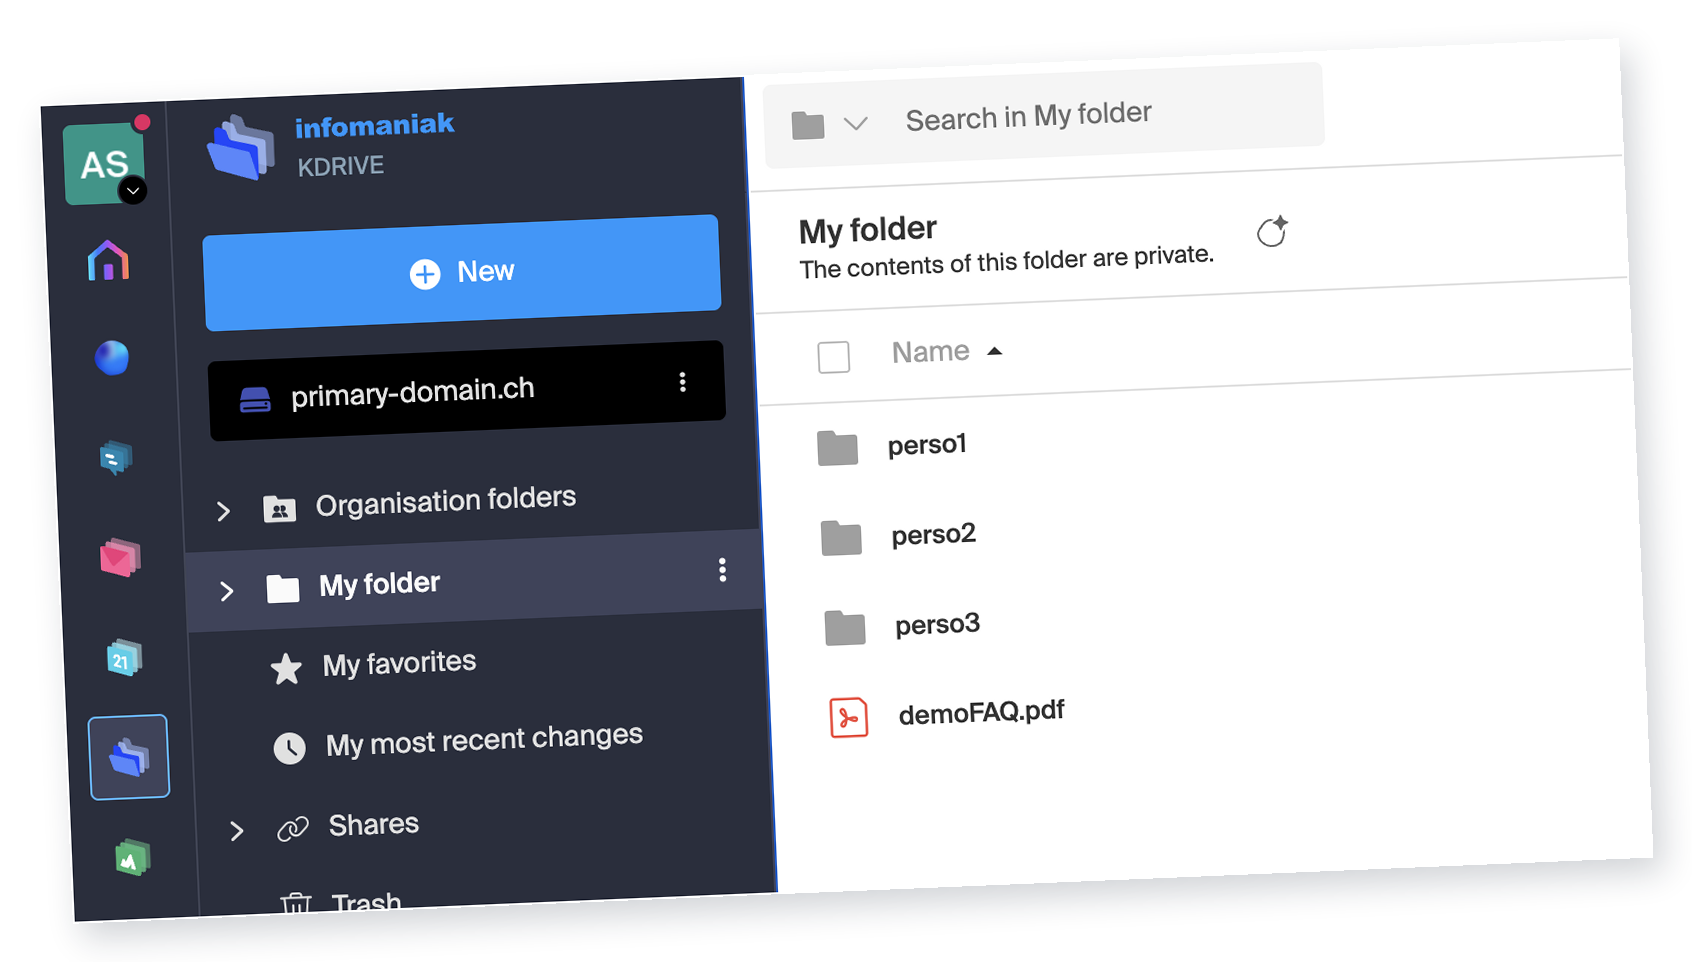
- Click here to access kDrive on your Infomaniak kSuite (❓: help).
- Check or select the kDrive in question from the dropdown menu in the left-hand sidebar.
Then choose one of the following:
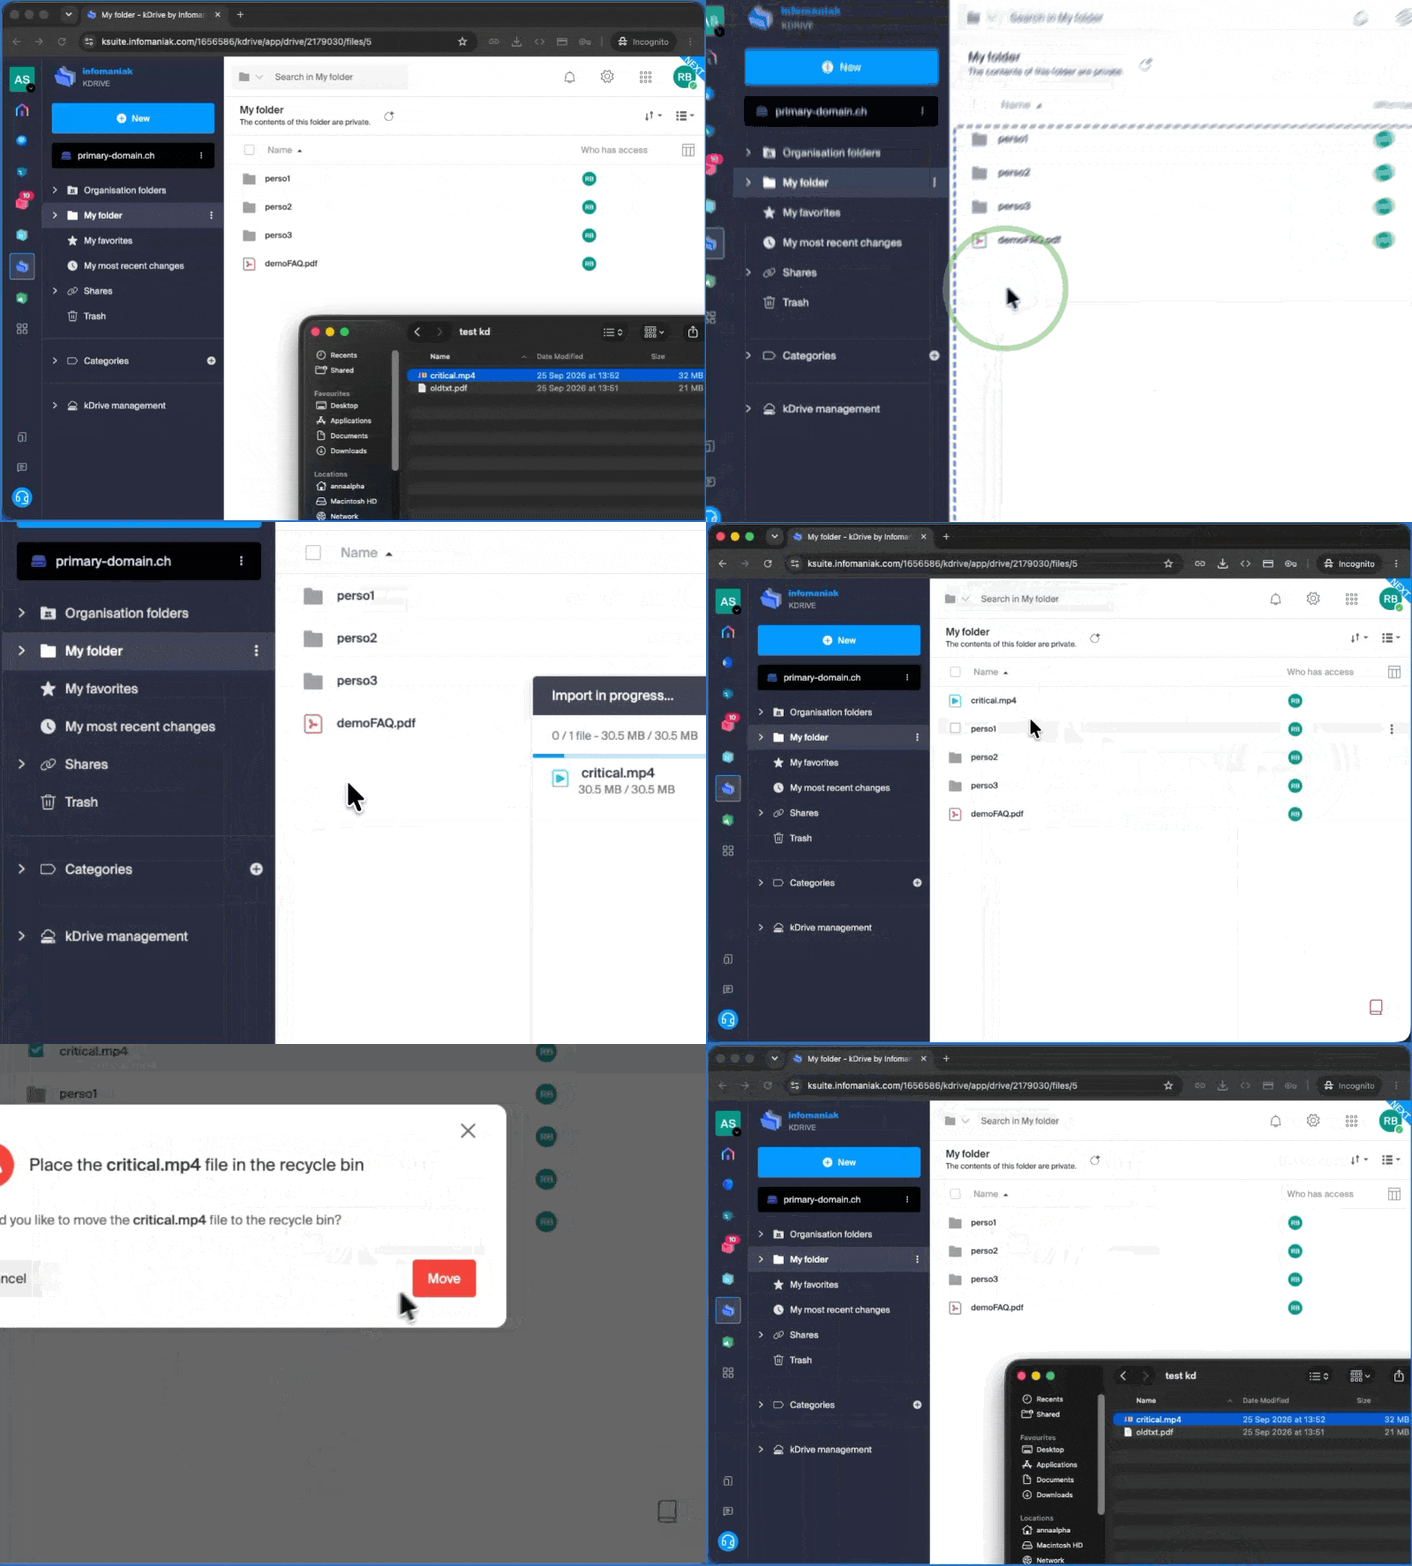
Drag & Drop
- Drag and drop the items you want to send to kDrive, from a window on your computer, to the browser window where the kDrive website is open:
“New” button
- Use the New button at the top left of your kDrive interface, then choose the desired import (either a file or a folder):
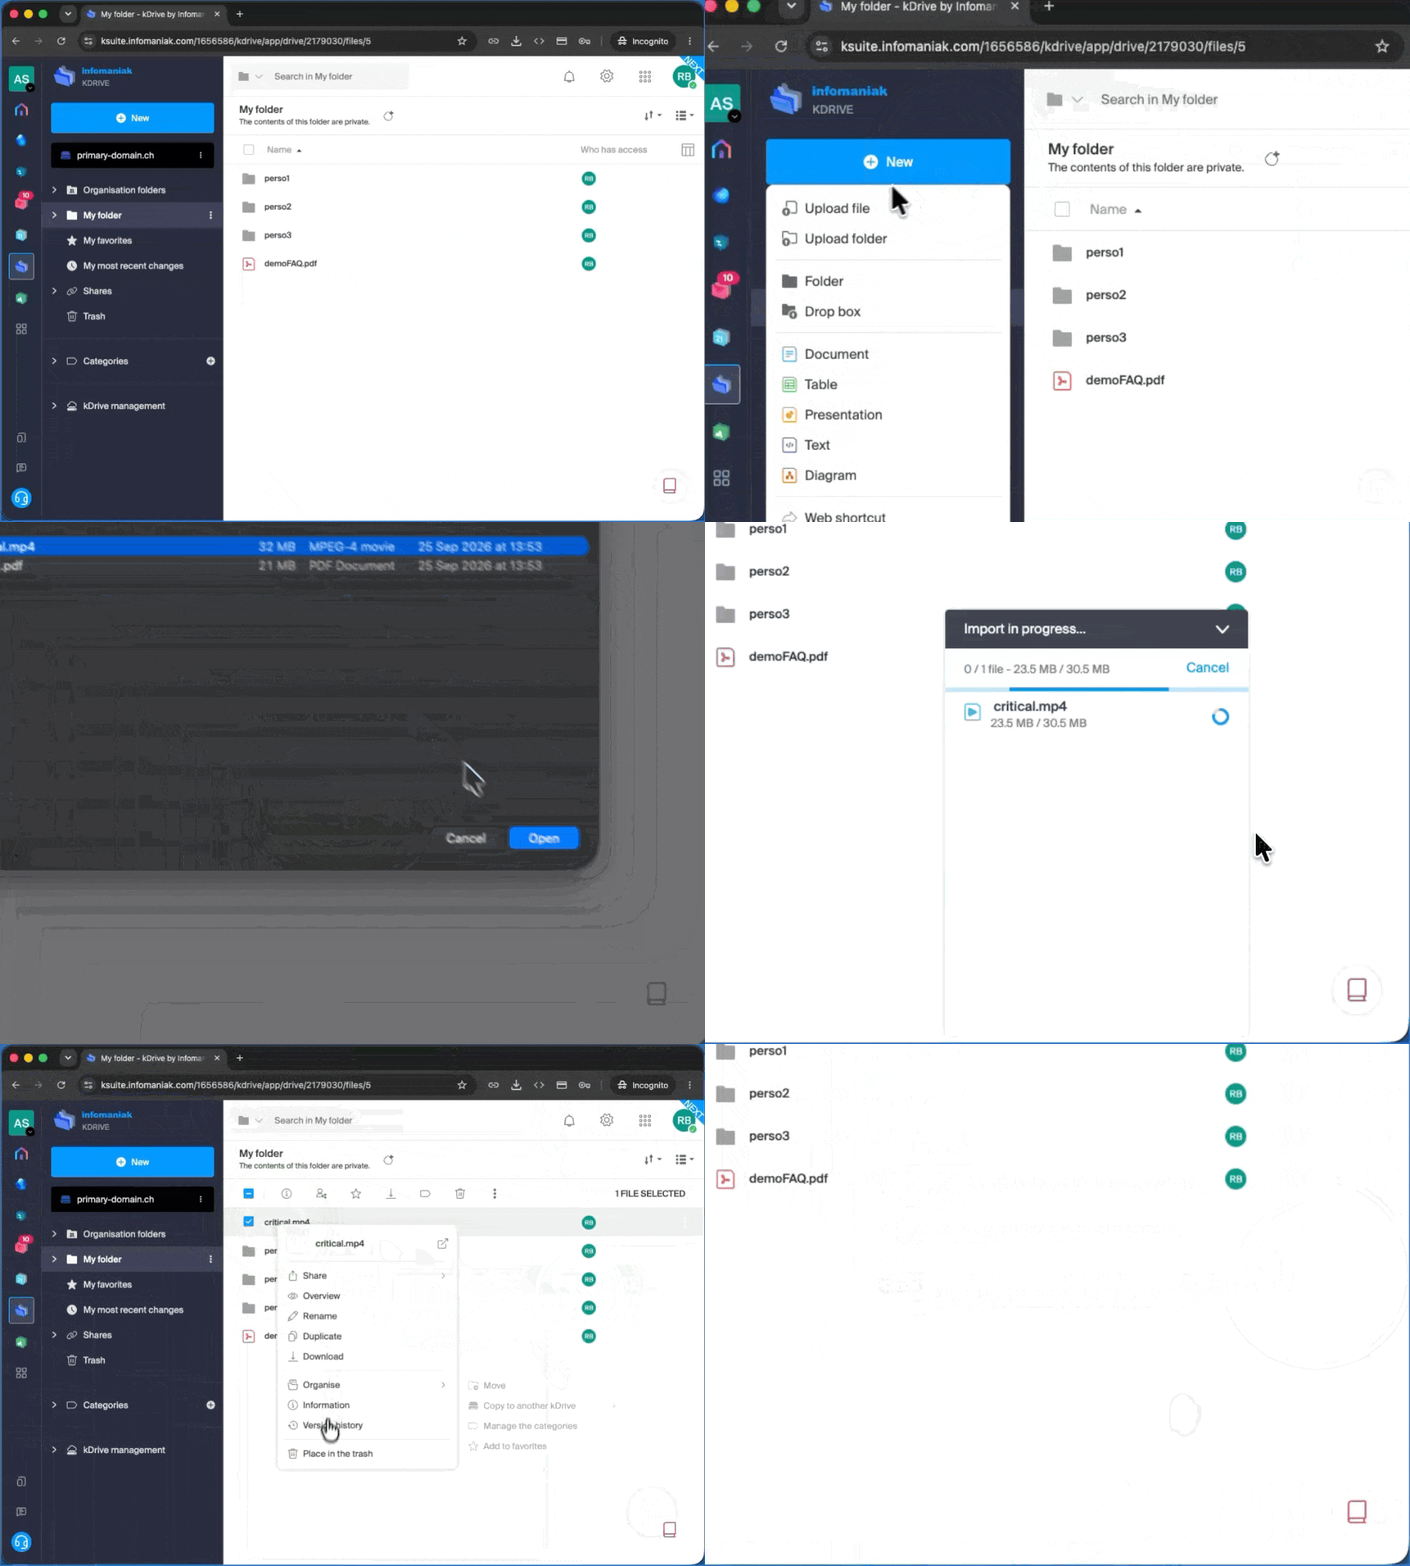
- The operating system (e.g., macOS) may ask for confirmation when a folder is being loaded.
Right-click
- Right-click where you want to import new content, then choose the desired import option (either a file or a folder):
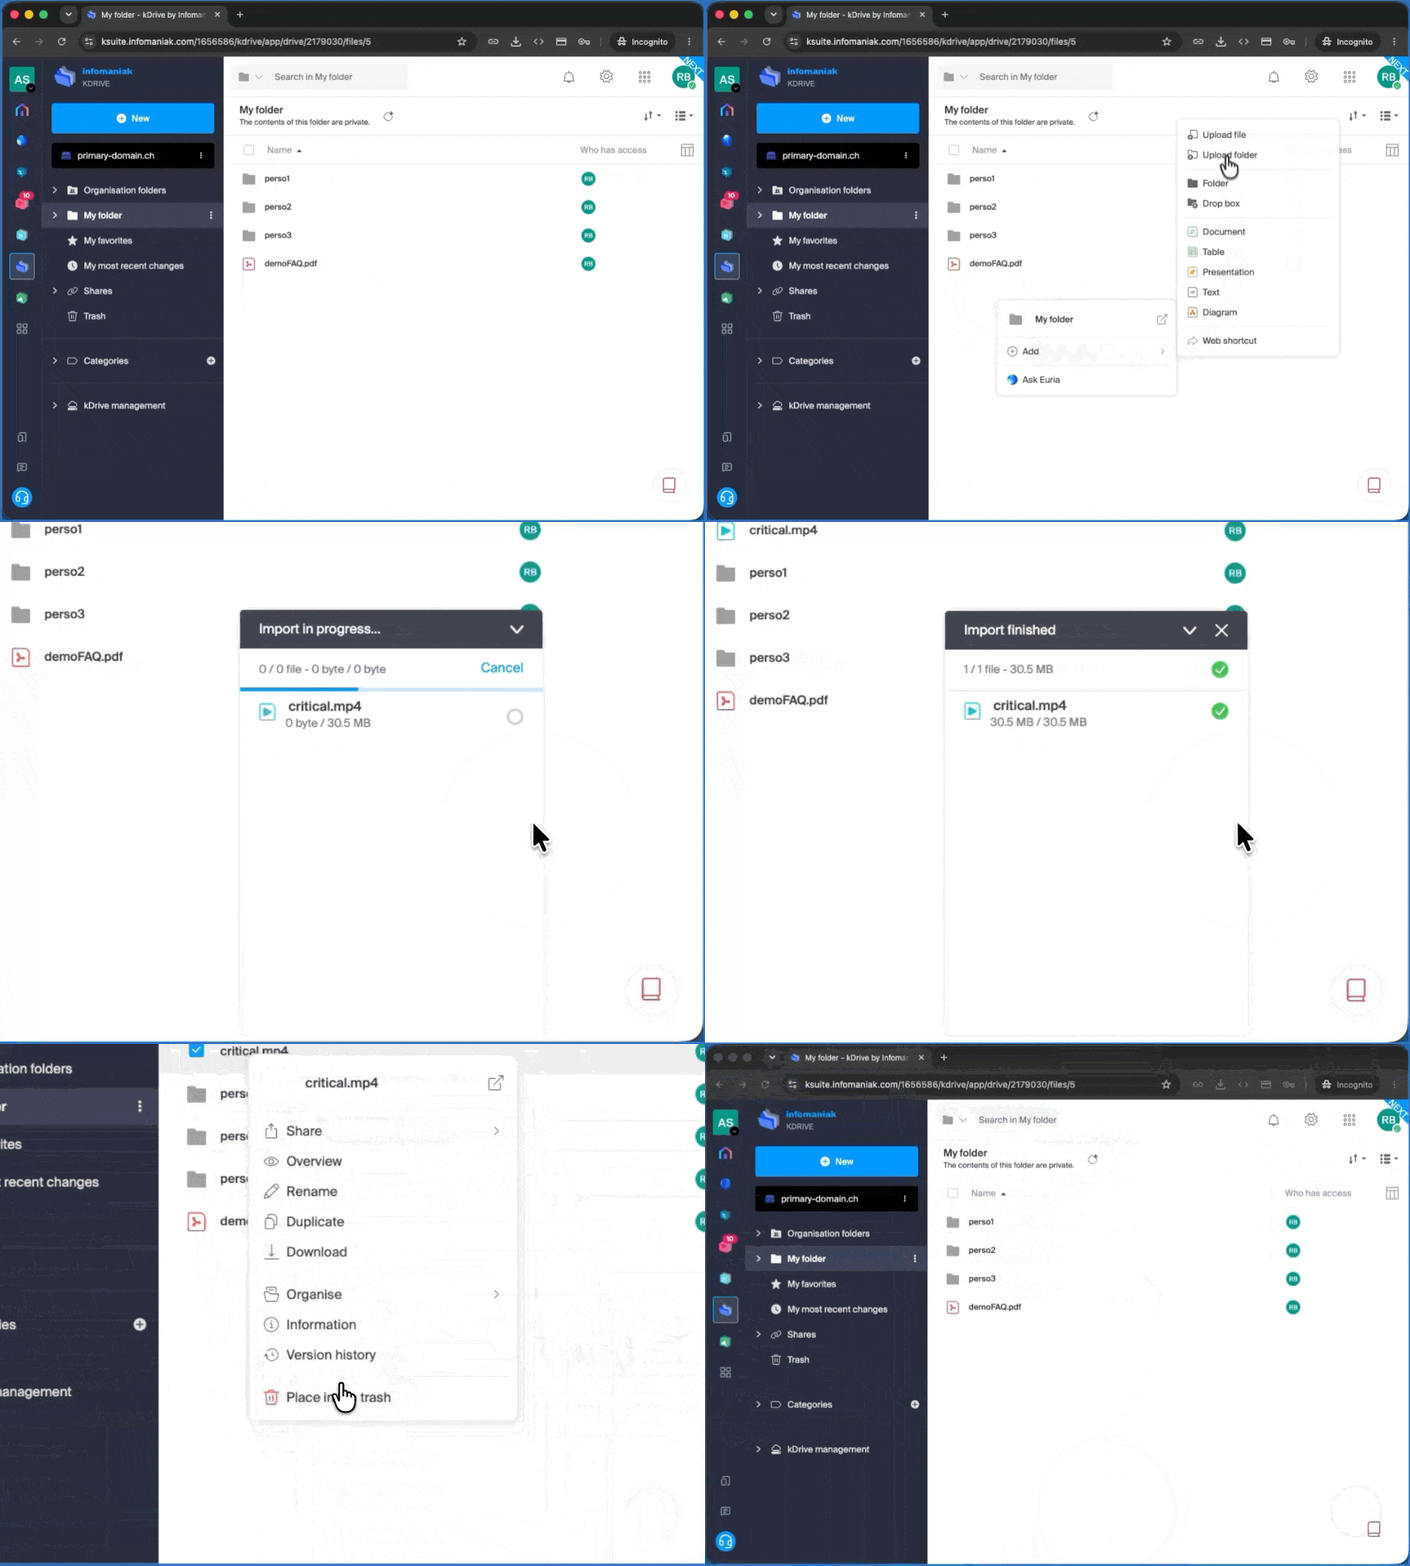
- The operating system (e.g., macOS) may ask for confirmation when uploading a folder.
Import external data
- Import specific content using the Import external data menu:
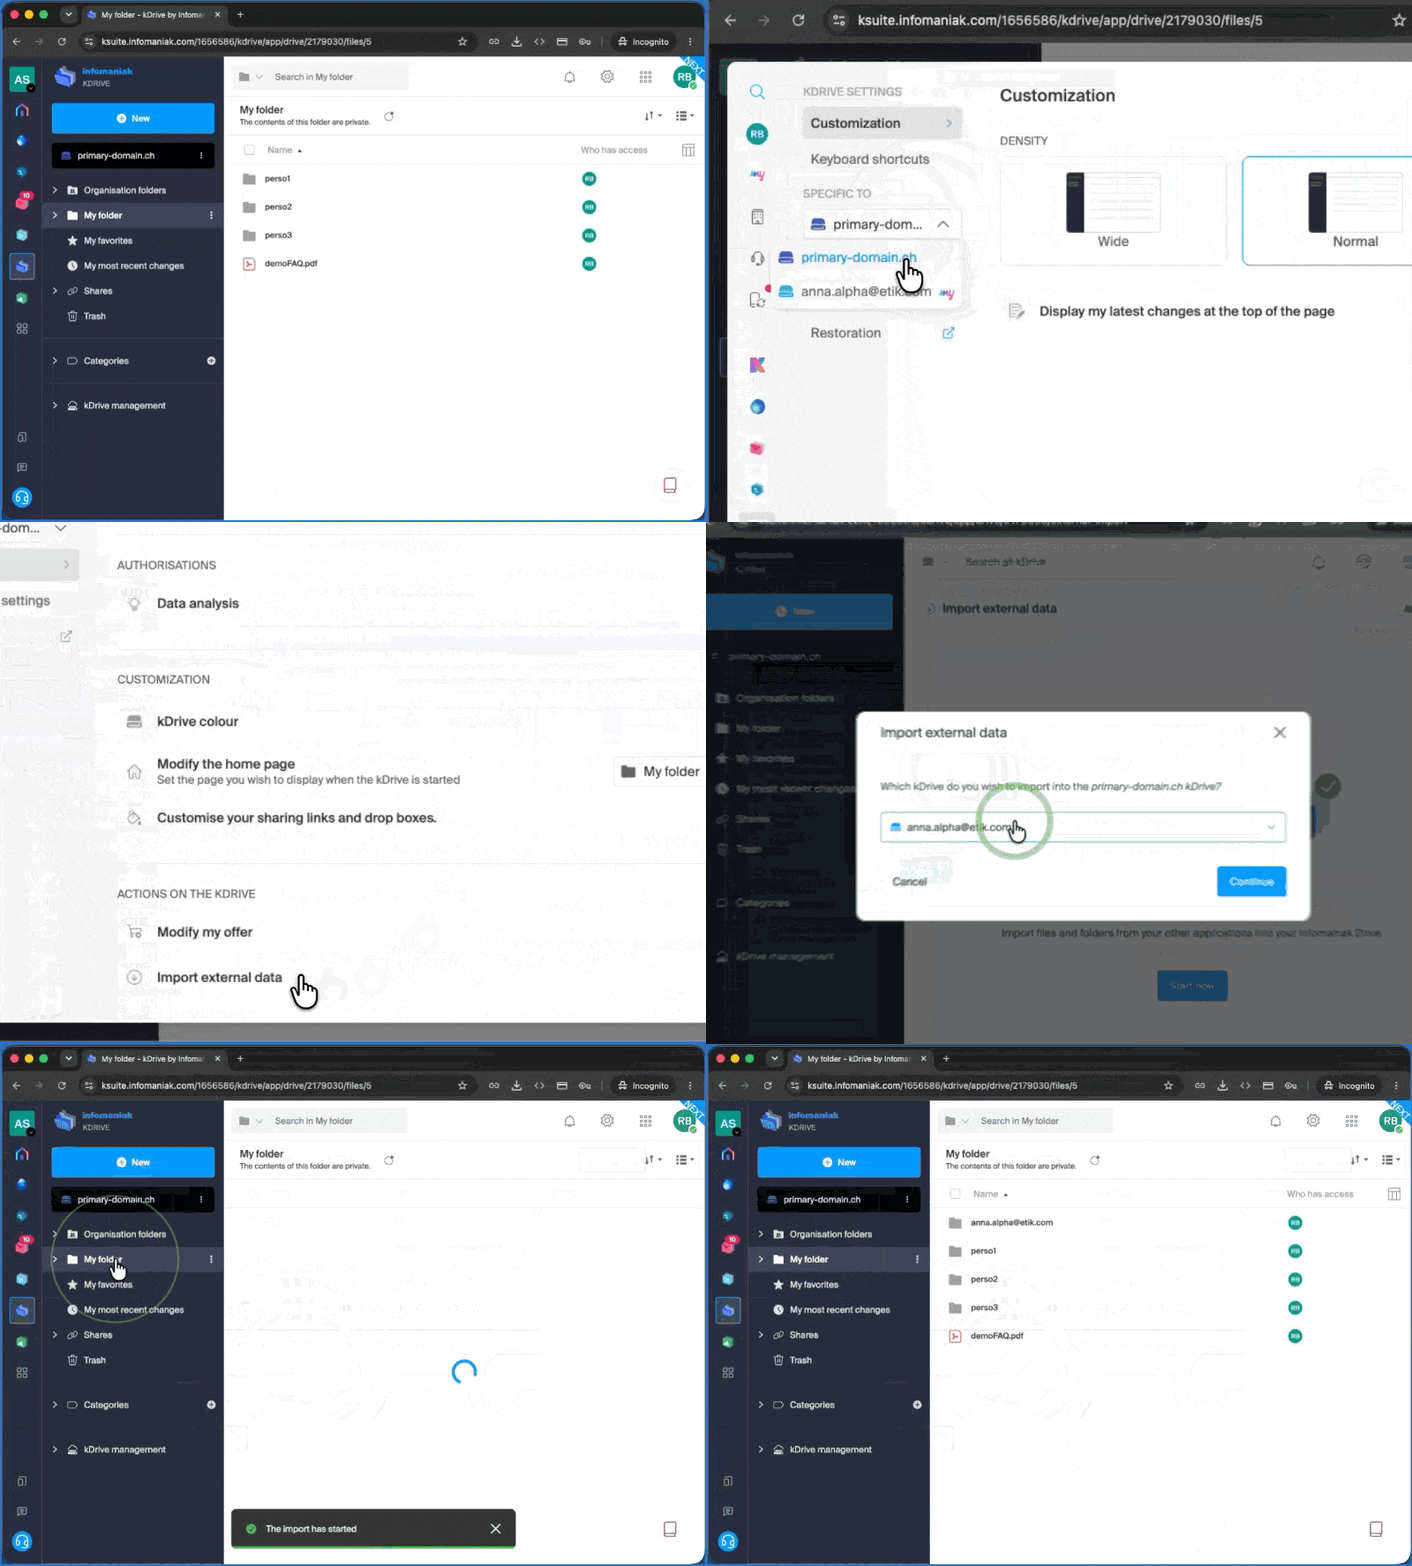
- Refer to this other guide if you are looking for information on importing data from another kDrive.
Regardless of the method used, please wait during the data transfer (the duration depends on the speed of your internet connection).
File types
You can send and preview any type of file, such as .pdf, .txt, or other extensions, including those related to 3D (❓: help) or eBooks (.epub, .azw3, .fb2, and .cbz).
kDrive also allows you to open and convert iWork files created on a Mac, so you can edit them from any device. These files from the Apple Suite have some specific features, especially with their extensions; for example, with the Numbers application:
.numbersfiles can be either files or folders, depending on the save settings (and the behavior during upload is different depending on whether it is a file or a folder).- If there is already a file, for example
calcul.numbers, on kDrive, and it is saved as a “package” on your desktop, then during the upload, the file will be considered a folder, and kDrive will try to upload files inside it, which is not possible, so the upload will not be allowed.- To resolve the problem, simply change the save format in the Apple Numbers application on macOS to “Single file”:

- To resolve the problem, simply change the save format in the Apple Numbers application on macOS to “Single file”:
Link to this FAQ: https://faq.infomaniak.com/2379
Has this FAQ been helpful?
This guide explains how to check and update the version of the desktop app kDrive (desktop application for macOS / Windows / Linux).
Accessing Version Information
To identify the version number of the kDrive application on macOS / Windows / Linux:
App v3.x
- Left-click the kDrive desktop app icon in your computer's notification area (top right on macOS, bottom right on Windows, and double-click in the taskbar on Linux).
- Click the ⋮ icon in the top right corner of the application, then click Preferences:
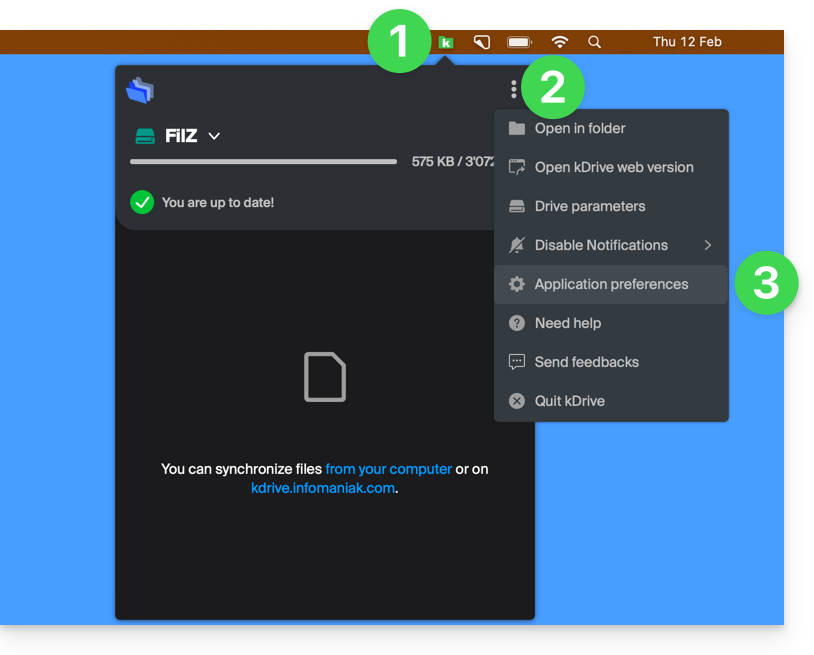
or directly on Preferences if the kDrive window is already open: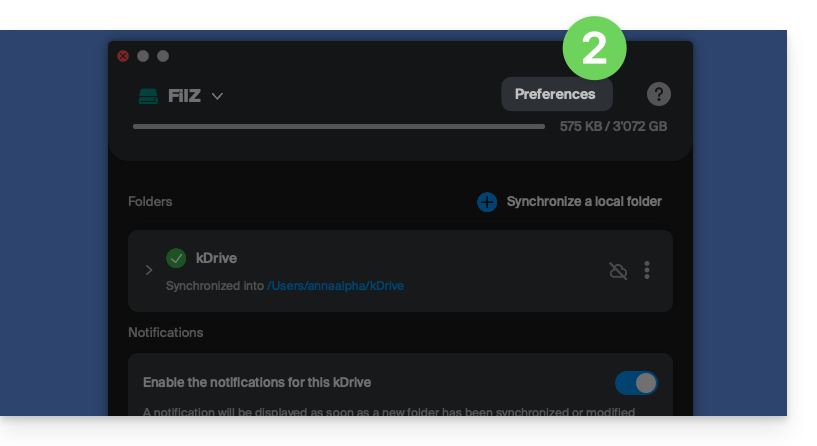
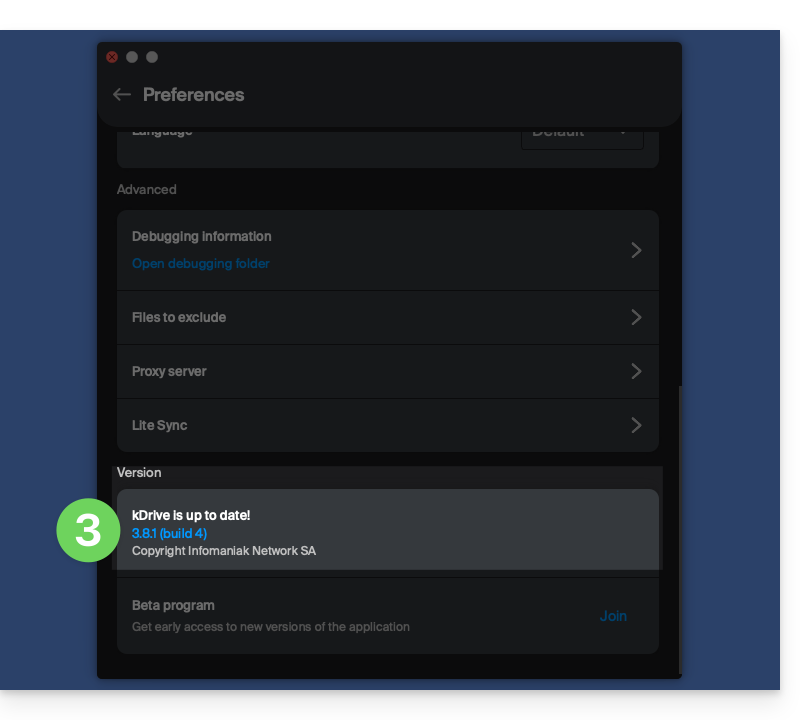
- Scroll to the bottom, and under the Version category, you will find the version currently installed on your computer:
App v4.x
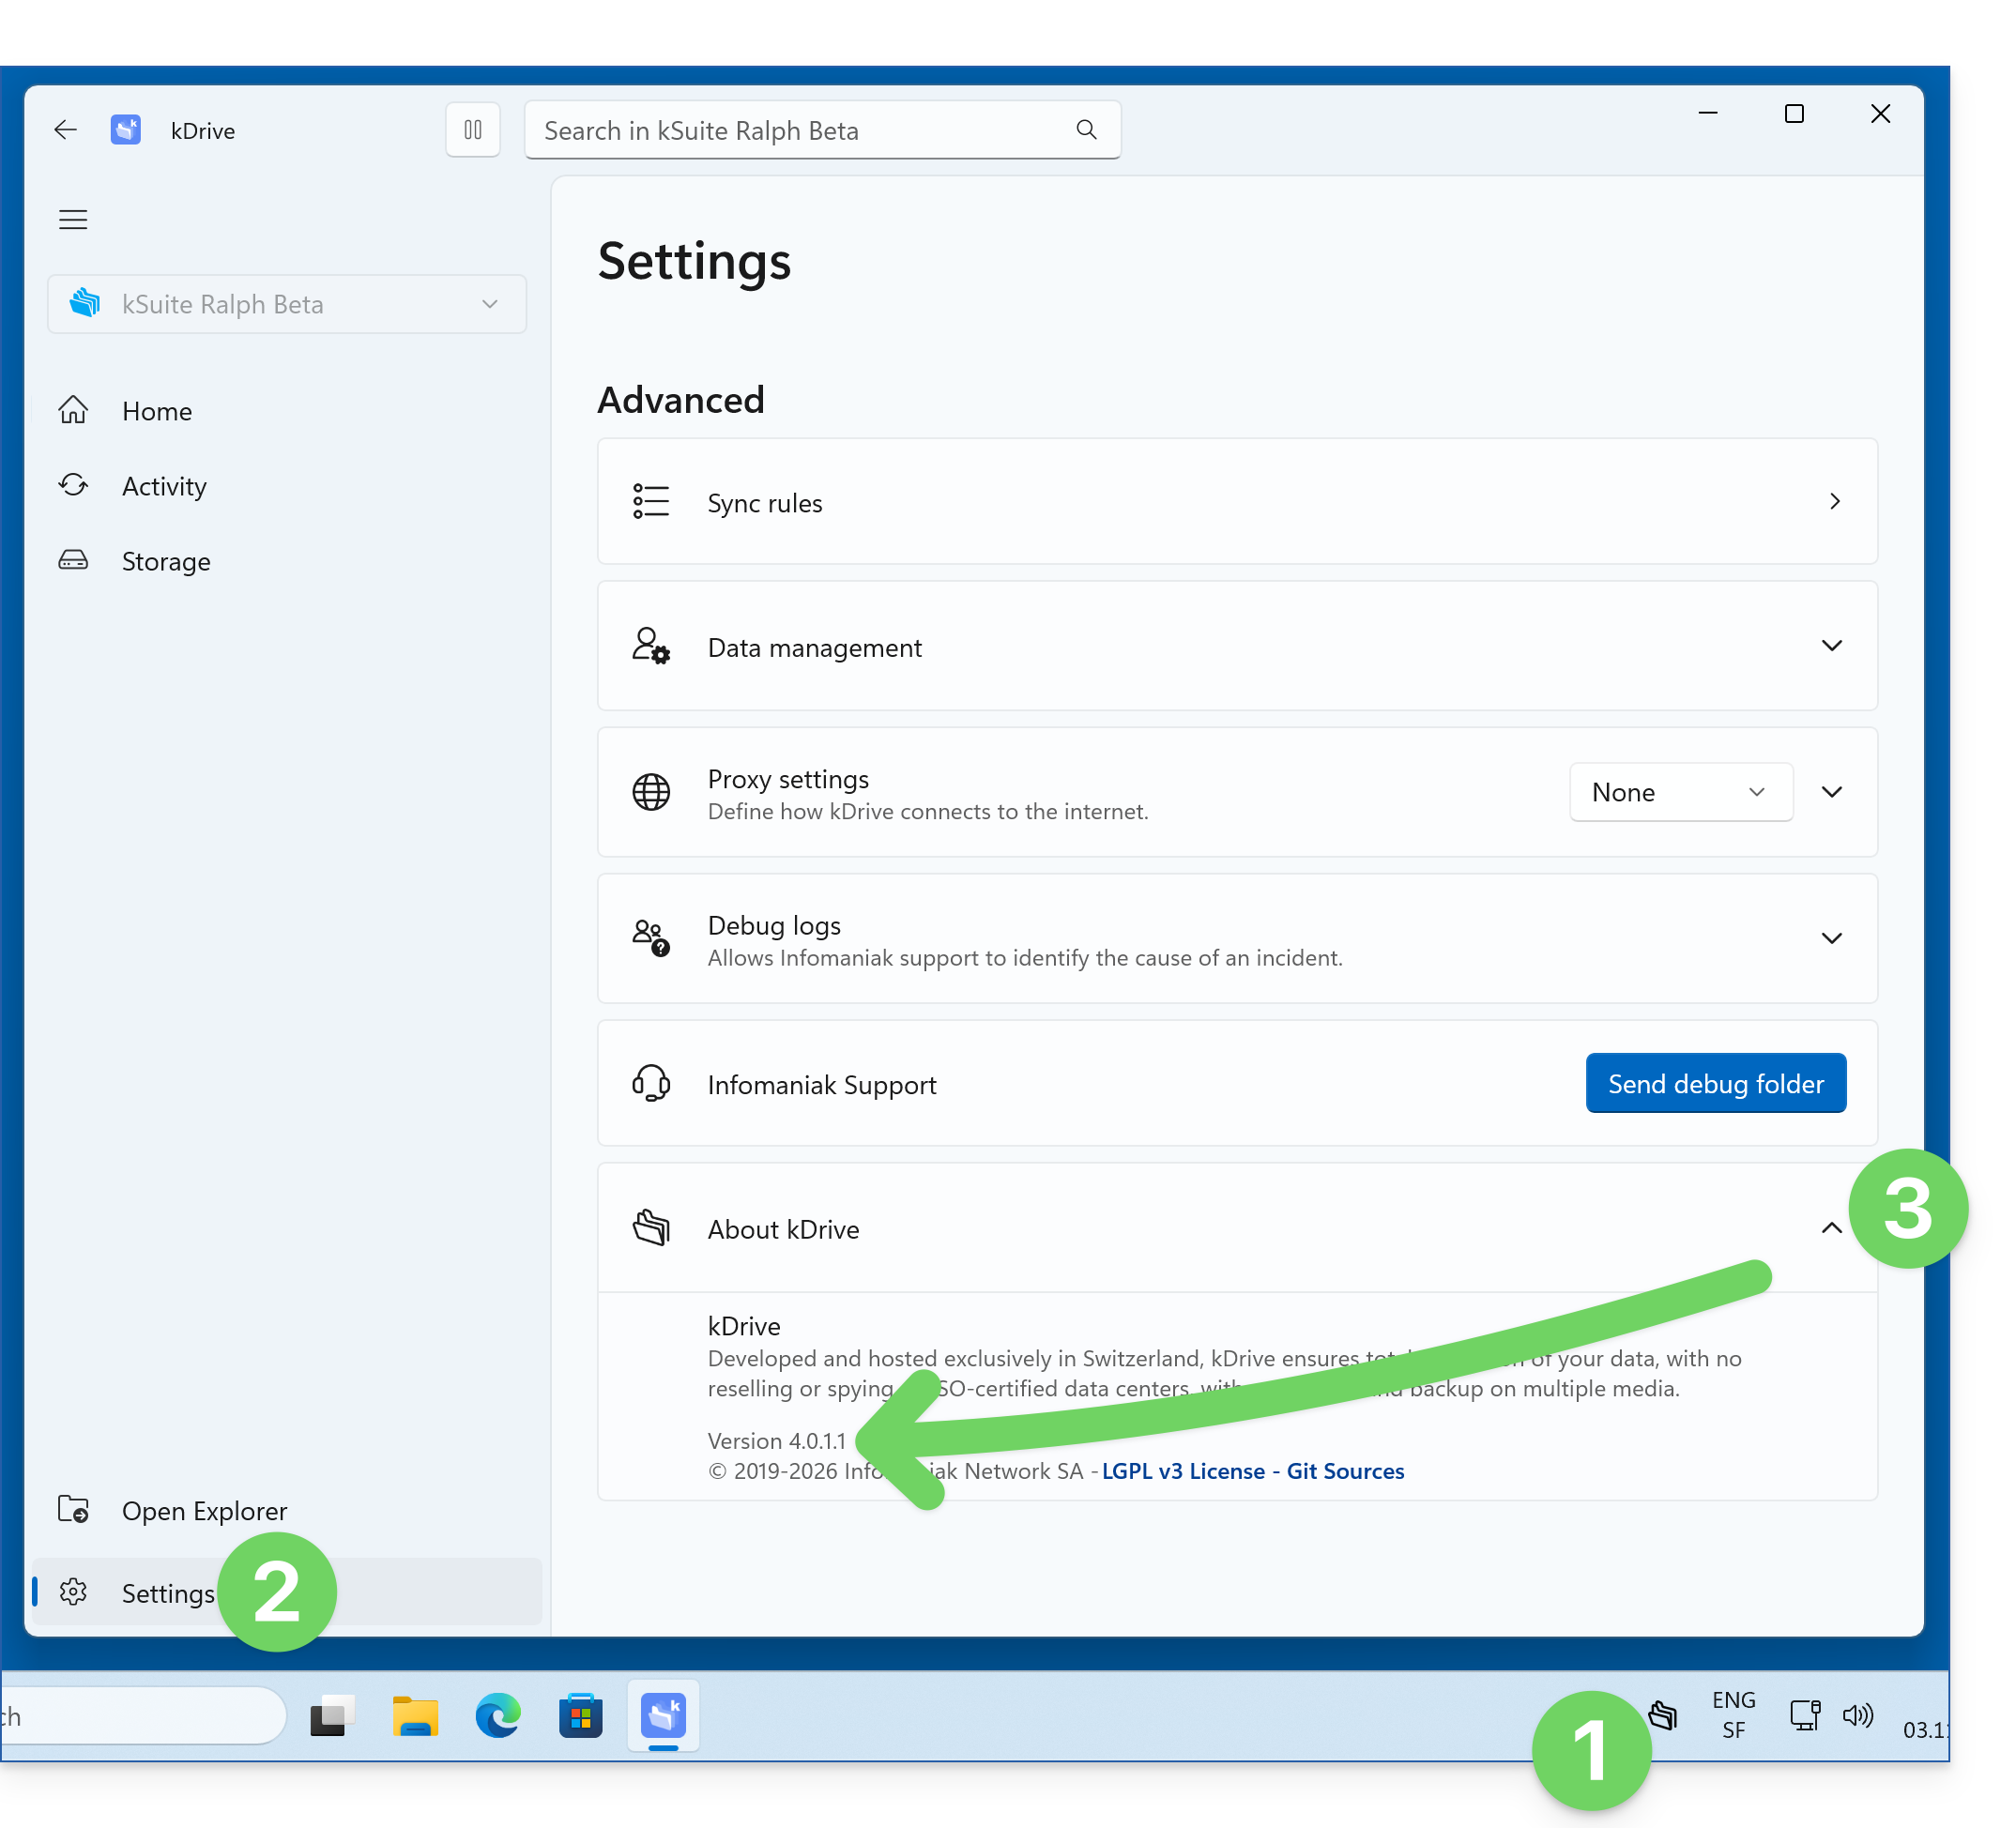
- Launch kDrive on your device: the app icon should be visible in the top right corner on macOS/Linux, and in the bottom right corner on Windows (❓: help).
- Right-click on the icon and choose Settings:
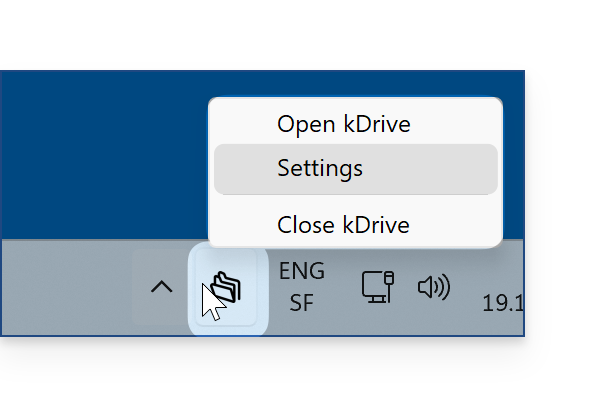
- Click on the chevron to the right of About kDrive; the version number is displayed below:
Update the installed version
With each new version of the kDrive application offered by Infomaniak, a message appears the first time you open the software after a restart (or a few minutes later if the application is not restarted), offering the option to install the update automatically: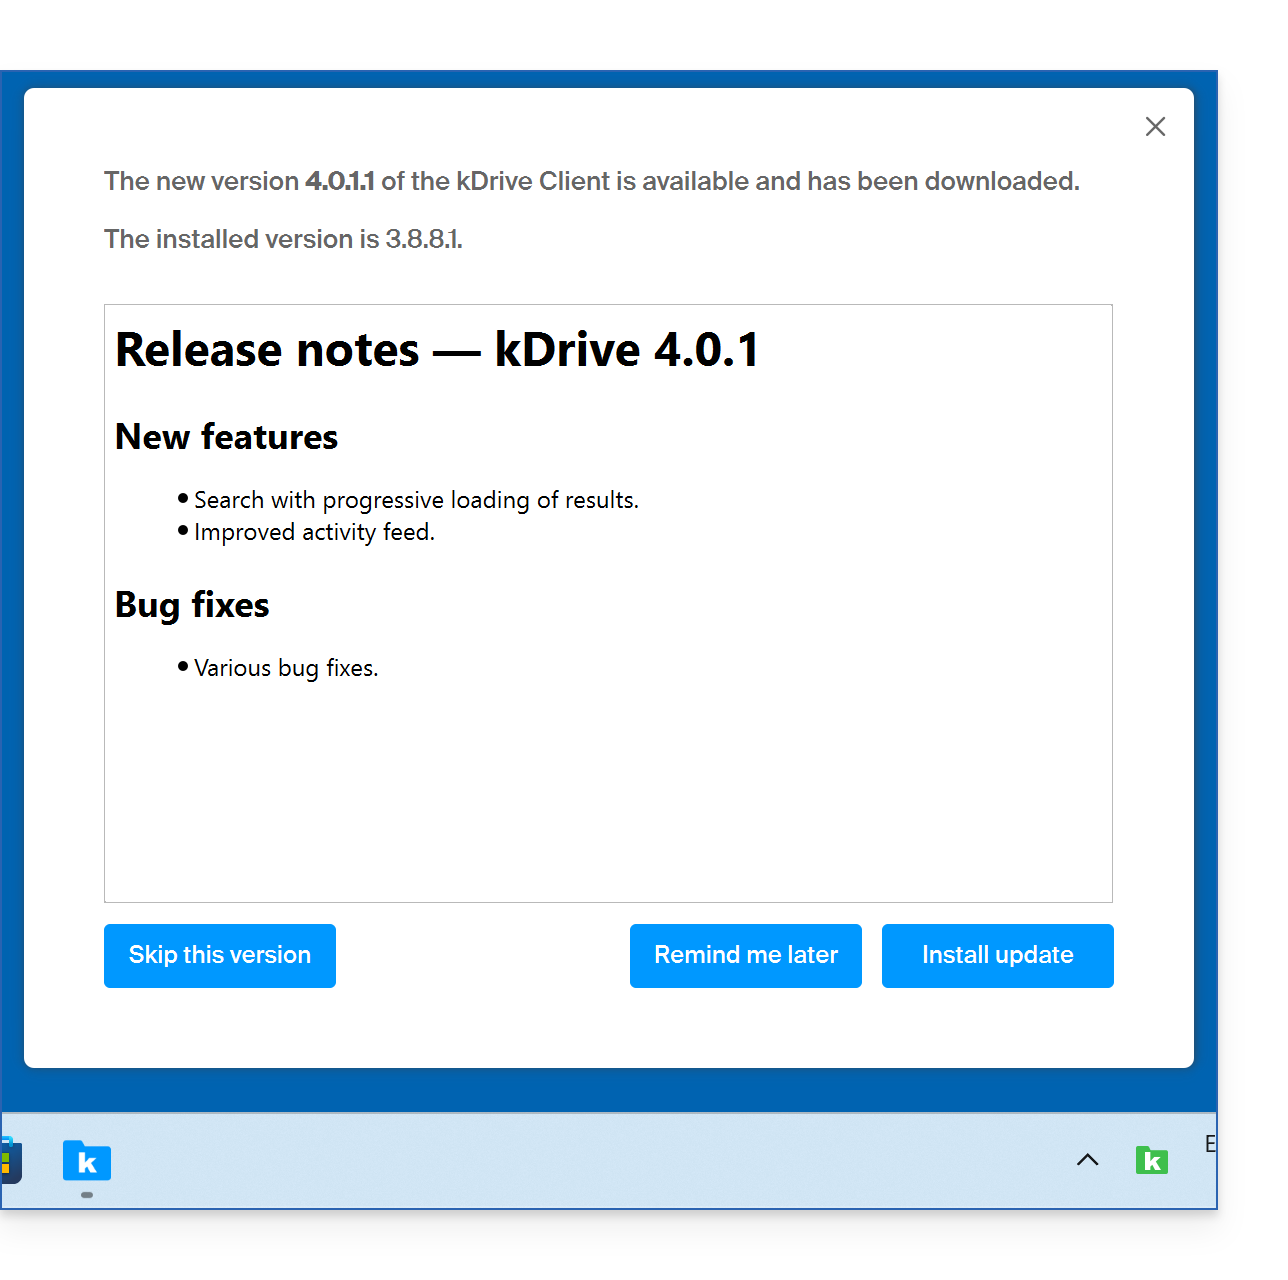
You can also follow the steps in the previous chapter to start the update based on the version number: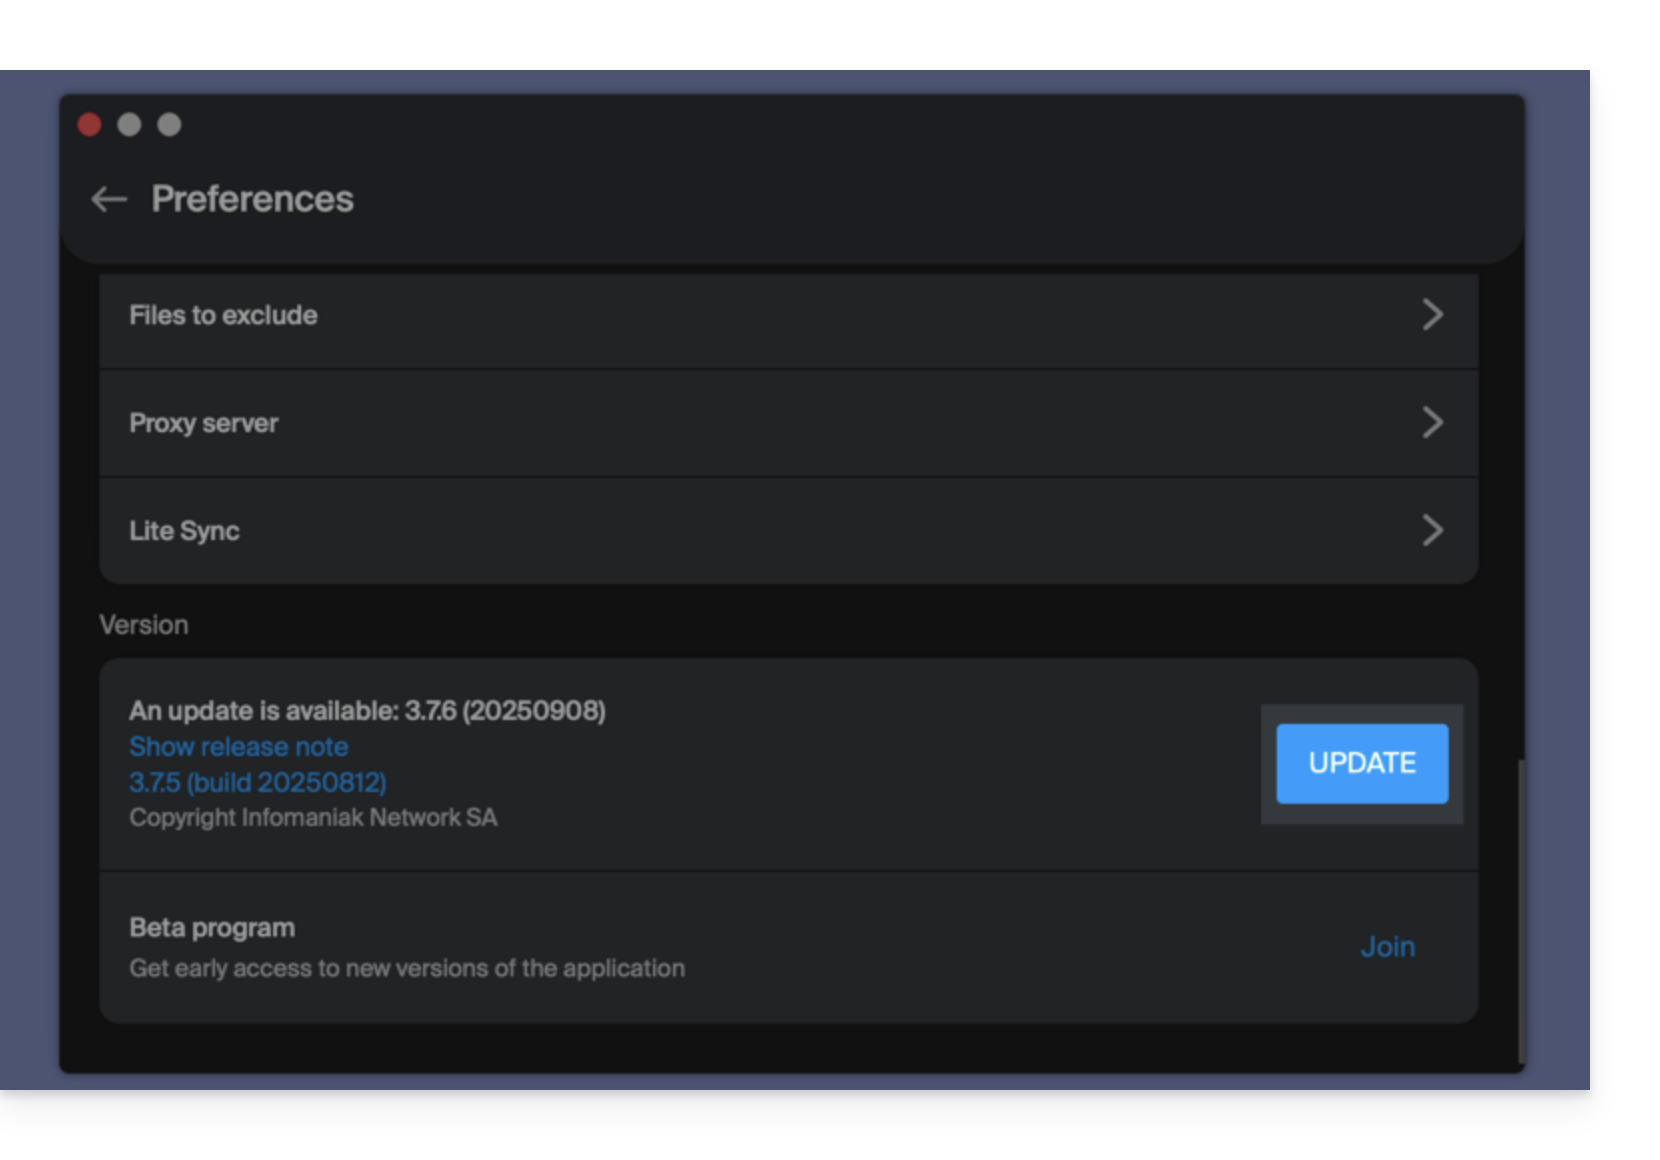
Click to install the update and wait for the process to complete. Synchronization will resume as soon as the new version is installed and active.
If the update cannot be installed
If the button is missing or the application version is too old:
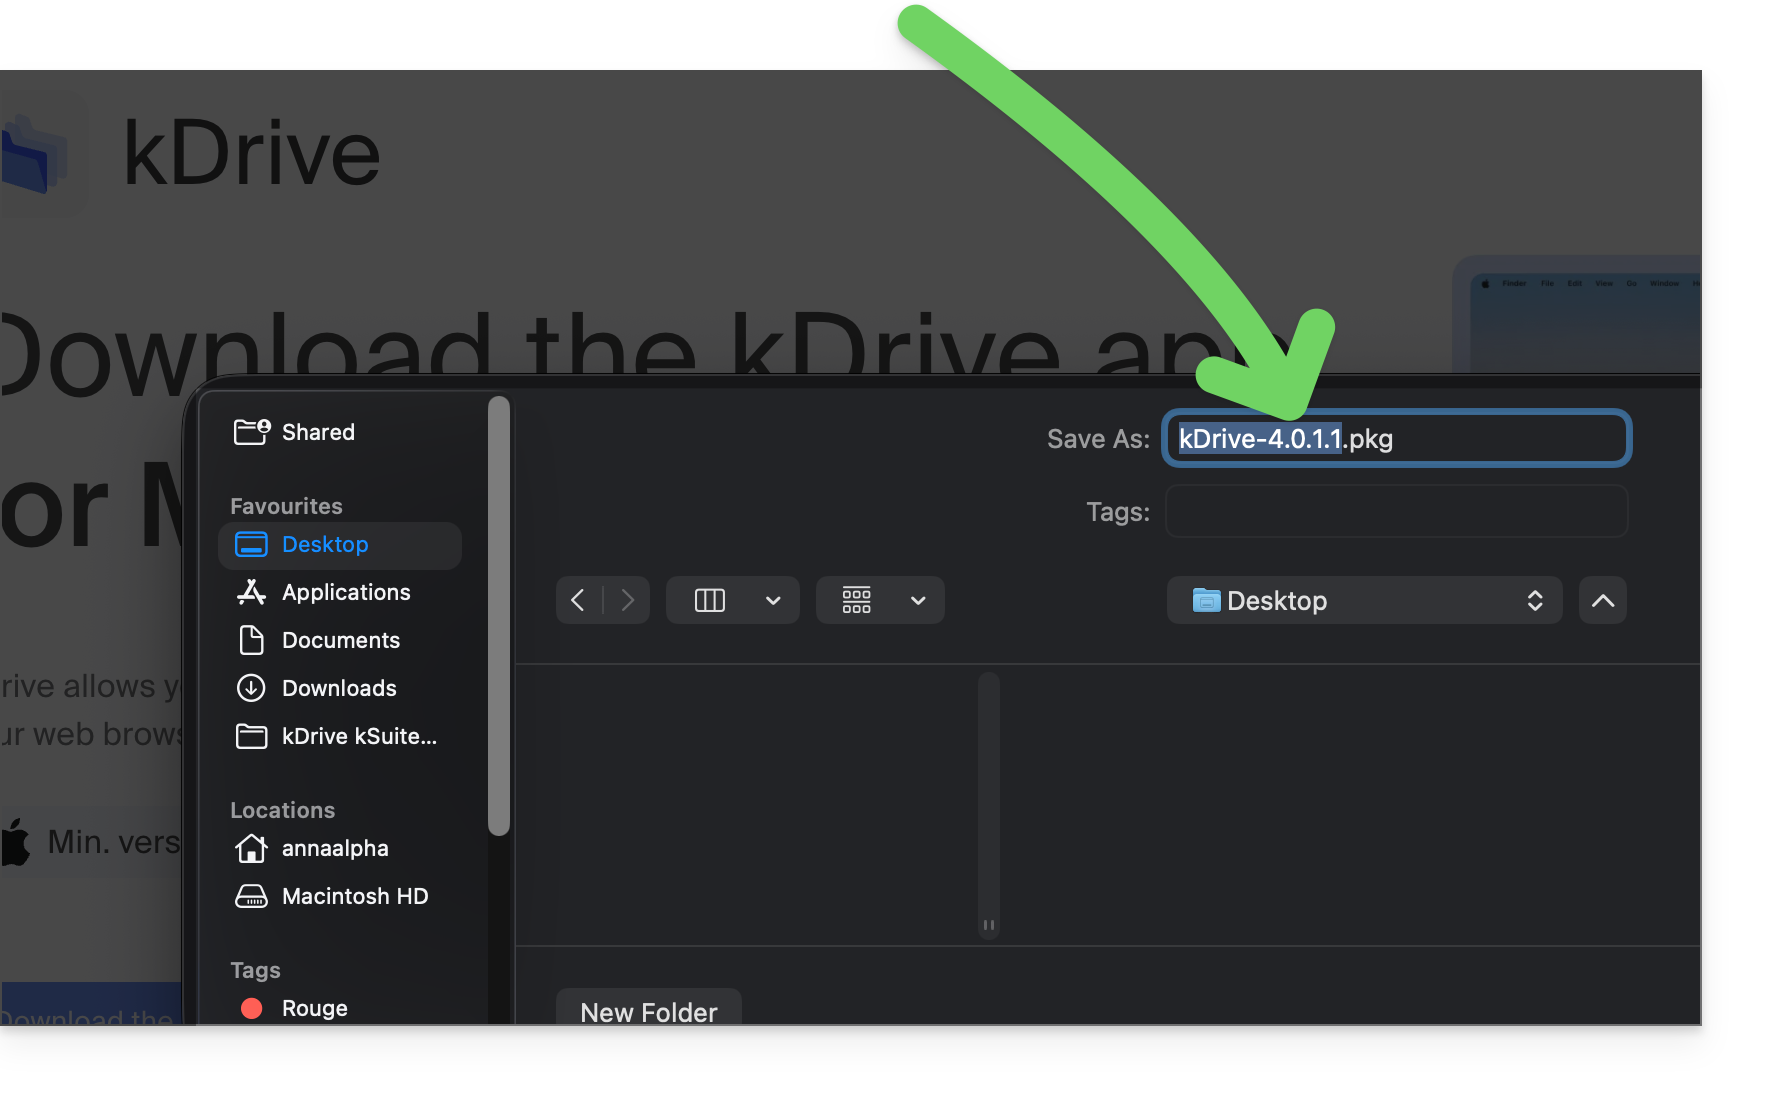
- Download the latest version from the official page (the latest version number is displayed in the file name):
- Do not install it yet.
- Uninstall your current kDrive application from your system's application manager.
- Do not touch the folder containing your synchronized files, do not move it (❓: help), do not rename it:
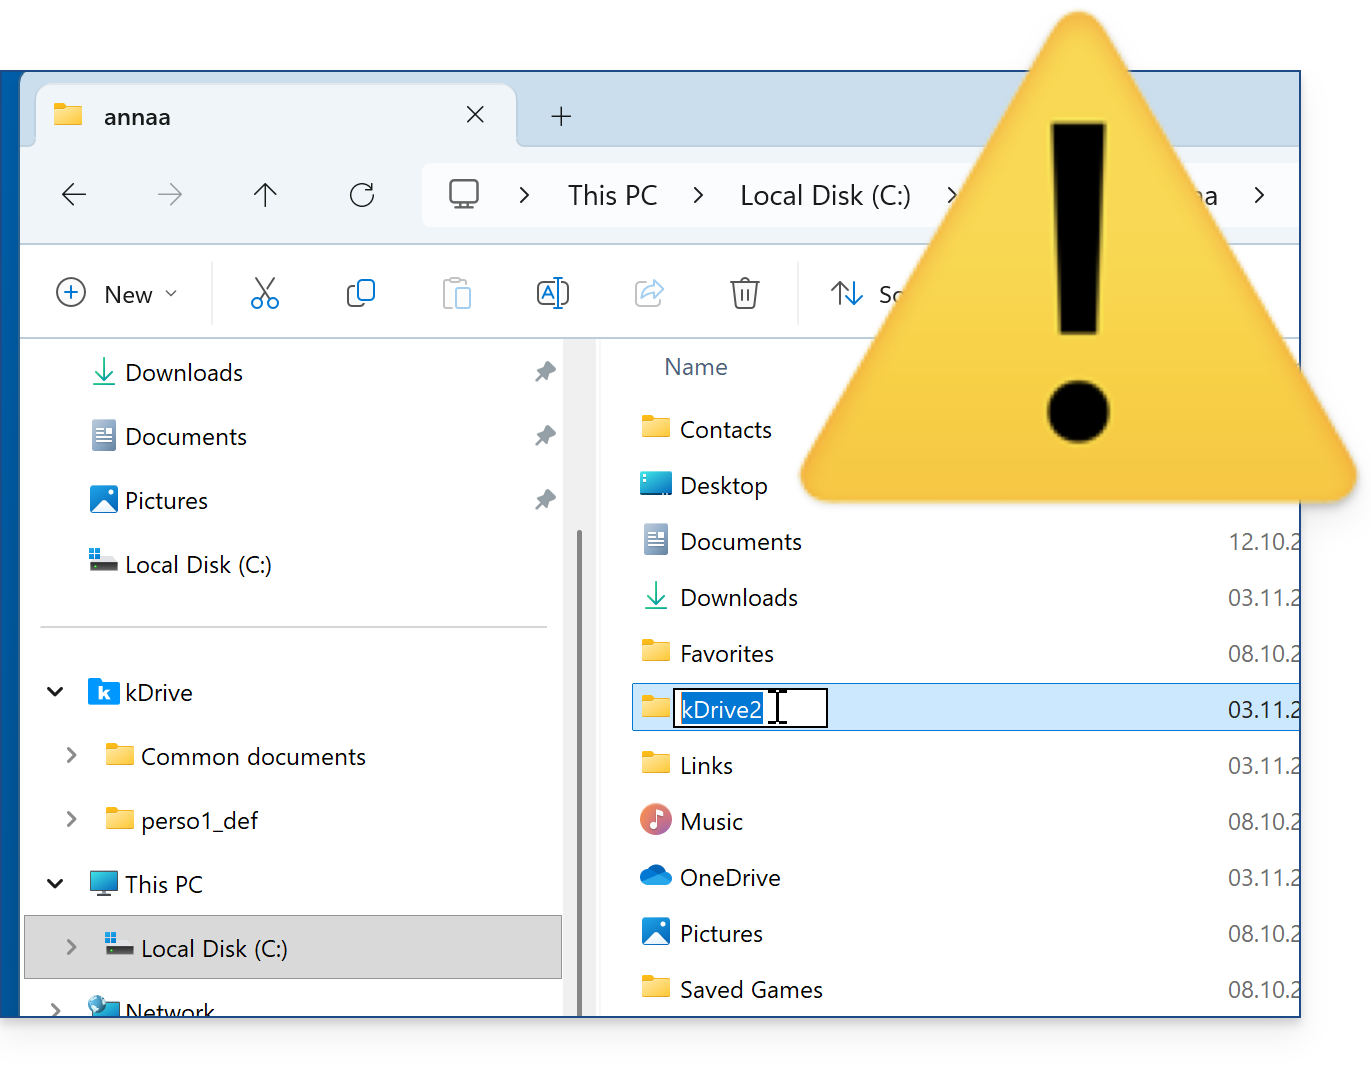
- Do not touch the folder containing your synchronized files, do not move it (❓: help), do not rename it:
- Install the new version you downloaded; you will need to log in to the Infomaniak account associated with the kDrive you want to access.
- During installation,You cannot select your previous storage folderbecause it is not possible to select a non-empty folder.
- A new storage folder for your synchronized files will be created.
- It will automatically be named after your kDrive.
- It will gradually be filled with all the online data from the kDrive in question.
- Once the synchronization of your files is complete and the kDrive application notifies you, you can move the files from the old folder to the new one on your computer's hard drive to complete any missing elements.
- Keep the old folder for a while as a safety measure and make sure that everything is now present in the new folder.
Link to this FAQ: https://faq.infomaniak.com/2580
Has this FAQ been helpful?
This guide explains how to store the database for Joplin on your Infomaniak kDrive and connect your various devices to it using the WebDAV protocol. This way, you can keep your notes safe and secure in a storage solution located in Switzerland.
✘ UNAVAILABLE with
kSuite Free / kSuite Standard
my kSuite / my kSuite+ (ik.me, etik.com, ikmail.com)
Introduction
- Joplin is a free and open-source note-taking tool that allows you to organize all your notes into folders and access them from any device (computer, mobile device, etc.).
- Joplin will store several of its configuration files, so to avoid cluttering your kDrive directories, it is recommended to create a dedicated folder in your personal directory on kDrive, with a simple folder name such as "
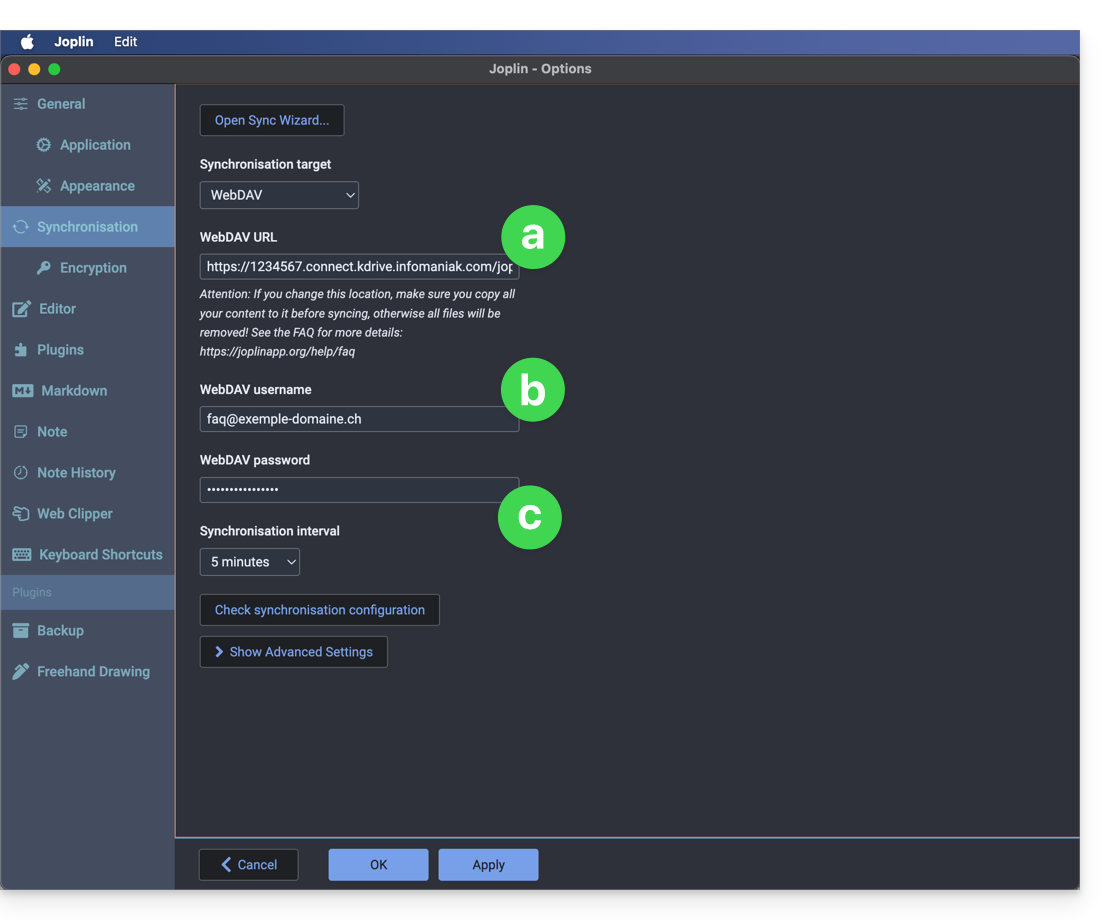
joplin" for example, and then specify it at the end of the WebDAV link in step 6 below: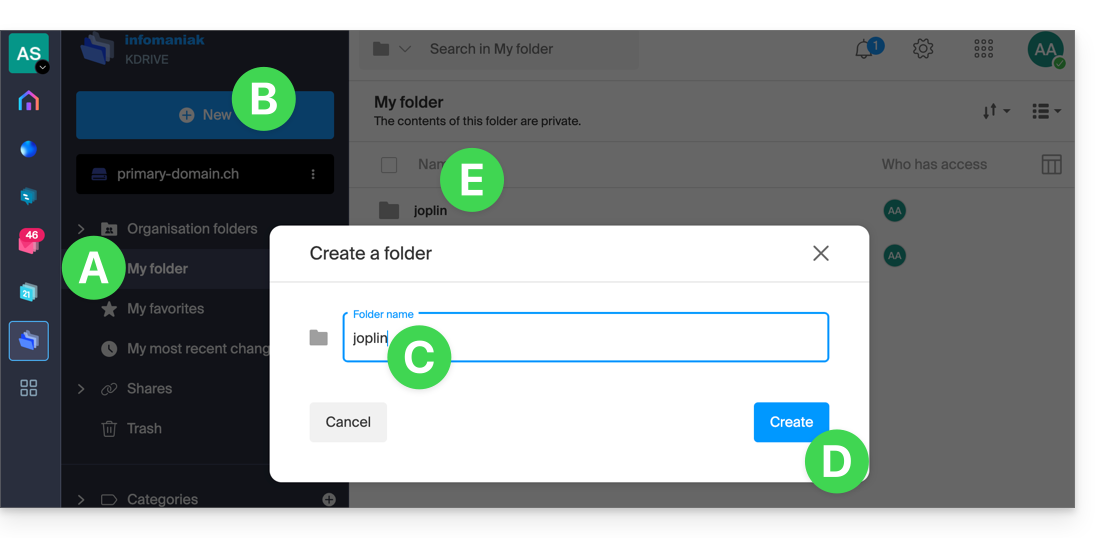
Configure Joplin to use kDrive via WebDAV
Prerequisites
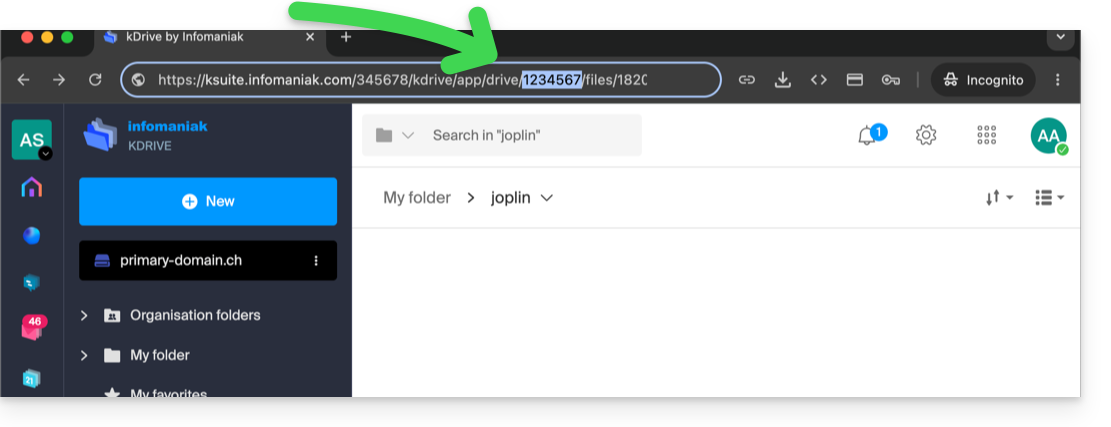
The example below is virtually identical across all versions of Joplin:
- Open the Joplin application.
- Go to the application's settings:
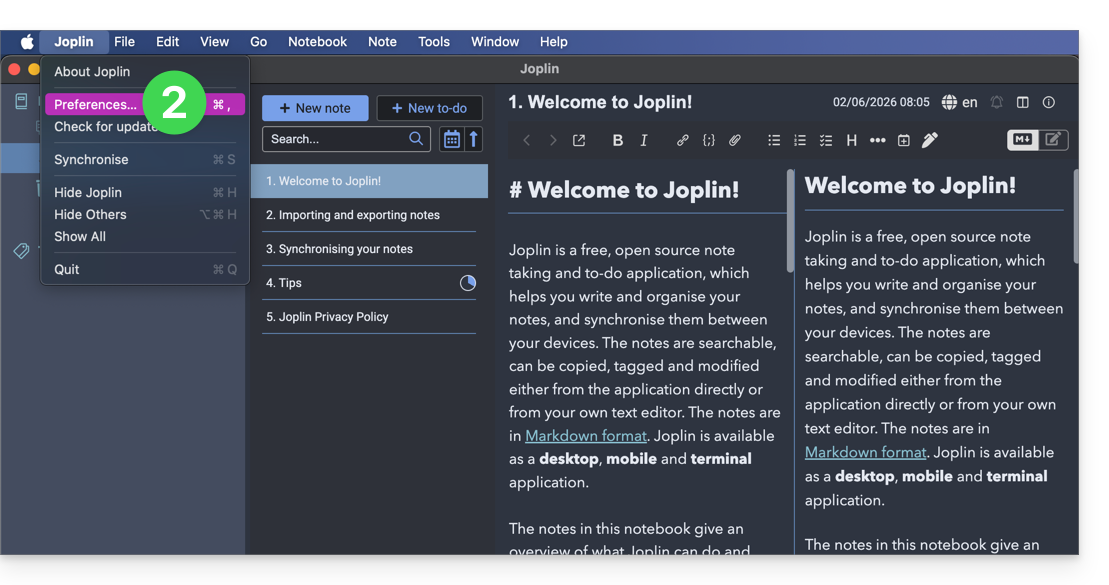
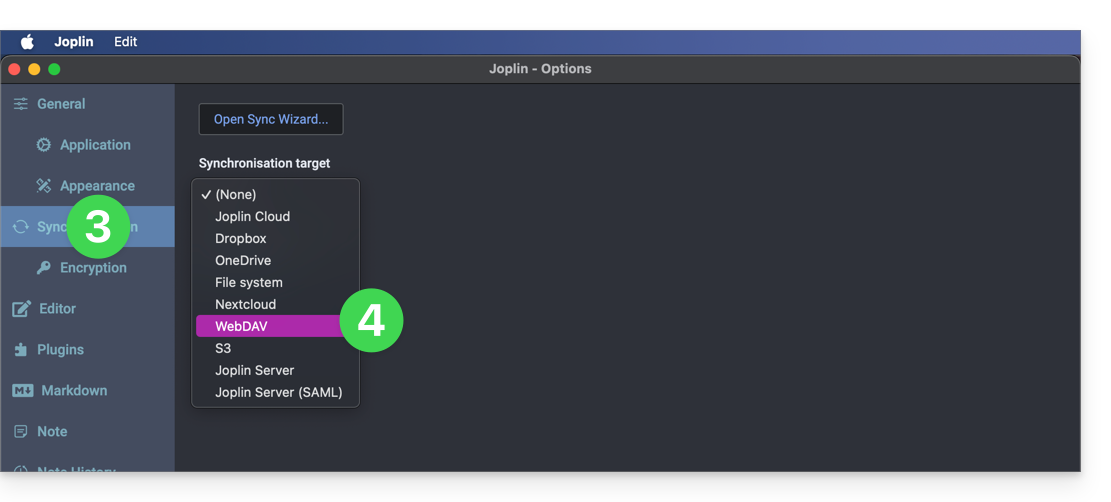
- Tap Sync.
- Tap the menu to select a target.
- Choose the WebDAV mode:
- For account settings, use the following information:
- Click on the synchronization test below and wait for the connection confirmation.
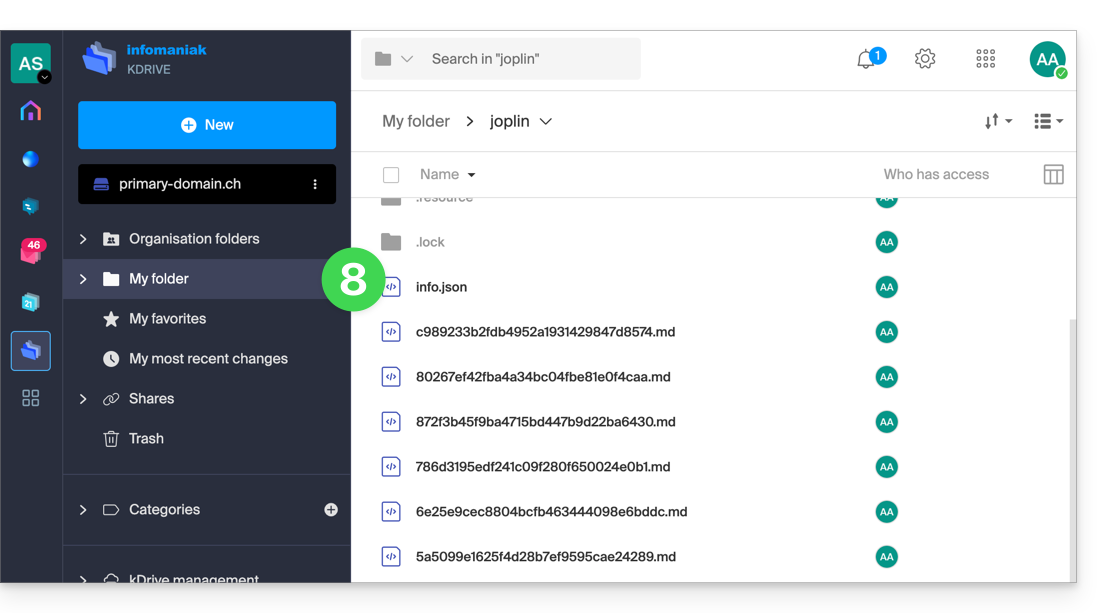
- Check in your kDrive folder that the Joplin files have been written correctly:
- Go back to the notes to start working.
Link to this FAQ: https://faq.infomaniak.com/1800
Has this FAQ been helpful?
This guide details how to manually back up data using the Mountain Duck application (macOS / Windows) via the OpenStack Swift protocol on Swiss Backup, the backup solution in a Swiss independent cloud.
Introduction
- Mountain Duck allows file synchronization as an alternative to Dropbox (for this use, it is also recommended to use kDrive).
Configure Mountain Duck with Swiss Backup
Prerequisites
- Have an Swiss Backup Infomaniak account with an available device quota (minimum 1) for a Cloud backup.
- Add 1 device of type Cloud to obtain the OpenStack Swift parameters.
- Download and install Mountain Duck (macOS / Windows).
To configure a new backup:
- Open Mountain Duck.
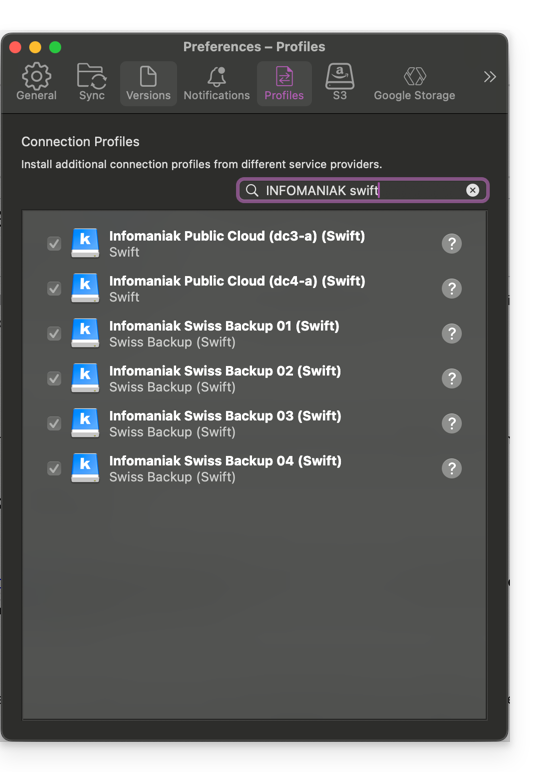
- In the application preferences, find and add the necessary profiles:
- Create a New connection.
- Select the corresponding profile from the list of proposed profiles (according to the information specific to your device — refer to this other guide).
- Enter the information specific to your device in the fields (based on the information specific to your device – refer to this other guide) by combining Project:Domain:Username:
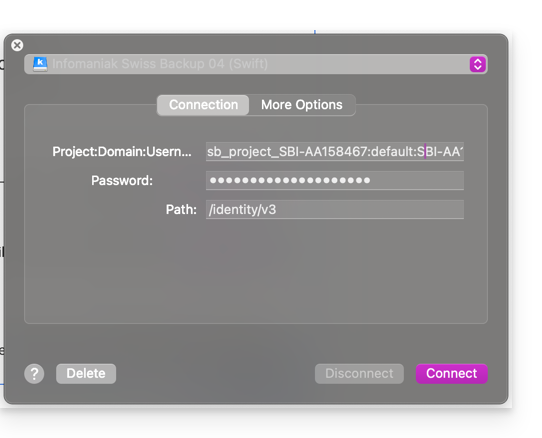
- Click Connect.
Link to this FAQ: https://faq.infomaniak.com/2337
Has this FAQ been helpful?
This guide will quickly introduce you to the essential features of Euria, the artificial intelligence available within kSuite. It performs particularly well with the kDrive Infomaniak web app (online service ksuite.infomaniak.com/kdrive).
✘ UNAVAILABLE with
kSuite Free / kSuite Standard
my kSuite / my kSuite+ (ik.me, etik.com, ikmail.com)
kDrive Solo / kDrive Team / kDrive Pro
Introduction
- Euria is also available in “RAG” mode (❓: help), which allows you to search for information in your stored data and generate responses based on its content.
Use AI for your files on kDrive
Prerequisites
- You must be at least an Administrator of the Organization (❓: help).
- Enable Euria for all users of your kDrive: follow the wizard that appears when you log in to kDrive (❓: help).
- Read and understand this other guide about the model used and the responsibilities of each party.
To access Euria on kDrive:
- Click here to access kDrive on your Infomaniak kSuite (❓: help).
- Open a PDF document (Euria is also available with other text/code file types:
.md,.txt,.json,.php, etc.) or right-click on the file in question. - Click to Ask Euria:
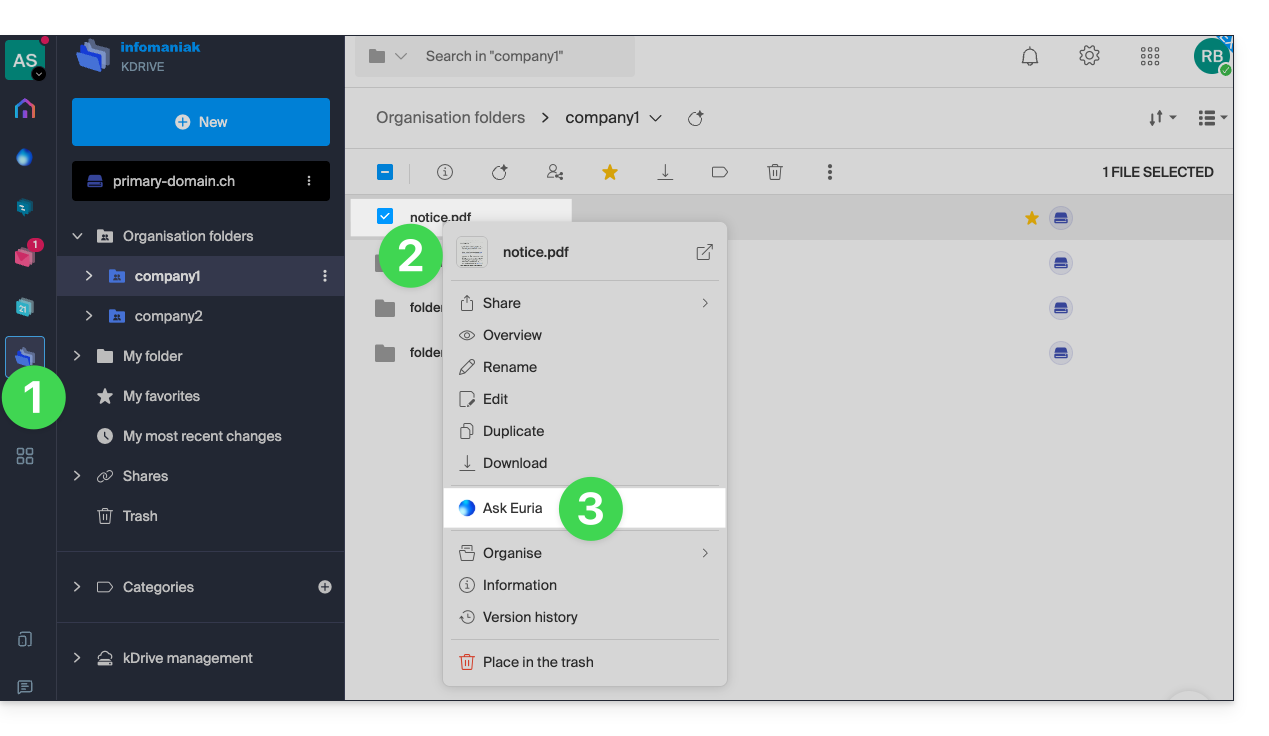
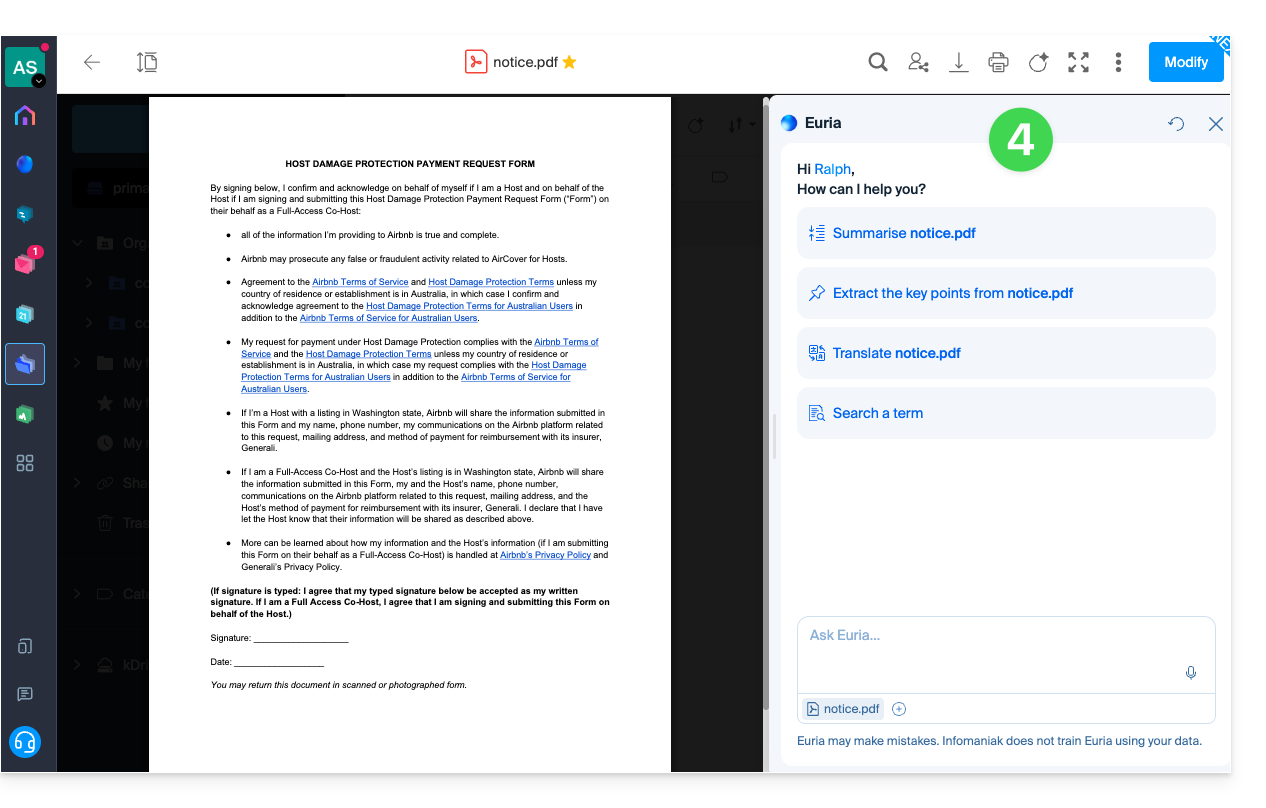
- Euria will open in a sidebar on the right:
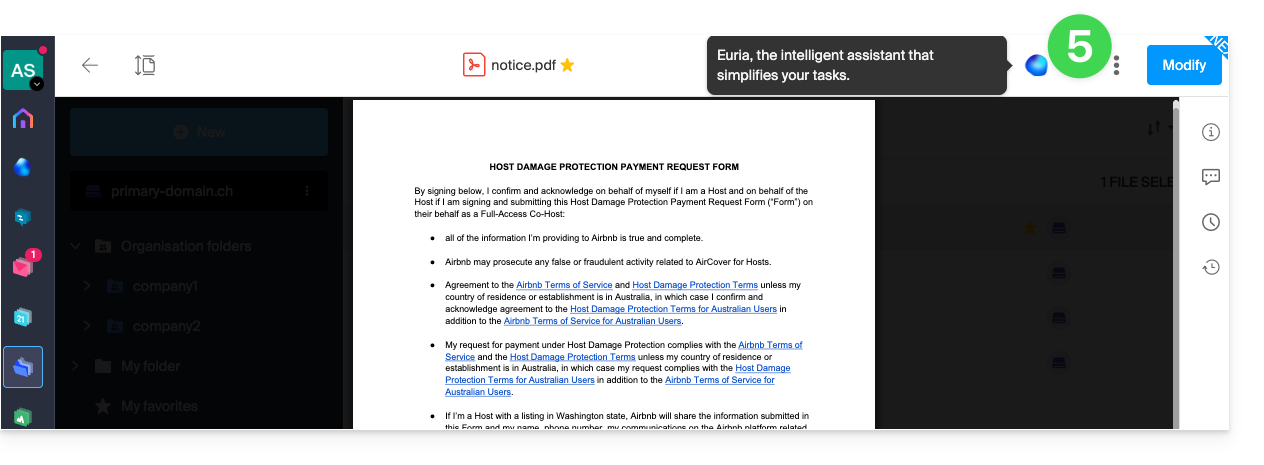
- If you close it, Euria remains accessible via the round icon located in the top right corner:
How can Euria help?
Euria helps you make the most of the document you have open (and only this one); it can, in particular:
- answer your questions about its content (details, statistics, changes)
- summarize the key points (or even simplify them, and even more so if you specify “for a 10-year-old”…)
- translate it
- provide metadata (size, creation or modification date)
- explain the terms or acronyms used
For example, if the document is a long company report on the past year, you can ask for the current size of the Development department, what the top priority projects are, or the last date the document was modified…
Create an event for your calendar
With a document mentioning an appointment (e.g., a medical appointment), you can ask Euria to create a code snippet that, once copied and pasted into an appropriate file, will allow you to add an event to your calendar. Example phrasing: “Create an event in ics format by taking the details from this appointment”.
Euria can also extract events from a more complex document: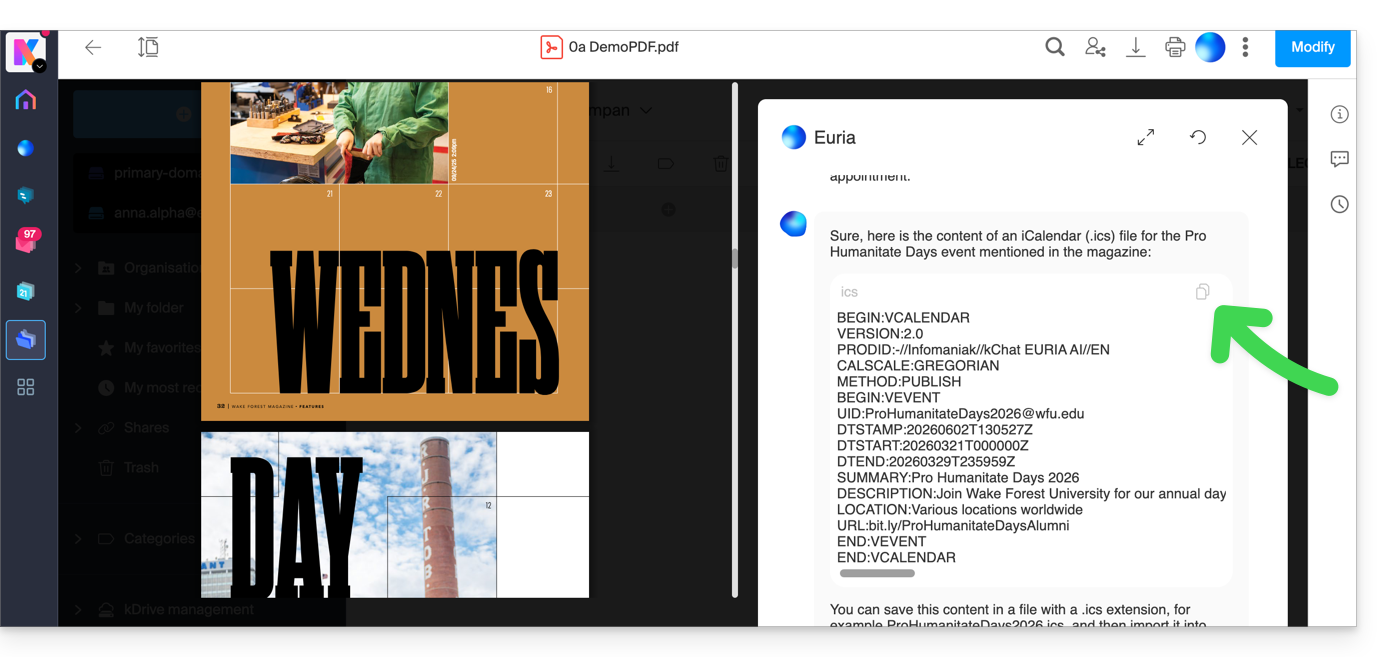
Euria will explain what it did (a VCALENDAR code) and what you need to do: create a new file with the .ics extension containing the code it generated, and open it on your computer to import it into your usual calendar app or import it into your kSuite calendar (❓: help)…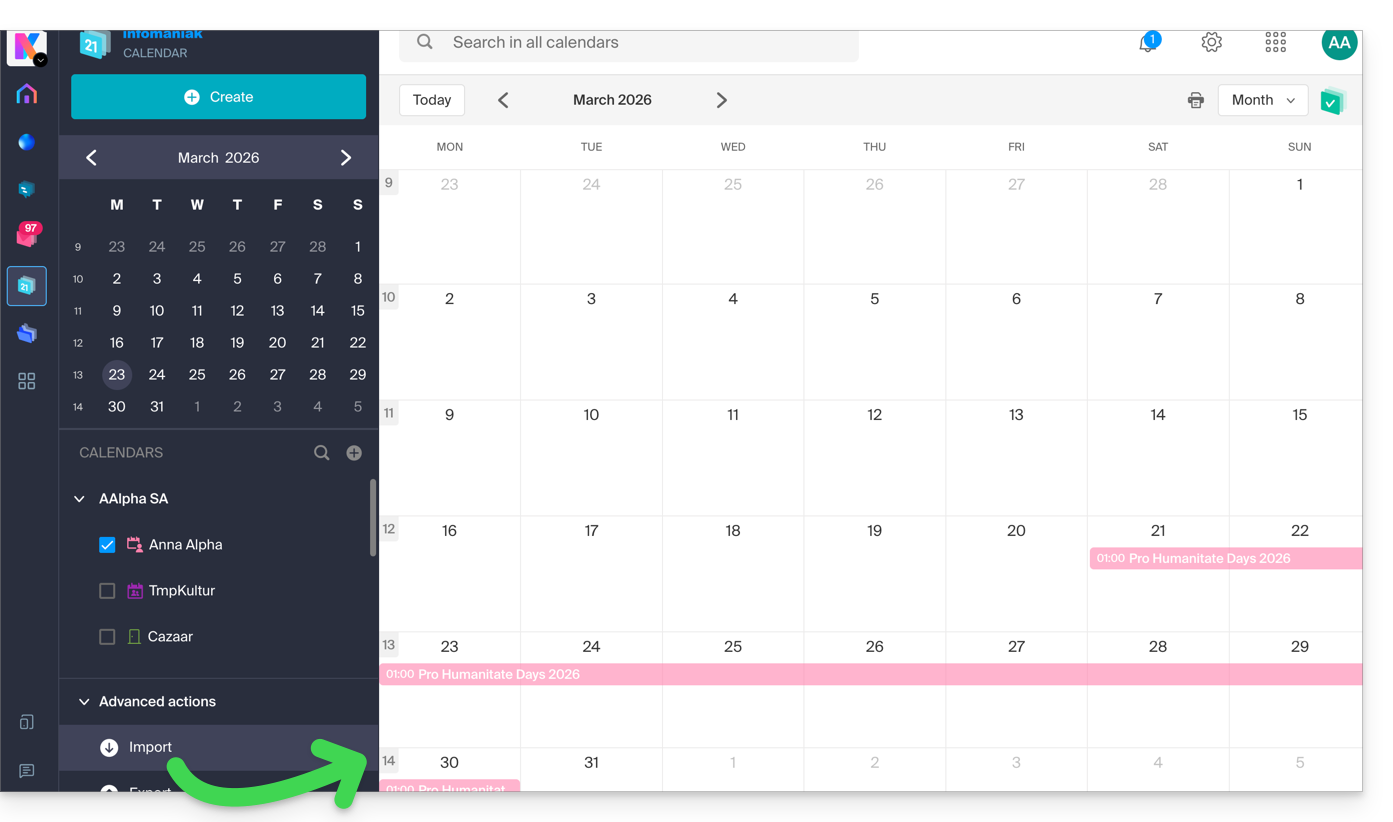
Create a character family tree
With a book stored on your kDrive, you can ask Euria to create a precise and complete family tree to show the relationships between all the characters. You will then obtain a list of names with their relationships.
But you can take the experience even further by then requesting a “Mermaid” diagram based on this list. Simply copy and paste the code provided by Euria into a tool like mermaid.live:
Analyze a survey, write a blog post
Based on a document of the type survey/report, you can ask Euria to write a new article in the tone you want, targeted at the desired audience. Example: “Based on all of this, write a blog post with an engaging title and text of no more than 400 words, for a target audience of women aged 30 to 40.”.
But you can also ask it to find “what are the biases in this survey” or “what elements should be explored or verified in more detailEuria can therefore help you adopt a critical perspective when reviewing a survey or report, by highlighting any potential shortcomings, exaggerations, or biases.
It can also rephrase the survey's conclusions for different audiences (professionals, teenagers, curious readers, etc.), suggest alternative angles for a related article, or even generate titles, introductions, or summaries according to the desired level of complexity.
The goal is to extract maximum editorial value from a single source of content by diversifying the formats, tones, and perspectives.
Link to this FAQ: https://faq.infomaniak.com/2566
Has this FAQ been helpful?
This guide explains how the new kDrive v4 application from Infomaniak works.
Introduction
- kDrive v4 is more than just a graphical update of the previous version: its interface and navigation have been completely redesigned, while retaining the main synchronization features already available.
- Most of the basic principles (❓: help) remain valid and should be understood to master kDrive.
A completely redesigned and more readable interface
It's here! Your kDrive v3.x app has been updated to v4, which introduces some major changes:
- Upon installation, the kDrive Windows application icon is added to your desktop.
- The application window can be freely positioned and resized; it provides simplified access to the status of your synchronizations.
- The icon of the open application is displayed in your taskbar (you can make it persistent via the context menu).
- Whether the main window is open or closed, kDrive continues to synchronize in the background, and for this purpose, its icon is displayed on Windows among the running services at the bottom right of your screen (without any particular color):
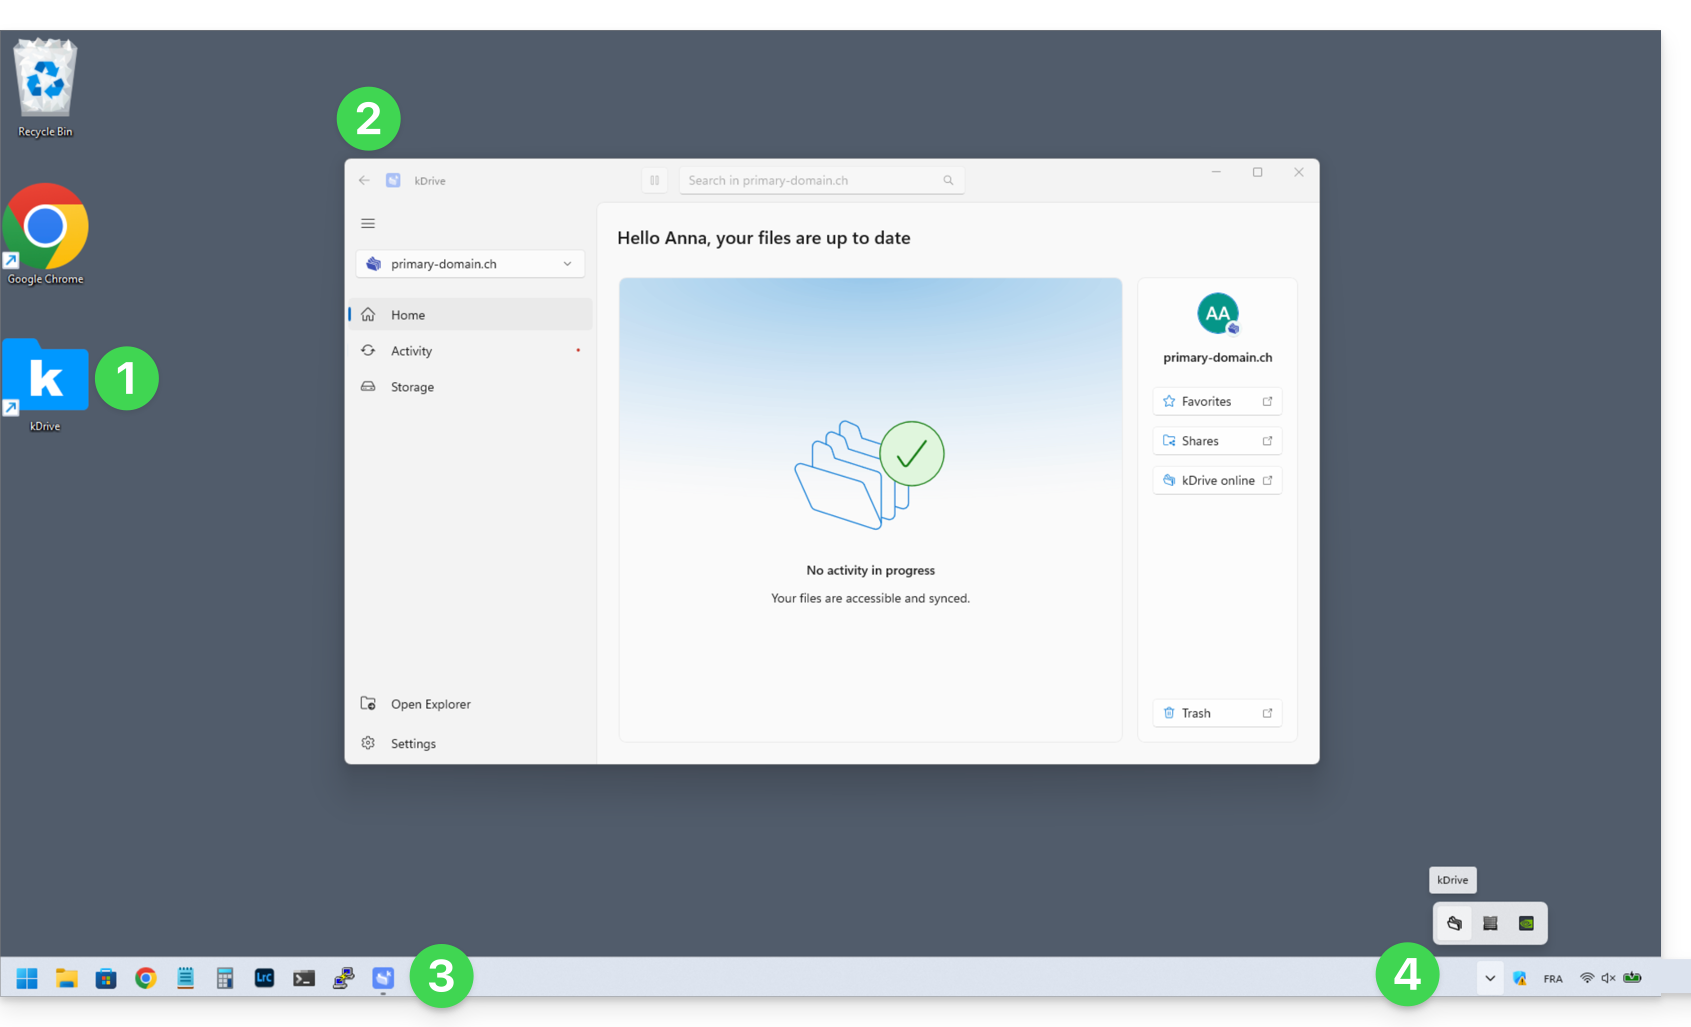
and at the top right on the macOS version: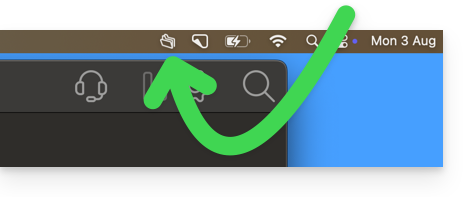
Welcome to the new Infomaniak app for kDrive
HOME menu
Click on Home to access:
- the online version (kDrive Web) of your favorites and shares
- the online version (kDrive Web) of your deleted files (still visible in the trash until it is emptied)
- file search (❓: help)
- pausing synchronization
Windows version: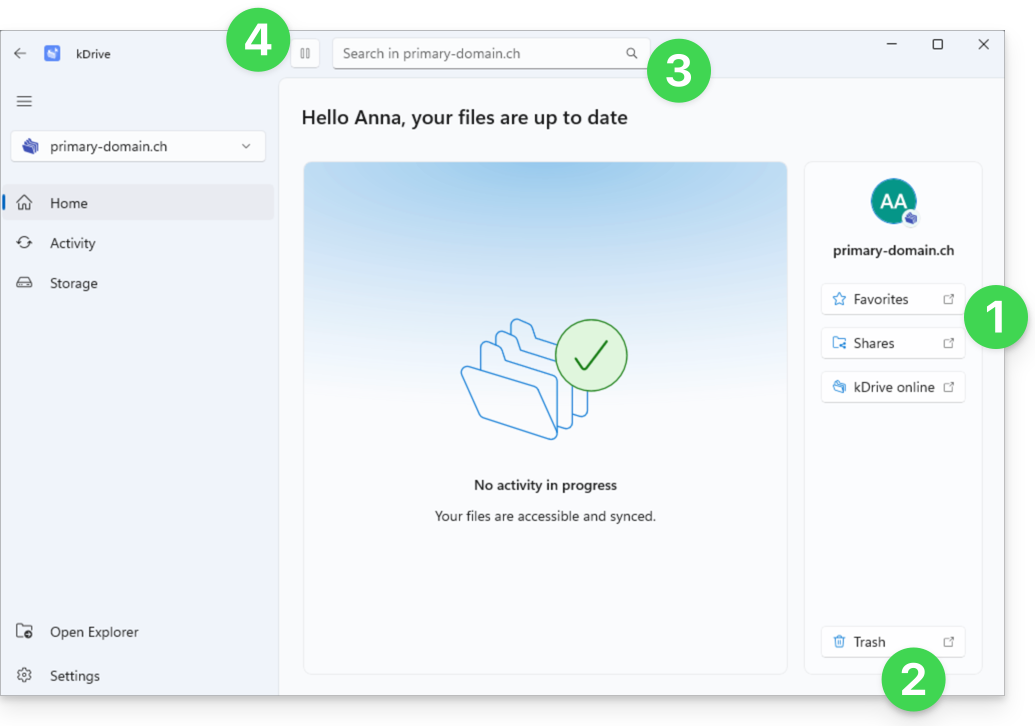
and macOS version: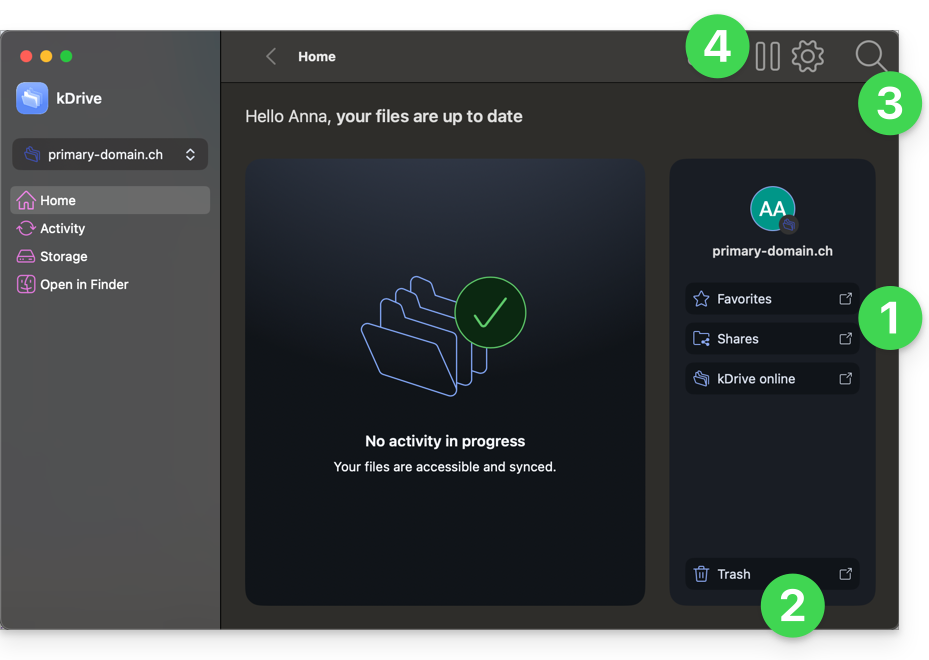
Regarding the trash/recycle bin, there are no particular changes to these deletion actions (❓: help):
- When you delete a file in the web app, it is moved and becomes visible in the web app's trash:
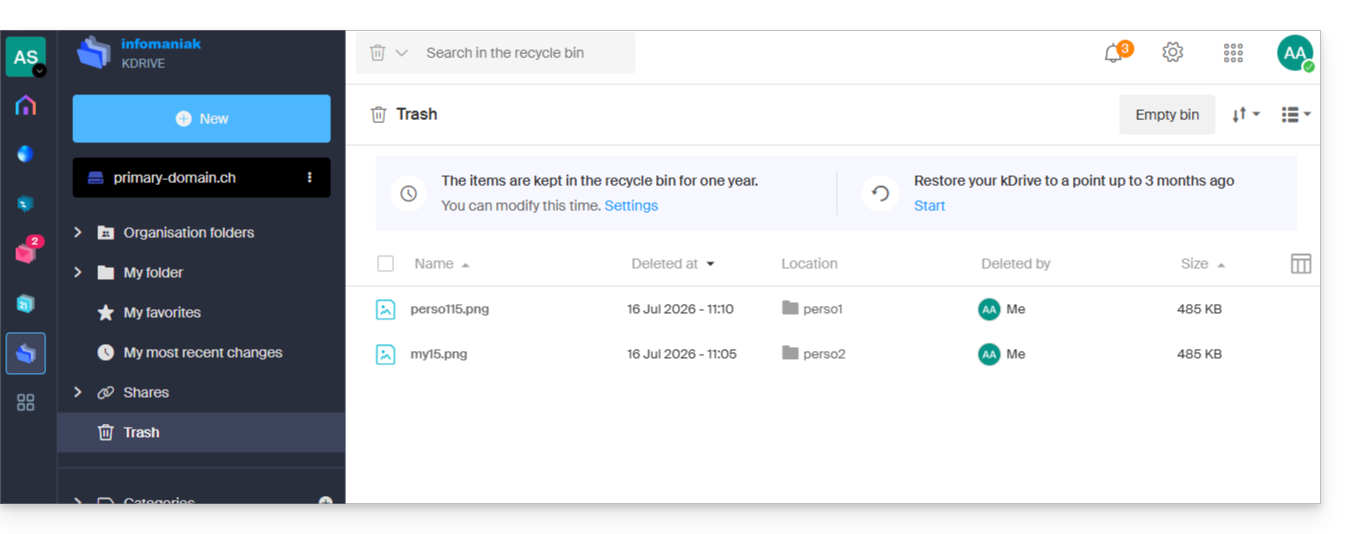
- This action is synchronized, so the file will also be moved to the trash on synchronized devices.
- When you delete a file from the synchronized data on your macOS/Windows device, it is moved and becomes visible in the macOS/Windows trash:
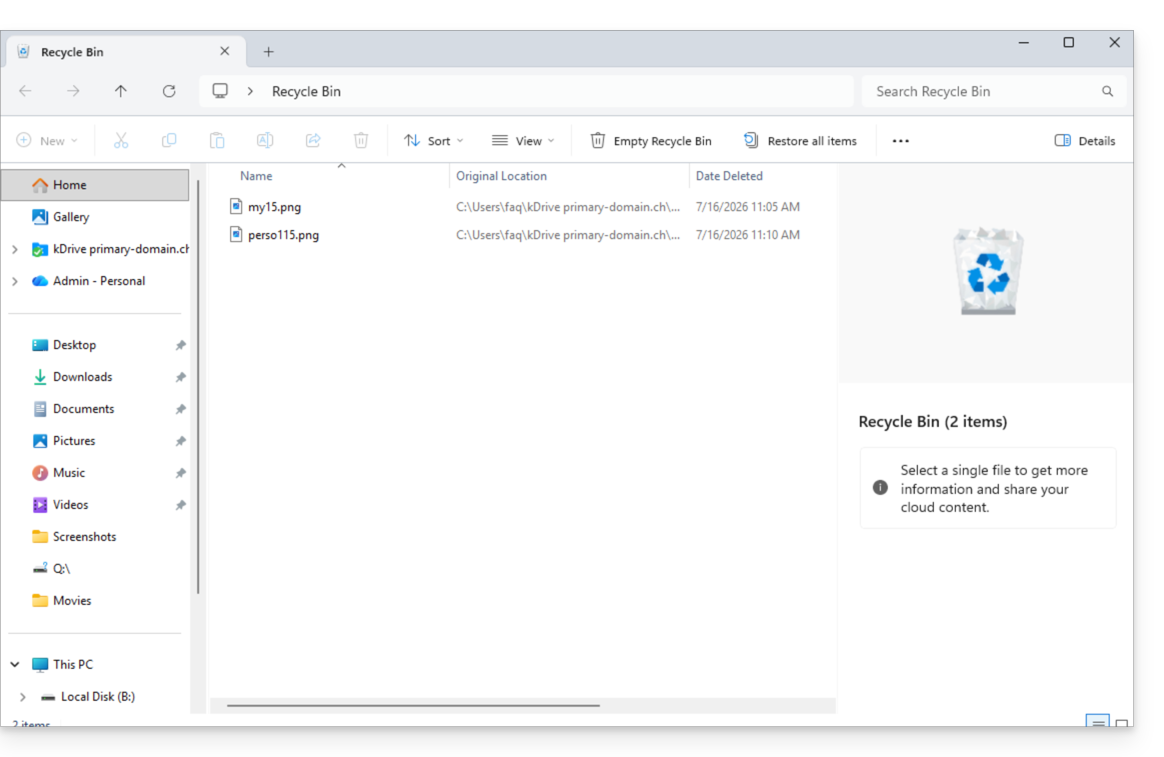
- This action is synchronized, so the file will also be moved to the kDrive web app's trash.
ACTIVITY Menu
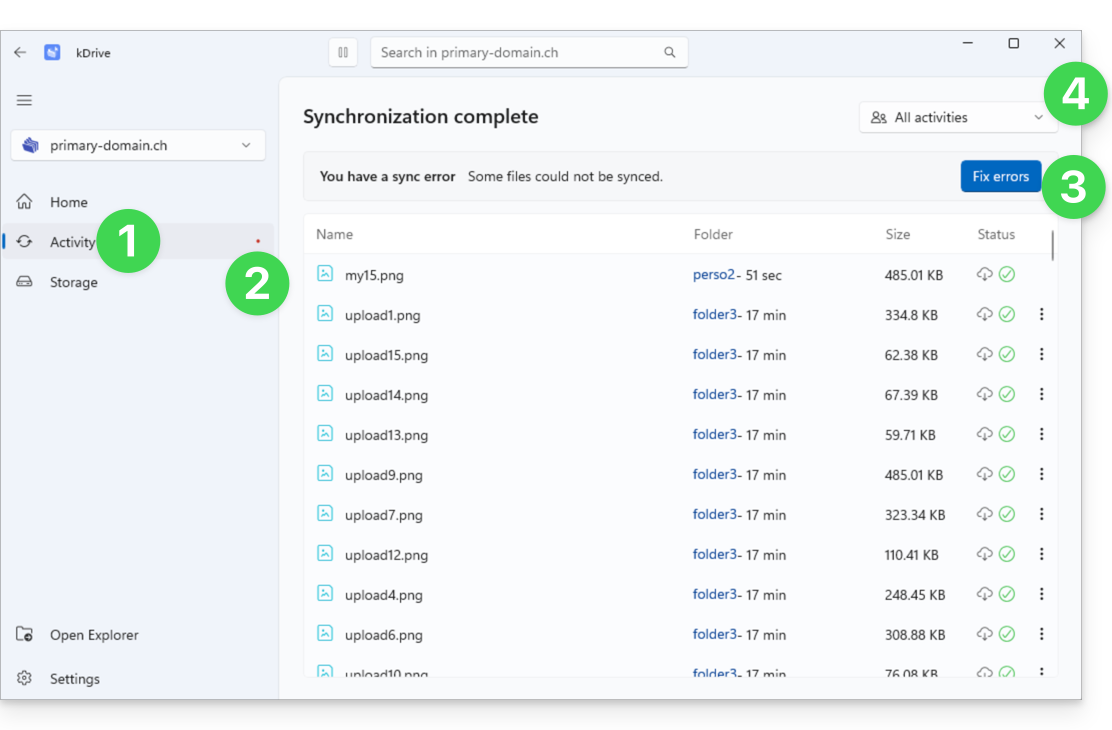
Click on Activity to access the view dedicated to operations and any synchronization issues:
- The Activity menu displays the latest operations that have occurred (new file synchronization, deletion, etc.).
- A red dot indicates warnings related to potential synchronization errors.
- The button to correct errors provides details about the current issues.
- A menu allows you to filter activities based on your personal usage:
STORAGE Menu
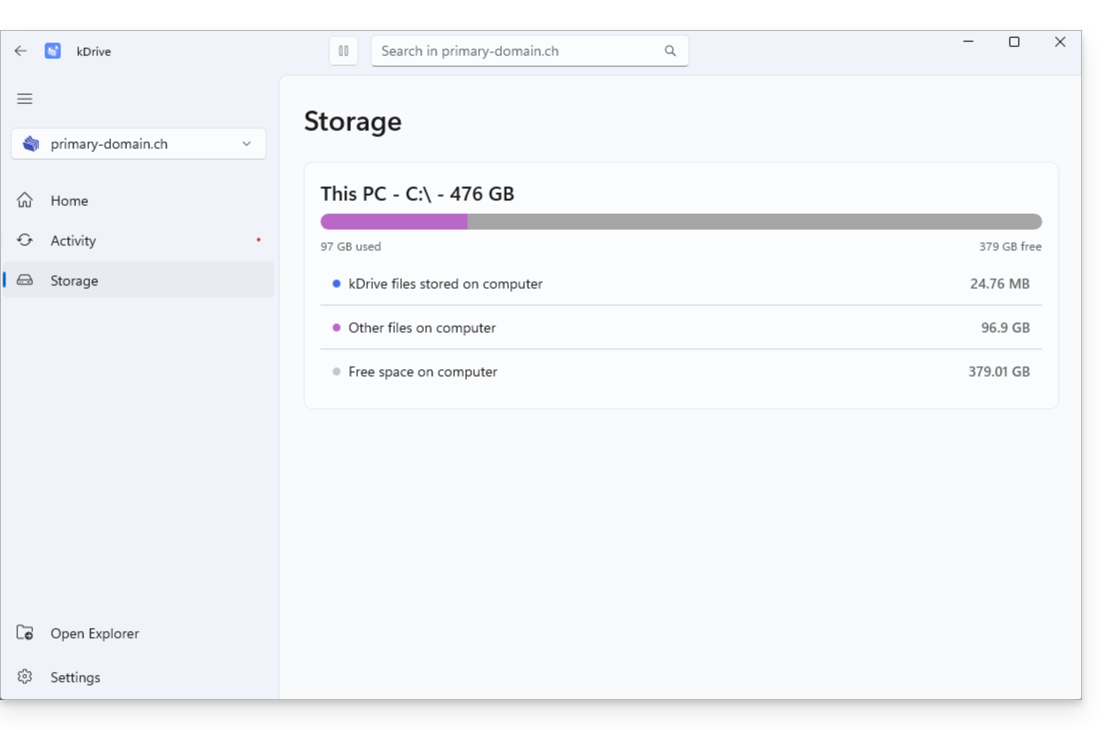
Click on Storage to access a clear overview of the space occupied by your data:
- The Storage menu allows you to view the space occupied by kDrive on your hard drive, which will vary depending on whether or not Online / Offline mode is enabled (❓: help), and to see the available space on your computer:
SETTINGS: General
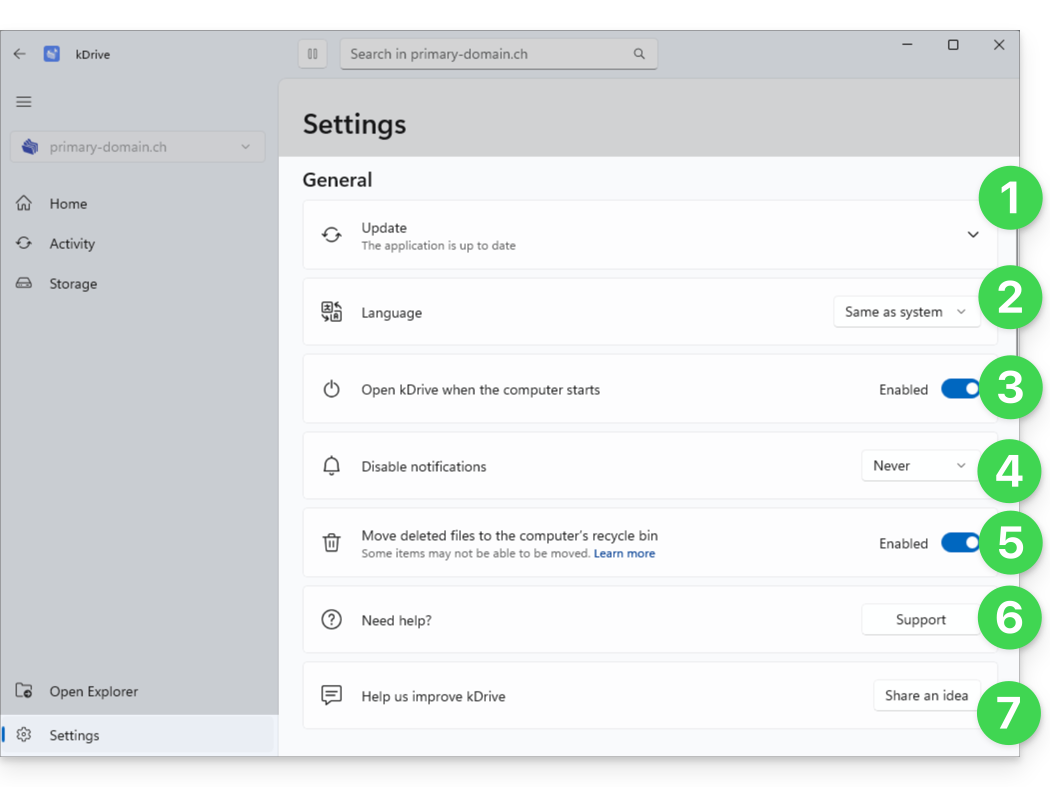
To help you quickly configure your kDrive:
- Version and update, Beta program
- Language settings
- Automatically start kDrive when the computer starts
- Manage notifications in case of an event.
- To choose whether deleting a file on the web app or the mobile app should move the file synchronized with this desktop app to the computer's recycle bin, activate the toggle switch.
- Link to Infomaniak support
- Suggest an improvement idea:
SETTINGS: Account & synchronization management
Centralized navigation between your different kDrive accounts:
- One login ID can be used for multiple kDrive accounts (and you can choose which ones to synchronize).
- Other login IDs can be entered to synchronize more kDrive accounts on the same device:
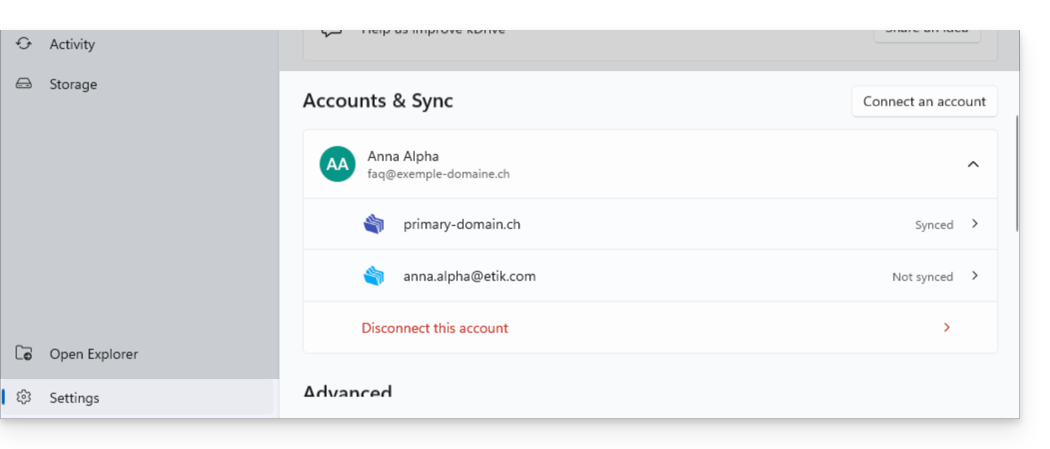
- Once identified, the different kDrive accounts are accessible at the top left of the interface:
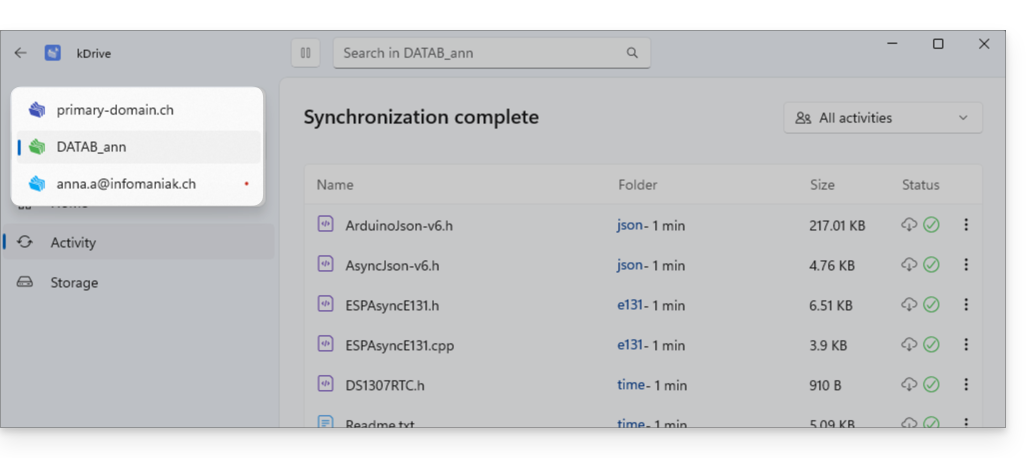
- They can be managed directly from the settings:
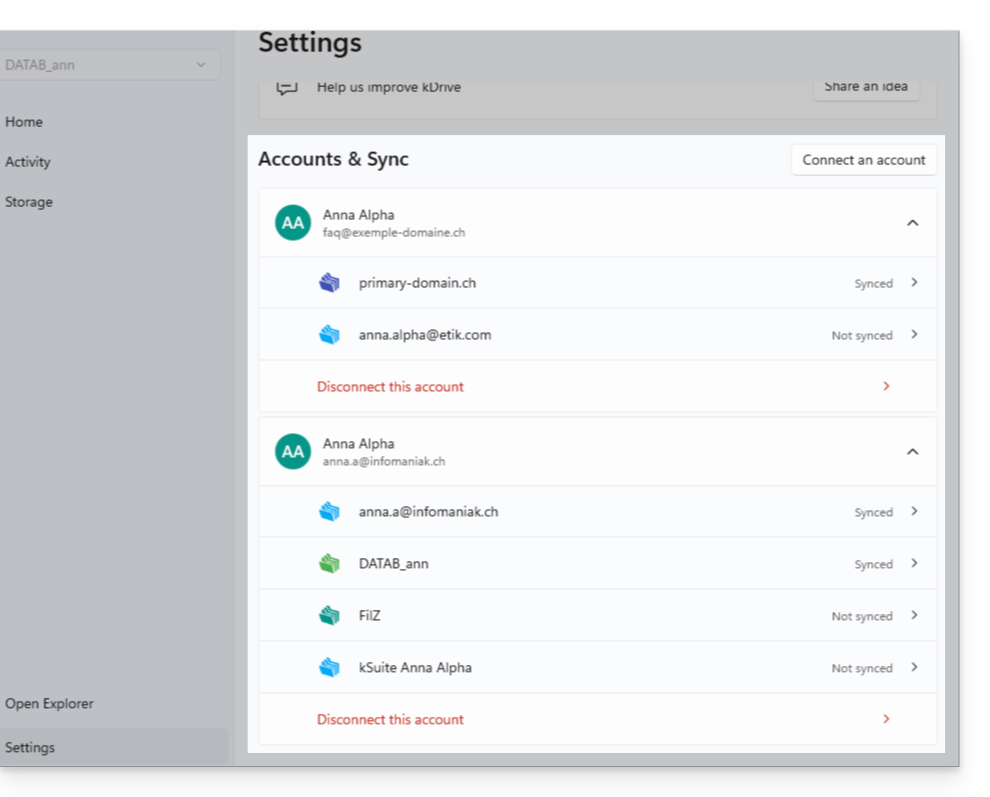
- They can be managed directly from the settings:
Advanced settings
Useful for gathering information in the event of a problem:
- Synchronization rules (see the dedicated chapter at the bottom of this guide)
- Tracking information and settings
- Proxy configuration (optional)
- Log management / Debug (❓: help)
- Version number & licenses:
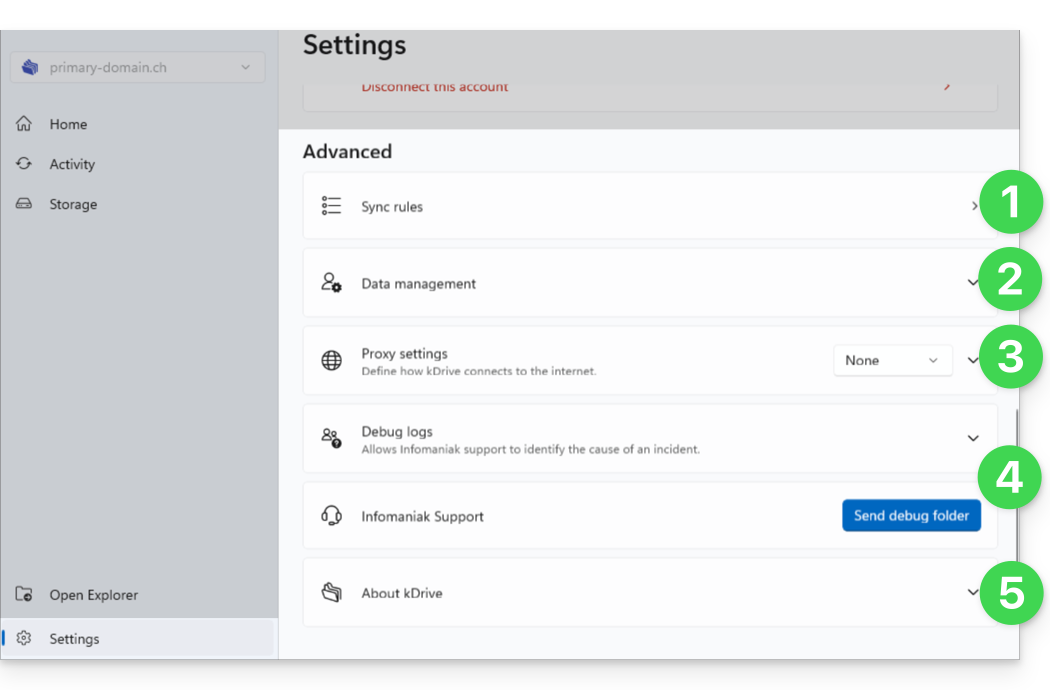
Finding your synchronizations after the update
Your kDrive folders, accessible from the File Explorer in Windows (on the left below) and their synchronized equivalent on Infomaniak's servers (on the right below), can be accessed with one click from the home page: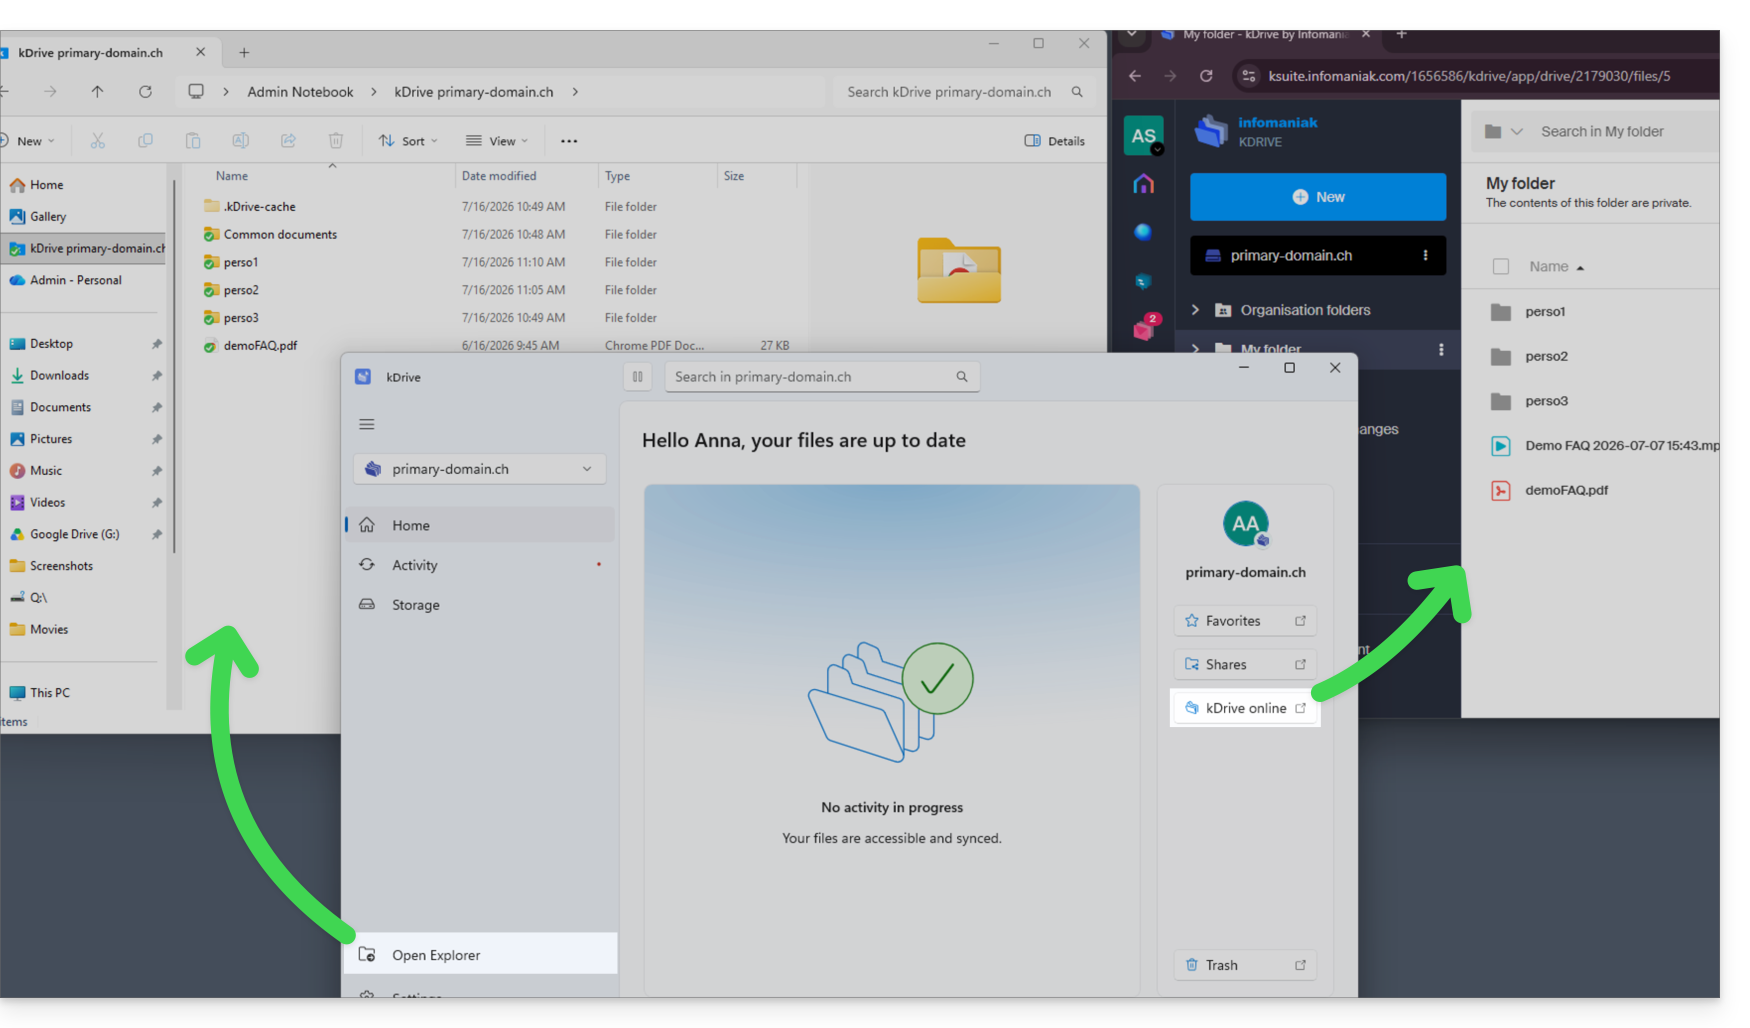
The principle is the same on macOS.
Troubleshooting a missing file issue
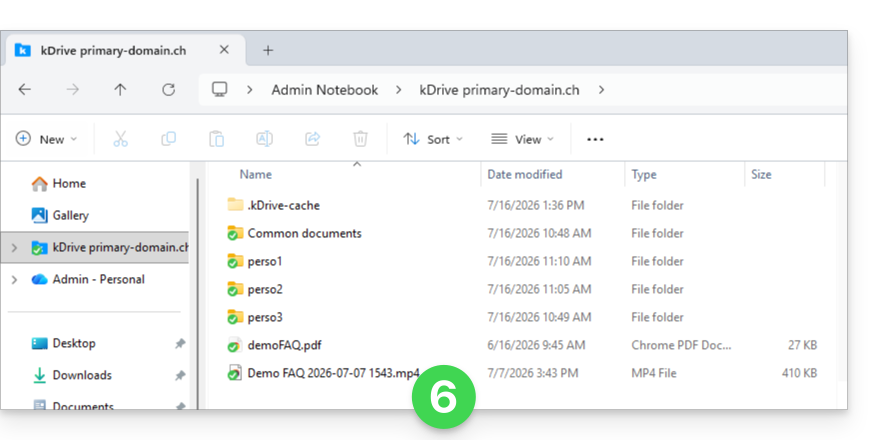
In this example, you will notice a video file present in the online version on the right, but absent on the synchronized device on the left. This is normal: the file name, originating from the macOS environment, is incompatible with Windows because it contains the forbidden character “:”. If you encounter this type of problem, open the Activities section to view the operations in progress, the recently processed files, and any errors reported by the application:
- A red dot therefore appears on the kDrive Windows app…
- A solution is proposed: rename the file:
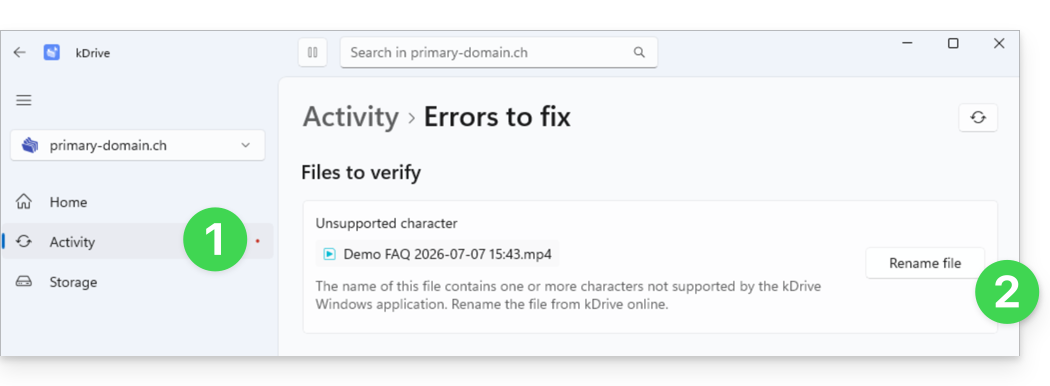
- Clicking the button takes you to kDrive Web so you can rename the file:
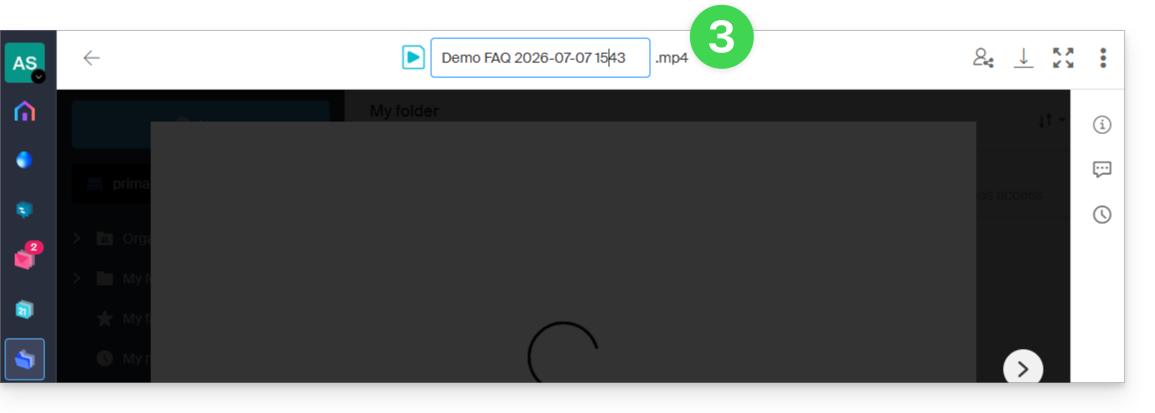
- Once renamed, the missing synchronization will occur, and an activity notification will appear in the bottom right corner of your screen:
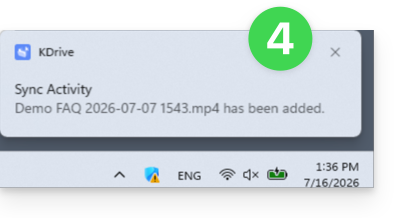
- The error will disappear in the Activity section of the kDrive Windows app:
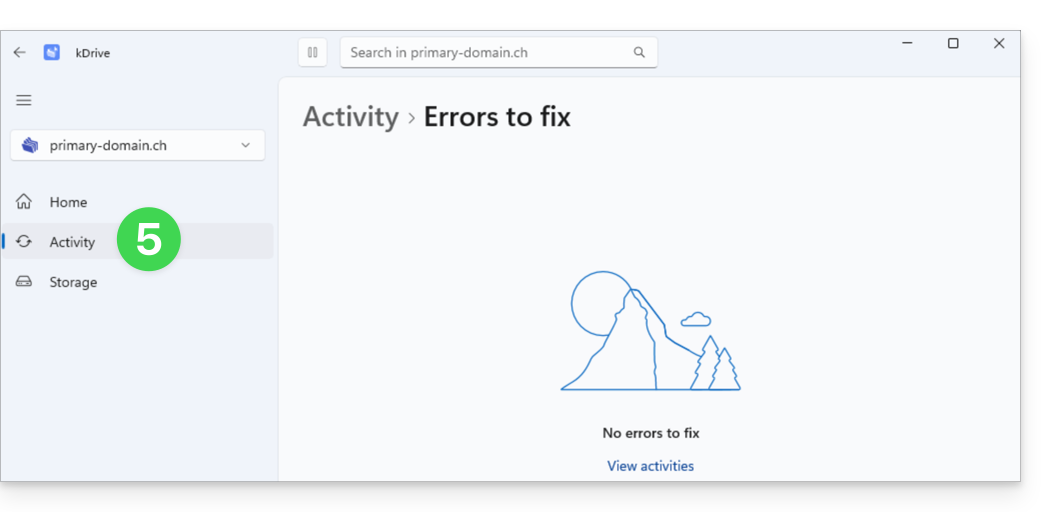
- The file is now synchronized and visible on all devices:
Link to this FAQ: https://faq.infomaniak.com/2923
Has this FAQ been helpful?
This guide details how to manually back up data using the Cyberduck application (macOS / Windows) via the OpenStack Swift protocol on Swiss Backup, the backup solution in a Swiss independent cloud.
Introduction
Configuring Cyberduck
Prerequisites
- Have an Swiss Backup Infomaniak account with an available device quota (minimum 1) for a Cloud backup.
- Add 1 device of type Cloud to obtain the OpenStack Swift parameters.
- Download and install Cyberduck (macOS / Windows).
- Familiarize yourself with the official documentation https://docs.cyberduck.io/protocols/openstack/infomaniak/.
To configure a new backup:
- Open the Cyberduck application.
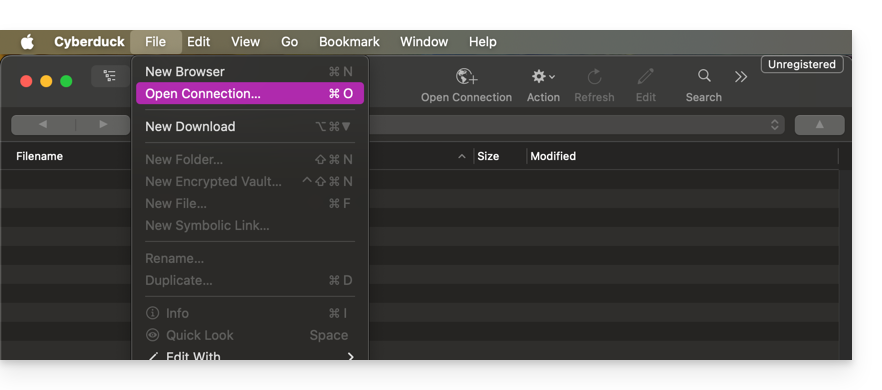
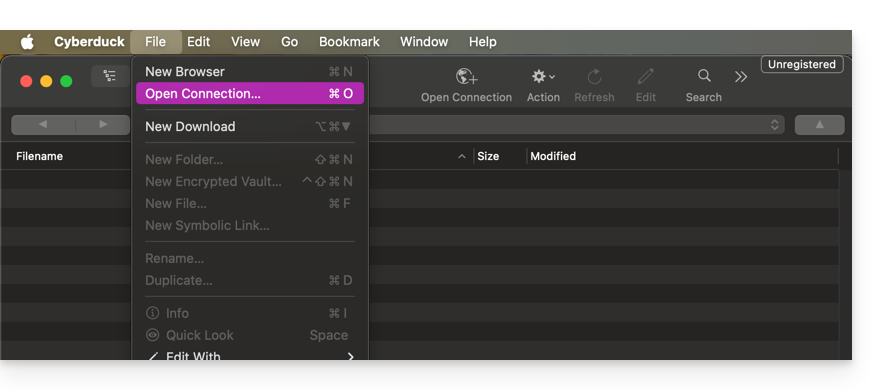
- Click on Open Connection:
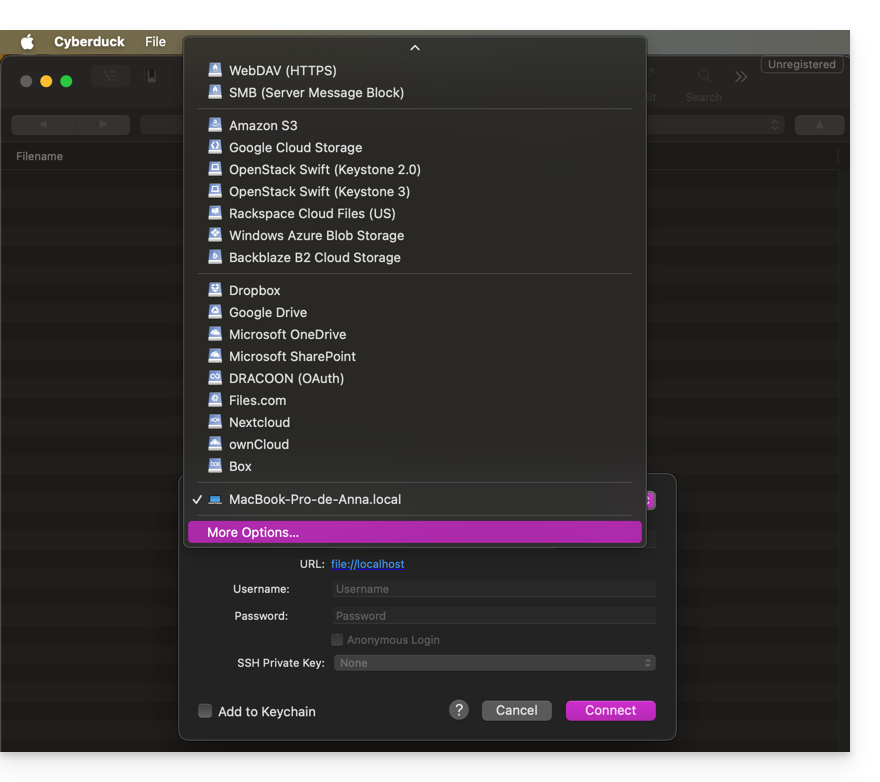
- Click on the dropdown menu and choose More Options:
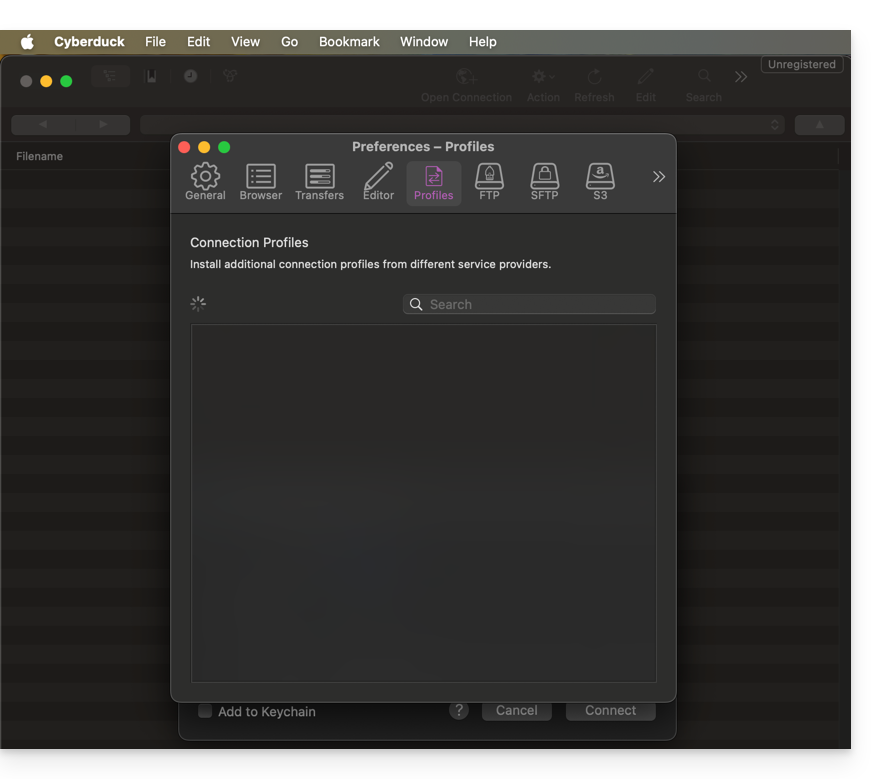
- Wait for the additional profiles to load:
- Search for and select the profiles corresponding to Infomaniak Swift:
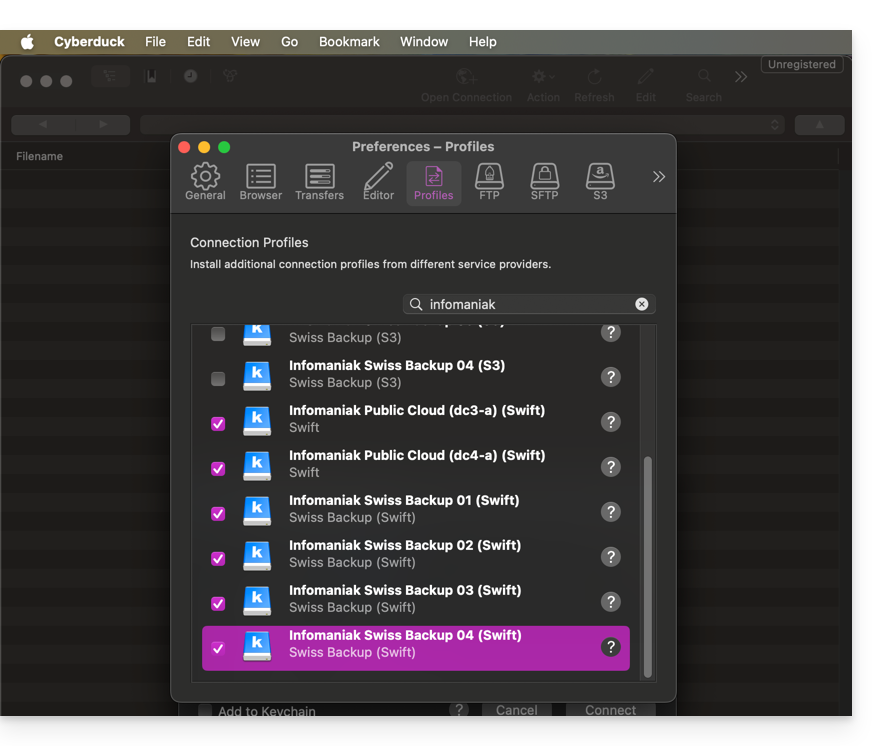
- If necessary, check your cluster number, which is indicated in the Manager under Cloud storage information, in the "Location" section.
- Close the window and restart Cyberduck if the profiles do not appear in the drop-down menu in step 3 above.
- Choose the corresponding profile:
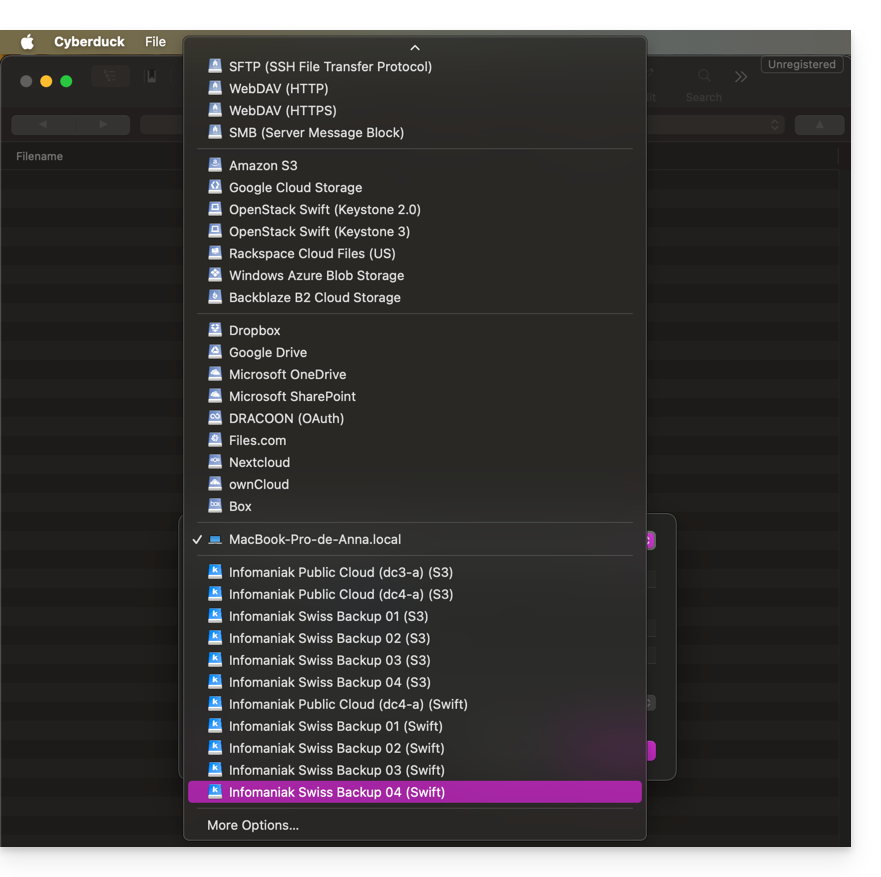
- Fill in the fields according to the information specific to your device:
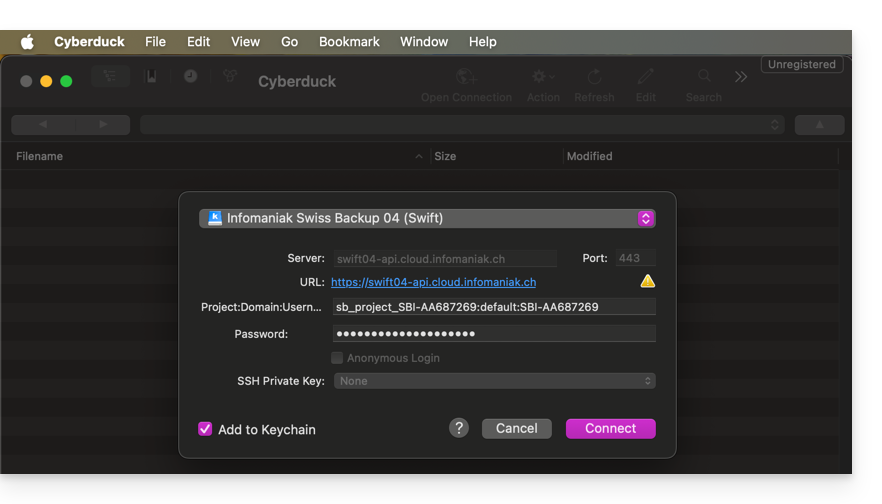
- Click the Connect button to establish the Swift connection.
Link to this FAQ: https://faq.infomaniak.com/2282
Has this FAQ been helpful?
This guide details how to manually back up data using the Cyberduck application (macOS / Windows) via the SFTP protocol on Swiss Backup, the backup solution in a Swiss independent cloud.
Introduction
Configure Cyberduck
Prerequisites
- Have an Swiss Backup Infomaniak account with available device quota (minimum 1) for a Cloud backup.
- Add a Cloud device to obtain the SFTP settings.
- Download and install Cyberduck (macOS / Windows).
To configure a new backup:
- Open the Cyberduck application.
- Click on Open Connection:
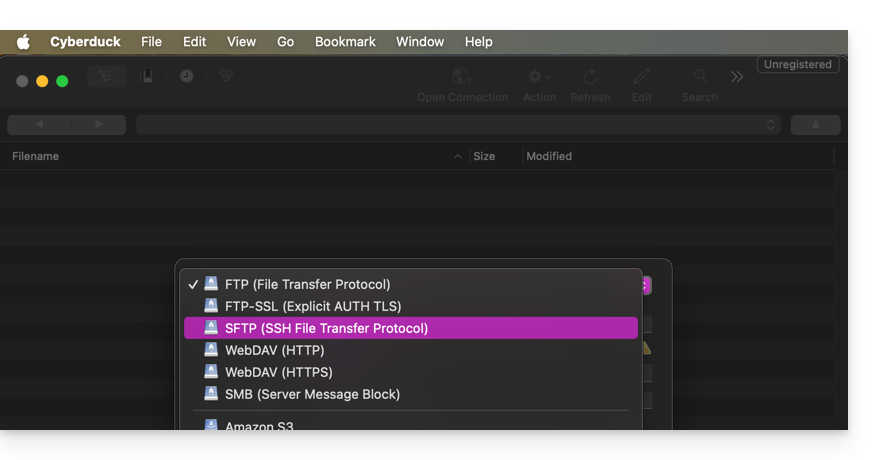
- Choose the corresponding protocol:
- Enter the information specific to your device (refer to this other guide):
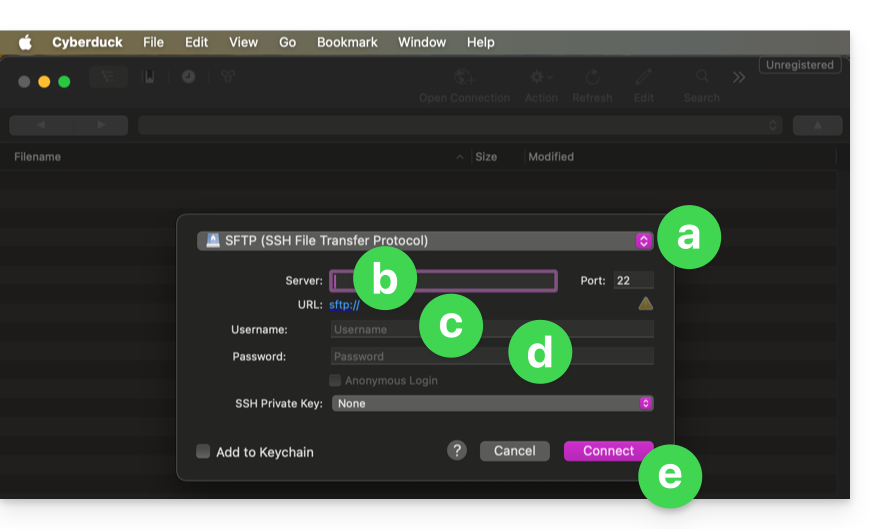
- In the drop-down menu, select:
SFTP(SSH File Transfer Protocol). - Server:
sftp.swiss-backup02.infomaniak.com - Username: the name of your Swiss Backup device (e.g.
SBI-MS0020). - Password: the password generated in the email you received after creating your Swiss Backup device.
- Click on Connect.
- In the drop-down menu, select:
Cyberduck allows you to create bookmarks, which are pre-configured access points for easy connection to the FTP storage later. Once the bookmark is created, you can double-click it to connect to the FTP storage.
Link to this FAQ: https://faq.infomaniak.com/2548
Has this FAQ been helpful?
This guide details how to manually back up data using the Cyberduck application (macOS / Windows) via the S3 Compatible protocol on Swiss Backup, the backup solution in a Swiss independent cloud.
Introduction
Configuring Cyberduck
Prerequisites
- Have an Swiss Backup Infomaniak account with an available device quota (minimum 1) for a Cloud backup.
- Add 1 device of type Cloud to obtain the S3 Compatible parameters.
- Download and install Cyberduck (macOS / Windows).
- Consult the official documentation https://docs.cyberduck.io/protocols/openstack/infomaniak/.
To configure a new backup:
- Open the Cyberduck application.
- Click on Open Connection:
- Click on the dropdown menu and choose More Options:
- Wait for the additional profiles to load:
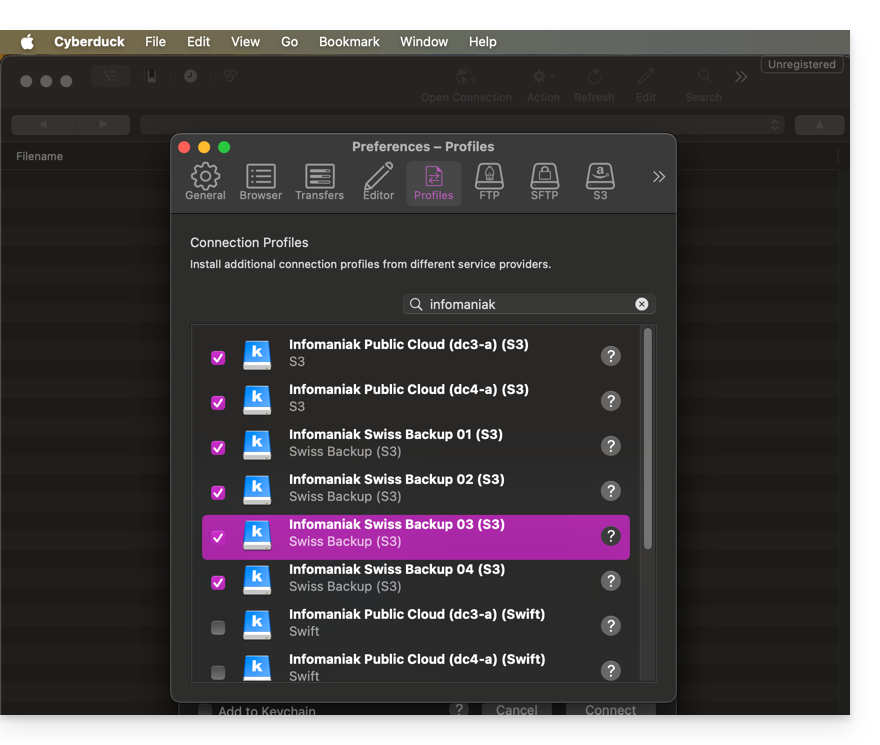
- Search for and select the profiles corresponding to Infomaniak S3:
- If necessary, check your cluster number, which is indicated in the Manager under Cloud storage information in the "Location" section.
- Close the window and restart Cyberduck if the profiles do not appear in the drop-down menu in step 3 above.
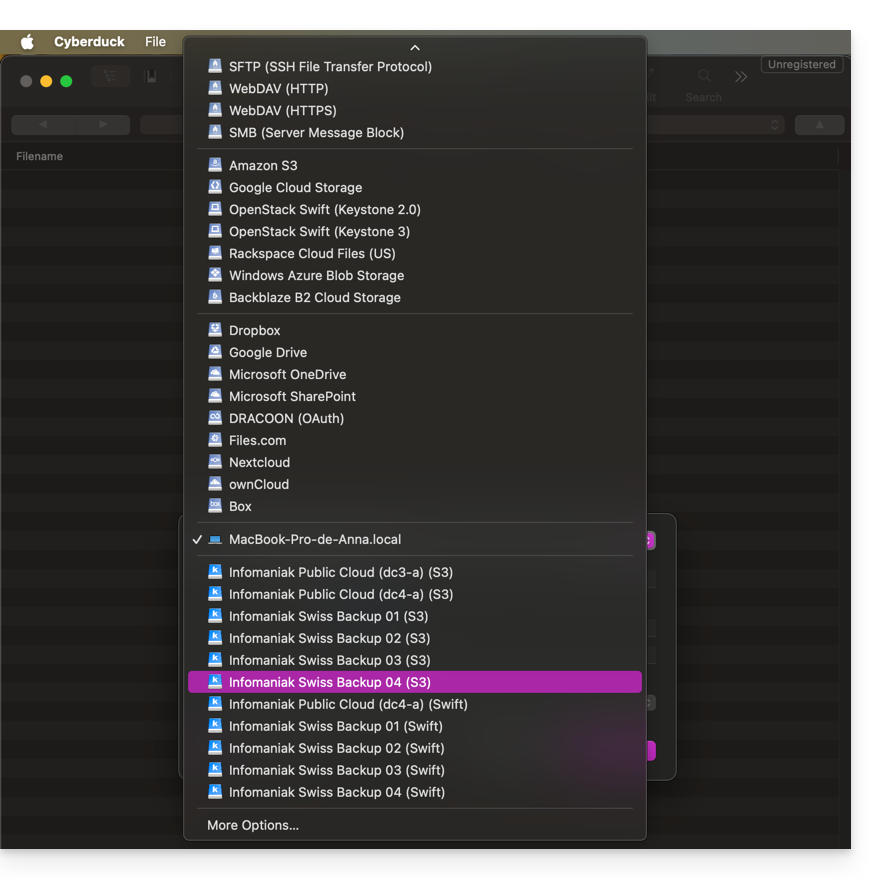
- Choose the corresponding profile:
- Fill in the fields according to the information specific to your device:
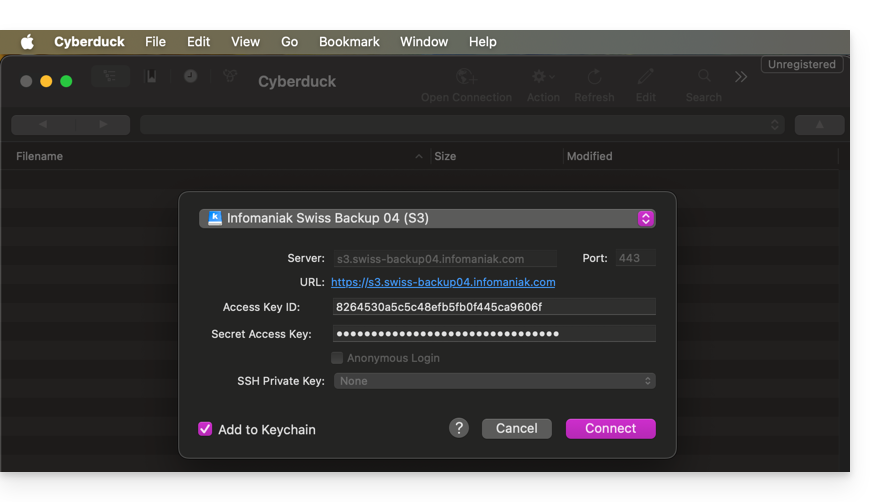
- Click the Connect button to establish the S3 connection.
Link to this FAQ: https://faq.infomaniak.com/2795
Has this FAQ been helpful?
This guide explains how to retrieve and transmit debugging information (logs, reports, and error logs) from the desktop app kDrive (desktop application on macOS / Windows / Linux) in case of an issue between the app and your device.
Introduction
- If the kDrive app synchronization with your device is blocked, which may have various causes (file type, name length, etc.), enabling the logs allows you to record the application's activity from that point on, in order to facilitate the analysis of the problem by Infomaniak Support.
Record and share the logs with Support
Desktop app v4.x
When requested by Infomaniak Support:
- Launch kDrive on your device: the app icon should be visible in the top right corner on macOS/Linux, and in the bottom right corner on Windows (❓: help).
- Right-click on the icon and choose Settings:
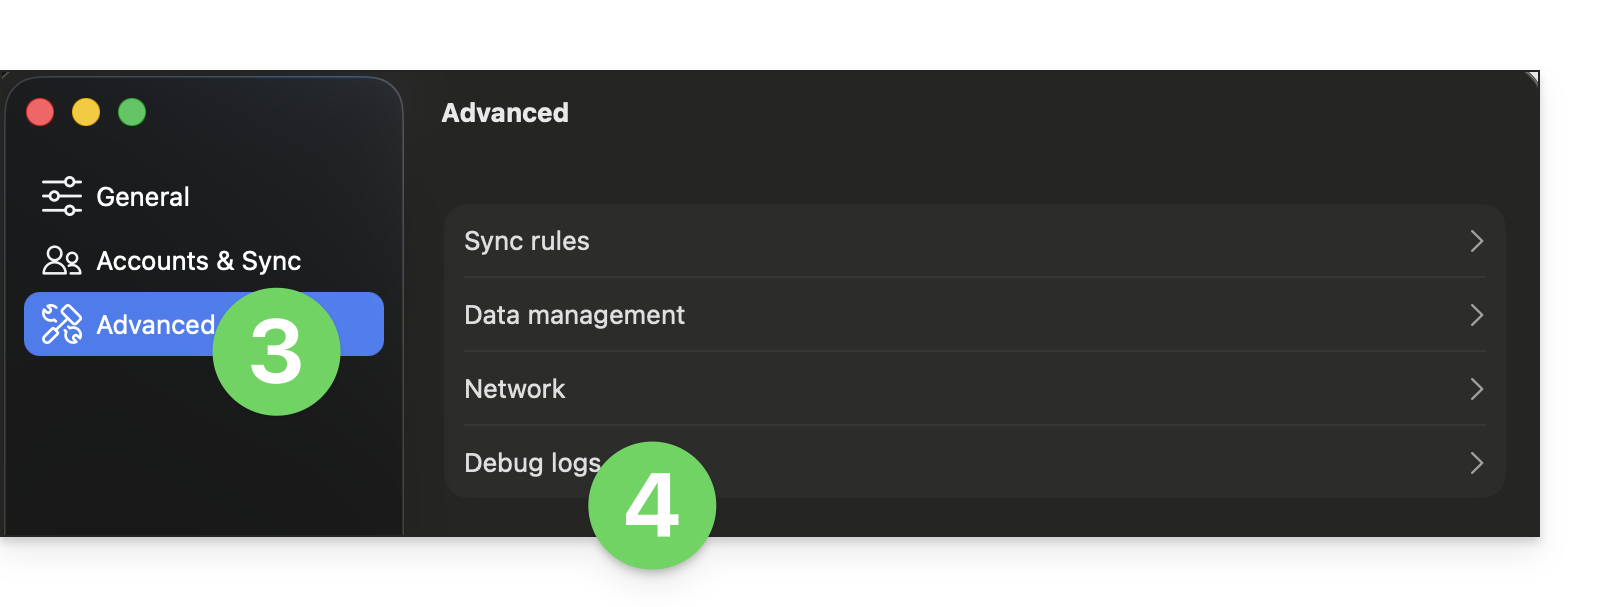
- Go to Advanced.
- Click on Debug information:
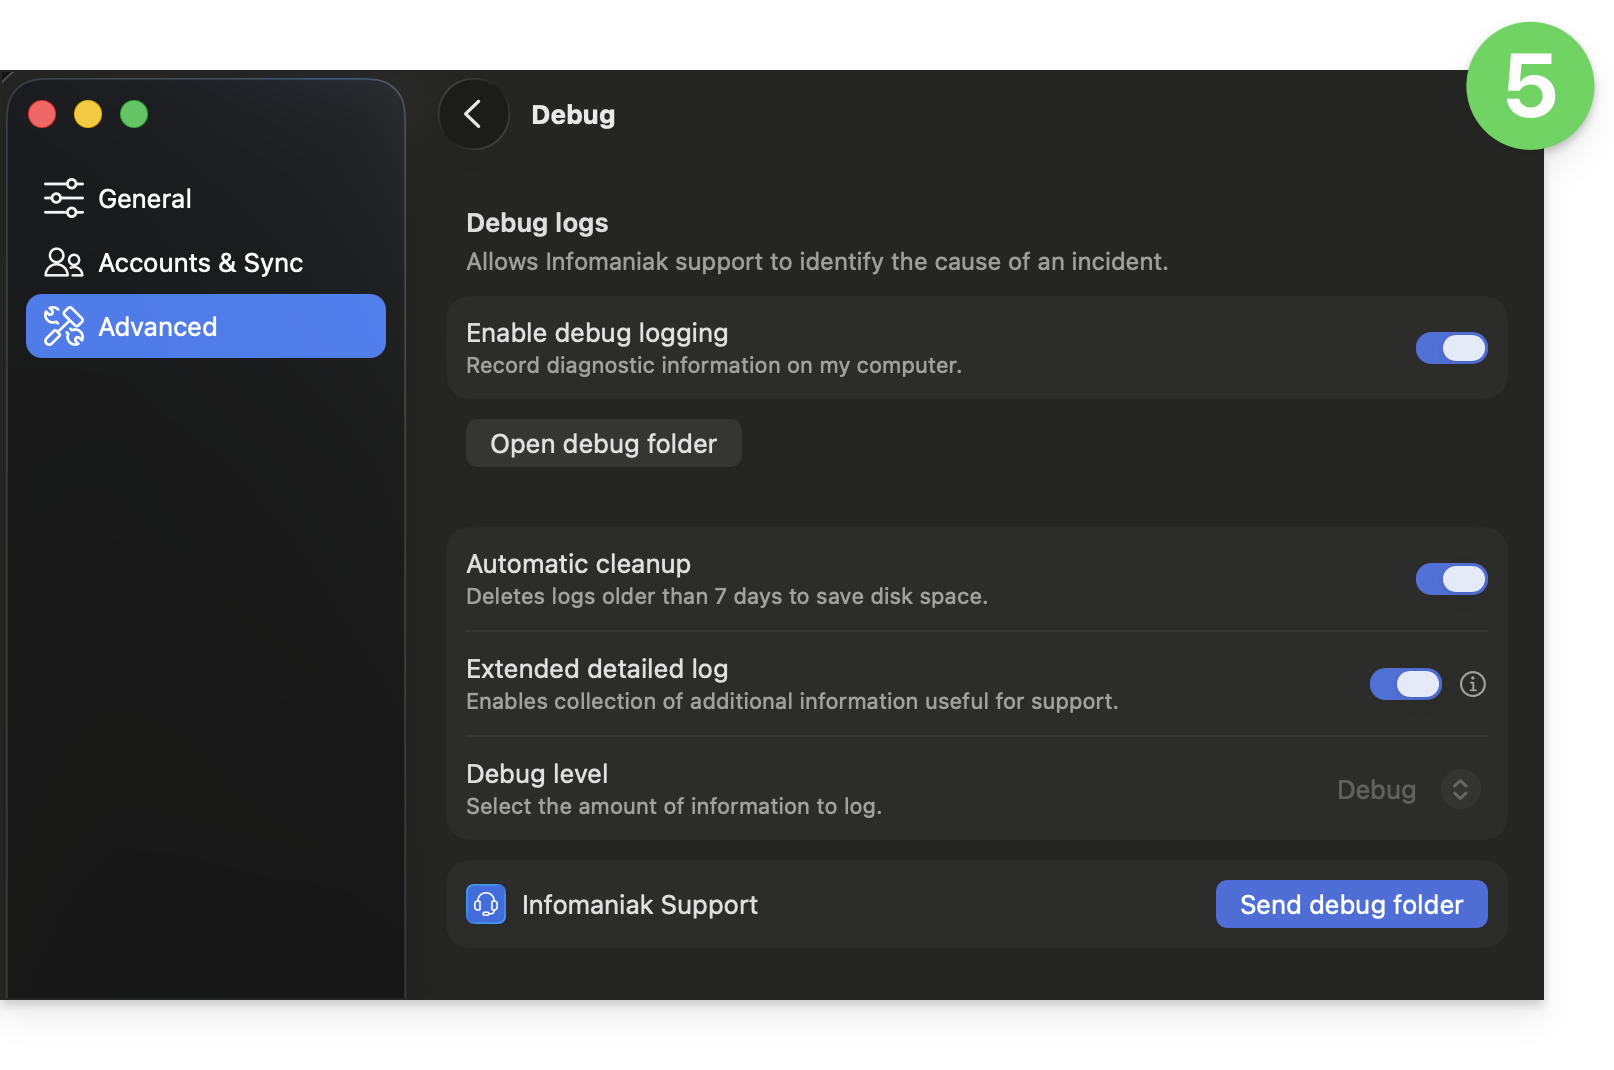
- Activate the various toggle switches as shown in the image below:
- Let the application run for at least 10 minutes.
- Return to the same location 10 minutes later, then click the blue button to share your debugging information with Infomaniak Support, and inform them of this action within the current exchange.
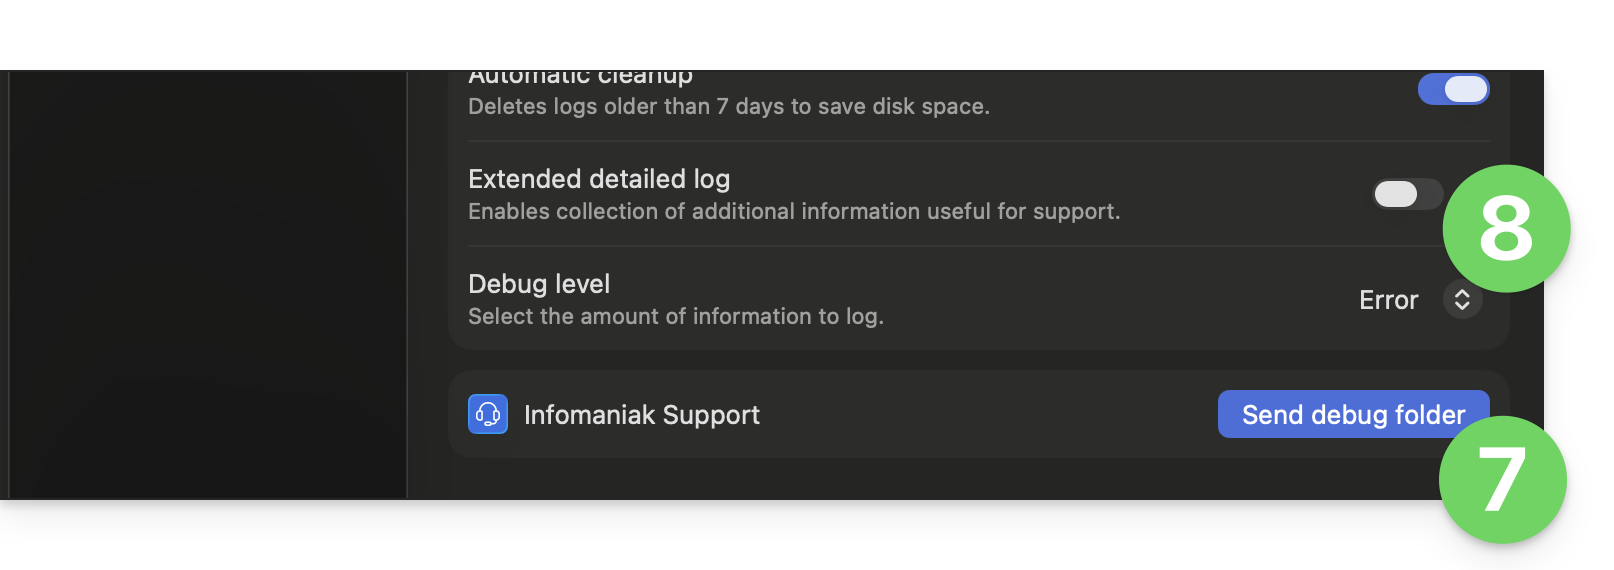
- Disable extended logs and the Debug level:
Desktop app v3.x
When requested by Infomaniak Support:
- Open the kDrive application on your computer.The app icon should be visible in the notification area..
- Left-click on the app icon in the notification area of your computer (top right on macOS, bottom right on Windows, and double left-click in the taskbar on Linux).
- Click on the action menu ⋮ to the right of the application window.
- Select App Preferences:
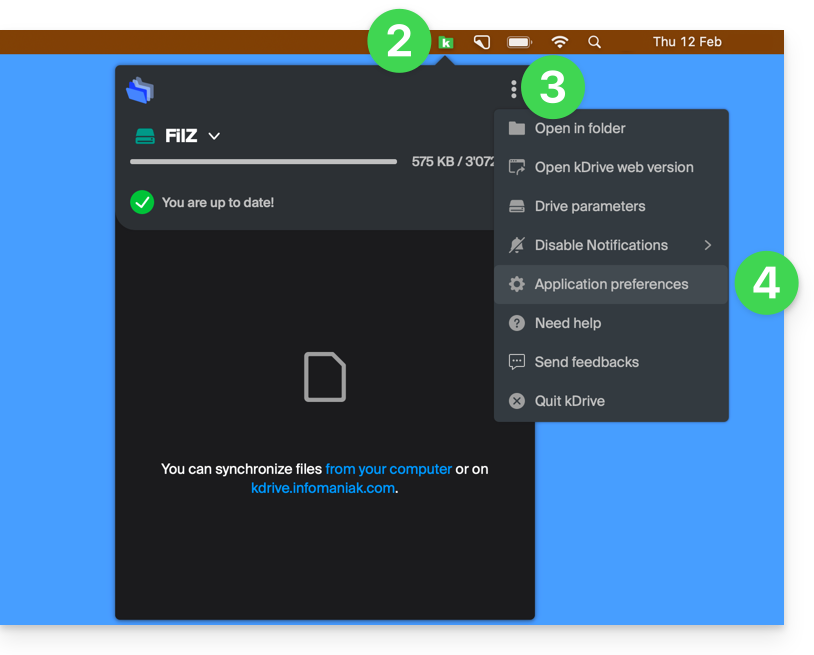
- Scroll down to the Advanced section and click the arrow to the right of Debugging information:
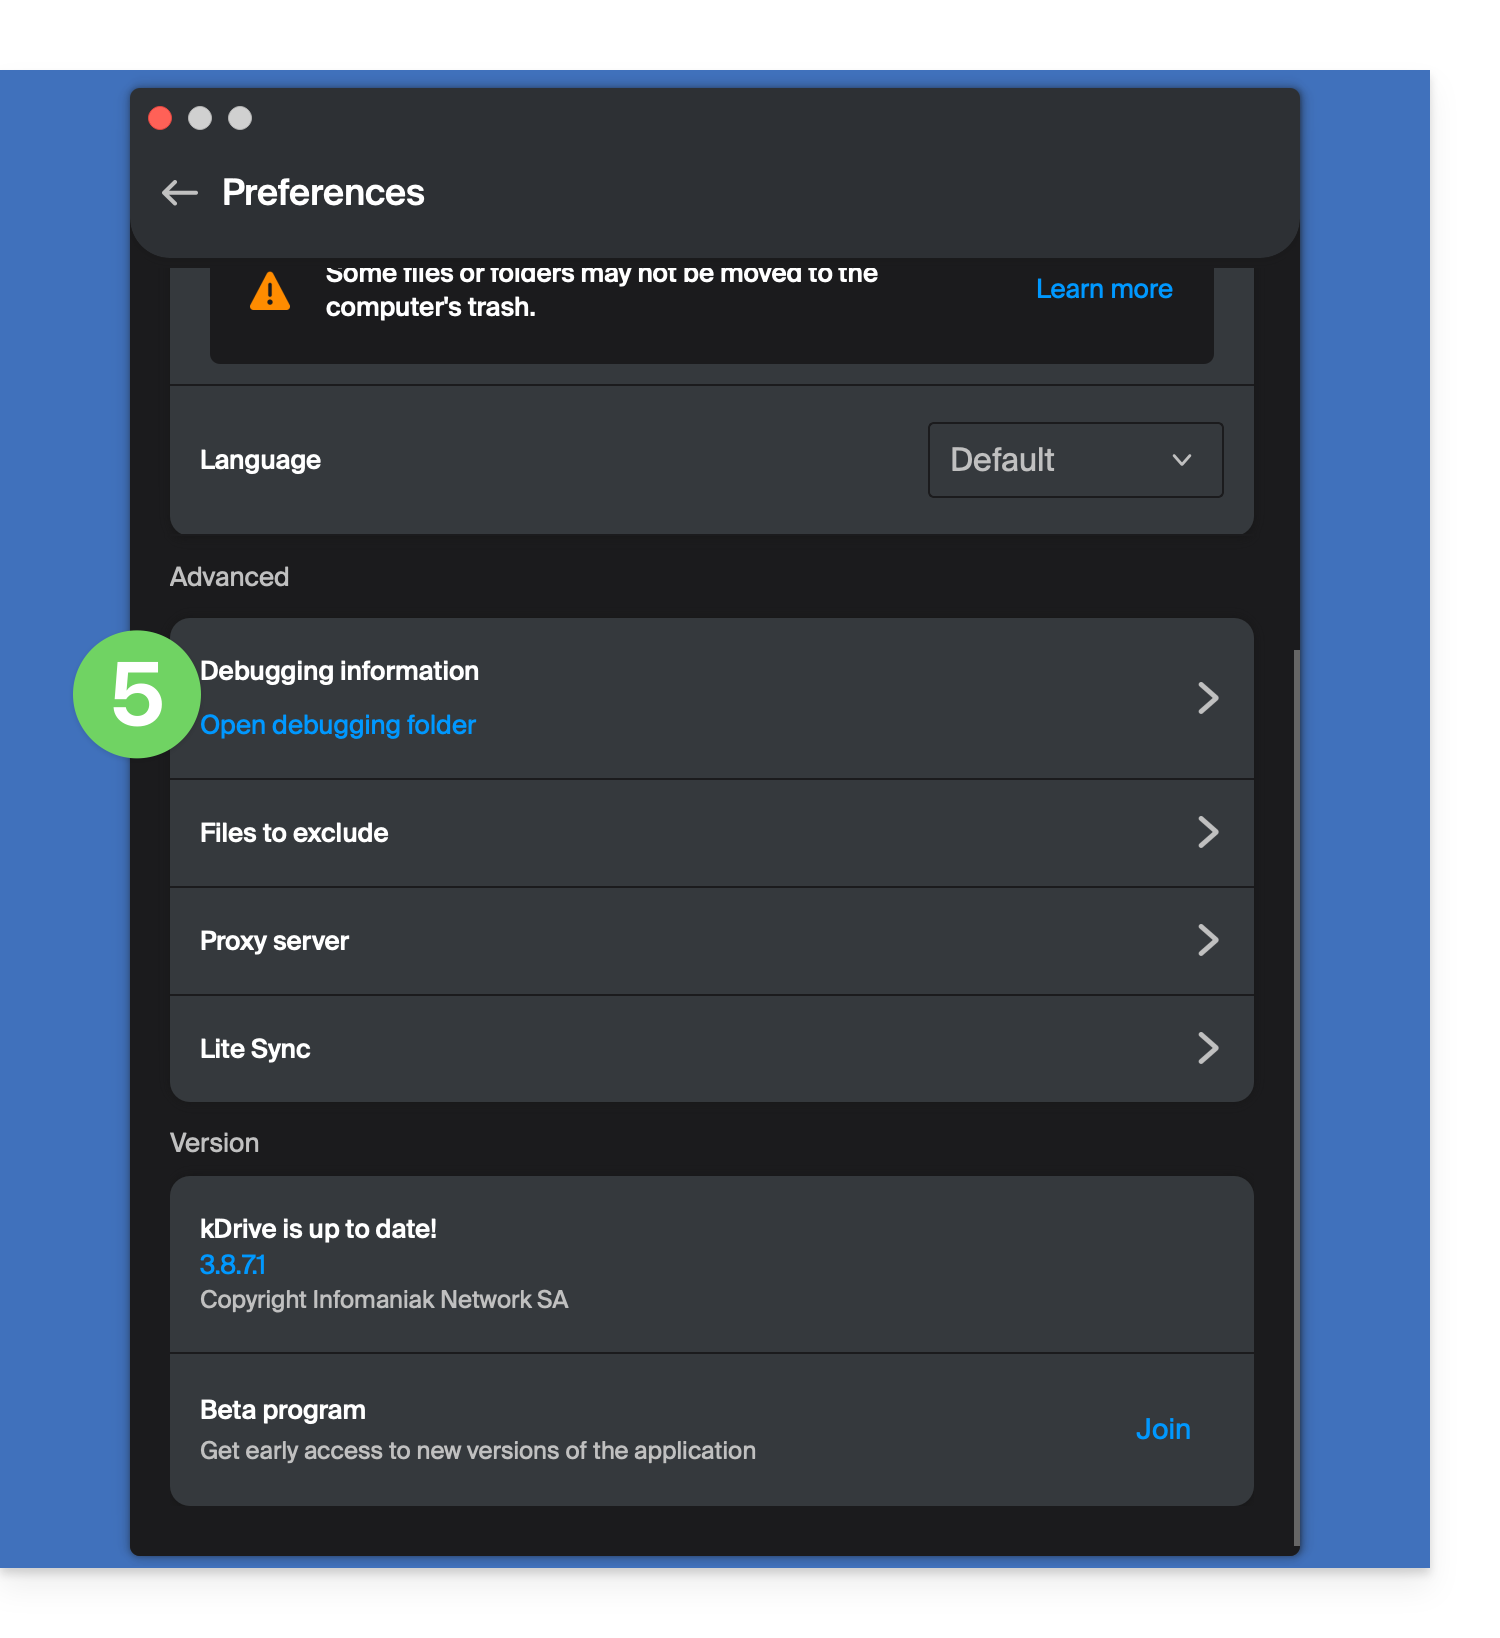
- Check the box for extended logs as shown in the image below.
- Click the SAVE button andlet the application run for at least 10 minutes:
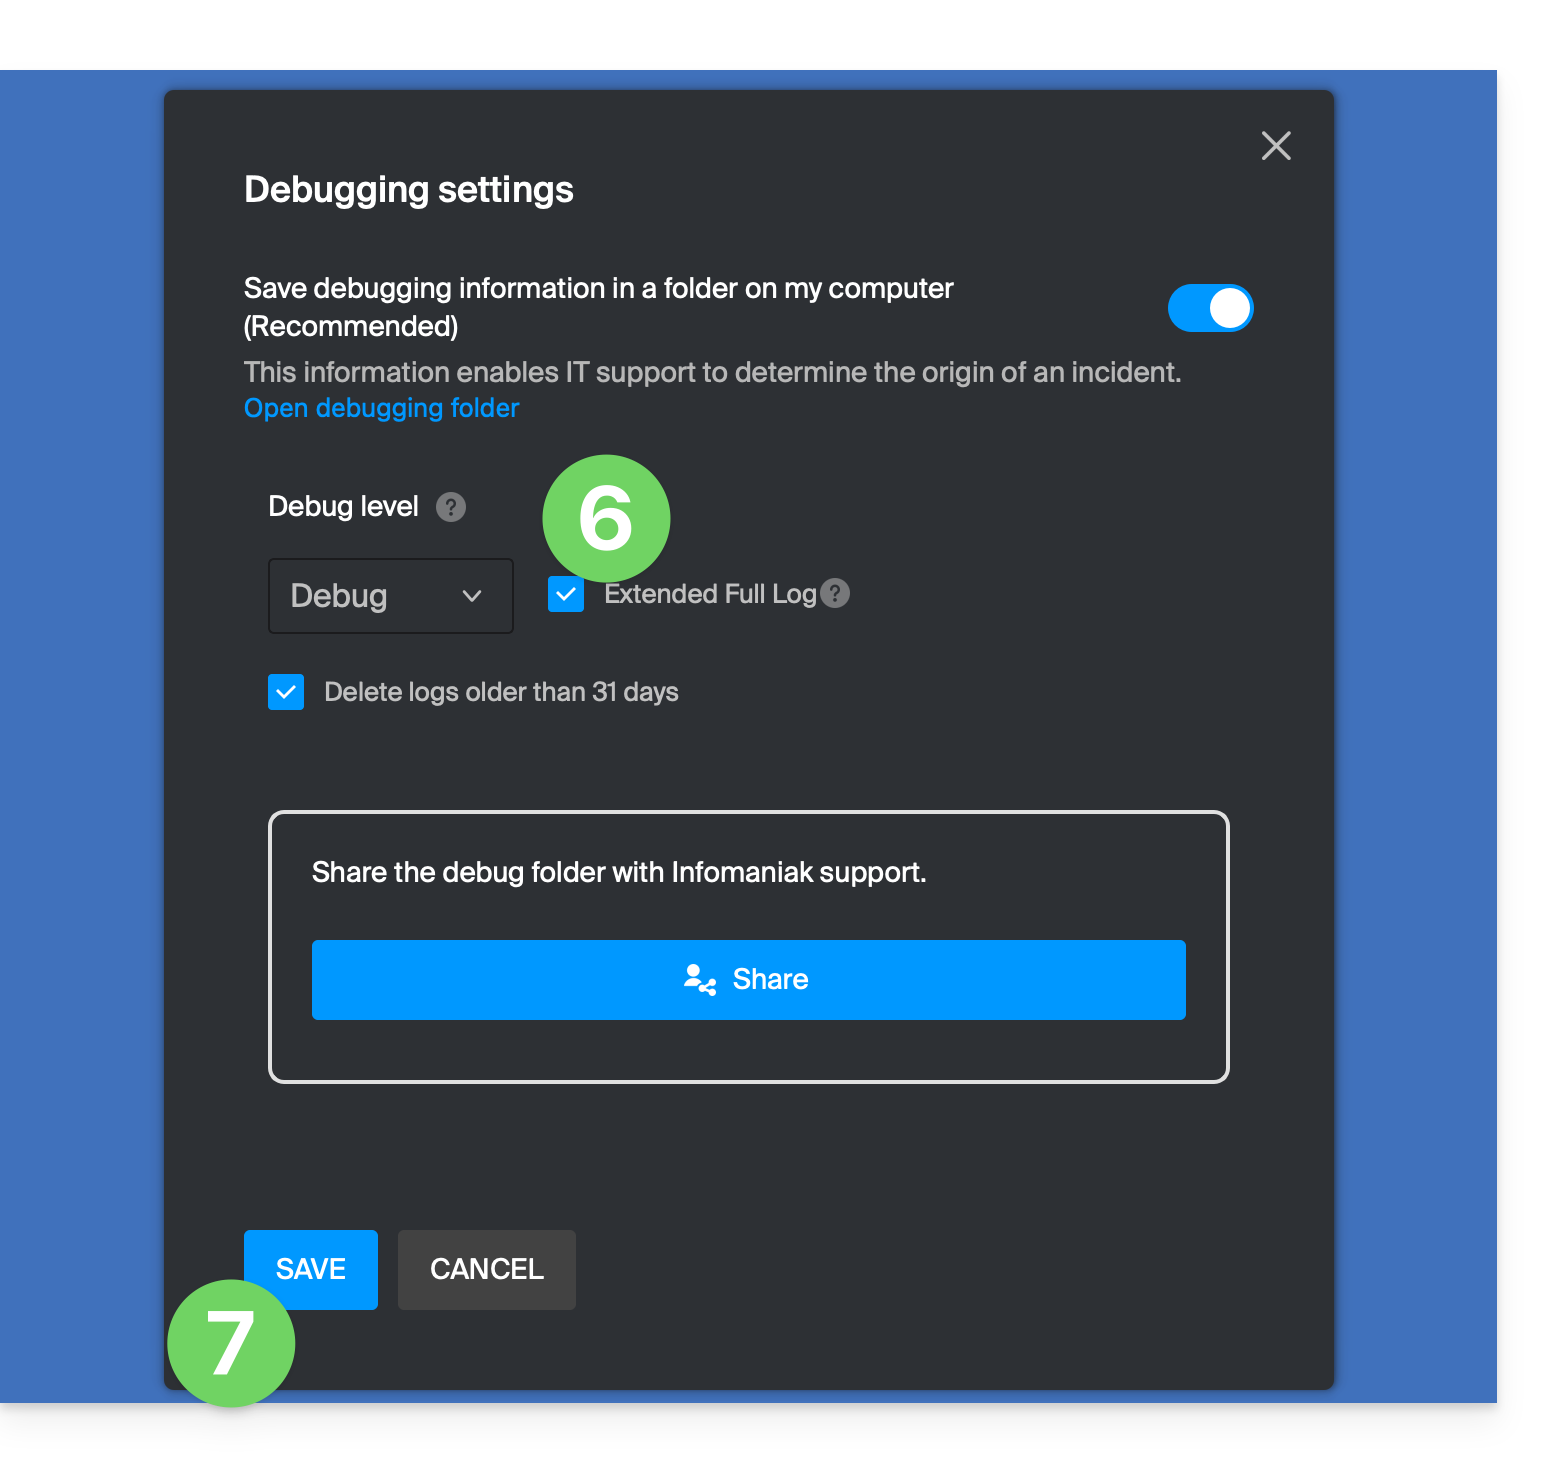
- Return to the same location 10 minutes later (steps 1-6 above) and then click the blue button to share your debugging information with Infomaniak Support:
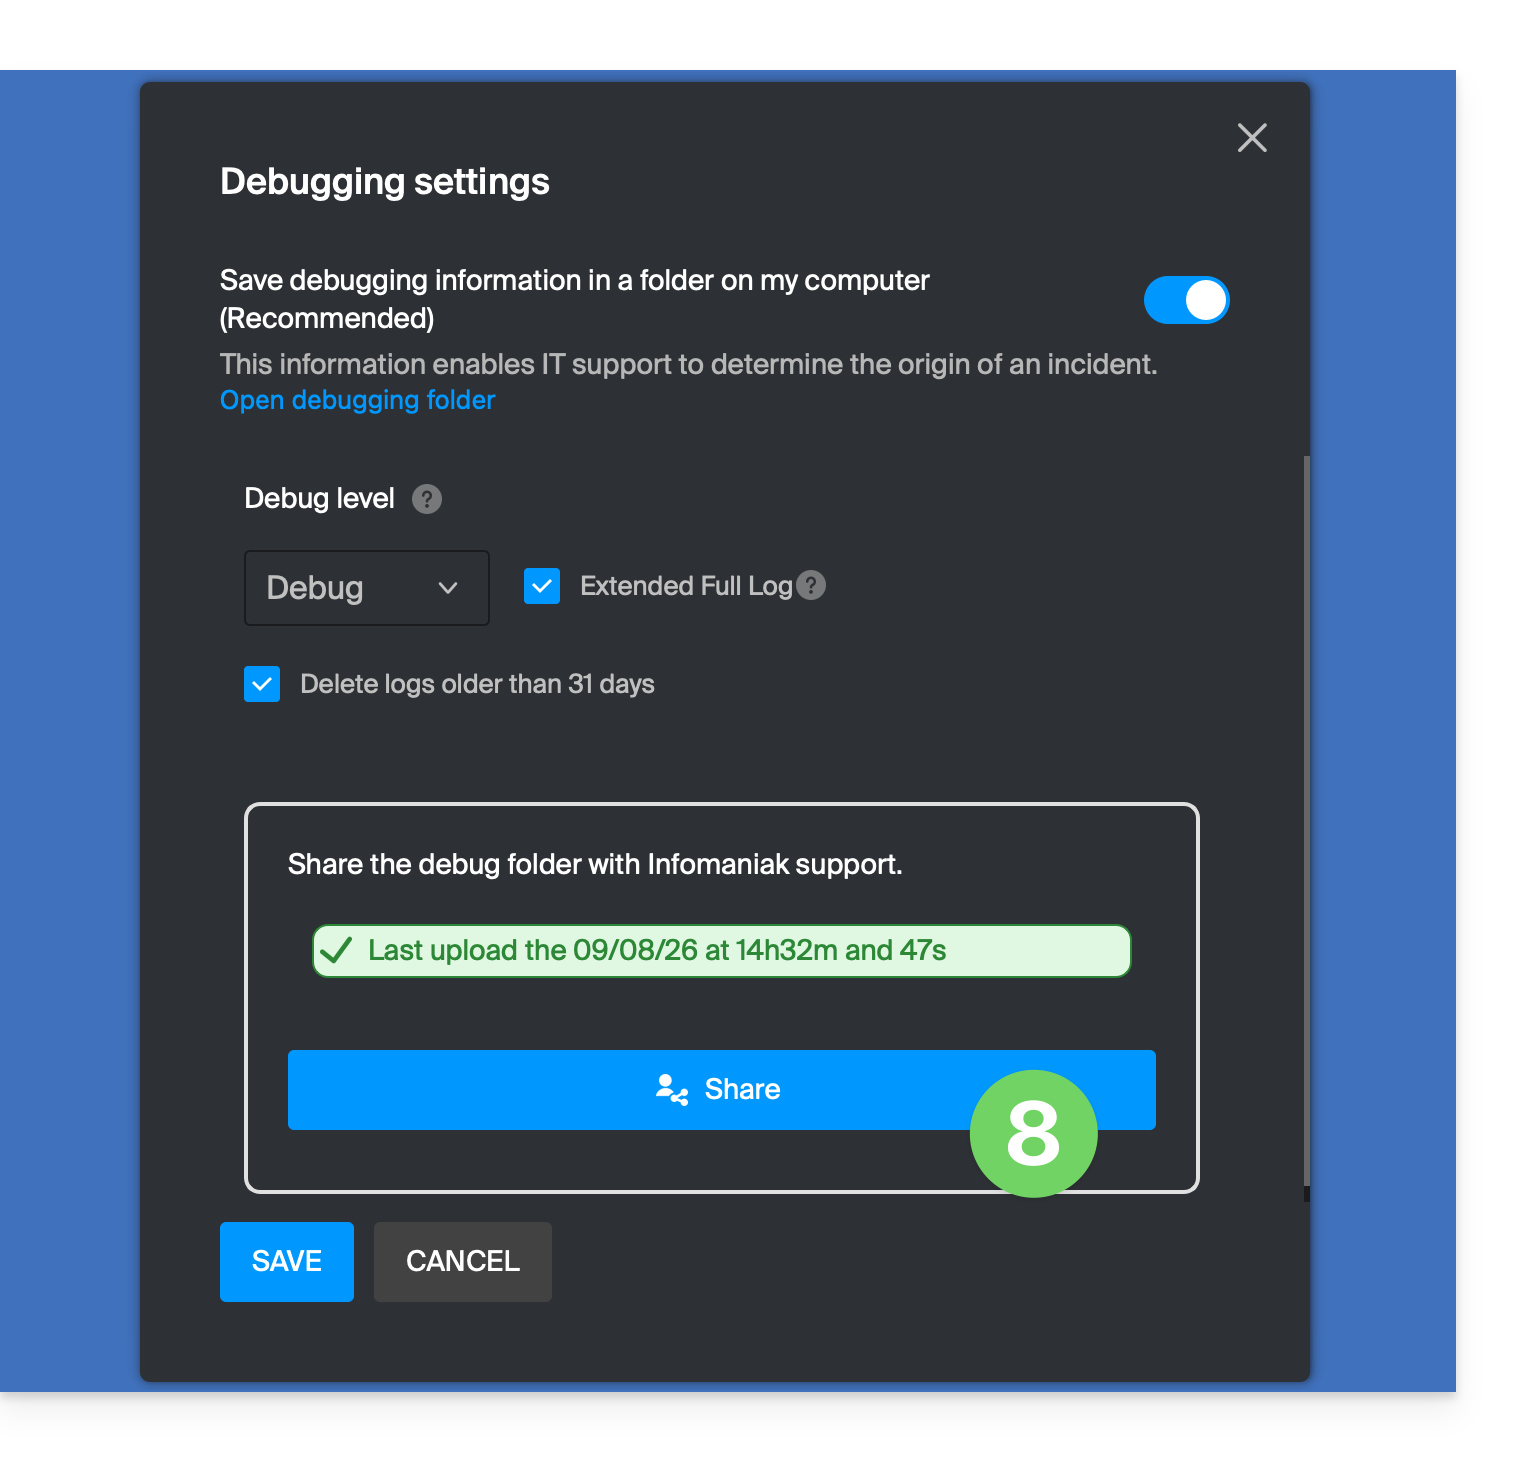
- Inform Infomaniak Support about this action within the current exchange.
Alternative methods
If you encounter any issues with the method above:
- Click on the blue link on the left to Open the debugging folder.
- From this folder, you will have access to all bug reports for the kDrive application on your device:
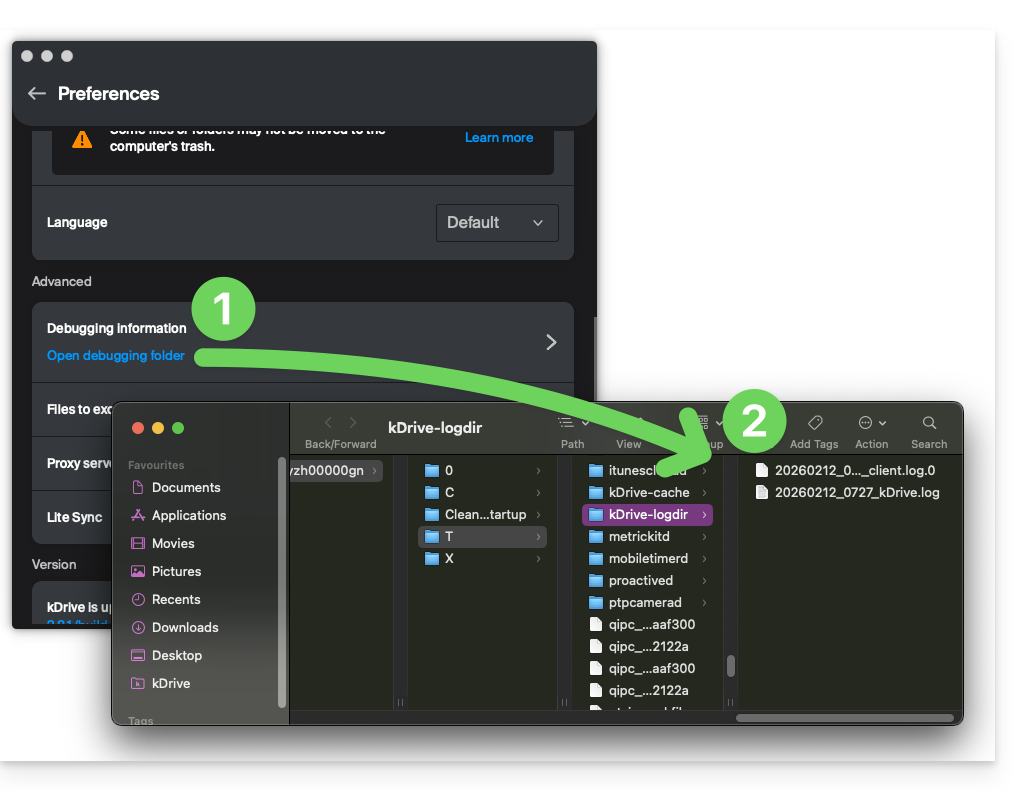
The same applies to v4.x: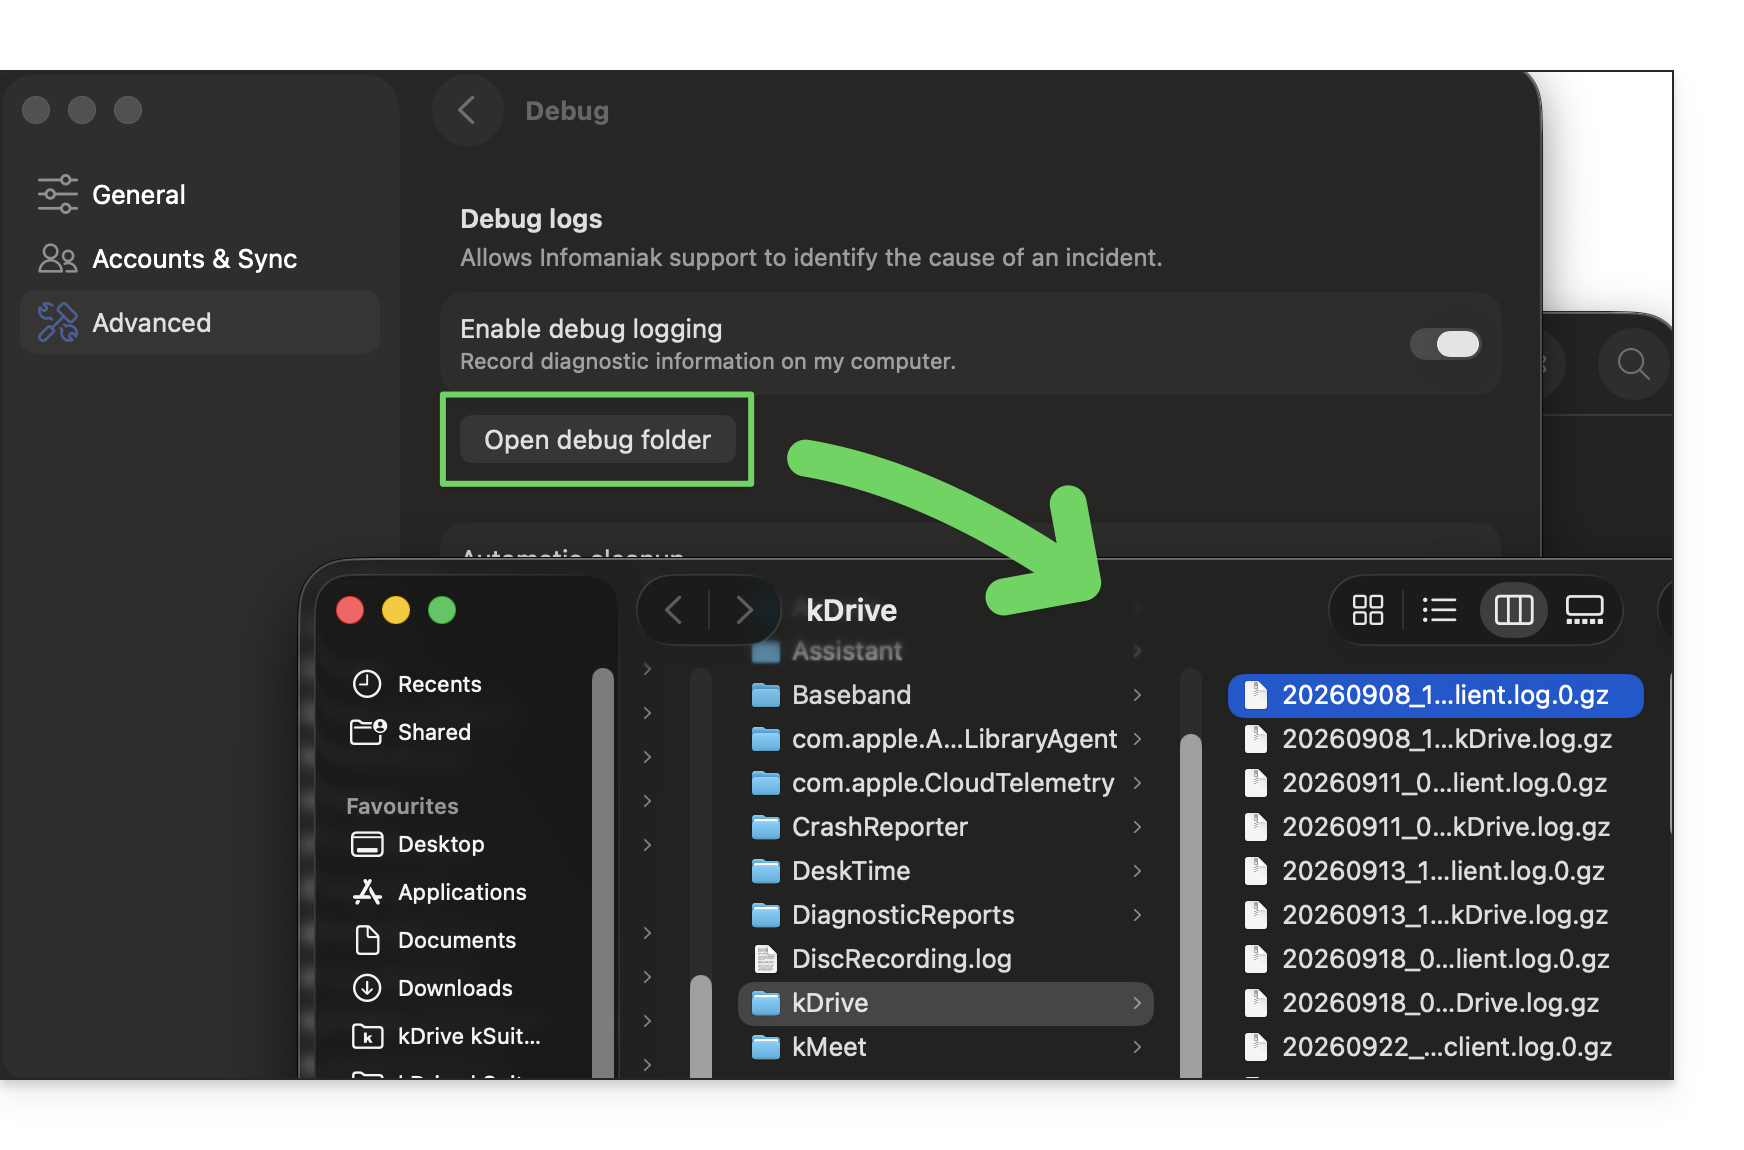
If the application does not open, you can also access the logs using these paths:
- macOS:
/Users//Library/Logs/kDrive - Windows (copy and paste into the file explorer):
C:\Users\%USERNAME%\AppData\Local\Temp\kDrive-logdir(if necessary, enable hidden files and folders in Windows Explorer) - Linux:
/home//.local/state/kDrive/logs
To manually send the collected files:
- If the files are not large, send them directly to Infomaniak Support within the current exchange.
- If the files are large, compress them in .zip format and send them to Infomaniak Support within the current exchange.
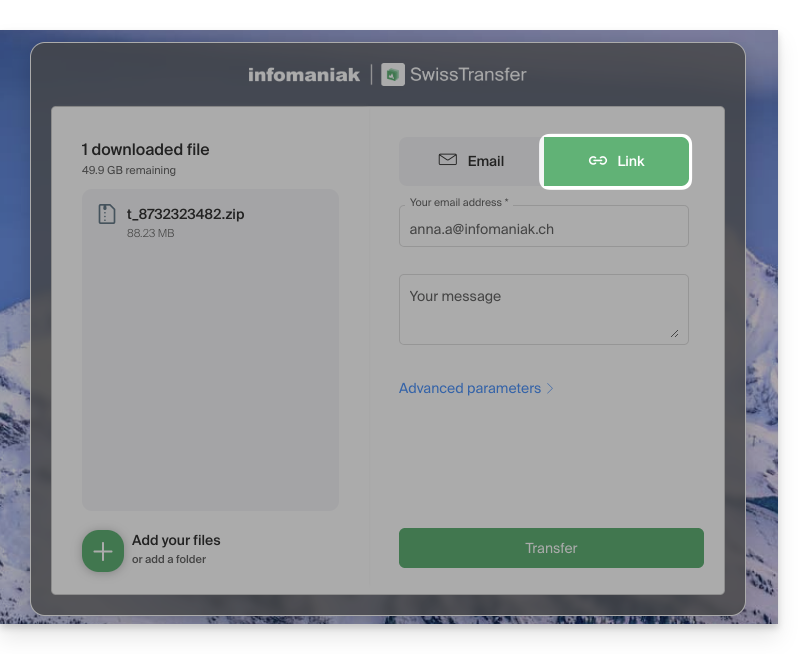
- If they are still too large to send by email, upload the .zip archive to swisstransfer.com to obtain a sharing link, which you will need to communicate to Infomaniak Support within the current exchange:
Link to this FAQ: https://faq.infomaniak.com/2488
Has this FAQ been helpful?
This guide explains how to modify certain language settings in the Manager and kSuite (Infomaniak Mail app, Calendar, Contacts, etc.).
Change the language of your Infomaniak account
To do this:
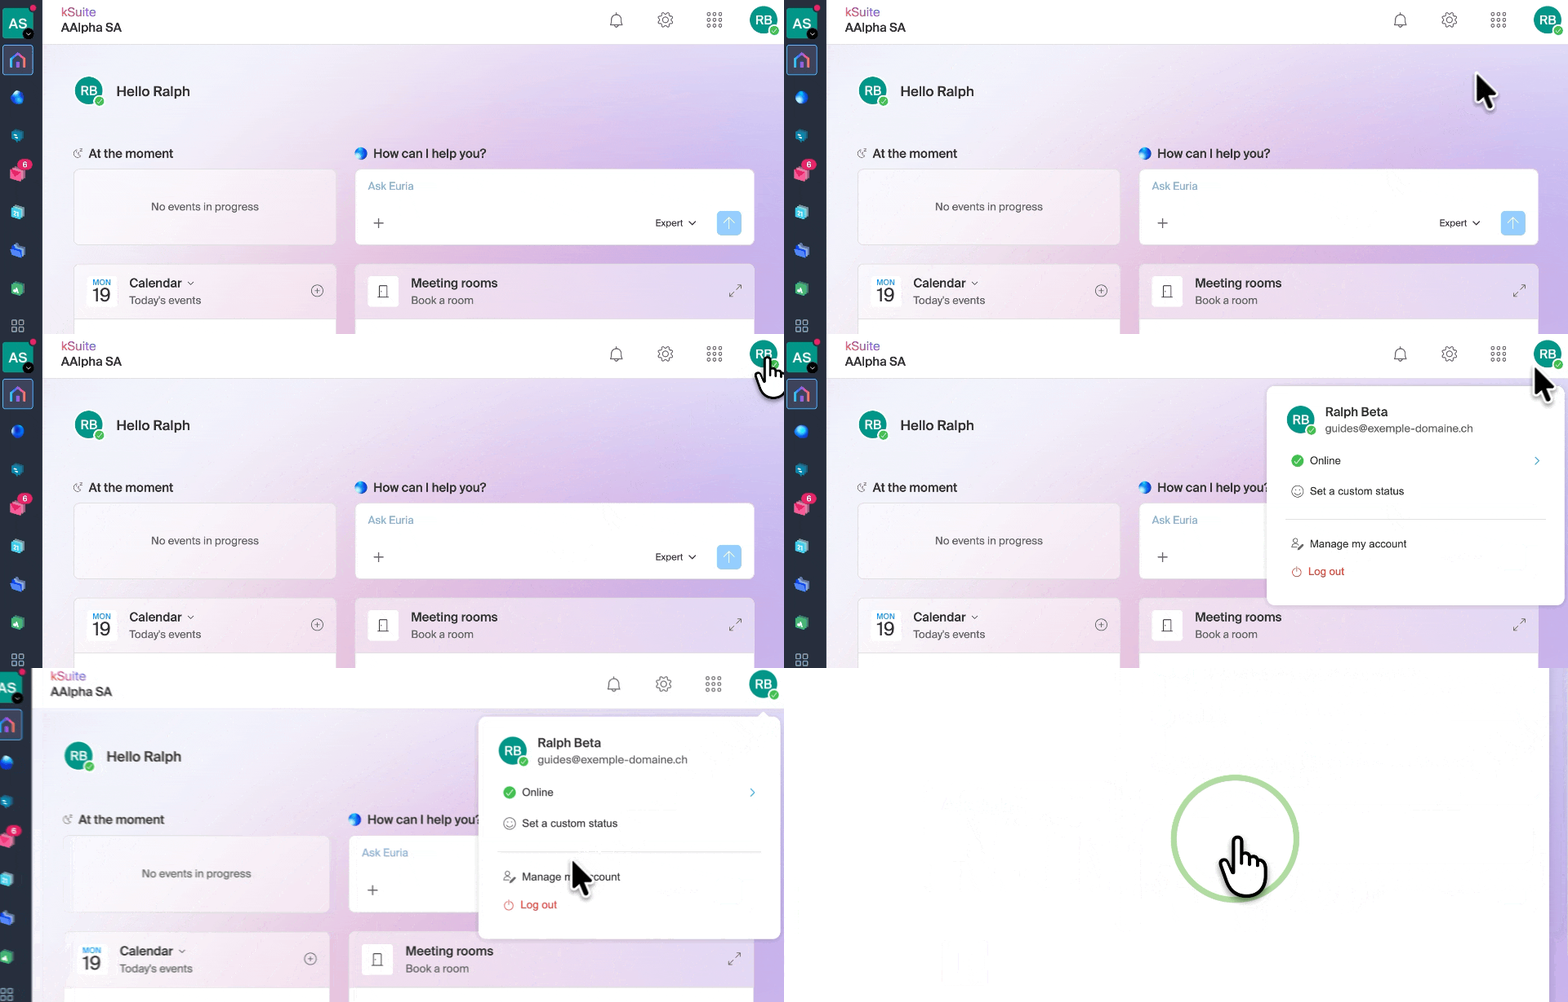
- Click here or at the top right, on your initials/avatar, to "Manage my account":
- Click on My profile in the left-hand menu.
- Click on the language dropdown menu to choose from French, English, German, Italian, Spanish, Portuguese, etc.:
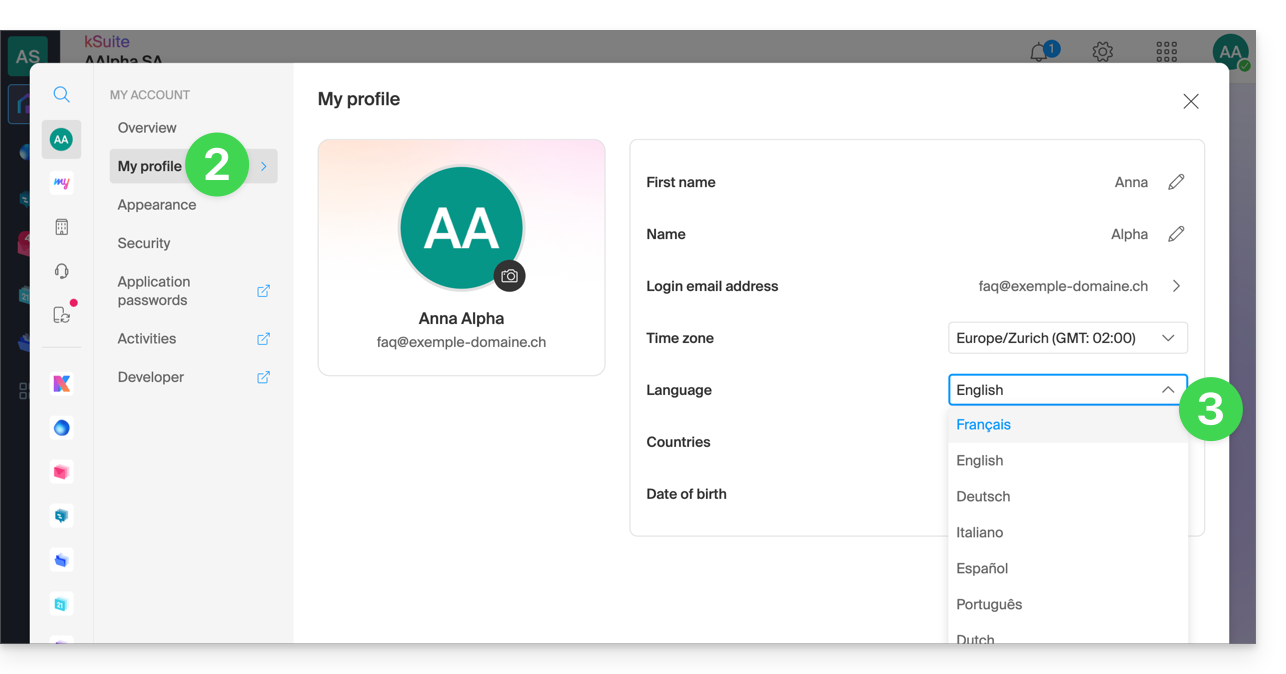
Modify your account's regional settings
In the same section, you can set the time zone for your region/country: 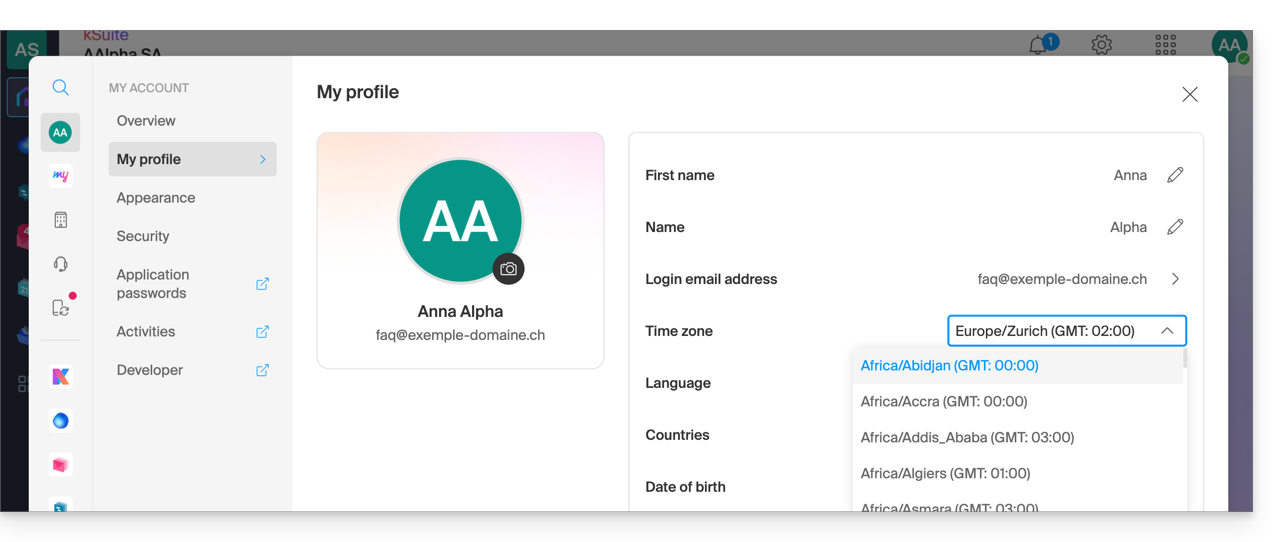
Link to this FAQ: https://faq.infomaniak.com/2144
Has this FAQ been helpful?
This guide explains how to resolve access errors to your Web Hosting following an IP address change (server migration, for example).
Introduction
- To save time, your system maintains a table that maps domain names to IP addresses.
- If the website changes its "location" (IP address), your computer tries to access the old address.
- Clearing the cache forces the system to request the new address from the DNS servers.
If your computer retains the old address in its memory,clearing the DNS cache can restore the connection.
Clear the DNS cache…
… on Windows
Use the command prompt to refresh your network settings:
- Open the Start menu.
- Type cmd and press Enter.
- In the black window that opens, type the following command and press Enter:
ipconfig /flushdns
… on macOS
On recent versions of macOS, the process is done via the Terminal:
- Open the Terminal (via Spotlight or Applications > Utilities).
- Copy and paste the following command:
sudo dscacheutil -flushcache; sudo killall -HUP mDNSResponder - Enter your session password (it will not be displayed while typing) and validate.
… on Linux
Most modern distributions use systemd-resolved. Open your terminal and run:
sudo resolvectl flush-caches
Note: If you are using an older service, the commandsudo systemctl restart nscd remains valid.
Link to this FAQ: https://faq.infomaniak.com/1041
Has this FAQ been helpful?
This guide explains how to find a solution if you are running a Swiss Backup but it fails with a connection error. It is necessary to check what may be blocking the connection…
Antivirus
In some cases, security programs such as antivirus software or other security suites block the functionality of the Acronis Agent.
To resolve the issue, add the program folders and executables to the whitelist:
- Windows: https://kb.acronis.com/content/36429#Windows3
- macOS: https://kb.acronis.com/content/36429#macOS4
- Linux: https://kb.acronis.com/content/36429#Linux5
Closed ports
Please consult the documentation on the ports that must be open or not used by another processand automatically check the ports using the CVT utility from Acronis:
- Windows / Linux: https://kb.acronis.com/content/47678
- macOS: from a
Terminalapplication (command-line interface,CLI), run the following command:
echo 0 | nc eu5-cloud.acronis.com 443 >/dev/null && echo "eu5-cloud.acronis.com 443: OK"; echo 0 | nc eu5-cloud.acronis.com 7790 >/dev/null && echo "eu5-cloud.acronis.com 7790: OK"; echo 0 | nc swift01-acronis.cloud.infomaniak.ch 44445 >/dev/null && echo "swift01-acronis.cloud.infomaniak.ch 44445: OK"; echo 0 | nc eu5-baas.acronis.com 8443 > /dev/null && echo "eu5-baas.acronis.com 8443: OK"Link to this FAQ: https://faq.infomaniak.com/2328
Has this FAQ been helpful?
This guide explains how to find a solution if the Acronis Agent for Swiss Backup asks you to register your machine and then returns an error when you click "Register Machine".
Manual registration…
In certain situations, particularly if you have (re)installed Acronis on your device, the application may ask you to register your machine and then display an error. In this case, you need to perform a manual Acronis registration according to your OS.
… on macOS
Refer to this other guide to uninstall the application.
Alternatively, run the following commands from a Terminal application (command-line interface, CLI) on your macOS device:
To unregister, enter the following command:
sudo "/Library/Application Support/BackupClient/Acronis/RegisterAgentTool/RegisterAgent" -o unregister -t cloud -a acronis.infomaniak.comTo re-register, enter:
sudo "/Library/Application Support/BackupClient/Acronis/RegisterAgentTool/RegisterAgent" -o register -t cloud -a acronis.infomaniak.com -u SBA-XXXX-XX -p "PASSWORD_HERE"- Replace and complete the information specific to your account in the commands above, then enter your computer's password when prompted.
… on Windows
Use the Acronis cleanup tool to uninstall the application.
Alternatively, run the following commands from a Terminal application (command-line interface, CLI) on your Windows device:
Open the Start menu by typing the following command:
cmd
- In the search results, right-click on
cmdand select Run as administrator. To unsubscribe, enter:
cd "C:\Program Files\BackupClient\RegisterAgentTool\"Then:
.\register_agent.exe -o unregister -t cloud -a acronis.infomaniak.comTo re-register, enter:
cd "C:\Program Files\BackupClient\RegisterAgentTool\"Then:
.\register_agent.exe -o register -t cloud -a acronis.infomaniak.com -u SBA-XXXX-XX -p "PASSWORD_HERE"- Replace and complete the information specific to your account in the commands above.
If you have Acronis 2FA enabled…
If Acronis two-factor authentication is enabled, the commands change slightly:
- Generate a registration token from https://acronis.infomaniak.com (need help?).
- Run the
unregistercommand (see above, depending on your OS). - Run the
registercommand as described above, but adapt it as follows:… macOS
sudo "/Library/Application Support/BackupClient/Acronis/RegisterAgentTool/RegisterAgent" -o register -t cloud -a acronis.infomaniak.com --token TOKEN_HERE… Windows
.\register_agent.exe -o register -t cloud -a acronis.infomaniak.com --token TOKEN_HERE
Was the registration successful?
If you receive a 200 or "success" message, the command executed successfully.
If the result is different, take a screenshot of the error message and then contact Infomaniak support.
Link to this FAQ: https://faq.infomaniak.com/2121
Has this FAQ been helpful?