Knowledge base
1000 FAQs, 500 tutorials and instructional videos. Here, there are only solutions!
This guide provides instructions for creating a highly available, multi-datacenter infrastructure with Jelastic Cloud.
Introduction
- The principle of a highly available, multi-datacenter infrastructure is to replicate all necessary elements (web server, database server, and load balancer) in another datacenter to ensure the operation of your websites and apps in the event of unforeseen circumstances (traffic spikes, hardware failures, network outages, etc.).
- The advantages of a highly available, multi-datacenter infrastructure are numerous:
- In the event of an issue with one server, another server immediately takes over; your websites and apps remain accessible.
- In the event of a disruption with a component in one datacenter, the replicated infrastructure in the other datacenter takes over immediately; your websites and apps remain accessible.
- In the event of significant traffic spikes, traffic is distributed between the two infrastructures by load balancers; your websites and apps remain accessible and fast.
Setting up a highly available infrastructure with Jelastic Cloud
For the purposes of this example, 2 web servers with 2 load balancers will be set up, each of these elements being hosted in Switzerland in a different Infomaniak datacenter.
Before proceeding, log in to the administration interface of your Jelastic Cloud server:
- Click here to access the management of your product on the Infomaniak Manager (need help?).
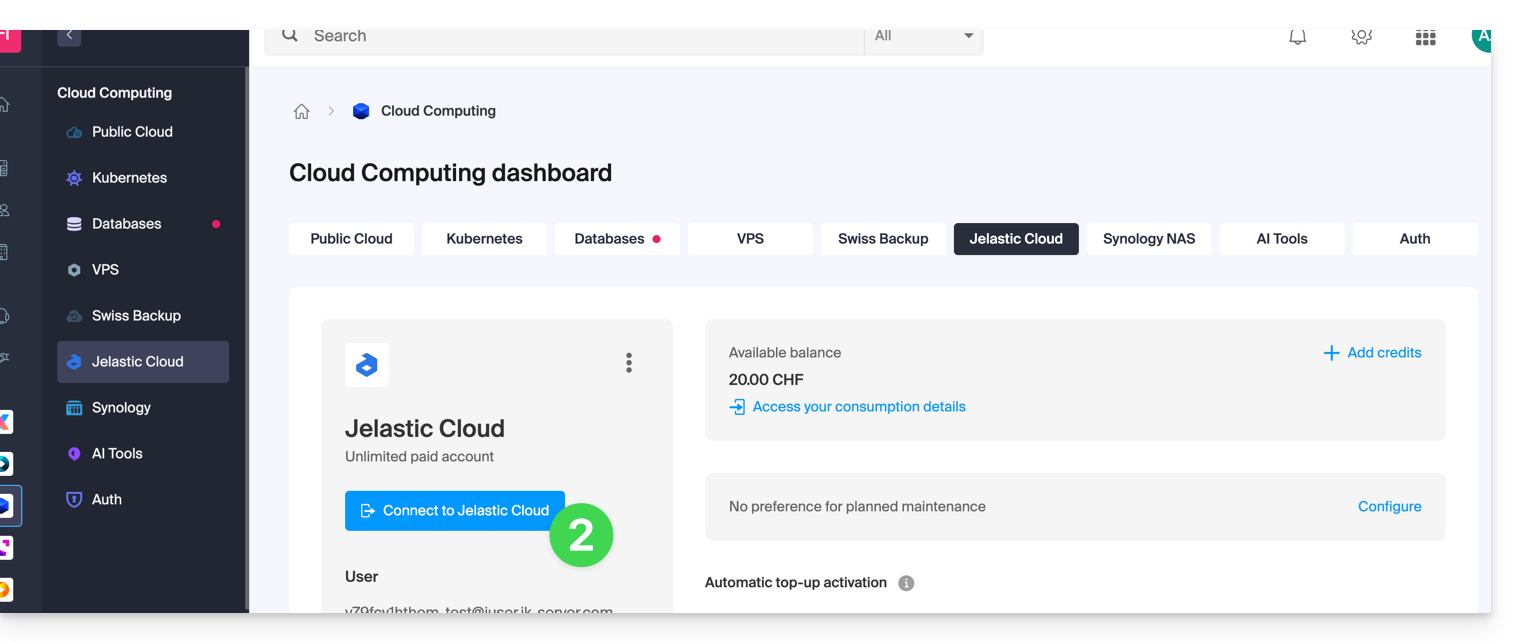
- Click on Connect to Jelastic Cloud:
1. Creating Web Servers
A web server hosts the content of your websites (PHP files, images, PDFs, etc.).
Here are the steps to create your first server:
- Click on New environment.
- Click on the PHP tab.
- In App. Servers, choose, for example, an Apache server.
- Adjust the environment's resources according to your needs.
- Choose Geneva DC2 for the server location.
- Rename the environment so you can easily identify it later (e.g. DC2-apache).
- Click on Create.
Then, create the second web server in a different datacenter:
- Click on New environment.
- Click on the PHP tab.
- In App. Servers, choose an Apache server, for example.
- Adjust the environment's resources according to your needs.
- Choose Geneva DC3 for the server location.
- Rename the environment so you can easily identify it later (e.g. DC3-apache).
- Click on Create.
2. Creating load balancers
A load balancer distributes the load and traffic of your websites across your web servers.
Here are the steps to create your first server:
- Click on New environment.
- Click on the PHP tab.
- In Load Balancing, choose an NGINX server, for example.
- Adjust the environment's resources according to your needs.
- Choose Geneva DC2 for the server location.
- Rename the environment so you can easily identify it later (for example, DC2-nginx).
- Click on Create.
Then, create the second load balancer in a different datacenter:
- Click on New environment.
- Click on the PHP tab.
- In Load Balancing, choose an NGINX server, for example.
- Adjust the environment's resources according to your needs.
- Choose Geneva DC3 for the server location.
- Rename the environment so you can easily identify it later (e.g. DC3-nginx).
- Click on Create.
3. Configuring the load balancers and the domain name
Now, you just need to tell the load balancers which web servers they should distribute traffic to.
Start by creating the load-balancer.conf file on both load balancers:
- Connect to the
DC2-nginxserver via SSH by clicking the Web SSH button in the environment. - Open the load-balancer.conf file:
nano /etc/nginx/conf.d/load-balancer.conf. - Adapt the code in the file with the URL of your web servers:
http {
upstream backend {
server apache-dc2.jcloud-ver-jpc.ik-server.com;
server apache-dc3.jcloud.ik-server.com;
}
server {
listen 80;
location / {
proxy_pass {{URL_4}}
}
}
}
- Repeat these 3 steps for the
DC3-nginxserver.
Next, modify the load balancer configuration file:
- Connect to the
DC2-nginxserver via SSH by clicking the Web SSH button in the environment. - Create the following configuration file:
nano /etc/nginx/nginx.conf. - Adjust the URL of the server configuration file:
user nginx;
worker_processes auto;
worker_rlimit_nofile 2048;
load_module modules/ngx_stream_module.so;
#load_module modules/ngx_http_modsecurity_module.so;
error_log /var/log/nginx/error_log info;
events {
worker_connections 2048;
use epoll;
}
include /etc/nginx/conf.d/load-balancer.conf;
- Restart the NGINX service:
sudo /etc/init.d/nginx restart. - Repeat these four steps for the
DC3-nginxserver.
You now need to specify which servers your domain name should redirect traffic to.
Beforehand,Install a public IP address on your load balancers :
- Deploy the DC2-nginx server node.
- Hover over the public IP line and click on the + that appears on the right.
- Add a public IPv4 address.
- Repeat these 3 steps for the DC3-nginx server.
At this point, all you have left to do is create two A records in the DNS zone of your domain name with the public IP address of your two load balancers.
To ensure that the changes are quickly taken into account, it is recommended to configure the A records with a TTL of 5 minutes.
In this example, the domain redirects your visitors to the load balancers, which in turn redirect traffic to the web servers.
4. Testing the high availability infrastructure
To test the proper functioning of your infrastructure, enter your domain name in a browser such as Brave, Chrome, Edge, Firefox, Opera, Safari… and try disabling one element of your infrastructure at a time (one of the two load balancers, one of the two web servers). If everything is working correctly, you should still be able to access the content hosted on one of the two web servers.
Please note: data replication between the web servers or database servers must be configured by you.
Link to this FAQ: https://faq.infomaniak.com/2401
Has this FAQ been helpful?
This guide explains how to add IP addresses to the whitelist of a website hosted with Infomaniak.
Introduction
- Allowing IPs on
xmlrpc.phpenables access to URLs that are blocked by default because they are considered risky. - This type of blocking is effective on all recent servers.
- Regarding WordPress, its XML-RPC functionality is only available by default through Infomaniak services and JetPack for security reasons.
Add IP addresses to the xmlrpc.php whitelist
To access the site management:
- Click here to access the hosting & site management section in your Infomaniak Manager (❓: help).
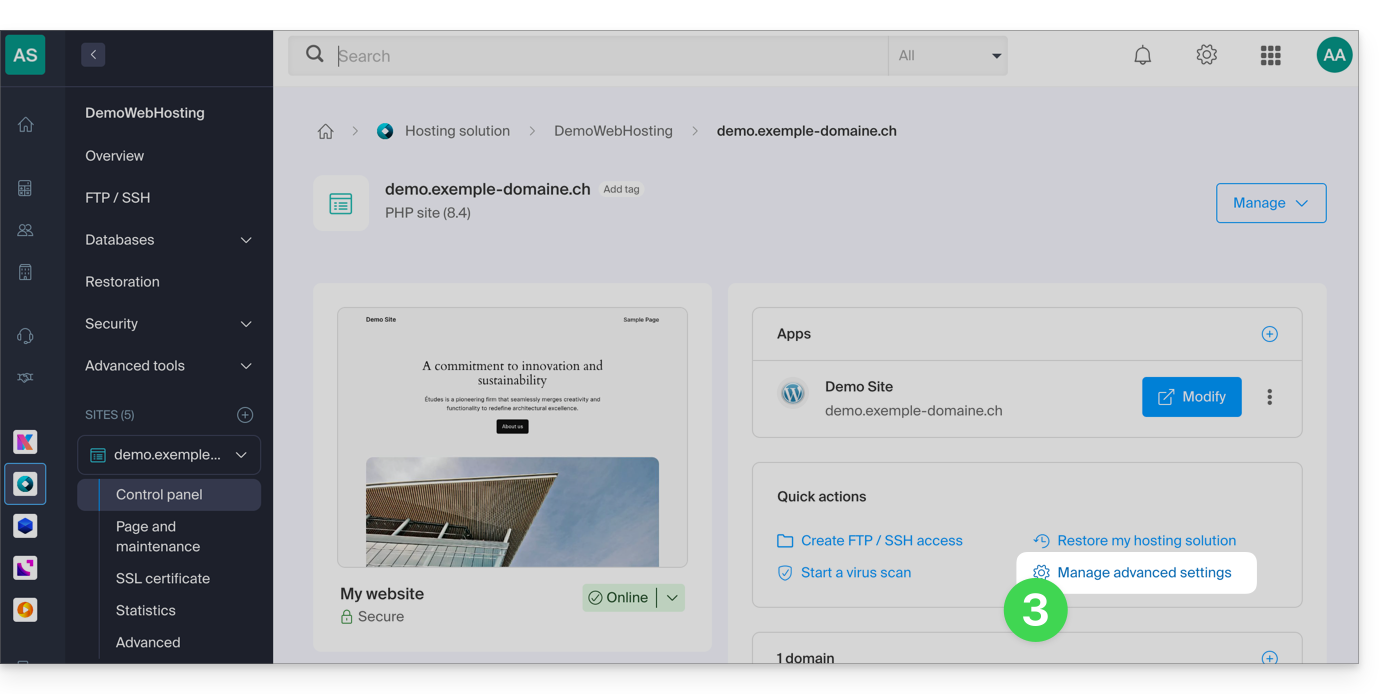
- Click on the name of the website in question.
- Click on Manage advanced settings:
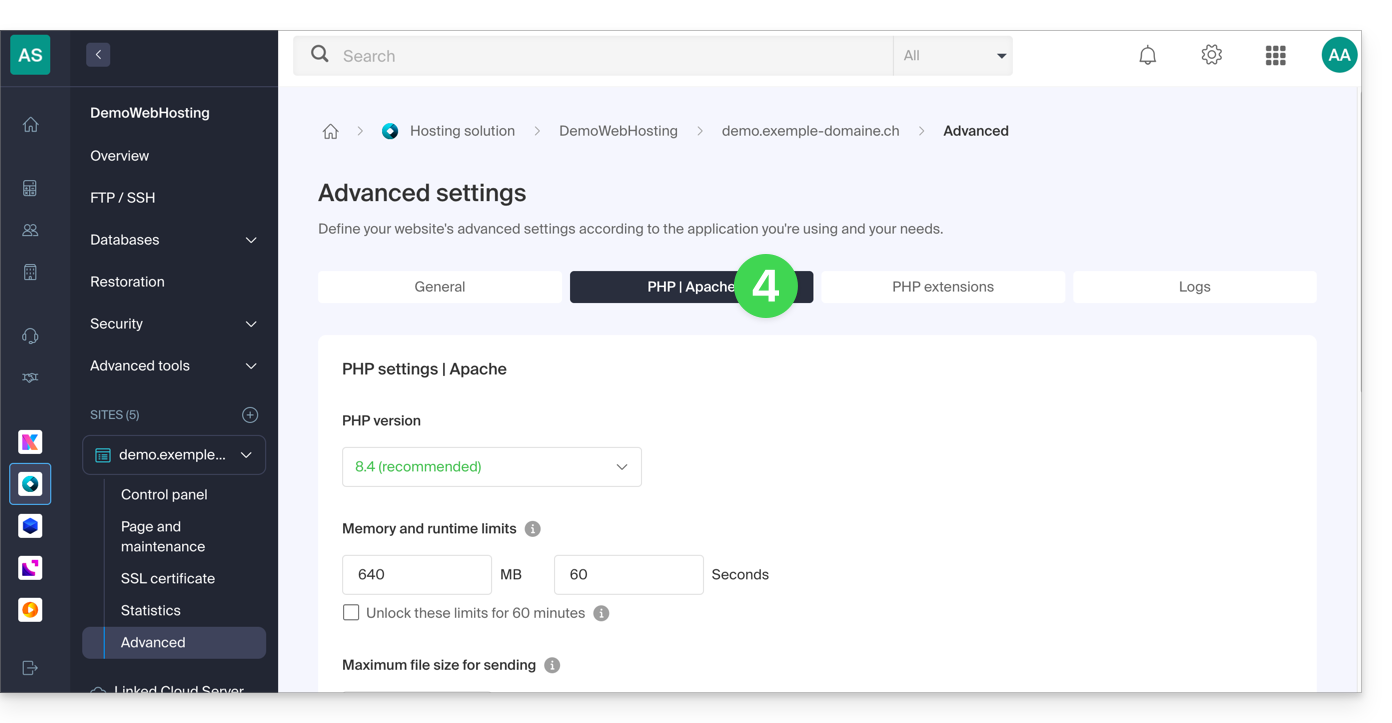
- Click on the PHP / Apache tab:
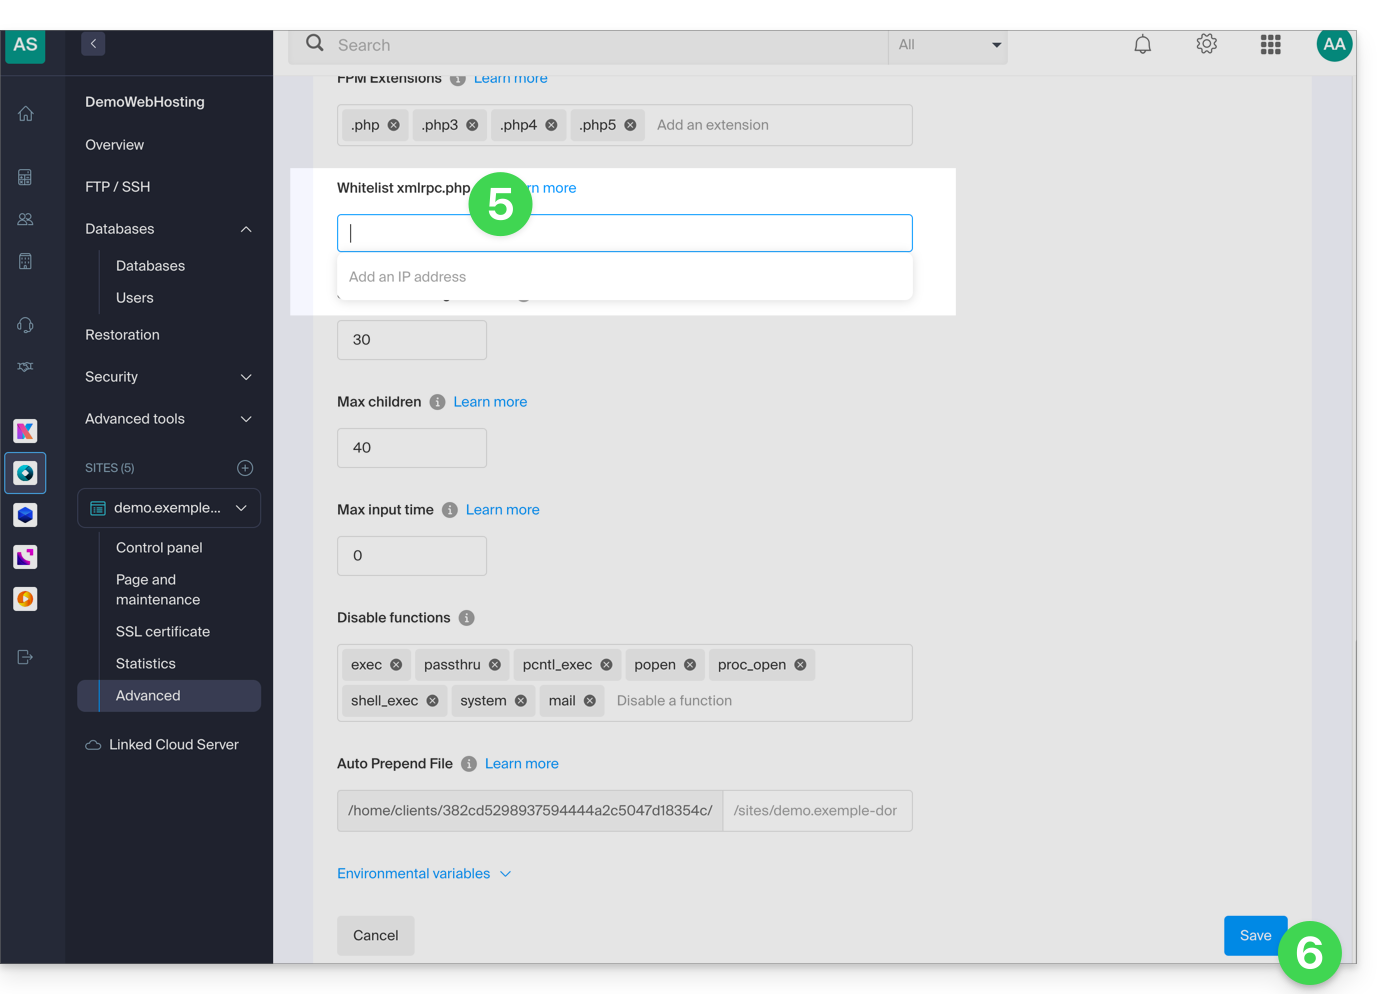
- Complete the relevant field.
- Click on the Save button at the bottom of the page:
Link to this FAQ: https://faq.infomaniak.com/2577
Has this FAQ been helpful?
This guide helps you set up the Access-Control-Allow-Origin header, an HTTP header that specifies which origin (domain, protocol, and port) can access resources on a server. This header is used to control cross-origin (CORS) access from a web application.
List of authorized domains
You can add the origin of a request to the list of domains authorized to access the server's resources by adding it to the values of the Access-Control-Allow-Origin header.
To allow, for example, the site https://domain.xyz to access resources using CORS, the header should be as follows:
Access-Control-Allow-Origin: {{URL_1}}You can configure it using the header() function in PHP, and you can refer to this guide for more information.
If you need this header to be applied everywhere, you can use an auto-prepend.
Link to this FAQ: https://faq.infomaniak.com/256
Has this FAQ been helpful?
This guide details the specific rules to follow when creating a user password with mysqli_connect() that contains the “dollar” character $ on Infomaniak platforms.
Introduction
- If you receive the error message "Access denied for user" when using
mysqli_connect(), and your database user password contains a$character, the problem may be due to how strings are handled in PHP. - The problem may also occur with email scripts.
Rules to follow
When the special character $ is used in a user password and is followed by any character other than a number, the variable name is invalid and the substitution will not be performed correctly.
Here are some solutions to fix this:
- Place the password between single quotes:
'$******' - Make sure a number immediately follows the dollar sign:
"$2*****" - Use a backslash to "escape" the dollar sign in the password:
“\$****”
Link to this FAQ: https://faq.infomaniak.com/2559
Has this FAQ been helpful?
This guide presents several examples of how to use Varnish on Infomaniak Cloud Server.
Introduction
- Consult these additional resources on the Varnish configuration language (VCL) to master request processing, routing, and caching:
Varnish Configuration
Once installed, configuring Varnish involves setting up specific caching and purging rules. Be sure to restrict access to prevent unauthorized entities from clearing your cache.
Here is an example of a configuration file that groups together the most common use cases:
vcl 4.0;

# Default backend configuration
backend default {
    .host = "127.0.0.80";  # Backend IP address
    .port = "80";           # Backend port
}

# Access Control List (ACL) for purge authorization
acl purge {
    "localhost";            # Local access
    "1.2.3.4";              # Trusted home IP
    "42.42.42.0"/24;        # Trusted company range
    ! "42.42.42.7";         # Specific IP exclusion (e.g., problematic user)
}

# Handle incoming requests
sub vcl_recv {
    # Handle PURGE requests
    if (req.method == "PURGE") {
        # Check if client IP is authorized
        if (!client.ip ~ purge) {
            return (synth(405, "IP not authorized for PURGE requests."));
        }
        return (purge);
    }

    # Custom PURGEALL for image directory
    if (req.method == "PURGEALL" && req.url == "/images") {
        if (!client.ip ~ purge) {
            return (synth(405, "IP not authorized for PURGEALL requests."));
        }
        # Invalidate all image-related objects in cache
        ban("req.url ~ \.(jpg|png|gif|svg)$");
        return (synth(200, "Images purged."));
    }

    # Bypass cache for authorized requests (e.g., admin panels)
    if (req.http.Authorization) {
        return (pass);
    }
}

# Handle backend responses before caching
sub vcl_backend_response {
    # Set TTL for images to 1 day
    if (beresp.http.content-type ~ "image") {
        set beresp.ttl = 1d;
    }

    # Respect backend's "uncacheable" instruction
    if (beresp.http.uncacheable) {
        set beresp.uncacheable = true;
    }
}
Purge via the CLI interface
Once your rules are active, you can test the purge of your site (e.g., "domain.xyz") using the curl tool:
# Purge the homepage
$ curl -X PURGE {{URL_5}}

# Expected Varnish response
<!DOCTYPE html>
<html>
<head>
    <title>200 Purged</title>
</head>
<body>
    <h1>Success 200: Purge completed</h1>
    <p>The page has been successfully purged.</p>
    <h3>Guru Meditation:</h3>
    <p>XID: 2</p>
    <hr>
    <p>Varnish Cache Server</p>
</body>
</html>
To purge a specific URL, simply modify the request path:
# Purge a specific file
$ curl -X PURGE {{URL_6}}

# Expected Varnish response
<!DOCTYPE html>
<html>
<head>
    <title>200 Purged</title>
</head>
<body>
    <h1>Success 200: Purge completed</h1>
    <p>The file has been successfully purged.</p>
    <h3>Guru Meditation:</h3>
    <p>XID: 4</p>
    <hr>
    <p>Varnish Cache Server</p>
</body>
</html>
Or, to trigger a bulk purge of the images defined in the VCL:
# Execute PURGEALL for images
$ curl -X PURGEALL {{URL_7}}

# Expected Varnish response
<!DOCTYPE html>
<html>
<head>
    <title>200 Purged images</title>
</head>
<body>
    <h1>Success 200: Images purged</h1>
    <p>All images have been successfully purged.</p>
    <h3>Guru Meditation:</h3>
    <p>XID: 32770</p>
    <hr>
    <p>Varnish Cache Server</p>
</body>
</html>
Purge from a CMS (PHP)
Cache management can also be done dynamically via your backend. In the previous configuration, a check on the Uncacheable header was added. Your CMS can send this header to force Varnish not to store a response.
Here's how to send a programmatic purge request in PHP:
<?php
// Initialize cURL for a specific URL
if ($curl = curl_init("{{URL_8}}")) {
    curl_setopt_array($curl, [
        CURLOPT_RETURNTRANSFER => true,
        CURLOPT_CUSTOMREQUEST => "PURGE",
        CURLOPT_HTTPHEADER => [
            "Host: {$_SERVER['HTTP_HOST']}" // Match the target host
        ]
    ]);

    curl_exec($curl);

    // Check if the purge was successful (HTTP 200)
    if (curl_getinfo($curl, CURLINFO_HTTP_CODE) == 200) {
        echo "Cache purged!";
    }
    curl_close($curl);
}
?>
Link to this FAQ: https://faq.infomaniak.com/2592
Has this FAQ been helpful?
This guide presents Jelastic Cloud, which is the result of close collaboration between Infomaniak and the company Jelastic (Virtuozzo).
Infomaniak
Infomaniak ensures the infrastructure, support, and performance, security, and reliability of the solution. Its infrastructure guarantees the availability and smooth operation of applications, handling traffic peaks and automatically reducing resource consumption during off-peak periods. This flexibility optimizes the cost/performance ratio by only charging for the resources actually used.
With this Cloud service, IT resources adjust to fluctuations in demand while maintaining budgetary control. All data is managed in Switzerland within Infomaniak's data centers, with support available in five languages.
Jelastic
Jelastic handles maintenance, software development, and provides the software component of the product.
Founded in 2011, Jelastic automates the creation, resizing, clustering, and security updates of traditional and native applications in the Cloud. It also supports Java, PHP, Ruby, Node.js, Python, .NET, Go environments, as well as Docker clusters.
Link to this FAQ: https://faq.infomaniak.com/2260
Has this FAQ been helpful?
This guide details the file transfer protocols supported on Infomaniak's Web Hosting and Cloud Server when connecting to ProFTPD servers.
Introduction
- With a Starter hosting plan (basic web page), only an FTP connection on port 21 (without SSL/TLS) is possible.
- When creating a website via Apache / PHP hosting, file access is possible via various protocols (FTP, SFTP, SSH).
- With a Node.js site, only SSH / SFTP is possible for accessing your environment.
FTP (File Transfer Protocol)
FTP connections in "active" and "passive" mode are supported (switch between the two to try and resolve any potential issues).
Infomaniak opens passive ports on its side [PassivePorts 42000 44000] but only for connections to its FTP server. Passive FTP mode involves the use of remote ports defined by the remote server, as well as local ports that may vary depending on the FTP software/client used.
Passive mode is primarily useful when the software/FTP client is behind a firewall or NAT router that blocks active FTP connections. However, in the Infomaniak infrastructure, active FTP connections are allowed, which means that using passive mode is generally not necessary.
Regarding PHP, it is not possible, by default, to manage this configuration in a centralized manner. Therefore, it is not feasible for Infomaniak to open all ports to support all remote configurations, as this would neither be practical nor secure.
Overall, the infrastructure does not fully support passive mode outgoing FTP connections. For a smoother file transfer experience, it is recommended to use active FTP mode or explore more modern technologies such as SFTP (see below).
SFTP (SSH File Transfer Protocol)
Creating SFTP connections ensures a high level of security for file transfers. Make sure you have enabled SSH on your SFTP software/client and use port 22 for the connection: sftp://*****.
FTPS (FTP over TLS/SSL)
Use FTPS for secure file transfers with port 21 and SSL/TLS encryption. With software like FileZilla, select "Explicit FTP over TLS" to configure your FTP client: ftpes://*****.
FTPaccess
Access to the FTP access configuration is available.
What is not supported
Public/Anonymous User
Connecting as a public or anonymous user is not allowed. You must have a valid user account to access your hosting space.
FTPs (Secure FTP on a custom port)
The FTPs protocol is not supported, which means that port 2121 is not open for this type of connection.
Link to this FAQ: https://faq.infomaniak.com/446
Has this FAQ been helpful?
This guide is intended for developers who want to use the Propel ORM on a hosting environment where command-line access is restricted.
Introduction
- The ORM allows you to link application objects to database tables. Data is manipulated via
PHPobjects rather than writing rawSQL. Propelis the abstraction layer that manages these interactions (relationships, joins, pagination) to simplify code maintenance.
Specific features & limitations
Propelis not pre-installed viaPear.- You must install it manually in your project.
- It is essential to download the "Conventional Package" version of
Propel.
- CLI commands (such as
propel-gen) cannot be executed on the server.- As a result,
Propelcan only be used in "Runtime" mode in production. Class generation (build) must be performed locally. - The workflow involves generating the code in a development environment and then transferring the resulting files to the server.
- As a result,
- Dependencies:
- All the libraries required for
Propelare available, with the exception ofPhing. - The absence of
Phingdoes not affect production, as this tool is only required during the local generation phase.
- All the libraries required for
Link to this FAQ: https://faq.infomaniak.com/1142
Has this FAQ been helpful?
This guide helps you resolve an issue with the CMS Prestashop v9.x regarding the generation of PDF invoices from the administration panel (Back Office), particularly when the French language is used.
The problem
When attempting to view or download a PDF invoice for an order in French, PrestaShop (version 9.x) returns a 500 Error. This malfunction is related to an incompatibility between the PDF generation library (TCPDF) using the default font (helvetica) and the hosting configurations.
Define a compatible font
The solution is to force the use of the freesans font, which is more compatible, via a custom configuration file.
It is strongly recommended to create a defines_custom.inc.php file. This method is the safest because it ensures that the fix will not be lost during PrestaShop core updates.
To do this:
- Access your PrestaShop 9.x installation via FTP or the File Manager.
- Navigate to the
/config/directory. - Create a new file named
defines_custom.inc.php. Edit the
defines_custom.inc.phpfile and add the following content:<?php /** * Avoid error PDF, force font 'freesans'. */ define('PDF_FONT_NAME_MAIN', 'freesans');- Save the file and test the generation of an invoice in French.
Link to this FAQ: https://faq.infomaniak.com/2690
Has this FAQ been helpful?
This guide explains how to prevent cyberattacks and how to avoid your website being hacked.
WordPress users: please refer to this dedicated article.
The role of the hosting provider
Infomaniak's job is to provide quality hosting, so it is essential to respond extremely quickly to the various and diverse attacks that any Internet player may be subject to. Infomaniak therefore does everything possible to take maximum precautions against hacking, in particular by keeping the different versions of the technologies used up to date.
In the event of a confirmed hacking incident, if it is possible to trace the perpetrator and the system was compromised due to a security flaw attributable to Infomaniak, and the integrity of the servers is at stake, Infomaniak will take matters into its own hands.
The role of the website owner and webmaster
If your website is hacked due to your own negligence (an outdated script, a security patch that has not been applied, etc.), Infomaniak will contact you to warn you about a problem that needs to be resolved quickly. Some organizations, such as Saferinternet, may also suspend the domain name, which will disable the website and email service.
Infomaniak cannot prevent exploits related to a bug in your PHP code or other code. If the hack is not detected, you will generally notice the intrusion fairly quickly through suspicious elements on your pages or by receiving numerous error emails.
Therefore, it is your responsibility to manage the evolution of your website over time and to ensure that it does not become neglected, even if this means hiring a webmaster whose job it is.
Infomaniak's recommendations
- Regularly update all your web applications (WordPress, Joomla, Drupal, ownCloud, etc.).
- Keep the PHP version of your website up to date on Infomaniak servers.
- Keep your website up to date by migrating to the new offers when they are offered to you.
- Add a protection system to your contact forms (captcha, etc.) and to any "recommend to a friend" tools.
- Run a antivirus scan of your hosting regularly.
- Monitor the vulnerability detection tool.
- Remove anything you haven't developed yourself and that the author hasn't updated/corrected for several months.
- Make regular backups of your site (refer to this other guide if you use WordPress) when everything is working correctly and keep them in a safe place (because automatic backups are only kept for a few days, which is sometimes not enough to revert to a previous state after you notice an intrusion).
- Visit ibarry.ch.
If a problem has occurred...
- Change the passwords for your web applications, your FTP accounts, and your databases after first checking that your computer is free of viruses.
- Restore a backup but Update everything that can be updated as soon as the restoration is complete.
- If you encounter a problem with a third-party software, contact its publisher directly or a Partner and consult the support policy as well as article 11.9 of the Infomaniak Terms of Service.
Please read these additional recommendations!
Link to this FAQ: https://faq.infomaniak.com/1214
Has this FAQ been helpful?
This guide concerns Jelastic Cloud, which allows you to create pre-configured containers for Java, PHP, Ruby, Node.js, Python, and Go with a single click. You also have the option to deploy any custom Docker container in the Cloud.
Introduction
- In the context of Jelastic, a container or node refers to an isolation and execution unit in which your applications are deployed and run, while benefiting from the resources provided by the node on which they are placed.
- This enables efficient application management and resource optimization based on your project's needs.
Container
In Jelastic, a container is a virtual execution environment that isolates your applications and their dependencies from the rest of the system. It can be a Docker container or another type of container supported by Jelastic.
Each container acts as a distinct unit, meaning you can run multiple applications in different containers without them interfering with each other.
Node
A node is a virtual or physical server instance on which one or more containers can be deployed. In other words, a node is a virtual or physical machine that provides the resources (such as CPU, memory, storage, etc.) needed to run your applications.
Jelastic automatically distributes containers across different nodes based on load and available resources to ensure optimal performance and high availability.
Link to this FAQ: https://faq.infomaniak.com/2254
Has this FAQ been helpful?
This guide explains how to view and download Apache logs for Web Hosting, which are useful for analyzing PHP errors or diagnosing certain application behaviors.
Introduction
- Access and error logs are kept for at least 7 days.
- Once the retention period has elapsed, older entries cannot be restored, even upon request.
- You can also find these files directly on the server via SSH/FTP in the
ik-logsfolder at the root of your hosting.
Accessing access and error logs
To view these logs:
- Click here to access the hosting & website management section in your Infomaniak Manager (❓: help).
- Click on the name of the website in question.
- Click on Advanced in the left sidebar.
- Click on Logs in the left sidebar.
- Click on Errors or Access to view the error log or access log.
- Select a period if necessary.
- Click on the icon to view the details.
- Click on Send by email to immediately receive all entries by email at your user address.
- Click to export the data in
.logformat: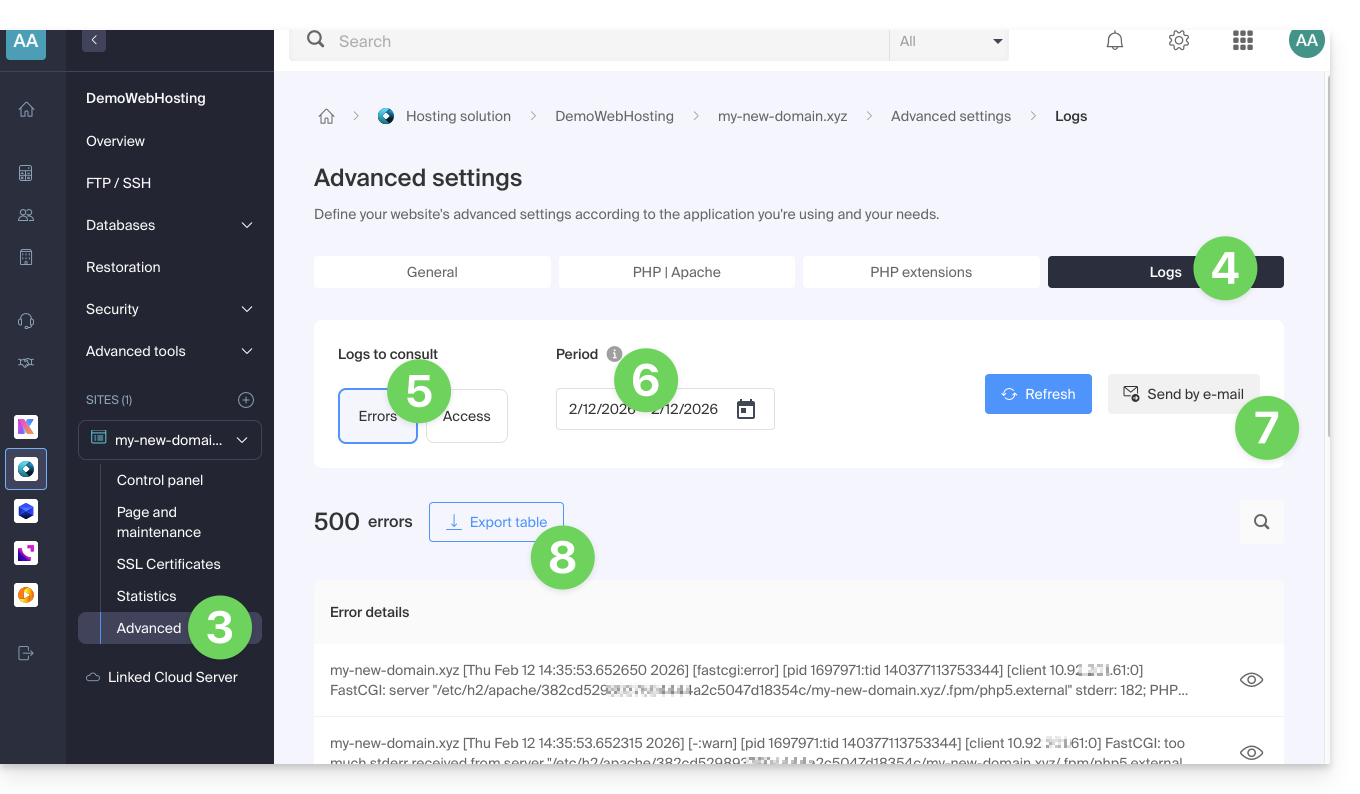
Identify the most active IP addresses in the access logs
To do this, connect to the server via SSH (need help?).
The command to execute via SSH is as follows:
cat ik-logs/access.log | awk '{ print $2}' | sort -n | uniq -c | sort -n | tail -n 20Link to this FAQ: https://faq.infomaniak.com/1926
Has this FAQ been helpful?
This guide explains how to use the HTTP header X-Frame-Options to limit the display of your pages in frames (<frame> and <iframe>) and to help protect against clickjacking attacks.
The ALLOW-FROM value is no longer supported by modern browsers. If you want to allow one or more specific domains, use the Content-Security-Policy (CSP) header with the frame-ancestors directive instead.
X-Frame-Options Header Values
The HTTP X-Frame-Options header indicates to the browser whether a page can be displayed within a <frame> or <iframe> tag.
DENY: completely prohibits displaying the page in a frame, including from your own site.SAMEORIGIN: allows display only when the page is embedded from the same domain.
Setting up the header
To apply this protection to your entire site, add the following directive to the .htaccess file:
Header set X-Frame-Options "SAMEORIGIN"You can also send this header from a PHP script:
Allow a specific domain with Content-Security-Policy
Autoriser un domaine spécifique avec Content-Security-Policy
To allow an external domain to embed your content in an iframe, use the Content-Security-Policy header with the frame-ancestors directive.
Example:
Header set Content-Security-Policy "frame-ancestors 'self' https://domain.xyz"This rule allows your own site ('self') as well as https://domain.xyz to embed your pages in an iframe.
Link to this FAQ: https://faq.infomaniak.com/360
Has this FAQ been helpful?
This guide explains how to use the Web FTP file manager, which allows you to easily and quickly manage the content of your Web Hosting.
Introduction
- The Web FTP / FTP Manager online service does not require any special access, provided you have management rights for a hosting account in the Infomaniak Manager and are logged in.
- Therefore, you do not need to have an FTP account and its password; the password for your Infomaniak account is sufficient.
- This allows you to:
- create files,
- navigate through directories,
- manage existing files (copy, rename, move, delete, unzip, etc.),
- edit and view text, PHP, and HTML files smaller than 1 MB,
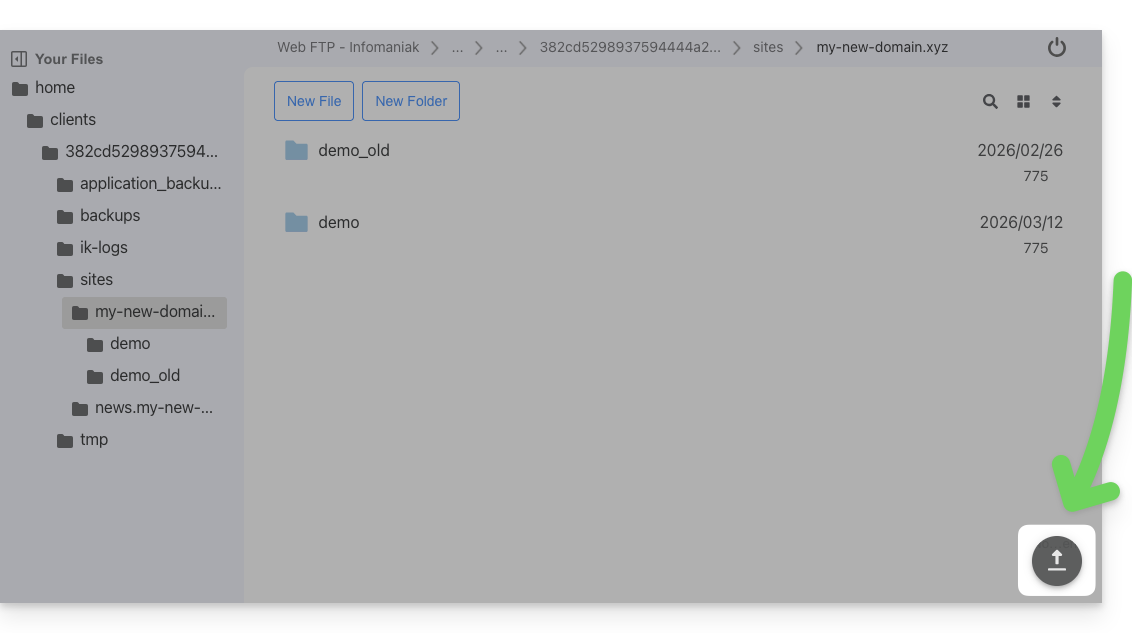
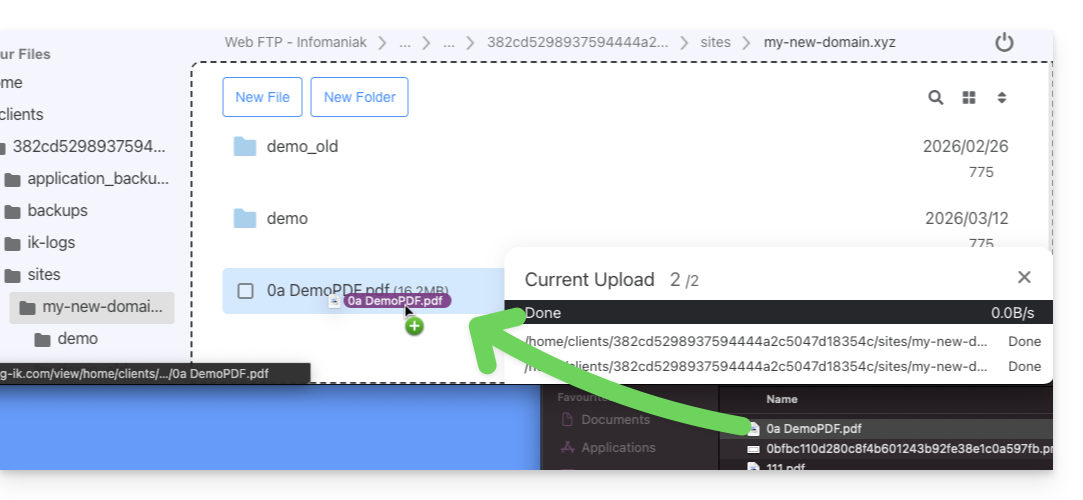
- transfer files smaller than 50 MB between your computer and the server:
- including by dragging and dropping directly from your computer to the Web FTP window:
- to exceed this limit and for background work capabilities, resuming transfers after interruptions, and limiting transfer speeds, etc., use an FTP software/client (❓: help).
- including by dragging and dropping directly from your computer to the Web FTP window:
Access the server via Web FTP
To quickly access the website's server via FTP or SSH:
- Click here to access the hosting & website management section in your Infomaniak Manager (❓: help).
- Click on the name of the relevant hosting.
- Click on FTP / SSH in the left-hand menu.
- Click on the
Web FTPorSSH consolebuttons available to you: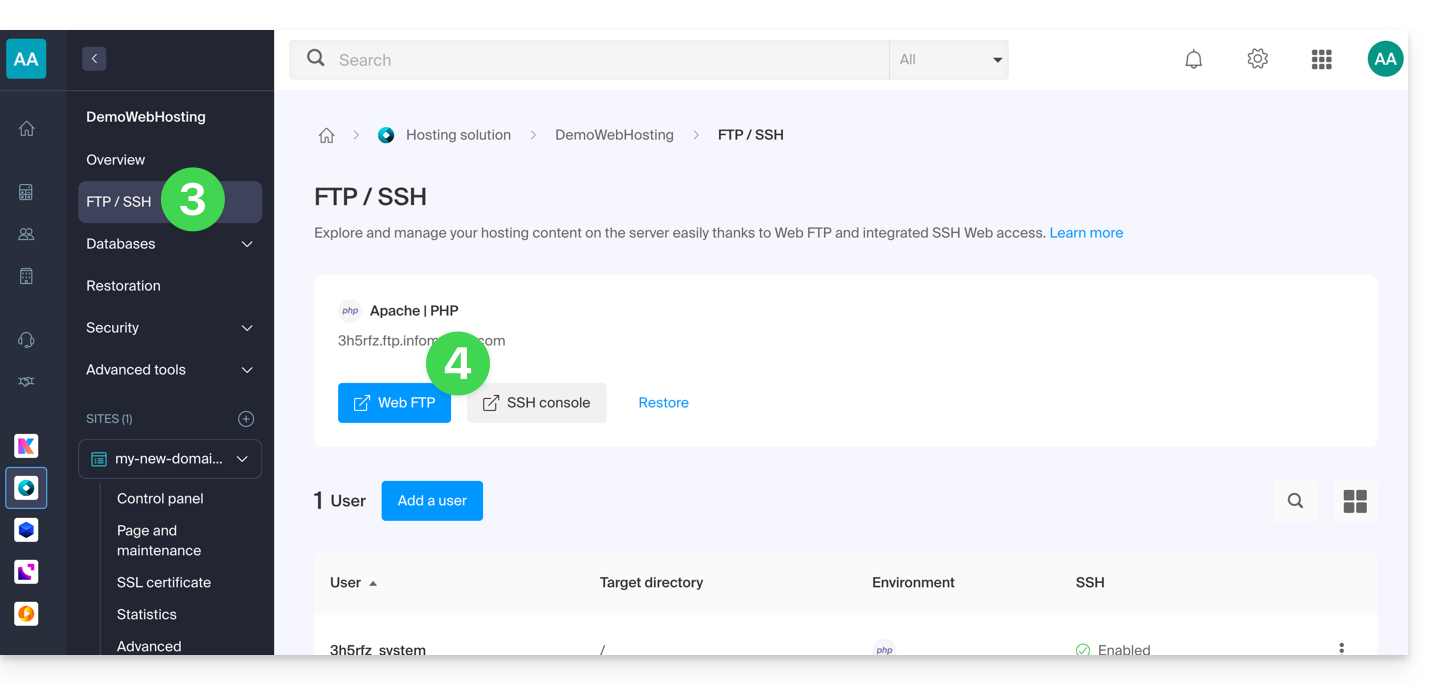
Link to this FAQ: https://faq.infomaniak.com/1130
Has this FAQ been helpful?
This guide explains how to make one of your calendars public from the Infomaniak Calendar web app (online service ksuite.infomaniak.com/calendar).
Introduction
- You will obtain a specific URL for your calendar in the format
.icsthat Calendar (formerly iCal Apple), Calendrier (formerly iCalendar Microsoft), Thunderbird (formerly Lightning Mozilla), or even Google Calendar can recognize to display your calendar: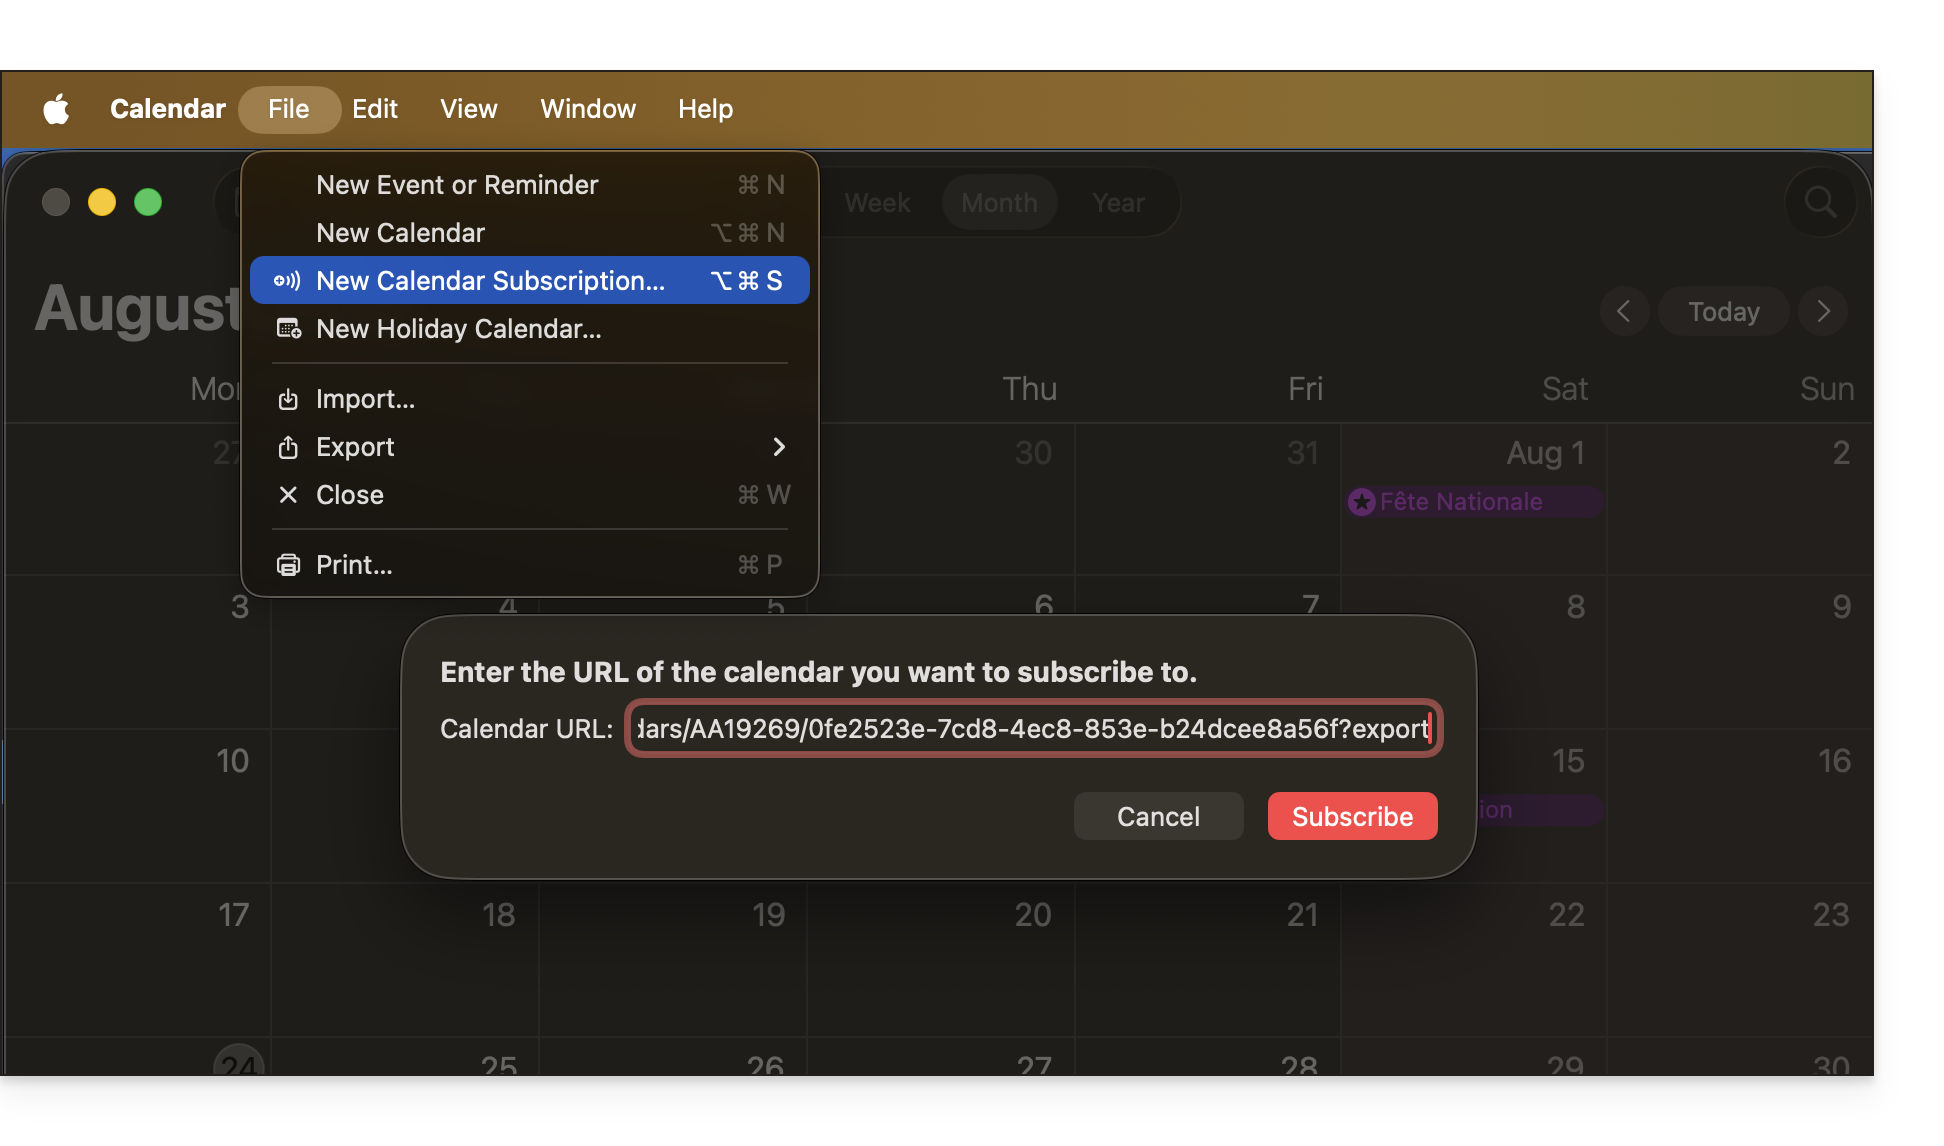
- The data contained in the shared calendar will no longer be private but will only be available in read-only mode to users who "subscribe" to it.
- The frequency of the incremental updates performed by the application that subscribes to your calendar's URL must be defined within that application.
- PHP scripts (not provided) can also be used to parse such files, allowing you, for example, to include events on a website.
- Refer to this other guide to configure the synchronization of your calendars, or this other guide to share a calendar with your colleagues with different permissions.
Enable public sharing of an Infomaniak calendar
To share a calendar publicly:
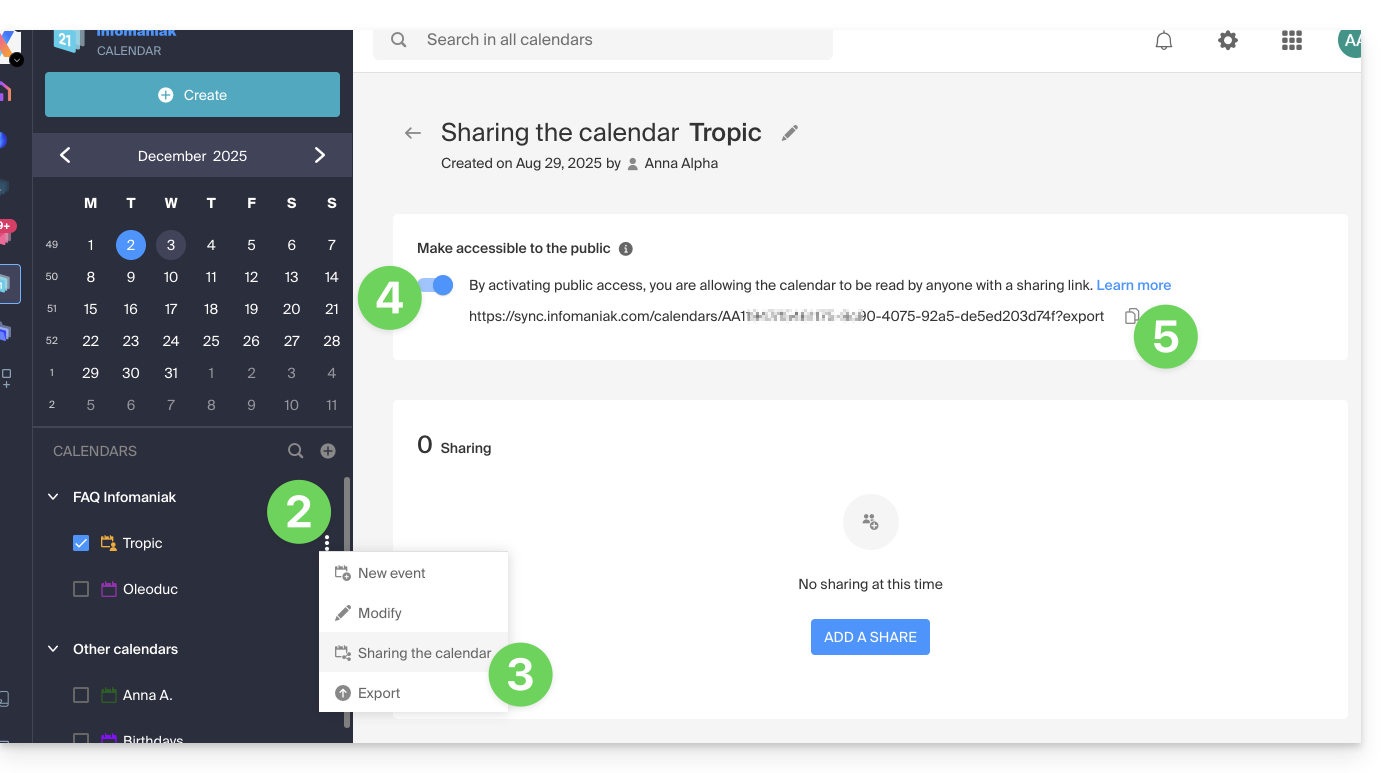
- Click here to access the Infomaniak Calendar web app (online service ksuite.infomaniak.com/calendar).
- Click on the action menu ⋮ to the right of a calendar.
- Click on Share calendar.
- Activate the toggle switch for public sharing.
- Click the icon to copy the address to the clipboard:
- You can always remove public access from this sharing page (see point 4 above):
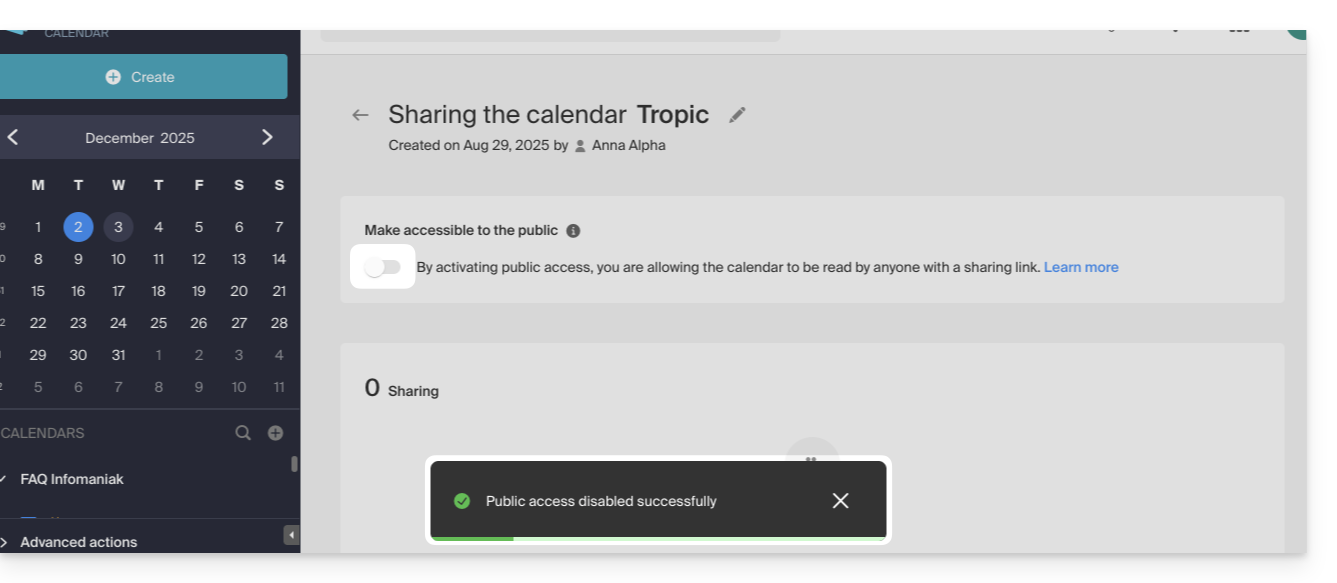
- You can always remove public access from this sharing page (see point 4 above):
Link to this FAQ: https://faq.infomaniak.com/1763
Has this FAQ been helpful?
This guide explains how to transfer to Infomaniak web data (website, FTP, databases) currently hosted elsewhere, for example with a competitor.
Prerequisites
- Have an Infomaniak web hosting plan (❓: help).
- Add a blank website to your Infomaniak hosting plan (❓: help).
Specific guides
Click on the link corresponding to the data to be migrated:
Guides for any other hosting provider
To retrieve any other website, follow the procedure below.
1. Recover Web Data
a. HTML, PHP, etc. files via FTP
To retrieve web data to your hard drive, you need to connect via FTP, which requires the server address from your hosting provider, the username, and the FTP password.
- Open an FTP client such as Filezilla.
- Connect to the server using your FTP credentials.
- Download the files for your website to your hard drive.
b. Exporting MySQL databases
Unless your website is static and simply in HTML, a dynamic website usually requires databases that must be exported from their management interface, generally PHPmyAdmin:
- Log in to the Control Panel of your current provider using a browser such as Brave, Chrome, Edge, Firefox, Opera, Safari…
- Access PHPMyAdmin.
- Connect to the server using your MySQL credentials.
- Click Export to configure the database export, then download your SQL data to your hard drive.
2. Upload this website data to Infomaniak
a. HTML, PHP, etc. files via FTP
Access your Infomaniak account and activate the FTP section:
- Click here to access the hosting & website management section in your Infomaniak Manager (❓: help).
- Click on the name of the relevant hosting.
- Click on FTP / SSH in the left-hand menu.
- Click on the Add button to create a new FTP / SSH account (❓: help).
- Open an FTP software/client such as Filezilla.
- Connect to the Infomaniak server using the FTP credentials obtained in step 4 above.
- Transfer the files from your hard drive (obtained in step 1.a.3) to the server in the folder corresponding to your website on Infomaniak.
b. Importing MySQL databases
Access your Infomaniak web hosting and enable the MySQL section:
- Click here to access the hosting & website management section in your Infomaniak Manager (❓: help).
- Click on the name of the relevant hosting.
- Click on Databases in the left-hand menu.
- Click on the Add button.
- Enter a database name after the prefix that has already been entered.
- Click the box to Create an associated user.
- Enter a username after the prefix that has already been entered.
- Enter a password.
- Click on Validate.
- Click on the blue Import button.
- Click on Select a file.
- Select the SQL files on your hard drive (obtained in step 1.b.4).
- Choose the database created in step 5 above as the destination.
- Click the blue Import button.
c. Adapt the site to the new infrastructure
Specific guides for adapting the configuration file: WordPress and Joomla.
If you are using another application such as Drupal or another web application (ownCloud, phpBB, etc.) that uses a database, adapt the following information in the appropriate configuration file based on the information available (❓: help) in the Manager so that your site works:
- the name of the database
- the database server
- the username that accesses the database
- the password for the username that accesses the database
Learn more
Link to this FAQ: https://faq.infomaniak.com/2643
Has this FAQ been helpful?
This guide helps you resolve an error of the type "Invalid query: MySQL server has gone away".
Introduction
- This type of error often occurs when a MySQL connection is kept open without submitting any queries for a period of time exceeding the connection timeout: http://dev.mysql.com/doc/refman/5.7/en/gone-away.html
- The
wait_timeoutandinteractive_timeoutvariables, which control this disconnection, are set to 30 seconds: http://dev.mysql.com/doc/refman/5.0/en/communication-errors.html
Solutions
To avoid the "MySQL server has gone away" error, here are several possible approaches:
Automatic Verification and Reconnection
Before executing a query, it is recommended to test whether the MySQL connection is still active. If the connection has been closed, you can automatically re-establish it before proceeding with your query. Here is an example in PHP:
if (!mysqli_ping($connexion)) {
mysqli_close($connexion);
$connexion = mysqli_connect($host, $user, $password, $database);
}
The mysqli_ping() function checks if the connection is still valid. If it is not, the script closes the connection and opens a new one.
Regular "Ping" Sending
Another method is to run a script that regularly sends a "ping" to the database to keep the connection active. For example, you could create a scheduled task (cron job) that sends a lightweight request, such as SELECT 1;, at regular intervals.
Adjusting MySQL parameters (Cloud Server)
With a Cloud Server, you can increase the values of the wait_timeout and interactive_timeout variables from the MySQL menu of your server to extend the connection duration before it is closed.
Link to this FAQ: https://faq.infomaniak.com/499
Has this FAQ been helpful?
This guide explains how to add two different EV or DV SSL Certificates to the same website.
Introduction
- Since it is not possible to install two SSL certificates on the same website, it is necessary to create two identical websites.
Creating the second website
Prerequisites
- Remove any existing domain name aliases from your site.
To access your web hosting and add a website:
- Click here to access your product management interface on the Infomaniak Manager (need help?).
- Click directly on the name assigned to the product in question.
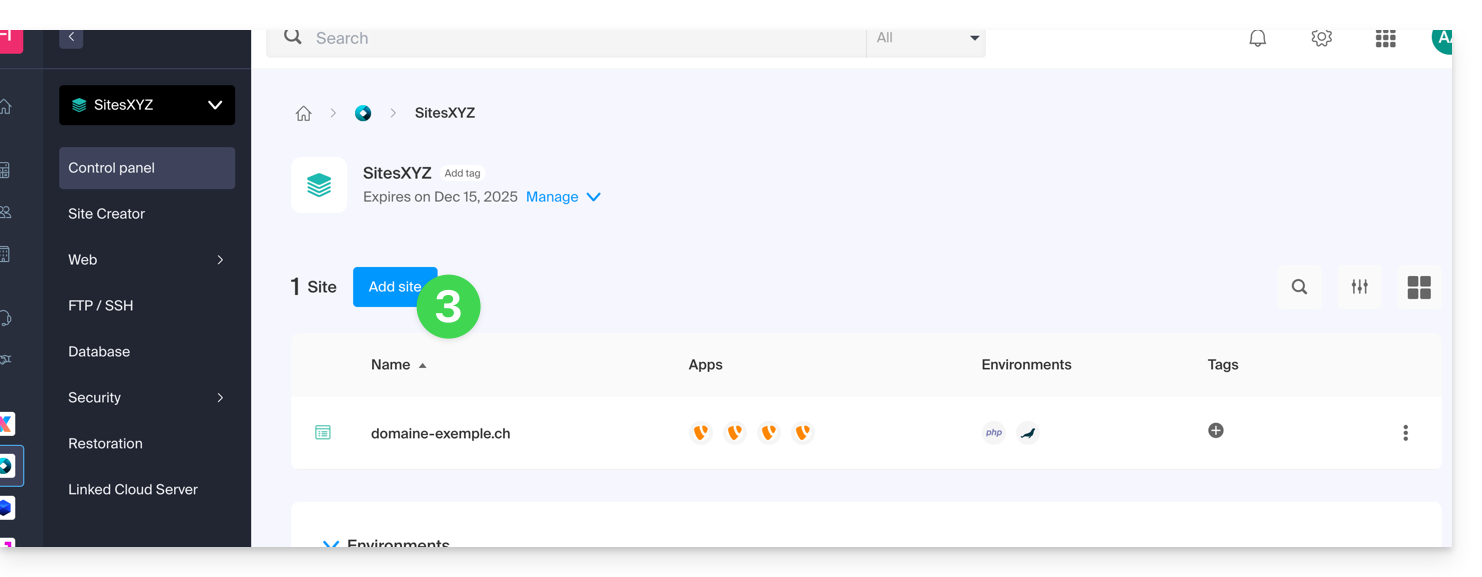
- Click on the Add a site button:
- Continue without installing any tools:
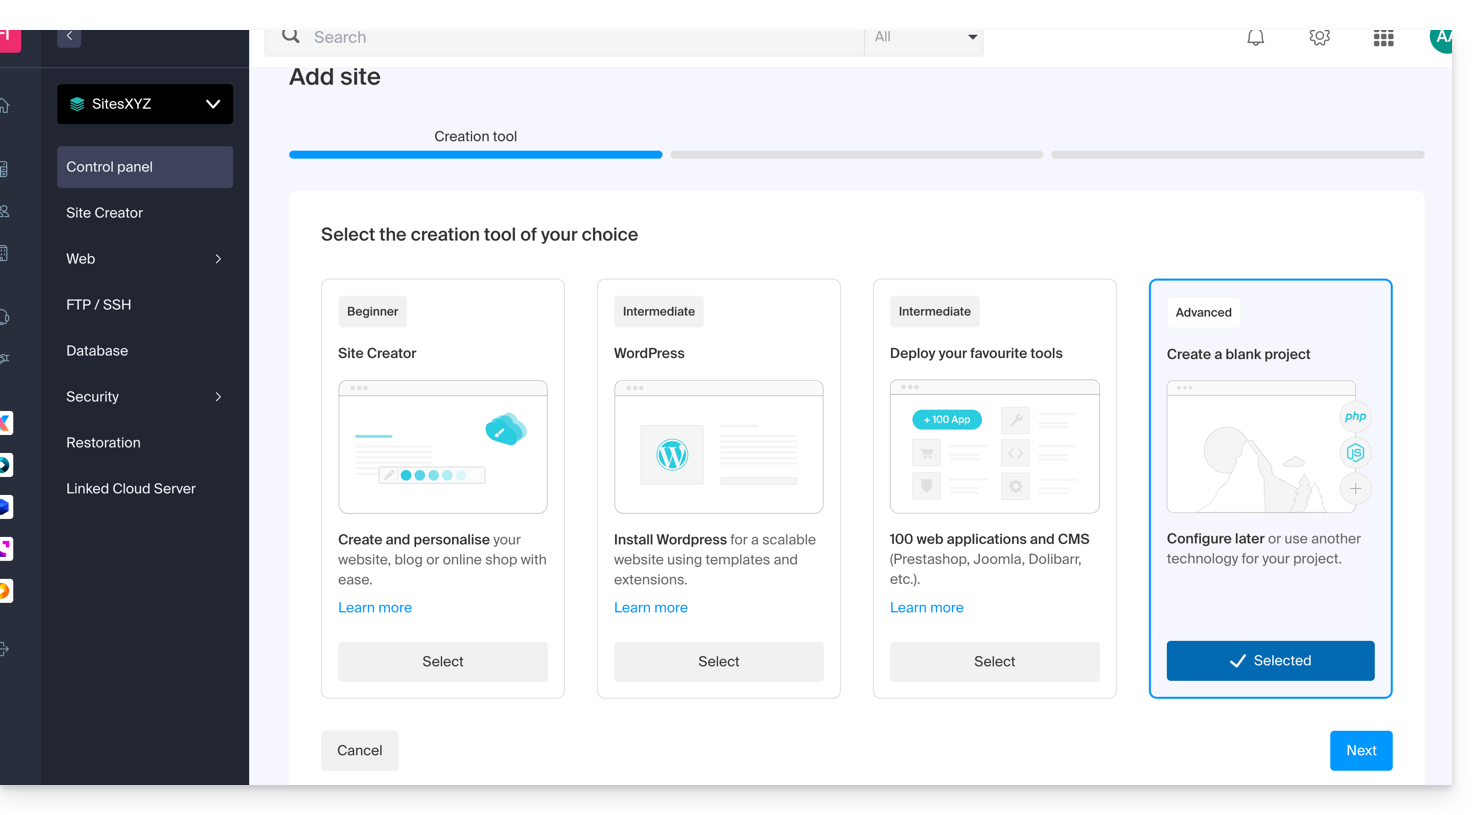
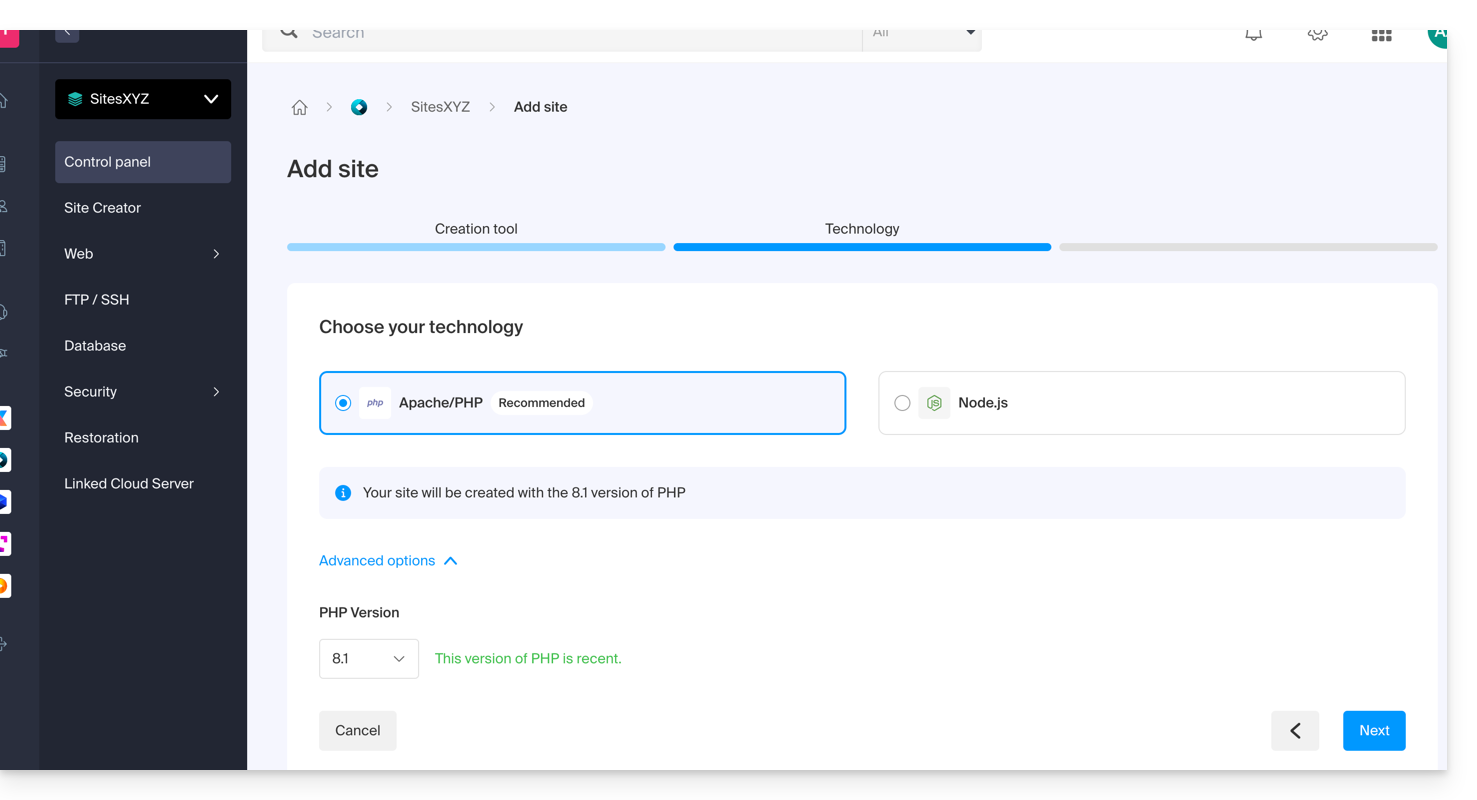
- Click on Apache and choose the same PHP version as the main site:
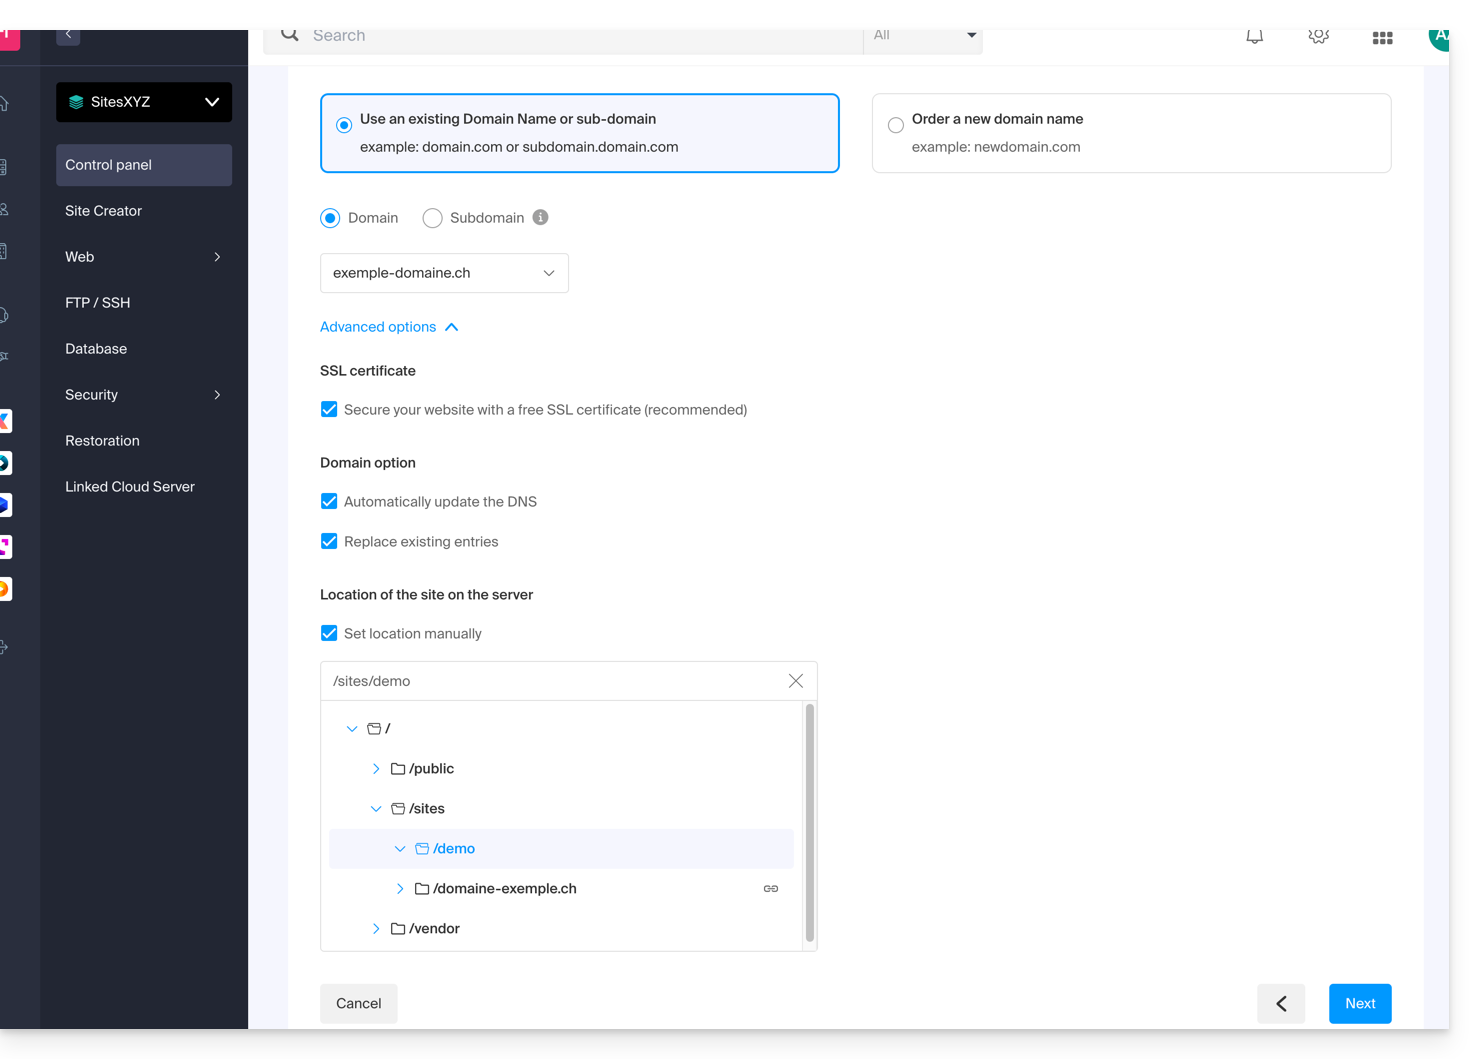
- Choose between using a domain name or a subdomain.
- Enter the domain name or subdomain.
- Click on Advanced options.
- Enable (or disable) the Let's Encrypt SSL certificate for the future website.
- Check the Set location manually box.
- Choose the same location as the main site:
- Click the blue Next button to start creating the website.
Install the SSL certificate
Once the second site is created (any DNS addition/modification may take up to 48 hours to propagate (❓: help)), you will be able to install an SSL certificate (if you chose not to install the certificate in step 9 above).
To access the website management:
- Click here to access your product management interface in the Infomaniak Manager (need help?).
- Click directly on the name assigned to the product in question.
- Click on SSL Certificates in the left-hand menu.
- Click on the blue Install an SSL certificate button and follow the procedure.
Link to this FAQ: https://faq.infomaniak.com/2522
Has this FAQ been helpful?
This guide provides suggestions for improving and reducing the response time of your Infomaniak Web Hosting.
Introduction
- TTFB, or *Time To First Byte*, is a unit of measurement used to evaluate the response speed of a web server.
- TTFB measures the time between an HTTP request from a user or browser and the receipt of the first byte of the website page being viewed.
- This delay is particularly important. It may be one of the SEO criteria taken into account by search engines such as Google.
Ways to improve TTFB
To speed up your website and improve TTFB (Time To First Byte):
- Use a Content Delivery Network (CDN).
- Optimize the website code.
- Optimize the database queries.
- Limit HTTP requests.
- Embed CSS and JavaScript in your HTML pages to avoid using external resources.
- Use an RFPL (*Response First, Process Later*) caching system.
Refer to the Criticalcase article (in English) for more information.
Test the server response speed
If you have any doubts about the server response speed, you can create an index2.html file, which will be saved at the same level as the index.html (or .php) file. This will allow you to perform an optimization test (e.g., domain.xyz/index2.html) without the main site/CMS being taken into account.
If the response time is normal, it means that the slowdowns are due to the website and not the server.
To learn more
Please refer to the following resources:
Link to this FAQ: https://faq.infomaniak.com/2619
Has this FAQ been helpful?
This guide helps you resolve issues related to special characters (accents, emojis, etc.) that are not displayed correctly or appear as symbols like ??, often due to incorrect encoding when connecting to MySQL.
Introduction
- By default, MySQL uses
UTF-8. - Recent MySQL servers are generally configured to use
UTF-8orUTF-8MB4by default.- This is suitable for most cases, especially for international languages and emojis.
- Also, refer to this other guide to learn how to avoid causing encoding issues with non-European characters and emojis in your developments.
Define the default MySQL / MariaDB charset (Cloud Server)
With an Infomaniak Cloud Server, it is possible to define the default charset (utf8 or utf8mb4):
- Click here to access the management of your product on the Infomaniak Manager (need help?).
- Click directly on the name assigned to the product in question.
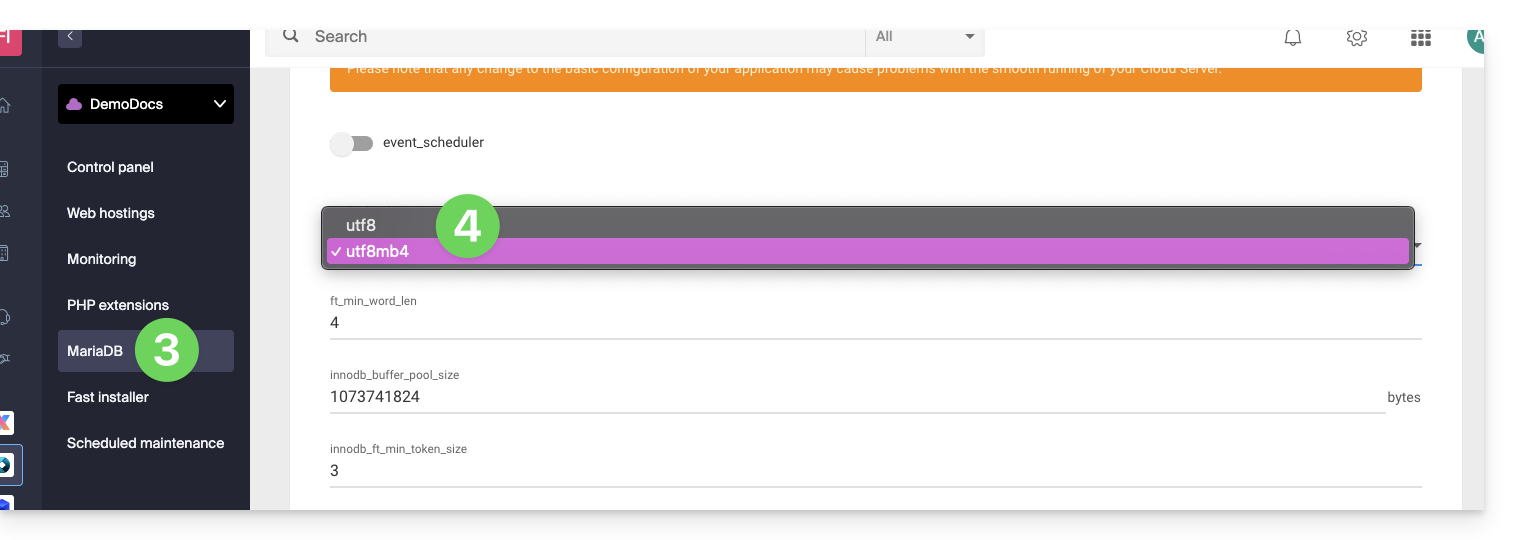
- Click on MariaDB in the left-hand menu.
- Choose the default character set:
- If you have not yet migrated to MariaDB, the principle is the same.
- Save your changes at the bottom of the page.
Force a specific encoding (e.g., latin1)
If you need to work with a database in latin1 (ISO-8859-1), you must explicitly align the encoding when connecting, depending on your environment.
For current offers, place the following code in a user.ini file located in the root directory of your hosting:
mysql.connect_charset = "latin1"
mysqli.connect_charset = "latin1"
pdo_mysql.connect_charset = "latin1"
or in PHP (MySQL API):
mysql_query("SET CHARACTER SET latin1");
For older hosting plans, force the MySQL connection to use latin1 via the .htaccess file located in the root directory of your hosting:
php_value mysql.connect_charset latin1
php_value mysqli.connect_charset latin1
php_value pdo_mysql.connect_charset latin1
Link to this FAQ: https://faq.infomaniak.com/1611
Has this FAQ been helpful?