Knowledge base
1000 FAQs, 500 tutorials and instructional videos. Here, there are only solutions!
This guide explains how to manually allow or deny participants to a kMeet meeting.
Introduction
- Once the option is enabled, each participant can approve the arrival of subsequent participants.
- If a meeting is created from the Infomaniak calendar, a kMeet link can be added, which will be accessible to all event participants; it is therefore recommended that the event initiator log in a little before the participants if they wish to configure their meeting (add a waiting room or a password, etc.).
Approve or reject participants
To do this:
- Click here to access kMeet in your Infomaniak kSuite (or launch the mobile/desktop app — ❓: help).
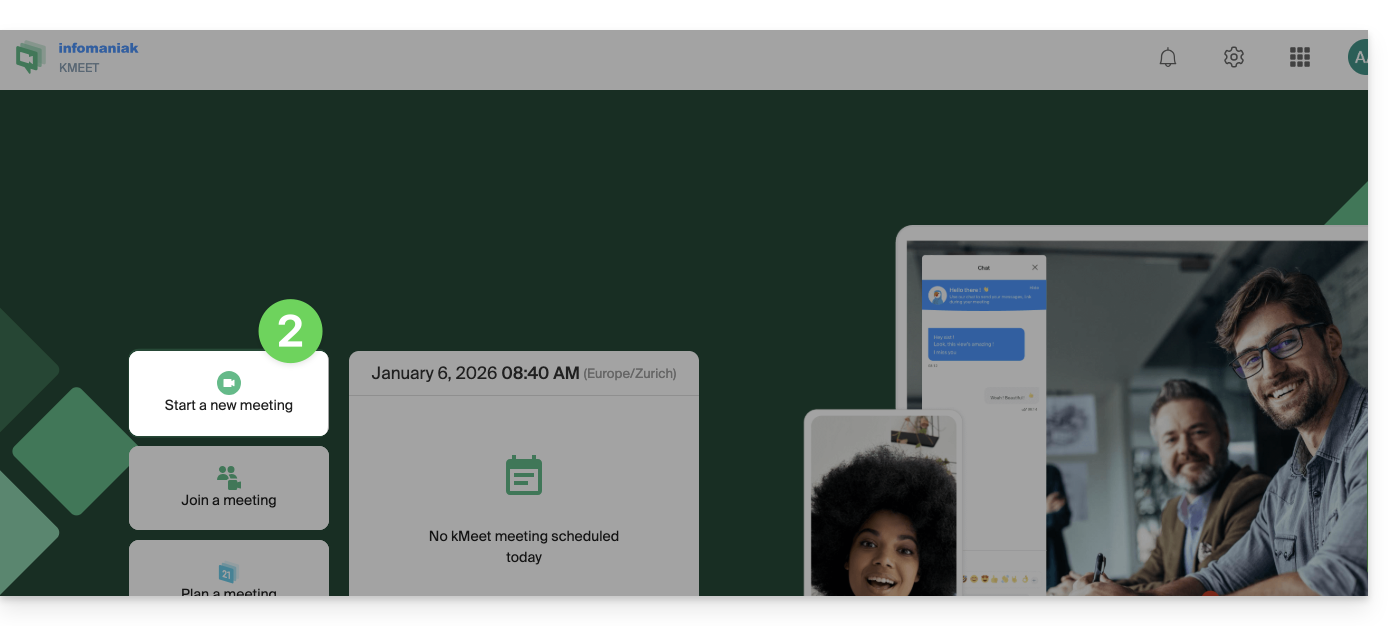
- Start a meeting (❓: help).
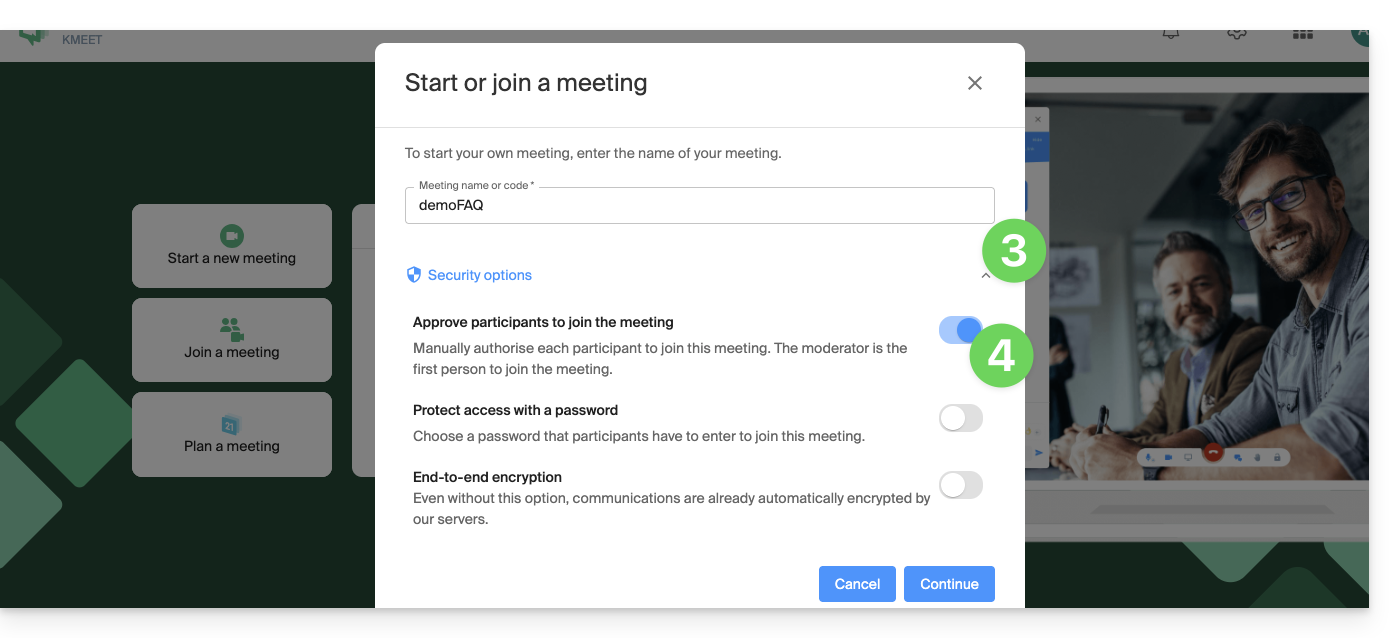
- Click on the chevron below the meeting name to expand the advanced options.
- Enable participant control:
- Start the meeting.
- Share the meeting link or code, and if necessary, the password and/or encryption key with your participants.
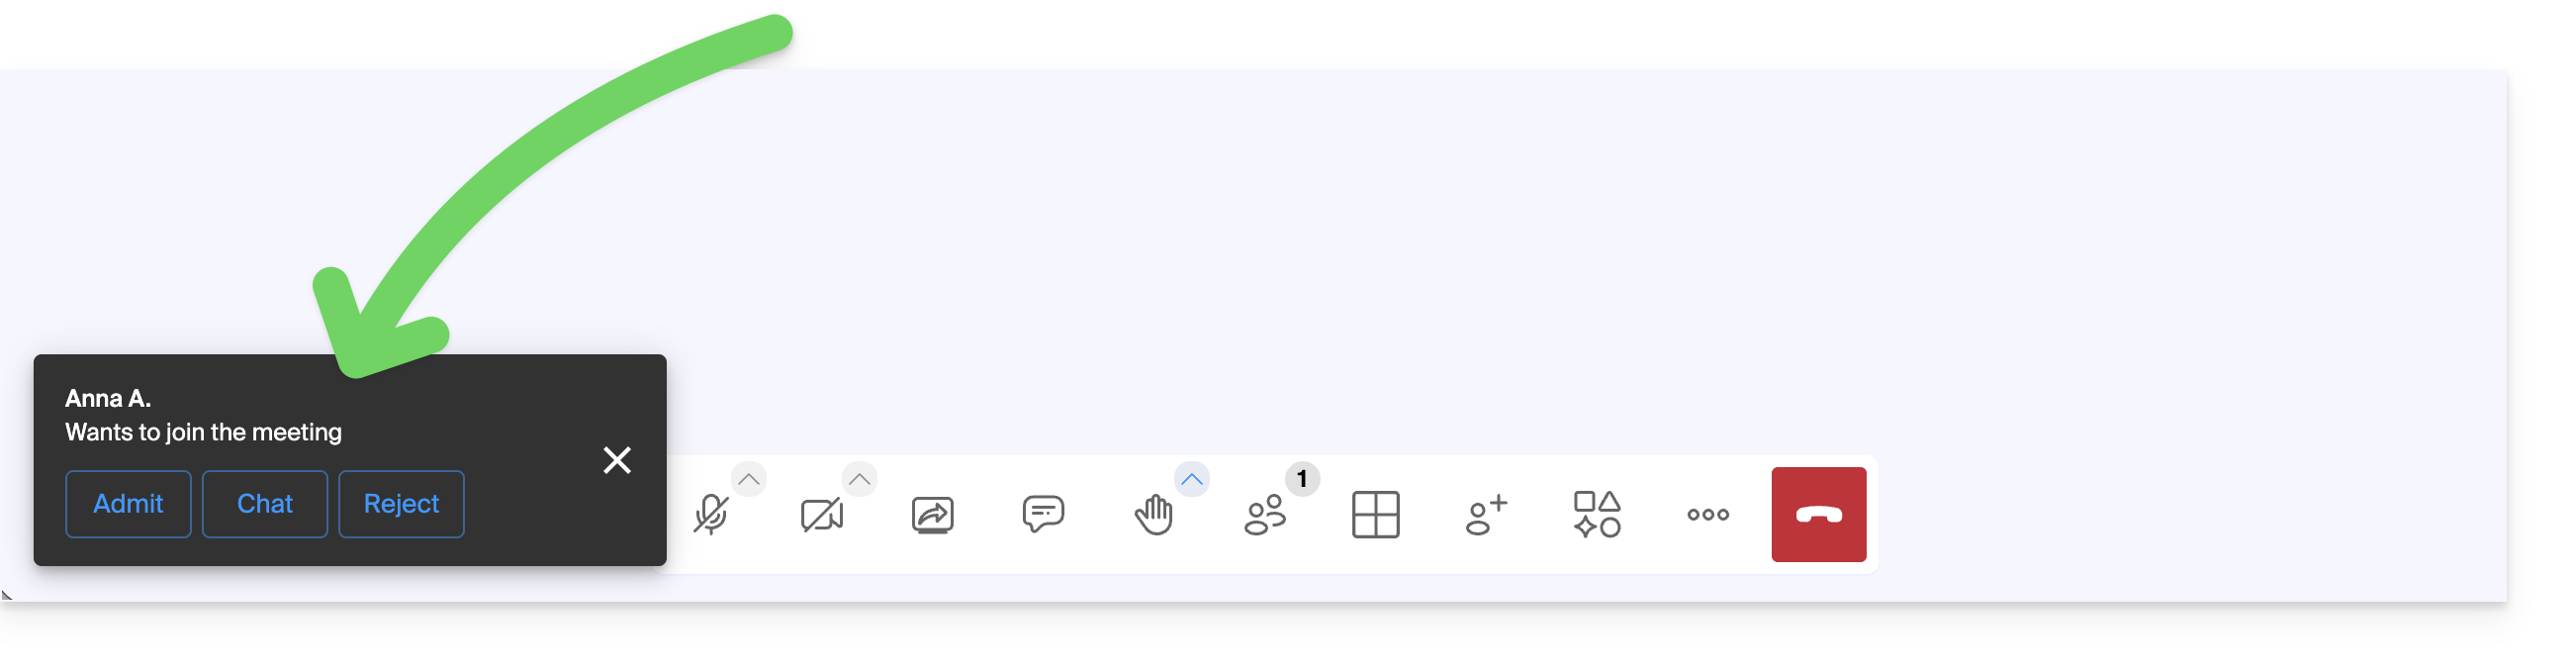
- When your participants try to join the meeting, an audible notification prompts you to allow or deny them access to the room:
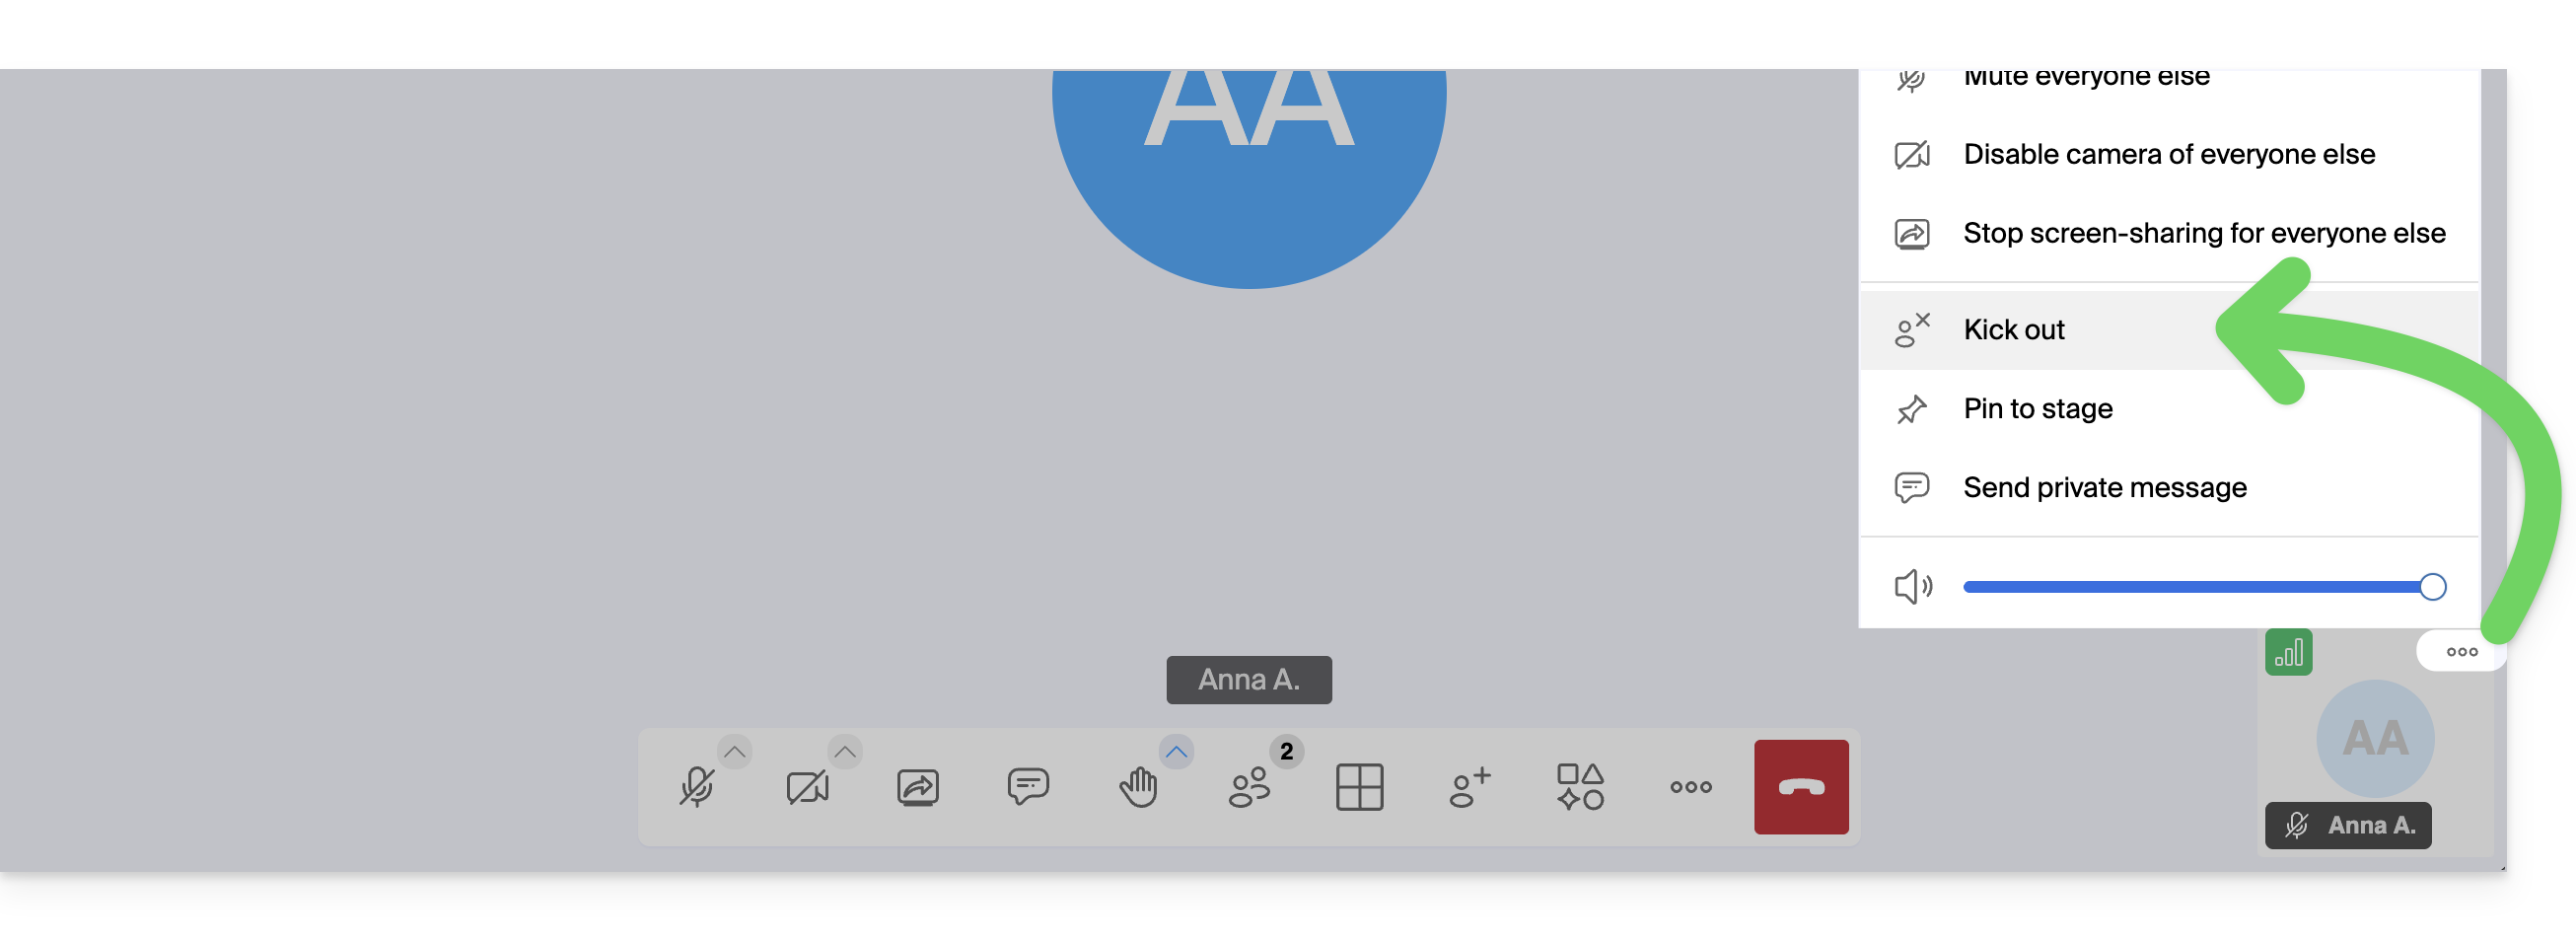
- You can exclude a participant, who was previously accepted, during the meeting:
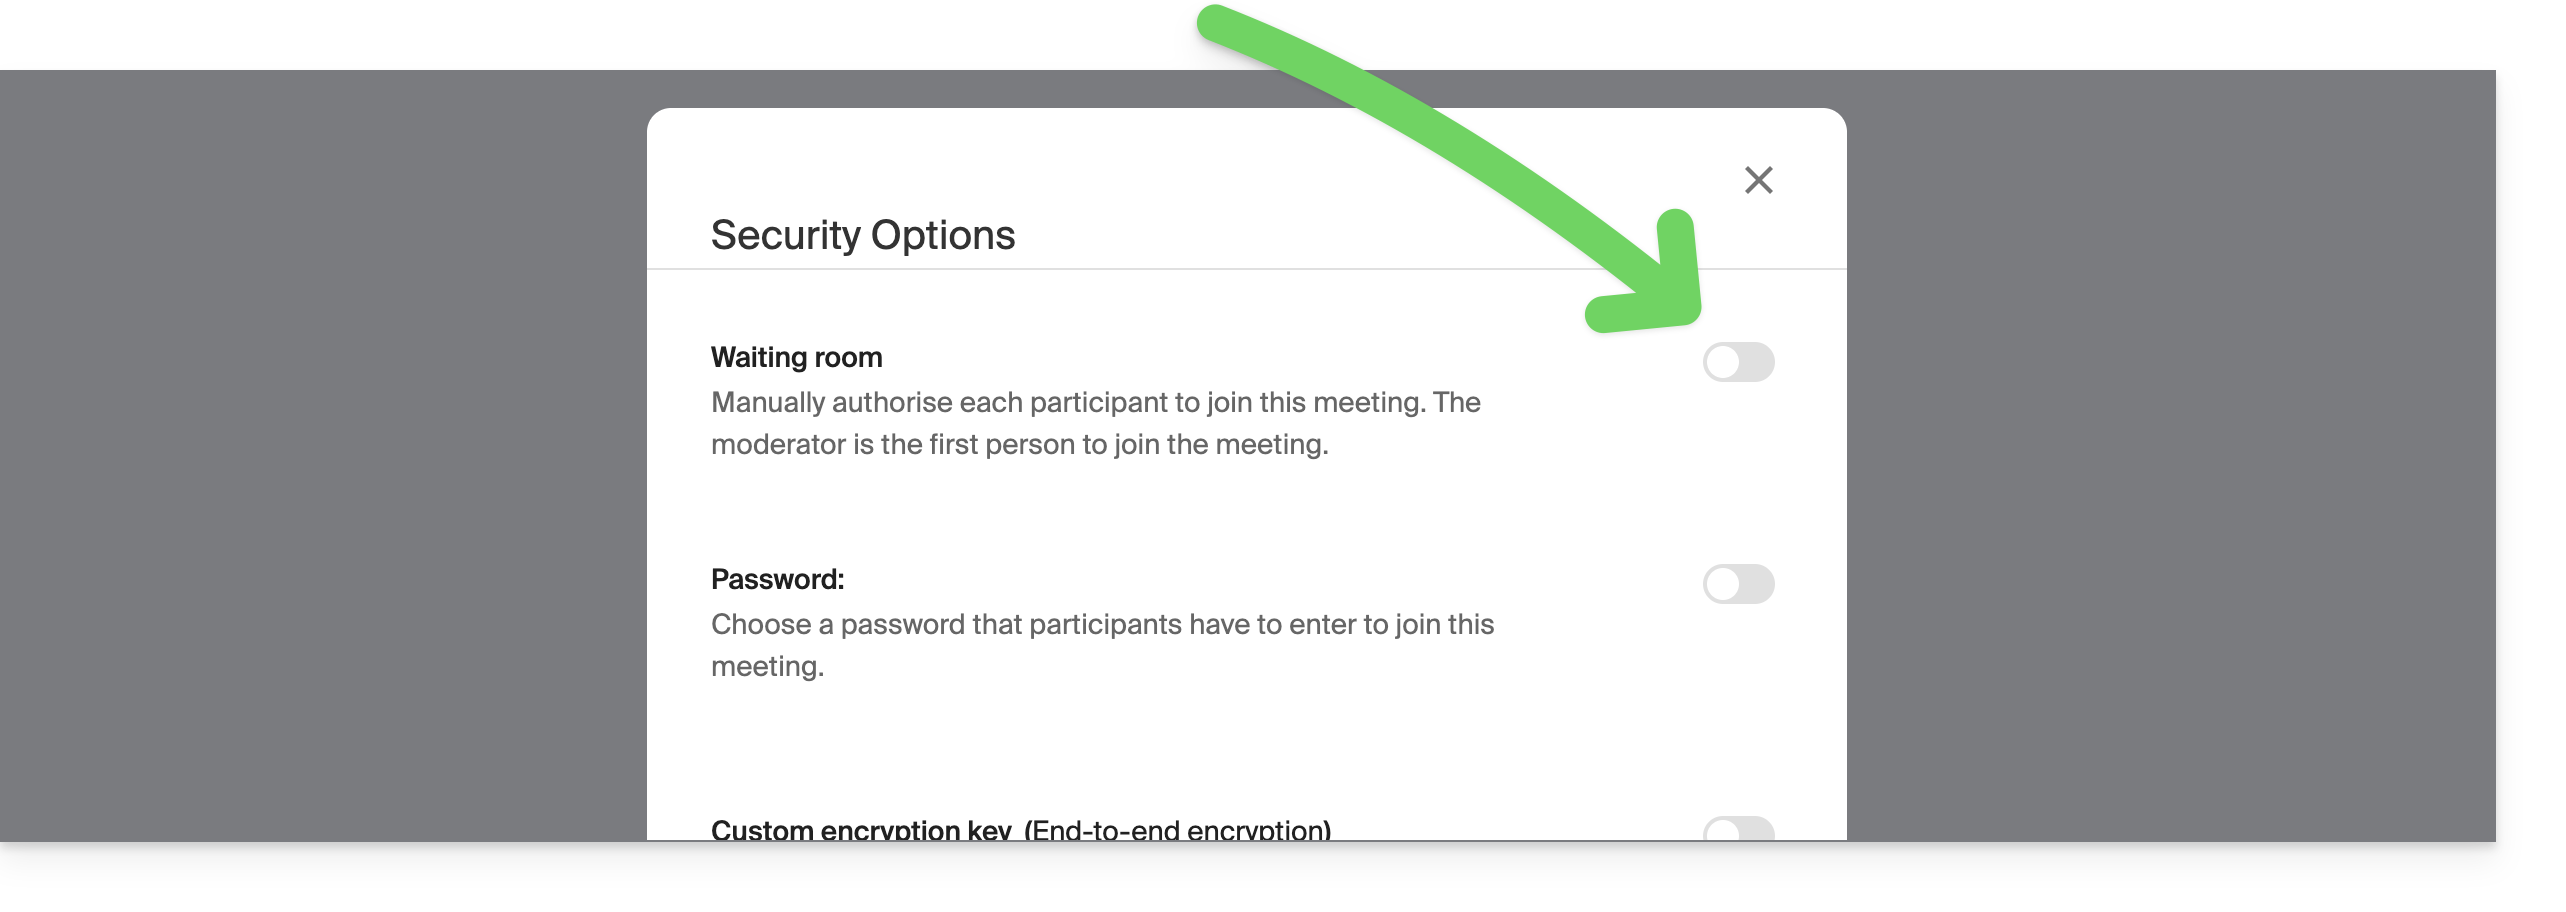
- The moderator can also disable the "waiting room" activated in step 4 above once the meeting has started:
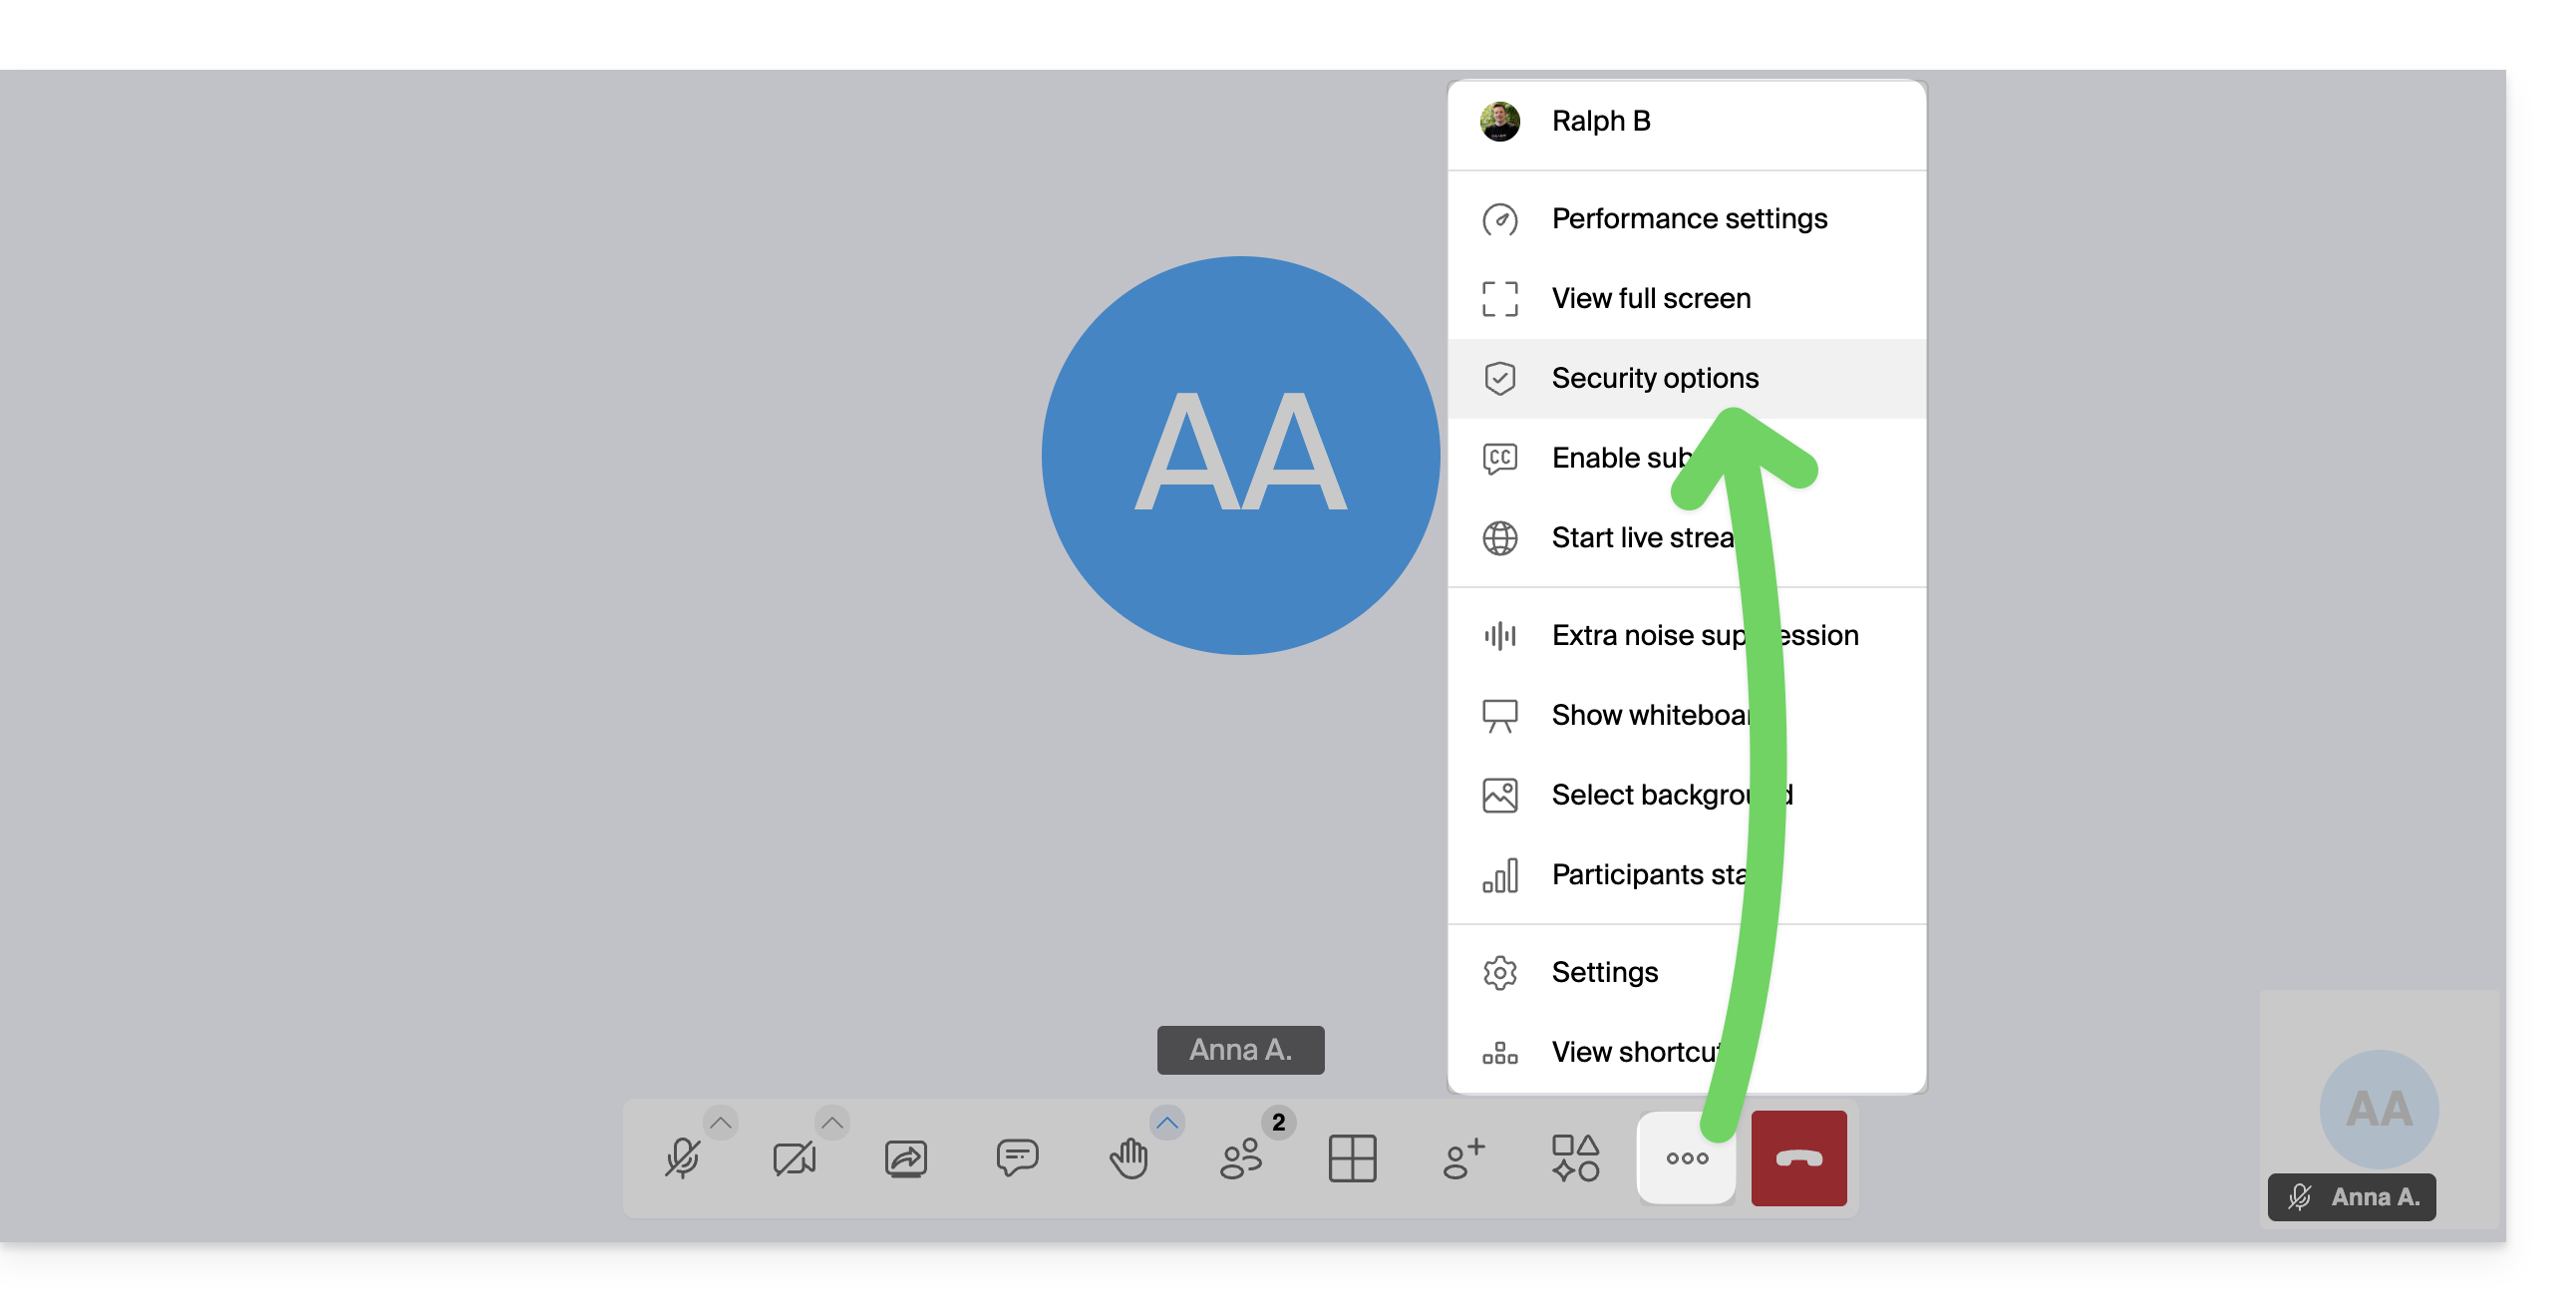
- Click on the ○○○ icon in the toolbar.
- Click on Security options:
- Disable the option to no longer have to manage new arrivals in the meeting:
Moderation options
Other moderation options are available:
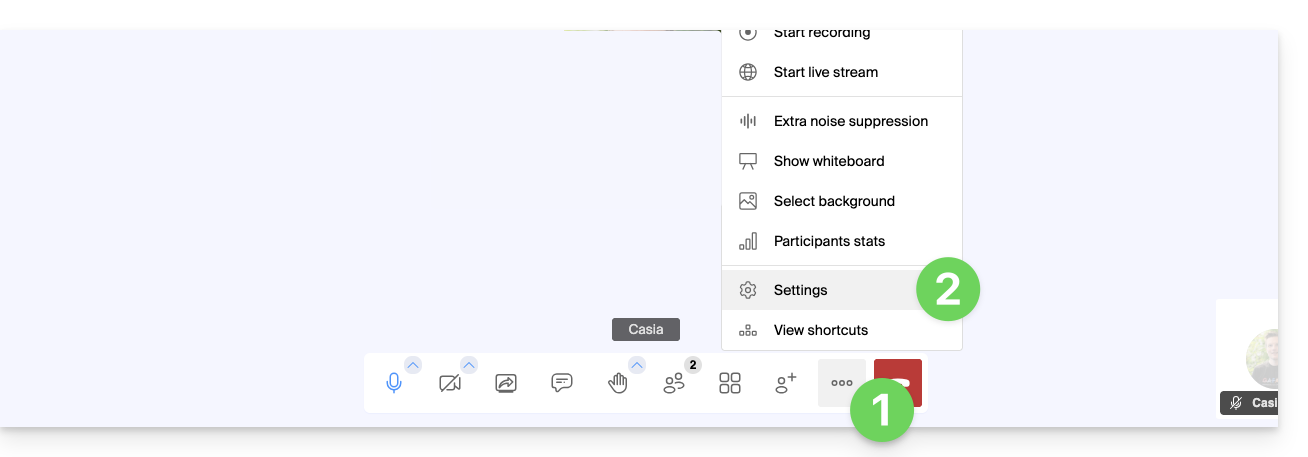
- Click on the ○○○ icon in the toolbar.
- Click on Settings:
- Click on Moderation.
- The options allow you to manage the expected behavior when new participants join:
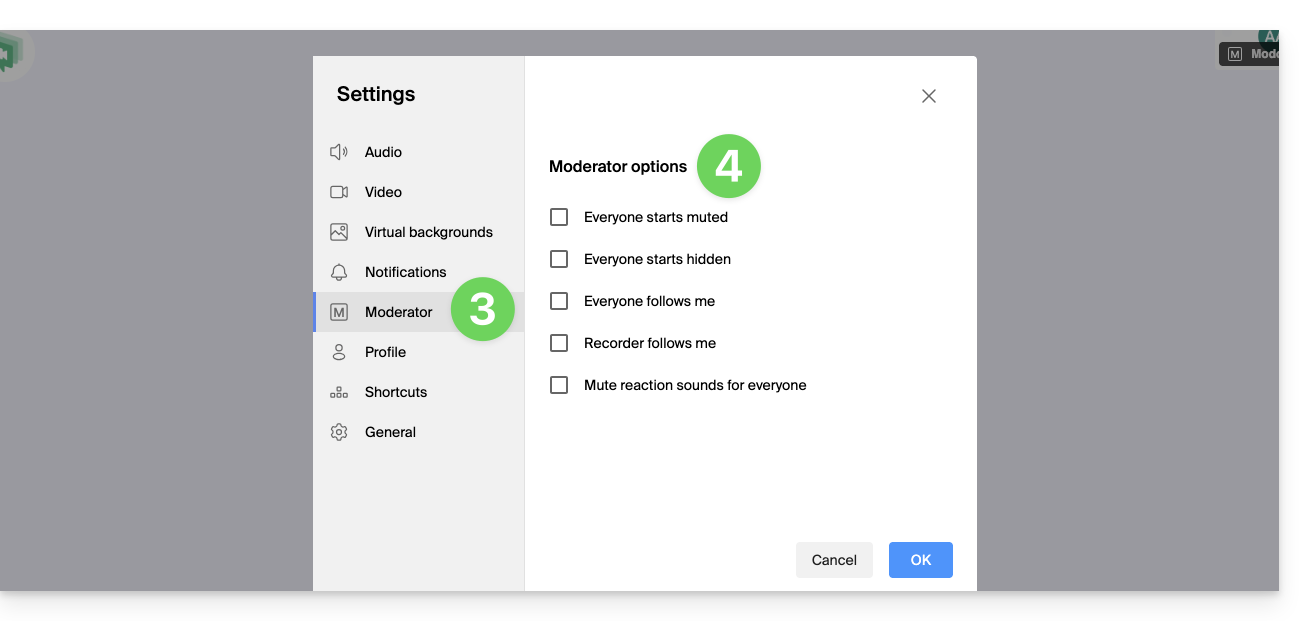
- all participants start with their microphone muted
- all participants start with their camera turned off
- all participants have the same interface display as the moderator (a specific participant is displayed in large format on the layout, etc.), which can be modified at any time by the users, but the moderator can update it at any time to enforce the setting
- the recording will use the same interface display as the moderator (a specific participant is displayed in large format on the layout, etc.)
- reaction emojis do not produce any sound
Link to this FAQ: https://faq.infomaniak.com/2476
Has this FAQ been helpful?
This guide explains how to link a stream added to your Infomaniak Streaming Radio with your setup that will broadcast the desired content.
Introduction
- In general, Infomaniak is compatible with all the software listed here: https://www.icecast.org/apps/, but not all of them support AAC streaming, for example.
- An example configuration is provided below for the free, cross-platform application Butt.
- Learn more about Edcast (standalone version) / SpacialAudio SAM Cast… There is also (without a guide) StreamDiffusion / MB Recaster…
Get the login information
To find the information needed to configure your encoder:
- Click here to access the management interface for your product in the Infomaniak Manager (need help?).
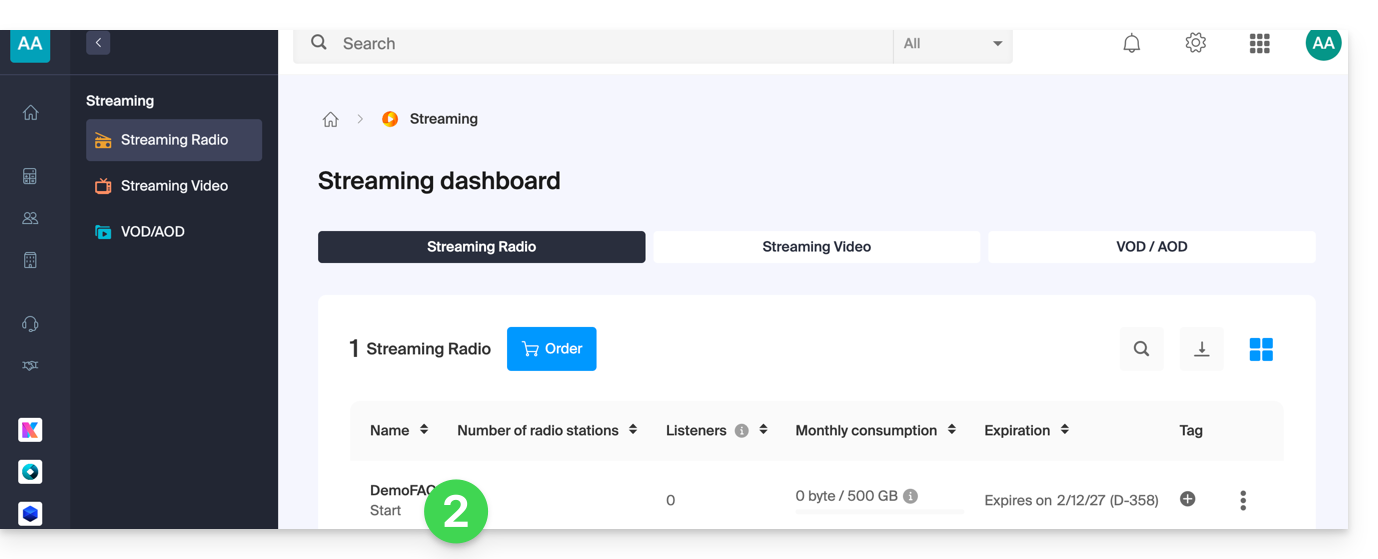
- Click directly on the name assigned to the product in question:
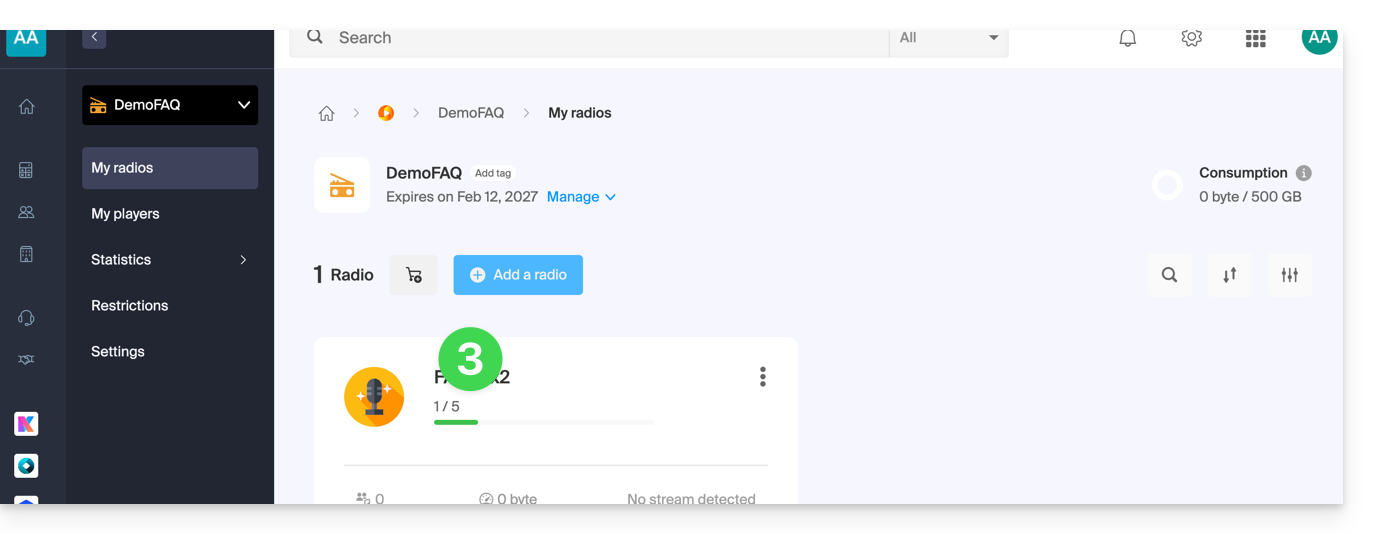
- Click on the name of the radio station in question:
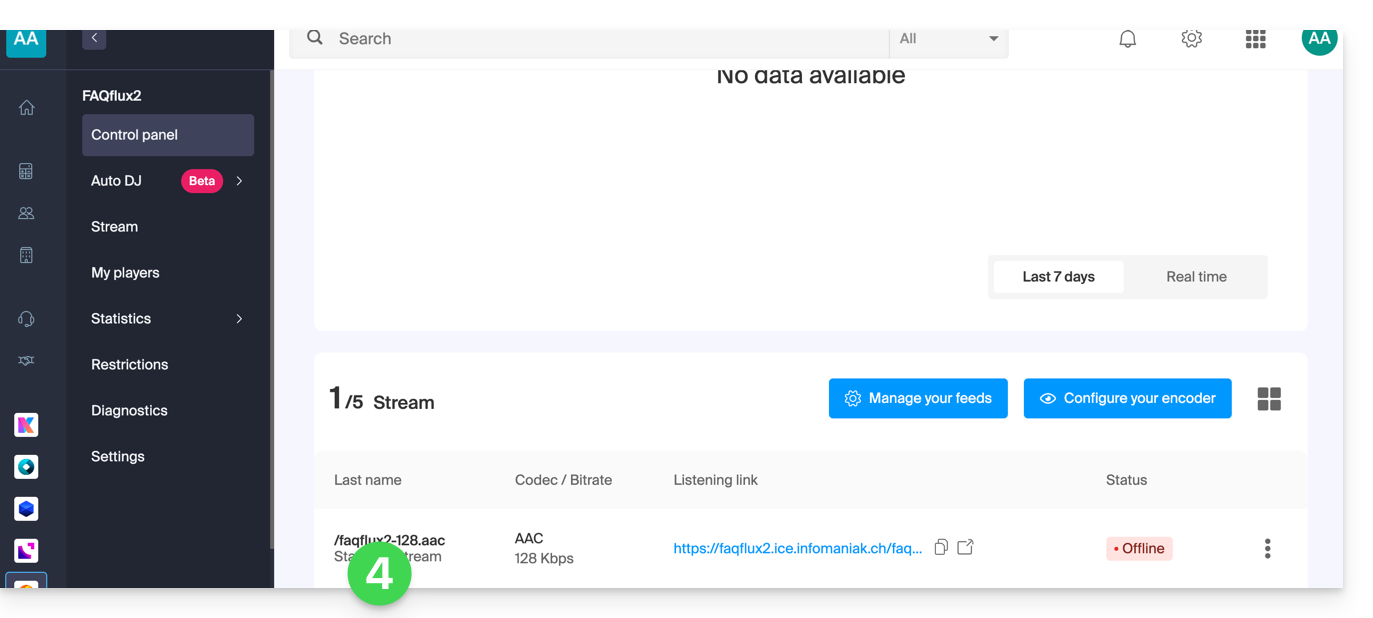
- Click on the name of the audio stream in question to view its details:
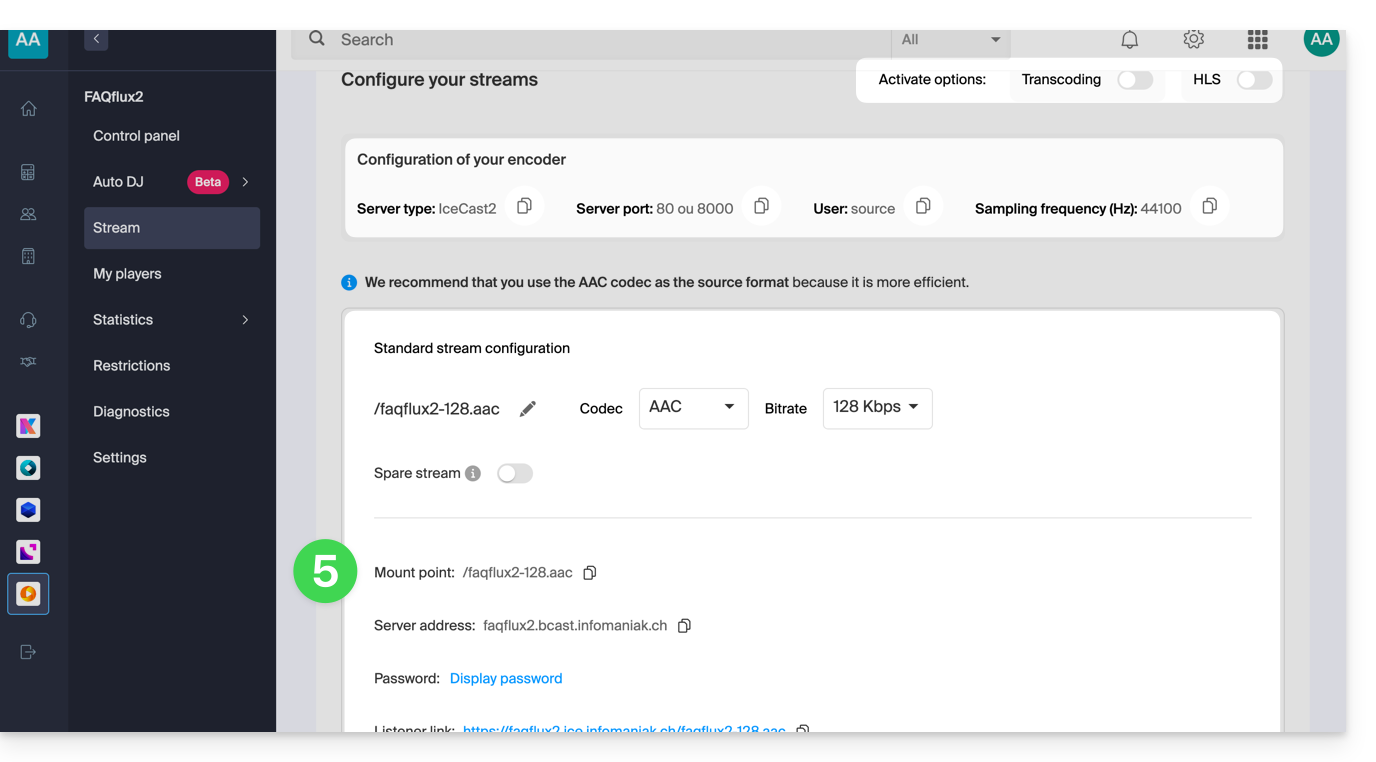
- The relevant information is displayed on the page:
Example of encoder configuration
You want to stream audio content from a computer. As specified in the preamble above, there are multiple software solutions available. Here is an example using the Butt tool, which is available, among other platforms, on macOS:
- Download Butt:
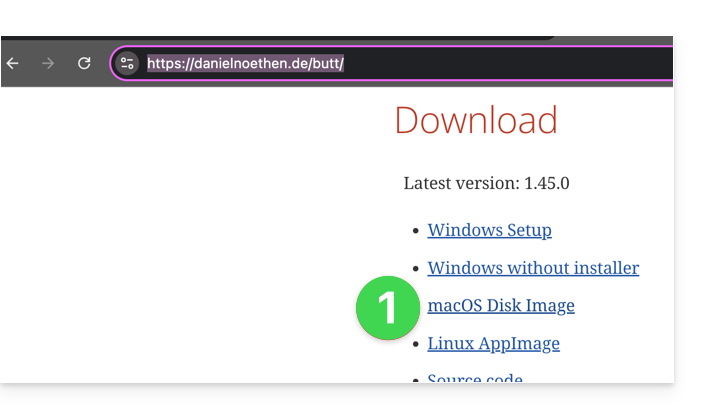
- Open the downloaded application on your computer.
- Install the application:
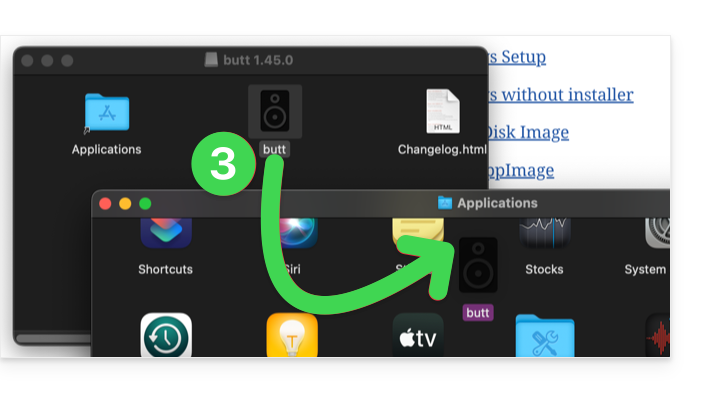
- Launch the application to use it:
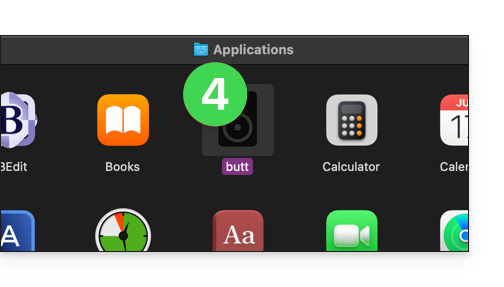
- Click on Settings:
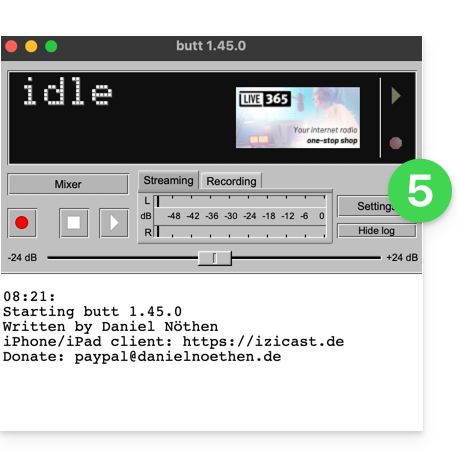
- Click on Add a server:
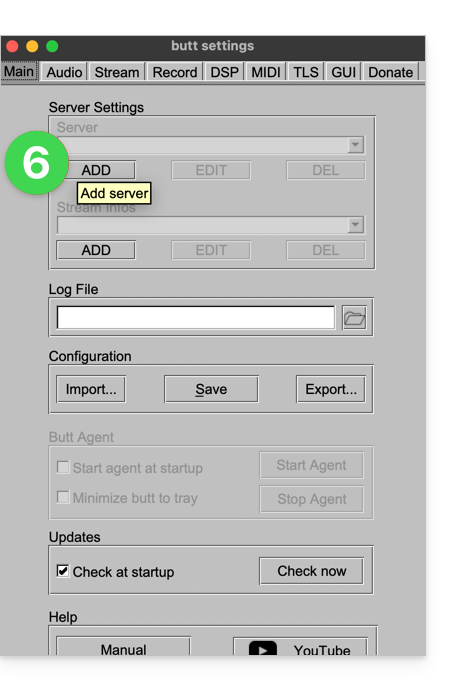
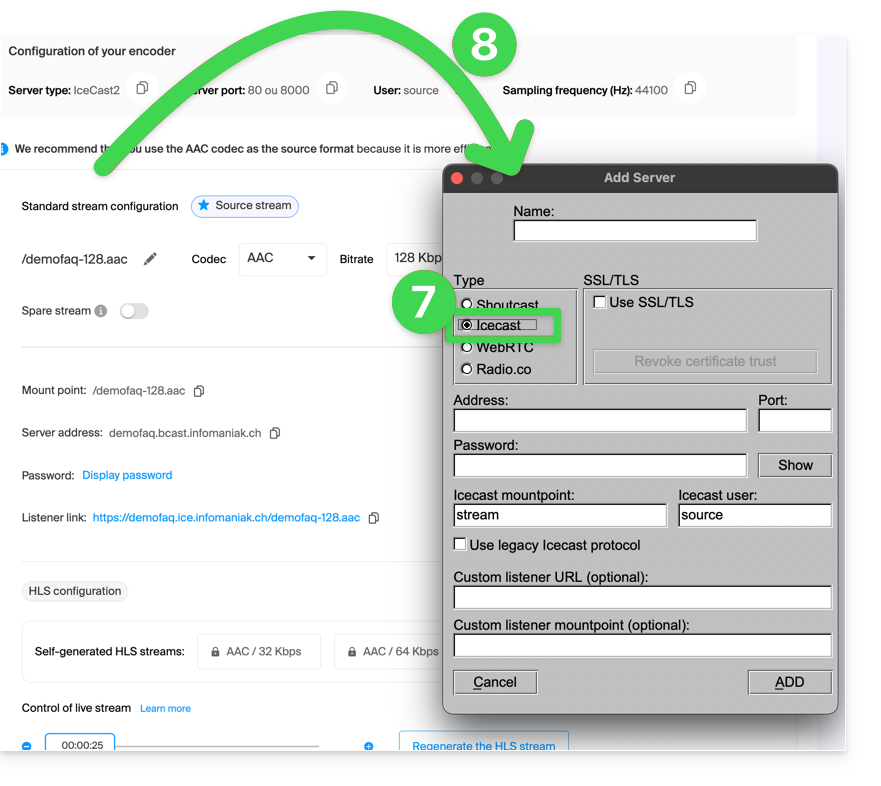
- Select the Icecast type.
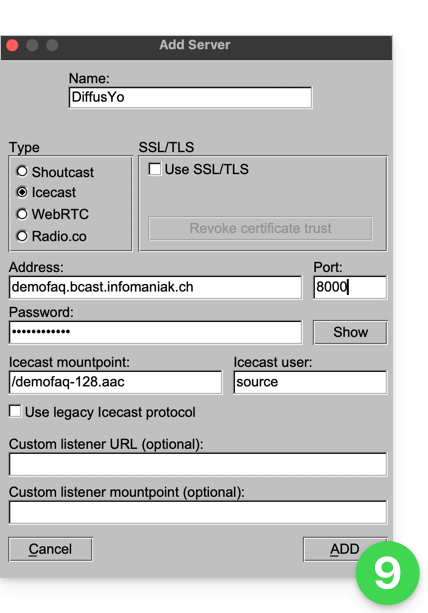
- Copy your stream information to the encoder (for the password, you will first need to enter your login password for the Manager, then the stream password will be copyable (and visible with the eye icon):
- Confirm your settings by clicking Add in the bottom right corner:
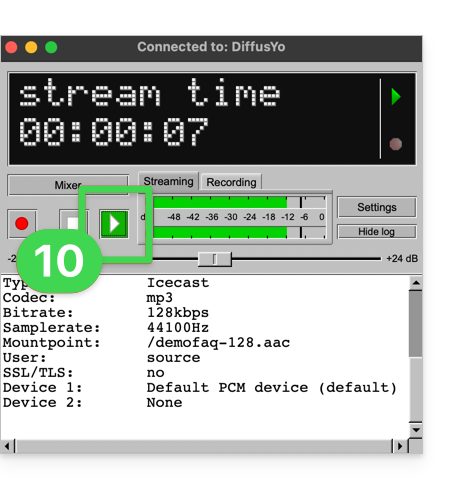
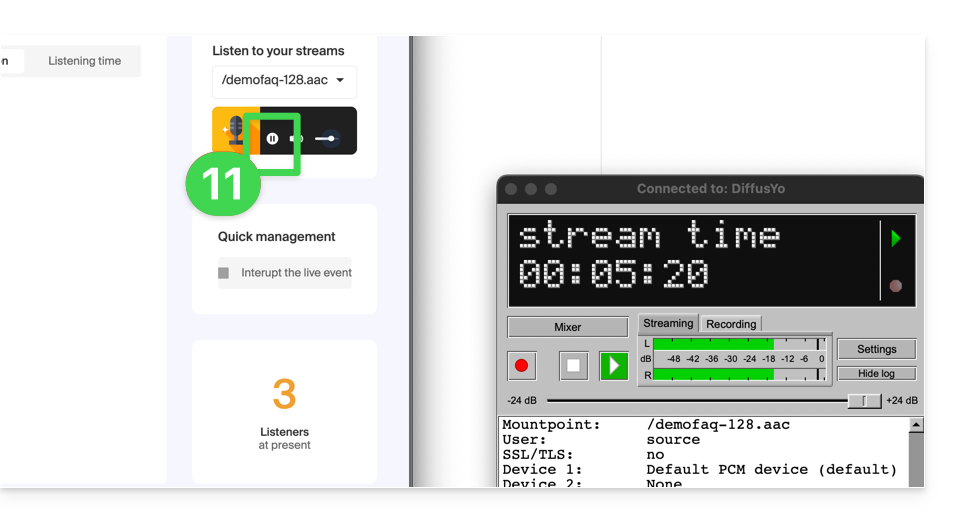
- Close the settings and click the Play button to start the broadcast:
- You can listen to your stream from the Infomaniak dashboard by starting the demo player:
Link to this FAQ: https://faq.infomaniak.com/1466
Has this FAQ been helpful?
This guide explains how to manage external applications with kChat using webhooks.
Introduction
- A webhook is a method that allows an application to be notified immediately when a specific event occurs in another application, rather than constantly asking that application if anything new has happened ("polling").
- Outgoing webhook: kChat communicates information to other apps when an event occurs in kChat.
- Incoming webhook: kChat receives information from other apps to trigger actions in kChat.
- It is not possible to import the history of discussions from another application (Slack, Teams, Jabber, etc.) or from another Organization.
- Maximum number of incoming/outgoing Webhooks:
- kSuite Free = 1 / 1
- kSuite Standard = 20 / 20
- kSuite Business = unlimited
- kSuite Enterprise = unlimited
Accessing the kChat webhooks interface
Prerequisites
- You must not be an external user (they will not see the Integrations menu).
To configure a webhook, find self-hosted or third-party applications and integrations:
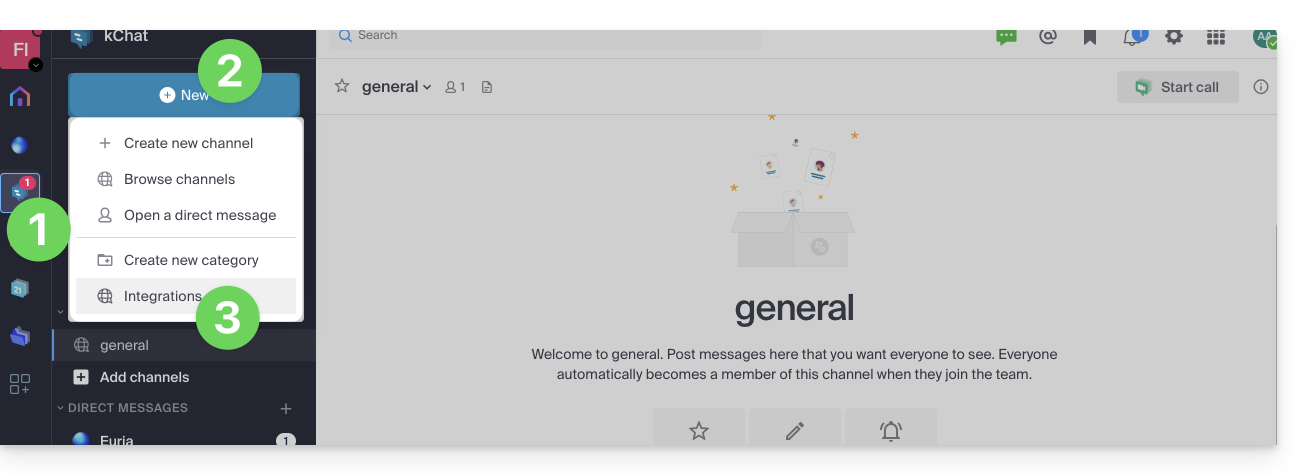
- Click here to access the kChat web app (online service ksuite.infomaniak.com/kchat) or open the kChat desktop app (desktop application on macOS / Windows / Linux).
- Click on the New icon next to your kChat organization's name.
- Click on Integrations:
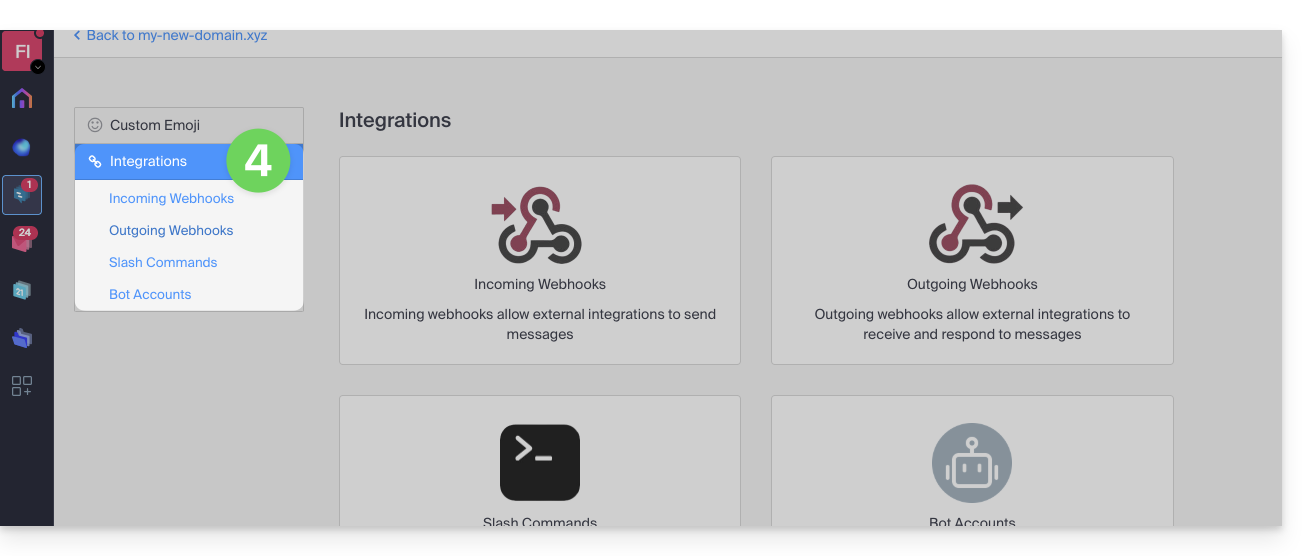
- Access the categories:
Specific guides
Examples of integration on kChat:
- Calendar Infomaniak: display an event reminder on kChat
- n8n application: trigger the sending of a message on kChat
Guides for other uses
To create an incoming webhook (to display an external event on kChat):
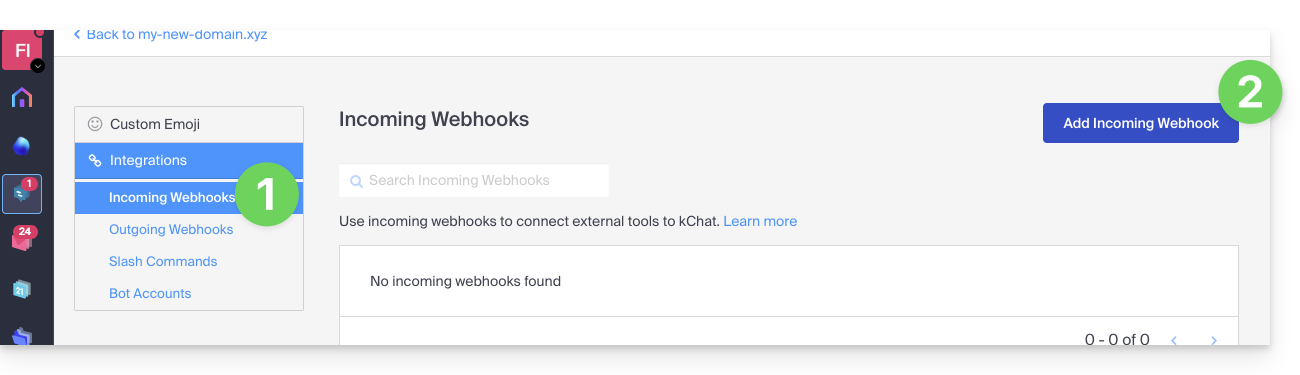
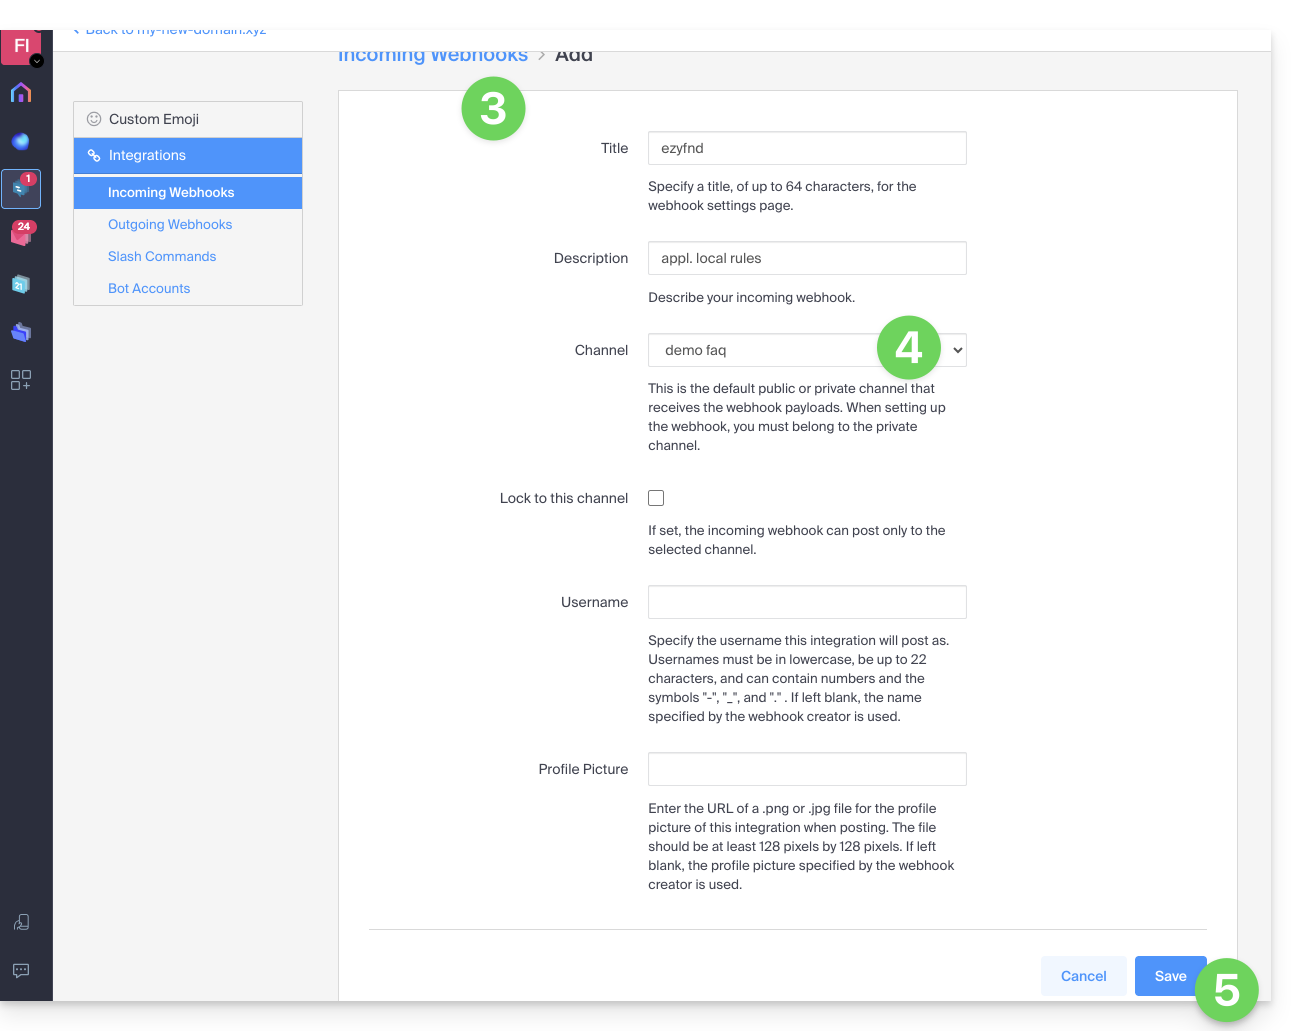
- Click on the Incoming Webhooks category.
- Click on the blue Add incoming webhooks button:
- Add a name and description for the webhook.
- Select the channel that will receive the messages.
- Click the button to Save:
- The URL to keep for your developments is displayed (do not disclose it publicly); example: “
https://your-server-kchat.xyz/hooks/xxx-key-generated-xxx”: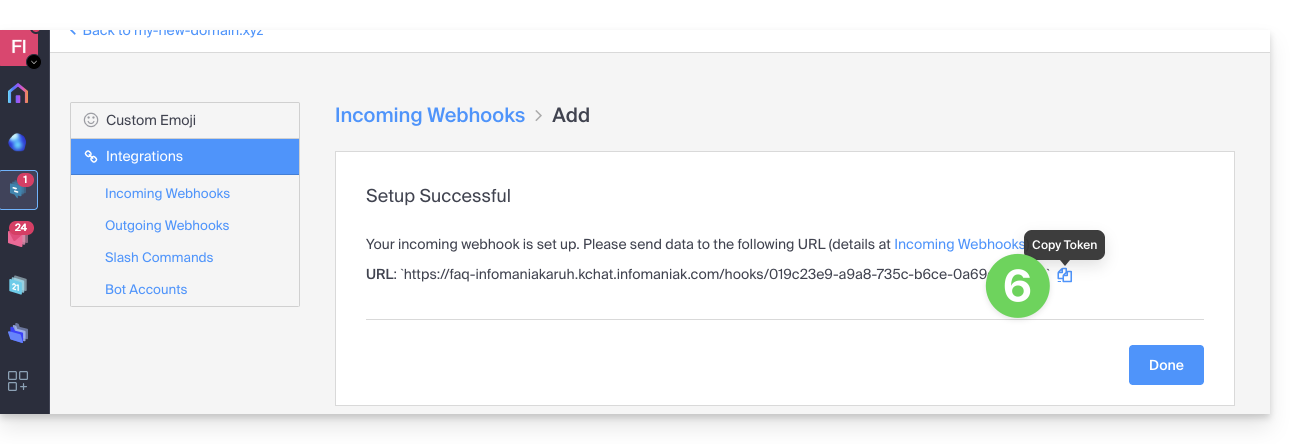
Using the webhook
Quick example
- A specific
curlcommand (detailed below) is entered into a terminal. - The command contains the URL obtained in step 6 above.
- The command will post a message in the channel specified in step 4 above:
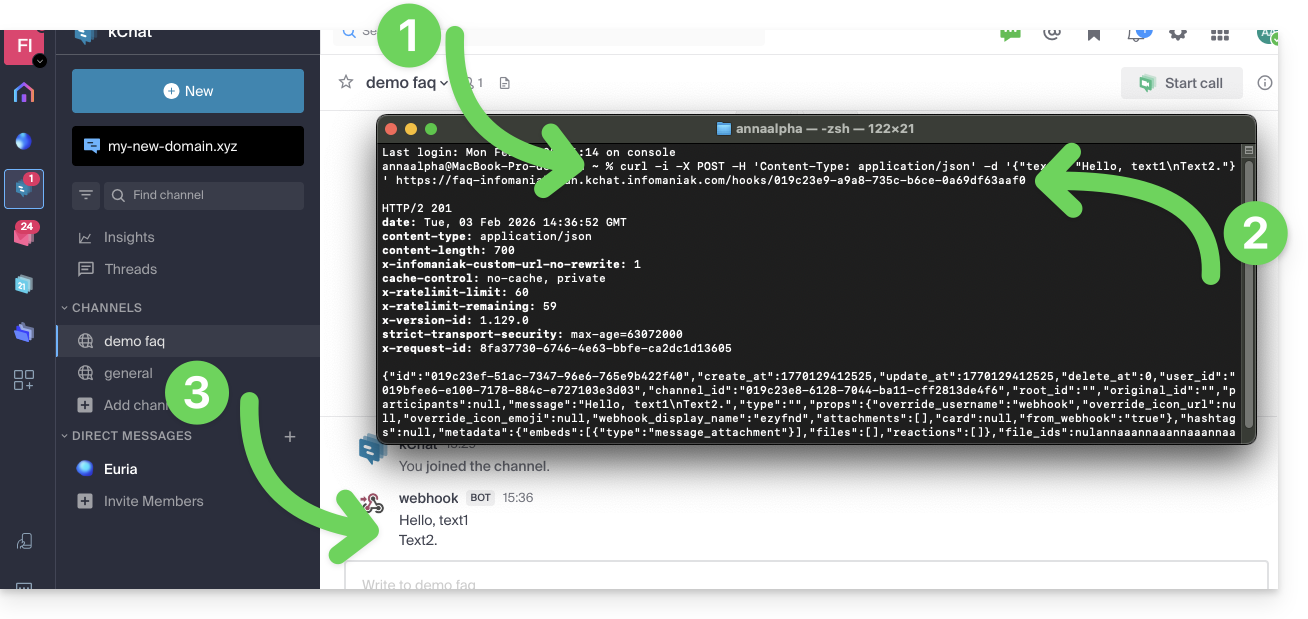
Details
Regarding the application that will post on kChat:
Adjust the code below based on the URL obtained from kChat:
POST /hooks/xxx-key-generated-xxx HTTP/1.1
Host: your-server-kchat.xyz
Content-Type: application/json
Content-Length: 63
{
    "text": "Hello, text1\nText2."
}
If necessary, use the same request but with
curl(to test from aTerminalapplication (command-line interface,CLI) on your device), as in the example image above:curl -i -X POST -H 'Content-Type: application/json' -d '{"text": "Hello, text1\nText2."}' {{URL_12}}
The BOT indicator is added next to the username on kChat for security reasons.
If no Content-Type header is defined, the request body must be preceded by payload= as follows:
payload={"text": "Hello, text1\nText2."}A successful request will receive the following response:
HTTP/1.1 200 OK
Content-Type: application/json
X-Version-Id: 4.7.1.dev.12799dvd77e172e8a2eba0f4041ec1471.false
Date: Sun, 01 Jun 2023 17:00:00 GMT
Content-Length: 58

{
    "id":"x",
    "create_at":1713198308869,
    "update_at":1713198308869,
    "delete_at":0,
    "user_id":"x",
    "channel_id":"x",
    "root_id":"",
    "original_id":"",
    "participants":null,
    "message":"test",
    "type":"",
    "props":{
        "override_username":"webhook",
        "override_icon_url":null,
        "override_icon_emoji":null,
        "webhook_display_name":"test",
        "attachments":[

        ],
        "card":null,
        "from_webhook":"true"
    },
    "hashtags":null,
    "metadata":{
        "embeds":[
            {
                "type":"message_attachment"
            }
        ],
        "files":[

        ],
        "reactions":[

        ]
    },
    "file_ids":null,
    "has_reactions":false,
    "edit_at":0,
    "is_pinned":false,
    "remote_id":null,
    "reply_count":0,
    "pending_post_id":null,
    "is_following":false
}
If you want to have the same response format as Slack:
HTTP/1.1 200 OK
Content-Type: text/plain
X-Request-Id: hoan69ws7rp5xj7wu9rmystry
X-Version-Id: 4.7.1.dev.12799dvd77e172e8a2eba0f4041ec1471.false
Date: Sun, 01 Jun 2023 17:00:00 GMT
Content-Length: 2
ok
You must add ?slack_return_format=true to the webhook URL.
Parameters
In addition to the text field, here is the complete list of supported parameters:
| Parameter | Description | Requirements |
|---|---|---|
text | Message in Markdown format to be displayed in the post. To trigger notifications, use “@<username>”, “@channel”, and “@here” as you would in other kChat messages. | Yes, if attachments is not defined |
channel | Replaces the channel in which the message is posted. Use the channel name, not the display name; for example, use “town-square,” not “Place de la ville.” Use "@" followed by a username to send a direct message. By default, it uses the channel defined when the webhook was created. The webhook can post in any public or private channel where the webhook creator is present. Posts in direct messages will appear in the direct message between the target user and the webhook creator. | No |
username | Replaces the username under which the message is posted. By default, it uses the username defined when the webhook was created; if no username was defined during creation, it uses webhook. | No |
icon_url | Replaces the profile image with which the message is posted. By default, it uses the URL defined when creating the webhook; if no icon was defined during creation, the standard webhook icon () is displayed. The configuration parameter Allow integrations to replace profile picture icons must be enabled for the icon replacement to take effect. | No |
icon_emoji | Replaces the profile image and the icon_url setting.By default, nothing is defined when the webhook is created. The expected value is the name of an emoji as it is typed in a message, with or without a colon ( :).The configuration parameterAllow integrations to replace profile picture icons must be enabled for the replacement to take effect. | No |
attachments | Message attachments used for richer formatting options. | Yes, if text is not defined. |
type | Defines the type of publication, primarily for use by plugins.If not empty, it must start with " custom_". | No |
Code example with parameters
Here's how to generate a more complete message with parameters, some of which can replace parameters already defined when creating the webhook (username, preferred channel, avatar, etc.), as shown in the table above:
curl -i -X POST -H 'Content-Type: application/json' \
-d '{
"username": "System Monitor",
  "icon_url": "{{URL_13}}",
  "text": "### System Status Report\nEnvironment: PRODUCTION\nStatus: SUCCESSFUL\n\n---\n\n| Component | Version | Build ID | Status |\n|:----------|:-------:|:---------|:-------|\n| API-Core  | 2.4.1   | #88421   | OK     |\n| Web-UI    | 1.9.0   | #88425   | OK     |\n| Database  | 14.5    | N/A      | OK     |\n\n---\n\n**Commit Reference:**\n`git-ref: a7f8e9c21b` \n\n**Summary:**\nAll automated integration tests passed successfully. No manual intervention is required. Please contact the DevOps team for further details regarding this release."
}' \
{{URL_14}}
Result of a similar example in the image: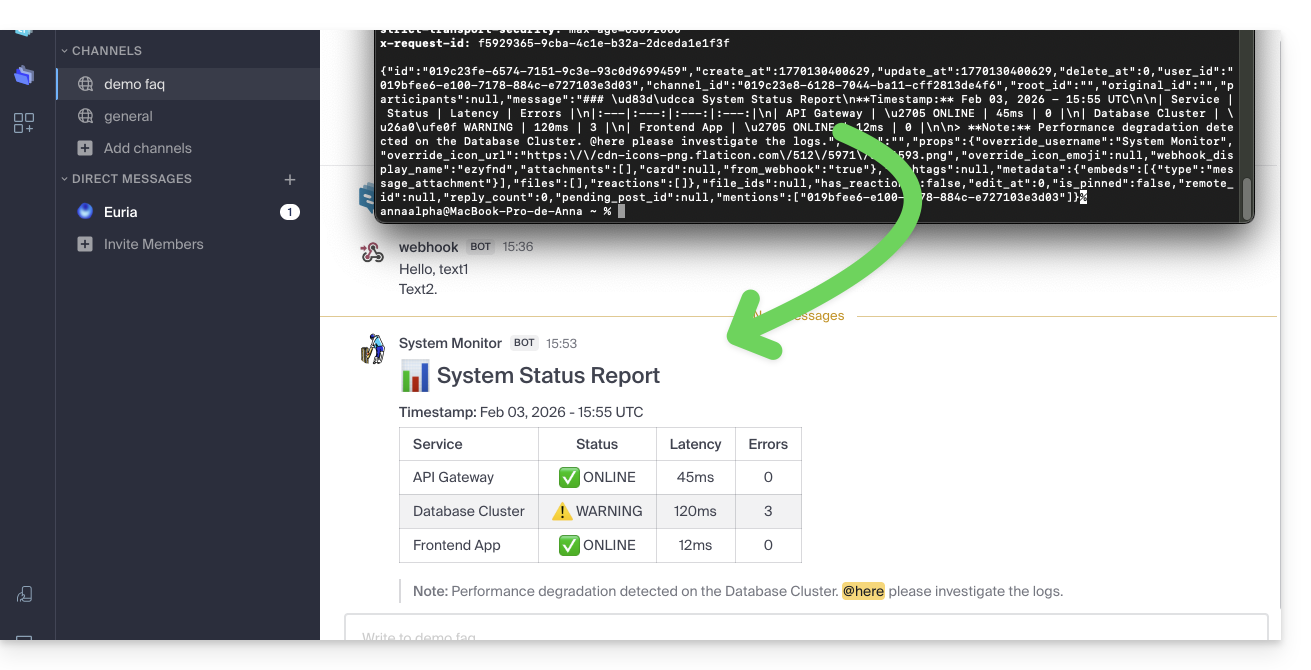
Link to this FAQ: https://faq.infomaniak.com/2001
Has this FAQ been helpful?
This guide concerns the "Applications" (or "modules", “extensions”) available in Infomaniak Site Creator depending on the version you have, to create a showcase website, a blog, or a 100% customizable online store, without any technical knowledge.
Different Applications
In addition to the content blocks offering different pre-formatted layouts, you can also insert blocks in the form of modules, each with a specific function:
- Video
- Audio player
- Image slider / slideshow
- File download
- Location on map
- Survey
- Knowledge base
- Questions and answers
- Calendar
- Calendly
- Subpage menu
- Sitemap
- Add to Google
- Custom HTML code
- Contact form
- Blog
- Shop
- RSS feed reader
- Restaurant menu
- Google Analytics
Insert a module on a page
Start by logging in to the Infomaniak Manager with your credentials (user account with the necessary rights for the relevant product):
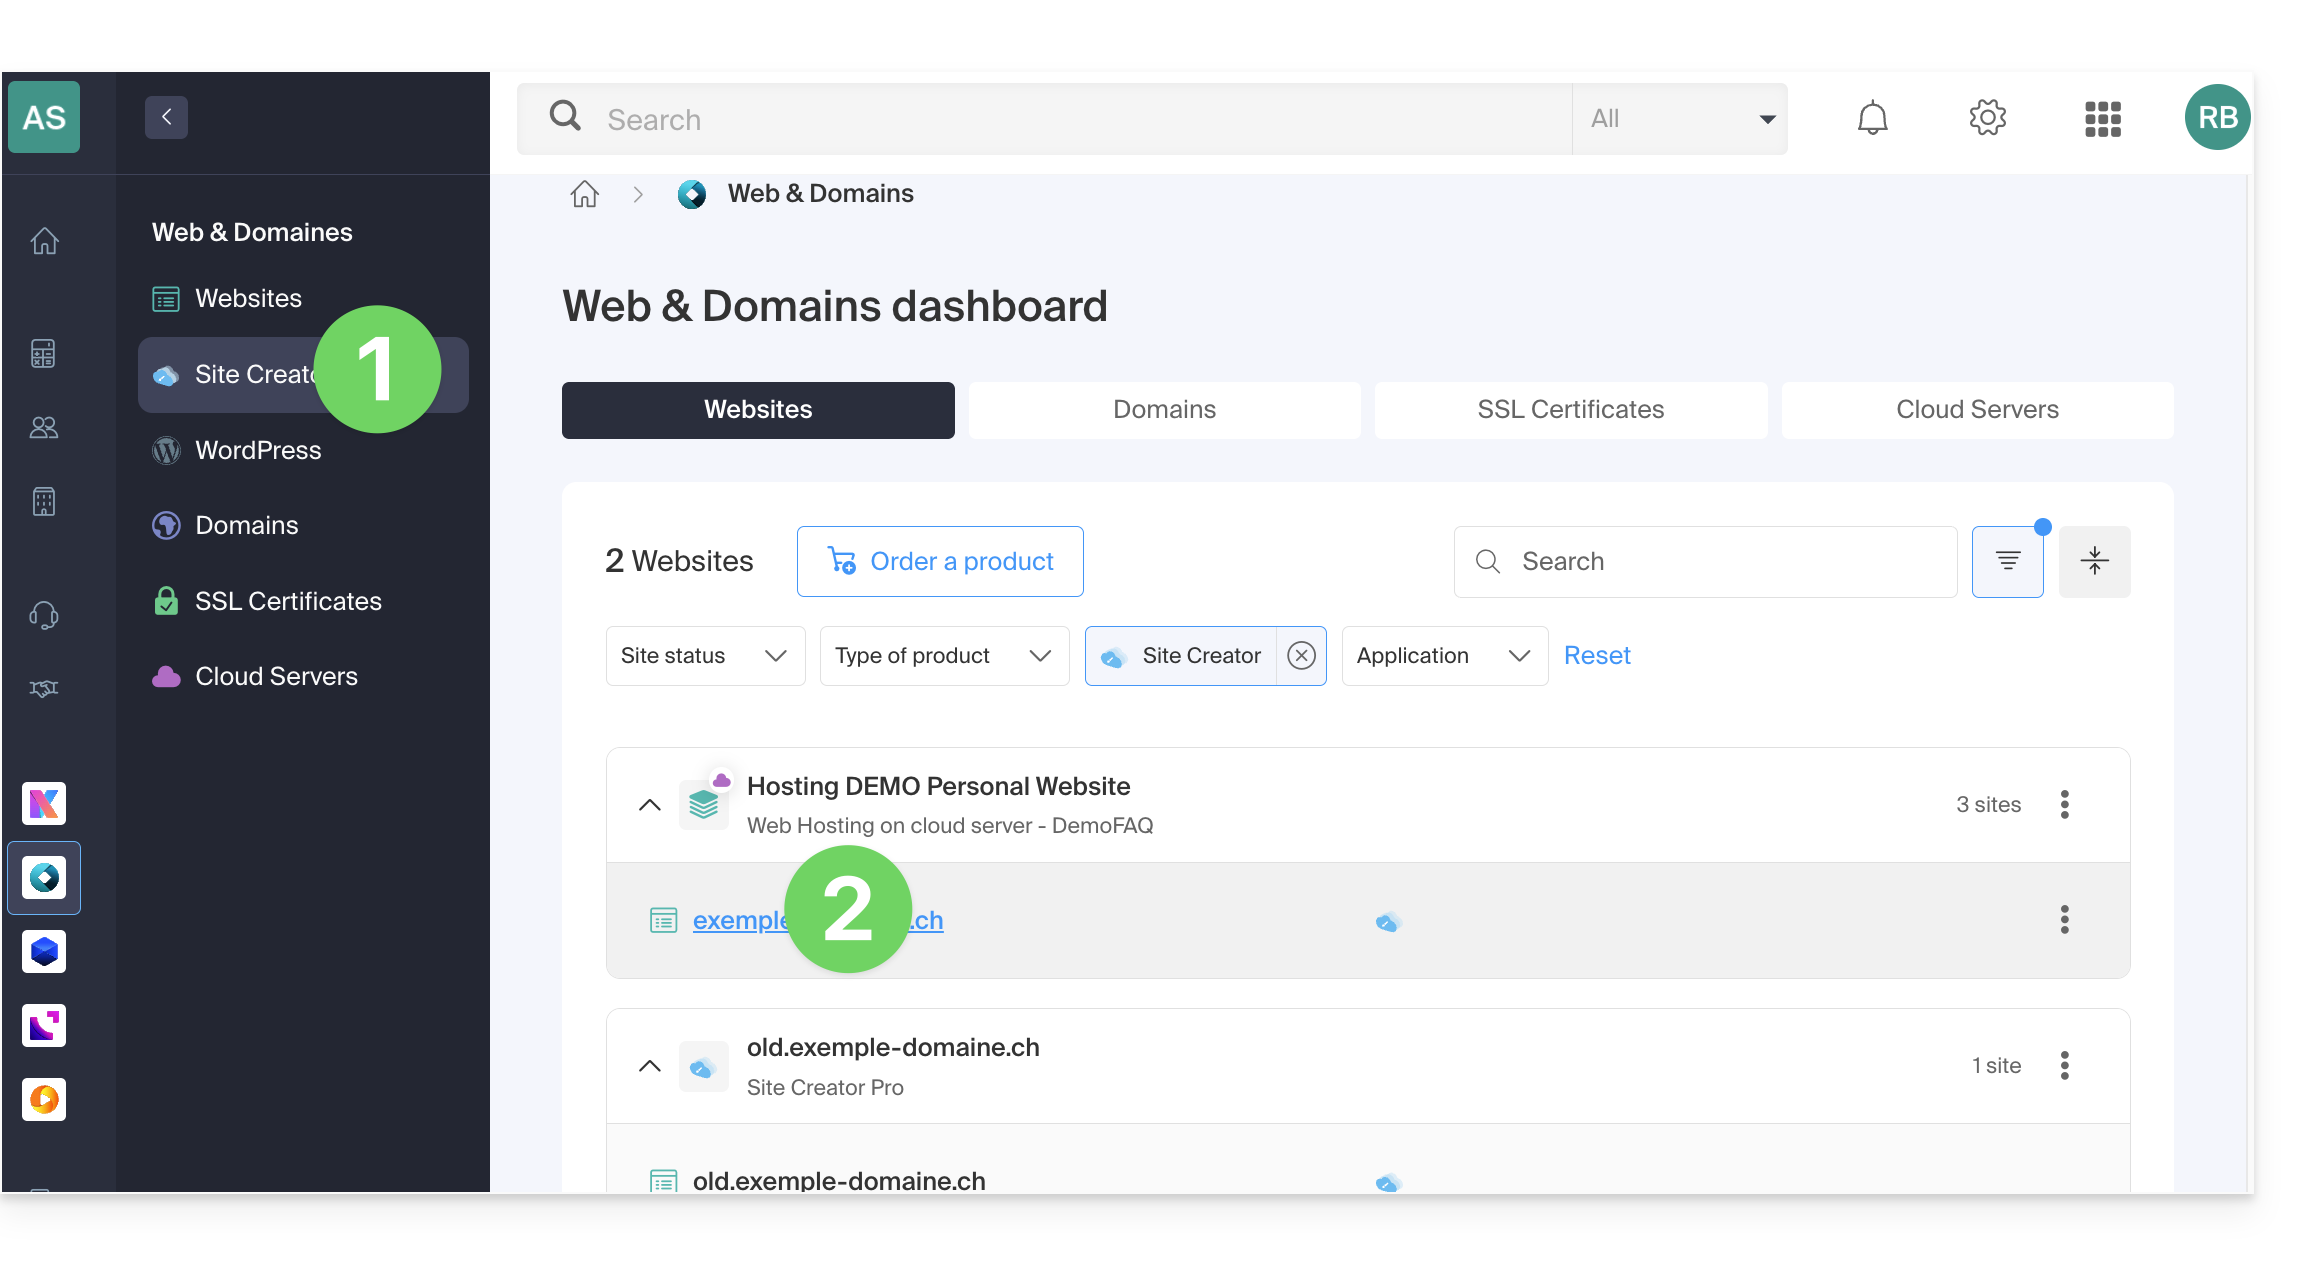
- Click here to access the hosting & site management interface (filtered to display only Site Creator).
- If nothing is displayed, you may not be in the Organization to which your site is linked (❓: help).
- Click on the name of the Site Creator in question:
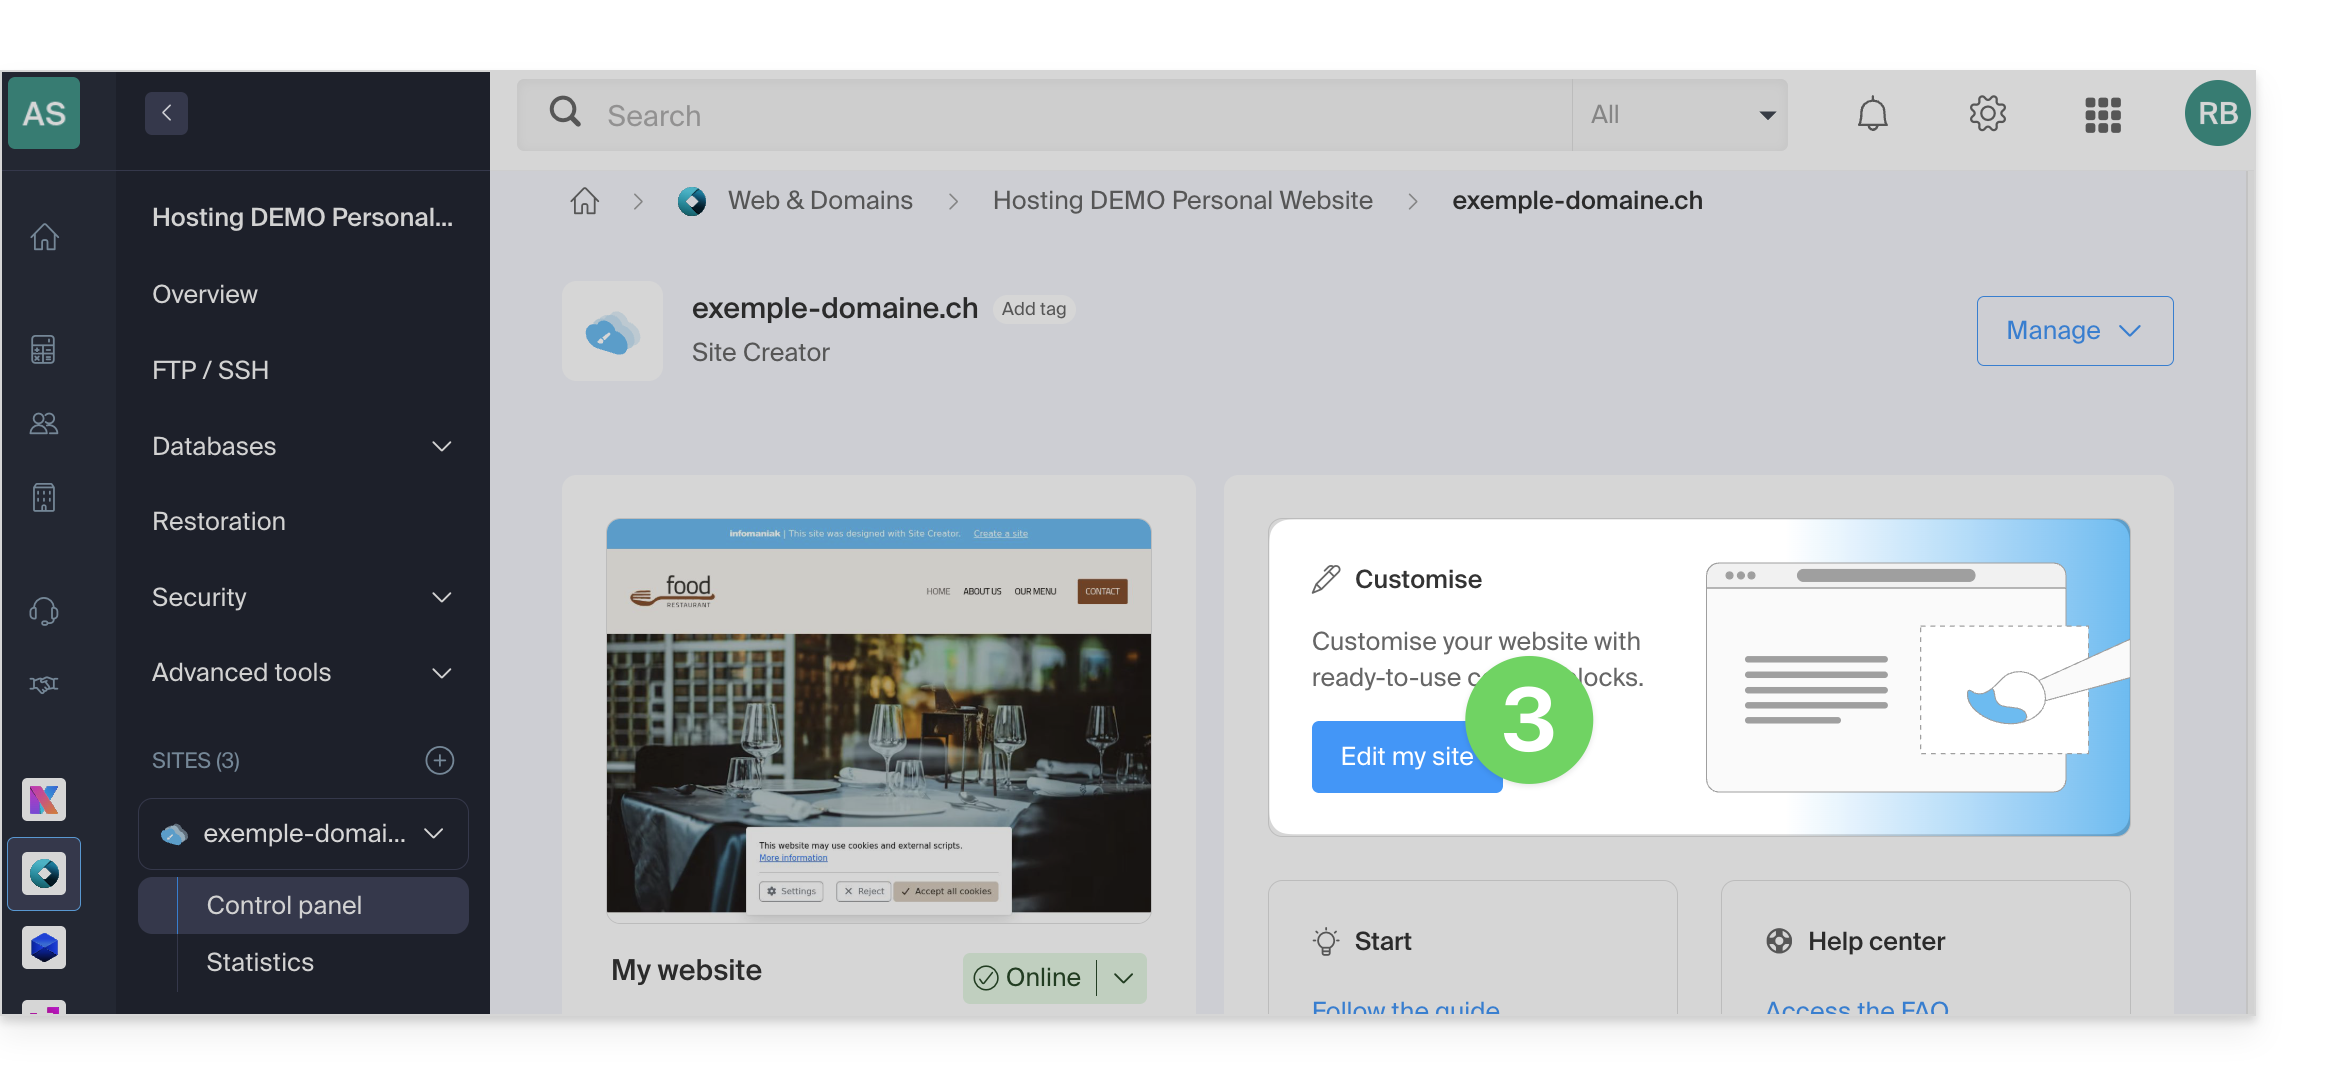
- Click on the button to edit your site:
Once in Site Creator:
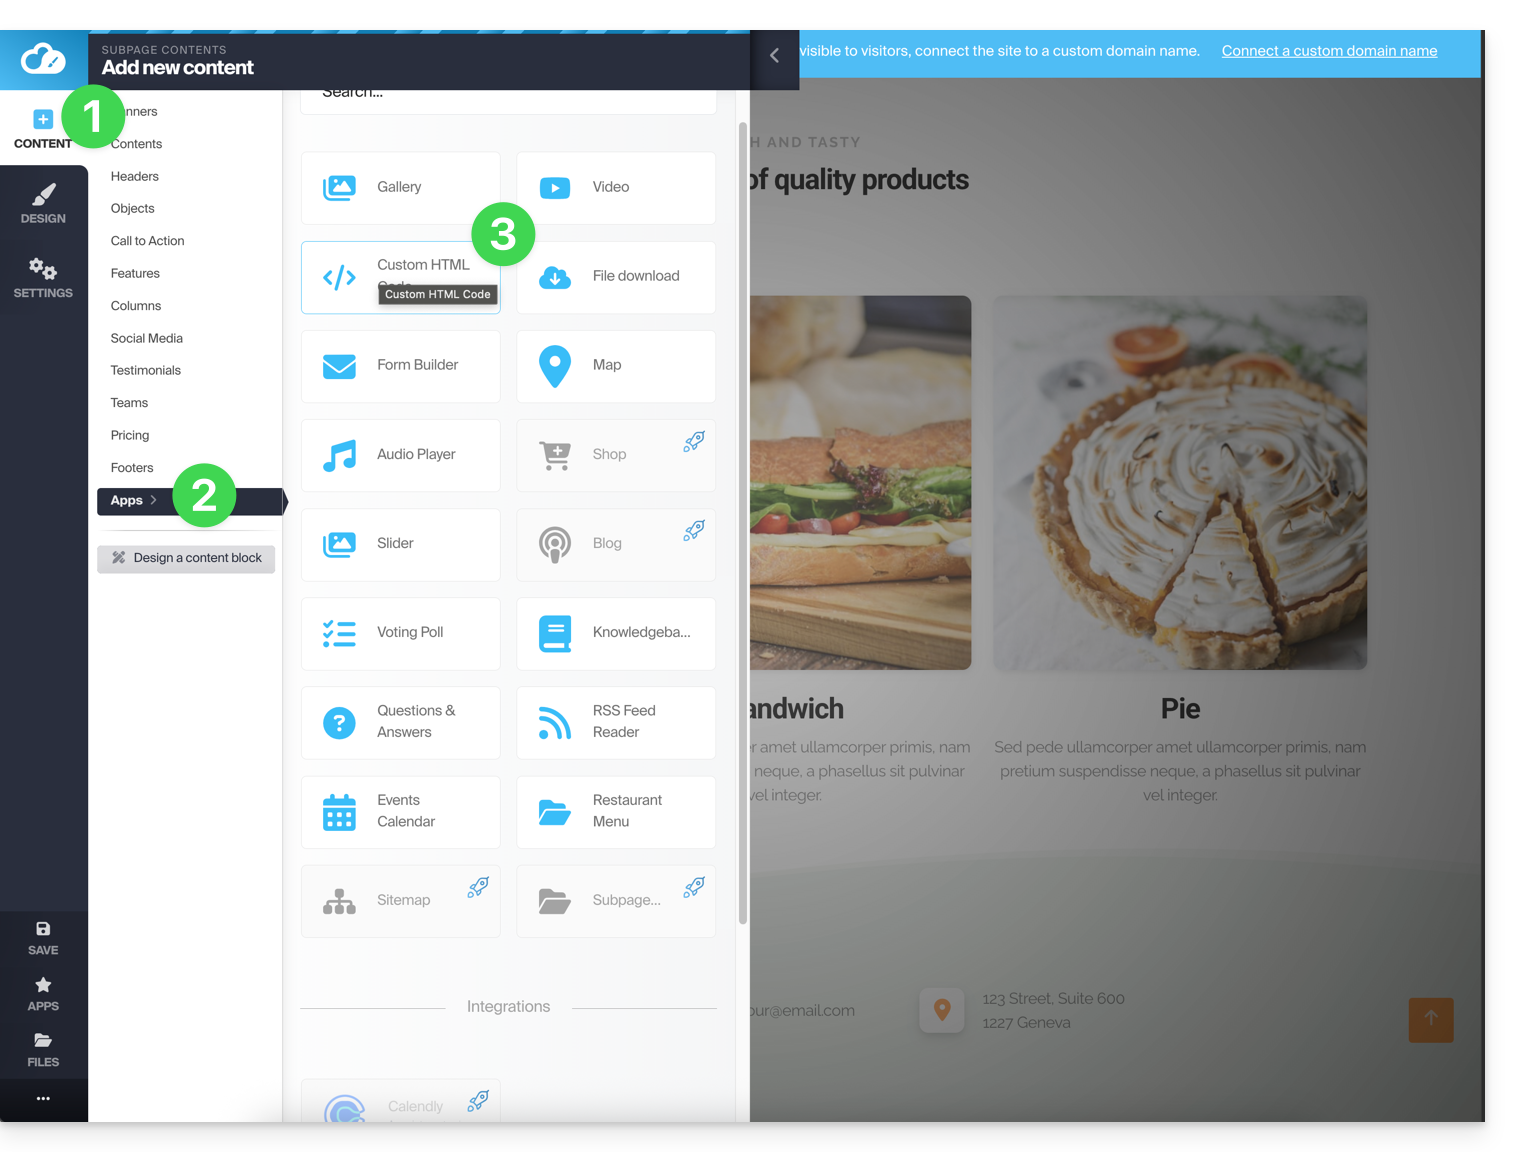
- Click on the Content button in the left-hand menu.
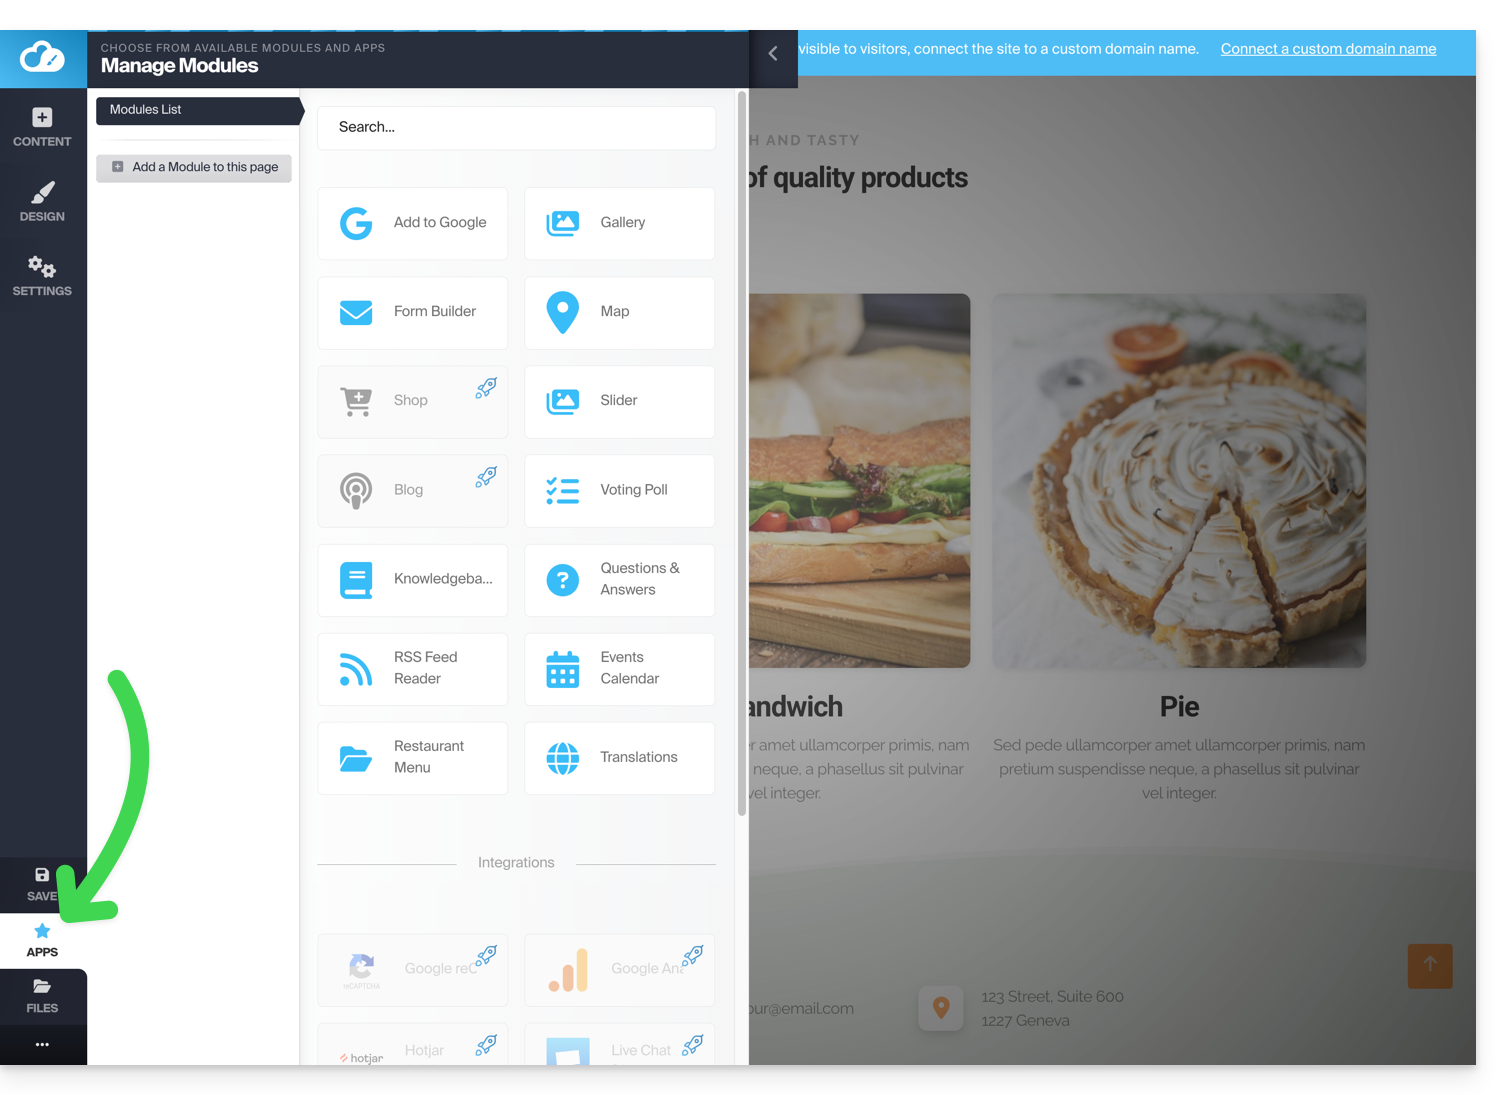
- Click on Applications at the bottom, and the available content will be displayed on the right.
- Click on one of these applications to insert it into the page:
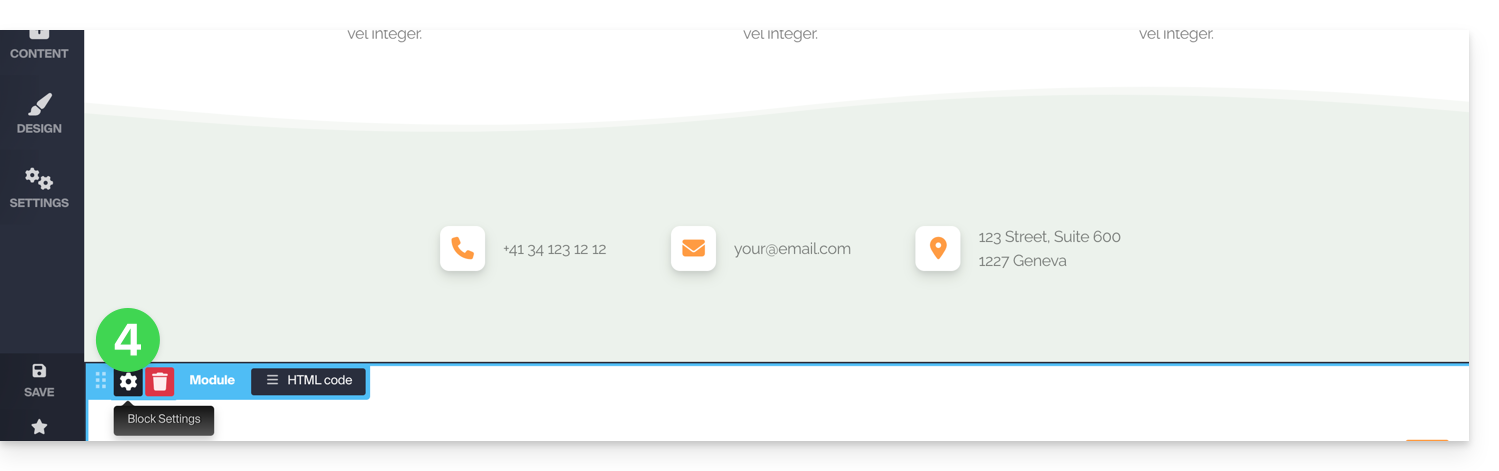
- Once inserted, hover over the module (or the block itself, depending on the module) to access its settings:
Multiple modules or missing module
If you delete one of your modules (such as the one for creating a survey) that you have already configured and want to revert the changes, click Cancel immediately:
or
You can also reinsert the module, which should revert to its previous settings.
You cannot insert multiple modules of the same type to customize them independently.
Other integrations & widgets
Click on the APPLICATIONS button in the left sidebar of Site Creator:
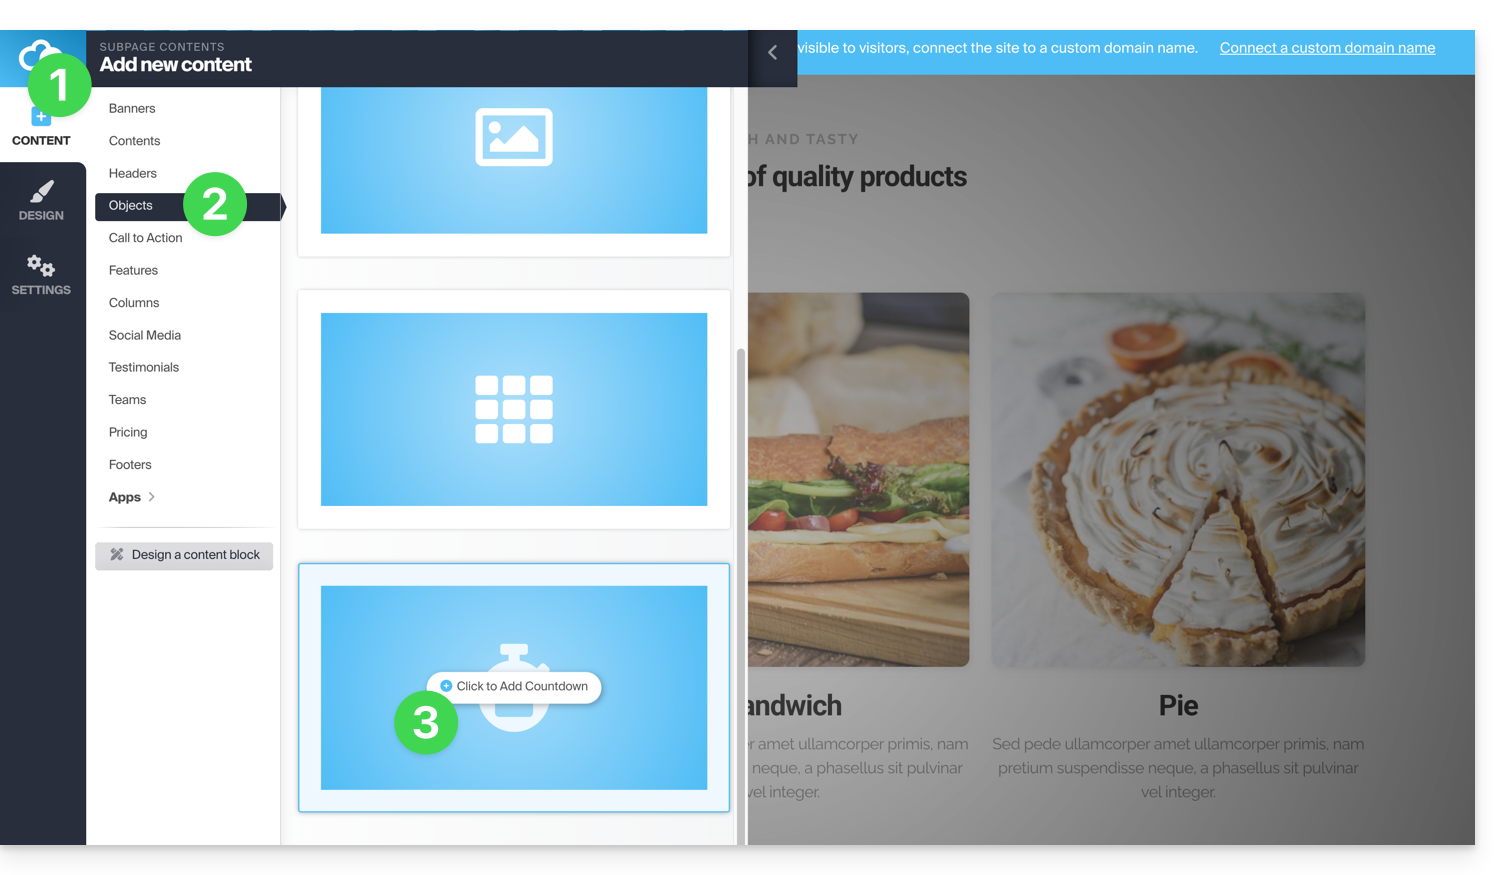
To add a counter to display a countdown:
- In the left-hand menu, click on the Content button.
- Click on Objects in the list, and the available content will be displayed on the right.
- Click on one of these objects to insert it on the page:
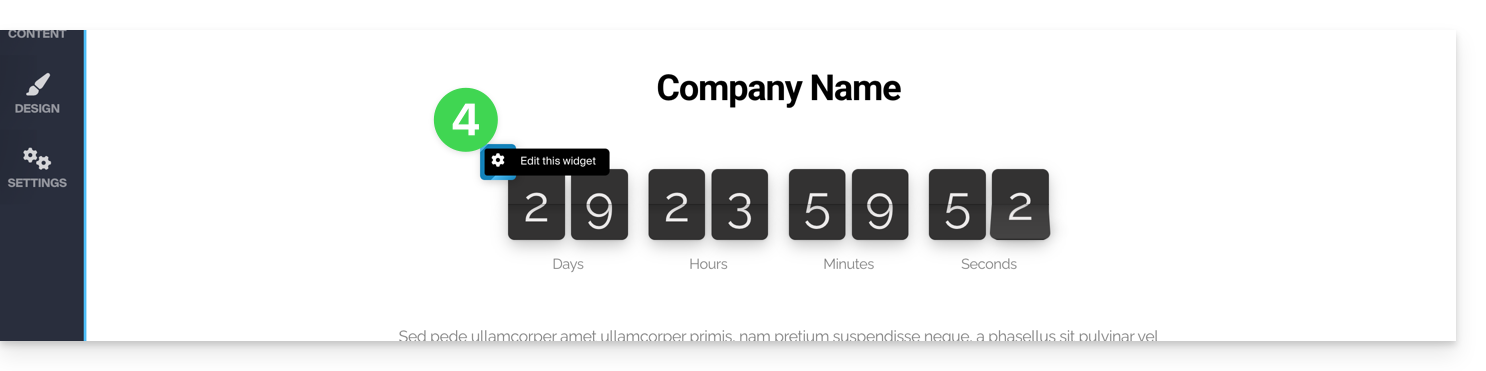
- Once inserted, hover over the module to access its settings:
Link to this FAQ: https://faq.infomaniak.com/2717
Has this FAQ been helpful?
This guide presents commands that can be executed to test a connection or network and thus further identify the possible source of the error.
Perform a Telnet…
TELNET allows you to test the connection to a server without taking into account all the additional settings of a mail or FTP application, in order to determine the source of a problem. For example, if the connection fails on an SMTP server, you will need to check whether your firewall is blocking port 587 or 465.
… on macOS
- Search for Network Utility.
- Go to the
Ping,Lookup, orTraceroutetab, depending on what you want to test. - You can also use a
Terminalapplication (command-line interface,CLI) on your device and, depending on what you want to test, enter:traceroute [server]nc [server] [port]
Replace[server]with the server name or its IP address, and do the same for[port]…
… on Windows
Enable Telnet beforehand if necessary.
- Use a
Terminalapplication (command-line interface,CLI) on your device, for example by typing Run thencmd. - In the window that opens, depending on what you want to test, type:
tracert [server]telnet [server] [port]
Example:telnet mail.infomaniak.com 587(this allows you to test the SMTP port if your software/email client does not allow you to send emails)…
… on Android
- Use the Simple Telnet Client app, which allows you to easily test by filling in two fields (for example,
mail.infomaniak.comand port143or993)…
Perform a PING
PING allows you to determine if a machine is accessible via the Internet. You can also use this tool to verify that you are connecting to the correct machine, for example, after a DNS change, by checking the IP address obtained. It is possible to perform a ping on a domain name, a hostname, or an IP address.
PING is definitely blocked on Infomaniak shared hosting plans.
Link to this FAQ: https://faq.infomaniak.com/727
Has this FAQ been helpful?
This guide explains how to increase your productivity with the Infomaniak Web Mail app (online service ksuite.infomaniak.com/mail) by using its keyboard shortcuts, which allow you to perform certain actions without using the mouse.
Enable or disable shortcuts
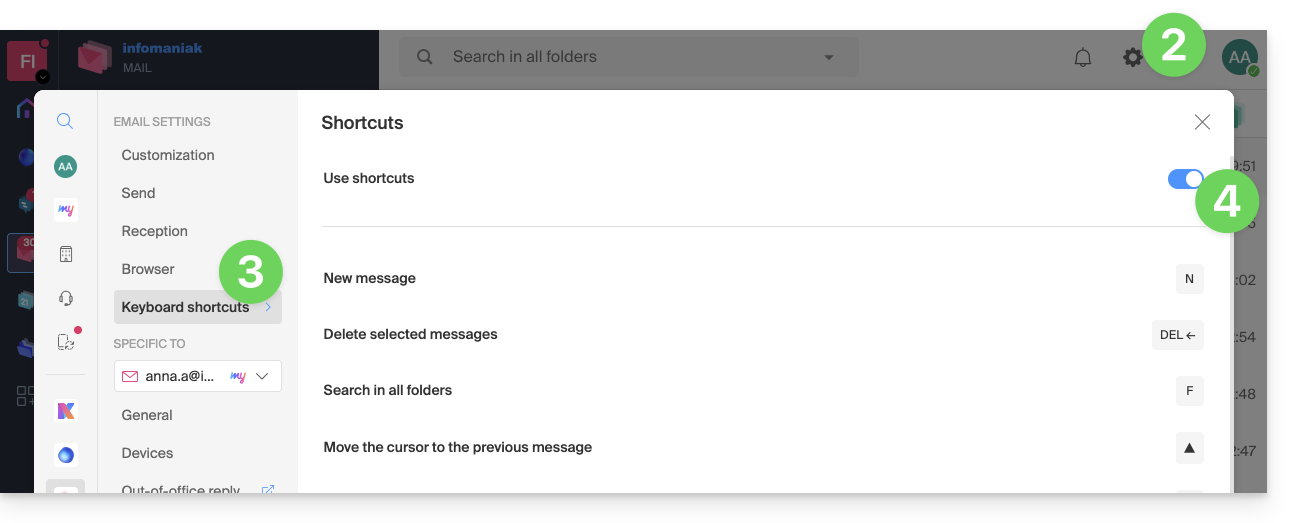
To enable or disable keyboard shortcuts throughout the Infomaniak Mail interface:
- Click here to access your emails in your Infomaniak kSuite (❓: help).
- Click on Settings in the top right corner.
- Click on Shortcuts.
- Enable or disable the use of shortcuts:
You can also access it using the key combination SHIFT+ALT+H (OPTION+MAJ+H on macOS).
Keyboard shortcut examples
Here are some keyboard shortcuts (refer to the chapters above to go directly to the complete list):
| Keyboard shortcuts | Definition | Action |
|---|---|---|
SHIFT+ALT+H | List of shortcuts | Displays the complete list of keyboard shortcuts available in Webmail. |
! | First message | Allows you to select the first message in the current folder |
SHIFT+LT+A | All messages | Allows you to select all messages in the current folder |
| DOWN | Next message | Allows you to move the cursor to the next message. |
| UP | Previous message | Moves the cursor to the previous message. |
| LEFT | Return to the message list | Return to the message list |
SHIFT+CLICK | Select multiple messages | Allows you to select multiple messages consecutively |
CMD/WINDOWS+CLICK | Select/Deselect a message | Allows you to select/deselect a message |
SHIFT+R | Reply to the message | Allows you to reply to the message sender |
SHIFT+ALT+R | Reply to all | Allows you to reply to the sender and all recipients in the message. |
SHIFT+ALT+N | New message | Allows you to create a new message |
SHIFT+ALT+DEL | Deletes the selected messages | Deletes all selected messages at once |
SHIFT+ALT+E | Archive the message | Allows you to move the message to the archive folder. |
Link to this FAQ: https://faq.infomaniak.com/1890
Has this FAQ been helpful?
This guide explains how to require users in your Organization to enable the two-factor authentication feature (2FA❓: help) and then verify that it remains enabled.
Introduction
- Every Infomaniak user can enable two-factor authentication for accessing their account, which significantly increases the security of all the organization's services.
- A legal representative can require this activation; otherwise, the user will no longer be able to access the Manager and web apps.
- Access to desktop apps (desktop application on macOS / Windows / Linux) and mobile apps (application for iOS / Android smartphones or tablets) will always be possible without 2FA.
- It is recommended to inform the users in your organization in advance so that they can continue to use the services.
- If an external user does not want to perform the action requested by an organization administrator, they can choose to leave the organization instead of enabling it.
Identify and prevent users without 2FA
You can easily identify and contact users who have not yet enabled this security feature on their account:
- Click here to access the user management section for your Organization.
- If necessary, enable the Security column:
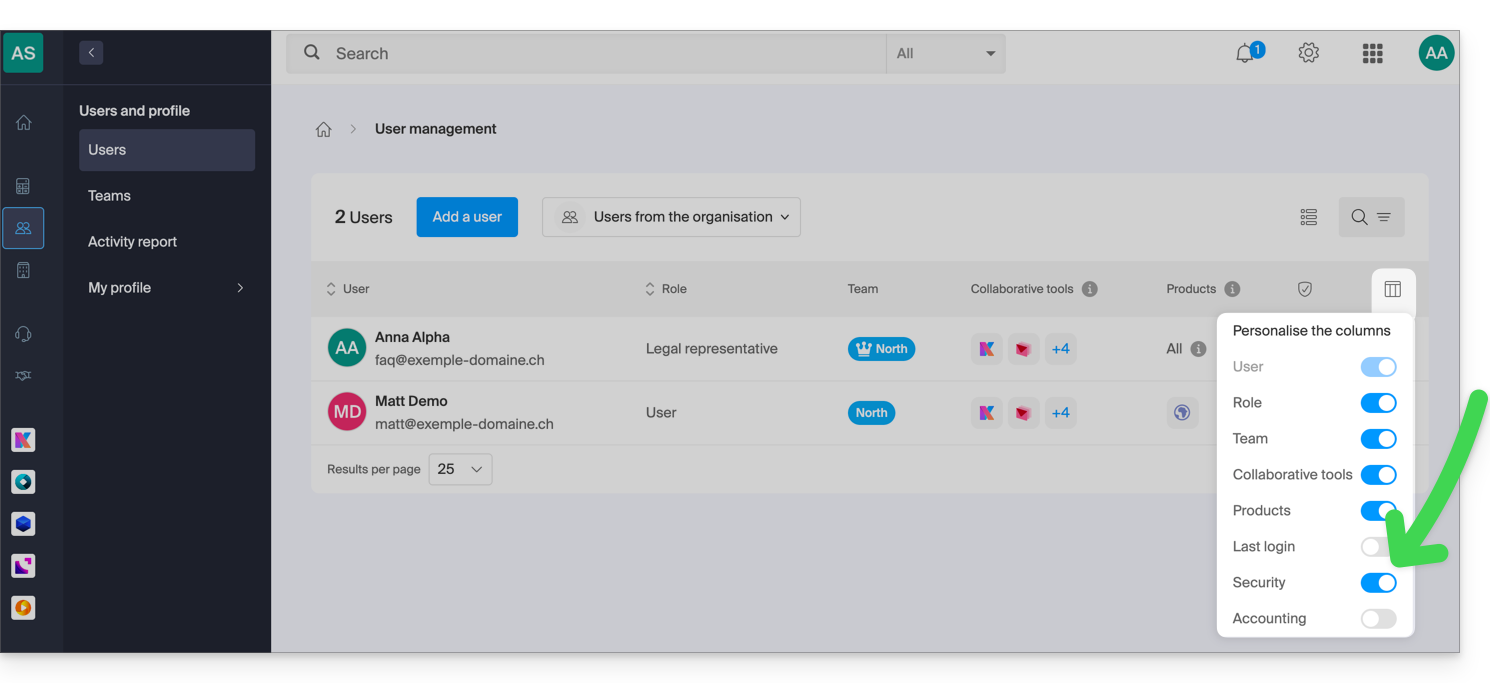
- In this Security column, the red symbol indicates that 2FA is not enabled:
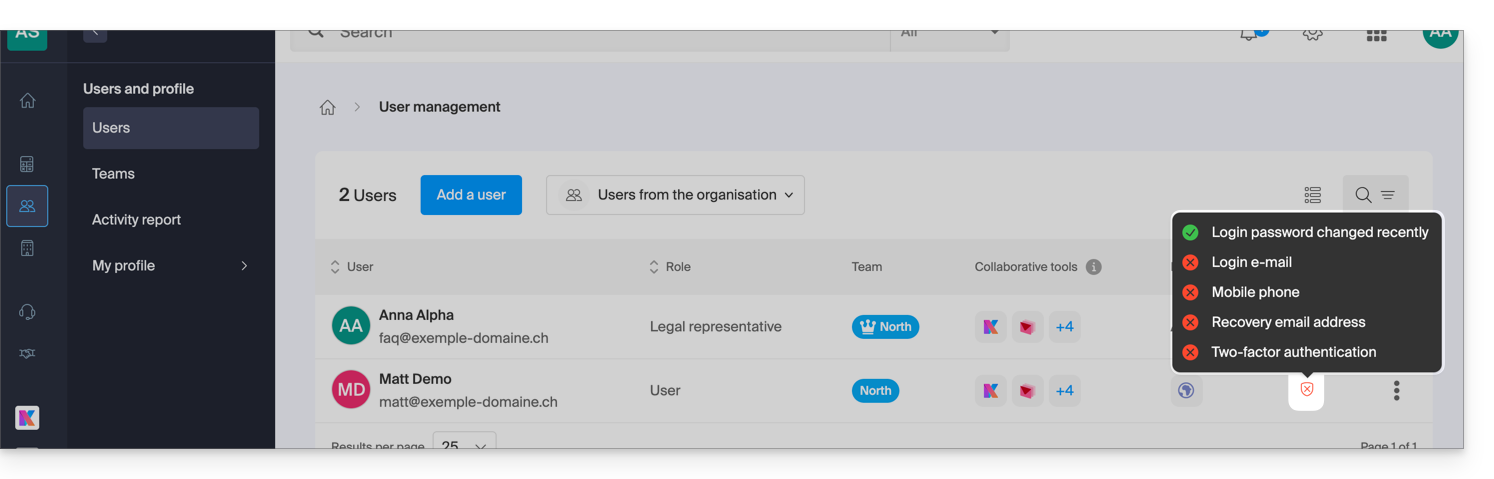
- Click on the user in question to access the alert sending feature:
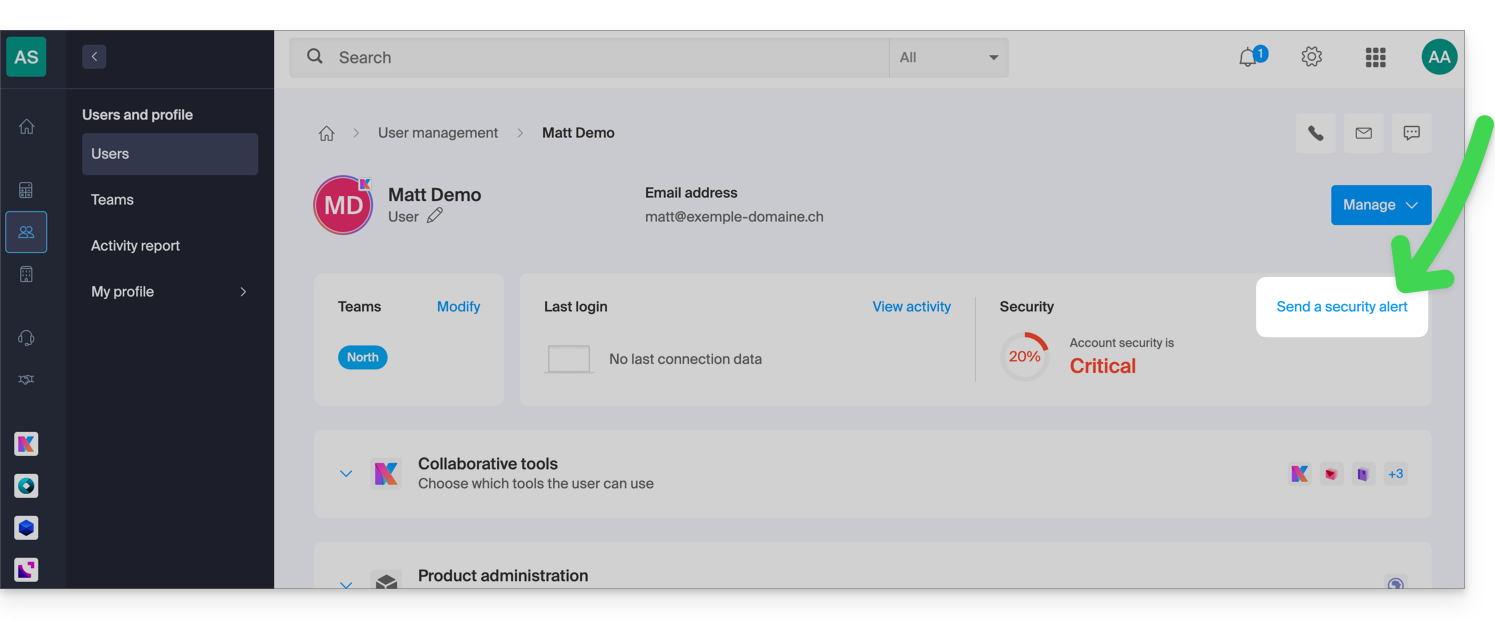
- After your confirmation, an alert email will be sent from a no-reply address to the user in question:
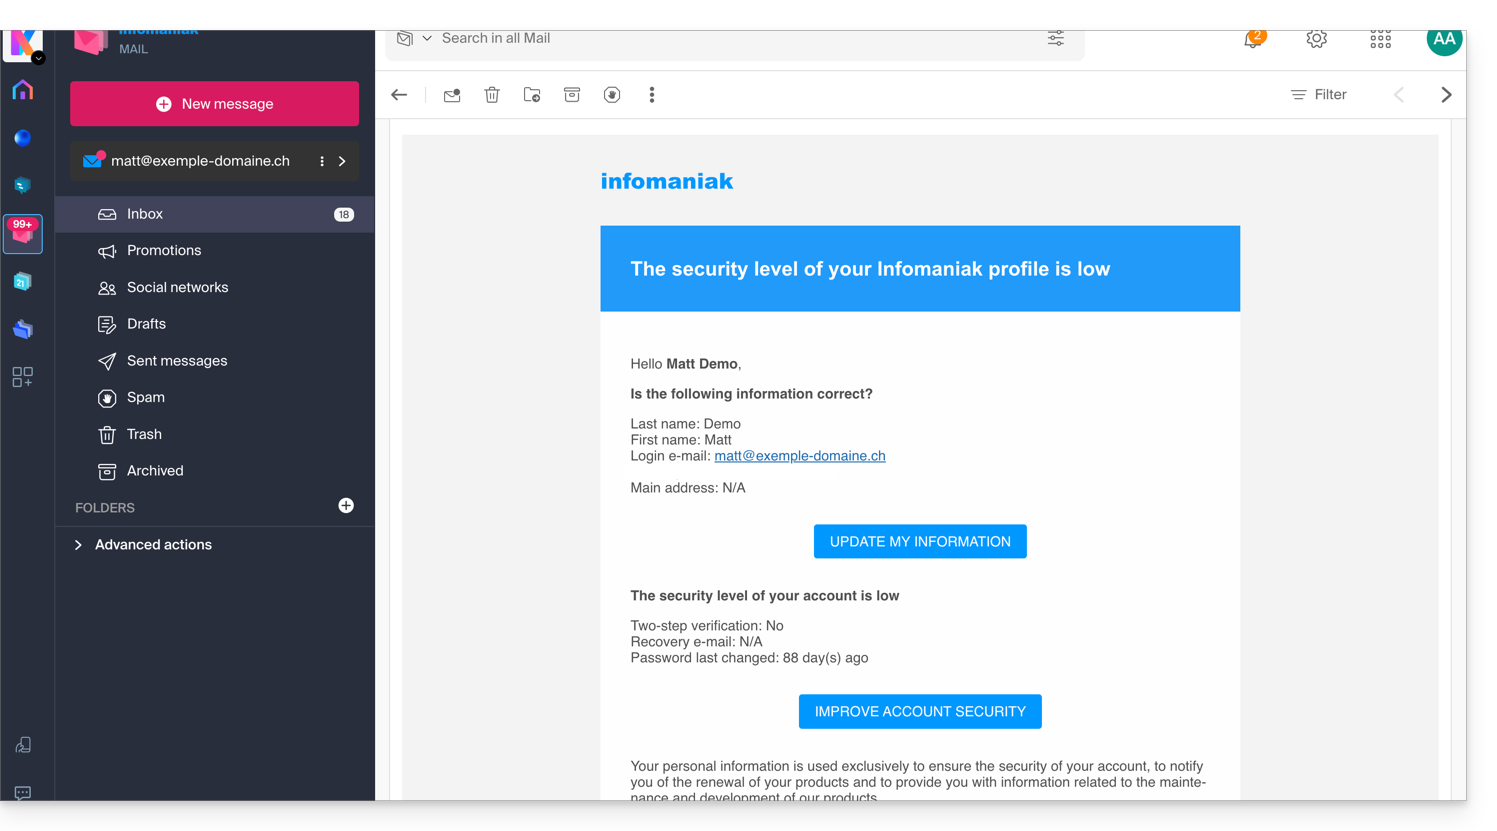
Require 2FA activation
Prerequisites
- You must be at least an Administrator of the Organization (❓: help).
To access the settings:
- Click here to access the Organization's security management in the Infomaniak Manager (❓: help).
- Click the toggle switch to enable an additional login verification for all users in the Organization:
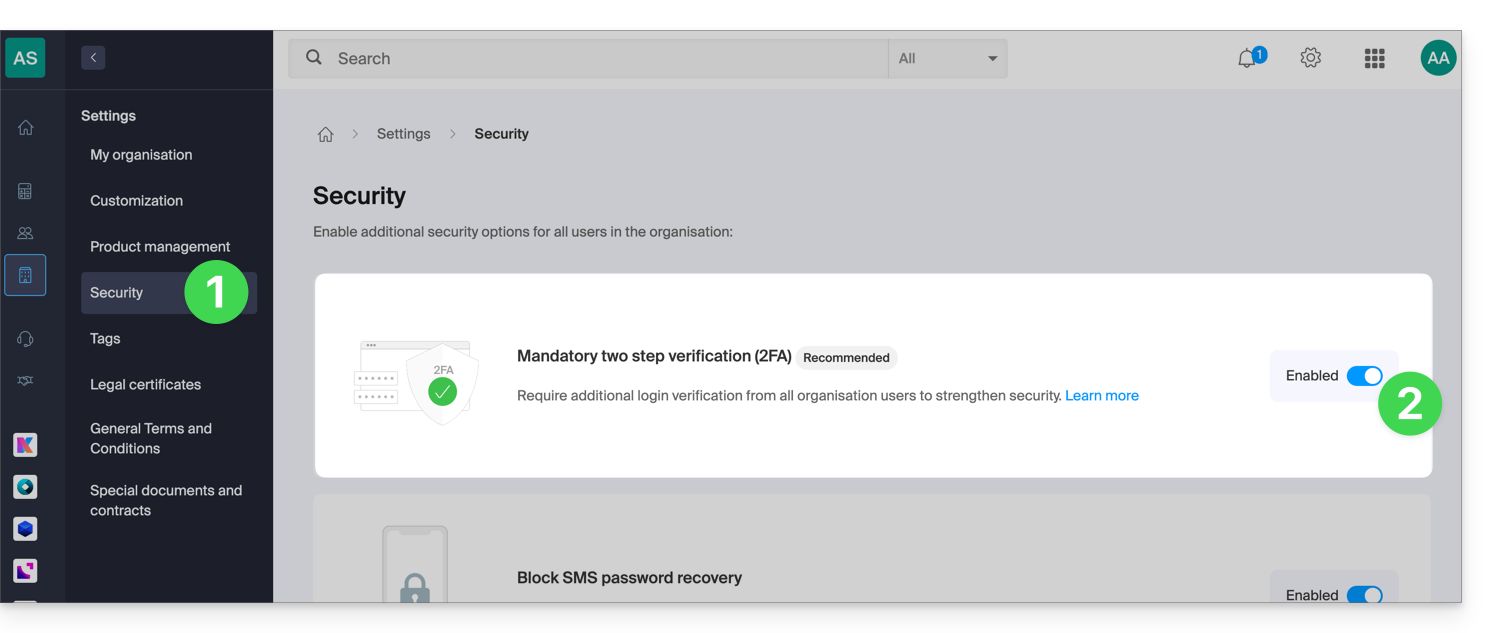
- Confirm the activation of the feature in the window that appears.
- Once the feature is activated, users in the Organization who have not yet activated 2FA will receive a message (the next time they take action on their account) prompting them to configure an additional authentication method from those offered (❓: help) and preventing them from taking any other action until they do so:
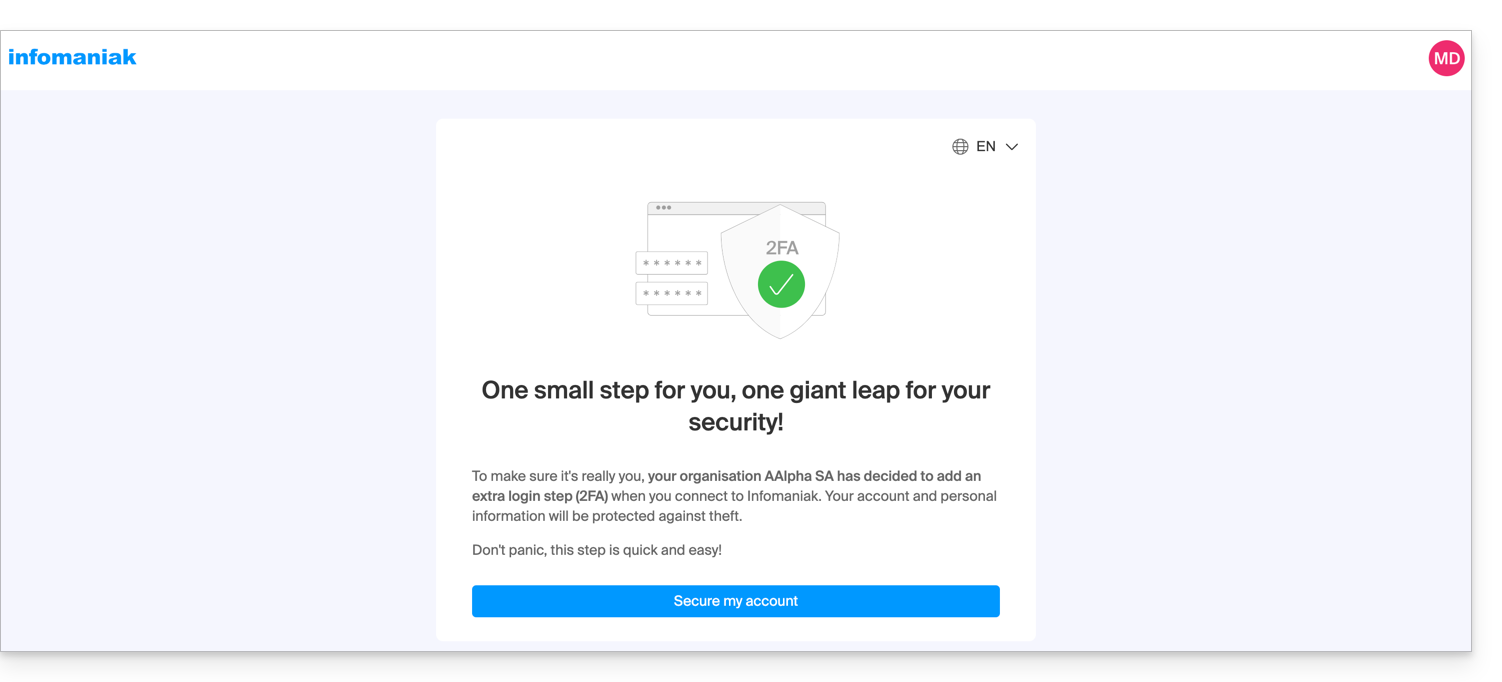
Link to this FAQ: https://faq.infomaniak.com/2192
Has this FAQ been helpful?
This guide explains how to add and customize the categories for your documents, to organize and classify your documents in the kDrive Infomaniak web app (online service ksuite.infomaniak.com/kdrive) and the kDrive mobile app (application for iOS/Android smartphones or tablets).
Introduction
- A category (or several at the same time) can be assigned to kDrive files and folders.
- Assigning a category is different from defining a color, which can also be assigned to folders and displayed in the web and mobile apps (only available with paid kDrive plans).
- However, there will be no synchronization of colors between a kDrive folder synchronized by the desktop app on macOS and the web or mobile app:

- However, there will be no synchronization of colors between a kDrive folder synchronized by the desktop app on macOS and the web or mobile app:
Add a category to a document…
Prerequisites
- The user must have sufficient rights, including at the level of category management permissions.
… on the kDrive Infomaniak web app
To assign a category to a file or folder in kDrive:
- Click here to access the Infomaniak kDrive web app (online service ksuite.infomaniak.com/kdrive).
- The kDrive file structure is displayed in the left-hand menu:
- Select the file(s).
- Click on the tag icon at the top of the table.
- Click on the category in which the file(s) should be classified:
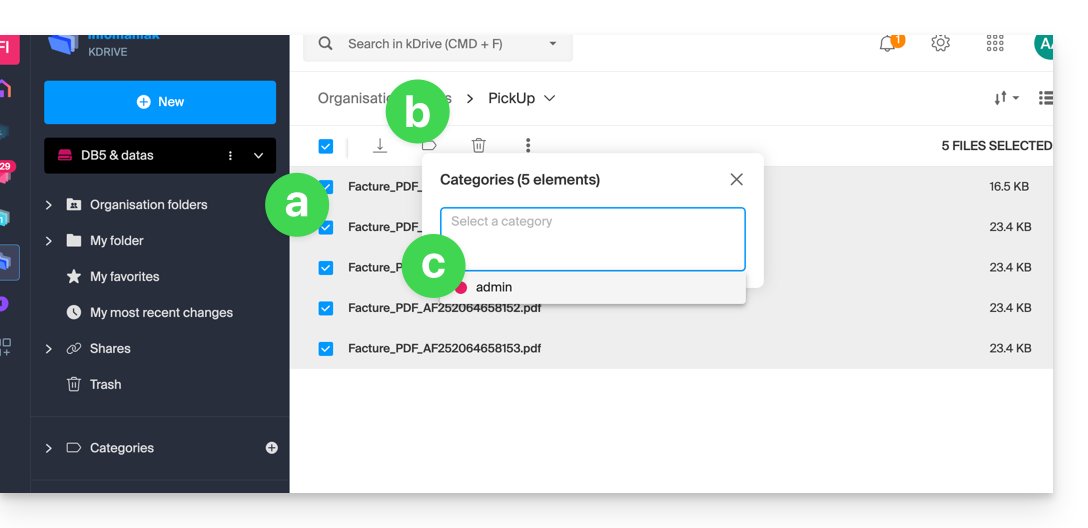
- You can also create a new category with the name of your choice:
- Select the file(s).
- Click on the tag icon at the top of the table.
- Enter the name of the category in which the file(s) should be classified.
- Click on the icon to create your category and be able to select it:
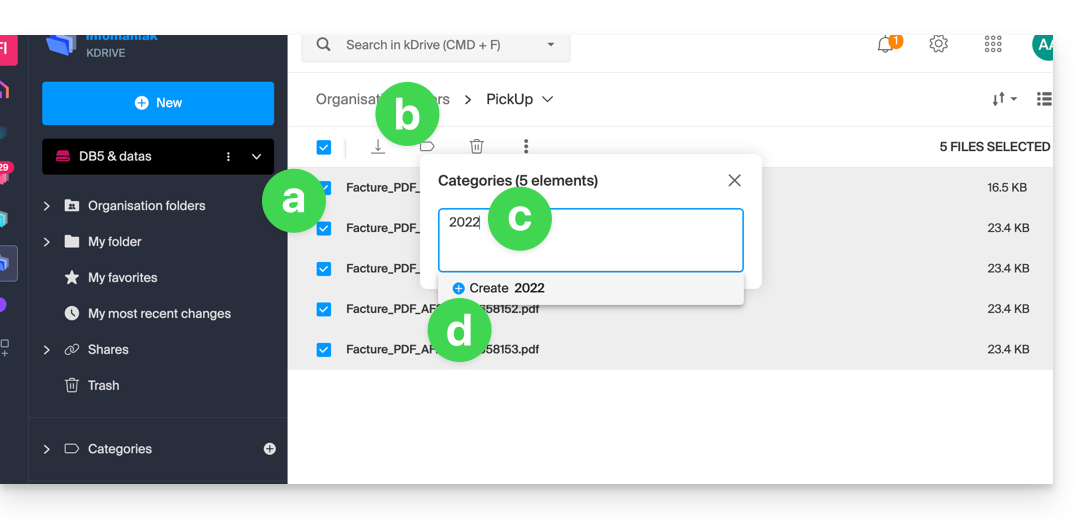
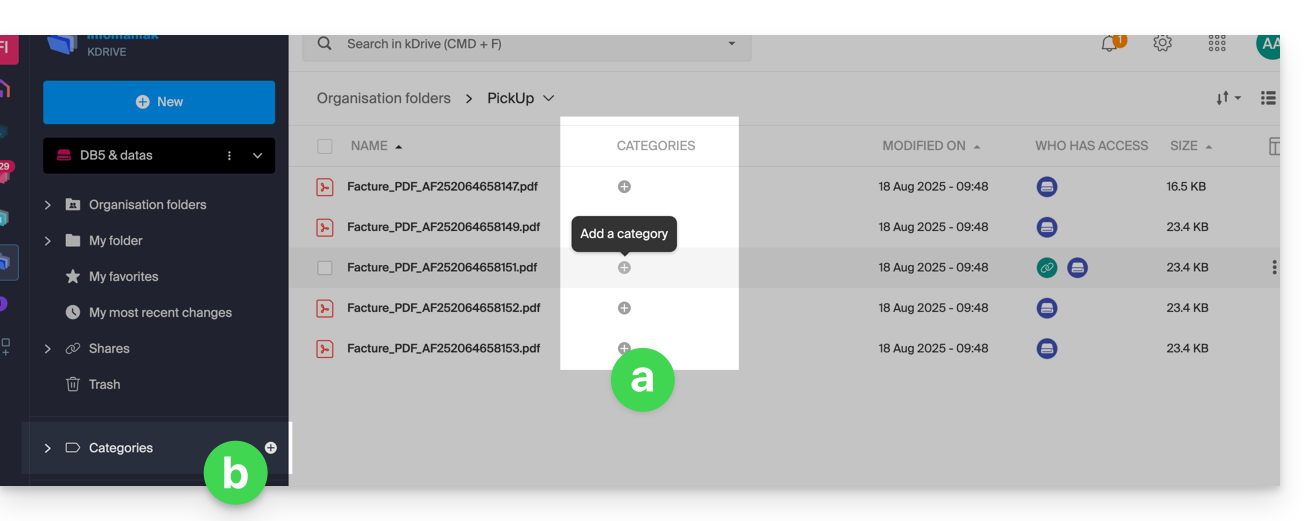
- You can also click on…
- … the icon in the CATEGORIES column of your file (the window must be large enough).
- … the icon in the left-hand menu:
…. on the kDrive mobile app
To assign a category to a kDrive file:
- Tap the action menu ⋮ located to the right of the item in question.
- Tap Manage categories.
- Tap the category or categories you want.
- Return to the content using the back arrow at the top left:

Sort your documents by category in…
… on the kDrive Infomaniak web app
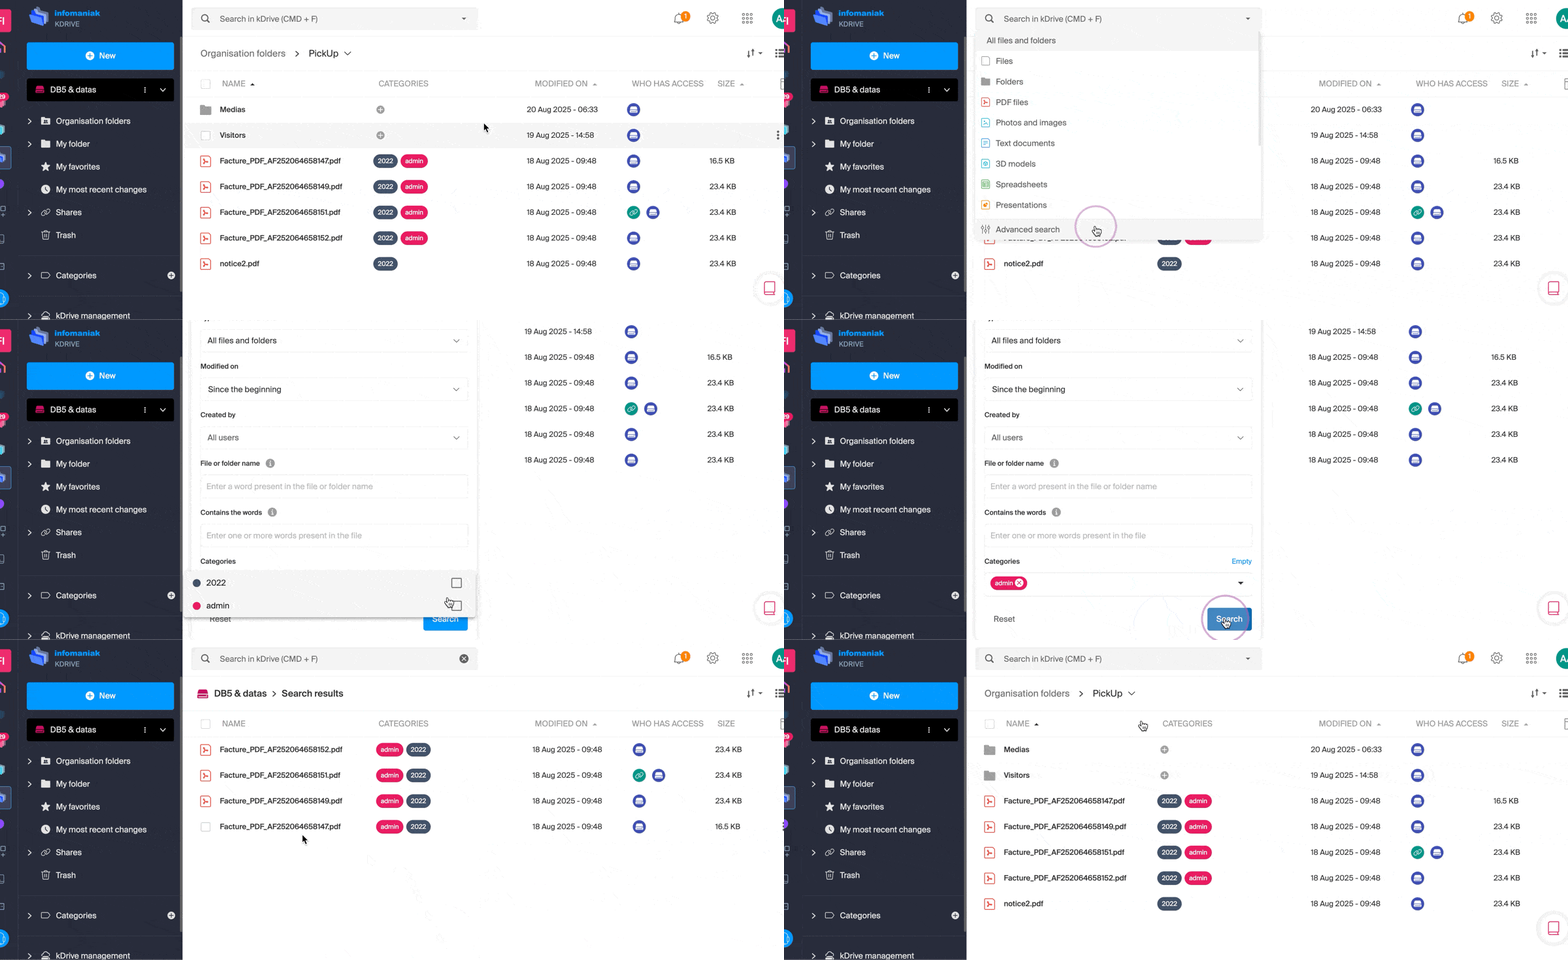
To display only the files from your kDrive that belong to a specific category:
Link to this FAQ: https://faq.infomaniak.com/2628
Has this FAQ been helpful?
This guide details the procedure for establishing your first SSH connection to an Infomaniak Cloud VPS or VPS Lite.
Connecting via Windows (PuTTY)
On Windows, the recommended tool is PuTTY.
Your private key must be converted to the .ppk format to work.
Step A: Conversion with PuTTYgen
- Launch PuTTYgen.
- Click on Load to upload your current private key.
- Click on Save private key to generate your
.ppkfile.
Step B: Configuring PuTTY
- In Session, enter the server's IP address in "Host Name".
- In Connection > SSH > Auth, click Browse to upload your
.ppkfile. - Click Open.
- A window will open: enter your username.
Connecting via a Unix terminal (macOS and Linux)
Use your system's native SSH client by opening a terminal.
The syntax is as follows:
ssh -i [key_path] [user]@[server]
Parameter details
[key_path]: Path to your private key file (generated or imported during the command).[user]: Username (see the table of distributions below).[server]: IPv4 address of your VPS, available in the Manager.
Note on permissions: if you get an error like "UNPROTECTED PRIVATE KEY FILE", secure your key with the following command: chmod 400 [key_path]
Default user list
Use the identifier corresponding to the Linux distribution installed on your server:
| Linux Distribution | Default User |
|---|---|
| Ubuntu | ubuntu |
| Debian 8 and later | debian |
| Debian 7 and earlier versions | root |
| AlmaLinux | almalinux |
| Arch Linux | arch |
| CentOS | cloud-user |
| Fedora | fedora |
| FreeBSD | freebsd |
| OpenBSD | openbsd |
| openSUSE Leap 15 | opensuse |
| openSUSE 16 | sles |
| openSUSE 42 / SLES | root |
| RancherOS | rancher |
| Rocky Linux | rocky |
Note: The user is always the one defined by default by the distribution's publisher.
Switching to Administrator (Root) Mode
For security reasons, the initial connection is not made directly as root.
To obtain full system privileges, run:
sudo -iThis command loads the complete root user environment (system variables and home directory).
Link to this FAQ: https://faq.infomaniak.com/1973
Has this FAQ been helpful?
This guide explains how to connect the eM Client desktop app (desktop application on macOS / Windows) to an email address hosted by Infomaniak.
Add the email address to the application
Prerequisites
- Create the email address (❓: help my kSuite | Mail Service/kSuite).
- Create a device password (❓: help my kSuite | Mail/kSuite Service).
- Verify that the domain is configured correctly (❓: help).
To configure the email application:
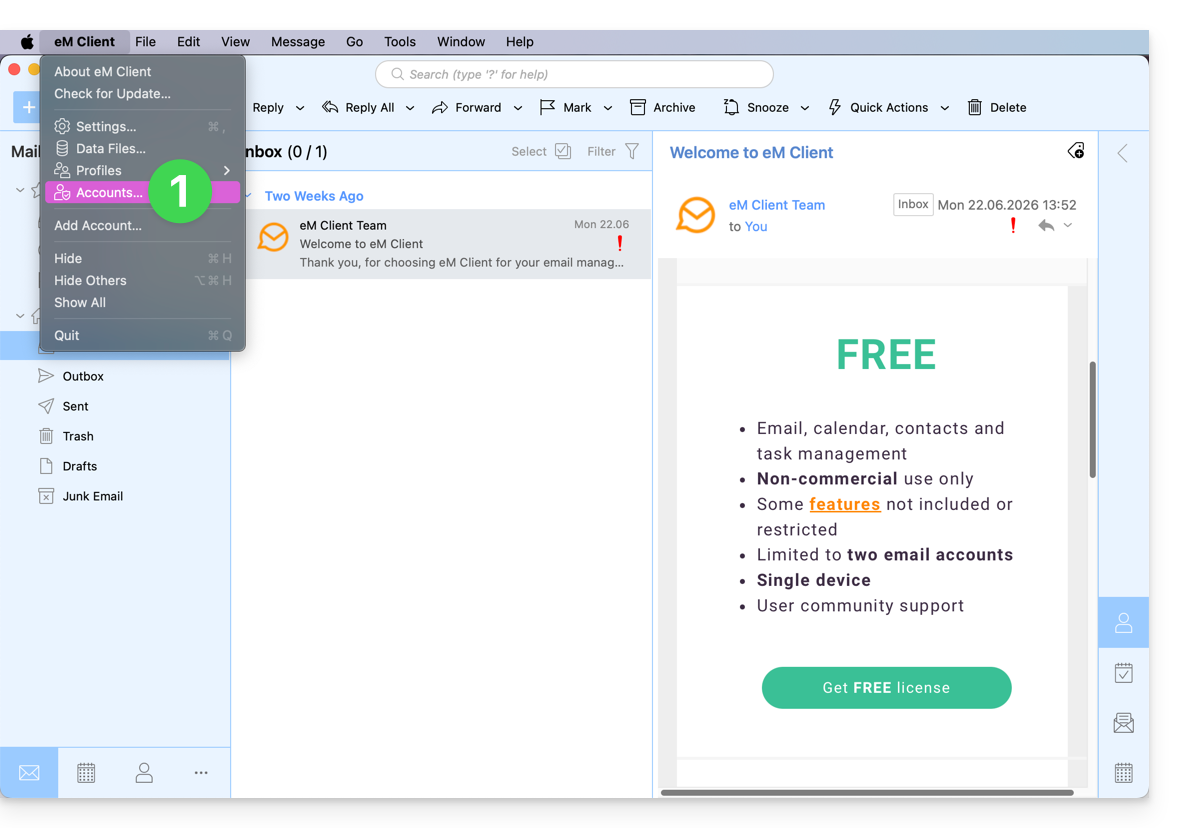
- Open the application and click on Accounts:
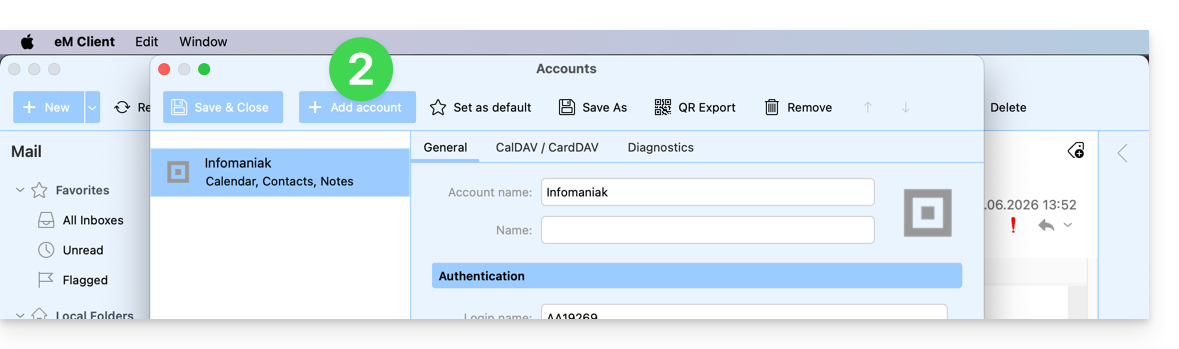
- Click on Add an account:
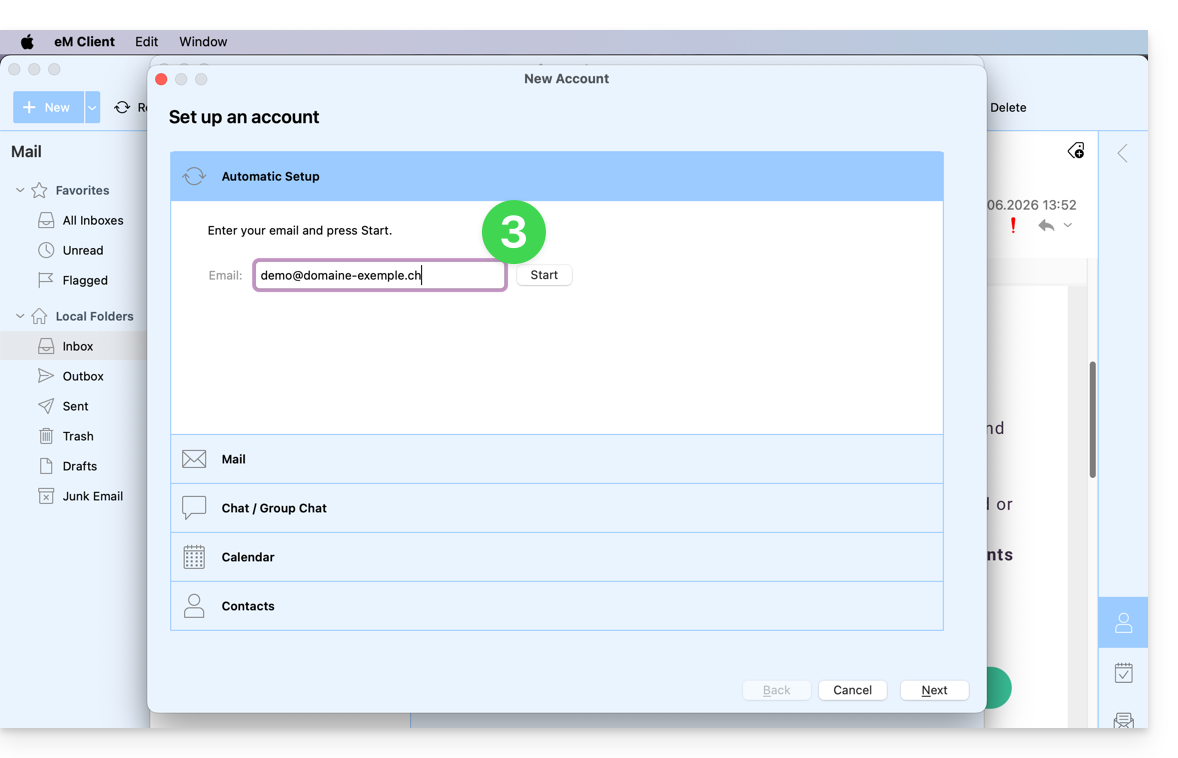
- Enter the email address to be linked, then click the Start button next to the field:
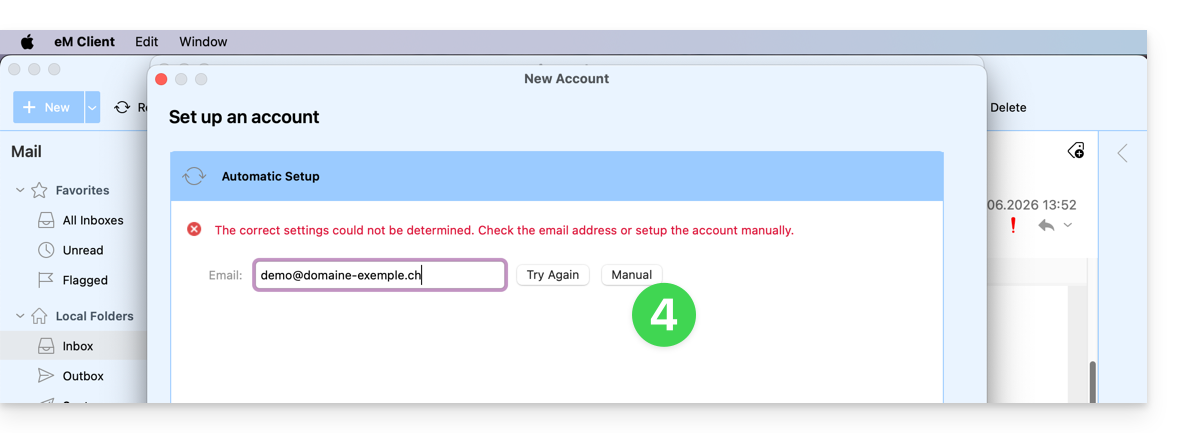
- Click the button to manually enter the settings:
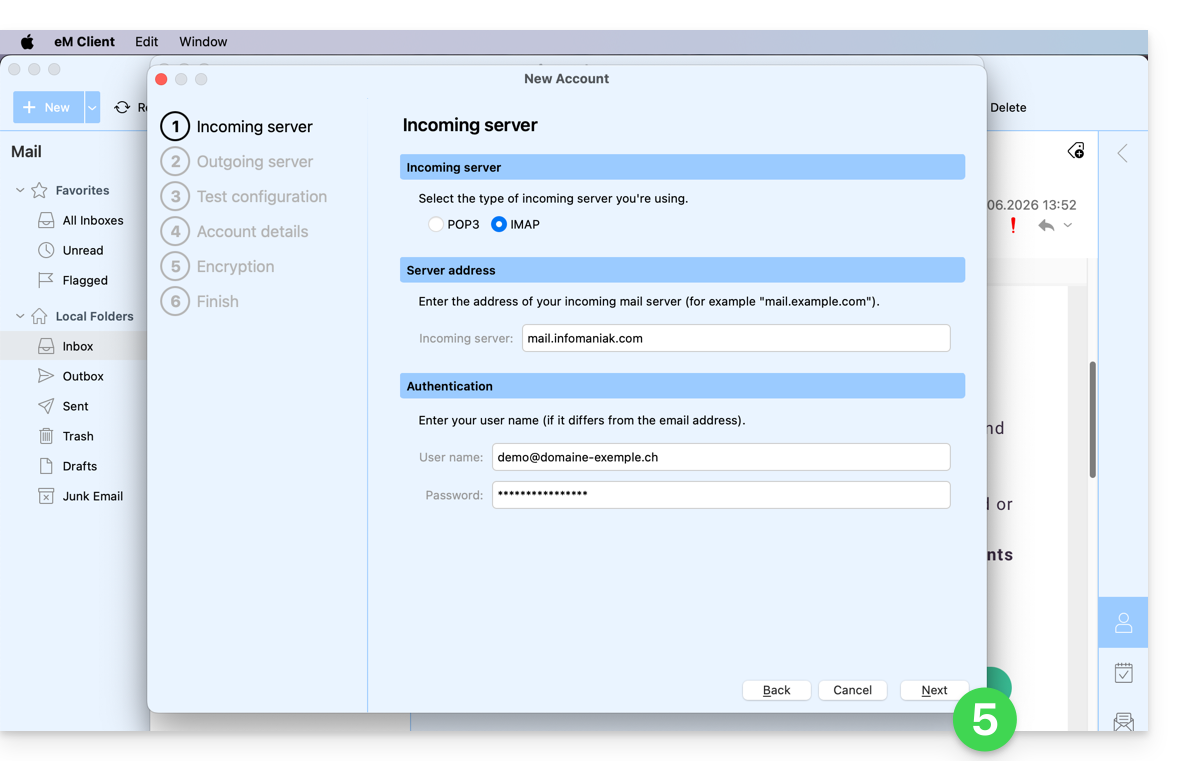
- Check the incoming server and complete any missing information (❓: help), then click Next:
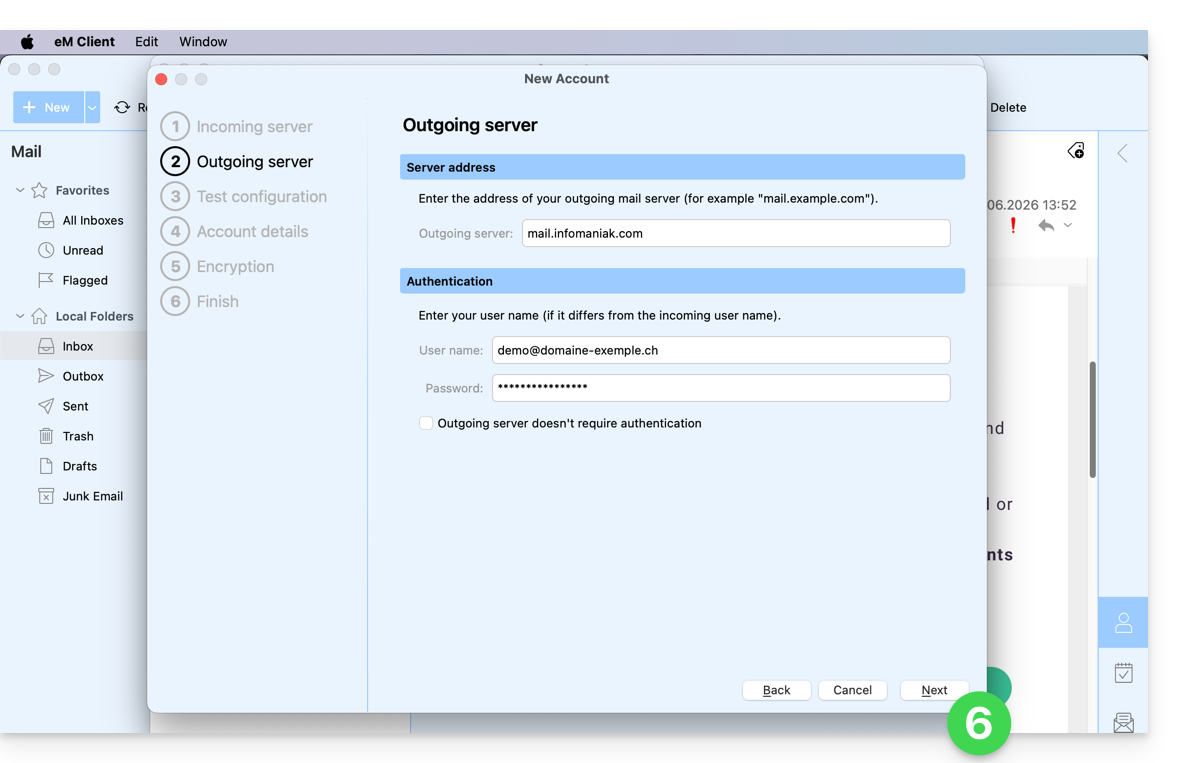
- Do the same for the outgoing server:
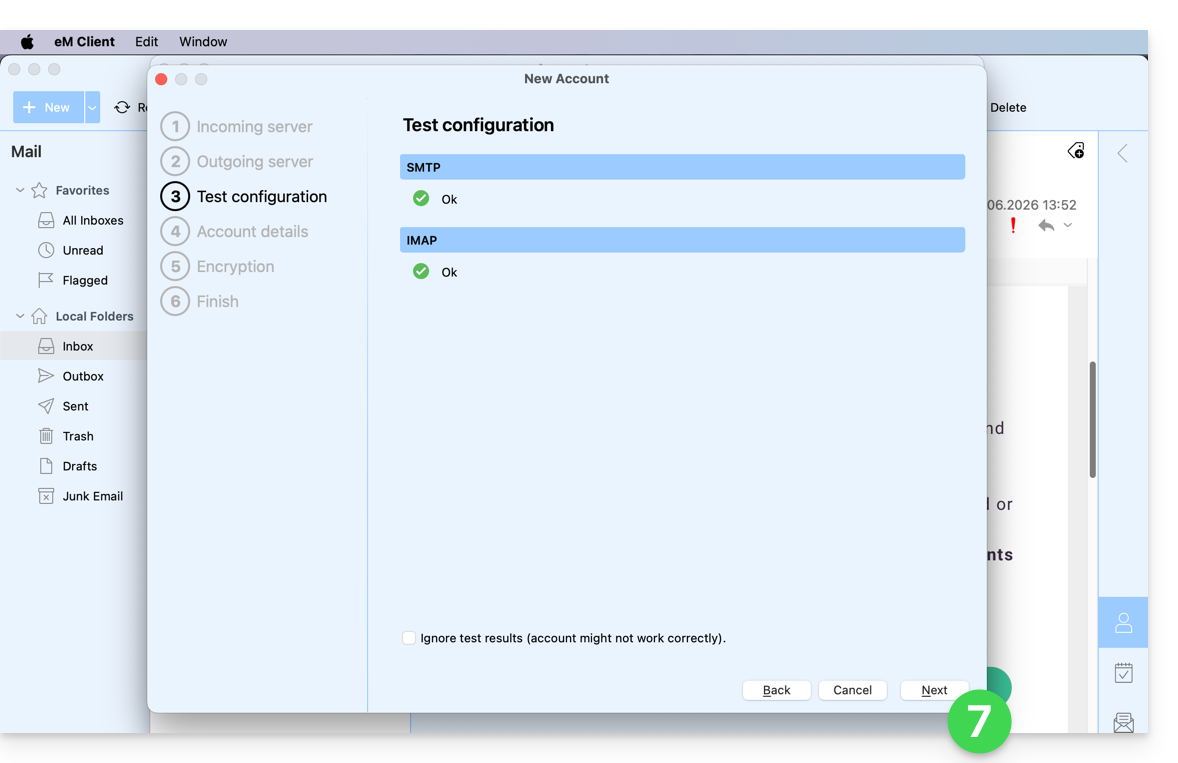
- Once the test indicators are green, click Next:
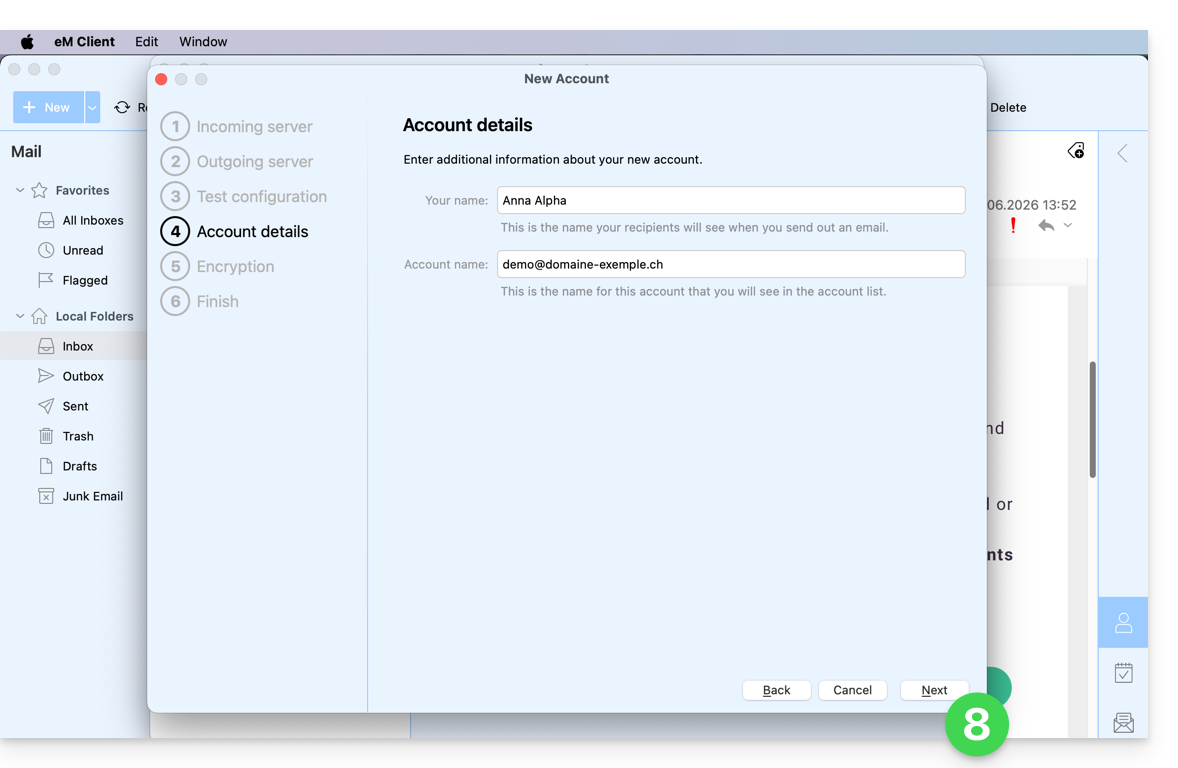
- Complete the missing information and then click Next:
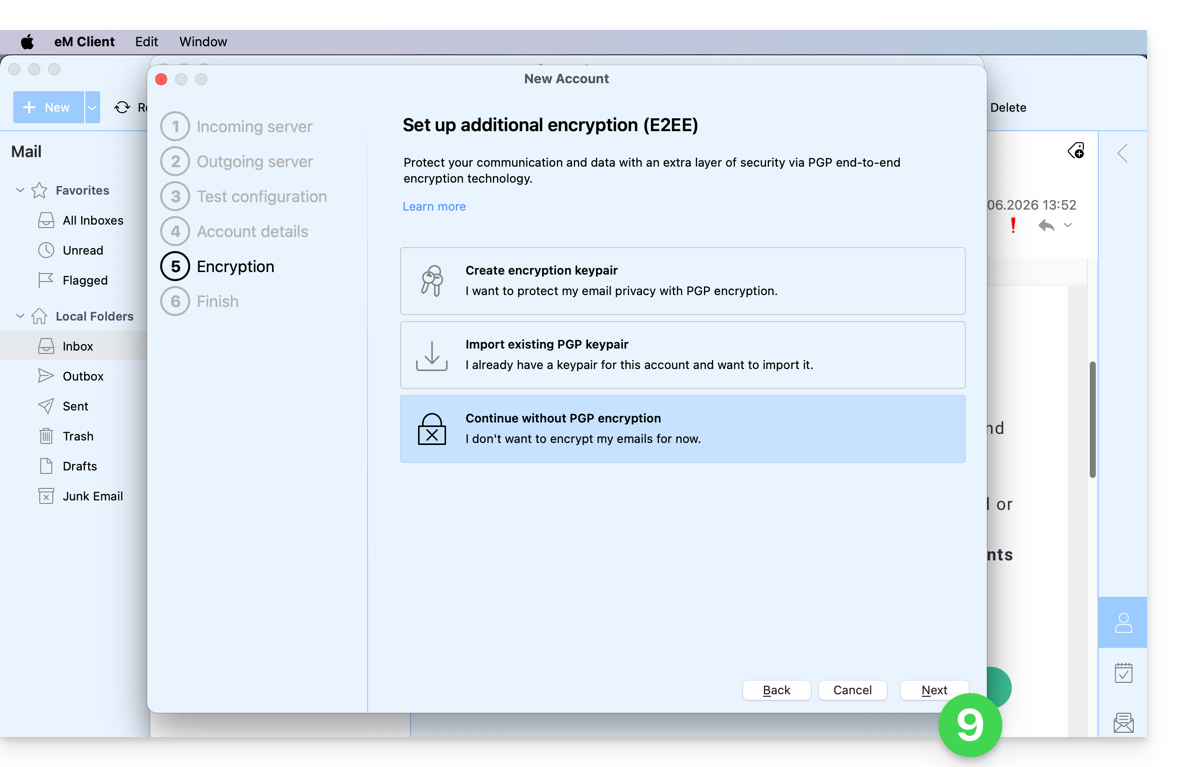
- Skip this step without adding extra security:
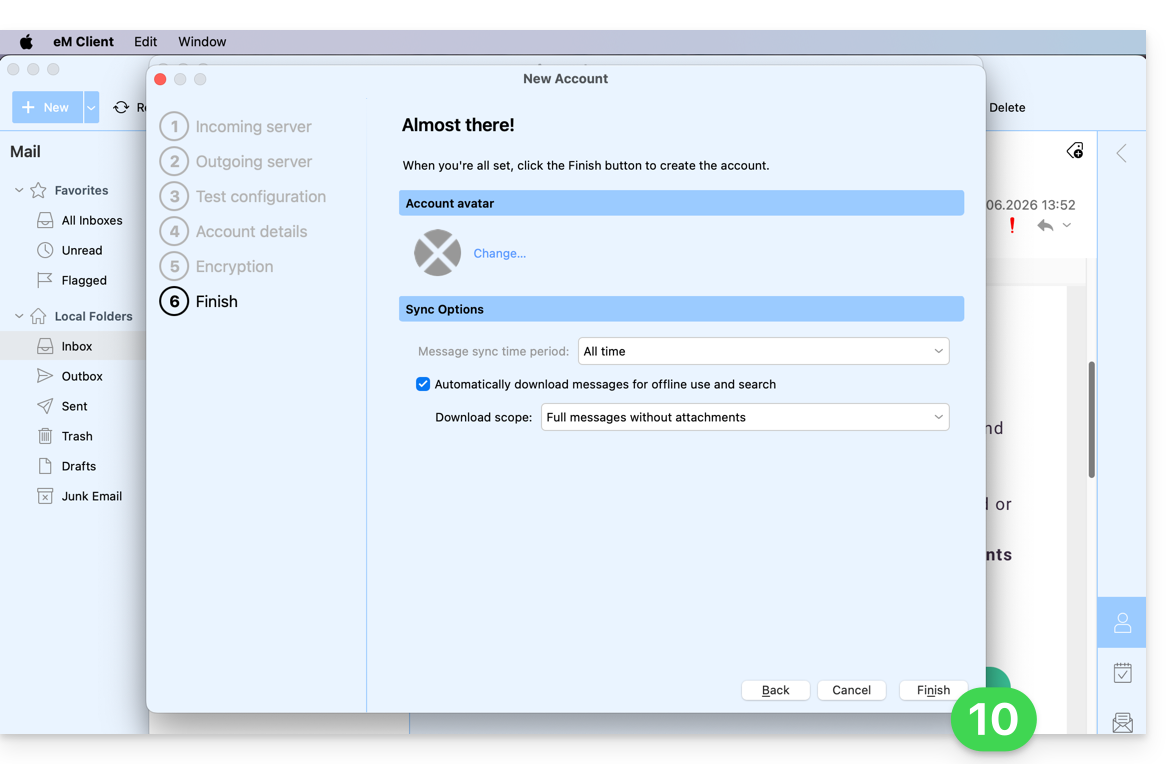
- Set your preferences and tap Finish:
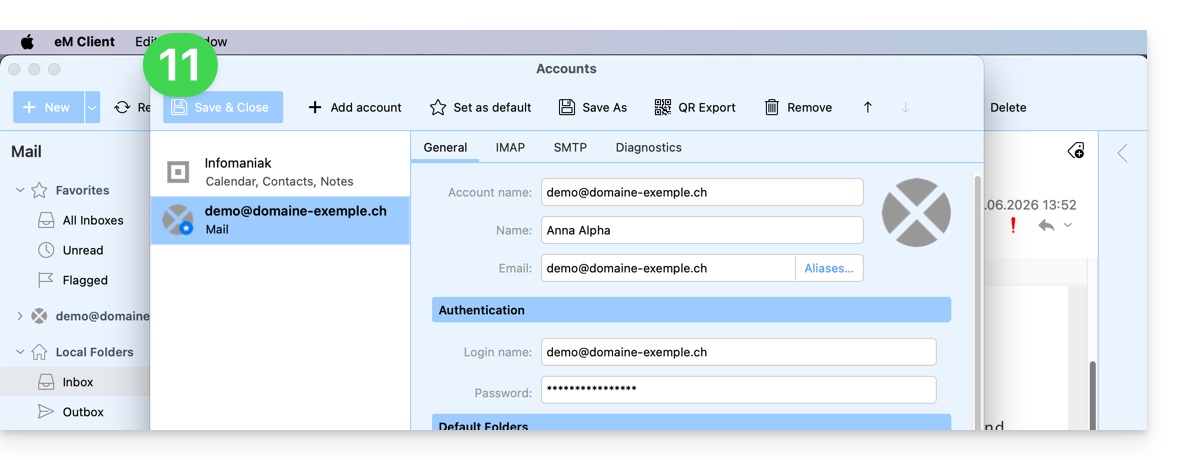
- Save the account addition:
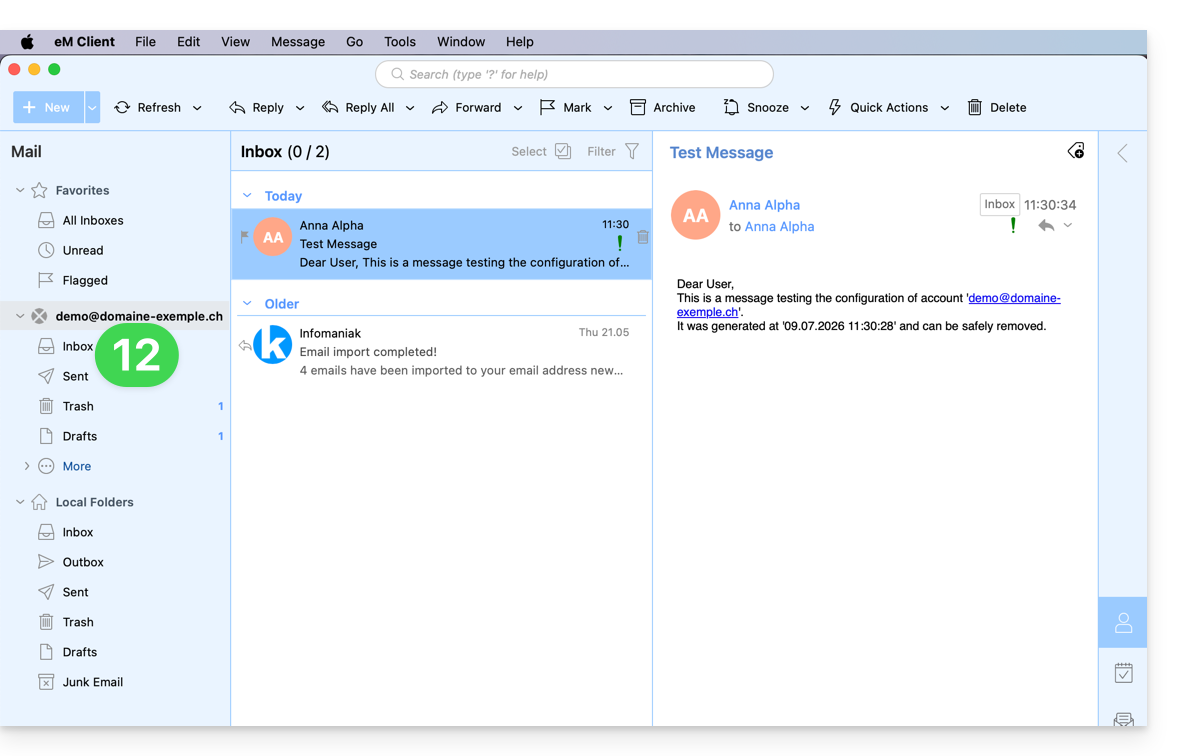
- Your email address is now configured in the application:
Recommended settings
- Incoming IMAP server =
mail.infomaniak.com - IMAP port =
993(with SSL) - Outgoing SMTP server =
mail.infomaniak.com - SMTP port & encryption protocol and command/method to activate this protocol:
587+ STARTTLS - Username = the complete email address (❓: help)
- Password = the password generated for the email address you want to access (❓: help my kSuite | Mail Service/kSuite).
- Mandatory authentication for sending emails:
- Enable this in the SMTP settings of your application.
- Check "use the same settings as the incoming server" or, depending on the software/email client, enter a username (i.e., the complete email address) and the generated password.
Refer to this other guide if you are looking for information about other compatible email ports and protocols (SSL / TLS, for example).
In case of a problem
Check that the Mail service is configured optimally (❓: help).
You do not need to contact Infomaniak Support if your email address works correctly outside the application. The most common error is using an incorrect password. Please refer to the solutions provided in this other guide regarding email in general.
Link to this FAQ: https://faq.infomaniak.com/2429
Has this FAQ been helpful?
This guide explains how to connect the desktop app Thunderbird (desktop application on macOS / Windows / Linux) to an email address hosted by Infomaniak.
Add the email address to the application
Prerequisites
- Create the email address (❓: help my kSuite | Mail Service/kSuite).
- Create a device password (❓: help my kSuite | Mail/kSuite Service).
- Verify that the domain is configured correctly (❓: help).
To configure the email application:
- Download the latest desktop version of Thunderbird (❓: help).
- Open the application.
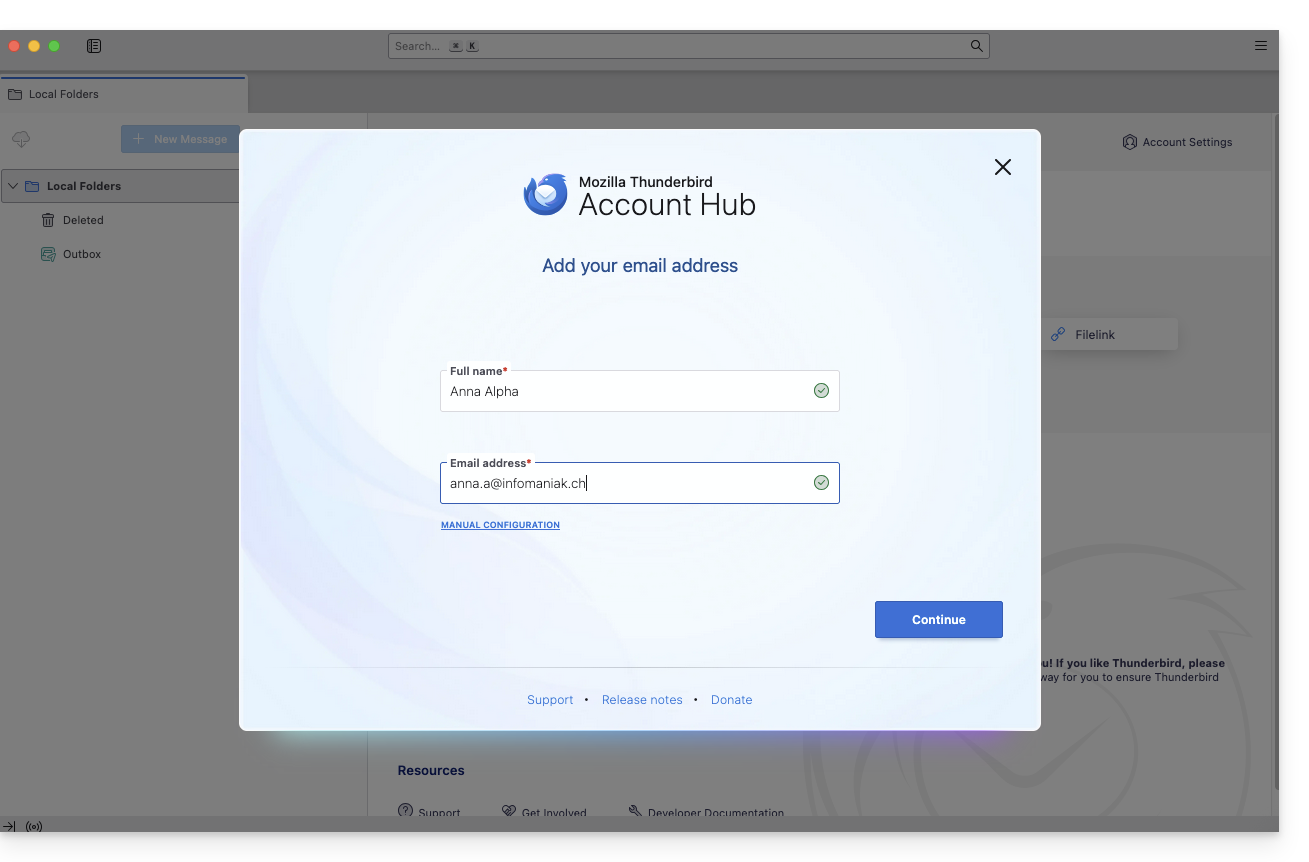
- Enter your account information and click Continue:
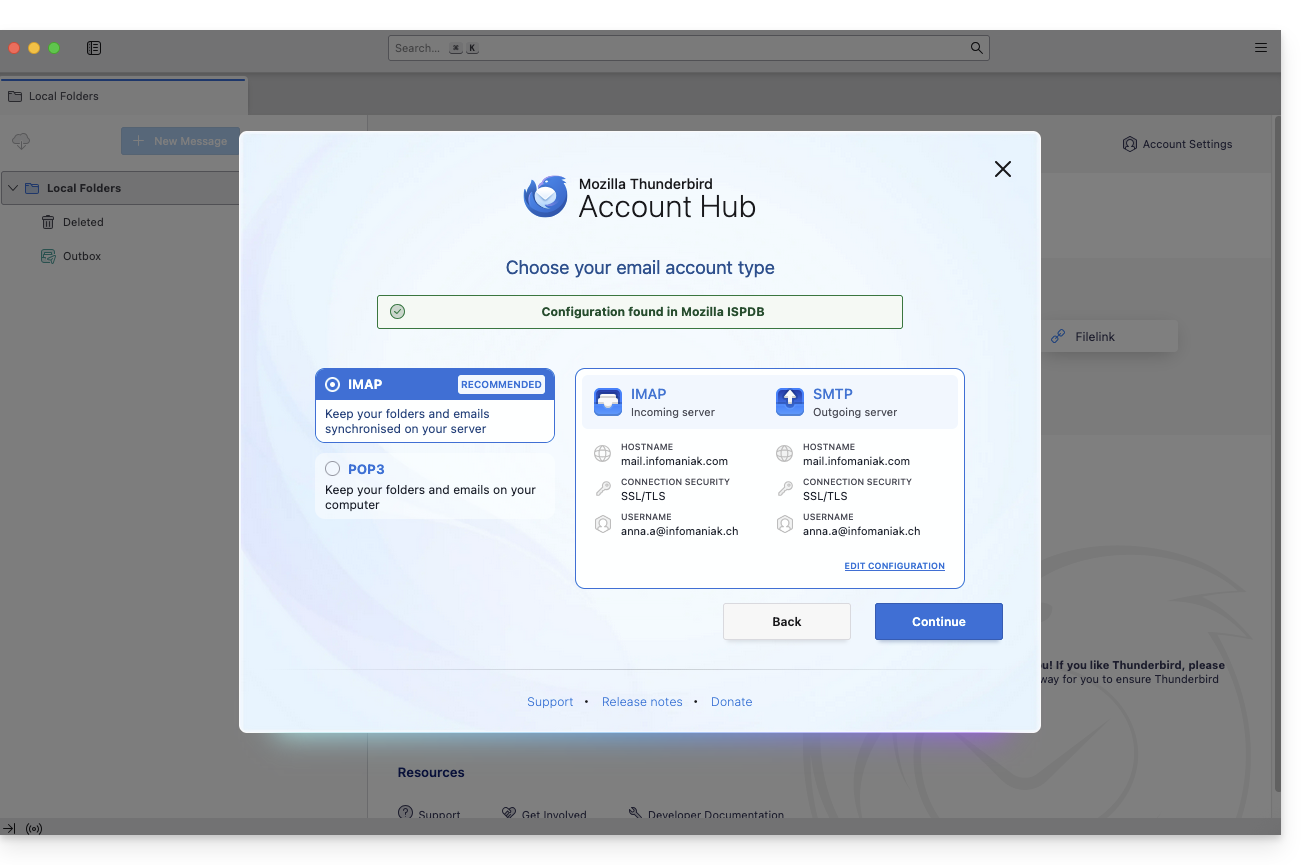
- Keep IMAP selected and click Continue:
- Enter your password and click Continue:
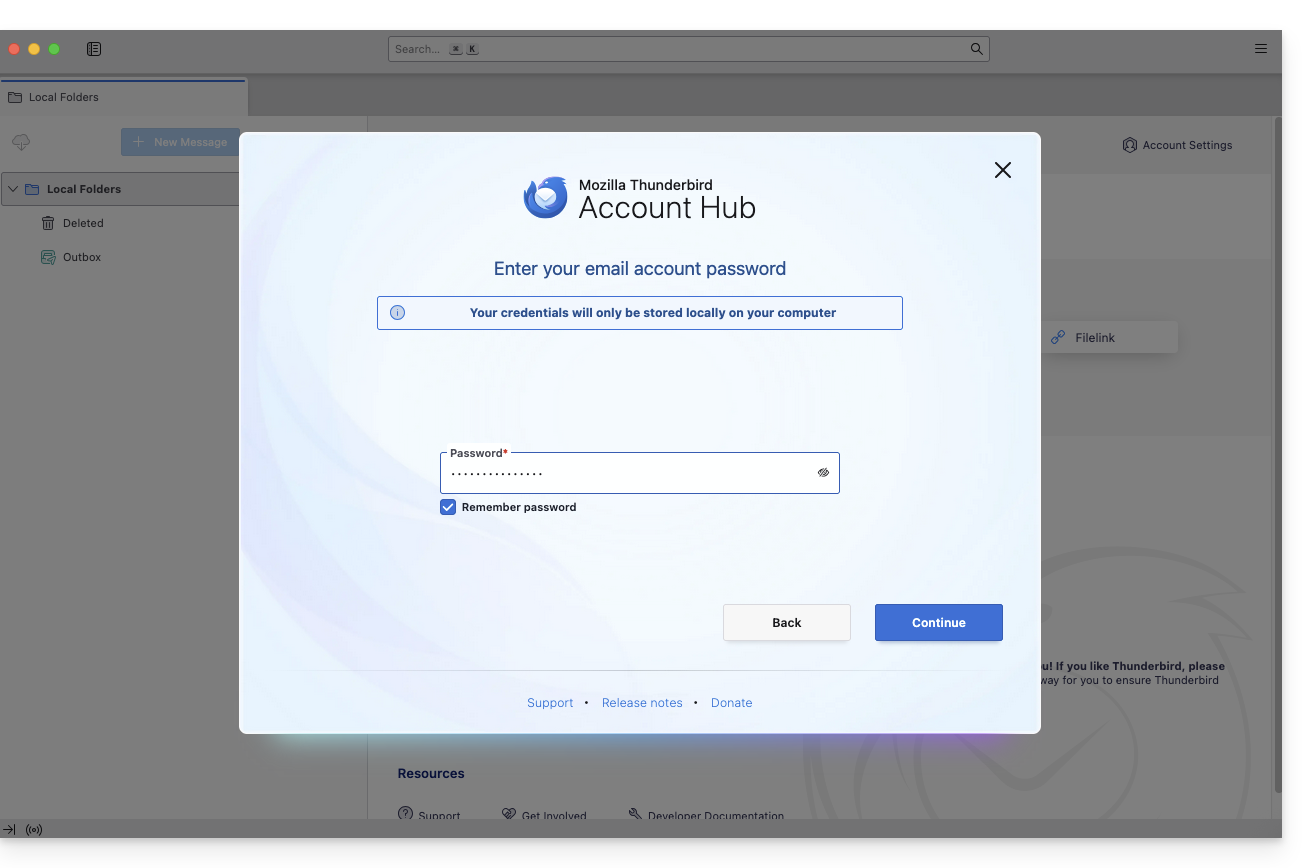
- Click on Continue:
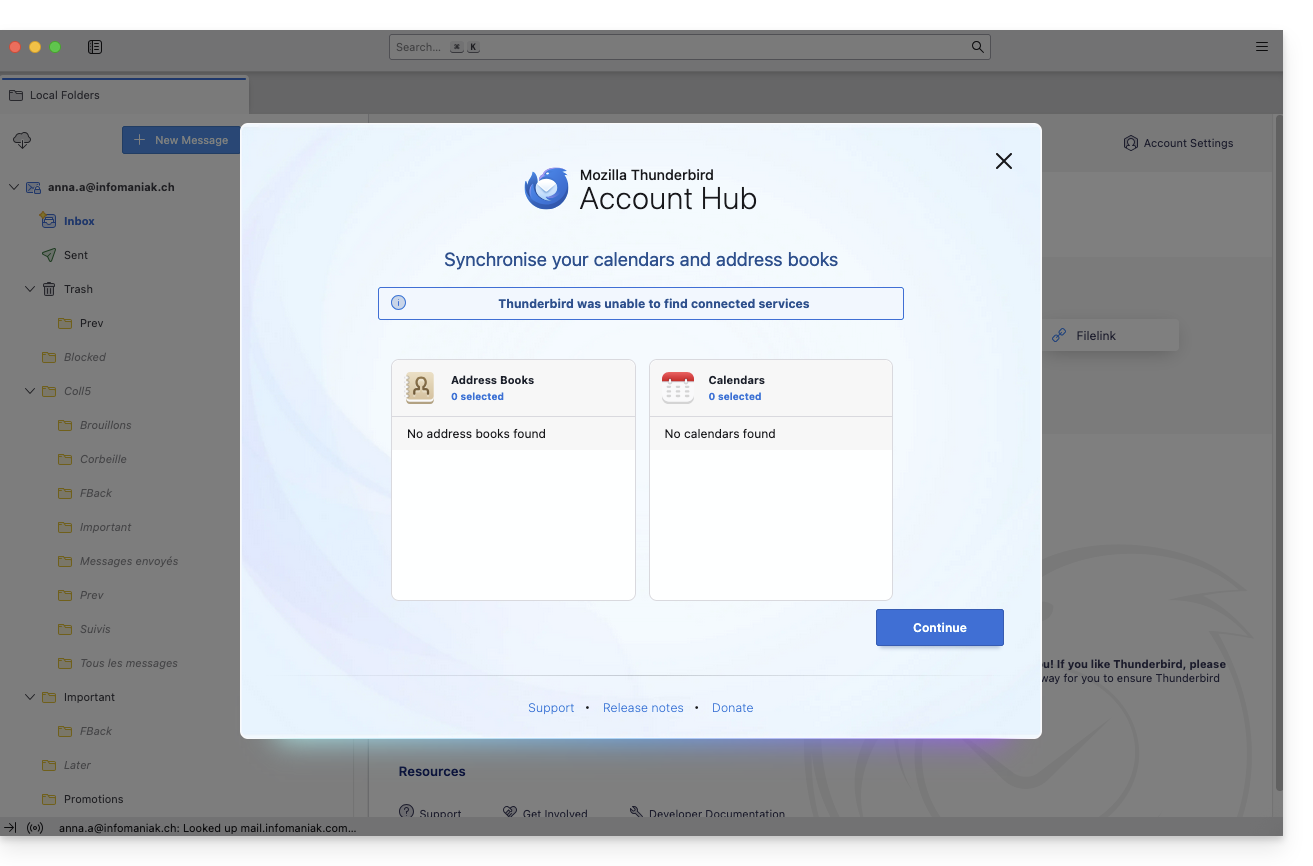
- Your registration summary is displayed. Click on Finish to add the address (or configure other services from there):
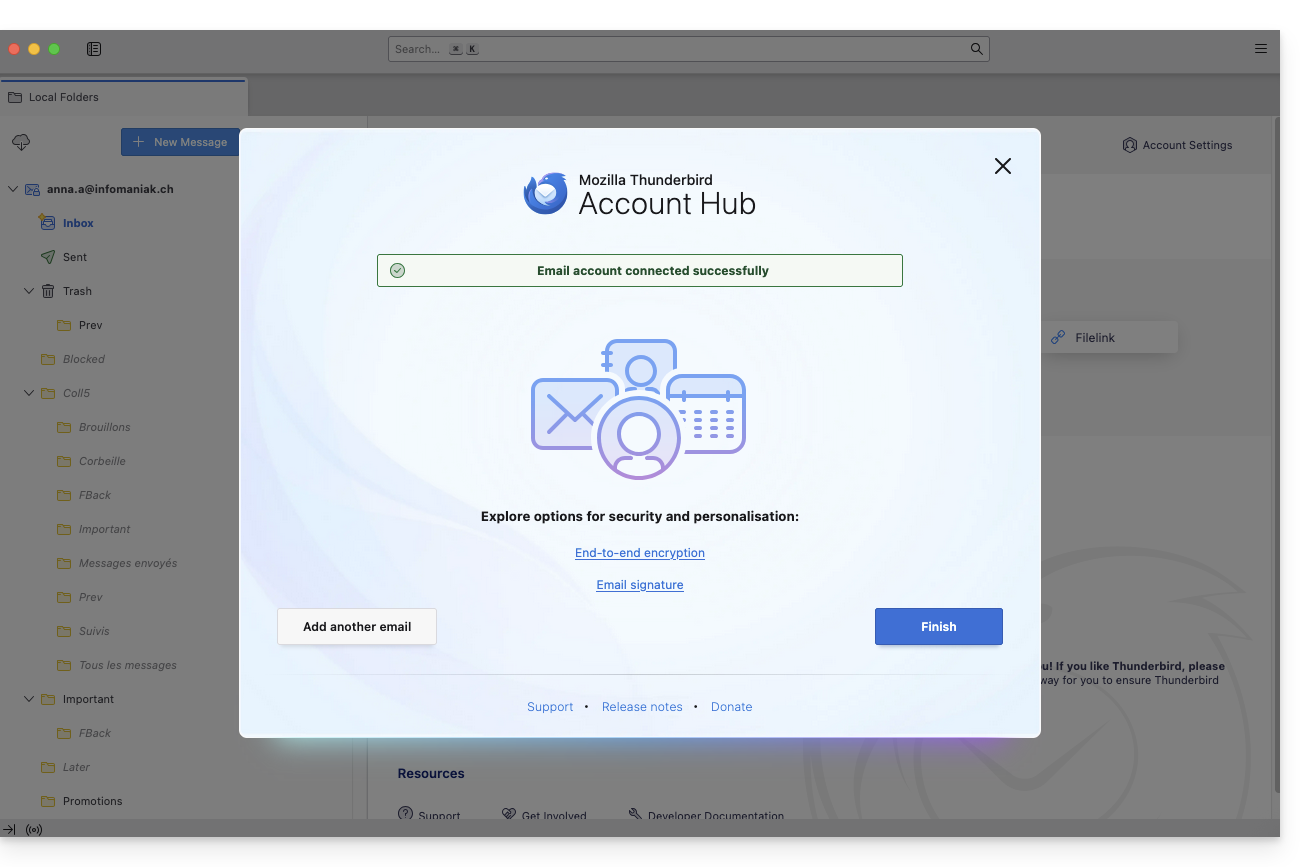
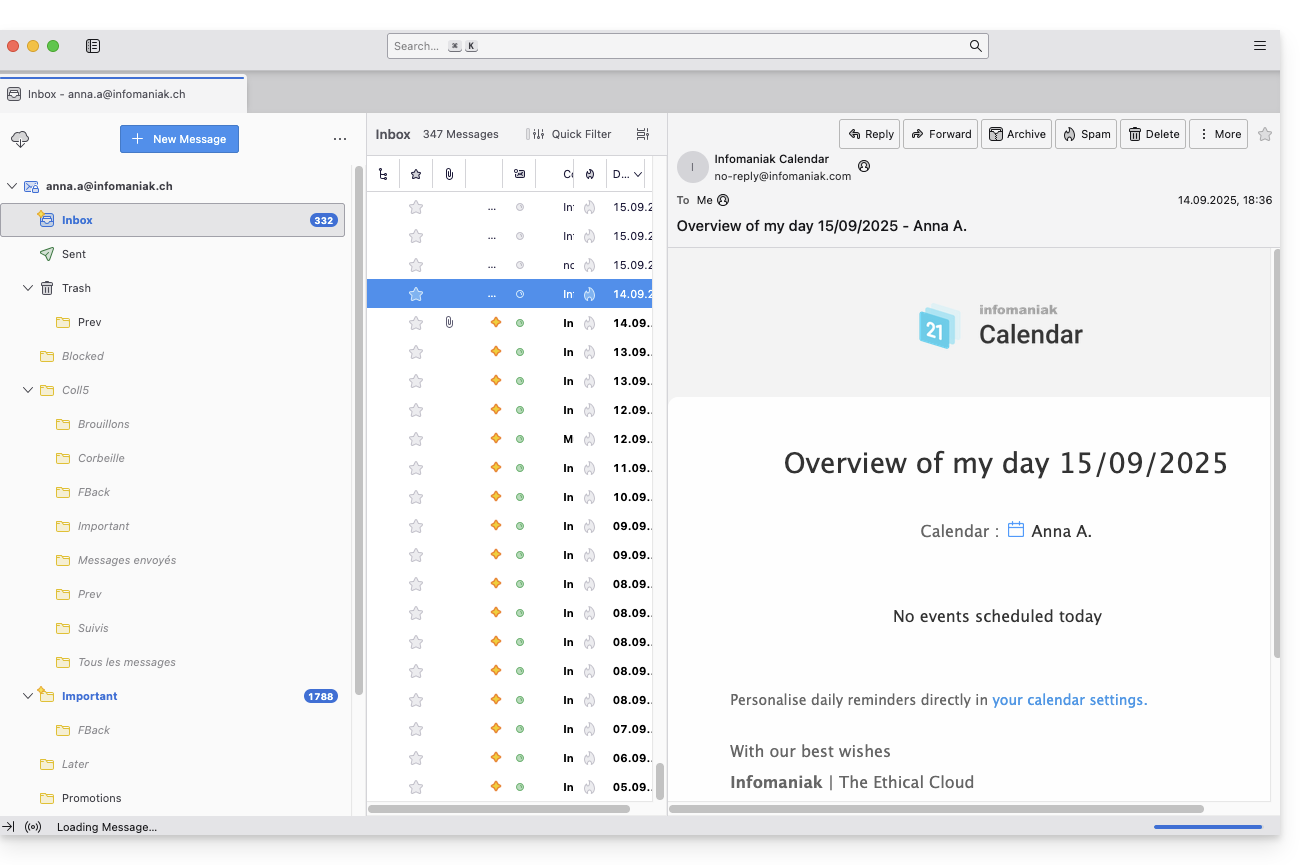
- Your email address is now configured in the application:
Recommended settings
- Incoming IMAP server =
mail.infomaniak.com - IMAP port =
993(with SSL) - Outgoing SMTP server =
mail.infomaniak.com - SMTP port & encryption protocol and command/method to activate this protocol:
587+ STARTTLS - Username = the complete email address (❓: help)
- Password = the password generated for the email address you want to access (❓: help my kSuite | Mail Service/kSuite).
- Mandatory authentication for sending emails:
- Enable this in the SMTP settings of your application.
- Check "use the same settings as the incoming server" or, depending on the software/email client, enter a username (i.e., the complete email address) and the generated password.
Refer to this other guide if you are looking for information about other compatible email ports and protocols (SSL / TLS, for example).
In case of a problem
Check that the Mail service is configured optimally (❓: help).
You do not need to contact Infomaniak Support if your email address works correctly outside the application. The most common error involves using an incorrect password. The troubleshooting guides will help you resolve any potential issues:
- Refer to the solutions provided in this other guide regarding email in general.
- This other guide is specifically about Thunderbird.
… and if Thunderbird is no longer working after a change of your email password, please refer to this other guide.
Link to this FAQ: https://faq.infomaniak.com/2430
Has this FAQ been helpful?
This guide explains how, from the Infomaniak Mail web app (online service ksuite.infomaniak.com/mail), to allow a person to access a mail address within the Infomaniak ecosystem, i.e., by using only the Mail web app and/or the Infomaniak Mail mobile app, without creating a specific password for the address.
Other access and management options are presented in the main guide.
Prerequisites
- You must already be a user of the email address in question, or add yourself beforehand (❓: help).
- Have permission to delegate access to the email address in question: it is possible that the Mail Service administrator has removed this permission from their admin account
help
To allow a user who is already active in the Organization to access the email address you want to share:
- Click here to access your emails on your Infomaniak kSuite (❓: help).
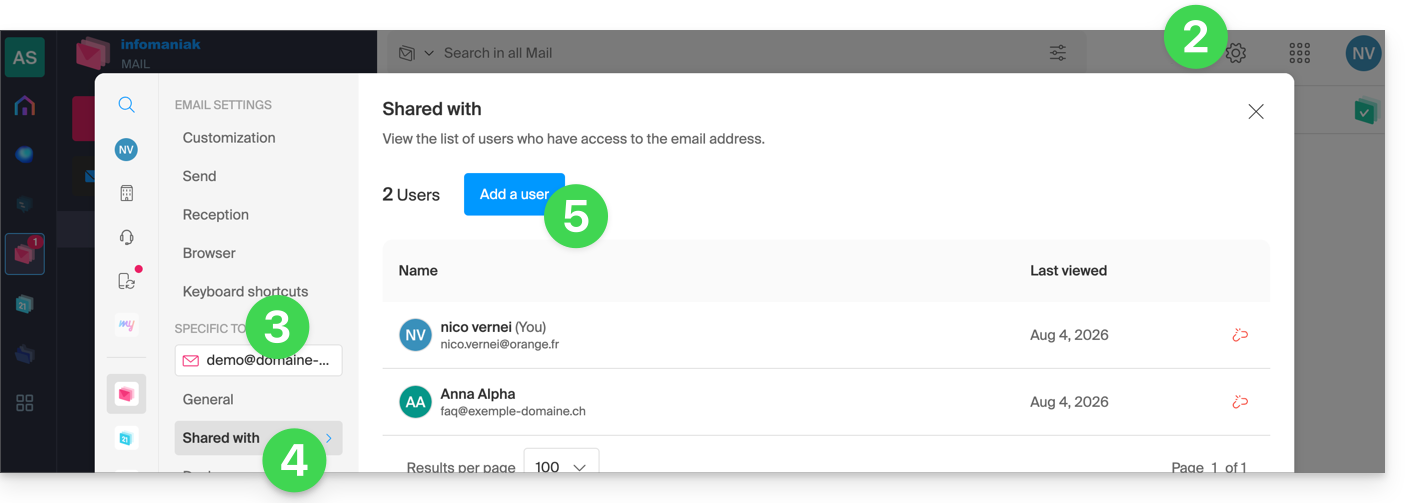
- Click on Settings in the top right corner.
- Check or select the relevant email address from the dropdown menu in the left-hand menu.
- Click on Shared with.
- Click on Add a user above the table of users who currently have access to the address in Mail:
- Enter the password to log in to your Infomaniak account if prompted.
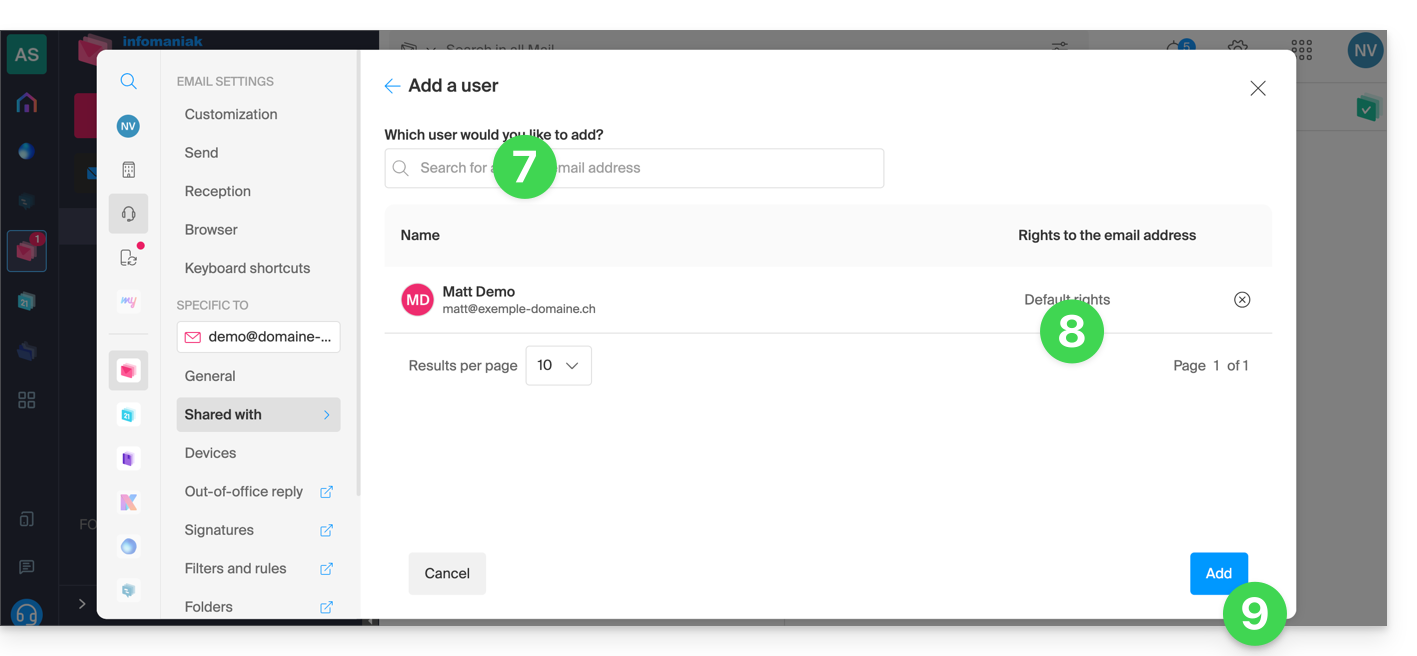
- Choose one of the existing users within your Organization.
- Added to the table, you can click to view their current permissions and determine if they can also delegate access to someone else in the Organization.
- Finish by clicking the Add button:
Result for the guest user
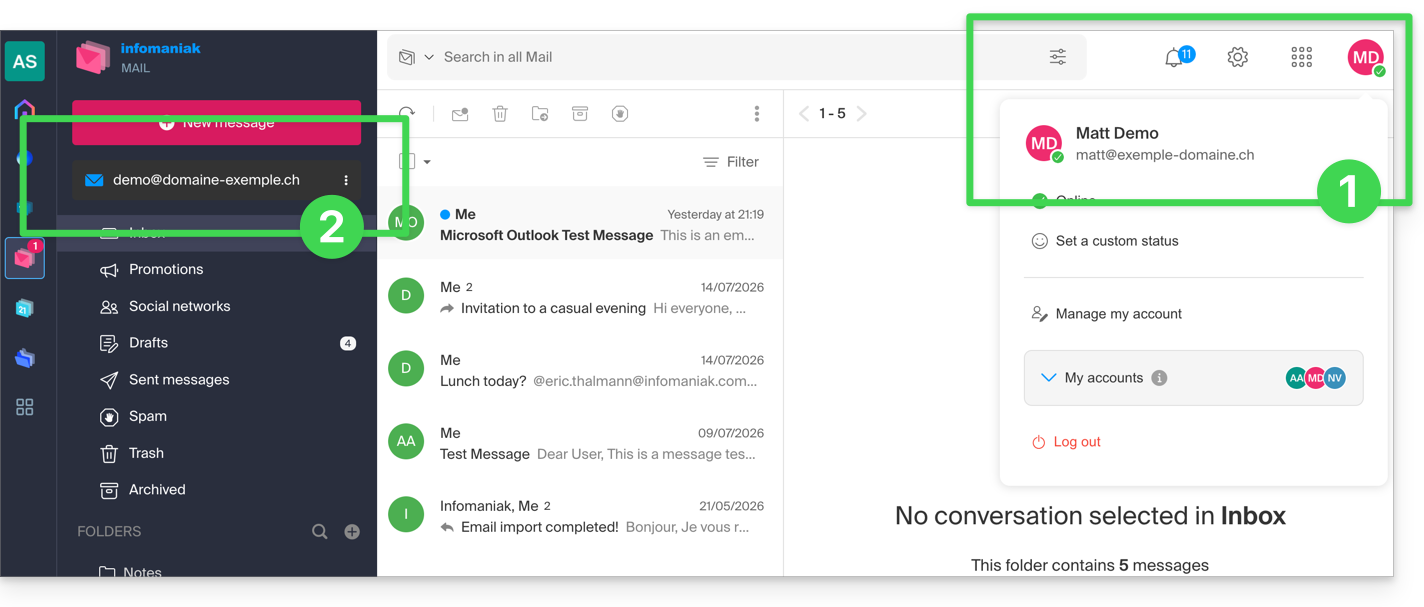
- The invited person logs in to their Infomaniak email…
- The email address in question will automatically be visible and accessible to the user:
If the user is unable to access the address, they can switch between their addresses at any time via the chevron located in the upper left corner of the screen: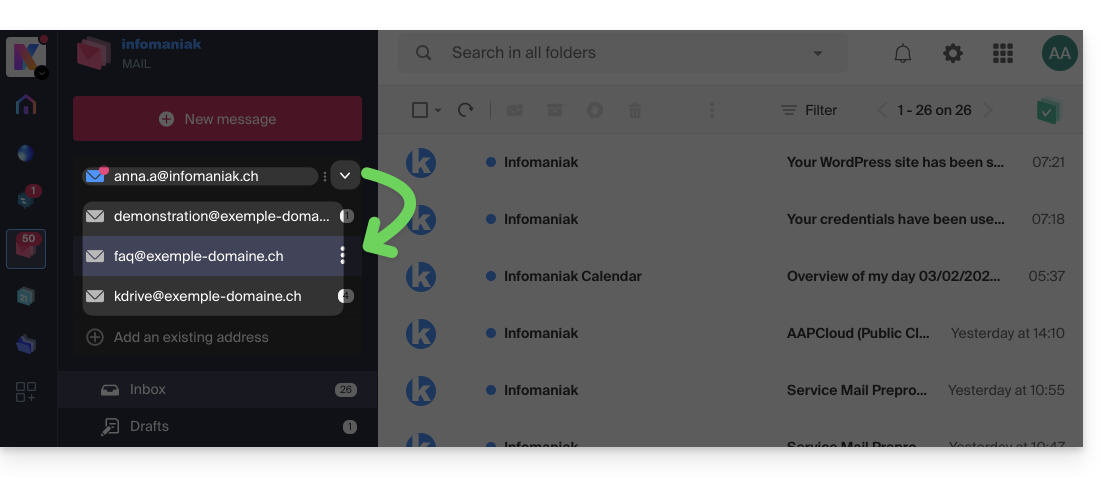
To do this, you may first need to select a different Organization (at the top left of the interface) from the ones you belong to.
If the address associated with the invitation still does not appear, try refreshing the browser page (Command ⌘ + R on macOS and Ctrl + F5 on Windows).
If the third party is not yet part of the Organization…
If you want to grant access to a user who is not yet part of the Organization, please refer to this other guide.
Link to this FAQ: https://faq.infomaniak.com/2925
Has this FAQ been helpful?
This guide explains how to import contacts into the address books of the Infomaniak Web app Contacts (online service ksuite.infomaniak.com/contacts).
Introduction
- An assistant facilitates the import of contacts from various sources, such as Outlook, macOS address books, Thunderbird, Gmail, etc.
- Import can be done using a file in
VCARDorCSVformat. - The file must not exceed 50 MB and must not contain more than 10,000 lines.
Import contacts
To do this:
- Click here to access the Import section of the Infomaniak Web app Contacts (online service ksuite.infomaniak.com/contacts):
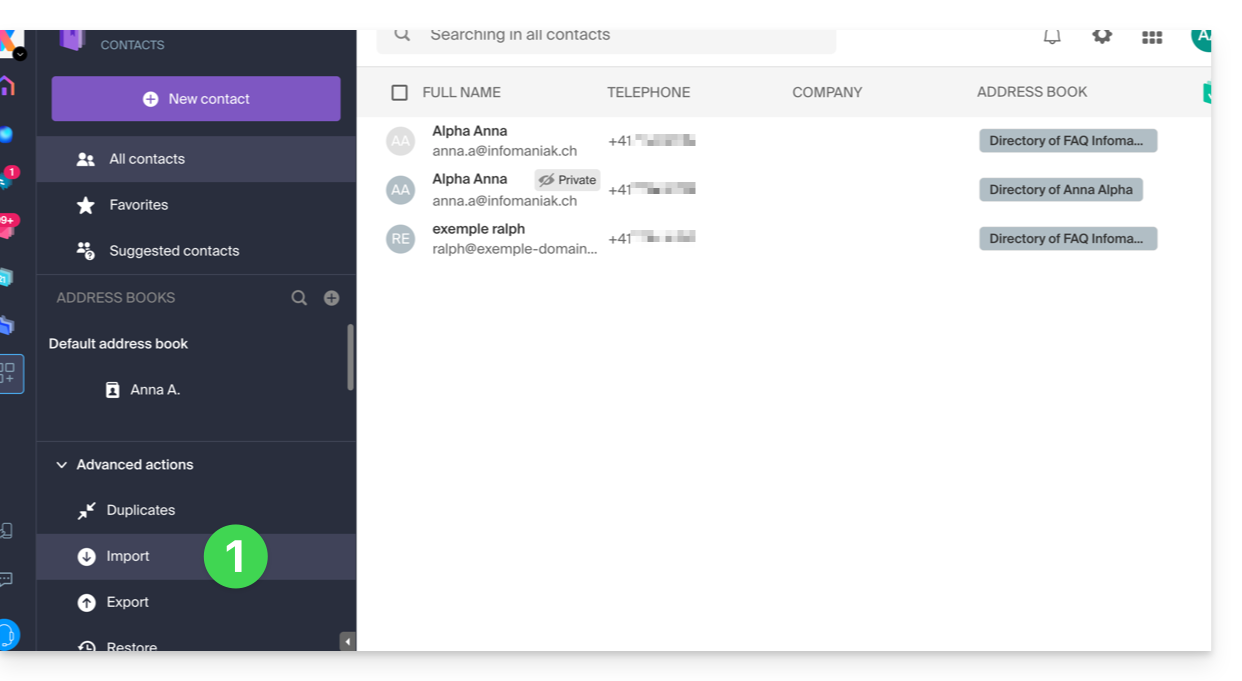
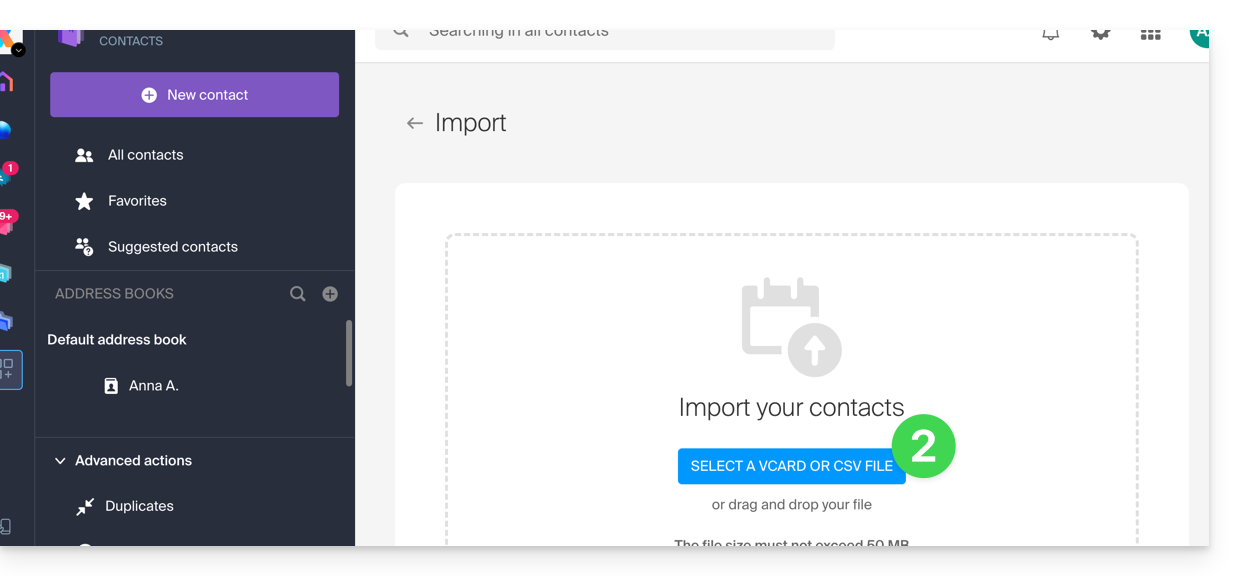
- Click on the blue Select a VCARD or CSV file button:
Import from a vCard (.vcf) file
The content of a contacts export in vCard format looks like this:
BEGIN:VCARD
VERSION:3.0
FN:John Smith
N:Smith;John;;;
EMAIL;TYPE=INTERNET:john.smith@example.com
TEL;TYPE=CELL:+41791234567
ORG:Example Ltd
END:VCARD
BEGIN:VCARD
VERSION:3.0
FN:Jane Miller
N:Miller;Jane;;;
EMAIL;TYPE=INTERNET:jane.miller@example.com
ORG:Freelance
END:VCARD
...
When you select your .vcf file in the import tool, here are the next steps:
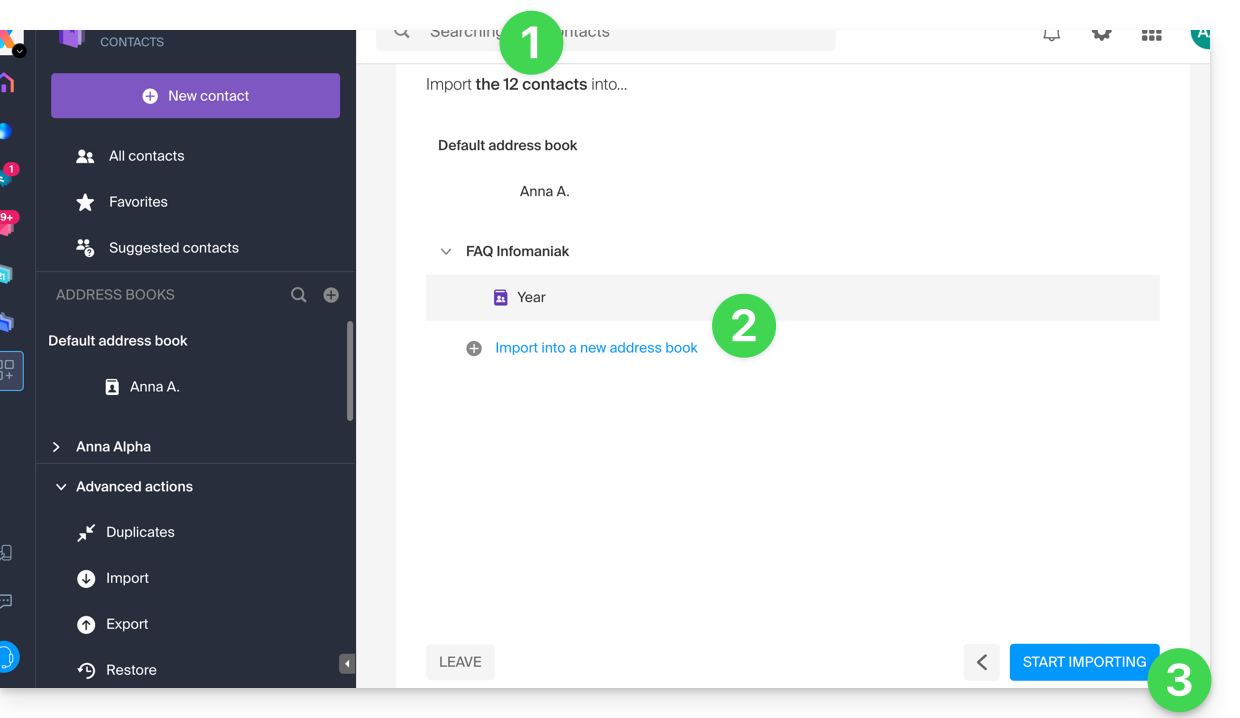
- The assistant indicates the number of contacts detected in your file.
- Choose an address book (or create a new one) to store your contacts.
- Click the button to start the import:
Import from a CSV file (.csv)
The content of a contacts export in CSV format looks like this:
Name,First name,Email,Phone,Organization,Notes
Smith,John,john.smith@example.com,+41791234567,Example Ltd,VIP customer
Miller,Jane,jane.miller@example.com,,Freelance,
Brown,Mark,,+41792345678,,Former colleague
Taylor,Sarah,sarah.taylor@example.com,+41793456789,City Hall,
Wilson,Lucas,lucas.wilson@example.com,,,Quote request in March
Moore,Elise,,+41794567890,BioShop,
Walker,Thomas,thomas.walker@example.com,+41795678901,InnoTech,Python expert
Young,Julie,julie.young@example.com,,,
...
When you select your .csv file in the import tool, here are the next steps:
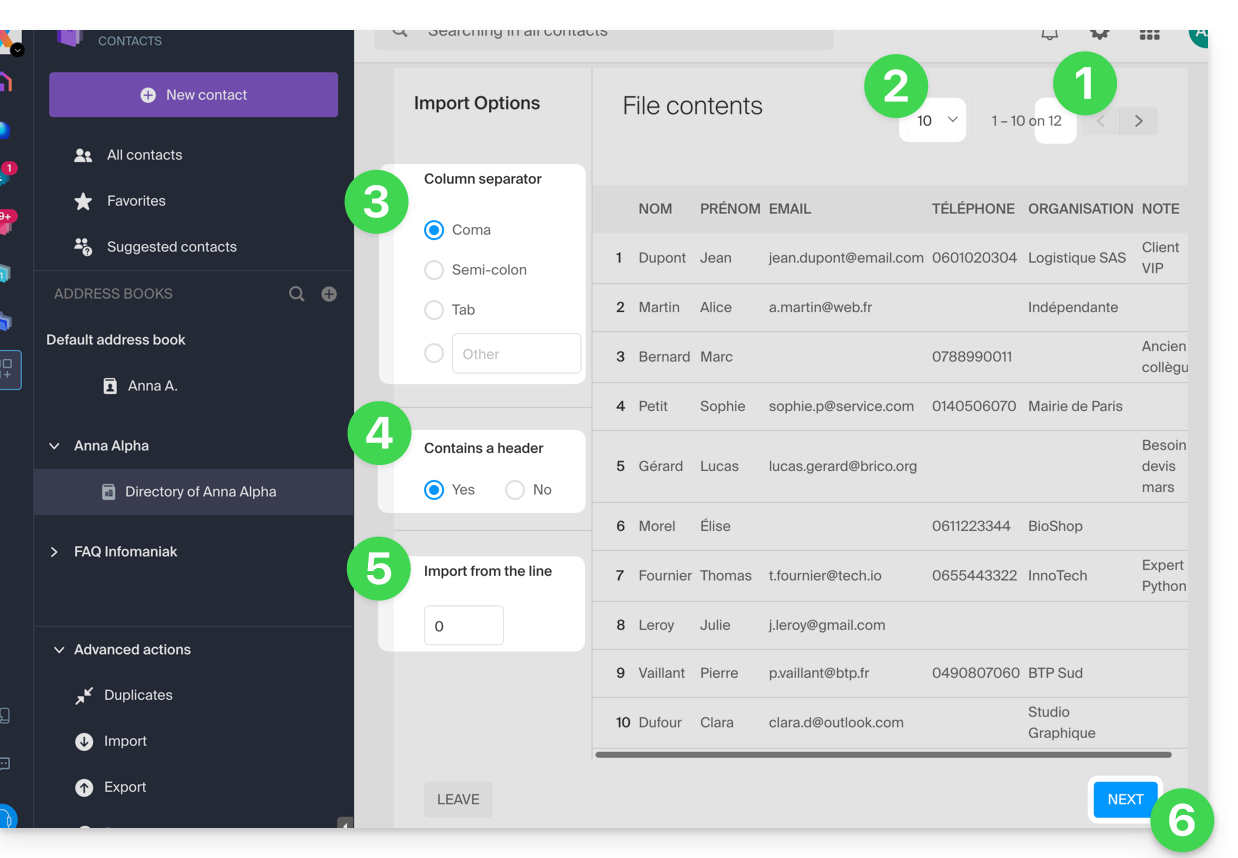
- The assistant indicates the number of contacts detected in your file.
- You can increase the number of contacts displayed per page, which allows you to better preview them in their entirety if needed.
- Choose the separator used to delimit the information in your text file.
- Specify whether the file containsFirst row without contact information (only column headers).
- Specify if you want to import contacts starting from a specific row.
- Click the button to continue:
- Assign the information detected in the file to each contact using the available fields in your address book:
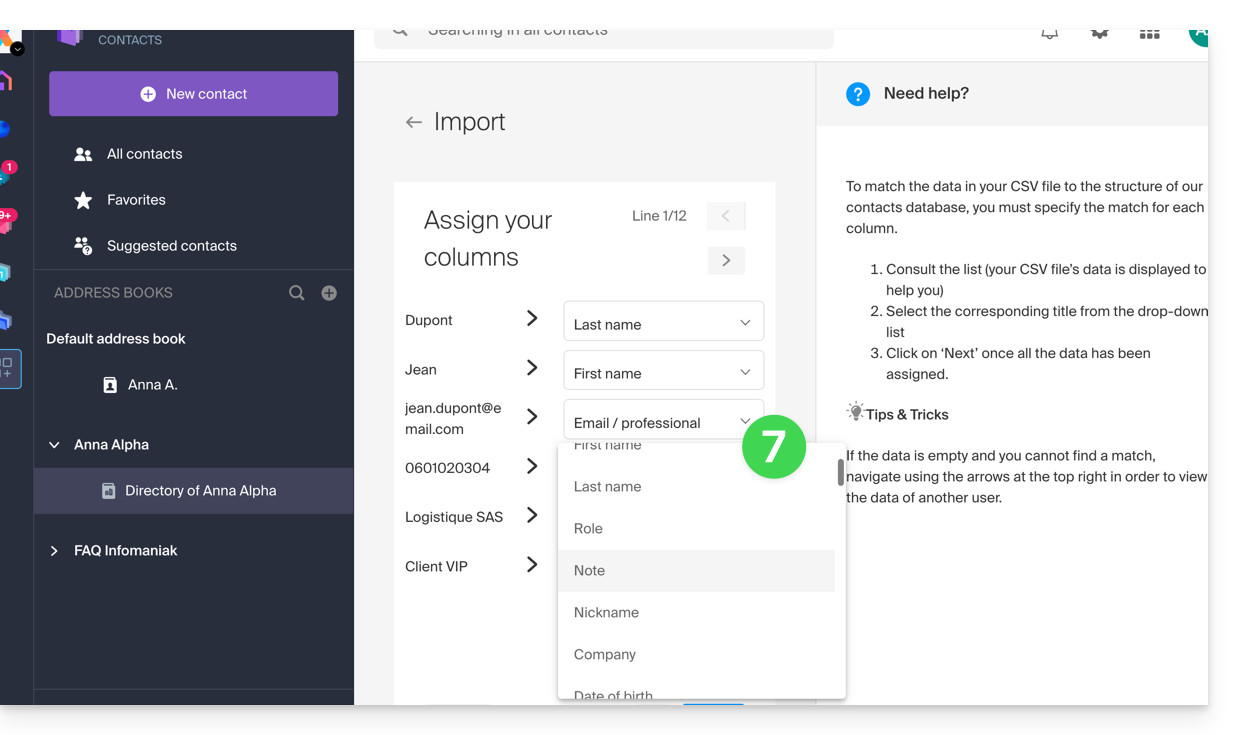
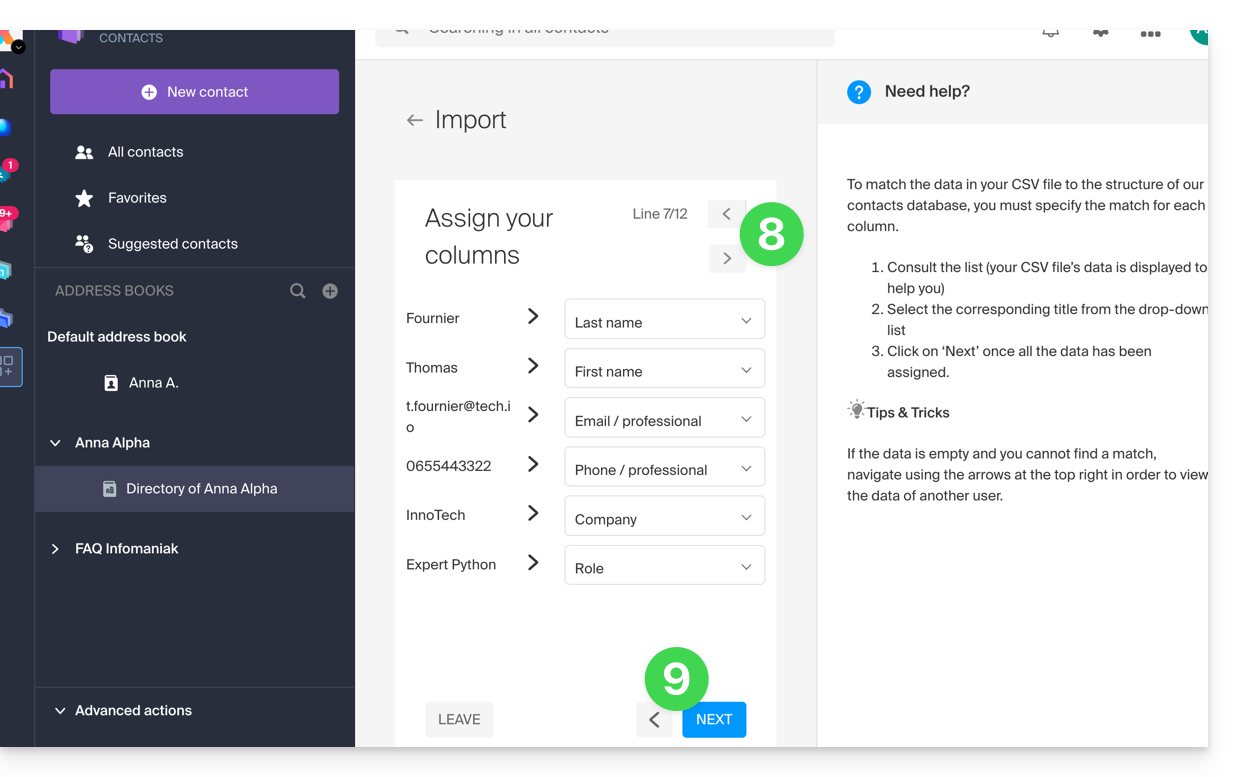
- Browse the contacts to import and specify any additional fields if necessary.
- Go back to check the impact of your changes, then click the button to continue:
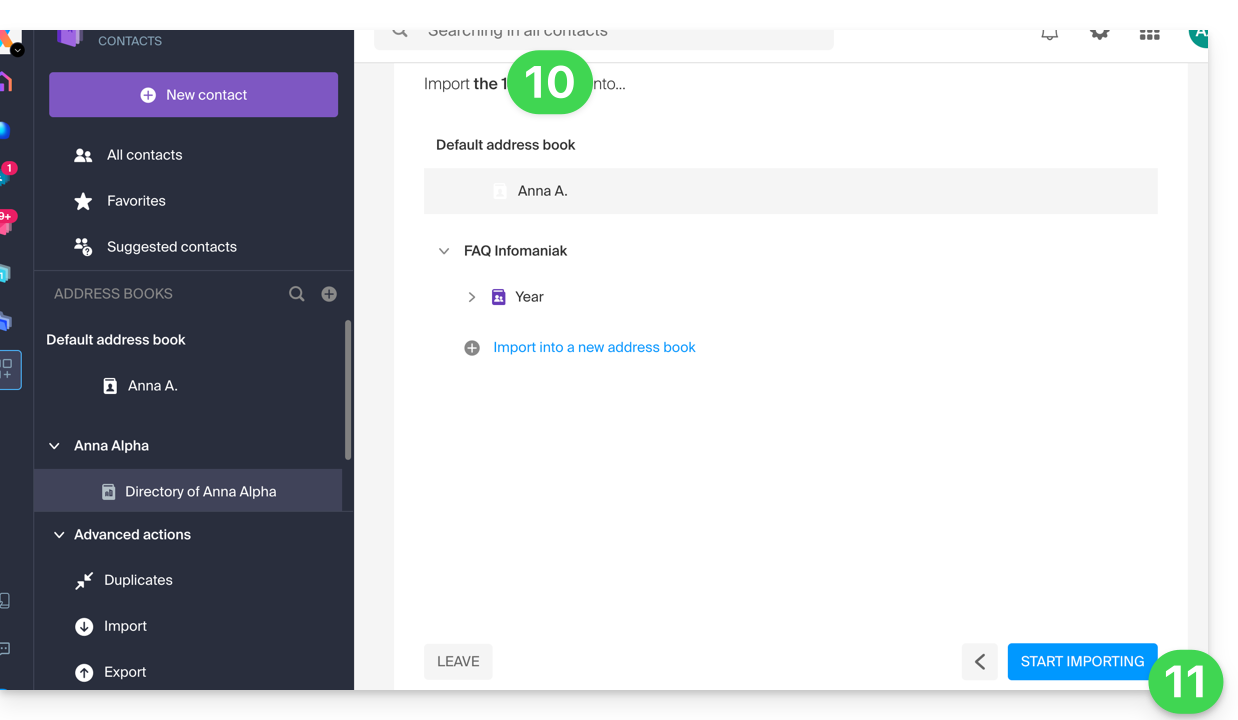
- Choose the address book (or create a new one) to store your contacts.
- Click the button to start the import:
Imported contacts
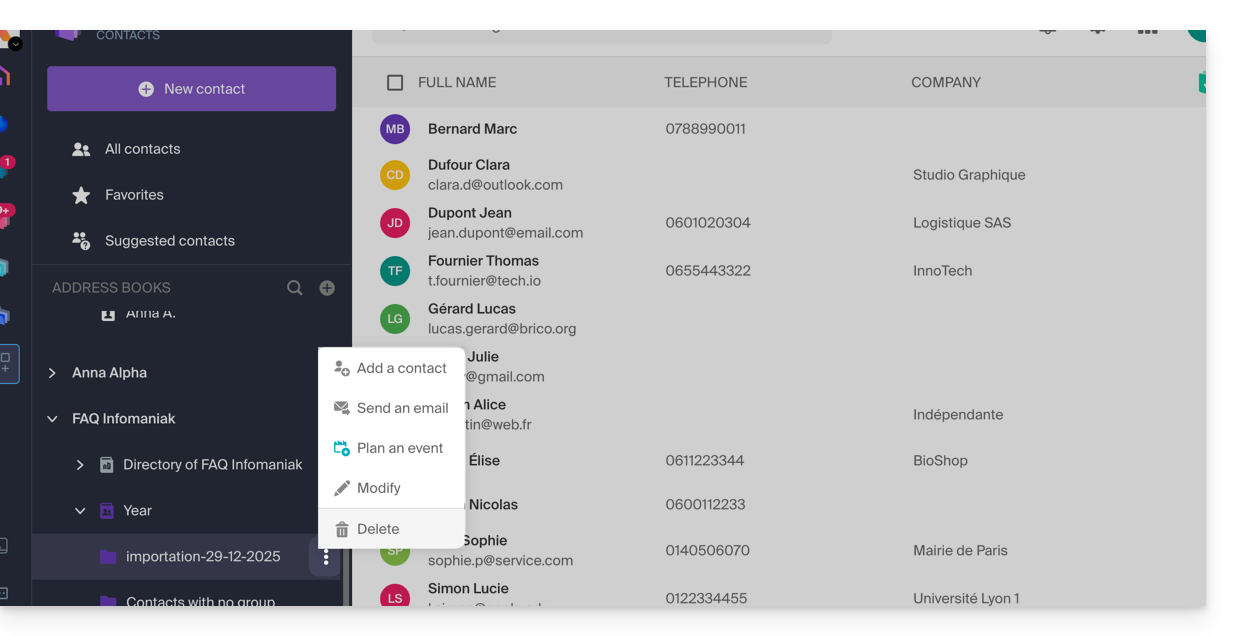
The contacts are imported into the specified location, within a group. If necessary, you can delete this folder, which was created for this purpose (this will not delete the contacts unless you enable this option when deleting the folder):
- Click on the action menu ⋮ located to the right of the name of the group created with the import date.
- Click on Delete:
In case of a problem
- Complete the contact details:
- A contact containing only the first and last name may be ignored by the system for security reasons.
- Make sure that at least one additional piece of information is present (email address or phone number).
- Check the header of your (CSV) file:
- The columns must be clearly named (e.g., "Name", "First Name", "Email").
- If the headers are missing or incorrect, the system will not be able to read the data.
- Data format:
- Check that phone numbers do not contain unusual special characters and that email addresses are spelled correctly (presence of the
@and the period).
- Check that phone numbers do not contain unusual special characters and that email addresses are spelled correctly (presence of the
- File encoding:
- For optimal results, save your CSV file in UTF-8 format; this ensures that accents and special characters are displayed correctly.
If you need to export them from...
... Outlook (older version)
- From your Outlook software, go to your address book.
- Select the contacts to export.
- In Actions, click Transfer as vCard.
- Send the email containing the vCard.
- Retrieve the email in the Infomaniak Mail web app (online service ksuite.infomaniak.com/mail).
- Click on Add all contacts.
... macOS (or refer to this other guide)
- In your Contacts application, go to File and select Export.
- Choose Export vCard.
- Save your vCard file to your computer.
... Thunderbird (or refer to this other guide)
- From your Thunderbird software, go to Window and select Address Book.
- In Tools, select Export.
- In the save options, choose Comma-separated as the format.
- Save your CSV file.
... Gmail (or refer to this other guide)
- From your Gmail interface, go to the Contacts section.
- Click the Export button.
- Select vCard format.
- Save your vCard file to your computer.
... Office 365 (or consult this other guide)
- From your Outlook software, go to the Contacts section.
- Click on Manage and choose Export.
- Save your CSV file to your computer.
... Yahoo Mail: refer to this other guide
... Proton Mail: check out this other guide
... Bluewin: check out this other guide
Refer to this other guide to import other data.
Link to this FAQ: https://faq.infomaniak.com/1599
Has this FAQ been helpful?
This guide explains how to connect the Apple Mail iOS app (iPhone, iPad, etc.) to an email address hosted by Infomaniak.
Introduction
- Your iOS device will be automatically configured using .mobileconfig configuration profiles compatible with Apple, unlike a manual configuration.
- It is possible to delete a configuration profile once it has been installed (scroll to the bottom of this page for instructions).
Install a configuration profile
Prerequisites
- Create the email address within my kSuite or a Mail Service / kSuite.
- Verify that the Mail Service is configured optimally.
Then:
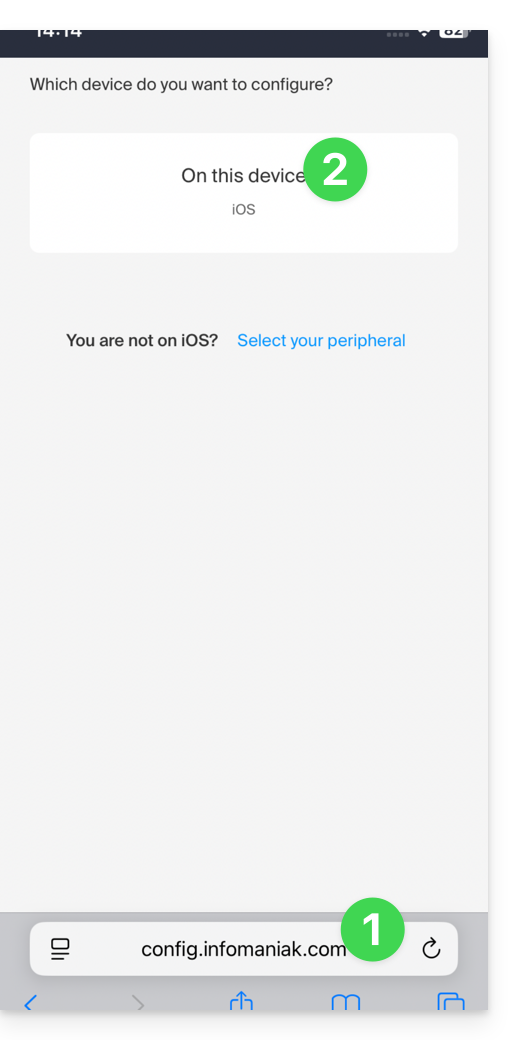
- Click here to access the Infomaniak configuration tool (online service https://config.infomaniak.com) — log in if necessary to your Infomaniak account for the Organization where your email address is managed.
- Choose to install the profile on this iOS device:
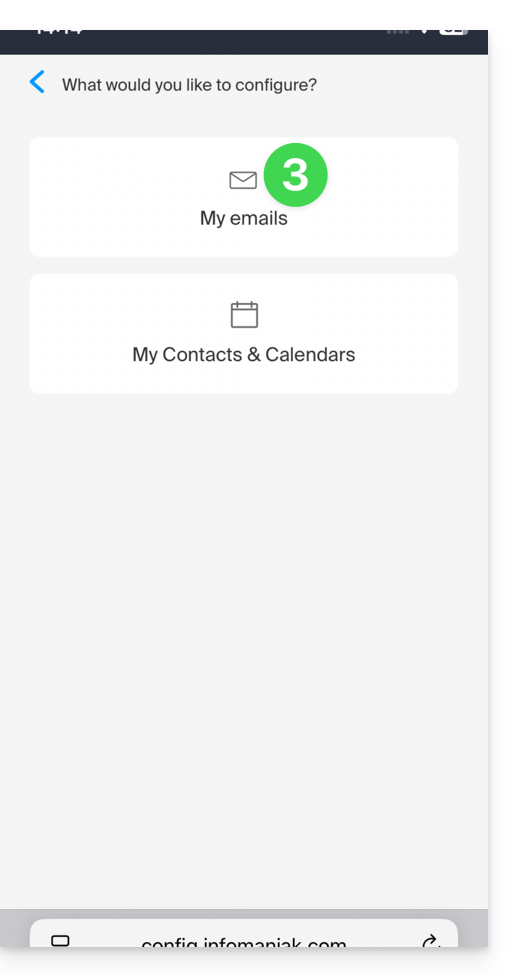
- Choose to synchronize emails:
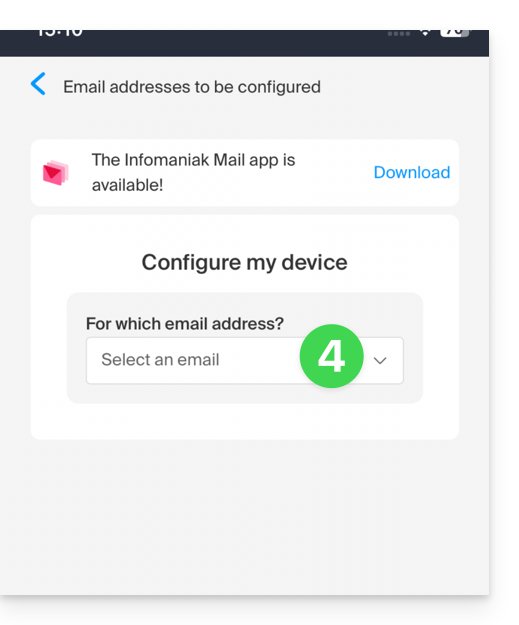
- Choose the email address (from those already linked to your current user) that should be synchronized on your device:
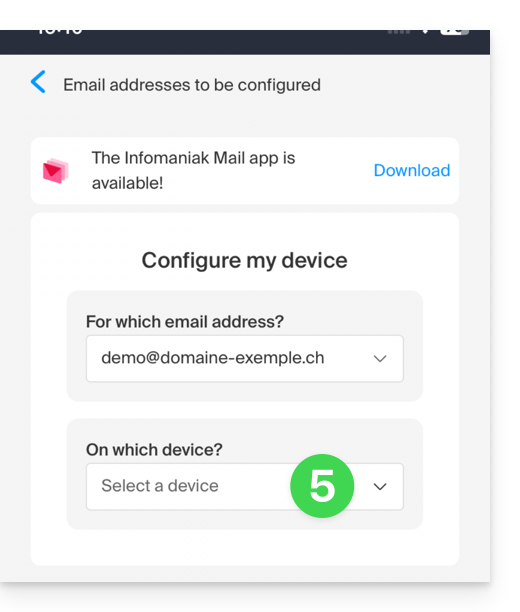
- Choose from the list of devices to enable synchronization on a new device (the one you are using):
- The device name, which is purely descriptive, is adjusted accordingly, but you can modify it if necessary:
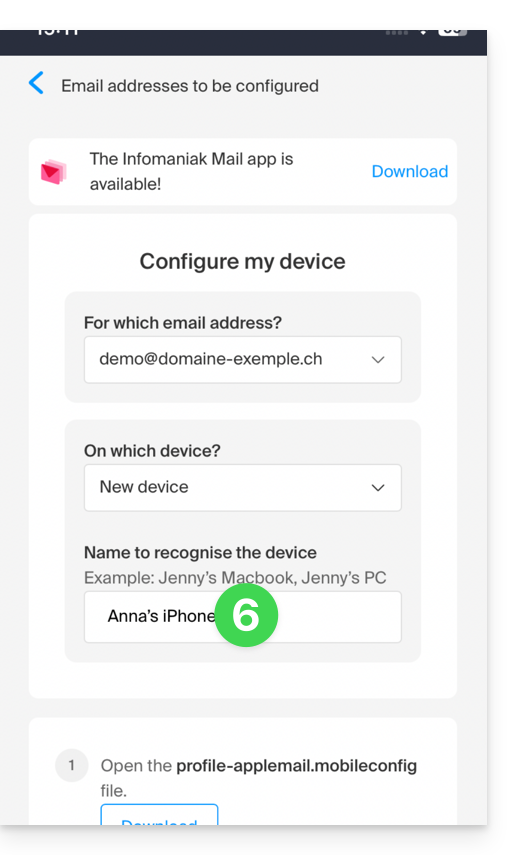
- Scroll down in the wizard and generate a password dedicated to email synchronization:
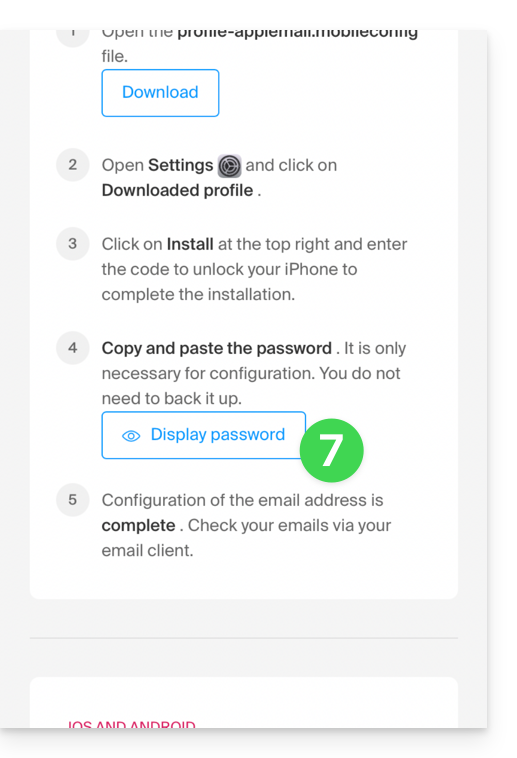
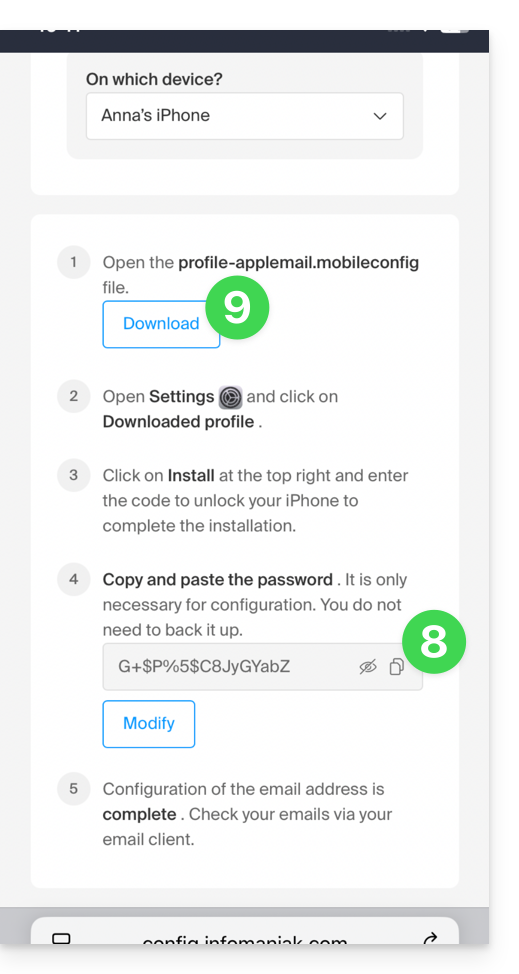
- Copy the generated password (you will be asked for it when installing the Apple profile).
- Download the Apple profile:
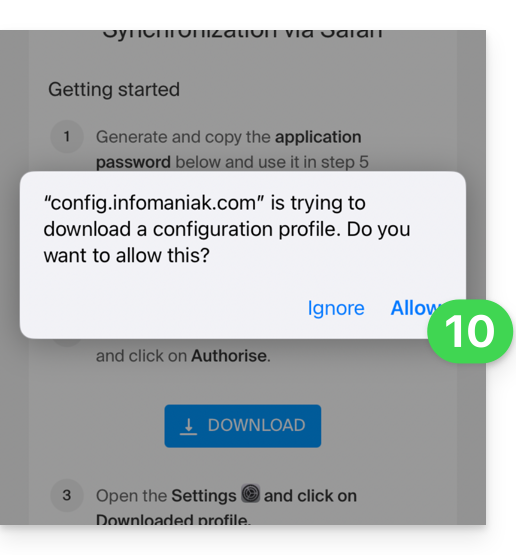
- Allow the download on the device:
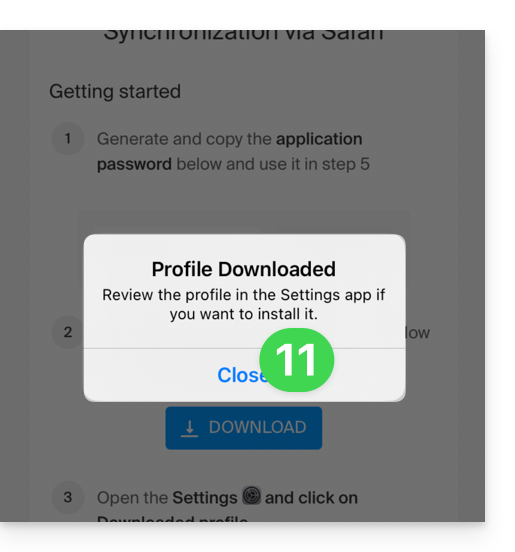
- Tap to close the message:
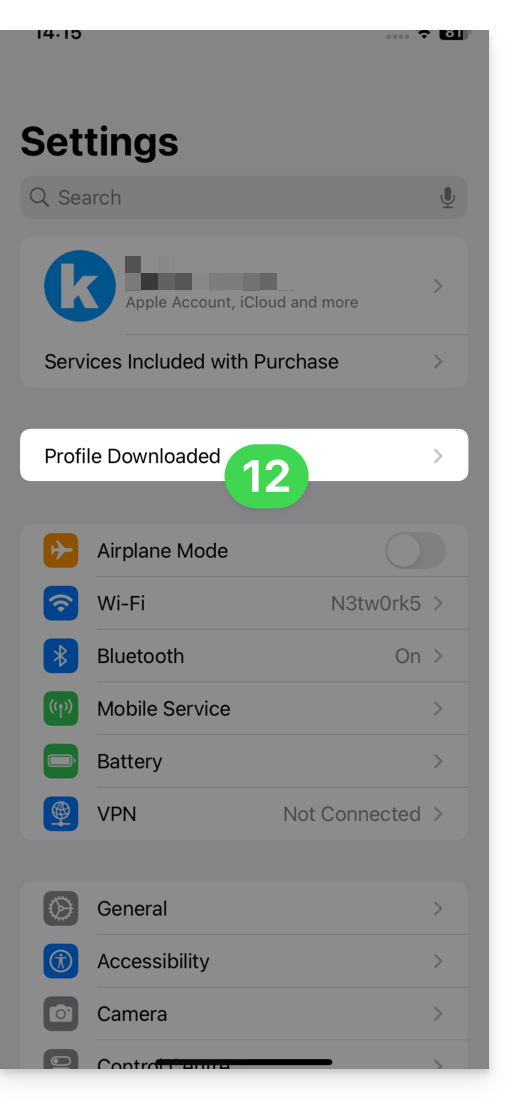
- Open the settings of your iOS device and tap on the banner at the top that informs you that a new profile has been downloaded:
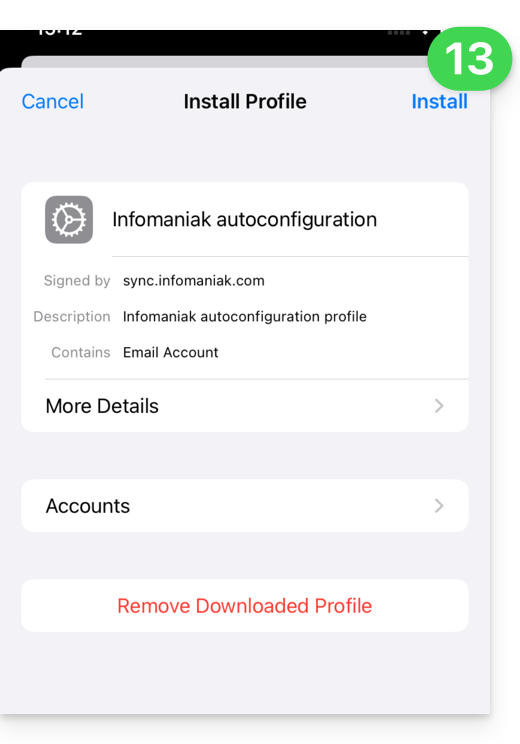
- Tap Install:
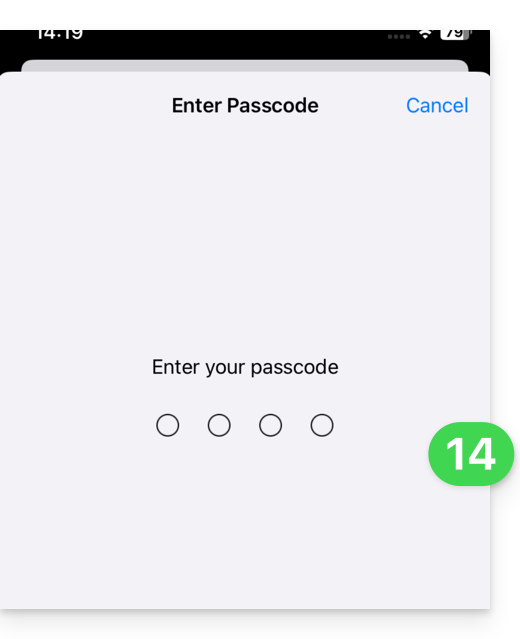
- Enter the code for your iOS device, as if you were unlocking it:
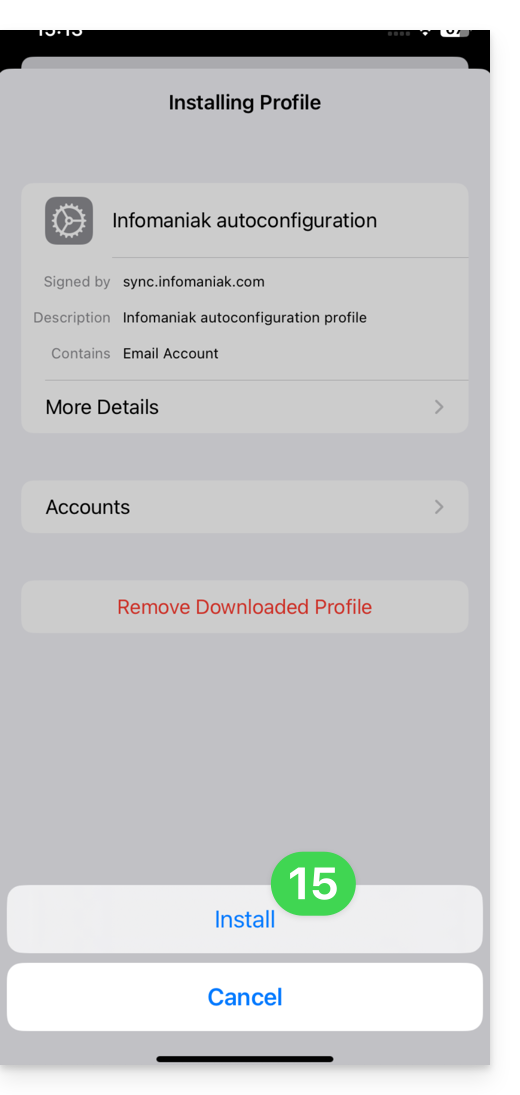
- Tap Install:
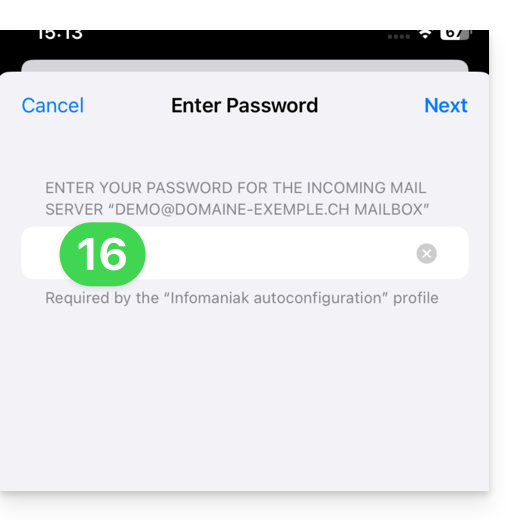
- Enter (or paste) the device password that you copied in step 8 above:
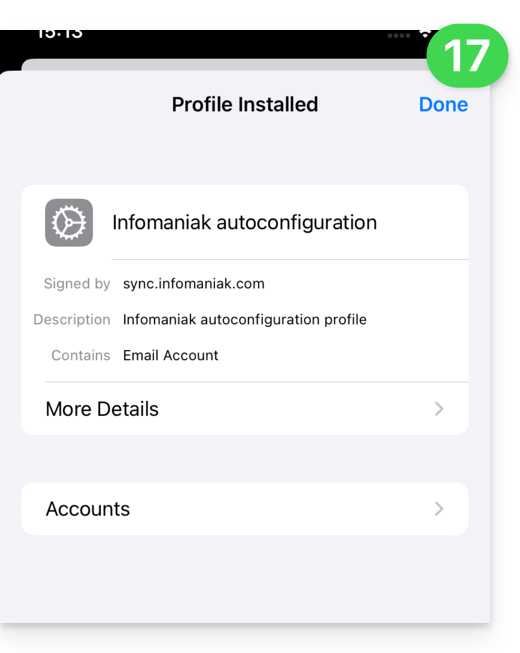
- When the message appears at the top, it's done:
If your Apple Mail iOS app was already open, you need to restart it. You will then see the information added by the synchronization: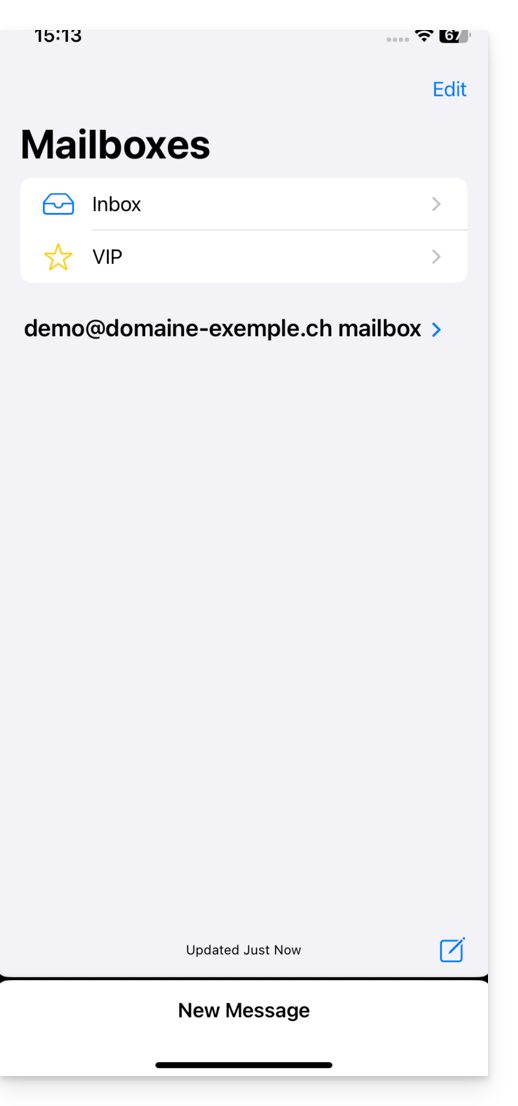
Remove an Apple profile
Refer to the official documentation, changing the version of your system at the top of the page * if necessary.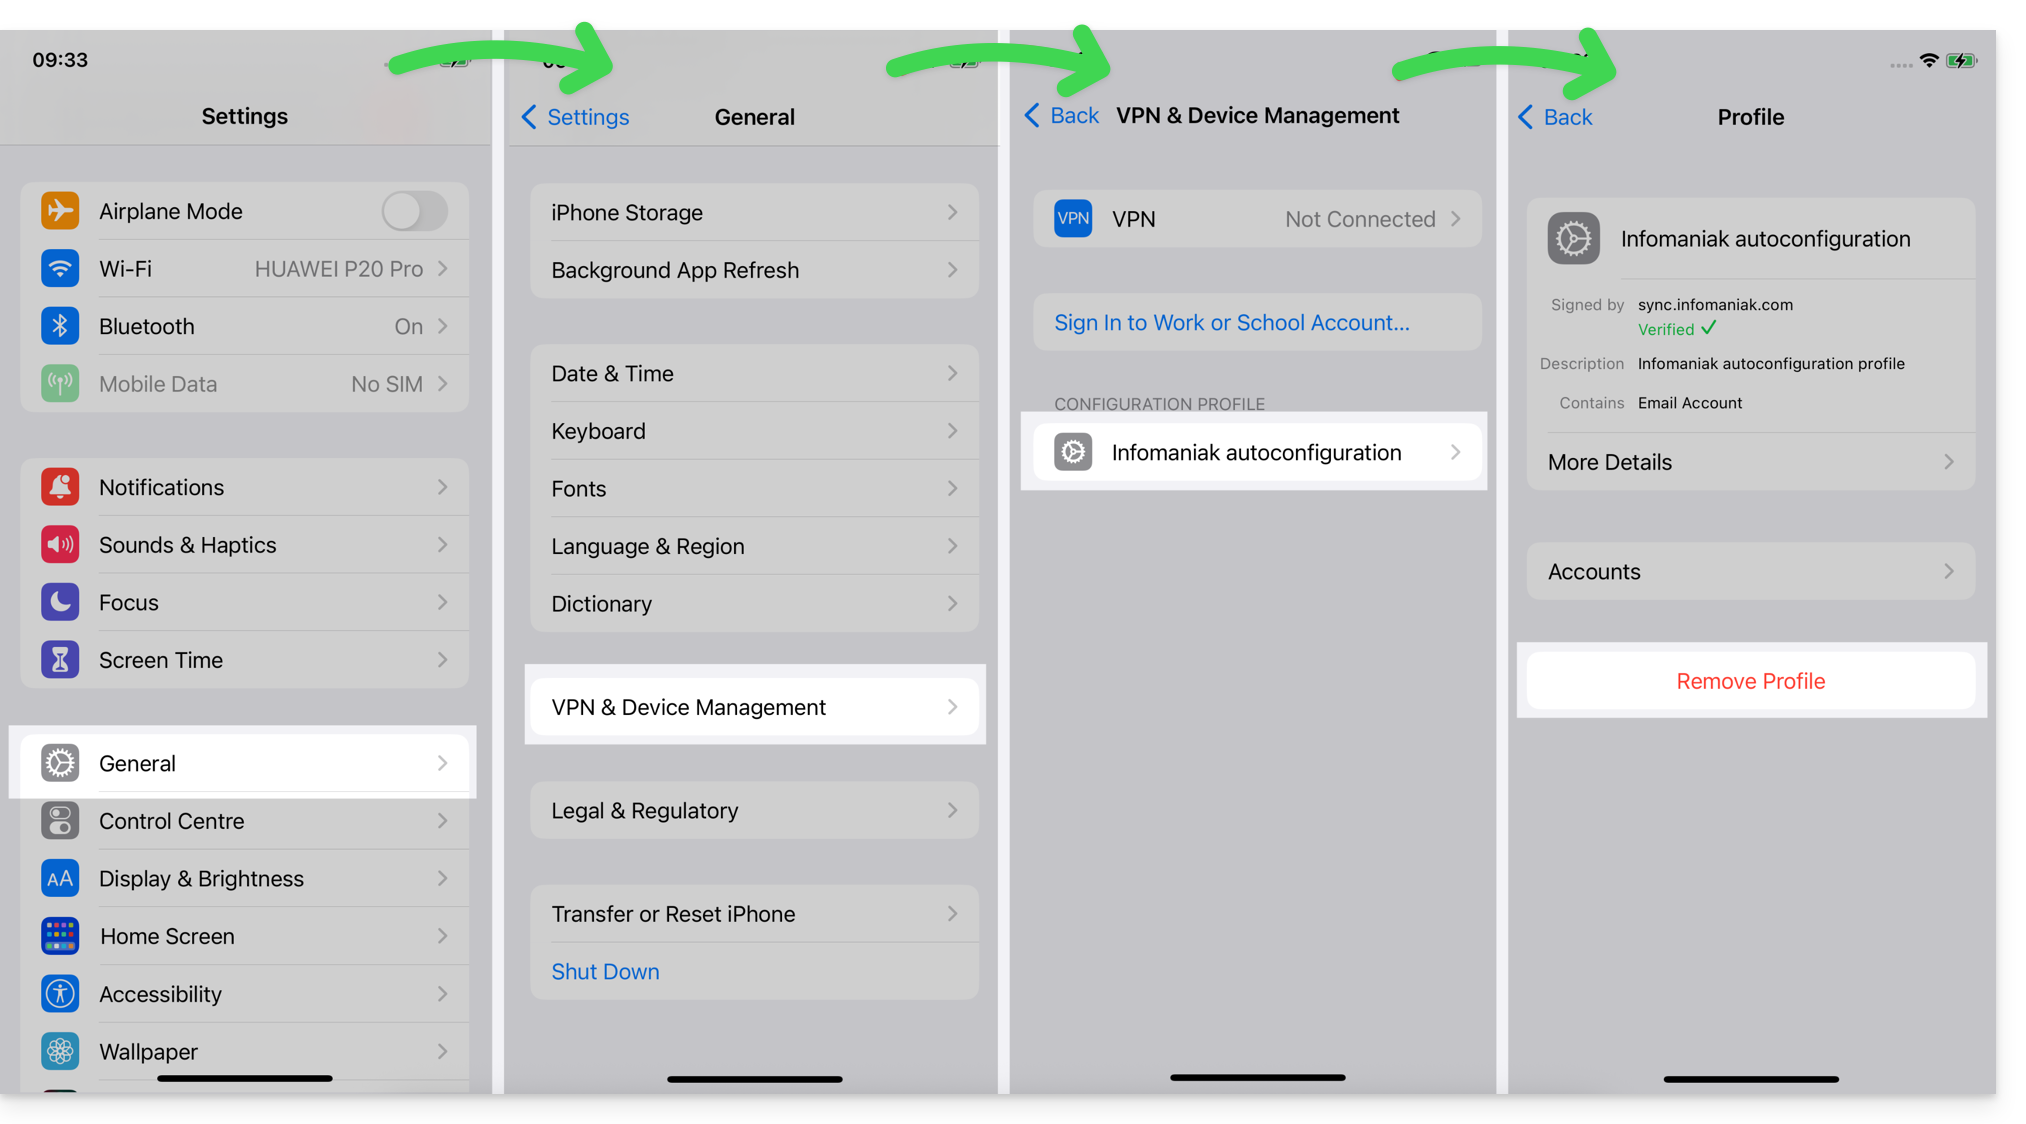
*Why is it necessary to choose the guide version that exactly matches your macOS/iOS system version? Apple introduces subtle changes with each new version of its system. For example, a path on iOS 15…
… becomes this on iOS 18…
Link to this FAQ: https://faq.infomaniak.com/1319
Has this FAQ been helpful?
This guide details the Statistics section, which is accessible online to administrators of a kDrive.
✘ UNAVAILABLE with
my kSuite (ik.me, etik.com, ikmail.com)
kSuite Free: statistics for the last 7 days only
Access kDrive statistics
To view the page that details the various statistics for your kDrive:
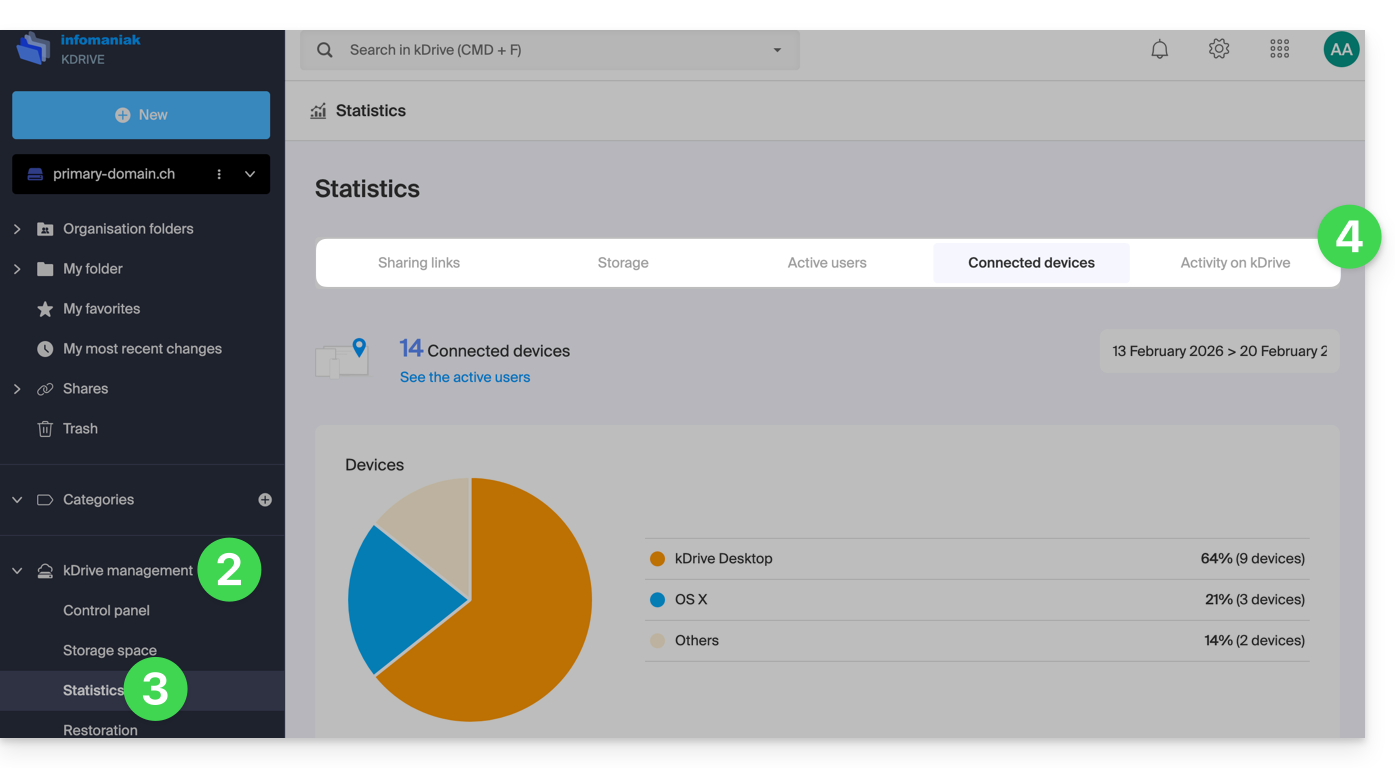
- Click here to access the Infomaniak kDrive web app (online service ksuite.infomaniak.com/kdrive).
- Click on kDrive Management in the left-hand menu.
- Click on Statistics.
- Choose the type of statistics to display:
Customize the display
Each screen of these statistics (Share links, kDrive activity, etc.) features icons and buttons: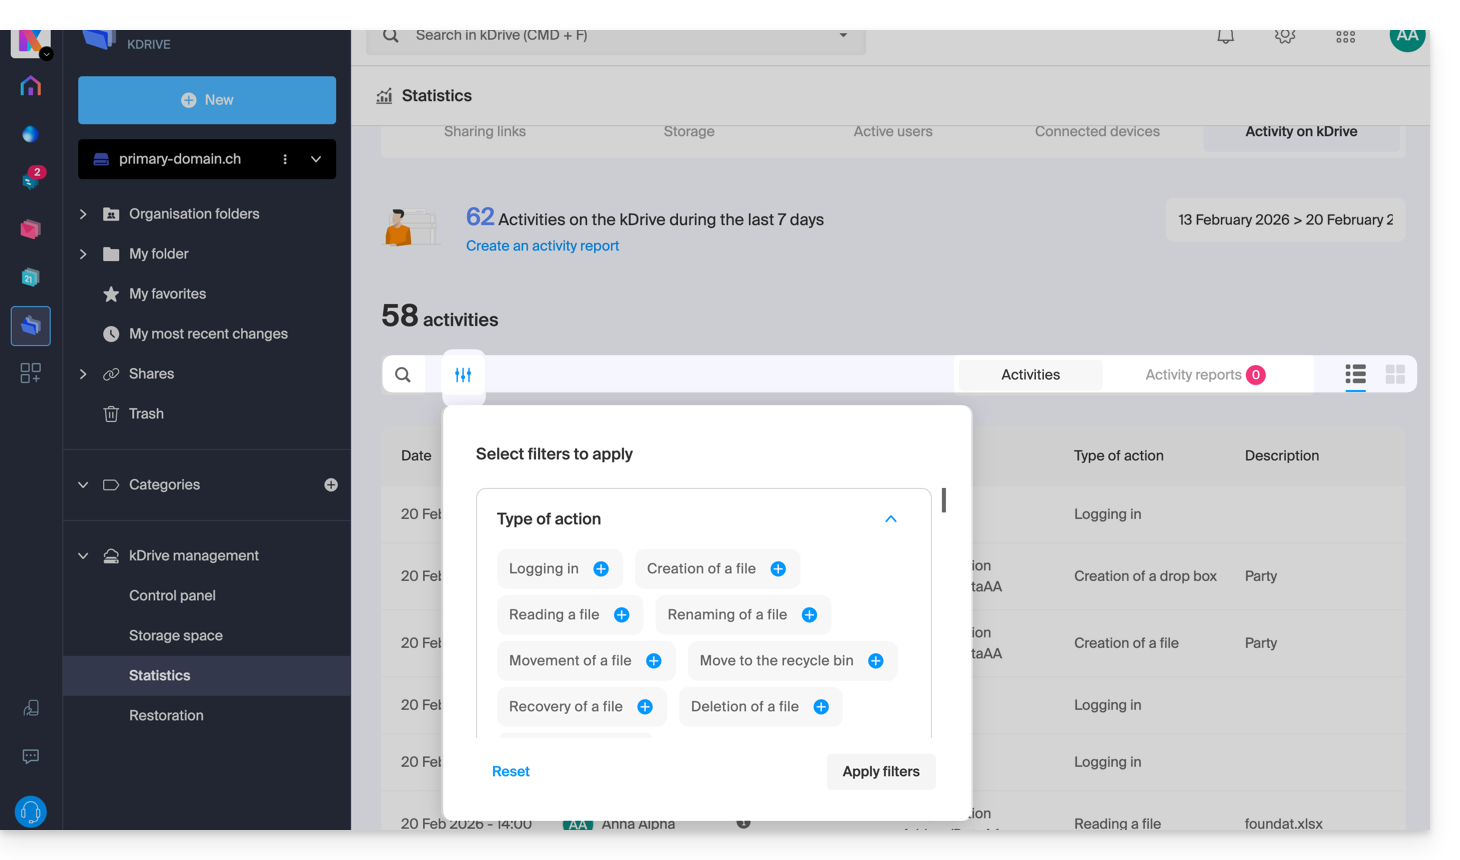
Clicking on it allows you to:
- perform a search for a term
- download a CSV file (
.csvformat) with the obtained data (see below) - filter items based on users, for example, or the number of views on the files, as well as the type of sharing (with or without a password and expiration date)
1. Share link stats
The creation of share links is listed in the left-hand menu of the kDrive web interface, but this statistics screen allows you to view the number of views for a file over a given period.
2. Storage statistics
This screen, which is updated every hour, allows you to view the space used by the various users, the total space, etc.
3. Active users
This screen shows the recently opened sessions (or sessions within the filtered period) by the users of your kDrive and their operating system.
4. Connected devices
This screen details the operating systems of the devices connected to your kDrive, with their representation in percentage: Windows X% (X devices); the same applies to macOS, Linux, Android, etc.
5. kDrive Activity
If you have any doubts about who did what on your shared space, whether it's updating a file, moving it to the trash, etc., this screen lets you know minute by minute what happened.
Create an activity report
With this information, you can create activity reports using the dedicated link at the top of the table. These reports can encompass one or more users and focus on one or more actions. You will receive the report by email within minutes and can download it in CSV format. Please note that the times mentioned may be in UTC 0 format.
Link to this FAQ: https://faq.infomaniak.com/2579
Has this FAQ been helpful?
This guide concerns messages that begin with / on kChat, which are interpreted as slash commands.
Executing a slash command on kChat
To access slash commands in kChat:
- Click in the text input field within a channel.
- Enter a
/(slash or forward slash) followed by the command. - Confirm to send the command.
If you type only the / symbol, a modal window will appear displaying the commands that can be executed, such as going offline, for example.
Here is a table of the main commands:
| command | description |
|---|---|
| /away | sets your status to "away" |
| /offline | sets your status to "offline" |
| /online | sets your status to "online" |
| /dnd | sets your status to "do not disturb" |
| /code | used to format text as code |
| /collapse | hides the element's content in the message |
| /expand | expands the content of the element in the message |
| /echo | repeats the text that follows the command |
| /header | displays a header in a message |
| /purpose | defines or displays the channel description |
| /rename | renames the current channel |
| /leave | leaves the current channel |
| /mute | mutes the current channel |
| /reminders | manages reminders |
| /search | search for messages and other content |
| /settings | opens the settings |
| /shortcuts | displays keyboard shortcuts |
Create a custom slash command
Prerequisites
- Do not be an external user (they will not see the Integrations menu).
To create a custom slash command:
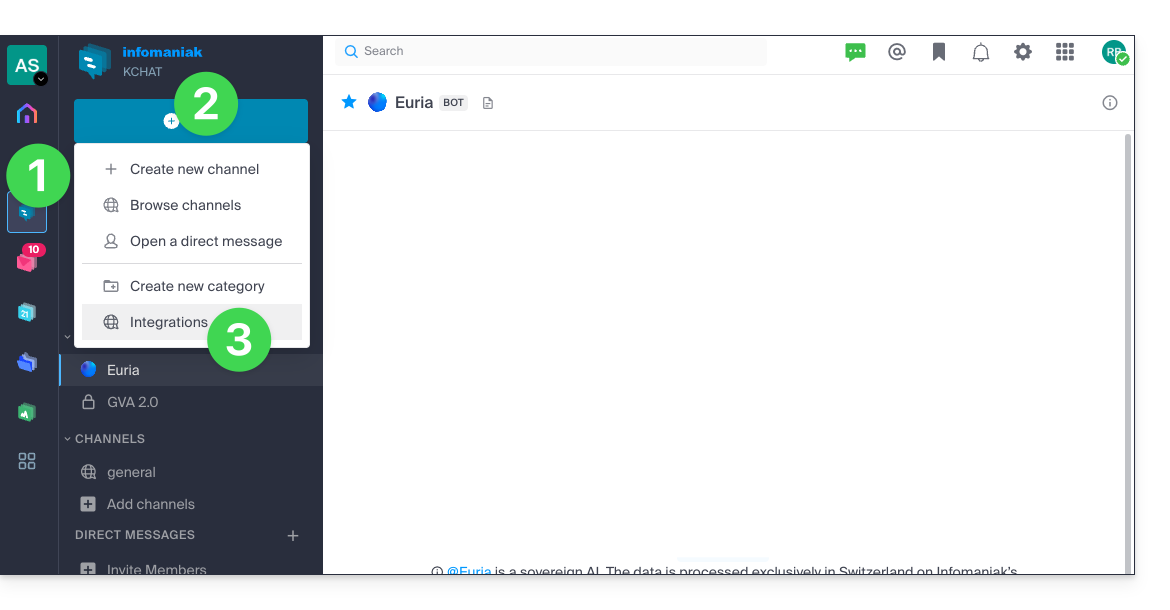
- Click here to access the Web kChat app (online service ksuite.infomaniak.com/kchat) or open the desktop kChat app (desktop application on macOS / Windows / Linux).
- Click on the New icon next to your kChat organization's name.
- Click on Integrations:
- Click on Slash commands:
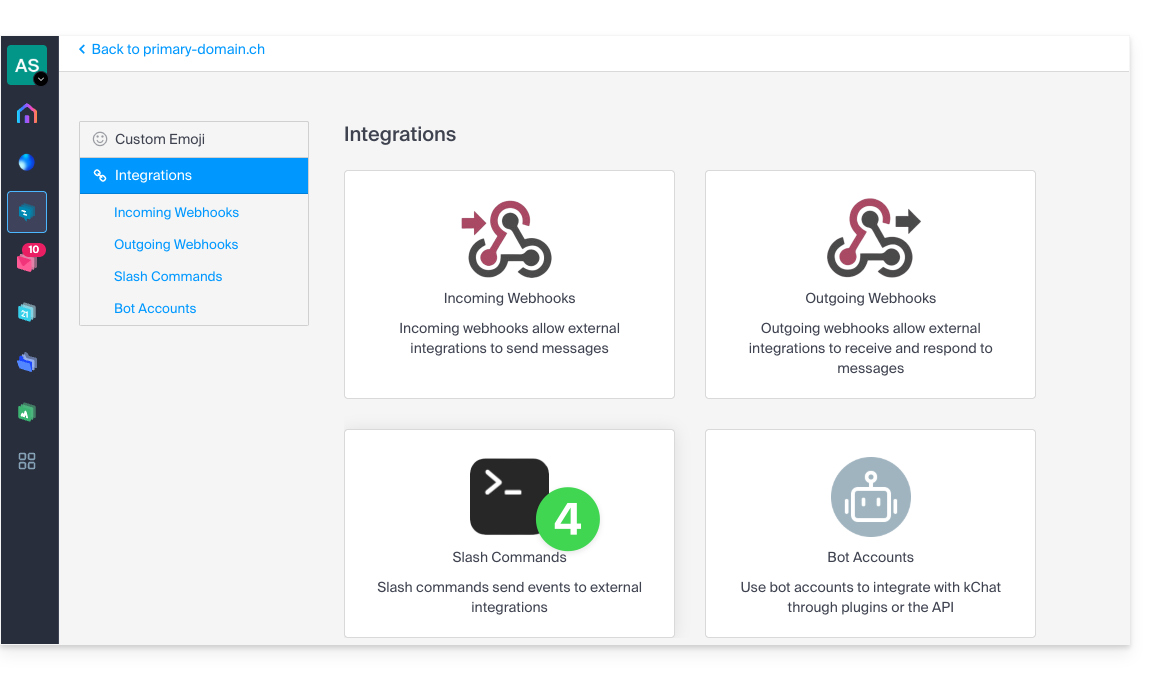
- Click on the blue button to Add a command:
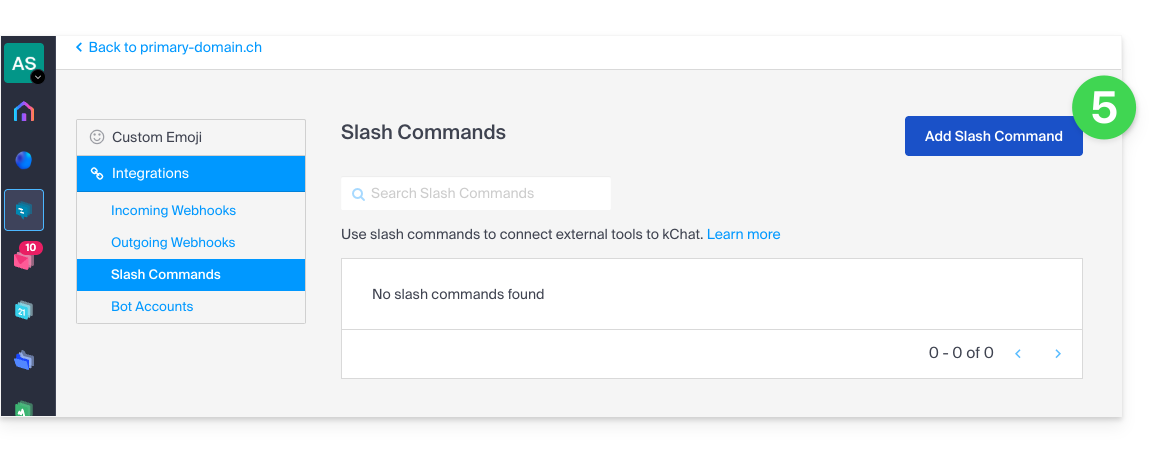
- Configure the slash command (name, trigger (without the
/), expected content type, action to be executed*, etc., including whether the command should be displayed in the help modal).- * This may include calling an external API, executing a script, displaying a specific response, etc. For this, you will generally need an external script or application that will respond to the commands. You can also define additional parameters for the command, such as drop-down options, check boxes, etc., depending on your needs.
- Save the command:
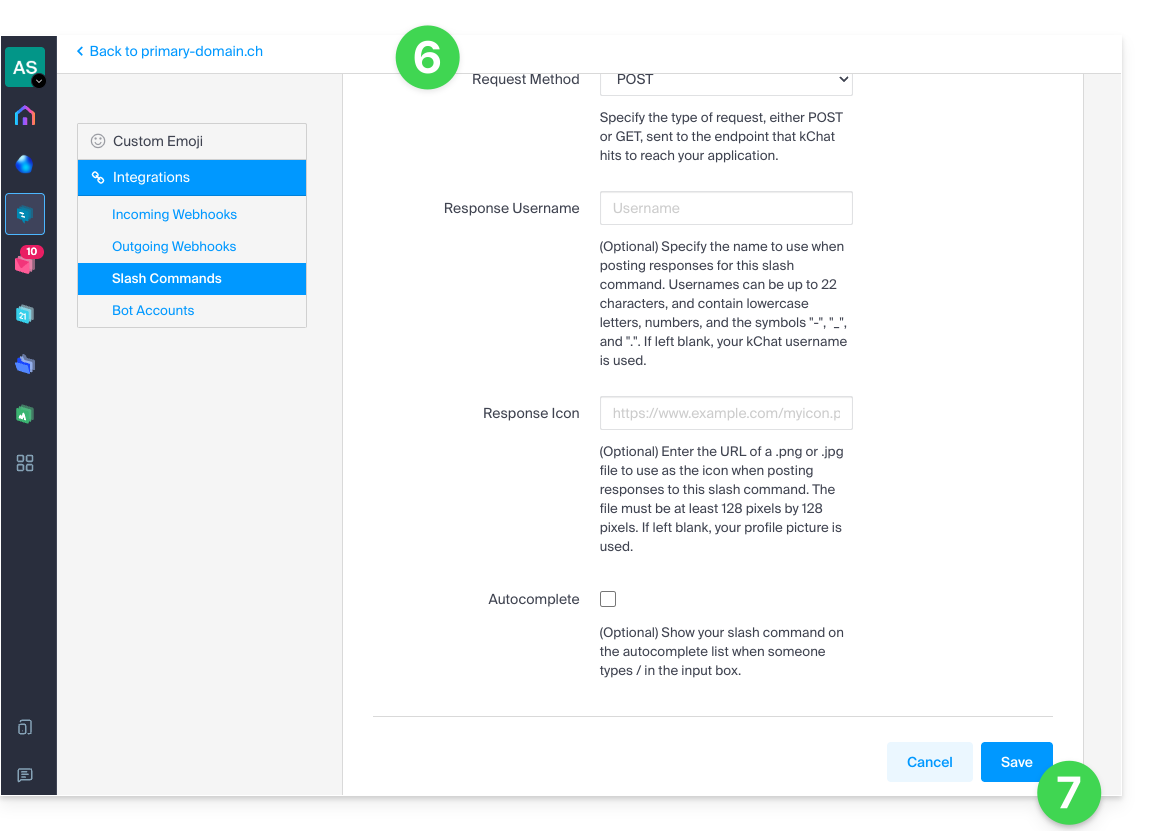
- Make sure to test the command to ensure it works as expected.
Keep in mind that creating custom slash commands may require additional programming skills, especially if you need to integrate custom features or interactions with external systems. Also, be sure to follow security best practices when creating these commands to avoid potential security vulnerabilities.
Link to this FAQ: https://faq.infomaniak.com/2134
Has this FAQ been helpful?
This guide explains how to manage the behavior of deleted files and the trash bin in kDrive.
Introduction
- When a file is deleted from one of the tools synchronized with kDrive, the kDrive web app (online service ksuite.infomaniak.com/kdrive) places the file in its recycle bin.
- If this kDrive recycle bin is emptied, it is impossible to recover its contents.
- If the operating system's recycle bin on the computer where kDrive is installed is emptied, this will not empty the recycle bin of the kDrive web app.
- The file remains in the kDrive recycle bin for at least 30 days, but some plans allow you to set a higher number for the file retention period in the kDrive recycle bin:
- Files remain in the kDrive trash for at least 30 days after deletion, but depending on the plan you have, the maximum retention period in the trash (in days) may be longer:
- kSuite Free = 30
- kSuite Standard = 60
- kSuite Business = 180
- kSuite Enterprise = 365
- my kSuite = 30
- my kSuite+ = 60
- kDrive Solo = 365
- kDrive Team = 365
- kDrive Pro = 365
Delete a file…
… on the kDrive web app
To delete a file and track its path to the recycle bin:
- Click here to access the kDrive web app (online service ksuite.infomaniak.com/kdrive).
- Select the file(s) in question.
- Click on the trash can icon in the top bar:
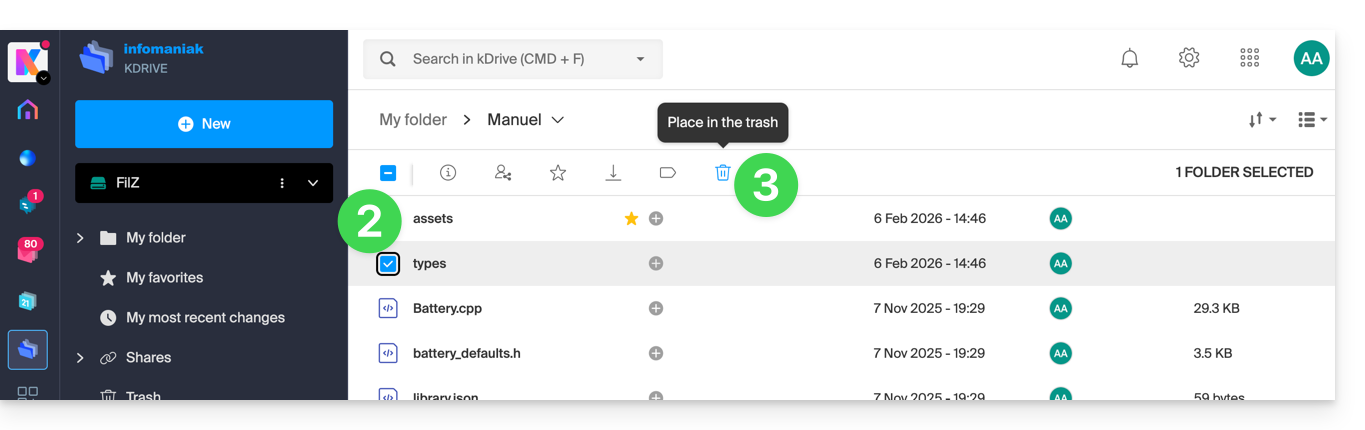
- Confirm the deletion:
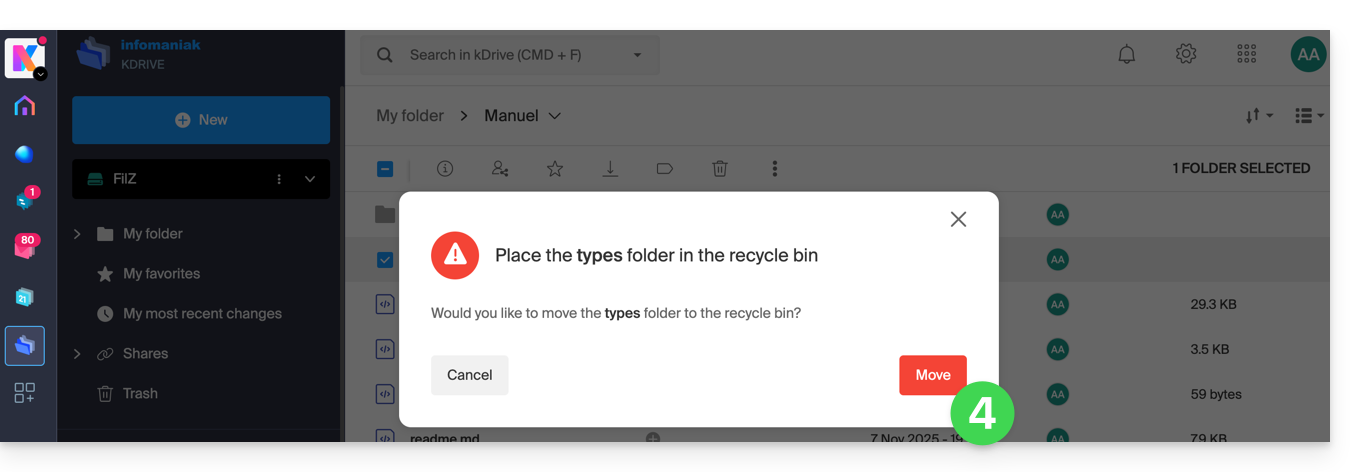
- A confirmation message appears at the bottom of the screen, allowing you to cancel the deletion if needed.
- Click on the Trash menu:
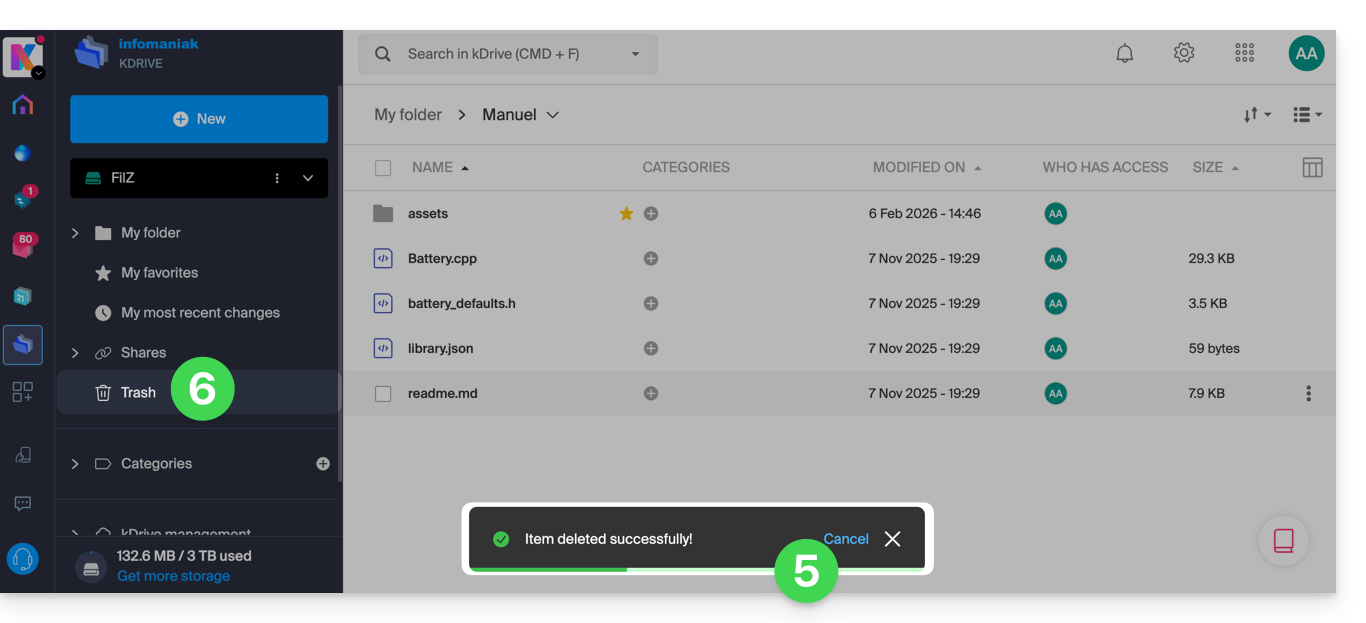
- Recently deleted items are displayed here:
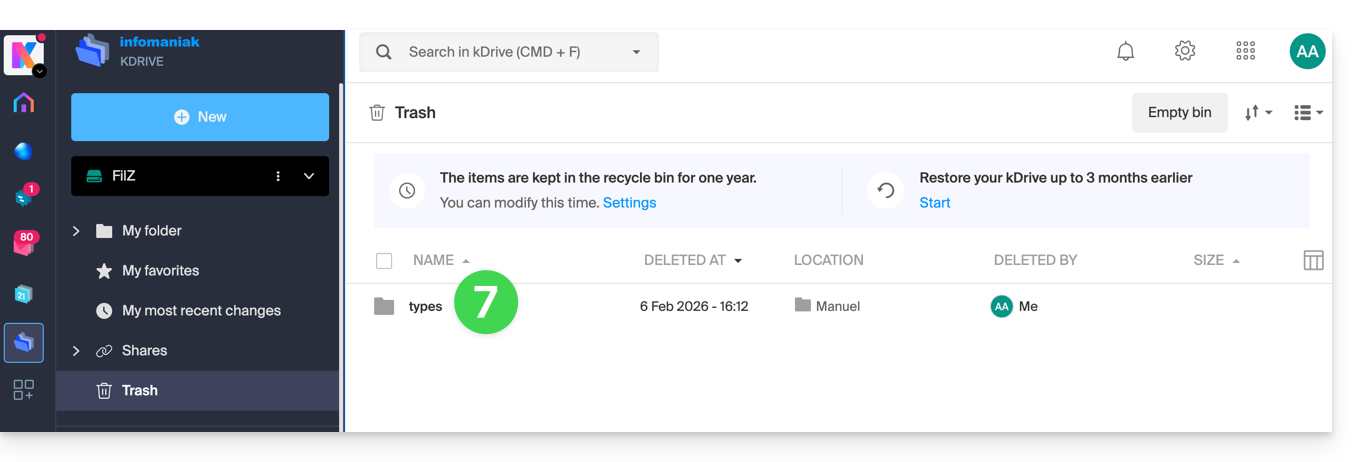
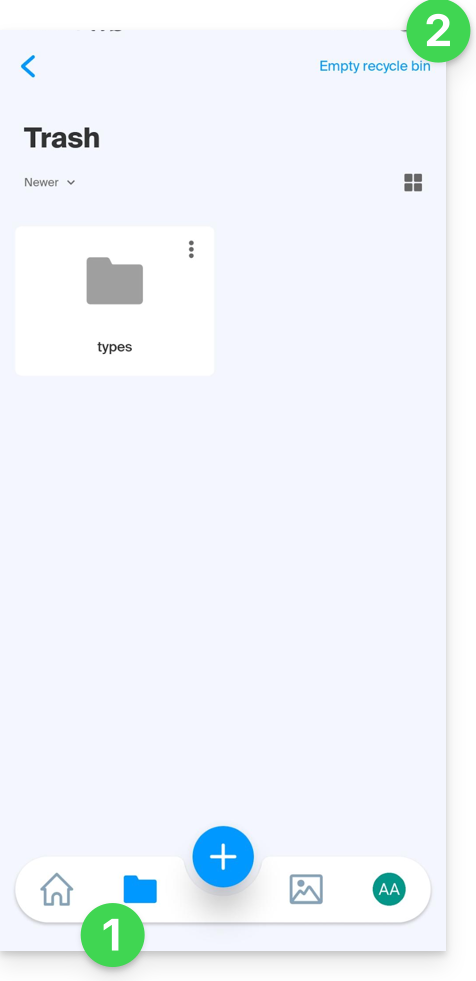
Deletion is synchronized with the various solutions connected to the same kDrive, for example the kDrive mobile app (application for iOS/Android smartphones or tablets):
- The Trash menu is located under the Folders icon at the bottom.
- You can empty the trash from this page, but please read the information below in this guide:
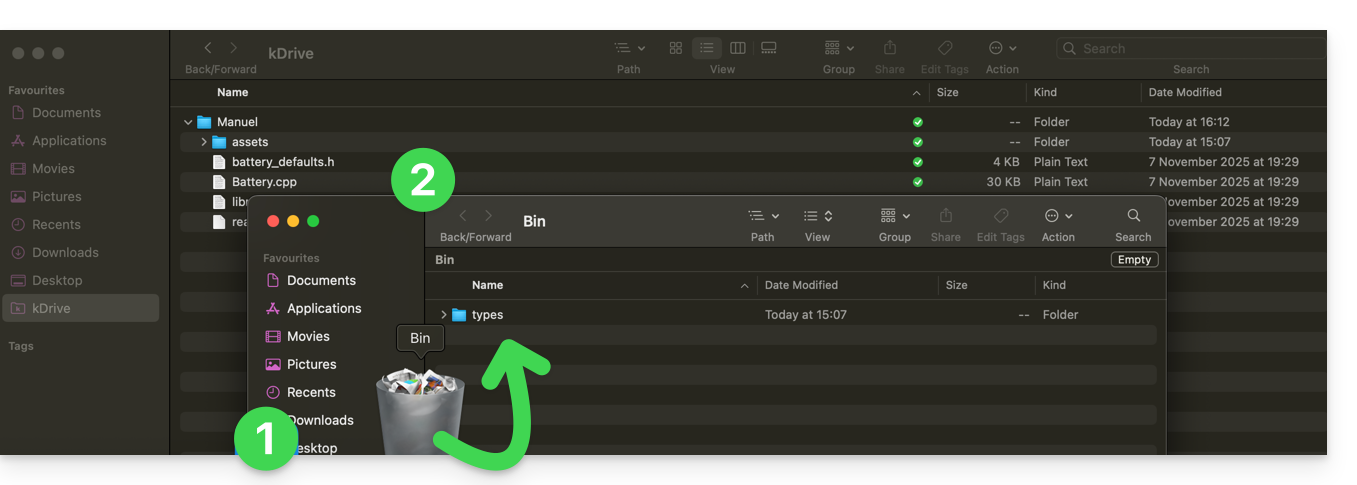
Deletion is also synchronized (if this option is not disabled – see below in this guide) with the desktop app kDrive (desktop application for macOS / Windows / Linux), which will instruct the computer to send any data deleted from the web app to the computer's recycle bin (and vice versa):
- Open the computer's recycle bin.
- Deleted data is in the trash, and no longer in the main kDrive file structure:
Empty the trash manually…
… on the kDrive web app
To empty the kDrive trash manually (not recommended as it is better to wait for the scheduled deletion):
- Click here to access the kDrive web app (online service ksuite.infomaniak.com/kdrive).
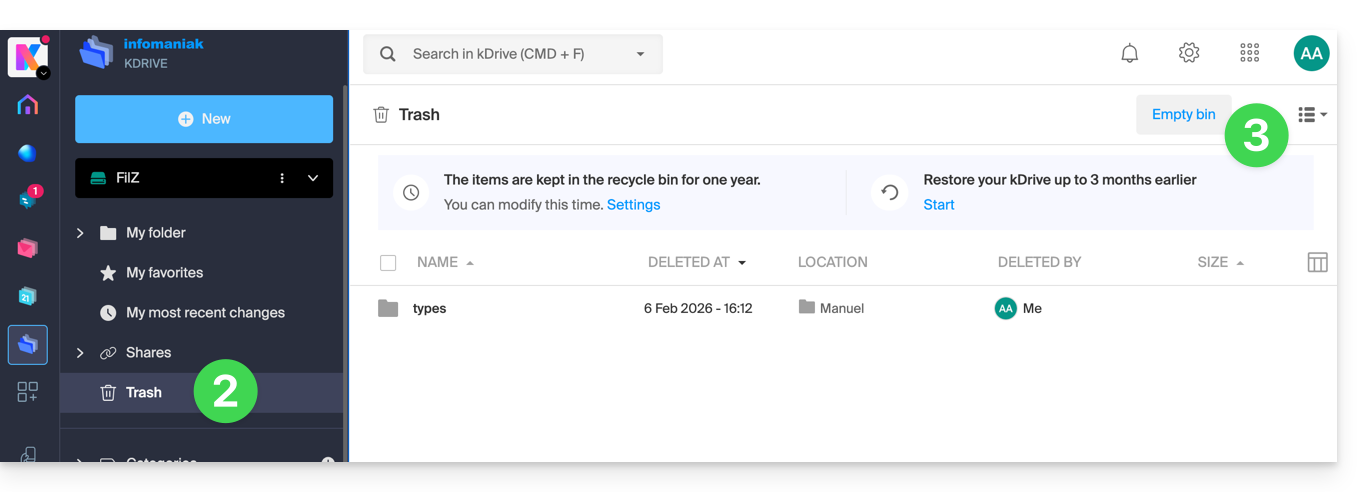
- Click on the Trash menu in the left-hand menu.
- Click on Empty Trash:
- Confirm the operation:
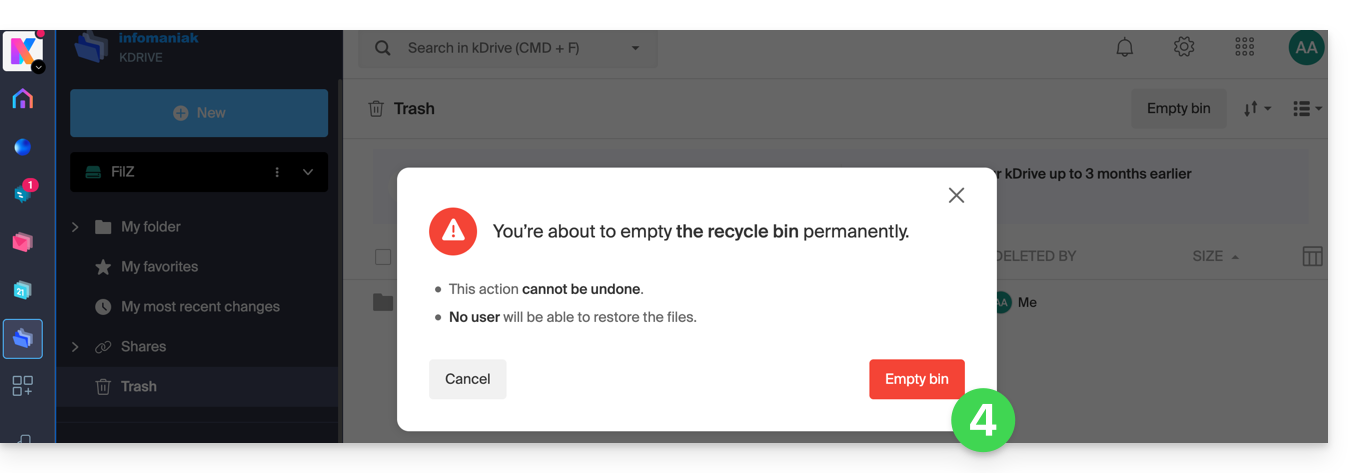
- Data is permanently deleted, only on the kDrive web app; files remain in the computer's recycle bin.
… on the synchronized computer
- If the computer's recycle bin is emptied (Empty button in the example below)…
- and the deletion is confirmed…
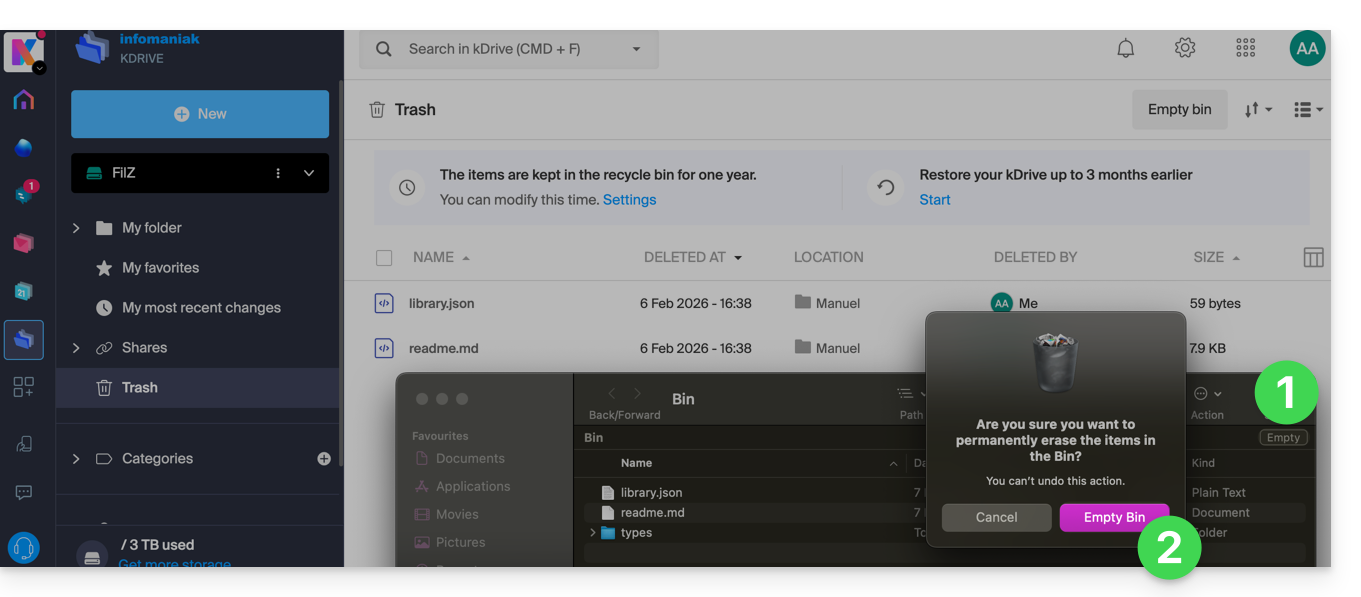
- … the web app's kDrive trash is not affected, and deleted files will still be found there, as long as this kDrive trash is not emptied, either manually or automatically after a certain period.
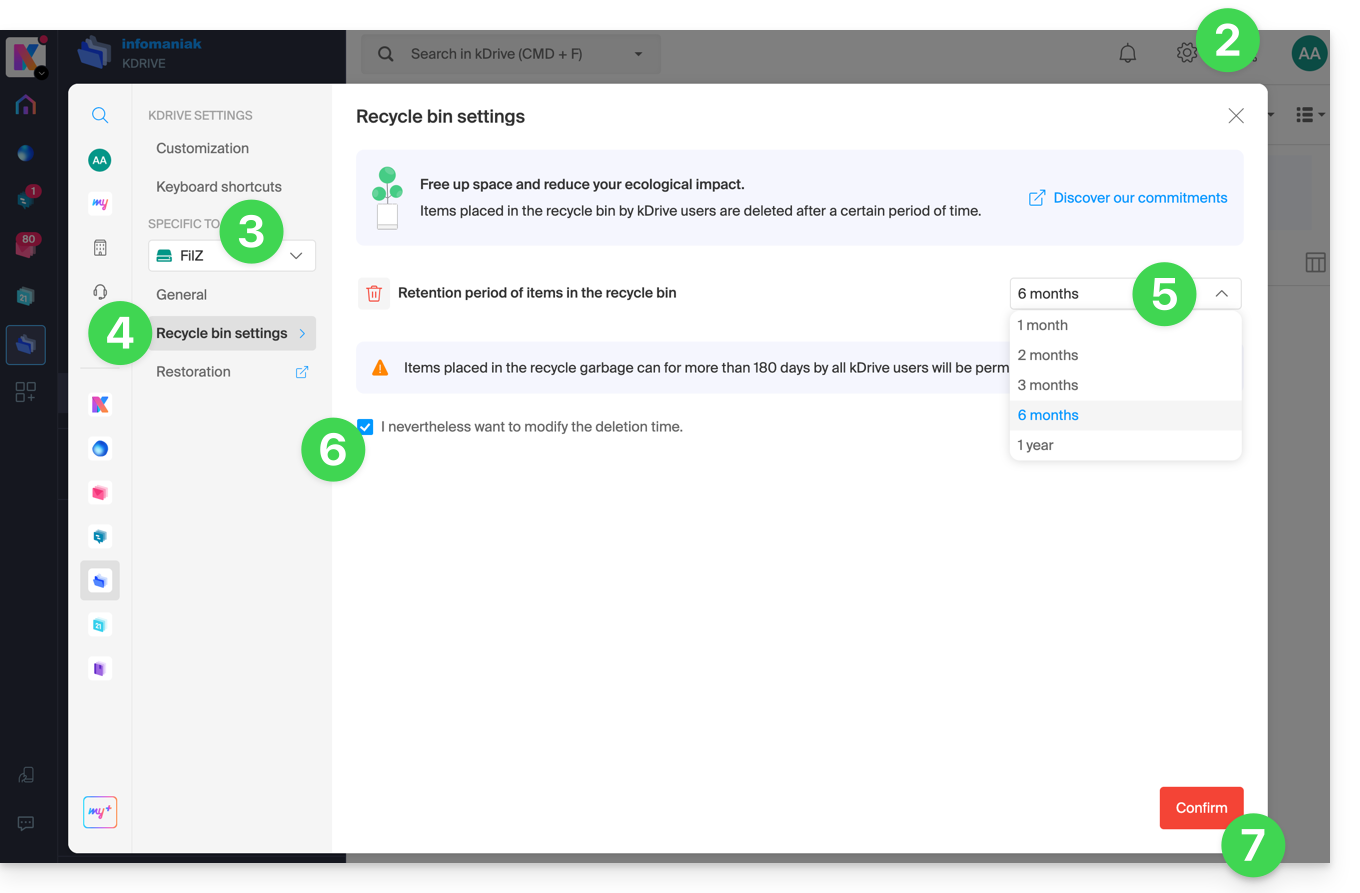
Manage the kDrive trash retention period
To access the files in the trash:
- Click here to access the kDrive web app (online service ksuite.infomaniak.com/kdrive).
- Click on Settings in the top right corner.
- Check or select the relevant kDrive from the drop-down menu in the left-hand menu.
- Click on Trash settings.
- Choose the desired duration from the drop-down menu (between 1 month and 1 year, depending on your plan – see at the top of this guide).
- Review the information regarding the possible permanent deletion of files moved to the trash before the new deadline you wish to apply, and confirm your choice.
- Click the button to Confirm:
Disable the delete order on the desktop app
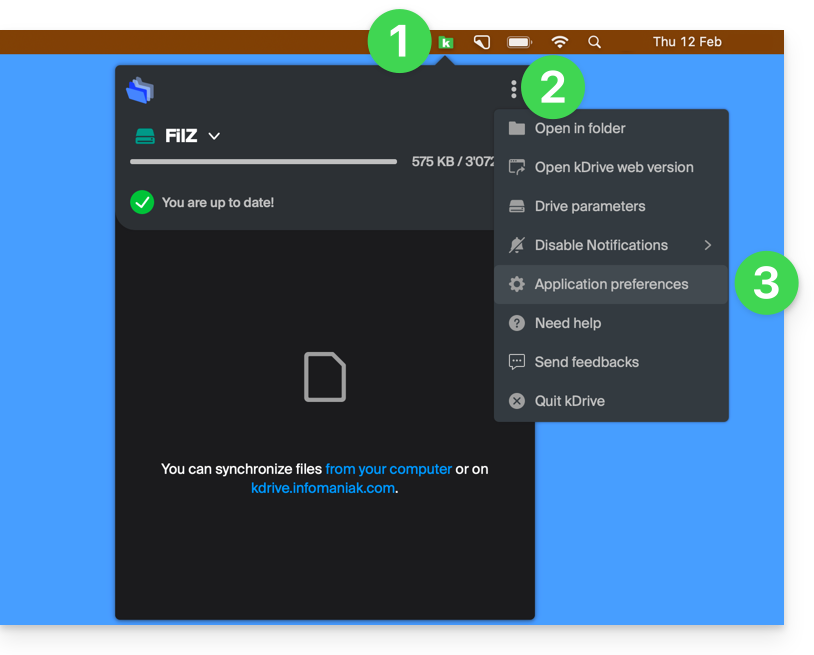
To choose whether deleting a file on the web app or the mobile app should move the file synchronized with the desktop app to the computer's recycle bin:
- Left-click on the desktop app icon in the notification area of your computer (top right on macOS, bottom right on Windows, and double-left-click in the taskbar on Linux).
- Click on the action menu ⋮ on the right of the window that appears.
- Click on Application Preferences:
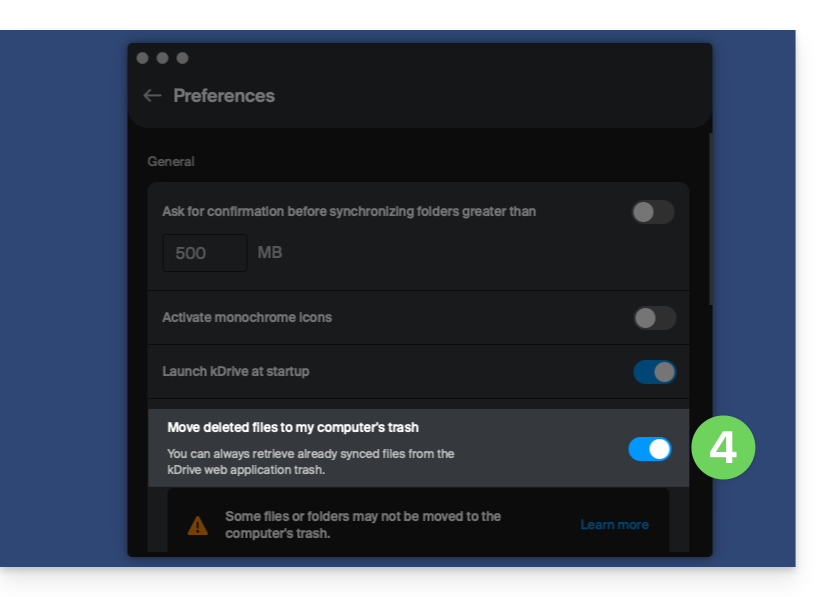
- Activate or deactivate the toggle switch to decide whether or not to send the synchronized version to the computer's trash/recycle bin:
Troubleshooting issues with moving files to the trash on your computer
In rare cases, even if you have configured the setting to move files to the trash (point 4 above), the desktop app may permanently delete the file from your computer:
- … the web app (online service ksuite.infomaniak.com/kdrive)…
- … the mobile app (application for iOS/Android smartphones or tablets)…
- … another synchronized computer…
instead of placing it in the trash, because:
- Insufficient space: the trash/recycle bin has reached its maximum configured size.
- No trash/recycle bin: on some file systems, such as network drives or removable drives (e.g., USB drives), there may be no trash/recycle bin.
This list is not exhaustive, but it covers the majority of cases that will not be reported to the user. Other issues, such as those related to the use of read-only mounted disks, will be taken into account and reported to the user.
If in doubt, also make sure that your computer does not instantly delete items that are too large when they are placed in the recycle bin, due to the size of the Windows recycle bin, for example:
Restore a file from the trash…
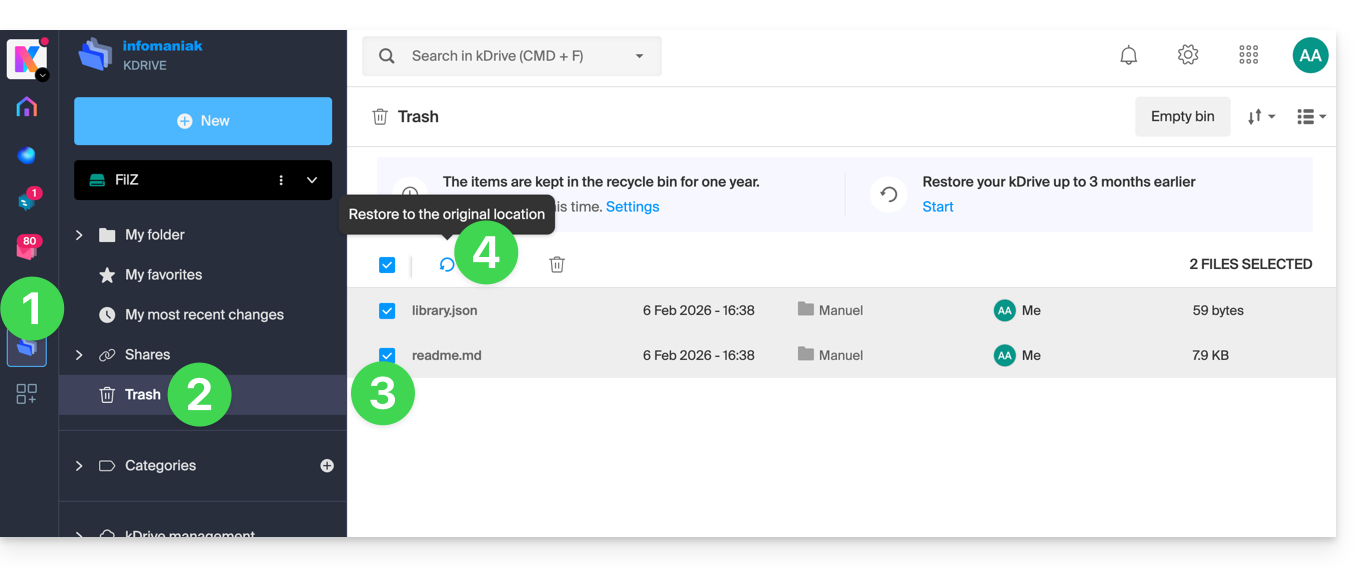
To restore a file to its original location before the trash has been emptied in the kDrive web app:
- Click here to access the kDrive web app (online service ksuite.infomaniak.com/kdrive).
- Click on Trash in the left-hand menu.
- Select the items to restore.
- Click on Restore:
To revert an entire kDrive to its state before any file movements or reorganizations, please refer to this other guide.
To restore a previous version of an existing file, please refer to this other guide.
Link to this FAQ: https://faq.infomaniak.com/2383
Has this FAQ been helpful?
This guide details how to manage the Organization Directory, which is a special address book available within the Infomaniak Contacts web app (online service ksuite.infomaniak.com/contacts).
Introduction
- The Organization directory is automatically populated with the users that make up each Organization to which your user is linked; it is synchronized with all internal users of these Organizations.
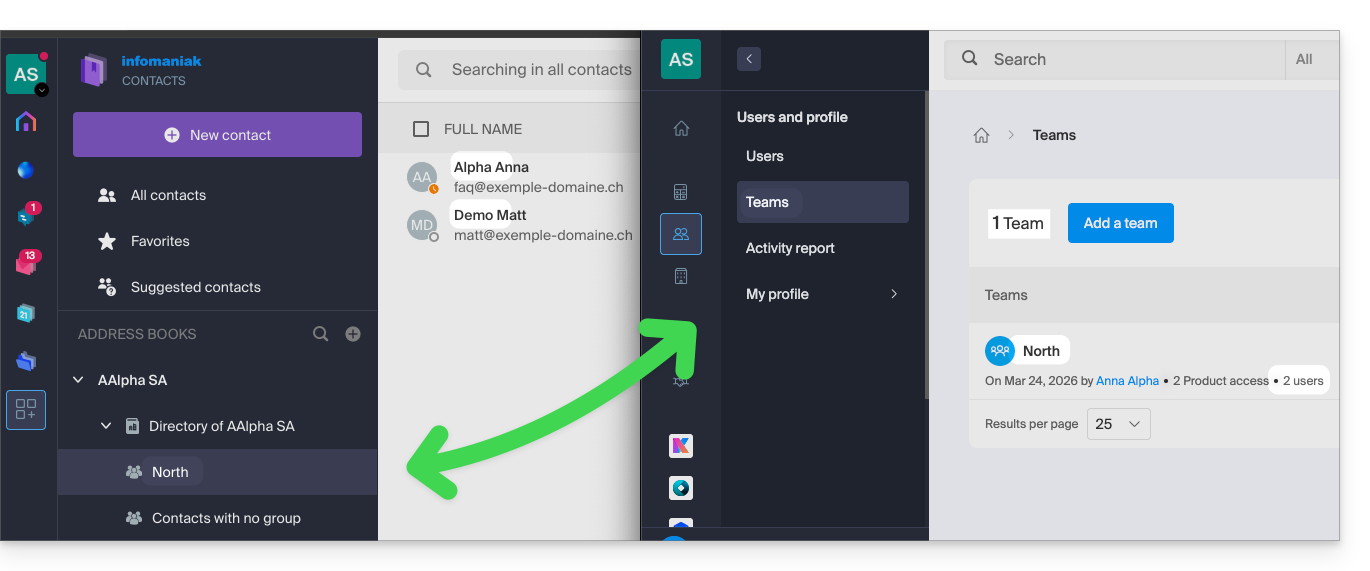
- If Groups (❓: help) are created within the Organization, they will be visible in the Organization's directory:
- It cannot be exported (❓: help) or renamed.
Access the Organization Directory
If your login ID corresponds to one or more Organizations, you can access the different directories of these Organizations:
- Click here to access the contacts in your kSuite Infomaniak (❓: help).
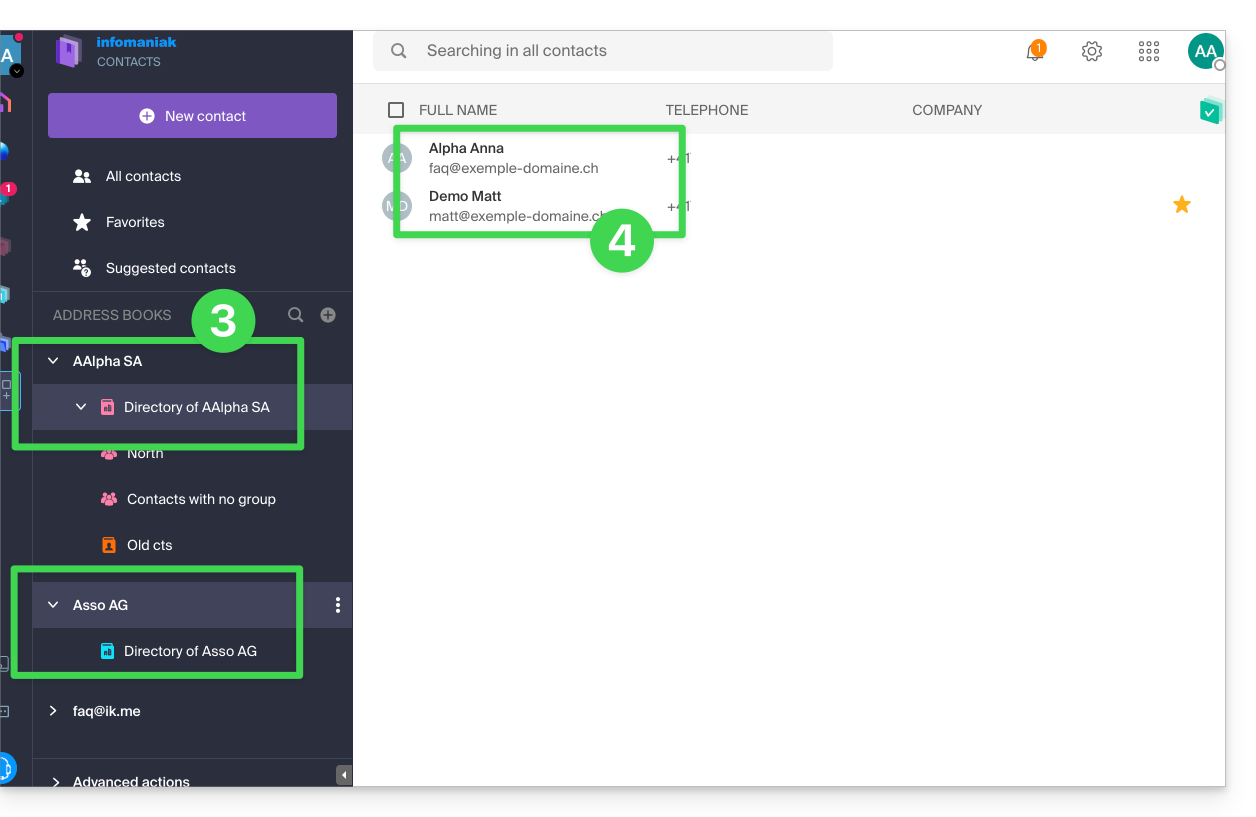
- Click on the chevron to the left of the name of the Organization in question.
- Click on {Organization name} Directory…
- The contacts of the selected Organization are displayed on the right:
Modify the contact details of a contact in the directory
You can do many things (copy, export the contact information, view the email exchanges or the events in the calendar, add to favorites, call, etc.) by clicking on a contact in the Organization Directory address book.However, you will not be able to modify the contact details on behalf of the person.: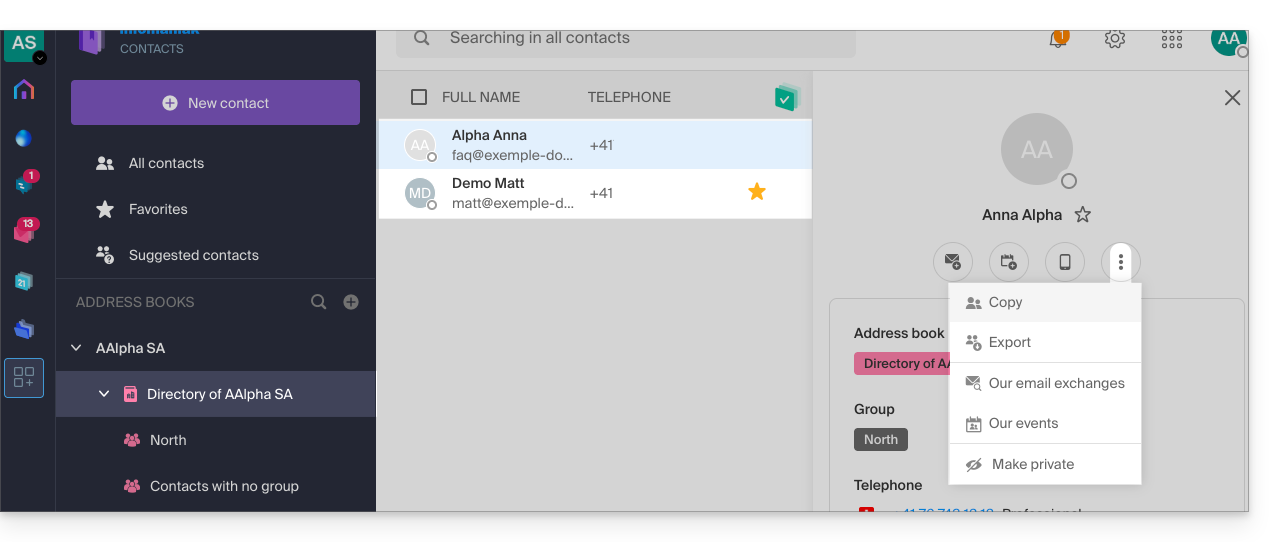
To modify the main information, the person concerned (the person for whom a change needs to be made) must log in to his/her profile and modify it (see below):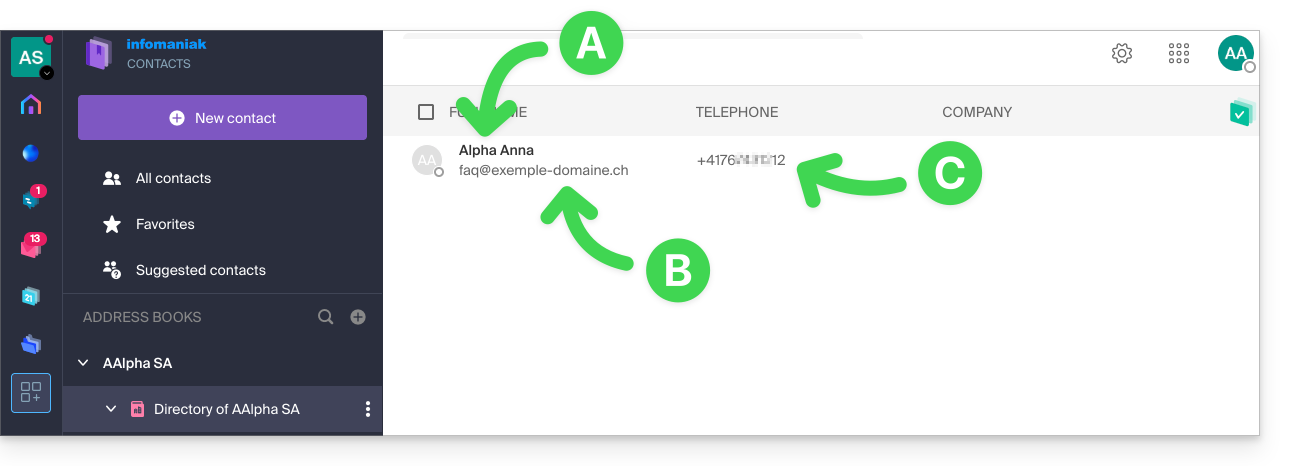
A. First name & Last name
To change the first name and last name displayed in one of the Organization notebooks, the user in question (here faq@exemple-domaine.ch) must log in to their account and modify their contact details (❓: help).
B. Email address
To change the email address displayed in an organization's directory, the user in question must log in to their account and modify their contact details (❓: help).
C. Phone number
To change the phone number displayed in an organization's directory, the user in question must log in to their account and modify their contact details (❓: help).
Hide certain information
Prerequisites
- You must be at least an Administrator of the Organization (❓: help).
To increase the privacy of contacts, you can:
- make a contact private in any address book (not just the directory) to hide it from users with fewer permissions:
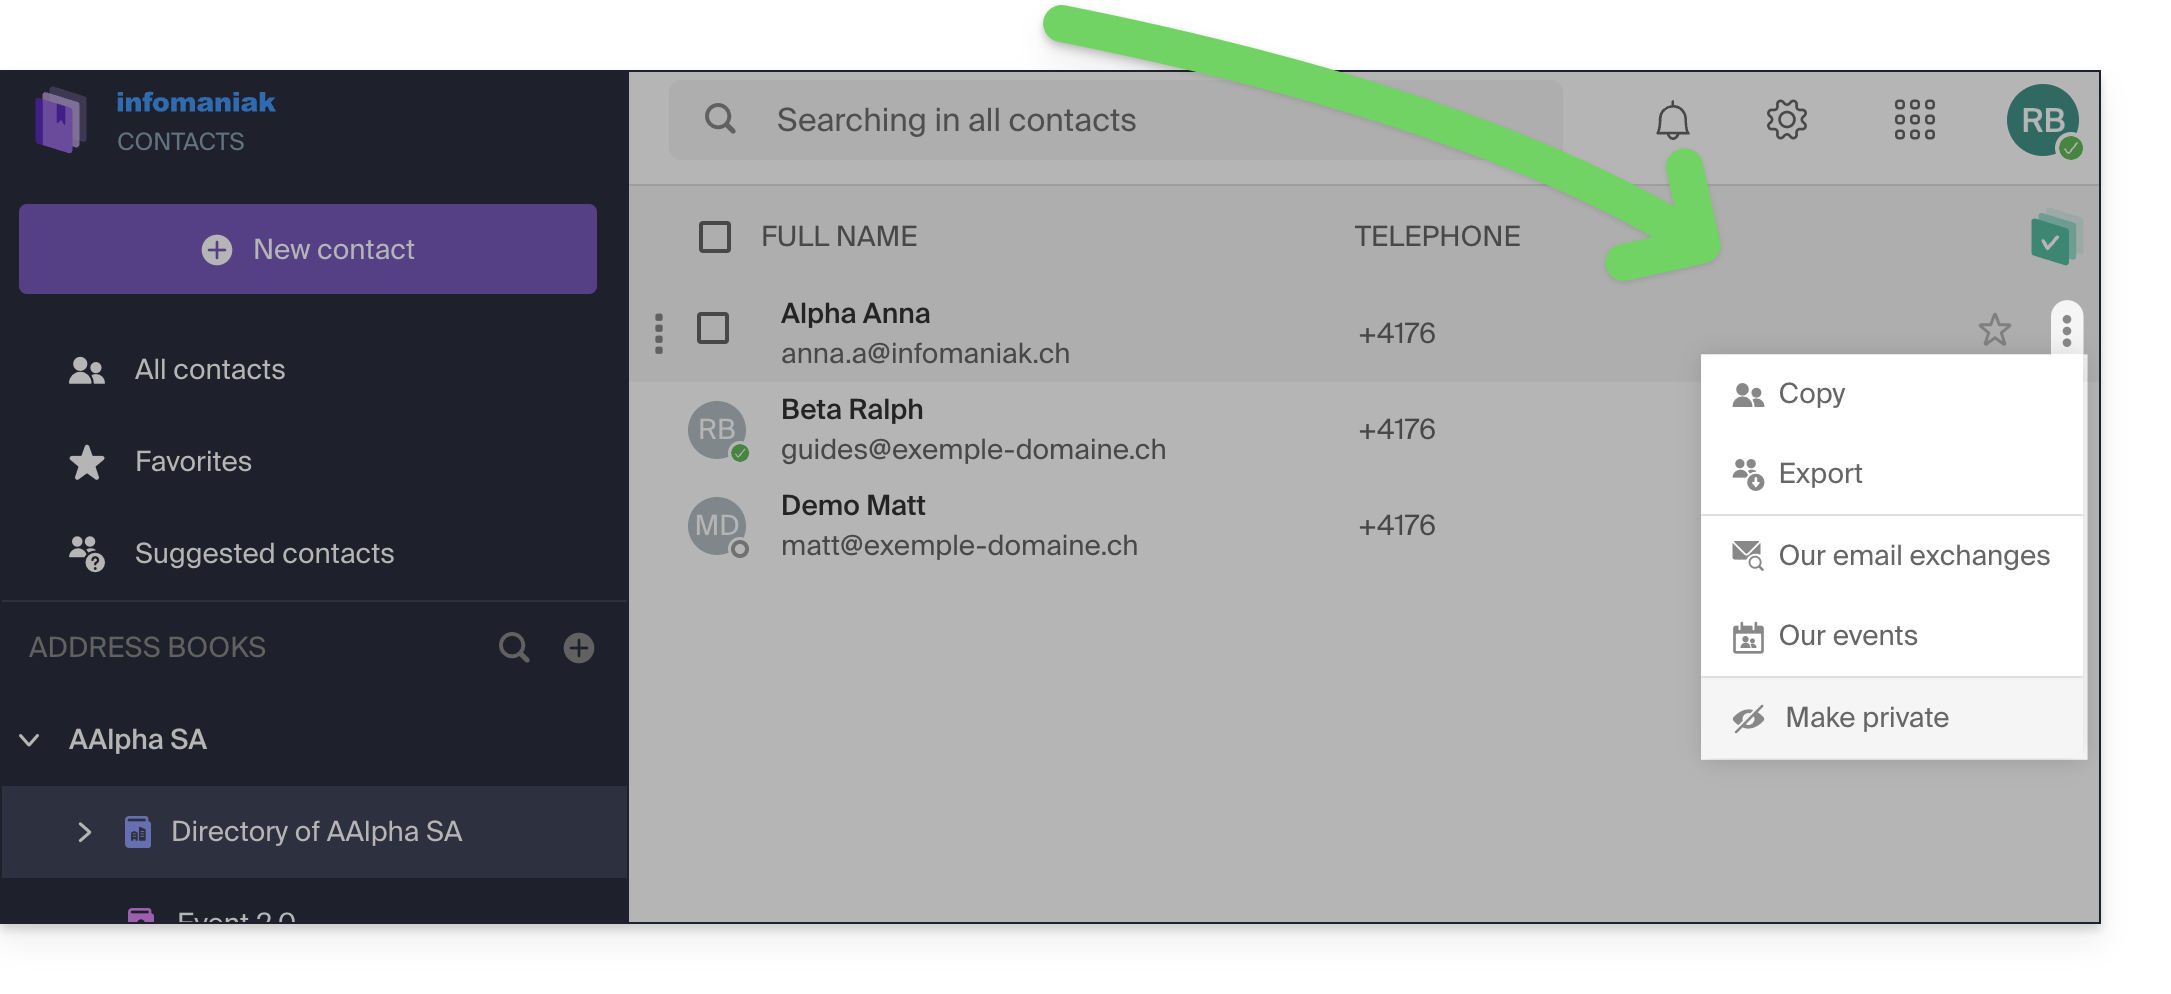
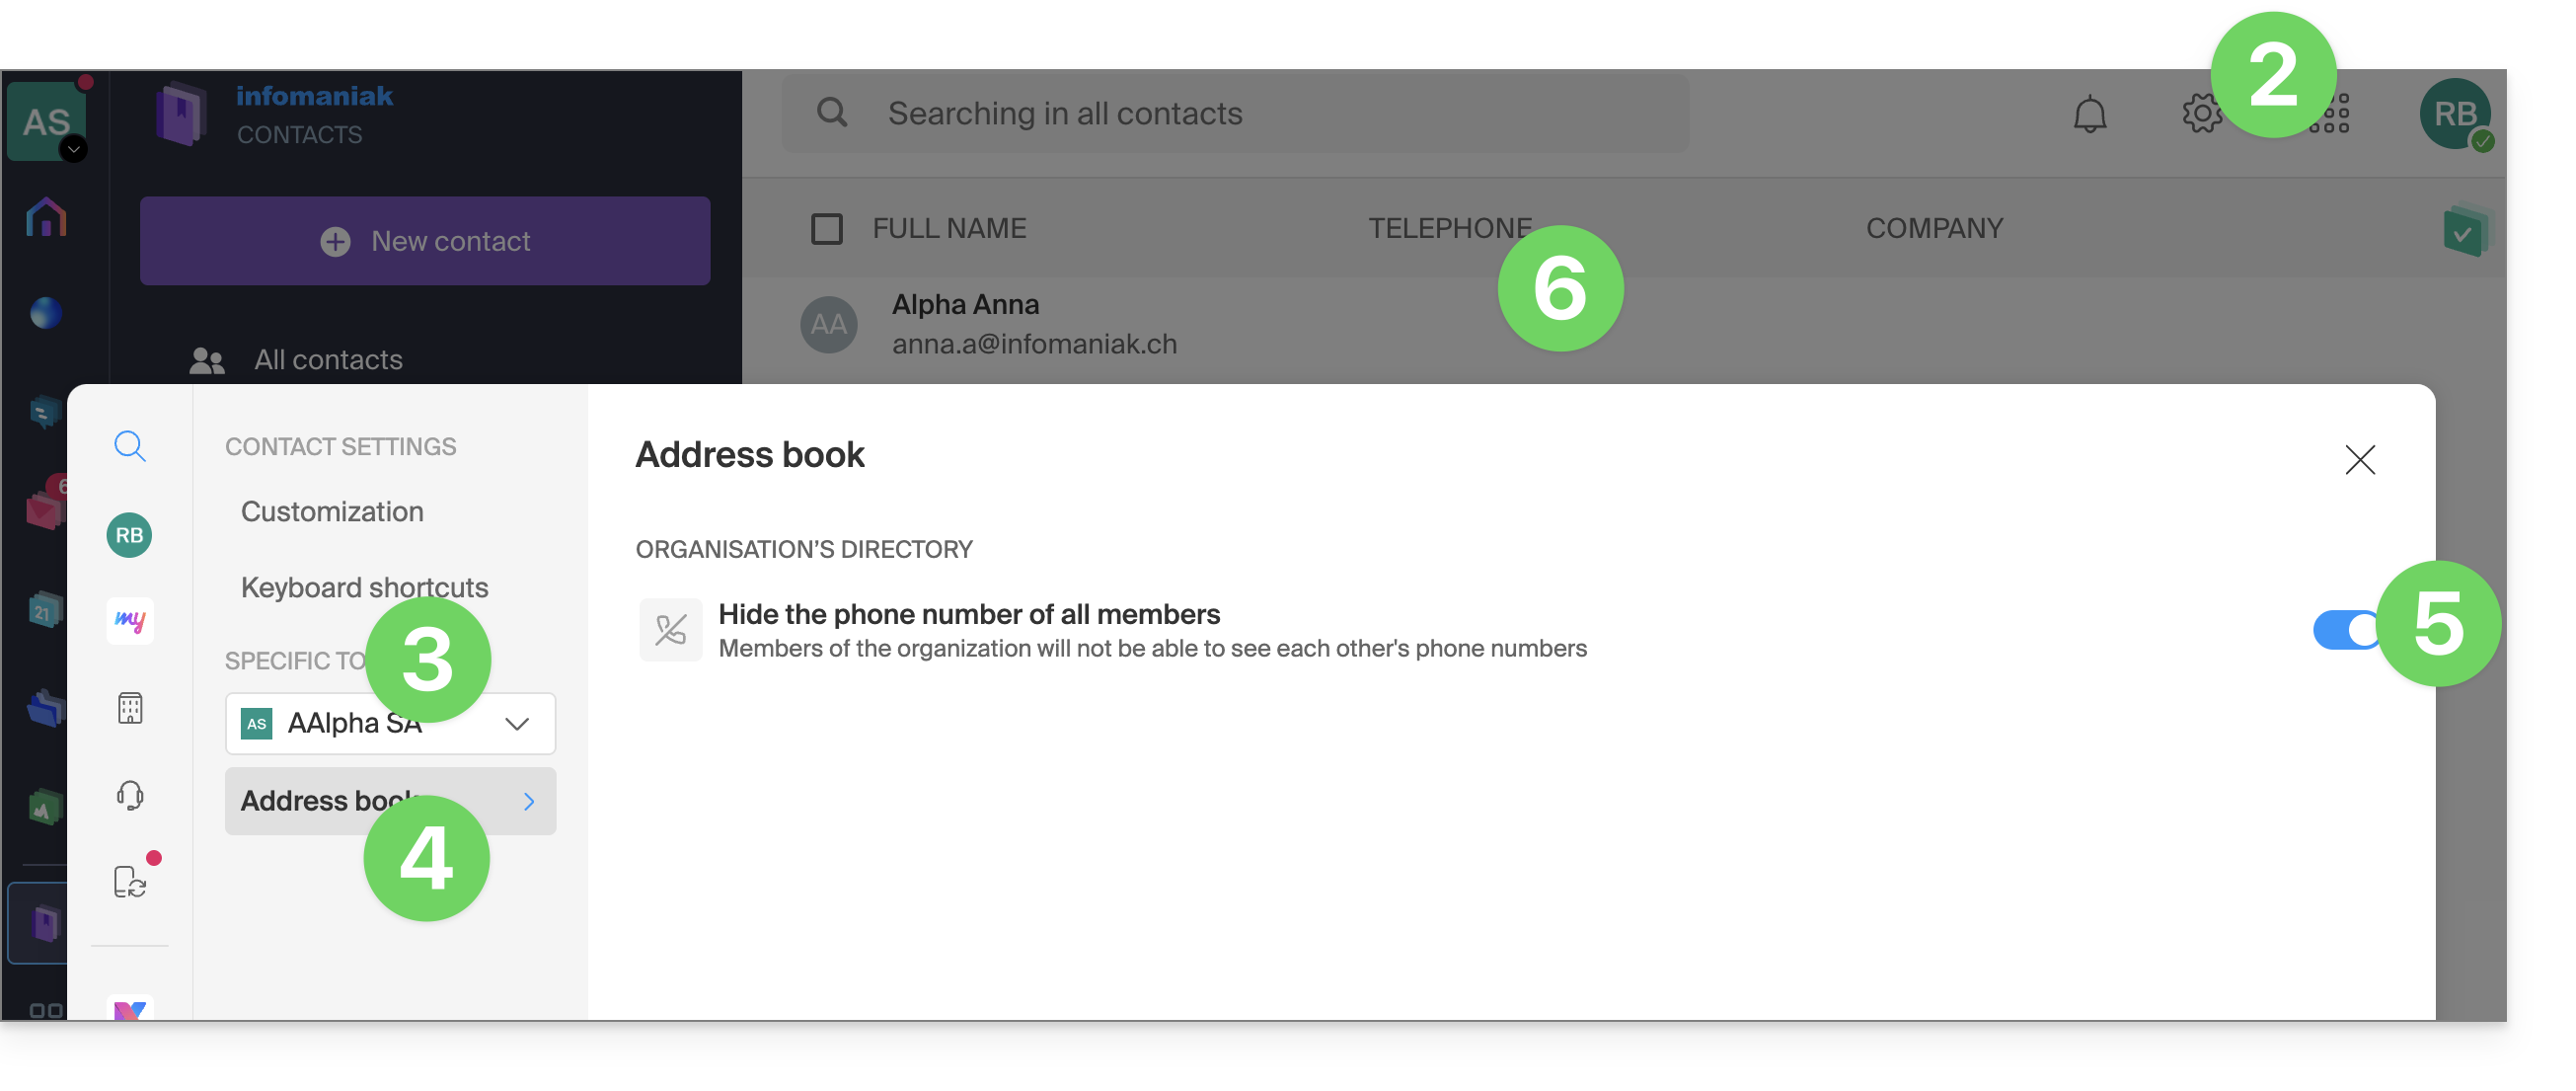
- hide the display of all telephone numbers of the directory members:
- Click here to access the contacts in your Infomaniak kSuite (❓: help).
- Click on Settings in the top right corner.
- Check or select the relevant Organization in the dropdown menu on the left-hand menu.
- Click on Address Book.
- Click on the toggle switch to disable the display of telephone numbers in the Organization's address books for all users of the Organization.
- The change is immediately visible:
Change the display color of a Directory
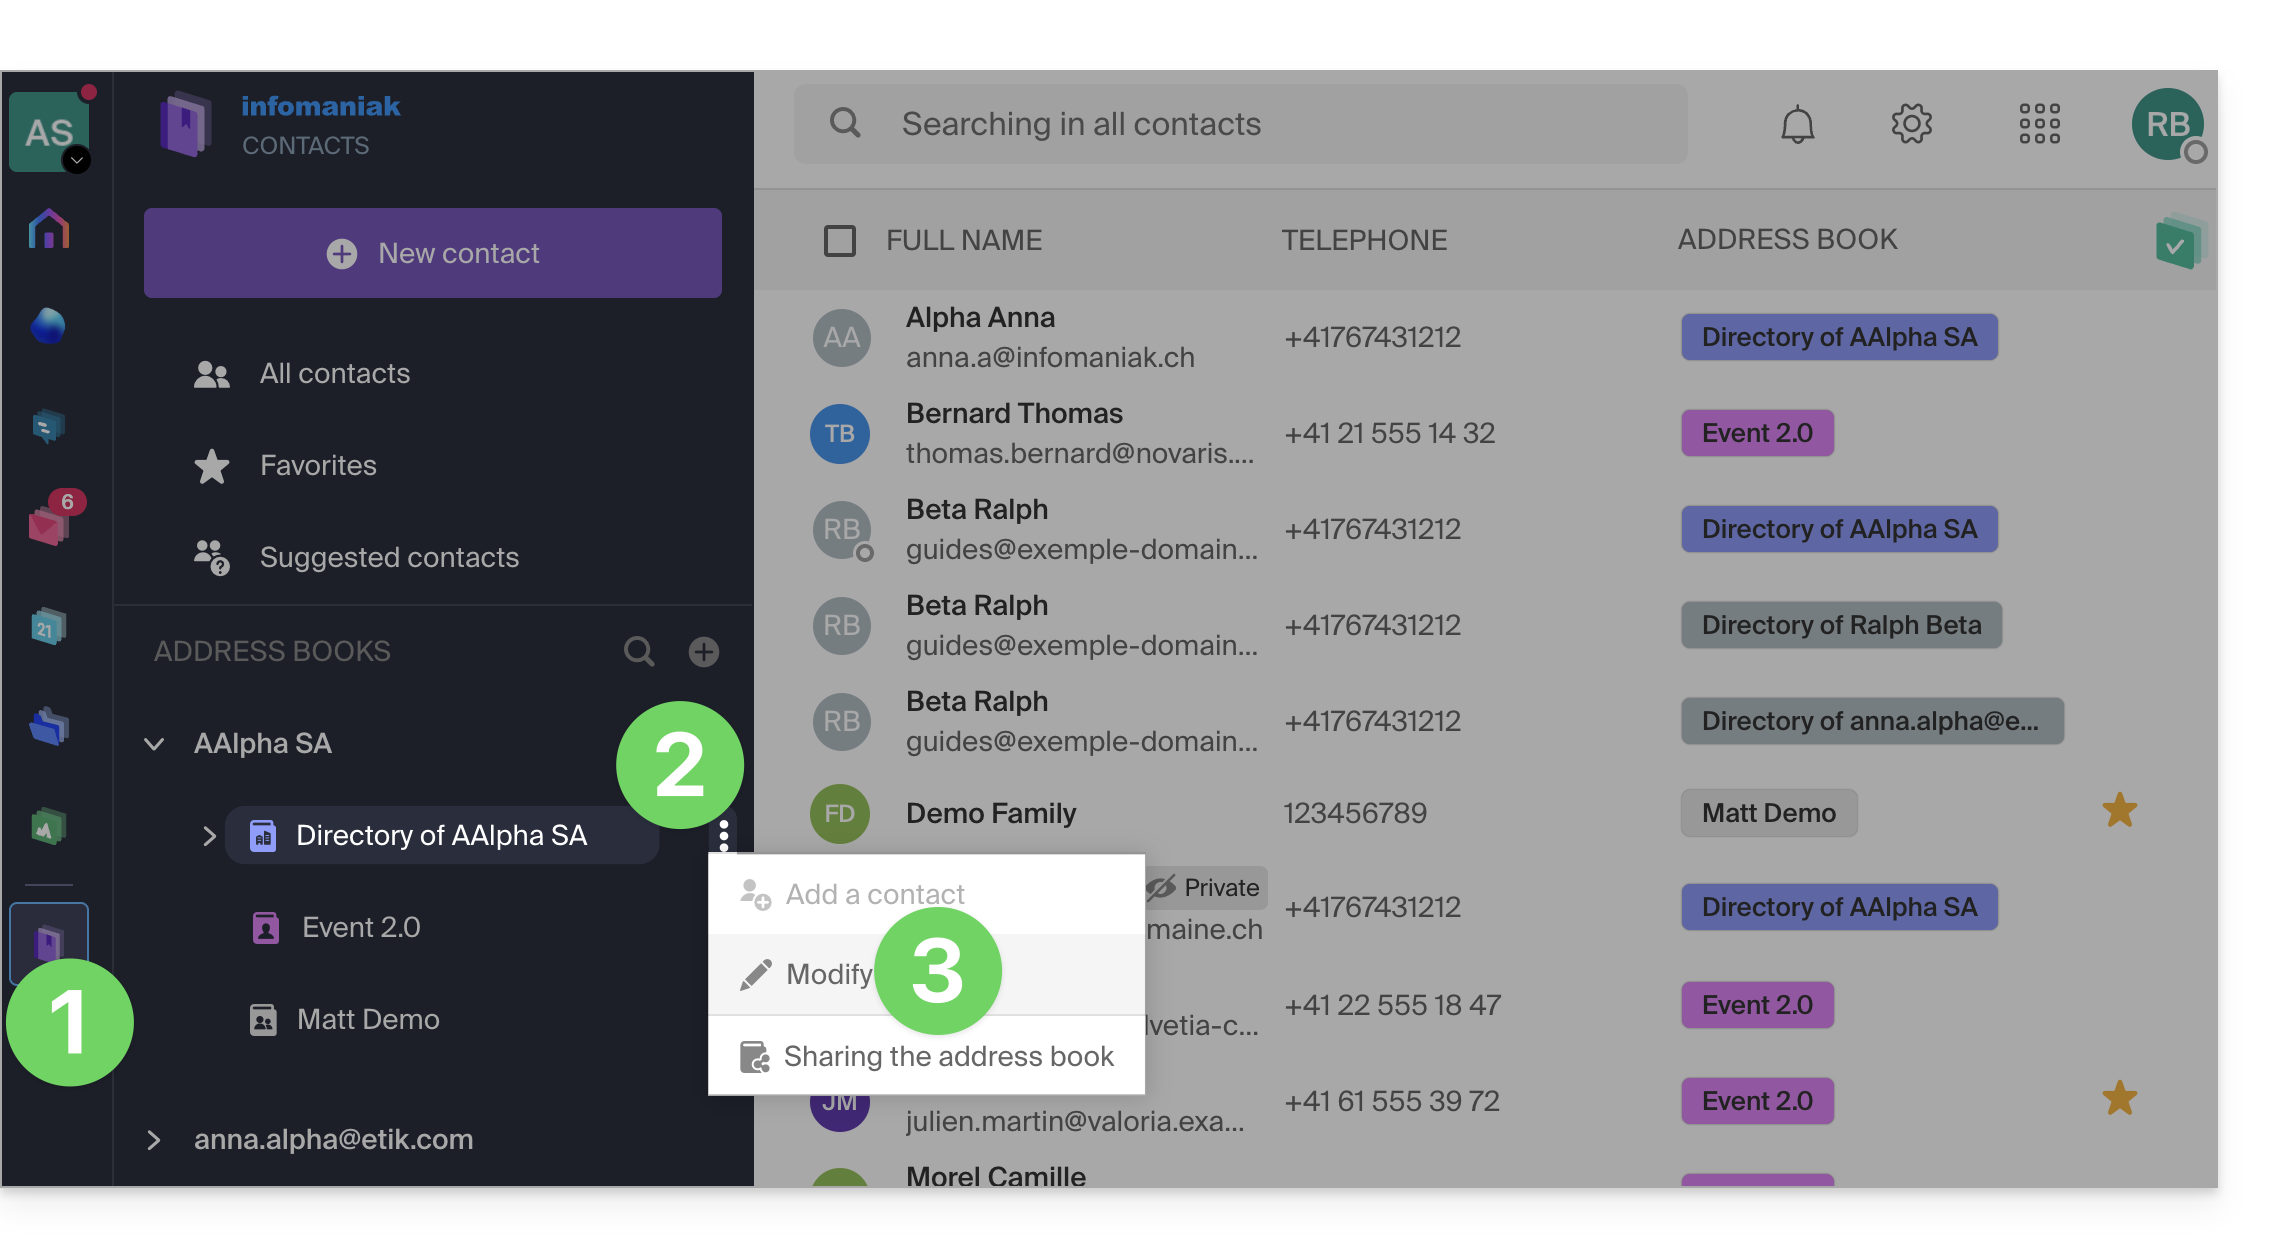
To change the color of the icon representing the Organization's Directory:
- Click here to access the contacts in your Infomaniak kSuite (❓: help).
- Click on the action menu ⋮ located to the right of the address book.
- Click on Edit:
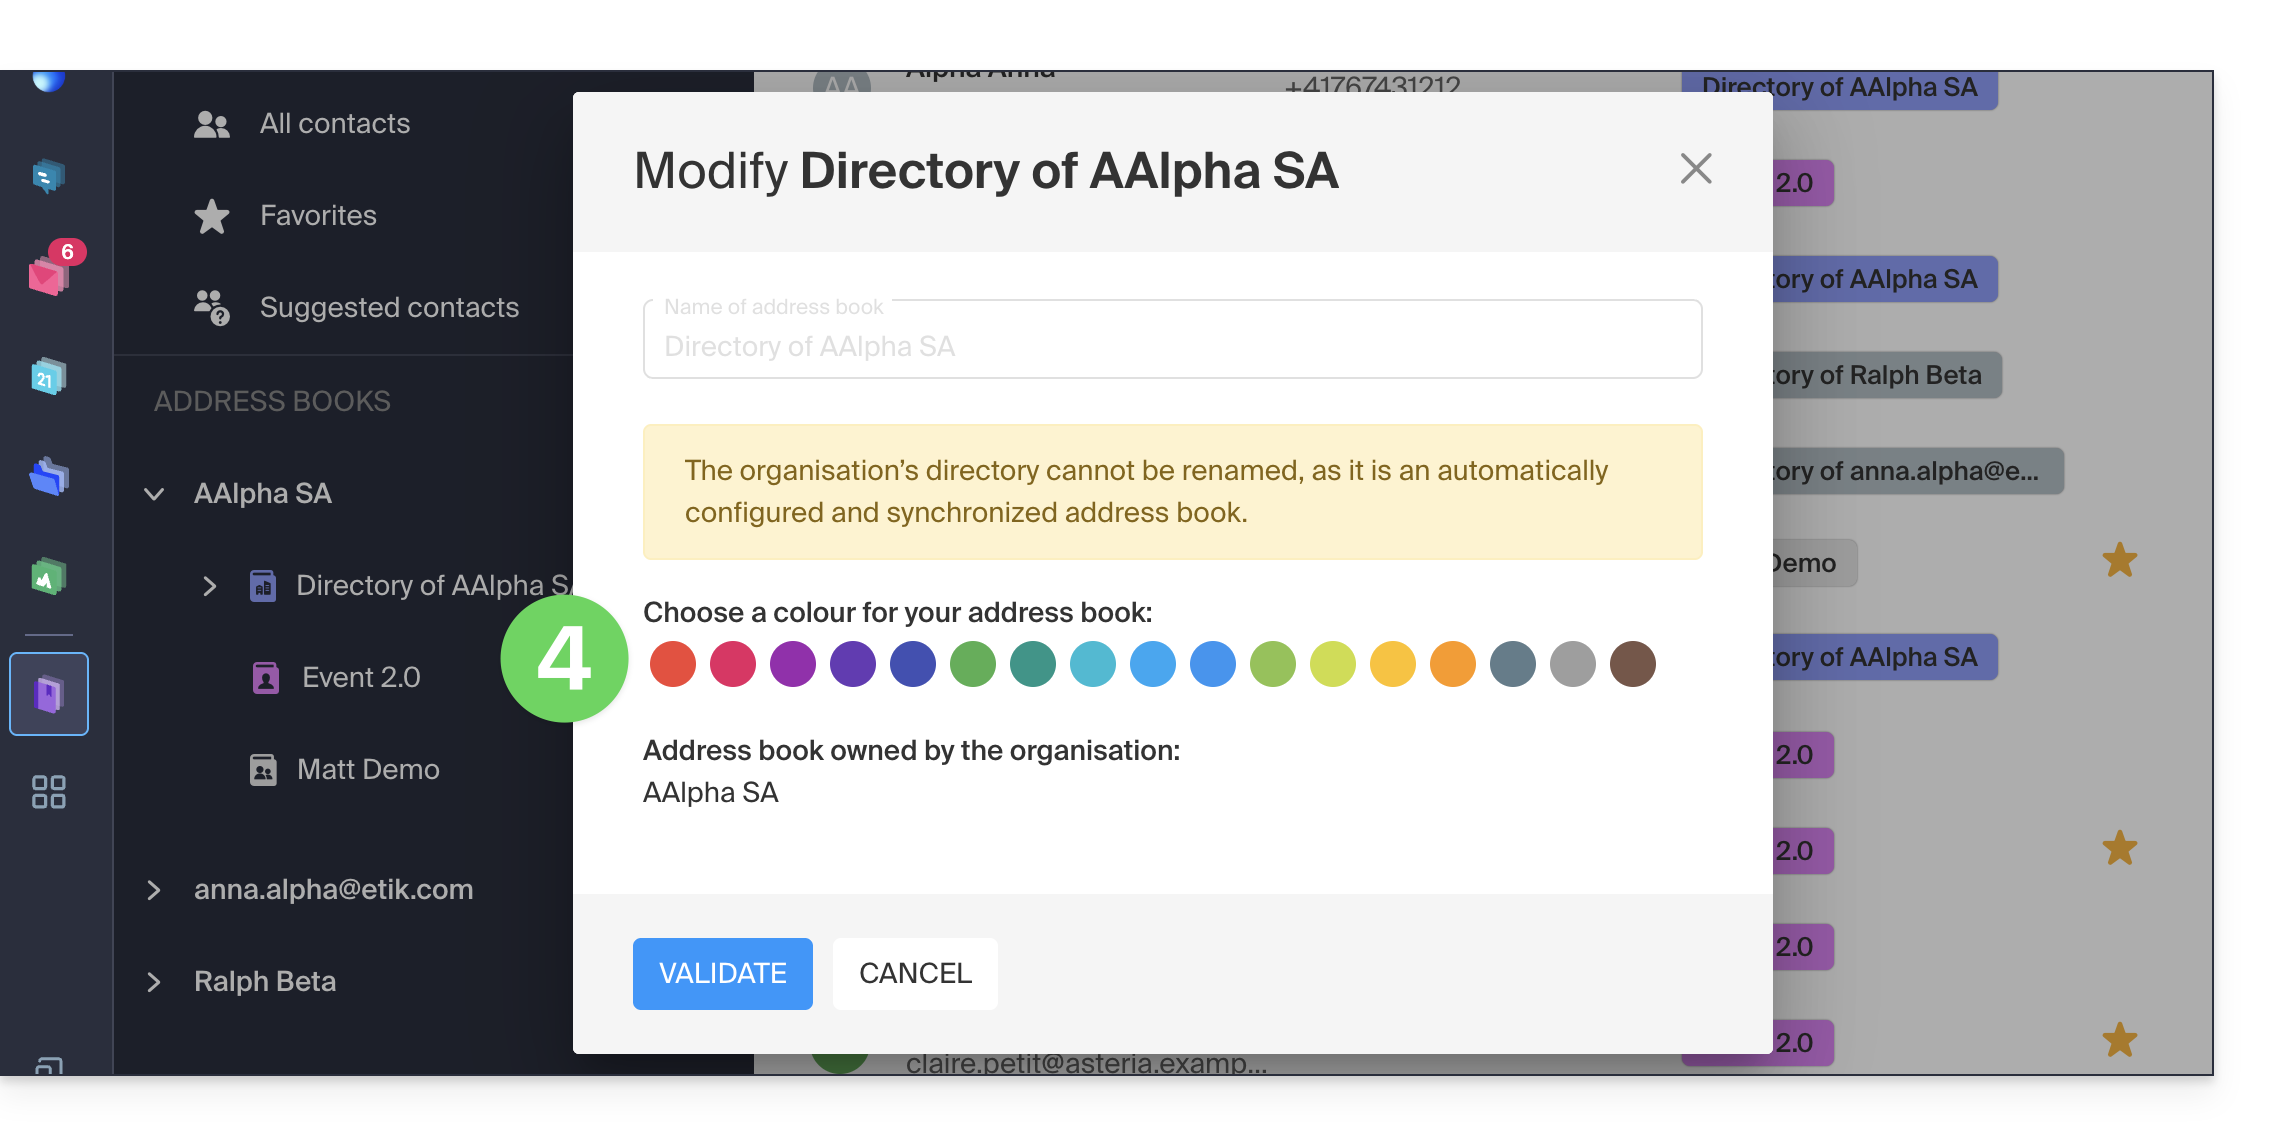
- Choose a color and confirm:
Link to this FAQ: https://faq.infomaniak.com/2558
Has this FAQ been helpful?
This guide explains how RBLs work, the questionable policies of some of them, and how to resolve any potential email blocking issues.
Introduction
- RBLs (Realtime Blackhole Lists) or DNSBLs (Black List DNS) are lists containing addresses, IP addresses, or names of providers and servers that are known as major spam senders.
- These are often large, general blacklists used to identify messages considered undesirable, as well as their senders, and are managed by certain providers such as smtpcheck or uceprotect (non-exhaustive list).
1. Adding the email address to the RBL
When an email address is identified as belonging to an unwanted sender, it is blocked to prevent the reception of unsolicited messages. A block in the RBL does not expire: addresses remain listed indefinitely.
If you receive a message indicating that your email address is blocked by an RBL, it means that Infomaniak's security system has detected suspicious or undesirable activity associated with that email address. This may include sending large numbers of unsolicited messages, participating in phishing campaigns, or other malicious behavior.
2. Resolving an email block (RBL)
If the error message mentions your address and an RBL
If you receive errors such as:
anna.a@domain.xyz is RBL blacklisted - http://chk.me/rbl
If you encounter this issue when sending an email and believe it is a false positive, contact Infomaniak support.
To prevent your email address from being blocked by the RBL blocking system in the future, follow best practices for email usage:
- Do not send unsolicited messages or mass messages to unknown recipients.
- Regularly sort the recipient list you use.
- Do not participate in phishing or cybercrime activities.
- Ensure the highest level of security where your emails are used:
- strong password
- up-to-date software
- up-to-date operating system (iOS, Android, Windows, macOS, etc.)
- up-to-date configuration of the associated domain
If the error mentions an organization such as Sorbs or Barracuda
If you receive errors such as:
554 5.7.1 Client host blocked using Sorbs
or similar:
- Follow the procedure outlined by the organization in question (for example, http://www.barracudacentral.org) to have your address removed from the list.
- Temporarily change your internet service provider or connection method (Wi-Fi vs. 4G/5G) to send your messages.
- Inform your contact and their email provider to take the necessary steps or to stop using an unreliable RBL.
- Please wait a few hours and try again.
Fewer and fewer professionals (ISPs, hosting providers, etc.) are using service providers such as Backscatterer / UCEPROTECT, whose primary purpose is financial gain. There are many other very effective lists, such as ABUSIX or SPAMCOP, which are well maintained and whose real goal is to fight spam, one of Infomaniak's priorities.
Link to this FAQ: https://faq.infomaniak.com/1333
Has this FAQ been helpful?
This guide explains how to import a MySQL/MariaDB database to an Infomaniak Web Hosting account.
Importing a database
To import an Infomaniak database:
- Click here to access the hosting & website management section in your Infomaniak Manager (❓: help).
- Click on the name of the hosting in question.
- Click on the downward-pointing chevron to the right of the database menu in the left-hand sidebar.
- Click on Databases.
- Click on the “More actions” button/menu to access different options.
- Choose Import a database:
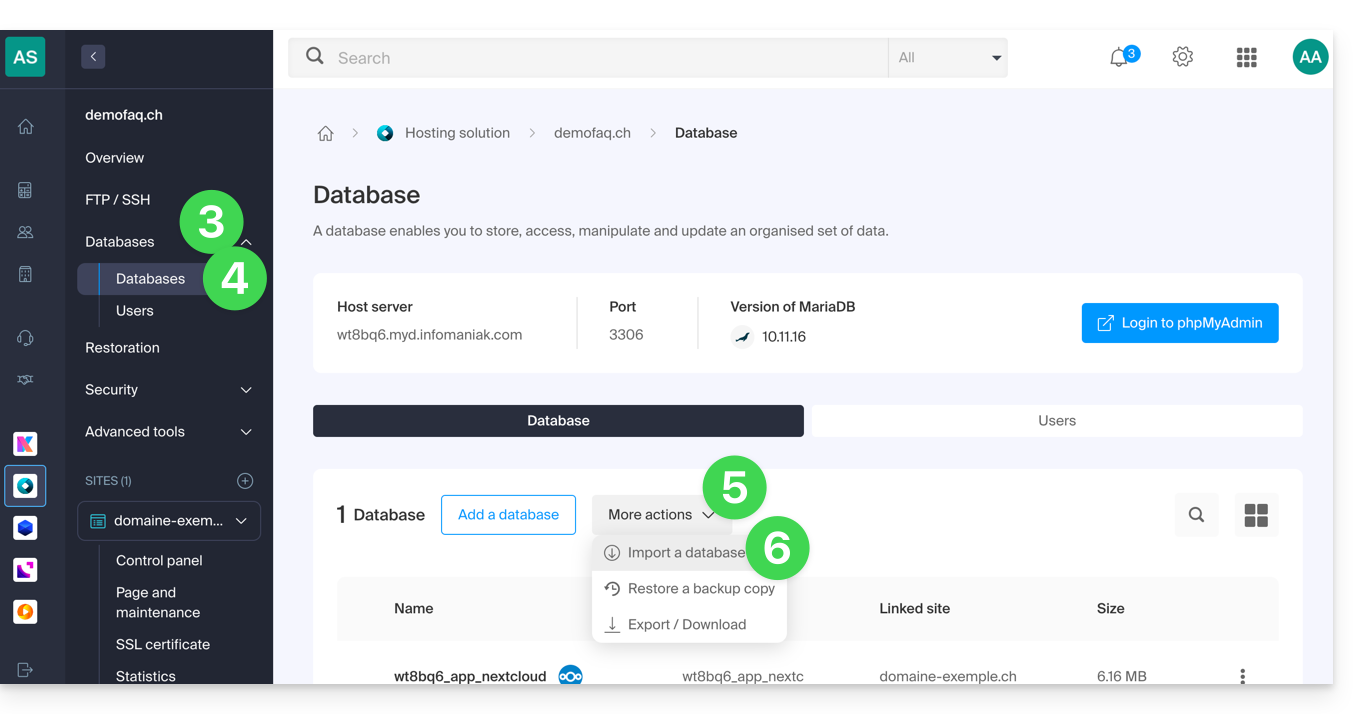
- You will then have the following options:
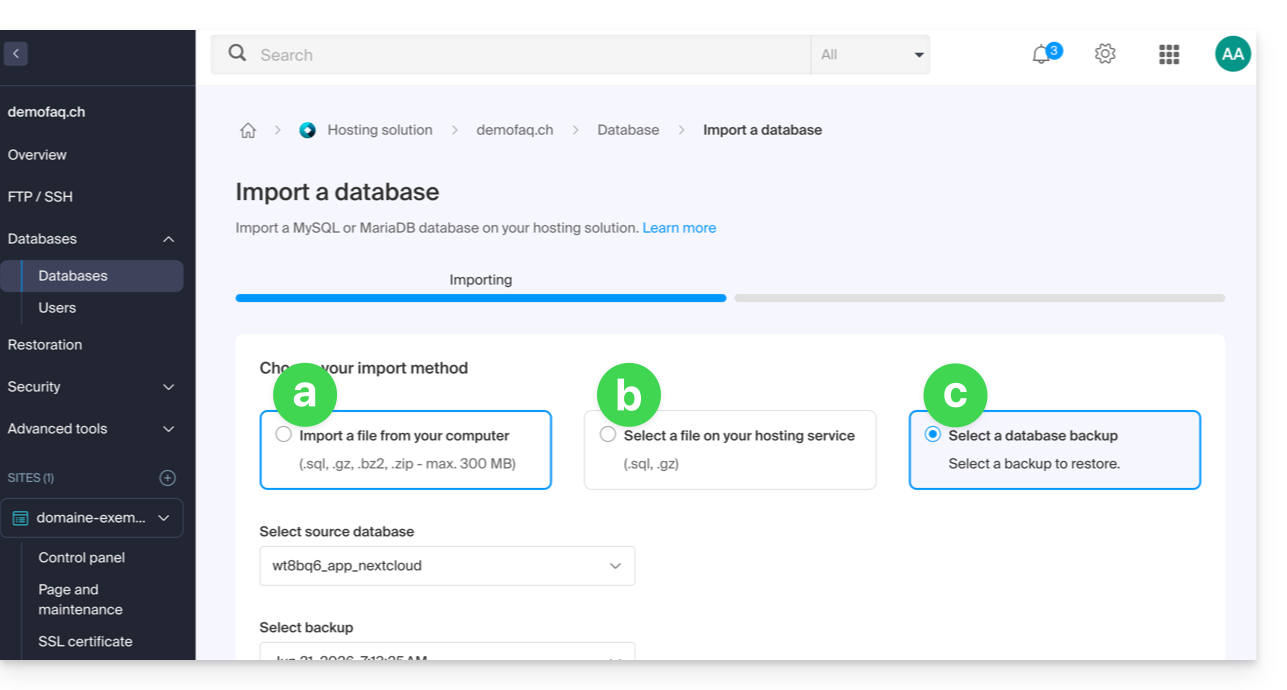
- you can also choose:
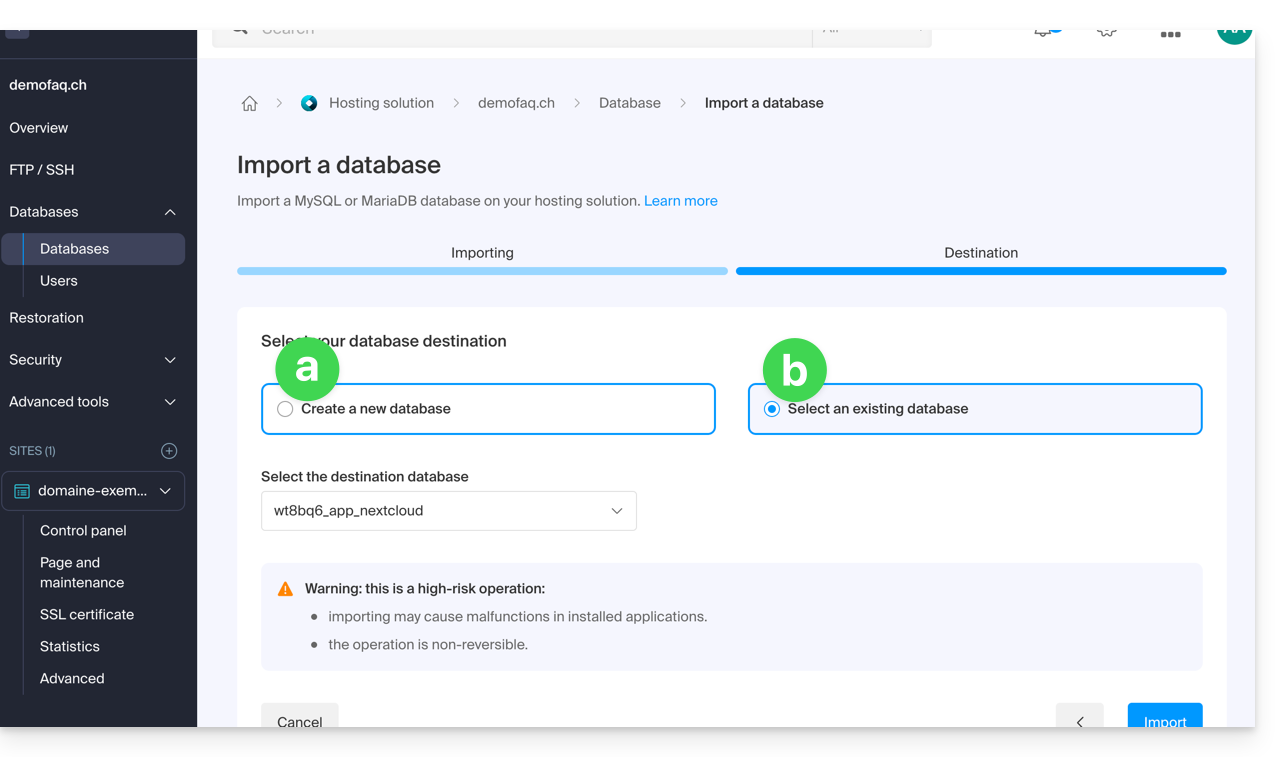
- import the data into a new database (creation),
- import into an existing database (replacement/overwrite).
Note:MySQL/MariaDB import following an exportrequires action on your part if you are using TRIGGERS/VIEWS (❓: help).
Alternative method (SSH - for advanced users)
Prerequisites
- Have the
.sqlfile of the database to be imported. - Have created a new, empty database (❓: help).
- Have a user who has all rights on the database (❓: help).
- Have an FTP + SSH account (❓: help).
To import via SSH:
- Upload the database to be imported via FTP to your hosting account (❓: help).
- Open an SSH terminal/console,
- From a
Terminalapplication (command-line interface,CLI) on your device, for example the PuTTY application (which you can download and install on Windows) or Terminal (installed by default on macOS), run and adapt the following command: ssh ftp-user@adresse-du-serveur- Replace
ftp-userwith the username of your FTP + SSH account (e.g.abcd_user). - Replace
adresse-du-serveurwith the address of your web hosting server (❓: help).
- Replace
- Enter the password for your FTP + SSH account.
Enter and adapt the following command:
mysql --verbose -u db-user -p db-name -h db-host < path- replace
db-userwith the database username (e.g.abcd_user) - replace
db-namewith the database name (e.g.abcd_sample) - replace
db-hostwith your hosting's MySQL server (❓: help) - replace
pathwith the path where you uploaded the database in step 1 of this procedure (if you have a single website stored in the default location, the path would be, for example,~/web/test.sql)
- replace
- Wait for the import to complete (this may take several minutes depending on the size).
Link to this FAQ: https://faq.infomaniak.com/1942
Has this FAQ been helpful?