Knowledge base
1000 FAQs, 500 tutorials and instructional videos. Here, there are only solutions!
This guide addresses Outgoing Spam from Infomaniak infrastructures and helps you identify and resolve potential causes when an email sent from an address hosted by Infomaniak arrives in the Spam (Junk) folder of the recipient.
Important: Infomaniak cannot act directly on the classification of a message as spam by other providers. Solutions must be sought with the administrators of the concerned receiving server.
Use email responsibly
Infomaniak implements enhanced measures to ensure the security and deliverability of emails. By also following the best practices below, you significantly reduce the risk that your messages will be considered unwanted.
1. Use a valid email address
- Check that your email address and associated domain are correct and valid.
- Check the security settings of your domain name (SPF, DKIM, DMARC).
- If you modify a setting, wait approximately 24 hours before sending another test.
2. Avoid suspicious content
- Avoid words, phrases, or presentations frequently associated with spam (excessive promotions, generic phrases, overly complex layout, etc.).
- Do not include non-secure, truncated, or poorly formatted links.
- Personalize your messages (for example, by mentioning the recipient's name) to enhance their credibility.
- Do not attach suspicious or overly large files; use a service like SwissTransfer instead.
3. Test sending from the Infomaniak Web Mail app
- If you use a third-party email software/client, try sending the message from the Infomaniak Web Mail app (ksuite.infomaniak.com/mail).
- Compare the results to identify if the issue comes from your email software/client or a configuration setting.
4. Monitor the reputation of your domain
- If your email address uses a custom domain (for example
@your-domain.xyz), a poor domain reputation can affect the deliverability of your messages. - Analyze and correct potential causes (previous mass mailings, poor configuration, reports, etc.).
5. Obtain the recipient's consent
- Only write to recipients who know you or are expecting your message.
- For group or regular mailings, use a voluntary subscription system (opt-in).
- For information or marketing campaigns, prefer the Infomaniak Newsletter solution.
6. Optimize the frequency and volume of sending
- Avoid sending a large number of identical messages to many recipients simultaneously.
- Respect a reasonable sending frequency to avoid being identified as a suspicious sender.
7. Be added to the Infomaniak whitelist
- If your emails are classified as spam by a recipient also hosted by Infomaniak, they can add your address to their whitelist.
- This action guarantees the receipt of your messages, but does not replace the verification of the causes that initially led to the classification as spam.
Link to this FAQ:
Has this FAQ been helpful?
This guide offers several solutions to quickly delete a large number of emails contained in an email address hosted by Infomaniak. Note that the size of your mailbox is not limited.
Delete emails in bulk…
… from the Infomaniak Web Mail app
- Click here to access the Infomaniak Web Mail app (online service ksuite.infomaniak.com/mail).
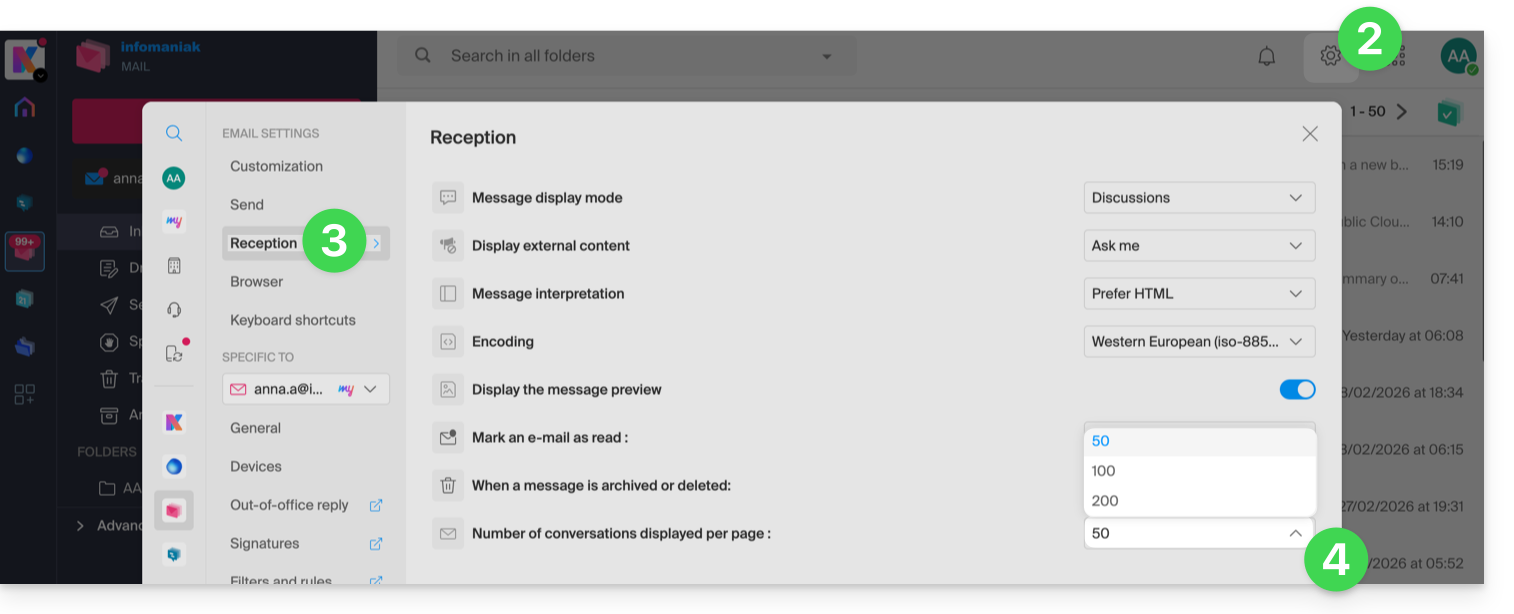
- Click on the Settings icon in the top right of the interface.
- Click on Reception.
- Display the maximum number of items loaded at once:
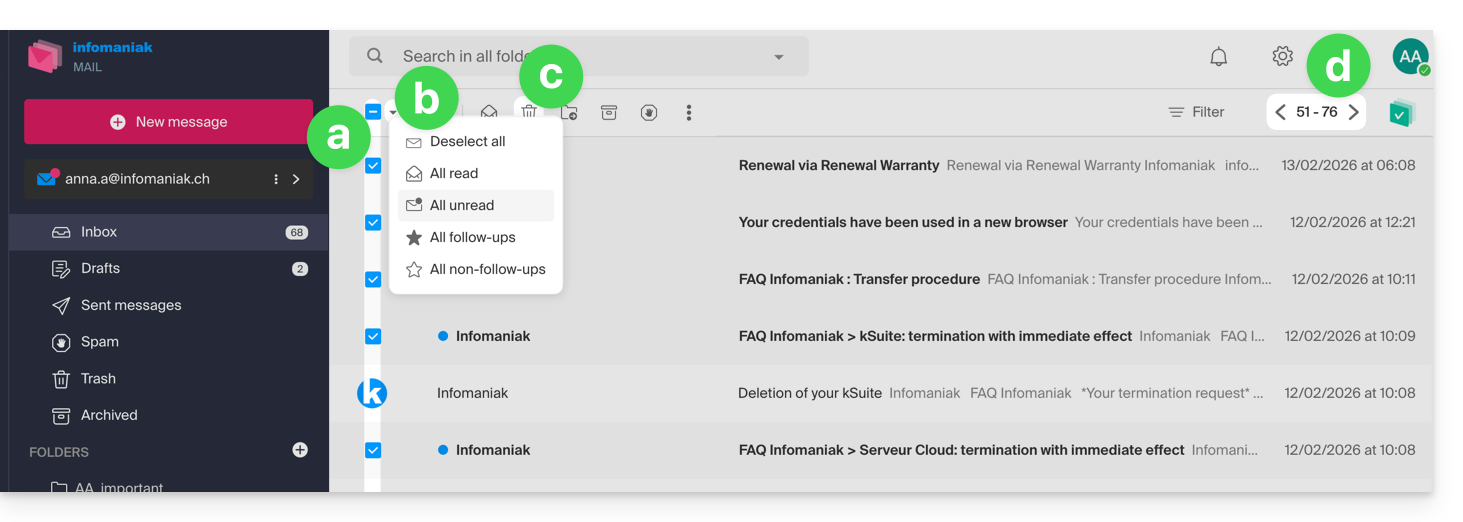
- To empty the inbox:
- Select all items visible on the screen.
- A more precise selection is possible.
- Click on the Trash icon to send them to the trash.
- Repeat this process on all pages:
- Apart from the inbox, folders can be emptied in a few clicks:
- Click on the action menu ⋮ to the right of the folder concerned.
- Click on Empty the folder:
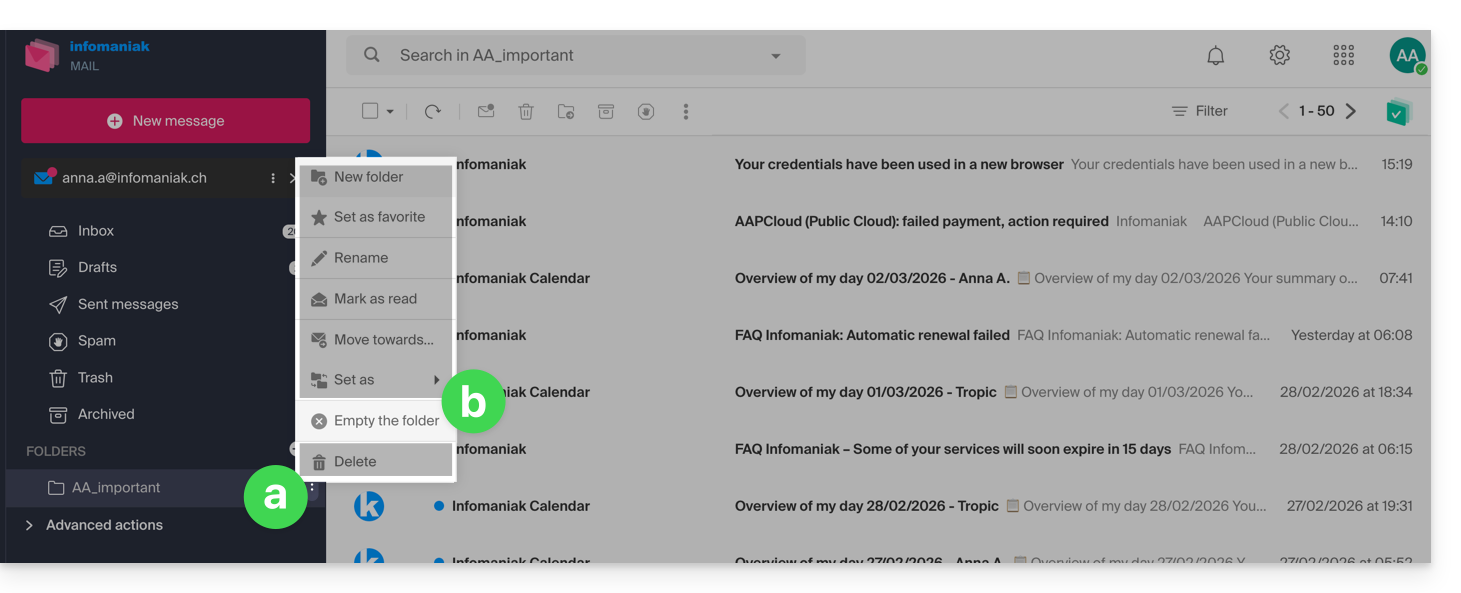
- Be careful, emails are deleted without going through the trash, as if you were deleting the folder itself — only a restoration can allow possible recovery.
You can also delete the email address found within a Mail Service, then recreate it. It will then be completely empty.
… from an IMAP email software/client
A solid solution is to configure the email address in an IMAP email software/client, which will allow the selection of all messages (without the notion of pagination…) therefore the deletion is easy and quick:
- Install Thunderbird (or any other messaging app on your device).
- Add your email address and specify its password.
- Wait for the inbox to load.
- Select all messages.
- Click on Delete.
- That's it, you can remove the application if you wish.
Special case: crossed-out messages
To permanently delete any tracked / struck-through emails appearing in your software/email client or on Mail Infomaniak: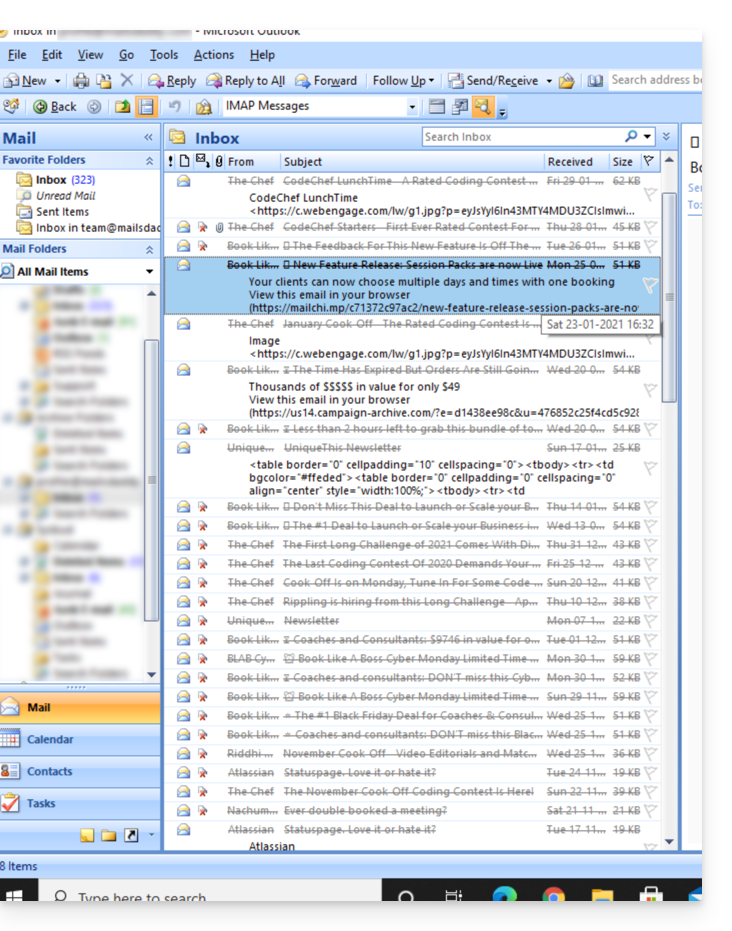
- Microsoft Outlook
- go to the Edit menu -> Empty Deleted Items (in English, you should have a menu Empty)
- Apple Mail
- go to the Mailbox menu -> Erase Deleted Items
They will then disappear from the Mail Infomaniak interface as well.
Link to this FAQ:
Has this FAQ been helpful?
This guide helps you understand the peculiarities that may arise in the display of emails when using different messaging applications and Infomaniak Mail apps.
Preamble
- It may happen that inconsistencies occur in the display of a list of emails contained in a folder (example: the Sent folder) and that the messages sorted and considered as the most recent by one device will not be the same as those displayed when using another tool. Sent Messages)
Understanding Unique Identifiers (UID)
UIDs (Unique Identifiers) are unique identifiers assigned to each message in an IMAP mailbox. They are used to uniquely identify each message, regardless of changes made to folders or messages themselves. UIDs are particularly useful for managing and synchronizing emails across multiple IMAP email software/clients:
- Each email is assigned a unique UID at the time of its creation in a mailbox; this UID never changes in principle as long as the email exists, even if its content or metadata is modified.
- UIDs are generally sequential, which means that more recent messages have higher UIDs in principle.
- When synchronizing emails, IMAP email software/clients can use UIDs to determine which messages are new, modified, or deleted since the last synchronization; this allows for efficient email management without having to download and compare all messages.
- Depending on the tool used, to display them in the order in which they were received, messages can be sorted by their reception date or by UID.
Not to be confused with:
- Message Sequence Number (used for temporary operations based on the current position of messages)...
- Message-ID (RFC 5322) (used to uniquely identify messages across different servers and email software/clients)...
- X-Message-Id (server-specific and used for internal tracking needs)...
- Thread-Index and Thread-Topic (used by Microsoft applications to track conversation threads)...
- GMail Unique Identifiers (used specifically by Gmail to manage messages and discussion threads)...
IMAP Applications and Infomaniak Mail App
The issue may appear in this form at the server command level:
758 - date.sent: 2017-10-11 23:15:26 (+0100)
757 - date.sent: 2017-10-11 15:00:55 (+0100)
756 - date.sent: 2017-10-11 14:39:28 (+0100)
(...)
742 - date.sent: 2018-01-17 00:40:21 (+0000)
741 - date.sent: 2018-01-17 00:30:33 (+0000)
740 - date.sent: 2018-01-17 00:26:07 (+0000)
(...)
51 - date.sent: 2022-10-07 16:39:16 (+0100)
50 - date.sent: 2023-06-13 10:15:00 (+0100)
49 - date.sent: 2023-06-07 12:11:35 (+0100)
Here, we see that emails from 2017 have a higher UID (758, 757, ...) than emails from 2023. UIDs must have been reassigned for some reason or another during the existence of this entire email account (moves, copies, imports, etc.).
Depending on how the messaging tool sorts emails, a message from 2017 may appear among recent messages while the message from 2018 is not loaded immediately. This is particularly true for the Mail Infomaniak app, which only loads a series of emails at a time based on the UID (this is subject to change).
Therefore, to resolve any inconsistencies, it is recommended to use an IMAP email software/client such as Thunderbird on a computer, which will allow you to quickly and efficiently sort all messages in a specific folder based on the email date, as the application will display all messages present on the Infomaniak server.
Link to this FAQ:
Has this FAQ been helpful?
This guide helps you protect the reputation of your domain name, to maintain the trust of Internet users and service providers in your website or business, thereby facilitating the smooth operation of your email.
The web reputation
There are different types of reputation on the Internet, including personal reputation, corporate reputation, and domain reputation.
Domain reputation is essentially a score that determines how email systems decide what to let through to users' inboxes. Fundamentally, the reputation of your domain is a measure of the health and legitimacy of your domain. This reputation can be influenced by the security of your email and website.
For example, the reputation of a domain can decrease if…
- … the site visible at the domain address is hacked, leading to the mass sending of fraudulent emails,
- … the domain's email is exploited for the involuntary sending of spam.
If the reputation of your domain remains poor, your emails may be marked as spam and not reach their intended audience. This can harm email deliverability (see this other guide in English on this topic).
Improving domain reputation
By following these few tips, you can improve the reputation of your domain and, for example, boost all your email marketing efforts:
- Set up and verify SPF, DKIM, and DMARC records that help protect your domain from identity theft attacks.
- Check the reputation of your domain with tools such as Google Postmaster Tools, Sender Score, Microsoft SNDS, McAfee or Talos Intelligence and identify potential issues.
- Only send emails to users who have chosen to subscribe!
- Get trusted links or backlinks…
See this other guide about RBLs.
Link to this FAQ:
Has this FAQ been helpful?
This guide explains how to connect the desktop app Apple Mail (desktop application on macOS) to an email address hosted by Infomaniak.
Preamble
- Your macOS computer will be automatically configured via configuration profiles .mobileconfig compatible with Apple, unlike a manual configuration.
- It is possible to remove a configuration profile once installed (scroll down to the bottom of this page for instructions).
Install a configuration profile
Prerequisites
- Create the email address within my kSuite or a Mail Service / kSuite.
- Check that the Mail Service is configured optimally.
You can download the profile from the device concerned or send it from another device (if you already have an email address that works correctly, for example):
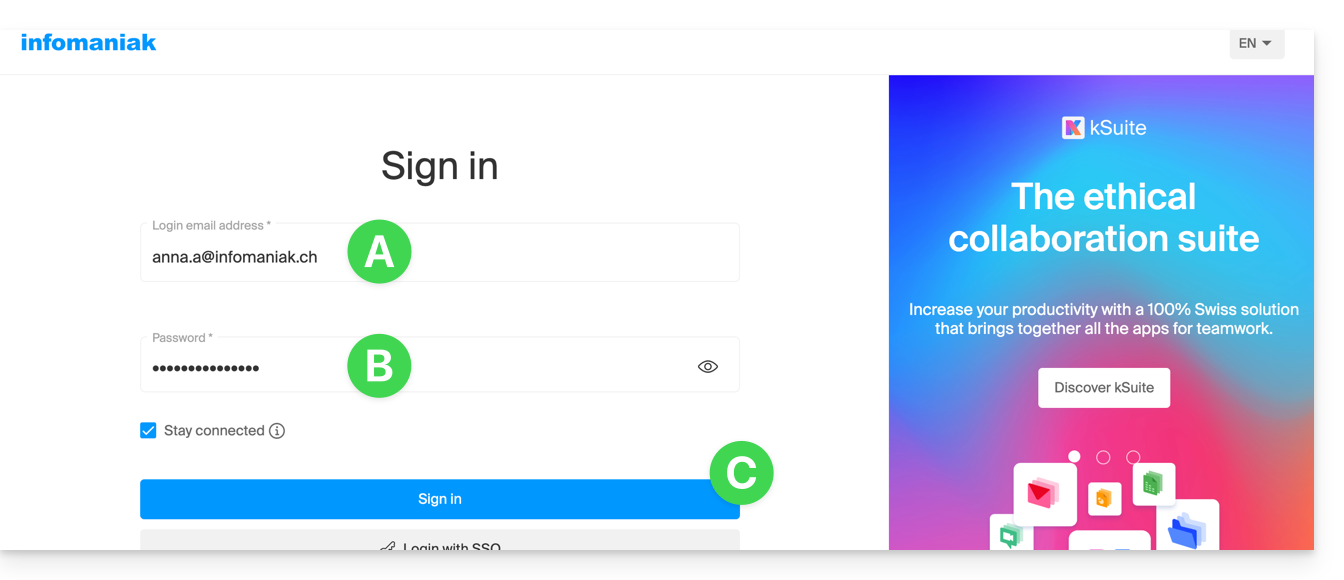
- Click here to access the Infomaniak configuration tool (online service https://config.infomaniak.com) — log in if necessary to your Infomaniak account on the Organization on which your email address is managed.
- Choose to install the profile on this device.
- Choose to synchronize emails.
- Choose the email address to configure on Apple Mail (from those you have access to).
- Create a new device:
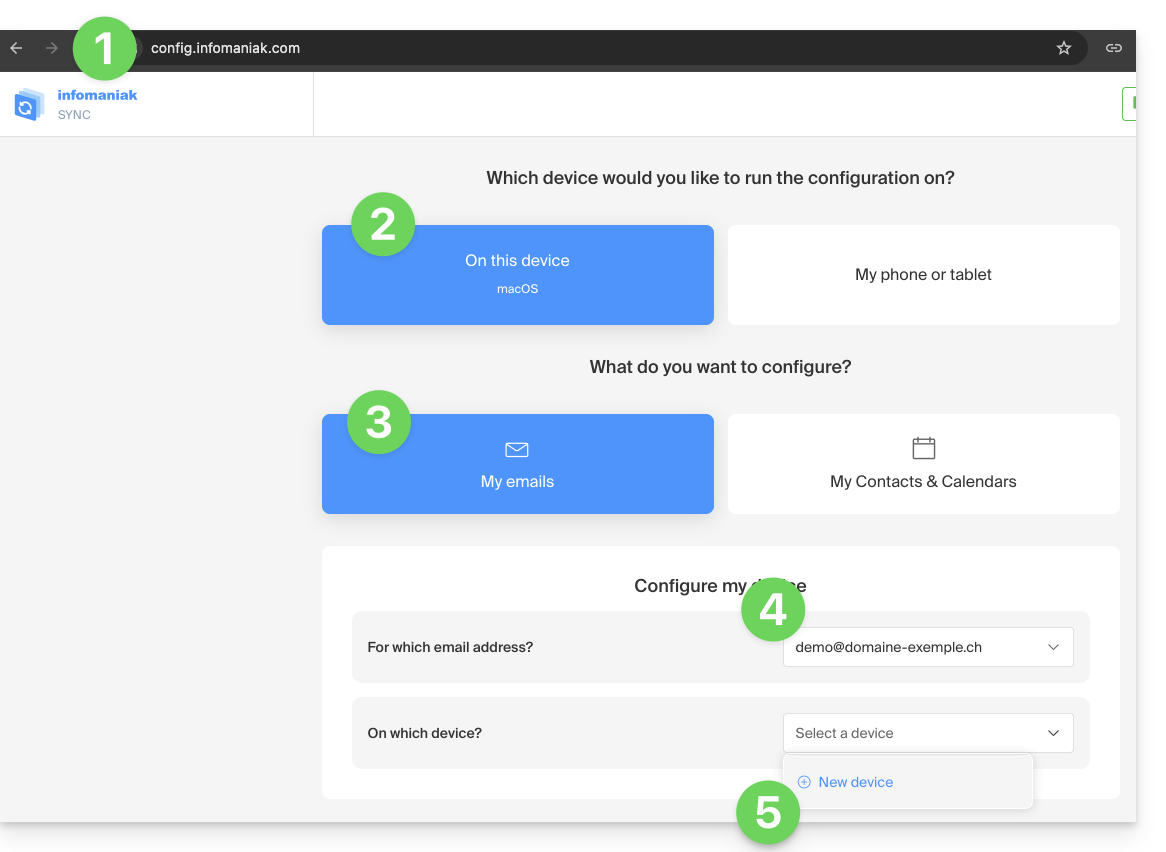
- Enter a descriptive name for the new device.
- Click the button to Download the profile (you can also send it by email using the link on the right):
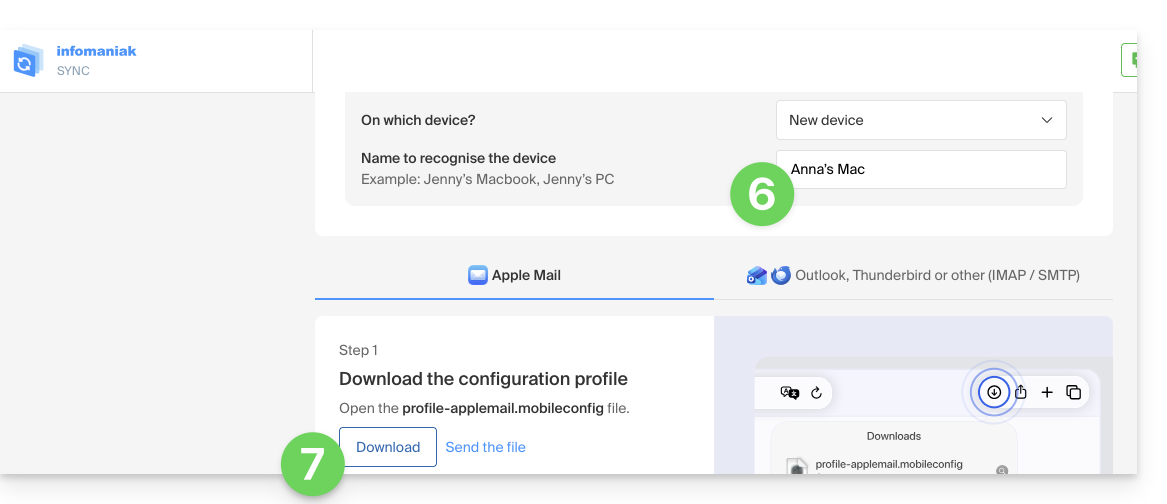
- Once the file
profile-applemail.mobileconfigis on your computer, double-click to open and run it. - Click OK:

- Open the System Settings of the computer.
- Click on Downloaded Profile in the sidebar, then double-click on the new profile to apply it:
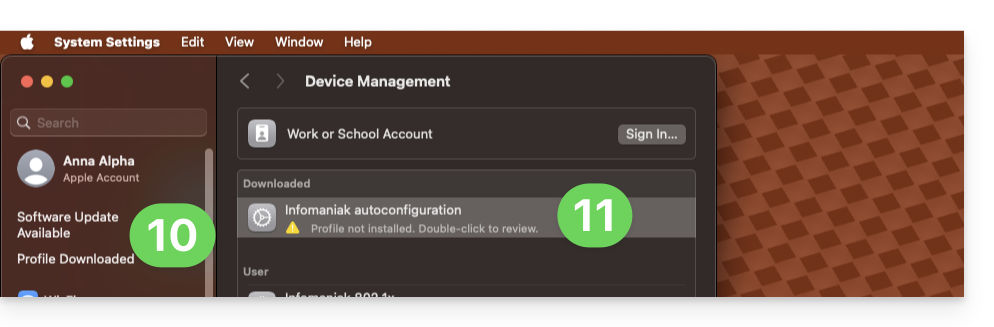
- If you have an older version of macOS or cannot find the profile, search for “profile” in the settings, or refer to the official documentation by changing the version of your system at the top of the page if necessary.
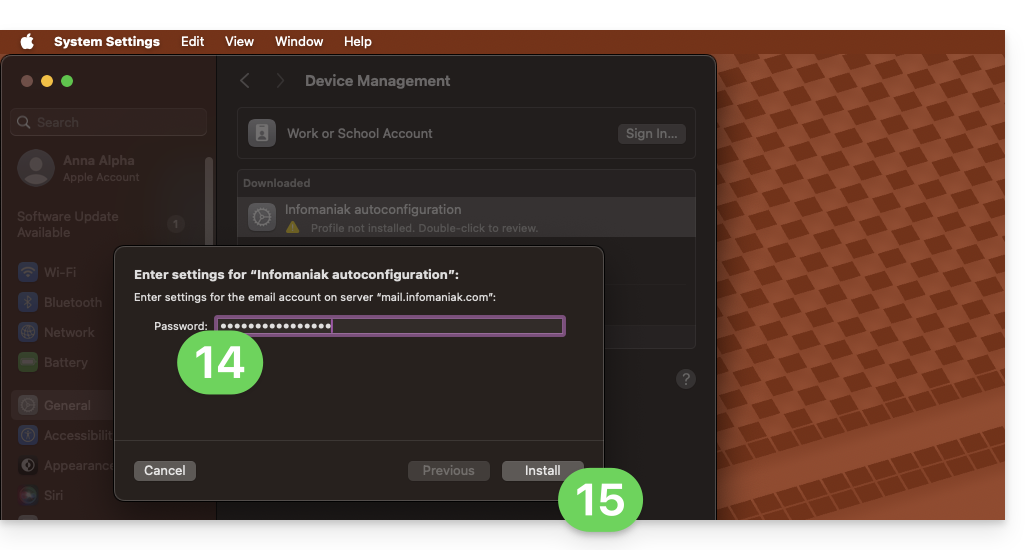
- Click on Install…:
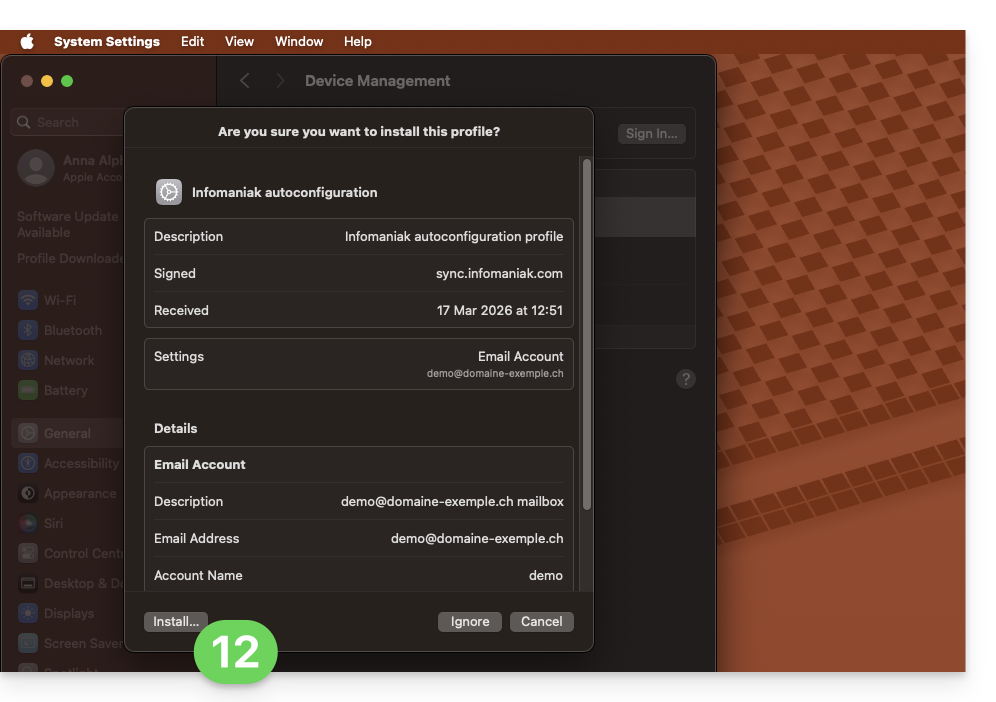
- A password is then requested…
- either you know it because you have already created it in the Devices section of the Mail Service:
- or you can copy the new password found below on the assistant page
config.infomaniak.comopened earlier: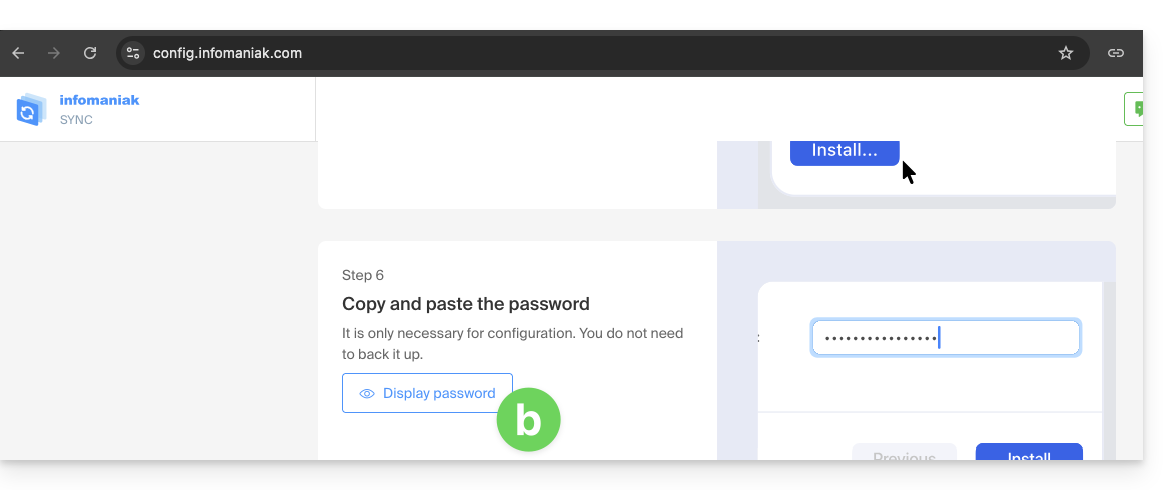
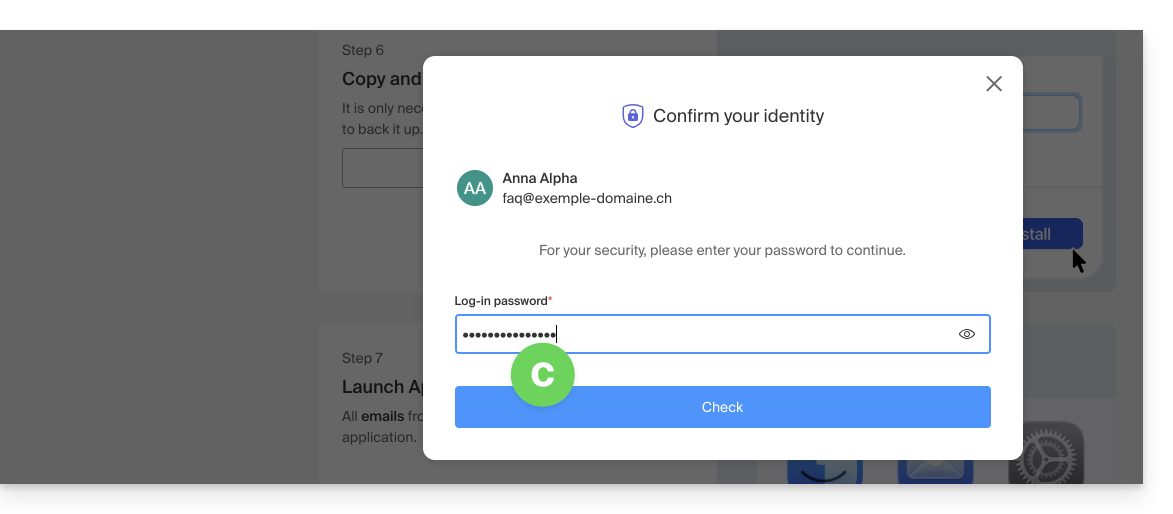
- Before the email password is displayed, your Infomaniak account password may be requested for security:
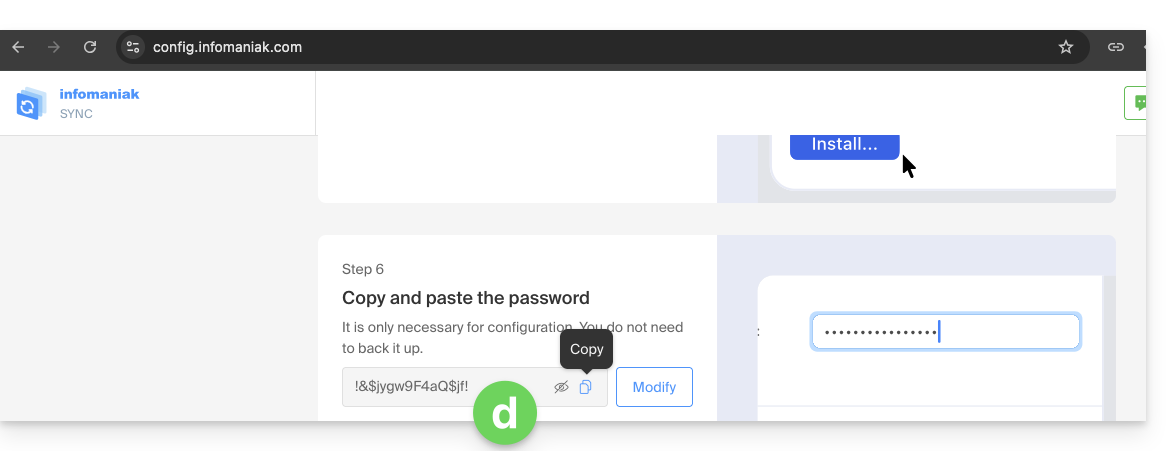
- Here it is, the randomly generated password is displayed, you just need to copy it:
- either you know it because you have already created it in the Devices section of the Mail Service:
- Paste the password into the macOS window.
- Click on Install to start the profile installation:
- Your email address is now configured in the Apple Mail application, which you can open and control:

Delete an IMAP account
Refer to the chapter "Stop using an account" by changing the system version at the top of the page if necessary (note: do not delete a POP-configured account without saving your messages first).
Delete an Apple profile
Refer to the official documentation by changing the system version at the top of the page if necessary.
*Why is it necessary to choose the guide version exactly corresponding to your macOS / iOS version? Apple introduces changes, sometimes subtle, with each new version of its system, for example a path on iOS 15…
… becomes this on iOS 18…
Link to this FAQ:
Has this FAQ been helpful?
This guide explains how to connect the Apple Mail mobile app on iOS to an email address hosted by Infomaniak.
Preamble
- Your iOS device will be automatically configured using Apple-compatible .mobileconfig configuration profiles unlike a manual configuration.
- It is possible to delete a configuration profile once installed (scroll to the bottom of this page for instructions).
- The various services offered by Infomaniak are all compatible with the corresponding standard protocols (IMAP/SMTP for email, for example), therefore if you encounter a problem with third-party software, contact its publisher or a Partner and consult the support policy as well as section 11.9 of the Infomaniak Terms of Service.
Install a configuration profile
Prerequisites
- Create the email address in my kSuite or a Mail Service / kSuite.
- Create a password for the email address on the device you are going to configure.
- Check that the Mail Service is configured optimally.
Download the profile from the relevant iOS device or send it from another device (if you already have a working email address, for example):
- Click here to access the Infomaniak configuration tool (online service https://config.infomaniak.com) — log in if necessary to your Infomaniak account on the Organization where your email address is managed.
- Choose to install the profile on this device:
- Choose to synchronize emails:
- Choose to synchronize another application than the Infomaniak Mail application:
- Enter the password for the email address (attached to Mail Infomaniak (Webmail)) that you want to synchronize on iOS.
- Press the blue Verify button:
- Press to copy the validated password.
- Download the configuration profile and authorize its opening:
- Open the settings of the iOS device:
- Press the recently downloaded profile:
- Press Install:
- Unlock your iOS device:
- Press Install:
- Paste the password of the previously verified email address (point 7 above).
- Press Next:
- There you go, your email address is now configured in the Apple Mail application that you can open and control:
Delete an Apple profile
Refer to the official documentation by changing the version of your system at the top of the page* if necessary.
*Why is it necessary to choose the guide version that exactly matches your macOS / iOS system version? Apple introduces changes, sometimes subtle, with each new version of its system, for example a path on iOS 15…
… becomes this on iOS 18…
Link to this FAQ:
Has this FAQ been helpful?
This guide explains how to quickly create/obtain a password from an Infomaniak Mail Service when you need to access an Infomaniak email address on third-party software, such as Outlook or Thunderbird.
Preamble
- When creating an email address, no password is defined:
- An email address can be accessed on Infomaniak Mail apps without a password other than the one that already allows you to access your Infomaniak account.
- You just need to authorize your account or invite a contact to be a user of the email address.
- You then simply create specific passwords for each device (Outlook, iPhone, CRM, etc.) as needed:
- You can create multiple passwords for the same email address without interrupting existing connections.
- Each password can be revoked individually, without affecting other users or devices linked to this address.
- A password is never displayed again after its creation; modify it or create a new one if necessary.
Generate an email password
Prerequisites
- Order a Mail Service from Infomaniak.
- Create one or more addresses on this Mail Service.
- Be Administrator or Legal Representative within the Organization.
If you cannot complete these steps because you receive different information on the screen, you probably lack the necessary permissions if you were not the original creator of the email address — refer to this other guide — an administrator can, for example, add the email address directly to your Web Mail app or send you a link allowing you to generate a password yourself.
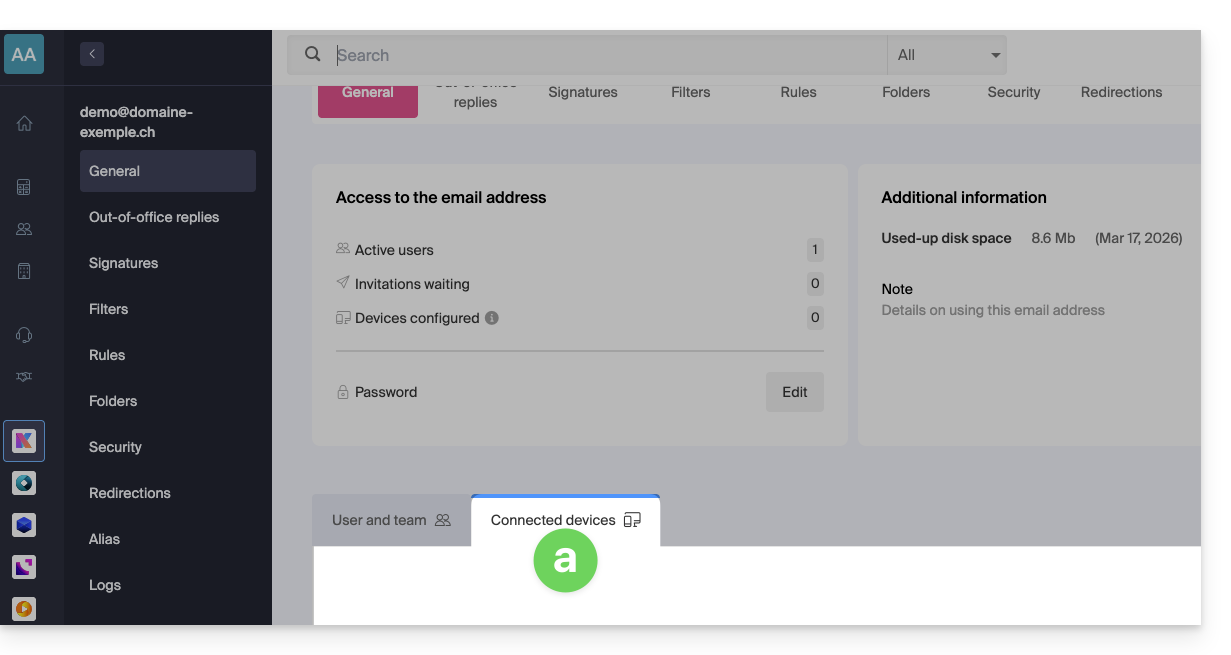
To add a password to the example address demonstration@example-domain.ch:
- Enter your Infomaniak account login and password on the page https://manager.infomaniak.com/:
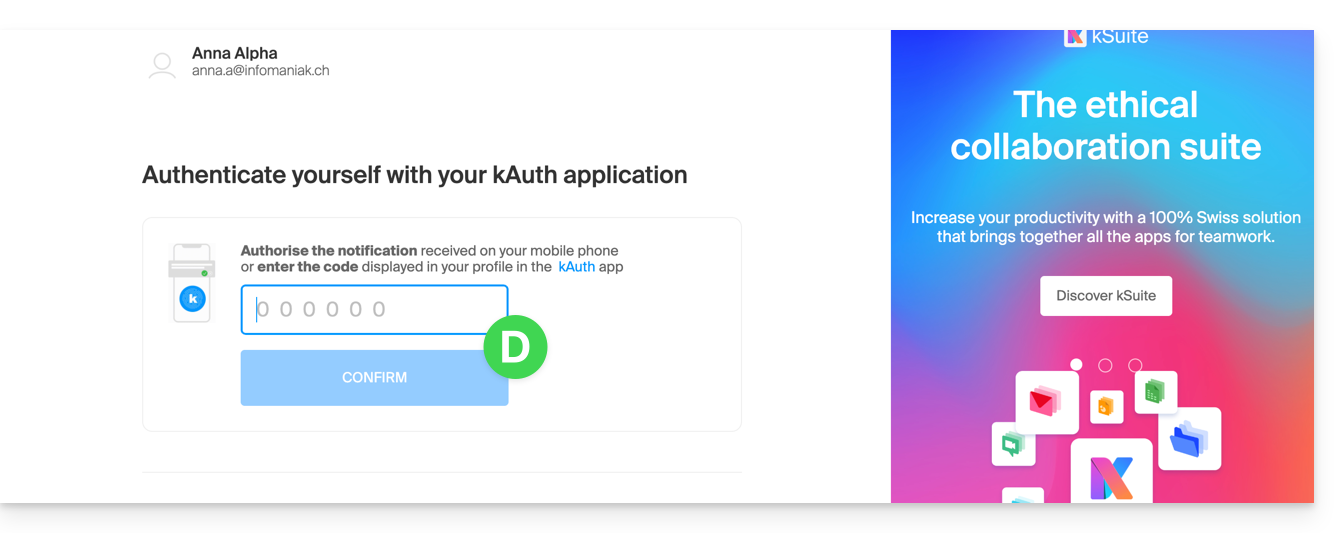
- Validate the entry on the Manager with the 2FA (two-factor authentication) method initially defined:
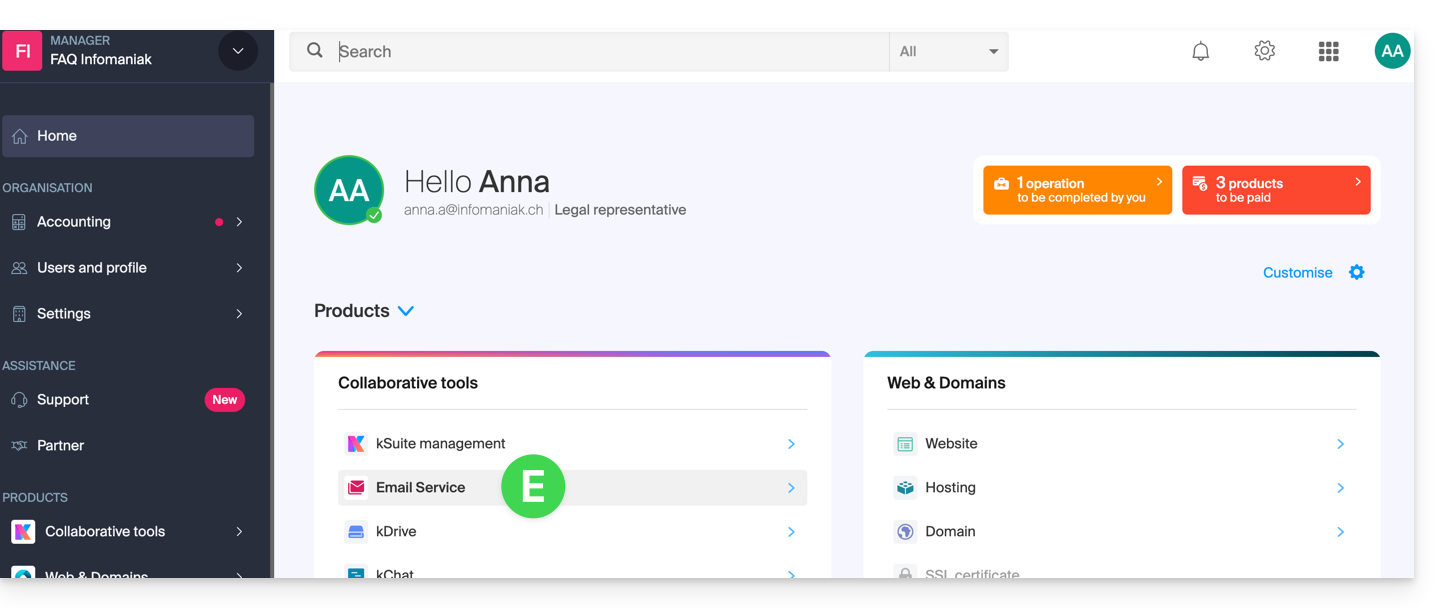
- Once on the dashboard, click on Mail Service:
- Once on your Mail Services, click on the name/domain name to which the email address in question belongs:
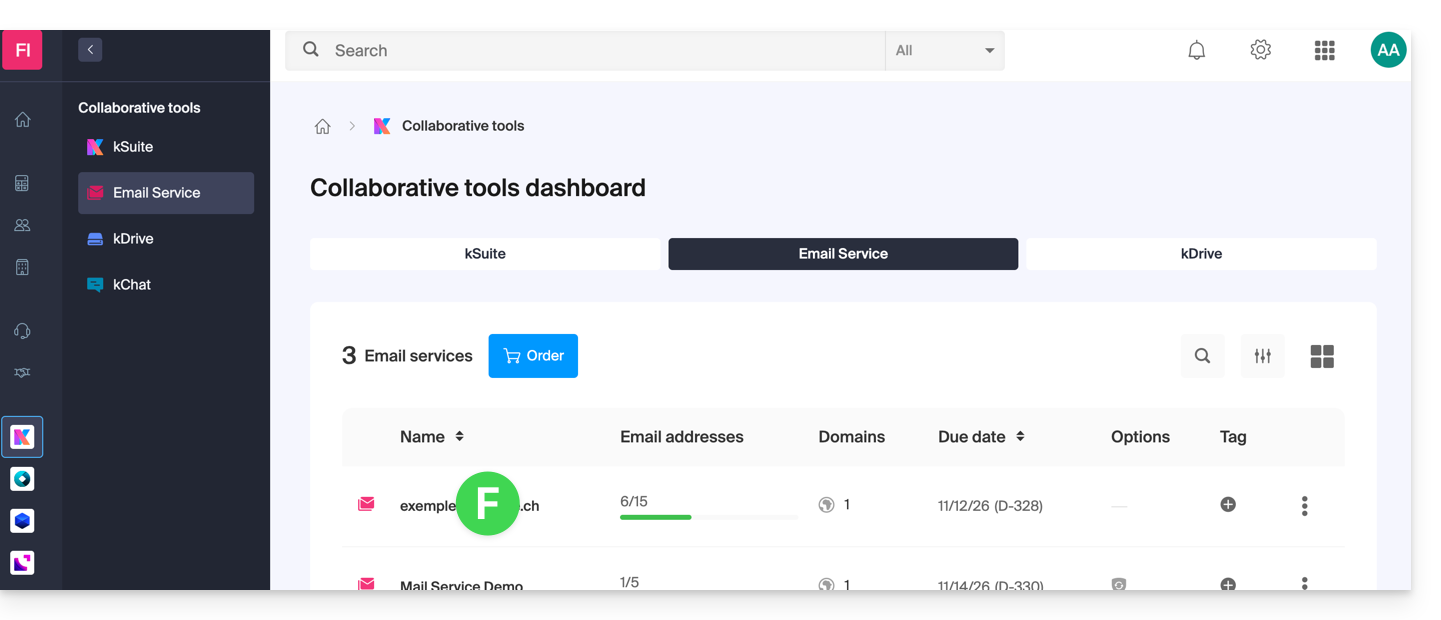
- Once on the Mail Service to which the address belongs, click on the email address in question:
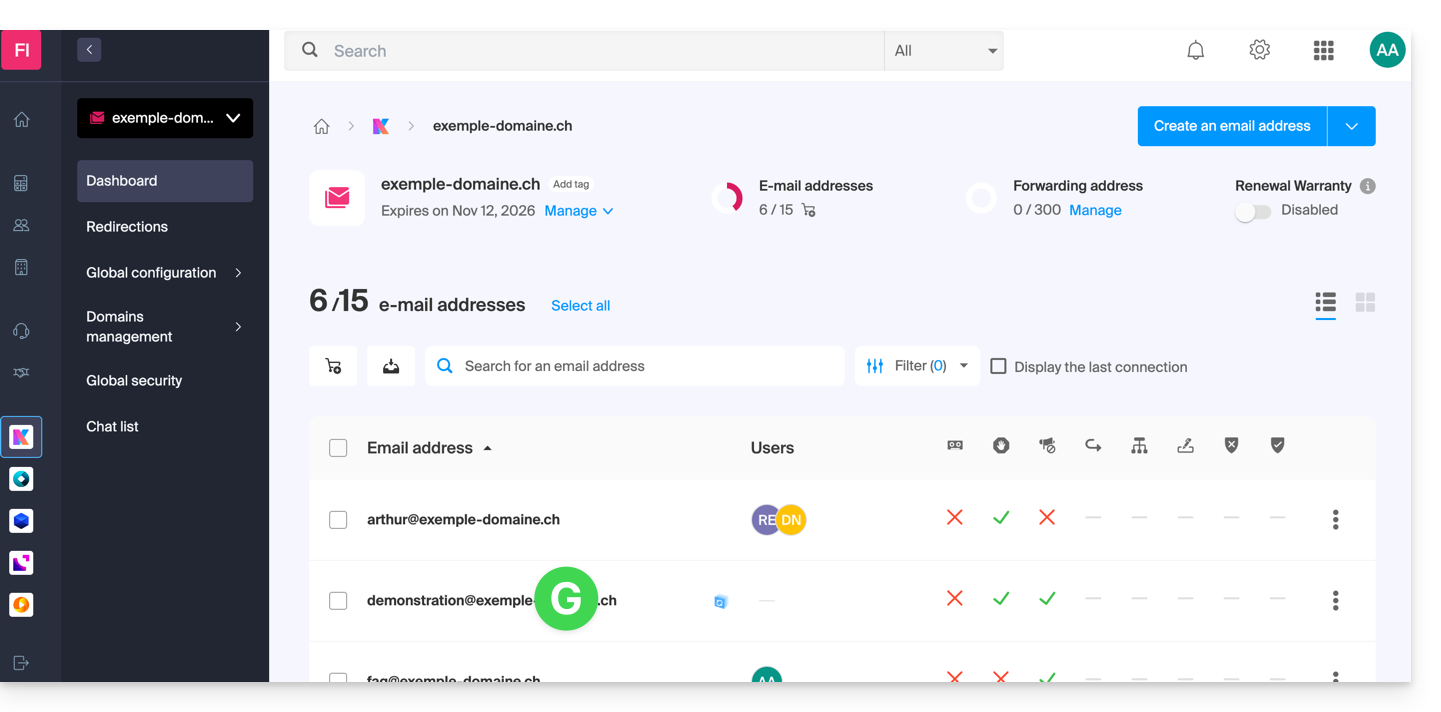
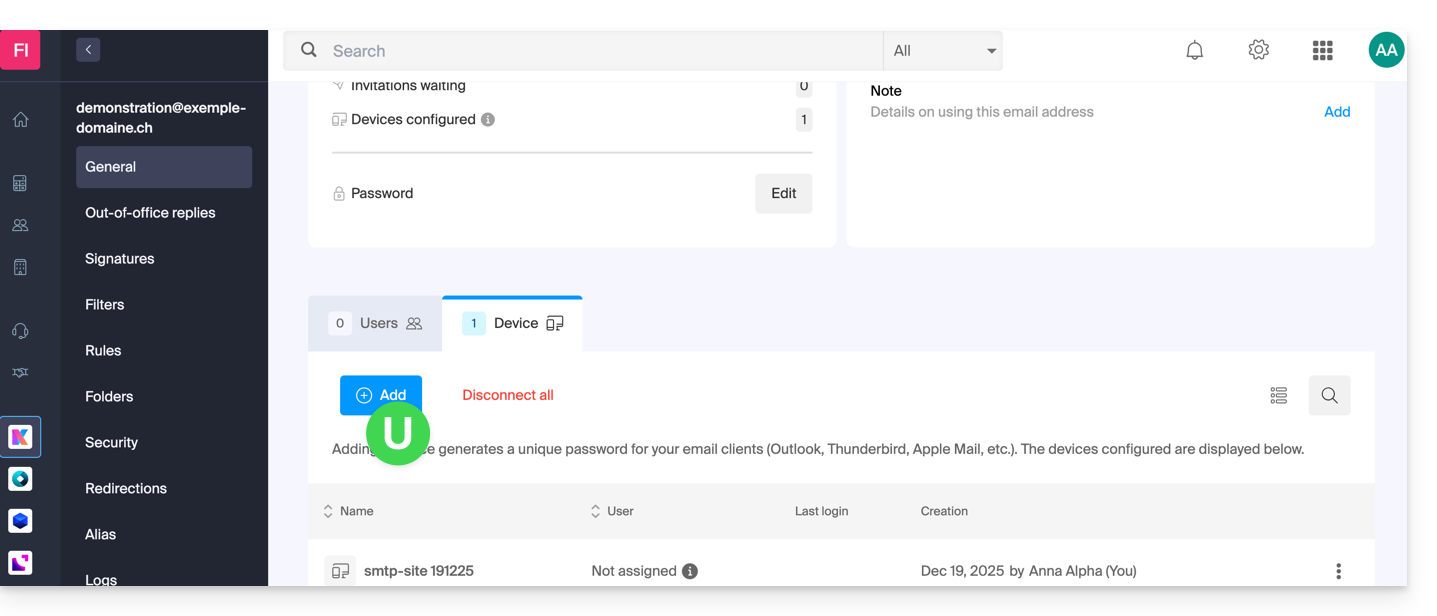
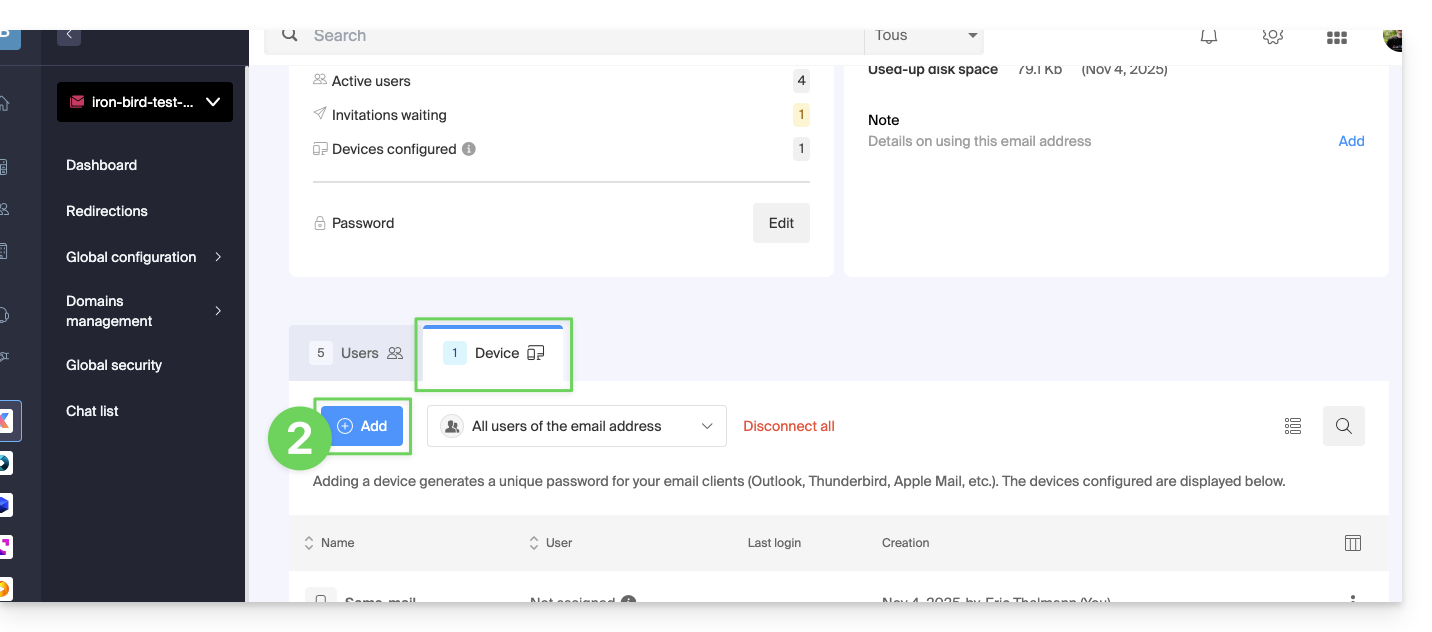
- Once on the email address in question, click on the Devices tab and then on Add a device:
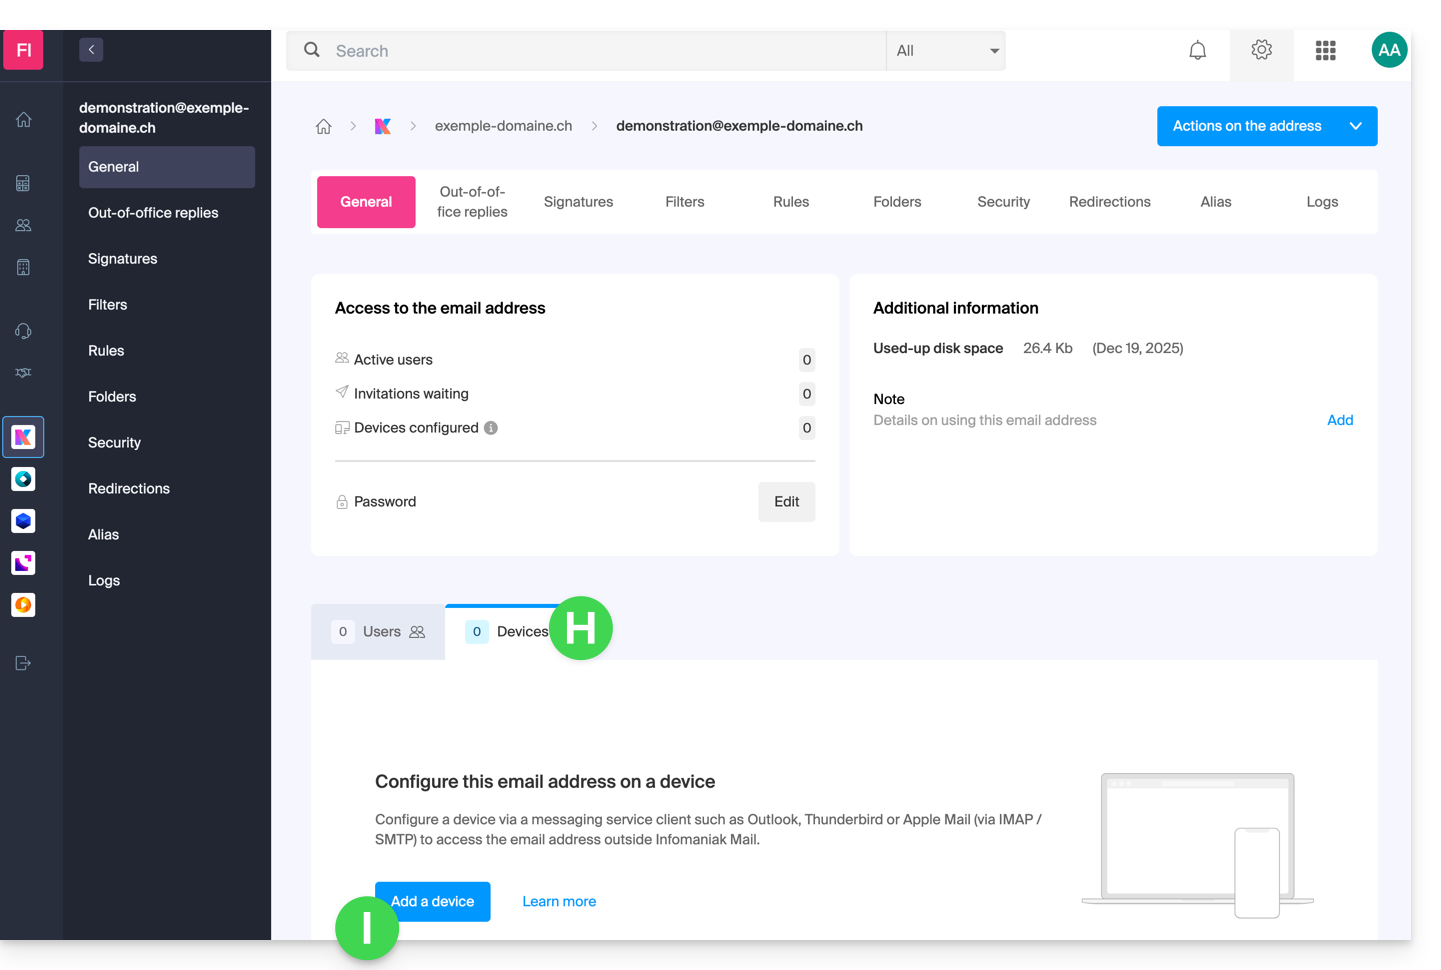
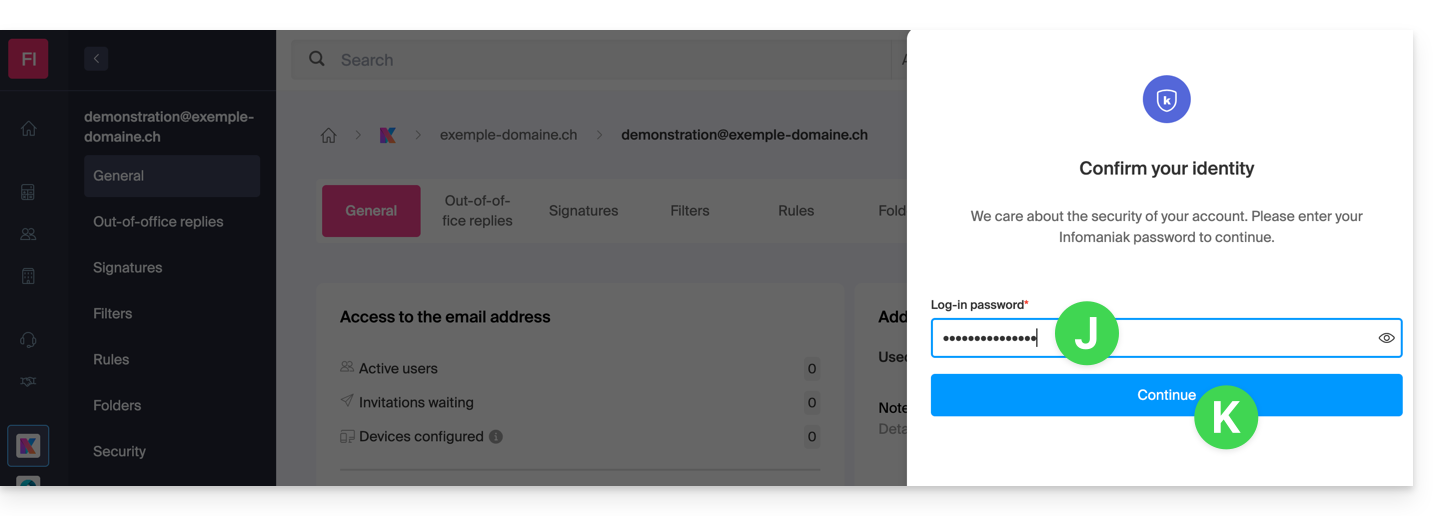
- It may be necessary at this stage to re-enter the login password (the one at point B above):
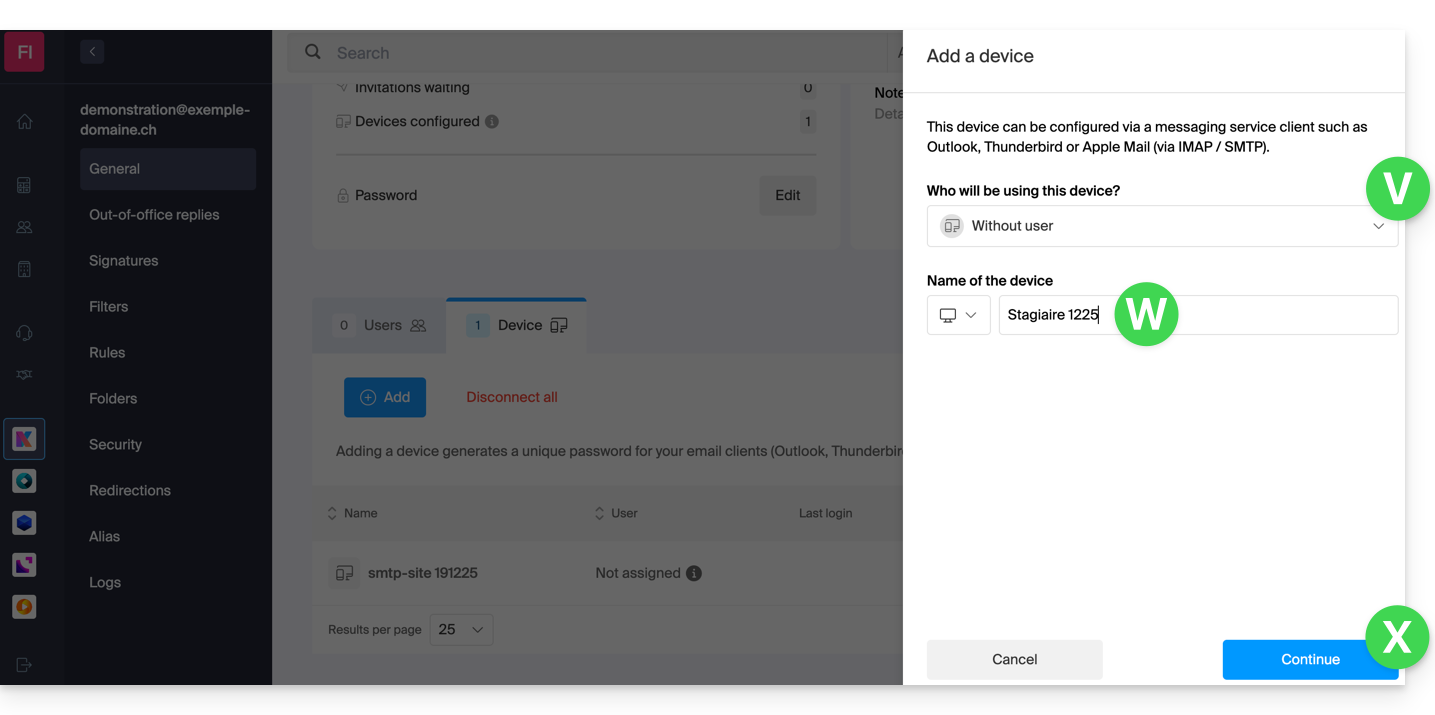
- Then choose to not specify a particular user ("Without user").
- Enter a descriptive name that allows you to identify the reason why you created this device (here the user needs a password to be able to send emails from a site, and adds as useful information today's date):
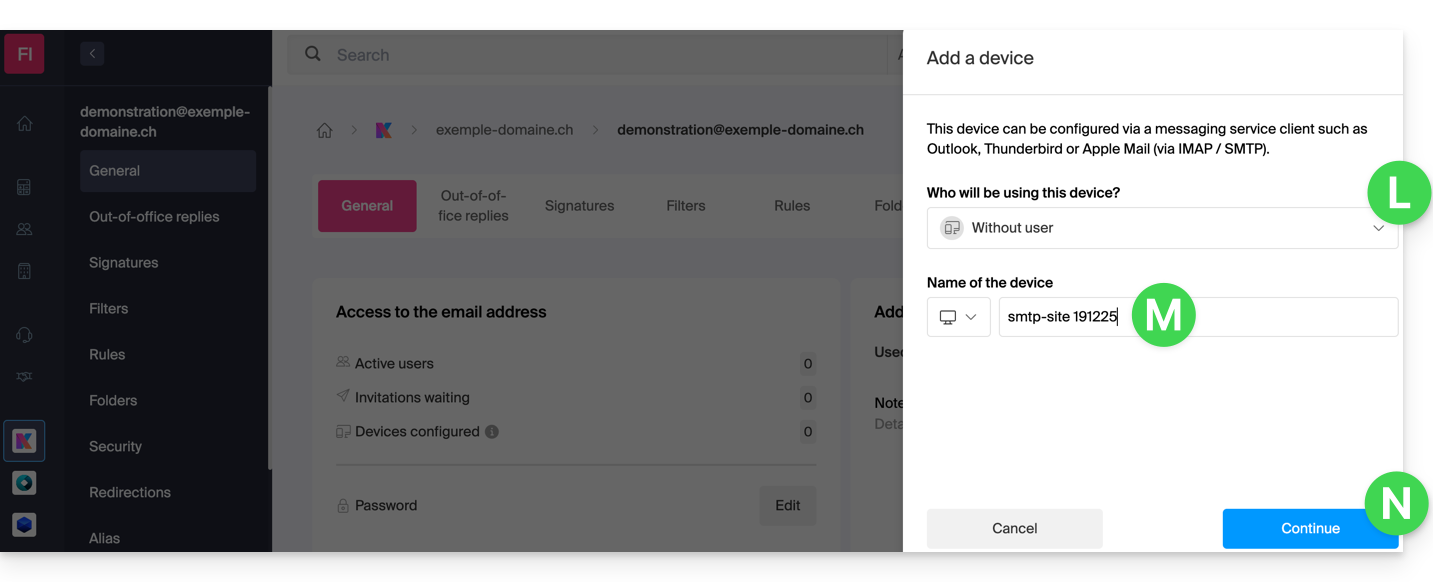
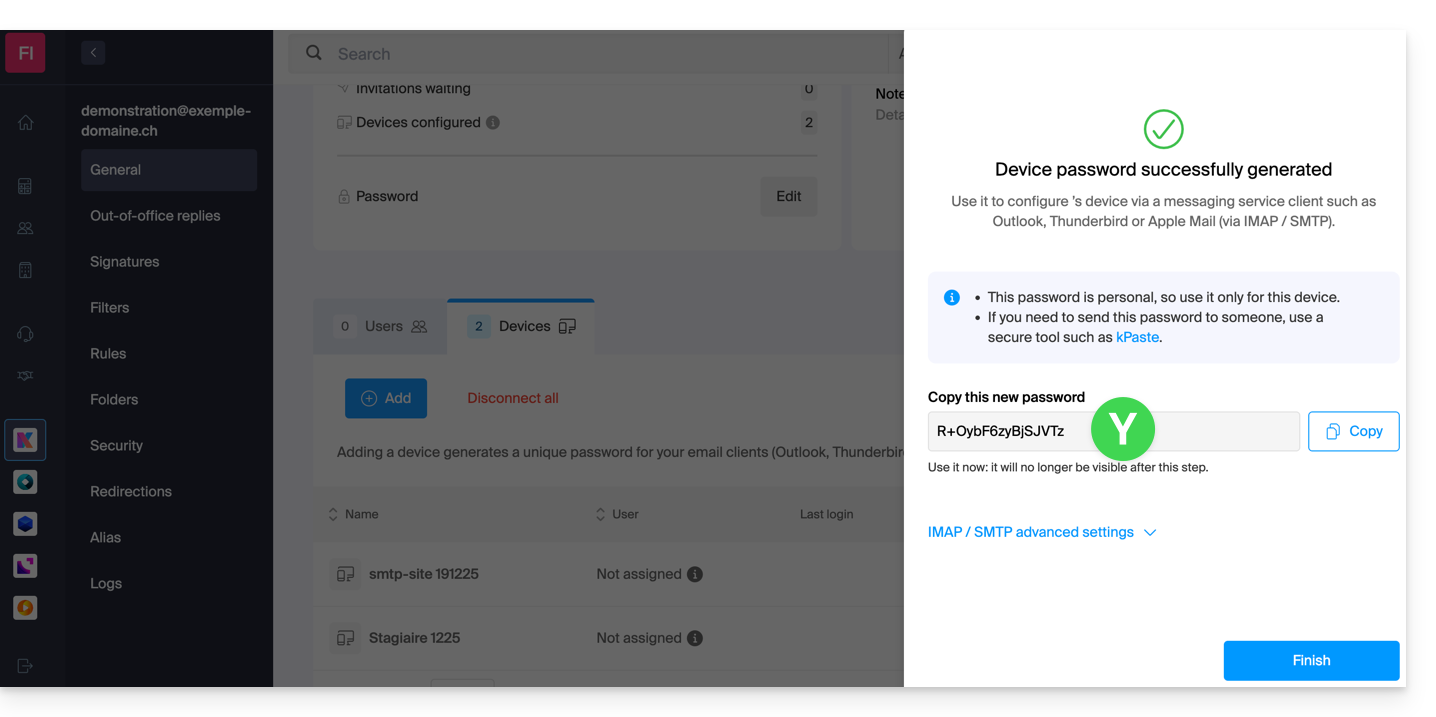
- There you go: the new password is displayed, you can change the characters (16 minimum) if necessary (be careful, it will not be possible to display it again later).
- Save it at the bottom of the page to use it as you wish:
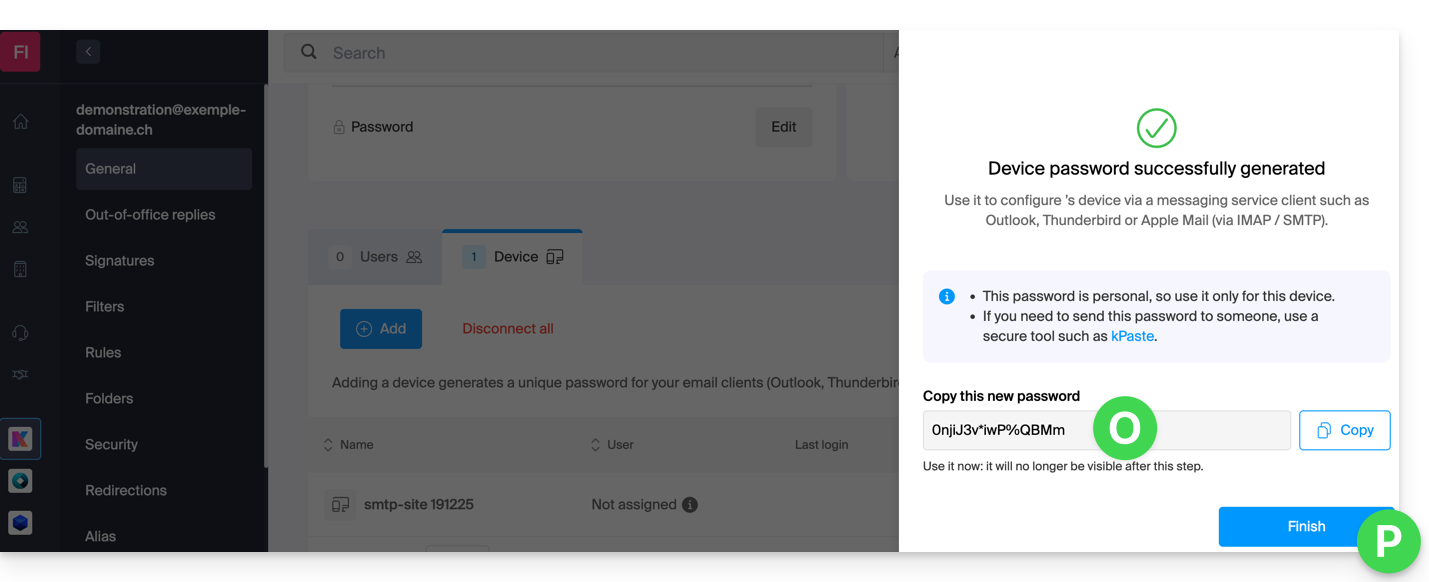
You clicked on the “Finish” button (above “P”) without noting the password? No problem, modify or generate a new one!
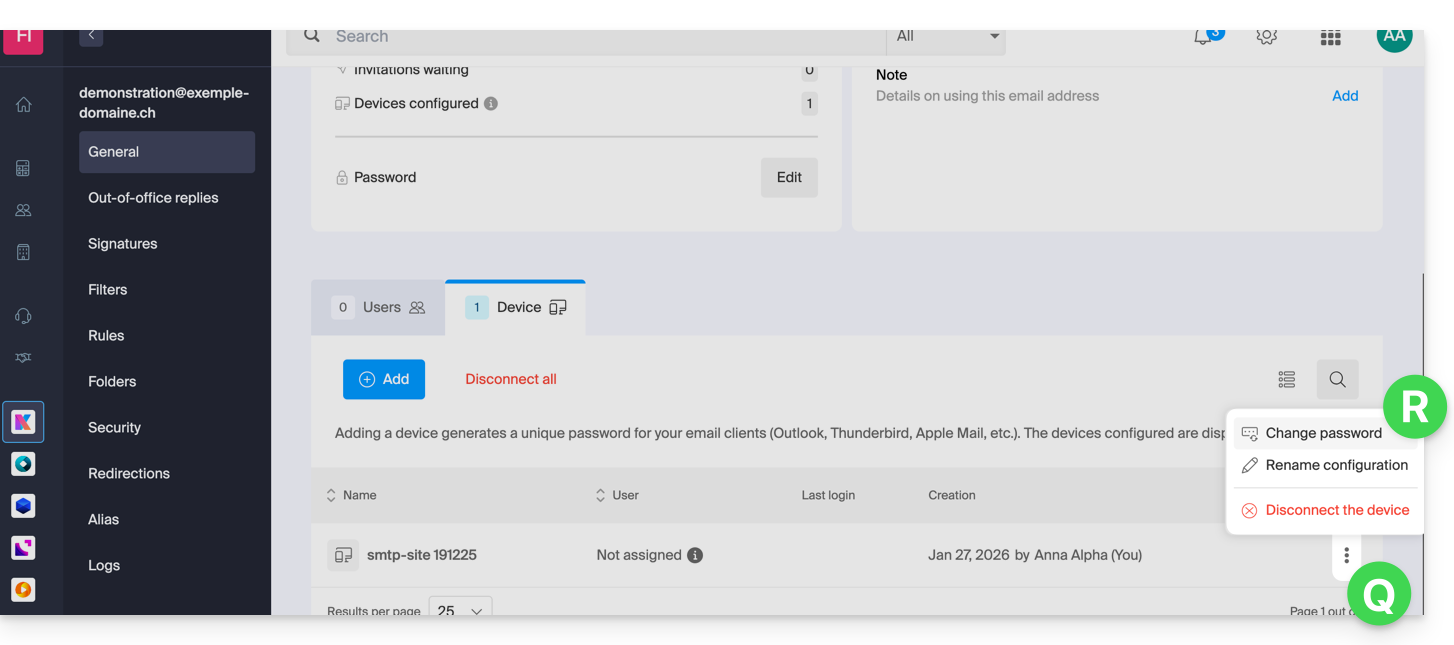
- Click on the action menu ⋮ located to the right of the device just created and click on Modify the password:
- Click on the button on the far right of the field to generate a new random password and/or enter the secure characters you wish to use (16 minimum) for the new password, then click on the button to save the modification:
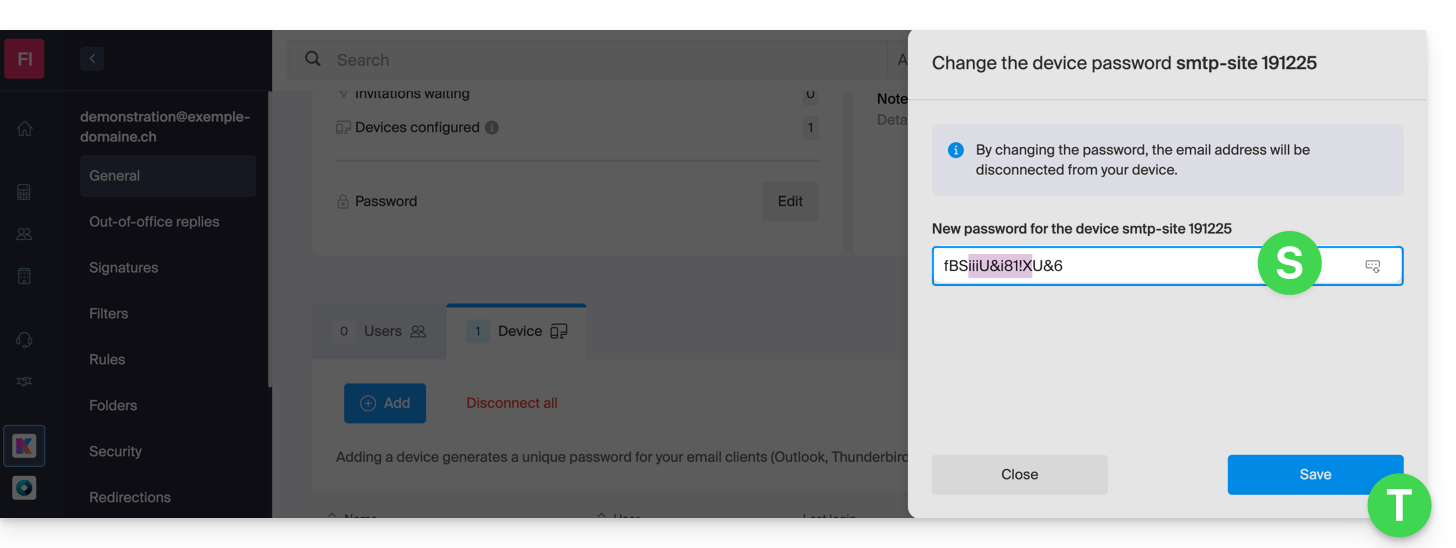
- There you go, the password that replaces the old one is displayed permanently, you can enter it on your device(s) in place of the previous one (be careful, it will not be possible to display it again later).
Do you need a password for a secondary and temporary user? No problem, generate a second one!
- Click on the button to Add another device:
- Then choose to not specify a particular user, and enter a name that allows you to identify the reason why you created this device (here the user needs a password for an intern for a week):
- There you go, the password is displayed, you can use it as you wish (be careful, it will not be possible to display it again later, however, as before, it will of course be possible to modify it or generate a new one):
Alternative: create a password for a user
Rather than creating a password yourself and having to communicate it to the user later, you can directly allow a user who does not have as many permissions as you to obtain the password for the device they need:
- Add the new user (existing in the Organization or not) as described in this other guide:

- Once the user is added, switch to the devices tab to add a new device:
- If necessary, enter the password to log in to your Infomaniak account and then select the user created in step 1.
- Click on the first option to send a setup assistant for the user's device.
- Click on the Continue button:
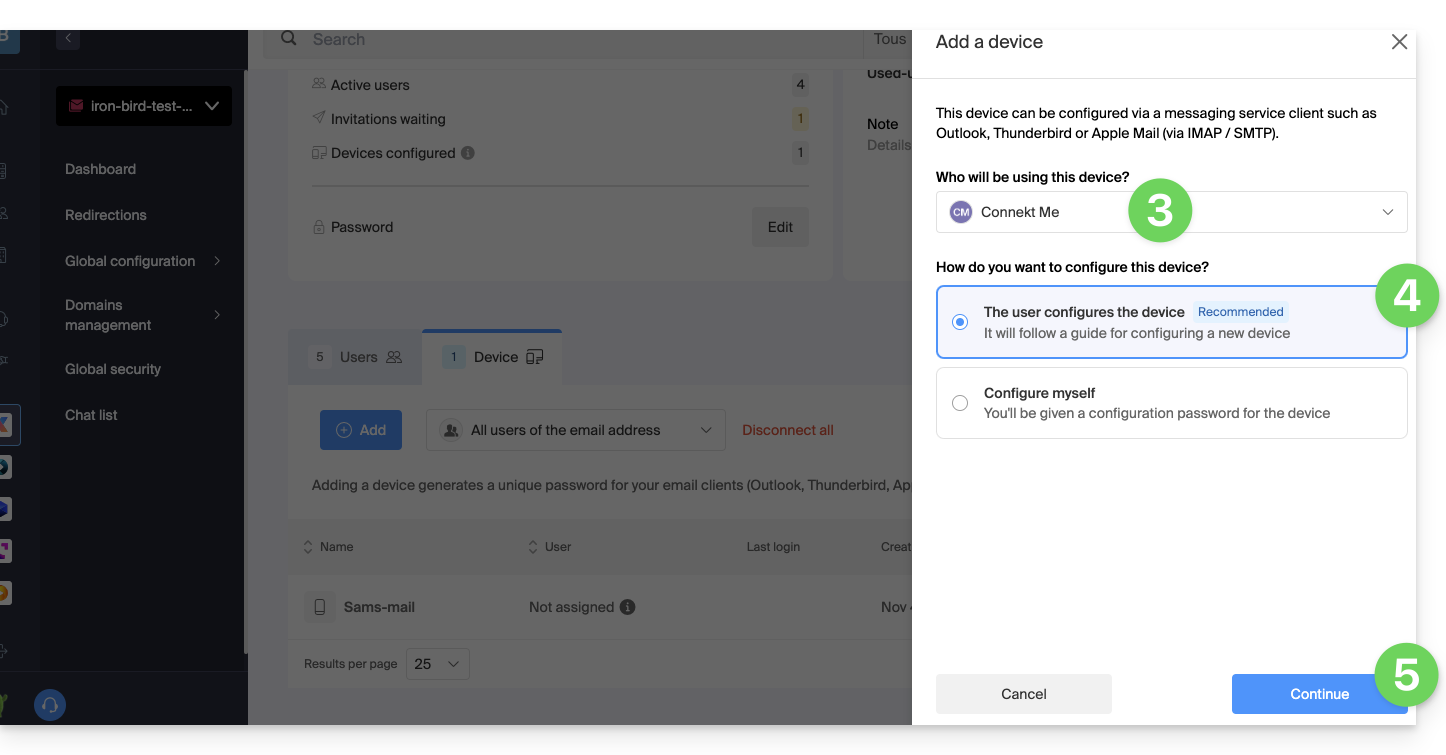
- Copy the invitation link valid for 30 days to send to the user.
- If necessary, send the invitation to the user's email address:
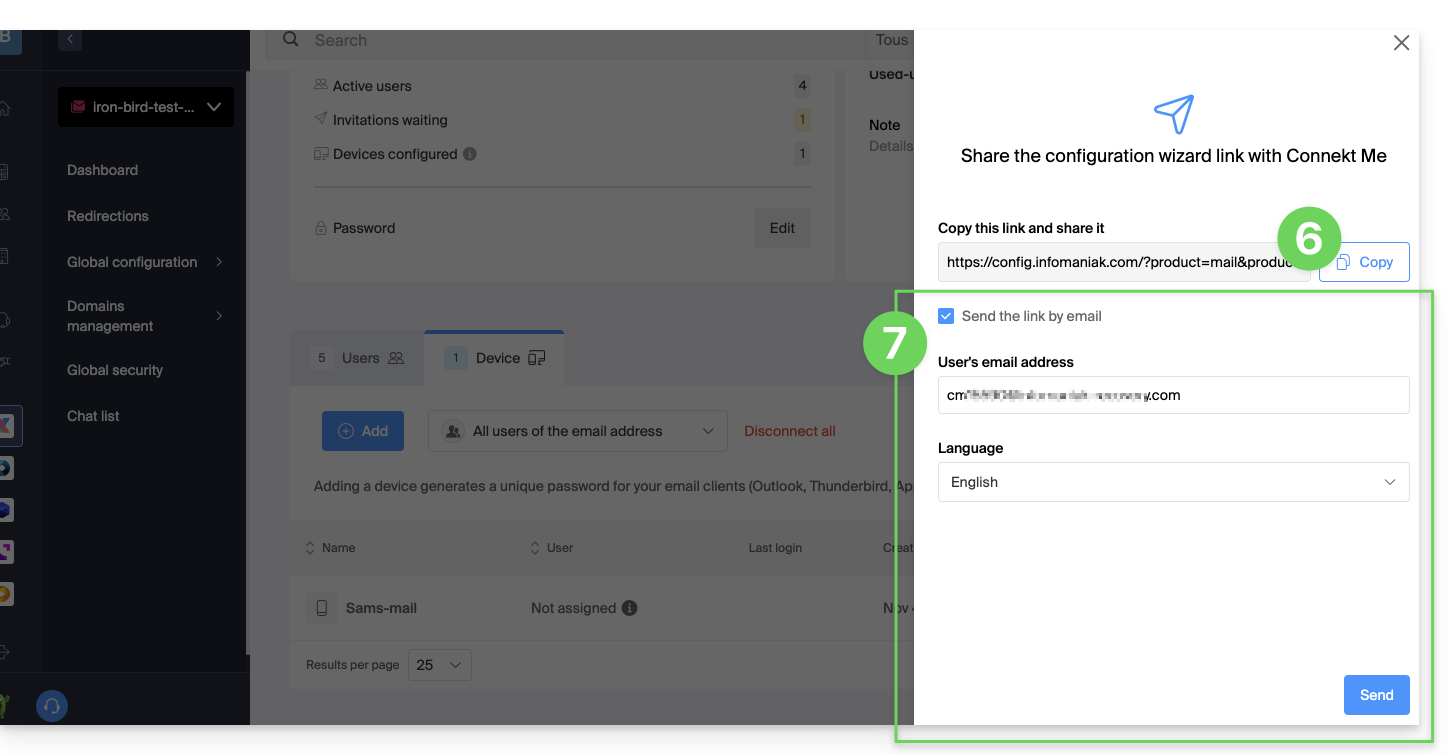
In point 4 above, you can also choose to generate a password:
- The created password will be displayed, you can modify it one last time, copy it, and keep it safe (password manager, for example); it will no longer be able to be displayed afterward.
Modify or remove an existing password
When access is no longer necessary, revoke only the password concerned: other accesses to the email address remain active.
Link to this FAQ:
Has this FAQ been helpful?
This guide explains how RBLs work, the questionable policy of some of them, and the ways to resolve a potential email block.
Preamble
- RBLs (Realtime Blackhole List) or DNSBL (DNS Black List) are lists containing addresses / IP / provider names / servers, known as major spam senders.
- These are often large generalized blacklists, allowing to spot messages considered as unwanted and those who send them, that some providers maintain (smtpcheck, uceprotect: non-exhaustive list)…
Adding the email address to the RBL
When an email address is identified as belonging to an unwanted sender, it is blocked to prevent the reception of unsolicited messages. A block in the RBL does not expire. Addresses will be listed indefinitely.
If you receive a message indicating that your email address is blocked by RBL, this means that the Infomaniak security system has detected suspicious or unwanted activities associated with this email address. This may include mass sending of unsolicited messages, participation in phishing campaigns or other malicious behaviors.
Resolving an email block (RBL)…
… if the error mentions your address and RBL
If you get errors of the type
anna.a@domain.xyz is rbl blacklisted - http://chk.me/rbl
when sending an email and you think it’s a false positive, contact Infomaniak support.
To avoid having your email address blocked by the RBL blocking system in the future, follow the best practices for using email:
- Do not send unsolicited messages or mass messages to unknown recipients.
- Regularly sort the list of recipients used.
- Do not participate in phishing or cybercrime activities.
- Ensure the best level of security where your emails are used:
- strong password
- up-to-date software
- up-to-date operating system (iOS, Android, Windows, macOS, etc.)
- up-to-date associated domain configuration
... if the error mentions an organization like Sorbs or Barracuda
If you get errors of the type
554 5.7.1 Client host blocked using sorbs
or similar:
- Follow the procedure of the mentioned organization (e.g. http://www.barracudacentral.org) to get your address removed from the list.
- Temporarily change your Internet service provider or connection method - WIFI vs 4G/5G - to send your messages.
- Inform your correspondent and their email provider to take the necessary steps and/or to stop using an unreliable RBL.
- Wait a few hours and try again.
Fewer and fewer professionals (ISP, hosts, etc.) use service providers like Backscatterer / UCEPROTECT which are primarily for profit, and there are many other very effective lists, such as ABUSIX or SPAMCOP, which are well-maintained and whose real goal is to fight spam, one of the priorities of Infomaniak.
Link to this FAQ:
Has this FAQ been helpful?
This guide presents the security model that allows you to assign users to an email address or to assign them a different password for each device or software that needs to access it.
Preamble
- Forget the times when a single, fragile password protected your mailbox:
- Previously, changing your password was a hassle: you had to update it on all your devices at the risk of locking yourself out.
- Now, you can create multiple passwords for the same email address without interrupting existing connections.
- Each password can be revoked individually, without affecting other users or devices linked to this address.
- A password is never displayed again after its creation; modify it or create a new one if necessary.
- If you change your phone, you only modify the access of this mobile device; your other installations remain connected without interruption.
- In case of loss of a device, you only revoke its specific password without affecting the others.
- You keep control over who accesses what, without having to reveal your main password.
Add a device
= Add a password to read the address on a device (iPhone, Outlook, etc.)
To set a new email password:
- When creating an email address, no password is defined (as using the address on Infomaniak Mail apps does not require a password other than the one that already allows you to access your Infomaniak account).
- From the Mail Service, you then simply create specific passwords for each device (Outlook, iPhone, CRM, etc.) as needed.
- You can also manage devices from the Web Mail app directly.
- When access is no longer needed, revoke the concerned password: other accesses to the email address remain active.
Add a user
= Allow viewing of the address on Infomaniak Mail interfaces
To authorize a user (including yourself) to view the email address on Infomaniak:
- From the Mail Service, you add the address to your Infomaniak Mail apps or decide which external user should access the email address.
- When access is no longer needed, still from your Mail Service, remove the user's access: other accesses to the email address remain active.
- Any user of an email address on Infomaniak can view the list of any other users who have access.
Link to this FAQ:
Has this FAQ been helpful?
This guide concerns the notifications you can receive with the Infomaniak Mail mobile app (application for iOS/Android smartphones or tablets).
Receive notifications based on a specific email address
The Infomaniak Mail mobile app allows you to manage multiple email addresses, and you can choose to receive notifications only for certain email addresses and not for others.
To access the app's notification settings, refer to this other guide.
Troubleshooting…
… on iOS
In the Infomaniak Mail mobile app settings, check that notifications are enabled for the email address in question: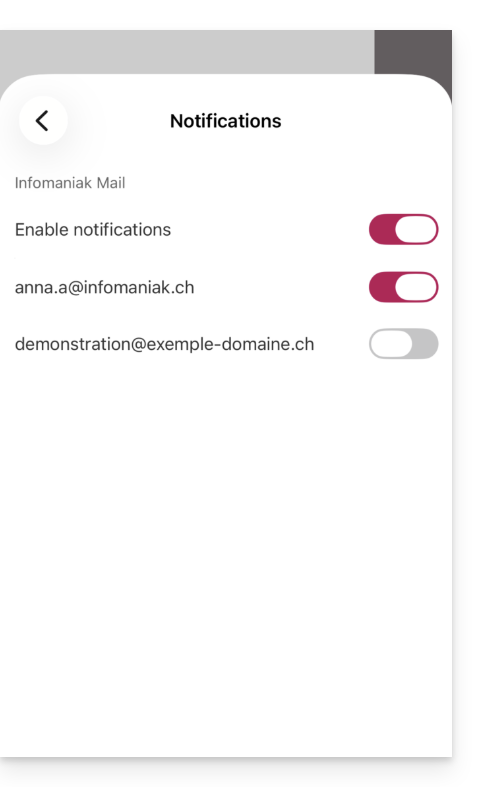
… on Android
On Android devices, especially Samsung devices with One UI 6.1 and later, the system settings screen for notifications no longer allows you to specify which of your email addresses should trigger a notification by default: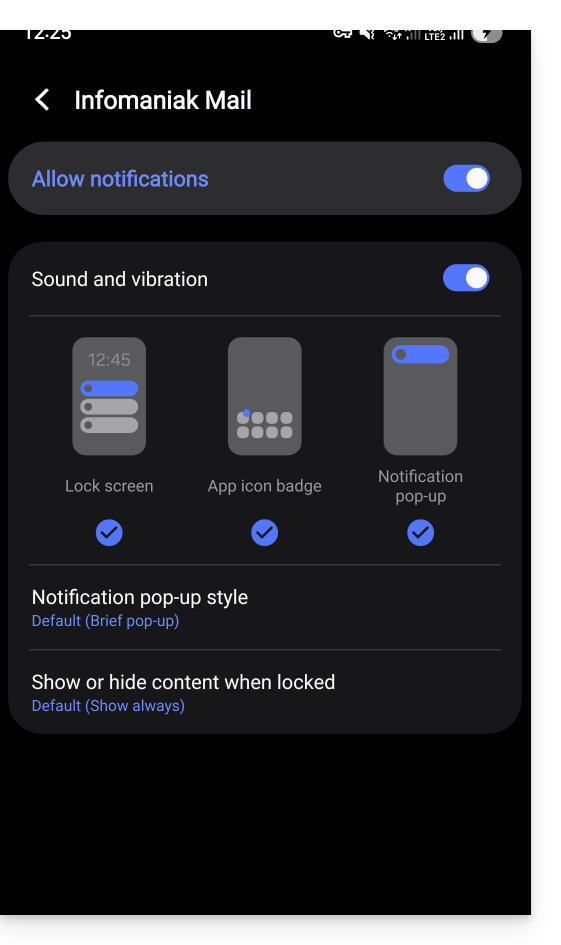
The solution is to enable it from the main Android notifications page by clicking on "Advanced settings" at the bottom of the window…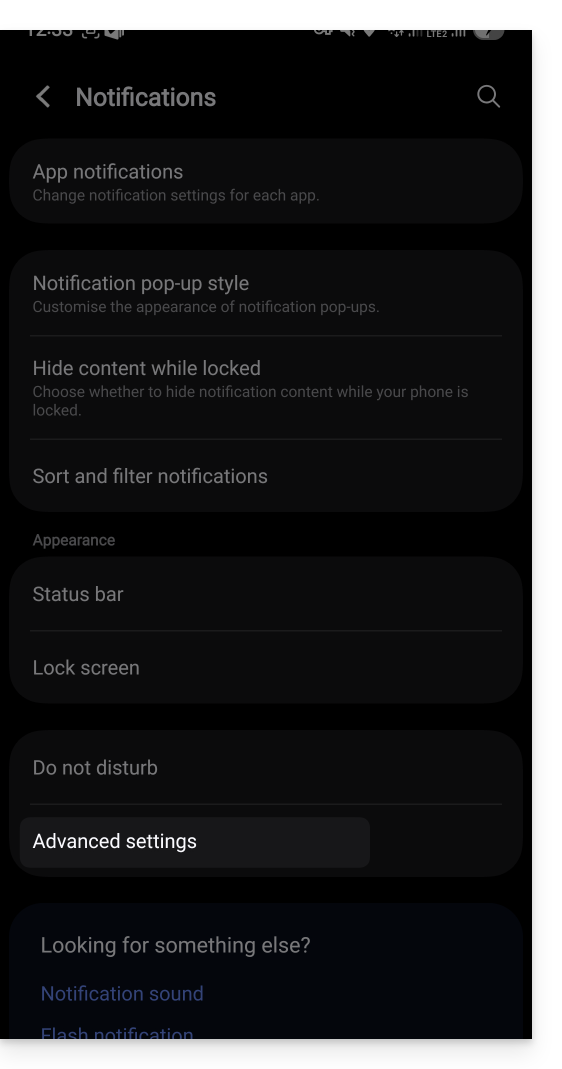
… the “Manage notification categories for each application” option: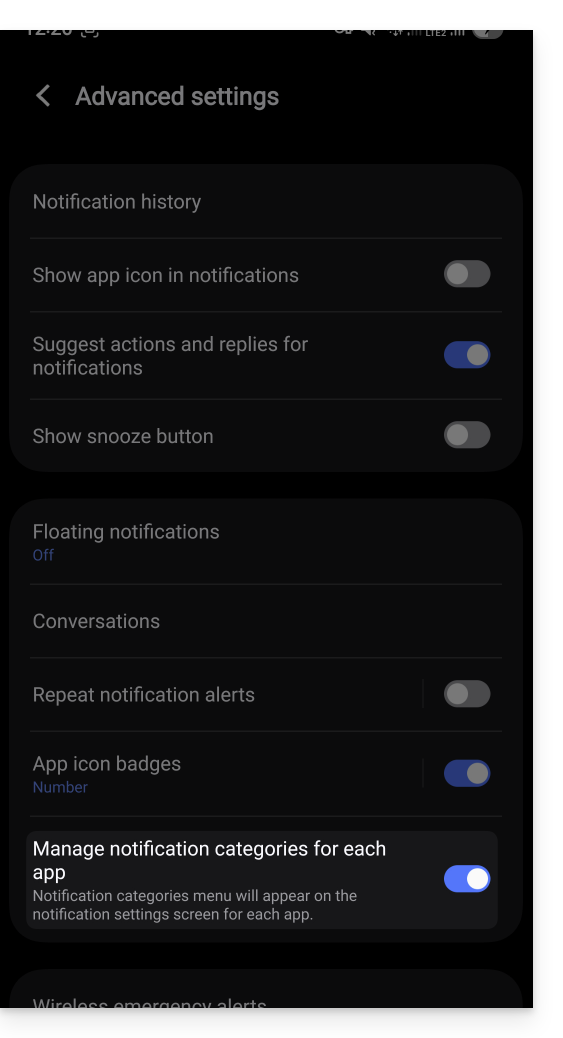
Then, go back to the Infomaniak app's notification page and you can tap on “Notification Categories”…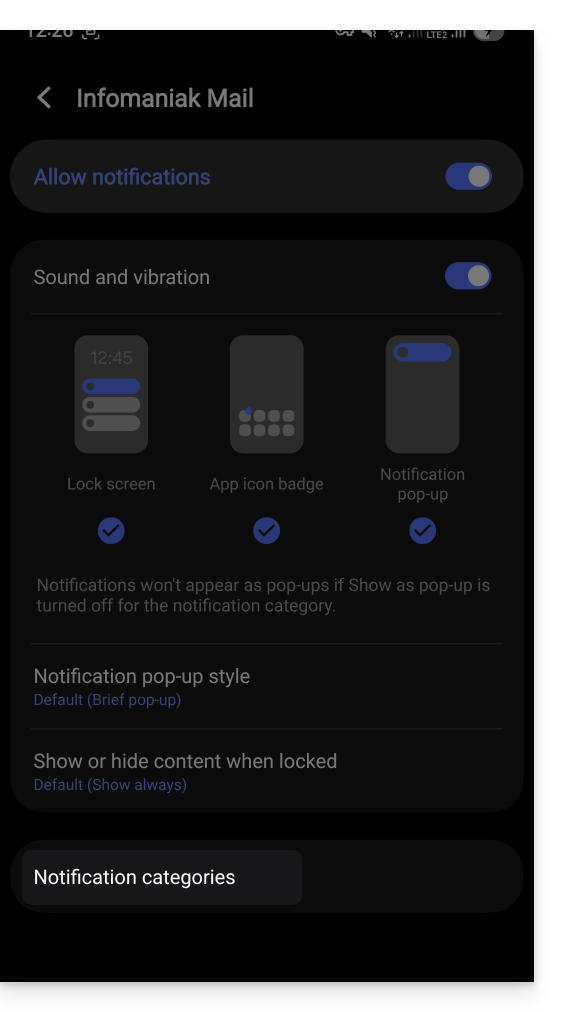
… to find the option to choose specific notifications by email address: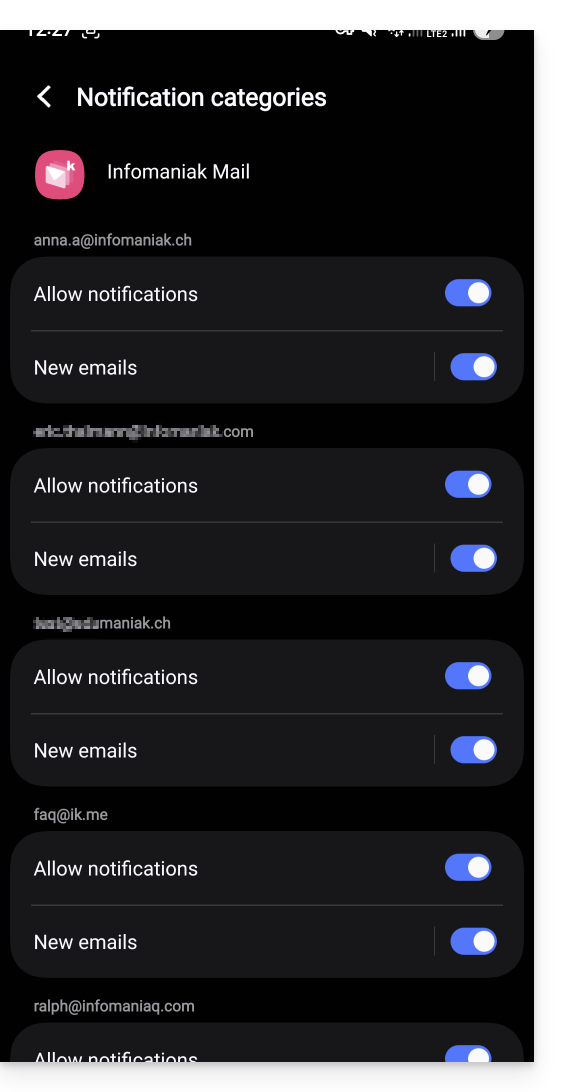
Receive all notifications
If you have enabled notifications for the app on your mobile device, you will receive a notification for each new message that arrives.
Troubleshooting…
If you see a new message arriving in your inbox, but it doesn't trigger any notifications on your device, there may be several reasons.
- Start by opening the app to make sure it is working, and update it if necessary.
- Open another app or turn off the device screen (if the Infomaniak Mail app is open, in the foreground, with the screen on, the device may not emit any notifications).
- Send a new test message to your email address to trigger a notification.
- Is the test message in the inbox? Indeed, a message going to spam or another folder may not trigger any notifications.
… on Android
- Have you waited several tens of minutes? Indeed, quick notifications (like push notifications) require going through a Google service to function, but some devices that do not use Google services (like Fairphone) may experience notifications arriving at much longer intervals.
Link to this FAQ:
Has this FAQ been helpful?
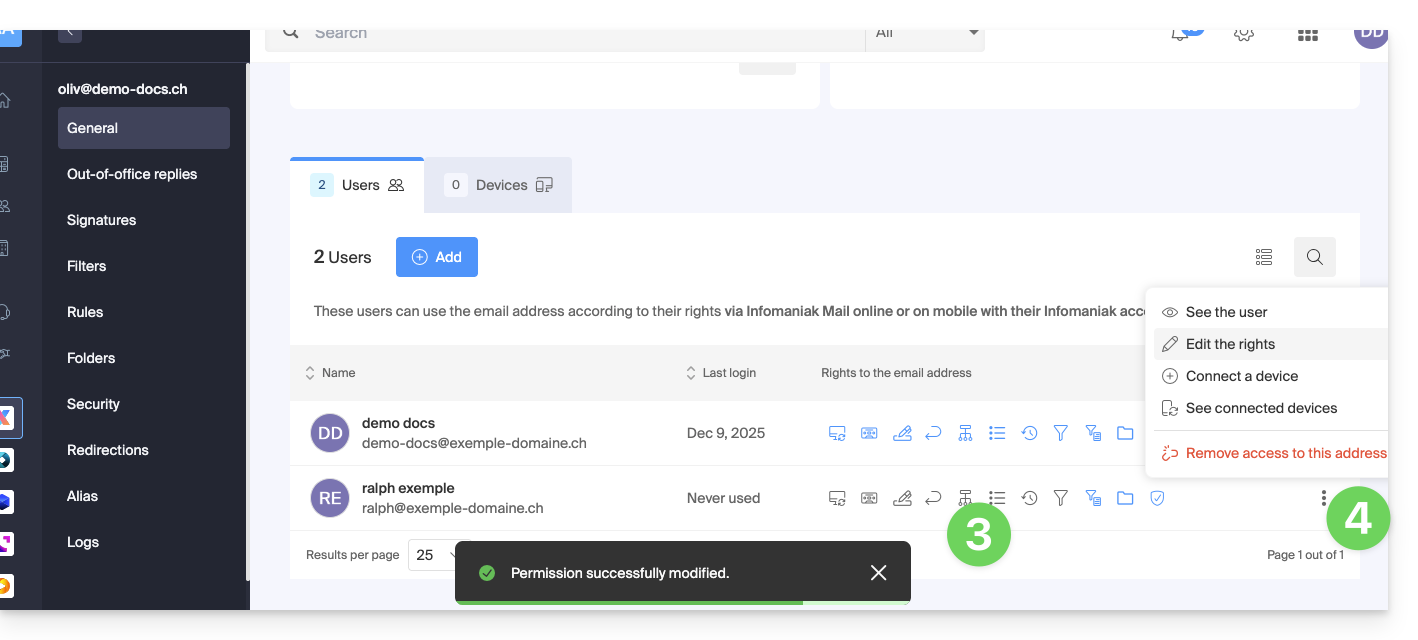
This guide explains how to manage users of an existing email address.
Prerequisites
- Order a Mail Service from Infomaniak.
- Create one or more addresses on this Mail Service.
- Be Administrator or Legal Representative within the Organization.
Managing and removing a user
The current model for managing mail access allows each user of an Organization to connect independently and securely to the same email address, without sharing a global password.
In the case of one or more existing users already in the Organization, the added email address can automatically be added to their Infomaniak Mail interface.
If a user should no longer have access to an email address and its content, simply remove them from the interface, but there are 2 possibilities:
- Click here to access the management of your product on the Infomaniak Manager (need help?).
- Click directly on the name assigned to the product concerned.
- Click on the email address concerned in the table that appears:
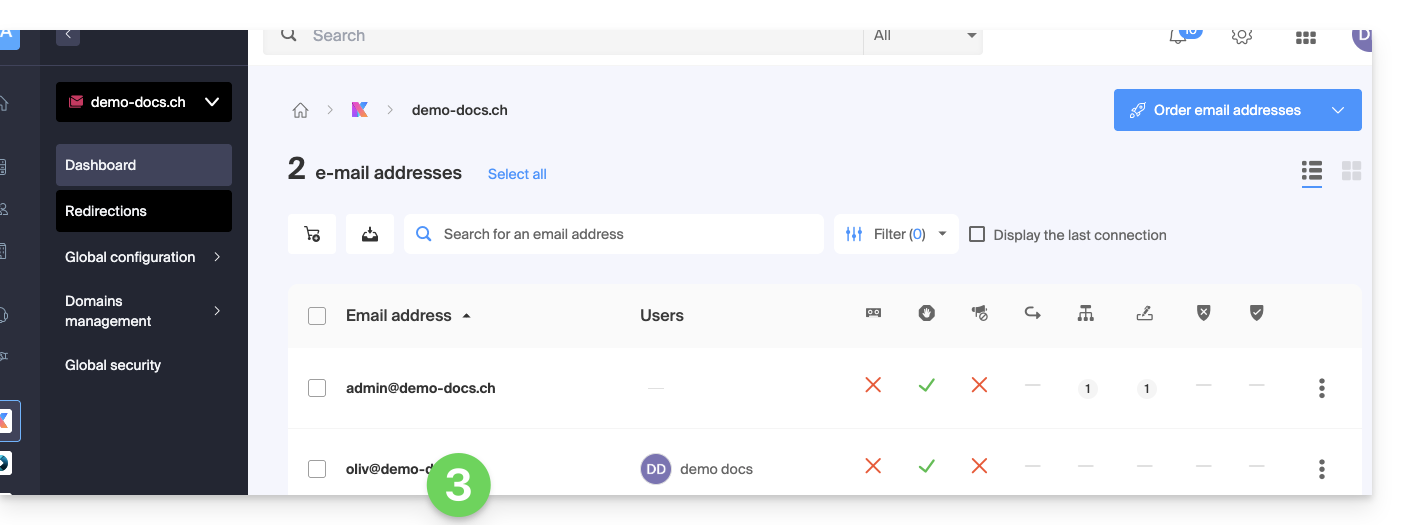
- On the table of users currently accessing the concerned address, click on the action menu ⋮ to the right of the concerned user.
- Choose whether you want to disconnect all of the user's devices: they will no longer have access to the email address on messaging software/clients but will continue to have access to the address on the Infomaniak app (Web, mobile…).
- You can choose to remove all of their access to the address, and they will never be able to access it again.
If you know that the user is using messaging software/client (but not listed among the users) you can also revoke a specific device without affecting other accesses/passwords/users.
Also refer if necessary to this other guide to block a complete Mail Service to all users.
Link to this FAQ:
Has this FAQ been helpful?
This guide presents, in the same way as adding devices (email passwords), the methods to allow a user (friend, colleague, client, family member, etc.) to view and use an email address created within an Infomaniak Mail Service, on the Infomaniak Web App Mail (online service ksuite.infomaniak.com/mail).
Preamble
- Refer to this other guide if you wish to access it yourself, with your own user.
- No password should be transmitted to the user you are inviting.
- The email address will be automatically added to the Infomaniak Mail interface of the user, after accepting the invitation.
- If the email address in question is used as a login identifier for an Infomaniak account, it cannot be shared for security reasons.
Invite to use the email from the Mail Service
To allow an already active user to access the email address you wish to share:
- Click here to access the management of your product on the Infomaniak Manager (need help?).
- Click directly on the name assigned to the product in question.
- Click on the email address concerned in the table that appears:
- Click on Add above the table of users currently accessing the email in question on Mail:
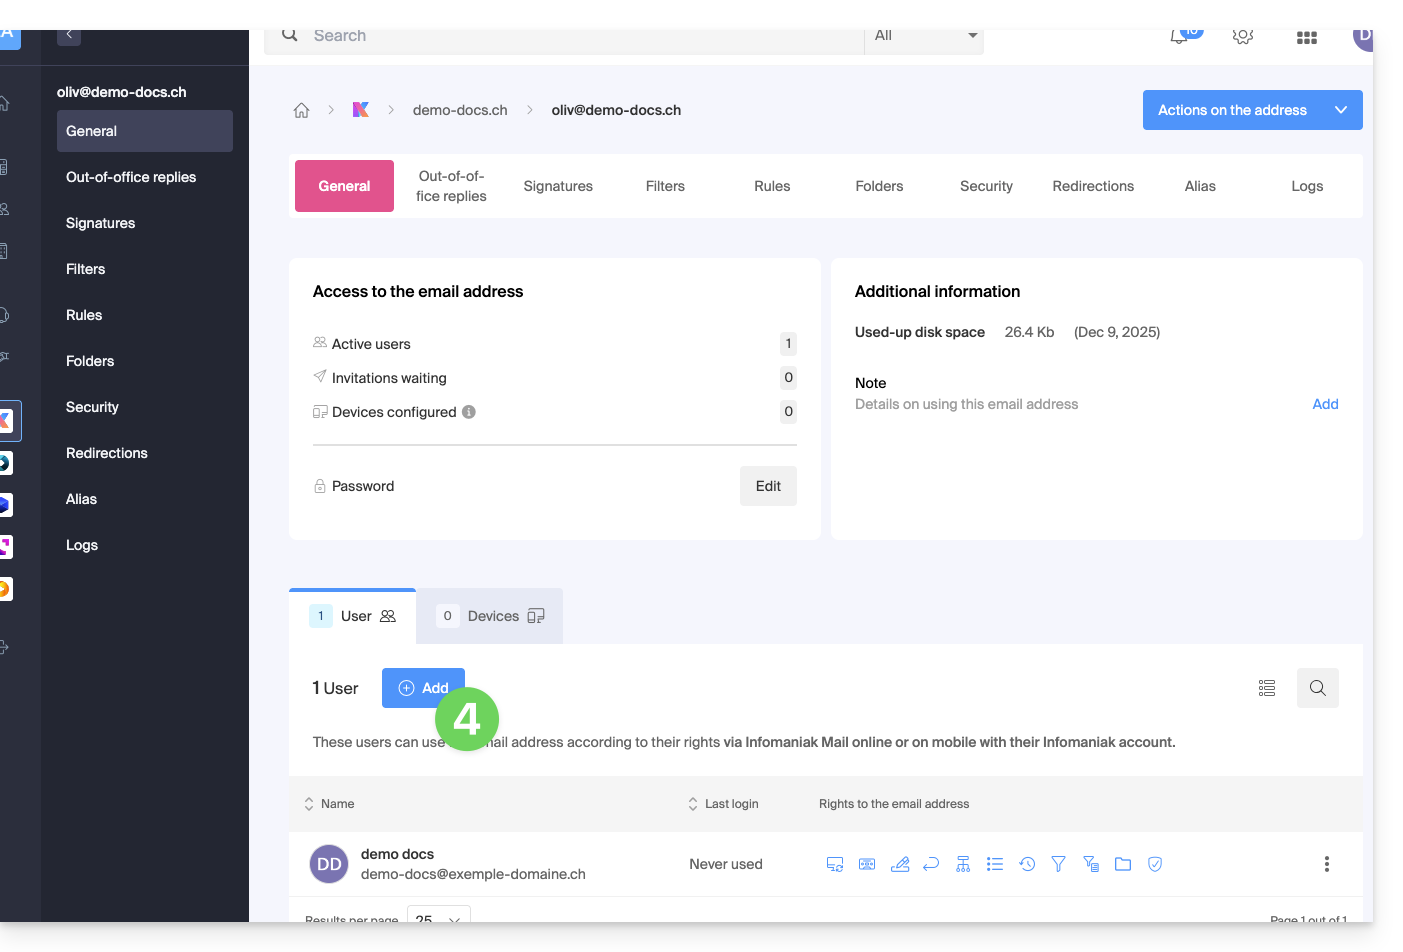
- Enter the password to log in to your Infomaniak account if prompted.
- Choose (a) one of the existing users within your Organization or (b) an external user to the Organization:
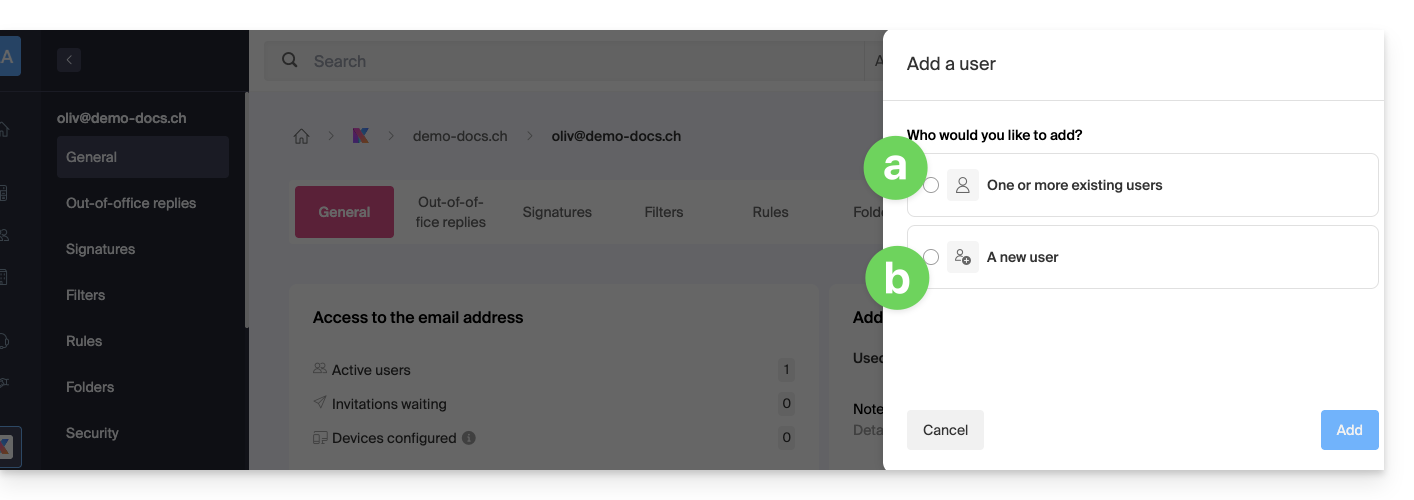
Choice [a]: existing user in the Organization
When the third party who needs access to the email is already part of the Organization, nothing could be simpler:
- The email address in question will be automatically visible and accessible to the selected user on the Infomaniak Web App Mail (online service ksuite.infomaniak.com/mail) with the specified permissions.
- Click the button to Add the user:
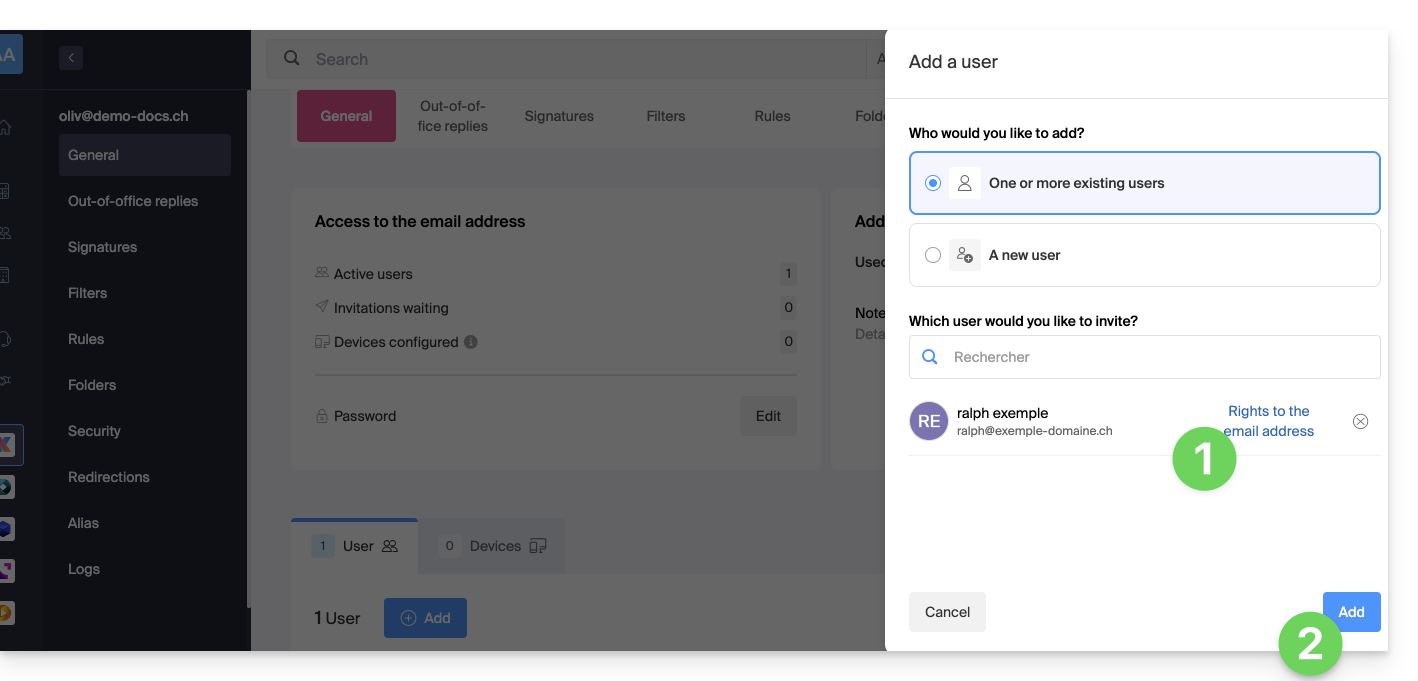
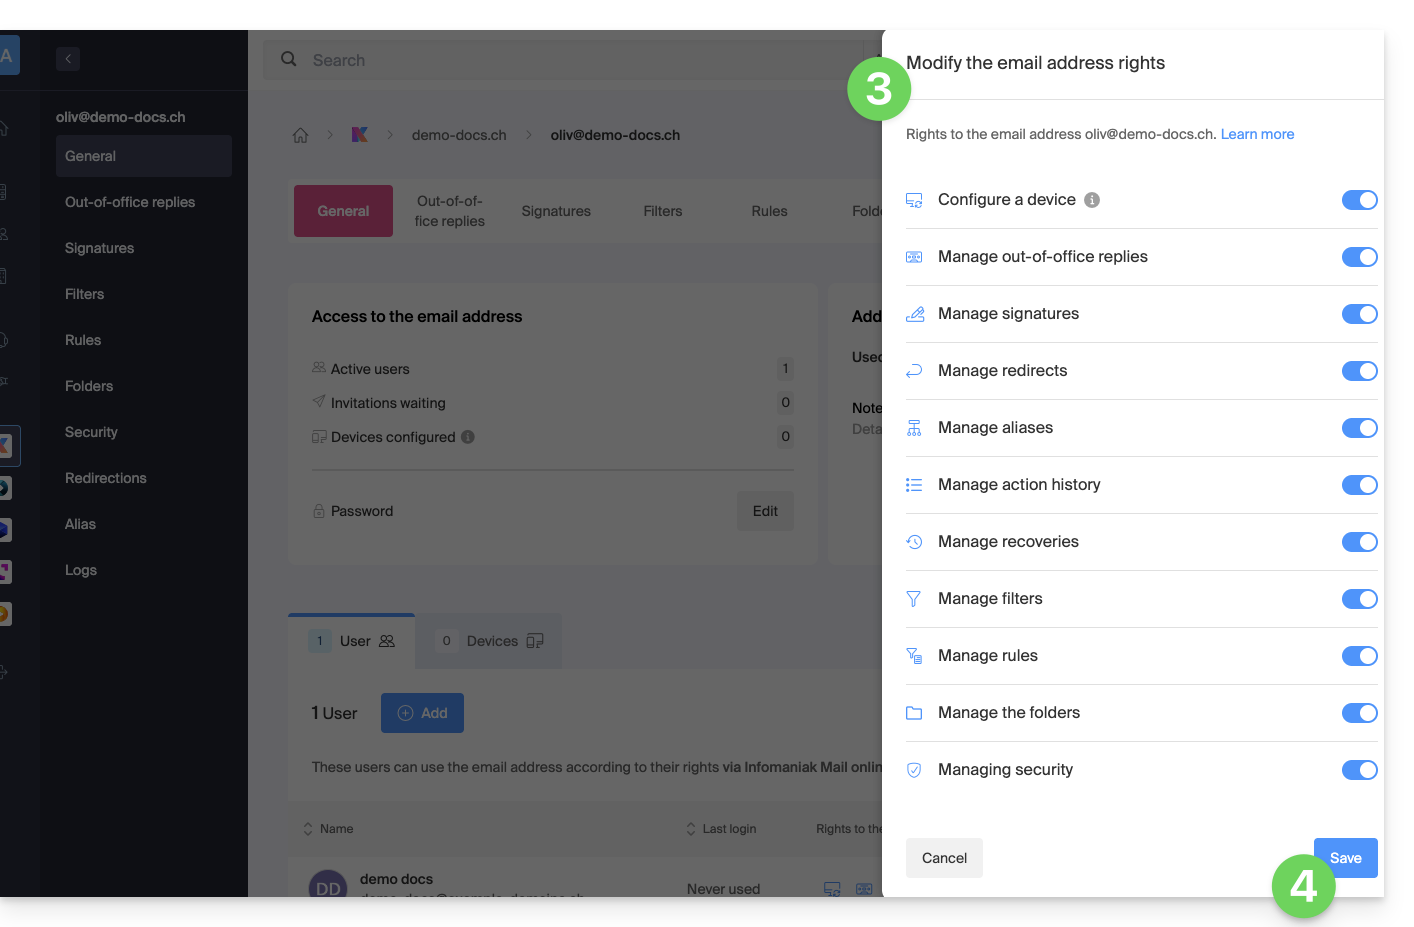
- After adding, it is always possible to restrict the user by clicking on the icons corresponding to the permissions…
- …or even revoke their access to the email address:
The user in question has access to the email address concerned: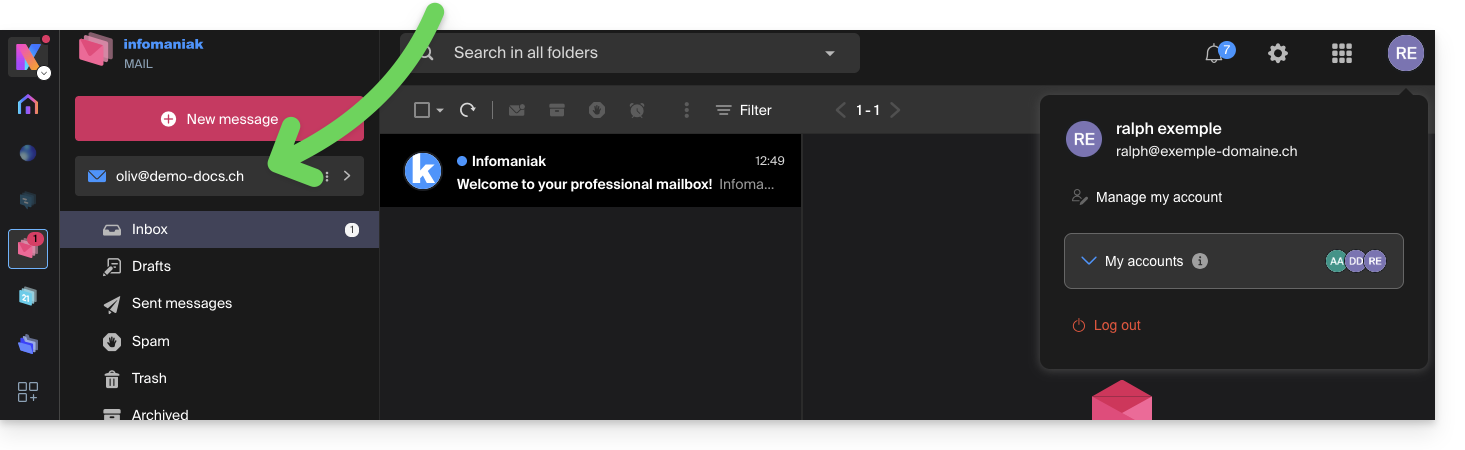
Choice [ b ]: external user to the Organization
If the third party is not at all attached to the Organization, either because they do not yet know Infomaniak, or because they have their own Organization on their side:
- Click on the radio button to select the choice of new user.
- Click to configure the user's rights:
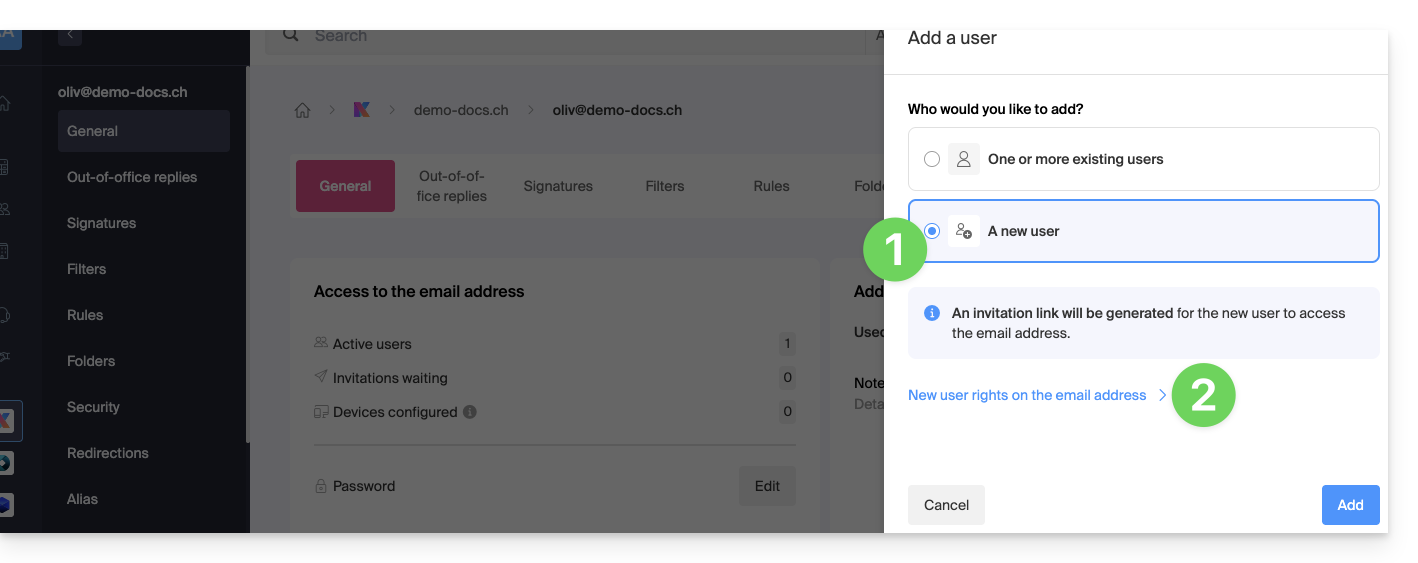
- Modify if necessary the permissions granted to the user for the email address concerned.
- Save the changes:
- Click on the button to Add the user:
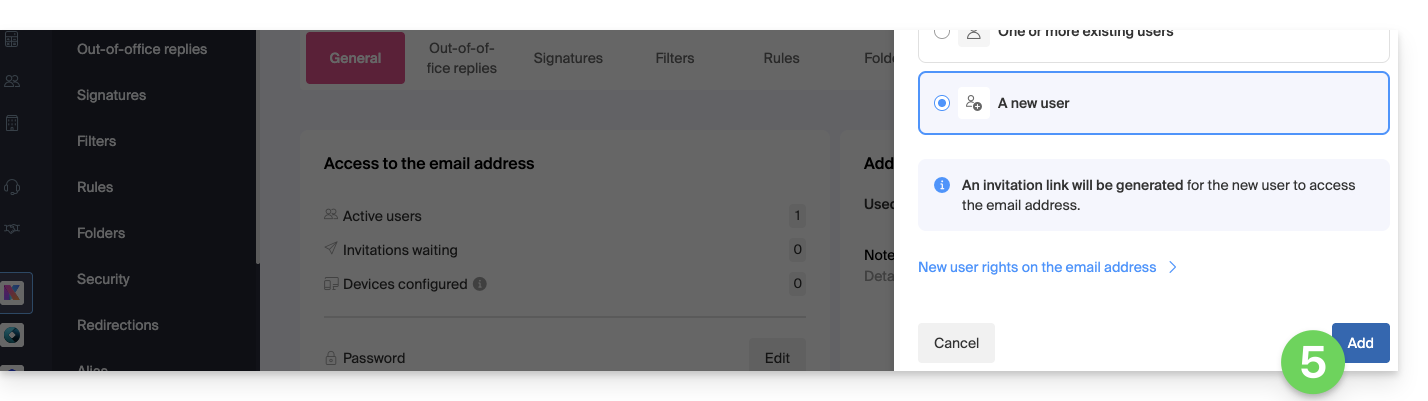
- The invitation is created (in the form of a URL type
https://welcome.infomaniak.com/iw/abcdef-12345..…) and the user just needs to execute the link (see below) for the email address concerned to be added to their Infomaniak Mail. - It is possible to send the invitation by email:
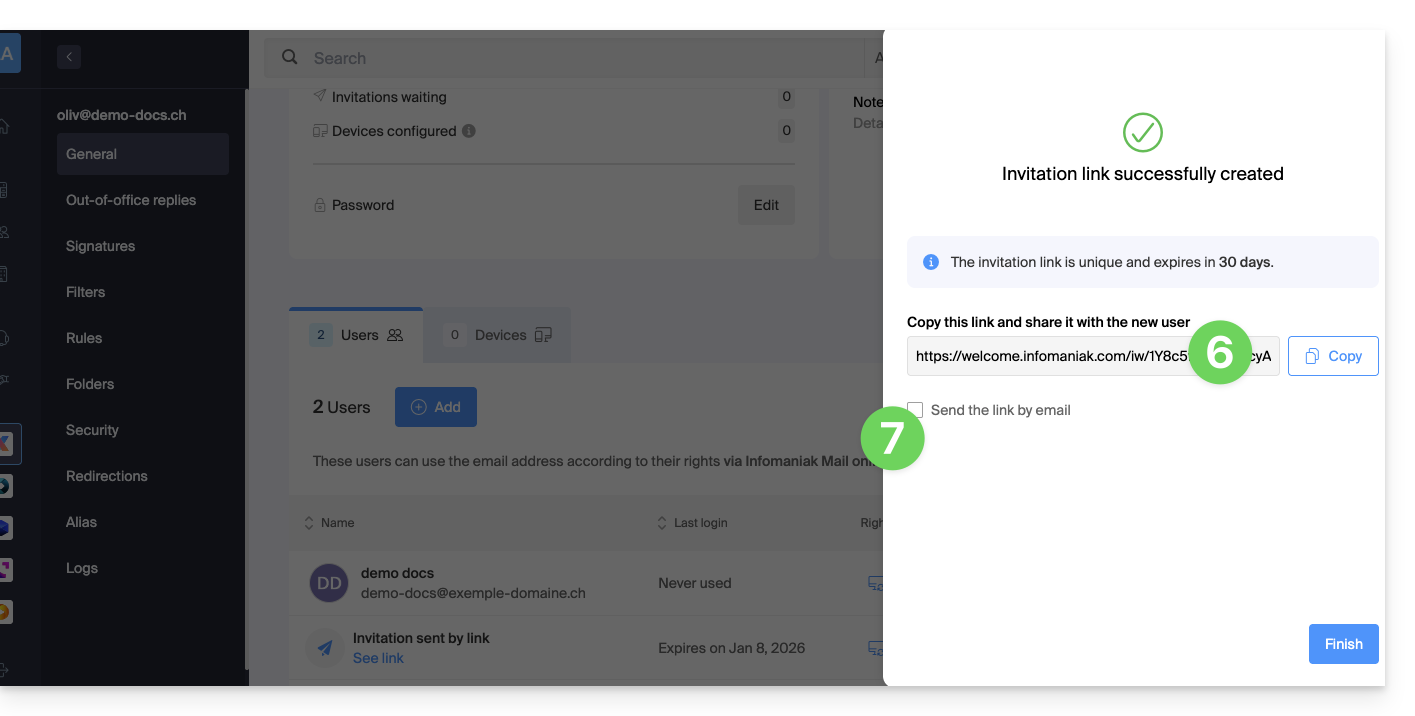
- The invitation is visible under the email address user tab, and it is possible to delete it at any time:

If the third party already uses the Infomaniak Web Mail app…
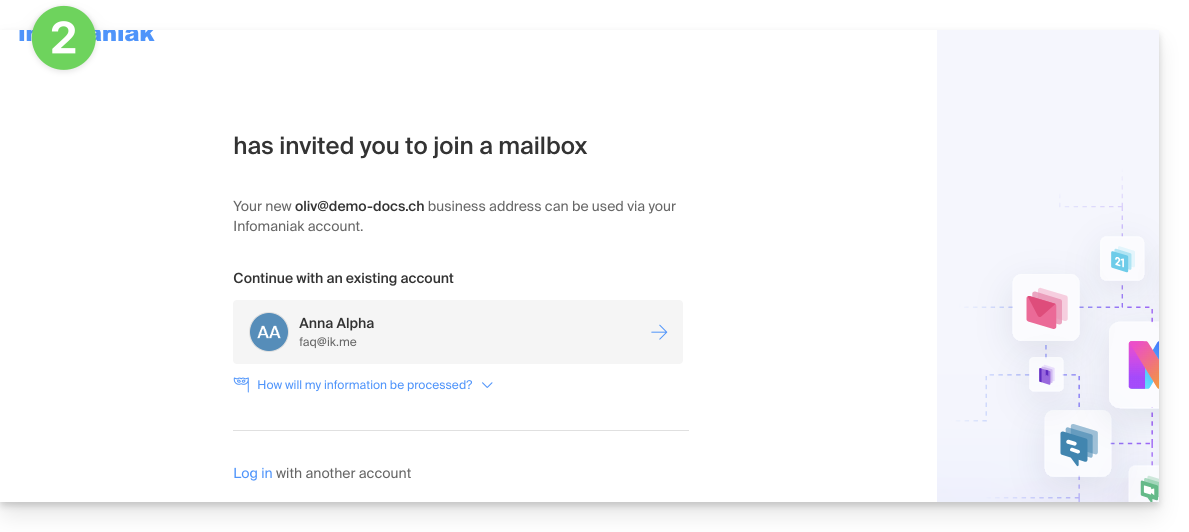
The user (third party) executes the invitation link while being logged in to their Infomaniak account…
- …or if they log in to their account after executing the invitation link:
- If necessary, the user can still switch accounts before attaching the address if necessary:
- The user in question has access to the email address concerned once they have chosen which Organization:
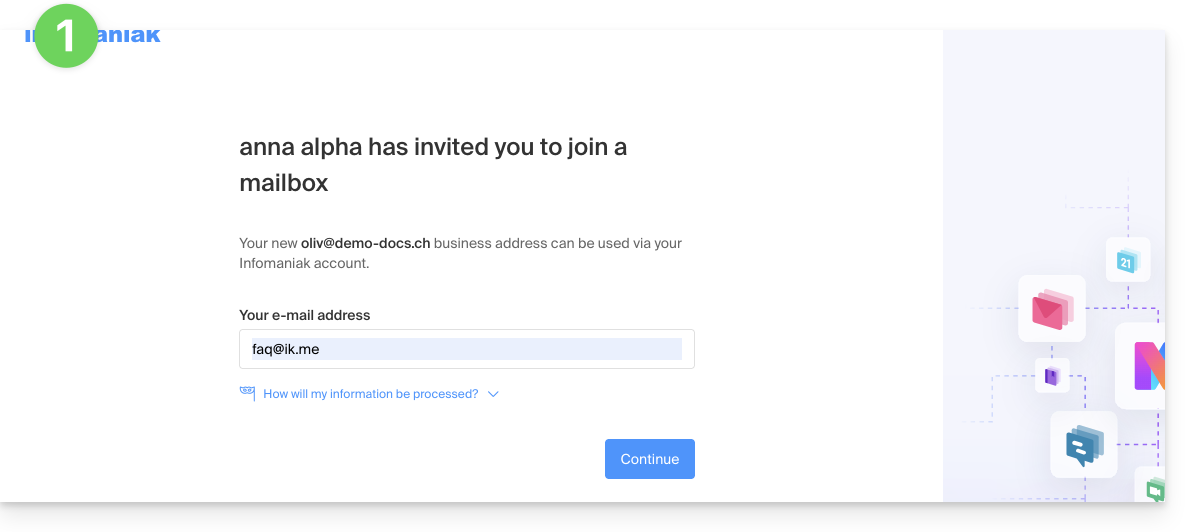
If the third party does not yet use Infomaniak…
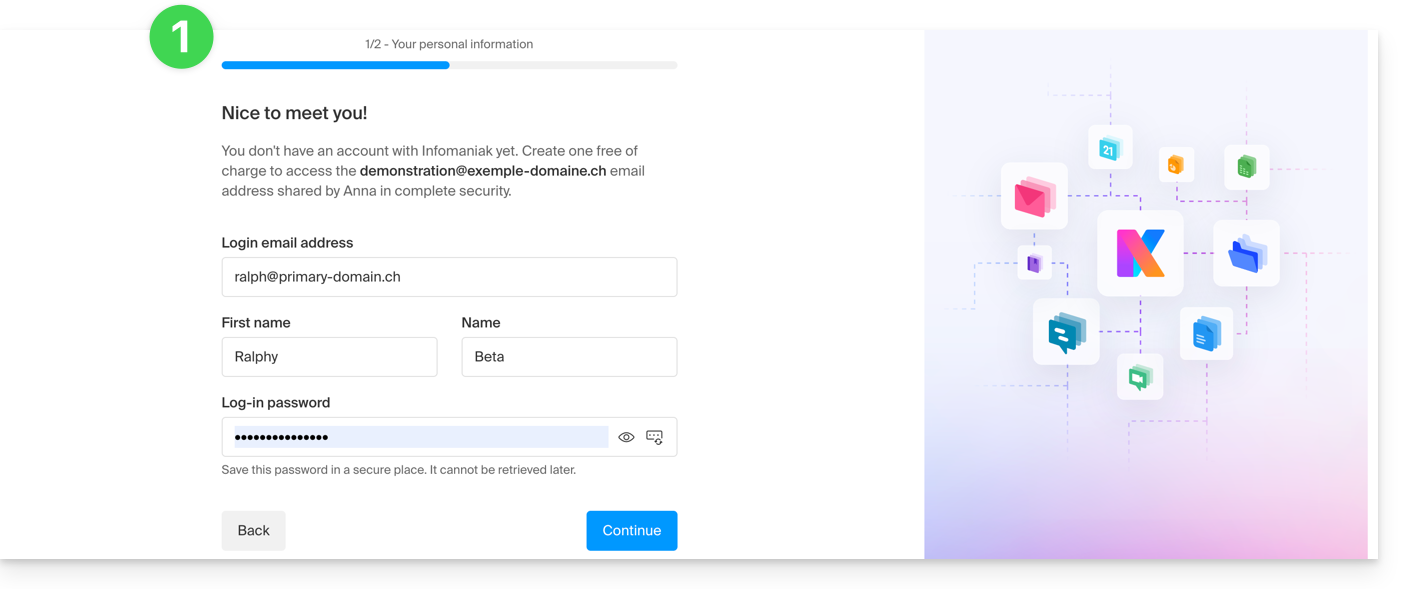
After executing the received invitation link and indicating their email address, the third party will be invited to create an Infomaniak account:
- They will need to provide their details and create a password to log in to their Infomaniak account:
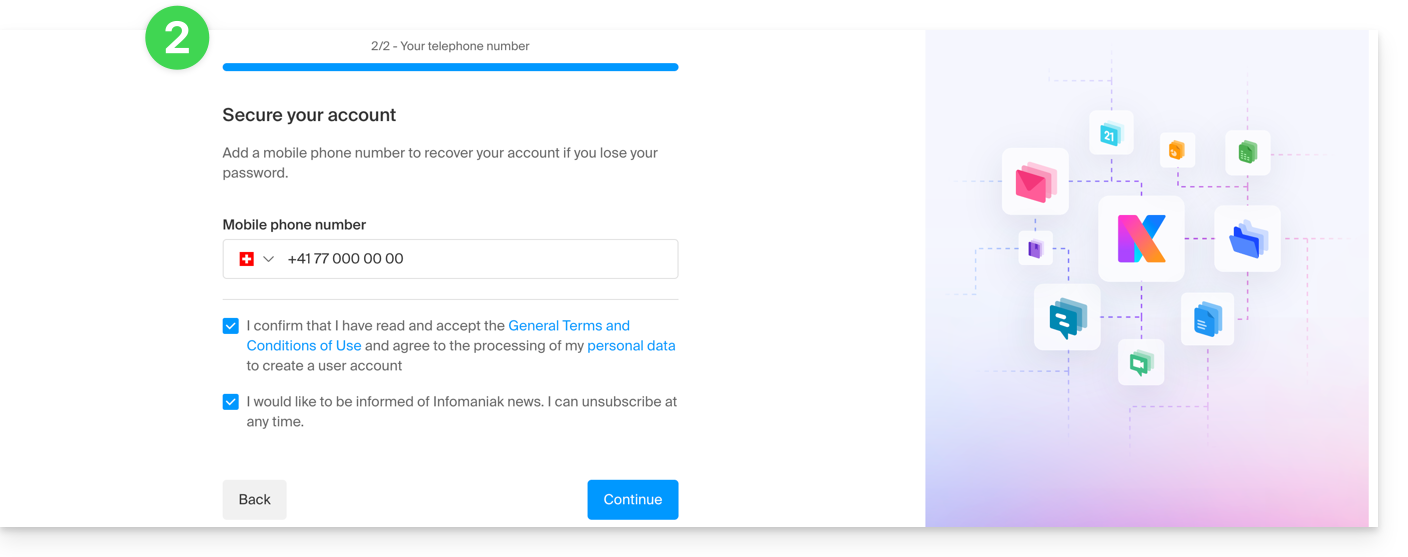
- They will need to provide a phone number and accept the general terms and conditions:
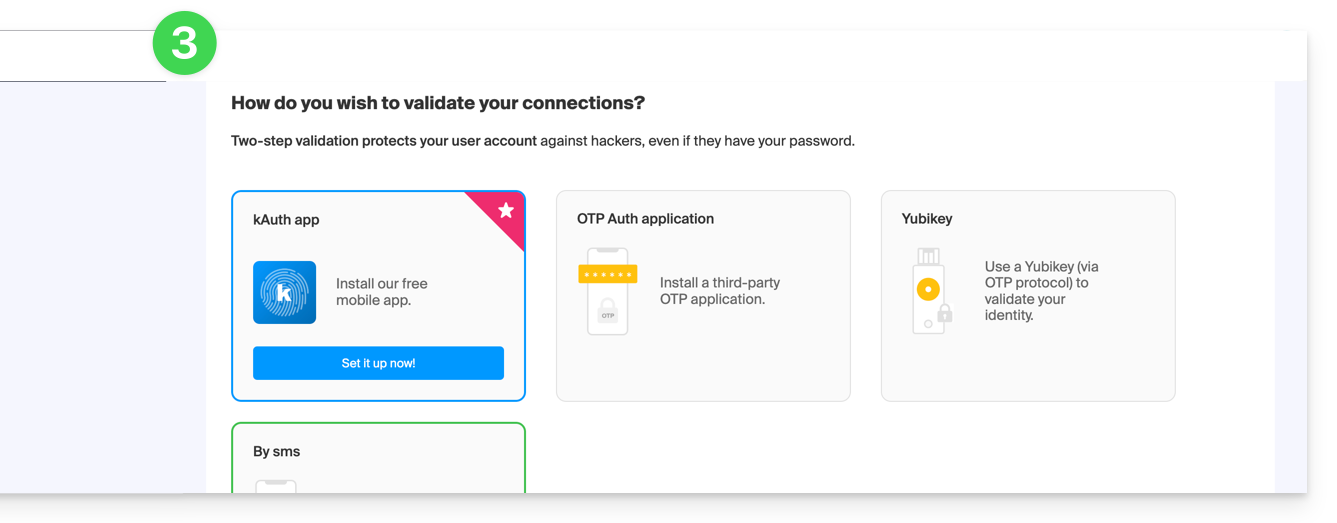
- They will need to add a two-factor authentication (2FA) method to secure access to their Infomaniak account:
- Once the 2FA method is added, that's it: the user is redirected to the Infomaniak Mail web app, which will display the email address to which the invitation link referred:
In case of a problem
If the Invite button is not visible or remains grayed out, check that:
- your user account has sufficient permissions to administer the product in question
- the email address in question does not yet exist as a login identifier for an Infomaniak Organization
- the table under the button does not mention a user listed with an email address identical to the email address in question
Example: you want to invite someone to view the address anna.a@domain.xyz but the button is grayed out because a user anna.a@domain.xyz is listed in the table.
Solution: to be able to invite a new user to view the address in question, refer to this other guide.
If a message indicates that it is not possible to proceed for security reasons, refer to this other guide.
If the user cannot access the address
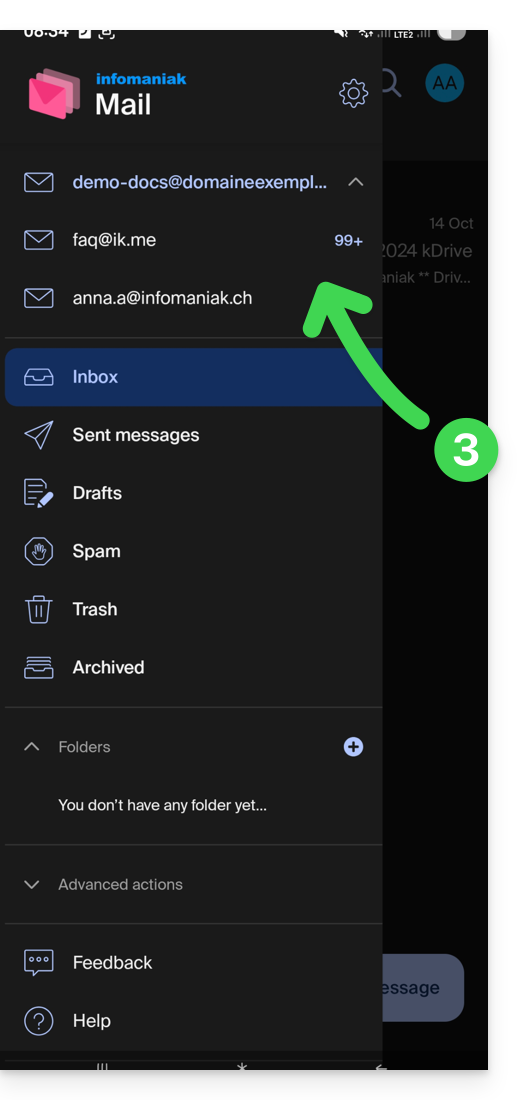
When a user is added, the email address is automatically added to their Infomaniak Mail apps: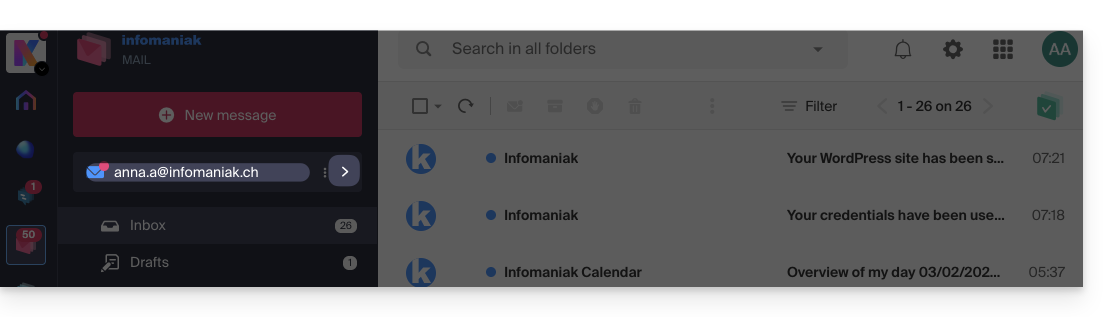
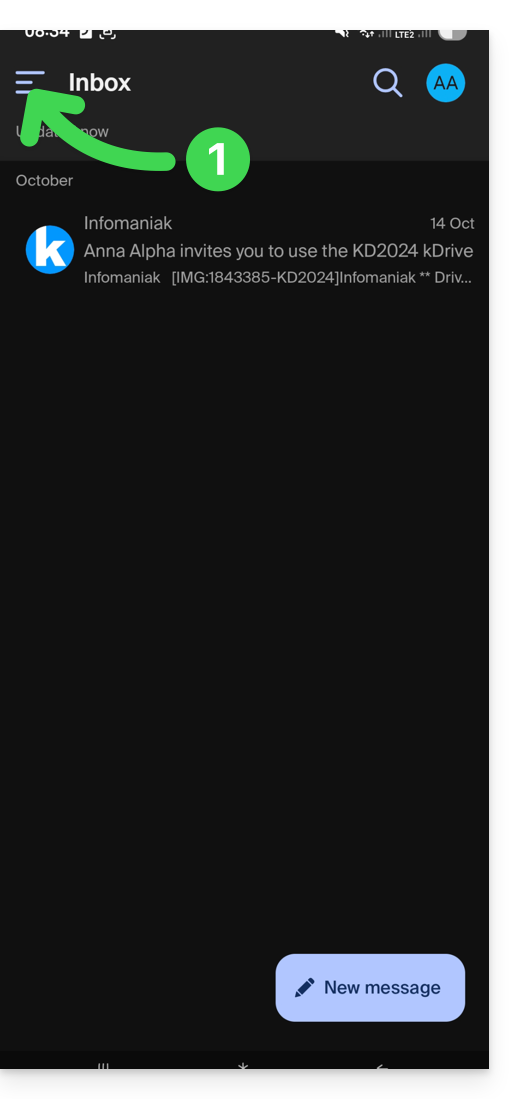
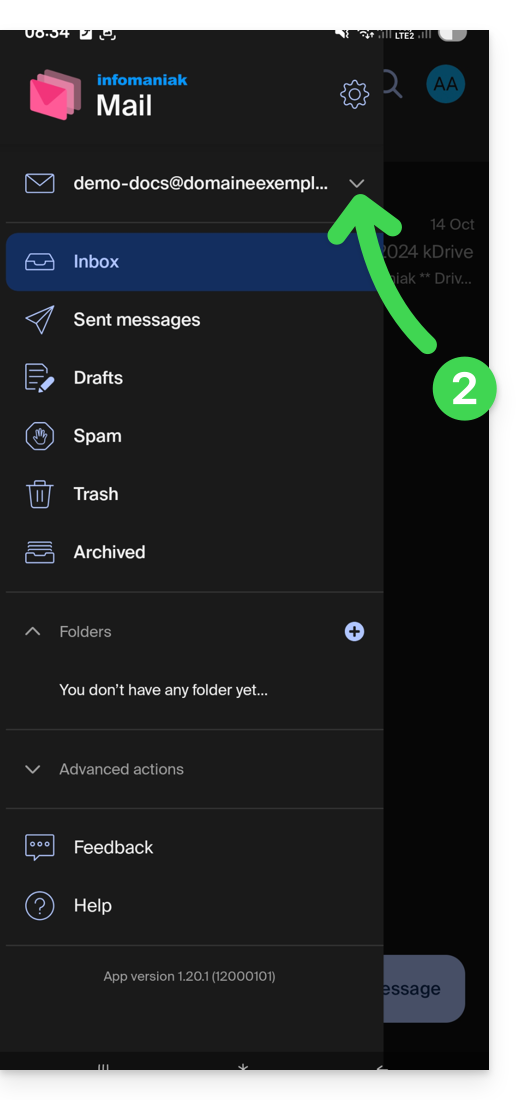
They can switch between their addresses at any time via the dropdown located at the top left of the screen: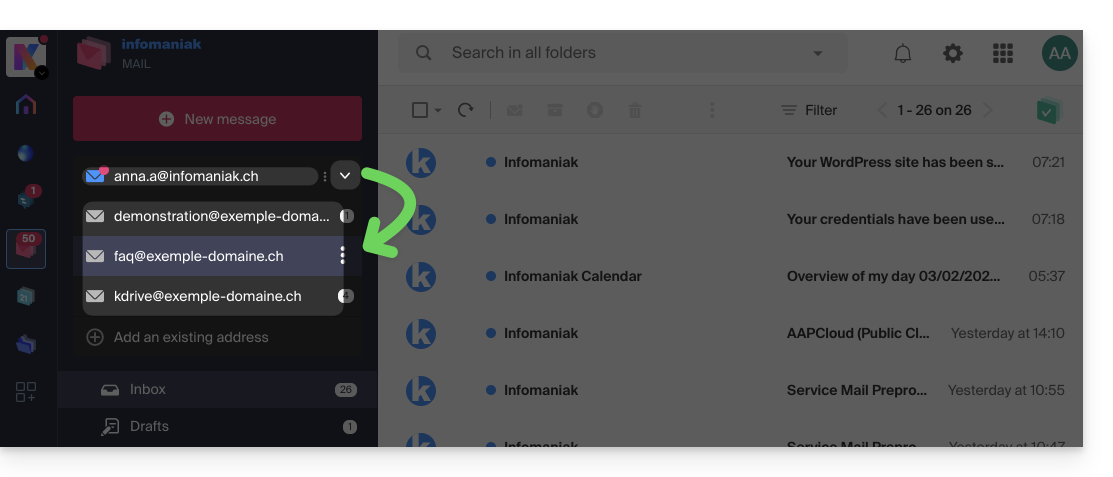
To do this, it is sometimes necessary to first choose to display, from the upper left part, all Organizations: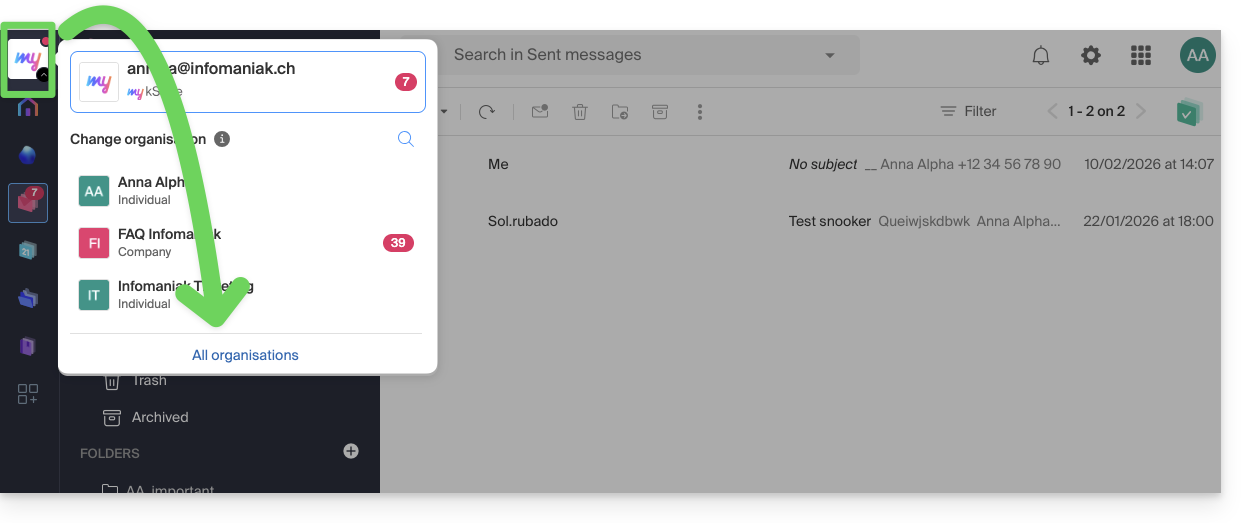
If the address on which the invitation depends still does not appear, try to refresh the browser page (Command ⌘ + R on macOS and Ctrl + F5 on Windows).
Link to this FAQ:
Has this FAQ been helpful?
This guide is about the DMARC policy and the optional security reports sent by email that can be activated or deactivated upon request.
Optional DMARC reports
The DMARC reports are optional and provide the following information:
- Third-party senders or servers that send emails on behalf of your domain.
- The percentage of messages from your domain that successfully pass the DMARC verification process.
- The servers or services that send emails failing DMARC verifications.
- The DMARC actions performed by the receiving server for unauthenticated messages from your domain (none, quarantine, or reject).
When the reports indicate that most emails successfully pass DMARC verifications, it is recommended to strengthen your DMARC settings by enforcing stricter measures. This will enhance the protection of your domain against spoofing.
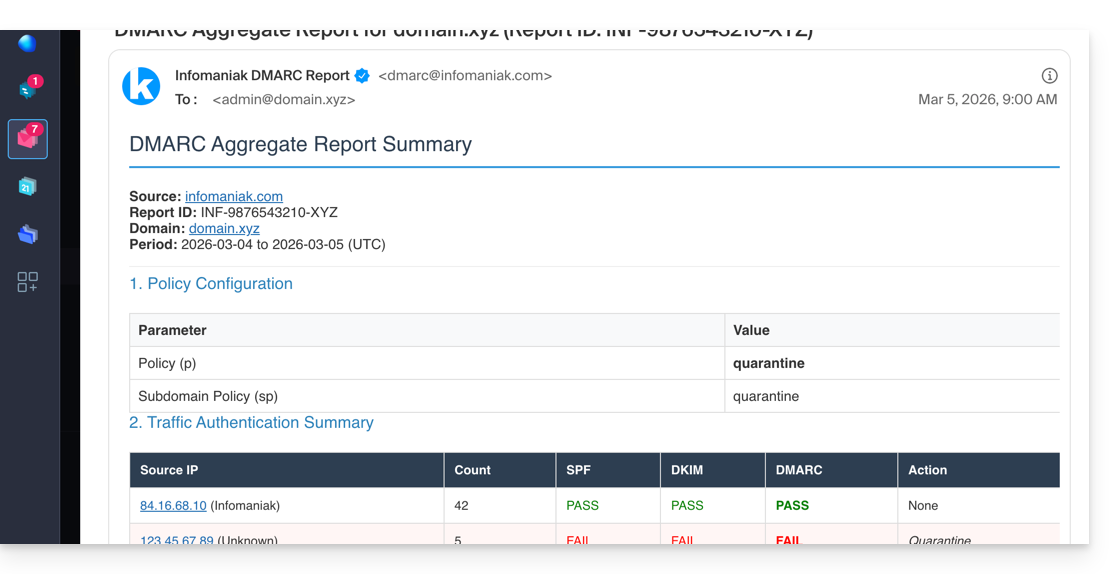
The written report is delivered as a ZIP archive containing the report in XML format. It is sent by email to the address you specify in the configuration, and will come from dmarc@infomaniak.com or other providers such as Microsoft, Google, Yahoo, etc.: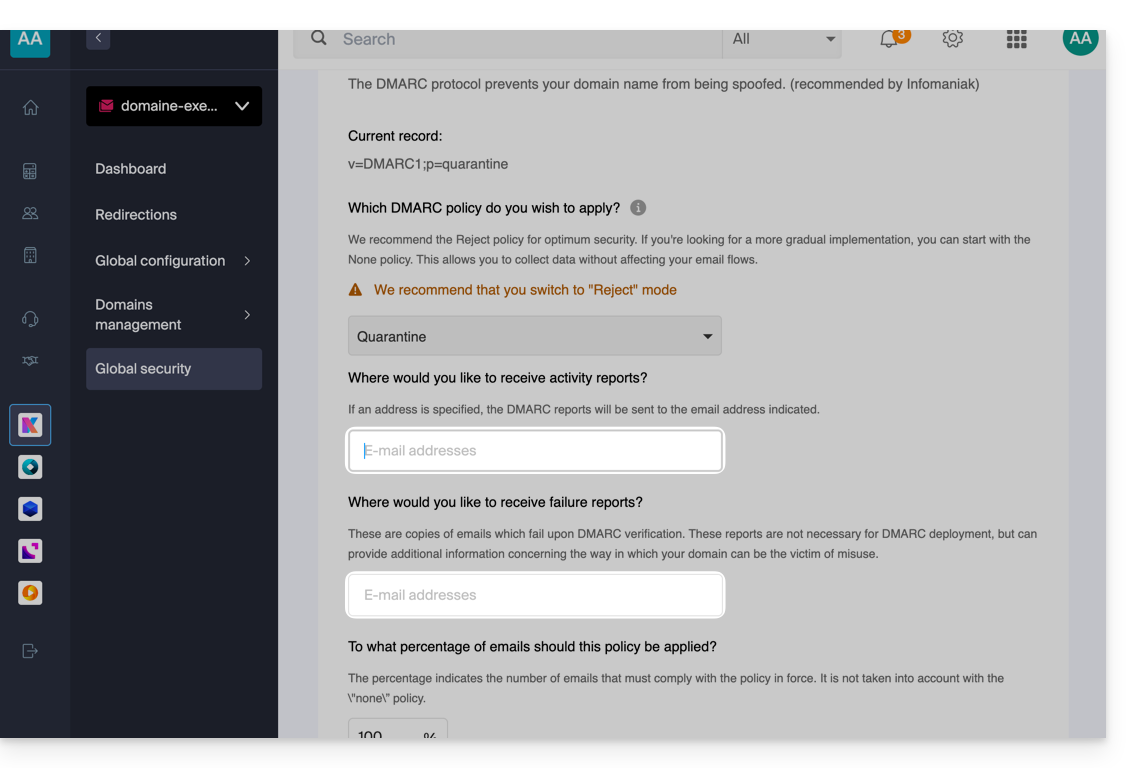
It is also possible to receive copies of problematic emails.
Analyzing a DMARC report
Infomaniak is neither able to analyze your potential DMARC reports and records, nor able to comment on the validity or compliance of these, as this is entirely your responsibility.
It is recommended to use an external service to analyze a DMARC report, such as https://dmarcadvisor.com/dmarc-analyzer/.
Deactivating a DMARC report…
… from a Mail Service
To deactivate the sending of a DMARC report if you still have a Mail Service (otherwise, see below):
- Click here to access the management of your product on the Infomaniak Manager (need help?).
- Click directly on the name assigned to the product concerned.
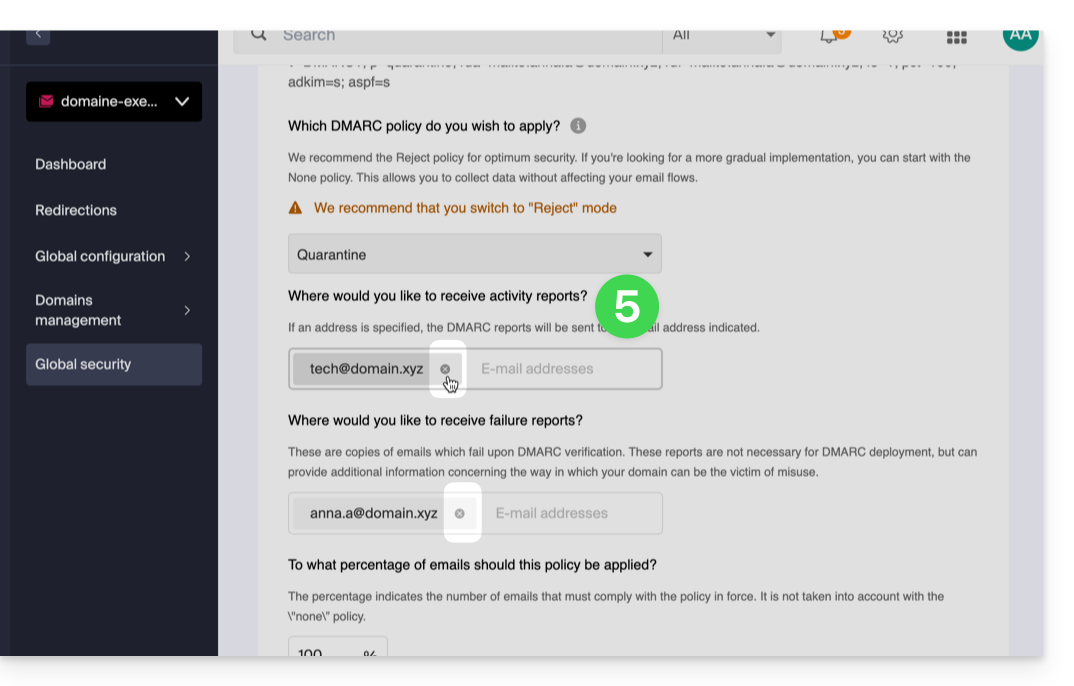
- Click on Global Security in the left sidebar.
- Click on Edit (in the DMARC section).
- Remove the registered addresses and validate at the bottom of the page to Apply the changes:
... from the DNS zone of a domain
If the Mail Service is no longer in use but you continue to receive email reports, you need to act directly on the domain name and delete the dmarc record from its DNS zone (or simply edit it to completely remove the 2 tags rua and ruf):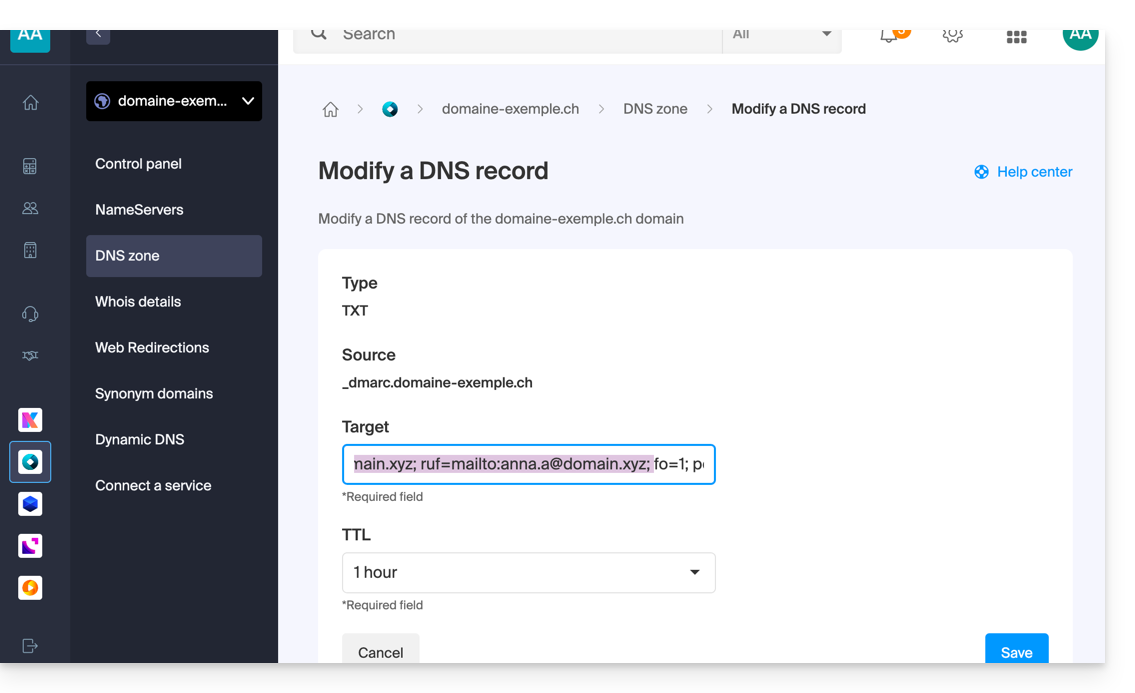
The difference between RUA and RUF
It is important to understand what you are disabling by removing ruf:
- RUA (Aggregate): a daily summary (explained above); it provides statistics: "Yesterday, 50 emails were successful, 10 failed."
- RUF (Forensic/Failure): an email sent instantly as soon as a single message fails the DMARC tests; it often contains the original content of the email (subject, body).
Link to this FAQ:
Has this FAQ been helpful?
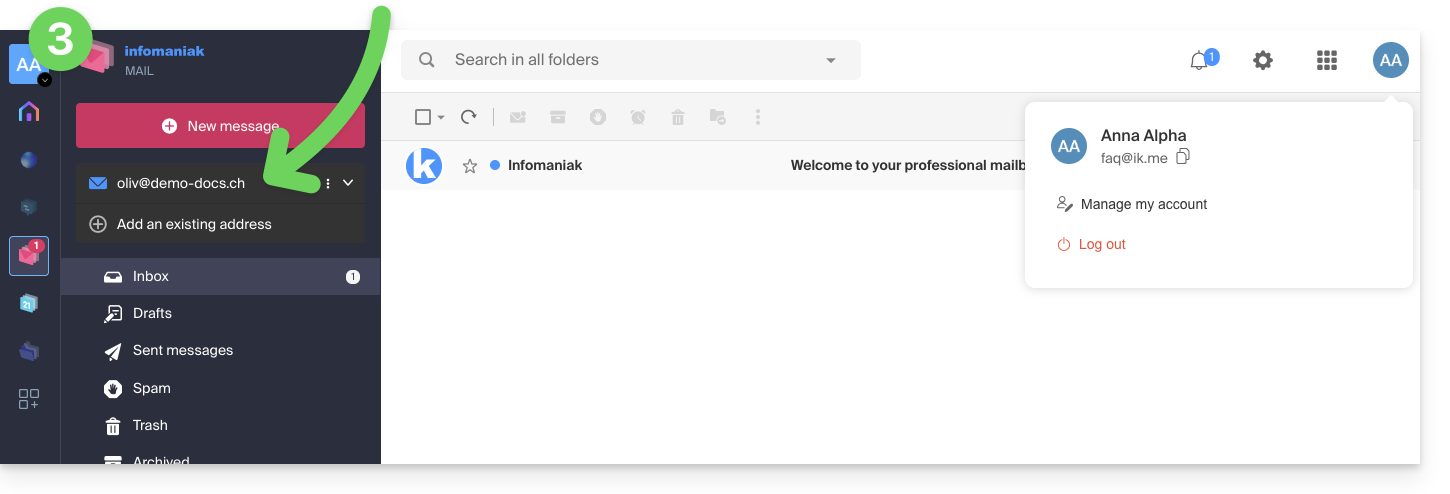
This guide presents, in the same way as adding devices (email passwords), the methods to allow you (you, with your Infomaniak account login credentials) to view and use an email address that you have created within an Email Service Infomaniak, on the Infomaniak Web App Mail (online service ksuite.infomaniak.com/mail).
Preamble
- Refer to this other guide to invite another user besides yourself.
- No password is required.
- The email address will be automatically added to the Infomaniak Mail interface.
Accessing your own email address
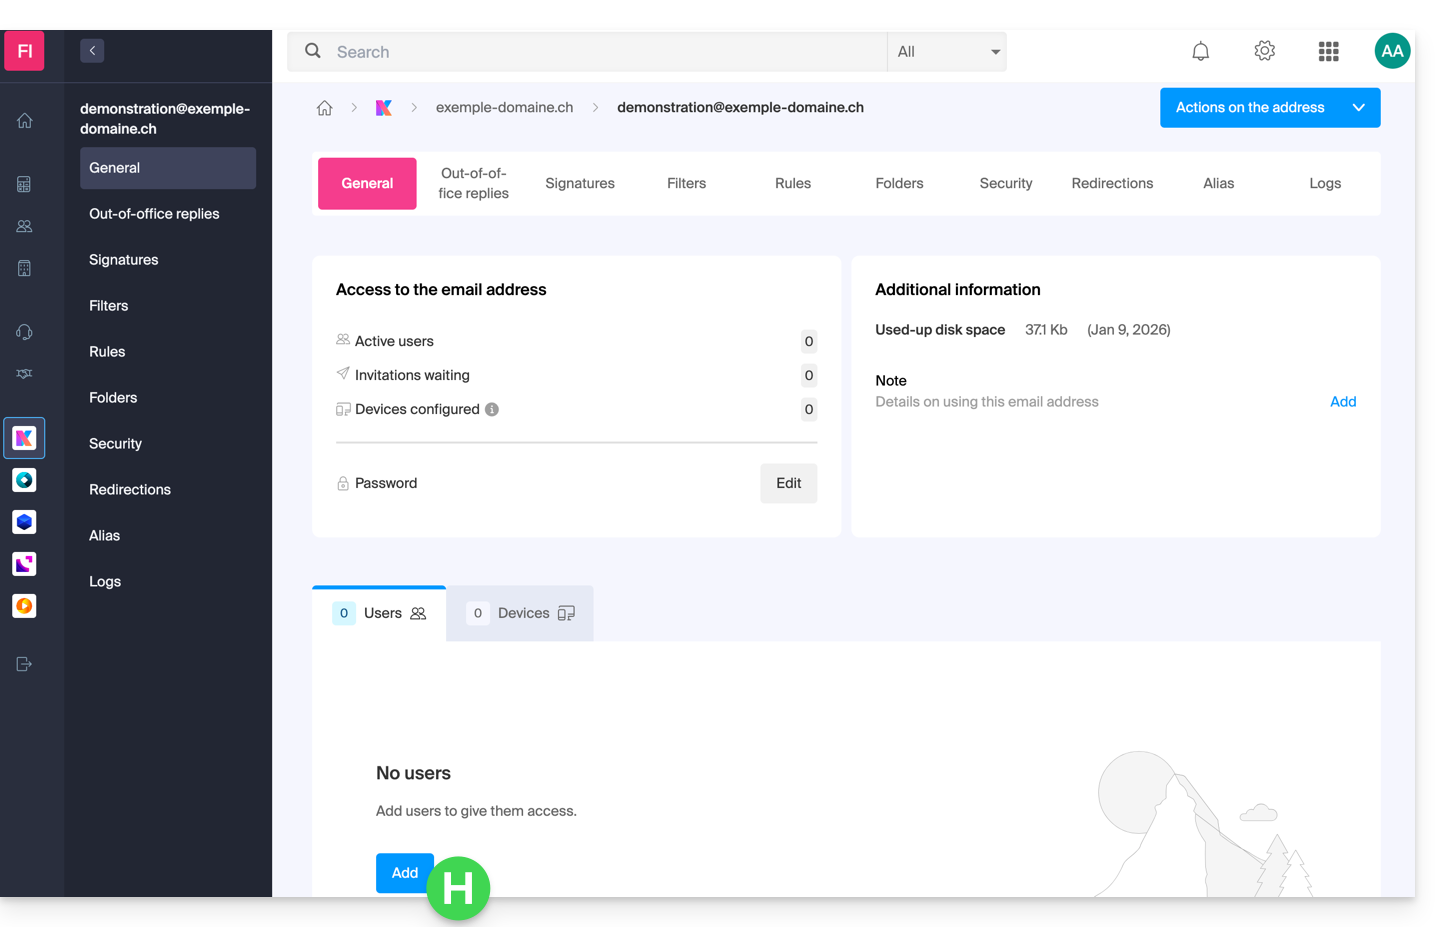
To use the existing email address demonstration@exemple-domaine.ch:
- Enter your login credentials for your Infomaniak account and your password on the page https://manager.infomaniak.com/:
- Validate the entry on the Manager with the 2FA method (two-factor authentication) initially defined:
- Once on the dashboard, click on Email Service:
- Once on your Email Services, click on the name / domain name to which the email address in question belongs:
- Once on the Email Service to which the address belongs, click on the email address in question:
- Once on the email address in question, click the Add button to add a user:
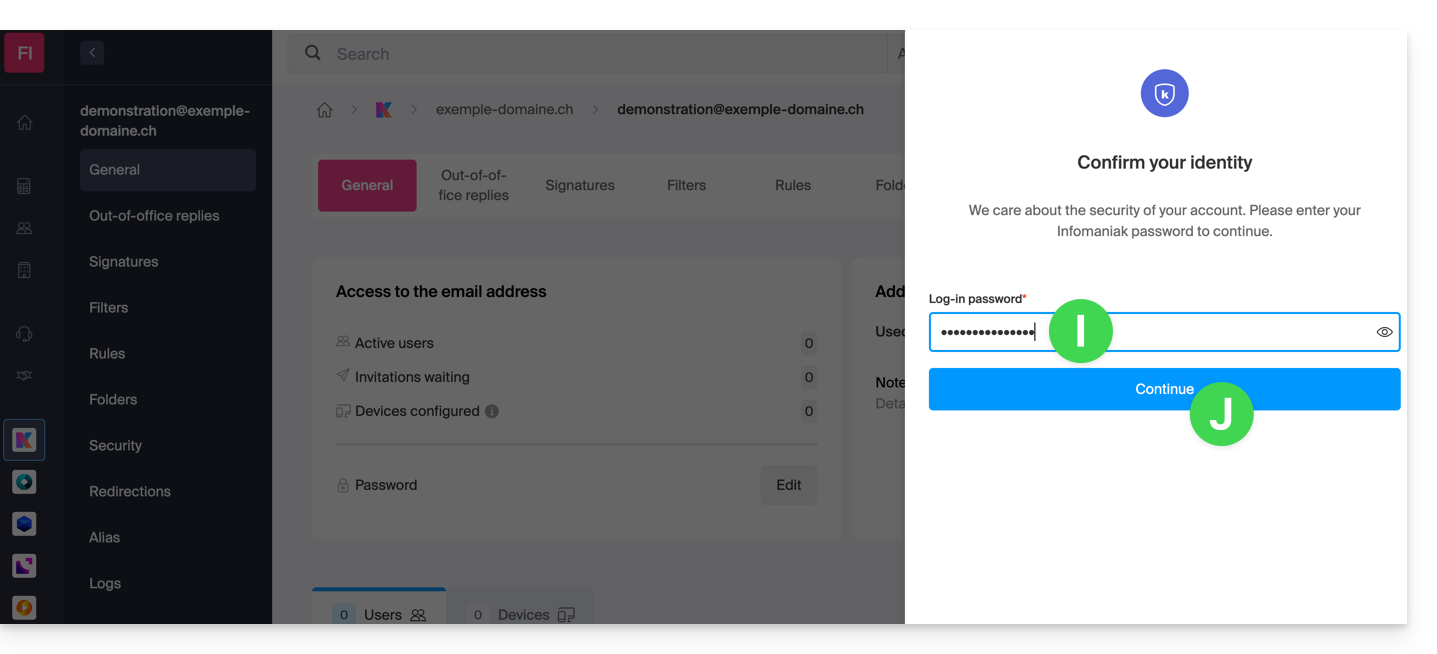
- At this stage, it may be necessary to re-enter the login password (the one from point B above):
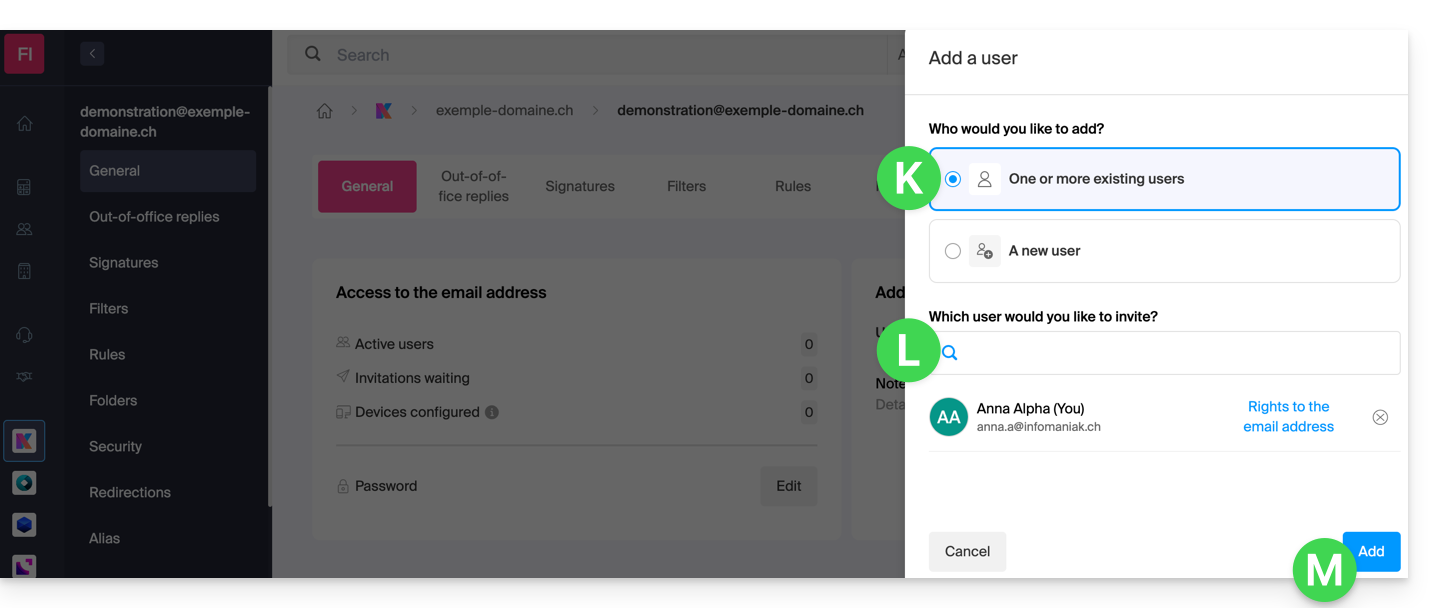
- Then choose the option to add an existing user, and click on the field below, which displays the list of users in the Organization to which you are connected, and click on your user (your Infomaniak account login credentials). Validate the addition with the button at the bottom right:
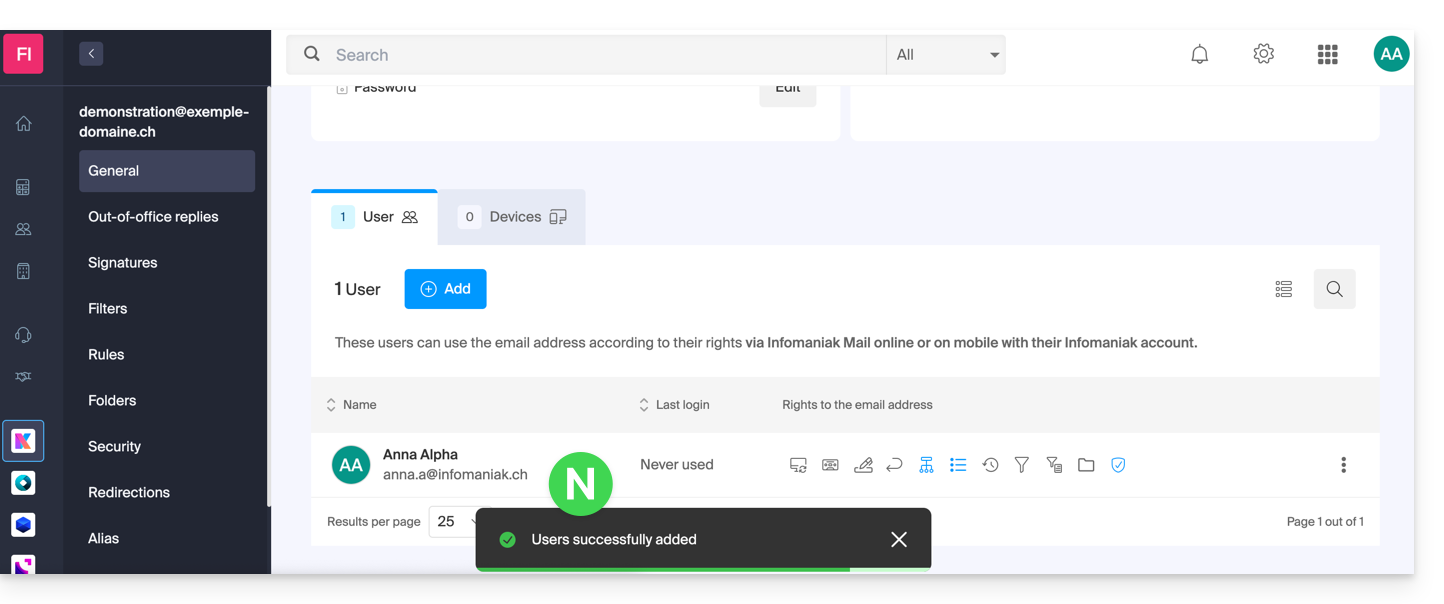
- It's done, your own user has been added:
- Then click on the icon at the top of the screen to open the kSuite tools and click on the Infomaniak Web App Mail:
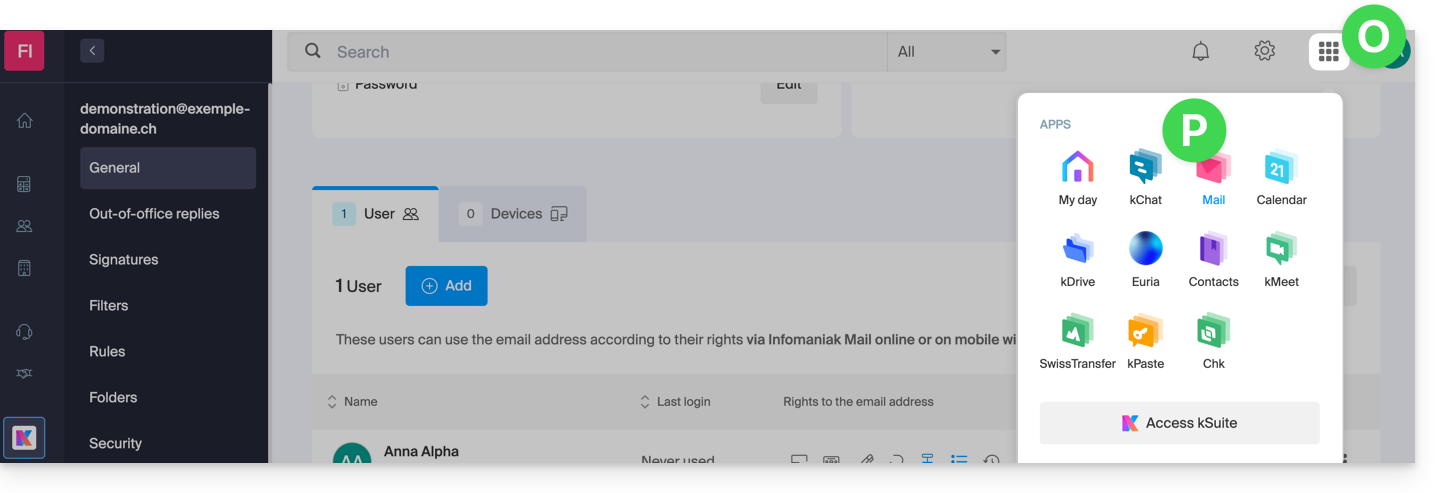
- The email address has been successfully added to the Web App Mail (click if necessary on the chevron to expand the address menu and access it). An informational email has been sent to the user (you, in this case) to notify of the operation:
When your identifier is added as a user with access to the email address, the mailbox is automatically added to your Infomaniak Mail apps:
You can switch between your addresses at any time via the chevron located at the top left of the screen:
To achieve this, it may be necessary to first choose to display, from the top left, all Organizations:
If the address still does not appear, try to refresh the browser page (Command ⌘ + R on macOS and Ctrl + F5 on Windows).
Link to this FAQ:
Has this FAQ been helpful?
This guide explains how to set up a DMARC policy for your email hosted by Infomaniak, an essential element to prevent potential delivery issues.
Preamble
- The DMARC (Domain-based Message Authentication, Reporting, and Conformance) protocol enhances the security of your domain by relying on SPF and DKIM checks.
- It instructs recipient servers on how to handle emails that fail these authenticity tests, with three protection policies (None, Quarantine, Reject) detailed below.
- In case of authentication failure, the recipient can send you a DMARC report; this data is essential to identify configuration errors or stop phishing attempts using your domain name.
DMARC Policy and Acceptance Percentage
For the instructions that can be given to recipient servers when a suspicious message is detected, 3 policies (p = policy) exist and can be refined with a percentage (pct):
None (none): The email is delivered normally (observation mode)
With "p=none", no email is rejected or quarantined based on the DMARC verification. However, the reception percentage can be used to collect data on unauthenticated emails, indicating how many of these emails should be subject to the DMARC policy. E.g., "p=none; pct=10" means that 10% of unauthenticated emails will be subject to the DMARC policy, while the remaining 90% will be accepted.
Quarantine (quarantine): The email is sent to spam
With "p=quarantine", unauthenticated emails can be quarantined, but the reception percentage determines the proportion actually subject to this policy. E.g., "p=quarantine; pct=50" means that 50% of unauthenticated emails will be quarantined, while the remaining 50% will be accepted.
Reject (reject): The email is purely and simply blocked/deleted
With "p=reject", unauthenticated emails are rejected. The reception percentage determines the proportion of unauthenticated emails that will actually be rejected. For example, "p=reject; pct=20" means that 20% of unauthenticated emails will be rejected, while the remaining 80% will be accepted.
Create a DMARC Record
There are 2 ways to manage DMARC.
If you have a Mail Service with Infomaniak, the simplest way is to go to the Global Security tool to manage your DMARC security policy and reports: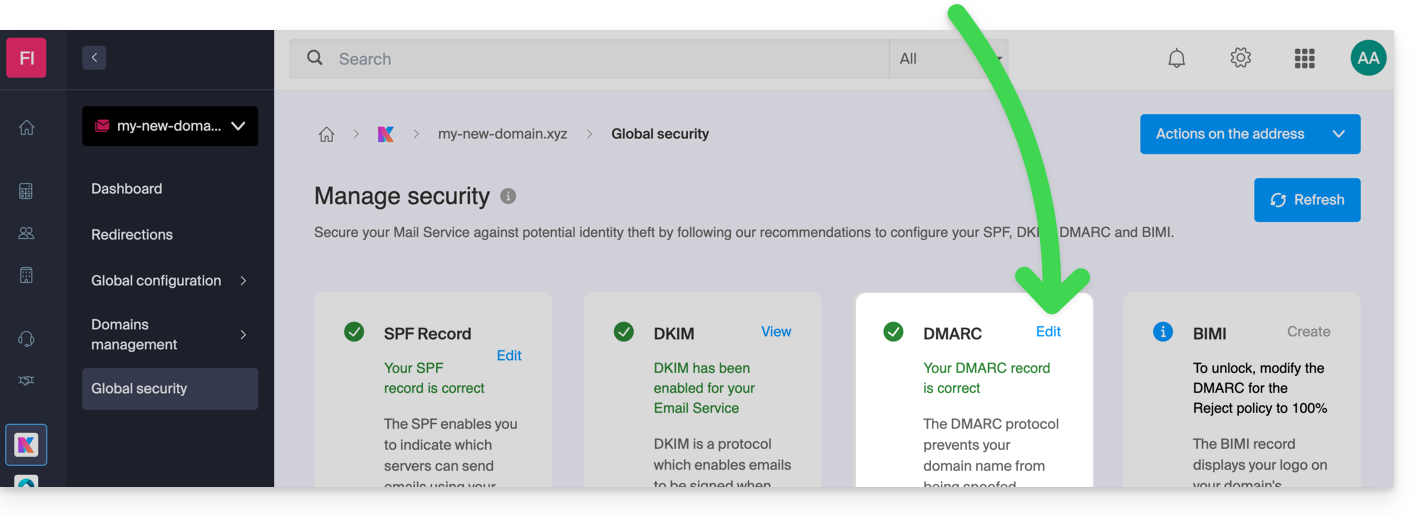
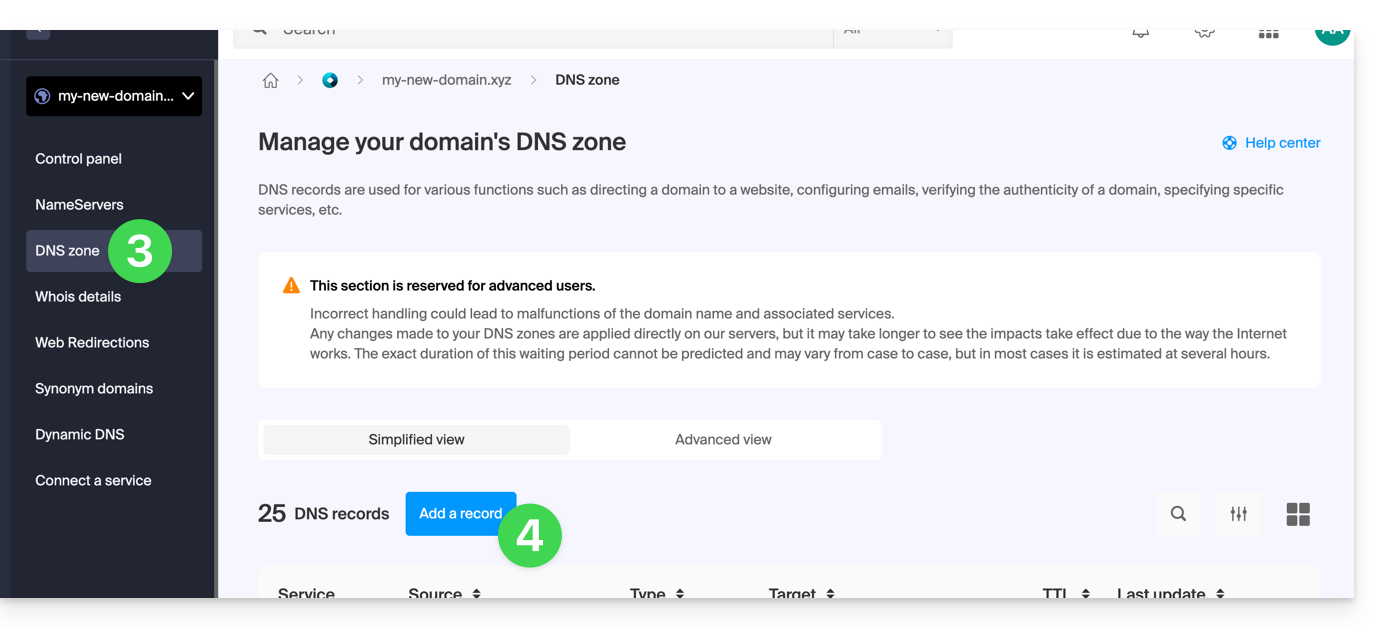
However, since the DMARC record is a type of DNS record, usually of type TXT, you can also manage it from the DNS zone of the domain name:
- Click here to access the management of your domain on the Infomaniak Manager (need help?).
- Click directly on the name assigned to the domain in question.
- Click on DNS Zone in the left sidebar menu.
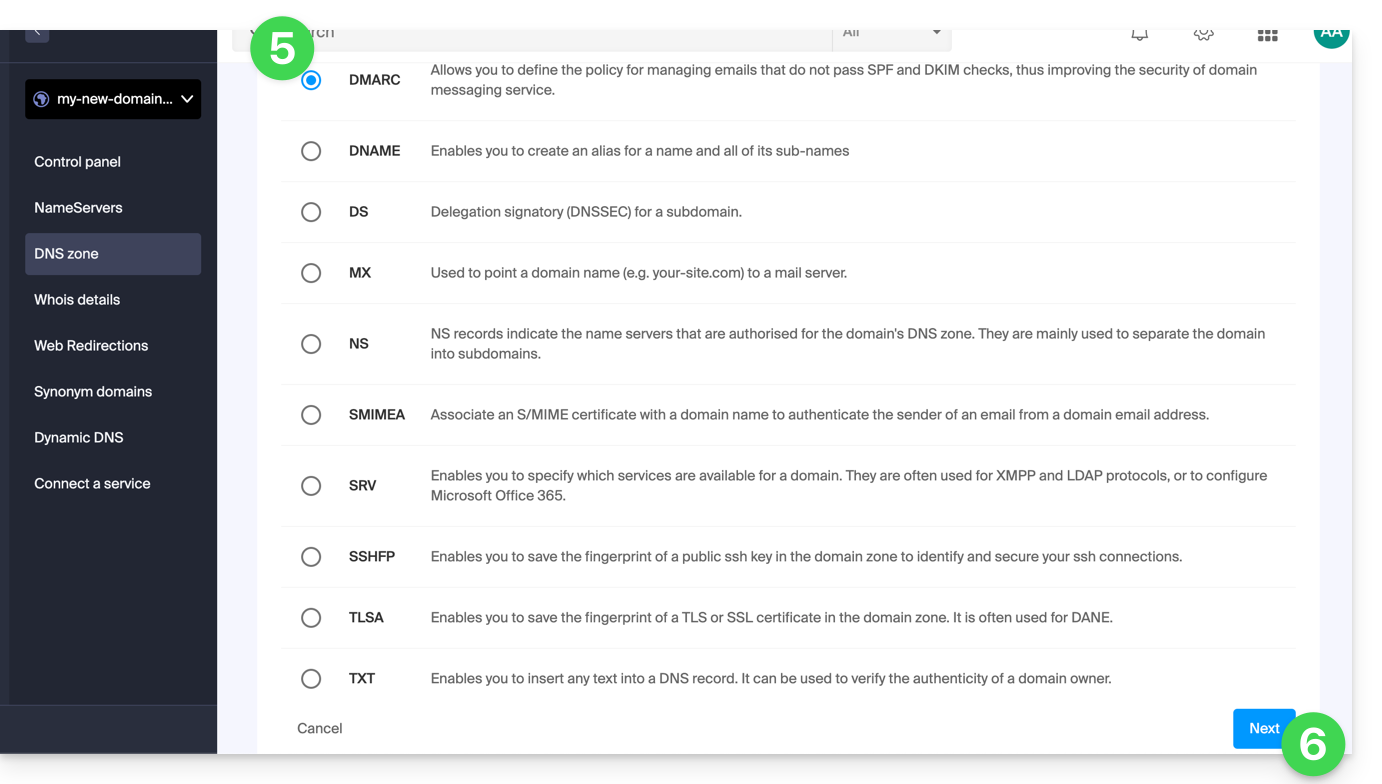
- Click the button to add a record:
- Click the radio button DMARC to add a record.
- Click the Next button:
- Leave (or add if necessary) the value
_dmarcin the Source field. The Target field must contain the parameters you wish to use, separated by
;:Tag Name Purpose Example v Protocol version v=DMARC1pct Percentage of messages subjected to filtering pct=20ruf URI for forensic reports ruf=mailto:authfail@domain.xyzrua URI for aggregate reports rua=mailto:aggrep@domain.xyzp Policy for the organizational domain p=quarantinesp Policy for the subdomains of the organizational domain sp=rejectadkim DKIM alignment mode adkim=saspf SPF alignment mode aspf=rwhich can result in, for example,
v=DMARC1;p=reject;pct=100;rua=mailto:postmaster@dmarcdomain.com(source)- Leave the default value for the TTL.
- Click the Save button:
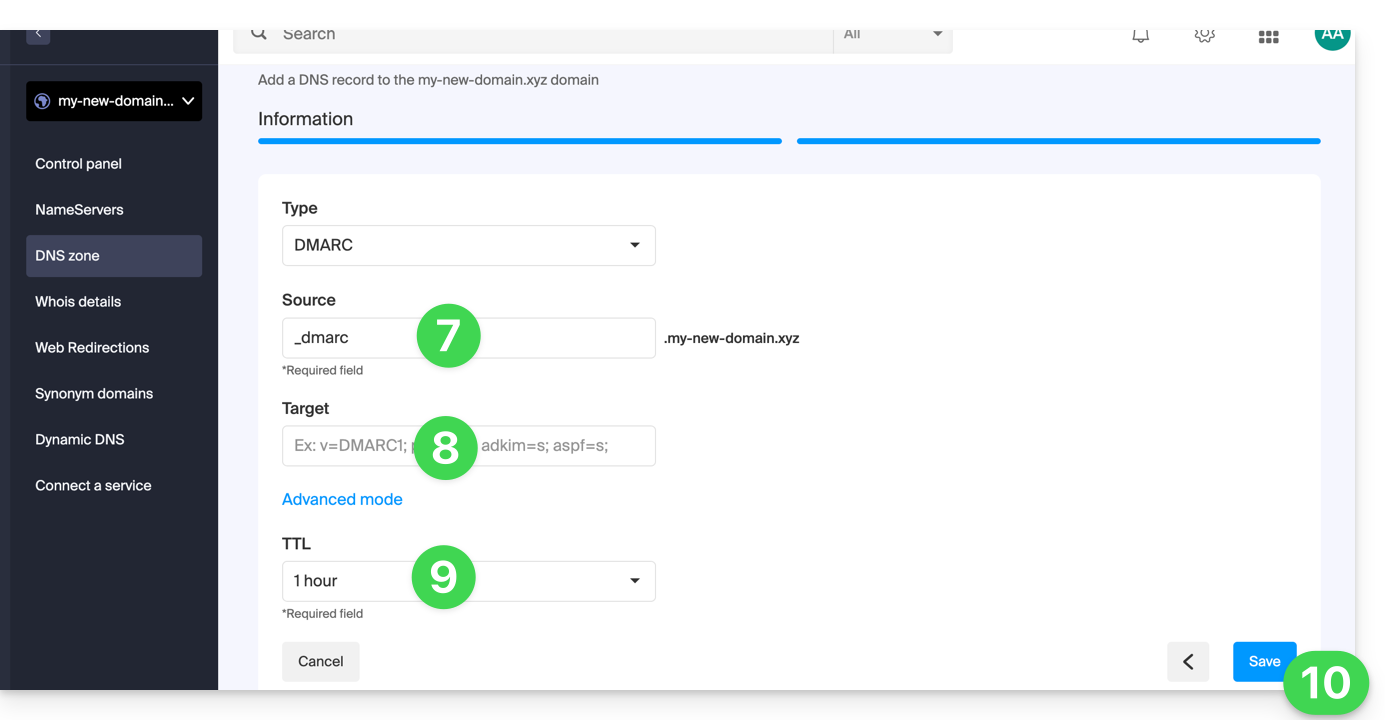
Any DNS addition/modification can take up to 48 hours to propagate.
Link to this FAQ:
Has this FAQ been helpful?
This guide explains how the Infomaniak Mail mobile app (for iOS/Android smartphones or tablets) works when you first open it after installation and during subsequent logins.
Start the setup assistant
When you first open the app, a step-by-step assistant suggests you choose the theme (pink or blue accent color) that you can also modify later:
It also shows you the main ergonomic features available with the app (long press, swipe).
In the final step, you can…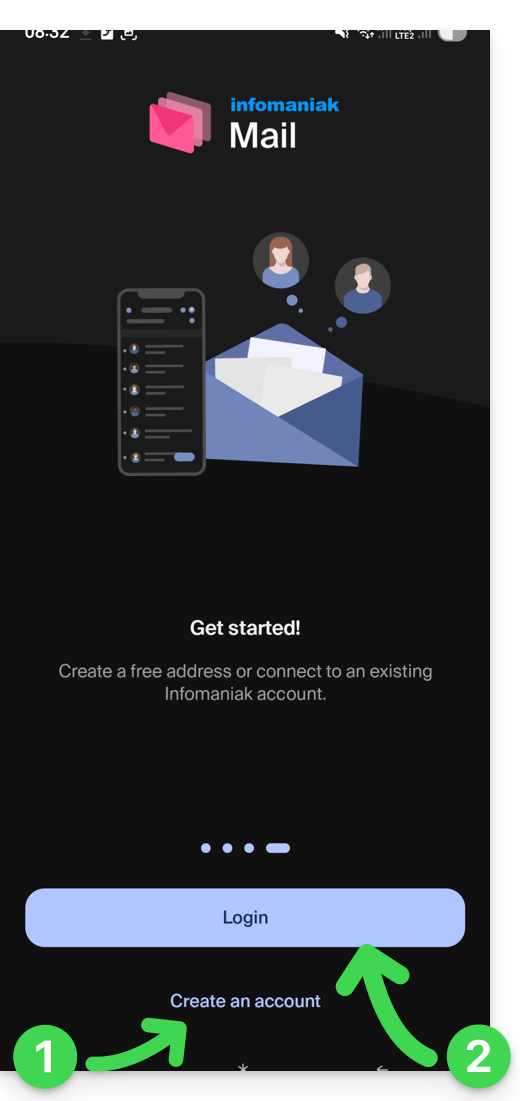
- … create an account, that is, get a new free email address…
- … or simply log in to your Infomaniak account with your usual credentials (your email address to log in to Infomaniak):
Multiple email addresses
Once logged in, after two-factor authentication (2FA) is completed, you still need to authorize access to your device's contacts and notifications:
You will then find all the email addresses already linked to Infomaniak Mail that you used to check on your web browser via the address ksuite.infomaniak.com/mail.
You can switch from one address to another…
- … by tapping at the top left of your inbox:
- … then on the chevron to the right of your displayed email address:
- … then on the address to view:
To add another one, refer to this other guide.
To remove one, refer to this other guide.
Multiple Infomaniak accounts
Imagine that in addition to your personal Infomaniak account with your favorite email addresses linked, you get a login from your employer to a user account with different company email addresses within this professional account…
To add the additional Infomaniak account:
- Tap at the top right of the inbox:
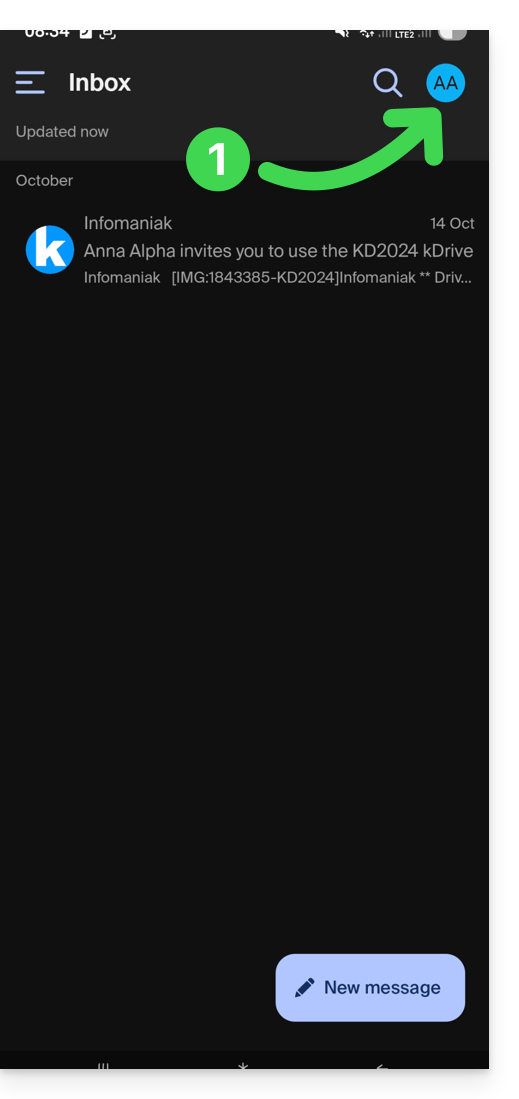
- Press Add an account to log in to the desired Infomaniak user account:
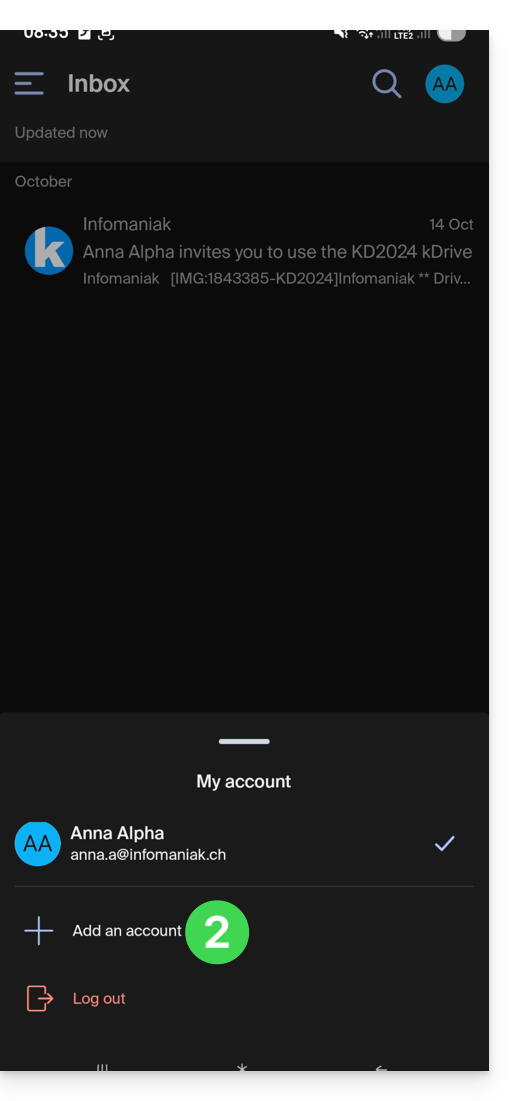
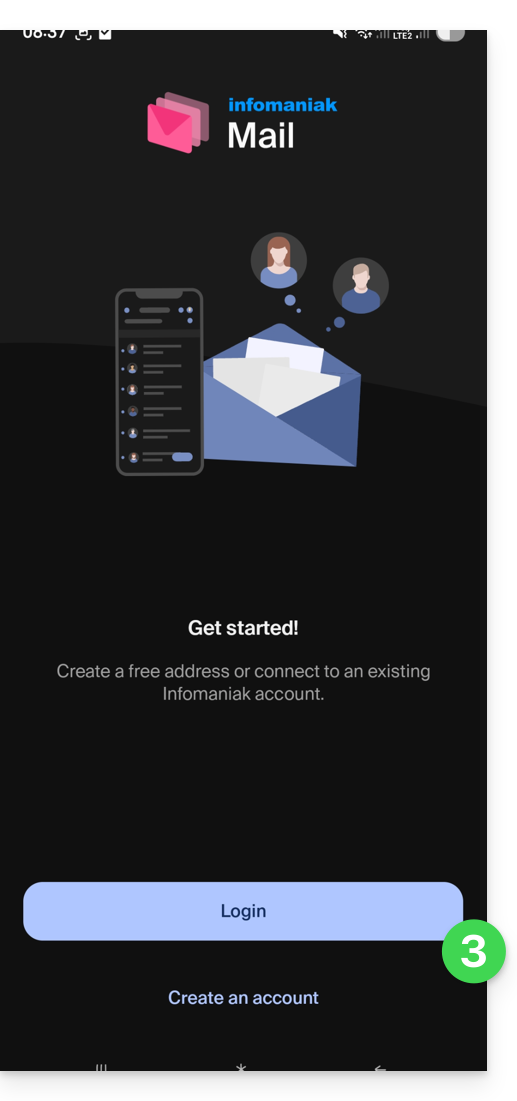
- Press the button to enter the Infomaniak account login information:
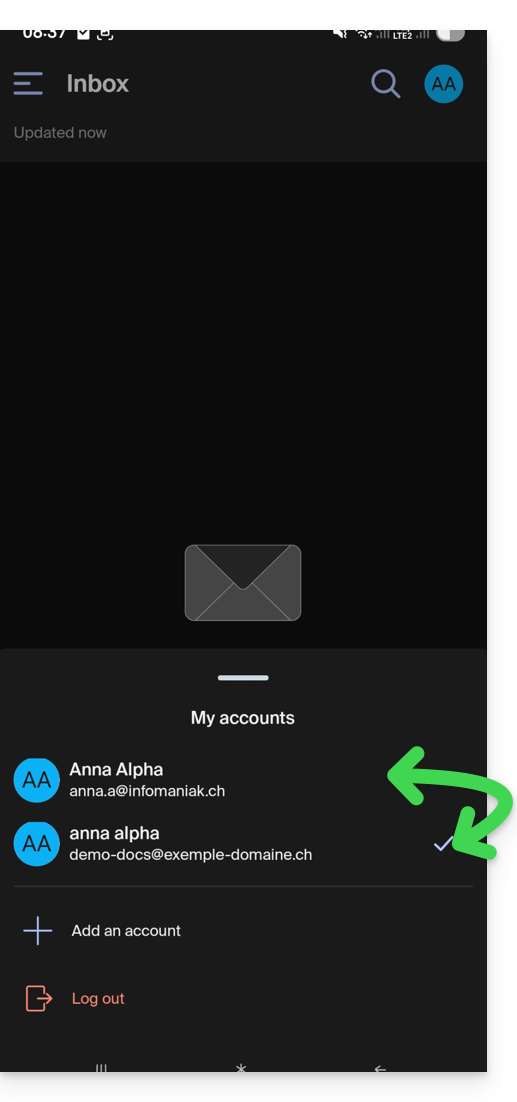
To easily switch from one user account to another:
- Click on one or the other of the attached user accounts, and thus view the email addresses attached within these accounts:
To detach an attached Infomaniak account in the application and no longer be able to view the email addresses attached within this account, simply…
- … go there one last time
- … then press the user menu at the top right:
- … to then log out at the bottom of the screen:
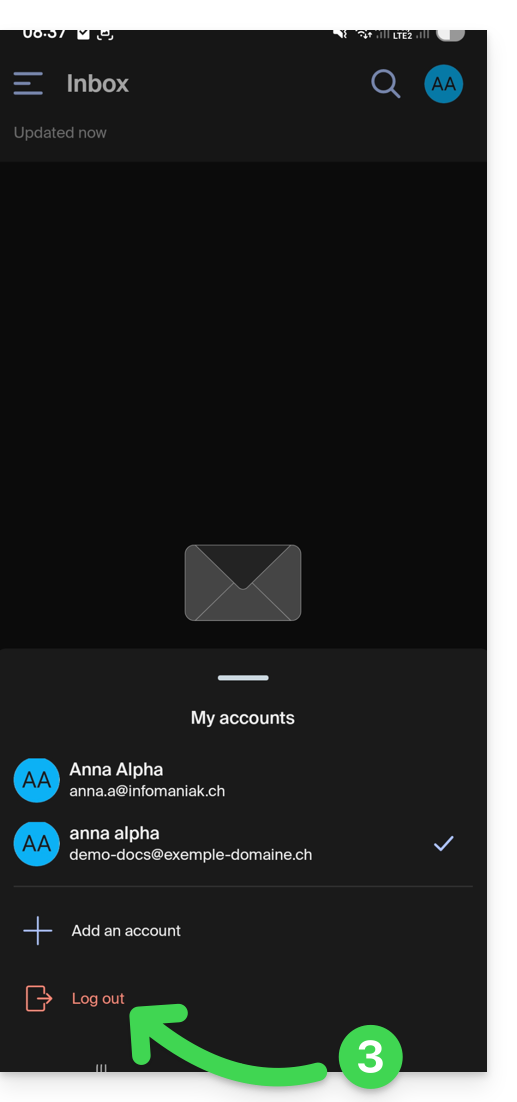
You will be automatically switched to one of the remaining accounts.
Link to this FAQ:
Has this FAQ been helpful?
This guide for the Web app Mail Infomaniak (online service ksuite.infomaniak.com/mail) or the mobile app Infomaniak Mail (application for iOS/Android smartphone or tablet) explains how to activate encryption for emails sent from Infomaniak Web and mobile services.
Preamble
- When encryption is activated, emails and attachments are encrypted as soon as they are received on Infomaniak servers, via the public keys of senders and recipients.
- Each email address generates a key upon its first use, securely stored in Infomaniak datacenters.
- The keys are based on elliptic curve cryptography (ECC) and use the OpenPGP standard.
- They are themselves encrypted in AES-256-GCM with automatic decryption via Infomaniak authentication.
- In search results, only the subject of encrypted messages will be visible, while their content will remain secure during storage.
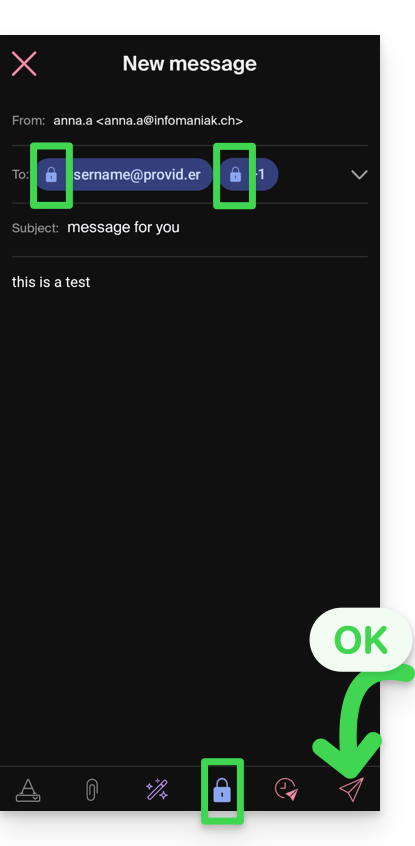
Activate email encryption…
…from the Infomaniak Web Mail app
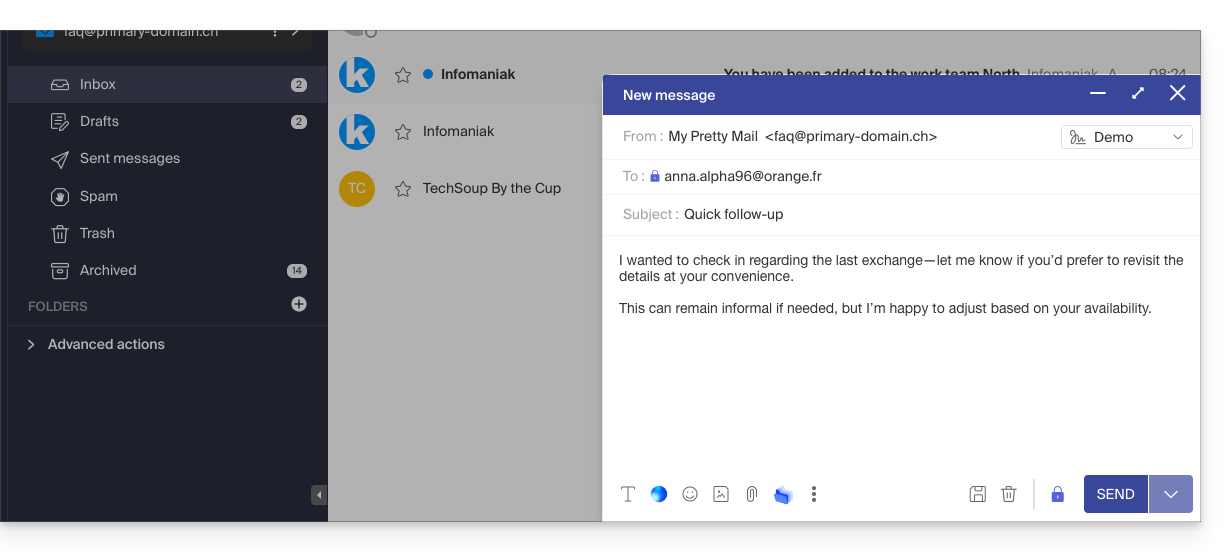
To automatically encrypt a message sent to an email address:
- Click here to access the Web app Mail Infomaniak (online service ksuite.infomaniak.com/mail).
- Compose a new message as usual.
- Click on the padlock icon to the left of the Send button to activate encryption:
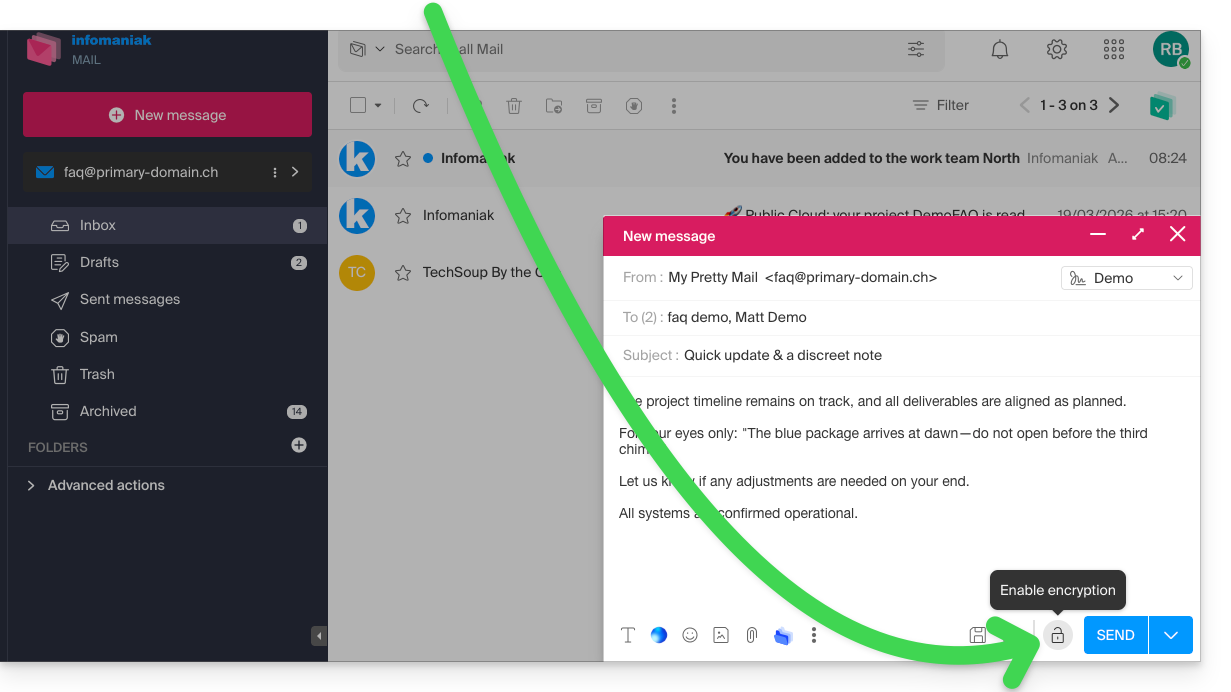
- Confirm the action if a confirmation window appears.
- The icon now represents a closed padlock and the color of the whole is changed:
- Press the Send button.
The action must be performed for each new send.
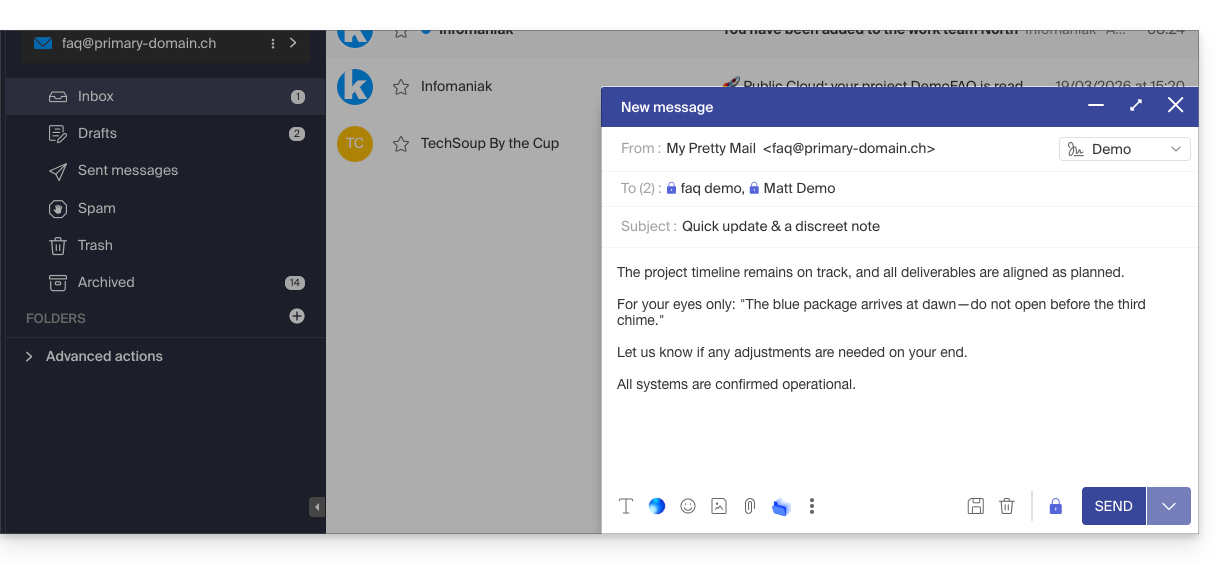
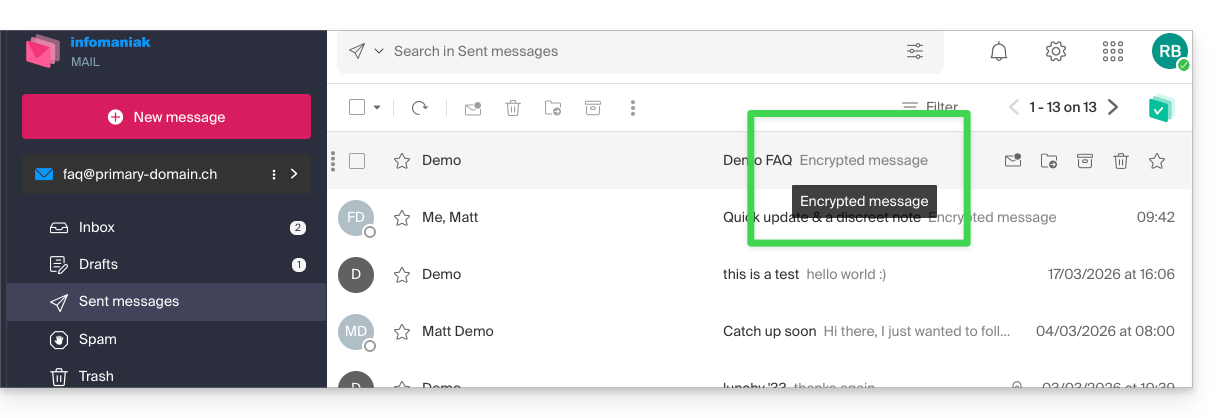
A. Recipient whose email is managed with Infomaniak
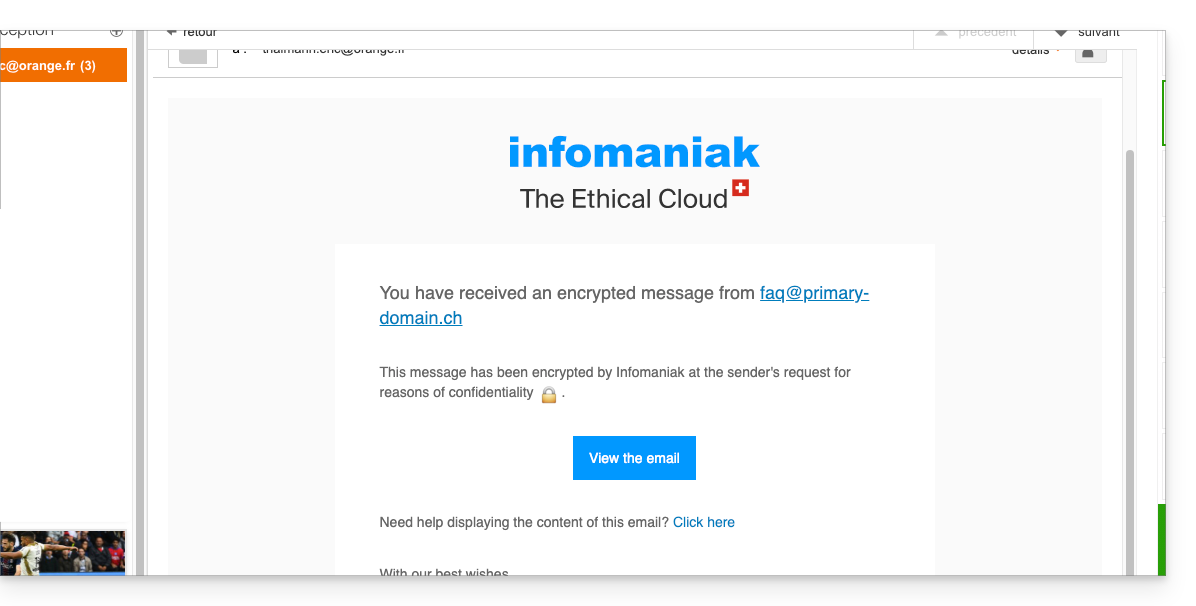
If the recipient of the encrypted email has an email address managed with Infomaniak, encryption is done in a completely transparent manner for both the sender and the recipient. A note will indicate the encryption of the message…
- …in the recipient's inbox:
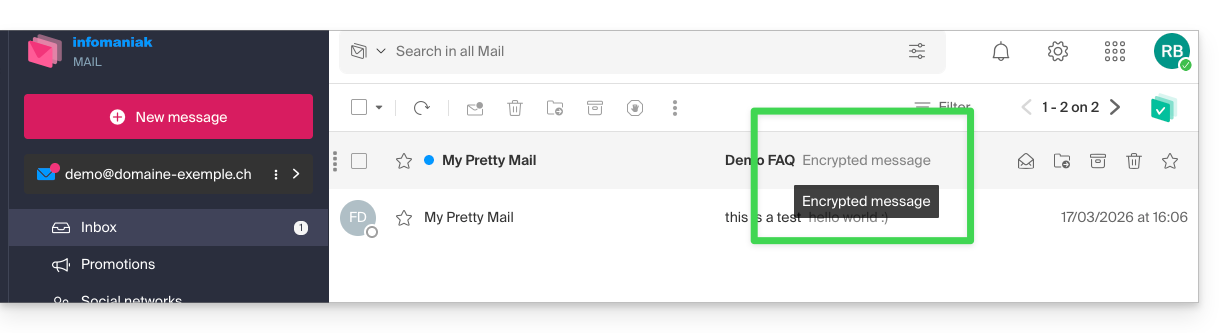
- … when opening the received message:
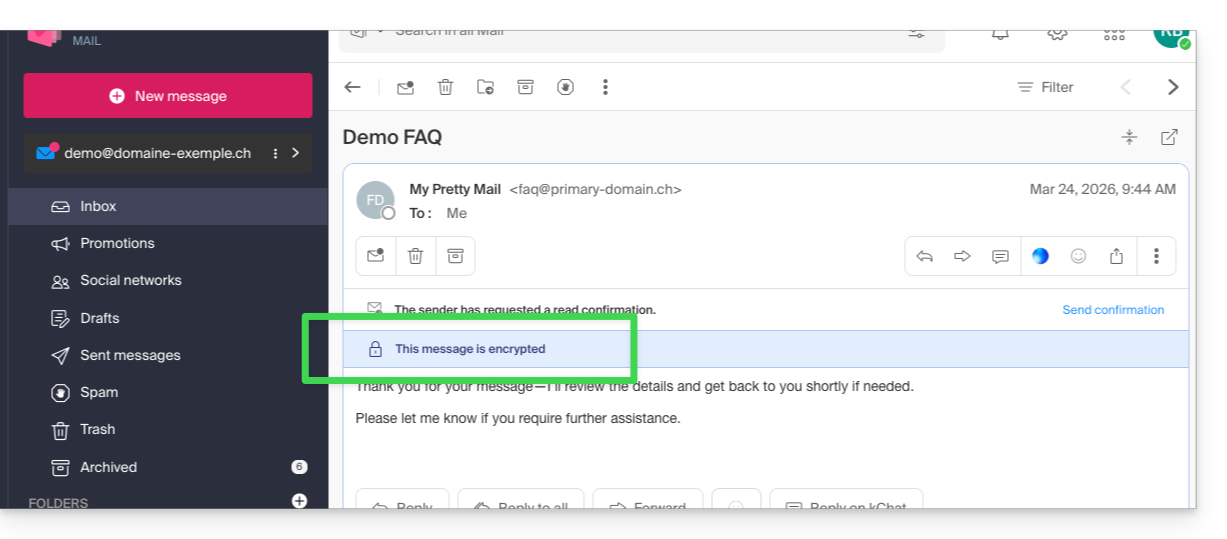
- ... and in the sender's sent folder:
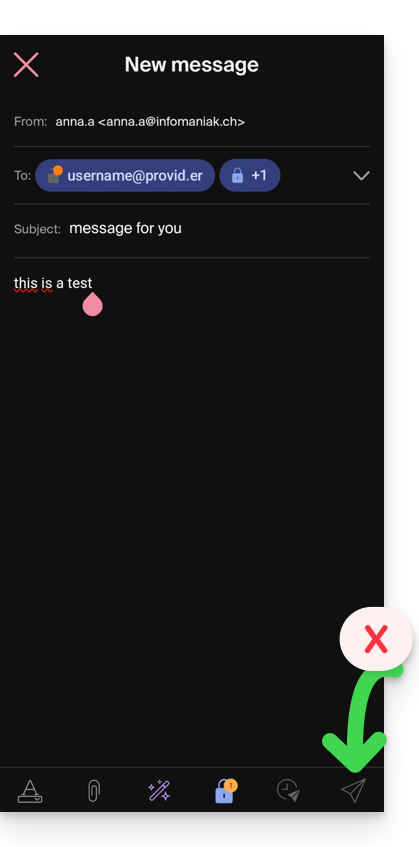
B. External recipient
If the recipient of the encrypted email has an email address managed outside of Infomaniak services, encryption is still possible, but it requires setting a password:
- Click here to access the Infomaniak Mail app (online service ksuite.infomaniak.com/mail).
- Compose a new message as usual, but addressed to an email address outside of Infomaniak.
- Click on the lock icon to the left of the Send button to enable encryption.
- A modal opens to allow you to create a password:
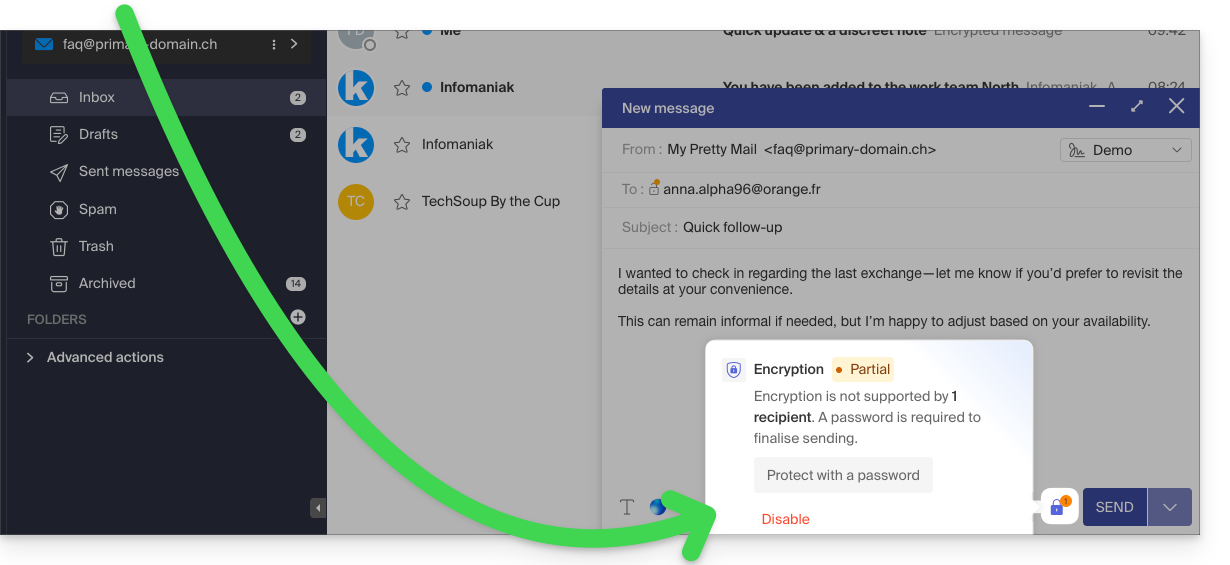
- Enter a password and copy it to send it by your own means (kPaste for example) to the recipient (you can agree on a password in advance so the recipient is already informed):
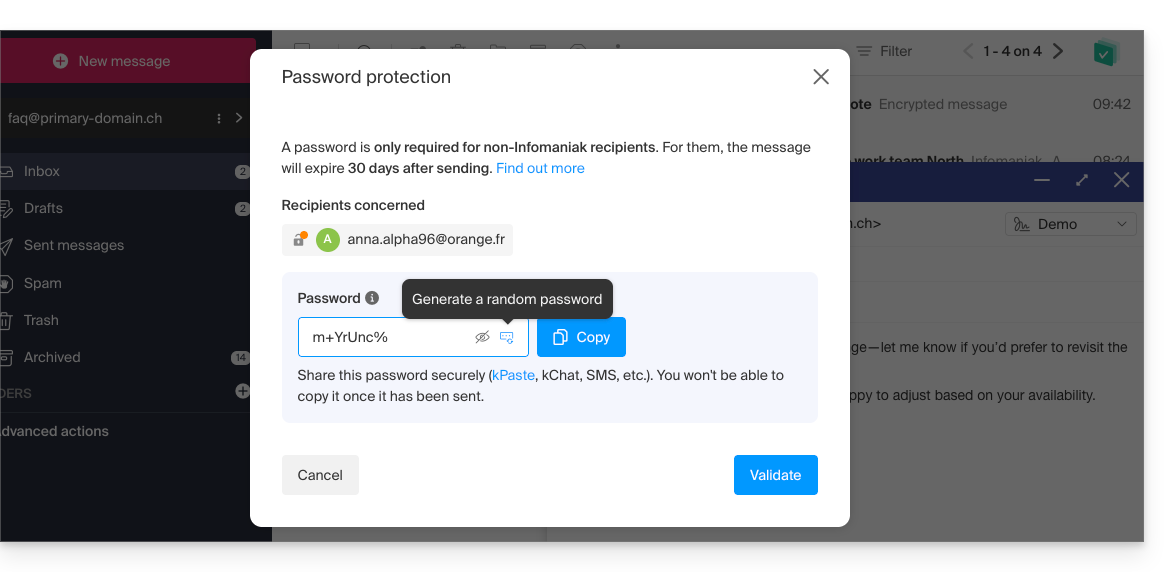
- Enter a password and copy it to send it by your own means (kPaste for example) to the recipient (you can agree on a password in advance so the recipient is already informed):
- The icon now represents a closed lock without an orange chip, and you can send the email as usual:
- Recipients will then receive a message notifying them that an encrypted email is waiting for them:
- By clicking on the provided button, they will be redirected to a secure web page where the password must be entered.
- Once the password is validated, the encrypted message can be viewed on the same page valid for 30 days.
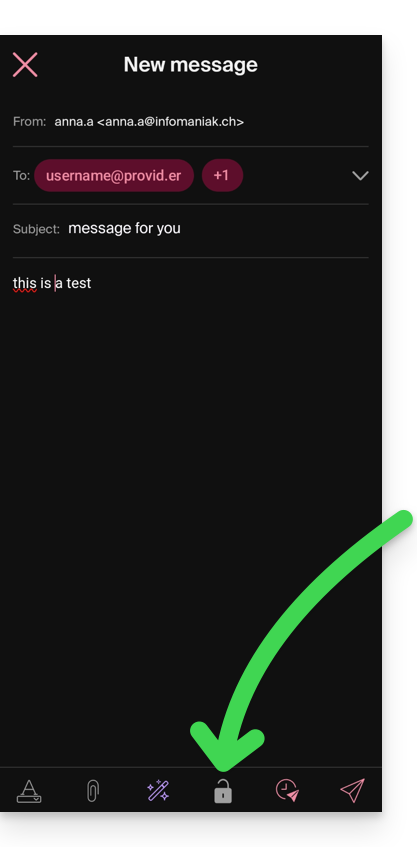
... from the Infomaniak Mail mobile app
To automatically encrypt a message sent to an email address:
- Open the Infomaniak Mail mobile app (app for iOS/Android smartphone or tablet).
- Compose a new message as usual.
- Press the lock icon at the bottom of the composition window to enable encryption:
A. Recipient whose email is managed with Infomaniak
If the recipient of the encrypted email has an email address managed by Infomaniak, encryption is done completely transparently for both the sender and the recipient:
- Closed locks are displayed on the screen.
- Press the send icon:
B. External recipient
If the recipient of the encrypted email has an email address managed outside of Infomaniak services, encryption is still possible, but it requires setting a password:
- . Sending will not be possible as the send icon will remain grayed out and symbols will appear on the locks:
- Press the lock icon.
- A modal opens to allow you to create a password.
- Leave the suggested password or enter a new password and copy it to send it by your own means (kPaste for example) to the recipient (you can agree on a password in advance so the recipient is already informed).
- Press the cross in the top left corner if you have finished managing the password.
- Here we go, the sending can now be done in an encrypted way:
Link to this FAQ:
Has this FAQ been helpful?
This guide explains how to report spam or declare a false positive if spam messages slip through the cracks in an Infomaniak Mail Service, or conversely if a valid email has been inadvertently classified as spam; you can intervene in a few clicks.
Report spam
Prerequisites
- Check that the spam filter is active.
Next, to automatically move an email from your inbox that has evaded the anti-spam filter to the Spam folder:
- Click here to access the Infomaniak Mail Web app (online service ksuite.infomaniak.com/mail).
- Select the message in the inbox and then click on the Spam icon in the toolbar:
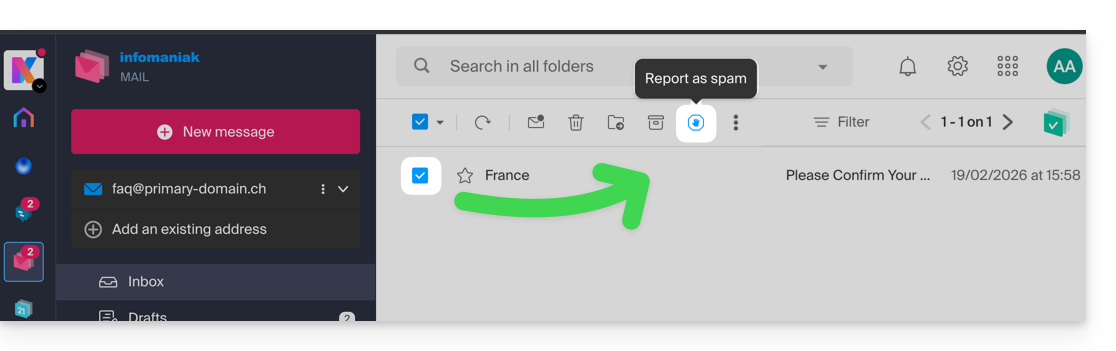
- You can also open it and declare it as Spam later:
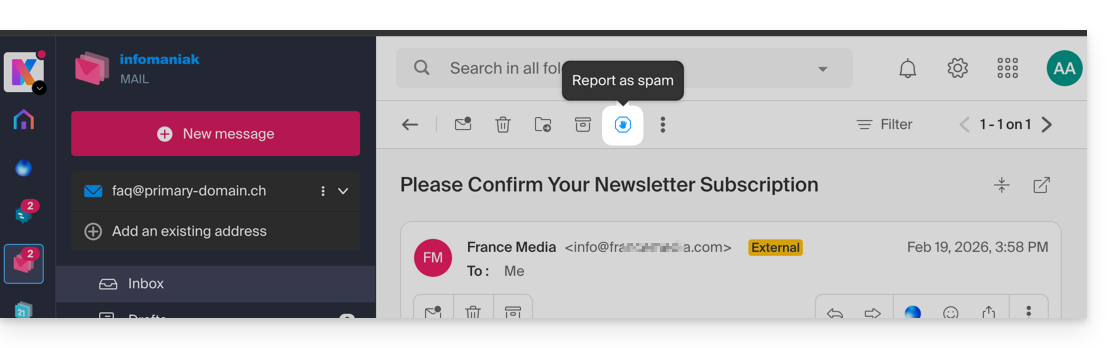
- Another option: open it and click on the action menu ⋮ on the right:
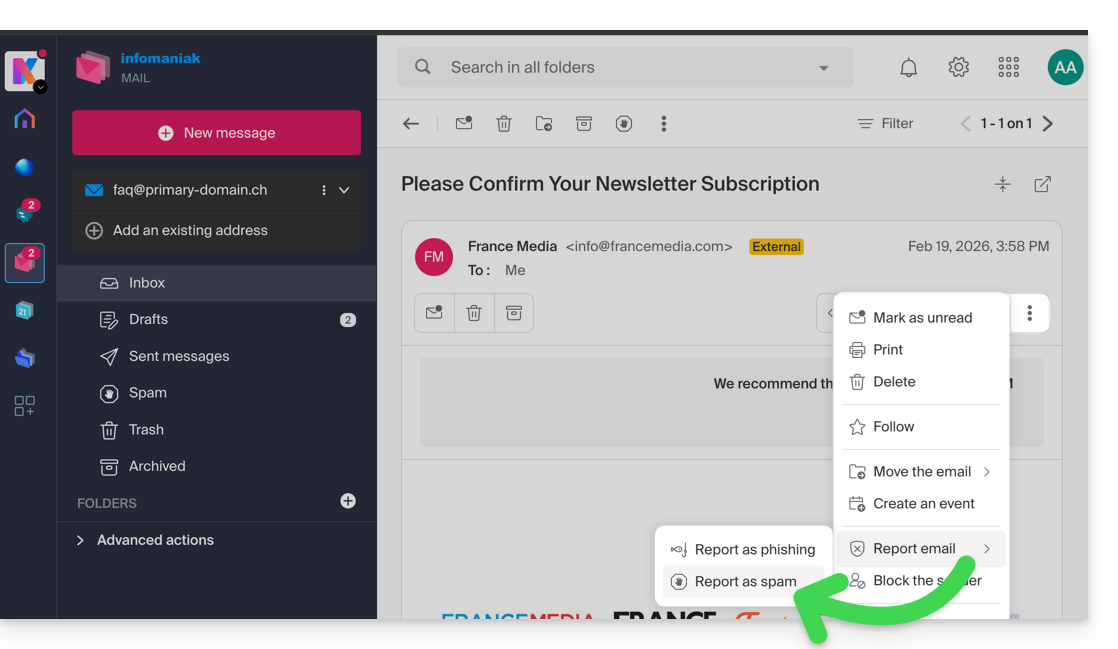
Once you have clicked on Report as spam:
- The email is moved to the Spam folder (or to the manually defined folder)
- The sender's address is added to the blocked users list
- The filter is refined for better handling over time.
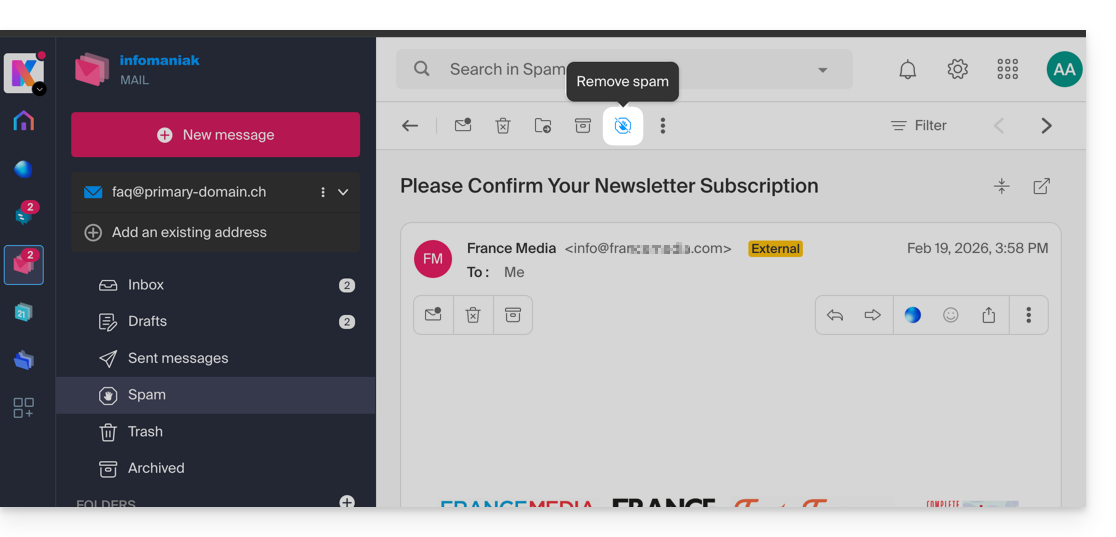
Declare a false positive
Conversely, if you act on an email falsely considered as spam (false positive) by clicking on the "This is not spam" icon:
- The email is moved to the inbox...
- The sender's address is added to the list of authorized users...
- This also affects the filter and its criteria.
Link to this FAQ:
Has this FAQ been helpful?
This guide explains how to handle Soft Bounce & Hard Bounce errors that can occur when sending emails, particularly when using the Infomaniak Newsletter.
Hard Bounce
A hard bounce is an email that cannot be delivered for permanent reasons.
- email sent to a fake address
- recipient's email domain that is not a real domain
- recipient's server that does not accept emails
- etc.
Soft Bounce
A soft bounce is an error message indicating that the email has not been delivered to its recipient and corresponds to a presumably temporary delivery issue: the email address is valid, the sender can resend the email.
Several reasons can explain a soft bounce and therefore why the recipient's server temporarily refuses the email:
- the recipient's inbox is full: due to insufficient storage capacity, the recipient no longer receives messages
- an issue occurs at the recipient's mail server: the server is temporarily unavailable or down, or the user has inadvertently set filters that prevent the reception of certain messages
- when the content of the email, particularly its attachments, is too large, the delivery issue is observed at the time of sending
Unless the recipient has permanently abandoned their inbox without deleting their account, the soft bounce is a temporary issue.
Example of the Infomaniak Newsletter tool after a send with a good score of 0% "Permanent Bounces" and 0.31% "Temporary Bounces":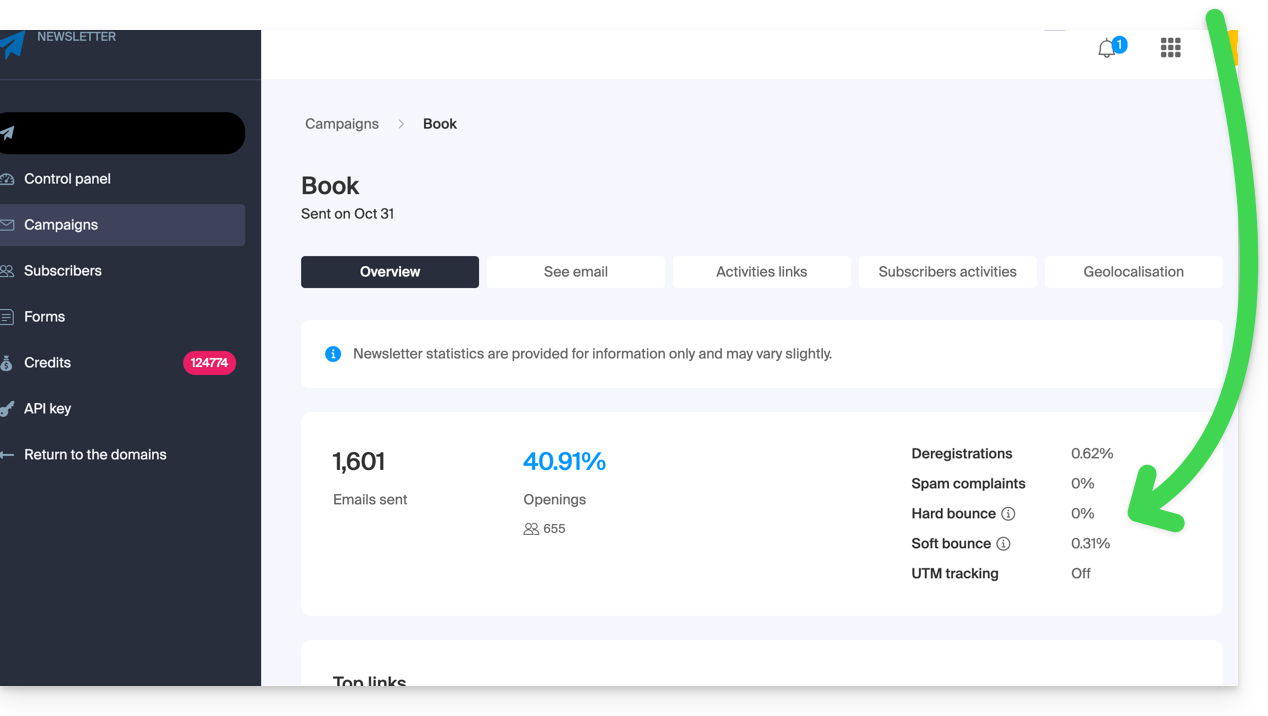
Also refer to this other guide.
Link to this FAQ:
Has this FAQ been helpful?
This guide details the specific rules to follow when using a password containing the “dollar” character $ to send an email via the Infomaniak SMTP in a script (PowerShell, Python, etc.).
Preamble
- If you encounter an authentication error (e.g.,
auth failed,invalid login or password) when sending an email via SMTP, even though the password is correct and works in software like Outlook, the issue may be due to the handling of the$character in your script or configuration file. - To ensure reliable execution of your SMTP scripts, it is strongly recommended to avoid any special characters with syntactic significance, particularly
$, in passwords used in scripts and configuration files. - The problem may also occur when connecting to databases.
Rules to follow
The character $ is a special symbol in many languages and environments. When used in a password in a script or configuration file, it may be mistakenly interpreted as a variable or control character.
Here are common cases where you should not use the character $ in a password:
- PowerShell:
$is used to declare variables. A password containing$can cause syntax errors or be truncated. - Bash / Shell (Linux):
$is also a variable prefix. It can trigger unexpected substitutions. - YAML files (e.g., Home Assistant, GitHub Actions, Docker Compose):
$can be interpreted as an environment variable. - Files
.env,.ini, or other configuration files: tools that read these files may attempt to interpret the variables. - Commands or URLs with authentication: a password containing
$may be incorrectly encoded or fail during parsing.
To correct or prevent this type of error:
- Avoid using the character
$in passwords intended for use in scripts or automated systems. - If you must use it, always properly enclose the password string according to the language:
- In PowerShell: use single quotes
'password$Test'if possible. - In Python: ensure the string is properly enclosed in single or double quotes, without interpretation.
- In Bash: escape the
$with a backslash\$.
- In PowerShell: use single quotes
Link to this FAQ:
Has this FAQ been helpful?