Knowledge base
1000 FAQs, 500 tutorials and instructional videos. Here, there are only solutions!
This guide explains how to modify product access rights for a user in your Organization on the Infomaniak Manager.
Preamble
- Since you opened your account with Infomaniak, you are part of at least one Organization.
- If you were alone and it was not an invitation, an Organization was created in your name and you automatically become the legal representative.
- Otherwise, you belong to the Organization that invited you (to join its kSuite, to manage a product, etc.).
- It is possible to modify a user's role within your Organization.
- You can then define whether a user…
- … is part of your Organization and should become:
- Legal representative
- Administrator
- Collaborator (this is the part that is detailed below…)
- … is external to your Organization (limited rights):
- External users are not included in the sharing of calendars and address books for the entire Organization.
- … is part of your Organization and should become:
Who can access what…
Prerequisites
- Switch to the desired Organization first if you do not find the expected user list.
- Be Administrator or Legal representative within the Organization.
- Have added a user as a collaborator.
The guide below allows you to manage product access for collaborators and external users. Indeed, a legal representative or an Administrator already has access to all existing products within the Organization and visible on the Infomaniak Manager.
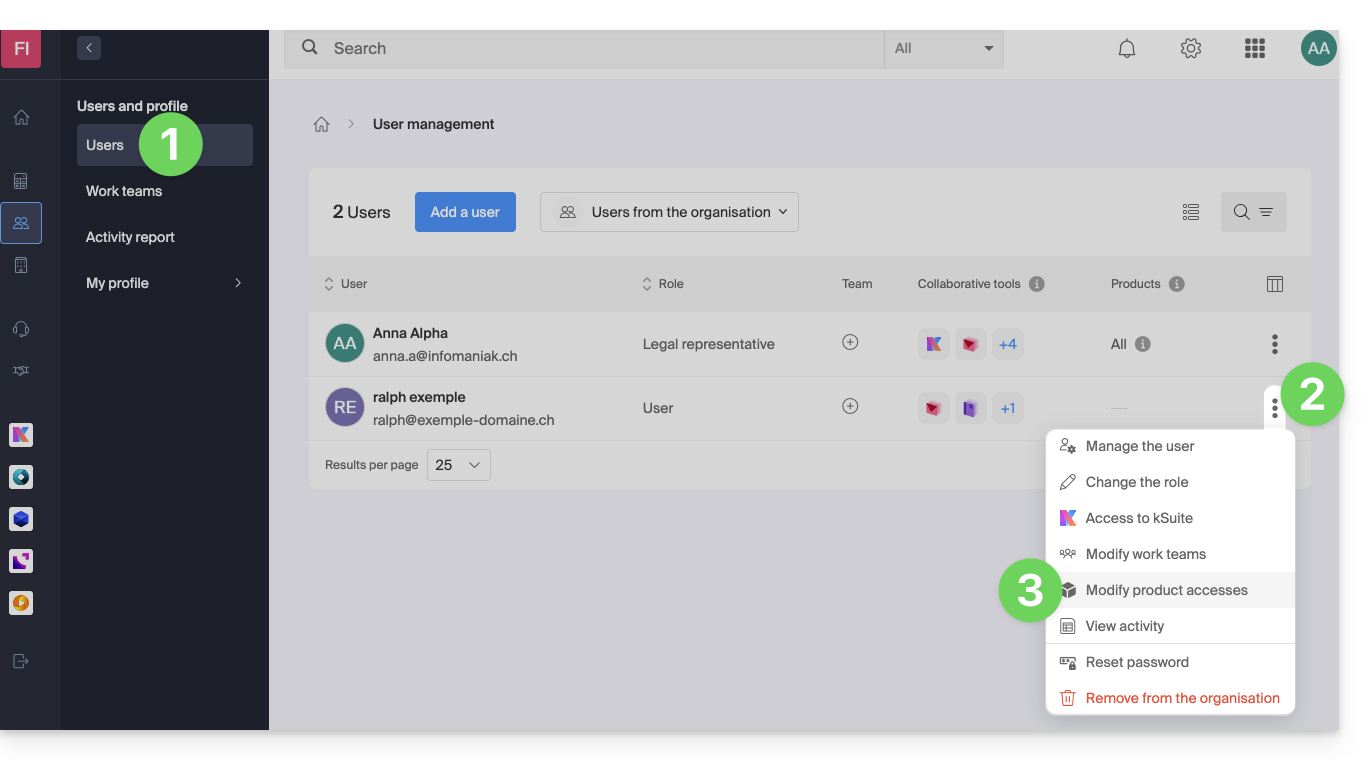
To modify the product access of an Organization user:
- Click here to access user management on the Infomaniak Manager (need help?).
- Click on the action menu ⋮ located to the right of the user concerned.
- Click on Modify product access:
- You can grant access to everything with maximum permissions in 1 click.
- Otherwise, click on the product category to which you want to grant access.
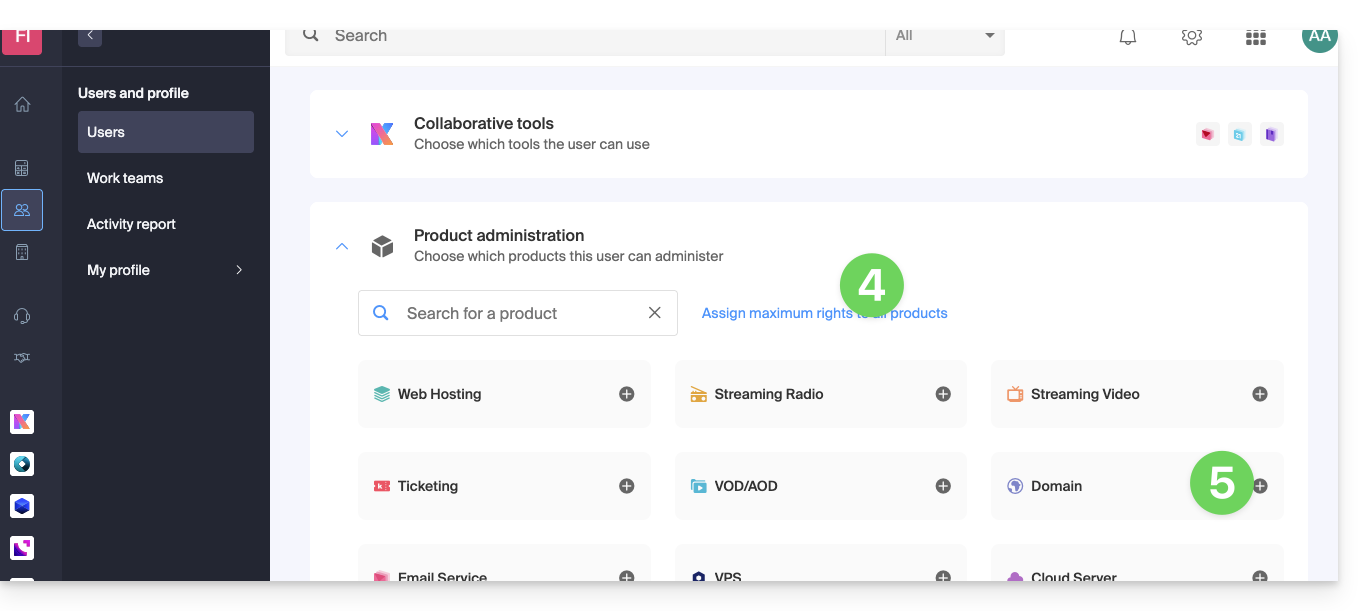
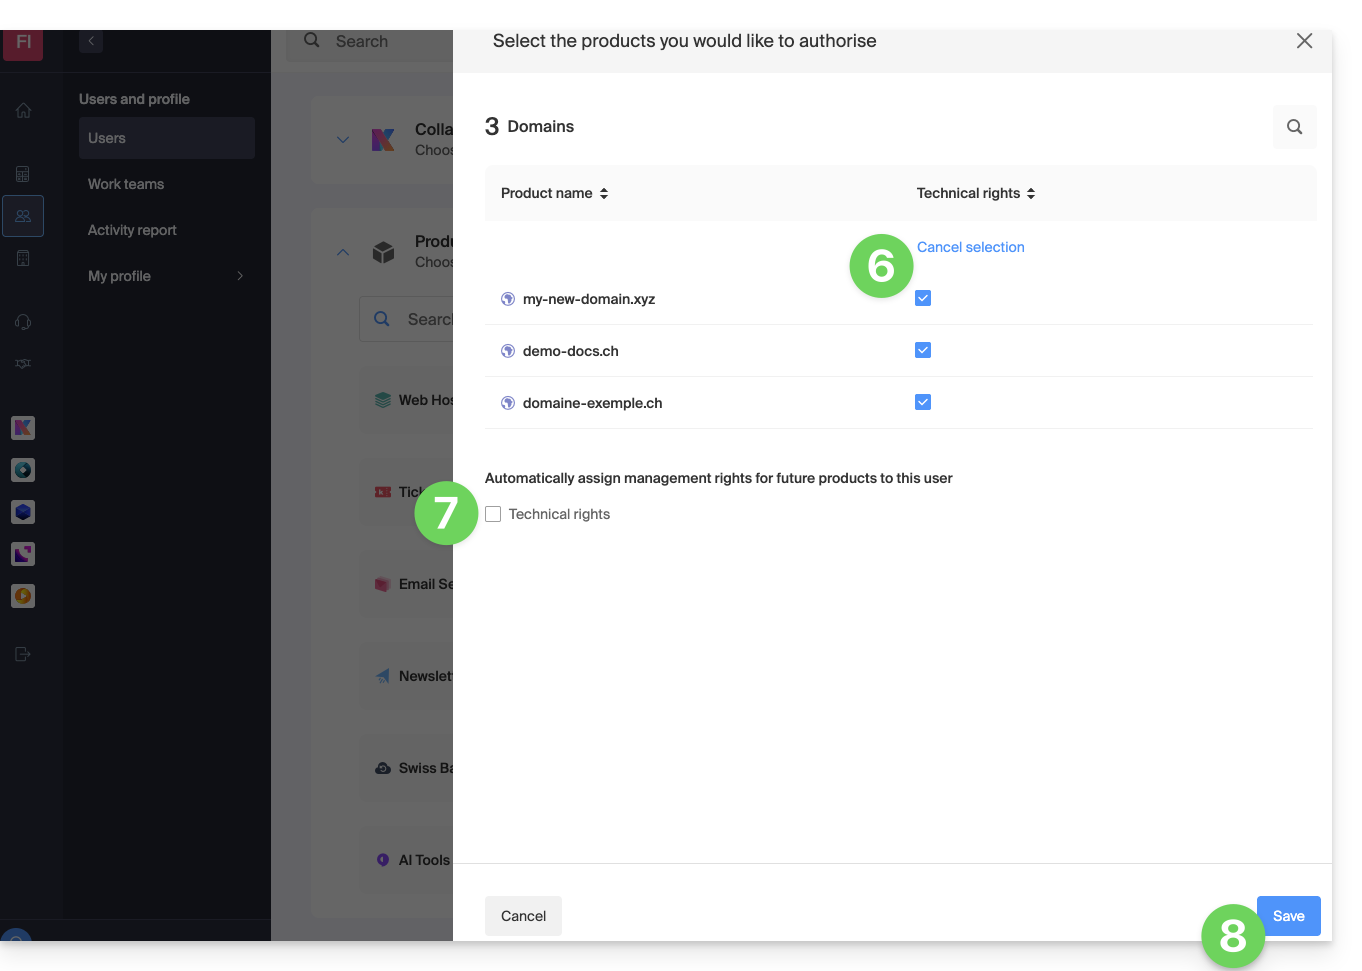
- Select the necessary product(s).
- If you have selected multiple products, decide whether a future additional product should automatically be visible to the user (and with what type of permissions).
- Click on the Save button:
- Rights are granted immediately.
- Click on the pencil icon ✎ to modify permissions:
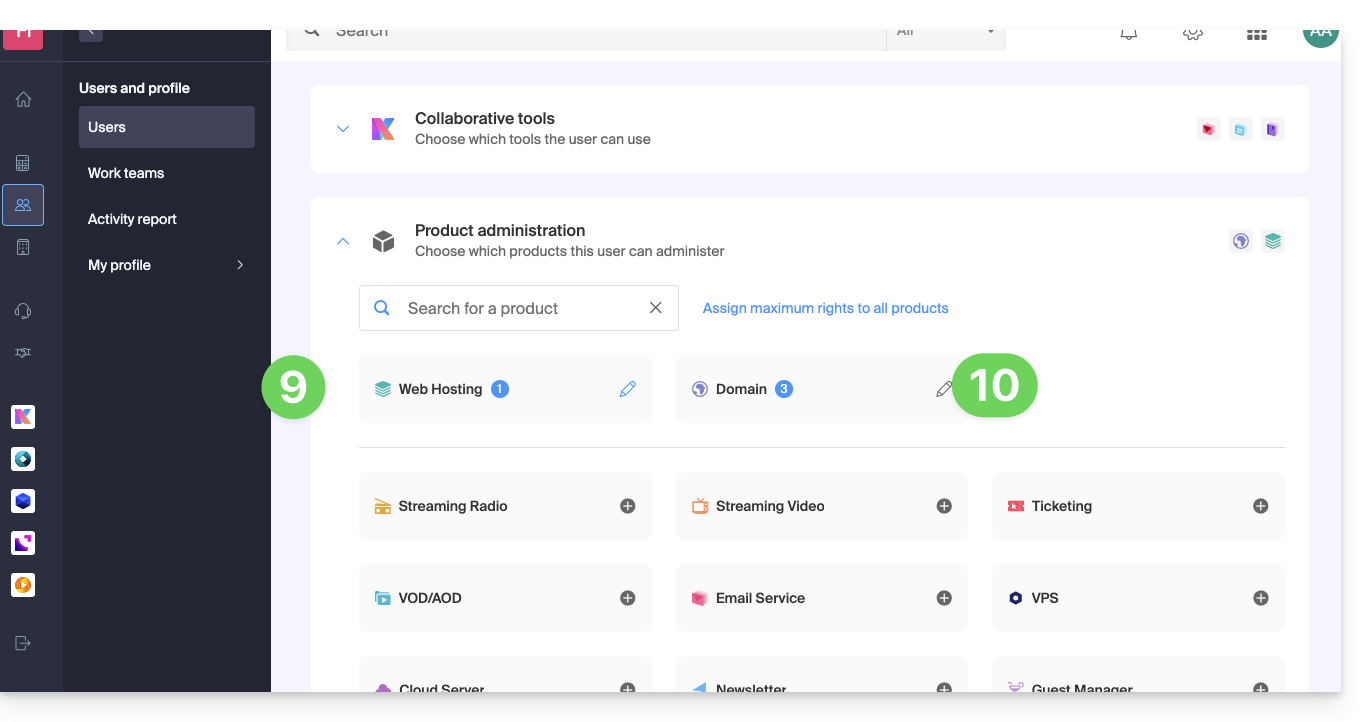
- Restart at step 5 if you need to grant access to multiple products.
Service usage / Service management
Be careful, on your product table, it is important to distinguish between product access (type kDrive for example, within the kSuite) and product management access: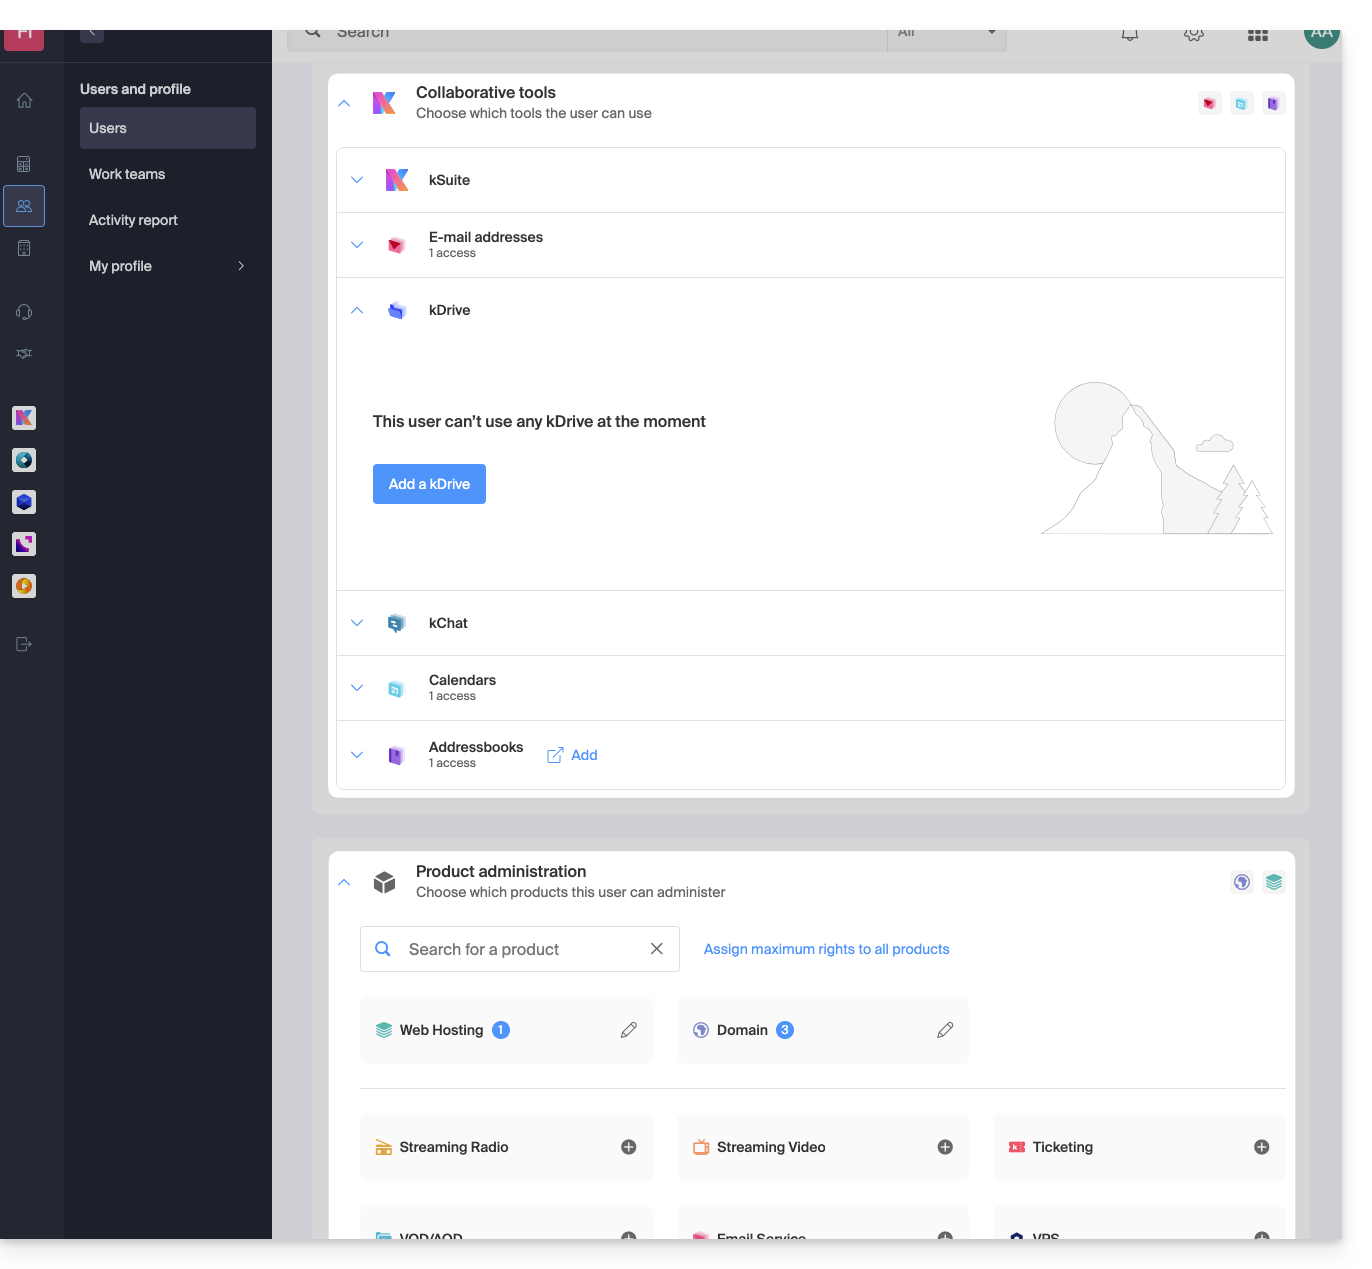
It is possible to authorize a user to use kDrive (they will be able to create a PDF for example) without granting them kDrive service management rights (they will not be able to change the offer, invite a new user, terminate, etc.).
Technical rights / Statistical rights
With certain services like kDrive, it is possible to give a collaborator TECHNICAL and/or STATISTICAL rights (adds access to the dashboard, share links, storage statistics, active users, connected devices, activity on kDrive):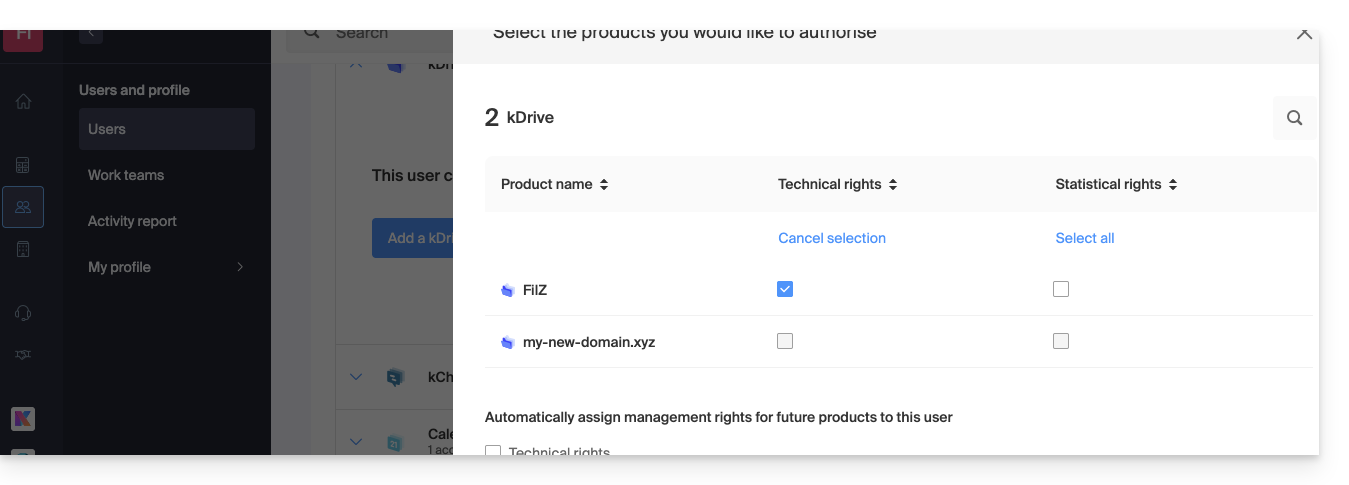
Other services like domain names do not have a STATISTICAL section: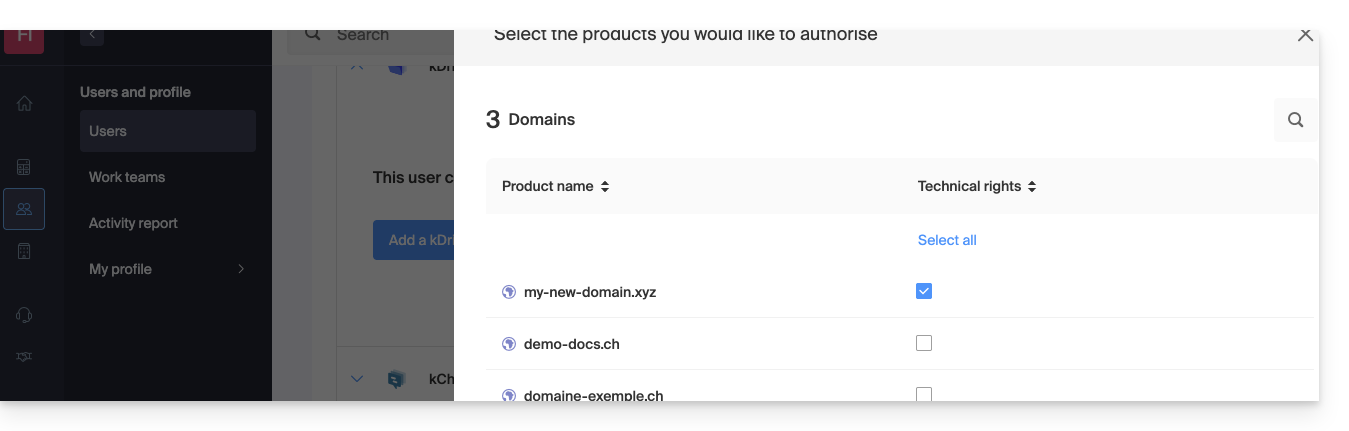
Certain specific services like ticketing allow granting even more detailed rights: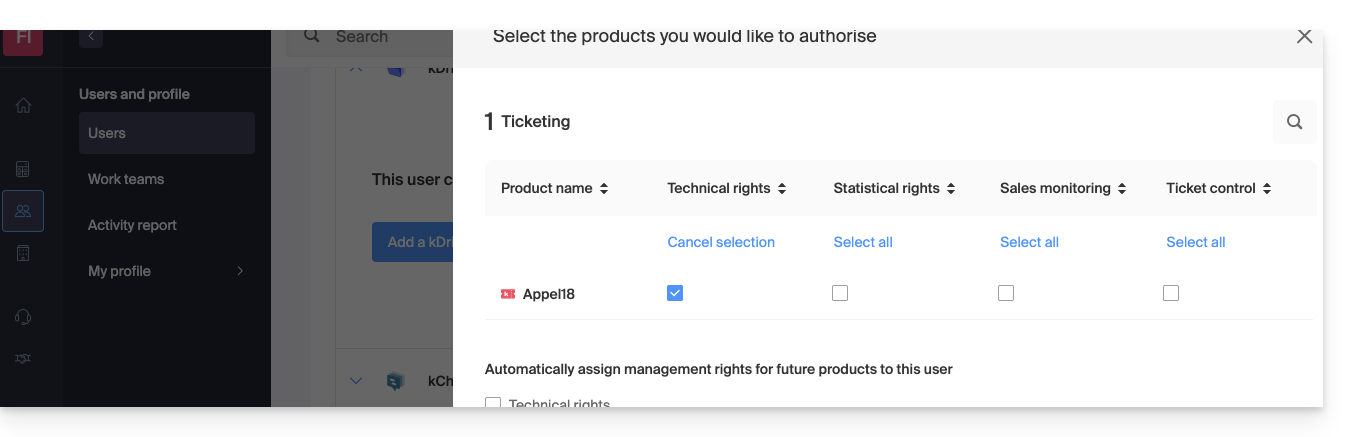
Easier access: Groups
In order to facilitate the addition of access rights to a product that is on your Organization, there are Groups. These allow you to create teams that are linked to Infomaniak products with the desired rights, very practical for giving a new collaborator of your Organization access to the products they will need in their daily activity.
Link to this FAQ:
Has this FAQ been helpful?
This guide explains which DKIM to add to secure Infomaniak messaging if it revolves around a domain name whose DNS is that of Cloudflare.
Preamble
- If you manage your emails at Infomaniak, as well as the associated domain name, but the DNS management is with Cloudflare, then you need to add the DKIM on the Cloudflare interface.
Add a DKIM on Cloudflare
Prerequisites
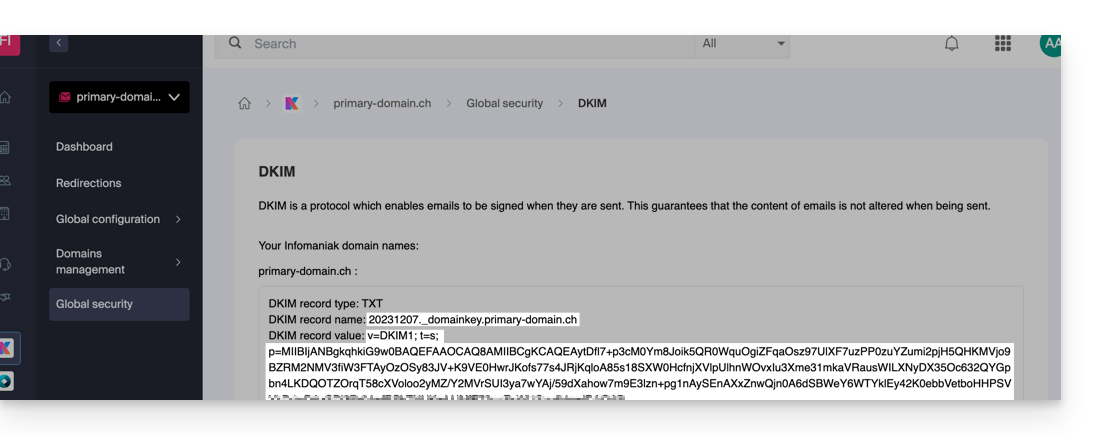
- Refer to this other guide to allow you to display the DKIM corresponding to your Infomaniak messaging.
- Display the DKIM to be able to copy-paste it. Example:
Follow the procedure below to correctly activate DKIM, thus improving the security and deliverability of emails for the domain in question:
- Click here to access your Cloudflare account.
- Select the domain in question.
- In the DNS section, search for and delete any NS records for "
_domainkey" pointing to Infomaniak. - Click on the Add a record (
Add record) button to open the input form. - Fill in the fields using the data obtained from the Infomaniak Manager, respecting the standard configuration for a TXT type DKIM record:
| Cloudflare Field | Value to Enter | Important Notes |
|---|---|---|
| Type | TXT (text) | Choose the standard type for DKIM keys. |
| Name (Host) | The DKIM selector (e.g. 20240112) | Enter only the selector as Cloudflare automatically adds the domain name and the suffix ._domainkey for you. Refer to the Cloudflare documentation if necessary. |
| Content (Value) | The public key (the long string) | Paste the entire DKIM public key provided (what comes after p=) |
| TTL | Auto | Leave the default value for optimal management by Cloudflare. |
Make sure the Proxy Status (cloud) is set to DNS Only (grayed out) for email authentication records.
Save and Propagation
After carefully verifying the accuracy of the Selector and Public Key, click the Save button. This validates the addition of your DKIM record in the Cloudflare DNS zone.
Any DNS addition/modification can take up to 48 hours to propagate.
Once the waiting period has elapsed, you can use online verification tools to confirm that the DKIM record is published and valid. This validation ensures that your Infomaniak emails will be properly signed and their deliverability will be optimal.
Link to this FAQ:
Has this FAQ been helpful?
This guide is for owners of a domain name on the Infomaniak infrastructure who encounter a DMARC issue when using certain Google tools such as Meet or Calendar.
Resolve a DMARC error
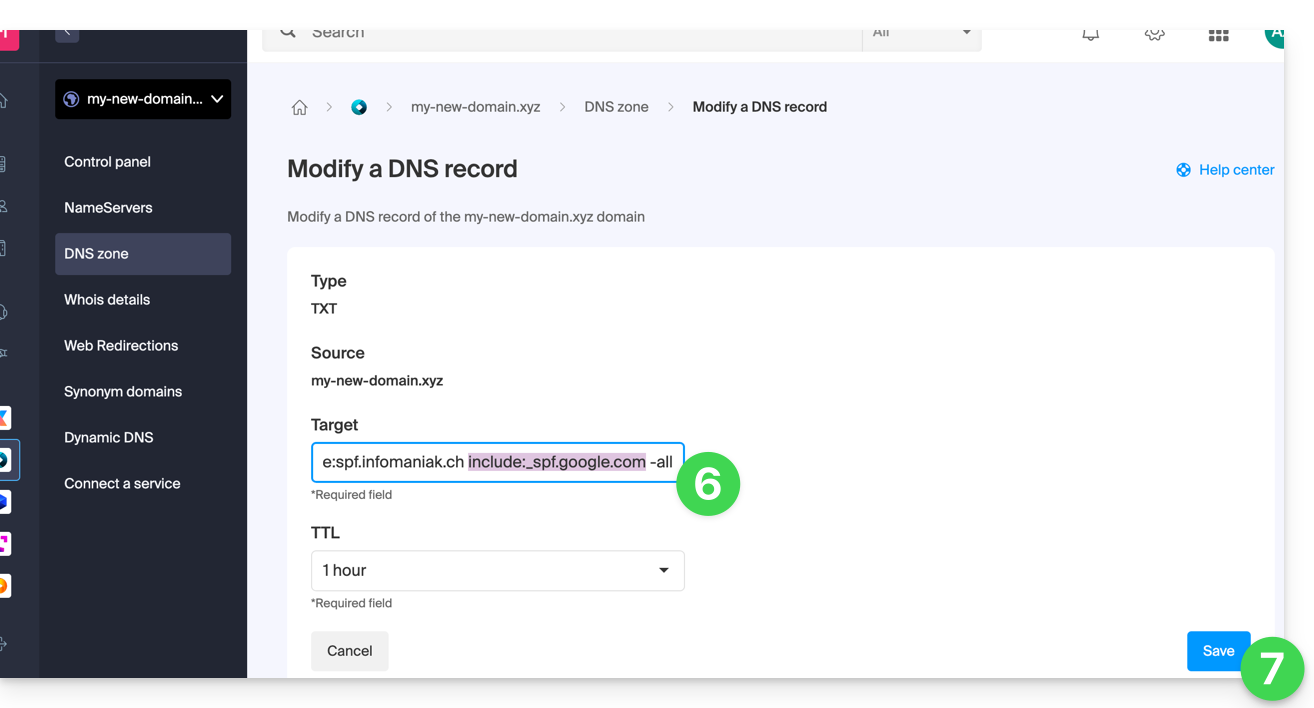
To make your domain name configuration (with a DMARC policy of type reject) compatible with the use of certain Google services, it is necessary to add a corresponding SPF record:
- Before:
v=spf1 include:spf.infomaniak.ch -all - After:
v=spf1 include:spf.infomaniak.ch include:_spf.google.com -all
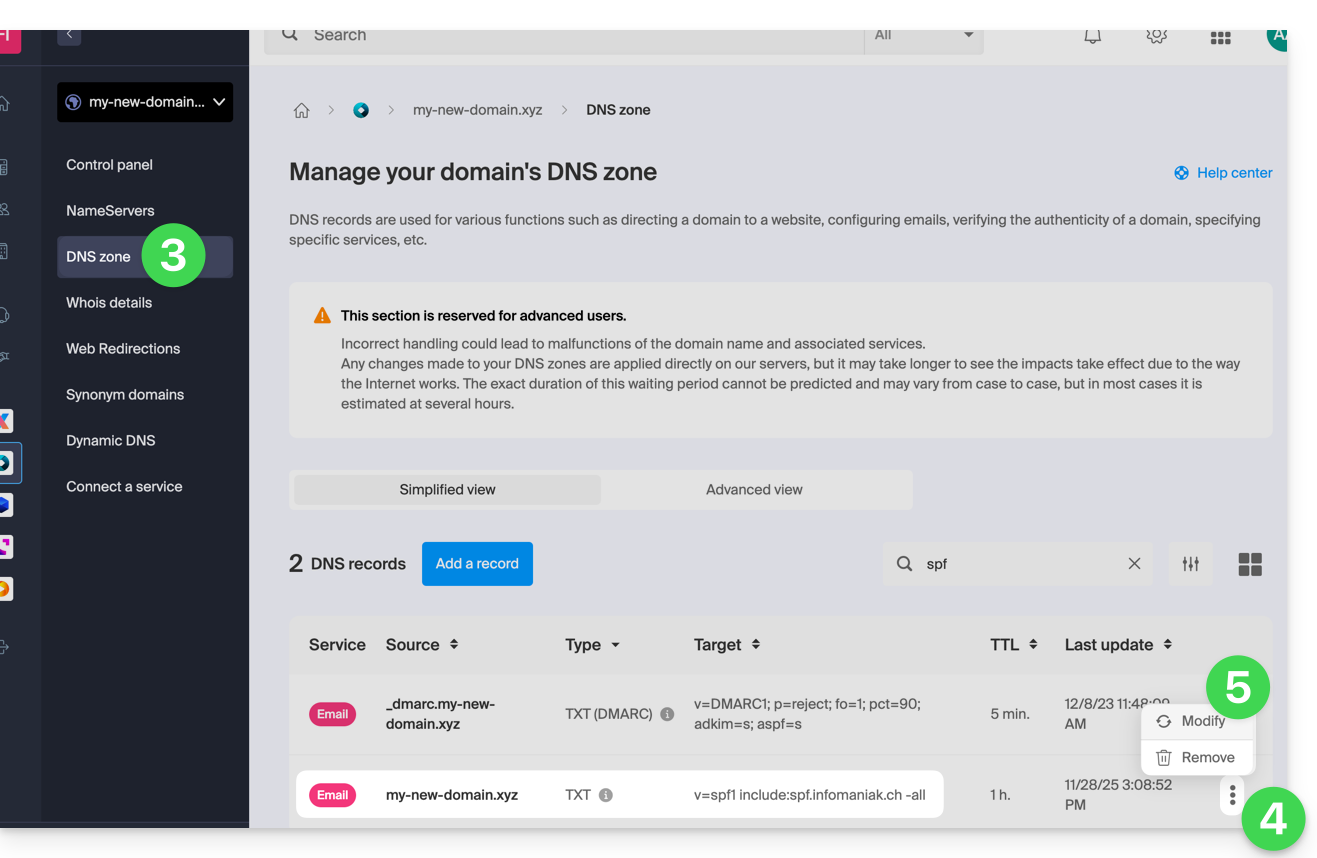
To edit the SPF currently configured in the DNS zone of your domain name:
- Click here to access the management of your product on the Infomaniak Manager (need help?).
- Click directly on the name assigned to the product concerned.
- Click on DNS Zone in the left sidebar.
- Click on the action menu ⋮ located to the right of the TXT type record containing the value of the SPF concerned.
- Click on Modify:
- Edit the field by adding on the same line
include:_spf.google.comafter the existing Infomaniak include, and this before the final-all. - Click on the Save button:
Any DNS addition/modification can take up to 48 hours to propagate.
Refer to this Google documentation if you are looking for information on configuring Google's SPF.
Link to this FAQ:
Has this FAQ been helpful?
This guide details the rules for sending group emails at Infomaniak to avoid any Spam qualification, in accordance with the Swiss federal laws and the Infomaniak Terms of Service.
Obtain consent (double opt-in)
The double opt-in is the only method to protect against complaints.
To be valid, the interested party's registration must:
- Come from a form dedicated to a specific subject.
- Be confirmed by the recipient via a validation link sent by email.
- Be tracked by the system (recording of the IP address and date).
How to stay compliant?
- Use a contact form with double opt-in to build your lists.
- Systematically keep the IP address and the registration date of each subscriber.
- Insert a mandatory unsubscribe link visible at the bottom of each email.
Handling spam complaints
In case of a complaint, Infomaniak may temporarily suspend the emails.
- If you provide proof of registration (IP and date): the complaint is closed without further action.
- Without proof of registration: the complaint is deemed justified. Infomaniak may then suspend the email address, the domain, or terminate the contract in case of recurrence.
Link to this FAQ:
Has this FAQ been helpful?
This guide explains how to suspend the administrative management of a product so that no user of the Organization can use it within the Infomaniak Manager. It is also possible to block a user of your Organization, without deleting them.
Preamble
- By blocking the management of a product:
- Only administrators and the legal representative will be able to unblock it.
- Users with limited rights (collaborators and clients) who have access to this product will no longer be able to manage it.
- An email is sent to the users of the Organization.
Block a product
Prerequisites
- Be an Administrator or Legal Representative within the Organization (users with limited rights (collaborators and clients) who have access to this product will not be able to do so).
To block or unblock certain products for the entire Organization:
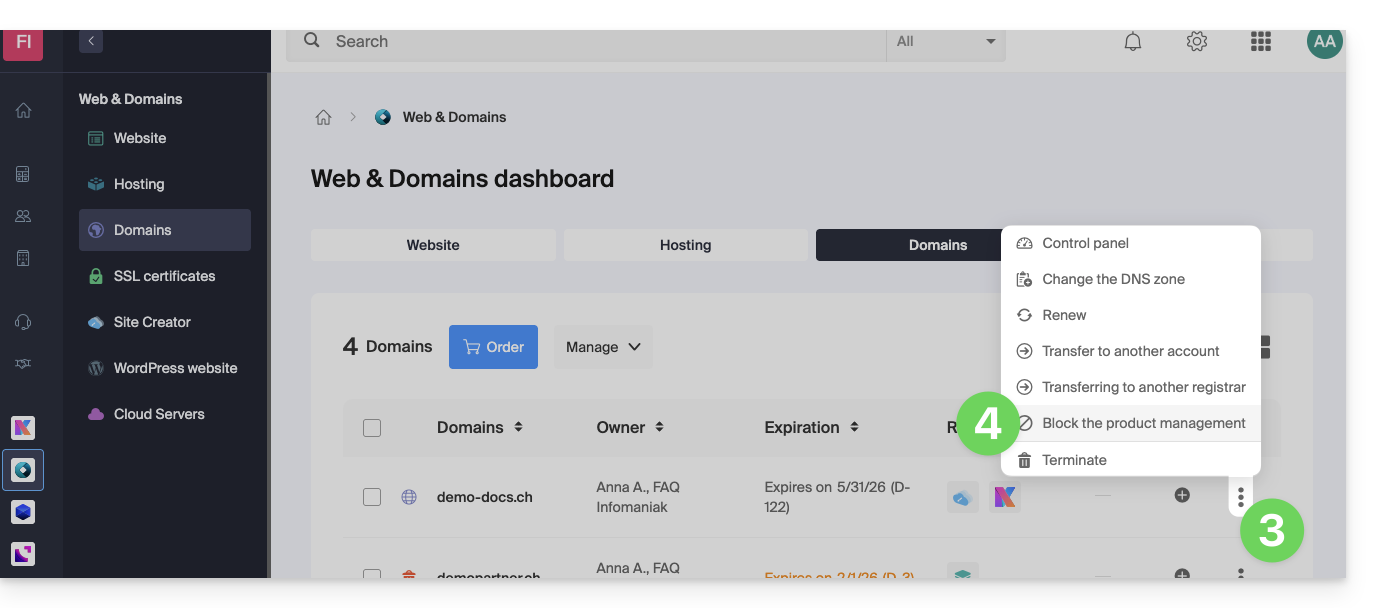
- Click here to access product management in the Infomaniak Manager (need help?).
- Access the service you wish to block.
- Click on the action menu ⋮ located to the right of the item in question.
- Click on Block product management:
- Example 1, Cloud Server:

- Example 2, domain name:
- Example 1, Cloud Server:
- Confirm the suspension.
Suspend emails
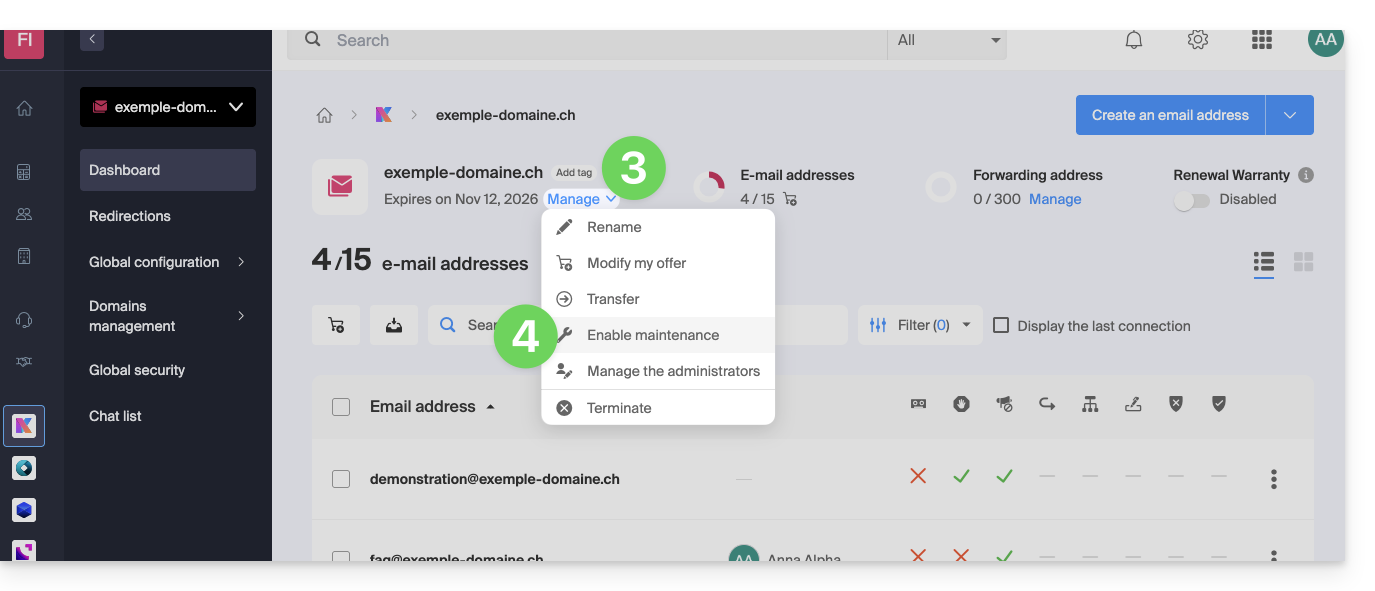
A Mail Service cannot be blocked in the way indicated above, but it can be put into maintenance.
Prerequisites
- Be an administrator or legal representative; users with limited rights (collaborators and clients) who have access to this product will not be able to do so.
To suspend email addresses:
- Click here to access the management of your product in the Infomaniak Manager (need help?).
- Click directly on the name assigned to the product in question.
- Click on Manage.
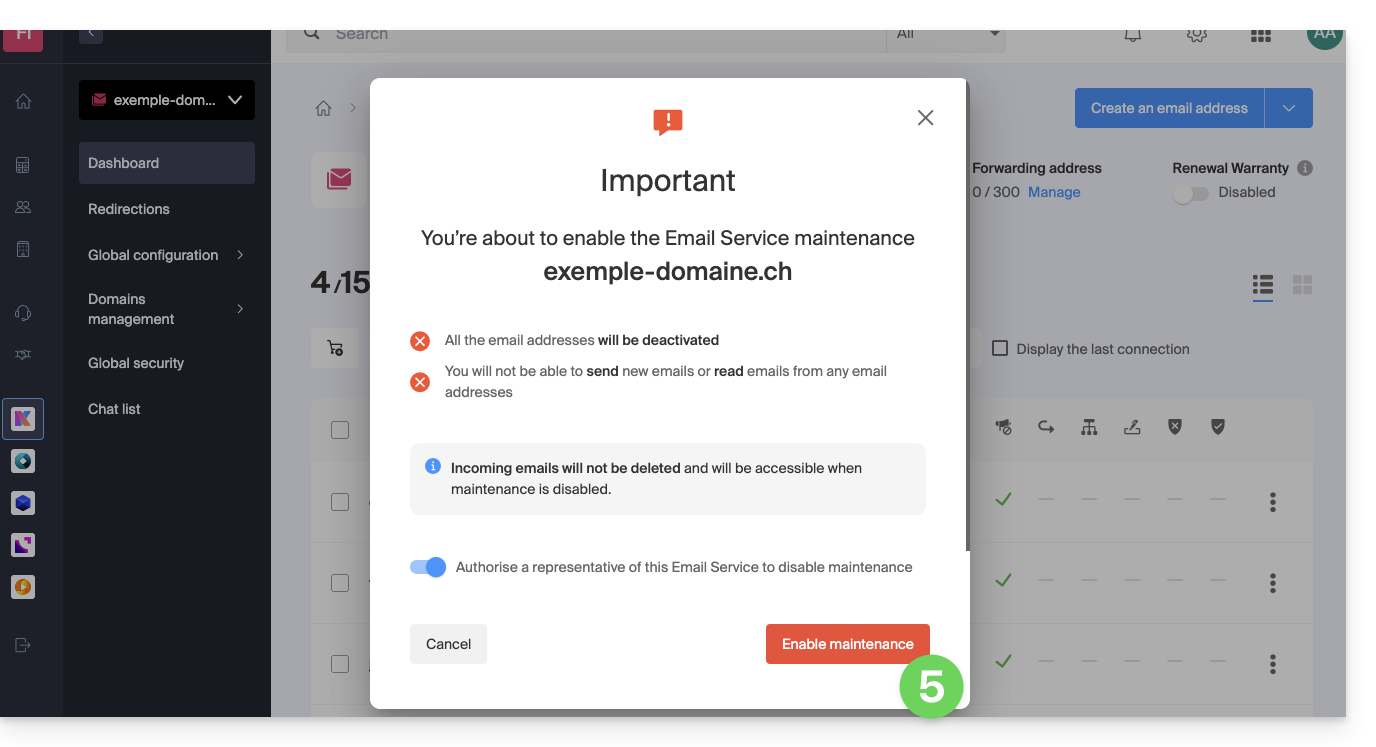
- Click on Enable maintenance:
- Confirm by clicking the red button to suspend the use of email addresses (reception is not interrupted but consultation is impossible):
Block an Organization user
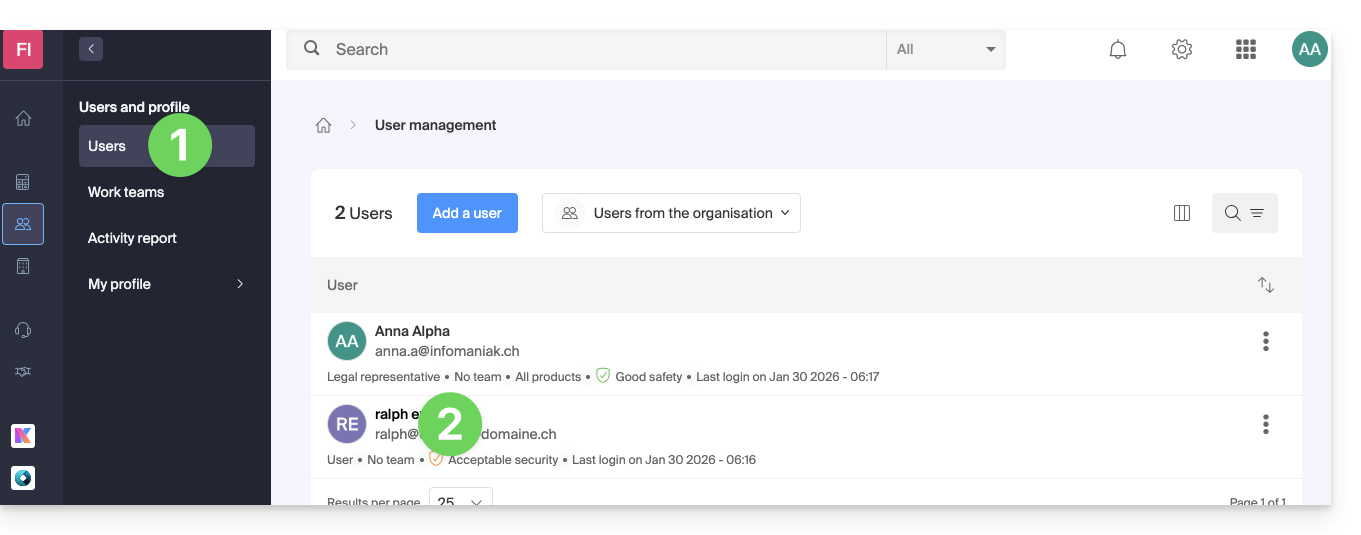
To quickly block an Organization user in case of a security incident, log in to manage your users as an Administrator or Legal Representative of the Organization:
- Click here to access user management on the Infomaniak Manager (need help?).
- Click on the user in question:
- From the Manage button at the top of the page, you can remove the user from the Organization (which also removes their various product management access).
- Further down, you can more finely manage the products to which the user should have access:
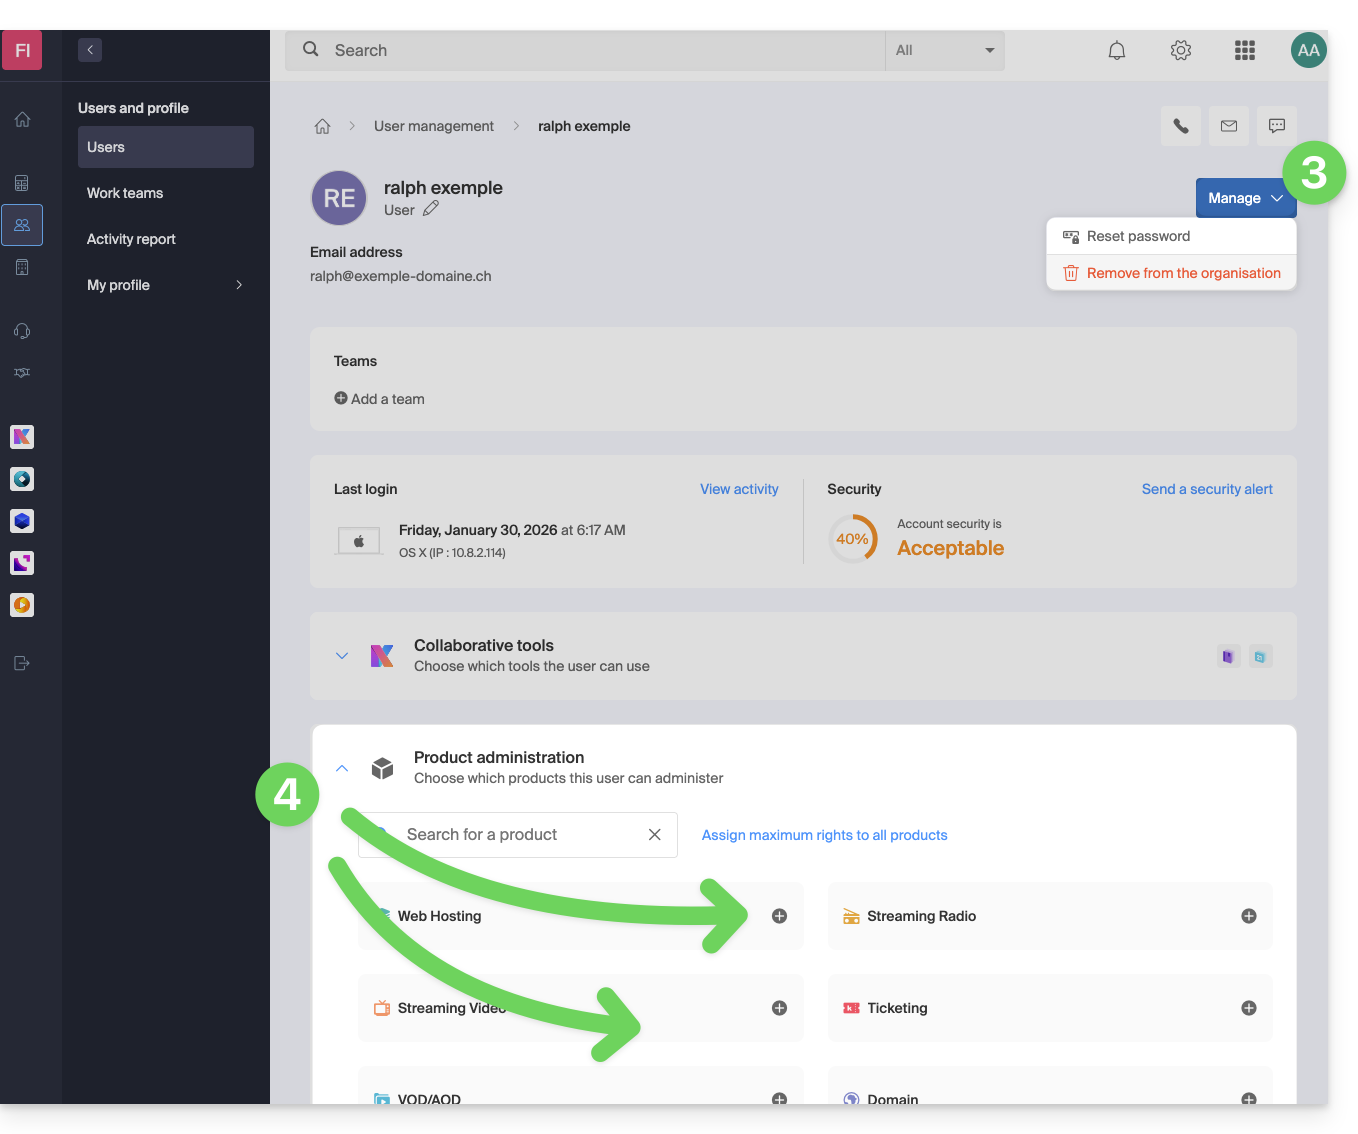
Thus, critical services, such as the Manager interface, of your Organization, the Web app kDrive and the Web app Mail may become inaccessible to them.
Depending on the situation, also refer to these links to block other services such as messaging (IMAP / SMTP) or Web services.
To not block the user yourself but to indicate a procedure for them to follow to secure their account, refer to this other guide.
Link to this FAQ:
Has this FAQ been helpful?
This guide concerns the configuration of the mobile app Infomaniak Mail (app for iOS/Android smartphone or tablet).
The language of the application is based on the language of your device on which the Infomaniak Mail mobile app is installed and not on the configured language on your user account.
Access the application settings
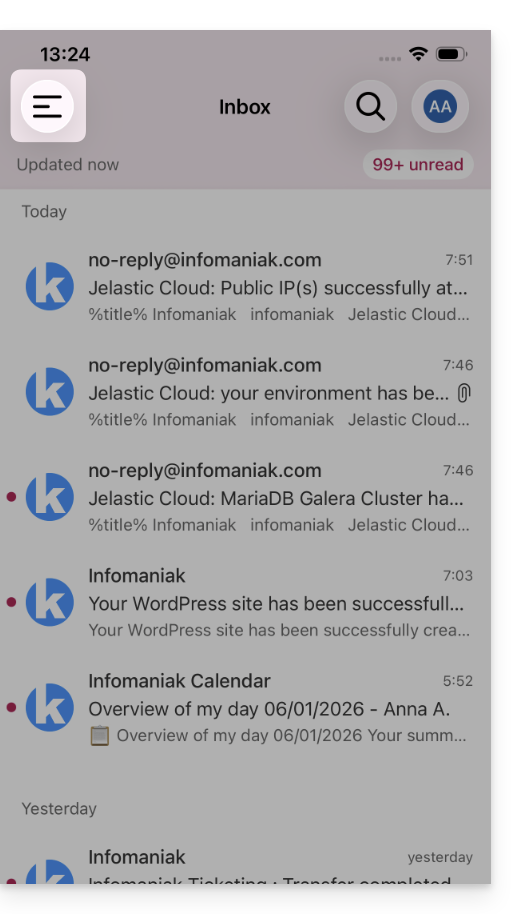
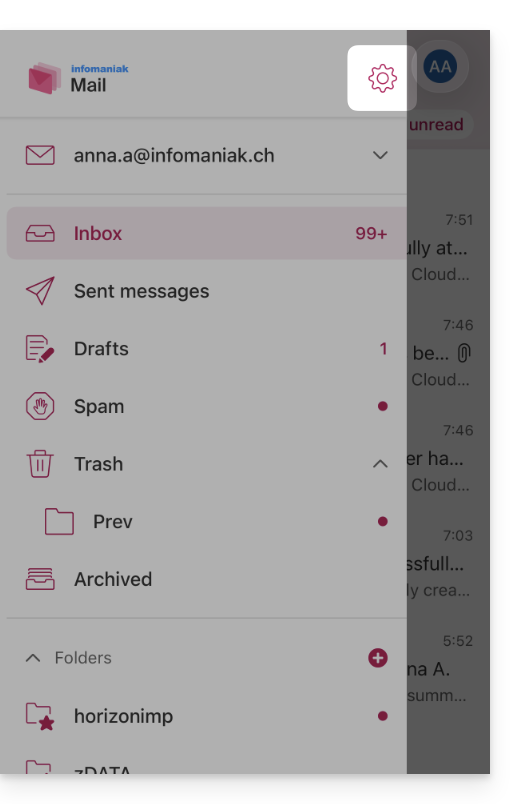
To open the settings of the mobile app Infomaniak Mail (app for iOS/Android smartphone or tablet) on your device:
- Tap at the top left of your inbox:
- Click on the Settings icon at the top right of the pane that opened:
- You can manage the settings from the screen that appears:
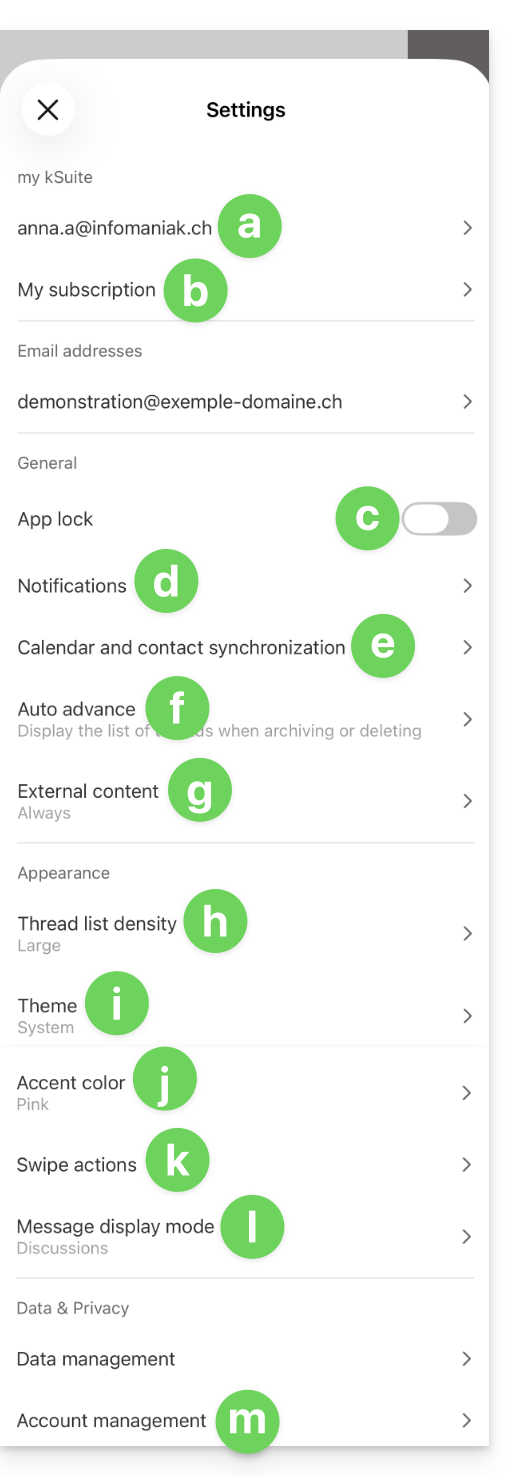
a. Signature selection
If you have multiple email addresses linked to your account, tap on the email address for which you want to change the signature. Then choose another signature from those configured.
On iOS, you can also manage your read receipt requests.
b. my kSuite only
Allows you to get information about the current subscription.
c. Application lock
This option allows you to protect the application by one of the locking methods of your device, which allows you to stay connected to Infomaniak messaging with your user account but prevents access to Infomaniak Mail by a third party when the app is no longer in the open applications.
If your device has a fingerprint reader, you can use this method to activate the lock. Same for Face ID on iOS: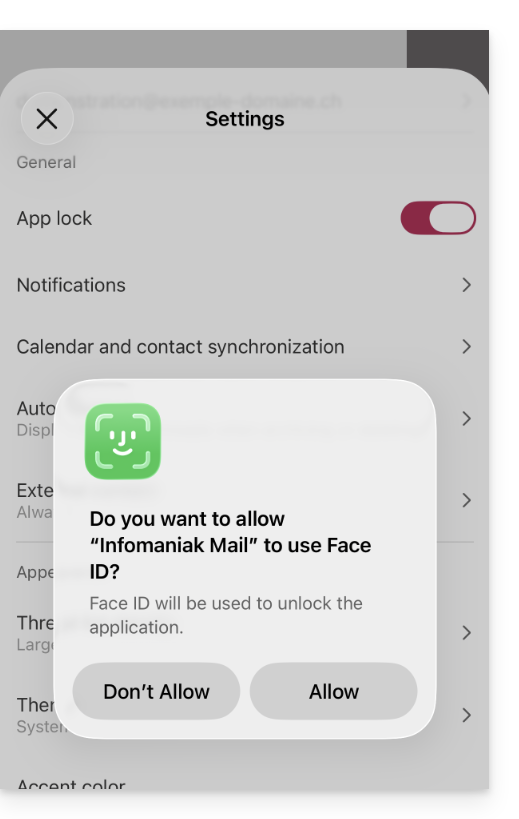
Upon reopening the application, authentication will be required.
d. Notifications on the device
You can configure the notifications for each of the email addresses linked in the application.
e. Synchronization of contacts & calendars
For now, this synchronization is managed externally; refer to the assistant https://config.infomaniak.com/.
f. Automatic advance
This section allows you to choose the action to be taken after archiving or deleting an email: open the next message, or the previous one, or return to the message list.
g. External content
This section allows you to choose whether to automatically display all external content present within an incoming email you are reading, or whether you prefer to hide it and only display it on demand.
h. Conversion list density
The display mode can be compact, normal, or large.
i. Theme
The theme allows you to choose a display type dark mode (dark) or conversely, a bright display black on white. This display can also be defined based on the device's theme (thus allowing for any system setting that might vary the display based on the time).
j. Accent color
The accent color is either blue or pink.
k. Swipe actions
Swipe actions allow you to define what operation my kSuite Mail should perform if you swipe your finger across a message from right to left or left to right: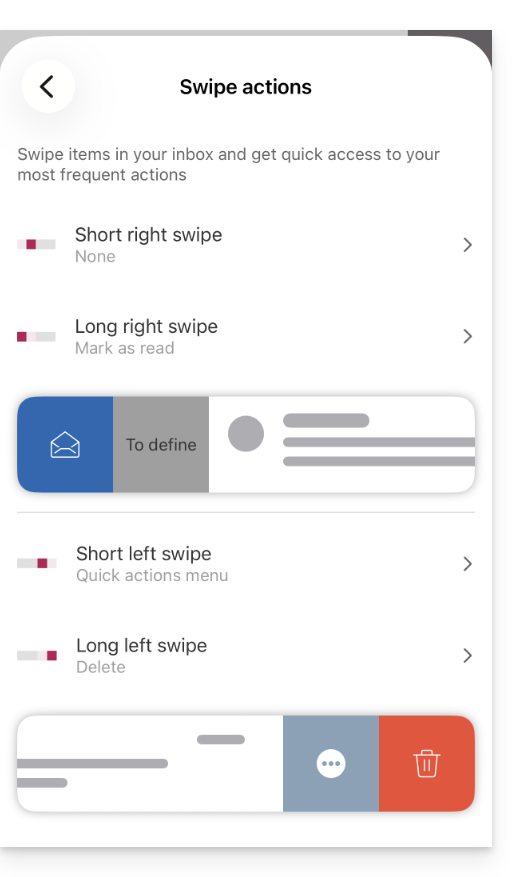
The possible actions are:
- delete the message (it goes to the trash)
- archive the message (it goes to an archive folder)
- mark it as read or unread
- move the message (and in this case the list of folders is displayed after a swipe)
- favorites (to activate a follow-up on the message)
- report as spam
- quick action menu (also accessible from reading the message and which offers to write a reply, perform a transfer, deletion, printing, etc.)
and it is also possible to choose "none" to avoid operations that would not be desired if your device is not suitable for swiping: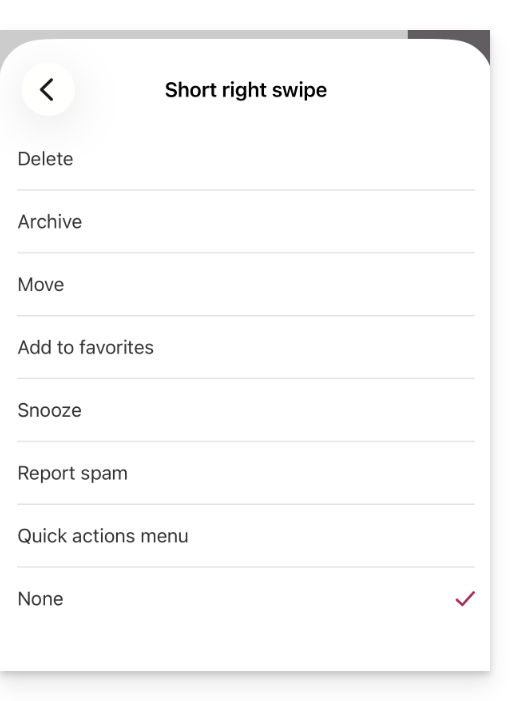
l. Message display mode
Choose between an individual display of messages or a “discussion” / “conversation” mode, which allows you to group your emails by subjects/senders, i.e., group the emails received based on the discussion topic, thus the display of the inbox is lighter and it is easier to follow the messages from the different participants in the conversation:
m. Account management
Allows you to delete the Infomaniak account (after confirming you have read the important warning). Also refer to this other guide.
Link to this FAQ:
Has this FAQ been helpful?
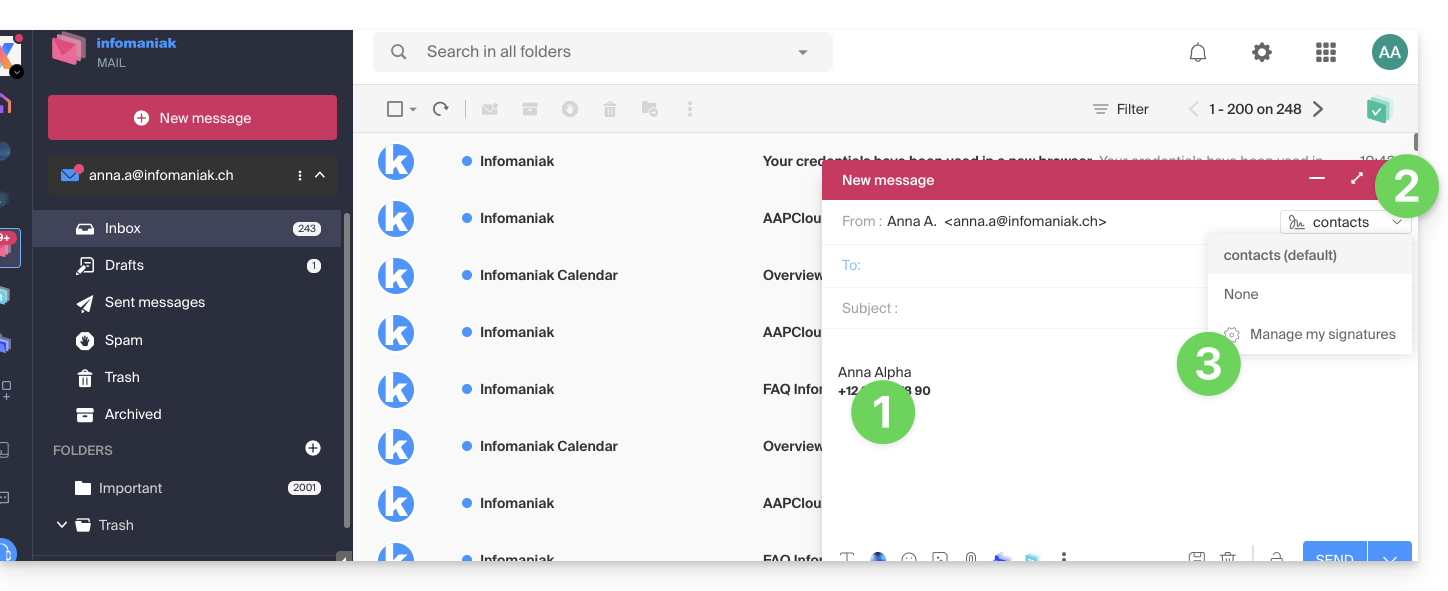
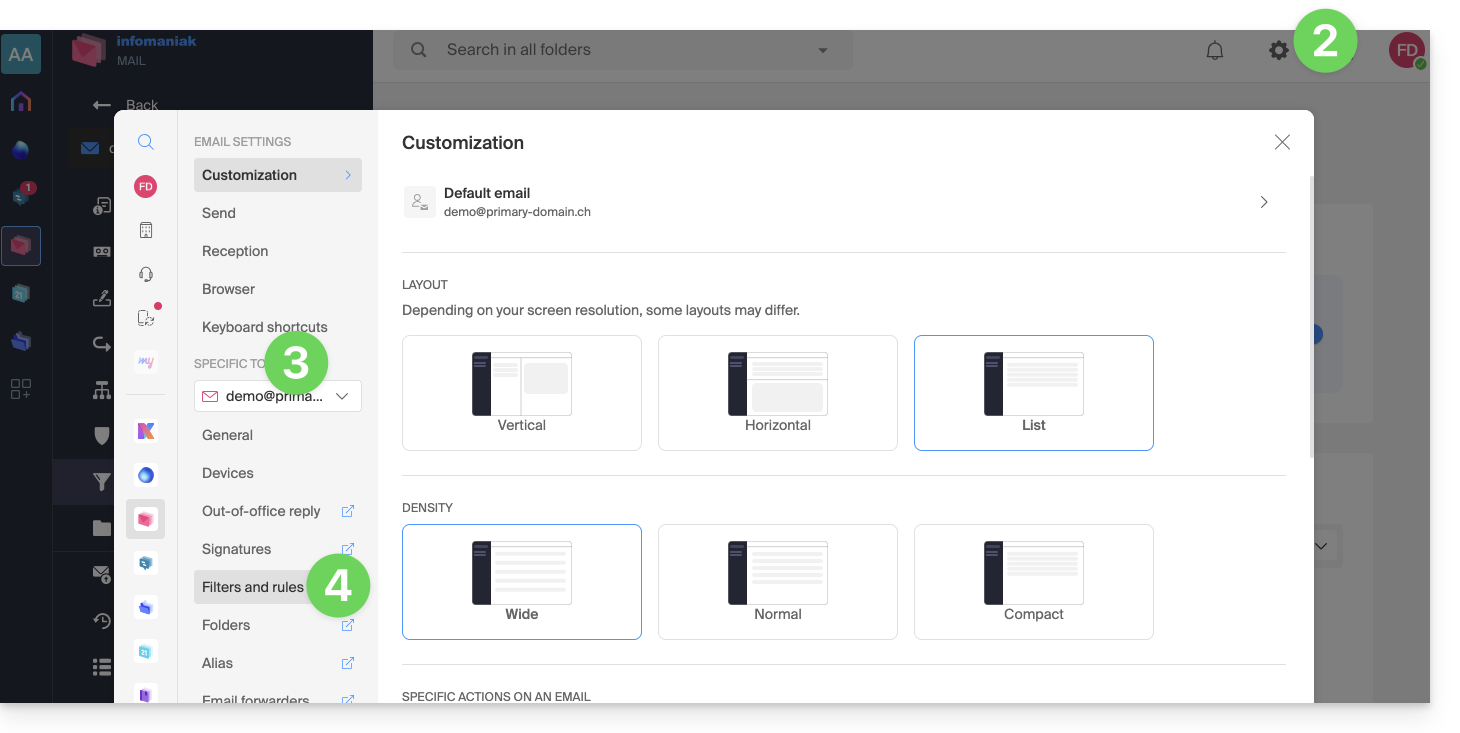
This guide explains how to create and then automatically add a signature to messages sent from the Infomaniak Mail Web app (online service ksuite.infomaniak.com/mail).
Refer to this other guide regarding the limitations of the my kSuite offer.
Preamble
- The signature will also be visible when sending from the Infomaniak Mail app (iOS / Android).
- It will not be present with another sending method (a software like Outlook for example).
- It is also not added to voicemail messages; it is necessary to add one directly in the out-of-office message.
- One or more signatures can be added from Mail and from the Manager where all addresses of a Mail Service are managed; choose which signature to use when sending.
Access signatures from the Infomaniak Web Mail app
Prerequisites
- Have permission to manage signatures: if you had been invited to the Infomaniak Mail Web app (online service ksuite.infomaniak.com/mail) to manage your address, it is possible that the Mail Service manager has revoked this right from their admin account.
To access signature management:
- Click here to access the Infomaniak Mail Web app (online service ksuite.infomaniak.com/mail).
- Click on the Settings icon at the top right of the interface.
- Check or select the email address concerned in the dropdown menu of the left sidebar.
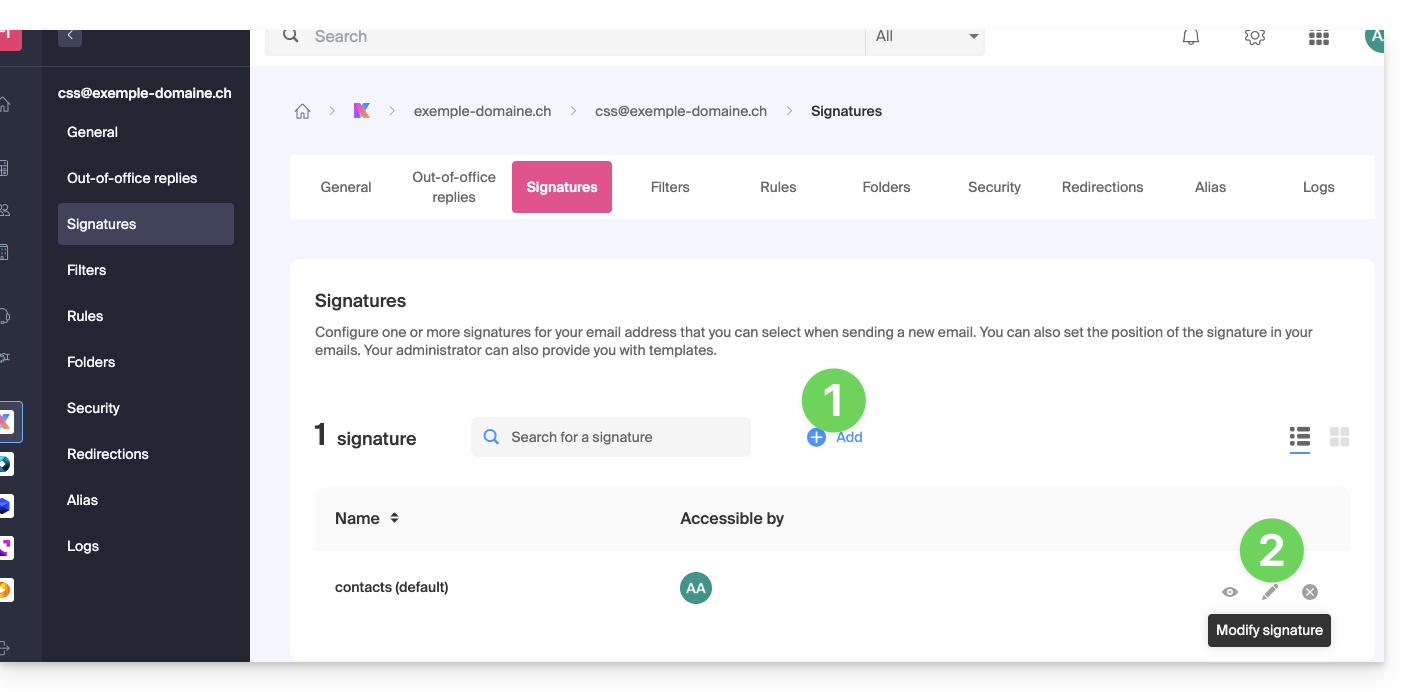
- Click on Signatures:
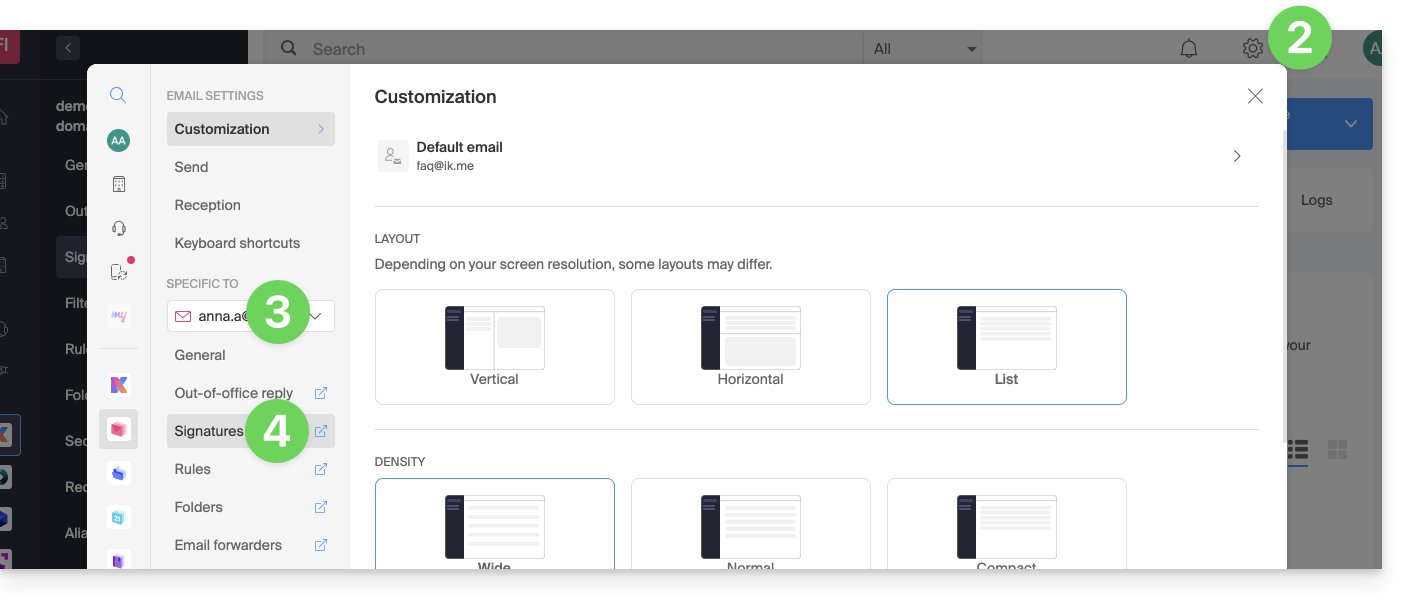
Access signatures from Mail Service
To access Mail Service and signature management:
- Click here to access the management of your product on the Infomaniak Manager (need help?).
- Click directly on the name assigned to the product concerned.
- Click on the email address concerned in the table that appears
- Click on Signatures in the left sidebar:
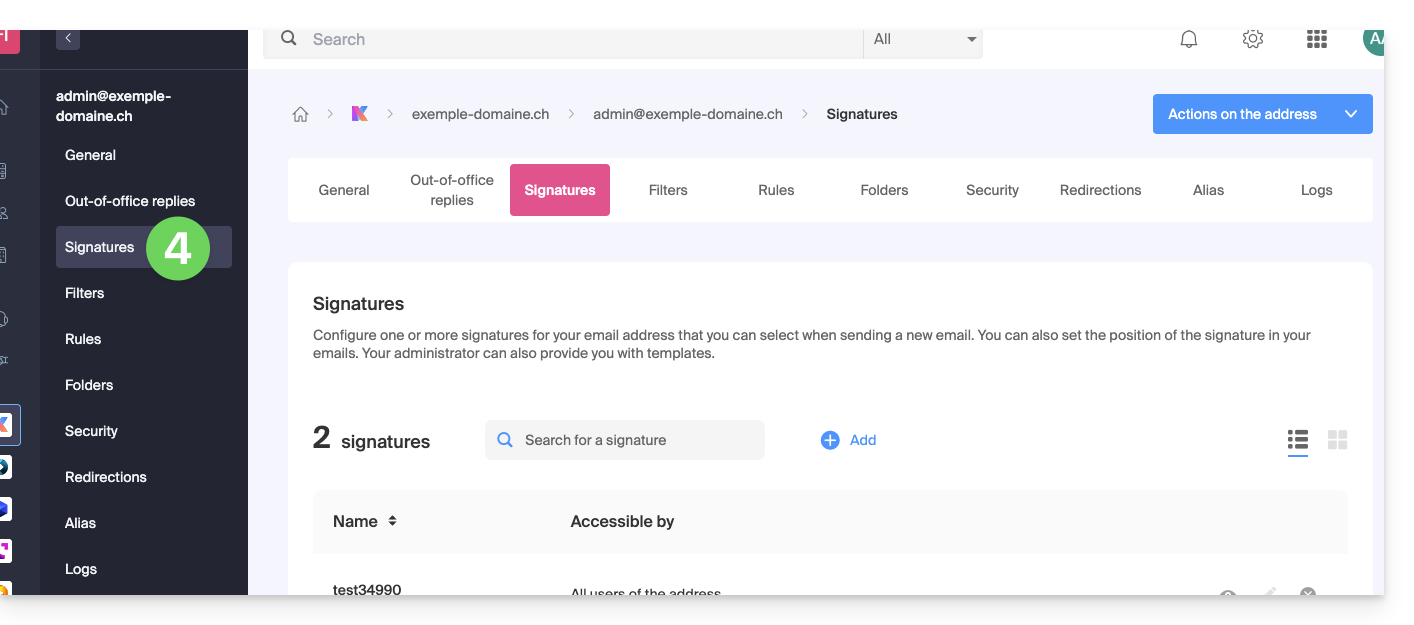
Create and edit the signature
You have two options:
- Click on Add to create a new signature.
- Click on the pencil icon ✎ next to an existing signature to edit it.
Then:
- Choose an existing template or a new one:
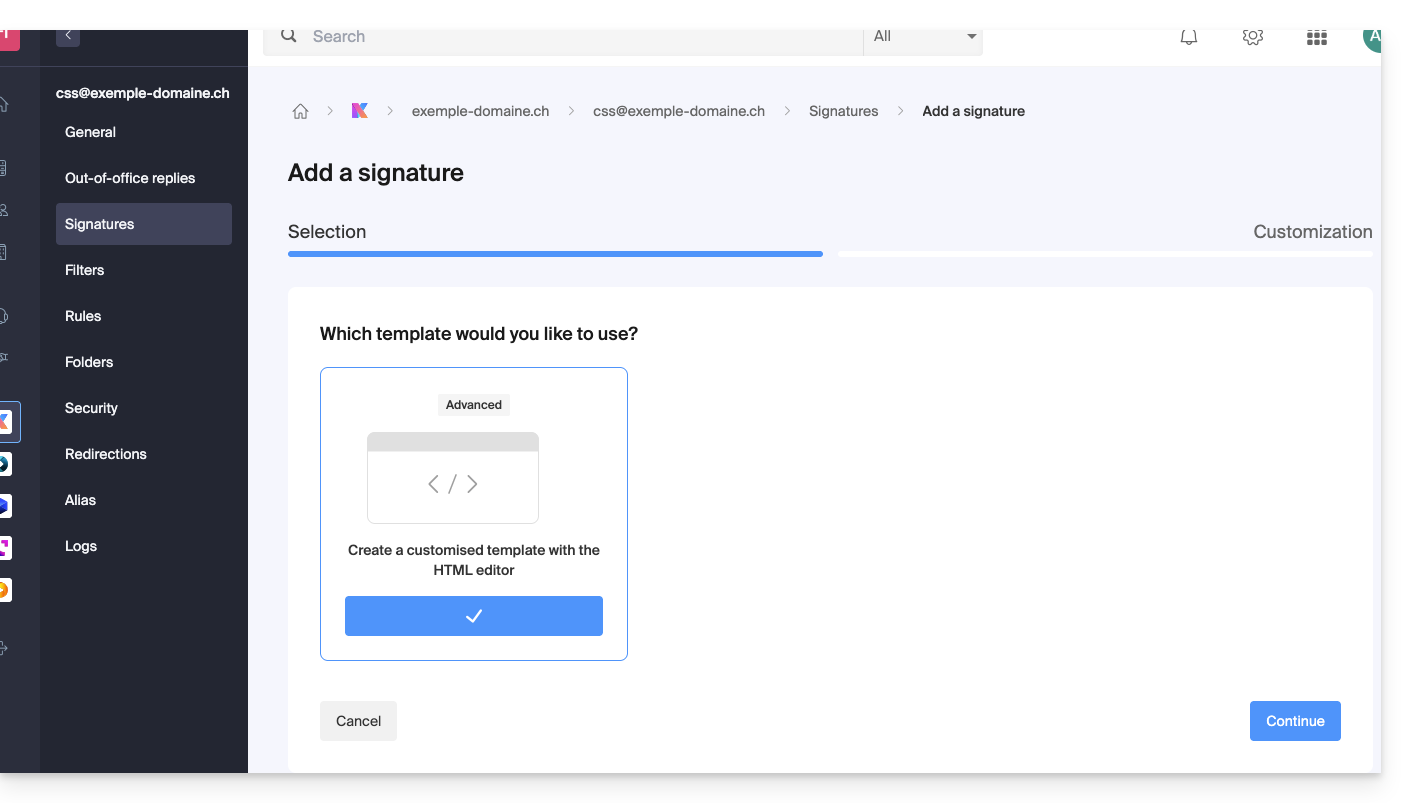
- Name the signature.
- Specify a name for your identity (it will be displayed next to your email address in messages received by your correspondents).
- Create the content of the signature in the designated area (see below for formatting options).
- Choose whether or not to share the signature with all users of the Mail address.
- Click on Advanced settings to choose the location to insert your signature: before the message (= header) or after the message (= signature)
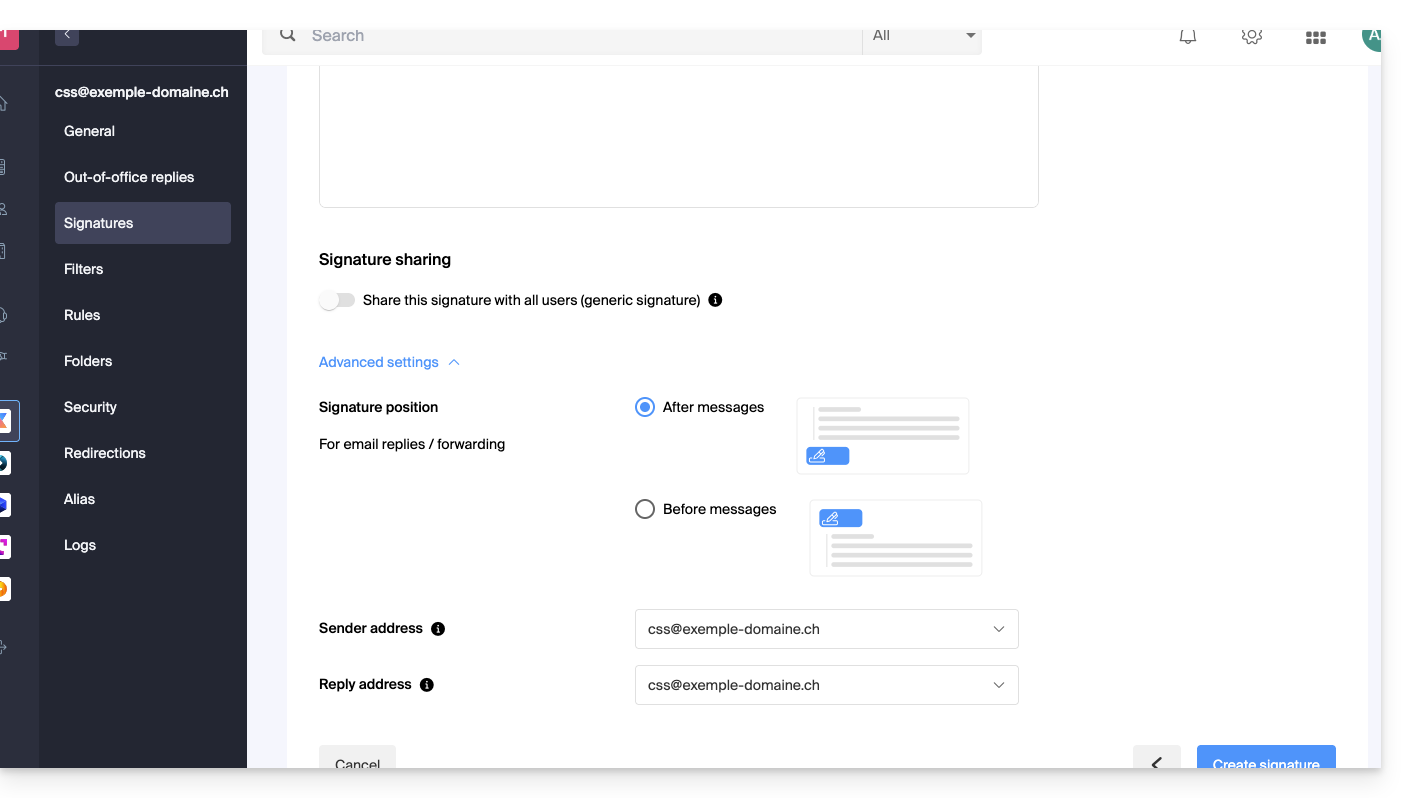
- Refer to this other guide regarding the choice of sending/replying addresses.
- Click on the Create the signature button.
Signature formatting
You can use an image, edit the HTML source code, and format your text using a set of tools.
To avoid excessive line spacing, use the shift key in conjunction with the ENTER key on your keyboard, which is equivalent to the HTML tag <br> that causes a line break instead of a new paragraph.
Set a default signature
To choose the signature used by default under certain conditions:
- Click here to access your signatures on the Infomaniak Mail Web app.
- Check or select the email address concerned in the dropdown menu of the left sidebar.
- Choose the signature that will be inserted by default when drafting:
- a new message
- a reply / forward
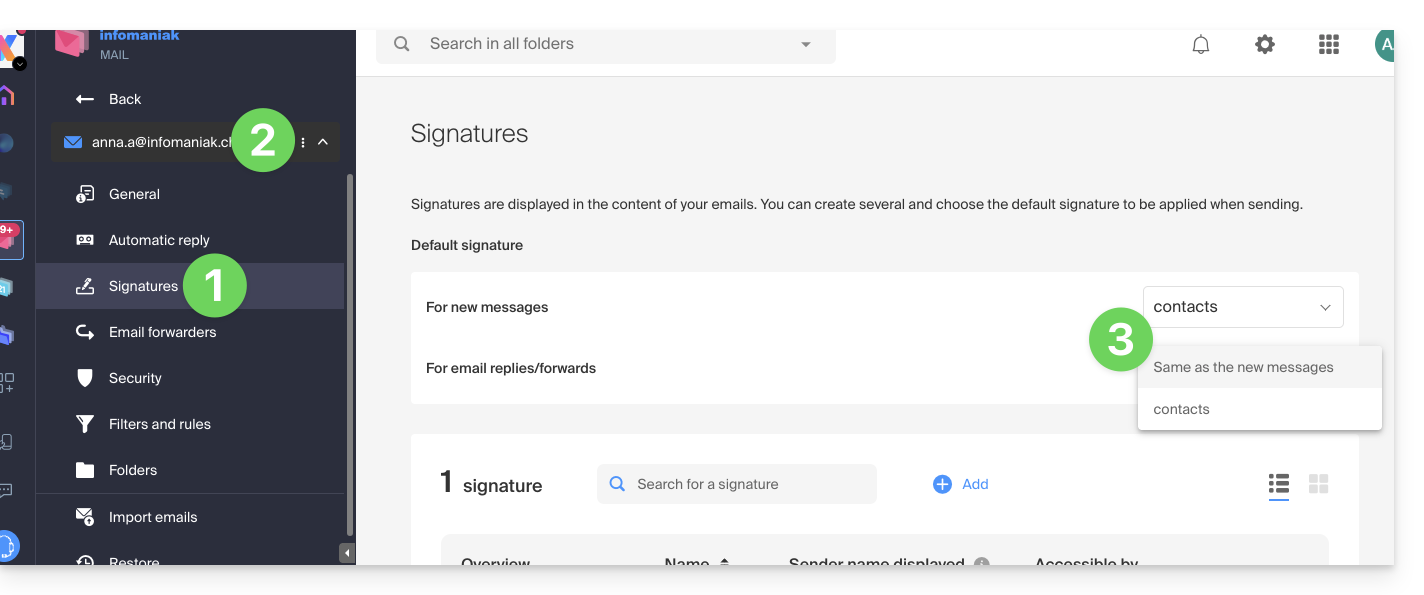
By setting a default signature from my kSuite+, it will be automatically displayed in the body of the email when drafting. You will still have the option to change the signature.
There is a case where the default signature will not be the one automatically inserted by default when drafting a message: see point 10 of this other guide.
Select or remove the signature when drafting
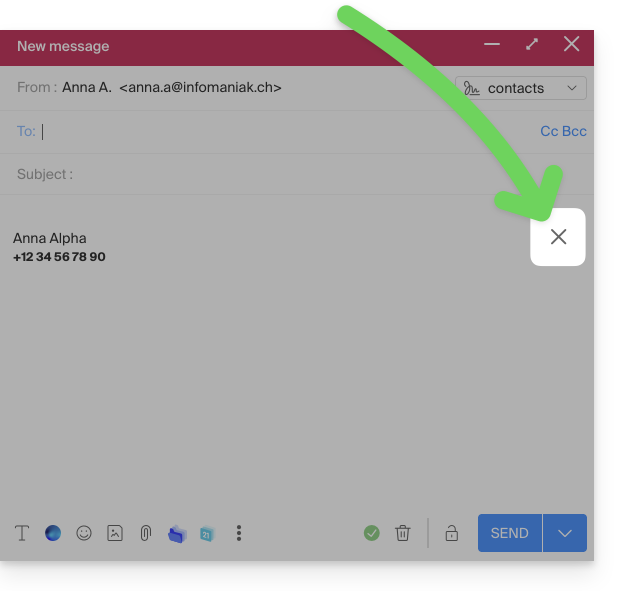
When you start drafting a new message:
- The signature is automatically inserted.
- If multiple signatures exist, you can choose another identity via the drop-down menu.
- You can also quickly access the signature settings via the button in the toolbar:
- You can remove the signature by hovering over it and clicking on the cross:
Associated addresses (multiple possible)
When a signature comes from a template (whether it was created from a model proposed by Infomaniak or generated with the advanced editor):
- users do not have access to the content of the signature in edit mode,
- they can enter dynamic values such as the sender's name or personal data that may be requested such as profession or phone number,
- they can also modify the advanced settings of the signature (such as the position of the signature in the context of a reply/forward) but to date, this setting is common to all users of the signature (1)
When a signature has been created directly without a template:
- if the signature is created from a predefined model:
- the behavior is the same as in the previous point, i.e., a signature created from a template
- if the signature was created via the advanced editor:
- users have access to the signature content in edit mode, but be careful, this content is shared; if Morgane modifies the content, Vanessa will have the same content once she has reloaded her Infomaniak Mail interface.
- Only the sender's name is specific to the user and there are no dynamic values in this kind of case.
- Advanced settings follow the same principle as in other cases: they are common to all users.
In all cases, assigning a default signature to an email account is at the user level. For example, within the same email account, the default signature chosen by Morgane is independent of the one chosen by Vanessa.
Go further with templates
Refer to this other guide if you are looking for how to define custom templates that can be applied as soon as a new email address is created on your Mail Service, for example, or in bulk to all addresses in your domain.
Link to this FAQ:
Has this FAQ been helpful?
This guide helps you resolve various issues related to setting up and using a DMARC policy with your email.
Refer to this other guide if you encounter a DMARC issue specifically when using Google services.
DMARC error or rejection...
...during a redirection while the initial destination address may have received the email (SPF error)
Email redirection without SRS generating an SPF error
Imagine you have set up an email redirection from your email address "user@example2.com" to your new address "user@yourdomain3.com", without using SRS. When someone sends an email to "user@example2.com", it is automatically redirected to "user@yourdomain3.com". Example:
- sender: john.doe@gmahoo1.com
- initial recipient: user@example2.com
- final destination: user@yourdomain3.com (SPF error)
In summary: when John sends an email to "user@example2.com", the email is redirected to "user@yourdomain3.com". However, the mail server of "yourdomain3.com" still sees the email as coming from "john.doe@gmahoo1.com".
In detail: when John sends an email to "user@example2.com", the email is redirected to user@yourdomain3.com" that is, the sender's envelope address will remain john.doe@gmahoo1.com but the recipient's envelope address will be changed to user@yourdomain3.com.
This will generate an SPF error because the SPF of the gmahoo1.com domain does not authorize the IP addresses of the example2.com SMTP servers to send emails for its domain.
It is this SPF error that will generate the DMARC rejection.
If you want the redirection to work without error, it is necessary for the provider of the redirecting email address to perform the redirections with SRS.
How email redirections work at Infomaniak
When you receive an email on an Infomaniak address and it is redirected to another email address, the sender's email address is rewritten to reflect the redirection. Thus, the recipient's mail server sees the email as coming from your own domain.
In summary, using SRS in email redirection helps maintain the integrity and security of emails while ensuring that authentication mechanisms such as SPF and DKIM remain valid.
...related to an incorrect DNS entry
Malformed DMARC Record: if the DMARC record is not correctly formatted, this can cause errors. Make sure that the tags and values are correctly specified.
Invalid DMARC Policy: errors can occur if the specified DMARC policy is not correct. The possible values for the policy are "none", "quarantine", and "reject". An incorrect value can cause problems.
Multiple DMARC Entries: having more than one DMARC entry in the DNS zone is considered an error.
If you have multiple DMARC records, mail servers may interpret this differently, which can lead to unpredictable behavior. Fix this by consolidating your DMARC settings into a single entry.
Check your current DMARC entry in dedicated tools like the ones below:
...linked to a send that does not comply with SPF and/or DKIM
A DMARC error or rejection related to SPF or DKIM can occur if the SPF or DKIM authentication mechanisms are not correctly configured or if they are not aligned with the domain's DMARC policy.
This can happen, for example, if you send an email from your Infomaniak email address using another provider's SMTP sending server. To resolve this issue:
- Check the overall security of the Mail Service.
I am sending an email from my Infomaniak address and I receive a "Reject DMARC" error email
To resolve this issue:
- Check the overall security of the Mail Service.
- Perform a send test from the Webmail mail.infomaniak.com and/or check the server settings of the email software/client.
I am sending an email from an external email address (Microsoft, Google, Yahoo, Orange, ...) and Infomaniak rejects my email with a DMARC error
To resolve this issue:
- Check with your email provider if the sends are made in accordance with their configuration recommendation and if necessary contact the sender's email provider for more information.
I want to receive an email on my Infomaniak address but the sender informs me that they receive a DMARC error when sending to my address
To resolve this issue:
- In this case, the email was blocked due to a violation of the DMARC policy that the sender has set up on their domain name; it is necessary for the sender to contact their email provider or the administrator of their service to inform them of the situation.
Link to this FAQ:
Has this FAQ been helpful?
This guide explains how to download an e-mail from the Infomaniak Web app Mail (online service ksuite.infomaniak.com/mail) to obtain a file in .eml format on your hard drive, compatible with all email software/clients.
It is not possible to reproduce this operation on the Infomaniak Mail mobile app (application for iOS/Android smartphone or tablet) but take note of the alternatives proposed at the end of this guide.
Download an e-mail
To save an e-mail from the Infomaniak Web app Mail (online service ksuite.infomaniak.com/mail):
- Click here to access the Infomaniak Web app Mail (online service ksuite.infomaniak.com/mail).
- Open the message to download.
- Click on the action menu ⋮ to the right of the open e-mail.
- Click on Other actions.
- Select Download:

4 alternatives
- The Save as... function of an email software/client such as Thunderbird allows you to achieve the same result:
- Open the Thunderbird software.
- In the inbox, right-click on the message to save.
- Choose the location to save the
.emlfile.
- To print the message and choose PDF from the available printers, refer to this other guide.
- To download the message to kDrive, refer to this other guide.
- To share it publicly using a simple shortcut to it, refer to this other guide.
Link to this FAQ:
Has this FAQ been helpful?
This guide explains how to create sorting rules (in Standard mode) to automatically classify your incoming emails on Infomaniak according to certain conditions.
Preamble
- These rules allow the following automatic actions, among others:
- Delete or move messages from email addresses you no longer wish to see.
- Forward to your spouse the emails from an email address so that you both receive them.
- Copy messages that contain a specific keyword to a folder.
- etc.
- Unlike the sorting rules offered within email software/clients (Microsoft Outlook, Mozilla Thunderbird, Apple Mail...), these rules will act directly on the server of your mailboxes before even the IMAP connection.
- You can make a template for all the addresses of your Mail Service.
- If you use an email software/client configured in POP, in parallel with Mail Infomaniak, messages classified in folders will no longer be downloaded by your application as the POP protocol only retrieves messages that are in your main inbox. To view the classified messages, it will be necessary to use the IMAP protocol or Mail only.
- Depending on the offer you have, there is an advanced mode to create sorting rules in a dedicated language.
Access the rules from the Infomaniak Web Mail app
Prerequisites
- Have permission to manage the rules: if you had been invited to the Infomaniak Web Mail app (online service ksuite.infomaniak.com/mail) to manage your address, it is possible that the Mail Service manager has revoked this right from their admin account.
To access the sorting filters for your Infomaniak mail:
- Click here to access the Infomaniak Web Mail app (online service ksuite.infomaniak.com/mail).
- Click on the Settings icon at the top right.
- Check or select the email address concerned in the dropdown menu.
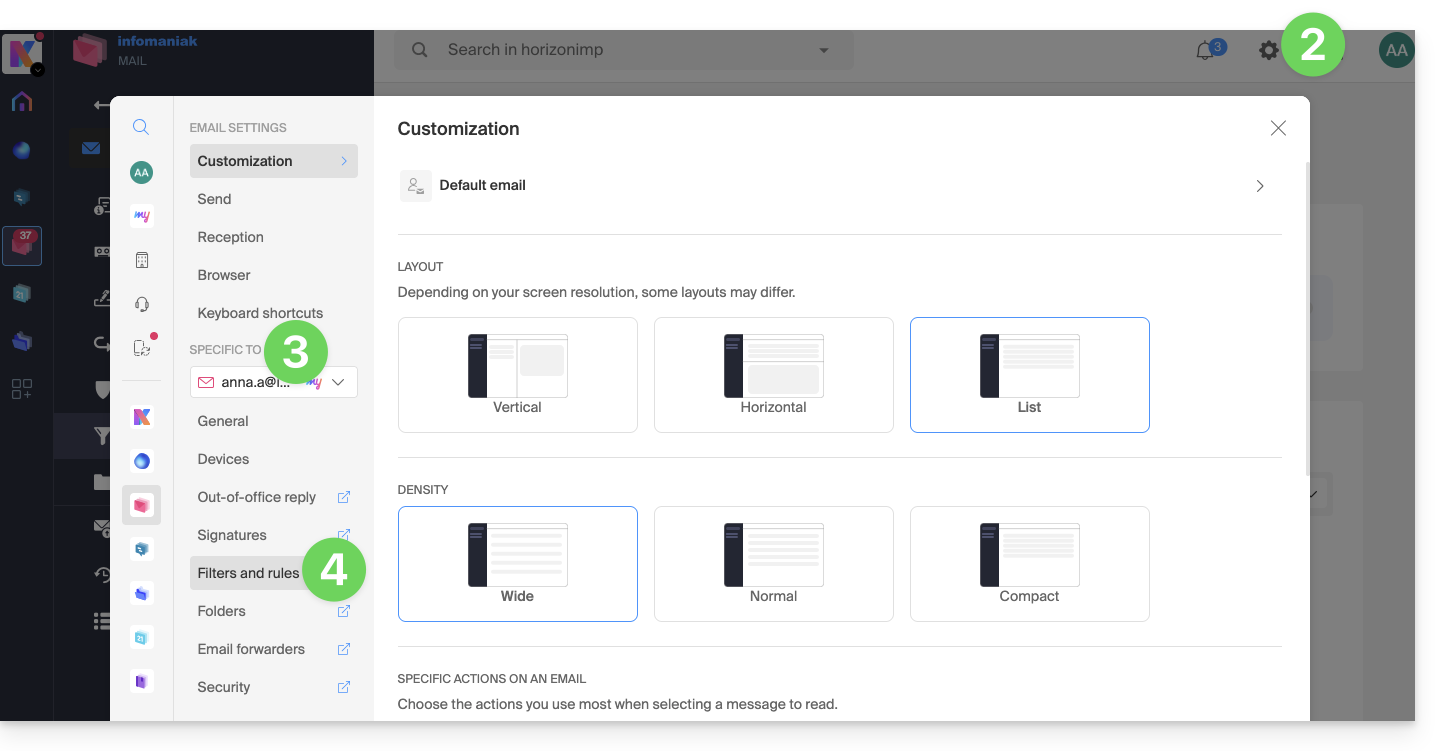
- Click on Filters and rules:
Define a rule based on a received email
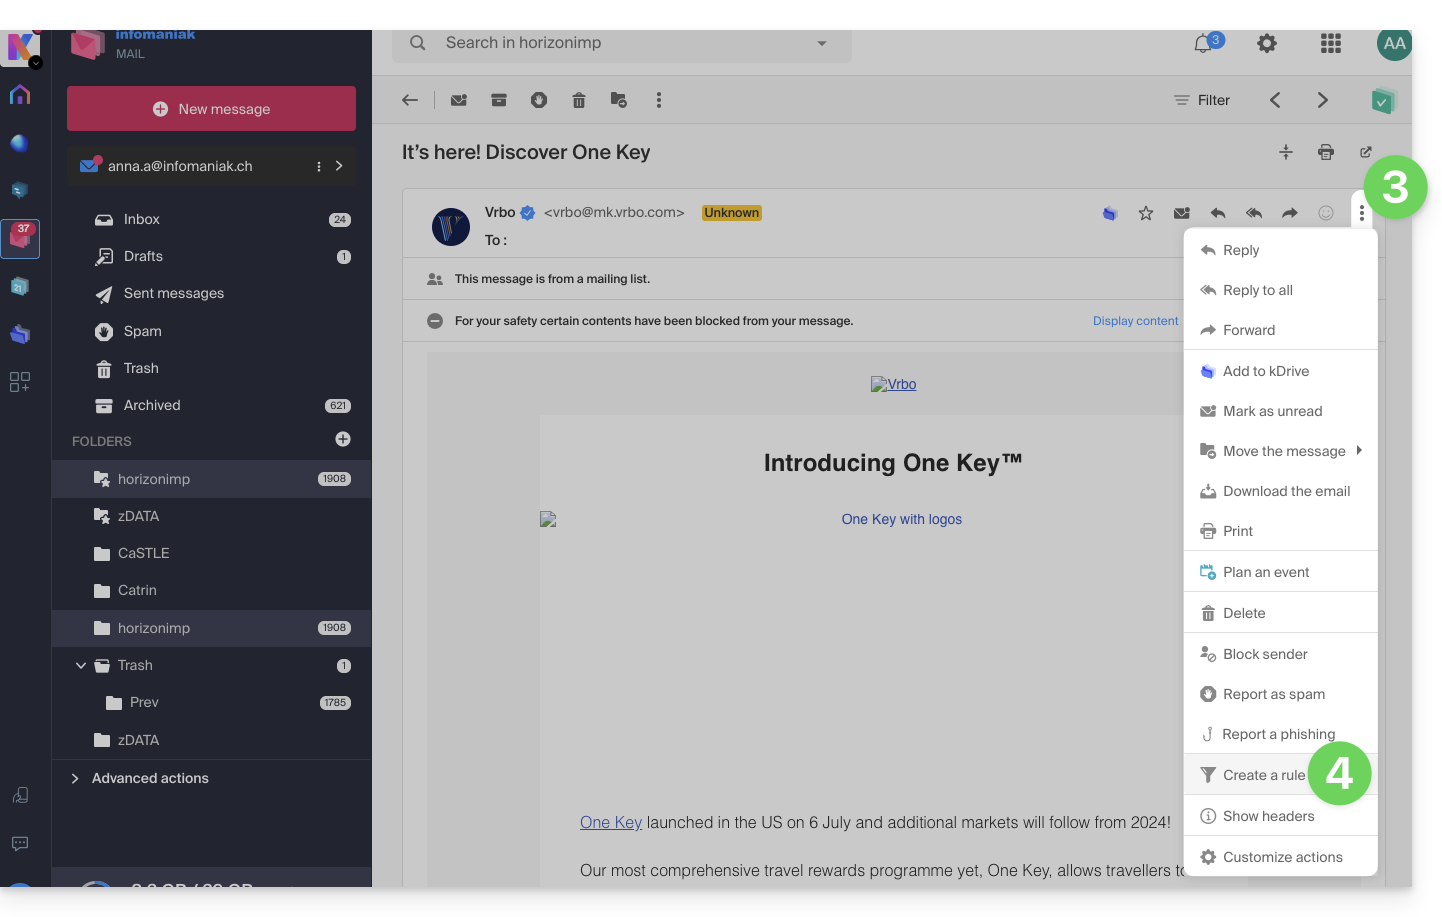
You can also create a rule directly from the received email:
- Click here to access the Infomaniak Web Mail app (online service ksuite.infomaniak.com/mail).
- Open the message from the sender in question.
- Click on the action menu ⋮ at the top right of the open message.
- Choose Create a rule to open the creation assistant that will be pre-filled with the elements of the message:
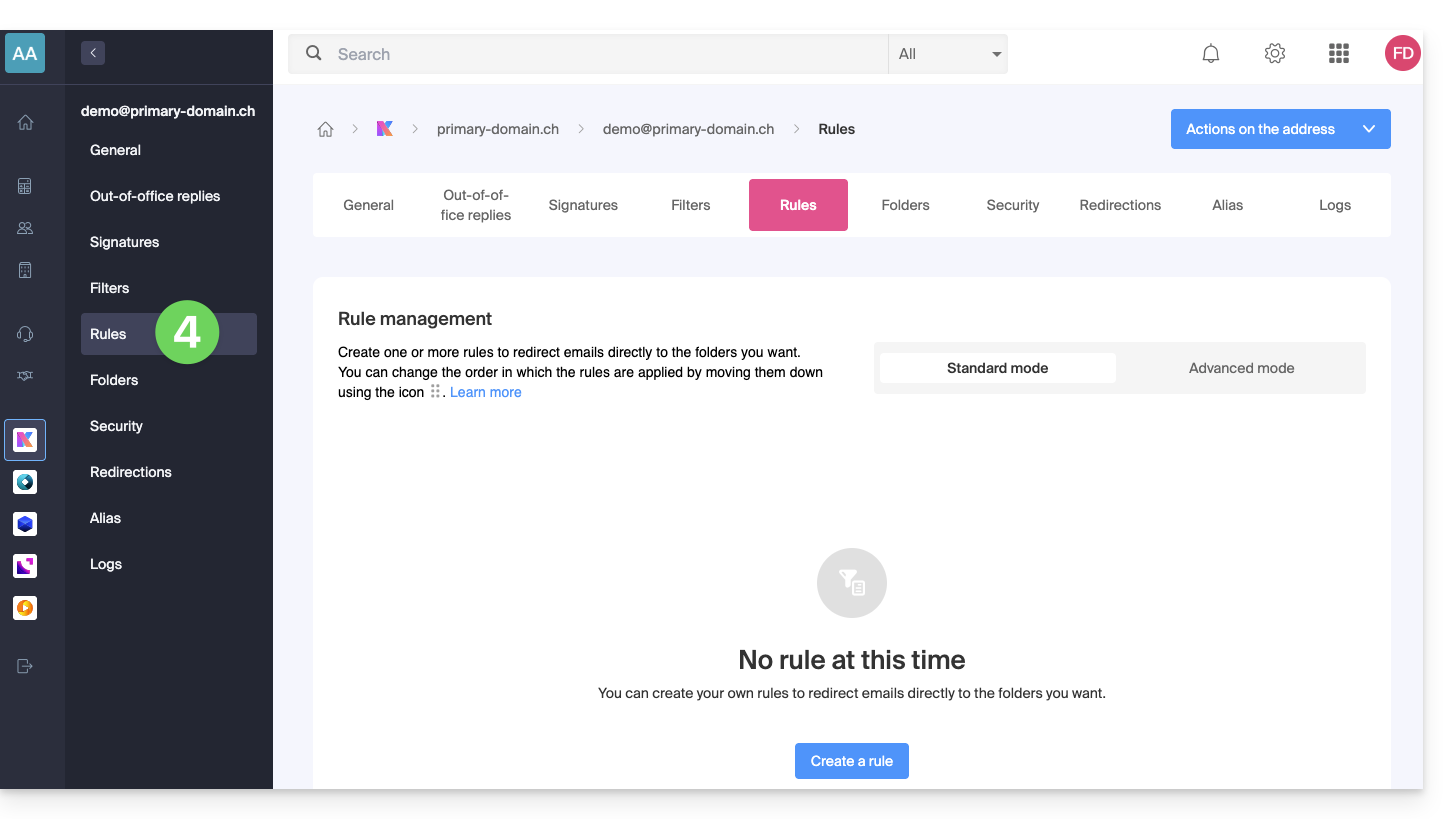
Access rules from a Mail Service
To access the sorting filters for your Infomaniak mail:
- Click here to access the management of your product on the Infomaniak Manager (need help?).
- Click directly on the name assigned to the product in question.
- Click on the email address concerned in the table that appears.
- Click on the tab Rules from the left sidebar (or top bar):

Create a new rule in Standard mode
- Click on the button Add a rule in Standard mode to create a new rule using a creation assistant/form:

- The different conditions available for sorting filters are presented in this other guide.
- Once a filter is created, click on Continue to activate it.
Add, duplicate, or modify a rule in Standard mode
If there are already sorting filters, the button to add is at the top right of the table:
These settings can be modified whenever you want by clicking on the pencil ✎ icon located to the right of the item in question.
It is also possible to duplicate an existing rule to rework it as a copy without affecting the first one: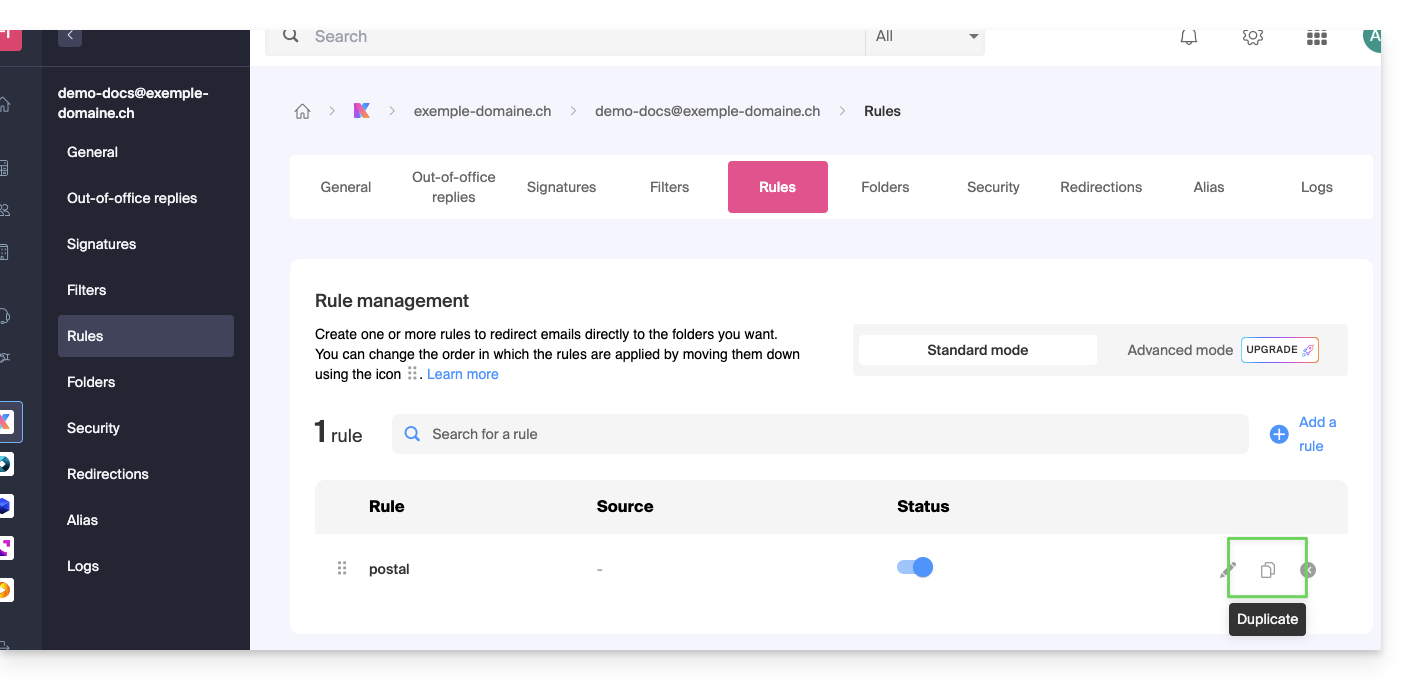
Link to this FAQ:
Has this FAQ been helpful?
This guide details what can be searched on the Web app Mail Infomaniak (online service ksuite.infomaniak.com/mail) or other kSuite services. To search on kDrive refer to this other guide.
Search for an email
On ksuite.infomaniak.com/mail, type in the search bar at the top of the page the term to be found.
The search will be performed within the email address mentioned in the left sidebar (to search across multiple email addresses at once, use an IMAP email software / client to which you connect your different addresses):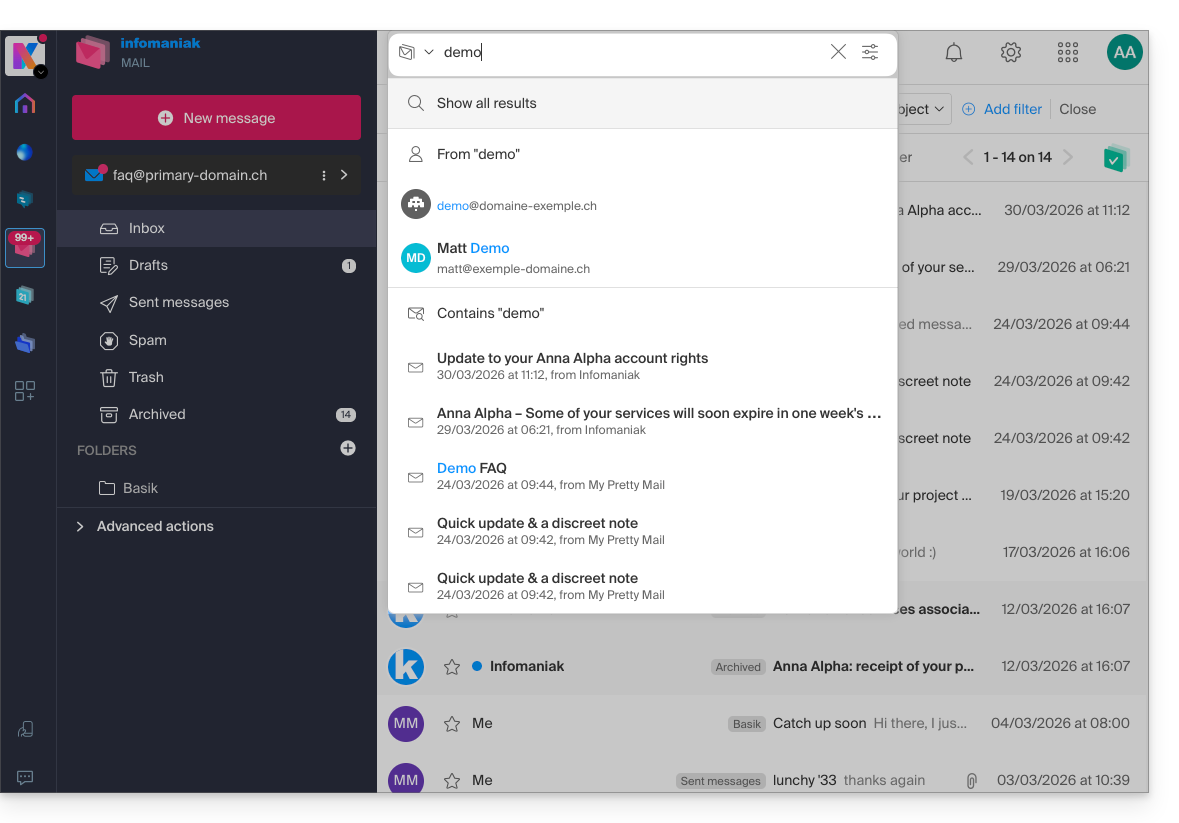
The advanced search is accessible to the right of the search field at the top of your Mail: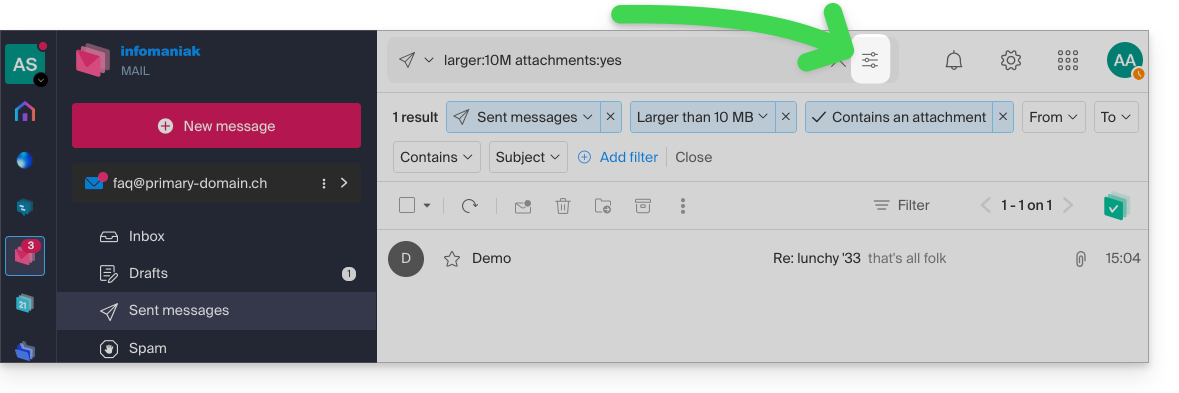
You can search for content…
- either in the body of the message,
- either in its subject,
- either among its senders/recipients…
You can also filter the search by message size and by presence of attachment or not.
Regarding the scope of searches:
- The content of encrypted emails is not indexed (except the subject of the email).
- The content of attachments, as well as their name, is not indexed: it is therefore not possible to find an email by searching for the name of the file that was associated with it.
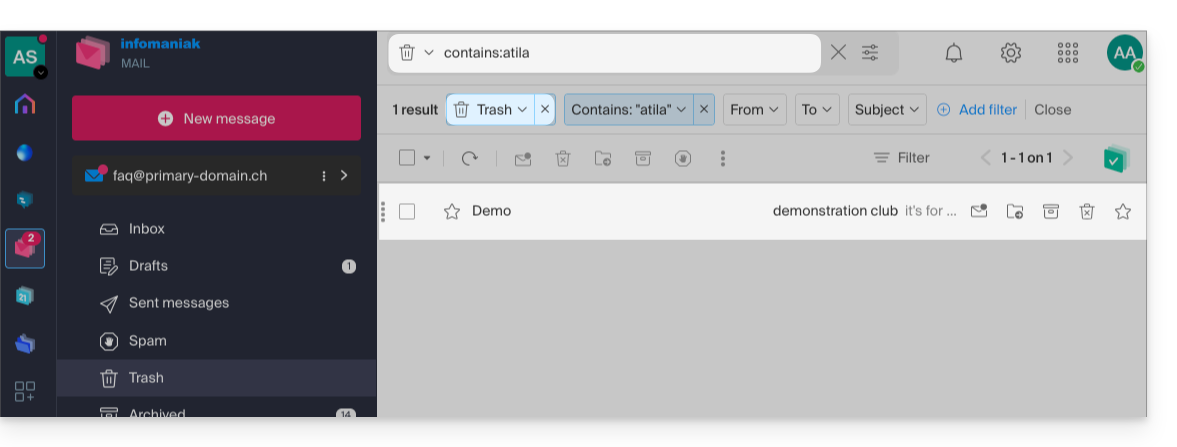
- The mention "Search all emails" does not include the Trash, nor the Spam folder:
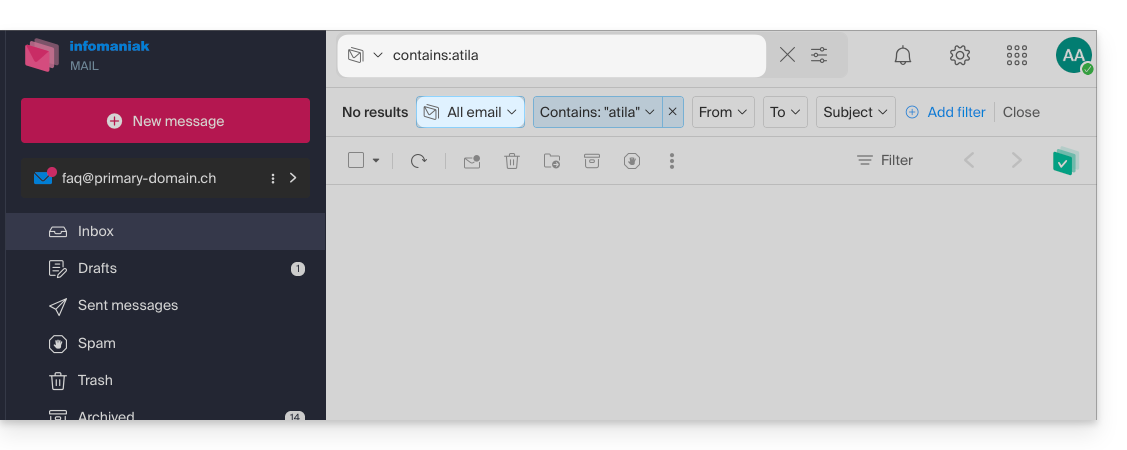
- If a global search yields no results, it is possible that the email is in one of these two folders.
- You will then need to go specifically to the Trash or Spam to perform the search there, or launch the search by selecting one of these 2 elements:
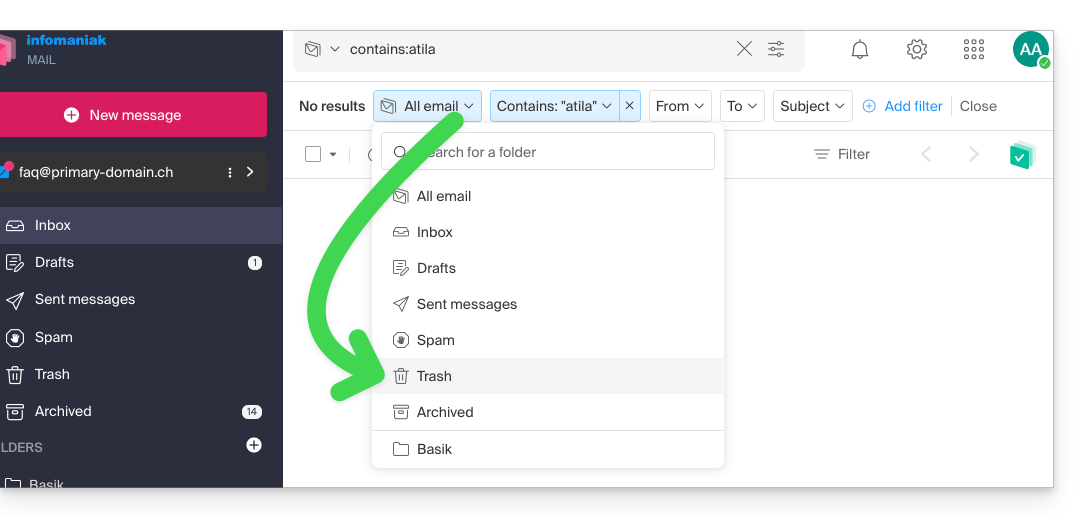
- The possible elements found will then be displayed:
- Same when you want to find a message in a specific directory, it is better to first go there from the left sidebar menu, then launch a search.
To search for the trace of an email or know its activity, you can also search in the logs of an email address.
Email search with a software/messaging client
To know how your specific messaging application performs searches, consult its documentation. For example, desktop apps (desktop application) Thunderbird and Outlook can synchronize messages locally and perform local searches, while other applications may prefer to search on the IMAP server and in this case, the software/messaging client sends a search command to the server, which then searches through all messages stored on the server and returns the results to the software/messaging client.
Search for a contact
Searching for an item is done automatically among all your address books, groups, contacts, thanks to the search field at the top of the interface ksuite.infomaniak.com/contacts: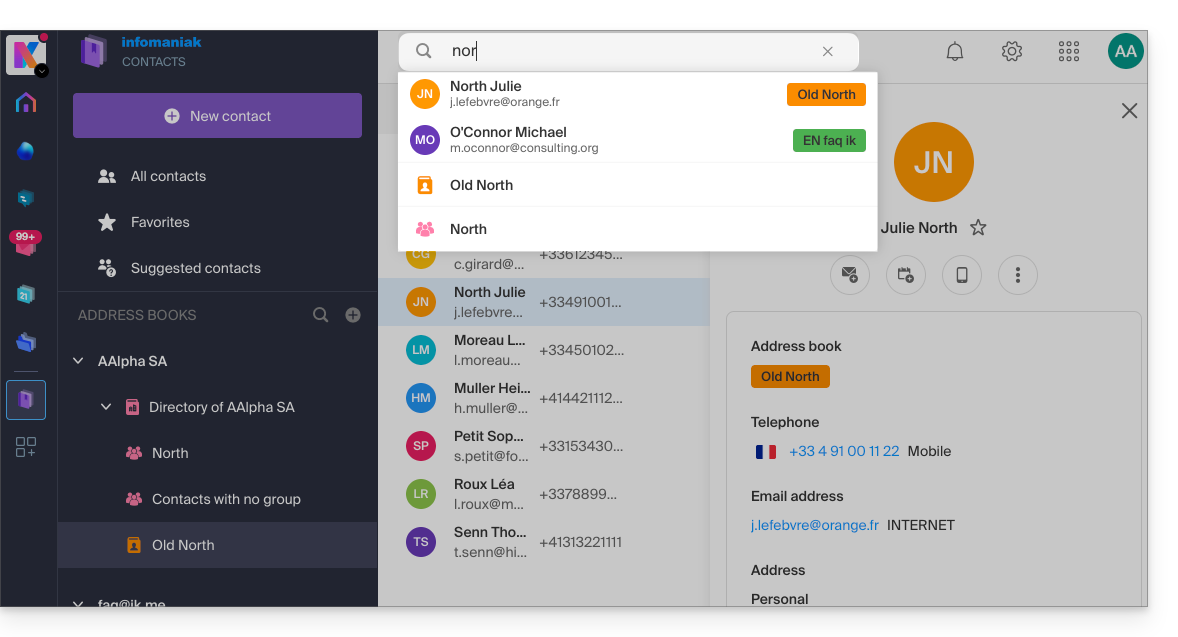
Search for an event
Searching for an item on ksuite.infomaniak.com/calendar is done automatically among all your calendars, events, rooms, including the description of these and the people associated with them (if you click on a contact, you get the events in common with this person):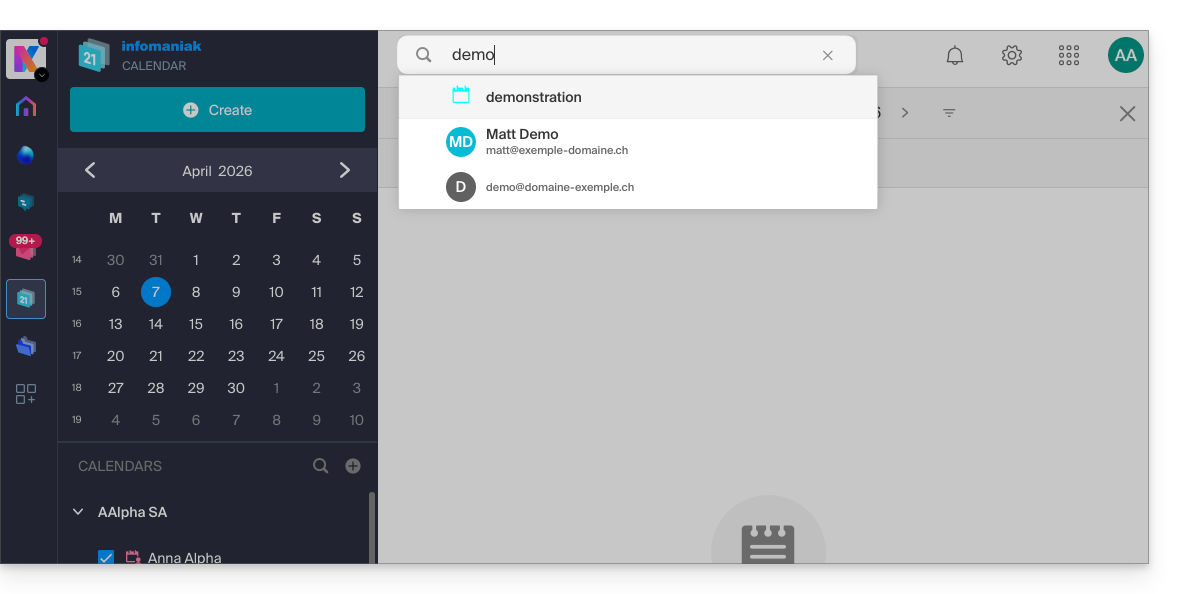
Link to this FAQ:
Has this FAQ been helpful?
This guide explains how to reset or delete the passwords of an email address from an Infomaniak Mail Service.
Preamble
- Changing the password of an email address means changing the IMAP / SMTP password:
- As soon as the password is changed, you must update your software (Outlook, etc.), mobile devices (iPhone), etc. with the new password (this is your responsibility).
- If you cannot log in to the Manager or Mail / my kSuite, you will not be able to manage the passwords of any of the email addresses: refer to this other guide in this case.
Remove a password / device
To disconnect any current IMAP/POP/SMTP connection made using a password generated on this interface (this does not remove the address from the Infomaniak Mail Web App (online service ksuite.infomaniak.com/mail) — you need to manage the users of the email address for this), you can revoke a device, or even delete all existing configurations in 1 click:
- Click here to access the management of your product in the Infomaniak Manager (need help?).
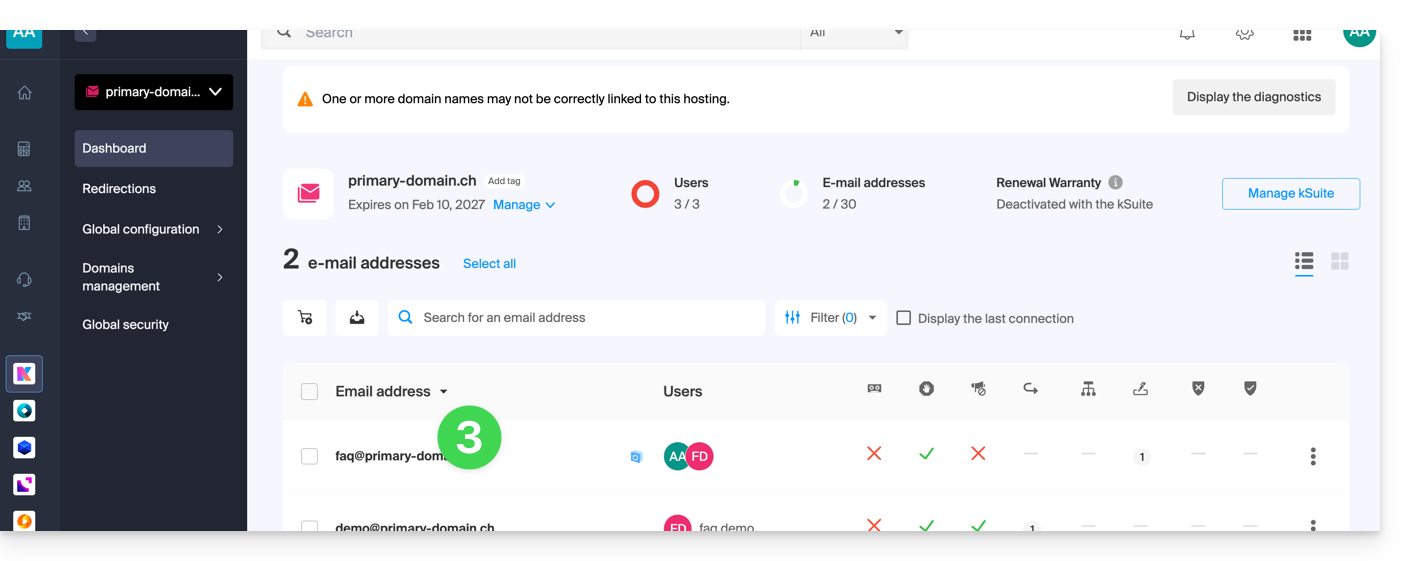
- Click on the name of the product concerned.
- Click on the email address concerned in the table:
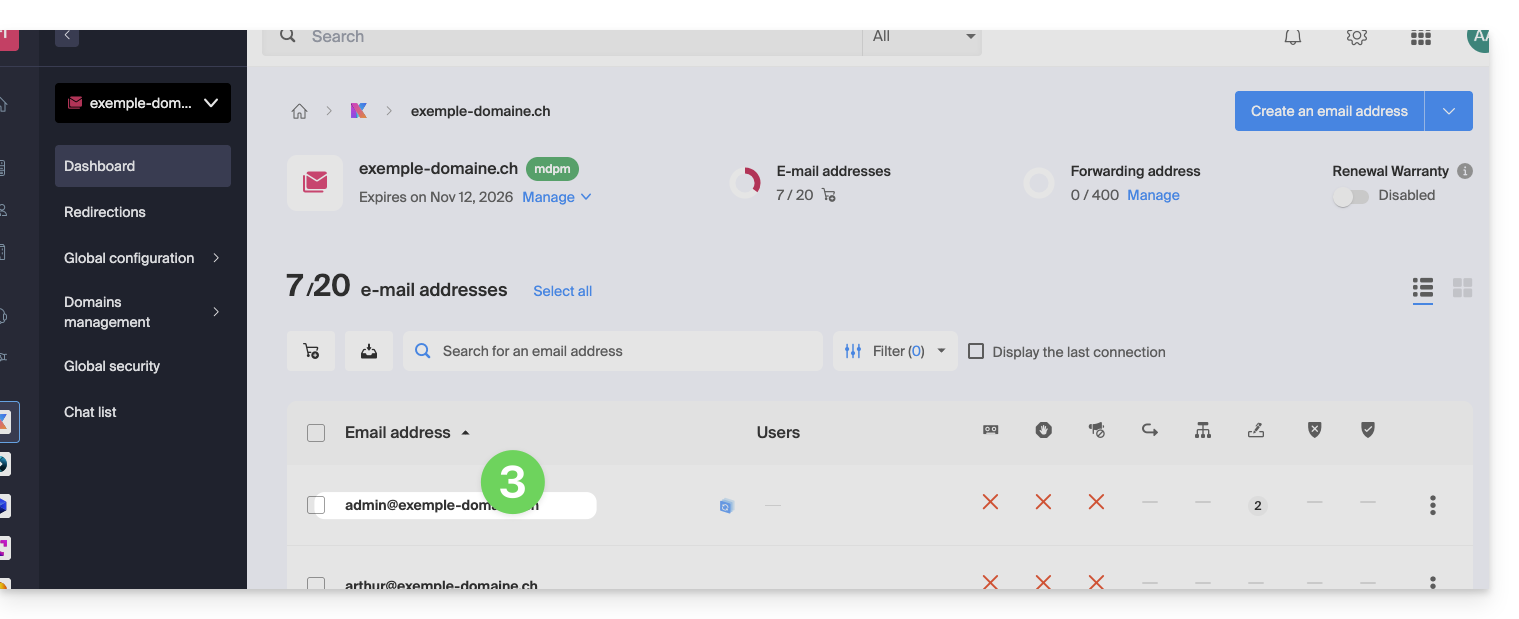
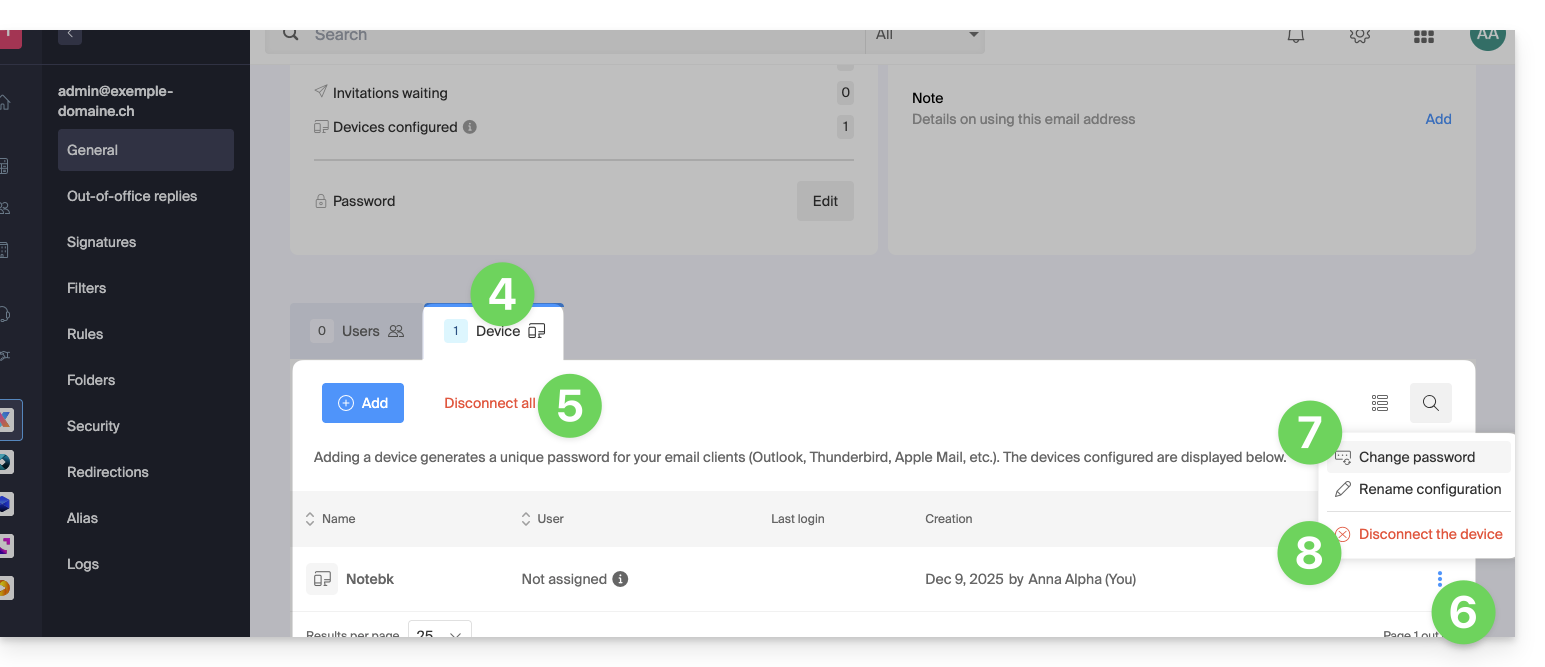
- Click on the Devices tab.
- Click on the red link to disconnect all registered devices (confirmation is required).
- Click on the action menu ⋮ located to the right of the device concerned.
- Click on “Change password” to disconnect the current connection but allow the device to reconnect with a new password directly.
- Click on “Disconnect the device” to remove it from the list and delete the corresponding connection:
What is a “generic” password?
Some email addresses may display a particular indication in the Devices section: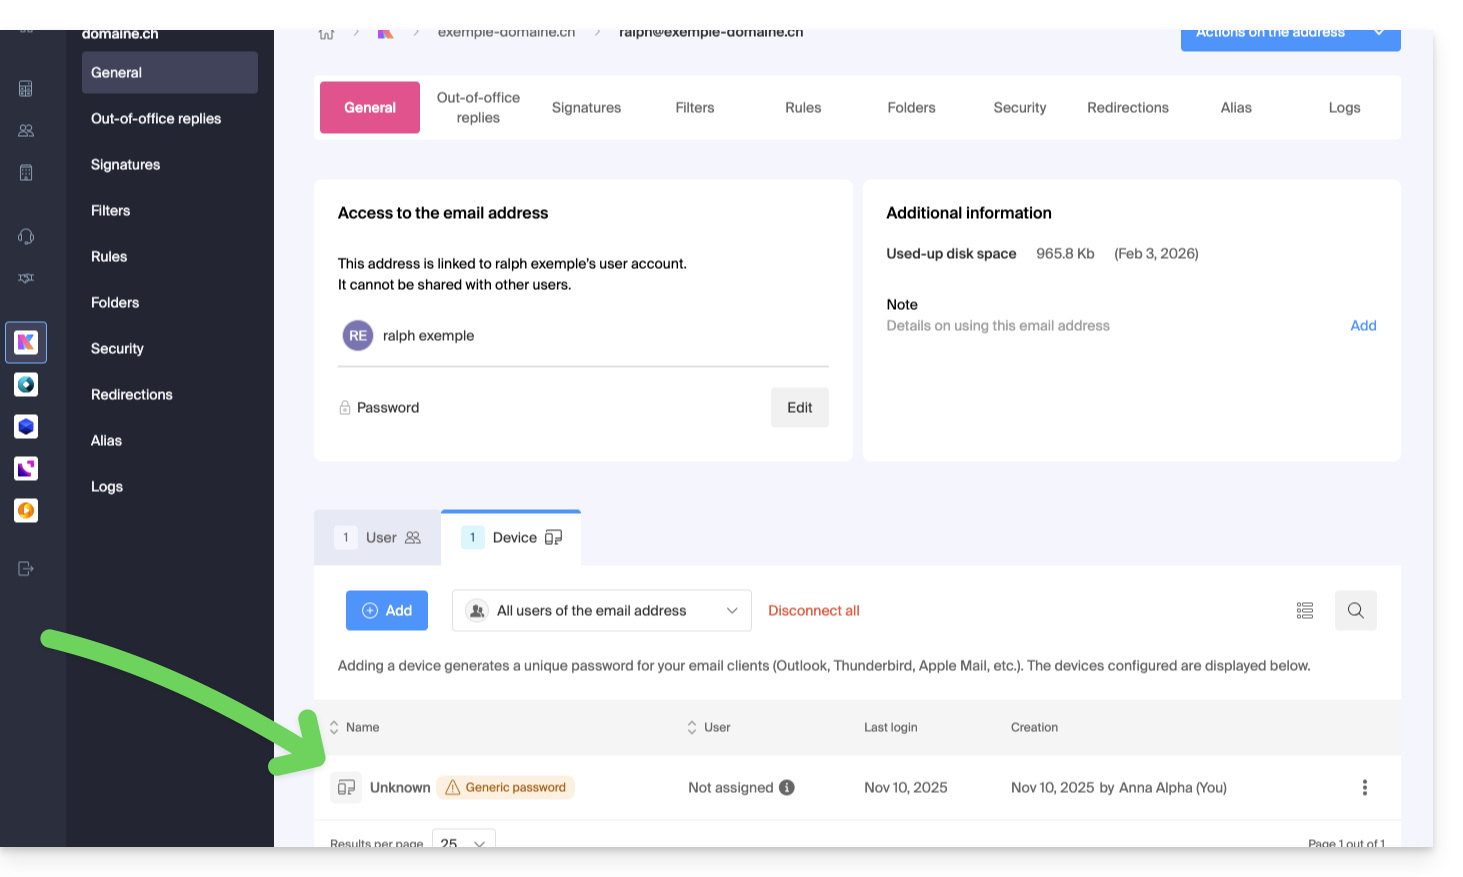
If this is the case, do not worry, this corresponds to the fact that the address has a password assigned when it was created (before the year 2026). This remains valid but, like other passwords, it is impossible to display. And unlike other passwords, this one cannot be reset (the option is grayed out, deactivated):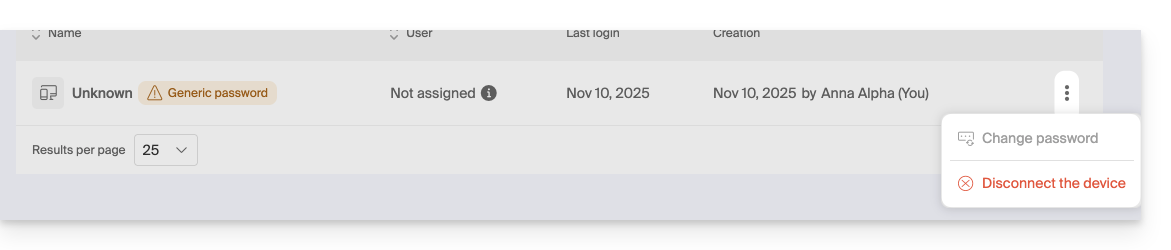
In this case, you can without any problem add an additional password.
Link to this FAQ:
Has this FAQ been helpful?
This guide explains how to activate an out-of-office reply (automatic email message) on an email address managed with Infomaniak. You can thus inform your correspondents that you are unable to respond to them immediately, because you are absent, on vacation, etc.out of office
Preamble
- The automatic reply in case of absence can be activated from the Infomaniak Mail web app (online service ksuite.infomaniak.com/mail) and from the Manager where all the addresses of a Mail Service are managed.
- You can activate or deactivate a previously recorded message, but there cannot be multiple active responders on the same email address: activating a message deactivates another if necessary
Activate the responder from the Infomaniak Mail web app
Prerequisites
- Have permission to manage the responder: if you had been invited to the Infomaniak Mail web app (online service ksuite.infomaniak.com/mail) to manage your address, it is possible that the Mail Service manager has removed this right from their admin account.
To activate the out-of-office message:
- Click here to access the Infomaniak Mail web app (online service ksuite.infomaniak.com/mail).
- Click on the Settings icon at the top right.
- Check or select the email address concerned in the dropdown menu of the left sidebar.
- Click on Responder:
- Activate the automatic message if necessary or read below:
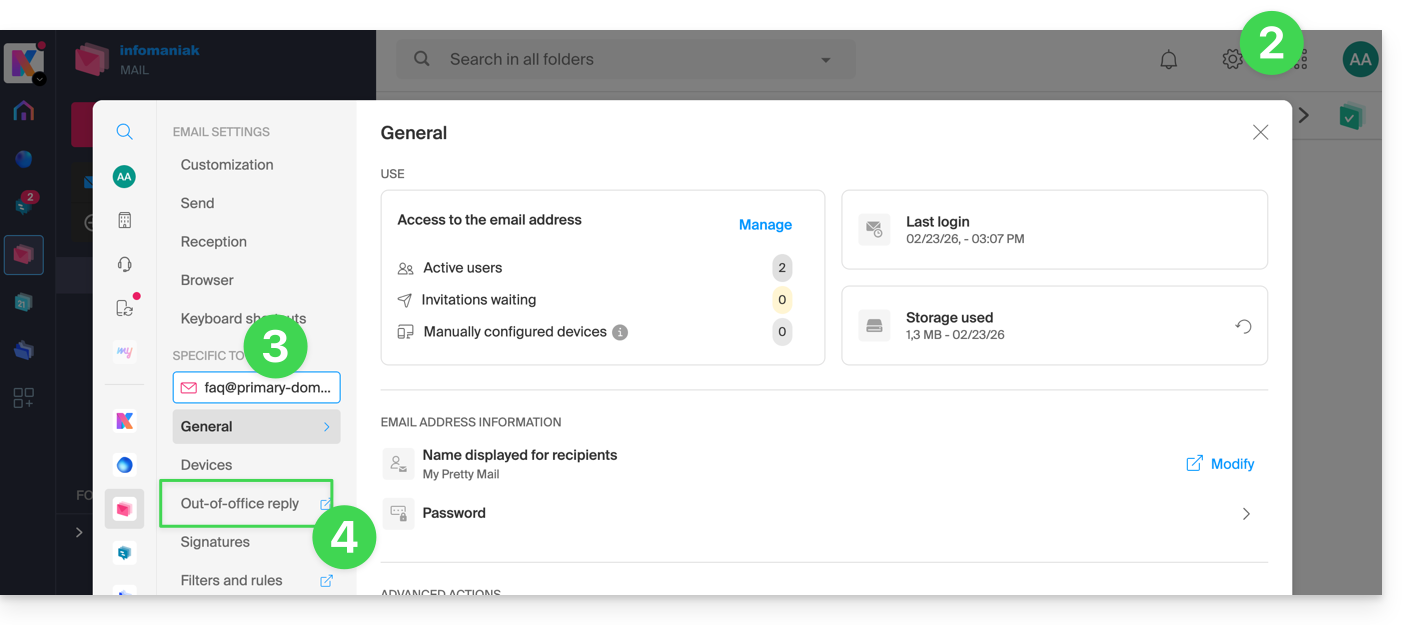
Activate the responder from the Infomaniak Manager
To activate the out-of-office message from the Manager:
- Click here to access the management of your product on the Infomaniak Manager (need help?).
- Click directly on the name assigned to the product concerned:
- Click on the email address concerned in the table that appears:
- Click on the Answering Machine menu in the left sidebar.
- Activate the automatic message if necessary or read below:
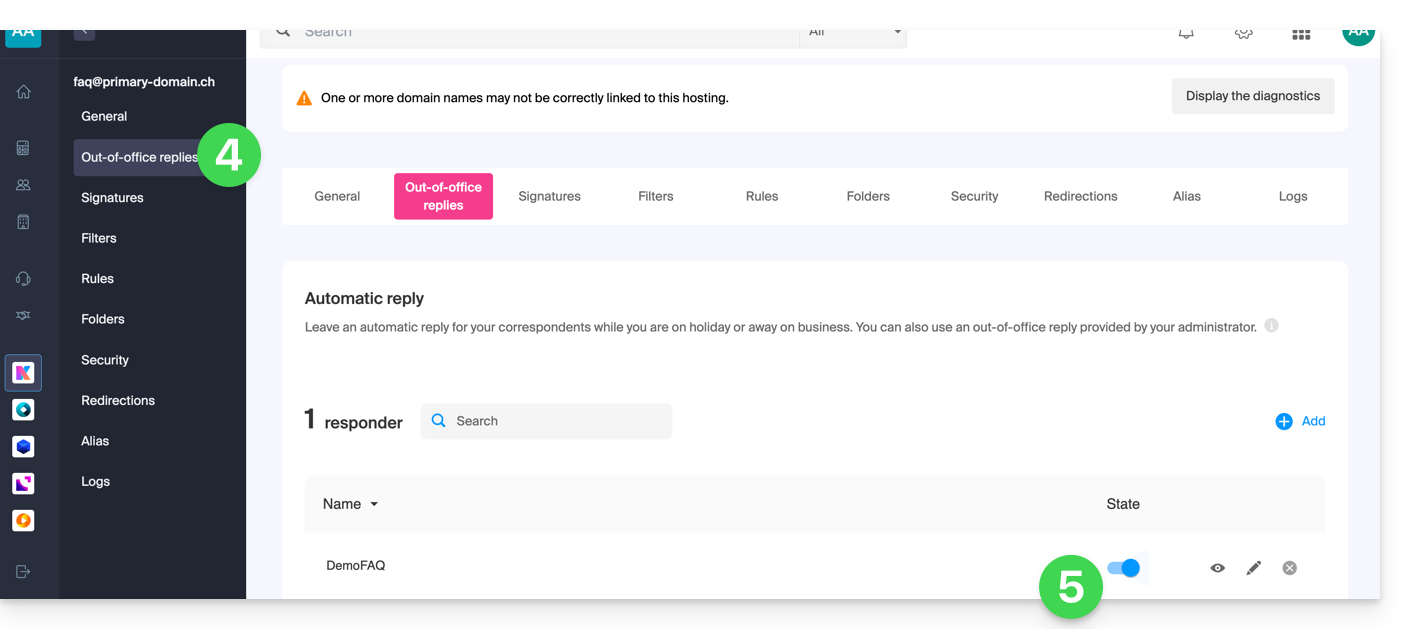
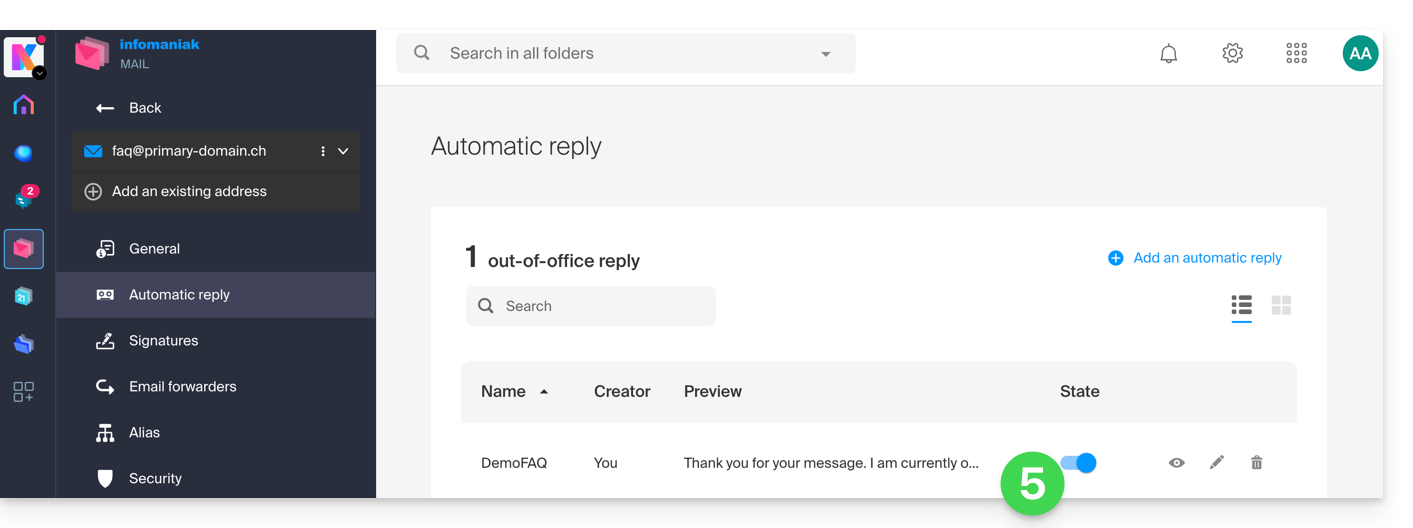
Compose the out-of-office message
To manage the message that should be automatically sent in response:
- Click on Add:
Then: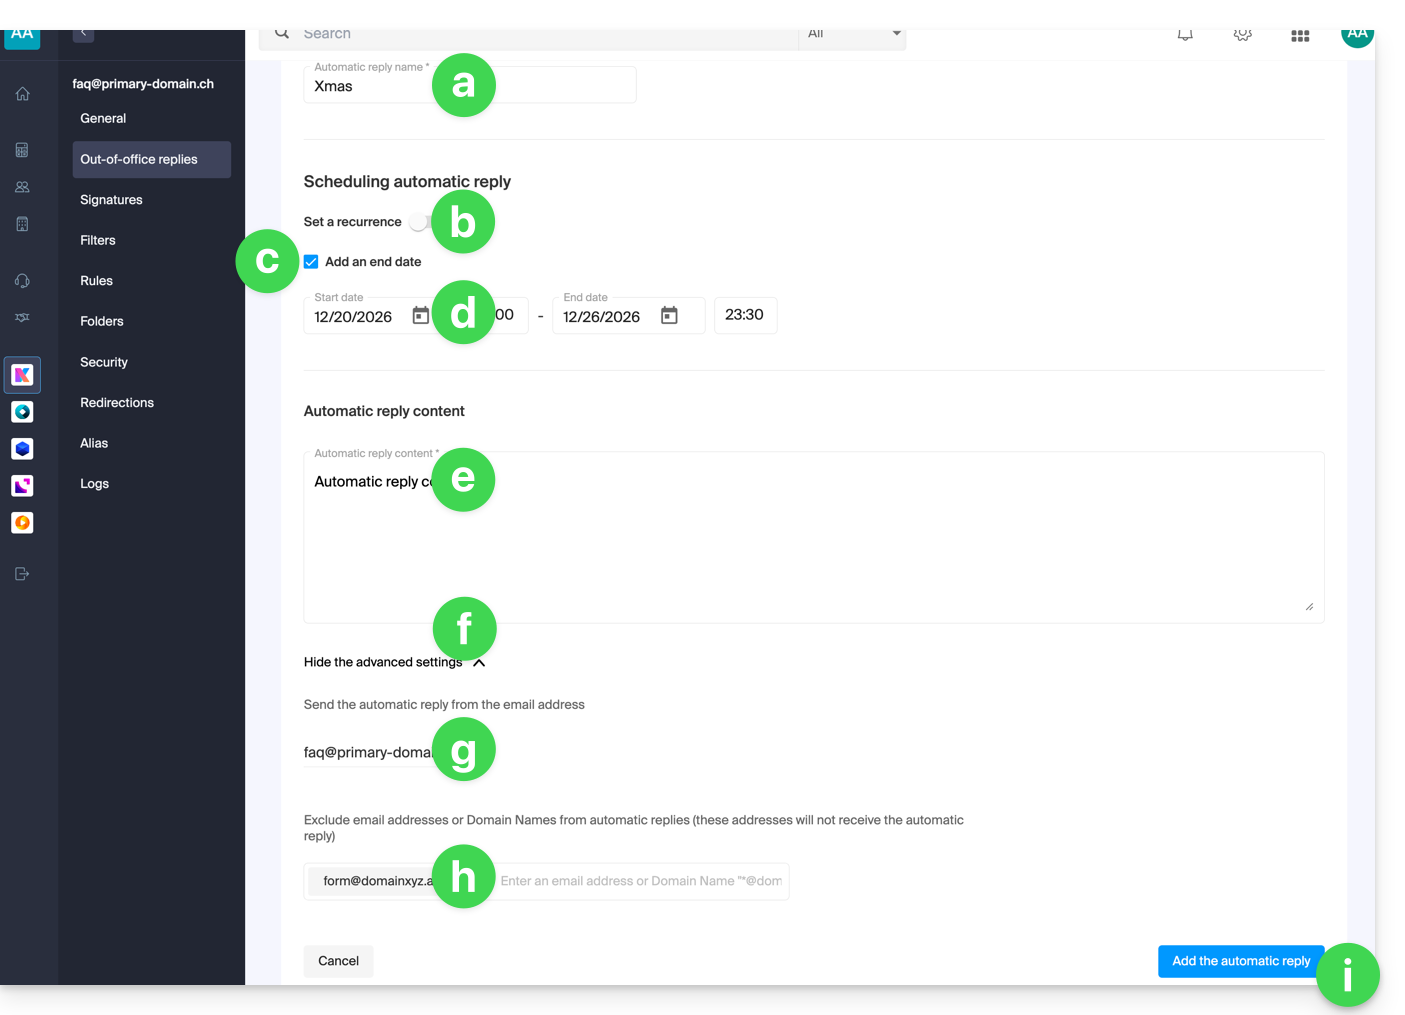
- Enter a name for your answering machine (to distinguish it from other messages if you create several).
- Specify if the automatic response should be provided on a recurring basis on certain days of the week.
- Specify an end date/time if the message should no longer be sent after a certain period.
- Specify a start date/time if the message is scheduled in advance for a specific period in the future.
- Compose your out-of-office message.
- Display advanced settings.
- If offered, specify any other email address that will be used to send your automatic out-of-office message (the address must be verified in advance).
- Enter specific email addresses (or
@domain.xyzfor an entire domain) to prevent them from receiving this out-of-office message. - Click the blue button at the bottom right to Add the message.
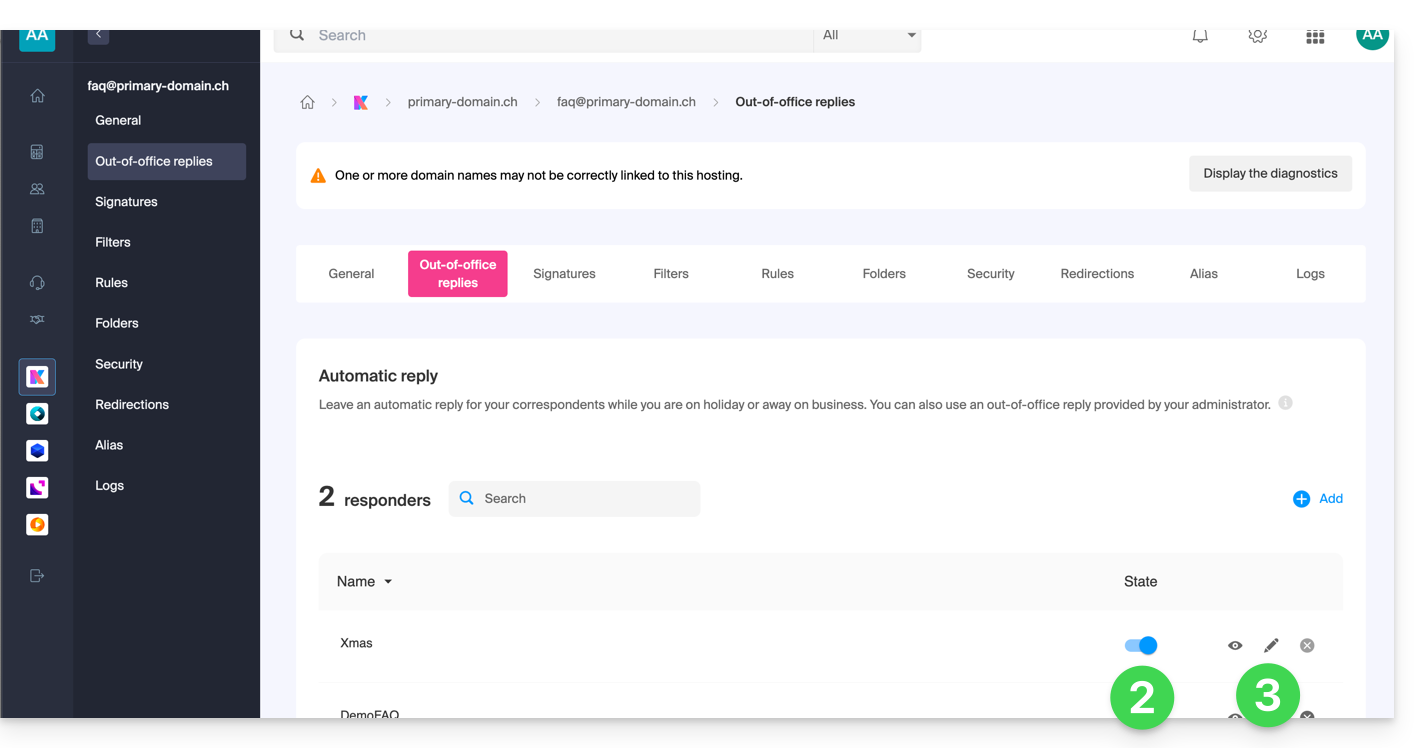
- Once added, you can activate or deactivate it.
- You can also edit a message already saved by the pencil icon ✎ on the right:
How often is the automatic response sent?
Your response is sent only once to people who send you messages.
However, if the same sender sends you a new email 7 days after the previous one and if your automatic reply is still active, an automatic response is sent again to remind them that you do not have access to your mailbox.
Be careful if you test it on your address, it is normal that it works only the first time. During subsequent tests, the answering machine no longer sends the message when it detects that the message comes from an address that has already sent a message before. You will therefore need to try again from another email address.
You can reset the 7-day counter by clicking on Reset when you edit your message: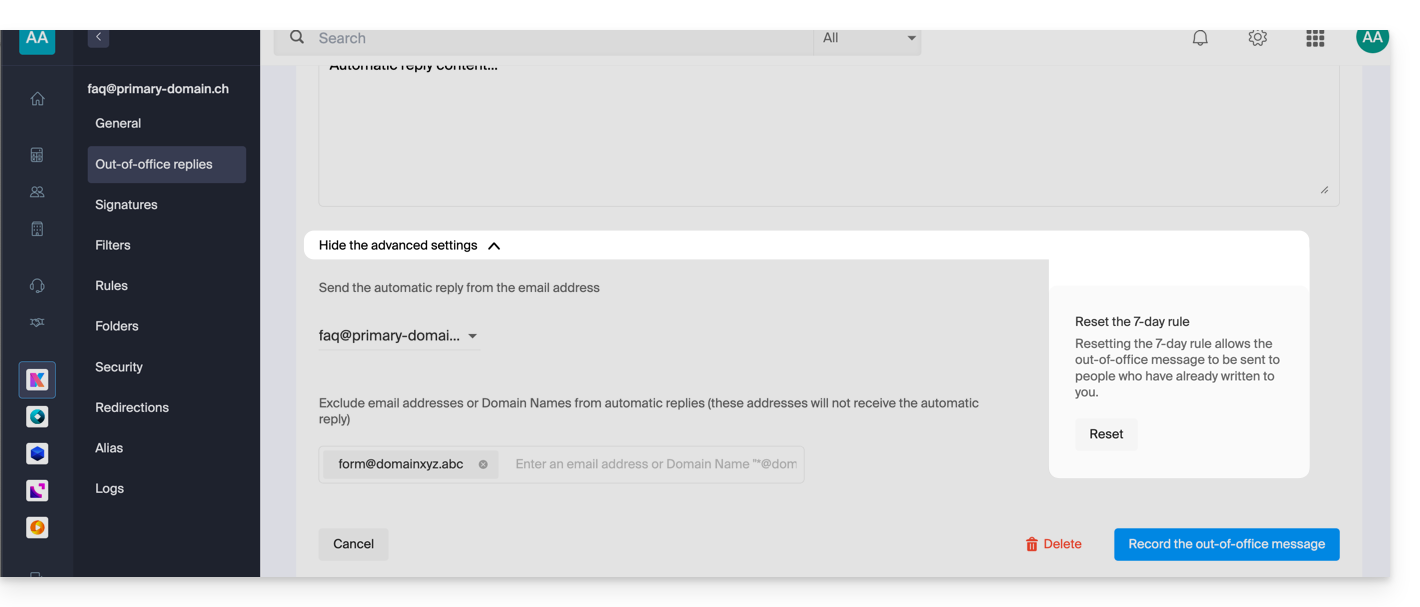
Go further with templates
Custom templates can be applied when creating a new email address on your Mail Service, for example, or in bulk to all addresses in your domain. Learn more
Link to this FAQ:
Has this FAQ been helpful?
This guide explains how to mark your chosen emails as "favorite" on the Infomaniak mail service to have "tracking" of these messages and to display them separately if you wish.
Monitor one or more messages…
… from the Infomaniak Web Mail app
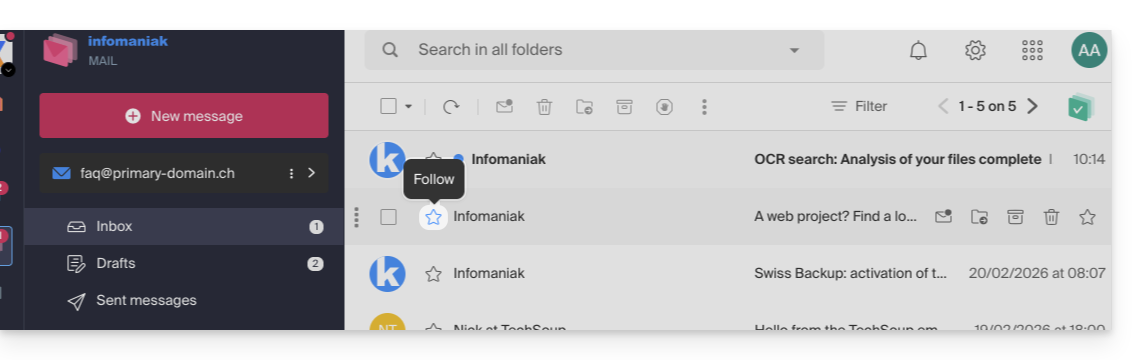
To add a message as a favorite:
- Click here to access the Infomaniak Web Mail app (online service ksuite.infomaniak.com/mail).
- Click on the ☆…
- … to the left of a message in the message list
- … at the top right of the message reading window
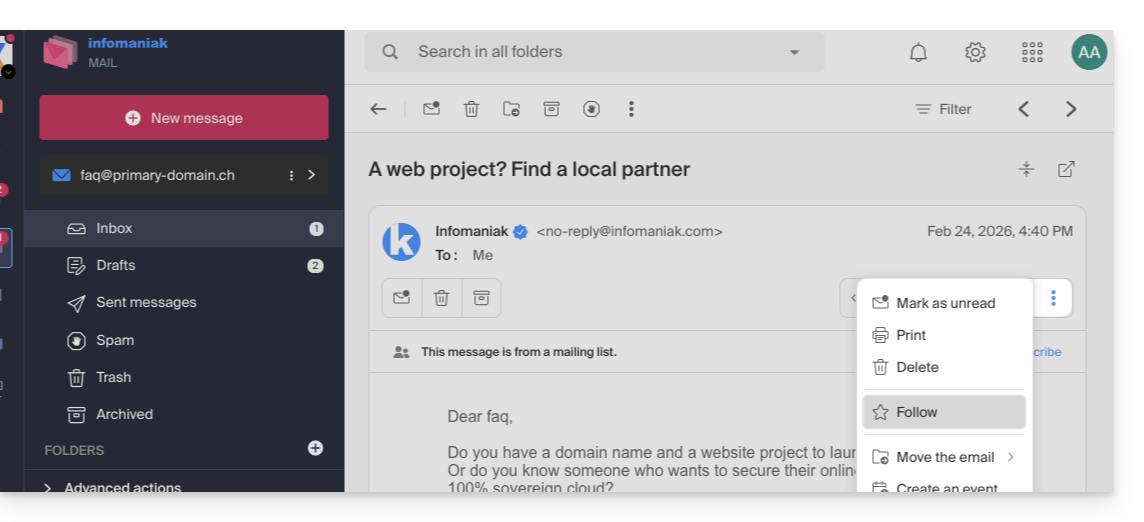
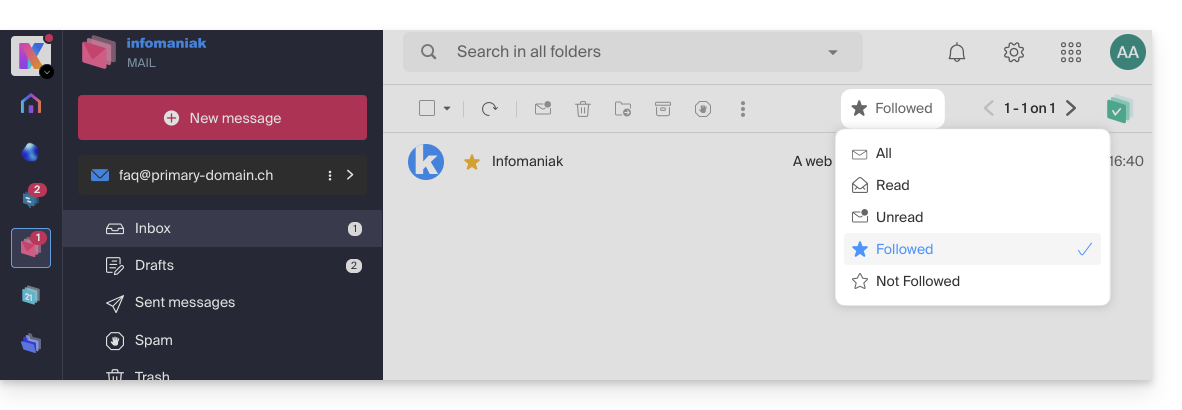
- … to the left of a message in the message list
- Once tracking is enabled, a dropdown menu in the top right corner allows you to display only a selection of your received messages according to several criteria: All, Read, Unread, Tracked, Untracked:
It is also possible to define an action on hover or add a shortcut in the bar above the message lists: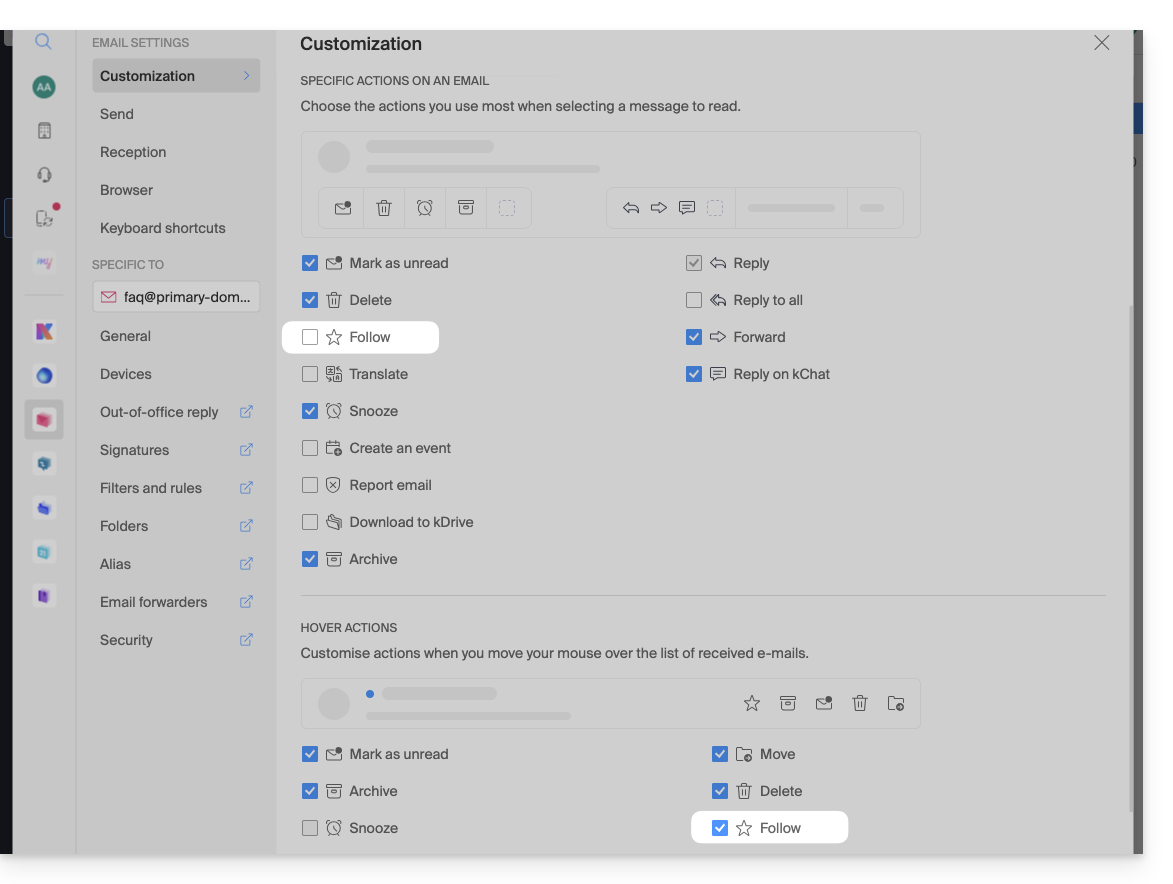
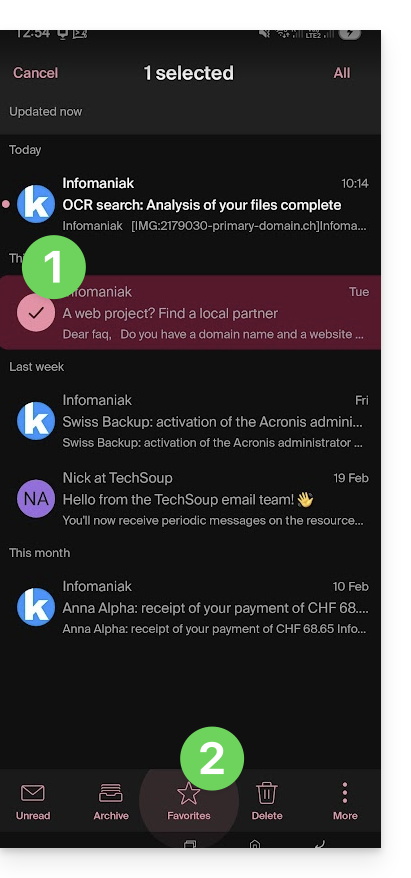
… from the Infomaniak Mail mobile app
On the message list:
- Press and hold your finger on a message.
- Press the ☆ icon at the bottom of the screen:
On a message being read:
- Press the ☆ icon at the top right of the message reading window:
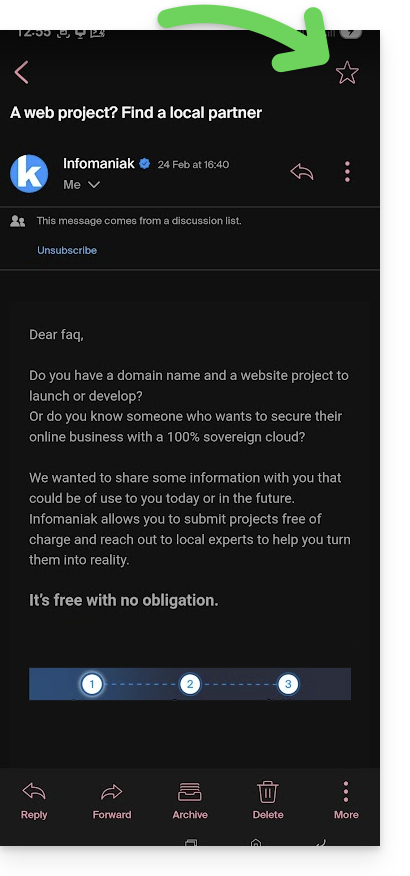
It is also possible to define a swipe gesture that would lead to a favorite marking of the message swiped with one finger.
Link to this FAQ:
Has this FAQ been helpful?
This guide explains how to link an external website (hosted by an all-in-one website creation service, for example) to your Infomaniak mailbox.
This will be useful in cases where, for example, your webmaster has modified the technical information (DNS) of your domain name to direct it to your external website and this has interrupted your mailbox.
Prerequisites
- Your domain name includes the DNS corresponding to the provider of your external web service (as this is the DNS zone with this provider that you will edit).
- Note the Infomaniak MX
mta-gw.infomaniak.chor sometimesmta-gw.infomaniak.ch.(presence of a final point). - Note the Infomaniak SPF
v=spf1 include:spf.infomaniak.ch -all. - Note the Infomaniak DKIM.
- Understand that any DNS addition/modification can take up to 48 hours to propagate.
Specific guides
Click on the link corresponding to the web site provider:
- Wix
- Wordpress.com
- Shopify
- Jimdo (guide A | guide B)
Guide for any other web provider
In general, you need to find the place on your web provider's dashboard where you can add the technical information (the 3 indications listed in the prerequisites above) to make your Infomaniak mailbox work while your domain name directs all traffic to this web provider:
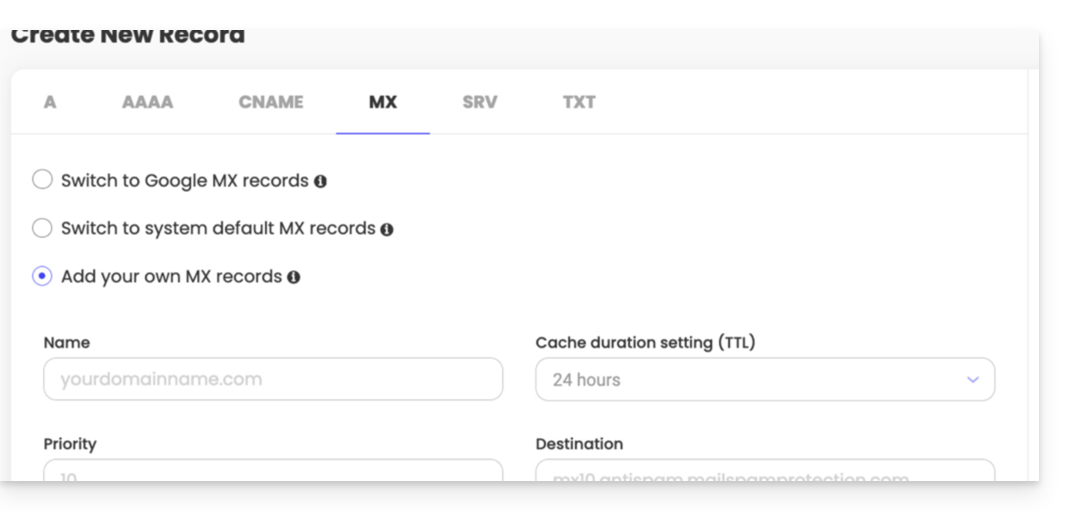
- The MX of Infomaniak.
- The SPF is a verification method that ensures an email is sent by the sender it claims to be, helping to combat spam and fraudulent emails; this is often added in the form of a TXT record addition.
- The presence of a DKIM has become essential for the optimal functioning of your Infomaniak mailbox.
If necessary, contact the technical service of the provider in question so that they can help you set up the information specified in the prerequisites above — local partners referenced by Infomaniak can handle these procedures: launch a free call for tenders, they take care of everything, freeing you from the technical details.
Link to this FAQ:
Has this FAQ been helpful?
This guide explains how to connect the desktop app Outlook 2013 (desktop application on Windows) to an email address hosted by Infomaniak.
Preamble
- The various services offered by Infomaniak are all compatible with the corresponding standard protocols (IMAP/SMTP for email, for example). Therefore, if you encounter a problem with third-party software, contact its publisher or a Partner and consult the support policy as well as article 11.9 of the Infomaniak Terms of Service.
Add the email address to the application
Prerequisites
- Create the email address in my kSuite or a Mail Service / kSuite.
- Create a password for the email address on the device you are going to configure.
- Check that the Mail Service is configured optimally.
To configure the email application:
- Open the application.
- Click on the File menu:
- Click on Account Settings.
- Click on Add or Remove Accounts:
- Click on New:
- Click on Manual Setup:
- Click on POP / IMAP.
- Click on Next:
- Check and complete the missing information.
- Click on More Settings:
- Click on the Outgoing Server tab.
- Click on My outgoing server requires authentication.
- Click on the Advanced tab:
- Replace the port numbers with the correct information and enable SSL.
- Click on OK.
- Click on Next:
- Click on Close:
- Click on Finish:
- Click on Close:
- There you go, your email address is now configured in the application:
Recommended settings
- Incoming IMAP server =
mail.infomaniak.com - IMAP port =
993(with SSL) - Outgoing SMTP server =
mail.infomaniak.com - SMTP port & encryption protocol and command/method to activate this protocol:
587+ STARTTLS - Username = full & complete email address ( ? )
- Password = the one generated for the email address you want to access
- Authentication required for sending emails:
- It is activated in the SMTP settings of your application.
- Check "use the same settings as the incoming server" or depending on the software/email clients, enter a username (= full & complete email address) and the generated password.
Refer to this other guide if you are looking for information about other mail ports and protocols compatible (SSL / TLS for example).
In case of a problem
Check that the Mail Service is configured optimally.
It is not necessary to contact Infomaniak Support if your email address works well outside the application. The most common error concerns the use of an incorrect password. The troubleshooting guides help you resolve any potential issues:
- Refer to the solutions given in this other guide regarding mail in general.
- This other guide is more specifically about Outlook.
… and if your Outlook no longer works since a change of mail password, refer to this other guide.
Link to this FAQ:
Has this FAQ been helpful?
This guide explains how to manage and modify user permissions (assigning an additional password, setting up an alias, etc. – see below for the complete list) for an Infomaniak user, so that they can manage more or fewer configuration elements in the Infomaniak Mail web app (online service ksuite.infomaniak.com/mail).
Introduction
- The email address is first created within a Mail Service and can then be used within one or more Infomaniak Mail interfaces by one or more users.
- The creator (or manager) of the address may want to limit the actions possible for one or the other of the users who will use the email address.
- This fine-grained permission management can be done during address creation or afterwards, and you can also define what the default rights should be for any new address created (see Global Configuration below).
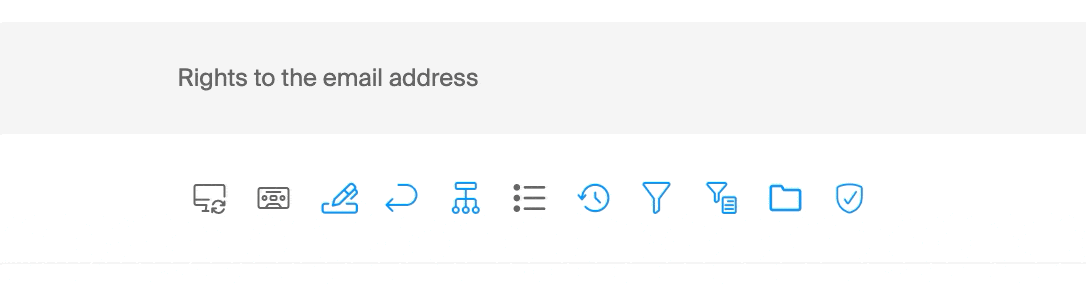
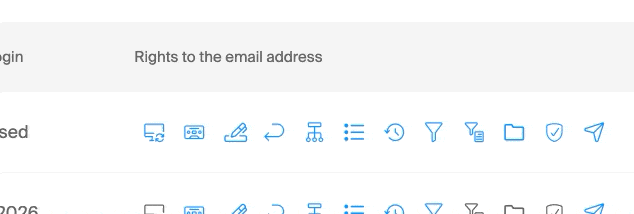
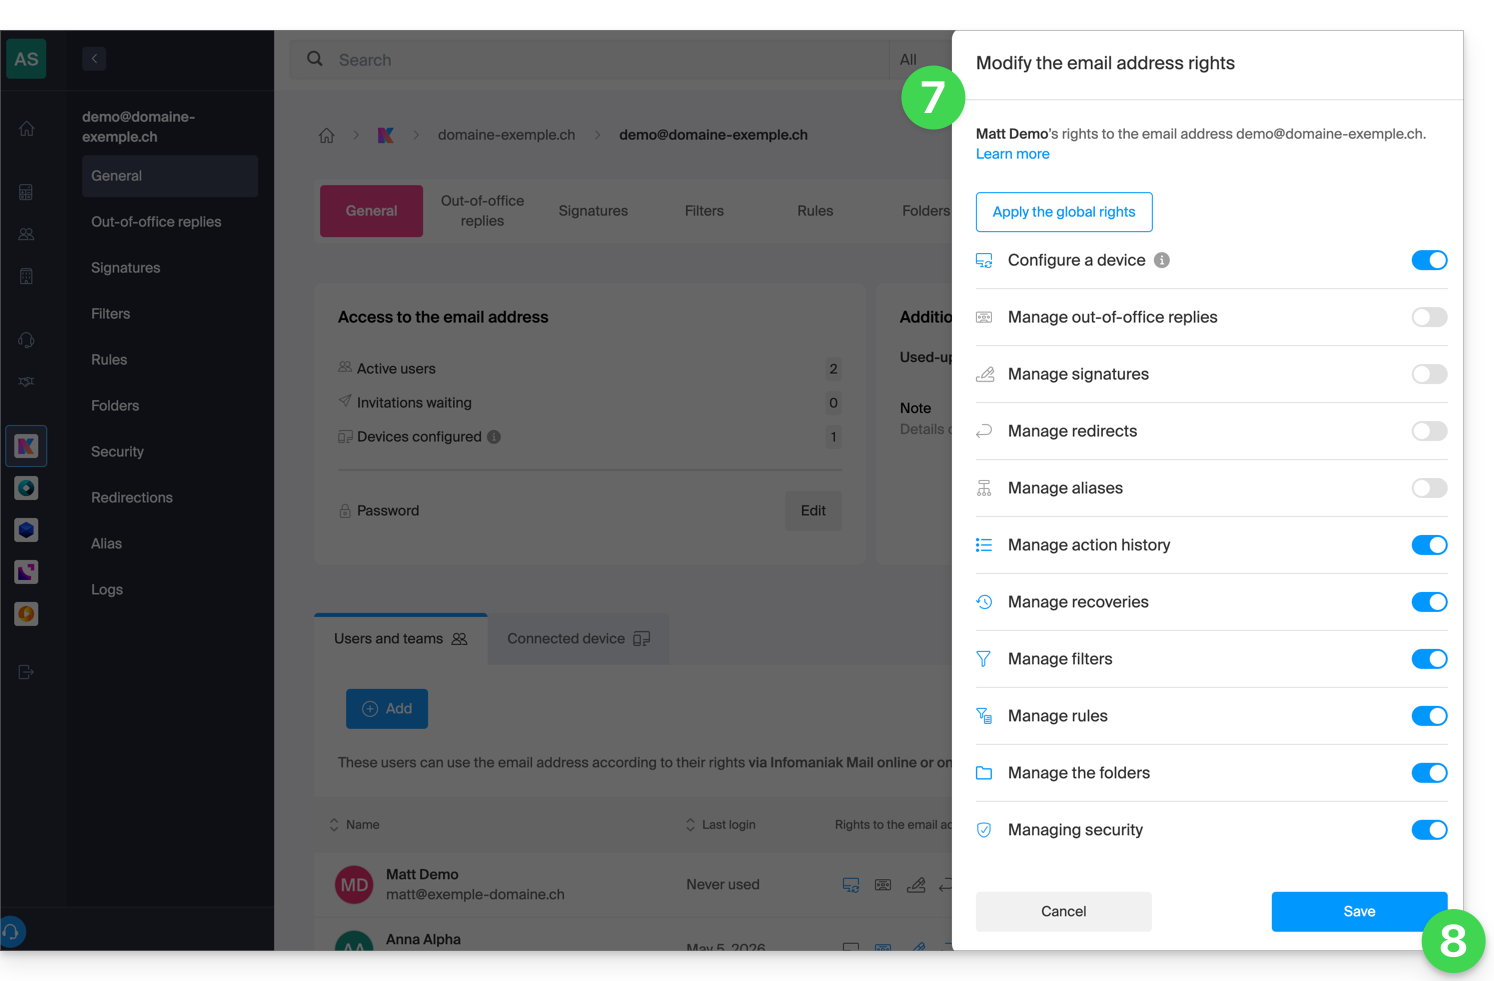
List of email user permissions
| Type / Icon | Description of the permission granted to the user |
|---|---|
| Configure a device | Manage devices (create a dedicated password) |
| Manage auto-replies | Create an out-of-office message (automatic reply) |
| Manage signatures | Add signatures and manage reply email addresses |
| Manage forwarding | Forward emails to one or more other addresses |
| Manage aliases | Create variations of your email address (by modifying what comes before the @) |
| Manage the history of actions | Access the logs for the email address |
| Manage restorations | Access backups and restorations |
| Manage filters | Access SPAM and other filters |
| Manage rules | Automatically sort and categorize new incoming emails |
| Manage folders | Customize IMAP folders |
| Manage security | Manage blocked and approved addresses |
| Manage email sending | Enable sending emails (authorize global SMTP) |
Manage permissions granted to a user
The password for logging into your Infomaniak account may be required to make changes to permissions.
… from the Mail Service
- Click here to access the management of your product in the Infomaniak Manager (need help?).
- Click directly on the name assigned to the product in question.
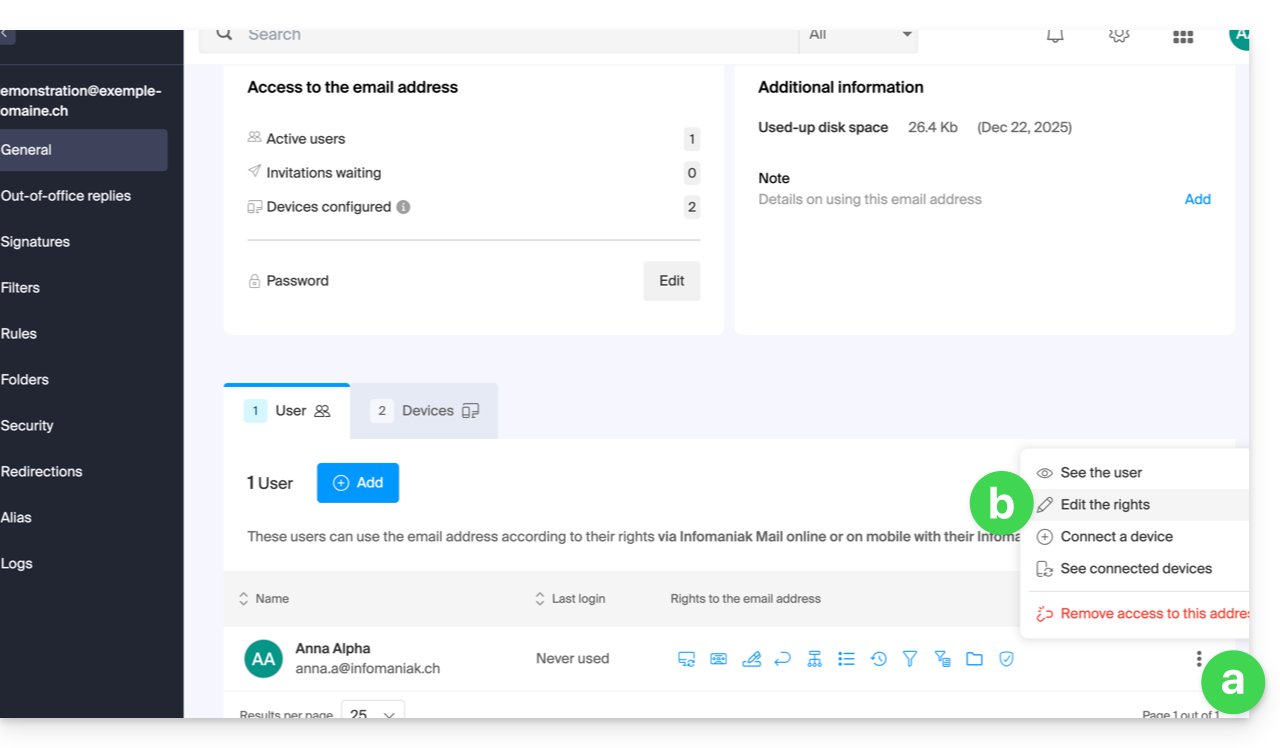
- Click on the email address in question in the table that appears.
- There are several ways to modify the permissions of a mail address:
- When adding a user to a mail address:
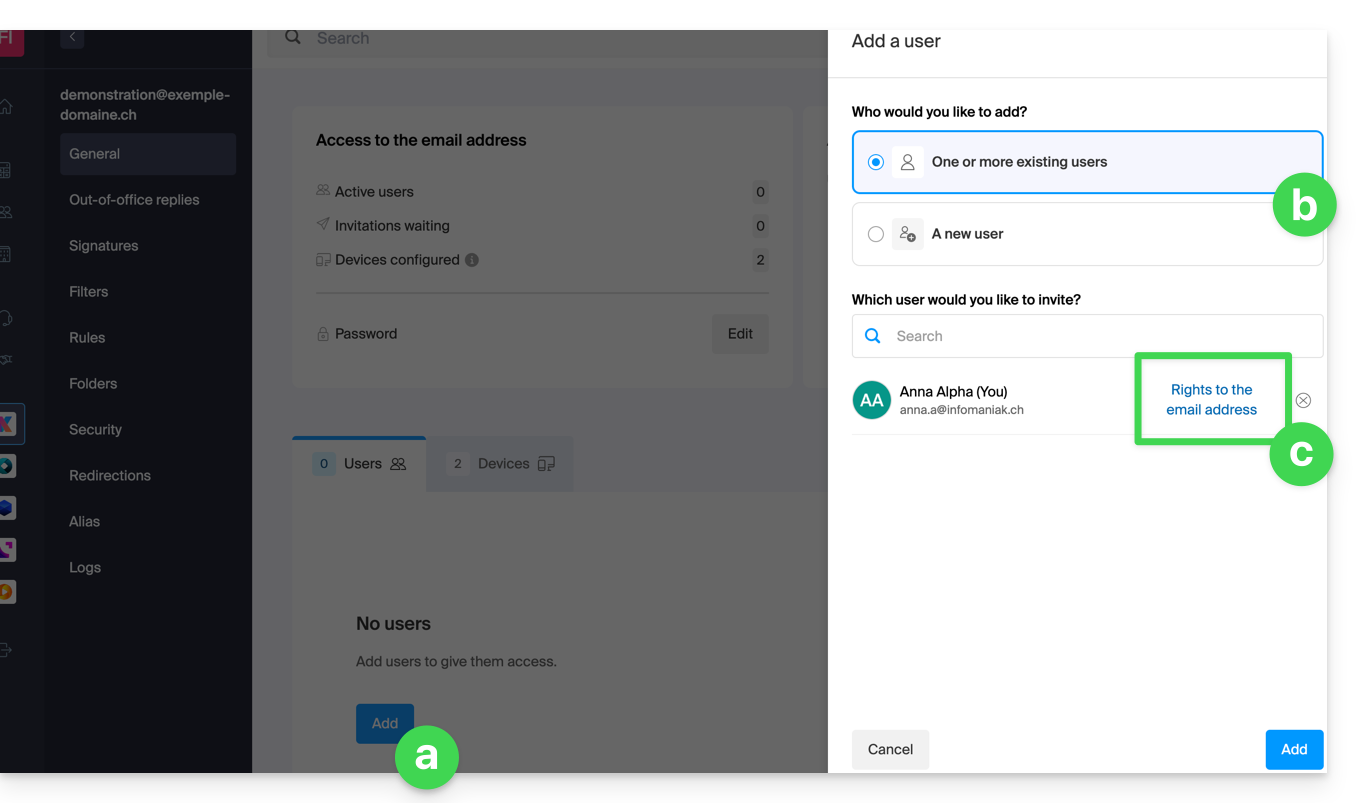
- Once the user has been added:
- Click on the action menu ⋮ located to the right of the user's name for the mail address.
- Select ✎ Modify permissions:
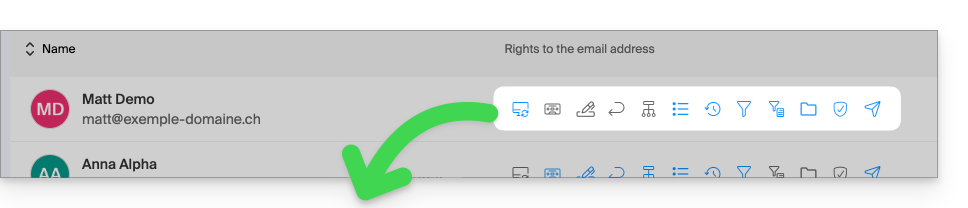
- Or click directly on the icons visible in the table:
- When adding a user to a mail address:
… from the Manager (user management)
- Click here to access user management in the Infomaniak Manager (need help?).
- Click on the user concerned in the table that appears.
- Expand the collaboration tools section by clicking on the chevron .
- Expand the mail addresses section accessed by the user by clicking on the chevron .
- Click on the action menu ⋮ located to the right of the mail address concerned.
- Select Modify permissions:
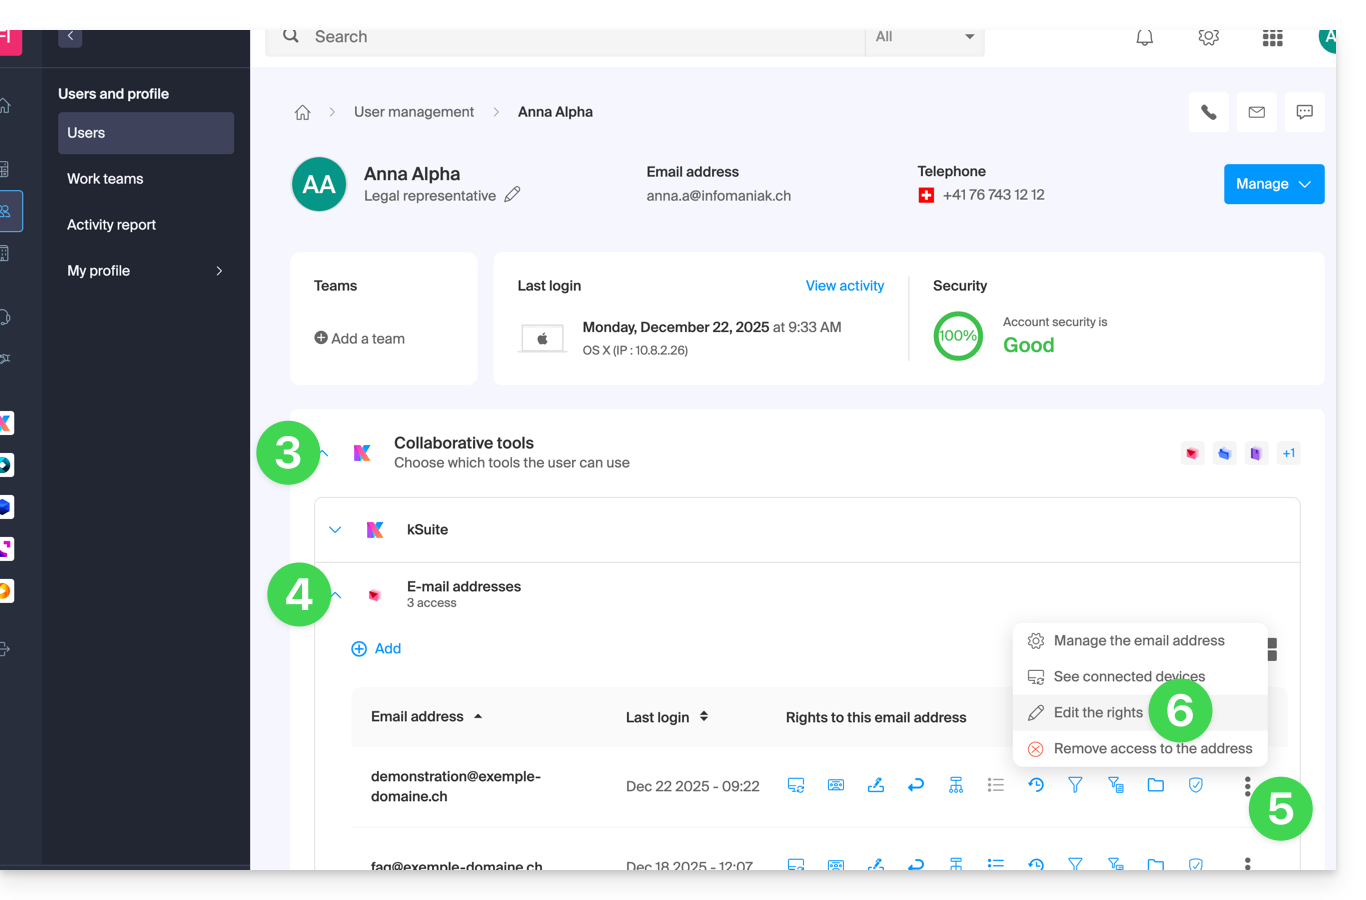
- Or, click directly on the icons visible in the table:
… from the Web Mail app
- Click here to access the Infomaniak Web Mail app (online service ksuite.infomaniak.com/mail).
- Click on the Settings icon in the top right corner of the interface.
- Check or select the email address in question from the drop-down menu in the left-hand menu.
- Click on Shared with.
- Click on the action menu ⋮ located to the right of the email address user's name.
- Select ✎ Edit permissions:
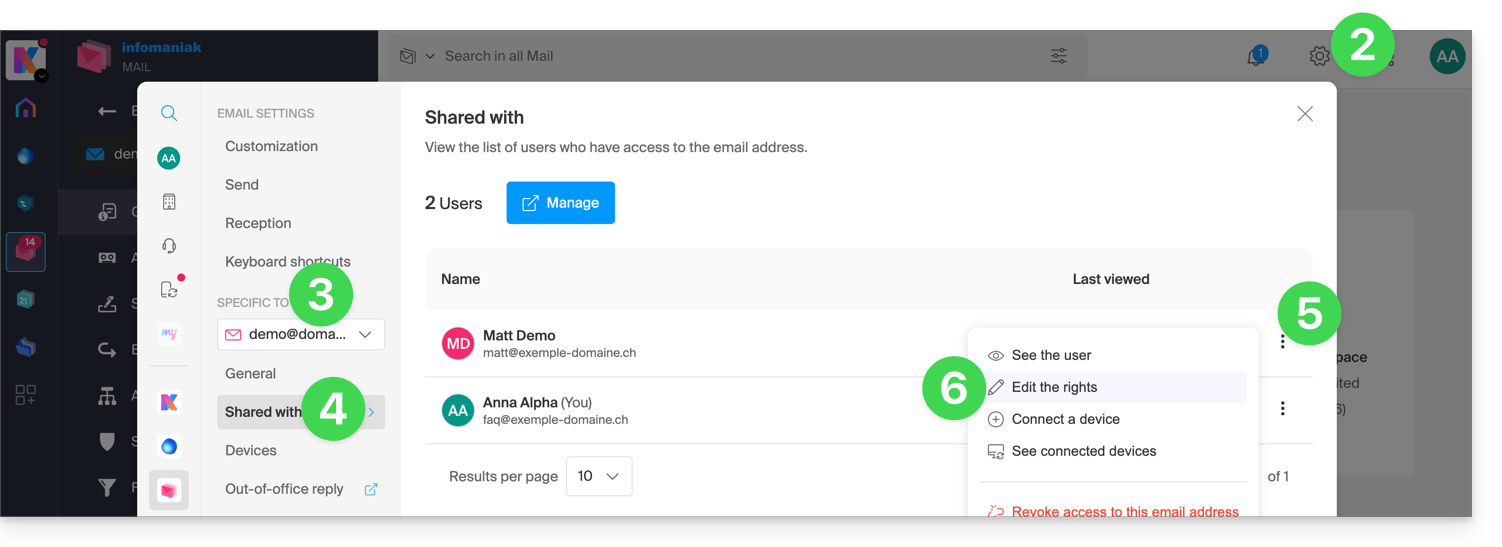
- You will be redirected to the settings for your email address in the Mail Service, and more specifically to the permissions section for the user in question.
- Adjust the permissions and save at the bottom of the page:
Result for the user
The user whose permissions are being revoked will no longer see certain corresponding menus in their email address settings.
For some features, even if the menu is still accessible, some buttons will be inoperative or grayed out: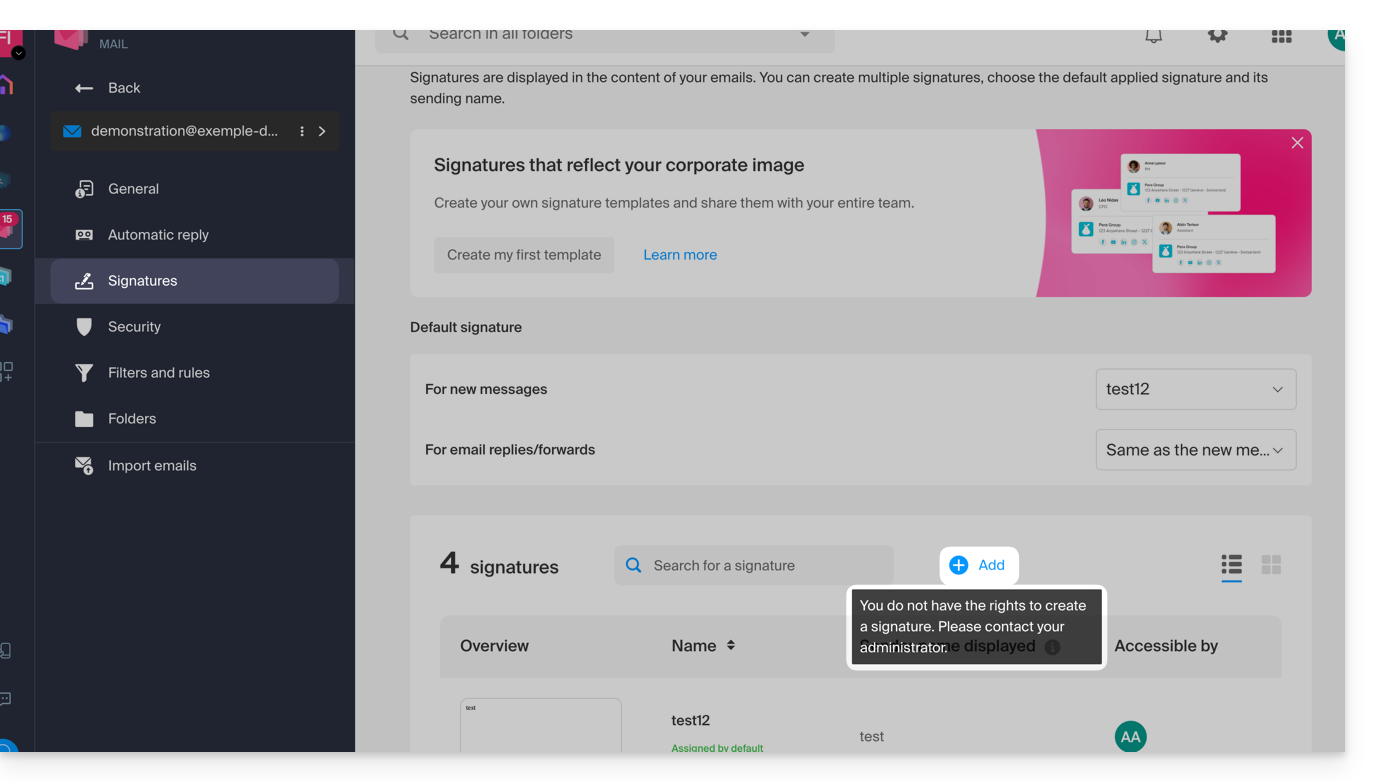
Global configuration
Define default settings
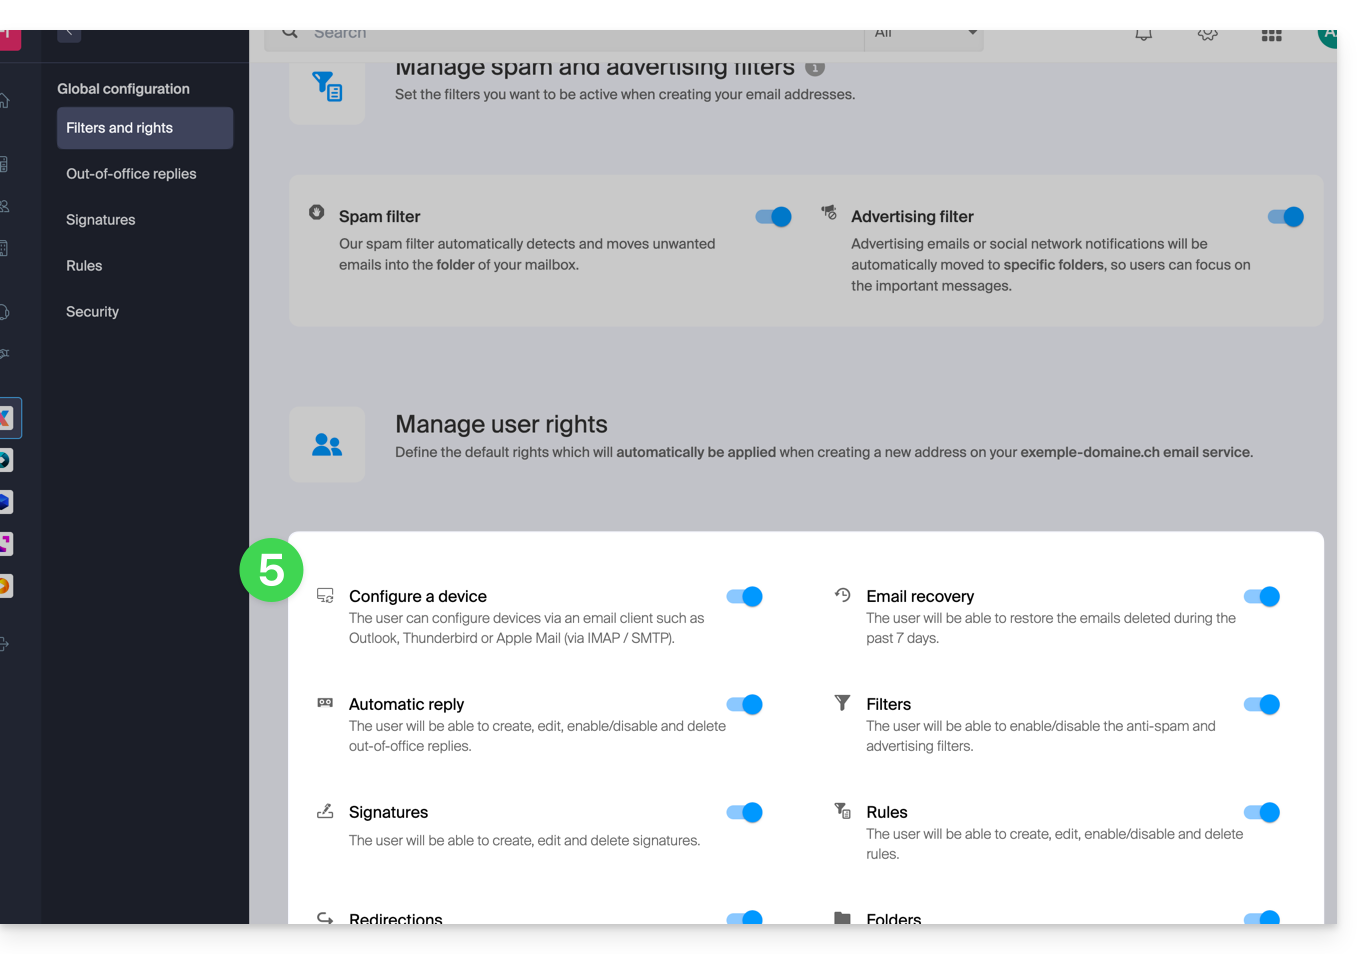
To define the default rights that will be automatically selected when the “global configuration” is applied by the administrator:
- Click here to access the management of your product on the Infomaniak Manager (need help?).
- Click directly on the name assigned to the product in question.
- Click on Global Configuration in the left-hand menu:
- Then click on Filters and Permissions.
- At the bottom, enable or disable the rights to be granted when creating new email addresses:
Global configuration during email address creation
If a new email address is created for one or more third-party users, the permissions defined in the Global Configuration will be automatically pre-selected during the wizard step: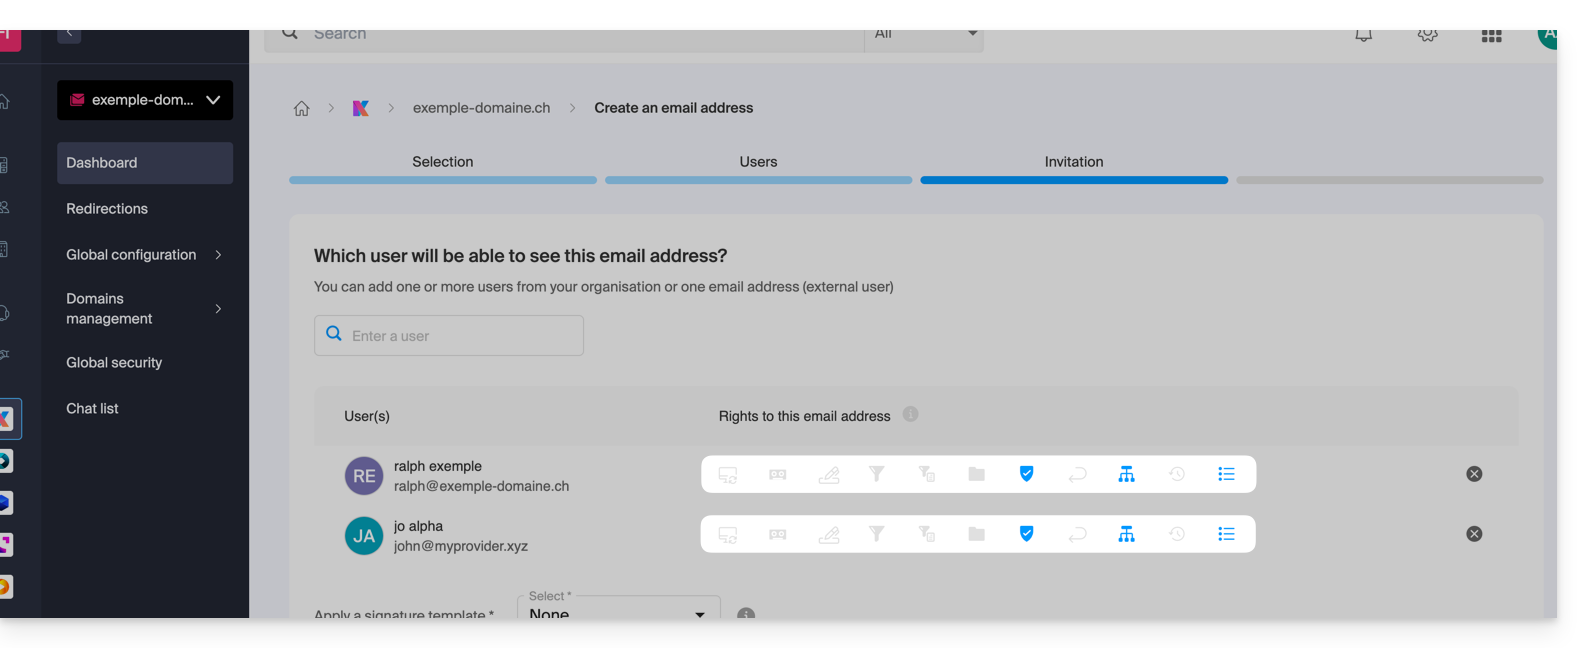
It is, of course, possible to modify the different permissions for the different users on a case-by-case basis.
Apply the global configuration to existing addresses
To apply this global configuration to the existing email addresses of a Mail Service (which will then apply to all users concerned, listed in the Users column):
- Click here to access the management of your product in the Infomaniak Manager (need help?).
- Click directly on the name assigned to the product in question.
- Select the email addresses concerned by checking the boxes to the left of the line.
- Click on Apply global configuration at the bottom of the screen (by first clicking on the action menu ⋮ if necessary):
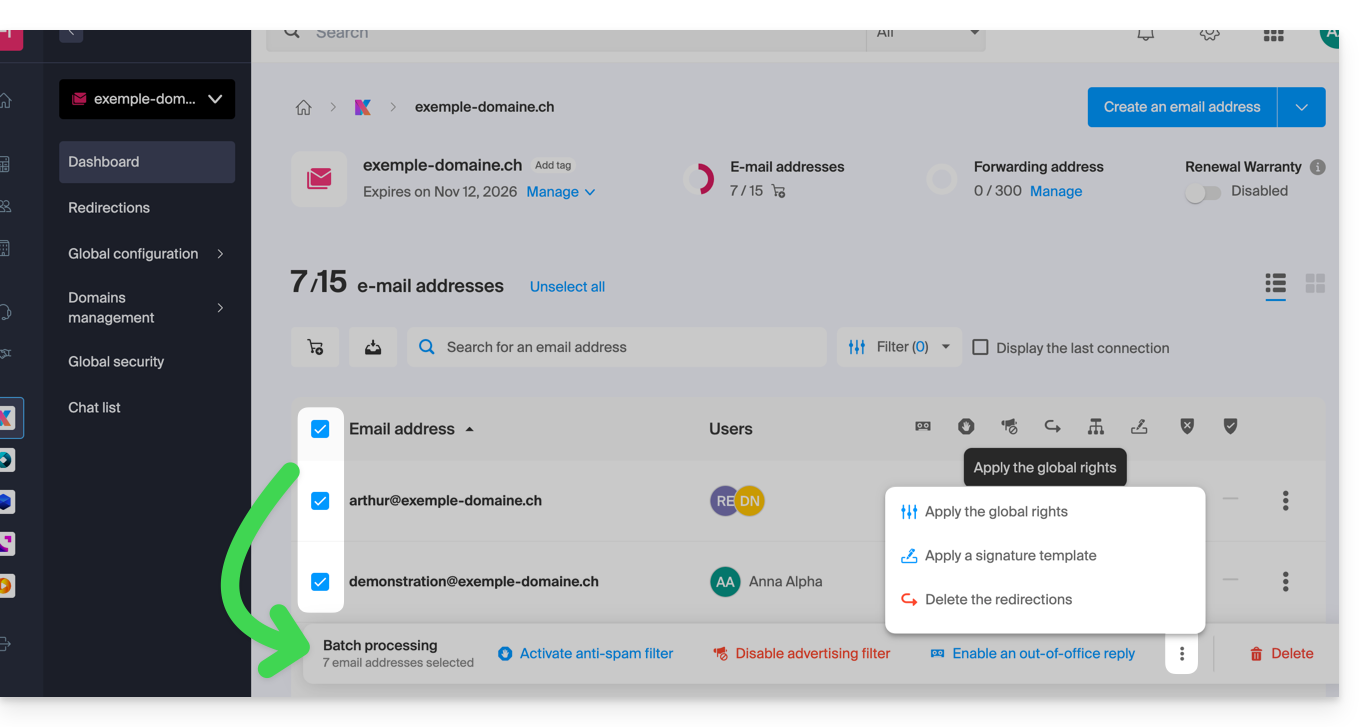
Apply the global configuration when managing permissions granted to a user
To apply this global configuration when you edit a user's permissions for an email address (refer to the "Manage permissions granted to a user" section at the top of this guide), click on the button dedicated to this purpose: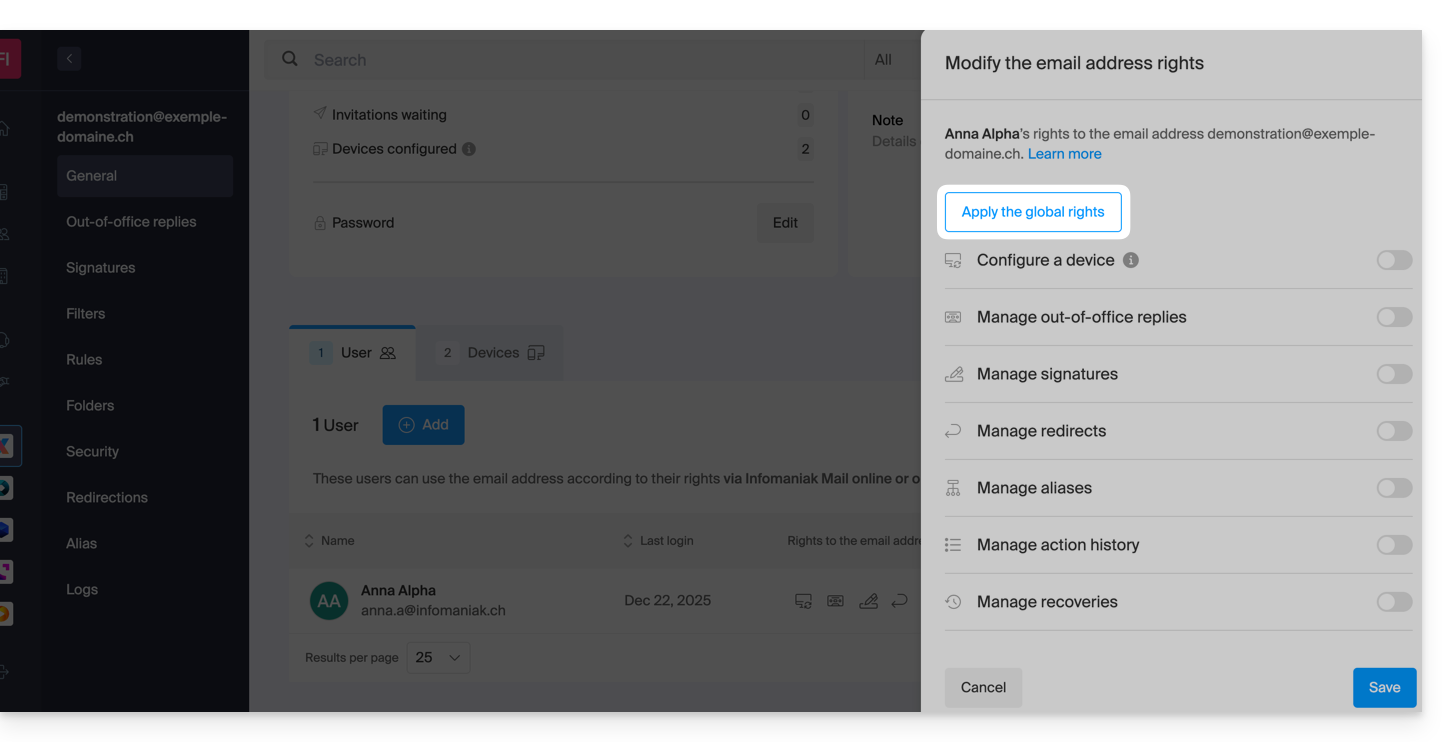
Link to this FAQ:
Has this FAQ been helpful?
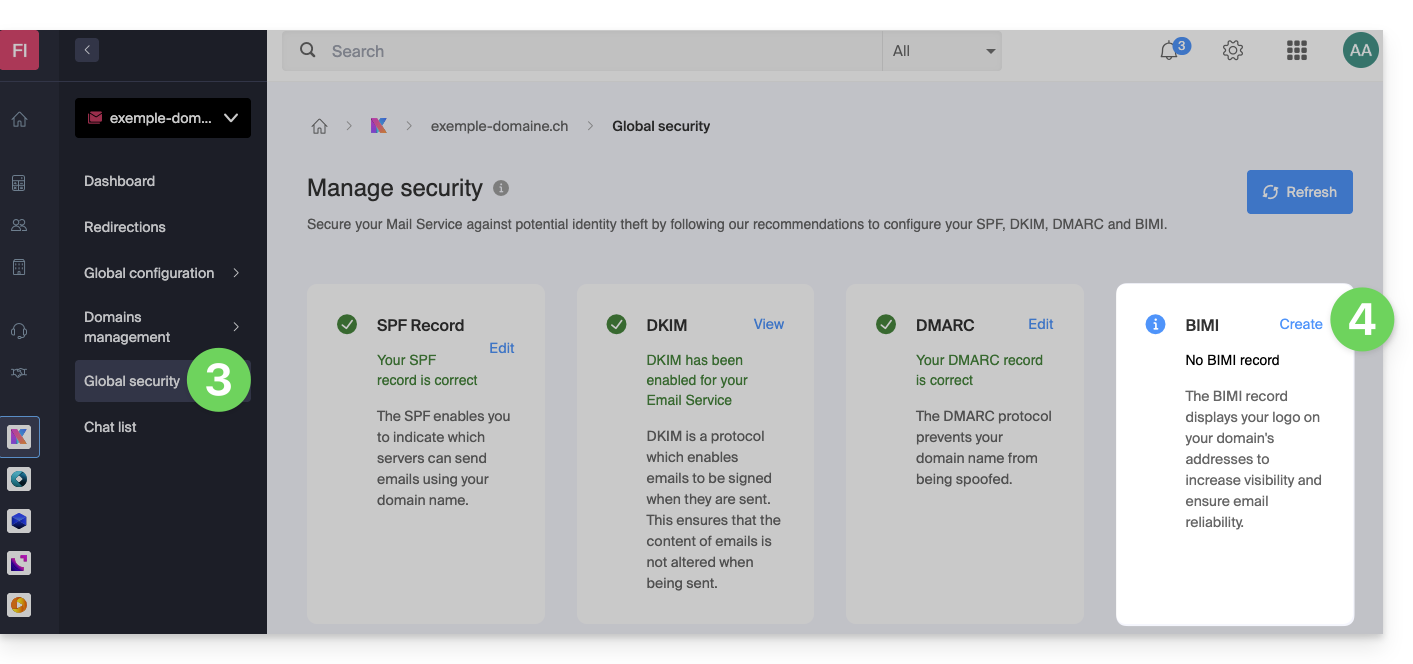
The BIMI (Brand Indicators for Message Identification) standard, brand indicators for message identification) allows companies to incorporate their logo into the emails they send.
Preamble
- Infomaniak applications (and other companies around the globe - read the in case of problem chapter below) are compatible with BIMI and will display the logos next to the received emails.
- Infomaniak Mail Services allow you to configure your email with your logo; the benefits are numerous:
- increased trust: recipients can visually identify your emails, thus reducing the risk of phishing.
- brand reinforcement: a well-visible logo in inboxes reinforces brand awareness.
- better deliverability: emails compliant with DMARC have a better chance of reaching the main inbox.
1. Create a logo
Create a logo in SVG (Scalable Vector Graphics) format. This format is required as it ensures optimal quality regardless of the device or display size.
To be imported on the Infomaniak interface (read below) it must not exceed 10 Mo, but it can also be hosted on a publicly accessible secure server and you will simply need to indicate its URL for the BIMI DNS registration.
2. Obtain the VMC certificate
A verified logo certification (VMC) is required; it certifies that you are the legitimate owner of the logo. You can obtain this certification from recognized certification authorities such as DigiCert and Entrust.
When your VMC certificate is issued, you receive a PEM file containing the entity certificate. This PEM file includes your logo in SVG format as well as the VMC.
3. Add the logo to the Mail Service
Prerequisites
- All the Global Security indicators of your Mail Service must be green (SPF + DKIM + DMARC)!
To access the Mail Service and set the logo of your company:
- Click here to access the management of your Mail Service on the Infomaniak Manager (need help?).
- Click directly on the name assigned to the Mail Service concerned.
- Click on Global Security in the left sidebar menu.
- Click on the Create button (in the BIMI section):
- Fill in the requested information from the documents received (see chapter 2 above) and do not forget to save.
In case of a problem
- If the Create button in the BIMI box remains gray, make sure to check the informative messages: DMARC may exist but not be at the required rejection percentage, so adjust the parameters according to the indications.
- When there are multiple domains linked to the Mail Service, you must ensure that you have a certificate on each linked domain if you want BIMI on them.
- Note that Apple Mail supports BIMI, unlike Microsoft Outlook, Thunderbird and the Mail app from Samsung which have not yet fully adopted it.
Disable BIMI
To disable BIMI, simply go to the domain name management page linked to the Mail Service and delete the corresponding TXT record.
Link to this FAQ:
Has this FAQ been helpful?
This guide explains how to block (or allow) email senders globally on an entire Service Mail. Refer to this other guide if you are looking for information on how blocked and allowed sender lists work.
Manage Security on Global Configuration
An administrator of a Service Mail can add email addresses or even entire domains to the lists of approved or rejected senders, and these lists will be applied to all email addresses of a Service Mail (without modifying the existing settings already on each email address):
- Click here to access the management of your Service Mail on the Infomaniak Manager (need help?).
- Click directly on the name assigned to the concerned Service Mail:
- Click on Global Configuration in the left sidebar menu.
- Click on the Security tab.
- Click on the Add an address button in the Blocked Address box to block an email from an unauthorized sender.
- Do the same for senders to be approved in the other box:
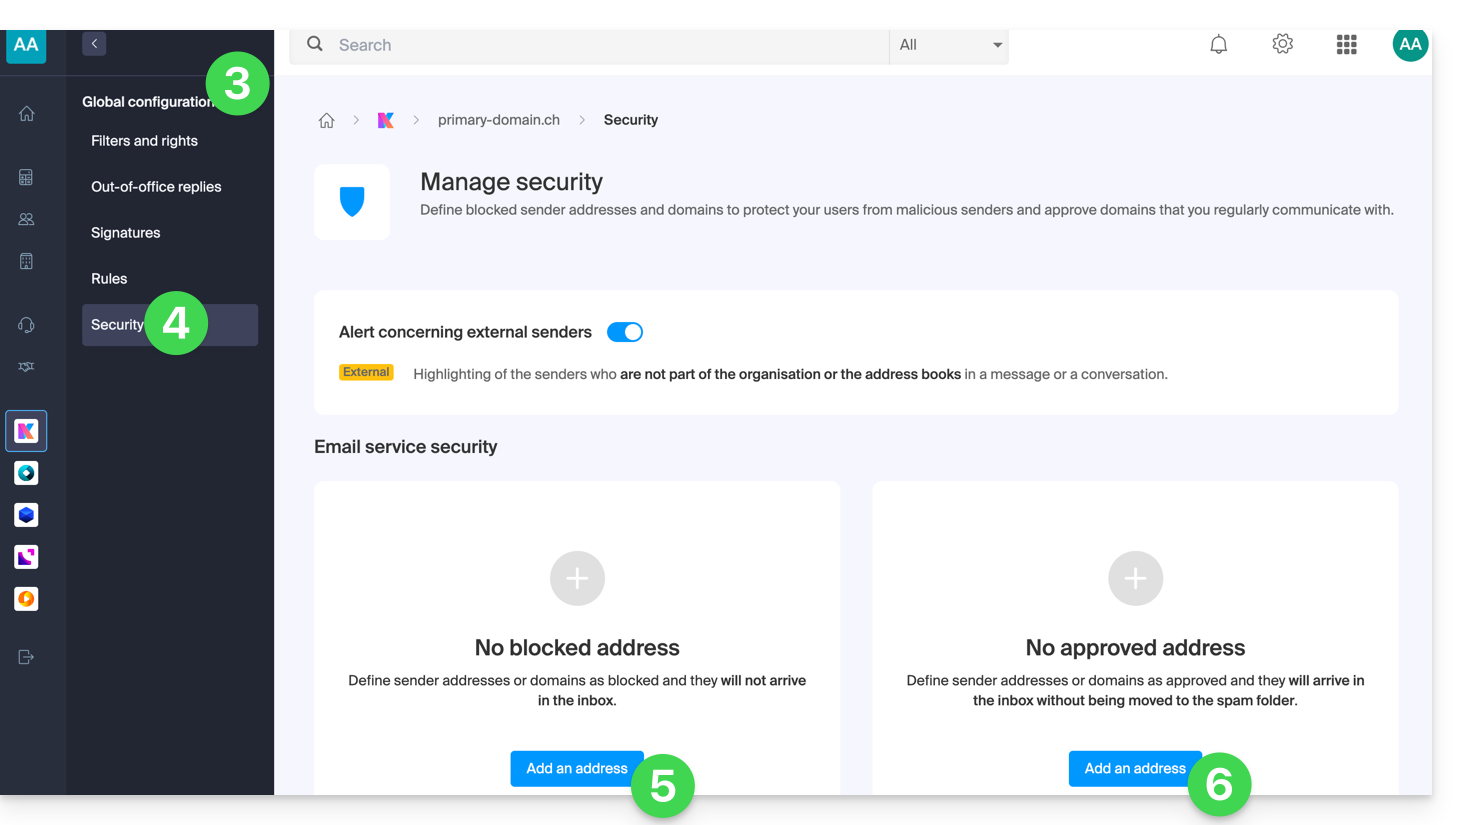
- Click on Validate to activate these lists on all email addresses of the domain.
Regarding the top part of the page, refer to this other guide.
Link to this FAQ:
Has this FAQ been helpful?
This guide explains how to create sorting rules in Advanced mode, scripts in Sieve language, to automatically classify your incoming emails on Infomaniak according to certain conditions.
✘ UNAVAILABLE with
kSuite free
my kSuite (ik.me, etik.com, ikmail.com)
Mail Service Starter
Preamble
- If you do not have a compatible offer or if you prefer a simplified configuration, refer to this other guide.
- ⚠️ No support is provided regarding the Sieve language (refer to this documentation — also discover the role of the host).
- Unlike the sorting rules offered within software/email clients (Microsoft Outlook, Mozilla Thunderbird, Apple Mail...), these rules will act directly on the server of your mailboxes before even the IMAP connection.
- It is possible to import Sieve files via a button.
- By activating this mode, the existing standard rules will be kept but deactivated.
- The
redirectcommand (allowing to forward an email to another address) is not allowed in scripts.- If you import a Sieve script from another host, make sure to remove this command.
- To forward emails, use the assistant in Standard mode or the Redirections section of your Mail Service.
Access rules from the Infomaniak Web Mail app
Prerequisites
- Have permission to manage rules: if you had been invited to the Infomaniak Web Mail app (online service ksuite.infomaniak.com/mail) to manage your address, it is possible that the Mail Service manager has removed this right from their admin account.
To access the sorting filters for your Infomaniak mail:
- Click here to access the Infomaniak Web Mail app (online service ksuite.infomaniak.com/mail).
- Click on the Settings icon in the top right corner.
- Check or select the email address concerned in the drop-down menu.
- Click on Filters and rules:
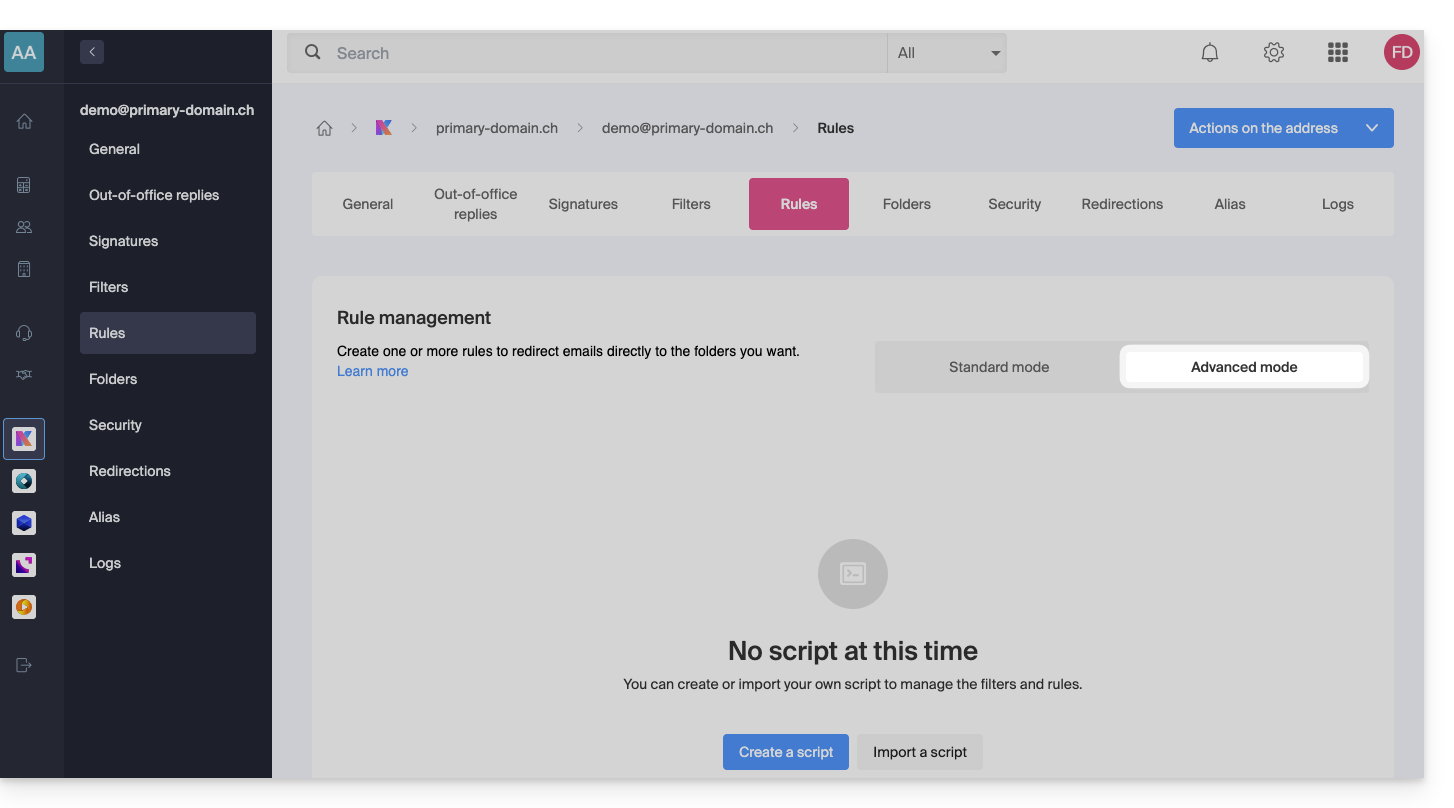
Access rules from a Mail Service
To access the sorting filters for your Infomaniak mail:
- Click here to access the management of your product on the Infomaniak Manager (need help?).
- Click directly on the name assigned to the product concerned.
- Click on the email address concerned in the table that appears.
- Click on the Rules tab from the left sidebar (or top bar):
Create a new rule in Advanced (expert) mode
- Make sure to click on Advanced mode:
First example of advanced sorting
Here is a simple example of a command using this language:
require ["fileinto"];
if address :contains "from" "facebook.com" {
    fileinto "fb";
} elsif header :matches "List-Unsubscribe" "*" {
    fileinto "nl";
} else {
    keep;
}
Explanations:
- Loading required extensions: use
require ["fileinto"];to indicate that you will use thefileintofunction. - Filtering Facebook messages: use
if address :contains "from" "facebook.com"to check if the sender's address contains "facebook.com"; if so, the message is filed in the "fb" folder withfileinto "fb";. - Filtering messages with an unsubscribe link: use
elsif header :matches "List-Unsubscribe" "*"to check if the "List-Unsubscribe" header is present in the message; if so, the message is filed in the "nl" folder withfileinto "nl";. - Keeping other messages: use
else { keep; }to keep all other messages that do not match the previous criteria.
Note:
- If you need to mention a subfolder, use the separator
/(as in the second example), but it is not necessary to specifyINBOXin your codes - Make sure that the folders
fbandnlalready exist in your inbox; otherwise, the messages may not be sorted correctly - The filter
address :contains "from" "facebook.com"works correctly for addresses that contain "facebook.com" in the "from" field - The filter
header :matches "List-Unsubscribe" "*"checks only for the presence of the "List-Unsubscribe" header, not its content
Second example of advanced sorting
This code modifies the subject based on thesender (adds a prefix to the subject when an email passes the filter, for example):
require ["fileinto", "editheader", "variables", "regex"];
if address "sender" "owner-scientific-linux-devel at LISTSERV.FNAL.GOV" {
    if header :regex "subject" "((Re|Fwd): *)\\[SCIENTIFIC-LINUX-DEVEL\\] *(.*)" {
        deleteheader "Subject";
        addheader "Subject" "${1}${3}";
    } else {
        # Ajouter un préfixe si l'objet ne correspond pas déjà au modèle
        deleteheader "Subject";
        addheader "Subject" "[SL-Devel] ${1}";
    }
    fileinto "Mail List/SL-Devel";
}
Explanations:
- Required extensions:
fileinto: to file messages in folders.editheader: to modify email headers.variables: to use variables in expressions.regex: for regular expressions.
- Sender condition:
if address "sender" "owner-scientific-linux-devel at LISTSERV.FNAL.GOV": checks if the sender matches.
- Subject condition:
if header :regex "subject" "((Re|Fwd): *)\\[SCIENTIFIC-LINUX-DEVEL\\] *(.*)": checks if the subject matches the specified pattern.deleteheader "Subject";andaddheader "Subject" "${1}${3}";: deletes the existing subject and adds a new subject with the captured parts.
- Add a prefix if the subject does not already match the pattern:
addheader "Subject" "[SL-Devel] ${1}";: adds a "[SL-Devel]" prefix to the subject if it is not already present.
- Message classification:
fileinto "Mail List/SL-Devel";: classifies messages in the "Mail List/SL-Devel" folder.
Note:
- Make sure the folder "
Mail List/SL-Devel" already exists in your inbox. - Check that the script correctly modifies the email subject to add or adjust the prefix if necessary.
Link to this FAQ:
Has this FAQ been helpful?