Knowledge base
1000 FAQs, 500 tutorials and instructional videos. Here, there are only solutions!
This guide describes the meaning of TTL, which stands for "Time To Live," as well as the principle of DNS propagation delays, concepts that are important in the operation of domain name-related services.
Introduction
- The TTL determines how long DNS information is cached before being updated.
- This directly influences the speed at which DNS changes are propagated across servers worldwide.
- Although reducing the TTL can speed up propagation, the behavior of ISPs and their caches can introduce additional delays.
The TTL (Time to Live)
TTL (Time to Live) is a key parameter in DNS record management. It represents the duration, expressed in seconds, for which DNS information can be stored in the cache before being refreshed. When a DNS server or an Internet Service Provider (ISP) queries a DNS zone, it temporarily stores the responses obtained to reduce the load on the servers and speed up navigation for users.
For example, if the TTL is set to 24 hours (86400 seconds), the DNS information for a domain will be cached and will not be refreshed during this entire period, even if you have modified settings such as the domain's IP address. This means that DNS changes will only take effect once this period has elapsed.
You can speed up the application of changes by reducing the TTL before proceeding with updates. For example, lowering the TTL to one hour (3600 seconds) allows DNS servers to check the new information more quickly after a modification.
DNS propagation
The TTL is directly related to the DNS propagation process. DNS propagation refers to the time it takes for changes made to a DNS zone to be disseminated to all DNS servers worldwide. This delay depends not only on the configured TTL but also on how ISPs and other DNS servers manage their caches.
When you modify DNS records, DNS servers and ISPs must wait for the TTL to expire before retrieving the new information. Therefore, the shorter the TTL, the faster the changes propagate across the network. However, some ISPs sometimes ignore the TTL duration and retain the information in the cache for a longer period (e.g., 24 hours or more), which can slow down the propagation of DNS changes, even if you have configured a reduced TTL.
Link to this FAQ: https://faq.infomaniak.com/2563
Has this FAQ been helpful?
This guide explains how to create and manage your authentication tokens to interact with the Infomaniak API securely.
Introduction
- Token features:
- Number: no limit to the number of tokens that can be created
- Validity: unlimited by default (customizable upon creation)
- Inactivity: a token is automatically deactivated if it is not used for one year
- Example of use:
Manage API tokens
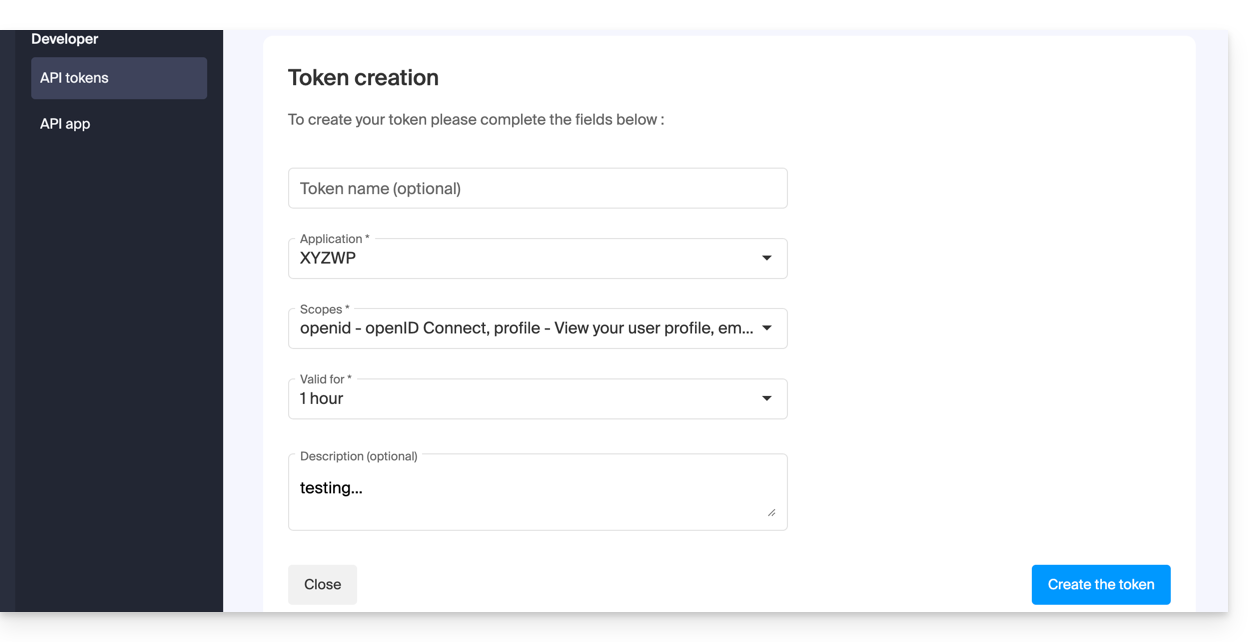
When creating a token, you must define the application and the scope of access:
- Access the token management section in the Manager (need help?).
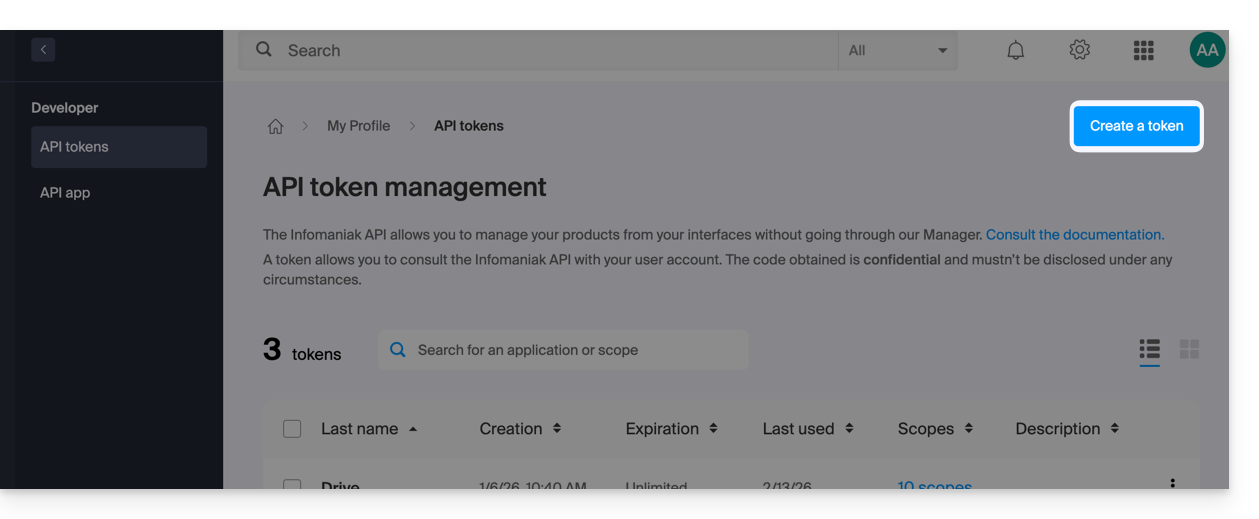
- Click on Create a token:
- Select the product/application and the validity period:
- Confirm the operation with your account password.
- Important: Copy the token and keep it in a safe place; it will no longer be displayed afterward.
To delete them, select them and click on the revocation button that appears: 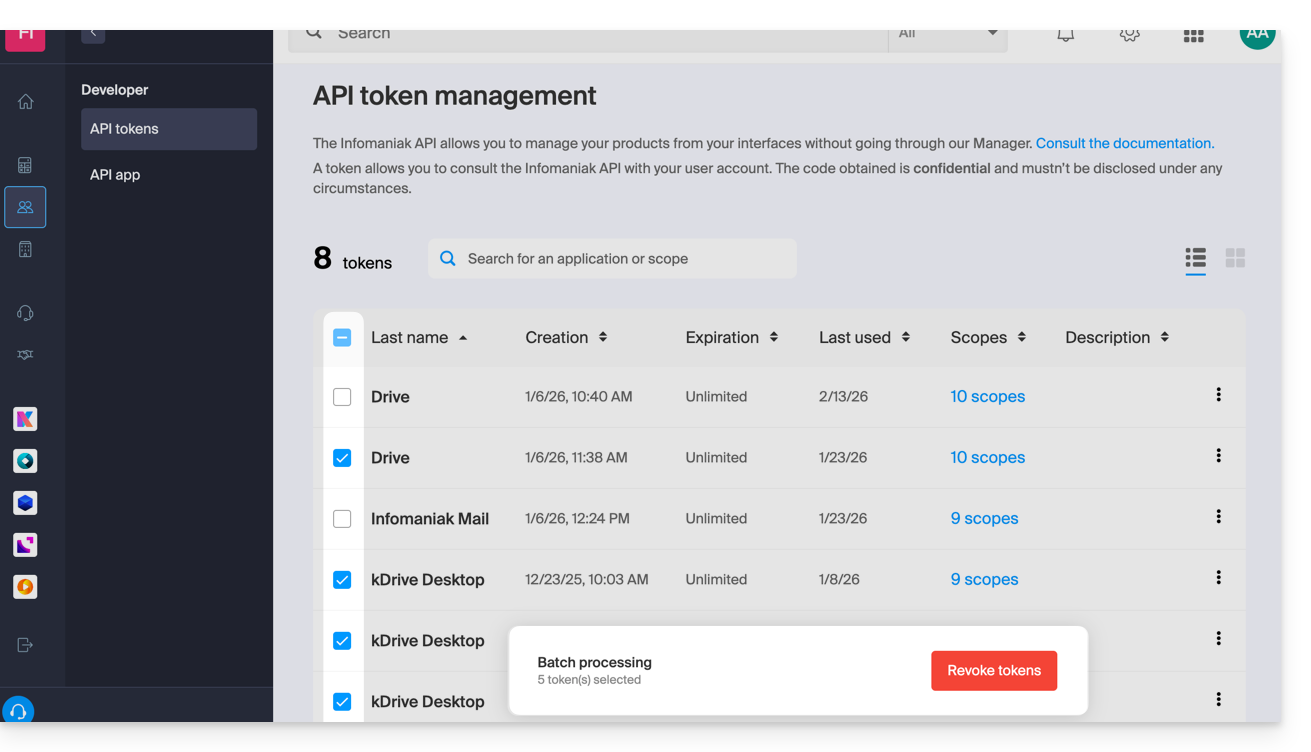
Link to this FAQ: https://faq.infomaniak.com/2582
Has this FAQ been helpful?
This guide explains how to link a domain name to the kSuite Infomaniak offer.
Manage the kSuite domain
To get started:
- Click here to access your kSuite management interface in the Infomaniak Manager (need help?).
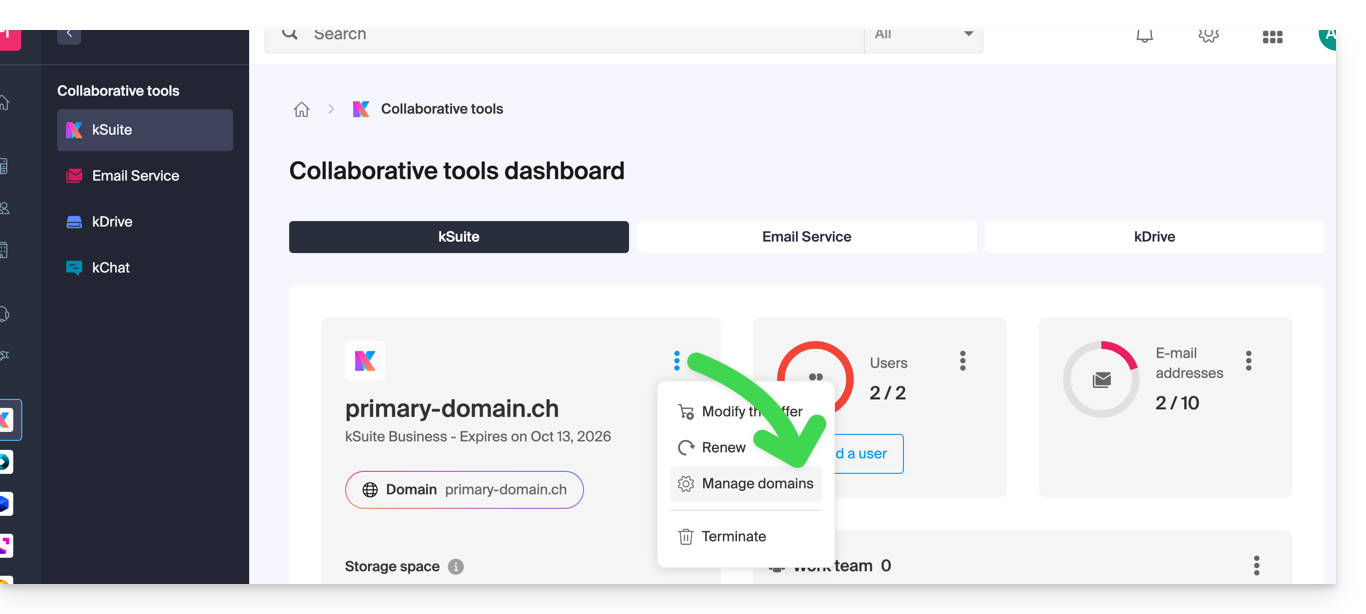
- If a domain is already linked, you can manage it by clicking on the action menu ⋮ to the right of the kSuite name, then Manage domains:
- If no domain is yet linked, you can add one by clicking on the button:
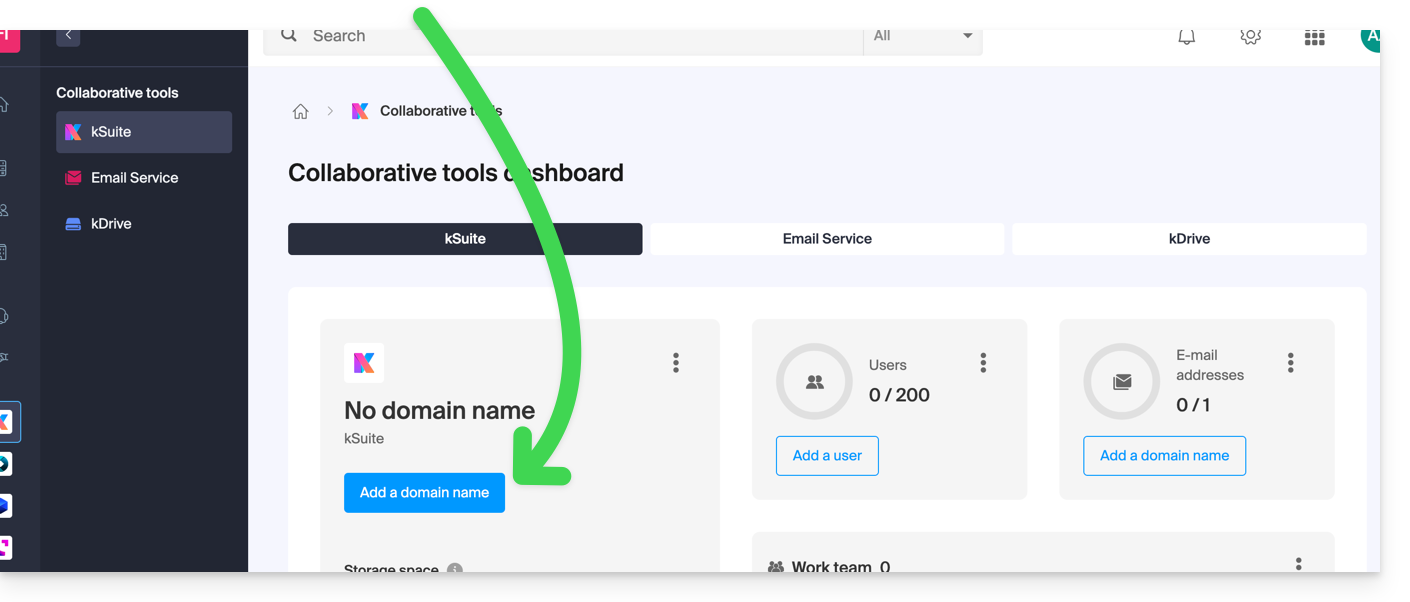
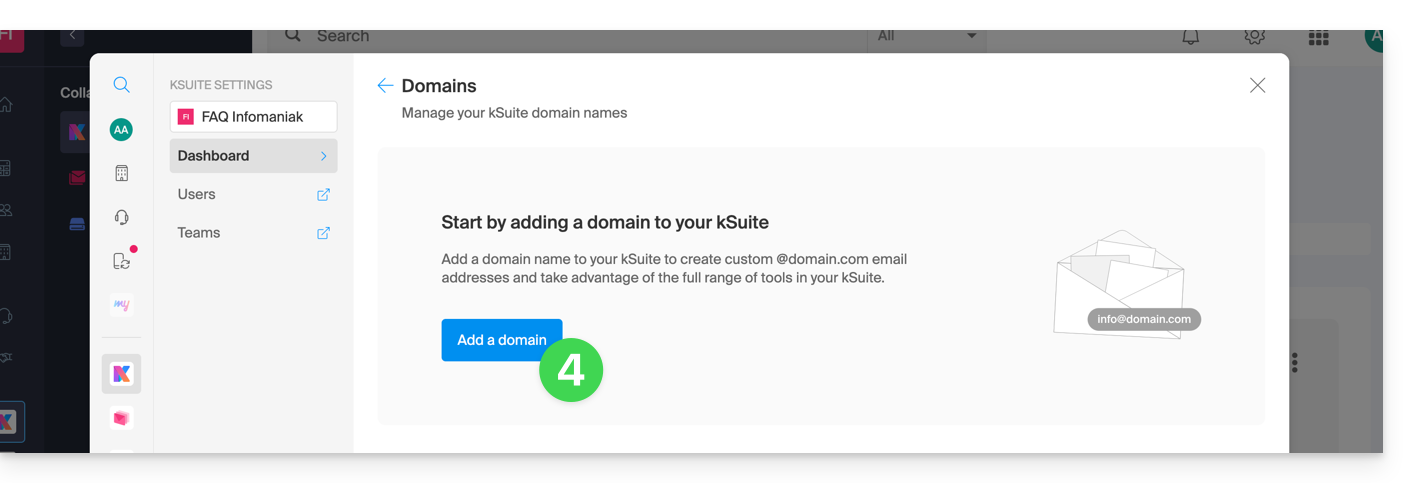
- Click the button to add a domain:
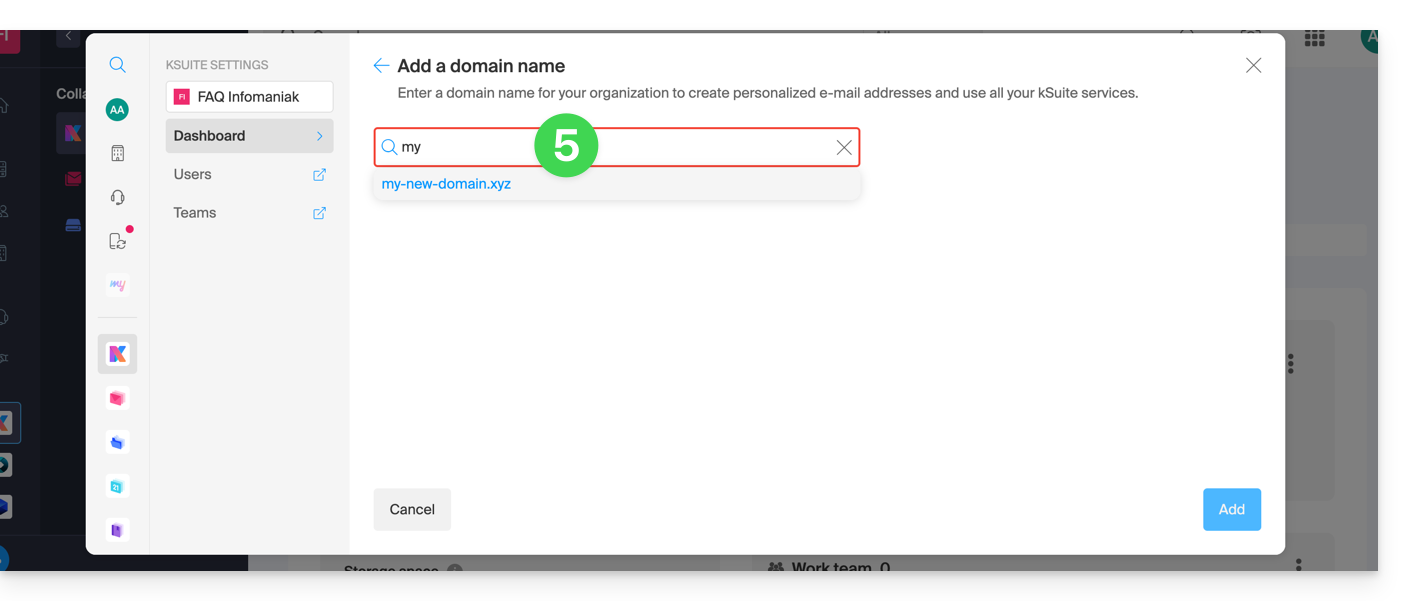
- Choose the domain to associate from among those in your Organization (still available, i.e., not associated with any service) or enter an external domain name:
- Depending on the status of your domain (also see the information below), you may need to perform some preliminary steps…
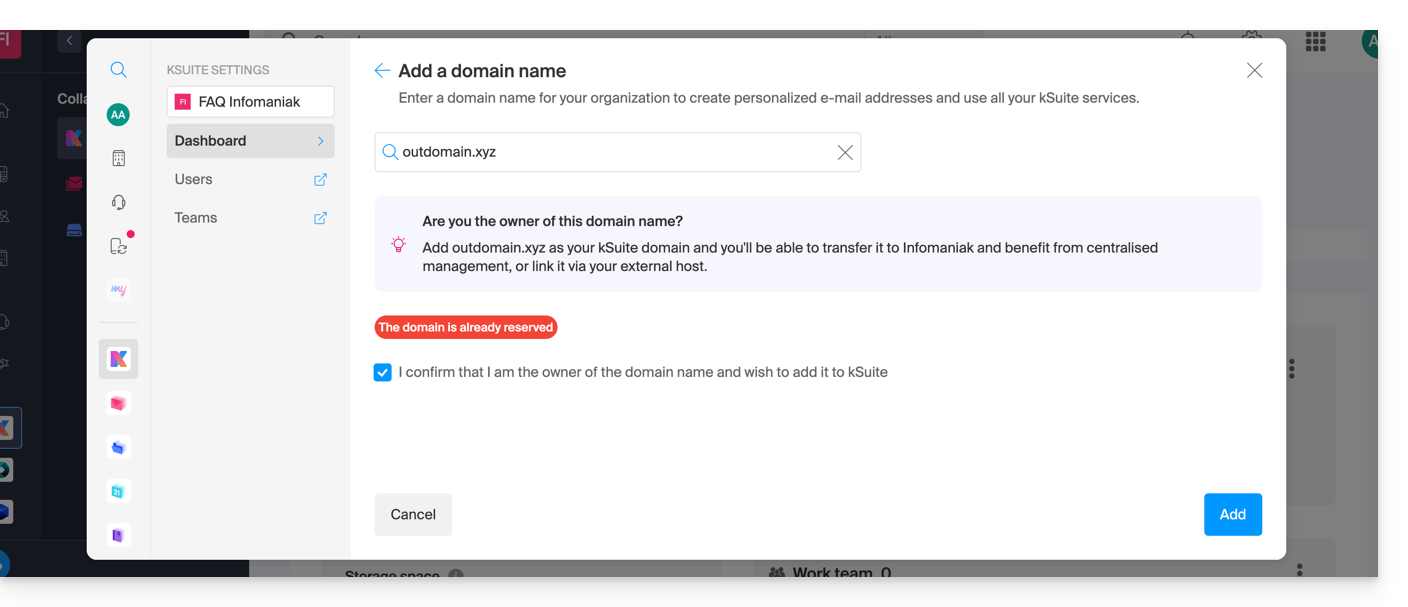
- … or even purchase a domain if necessary:
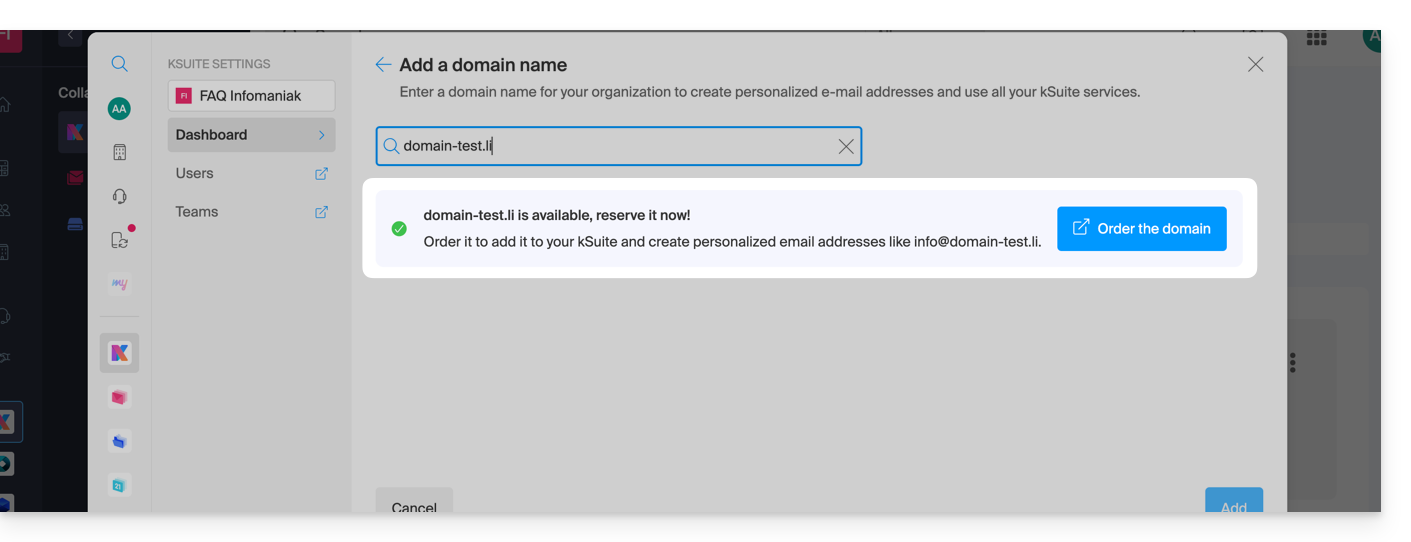
- Depending on the status of your domain (also see the information below), you may need to perform some preliminary steps…
If the domain name is located…
…with Infomaniak, within the same Organization
If your domain name is registered with Infomaniak and is in the same user account or Organization as your email, then there is nothing to do.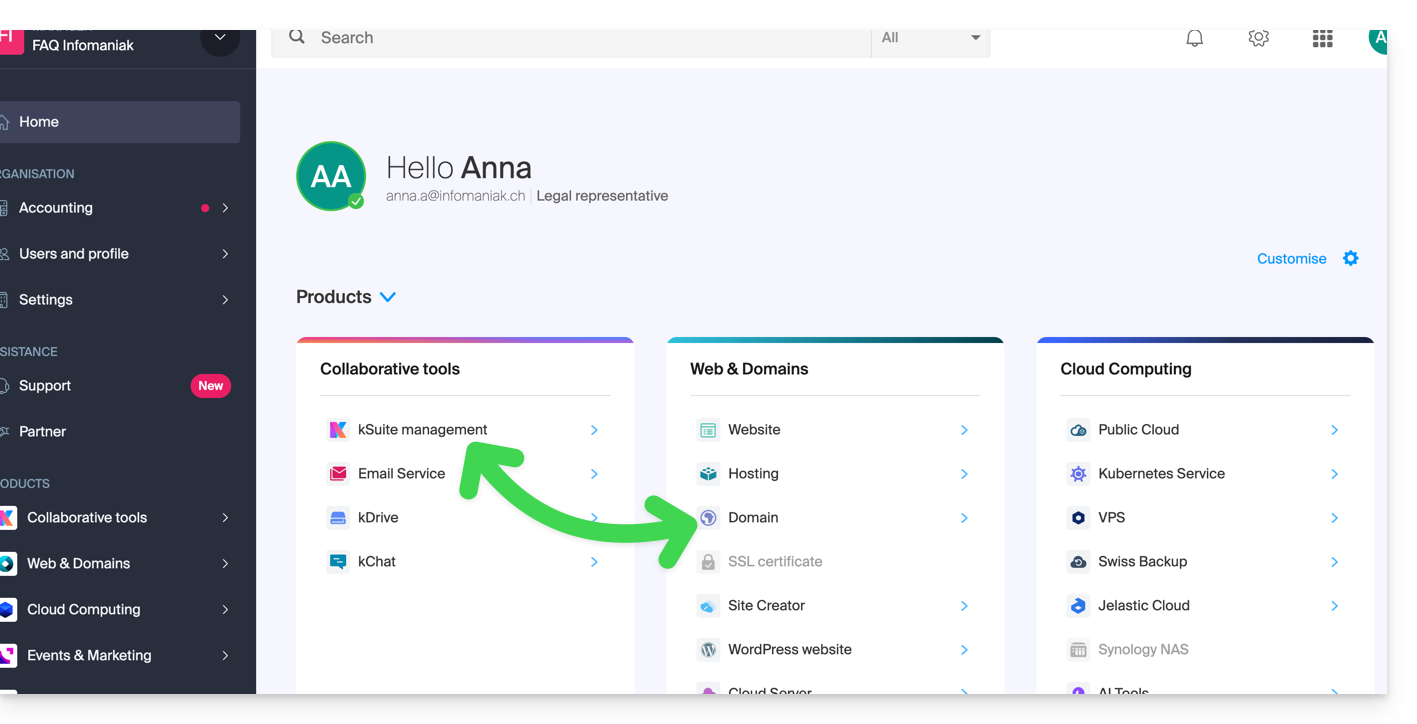
Simply add it to your kSuite: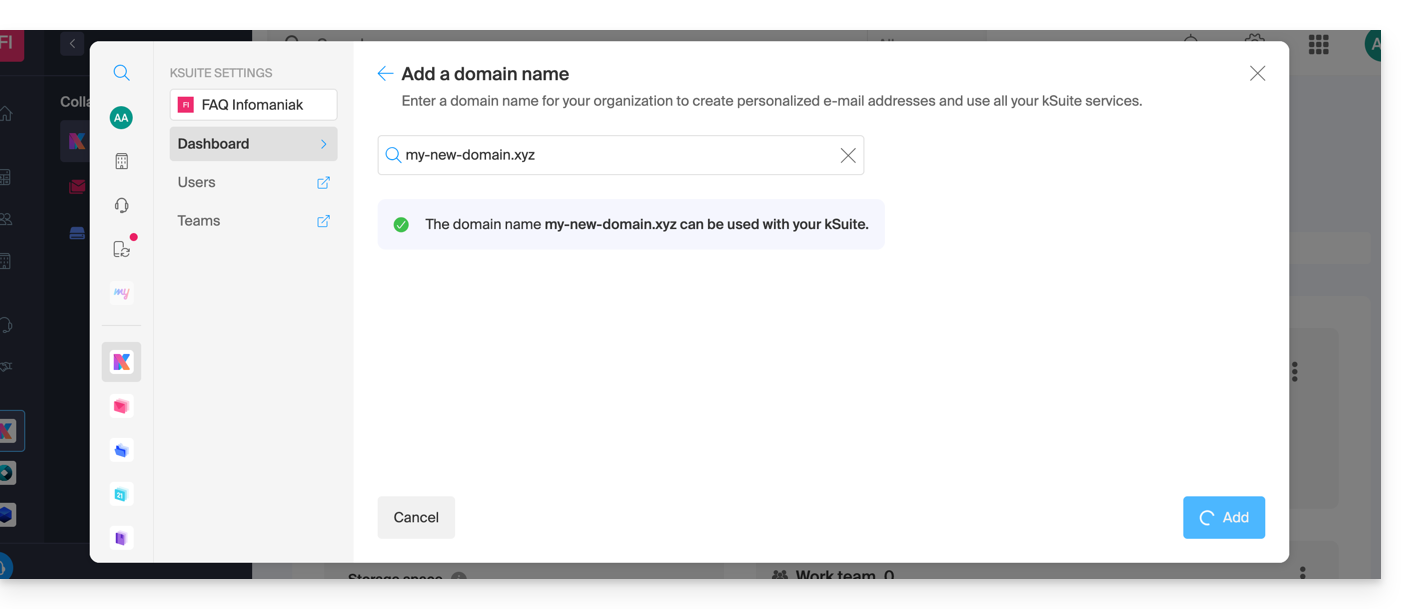
The domain will then be added and visible on the dashboard: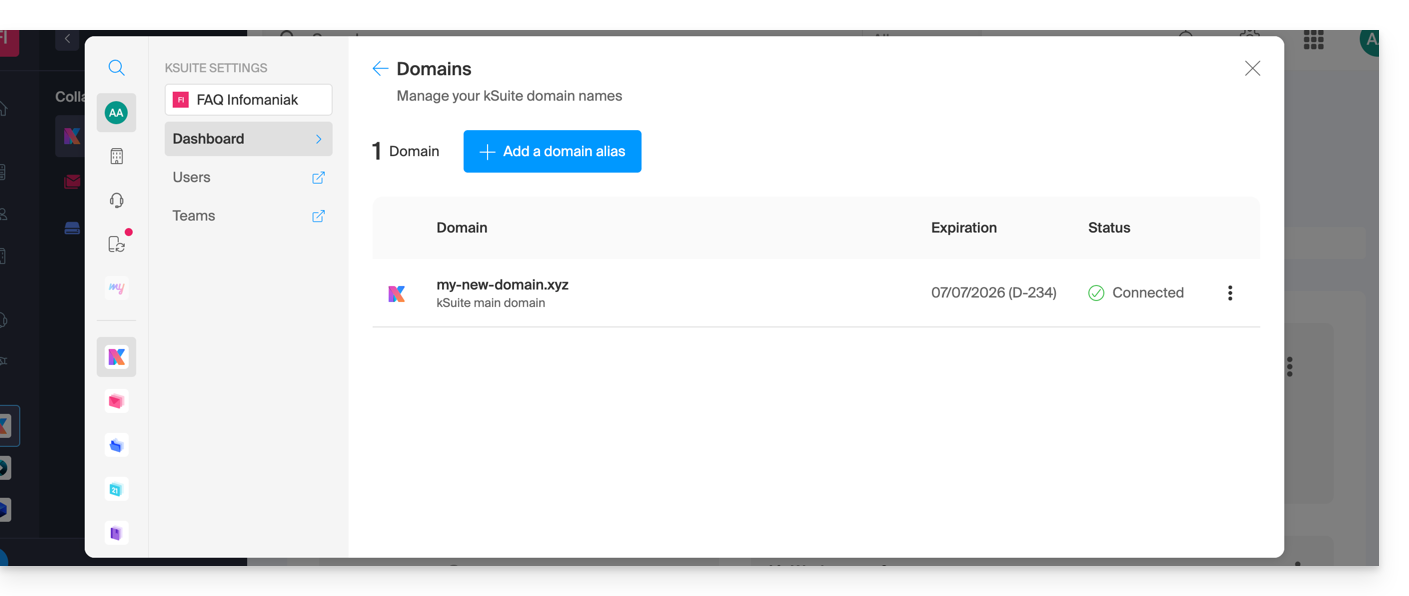
- Refer to this other guide to check and correct any potential configuration errors.
... with Infomaniak, even if you already have an Organization and are linked to a Mail Service or kDrive
No problem, you can convert your existing products to kSuite.
… with Infomaniak, Different Organization
If your domain name is registered with Infomaniak but in a different user account or Organization, then:
- Edit its DNS zone by specifying Infomaniak's MX record (+ SPF & DKIM).
- Any DNS addition/modification may take up to 48 hours to propagate.
OU
- Move it within the same Organization.
Generally, a message will notify you of this situation: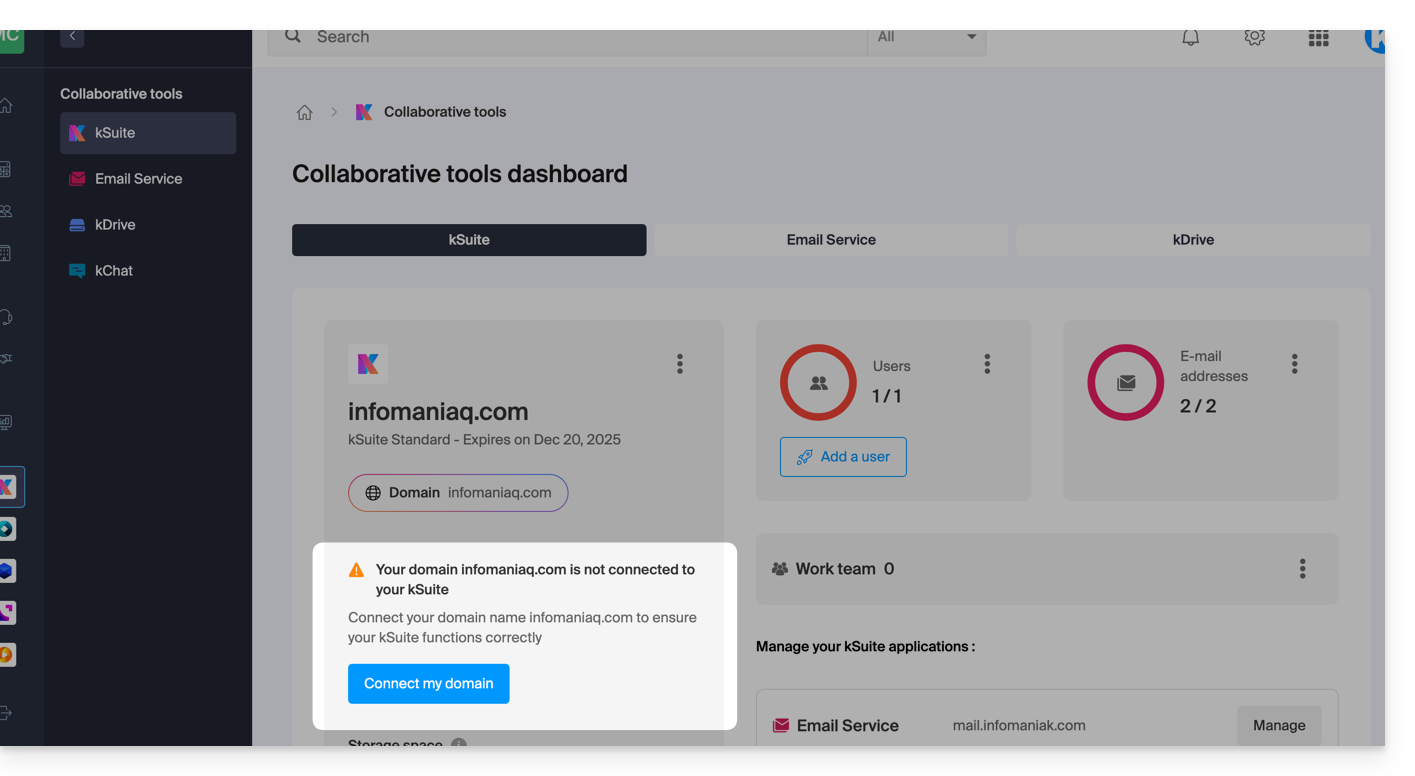
… and the technical information, which you should enter where the domain is located, will be provided: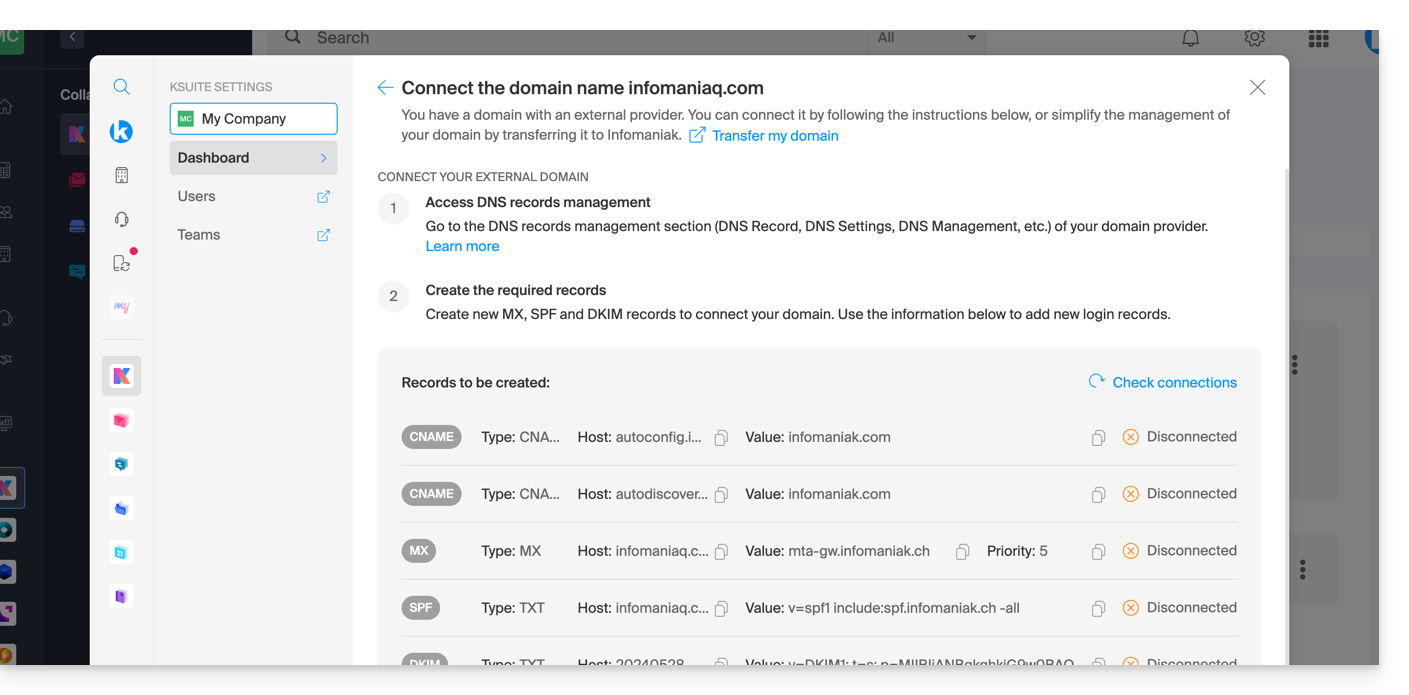
… with Infomaniak using external DNS
If your domain name uses DNS servers other than Infomaniak's, then:
- Edit the current DNS zone where it is hosted (if necessary, consult the help documentation of the provider in question) and specify Infomaniak's MX record (+ SPF & DKIM).
- Any DNS addition/modification may take up to 48 hours to propagate.
OU
- Change your current DNS settings and select the option to use Infomaniak's DNS servers.
- Any DNS addition or modification may take up to 48 hours to propagate.
- Refer to this other guide to check for and correct any potential configuration errors.
You will be notified (see the images above).
… elsewhere, with external DNS
If your domain name is registered with another registrar and uses DNS servers other than Infomaniak's, then:
- Edit the current DNS zone where it is hosted (if necessary, consult the provider's help documentation) and specify Infomaniak's MX record (+ SPF & DKIM).
- Any DNS addition or modification may take up to 48 hours to propagate.
OU
- Change your current DNS settings (if necessary, consult the documentation provided by your provider) and specify Infomaniak's DNS servers (this requires you to have a DNS zone with Infomaniak).
- Any DNS addition or modification may take up to 48 hours to propagate.
- This DNS zone with Infomaniak will be configured correctly, but please refer to this other guide to check for and correct any potential configuration errors.
You will be notified (see the images above).
… elsewhere, but you bring it back
If your domain name is registered with another registrar and you would like to transfer it to the same location as your Infomaniak email, then:
- Transfer the domain name to Infomaniak (it will be configured correctly, but please refer to this other guide to check and correct any potential configuration errors).
Alternatively, consider ordering a new domain name if necessary.
Link to this FAQ: https://faq.infomaniak.com/2629
Has this FAQ been helpful?
This guide explains how to have multiple domain names linked to an existing kSuite, by adding additional domain names to it.
Prerequisites
- Own the new domain name (if necessary, you may need to create it first: help).
- Review the instructions in this other guide and apply the instructions that apply to your situation (this is to ensure that the domain name works when it is linked to your kSuite).
Add a domain name to kSuite
Once the new domain name is ready to be used alongside the old one, you need to add it to kSuite:
- Click here to access your kSuite management (❓: help).
- Click on the Settings icon in the top right corner.
- Click on kSuite in the left-hand menu.
- Click on Domains:
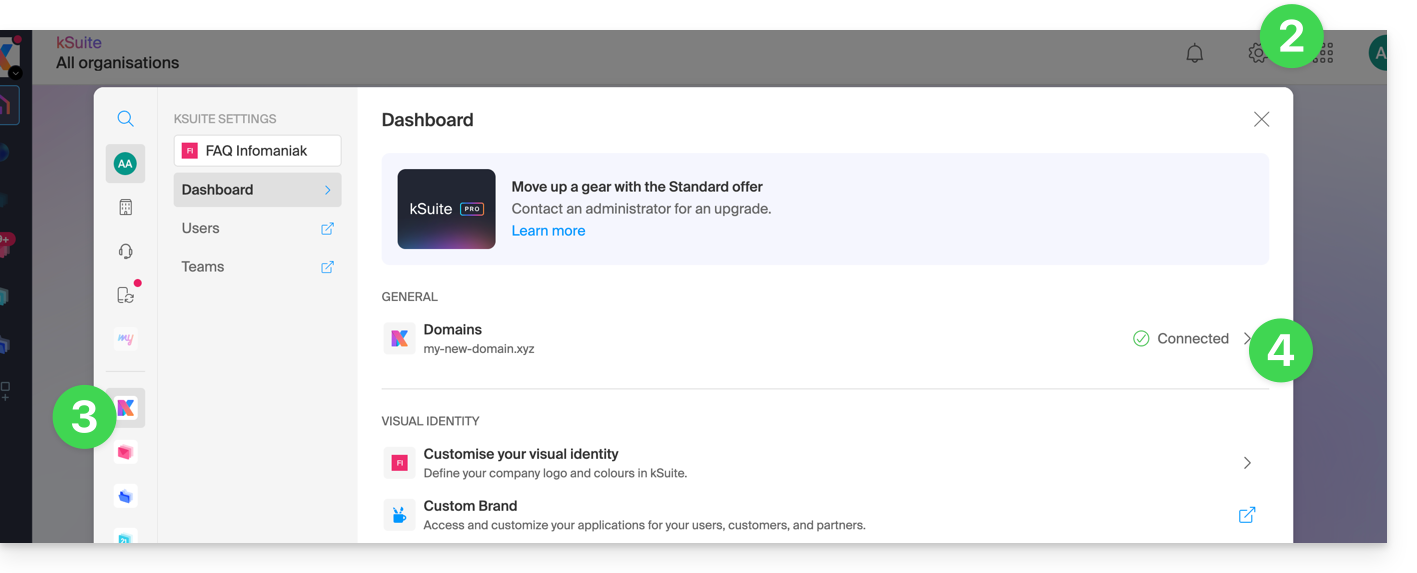
- Click the blue Add an alias domain button:

- Choose the domain to associate from among those in your Organization (still available, i.e., not yet associated with any service) or enter an external domain name (see prerequisites).
- Click the button to add the domain:
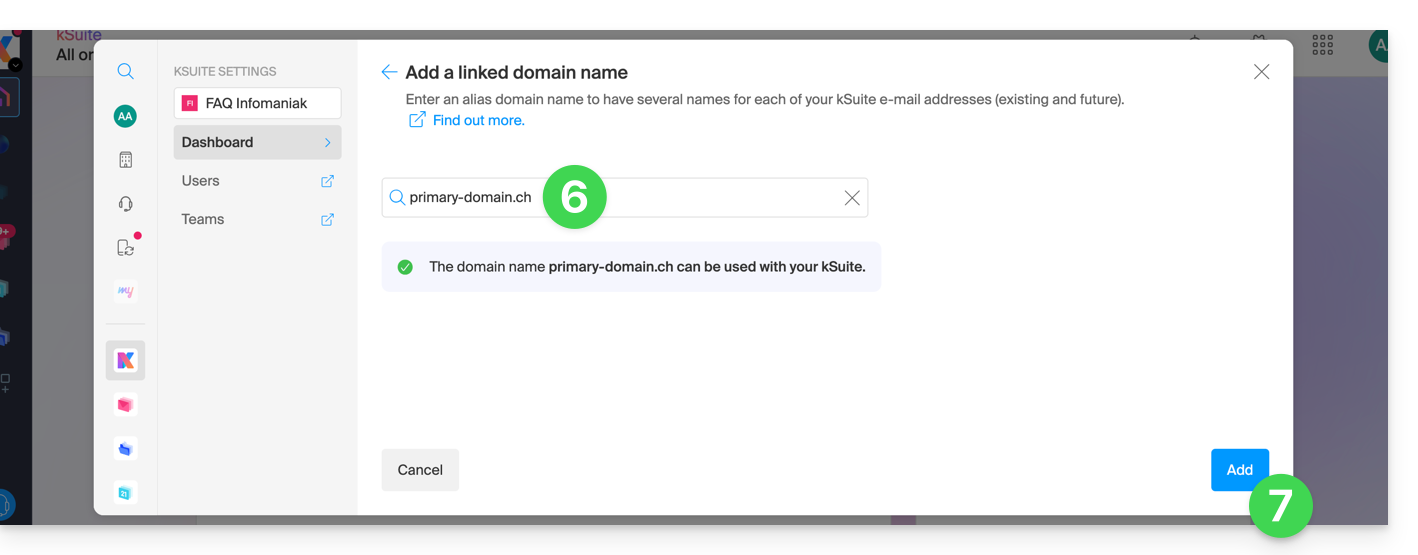
- The domain has been successfully linked:
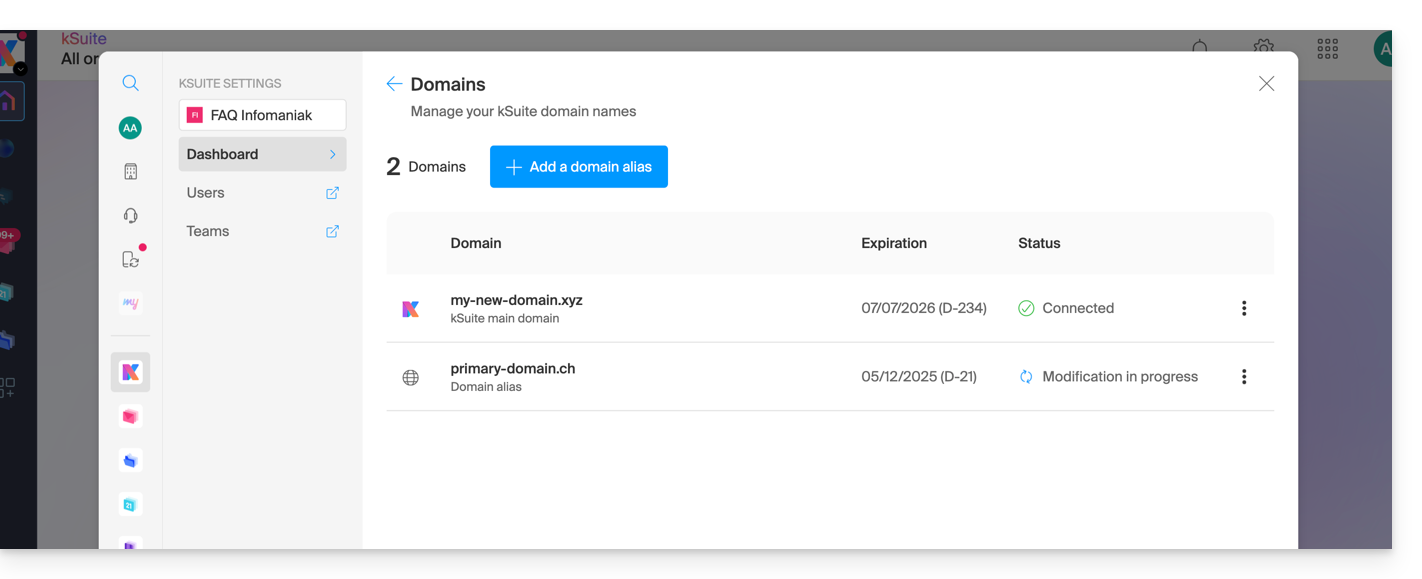
You can also consider swapping the additional domain name linked to kSuite with its main domain, in order to change the domain name of your kSuite (❓: help).
Link to this FAQ: https://faq.infomaniak.com/2640
Has this FAQ been helpful?
This guide explains how to replace the primary domain name associated with a kSuite.
Introduction
- Changing the domain linked to kSuite is useful if your business name changes.
- This affects:
- Custom Brand (and therefore the custom URLs leading to your tools such as kDrive or Euria)
- Mail Service (and therefore your email addresses)
Modify the kSuite domain name
Prerequisites
- Own the new domain name (if necessary, create it beforehand).
- Consult the instructions in this other guide and apply the instructions that correspond to your situation (to ensure that the domain name works when it is linked to your kSuite).
- Add the domain name to kSuite.
Once the new domain name is ready to be used instead of the old one:
- Click here to access your kSuite management interface (need help?).
- Click on the Settings icon in the top right corner.
- Click on kSuite in the left-hand menu.
- Click on Domains:
- Click on the action menu ⋮ located to the right of the domain you want to use as the new primary domain.
- Click on Set as primary domain:
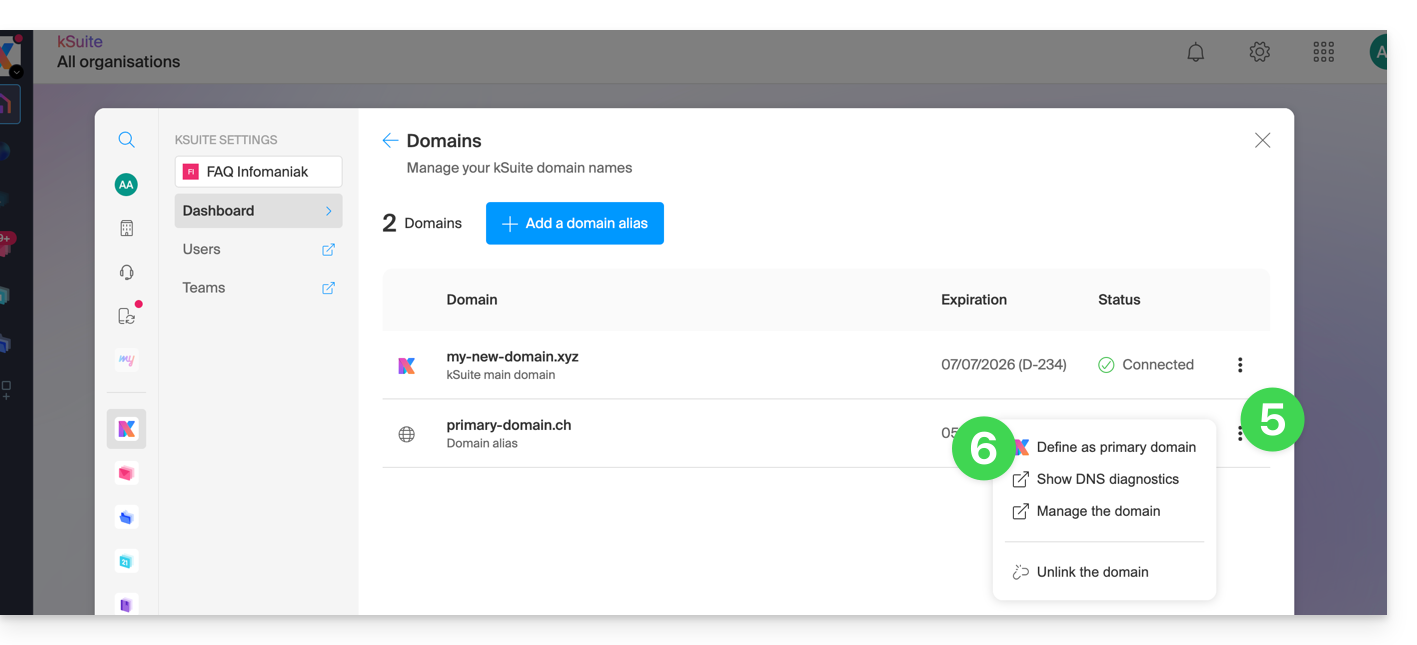
- Information is displayed, click the Continue button.
- Read the information on the screen and then confirm that you have read it.
- Click on the Continue button:

- Click on the Confirm button:
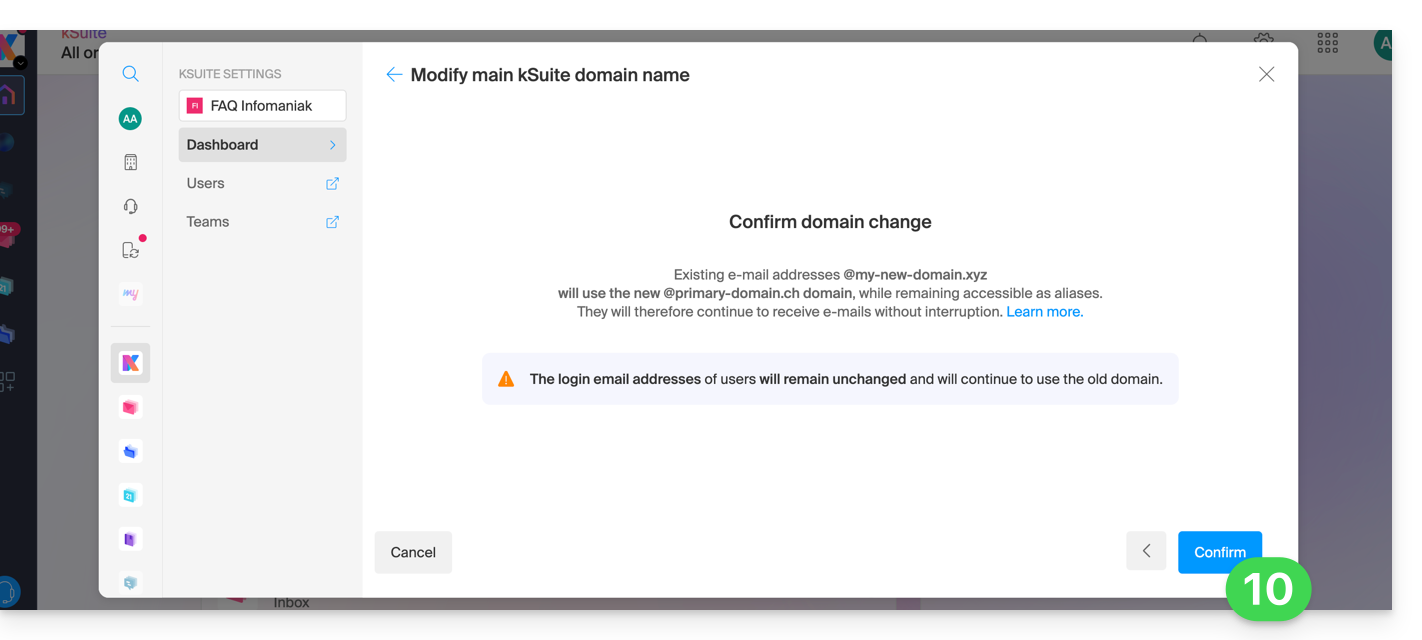
Impact on the Mail Service
By reversing the domain name of the kSuite as shown above, the Mail Service within kSuite is automatically updated. You will switch from: 
… to this:
Link to this FAQ: https://faq.infomaniak.com/2701
Has this FAQ been helpful?
This guide explains how to connect a website created with Infomaniak's Site Creator to a domain name.
Prerequisites
- The Site Creator Free offer allows you to access the site using an address in the format
123xyz.infomaniak.site…- To connect a custom domain name, you must first upgrade to a higher plan:
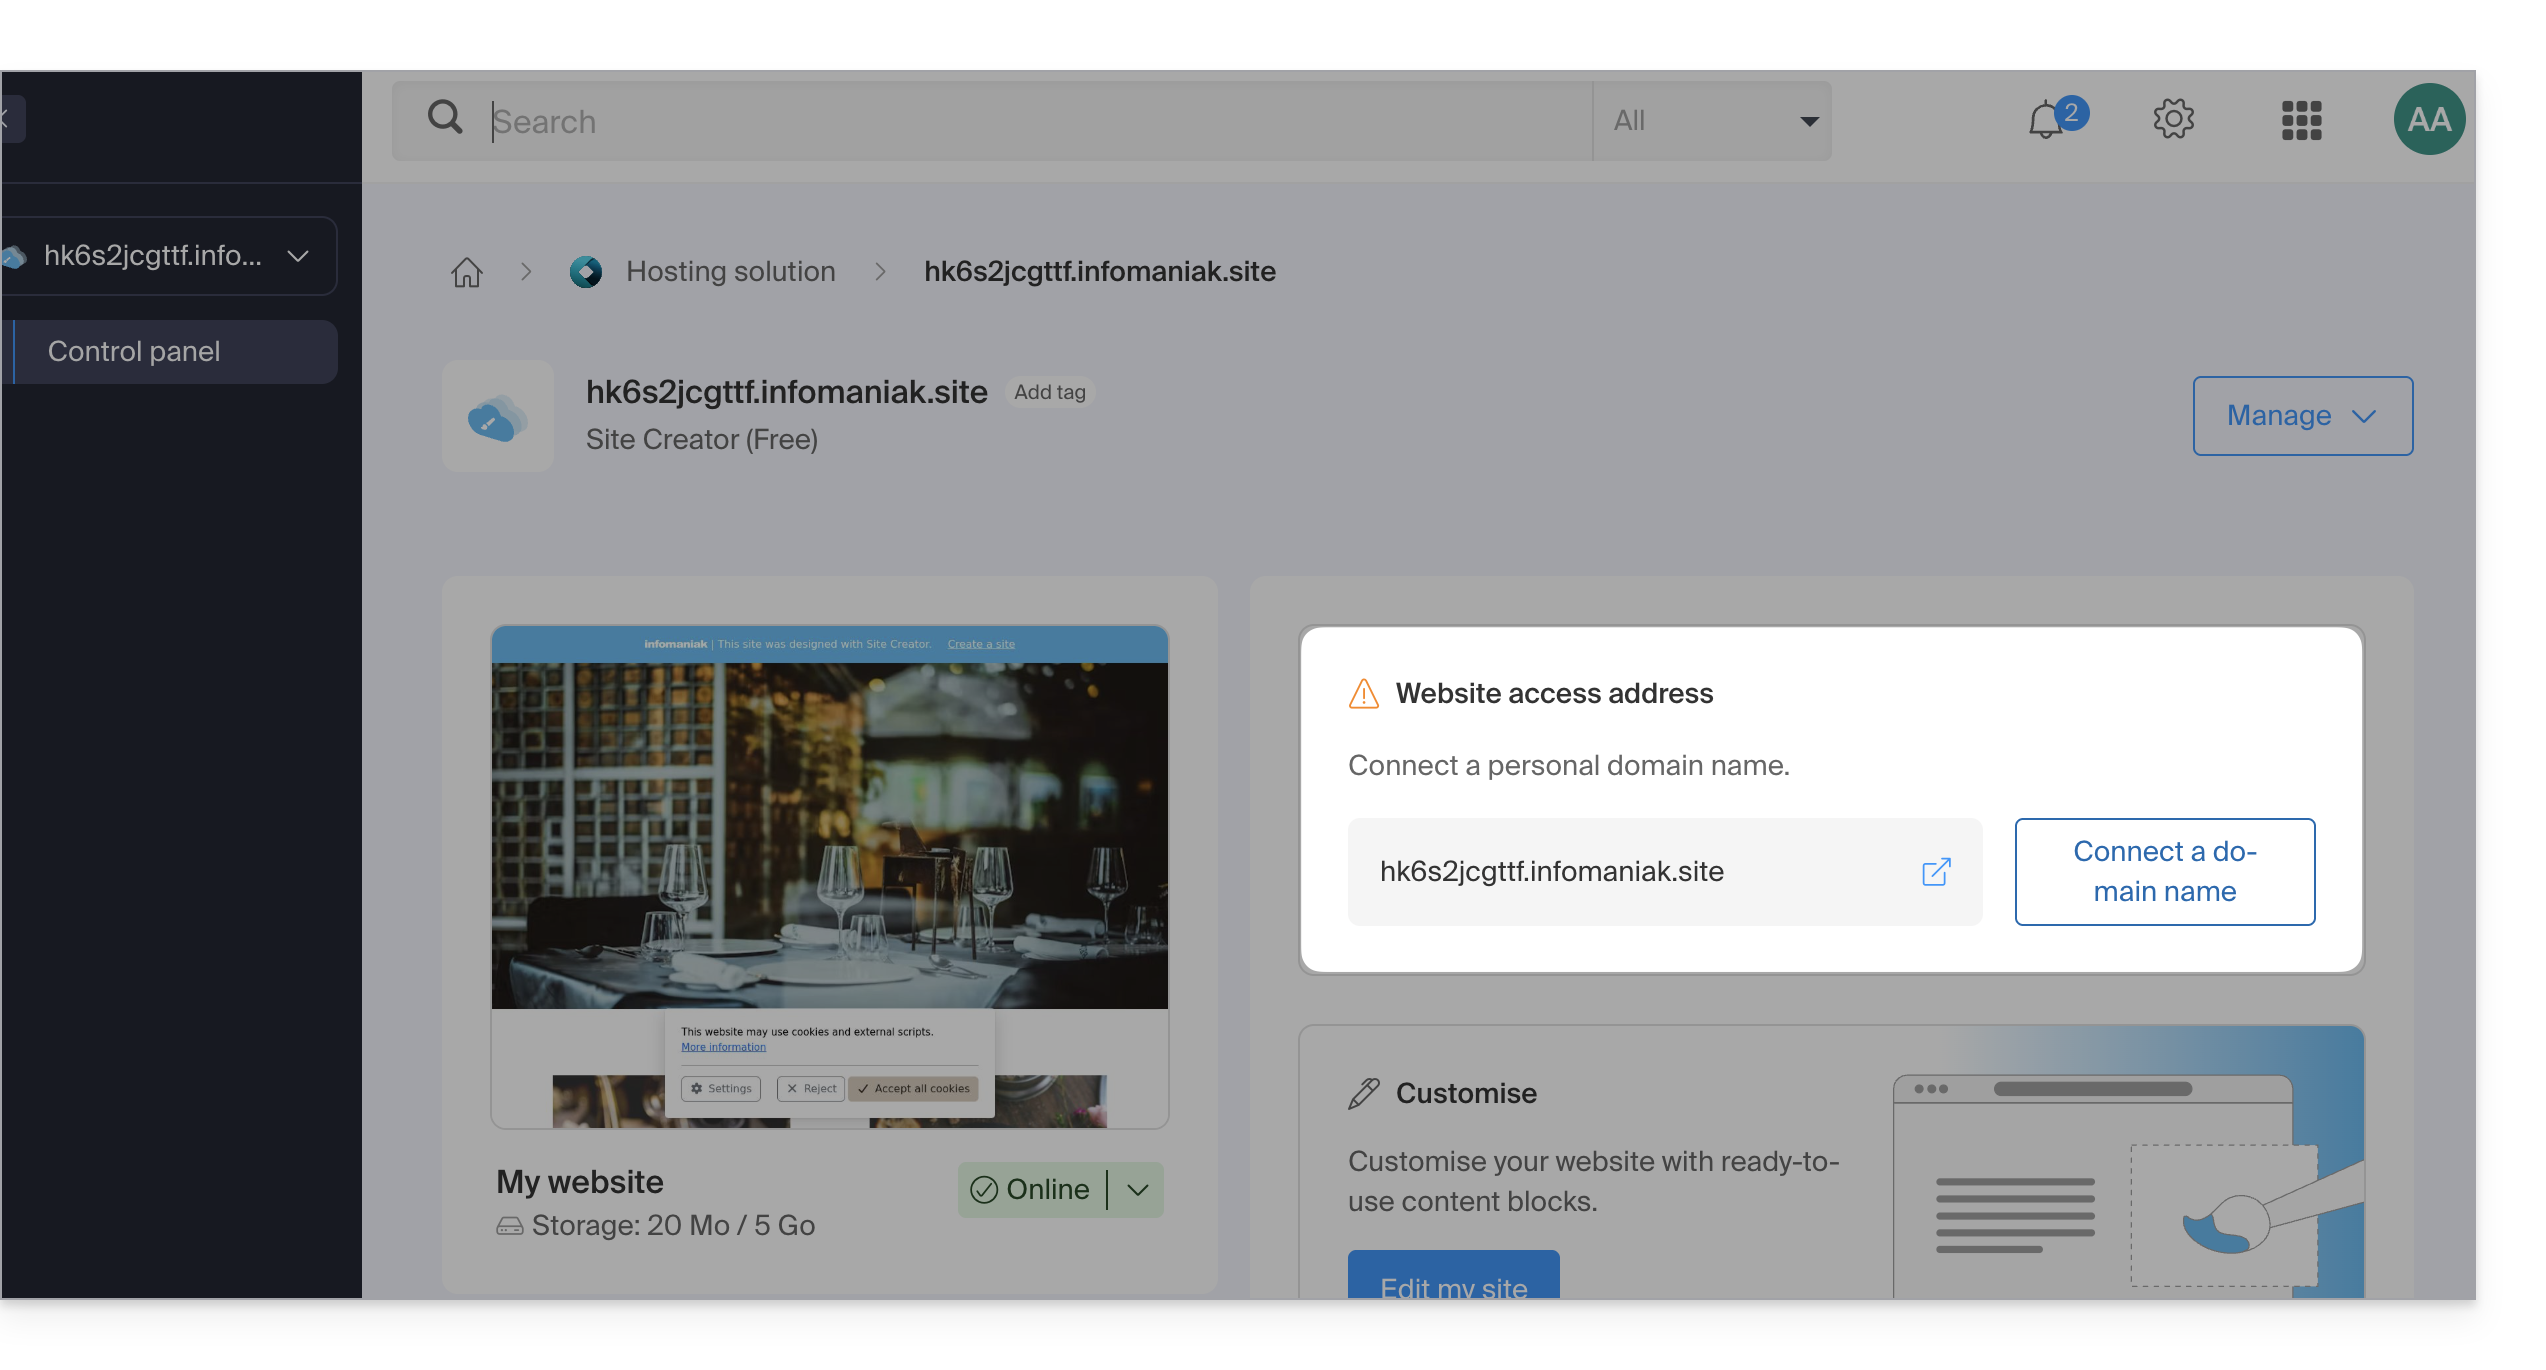
- To connect a custom domain name, you must first upgrade to a higher plan:
- The Site Creator Lite and Pro plans offer a free domain name for 1 year from the following extensions:
.ch,.com,.fr,.org,.co.uk,.be,.de,.eu,.it,.es - If you want to use an existing domain, it must be located within the same Organization.
- Make sure you have previously completed the initial setup by selecting a theme:
- Once this step is complete, you can access the Site Creator dashboard and connect your domain name.
Connect Site Creator to a domain name
To connect Site Creator (excluding the Free plan) to a domain name:
- Click here to access your website management in the Infomaniak Manager (need help?).
- Click directly on the name assigned to the website in question:
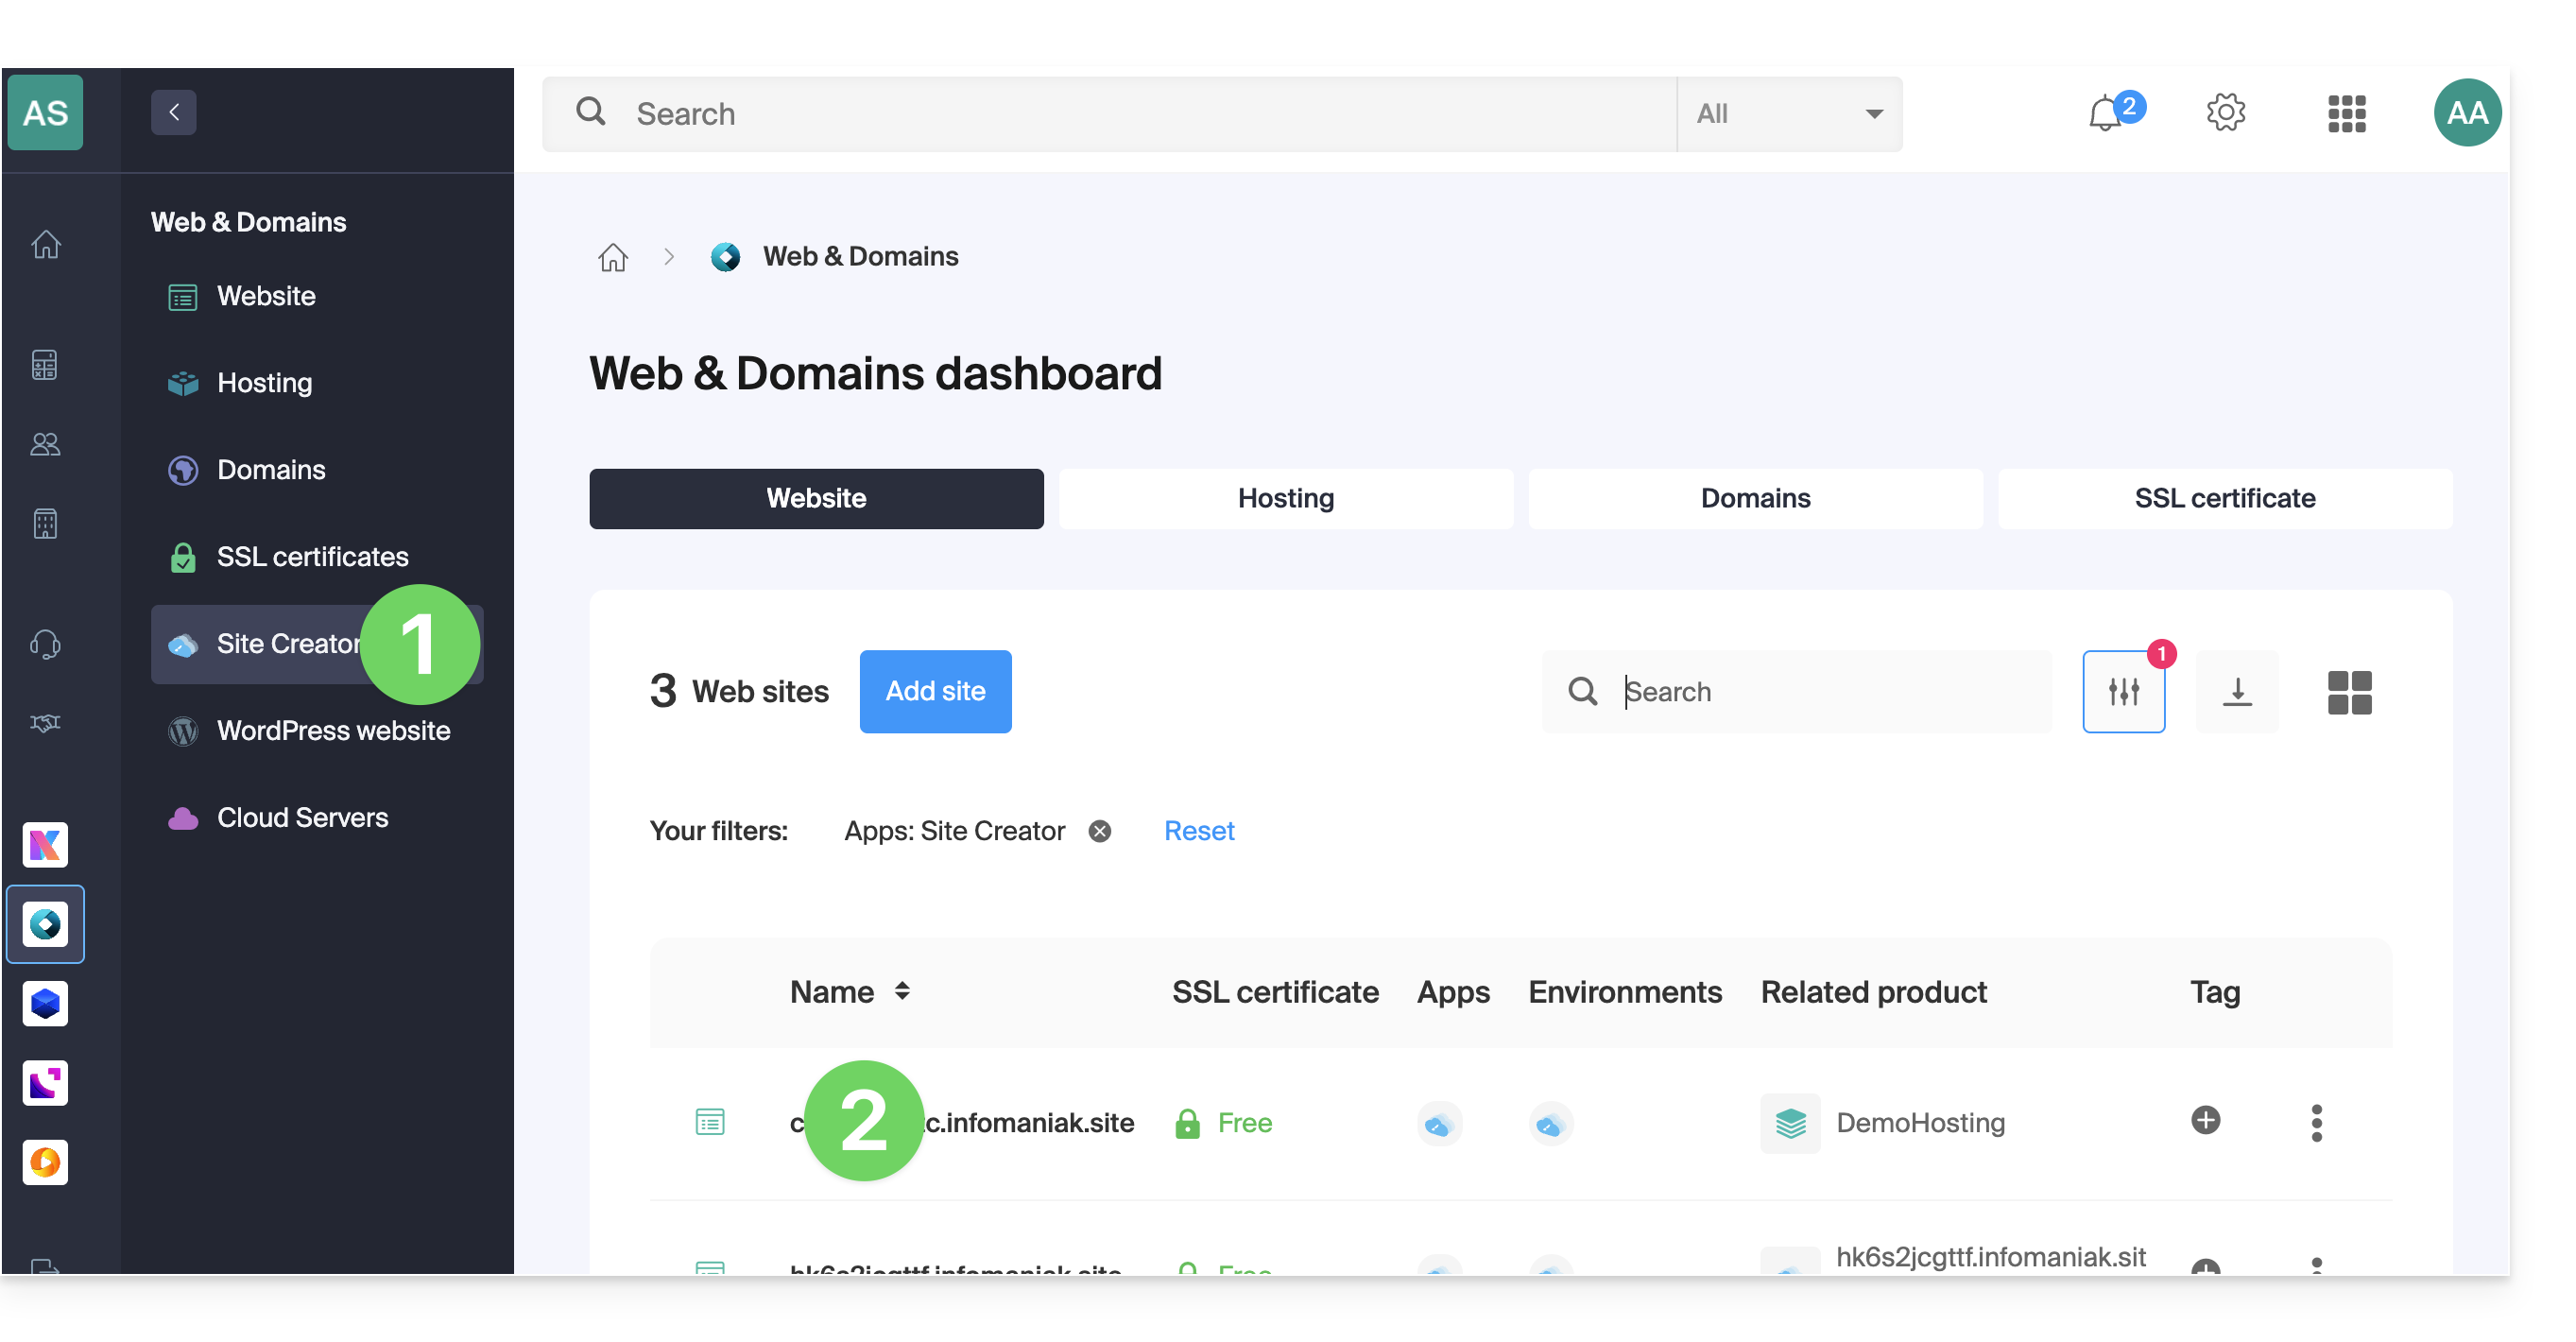
- Click on Connect my site to a domain to start the configuration wizard:
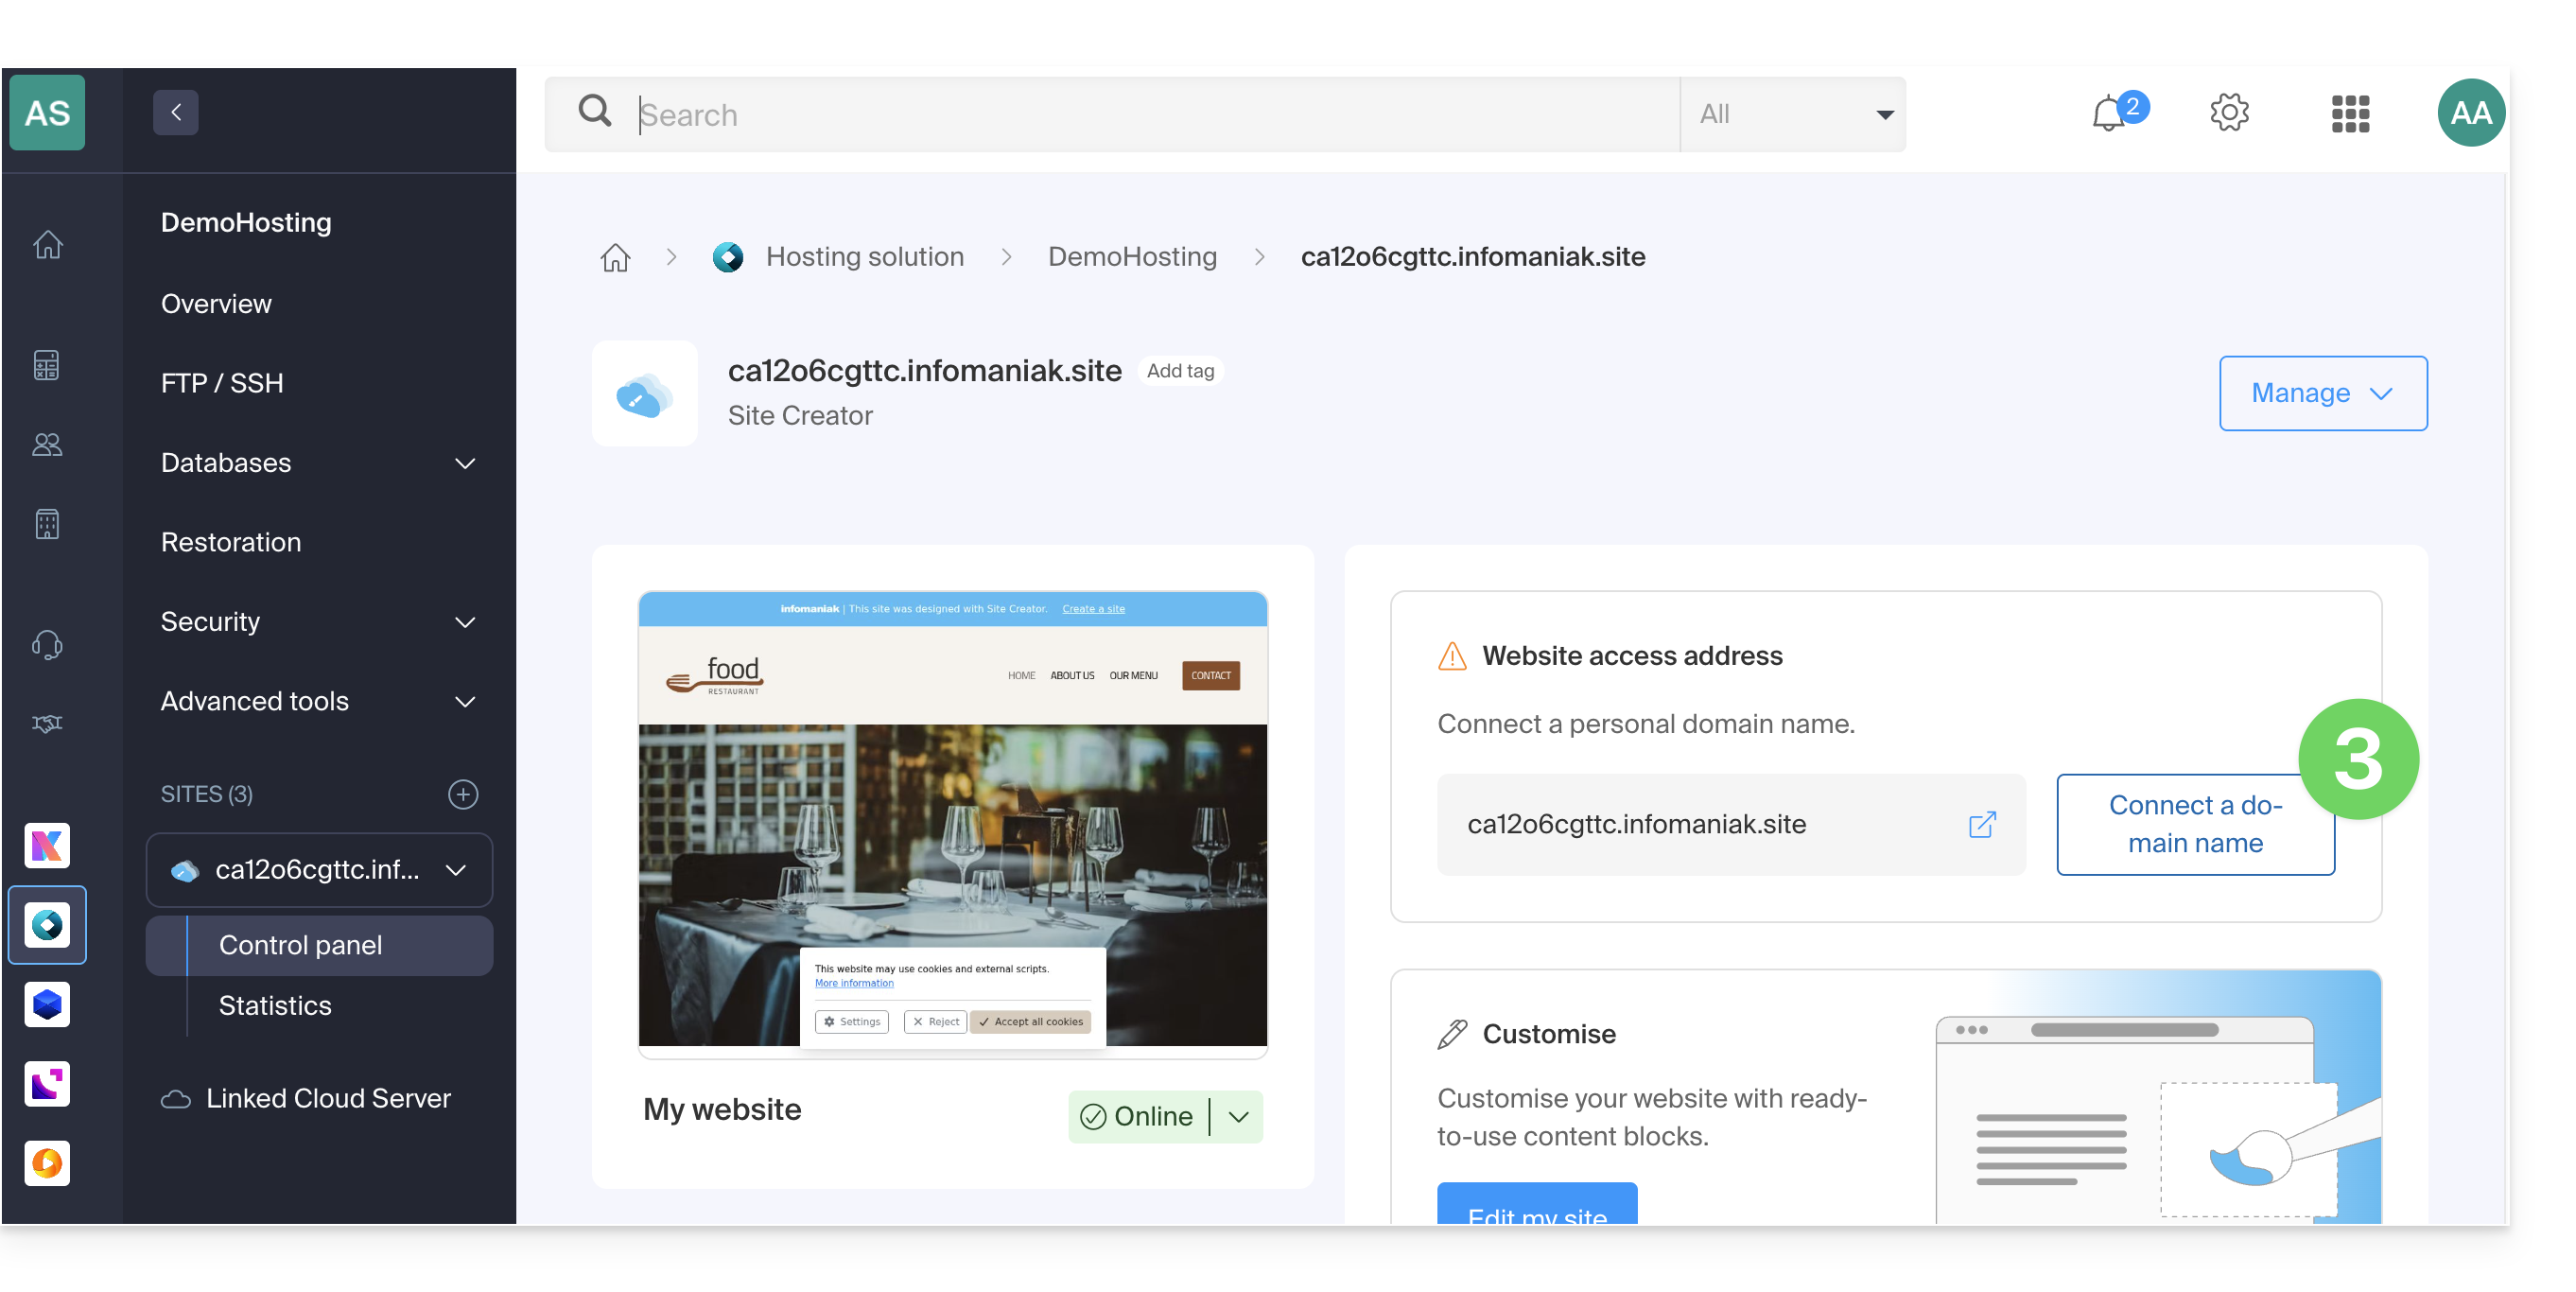
- The wizard offers you the option to create a new domain name or use an existing one:
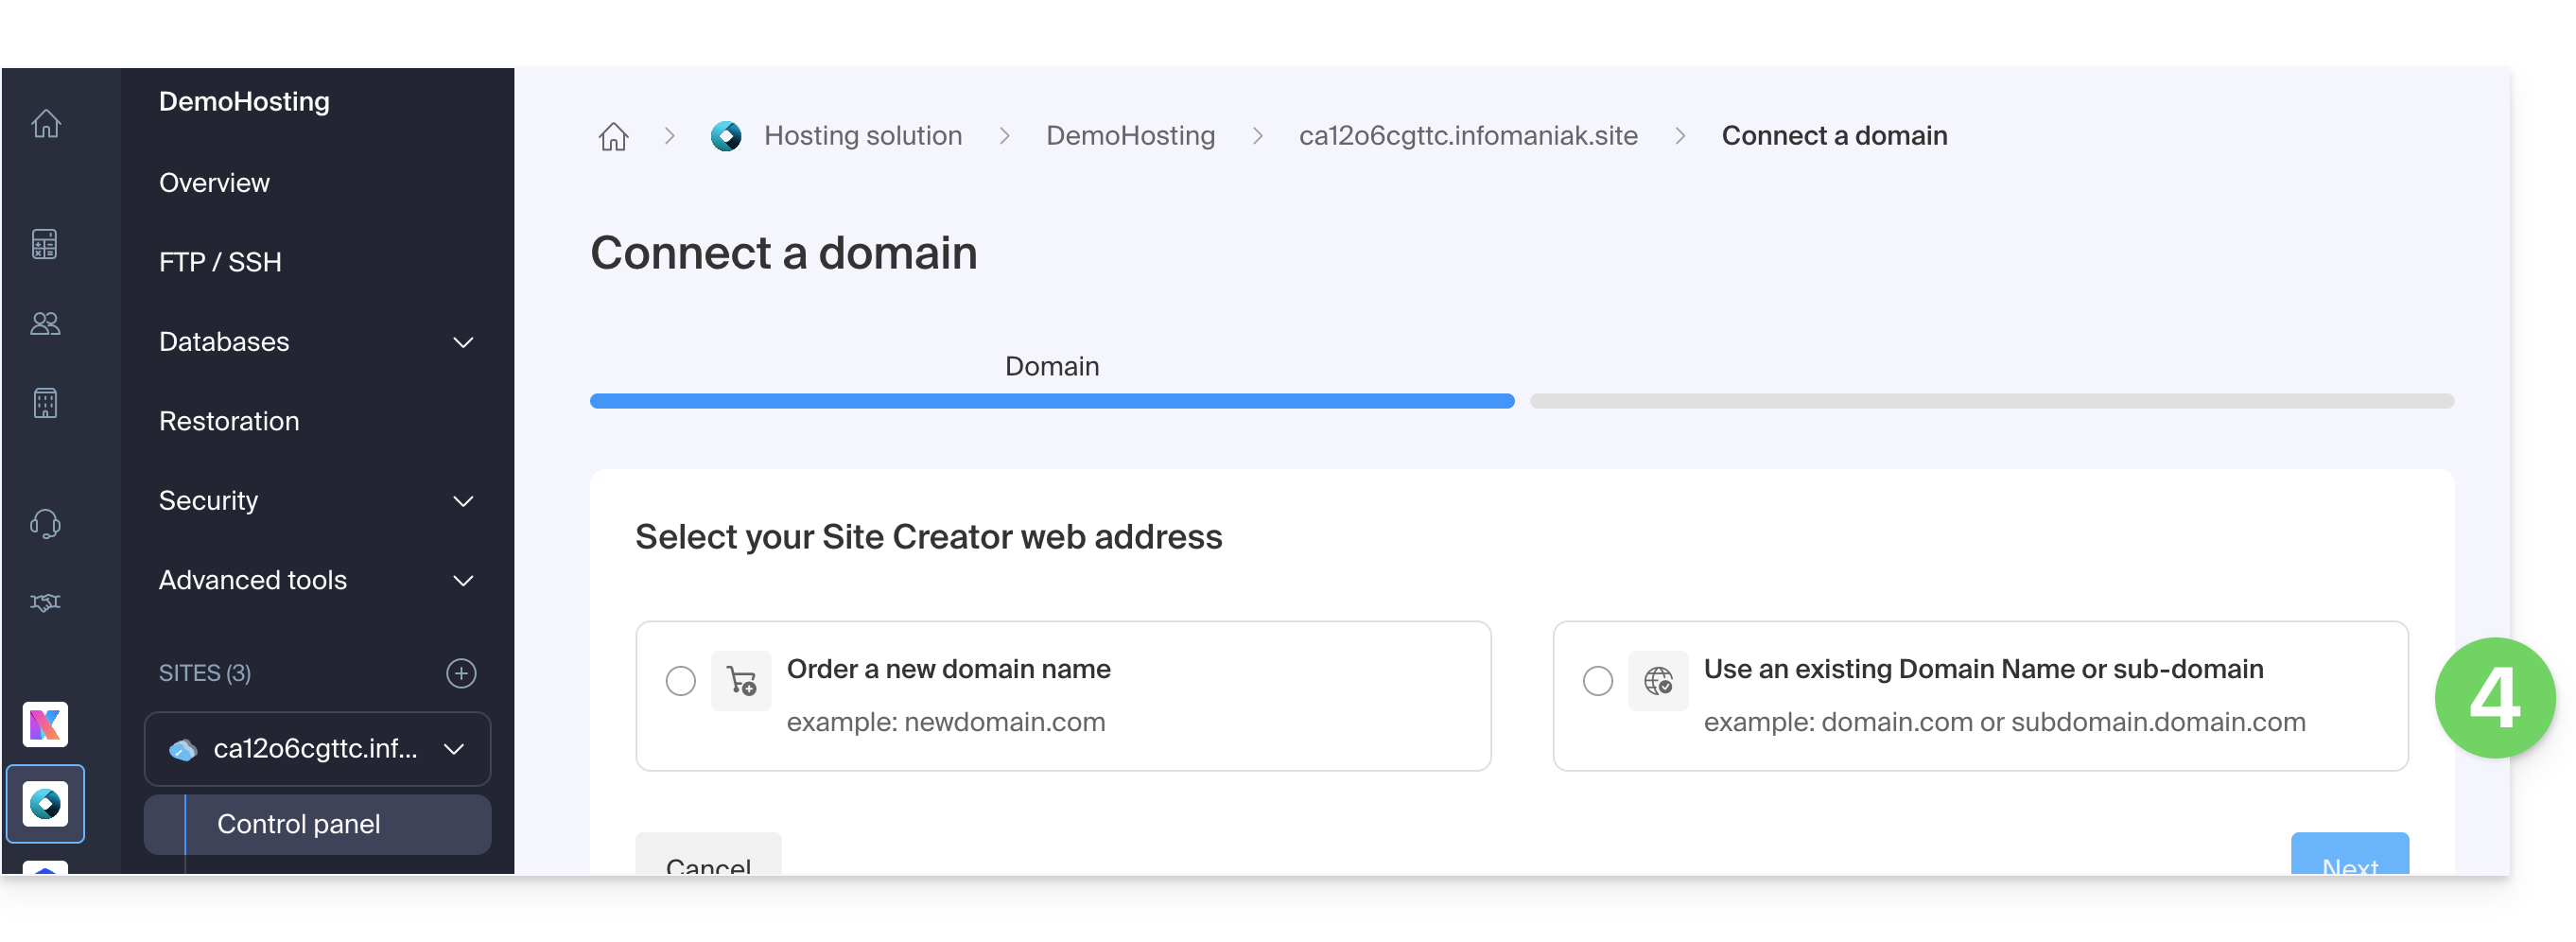
- If you create a new domain name at this time, you will need to return to this configuration wizard once the process is complete.
- If you choose to attach a domain from those already existing in your Organization, the wizard will offer you a list of domains, and a subdomain can be created at this time:
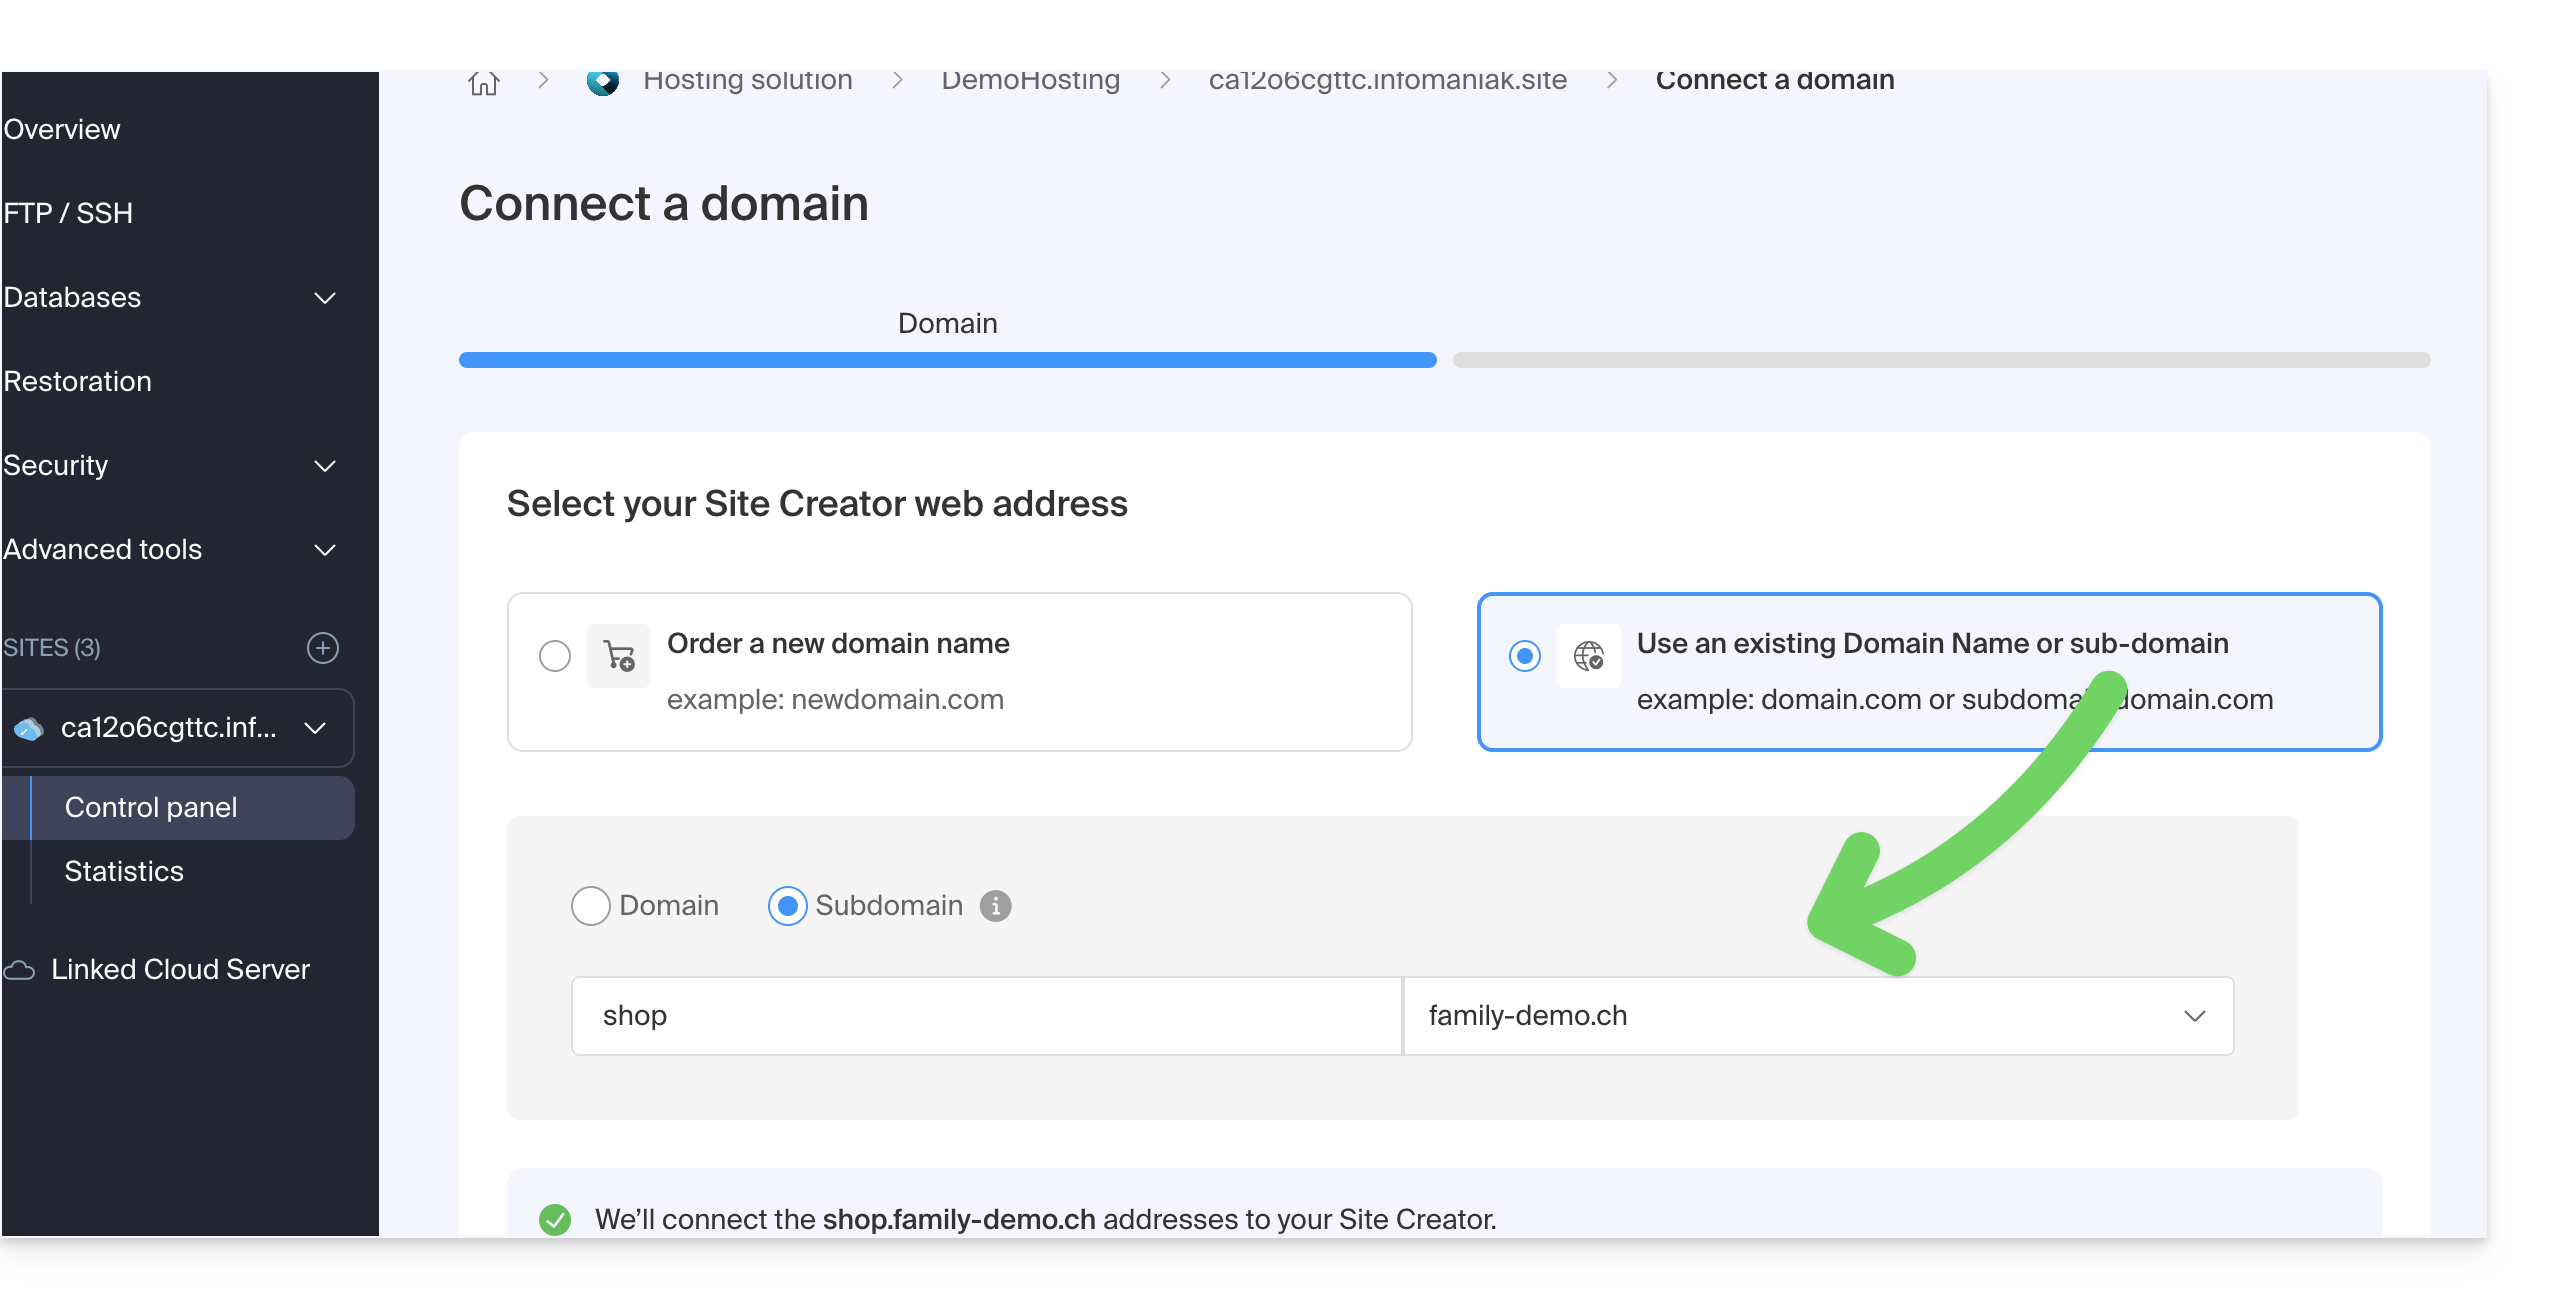
- Click on the Next button:
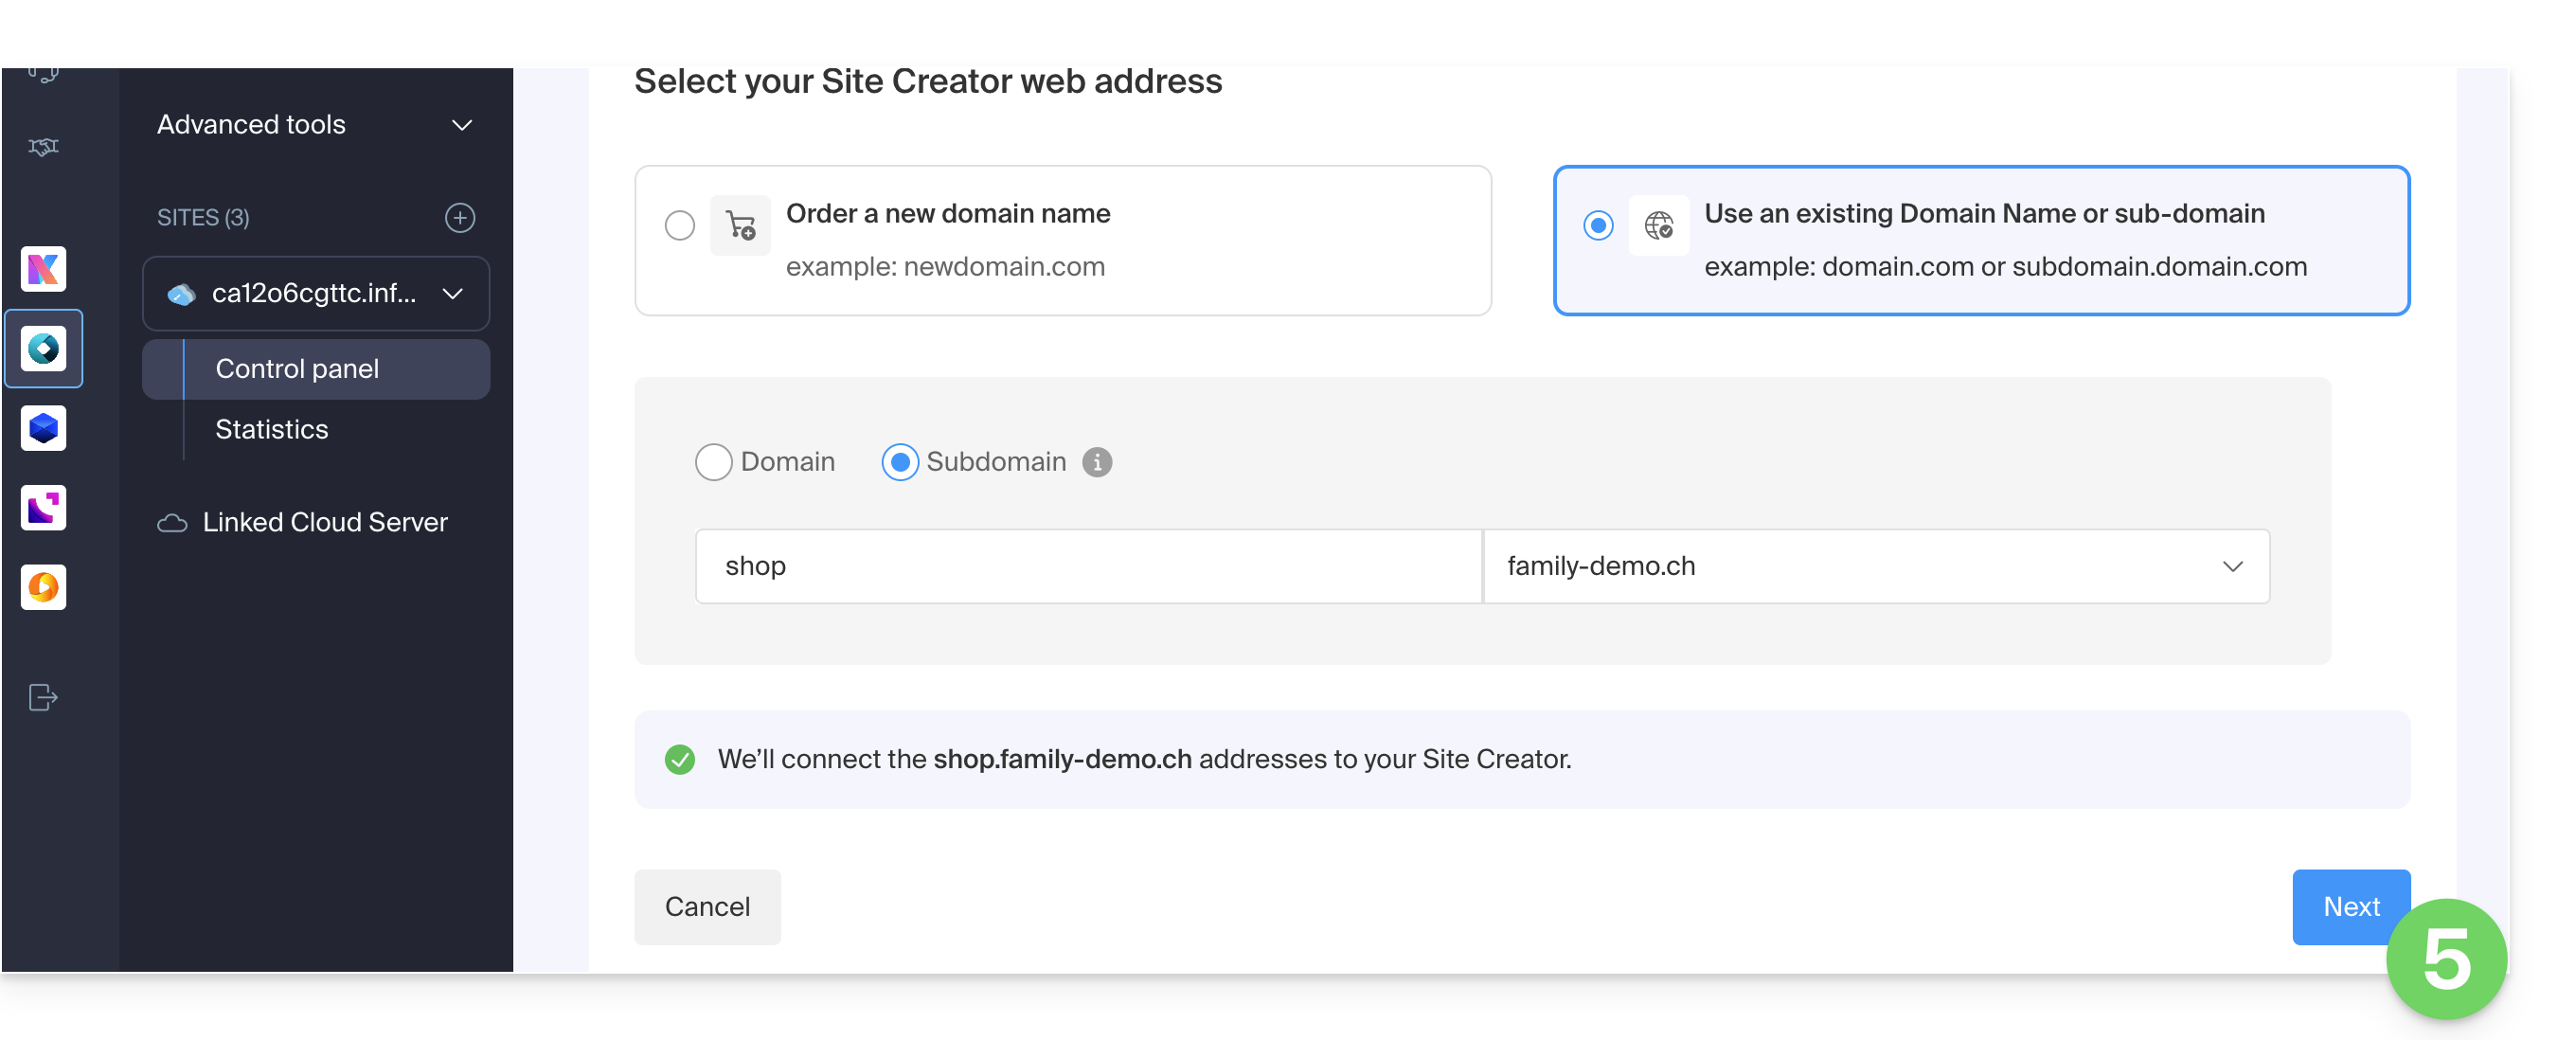
- Check the address you have chosen, then click on the button to Confirm:
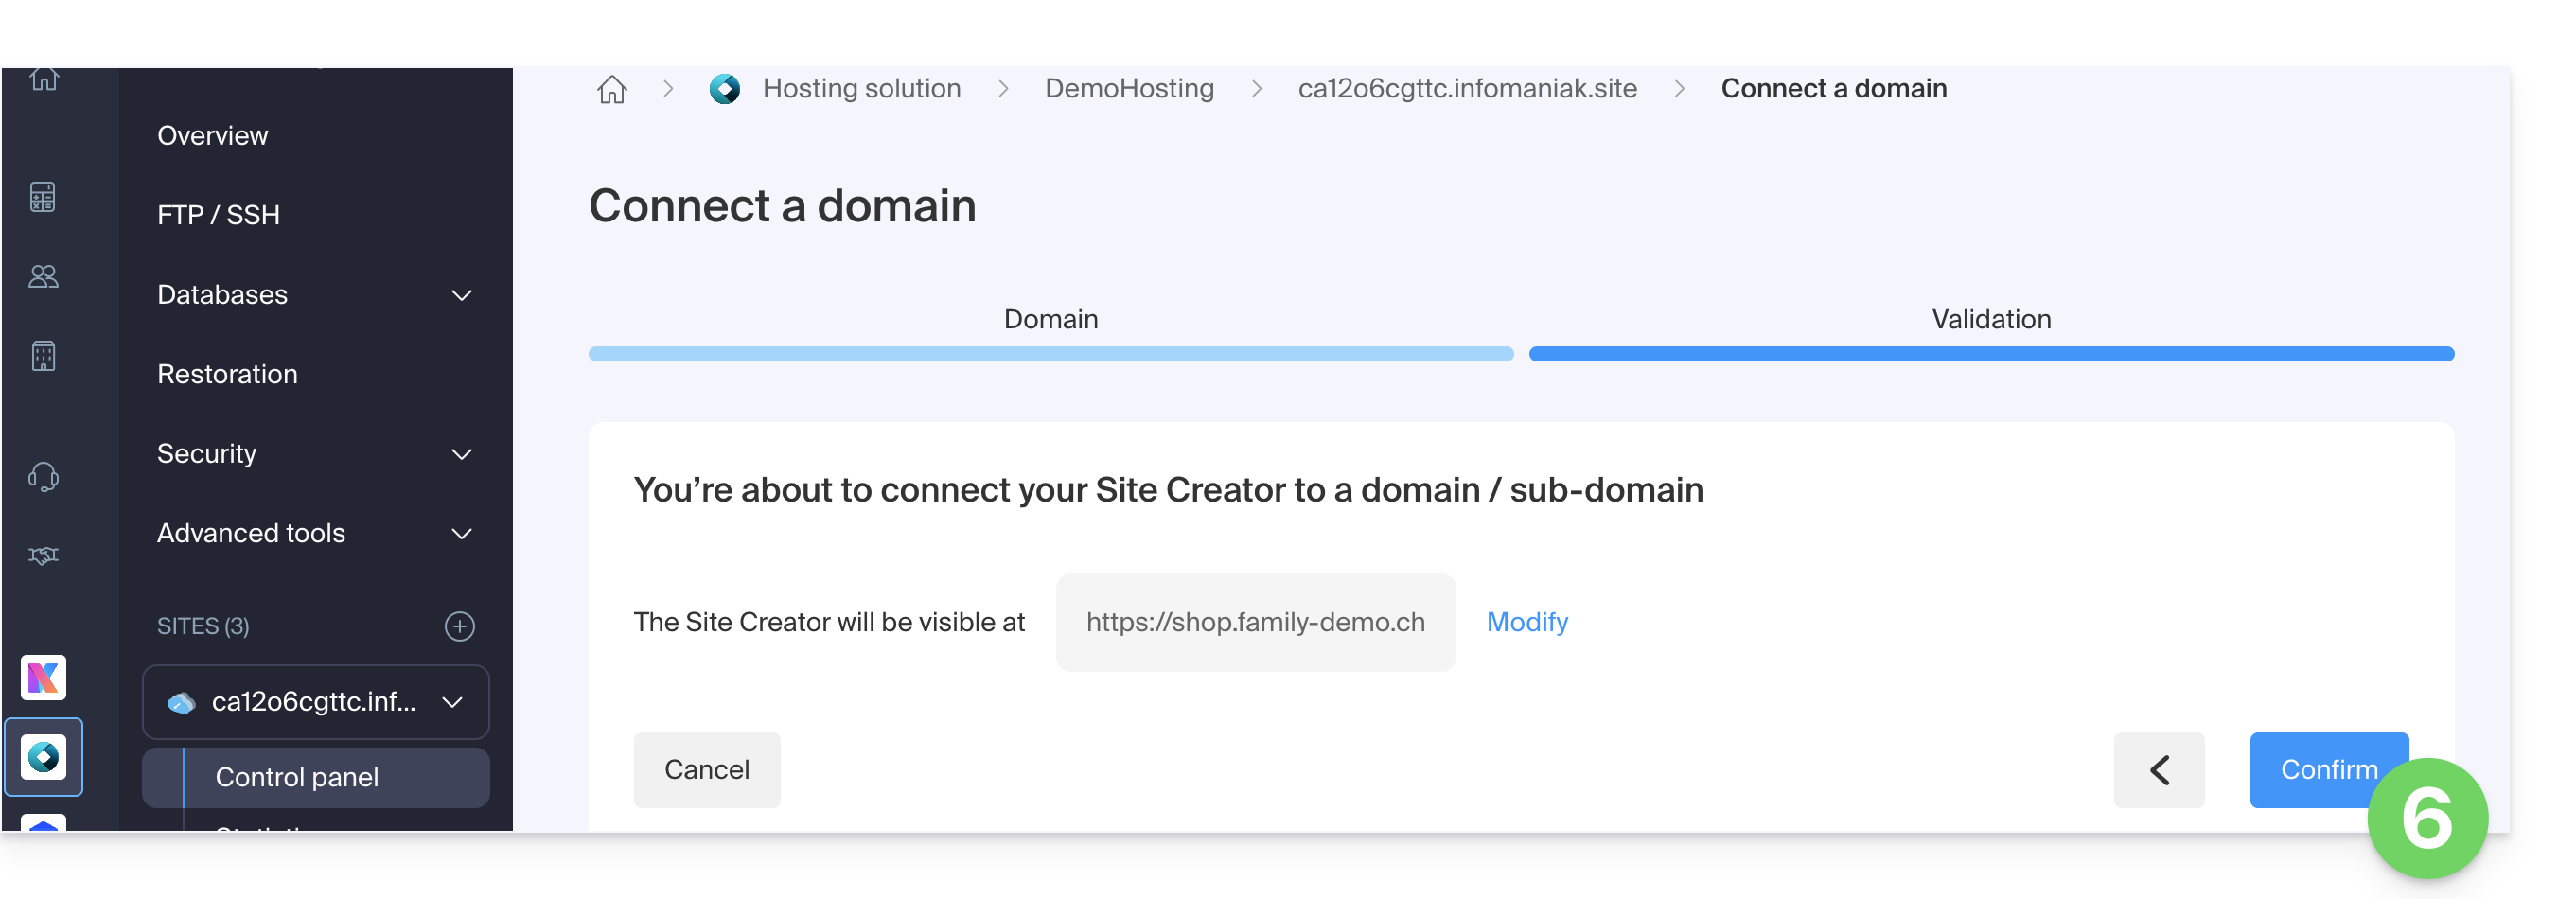
Some domain names cannot be connected to Site Creator; the assistant will notify you of any potential issues. Consult this other guide to understand and resolve these issues.
Manage Site Creator domain(s)
To manage the domain name(s) used with Site Creator:
- Click here to access your site management in the Infomaniak Manager (need help?).
- Click directly on the name assigned to the site in question:
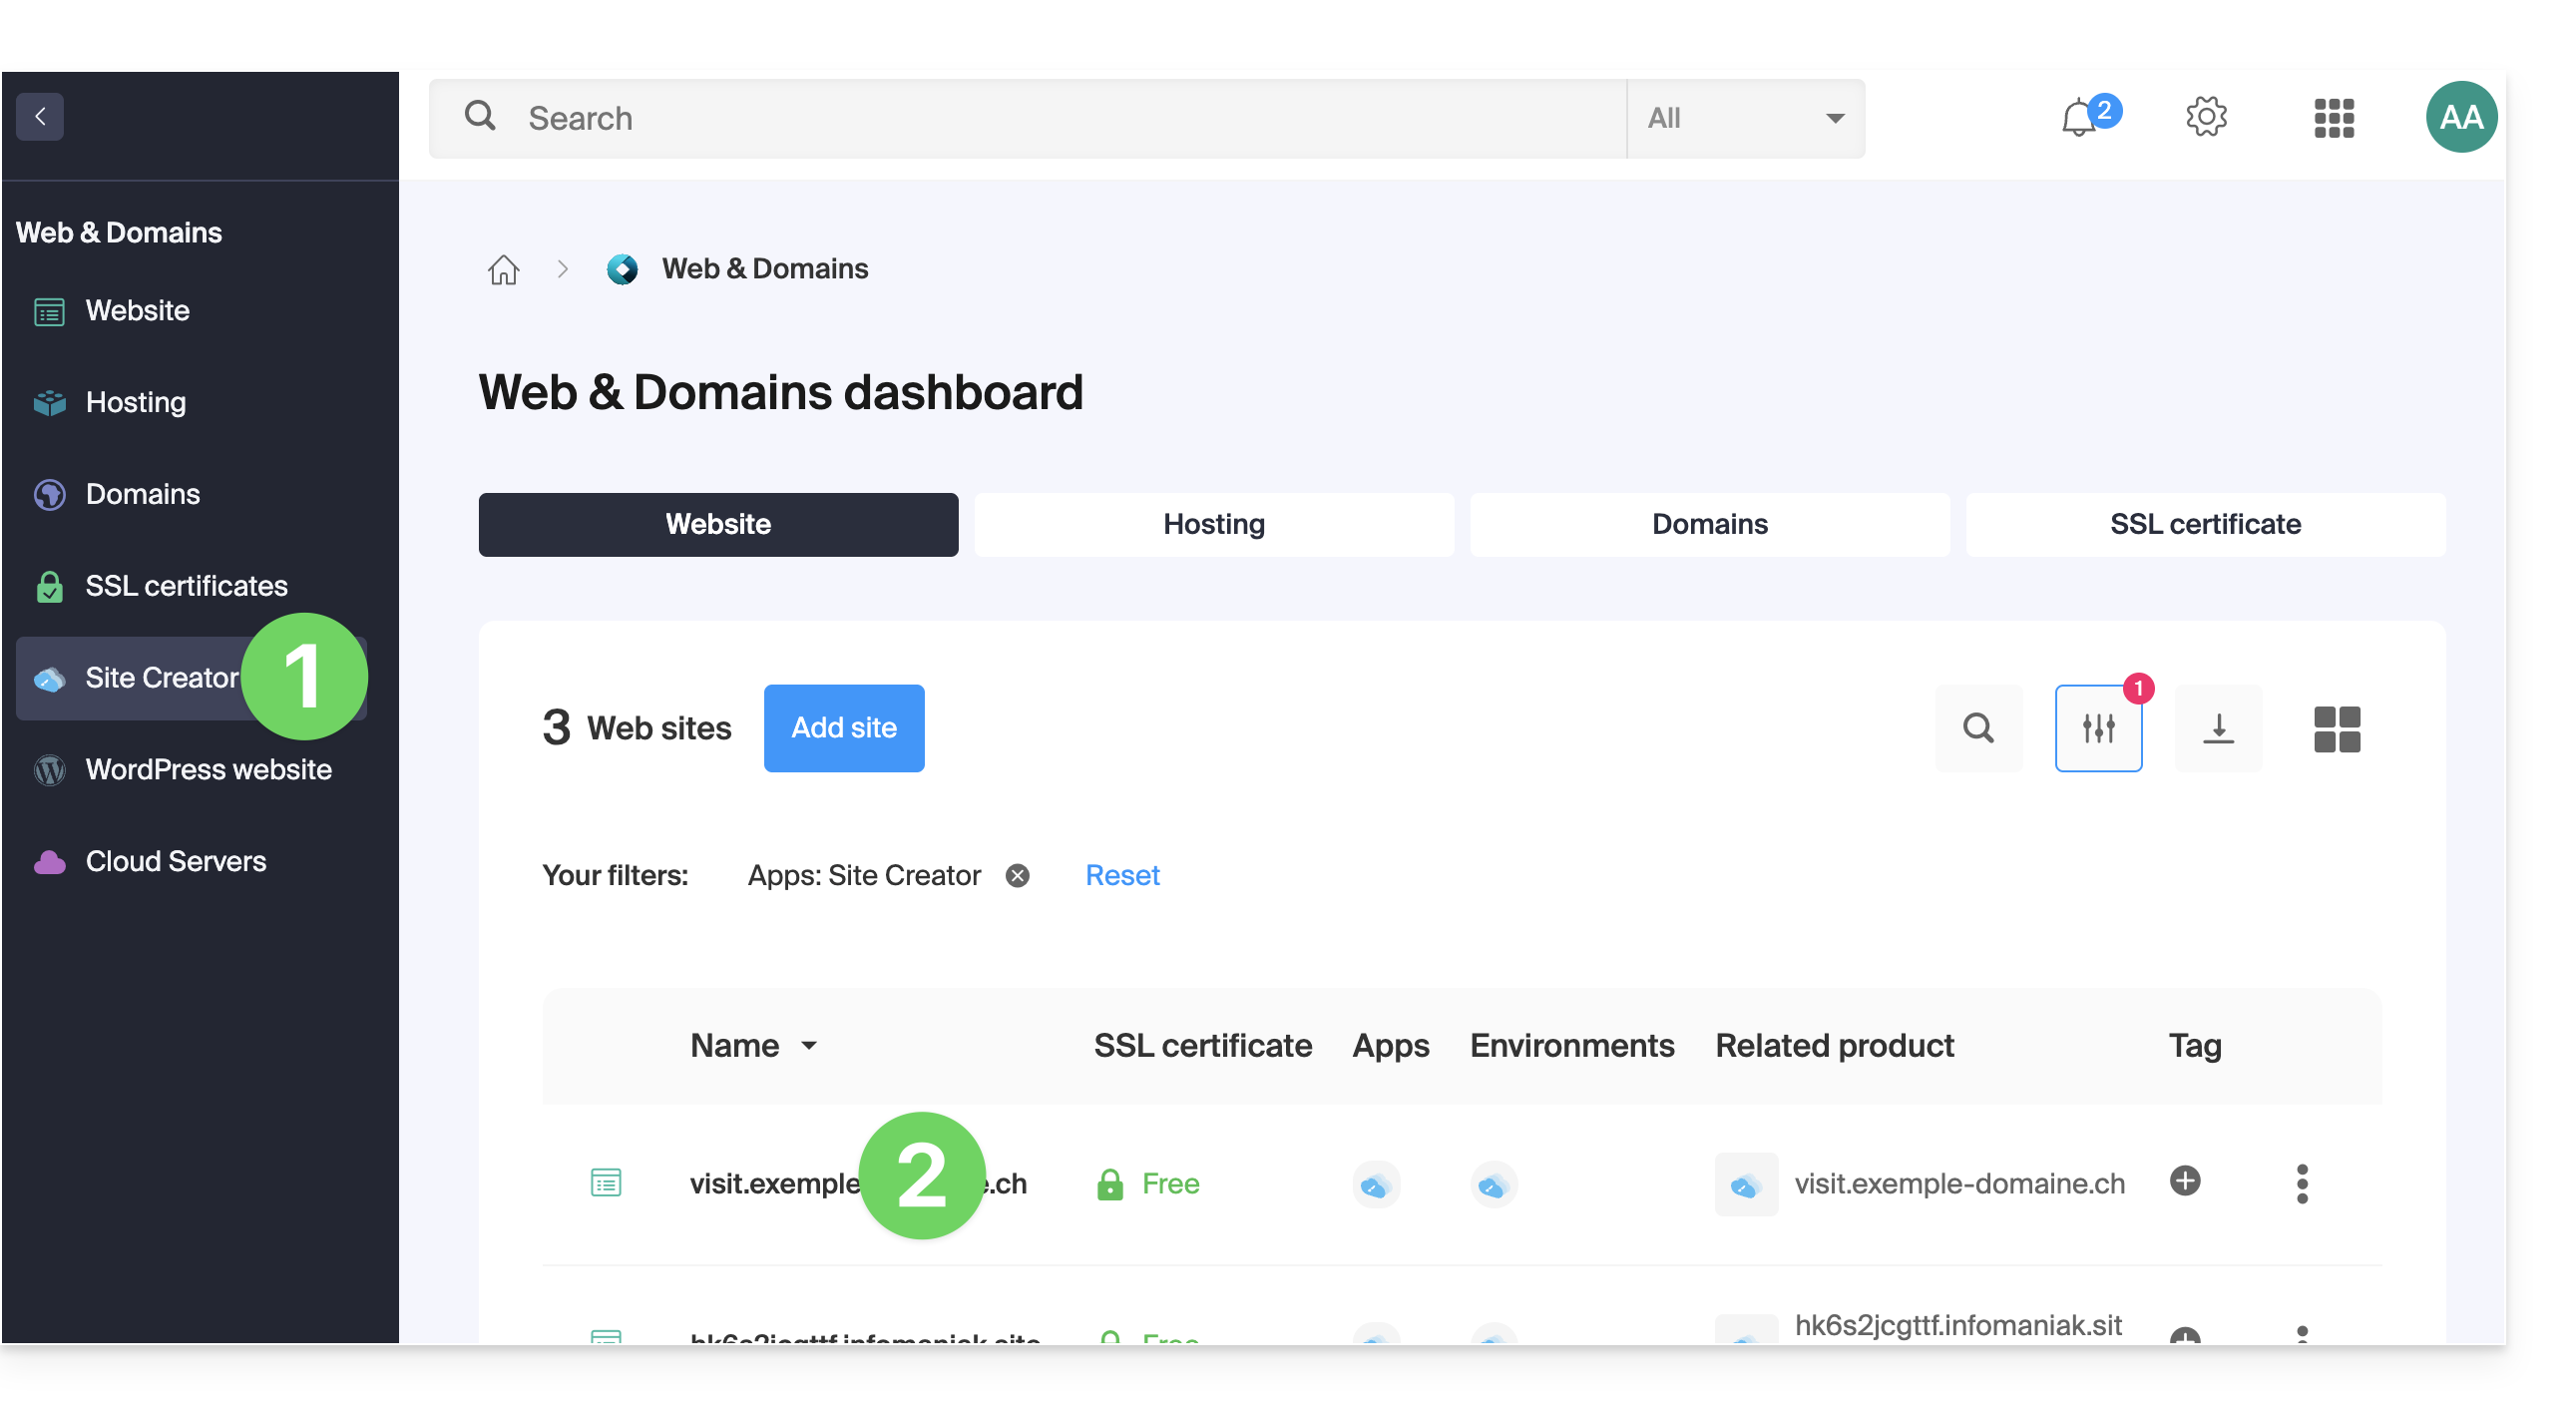
At the top of the page, any messages regarding Site Creator and domain-related issues will be displayed.
Below, you can manage your domains, if you have any: 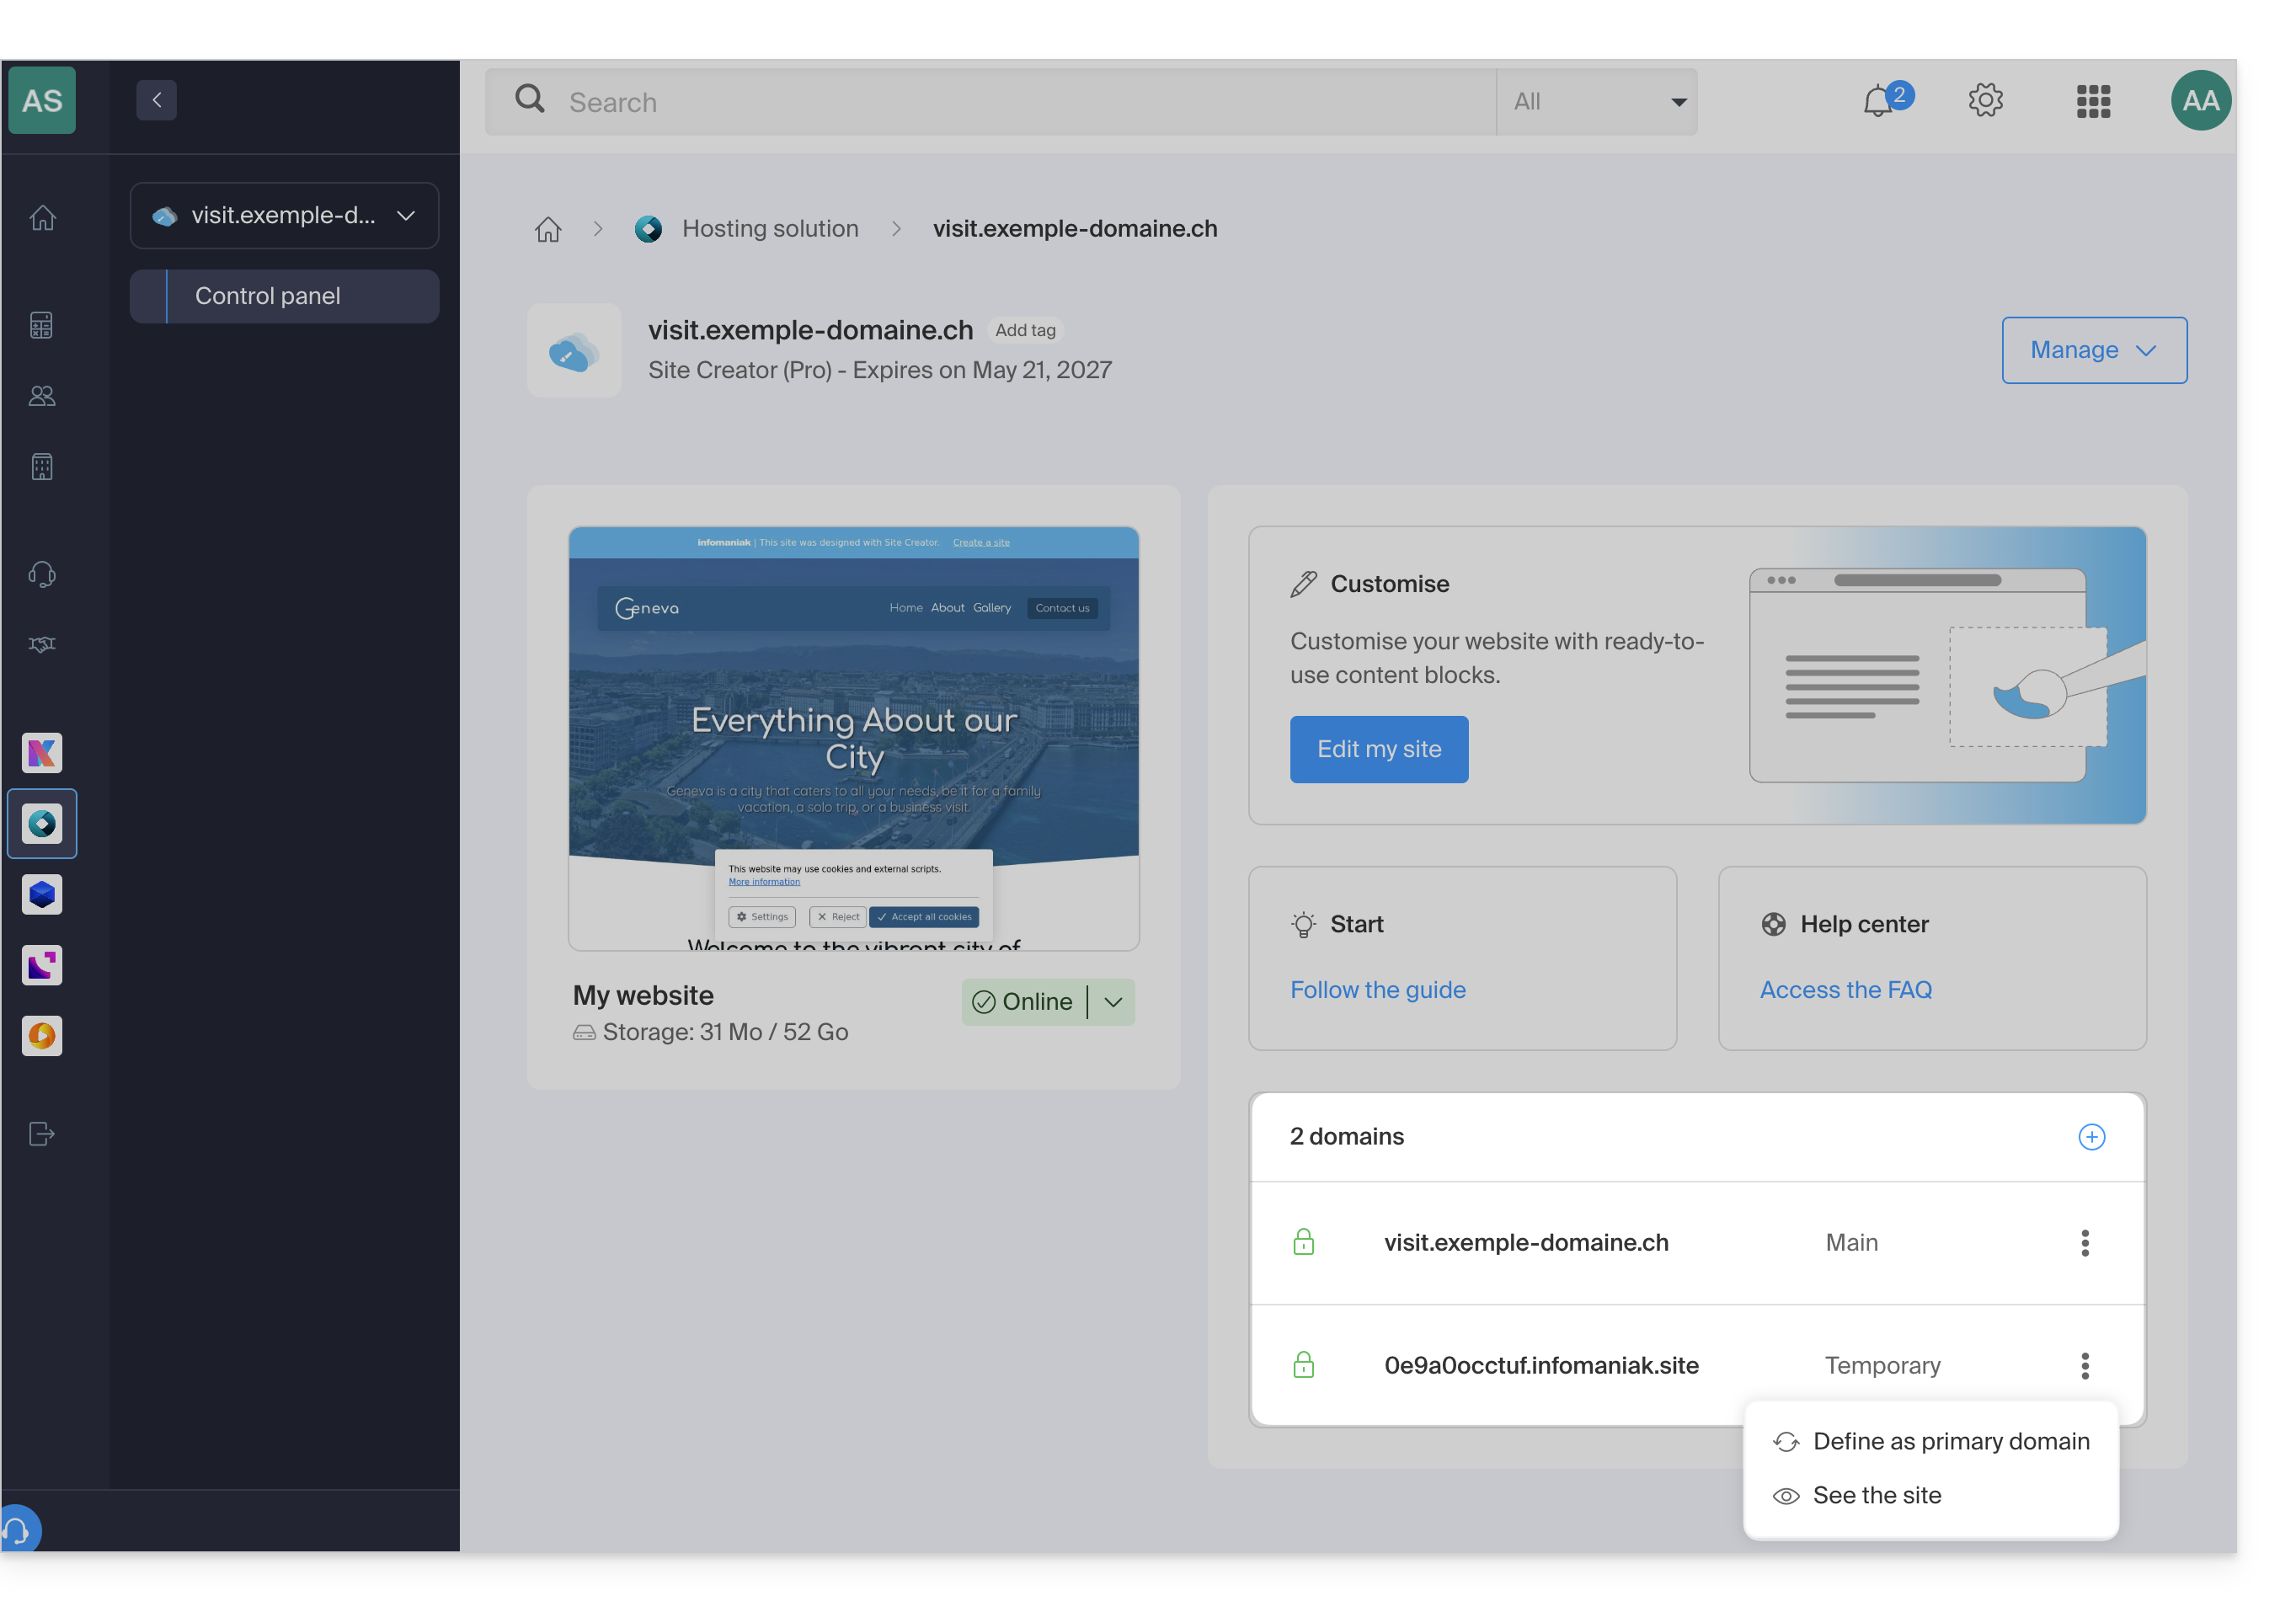
Temporary domain, provisional address, preview URL…
Several domain names can be linked to Site Creator, deleted, or interchanged and reversed as needed.
Click on to add a domain (or subdomain) to the current list, or click on the action menu ⋮ on the right to manage the domain in question: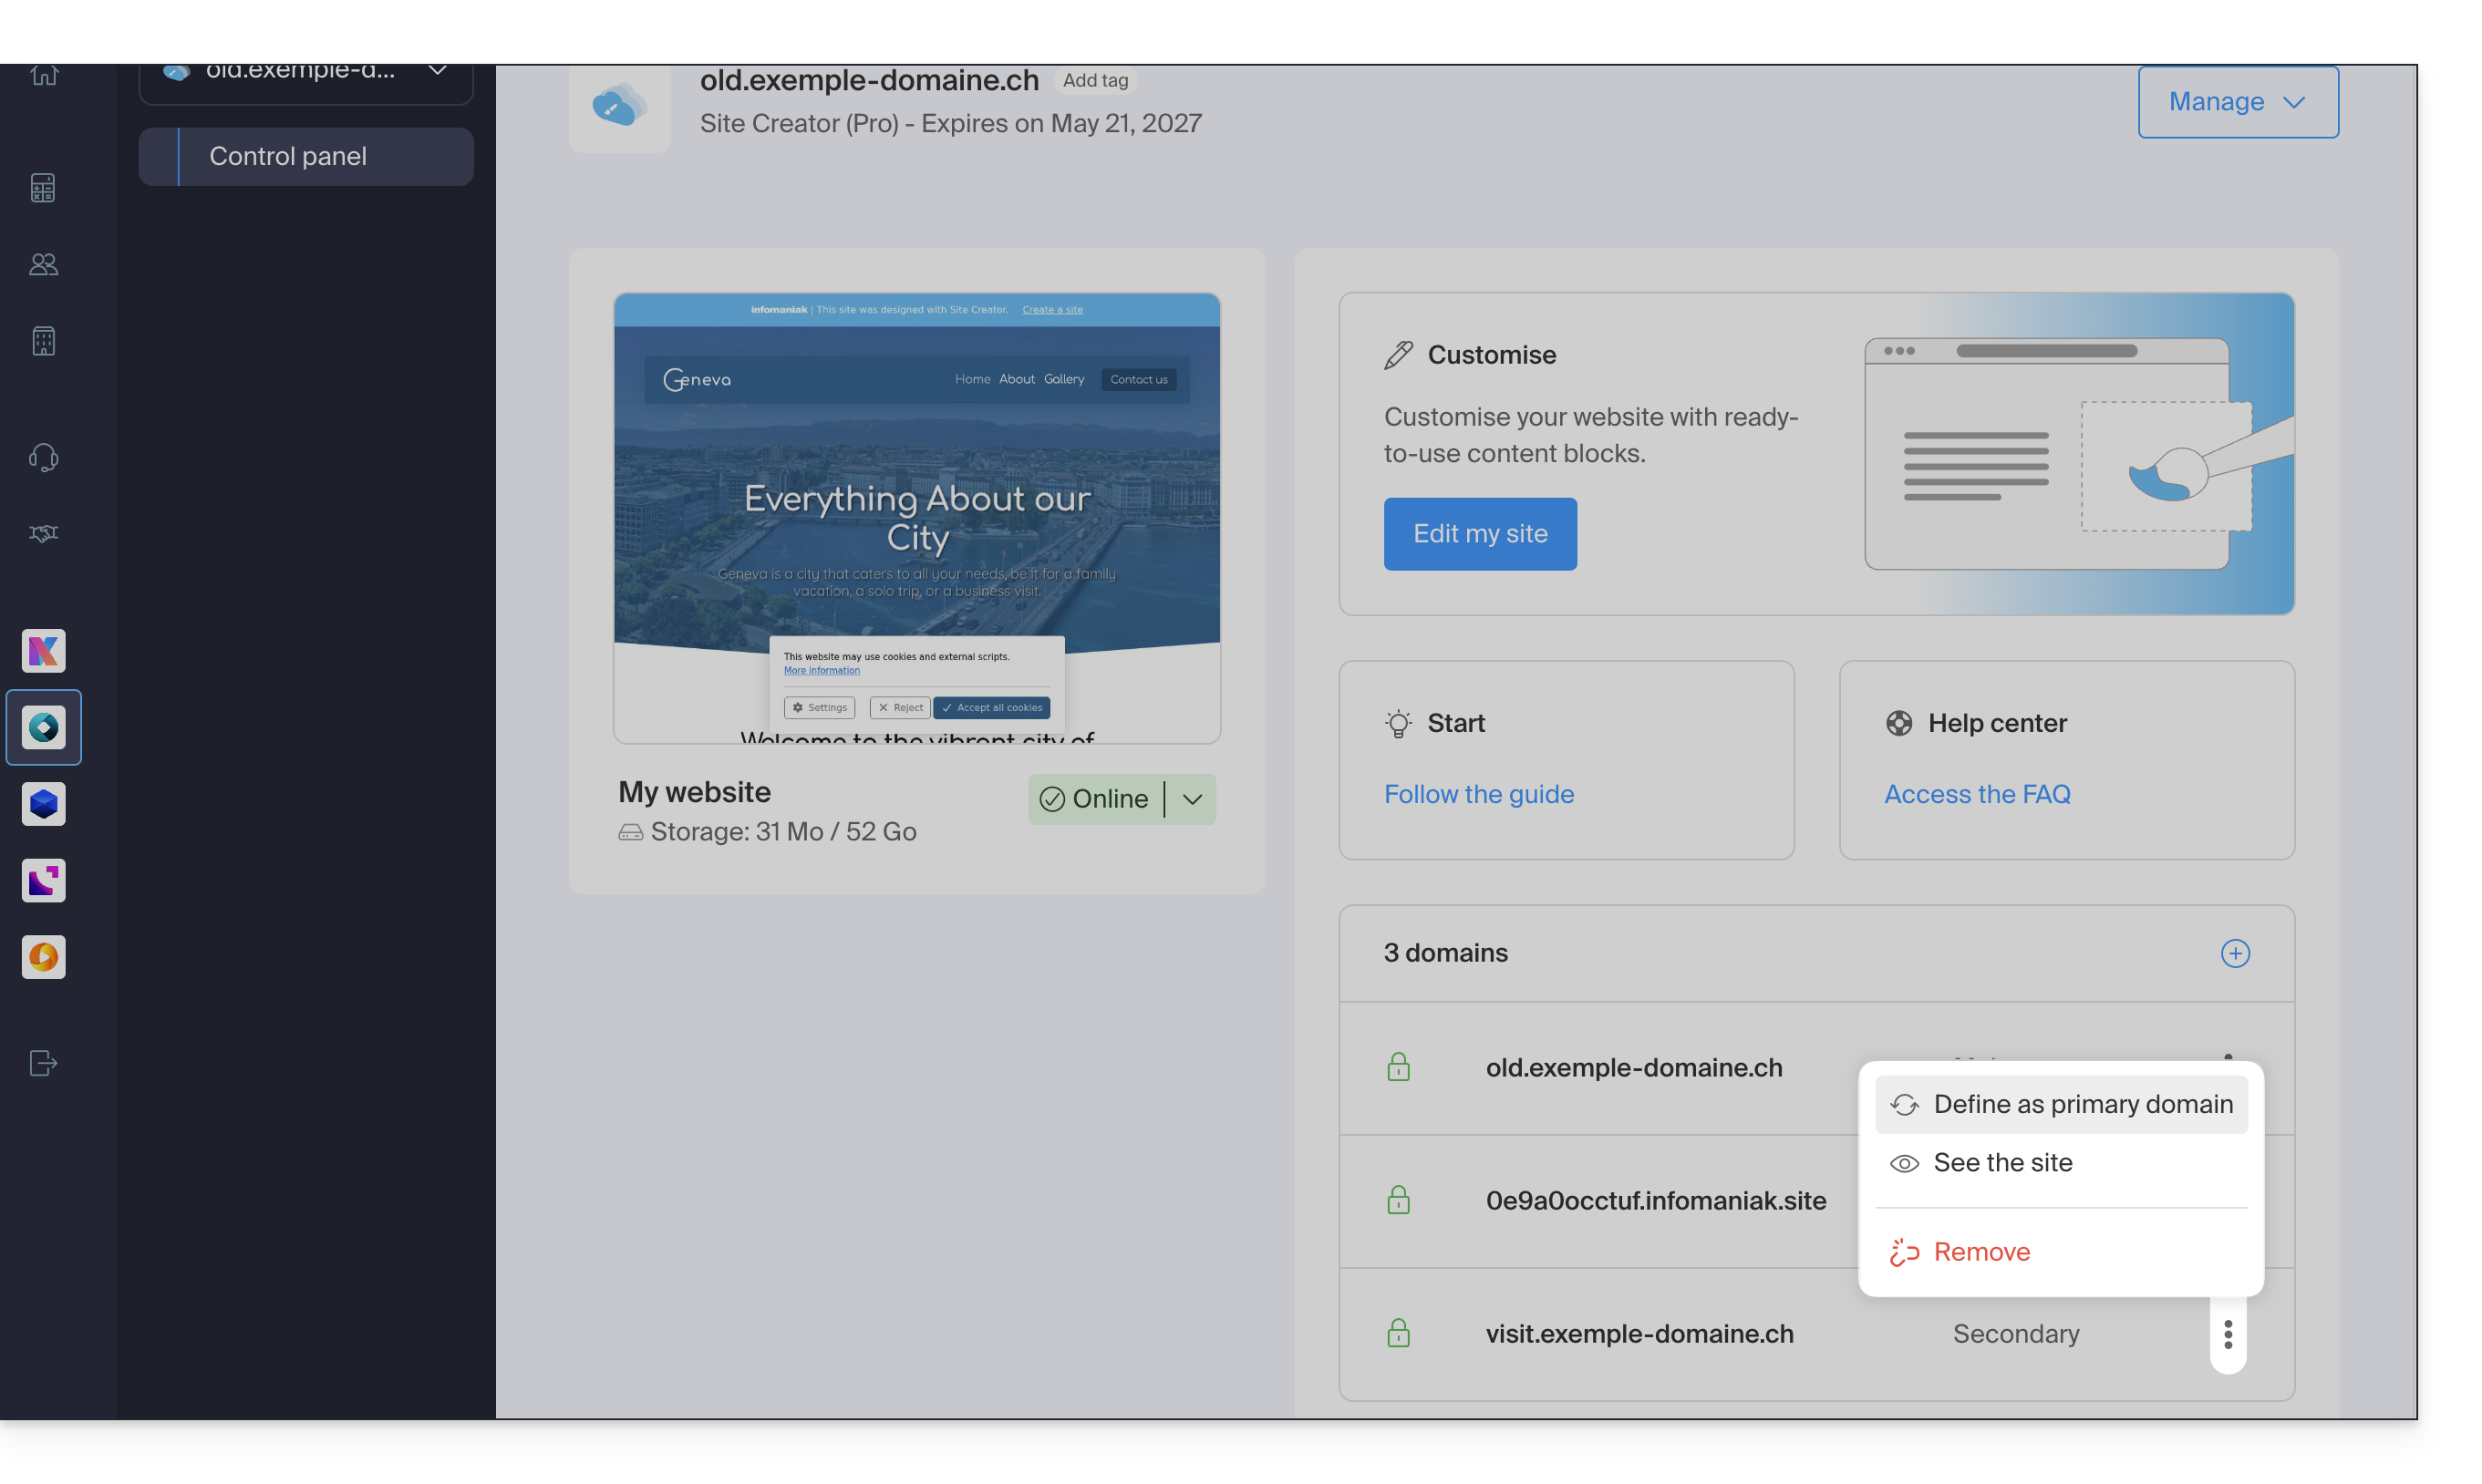
However, the preview URL, of the type 123xyz.infomaniak.site and distinct in the Site Creator domain list, can never be deleted for your site to function correctly.
Link to this FAQ: https://faq.infomaniak.com/2736
Has this FAQ been helpful?
This guide explains how to obtain the EPP code for your domain name at EuroDNS so that you can transfer it to Infomaniak.
Introduction
- The terms "
EPP", "AuthCode", "AuthInfo", "transfer code", and "authorization code" all refer to alphanumeric sequences specific to the domain, the main purpose of which is to verify the owner's authorization before a transfer between registrars. - Refer to the main guide for the rest of the transfer procedure.
- ⚠️ This involves transferring a domain name that you own from a different provider than Infomaniak, so that the future management of this domain is handled by Infomaniak; therefore, this is not an internal transfer from one account holder to another, and the code you need to obtain is not a code for an internal transfer to your current provider.
Transfer the domain name to Infomaniak
To obtain the authorization code from your current provider:
- Click here to log in to the management interface for your products at your current registrar.
- Click on Domain names.
- Read the complete procedure provided by EuroDNS to obtain the code and keep it in a safe place.
- Once you have obtained the authorization code, please consult the main Infomaniak guide regarding the rest of the domain name transfer procedure.
Link to this FAQ: https://faq.infomaniak.com/2807
Has this FAQ been helpful?
This guide explains how to transfer data (Web, Mail, Domain) currently hosted by Swisscom to InfomaniakThe first year of Web + Mail hosting (find out more) is offered to Swisscom customers who decide to switch to Infomaniak!
Transfer your Swisscom services to Infomaniak
To avoid interrupting your website and email services, migrate your services in the order indicated above.
Why choose Infomaniak?
By consolidating your domain names, websites, and email addresses with Infomaniak, you simplify the management of your invoices and services. Furthermore, your domains will be automatically linked to your website and email address. You will therefore not need to manually configure the DNS settings for your domains with another registrar.
Link to this FAQ: https://faq.infomaniak.com/2847
Has this FAQ been helpful?
This guide explains how to obtain the EPP code for your domain name at Swisscom so that you can transfer it to Infomaniak.
Introduction
- The terms "
EPP", "AuthCode", "AuthInfo", "transfer code", and "authorization code" all refer to alphanumeric sequences specific to the domain, the main purpose of which is to verify the owner's authorization before a transfer between Registrars. - Refer to the main guide for the rest of the transfer procedure.
- ⚠️ This involves transferring a domain name that you own from a different provider than Infomaniak, so that the future management of this domain is handled by Infomaniak; therefore, this is not an internal transfer from one account holder to another, and the code you need to obtain is not a code for an internal transfer to your current provider.
Transfer the domain name to Infomaniak
To obtain the authorization code from your current provider:
- Click here to log in to the management interface for your Control Panel HCP Swisscom products.
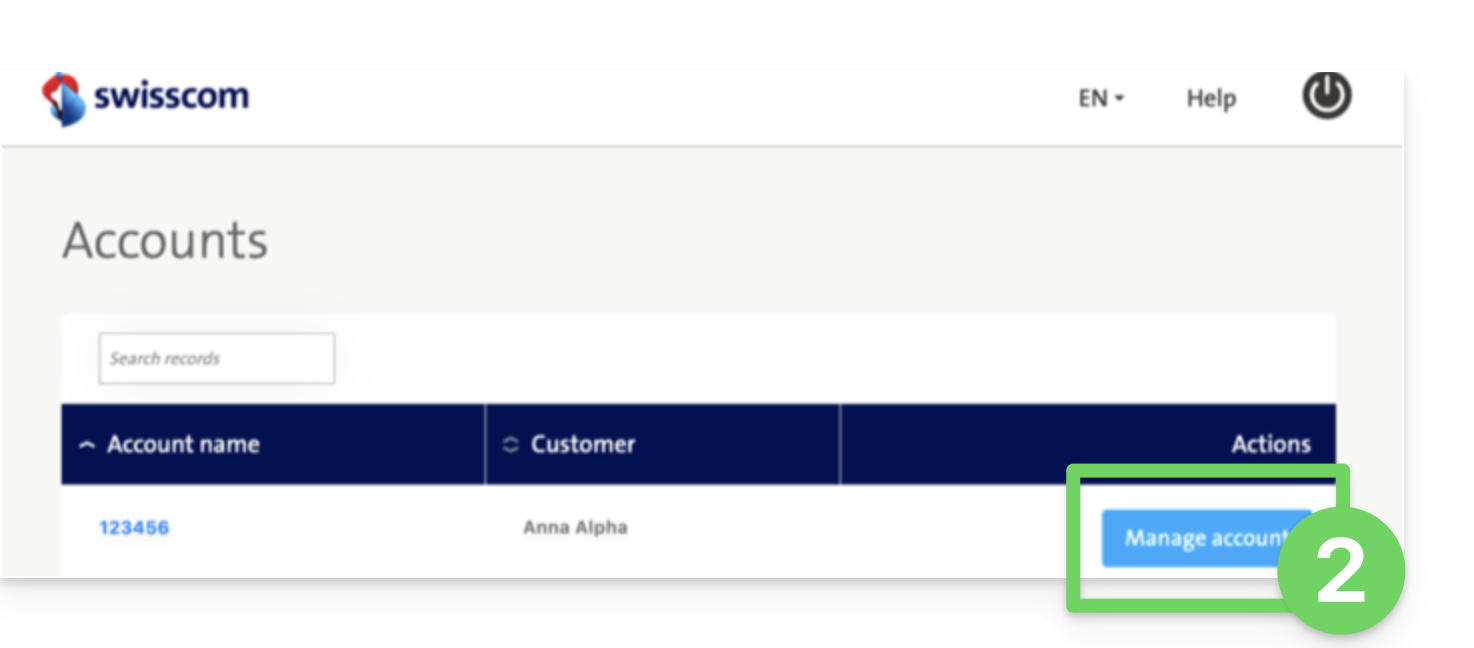
- Click on the blue Manage account button:
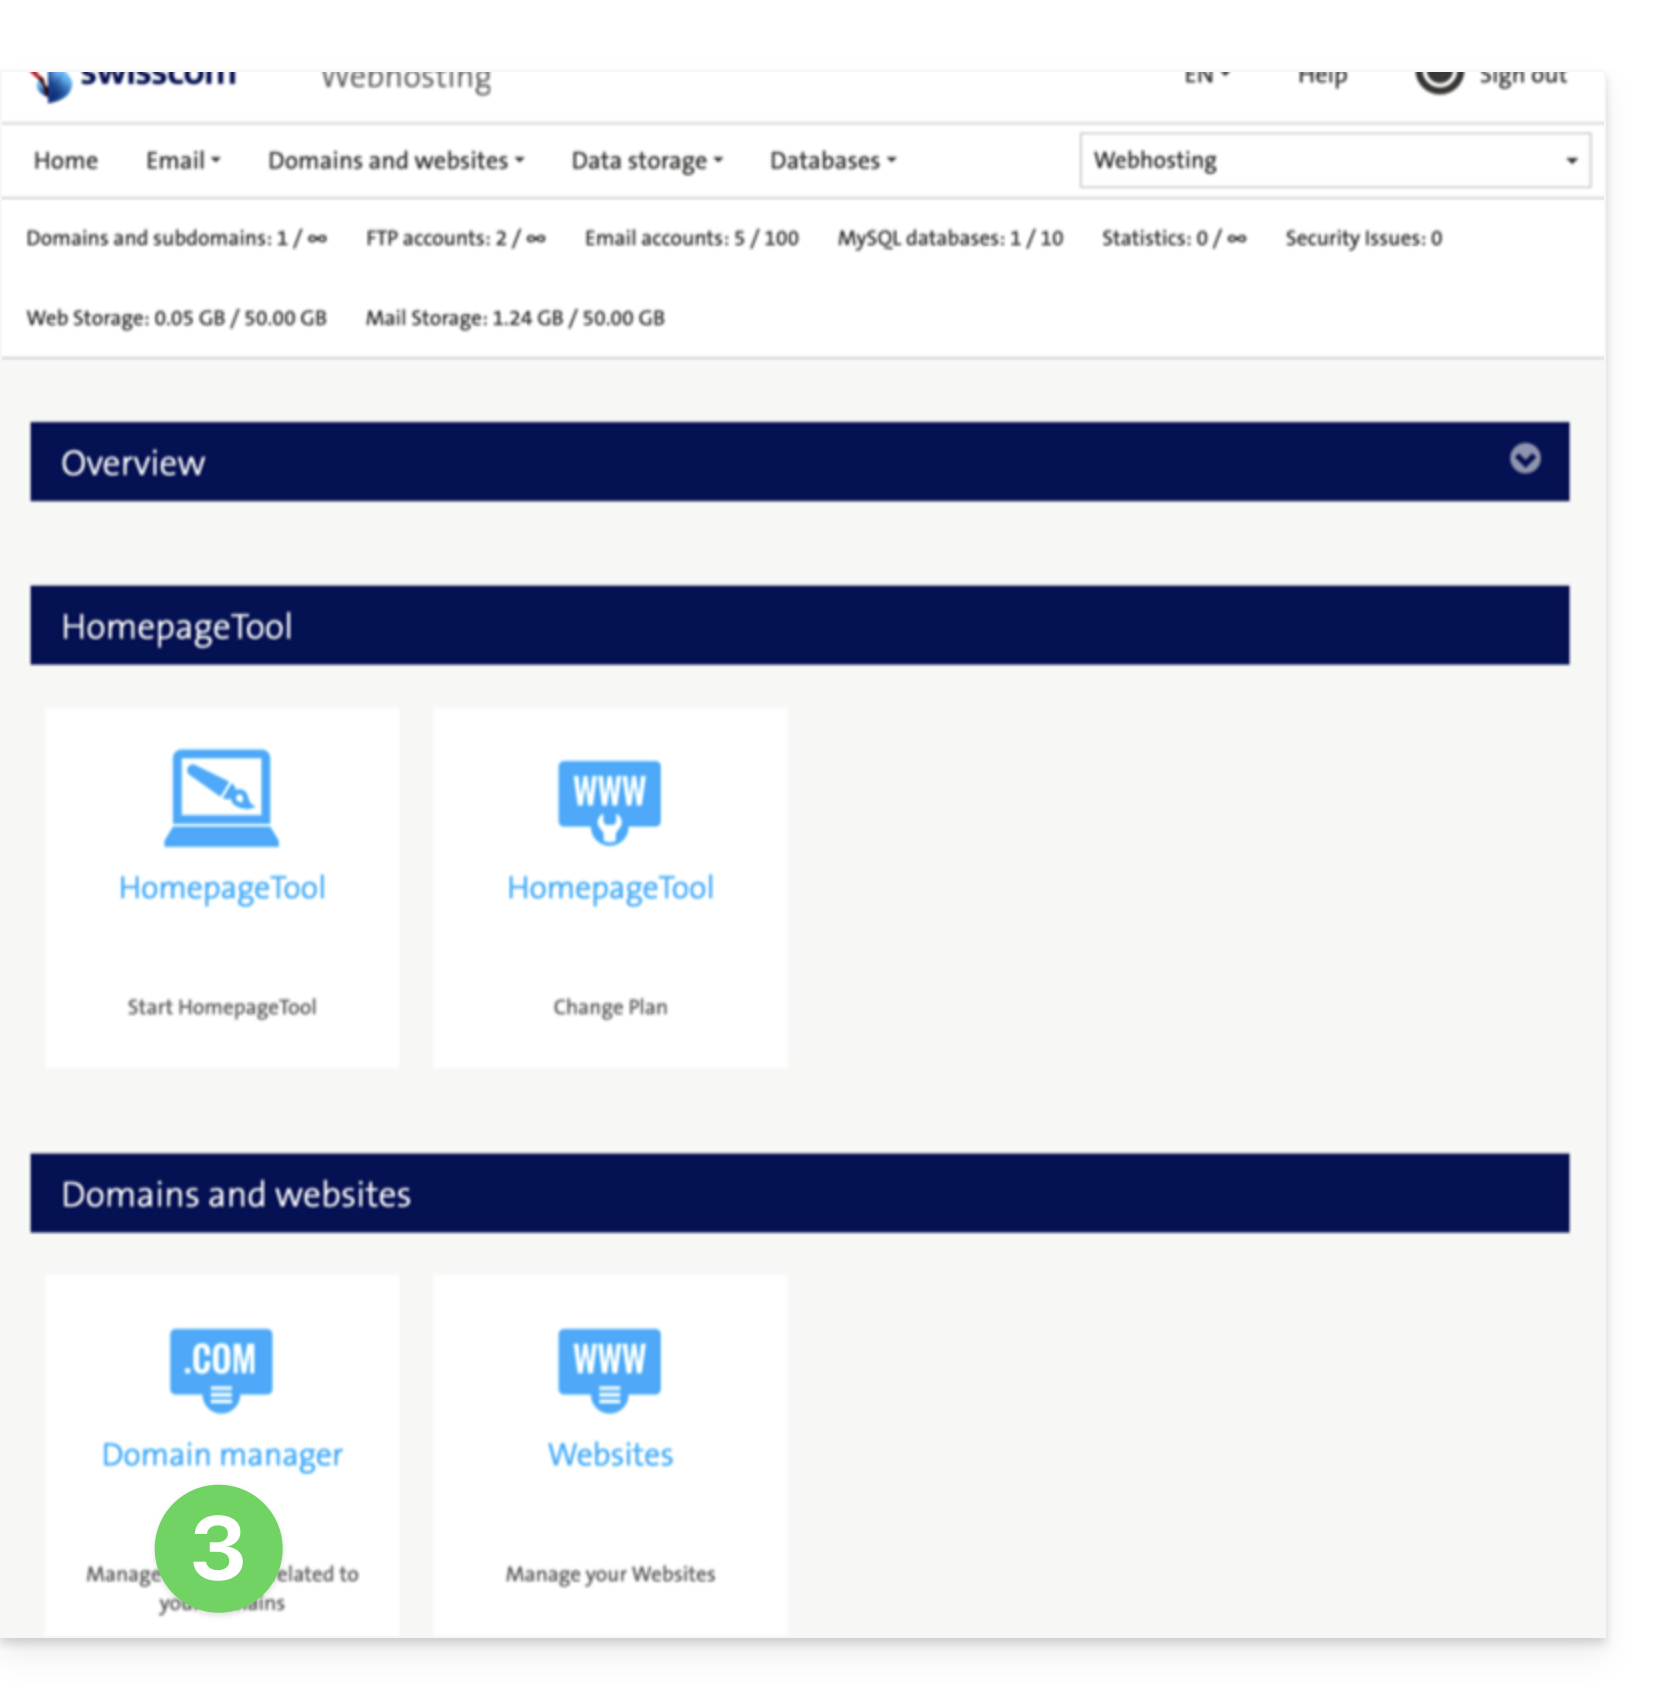
- Click on Domain Manager (in the Domains and Websites section):
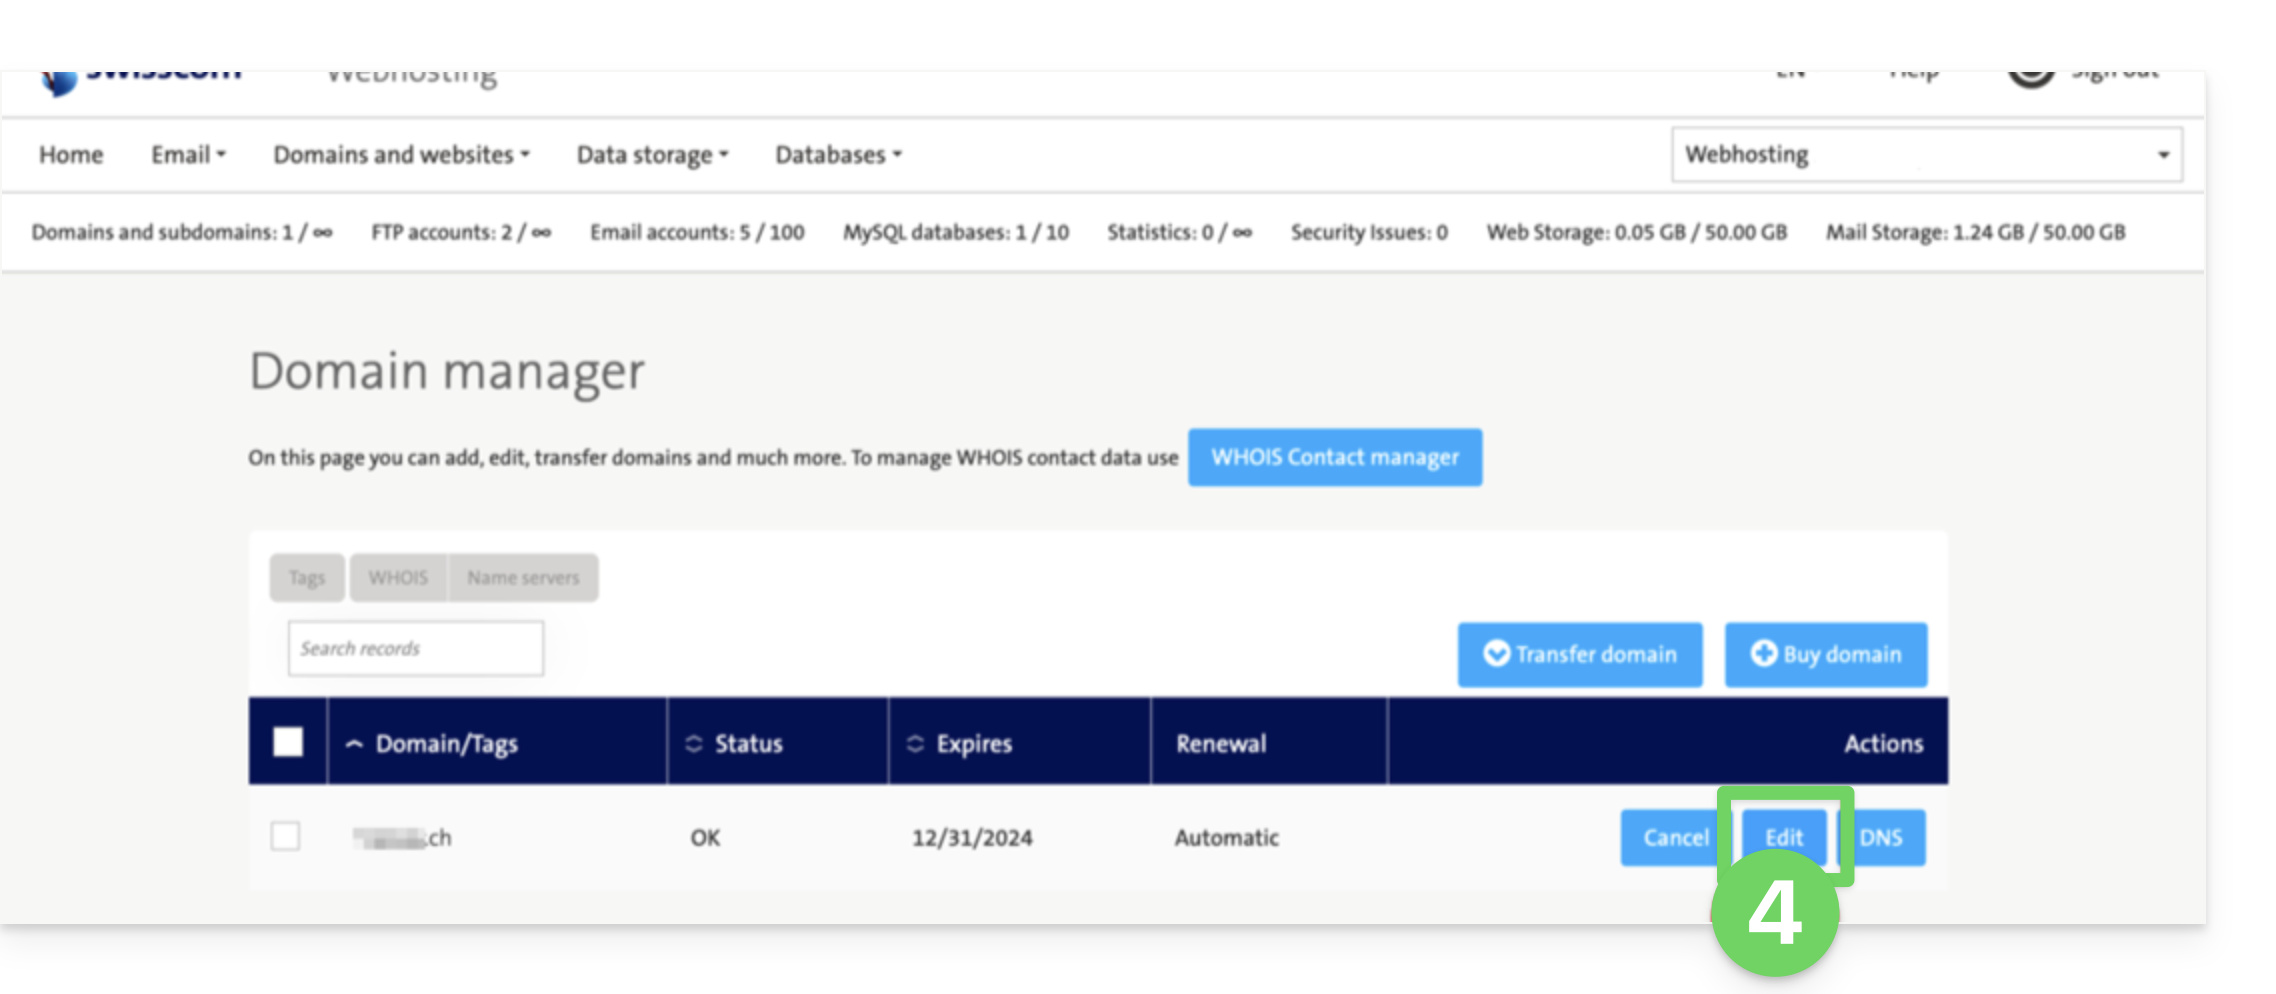
- Click on Edit next to the domain in question:
- Click on Transfer (in the Edit section).
- Check the contact email address.
- Click Generate to send the code by email (to the address in step 6 above):
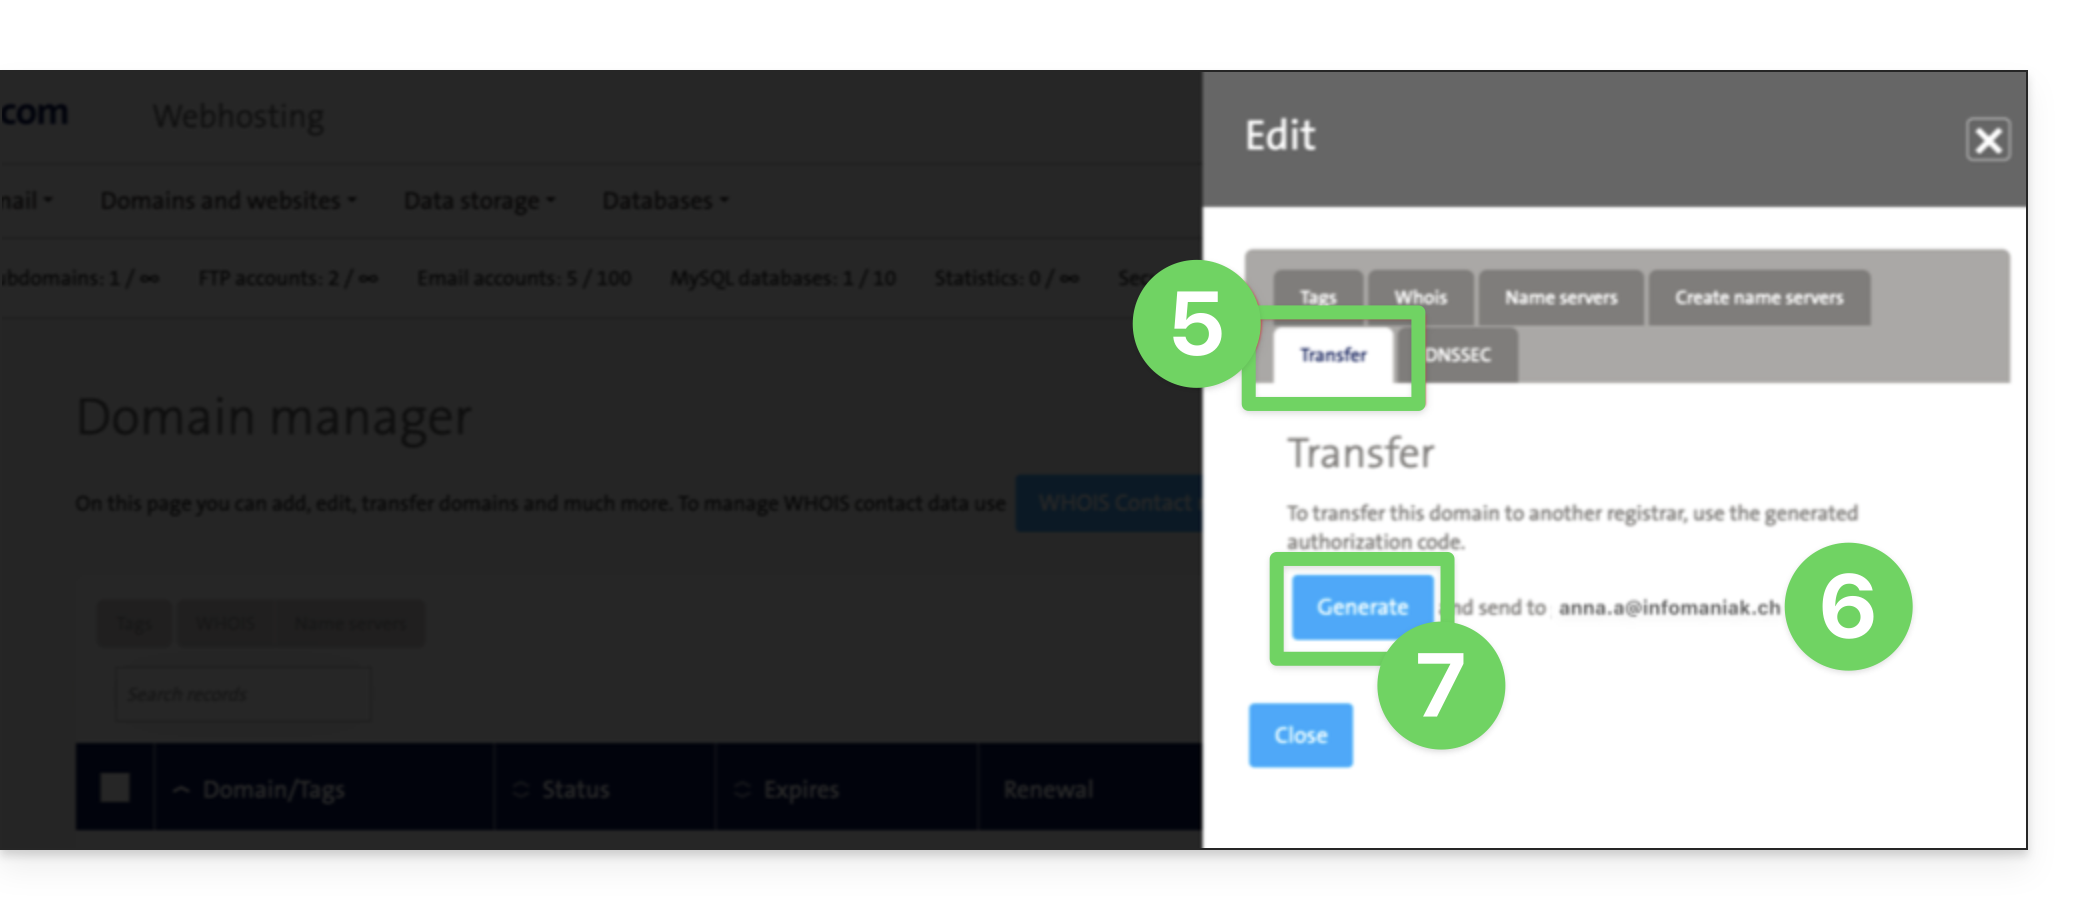
- Once you have obtained the authorization code, please consult the main Infomaniak guide regarding the rest of the domain name transfer procedure.
Link to this FAQ: https://faq.infomaniak.com/2853
Has this FAQ been helpful?
This guide explains how to obtain the EPP code for your domain name at PlanetHoster so that you can transfer it to Infomaniak.
Introduction
- The terms "
EPP", "AuthCode", "AuthInfo", "transfer code", and "authorization code" all refer to alphanumeric sequences specific to the domain, the main purpose of which is to verify the owner's authorization before a transfer between Registrars. - Refer to the main guide for the rest of the transfer procedure.
- ⚠️ This involves transferring a domain name that you own from a different provider than Infomaniak, so that the future management of this domain is handled by Infomaniak; therefore, this is not an internal transfer from one account holder to another, and the code you need to obtain is not a code for an internal transfer to your current provider.
Transfer the domain name to Infomaniak
To obtain the authorization code from your current provider:
- Click here to log in to the management interface for your products at your current registrar.
- Click on Domain names in the left-hand menu.
- Click on Domain management.
- Familiarize yourself with the complete procedure provided by PlanetHoster to obtain the code and keep it in a safe place.
- Once you have obtained the authorization code, refer to the main Infomaniak guide regarding the rest of the domain name transfer procedure.
Link to this FAQ: https://faq.infomaniak.com/2865
Has this FAQ been helpful?
This guide shows you how to configure a UniFi gateway to access your services and devices via Infomaniak DynDNS.
Prerequisites
- You must have a compatible UniFi gateway, such as a UDM Pro/SE, a UDR, an UXG, a Cloud Gateway Ultra, or a USG.
- A dynamic DNS must have been created for the domain in question from the Infomaniak Manager.
- The UniFi gateway must have a public IP address on its WAN interface.
Configure DynDNS on a UniFi gateway
UniFi gateways include a DynDNS client that can be configured from the UniFi Network interface:
- Access your UniFi Network interface from the local IP address of your device or from the UniFi portal.
- Open the Settings.
- Select Internet.
- Click on the relevant WAN interface, usually named Primary or WAN.
- In the Dynamic DNS section, click on Create New Dynamic DNS.
- Enter the following information:
- Service: select Custom.
- Hostname: enter the fully qualified domain name configured in the Infomaniak Manager, for example
my-domain.xyzorddns.my-domain.xyz. - Username: enter the ID defined in the Infomaniak Manager when creating the DynDNS.
- Password: enter the password defined in the Infomaniak Manager.
- Then complete the configuration according to the fields displayed in your UniFi interface:
If the interface displays only a Server field:
Enter the following value, without adding
https://:infomaniak.com/nic/update?hostname=%h&myip=%i- If the interface displays separate Server and Request URL or Update URL fields:
Server:
infomaniak.comRequest URL / Update URL:
https://infomaniak.com/nic/update?hostname=%h&myip=%i
- Save the configuration.
Important: if your UniFi interface has a single Server field, do not insert https:// before the address. The variables %h and %i will be automatically replaced with the domain name and the public IP address.
Then, check that the configured domain name points to the public IP address of your connection.
Configure a port forwarding
DynDNS updates the IP address associated with the domain name, but does not open any access to your local network. To access a specific service from outside, such as a NAS, camera, or server, you need to configure port forwarding:
- In the Settings, open the Port Forwarding section. Depending on the version of UniFi Network, this may be found in Policy Engine or Security.
- Click the button to create a new rule.
- Configure the following settings:
- Name: enter a descriptive name, for example
NAS Access. - WAN Interface: select the relevant Internet interface.
- Incoming Port / Port: specify the port accessible from the Internet.
- Forward IP: enter the local IP address of the device, for example
192.168.1.123. - Forward Port: specify the port used by the service on the device.
- Protocol: select the required protocol, for example TCP, UDP, or both.
- Name: enter a descriptive name, for example
- Save the rule.
Warning: only open the ports that are strictly necessary and ensure that the exposed service is properly secured.
Link to this FAQ: https://faq.infomaniak.com/2891
Has this FAQ been helpful?
This guide explains how to remove the link between a domain name and kSuite Free.
Introduction
- Once deleted, the domain name is available again to be linked to one of your services.
Delete the linked domain
To unlink a domain name from kSuite Free:
- Click here to access the management interface for your kSuite in the Infomaniak Manager (need help?).
- Click on the action menu ⋮ to the right of the kSuite name.
- Select Manage domains:
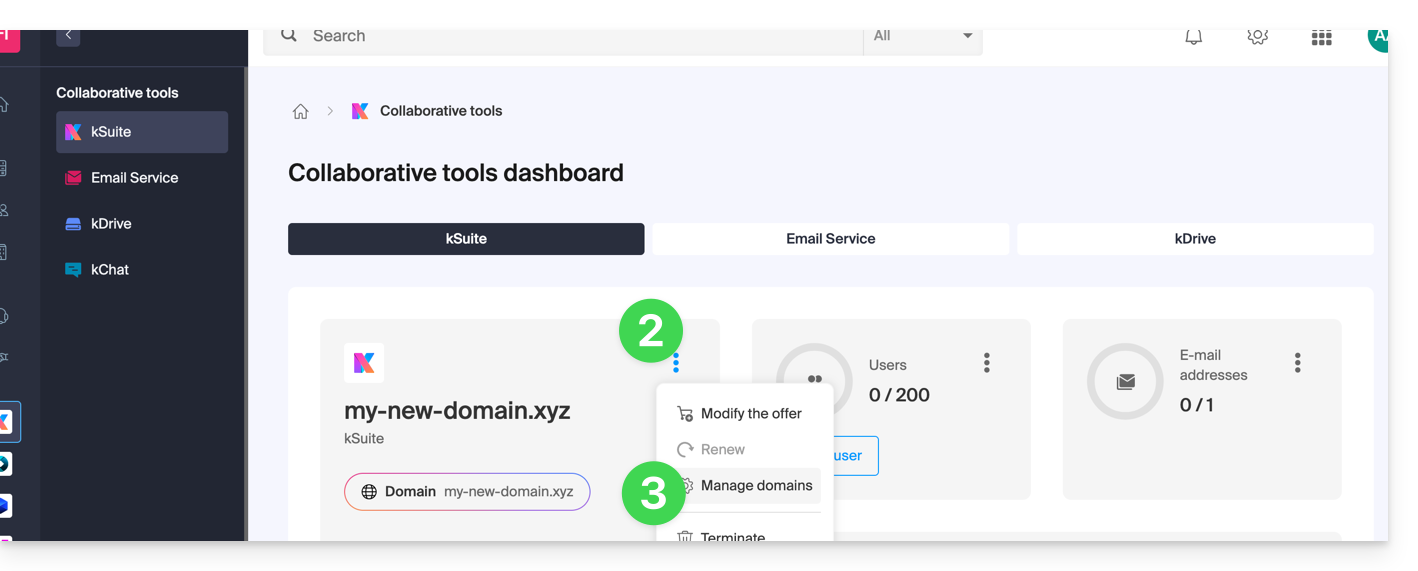
- Click on the ⋮ icon to the right of the domain name you wish to disassociate.
- Click on “Disassociate domain”:
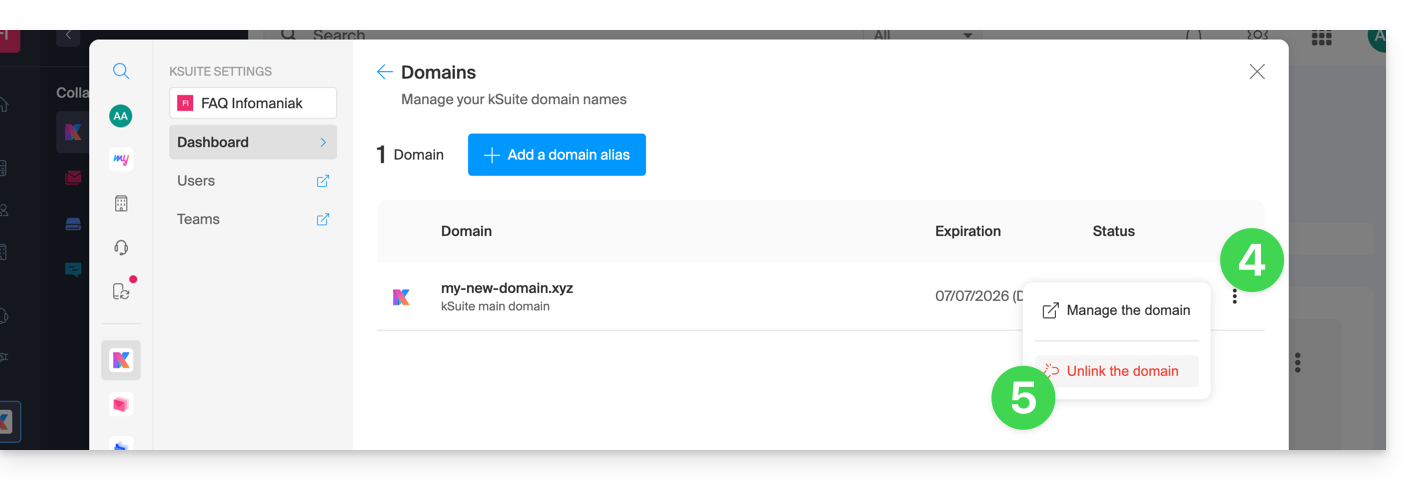
- If you have a paid kSuite plan, you cannot disassociate the domain name (cancel the paid plan if necessary):
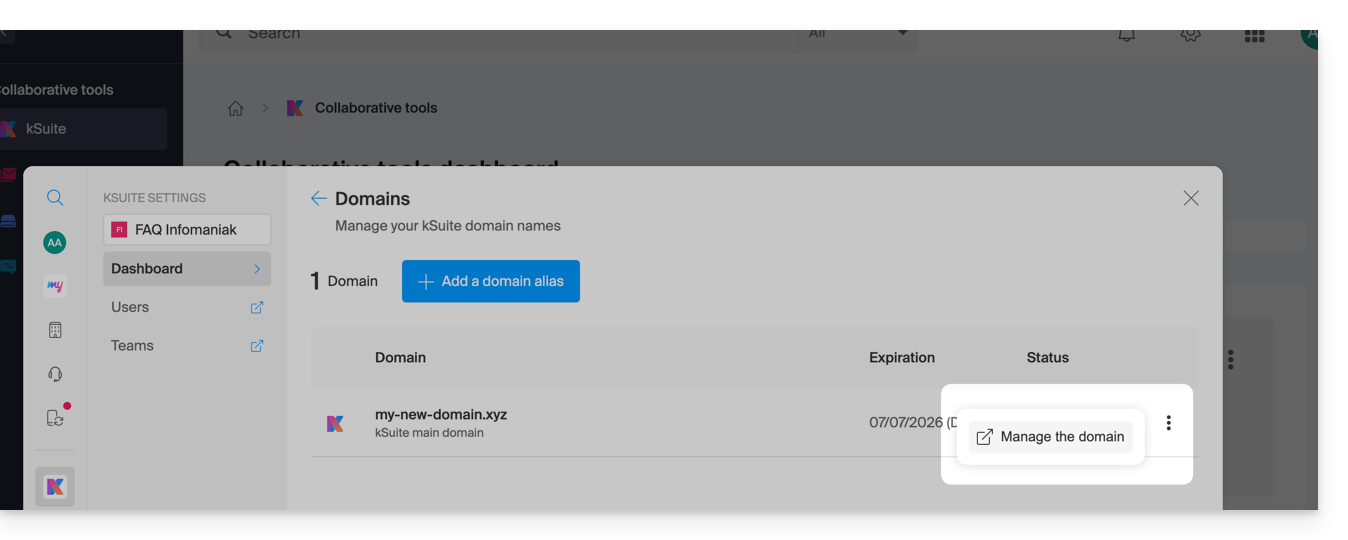
- If you have a paid kSuite plan, you cannot disassociate the domain name (cancel the paid plan if necessary):
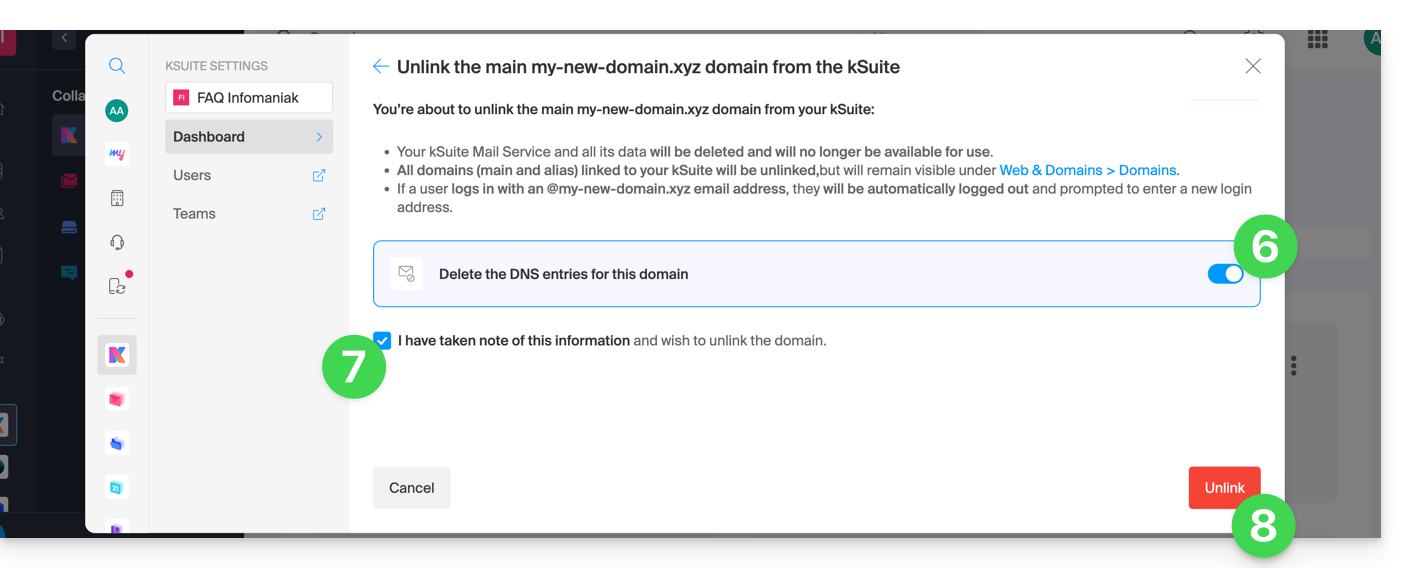
- If necessary, enable the deletion of the domain name's DNS entries.
- Confirm the detachment.
- Click the button to confirm:
Link to this FAQ: https://faq.infomaniak.com/2893
Has this FAQ been helpful?