Knowledge base
1000 FAQs, 500 tutorials and instructional videos. Here, there are only solutions!
The CGID module for Apache has been disabled on Infomaniak's shared web hosting offers.
If necessary, you should consider changing your plan to a Cloud Server if you are currently on a shared web hosting plan. This can be done transparently: refer to this other guide on the subject.
Link to this FAQ:
Has this FAQ been helpful?
This guide explains how to increase the max_children value on Managed Cloud Server to increase the number of simultaneous PHP processes that can be used by your site. This will be very useful for resolving infinite page loading issues on your site.
Preamble
- By default on all hosting, the
max_childrenlimit is set to 20.- Although it is possible to increase this value from the Infomaniak Manager, the
max_childrenlimit is automatically adjusted based on the configuration of your Managed Cloud Server. - To increase this limit on shared hosting, migrate to Managed Cloud Server.
- Although it is possible to increase this value from the Infomaniak Manager, the
- To understand how to calculate the
max_childrenneeded as accurately as possible, refer to this article on the subject.
Increase the max_children value
Prerequisites
- Ensure that you have the necessary resources on the Managed Cloud Server.
- Ensure that all resources of the Managed Cloud Server are not being used; if it turns out that they are fully used, increasing the
max_childrenvalue will have no effect (Modify Managed Cloud Server resources). - Monitor the resources of your server, in case the resources of your server are reached, it will be necessary to check the optimization of processes and your site before considering increasing the
max_childrenvalue. - Consult the PHP error reports from the
/ik-logsfolder (master process php logs - file name: php-fpm.log) to check if the "max_children" limit has been exceeded... example of error:[05-Jul-2024 09:08:58] WARNING: [pool www.infomaniak.ch] server reached max_children setting (20), consider raising it
To access the management of PHP / Apache parameters of the site for which you need to increase the max_children value on Managed Cloud Server, refer to this other guide.
You will be able to...
- ... choose a new
max_childrenvalue: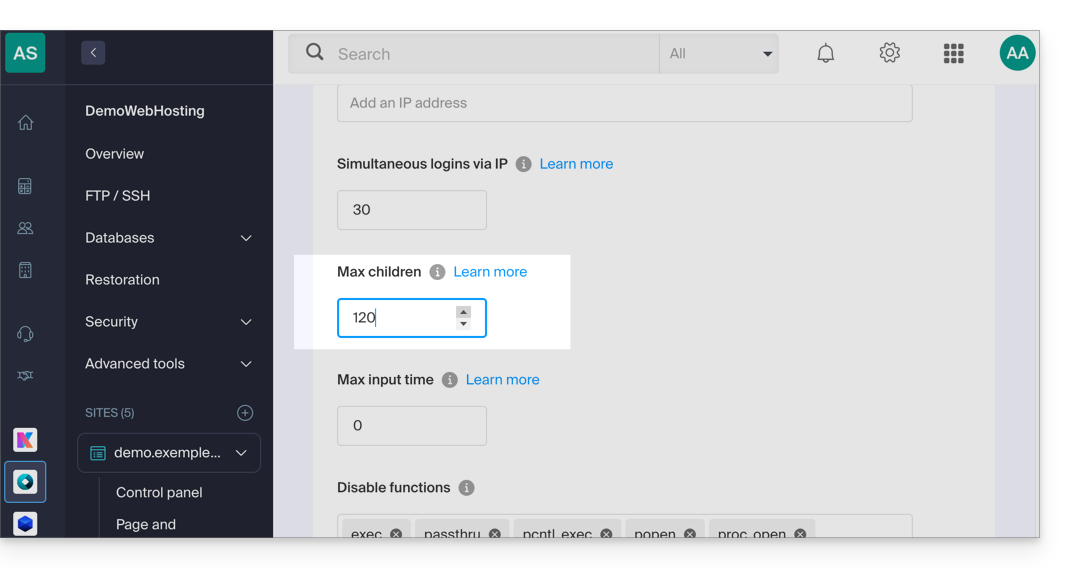
Do not forget to save the changes at the bottom of the page.
Limits depending on the server
Limit of max_children depending on the resources of the Managed Cloud Server:
| Managed Cloud Server Configuration | max_children |
|---|---|
| 2 CPU / 6 Go RAM | 20 |
| 4 CPU / 12 Go RAM | 40 |
| 6 CPU / 18 GB RAM | 60 |
| 8 CPU / 24 GB RAM | 80 |
| 12 CPU / 36 GB RAM | 120 |
| 16 CPU / 48 GB RAM | 160 |
| 24 CPU / 72 GB RAM | 240 |
| 32 CPU / 96 or 128 GB RAM | 320 |
Link to this FAQ:
Has this FAQ been helpful?
This guide is for you if you wish to perform vulnerability tests on your site / server hosted by Infomaniak.
Tolerated and restricted
You are free to perform vulnerability tests (SQL injection, XSS, etc.), intrusion, or penetration testing (pentest) on your Infomaniak hosting only under the following conditions:
- ... between 9 AM and 5 PM CET
- ... from Monday to Friday
- ... with the minimum number of attack packets regardless of the software used (AppScan for example)
- ... without ever performing a single DoS or DDoS (Denial of Service) attack
- ... by respecting the Infomaniak Terms of Service, in particular the shared framework of the services
Any abusive use may result in early termination by Infomaniak.
Link to this FAQ:
Has this FAQ been helpful?
This guide details the use of Perl or Python scripts on Infomaniak hosting and the management of their modules.
Prerequisites
- Shared Web Hosting: the CGI module is no longer available; the execution of Perl and Python scripts is therefore not supported.
- It is necessary to migrate to a Cloud Server.
- Managed Cloud Servers: to benefit from the latest technologies, it is possible to upgrade your Cloud Server.
Web Configuration (Apache/CGI)
To run Python or Perl scripts via Apache on Cloud Server, the interpretation of files with the extensions .py and .pl is not active by default.
Using your FTP software/client or the Web FTP, add and adapt the following directive in the .htaccess file located in the folder containing your scripts:
AddHandler cgi-script .pl .cgi .py
Options +ExecCGI
Installation of additional modules
On a Cloud Server, you have the possibility to install third-party libraries that are not present by default.
Python
- The installation is done through
PIP, which is a package manager used to install and manage packages written in Python. - Infomaniak offers
PIPandPIP3via the Fast Installer tool. - Once PIP is installed, you will be able to install Python modules by specifying
--userduring the command. For example: pip3 install mysql-connector-python --user
Perl
- The addition of Perl modules is also done via SSH (console). It is necessary to install them in the user directory and to define the full path within the scripts.
Important technical information
- Interpreter Path:
/usr/bin/python - Extensions: Scripts must have the extension
.pl,.cgior.py. - Limitations: The
mod_pythonmodule is not supported.
Error Resolution (CGIWrap)
If you encounter the following error when loading an image:
CGIWrap Error: Execution of this script not permitted
Request Data:Extra Path Info: /dossier/.../image.PL.12.34.gif
The server interprets the file as a script because it contains ".PL" (or .PY) in its name.
Solution: Simply rename the file to remove this mention (example: image-12-34.gif).
Link to this FAQ:
Has this FAQ been helpful?
This guide will help you if, for example, you want to deploy a package like pymysql and it requires a Python version higher than the default one provided on your hosting.
Preamble
- Anaconda is a free and open-source distribution of the programming languages Python and R; it aims to simplify package management and deployment.
- It is recommended to use Miniconda (a lightweight version of conda); it installs in your user space, avoiding any conflict with the system Python and not requiring administrator rights.
- Refer to the official documentation.
1. Download the installer
For example, the 64-bit Linux version for Python 3.11.
user@server:~$ wget https://repo.anaconda.com/miniconda/Miniconda3-py311_23.10.0-1-Linux-x86_64.sh
--2024-03-10 12:00:00--  https://repo.anaconda.com/miniconda/Miniconda3-py311_23.10.0-1-Linux-x86_64.sh
Resolving repo.anaconda.com... 104.16.131.3, 104.16.130.3
Connecting to repo.anaconda.com|104.16.131.3|:443... connected.
HTTP request sent, awaiting response... 200 OK
Length: 72787200 (69M) [application/x-sh]
Saving to: ‘Miniconda3-py311_23.10.0-1-Linux-x86_64.sh’

Miniconda3-py311_23.10.0-1-Linux-x86_64.sh  100% [===================>]  69.42M  --.-KB/s    in 0.3s
2. Check the integrity (SHA256 Hash)
user@server:~$ sha256sum Miniconda3-py311_23.10.0-1-Linux-x86_64.sh
6c714a33ea348303f909194246990422e698889417d74b9714856b3e9a7e6c3a  Miniconda3-py311_23.10.0-1-Linux-x86_64.sh
3. Run the installation
The -b argument allows for a silent installation. By default, Miniconda will install in ~/miniconda3.
user@server:~$ bash Miniconda3-py311_23.10.0-1-Linux-x86_64.sh -b
PREFIX=/home/clients/your_client_hash/miniconda3
Unpacking payload ...
Collecting package metadata (current_repodata.json): done
Solving environment: done
Executing transaction: done
installation finished.
4. Initialize and activate Conda
To use conda immediately and with each SSH connection:
user@server:~$ ~/miniconda3/bin/conda init bash
no change     /home/clients/your_client_hash/miniconda3/condabin/conda
...
modified      /home/clients/your_client_hash/.bashrc

user@server:~$ source ~/.bashrc
5. Install a package (example: pymysql)
Once activated, the (base) prefix appears before your command prompt. You can then install your tools without sudo or --user.
(base) user@server:~$ python -V
Python 3.11.5

(base) user@server:~$ pip install pymysql
Collecting pymysql
  Downloading PyMySQL-1.1.0-py3-none-any.whl (44 kB)
Installing collected packages: pymysql
Successfully installed pymysql-1.1.0
Link to this FAQ:
Has this FAQ been helpful?
This guide covers the support of secure hash functions (including SHA-256) by Infomaniak servers, as well as the emphasis on the security of SSL/TLS certificates using CSRs generated with SHA-256.
SHA-256 hashing algorithm
The cryptographic hash function SHA-1 is compatible and Infomaniak servers also support the SHA-256 function, which is useful for PayPal and SaferPay (SIX).
The CSRs (certificate signing requests) are in SHA-256 and not in SHA-1.
Link to this FAQ:
Has this FAQ been helpful?
This guide explains how to back up a Cloud VPS in the form of a snapshot.
Introduction
- A snapshot is like a picture of your Cloud VPS at a specific point in time, containing everything on your server, including your operating system, applications, data, etc.
- Snapshots can be used, in particular, to…
- … protect your Cloud VPS in case of a problem: if you encounter a problem with your Cloud VPS, you can restore a snapshot to return to a previous state.
- … test changes without risk: before making significant changes to your Cloud VPS, you can create a snapshot so that you can revert if necessary.
- You benefit from one free snapshot to back up your entire server in a dedicated space; if needed, it is possible to order additional space or delete a snapshot to create a new one.
- Two types of backup are possible:
- Snapshot of the data: allows you to create an image of the volume that contains your data (not available for Windows distributions).
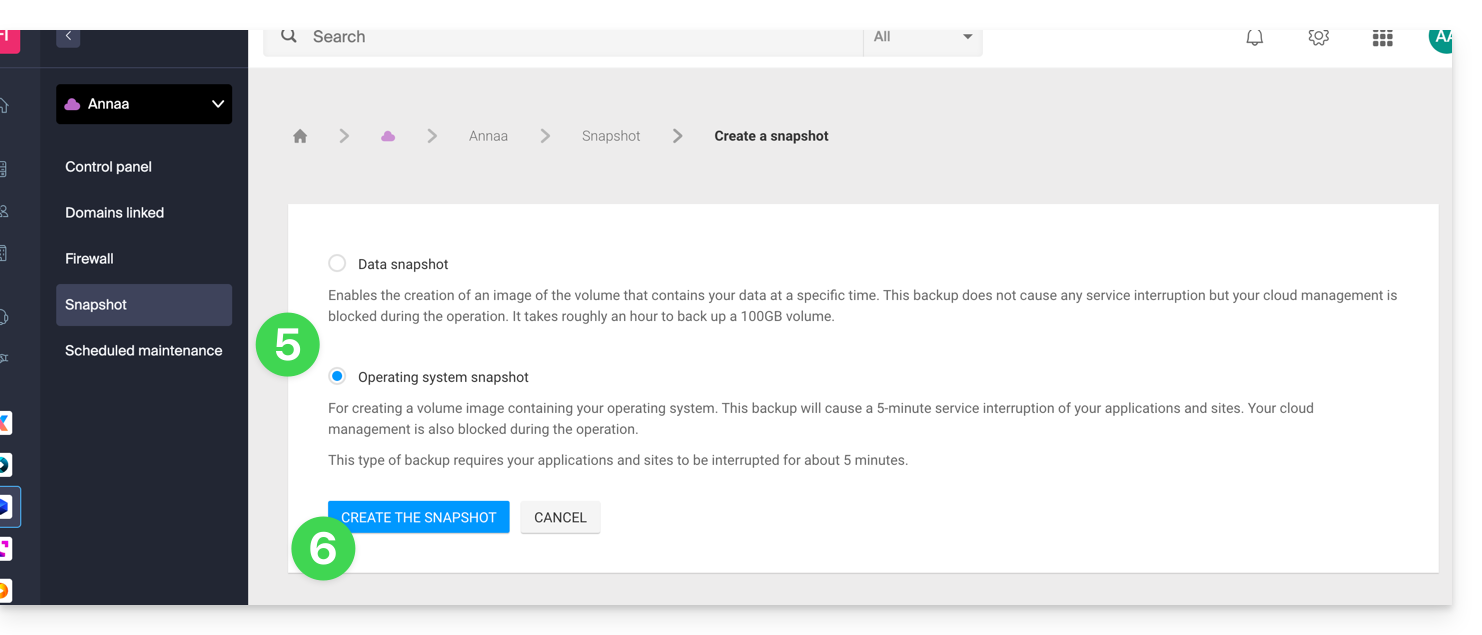
- Snapshot of the operating system: allows you to create an image of the volume that contains your operating system. This type of backup involves a brief interruption of a few minutes for your applications and websites.
- It is recommended to create snapshots regularly, for example once a week or once a month; this will allow you to have a history of your Cloud VPS and to be able to revert in case of a problem.
- It is obviously possible to restore the Cloud VPS to its previous state using the snapshot created earlier.
Create a snapshot
To do this:
- Click here to access the management of your product in the Infomaniak Manager (need help?).
- Click directly on the name assigned to the product in question.
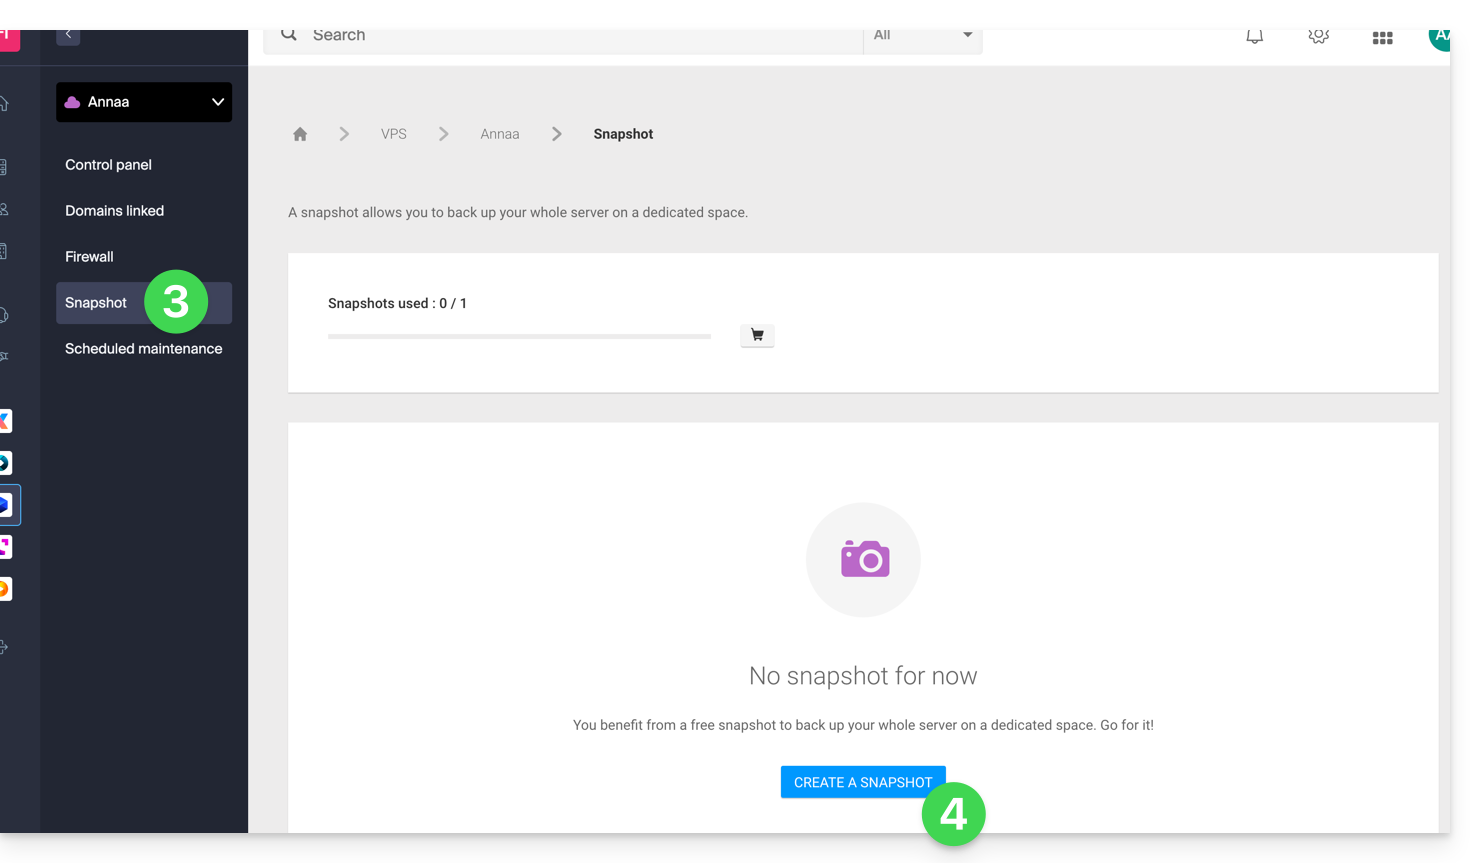
- Click on Snapshot in the left-hand menu.
- Click on the blue Create a snapshot button:
- Choose the type of snapshot to create (data or operating system).
- Click on the blue button to start creating the snapshot:
- An email is sent when the snapshot is generated.
Delete a snapshot
To do this:
- Click here to access the management of your product in the Infomaniak Manager (need help?).
- Click directly on the name assigned to the product in question.
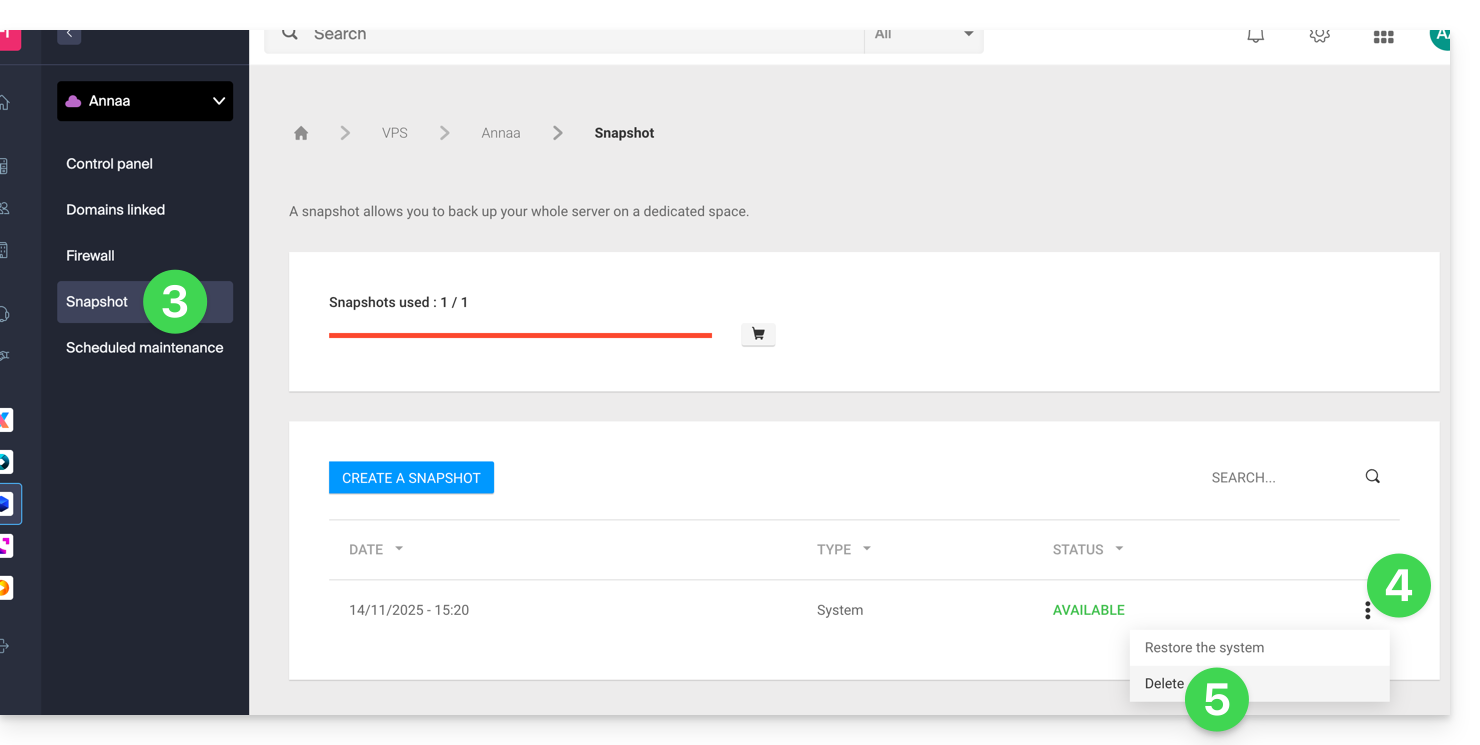
- Click on Snapshot in the left-hand menu.
- Click on the action menu ⋮ to the right of the item in question in the table that appears.
- Click on Delete:
Order additional snapshots
To do this:
- Click here to access the management of your product on the Infomaniak Manager (need help?).
- Click directly on the name assigned to the product in question.
- Click on Snapshot in the left-hand menu.
- Click on the shopping cart icon:
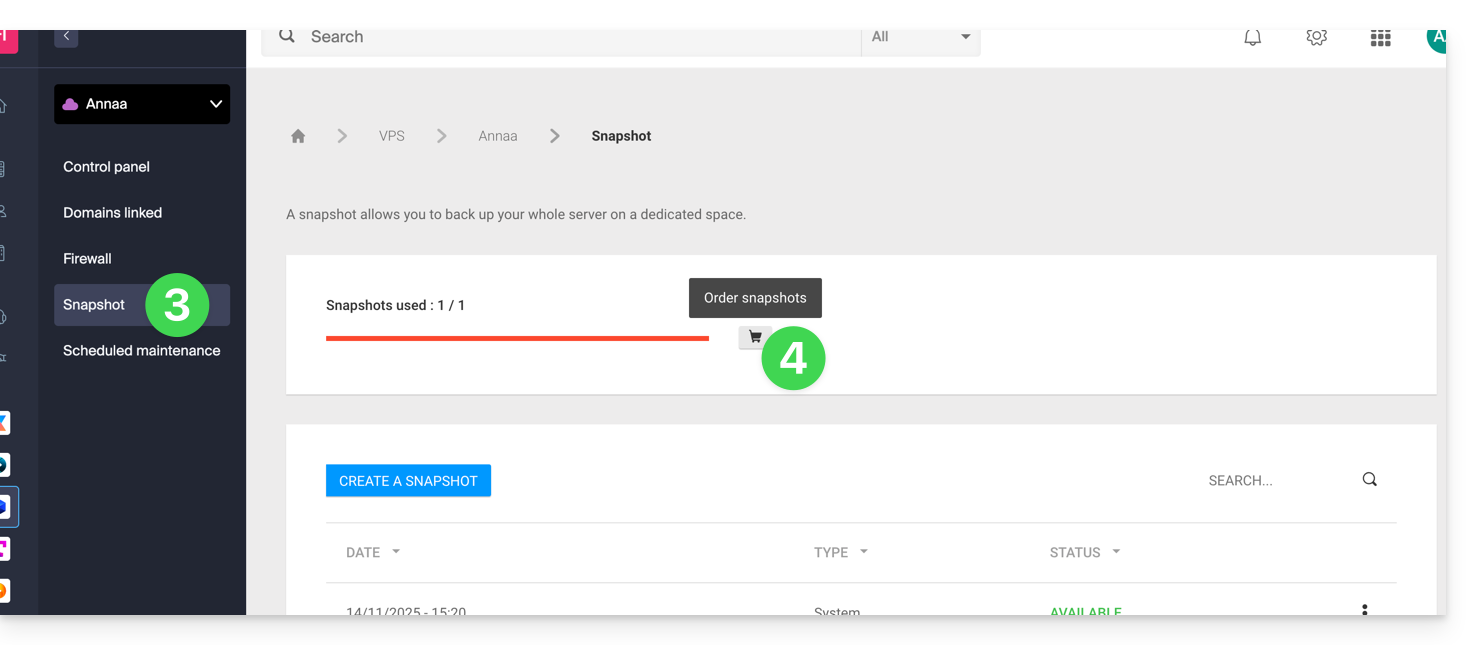
- Follow the instructions to complete the order.
It is not possible to order an additional snapshot if a snapshot is currently in progress.
Link to this FAQ:
Has this FAQ been helpful?
This guide explains how to display the IP address of a site on your Web Hosting.
Preamble
- The IPv4 address is usually the same for each of the sites on the hosting (unless you have acquired a dedicated IP).
Display the IP address of your site
The IP address is specified on the hosting management page (Starter or containing multiple sites):
- Click here to access the management of your site on the Infomaniak Manager (need help?).
- Click directly on the name assigned to the product concerned.
- Then click on the chevron to expand the Information section of this hosting.
- The IPv4 address is displayed on the page:

- The IPv6 address is also displayed in the case of paid hosting:

Link to this FAQ:
Has this FAQ been helpful?
This guide details the "502 Bad Gateway" errors that can be encountered when visiting a website.
Preamble
- The 502 Bad Gateway error occurs when the server acting as a gateway between the browser and the origin web server receives an invalid response.
- This error can be caused by an overloaded web server, communication issues between a CDN and the hosting web server, or a misconfigured proxy server.
- Sometimes, the error can be caused by a bad entry in the DNS server.
Troubleshooting steps
To resolve the 502 Bad Gateway error, you often need to proceed by elimination:
- Check if the server is temporarily overloaded: simply reload the page after a few minutes for the error to disappear.
- Clear the browser cache.
- Try from another browser.
Link to this FAQ:
Has this FAQ been helpful?
This guide details the specifics related to managing MongoDB on your Managed Cloud Server, particularly regarding the version lifecycle.
Preamble
- Any new installation of the application deploys MongoDB version 7.0 (or higher) by default.
Upgrading from version 6 to 7
It is not possible to perform an automatic update (upgrade) from version 6 to version 7 directly from your interface.
Two solutions are available to you:
- Order a new Cloud Server: it will natively have version 7, and you can then migrate your data to it.
- Reinstall the application: uninstall and then reinstall MongoDB on the current server.
Uninstalling the application deletes all of your MongoDB data. Additionally, it will no longer be possible to reinstall version 6 after this operation.
Backups and responsibility
As an administrator, the management and integrity of your data are entirely your responsibility.
Before any manipulation (especially reinstallation):
- Perform your own backups and exports (dump) of your databases.
- Plan for the manual import of your data once the new version is active.
Link to this FAQ:
Has this FAQ been helpful?
This guide explains what you need to determine as a website visitor if you encounter a 403 error to resolve this issue.
What is the 403 error?
The HTTP 403 error code generally means that access to a resource is denied to the client by the server.
In what case does this error occur?
The user is not authenticated: the server requires the user to identify themselves to access the resource. This can be the case for private pages requiring authentication, for example.
The user is authenticated but does not have the necessary permissions: the server recognizes the user but does not authorize them to access the requested resource due to permission or role restrictions. This cause of 403 error may be an incorrect permission issue on a folder or file. For a folder, the error message is of type "403 Forbidden", for a file, "failed to open stream: Permission denied". In this case, you must verify that the permissions of your folders/files are correct, i.e., a minimum of 644 for a file and 755 for a folder. Refer to this other guide.
The user's IP address is blocked or restricted: the server may block access to a specific IP address for security reasons, protection against attacks... Refer to this other guide.
The requested resource does not exist on the server: in this case, the server returns a 403 error instead of a 404 error to avoid disclosing confidential information. If you are simply trying to access your homepage or a part of your site by indicating an address of type www.domain.xyz or www.domain.xyz/folder/ make sure there is a homepage named "index.html or .htm or .php" placed in the correct location (at the root of your FTP space, in the /web directory, or in the /folder/ directory). Refer to this other guide.
Additionally, check that there are no uppercase letters in the file name; all file or folder names present must be in lowercase, without accents or spaces.
Script-related error: if you were running a script, filling out a form, uploading a file online, and you get this type of message:
Accès interdit!
Vous n'avez pas le droit d'accéder à l'objet demandé.
Soit celui-ci est protégé, soit il ne peut être lu par le serveur.
Si vous pensez qu'il s'agit d'une erreur du serveur, veuillez contacter le gestionnaire du site.
Error 403
the cause may be a filter that prevents the unwanted use of scripts by spammers. Indeed, the Infomaniak antivirus blocks the uploading of files via scripts or via FTP. This concretely means that when a hacker sends a file identified as a virus via a form, an insecure script, or via FTP, its installation is directly blocked, the file is not uploaded to the server, and the upload generates a 403 error.
In case of a false positive, contact Infomaniak support by providing the URL of the page where you encounter this error message to precisely diagnose the origin of the problem.
However, there are many other cases in which you might receive a "403 forbidden" message and for very diverse reasons (PHP, perl, mod_security, .htaccess scripts, ...).
Link to this FAQ:
Has this FAQ been helpful?
This guide helps resolve issues with special characters (accents, emojis, etc.) that do not display correctly or appear as symbols like ??, often due to incorrect encoding when connecting to MySQL.
Preamble
- By default, MySQL uses
UTF-8. - Recent MySQL servers are generally configured to use
UTF-8orUTF-8MB4by default.- This is suitable for most cases, especially for international languages and emojis.
- Also, refer to this other guide to learn how to avoid encoding issues with non-European characters and emojis in your developments.
Set the default MySQL / MariaDB charset (Cloud Server)
With an Infomaniak Cloud Server, you can set the default charset (utf8 or utf8mb4):
- Click here to access the management of your product on the Infomaniak Manager (need help?).
- Click directly on the name assigned to the product concerned.
- Click on MariaDB in the left sidebar.
- Choose the default charset:
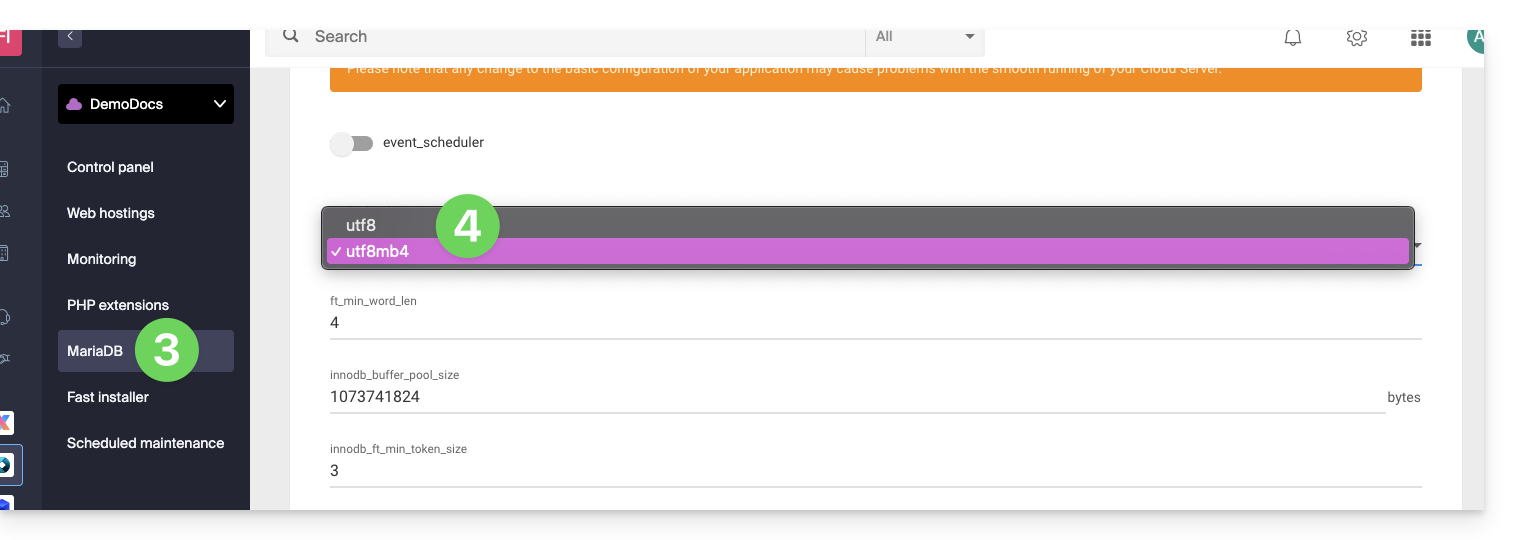
- If you have not yet migrated to MariaDB, the principle is the same.
- Save your changes at the bottom of the page.
Force a specific encoding (latin1 for example)
If you need to work with a database in latin1 (ISO-8859-1), you must explicitly align the encoding when connecting, depending on your environment.
On current offers, place the following code in a user.ini file located at the root of your hosting:
mysql.connect_charset = "latin1"
mysqli.connect_charset = "latin1"
pdo_mysql.connect_charset = "latin1"
or in PHP (MySQL API):
mysql_query("SET CHARACTER SET latin1");On older hosting plans, force the MySQL connection to latin1 via the .htaccess file located at the root of your hosting:
php_value mysql.connect_charset latin1
php_value mysqli.connect_charset latin1
php_value pdo_mysql.connect_charset latin1
Link to this FAQ:
Has this FAQ been helpful?
This guide concerns MySQL/MariaDB and, more specifically, index and query analysis with Web Hosting.
Slowlog for long queries
The MySQL slowlog is enabled on all MySQL servers and groups queries that take more than 5 seconds* to execute. If your queries are well-structured, you will never see these files. Otherwise, check them regularly to correct any issues and ensure your site functions properly.
Contact Infomaniak support in writing to obtain them (except for older v1 hosting plans - old formula), which can be directly accessed from the Web FTP, one level above /web in the /logs directory.
What about logs?
No MySQL log is created (apart from slowlogs) because the MySQL servers could not handle the load of millions of logs being recorded simultaneously. If needed, Infomaniak can activate this MySQL log for 5 minutes to allow you to analyze it with EXPLAIN and determine useful indexes, for example. To do this, contact Infomaniak support in writing.
* elapsed time. Regarding locks, the documentation provides the following clarification: "The time to acquire the initial locks is not counted as execution time."
Link to this FAQ:
Has this FAQ been helpful?
This guide details the Infomaniak Managed Cloud Server offer and the Infomaniak VPS offer intended for different uses.
Preamble
- Infomaniak offers two advanced hosting solutions:
- the Managed Cloud Server, which allows you to create multiple hosts (FTP/SSH spaces) on which you add your sites (Apache vhosts),
- and the VPS (Virtual Private Server), which offers complete administrative freedom and meets different needs.
Managed Cloud Server
The Cloud Server allows you to exceed the limits of shared hosting. You can create and distribute your sites as you wish, define the root directory of each site, and adjust parameters such as memory_limit and max_execution_time.
Integrated tools are provided: cronjobs, Site Creator, simplified installation of WordPress, access and error logs (logs). It is also possible to add specific Apache modules or install a caching system.
The software environment is managed by Infomaniak (FastCGI, PHP-FPM). You do not have complete freedom to configure the server (no arbitrary software installation), but certain specific programs can be installed.
VPS (unmanaged)
The VPS gives you full control over the server, but it is your responsibility. Infomaniak manages the hardware and installs the version of Linux or Windows chosen at the time of ordering. No software intervention is performed by Infomaniak: you administer the system, install, and configure the software.
You can restart the server via the Infomaniak Manager. A snapshot system is available (excluding VPS Lite offer).
Video content and alternatives
If your project mainly involves a large volume of videos, it is often preferable to separate video streaming from the main hosting. Associated with shared hosting, the Infomaniak VOD/AOD space allows you to efficiently store and stream videos, support load increases, and obtain detailed viewing statistics.
Migration between Cloud Server and VPS
There is no automatic migration solution between a Managed Cloud Server and a VPS. To switch from one offer to another, you need to cancel the product you no longer use and order the new offer. Infomaniak refunds, upon request, any new server if the cancellation occurs within 30 days of the order.
Link to this FAQ:
Has this FAQ been helpful?
This guide explains how to view and modify the configuration settings for MySQL / MariaDB on a Managed Cloud Server. These settings allow you to adjust the behavior, performance, and certain features of the service, including resource limits.
Introduction
MySQLis installed on a Dedicated Managed Cloud Server: resources are not shared with other customers.- Only one instance of
MySQLorMariaDBis present per Cloud Server. - The number and size of databases depend solely on the available disk space and resources.
- For very large volumes of non-relational data, MongoDB is recommended.
Configurable MySQL / MariaDB Parameters
The following list presents the main variables that you can customize in your MySQL / MariaDB instance:
| Name | Description | Value |
|---|---|---|
bulk_insert_buffer_size | Size of the buffer for bulk insert operations | 8M |
default_charset | Defines the default character set for the database | utf8mb4 |
declare_explicit_defaults_for_timestamp | Allows you to explicitly declare default values for timestamp type columns | "" |
declare_innodb_autoextend_increment | Increment used for automatic extension of the InnoDB tablespace | "" |
declare_key_buffer | Key buffer size for MyISAM tables | "" |
event_scheduler | Enable or disable the MariaDB event scheduler (allows scheduled tasks to be executed on the server side) | OFF |
ft_max_word_len | Maximum word length for full-text search | Undefined |
ft_min_word_len | Minimum word length for full-text search | 3 |
innodb_additional_mem_pool_size | Size of the additional memory pool for InnoDB | "" |
innodb_buffer_pool_size | Size of the InnoDB buffer pool (stores data and indexes) | "" |
innodb_flush_log_at_trx_commit | Frequency of writing InnoDB logs to disk | "" |
innodb_large_prefix | Enable large prefix for InnoDB indexes | |
innodb_lock_wait_timeout | Maximum wait time for obtaining InnoDB locks | "" |
innodb_log_buffer_size | Size of the InnoDB log buffer | "" |
innodb_log_file_size | Size of the InnoDB log files | "" |
innodb_ft_min_token_size | Minimum token size for full-text search | Undefined |
innodb_ft_max_token_size | Maximum token size for full-text search | Undefined |
join_buffer_size | Join buffer size for queries | 1M |
key_buffer_size | Key buffer size for MyISAM tables | 4M |
lc_time_names | Defines the language used for the format of month and day names | Undefined |
local_infile | Enable or disable local file reading | 0 |
log_bin_enabled | Enable or disable binary logging of transactions | true |
max_allowed_packet | Maximum size of allowed network packets | Undefined |
max_connect_errors | Maximum number of connection errors before blocking | 10 |
max_connections | Maximum number of simultaneous connections | Undefined |
max_heap_table_size | Maximum size of in-memory tables | 8M |
max_user_connections | Maximum number of simultaneous connections per user | 38 |
myisam_max_sort_file_size | Maximum size of the temporary file used for sorting MyISAM tables | 2G |
myisam_sort_buffer_size | Sort buffer size for MyISAM tables | 16M |
myisamrecover | Automatic recovery options for MyISAM tables | myisam-recover-options |
query_cache_enabled | Enable or disable the query cache | |
query_cache_limit | Size limit for results stored in the query cache | 256K |
query_cache_size | Total size of the query cache | 64M |
query_cache_type | Type of cache used for queries | 0 |
read_buffer_size | Size of the sequential read buffer | 2M |
read_rnd_buffer_size | Size of the random read buffer | 2M |
table_open_cache | Number of tables the server can keep open simultaneously | 256 |
thread_cache_size | Size of the thread cache | 1 |
thread_concurrency | Number of concurrent threads (0 = unlimited) | 0 |
thread_stack | Thread stack size | 256K |
timeouts | Timeout values (wait_timeout and interactive_timeout) | 30 |
tmp_table_size | Maximum size of in-memory temporary tables | 8M |
tmpdir | Temporary directory used for temporary files | "/home/nfs-clients/.mysql_tmp" |
Any undefined parameter will remain at its default value.
Modify MySQL / MariaDB parameters
To modify your instance configuration:
- Click here to access your product management in the Infomaniak Manager (need help?).
- Select the name of the Cloud Server in question.
- Click on MySQL / MariaDB in the side menu.
- Edit the desired parameters and then validate your changes.
Link to this FAQ:
Has this FAQ been helpful?
This guide explains how to change the management password for WordPress or any other Web Application (Joomla, Drupal, Typo3, PrestaShop, ownCloud, etc.) installed via the Infomaniak tools included in the paid Web Hosting offers.
Preamble
- Some applications also allow changing the user password directly from their dedicated interface:
- Example: WordPress (manage users, names, passwords, roles, etc.).
Change the password of a Web App
To change the password to access the administration panel of your web application, perform the following actions:
- Click here to access the management of your site on the Infomaniak Manager (need help?).
- Click directly on the name assigned to the site concerned:
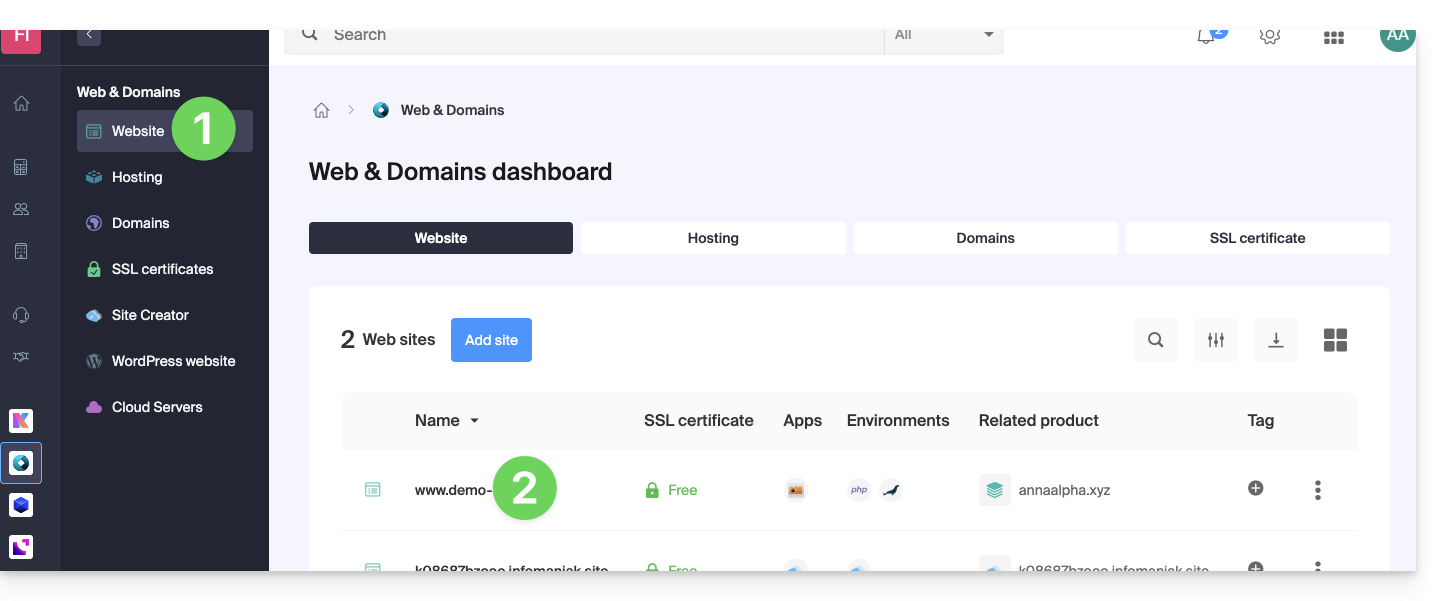
- Click on the action menu ⋮ located to the right of the Web Application concerned.
- Click on Settings of the application:
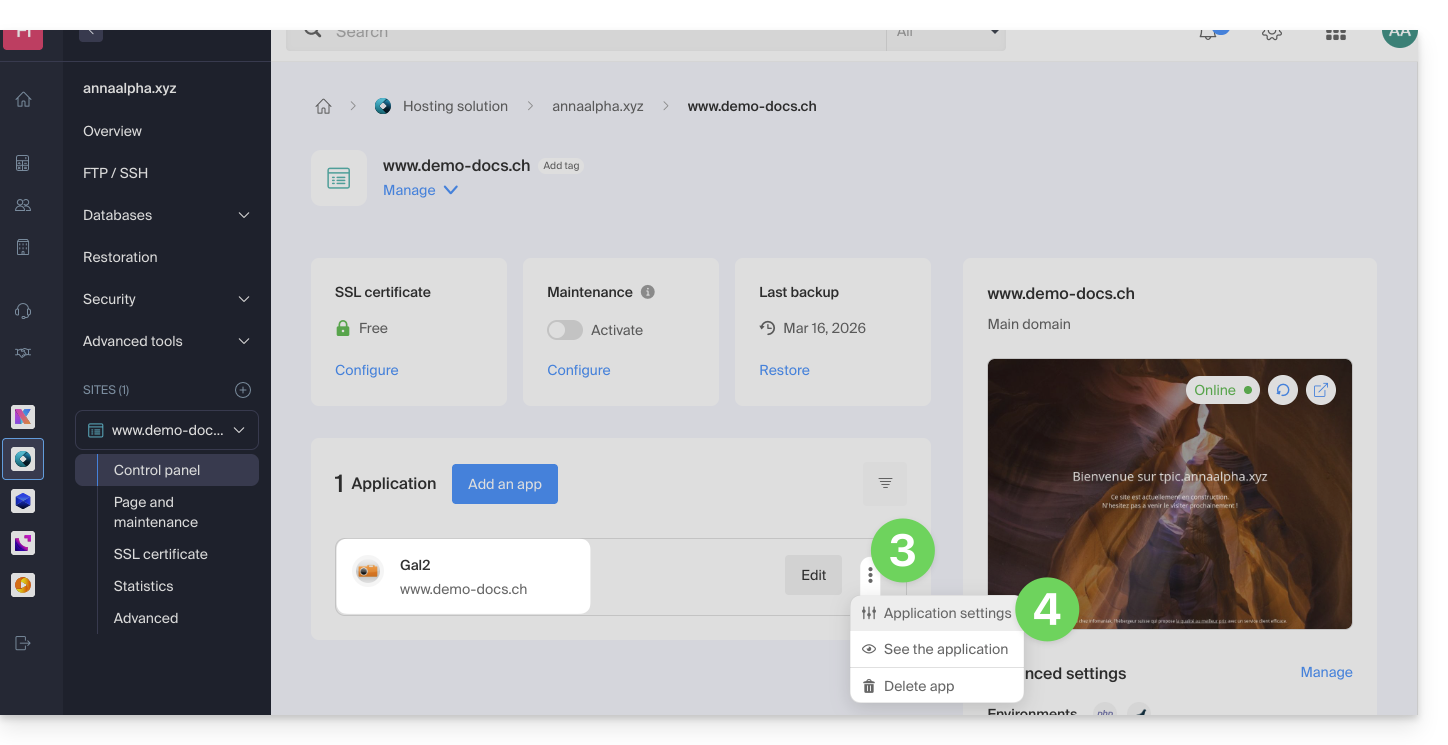
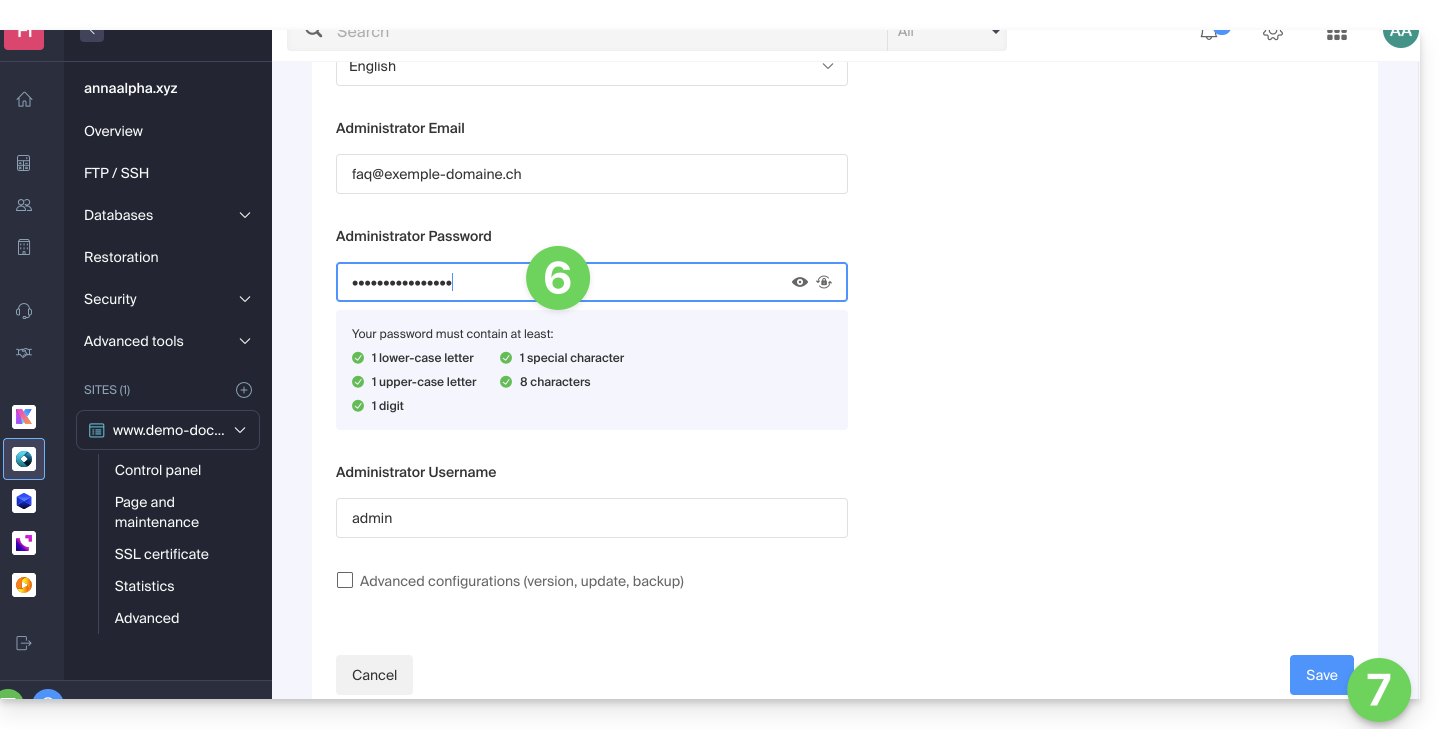
- Click on Modify to the right of the Application:
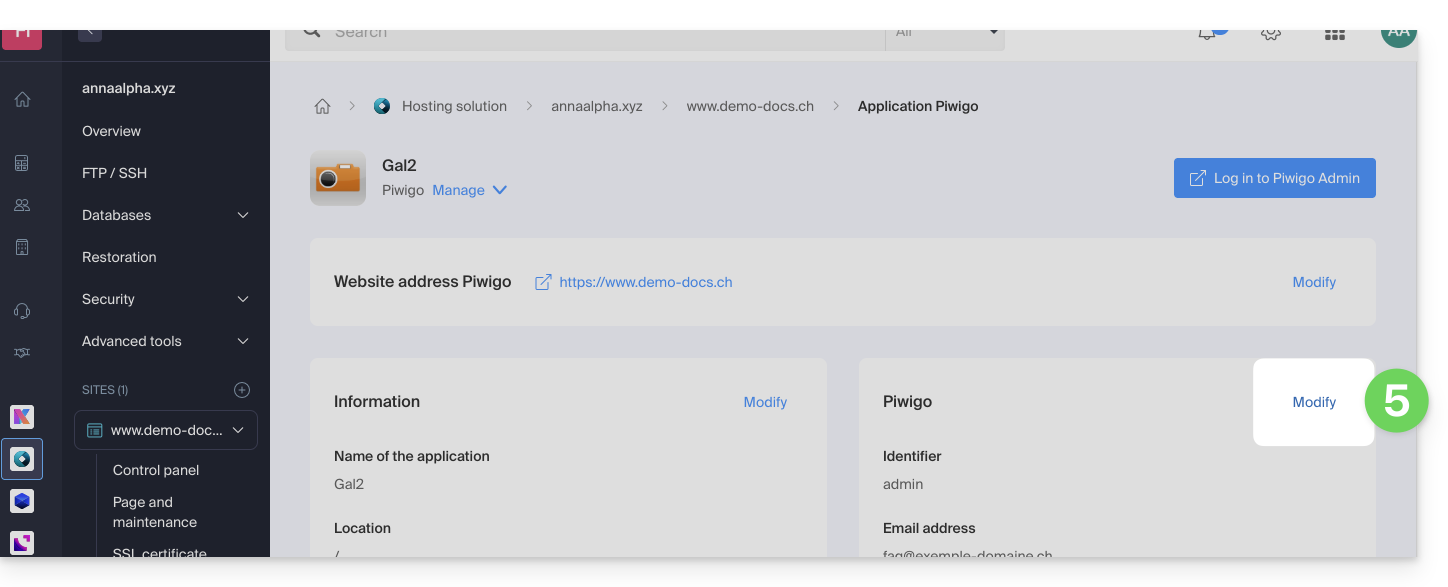
- Under Password enter the new password (for the connection with the identifier indicated above).
- Click on the Save button at the bottom of the page:
Link to this FAQ:
Has this FAQ been helpful?
The user and the process "cloud base - ini" are used as part of the VPS Cloud / VPS Lite infrastructure of Infomaniak (in the case, for example, where the instance is rebuilt). Learn more
Link to this FAQ:
Has this FAQ been helpful?
This guide explains how to view and download Apache logs from Web Hosting, which are useful for analyzing PHP errors or diagnosing certain application behaviors.
Introduction
- Access and error logs are kept for at least 7 days.
- Once the retention period has expired, older entries cannot be restored, even upon request.
- You can also find these files directly on the server via SSH/FTP in the
ik-logsfolder at the root of your hosting.
Accessing access and error logs
To view these logs:
- Click here to access your site management on the Infomaniak Manager (need help?).
- Click directly on the name assigned to the site concerned:
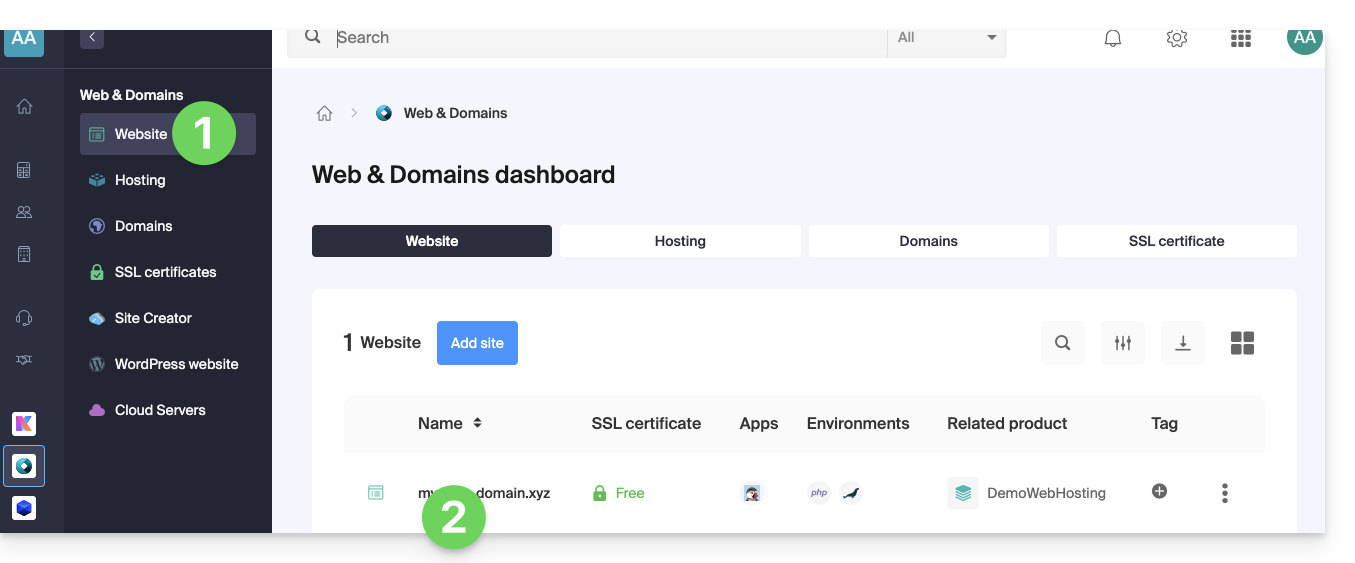
- Click on Advanced in the left sidebar.
- Click on Logs in the left sidebar.
- Click on Errors or Access to display the error log or access log.
- Choose a period if necessary.
- Click on the icon to see the details.
- Click on Send by email to immediately receive all entries by email to your user address.
- Click to export the data in
.logformat: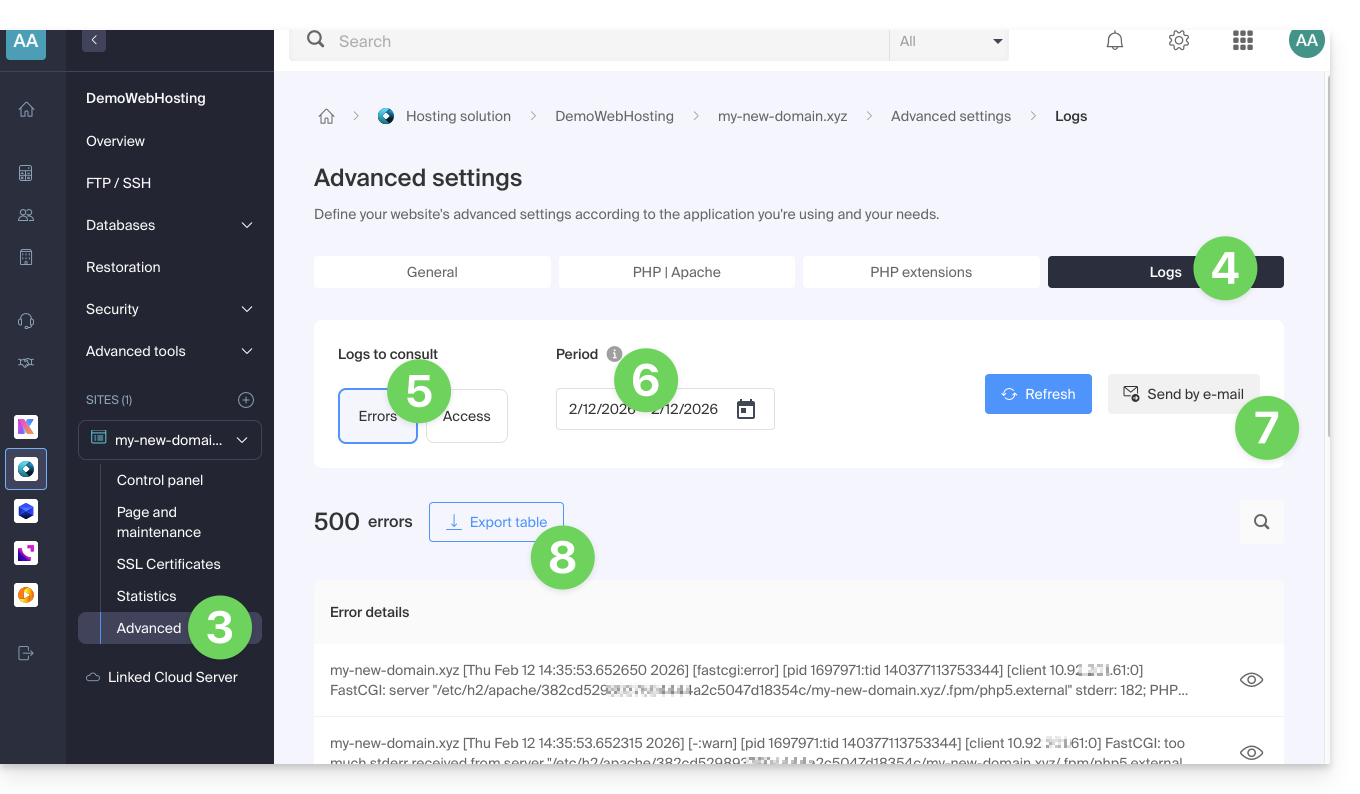
Identify the most active IP addresses in the access logs
To do this, connect to the server via SSH (need help?).
The line to execute in SSH is as follows:
cat ik-logs/access.log | awk '{ print $2}' | sort -n | uniq -c | sort -n | tail -n 20Link to this FAQ:
Has this FAQ been helpful?
This guide lists the supported operating systems (Linux distributions) that can be installed when ordering a Cloud VPS / VPS Lite.
Regarding Windows, please refer to this other guide.
Prerequisites
- Create a password for your user after logging in for the first time with the private key, especially to be able to troubleshoot your server by connecting via the VNC console in case of a problem.
Linux distributions natively supported
Debian
If you are familiar with Debian, then a server of this type would be an excellent choice, an alternative to CentOS offered below. The Debian editions are very stable, especially since "Buster" or more recently "Bookworm" (Debian 12). Learn more
Ubuntu
If you are familiar with Ubuntu in desktop version, you may want to have it on your server. Learn more
FreeBSD
The FreeBSD core code has been developed, improved, and optimized continuously for over thirty years. It is developed and maintained by a large team of people. FreeBSD offers advanced networking features, enhanced security, and high performance. Learn more
openSUSE
This distribution is ideal for beginners, experienced users, and ultra geeks, in short, it is suitable for everyone! Learn more
CentOS
CentOS is the most popular distribution for a web server and therefore has extensive support, whether on the community forum or anywhere on the web. CentOS editions are very stable and designed for long-term use. Learn more
Other Linux distributions
Infomaniak regularly adds new Linux distributions:
- Fedora
- rancherOS
- ArchLinux
- AlmaLinux
- RockyLinux
Specific distribution / disk image
Only official images can be installed, and Infomaniak does not install any operating systems from ISO disk images. If you wish to install a specific distribution, you can do so by importing the image into Public Cloud.
Link to this FAQ:
Has this FAQ been helpful?
This guide explains how to connect via SSH to a Web Hosting or a Cloud Server.
Connect via SSH…
… via a Web Browser
- Click here to access the management of your hosting on the Infomaniak Manager (need help?).
- Click directly on the name assigned to the hosting concerned:
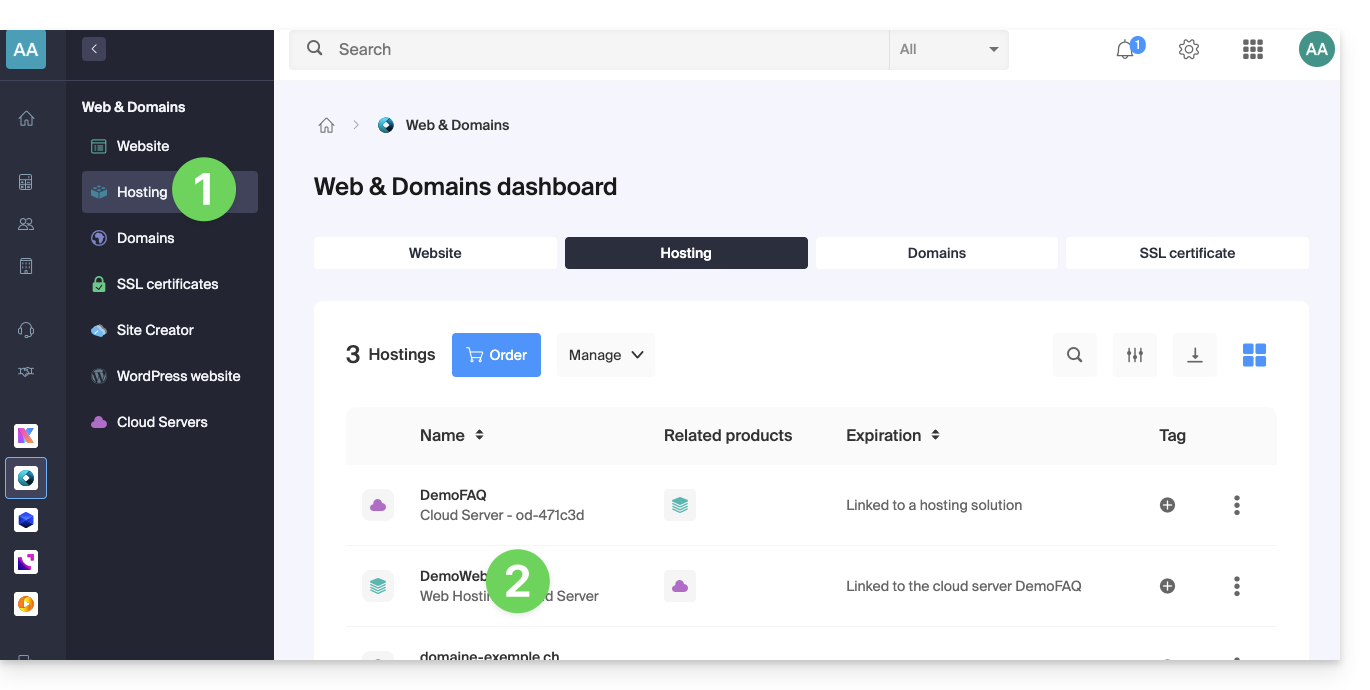
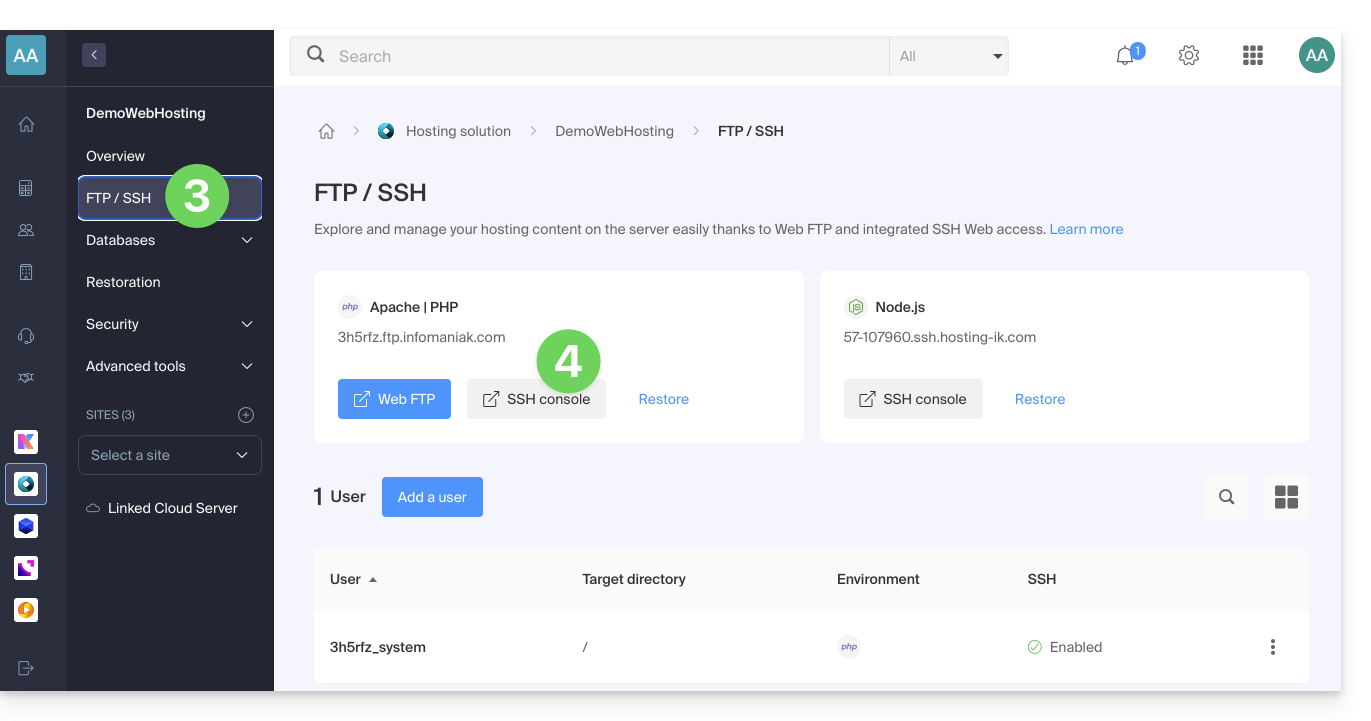
- Click on FTP / SSH in the left sidebar menu.
- Click on the SSH Console button:
… via the terminal or an application
To connect via SSH, use the following commands from a Terminal type application (command-line interface, CLI / Command Line Interface) on your device, for example:
- Terminal (application already integrated with macOS and Linux)
- PuTTY (Windows)
- Windows 10 SSH Client (help in French / in English)
Then enter the following command:
ssh username@serverusernamebeing the username of the FTP accountserverbeing the host server (e.g. xxxx.ftp.infomaniak.com)
To know which command is available and the path to use, run the command "whereis":
$ whereis mysql
mysql: /opt/mysql/bin/mysql
Link to this FAQ:
Has this FAQ been helpful?