Knowledge base
1000 FAQs, 500 tutorials and instructional videos. Here, there are only solutions!
This guide details the differences between the IMAP and POP3 protocols in an email client (Outlook, Microsoft 365, Thunderbird, Apple Mail, eM Client, etc.) and explains why it is crucial not to use them simultaneously for the same email address managed by Infomaniak.
IMAP (recommended)
IMAP is the synchronization protocol. Messages remain on the server and can be accessed from anywhere.
- Multi-device access: your emails are synchronized between your computer, your mobile device, and the Infomaniak Web Mail app.
- Collaborative work: ideal for shared mailboxes. If a user moves or deletes a message, the change is visible to everyone.
- Security: in the event of a computer failure, your messages remain saved on the server.
POP3 (specific use)
POP3 is a download protocol. Messages are retrieved to your computer and generally deleted from the server.
- Offline access: messages are stored locally on your hard drive.
- Major drawback: once downloaded, messages are no longer visible on the Infomaniak Mail web app or on your other devices.
- Risks: if you use the "keep a copy of messages on the server" option, you may experience duplicate downloads and synchronization errors.
Important: Never mix POP and IMAP
Using both of these protocols simultaneously for the same address causes major technical conflicts:
- Messages inexplicably disappear on certain devices.
- Repeated downloads of old messages that have already been read (especially on Outlook).
- Unnecessary saturation of storage space.
Tip:we recommend using IMAP with all your email software/clients.
Refer to these other guides to configure an account in IMAP or to switch from POP to IMAP.
Link to this FAQ: https://faq.infomaniak.com/787
Has this FAQ been helpful?
This guide explains how to change the location of certain folders that are automatically present in the structure of your Infomaniak email address.
Introduction
- The structure of a standard mailbox may contain certain special folders, such as the one that stores emails…
- … once they have been sent (= "Sent messages").
- … for a few days before they are permanently deleted (= "Trash").
- Everything is already configured so that, by default, synchronized across the various email interfaces around the world.
- If you wish to make adjustments for various reasons, sometimes linguistic ones, then please refer to the guide below to modify these special folders:
- drafts
- sent messages
- trash
- archives
- This allows you to customize the synchronization of these folders with IMAP clients such as Outlook, Mail iOS, Thunderbird, Spark, etc.
- Note that this does not change the retention period (❓: help)emails placed in some of these special folders.
Access from the Infomaniak Web Mail app
Prerequisites
- You must have a valid access to the Infomaniak Mail web app (online service ksuite.infomaniak.com/mail) to which the email address is linked.
- You may not have permission to edit special folders: it is possible that the Mail Service administrator has removed this right from their admin account (❓: help).retiré ce droit depuis son compte admin (❓: aide).
To modify these special folders:
- Click here to access your emails on your Infomaniak kSuite (❓: help).
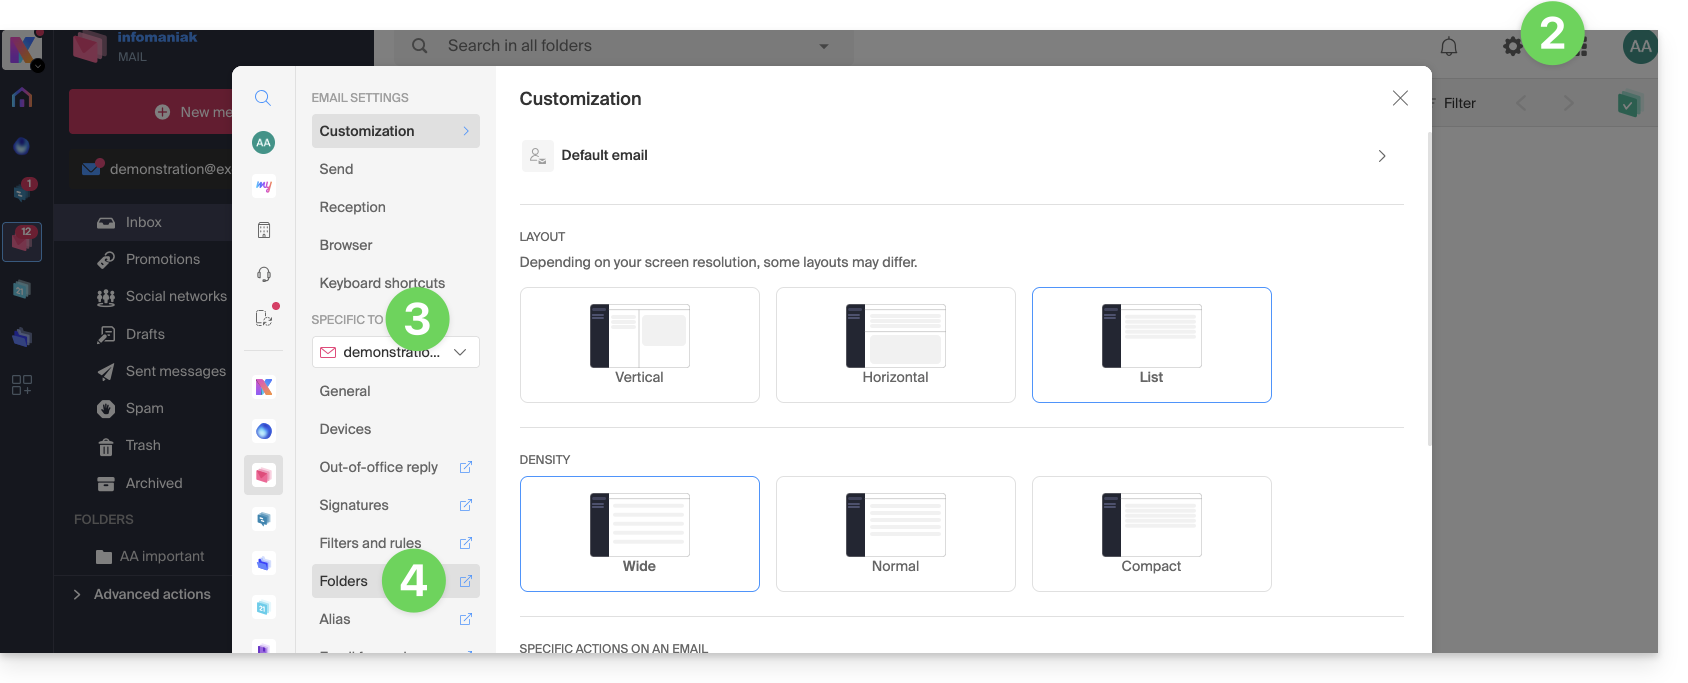
- Click on Settings in the top right corner.
- Check or select the relevant email address from the drop-down menu in the left-hand menu.
- Click on Folders:
Access from the Mail Service
To access this option from a Mail Service:
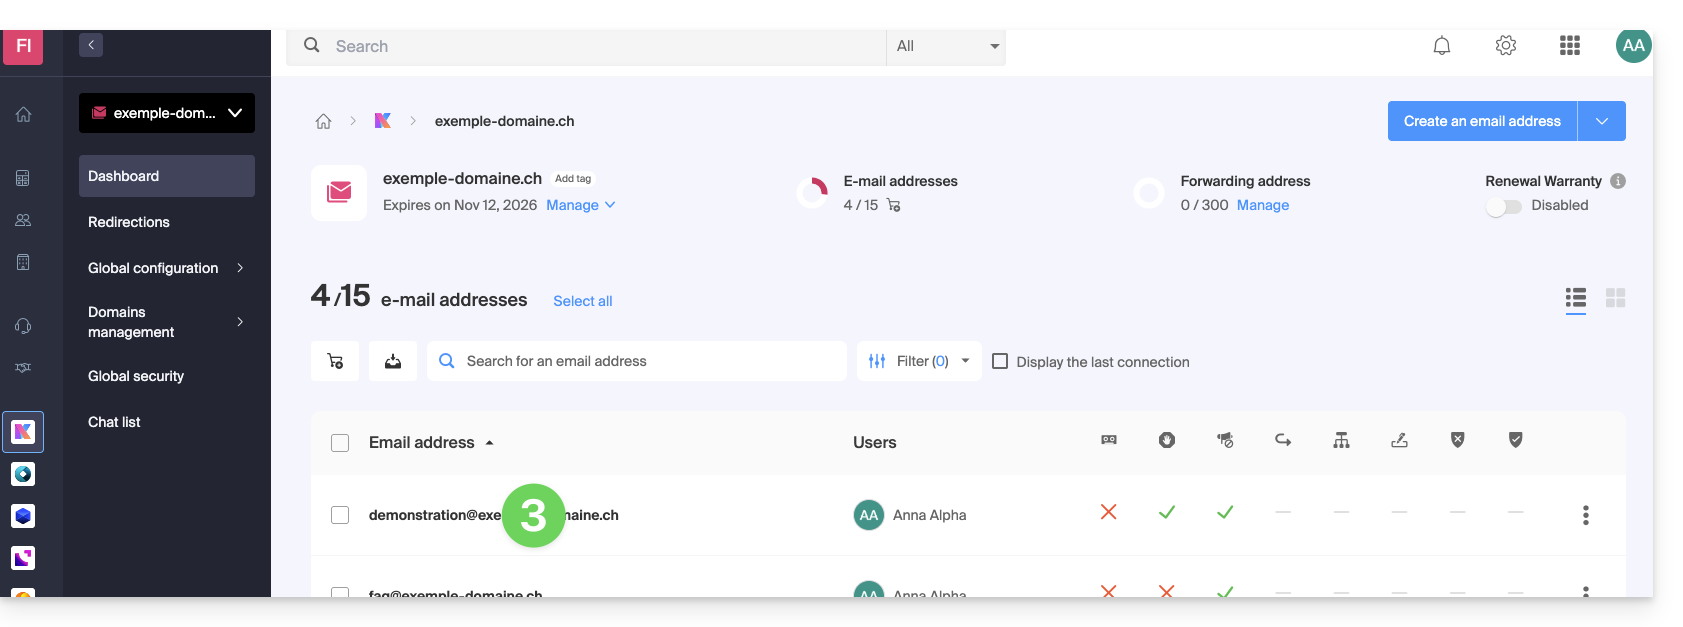
- Click here to access the Mail Service management in your Infomaniak Manager (❓: help).
- Click on the name of the Mail Service in question.
- Click on the email address in question in the table that appears:
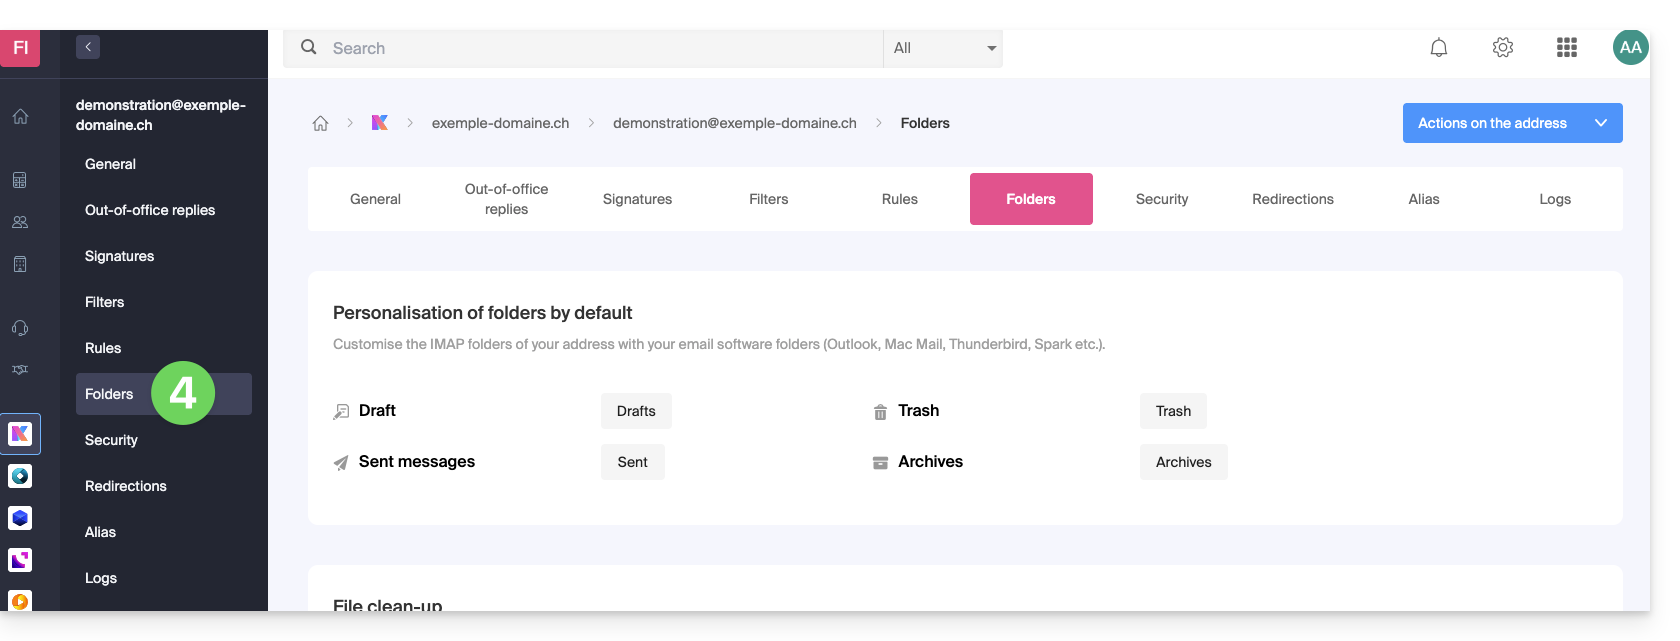
- Click on the Folders tab/menu:
Configure special folders
For security reasons, folder management is confidential and restricted to users added to the relevant email address.
Select the desired folders to store your drafts, archives, sent messages, and trash by default by clicking on the area to the right of each item: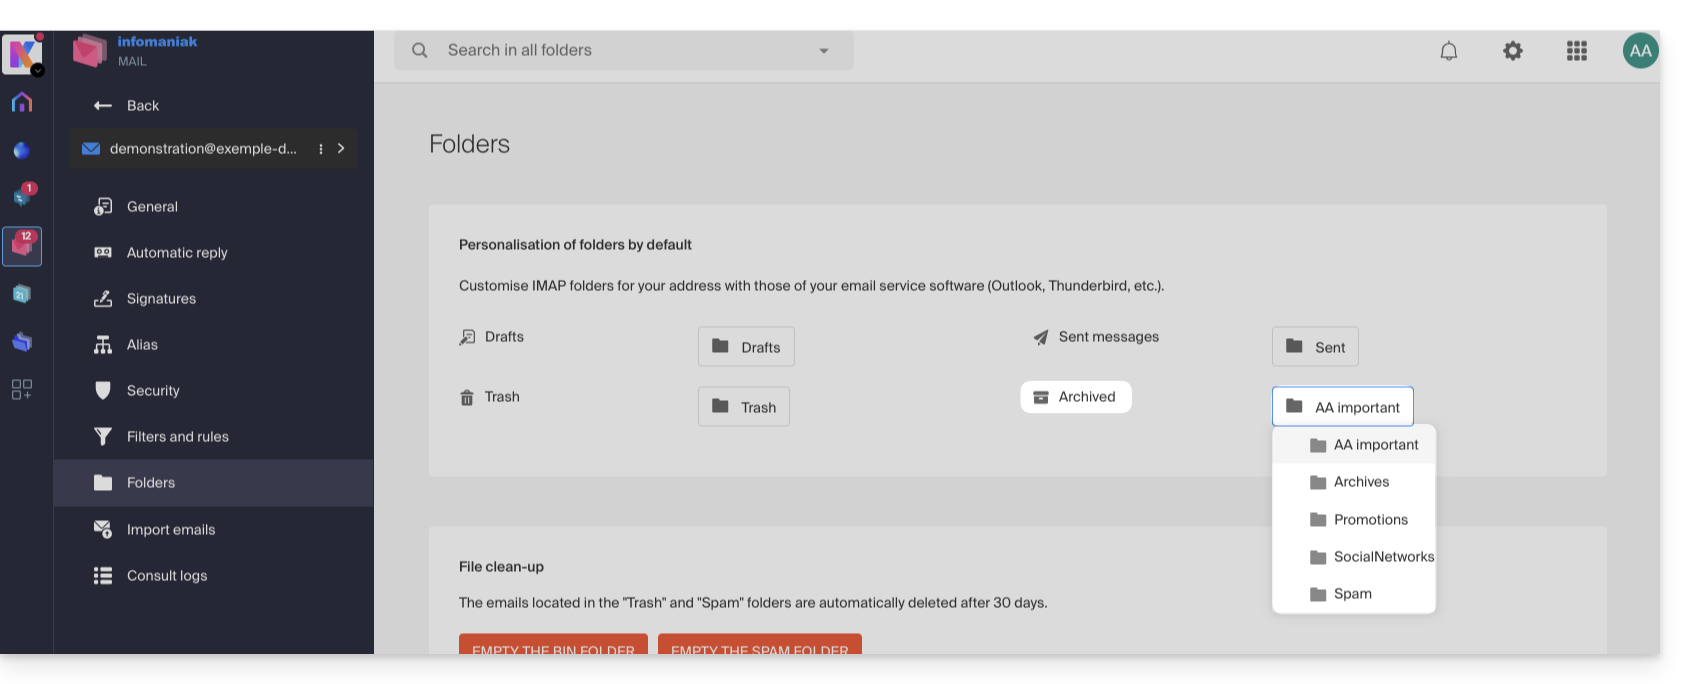
This will display the list of folders already present in your email's directory structure.
- If needed, create the desired folder beforehand from Mail or an IMAP software:
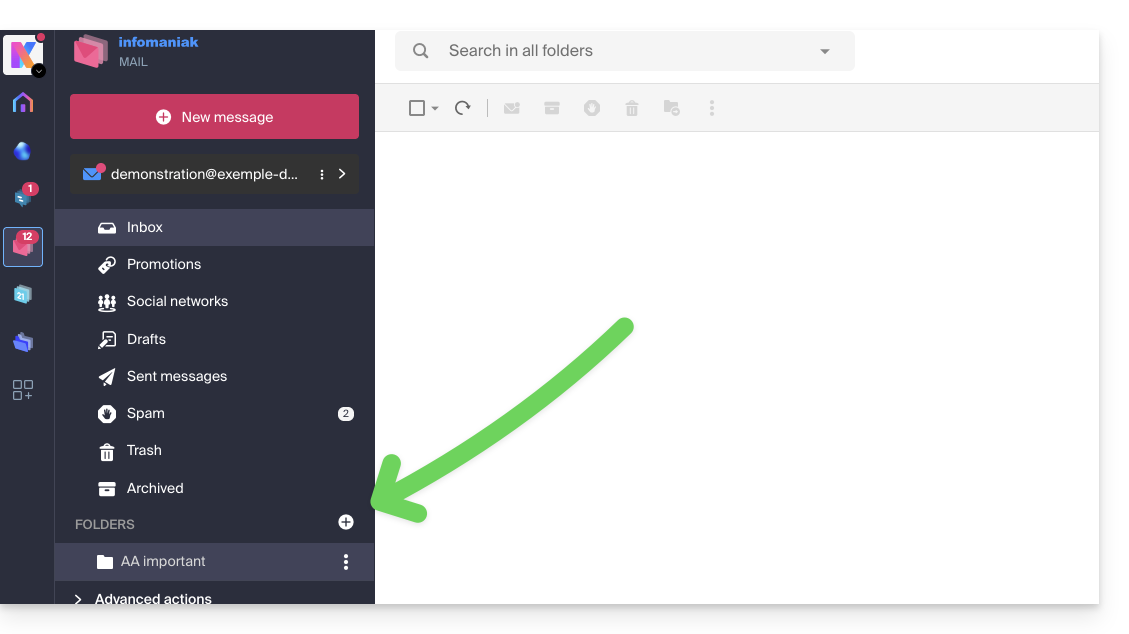
To modify the default folders that contain spam and advertising messages & social media notifications, you must do so directly from the Spam Filter (❓: help) and Advertising Filter (❓: help):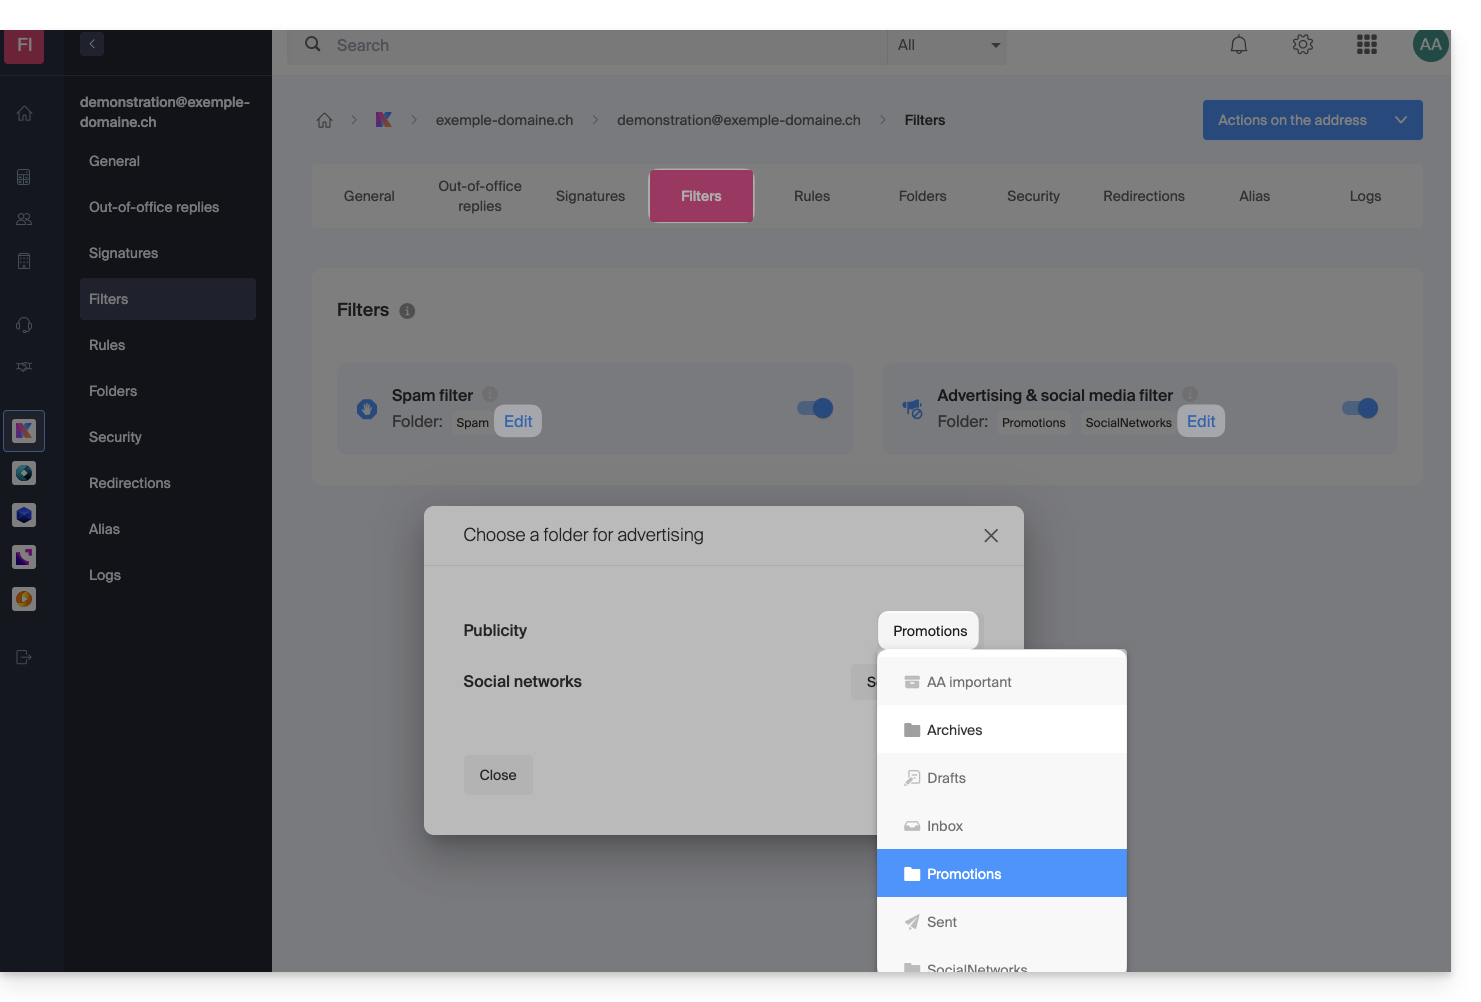
Alternative solutions for…
Some software/email clients also allow you to change the location of special folders. Consult the official documentation for your application if needed. The following links are provided for informational purposes:
… Mozilla Thunderbird
Refer to this other official guide if you are looking for information on assigning specific folders (such as the Trash, Drafts, and Sent Messages folders) to the IMAP account and synchronizing them with Infomaniak.
… Microsoft Outlook 2013
Refer to this other unofficial guide if you are looking for information on how using the IMAP protocol in the application can lead to a configuration where messages are stored only locally and not synchronized with the server, which contradicts the main objective of IMAP, which is to maintain consistency between devices.
… Microsoft Outlook 2021
Refer to this other unofficial guide if you are looking for information on how to save sent emails in the "Sent" folder instead of the "Sent Items" folder in the application.
… Apple iOS
Refer to this other unofficial guide if you are looking for information on how to configure the sent, drafts, and deleted messages folders on an iPhone so that they are synchronized with the mail server, by accessing the advanced settings of the Mail application and selecting the corresponding folders on the IMAP server.
Link to this FAQ: https://faq.infomaniak.com/2107
Has this FAQ been helpful?
This guide offers several solutions to quickly delete a large number of emails within an email address hosted by Infomaniak. Please note that the size of your mailbox is not limited.
Deleting emails in bulk…
… from the Infomaniak Web Mail app
- Click here to access your emails on your Infomaniak kSuite (❓: help).
- Click on Settings in the top right corner.
- Click on Reception.
- Display the maximum number of items loaded at once:
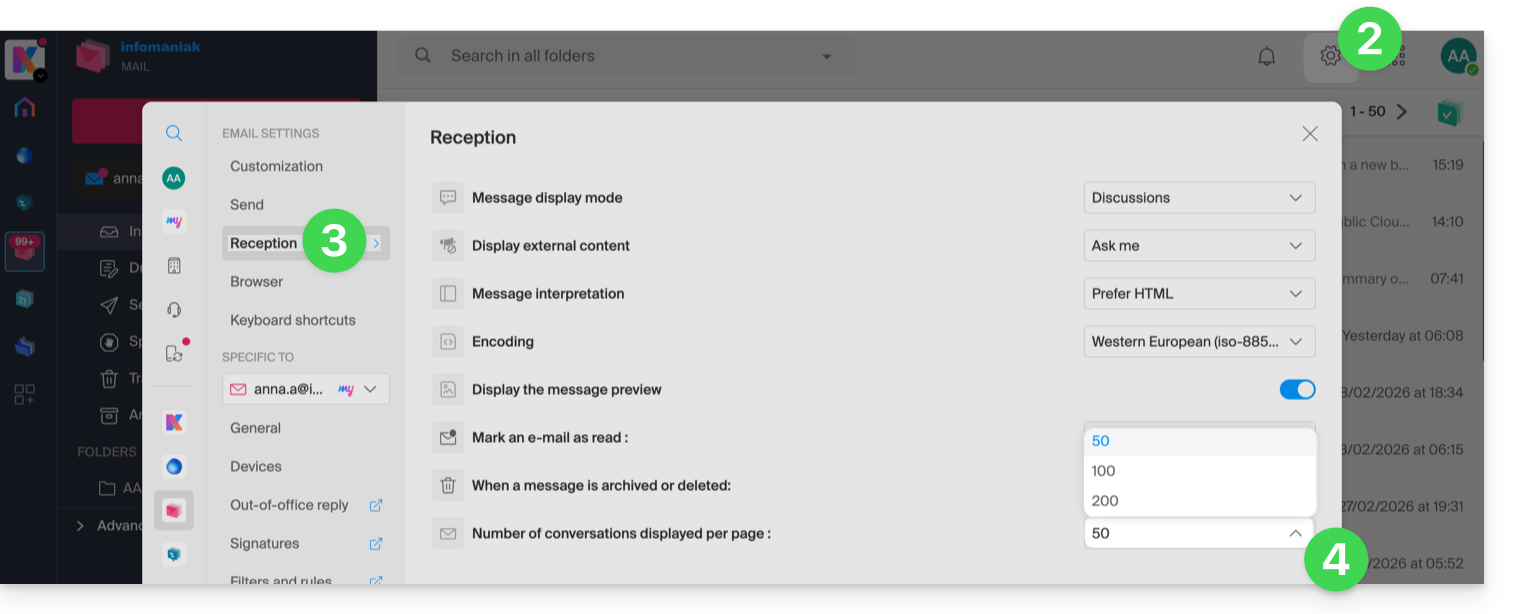
- To empty the inbox:
- Select all items visible on the screen.
- A more precise selection is possible.
- Click on the Trash icon to send them to the trash.
- Repeat this process on all pages:
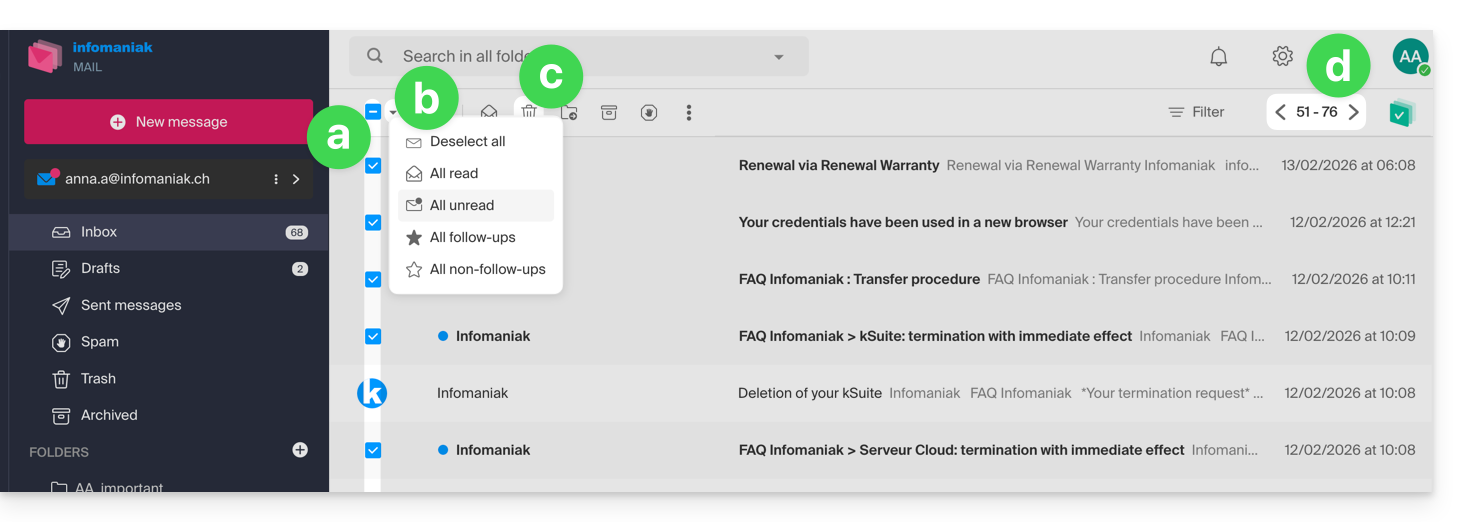
- Besides the inbox, folders can be emptied in a few clicks:
- Click on the action menu ⋮ to the right of the folder in question.
- Click on Empty the folder:
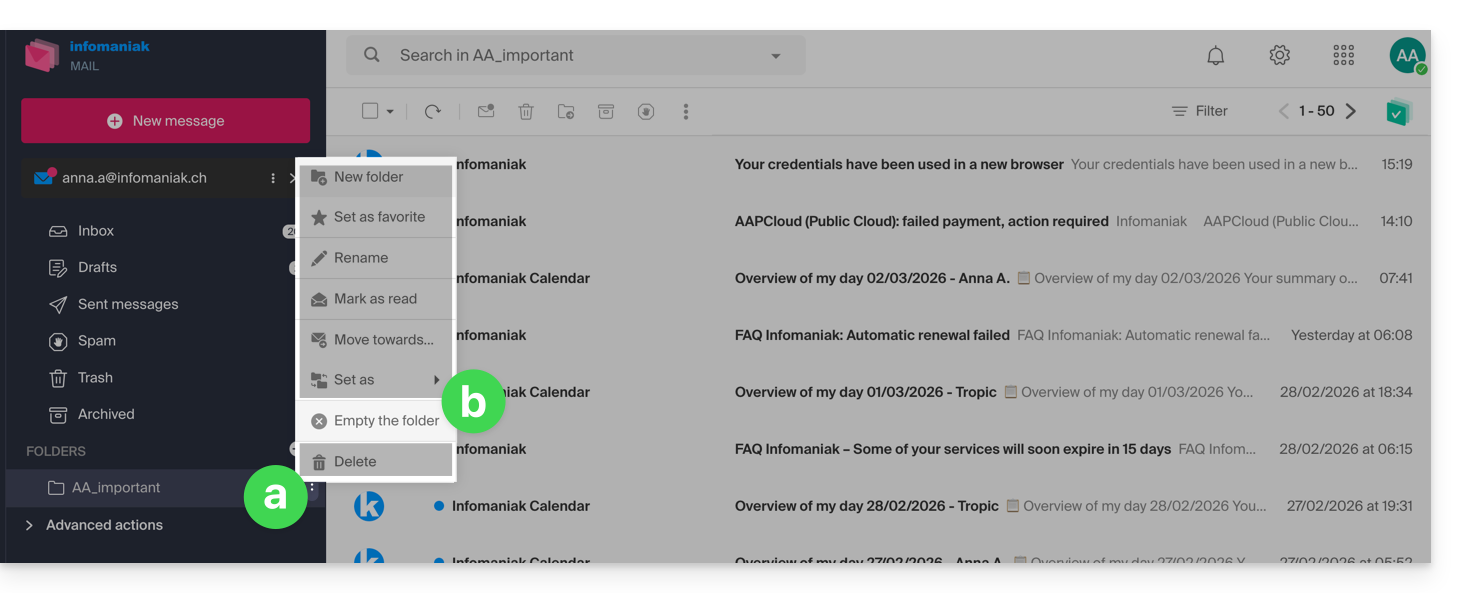
- Please note that emails are deleted without going through the trash, as if you were deleting the folder itself — only a restore can allow for possible recovery.
You can also delete the email address within a Mail Service, and then recreate it. It will then be completely empty.
… using an IMAP email client/application
A reliable solution is to configure the email address in an IMAP email client/application, which will allow you to select all messages (without pagination…) and therefore delete them easily and quickly:
- Install Thunderbird (or any other email app on your device).
- Add your email address, providing its password.
- Wait for the inbox to load.
- Select all messages.
- Click on Delete.
- That's it, you can remove the application if you wish.
Special case: crossed-out messages
To permanently delete any crossed-out or strikethrough emails that may appear in your email software/client or on Mail Infomaniak: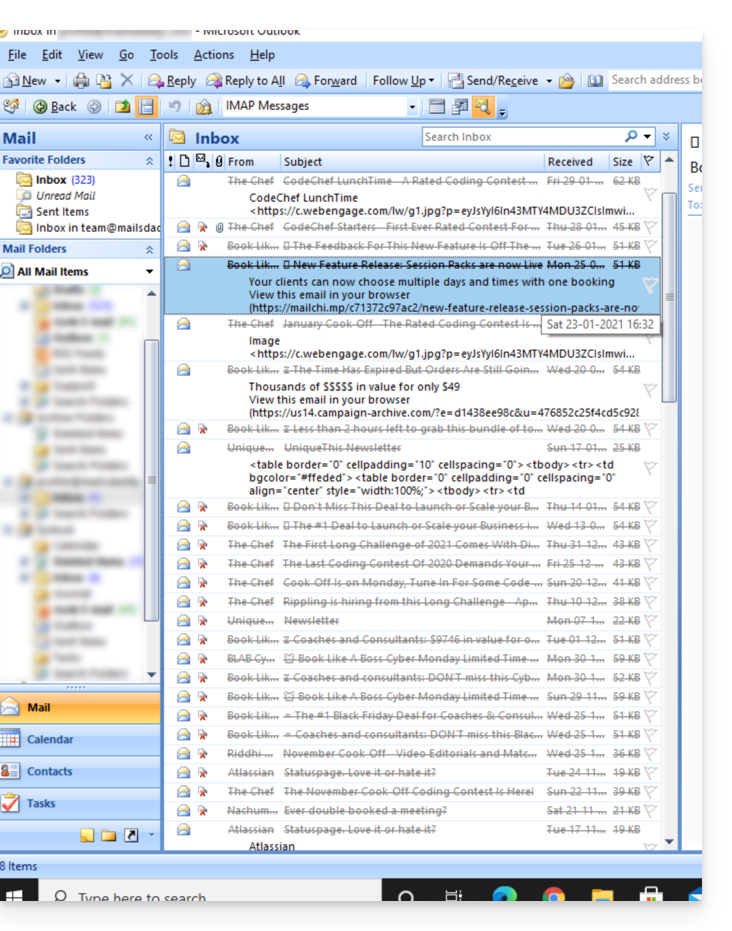
- Microsoft Outlook
- Go to the Edit menu -> Clear Deleted Messages (in English, you should have a Purge menu)
- Apple Mail
- Go to the Mail menu -> Clear Deleted Items
They will then also disappear from the Infomaniak Mail interface.
Link to this FAQ: https://faq.infomaniak.com/1247
Has this FAQ been helpful?
This guide details how to use a my kSuite account, and it is important to distinguish between the Infomaniak account password and the passwords for the my kSuite address (ik.me, etik.com, ikmail.com).
1. Registration: creating the login and password
When you registered for my kSuite, you chose an email address, which is also your login ID, in the format xxx@ik.me or xxx@ikmail.com, etc., as well as a login password: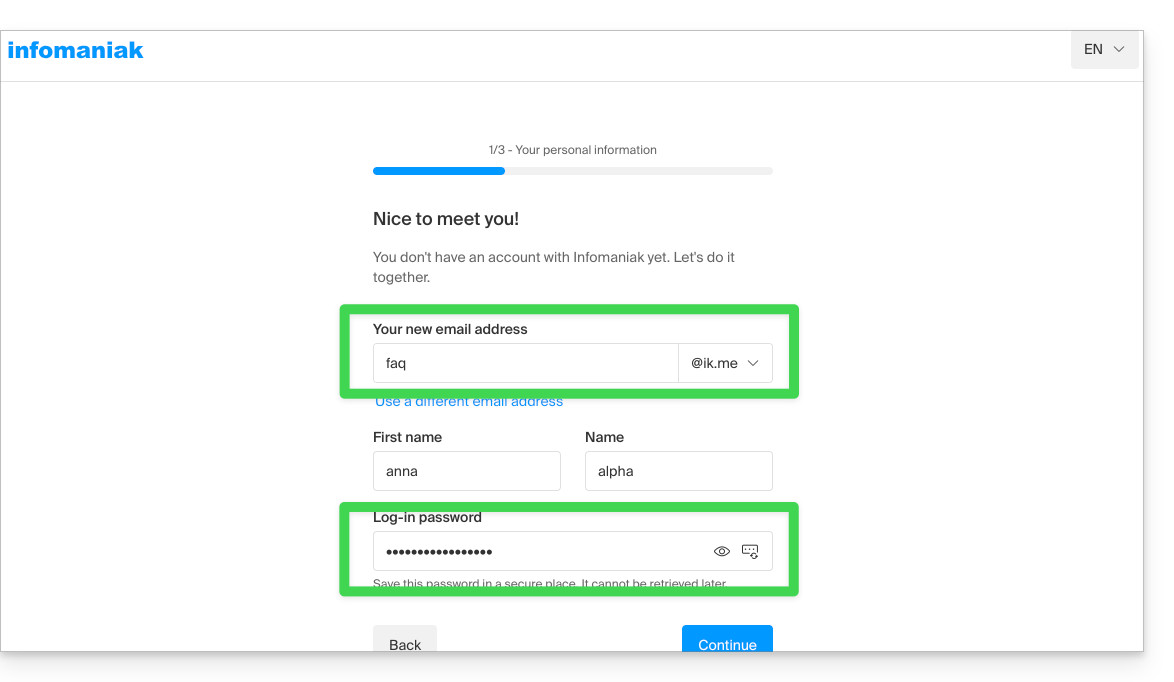
Once registered, you can go to ksuite.infomaniak.com/mail and use the email service: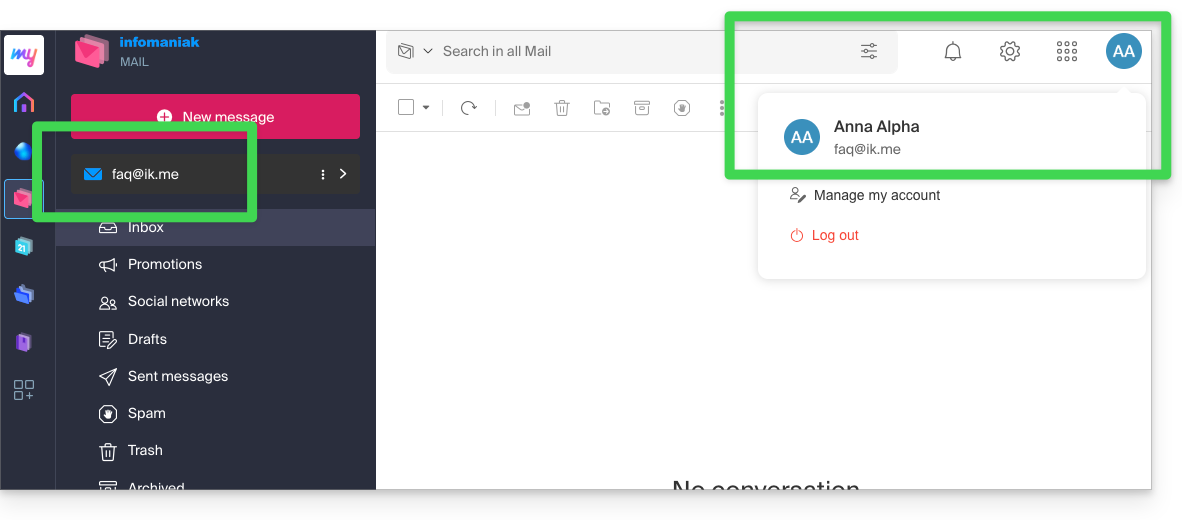
2. Reconnecting: using your username and password
On another computer or after reopening your browser, simply go back to ksuite.infomaniak.com/mail (or ik.me) and reconnect using the credentials you created and obtained (see point 1 above):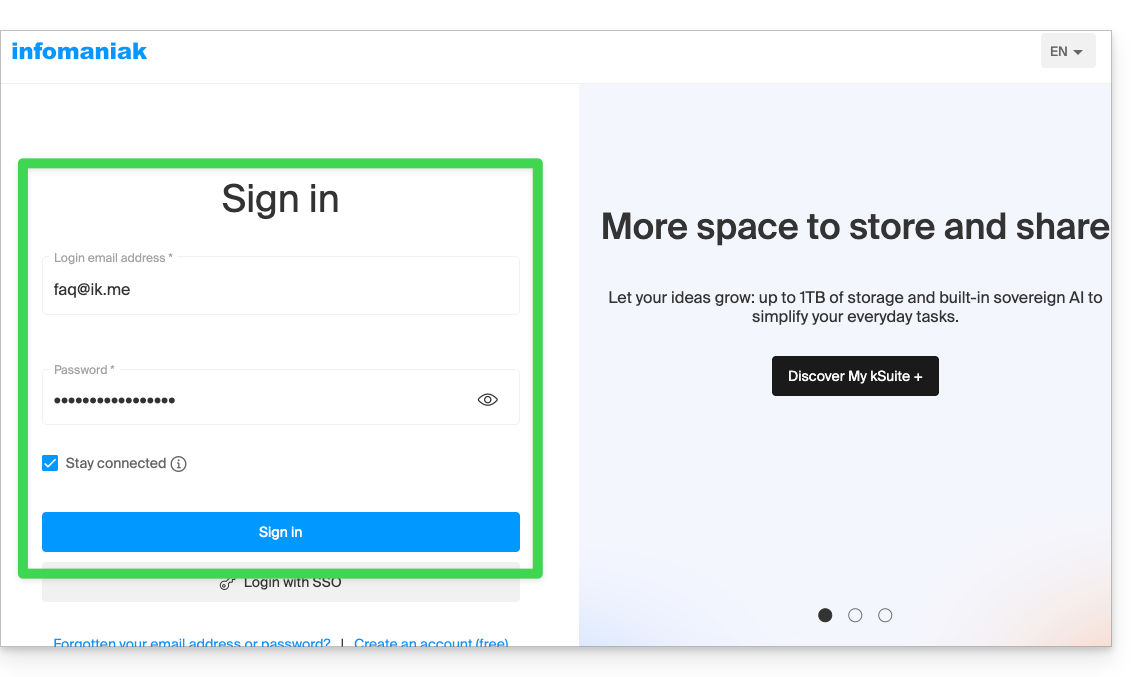
You will then access your email within the my kSuite Infomaniak interface: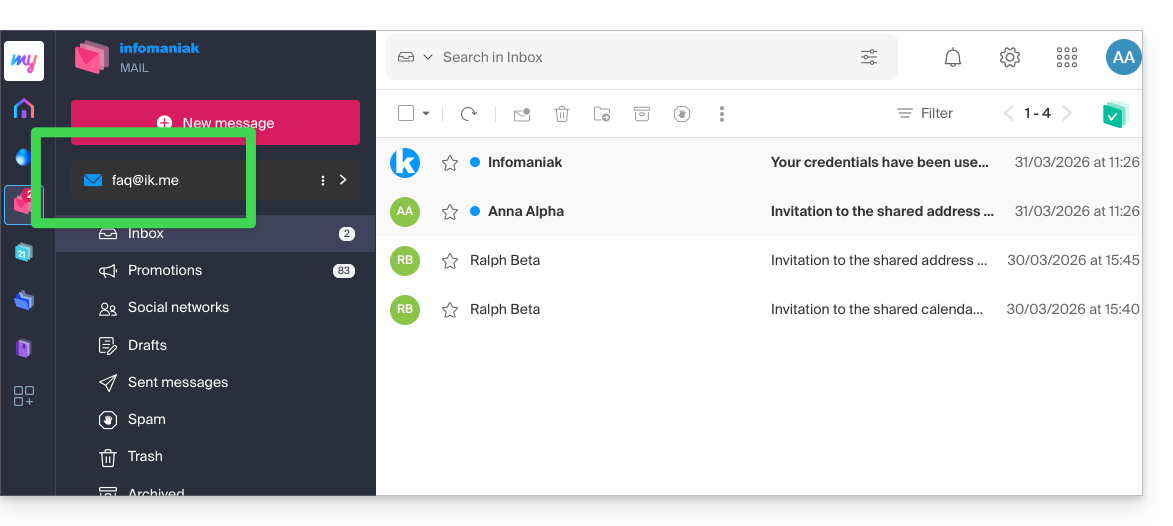
3. Using the email address outside of Infomaniak
To synchronize your email address with a mail client such as Outlook or Thunderbird, or even on an iPhone or Apple Mail on macOS, you need to create an additional password (= “a device”) because the password for your Infomaniak account (points 1 & 2 above) will not allow you to configure the address outside of Infomaniak.
To add a device (= “create an additional password”) and use it in your IMAP/SMTP configurations:
- Log in to your my kSuite account as described in step 2 above.
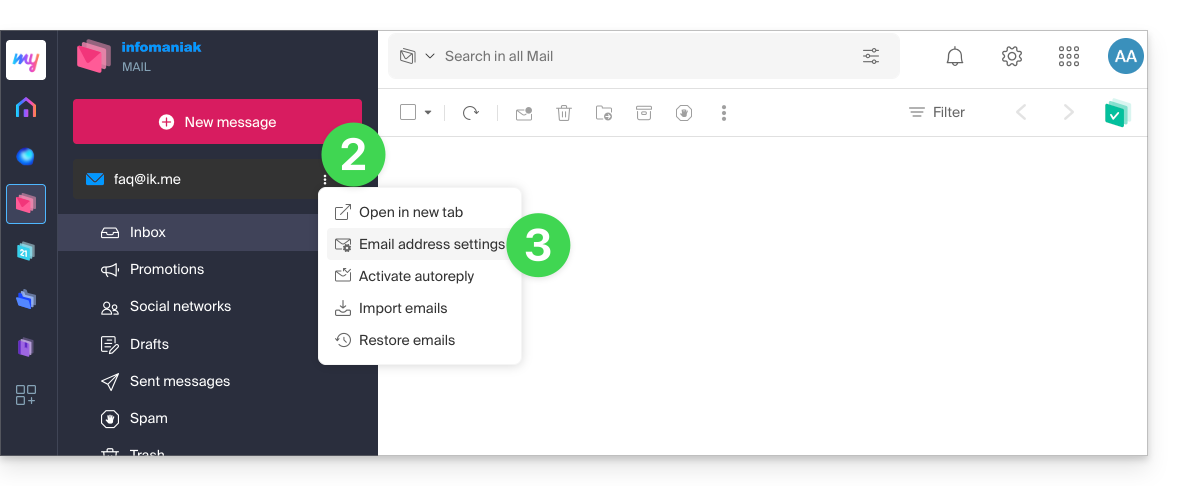
- Click the action button ⋮ to the right of your my kSuite address.
- Click on the settings for the email address:
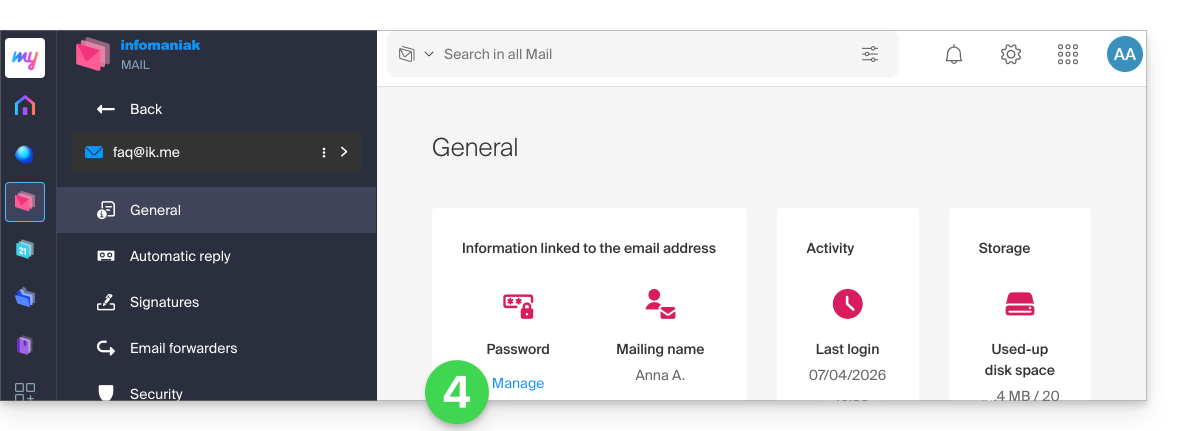
- Click on Manage password:
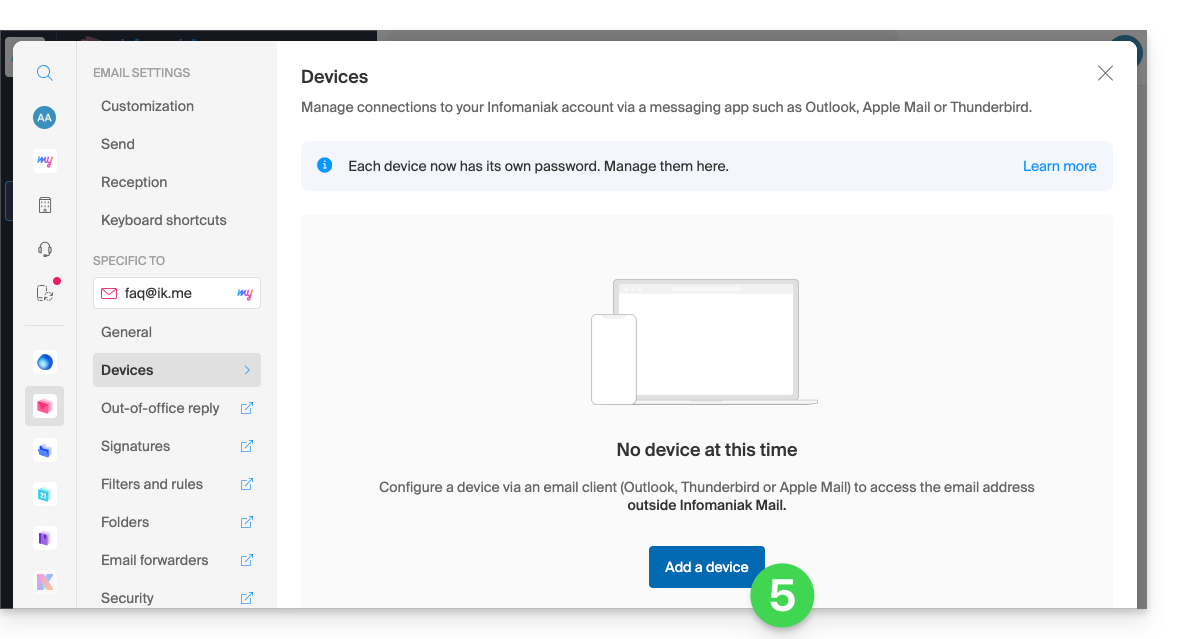
- Click on Add a device:
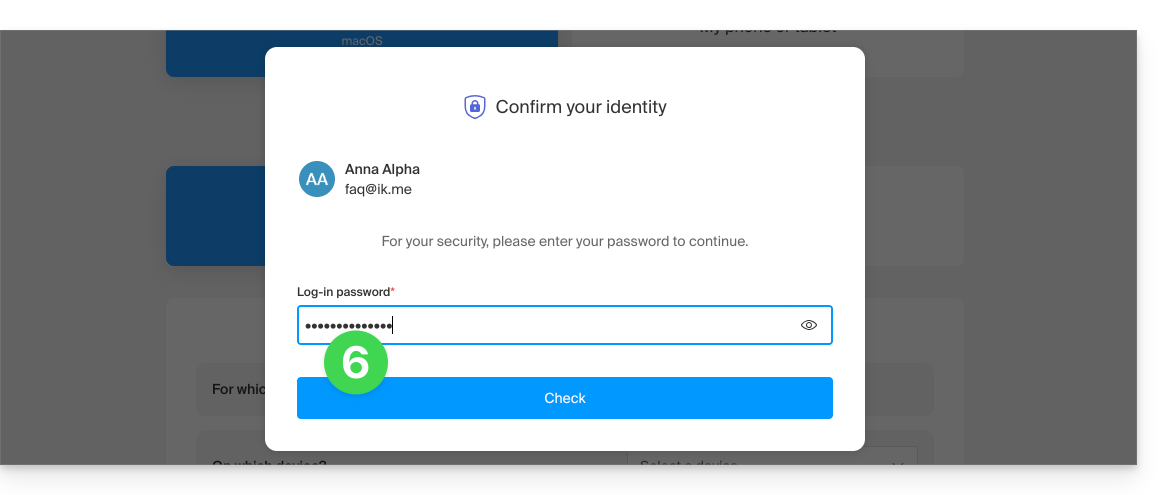
- Enter the login password if required for security purposes:
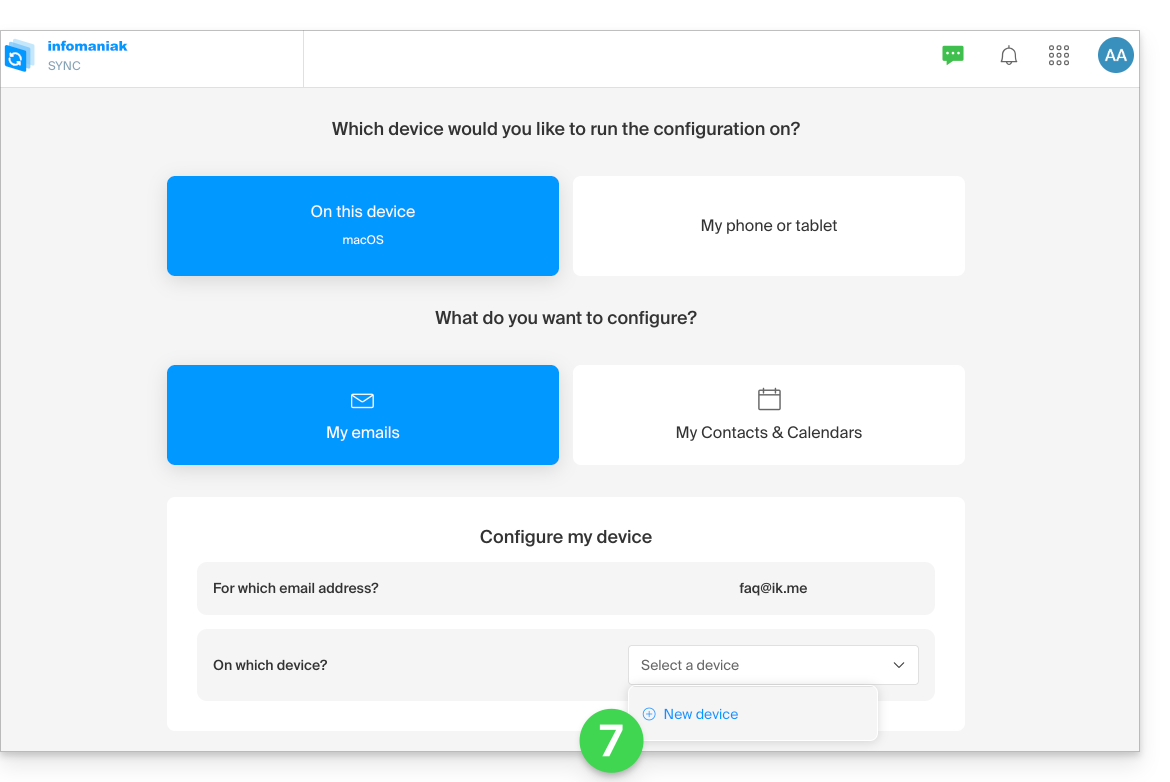
- Follow the wizard according to your needs, until a new device is created:
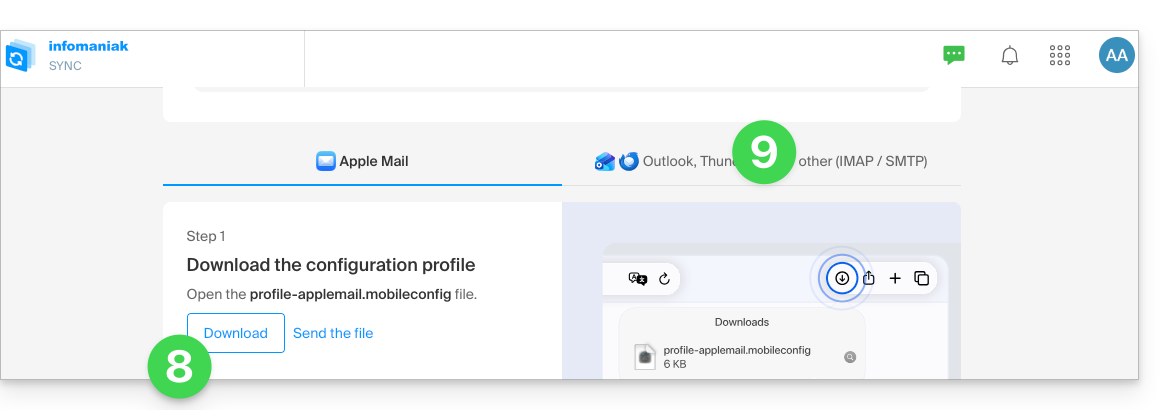
- The wizard will offer you to download an Apple profile, depending on your device (refer to this other guide for macOS or this one for iOS), and then create a new secure password to enable synchronization via the profile.
- To simply create a new password and configure the tool of your choice (refer to the configuration guides), click on the IMAP / SMTP tab:
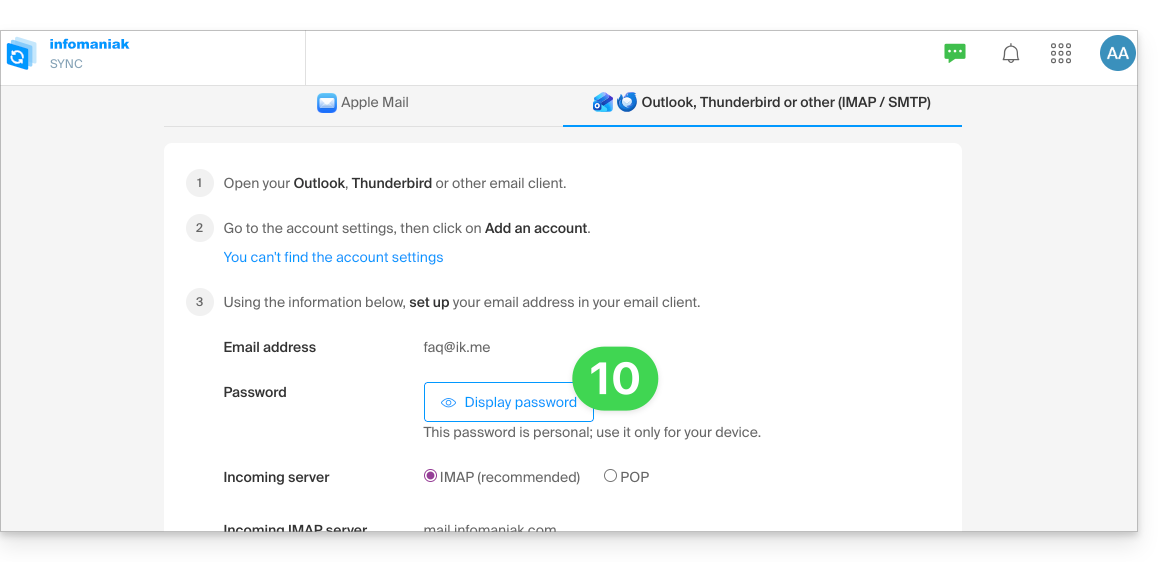
- You can then generate a new secure password to use in your configuration:
Link to this FAQ: https://faq.infomaniak.com/2904
Has this FAQ been helpful?
This guide explains how to switch from a POP configuration to an IMAP configuration for the same email account in your email software/client. Indeed, for many reasons, it is strongly recommended to use the IMAP protocol instead of POP.
Introduction
- If your email address is already configured with the POP protocol in your email software/client (Mozilla Thunderbird, Microsoft Outlook, etc.), it is impossible to switch to the IMAP protocol directly on the account.
- Indeed, most common email software/clients do not allow you to modify an existing POP3 account and define it as IMAP instead.
- The solution is therefore toadd the same email account but using the IMAP protocolin your email software/client, then move your messages and folders from the POP account (on your computer) to the IMAP account (on the email server).
⚠️ Warning: a POP3 account in your email software/client means that Infomaniak usually does not have any backups. Therefore, be sure to back up your messages on your end before performing any critical operations.
Switching from POP to IMAP in Microsoft Outlook
Some versions of Outlook, such as 2016, prevent you from easily adding a second account with the same name (identical email address).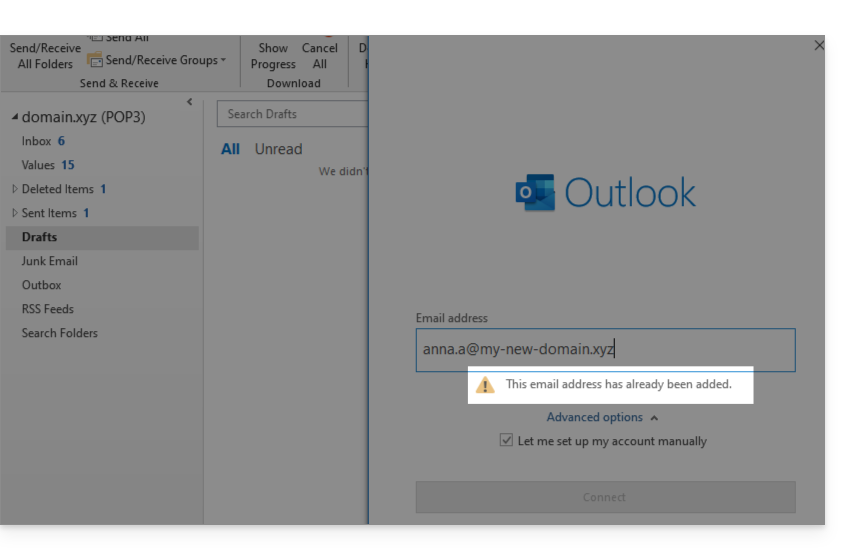
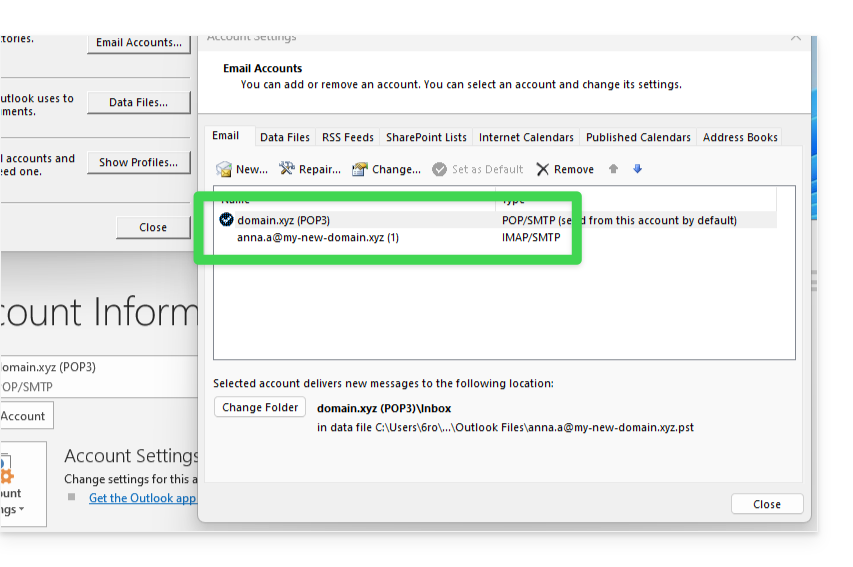
To work around this, you need to add the account from the Profiles section: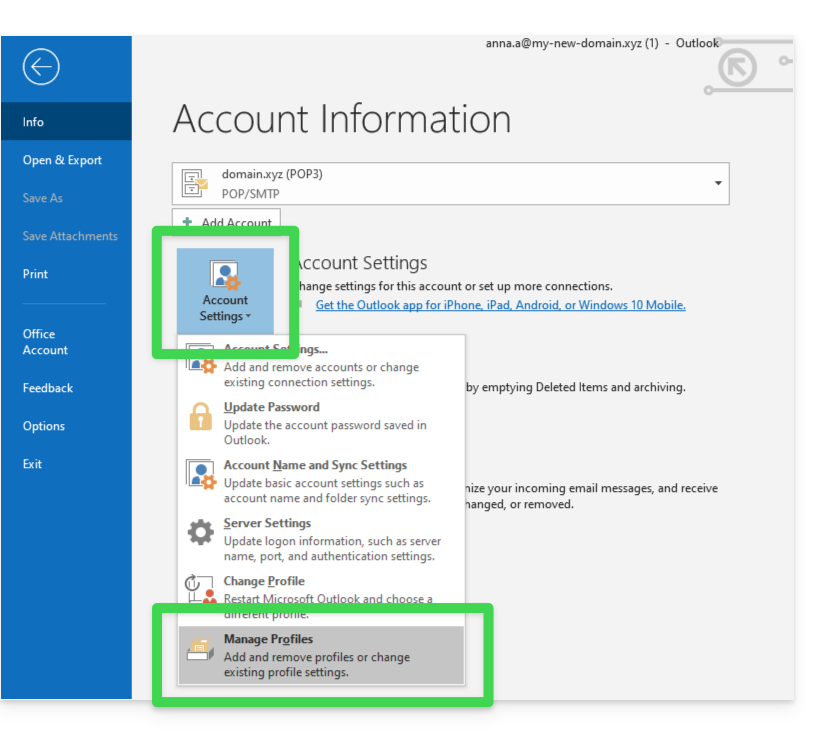
From there, you can add the additional account using IMAP: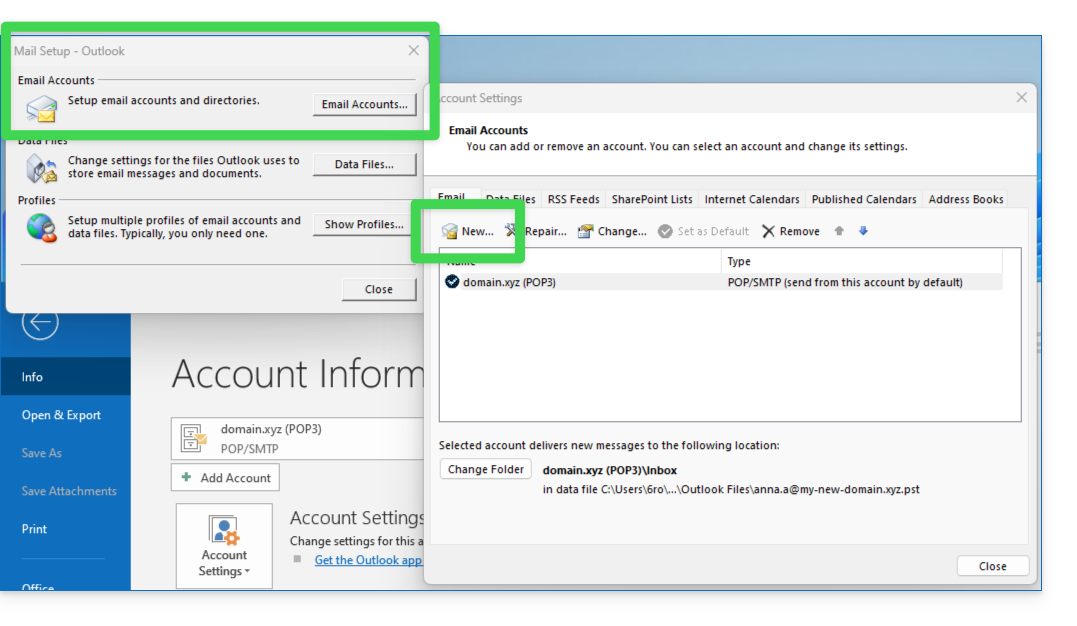
- Configure the new email account using the IMAP protocol (the same account as the one configured in POP, but this time in IMAP):
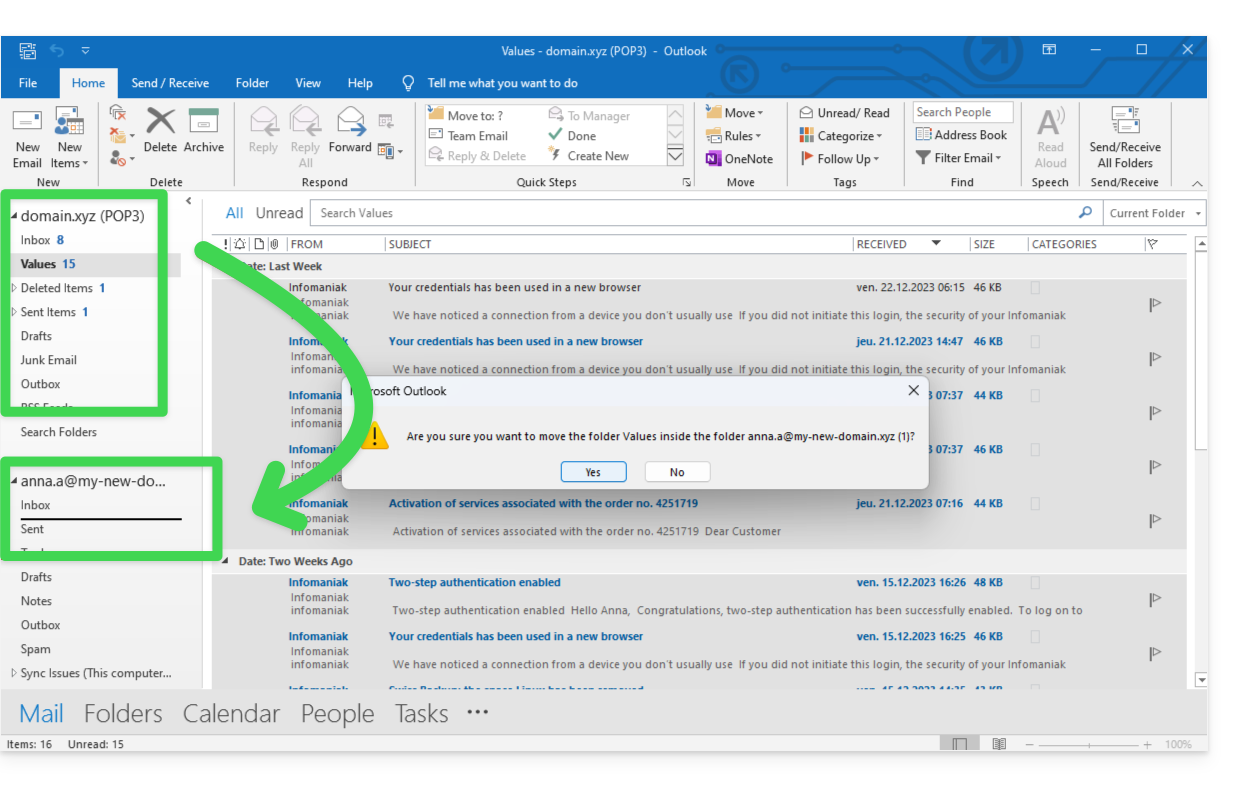
- Move each folder by dragging it to the inbox of the new account configured in IMAP:
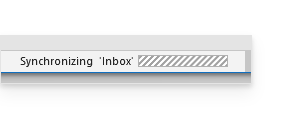
- Wait for the transfer to complete (this may take some time depending on the amount of data being transferred to the server); the progress is indicated at the bottom of the window:
If your POP account kept a copy of the messages on the server (an option that is not recommended and can be found in the advanced settings of your Outlook), you may end up with duplicate messages.
Switching from POP to IMAP in Apple Mail
Deleting a mail account configured in POP deletes the messages it contains. It is therefore recommended to disable the POP account instead of deleting it!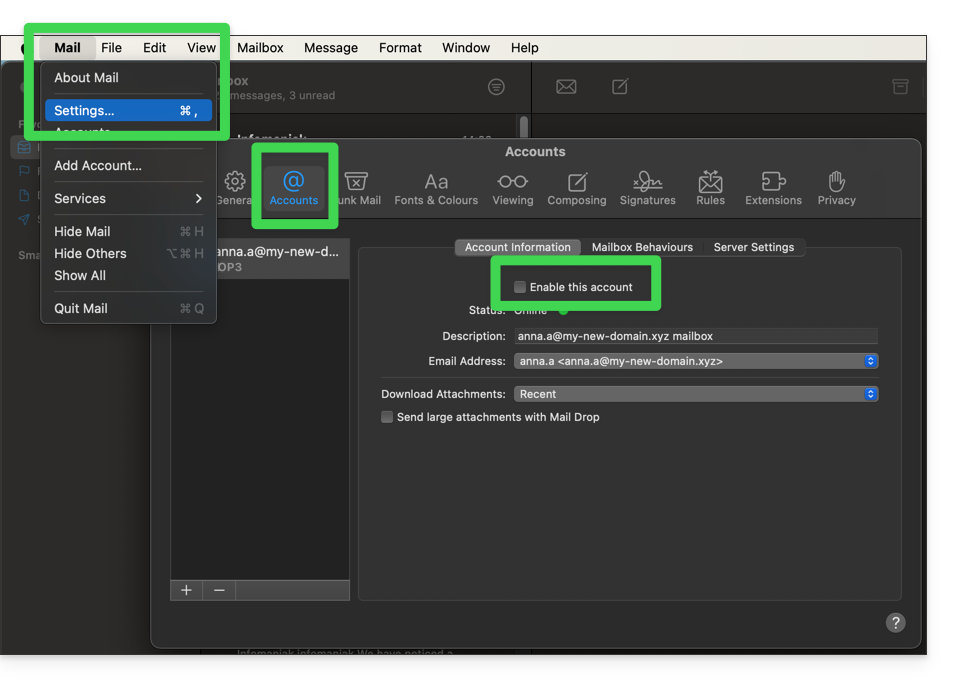
Once the POP account is disabled, refer to this other guide to configure your email address in Apple Mail, using IMAP.
Once you are finished, all that remains is to drag the messages from your POP account's folder structure to the new IMAP account's folder structure.
Link to this FAQ: https://faq.infomaniak.com/1122
Has this FAQ been helpful?
This guide explains how to delete folders that appear grayed out in the Infomaniak Mail web app (online service ksuite.infomaniak.com/mail) or in certain email software/clients such as Apple Mail, Mozilla Thunderbird, or Microsoft Outlook.
Ghost folders
Some email software/clients, such as Microsoft Outlook, allow you to create subfolders of non-existent folders. For example, it is possible to create the folder /abc/klm/xyz even though the folder "klm" does not exist.
In Mail Infomaniak or other software, ghost folders like the folder "klm" appear in gray and cannot be deleted directly because they are only "paths" to a real subfolder.
To delete these ghost folders, you must first delete their subfolders (in this example: xyz).
Stubborn Folders
If, when viewing your Infomaniak email address in Outlook, ghost folders persist or reappear immediately after deletion, here are the technical procedures recommended by Microsoft to force synchronization:
1. Force a reset of the Outlook folders
Sometimes, Outlook's local folder table is corrupted. A simple command can often fix this without deleting anything:
- Close Outlook completely.
- Press the
Windows + Rkeys on your keyboard. - Type
outlook.exe /resetfoldersand press Enter (this restores missing or corrupted folders from the server).
2. Reset the IMAP cache (.ost)
If the problem persists, forcing Outlook to rebuild its local database is often the most effective solution:
- Close Outlook.
- Go to the folder:
C:\Users\[Your Username]\AppData\Local\Microsoft\Outlook. - Identify the
.ostfile with the name of your Infomaniak address and delete it (or rename it to.oldfor safety). - Restart Outlook; the software will redownload all your messages and folders cleanly from the Infomaniak servers.
3. Using the MFCMAPI Tool (Advanced Level)
MFCMAPI allows you to directly access the MAPI structure of your mailbox to delete items that the standard Outlook interface refuses to touch:
- Download the latest version of MFCMAPI from GitHub (Official source).
- Launch
MFCMAPI.exeand go toSession > Logon; select your Outlook profile. - Double-click on your Infomaniak email account in the list.
- In the new window, expand
Root Container(orRacine - Boîte aux lettres), thenIPM_SUBTREE. - Locate the problematic folder, right-click on it, and select
Delete folder. - Warning: In the dialog box, first try a simple deletion; if that fails, try again by checking
DELETE_HARD_DELETE(permanent deletion at the server level).
4. Final check via Webmail
If a folder is deleted in Outlook but keeps reappearing, be sure to check in the Infomaniak Mail web app to see if the folder is present there, and first delete it via the web interface before applying step #1 (resetfolders) in Outlook.
Deleting an account and reconfiguring it immediately remains the simplest alternative if MFCMAPI seems too complex.
Link to this FAQ: https://faq.infomaniak.com/865
Has this FAQ been helpful?
BIMI (Brand Indicators for Message Identification) is a standard that provides brand indicators for message identification) allows businesses to incorporate their logo into the emails they send.
Introduction
- Infomaniak applications (and those of other companies worldwide - see the troubleshooting section below) are compatible with BIMI and will display logos next to received email messages.
- Infomaniak Mail Services allow you to configure your email with your logo; the benefits are numerous:
- increased trust: recipients can visually identify your emails, reducing the risk of phishing.
- brand reinforcement: a clearly visible logo in inboxes strengthens brand awareness.
- improved deliverability: emails that comply with DMARC are more likely to reach the main inbox.
1. Create a logo
Create a logo in SVG format (Scalable Vector Graphics). This format is required because it ensures optimal quality regardless of the device or display size.
To be imported into the Infomaniak interface (see below), it must not exceed 10 MB, but it can also be hosted on a secure server that is publicly accessible, in which case you will simply need to provide its URL for the BIMI DNS record.
2. Obtain the VMC certificate
A verified logo certificate (VMC) is required; it confirms that you are the legitimate owner of the logo. You can obtain this certificate from recognized certification authorities such as DigiCert and Entrust.
When your VMC certificate is issued, you will receive a PEM file containing the entity's certificate. This PEM file includes your logo in SVG format as well as the VMC.
3. Add the logo to the Mail Service
Prerequisites
- All indicators Global Securityfor your Mail Service must be green (SPF + DKIM + DMARC)!
To access the Mail Service and define your company's logo:
- Click here to access the Mail Service management in your Infomaniak Manager (❓: help).
- Click on the name of the Mail Service in question.
- Click on Global Security in the left-hand menu.
- Click on the Create button (in the BIMI section):
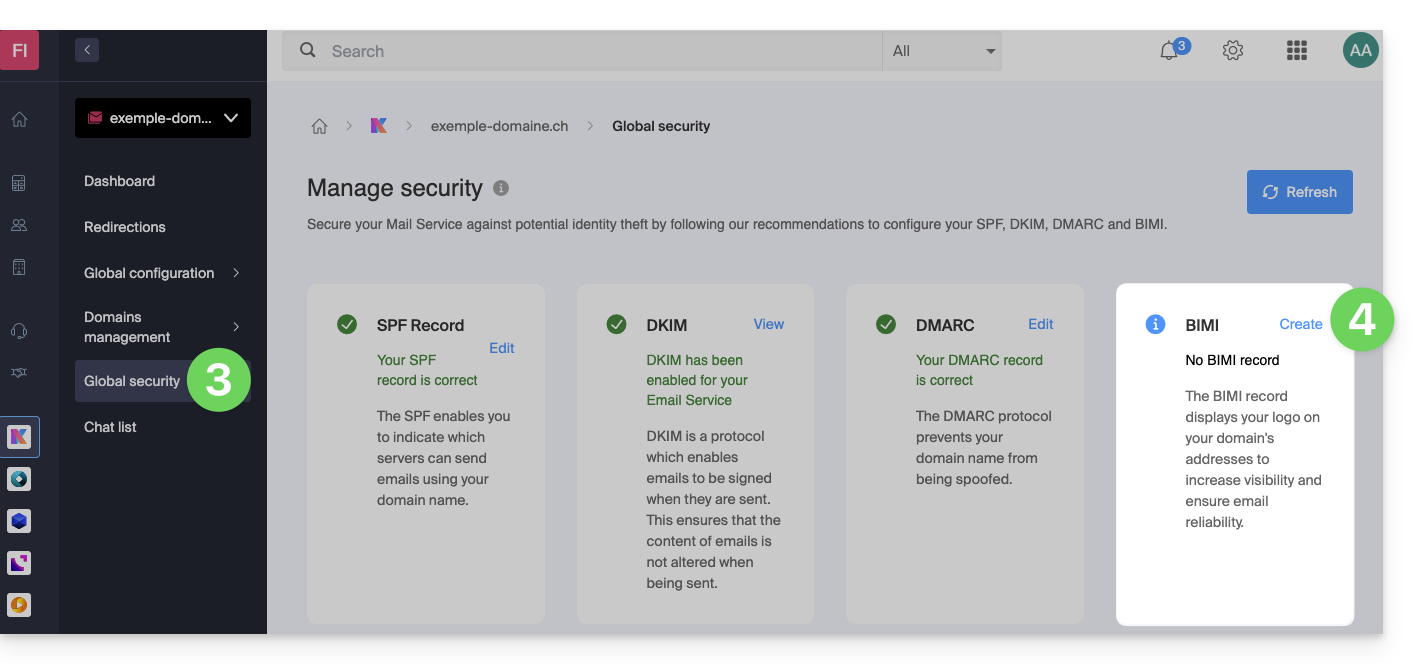
- Fill in the requested information using the documents you received (see chapter 2 above) and don't forget to save.
In case of a problem
- If the Create button in the BIMI box remains gray, carefully check the information messages: DMARC may exist but not be at the required rejection percentage, so adjust the settings according to the instructions.
- When there are multiple domains linked to the Mail service, make sure you have a certificate on each linked domain if you want BIMI to be enabled on those domains.
- Note that Apple Mail supports BIMI, unlike Microsoft Outlook, Thunderbird, and the Mail app from Samsung, which have not yet fully adopted it.
Disable BIMI
To disable BIMI, simply go to the domain name management page associated with the Mail service and delete the corresponding TXT record.
Link to this FAQ: https://faq.infomaniak.com/1816
Has this FAQ been helpful?
This guide details how to disable the SMTP protocol, thereby preventing a specific user from sending emails from a specific email address.
Introduction
- Removing an user’s sending rights will prevent them from sending a message (new, reply, reaction, etc.) from the Infomaniak Mail web app (online service ksuite.infomaniak.com/mail) and the mobile app.
- If the user in question is also specified in the connected devices, sending will also be impossible from a software/email client such as Outlook, Apple Mail, Thunderbird, etc.
- There is a specific permission regarding out-of-office messages if you also want to prevent this type of message from being sent.
Prevent a user from sending messages from a specific email address
New user
Do you want to allow a new colleague to view a mail address (be able to read incoming emails) but without allowing them to send new messages?
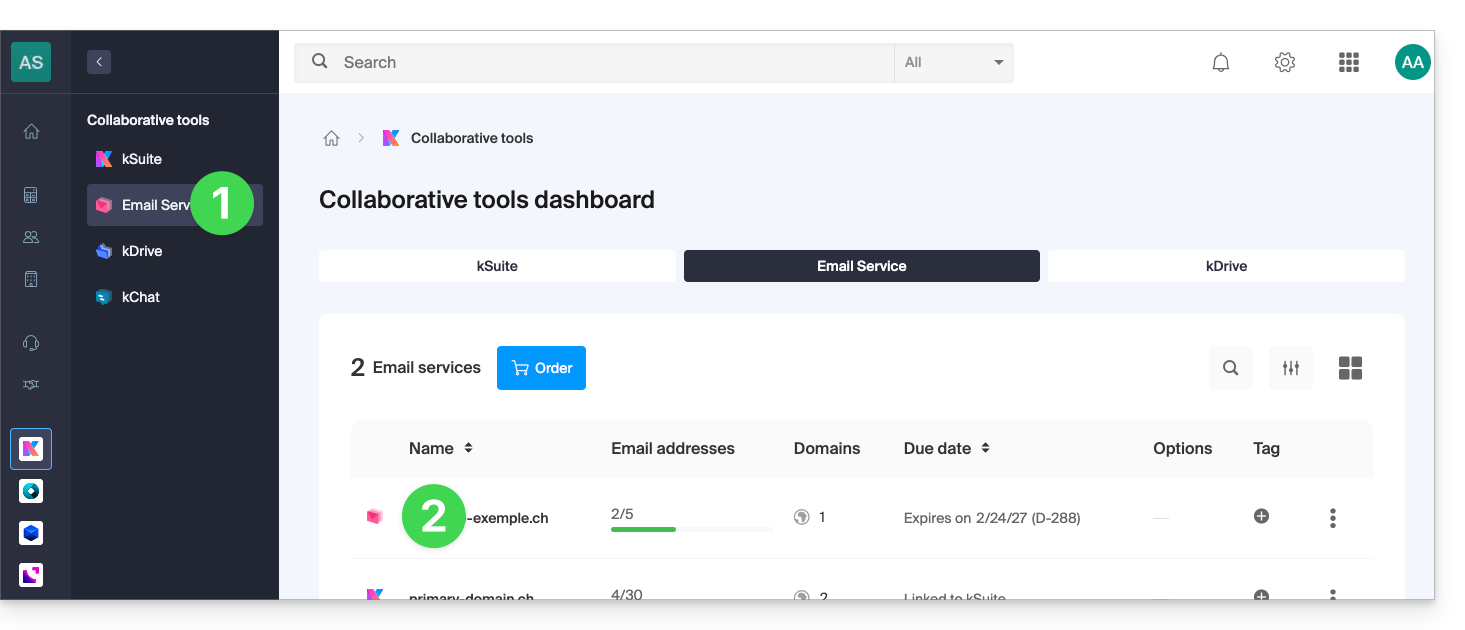
- Click here to access the Mail Service management in your Infomaniak Manager (❓: help).
- Click on the name of the Mail Service in question:
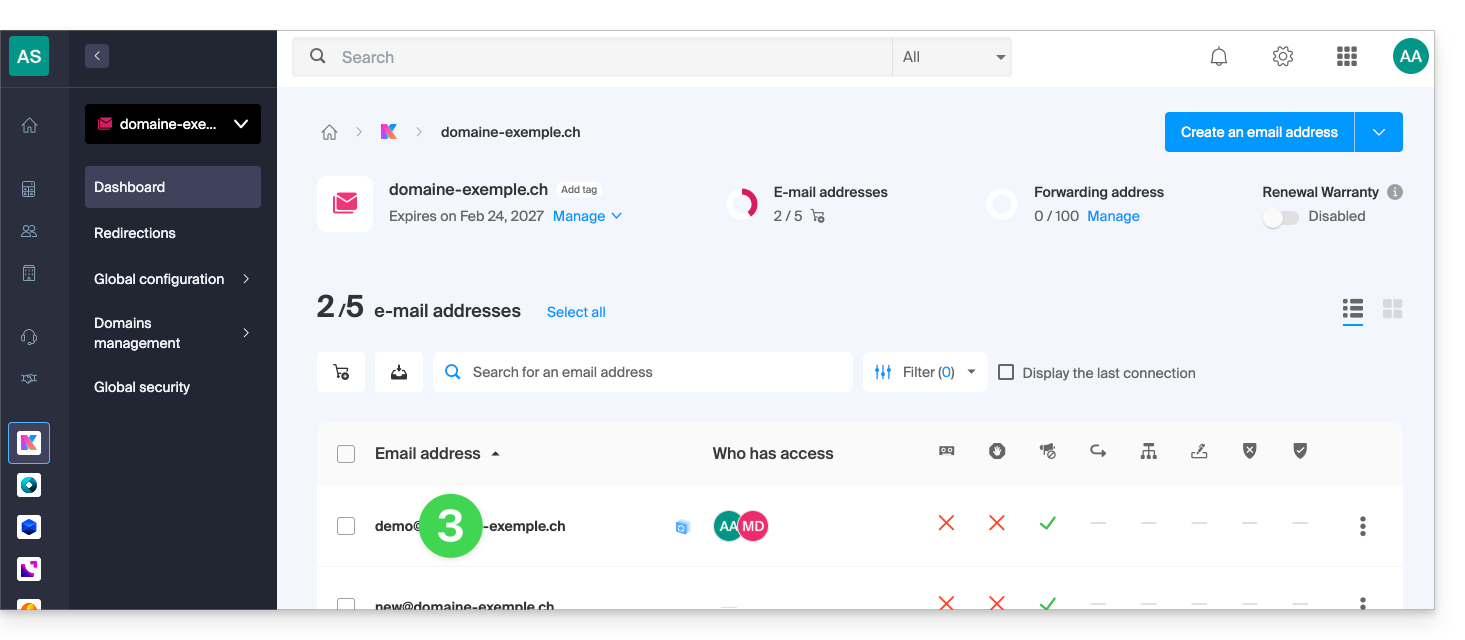
- Click on the relevant email address in the table that appears:
- Click to Add a new user:
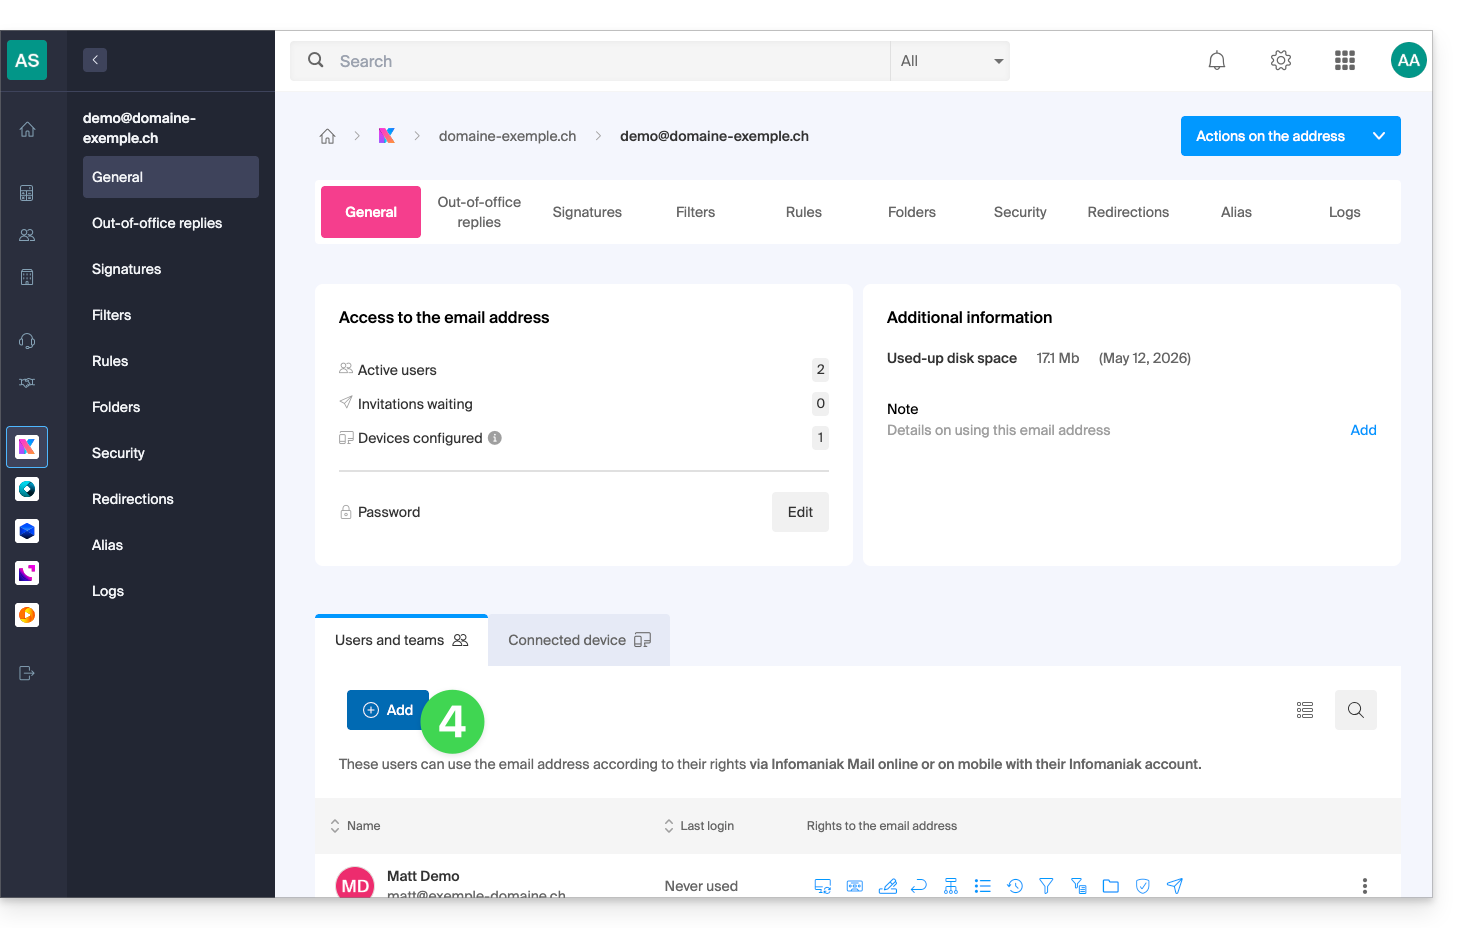
- In this example, the collaborator is external, so click to Create an invitation link.
- Click to manage the permissions for this user on the relevant email address:
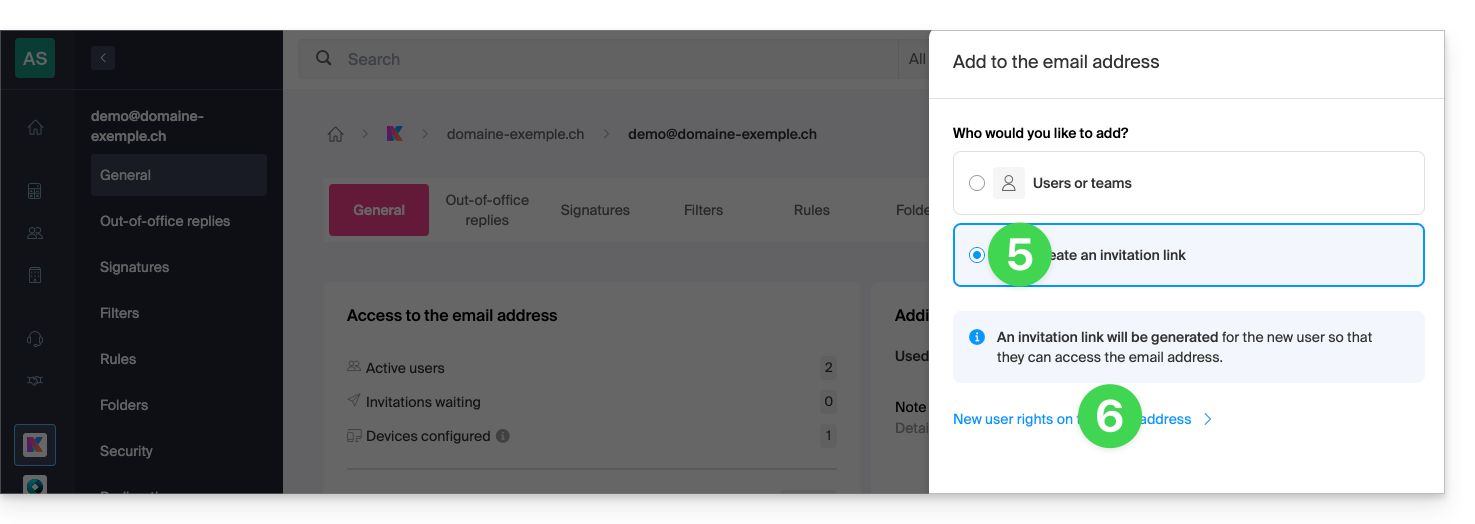
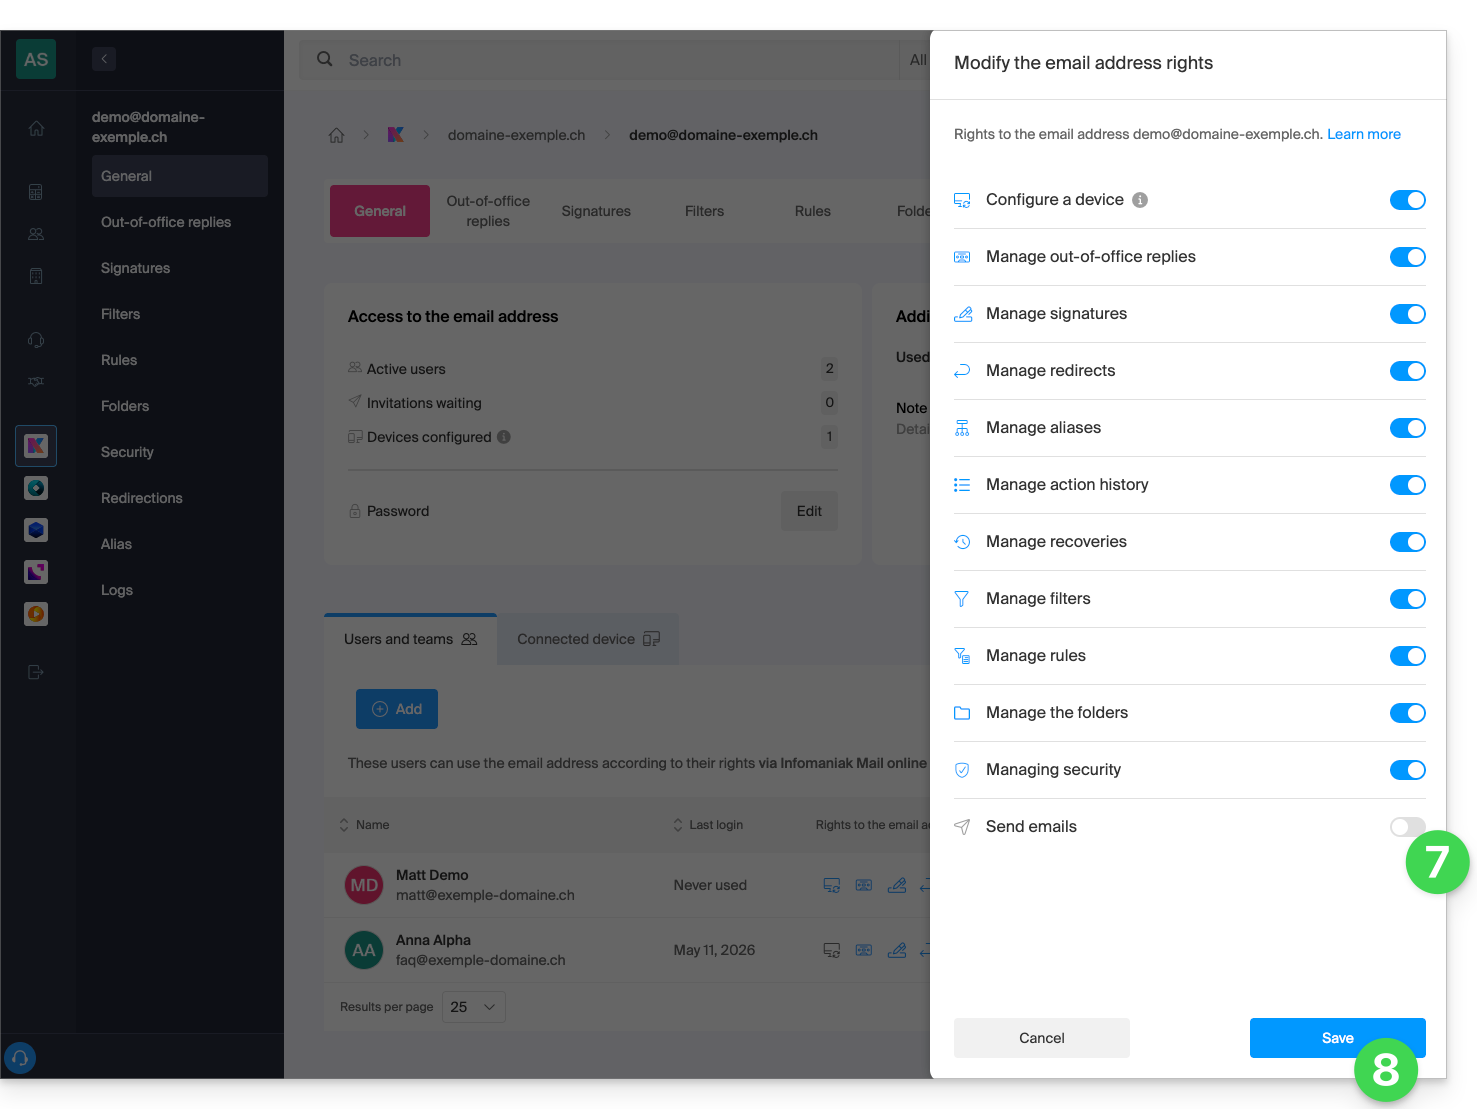
- Click on Email Sending to revoke their sending privileges.
- Save the change:
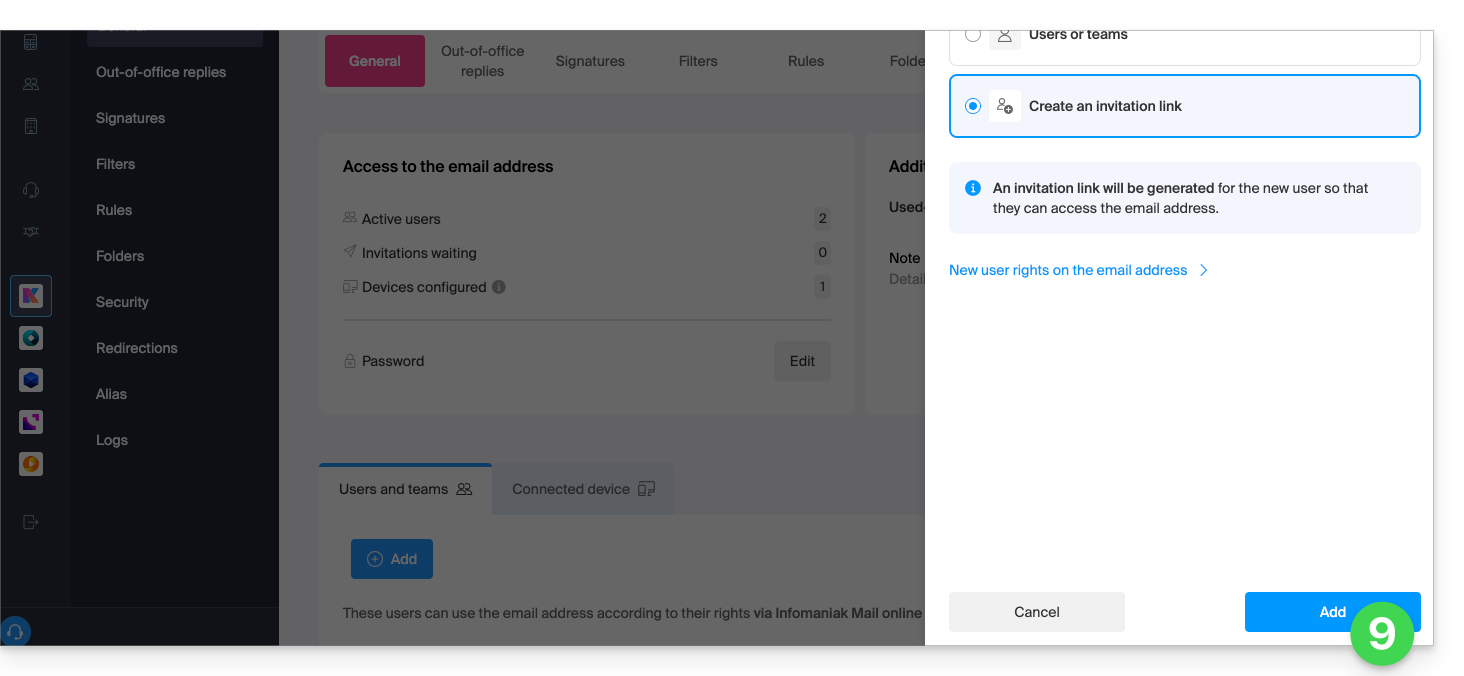
- Click on Add to complete the invitation:
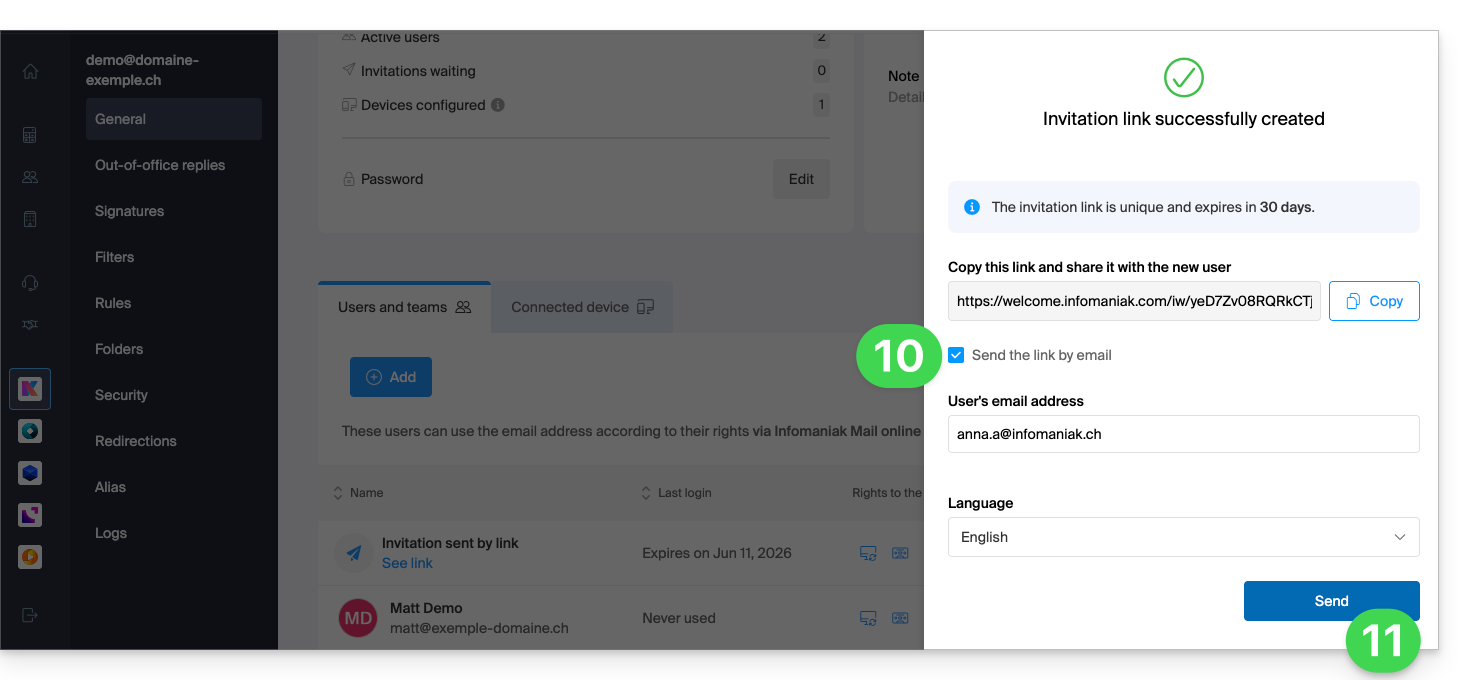
- Enter the email address to which the invitation should be sent.
- Click on Send:
The invited user accepts the invitation: they can then access the email address and its messages, but the button to compose a new message will remain grayed out, preventing them from drafting an email (or even replying, reacting, etc., as these buttons will also be grayed out/disabled):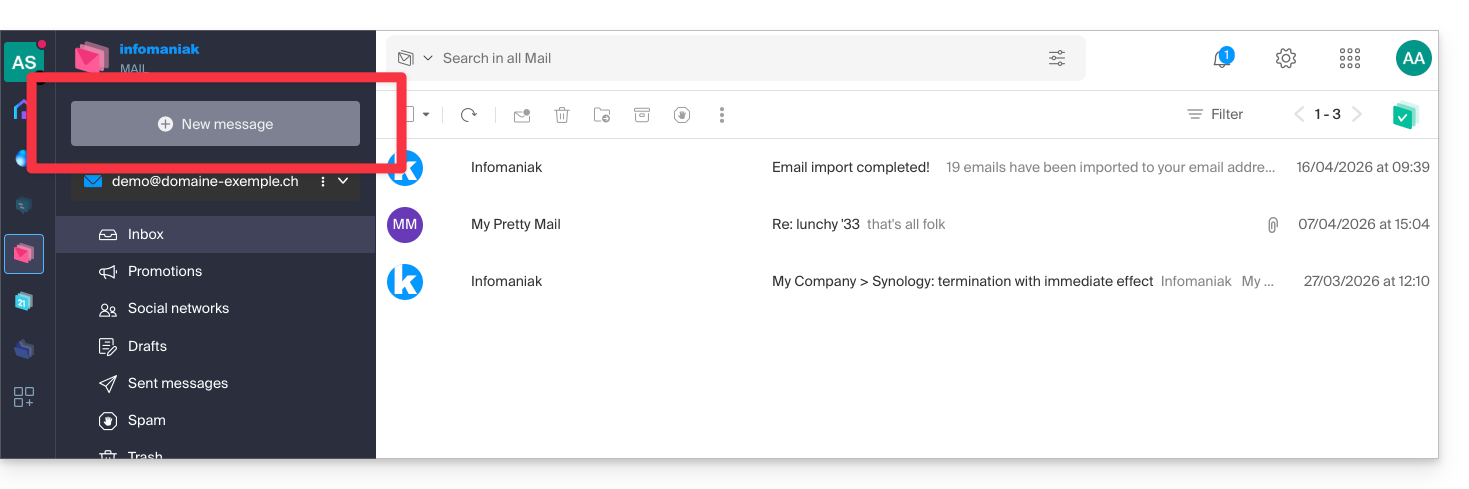
Prevent sending to an existing user
Do you want to allow collaborators to continue viewing a mail address (i.e., be able to read incoming emails) but prevent them from sending new messages?
- Click here to access the Mail Service management section in your Infomaniak Manager (❓: help).
- Click on the name of the Mail Service in question:
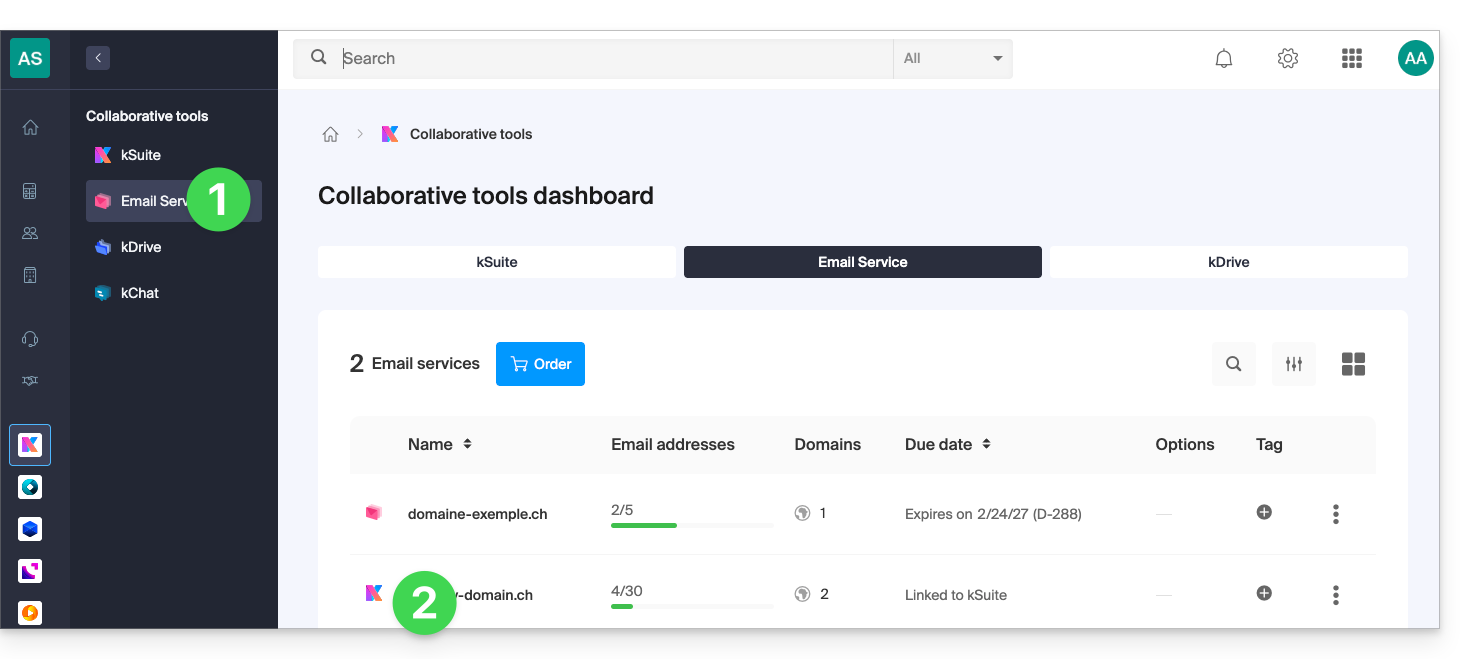
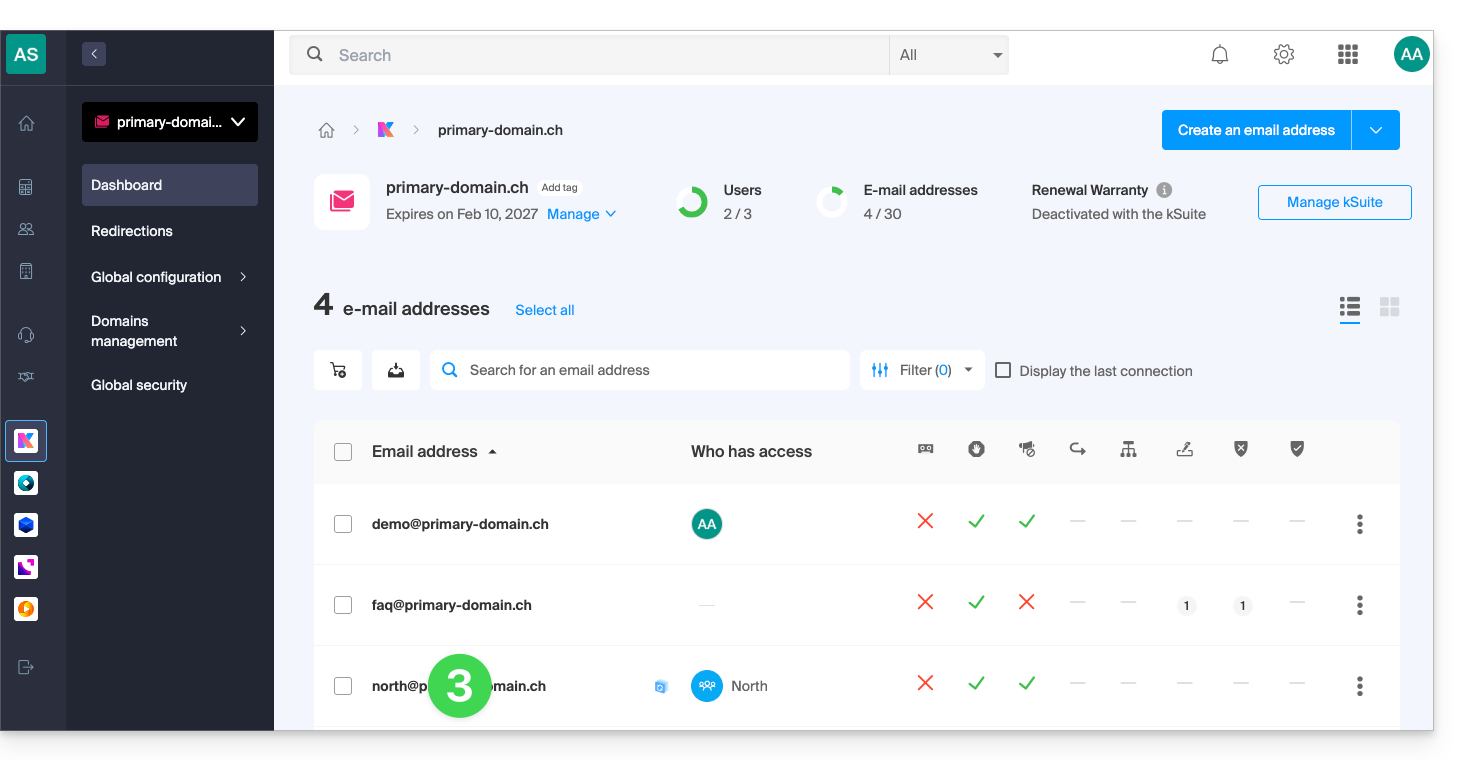
- Click on the email address in the table that appears:
- Click on Sending emails to remove the sending permission:
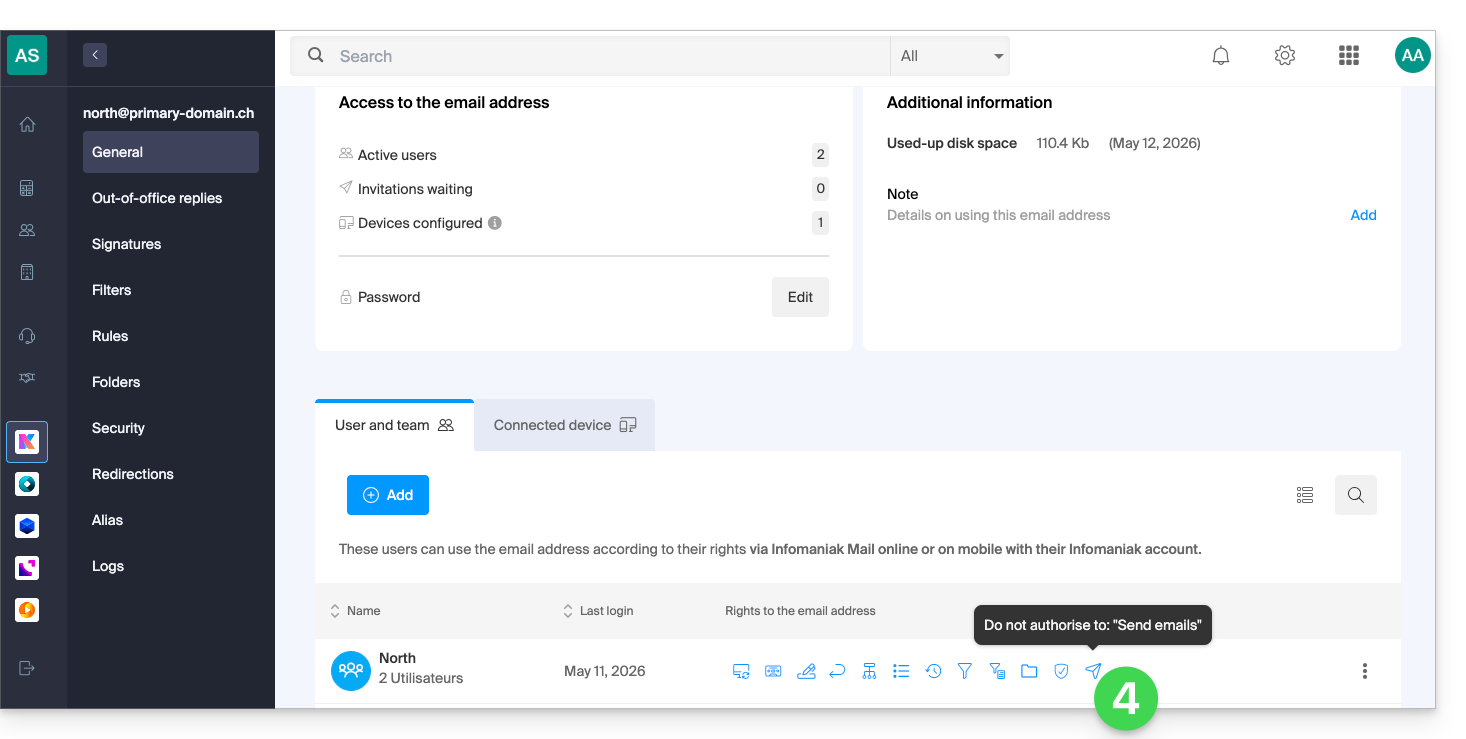
The user can then access the email address and its messages, but the button to compose a new message will remain grayed out, preventing them from drafting a message (or even replying, reacting, etc., as these buttons will also be grayed out/disabled):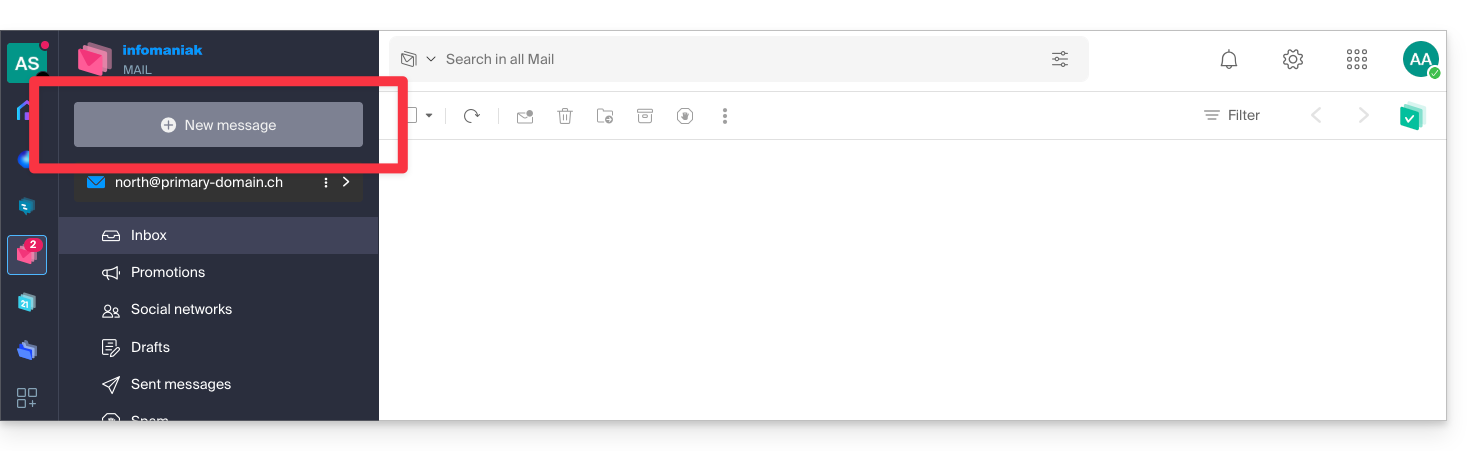
Prevent sending from an SMTP email client/software
If you want to prevent a user from sending emails from a mail client or any fixed or mobile device containing an SMTP email app, start by following the steps above.
You will then need to create a password (= "connected device") linked to this user (therefore, in step 8 of this other guide, instead of “No user”, you will need to specify the ID of the relevant collaborator, who has already been added in the users tab):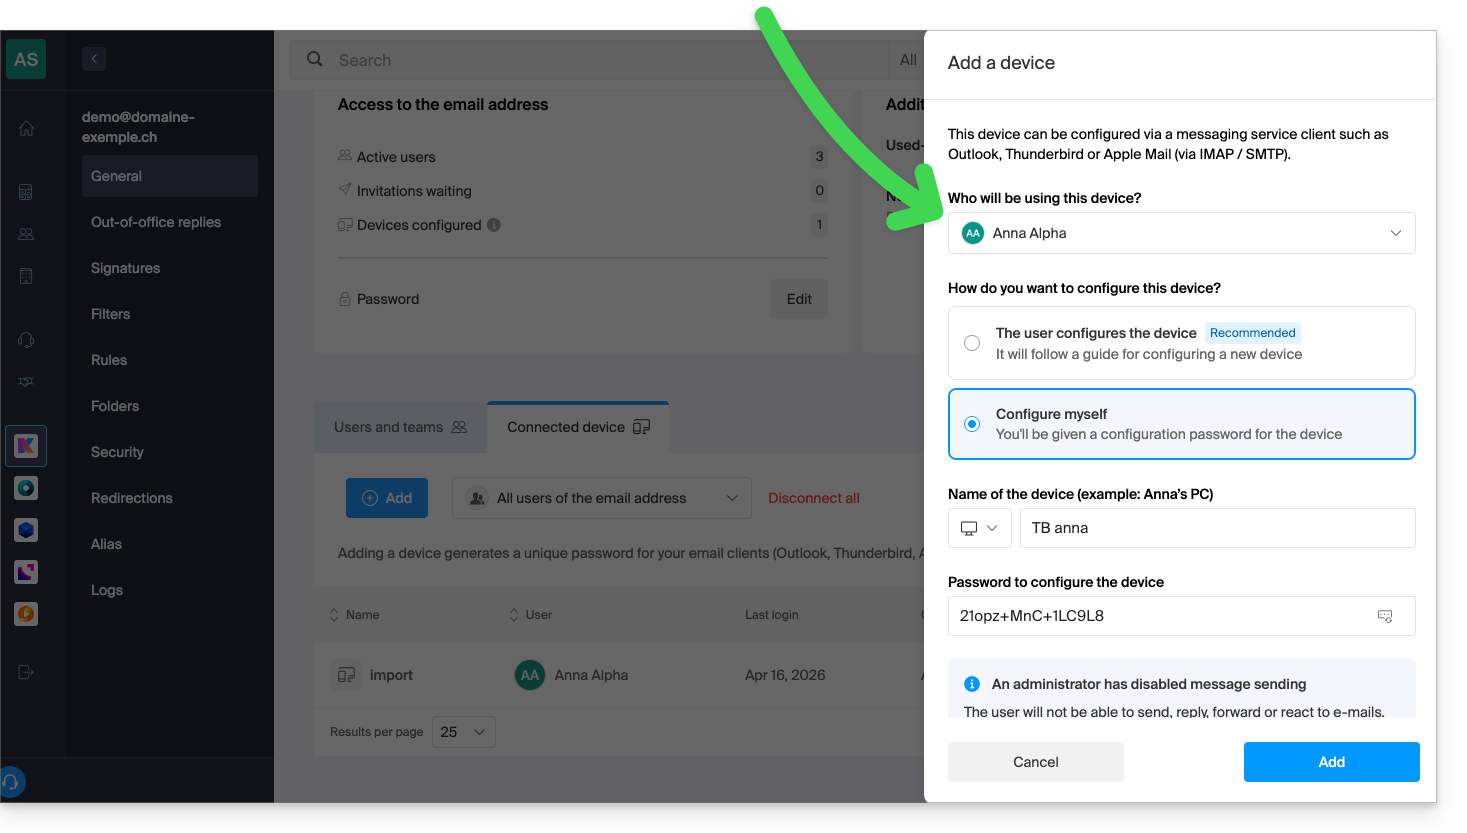
This way, the software/email client can be configured to receive emails but will not allow any emails to be sent, continuously causing an error (password request) if the user insists on sending an email: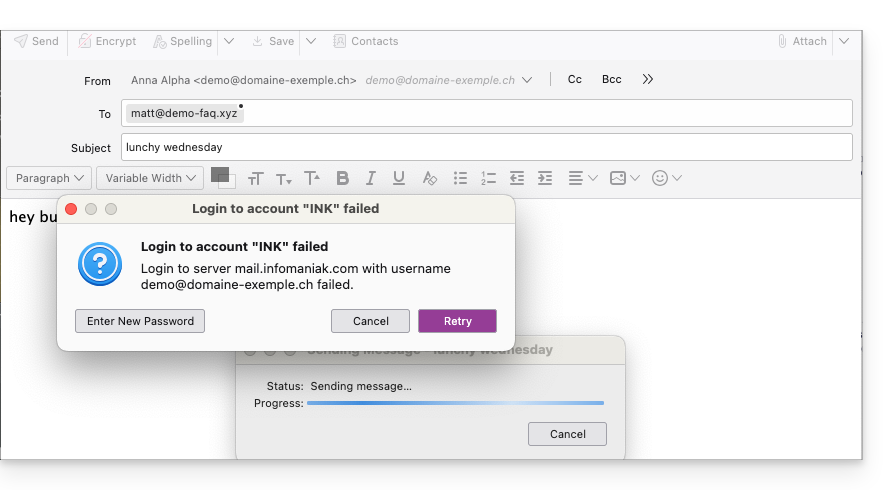
Link to this FAQ: https://faq.infomaniak.com/593
Has this FAQ been helpful?
This guide explains how to configure a different sending and reply address than the email address used on the Infomaniak platform.
✘ NOT AVAILABLE with
my kSuite (ik.me, etik.com, ikmail.com)
Introduction
- This is useful for working with one of your mail aliases (special aliases only) or synonymous domains.
- This will work with the Infomaniak Mail web app (online service ksuite.infomaniak.com/mail) but also with most email software/clients.
- Please note: there is no link between the settings entered in the Mail Infomaniak signature section and the email software/clients.
- Each email software/client has its own settings, and you can, for example, define a different reply address within each tool (see the bottom of this guide).
- To manage the sender of out-of-office messages, please refer to this other guide.
Configure the sending address in the Infomaniak Web Mail app
Prerequisites
- The secondary email address that can be used must have been added as:
- … either as an email alias (example:
aa@instead ofanna.alpha@) but excluding special aliases: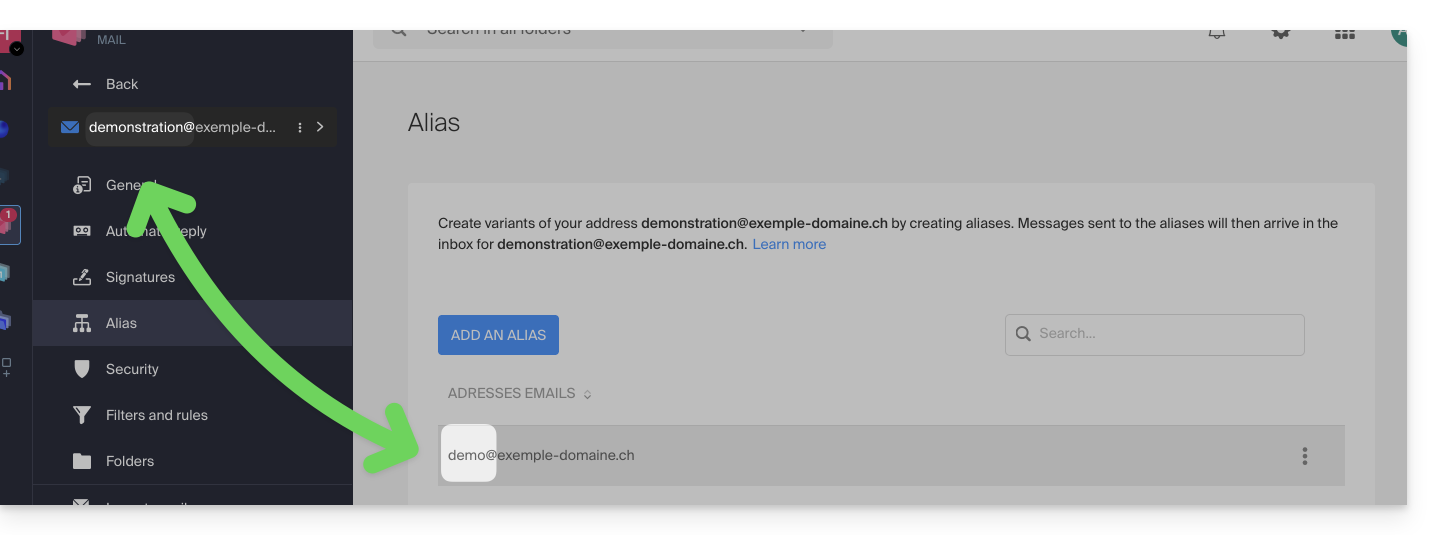
- … or as synonymous domains (example:
@short-dom.xyzinstead of@my-super-long-domain.xyz).
- … either as an email alias (example:
To access the options for sending addresses:
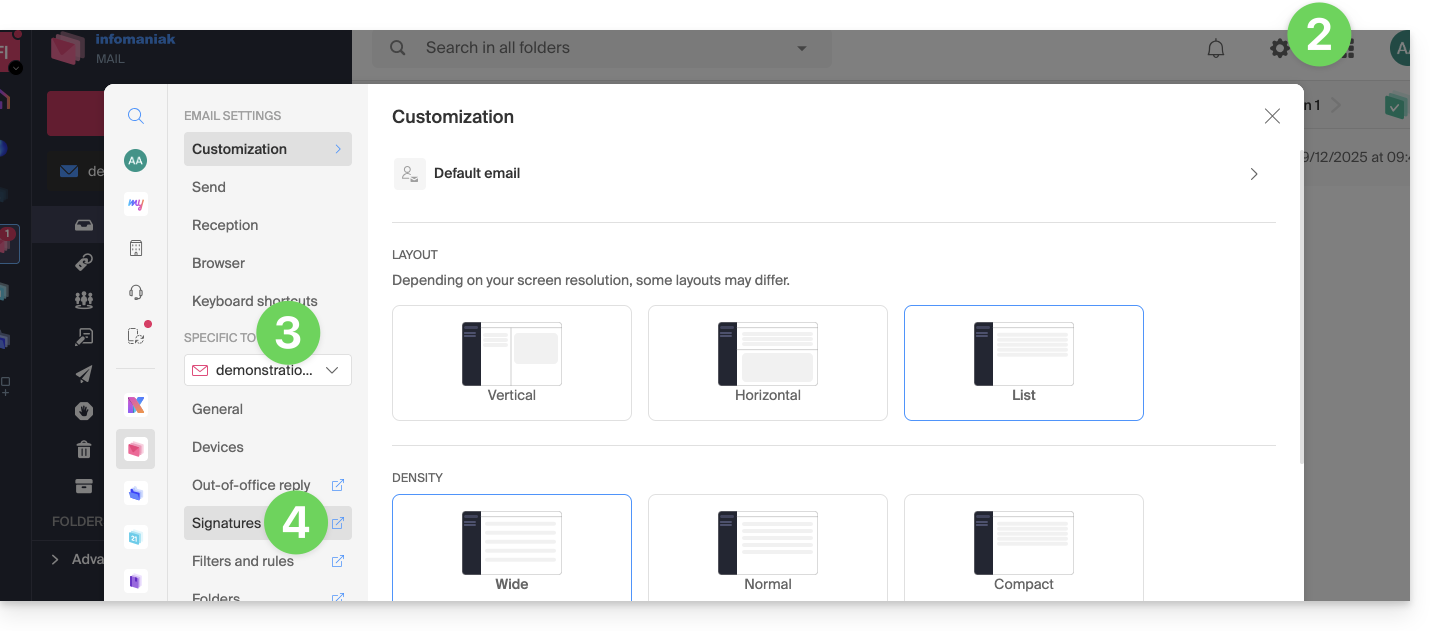
- Click here to access your emails on your Infomaniak kSuite (❓: help).
- Click on Settings in the top right corner.
- Check or select the relevant email address from the dropdown menu in the left-hand sidebar.
- Click on Signatures:
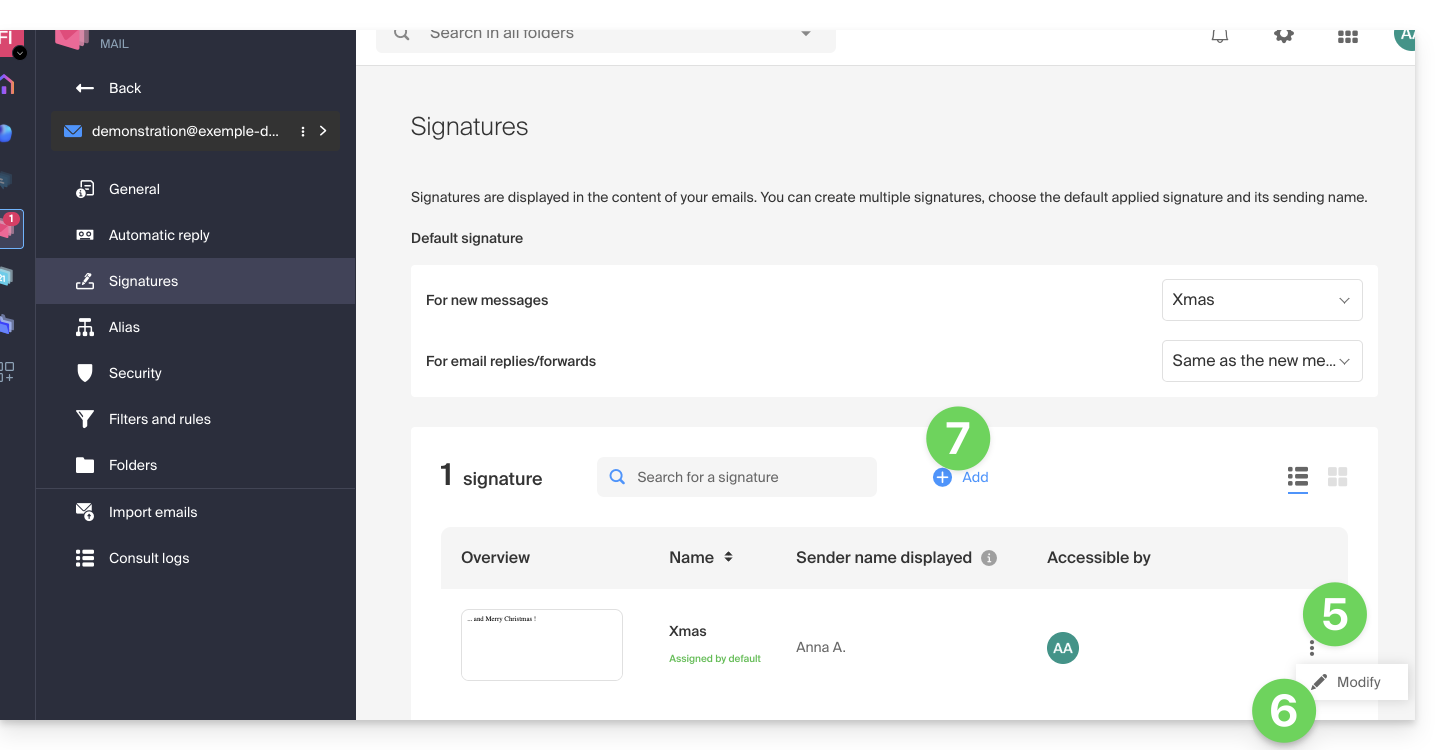
- Click on the action menu ⋮ to the right of the current signature.
- Click on the pencil ✎ icon to edit the current signature.
- OR create a new signature:
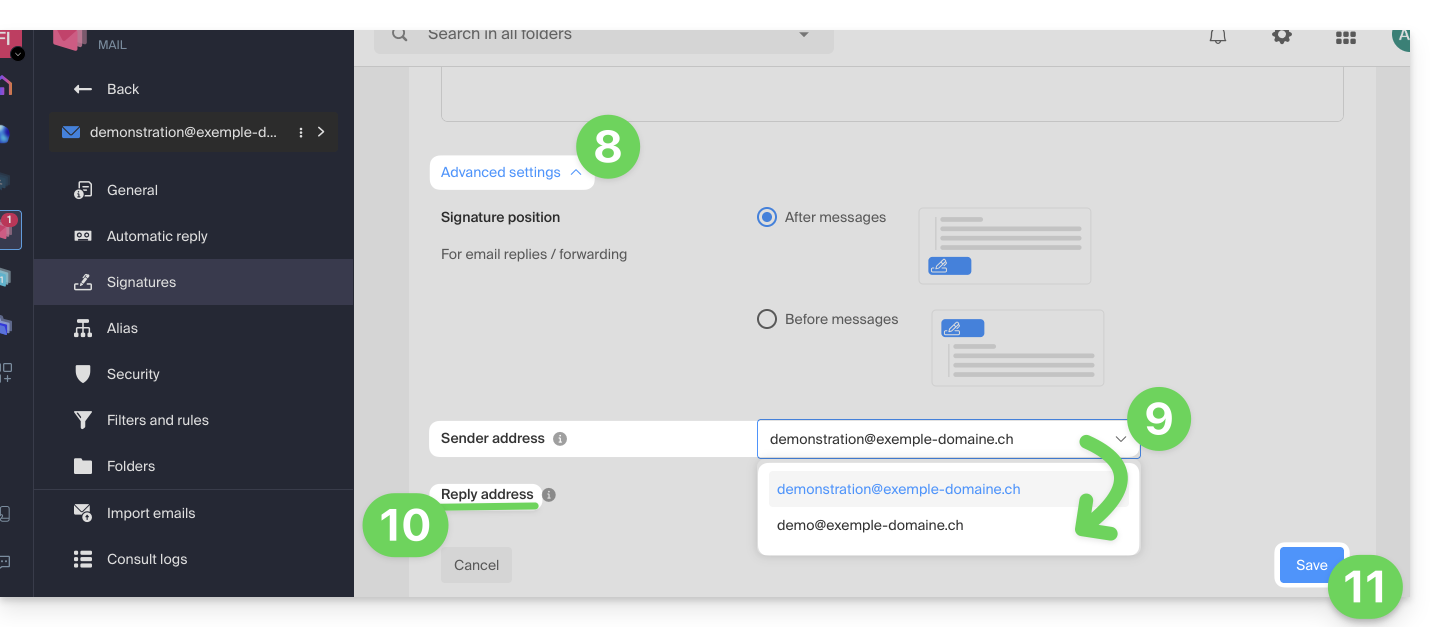
- Click on the chevron to expand the Advanced Settings section at the bottom of the page.
- Sender address: If available, this allows you to specify the address that will be displayed as the sender in your recipients' inboxes.
- Reply-to address: This allows you to receive future replies to your messages (return-path) at a different address.(from the options specified in the prerequisites above)…
- …and if you write a message in response to a reply received on this alias, the signature that allows sending with this alternative identity will be applied instead of the signature that is defined by default.
- Confirm with the Save button (if this button remains grayed out, make sure that all fields are filled in, especially the full name field):
- Write a new message by selecting the corresponding signature:
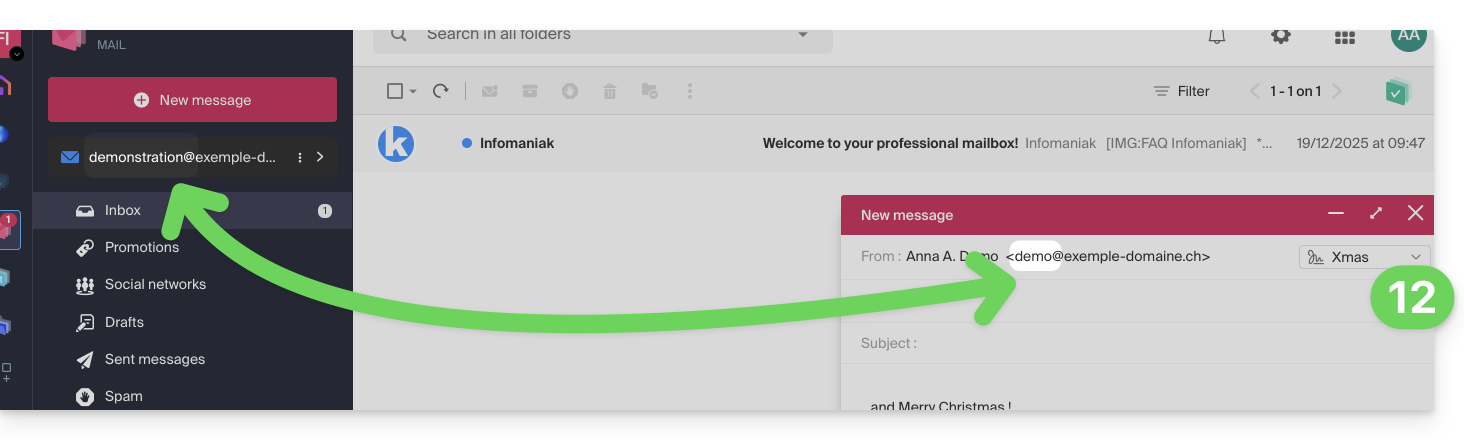
In the example above, the shipping address has been modified, but not the reply-to address. This produces the expected result for the recipient (simply check the headers of the received message to confirm).
Now, add the same secondary address in an email software/client; the effect will be the same.
Configure the sending address in your email software/client
Prerequisites
- The secondary email address that can be used must have been added as:
- … either as an email alias (example:
aa@instead ofanna.alpha@) including special aliases. - … or as synonymous domains (example:
@short-dom.xyzinstead of@my-super-long-domain.xyz).
- … either as an email alias (example:
It is possible to configure an email client with any existing email address, even if it exists as an alias in your Mail Service. Sending will be done in the same way as with an address defined as a "primary" email.
Example in the Thunderbird software:
- Add an account with the correct mail settings related to the alias:
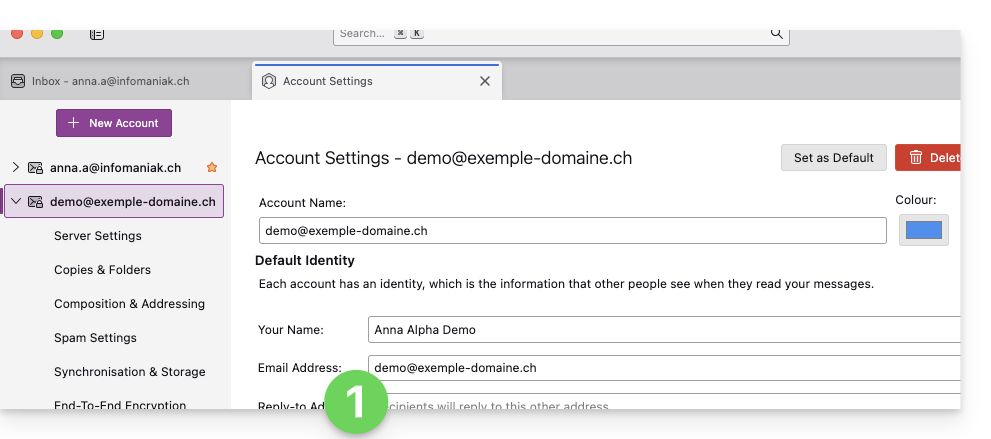
- Compose a new message from your email software/client.
- Once received, the message is clearly identified, including in its headers, as being sent from an address that you will recognize as an alias:
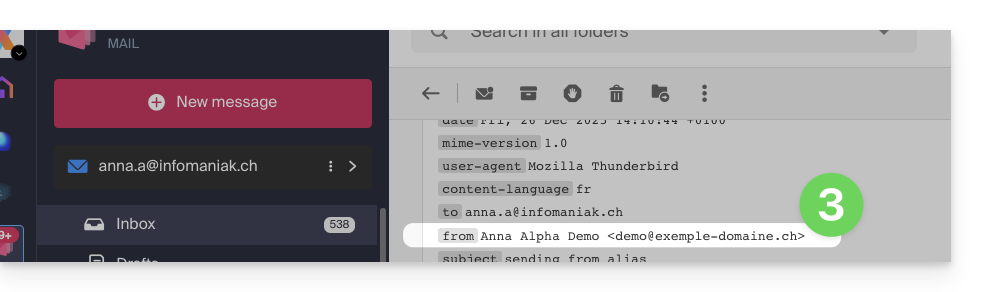
Link to this FAQ: https://faq.infomaniak.com/2490
Has this FAQ been helpful?
This guide explains why some attachments sent from Microsoft Outlook arrive in winmail.dat format at your email address hosted by Infomaniak, and how to permanently resolve the problem on the sender's side (where it is created).
Introduction
winmail.datis the container used by Outlook/Exchange when a message is sent in RTF/TNEF format.- It encapsulates the formatting and attachments.
- Many non-Microsoft software/email clients cannot interpret TNEF:
- the formatting disappears, and the attachments become a single
winmail.datfile.
- the formatting disappears, and the attachments become a single
Important: the generation of a winmail.dat file does not depend on Infomaniak; the issue originates with the sender (Outlook/Exchange) and must be resolved on their computer or by their Microsoft 365 administrator.
Resolving the issue (actions to request from the sender)
The most effective solution is to have the sender modify their Outlook configuration.
Disable RTF/TNEF and resend the message in HTML or plain text
- Classic Outlook for Windows (Microsoft 365/2021/2019, Win32 application)
Menu:File > Options > Mail
Composition:Compose messages in the following format:choose HTML (or Plain Text).
Message format: inWhen sending rich text messages to Internet recipients, select Convert to HTML (or Convert to plain text).
On a case-by-case basis (single email): in the message window,Format Texttab > choose HTML.
- New Outlook for Windows (application based on Outlook on the web)
Menu:Settings (gear icon) > Mail > Compose and reply
Message format:Compose messages in:choose HTML (or Plain text).
This client does not offer an RTF option; sending in HTML/text avoidswinmail.dat.
- Outlook on the web (Exchange Online/Outlook.com)
Menu:Settings > Mail > Compose and reply > Message format> choose HTML (or Plain text).
- Outlook for Mac
Menu:Outlook > Preferences > Writing> check/uncheck Write messages in HTML by default.
For a single message: in the writing window, Options tab > toggle HTML or Plain Text.
Note: if the sender has attached files, they will be readable by all recipients as long as the message is sent in HTML/text. Zipping the attachments (.zip) does not prevent Outlook from encapsulating the message if RTF/TNEF is still active.
Disable RTF for specific recipients (e.g., yourself)
- Classic Windows Outlook: open the Contact card > double-click the email address > Outlook Properties > Internet format: select Send in plain text only (or Let Outlook decide if the administrator is already forcing the conversion).
- Clear the auto-complete (it may “memorize” RTF for a recipient):
File > Options > Mail > Send messages > Clear the auto-complete list, then retype the address manually the next time you send a message.
- Microsoft 365 administrators (on the sender's side): in the Exchange Admin Center:
Mail flow > Remote domains > Default> Rich Text Format: choose Never. In PowerShell:Set-RemoteDomain Default -TNEFEnabled $false.
If this doesn't work: use another email client to send the invitation (e.g. Thunderbird), or check that calendar invitations are sent in iCalendar format (File > Options > Calendar > enable Use the iCalendar format for external recipients).
If you do not wish to contact the sender again
You can extract the content of winmail.dat using TNEF decoding tools (online or desktop applications). Search for “open winmail.dat” and choose a reputable tool for your system (Windows, macOS, Linux). This usually restores the attachments, but it is not a permanent solution. Furthermore, confidentiality and security are in no way guaranteed during these operations.
Link to this FAQ: https://faq.infomaniak.com/460
Has this FAQ been helpful?
This guide will help you better understand the specific issues that may arise when displaying emails when using different email applications and Infomaniak's Mail apps.
Introduction
- It may happen that inconsistencies occur when displaying a list of emails within a folder (e.g., the Sent Messages folder), and the messages sorted and considered the most recent by one device are not the same as those displayed when using another tool.
Understanding Unique Identifiers (UIDs)
UIDs (Unique Identifiers) are unique identifiers assigned to each message in an IMAP mailbox. They are used to uniquely identify each message, regardless of changes made to the folders or the messages themselves. UIDs are particularly useful for managing and synchronizing emails across multiple IMAP email clients:
- Each email is assigned a unique UID when it is created in a mailbox; this UID never changes in principle as long as the email exists, even if its content or metadata is modified.
- UIDs are generally sequential, meaning that newer messages typically have higher UIDs.
- When synchronizing emails, IMAP email clients can use UIDs to determine which messages are new, modified, or deleted since the last synchronization; this enables efficient email management without having to download and compare all messages.
- Depending on the tool used, to display them in the order they were received, messages can be sorted by their date of receipt or by UID.
Do not confuse with:
Message Sequence Number(used for temporary operations based on the current position of the messages)…Message-ID (RFC 5322)(used to uniquely identify messages across different servers and email software/clients)…X-Message-Id(server-specific and used for internal tracking purposes)...Thread-IndexandThread-Topic(used by Microsoft applications for tracking conversation threads)...
IMAP applications and the Infomaniak Mail app
The issue may appear in this form at the server command level:
758 - date.sent: 2017-10-11 23:15:26 (+0100)
757 - date.sent: 2017-10-11 15:00:55 (+0100)
756 - date.sent: 2017-10-11 14:39:28 (+0100)
(...)
742 - date.sent: 2018-01-17 00:40:21 (+0000)
741 - date.sent: 2018-01-17 00:30:33 (+0000)
740 - date.sent: 2018-01-17 00:26:07 (+0000)
(...)
51 - date.sent: 2022-10-07 16:39:16 (+0100)
50 - date.sent: 2023-06-13 10:15:00 (+0100)
49 - date.sent: 2023-06-07 12:11:35 (+0100)
Here, we observe that emails dating from 2017 have a higher UID (758, 757, ...) than emails with a more recent date in 2023. The UIDs must have been reassigned for one reason or another during the lifetime of this email account (moves, copies, imports, etc.).
Depending on how the email tool sorts the emails, a message from 2017 may appear among the recent messages, while the message from 2018 will not be loaded immediately. This is particularly true for the Mail Infomaniak app, which only loads a series of emails at a time based on the UID (this is likely to change).
Therefore, to resolve any potential inconsistencies, it is recommended to use an IMAP email client such as Thunderbird on a computer. This will allow you to quickly and efficiently sort all messages in a specific folder, based on the email date, as the application will display all messages present on the Infomaniak server.
Link to this FAQ: https://faq.infomaniak.com/1276
Has this FAQ been helpful?
This guide explains how to import a calendar into the Infomaniak Calendar web app (online service ksuite.infomaniak.com/calendar).
Introduction
- Consult this other guide if you only want to display an Infomaniak calendar in read-only mode on Google Calendar (web & mobile app).
- Consult this other guide if you prefer to edit events in the calendar from both sides, but only on the mobile version of the Google Calendar app.
- You can also import tasks into the dedicated section of the calendar.
Import a calendar via a URL
You can display an existing calendar managed externally in Calendar. It will be automatically updated every hour via the URL you specify.
Please note that this is not a calendar synchronization, but a read-only, one-way display that is updated regularly.
To do this:
- Click here to access the Infomaniak Calendar web app (online service ksuite.infomaniak.com/calendar).
- Click on in the left-hand menu.
- Click on "From a URL":
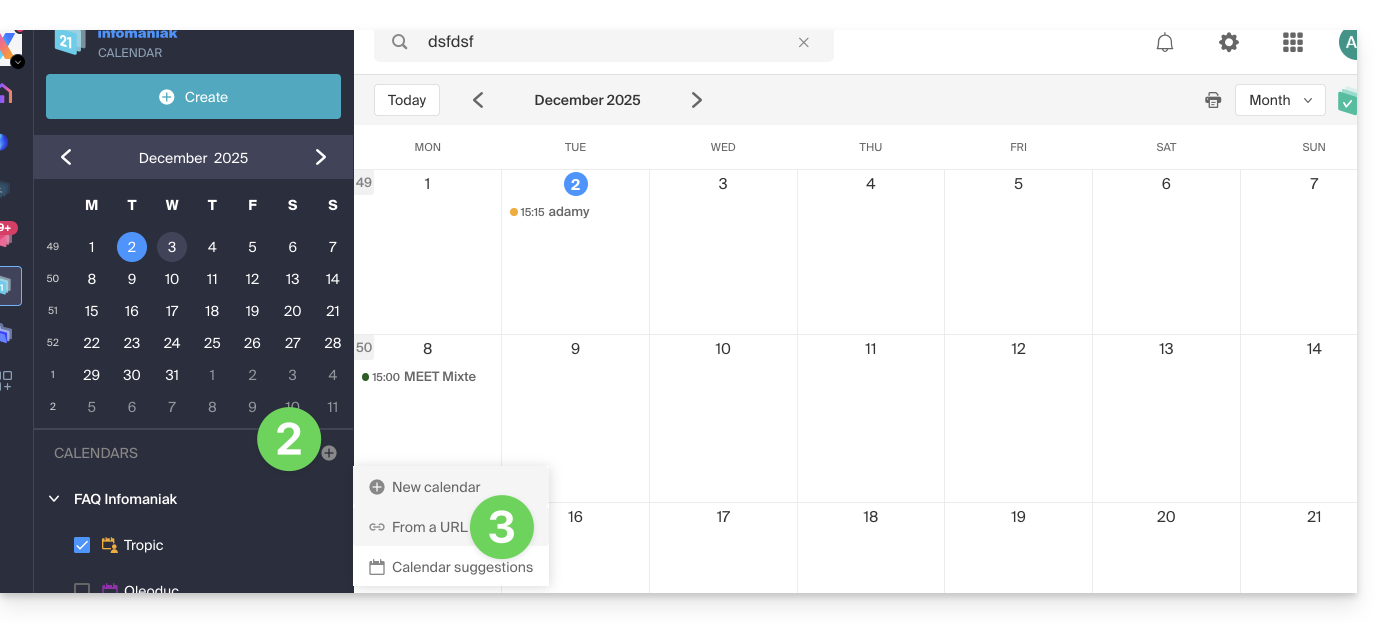
- Enter the URL of the calendar to import.
- Check the I want to subscribe to this calendar box.
- If necessary, select the Organization in which the calendar will be imported.
- Click on Import calendar:
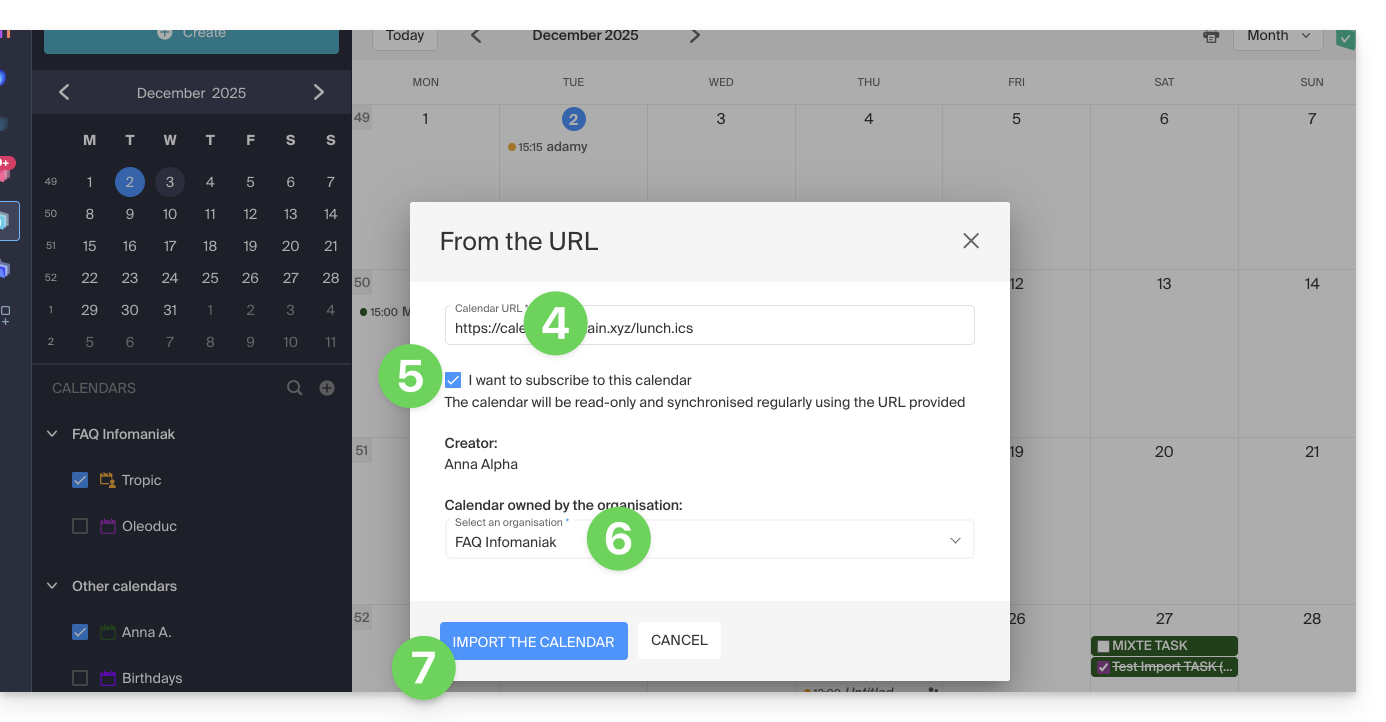
You can also go directly through one of the Organizations you belong to:
- Click here to access the Infomaniak Calendar web app (online service ksuite.infomaniak.com/calendar).
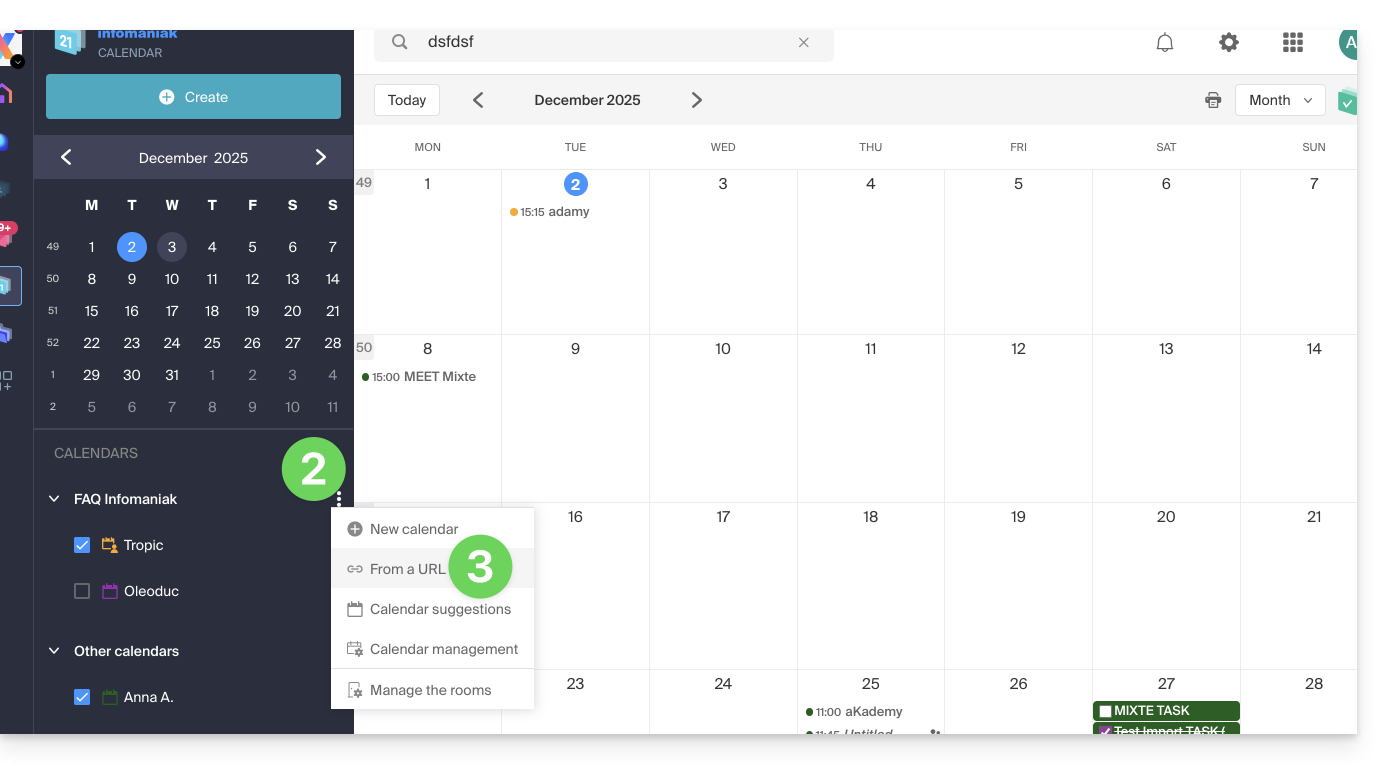
- Click on the action menu ⋮ to the right of the Organization in the table that appears.
- Click on "From a URL":
Link a Google calendar using its "secret" URL
The "secret" URL of a Google calendar, which you can paste in step 3 above, can be found in the Google calendar settings:
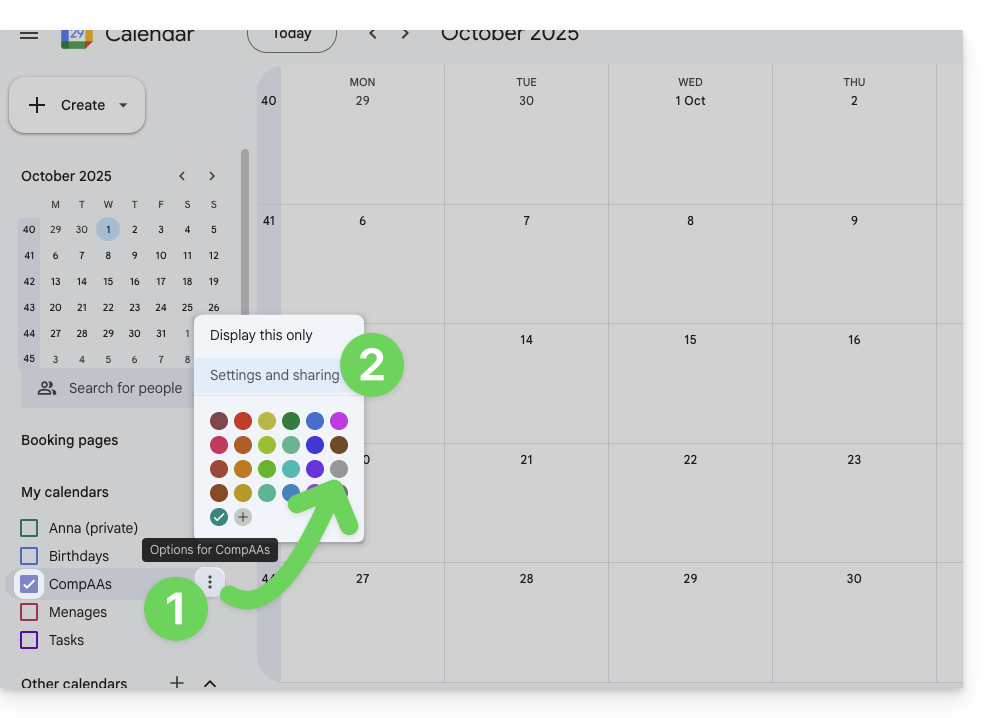
- Click on the action menu ⋮ to the right of the Google Calendar in question.
- Click on Settings and sharing:
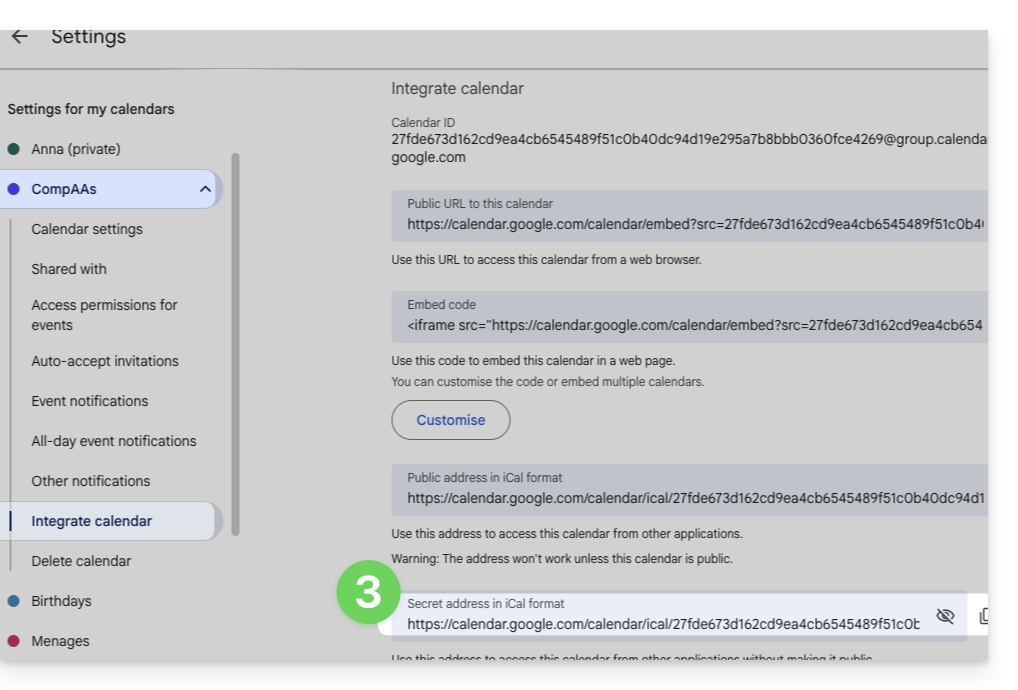
- Scroll down the page until you find the secret iCal URL and click on the icons to view and/or copy the URL:
- Paste the URL according to the procedure in step 3 of the previous chapter above.
Please note that this is not a calendar synchronization, but rather a read-only, one-way feed that is updated regularly.
The calendar will be visible and will regularly display any updates made, but it will not be possible to edit it directly from the Infomaniak interface; this is a "one-way synchronization" with Google.
You can, however, force synchronization to immediately display any new events or changes:
- Click on the action menu ⋮ to the right of the imported calendar on Infomaniak.
- Click on Display information:
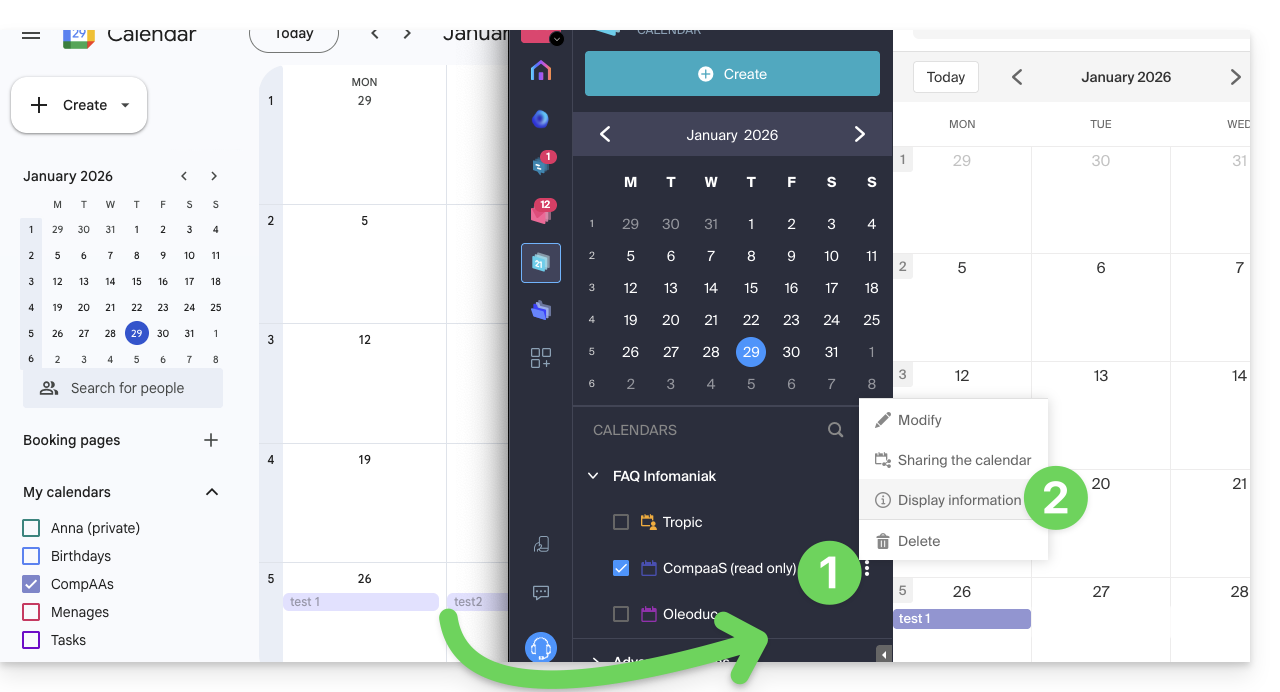
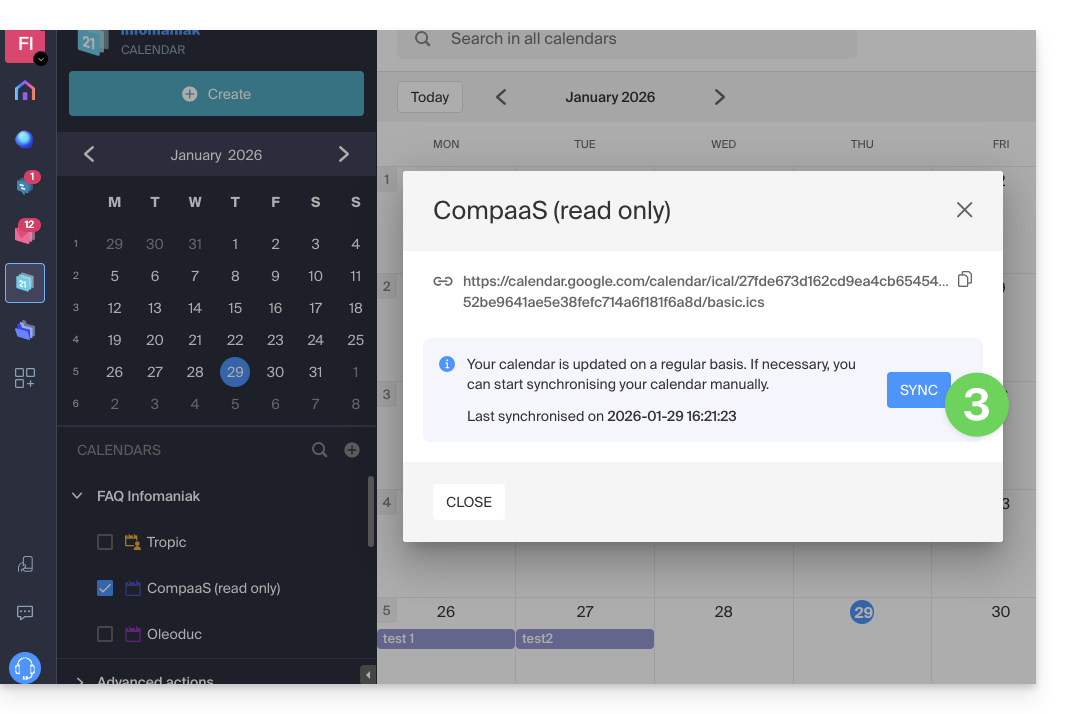
- Click on the SYNC button to synchronize the imported content, then wait a few seconds:
Import events via an .ics file
To access the Advanced actions for importing, exporting, and restoring calendars:
- Click here to access the Infomaniak Web app Calendar (online service ksuite.infomaniak.com/calendar).
- Click on Advanced actions in the left-hand menu.
- Click on Import.
- Upload the
.icsfile corresponding to the export performed from your previous provider: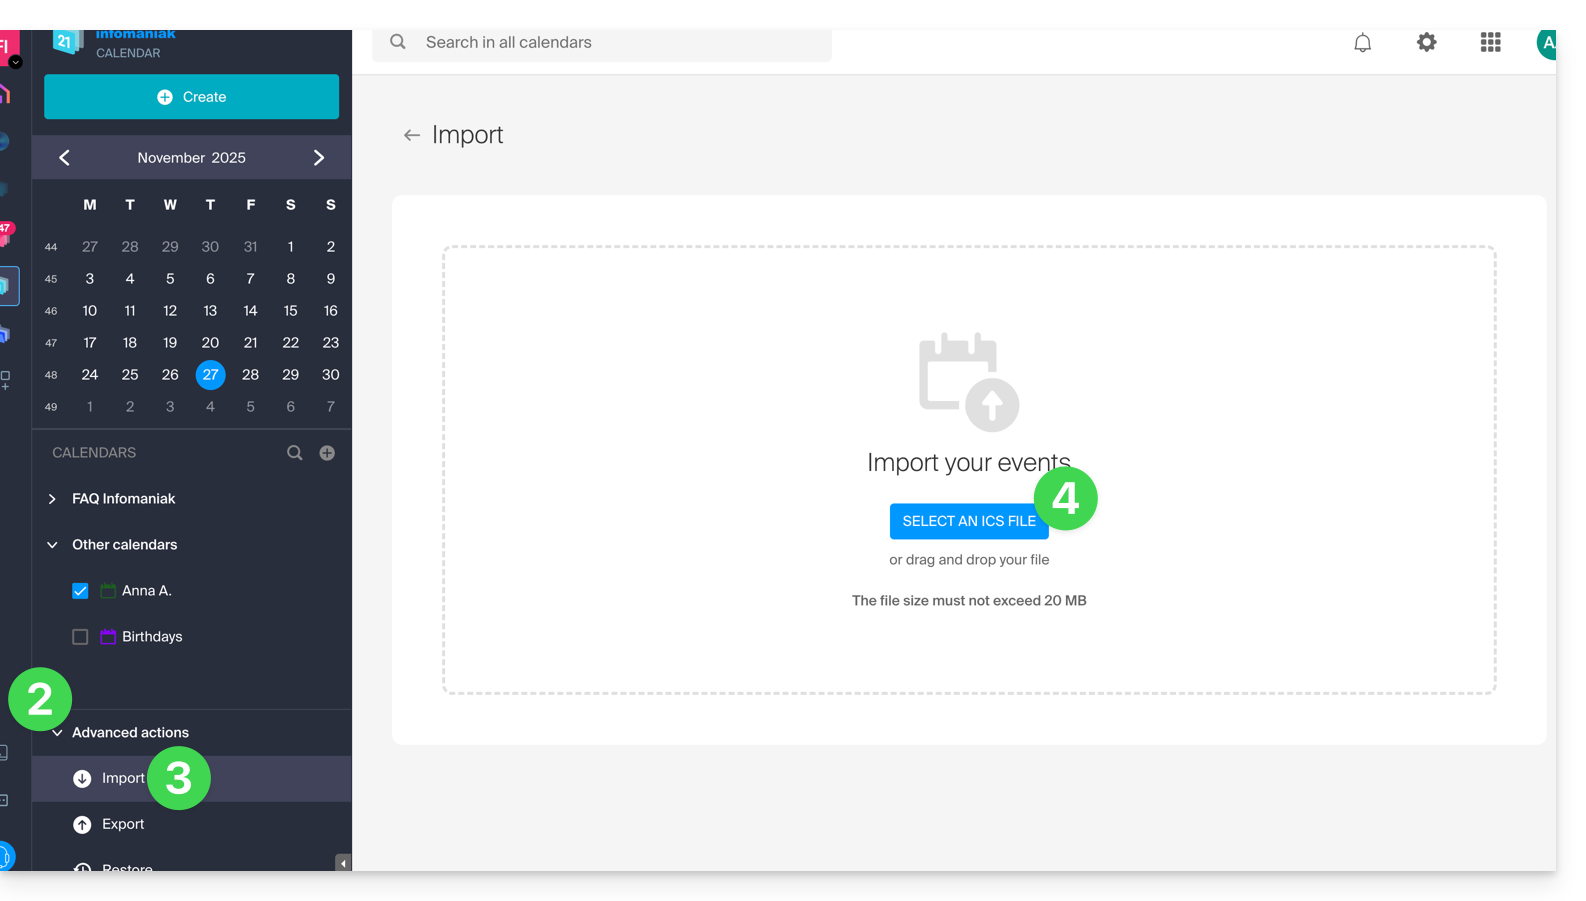
You can choose which existing calendar to import the events into, or create a new calendar (tasks are also imported if the .ics file contains them).
Please note that this is not a calendar synchronization, but a one-time, one-way import.
Export data from your previous provider
Here are some specific guides provided for reference to export the calendar from a third-party provider, which will allow you to re-import this data into Infomaniak:
- Apple Mail
- Gmail
- Outlook (section Publish > ICS link)
- Yahoo
- Proton
- Thunderbird
Refer to this other guide to import other data.
Link to this FAQ: https://faq.infomaniak.com/1943
Has this FAQ been helpful?
This guide explains how to connect the desktop app New Outlook (the new Outlook desktop application on Windows, replacing Windows Mail) to an email address hosted by Infomaniak.
Introduction
- Although the emails themselves remain stored on the Infomaniak server, the experience in New Outlook is highly integrated with the Microsoft cloud:
- Some of your account information may be used by Microsoft for centralized management and a better synchronization experience.
- If you want to have full and local control over your emails, consider using third-party email software/clients (such as Thunderbird, for example) that allow for more direct storage (❓: help).
Add the email address to the application
Prerequisites
- Create the email address (❓: help my kSuite | Mail Service/kSuite).
- Create a device password (❓: help my kSuite | Mail/kSuite Service).
- Verify that the domain is configured correctly (❓: help).
The password created for the email address must meet the criteria detailed at the bottom of this guide.
To configure the email application:
- Open the application.
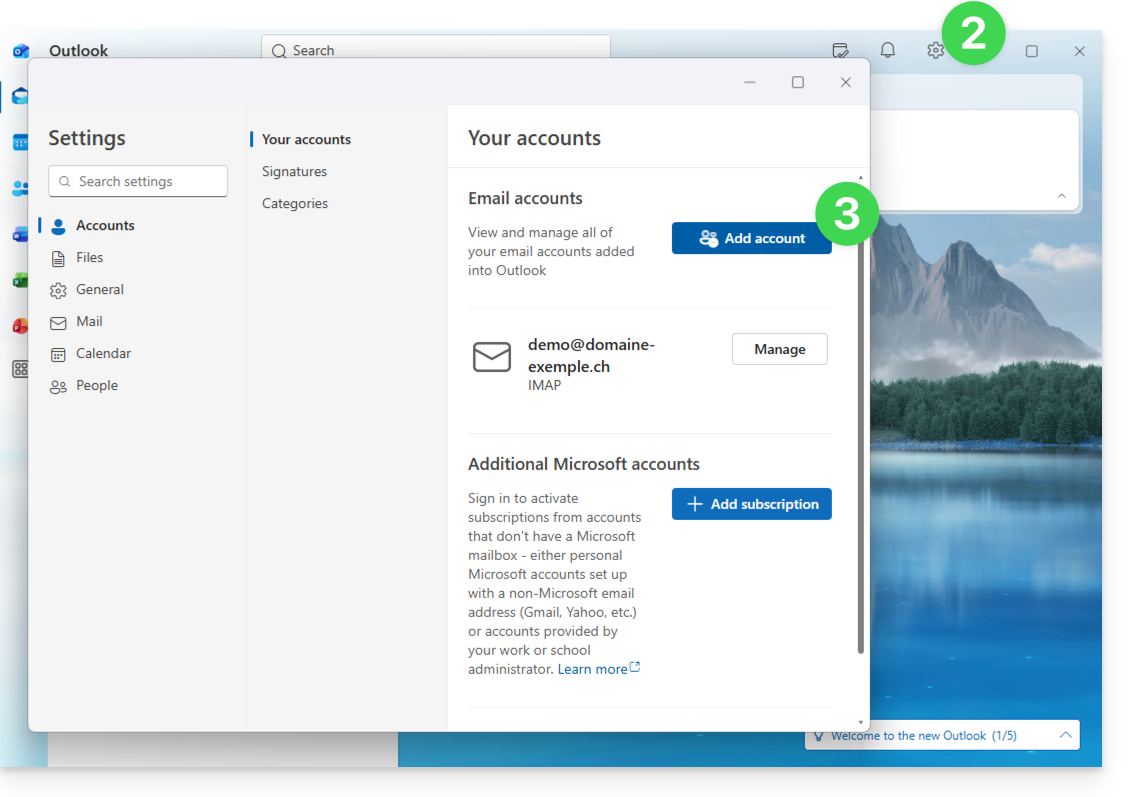
- If necessary, click on the gear icon in the top right corner (otherwise, skip to step 4).
- Click on Add an account:
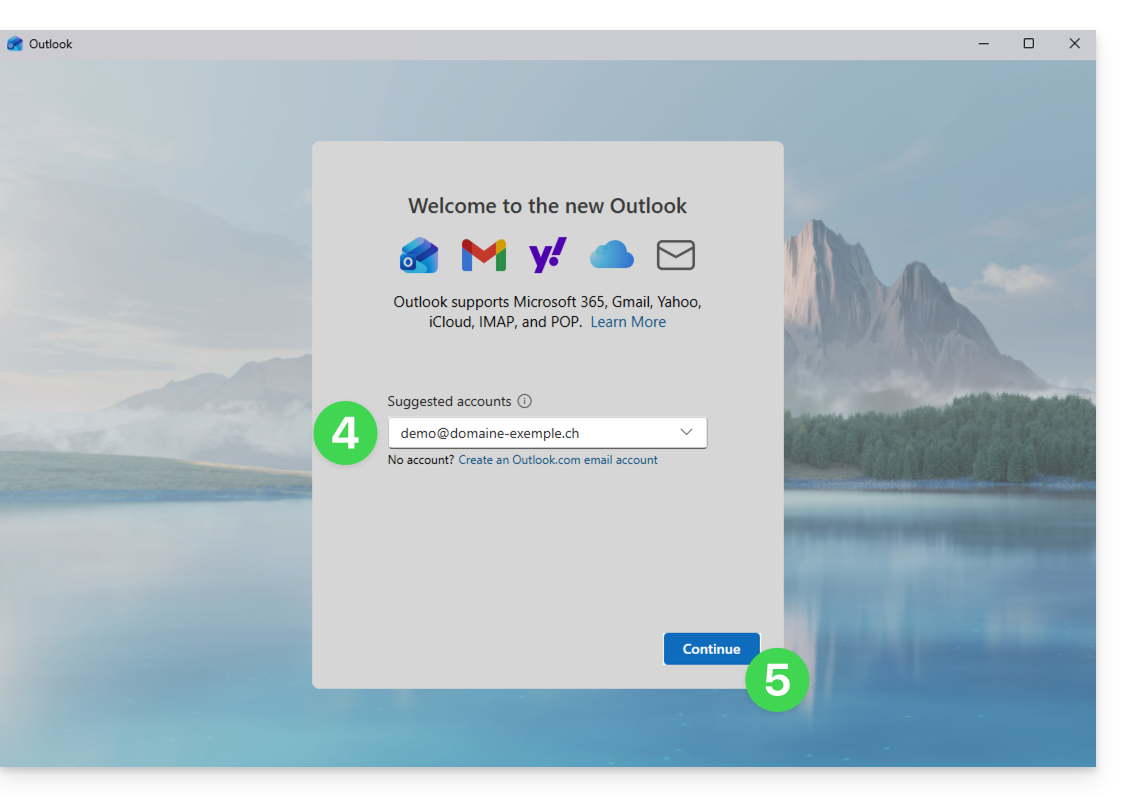
- Enter the email address to associate.
- Click on Continue:
- Enter the password for the email address (❓: help).
- Click on the View more button.
- Check and complete any missing information (❓: help):
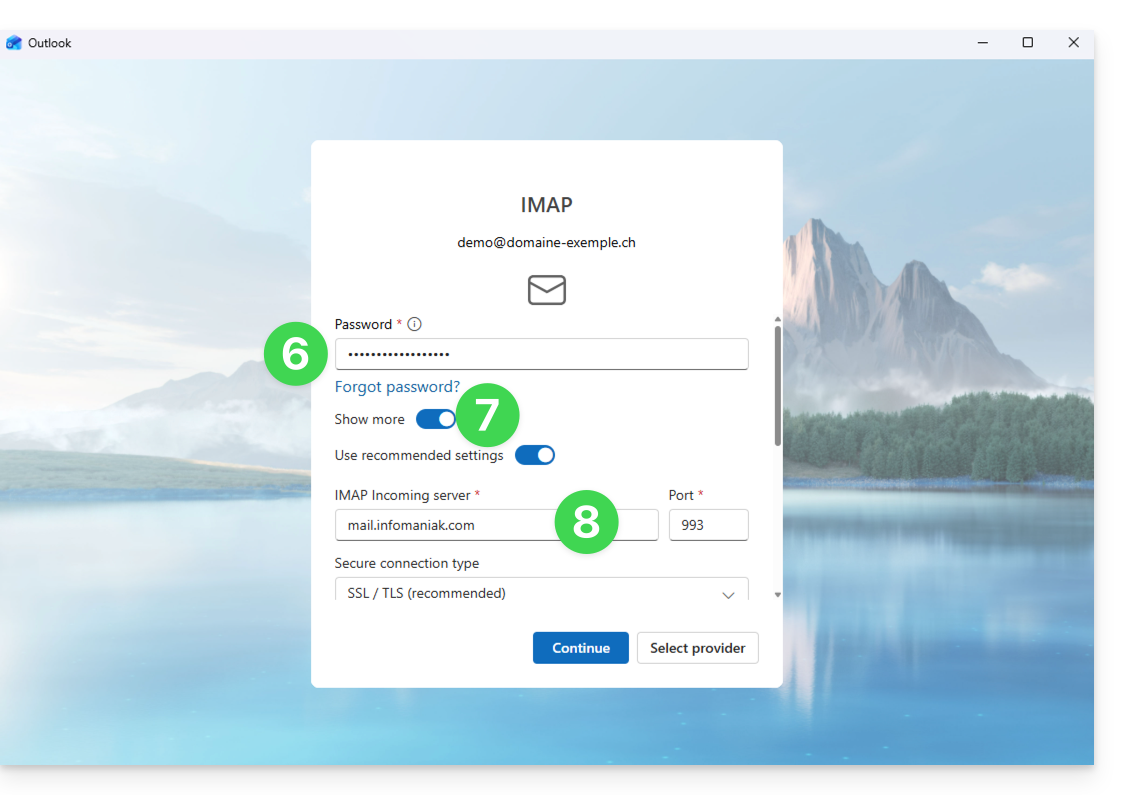
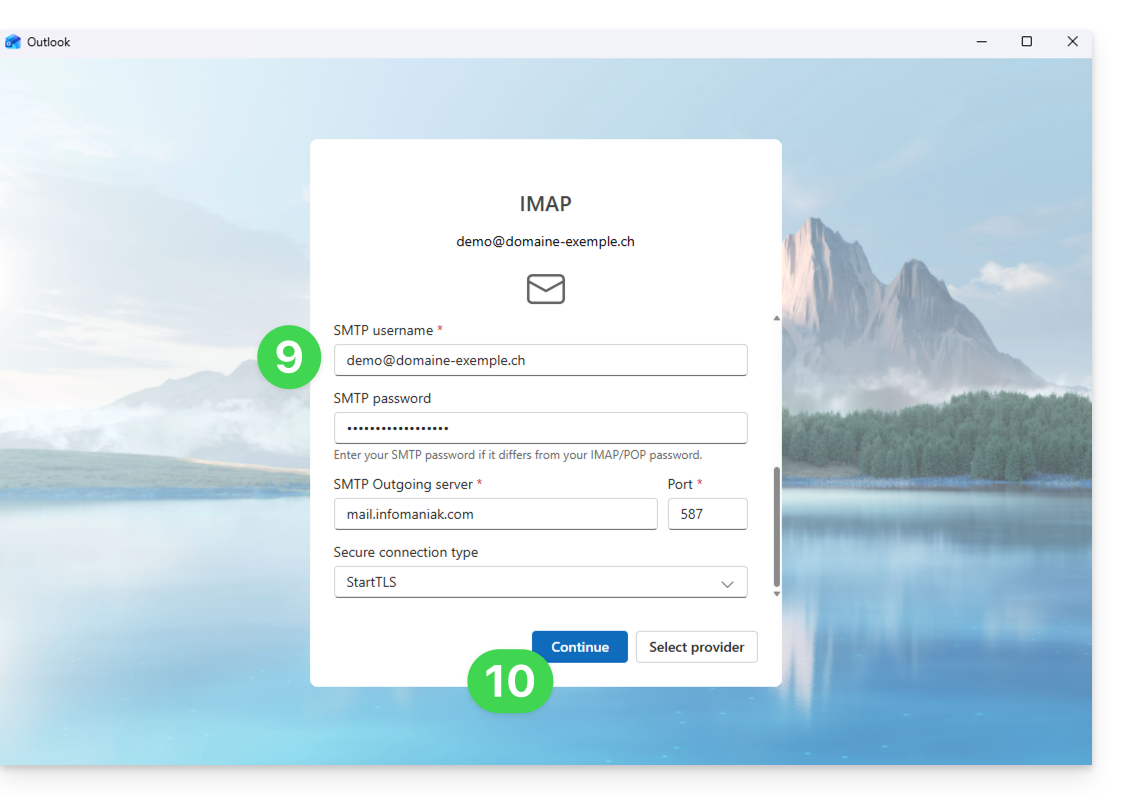
- Scroll down to the bottom of the page, then check and complete any missing information (❓: help).
- Click Continue:
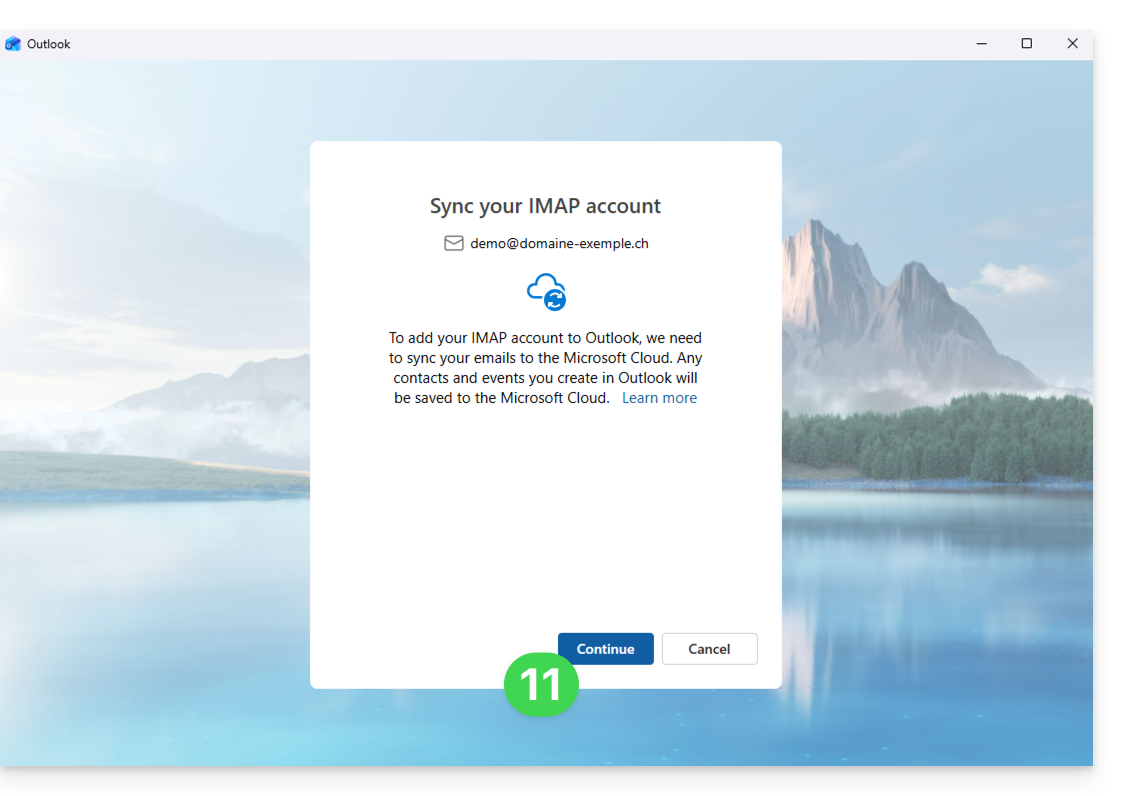
- Read and go through the various Microsoft information windows:
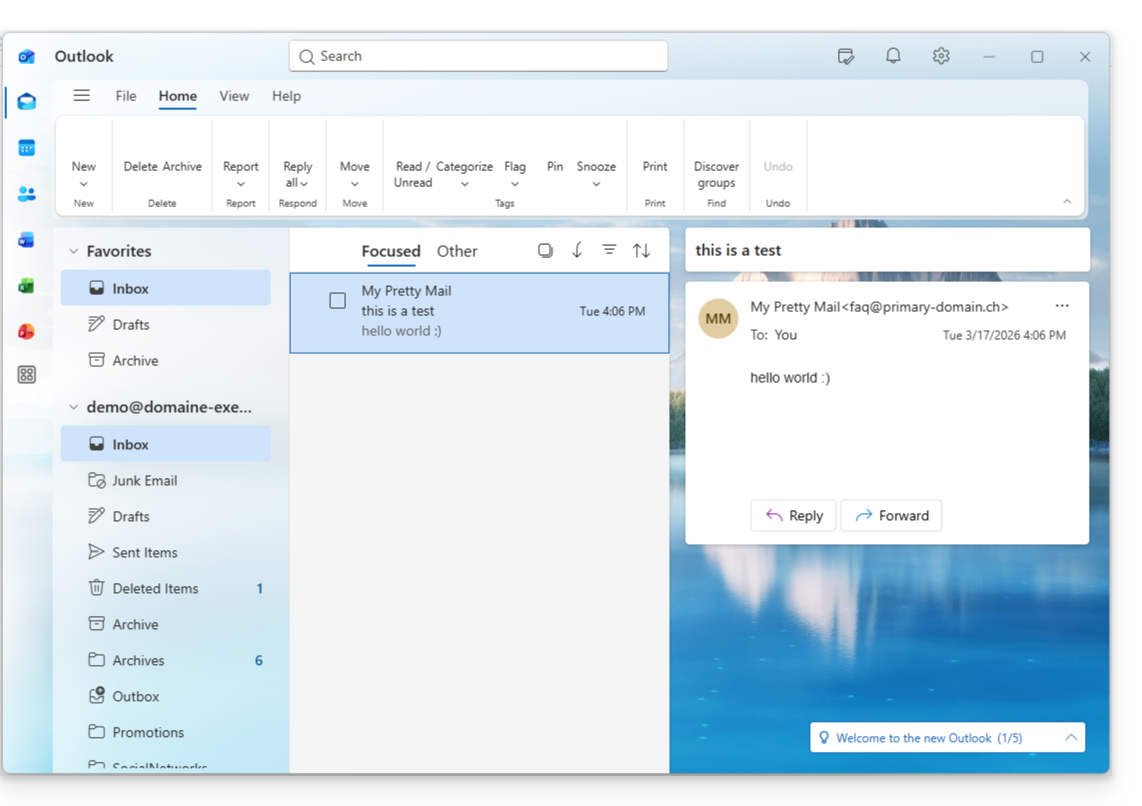
- Done! Your email address is now configured in the application:
Recommended settings
- Incoming IMAP server =
mail.infomaniak.com - IMAP port =
993(with SSL) - Outgoing SMTP server =
mail.infomaniak.com - SMTP port & encryption protocol and command/method to activate this protocol:
587+ STARTTLS - Username = the complete email address & (❓: help)
- Password = the password generated for the email address you want to access (see prerequisites).
- Authentication required for sending emails:
- Enable this in the SMTP settings of your application.
- Check "use the same settings as the incoming server" or, depending on the software/email client, enter a username (= the complete email address) and the generated password.
Refer to this other guide if you are looking for information about other email ports and protocols that are supported (SSL/TLS, for example).
In case of a problem
A solution that seems to work is the combination of these 2 situations:
- Being logged in to your Windows session with a Microsoft account (not just a local account).
- Added the email address used to log in to Windows to this version of Outlook.
Also, create a new password (❓: help) by letting it be generated randomly, but also ensuring that it meets the criteria imposed by Microsoft:
| Allowed characters |
|
| Forbidden characters |
|
| Password length | 16 characters MAXIMUM |
Make sure that the Mail service is configured optimally (❓: help).
The troubleshooting guides will help you resolve any potential issues:
- Consult the solutions provided in this other guide regarding email in general.
- This other guide focuses specifically on Outlook.
… and if your Outlook is no longer working after a change of email password, please refer to this other guide.
Link to this FAQ: https://faq.infomaniak.com/2434
Has this FAQ been helpful?
This guide details what you can search for in the Infomaniak Mail web app (online service ksuite.infomaniak.com/mail) or other kSuite services.
Introduction
- For information on searching in kDrive, please refer to this other guide.
Search for an email
On ksuite.infomaniak.com/mail, type the term you want to find in the search bar at the top of the page.
The search will be performed within the email address specified in the left sidebar(to search across multiple email addresses at once, use an IMAP email client to which you connect your different addresses):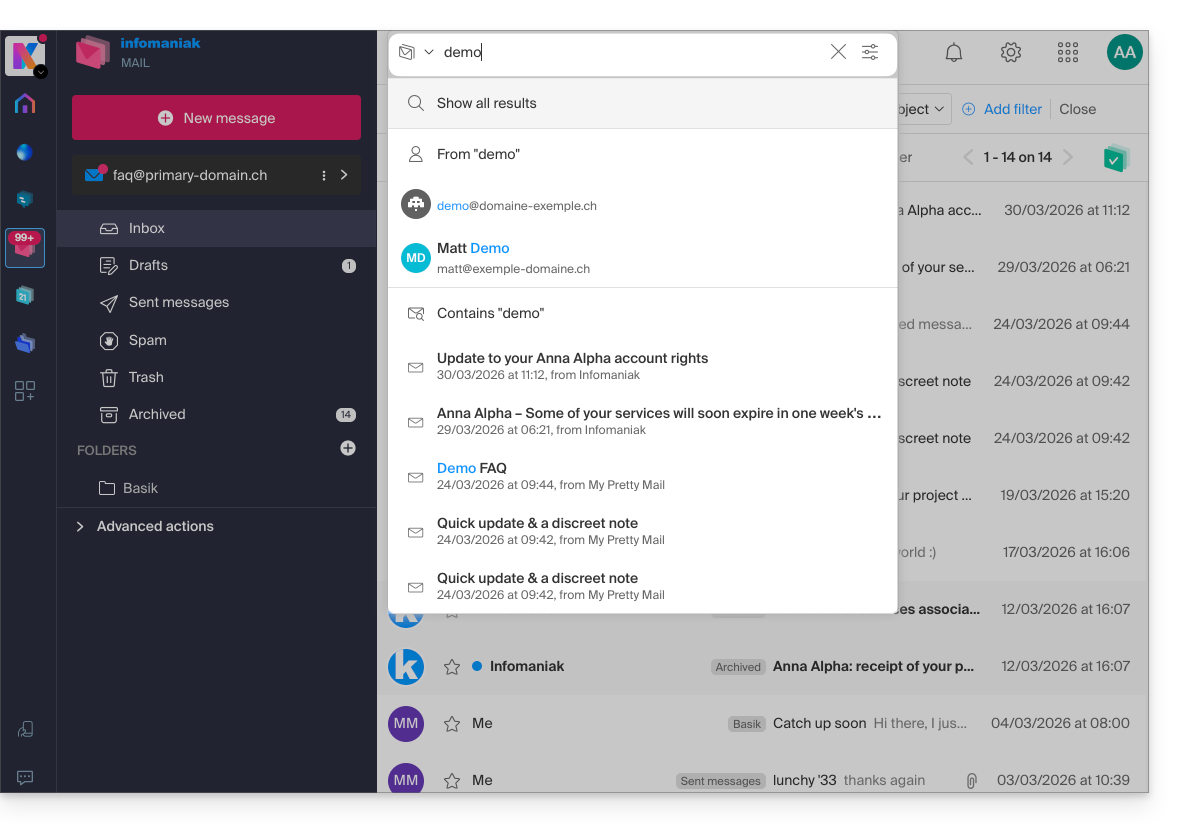
Advanced search is accessible to the right of the search field at the top of your Mail: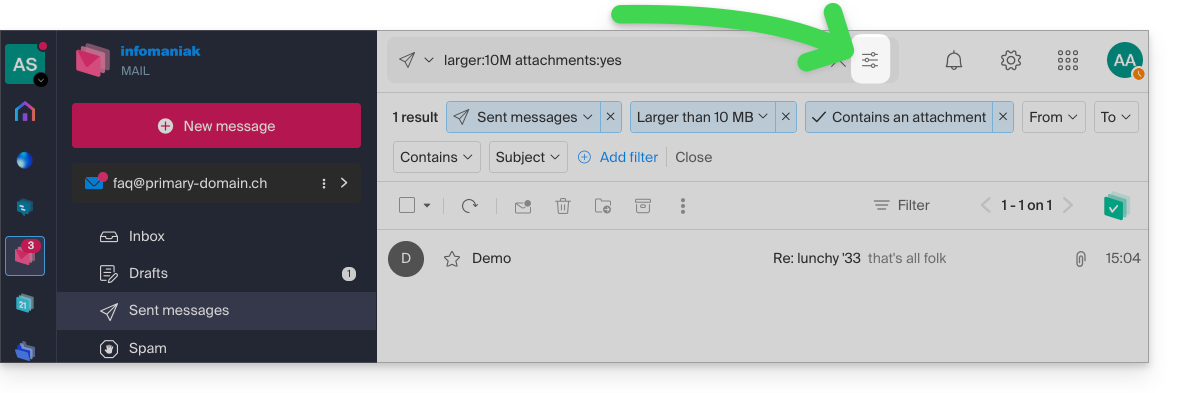
You can search for content…
- either in the body of the message,
- either in its subject,
- or among its senders/recipients…
You can also filter the search by message size and by whether or not it contains an attachment.
Regarding the scope of the searches:
- The content of encrypted emails is not indexed (except for the email subject).
- The content of attachments, as well as their name, is not indexed: therefore, it is not possible to find an email by searching for the name of the file that was attached to it.
- The "Search all emails" function does not include the Trash or Spam folder:
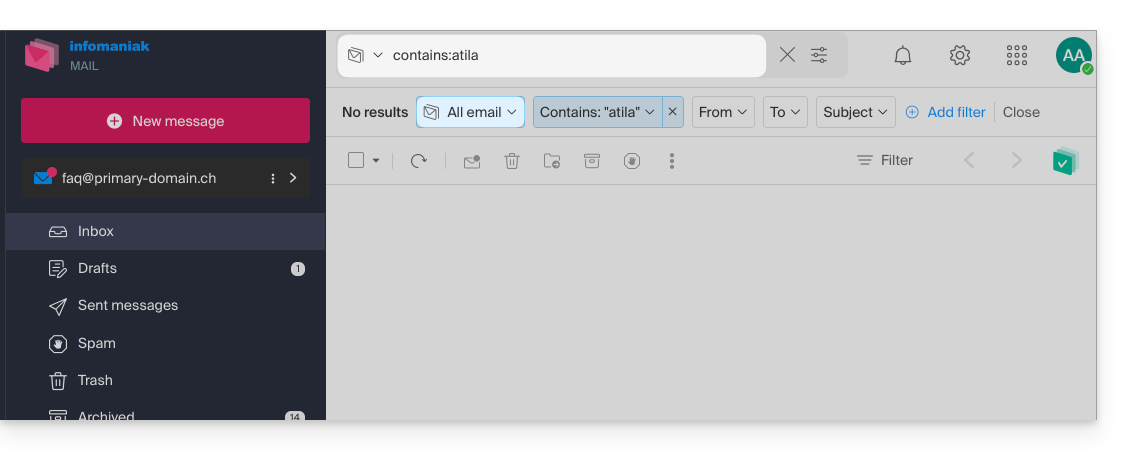
- If a global search returns no results, the email may be in one of these two folders.
- You will then need to go specifically to the Trash or Spam folder to perform the search, or launch the search by selecting one of these two items:
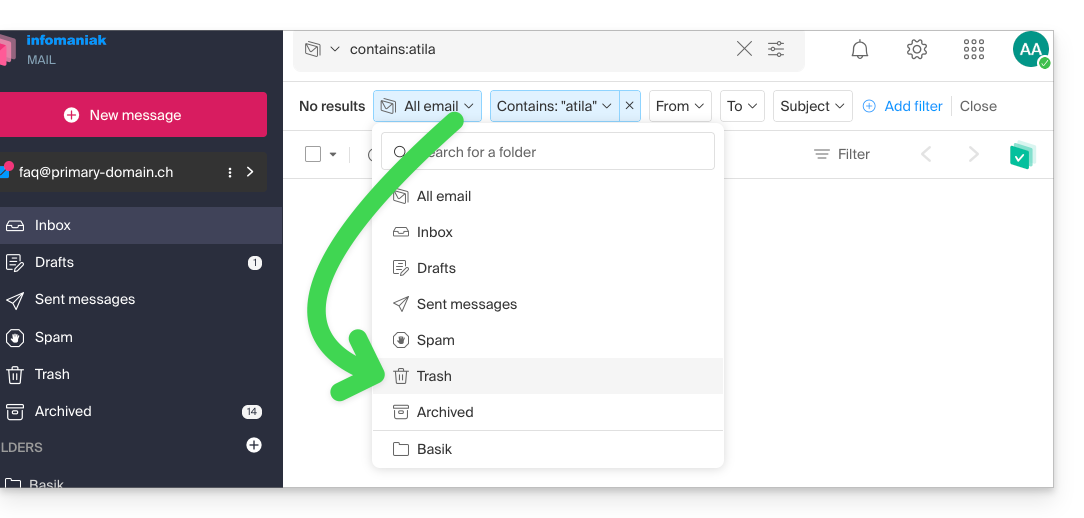
- Any items found will then be displayed:
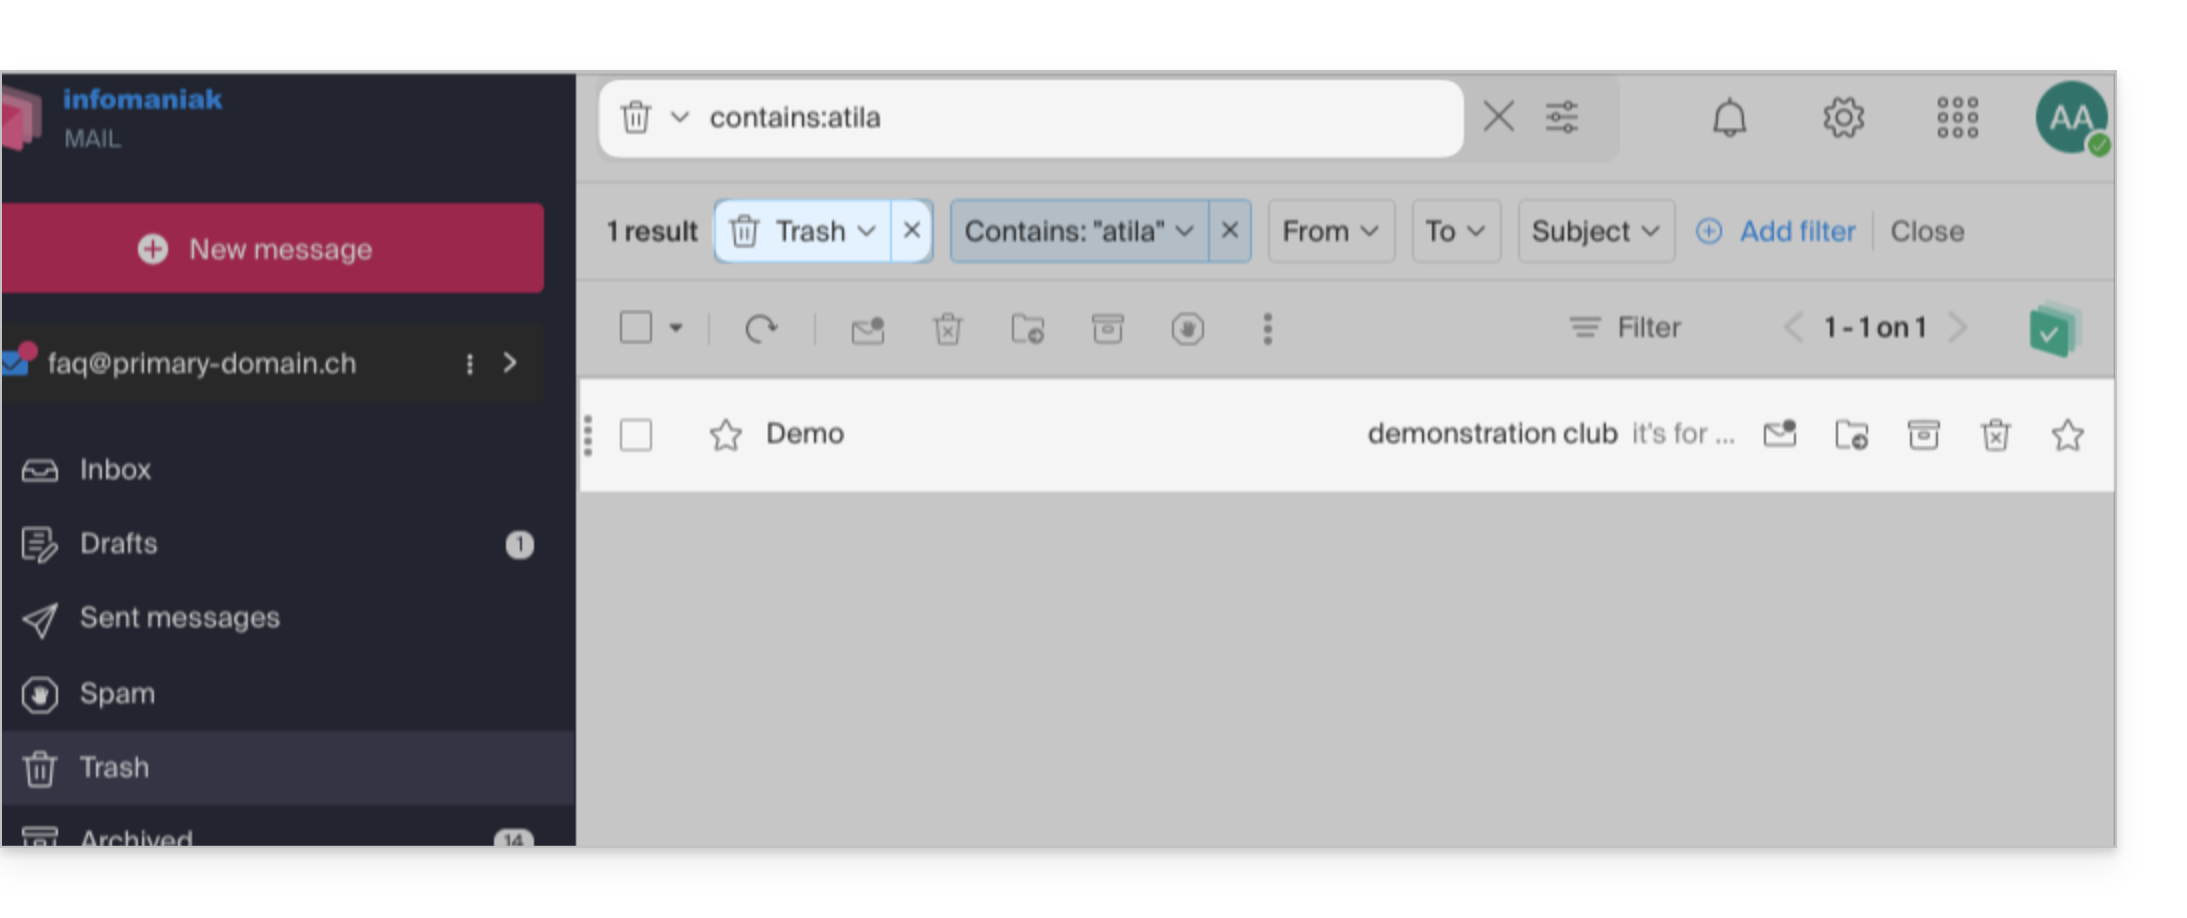
- Similarly, if you want to find a message in a specific folder, it is best to go there first from the left-hand menu, and then launch a search.
To search for traces of an email or to see its activity, you can also search in the logs of an email address.
Email search with a software/email client
To find out how your specific email application performs searches, consult its documentation. For example, desktop apps such as Thunderbird and Outlook can synchronize messages locally and perform local searches, while other applications may prefer searching on the IMAP server. In this case, the software/email client sends a search command to the server, which then searches through all messages stored on the server and returns the results to the software/email client.
Search for a contact in your address books
The search is performed automatically across all your address books, groups, and contacts, using the search field at the top of the ksuite.infomaniak.com/contacts interface: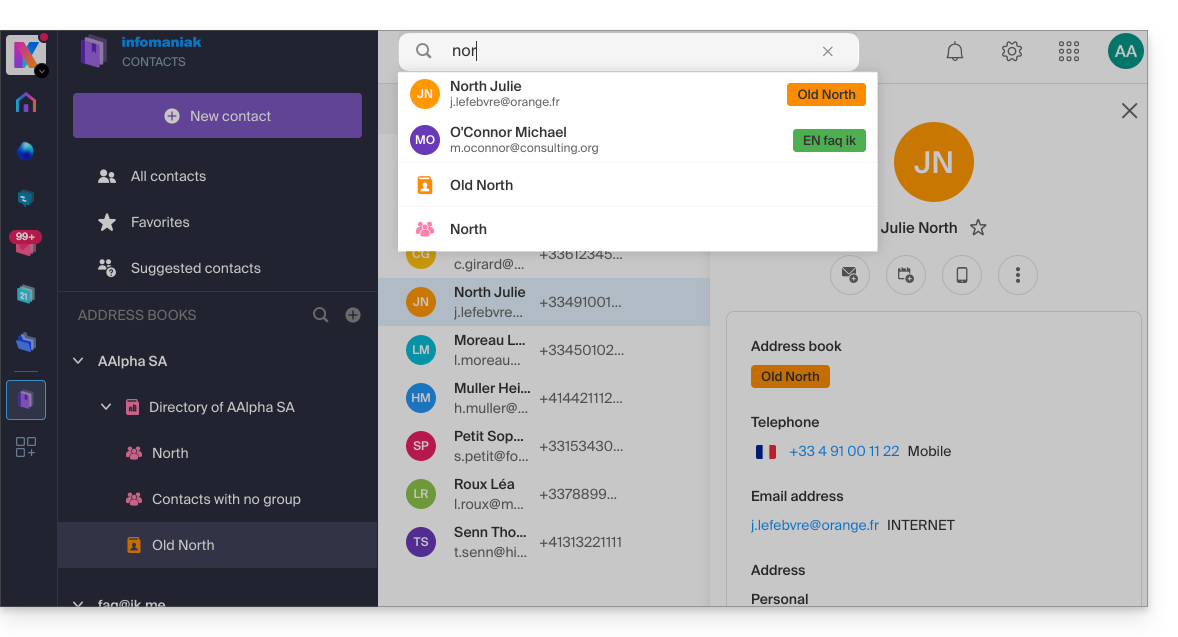
Search for an event in your calendars
Searching for an item on ksuite.infomaniak.com/calendar automatically searches through all your calendars, events, rooms, including the description of these, and the people associated with them (if you click on a contact, you will see the events you have in common with that contact):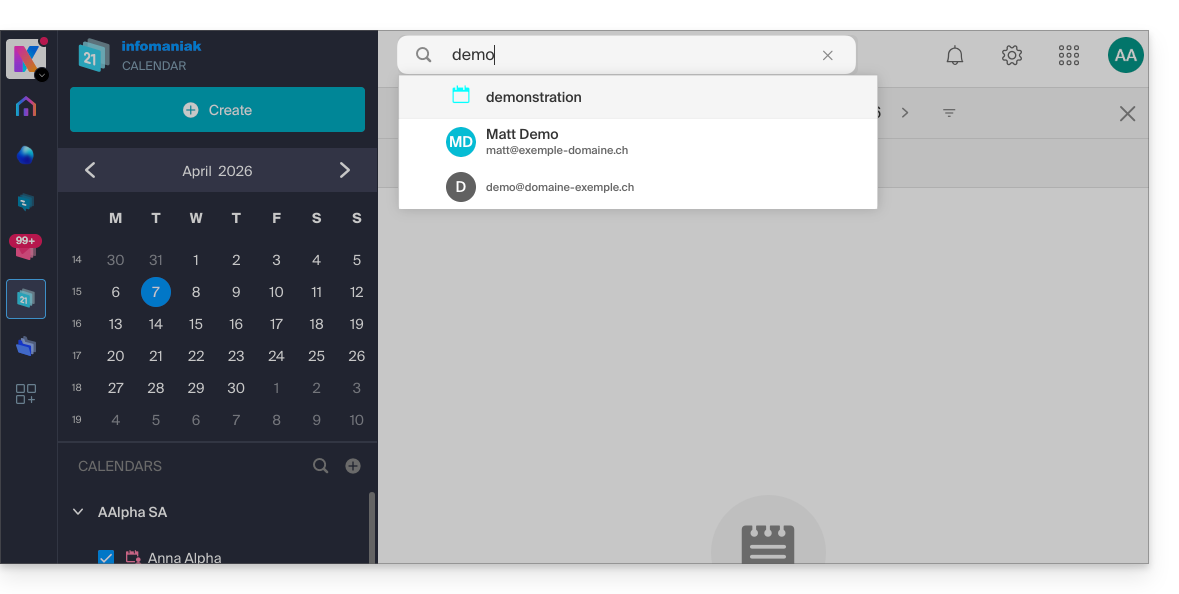
Search in kChat
To search for an item on ksuite.infomaniak.com/kchat, use the main search field to find messages, replies, or file content: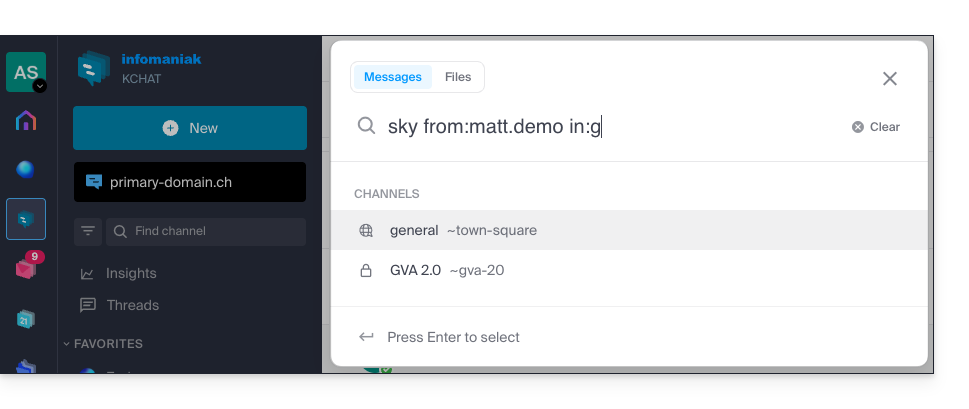
To refine your search results, several search modifiers are available:
from:: to find messages sent by a specific user (e.g.,from:jean.dupont).in:: to restrict the search to a specific public channel, private channel, or direct message (e.g.,in:channel-name).before:,after:,on:: to target a specific date (in YYYY-MM-DD format) or period (e.g.,on:2026-09-01).
Exclude a channel or terms from a search (exclusions)
It is possible to exclude certain search results by using the hyphen - before a term or modifier. This is an extremely useful feature for filtering out irrelevant results:
- Exclude a channel: add
-in:channel-nameto your query to completely exclude results from that channel. - Exclude a word: type
test -releaseso that the results include the term "test" while excluding messages containing "release". - Exclude a user: type
-from:userto hide messages sent by that specific person.
You can perfectly combine these exclusions. For example, the search test -release -in:release-discussion -from:anna will find the word "test", excluding the word "release", completely ignoring the "release-discussion" channel, and excluding messages from the user “anna”.
Link to this FAQ: https://faq.infomaniak.com/1733
Has this FAQ been helpful?
This guide details the specific features and limitations of Infomaniak contacts and calendars synchronization with native Apple applications (macOS and iOS), particularly for managing shared data.
Introduction
- Contacts and calendars hosted with Infomaniak can be synchronized with native Apple applications:
Contacts: synchronizing address books
The CardDAV protocol does not allow you to individually select the items to be synchronized; all data from the account is retrieved by default.
- Before adding a synchronization:
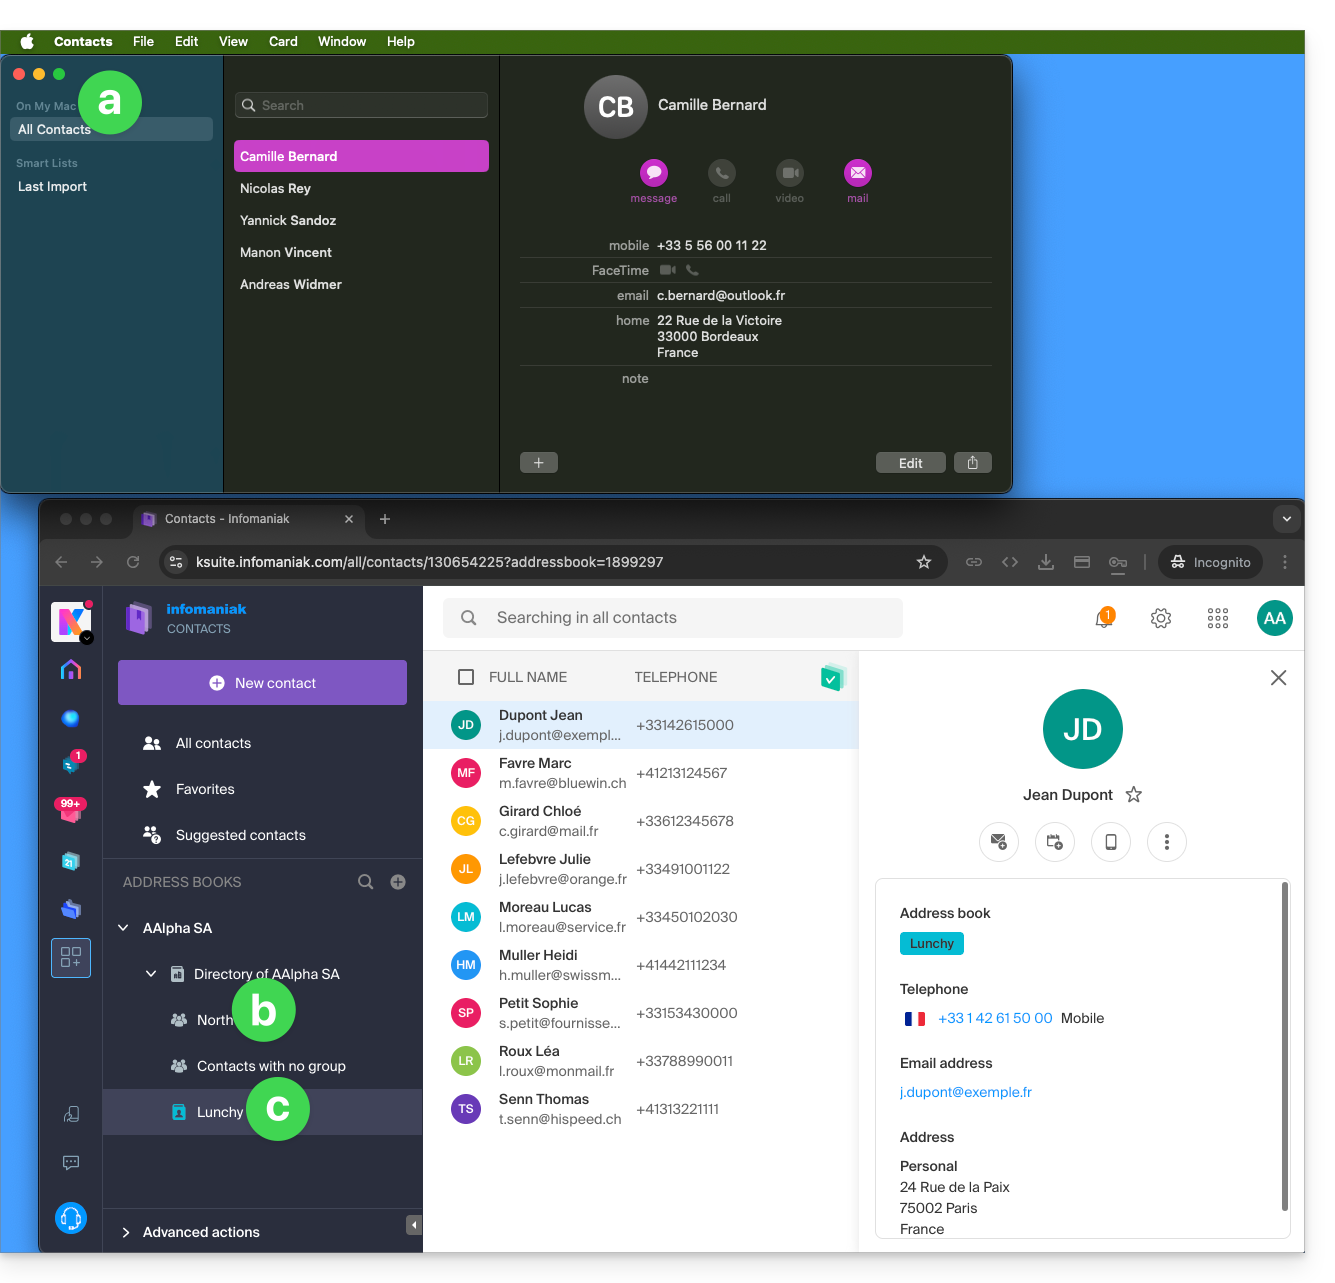
- All existing contacts on the macOS device
- Existing contacts on the user's Organization (named here AAlpha SA) in Infomaniak, including the Organization's directory (❓: help), which contains a group called North (in this case, it is a “circle” automatically created after setting up a Group (❓: help) in the Manager).
- The user's address book is called Lunchy.
- After adding a synchronization per macOS profile:
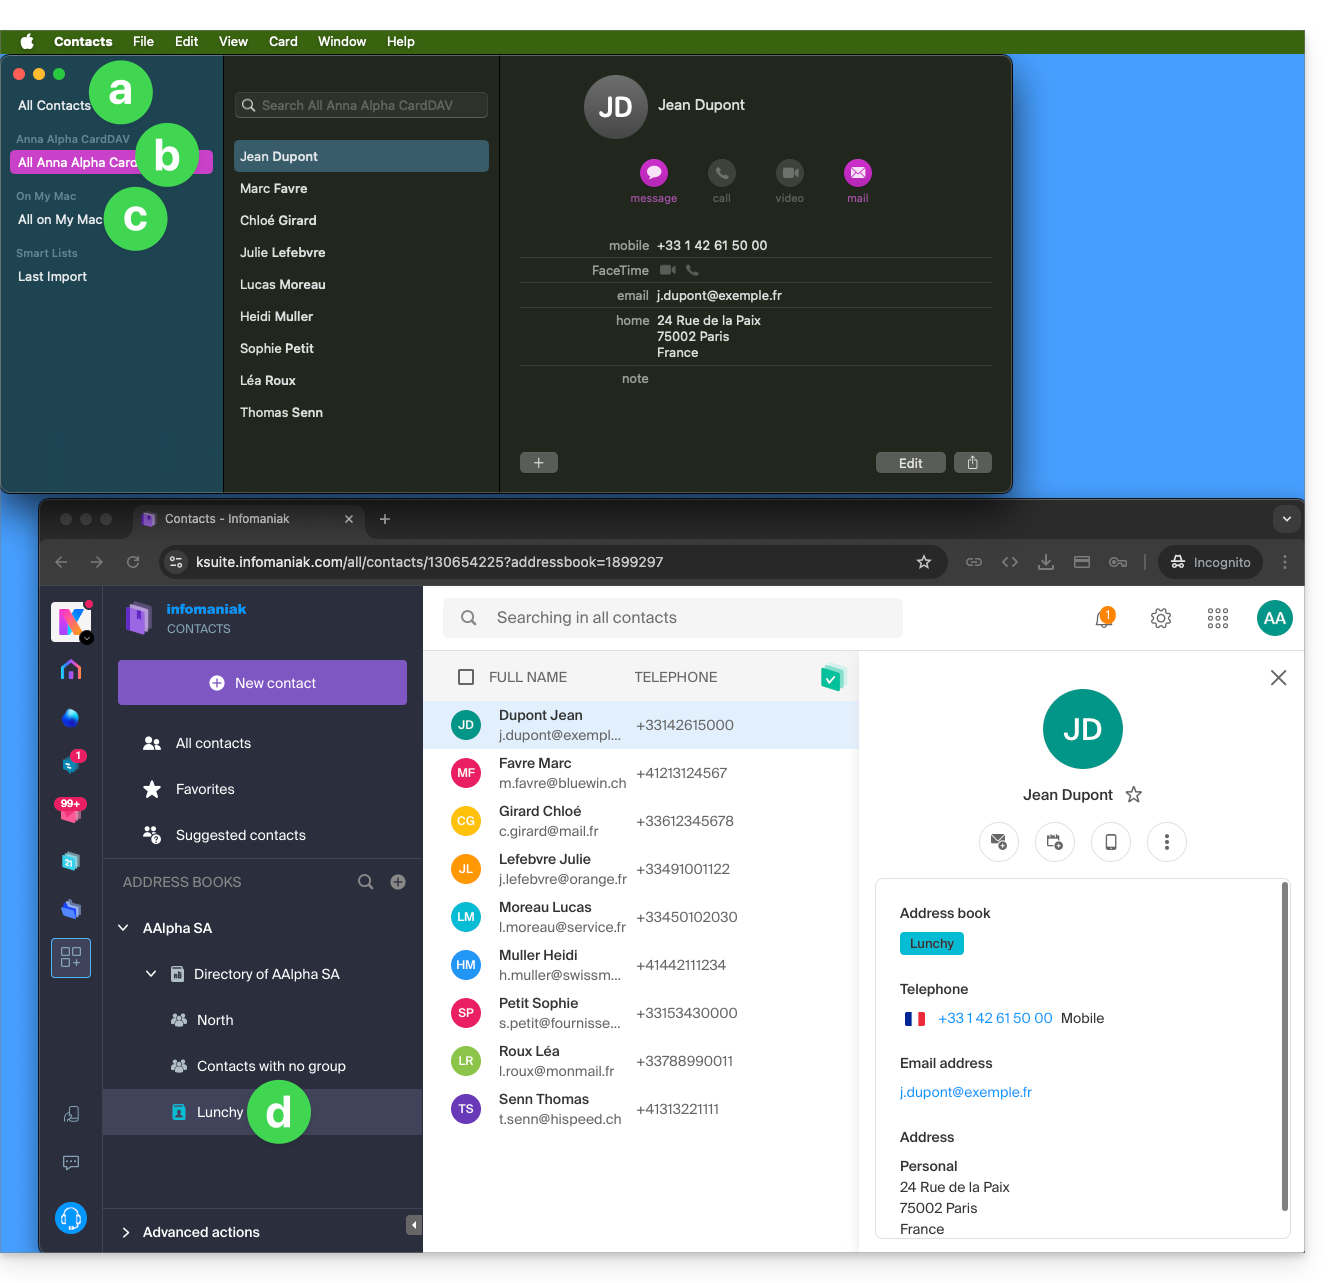
- All existing contacts on the macOS device (this displays the contacts that were already present, as well as the new contacts from the synchronization).
- Contacts from the synchronization (see point 2.d below).
- A downloaded profile contains the Infomaniak account user's name; this name will be used for the synchronized address book that will be displayed on the Apple side.
- In the example below, the user's name is Anna Alpha and the address book name is Lunchy; this is the user's name that will be displayed to describe the contacts on the Apple side.
- You can change the synchronization name in the Account Information:
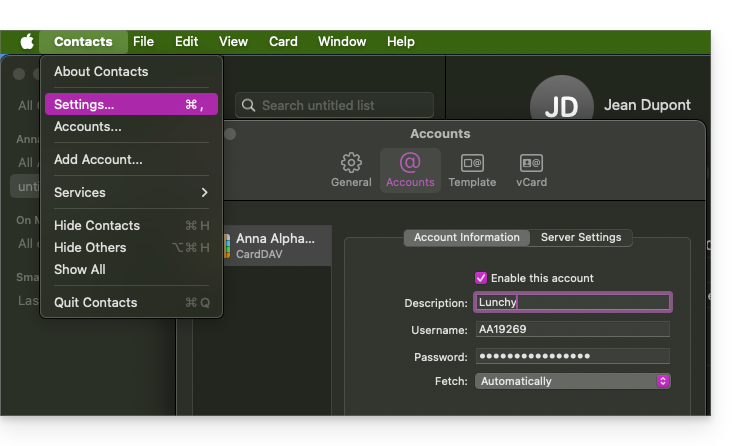
- Existing contacts on the macOS device (those from point 1.a above — they remain local on macOS and are not synchronized — you need to move them if necessary).
- You can change the address book used by default for future contacts created on your device:
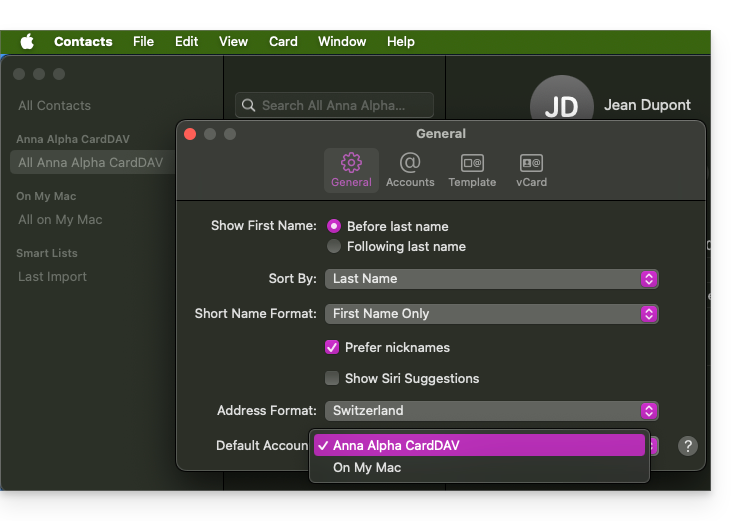
- You can change the address book used by default for future contacts created on your device:
- The user's address book is called Lunchy here — the equivalent of point 2.b above).
On iOS
New contacts created on iPhone are often saved locally ("On my iPhone"):
- You need to modify the default notebook in the device settings so that it is synchronized with the Infomaniak server.
Groups and lists
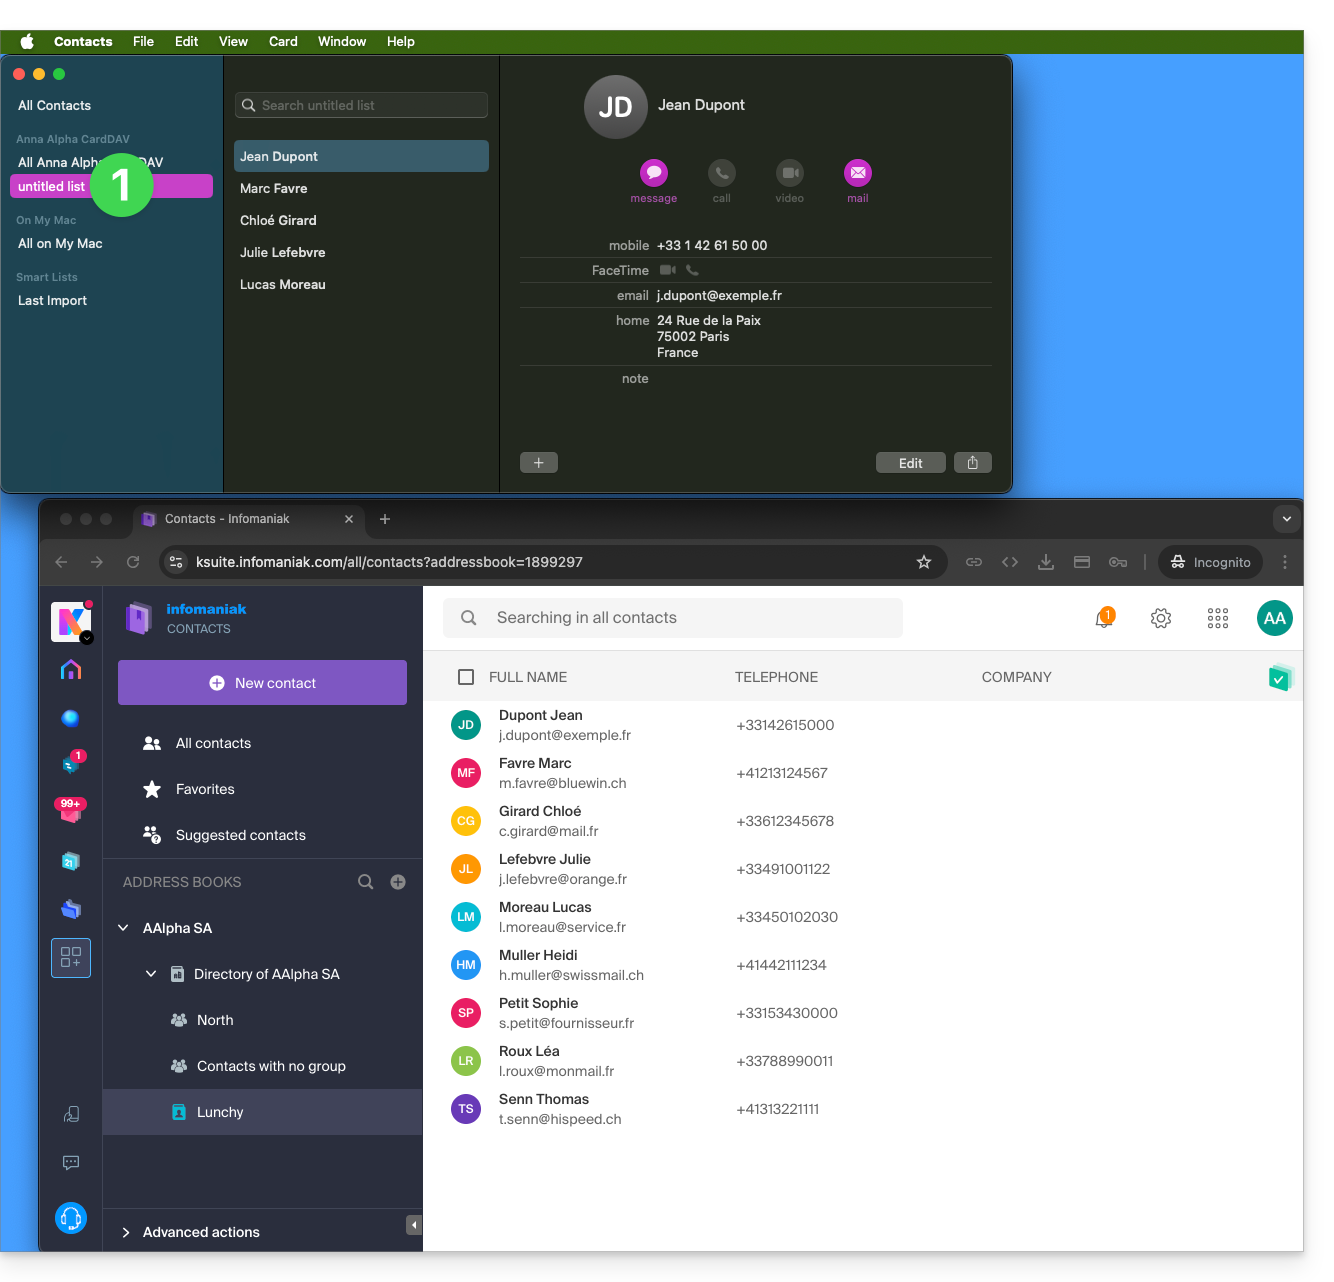
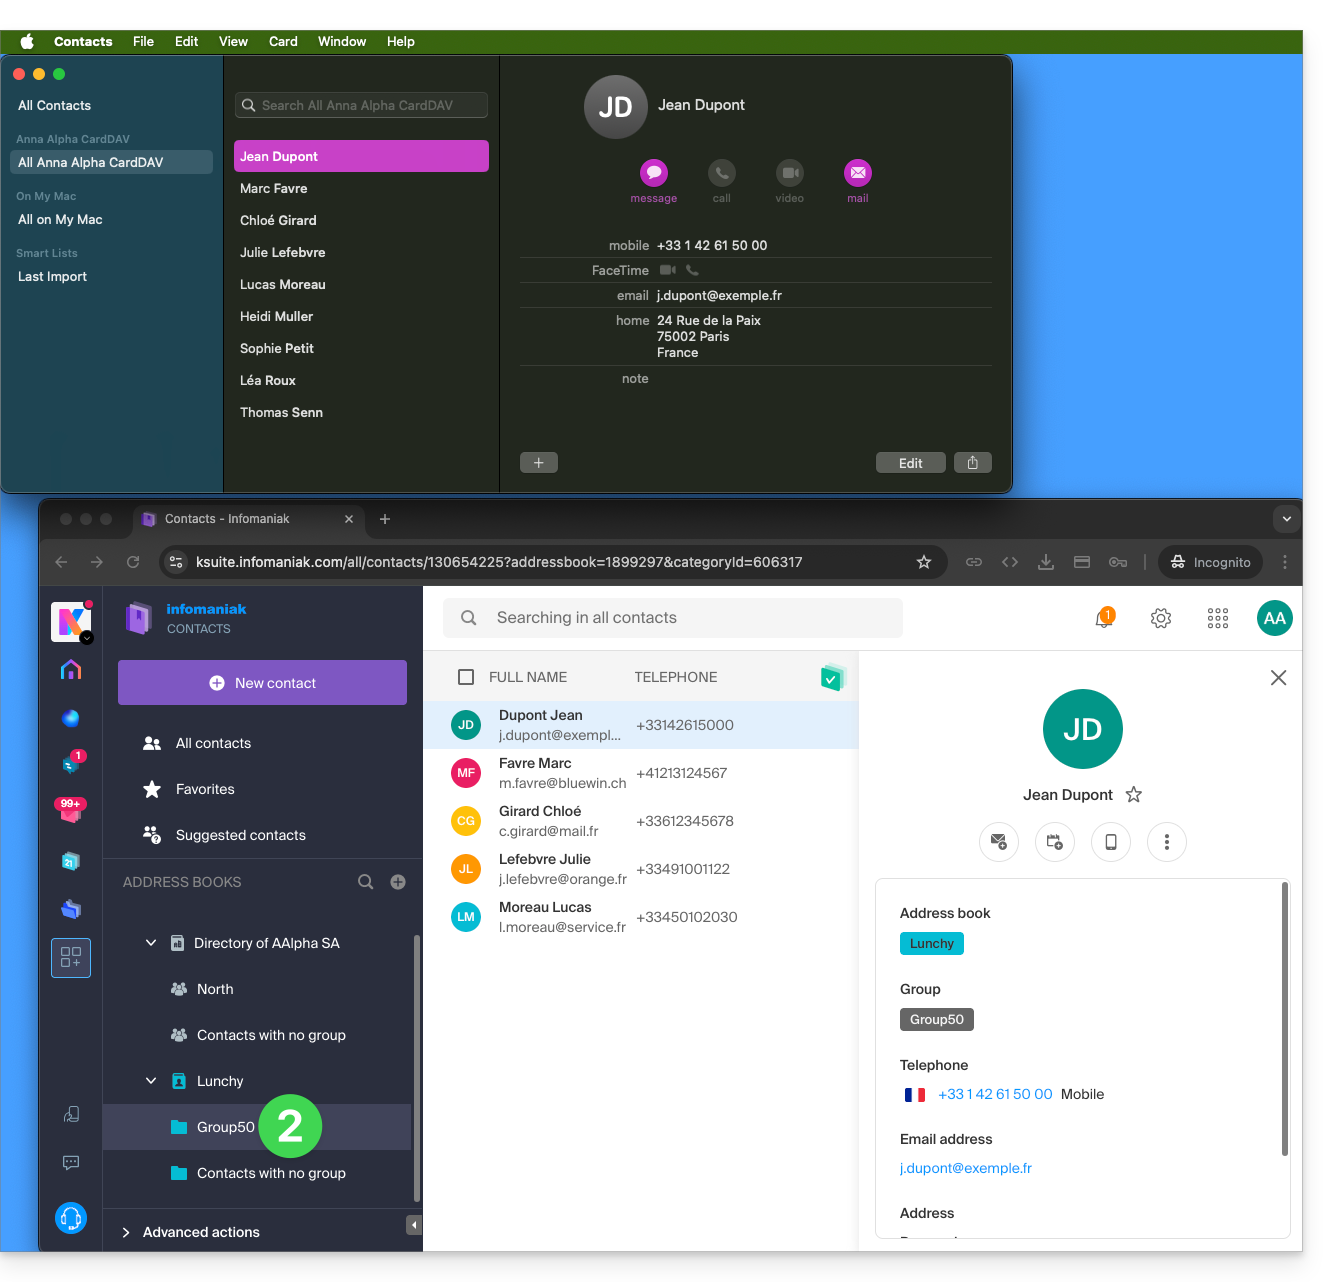
Grouping contacts into folders or lists does not synchronize bidirectionally. The list system does not use actual folders but category tags, which makes it impossible to retrieve contact groups.
- Lists created on Apple devices are not reflected on the Infomaniak server (but the contacts contained within them are):
- Groups configured in the web interface are not displayed in the Apple Contacts app (but the contacts they contain are):
- Tip: to delete a list created on the Apple side, select it and press the DEL./DELETE key on your keyboard.
Additional notebooks
The Contacts app does not support multiple address books for the same account:
- Only the default address book is synchronized.
- To access all your notebooks, using software such as Thunderbird is required.
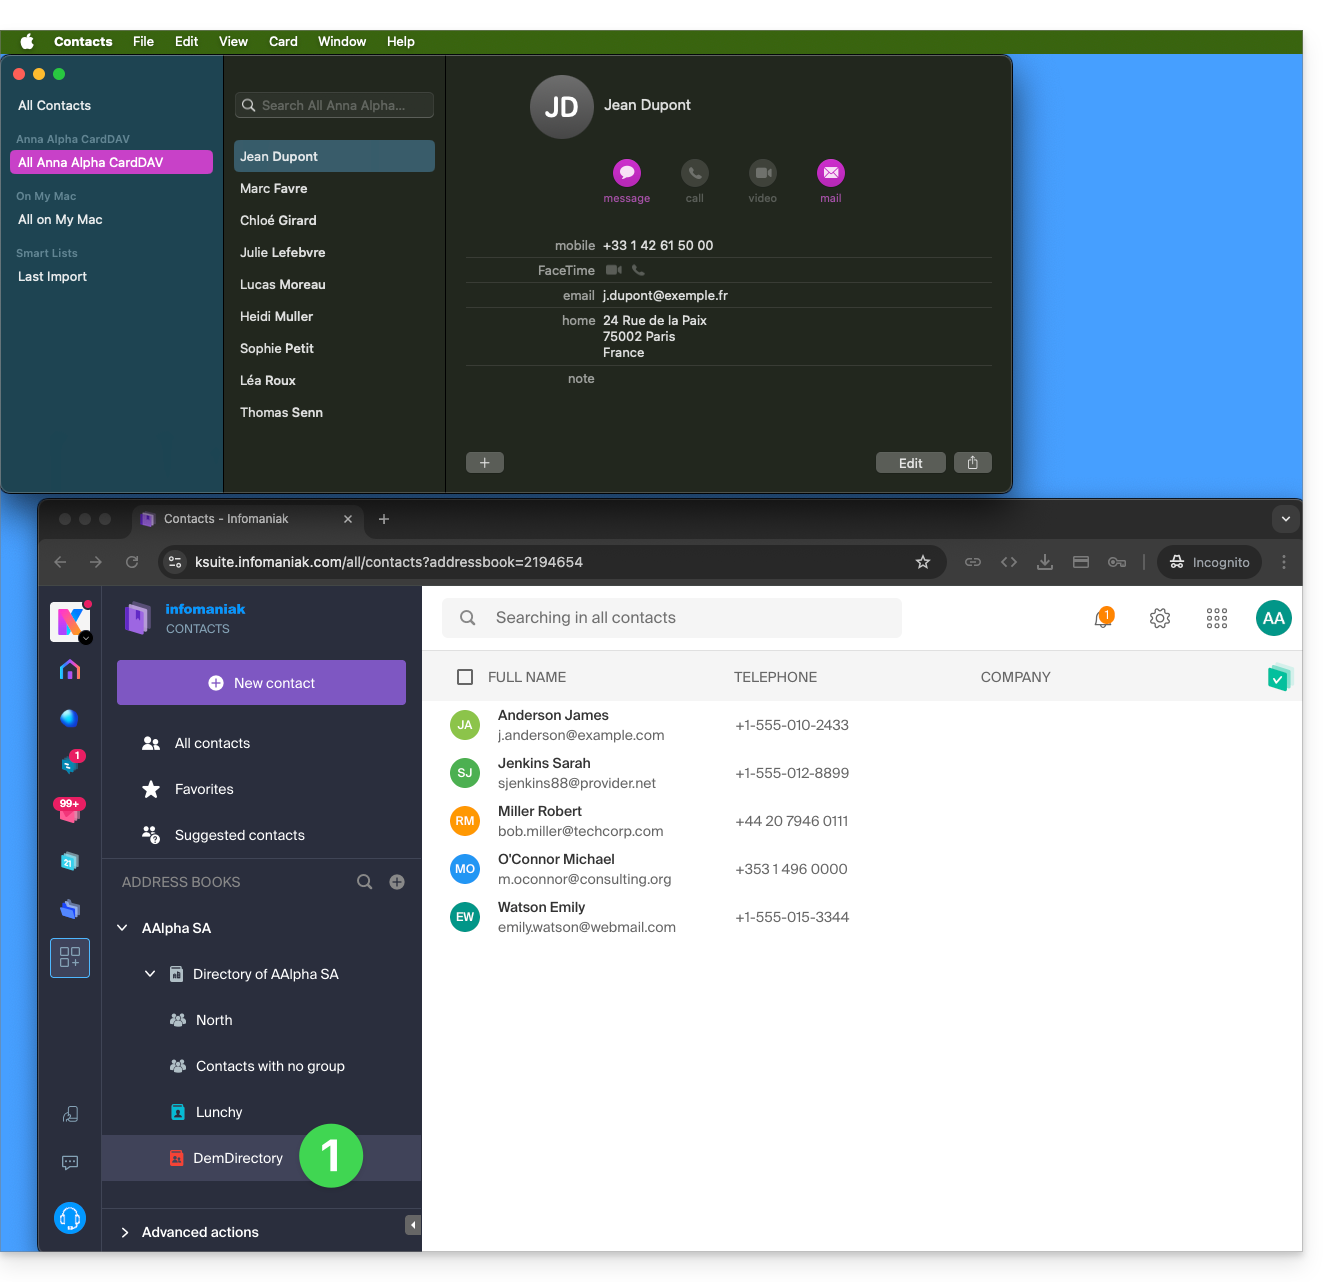
Example of a new notebook on the Infomaniak side:
- The content of this second notebook is not synchronized:
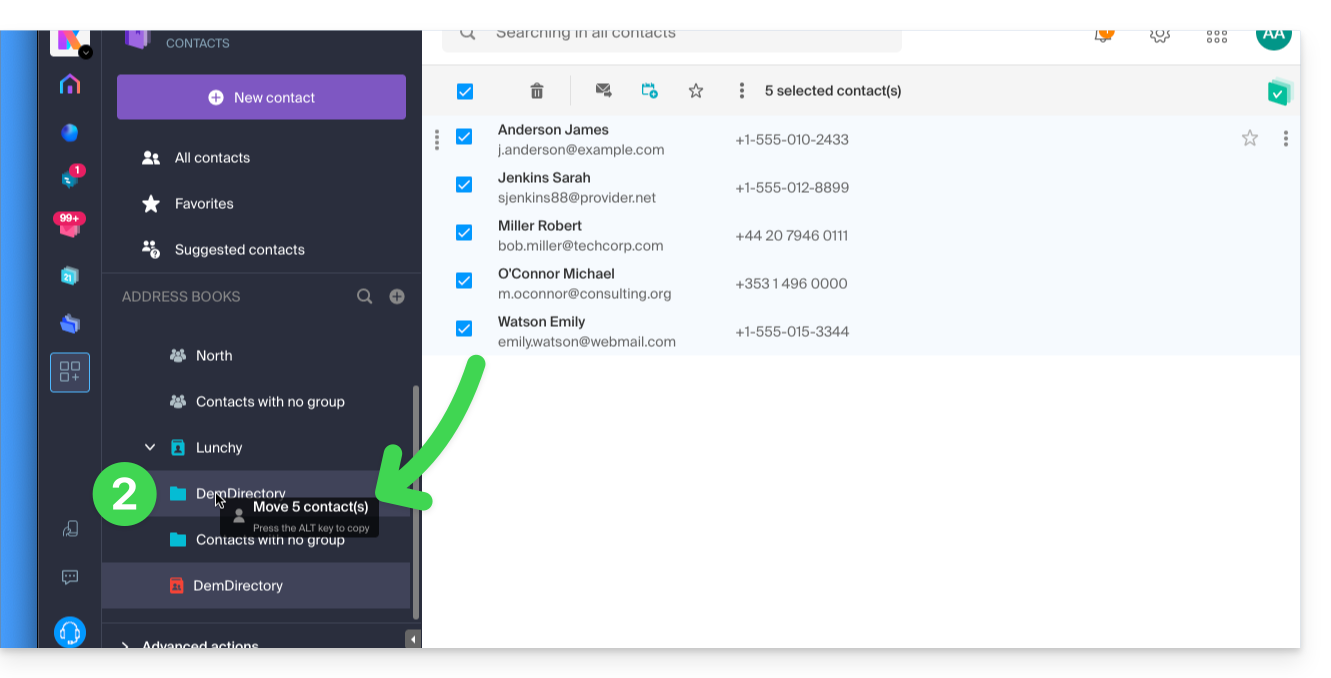
- One solution to organize yourself in a similar way would be to create a group in Lunchy and add the 5 contacts to it:
Shared address books
An address book shared with another Infomaniak user will continue to be synchronized, including if contacts are added/edited via the shared access, as in this example of shared access with maximum permissions: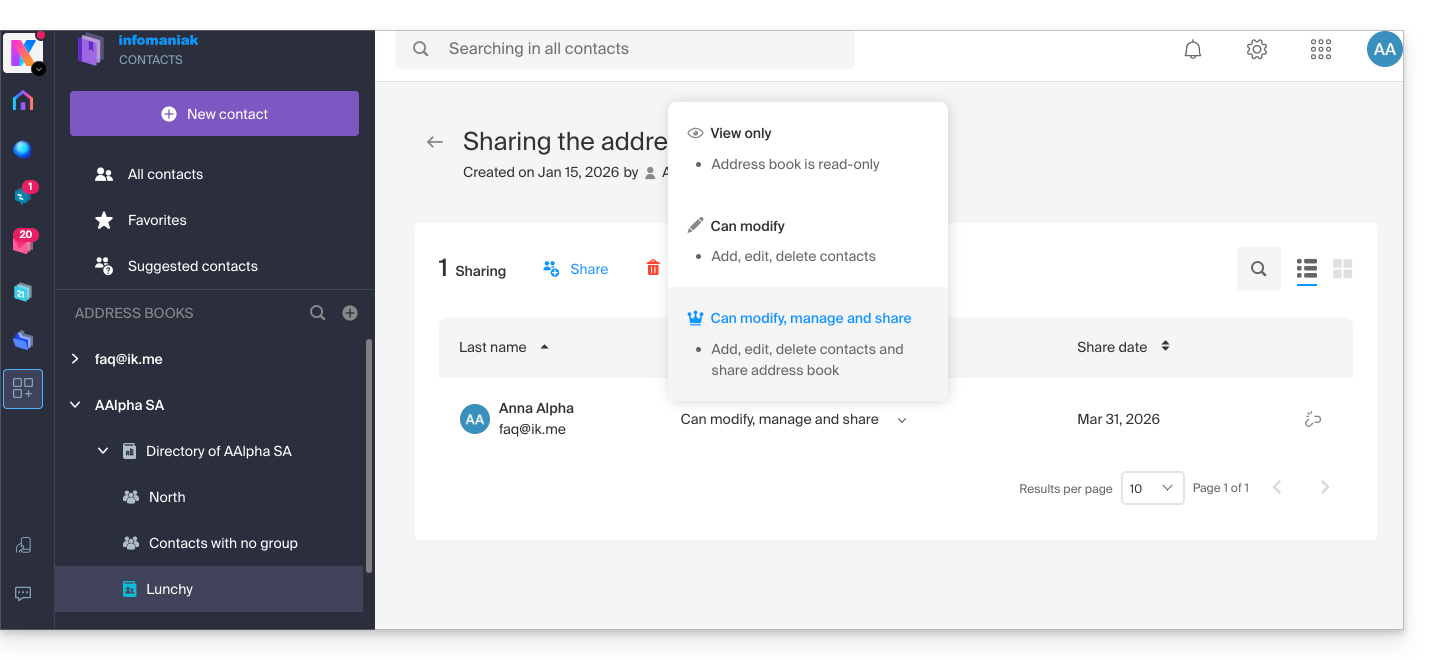
Conversely, receiving contact sharing from another Infomaniak user adds an additional address book. Synchronizing these additional contacts is therefore not possible (the same rule applies as presented in the “Additional address books” section above).
Calendar: displaying shared calendars
The CalDAV protocol does not allow you to individually select the items to be synchronized; all data from the account is retrieved,including calendars that you share and those to which you have been granted access/modification rights.: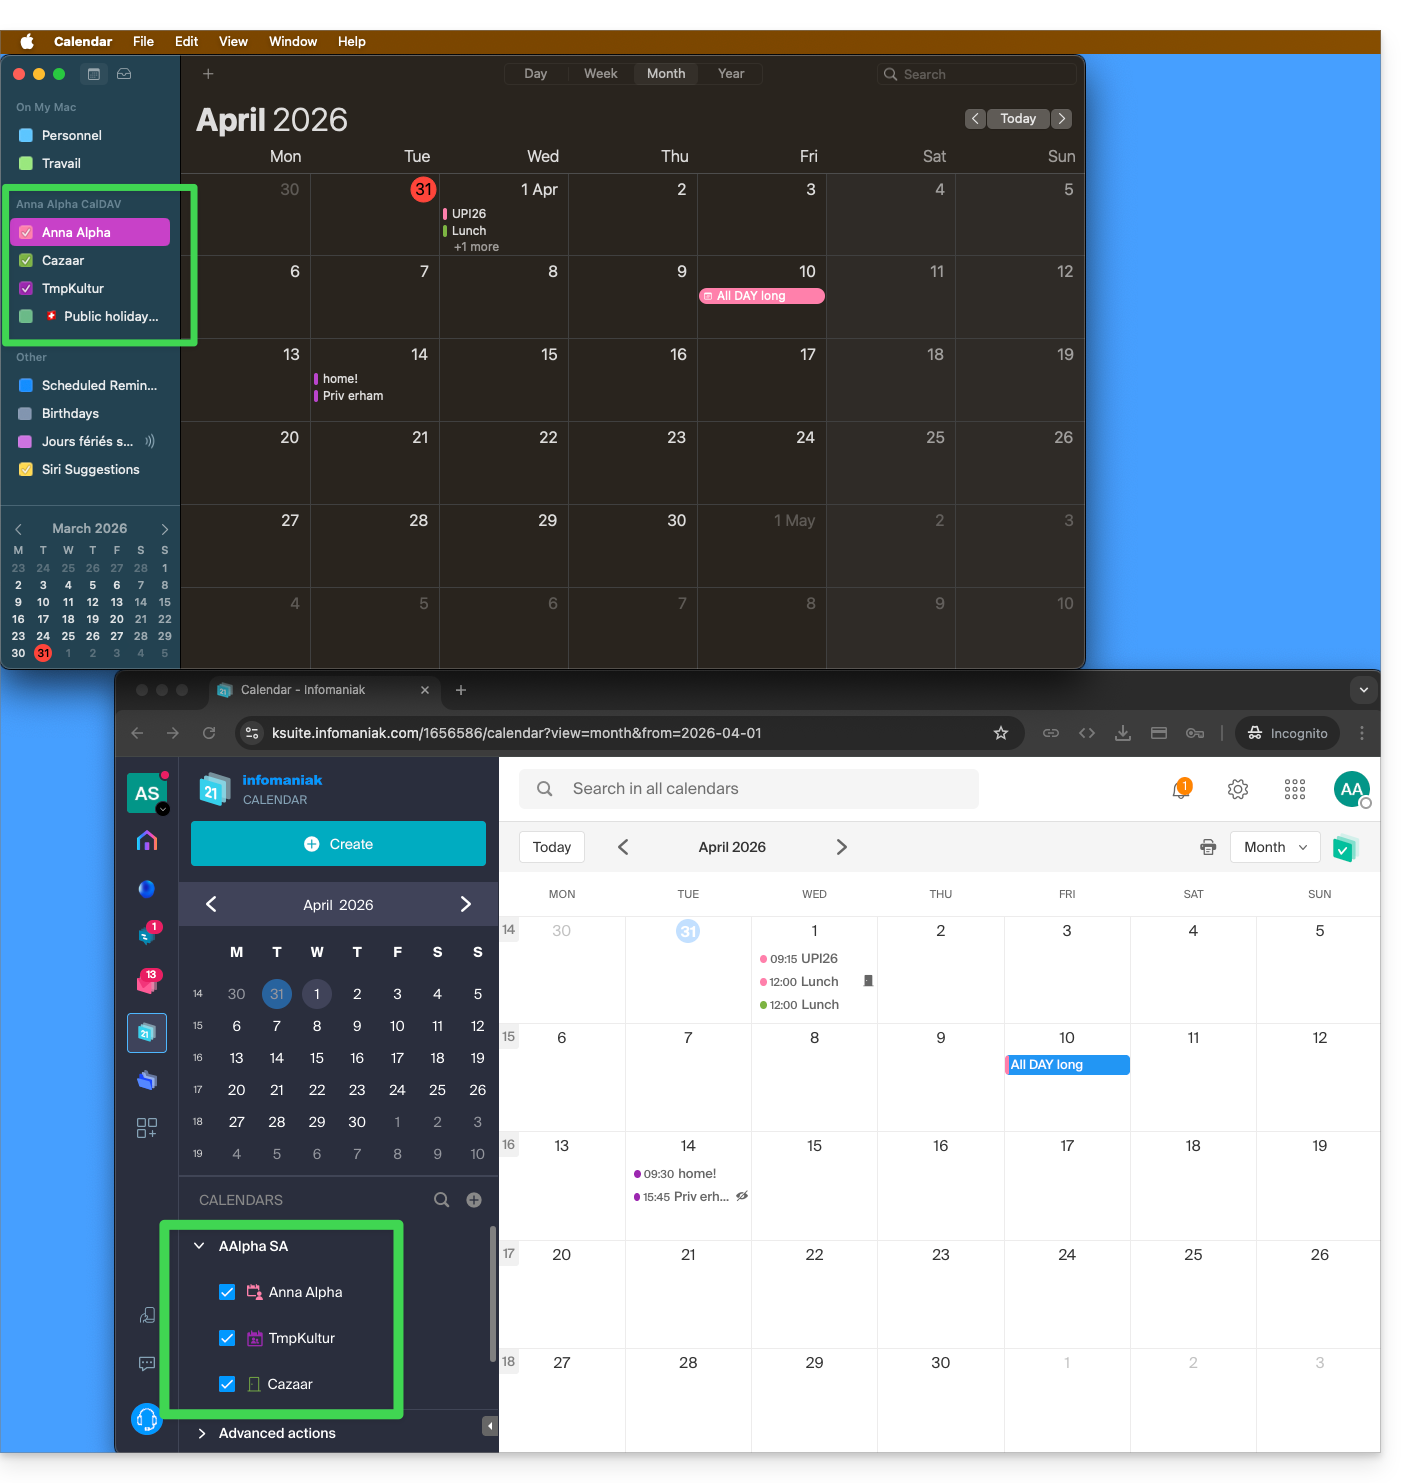
If only your personal calendar is displayed, then try this procedure to enable additional calendars:
On macOS
- Open iCal / Calendar.
- Go to the Calendar menu > Settings (or Preferences).
- Go to the Accounts tab.
- Select the Infomaniak account and click on the Delegation tab.
- Check the shared calendars to display.
On iOS
- Open iCal / Calendar.
- Tap the Calendars button at the bottom of the screen.
- Check the shared calendars in the list.
Notifications (iOS)
You can enable or disable alerts for each specific calendar by tapping the ⓘ icon to the right of its name: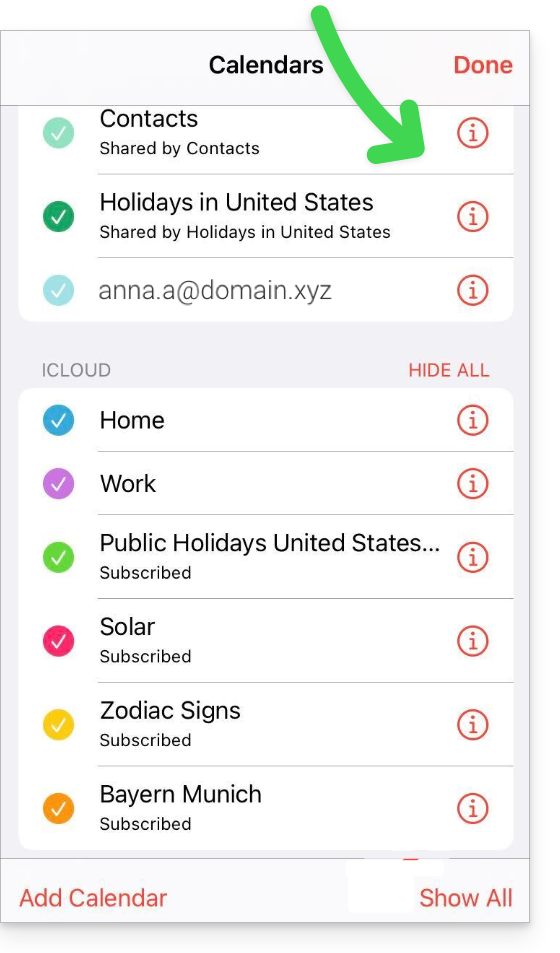
Link to this FAQ: https://faq.infomaniak.com/2181
Has this FAQ been helpful?