Knowledge base
1000 FAQs, 500 tutorials and instructional videos. Here, there are only solutions!
This guide details the specifics and limitations of synchronizing contacts & calendars with Infomaniak using native Apple applications (macOS and iOS), particularly for managing shared data.
Preamble
- Contacts & calendars hosted by Infomaniak can be synchronized with native Apple applications:
Contacts: Synchronizing address books
The CardDAV protocol does not allow individual elements to be selected for synchronization; all account data is retrieved by default.
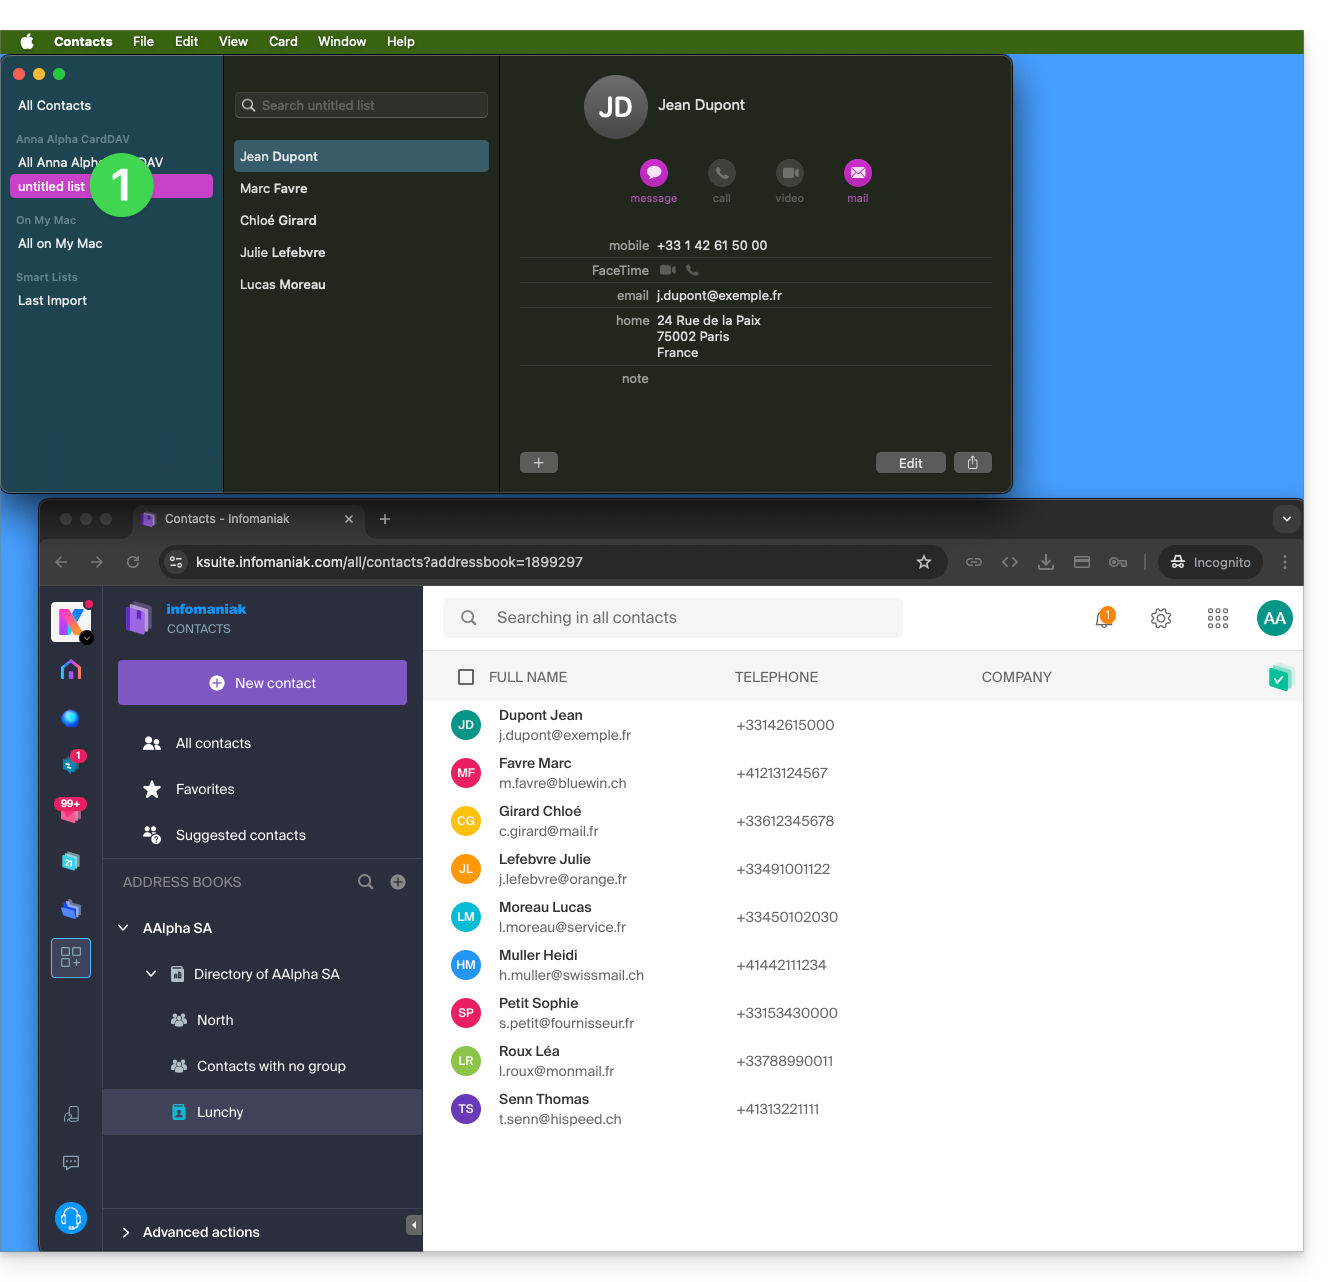
- Before adding a synchronization:
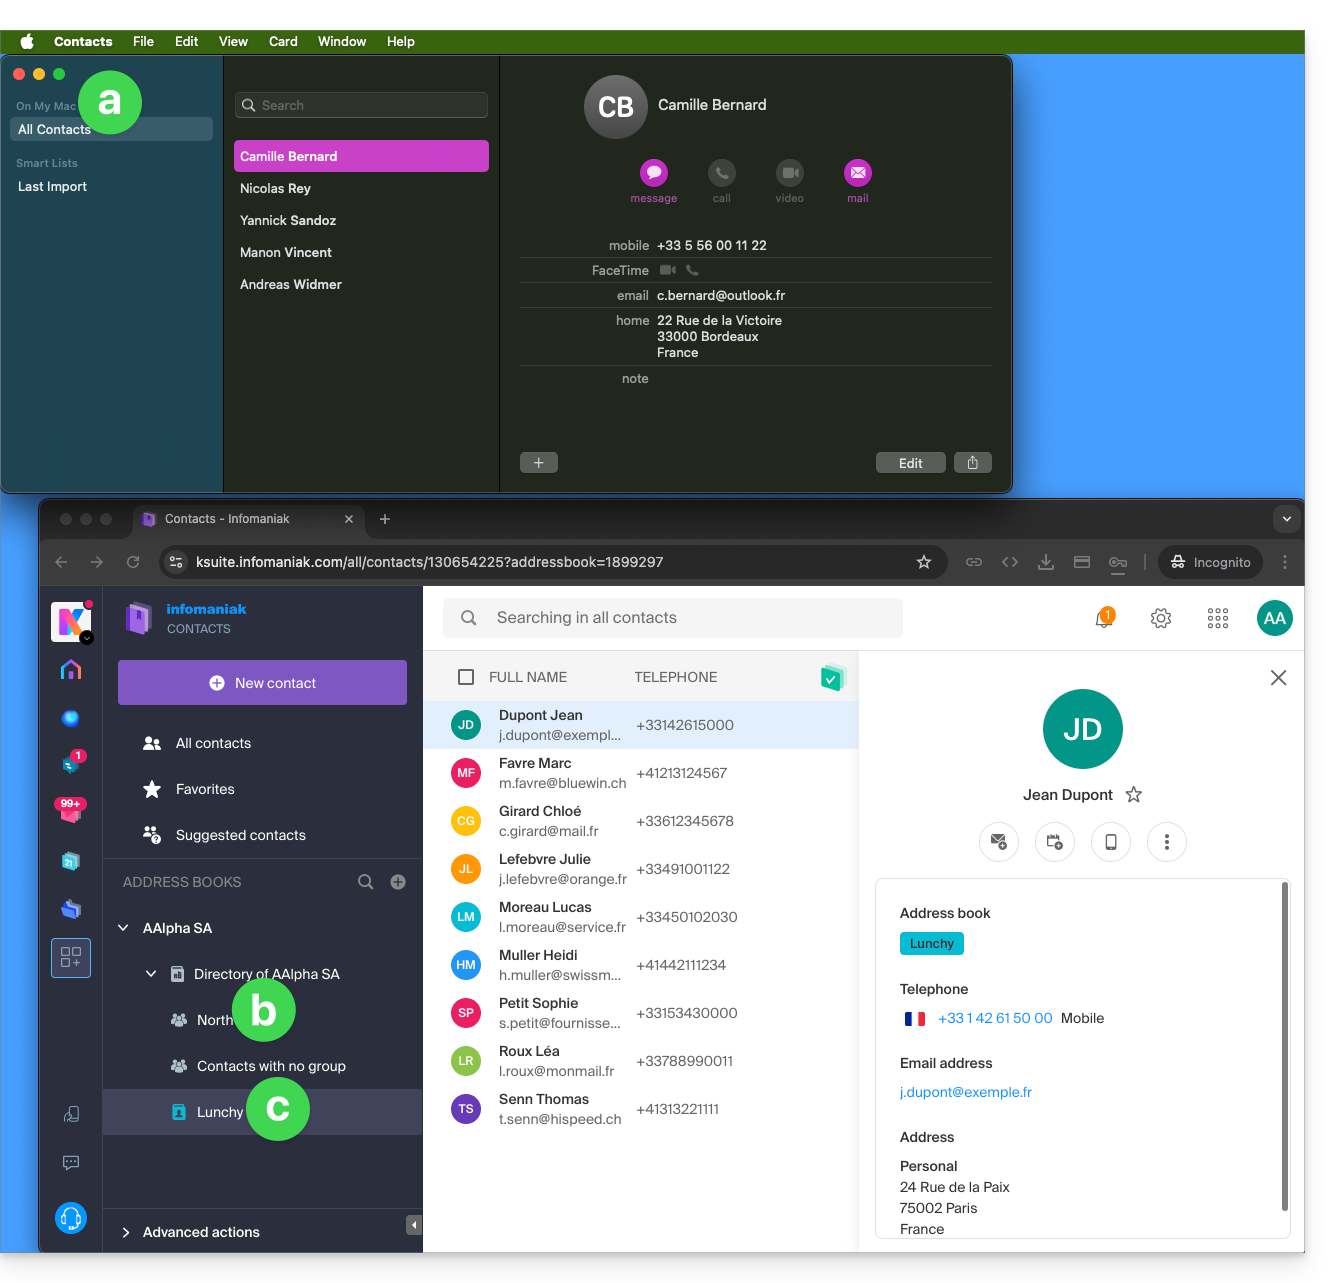
- All existing contacts on the macOS device
- Existing contacts in the Infomaniak user Anna Alpha's Organization (named AAlpha SA here), including the Organization directory, which contains a group called North here (in this case, it is a group automatically formed after setting up a work team).
- The user's address book is named Lunchy here.
- After adding a macOS profile synchronization:
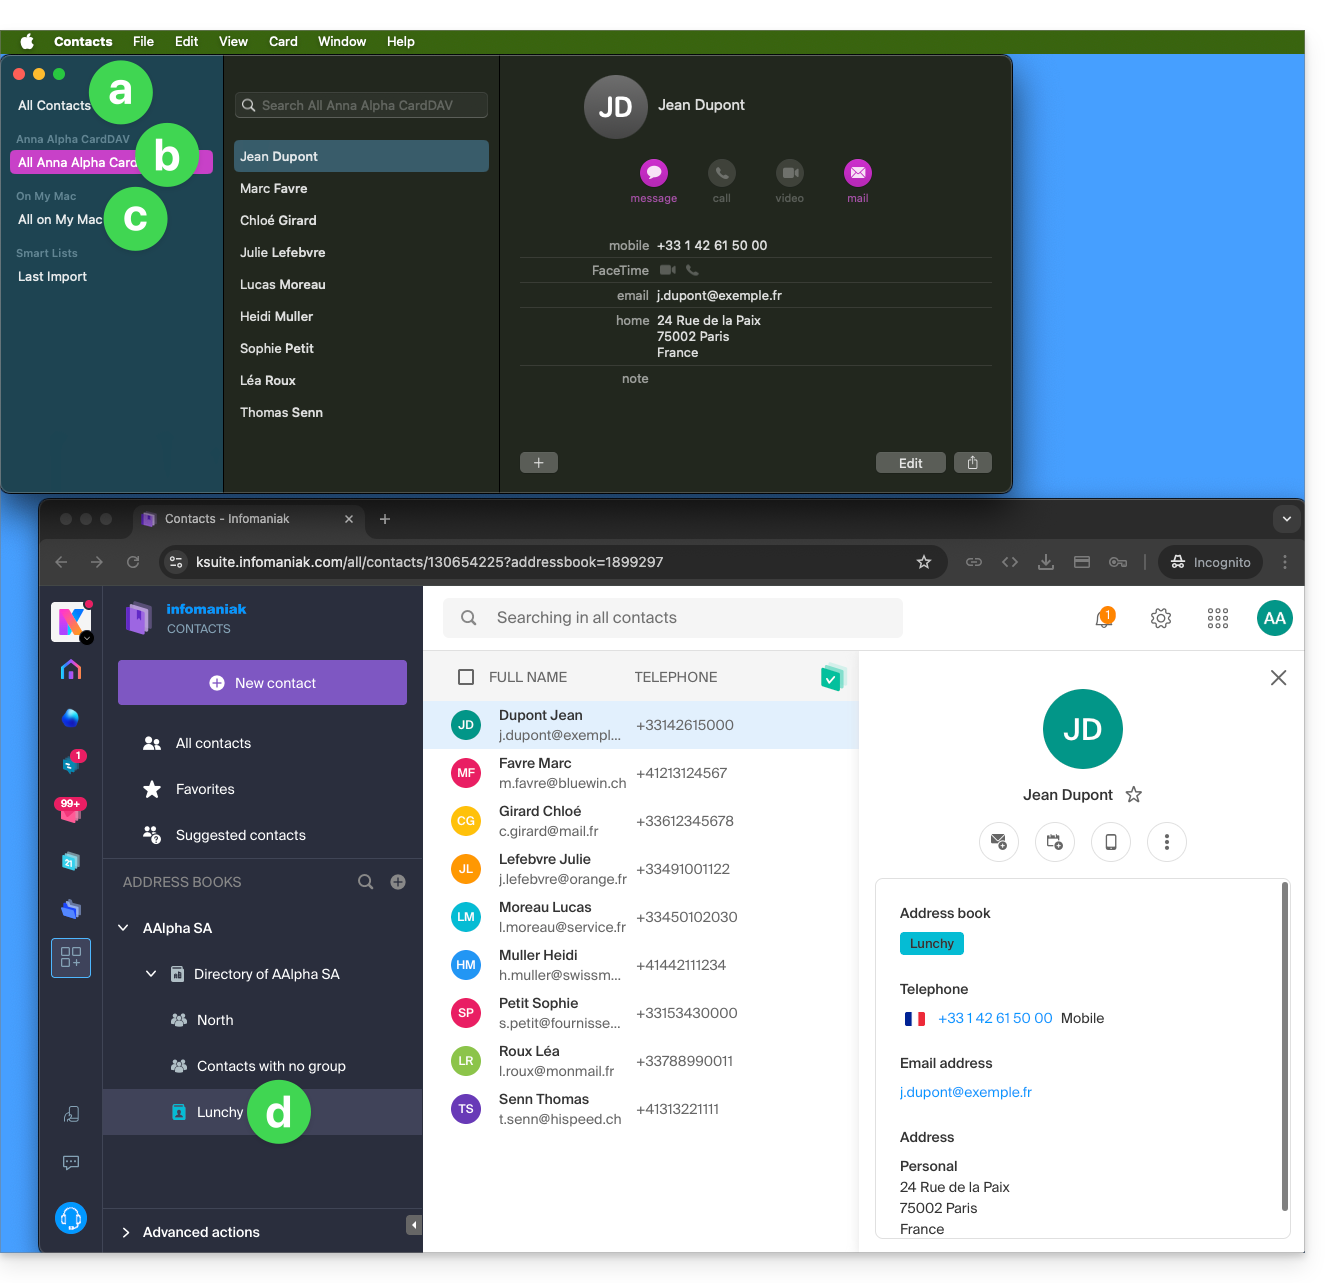
- All existing contacts on the macOS device (they display the contacts that were already present, as well as new contacts from the synchronization).
- Contacts from the synchronization (see point 2.d below).
- A downloaded profile contains the Infomaniak account username; this name will be given to the synchronized address book that appears on the Apple side.
- Example below, the username is Anna Alpha and the address book name is Lunchy; it is the username that will appear to describe the contacts on the Apple side.
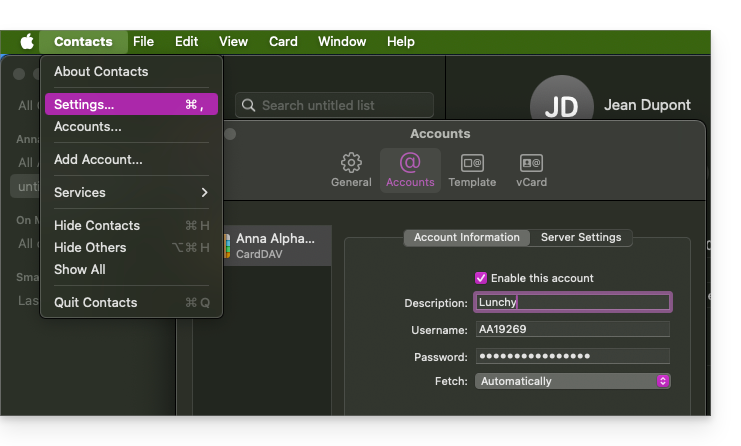
- You can modify the synchronization name in the Account Information:
- Existing contacts on the macOS device (those from point 1.a above — they remain local on macOS and are not synchronized — they need to be moved if necessary).
- You can modify the default address book used for future contacts created on your device:
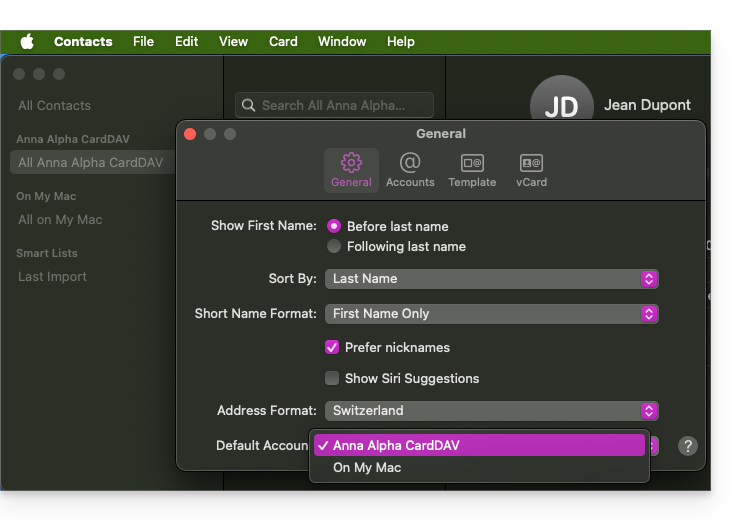
- You can modify the default address book used for future contacts created on your device:
- The user's address book is named Lunchy here — equivalent to point 2.b above).
On iOS
New contacts created on iPhone are often saved locally (On my iPhone"):
- It is necessary to modify the default address book in the device settings so that they are synchronized on the Infomaniak server.
Groups and lists
Grouping contacts into folders or lists does not synchronize bidirectionally. The list system does not use real folders but category tags, making it impossible to retrieve contact groups.
- Lists created on Apple do not appear on the Infomaniak server (but the contacts contained within them do):
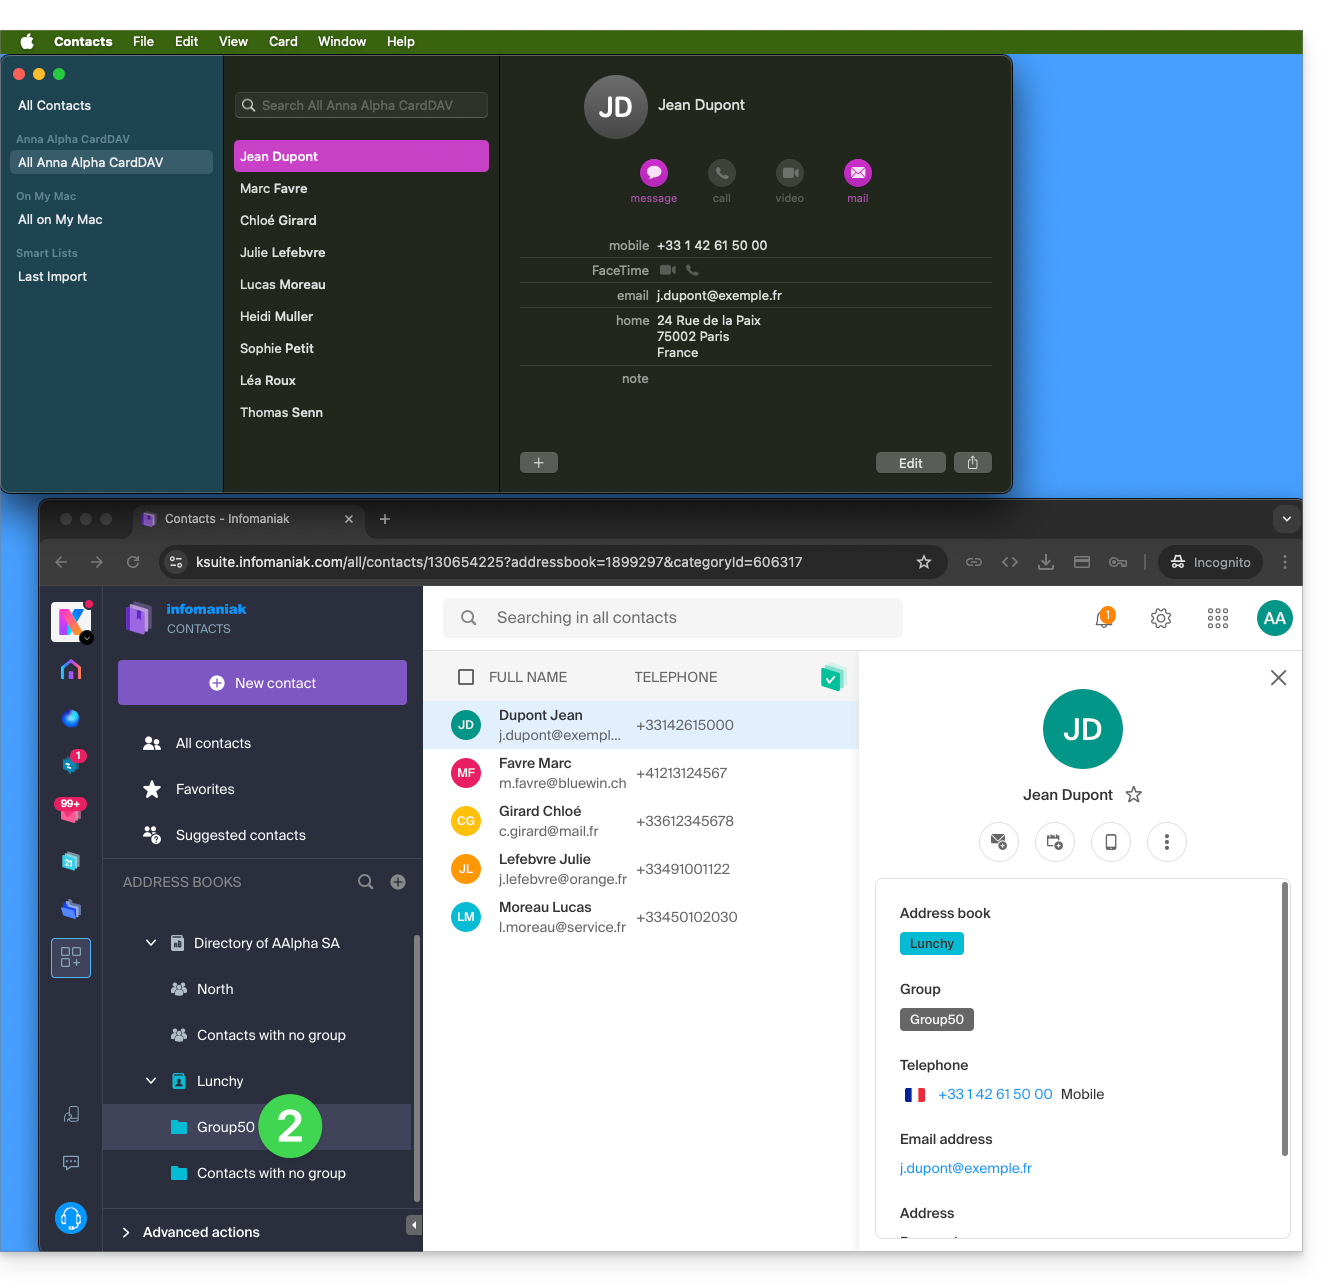
- Groups configured on the web interface do not appear in the Apple Contacts application (but the contacts contained within them do):
- Tip: to delete a list created on the Apple side, select it and press the DEL./SUPPR. key on your keyboard.
Additional address books
The Contacts application does not support multi-address books for the same account:
- Only the default address book is synchronized.
- To access all your address books, a third-party software (type Thunderbird) is required.
Example of a new address book on the Infomaniak side:
- The content of this second address book is not synchronized:
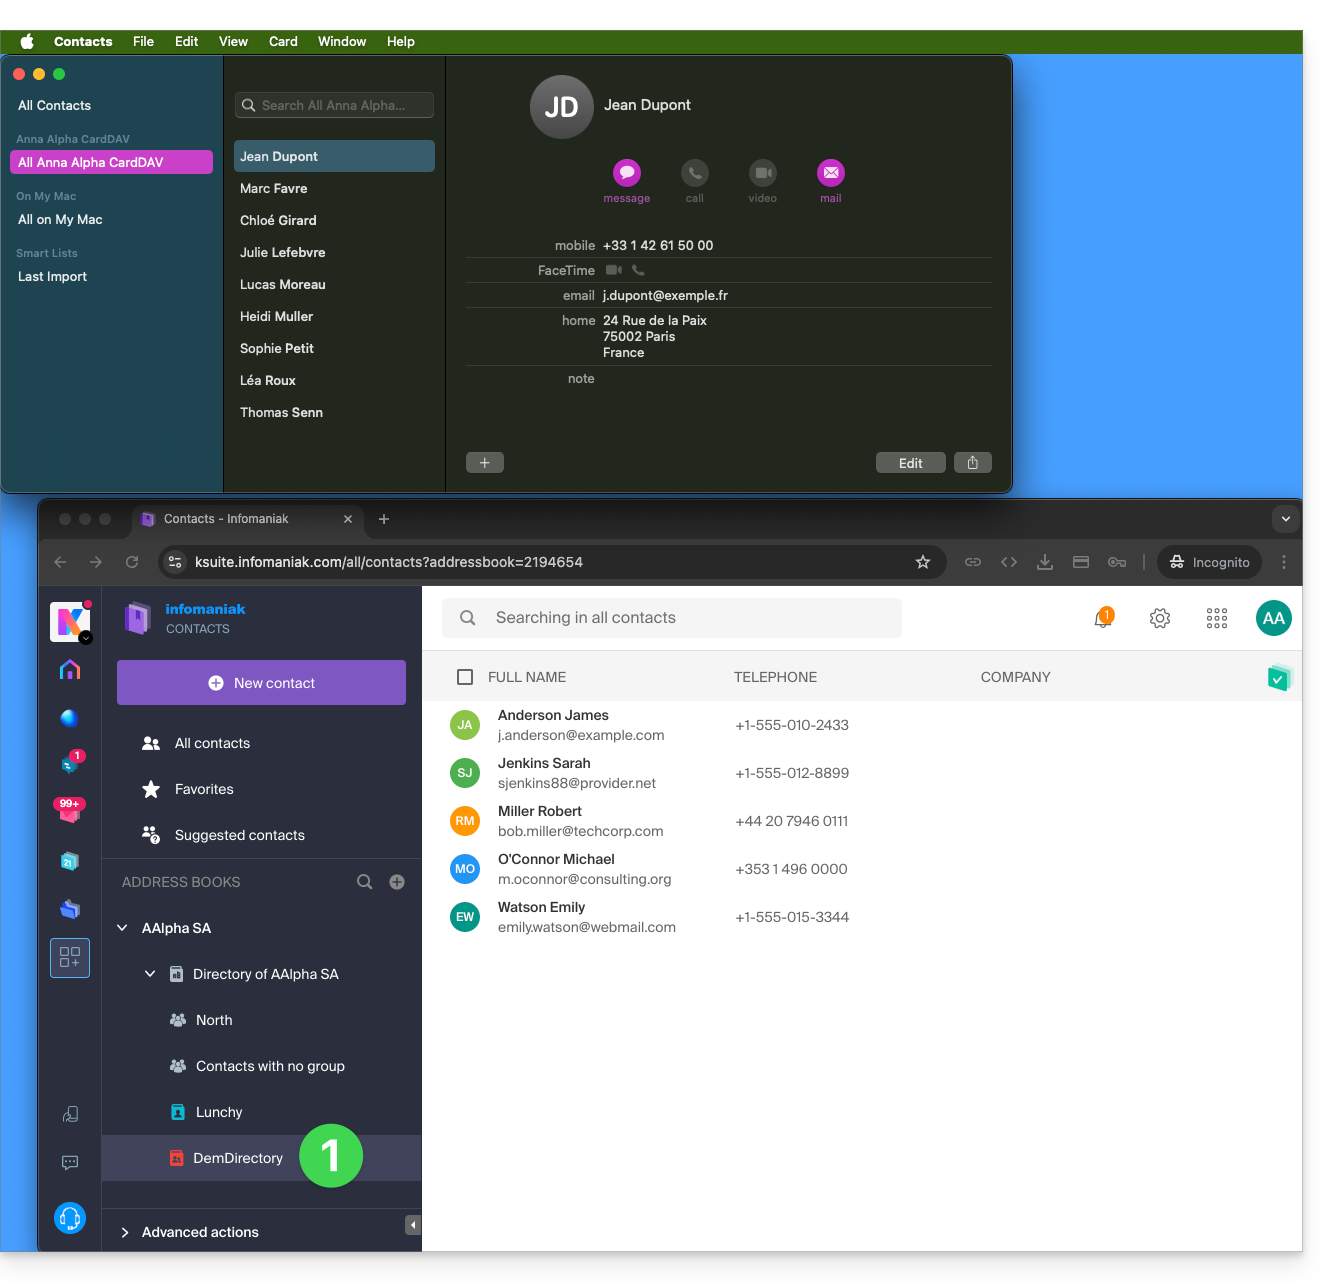
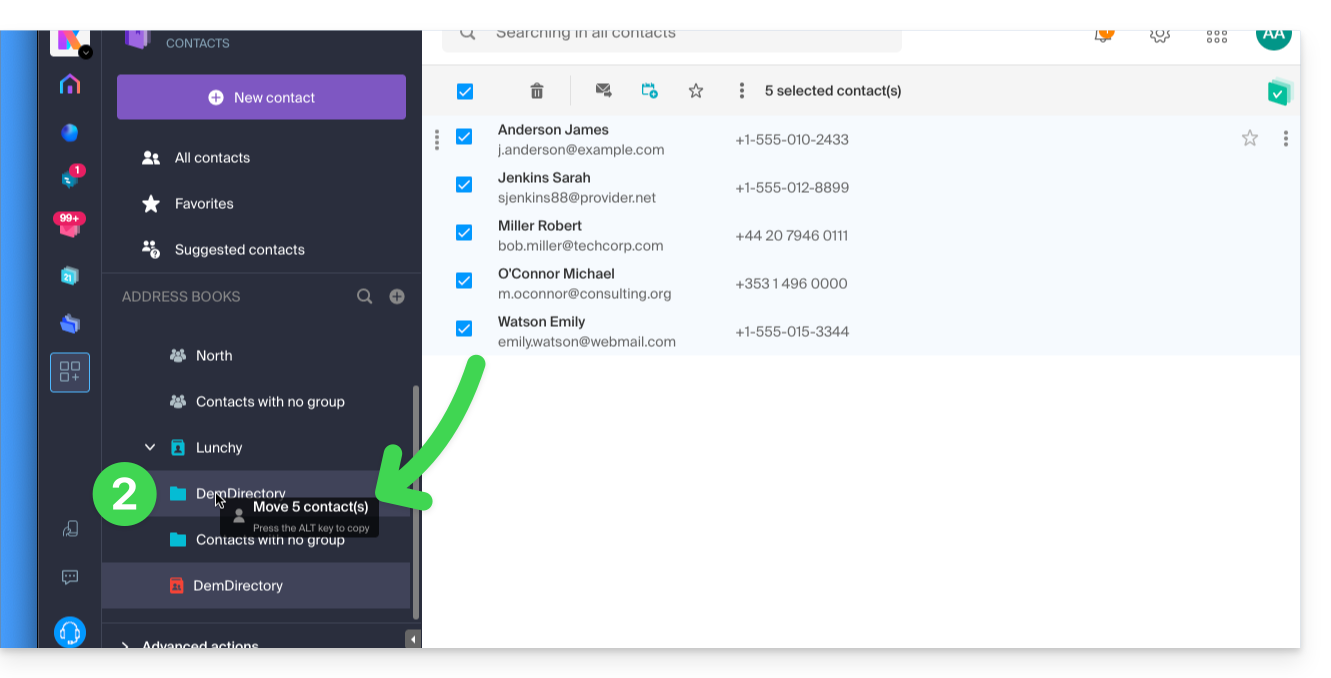
- A solution to organize yourself similarly could be to create a group under Lunchy and add the 5 contacts there:
Shared address books
An address book shared with another Infomaniak user will continue to be synchronized, including if contacts are added/edited via sharing, as in this example of sharing with maximum permissions: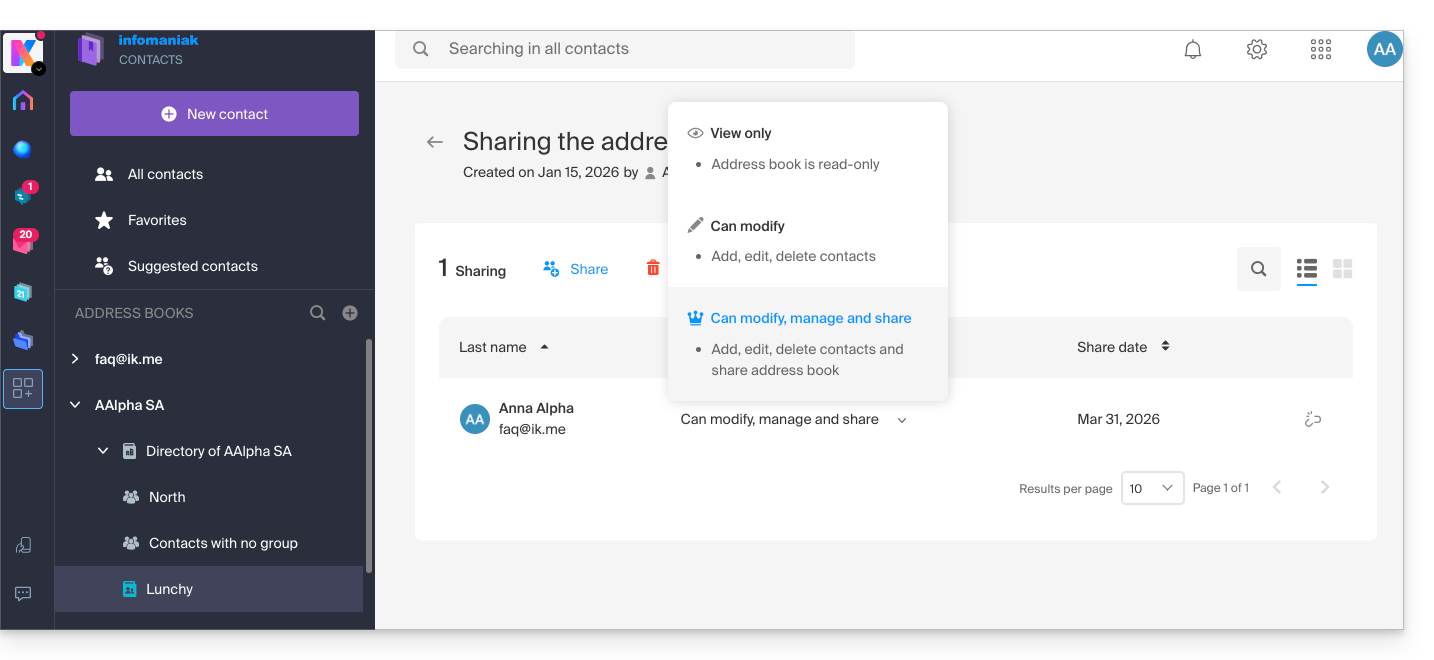
The reverse (receiving contact sharing from another Infomaniak user) adds an additional address book. Synchronization of these additional contacts is therefore not possible (same rule as the one presented in the chapter “Additional address books” above).
Calendar: Displaying shared calendars
The CalDAV protocol does not allow you to choose which items to synchronize; all account data is retrieved, including the calendars you share and those for which you have been granted access/modification rights: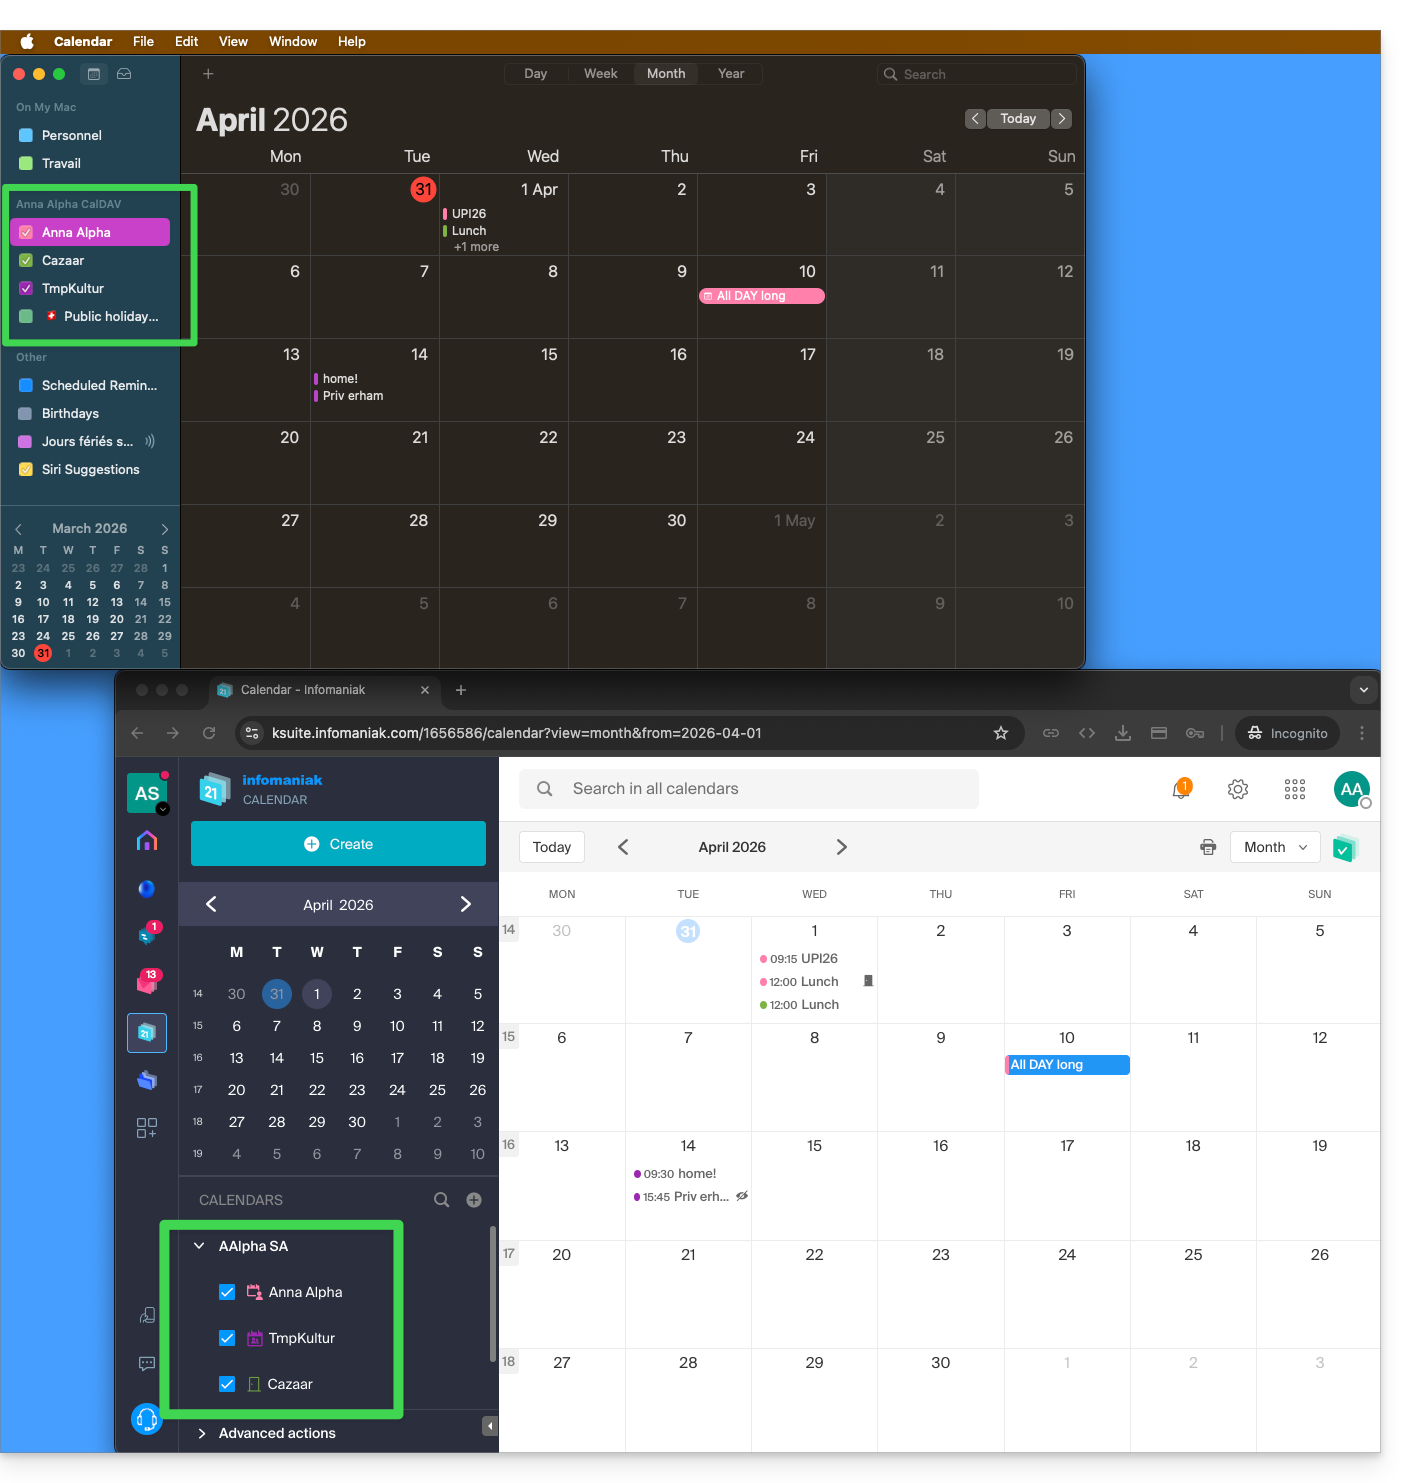
If only your personal calendar is displayed, then try this manipulation to activate additional calendars:
On macOS
- Open iCal / Calendar.
- Go to the Calendar > Settings (or Preferences).
- Go to the Accounts tab.
- Select the Infomaniak account and click on the Delegation tab.
- Check the shared calendars to display.
On iOS
- Open iCal / Calendar.
- Tap the Calendars button at the bottom of the screen.
- Check the shared calendars in the list.
Notifications (iOS)
You can enable or disable alerts for each specific calendar by tapping the ⓘ icon located to the right of its name: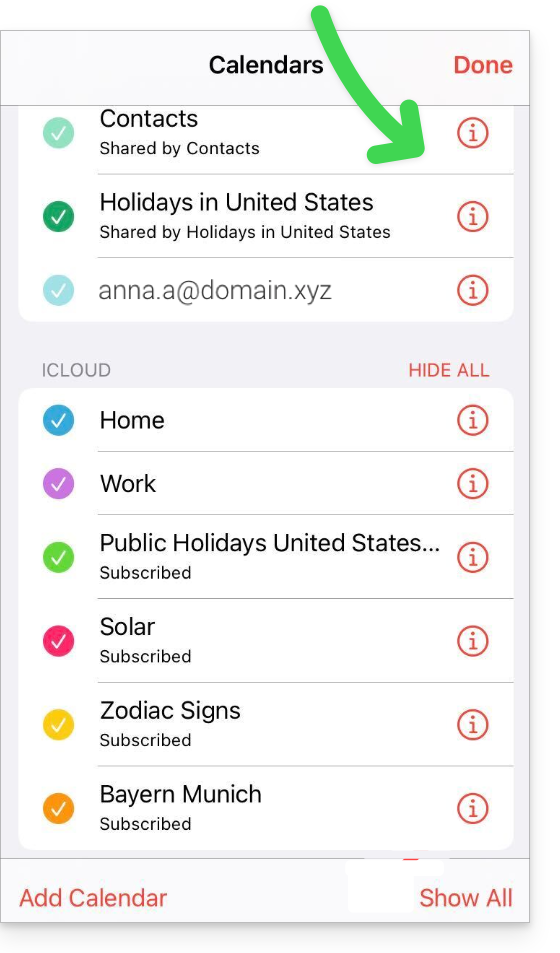
Link to this FAQ:
Has this FAQ been helpful?
This guide explains how to connect the desktop apps Contacts and Calendar (desktop applications on macOS) with the contacts & calendars hosted by Infomaniak.
Preamble
- Your macOS computer will be automatically configured via configuration profiles .mobileconfig compatible with Apple, unlike a manual configuration.
- Infomaniak contacts & calendars are linked to your Infomaniak account; when you log in to ksuite.infomaniak.com/contacts or /calendar you probably have to perform double validation (2FA) when logging in.
- In this case, an application password is required to establish synchronization between your device and Infomaniak tools.
- But don't worry, creating such a password is offered by following the configuration assistant.
- The various services offered by Infomaniak are all compatible with the corresponding standard protocols (CalDAV/CardDAV for contacts & calendars for example), consequently if you encounter a problem with third-party software, contact its publisher or a Partner and consult the support policy as well as article 11.9 of the Infomaniak Terms of Service.
Install a configuration profile
To do this:
- Click here to access the Infomaniak configuration tool (online service https://config.infomaniak.com) — log in if necessary to your Infomaniak account on the Organization on which your services to be synchronized are managed.
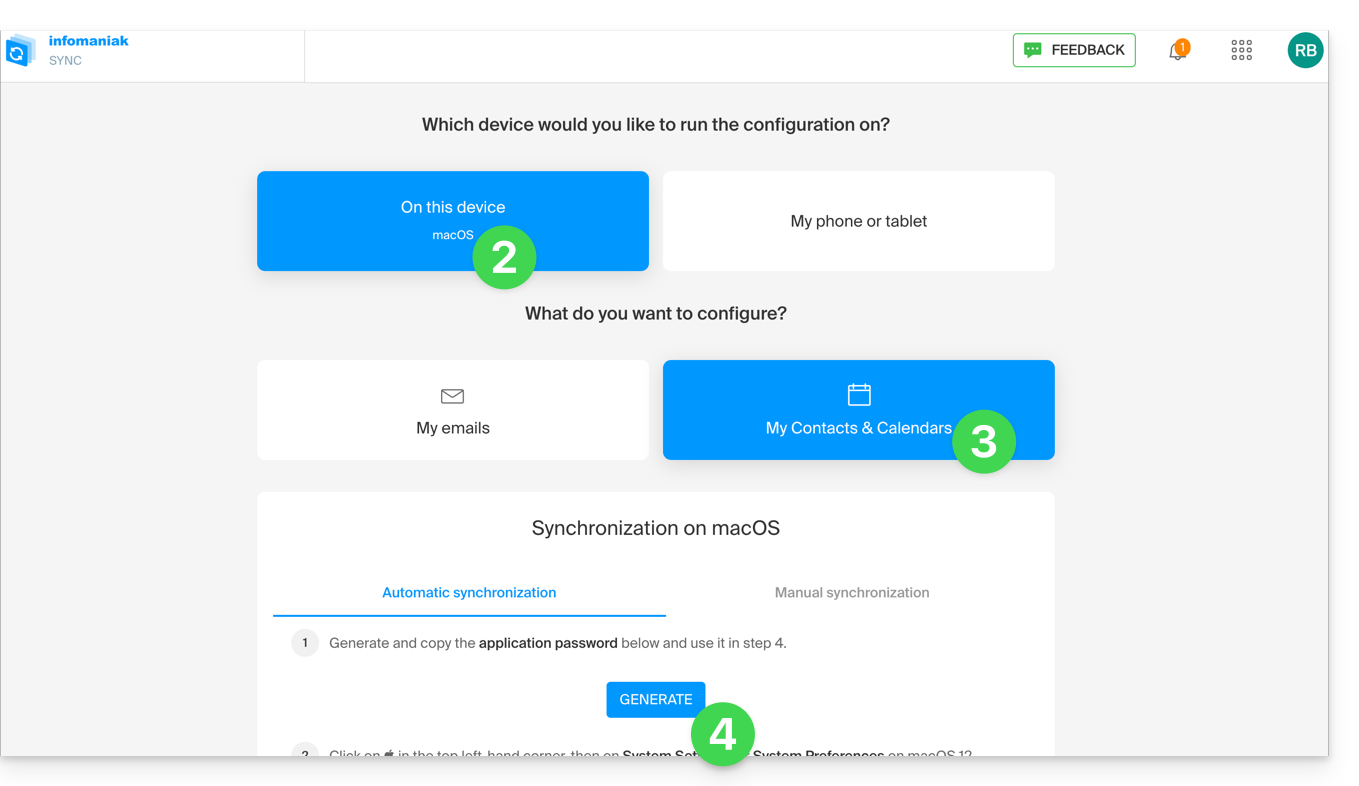
- Choose to install the profile on this device.
- Choose to synchronize contacts & calendars.
- Generate an application password dedicated to synchronization (to keep the usual 2FA connection of your user account):
- Copy the generated application password (it will be requested during the installation of the Apple profile).
- Download the Apple profile:
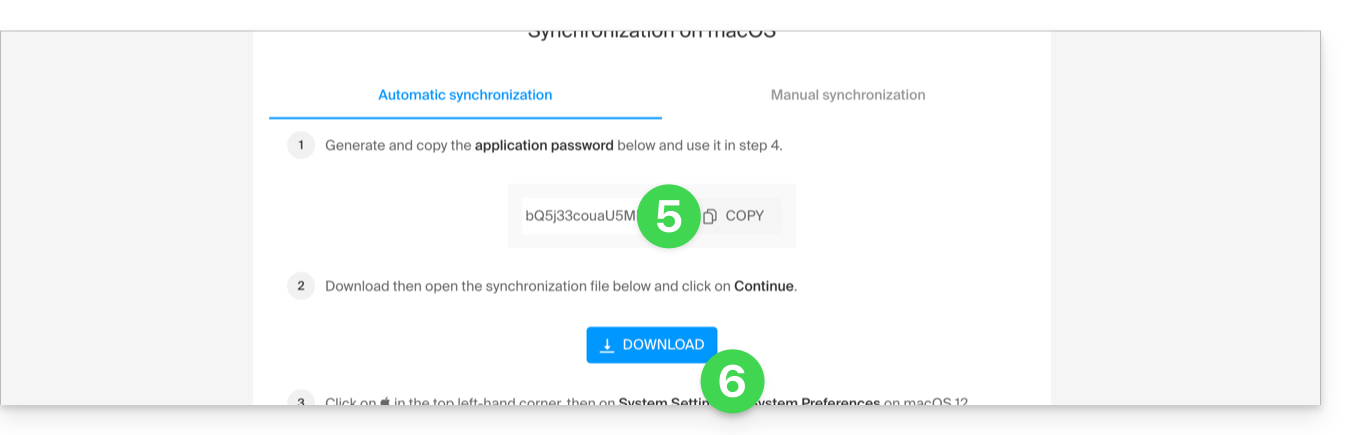
- Open this file newly downloaded to your hard drive.
- Click on OK in the confirmation window:
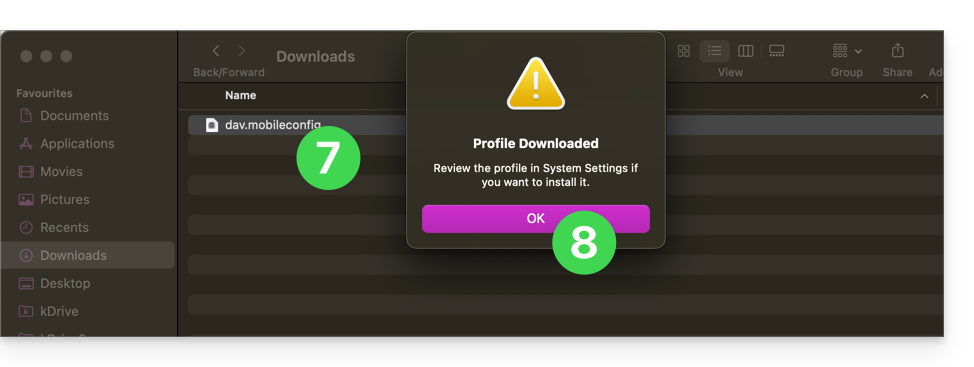
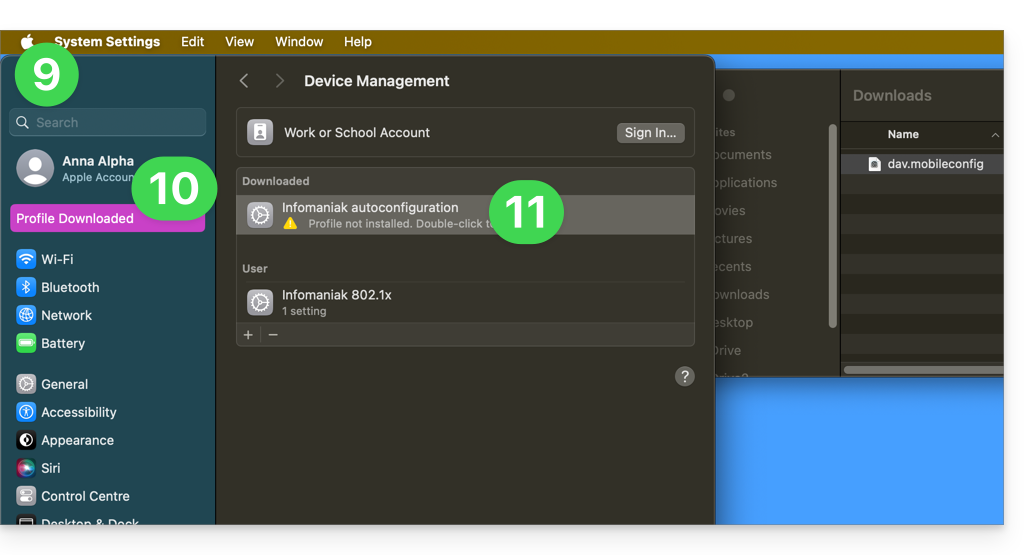
- Open the System Settings of the computer.
- In principle, the new profile is indicated as such and you need to click on this menu item…
- otherwise, click on General in the sidebar
- then click on Device Management (for macOS Sequoia 15 version)
- if you have a lower version or cannot find the profile, refer to the official documentation by changing the version of your system at the top of the page if necessary…
- Double-click on the proposed profile:
- Click on Install:
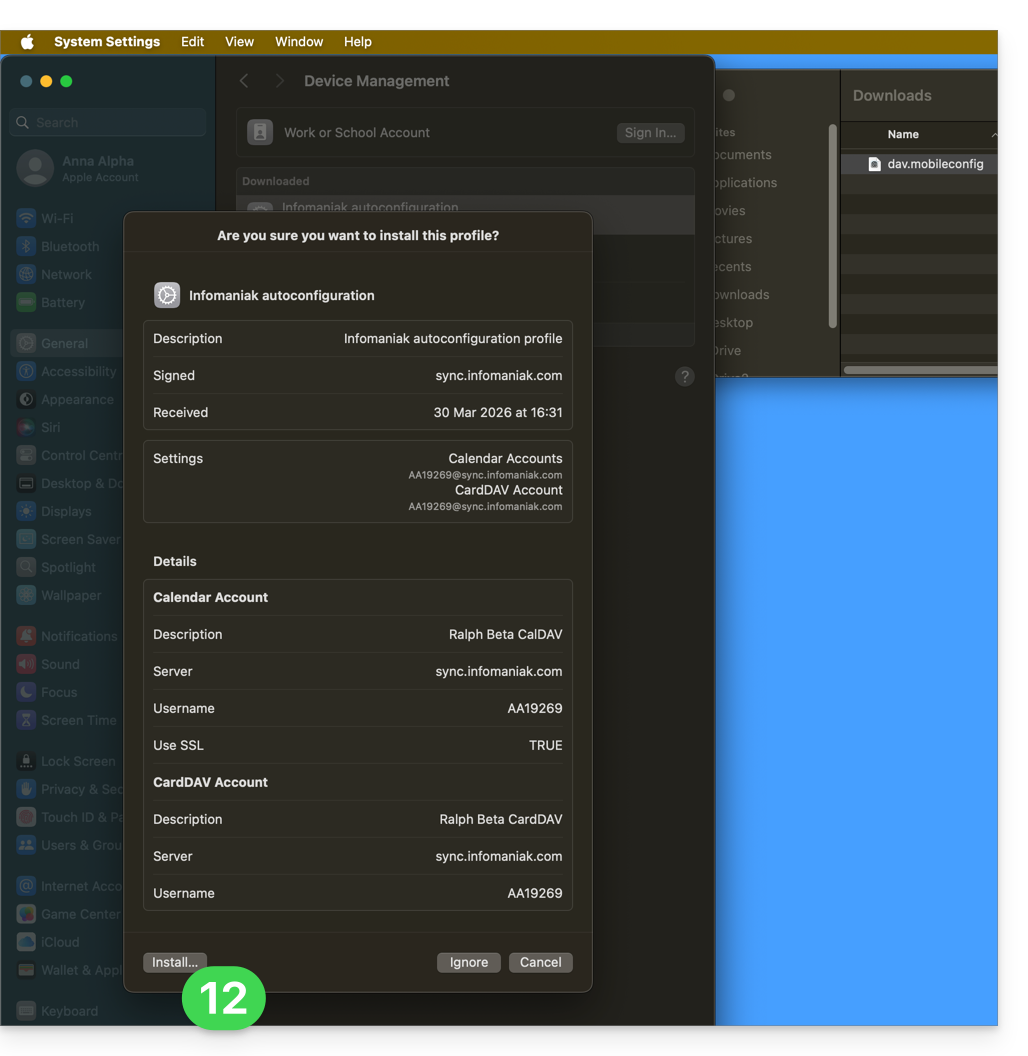
- Enter the application password noted in point 5 above, in order to connect to the Calendars.
- Click on Next:
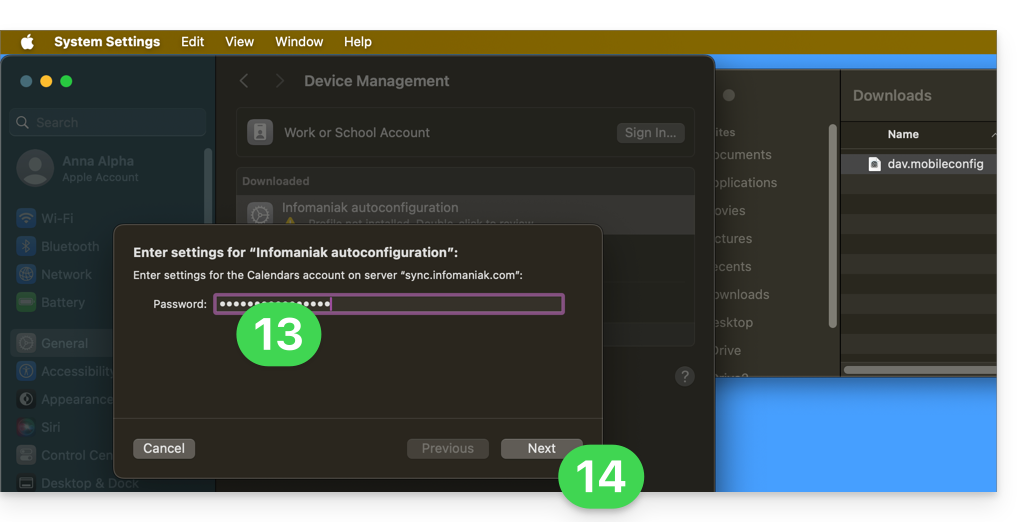
- Enter the password a second time (for Contacts this time) and click on Install to finish.
- There you go, you can now open your macOS Contacts and Calendar applications.
If your applications were already open, you need to restart them. You will then see the information added by the synchronization: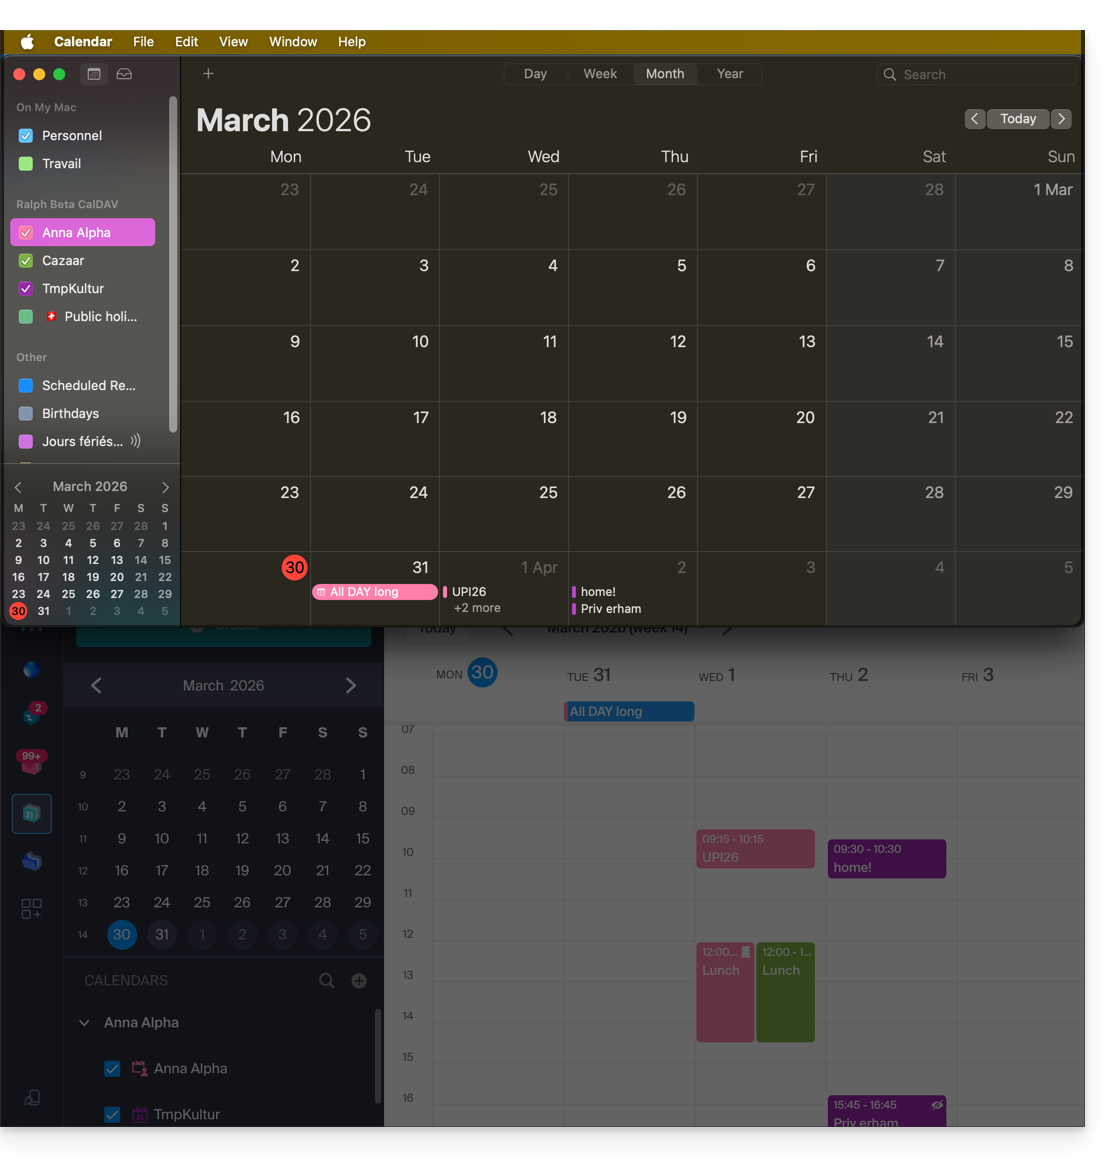
Synchronization specifics
Refer to this other guide.
Delete an Apple profile
Refer to the official documentation by changing the version of your system at the top of the page if necessary: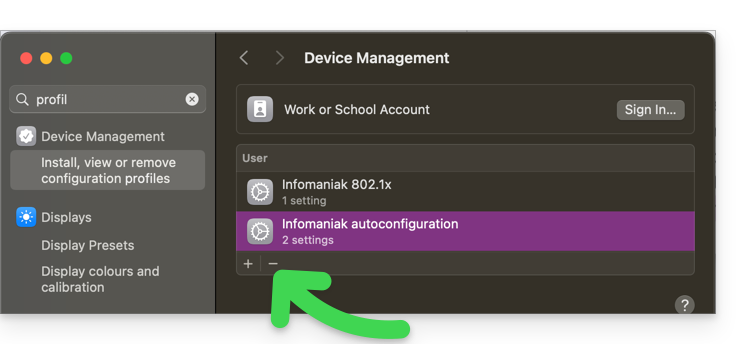
*Why is it necessary to choose the guide version that exactly matches your macOS / iOS system version? Apple introduces changes, sometimes subtle, with each new version of its system, for example a path on iOS 15…
… becomes this on iOS 18…
Link to this FAQ:
Has this FAQ been helpful?
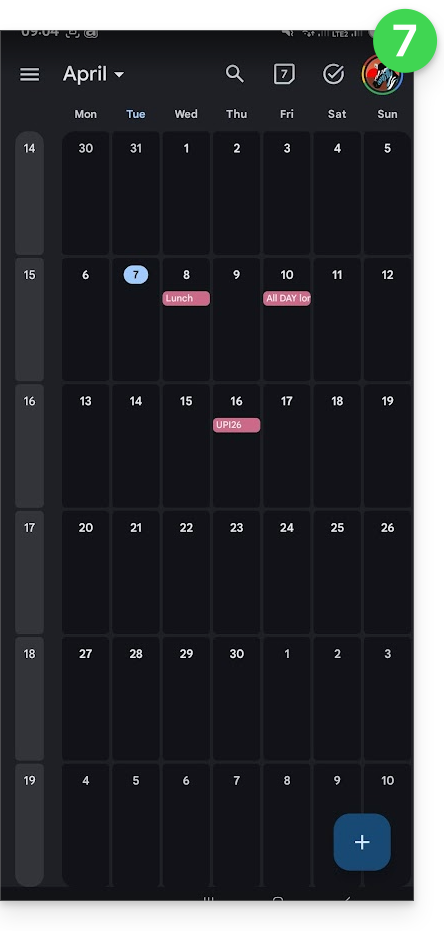
This guide explains how to manage a calendar and its events within the mobile app Google Calendar (app for iOS/Android smartphone or tablet) and/or the web app Calendar Infomaniak (online service ksuite.infomaniak.com/calendar) while keeping all data fully synchronized thanks to the mobile app Infomaniak kSync (app for Android smartphone or tablet).
Preamble
- Refer to this other guide if you only want to display a read-only Infomaniak calendar on Google Calendar (web & mobile app).
- The reverse is also possible if you only want to display a read-only Google calendar on the web app Calendar Infomaniak (online service ksuite.infomaniak.com/calendar).
- The procedure below allows you to edit the calendar events on both sides but only on the mobile version of the Google Calendar app.
- The various services offered by Infomaniak are all compatible with the corresponding standard protocols (CalDAV/CardDAV for contacts & calendars, for example), therefore if you encounter a problem with third-party software, contact its publisher or a Partner and consult the support policy as well as section 11.9 of the Infomaniak Terms of Service.
Synchronize the Infomaniak calendar and the mobile device
Prerequisites
- Download the Android mobile app Google Calendar.
- Download the mobile app Infomaniak kSync (app for Android smartphone or tablet) here:

- The kSync application is also available on F-droid.
- Install kSync.
Then, launch the kSync app on your Android device, a step-by-step assistant will help you configure the application according to your needs:
- Decide whether you want to synchronize tasks.
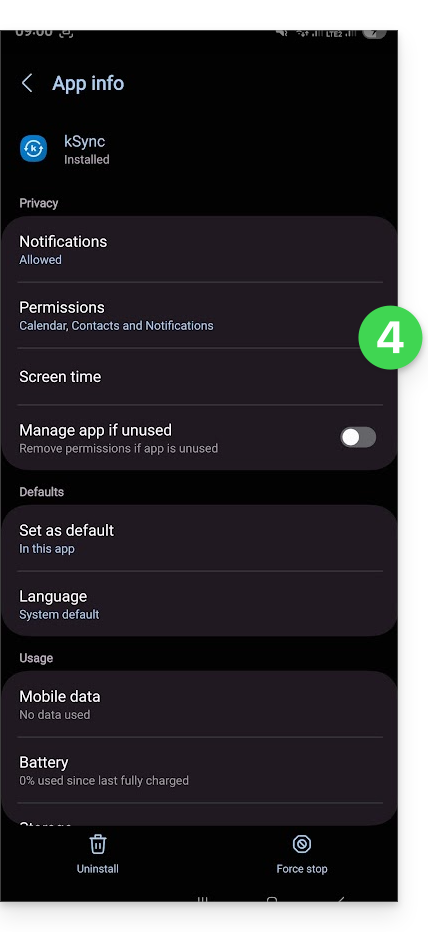
- Allow kSync to access the required items on the device, primarily the calendar.
- Allow the application to run in the background for better synchronization (uses more battery); settings are also possible within the app itself:
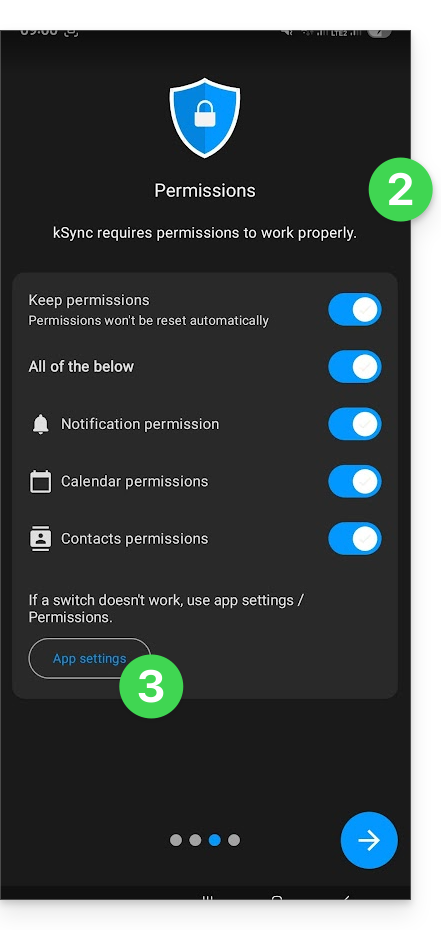
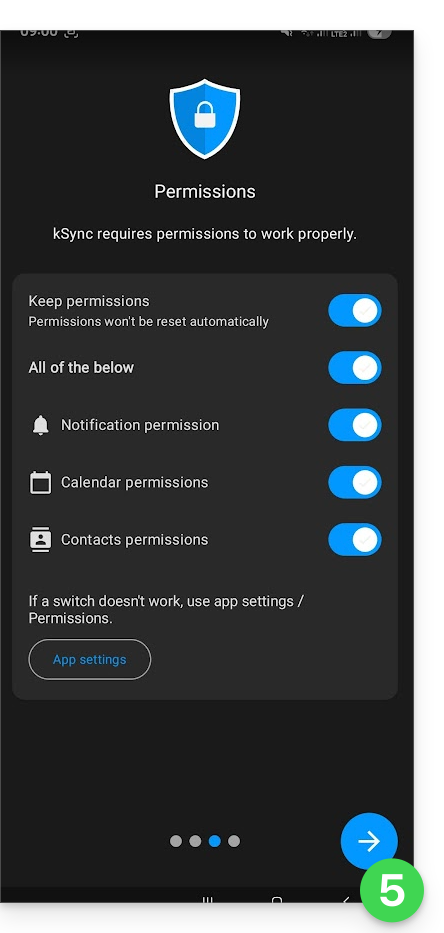
- The main thing is to grant access rights to the services you need to synchronize:
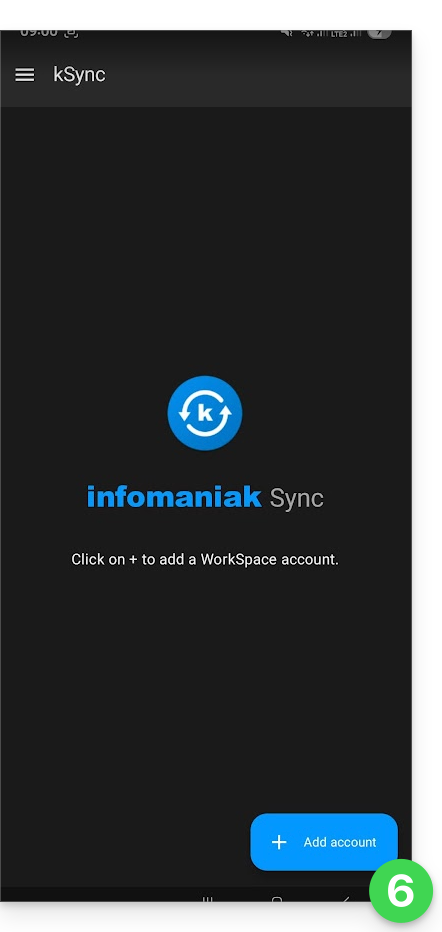
- Go back to the kSync app and continue the configuration:
- Tap to add an Infomaniak user account (the one you use to log in to your Infomaniak services):
- For example, on the web app Calendar, the user menu at the top right informs you of the login email used.
- It is then possible to access the calendars of the Organization to which the current user is attached:
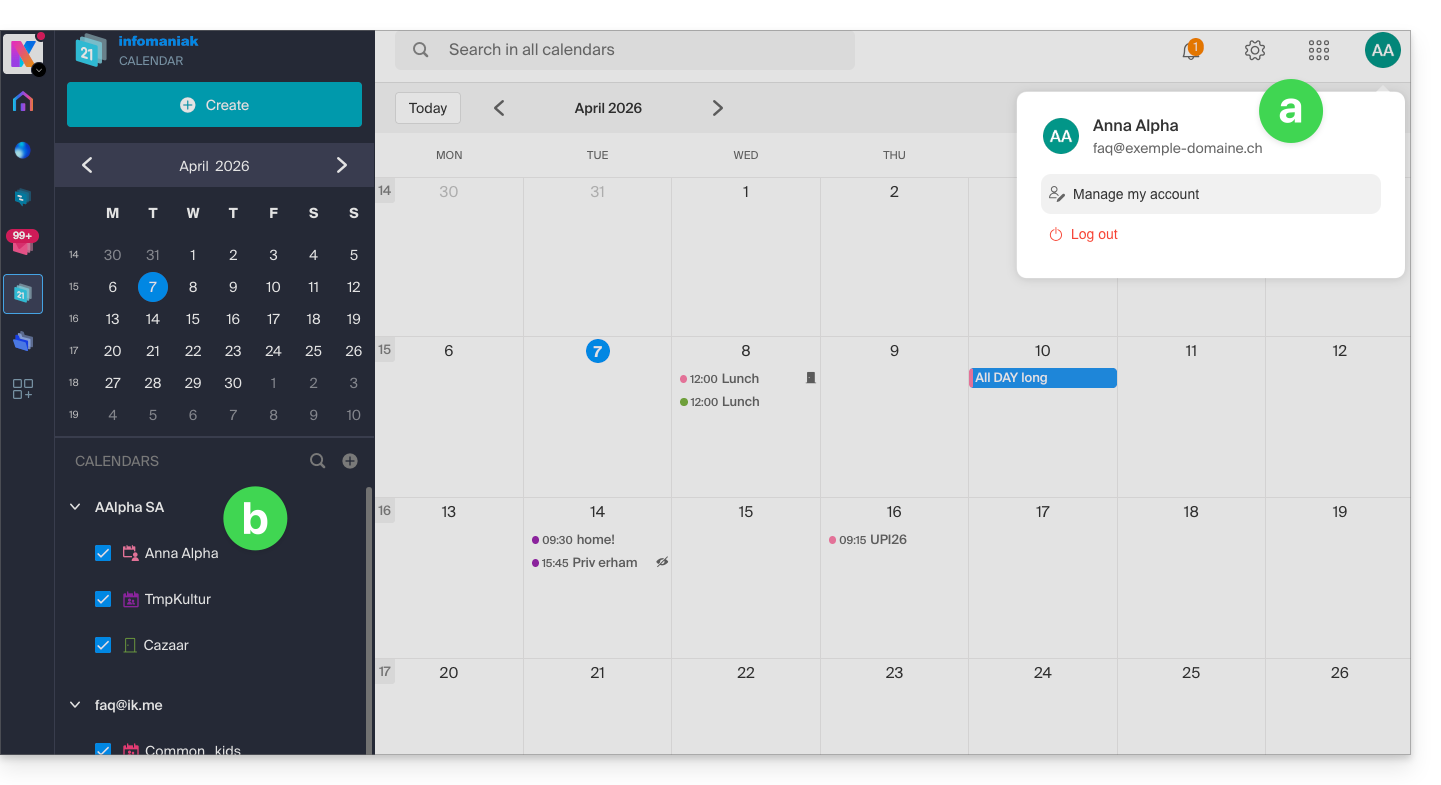
- These are the data that will be synchronized on your device when you log in to the same Infomaniak account on kSync...
- Enter your Infomaniak login credentials (see point a above).
- Tap the button to log in:
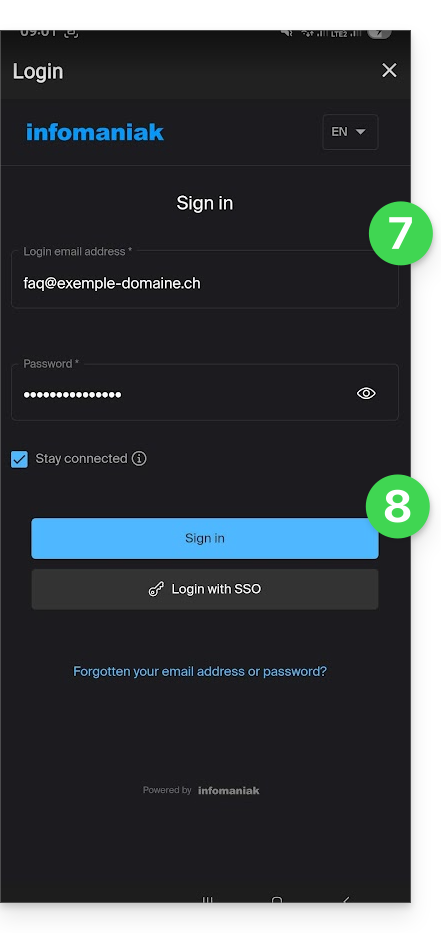
- Perform the double authentication steps as during your usual logins.
- Once logged in to kSync, activate the calendars (from those displayed, which are those linked to your Infomaniak account) to synchronize from the CALDAV tab:
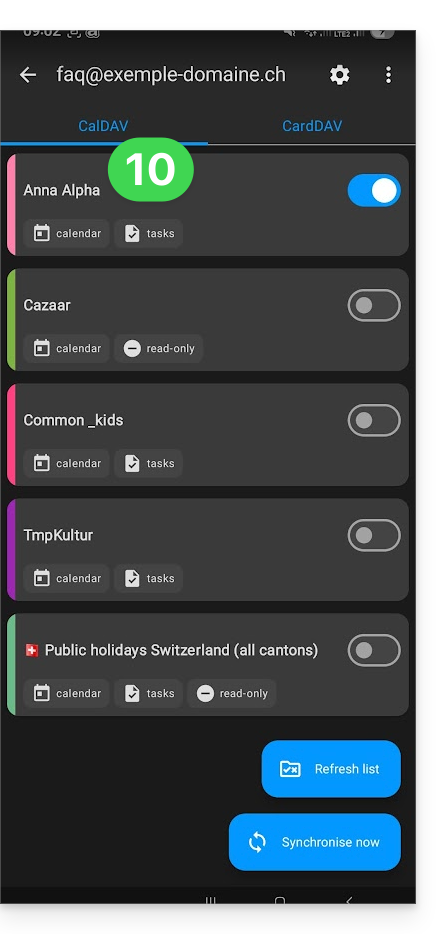
- Start the synchronization with the button located at the bottom right.
Automatic synchronization of the native calendar
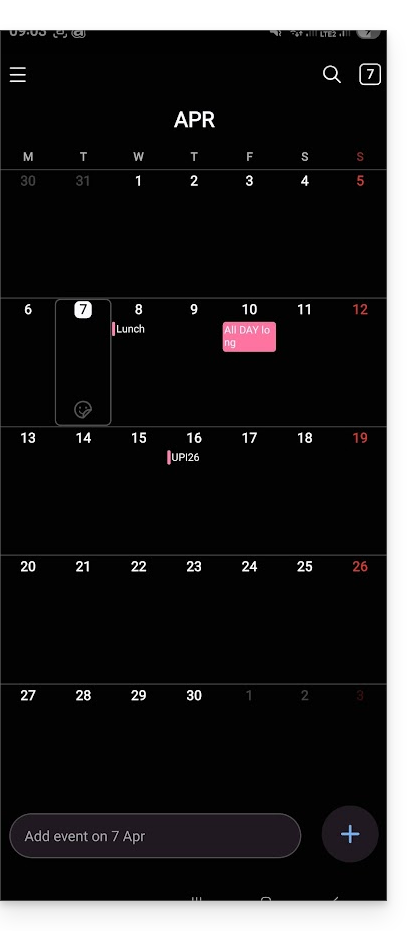
- At this stage, it is the native application of your Android device (Samsung Calendar for example on Samsung brand devices) that will be synchronized and display the events of your Infomaniak calendar (sometimes you need to activate the account on the application in question):

- An event added and/or modified on one or the other of the interfaces will be automatically synchronized everywhere:
Enable the calendar on Google Calendar
To find your Infomaniak calendar on Google Calendar and be able to edit its events:
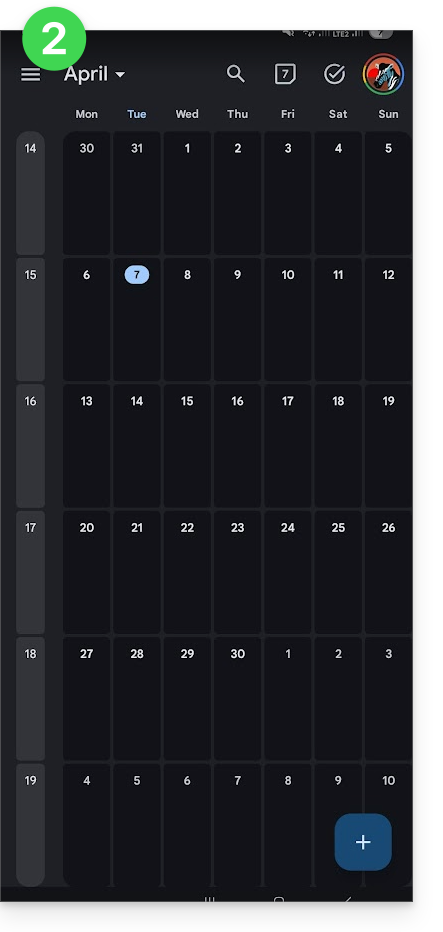
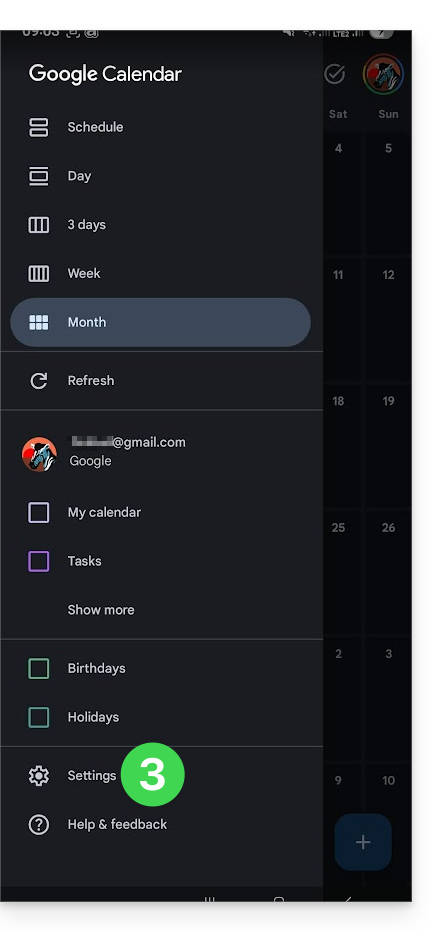
- Open Google Calendar on your Android device.
- Press the three horizontal line menu button ☰ at the top left of the interface:
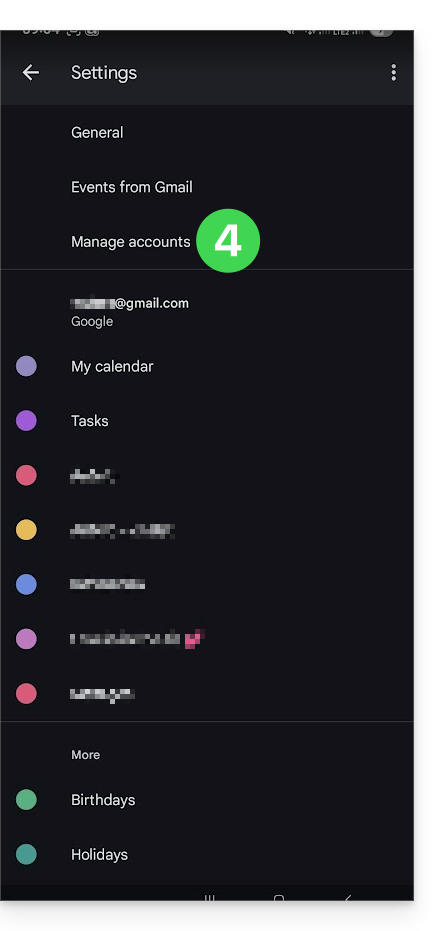
- Press Settings at the bottom of the menu:
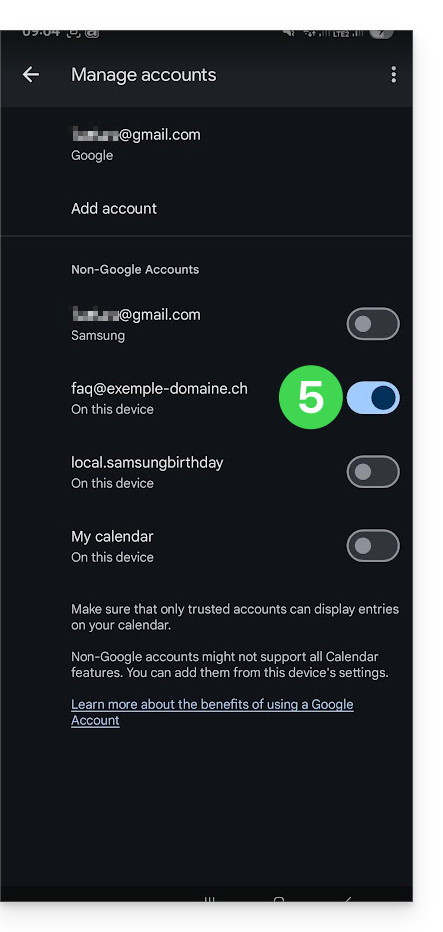
- Press Manage accounts:
- Activate the account corresponding to your Infomaniak calendar:
- Go back to the previous page and check that the Infomaniak calendar appears among the accounts and modify the color if necessary:
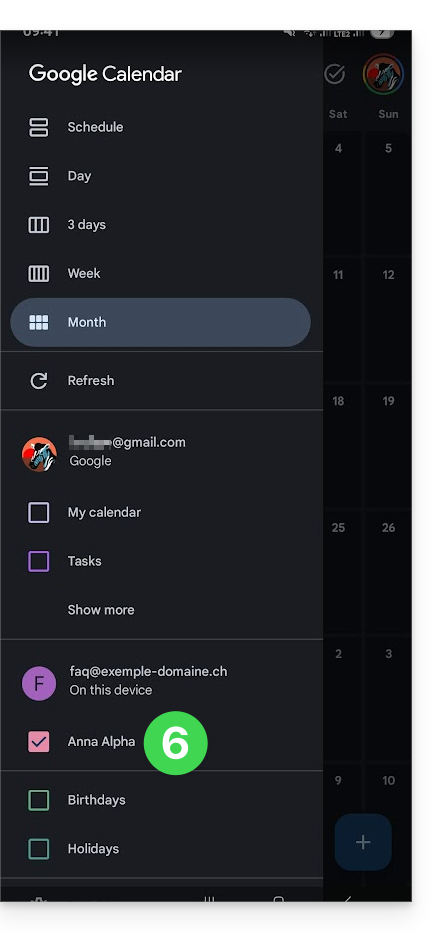
- That's it, Google Calendar is synchronized with the Infomaniak calendar, an event added and/or modified on one or the other of the interfaces will be automatically synchronized everywhere:
Link to this FAQ:
Has this FAQ been helpful?
This guide explains how to synchronize Microsoft Outlook contacts & calendars (Windows only, Office 365 / 2019, 2016, 2013, 2010, 2007 versions) with contacts & calendriers hosted by Infomaniak, using an extension for Outlook available on caldavsynchronizer.org.
* The free versions of Outlook (New Outlook) and the macOS version are unable to install an extension; they are therefore unfortunately incompatible with Infomaniak data!
Preamble
- The various services offered by Infomaniak are all compatible with the corresponding standard protocols (CalDAV/CardDAV for contacts & calendars, for example), therefore if you encounter a problem with third-party software, contact its publisher or a Partner and consult the support policy as well as article 11.9 of the Infomaniak Terms and Conditions.
- There is a paid alternative for Windows, Evo Collaborator, which offers a preconfigured profile for Infomaniak.
Configure Outlook CalDav Synchronizer
Outlook CalDav Synchronizer allows you to synchronize contacts & calendars via CalDAV and CardDAV protocols, including multiple calendars (non-shared only):
- Download CalDav Synchronizer for Outlook.
- Close Outlook and launch the installation of the plugin downloaded above:

- Once the plugin is installed, open Outlook and click on the new tab CalDav Synchronizer.
- Click on Synchronization Profiles.
- Click on the + icon to create a first profile (for the calendar or contacts - you will need to create a second profile later to synchronize both).
- Choose a generic profile type (first radio button):

- Enter a profile name (name of the Infomaniak calendar or address book you want to synchronize, for example).
- Check the synchronization box.
- Click on the [ ▪ ▪ ▪ ] button.
- Click on the New… button:

- Enter a new folder name.
- Choose the type of items the folder will contain (Calendar or Contacts).
- Click on the parent folder “Outlook” to create the folder in its hierarchy.
- Confirm with the OK button:

- Confirm with OK:

- Open the assistant https://config.infomaniak.com/ to obtain the information regarding synchronization with Outlook.
- Click the button to generate an application password (allows you to bypass the 2FA of your user account for synchronization only):

- Copy the information (password, URL, and username) obtained on config.infomaniak.com.
- Enter the email address, that of your user account.
- Click the button to Test the settings:

- Choose in the window that opens the Infomaniak calendar to synchronize.
- Click the OK button:

- Additional information may then automatically appear in certain fields.
- Save a second profile if necessary (start again at point 4 in this case).
- Finish with OK at the bottom right.

- A restart of Outlook may be required to update the added information.
Resolve event duplicates
If you notice duplicated events in your Outlook calendar without them being duplicated on ksuite.infomaniak.com/calendar, apply these settings:
- Click to Show Advanced Settings.
- Click on Event Mapping Configuration.
- Check the box Use GlobalAppointmentID for UID attribute.
- Check the box Cleanup duplicate events.
- Save the changes by clicking on the OK button:

The deletion of duplicate events, and therefore potentially duplicate invitations, may result in a notification of event refusal to the organizer. However, this has no impact on the participant's initial choice.
For advanced macOS users
There is an alternative for Outlook / Exchange on macOS, via the ews-caldav-sync python script:
- Unlike an ICS file import provided by Outlook Web, which only includes the last few weeks of events, the script will import all calendar events, including event series, but not tasks.
- Synchronization via this script is one-way, from Microsoft Exchange to the CalDAV server. It is recommended to run it at regular intervals.
Link to this FAQ:
Has this FAQ been helpful?
This guide explains how to obtain and install an application on a computer from certain Infomaniak interfaces such as kSuite or those that allow you to manage your calendars/agendas or your address books.
Preamble
- A Progressive Web App (PWA) is an application designed for the Web and offers an experience similar to that of a native application.
- PWAs are fast, accessible directly from your browser, and can offer features such as offline operation or sending notifications.
- Installing a PWA allows you to create a standalone application on your computer, without going through a store traditional.
Install a progressive web app (PWA)
To download the PWA app (example here with Infomaniak Mail), depending on the browser used:
- Click here to access the Infomaniak Web app Calendar.
- Once the page is loaded, check for the presence of the installation icon in the browser's address bar (often represented by a screen with a “+”):
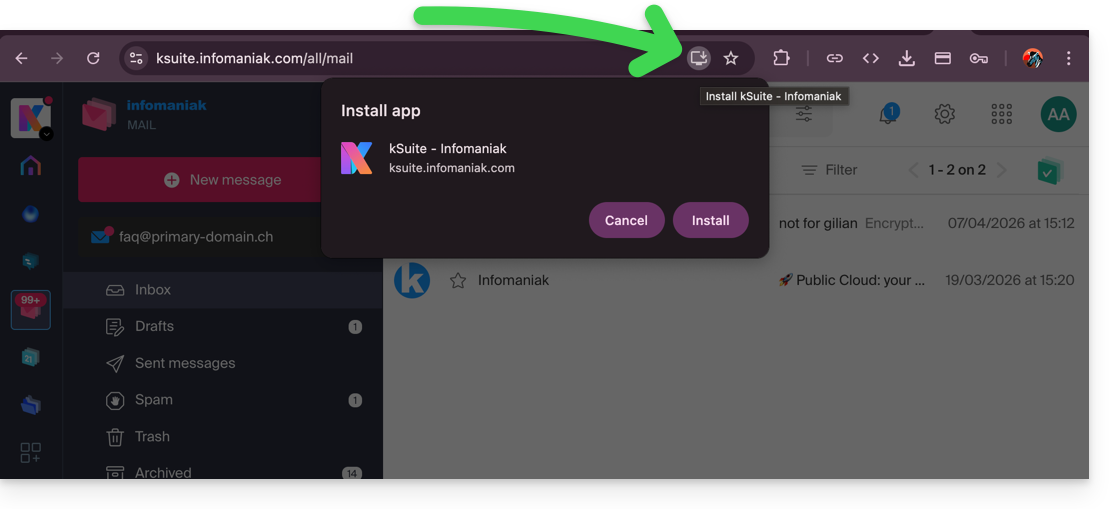
- Google Chrome / Chromium:
Click on the installation icon located in the address bar, or open the ⋮ menu and then click on Install [application name]. - Microsoft Edge:
Click on the Applications icon in the address bar or open the ⋯ menu, then select Applications > Install this site as an application. - Mozilla Firefox:
PWA installation is not fully supported natively. However, it is possible to use alternative solutions (extensions or shortcut creation) to simulate similar behavior. - Safari (macOS):
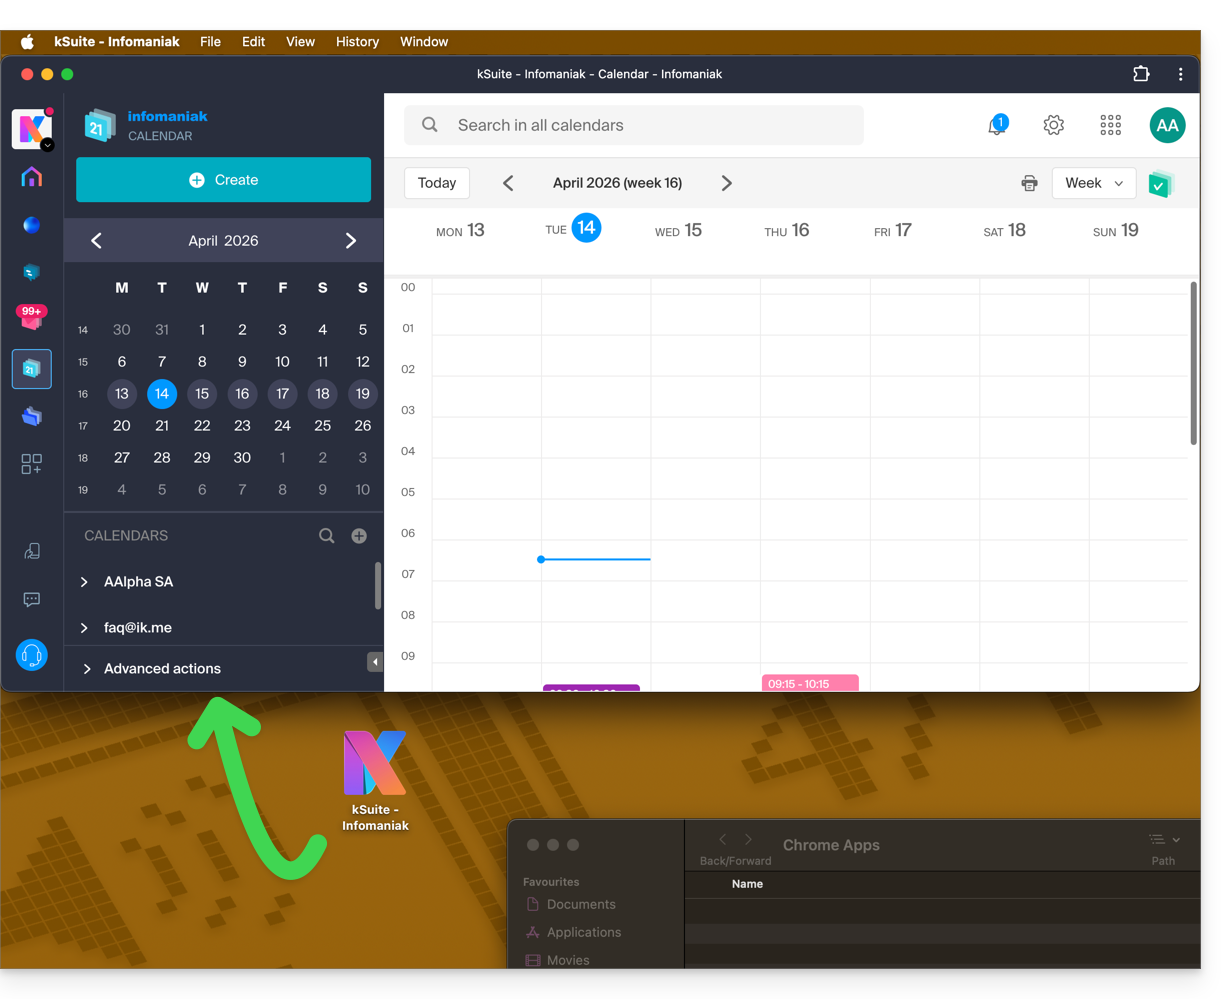
From recent versions of macOS, open the File menu and then click on Add to Dock to create a web application.
- Google Chrome / Chromium:
- The app is then present on your computer (example here with Infomaniak Calendar) and allows you to open the data while being completely autonomous outside the browser:
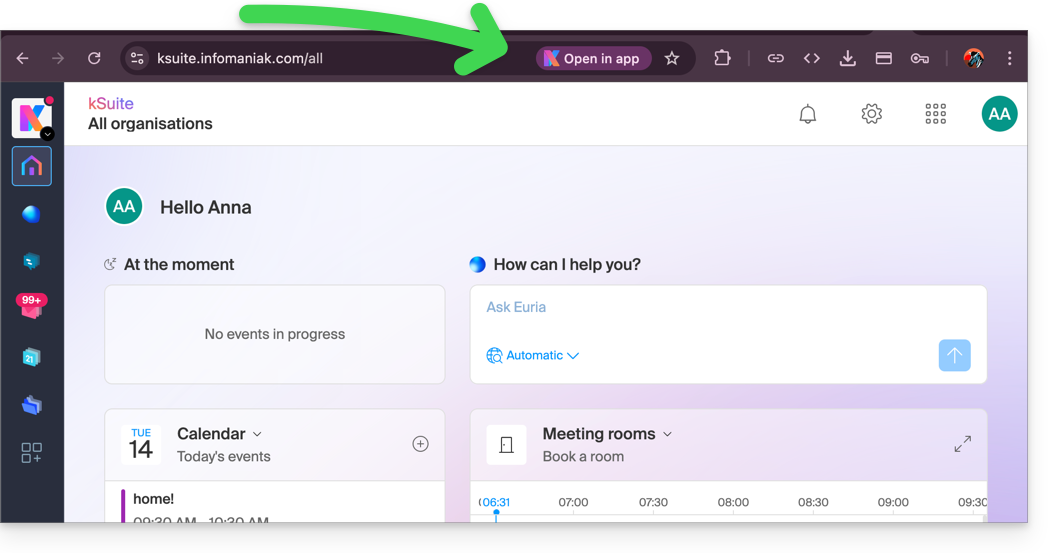
- When the app is detected on your computer, you can easily return to the app from the browser when you are on other Infomaniak pages (example here with a kSuite user space):
Remove the Infomaniak “PWA” application
To remove this local application system:
- Open the previously installed application.
- Click on the action menu ⋮ or ⋯ depending on your browser.
- Select Uninstall or Remove the application.
- Confirm the deletion if necessary.
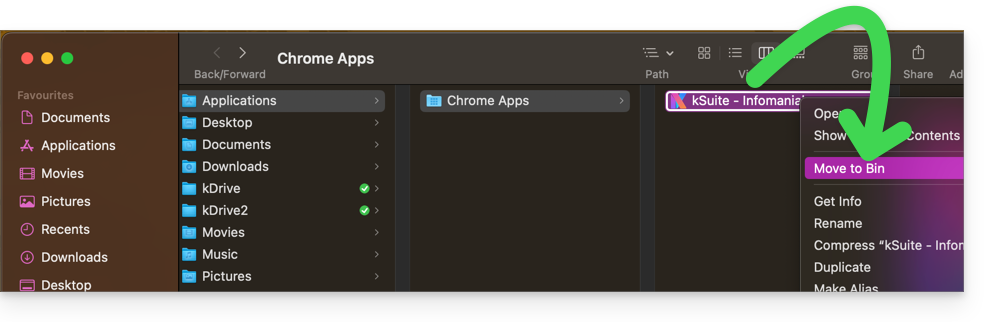
- You can also delete the application directly from your operating system (like any other application) or move the icon to the trash:
Link to this FAQ:
Has this FAQ been helpful?
This guide explains how to set up the synchronization of calendars/agendas and contacts Infomaniak with the desktop app Mozilla Thunderbird (desktop application on macOS / Windows / Linux).
Preamble
- The various services offered by Infomaniak are all compatible with the corresponding standard protocols (CalDAV/CardDAV for contacts & calendars, for example), therefore if you encounter a problem with third-party software, contact its publisher or a Partner and consult the support policy as well as article 11.9 of the Infomaniak TOS.
Obtain the advanced URL
Prerequisites
- Obtain your synchronization information provided by the Infomaniak synchronization assistant:
- account address:
https://sync.infomaniak.com - username: for example
AB12345 - application password if double authentication is enabled or the one from your Infomaniak account if you have not enabled 2FA
- account address:
To obtain a more elaborate synchronization URL, usually requested for synchronization with Thunderbird:
- Open the Infomaniak synchronization assistant.
- Click on the blue link Select a device:
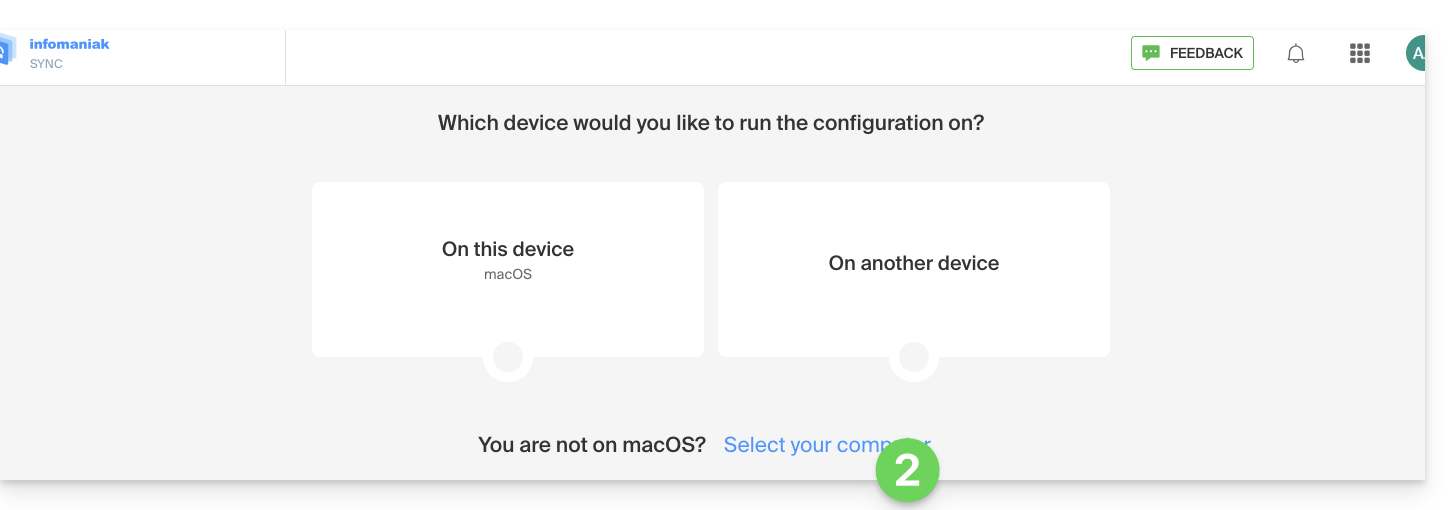
- Choose a GNU/Linux synchronization.
- Note the complete synchronization URL displayed in step 4 of the assistant:

Synchronize calendars and address books
Connect to a CardDAV address book
With the latest versions of Thunderbird, the synchronization of your Infomaniak calendars and address books is offered to you right after configuring your email address within the software: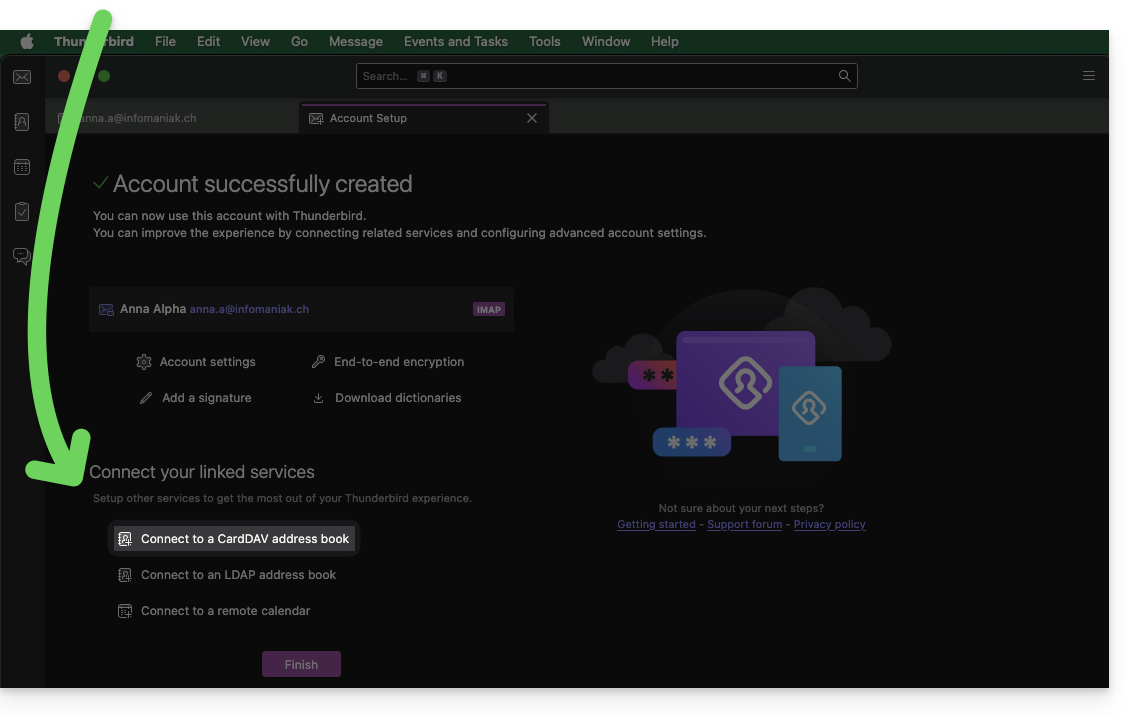
Click on it; the configuration starts:
- Enter the short username and the advanced URL (see above).
- Press Continue.
- Thunderbird then asks for the password (see above).
- Press OK:

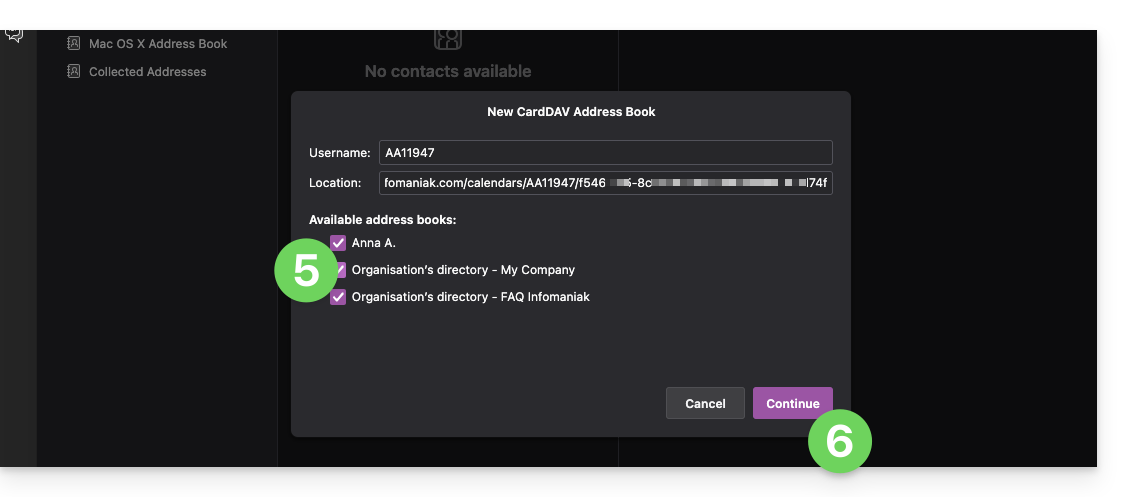
- Once the authentication is successfully completed, the application shows you the address books linked to your Infomaniak account; choose which ones to synchronize.
- Press Continue to finish:
Connect to a remote calendar
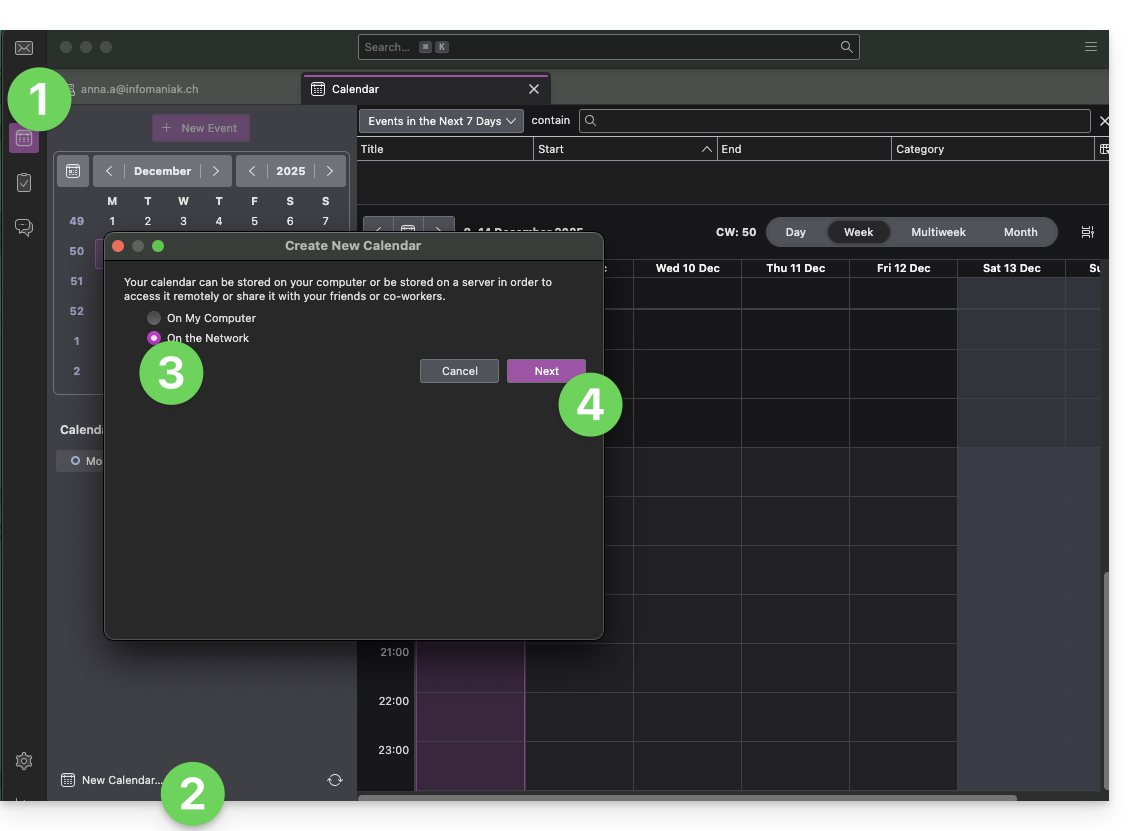
Add a new calendar in Thunderbird:
- Switch to Calendars if necessary.
- Click on New Calendar…
- Choose On the network.
- Click on Next:
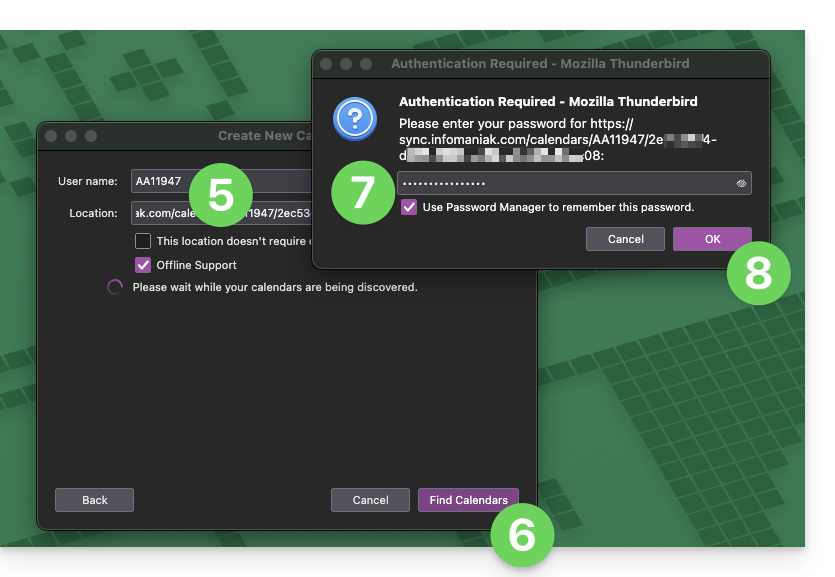
- Enter the short username and the advanced URL (see above).
- Press the button to find the Calendars associated.
- Thunderbird then asks for the password (see above).
- Press OK:
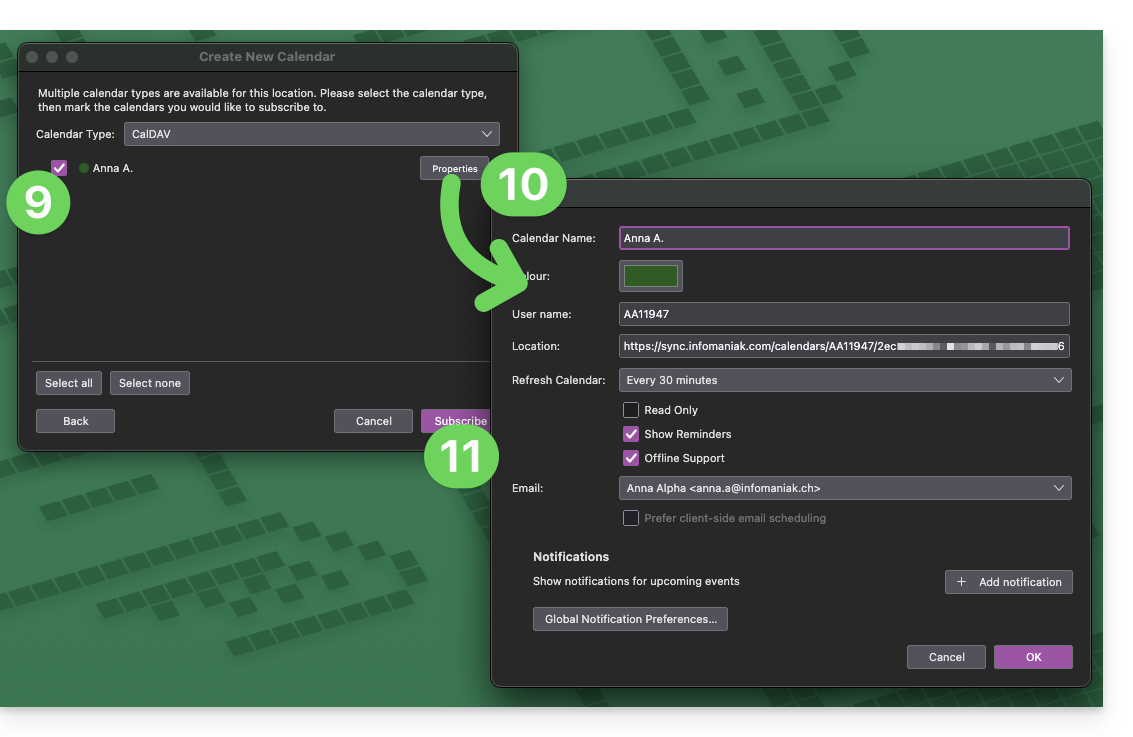
- Once authentication is successfully completed, the application shows you the schedules linked to your Infomaniak account; choose which ones to synchronize.
- You can manage advanced properties of your calendars in Thunderbird if necessary.
- Press the button to Subscribe and finish:
Refer to this other guide if you need to fix a configuration issue with Thunderbird (email, contacts, schedules)…
Link to this FAQ:
Has this FAQ been helpful?
This guide explains how to connect the mobile apps Contacts and CalendariOS (iPhone, iPad, etc.) to the contacts & calendars hosted by Infomaniak.
Préambule
- Your iOS device will be automatically configured via Apple .mobileconfig profiles compatible with Apple, unlike a manual configuration.
- It is possible to delete a configuration profile once installed (scroll down to the bottom of this page for instructions).
- Infomaniak contacts & calendars are linked to your Infomaniak account; when you log in to ksuite.infomaniak.com/contacts or /calendar you will likely need to perform two-factor authentication (2FA) when logging in.
- In this case, an application password is required to establish synchronization between your device and Infomaniak tools.
- But don't worry, creating such a password is offered by following the configuration assistant.
- The various services offered by Infomaniak are all compatible with the corresponding standard protocols (CalDAV/CardDAV for contacts & calendars, for example), therefore if you encounter a problem with third-party software, contact its publisher or a Partner and consult the support policy as well as article 11.9 of the Infomaniak Terms of Service.
Install a configuration profile
To do this:
- Click here to access the Infomaniak configuration tool (online service https://config.infomaniak.com) — log in if necessary to your Infomaniak account on the Organization on which your email address is managed.
- Choose to install the profile on this device:
- Choose to synchronize contacts & calendars:
- Generate an application password dedicated to synchronization (to maintain the usual 2FA connection of your user account):
- Copy the generated application password (it will be requested during the installation of the Apple profile).
- Download the Apple profile:
- Allow the download on the device:
- Open the device iOS settings:
- Press the recently downloaded profile:
- Press Install:
- Unlock your iOS device:
- Press Install:
- Enter (or paste) the application password twice consecutively (contacts + calendars).
- Tap on Finish:
If your iOS Contacts and Calendar applications were already open, you will need to restart them. You will then see the information added by the synchronization.
Particularities of synchronization
Refer to this other guide.
Delete an Apple profile
Refer to the official documentation by changing the version of your system at the top of the page if necessary.
*Why is it necessary to choose the guide version corresponding exactly to your macOS / iOS system version? Apple sometimes introduces subtle changes with each new version of its system, for example a path on iOS 15…
… becomes this on iOS 18…
Link to this FAQ:
Has this FAQ been helpful?
This guide explains how to synchronize eM Client contacts & calendars with contacts & calendars hosted by Infomaniak.
Preamble
- Infomaniak contacts & calendars are linked to your Infomaniak account; when you log in to ksuite.infomaniak.com/contacts or /calendar you will likely have to perform two-factor authentication (2FA) when logging in.
- In this case, an application password is required to establish synchronization between your device and Infomaniak tools.
- But don't worry, creating such a password is offered to you by following the setup assistant.
- The various services offered by Infomaniak are all compatible with the corresponding standard protocols (CalDAV/CardDAV for contacts & calendars, for example), therefore if you encounter a problem with third-party software, contact its publisher or a Partner and consult the support policy as well as section 11.9 of the Infomaniak Terms of Service.
Synchronize contacts & calendars (eM Client 10 macOS)
Prerequisites
- Obtain your synchronization information provided by the Infomaniak synchronization assistant:
- account address:
https://sync.infomaniak.com - username: for example
AB12345 - application password if two-factor authentication is enabled or the one of your Infomaniak user account if you have not enabled 2FA
- account address:
Next:
- Open eM Client
- Click on the eM Client Menu
- Click on Accounts
- Click on Add an account
- Click on Calendar
- Click on CalDAV
- Click on Next

- Choose a title for the account name (e.g., Infomaniak agenda) and complete the procedure
You can start the Contacts part if you wish, but in any case, 1 CalDAV procedure configures CardDAV at the same time, and vice-versa.
Link to this FAQ:
Has this FAQ been helpful?
This guide explains how to get event reminders from the Infomaniak Web app Calendar (online service ksuite.infomaniak.com/calendar) on a chat system like kChat in order to be notified in your chosen chat thread when an event is approaching.
⚠ Available with:
| kSuite | Free | * |
| Standard | ||
| Business | ||
| Enterprise | ||
| my kSuite | ||
| my kSuite+ | ||
| Mail Service | Starter 1 max. address | |
| Premium 5 min. addresses |
*limited to 1 webhook
Prerequisites
- Create an incoming webhook on the kChat app to obtain a URL of type
https://your-server-kchat.xyz/hooks/xxx-key-generated-xxx:
Link the kChat webhook to Calendar
To add the webhook from your chat system to the Calendar app:
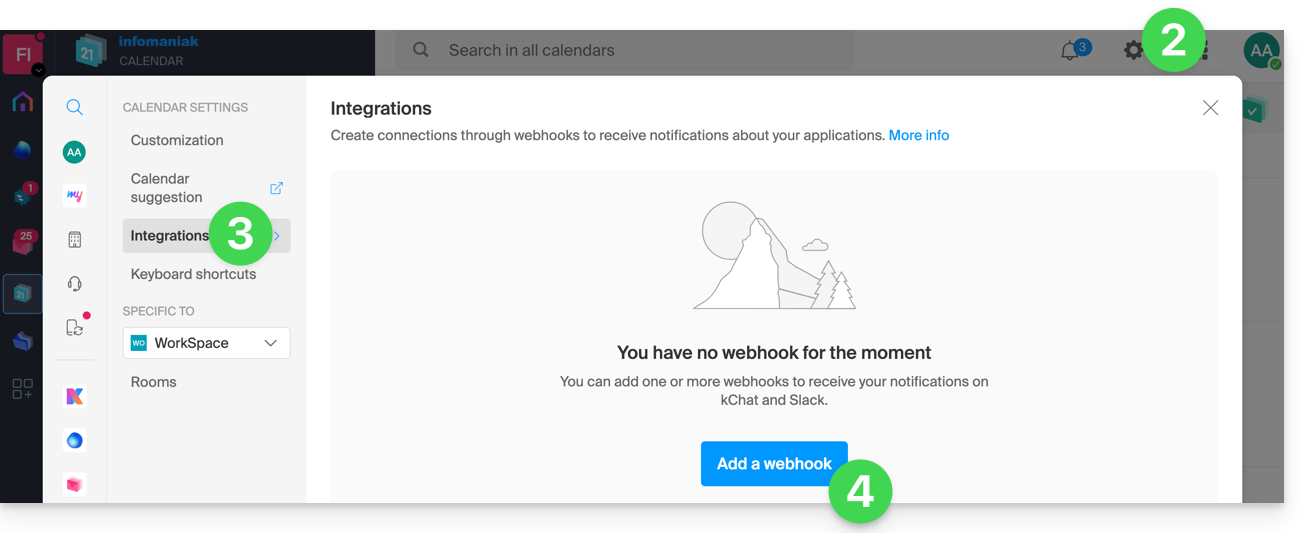
- Click here to access the Infomaniak Web app Calendar (online service ksuite.infomaniak.com/calendar).
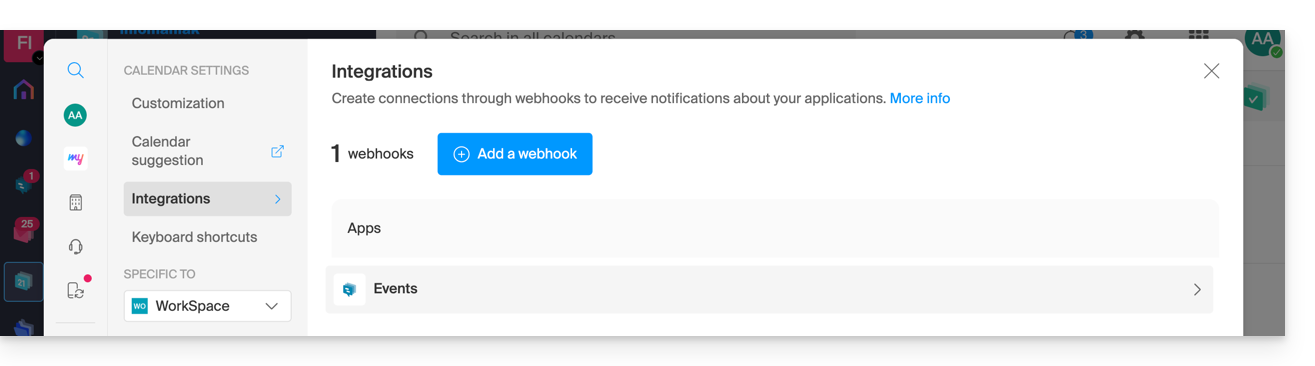
- Click on the Settings icon at the top right.
- Click on Integrations in the left sidebar menu.
- Click on the Add a webhook button:
- Define:
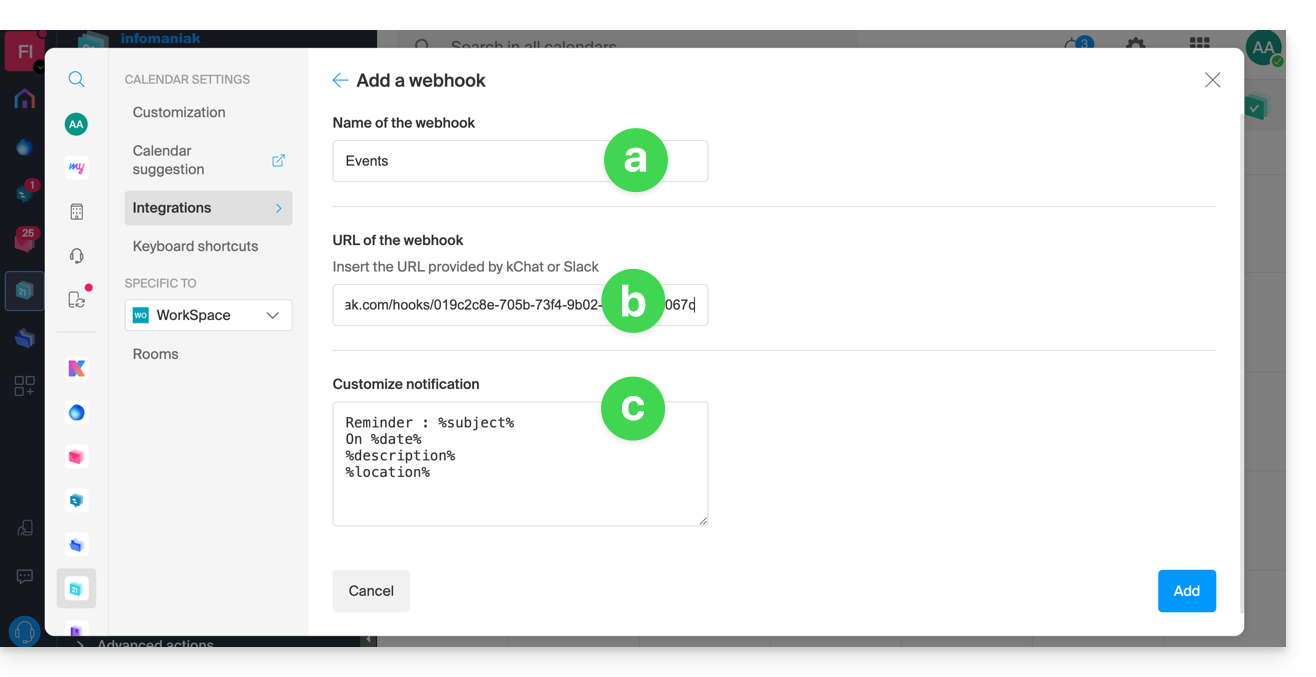
- A name to easily identify the Webhook when you add reminders.
- The webhook URL (obtained from your chat system).
- The elements (automatically taken from your event and/or added manually here) and their arrangement in the message to be sent:
- Insert %subject% to include the subject of the event.
- Insert %date% to include the date of the event.
- Insert %description% to include the description of the event.
- Insert %location% to include the possible location of the event.
- Click the button to Add the configured element and see it created:
Create an event with a chat reminder
Now that Calendar is linked to your chat system account, you can choose to be notified in a chat when you add a reminder to an event:
- Click here to access the Infomaniak Calendar Web app (online service ksuite.infomaniak.com/calendar).
- Click the button Create at the top left.
- Click on Event:
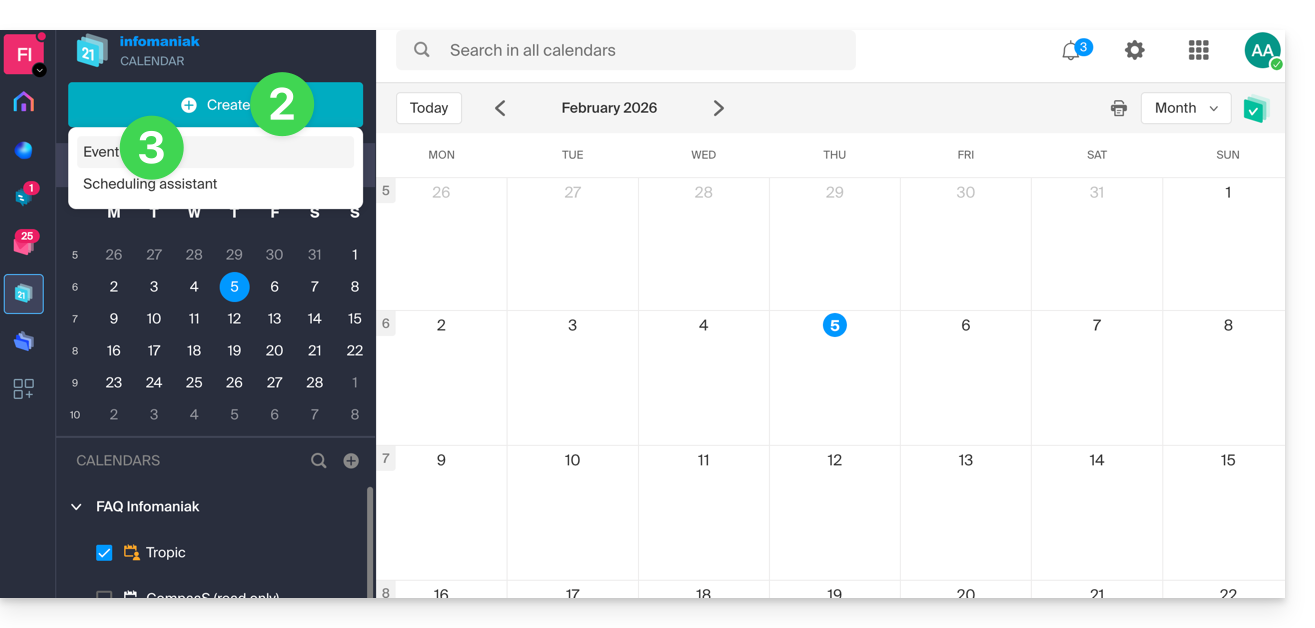
- You could also click on an existing event on the calendar to modify it.
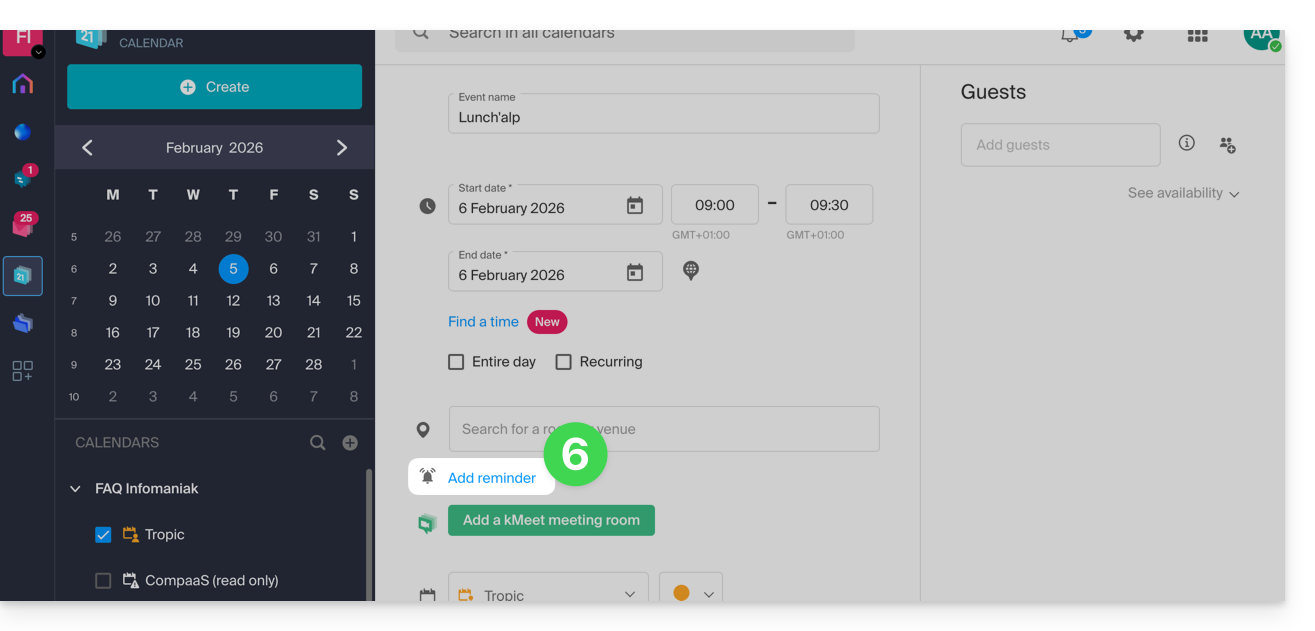
- Enter the event details.
- Display the additional fields:
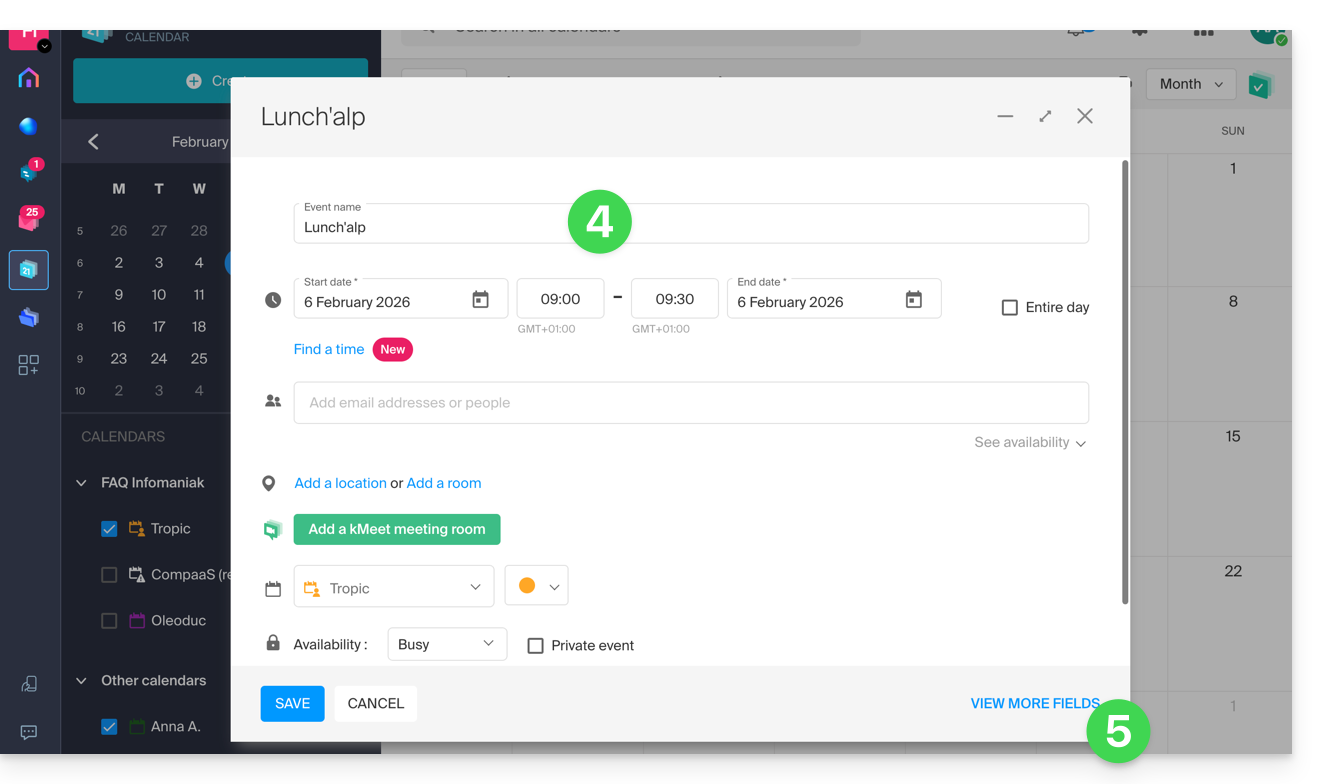
- Click on Add a reminder to configure it:
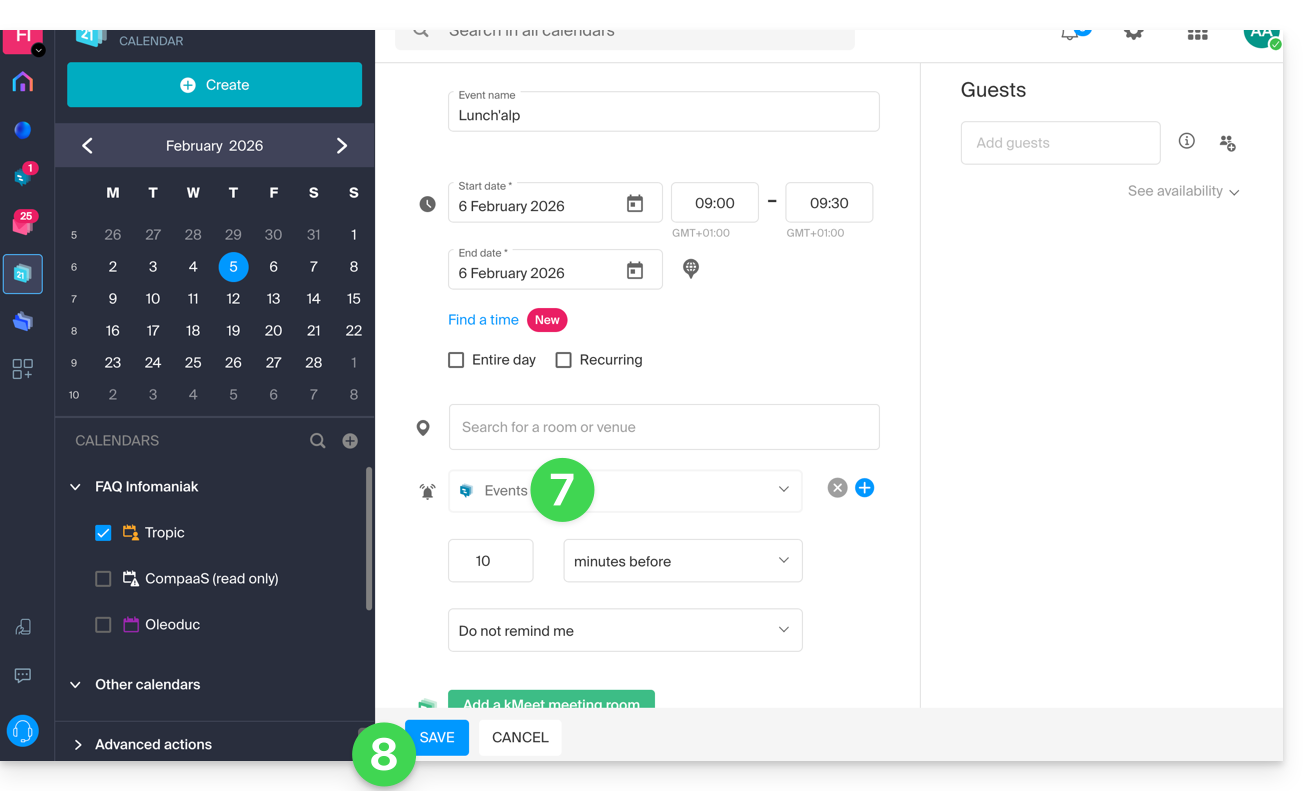
- In the reminder type dropdown menu, choose the webhook configured (according to the name given in 5a above).
- Save the event at the bottom of the page:
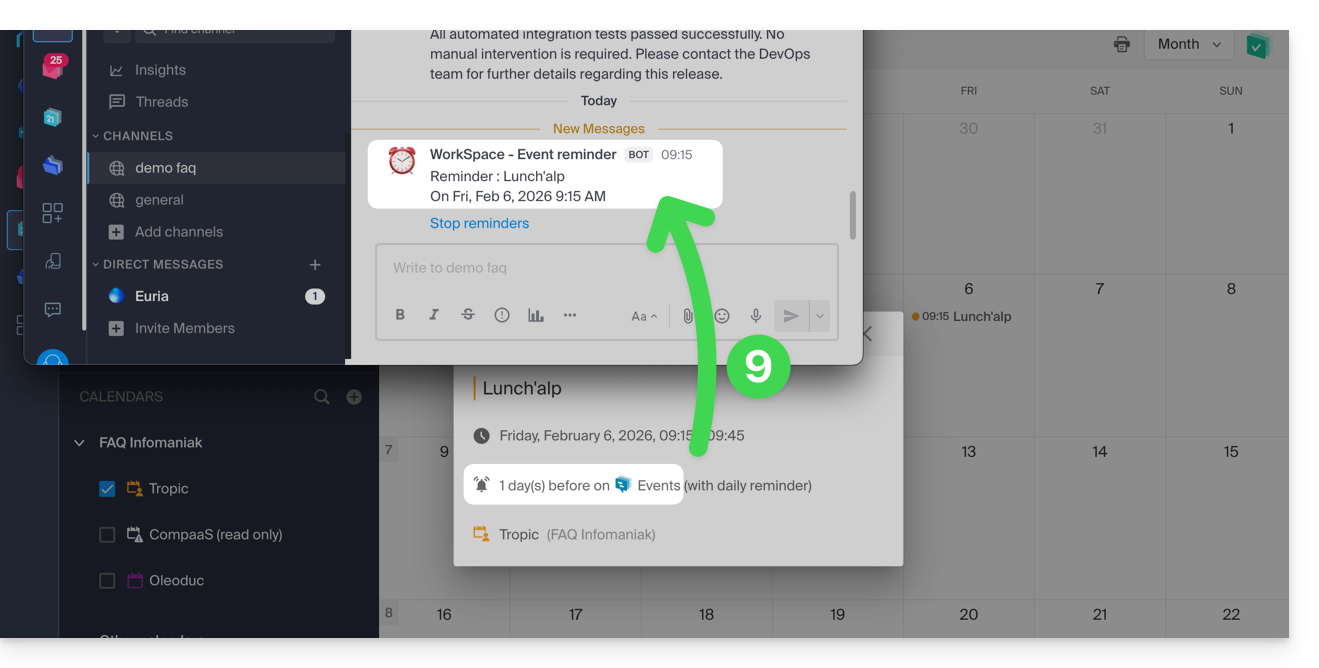
- When the reminder time arrives, a message (in the format configured in 5c above) is sent to kChat about the event, on the channel configured in the kChat webhook (see prerequisites above):
And on other chat systems?
Slack
- Click here to access Slack WebHooks.
- Choose the chat thread where your reminders will appear (e.g., @slackbot or #general):

- Save to get the webhook URL.
Create other webhooks to set reminders in other chat threads.
You can freely use Slack formatting options in your notifications. Example in French:
N'oubliez pas de %subject% pour le %date%.
À prendre avec le jour J : %description%.
Lieu de l'évènement : %location%
Link to this FAQ:
Has this FAQ been helpful?
The mobile app Infomaniak kSync is a free solution offered by Infomaniak that allows you to synchronize contacts, calendars/agendas and tasks of your Android mobile devices (Samsung, Huawei, Google Pixel, etc.) with the tools offered by Infomaniak:
- ksuite.infomaniak.com/contacts for managing contacts / address books
- ksuite.infomaniak.com/calendar for managing calendars / agendas
Preamble
- Configuring mail synchronization does not mean that contacts & calendars will also be synchronized!
- Email is synchronized via the IMAP protocol, while your contacts & calendars can be synchronized with the CardDAV and CalDAV protocols.
- And to facilitate this synchronization on Android devices, it is recommended to install kSync.
- On iOS (iPhone, iPad, etc.) use an Apple profile, to download from the configuration assistant.
- Microsoft has its own format that is not directly compatible with CardDAV and CalDAV; therefore, it is not possible on the Outlook mobile app to synchronize contacts & calendars with Infomaniak (PS: a paid and untested solution exists here).
- To synchronize Outlook on computer refer to this other guide.
What do you want to do?
- Download and install kSync on Android device
- Configure kSync
- Use kSync to synchronize Google Calendar
- Add a new address book or calendar from kSync
- Synchronize tasks between Infomaniak Mail and your Android devices
- Force kSync synchronization
- Generate a specific password in case of two-factor authentication enabled
Link to this FAQ:
Has this FAQ been helpful?
This guide explains how to download and use the mobile app Infomaniak kSync for Android devices (Samsung, Huawei, Google Pixel, etc.) that allows you to synchronize calendars & contacts between Android devices (with data stored at Infomaniak).
Preamble
- Once the kSync application is configured, the selected items are automatically synchronized with the Contacts and Calendar apps, which are installed by default on an Android device.
- Ability to display or hide your different Infomaniak address books and calendars directly in these apps.
- Any modification (addition, editing, deletion) made on the phone is reflected on the Infomaniak interface, and vice versa.
- Data updates occur continuously according to the configured synchronization interval.
- Refer to this other guide for an example of using kSync: synchronize an Infomaniak calendar with a Google calendar.
Configure kSync
Prerequisites
- Download the mobile app Infomaniak kSync (app for Android smartphone or tablet) here:
- The kSync application is also available on F-droid.
- Install kSync.
Then, launch the kSync app on your Android device, a step-by-step assistant will help you configure the application according to your needs:
- Decide if you want to synchronize tasks.
- Allow kSync to access the required items on the device, primarily the calendar.
- Allow the application to run in the background for better synchronization (uses more battery); settings are also possible within the app itself:
- The essential thing is to grant access rights to the services you need to synchronize:
- Go back to the kSync app and continue the configuration:
- Tap to add an Infomaniak user account (the one you use to log in to your Infomaniak services):
- For example, on the Web app Calendar, the user menu at the top right informs you of the login email used.
- It is then possible to access the calendars of the Organization to which the current user is attached:
- These are the data that will be synchronized on your device when you log in to the same Infomaniak account on kSync...
- Enter your Infomaniak login credentials (see point a above).
- Tap the button to log in:
- Perform the double authentication steps as you do for your usual logins.
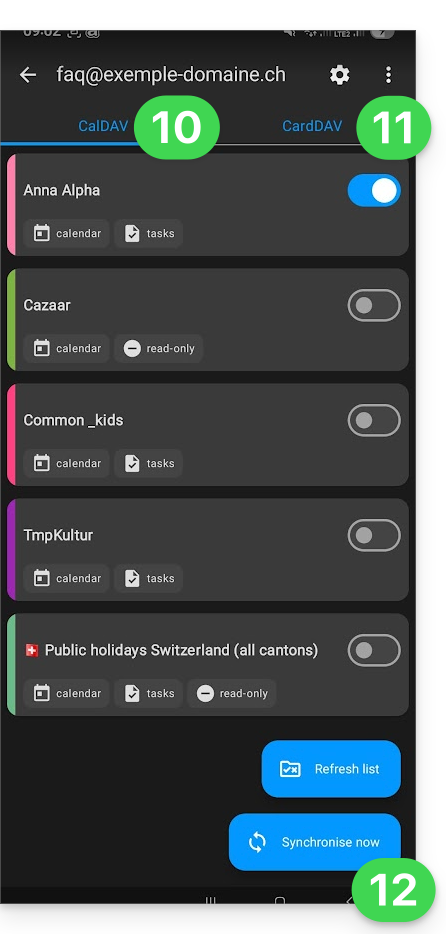
- Once logged in to kSync, under the Agendas CalDAV tab, choose the calendar(s) that should appear on your device.
- Under the Address Books CardDAV tab, choose the address book(s) that should appear on your device.
- Start the synchronization with the button located at the bottom right:
kSync synchronization settings
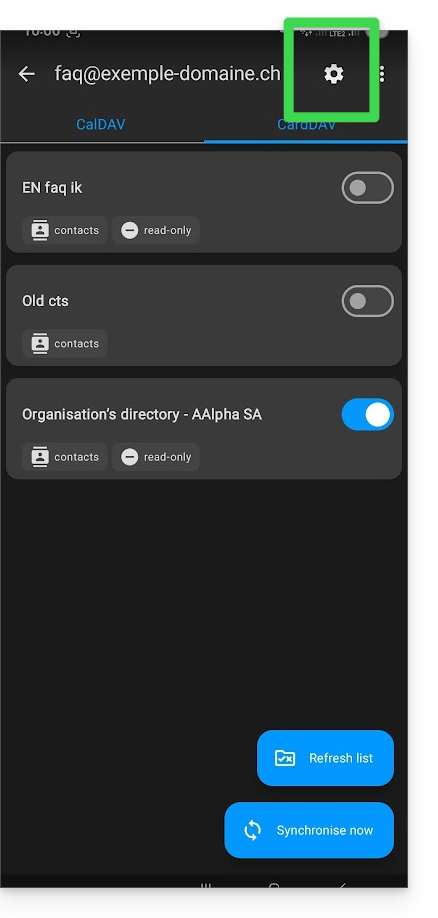
Click on the Settings icon at the top right of the interface to adjust some important kSync settings:
- Synchronization interval: you can modify the frequency of synchronizations (15, 30, 60 minutes, etc.) for each type of information (address books, calendars, tasks).
- Synchronization only via WiFi (and if so, with which networks...).
- Limit the display of past events.
- Receive a notification for each event that does not have a specific reminder, with a notification delay defined in advance (in minutes).
- Display event colors and persistent synchronization of colors or not.
- Display contact groups.
You can also tap on the address books or calendar to configure certain elements:
- It is possible to force read-only via kSync, which means that the elements are synchronized but cannot be modified by the device.
- You can also delete a calendar or address book (excluding the Organization directory):

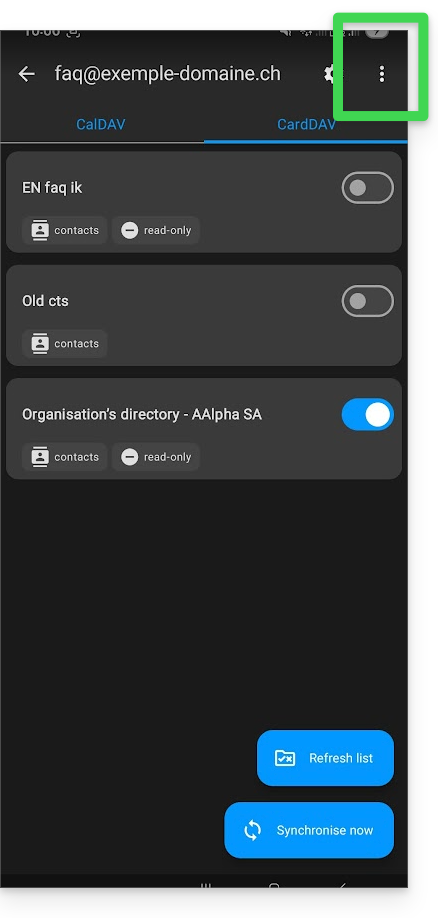
Rename/remove the Infomaniak account from kSync
Tap on the action menu ⋮ located to the right of the account concerned:
- You can create a new address book or calendar.
- You can rename or delete the account linked to kSync:
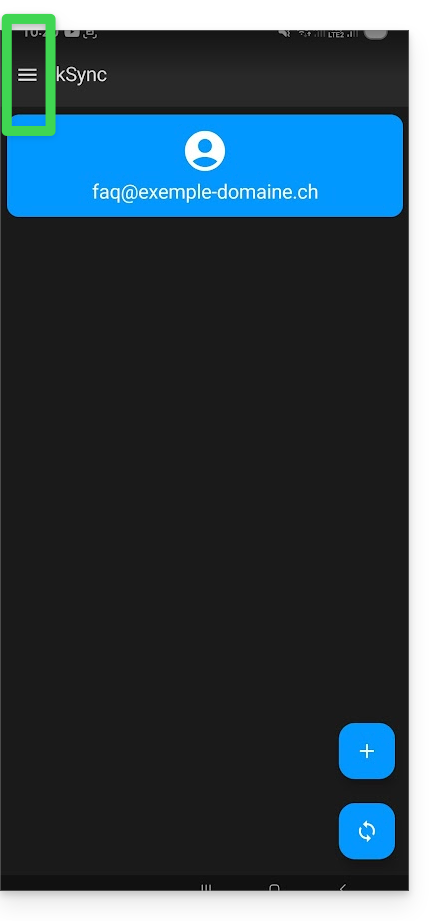
General settings of the kSync app
Press the back arrow at the top left of the screen to return to the home page.
- Then press the menu button with three horizontal lines ☰ and then the menu item “Settings”:
Link to this FAQ:
Has this FAQ been helpful?
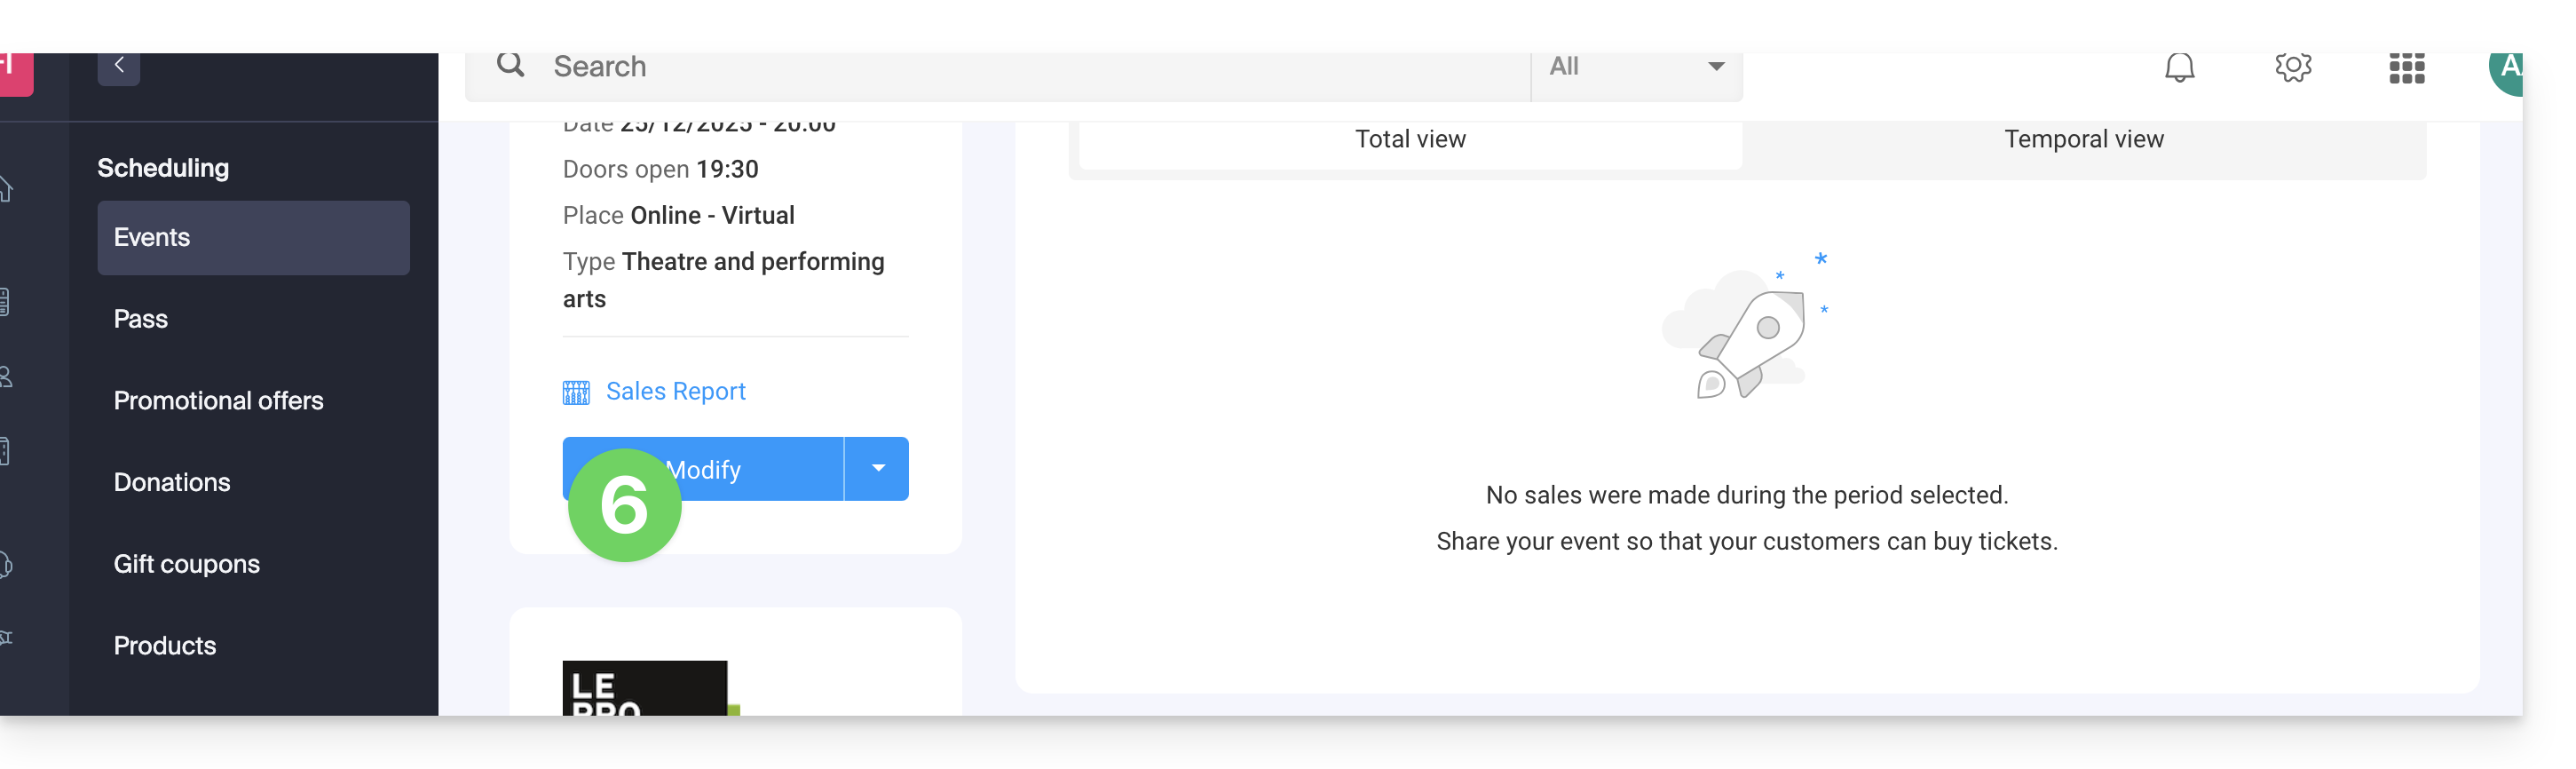
This guide explains how to modify the display of your events (within the framework of the Infomaniak ticketing system).
Access the options to configure the display
To do this:
- Click here to access the management of your product on the Infomaniak Manager (need help?).
- Click directly on the name assigned to the ticketing concerned by the event.
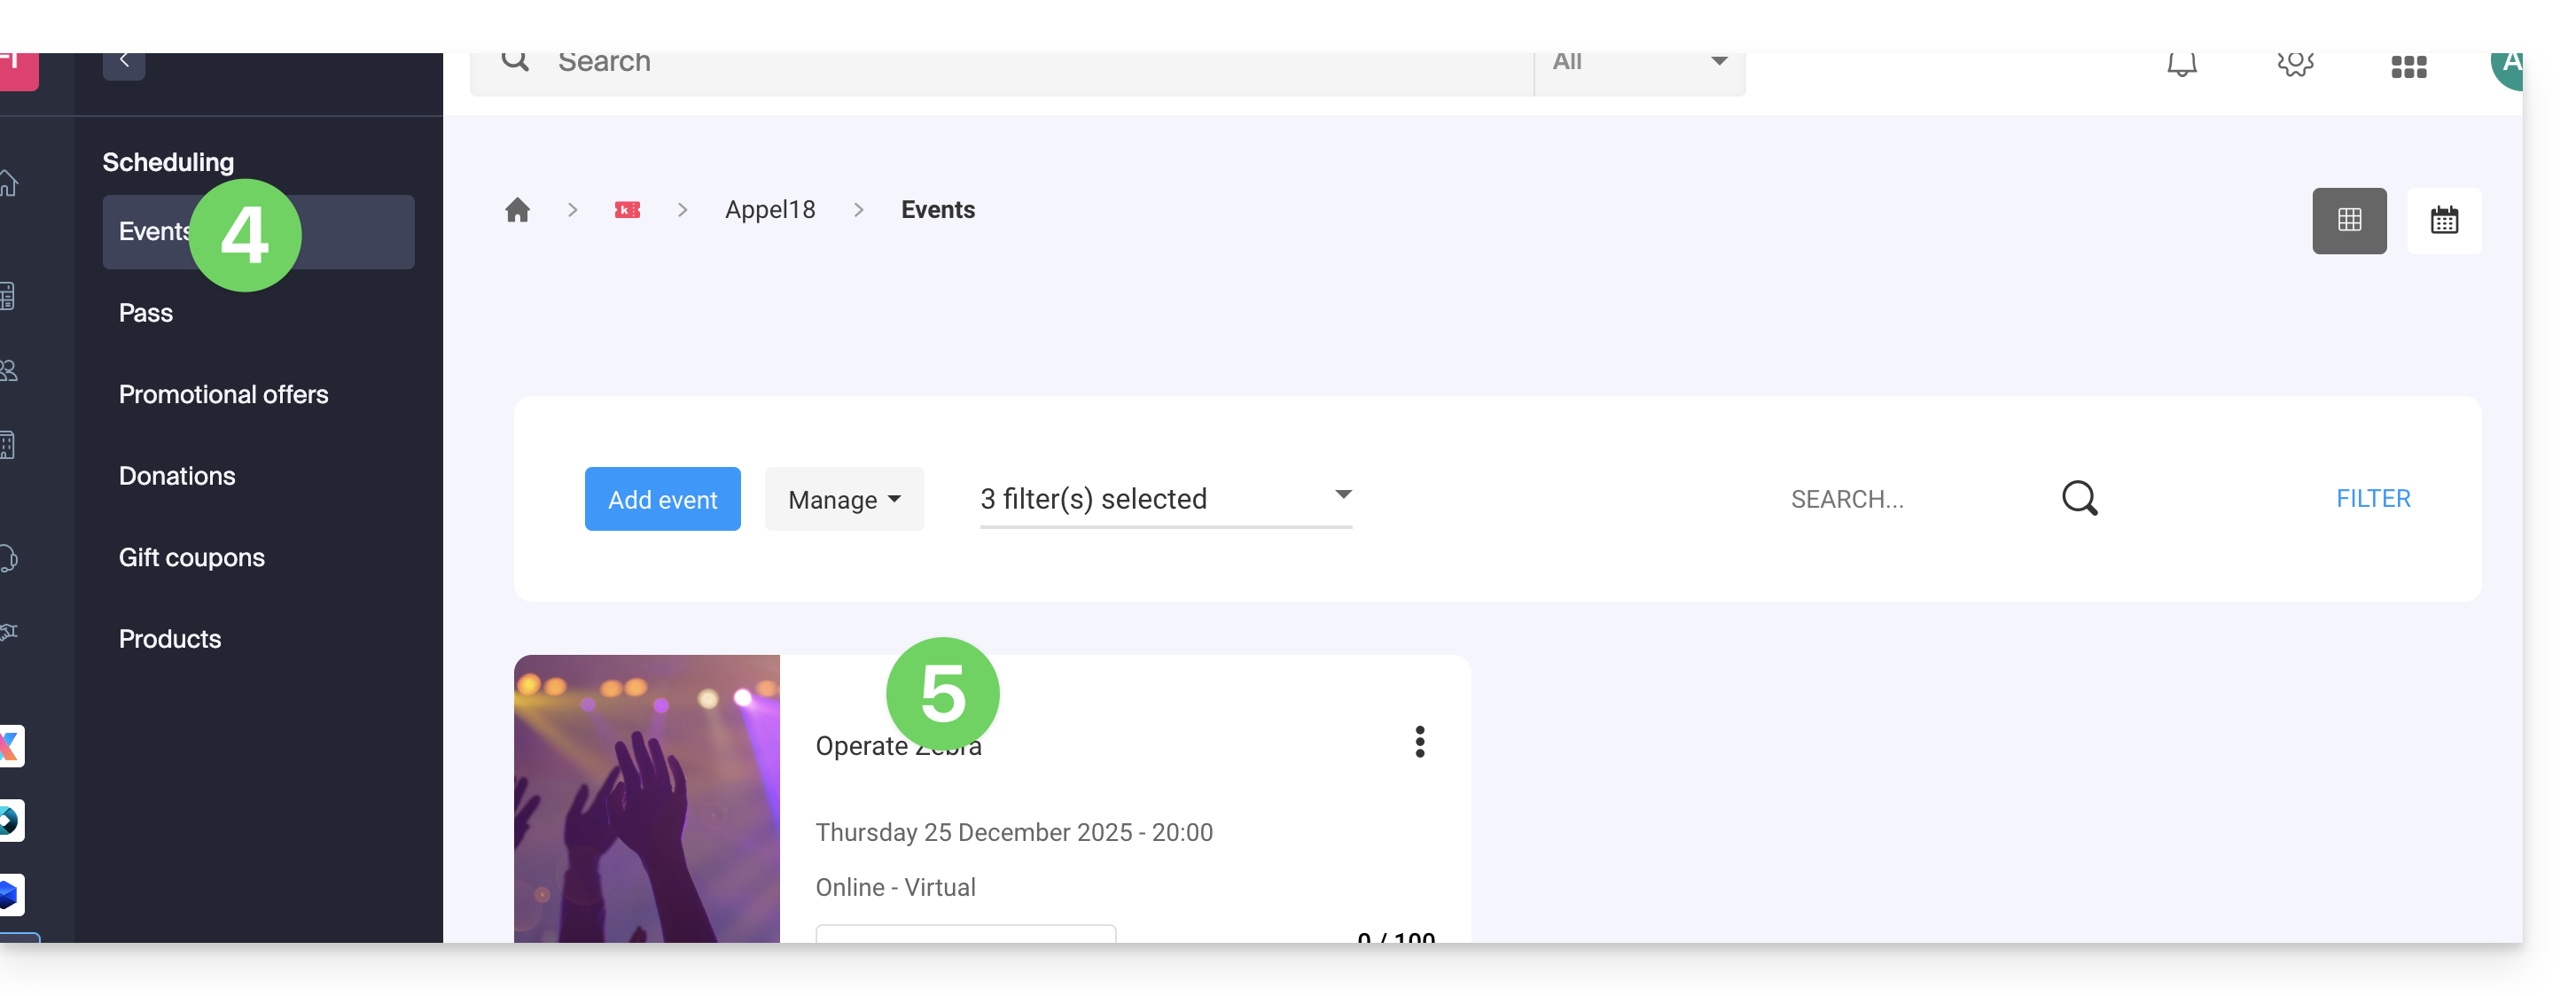
- Click on Programming in the left sidebar menu.
- Click on Events in the left sidebar menu.
- Click on the name of the event concerned:
- Click on the Edit button:
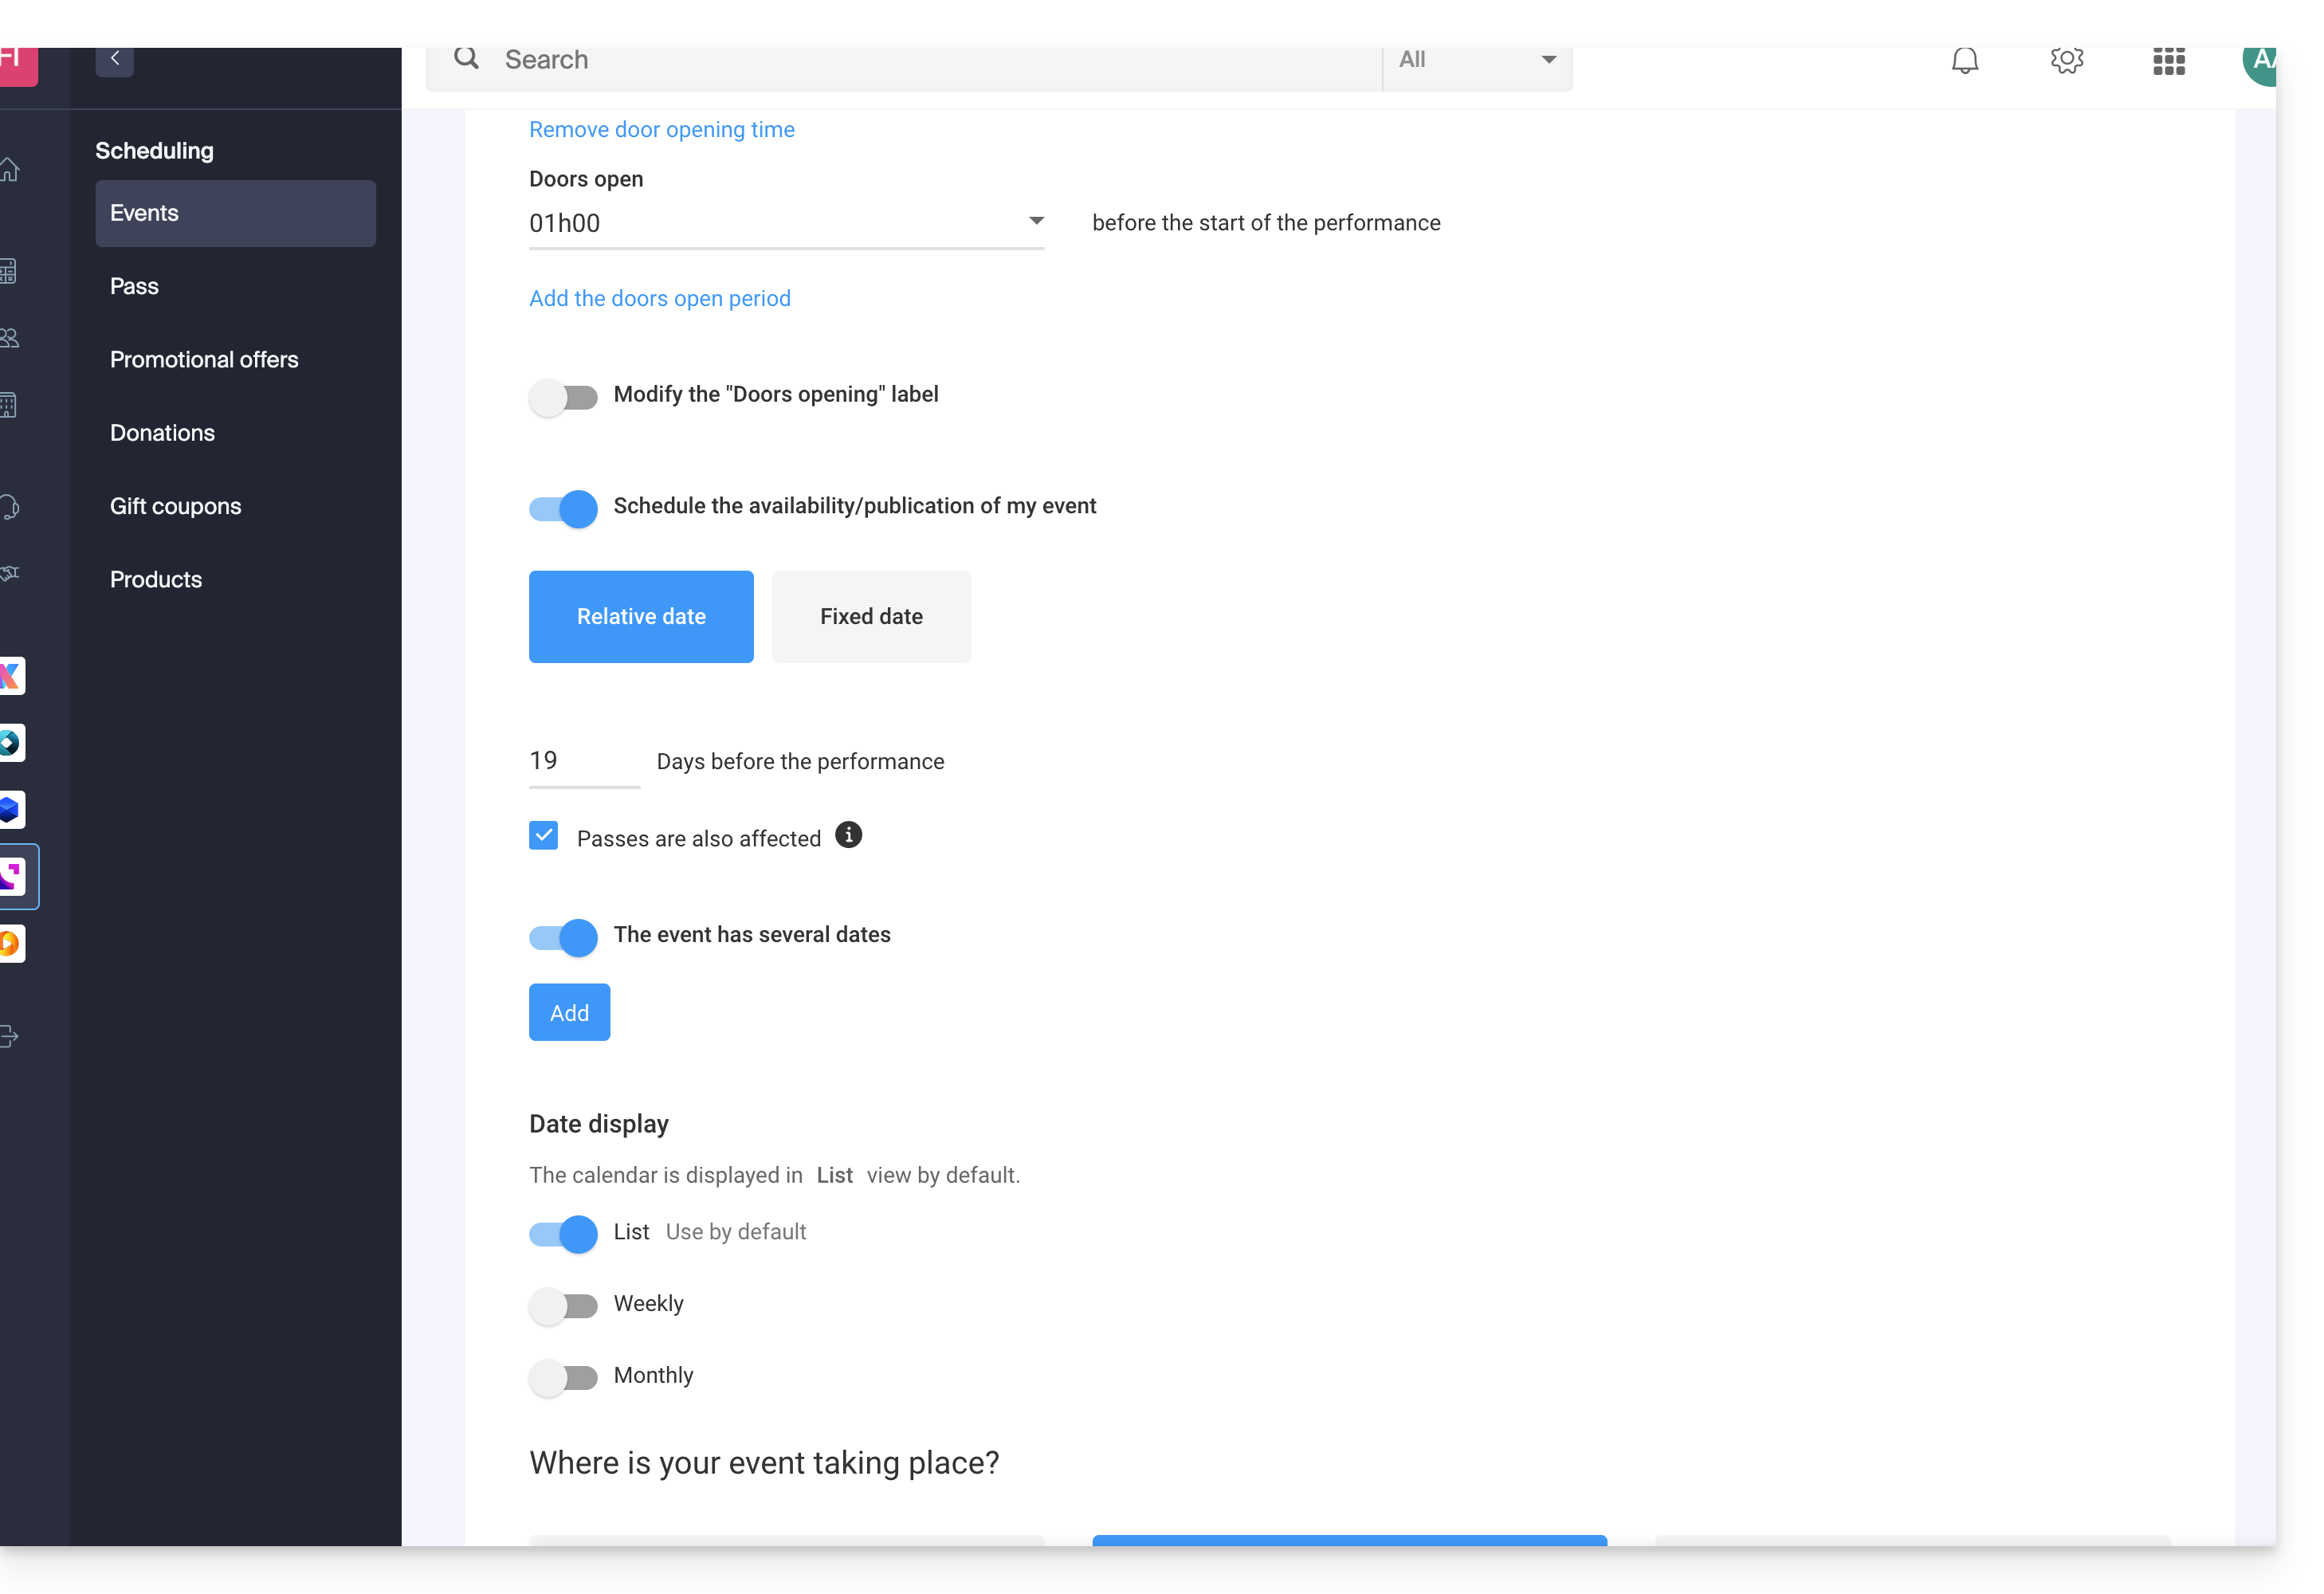
Choose a multi-date event display mode
To do this:
- Add new possible dates...
- Choose the methods for displaying these dates on the calendar; these modes will be available on the online ticketing and will allow your customers to switch between the different display modes they prefer (see below)...
- Choose which display mode will be used by default...
The different available displays
The list display
The list display is practical if the dates are spaced out over time with empty periods (weekly, or monthly for example) and/or if the ticketing needs to be able to offer several dates or sessions, without these being indicated on a calendar.
The monthly calendar
The monthly calendar allows you to place events on a monthly calendar. It is an effective display, but can be very busy if there are many sessions per day.
The weekly calendar
Very useful if you want to display the dates week by week, especially if there are several performances per day, or in the case where the event only lasts for a short period, and you want to display the days of the week.
Link to this FAQ:
Has this FAQ been helpful?
This guide explains how to synchronize tasks with kSync, the Infomaniak mobile app used to link your calendars & contacts stored at Infomaniak with the data on your Android devices.
Prerequisites
- Install and download the free application jtx Board.
Synchronize tasks
To synchronize data between the tasks of Infomaniak Calendar and your Android devices, jtx Board will, using kSync, synchronize the tasks based on one or more Infomaniak calendars at regular intervals.
- Here is a task present on Infomaniak:

- After synchronization, it appears on jtx Board:

- Example of task validation when it is executed, then adding a second task from the application:

- Result on Infomaniak:

To go further, it may be necessary to purchase the Pro version of the jtx Board application.
Recommended settings
It is recommended to improve the readability of your tasks in the application to disable these 2 parameters in the settings of the jtx Board application…
… then remove "local" from the list of locations to keep only the possibility of saving in your kDrive account(s).
Link to this FAQ:
Has this FAQ been helpful?
This guide explains how to automatically receive a summary of your activities scheduled on Calendar Infomaniak in your Mail and/or kChat inbox every morning.
Preamble
- This feature is disabled by default on all calendars.
- This summary is sent to your email address (the one used to log in to your Infomaniak account).
- It contains a list of all the day's events with their most important information (possible kMeet link, location, times, etc.).
- You can even imagine forwarding this daily schedule to your team or assistant so they know the best time to contact you, even by creating a rule for automatic forwarding based on the criteria corresponding to the received email.
Obtain a schedule automatically and daily
Prerequisites
- Sending a summary on kChat requires having kChat within your Organization.
To start the day by consulting a message in your Infomaniak inbox containing the schedule based on your Infomaniak agenda:
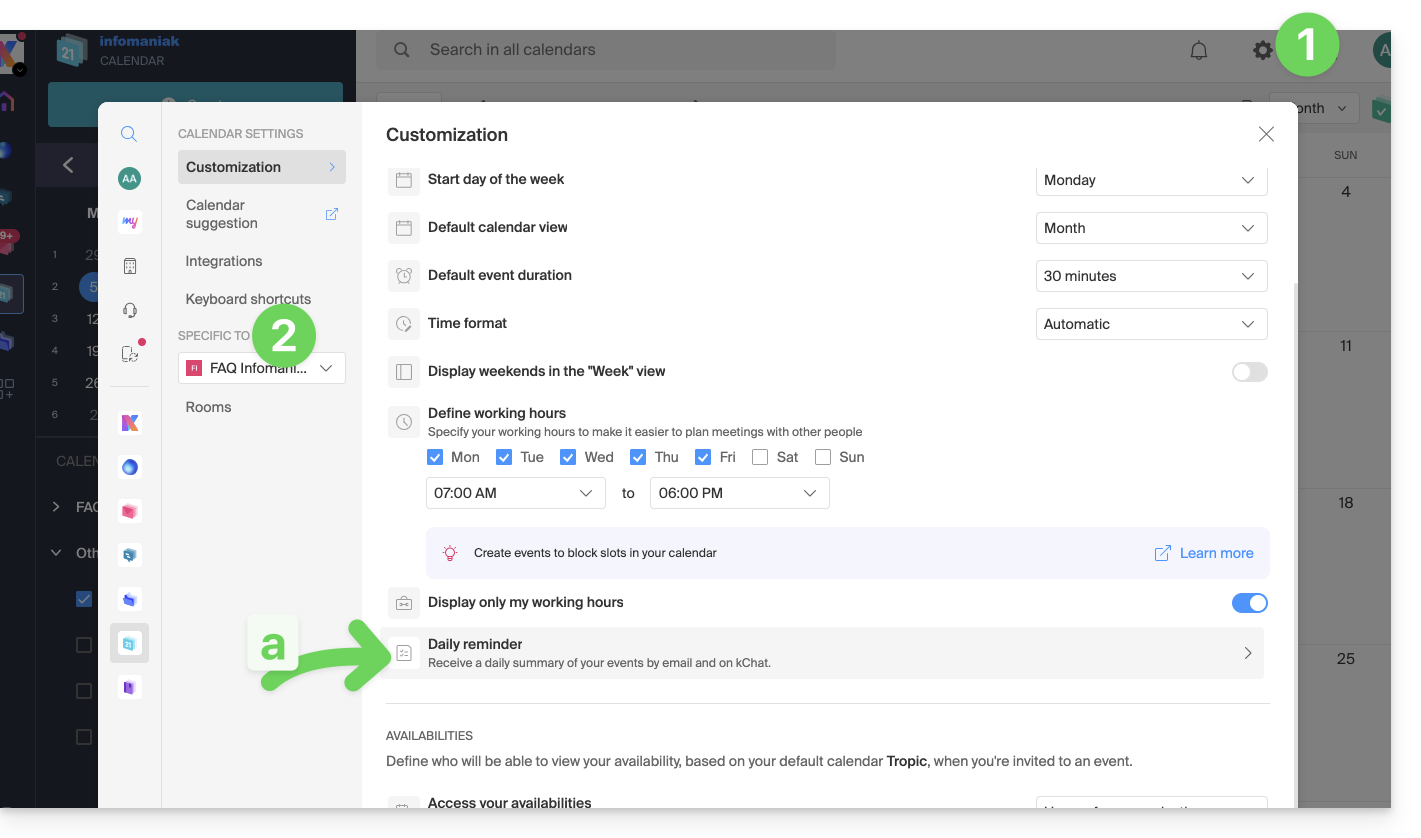
- Click here to log in to the unified settings of your Infomaniak Web apps and more specifically to the settings of the daily reminder of the Calendar app.
- Check or select the relevant Organization in the dropdown menu of the left sidebar.
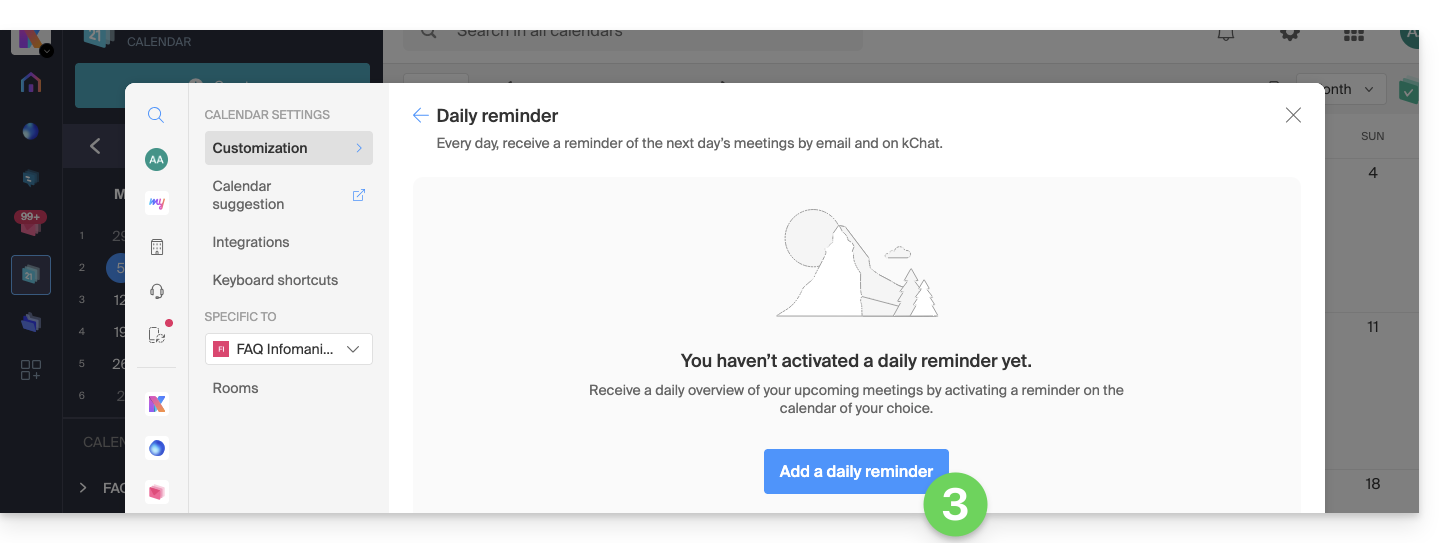
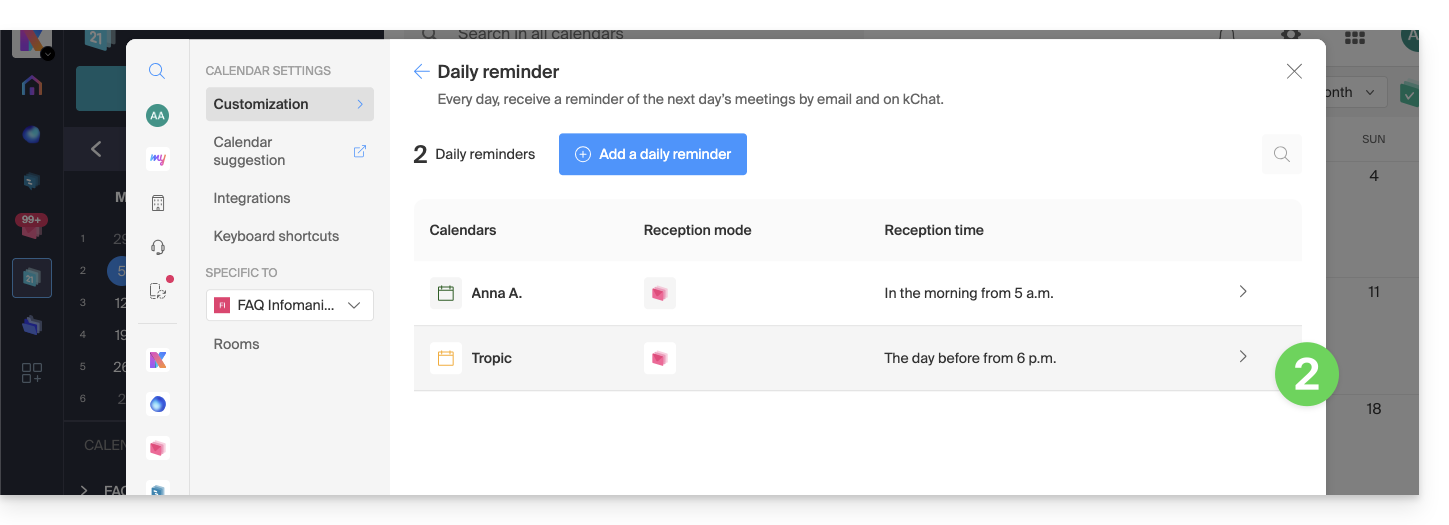
- If you modify it, return to the settings by clicking on the daily reminder item to access the settings:
- If you modify it, return to the settings by clicking on the daily reminder item to access the settings:
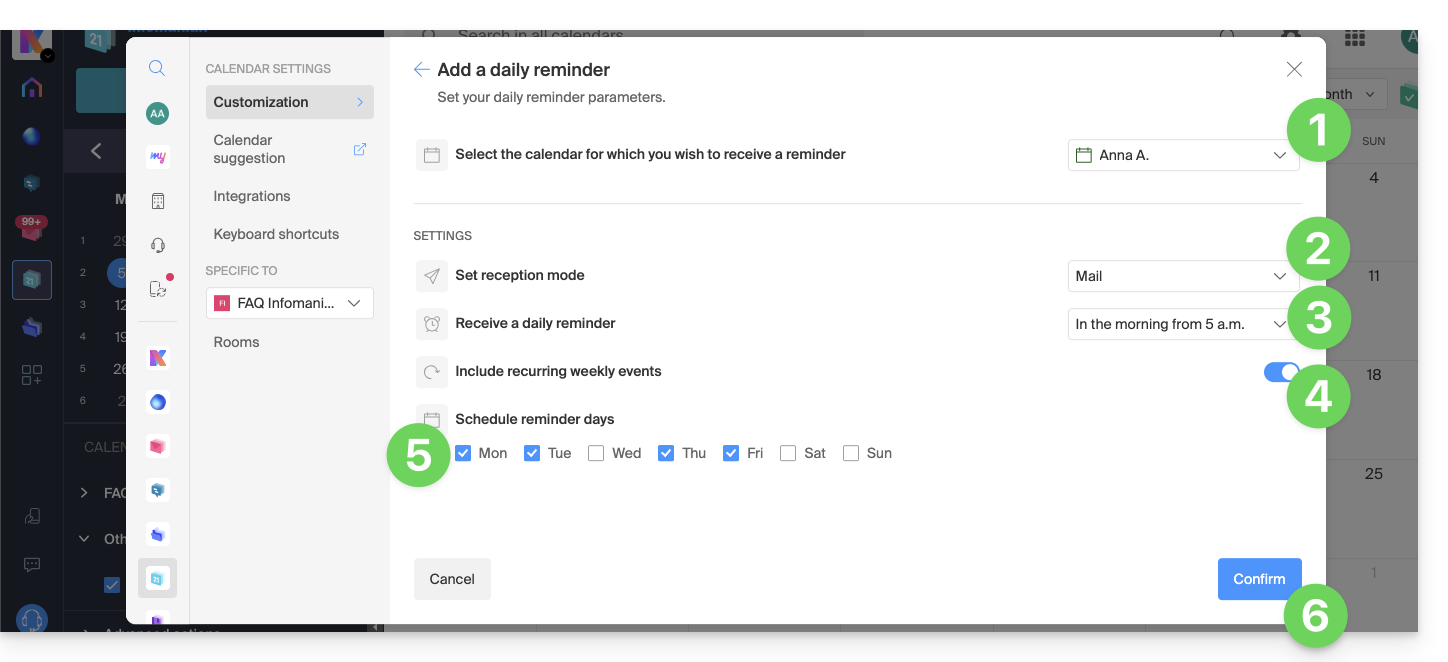
- Click the button to Add a daily reminder and configure it:
To customize your reminder according to your needs:
- Select the relevant calendar.
- Choose the reception mode (Mail, kChat or both).
- Choose the time you want to receive the reminder (the evening before or early the same day).
- Choose whether or not to include recurring events.
- Choose the days on which the daily reminder will be sent.
- Confirm your choices at the bottom of the page:
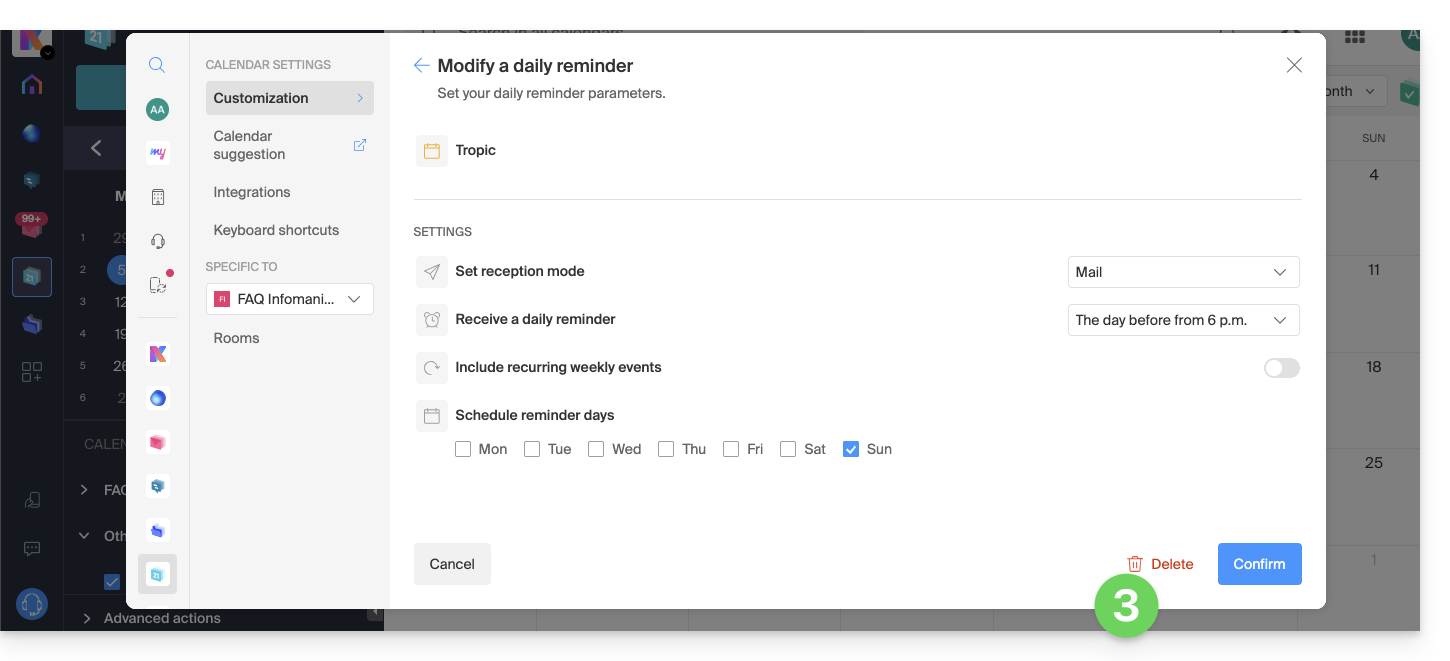
Disable the daily reminder
To stop receiving the daily summary by email or via Euria on kChat:
- Click on the link located at the bottom of the notification received:

- Click on the reminder to delete:
- Delete the reminder from the edit page:
Link to this FAQ:
Has this FAQ been helpful?
This guide explains how to display a countdown before the next live stream or during a scheduled interruption on Infomaniak's video streaming service.
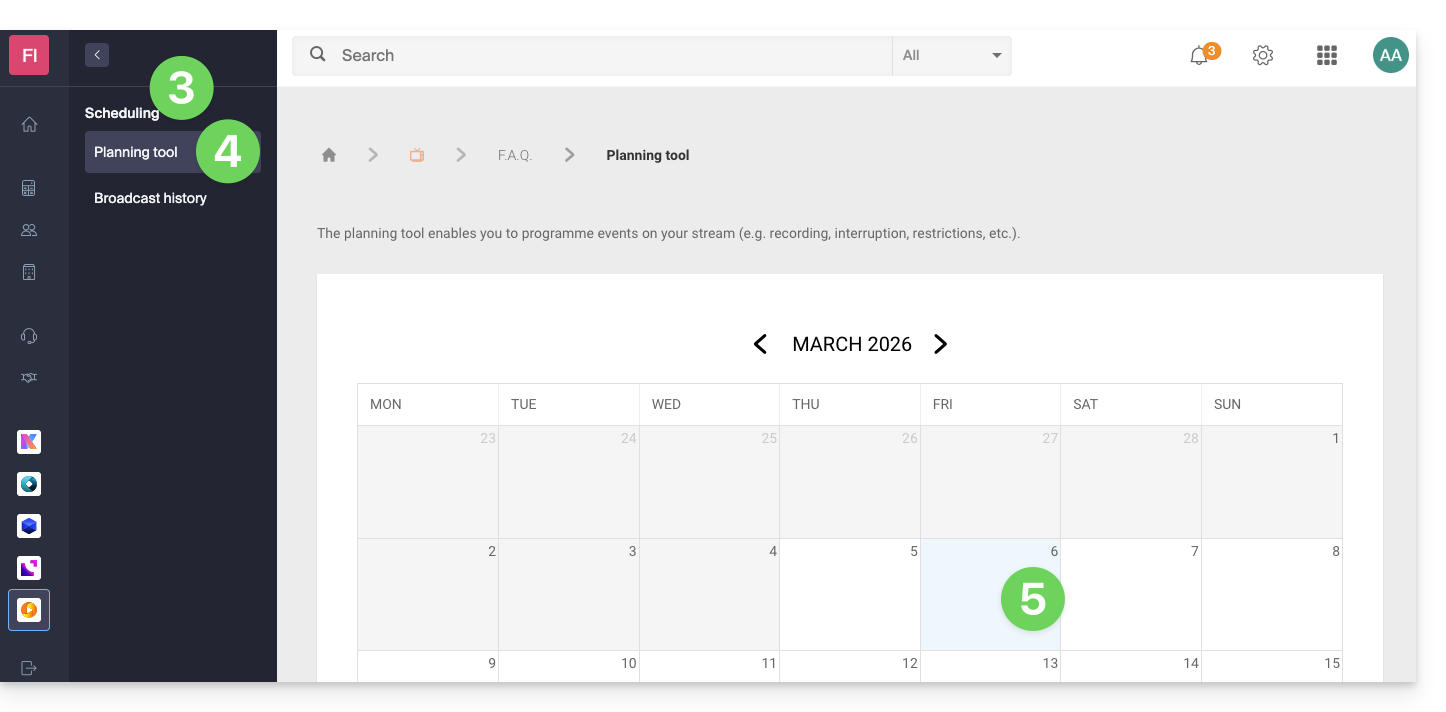
Access the scheduling calendar
To do this:
- Click here to access the management of your product on the Infomaniak Manager (need help?).
- Click directly on the name assigned to the product concerned:
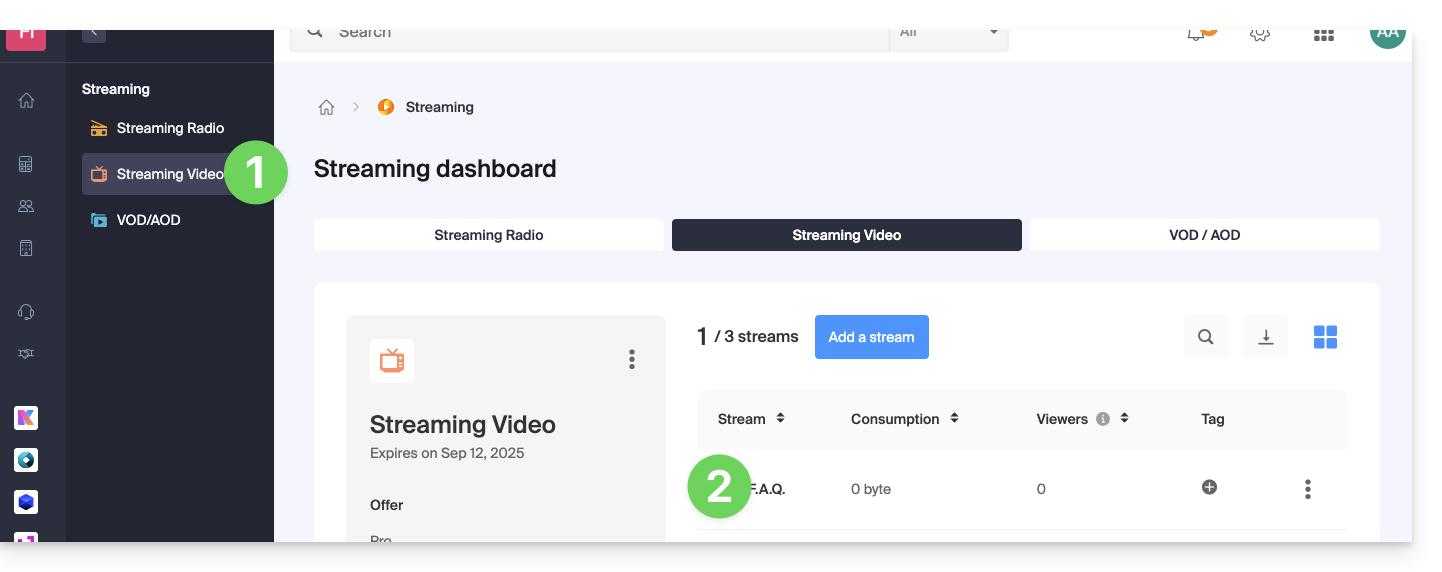
- Click on Scheduling in the left sidebar.
- Click on Scheduling tool in the left sidebar.
- Click on the desired date:
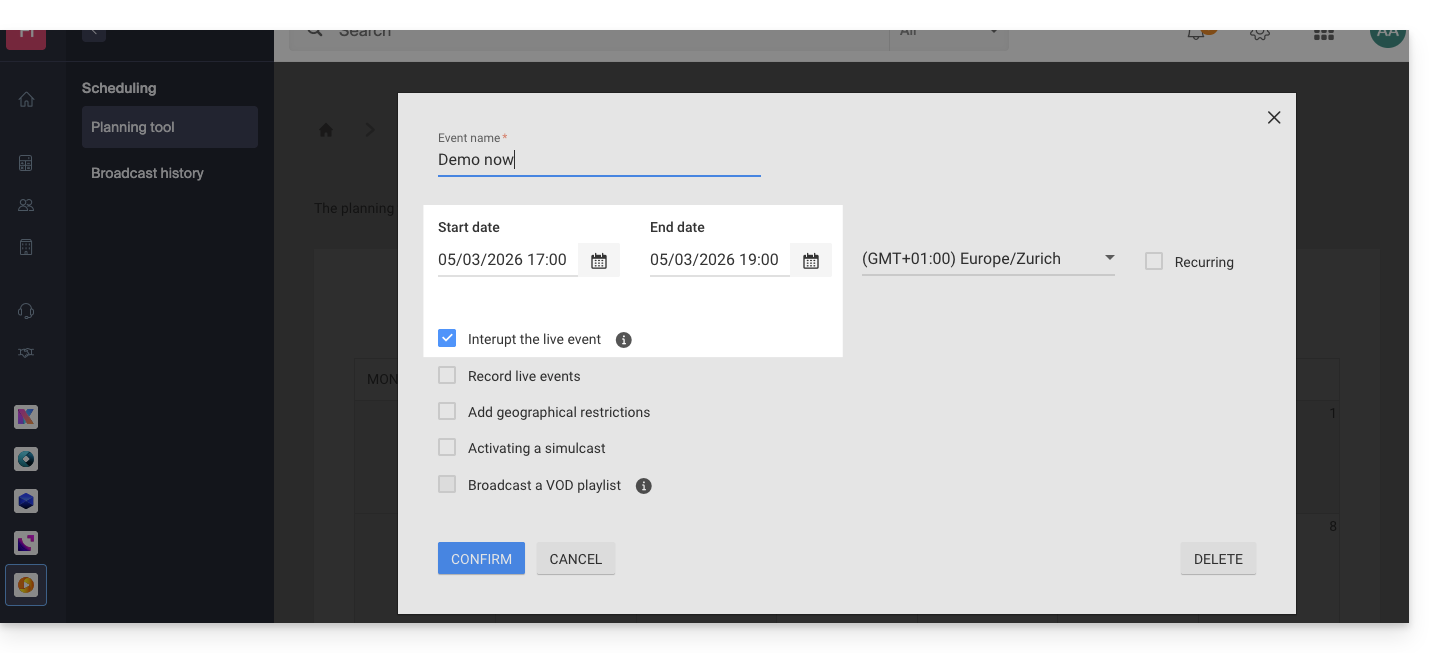
Interruption function on the schedule
For example:
- This configuration on the calendar to interrupt a live program…
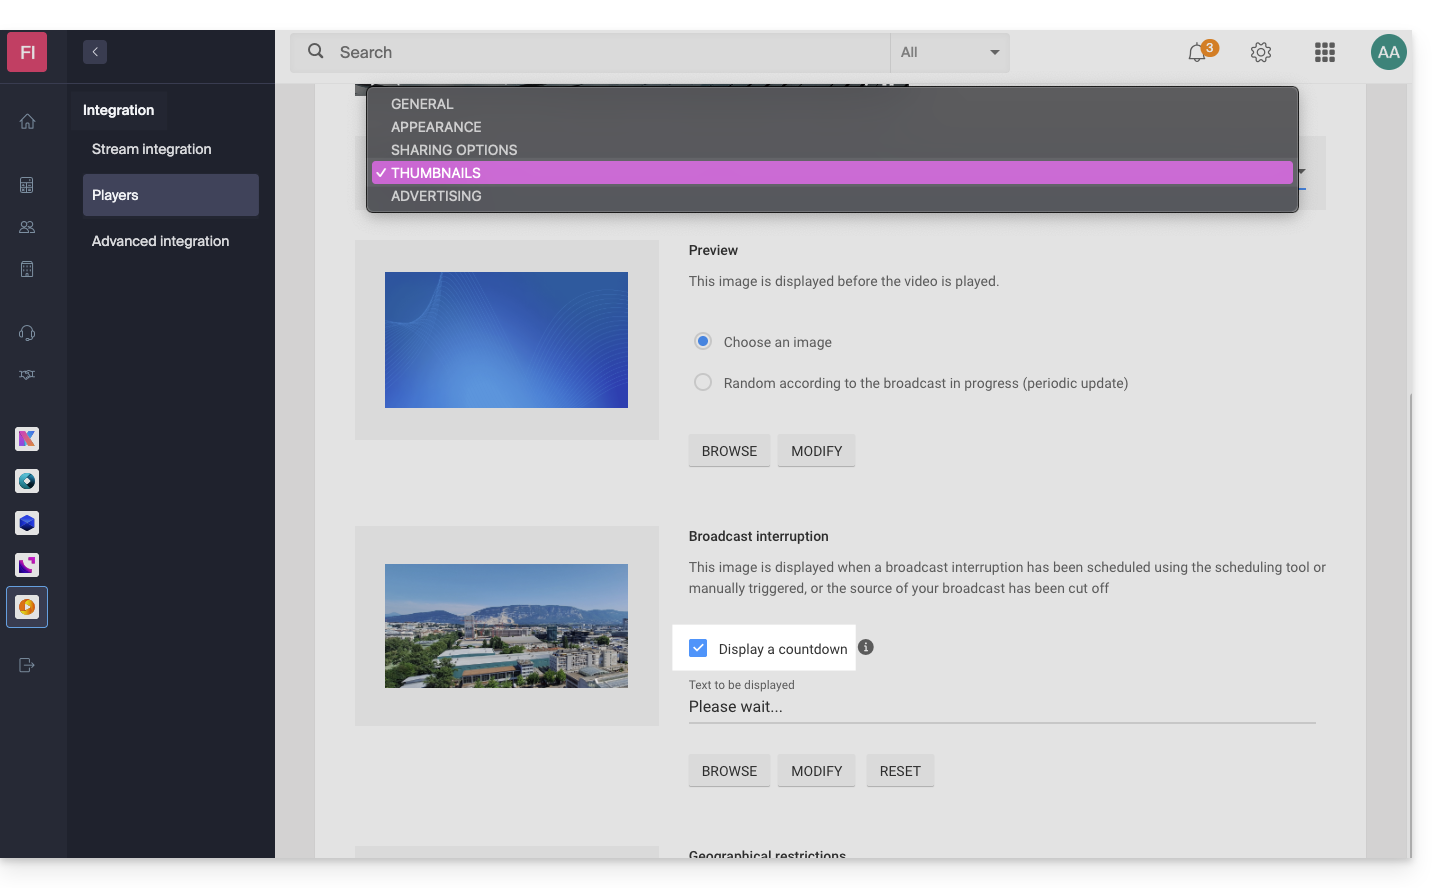
- … and this configuration at the level of the image (thumbnail) and text choice of the video player…
- … will display this result from 5 PM, with a 2-hour countdown in seconds visible on the player of your TV stream:

The countdown, once scheduled, works in correlation with stream interruptions if you set one (or more in succession, thus managing the overlap). Note: it takes 2 minutes for a scheduled interruption to be reflected in the countdown.
Link to this FAQ:
Has this FAQ been helpful?
Infomaniak offers to replace Skype with its own solutions, whether for individual calls, remote meetings, or team exchanges.
kMeet, video conferencing for individuals & businesses
Despite its initial success, the communication platform Skype has seen its use decrease in the face of the emergence of solutions better integrated with new collaborative uses.
One of the simplest ways to replace Skype is to adopt kMeet:
- Unlimited audio and video calls
- Access without registration
- Compatibility Web, mobile and desktop
- Integrated chat & reactions (emojis, sounds)
- Screen sharing with drawing tools, remote control
- Breakout rooms
- Integration with the calendar (creation of video link)
- Integration with kDrive for storing meeting recordings
- Integration with kChat for video calls
- Privacy respect (no ads, hosting in Switzerland)
- Security with AES-256 encryption
- Eco-friendly (renewable energy, CO2 compensation)
Replace Skype with kMeet
The alternative kMeet to replace Skype can be set up in different ways:
1. Quick use without registration
To start a private communication between several people on the Internet, all you need is for one of them to go to kMeet and then share the meeting link with the others. Here is the step-by-step procedure:
- Enter kmeet.infomaniak.com in a browser like Chrome or Safari.
- Click on Start a new meeting:

- Enter a name for the meeting, which allows future participants to know the subject of the discussion they are joining.
- Click on the button to Continue:

- Grant the necessary rights to kMeet:

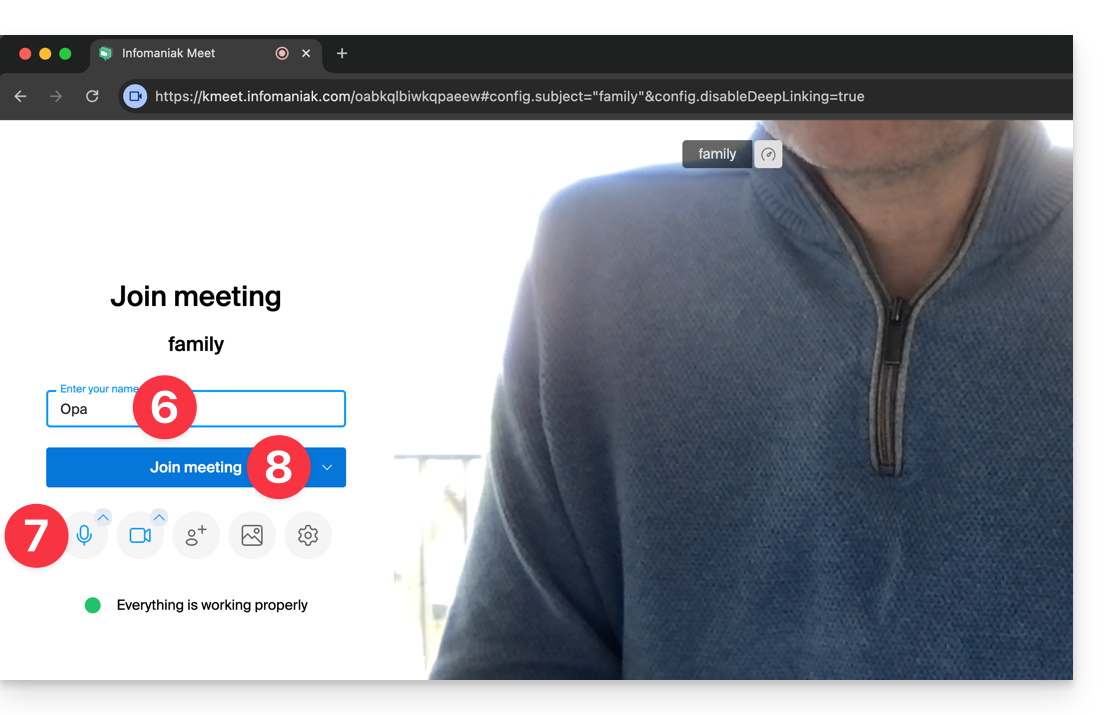
- Enter your name, the one that other participants will see.
- Enable or disable any communication means if these should not be used for the moment.
- Click on the button to join the virtual meeting room (as the first participant since no one else has been invited yet):
- There you go, the room is created and you can now copy the information related to this session and send it to the correspondents so that they can join you (they will only have to execute the link you send them).
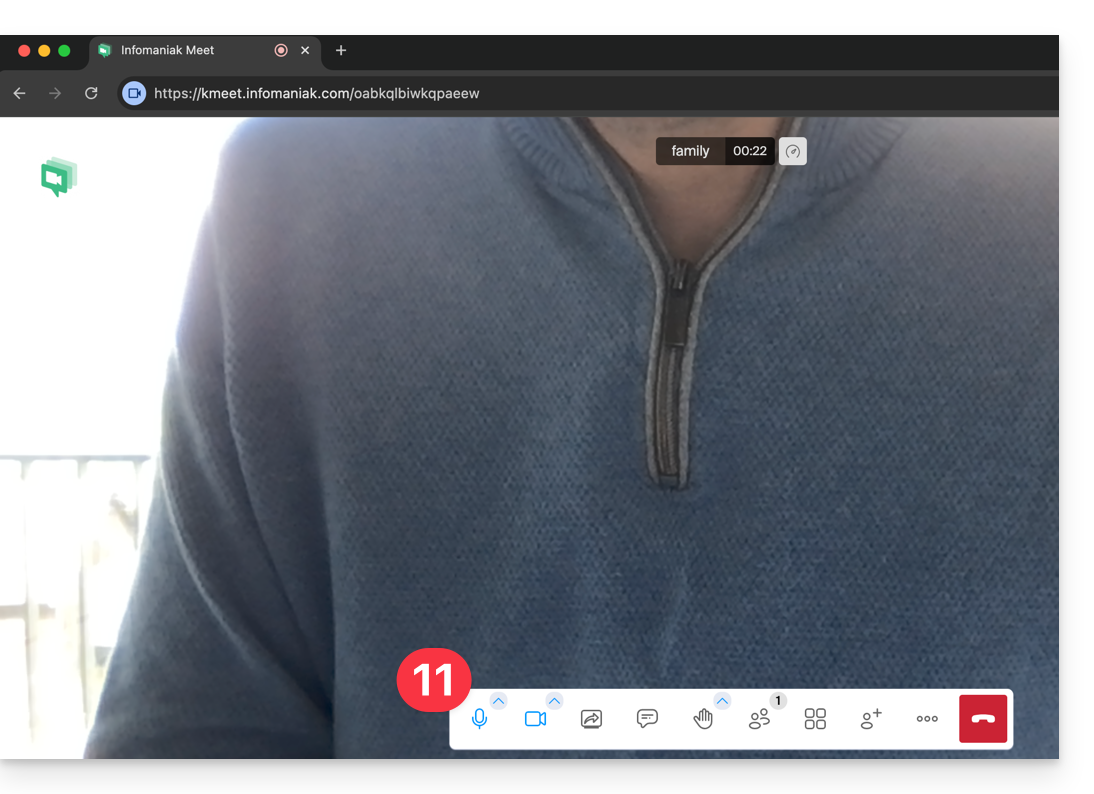
- Close the information window so that you can all chat together:

- The toolbar at the bottom of the screen allows you to enable or disable the microphone, the camera, etc.:
To discover all the possibilities that kMeet offers, refer to this other guide.
2. Scheduling and invitations with my kSuite
To work efficiently, kMeet can be directly linked to your professional calendar. This means that every time you create an event in your calendar…
- … a video conference link is automatically generated…
- … participants receive the invitation by email with all the information…
- … and on the day of the event, they can join the meeting in one click, without registration or software to install.
Advantage: you centralize the management of meetings, reduce forgetfulness and simplify organization, all from a single interface.
To set up this solution:
- Sign up for free to my kSuite to have an email address for example
anna.alpha@ikmail.comand above all access to Infomaniak services. - Access the calendar ksuite.infomaniak.com/calendar then create an event on the day of your choice.
- Add participants to the event, even if they are not Infomaniak customers.
- Click the green button to automatically add a kMeet link to the event.
- Click the button to save your event:

- Invitations will then be automatically sent by email to the participants, containing the clickable link to join the online discussion when the time comes:

- The kMeet meeting link is also visible on the event in the calendar directly:

3. Call your correspondent like Skype
To start a conversation at any time with a contact previously saved in your address book, you must both have kChat, available within the kSuite Infomaniak. To implement this solution, which can be extended to an entire group of contacts:
- Sign up for kSuite to have access to the corresponding Infomaniak services.
- Configure the users (these can even be external) on the kSuite.
- Install the kChat app or go to the URL https://ksuite.infomaniak.com/kchat
- A user can then be called via kChat, which will ring the recipient's device:
- = Internet browser if the kChat URL is open, or computer/mobile device if the kChat app is installed.
- Refer to this other guide to learn more about video calls on kChat.
- Your correspondent can then choose to answer; the call will be made with the kMeet technology within kChat or on the kMeet app if it is installed.
Link to this FAQ:
Has this FAQ been helpful?
This guide explains how to quickly schedule a meeting between multiple users from the Infomaniak Web app Mail (online service ksuite.infomaniak.com/mail).
Create an event from an email
To start the scheduling assistant:
- Click here to access the Infomaniak Web app Mail (online service ksuite.infomaniak.com/mail).
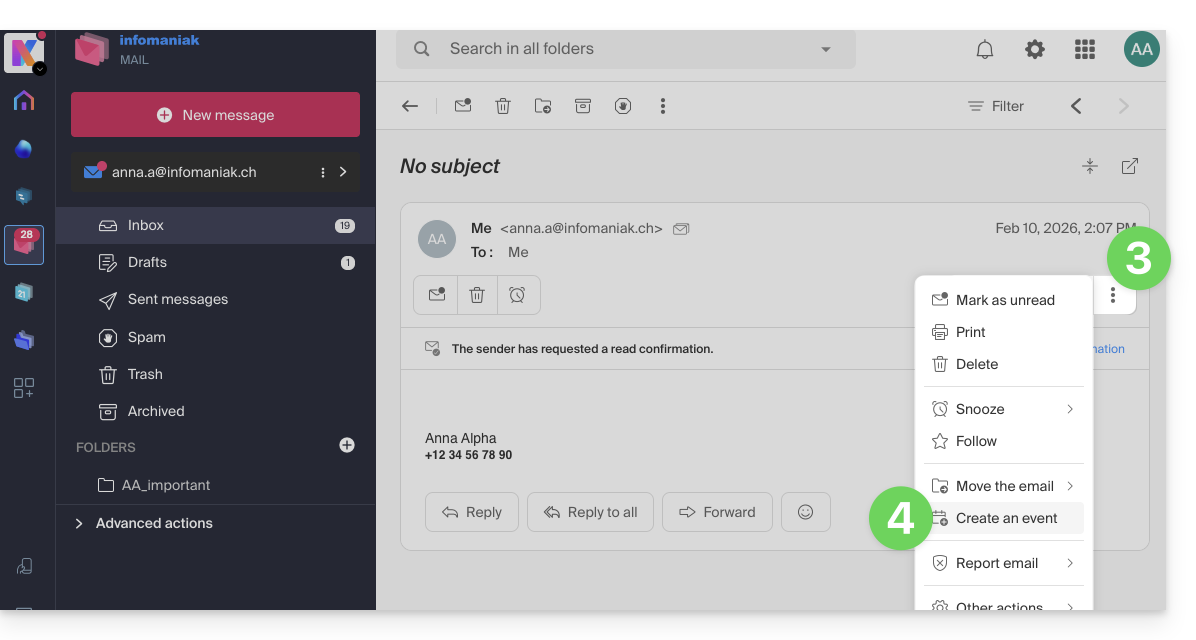
- Open the message from the sender (or the discussion between multiple participants) with whom you wish to organize a meeting / a joint event.
- Click on the icon ⋮ at the top right of the open message.
- Click on Create an event:
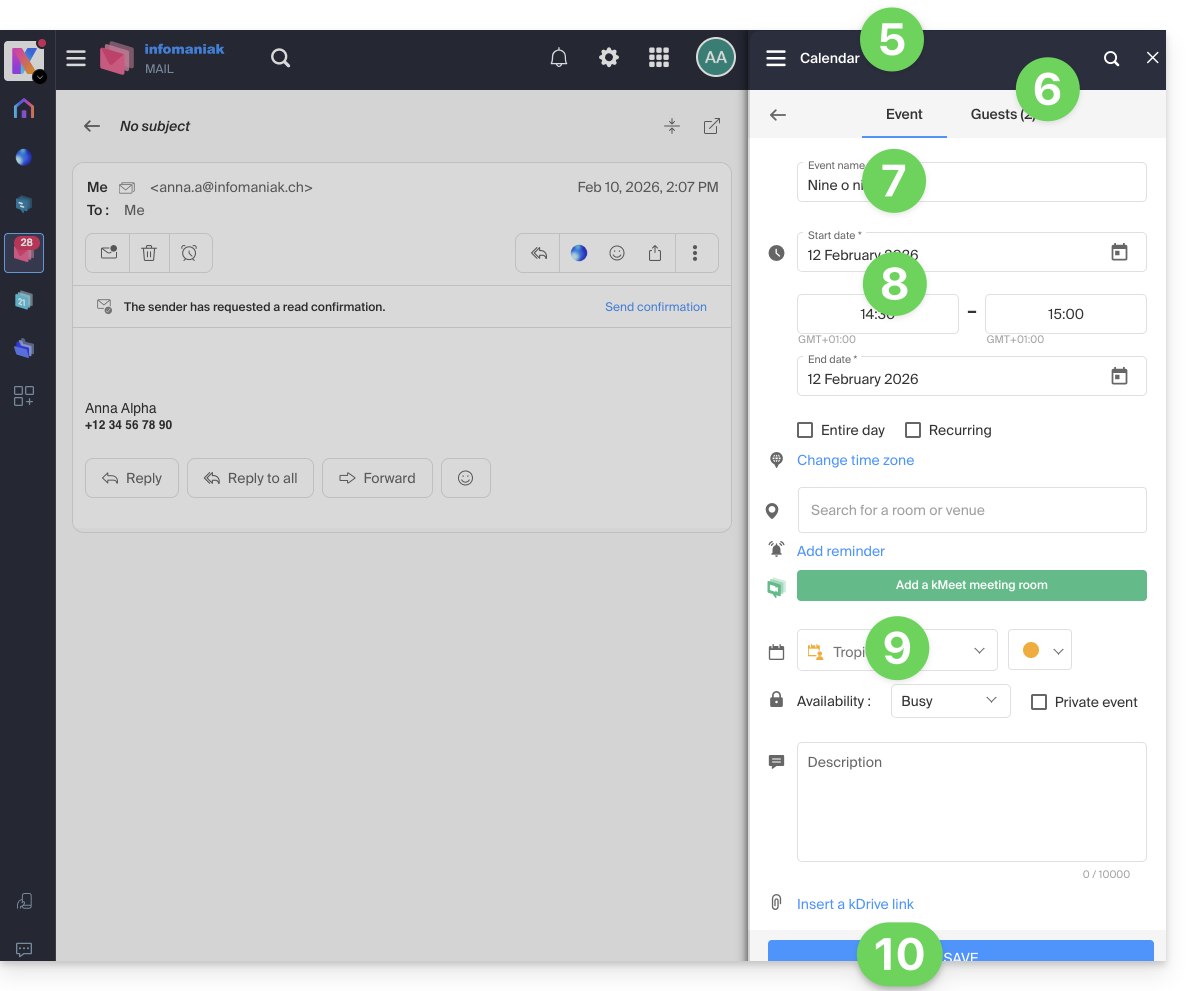
- The assistant of the Infomaniak app Calendar appears on the right of the screen.
- The participants in the discussion are automatically added from their email address and can be managed in the second tab.
- The title of the meeting is automatically generated from the subject of the email but it can be modified.
- The duration of the event (and its placement within the day) is automatically generated as close as possible to the present moment, but it can be modified, just like a possible room can be added below.
- Check or change the calendar used.
- Save the information to create the event and the invitations:
Link to this FAQ:
Has this FAQ been helpful?
This guide covers the management of application passwords from the Infomaniak Manager.
Preamble
- Application passwords allow you to establish an authenticated connection between certain tools & services even if the two-step validation (2FA authentication) is activated.
- To synchronize, for example, contacts & calendars from your Infomaniak account with a mobile device or email software/client, perform the actions presented in the guide below to generate a new password specific to this application.
- It is possible to generate multiple specific passwords (for example 1 for the contacts and 1 for the calendars) or to use the same one for synchronizing both services.
Create an application password
To do this:
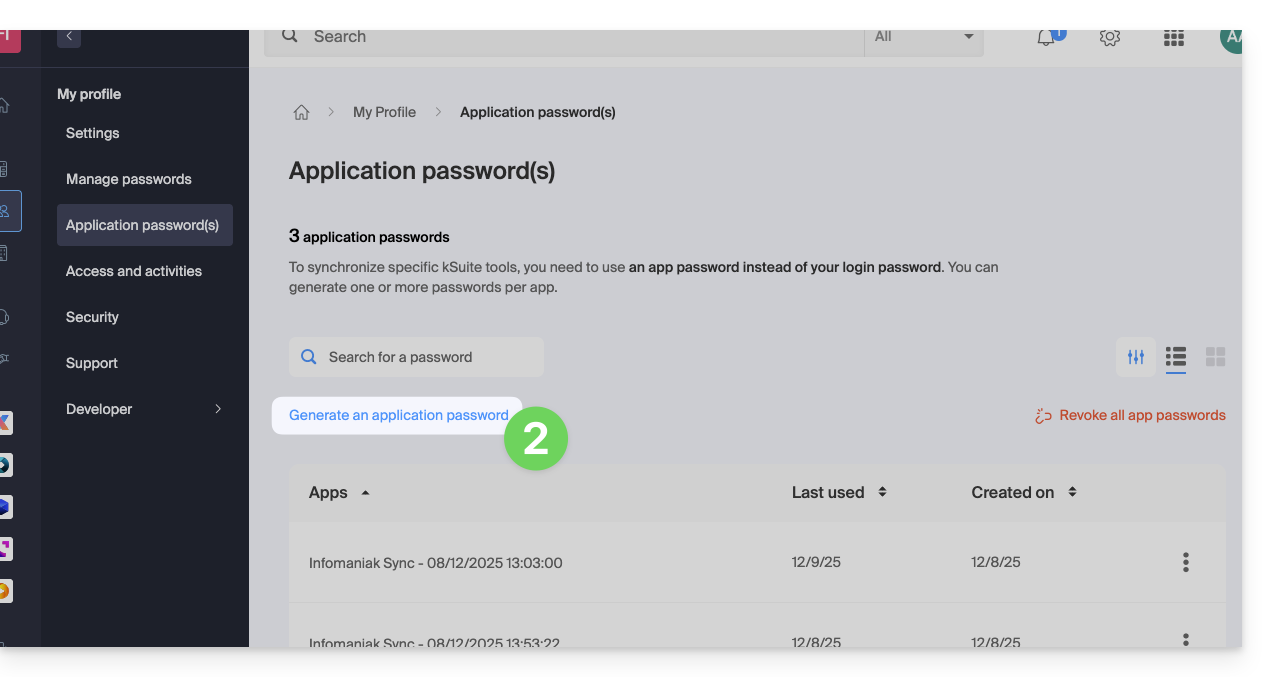
- Click here to access the management of application passwords on the Infomaniak Manager.
- Click on Generate an application password:
- Enter a name for the application password in the dialog box, then click on Generate an application password:
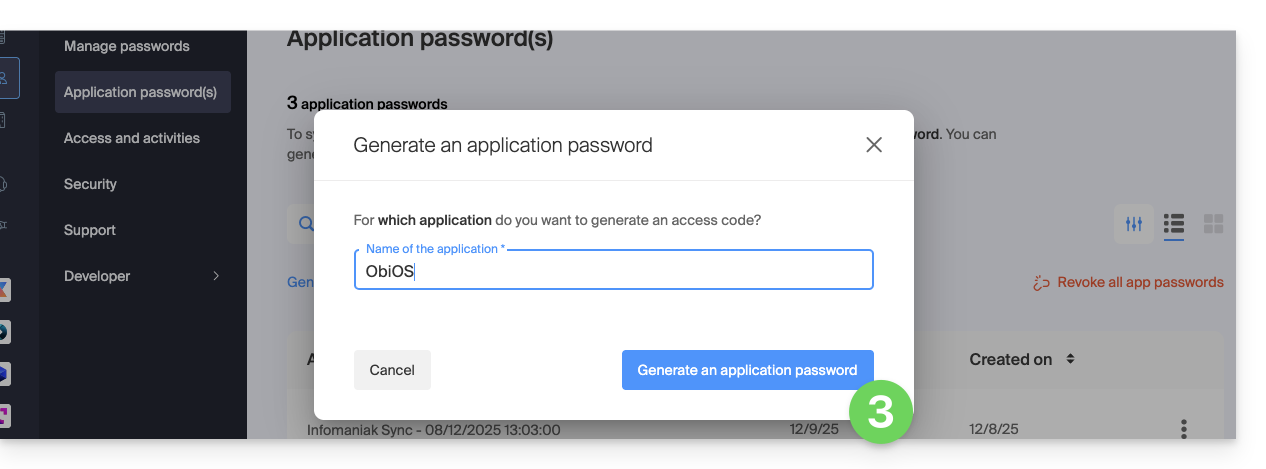
- Copy and save the generated application password in a safe but accessible place, it will no longer be accessible once the window is closed.
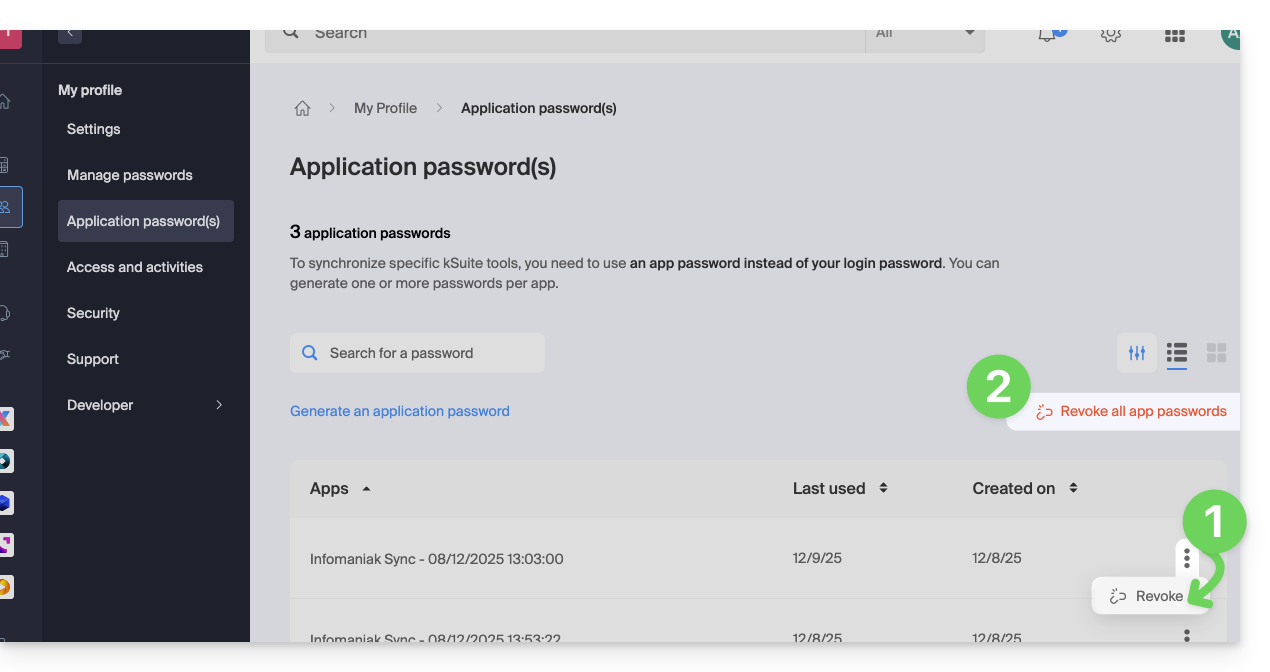
Revoke application passwords
In the same place, you can delete one or more application passwords when they are no longer useful:
- Click on the action button ⋮ to the right of each password and then revoke them…
- or on Revoke all at the top of the table:
Link to this FAQ:
Has this FAQ been helpful?
This guide explains how to configure the visual displayed on the screen of the device scanning tickets during an event (as part of the Infomaniak ticketing system).
Preamble
- Infomaniak offers an app for ticket control.
- It is possible to set a specific icon that will be displayed on the device screen when scanning a ticket.
- If the ticket is valid and an icon is set, the scanner will display the chosen icon on a green background.
Set up the scan validation icon
The choice of visual is configured in the advanced settings of a rate:
- Click here to access the management of your product on the Infomaniak Manager (need help?).
- Click directly on the name assigned to the ticketing related to the event.
- Click on Scheduling in the left sidebar.
- Click on Events in the left sidebar.
- Click on the relevant event.
- Click on the Pricing tab.
- If the event has multiple dates, this section is replaced by “Dates” which opens a calendar.
- Click on the date in the calendar to access the pricing…
- Click on the action menu ⋮ located to the right of the price (first expand the Zone using the chevron if necessary).
- Click on Edit:

- Then click on the chevron to expand the advanced settings.
- Enable the option Set a visual for the scan app.
- Select the icon name.
- Click the Confirm button:

Result on the scan device
Here is an example of the display when validating a correctly registered ticket:
Link to this FAQ:
Has this FAQ been helpful?