Knowledge base
1000 FAQs, 500 tutorials and instructional videos. Here, there are only solutions!
This guide covers data protection regulations in Switzerland and Europe, and the measures taken by Infomaniak to secure your customer data and data within Web Hosting and Mail Services.
Understanding the difference between data security and data privacy
Data security aims to prevent unauthorized access to your information. It relies on measures such as encryption, firewalls, or VPNs. A security breach can have disastrous consequences: imagine a hacker stealing your entire customer database and demanding a ransom to recover it. This type of attack – ransomware – can cripple a company overnight.
Data privacy concerns who can access your information and how it is used. Even if your data is secure against hacking, it can be collected, analyzed, and resold… perfectly legally.
Example: you carefully store your customers' information, but without realizing it, a service you use shares – anonymously – this data with third parties. Result? Your competitors can obtain valuable insights into your market and target your own customers without ever needing to hack into your systems.
FDPA & GDPR
In Switzerland, the FDPA (Federal Act on Data Protection) and nFDPA (for the "new Act" in force since September 2023) protect the privacy of residents by regulating the collection and processing of personal data by organizations.
The EU's GDPR (General Data Protection Regulation), which has been in effect since May 2018, affects global companies that process the data of European residents, including in Switzerland. While the Swiss Federal Act on Data Protection (FADP) applies to the data of Swiss residents, the GDPR concerns the data of EU residents. Swiss companies that manage European data must comply with the GDPR requirements, including the designation of a Data Protection Officer and the performance of Impact Assessments in the event of risky processing.
Your Role as an Infomaniak Customer
With regard to the data hosted that belongs to you – and in particular if this data contains personal data of your visitors, contacts or customers – it is your responsibility to ensure its compliance.
When processing this personal data, it is essential to inform users about the purpose and methods of this processing. This is generally done through a privacy policy or a data processing agreement (DPA).
Agreement between Data Controller and Data Processor
A DPA (Data Processing Agreement), called AVV (Auftragsverarbeitungsvertrag) in German, ATD (Accordo di Trattamento dei Dati) in Italian and CTA (Contrato de Tratamiento de Datos) in Spanish, translates to Data Processing Agreement or Data Processing Contract.
This is a mandatory contract provided for by the GDPR between a data controller and a data processor. It defines the purpose, duration, and nature of the processing, as well as the obligations and security measures. Its objective is to protect the personal data entrusted to a service provider.
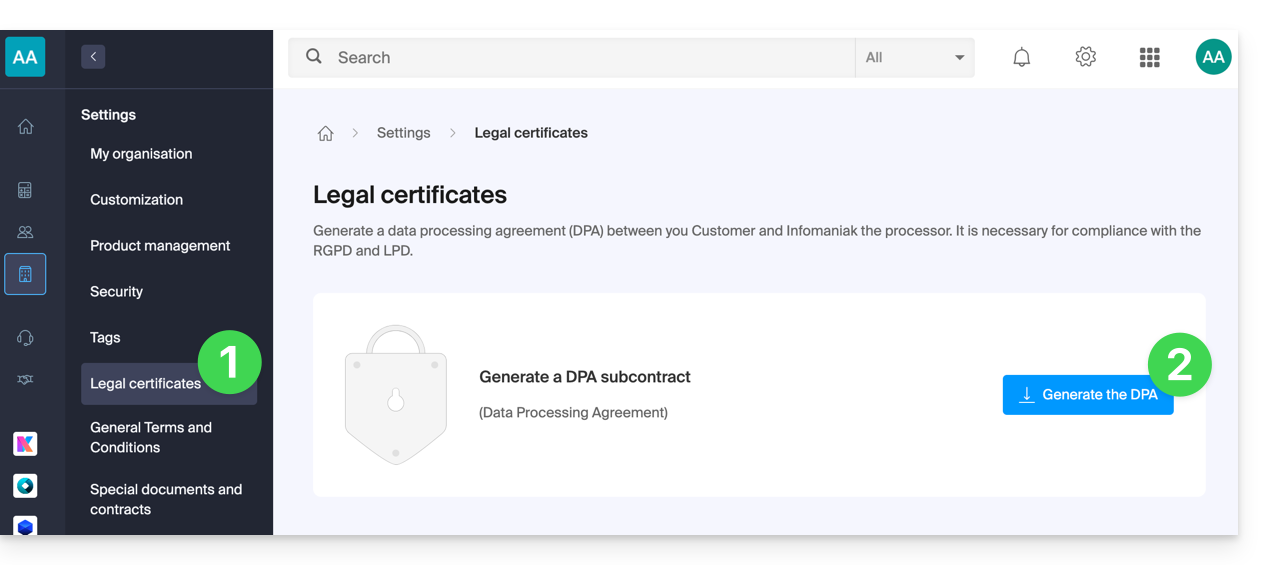
This GDPR certificate (in PDF format) can be generated and downloaded from the Manager (accessible to users of the organization who are owners or administrators):
- Click here to access the Data Processing Agreement (DPA) management in the Infomaniak Manager (need help?).
- Click the Generate button to download the customized PDF document:
Here are some tips:
- Provide information on all data processing activities, not just those related to the website.
- Ensure easy access to the privacy policy on the website, for example in the footer of each page.
- In general, it is not necessary to obtain user approval for privacy policies (e.g., for forms); simply indicate where to find the policy (example Site Creator).
- Keep in mind that the new, more detailed information rules may require adjustments to existing privacy policies.
It is crucial to differentiate between the security of the infrastructure where your data is hosted and the management and implementation of data on your side. As a hosting provider, Infomaniak acts as a data processor for your GDPR-related obligations. In this context, its privacy policy and cookie policy, as well as its terms and conditions, provide you with the necessary guarantees regarding its compliance as a data processor.
If necessary, you can find professionals or online guides to help you with the compliance process.
Infomaniak's Role
Like companies that work with user data, Infomaniak must comply with the LPD and, because some of its users are European citizens, also with the GDPR:
- the data privacy policy details the data that Infomaniak stores to provide and deliver its services
- the policy related to the protection of your personal data describes Infomaniak's commitments as a subcontractor that hosts all of your data, including personal data
These commitments, as outlined in the general and specific terms and conditions, are as follows:
- store your data within data centers exclusively located in Switzerland and never transfer your information outside of these infrastructures
- apply rigorous security standards and continuously improve processes to guarantee a high level of security across all services
- promptly inform you in the event of a data breach
- ensure transparency towards you when Infomaniak uses subcontractors that may process your data
- strengthen and develop physical security measures to prevent unauthorized access to the infrastructures where your data is stored
- implement physical and/or logical isolation systems (depending on the services) to separate the hosting of different clients; in addition, Infomaniak conducts annual penetration tests to guarantee data isolation between clients
- demonstrate a high level of responsiveness in securely updating the systems under their responsibility
Manage cookies on the infomaniak.com website
When you visit the infomaniak.com page, you must make a choice regarding the acceptance of certain cookies. To change this choice later, access your preferences from the footer of the website: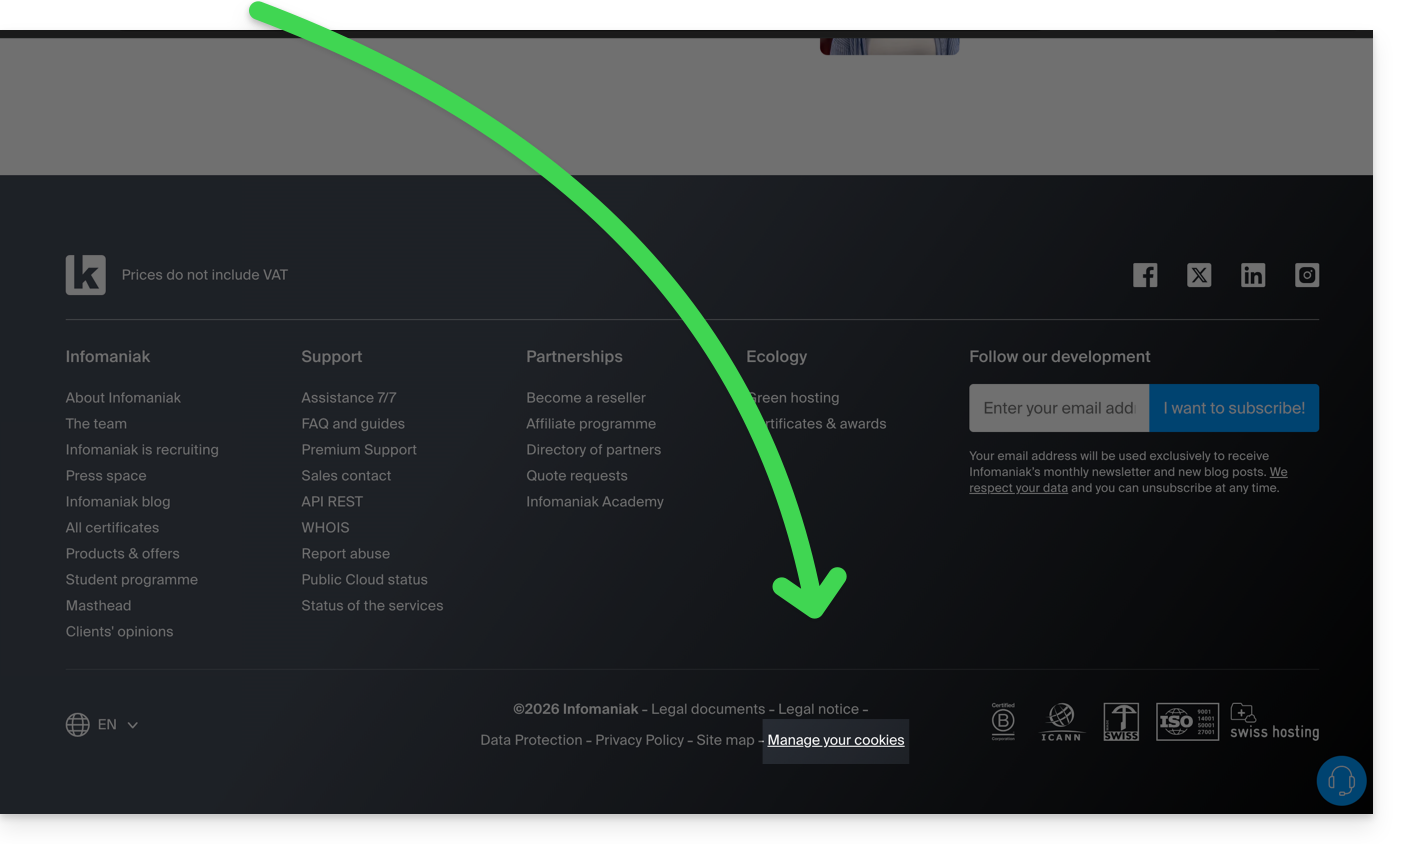
Link to this FAQ: https://faq.infomaniak.com/2820
Has this FAQ been helpful?
This guide explains how to copy the content of one or more Infomaniak email addresses (all email messages, folders, subfolders, in short, the entire structure of your mailbox) to one or more of your existing addresses, also hosted with Infomaniak (regardless of the Mail service), thanks to the Infomaniak import tool!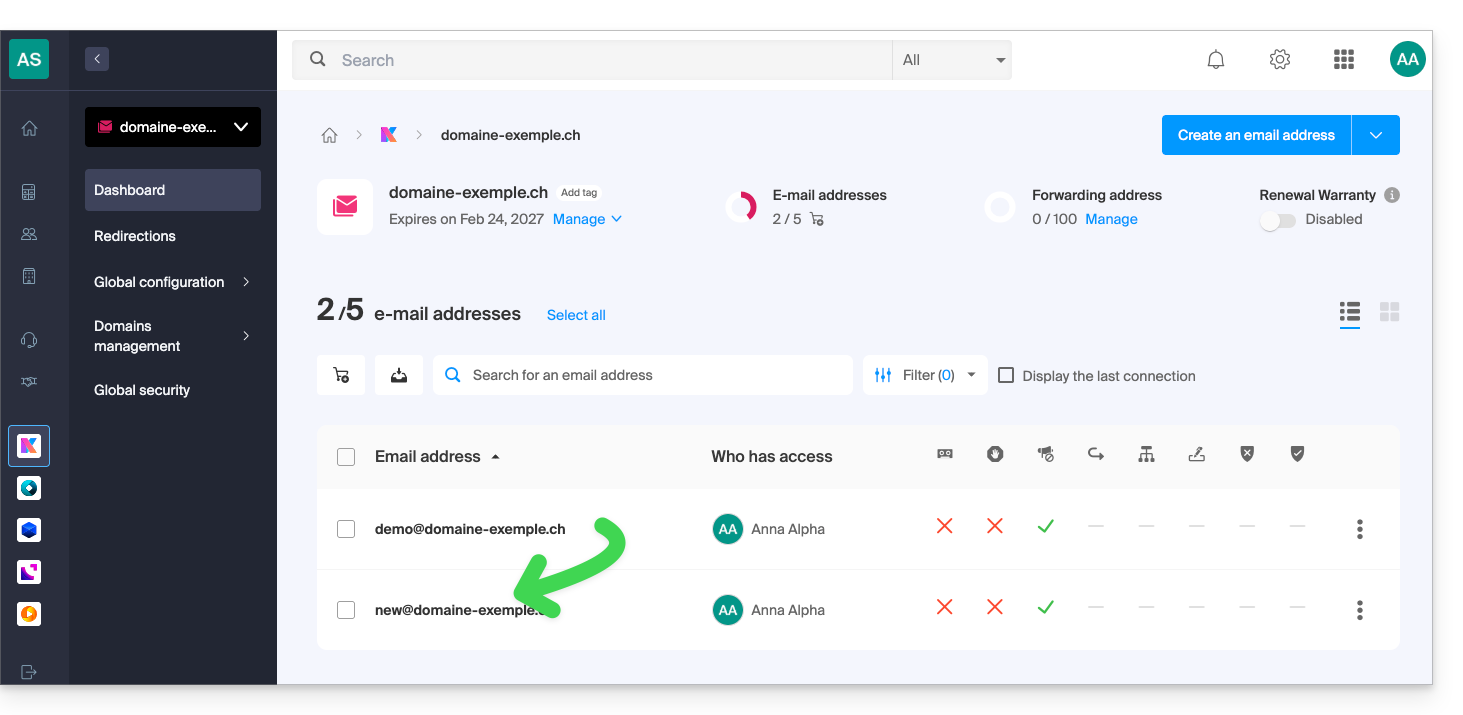
Introduction
- The operation does not affect either the data already present in the destination address or the data in the source address.
- The entire mailbox will be imported.
- Once the import process has started, it is no longer possible to interrupt it.
- Any duplicates will be handled: identical content will only be copied once.
Copy emails from one Infomaniak mailbox to another
Prerequisites
- Add a device password to the source address (the one from which the content must be retrieved):
- The password for logging in to the Infomaniak account with the same name is not the one expected.
- You need a password specific to the email address in question = a device password:
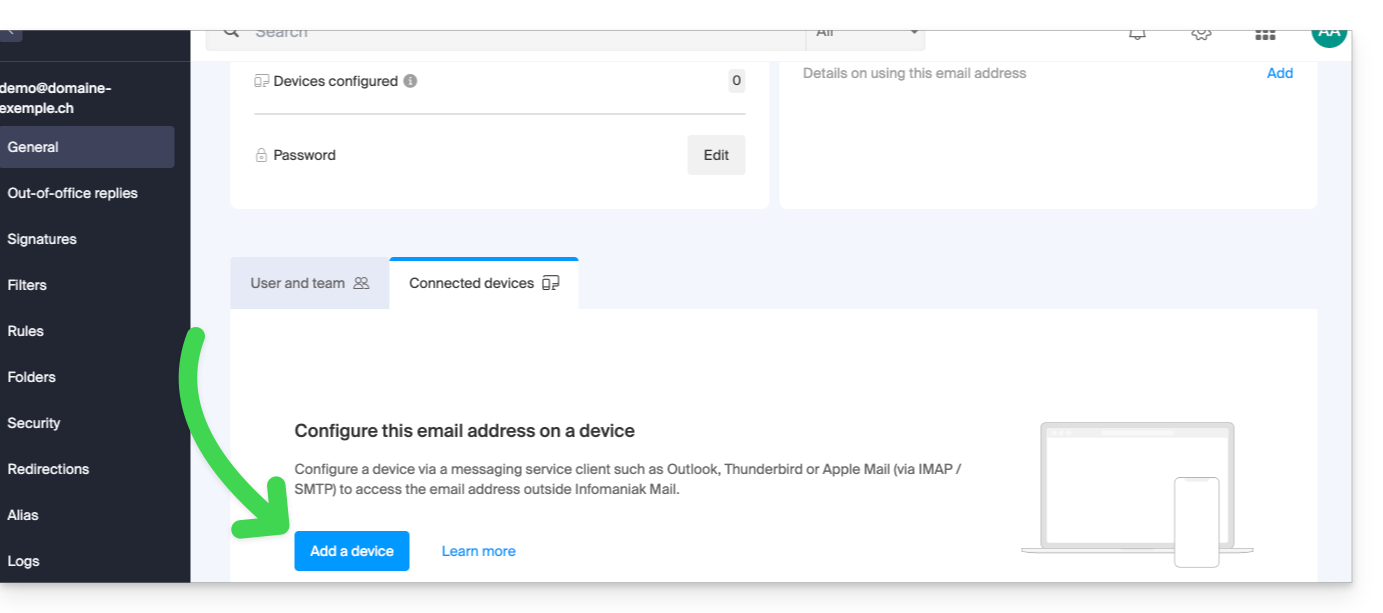
- The email address of the destination must be linked to the user (= the Infomaniak account) you are using.
Next, to import your email content:
- Click here to access the import tool (online service https://import-email.infomaniak.com).
- If necessary, log in to your Infomaniak account for the relevant organization; the import will be done to one of the email addresses associated with the Infomaniak Mail web interface (online service ksuite.infomaniak.com/mail) of the Infomaniak account you are using.
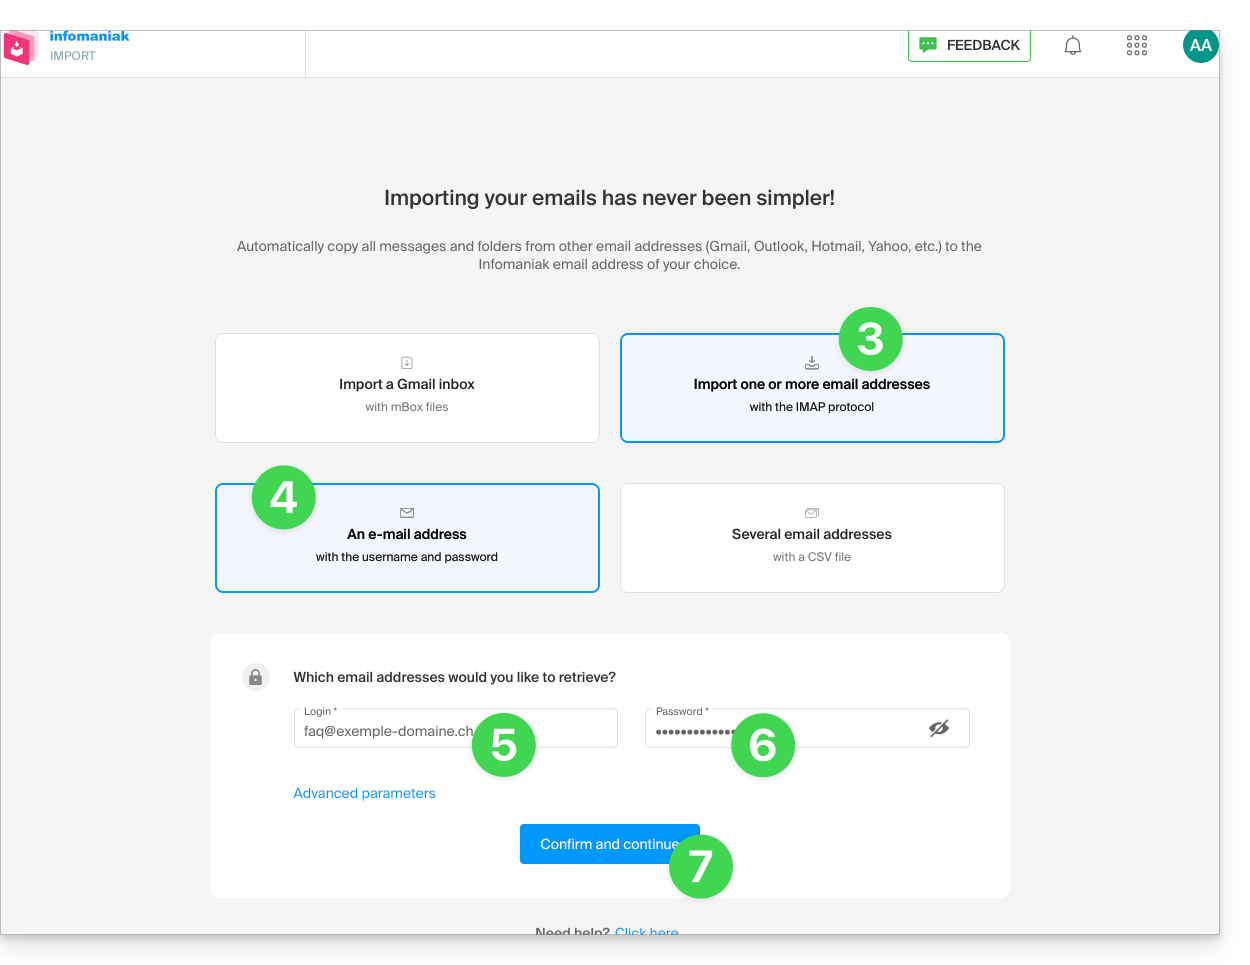
- Click on the IMAP import.
- Click on one-time import.
- Fill in the field on the left with your source email address (from which the content will be copied).
- Fill in the field on the right with the password for this same source email address (see prerequisites).
- Click on Confirm:
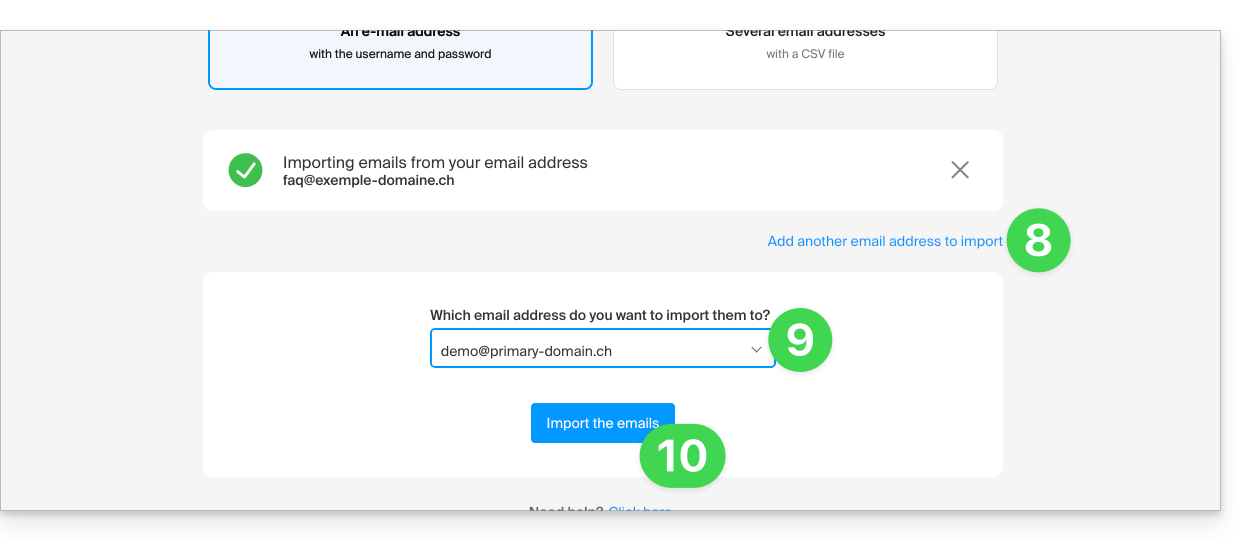
- If necessary, enter a second email address to be imported at the same time.
- Choose the email address to which the emails will be imported; the drop-down menu lists the email addresses currently associated with your Infomaniak Web Mail interface (online service ksuite.infomaniak.com/mail) of the Infomaniak account you are logged into.
- It is obviously impossible to copy emails to the same address as the source.
- After selecting the desired destination address from the list, click the blue Import Emails button:
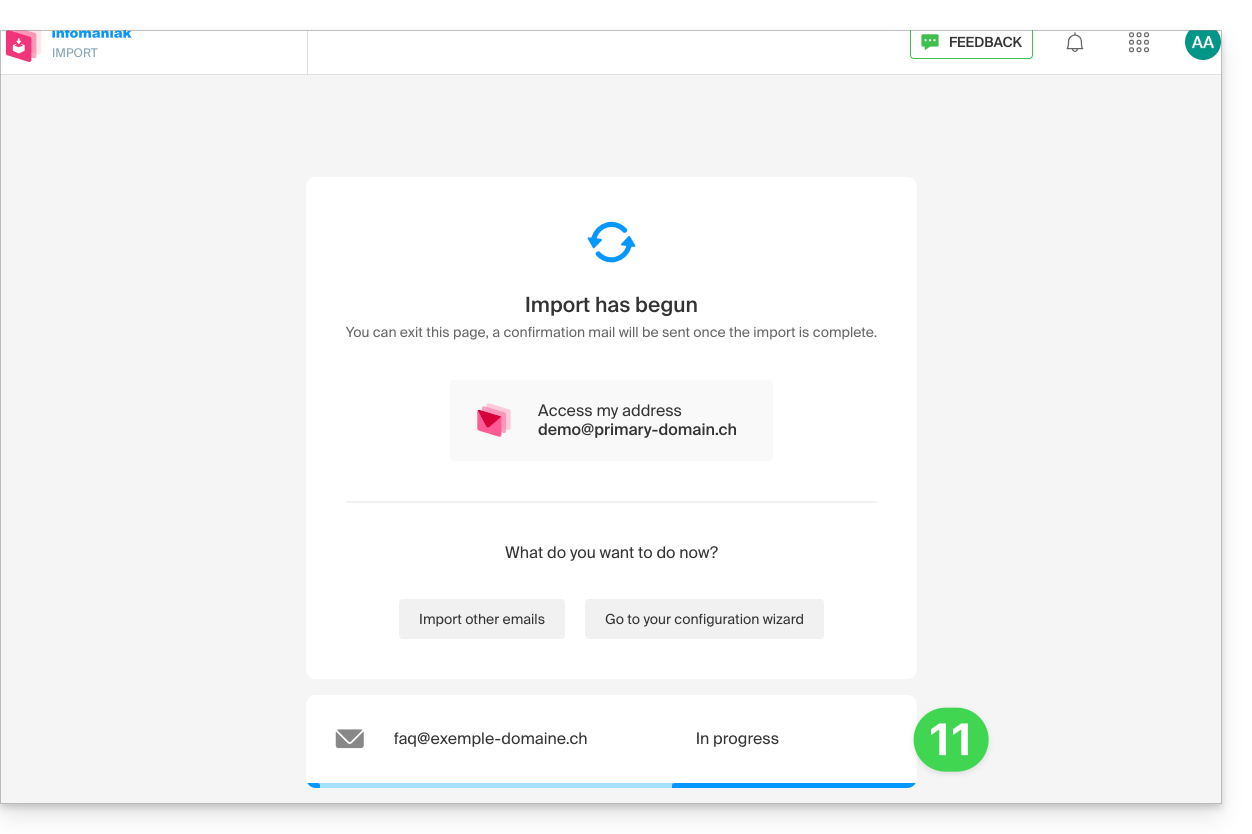
- The copy process begins. You can wait and see the result on the page once the import is complete, or close the window (the import continues in the background, and progress can be tracked - see below):
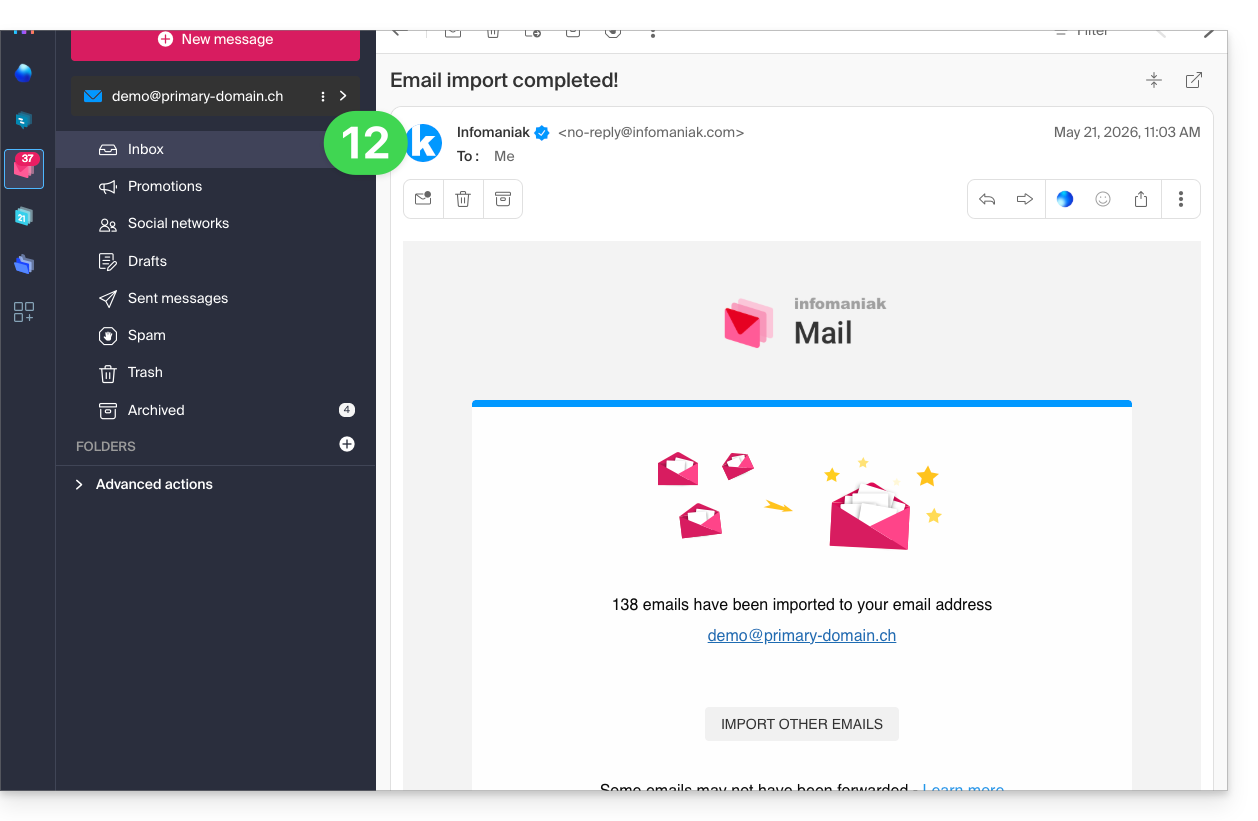
- A confirmation email will be automatically sent to all email addresses involved in the operation once the import is complete, indicating the number of messages copied:
- Progress can be monitored in the settings of the destination email address, on the web app Mail (online service ksuite.infomaniak.com/mail) only:
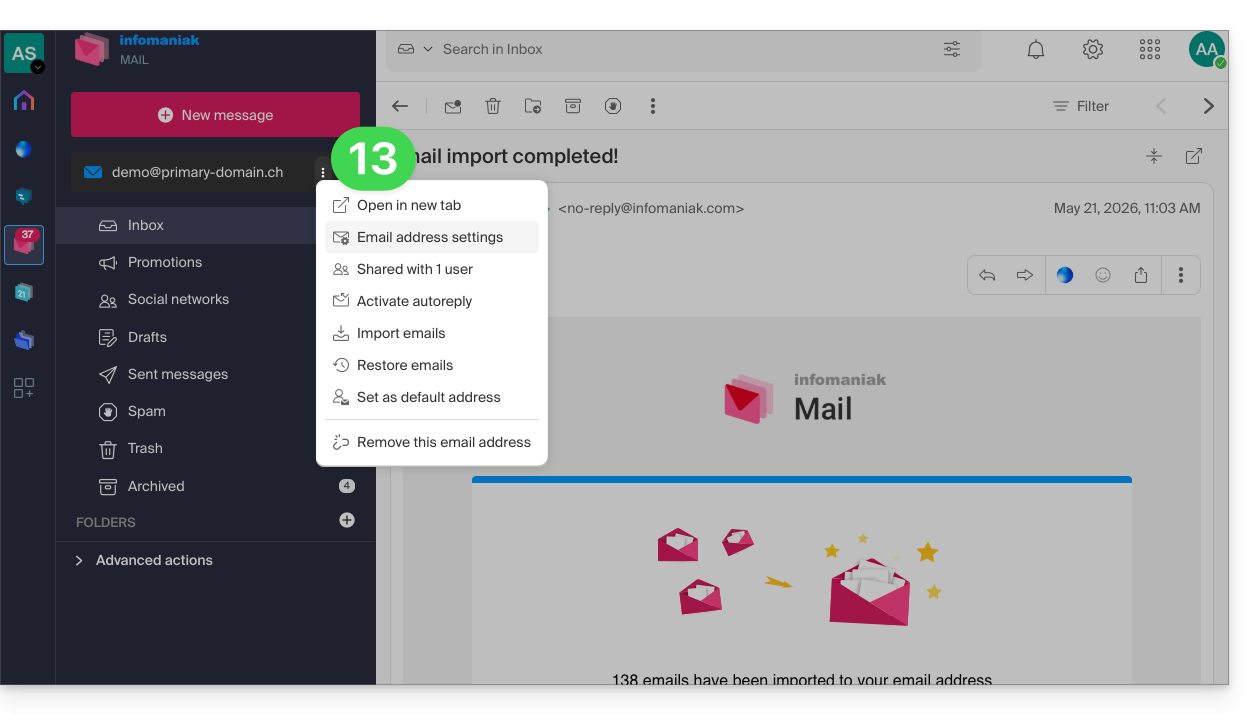
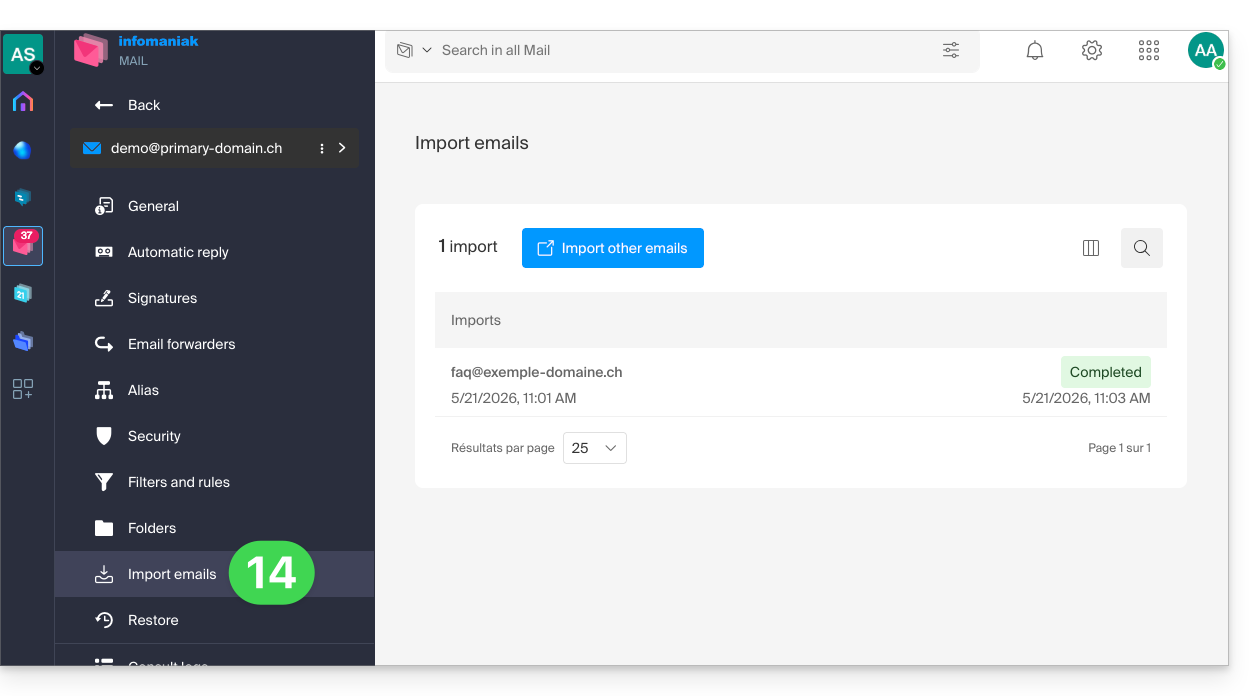
- The tracking feature allows you to view the import history for the address in question:
Copy the content from multiple Infomaniak addresses in bulk
Prerequisites
- Add a device password to each Infomaniak source address (the ones from which the content needs to be retrieved).
- The password for logging in to the Infomaniak account with the same name is not the one expected.
- You need a password specific to each email address = one device password per address.
- The destination email addresses must be linked to the user (= the Infomaniak account) you are using.
To import the content of multiple Infomaniak email addresses (maximum 25 at a time) to one or more destination email addresses:
- Click here to access the import tool (online service https://import-email.infomaniak.com).
- If necessary, log in to your Infomaniak account for the relevant organisation; the import will be done to one of the email addresses associated with the Infomaniak Mail web interface (online service ksuite.infomaniak.com/mail) of the Infomaniak account you are using.
- Click on IMAP import.
- Click on advanced mode: Import multiple email addresses from a CSV file (
.csvformat). - Download the example
CSVtemplate: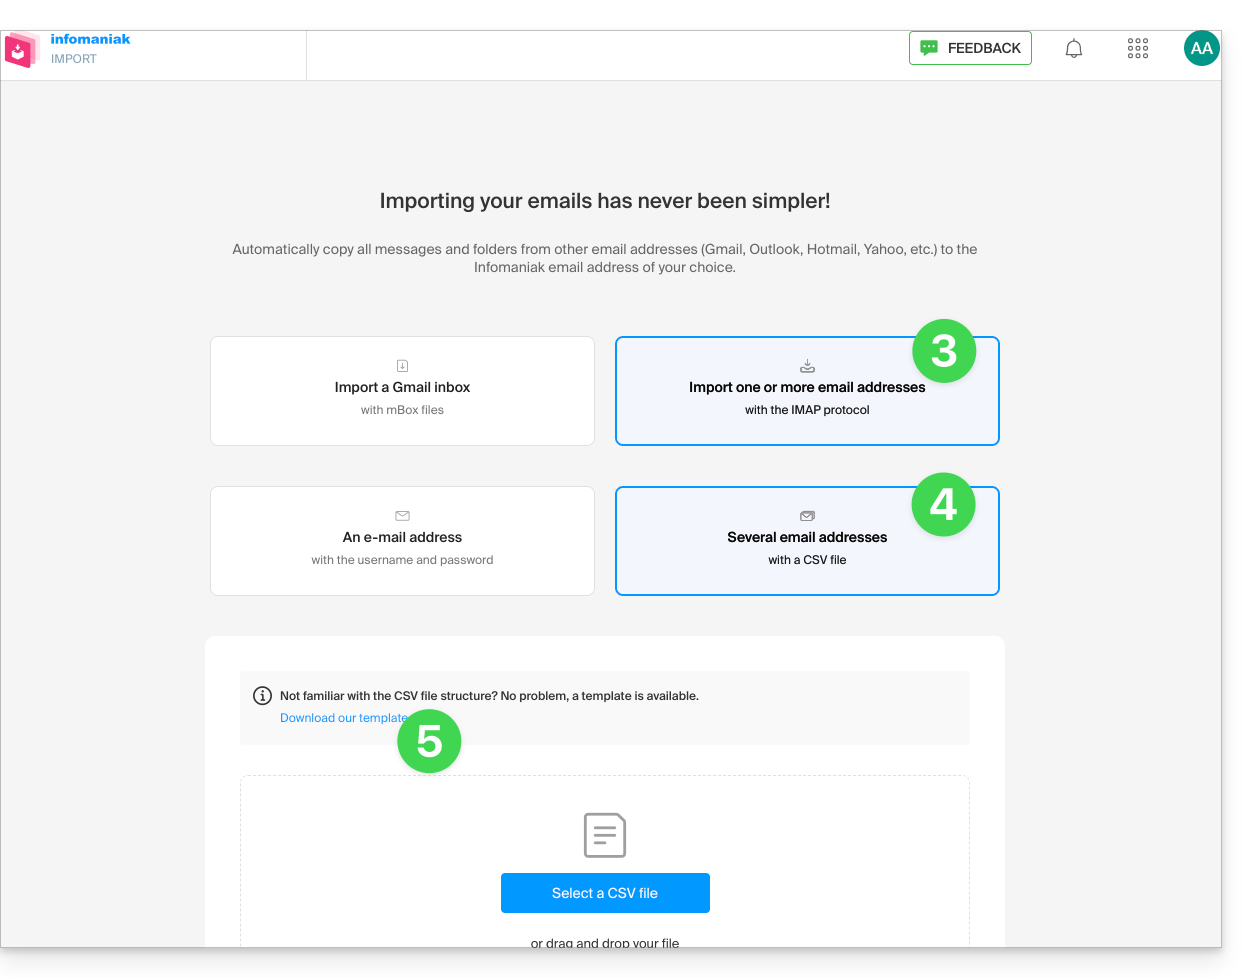
- The template has this format:
source-email@domain.com;sourcePassword;imap.source-host.com;sourcePort(993);sourceSsl(1or0);dest-email@domain.com - This means, in this case:
source email address;source email password;mail.infomaniak.com;993;1;destination email address, all without spaces (example below)
- The template has this format:
- Edit the
csvfile to create one with the correct information needed for the copy (see prerequisites):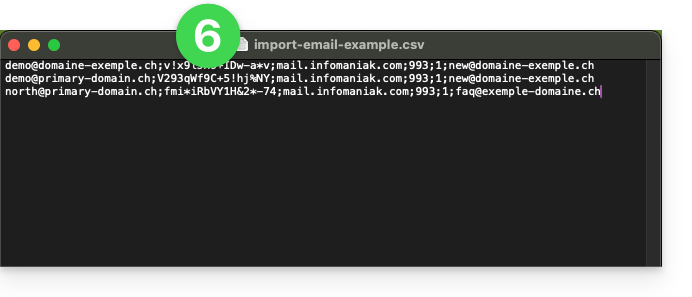
- Upload the file using the Select a CSV file button.
- Once the file has been uploaded to the tool's page, correct or ignore any errors; click on Import:
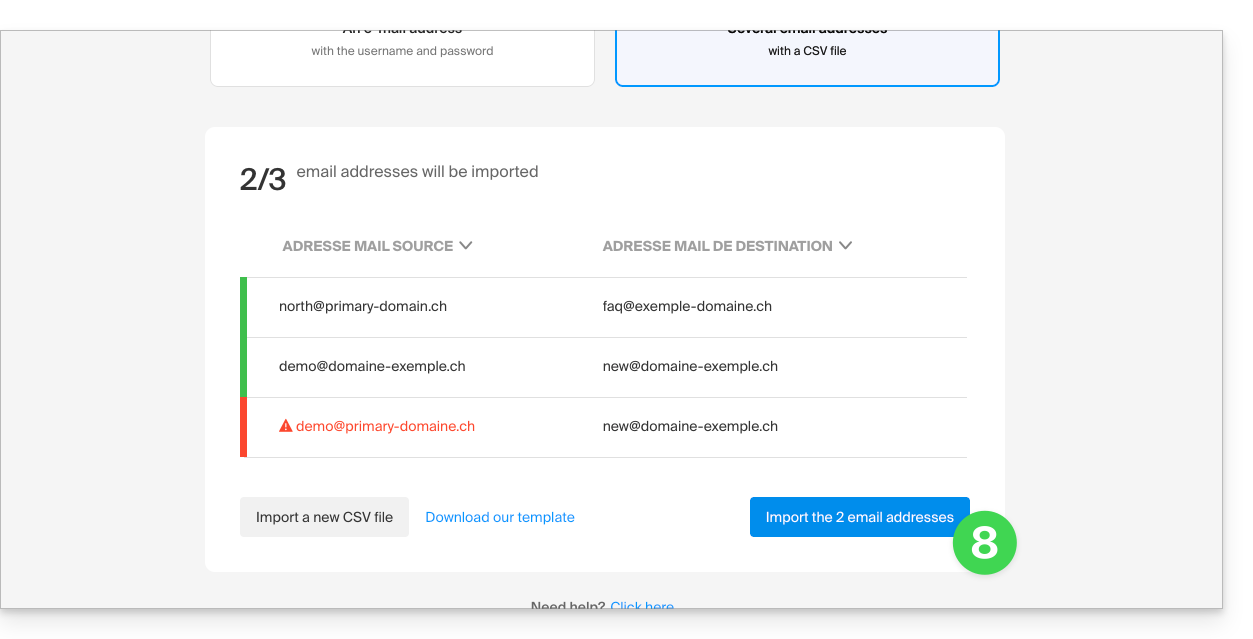
- The copy process has started. You can wait and view the result on the page once the import is complete, or close the window (the import will continue in the background, and you can track its progress - see below).
- A confirmation email will be automatically sent to all email addresses involved in the operation once the import is complete, indicating the number of messages copied.
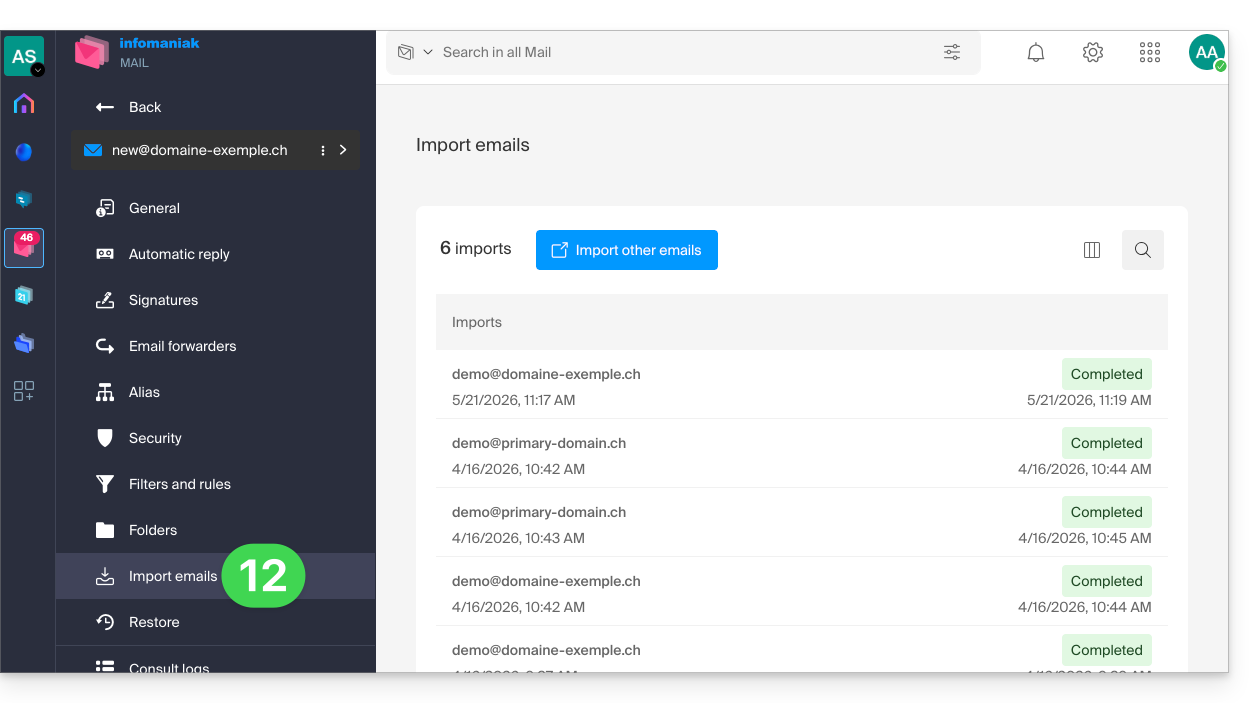
- Tracking is available in the settings for the destination email addresses, on the web app Mail (online service ksuite.infomaniak.com/mail) only.
- Tracking allows you to view the import history:
Link to this FAQ: https://faq.infomaniak.com/2826
Has this FAQ been helpful?
This guide explains how to activate the Infomaniak anti-spam filter, which helps to significantly reduce the number of unsolicited messages that may arrive in your Infomaniak email address if you share it with third parties.
Introduction
- Spam is an unsolicited message, often of an advertising or fraudulent nature, with the aim of promoting products, services, or carrying out online scams; fortunately, Infomaniak has implemented strategies to combat this form of digital pollution.
- Thanks to the anti-spam filter, the messages you actually want to see quickly will no longer be buried among dozens of other unwanted messages, as the latter will be automatically placed in a special folder, the
Spamfolder (or in the spam destination folder - read more below) and then automatically deleted after 30 days. - Moreover, the filter is automatically activated (❓: help) when creating a mail address within an Infomaniak Mail Service or when subscribing to a my kSuite / my kSuite+ offer.
Activate the option from the Infomaniak Web Mail app
Prerequisites
- You must have permission to manage the filter: it is possible that the Mail Service administrator has removed this right from your account (❓: help).
To access your Infomaniak email settings:
- Click here to access the Mail Infomaniak web app (online service ksuite.infomaniak.com/mail).
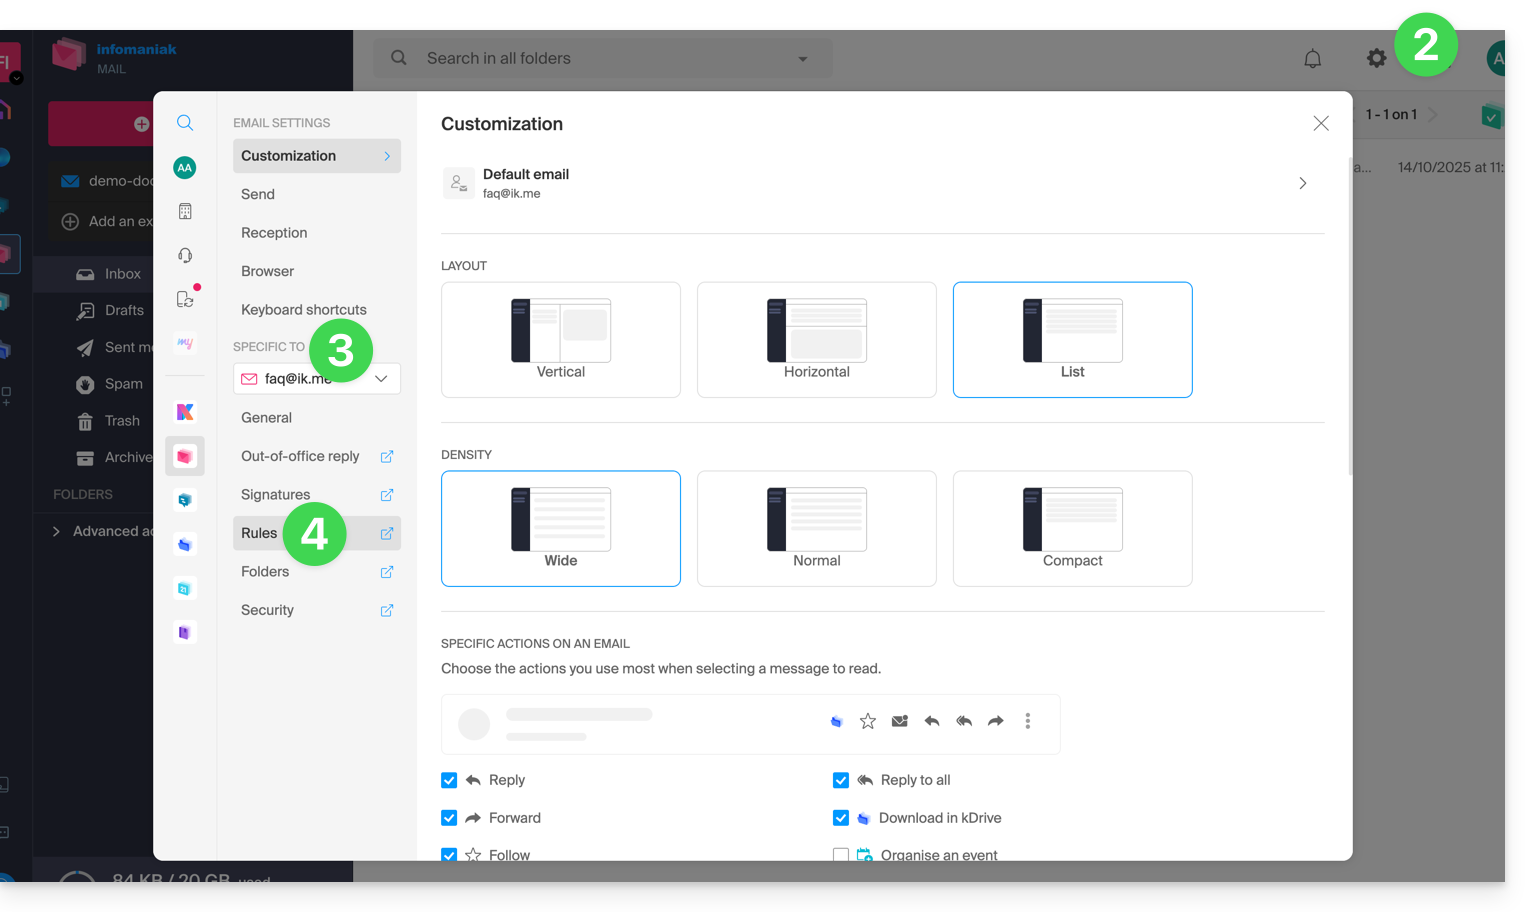
- Click on the Settings icon in the top right corner.
- Check or select the relevant email address from the drop-down menu in the left-hand menu.
- Click on Filters and rules:
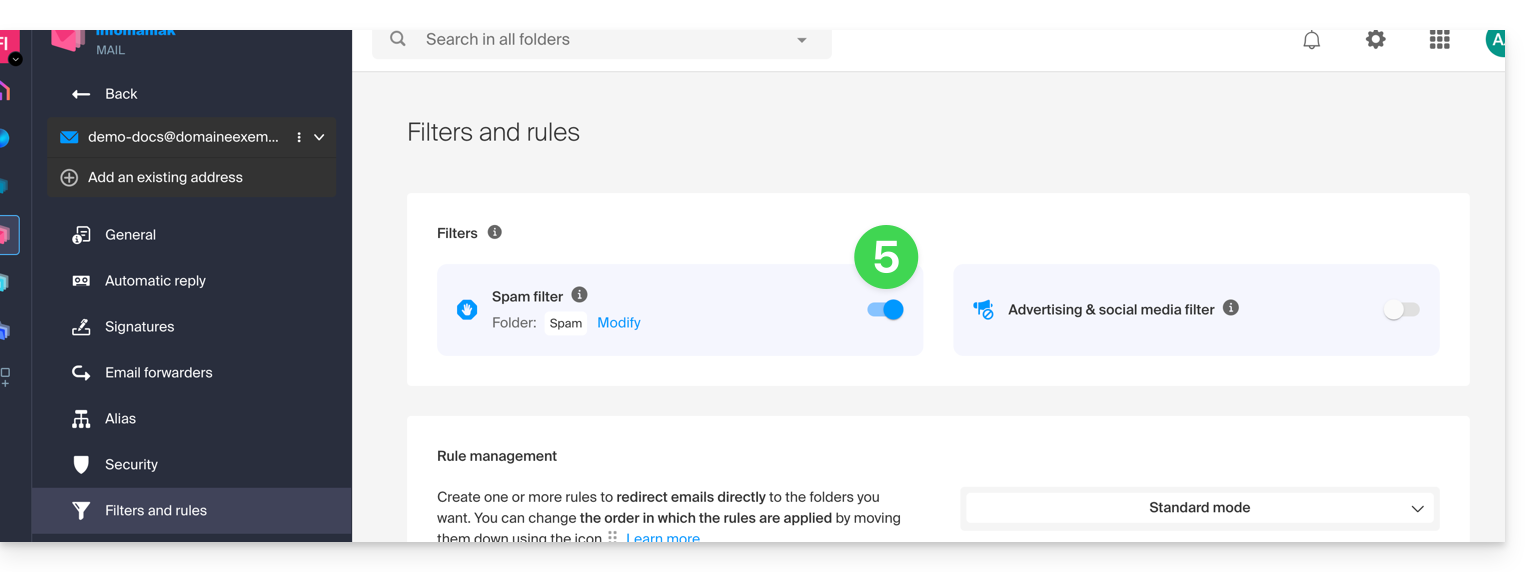
- Enable the spam filter option; the effect is immediate (wait for the confirmation message to appear on the screen). In this case, all future messages with a header indicating a high spam score, and senders who have been blocked (❓: help), will go to the Spam folder:
- Simply click the toggle switch again to disable the filter; in this case, all future messages will go to the inbox, including messages with a header indicating a high spam score.
Enable the option from a Mail Service
To access your Infomaniak email settings:
- Click here to access your product management on the Infomaniak Manager (❓: help).
- Click directly on the name assigned to the product in question.
- Click on the email address in question in the table that appears.
- Click on Filters in the left-hand menu.
- Enable the spam filter option; the effect is immediate:
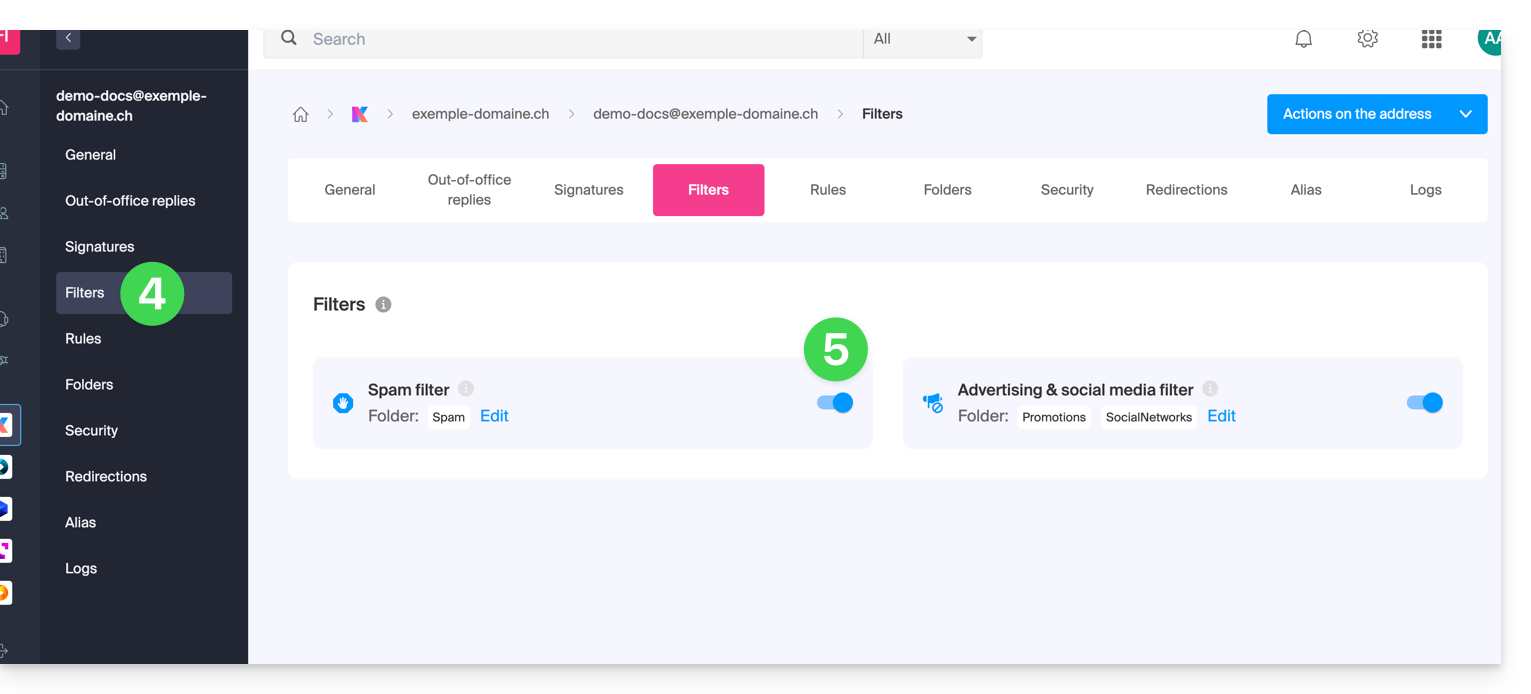
- Simply click the toggle switch again to disable the filter; in this case, all future messages will go to the inbox, including messages with a header indicating a high spam score (they can then be processed by your email software/client if it supports reading this type of header).
Note that you can enable it in bulk for multiple addresses at once (❓: help).
Customize the anti-spam filter
Change the location for spam
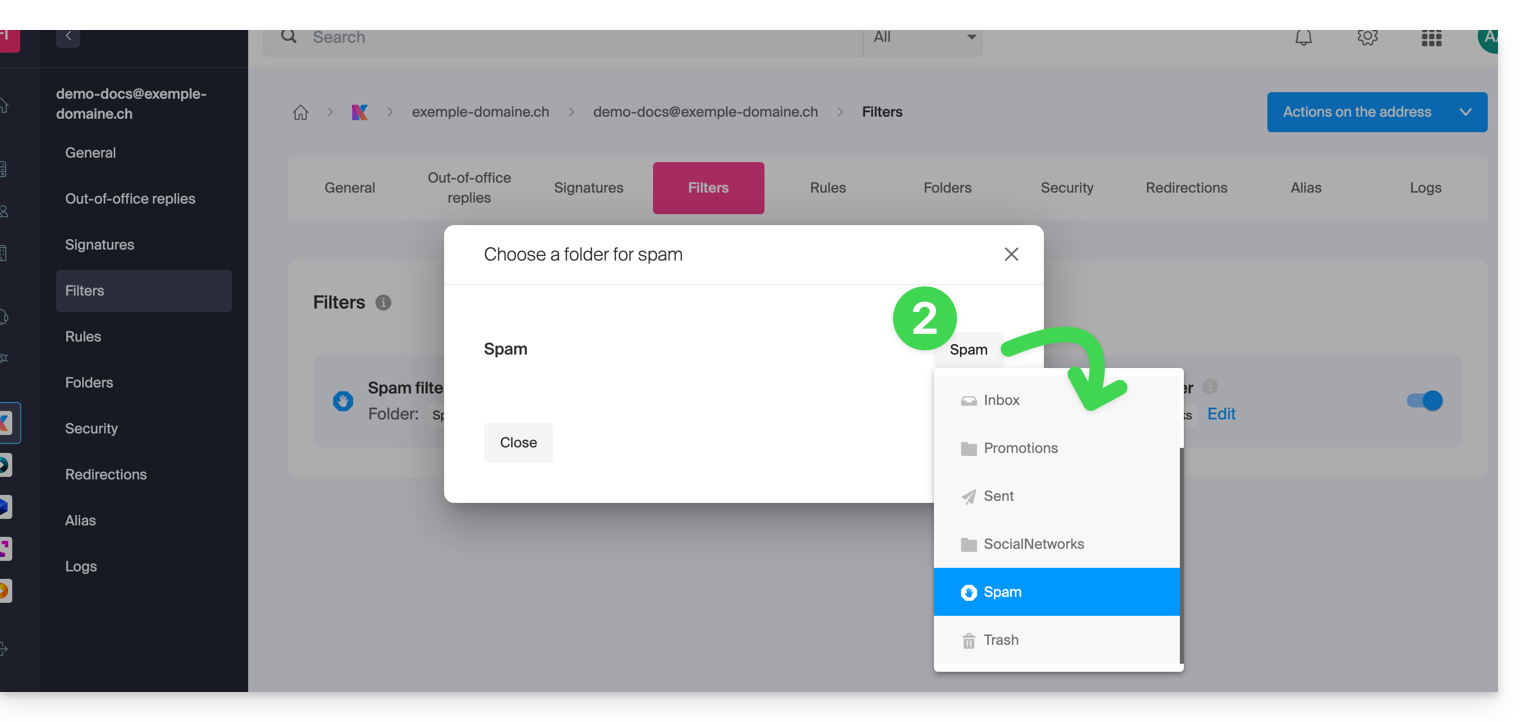
You can choose the default location for the folder where messages identified as spam will be automatically placed, similar to special IMAP folders (❓: help).
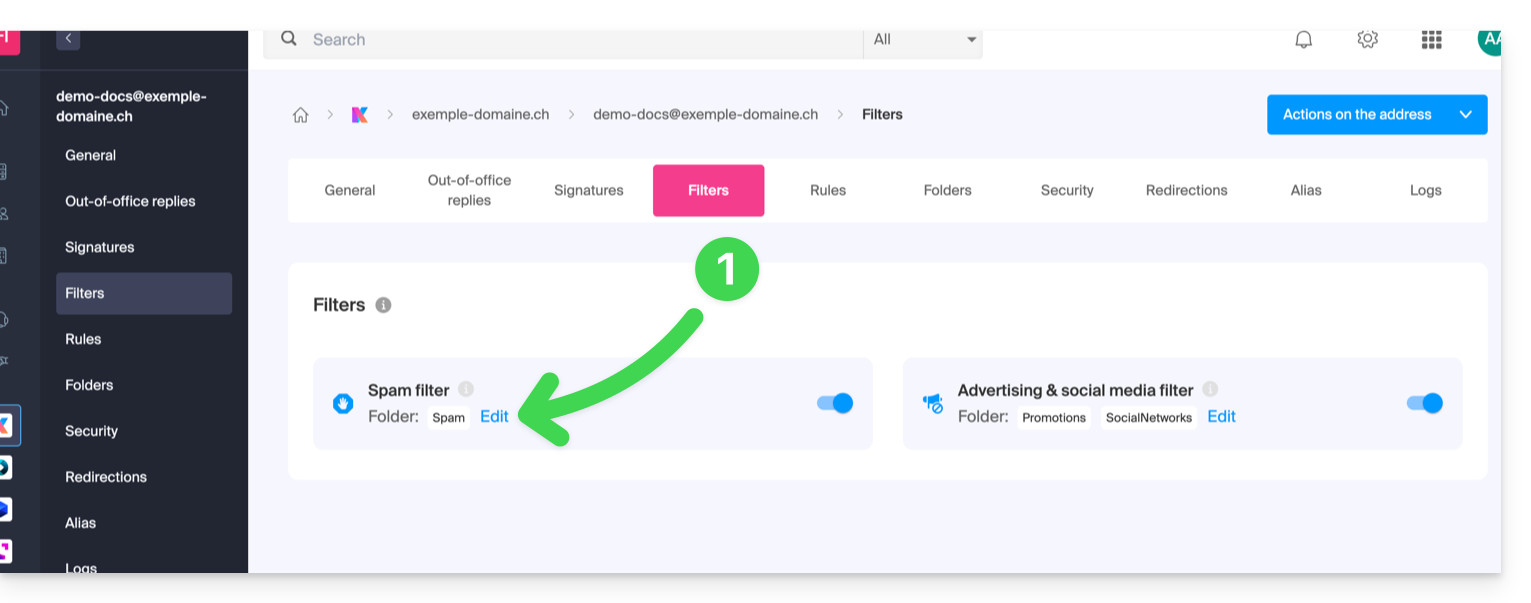
This setting is available where you have enabled the spam filter:
- Click on Edit:
- Click on the folder name to choose a different one (create a new one beforehand if necessary):
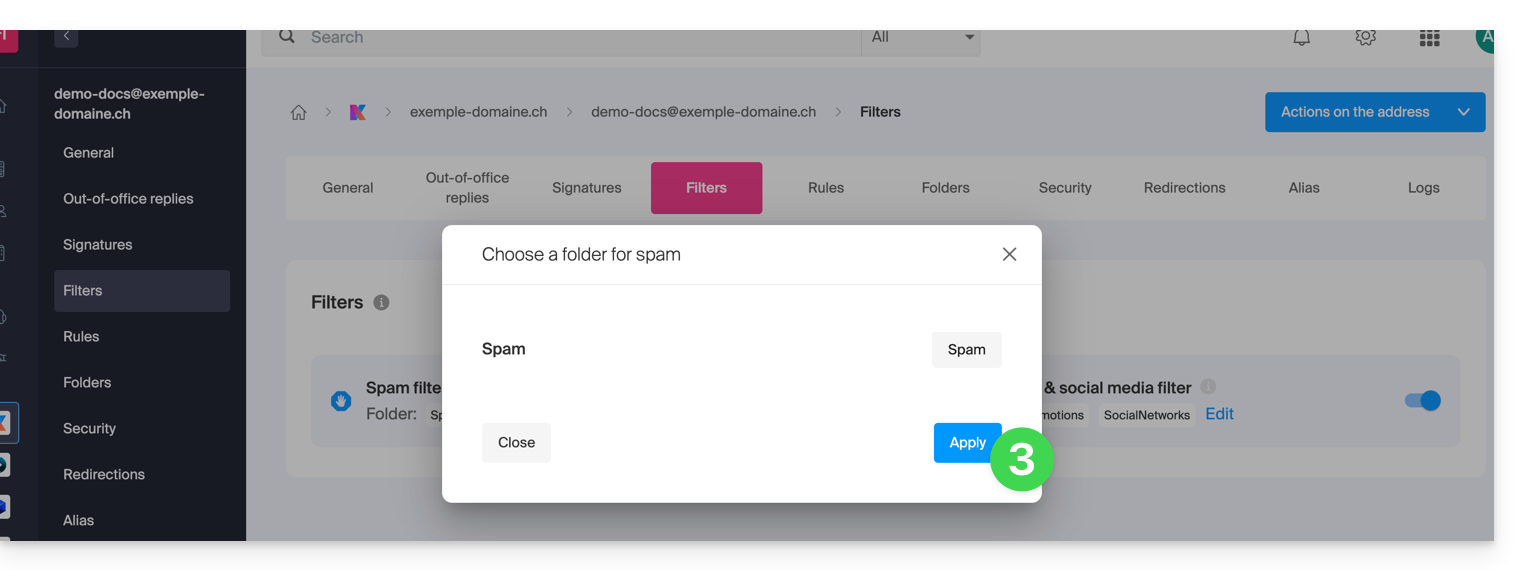
- Click the Confirm button:
Report a filtering issue or manually block senders
To report unfiltered spam or an email that was incorrectly filtered as spam (false positive), please refer to this other guide.
You can also specify in advance which senders should always go to the Spam folder or, conversely, if they should not be filtered (❓: help).
For enhanced security, enable the external email disclaimer (❓: help).
Link to this FAQ: https://faq.infomaniak.com/2838
Has this FAQ been helpful?
This guide explains how to enable or disable the Infomaniak ad filter, which automatically sorts emails detected as newsletters or activity notifications into specific folders.
Introduction
- The filter is, in principle, automatically activated (❓: help) when creating a mail address within an Infomaniak Mail Service or when subscribing to a my kSuite / my kSuite+ offer.
- It allows you to focus on relevant and important emails, which improves your productivity by reducing distractions related to advertisements and spam.
- It helps maintain a cleaner and better-organized inbox by separating promotional emails, which makes it easier to manage important emails.
Enable the option from the Infomaniak Web Mail app
Prerequisites
- You must have permission to manage filters: it is possible that the Mail Service administrator has removed this right from your account via their admin account (❓: help).
To access your Infomaniak email settings:
- Click here to access the Infomaniak Mail web app (online service ksuite.infomaniak.com/mail).
- Click on the Settings icon in the top right corner.
- Check or select the relevant email address from the drop-down menu in the left-hand menu.
- Click on Filters and rules:
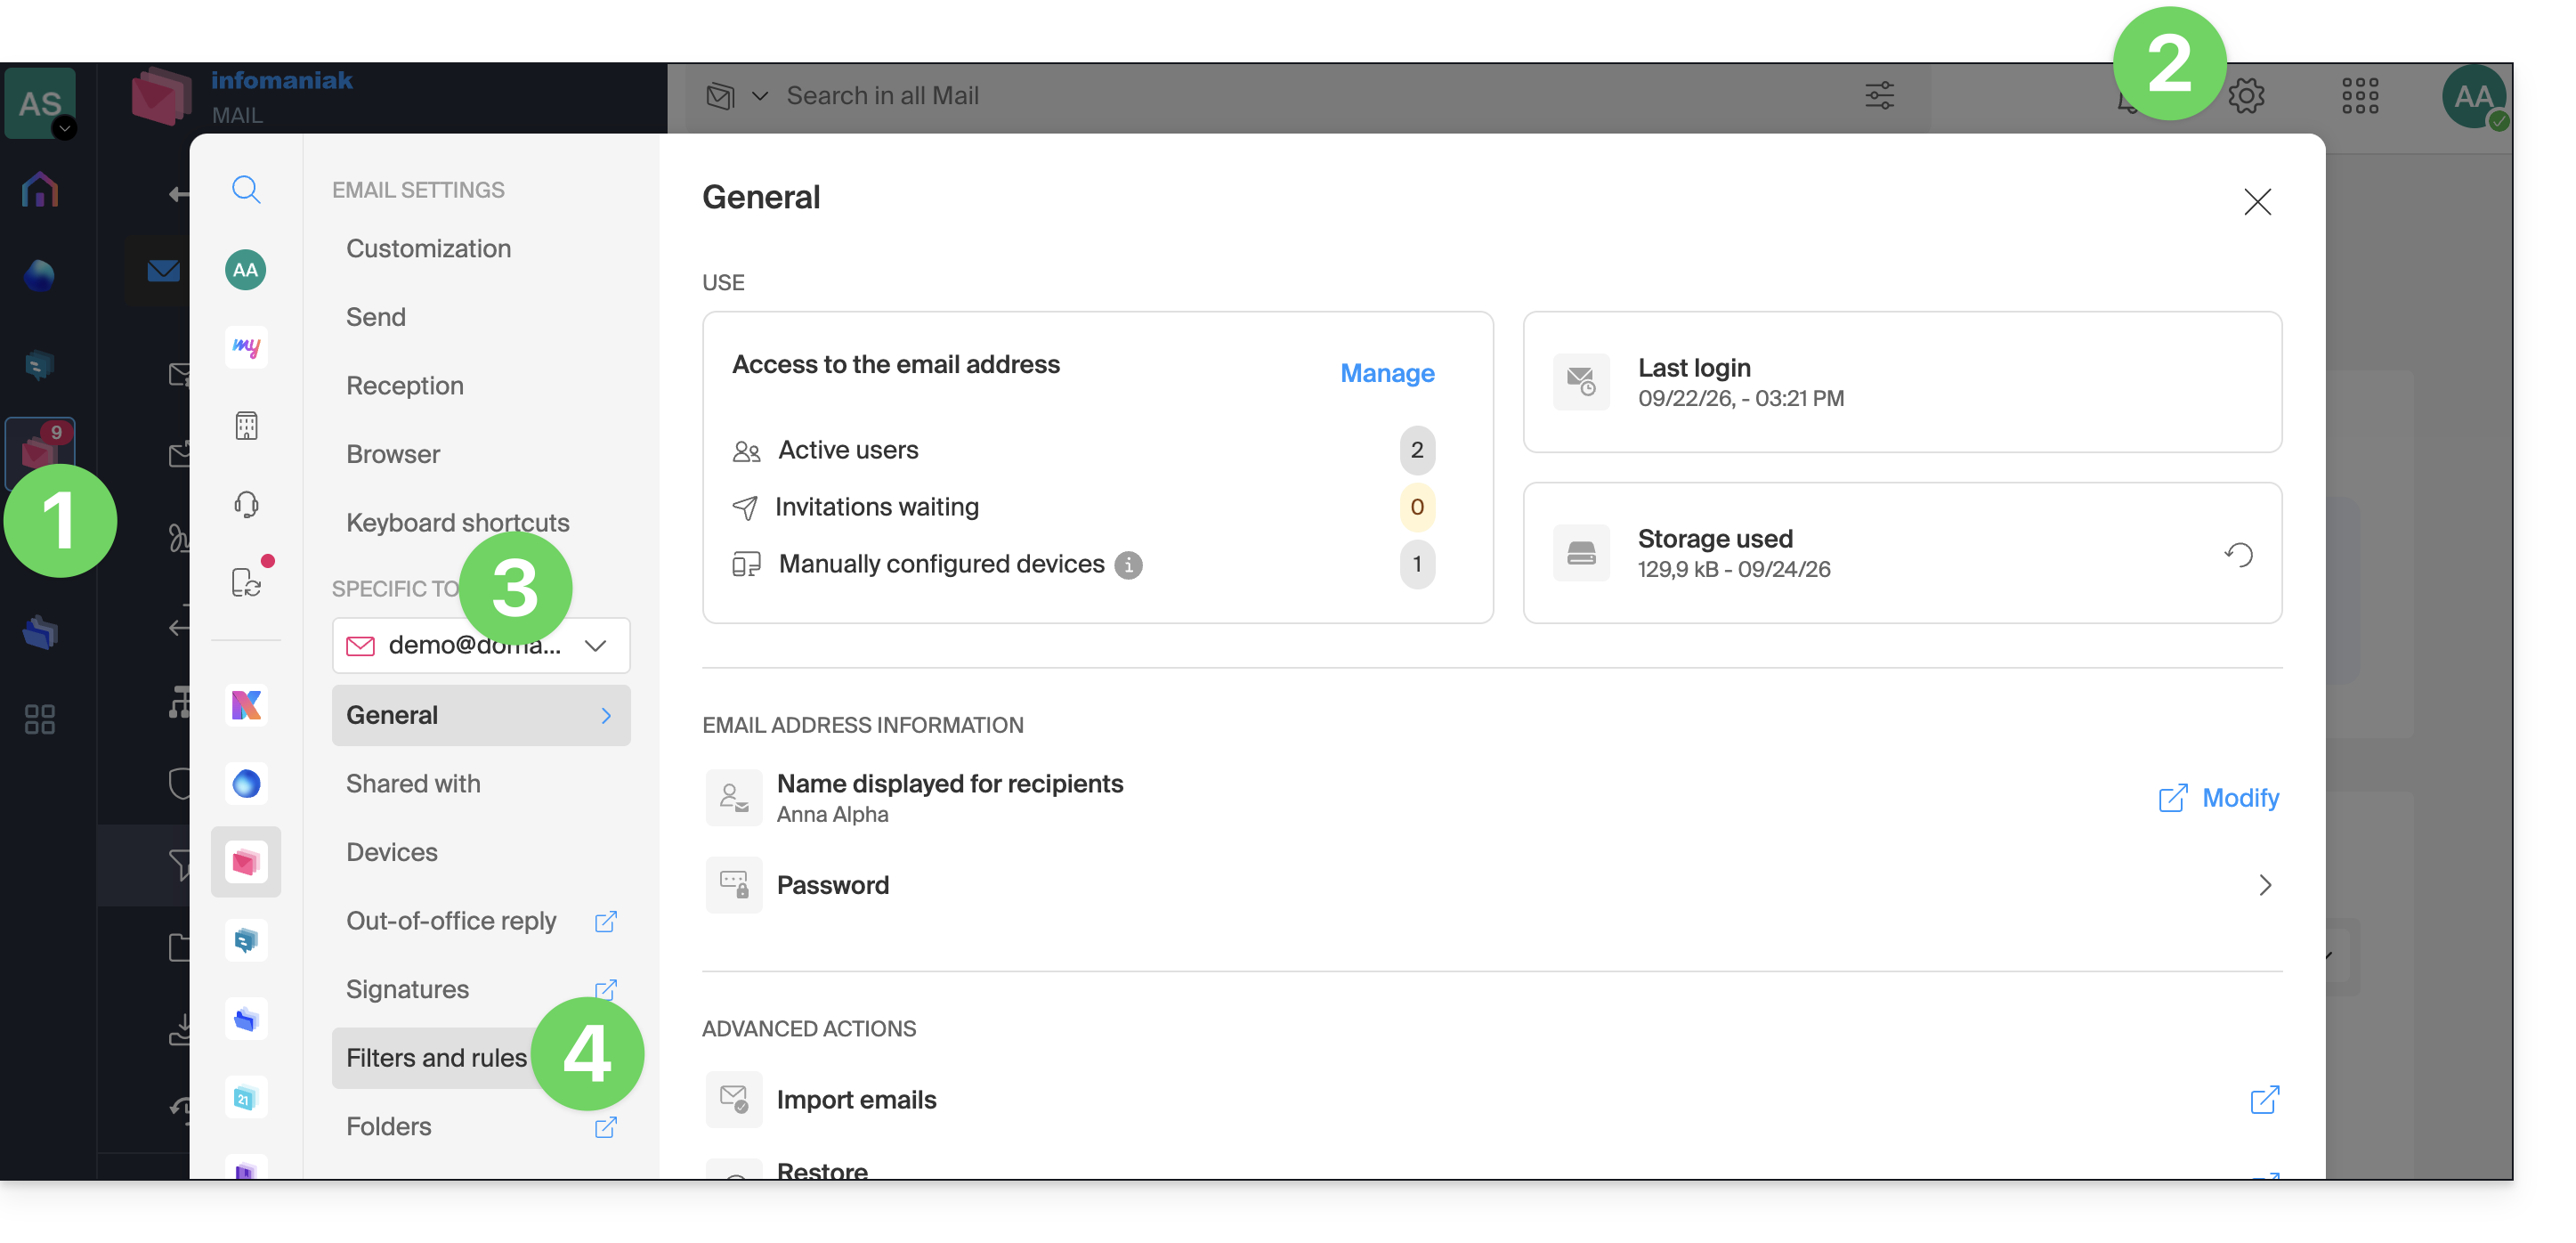
- Enable the ad filter option; the effect is immediate:
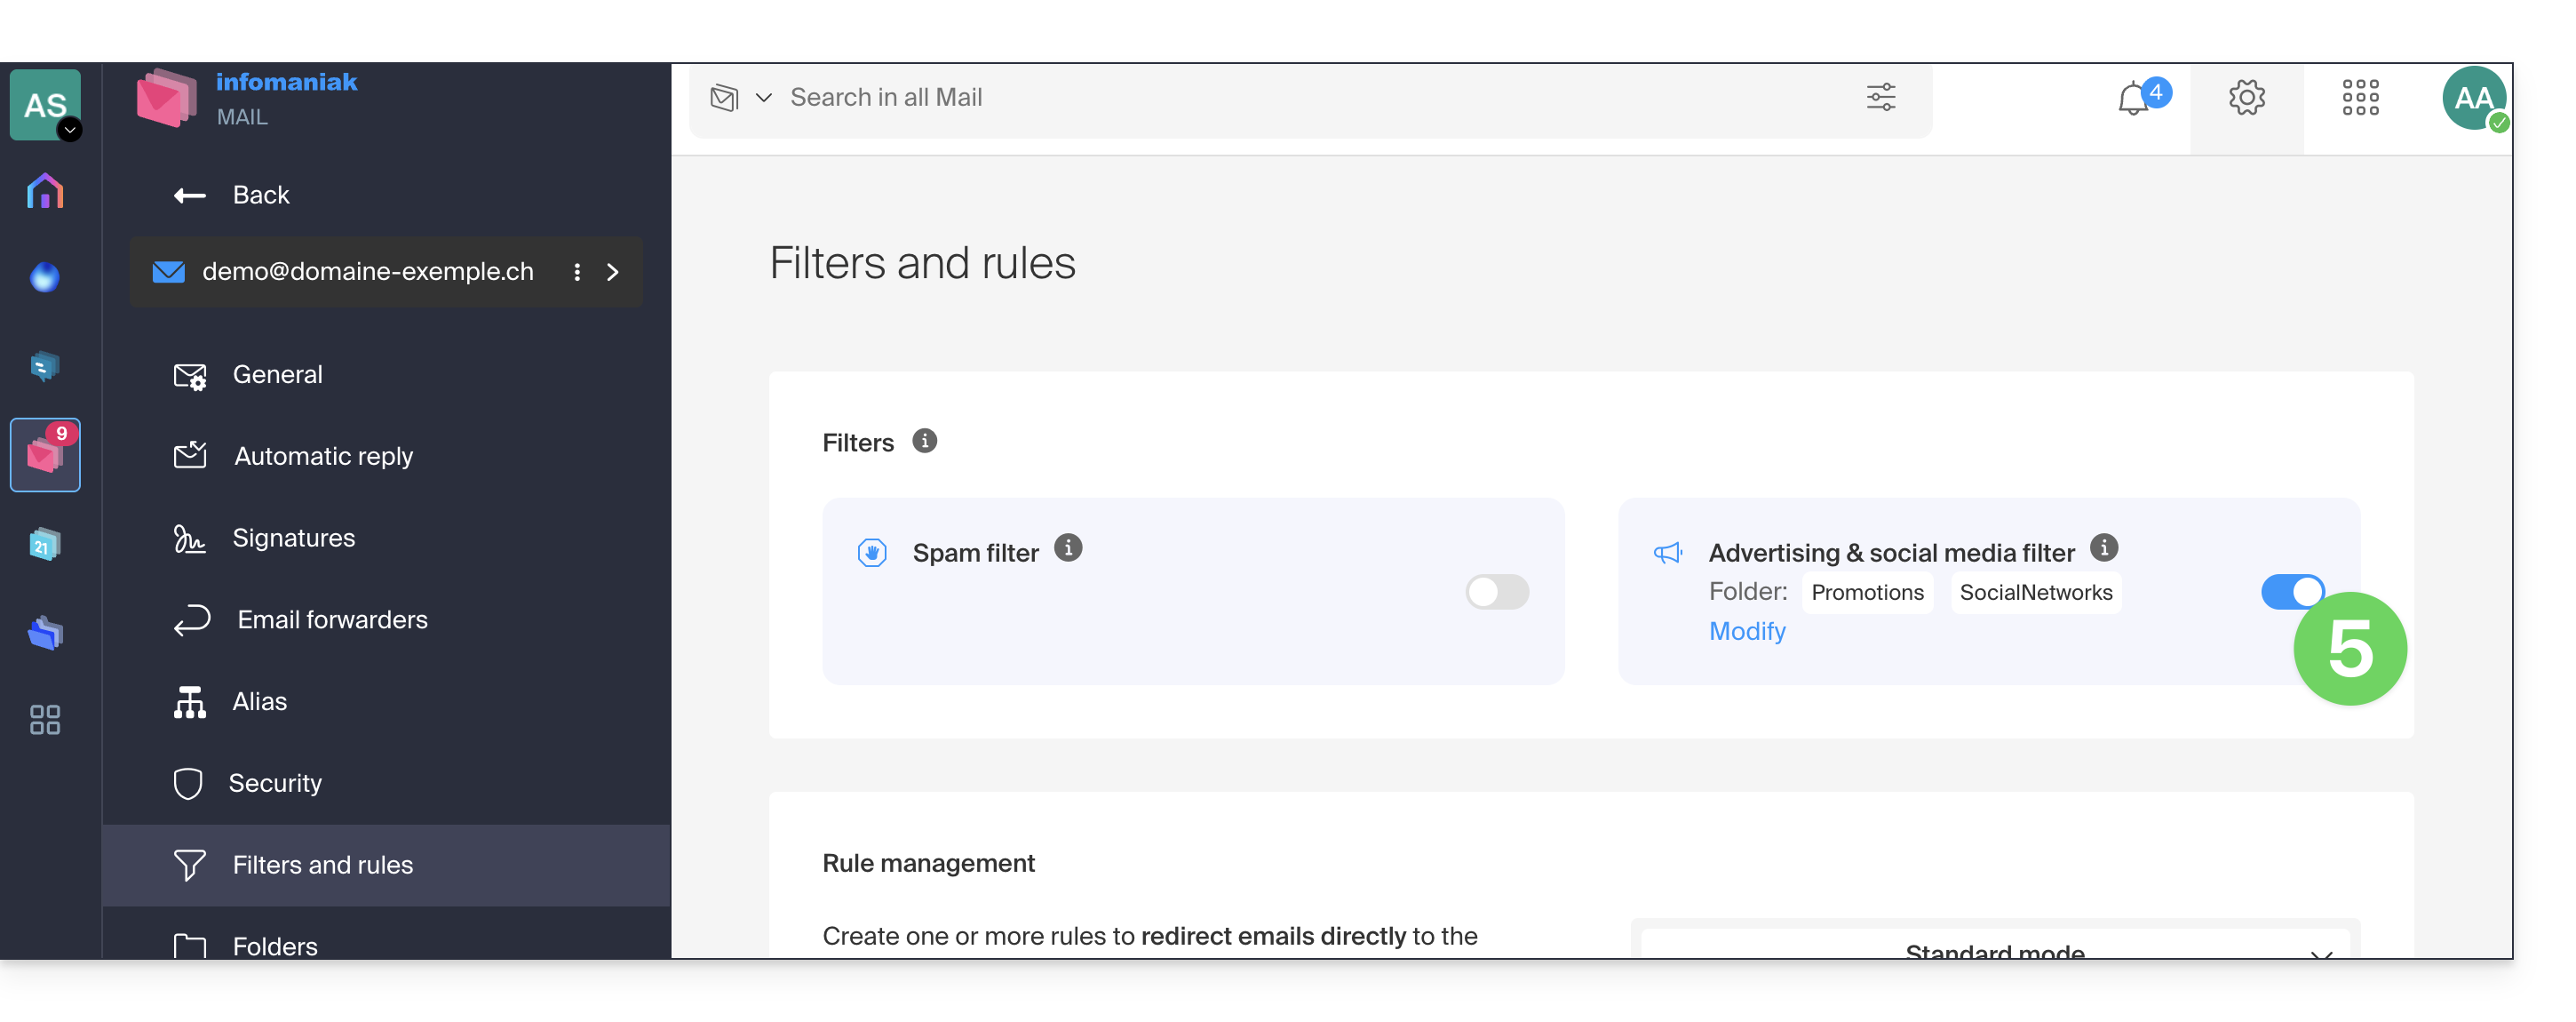
- To disable the filter, simply click the toggle switch again; in this case, all future incoming messages will go to the inbox.
Enable the option from a Mail Service
To access your Infomaniak email settings:
- Click here to access your product management interface on the Infomaniak Manager (❓: help).
- Click directly on the name assigned to the product in question.
- Click on the email address in question in the table that appears:
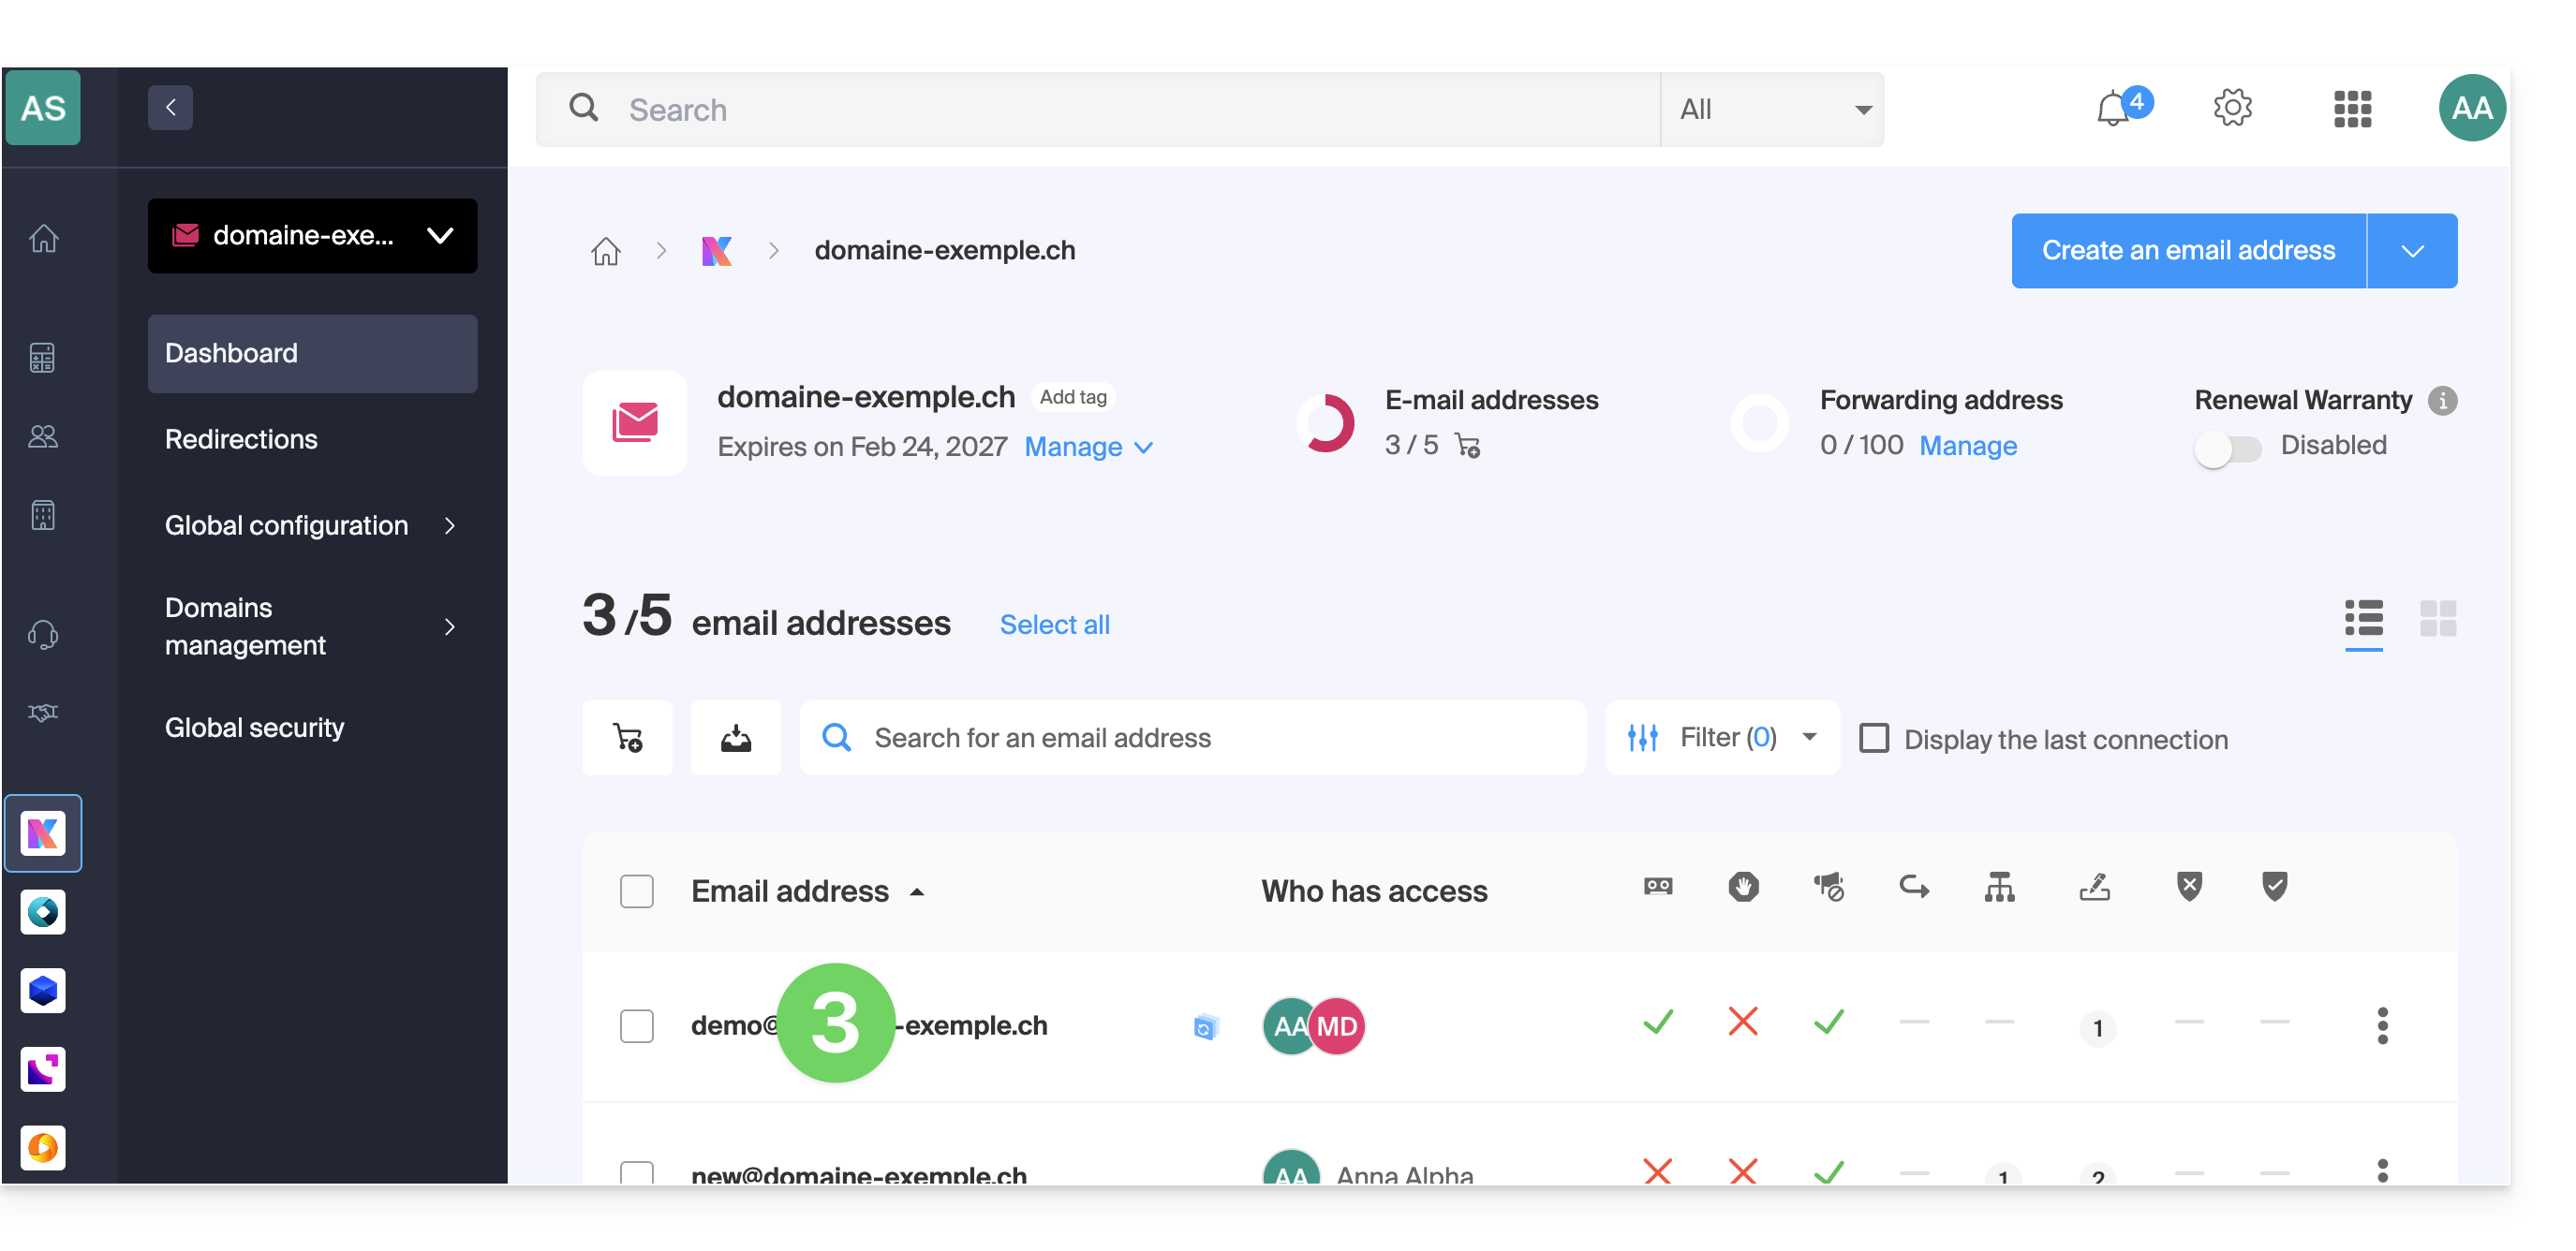
- Click on Filters and rules in the left-hand menu.
- Enable the ad filter option; the effect is immediate:
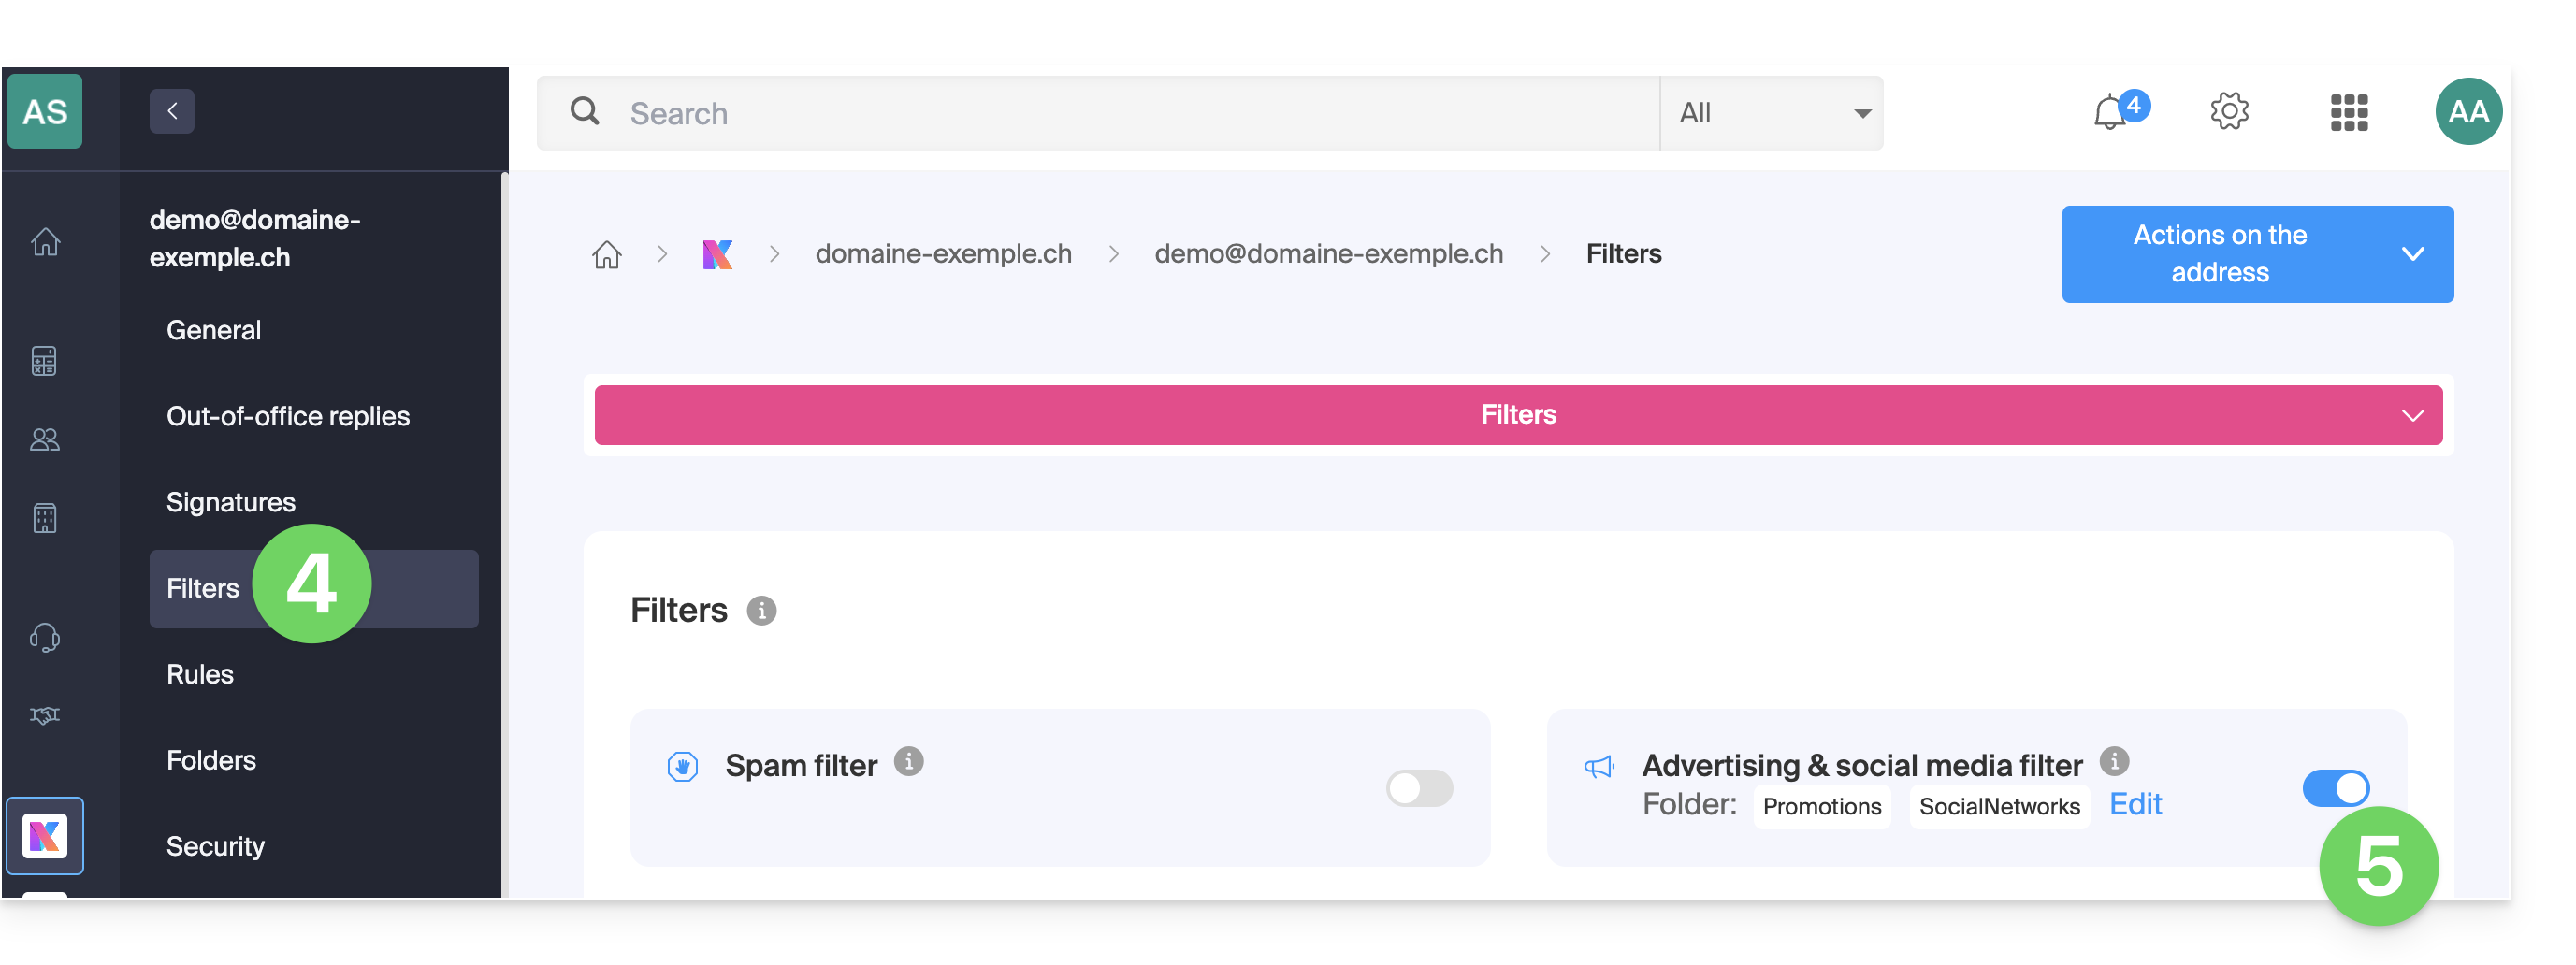
- To disable the filter, simply click the toggle switch again; in this case, all future incoming messages will go to the inbox.
Note that you can enable it in bulk for multiple addresses at once (❓: help).
Customize the ad filter
Email location
In the same location (point 5 in the images above), by clicking on Edit, you can choose the default location for the 2 folders where messages will be automatically placed, similar to special IMAP folders (❓: help).
Link to this FAQ: https://faq.infomaniak.com/2839
Has this FAQ been helpful?
This guide explains how to transfer to Infomaniak email addresses currently hosted by Swisscom, using an IMAP import tool.
Introduction
- This operation does not affect the data already present in the destination address, nor the data in the source address.
- The entire external mailbox will be imported.
- Once the import process has started, it is no longer possible to interrupt it.
- Any duplicates will be handled: identical content will only be copied once.
- Refer to this other guide if you are looking for alternatives to this IMAP process.
Import your entire email history
1. Swisscom Prerequisites
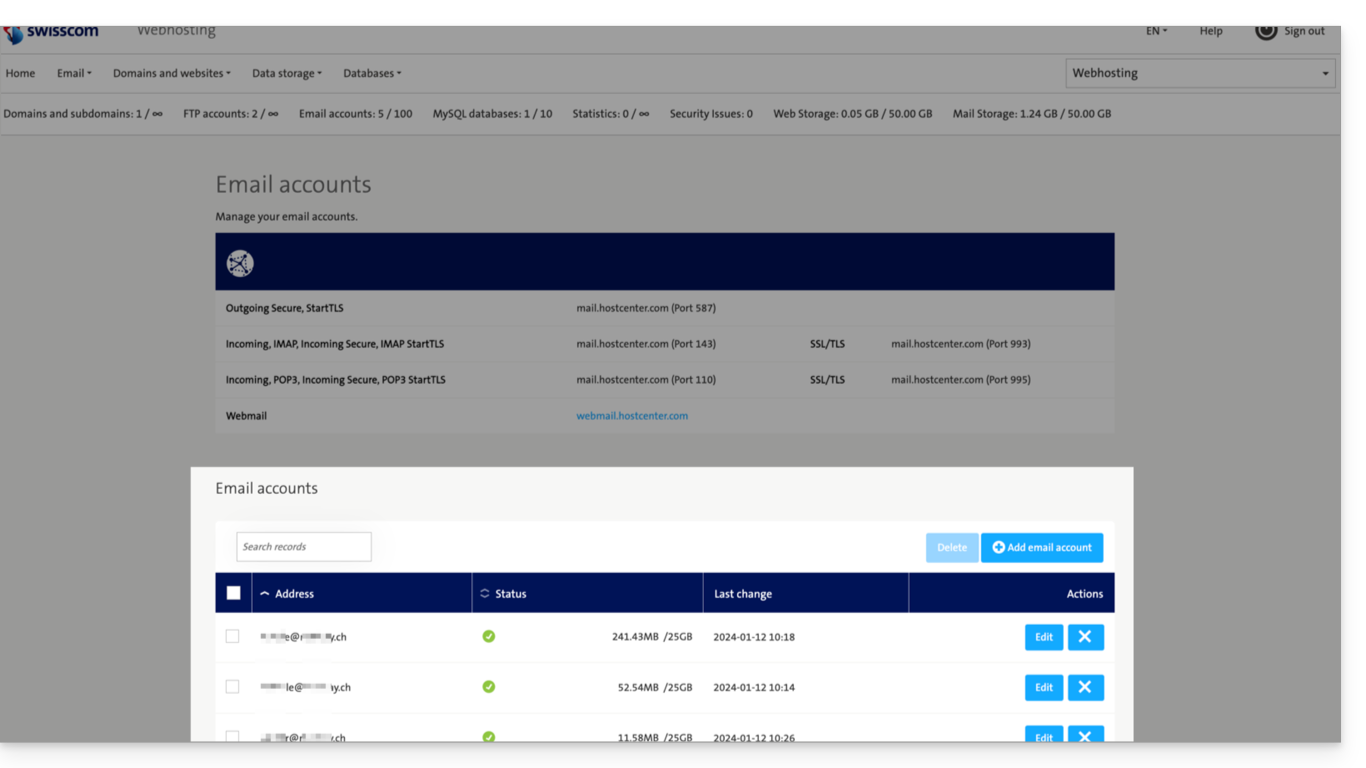
- If necessary, note down the specific email addresses you have with Swisscom so you don't forget any; to do this:
- Click here to access the Swisscom HCP Control Panel.
- Click on Manage account.
- Click on Email account:
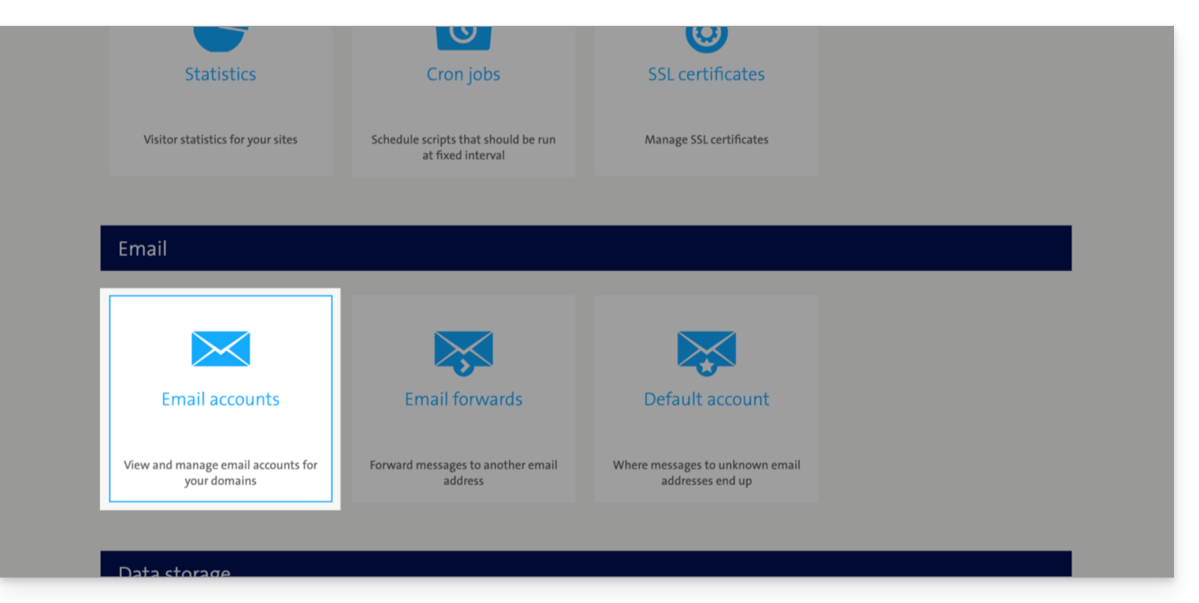
- The list of your current addresses is displayed at the bottom (click on Edit to the right of an email address to update its password if you have forgotten it):
2. Infomaniak Prerequisites
- You must have a Mail Service on your Infomaniak Manager.
- Have a number of available addresses or adjust it if necessary.
- Make sure your email is properly secured
- Create one or more addresses on this Mail service.
- If you have many (10+) email addresses to create, please refer to this other guide regarding bulk creation.
- The destination email address must be linked to the user (= the Infomaniak account) you are using.
3. Import your Swisscom email content to Infomaniak
- Click here to access the import tool (online service https://import-email.infomaniak.com).
- If necessary, log in to your Infomaniak account for the relevant organization; the import will be done to one of the email addresses associated with the Infomaniak Mail web interface (online service ksuite.infomaniak.com/mail) of the Infomaniak account you are using.
- Click on the IMAP import option.
- Click on one-time import.
- Fill in the field on the left with your source email address (the content of which you want to copy):
- Fill in the field on the right with the password for this same source email address (see prerequisites).
- If necessary, modify the Advanced Settings to specify an IMAP server address:
- Enter the IMAP server name
mail.hostcenter.com. - Leave the default port (993) and SSL enabled.
- Enter the IMAP server name
- Click on Confirm.
- If necessary, enter a second email address to be imported at the same time.
- Choose the email address from which to import emails; the drop-down menu lists the email addresses currently associated with your Infomaniak Web Mail interface (online service ksuite.infomaniak.com/mail) for the Infomaniak account you are logged into.
- After selecting the desired destination address from the list, click the blue Import Emails button.
- The copy process has started. You can wait and view the results on the page once the import is complete, or close the window (the import will continue in the background, and progress can be tracked - see below).
- A confirmation email will be automatically sent to all email addresses involved in the operation once the import is complete, indicating the number of messages copied.
- Tracking is available in the settings of the destination email address, only on the web app Mail (online service ksuite.infomaniak.com/mail).
- Tracking allows you to view the import history for the address in question.
4. Adjust the application settings
Once you have configured your domain name to work with Infomaniak, modify the settings of the email software/clients you use so that they connect correctly to the Infomaniak servers: follow the configuration wizard.
Link to this FAQ: https://faq.infomaniak.com/2852
Has this FAQ been helpful?
Infomaniak tools, such as the Web Mail app (online service ksuite.infomaniak.com/mail) or the Calendar, Contacts, kSuite interfaces, can be displayed in light mode or dark mode, including based on the settings of your current operating system:
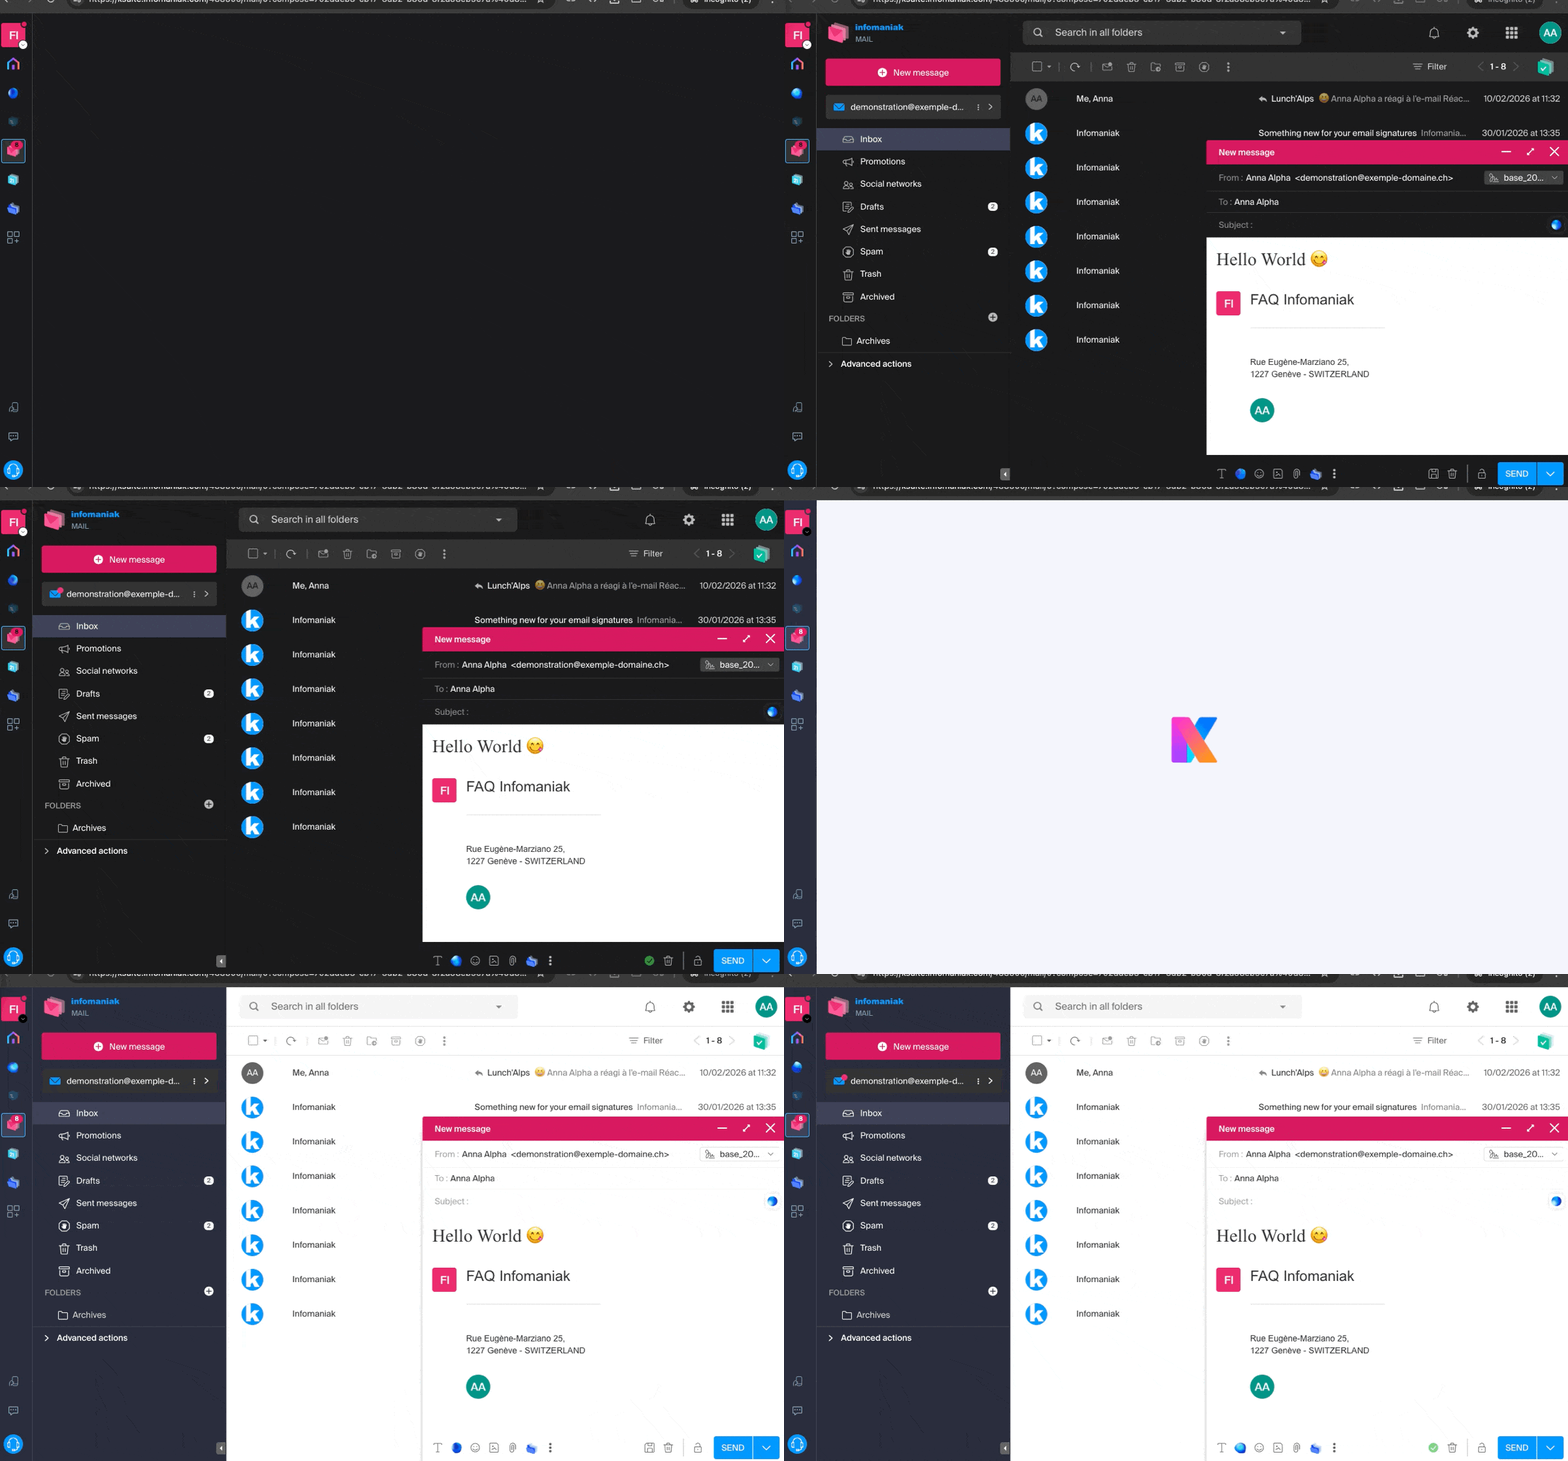
Enable manual mode
To manually choose a dark or light display, without relying on a potentially different display setting on the operating system:
- Click here (or on the badge with your initials / avatar in the top right corner of the Infomaniak Manager) to "Manage my account":
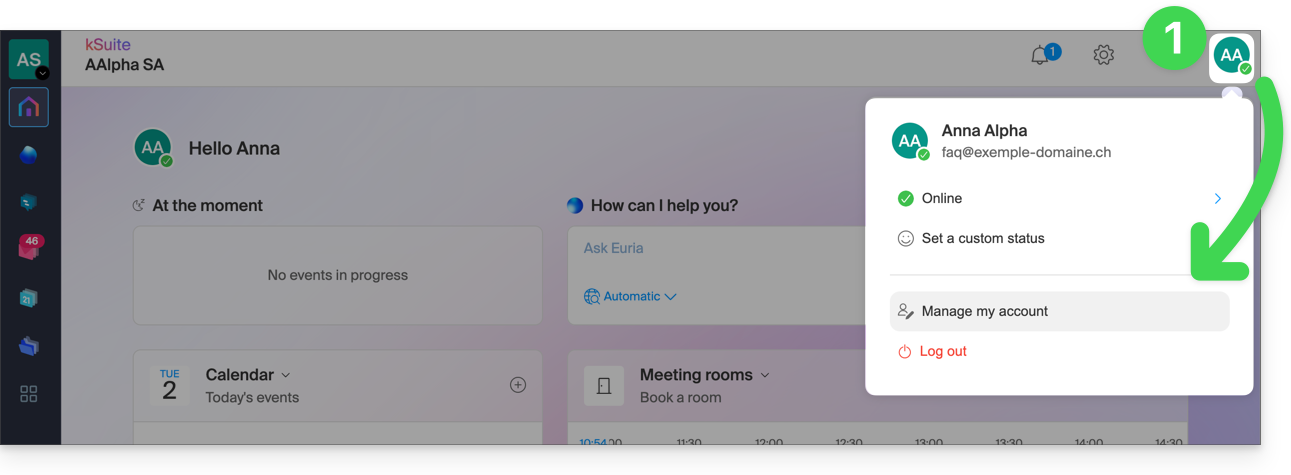
- Then, click on Appearance in the left-hand menu.
- Click on Light to apply the light mode:
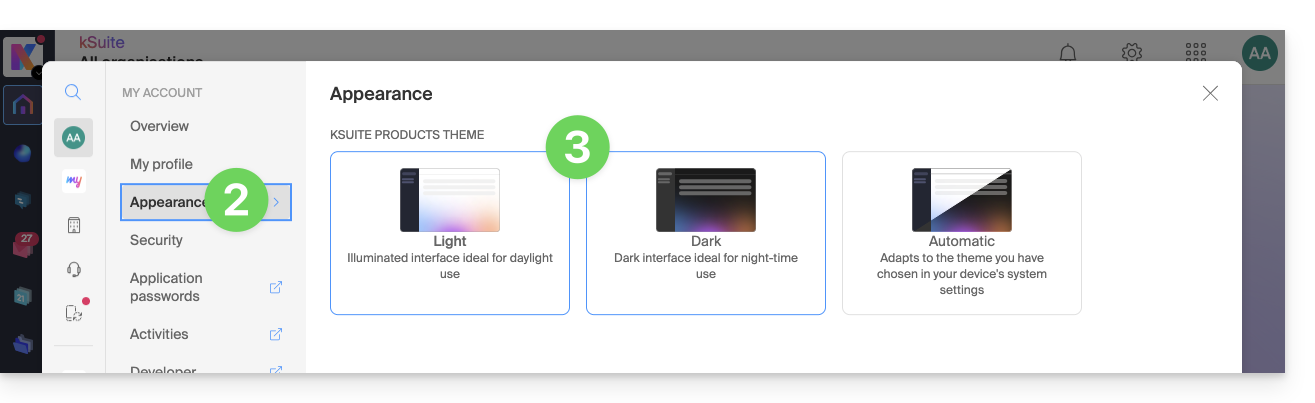
- Click on Dark to enable dark mode.
Enable automatic mode
Automatic mode is based on your operating system settings (macOS / Windows...):
- Click here or on the badge with your initials / avatar in the top right corner of the Infomaniak Manager to "Manage my account":
- Click on Appearance in the left-hand menu.
- Click on Automatic mode:
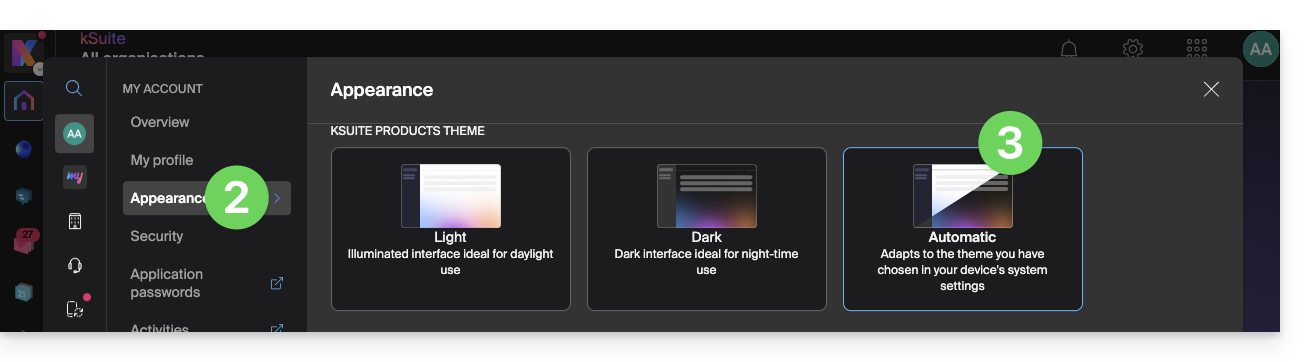
Then, if you want to change the light or dark theme on your computer, so that the automatic mode in the Manager takes your preferences into account…
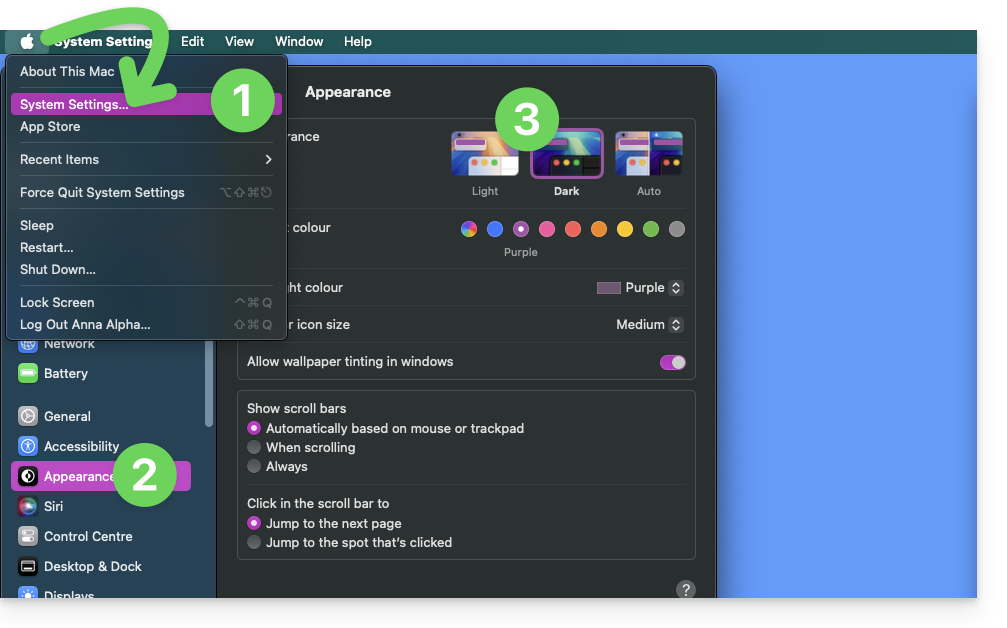
… on macOS
- Click on System Preferences…
- Click on Appearance.
- Choose the desired mode on the right:
… on Windows
- In the Start menu, open Settings > Personalization.
- Select Colors, then Choose your mode:
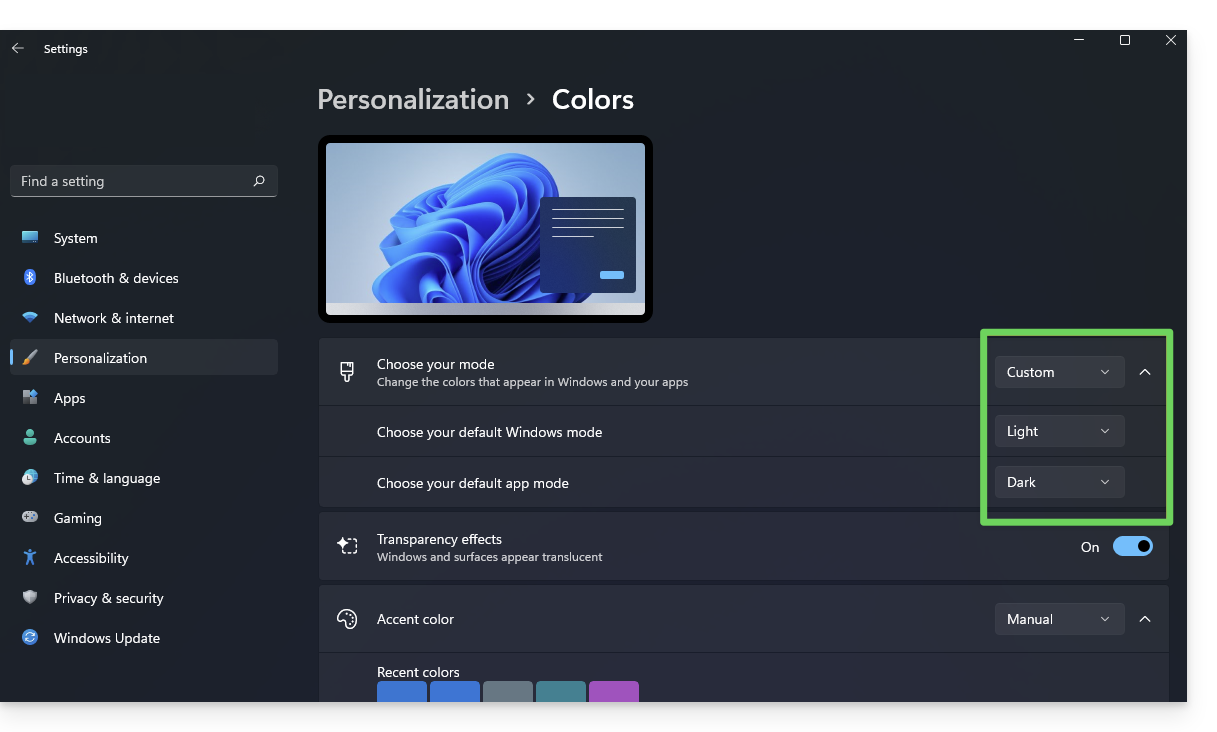
- You can choose between Light, Dark, or Custom.
- If you select Custom, you will have the option to choose a default Windows mode and a different default application mode.
And on mobile?
Dark mode is enabled on mobile devices for Infomaniak login and account creation pages; it automatically adapts to the mobile system's preferences, providing a consistent visual experience between mobile apps and login/account creation.
Link to this FAQ: https://faq.infomaniak.com/2870
Has this FAQ been helpful?
This guide explains how to obtain and install an application on your computer from certain Infomaniak interfaces, such as the kSuite interface or those that allow you to directly manage your calendars or your address books.
Introduction
- A Progressive Web App (PWA) is an application designed for the web and offering an experience similar to that of a native application.
- PWAs are fast, accessible directly from your browser, and can offer features such as offline operation or sending notifications.
- Installing a PWA allows you to create an independent application on your computer, without going through a traditional store.
Install a progressive web app (PWA)
To download the PWA app (example here with Mail Infomaniak), depending on the browser used:
- Click here to access the Calendar Infomaniak web app.
- Once the page has loaded, check for the installation icon in the browser's address bar (often represented by a screen with a “+”):
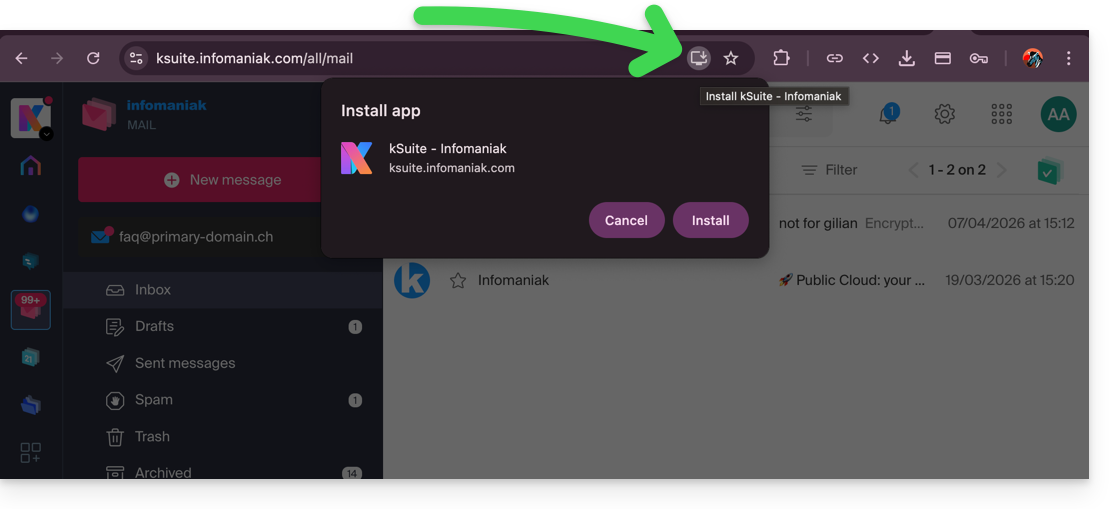
- Google Chrome / Chromium :
Click on the installation icon in the address bar, or open the ⋮ menu and click on Install [application name]. - Microsoft Edge :
Click on the Applications icon in the address bar or open the ⋯ menu, then select Applications > Install this site as an application. - Mozilla Firefox :
The installation of PWAs is not fully supported natively. However, it is possible to use alternative solutions (extensions or shortcuts) to simulate similar behavior. - Safari (macOS) :
From recent versions of macOS, open the File menu and click on Add to Dock to create a web application.
- Google Chrome / Chromium :
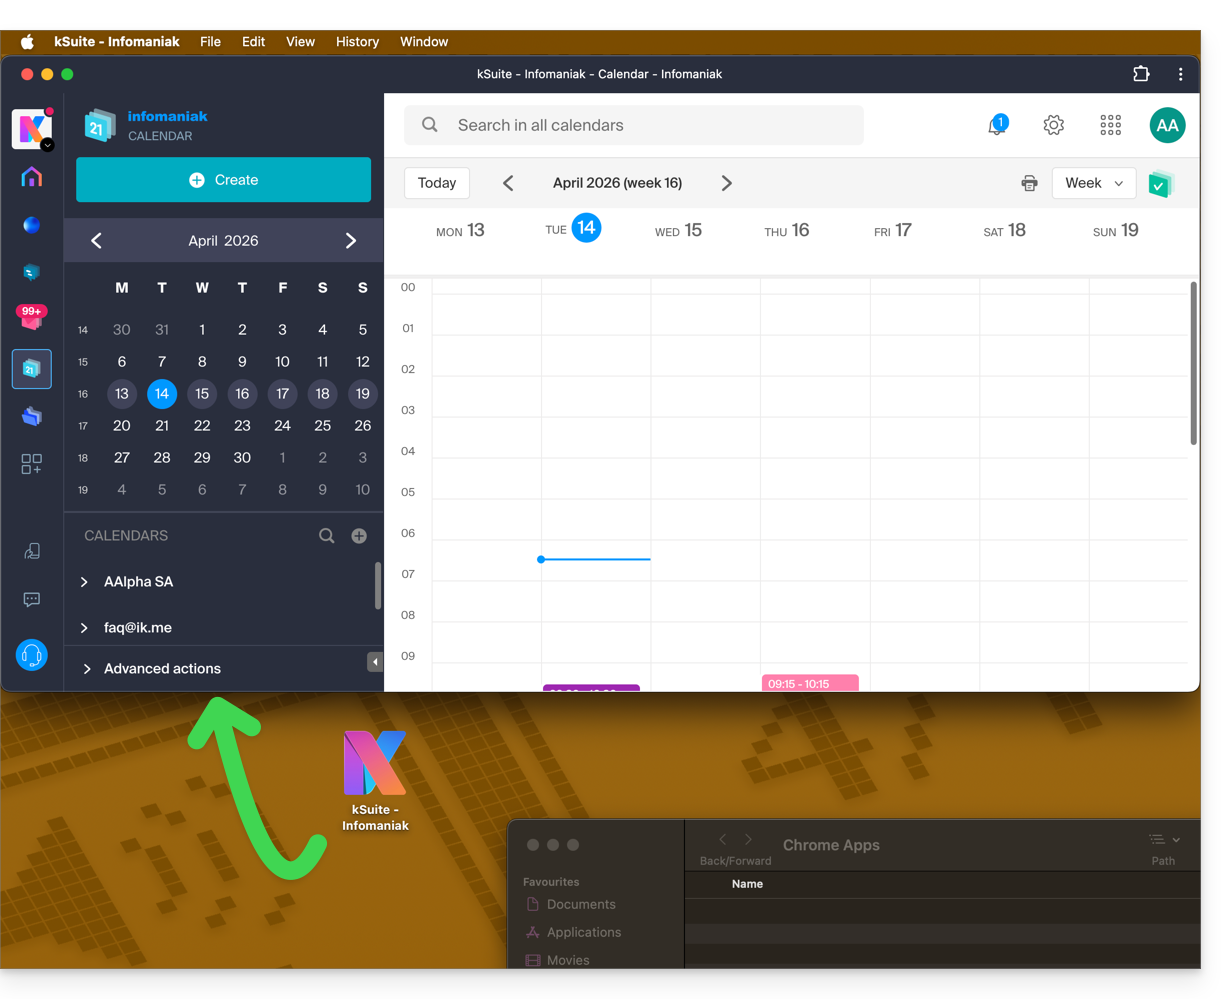
- The app is then available on your computer (example here with Calendar Infomaniak) and allows you to open the data while being completely independent of the browser:
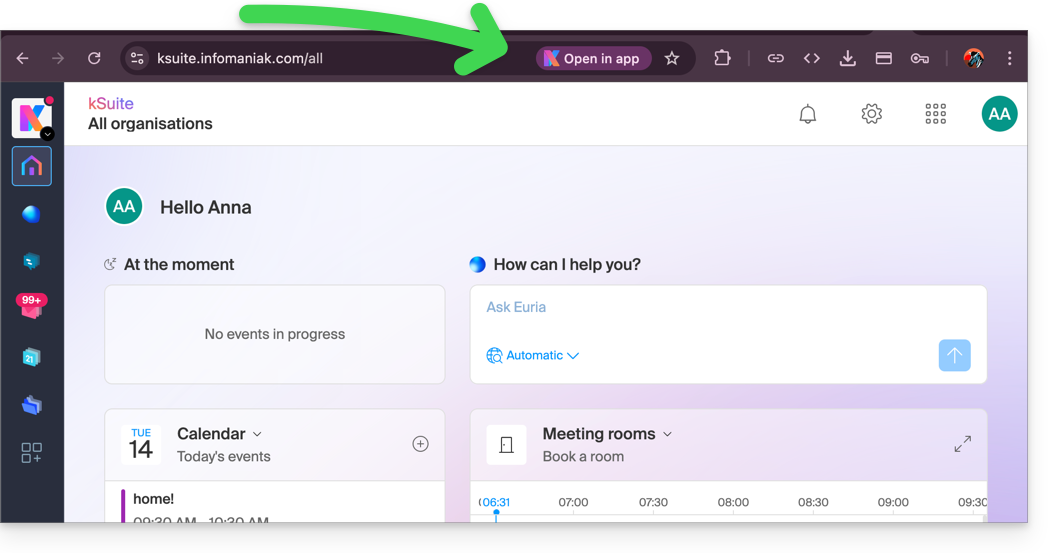
- When the app is detected on your computer, you can easily return to the app from the browser when you are on other Infomaniak pages (example here with a kSuite user space):
Remove the Infomaniak “PWA” app
To remove this local application system:
- Open the application you previously installed.
- Click on the action menu ⋮ or ⋯, depending on your browser.
- Select Uninstall or Remove app.
- Confirm the removal if necessary.
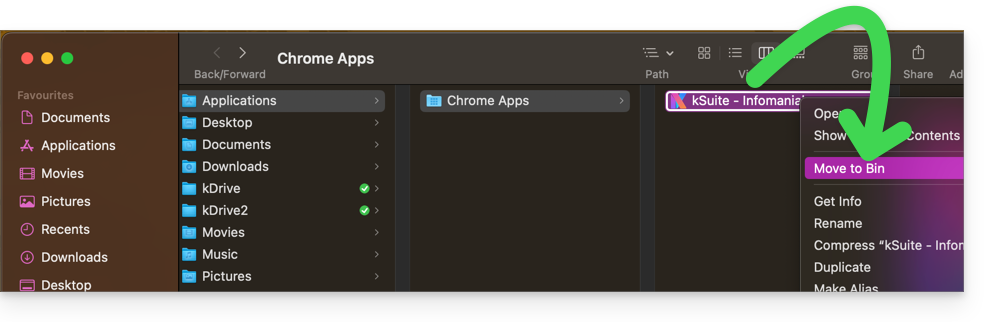
- You can also delete the application directly from your operating system (like any other application) or move the icon to the trash:
Link to this FAQ: https://faq.infomaniak.com/2872
Has this FAQ been helpful?
This guide presents the email authentication mechanisms and ways to resolve the Sender Mismatch error.
Introduction
- The "Sender Mismatch" error occurs when the address used to send an email does not match the authentication address used when connecting to the SMTP server.
- This error is related to two specific elements:
- the
Return-path(also called "envelope sender"), which is used by the mail server to manage returns and delivery errors, - and the
Fromheader, which is the sender address visible to the recipient in the message.
- the
Troubleshooting the Sender Mismatch Error
Technically, when sending an email via a software/email client, you must authenticate using a username (your email address) and a password.
If, after authentication, the sender address specified in the "From" or "Return-path" header is different from the address used for authentication, the Infomaniak server may consider this a forgery attempt.This inconsistency triggers the "Sender Mismatch" error.
To fix this error:
- Make sure that the email address used for sending is the same as the one you use to log in (or a valid alias).
- Do not modify the
Return-pathaddress or theFromheader to use another unauthorized address (if necessary, please refer to this other guide to test another email application or configure your current email software/client correctly).
Link to this FAQ: https://faq.infomaniak.com/2887
Has this FAQ been helpful?
This guide details the steps to follow when you want to “release” the management of an email address that is currently “restricted” by the use of an Infomaniak account with the same name.
Introduction
- For example, the email address
benevolon the Mail Serviceexample.xyzwill no longer be shareable with other users once an Infomaniak account is created with a login ID in the form of the email addressbenevol@example.xyz. - Therefore, a procedure exists for the administrator of a Mail Service to activate the release of the corresponding Infomaniak account if necessary.
- The corresponding email address, which was previously linked and accessible, will no longer be, but the account data will not be deleted.
- Only the login address should be provided in a different form by the user in question.
Request to unblock the Infomaniak account
To enable the deletion of the login ID when it is identical to an email address that can no longer be shared, the Mail Service administrator must go to the Manager:
- Click here to access the management of your product on the Infomaniak Manager (need help?).
- Click directly on the name assigned to the product in question.
- Click on the email address in question in the table that appears.
- Under the General tab, you can see the users who have accessed this address, and among them, you will find the relevant user.
- Click on the Add button in the Users section (an operation that is currently not possible):
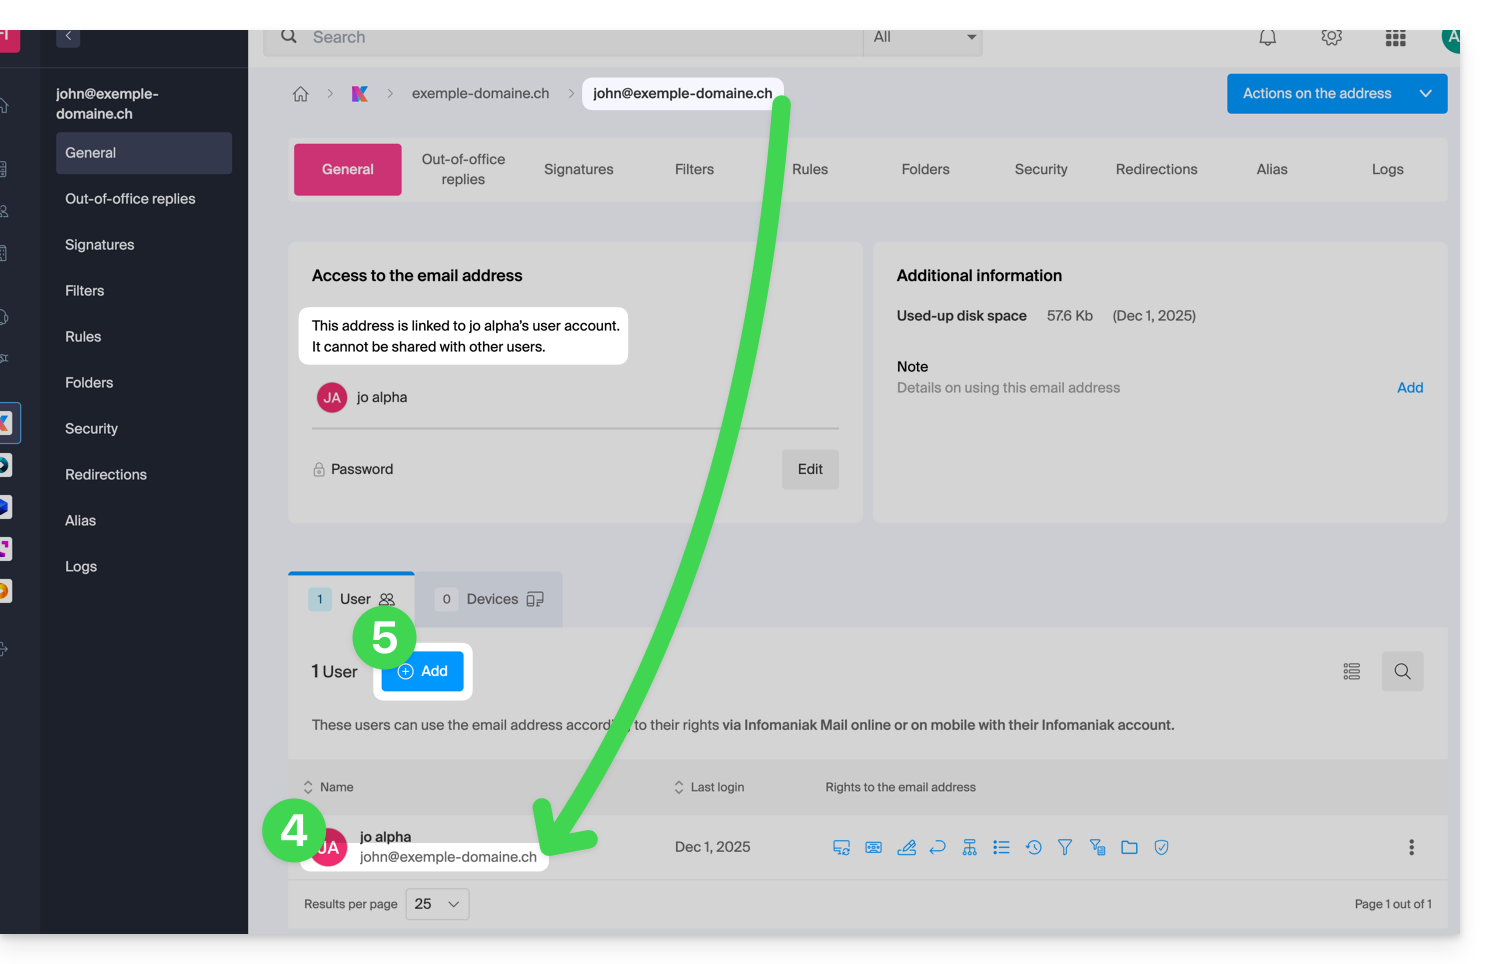
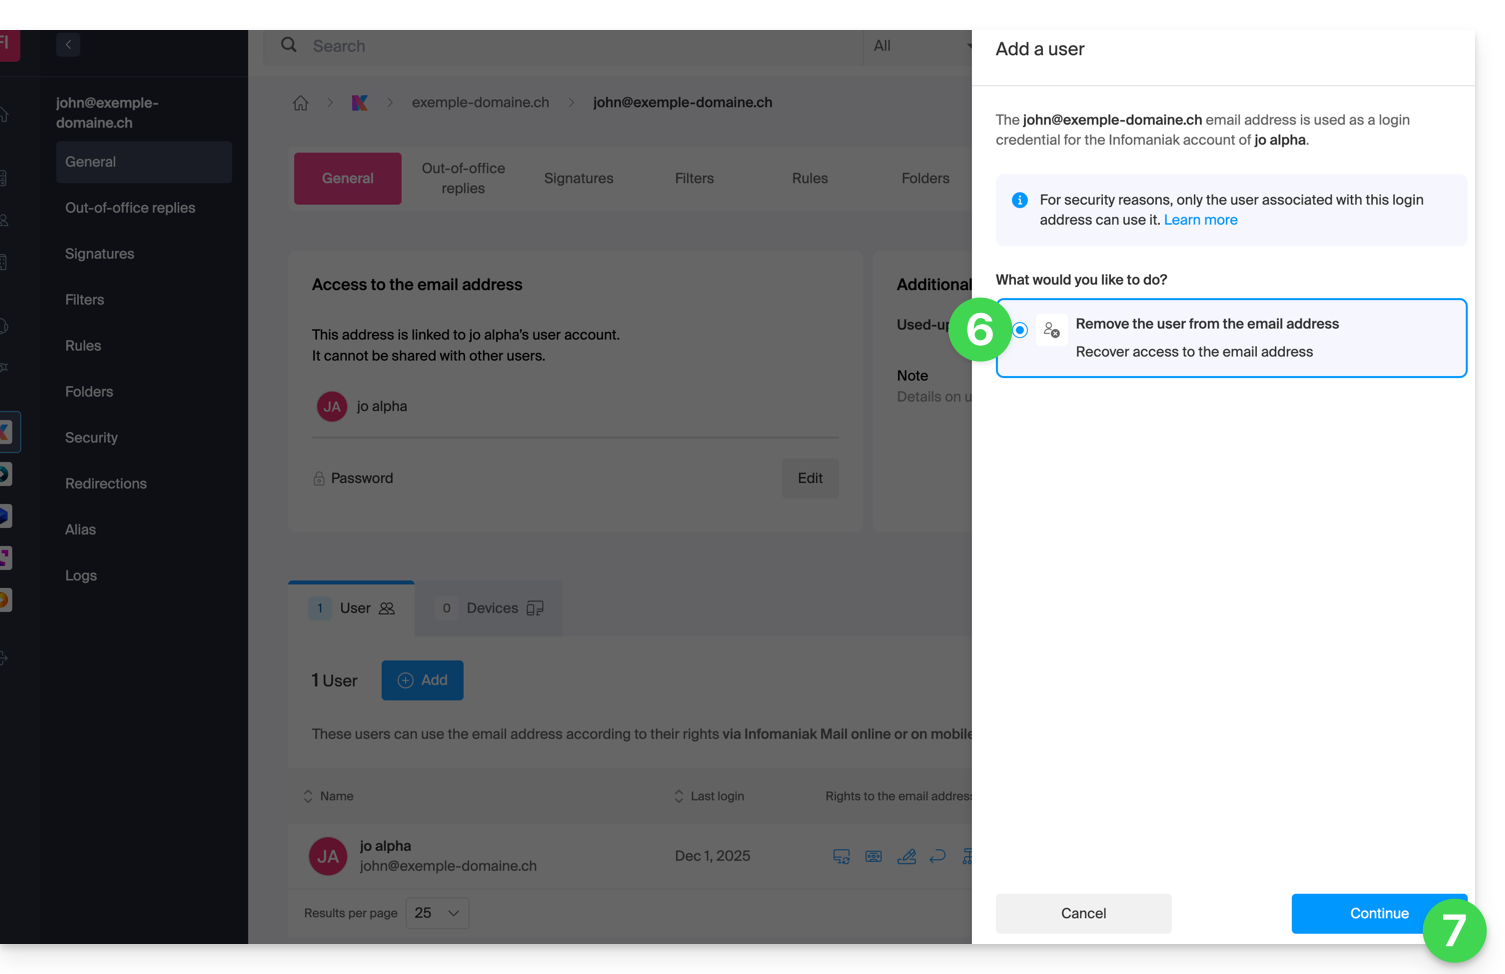
- In the right sidebar, the wizard for freeing up the address will open; click the radio button to activate the operation.
- Click on Continue:
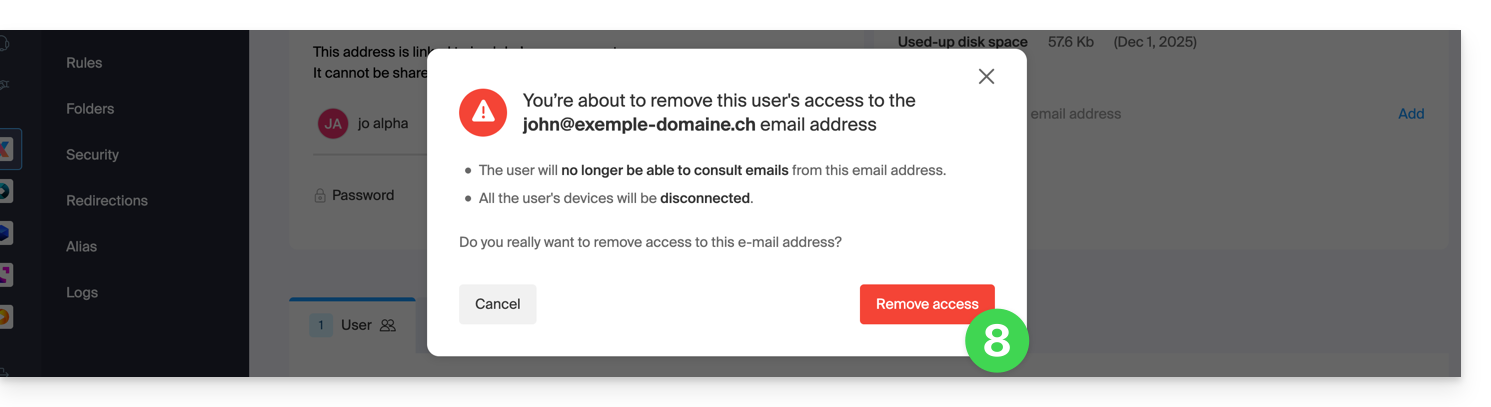
- Confirm the user logout operation:
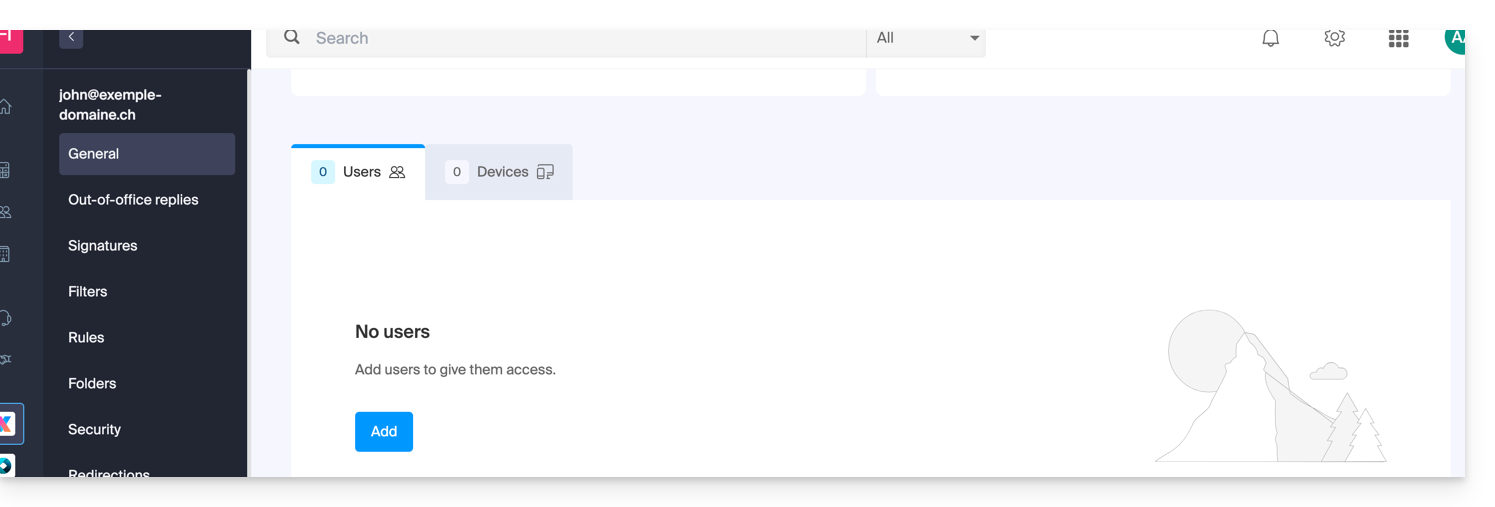
- The linked user disappears from the user page:
- At the same time, he receives a similar SMS to the example below, on the phone number he provided during registration:
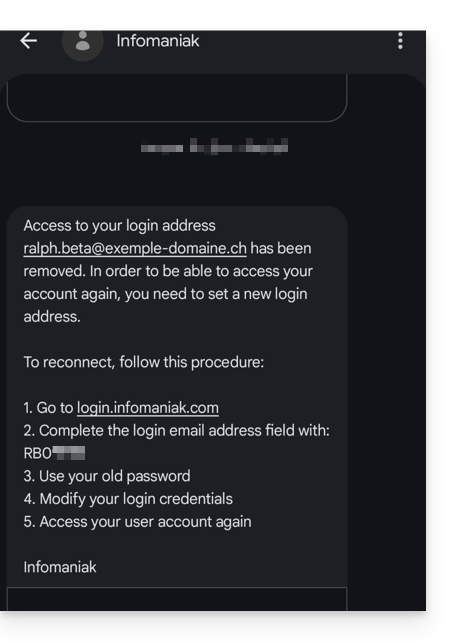
- This SMS tells him the steps to follow to reconnect to his Infomaniak account with another email address of his choice (see below).
Recover access to your Infomaniak account
To regain access to your Infomaniak account now that you can no longer access it with your old email address, the Infomaniak account user must go to the address mentioned in the SMS:
- Click here to access the login page.
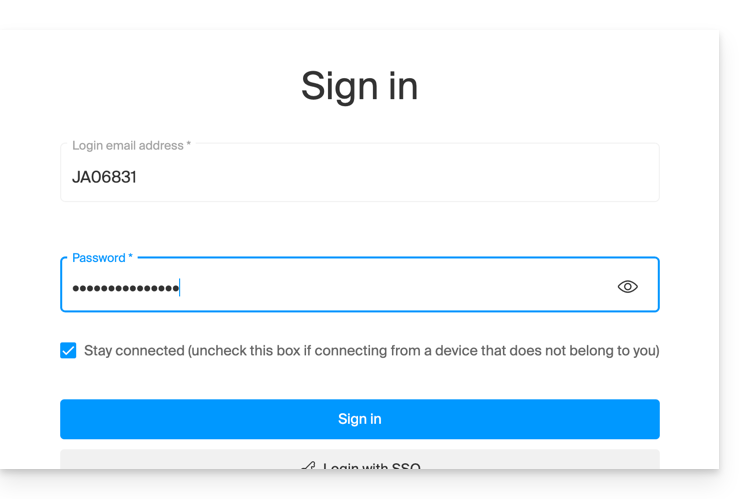
- Enter the username specified in the SMS (usually the initials of your account followed by a series of numbers).
- Enter your usual password (it has not changed):
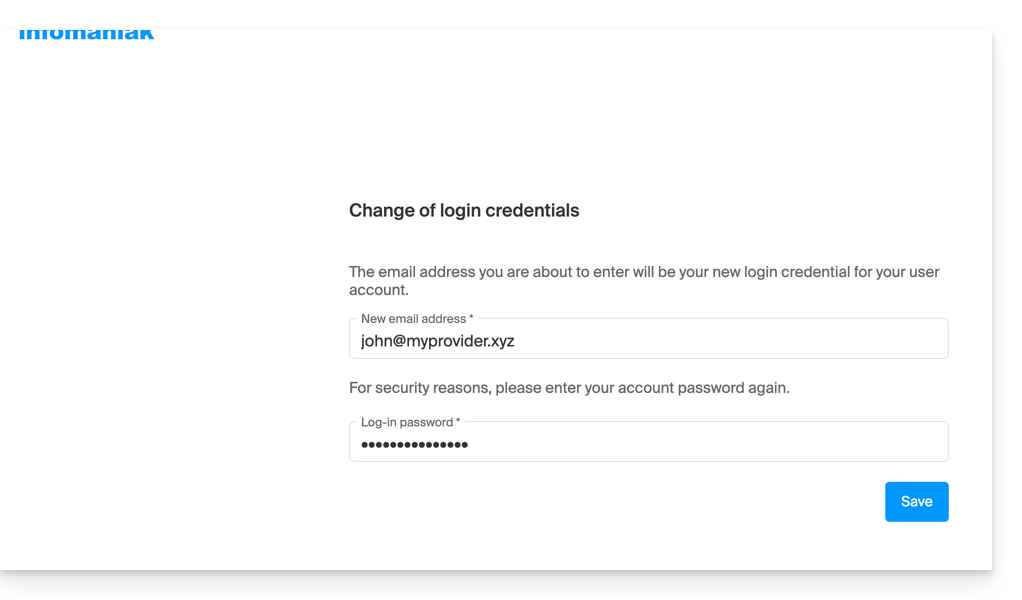
- Enter the new information requested:
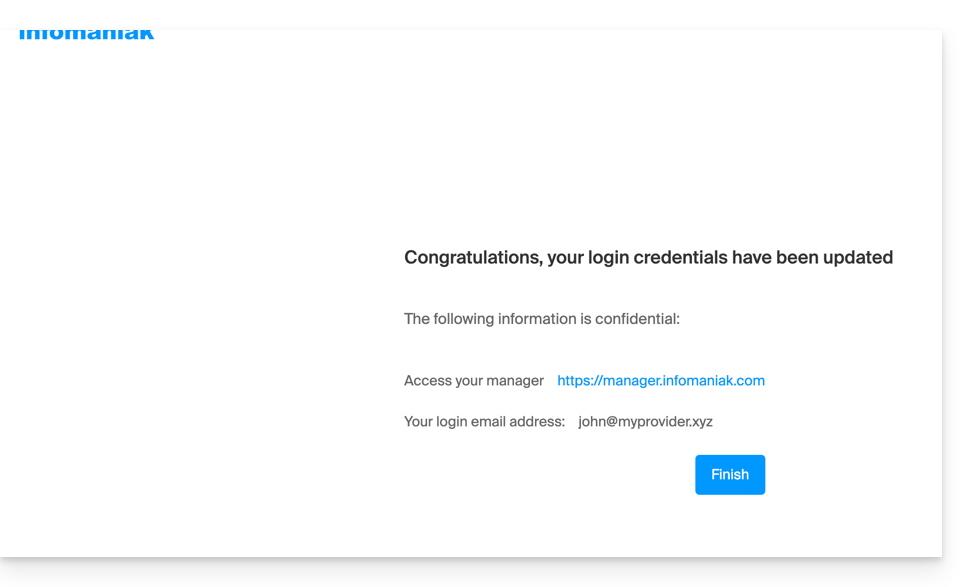
- You will be logged back into your account:
Link to this FAQ: https://faq.infomaniak.com/2895
Has this FAQ been helpful?
This guide details the feature that allows you to tag (identify/mention) contacts when composing a new message in the Infomaniak Mail web app (online service ksuite.infomaniak.com/mail).
Introduction
- You can only insert contacts from existing address books within the Organization, and only if their email address is provided.
- You can also mention an email address that is not in any address book.
- The contact or email address mentioned during composition will be automatically added to the email recipients.
- It will be visually identified in the text with an
@followed by the name/first name or email address in the case of a non-existent contact. - The recipient mentioned in an email will also be distinguished in their inbox with a specific
@icon. Please note: removing a contact mention from the message being composed does not remove their email address from the recipients (and vice versa).
Mention a contact/email address in an email
To tag (identify/mention) contacts:
- Click here to access the Infomaniak Mail web app (online service ksuite.infomaniak.com/mail).
- Compose a new message:
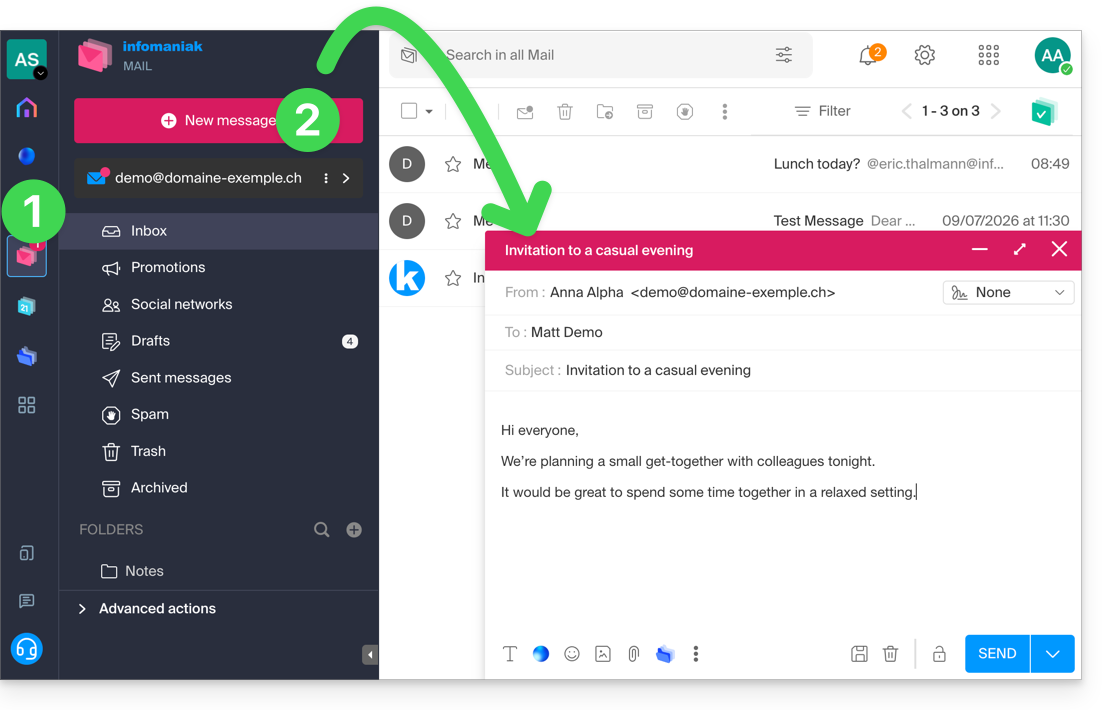
- In your message, type the at symbol (
@) followed by the first letters of a contact or email address: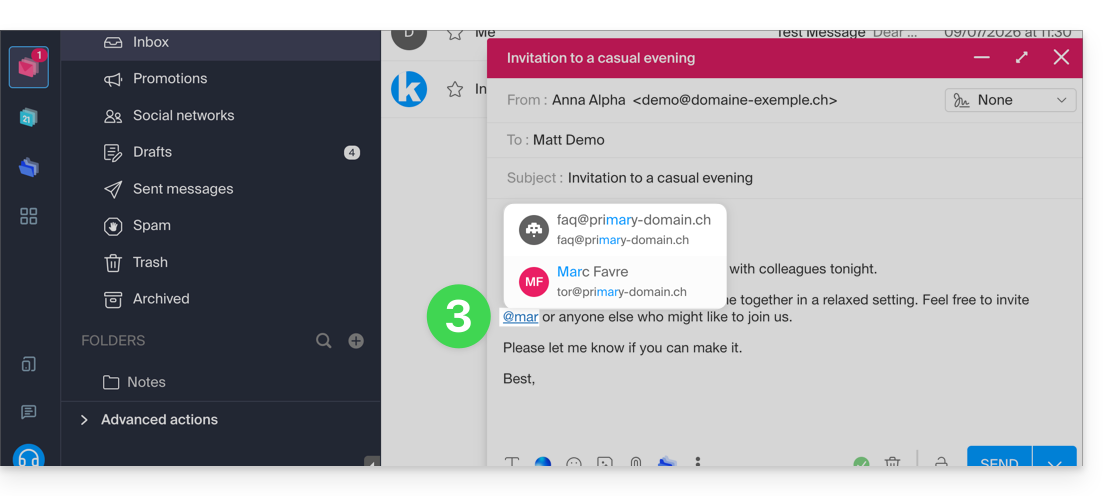
- The selected user is added to the email recipients.
- You can send the message to the recipients:
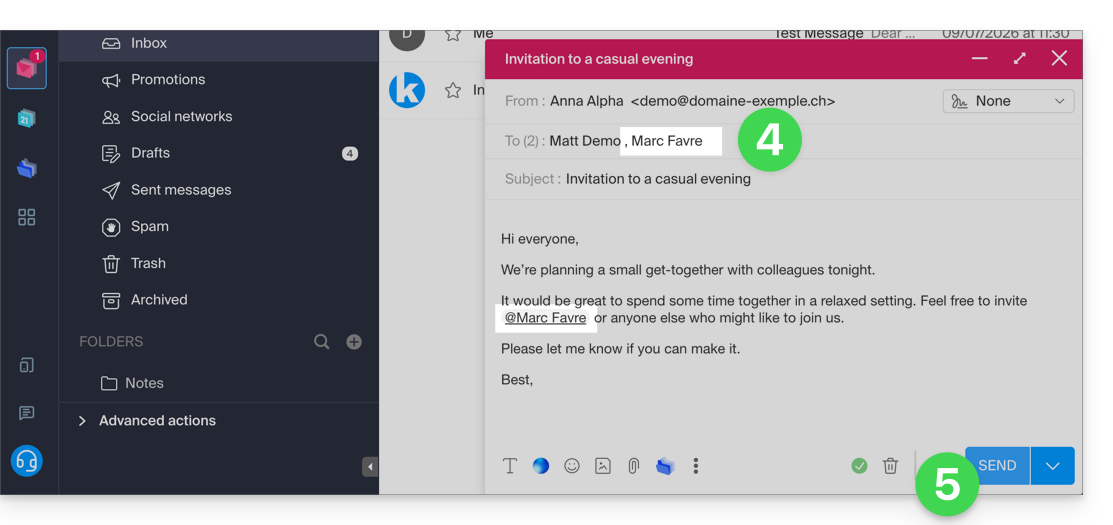
- The message arrives to the recipients, with a specific mention
@visible when the message is unread: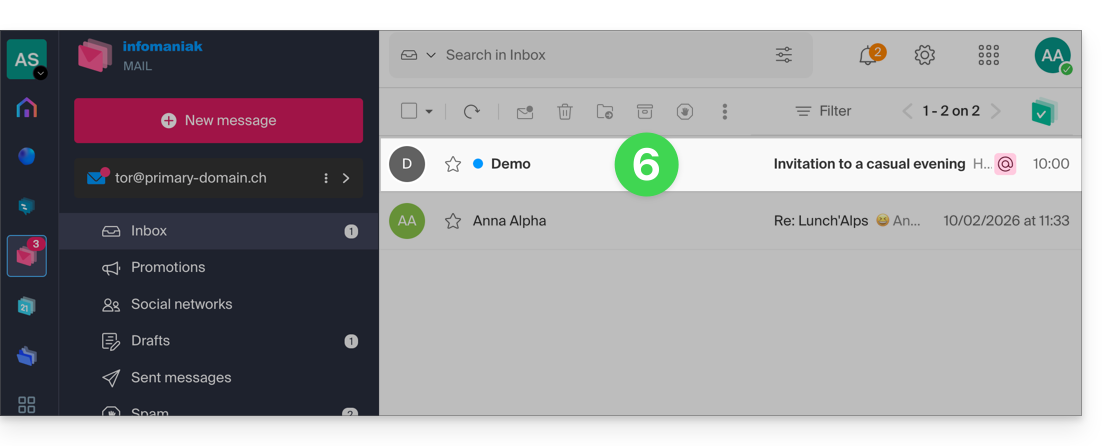
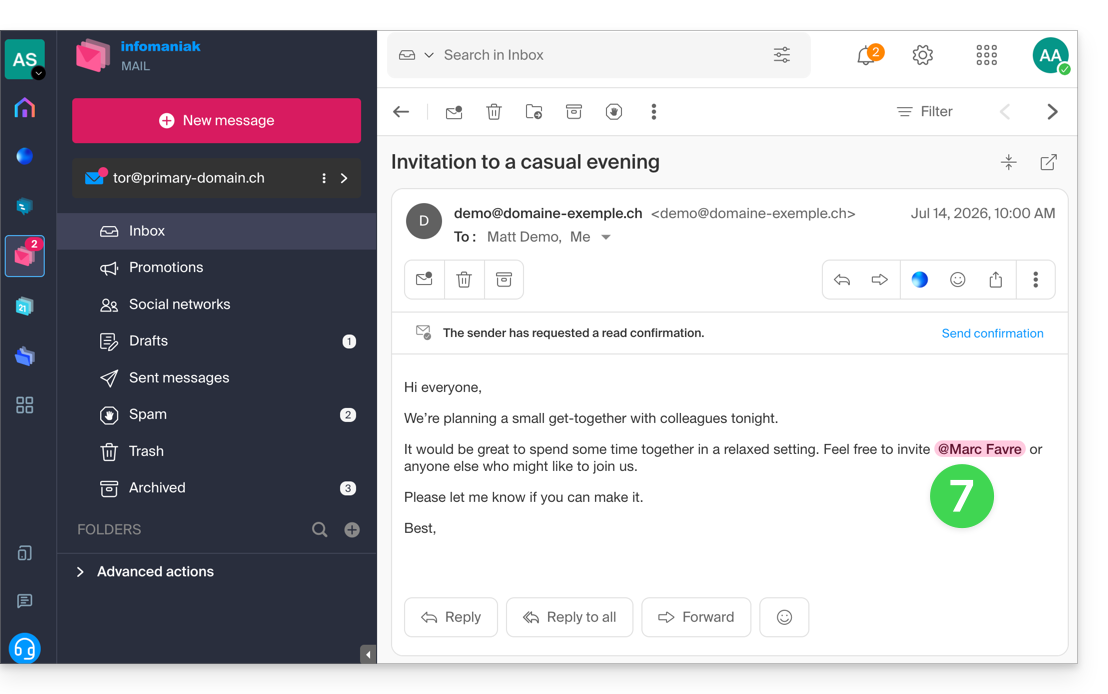
- The message content clearly mentions the added recipient and highlights it with a specific color for the reader if that reader is the recipient:
- If other mentioned recipients are added, their highlight color is different:
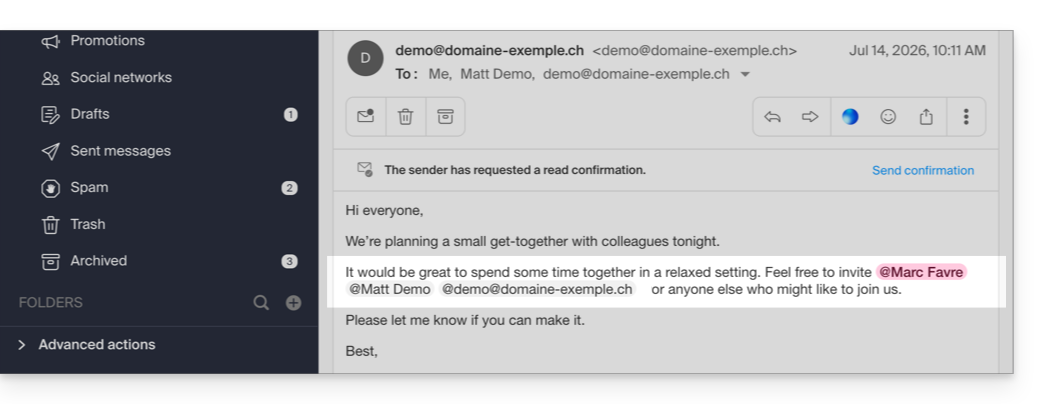
- If other mentioned recipients are added, their highlight color is different:
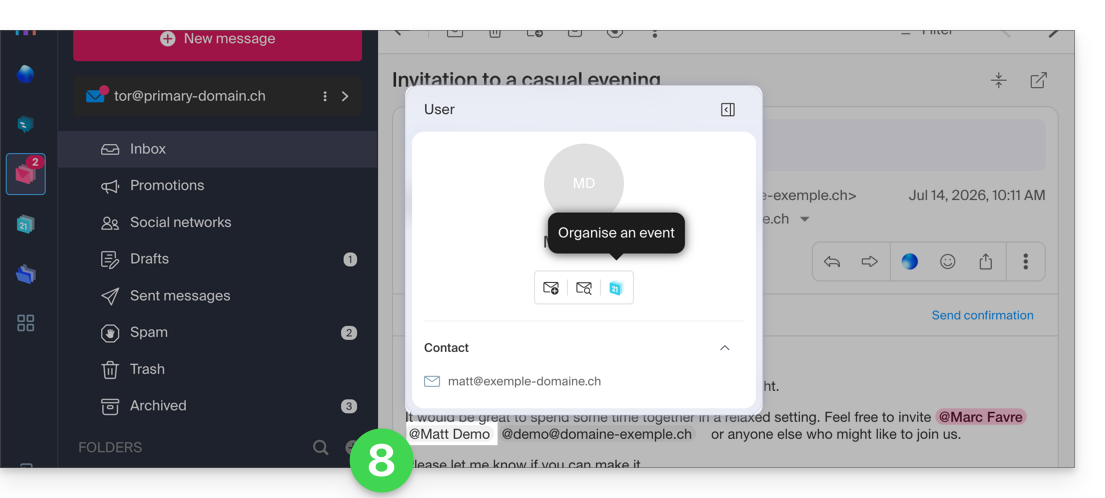
- Click on a user mention to get more information and actions, such as reviewing previous email exchanges with that user, or scheduling a new event:
Link to this FAQ: https://faq.infomaniak.com/2921
Has this FAQ been helpful?
This guide explains how to allow a person to access an email address within the Infomaniak ecosystem, using only the Infomaniak Mail web app (online service ksuite.infomaniak.com/mail), and/or the Infomaniak Mail mobile app (application for iOS/Android smartphones or tablets), without creating a specific password for the address.
Other access and management options are presented in the main guide.
Prerequisites
- You must have at least the right to delegate access to the email address in question (or be Administrator / Legal Representative within the Organisation).
Invite a user to use an email address from Mail Infomaniak
To allow a user who is already active in the Organization to access the email address you want to share:
- Click here to access the Infomaniak Mail web app (online service ksuite.infomaniak.com/mail).
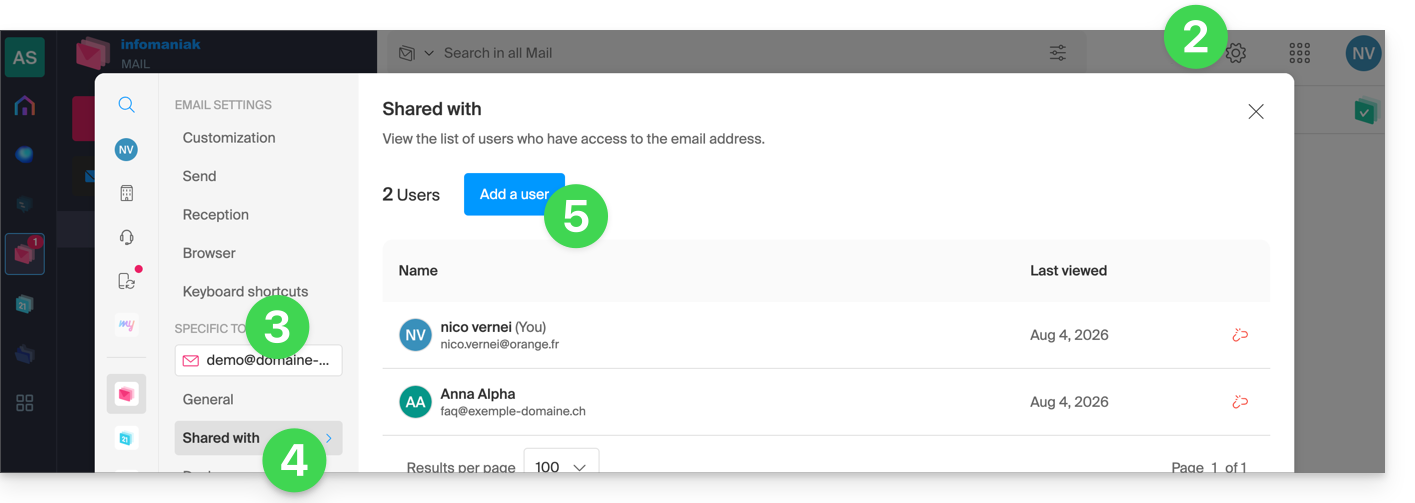
- Click on the Settings icon in the top right corner of the interface.
- Check or select the relevant email address from the dropdown menu in the left sidebar.
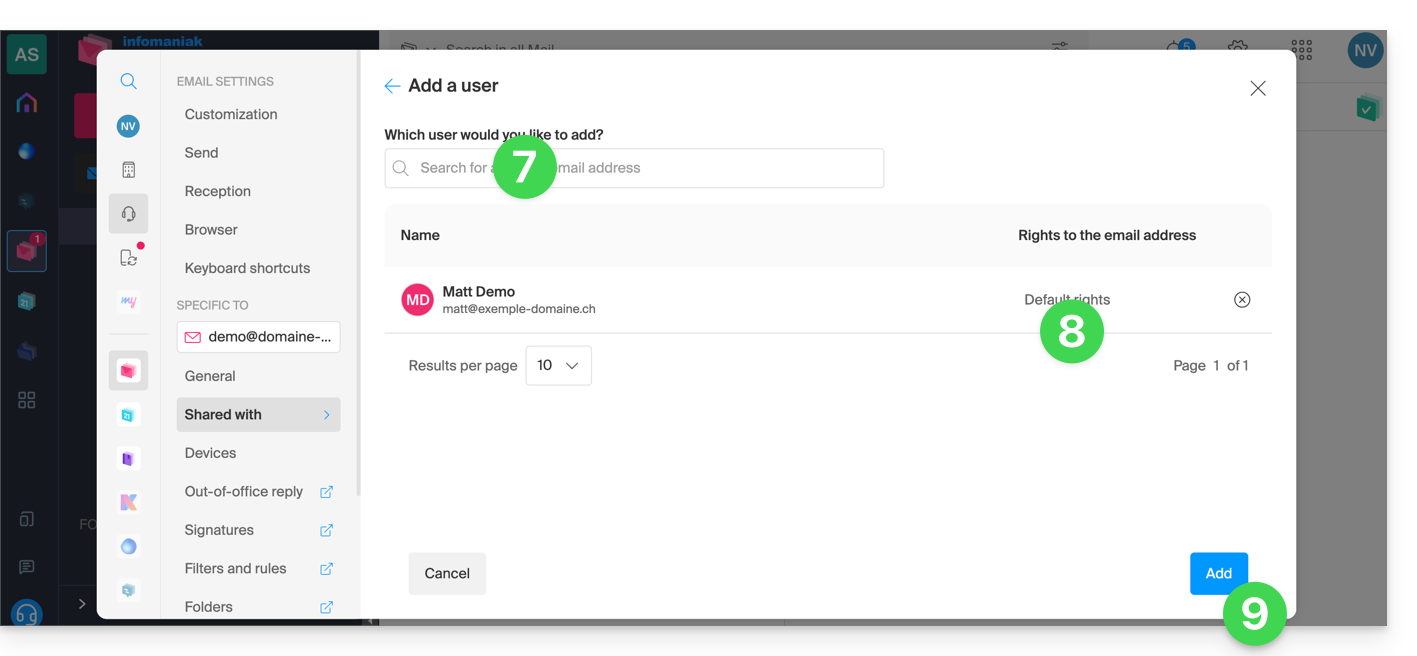
- Click on Shared with.
- Click on Add a user above the table of users who currently have access to the address in question on Mail:
- Enter the password to log in to your Infomaniak account if prompted.
- Choose one of the existing users within your Organization.
- Once added to the table, you can click to view their current permissions and determine if they can also delegate access to someone else in the Organization.
- Finish by clicking the Add button:
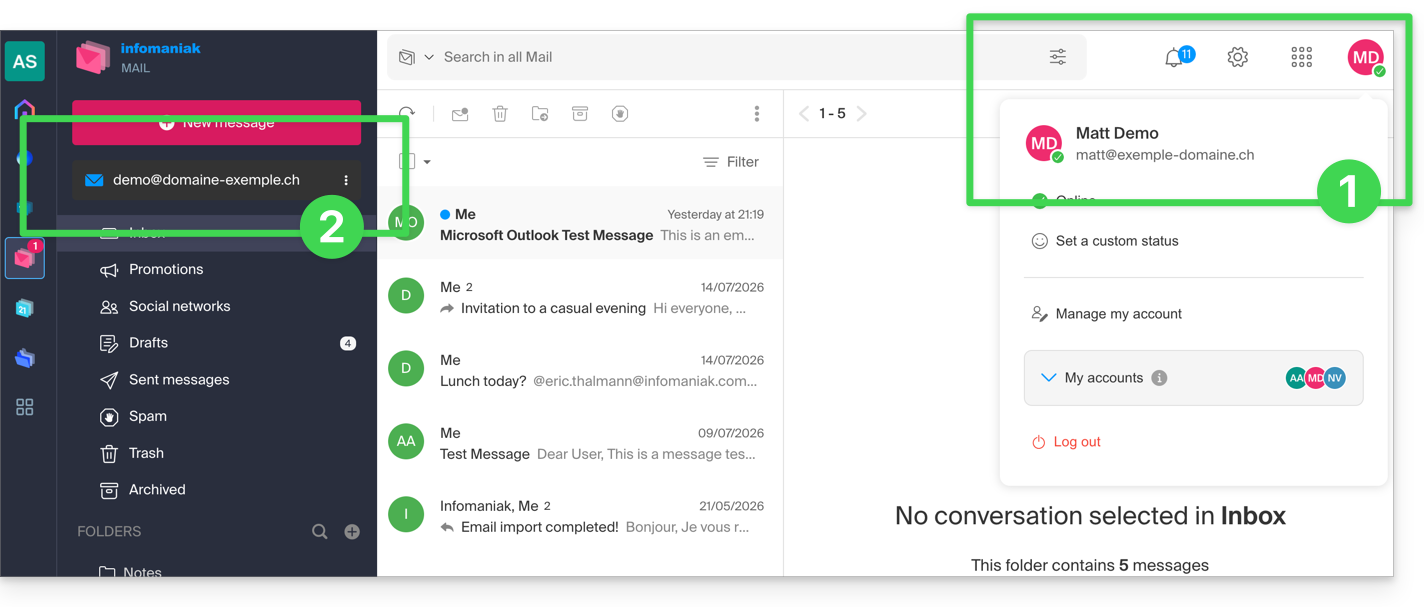
Result for the guest user
- The invited person logs in to their Infomaniak email account…
- The relevant email address will be automatically displayed and accessible to the user:
If the user cannot access the address, they can switch between their addresses at any time via the chevron located in the top left corner of the screen: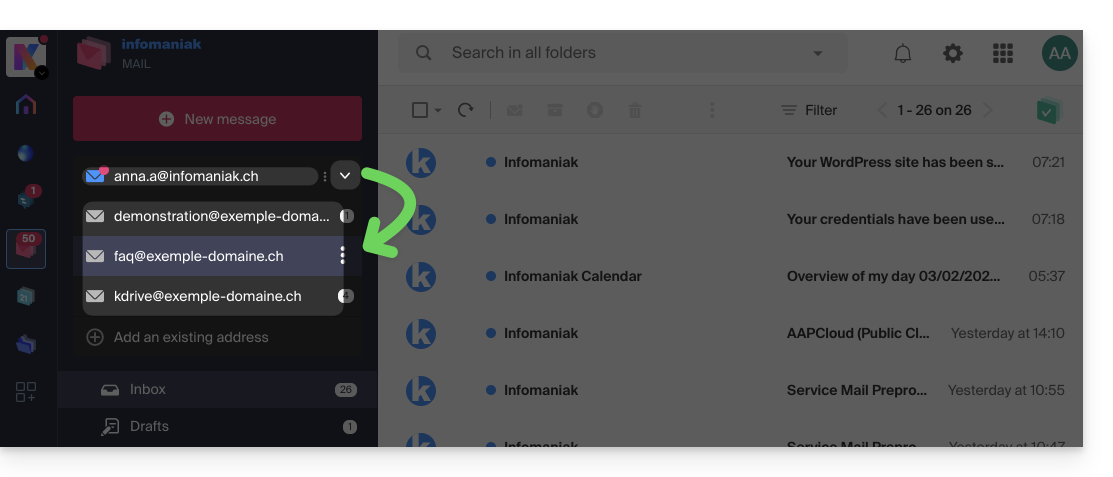
To do this, it may sometimes be necessary to first select a different Organization (in the top left corner of the interface) from the ones you belong to.
If the address associated with the invitation still doesn't appear, try refreshing the browser page (Command ⌘ + R on macOS and Ctrl + F5 on Windows).
If the third party is not yet part of the Organization…
If you want to grant access to a user who is not yet part of the Organization, please refer to this other guide.
Link to this FAQ: https://faq.infomaniak.com/2925
Has this FAQ been helpful?