Knowledge base
1000 FAQs, 500 tutorials and instructional videos. Here, there are only solutions!
This guide provides information about the robots.txt file created by default for web hosting where this file is missing.
Preamble
- The
robots.txtfile acts as a guide for search engine crawler robots - It is placed at the root of a website and contains specific instructions for these robots, indicating which directories or pages they are allowed to explore and which they should ignore
- However, note that robots may choose to ignore these directives, making the
robots.txta voluntary guide rather than a strict rule
File Content
If the robots.txt file is missing from an Infomaniak site, a file of the same name is automatically generated with the following directives:
User-agent: *
Crawl-delay: 10
These directives tell the robots to space out their requests by 10 seconds, which prevents unnecessarily overloading the servers.
Bypassing the Default robots.txt
It is possible to bypass the robots.txt by following these steps:
- Create an empty
robots.txtfile (it will only serve as a placeholder so that the rules do not apply). - Manage the redirection of the URI (Uniform Resource Identifier)
robots.txtto the file of your choice using a.htaccessfile.
Example
<IfModule mod_rewrite.c>
RewriteEngine On
RewriteCond %{REQUEST_URI} /robots.txt$
RewriteRule ^robots\.txt$ index.php [QSA,L]
</IfModule>
Explanations
- The
mod_rewritemodule of Apache is enabled to allow redirections. - The condition
RewriteCond %{REQUEST_URI} /robots.txt$checks if the request concerns therobots.txtfile. - The rule
RewriteRule ^robots\.txt$ index.php [QSA,L]redirects all requests torobots.txttoindex.php, with the[QSA]option that preserves the query parameters.
It is recommended to place these instructions at the beginning of the .htaccess file.
Link to this FAQ:
Has this FAQ been helpful?
This guide is about IP addresses, those…
- …assigned to sites/hosting/servers, dynamic or static, shared or dedicated,
- …assigned by your Internet Service Provider (ISP) when establishing an Internet connection to your Infomaniak product.
Preamble
- A dedicated or static IP address for a website is a permanent IP address specifically assigned to it.
- Unlike a shared IP address, which is used by multiple websites, a dedicated IP address ensures that only this platform is associated with this address.
- Dedicated IP addresses for websites are often used in cases where stability, customization, and security are important, such as server hosting, firewall configuration, or activating SSL certificates (although it is possible to proceed without a dedicated IP address to install an SSL certificate).
- Here are the main advantages:
- Configuring a PTR entry or reverse DNS on dedicated IPs is useful, especially for installing a mail server, as some email providers check the PTR record before accepting emails sent from a server.
- Better connection stability.
- Reduced risk of a bad reputation due to websites sharing the same IP address.
- Easier configuration of certain technical aspects.
- A dedicated IP can improve a website's search engine ranking (although there are differing opinions among SEO specialists).
- Note: Infomaniak does not allow access to websites via HTTP(S) by IP (dedicated) on managed servers; you must use a domain name that points to the IP (or use the preview URL).
Add a dedicated IP to the website
To add a dedicated IP to your website, refer to this guide.
If you encounter issues directing web traffic to a defined port, refer to this other guide.
IP address blockage (Internet connection)
If you can no longer access…
- … all your email addresses that you own with Infomaniak (which usually work fine) and this with an email software/client from the same Internet network (i.e., from the same IP address provided by your ISP)…
… or if you unfortunately performed this type of operation:
- repeated unsuccessful connection attempts via FTP, SSH, or on access points such as the WordPress login…
- requests returning too many errors such as mass 403 errors…
… your access to Infomaniak servers may be blocked following the banning of the IP address (banip / ipban) of your internet connection.
To unblock the situation, contact Infomaniak support by email and specify the domain concerned and especially your public IP address concerned.
Permanent Unblocking (IP Whitelisting)
With a Managed Cloud Server, you can request to permanently authorize the IP address in question so that it is never blocked again, regardless of the situation. To do this, you must:
- Have a dedicated IP associated with your Managed Cloud Server.
- Be aware that Infomaniak will no longer block any potential attacks from this IP; attacks or malicious access attempts from this address will no longer be automatically blocked by the security systems.
- Confirm by email and from a contact address associated with the account (owner or administrator) that you understand and accept full responsibility in case of an attack from this IP.
Link to this FAQ:
Has this FAQ been helpful?
This guide explains how to order, link or remove a dedicated IP from a website.
Manage dedicated IPs on hosting
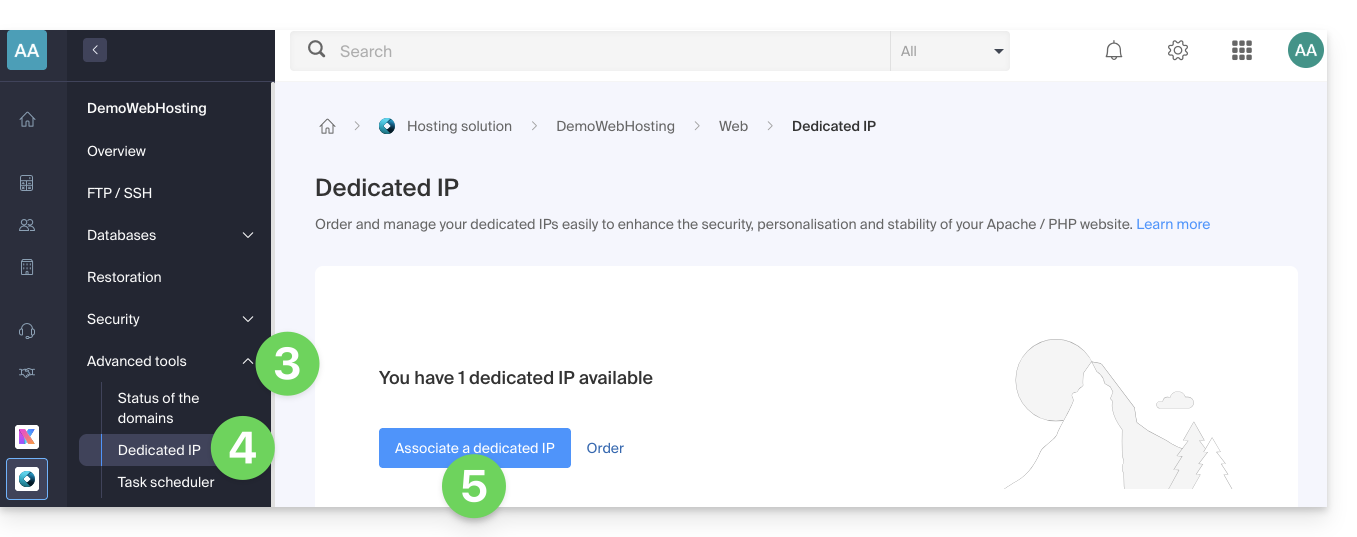
Order one or more first dedicated IP addresses
To do this:
- Click here to access your site management on the Infomaniak Manager (need help?).
- Click directly on the name assigned to the site concerned:
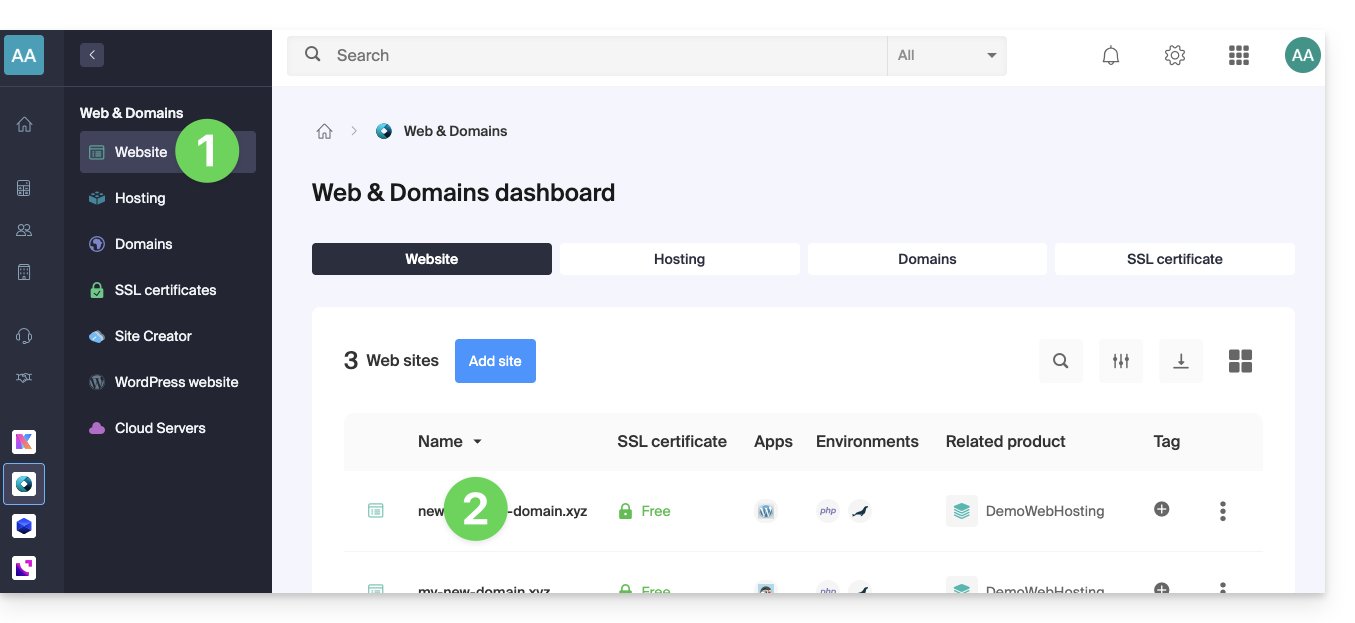
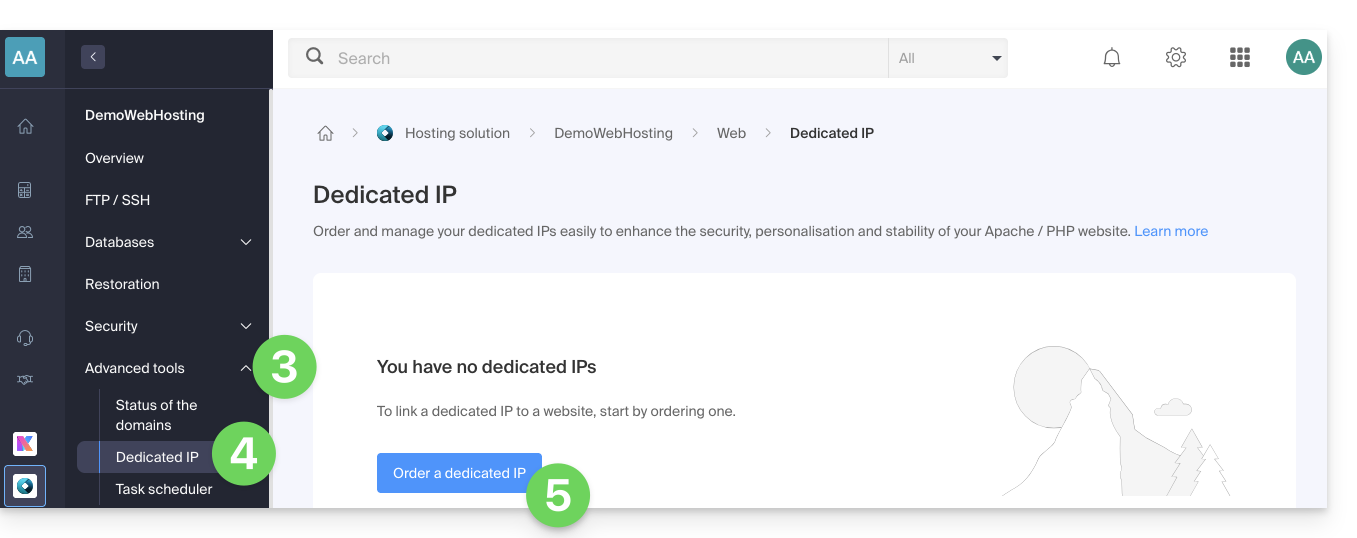
- Click on the chevron to the right of Advanced Tools in the left sidebar menu.
- Click on Dedicated IPs in the left sidebar menu.
- Click the button to order one or more IP addresses:
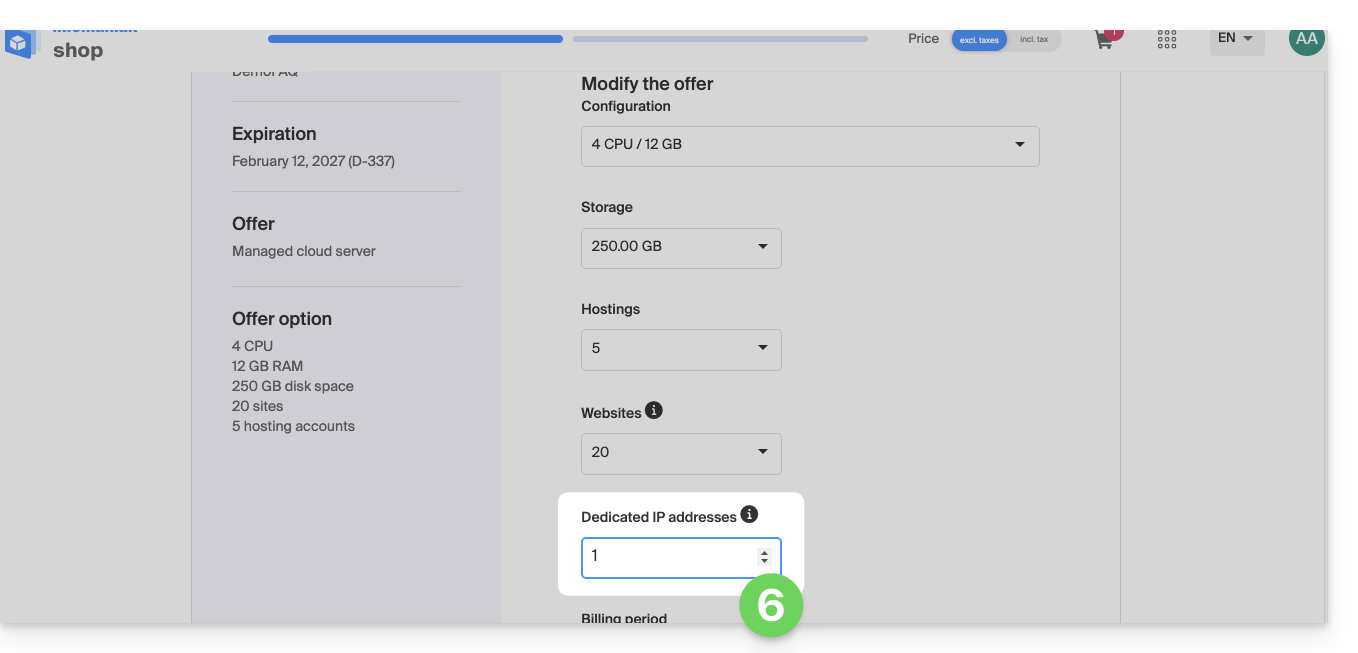
- Increase according to the number of desired IPs:
Order one or more additional dedicated IP addresses
To do this:
- Click here to access your site management on the Infomaniak Manager (need help?).
- Click directly on the name assigned to the site concerned.
- Click on the chevron to the right of Advanced Tools in the left sidebar menu.
- Click on Dedicated IPs in the left sidebar menu.
- Click on the text to order one or more additional IP addresses:
- Increase according to the number of desired IPs.
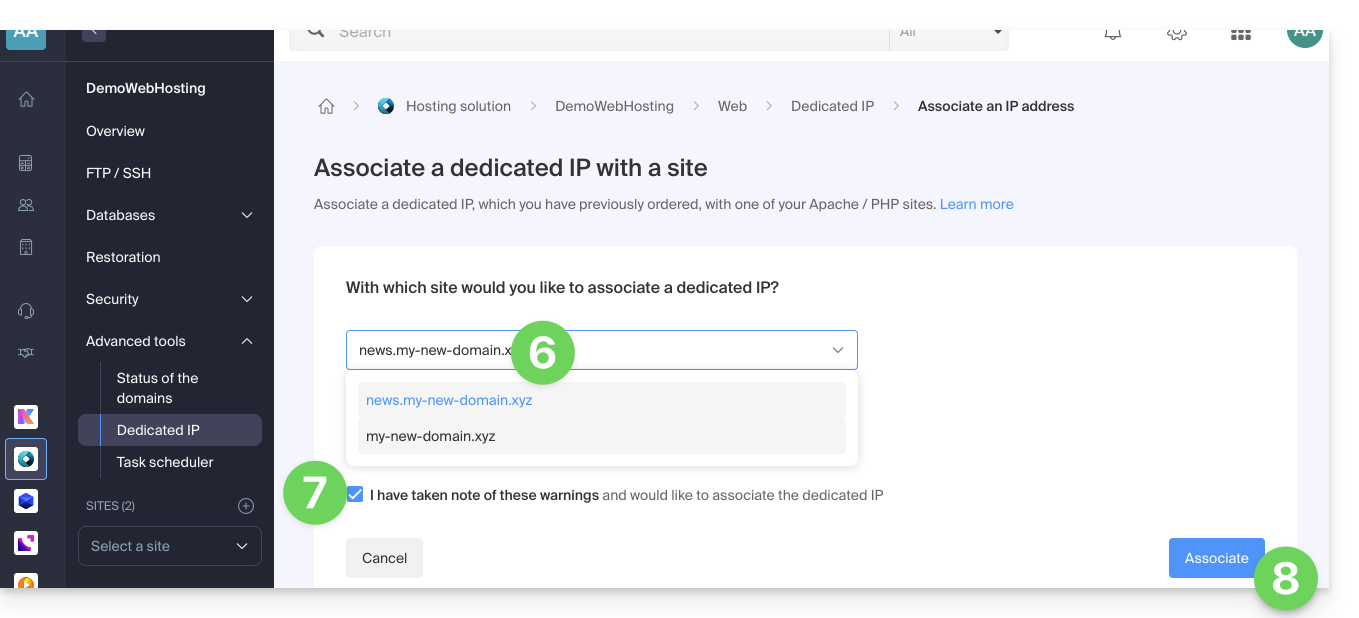
Link a dedicated IP address to a website on hosting
Once the IP is ordered and paid for, be aware of the prerequisites below as switching to a dedicated IP address for a website can cause temporary disruption, especially in the presence of a Let's Encrypt SSL certificate.
Prerequisites
- Start by reducing the TTL of DNS records
AandAAAA(for@andwww) to 5 minutes. - Wait for the previous TTL duration before making any changes.
- The change below should be made during a period of low traffic to limit the inconvenience caused by the inevitable disruption.
- At the end of the procedure, you will need to wait for the new TTL to propagate the new configuration and regenerate the SSL certificate, then check the accessibility of the site in HTTPS to ensure everything is working correctly.
To switch to a dedicated IP address:
- Click here to access your site management on the Infomaniak Manager (need help?).
- Click directly on the name assigned to the site concerned.
- Click on the chevron to the right of Advanced Tools in the left sidebar menu.
- Click on Dedicated IPs in the left sidebar menu.
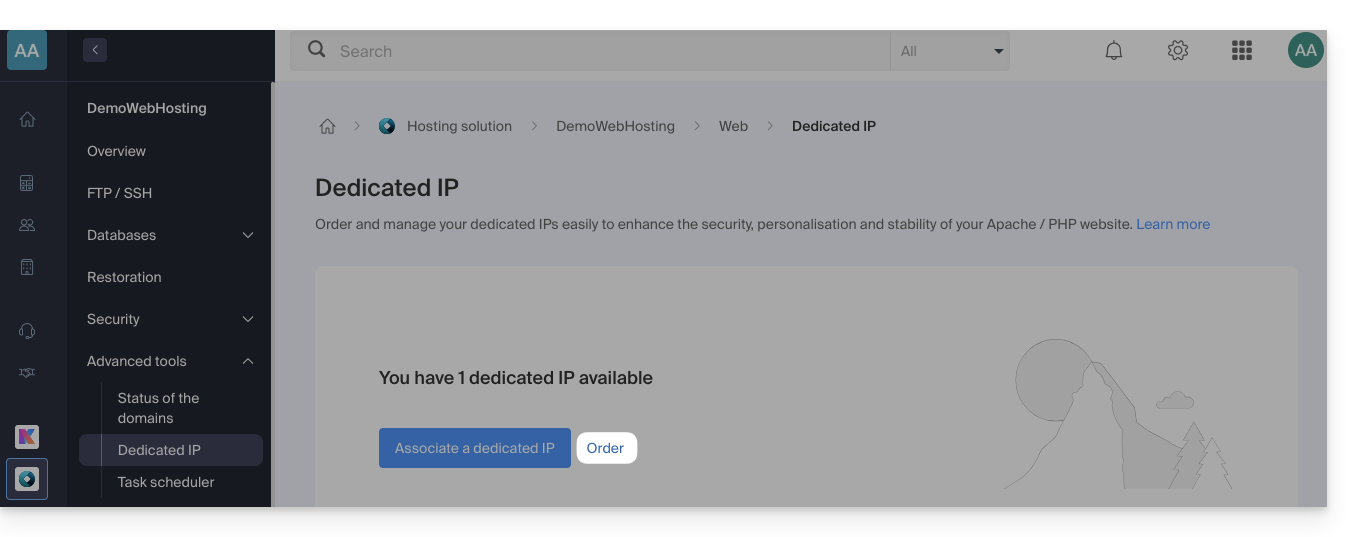
- Click the button to associate the IP with a site on your hosting:
- Choose the site to assign the new IP address to.
- Check the box after reading the warnings.
- Click the Associate button:
Remove a dedicated IP address from a website
Once the IP is installed, to uninstall it:
- Click here to access your site management on the Infomaniak Manager (need help?).
- Click directly on the name assigned to the site concerned.
- Click on the chevron to the right of Advanced Tools in the left sidebar menu.
- Click on Dedicated IPs in the left sidebar menu.
- Click on the action menu ⋮ located to the right of the item concerned.
- Choose Unlink:
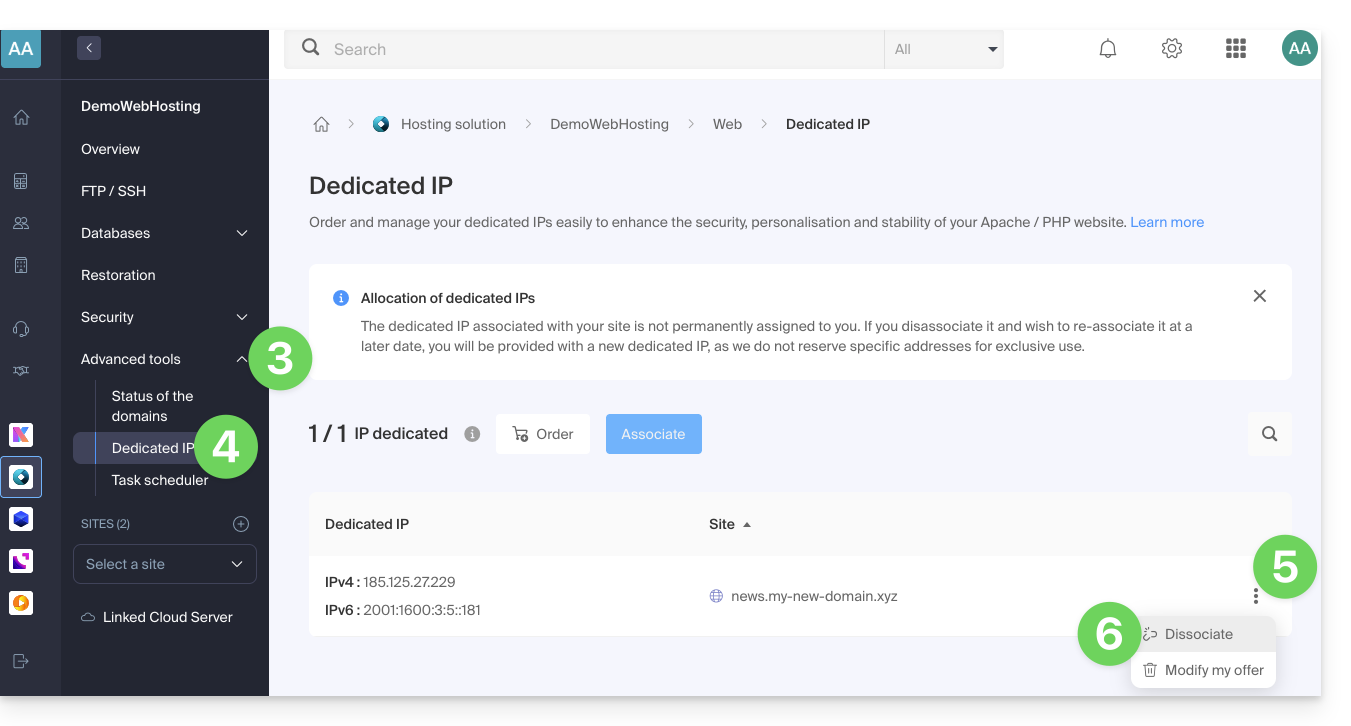
- Read the warnings and confirm the deletion to complete the IP uninstallation procedure.
Refer to this other guide if you are looking for information on potential issues related to your IP.
Link to this FAQ:
Has this FAQ been helpful?
This guide explains how to migrate a Web Hosting from MySQL to MariaDB.
Preamble
- MariaDB is an enhanced version of MySQL, featuring numerous powerful built-in features and many improvements in terms of usage, security, and performance:
- MariaDB has a larger connection pool supporting up to 200,000 connections, whereas MySQL has a smaller connection pool.
- When comparing the performance of MariaDB and MySQL, it is observed that replication is faster in MariaDB and slower in MySQL; MariaDB is faster than MySQL overall.
- MariaDB is Open Source, whereas MySQL uses proprietary code in its Enterprise edition.
- The update to MariaDB is irreversible, and all sites on your hosting will subsequently run with this version of MariaDB.
- Check the compatibility of your scripts before proceeding.
- During this operation, the statistics are reset.
Using MariaDB instead of MySQL
To migrate a Web Hosting to MariaDB:
- Click here to access the management of your product on the Infomaniak Manager (need help?).
- Click directly on the name assigned to the product concerned.
- Click on Databases in the left sidebar.
- Click on the link Migrate to MariaDB.
To migrate a Cloud Server, refer to this other guide regarding the migration to a new generation of Cloud Server.
Link to this FAQ:
Has this FAQ been helpful?
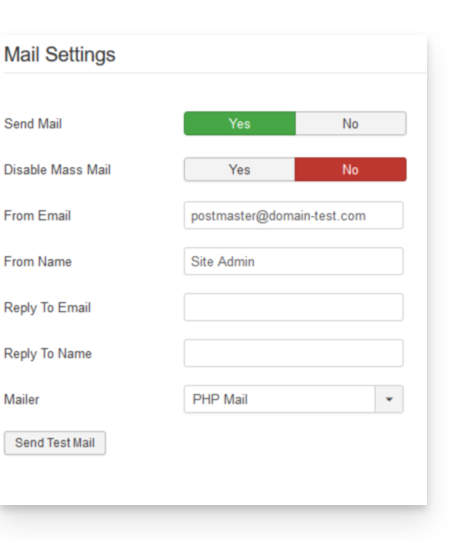
This guide details sending emails from a website hosted by Infomaniak using the PHP function mail() which is disabled by default.
Preamble
- Infomaniak strongly discourages the use of the PHP mail() function for sending emails from your applications:
- The emails will be considered as "unauthenticated" and will therefore be subject to limits.
- Their deliverability will be affected, which can harm your website.
- It is strongly recommended to use an authenticated SMTP sending method for your email sending from your applications; Infomaniak offers a corresponding service.
Specify the sender's address
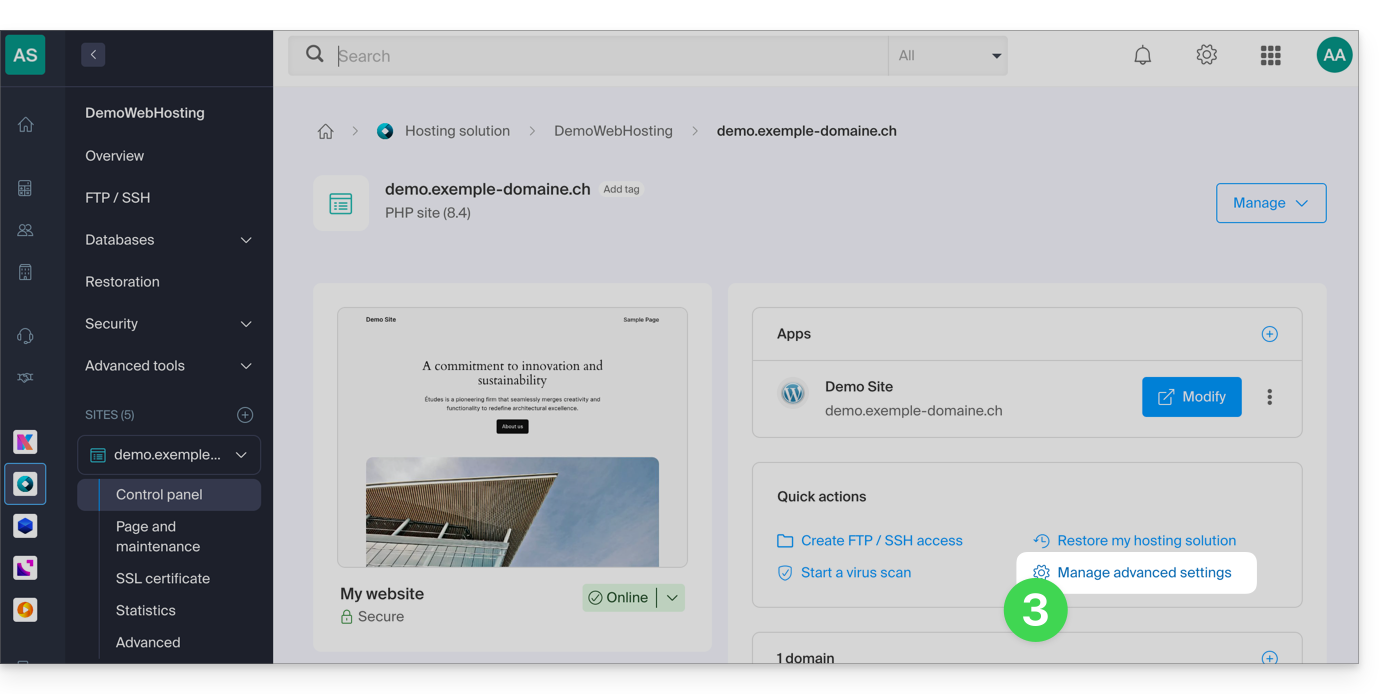
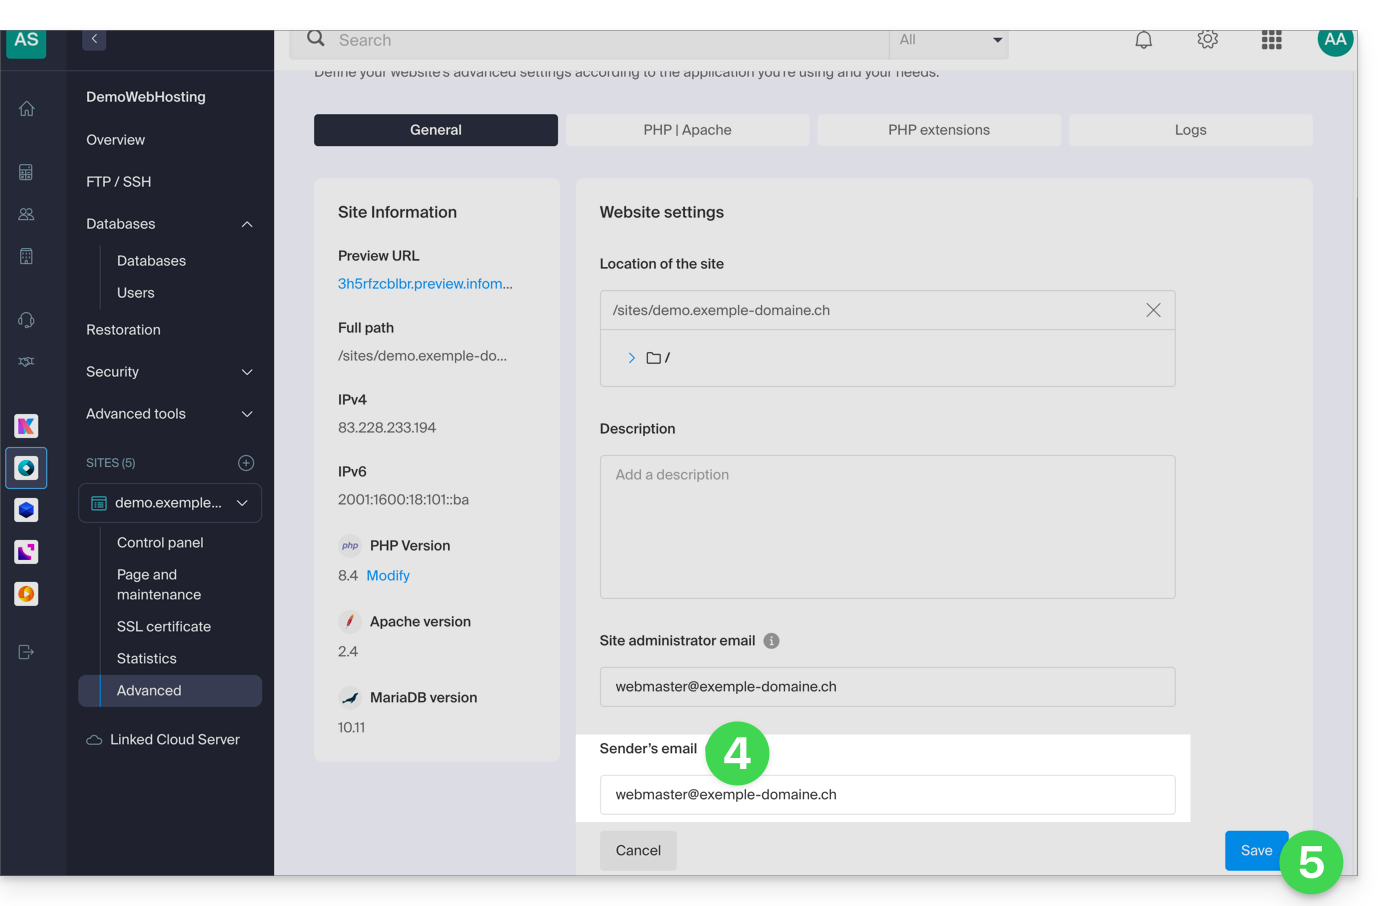
For messages to be sent correctly from your CMS/web application (and to avoid an error such as Could not instantiate mail function or sender mismatch) it is necessary to specify a valid address in the site parameters on the Infomaniak side:
- Click here to access the management of your site on the Infomaniak Manager (need help?).
- Click directly on the name assigned to the site concerned:
- Click on Manage advanced settings:
- From the General tab, enter an existing email address in the Sender's email field.
- Click on the blue Save button:
Re-enable the mail function
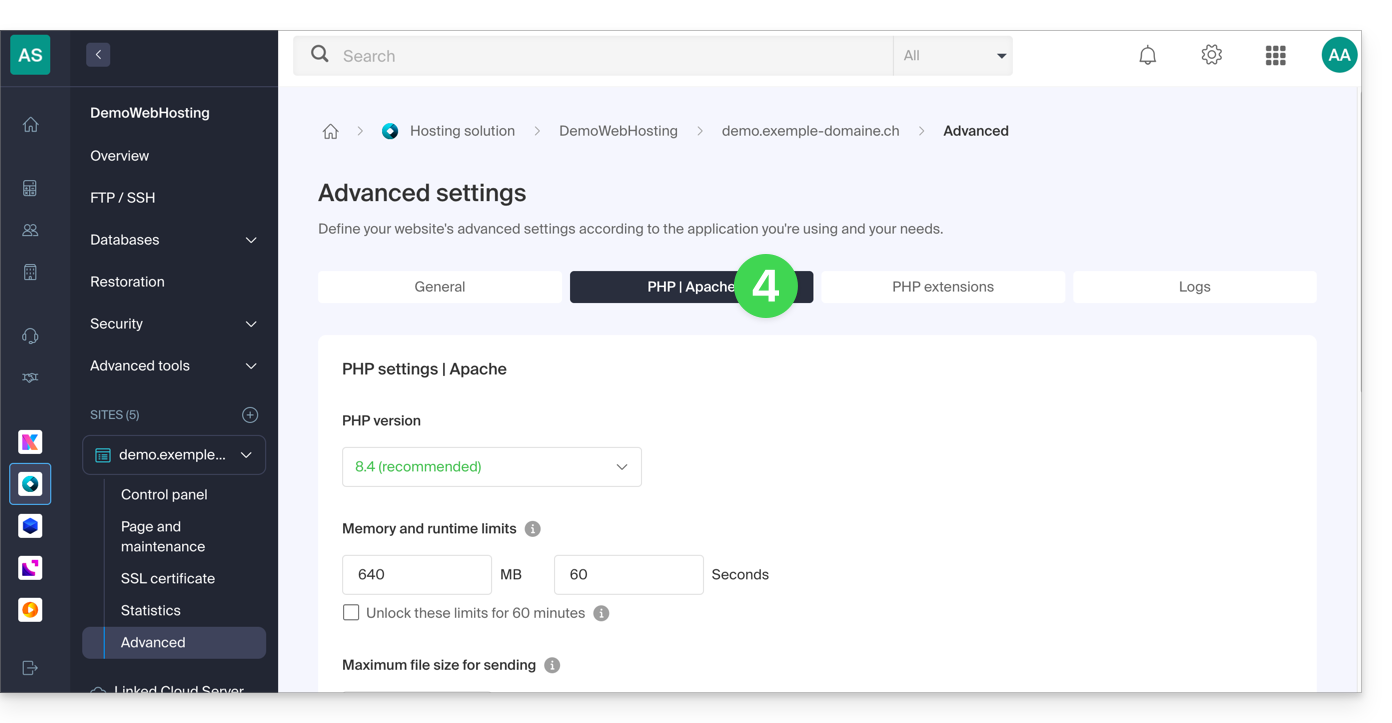
If you still want to use the PHP mail function, you will need to activate it on each of the sites of your concerned Web Hosting:
- Click here to access the management of your site on the Infomaniak Manager (need help?).
- Click directly on the name assigned to the site concerned:
- Click on Manage advanced settings:
- Click on the PHP / Apache tab:
- Activate the mail function:
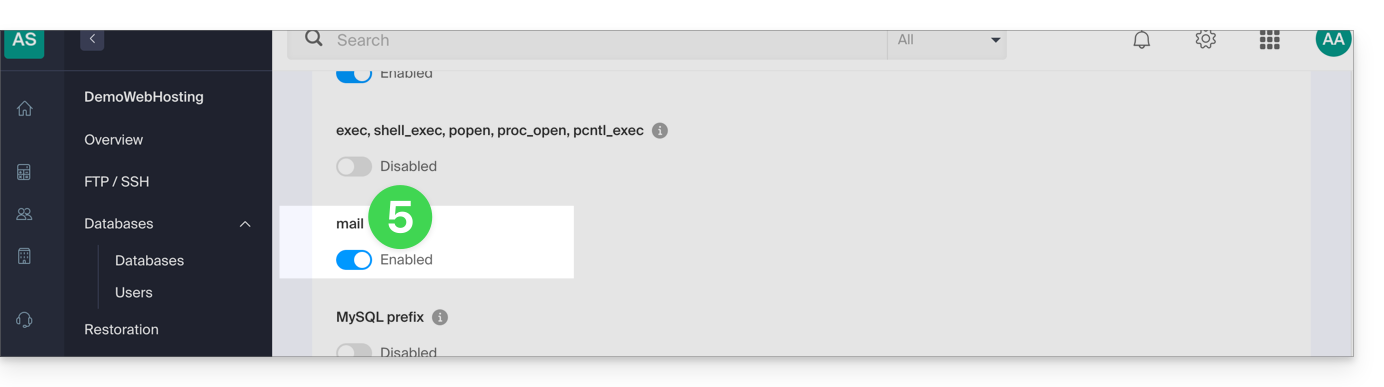
- Click on the Save button at the bottom of the page to validate the changes.
PHP mail() examples...
...on WordPress
Configure the sending of the default contact form included with Divi Builder:
- Log in to the WordPress admin dashboard.
- Go to the Divi editor of the page containing the contact form.
- Click on the Settings icon to configure the Divi contact form:

- Under EMAIL, enter the email address that will receive the form submissions and save:

- By default, when a visitor uses the form to contact you, you will receive an email from
mail@your-site-nameand if you reply, the recipient will automatically be the email address indicated by the visitor when filling out the contact form.
... on Prestashop
Go to Prestashop advanced settings:
- Specify the SMTP mode.
- Enter
localhostas the server. - Enter port
25. - Do not specify a username or password.

... on Joomla
Configure email sending via PHPmail (not recommended) in Joomla:
- Log in to the admin dashboard of your Joomla site.
- Go to Configuration then Server.
- Do not enter ANYTHING in the Site Email field:
This unfortunately prevents any test sending via the button for this purpose, but it will work if you configure a contact form on your site. Click on Save once the box is left empty.
PHP mail() reply address
When sending an email with PHP's mail() function, the return-path will be written in the form root@h2web3.infomaniak.ch for example. However, the header Reply-To: present in the code of your form allows you to specify a valid reply address.
Link to this FAQ:
Has this FAQ been helpful?
This guide explains why it is dangerous to use a PHP version that is no longer officially updated and how to use a more recent PHP version with a website hosted by Infomaniak.
Is an outdated PHP version dangerous?
When you use a (soon-to-be) vulnerable PHP version on one or more of your websites, a warning message appears in the dashboard of the affected hostings.
The PHP language evolves regularly and when you use a PHP version that is no longer updated, you expose your website to security risks. Malicious individuals could, for example, exploit known security vulnerabilities to gain access to your site and modify its content. It is therefore strongly recommended to always use a recent PHP version.
3 situations are possible:
- The PHP version is fully supported: no action is required
- The PHP version only receives security updates: it is recommended to use a more recent PHP version
- The PHP version is no longer updated: it is strongly recommended to use a more recent PHP version
Learn more: https://www.php.net/supported-versions.php
Using a more recent version
The latest PHP versions are more performant and speed up website loading.
Before using a more recent PHP version, it is important to follow the following precautions:
- If your site uses a CMS or a web application (WordPress, Joomla, Drupal, etc.), make sure the current version of the CMS is supported by the PHP version you want to use.
- If your site was developed manually, consult the official PHP documentation to learn about modified functions and potential changes that may affect the operation of your code.
In case of malfunction after migration to a more recent PHP version, it is sometimes possible to revert to a previous version, provided that it is still supported!
Link to this FAQ:
Has this FAQ been helpful?
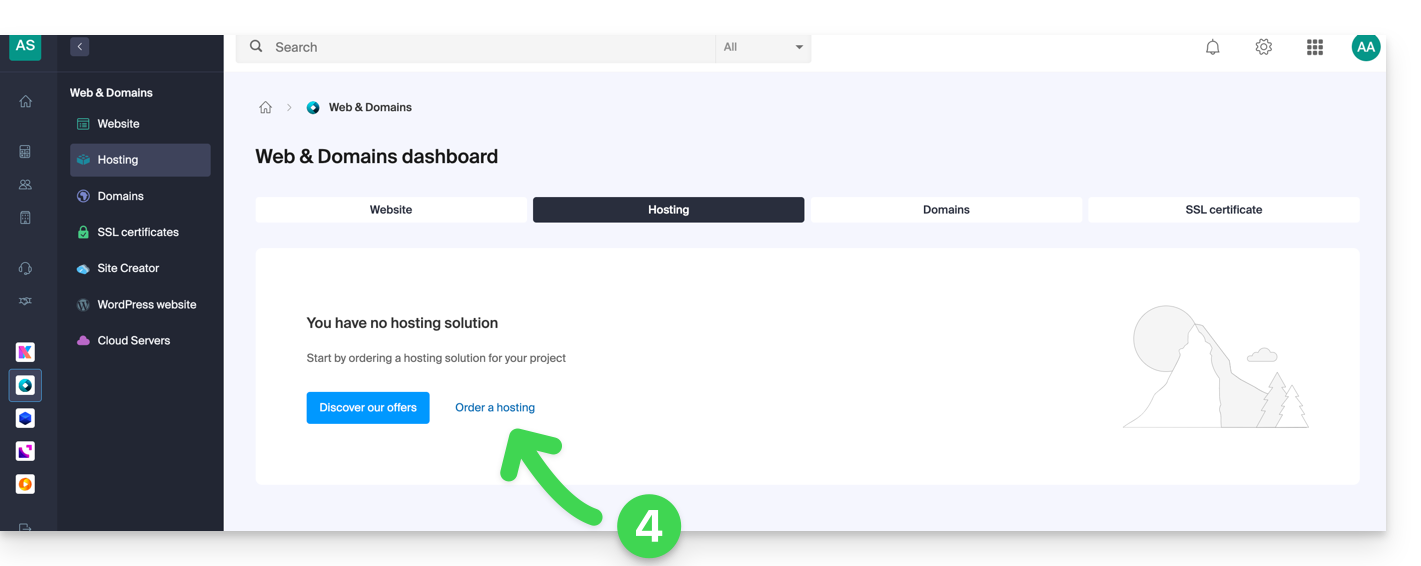
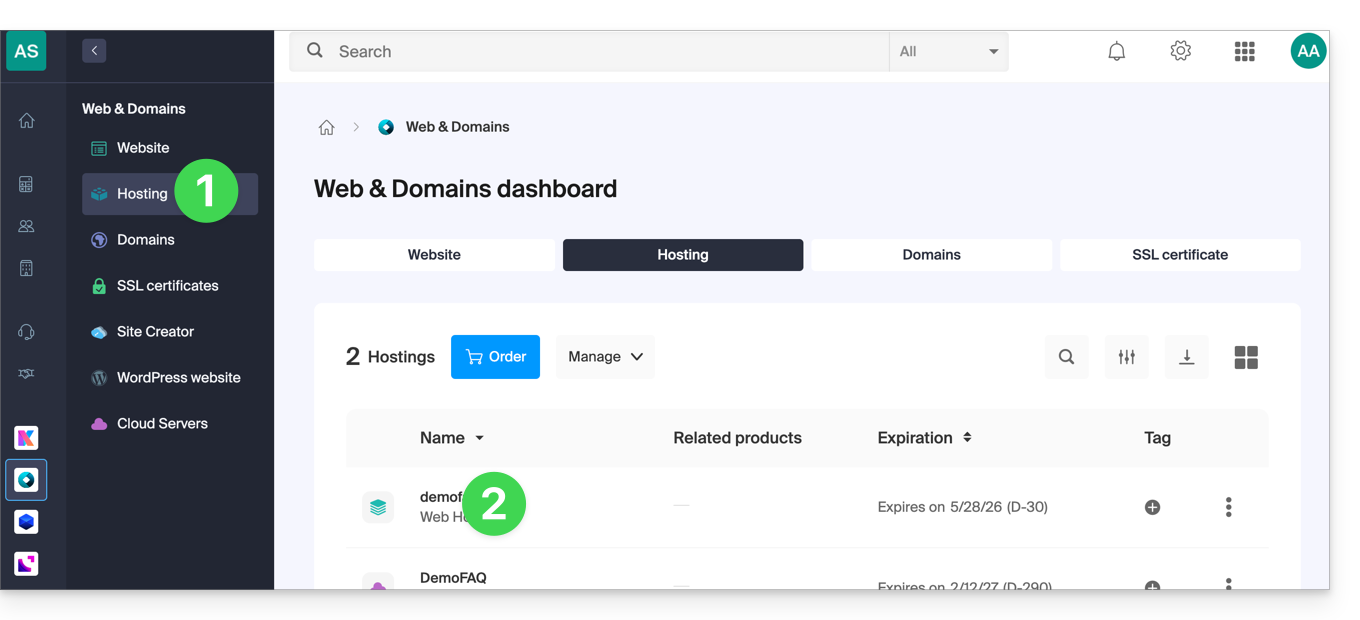
This guide explains how to order Web Hosting at Infomaniak.
Already a customer, you already have hosting
To order an additional hosting:
- Click here to access the management of your product on the Infomaniak Manager (need help?).
- Click on the supermarket cart icon:
If you already have web hosting, you can also add a site to an existing hosting without ordering or paying for new hosting (multi-site/multi-domain management).
Order new Infomaniak web hosting
To order your first web hosting:
- If necessary, create a user account.
- Click here to access the Infomaniak Manager.
- Click on Hosting (Web & Domain universe):
- Click to order new hosting:
- Once on the Shop, check that you are ordering in the desired Organization (select another from the list if necessary or create a new one at point 6 below):

- Confirm your choice by clicking on the blue button at the bottom of the page (or first create a new Organization if necessary using the dedicated blue link):

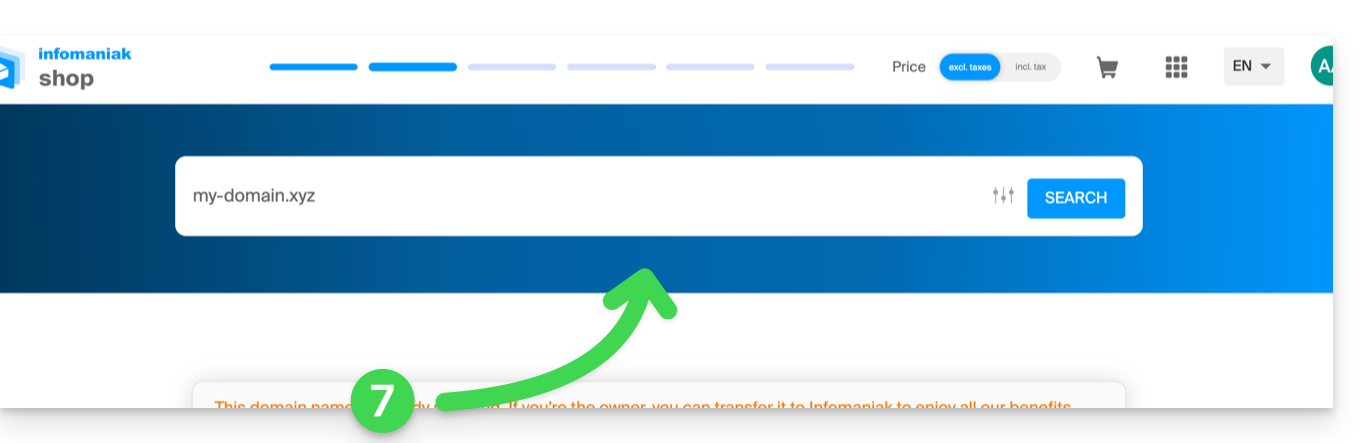
- At the top, enter the domain name of your hosting and click on Search (even if you already manage it with another registrar):
- Two scenarios are then possible:
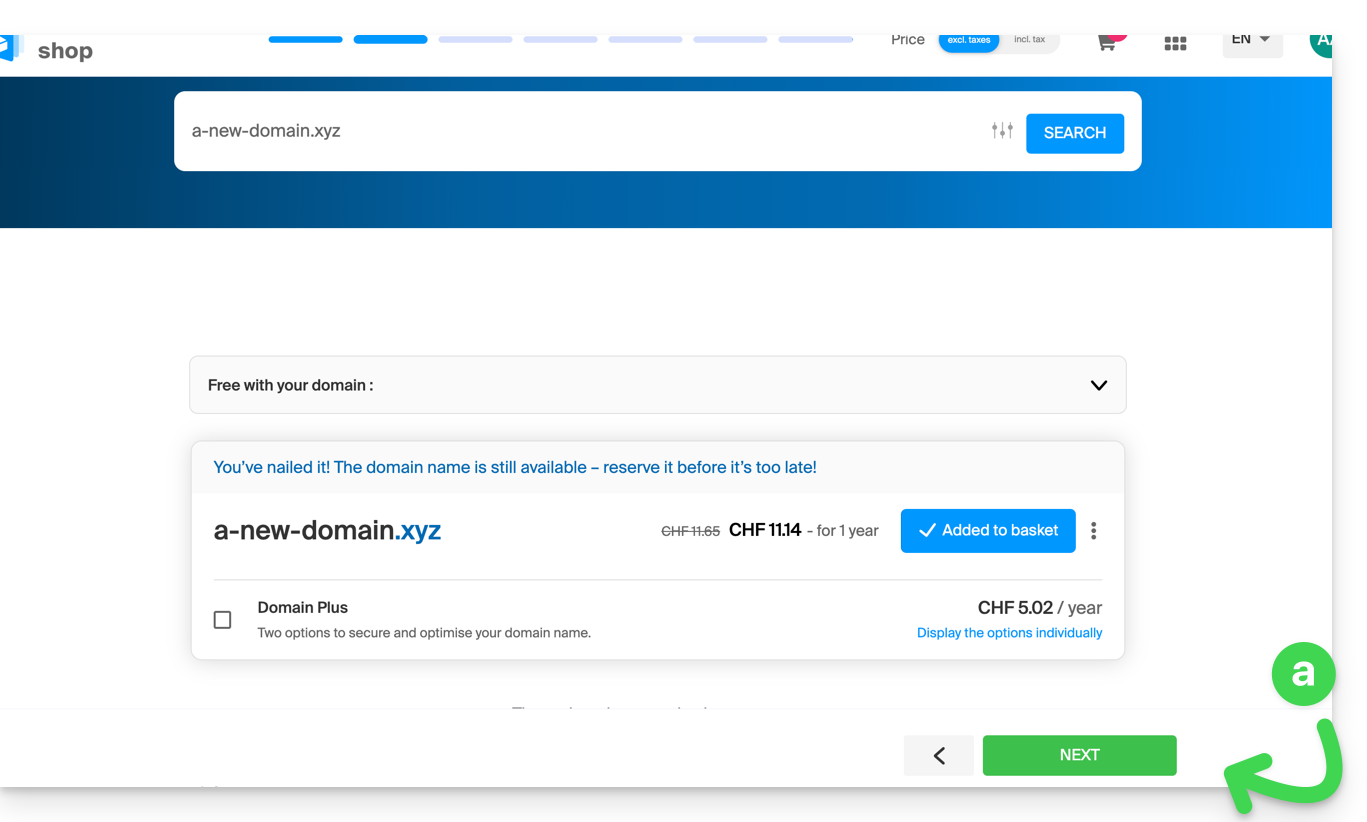
- You do not yet own the domain name: check the information and options on the screen, then click on the Next button:
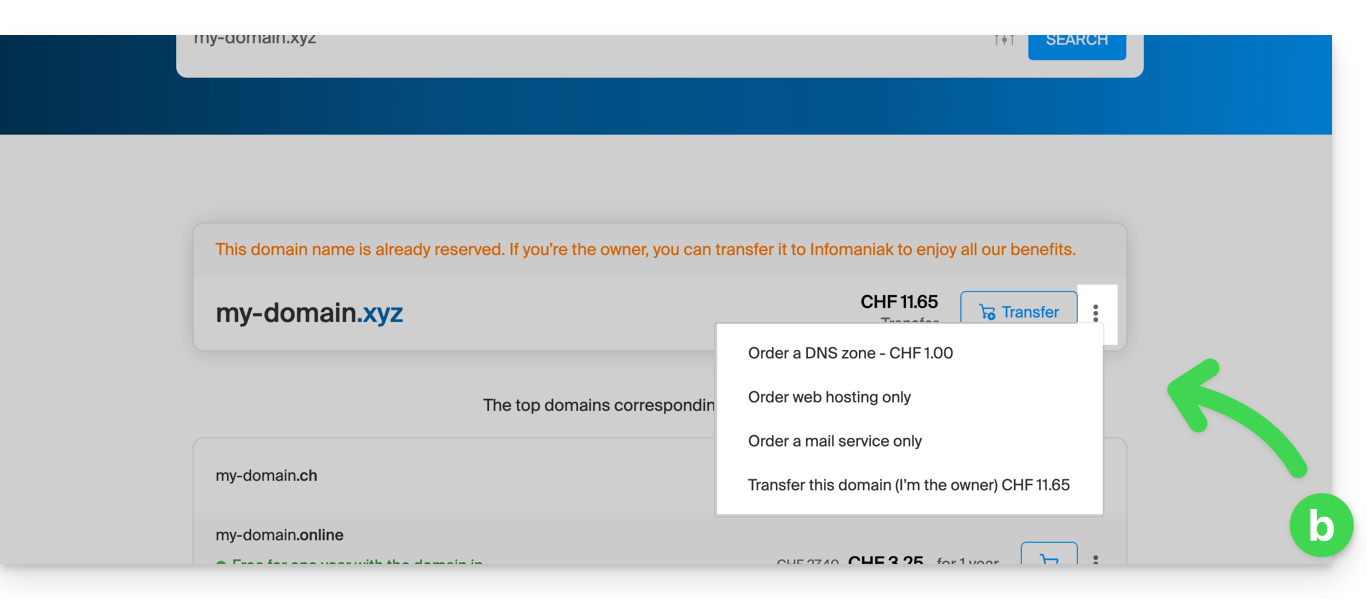
- You own and manage your domain names with another registrar: click on the action menu ⋮ to the right of the domain name to Order hosting only:
- You do not yet own the domain name: check the information and options on the screen, then click on the Next button:
- Choose the hosting that suits you.
- Click on Next.
- Complete the order.
Link to this FAQ:
Has this FAQ been helpful?
This guide explains how to update an Let's Encrypt SSL certificate for a website hosted by Infomaniak.
Preamble
- It may be necessary following the addition or removal of aliases to a website to regenerate a certificate to include the new domain names linked to the website.
- The dashboard will clearly indicate that one of the domains linked to the site is not included in the SSL certificate in place:
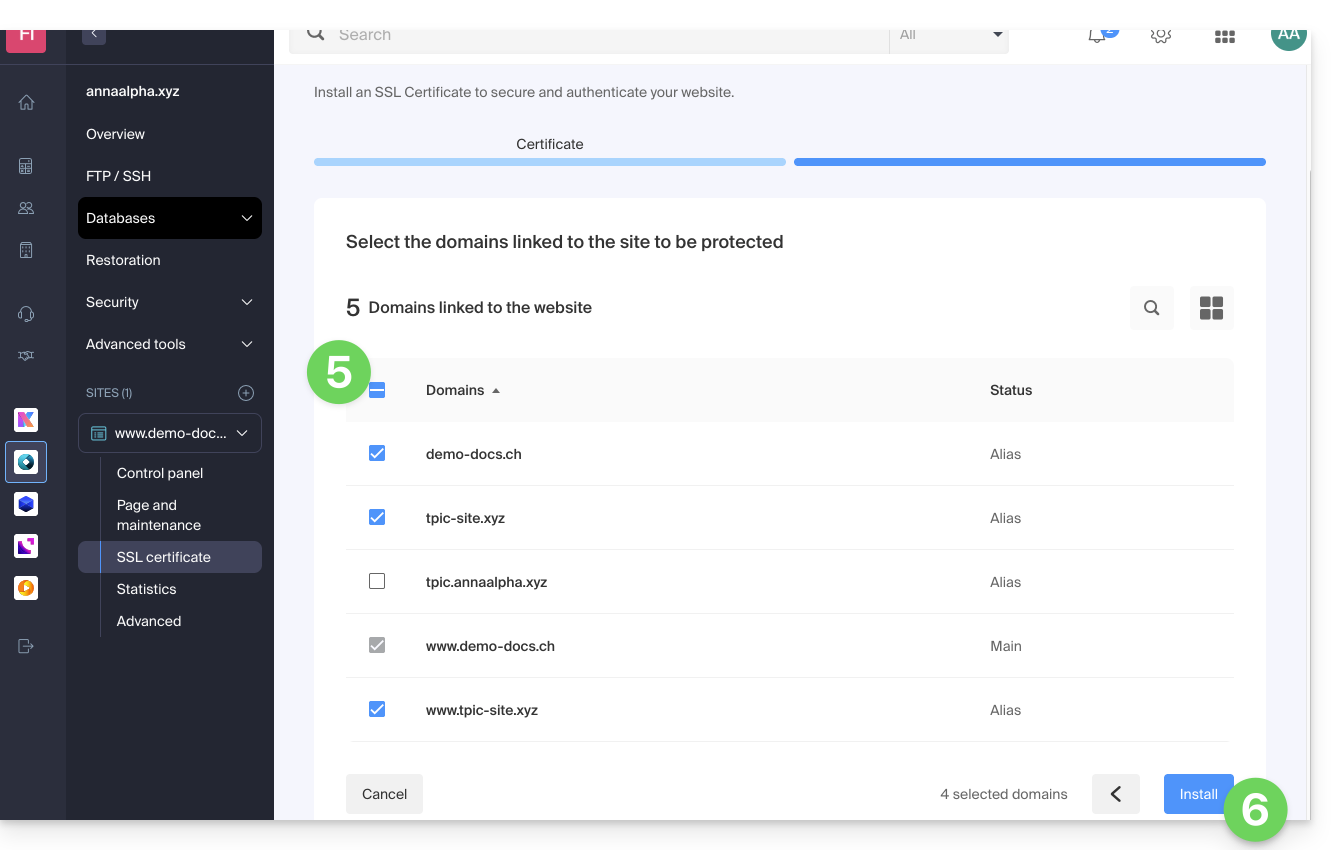
Update a Let's Encrypt certificate
To access certificate management:
- Click here to access the management of your product on the Infomaniak Manager (need help?).
- Click directly on the name assigned to the product concerned:

- Click on the action menu ⋮.
- Click on Update the certificate:
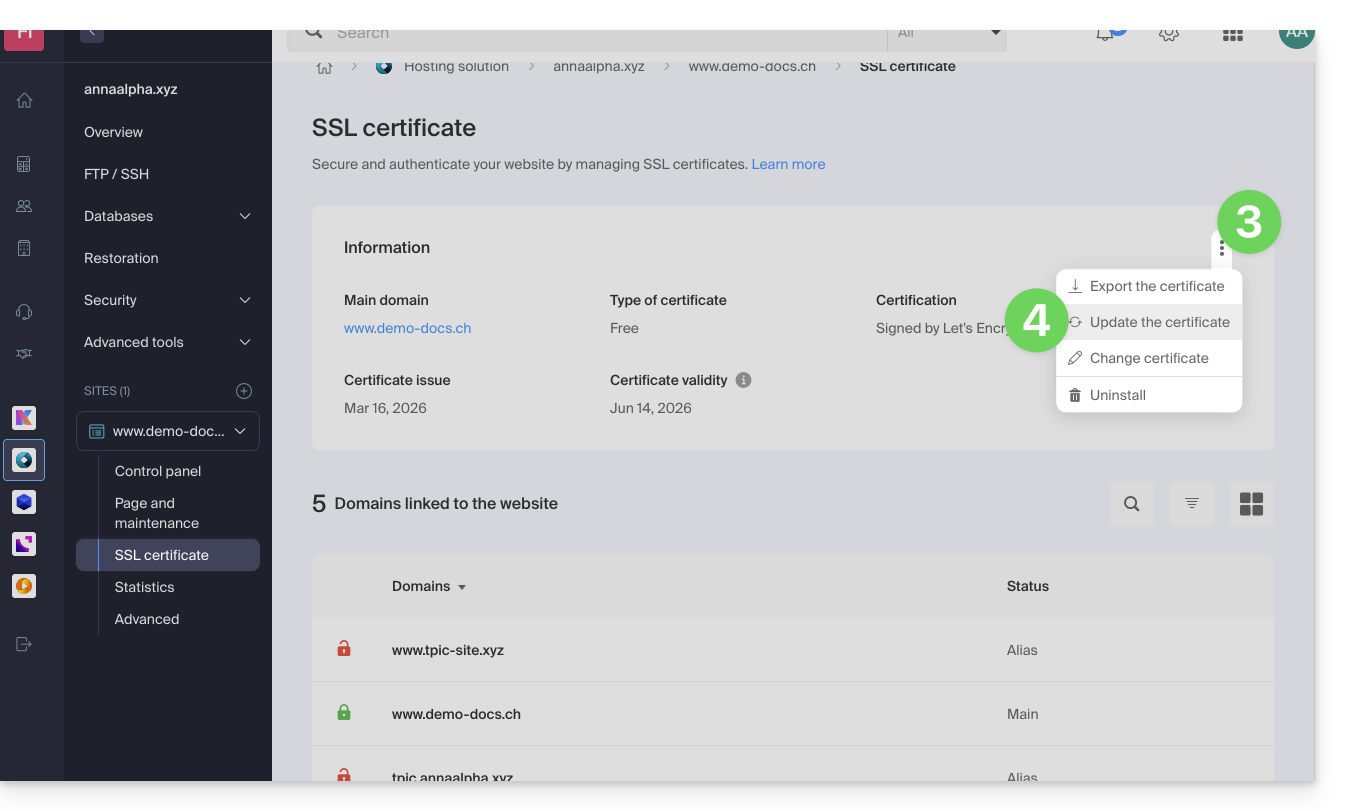
- Check or select the domains concerned.
- Click on the button Install:
Link to this FAQ:
Has this FAQ been helpful?
This guide explains how to configure PHP settings for Web Hosting directly from the command line when you run PHP scripts using PHP CLI (Command Line Interface).
Preamble
- This type of configuration can be useful when you need to temporarily modify certain parameters for a specific script or for a PHP session.
- These changes will only be valid for the execution of the current script and will not modify the global PHP configuration.
Modify PHP CLI settings
For example, to temporarily modify the settings for a specific script without having to modify the configuration of the server's global PHP, follow the method below; with the PHP CLI environment, you can specify multiple PHP parameters at the same time by separating them with spaces.
Using the -d parameter
When you run PHP from the command line, you can use the -d parameter to specify PHP configurations. This allows you to modify the PHP parameters for this specific execution. For example, to set the maximum execution time to 90 seconds, the memory limit to 256 MB, and disable safe mode, you can do it as follows:
php -d max_execution_time=90 -d memory_limit=256M -d safe_mode=Off -f test.phpLink to this FAQ:
Has this FAQ been helpful?
This guide explains how to customize the limits of a site hosted on a Web Hosting mutualized or a Cloud Server.
Unlock or adjust the limits of a site
To access the website management:
- Click here to access the management of your site on the Infomaniak Manager (need help?).
- Click directly on the name assigned to the site concerned:
- Click on Manage advanced settings:
- Click on the tab PHP / Apache:
You can notably...
- ... unlock for 60 minutes the memory limit (
memory_limit= 1280 MB) and the maximum execution time of scripts (max_execution_time= 60 minutes):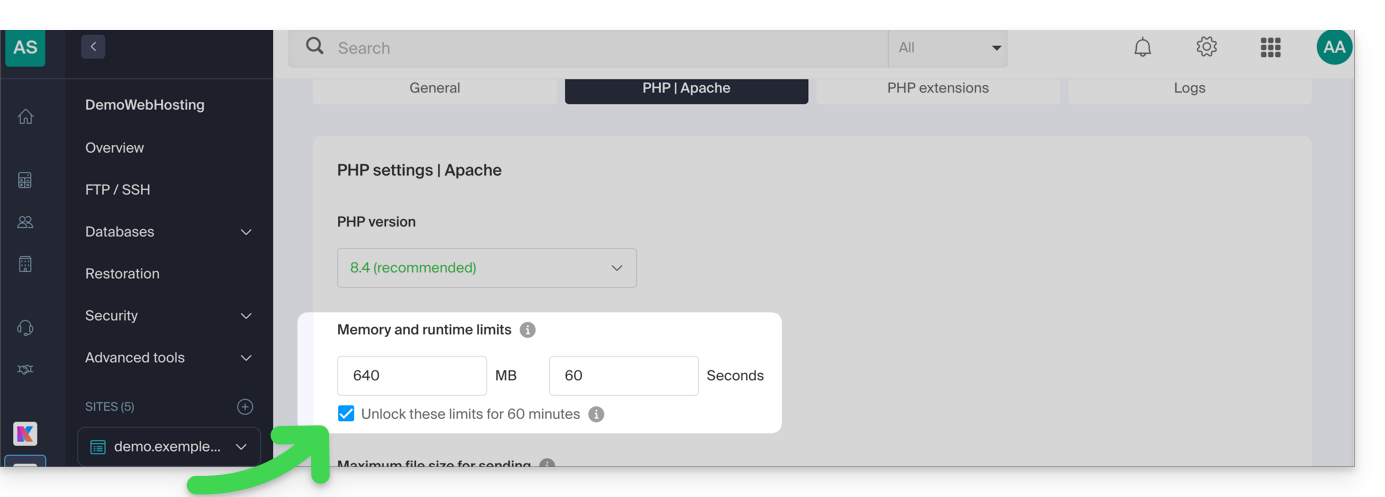
- This unlock is possible up to 10 times per year.
- ... customize the limits of:
max_execution_time(in seconds)memory_limit(in MB)post_max_size&upload_max_filesize(maximum file size for sending, in MB)- Cloud Server only:
Max children(refer to this other guide) - Cloud Server only:
Max input time
Do not forget to save the changes at the bottom of the page.
Maximum values by hosting type
| Limits | Mutualized | Cloud Server | CLI (Cloud Server only) |
|---|---|---|---|
| max_execution_time | 300 s | 3600 s | 0 (unlimited) s max |
| memory_limit | 1280 MB | 2048 MB max | 512 MB max |
| post_max_size + upload_max_filesize | 9223372036854775807 MB max | 9223372036854775807 MB max | 48 MB max |
| max_children | 20 max | 20 (default, modifiable) | |
| simultaneous connections per IP | 30 max | 30 (default, modifiable) | |
| max_input_time | 0 (unlimited) | 0 (default, modifiable) | 0 (unlimited) |
| files (inodes) | no limit on the number of files per hosting | ||
Link to this FAQ:
Has this FAQ been helpful?
This guide explains how to replace, within an Infomaniak Web Hosting, the address of a site currently a subdomain (https://dev.domain.xyz) with the main domain (https://domain.xyz).
Preamble
- Operations in brief:
- We start with a site created and accessible via the main domain URL
dev.domain.xyz. - We add an alias
domain.xyzto it. - We reverse the 2 types (the main domain becomes an alias and the alias becomes the main domain).
- We remove the old name
dev.domain.xyz.
- We start with a site created and accessible via the main domain URL
- Note that the site's location remains in the original folder on the server; the name of this location may be of the form
/sites/dev.domain.xyzbut this has absolutely no impact on the production site. - Also refer to the last chapter of this other guide.
Reverse a linked domain
Here are the detailed operations to go from a site with a subdomain type address to a direct address (here dev.domaine-exemple.ch becomes domaine-exemple.ch):
- Click here to access the management of your site on the Infomaniak Manager (need help?).
- Click directly on the name assigned to the site concerned:
- Then click on the chevron to expand the Domains section of this site:
- Click on the Add a domain button:

- Add the desired new name (if the domain name to be added is under the same Organization, it will be suggested in the list, otherwise enter its spelling):
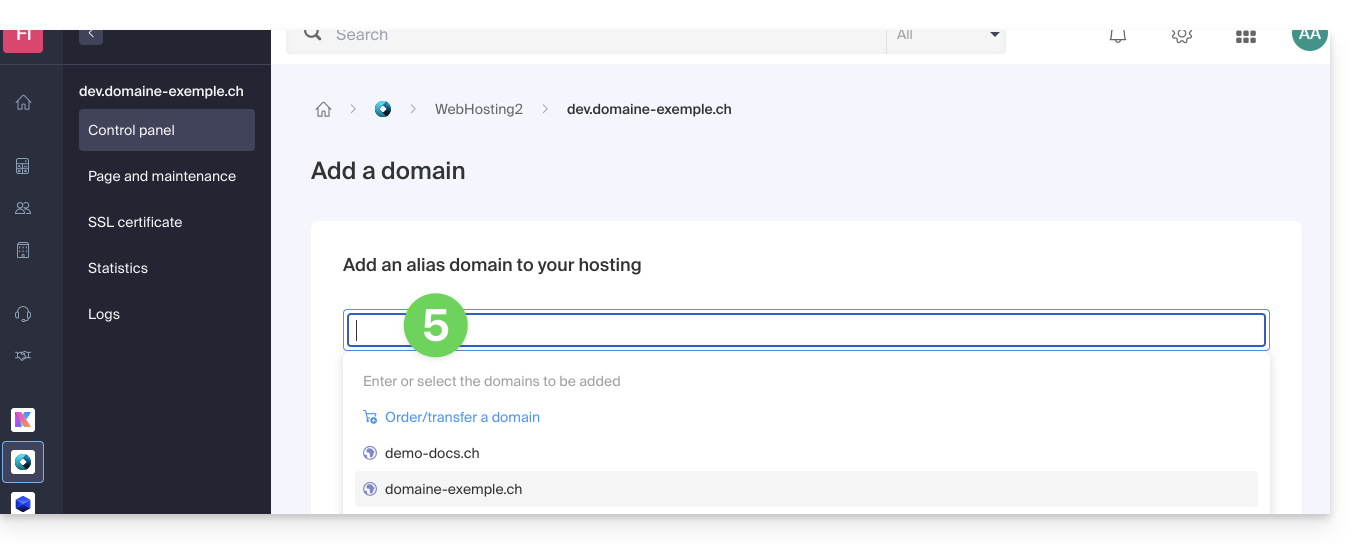
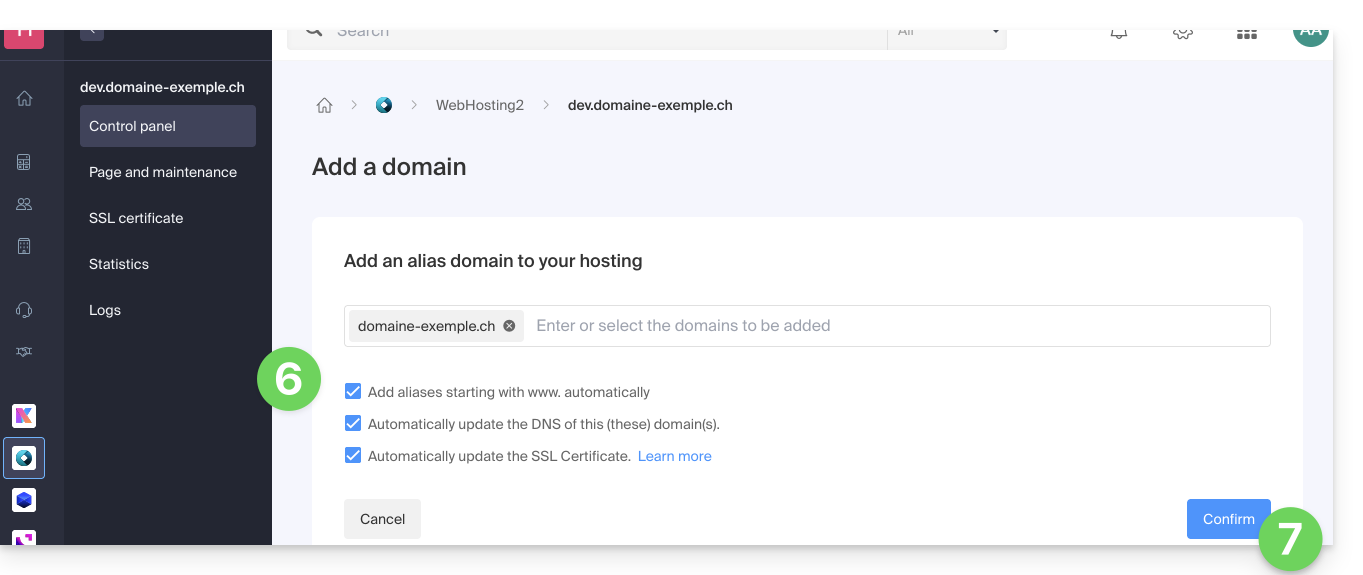
- Enable or disable the checkboxes:
- If the added domain is not in the form of a subdomain, it is possible to request to automatically add the
wwwversion of the domain. - Automatically update (if possible) the DNS records of the added domains.
- Automatically update the related SSL certificates (if possible).
- If the added domain is not in the form of a subdomain, it is possible to request to automatically add the
- Click the button to Confirm and wait:
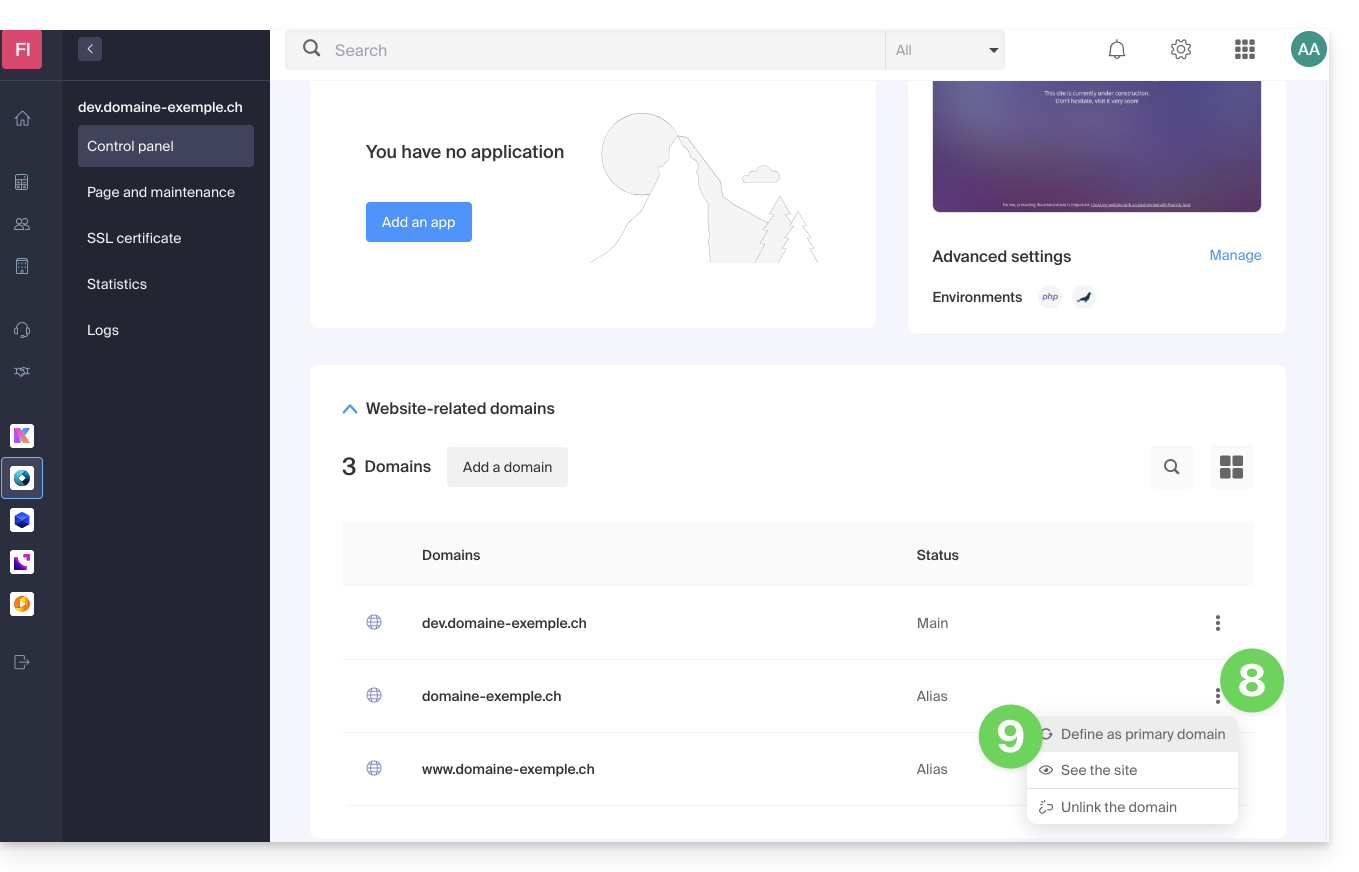
- Once the addition is complete, click on the action menu ⋮ located to the right of the domain that has just been added and that you wish to set as the main domain:
- Choose to set the item as the main domain:
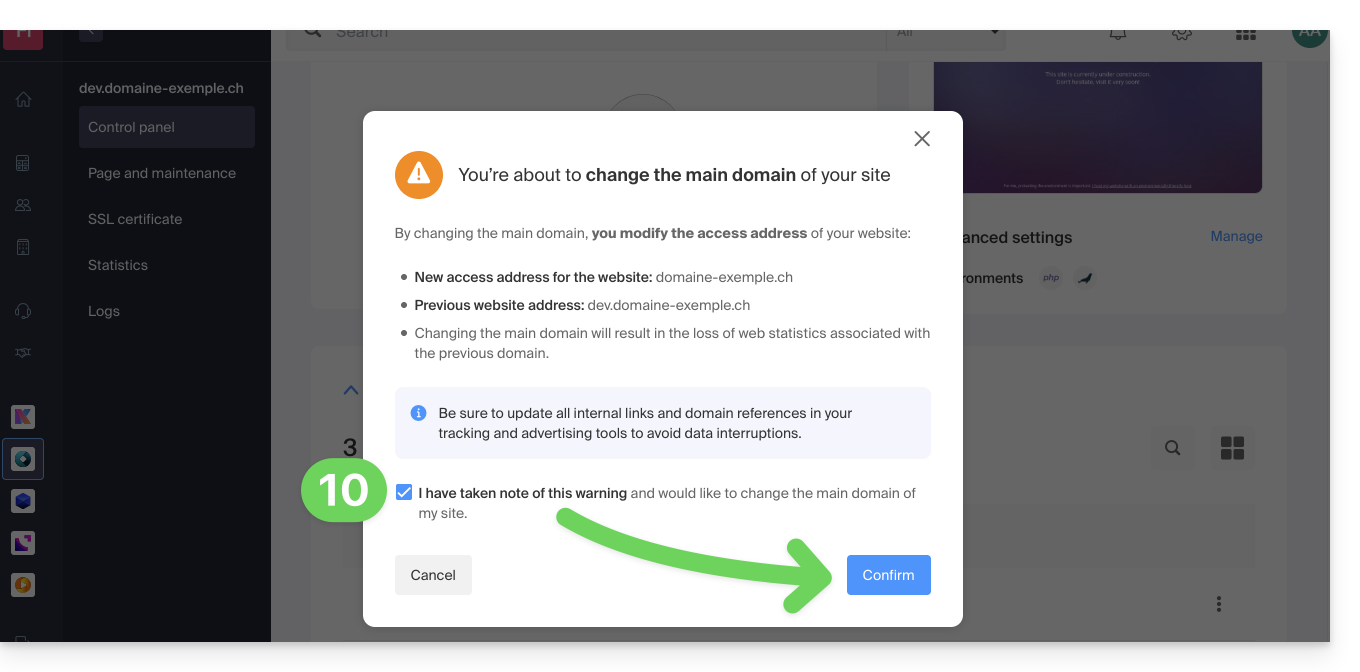
- Confirm the operation to proceed with the domain reversal:
Link to this FAQ:
Has this FAQ been helpful?
This guide concerns the task scheduler, a feature that allows you to run scripts on Web Hosting at the time and frequency of your choice to automate repetitive tasks.
Also refer to this other guide if you are looking for information about crontab (crons via SSH) on Cloud Server.
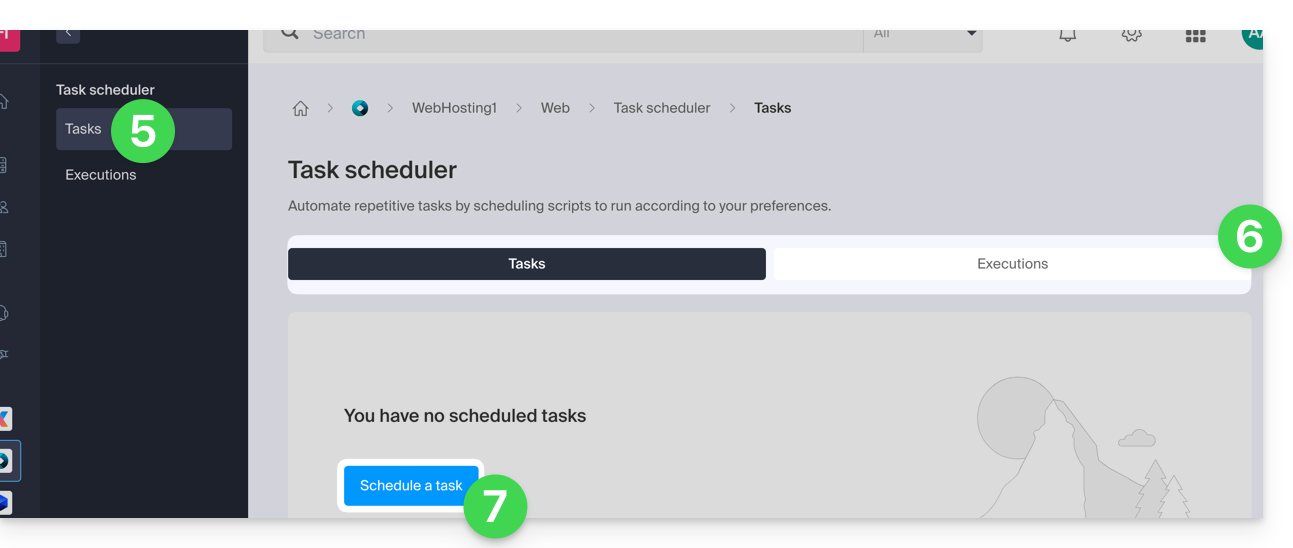
Access the task scheduler (webcron)
To access the task scheduling tool:
- Click here to access the management of your product on the Infomaniak Manager (need help?).
- Click directly on the name assigned to the product concerned.
- Click on Web in the left sidebar.
- Click on Task Scheduler in the left sidebar:

- Click on Tasks in the left sidebar.
- Existing crons and running tasks are displayed under the 2 tabs of the page.
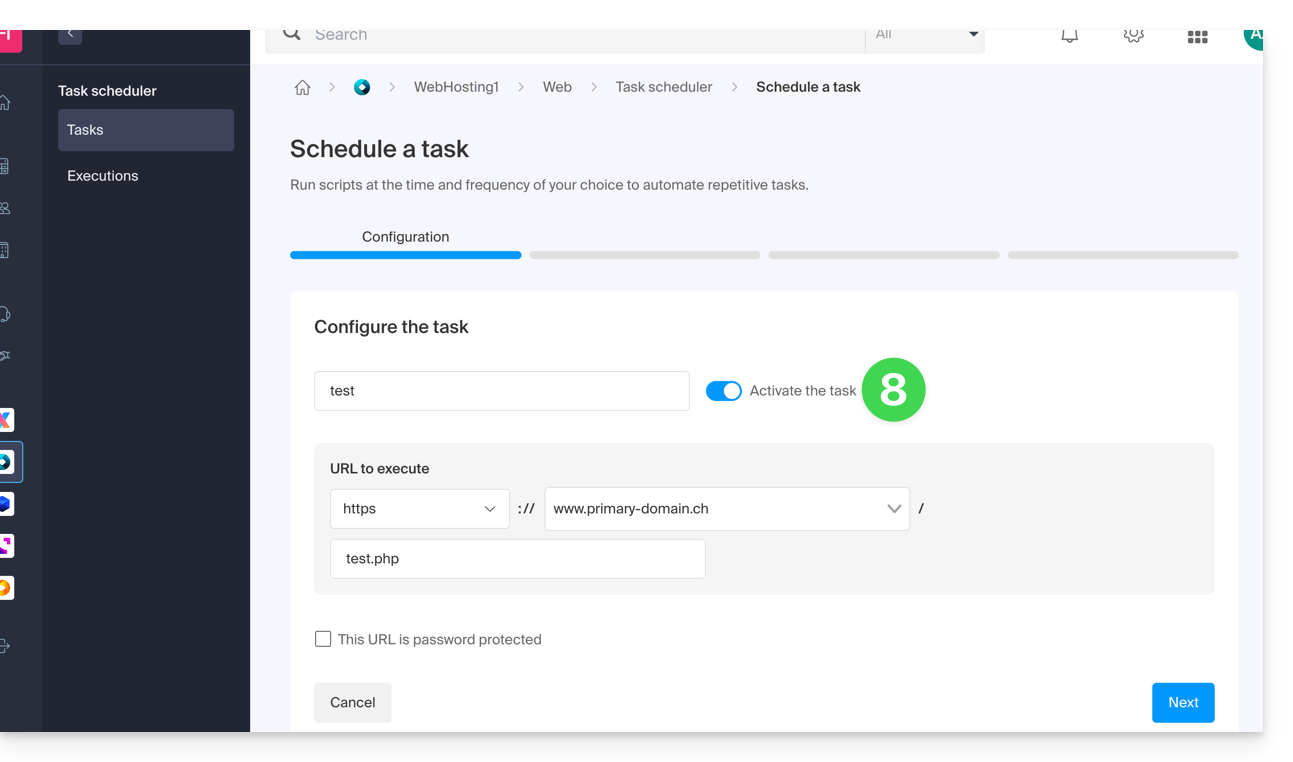
- Click the Schedule a Task button to create a scheduled task by specifying, among other things, whether the URL of the script to be executed is password-protected, whether you want to receive notifications, and of course the desired interval (see below), etc.:
- Do not forget to activate the task with the toggle switch:
Minimum intervals
In the next step, you can schedule the cron according to…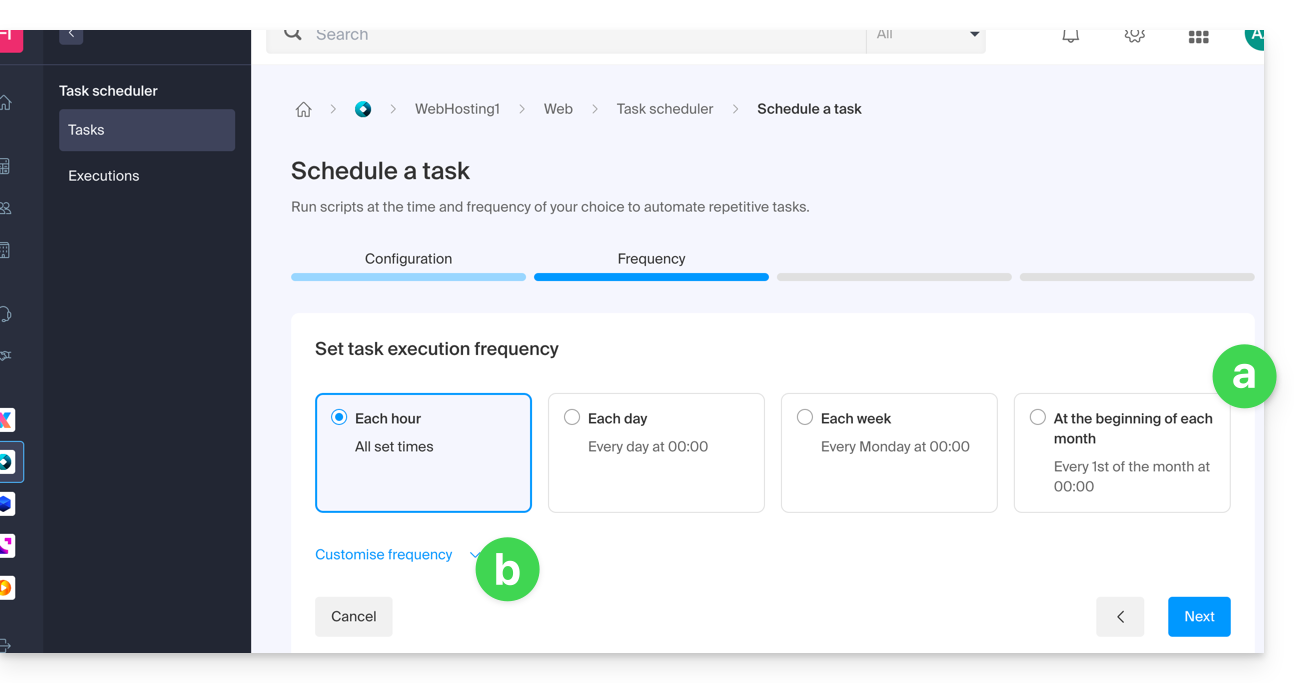
- [ a ]… predefined intervals such as once a week…
- [ b ]… or customization to a minimum interval of:
- 15 minutes with a shared hosting
- 1 minute on Cloud Server
Notifications & analysis
In the next step, you can activate notification emails: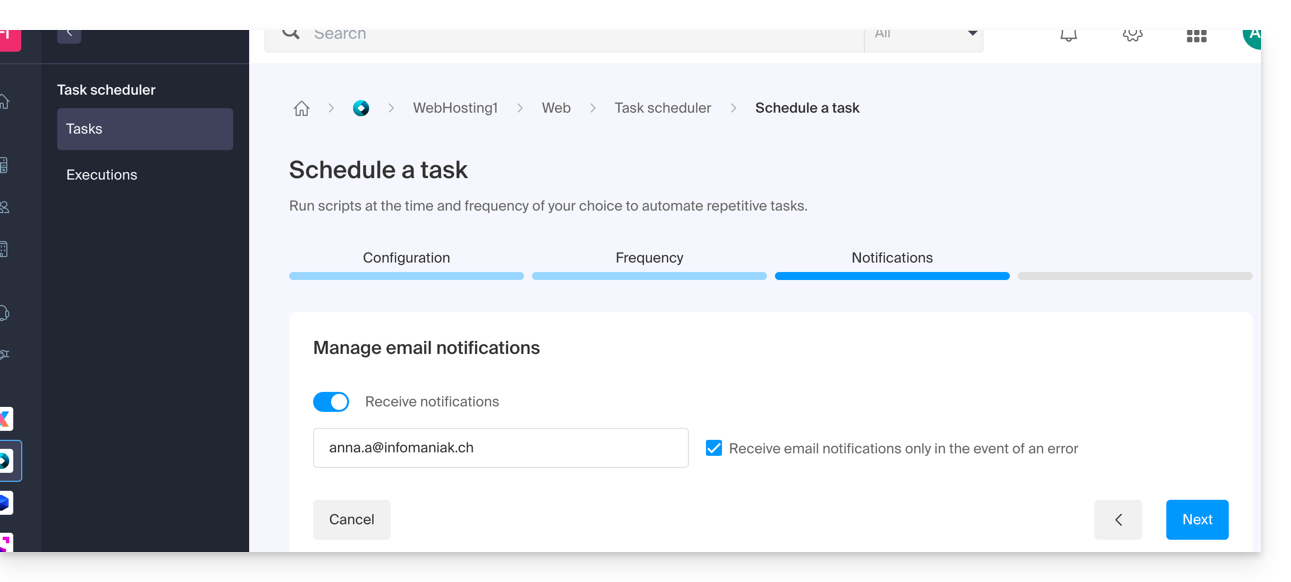
The next step allows you to activate an analysis of the task: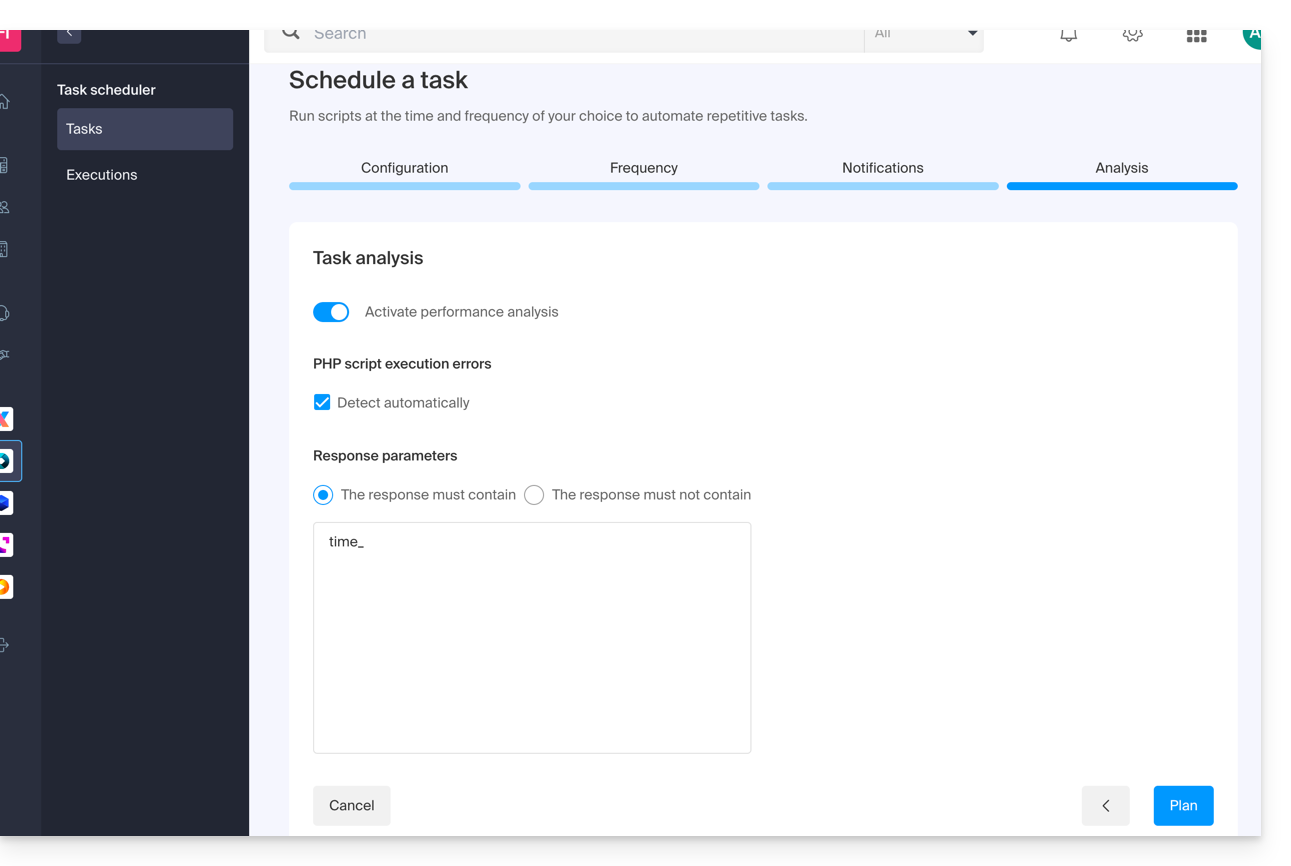
Run the task manually 1 time
Once the task is created, click on the action menu ⋮ located to the right of the item concerned to access the quick management of your task and its execution log: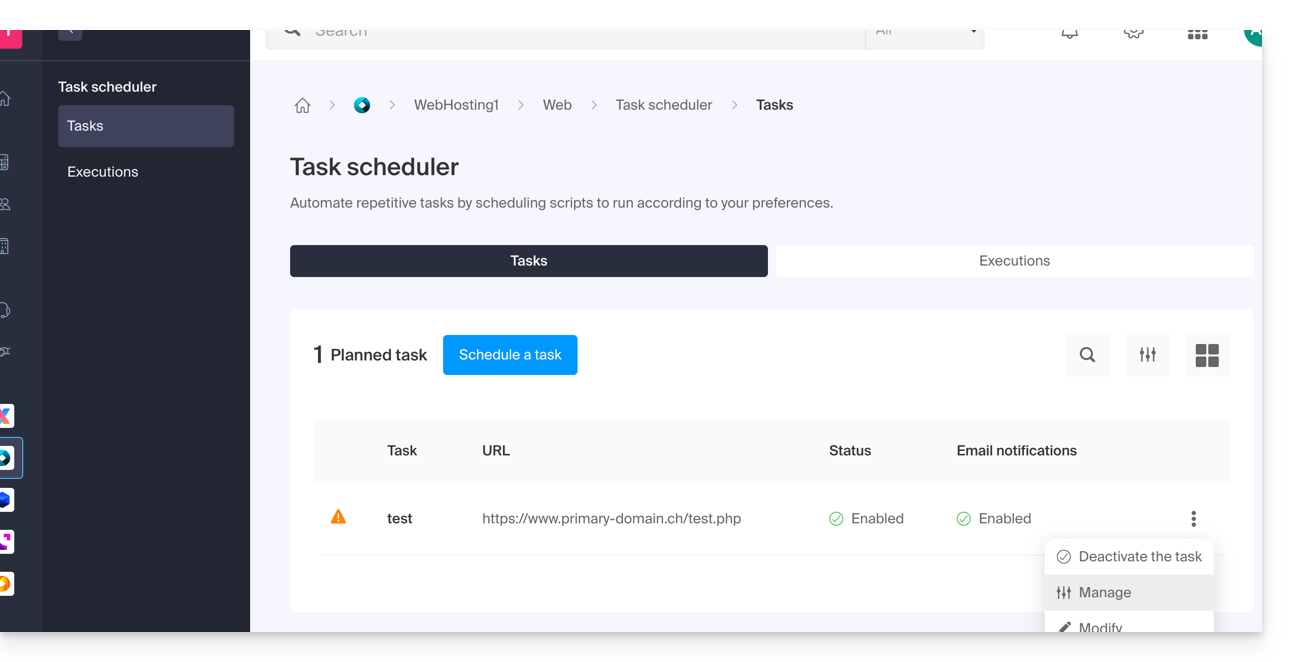
At the top of the page, you can click the button to manually run the task 1 time: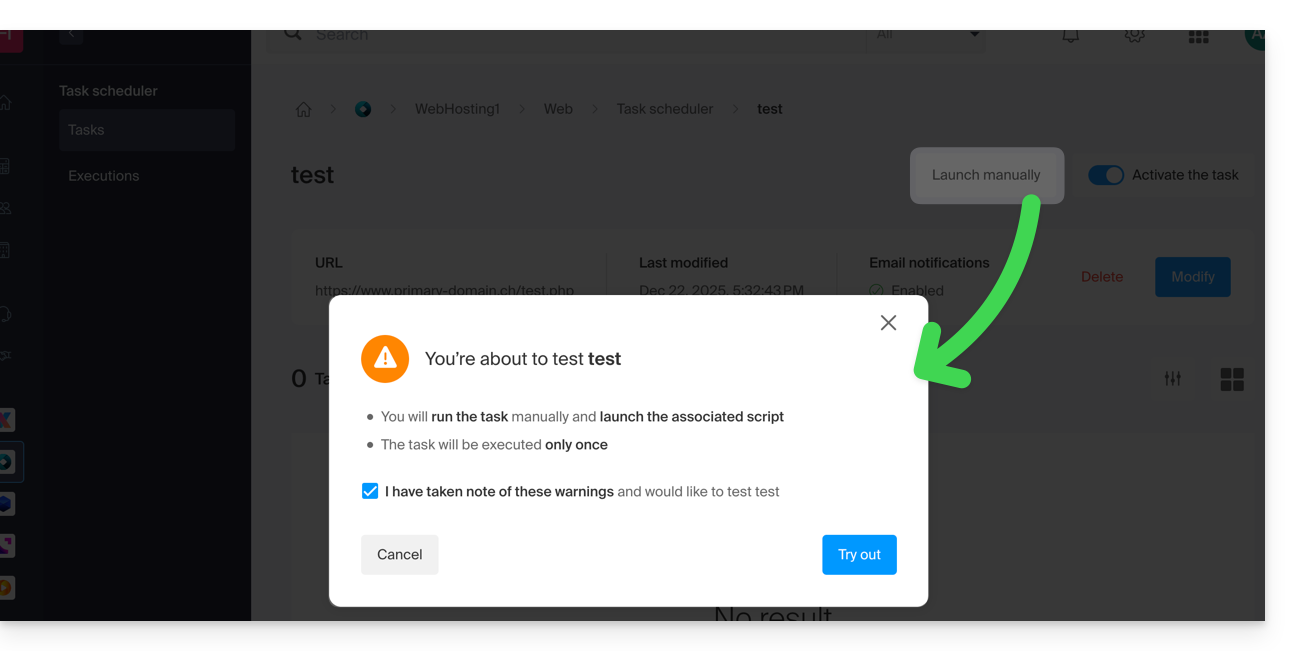
Link to this FAQ:
Has this FAQ been helpful?
This guide explains how to install Nextcloud, an enhanced version of Owncloud, in a few clicks on the paid Web Hosting offers.
Regardless of your hosting products, Infomaniak also offers a high-performance Cloud service: kDrive (file storage, synchronization, and sharing)
Preamble
- Nextcloud is part of the applications (not developed by Infomaniak) and allows the implementation of a file storage & sharing system within a "cloud" that you fully control (user management, permissions, quotas, associated mobile applications, etc.).
- Unlike other hosts, Infomaniak allows the use of this type of app on its hosting:
- Personal use is allowed on shared Web Hosting.
- For intensive and professional use, it is recommended to opt for a Cloud Server to install ownCloud / Nextcloud.
Install Nextcloud
Prerequisites
- Have an Infomaniak Web Hosting (order if necessary).
- Upgrade the Databases part if necessary (especially for Nextcloud).
- If a blank site is already present on the hosting, click the button as in the image below and skip directly to step 9:
To access Web Hosting and install a new site with the application:
- Click here to access the management of your hosting on the Infomaniak Manager (need help?).
- Click directly on the name assigned to the hosting on which to install the application:
- Click the Add a site button:
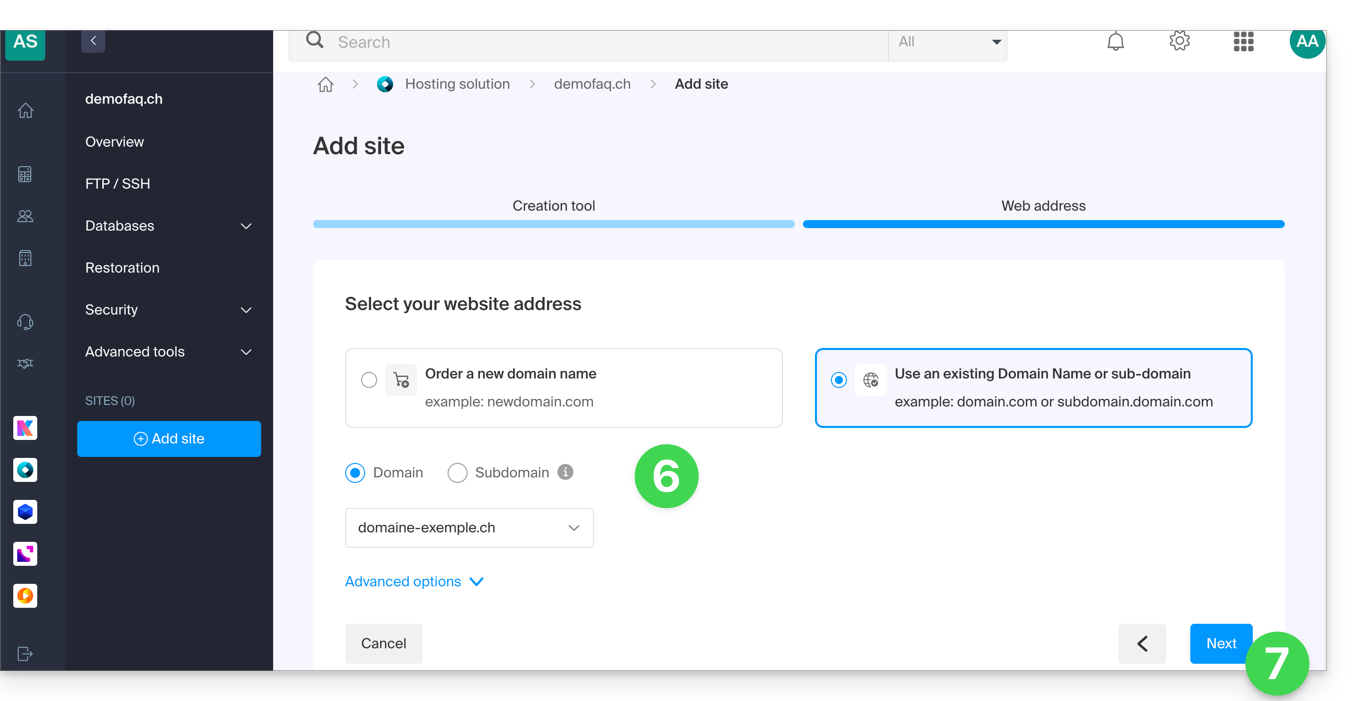
- Select the intermediate option for tool deployment.
- Click Next:

- Select the domain or subdomain and advanced options if necessary.
- Click Next:
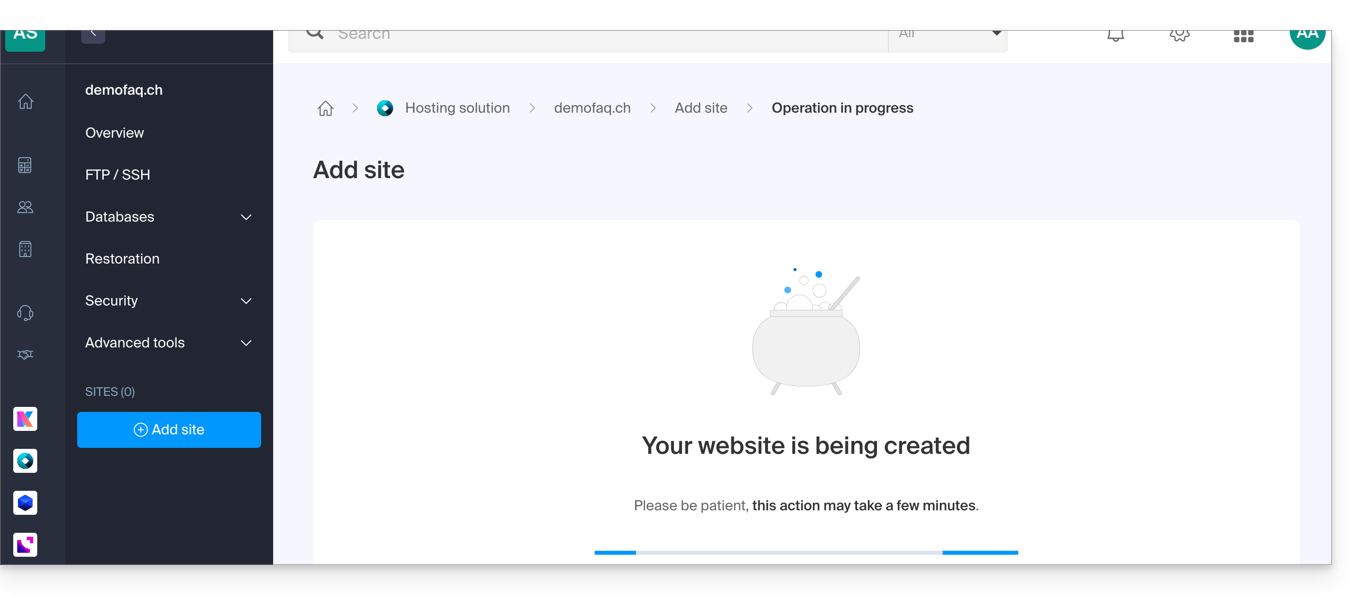
- Wait a few minutes while the site is being created:
- Select the desired application (if necessary, filter and search):
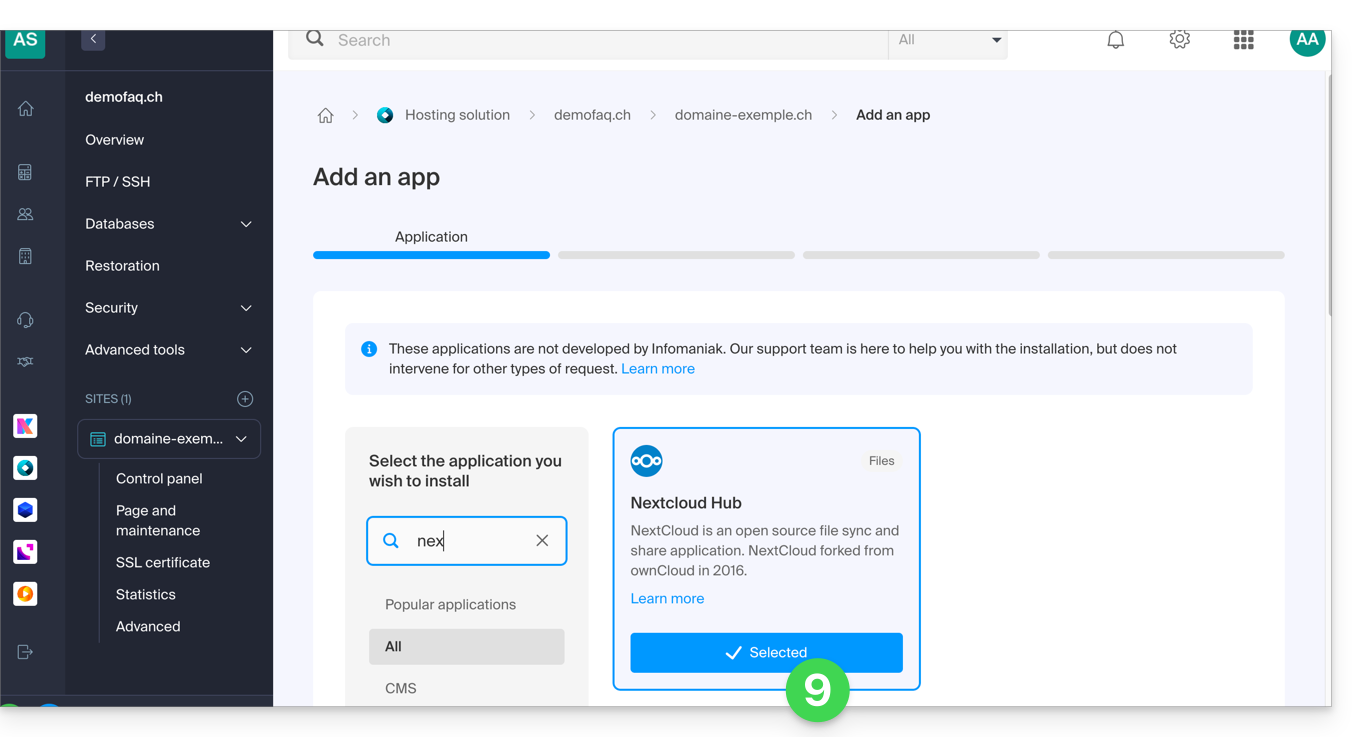
- Click on Next at the bottom of the page.
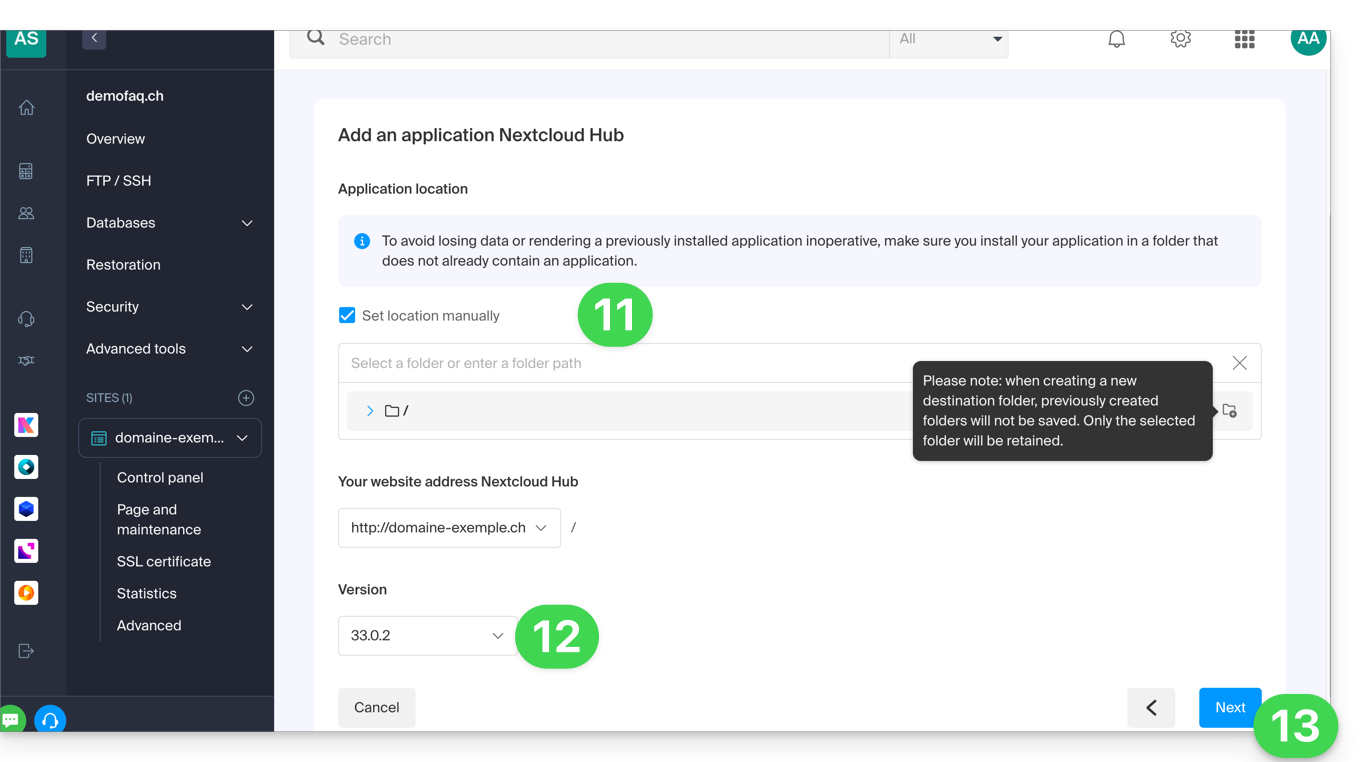
- Leave the location by default or check the box to install the app in a new folder that you can create using an icon visible to the right of point 11 in the image.
- Optionally, choose to install an earlier version if necessary.
- Click on Next:
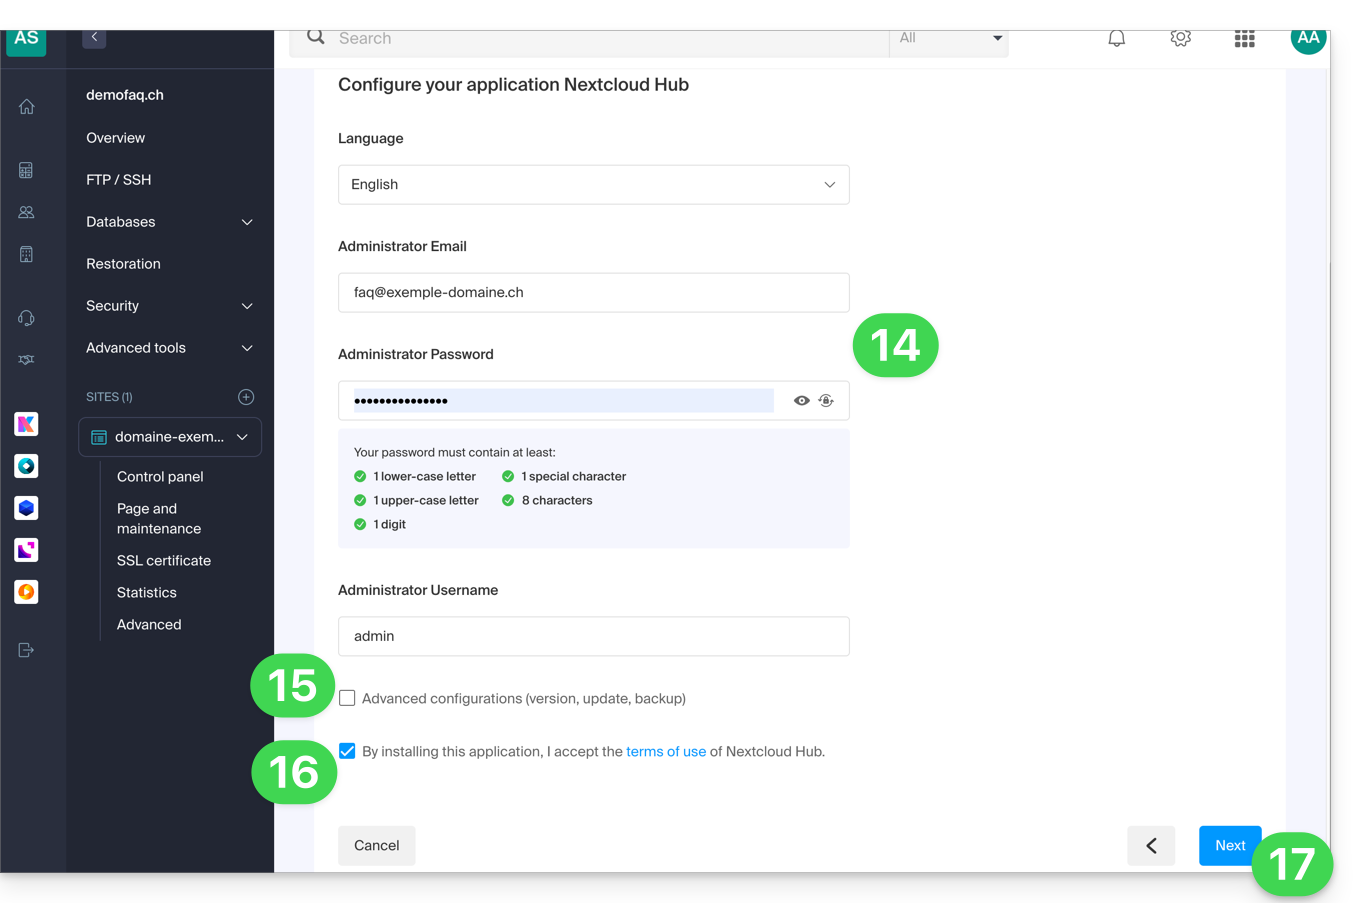
- Configure username and password.
- Specify certain advanced settings if necessary (backup type in particular).
- Read and accept the terms of use of the selected app.
- Click on Next:
- Confirm the installation of the application in the next step and wait:
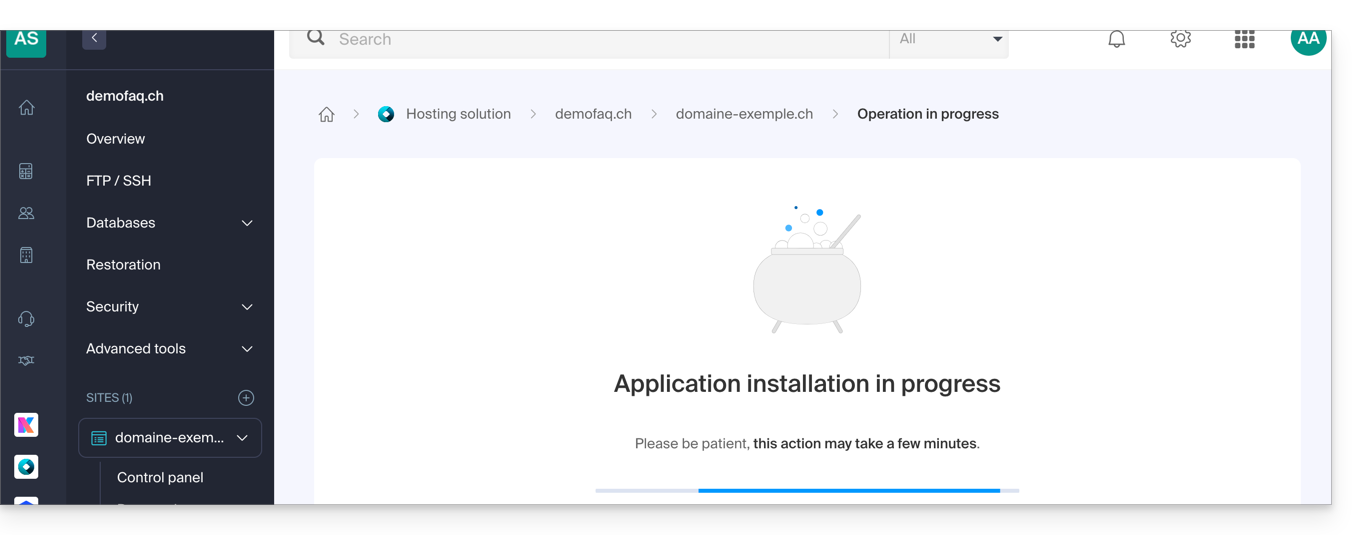
- Take note of any error message on the screen if, for example, the chosen installation folder is not empty or if the PHP version of the site on which you are attempting the installation is not compatible.
- Once the installation is complete, you can manage your application as desired:
Link to this FAQ:
Has this FAQ been helpful?
This guide explains what the "MySQL Prefix" option is for in the parameters of a site and what its implications are for the operation of your web applications (CMS) and PHP scripts.
Preamble
- When the "MySQL Prefix" option is activated for a site, it is no longer necessary to add the prefix "
wxyz_" before the name and users of your MySQL databases. - A PHP script can thus connect to MySQL with the user "monuser" and a database "mabase" and access will be automatically made with the user "wxyz_monuser" and the database "wxyz_mabase".
- ⚠ If you are migrating from an old Infomaniak offer:
- After migrating a site from the old console, the "MySQL Prefix" option is activated by default in order to automatically maintain the connection of your web applications (WordPress, Joomla, Drupal, etc.) and PHP scripts with your MySQL databases.
- In order to ensure the proper functioning of your sites in case of migration of your hosting to another server, it is strongly recommended to deactivate this function and make the adjustments it implies.
Manage the MySQL Prefix option
Go further with environment variables
It is possible to configure environment variables directly from the Manager for your entire website:
- Click here to access the management of your site on the Infomaniak Manager (need help?).
- Click directly on the name assigned to the site concerned:
- Click on Manage advanced settings:
- Click on the PHP / Apache tab:
- Activate or deactivate the toggle switch MySQL Prefix:
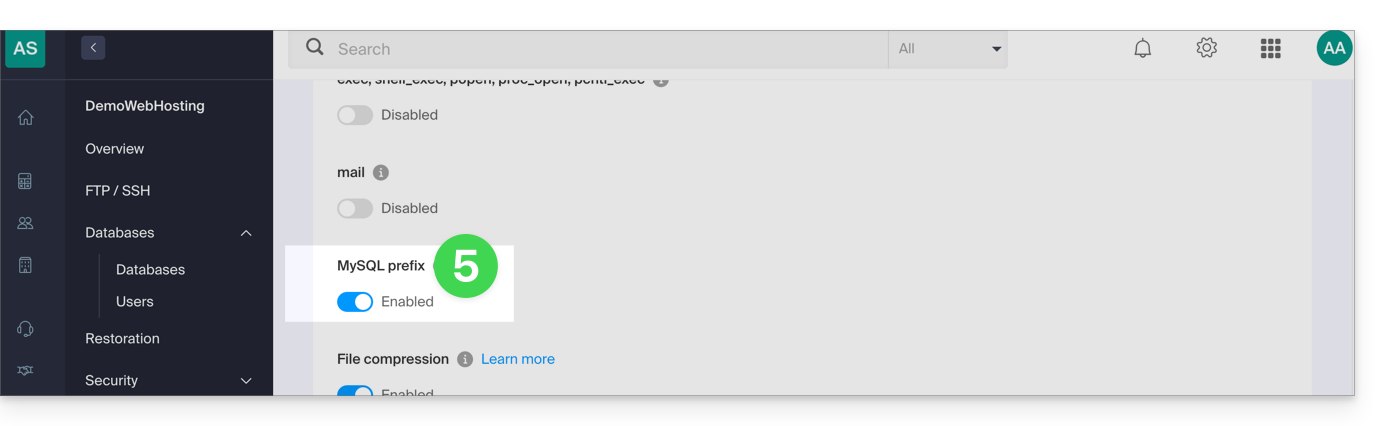
- Click on the Save button at the bottom of the page.
- Make the necessary adjustments in the configuration files of your web applications and PHP scripts...
Implications and adjustments to be made
After deactivating the MySQL Prefix option for a site, some PHP scripts or CMS may no longer work.
In order to restore the connection to your databases, you will necessarily have to update the following information in the configuration file(s) of the scripts concerned:
- The name of the MySQL database: you will need to add the prefix of your server
- before:
dbname - after:
wxyz_dbname
- before:
- The user of the MySQL database: you will need to add the prefix of your server
- before:
dbuser - after:
wxyz_dbuser
- before:
Link to this FAQ:
Has this FAQ been helpful?
This guide covers redirecting web traffic to a specific port, including when using a dedicated IP and a specific web application (such as Node or Varnish, for example).
Prerequisites
- Add a site to your hosting.
- Install
HAProxyon the Cloud Server.
Redirect web traffic to a specific port
By default, on the Cloud Server, web traffic is sent to Apache. To send requests to a Node script or another service (provided it "listens" on a port between 4000 and 4009), you need to go through HAProxy.
This applies in particular to Express, Socket.IO, Meteor.js, Nuxt.js, Django, Flask, Ruby on Rails, even possibly Java (J2E), etc.
To do this, you need to ensure that the service is listening on a port between 4000 and 4009 (especially with server.listen(4000) for Express or a basic HTTP Node server, but depending on the type of project by other means, a configuration file, in the code or otherwise) and on all interfaces (0.0.0.0).
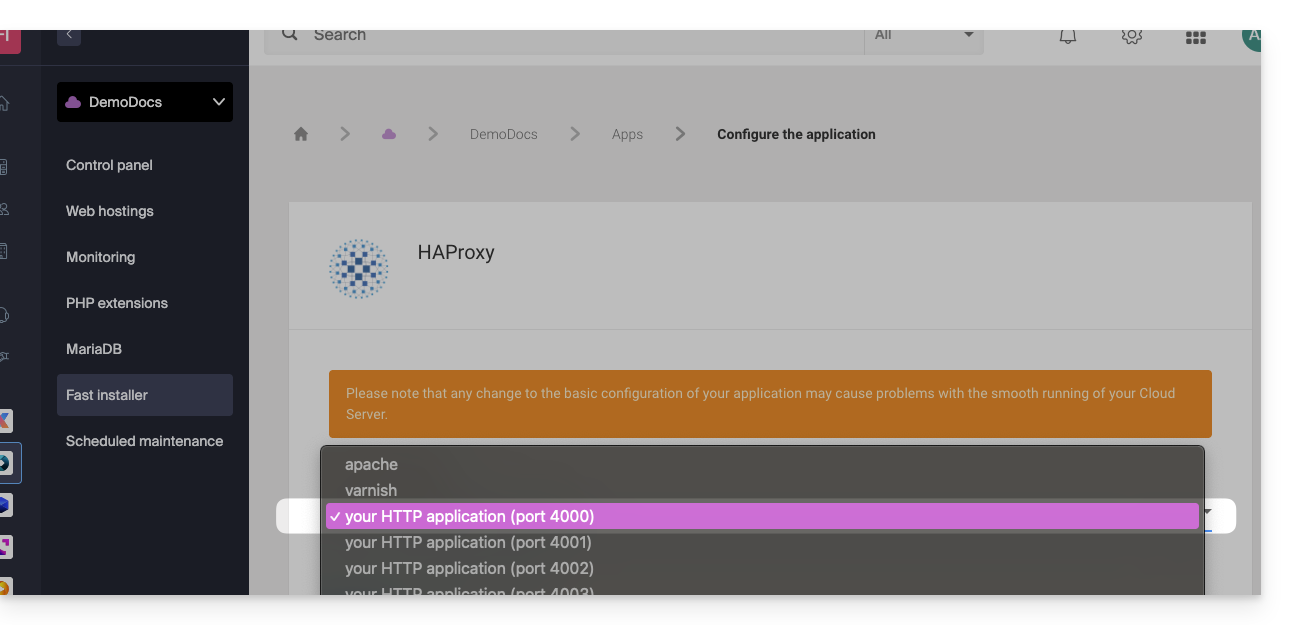
It will also be necessary to configure HAProxy as in the example below:
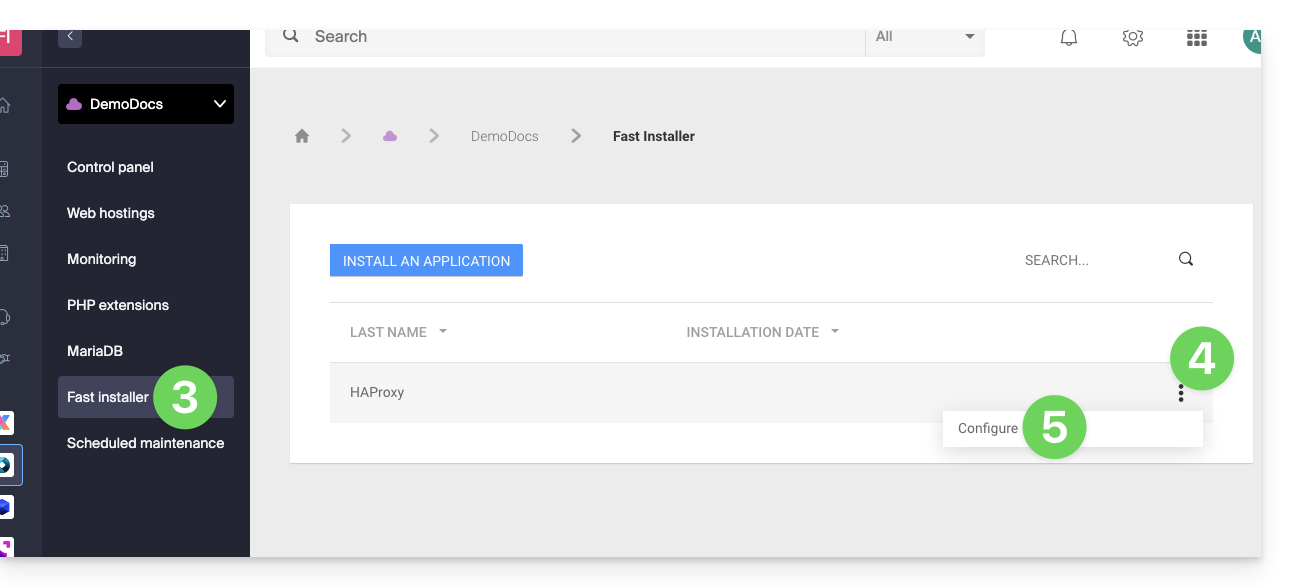
- Click here to access the management of your Cloud Server on the Infomaniak Manager (need help?).
- Click directly on the name assigned to the Cloud Server concerned.
- Click on Fast installer in the left sidebar.
- Click on the action menu ⋮ located to the right of
HAProxy. - Click on Configure:
- Choose the desired information and save:
Special case of aliases and wildcards
Configuring HAProxy via the Fast Installer applies exclusively to the main domain of the hosting.
Currently, domain aliases (whether specific or of the wildcard type like *.domain.xyz) are not natively supported by this tool.
To redirect traffic from an alias to your application (listening, for example, on port 4000), you must manually configure a "proxy" type rule in the .htaccess file located at the root of your site:
# Redirect all traffic to the application (e.g., Node.js on port 4000)
RewriteEngine On
RewriteRule ^(.*)$ http://localhost:4000/$1 [P,L]
Without this manual directive, all requests corresponding to your aliases or wildcards will be directed by default to Apache instead of your specific application.
Retrieving the source IP of a request
When you redirect Web traffic to your Web application, request processing changes and the request is first received by a reverse proxy (local to the server) which then forwards the request to the chosen port. Thus, due to the request transfer, the methods usually used to retrieve the visitor's IP will give the IP of the reverse proxy instead of the visitor's.
Thus, to retrieve the real source IP of the visitor in these cases, you need to consult an HTTP header named X-Forwarded-For, which will contain the source IPs accumulated during each redirection. This header will therefore contain last the original IP address of the client, allowing the real visitor to be identified.
Warning: it is important to note that HTTP headers can be tampered with, which presents security risks. To minimize these risks, it is recommended to verify that the request comes from a trusted server before trusting the content of the header X-Forwarded-For. This verification may involve ensuring that the request was transmitted by a trusted intermediate server, identified by a pre-established list of IP addresses. In the case where the site uses a dedicated IP, the trusted servers are:
- 83.166.133.15
- 83.166.133.17
- 83.166.133.16
- 84.16.92.5
- 84.16.92.43
- 10.2.32.255
- 10.2.34.164
Link to this FAQ:
Has this FAQ been helpful?
This guide explains how to access phpMyAdmin with Web Hosting.
Preamble
- phpMyAdmin is an open-source administration tool designed to manage your MySQL and MariaDB databases via an intuitive web interface.
- It allows you to perform complex operations such as executing SQL queries, creating tables, or importing and exporting data without having to use the command line.
Access phpMyAdmin
To access Web Hosting in the Databases section:
- Click here to access your hosting management on the Infomaniak Manager (need help?).
- Click directly on the name assigned to the hosting concerned:
- Click on the chevron to the right of Databases in the left sidebar menu.
- Click on Databases in the left sidebar menu.
- Click on Connect to phpMyAdmin:
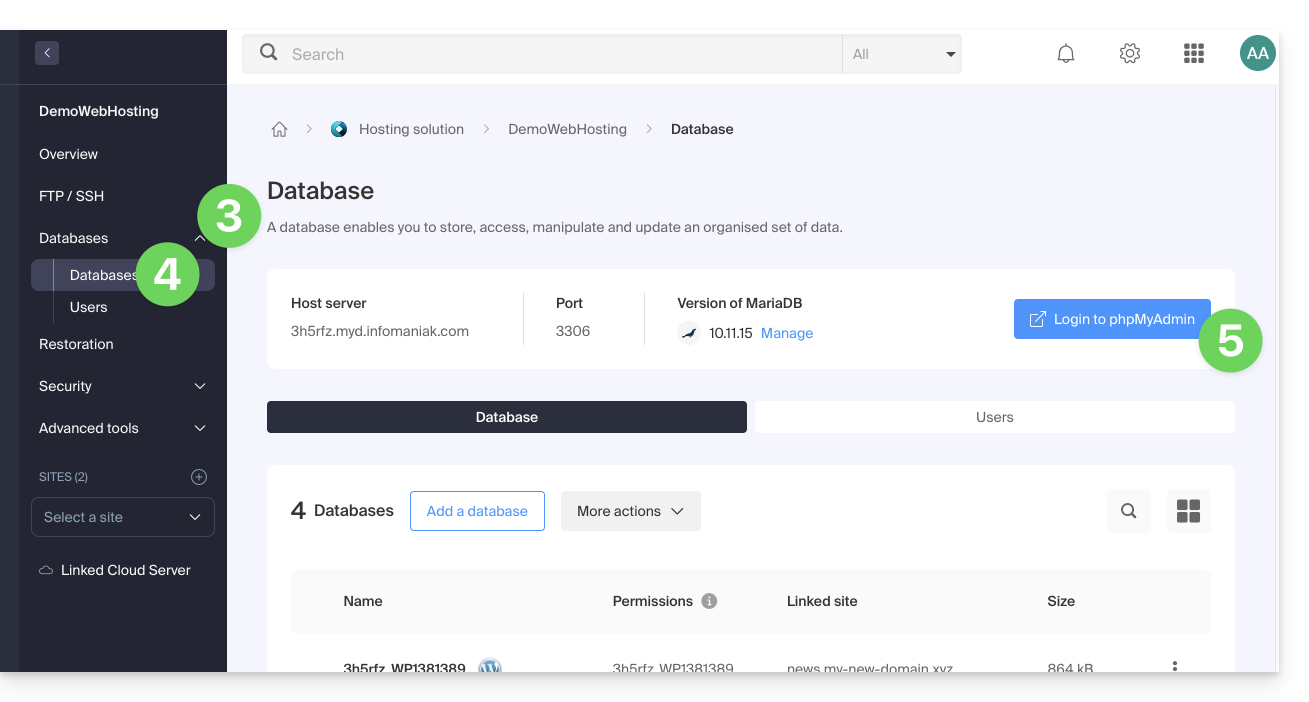
- The correct server and a temporary user are automatically filled in.
You can also click on the action menu ⋮ located to the right of a database user: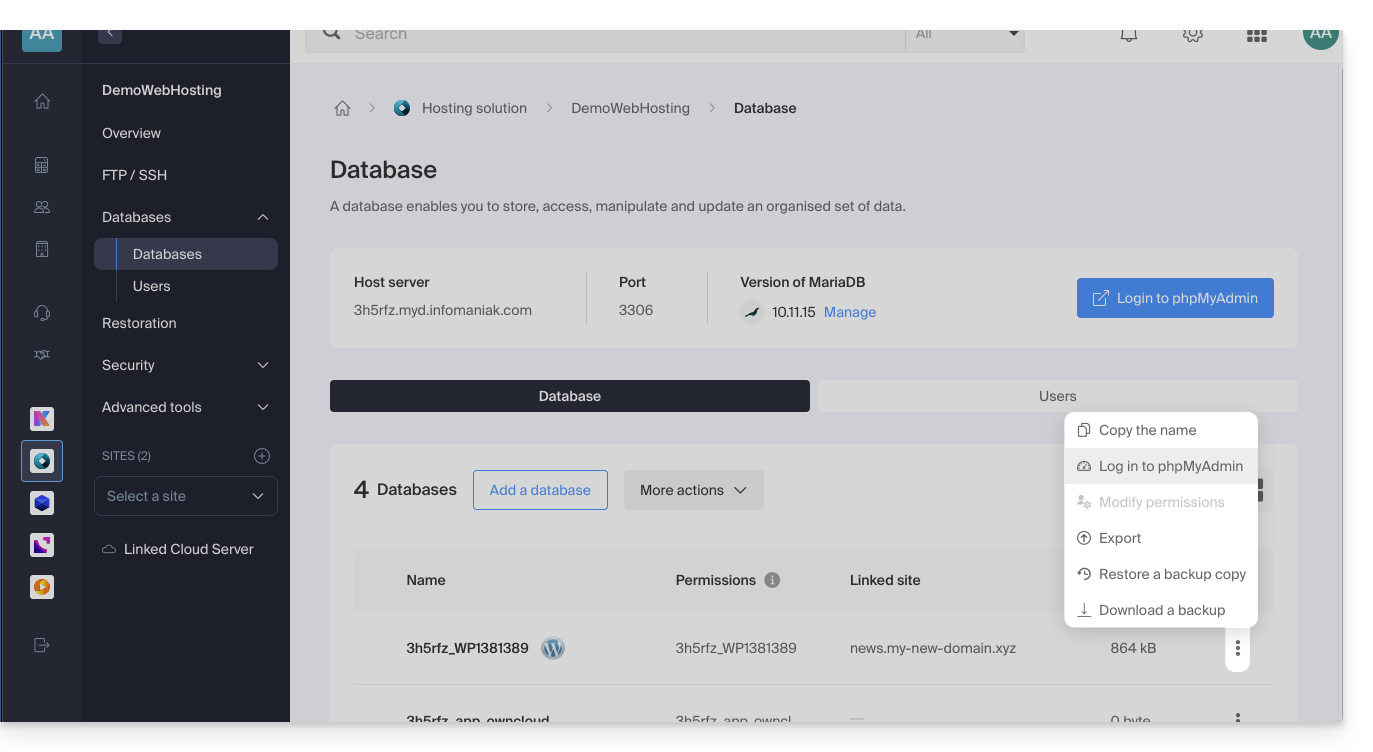
- The correct server is automatically filled in.
- The password to enter corresponds to the database user (the one you chose when creating the MySQL user to redefine if you have forgotten it):
Link to this FAQ:
Has this FAQ been helpful?
This guide explains how to activate a CDN to optimize an Infomaniak Web Hosting.
Preamble
- CDN stands for "Content Delivery Network" in English, which translates to "Content Distribution Network" in French.
- A CDN stores a copy of your site's content (images, videos, CSS/JS files) on multiple geographically dispersed servers.
- When a user accesses your site, the CDN provides this content from the server closest to their location, thus reducing loading times:
- Your site loads faster for visitors, which can reduce the bounce rate and improve the user experience.
- By distributing the content, the CDN reduces the load on your main server, improving its performance and availability.
- Some CDNs offer security features such as protection against DDoS attacks and data security.
Setting up a CDN
To use a CDN, you will generally need to make adjustments at the configuration level of your domain name, specifically at the DNS records level. This will direct the traffic of your website to the CDN's network of servers. Therefore, in general:
- Create an account on the website of your chosen CDN and add your site to it.
- Modify the DNS zone of your domain name according to the instructions provided by the CDN.
- Test your site to ensure the CDN is working correctly.
Cloudflare-specific guide
For customers who want to optimize their site against the overload caused by the intensive passage of bots, using a CDN like Cloudflare is often recommended. The Cloudflare CDN allows you to optimize the performance and security of a website with features such as:
- caching of a site's static content
- minification of HTML, CSS, and Javascript code
- basic anti-DDoS protection
- etc.
To set up Cloudflare:
- If necessary, create an account with Cloudflare.
- Add the domain name of the site in question.
- Report all DNS zone records of the domain in question to Cloudflare (A, MX, TXT, NS records, etc.).
- On the Infomaniak Manager, modify the DNS of the domain in question with the DNS servers indicated by Cloudflare.
- Configure DKIM and DNSSEC if necessary.
- Any DNS addition/modification can take up to 48 hours to propagate.
Note: mod_cloudflare is enabled by default on all paid web hostings.
Enable Cloudflare Rate Limiting
By default, Cloudflare simply acts as an intermediary between the site and Infomaniak, forwarding all requests to the Infomaniak servers. Thus, during traffic spikes or attacks, requests still reach the origin server, but with Cloudflare IP addresses, making it difficult to manage mitigation on a shared server.
Setting up "rate limiting" rules in Cloudflare's application firewall is now an effective solution offered. This feature limits the number of requests sent to the server, blocking aggressive scans and protecting the server from excessive overloads.
And also…
… Amazon CloudFront
If you already use AWS services, CloudFront is easy to set up. Create a distribution, configure the settings, and link it to your site.
… Fastly
Sign up on Fastly, configure your service by adding your site and setting the cache parameters. Fastly offers advanced configuration options.
Link to this FAQ:
Has this FAQ been helpful?
This guide explains how to modify the automatic backup configuration of Infomaniak Web Applications (Joomla, Drupal, Typo3, PrestaShop, ownCloud, etc.) included in the paid Web Hosting offers.
Preamble
- This does not concern WordPress, which can be backed up and then restored via:
- the automatic backups of hosting,
- the extensions allowing you to manually create a complete backup including an easy reinstallation file.
Configure backups
To manage the backups of Apps:
- Click here to access the management of your site on the Infomaniak Manager (need help?).
- Click directly on the name assigned to the site concerned:
- Click on the action menu ⋮ located to the right of the Web Application concerned.
- Click on Settings of the application:
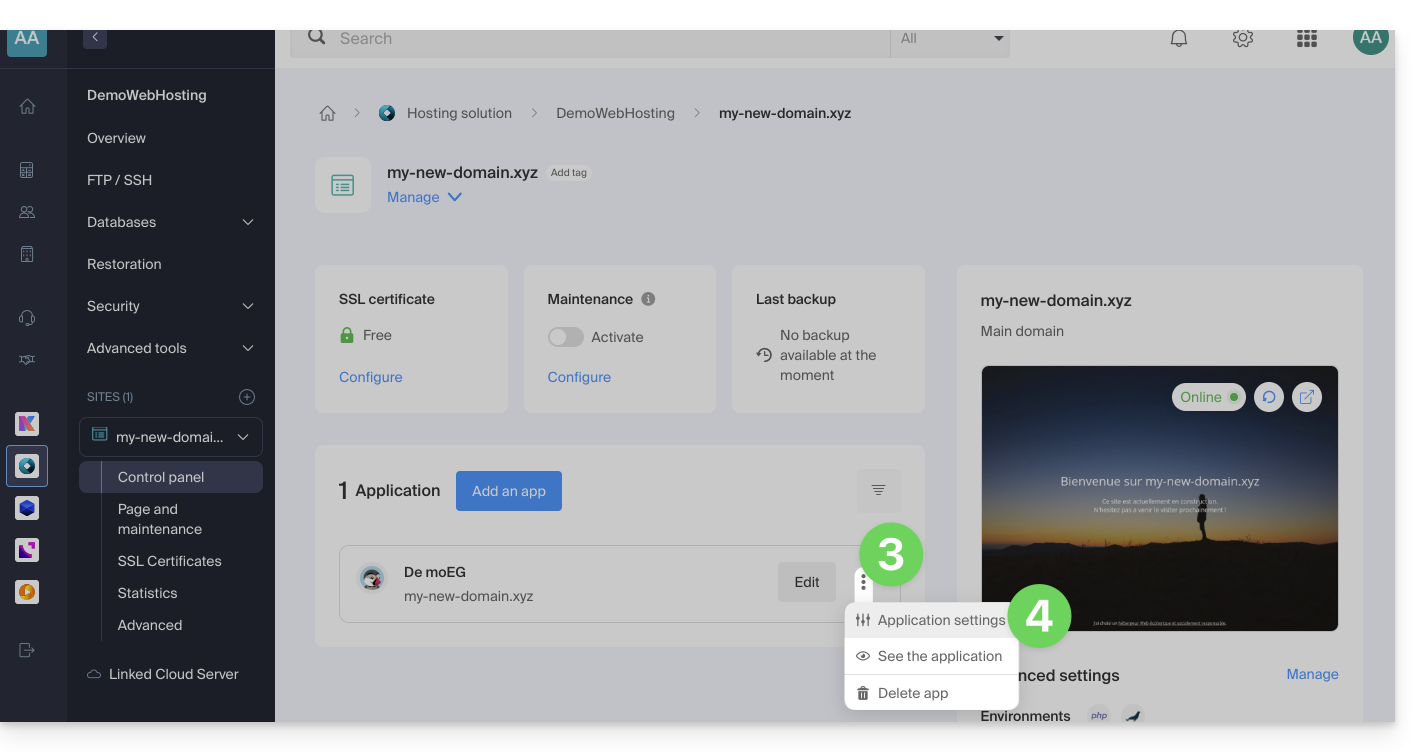
- Click on Modify to the right of the Application:

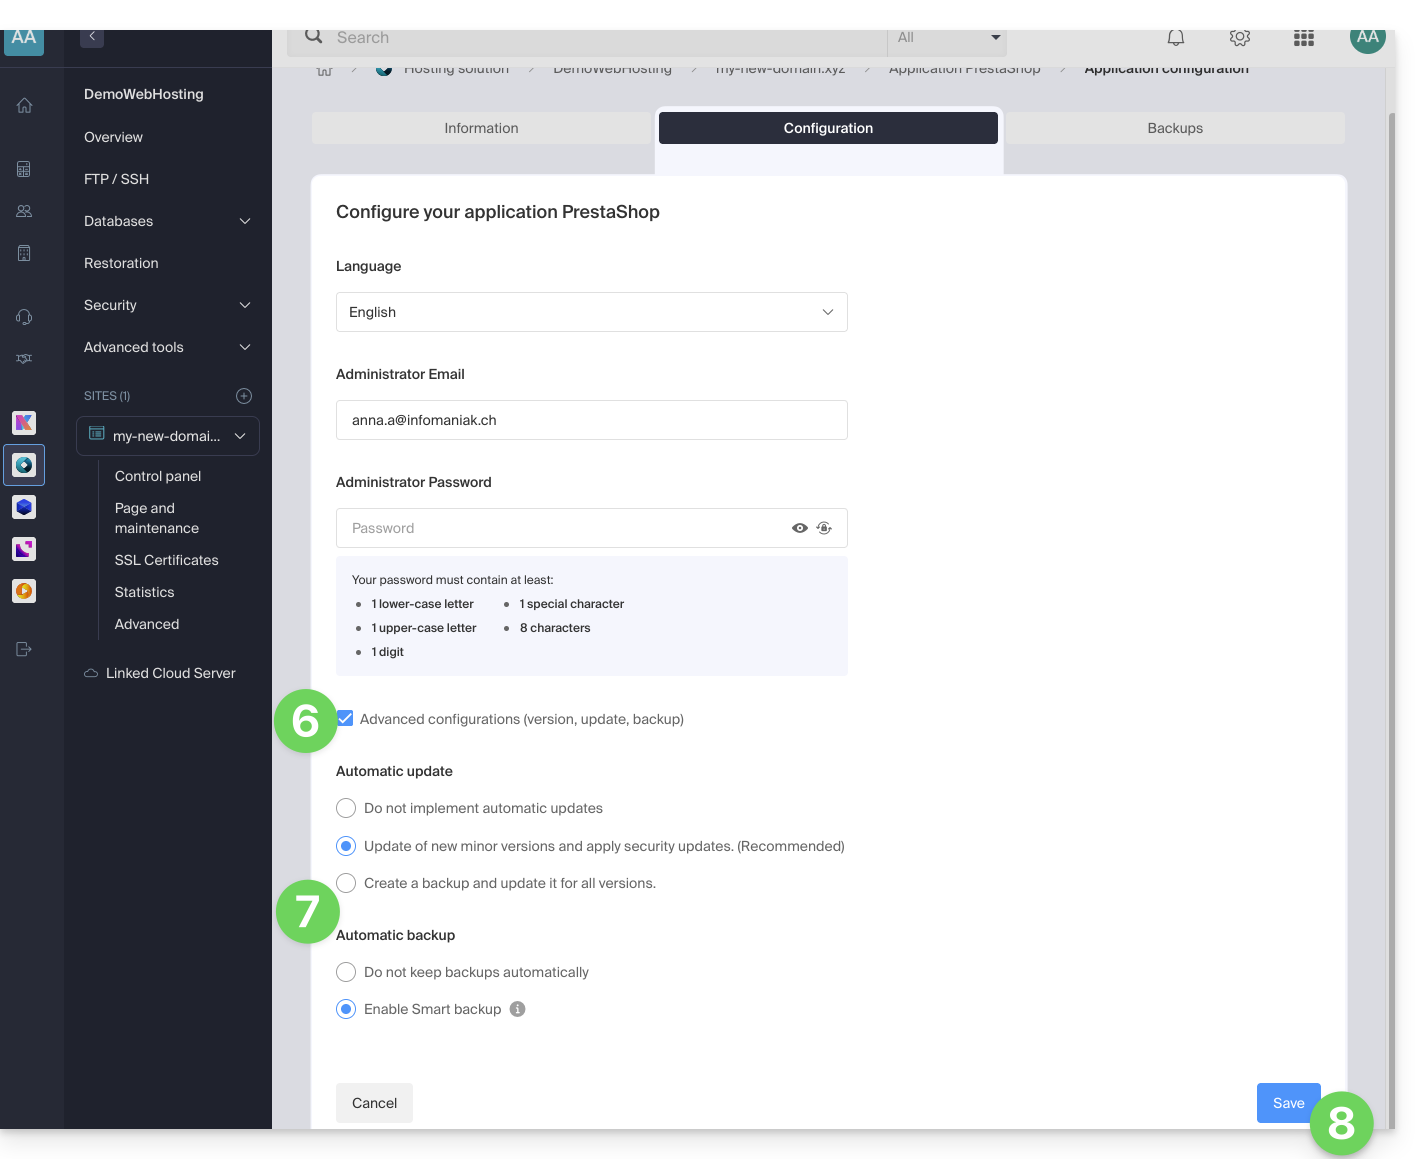
- Under the Configuration tab, click on the box to access the advanced configuration.
- Choose the desired update and backup modes:
- 7 recent backups are kept as well as those from 15 and 30 days ago.
- Save the changes using the button at the bottom right:
Learn more
Link to this FAQ:
Has this FAQ been helpful?
This guide explains how to protect your website and its visitors from malicious exploitation of MIME-Type sniffing.
Preamble
- MIME-Type sniffing, or MIME type detection, is a technique used by web browsers to determine the content type of a resource when the MIME type provided by the server is ambiguous, missing, or incorrect.
- Although this can sometimes improve the user experience by making content accessible despite server configuration errors, this feature also introduces significant security vulnerabilities:
- When a browser performs MIME-Type sniffing, it can interpret a text file as an executable script, thus opening the door to cross-site scripting (XSS) attacks.
- For example, a file intended to be processed as plain text could be interpreted as JavaScript, allowing an attacker to execute malicious code on the user's browser.
- By disabling MIME-Type sniffing, you protect visitors from the unauthorized execution of malicious scripts and also strengthen the overall security of your website by reducing potential attack vectors.
Disable MIME-Type sniffing
To protect users and web applications from this type of vulnerability, it is possible to disable automatic resource type detection via the .htaccess file of your sites to instruct the browser to strictly rely on the MIME type specified by the server without attempting to guess it.
By placing the code below in your .htaccess file, you ensure that MIME-Type sniffing is disabled as long as the mod_headers module (which allows adding the header below) is enabled on your Apache server:
- Open the
.htaccessfile of the concerned site from an FTP software/client or the Web FTP. Add the following code:
<IfModule mod_headers.c> Header always set X-Content-Type-Options "nosniff" </IfModule>- Save the
.htaccessfile.
Link to this FAQ:
Has this FAQ been helpful?
This guide explains how to view the disk space of an Infomaniak Web Hosting and display the size of directories.
Find large folders in a Web Hosting
To do this:
- Connect to the server via SSH (need help?).
Run the following SSH command:
ncdu- Navigate through the folder structure using the keyboard's directional arrows.
- Exit with the key combination
CTRL + C.
Link to this FAQ:
Has this FAQ been helpful?