Knowledge base
1000 FAQs, 500 tutorials and instructional videos. Here, there are only solutions!
This guide helps to identify and correct 404 errors, blank pages or websites that do not display when it is impossible to reach the hosting from your browser.
Points to check absolutely
It is strongly recommended to perform the following steps:
- Check the Internet connection: visit a third-party site like https://www.ch.ch or https://www.microsoft.com. If these addresses are inaccessible, contact your Internet Service Provider (ISP) as the problem is with your connection.
- Clear the browser cache to force the page to refresh; learn more.
- Test the site's visibility by third parties: ask acquaintances outside your local network to test access or use the service https://downforeveryoneorjustme.com to find out if the site is down for everyone or just for you.
- Use a proxy to simulate a connection to your site from another geographical location.
- Check that the domain name has not expired: hosting and domain are two separate entities. Your hosting may be active at Infomaniak (check it on the Manager) while the domain has expired. Perform a WHOIS and contact the registrar if necessary.
- Consult the configuration file of your script or CMS to verify the database connection information (name, address, user, and password); learn more.
If the problem persists
Please contact Infomaniak support in writing by providing the following information:
- Name of the site concerned.
- Your public IP address at the time of the tests (available on https://www.infomaniak.com/ip).
Link to this FAQ:
Has this FAQ been helpful?
This guide explains why a website may be "broken" or no longer display anything, following a password change at the level of a Web Hosting.
Broken link with the database
When your website and more particularly a script (CMS, WordPress, Prestashop or any other application using MySQL databases) can no longer connect to the MySQL MariaDB or other database, an error message may be displayed, such as:
Erreur lors de la connexion à la base de donnéesDatabase Error: Unable to connect to the database:Could not connect to MySQLLink to database cannot be established
Remember your last action...
In the event of an error on your site, you should always examine the recent history. In this case, has there been...
- ... an action on your part regarding the configuration file of the script in question? Has it been touched, modified, moved?
Sometimes, the involuntary insertion of a space before or after a word can cut the link between the web server and the database server. Go back over your file modifications.
If necessary, restore an old version of the files that you have modified recently.
- ... an action regarding the database password in the Infomaniak Manager?
If you change the password of your database via the Infomaniak Manager, then your script, which retrieves its information from the databases, will no longer display anything.Changing something in the Infomaniak Manager means you have to change it everywhere else. This change that you made in the Manager must also be reported / reflected in the script's configuration file by connecting via FTP and modifying the appropriate file, usually "wp-config.php", "configuration.php" or similar.
- ... a server move announced by Infomaniak?
If this error follows a server move or another operation announced by email and related to the product in question, do not hesitate to contact Infomaniak support.
Link to this FAQ:
Has this FAQ been helpful?
This guide details the management of access and security for your databases (MySQL, MariaDB, and MongoDB) on a Managed Cloud Server.
Preamble
- The firewall is accessible in your Manager even if no Apache site is configured (useful for Node.js-only projects, for example).
- Regarding access to MySQL databases from another Infomaniak Web Hosting, refer to this other guide.
- Regarding MongoDB:
- To ensure the security of your data, the system blocks registration if you attempt to disable
local_onlymode without enablingauthentication. - Infomaniak's automatic backups do not include MongoDB databases.
- To ensure the security of your data, the system blocks registration if you attempt to disable
Allow outgoing access (Infomaniak → external)
From an Infomaniak Web Hosting or Cloud Server, requests to external databases are allowed by default without port restrictions.
Allow incoming access (external → Infomaniak)
To access your databases from the outside, you must have a Cloud Server and open the corresponding ports in the firewall of your server:
- MySQL / MariaDB: port
3306(TCP) - MongoDB: port
27017(TCP)
Configure remote access for MongoDB
By default, MongoDB only accepts local connections.
Before making your instance public (remote access), you must create a user within your database.
To allow remote access via Fast Installer, you must adjust the configuration while adhering to strict security rules.
- Click here to access the management of your Cloud Server on the Infomaniak Manager (need help?).
- Click directly on the name assigned to the Cloud Server in question.
- Click on Fast Installer in the left sidebar.
- Click on MongoDB.
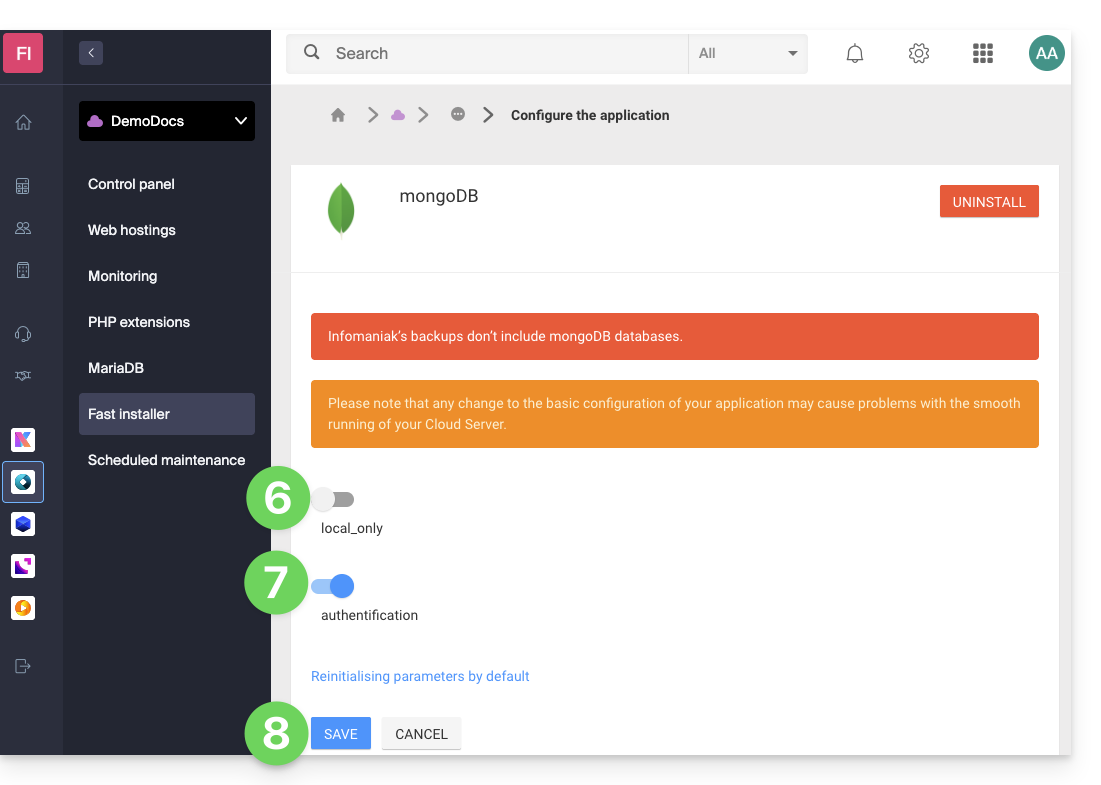
- Click on the action menu ⋮ to the right of the instance and choose Configure.
- Disable the
local_onlyoption. - Enable the
authentificationoption. - Save the changes:
Link to this FAQ:
Has this FAQ been helpful?
This guide explains how to download or export an SSL certificate from the Infomaniak Manager.
Preamble
- The download of the certificate produces a file in
.zipformat. - The archive contains the
.keyand.crtfiles (as well as_windows.pfx&.protected.keydepending on the type of certificate):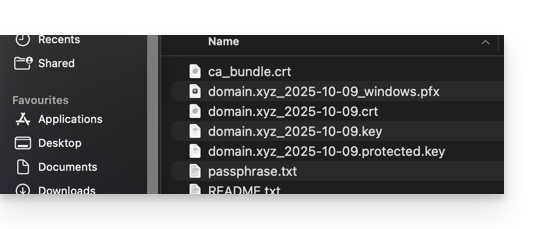
- It is recommended to store this certificate and its private key in a secure location, as the latter could allow access to your encrypted data.
Export or download an SSL certificate
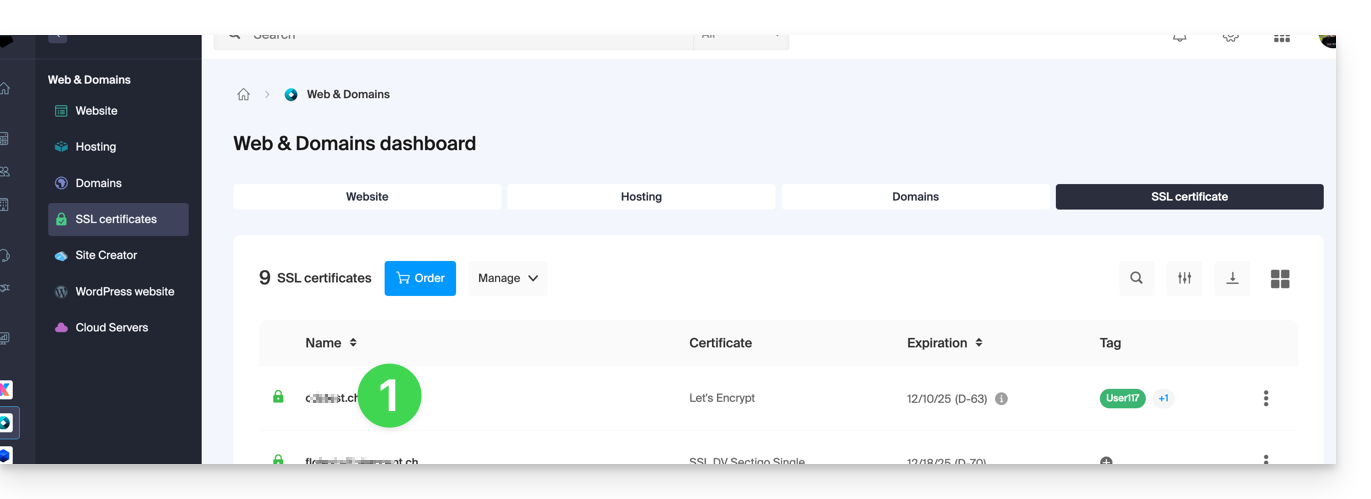
To access the management of your certificates:
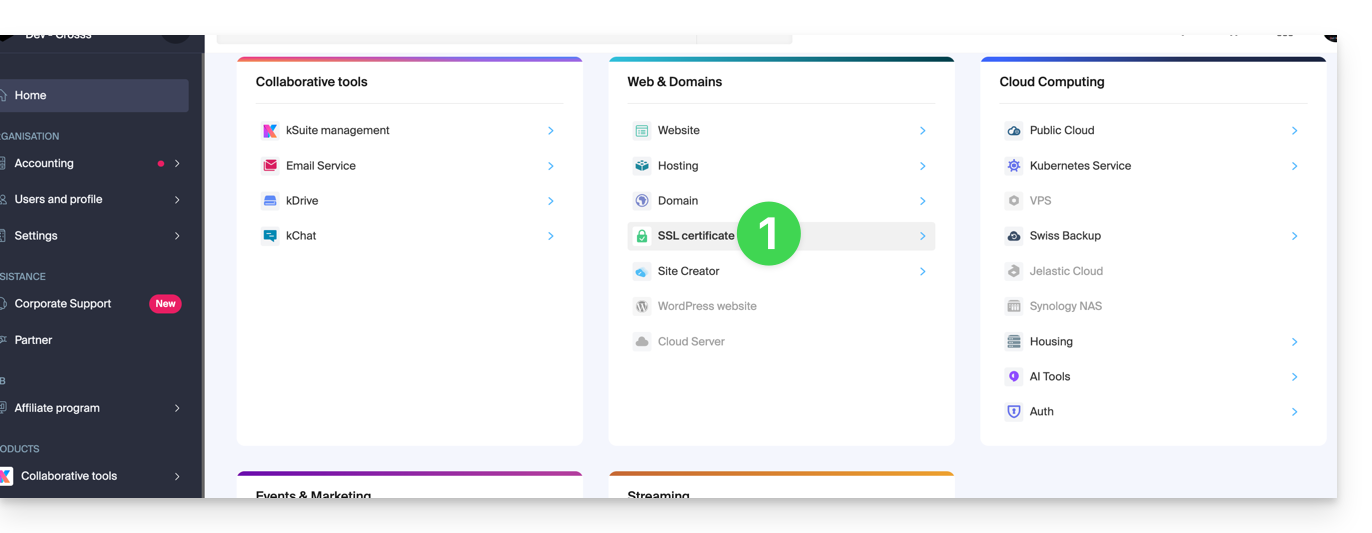
- Click here to access the management of your product on the Infomaniak Manager (need help?):
- Filter your certificate types if necessary by clicking on the icon dedicated to this effect.
- Display the different types of certificates such as Let's Encrypt, Sectigo DV & EV...
- Add the certificates that need to be displayed.
- Apply the filters:
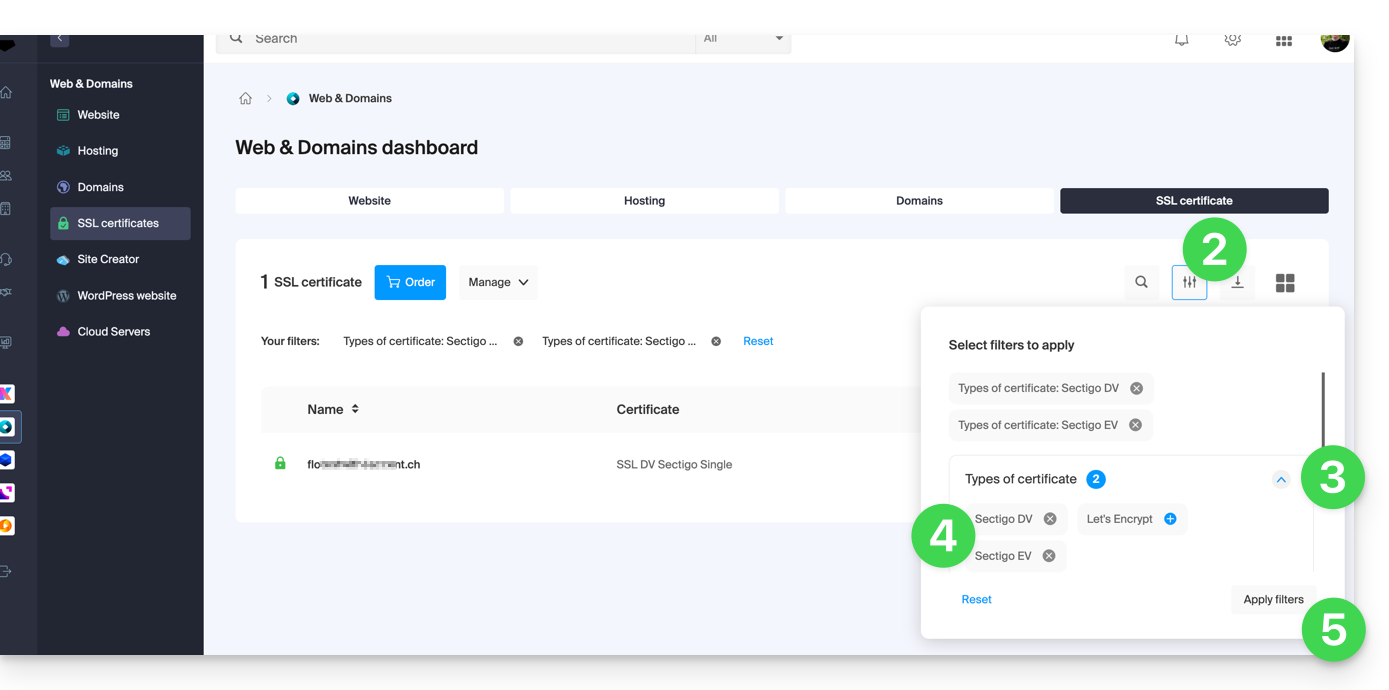
- The table now only displays the types of certificates you have selected.
Export a Let's Encrypt certificate
- Click directly on the name assigned to the certificate Let's Encrypt in the list:
- Click on the action menu ⋮ to the right of the object concerned in the table that appears.
- Choose Export the certificate and follow the instructions to download the archive to your device:

Export a Sectigo certificate
- Click directly on the name assigned to the certificate in the list of certificates.
- Click on the Manage button.
- Click on Download the certificate and follow the instructions to download the archive to your device:

Link to this FAQ:
Has this FAQ been helpful?
This guide explains how to resolve access errors to your Web Hosting following an IP address change (e.g., server migration).
Preamble
- To save time, your system maintains a lookup table between domain names and IP addresses.
- If the site changes "home" (IP), your computer tries to knock on the old door.
- Clearing the cache forces it to request the new address from the DNS servers.
If your computer retains the old address in memory, clearing the DNS cache allows you to restore the connection.
Clear the DNS cache…
… on Windows
Use the command prompt to refresh your network settings:
- Open the Start menu.
- Type cmd and validate.
- In the black window that opens, type the following command and press Enter:
ipconfig /flushdns
… on macOS
On recent versions of macOS, the procedure is done via the Terminal:
- Open the Terminal (via Spotlight or Applications > Utilities).
- Copy and paste the following command:
sudo dscacheutil -flushcache; sudo killall -HUP mDNSResponder - Enter your session password (it will not be displayed during entry) and validate.
… on Linux
Most modern distributions use systemd-resolved. Open your terminal and run:
sudo resolvectl flush-caches
Note: If you are using an older service, the command sudo systemctl restart nscd is still valid.
Link to this FAQ:
Has this FAQ been helpful?
This guide provides solutions to errors of the type “Malicious site! The website has been reported as a malicious site and has been blocked based on your security preferences” ("STOP! This Website Can Harm Your Computer!" in English).
Who put this message?
This error message or warning…
- ... IS NOT added by Infomaniak.
- ... is generated by Google based on https://www.stopbadware.org/.
- ... may no longer appear directly because…
- ... you are no longer indexed by Google.
- ... you are using a browser that does not rely on Google's checks.
What to do?
If this does not concern the site you are managing, refer to Google's help on the subject.
If the site is yours, refer to the advice below:
- Check the source code of the published page: there is surely additional code compared to still healthy pages; it may be a malicious iframe or any inclusion…
- On the page in question, click on the "Why was this site blocked" button and follow the instructions…
- Refer to the Google documentation on the subject.
- Monitor the vulnerability detection tool which may resolve the issue in the meantime.
Link to this FAQ:
Has this FAQ been helpful?
This guide helps resolve a potential error 530 by reducing the number of simultaneous FTP connections to Web Hosting.
Resolve error 530
The number of FTP connections that can be established simultaneously to the FTP space of a hosting is limited to 25.
The error message 530 Sorry, the maximum number of clients (25) for this user are already connected generally appears following multiple and simultaneous connections with an FTP software/client that poorly manages disconnections or attempts to open multiple connections at once thinking it will speed up the download.
Once you have encountered this error, you need to close the FTP program and wait 30 minutes so that the server terminates the active connections and you can reconnect.
You can also create a new FTP user and connect with it.
To avoid this situation with FileZilla, go to the menu Edit -> Settings then under the Transfers tab and set the number of simultaneous transfers to 2.
It is recommended to use the Web FTP on the Manager.
Link to this FAQ:
Has this FAQ been helpful?
This guide explains how to manage the files of a Web Hosting with an FTP software/client.
Preamble
- To easily & quickly manage the files of your web hosting without having to install an application or enter FTP credentials, use the Web FTP on the Manager (it allows, among other things, CHOWN and file compression/decompression
zip). - Regarding the protocols supported by Infomaniak (FTP, SFTP, etc.) depending on your hosting offer (Starter, Node.js, etc.), refer to this other guide.
Parameters to provide for FTP software
Prerequisites
- Create an FTP/SSH account.
- Install an FTP software/client like Filezilla, Cyberduck, Commander One, Transmit, etc.
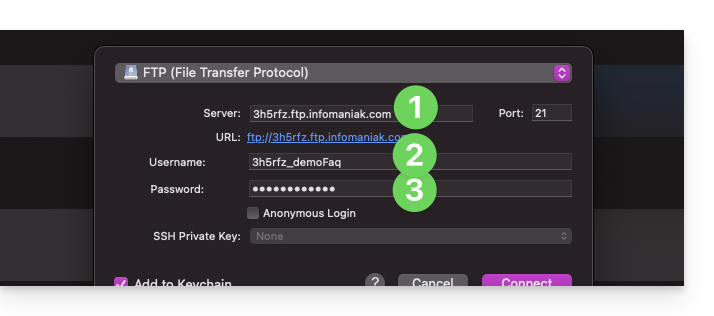
Regardless of your FTP software/client, the 3 essential parameters for configuring FTP access are always:
- Hostname: FTP server address
- Username: FTP account name
- Password: that of the FTP account
- The port number is usually left at default.
- The type and connection mode are usually left at default.
- If a limit on the number of simultaneous connections is offered, it is recommended to activate it.
Obtain the connection information to the hosting
You will find all the information on your Infomaniak Manager:
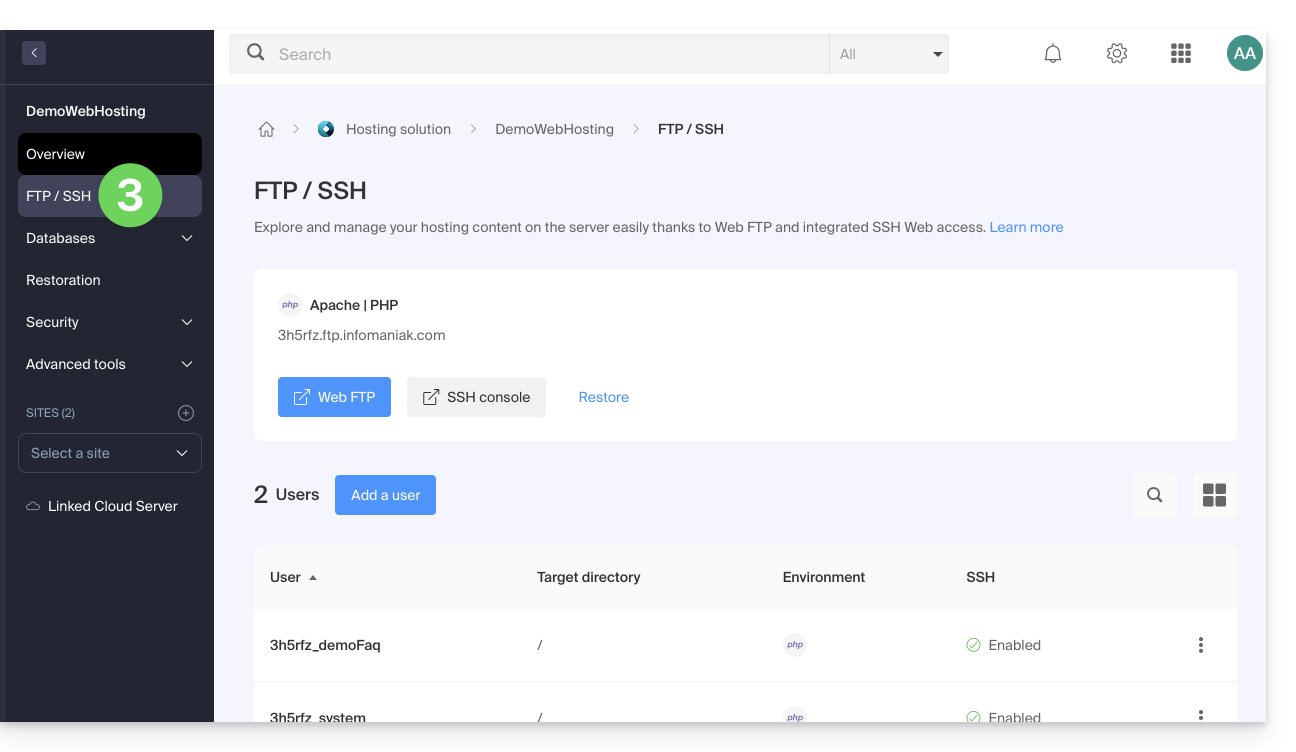
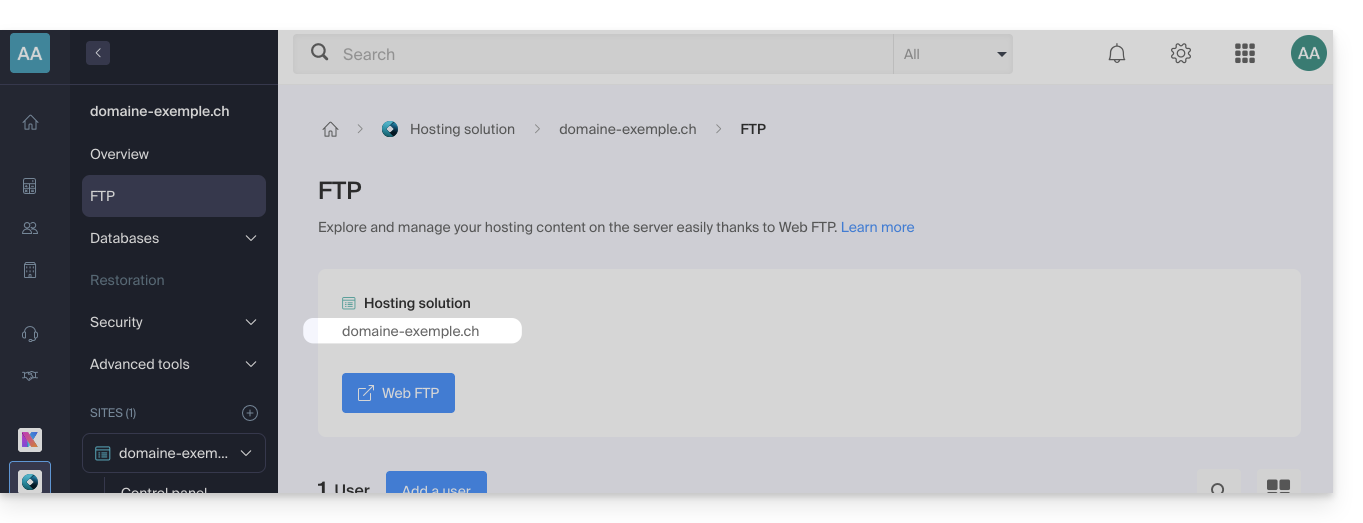
- Click here to access the management of your hosting on the Infomaniak Manager (need help?).
- Click directly on the name assigned to the hosting concerned:

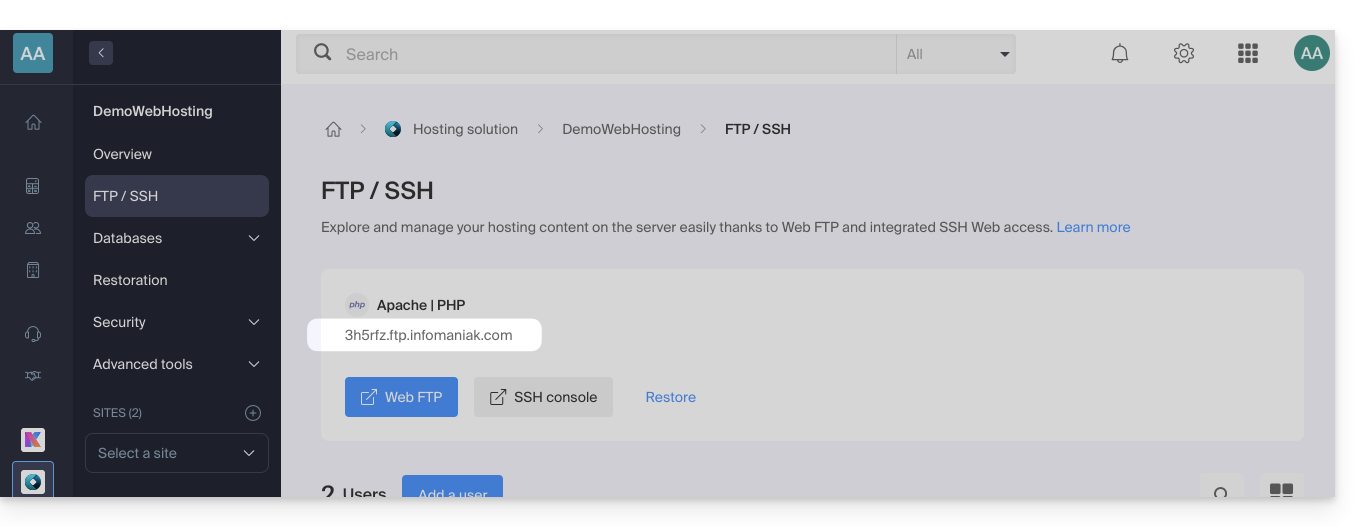
- Click on FTP (or FTP / SSH) in the left sidebar
1. FTP hostname
The hostname to use in your FTP software/client is specified at the top of the page obtained in point 3 above and an icon allows you to copy the address to the clipboard.
Starter Offer - Basic Web Page
If the specified domain is not functional (does not point to the hosting IP address, for example), then use the IP address as the host name, in the form 123.45.678.123 (refer to this other guide).
Paid Web Hosting
Use the host name in the form xyzb.ftp.infomaniak.com, for example.
2. FTP Username
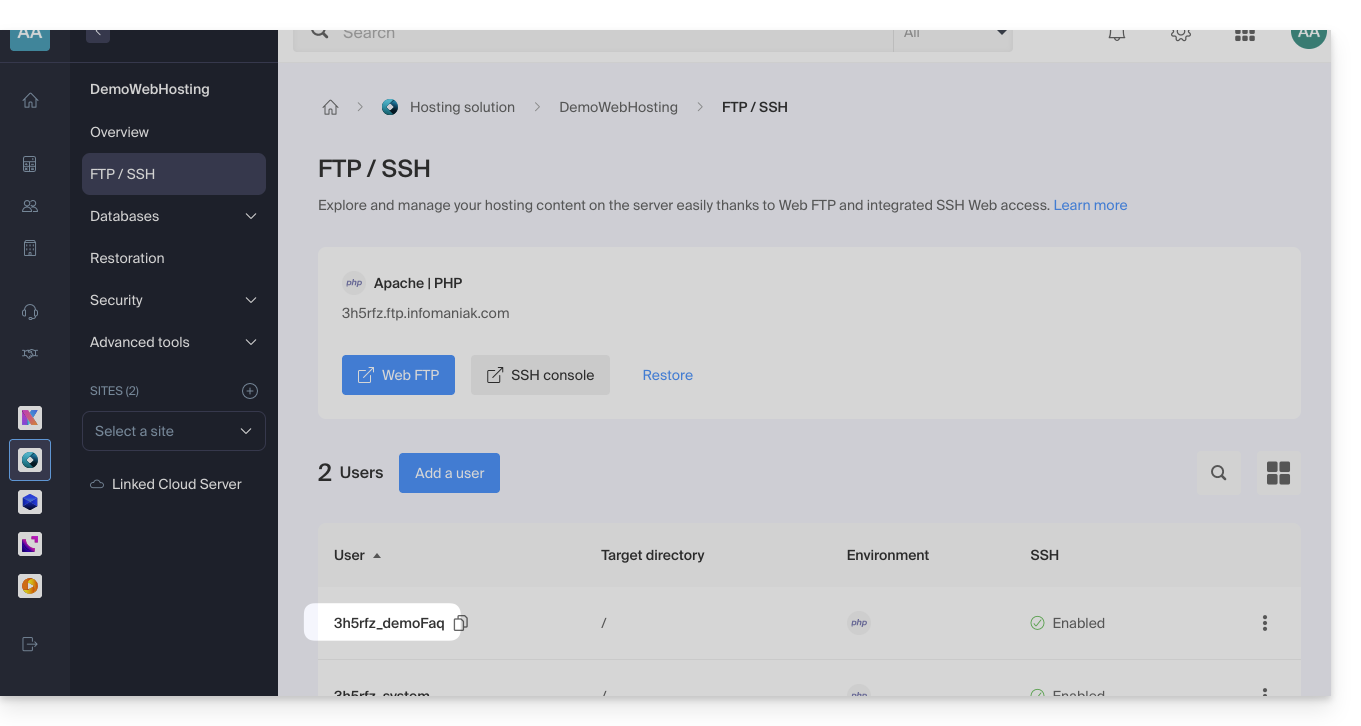
The username is the name of the account to be created in your Manager: xyzb_abcdefg, for example.
3. FTP User Password
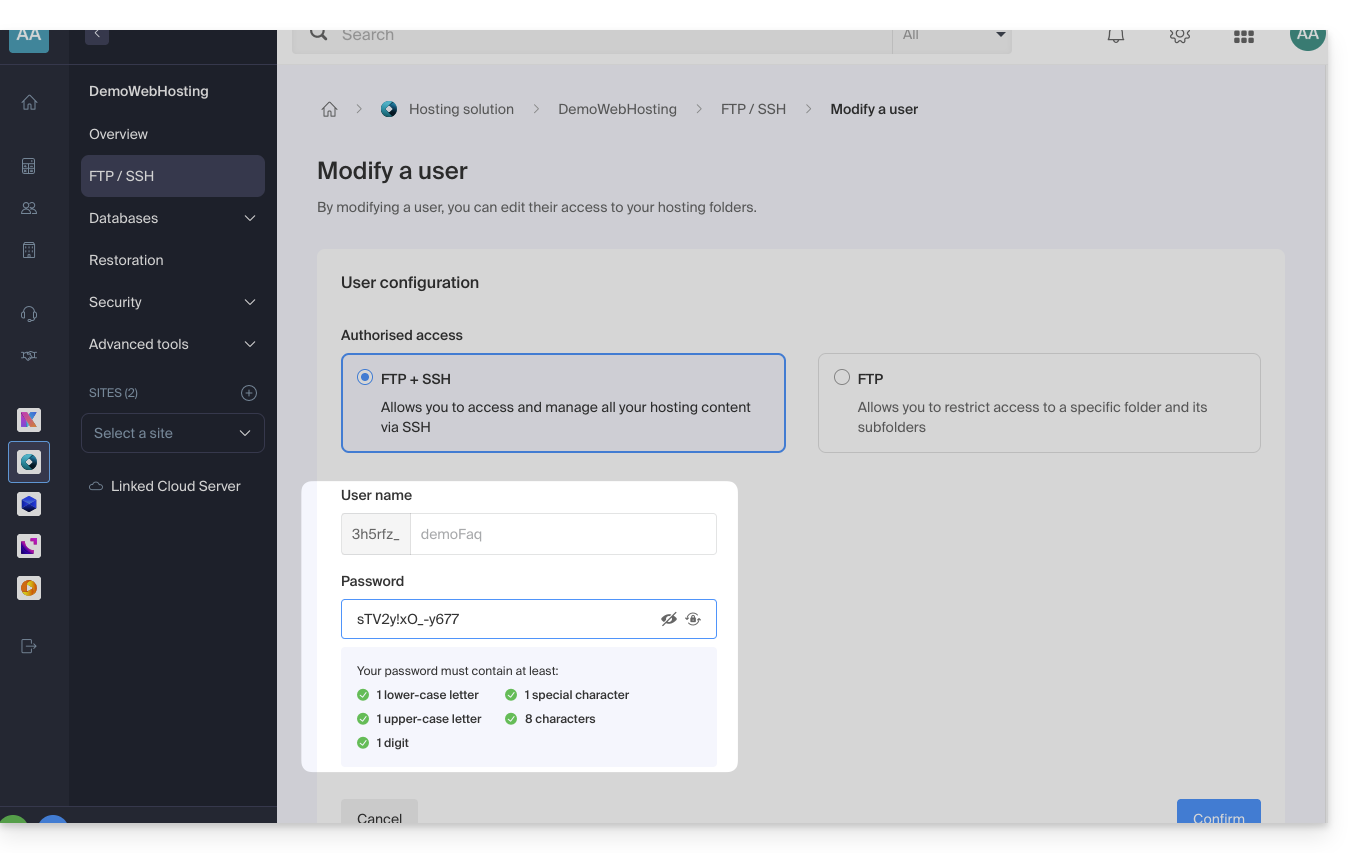
The FTP user password is set by the creator of the FTP account. If you forget it, edit the FTP account by clicking on it and set a new password.
It is not possible to display an already applied password; you must reapply a new password if you no longer have the currently defined password.
Once the connection is established…
When you enter the 3 required parameters, your FTP application should display the directory structure of your hosting: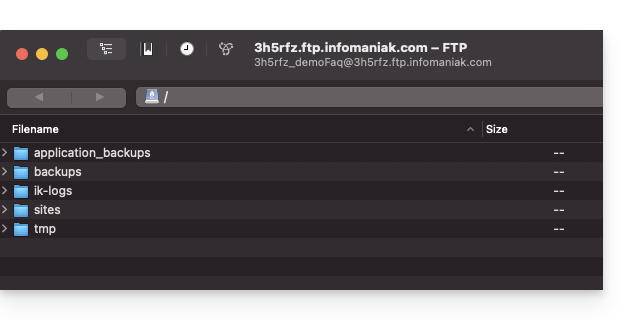
Link to this FAQ:
Has this FAQ been helpful?
This guide concerns the MySQL query cache which, when enabled, stores the results of already executed queries in memory.
Preamble
- MySQL Query Cache allows to speed up subsequent identical queries by avoiding to execute them again.
- This can improve the overall performance of the database server by reducing the load and decreasing the response time for frequent queries.
query_cache_type ON or OFF?
On Shared Web Hosting (i.e. excluding Cloud Server) MySQL Query Cache is neither enabled nor enableable.
On Cloud Server, enable MySQL Query Cache via Fast Installer.
Link to this FAQ:
Has this FAQ been helpful?
This guide explains how to modify the value of the PHP directive include_path.
Modify the include_path
Like any other PHP parameter, include_path is defined in the .user.ini file.
Here is an example of a path to use in your .user.ini file:
include_path = ".:/home/clients/123456789a12345b12fc345d/web/www.domain.xyz/include"- The dot (
.) at the beginning allows you to keep the current directory in the search. - The colon (
:) is used as a separator between the different folders.
Refer to this other guide about phpinfo to verify that your new directive has been taken into account (the modification may take a few minutes to appear).
Although this method is still functional, using theautoloader of Composer is now the preferred solution for managing inclusions.
Link to this FAQ:
Has this FAQ been helpful?
This guide shows you how to modify the error_reporting() directive on your website.
Enable error reporting
Enter the following 2 pieces of information in your .user.ini file:
display_errors=on
error_reporting=E_ALL & ~E_NOTICE & ~E_STRICT
If your browser does not display any errors or warnings, then there are none.
Disable PHP error display
For WordPress, edit the wp-config.php file and replace the line:
define('WP_DEBUG', false);with:
ini_set('display_errors','Off');
ini_set('error_reporting', E_ALL );
define('WP_DEBUG', false);
define('WP_DEBUG_DISPLAY', false);Otherwise, you can add the following code to the .user.ini file:
display_errors=offLink to this FAQ:
Has this FAQ been helpful?
This guide is intended for developers and webmasters experiencing issues with the display of special characters (e.g., accents, Arabic characters, Chinese characters, emojis, etc.), whether on an Infomaniak website or in its database.
Preamble
- Common causes of incorrectly displayed characters that appear in place of special characters or emojis like
??:- PHP connection in
utf8instead ofutf8mb4 - MySQL table or column in
latin1orutf8instead ofutf8mb4 - SQL file encoded differently from the import parameter
- HTML/CSS/JS files incorrectly encoded
- Missing or incorrect declaration of the charset in HTML, PHP, or HTTP
- PHP connection in
- Common solutions:
- Use
utf8mb4everywhere: database, connections, tables, columns, files, headers - Validate the encoding of all files and dumps
- Test the display of emojis, accents, and other multilingual characters
- Use
- Also refer to this other guide to force another encoding when connecting to a MySQL database.
Use a text editor that supports saving in UTF-8 without BOM (Visual Studio Code, Sublime Text, Notepad++...)
1. Use UTF-8 or UTF-8MB4 everywhere
The utf8 encoding of MySQL does not support 4-byte characters, such as emojis. These will display as ??. Therefore, you need to use utf8mb4, which is a complete implementation of UTF-8.
2. HTML – Correct declaration of encoding
In the <head> of your HTML pages:
<meta charset="UTF-8">Also ensure that CSS/JS files are saved in UTF-8 (without BOM).
3. PHP – Force UTF-8 or UTF-8MB4
a) HTTP headers
header('Content-Type: text/html; charset=utf-8');b) MySQL connection (MySQL API)
$connection = mysql_connect($host, $user, $pass);
mysql_set_charset('utf8mb4', $connection);
c) PDO connection
 $dsn = "mysql:host=localhost;dbname=ma_base;charset=utf8mb4";
$pdo = new PDO($dsn, $user, $pass, [
    PDO::ATTR_ERRMODE => PDO::ERRMODE_EXCEPTION
]);
4. MySQL database
a) Configuration in phpMyAdmin
- Database, tables, and columns must be in
utf8mb4_unicode_ciorutf8mb4_general_ci. - In the Operations tab, choose
utf8mb4_unicode_cifor the collation.
b) Useful SQL commands
ALTER DATABASE ma_base CHARACTER SET = utf8mb4 COLLATE = utf8mb4_unicode_ci;
ALTER TABLE ma_table CONVERT TO CHARACTER SET utf8mb4 COLLATE utf8mb4_unicode_ci;
c) After PHP connection
mysqli_query($conn, "SET NAMES 'utf8mb4'");
mysqli_query($conn, "SET CHARACTER SET 'utf8mb4'");
5. .user.ini / .htaccess
To force server-side (Apache) encoding:
AddDefaultCharset utf-8
Header set Content-Type "text/html; charset=utf-8"
# Pour PHP
php_value default_charset UTF-8
php_value mbstring.internal_encoding UTF-8
6. SQL dump import / export
Errors such as é becoming ? or an emoji ☺ becoming ?? often come from encoding misalignment.
Check the SQL file encoding before import. Use iconv if necessary:
iconv -f ISO-8859-1 -t UTF-8 dump.sql > dump_utf8.sqlIn phpMyAdmin, specify the import encoding (e.g., UTF-8, UTF-8MB4 or latin1 depending on the file).
Link to this FAQ:
Has this FAQ been helpful?
This guide explains how to use the Web FTP file manager, which allows you to easily and quickly manage the content of your Web Hosting.
Introduction
- The online Web FTP / FTP Manager service does not require any special access as long as you have management rights for a hosting account in the Infomaniak Manager and are logged in.
- Therefore, you do not need to have an FTP account and its password; the password for your Infomaniak account is sufficient.
- This allows you to:
- create files,
- navigate through directories,
- manage existing files (copy, rename, move, delete, unzip, etc.),
- edit and view text, php, and html files of less than 1 MB,
- transfer files of less than 50 MB between your computer and the server:
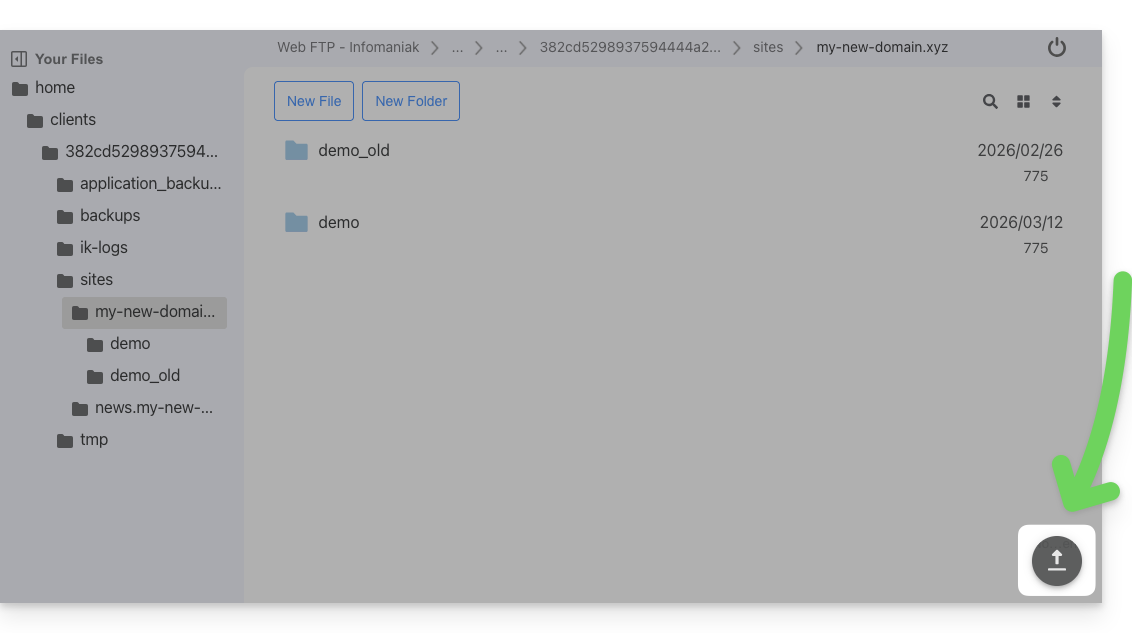
- including by drag-and-drop directly from your computer to the Web FTP window:
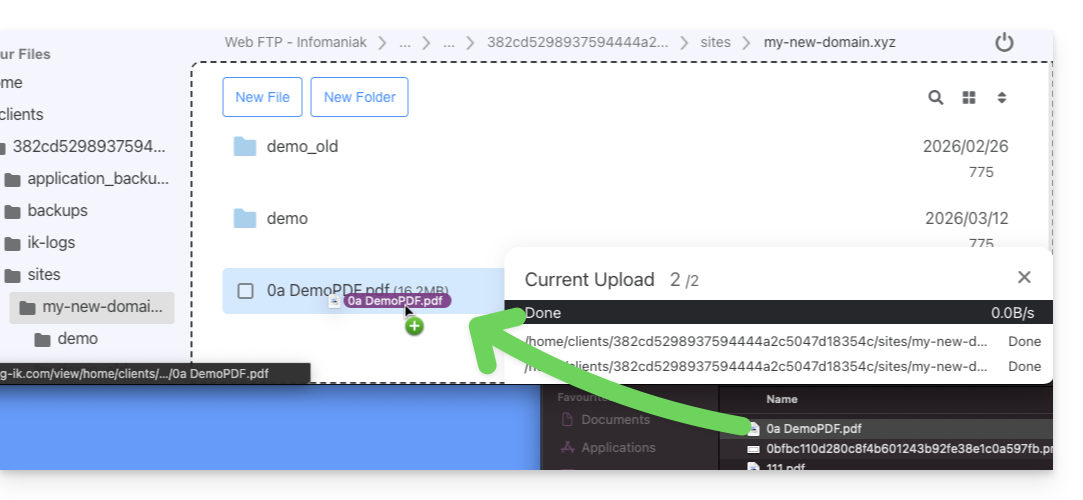
- to go beyond this limit and for more advanced features such as background processing, resuming transfers after a disconnection, and limiting transfer speeds, use an FTP software/client.
- including by drag-and-drop directly from your computer to the Web FTP window:
Access the server via Web FTP
To quickly access the website server via FTP or SSH:
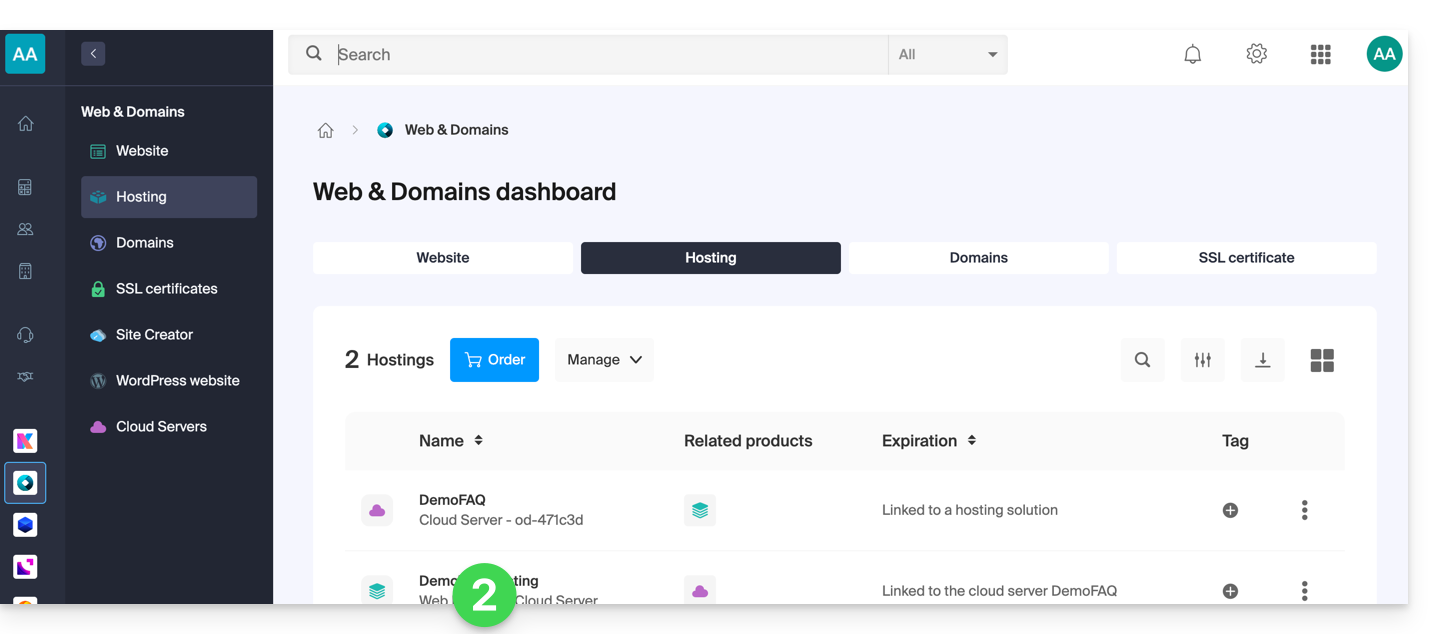
- Click here to access the management of your hosting account in the Infomaniak Manager (need help?).
- Click directly on the name assigned to the hosting in question:
- Click on FTP / SSH in the left-hand menu.
- Click on the
Web FTPorSSH consolebuttons available to you: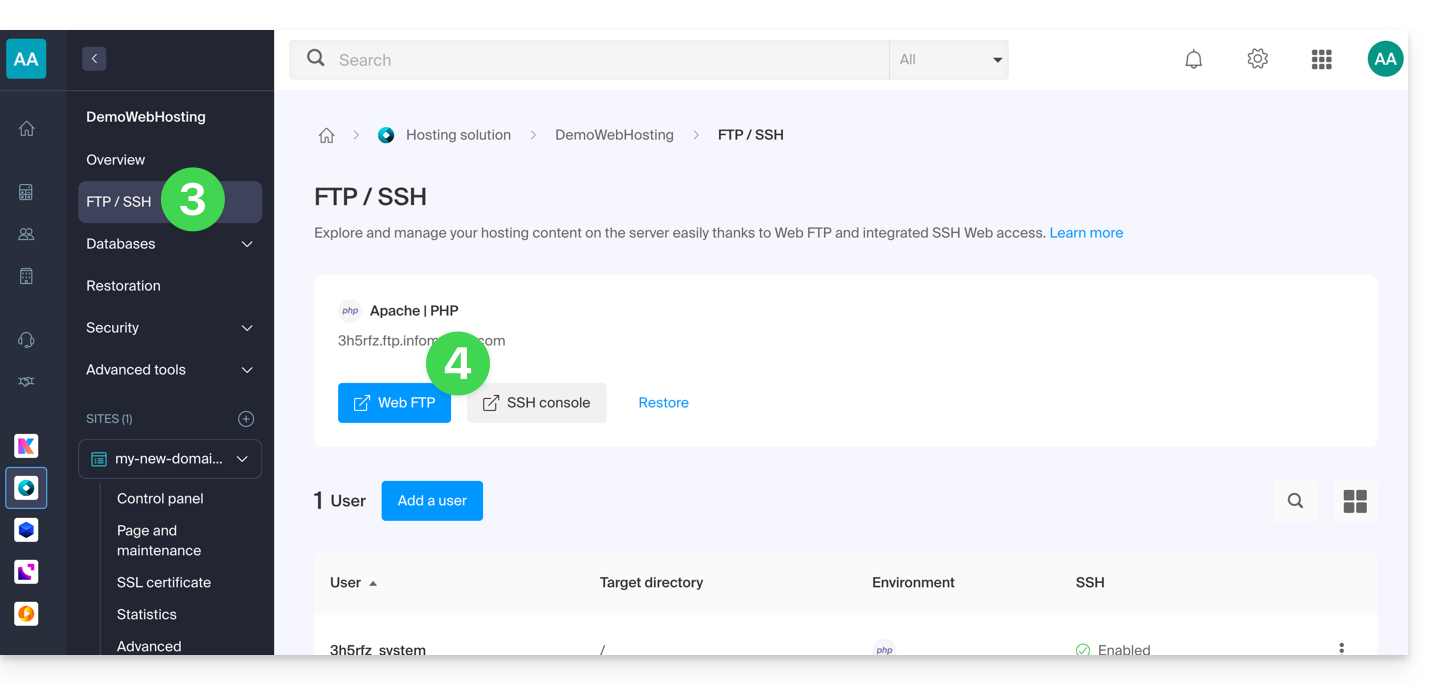
Link to this FAQ:
Has this FAQ been helpful?
This guide explains how to optimize a website hosted on a Web Hosting service to make it faster and provide a smooth navigation experience for all your visitors, regardless of their connection speed.
The role of the host
The loading speed of a website depends on many factors: server performance, host network infrastructure, visitor's internet connection, and site optimization itself.
As a host, Infomaniak strives to offer the best in hosting by continuously evolving its products and infrastructure:
- All hosting services run on the latest generation of SSD drives.
- The infrastructure benefits from over 70 Gbit/s of interconnection and redundancy with partners like Cogent or Level3.
- To handle traffic spikes, servers use regularly renewed 64-bit Intel Xeon processors. Shared servers use, on average, only 40% of their CPU power.
When you submit a support request regarding slowness, Infomaniak checks the following points:
- Your hosting server is functioning normally and has not encountered any incidents in the last 48 hours.
- The network infrastructure has not experienced any disruptions during this same period.
The role of the site owner and the webmaster
Infomaniak does not intervene on the content of the servers or the development of the sites. The creation and maintenance of a site are distinct professions, although they use the tools and services provided by the host.
Analyze the cause of slowness
Here are the actions to take if you notice slowness on your site:
- Apply the Google PageSpeed Insights recommendations. These points concern the design of the site and not the server configuration. Refer to this other guide if the test recommends enabling resource compression.
- If slowness is noticed from abroad, activate DNS Fast Anycast.
- Install a caching system to reduce redundant database accesses and speed up display.
- Consider using a CDN.
- Test the server response time or TTFB.
- Scan your hosting to detect any potential viruses.
- Purge your databases regularly by deleting unnecessary entries.
- Use the latest PHP version compatible with your site or CMS.
- Avoid images, counters, or media hosted on external servers: if they are unreachable, your site will appear slow.
- Deactivate unnecessary or resource-intensive WordPress extensions.
- Keep your CMS and web applications regularly updated.
- Limit the impact of overly aggressive indexing robots by configuring a Crawl-delay.
- Analyze the error-logs: correcting the errors generated by your site improves its performance.
- Review the slowlogs to identify SQL queries taking more than 5 seconds to execute and optimize them (optimization examples).
- Add a server cache engine like Memcached (available on Cloud servers only).
- Increase the max_children value (only on Cloud servers).
If the problem persists
If you or your webmaster cannot find the source of the slowdowns, contact Infomaniak support in writing by providing the following information:
- Name of the hosted site.
- Exact dates and times of the slowdowns.
- Name of the database or FTP account potentially involved.
- Your public IP address during tests (visible on https://www.infomaniak.com/ip).
- Type of slowdown (display, FTP transfers, etc.).
- Indicate if you can normally access the Infomaniak site during these episodes.
- Complete result of a traceroute to
84.16.66.66. - Result of a speed test on speedtest.net by selecting Infomaniak as the destination server.
If your needs evolve
If shared hosting is no longer sufficient, consider switching to a Managed Cloud Server. Your site can be easily migrated to take advantage of dedicated resources and advanced caching technologies.
Link to this FAQ:
Has this FAQ been helpful?
This guide is intended for developers who wish to use the ORM Propel on a hosting environment where command-line access is restricted.
Preamble
- The ORM allows linking application objects to database tables. Data is manipulated via
PHPobjects rather than writing rawSQL. Propelis the abstraction layer that manages these interactions (relations, joins, pagination) to simplify code maintenance.
Particularities & limitations
Propelis not pre-installed viaPear.- You must install it manually in your project.
- It is imperative to download the "Conventional Package" version of
Propel.
- CLI commands (such as
propel-gen) are not executable on the server.- Consequently,
Propelis only used in "Runtime" mode in production. Class generation (build) must be performed locally. - The workflow involves generating code in a development environment and then transferring the resulting files to the server.
- Consequently,
- Dependencies:
- The complete set of libraries required for
Propelis available, except forPhing. - The absence of
Phingdoes not impact production, as this tool is only required during the local generation phase.
- The complete set of libraries required for
Link to this FAQ:
Has this FAQ been helpful?
This guide is intended for users who have chosen Infomaniak, a hosting provider committed to the planet: you will find below the details of the calculation method used to display CO2 on invoices, as well as tips to reduce your own digital footprint.
Preamble
- For Web hosting and Mail services, Infomaniak displays the amount of CO2 emitted annually, data that is based on a rigorous Life Cycle Analysis (LCA) method that adds two key factors:
- Material impact (Full life cycle)
- Thanks to the emission factors of the ResilioDB database, the calculation includes the emissions generated during the manufacturing (BLD), transport (DIS) and end-of-life/recycling (EOL) of each piece of equipment (servers, RAM, disks, etc.).
- Energy impact (Actual consumption)
- The actual electrical consumption of the servers is measured via IPMI probes.
- This energy is then converted into CO2 equivalent according to Infomaniak's specific energy mix, which is very low in carbon (11.77g CO2eq/kWh).
- Material impact (Full life cycle)
- The total impact is then distributed according to the unit of use of the customers (per hosted website or per mailbox).
How can you act at your level?
If the hosting provider optimizes its infrastructures upstream, the end user also plays a key role. Here's how to reduce the footprint of your services.
For Websites
The goal is to minimize the energy consumption of servers and visitors' terminals:
- Technical optimization: Compress images, minify scripts, and use modern formats (WebP).
- Clean design: Limit autoplay videos, ads, and heavy scripts that consume bandwidth.
- Best practices: For WordPress in particular, it is recommended to consult the GreenIT sheets.
For Messaging
Email communication can also be optimized:
- Sobriety: Prefer plain text emails over HTML and limit heavy graphical signatures.
- Attachments: Prefer sending download links (via kDrive or SwissTransfer) to large attachments, or use the compressed PDF format.
- Cleanup: Unsubscribe from unnecessary newsletters and use tracking tools to avoid sending unopened emails.
It is recommended to regularly monitor statistics to improve ecological performance. While waiting for Infomaniak's future integrated tools, it is possible to audit the impact of web pages via GreenFrame.io.
Link to this FAQ:
Has this FAQ been helpful?
This guide concerns website optimization and more specifically the use of a cache engine on it.
Preamble
- When Infomaniak notices that your website consumes more resources than other sites on the same server, an analysis is carried out.
- Often, it turns out that a simple modification of a request or a parameter would allow you to optimize your site and reduce the server load.
- You will then be contacted by email with the instructions to follow, which frequently include the installation or activation of a cache engine.
- Resource consumption is not necessarily related to the number of visitors.
- A well-optimized, up-to-date site with a correctly configured cache engine can handle several tens of thousands of daily visitors, while a poorly optimized site can consume far too many resources with just a few visits per day.
- A cache engine temporarily stores frequently used data in order to provide it more quickly for new requests.
- This significantly improves the speed of the site and reduces the load on databases or web services.
- To install an advanced caching system (Redis, Memcached) on Infomaniak Cloud Server, refer to this guide.
Activate a cache engine...
... on WordPress
WordPress has many caching plugins. Here are the most popular and effective ones:
- WP Rocket (paid, the most powerful and simple "all-in-one" solution).
- WP Super Cache (free, developed by Automattic, very reliable).
- LiteSpeed Cache (free, extremely comprehensive).
Standard activation procedure:
- Log in to your WordPress administration.
- Go to Extensions > Add.
- Search for one of the mentioned plugins, install it, and then activate it.
- Configure the cache options: page caching, CSS/JS minification, and especially Lazy Load for images.
Also, refer to this other guide on the subject.
… on Joomla (v4 & v5)
- Go to System > Global Configuration.
- Select the System tab.
- In the Cache Settings section, enable the cache (the Conservative mode is the safest to start with).
- Select the cache manager (default File).
- Then go to System > Plugins and make sure the System - Cache plugin is enabled to cache entire pages.
… on PrestaShop (v1.7 & v8+)
- Go to Advanced Parameters > Performance.
- Smarty: check "Never recompile template files" (in production) and enable "Cache".
- CCC (Combine, Compress and Cache): enable all options (Smart cache CSS, Smart cache JS, Apache optimization).
- Cache: at the bottom of the page, enable "Use cache". On shared hosting, prioritize the file system; on Cloud Server, use Memcached.
… on Drupal (v9, v10 & v11)
Caching is natively integrated and very powerful on Drupal:
- Go to Configuration > Development > Performance.
- Check "Cache pages for anonymous users".
- Set a duration for "Maximum cache lifetime in the browser and proxy" (e.g., 10 minutes).
- Enable the aggregation of CSS and JavaScript files.
… on Contao (v4 & v5)
- The cache is now mainly managed via the configuration file
config/config.yamlor via the administration interface under Layout > Themes > Edit page layout. - Define a "Cache expiration delay" for the page in question.
- Use the Contao Manager to clear the production cache (Symfony Cache) after structural changes.
Check the effectiveness
After activation, test your site with these free tools:
Link to this FAQ:
Has this FAQ been helpful?
This guide explains how to report a phishing attempt that you are a victim of.
Introduction
- Phishing is a fraud and scam attempt aimed at fraudulently obtaining sensitive information.
- Generally, the victim receives a message in their inbox that appears to be from Infomaniak, their bank, or a trusted organization, indicating that a problem has occurred with their account or in their daily life:
- The purpose of this identity theft is generally for the user to voluntarily go to a page and provide private information that will then be used for various purposes, mainly financial ones.
- If it is not a message “pretending to be something it is not”, but only an unsolicited advertising message, it is better to report it as Spam.
Reporting a Phishing Email
Prerequisites
- Verify that the spam filter is active.
- For greater security, enable the display of external mail.
Then, if you find an email of this type directly in your inbox, you have the option to take action so that these messages decrease and eventually disappear from the messaging systems:
- Click here to access the Infomaniak Mail web app (online service at ksuite.infomaniak.com/mail).
- Open the phishing message.
- Click on the action menu ⋮ on the right.
- Click on Report message.
- From the menu that appears, select Report as phishing:

- Confirm the submission for processing.
- Delete the email.
Once you have clicked on Report as phishing, an email is automatically sent to Infomaniak with all the information needed to process the scam report.
In the event of a more serious problem (when the message is directly addressed to you by someone you know or a contact, and it is not a mass mailing), it is recommended to contact an organization such as report.ncsc.admin.ch.
Link to this FAQ:
Has this FAQ been helpful?
This guide explains how to view file activity on your Infomaniak hosting server.
FTP space activity logs
To know the activity of exchanges on your FTP space, contact Infomaniak support to request FTP logs by first authenticating with the credentials corresponding to the management of your web hosting.
The log is only updated if there has been FTP activity.
Help reading logs: http://www.castaglia.org/proftpd/doc/xferlog.html
Link to this FAQ:
Has this FAQ been helpful?
The possible indication information_schema does not concern you directly.
Please disregard this.
It is an internal database of MySQL that is a summary of the information from your own databases.
Link to this FAQ:
Has this FAQ been helpful?