Knowledge base
1000 FAQs, 500 tutorials and instructional videos. Here, there are only solutions!
This guide concerns RTMP (Real-Time Messaging Protocol), a service that allows real-time multimedia content to be streamed over the Internet:
- This is a proprietary protocol developed by Adobe and its use requires the configuration of a dedicated RTMP server or the use of RTMP hosting services.
- Viewers can access the live stream using an RTMP-compatible media player, such as VLC.
By default, RTMP is blocked by Infomaniak security rules.
- Refer to this other guide to open the corresponding port.
Link to this FAQ:
Has this FAQ been helpful?
This guide is for you if you encounter the error The web host does not exist when visiting the address of a site on an Infomaniak Web Hosting.
Preamble
- This type of error usually occurs because your domain name is not correctly linked to your site (your domain name is probably pointing to the wrong IP address or is misconfigured).
- Example: a domain
abc.xyzthat is misconfigured and would point to an IPv4 Starter hosting and to a shared hosting in IPv6…
- Example: a domain
Resolve a Domain - Website Linking Issue
To get your site back online:
- Check the DNS zone of your domain name, especially its A records.
- Correct them if necessary by entering the IP address of your hosting.
- Any DNS addition/modification can take up to 48 hours to propagate.
To do this, the easiest way is to use the Infomaniak DNS Diagnostic Tool to automatically correct the pointing, by previously grouping the products in the same Organization if necessary.
Link to this FAQ:
Has this FAQ been helpful?
This guide explains how to prevent cyber attacks and how to avoid a website hack for the website you manage.
WordPress users: refer to this dedicated article.
The role of the host
Infomaniak's job is to provide quality hosting, so it is crucial to respond extremely quickly to the various attacks that any Internet actor may be subject to. Infomaniak therefore does everything possible to take the maximum of precautions against hacking, notably by keeping the different versions of the technologies used up to date.
In the event of a proven hack, if it is possible to trace back to the author and the machine has been compromised due to a security flaw on Infomaniak's part, if the integrity of the servers is at stake, Infomaniak takes matters into its own hands.
The role of the site owner and the webmaster
If the hacking of your site is your responsibility (an outdated script, a security patch that has not been applied, etc.), Infomaniak contacts you to warn you of a problem that will need to be resolved quickly. Some organizations like Saferinternet can also suspend the domain name upstream, which will deactivate the site but also the email.
Infomaniak cannot counter exploits related to a bug in your PHP code or other. If the hacking is not detected, you will generally notice the intrusion quite quickly through suspicious elements in your pages or by receiving numerous error emails.
It is therefore your responsibility to take care of the evolution of your website over time and not to let it "die" in a corner, even if it means calling on a webmaster whose job it is.
Infomaniak recommendations
- Regularly update all your web applications (WordPress, Joomla, Drupal, ownCloud, etc.).
- Keep the PHP version of your site on Infomaniak servers up to date.
- Keep your site up to date by migrating to new offers when they are proposed to you.
- Add a protection system on your contact forms (captcha, etc.) and on any "recommend to a friend" tools (tell-a-friend...).
- Regularly run an antivirus analysis of the hosting.
- Monitor the vulnerability detection tool.
- Remove anything you have not developed yourself and for which the author has not provided an update/correction for several months.
- Make a regular backup of your site (refer to this other guide if you use WordPress) when everything is fine and keep it safe (as automatic backups are only kept for a few days and this is sometimes not far enough back to go back after you notice an intrusion).
- Consult ibarry.ch.
If a problem has occurred...
- Change the passwords of your Web applications, your FTP accounts and your databases by previously checking that no virus is on your computer.
- Restore a backup but update immediately what can be updated as soon as the restoration is complete.
- If you encounter a problem with third-party software, contact its publisher or a Partner and refer to the support policy as well as section 11.9 of the Infomaniak Terms of Service.
Be aware of these additional recommendations!
Link to this FAQ:
Has this FAQ been helpful?
The CGID module for Apache has been disabled on Infomaniak's shared web hosting offers.
If necessary, you should consider changing your plan to a Cloud Server if you are currently on a shared web hosting plan. This can be done transparently: refer to this other guide on the subject.
Link to this FAQ:
Has this FAQ been helpful?
This guide concerns YAZ, a software library used to implement the Z39.50 protocol, an information retrieval protocol that enables communication between different library management systems (LMS) such as PMB, widely used in France.
Infomaniak for efficient library management
On Infomaniak's Web Hosting, PMB is supported and YAZ is activated by default.
However, if you encounter errors such as Call to undefined function yaz_connect(), you will need to open ports via the Manager. Port 210 is the standard port used for Z39.50 communications, but do not hesitate to consult the documentation of your applications.
For older Infomaniak hosting plans, consider changing your offer.
Link to this FAQ:
Has this FAQ been helpful?
This guide explains how to increase the max_children value on Managed Cloud Server to increase the number of simultaneous PHP processes that can be used by your site. This will be very useful for resolving infinite page loading issues on your site.
Preamble
- By default on all hosting, the
max_childrenlimit is set to 20.- Although it is possible to increase this value from the Infomaniak Manager, the
max_childrenlimit is automatically adjusted based on the configuration of your Managed Cloud Server. - To increase this limit on shared hosting, migrate to Managed Cloud Server.
- Although it is possible to increase this value from the Infomaniak Manager, the
- To understand how to calculate the
max_childrenneeded as accurately as possible, refer to this article on the subject.
Increase the max_children value
Prerequisites
- Ensure that you have the necessary resources on the Managed Cloud Server.
- Ensure that all resources of the Managed Cloud Server are not being used; if it turns out that they are fully used, increasing the
max_childrenvalue will have no effect (Modify Managed Cloud Server resources). - Monitor the resources of your server, in case the resources of your server are reached, it will be necessary to check the optimization of processes and your site before considering increasing the
max_childrenvalue. - Consult the PHP error reports from the
/ik-logsfolder (master process php logs - file name: php-fpm.log) to check if the "max_children" limit has been exceeded... example of error:[05-Jul-2024 09:08:58] WARNING: [pool www.infomaniak.ch] server reached max_children setting (20), consider raising it
To access the management of PHP / Apache parameters of the site for which you need to increase the max_children value on Managed Cloud Server, refer to this other guide.
You will be able to...
- ... choose a new
max_childrenvalue: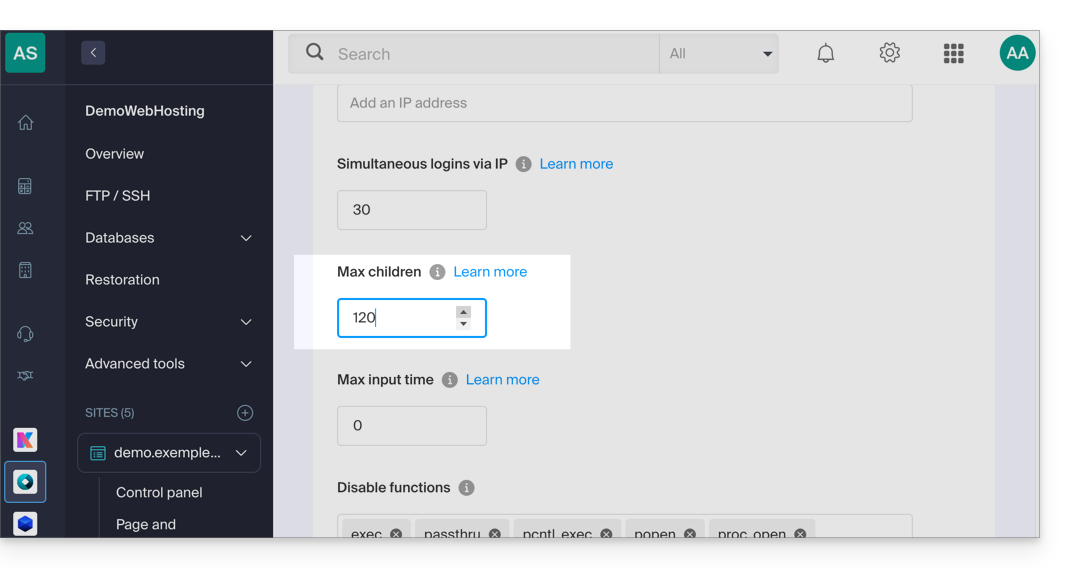
Do not forget to save the changes at the bottom of the page.
Limits depending on the server
Limit of max_children depending on the resources of the Managed Cloud Server:
| Managed Cloud Server Configuration | max_children |
|---|---|
| 2 CPU / 6 Go RAM | 20 |
| 4 CPU / 12 Go RAM | 40 |
| 6 CPU / 18 GB RAM | 60 |
| 8 CPU / 24 GB RAM | 80 |
| 12 CPU / 36 GB RAM | 120 |
| 16 CPU / 48 GB RAM | 160 |
| 24 CPU / 72 GB RAM | 240 |
| 32 CPU / 96 or 128 GB RAM | 320 |
Link to this FAQ:
Has this FAQ been helpful?
This guide is for you if you wish to perform vulnerability tests on your site / server hosted by Infomaniak.
Tolerated and restricted
You are free to perform vulnerability tests (SQL injection, XSS, etc.), intrusion, or penetration testing (pentest) on your Infomaniak hosting only under the following conditions:
- ... between 9 AM and 5 PM CET
- ... from Monday to Friday
- ... with the minimum number of attack packets regardless of the software used (AppScan for example)
- ... without ever performing a single DoS or DDoS (Denial of Service) attack
- ... by respecting the Infomaniak Terms of Service, in particular the shared framework of the services
Any abusive use may result in early termination by Infomaniak.
Link to this FAQ:
Has this FAQ been helpful?
This guide explains how to optimize the caching of web resources using HTTP headers.
Preamble
- A good caching strategy can significantly improve the performance of your site by avoiding the unnecessary retransmission of unchanged files.
- Web caching relies on two complementary mechanisms:
- The cache validity period (via the
Expiresheader) which indicates how long a resource can be reused without contacting the server. - Conditional validation (via the
Last-Modified/If-Modified-Sinceheaders) which allows checking if a resource has changed before re-downloading it.
- The cache validity period (via the
Configuring the cache duration with Expires
The Expires header allows specifying a duration during which the browser can directly reuse resources from its local cache. Here is how to configure it in your .htaccess file:
- Create or open the
.htaccessfile at the root of your site (usually in/webor/sites/domain.xyz). Add the configuration of the
expiresmodule:<IfModule mod_expires.c>Define the appropriate cache durations for each type of resource:
ExpiresActive On
ExpiresByType text/html "access plus 1 week"
ExpiresByType image/jpeg "access plus 1 month"
ExpiresByType text/css "access plus 1 month"
ExpiresByType application/javascript "access plus 1 month"
These directives mean that:
- HTML pages will be cached for one week.
- JPEG images, CSS files, and JavaScript will be kept for one month.
Adjust these durations according to the frequency of updates to your resources.
Close the configuration section:
</IfModule>
Conditional validation with Last-Modified
Even when a resource has expired in the cache, it is not always necessary to completely re-download it. The conditional validation mechanism allows the browser to check if its cached version is still up-to-date. This process works as follows:
- The server automatically sends a
Last-Modifiedheader with each resource, indicating its last modification date.- Apache handles this natively for static files - no additional configuration is required.
When the browser requests the resource again, it sends an
If-Modified-Sinceheader containing the date it has in cache:GET /resource HTTP/1.1 Host: www.example.com If-Modified-Since: Wed, 21 Oct 2015 07:28:00 GMT- The server compares this date with the actual file modification date:
- If the file has not changed, it simply returns a
304 Not Modifiedcode, thus saving bandwidth. - If the file has been modified, it returns the new version with a
200 OKcode.
- If the file has not changed, it simply returns a
Link to this FAQ:
Has this FAQ been helpful?
This guide explains why an FTP account (and most of the time Web Hosting as well) can suddenly become blocked.
Preamble
- Infomaniak uses an antivirus solution on all shared servers to combat the sending of viruses via FTP and scripts.
- The antivirus allows for the detection of:
- potential FTP account hacks
- the intentional or unintentional sending of files (WordPress themes, fraudulent modules, etc.) containing malicious code lines or inclusions
Detection of malicious file
The antivirus scans all files sent under 1 MB to prevent any upload of viruses / spam scripts / etc.
If a suspicious element is detected, the FTP account password is automatically changed and the incriminated files on the server are locked (FTPban).
The FTP server then sends the FTP client a message of the type
550 Virus Detected and Removed: botnet.infomaniak.5.UNOFFICIALor
550 Virus Detected and Removed: winnow.botnet.ff.trojans.15900.UNOFFICIAL
What to do if the account is blocked?
If your FTP account is suddenly blocked, you will receive an email; follow the procedure indicated in it to unlock the situation. In particular:
- Clean your site and analyze what you wanted to send to the server.
- Check if the web applications and CMS you use are up to date:
- The cause of most hacks comes from a security deficit in outdated web applications or weak passwords.
Resolve the problem definitively
To prevent your site from being hacked and blocked again, perform the following actions:
Do not republish the same contaminated files on your hosting as the site would be blocked again.
- Update the web applications (WordPress, Joomla, etc.) and extensions used.
- Delete unused web applications.
- Change the password for all your FTP accounts.
- Change the passwords to access web applications (WordPress, Joomla, etc.).
- Change the password for MySQL database users.
- Delete MySQL database users that you are not using.
- Use a different, complex password each time, with at least 8 characters.
- Run a manual antivirus scan on your hosting.
- Install and use an up-to-date antivirus (regardless of the operating system).
- Refer to this other guide if you are looking for information on monitoring and resolving vulnerabilities in hosted scripts.
If your site does not work after cleaning, it may be necessary to replace some deleted files with healthy files.
Link to this FAQ:
Has this FAQ been helpful?
This guide details the use of Perl or Python scripts on Infomaniak hosting and the management of their modules.
Prerequisites
- Shared Web Hosting: the CGI module is no longer available; the execution of Perl and Python scripts is therefore not supported.
- It is necessary to migrate to a Cloud Server.
- Managed Cloud Servers: to benefit from the latest technologies, it is possible to upgrade your Cloud Server.
Web Configuration (Apache/CGI)
To run Python or Perl scripts via Apache on Cloud Server, the interpretation of files with the extensions .py and .pl is not active by default.
Using your FTP software/client or the Web FTP, add and adapt the following directive in the .htaccess file located in the folder containing your scripts:
AddHandler cgi-script .pl .cgi .py
Options +ExecCGI
Installation of additional modules
On a Cloud Server, you have the possibility to install third-party libraries that are not present by default.
Python
- The installation is done through
PIP, which is a package manager used to install and manage packages written in Python. - Infomaniak offers
PIPandPIP3via the Fast Installer tool. - Once PIP is installed, you will be able to install Python modules by specifying
--userduring the command. For example: pip3 install mysql-connector-python --user
Perl
- The addition of Perl modules is also done via SSH (console). It is necessary to install them in the user directory and to define the full path within the scripts.
Important technical information
- Interpreter Path:
/usr/bin/python - Extensions: Scripts must have the extension
.pl,.cgior.py. - Limitations: The
mod_pythonmodule is not supported.
Error Resolution (CGIWrap)
If you encounter the following error when loading an image:
CGIWrap Error: Execution of this script not permitted
Request Data:Extra Path Info: /dossier/.../image.PL.12.34.gif
The server interprets the file as a script because it contains ".PL" (or .PY) in its name.
Solution: Simply rename the file to remove this mention (example: image-12-34.gif).
Link to this FAQ:
Has this FAQ been helpful?
This guide explains how to resolve an issue with importing a .csv file into a MySQL table. The proposed alternative is to read the CSV file line by line with PHP and insert the data into the MySQL database.
Disabled “LOAD DATA LOCAL INFILE” function
The LOAD DATA LOCAL INFILE function allows importing a CSV file directly into a MySQL table. However, this feature is often exploited by attackers to gain unauthorized access to sites hosted on servers that accept it.
To prevent any security risks and protect customer data, Infomaniak has disabled the LOAD DATA LOCAL INFILE function. Users who import their CSV files via phpMyAdmin (without checking the “CSV via LOAD DATA” option) are not affected.
Here is an alternative method to import CSV-formatted data into a MySQL table. The example below shows how to properly handle errors when opening the CSV file and inserting data into the database.
This script uses mysqli to connect to the database and prepared statements to insert the data. This ensures better security, optimal compatibility with recent versions of PHP, and simple integration into your project, whether in an existing script or a new file located in the /web directory:
$fileName = "data.csv";

// Connect to MySQL database using mysqli
$link = new mysqli("localhost", "username", "password", "database");

// Check database connection
if ($link->connect_error) {
   die("Connection failed: " . $link->connect_error);
}

// Open the CSV file for reading
if (($handle = fopen($fileName, "r")) !== FALSE) {

   // Read each line of the CSV file
   while (($data = fgetcsv($handle, 1000, ";")) !== FALSE) {

       // Prepare the SQL query dynamically
       $query = "INSERT INTO `test` VALUES (" . str_repeat('?,', count($data) - 1) . "?)";
       $stmt = $link->prepare($query);

       // Check if query preparation was successful
       if ($stmt === FALSE) {
           die("Query preparation failed: " . $link->error);
       }

       // Bind parameters (assuming all columns are strings)
       $types = str_repeat('s', count($data));
       $stmt->bind_param($types, ...$data);

       // Execute the query
       if (!$stmt->execute()) {
           die("Query execution failed: " . $stmt->error);
       }

       // Close the statement
       $stmt->close();
   }

   // Close the CSV file
   fclose($handle);

} else {
   echo "Error: unable to open the file.\n";
   exit(1);
}

// Close the database connection
$link->close();
?>
Get help
Unfortunately, it is not possible to specify exactly where in the script these lines of code should be inserted.
If this method causes issues (for example, when importing multiple CSV files simultaneously without an error message), it is possible that the table structure or field indexing is the cause. In this case, contact your webmaster for verification.
Also refer to the official PHP documentation regarding the fgetcsv() function.
Link to this FAQ:
Has this FAQ been helpful?
This guide helps you protect the reputation of your domain name, to maintain the trust of Internet users and service providers in your website or business, thereby facilitating the smooth operation of your email.
The web reputation
There are different types of reputation on the Internet, including personal reputation, corporate reputation, and domain reputation.
Domain reputation is essentially a score that determines how email systems decide what to let through to users' inboxes. Fundamentally, the reputation of your domain is a measure of the health and legitimacy of your domain. This reputation can be influenced by the security of your email and website.
For example, the reputation of a domain can decrease if…
- … the site visible at the domain address is hacked, leading to the mass sending of fraudulent emails,
- … the domain's email is exploited for the involuntary sending of spam.
If the reputation of your domain remains poor, your emails may be marked as spam and not reach their intended audience. This can harm email deliverability (see this other guide in English on this topic).
Improving domain reputation
By following these few tips, you can improve the reputation of your domain and, for example, boost all your email marketing efforts:
- Set up and verify SPF, DKIM, and DMARC records that help protect your domain from identity theft attacks.
- Check the reputation of your domain with tools such as Google Postmaster Tools, Sender Score, Microsoft SNDS, McAfee or Talos Intelligence and identify potential issues.
- Only send emails to users who have chosen to subscribe!
- Get trusted links or backlinks…
See this other guide about RBLs.
Link to this FAQ:
Has this FAQ been helpful?
This guide will help you if, for example, you want to deploy a package like pymysql and it requires a Python version higher than the default one provided on your hosting.
Preamble
- Anaconda is a free and open-source distribution of the programming languages Python and R; it aims to simplify package management and deployment.
- It is recommended to use Miniconda (a lightweight version of conda); it installs in your user space, avoiding any conflict with the system Python and not requiring administrator rights.
- Refer to the official documentation.
1. Download the installer
For example, the 64-bit Linux version for Python 3.11.
user@server:~$ wget https://repo.anaconda.com/miniconda/Miniconda3-py311_23.10.0-1-Linux-x86_64.sh
--2024-03-10 12:00:00--  https://repo.anaconda.com/miniconda/Miniconda3-py311_23.10.0-1-Linux-x86_64.sh
Resolving repo.anaconda.com... 104.16.131.3, 104.16.130.3
Connecting to repo.anaconda.com|104.16.131.3|:443... connected.
HTTP request sent, awaiting response... 200 OK
Length: 72787200 (69M) [application/x-sh]
Saving to: ‘Miniconda3-py311_23.10.0-1-Linux-x86_64.sh’

Miniconda3-py311_23.10.0-1-Linux-x86_64.sh  100% [===================>]  69.42M  --.-KB/s    in 0.3s
2. Check the integrity (SHA256 Hash)
user@server:~$ sha256sum Miniconda3-py311_23.10.0-1-Linux-x86_64.sh
6c714a33ea348303f909194246990422e698889417d74b9714856b3e9a7e6c3a  Miniconda3-py311_23.10.0-1-Linux-x86_64.sh
3. Run the installation
The -b argument allows for a silent installation. By default, Miniconda will install in ~/miniconda3.
user@server:~$ bash Miniconda3-py311_23.10.0-1-Linux-x86_64.sh -b
PREFIX=/home/clients/your_client_hash/miniconda3
Unpacking payload ...
Collecting package metadata (current_repodata.json): done
Solving environment: done
Executing transaction: done
installation finished.
4. Initialize and activate Conda
To use conda immediately and with each SSH connection:
user@server:~$ ~/miniconda3/bin/conda init bash
no change     /home/clients/your_client_hash/miniconda3/condabin/conda
...
modified      /home/clients/your_client_hash/.bashrc

user@server:~$ source ~/.bashrc
5. Install a package (example: pymysql)
Once activated, the (base) prefix appears before your command prompt. You can then install your tools without sudo or --user.
(base) user@server:~$ python -V
Python 3.11.5

(base) user@server:~$ pip install pymysql
Collecting pymysql
  Downloading PyMySQL-1.1.0-py3-none-any.whl (44 kB)
Installing collected packages: pymysql
Successfully installed pymysql-1.1.0
Link to this FAQ:
Has this FAQ been helpful?
This guide details the compatibility of Infomaniak web hosting with IPv4 and IPv6.
Preamble
- Infomaniak supports both IPv4 and IPv6, thus ensuring optimal connectivity for all users.
- Only Starter (free) hosting and old hosting plans are not compatible: upgrade to a Cloud Server or shared hosting.
- Compatibility with IPv4 and IPv6 means that the Infomaniak hosting service allows websites to be accessible to users using both IPv4 and IPv6 addresses.
- This ensures that your site can be visited by all types of devices and networks, providing an optimal experience for your users, regardless of the protocol they use to connect to the Internet.
IPv4, or Internet Protocol version 4
This is the first version of the Internet Protocol widely used since the 1980s. It uses 32-bit IP addresses, which allows identifying and locating devices connected to the Internet. However, with the exhaustion of IPv4 addresses, it has become necessary to develop a new version (read below):
- Example of an IPv4 address: 192.168.0.1
- In this example, the IPv4 address consists of four groups of numbers separated by dots…
- Each group can contain a number from 0 to 255.
- The address 192.168.0.1 is often used to represent a local IP address in a private network.
- Find the IP of your website: refer to this other guide…
- Obtain the public IP of your current Internet connection: https://chk.me/ip
IPv6, or Internet Protocol version 6
This is the latest version of the Internet Protocol introduced to solve the problem of IPv4 address exhaustion. IPv6 uses 128-bit IP addresses, offering practically unlimited address space. It also provides enhanced features such as security, quality of service, and automatic address configuration:
- Example of an IPv6 address: 2001:0db8:85a3:0000:0000:8a2e:0370:7334
- In this example, the IPv6 address consists of eight groups of numbers and letters separated by colons…
- Each group can contain a hexadecimal number from 0 to FFFF.
- The IPv6 address is much longer than the IPv4 address, thus offering a much larger address space.
Link to this FAQ:
Has this FAQ been helpful?
This guide explains how to set up a WordPress multisite network to manage multiple sites from a single WordPress installation by Infomaniak, with URLs such as site1.domain.xyz, site2.domain.xyz, or even domain1.com, domain2.com, etc.
WordPress multisite installation
To get started:
- Install WordPress via Infomaniak on your hosting space with a main domain name:

- This first WordPress site must be reachable and functioning correctly:

- This first WordPress site must be reachable and functioning correctly:
- Connect via FTP.
- Edit the
wp-config.phpfile of this first WordPress site. - Above the line "
/* That's all, stop editing! Happy blogging. */" (#94) copy-paste the codedefine('WP_ALLOW_MULTISITE', true);:
- Save your changes.
- Then log in to the administration of your WordPress site.
- Temporarily deactivate all WordPress plugins:

- Go to the TOOLS menu to create a Network:
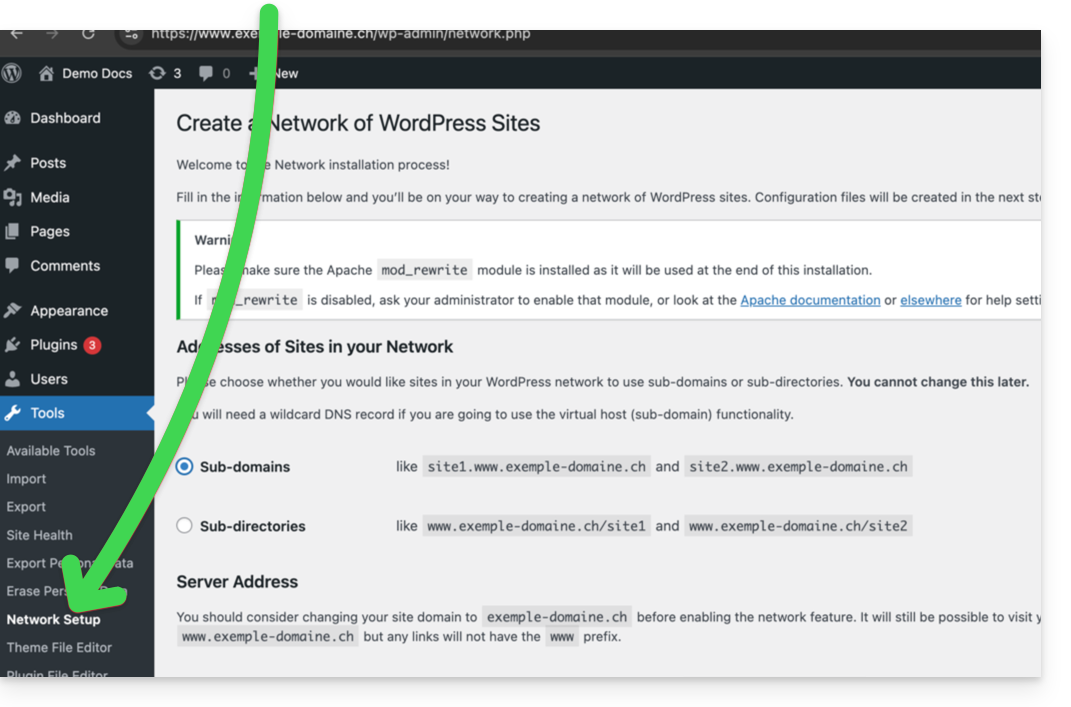
- Choose the method for creating your different WordPress sites (on subdomains)…
- Click the installation button:

- Add the instructions displayed on the screen to the
wp-config.phpand.htaccesson the server. - After reconnecting to your WordPress, you will get a new "My Sites" menu where you can add and manage your different sites in the same network:

- Reactivate your deactivated plugins.
- On the Manager, add an alias to your site in the form
*.your-domain-here (the asterisk allows you to create a wildcard alias) with DNS update so that the correctCNAMEis automatically added to the zone:
- Install or update your SSL certificates:

- When you create a new site within the network, for example by naming it
home2, it will then be accessible viahome2.domain.xyzand so on:
Link to this FAQ:
Has this FAQ been helpful?
This guide covers the support of secure hash functions (including SHA-256) by Infomaniak servers, as well as the emphasis on the security of SSL/TLS certificates using CSRs generated with SHA-256.
SHA-256 hashing algorithm
The cryptographic hash function SHA-1 is compatible and Infomaniak servers also support the SHA-256 function, which is useful for PayPal and SaferPay (SIX).
The CSRs (certificate signing requests) are in SHA-256 and not in SHA-1.
Link to this FAQ:
Has this FAQ been helpful?
This guide explains how to display the IP address of a site on your Web Hosting.
Preamble
- The IPv4 address is usually the same for each of the sites on the hosting (unless you have acquired a dedicated IP).
Display the IP address of your site
The IP address is specified on the hosting management page (Starter or containing multiple sites):
- Click here to access the management of your site on the Infomaniak Manager (need help?).
- Click directly on the name assigned to the product concerned.
- Then click on the chevron to expand the Information section of this hosting.
- The IPv4 address is displayed on the page:

- The IPv6 address is also displayed in the case of paid hosting:

Link to this FAQ:
Has this FAQ been helpful?
This guide details the "502 Bad Gateway" errors that can be encountered when visiting a website.
Preamble
- The 502 Bad Gateway error occurs when the server acting as a gateway between the browser and the origin web server receives an invalid response.
- This error can be caused by an overloaded web server, communication issues between a CDN and the hosting web server, or a misconfigured proxy server.
- Sometimes, the error can be caused by a bad entry in the DNS server.
Troubleshooting steps
To resolve the 502 Bad Gateway error, you often need to proceed by elimination:
- Check if the server is temporarily overloaded: simply reload the page after a few minutes for the error to disappear.
- Clear the browser cache.
- Try from another browser.
Link to this FAQ:
Has this FAQ been helpful?
This guide explains how to change the URL of your website from the Joomla app installed on your Web Hosting Infomaniak (only in the case where you have installed Joomla via the dedicated tools offered by Infomaniak).
This allows you to assign a different domain name to your Joomla site.
Prerequisites
- The domain name you wish to use must first be added as an alias to the main domain on the site in question.
Change the Joomla domain name
To change the address of the site created with Joomla to another domain name that already appears in the same Organization:
- Click here to access the management of your site on the Infomaniak Manager (need help?).
- Click directly on the name assigned to the product in question:

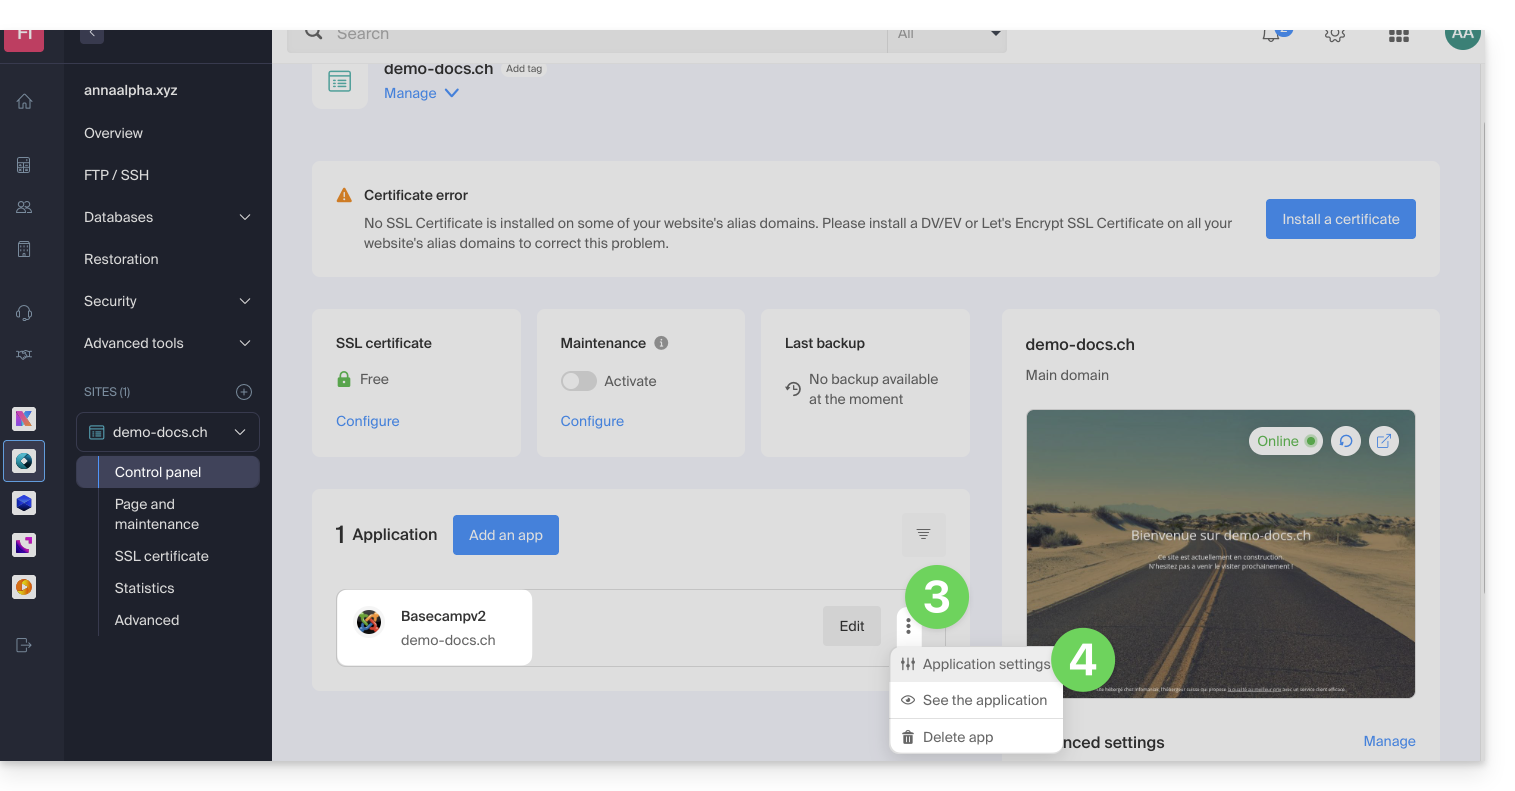
- Click on the action menu ⋮ located to the right of the Web Application in question.
- Click on Settings of the application:
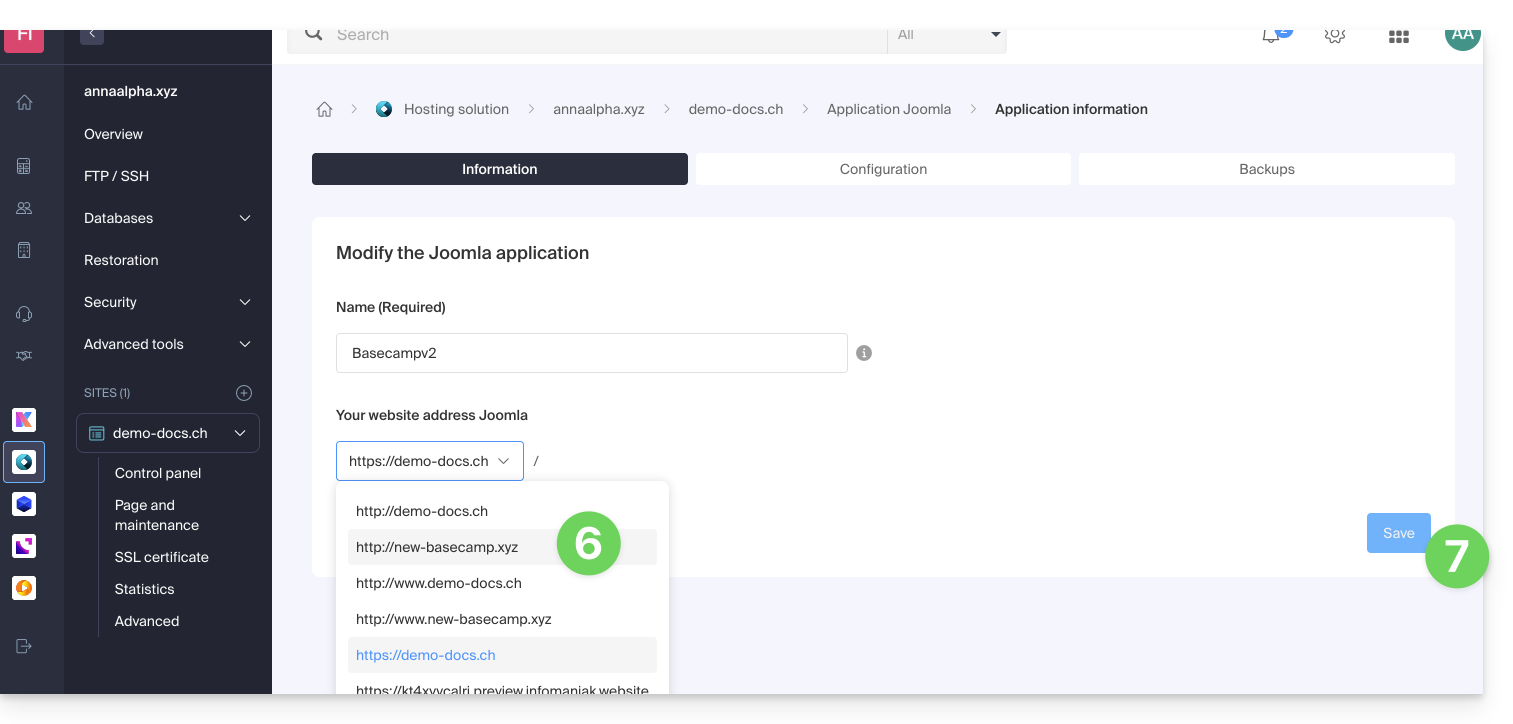
- Click on Modify to the right of the Joomla:
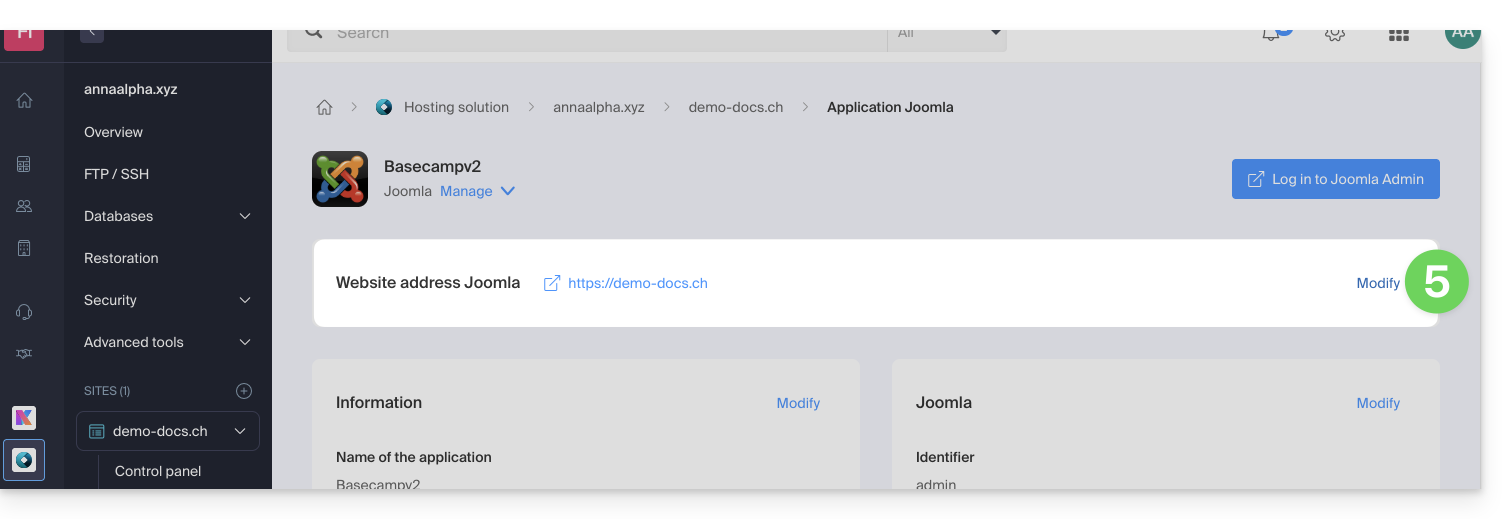
- Under Site URL, select the desired web address from the drop-down menu:
- If you have not followed the prerequisites above, the desired domain will not appear even if it is registered in the same Organization.
- If you have added the domain as an alias to the site, the desired domain will appear and you will be able to select it to replace the previous domain.
- Click on the Save button:
“…preview.infomaniak.website” domain?
Among the URLs present in the drop-down menu, the preview URL allows you to access your Joomla site in case the site's domain name is not yet correctly configured to point to your app: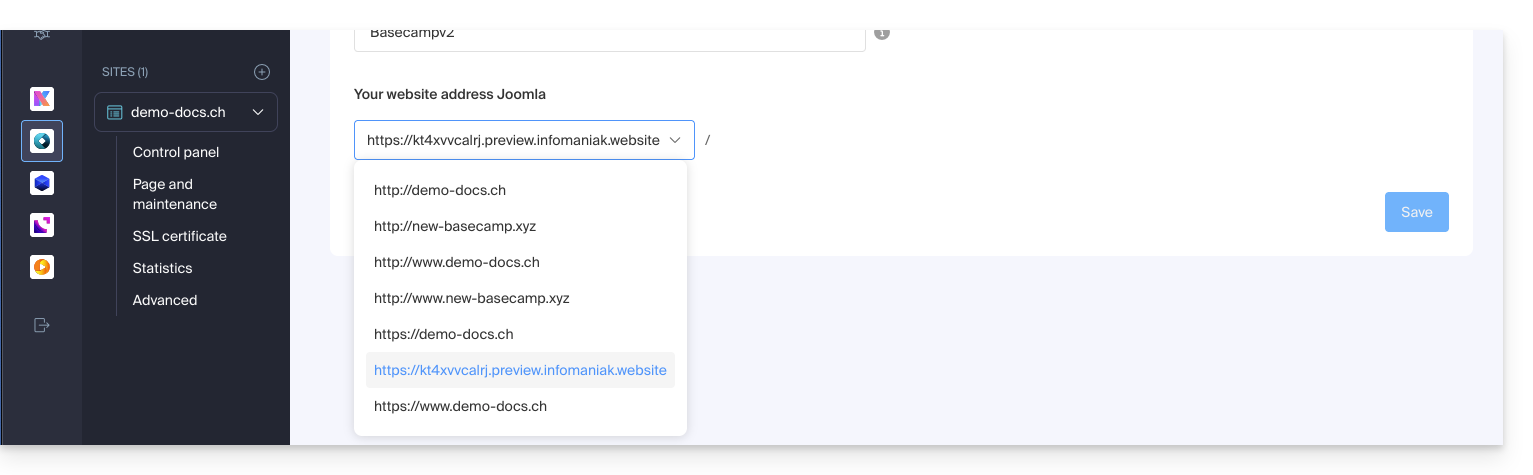
Change the address or location of Joomla
⚠️ These manipulations break the link between your Joomla and the Infomaniak Web Applications system; it will no longer be possible to benefit from the advantages of the latter.
Prerequisites
- Create an FTP account (need help?).
- Connect via FTP (need help?).
To modify the Joomla installation if it was done in a subfolder…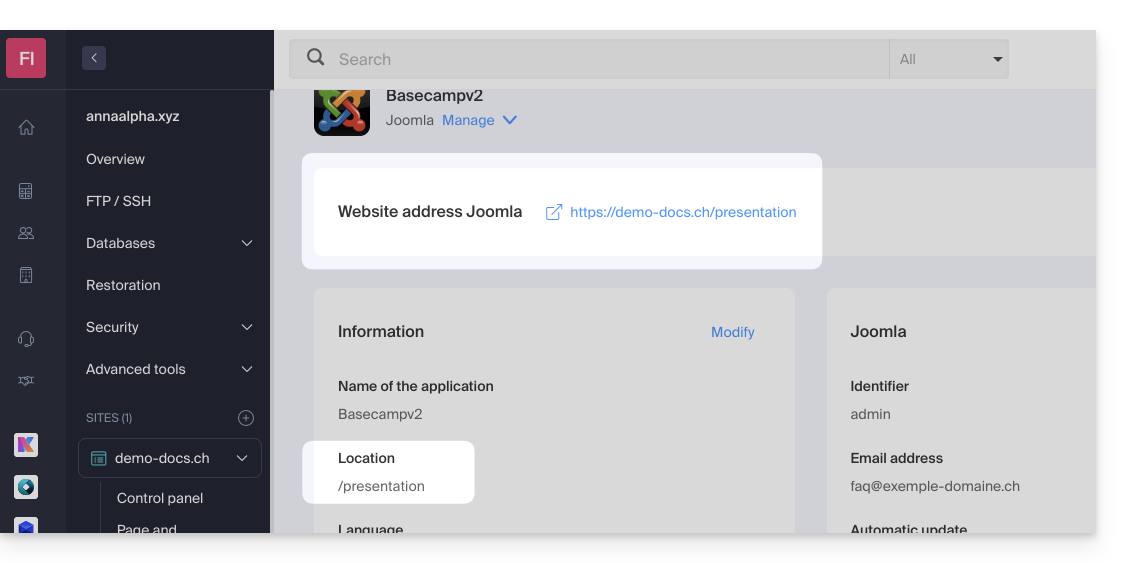
… and if the latter is visible in the site address on each consultation…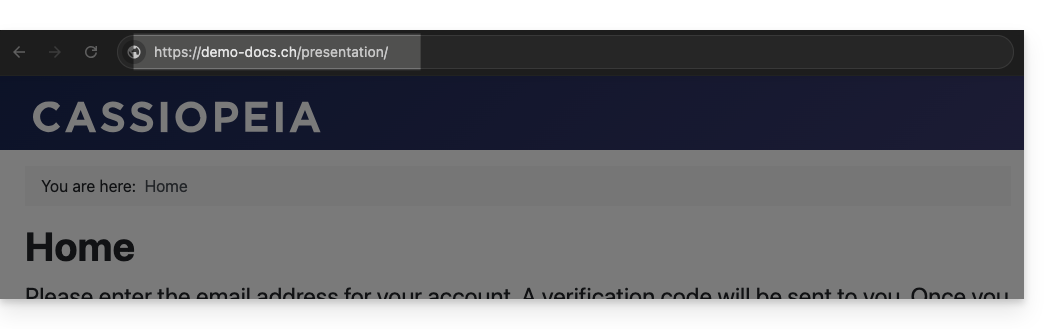
… here is how to proceed:
- On the FTP, move (to bring them back to the root in the target folder of the website) all the files of your Joomla currently installed in a subfolder (folder
/presentationin the example below):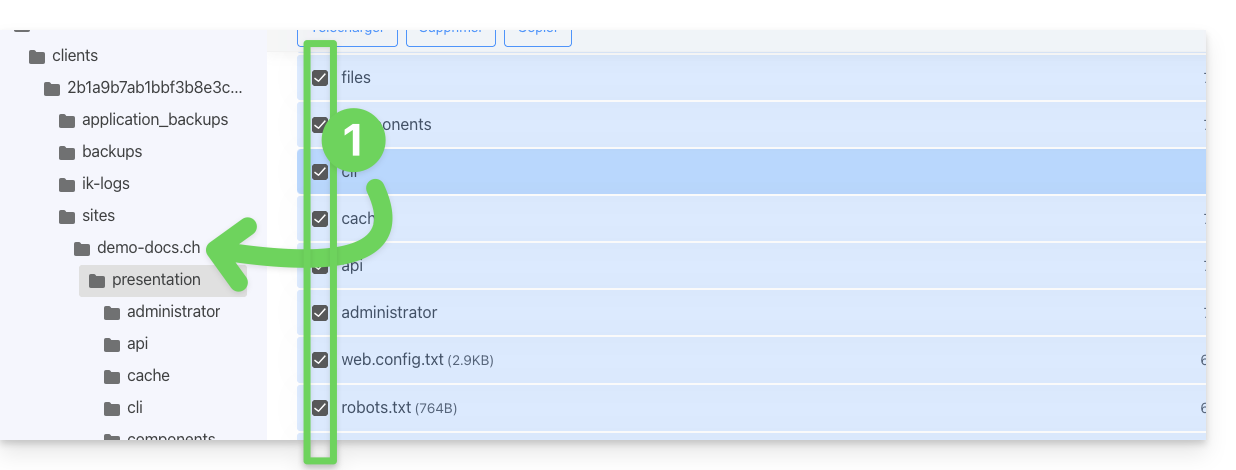
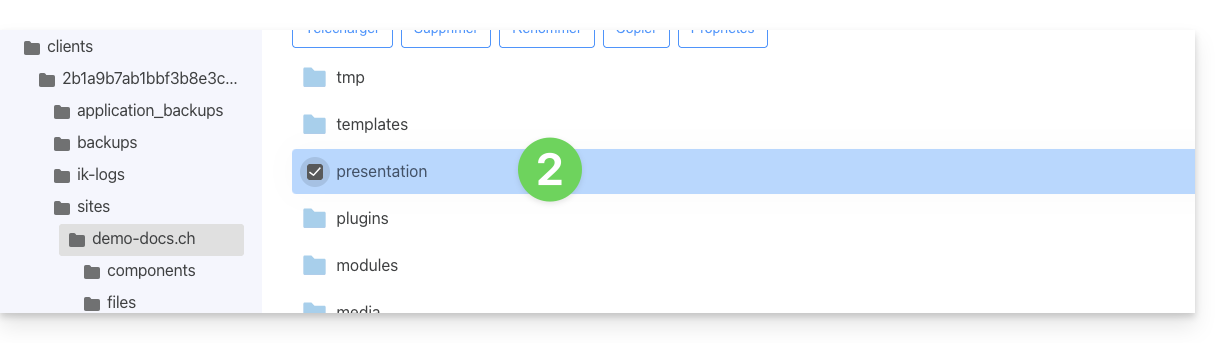
- Delete the now empty subfolder:
- Modify the
.htaccessfile located at the root of your Joomla directory. - Replace
RewriteBase /presentationwithRewriteBase /: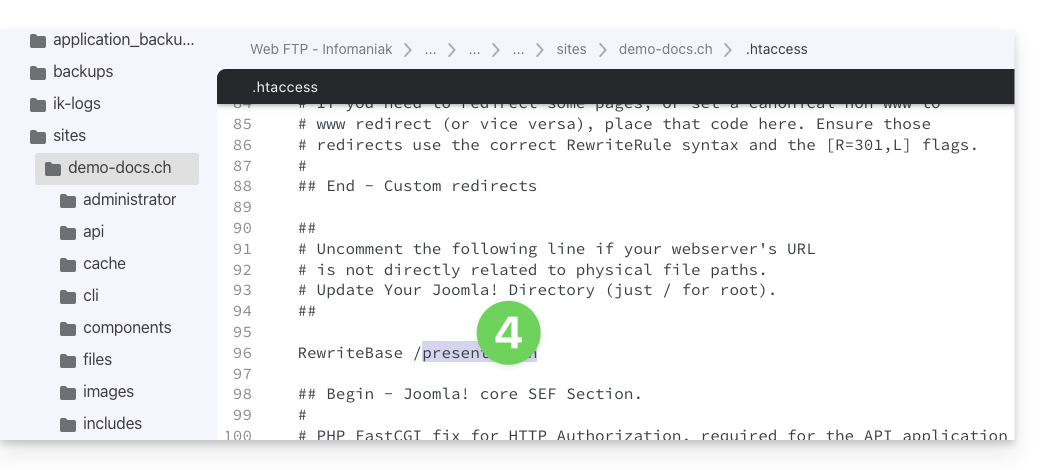
- Save the changes.
- Do not uninstall the Joomla Web Application but simply stop using it and log in directly to the management interface of your Joomla via the URL
/administrator:
Link to this FAQ:
Has this FAQ been helpful?
This guide explains how to manage interactions between your Infomaniak VOD/AOD space and any of your WordPress sites, using an extension developed by Infomaniak
Preamble
- This WordPress extension allows you to retrieve and manage all your videos present on an Infomaniak VOD/AOD space, with automatic updates when new videos are added.
- It manages the automatic retrieval of existing Players and playlist management.
- You will be able to search for your videos when writing an article or page or import media directly from the CMS administration.
- Possible incompatibilities:
- The plugin is not compatible with Elementor.
- Test if the problem persists after installing another editor.
- The plugin is not compatible with WordPress Multisite.
- The plugin is not compatible with Really Simple Security (Really Simple SSL).
- Test if the problem persists by activating or deactivating this setting of the Really Simple Security extension:

- Test if the problem persists after using another similar module.
- If problems persist, refer to this other guide.
- Test if the problem persists by activating or deactivating this setting of the Really Simple Security extension:
- The plugin is not compatible with Elementor.
Get the Infomaniak VOD extension
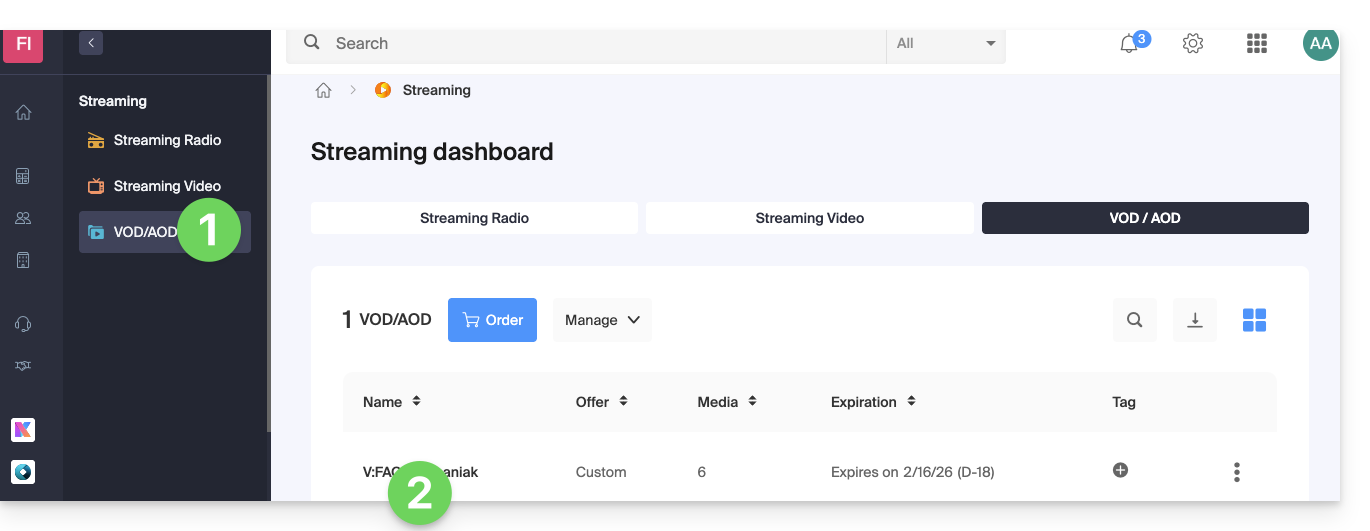
Go to your VOD space to obtain the information necessary for the external WordPress module:
- Click here to access the management of your product on the Infomaniak Manager (need help?).
- Click directly on the name assigned to the product concerned:
- Click on CMS Extensions/API in the left sidebar menu.
- Click on CMS Extensions in the left sidebar menu.
- Download the WordPress extension.
- Configure the extension using the provided instructions:

- It is recommended to create a new user in your Organization with only technical rights on the VOD/AOD product and then create the application password from this dedicated account.
You can also download the extension directly from the WordPress extension library: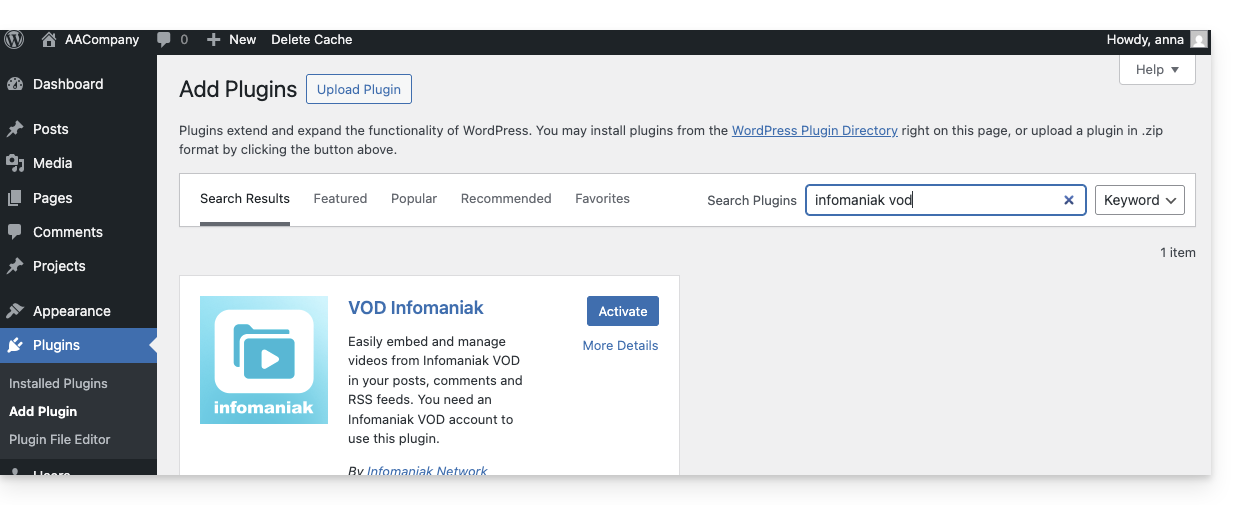
A similar feature exists for Typo3 with the dedicated extension that you can find and install from its extension library: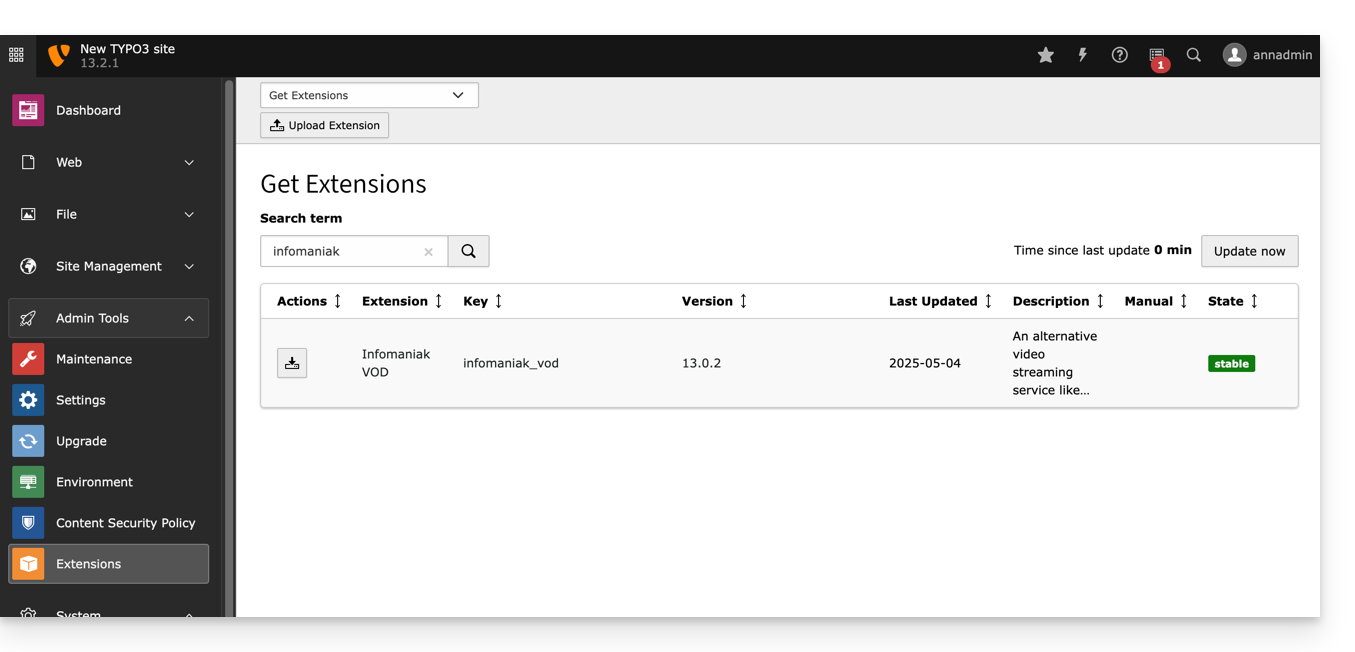
Link to this FAQ:
Has this FAQ been helpful?