Knowledge base
1000 FAQs, 500 tutorials and instructional videos. Here, there are only solutions!
This technical guide details the resource limits for Infomaniak Web Hosting; it is essential to distinguish between real time (clock time) and processing time (CPU time) to understand the cause of script interruptions.
1. MySQL connection time (I/O)
Limit: 30 seconds (actual time)
This limit corresponds to the absolute time elapsed, measured "as the clock ticks". It concerns the communication between PHP and the database server (MySQL/MariaDB).
As soon as a connection is opened, the database server allocates a maximum of 30 seconds to receive the request, execute it, and return the results. If this time limit is exceeded (often due to a poorly optimized SQL query), the MySQL server abruptly terminates the connection. This usually generates the MySQL server has gone away error.
2. PHP processing time (CPU)
Limit: 10 seconds CPU
This limit applies exclusively to the processing power consumed by the web server to execute PHP code.
It is crucial to note that the waiting time does not count. When PHP is waiting for a response from the database, it is paused and consumes almost no CPU time. Therefore, a script will only be interrupted by the web server if it performs intensive calculations (complex loops, cryptography, file processing) for more than 10 seconds cumulatively.
Interaction of the two limits
To ensure the application's stability, each operation must simultaneously meet these two distinct constraints:
- The application has a total of 30 seconds to interact with the database (network latency + SQL execution).
- The application has 10 seconds of pure processing time to handle the received data.
Example of valid operation: a script that waits 25 seconds for a complex response from MySQL (I/O) and then processes the result for 2 seconds (CPU) will work perfectly, as it has not exceeded either of the individual quotas, even though the total time is 27 seconds.
Link to this FAQ: https://faq.infomaniak.com/481
Has this FAQ been helpful?
This guide explains how to redirect traffic from an alias (synonym) domain name to your main domain, or force the display of the main domain in the browser's address bar.
Prevent duplicate content
Let's imagine that your website is hosted under the main domain example.com and that you have configured an alias domain such as example-alias.com.
By default, when a visitor enters one or the other of these addresses in their browser, the typed URL remains displayed. This can generate duplicate content, which harms natural search engine optimization (SEO).
To prevent this, you can force a redirect: if a visitor types example-alias.com, they will be automatically redirected to example.com.
This configuration is done in the .htaccess file located at the root of your hosting (usually in the /web folder via your FTP access). If this file does not yet exist, you must create it.
Then, insert the following directives into the file:
RewriteEngine On

# Force HTTPS and canonical domain redirection
RewriteCond %{HTTP:X-Forwarded-Proto} !https [OR]
RewriteCond %{HTTP_HOST} !^example\.com$ [NC]
RewriteRule ^(.*)$ https://example.com/$1 [R=301,L]
Adapt the code above to your needs:
- Replace
example.comwith your main domain name and its extension (.com, .org, .ch, etc.). Addwww.before your domain if you prefer to force the display of thewwwsubdomain. - If a redirection loop occurs, you can replace the protocol condition with
RewriteCond %{HTTPS} off(especially if your hosting does not use a reverse proxy).
For more information, see the documentation on automatic redirects to HTTPS.
Link to this FAQ: https://faq.infomaniak.com/482
Has this FAQ been helpful?
This guide covers synchronizing servers via the NTP (Network Time Protocol) and configuring the timezone on Infomaniak servers.
Accurate server synchronization via NTP
Infomaniak's servers are all synchronized via the NTP protocol. The company provides its own stratum-1 NTP servers, which are publicly accessible for flexible use.
To integrate these servers into your settings, use the following entry: pool.ntp.infomaniak.ch.
The default timezone setting is UTC. However, PHP functions are designed to take different timezones into account based on specific needs.
To adjust the timezone in your PHP scripts, use the date_default_timezone_set('UTC') function.
MySQL: Temporal Specificities
The Infomaniak infrastructure supports features that allow you to work with temporal data in a precise and efficient manner, taking time zones into account, which is crucial for many modern applications:
- MySQL uses a time zone database to store and manage time zone information.
- The
mysql.time_zonetable contains time zone data, including information on time offsets, time zone names, etc. - The
CONVERT_TZfunction is used to convert a time from one time zone to another in MySQL, using the following syntax:CONVERT_TZ(dt, from_tz, to_tz), where:dtis the date/time to be converted.from_tzis the source time zone.to_tzis the target time zone.
- Example:
CONVERT_TZ('2024-05-14 12:00:00', 'UTC', 'America/New_York')will convert the time 12:00:00 UTC to the local time in New York.
Link to this FAQ: https://faq.infomaniak.com/487
Has this FAQ been helpful?
This guide helps you resolve an error of the type "Invalid query: MySQL server has gone away".
Introduction
- This type of error often occurs when a MySQL connection is kept open without submitting any queries for a period of time exceeding the connection timeout: http://dev.mysql.com/doc/refman/5.7/en/gone-away.html
- The
wait_timeoutandinteractive_timeoutvariables, which control this disconnection, are set to 30 seconds: http://dev.mysql.com/doc/refman/5.0/en/communication-errors.html
Solutions
To avoid the "MySQL server has gone away" error, here are several possible approaches:
Automatic Verification and Reconnection
Before executing a query, it is recommended to test whether the MySQL connection is still active. If the connection has been closed, you can automatically re-establish it before proceeding with your query. Here is an example in PHP:
if (!mysqli_ping($connexion)) {
mysqli_close($connexion);
$connexion = mysqli_connect($host, $user, $password, $database);
}
The mysqli_ping() function checks if the connection is still valid. If it is not, the script closes the connection and opens a new one.
Regular "Ping" Sending
Another method is to run a script that regularly sends a "ping" to the database to keep the connection active. For example, you could create a scheduled task (cron job) that sends a lightweight request, such as SELECT 1;, at regular intervals.
Adjusting MySQL parameters (Cloud Server)
With a Cloud Server, you can increase the values of the wait_timeout and interactive_timeout variables from the MySQL menu of your server to extend the connection duration before it is closed.
Link to this FAQ: https://faq.infomaniak.com/499
Has this FAQ been helpful?
This guide explains the role of the browscap.ini file, which is used by PHP to identify certain characteristics of a web browser (name, version, operating system, and capabilities) based on its HTTP User-Agent header.
The use of browscap.ini is now mainly intended to ensure compatibility with existing applications. For new developments, more modern methods are generally preferred.
Using with the get_browser() function
The native PHP get_browser() function requires access to an up-to-date browscap.ini file in order to identify the characteristics of the browser that made the request.
On Infomaniak Web Hosting, this file is generally available at the following location:
/opt/php/lib/php/browscap.iniIf necessary, you can check its content using the following script:
<?php
header('Content-Type: text/plain');

$file = '/opt/php/lib/php/browscap.ini';

if (file_exists($file)) {
    echo file_get_contents($file);
} else {
    echo 'File not found.';
}
Due to its size and the cost of loading it, using browscap.ini can impact the performance of applications that rely on get_browser().
Recommended alternatives
For new projects, it is generally preferable to use solutions that are better suited to current web development practices:
- PHP libraries installed with Composer, such as
matomo/device-detectororwhichbrowser/parser, which offer regularly updated and more comprehensive browser and device detection. - User-Agent Client Hints (UA-CH), when supported by the browser, to obtain structured information via the mechanisms provided by current HTTP standards.
- Feature Detection, by directly checking the availability of a feature (e.g., in JavaScript or with the CSS rule
@supports) rather than inferring behavior based on the browser used.
Link to this FAQ: https://faq.infomaniak.com/505
Has this FAQ been helpful?
This guide concerns Django, an open-source web development framework in Python.
Prerequisites
- A Cloud VPS or VPS Lite (shared hosting and Managed Cloud Server are not supported).
- Python 3 and the
pippackage manager installed on the server, and full SSH access. - Master the command line interface (CLI Linux) and the management of Python virtual environments (e.g.
venv).
Installation and initialization
Here are the general steps to set up your environment on your server:
- Connect to your VPS via SSH.
- Create and activate a virtual environment to isolate your project's dependencies:
python3 -m venv my_environment && source my_environment/bin/activate - Install the framework:
pip install django - Initialize your project:
django-admin startproject name_of_project
Deployment
The built-in development server (runserver) is not designed for a production environment. To securely expose your application on the Internet, configure an application server (e.g., Gunicorn or uWSGI) behind a reverse proxy such as Nginx or Apache.
Link to this FAQ: https://faq.infomaniak.com/516
Has this FAQ been helpful?
This guide will help you find the public IP address of your device, which can be useful when submitting certain support requests.
Display the public IP address on the connected device
Click here to obtain the public IP address of your device in IPv4 and IPv6 format.
Alternative methods
Visit ipinfo.io or ifconfig.me.
… on macOS
- From a
Terminalapplication (command-line interface,CLI) on your device, run thecurl ifconfig.mecommand and press Enter. - The address displayed is the public IP address of your computer.
Please note that this address may change periodically, especially if the router restarts or if the internet service provider uses dynamic IP address assignment.
To automate the process of finding the public IP address, use commands or scripts that query services such as api.ipify.org...
Link to this FAQ: https://faq.infomaniak.com/528
Has this FAQ been helpful?
This guide explains how to use PHPMailer with Infomaniak Web Hosting to send emails from a website.
⚠ WARNING ⚠
Infomaniak guarantees that its services comply with standard protocols (IMAP, S3, etc.), but does not provide additional support for external services or software, as their configuration may change depending on the provider or publisherThis guide is therefore provided for informational purposes only, and its implementation remains your responsibility (see: Support Policy / Art. 11.9 of the Terms of Service). If needed, a qualified professional can assist you.
Introduction
- PHPMailer is a PHP library that allows you to create and send emails from a website, particularly via SMTP.
- It allows you to send messages in HTML format, add an alternative text version, manage attachments, and use SMTP authentication.
- For authenticated sending via SMTP, the PHP environment used by the website must be compatible with a recent encrypted connection, specifically TLS 1.2 or higher.
- An outdated version of PHP or the OpenSSL library used by PHP may cause a connection or authentication error, even if the email address and password are correct.
- Do not use PHP 5.3/5.4 for this type of sending; use a recent and supported version of PHP.
- With authenticated SMTP sending, the address used as the sender must match the email address used for SMTP authentication.
Install PHPMailer
To use PHPMailer, install the library in your website's files.
- Download PHPMailer from its official repository or install it with Composer if your project uses it.
- Copy the PHPMailer files into a directory on your website via FTP.
Upload the necessary files to your PHP script, adapting the path according to the chosen location:
use PHPMailer\PHPMailer\PHPMailer;
use PHPMailer\PHPMailer\Exception;

require **DIR** . '/PHPMailer/src/Exception.php';
require **DIR** . '/PHPMailer/src/PHPMailer.php';
require **DIR** . '/PHPMailer/src/SMTP.php';
Configure SMTP sending with Infomaniak
Use the following authenticated SMTP settings:
- SMTP server:
mail.infomaniak.com - Port:
465 - Encryption:
SMTPS/ SSL-TLS - Authentication: required
- Username: the complete email address
- Password: the password for the email address used
Example of a complete configuration:
<?php

use PHPMailer\PHPMailer\PHPMailer;
use PHPMailer\PHPMailer\Exception;

require **DIR** . '/PHPMailer/src/Exception.php';
require **DIR** . '/PHPMailer/src/PHPMailer.php';
require **DIR** . '/PHPMailer/src/SMTP.php';

$mail = new PHPMailer(true);

try {
// Configuration SMTP
$mail->isSMTP();
$mail->Host       = 'mail.infomaniak.com';
$mail->SMTPAuth   = true;
$mail->Username   = '[sender@domain.xyz](mailto:sender@domain.xyz)';
$mail->Password   = 'mot_de_passe_de_l_adresse_mail';
$mail->SMTPSecure = PHPMailer::ENCRYPTION_SMTPS;
$mail->Port       = 465;
$mail->CharSet    = 'UTF-8';

```
// Expéditeur
// L'adresse doit correspondre à celle utilisée pour l'authentification SMTP.
$mail->setFrom('sender@domain.xyz', 'Nom du site');

// Destinataire
$mail->addAddress('recipient@example.com');

// Adresse de réponse facultative
$mail->addReplyTo('sender@domain.xyz', 'Nom du site');

// Contenu du message
$mail->isHTML(true);
$mail->Subject = 'Message envoyé depuis le site';
$mail->Body    = '<p>Contenu HTML du message.</p>';
$mail->AltBody = 'Contenu texte du message.';

$mail->send();
echo 'Message envoyé';
```

} catch (Exception $e) {
echo 'Le message n'a pas pu être envoyé. Erreur: ' . htmlspecialchars($mail->ErrorInfo);
}
If your application requires the use of port 587, use STARTTLS:
$mail->SMTPSecure = PHPMailer::ENCRYPTION_STARTTLS;
$mail->Port       = 587;
Check the PHP version and TLS compatibility
Authenticated SMTP sending requires a recent encrypted connection. If the site uses an outdated version of PHP, for example PHP 5.3, or an outdated OpenSSL library, PHPMailer may fail before or during authentication. The errors may then be misleading, for example:
SMTP connect() failedCould not authenticatestream_socket_enable_crypto()- an authentication error even though the password is correct
In this case, check the following:
- the PHP version used by the website;
- the OpenSSL version used by PHP;
- the version of PHPMailer used by your project;
- the correspondence between the SMTP port and the chosen encryption method.
For reliable configuration, use a recent version of PHP that is compatible with TLS 1.2 or higher, as well as a current version of PHPMailer. If necessary, refer to these guides:
- Change the PHP version of a website
- Troubleshoot a PHP issue related to an outdated version
- Display the website's technical information
Resolving a Sender Mismatch Error
The error Sender mismatch SMTP code: 550 Additional SMTP info: 5.7.1 can occur when the address used as the sender does not match the email address used for SMTP authentication. Here is an example to avoid:
$mail->Username = 'sender@domain.xyz';
$mail->setFrom('another-address@domain.xyz', 'Nom du site');
In this example, the script authenticates with sender@domain.xyz, but attempts to send the message using a different sender address.
Use the same email address for SMTP authentication and for the sender:
$mail->Username = 'sender@domain.xyz';
$mail->setFrom('sender@domain.xyz', 'Nom du site');
The sender name can be customized, but the email address must remain consistent with the SMTP account used.
In the case of a contact form
If a visitor enters their email address in a form, do not use it as the sender's address for the message. Use the authenticated email address as the sender, and then add the visitor's address as the reply-to address.
Example:
$mail->Username = 'sender@domain.xyz';
$mail->setFrom('sender@domain.xyz', 'Formulaire du site');
$mail->addReplyTo($email_visiteur);
This configuration allows you to respond to visitors from your email software without sending the message with an unauthorized sender address.
Temporarily enable debug mode
In case of an error, temporarily enable PHPMailer's debug mode to obtain more details about the SMTP connection:
$mail->SMTPDebug = 2;
$mail->Debugoutput = 'html';
Disable this mode after your tests to avoid displaying technical information to website visitors.
Learn more
Link to this FAQ: https://faq.infomaniak.com/576
Has this FAQ been helpful?
This guide concerns the use of Java technology, which, particularly in terms of RAM consumption, is incompatible with the constraints of Infomaniak's shared hosting offers. Java applications are often resource-intensive, which can affect the performance and stability of servers shared among multiple users.
Limited support for client-side applets
Only client-side Java applets, i.e., those executed in the user's web browser, are supported by shared servers. These applets do not require significant server resources and therefore do not pose the same problems as server-side Java applications. Consequently, no product using server-side Java technology is supported.
Unsupported products and technologies
Here is a non-exhaustive list of specific products and technologies that are not supported on shared servers:
- Apache OFBiz
- Greenstone
- Opentaps
- Compiere (which requires Tomcat)
- Play!
- Solr
- Resin
- JBoss
- Scala
- jftp
- Jakarta EE (formerly Java 2 Platform, Enterprise Edition, or J2EE, then Java Platform, Enterprise Edition or Java EE)
This policy ensures optimal performance and fair resource allocation for all users of shared servers.
Link to this FAQ: https://faq.infomaniak.com/591
Has this FAQ been helpful?
This guide covers the execution of the C# language and the .NET framework via the Mono implementation on Infomaniak hosting.
Technologies for software development
To use the C# language and the .NET framework with the Mono implementation, in order to develop software applications that can be deployed and executed on multiple platforms, outside of the Windows environment, it is recommended to opt for solutions such as:
The flexibility and portability offered by these multi-platform environments mean that shared web hosting does not allow execution projects based on C#, .NET or Mono.
Link to this FAQ: https://faq.infomaniak.com/607
Has this FAQ been helpful?
This guide explains how to modify an existing Web Hosting plan, for example, to host additional websites if the maximum number of websites allowed has been reached, or to obtain a more recent hosting solution to benefit from the latest versions of PHP & MySQL.
Order additional websites, disk space, or IP addresses
To access the Web Hosting configuration tool:
- Click here to access the hosting & website management section in your Infomaniak Manager (❓: help).
- Click on the action menu ⋮ located to the right of the relevant hosting.
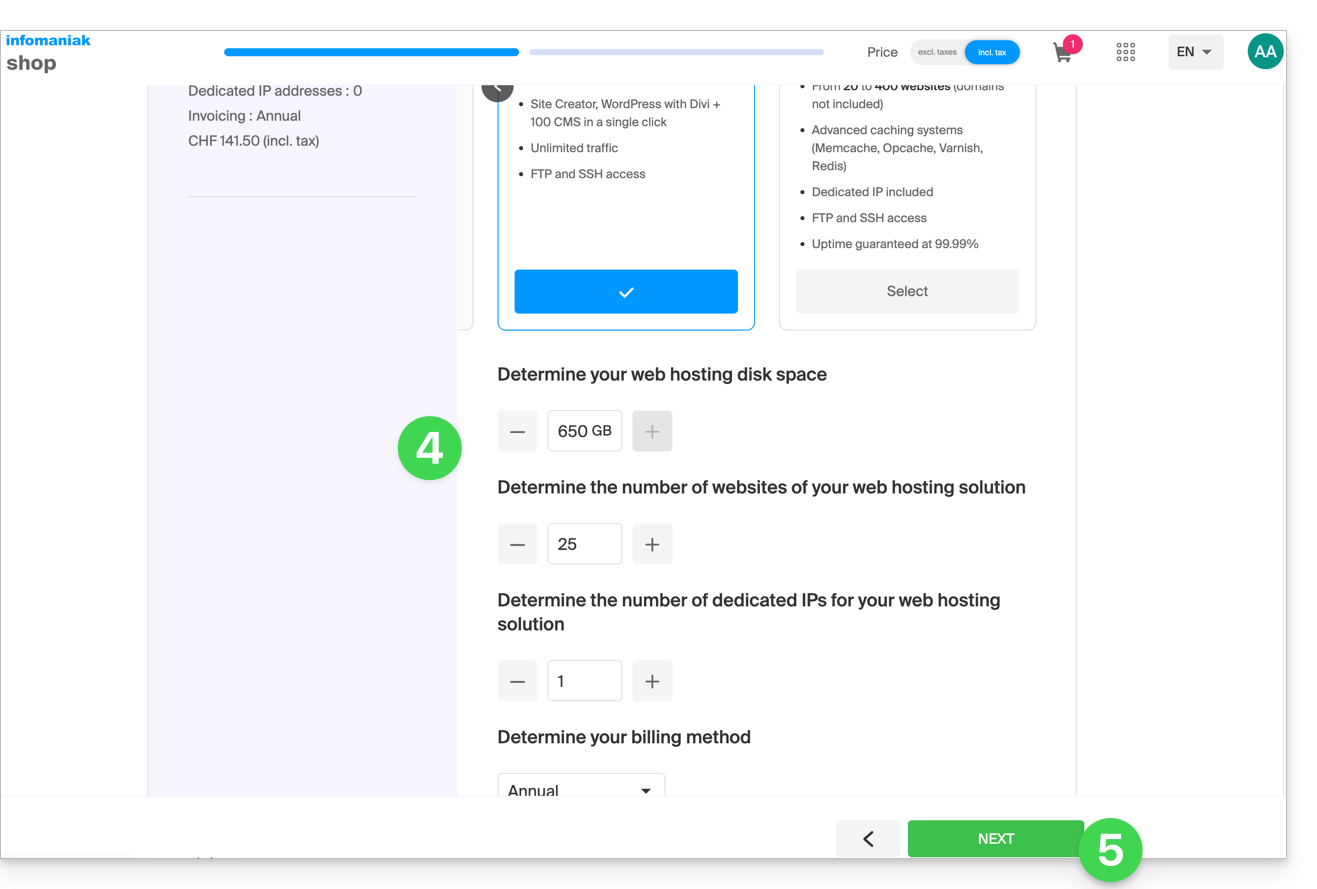
- Click on Modify offer.
- Increase the values you wish to modify.
- Click on the Next button to proceed to payment for the changes made to the hosting:
Switch to a more recent server
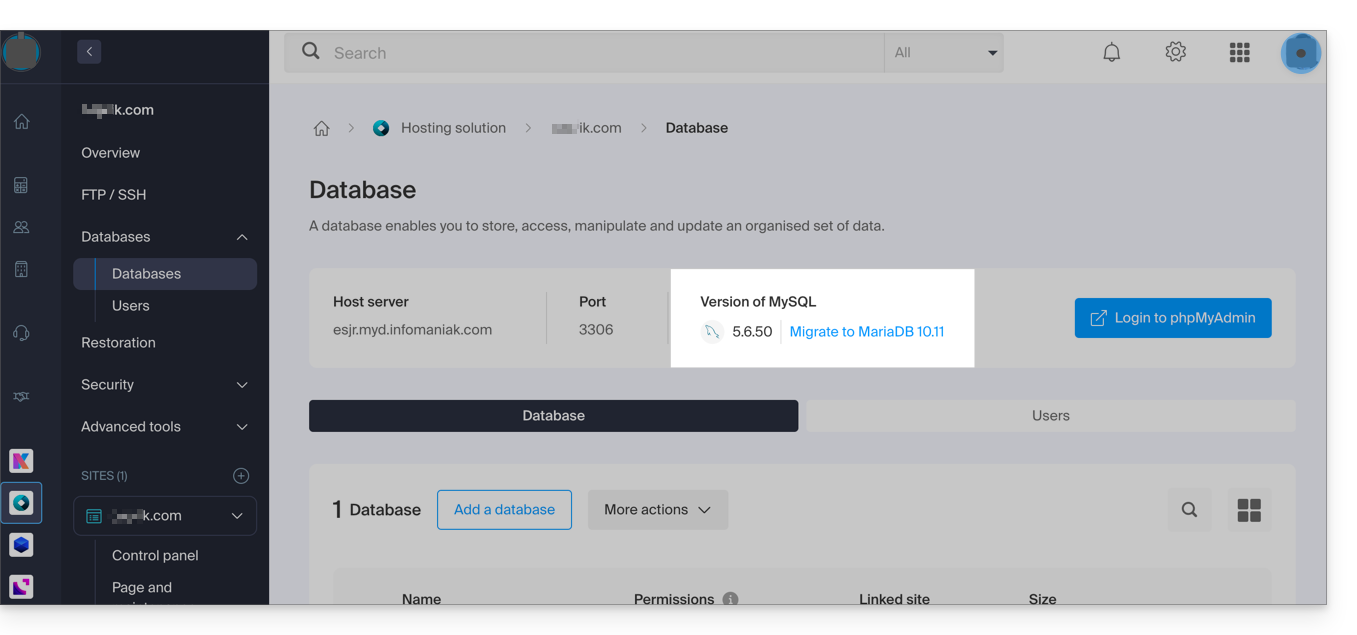
To obtain a hosting solution on a more recent server and thus benefit from the latest versions of PHP & MySQL, you can either…
- … refer to this other guide and follow the procedure described in it to the very end:
- … refer to this other guide and follow the procedure described in it up to step 4, then click the button to update:
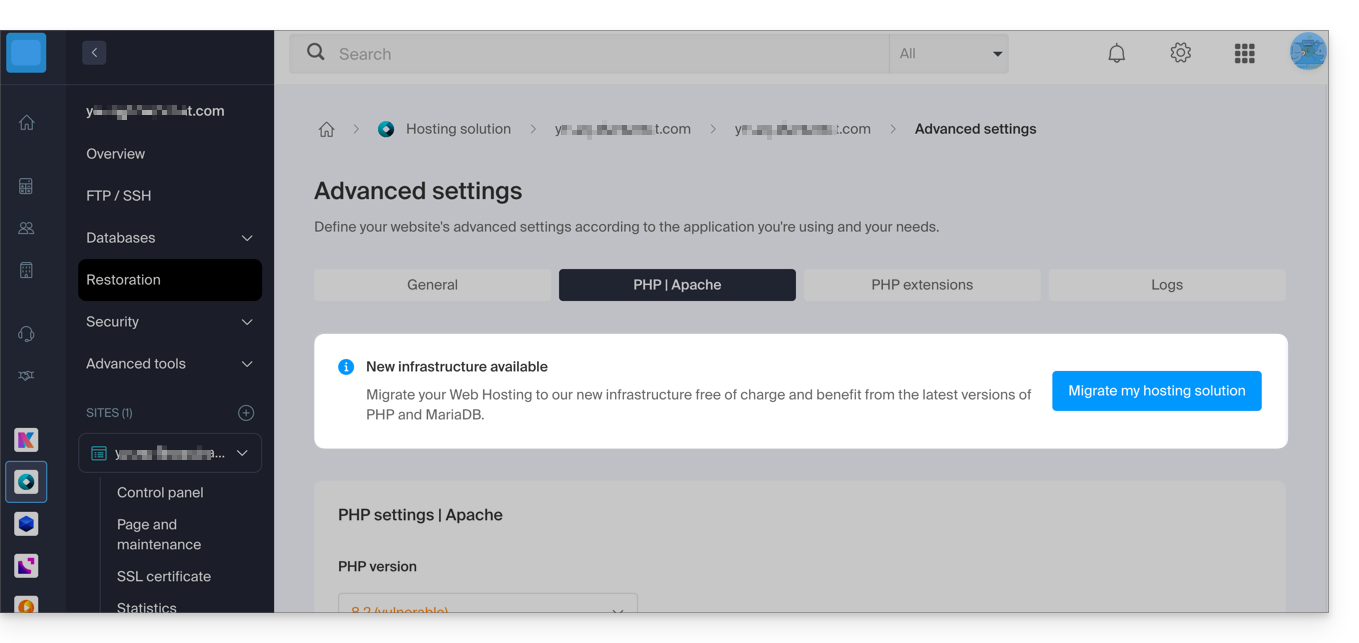
If no information banner is displayed, it means you already have a recent hosting plan.
Link to this FAQ: https://faq.infomaniak.com/626
Has this FAQ been helpful?
This guide explains how to host an ASP, ASP.NET Framework, or ASP.NET Core (.NET modern) application on Infomaniak Cloud infrastructure.
Introduction
- The Web Hosting and Managed Cloud Server offers are based on a Linux / Apache infrastructure; they do not support IIS (Internet Information Services) or the native execution of applications developed for Microsoft Windows (classic ASP or ASP.NET Framework).
- The solutions and alternatives are presented below.
Details of compatible hosting solutions
1. Cloud VPS with Windows Server Classic ASP (ASP 3.0) & ASP.NET Framework (v1.0 to 4.8)
For applications based on the traditional Windows ecosystem (IIS, VBScript, C#, .NET Framework):
- Deploy a Cloud VPS or VPS Lite with Windows Server (versions 2019, 2022, or 2025).
- Enable the Web Server (IIS) role with full administrator access via RDP.
2. Jelastic Cloud (ASP.NET Core & modern .NET)
For cross-platform ASP.NET Core applications:
- Simplified deployment via Docker container or .NET runtime.
- Automatic resource scaling (CPU/RAM) and high availability.
3. Cloud VPS Linux ASP.NET Core (.NET 6, 8, 9+)
You can also host an ASP.NET Core application on a Cloud Linux VPS (Debian, Ubuntu, etc.) configured with a reverse proxy (Nginx or Apache) in front of the .NET Kestrel server.
4. Public Cloud (OpenStack)
Suitable for enterprise projects requiring a virtual private cloud (VPC), block/object storage, or large-scale hybrid deployment.
Link to this FAQ: https://faq.infomaniak.com/631
Has this FAQ been helpful?
This guide explains how to limit hotlinking on files hosted by your Infomaniak Web Hosting.
Introduction
- Hotlinking is when a third-party website displays images, videos, or other files hosted on your server directly, using their public URL, without hosting them itself.
- This practice uses your hosting's resources (bandwidth, HTTP connections, and server resources) without your authorization. It can also infringe on your copyrights or your control over the distribution of your content.
- Although current network capabilities make the impact on bandwidth generally less critical than before, it is still recommended to limit hotlinking to avoid unnecessary consumption of your hosting resources.
Prevent hotlinking with an .htaccess file
If your website uses the Apache web server and the mod_rewrite module, you can restrict direct access to certain files by adding rules to the .htaccess file located in the root directory of your website.
The example below protects the main image formats, including the modern WebP and AVIF formats:
RewriteEngine On

# Allow requests without a Referer header
RewriteCond %{HTTP_REFERER} !^$

# Allow requests from your own domain (replace with your domain)
RewriteCond %{HTTP_REFERER} !^https?://(www\.)?votre-domaine\.com [NC]

# Allow major search engines
RewriteCond %{HTTP_REFERER} !^https?://(www\.)?google\. [NC]
RewriteCond %{HTTP_REFERER} !^https?://(www\.)?bing\. [NC]
RewriteCond %{HTTP_REFERER} !^https?://(www\.)?yahoo\. [NC]

# Block hotlinking for image files
RewriteRule \.(jpg|jpeg|png|gif|svg|webp|avif)$ - [F,NC,L]
Adapt before use:
- Replace
your-domain.comwith your own domain name. - Requests that do not contain an HTTP
Refererheader are allowed in order to maintain compatibility with certain browsers, applications, or privacy protection mechanisms that do not transmit this header. - The rules allowing major search engines to access images enable their robots to index them. Deleting them will prevent these images from being indexed.
- The rule uses the
[F]option, which returns an HTTP403 Forbiddenresponse. This method immediately blocks the request without serving any additional content, which limits the consumption of server resources.
If you are using Cloudflare as a CDN in front of your Infomaniak hosting, you can also enable the Hotlink Protection feature from its administration interface to block this type of access before it reaches your hosting.
Link to this FAQ: https://faq.infomaniak.com/678
Has this FAQ been helpful?
This guide presents commands that can be executed to test a connection or network and thus further identify the possible source of the error.
Perform a Telnet…
TELNET allows you to test the connection to a server without taking into account all the additional settings of a mail or FTP application, in order to determine the source of a problem. For example, if the connection fails on an SMTP server, you will need to check whether your firewall is blocking port 587 or 465.
… on macOS
- Search for Network Utility.
- Go to the
Ping,Lookup, orTraceroutetab, depending on what you want to test. - You can also use a
Terminalapplication (command-line interface,CLI) on your device and, depending on what you want to test, enter:traceroute [server]nc [server] [port]
Replace[server]with the server name or its IP address, and do the same for[port]…
… on Windows
Enable Telnet beforehand if necessary.
- Use a
Terminalapplication (command-line interface,CLI) on your device, for example by typing Run thencmd. - In the window that opens, depending on what you want to test, type:
tracert [server]telnet [server] [port]
Example:telnet mail.infomaniak.com 587(this allows you to test the SMTP port if your software/email client does not allow you to send emails)…
… on Android
- Use the Simple Telnet Client app, which allows you to easily test by filling in two fields (for example,
mail.infomaniak.comand port143or993)…
Perform a PING
PING allows you to determine if a machine is accessible via the Internet. You can also use this tool to verify that you are connecting to the correct machine, for example, after a DNS change, by checking the IP address obtained. It is possible to perform a ping on a domain name, a hostname, or an IP address.
PING is definitely blocked on Infomaniak shared hosting plans.
Link to this FAQ: https://faq.infomaniak.com/727
Has this FAQ been helpful?
This guide explains how to work without the PECL SSH2 client module, which is not available on Infomaniak Web Hosting and Cloud Servers, by using the phpseclib library instead, which works in native PHP without requiring a specific extension.
Introduction
- Using the
PECL SSH2 clientresults in errors such asNo compatible key exchange algorithms foundorUnable to exchange encryption keysin its latest available version. Phpseclibprovides:- SSH authentication via password or private key.
- Remote command execution.
- Secure file transfer (SFTP).
- SSH key management.
Using phpseclib
To integrate an SSH connection into a PHP script, use phpseclib as follows:
use phpseclib3\Net\SSH2;
use phpseclib3\Crypt\PublicKeyLoader;

$ssh = new SSH2('domain.xyz');
$key = PublicKeyLoader::load(file_get_contents('/path/to/private_key'));

if (!$ssh->login('user', $key)) {
    exit('Authentication Failed');
}

echo $ssh->exec('ls -la');
Link to this FAQ: https://faq.infomaniak.com/767
Has this FAQ been helpful?
This guide details the steps to take if you don't see any difference on your website after making a change, compared to its version before the change. These tips are also relevant if you encounter issues while using the Infomaniak product interface.
Introduction
- While you browse, a web browser saves the data you view in a dedicated space. This is done to avoid repeatedly requesting the same data from the server, saving time and resources.
- Your cache can contain a large amount of data, and sometimes the browser gets confused. As a result, websites may not display correctly or may display an outdated version.
- Clearing the cache ensures that you are viewing the latest version of the page or folder.
Clear your web browser's cache…
… on Safari
Choose your macOS version to view the corresponding Apple support.
… regarding Google tools (Chrome, Android, etc.)
Please refer to the Google help.
… on Firefox
Please refer to the Mozilla help.
… on Edge / Internet Explorer
Refer to the Microsoft help.
Link to this FAQ: https://faq.infomaniak.com/793
Has this FAQ been helpful?
This guide details the features available for managing relational databases on Infomaniak hosting plans.
Using Views, Triggers, Stored Procedures, and Routines
Regarding the management of relational databases, the functionality of views is available by default, allowing users to create views to simplify data management and presentation.
However, some advanced features that enable finer and more complex data manipulation, such as…
- “triggers”
- stored procedures
- routines
- and the creation of functions
… are only available on Cloud Servers.
They are not allowed on shared servers.
This restriction is mainly due to the potential risks to the stability of the infrastructure. Incorrect configuration or excessive use of these features could create infinite loops or significant overloads, affecting not only the performance of the server in question but also the experience of all customers hosted on the same infrastructure.
Troubleshooting MySQL/MariaDB dump import issues
When exporting and then re-importing a MySQL or MariaDB database via the Infomaniak hosting interface, the operation may fail due to errors related to the DEFINER of triggers or views. This occurs when the database objects were created with a specific user (called the definer) who no longer exists at the time of import.
Specifically, the export and import process uses a temporary user, which is used only during these operations. After this user is deleted, the views or triggers defined with this account as the DEFINER become invalid, causing errors such as:
General error: 1449 The user specified as a definer ('xxxx_temp_1'@'%') does not exist
To avoid this issue, you can correct the backup file (dump.sql or dump.sql.gz) before importing it by replacing the definer definitions with CURRENT_USER. This will automatically associate the triggers and views with the current user at the time of import.
Here is an example of a command to modify the dump before importing it:
sed -E 's/DEFINER=`[^`][^`]*`@`[^`][^`][^`]*`/DEFINER=CURRENT_USER/g' dump.sql > dump-corrected.sql
Once this replacement is done, the corrected file can be imported normally via the Infomaniak Manager. This behavior is known and related to the way temporary users function during the dump/restore process. No changes to the export/import process are planned in the short term, but the issue is still being evaluated on the infrastructure side.
For more information on the CURRENT_USER variable, please refer to the official documentation of:
Link to this FAQ: https://faq.infomaniak.com/821
Has this FAQ been helpful?
This guide explains how to change the password for a MySQL / MariaDB database on a Web Hosting plan.
Introduction
- Refer to this other guide if you are looking for information on updating login details (scripts, websites, etc.) related to a database password change.
- A database user created after installing a Web Application (provided by Infomaniak) cannot be modified.
- To access the database to which it is linked, you must create a new database user with the password of your choice and then grant it the necessary rights to the desired database.
Change the MySQL MariaDB password, etc.
To do this, you need to modify the user associated with the database in question and change their password (without having to provide the old password) from the Infomaniak Manager:
- Click here to access the hosting & website management section in your Infomaniak Manager (❓: help).
- Click on the name of the relevant hosting.
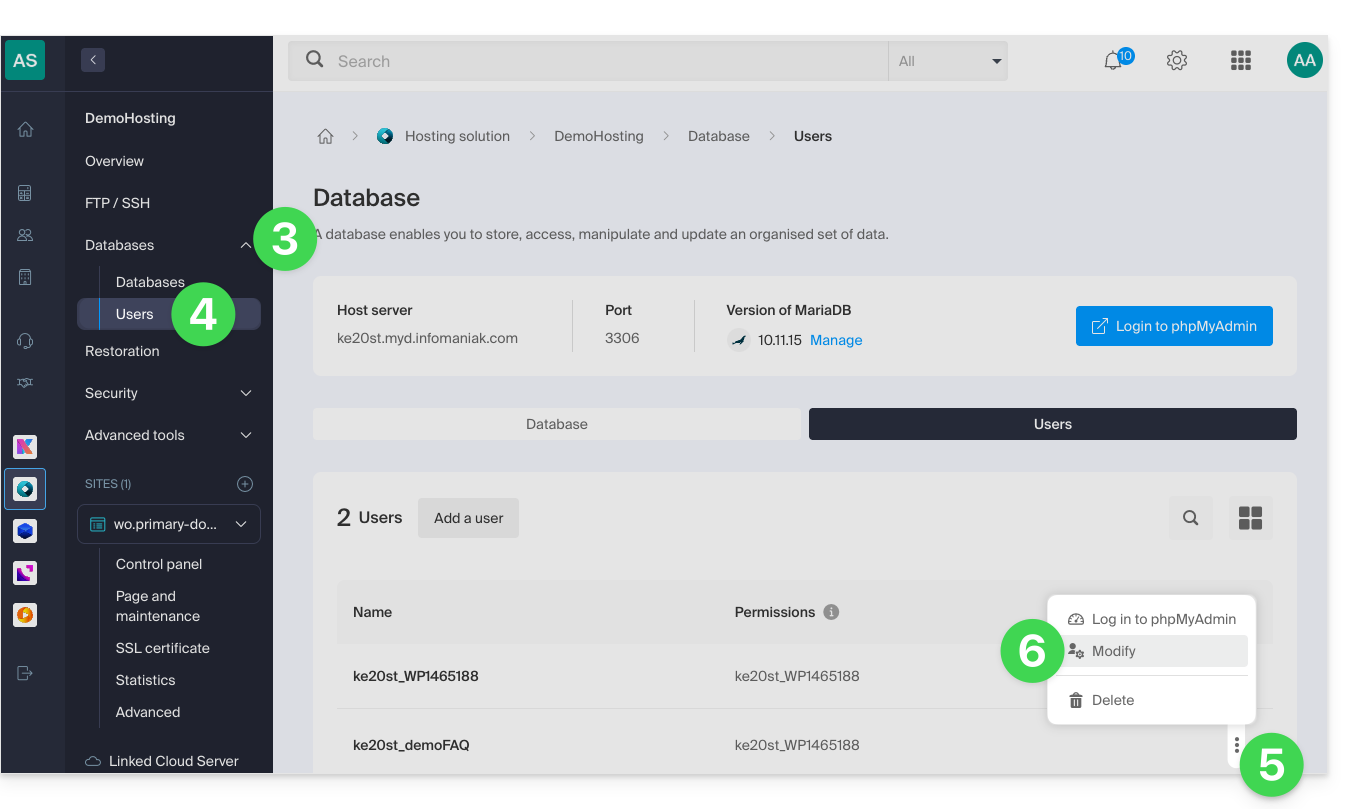
- Click on Databases in the left-hand menu.
- Click on the Users menu.
- Click on the action menu ⋮ located to the right of the item in question.
- Click on Edit:
- Click on Change password.
- Enter the new password you want.
- Click on the Save button:
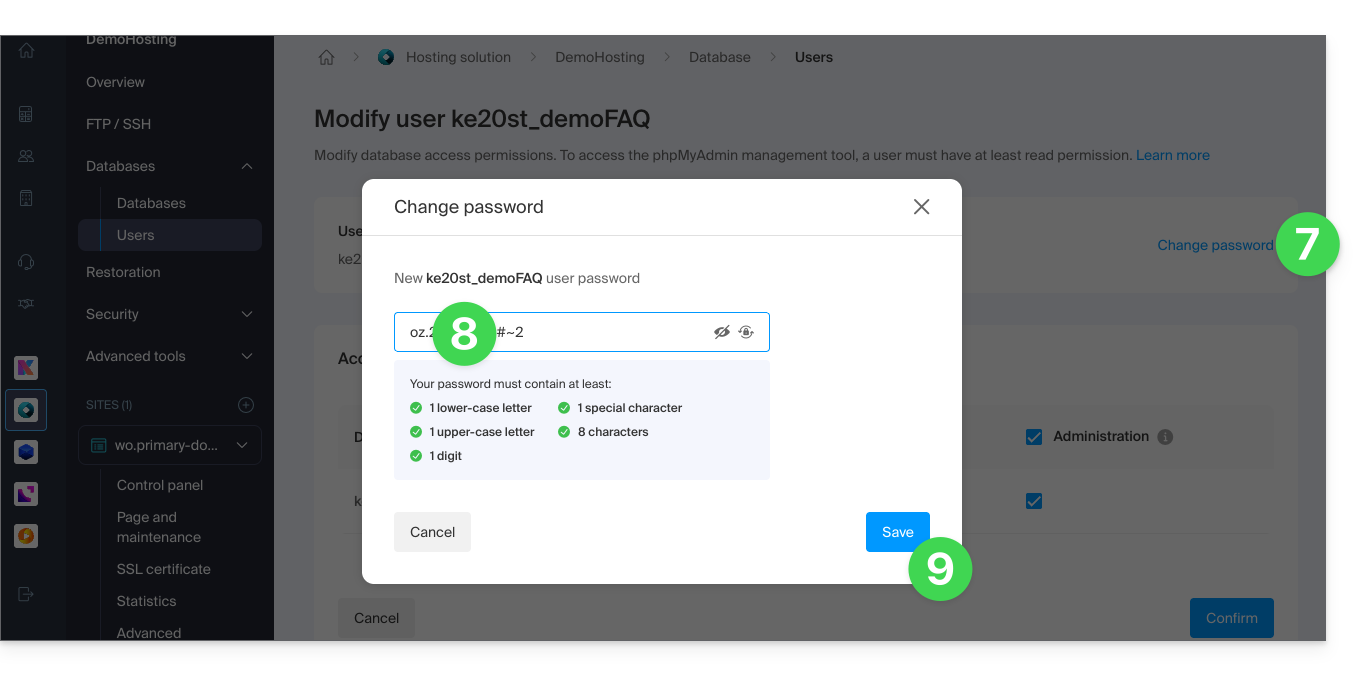
- If necessary, you can configure the new permissions for the user (read / write / administration) to access existing databases on the hosting.
Link to this FAQ: https://faq.infomaniak.com/846
Has this FAQ been helpful?
This guide explains how to launch a content analysis of a Web Hosting service to detect and remove files containing viruses and other malicious scripts that could threaten the security of websites.
Introduction
- You will receive an email when the operation is complete (the antivirus scan may take some time; the Manager can be closed).
- Infomaniak ensures the protection of hosting by scanning only the website folders (webroot); no synchronous scan is performed on the rest of the hosting.
- Also consider using the vulnerability detection tool to monitor any potential vulnerabilities that are automatically corrected on your websites.
Start an antivirus scan of your websites
To analyze potentially infected content:
- Click here to access the hosting & website management section in your Infomaniak Manager (❓: help).
- Click on the name of the hosting account in question.
- Click on Security in the left-hand menu.
- Click on Antivirus in the left-hand menu.
- Click on the blue Scan button:
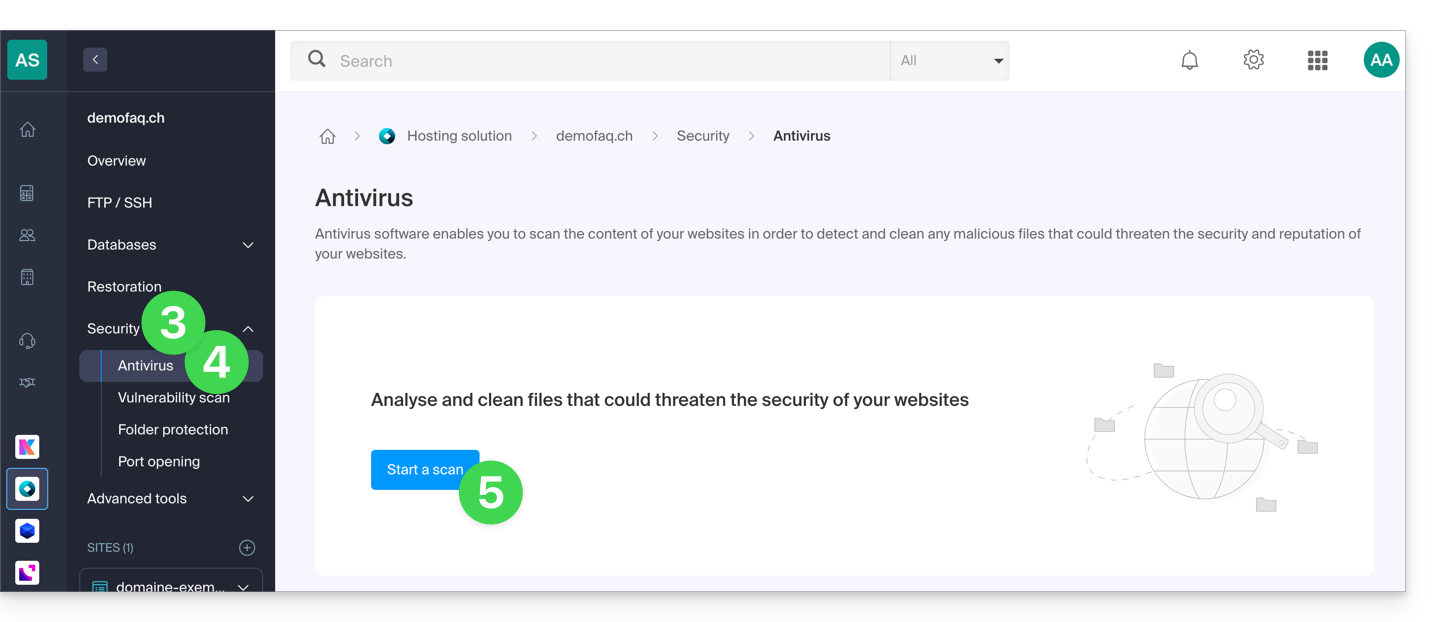
- Select the site(s) to analyze.
- Click the blue Start analysis button:
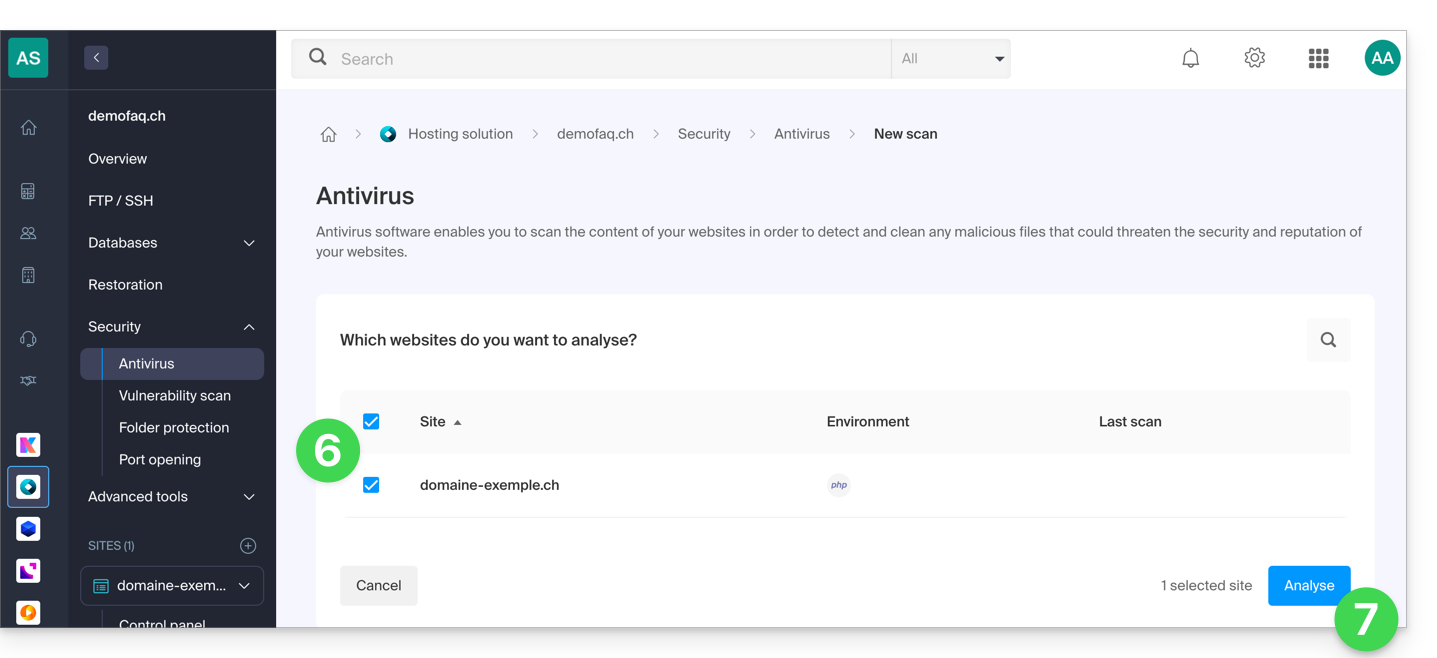
- Follow the procedure until the file analysis starts.
Link to this FAQ: https://faq.infomaniak.com/857
Has this FAQ been helpful?
This guide explains how to quickly install applications, PHP extensions, and technologies (non-exhaustive list below) in just a few clicks on Cloud Server only.
Refer to this other guide if you are looking for information about additional Web Applications that can be installed on any type of hosting, including standard/shared hosting.
Install (or uninstall) PHP apps/extensions…
To find the list of technologies and proceed with their installation:
- Click here to access the management of your Cloud Server in the Infomaniak Manager (need help?).
- Click directly on the name assigned to the Cloud Server in question:
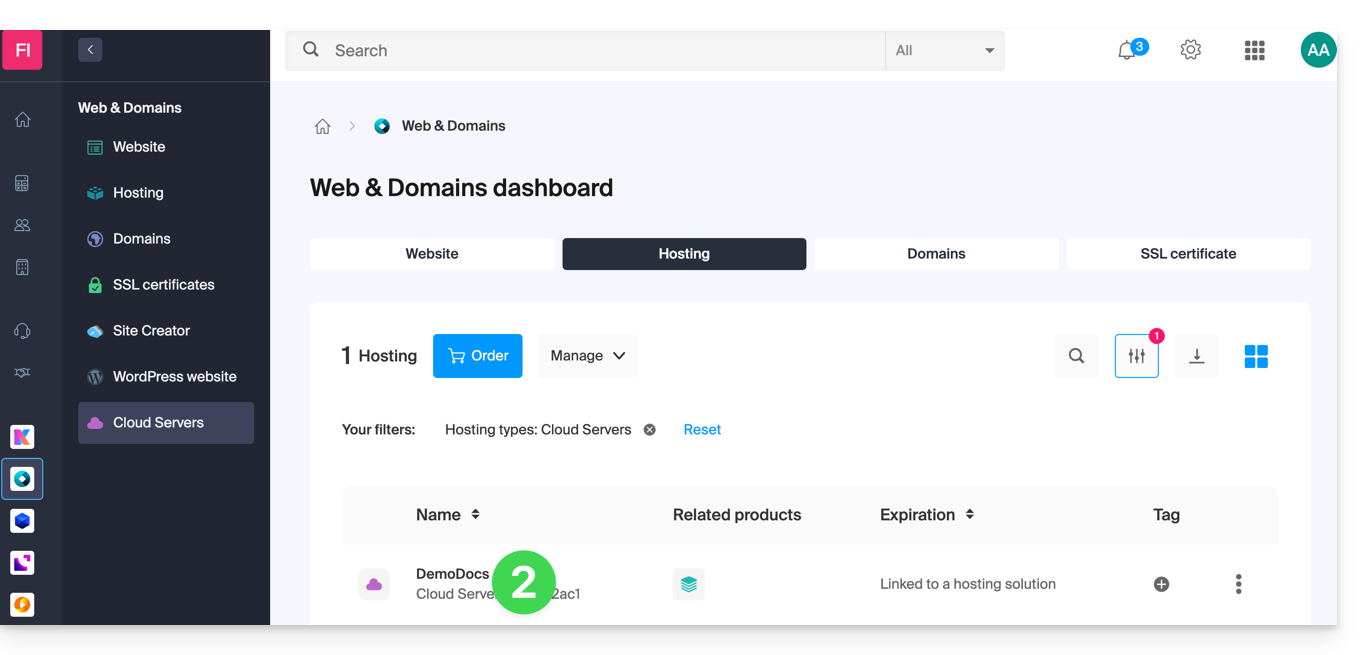
- Click in the left-hand menu:
- PHP Extensions
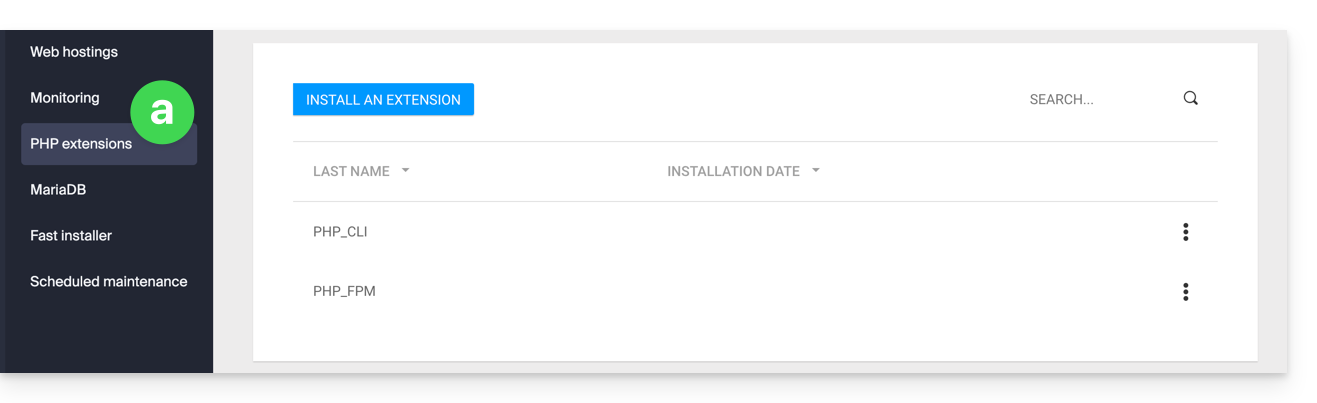
- Fast Installer
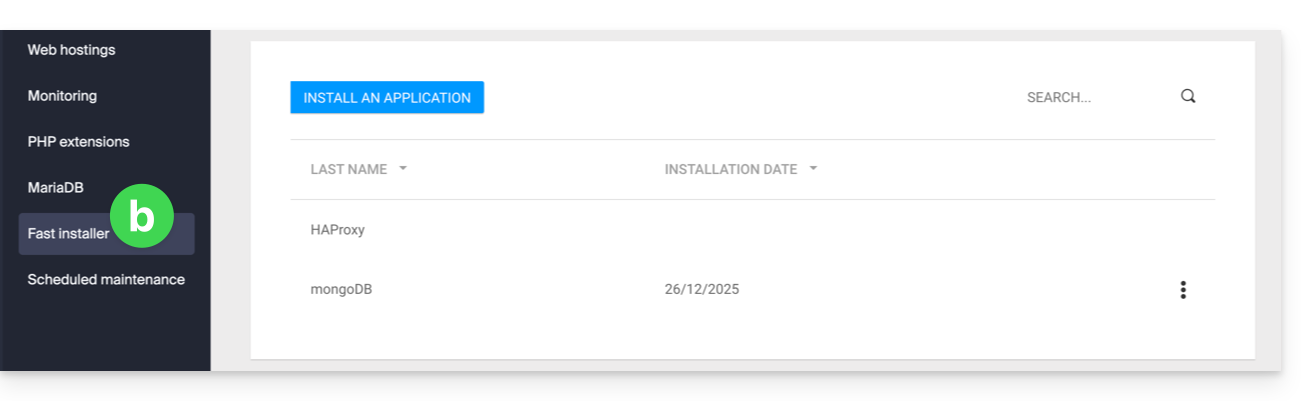
- PHP Extensions
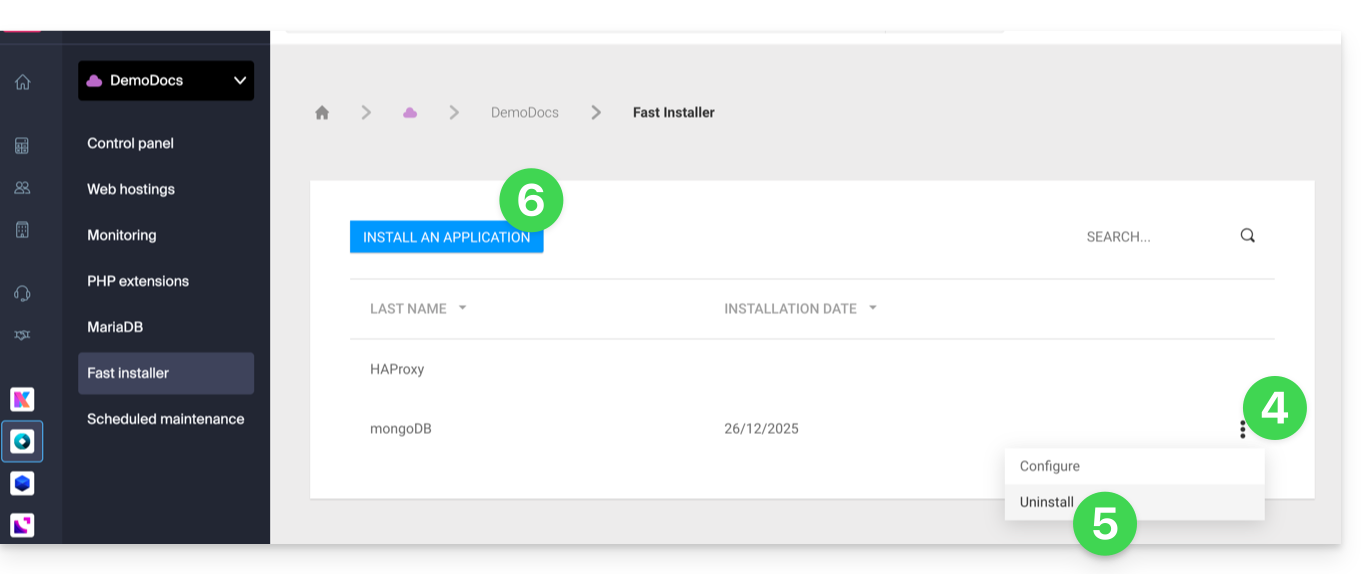
- Click on the action menu ⋮ to the right of the extension you wish to uninstall in the table that appears.
- Click on Uninstall.
- Otherwise, click on the blue button.Install an extension / Install an application:
- Then, select the new installation you want:
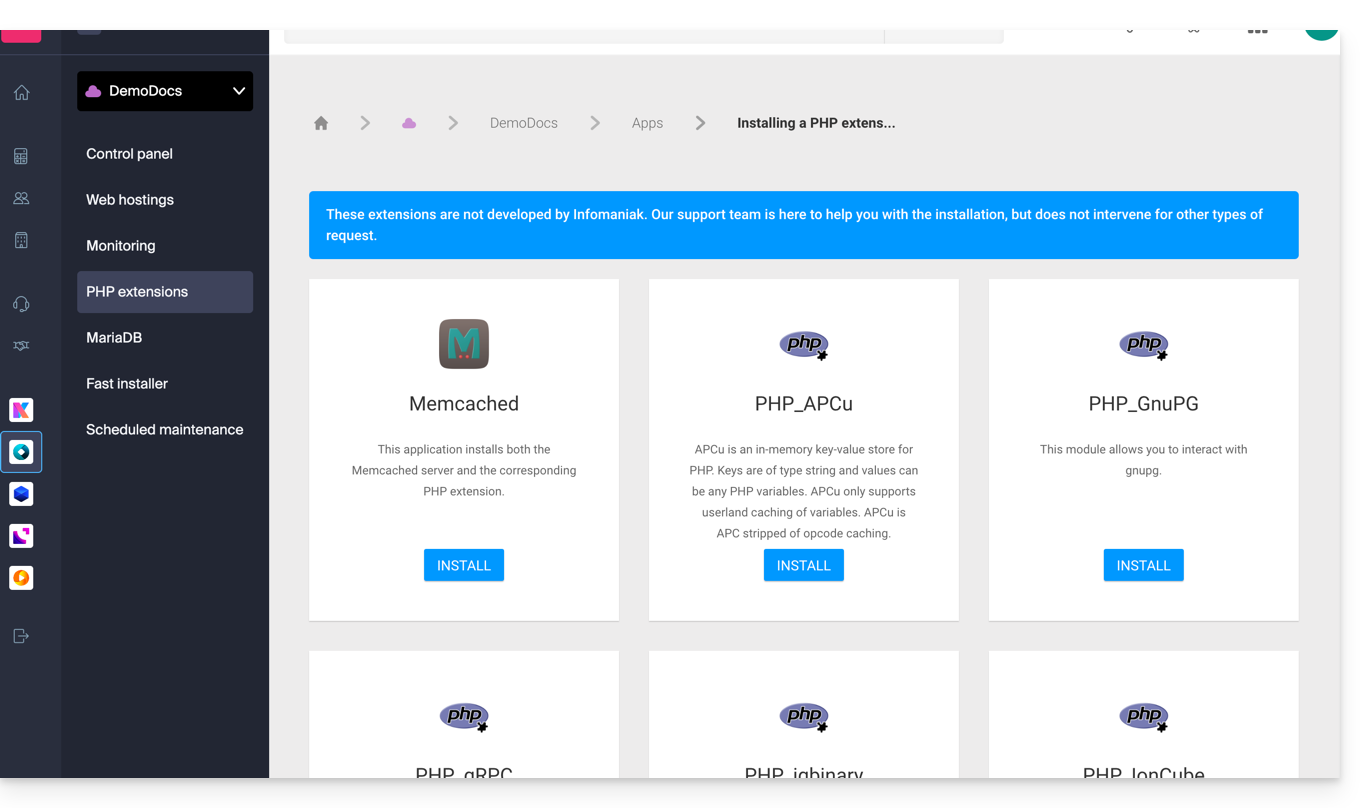
Non-exhaustive list of available apps & extensions
AdvanceCOMPBuildEssentialelectron_devExifToolFFmpeg↗ guideGhostscriptGifsicleGraphicsMagickHAProxyImagemagick↗ guideJpegoptimlibjpeg_turbolibqrencodelibX11_xcb1MidnightCommanderMemcached↗ guidemongoDB↗ guideNVM Node Version ManagerOptiPNGp7zipPDFtkPHP_APCuPHP_CLI↗ guidePHP_FPMPHP_GnuPG(deprecated extension) ↗ guide for the pure PHP alternativePHP_gRPCPHP_igbinaryPHP_IonCube↗ guidePHP_OPcachePHP_PDFPHP_PDO_ODBC↗ guidePHP_SwoolepipPngcrushPngquantRedis↗ guideRRDTool The Round Robin Database ToolRubyCompasssystemd↗ guidetesseract_ocrvarnish↗ guidevirtualenvWebPxauthxpdfxvfbZSH
Link to this FAQ: https://faq.infomaniak.com/877
Has this FAQ been helpful?