Knowledge base
1000 FAQs, 500 tutorials and instructional videos. Here, there are only solutions!
This guide explains how to transfer to Infomaniak web data (website, FTP, databases) currently hosted elsewhere, for example with a competitor.
Prerequisites
- Have an Infomaniak web hosting plan (❓: help).
- Add a blank website to your Infomaniak hosting plan (❓: help).
Specific guides
Click on the link corresponding to the data to be migrated:
Guides for any other hosting provider
To retrieve any other website, follow the procedure below.
1. Recover Web Data
a. HTML, PHP, etc. files via FTP
To retrieve web data to your hard drive, you need to connect via FTP, which requires the server address from your hosting provider, the username, and the FTP password.
- Open an FTP client such as Filezilla.
- Connect to the server using your FTP credentials.
- Download the files for your website to your hard drive.
b. Exporting MySQL databases
Unless your website is static and simply in HTML, a dynamic website usually requires databases that must be exported from their management interface, generally PHPmyAdmin:
- Log in to the Control Panel of your current provider using a browser such as Brave, Chrome, Edge, Firefox, Opera, Safari…
- Access PHPMyAdmin.
- Connect to the server using your MySQL credentials.
- Click Export to configure the database export, then download your SQL data to your hard drive.
2. Upload this website data to Infomaniak
a. HTML, PHP, etc. files via FTP
Access your Infomaniak account and activate the FTP section:
- Click here to access the hosting & website management section in your Infomaniak Manager (❓: help).
- Click on the name of the relevant hosting.
- Click on FTP / SSH in the left-hand menu.
- Click on the Add button to create a new FTP / SSH account (❓: help).
- Open an FTP software/client such as Filezilla.
- Connect to the Infomaniak server using the FTP credentials obtained in step 4 above.
- Transfer the files from your hard drive (obtained in step 1.a.3) to the server in the folder corresponding to your website on Infomaniak.
b. Importing MySQL databases
Access your Infomaniak web hosting and enable the MySQL section:
- Click here to access the hosting & website management section in your Infomaniak Manager (❓: help).
- Click on the name of the relevant hosting.
- Click on Databases in the left-hand menu.
- Click on the Add button.
- Enter a database name after the prefix that has already been entered.
- Click the box to Create an associated user.
- Enter a username after the prefix that has already been entered.
- Enter a password.
- Click on Validate.
- Click on the blue Import button.
- Click on Select a file.
- Select the SQL files on your hard drive (obtained in step 1.b.4).
- Choose the database created in step 5 above as the destination.
- Click the blue Import button.
c. Adapt the site to the new infrastructure
Specific guides for adapting the configuration file: WordPress and Joomla.
If you are using another application such as Drupal or another web application (ownCloud, phpBB, etc.) that uses a database, adapt the following information in the appropriate configuration file based on the information available (❓: help) in the Manager so that your site works:
- the name of the database
- the database server
- the username that accesses the database
- the password for the username that accesses the database
Learn more
Link to this FAQ: https://faq.infomaniak.com/2643
Has this FAQ been helpful?
This guide helps you resolve an issue with the CMS Prestashop v9.x regarding the generation of PDF invoices from the administration panel (Back Office), particularly when the French language is used.
The problem
When attempting to view or download a PDF invoice for an order in French, PrestaShop (version 9.x) returns a 500 Error. This malfunction is related to an incompatibility between the PDF generation library (TCPDF) using the default font (helvetica) and the hosting configurations.
Define a compatible font
The solution is to force the use of the freesans font, which is more compatible, via a custom configuration file.
It is strongly recommended to create a defines_custom.inc.php file. This method is the safest because it ensures that the fix will not be lost during PrestaShop core updates.
To do this:
- Access your PrestaShop 9.x installation via FTP or the File Manager.
- Navigate to the
/config/directory. - Create a new file named
defines_custom.inc.php. Edit the
defines_custom.inc.phpfile and add the following content:<?php /** * Avoid error PDF, force font 'freesans'. */ define('PDF_FONT_NAME_MAIN', 'freesans');- Save the file and test the generation of an invoice in French.
Link to this FAQ: https://faq.infomaniak.com/2690
Has this FAQ been helpful?
This guide explains how to back up WordPress data to a Swiss Backup backup space, the backup solution in an independent Swiss cloud.
Introduction
- If the backups offered by Infomaniak no longer meet your availability or security requirements, or if your website is hosted elsewhere, your data can be backed up via an S3 Compatible connection on Infomaniak's servers, ensuring that you don't lose any data.
Install and configure the UpdraftPlus extension
Prerequisites
- Have an Swiss Backup Infomaniak account with available device quota (minimum 1) for an iCloud backup.
- Add 1 device of type Cloud to obtain the S3 Compatible settings.
Then:
- Add the WordPress plugin UpdraftPlus, which offers WordPress data backup to S3-compatible storage.
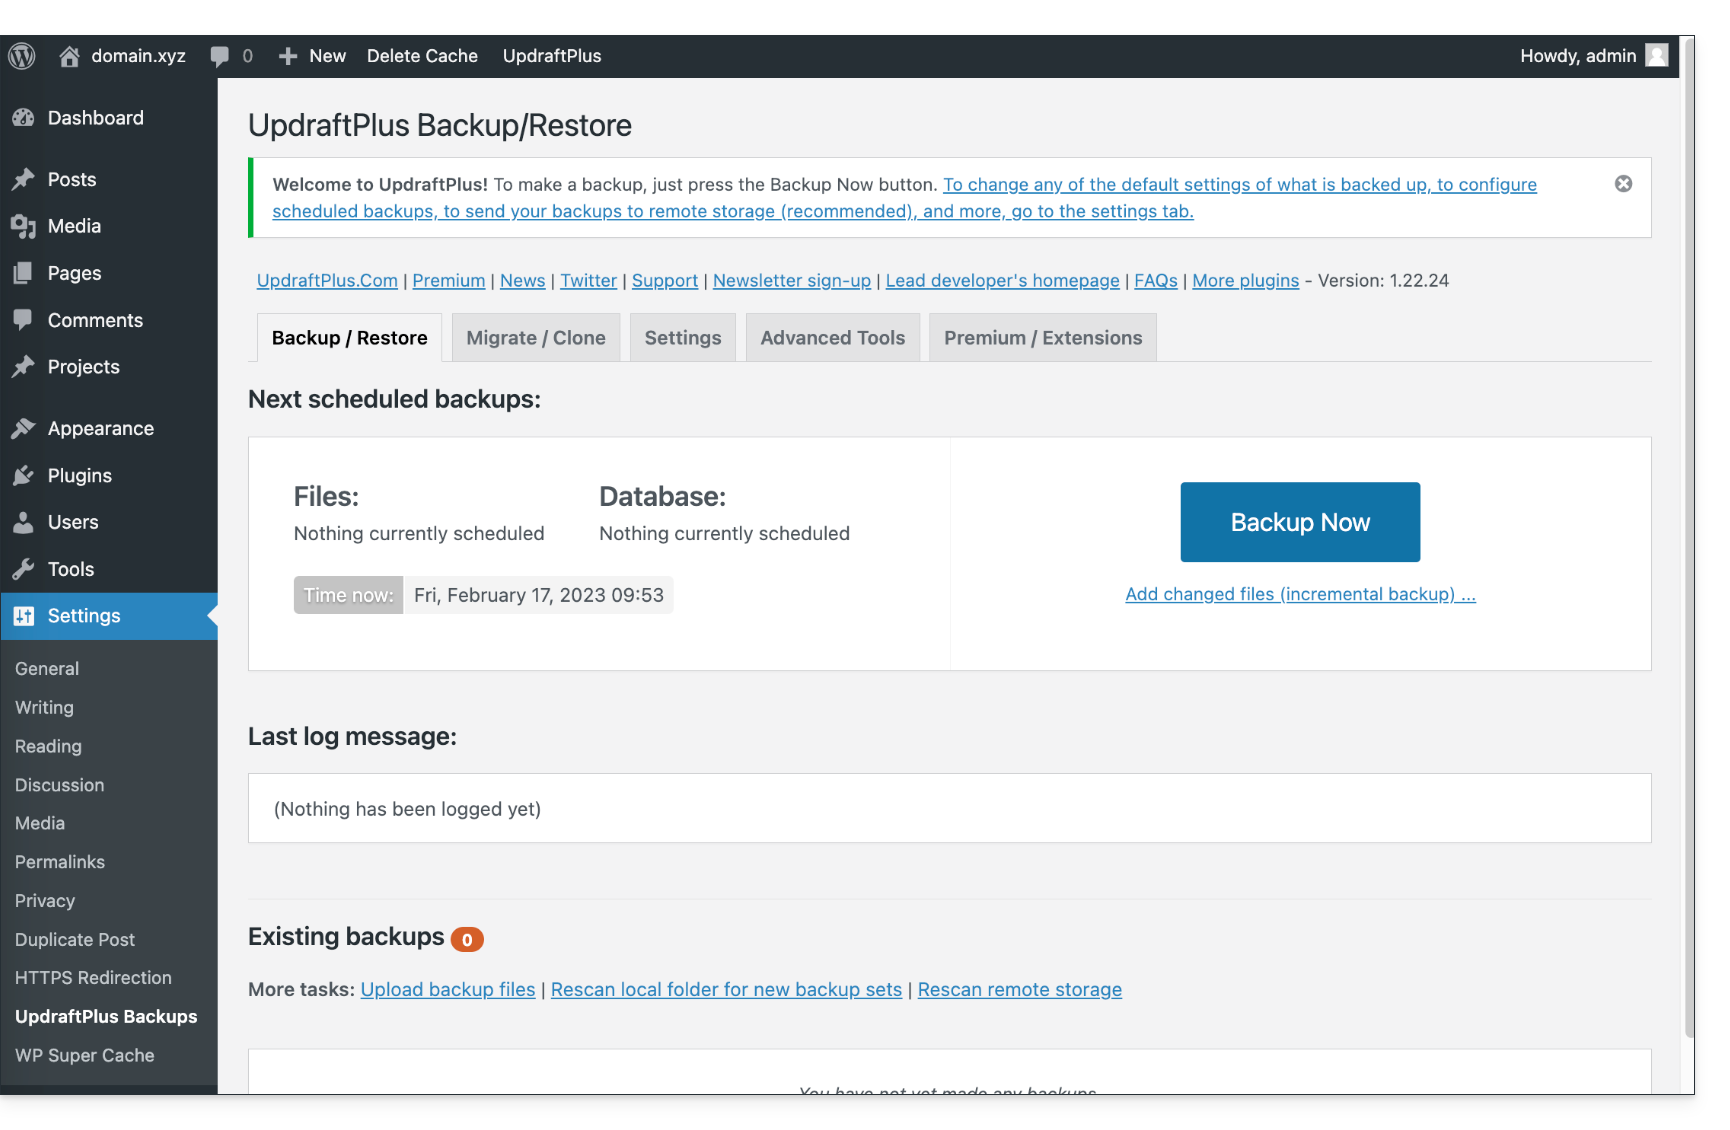
- Click on Settings then UpdraftPlus Backups:
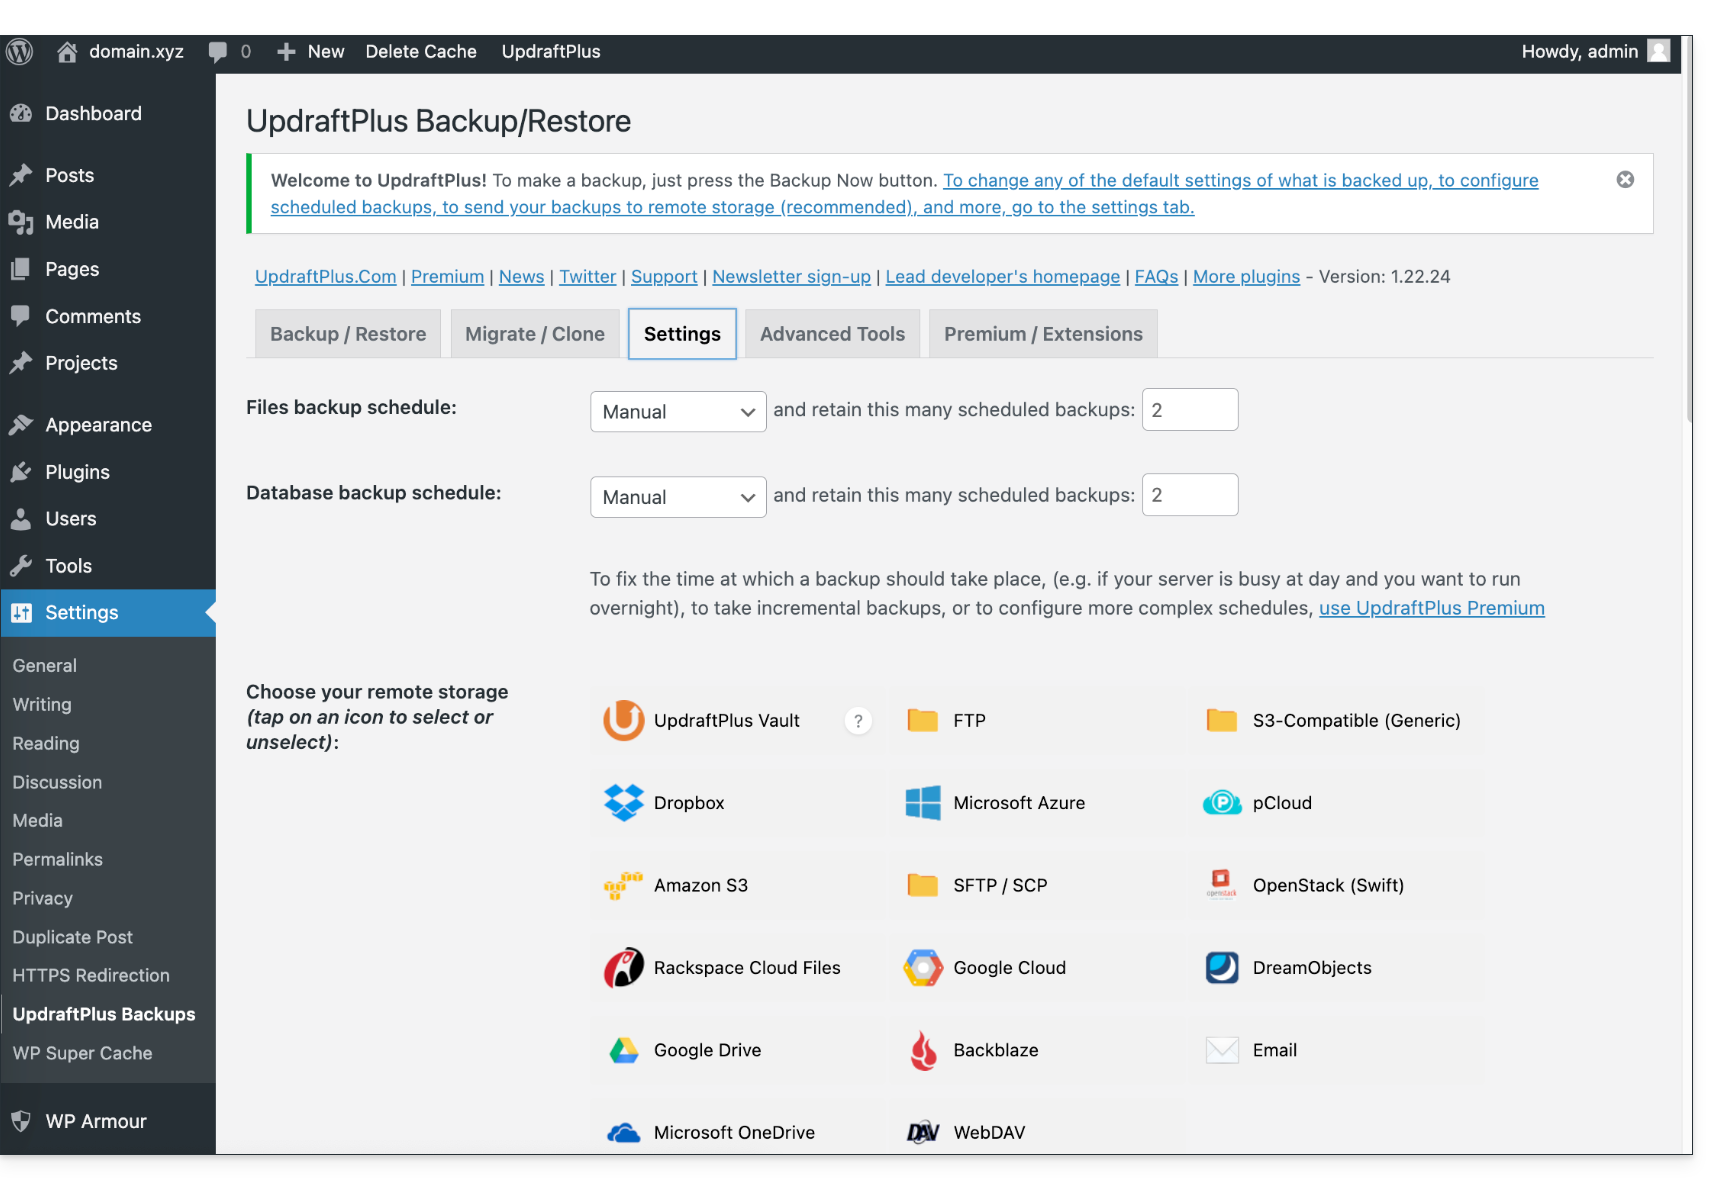
- Click on Settings then S3-Compatible (Generic):
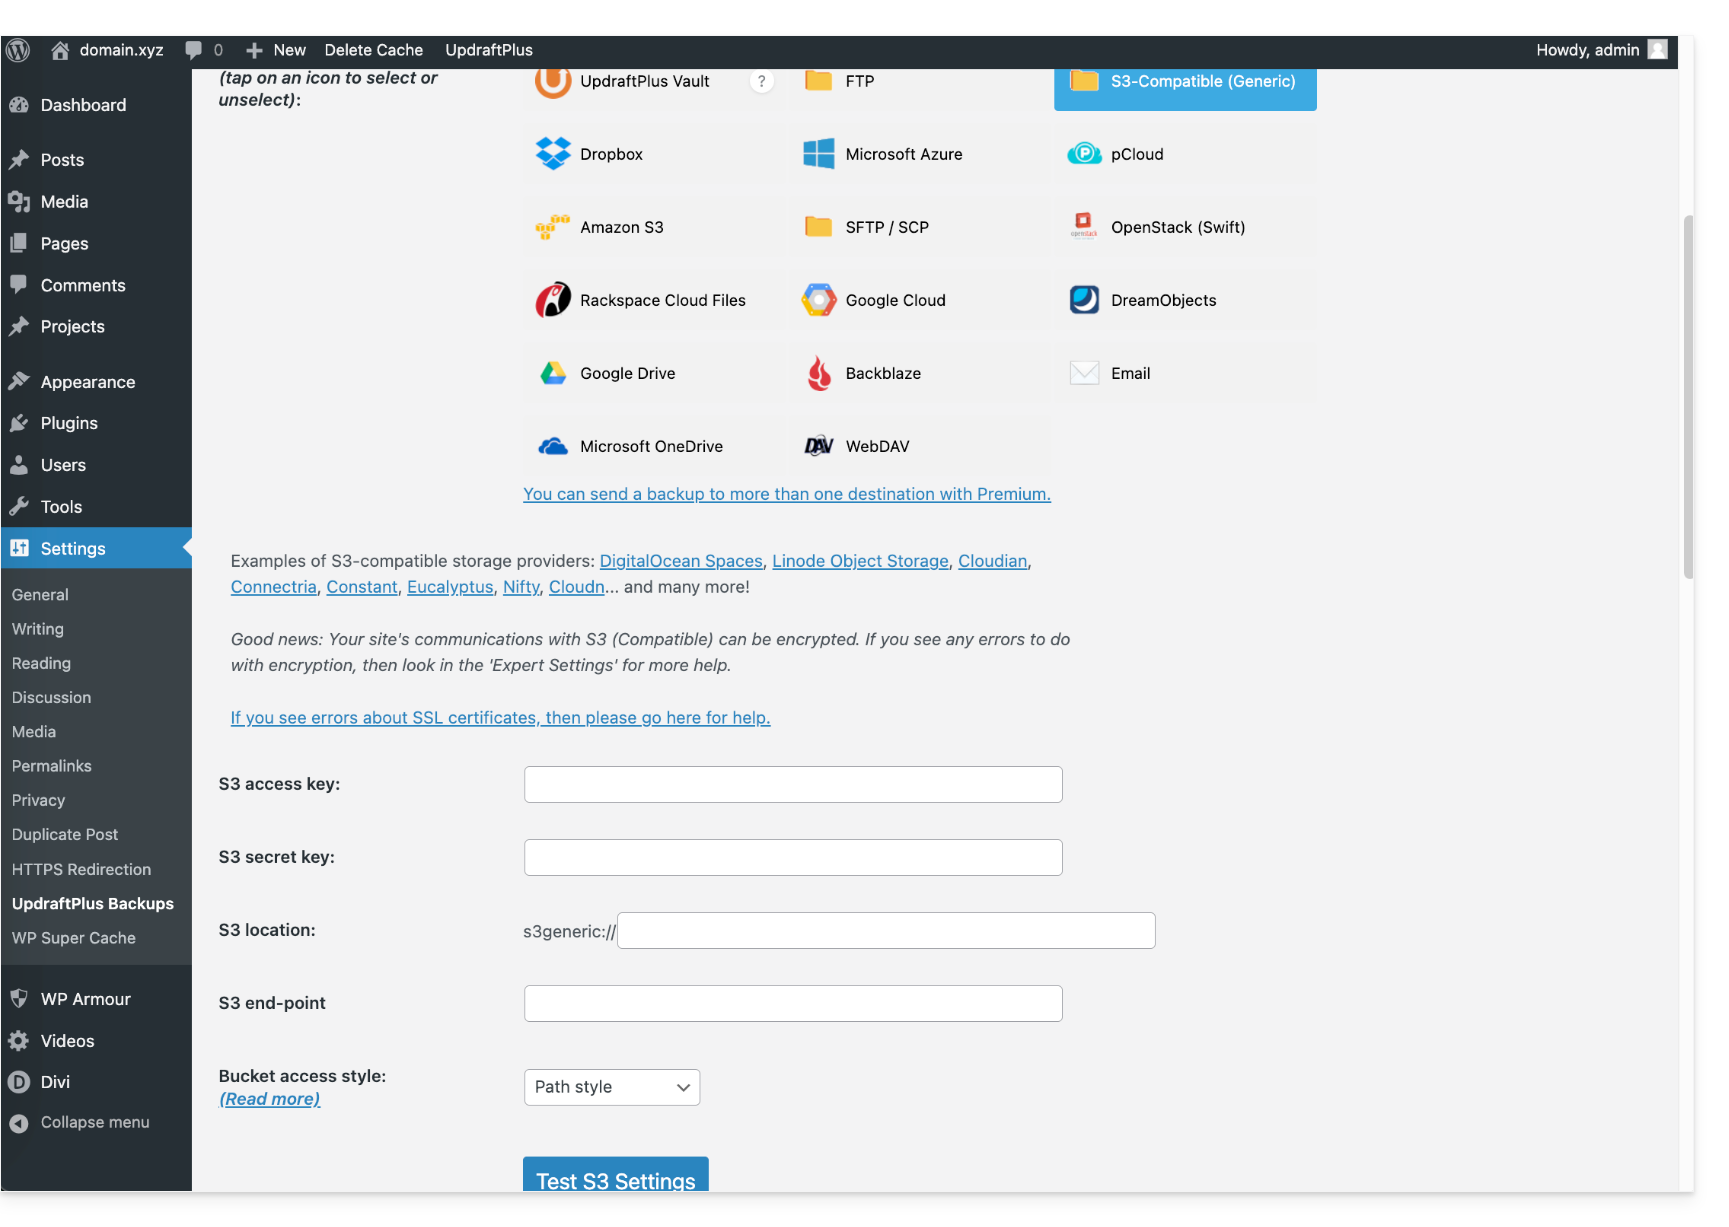
- Further down, fill in the fields according to the information specific to your device.
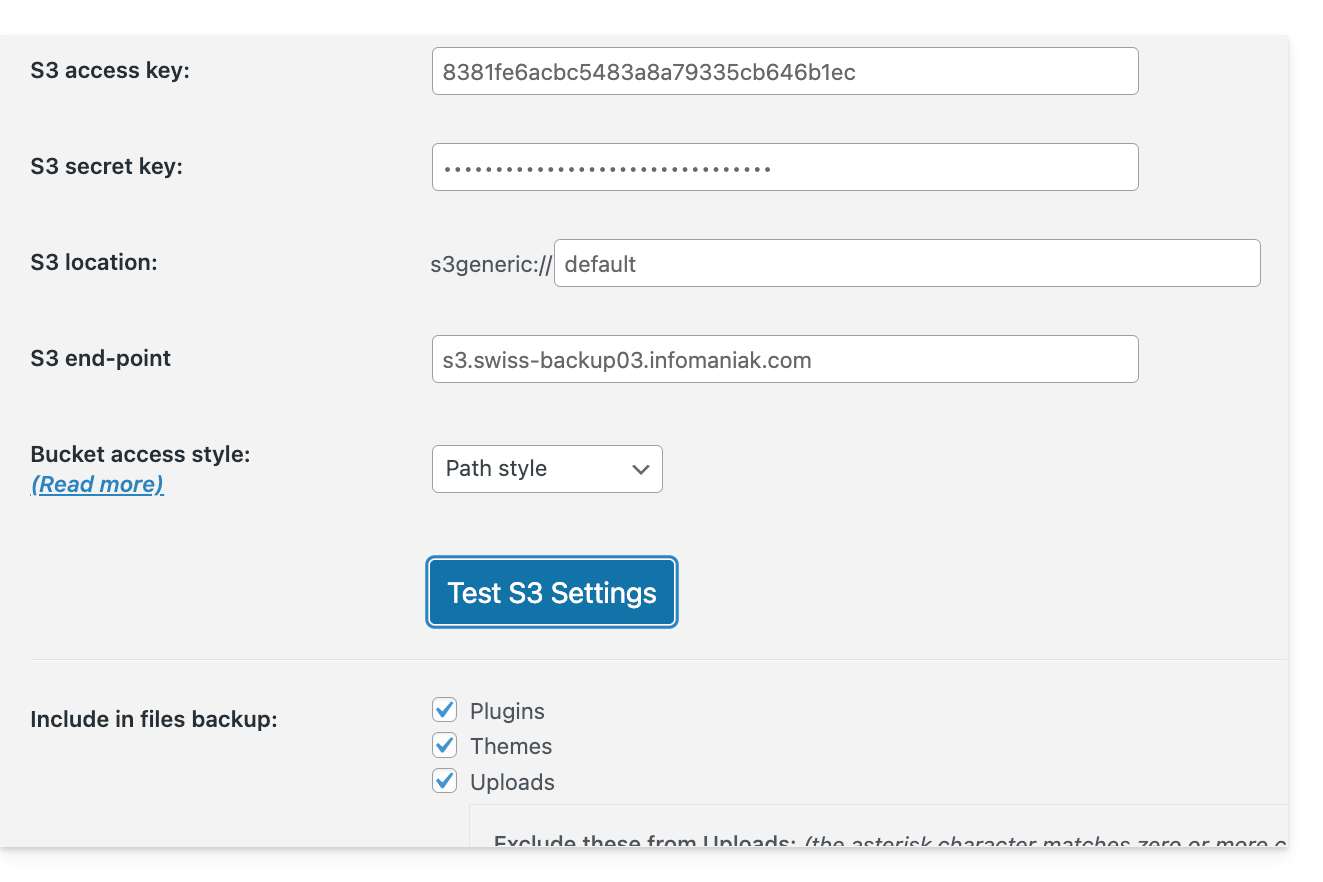
- Here is the type of information you need to have and that you must specify in the various fields to create the connection:
You can then schedule your backups at regular intervals.
Download the backup manually
Your backups made via UpdraftPlus - S3 can be retrieved using an S3-compatible client, such as Cyberduck.
Restore an UpdraftPlus backup
Please refer to this official guide in English.
Link to this FAQ: https://faq.infomaniak.com/2767
Has this FAQ been helpful?
This guide explains how to rename a web hosting service in the Infomaniak Manager within your Organization.
Introduction
- Web hosting is, in simple terms, the storage space reserved for hosting one or more of your websites (❓: help).
- By default, your Infomaniak hosting takes the name of the first website that you add to this hosting:
- You own the domain name "domaine.xyz" and want a website with this domain name…
- You purchase web hosting which will automatically be named "domaine.xyz" even if you add a second website "toto.com" later.
- The hosting can be renamed with a more generic name, such as "My Websites", to better reflect its actual content.
- This renaming is intended to improve the readability/understanding of the products listed in your Manager and has absolutely no impact on the domains of the websites (❓: help).
Rename a Web Hosting
To access the web hosting in order to change its name:
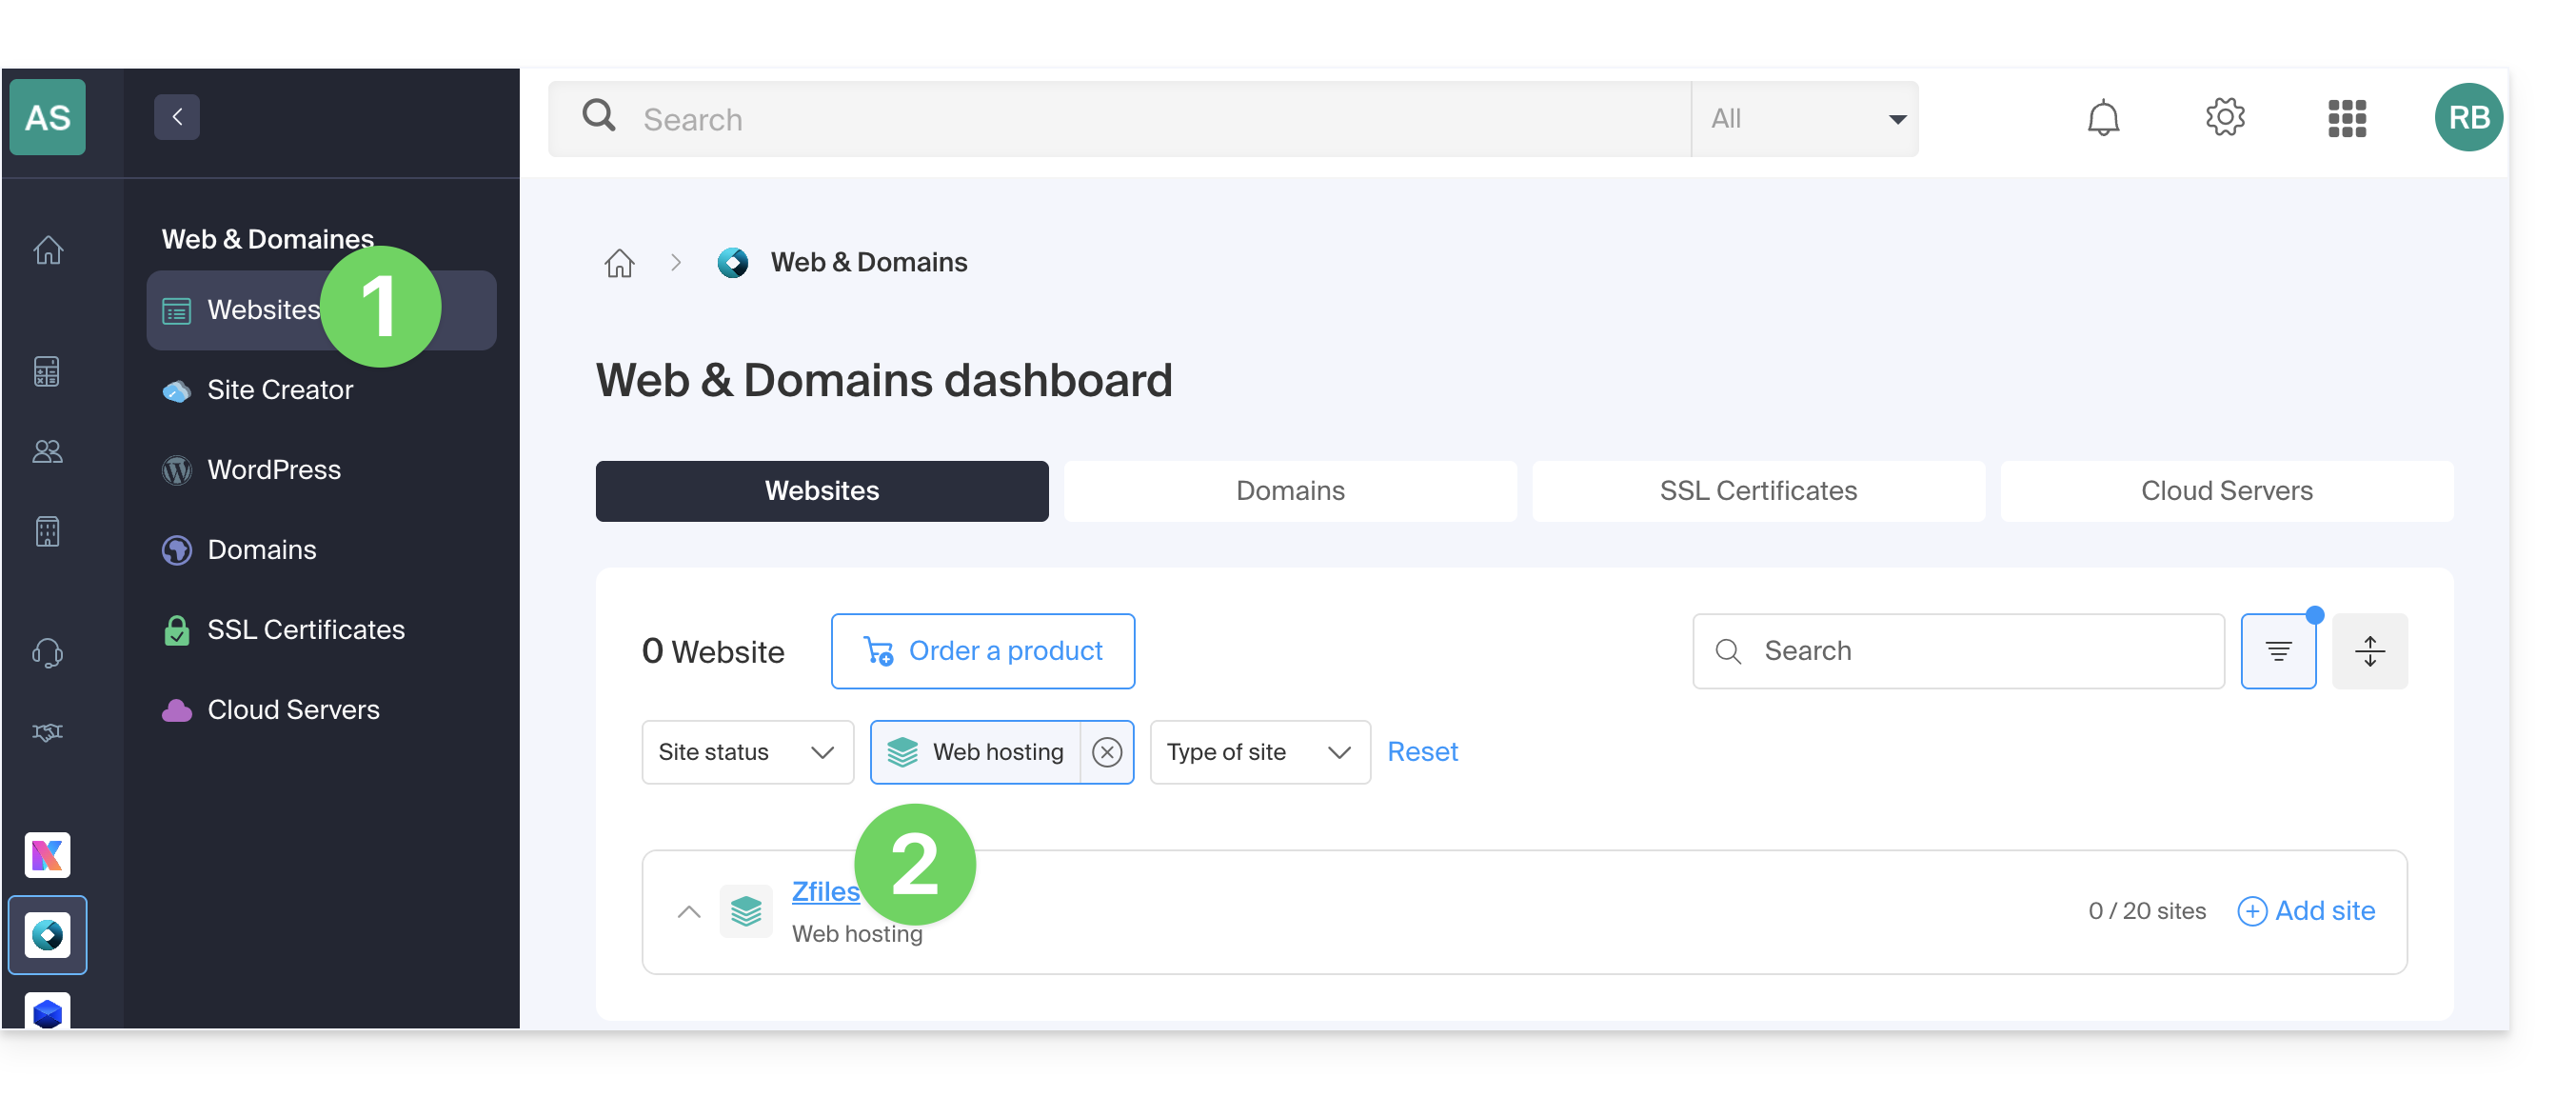
- Click here to access the hosting & website management section in your Infomaniak Manager (❓: help).
- Click on the name of the relevant hosting account:
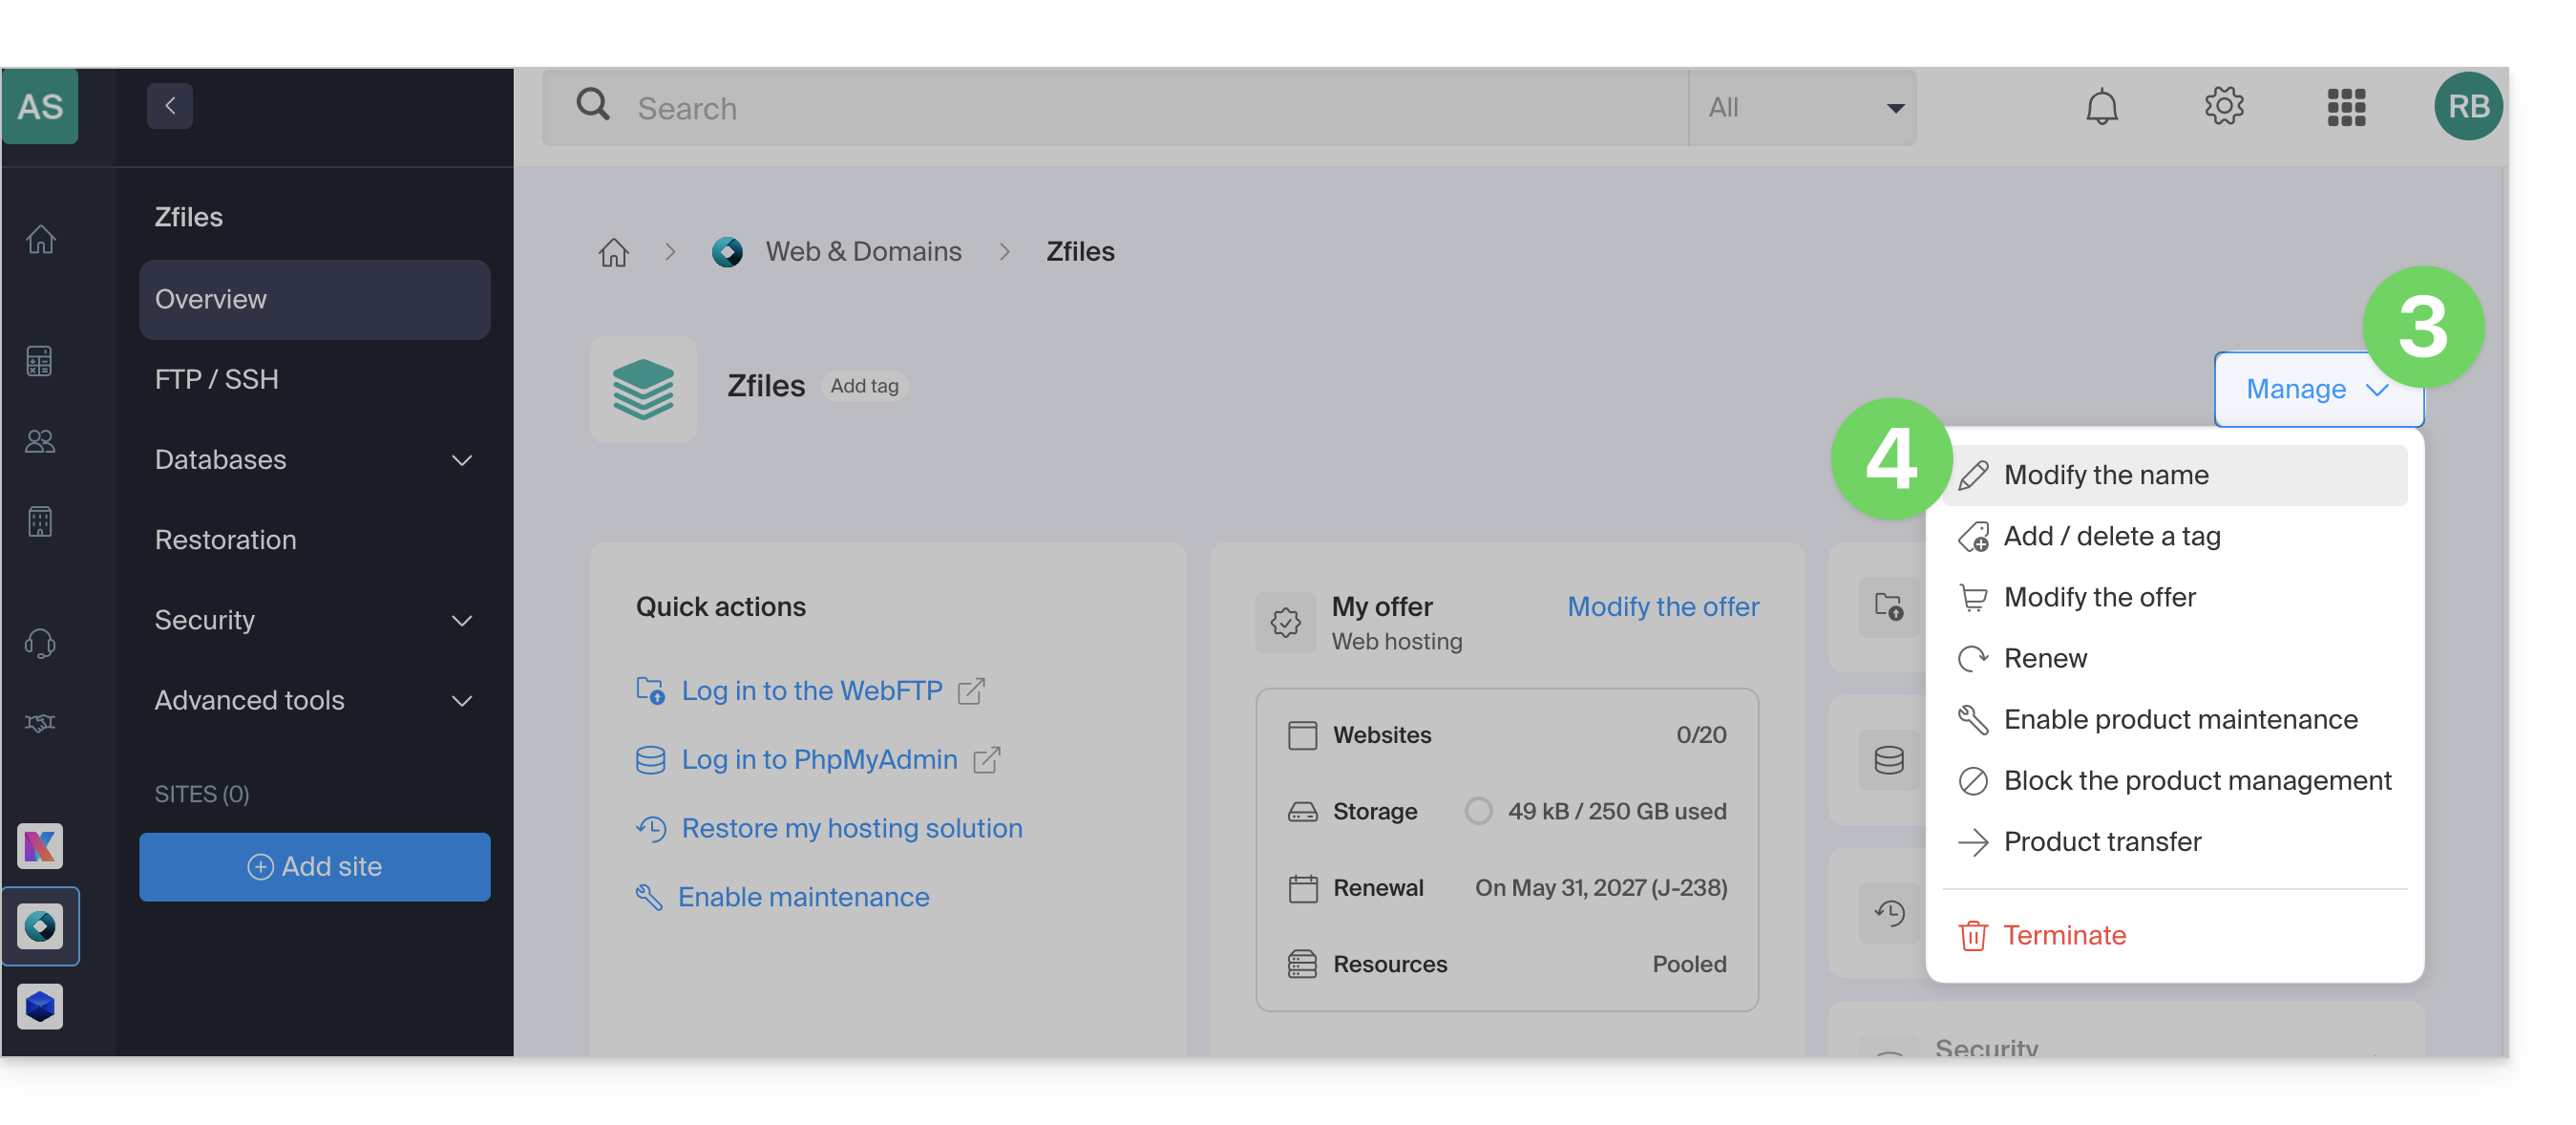
- Click on the Manage button.
- Click on Edit name:
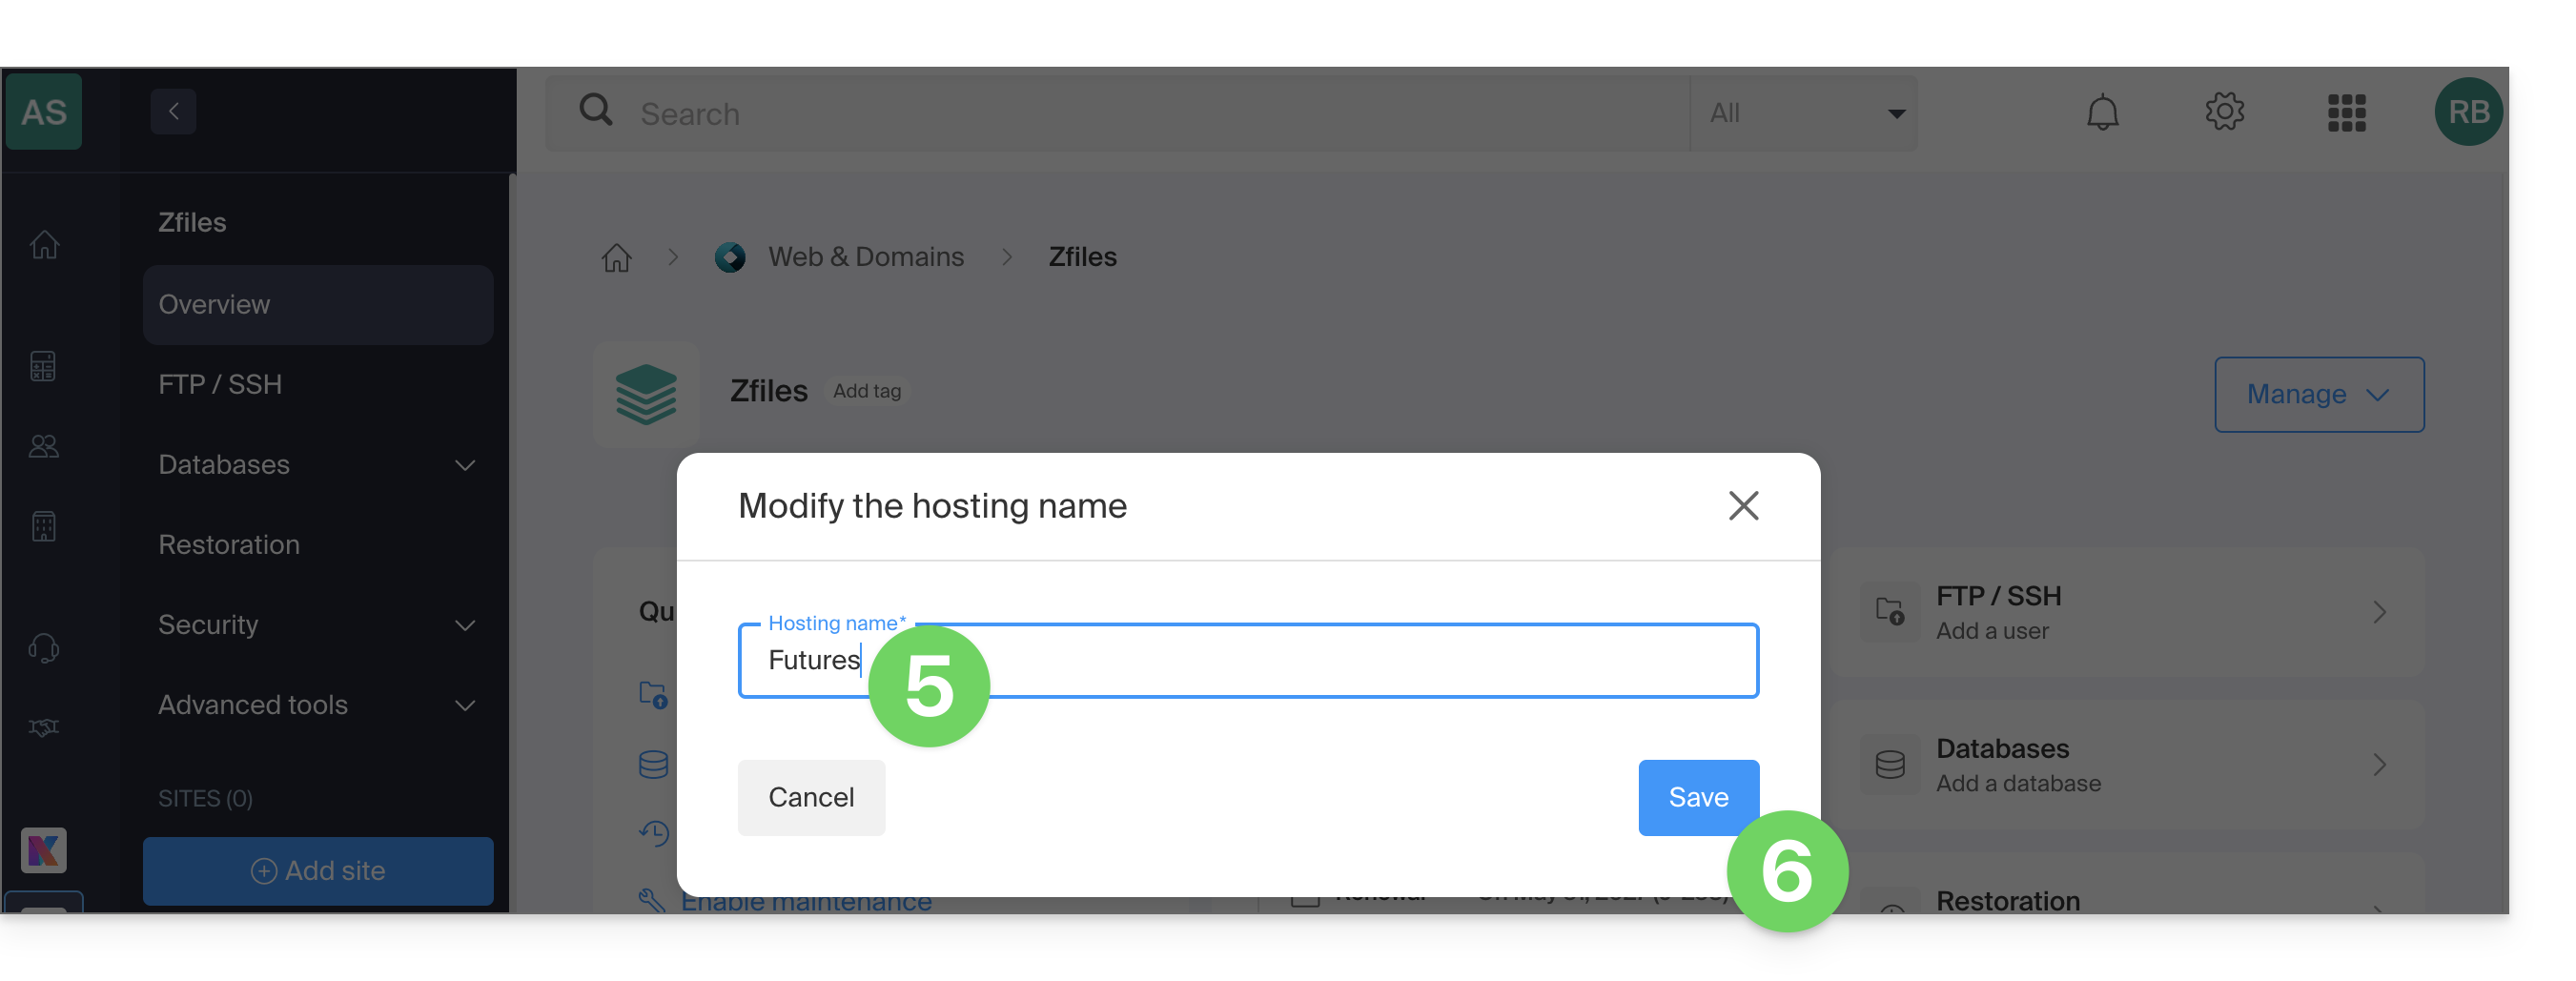
- Enter the desired new name.
- Click on Save:
Link to this FAQ: https://faq.infomaniak.com/2803
Has this FAQ been helpful?
This guide covers data protection regulations in Switzerland and Europe, and the measures taken by Infomaniak to secure your customer data and data within Web Hosting and Mail Services.
Understanding the difference between data security and data privacy
Data security aims to prevent unauthorized access to your information. It relies on measures such as encryption, firewalls, or VPNs. A security breach can have disastrous consequences: imagine a hacker stealing your entire customer database and demanding a ransom to recover it. This type of attack – ransomware – can cripple a company overnight.
Data privacy concerns who can access your information and how it is used. Even if your data is secured against hacking, it can be collected, analyzed, and resold… perfectly legally.
Example: you carefully store your customers' information, but without realizing it, a service you use shares this data – anonymously – with third parties. Result? Your competitors can obtain valuable insights into your market and target your own customers without ever needing to resort to hacking.
LPD & GDPR
In Switzerland, the LPD (Federal Act on Data Protection) and nLPD (for the "new Law" in force since September 2023) protect the privacy of residents by regulating the collection and processing of personal data by organizations.
The GDPR (General Data Protection Regulation) of the EU, in force since May 2018, also affects global companies that process the data of European residents, including in Switzerland. While the LPD applies to the data of Swiss residents, the GDPR concerns the data of EU residents. Swiss companies that manage European data must comply with the requirements of the GDPR, including the designation of a Data Protection Officer and the performance of Impact Assessments in the event of risky processing.
Your role as an Infomaniak customer
With regard to the data hosted that belongs to you – and in particular if this data contains personal data of your visitors, contacts or customers – you are responsible for ensuring its compliance.
When processing this personal data, it is essential to inform users about the purpose and methods of this processing. This is generally done through a privacy policy or a data processing agreement (DPA).
Agreement between data controller and data processor
A DPA (Data Processing Agreement), known as AVV (Auftragsverarbeitungsvertrag) in German, ATD (Accordo di Trattamento dei Dati) in Italian, and CTA (Contrato de Tratamiento de Datos) in Spanish, translates to Data Processing Agreement or Data Processing Contract.
This is a mandatory contract required by the GDPR between a data controller and a data processor. It defines the purpose, duration, and nature of the processing, as well as the obligations and security measures. Its objective is to protect the personal data entrusted to a service provider.
This GDPR certificate (in PDF format) can be generated and downloaded from the Manager (accessible to users within the organization who are owners or administrators):
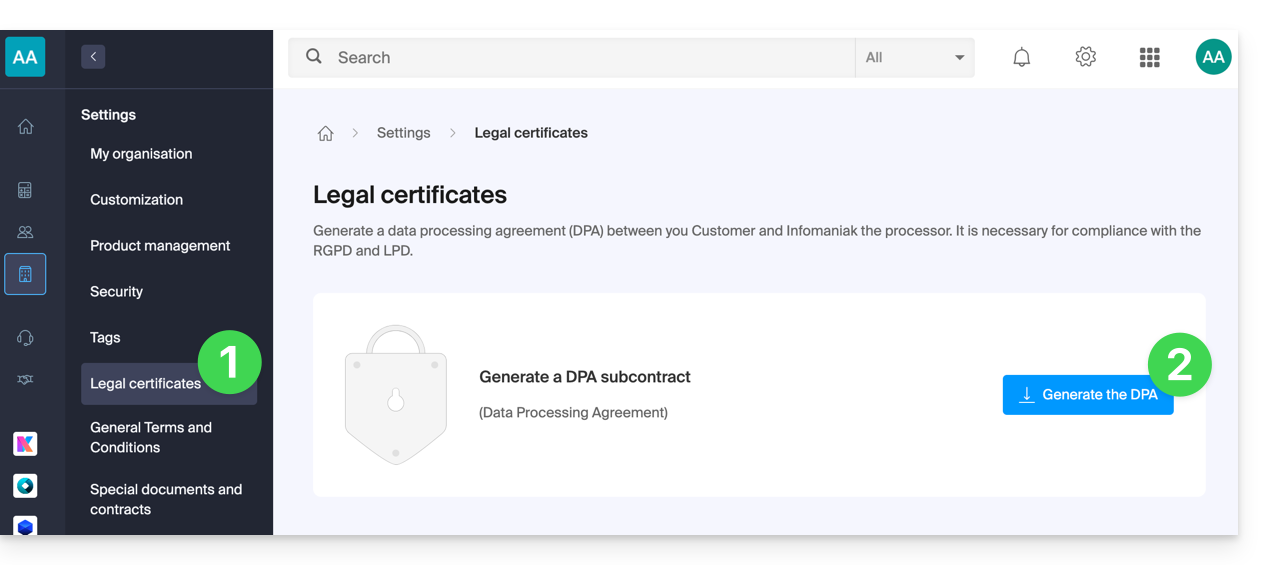
- Click here to access the DPA management section in the Infomaniak Manager (need help?).
- Click the Generate button to download the customized PDF document:
Here are some tips on this:
- Provide information on all data processing activities, not just those related to the website.
- Ensure easy access to the privacy policy on the site, for example in the footer of each page.
- In general, it is not necessary to obtain user approval for privacy policies (e.g. for forms); simply indicate where to find the policy (example Site Creator).
- Keep in mind that the new, more detailed information rules may require adjustments to existing privacy statements.
It is crucial to differentiate between the security of the infrastructure where your data is hosted and the management and implementation of your data on your end. As a hosting provider, Infomaniak acts as a subcontractor for your GDPR-related obligations. In this context, its privacy and cookie policies, as well as its terms and conditions, provide you with the necessary guarantees regarding its compliance as a subcontractor.
If necessary, you can find professionals or online guides to help you with the compliance process.
Infomaniak's Role
Like companies that work with user data, Infomaniak must comply with the LPD and, because some of its users are European citizens, also with the GDPR:
- the data privacy policy details the data that Infomaniak stores to provide and deliver its services
- the policy related to the protection of your personal datadescribes Infomaniak's commitments as a subcontractor hosting all of your data, including personal data.
These commitments, as outlined in the general and specific terms and conditions, are as follows:
- store your data within data centers exclusively located in Switzerland and never transfer your information outside of these infrastructures
- apply rigorous security standards and constantly improve processes to guarantee a high level of security across all services
- promptly inform you in the event of a data breach
- ensure transparency with you when Infomaniak uses subcontractors who may process your data
- strengthen and develop physical security measures to prevent any unauthorized access to the infrastructure where your data is stored
- implement physical and/or logical isolation systems (depending on the services) to separate the hosting of different customers; in addition, Infomaniak conducts annual penetration tests to guarantee data isolation between customers
- demonstrate a high level of responsiveness in securely updating the systems under their responsibility
Manage infomaniak.com website cookies
When you visit the infomaniak.com page, you must make a choice regarding the acceptance of certain cookies. To change this choice later, access your preferences from the footer of the website: 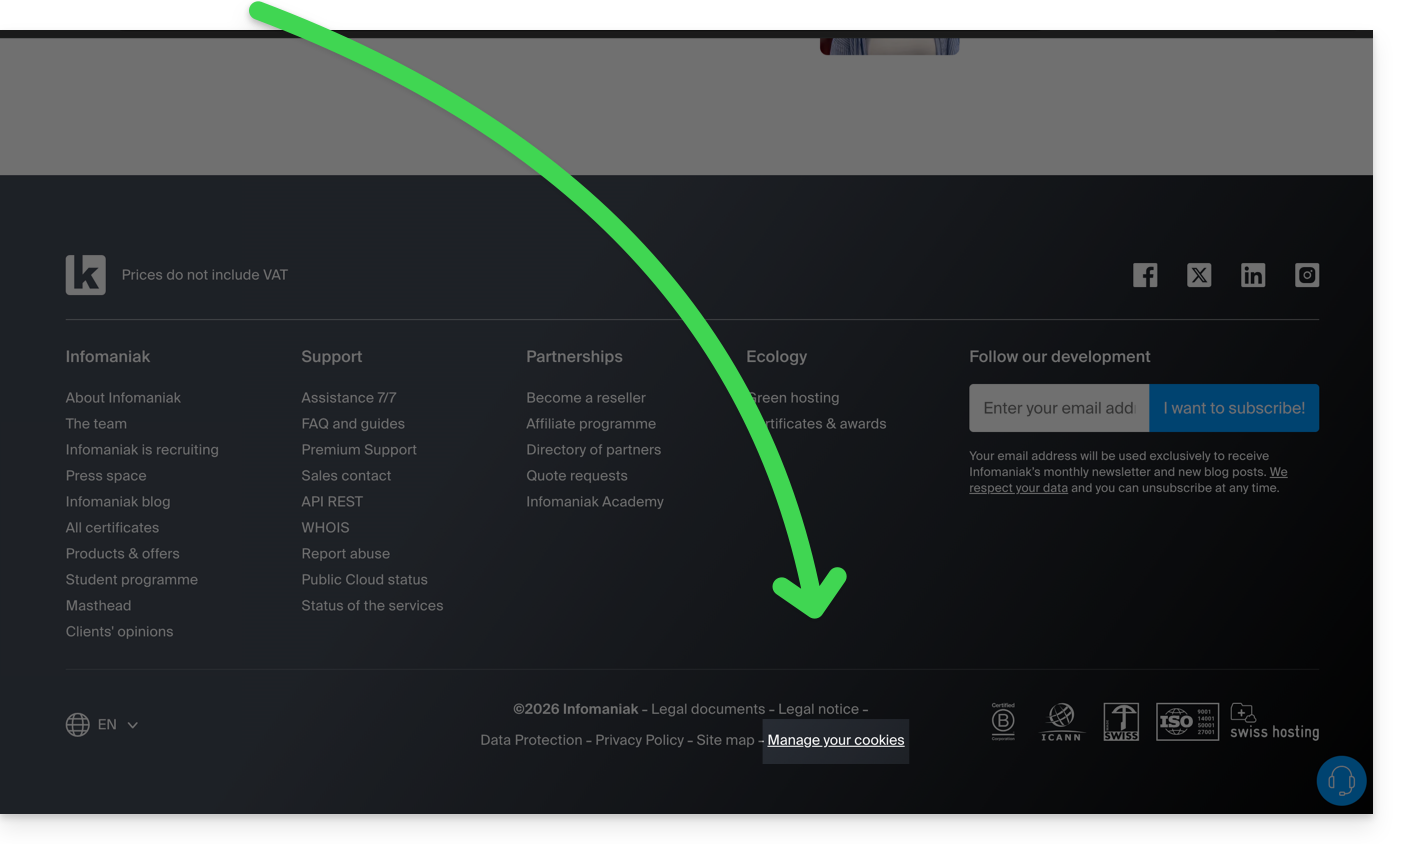
Link to this FAQ: https://faq.infomaniak.com/2820
Has this FAQ been helpful?
This guide details the resource limit errors that can occur when managing and visiting a website.
Introduction
- Resource limits are put in place to maintain the integrity, stability, and performance of the shared server, while ensuring a fair experience for all users.
- If a website or application requires significantly more resources, it may be necessary to switch to a Cloud Server or another type of virtual hosting where resources are allocated more flexibly.
Error Origin
Fatal error: Maximum execution time of 30 seconds exceeded
This error occurs when the server sets a time limit for script execution, usually to prevent tasks from taking too long. For example, if a script attempts to resize many large images in a single operation, it may exceed the allowed execution time limit. The server imposes this limit to ensure a quick response to user requests. The path often mentioned in the error can indicate a more precise origin (e.g., Fatal error: Maximum execution time of 30 seconds exceeded in /home/www/1234567abc/web/wp-includes/media.php on line 123).
memory_limit exceeded
This error occurs when a script or application uses more memory than it is allocated. This can happen when a script processes a large volume of data or when there is a memory leak. For example, an image management script may consume more memory than allowed, resulting in this error.
Troubleshooting steps
Here are some suggestions for resolving these errors:
- Check the scripts that make multiple connections to the server to display data.
- Optimize the script(s) in question so that they require fewer resources.
- Increase the limits for the site in question to allow the script to perform all its functions and/or limit the number of simultaneous connections (especially on a Cloud Server where the limits (RAM, execution time, simultaneous connections) can be significantly increased).
- Migrate your hosting to a Cloud Server.
Also, please refer to this other guide.
Link to this FAQ: https://faq.infomaniak.com/2828
Has this FAQ been helpful?
This guide helps you diagnose and resolve the "Your connection is not private" error (or NET::ERR_CERT_AUTHORITY_INVALID). This security alert can affect both the visitors to a website and its administrators.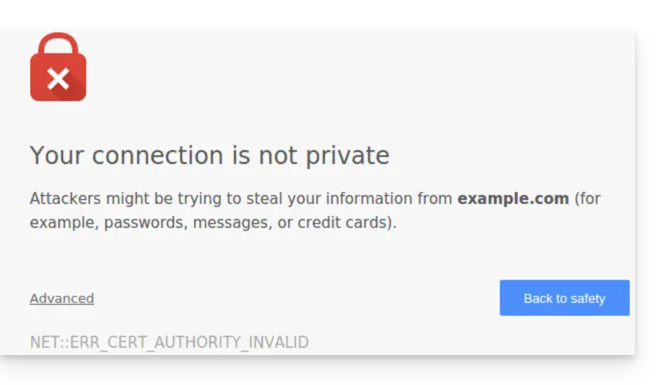
Introduction
- This alert is a security mechanism for your browser.
- It indicates that a secure connection could not be established with the server for one of the following reasons:
- The site does not have an SSL/TLS security certificate.
- The installed certificate is expired or incorrectly configured.
- The connection between your device and the server is being intercepted or disrupted.
- Warning: on a site displaying this error, the data you enter (passwords, credit card numbers) is not encrypted and may be intercepted by third parties.
Solutions for visitors
If you encounter this error on a website that you do not manage, the problem may sometimes be due to your own configuration. Here are the points to check:
- Check your device's time: if your computer or smartphone is not set to the correct date/time, certificate validation will consistently fail.
- Test in private browsing mode: if the error disappears, clear your browser's cache and cookies.
- Check your network: avoid public Wi-Fi networks that may force their own login portals.
- Antivirus and Firewall: some security software analyzes HTTPS connections and may cause false positives.
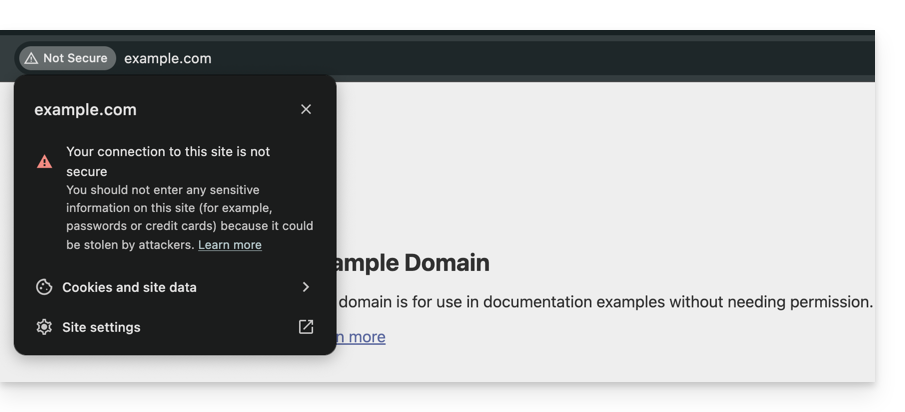
Solutions for website owners hosted at Infomaniak
If you are the website administrator, you must ensure that your SSL certificate is active and valid to cover all of your domain names.
1. Is the SSL certificate installed?
If your website is still using HTTP, you need to generate a certificate (free via Let's Encrypt or paid). Learn about the certificates available from Infomaniak.
Important: If you have added aliases (secondary domain names) to your website after installing the SSL certificate, you need to update the certificate to include them.
2. Check Validity and Expiration
At Infomaniak, certificates are automatically renewed, but a technical issue may sometimes occur. To check the status of your certificate:
- Click here to access your certificate management in the Manager (need help?).
- Check the status and expiration date in the dashboard:

3. Enforce HTTPS and fix "Mixed Content"
If your certificate is valid but the error persists (or the padlock is not green), it is possible that your site is still loading some elements (images, scripts) over HTTP. To fix this, please refer to this other guide.
Link to this FAQ: https://faq.infomaniak.com/2833
Has this FAQ been helpful?
This guide explains how to transfer data (Web, Mail, Domain) currently hosted by Swisscom to InfomaniakThe first year of Web + Mail hosting (find out more) is offered to Swisscom customers who decide to switch to Infomaniak!
Transfer your Swisscom services to Infomaniak
To avoid interrupting your website and email services, migrate your services in the order indicated above.
Why choose Infomaniak?
By consolidating your domain names, websites, and email addresses with Infomaniak, you simplify the management of your invoices and services. Furthermore, your domains will be automatically linked to your website and email address. You will therefore not need to manually configure the DNS settings for your domains with another registrar.
Link to this FAQ: https://faq.infomaniak.com/2847
Has this FAQ been helpful?
This guide explains how to transfer to Infomaniak Web data (site, FTP, databases) currently hosted by Swisscom, which has ended its hosting offer in May 2024. Furthermore, Infomaniak offers you the first year of Web + Mail hosting (learn more)!
Prerequisites
- Have an Infomaniak Web hosting (order if necessary).
- Add a blank website to the Infomaniak hosting.
- If you use a WordPress interface to manage your site at Swisscom, refer to this other guide illustrating a simplified method.
Transfer the site from Swisscom to Infomaniak
To retrieve any other site, created with HomepageTool or not, follow the procedure below.
1. Retrieve Web data from Swisscom
a. HTML, PHP, etc. files via FTP
To retrieve Web data on your hard drive, you need to connect via FTP with an FTP software/client like Filezilla (free). To do this, you need the Swisscom server address, FTP username, and password. If you do not have this information:
- Log in to the Swisscom HCP Control Panel (login.hostcenter.com) from a Web browser like Brave or Edge.
- Click on Manage account:
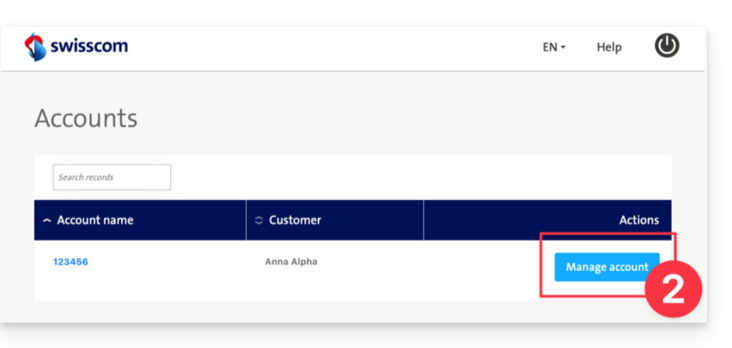
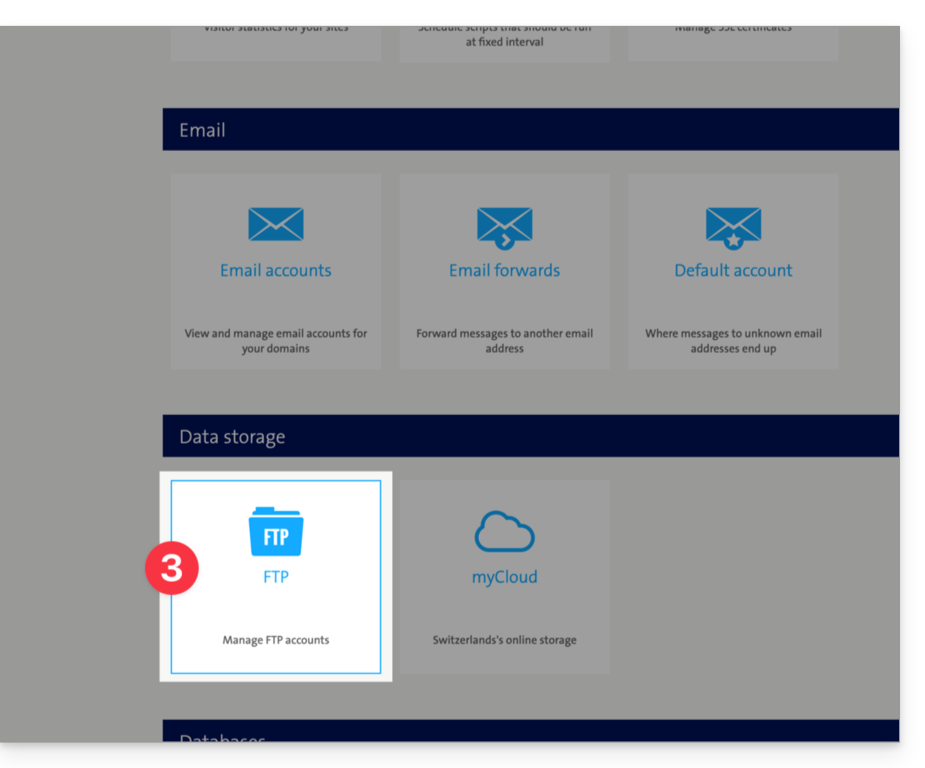
- Click on FTP accounts (in the Data storage section):
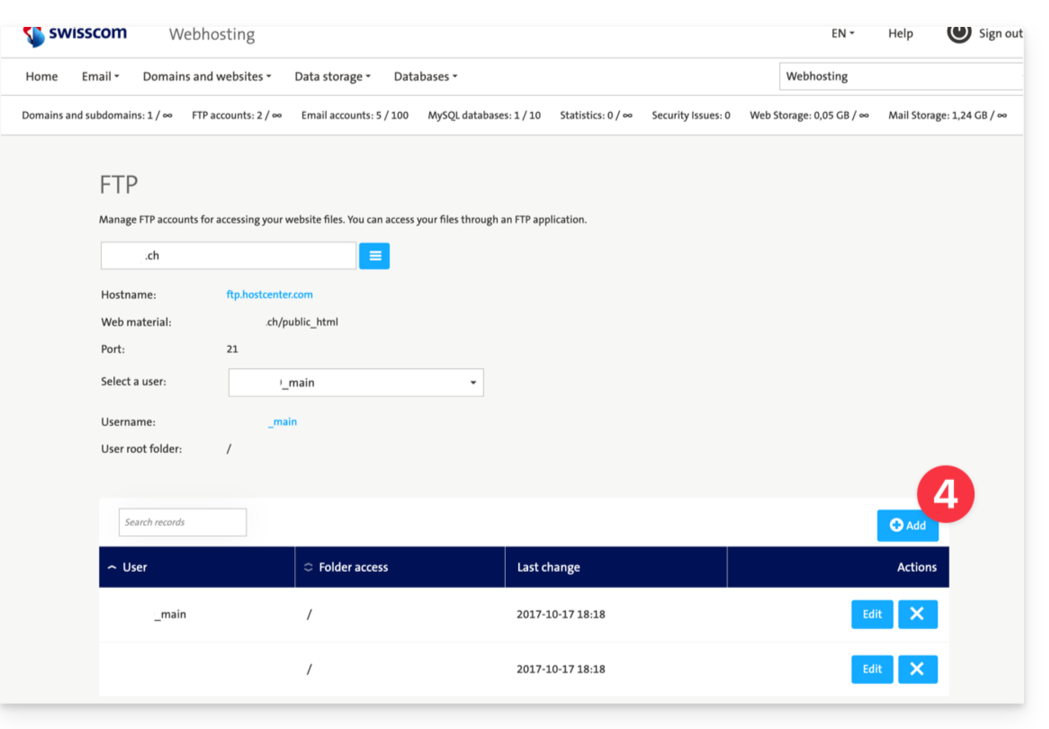
- Click on Add to create an FTP account if necessary:
- Open an FTP software/client like Filezilla.
- Log in to the Swisscom server with the FTP information obtained in step 3 above.
- Download the files corresponding to your Swisscom site to your hard drive.
b. Export MySQL databases
Unless your site is static and simply in HTML, a dynamic site most often requires databases that need to be exported from their administration interface, PHPmyAdmin:
- Log in to the HCP Swisscom Control Panel (login.hostcenter.com) from a web browser like Brave or Firefox.
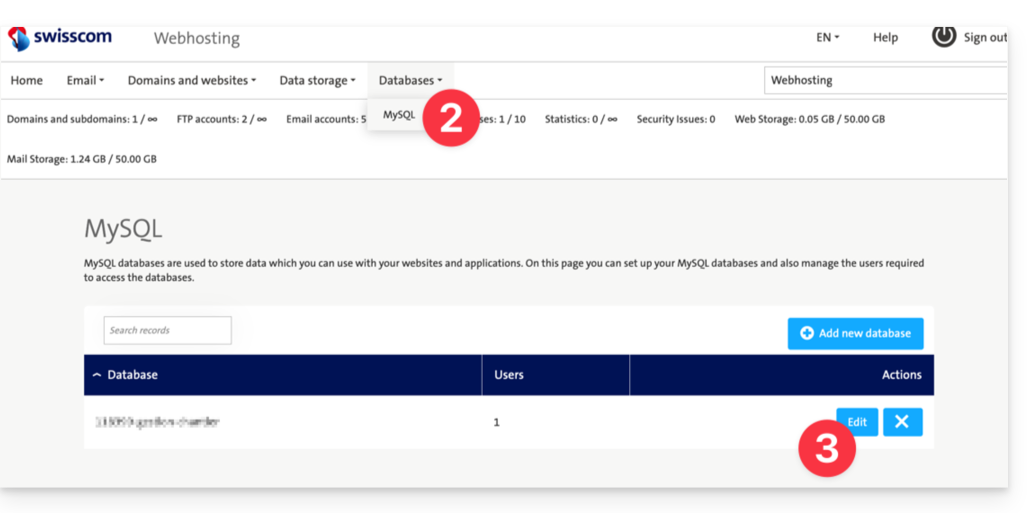
- Click on Databases > MySQL from the main menu.
- Click on Edit to the right of the corresponding database:
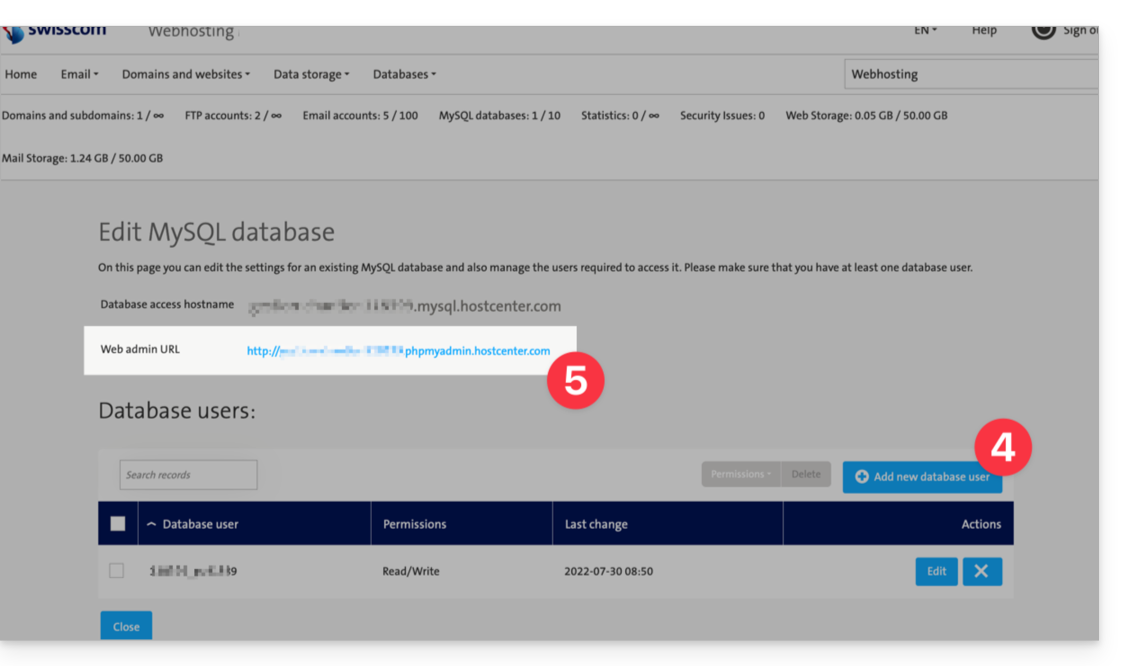
- Click (optional step) on the blue button Add a new database user to create a user and password that will have access to the database.
- Click on the blue link Web-Admin URL to access PHPMyAdmin:
- Log in to the Swisscom server with the usual MySQL information or obtained in point 4 above.
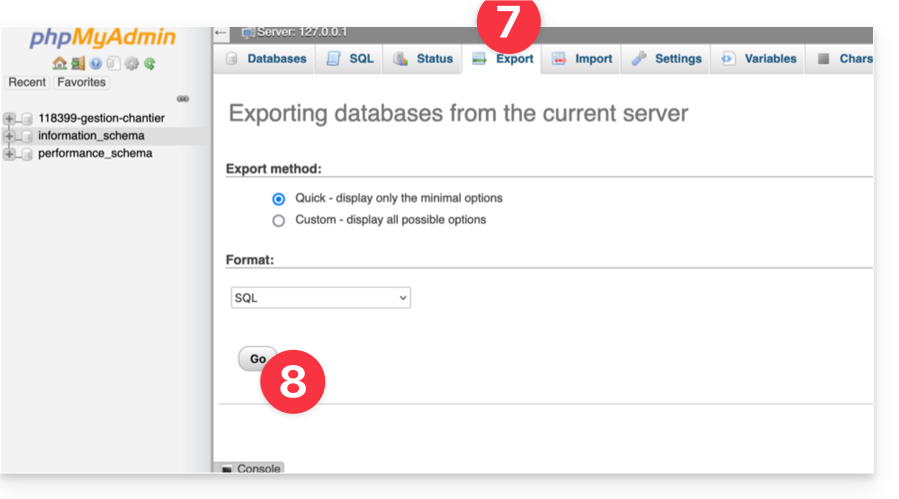
- Click on Export to configure the database export.
- Click on Go to download your SQL data to your hard drive:
2. Send Web data to Infomaniak
a. HTML, PHP, etc. files via FTP
Access Infomaniak Web Hosting and activate the FTP section:
- Click here to access the management of your product on the Infomaniak Manager (need help?).
- Click directly on the name assigned to the product concerned.
- Click on FTP / SSH in the left sidebar menu.
- Click on the Add button to create a new FTP / SSH account.
- Open an FTP software/client like Filezilla.
- Log in to the Infomaniak server with the FTP information obtained in point 4 above.
- Transfer the files from the hard drive (obtained in point 1.a.5) to the server in the folder corresponding to your Infomaniak site.
b. Import MySQL databases
Access Infomaniak Web Hosting and activate the MySQL section:
- Click here to access the management of your product on the Infomaniak Manager (need help?).
- Click directly on the name assigned to the product concerned.
- Click on Databases in the left sidebar menu.
- Click the Add button.
- Enter a database name after the already entered prefix.
- Click the box to Create an associated user.
- Enter a username after the already entered prefix.
- Enter a password.
- Click Validate.
- Click the blue Import button.
- Click Select a file.
- Select the SQL files on the hard drive (obtained in step 1.b.6).
- Choose the database created in step 5 above as the destination.
- Click the blue Import button.
c. Adapt the site for the new infrastructure
If you are using an application such as WordPress, Joomla, Drupal or another web application (ownCloud, phpBB, etc.) using a database, adapt the following information in the appropriate configuration file from the information available on the Manager so that your site works:
- the name of the database
- the database server
- the username that accesses the database
- the password of the username that accesses the database
Refer to these other guides to adapt the configuration file: WordPress and Joomla.
Learn more
Link to this FAQ: https://faq.infomaniak.com/2851
Has this FAQ been helpful?
This guide explains how to transfer a website on which WordPress is installed, using one of its extensions, Duplicator.
Prerequisites
- Order a Web Hosting / Cloud Server if you don't already have one (❓: help).
- Create a website (❓: help) on your new hosting without installing Infomaniak WordPress.
Complete WordPress site backup
To back up all the files and the database of a WordPress site:
- Install and activate the Duplicator extension (❓: help) from the WordPress administration interface.
- Open the extension dashboard from the main WordPress menu.
- Follow the wizard to create a new backup package.
- Download the installer (the
installer.phpfile, typically) and the archive (typically a.zipfile) to your computer at the end of the process.
If necessary, consult this video installation guide.
Preparing for the website restoration
On your web hosting:
- Create an FTP account (❓: help).
- Create a MySQL database (❓: help).
- Upload the installer and archive (❓: help) created in step 1 to your hosting via FTP.
Please note the following:
- the FTP host server
- the FTP account name
- the FTP account password
- the database host server
- the database name
- the database user's password
Restoring the WordPress site
To restore the WordPress site to the domain name of your choice:
- Go to the installer's URL (e.g.
www.domain.xyz/installer.php). - Check the Connect and Remove All Data box and enter the requested information regarding the database.
- In step 2 (Update) of the restoration process, you can specify the new domain name for the WordPress site under New settings.
- After the restoration is complete, test the site and delete the archive and the Duplicator extension installer.
The WordPress site that has been "restored" in this way will not be visible in the WordPress & Apps section of Infomaniak, as it was not installed from scratch like a new installation would be.
Link to this FAQ: https://faq.infomaniak.com/2854
Has this FAQ been helpful?
This guide explains how to manage the preview image (thumbnail) of a website as seen in the Infomaniak Manager.
Create the preview image in the Manager
To access the Manager to manage the website preview image:
- Click here to access the hosting & website management section in your Infomaniak Manager (❓: help).
- Click on the name of the website in question.
- The preview image of the current website is displayed (it is at most 7 days old).
- If it is not up to date, hover over the image and click on Update preview:
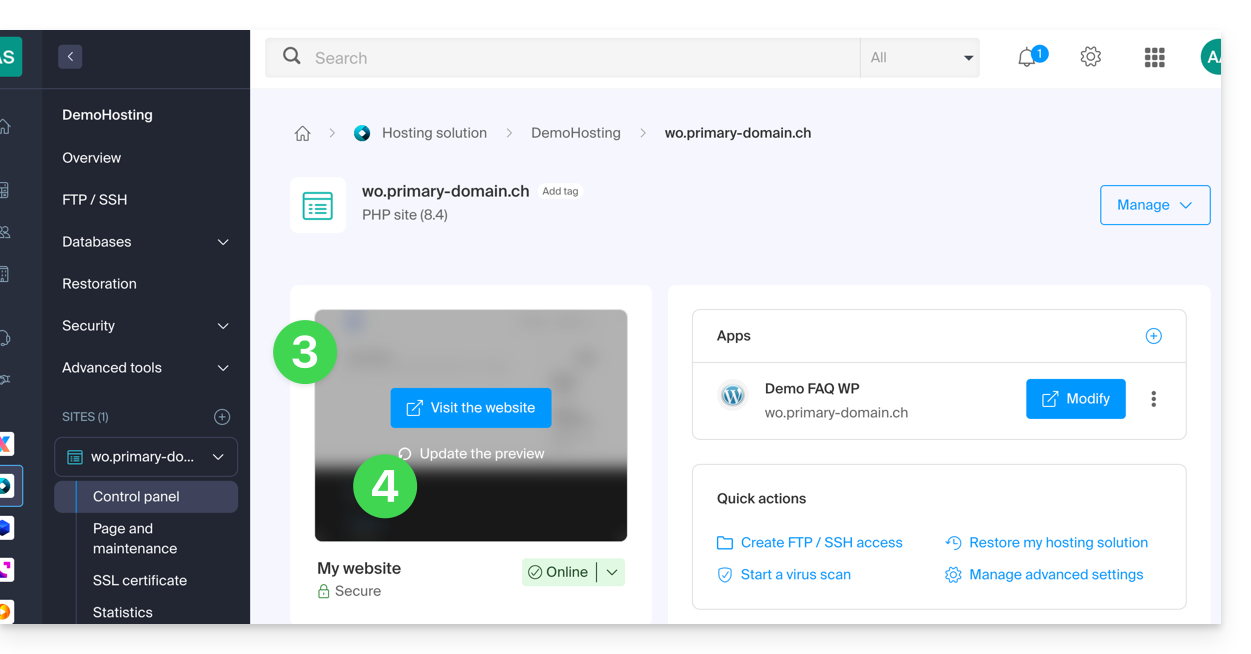
If no link allows you to refresh the image, it means that a recent request has already been made within the last thirty minutes.
Link to this FAQ: https://faq.infomaniak.com/2916
Has this FAQ been helpful?