Knowledge base
1000 FAQs, 500 tutorials and instructional videos. Here, there are only solutions!
This guide explains how to obtain and install an application on your computer from certain Infomaniak interfaces, such as the kSuite interface or those that allow you to directly manage your calendars or your address books.
Introduction
- A Progressive Web App (PWA) is an application designed for the web and offering an experience similar to that of a native application.
- PWAs are fast, accessible directly from your browser, and can offer features such as offline operation or sending notifications.
- Installing a PWA allows you to create an independent application on your computer, without going through a traditional store.
Install a progressive web app (PWA)
To download the PWA app (example here with Mail Infomaniak), depending on the browser used:
- Click here to access the Calendar Infomaniak web app.
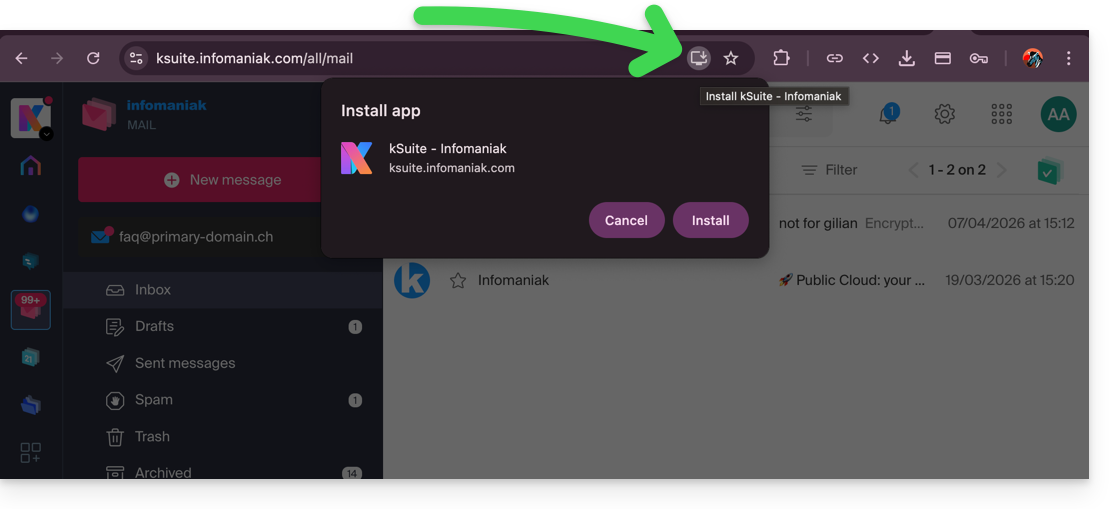
- Once the page has loaded, check for the installation icon in the browser's address bar (often represented by a screen with a “+”):
- Google Chrome / Chromium :
Click on the installation icon in the address bar, or open the ⋮ menu and click on Install [application name]. - Microsoft Edge :
Click on the Applications icon in the address bar or open the ⋯ menu, then select Applications > Install this site as an application. - Mozilla Firefox :
The installation of PWAs is not fully supported natively. However, it is possible to use alternative solutions (extensions or shortcuts) to simulate similar behavior. - Safari (macOS) :
From recent versions of macOS, open the File menu and click on Add to Dock to create a web application.
- Google Chrome / Chromium :
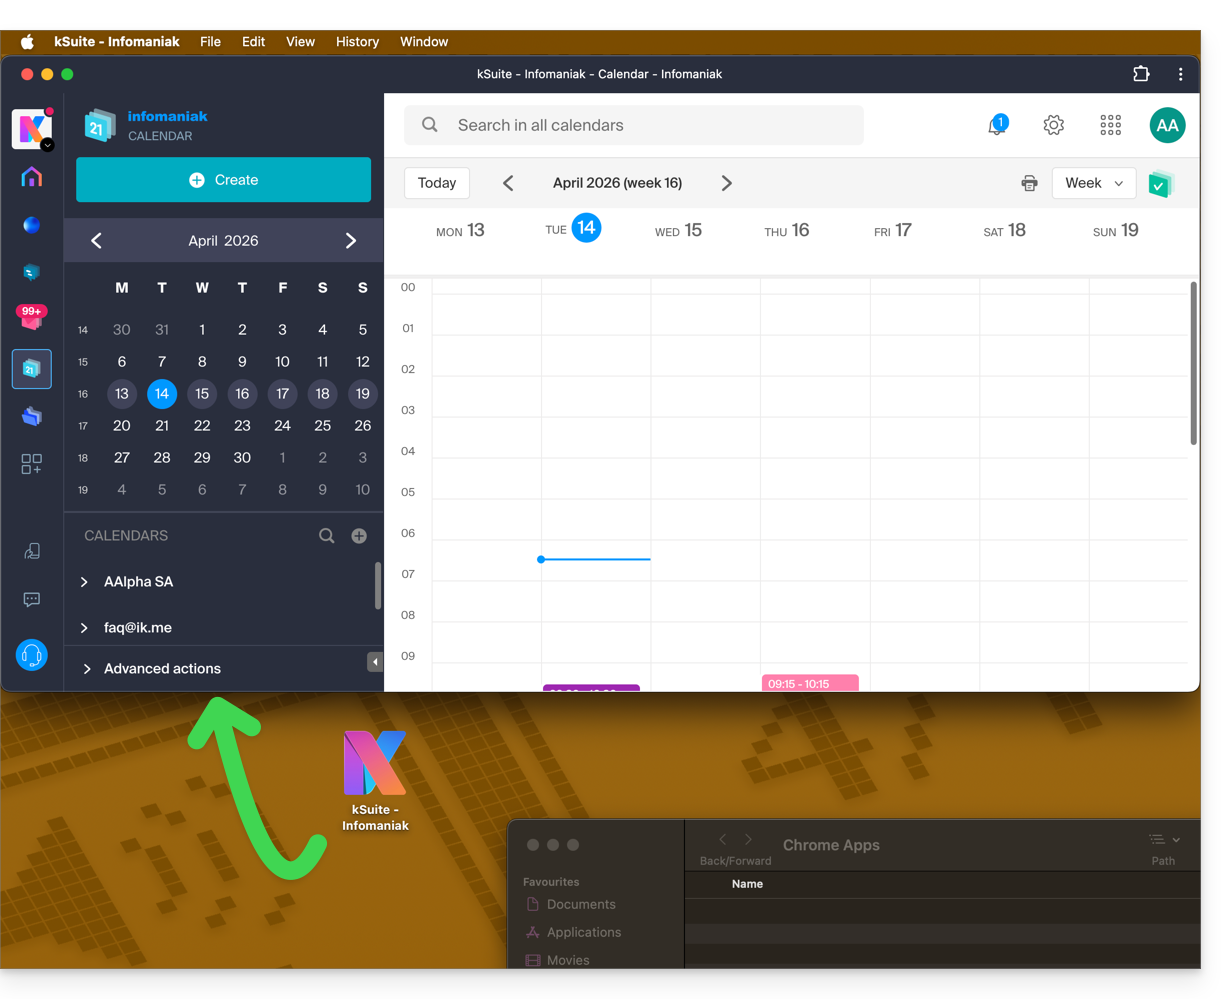
- The app is then available on your computer (example here with Calendar Infomaniak) and allows you to open the data while being completely independent of the browser:
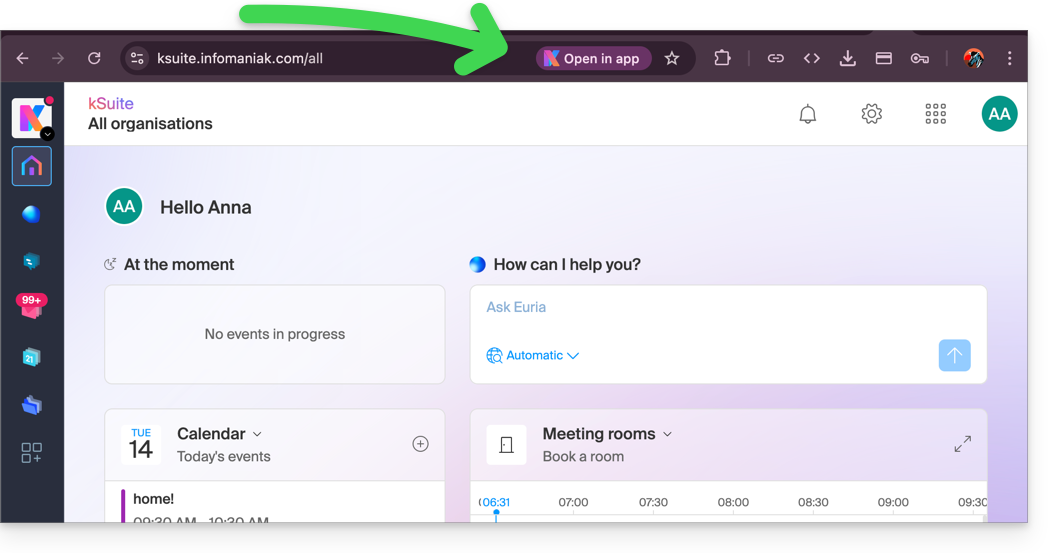
- When the app is detected on your computer, you can easily return to the app from the browser when you are on other Infomaniak pages (example here with a kSuite user space):
Remove the Infomaniak “PWA” app
To remove this local application system:
- Open the application you previously installed.
- Click on the action menu ⋮ or ⋯, depending on your browser.
- Select Uninstall or Remove app.
- Confirm the removal if necessary.
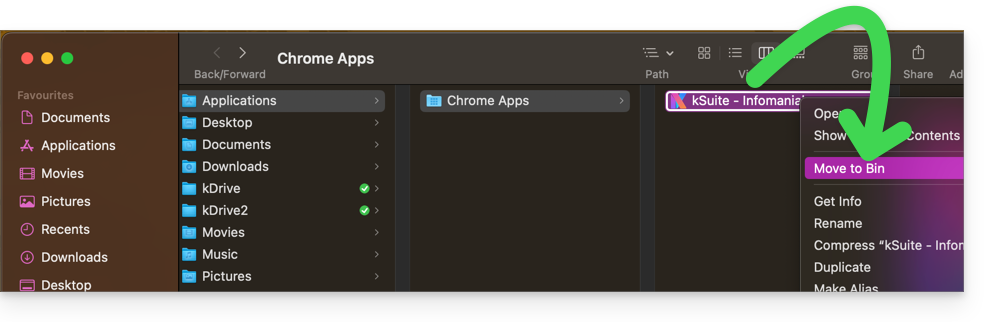
- You can also delete the application directly from your operating system (like any other application) or move the icon to the trash:
Link to this FAQ: https://faq.infomaniak.com/2872
Has this FAQ been helpful?
Infomaniak offers you the possibility of replacing Skype with its own solutions, whether for individual calls, remote meetings, or group discussions.
kMeet, the video conferencing solution for individuals & businesses
Despite its initial success, the Skype communication platform has seen its usage decline with the emergence of solutions better integrated into new collaborative practices.
One of the easiest ways to replace Skype is to adopt kMeet:
- Unlimited audio and video calls
- Access without registration
- Compatibility with Web, mobile, and desktop
- Integrated chat & reactions (emoticons, sounds)
- Screen sharing with drawing and remote control tools
- Sub-commission rooms (breakout rooms)
- Integration with the calendar (create a video call link)
- Integration with kDrive for storing meeting recordings
- Integration with kChat for video calls
- Privacy-focused (no advertising, hosting in Switzerland)
- Security with AES-256 encryption
- Eco-friendly (renewable energy, CO₂ compensation)
Replace Skype with kMeet
The kMeet alternative to replace Skype can be implemented in several ways:
To start a private conversation between several people on the Internet, simply have one of them go to kMeet and then share the meeting link with the others. Here is the step-by-step procedure:
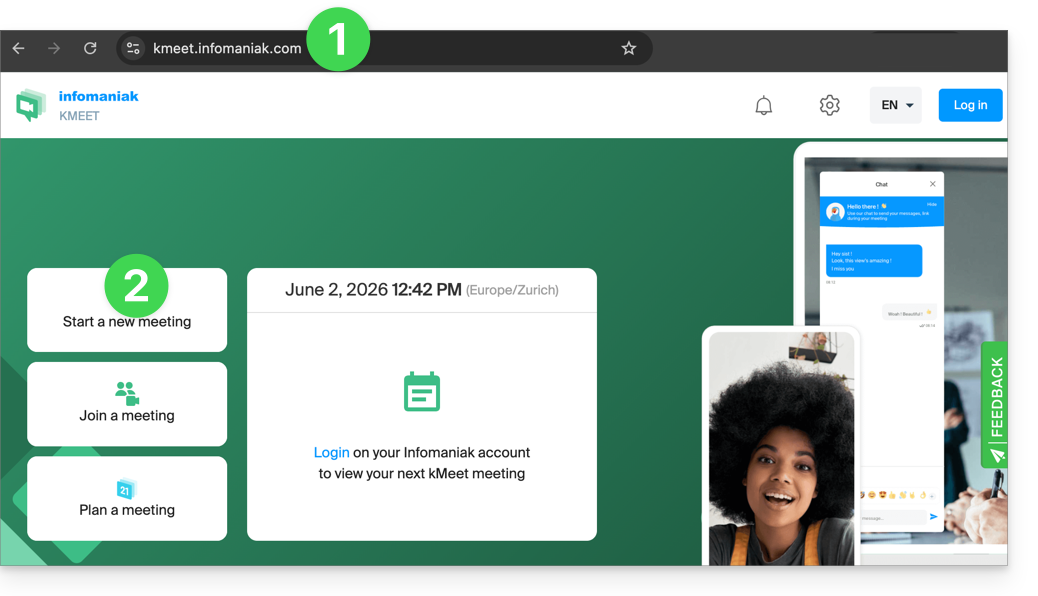
- Enter kmeet.infomaniak.com in a browser such as Brave, Chrome, Edge, Firefox, Opera, Safari….
- Start a meeting (❓: help):
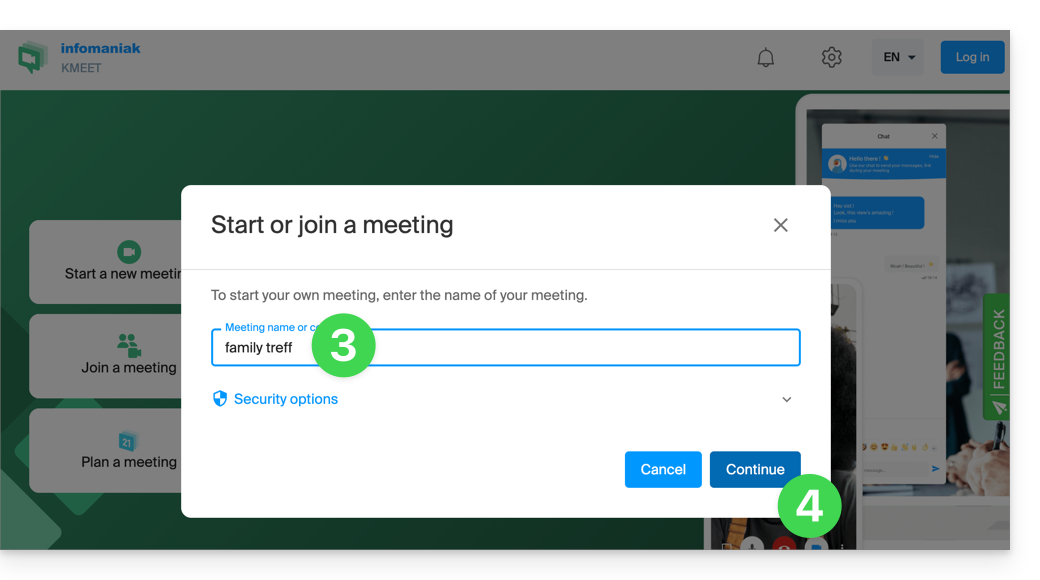
- Enter a name for the meeting, which will indicate to future participants the subject of the discussion they are joining.
- Click the button to Continue:
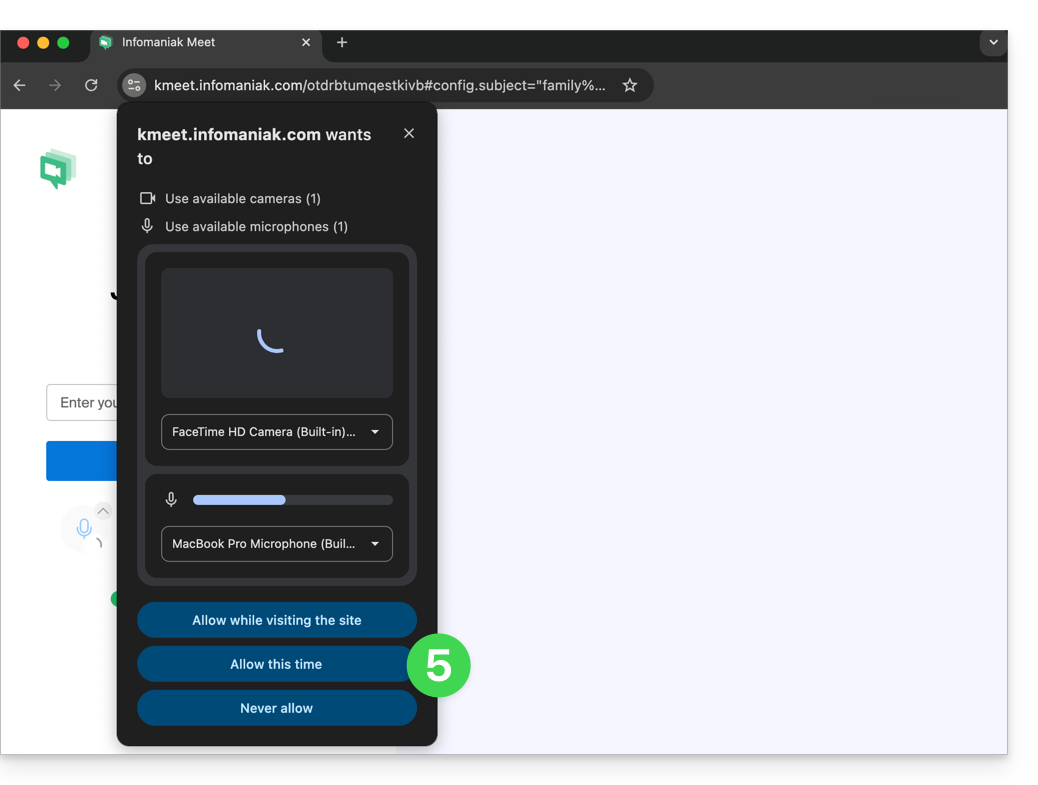
- Grant the necessary permissions to kMeet:
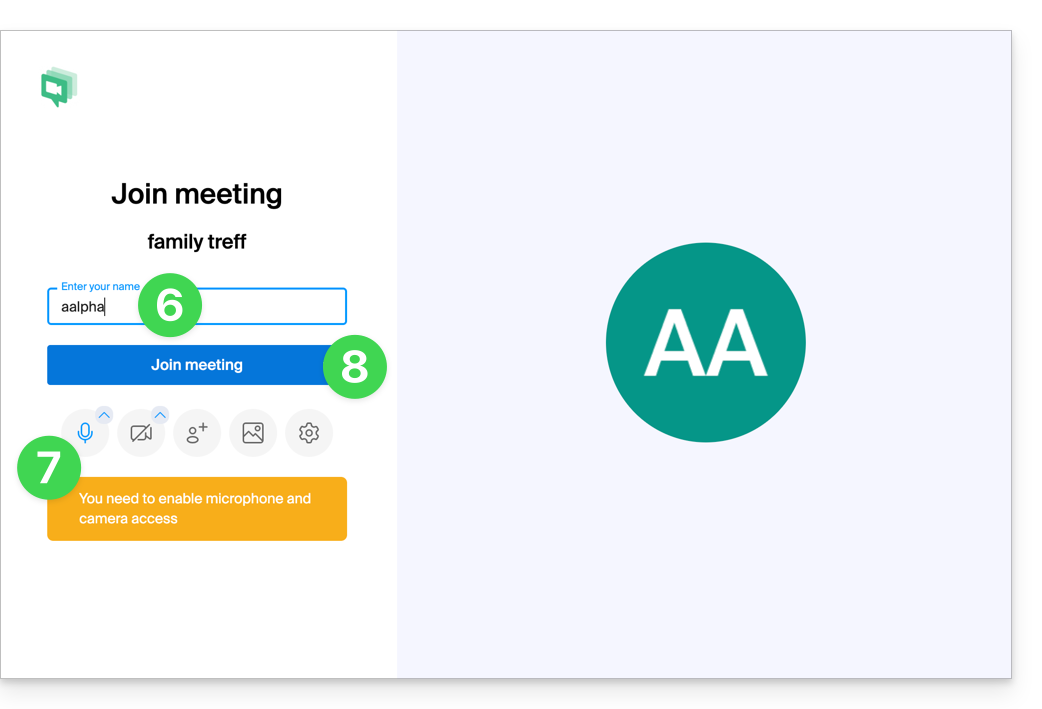
- Enter your name, which will be visible to other participants.
- Enable or disable any communication methods if they should not be used at this time.
- Click the button to join the virtual meeting room (as the first participant, since no one else has been invited yet):
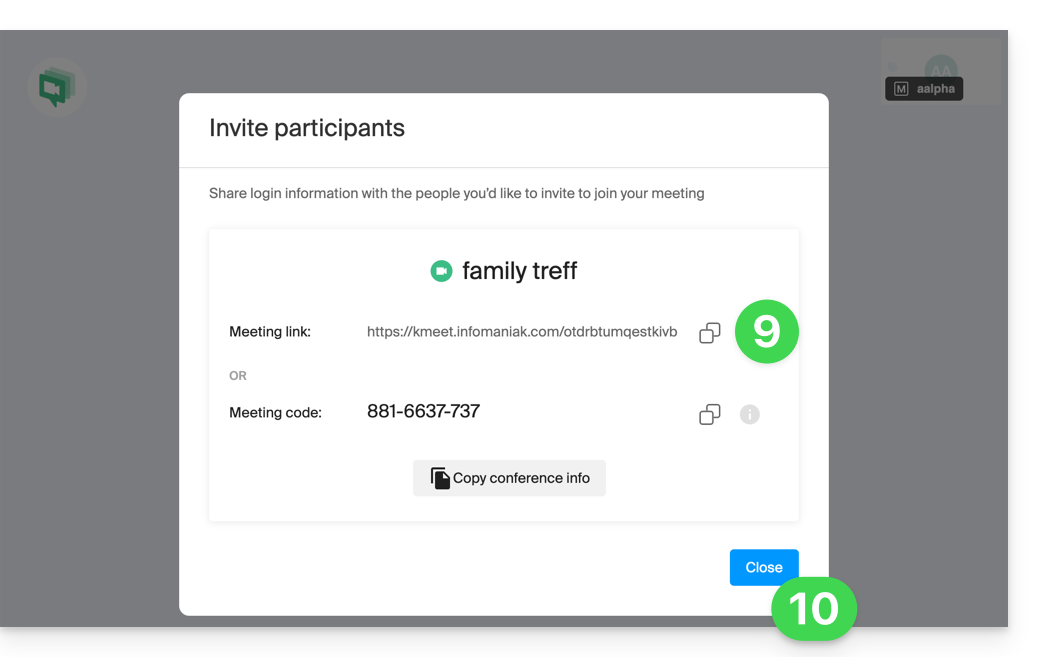
- Done, the room has been created, and you can now copy the information about this session and send it to the contacts so they can join you (they will only need to click the link you send them).
- Close the information window so that you can all chat together:
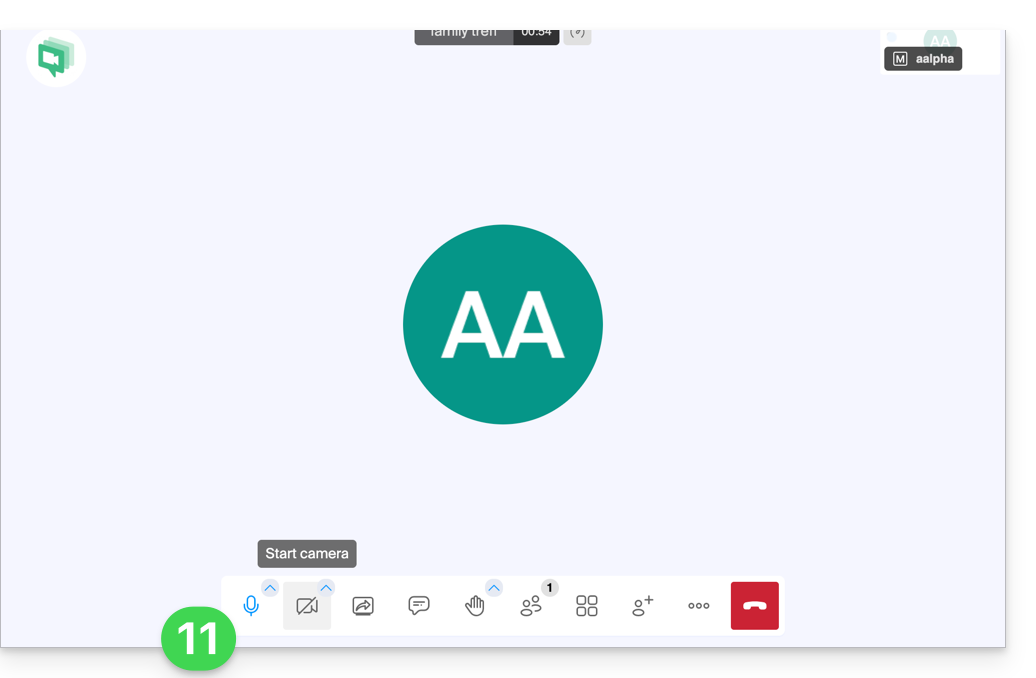
- The toolbar at the bottom of the screen allows you to enable or disable the microphone, camera, etc.:
To discover all the possibilities offered by kMeet, consult this other guide.
2. Scheduling and invitations with my kSuite
To work efficiently, kMeet can be directly linked to your professional calendar. This means that every time you create an event in your calendar…
- … a video conferencing link is automatically generated…
- … participants receive the invitation by email with all the information…
- … and on the day, they can join the meeting with a single click, without registration or the need to install any software.
Benefit: you centralize meeting management, reduce forgotten appointments, and simplify organization, all from a single interface.
To implement this solution:
- Sign up for free to my kSuite to get a mail address, for example
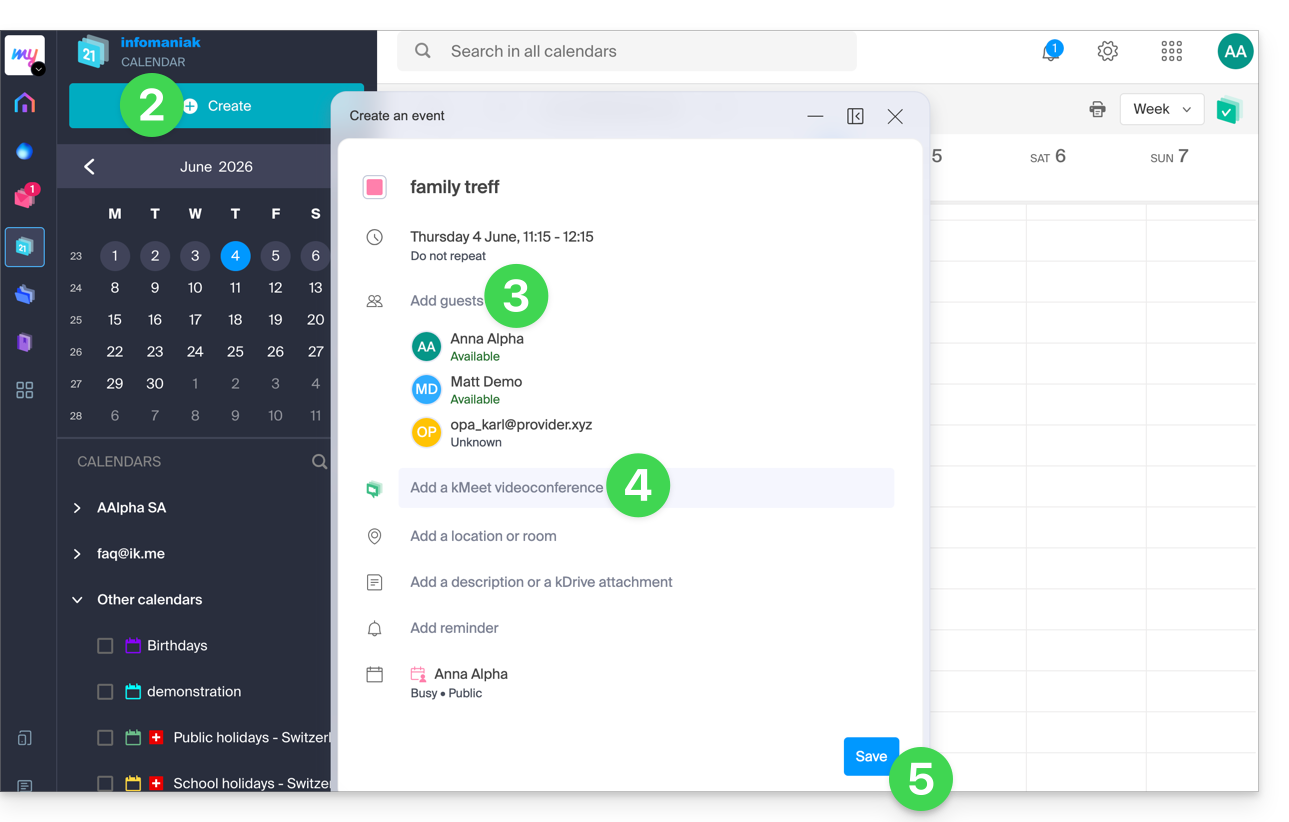
anna.alpha@ikmail.com, and especially access to Infomaniak services. - Connect to the calendar at ksuite.infomaniak.com/calendar, then create an event on the day of your choice.
- Add participants to the event, even if they are not Infomaniak customers.
- Click the green button to automatically generate a kMeet link that will be added to the event.
- Click the button to save your event:
- Answer YES to the prompt to send notifications to the guests.
- Invitations will then be automatically sent to participants via email, containing the clickable kMeet link that allows them to join the online discussion when the time comes:
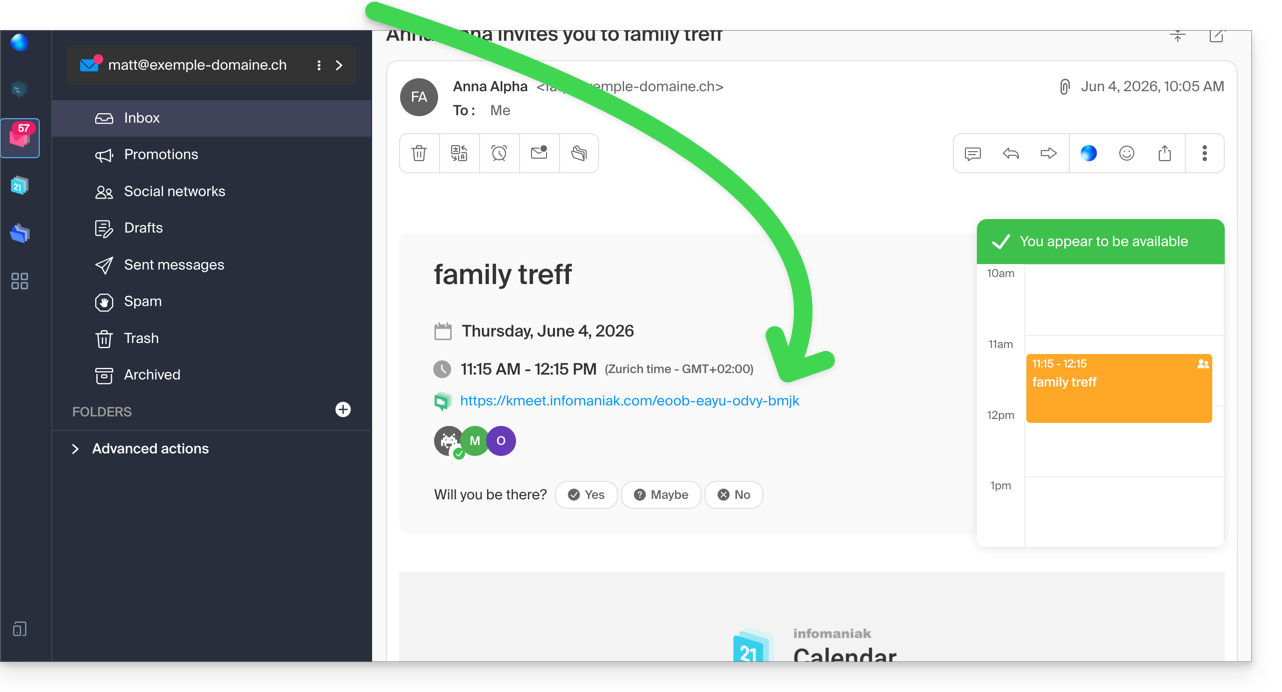
- The kMeet meeting link is also visible directly on the event in the calendar.
3. Call your contact as you would with Skype
To start a conversation at any time with a contact that you have previously saved in your address book, both of you need to have kChat, which is available within the kSuite from Infomaniak. To set up this solution, which can also be extended to an entire group of contacts:
- Register for kSuite to gain access to the corresponding Infomaniak services.
- Configure users (these can even be external) in kSuite.
- Install the kChat app or go to the URL https://ksuite.infomaniak.com/kchat
- A user can then be called via kChat, which will make the recipient's device ring:
- = browser if the kChat URL is open in it, or computer/mobile device if the kChat app is installed.
- Refer to this other guide to learn more about video conference calls on kChat.
- Your contact can then respond; the call will be made using kMeet technology within kChat or on the kMeet app if it is installed.
Link to this FAQ: https://faq.infomaniak.com/2890
Has this FAQ been helpful?
This guide explains how to remove the link between a domain name and kSuite Free.
Introduction
- A domain name can be associated with any kSuite offer (❓: help), but only the kSuite Free offer allows you to remove its link to the domain.
- Once this link is removed, the domain name becomes available again to be linked to one of your services.
Remove the associated domain
To disassociate a domain name from kSuite Free, start by logging in with your credentials (user account with the necessary permissions for the product in question):
- Click here to access kSuite.
- If nothing appears after logging in, you may not be in the Organization to which your kSuite is linked (❓: help).
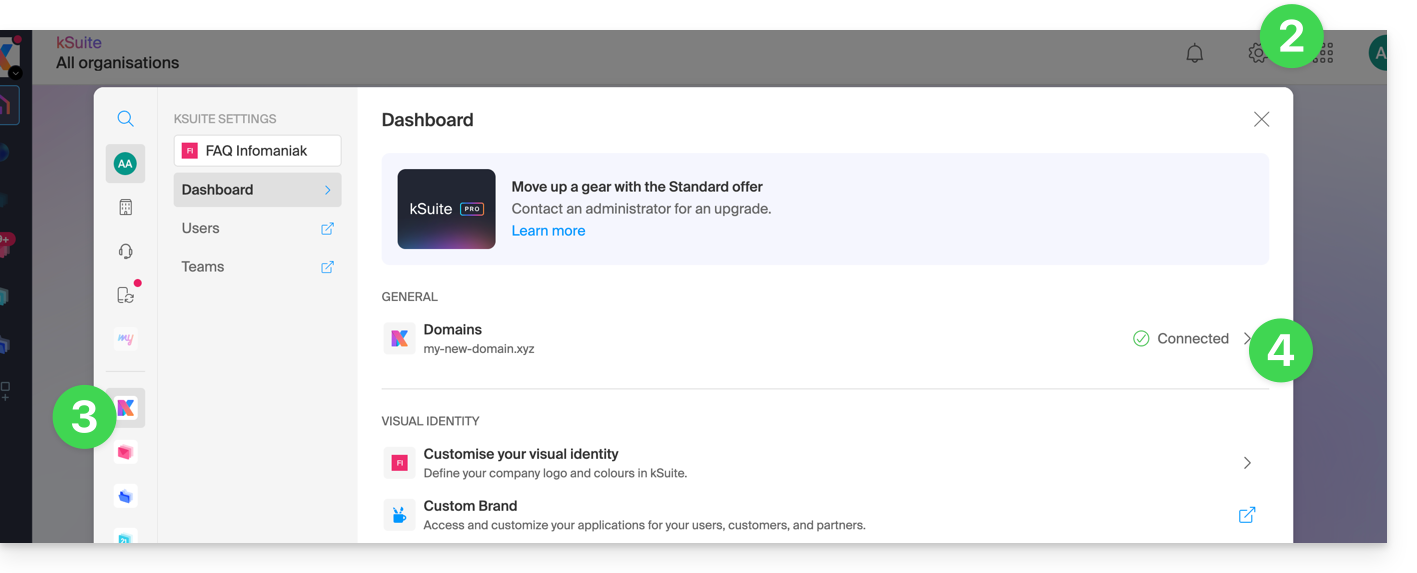
- Click on Settings in the top right corner.
- Click on kSuite in the left-hand menu.
- Click on Domains:
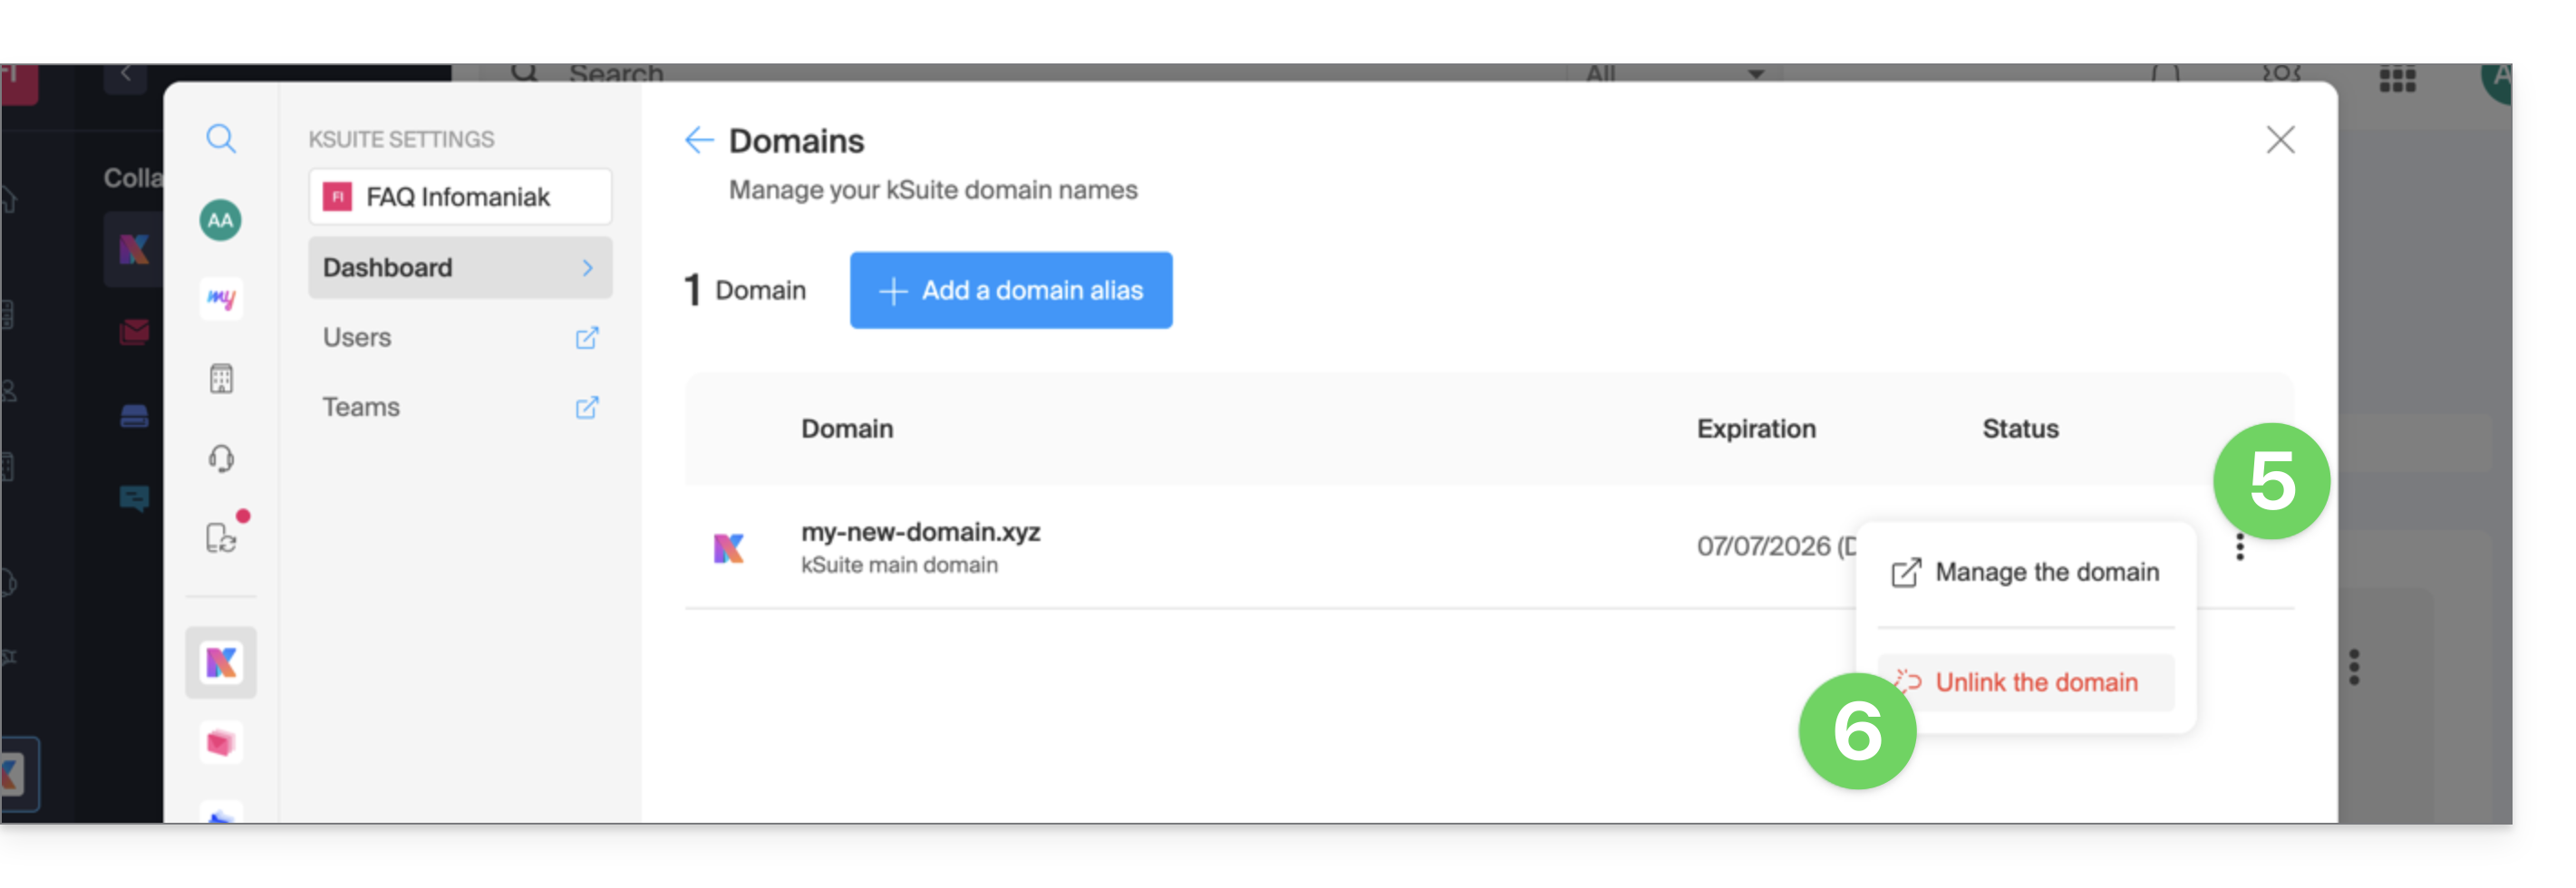
- Click on the action menu ⋮ to the right of the domain name you wish to disassociate.
- Click Disassociate the domain:
- If you have a paid kSuite plan, you cannot disassociate the domain name; cancel the paid plan if necessary (❓: help):
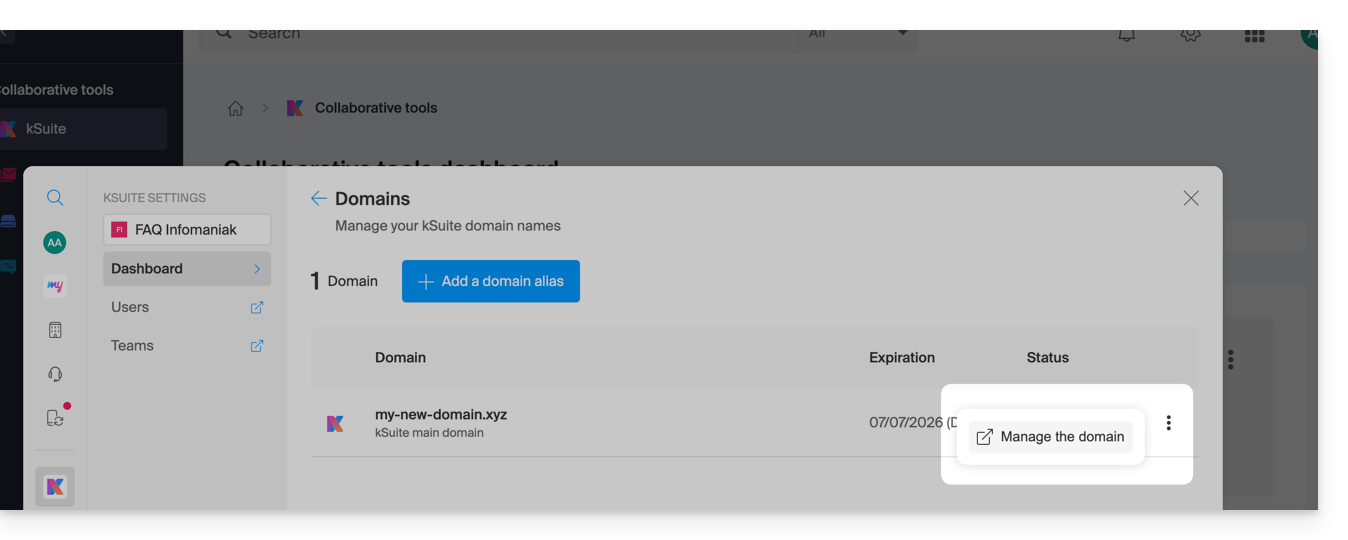
- If you have a paid kSuite plan, you cannot disassociate the domain name; cancel the paid plan if necessary (❓: help):
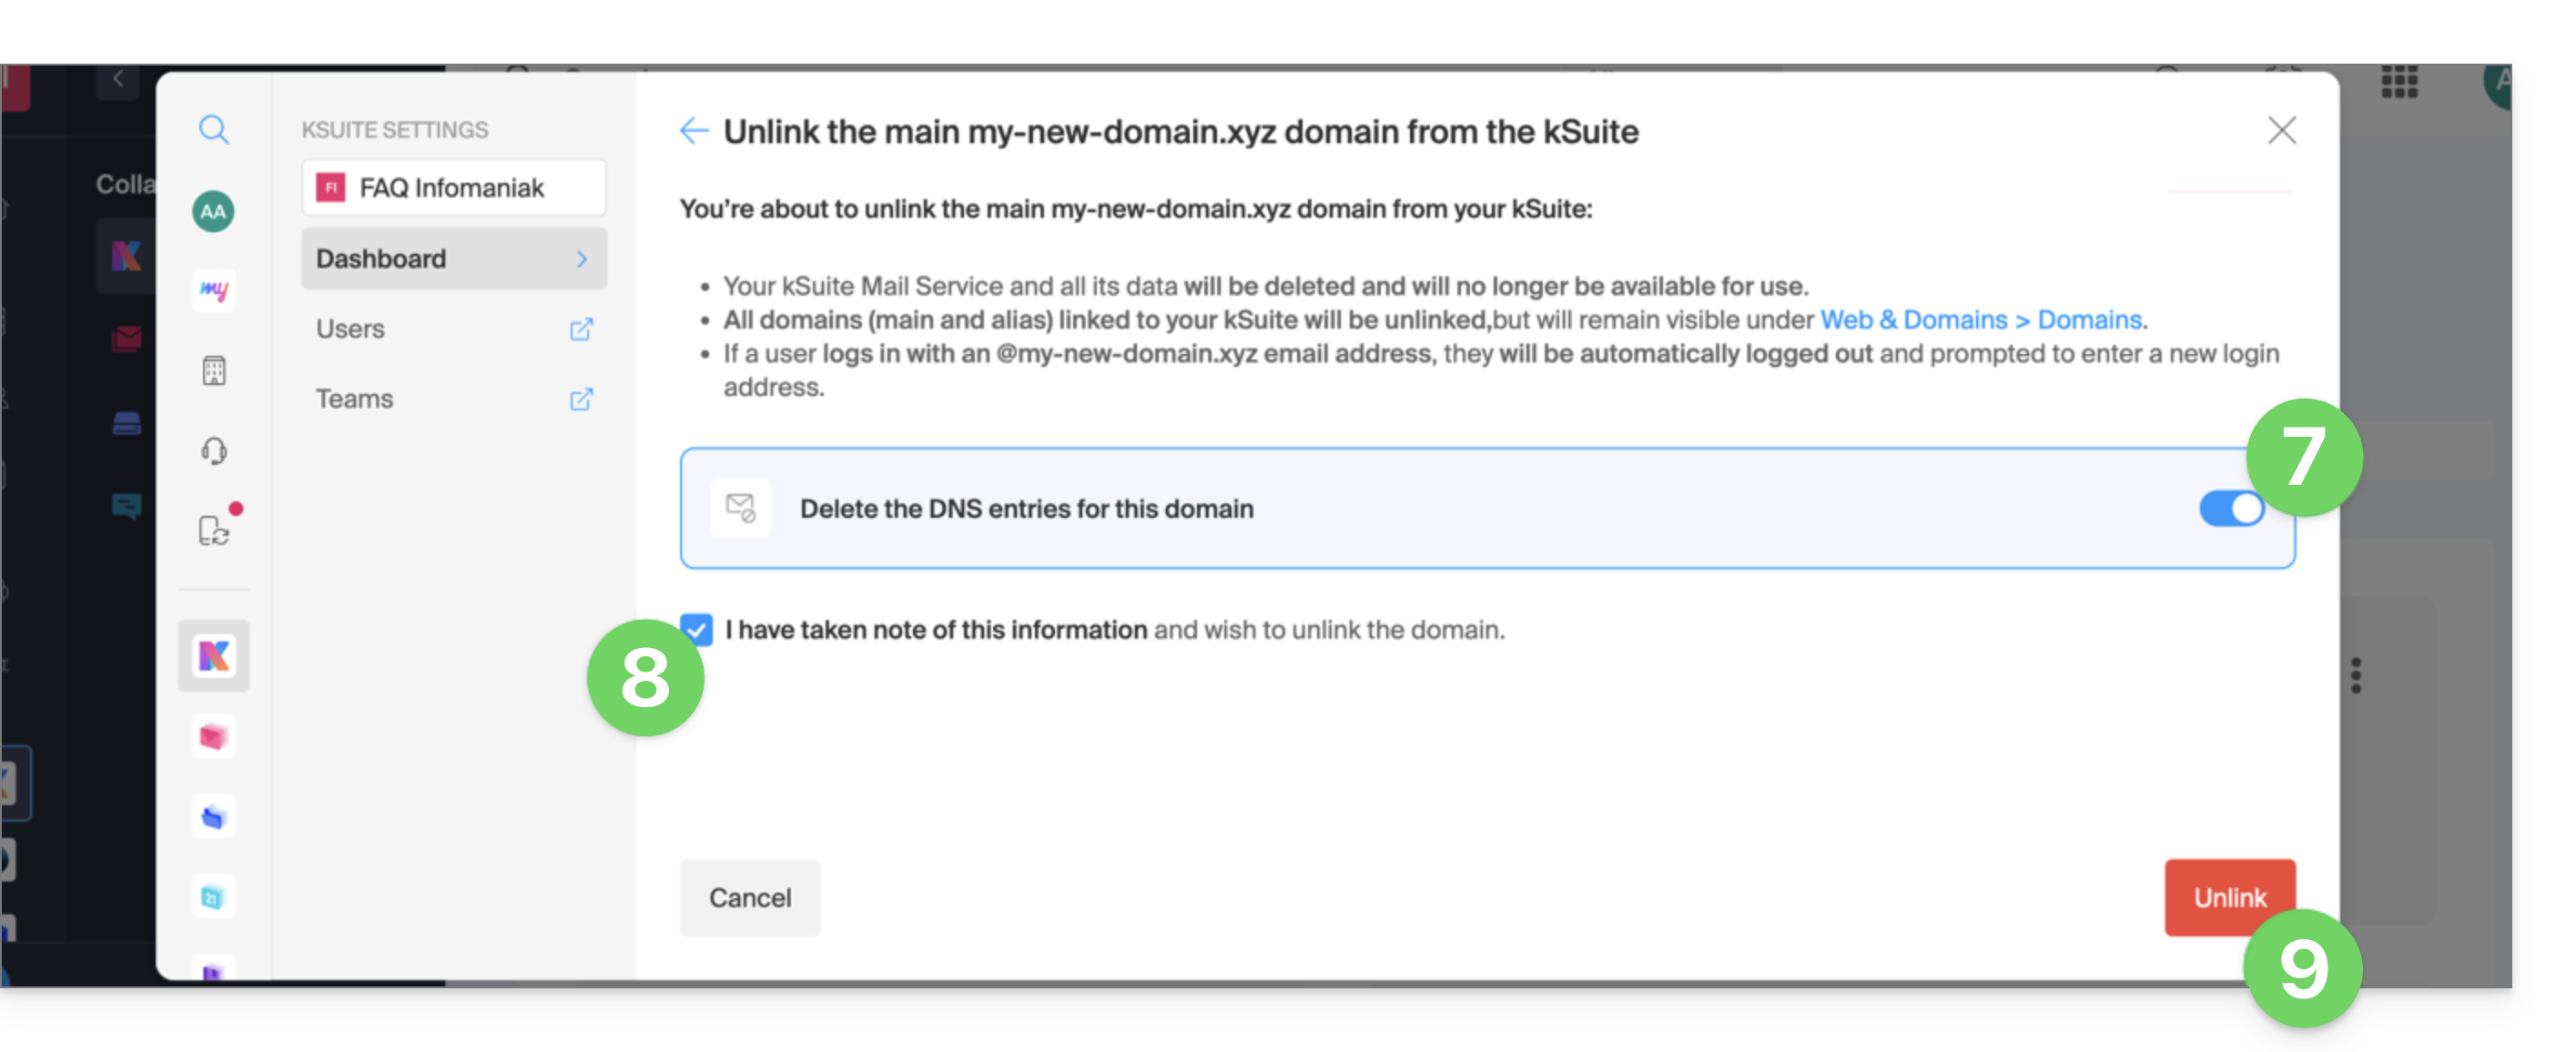
- If necessary, enable the deletion of the domain name's DNS entries.
- Confirm the detachment.
- Click the button to confirm the disassociation:
Link to this FAQ: https://faq.infomaniak.com/2893
Has this FAQ been helpful?
This guide explains how to enable two-factor authentication using an Infomaniak app already installed on your devices.
Introduction
- Consult this other guide about enabling the 2FA feature.
Receive a notification when a login authorization request is made via Infomaniak apps
From the moment you enable 2FA by configuring one of the available methods, the Infomaniak apps (Mail, Euria, kDrive, etc.) will automatically allow you to validate the connection.when logging in from another device:
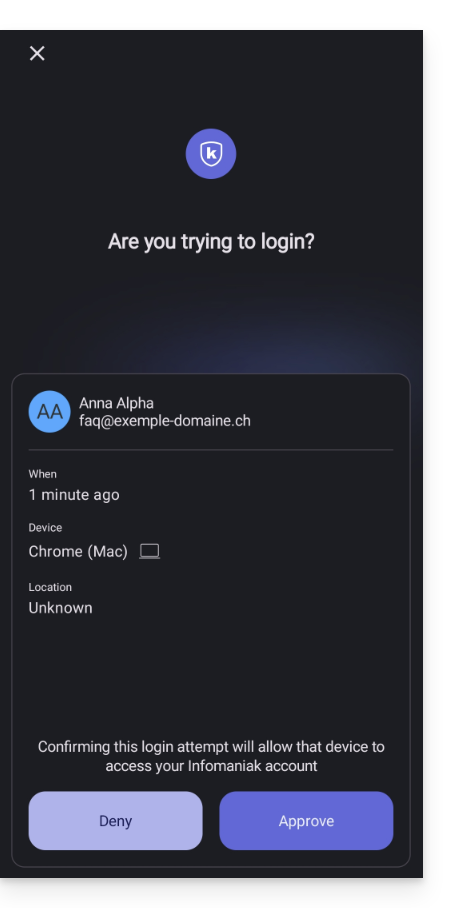
- A modal window will open, asking you to confirm the login if it originates from you:
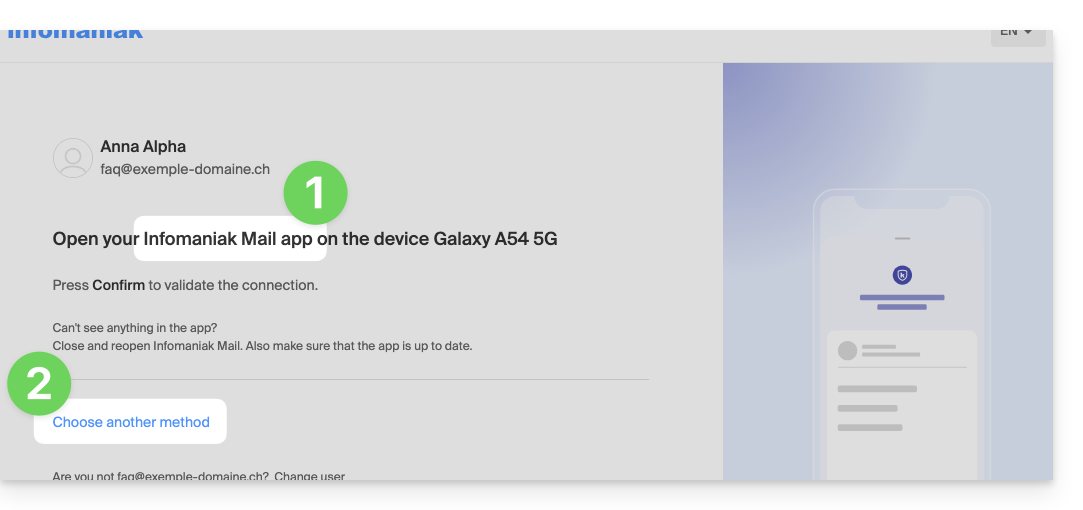
- You can, of course, request on a case-by-case basis to receive the validation request using one of the other registered methods:
- In this case, you will accessdifferent 2FA methods already registered for your account:
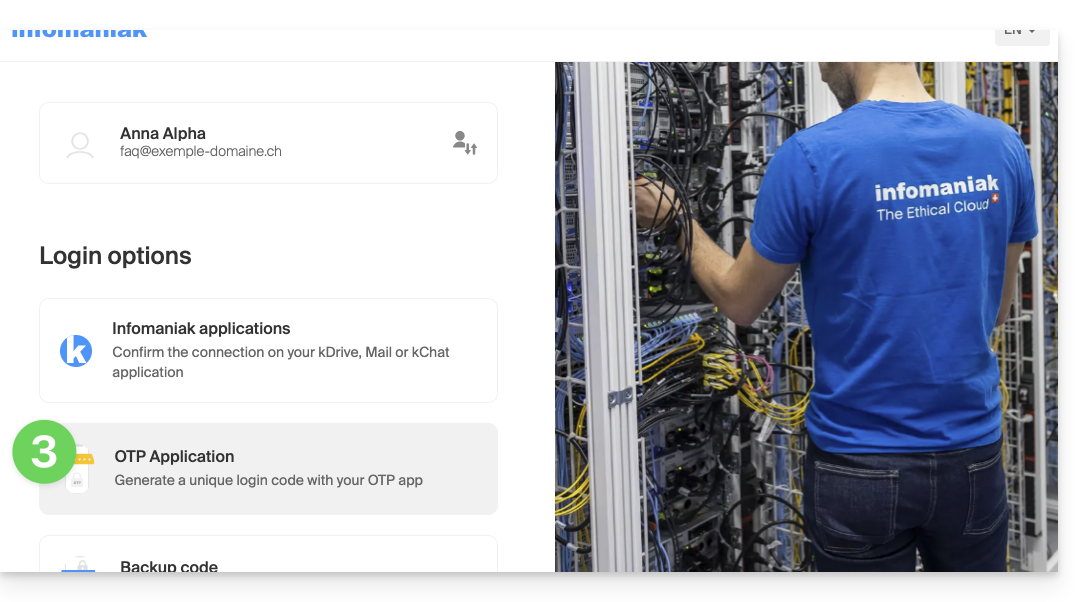
If you have enabled multiple verification methods (SMS, OTP app, etc.), you can specify which one will be offered by default during each login. Please note, however, that the priority method will remain the verification method used in the Infomaniak app installed (Mail, Euria, kDrive…) on your devices:
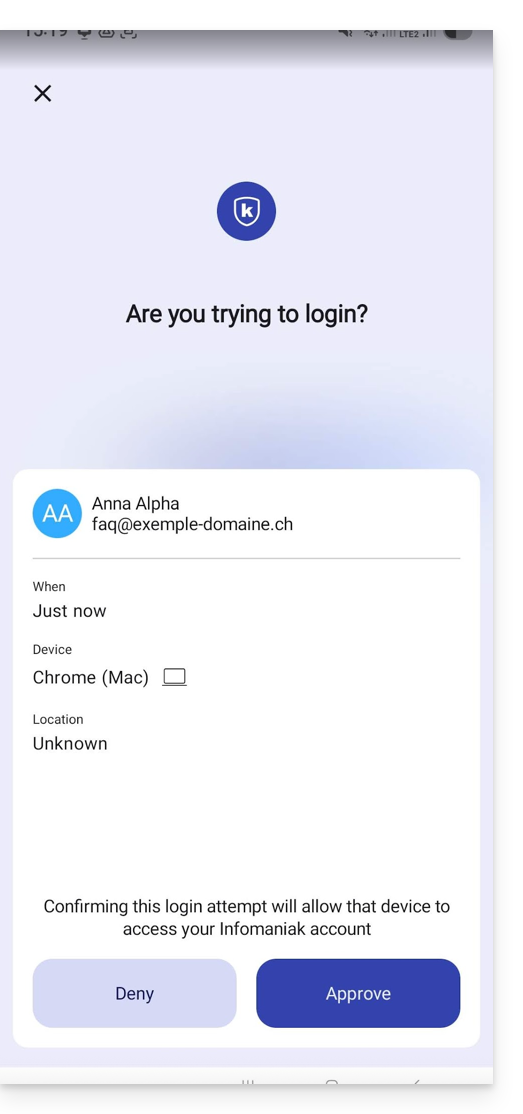
- The notification appears in full screen when you open the specified application, and a button allows you to validate the connection (to confirm that it is indeed you):
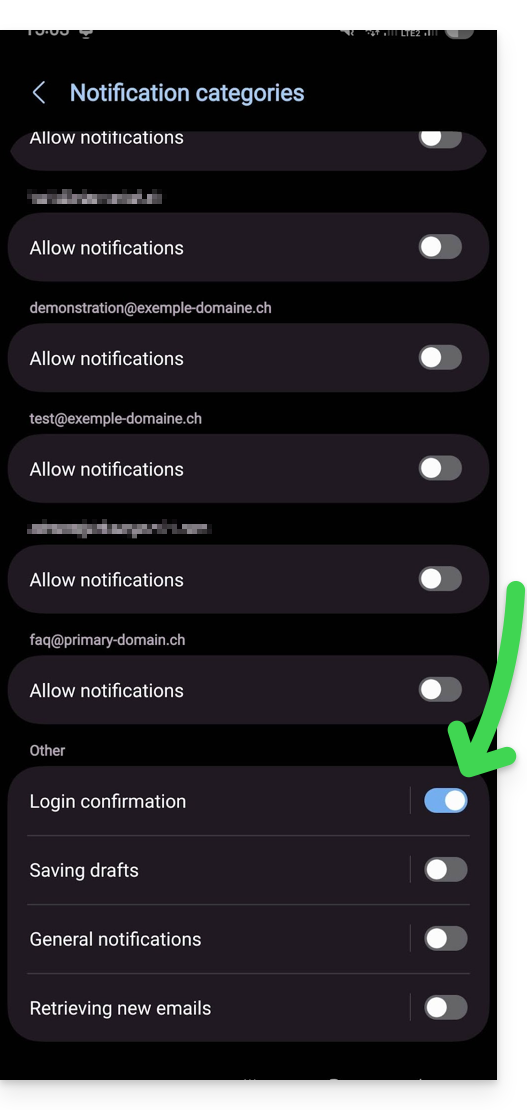
- In the Android settings of Infomaniak apps (Mail for example), you can choose to only enable the notification for connection authentication requests:
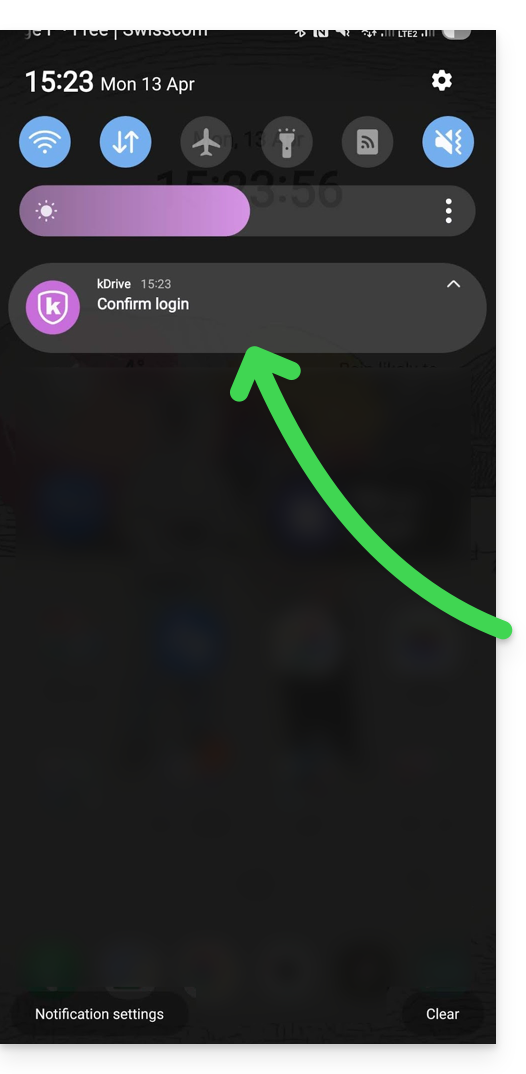
- An Android notification will alert you to the pending authentication request, and you can open the app directly from the notification:
Link to this FAQ: https://faq.infomaniak.com/2899
Has this FAQ been helpful?
This guide explains how to configure and optimize Projects on Euria, Infomaniak's AI assistant, to create customized and secure workspaces using your own instructions and documents.
Introduction
- A Project on Euria is a dedicated workspace that allows you to group your interactions around a specific topic or activity.
- By adding custom instructions and your own documents, you create a real knowledge base that the AI assistant uses to provide much more precise and contextually relevant answers.
- It is the equivalent of Projects on ChatGPT or Claude, with the added benefit of exclusive hosting in Switzerland and complete protection of your data.
Why and how to create my first AI Project on Euria, a Project with custom instructions?
Without a project, an AI assistant responds in a general way. With an Euria project, you provide context through custom instructions: your preferred tone, information about your company, your reference files, etc. Result: tailored responses, as if your AI assistant already knows your world. Unlike ChatGPT's custom instructions or Claude's project instructions, your data remains hosted in Switzerland and is never used to train models.
Go to Euria, Infomaniak's AI assistant, log in, and create your first project in a few clicks. Add your custom instructions and your documents to immediately obtain a personalized AI assistant, hosted in Switzerland:
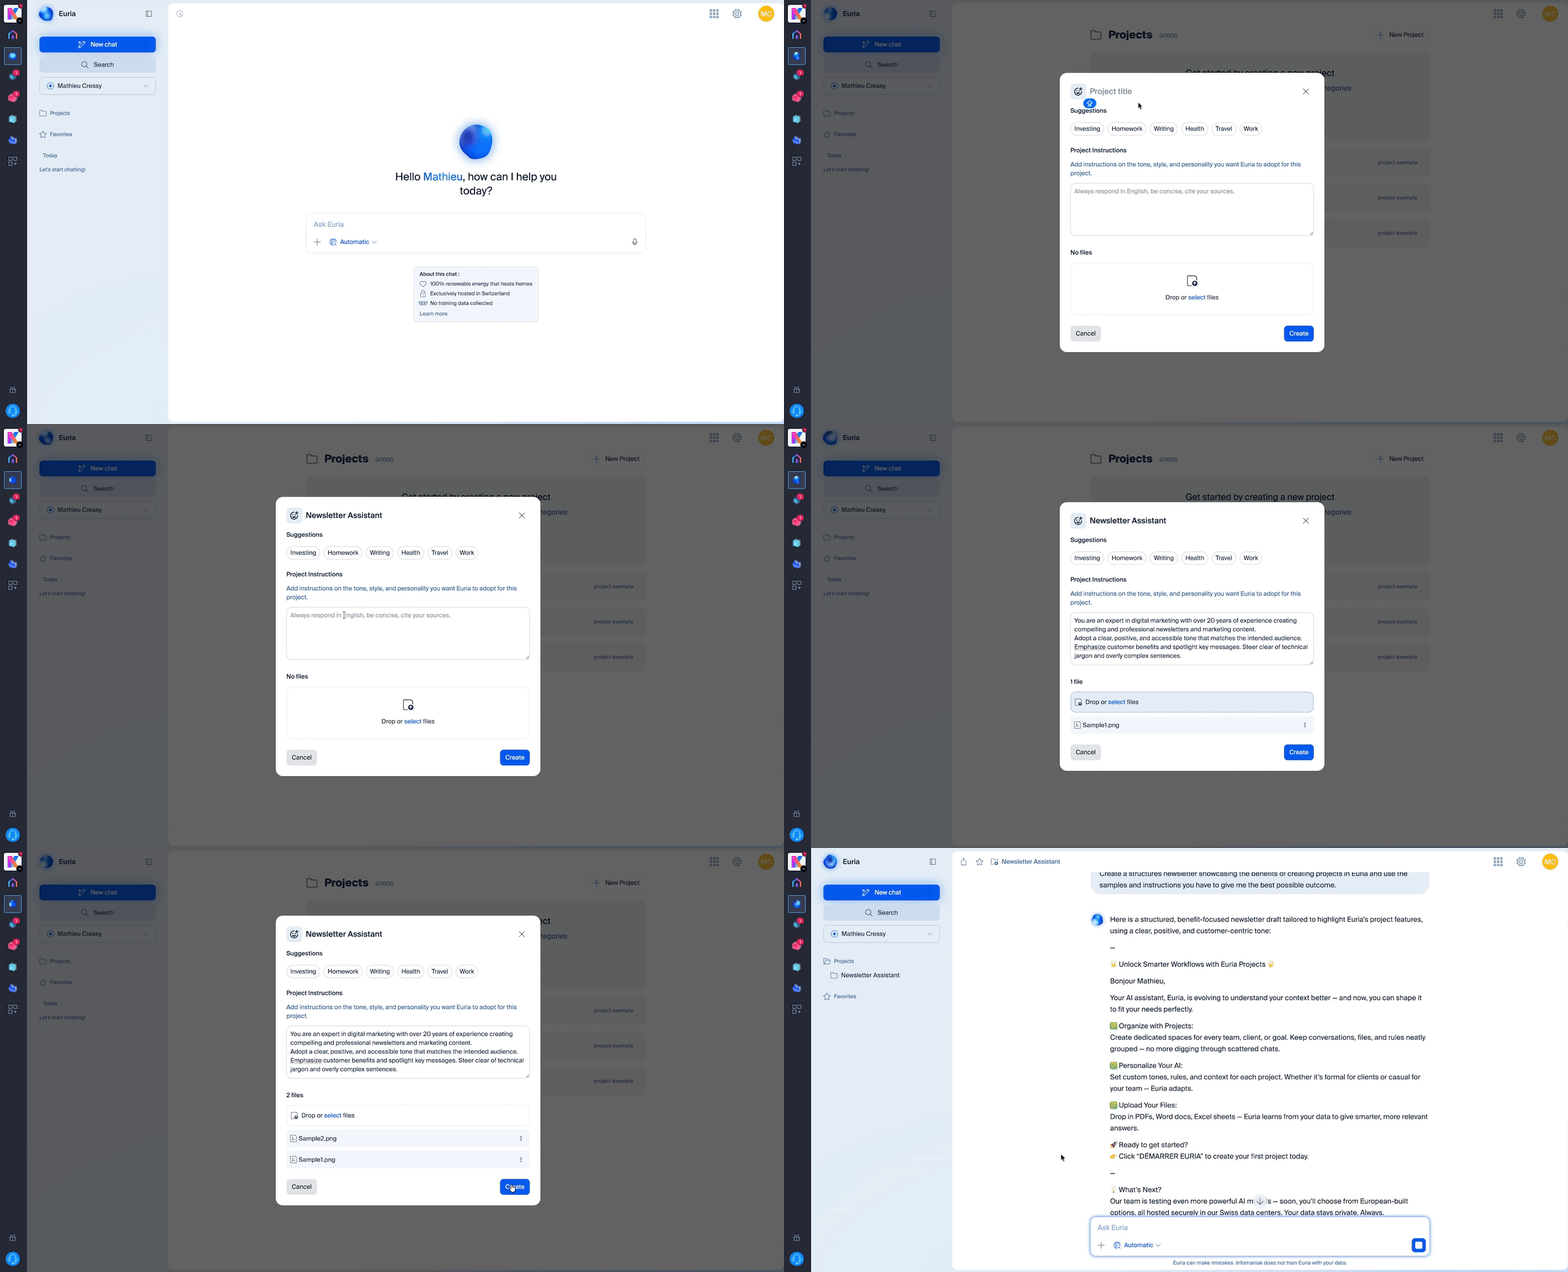
- From the Euria home screen, click on « Projects » in the left-hand menu.
- Click on « New project » and give it a name (e.g., « Marketing », « Customer Support », « My company »).
- Your project is created – all that remains is to customize it with your instructions and documents.
Add a custom instruction
A custom instruction is a directive that you give to Euria so that it can adapt its responses to your specific needs. Once in your project, go to the Instructions section. This is where you can specify to Euria:
- The tone to adopt (formal, friendly, technical, etc.)
- The context of your interactions (industry, type of customers, objectives, etc.)
- The role that the AI should play (writer, advisor, analyst, etc.)
- Specific instructions (languages to use, desired response formats, information to always include, etc.)
The more detailed your custom instructions are, the more relevant and consistent your AI assistant's responses will be.
Build a knowledge base with your documents
Open a project from euria.infomaniak.com, then drag and drop the documents of your choice into the right-hand bar.
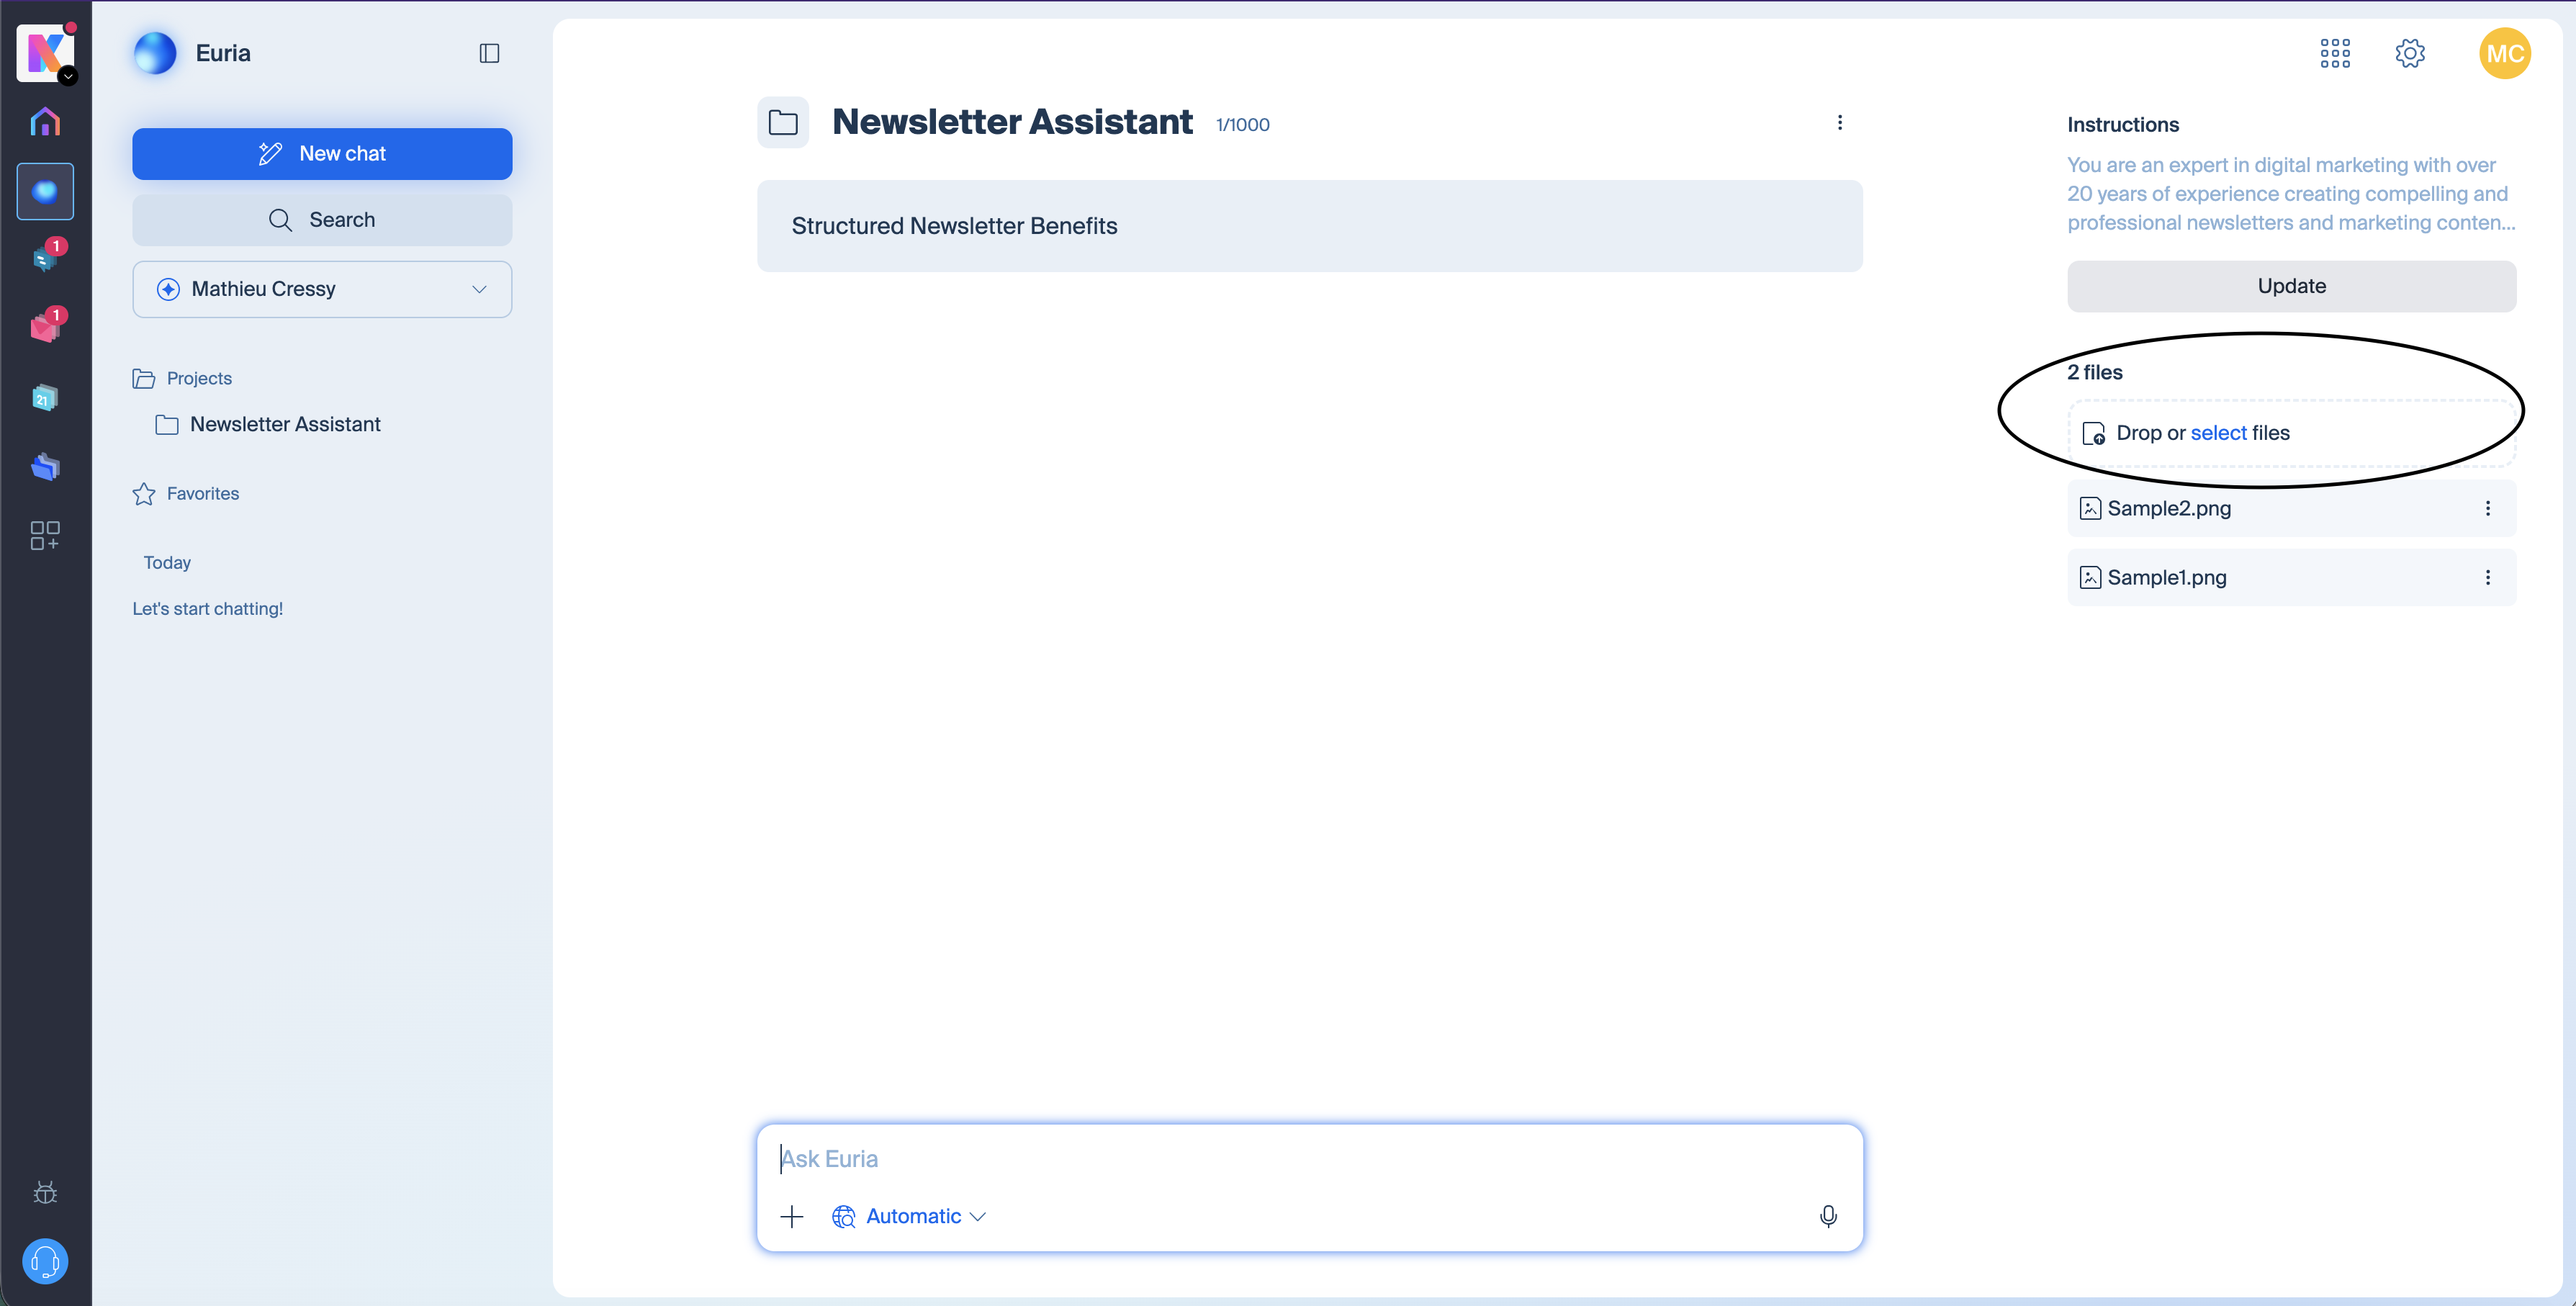
You can import your files (PDFs, texts, spreadsheets, etc.). Euria will use these documents to answer your questions with accurate and up-to-date information. This is ideal for uploading, for example, an editorial charter, a product catalog, internal FAQs, procedures, or any other reference document. The richer your knowledge base, the more effective your personalized AI assistant will be.
Types of files accepted for the knowledge base
Euria accepts several common formats for populating your knowledge base: PDF, text documents, markdown, Word, Excel, etc. If a format is not supported, Euria will notify you during import.
Create Multiple Projects on Euria
You can create as many projects as needed – one per client, per department, per topic… Each project operates independently with its own custom instructions and its own knowledge base, for an AI assistant that is truly tailored to each use case.
How does Euria differ from ChatGPT and Claude for AI project management?
Like ChatGPT and Claude, Euria allows you to create workspaces with custom instructions and a knowledge base. The main differences lie in data protection and technological transparency.
Euria is hosted exclusively in Switzerland, in Infomaniak's data centers. Your documents and conversations remain private, no data is used to train the AI models, and you have complete control over your information. In addition, Euria relies exclusively on open-source models, which are auditable and deployed locally – unlike the proprietary and closed technologies of ChatGPT or Claude. An open-source model "does not call its country of origin." Once deployed locally, it functions like any software installed on a server. For companies and professionals concerned about the sovereignty of their data, Euria offers a sovereign solution to ChatGPT and Claude that complies with the strictest confidentiality requirements. Sovereignty here applies to the infrastructure, jurisdiction, data flows, and Infomaniak's business model, which depends exclusively on its customers.
Is my data protected on Euria?
Euria is based exclusively on open-source models hosted and run in Switzerland.
In practice: the models are not retrained with user data, and conversations are not used to train other models.
The major difference compared to OpenAI, Google, or Anthropic:
there is no dependency on an external API
no data flow to a hyperscaler
no opaque proprietary technology
100% of Infomaniak's staff and data centers are in Switzerland
and Infomaniak is a 100% independent and Swiss company, compliant with GDPR
Link to this FAQ: https://faq.infomaniak.com/2907
Has this FAQ been helpful?
This guide details how to use Euria, and more specifically, how to manage conversations within Infomaniak's AI application.
Getting started with Euria and creating different conversations
To do this:
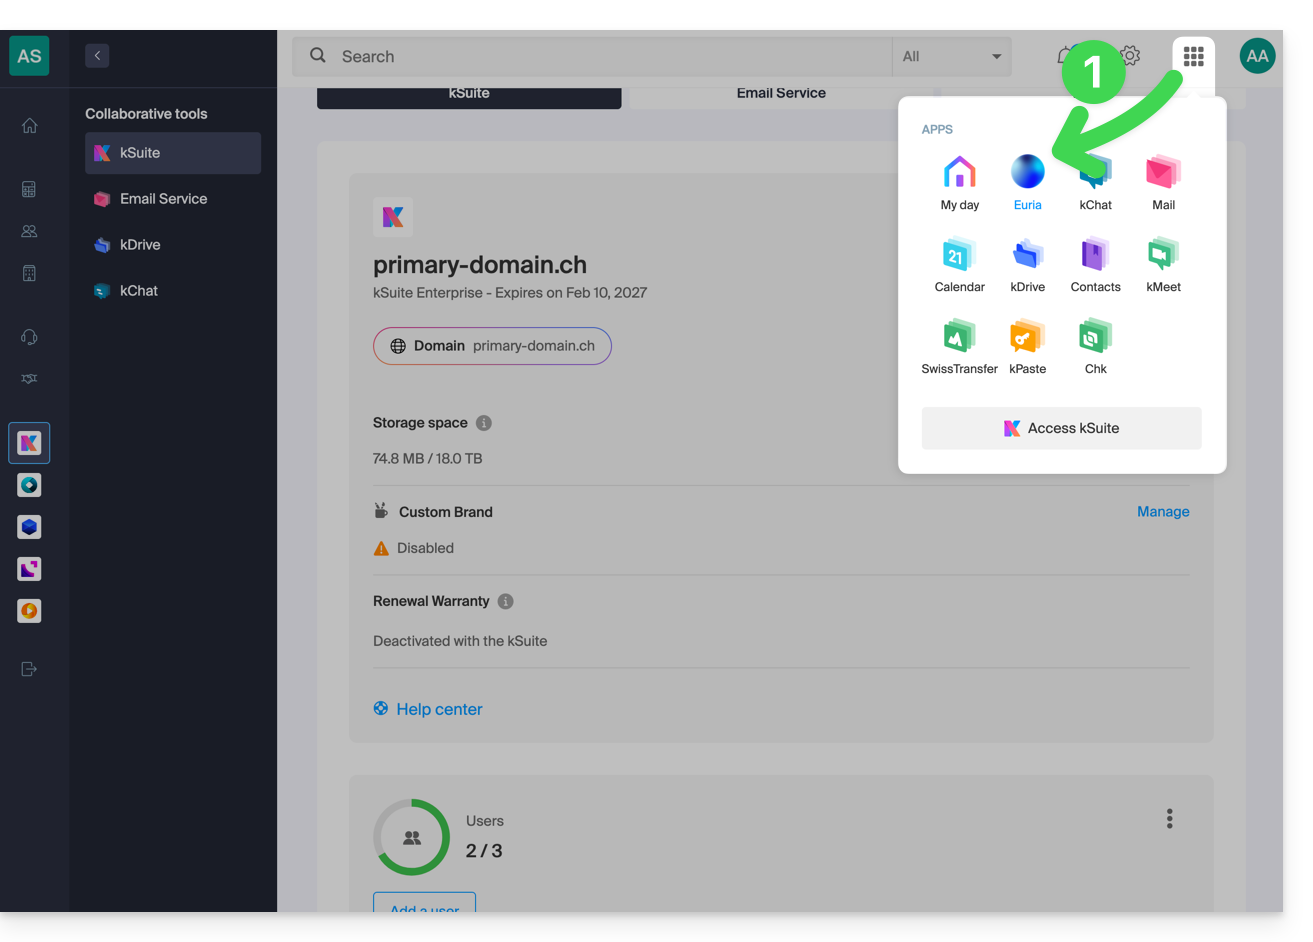
- Click here to access the Euria web app (online service ksuite.infomaniak.com/euria) or open the Euria mobile app (application for iOS/Android smartphones or tablets):
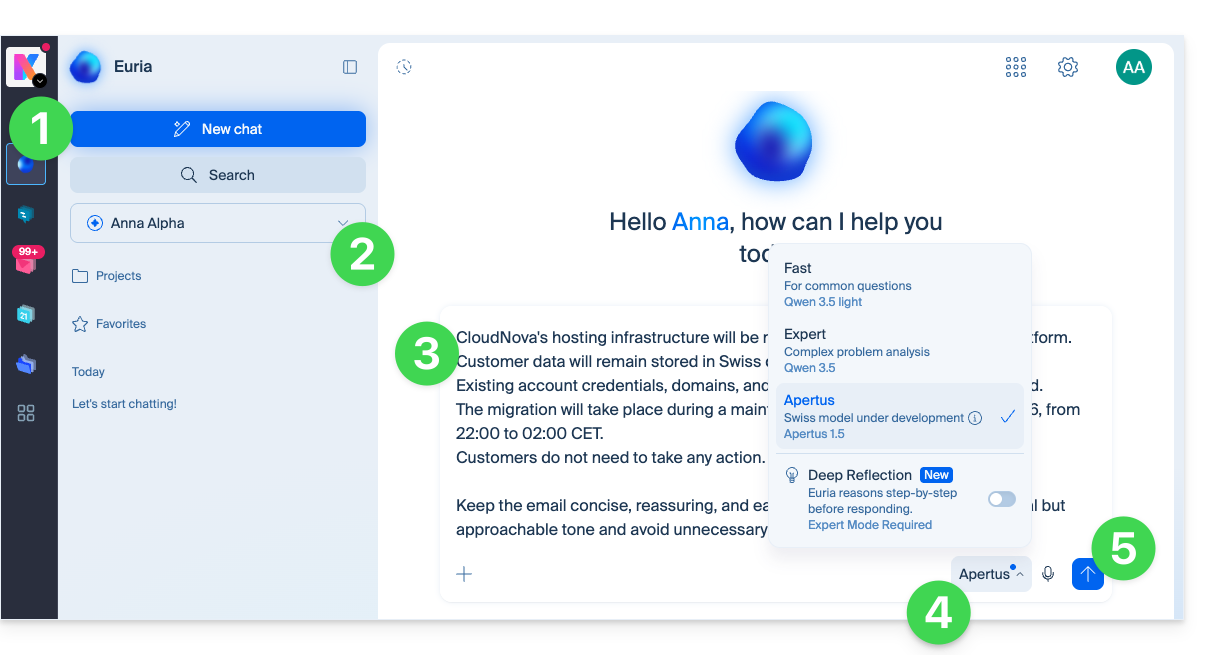
- Check or select the relevant Organization from the dropdown menu in the left-hand sidebar.
- Start a conversation by typing your message, request, or prompt.
- Select the reasoning mode that the AI should use to process your request.
- Click the button to start the conversation with Euria:
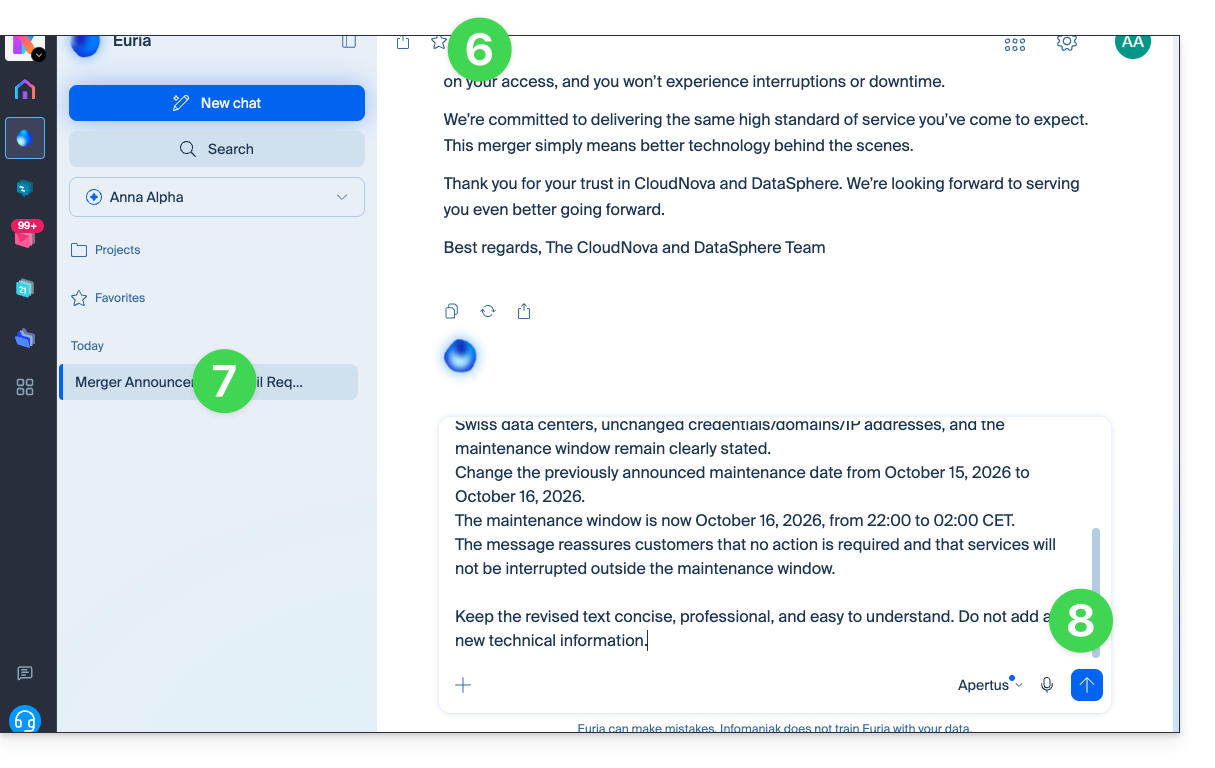
- A response from Euria is displayed.
- The conversation is now available in the left-hand menu, and clicking on it will allow you to return to it at any time.
- You can add elements and continue the discussion:
- Click the New Chat button to start a brand new discussion on a different topic.
- Type your message, request, or prompt and press send:
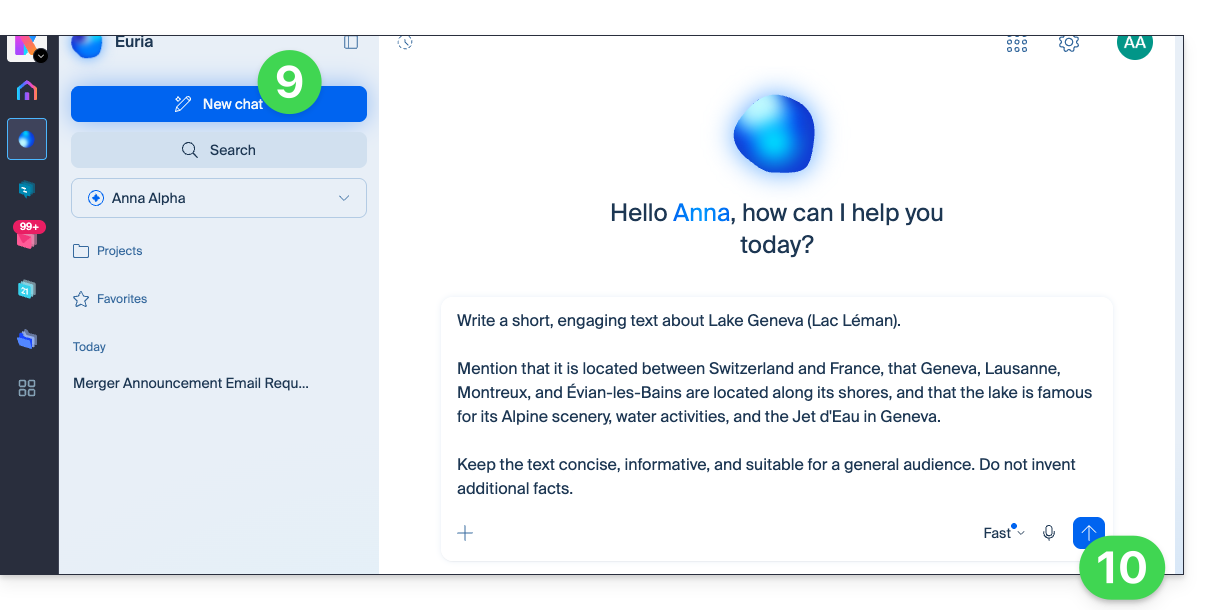
- Euria's response is displayed, and a second conversation is created in the left-hand menu; clicking on it will allow you to return to it at any time and continue the discussion with the associated history:
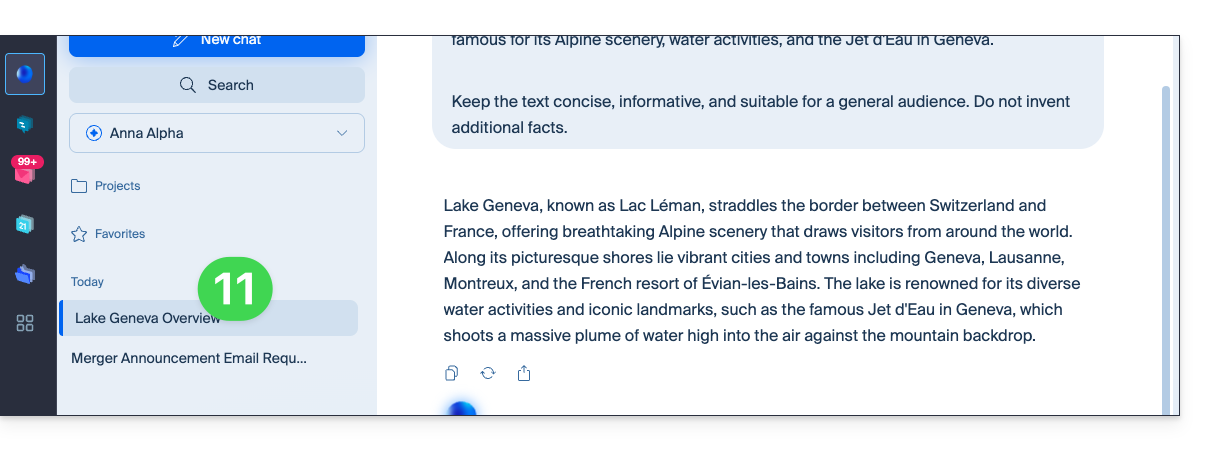
Archiving
Archive a specific conversation
Archiving a conversation removes it from the main page. It can still be shared.
Archived conversations are also deleted when the entire Euria history is cleared.
To archive a conversation:
- Hover over the conversation in the left-hand menu of Euria.
- Click on the action menu ⋮ located to the right of the item in question.
- Choose Archive:
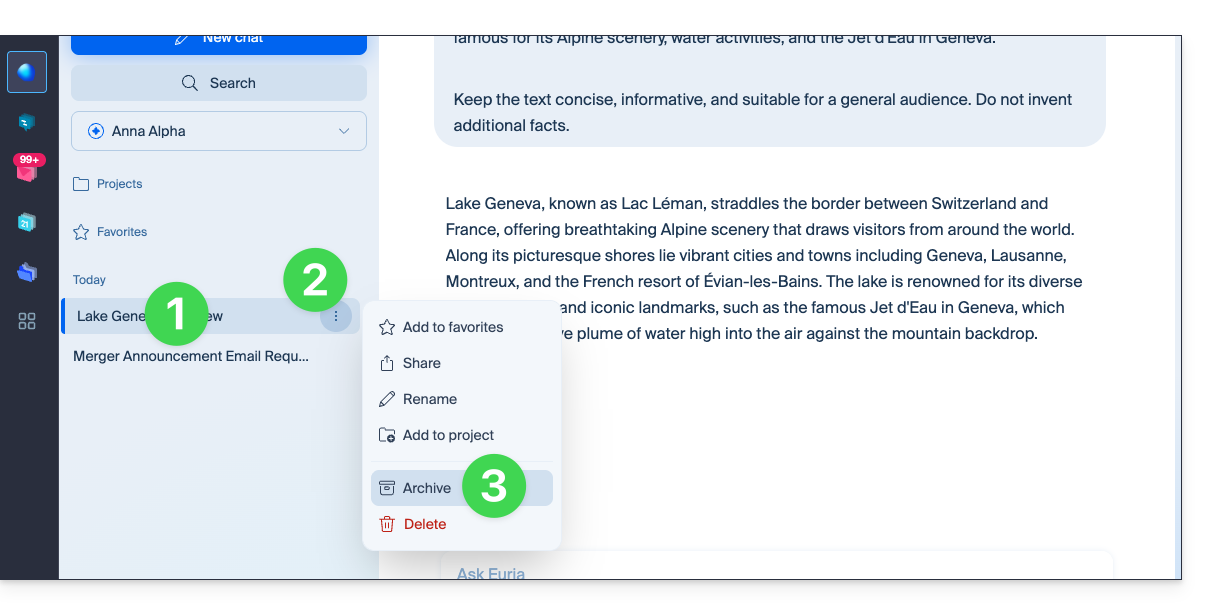
- It is archived immediately.
Archive all user conversations
To archive all conversations visible in Euria:
- Click on Settings in the top right corner.
- Check or select the relevant Organization from the dropdown menu in the left-hand sidebar.
- Click on Archive conversation history:
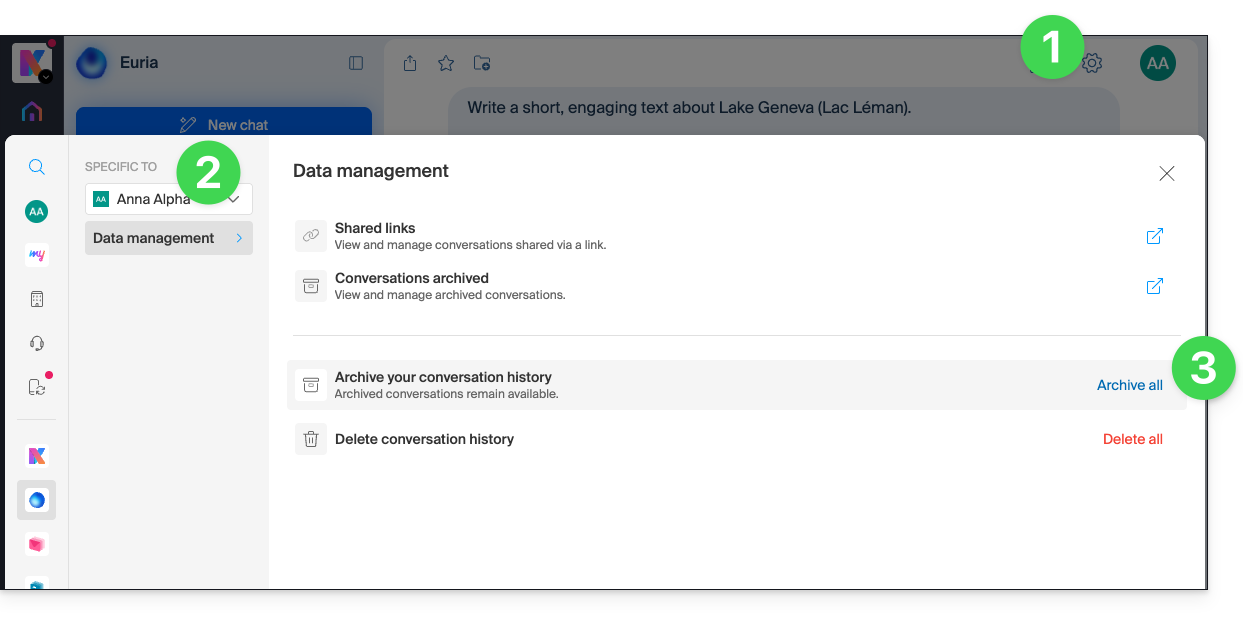
- Confirm the operation:
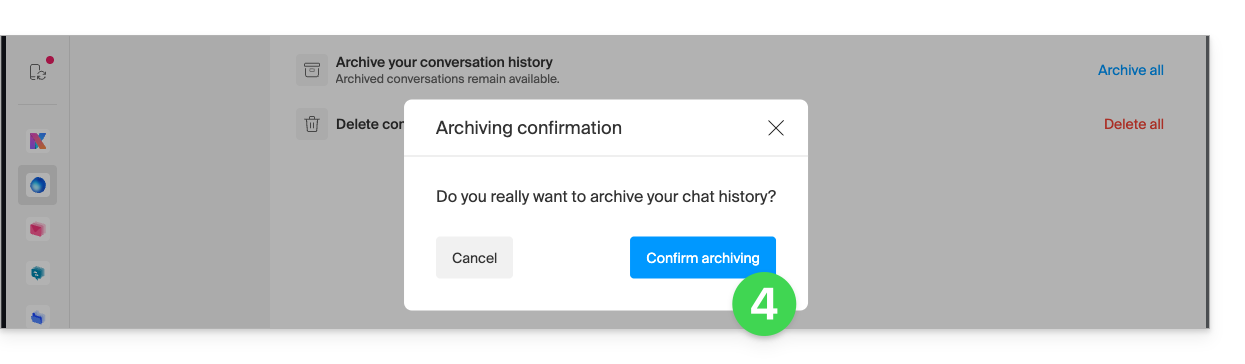
- All conversations will be deleted…
Manage archived conversations
To access archived messages:
- Click on Settings in the top right corner.
- Check or select the relevant Organization from the dropdown menu in the left-hand menu.
- Click on the archived conversations:
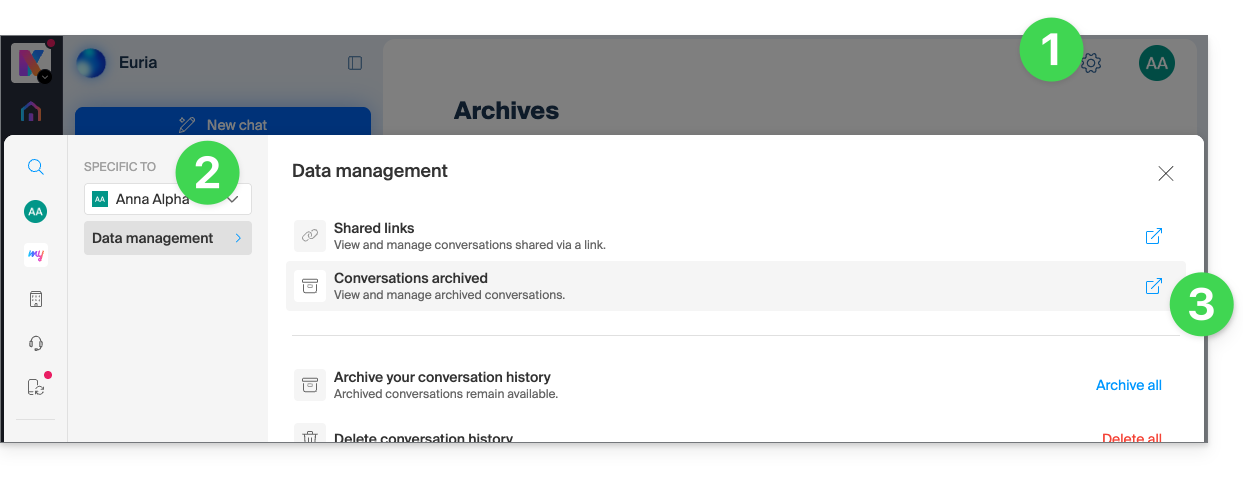
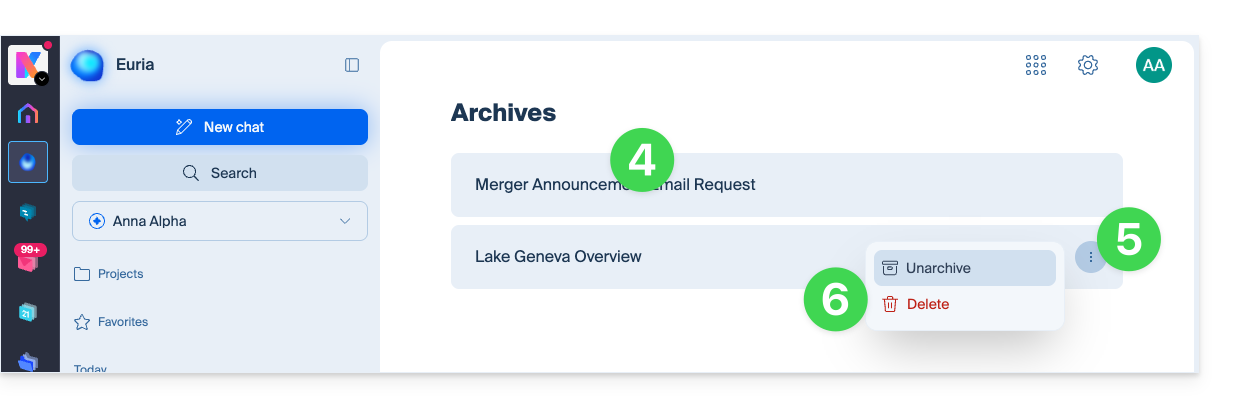
- The titles of the different archived conversations are displayed; click on them to view them.
- Otherwise, click on the action menu ⋮ located to the right of the item in question.
- If necessary, choose whether to unarchive the conversation in question or to delete it permanently (after confirmation):
Deletion
Delete a specific conversation
To delete a specific conversation:
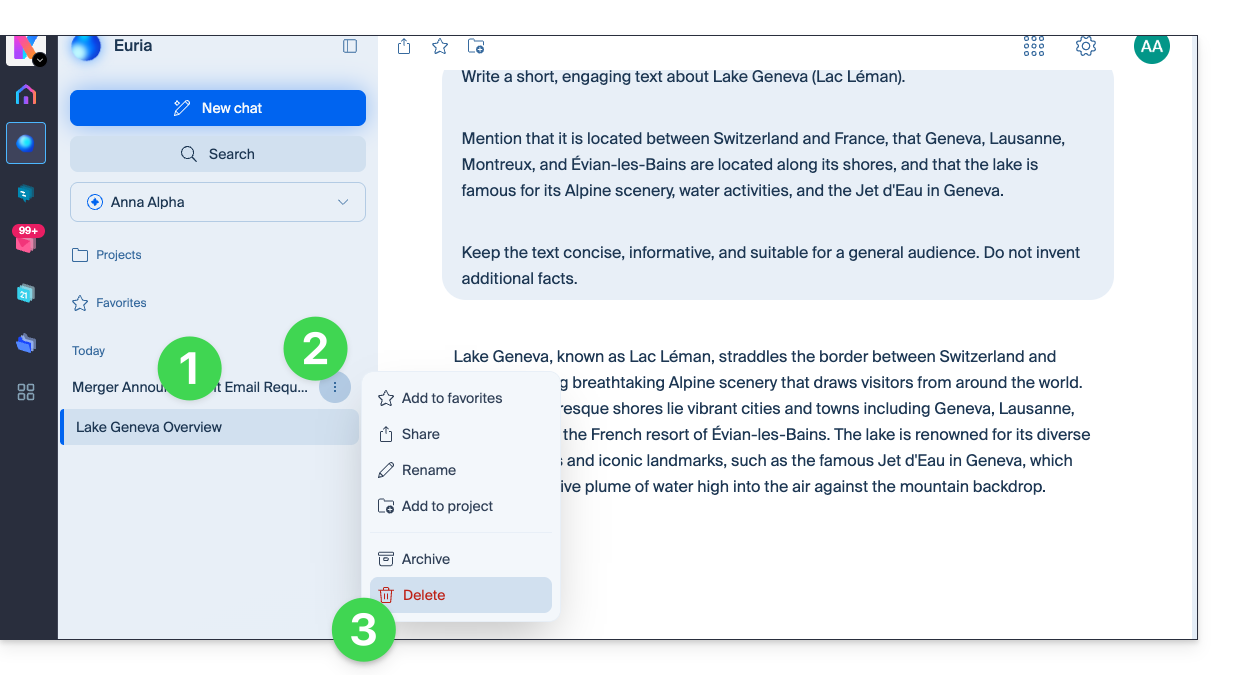
- Hover over the conversation in question in the left-hand menu of Euria.
- Click on the action menu ⋮ located to the right of the item in question.
- Choose Delete:
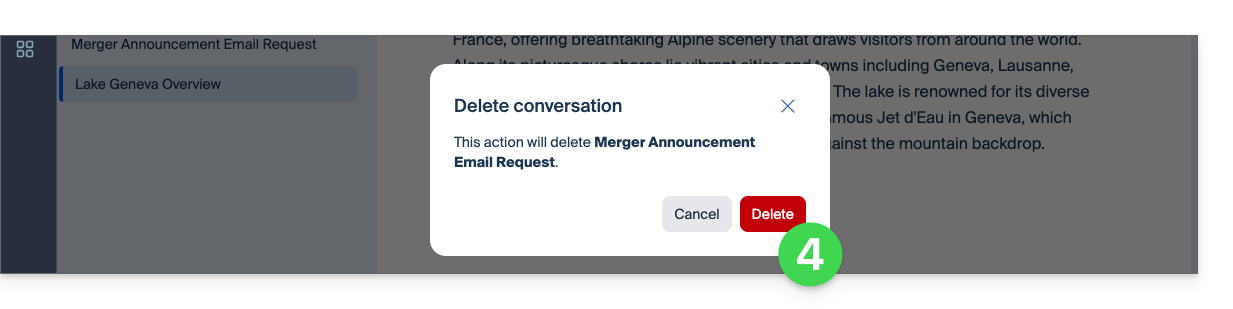
- Confirm the operation:
Delete all user conversations
To delete all conversations, including archived conversations:
- Click on Settings in the top right corner.
- Check or select the relevant Organization from the dropdown menu in the left-hand sidebar.
- Click on Delete conversation history:
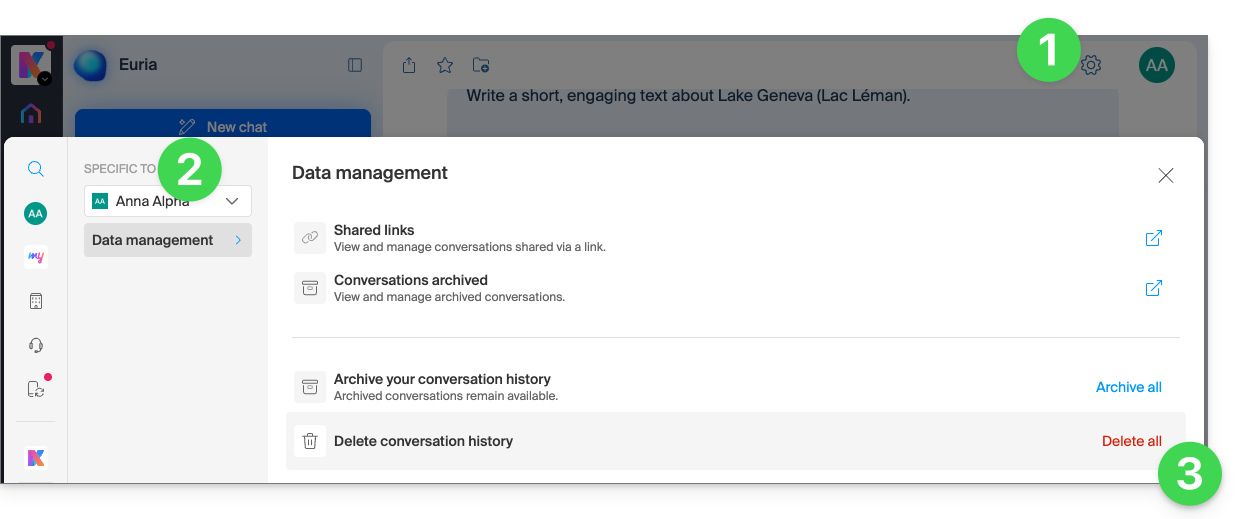
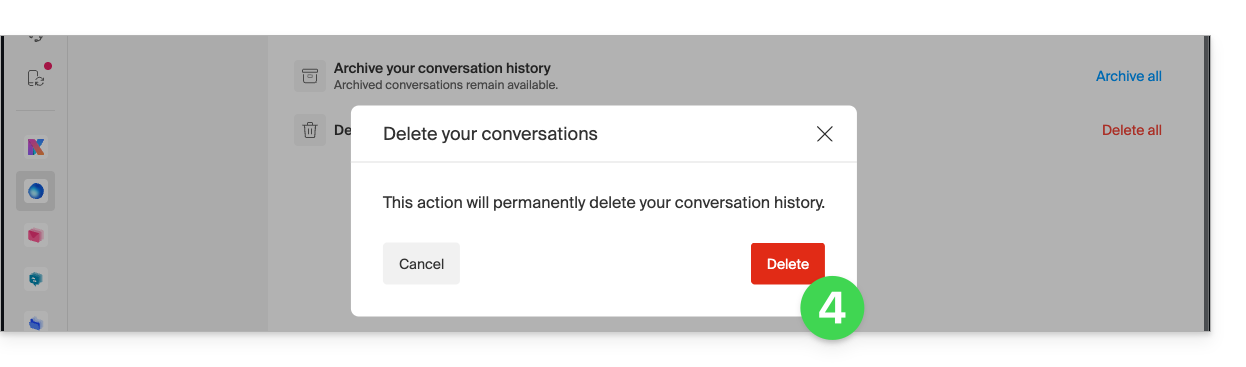
- Confirm the operation:
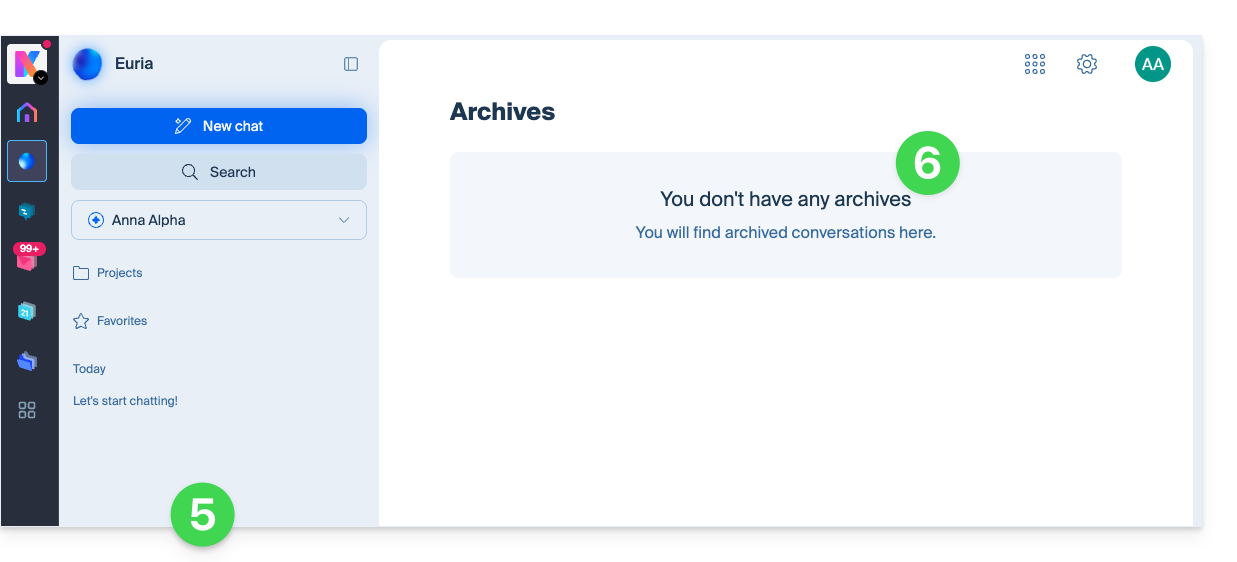
- All conversations will be deleted…
- … including archived messages:
Link to this FAQ: https://faq.infomaniak.com/2915
Has this FAQ been helpful?
This guide helps you choose the Infomaniak email service that best suits your needs, whether you are looking for a simple free address or a professional solution.
1. I would like a free email address
Example: jean.dupont@ik.me or plomberie-du-lac@etik.com
- Choose the My kSuite plan.
- It allows you to create 1 email address for free by choosing from three extensions:
@ik.me,@etik.comor@ikmail.com. - Click here to register (❓: help).
2. I would like a professional (custom) email address
To obtain an address ending with your company name or your last name (e.g., @plomberie-du-lac.ch), you must own what is called a domain name.
If you only need ONE address
- Example:
contact@plomberie-du-lac.ch - Choose the Starter plan.
- It includes 1 free email address when you purchase a custom domain name (❓: help).
If you need MULTIPLE addresses
- Examples:
contact@plomberie-du-lac.ch,jean@plomberie-du-lac.ch, etc. - For 2 addresses: choose kSuite Standard.
- For 5 addresses or more: choose a Mail Service (either standalone or included in a kSuite Business/Enterprise if you plan to collaborate with multiple users).
- Once you have chosen an offer, you can create your various email addresses (❓: help) on your domain name and even link a second domain name (❓: help) if necessary.
Link to this FAQ: https://faq.infomaniak.com/2920
Has this FAQ been helpful?
This guide introduces Apertus, a Swiss artificial intelligence model available in Euria, Infomaniak's sovereign AI assistant.
Introduction
- Apertus is a language model developed in Switzerland by the Swiss AI Initiative, a collaboration between EPFL, ETH Zurich, and the Swiss National Supercomputing Centre (CSCS).
- It is an open, transparent model designed to support a large number of languages.
- Its integration into Euria is part of a collaboration between Infomaniak and the teams behind the Apertus project.
- The model is executed on Infomaniak's infrastructure in Switzerland.
What is Apertus?
Apertus is a large language model, also known as an LLM, capable of understanding and generating text from the instructions provided to it.
This model was developed with particular attention paid to transparency, multilingualism, and digital sovereignty. Its weights, code, training methods, and documentation are publicly accessible.
Apertus can be used, in particular, for:
- write and rewrite content;
- summarize information or documents;
- translate text;
- extract and structure information;
- answer general questions;
- generate ideas or prepare a first draft of content.
Why is Apertus offered in Euria?
The integration of Apertus allows Euria to offer a model developed in Switzerland that meets Infomaniak's objectives of transparency, technological independence, and data protection.
Requests addressed to Apertus, as well as all artificial intelligence models available in Euria, are processed by Infomaniak's infrastructure in Switzerland. The transmitted content is not used to train these models.
Using Apertus in Euria
To start a conversation with Apertus:
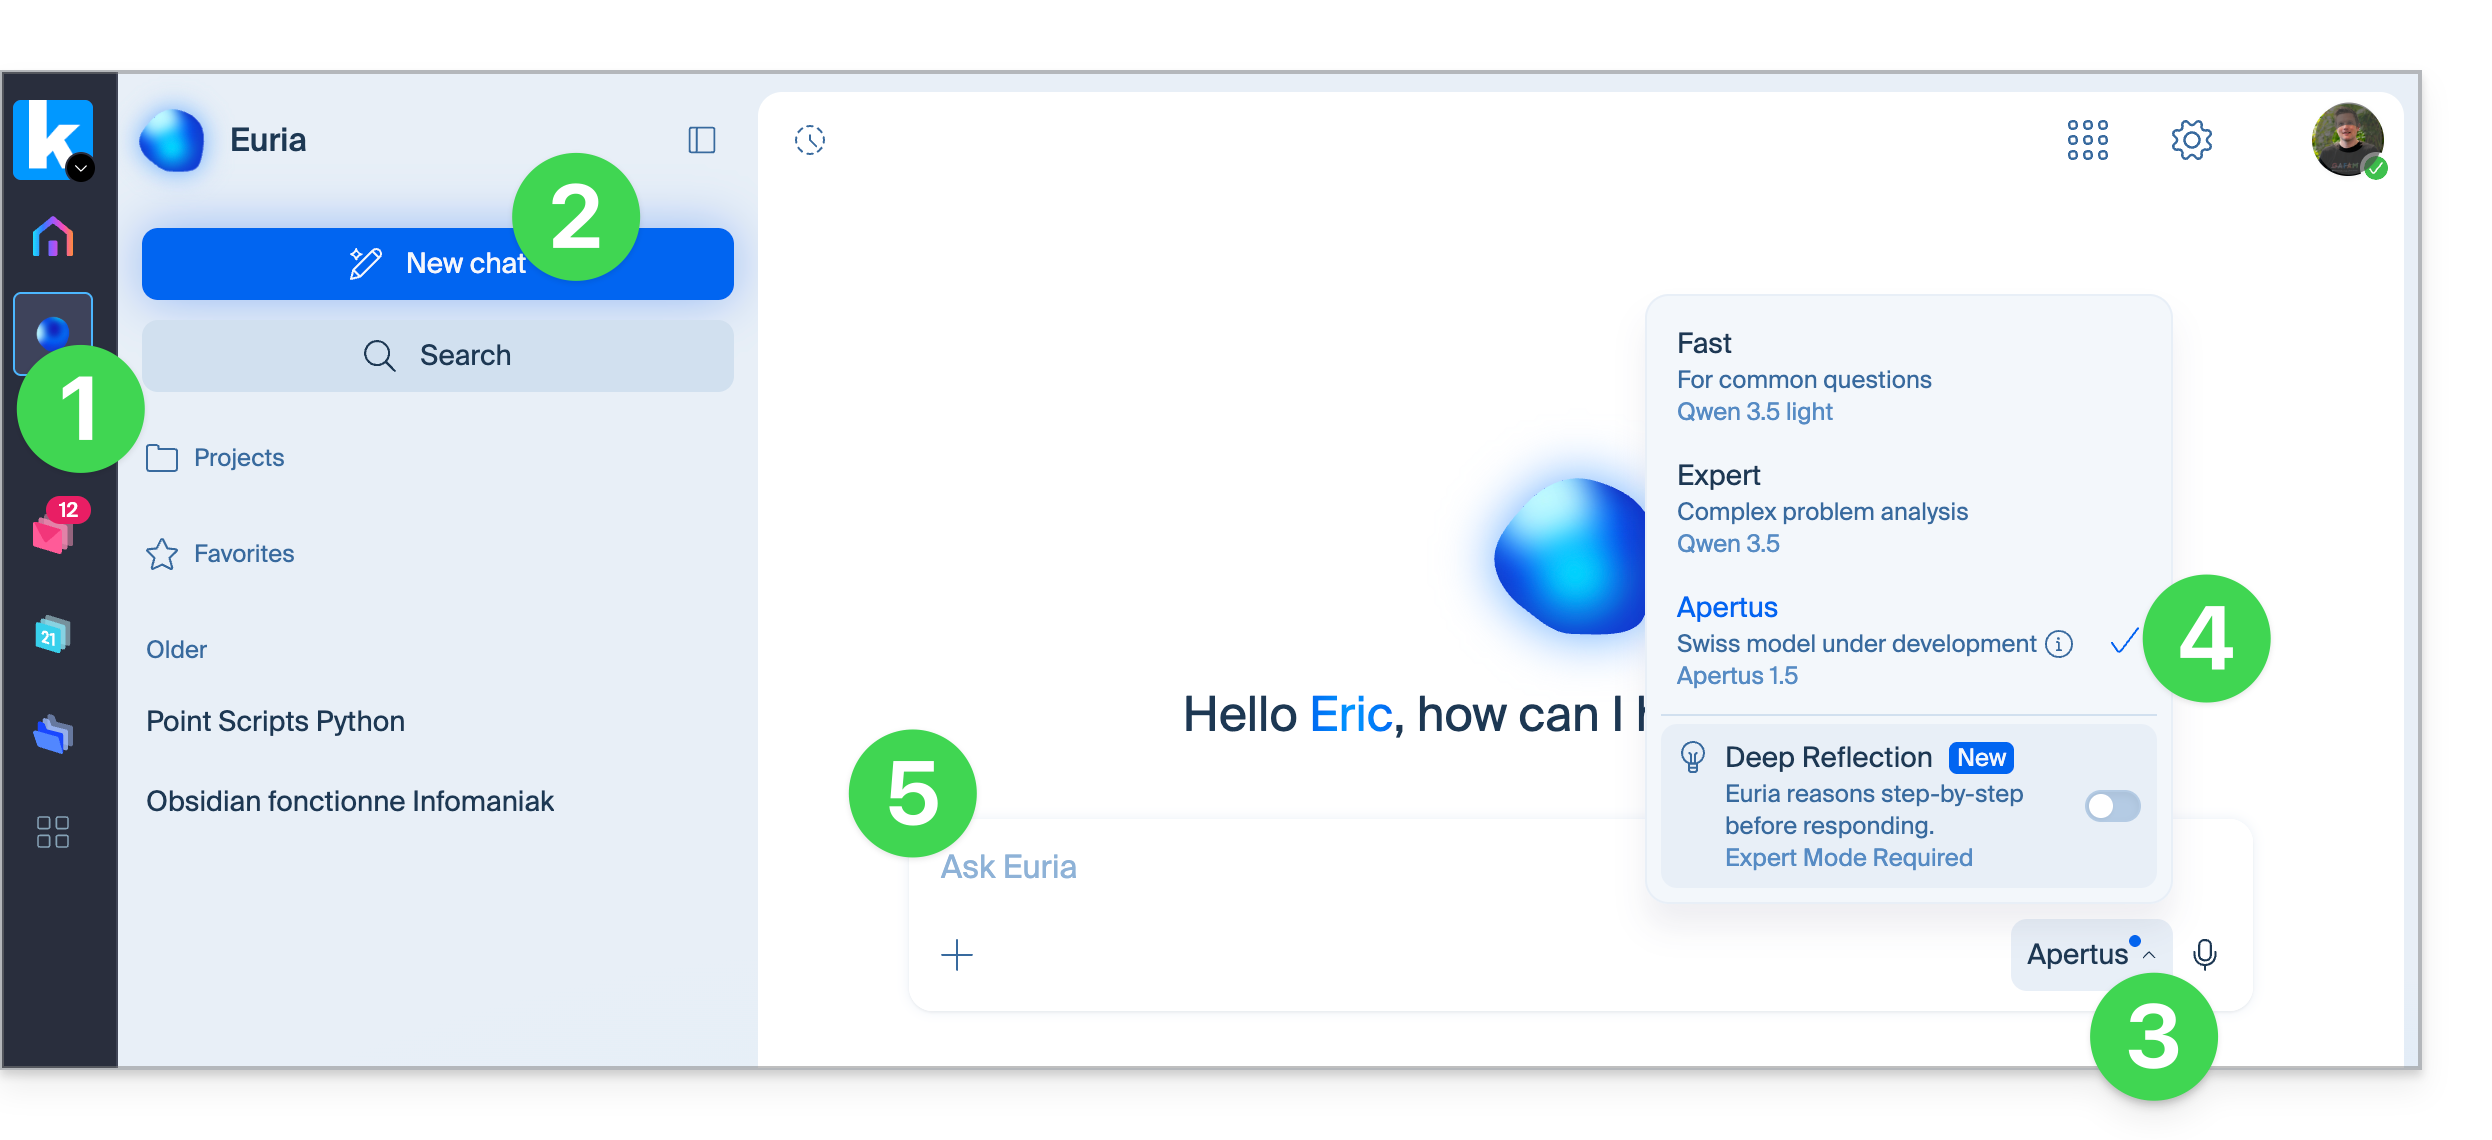
- Go to Euria.
- Start a new conversation.
- Open the template selector.
- Select Apertus from the available templates.
- Write your request and send your message:
Choosing Apertus or another model
Each model available in Euria has its own characteristics. Apertus may be particularly suitable when you prioritize:
- a model developed in Switzerland;
- a fully open and documented technology;
- processing of multilingual content;
- use based on a sovereign infrastructure in Switzerland.
For some complex requests, another model available in Euria may provide a different or more suitable result. You can compare the responses by switching models and resubmitting your request.
Link to this FAQ: https://faq.infomaniak.com/2924
Has this FAQ been helpful?
This guide explains how to suggest dates and times for meetings to multiple people using the Infomaniak Calendar web app (online service ksuite.infomaniak.com/calendar). Guests can then indicate their availability by voting for the time slots proposed by the organizer.
Introduction
- The functionality is similar to Doodle, but with a key difference: the organizer defines the guests precisely in advance (or as they go), and only these invited people can participate, unlike a poll that is accessible to anyone with the link.
- You can also access the feature while reading an email.
- To schedule a meeting based on the available times of each invitee, please refer to this other guide.
Suggest a meeting
To suggest a new joint event using a meeting request:
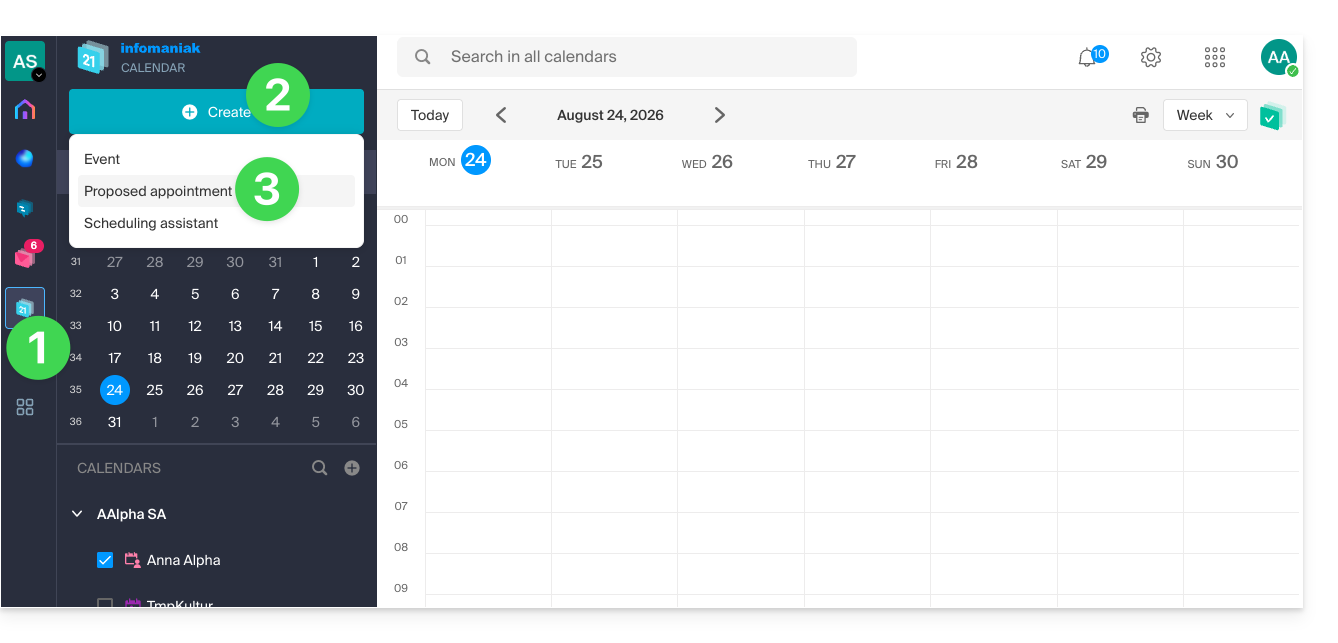
- Click here to access the Infomaniak Calendar web app (online service ksuite.infomaniak.com/calendar).
- Click on the Create button in the upper left corner.
- Click on Suggest a meeting:
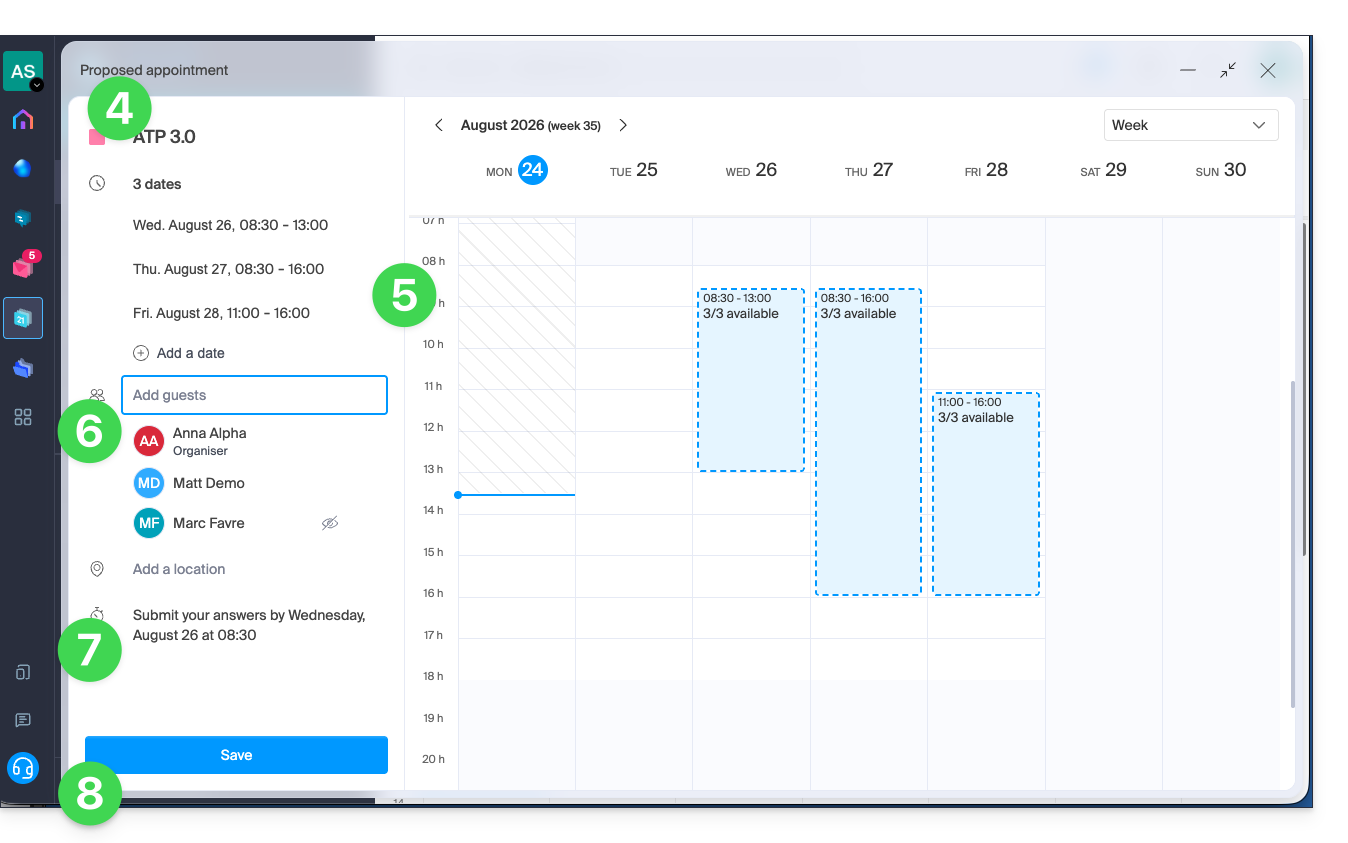
- Indicate the color and title (subject) of the event; the event location can be defined below.
- Enter the proposed dates/times manually or by clicking on the calendar displayed on the right.
- Enter the guests, using their email address if the guest is not a user of the Organization.
- Enter the deadline date/time after which it will no longer be possible to respond.
- Save the preferences using the button at the bottom of the page to create the invitation and date suggestions, for which guests will be able to vote:
Vote for one or more of the proposals
The invited user receives an email containing the organizer's various proposals; they can then indicate whether they are available during one or more of the proposed time slots.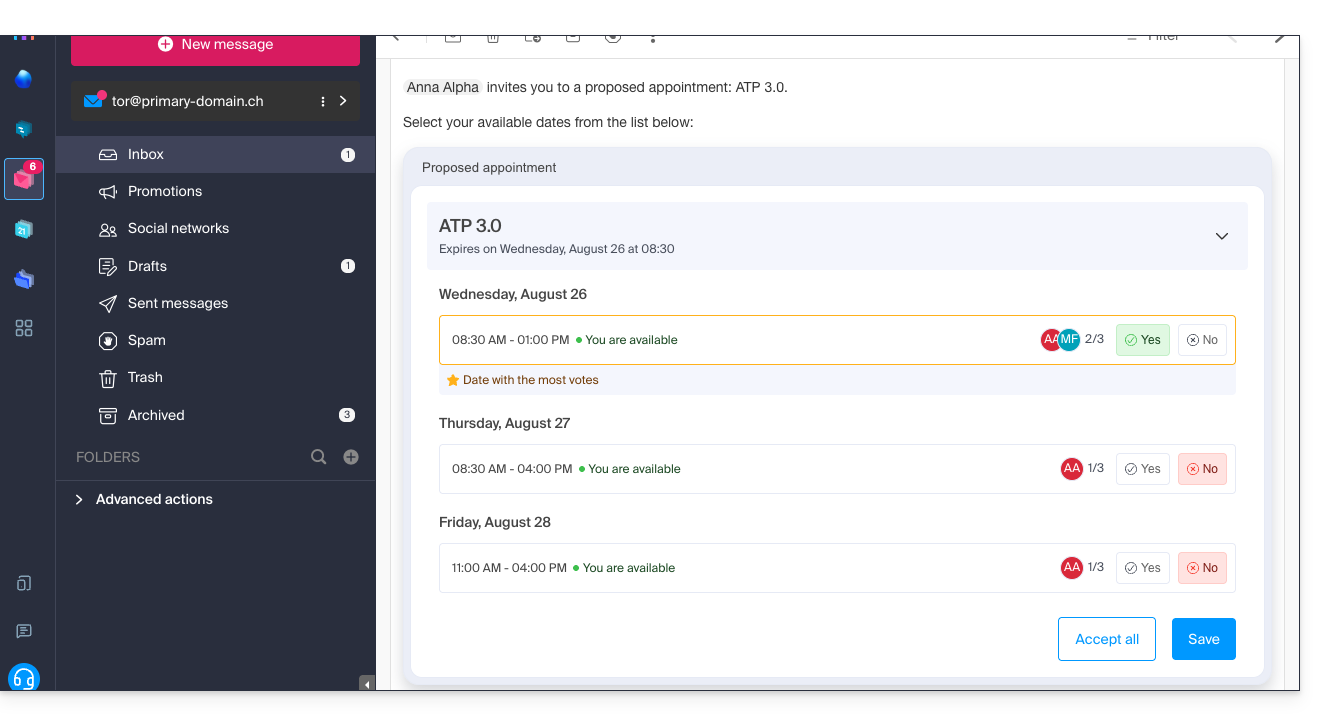
If the user is external to Infomaniak, or if they access their email via an email client such as Outlook, then managing their participation takes place in two steps: the email contains information and a link that leads to a simplified and neutral interface, allowing them to register their vote: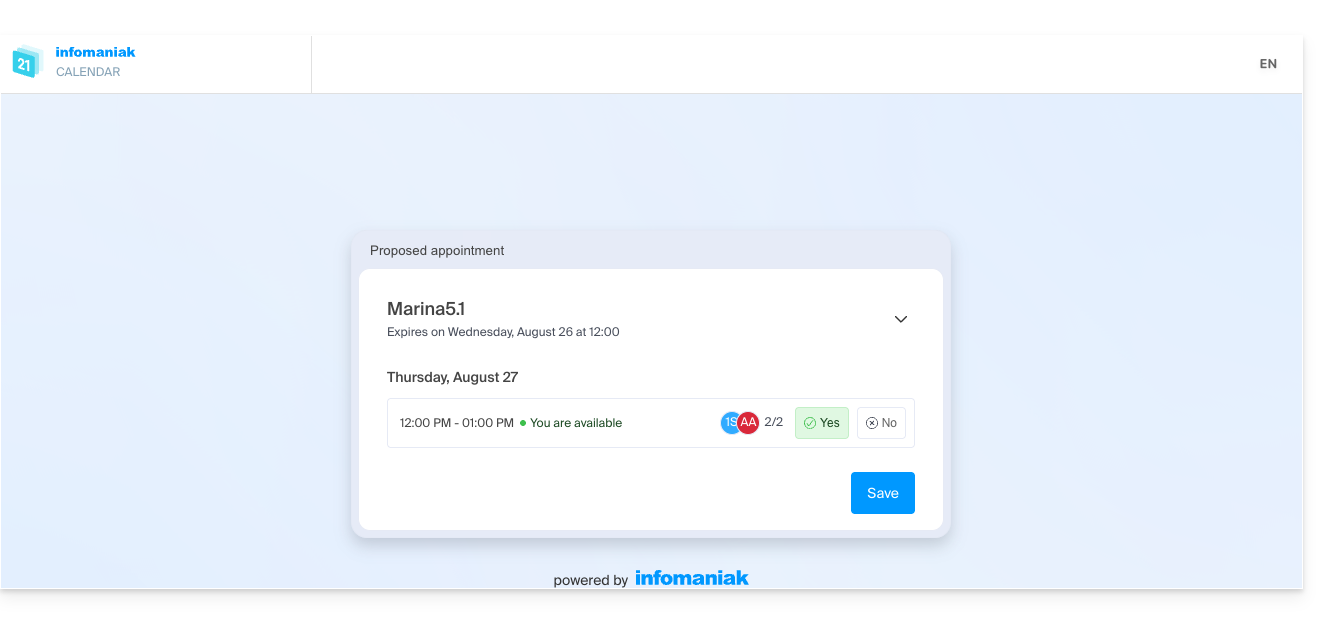
Decide on the date of the event based on the responses
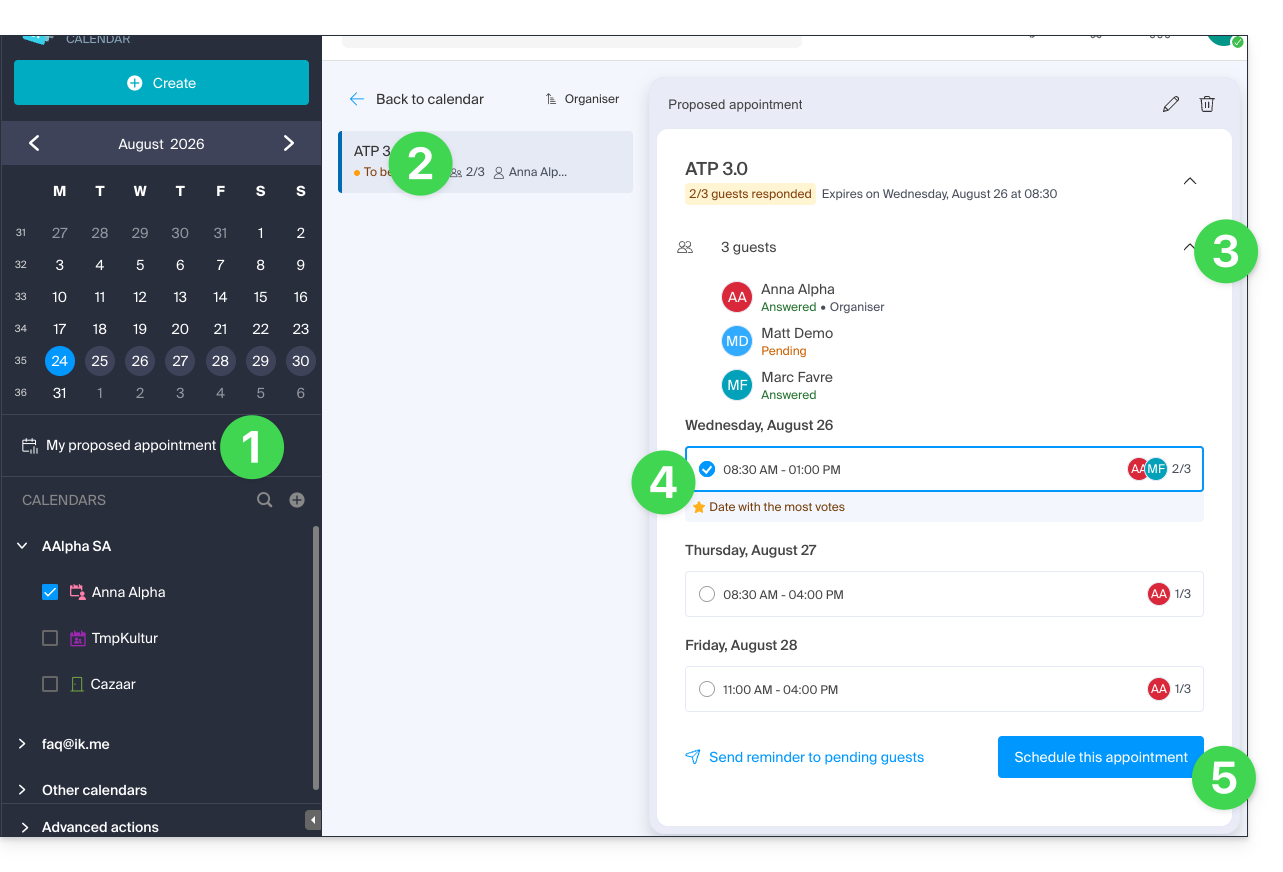
The organizer can access the proposed meeting times and select one of the proposals as the final one:
- Click on the left-hand side menu “My meeting proposals”.
- Click on the relevant suggestion.
- Click on the chevron to see the details of the guests who voted or did not vote.
- Click the radio button to select one option over another.
- Confirm the appointment by clicking the button in the bottom right corner:
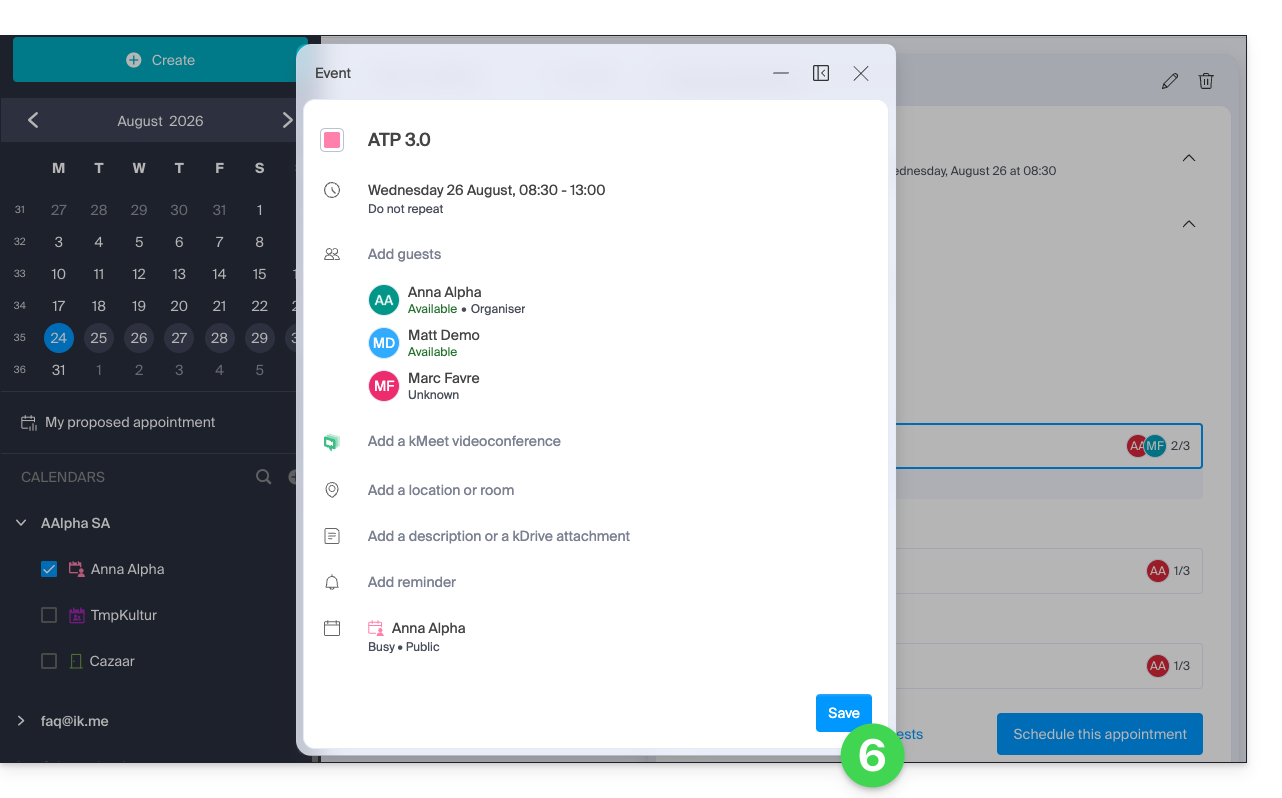
- All that remains is to complete and validate the event creation, including its associated invitations:
- In the same location, the meeting proposal is now defined as Scheduled.
- It is still possible to perform certain actions on the event later, including deleting it:
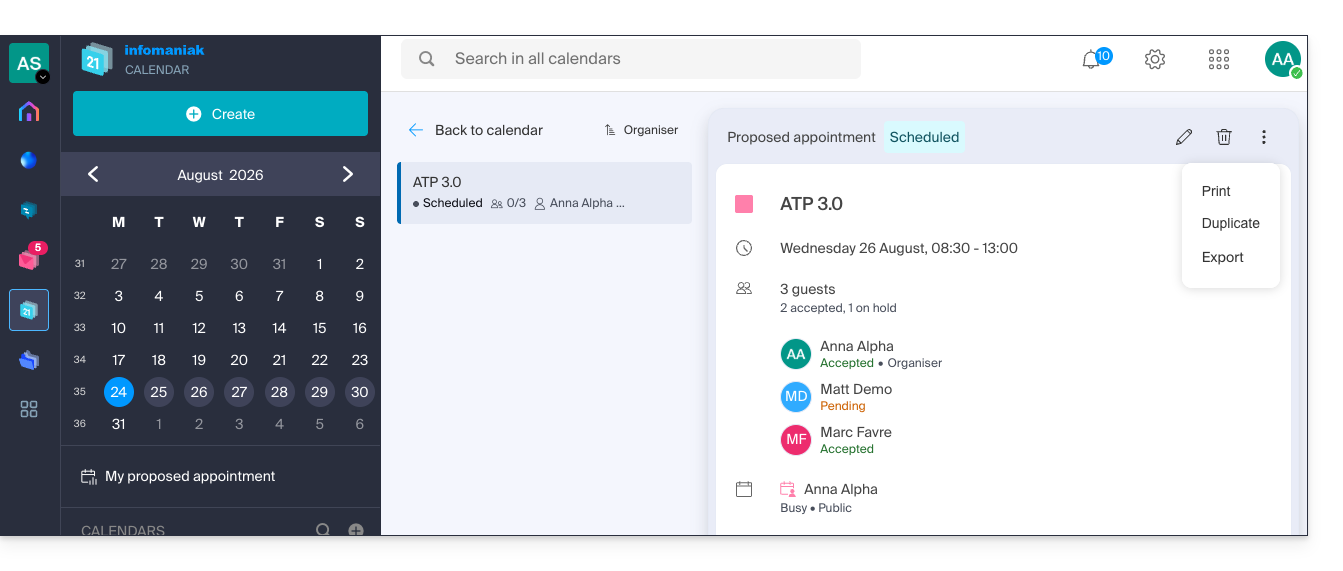
- Note: deleting a meeting proposal removes it from the dedicated menu, but will not automatically delete any associated event that may have been created in the meantime.
Link to this FAQ: https://faq.infomaniak.com/2928
Has this FAQ been helpful?
This guide details the use of SwissTransfer / SwissTransfer Pro, the Infomaniak service that you will find within kSuite & my kSuite+.
Introduction
- Registering for SwissTransfer allows you to access the transfer history; however, some limitations apply (❓: help).
- The history is available from the registration date; transfers made before this date will not be retroactively retrieved and will therefore not appear in the history.
- An active transfer that is still in the history can be deleted so that it is no longer available for download.
- You can go even further by customizing your transfers (❓: help) with SwissTransfer Pro.
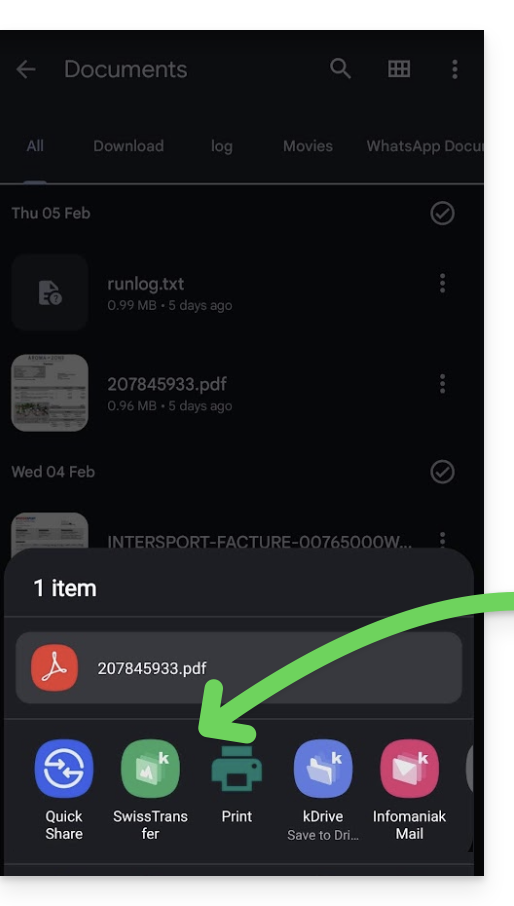
- You can also use SwissTransfer via the mobile app (application for iOS/Android smartphones or tablets); thanks to its integration, it offers quick file sharing options for your files, photos, PDFs, etc., directly from the file explorer:
Transfer data while connected to Infomaniak
To send files and keep a history of transfers:
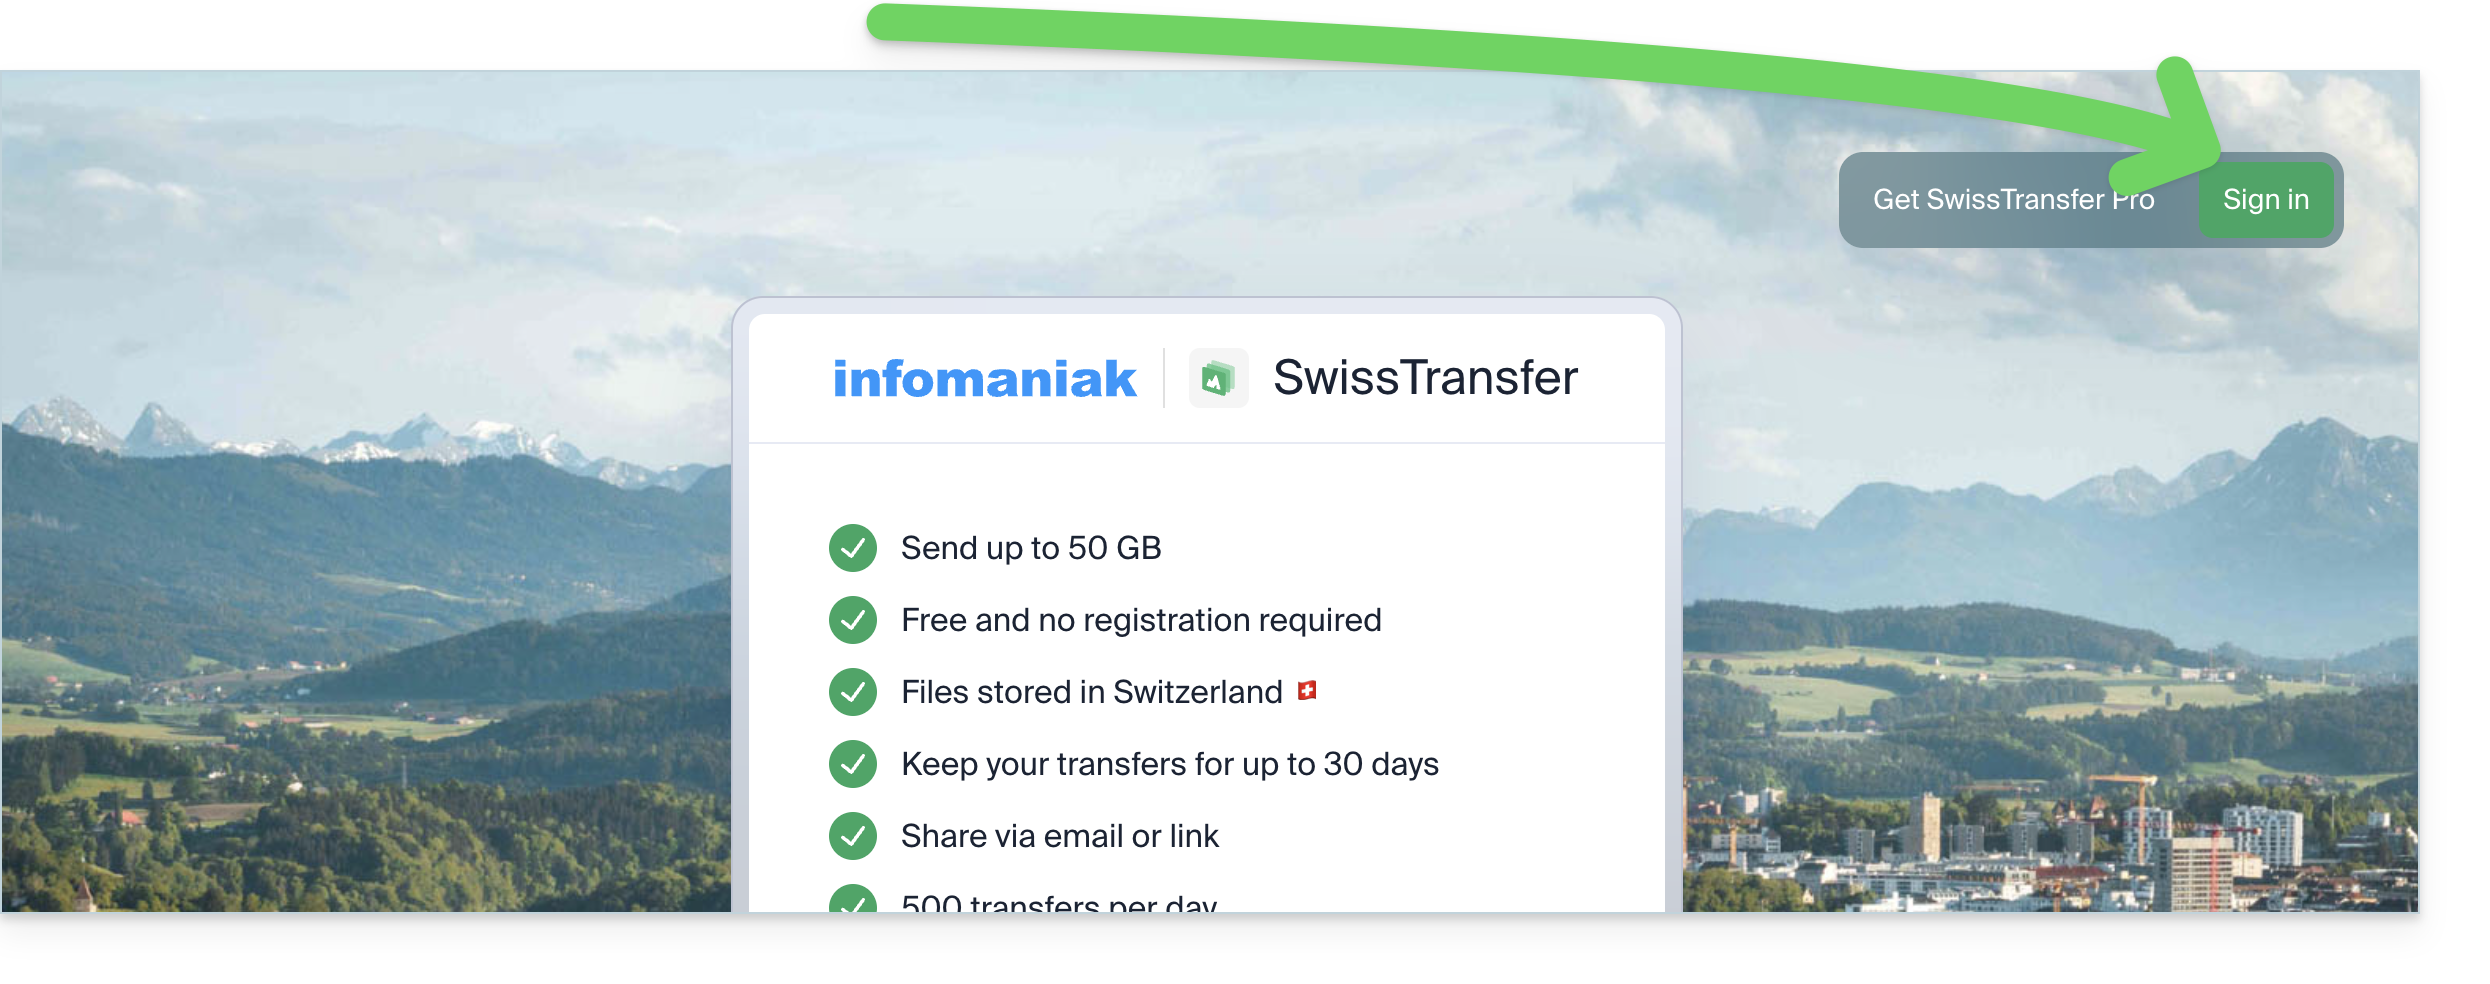
- Click here to access the Infomaniak SwissTransfer web app (online service swisstransfer.com) and click the button to log in:
- Enter your login ID and password, and complete the two-factor authentication if necessary.
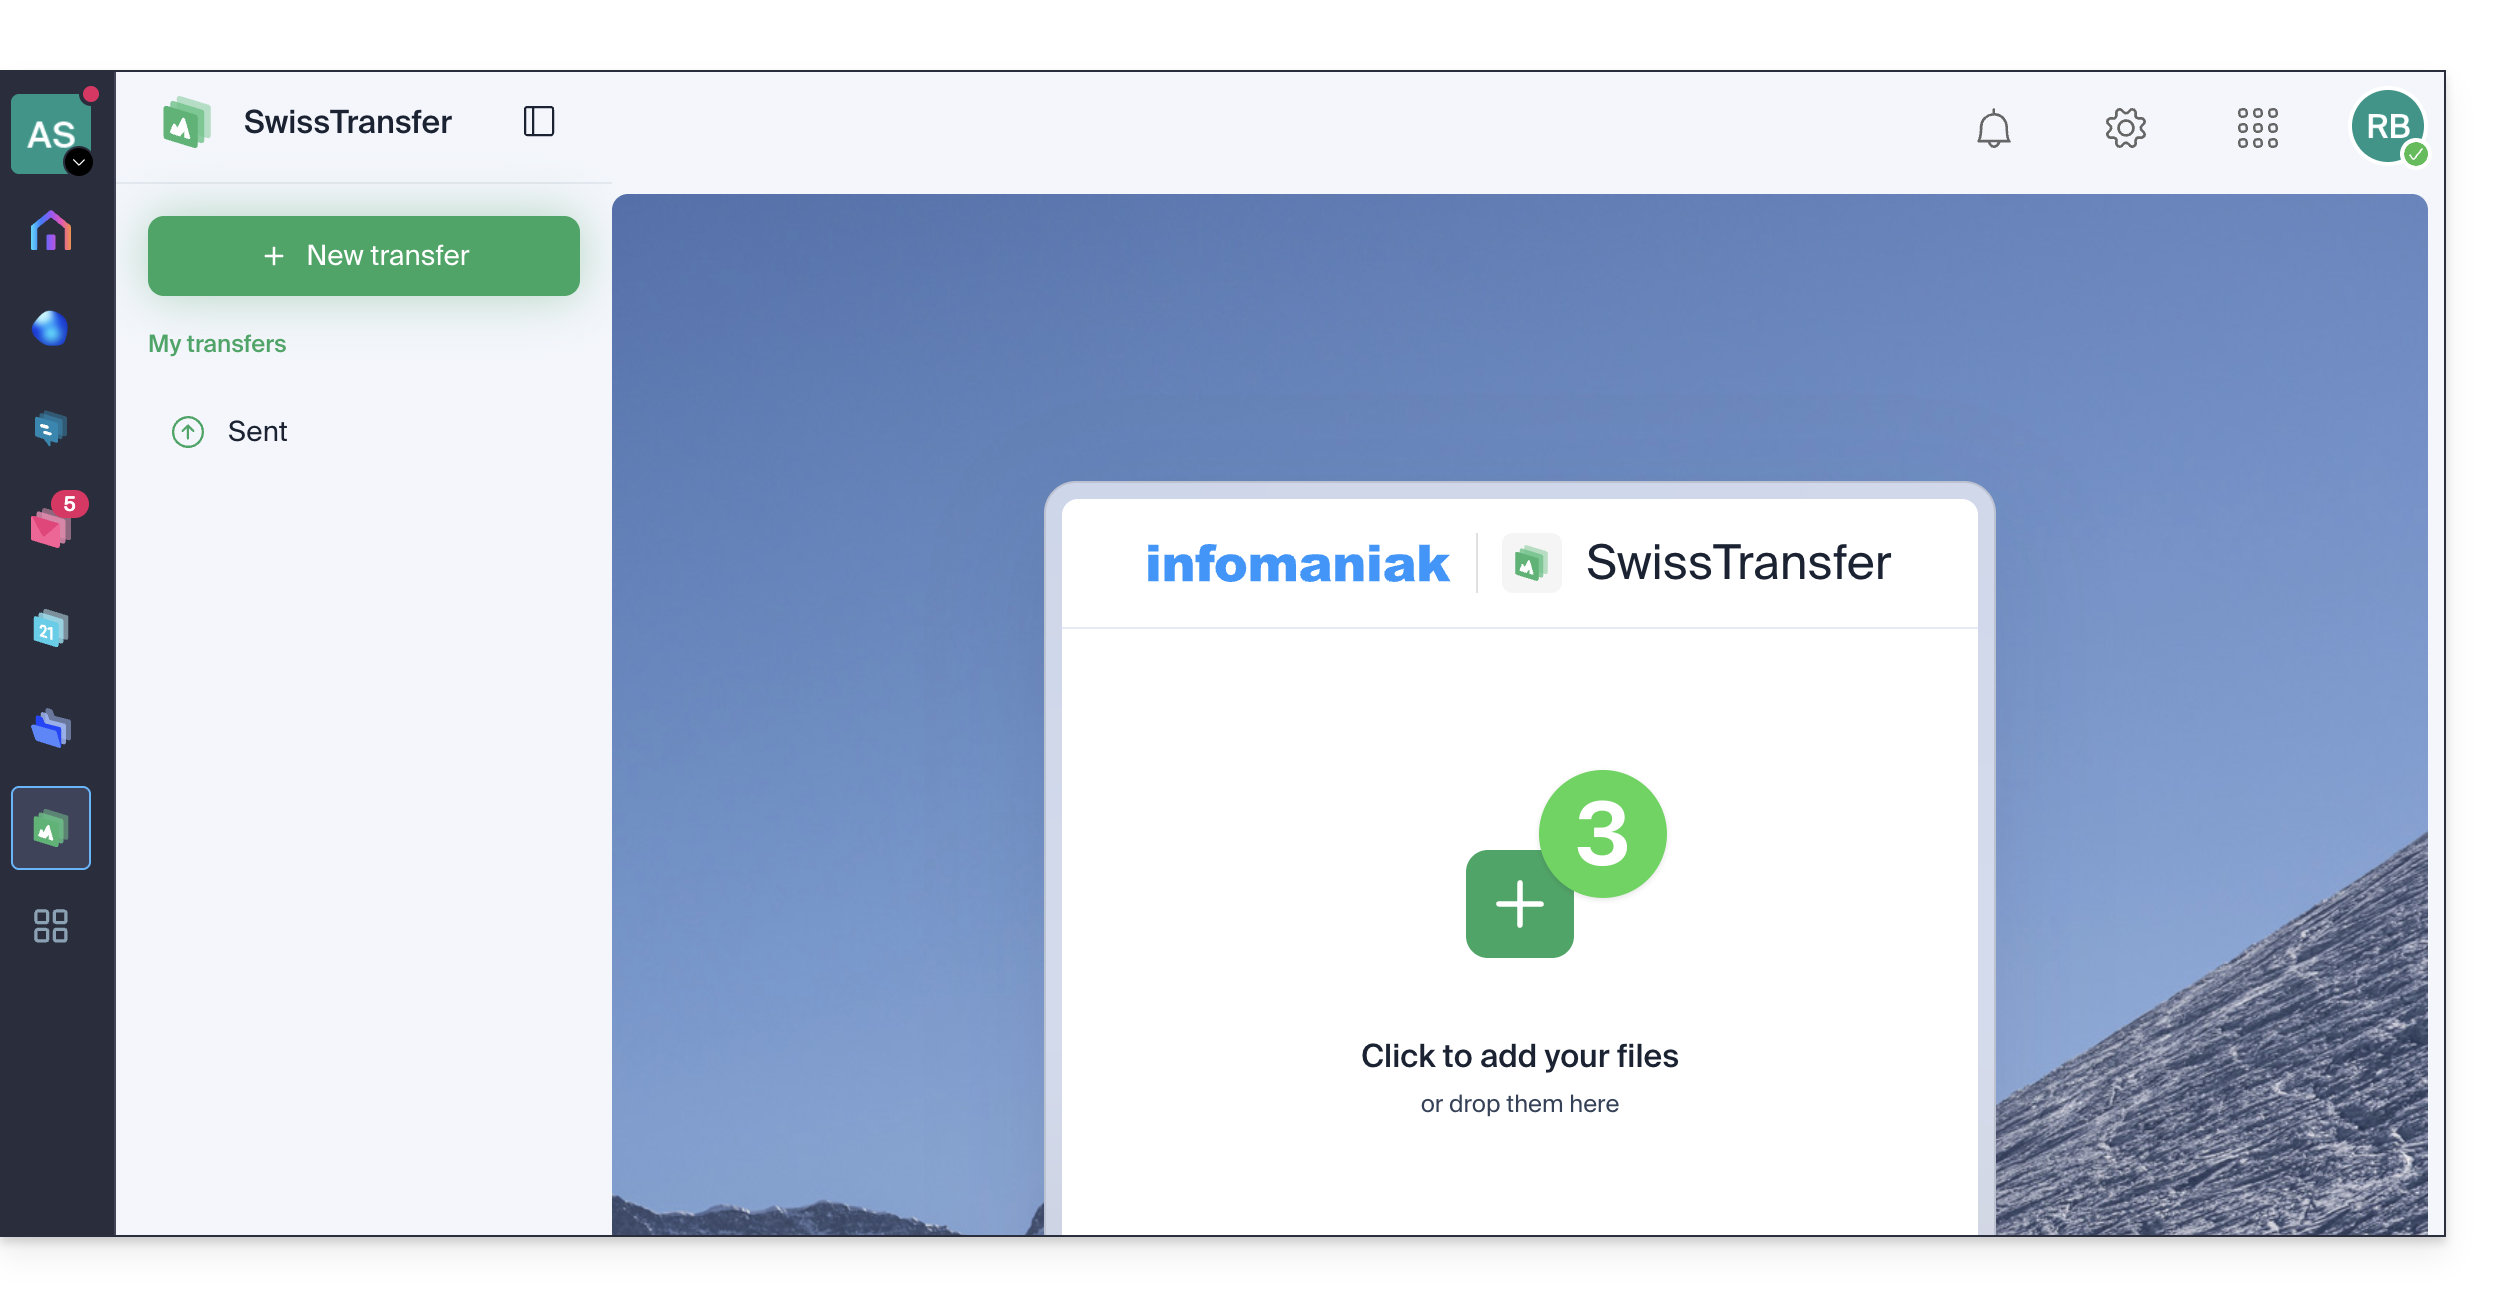
- Once logged in, click the button to add the documents to transfer (the service accepts large files up to 50 GB); you can also drag and drop your data into this area:
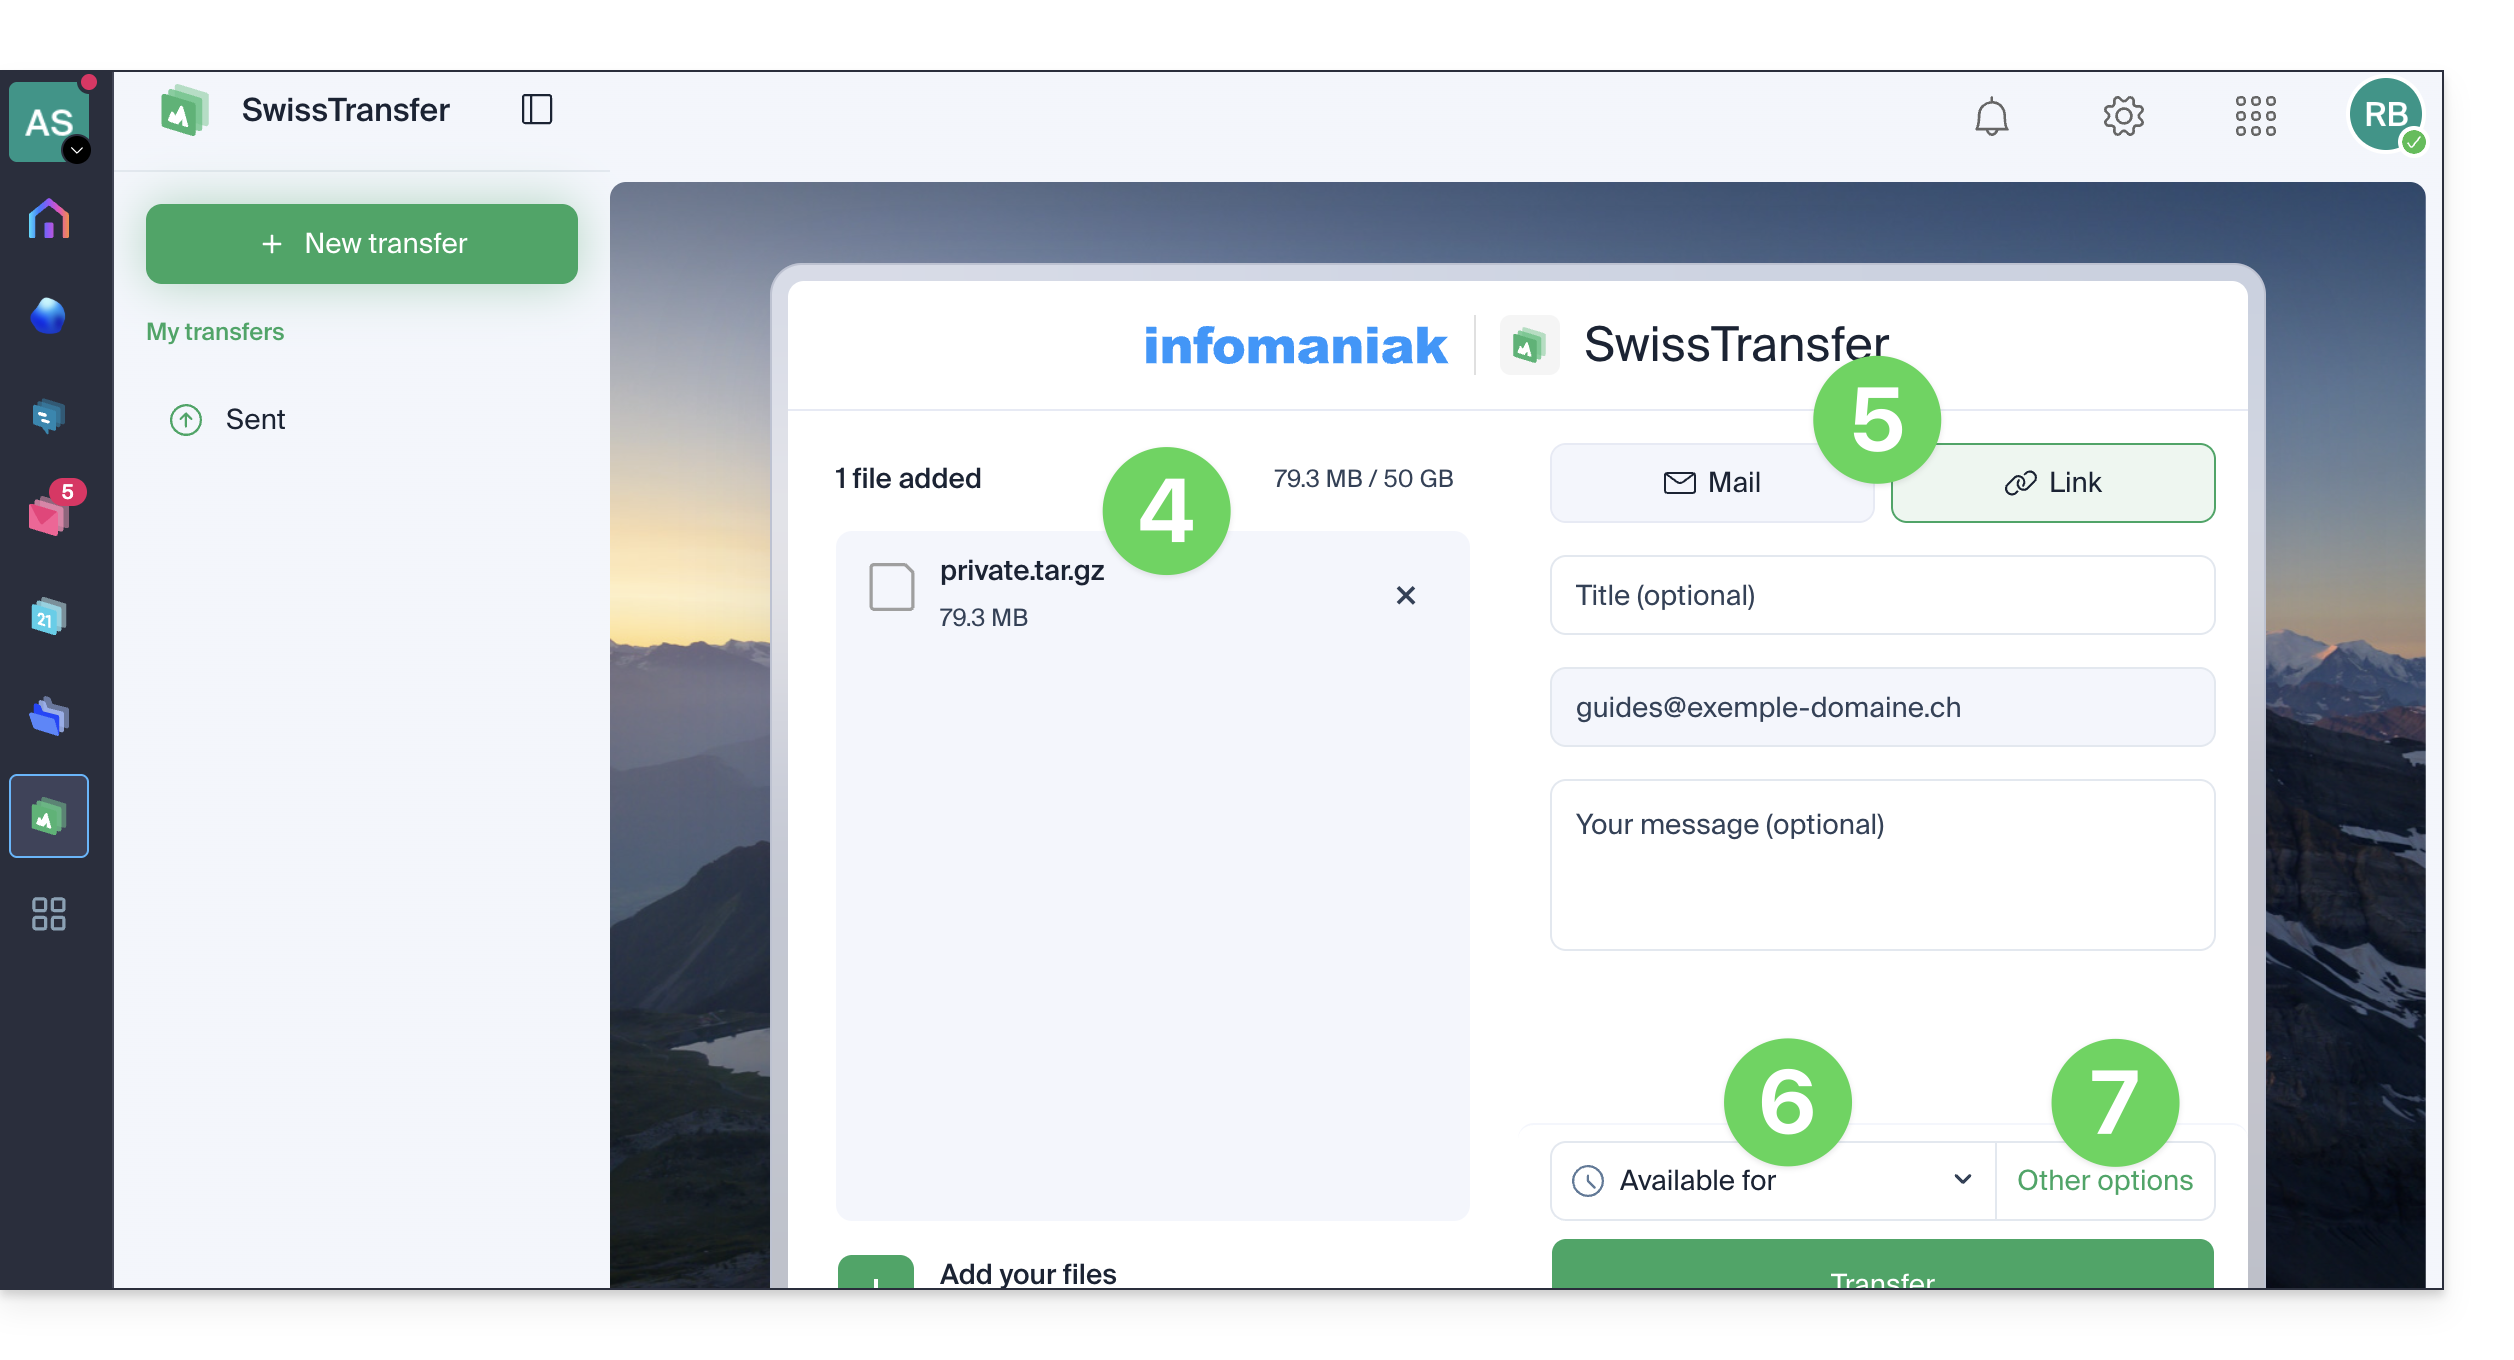
- Your files are ready to be transferred.
- Then decide if you want to create an email to the address of your choice, or get a link leading to your transfer (without sending it to anyone).
- Also, choose the duration for which your data will be available for download (between 1 and 60 days depending on the plan).
- In the options, you can also restrict, if needed, the maximum number of times the content can be downloaded by your recipients (between 1 and 250) or leave it unlimited, add a possible password protection, and, depending on the plan, customize your sends (❓: help):
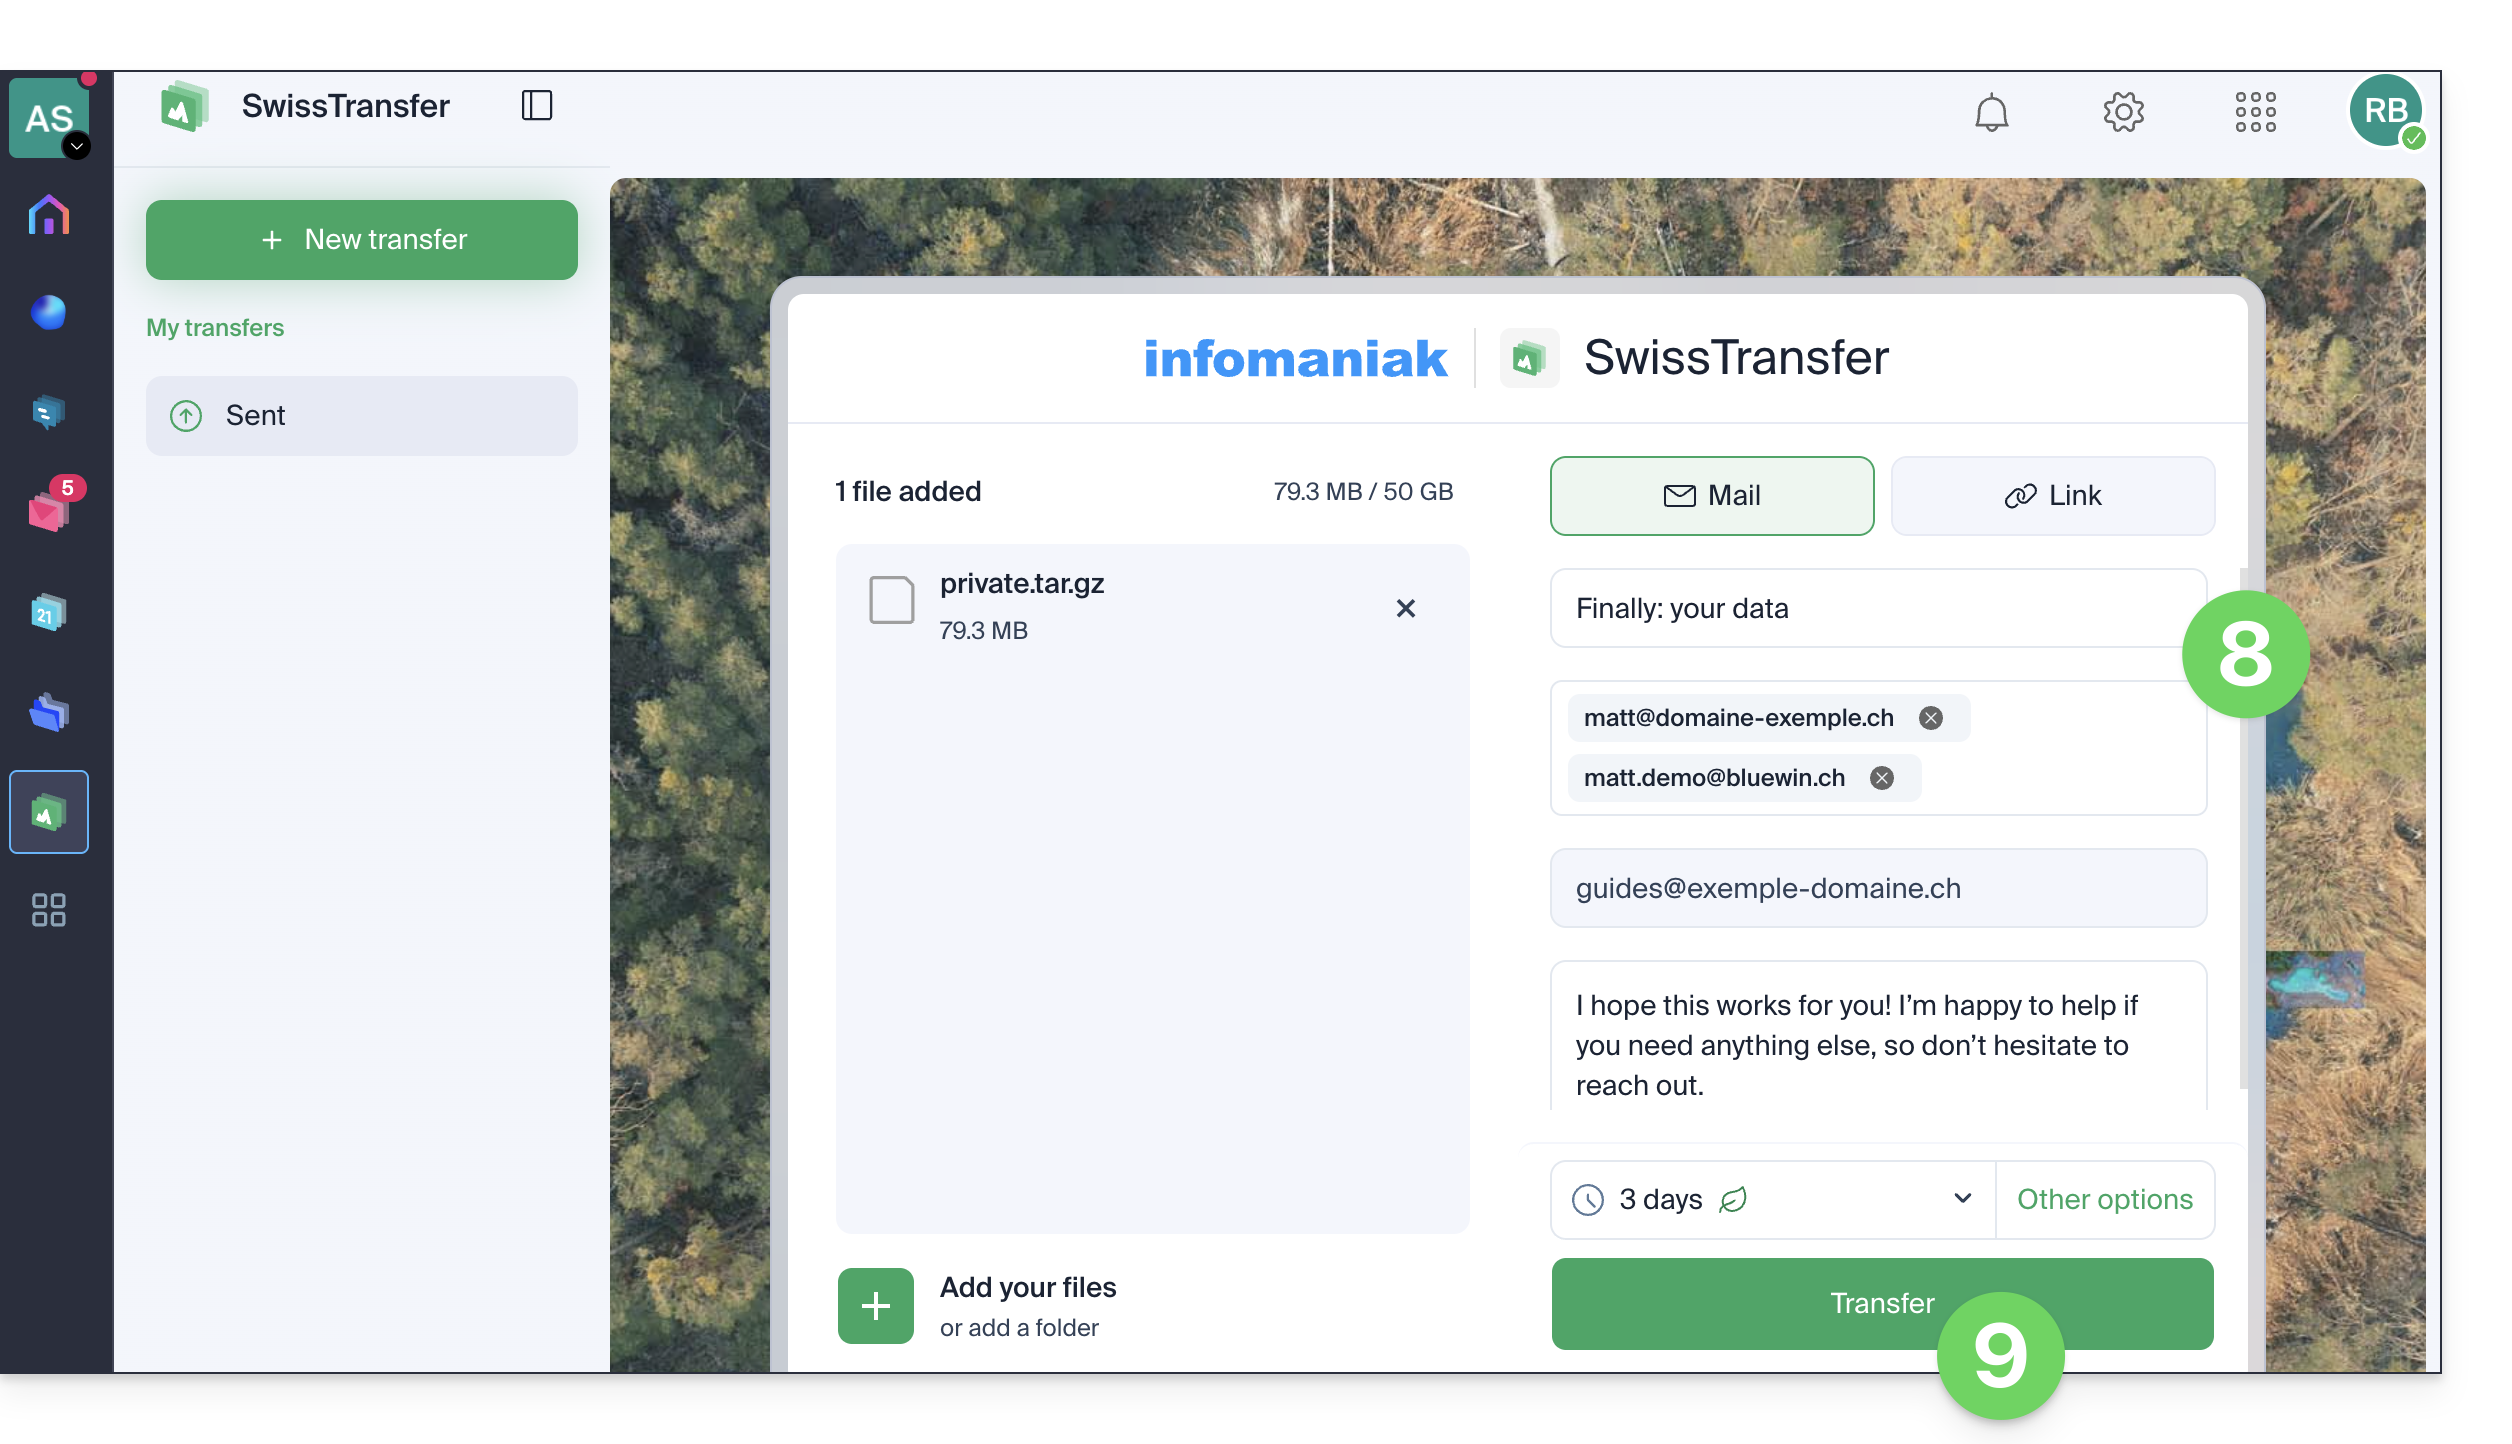
- Complete your information:
- Title and message
- Sending by email requires adding one or more destination email addresses.
- The sender is automatically taken from your login ID for the Organization.
- Click the button to Send:
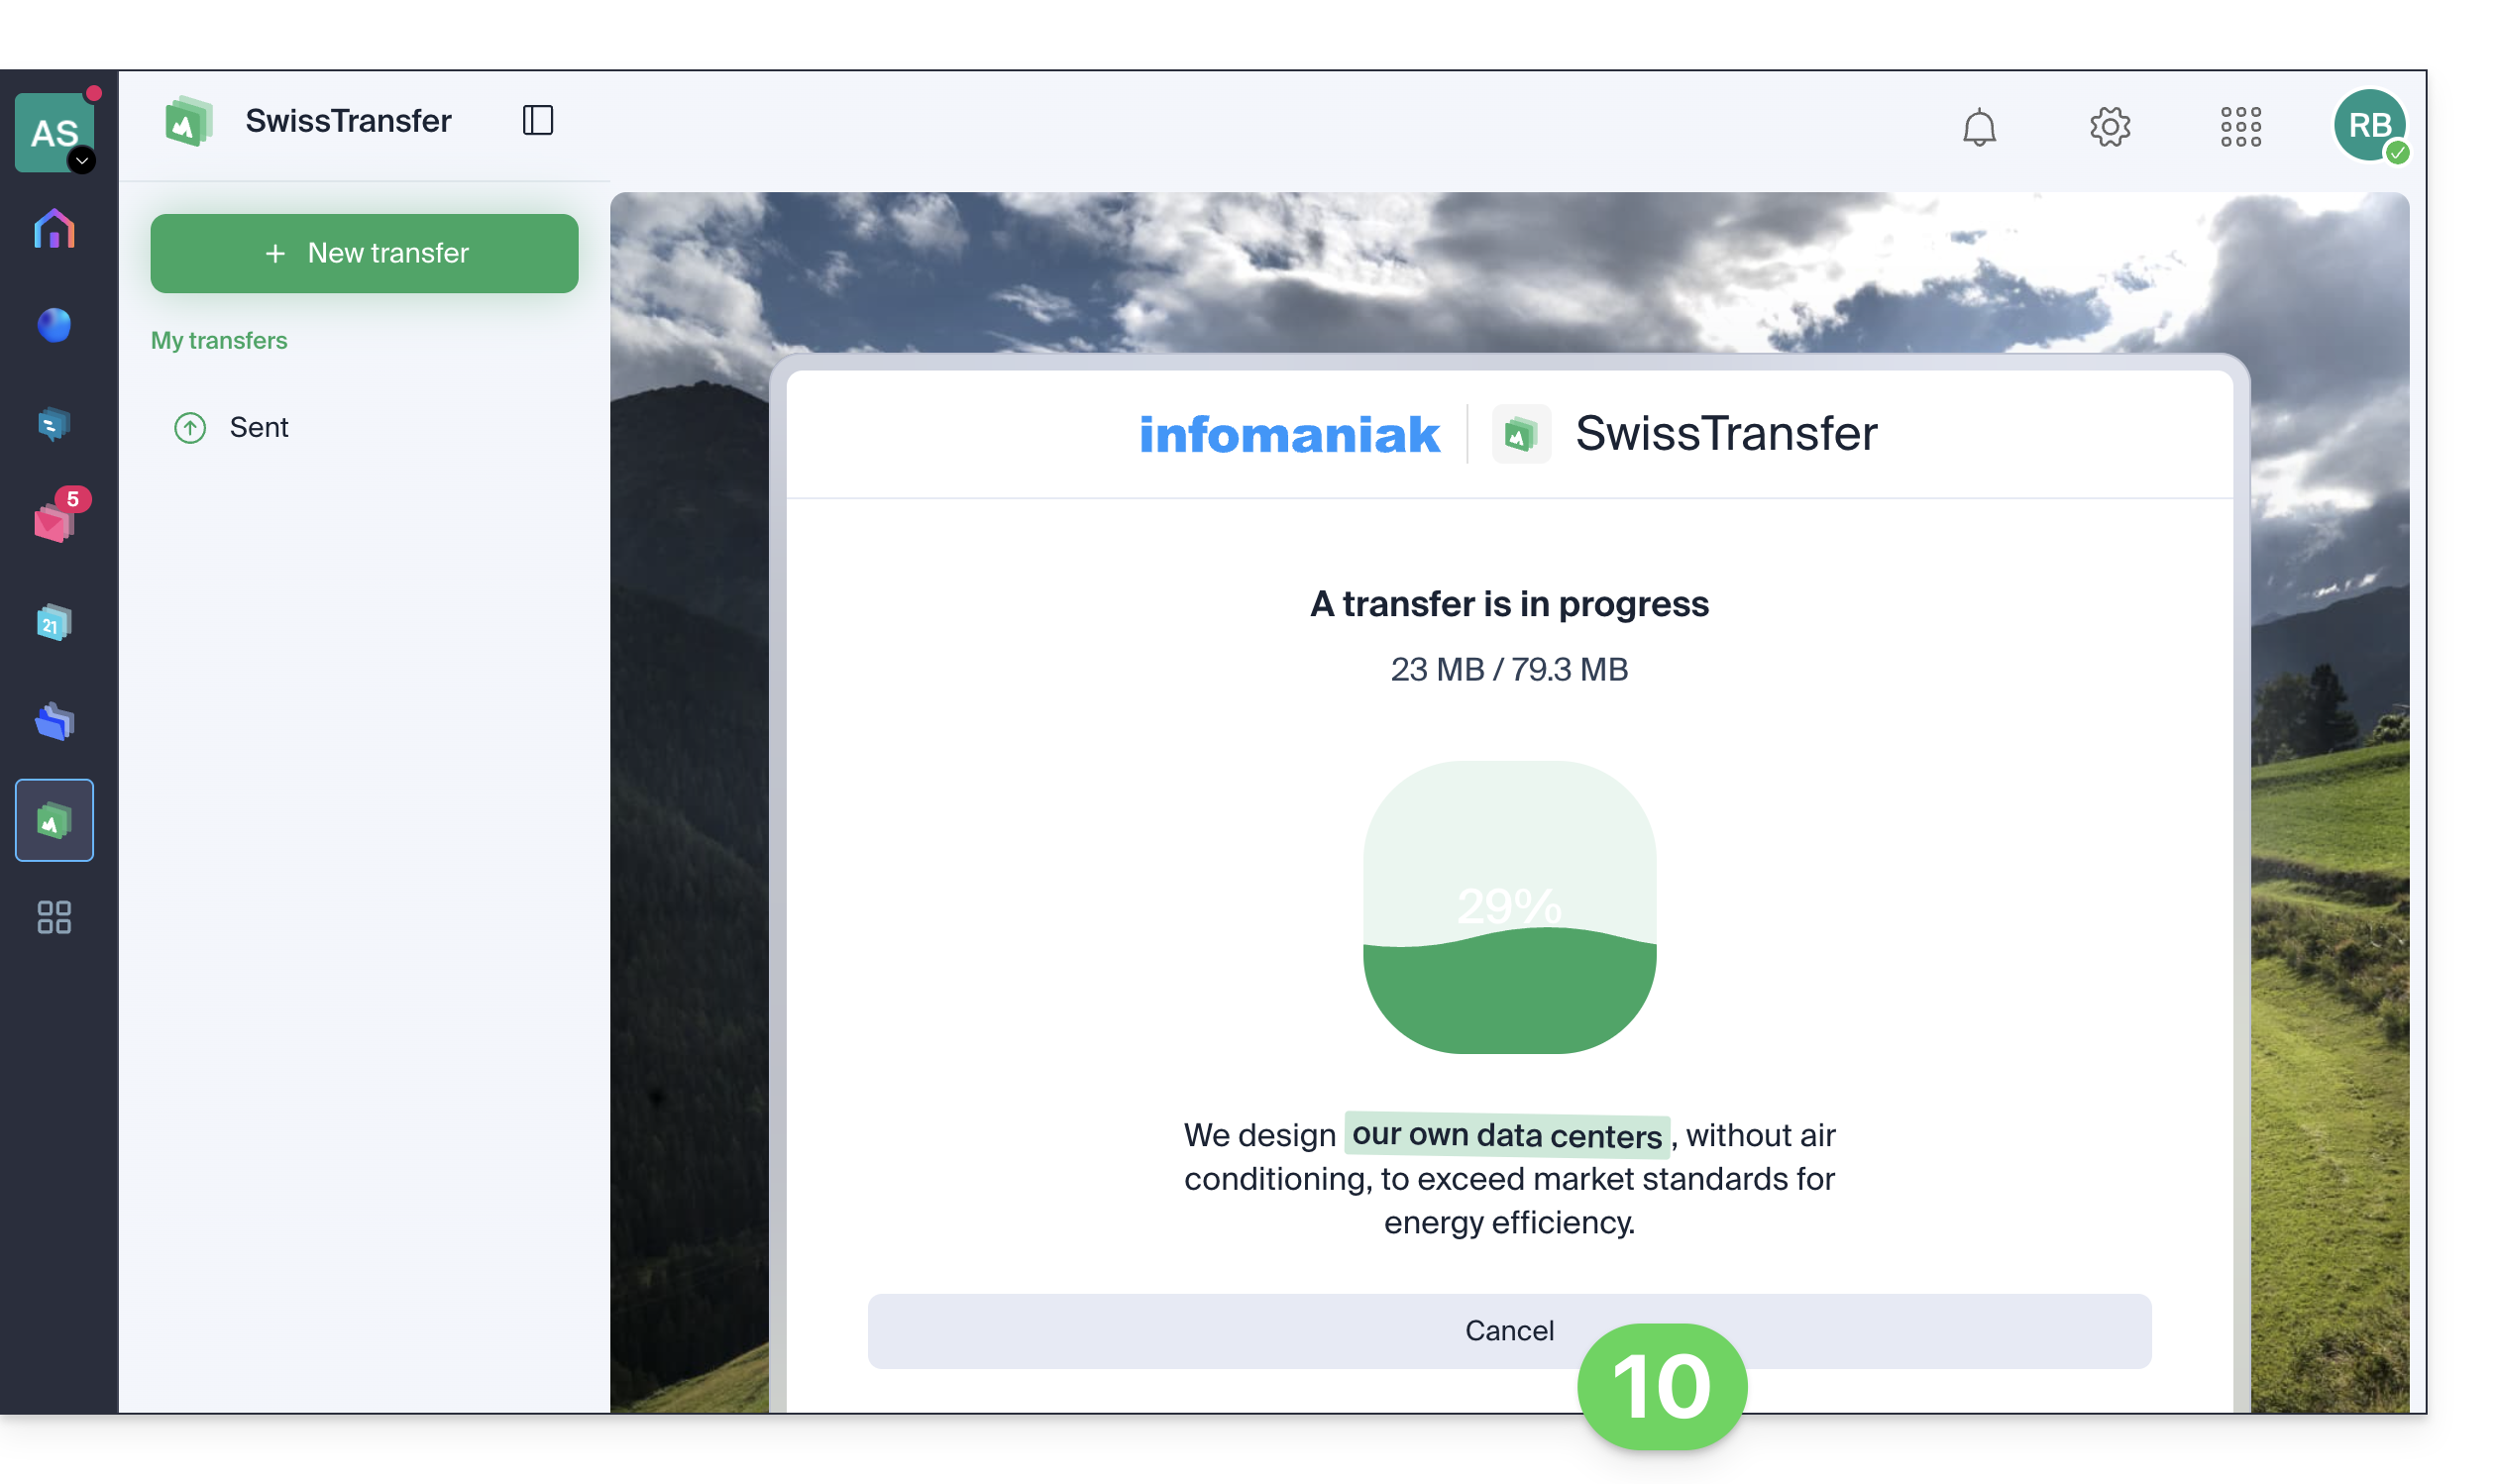
- Do not close the browser window until you see the confirmation message; if necessary, you can cancel the current upload:
When a recipient downloads the file, an email is sent to the sender to notify them.
Manage transfer history
Keep track of your uploads and their details (including statistics):
- Access the Sent menu.
- Click on the action menu ⋮ to the right of the transfer you want to delete.
- Click on Delete to make it no longer available for download:
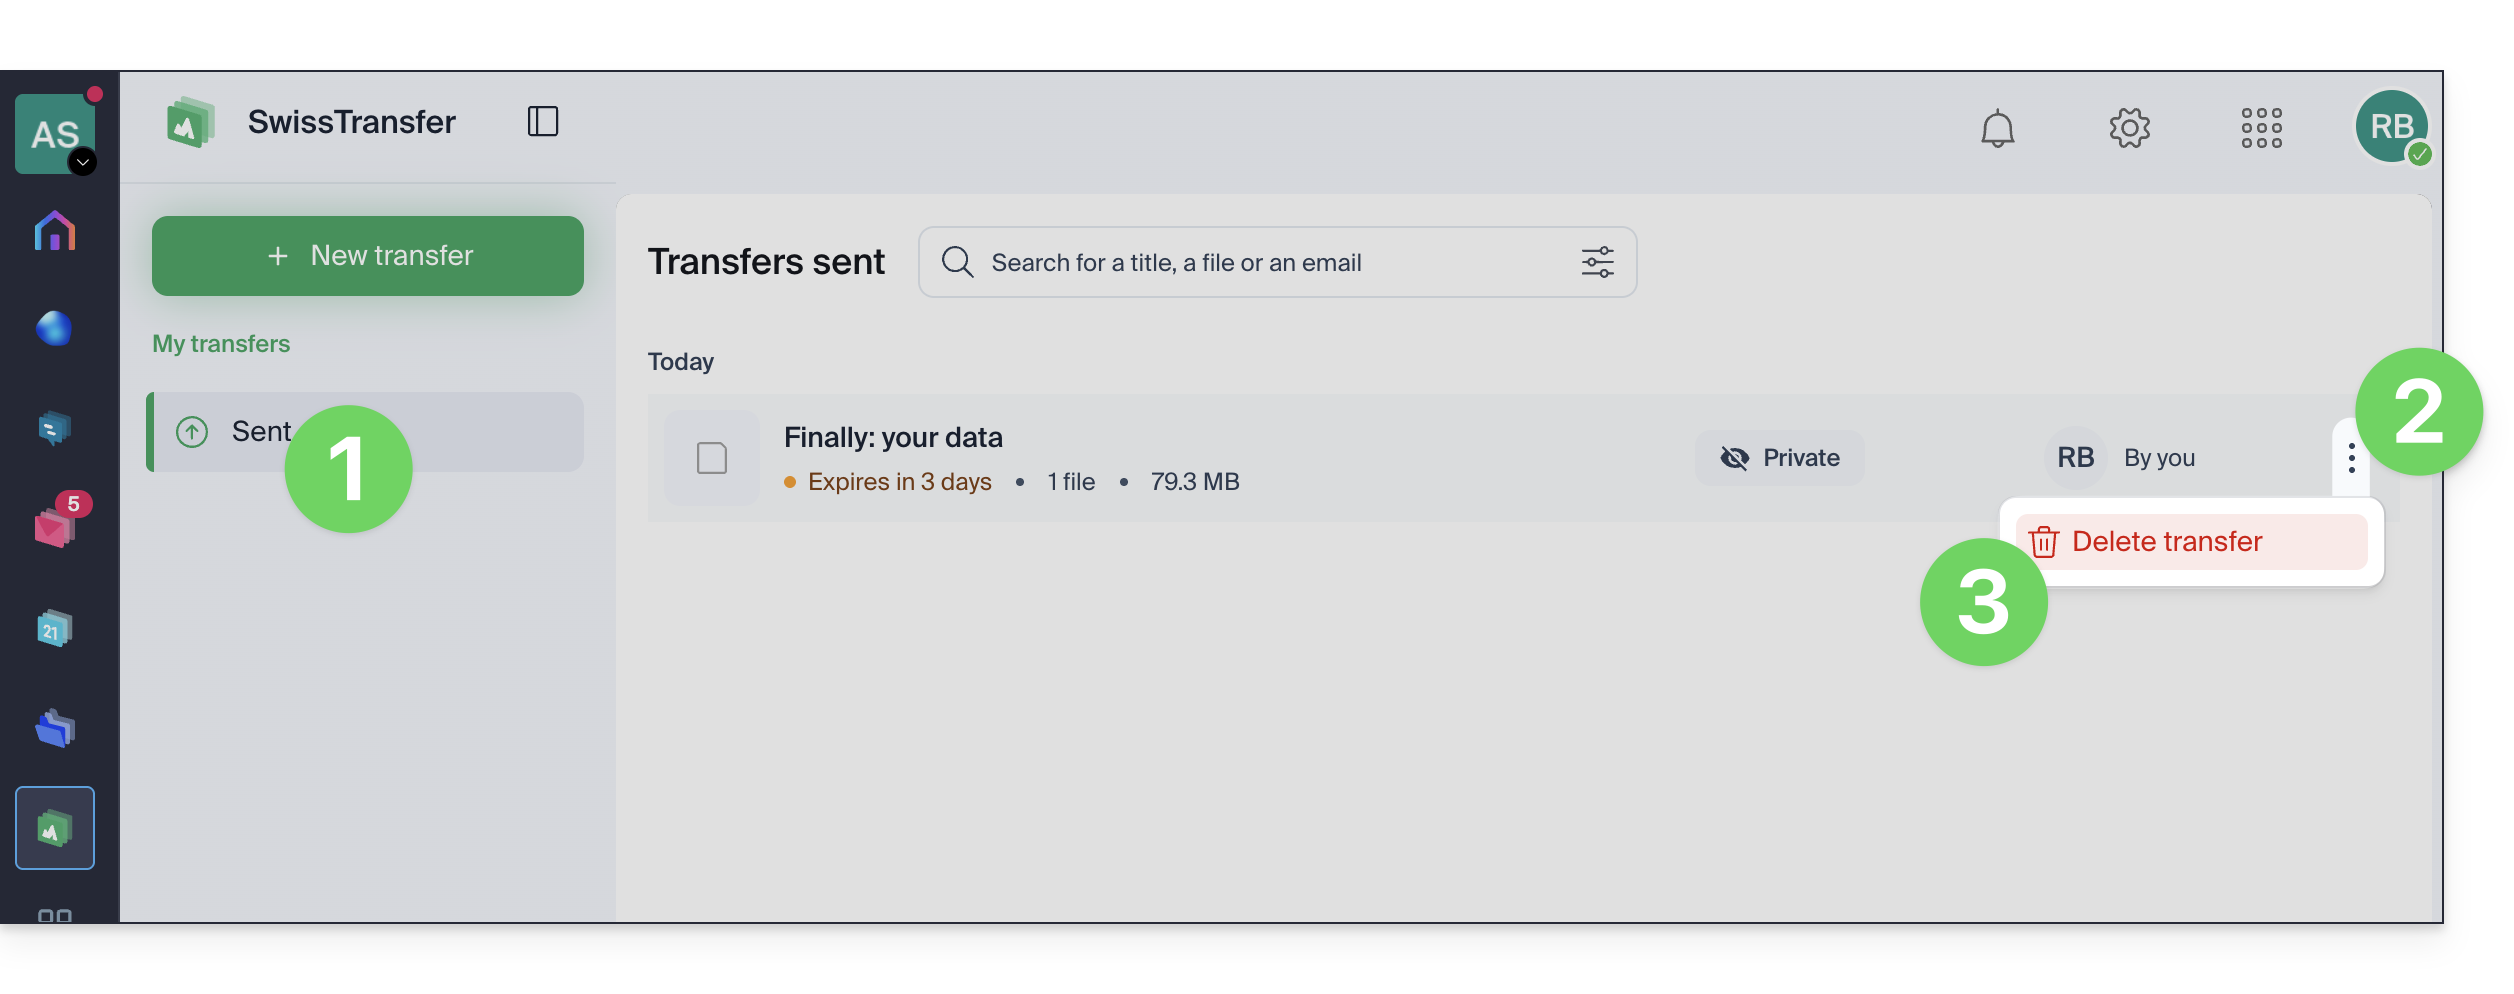
- Otherwise, click on the transfer to view details and download each file contained in the transfer.
Link to this FAQ: https://faq.infomaniak.com/2931
Has this FAQ been helpful?