Knowledge base
1000 FAQs, 500 tutorials and instructional videos. Here, there are only solutions!
Infomaniak tools, such as the Web Mail app (online service ksuite.infomaniak.com/mail) or the Calendar, Contacts, kSuite interfaces, can be displayed in light mode or dark mode, including based on the settings of your current operating system: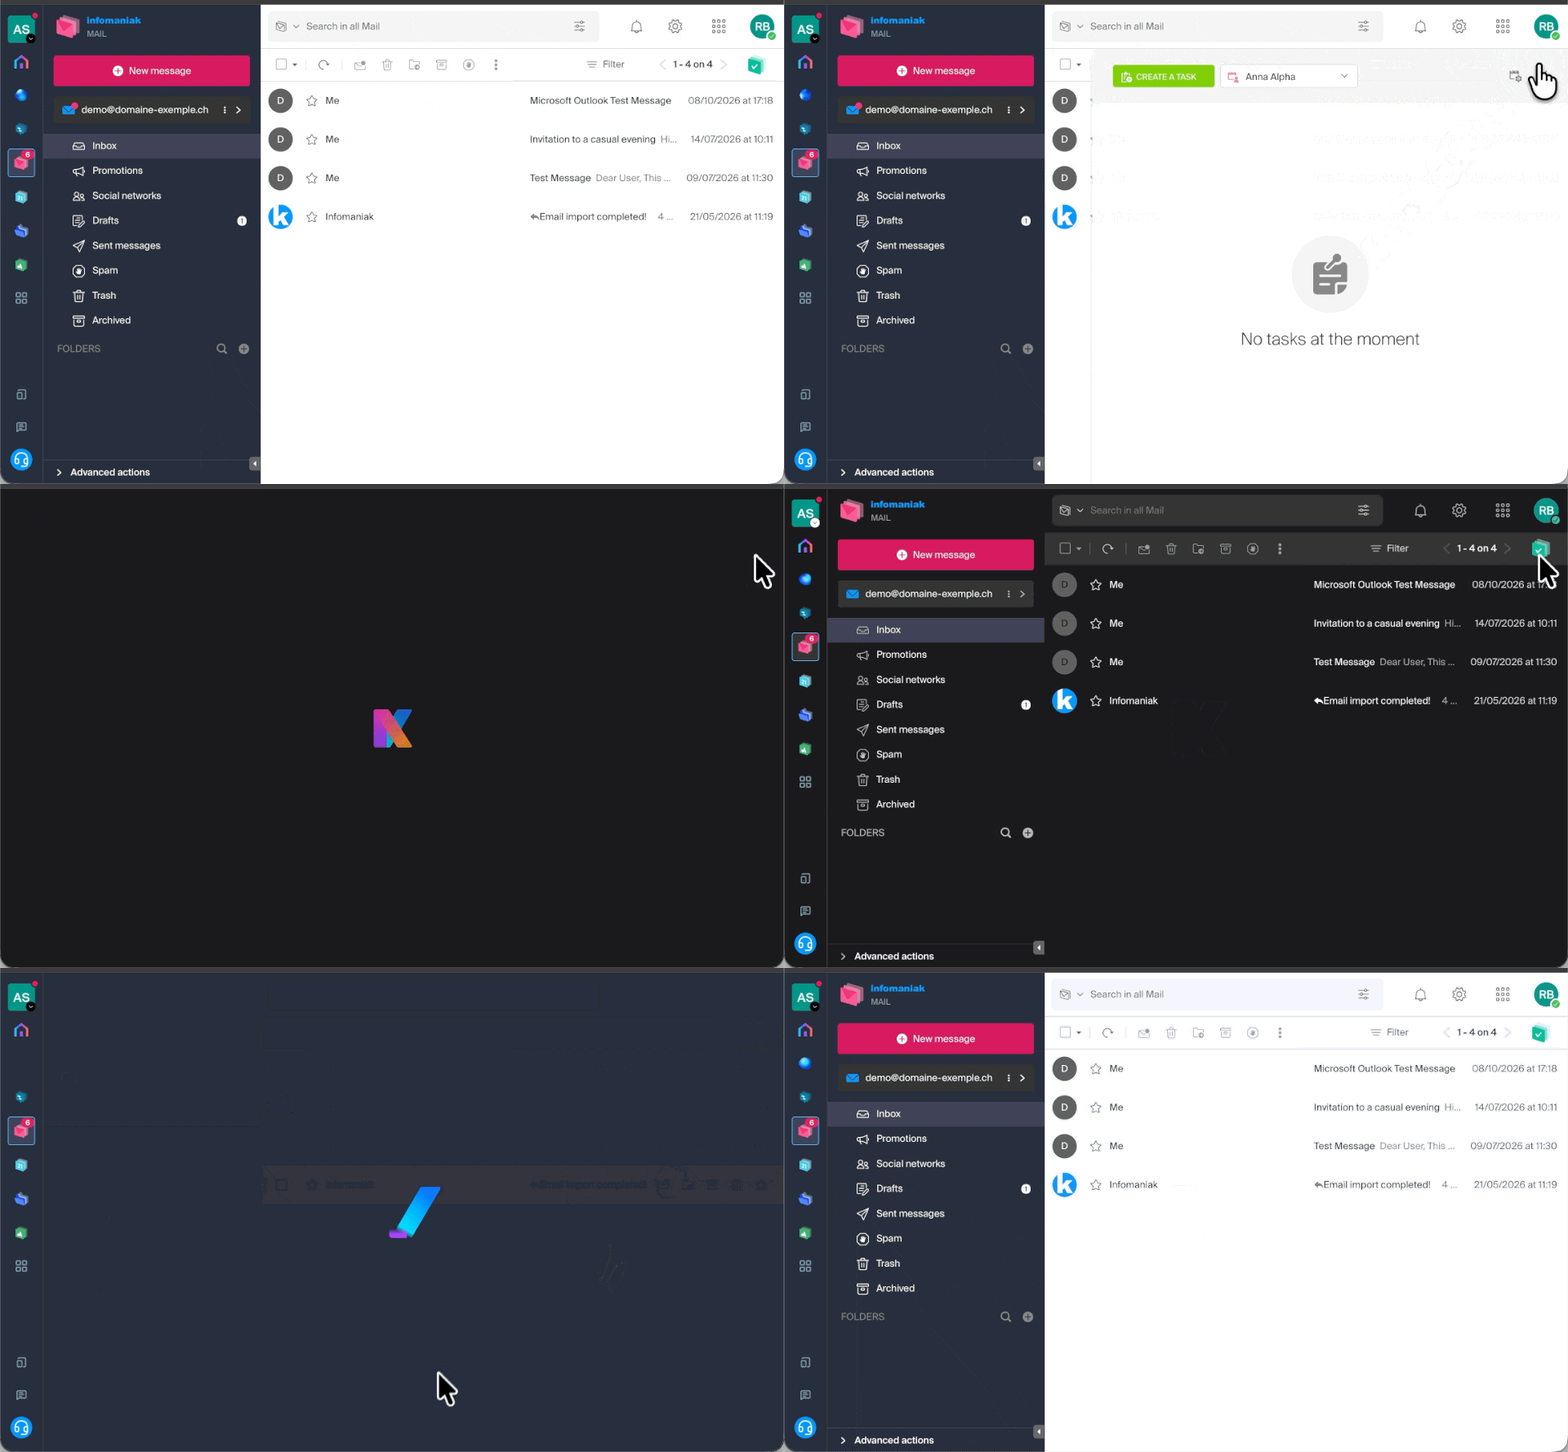
Enable manual mode
To manually choose a dark or light display, without relying on a potentially different display setting on the operating system:
- Click here or at the top right, on your initials/avatar, to "Manage my account":
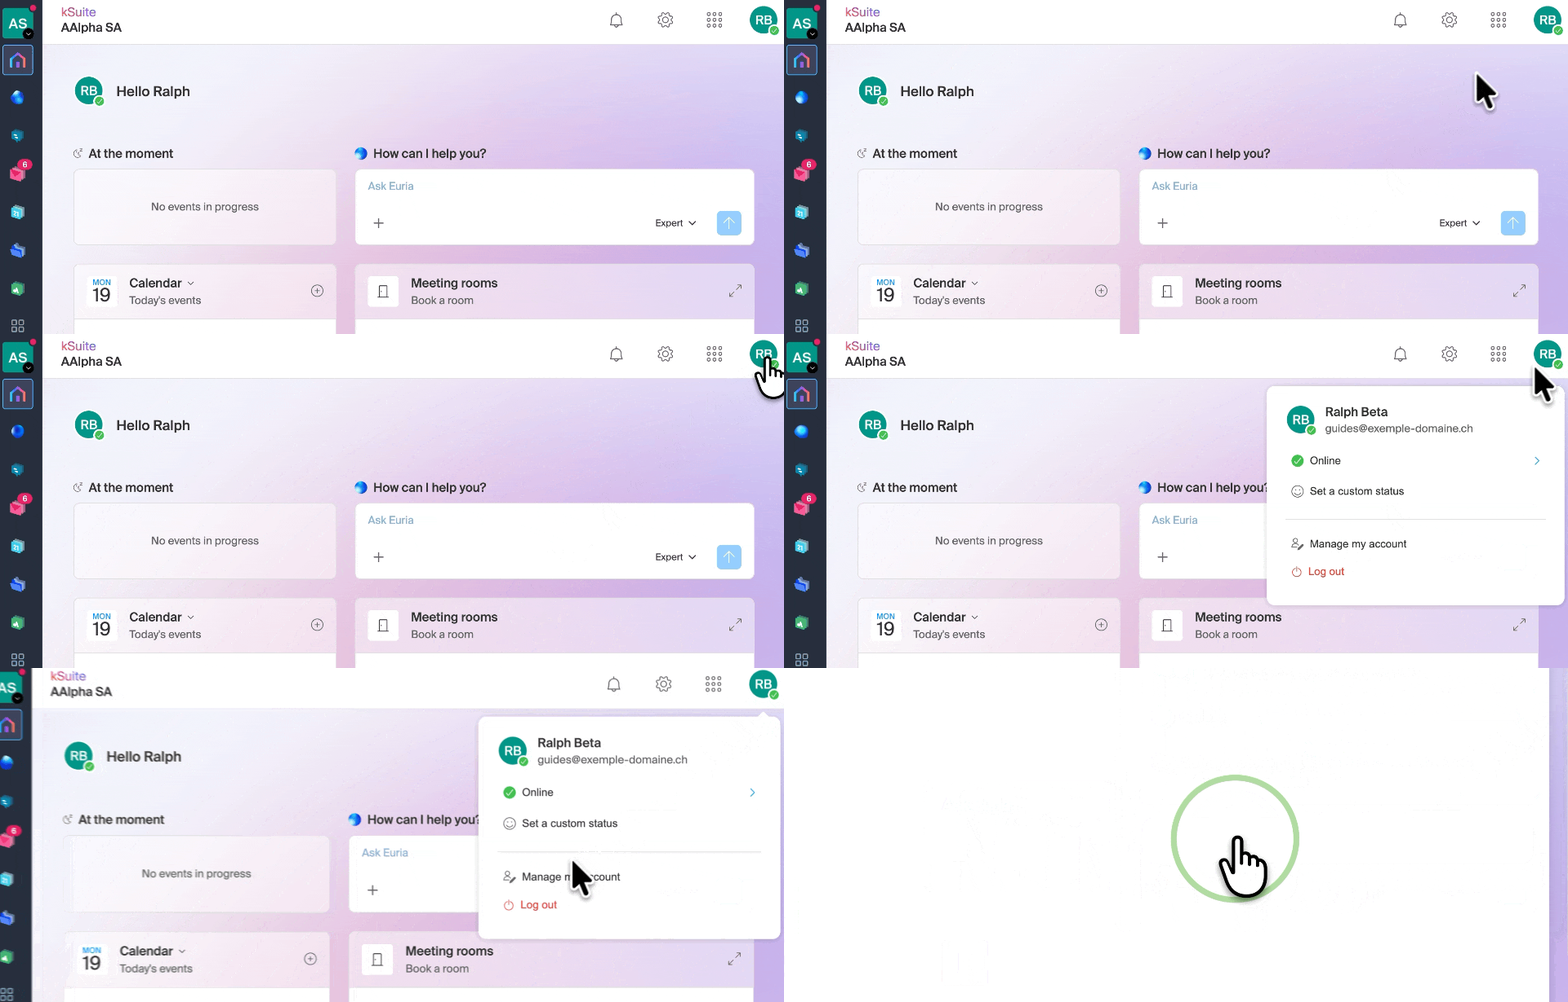
- Then, click on Appearance in the left-hand menu.
- Click on Light to apply the light mode:
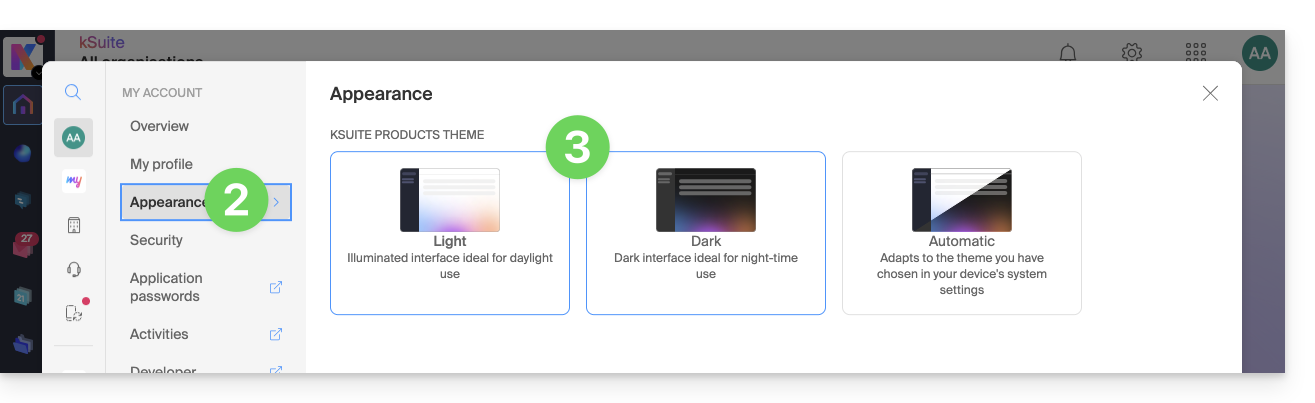
- Click on Dark to enable dark mode.
Enable automatic mode
Automatic mode is based on your operating system settings (macOS / Windows...):
- Click here or on the badge with your initials / avatar in the top right corner of the Infomaniak Manager to "Manage my account":
- Click on Appearance in the left-hand menu.
- Click on Automatic mode:
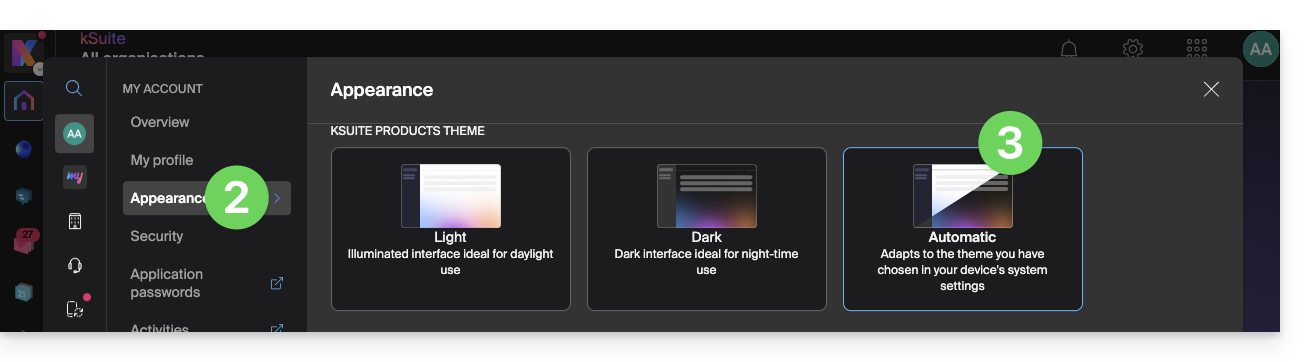
Then, if you want to change the light or dark theme of your computer, so that the automatic mode of the Manager takes your preferences into account…
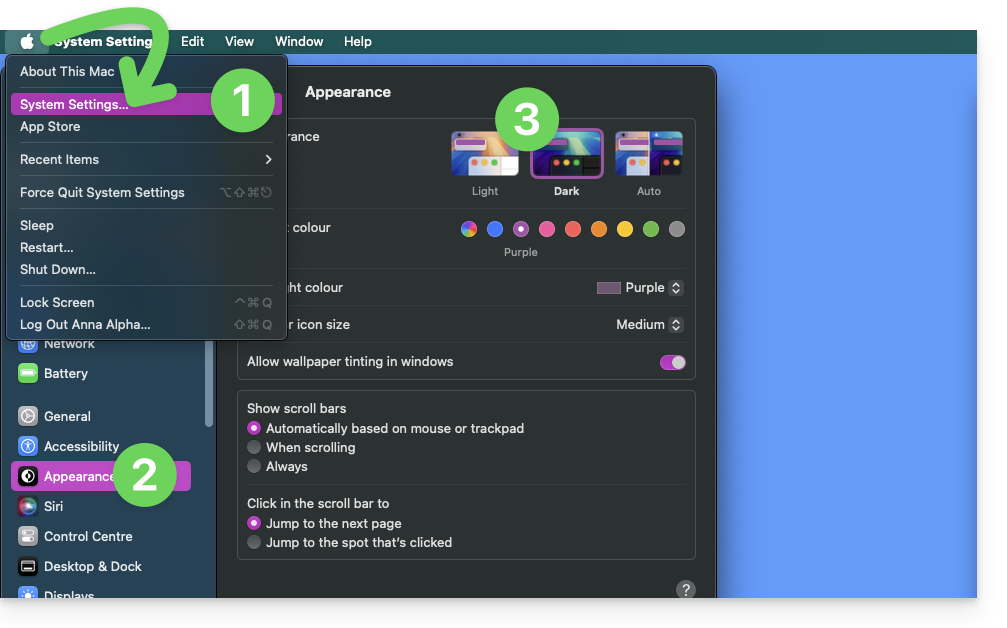
… on macOS
- Click on System Preferences…
- Click on Appearance.
- Choose the desired mode on the right:
… on Windows
- In the Start menu, open Settings > Personalization.
- Select Colors, then Choose your mode:
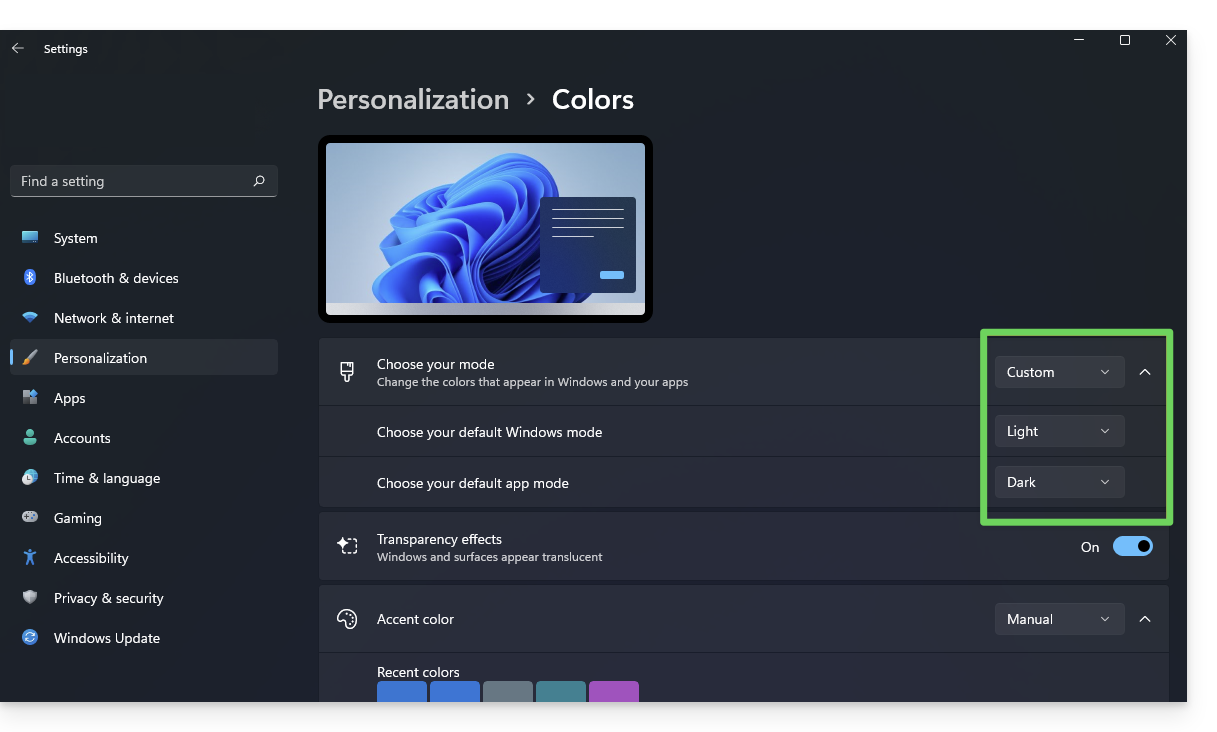
- You can choose between Light, Dark, or Custom.
- If you select Custom, you will have the option to choose a default Windows mode and a different default application mode.
And on mobile?
Dark mode is enabled on mobile devices for Infomaniak login and account creation pages; it automatically adapts to the mobile system's preferences, providing a consistent visual experience between mobile apps and login/account creation.
Link to this FAQ: https://faq.infomaniak.com/2870
Has this FAQ been helpful?
This guide explains how to exclude files and folders from a kDrive synchronization on your computer, and which file types are already excluded by default.
Introduction
- The files that are excluded by default (items in the list that cannot be deleted) vary depending on the operating system and are excluded because they pose a risk of synchronization errors.
Manage files excluded from kDrive
Desktop app v4.x
The kDrive v4.x app allows you to view existing automatic exclusions and create your own exclusion rules:
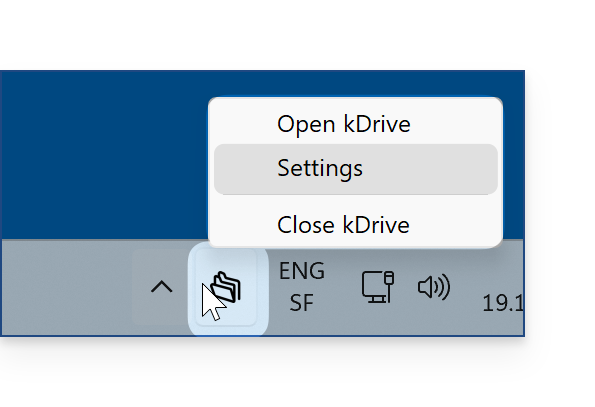
- Launch kDrive on your device: the app icon should be visible in the top right corner on macOS/Linux, and in the bottom right corner on Windows (❓: help).
- Right-click on the icon and choose Settings:
- Go to Advanced.
- Click on Synchronization rules:
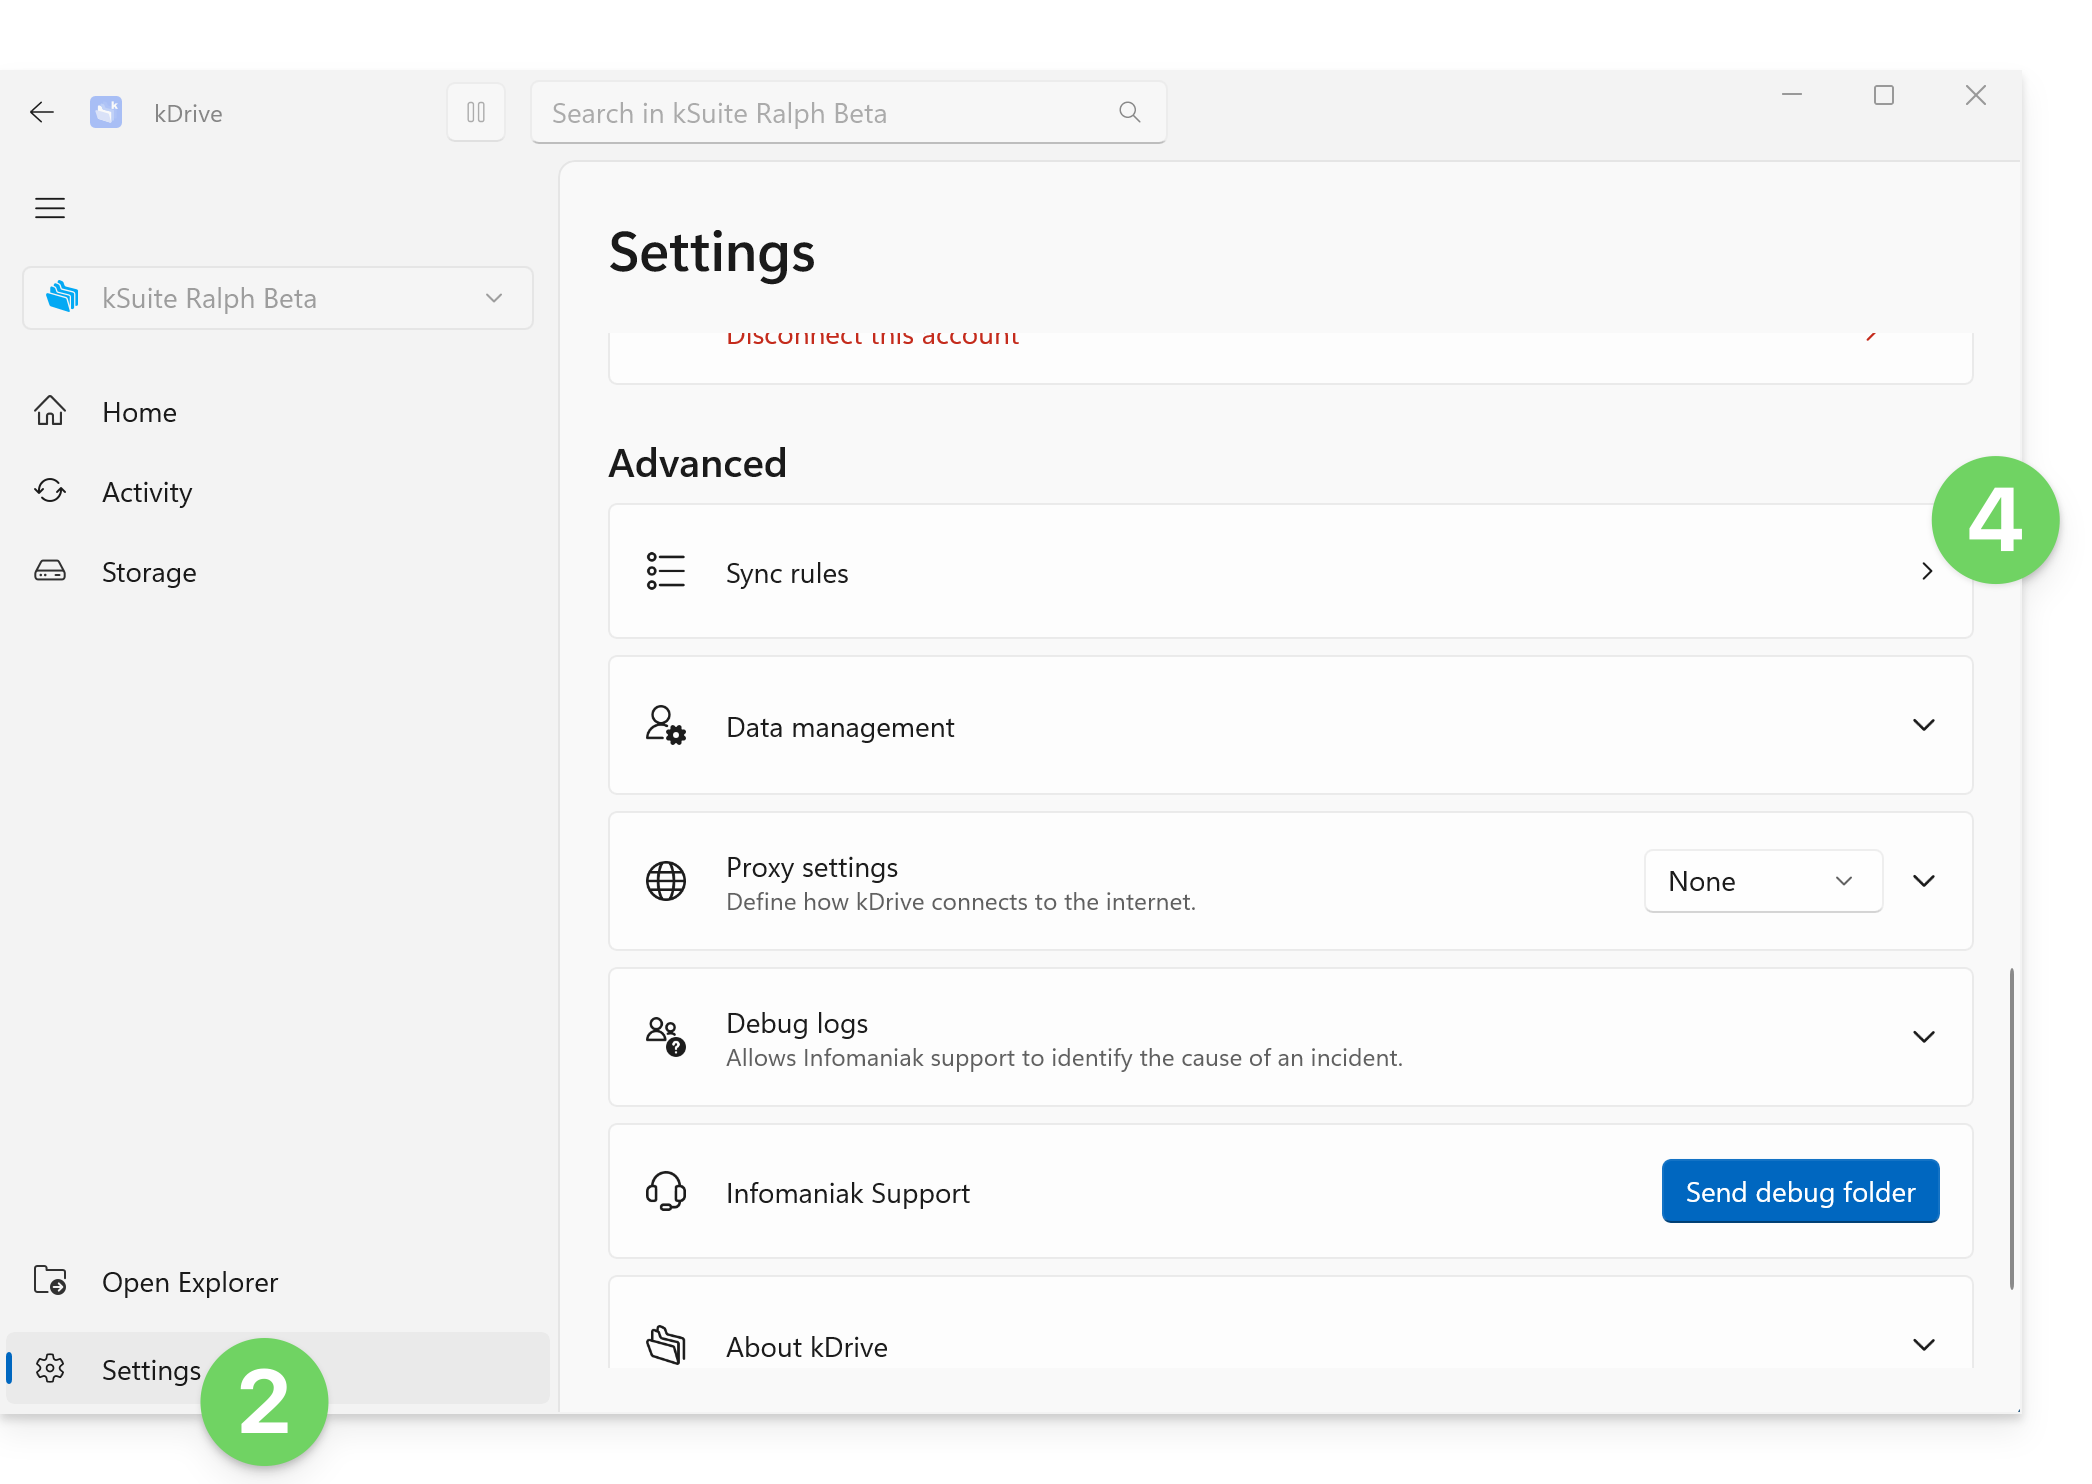
- The list that appears when you click on the chevron represents the files that are ignored by default by kDrive, and the corresponding rules cannot be modified.
- The files that are excluded by default (items in the list that cannot be deleted) vary depending on the OS and are excluded because they represent a risk of synchronization errors.
- Custom exclusion rules: these allow you to specify which name (or which part of a name) should never be synchronized, including in the file name extension (type) if necessary:
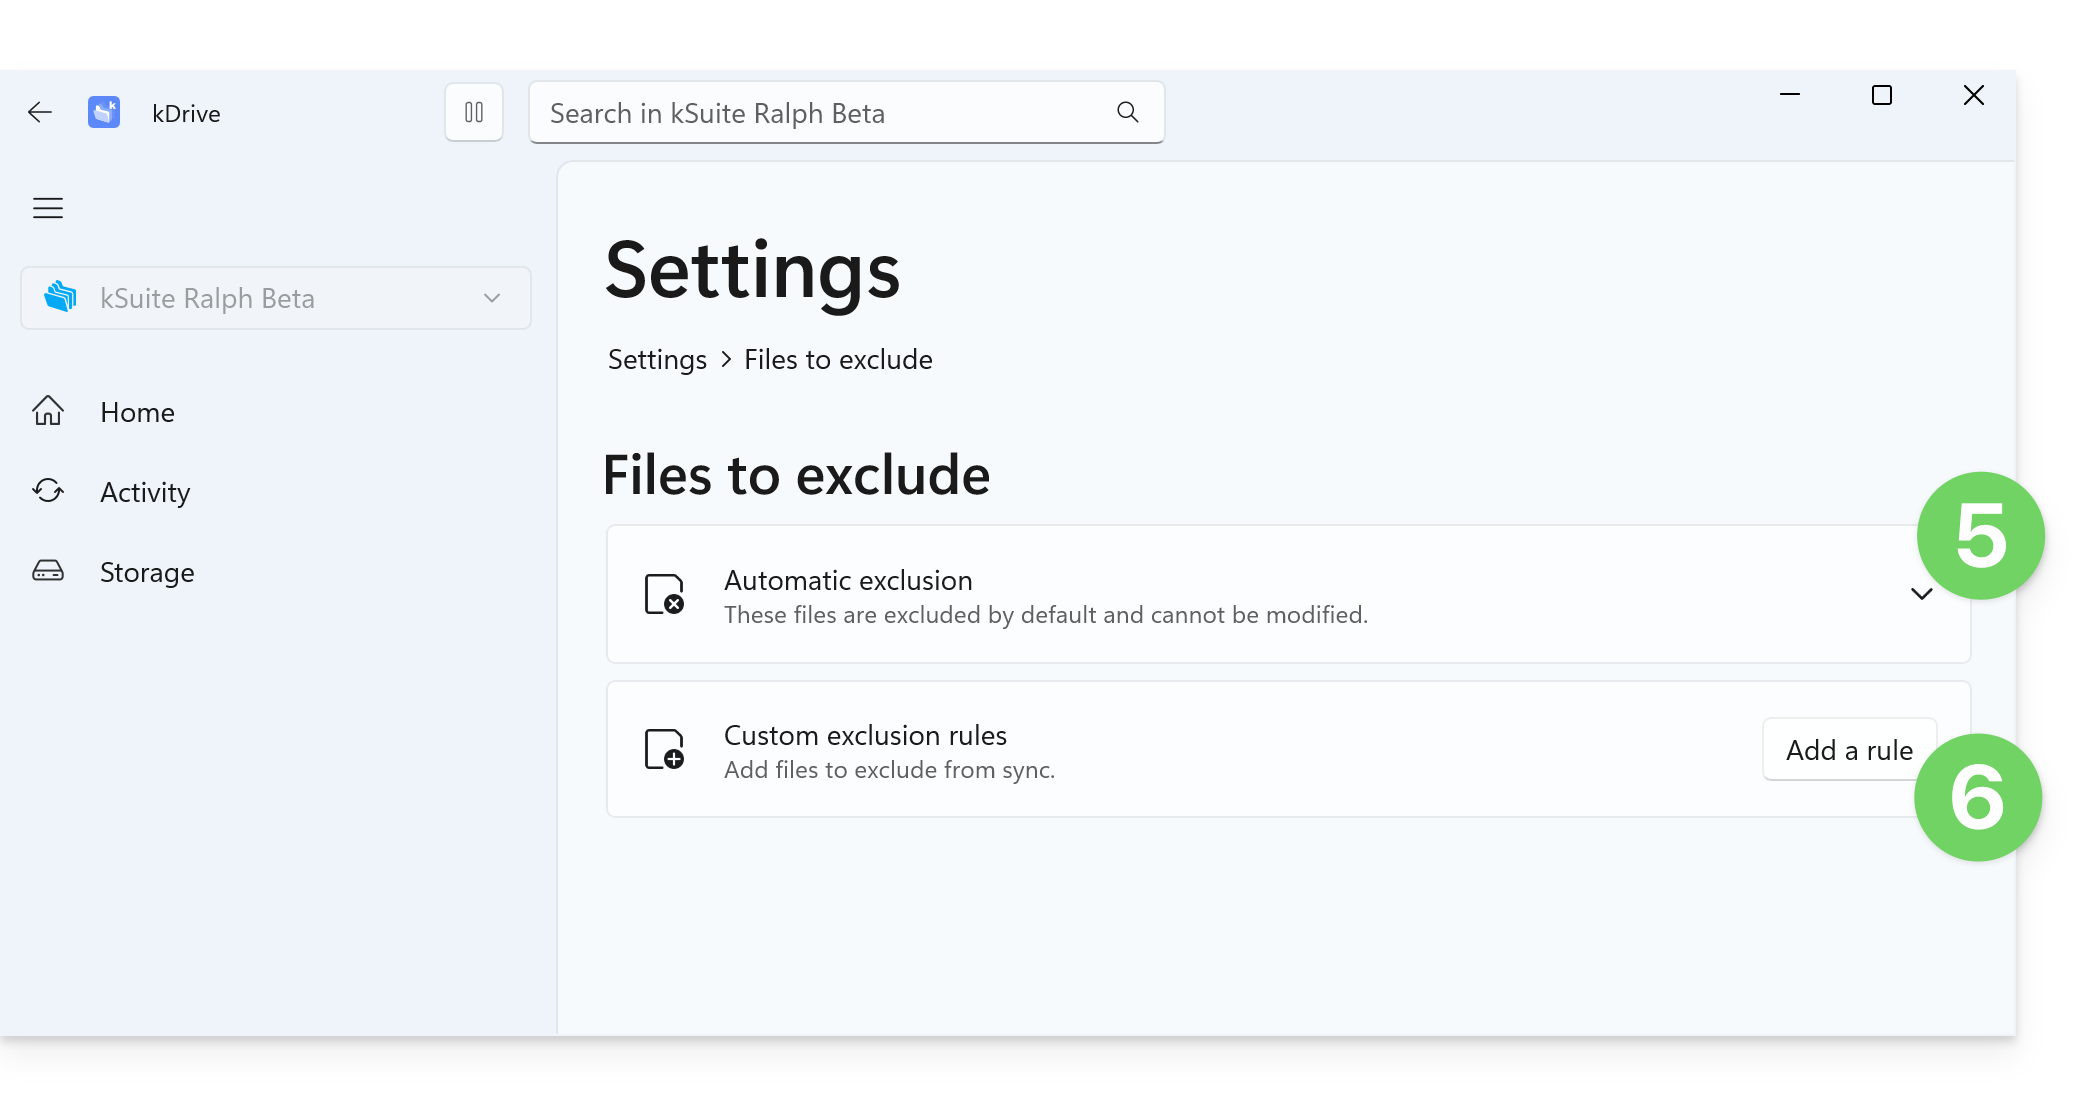
- To create a custom exclusion, click the Add rule button, then enter the term you want to exclude from any synchronization:
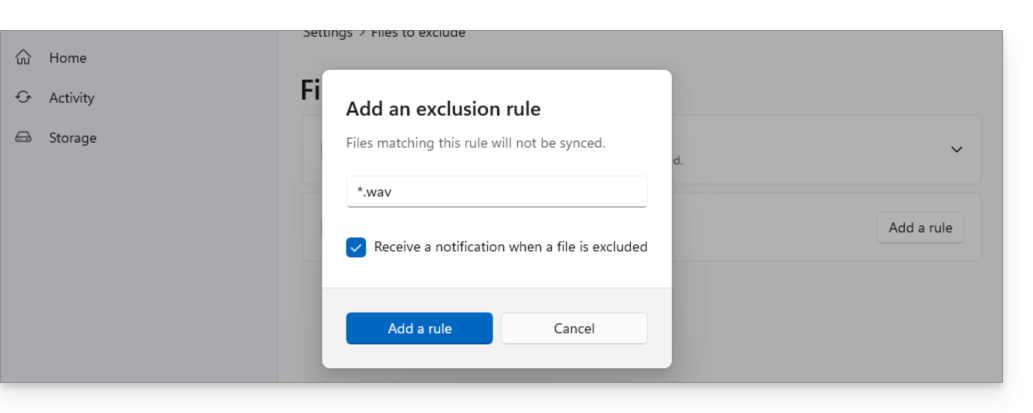
wavwill only exclude files that are named exactlywav(a filewav.txtwill not be excluded)..wavwill only exclude files that are named exactly.wav(a filetest.wavwill not be excluded).*.wavwill exclude all files that end with.wav. For example,test.wavwill be excluded, but nottest.wav.2.*wav*will exclude all files that containwav. For example,fichier-wav-audio.mp3will be excluded.
- Enable the checkbox if necessary to receive a notification when a synchronization excludes a file for the reason you have configured.
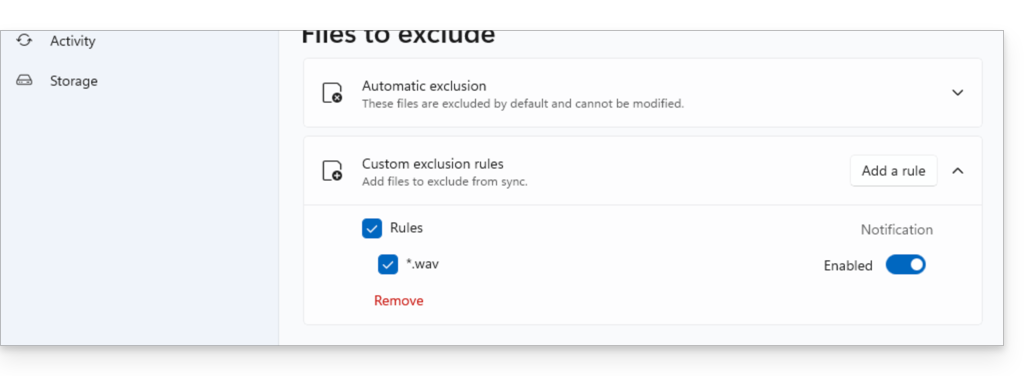
- The rule is displayed, and you can simply select it to delete it if needed. You can also click the toggle switch to enable or disable notifications when this type of exclusion occurs:
Desktop app v3.x
To do this:
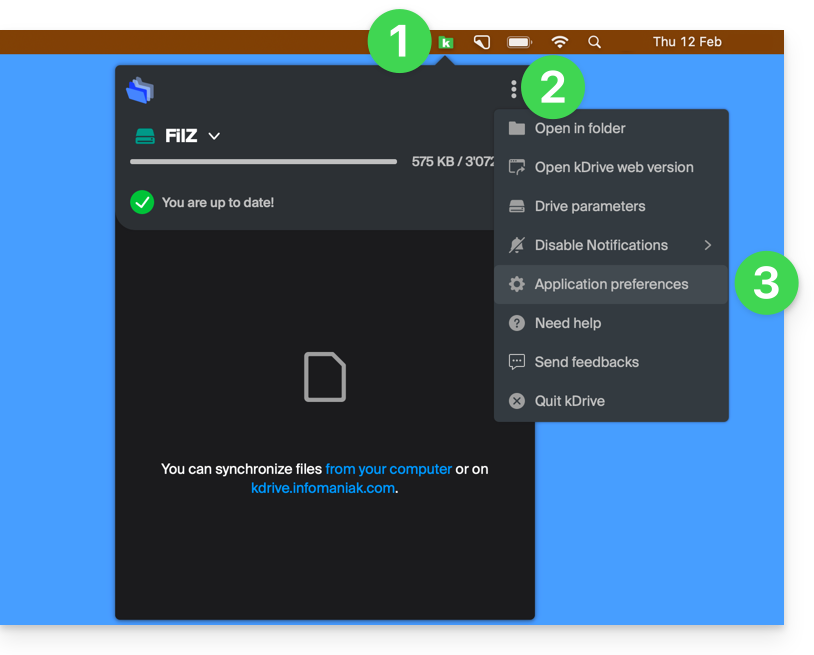
- Left-click on the desktop app icon in the notification area of your computer (top right on macOS, bottom right on Windows, and double-left-click in the taskbar on Linux).
- Click on the action menu ⋮ in the top right corner of the application.
- Click on Preferences:
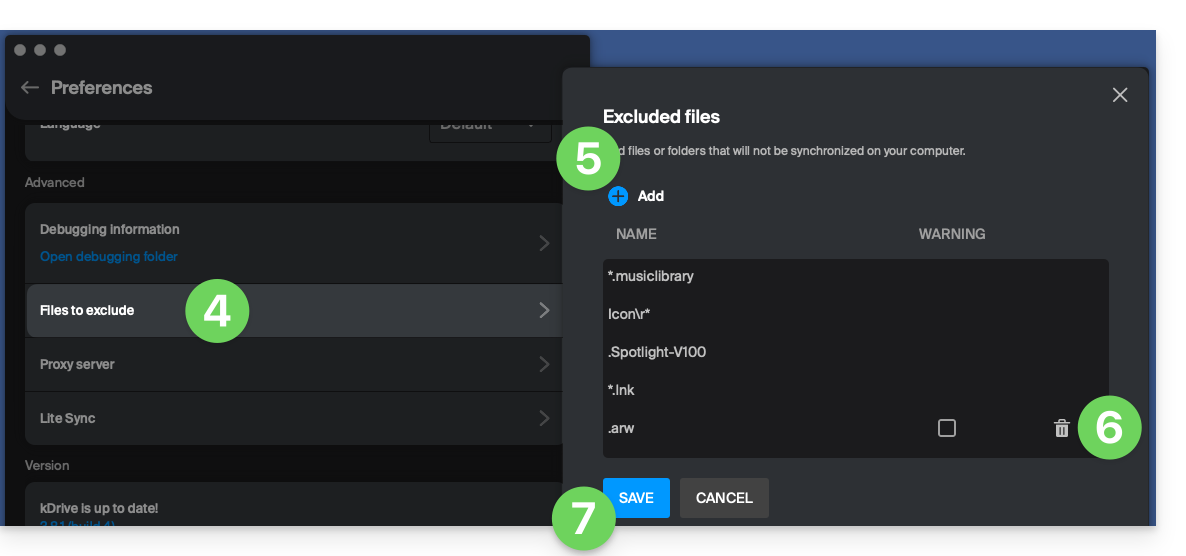
- Click on Files to exclude (in the Advanced section).
- To add files to exclude, click the Add icon and enter the name.
- To exclude a collection of files, specify, for example,
*.bak(asterisk "wildcard" preceding the file extension in question). - If you add the name of a folder, it will no longer be synchronized, including its content, subfolders, etc.
- To exclude a collection of files, specify, for example,
- To remove files/folders that you added to exclude them from synchronization, click the trash can icon Delete at the far right of the corresponding line.
- It is possible to hide synchronization warning messages for excluded files by checking the box to the right of the excluded file.
- Click on the blue Save button:
Link to this FAQ: https://faq.infomaniak.com/2871
Has this FAQ been helpful?
This guide details some of the basic operations that can be easily performed with data on kDrive Infomaniak.
Add a file / folder
On the kDrive web app
To add a file or folder to kDrive Infomaniak:
- Click here to access the Infomaniak kDrive web app (online service ksuite.infomaniak.com/kdrive).
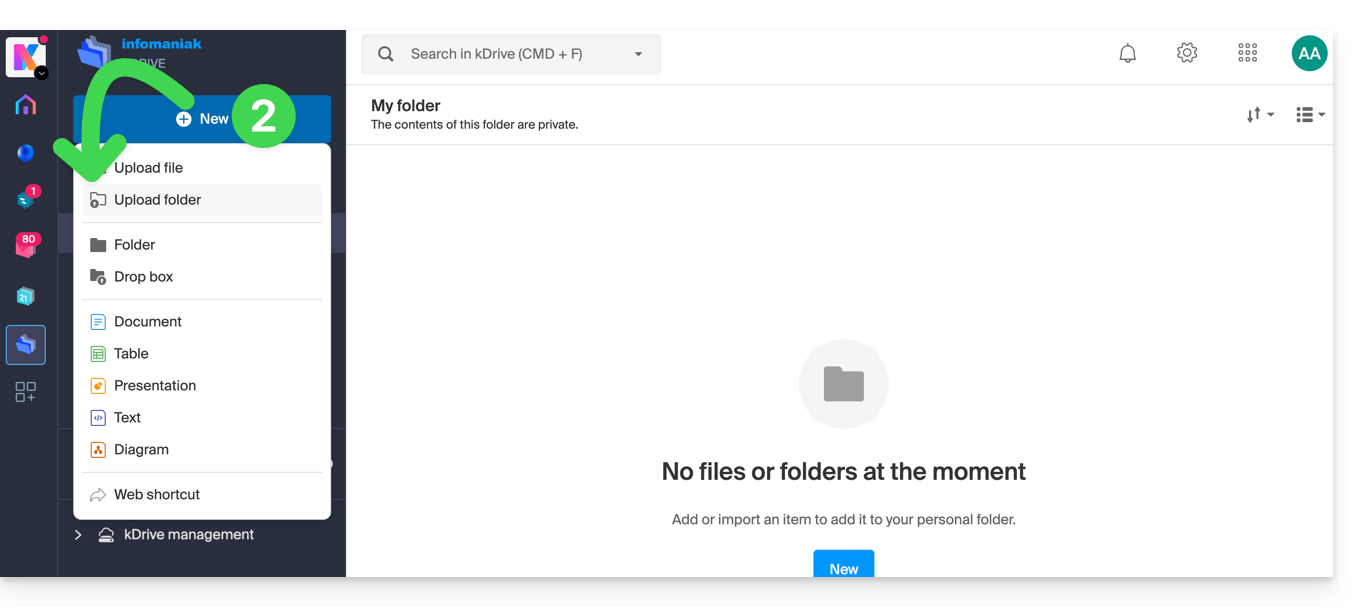
- Click the New button to send a folder:
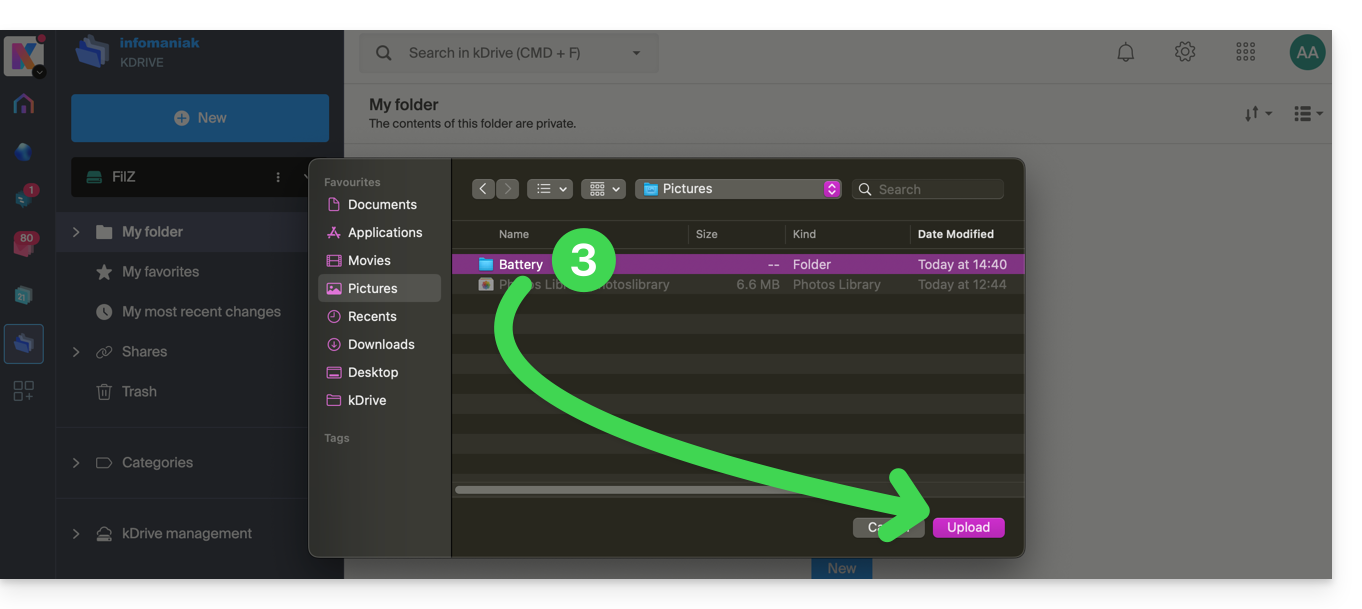
- Select the folder to upload to kDrive:
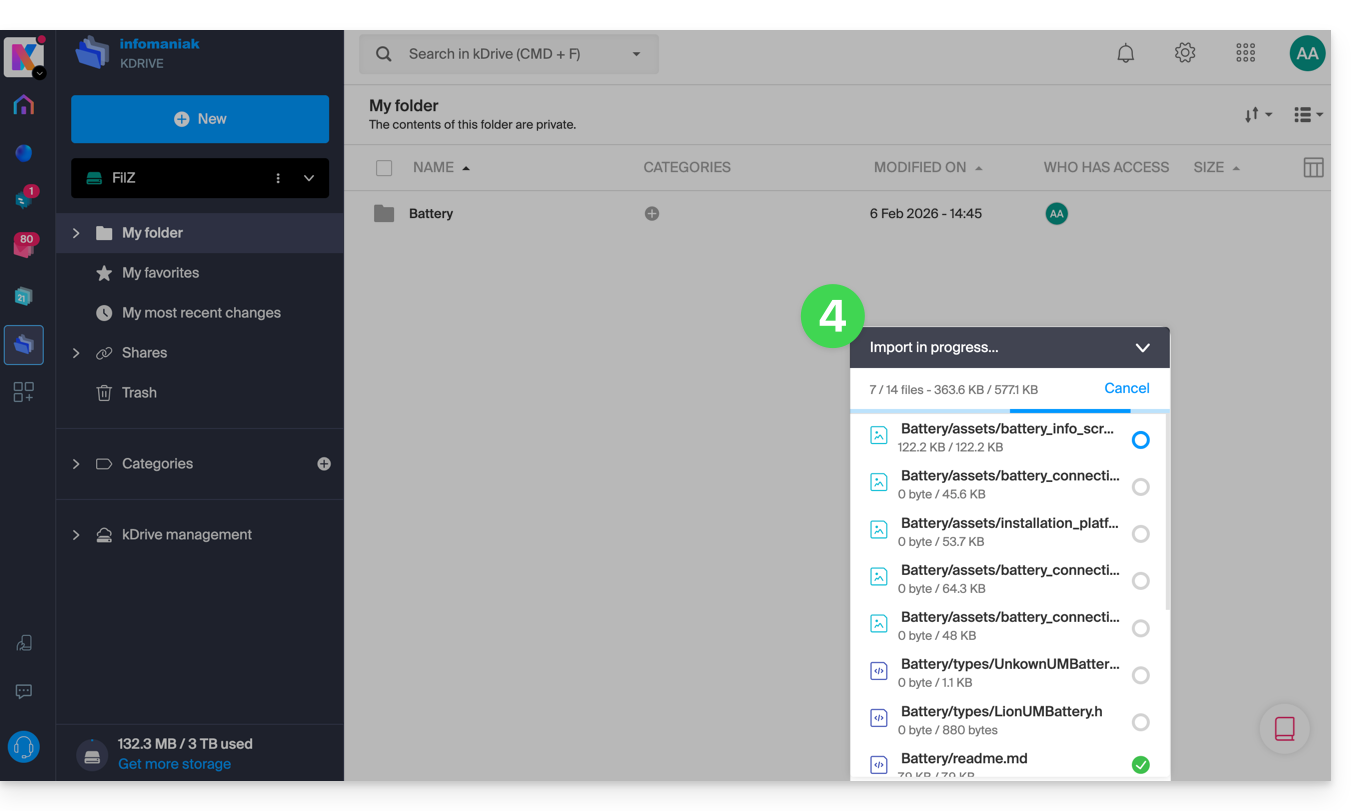
- The folder and its contents are sent to Infomaniak kDrive; please wait until the import is complete:
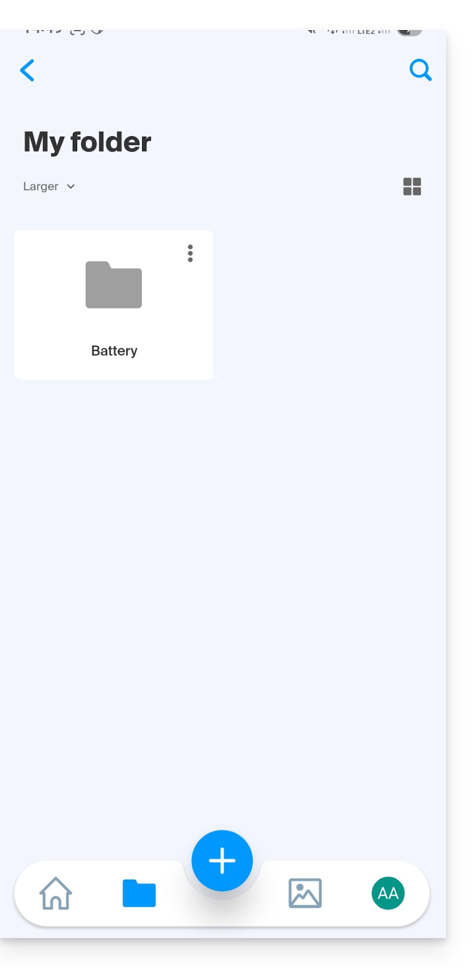
Data will be synchronized with the various solutions linked/connected to the same kDrive, for example:
- the kDrive mobile app (application for iOS/Android smartphones or tablets):
- and the desktop app kDrive (desktop application for macOS / Windows / Linux)…
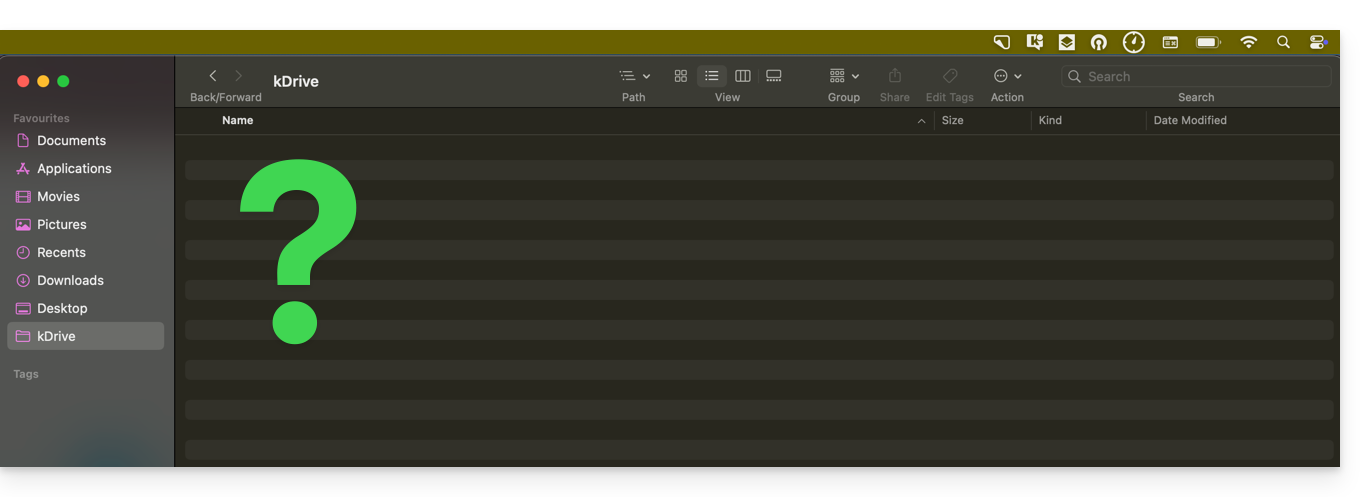
And if, as in the example above, your computer doesn't display anything new in the folder corresponding to kDrive (no synchronization), please refer to this other guide to explore some possible solutions to the problem.
Rename a file / folder
On the kDrive web app
To rename a file or folder in Infomaniak kDrive:
- Click here to access the Infomaniak kDrive web app (online service ksuite.infomaniak.com/kdrive).
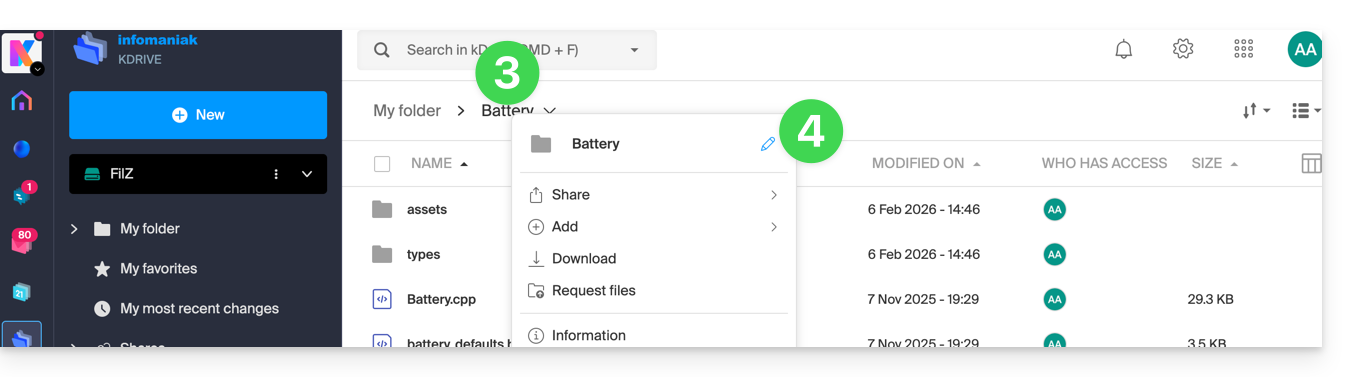
- Select a file to rename and right-click on it.
- You can also click on a folder name in the top bar.
- Click on the pencil icon:
- Enter the new name and validate by pressing the ENTER key or by clicking on the validation icon:
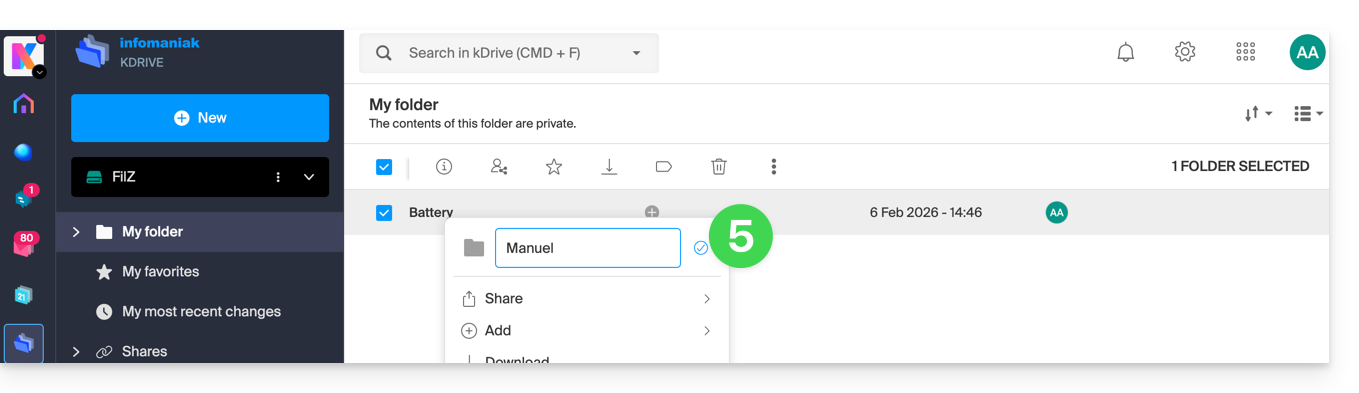
The new name is synchronized with the various solutions linked/connected to the same kDrive, for example, the mobile app kDrive (you need to refresh the interface if you are already in the folder in question) and the desktop app kDrive (desktop application on macOS / Windows / Linux):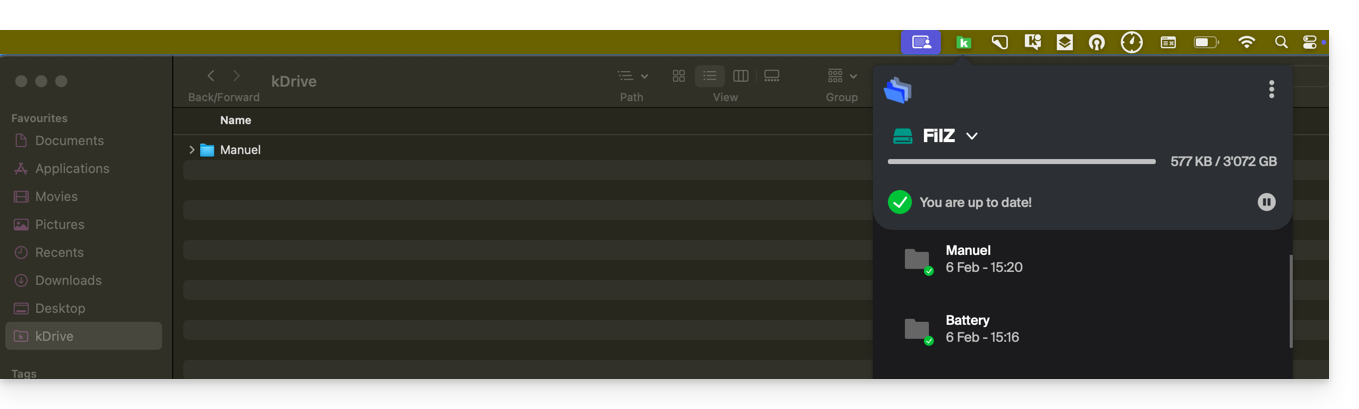
Add to favorites / track file
On the kDrive Web App
To add a file or folder to your favorites in the Infomaniak kDrive Web app (online service ksuite.infomaniak.com/kdrive):
- Click here to access the Infomaniak kDrive web app (online service ksuite.infomaniak.com/kdrive).
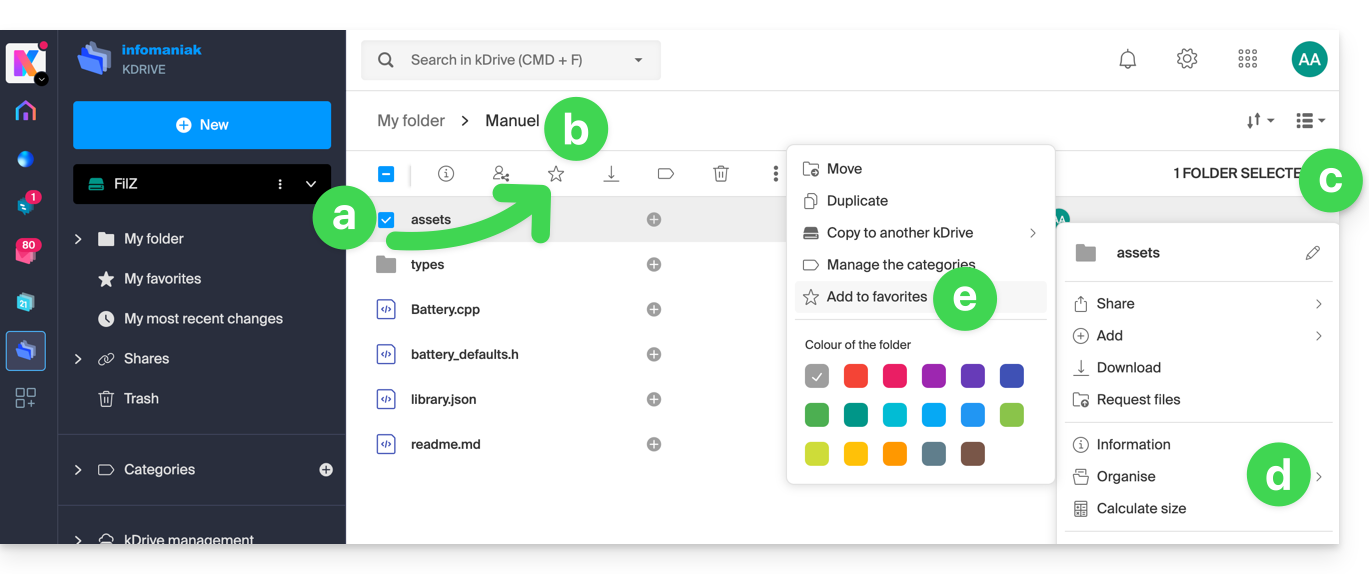
- There are several ways to add an item to your favorites:
- Select the file you want to add to your favorites.
- Click the ☆ icon in the top bar.
- You can also click the ⋮ action menu to the right of the item.
- Choose Organize.
- Click Add to favorites:
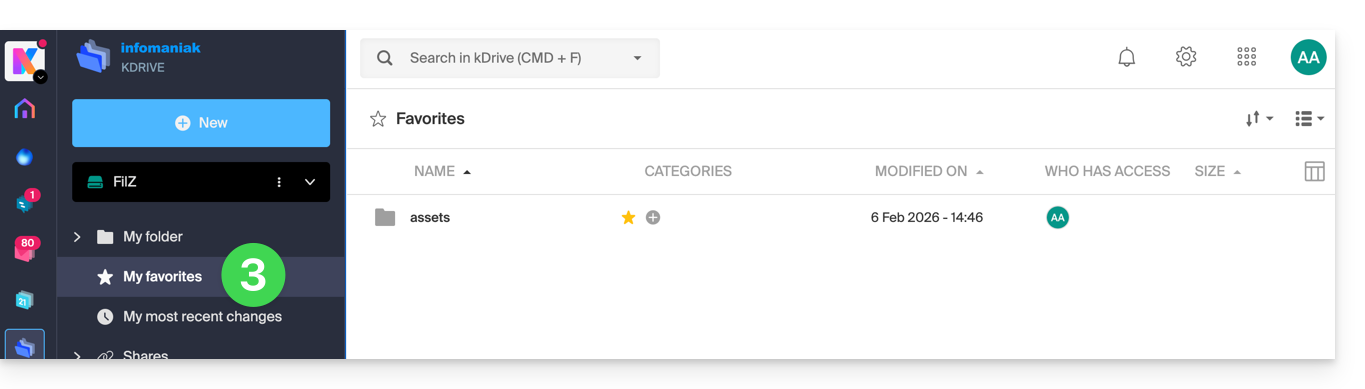
- A yellow star appears to represent favorite files/folders; they can then all be viewed from the My favorites menu in the left sidebar:
Favorites are synchronized with the various solutions connected to the same kDrive, for example the kDrive mobile app (application for iOS/Android smartphones or tablets):
- The Favorites menu is located under the Folders icon at the bottom…
- … but sometimes it is necessary to first go back if you were already browsing a folder:
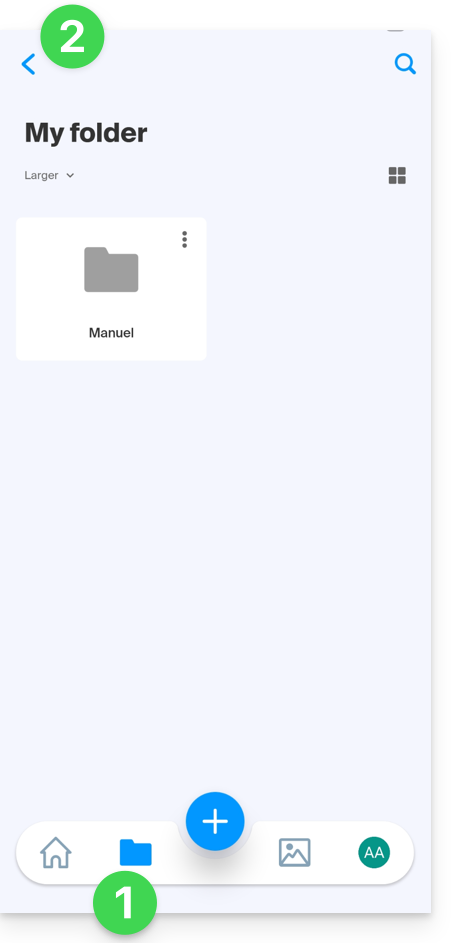
- Then click on Favorites:
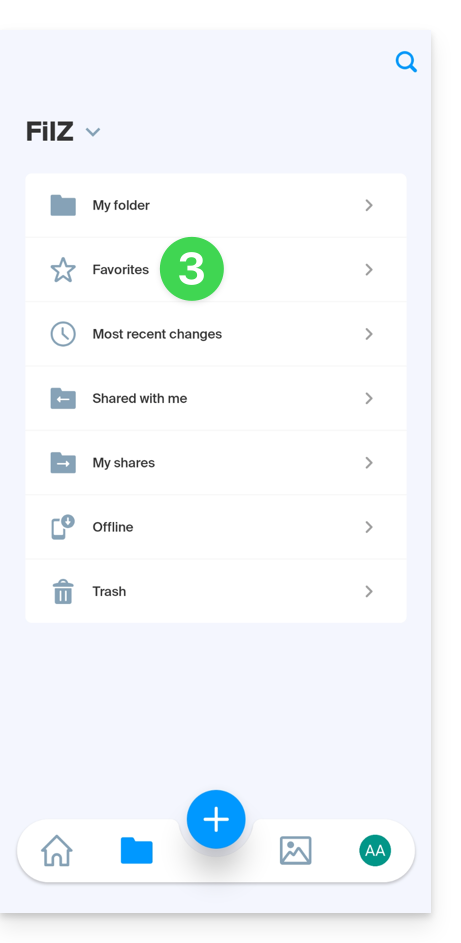
- The synchronized favorites are displayed:
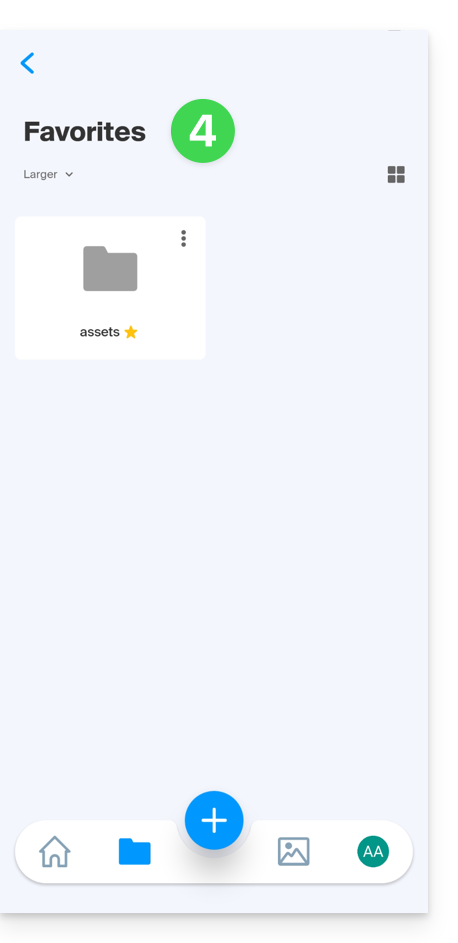
On the desktop app kDrive (desktop application for macOS / Windows / Linux), there is no favorites system; no special distinction will be made for your files placed in favorites on other platforms.
Unzip an archive
This feature for .zip files is planned but not yet available.
Link to this FAQ: https://faq.infomaniak.com/2873
Has this FAQ been helpful?
This guide explains how to edit a file in PDF format on the kDrive web app (online service ksuite.infomaniak.com/kdrive).
✘ UNAVAILABLE with
kSuite Free
my kSuite (ik.me, etik.com, ikmail.com)
Introduction
- The kDrive web app natively integrates an editor that allows you to edit a PDF document online.
- Your files are never analyzed and are stored exclusively in Switzerland (❓: help).
- Refer to this other guide if you are looking for information on editing other file formats.
Edit a PDF file
To access kDrive and edit the PDF document:
- Click here to access the kDrive web app (online service ksuite.infomaniak.com/kdrive).
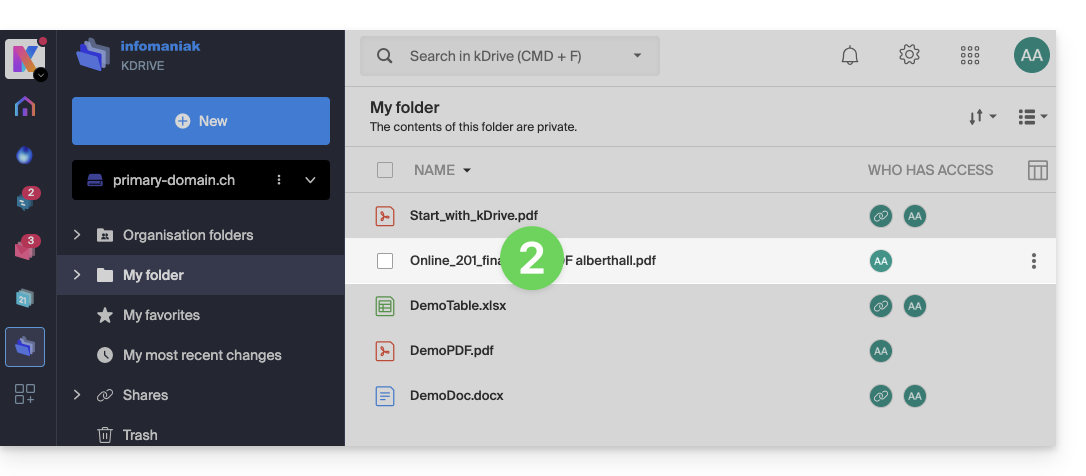
- Click on the PDF document in question to open it:
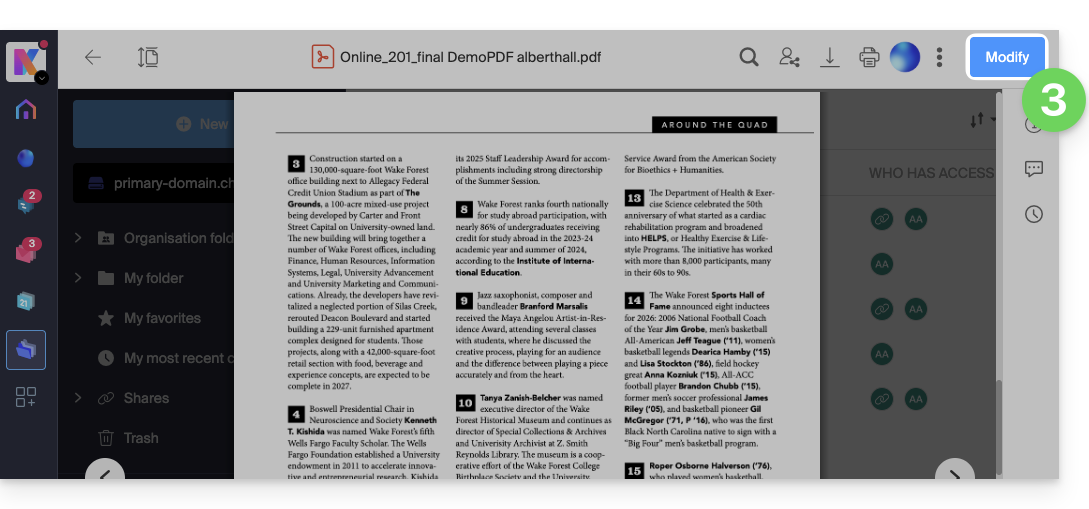
- Click the Edit button at the top of the document to access the file editor:
- For add text at the location, size, and color of your choiceusing the PDF editor:
- Click on the TEXT button in the toolbar.
- Click on the page and enter the text as desired.
- Then click on the buttons that have appeared to adjust the size or color of the text.
- Click on the trash can button to delete your selected text blocks:
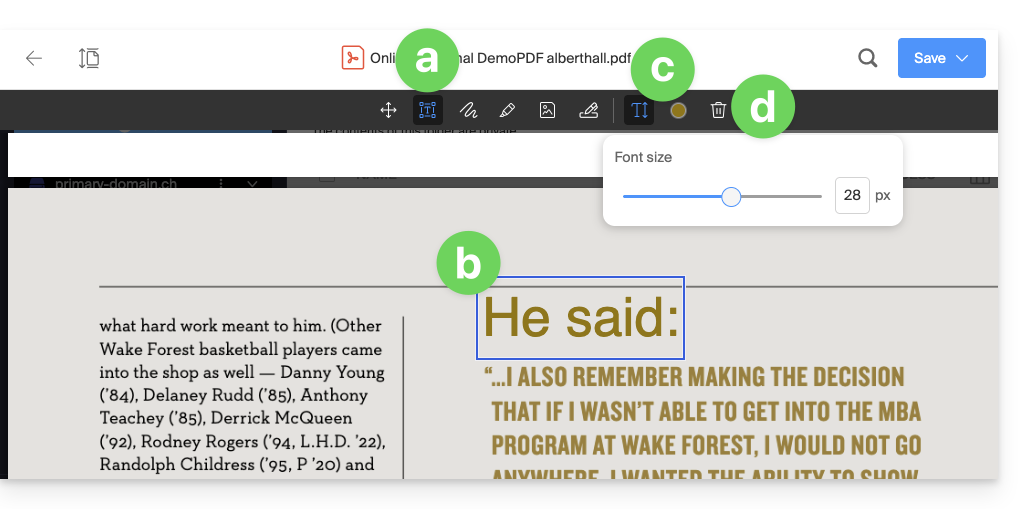
- Todraw at the location, size, and color of your choiceusing the PDF editor:
- Click on the DRAW button in the toolbar.
- Click on the page and draw as desired.
- Then click on the buttons that appear to adjust the size or color of the lines.
- Click on the trash can button to delete your selected lines:
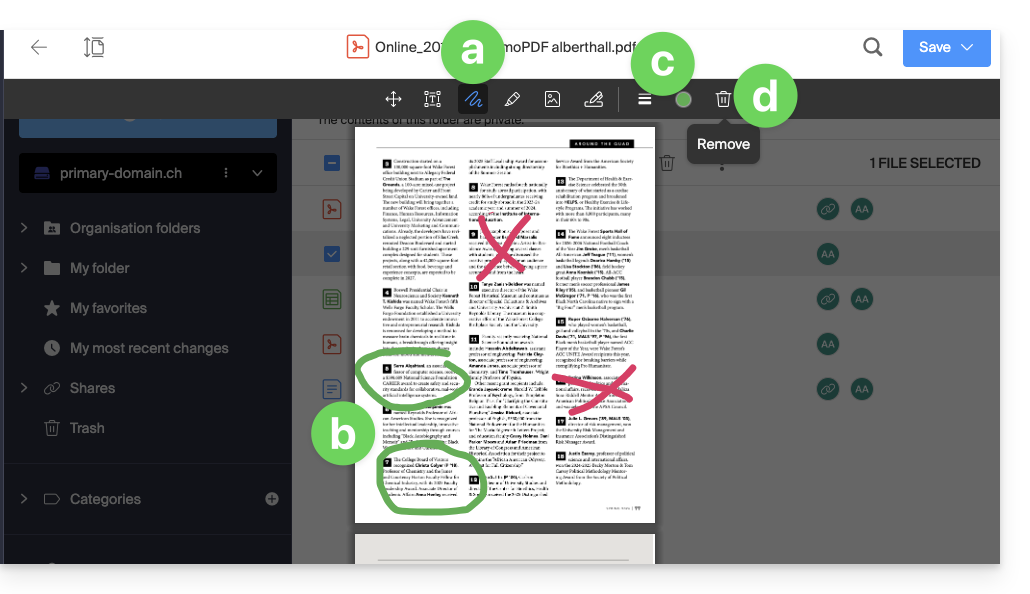
- To highlight text using the PDF editor:
- Click on the PENCIL button in the toolbar.
- Increase the display size if necessary using the zoom tools at the bottom of the screen.
- Highlight your text as desired.
- Click on the trash can button to delete the selected highlights:
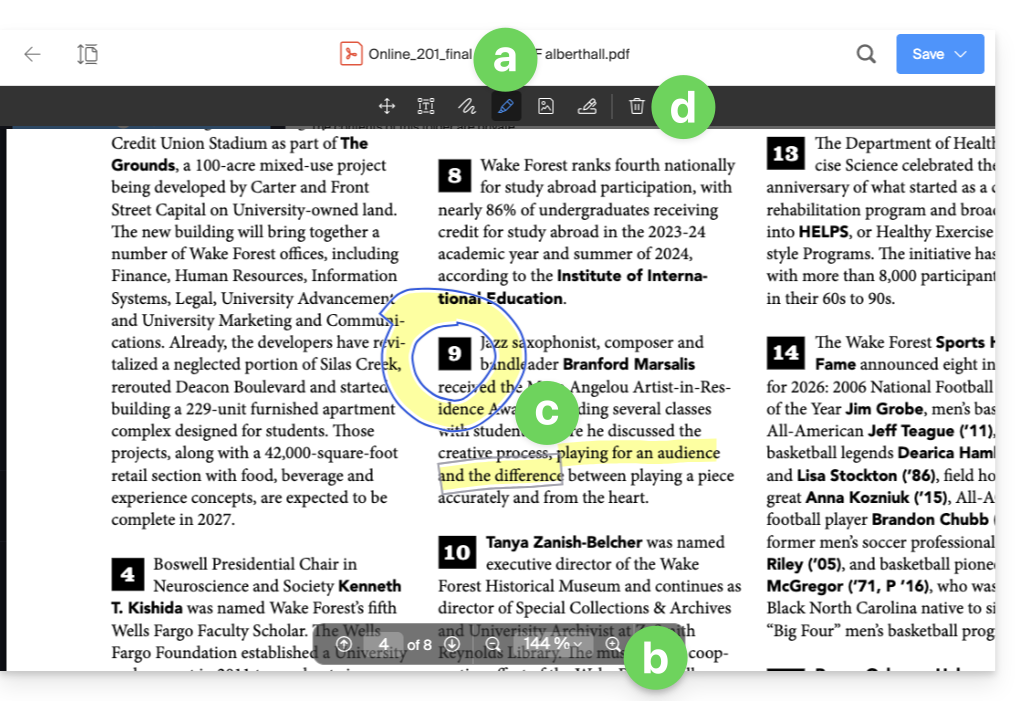
- To insert an image using the PDF editor:
- Click on the IMAGE button in the toolbar.
- Then click on the button that appears to import an image from your device.
- Place and resize the image as desired.
- Add alternative text (optional).
- Click on the trash can button to delete the inserted image:
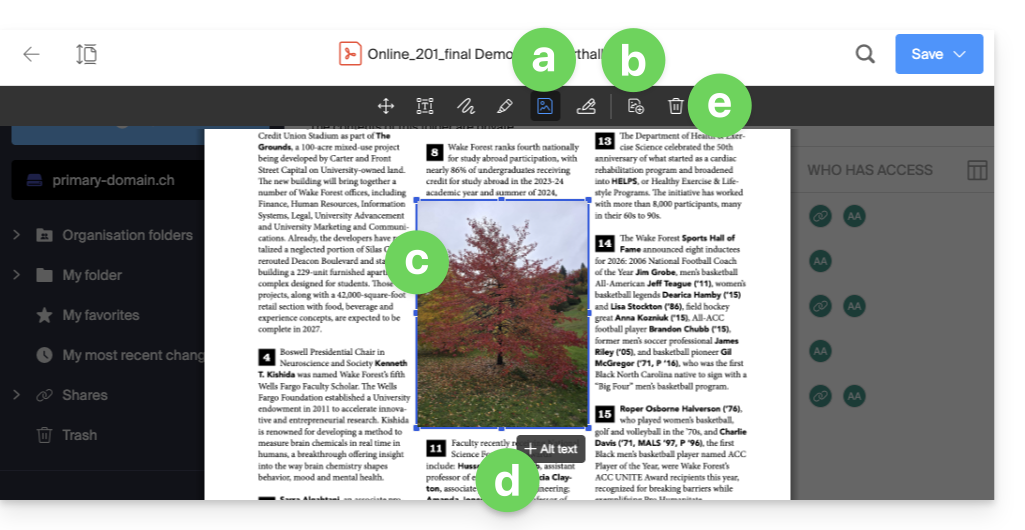
- To create a signature and then sign documents: refer to this other guide on the subject:
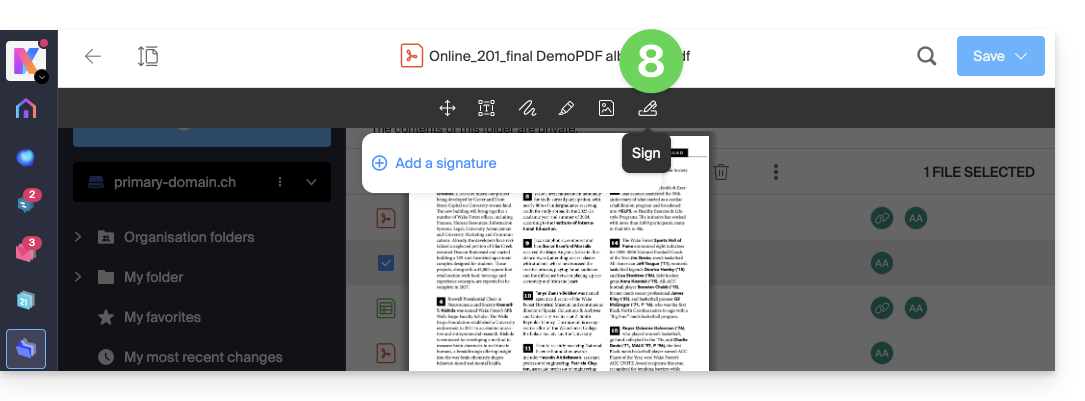
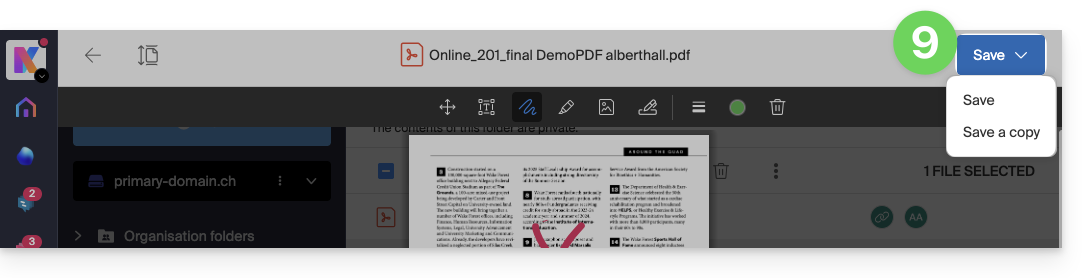
- Once finished, save the changes and choose whether to create a copy of the modified document or overwrite the existing file:
Rename a file (PDF or other)
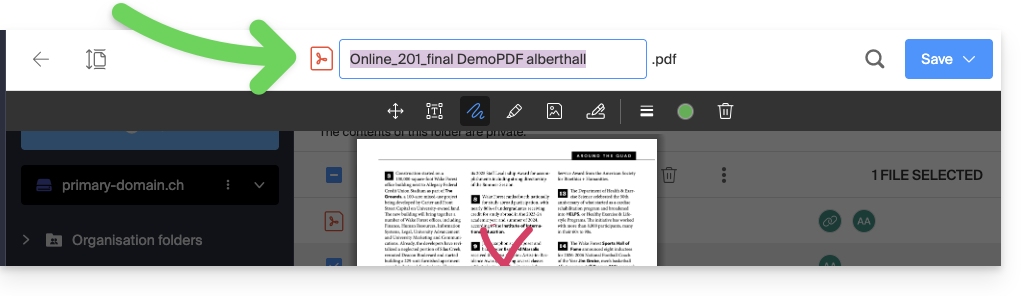
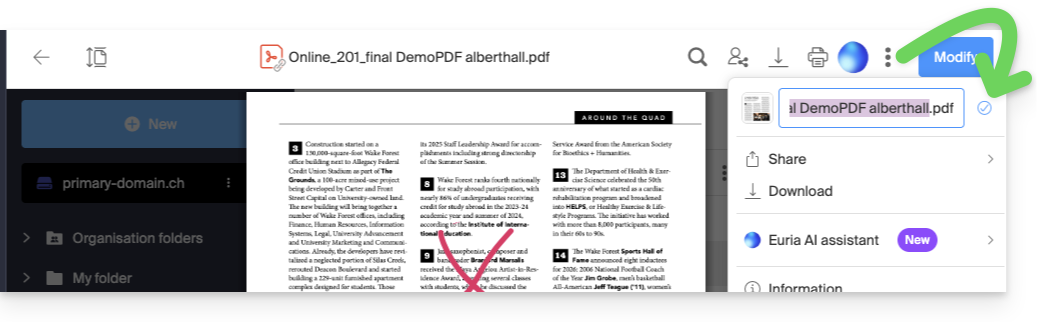
You can rename any file:
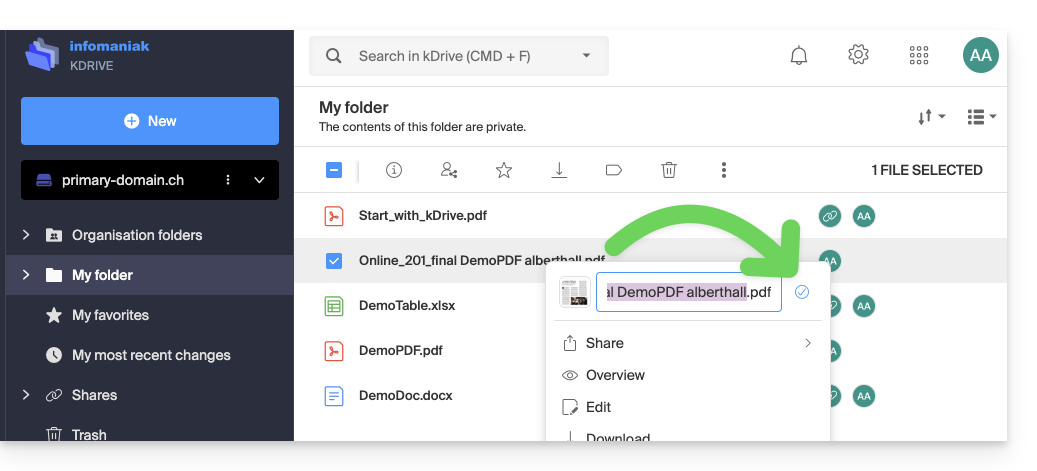
- from the file editor or preview by double-clicking on the document name:
- from the preview, by clicking on the action menu ⋮ and then on the Pencil icon:
- from the kDrive tree view, by clicking on the action menu ⋮ located to the right of the item in question (or by right-clicking) and then on the Pencil icon:
Link to this FAQ: https://faq.infomaniak.com/2885
Has this FAQ been helpful?
This guide explains how to troubleshoot issues with opening the document editor integrated into the kDrive mobile app on iOS (iPhone / iPad).
Introduction
- On iOS and iPadOS, the kDrive application uses a secure web view to launch the editor.
- If the device has active restrictions (the "Screen Time" feature, parental controls, or MDM management), the operating system may block access to the technical URLs required for the editor.
- Unlike the Android version, which can use a third-party application, the iOS editor requires an active internet connection; if no network is available, a message indicating that the editor cannot be opened will normally be displayed.
Troubleshooting Document Editor Access
If, when you try to edit a document (Word, Excel, PowerPoint) from the kDrive app on iOS:
- A message appears: Unable to load document editor,
- A blank page is displayed and remains frozen without an error message,
- The loading indicator spins indefinitely after you tap the edit icon (pencil)…
… then it is necessary to specifically allow Infomaniak domains in the iOS device settings:
- Open the Settings app on your iOS device.
- Go to Screen Time > Content & Privacy Restrictions.
- Enable restrictions if they are not already enabled, then tap Content Restrictions > Web Content.
- In the Always Allow section, add the following two addresses:
https://kdrive.infomaniak.comhttps://onlyoffice.infomaniak.com
Once these exceptions have been added, return to the kDrive application to resume editing the document.
For more details on configuring web restrictions on Apple devices, please refer to the official documentation.
Link to this FAQ: https://faq.infomaniak.com/2892
Has this FAQ been helpful?
This guide provides instructions for synchronizing kDrive with Linux using the WebDAV connection protocol.
✘ UNAVAILABLE with
kSuite Free / kSuite Standard
my kSuite / my kSuite+ (ik.me, etik.com, ikmail.com)
Introduction
- Most recent software supporting the WebDAV protocol is compatible with kDrive offers that also support WebDAV. Infomaniak cannot guarantee the compatibility of the service with external applications and does not provide support for this protocol.
- It is recommended toinstall the kDrive application to prevent any file loss.
Connect to kDrive via WebDAV on Linux (Gnome)
To do this:
- Open Files.
- In the sidebar, click on Network:
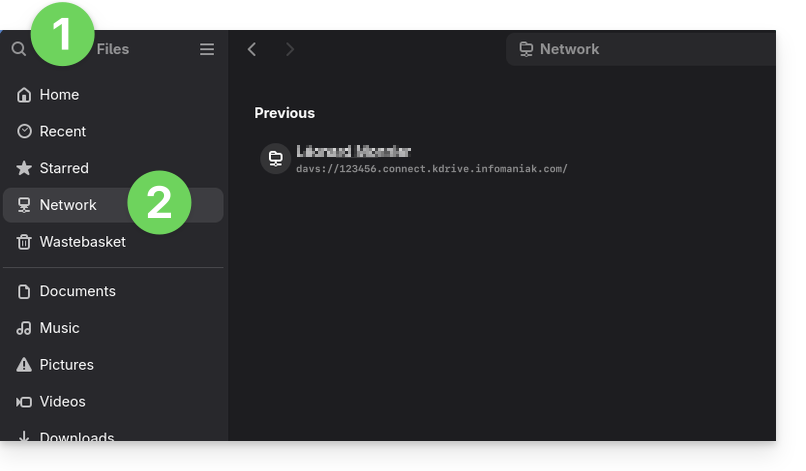
- Enter the server address:
davs://IDkDrive.connect.kdrive.infomaniak.com(need help?). - Click on Connect.
- For the account settings, use the following information:
- Username: the email address you use to log in to your Infomaniak account.
- Password: create an application password for this specific use.
- Click on Log in.
Link to this FAQ: https://faq.infomaniak.com/2894
Has this FAQ been helpful?
This guide will help you test whether kDrive synchronization is working correctly on your device.
Prerequisites
- For synchronization between your devices to work when your data is updated on kDrive (new file, edited document, etc.), it is obviously necessary that:
Check that the kDrive app is running in the background
On macOS / Linux
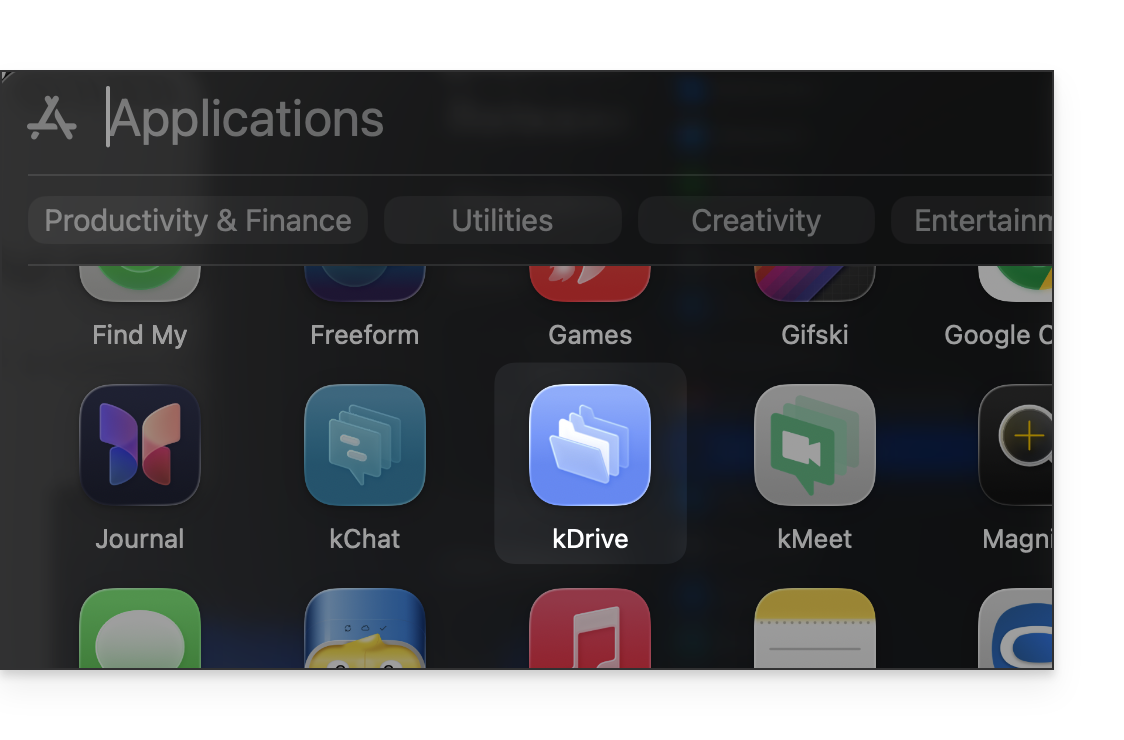
- Launch kDrive from the installed Applications:
- kDrive can also be launched from the Finder:
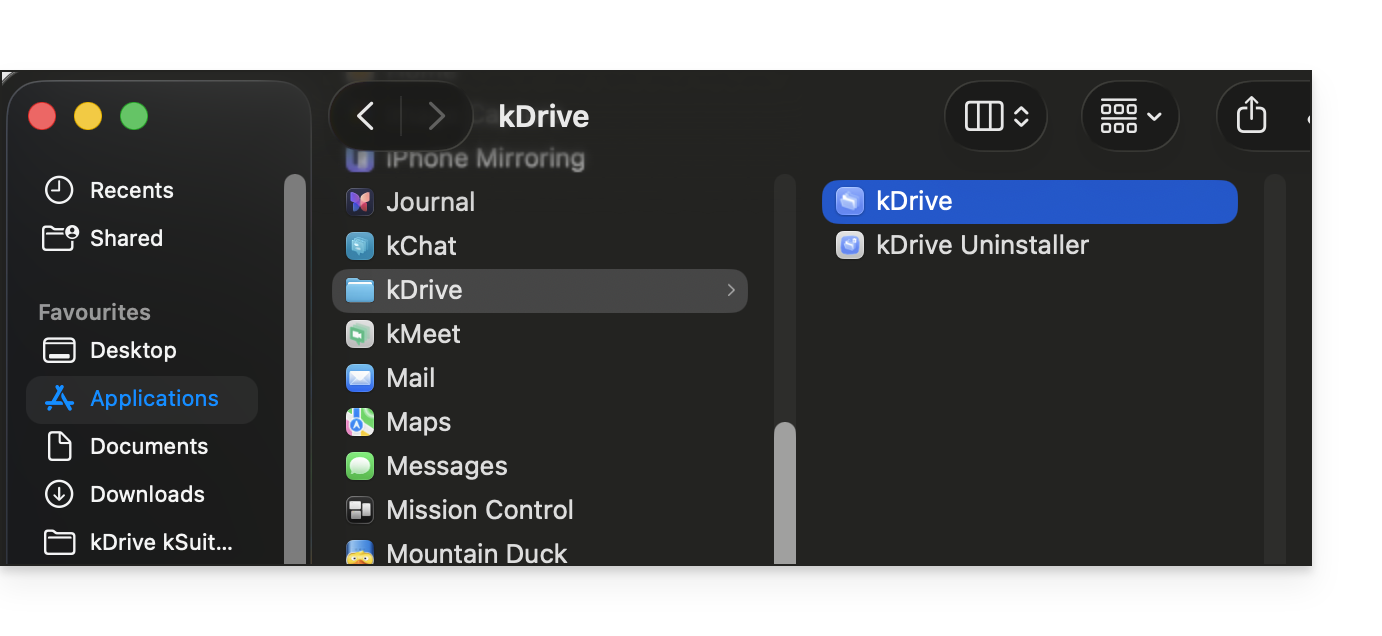
- kDrive can also be launched from the Finder:
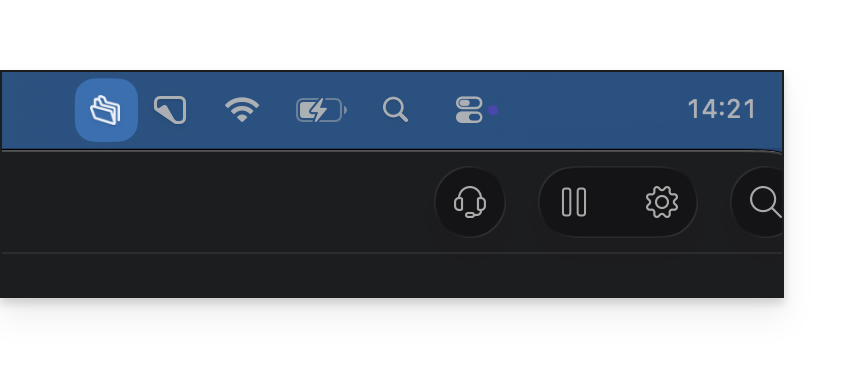
- When kDrive is launched and running in the background, its icon should appear in the notification area at the top right, next to the clock and network settings:
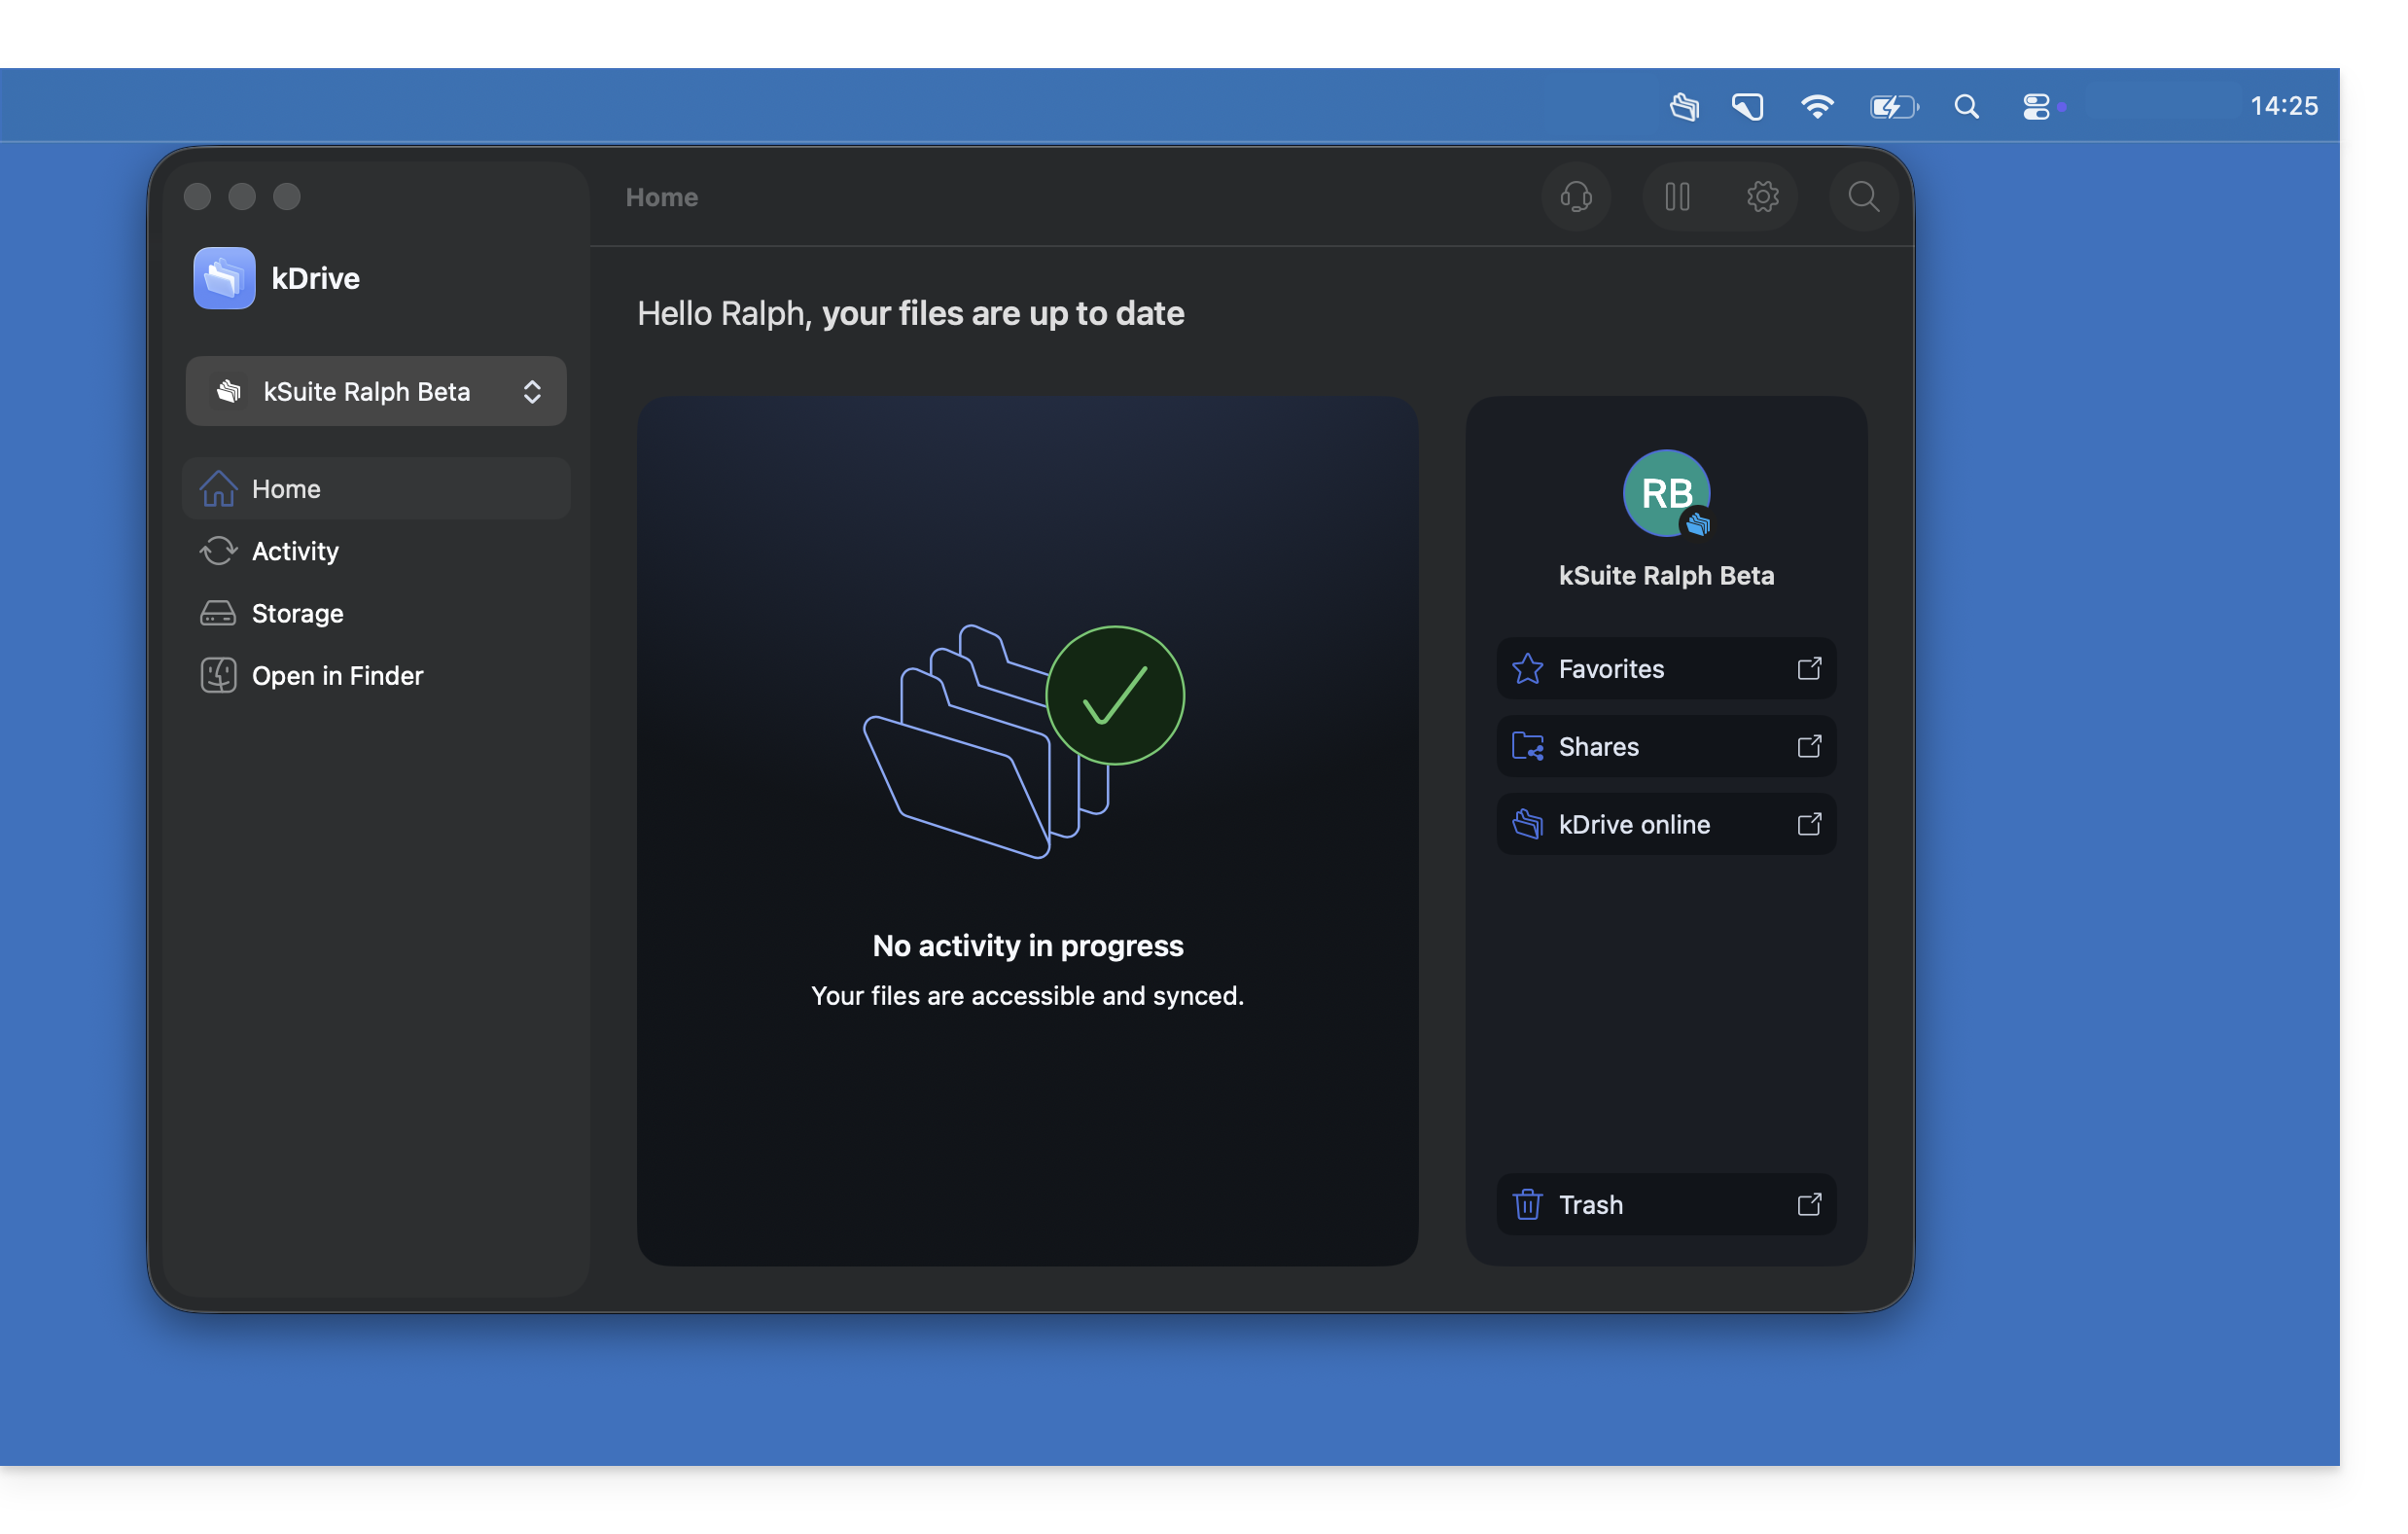
- Left-click on the kDrive app icon; the application interface should appear in the foreground:
On Windows
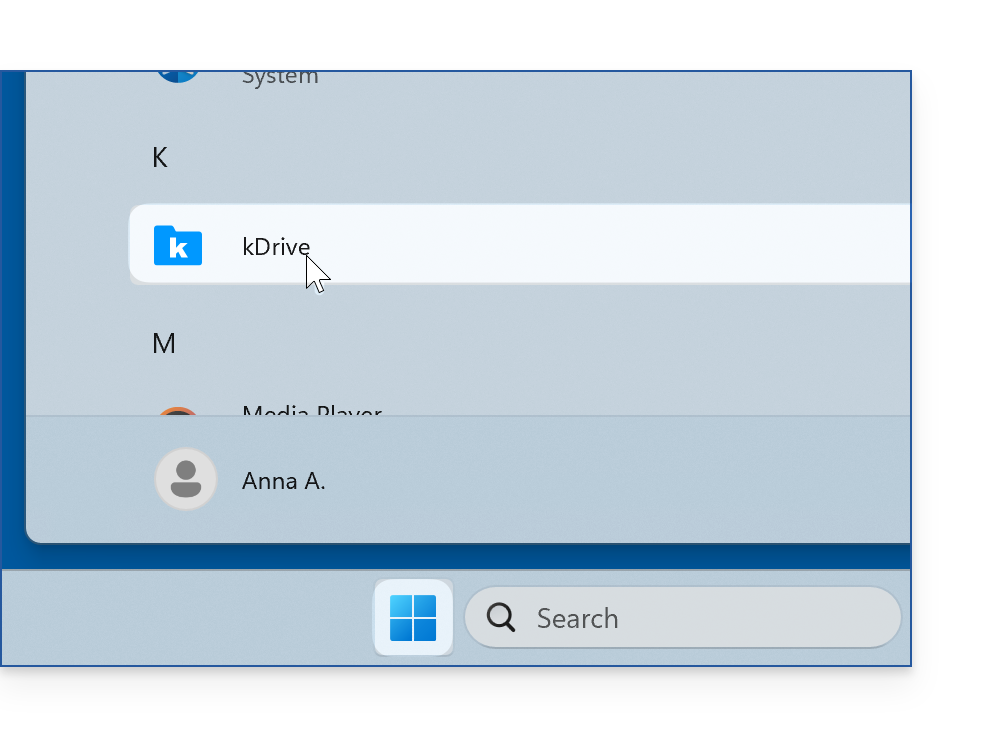
- Launch kDrive from the Windows Start menu:
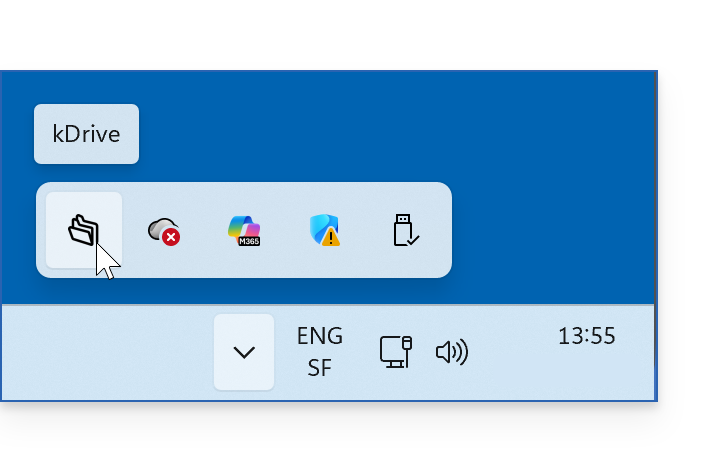
- When kDrive is launched and running in the background, its icon should appear in the notification area at the bottom right on Windows; however, it may be “hidden” behind the menu accessible via the down arrow (❓: help):
- To make the kDrive icon directly visible on the taskbar, open the Start menu.
- Click on Settings:
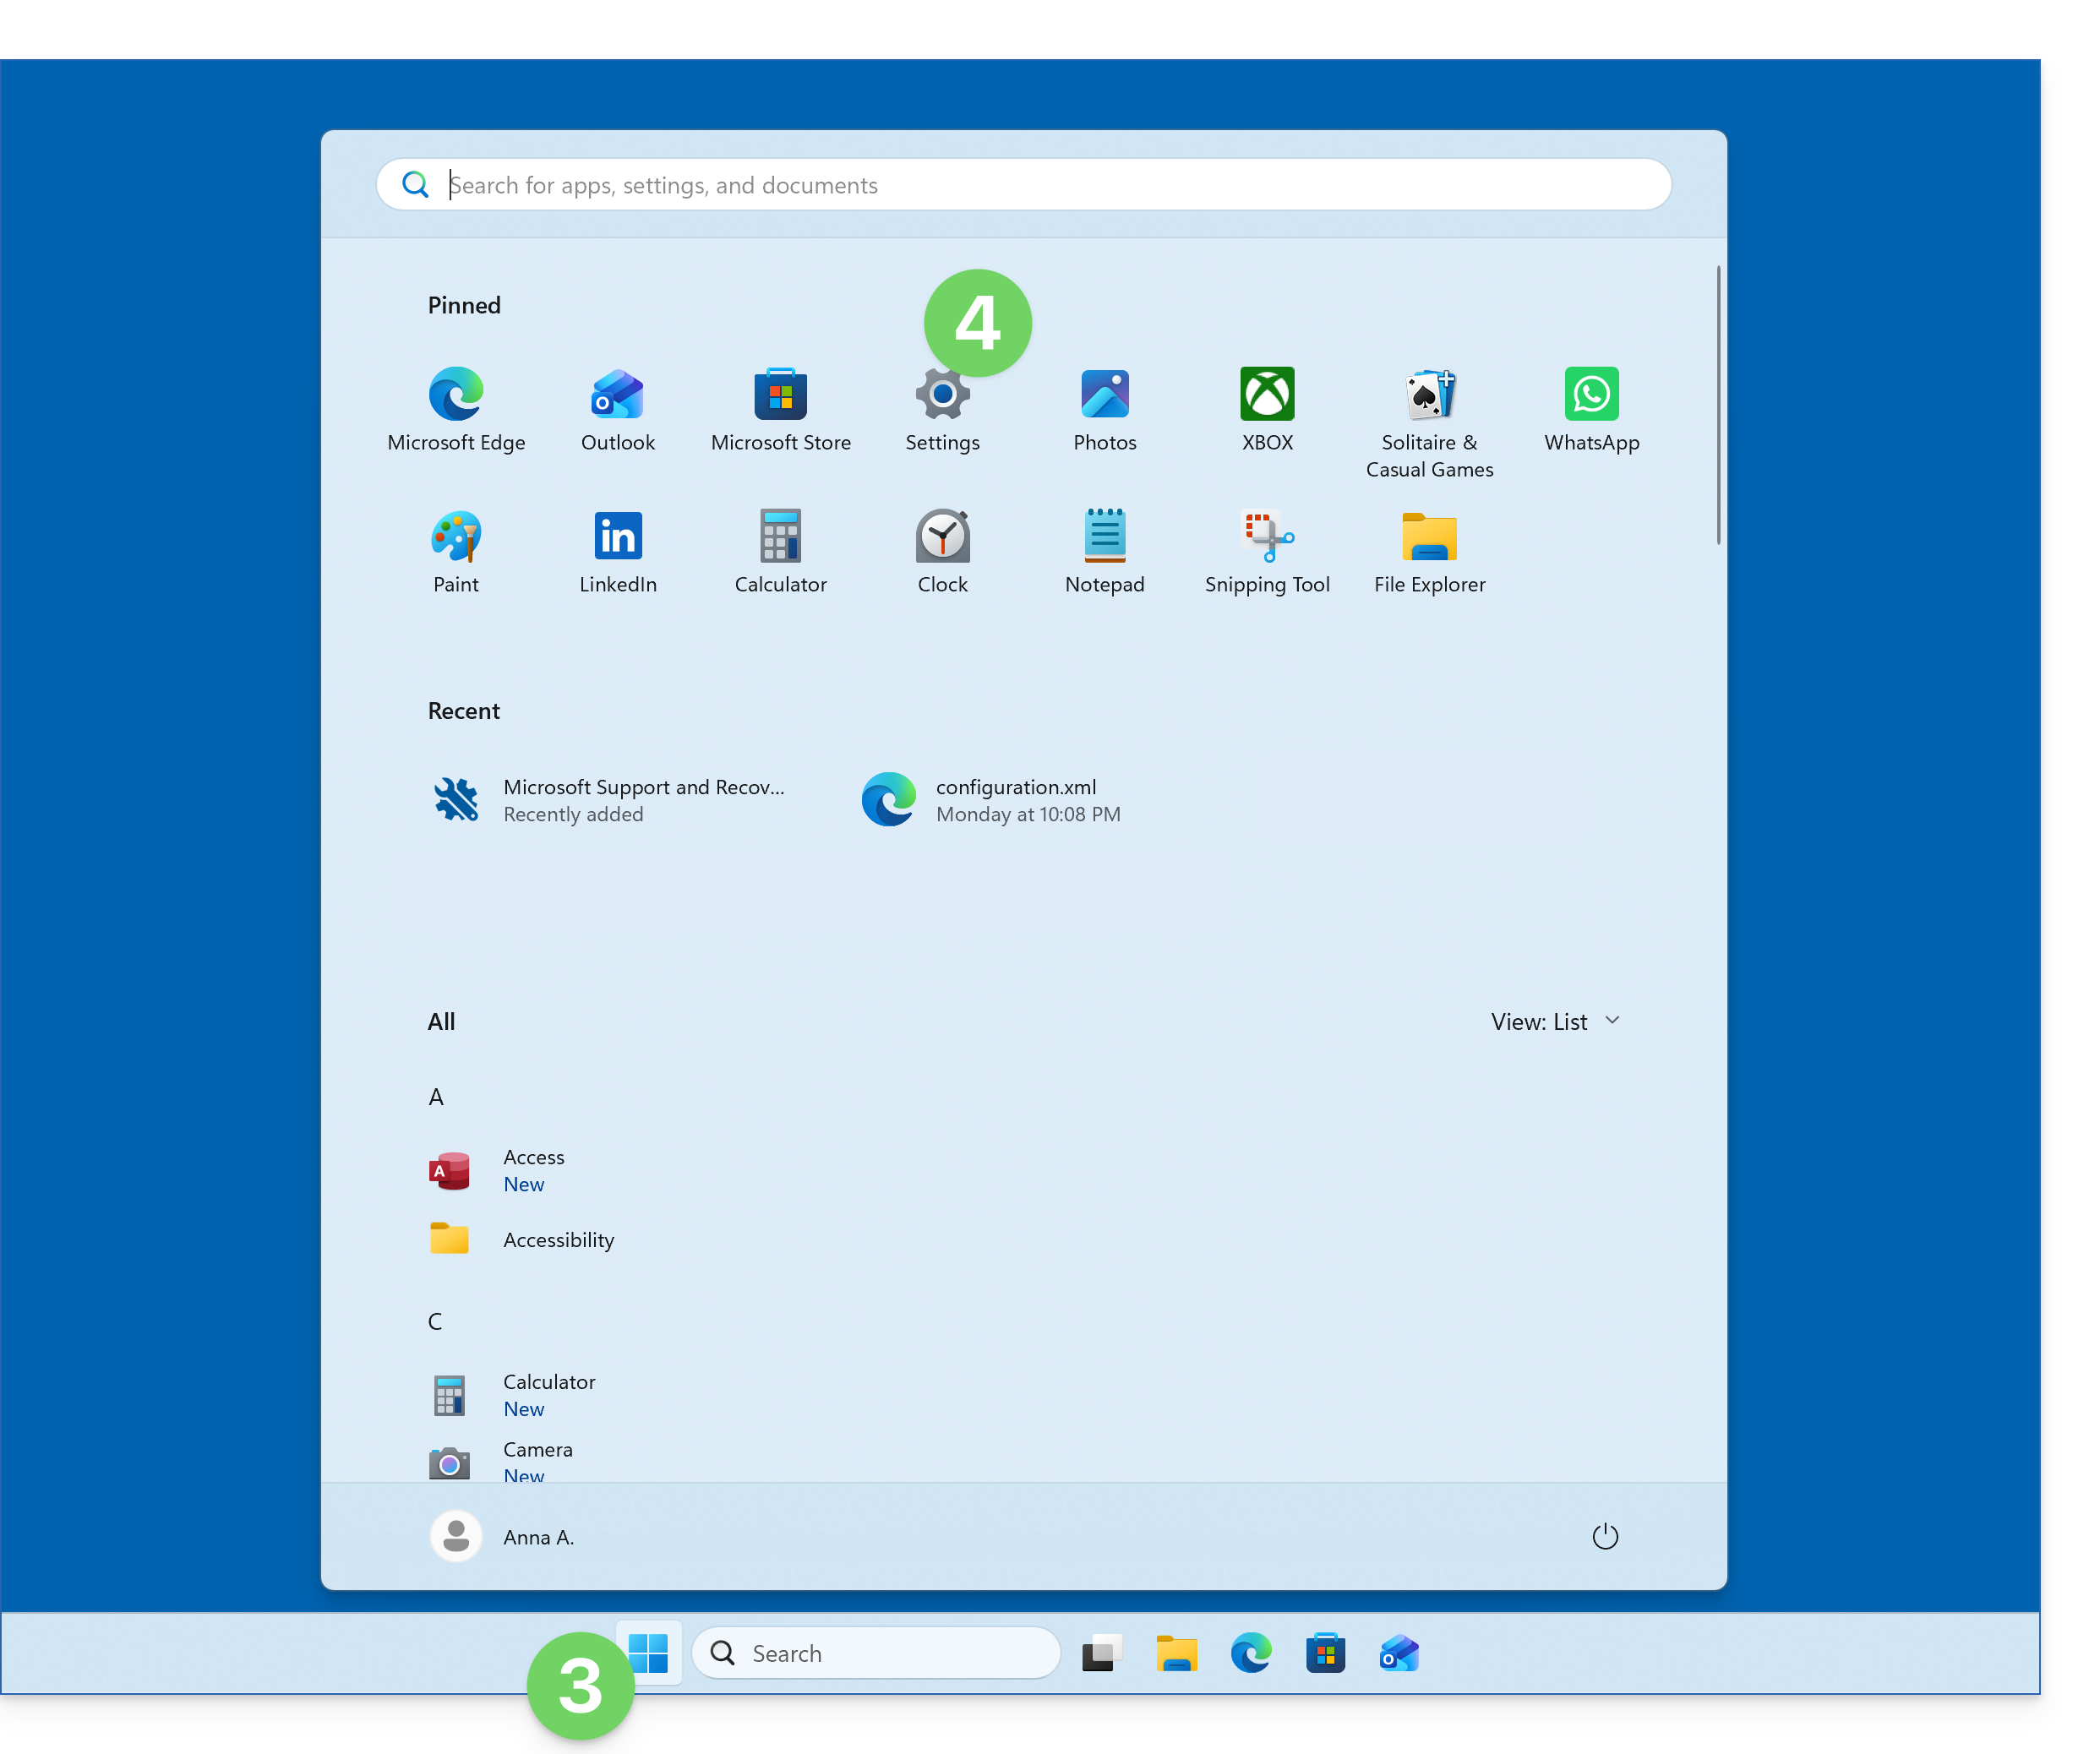
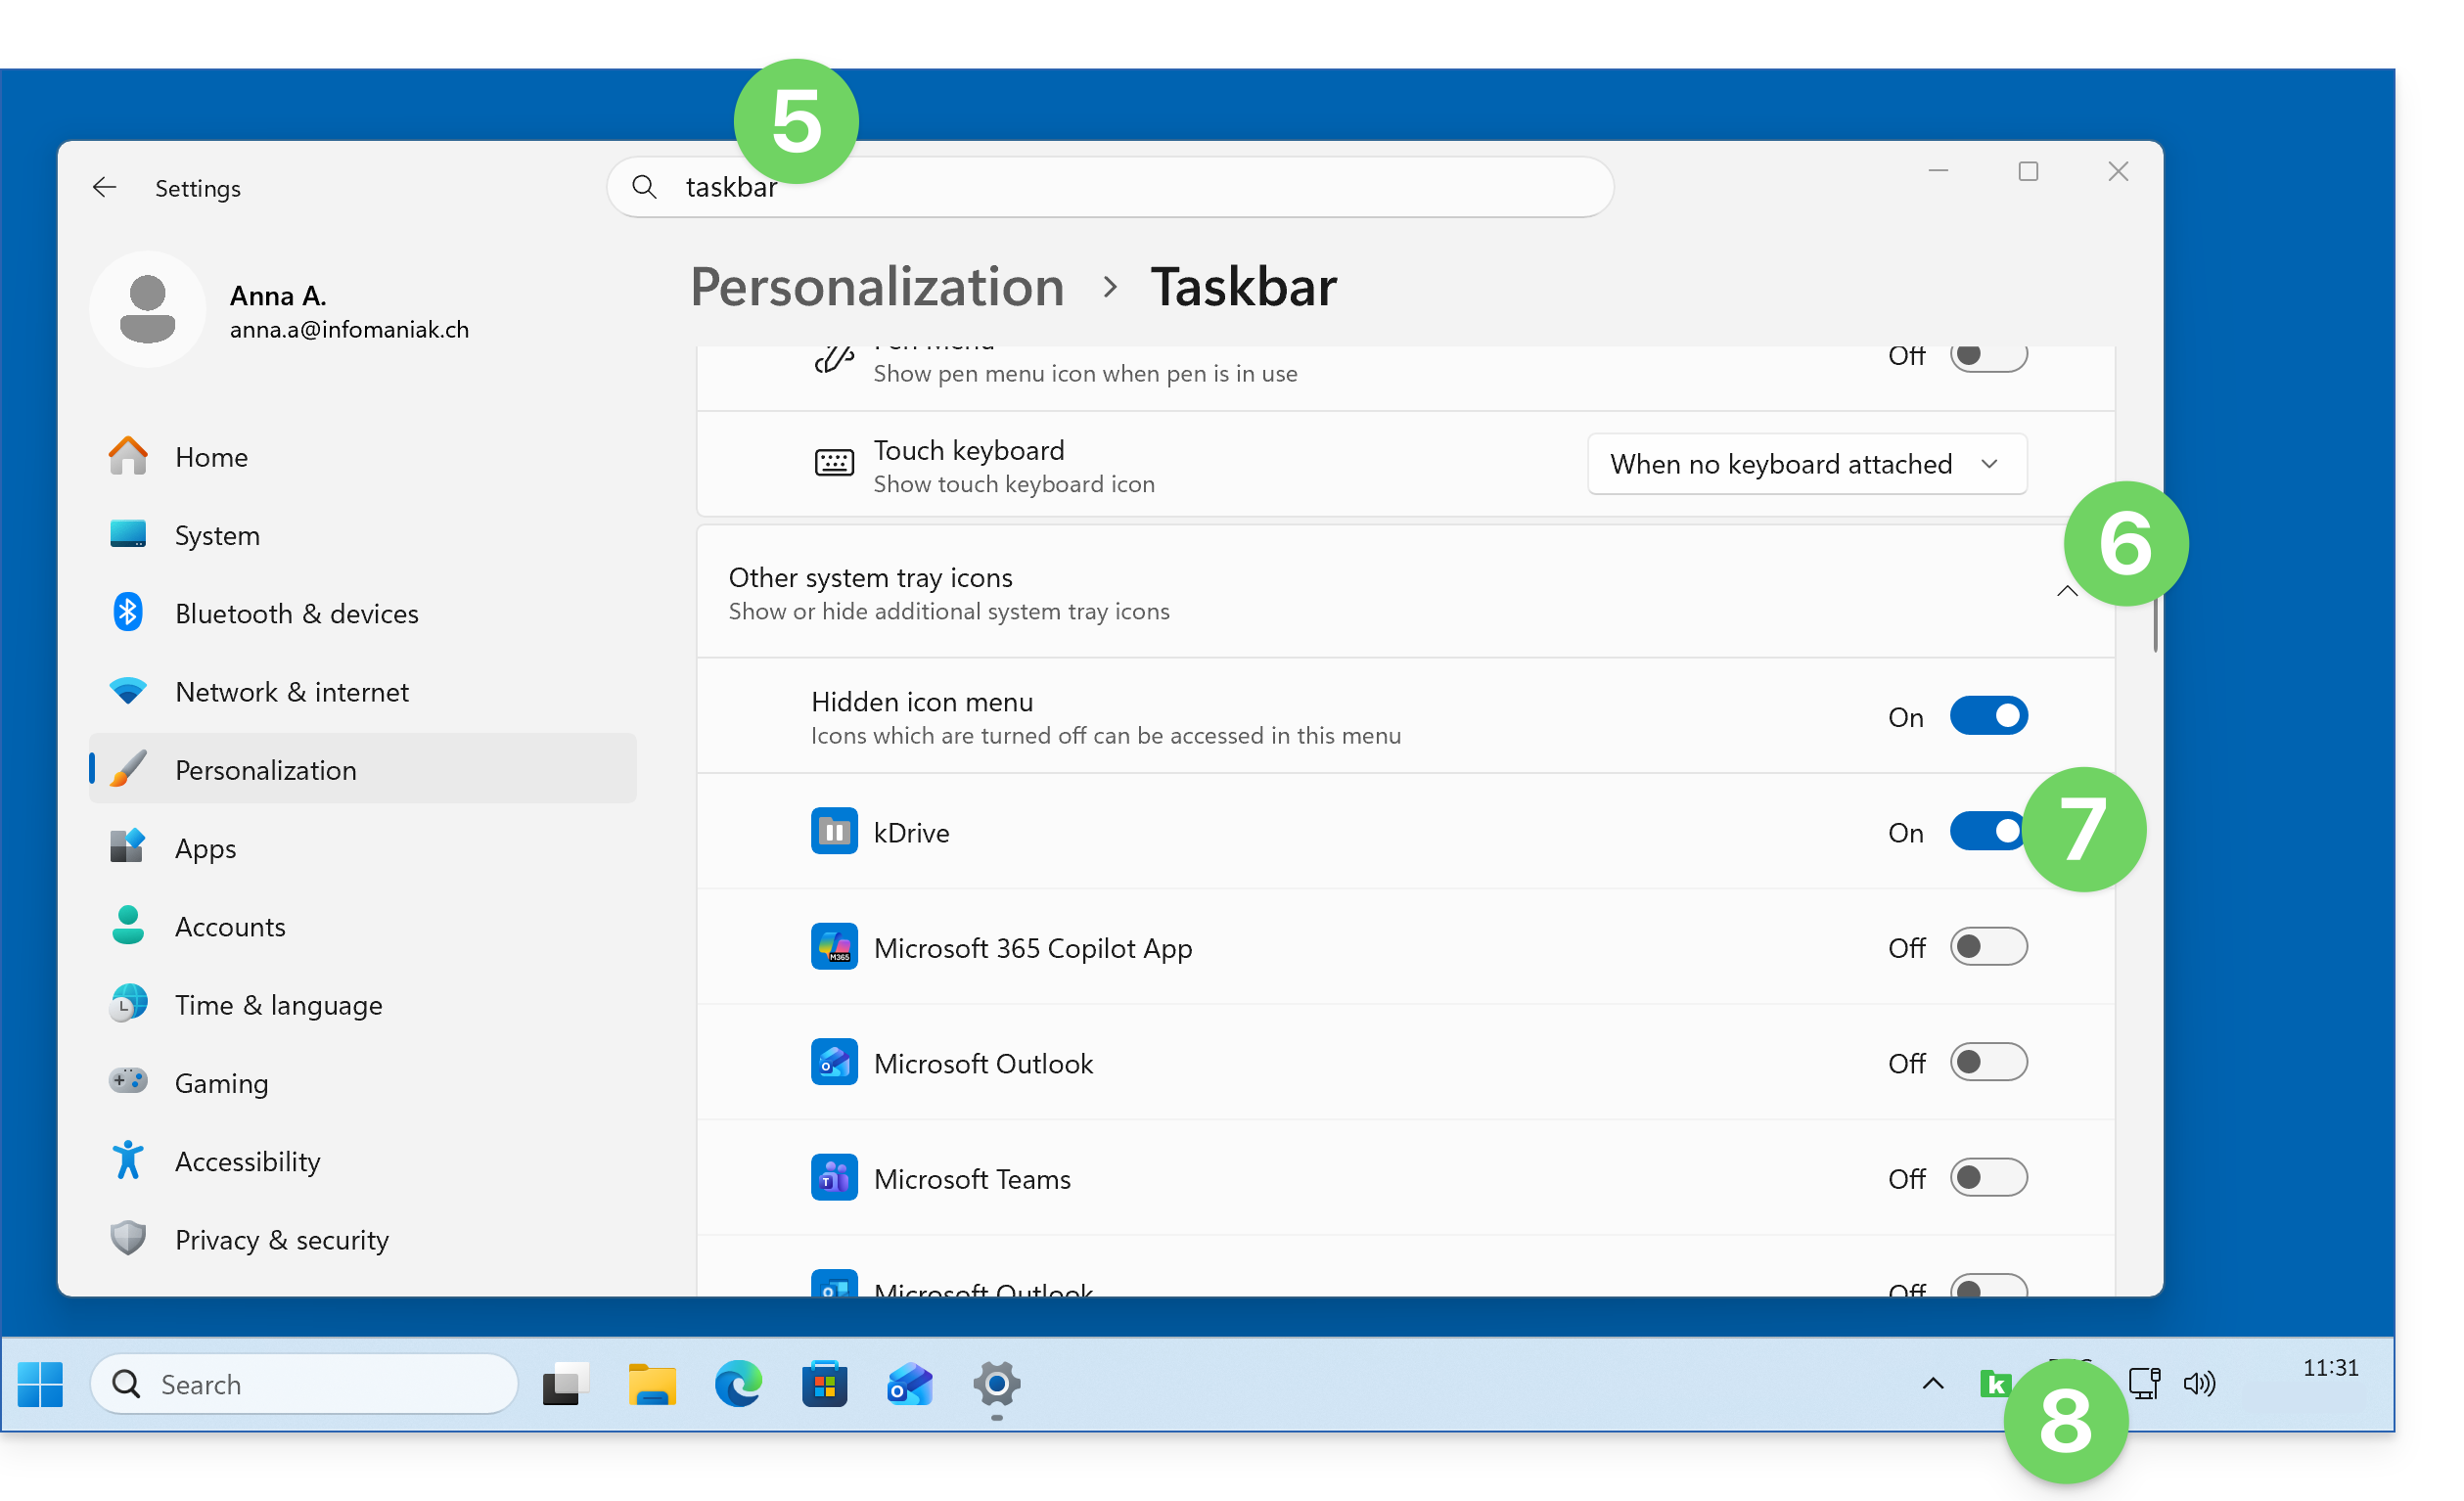
- Find the settings for the taskbar.
- Click on the chevron to expand the “Other icons in the notification area” section.
- Click on the toggle switch to the right of kDrive to make it always visible.
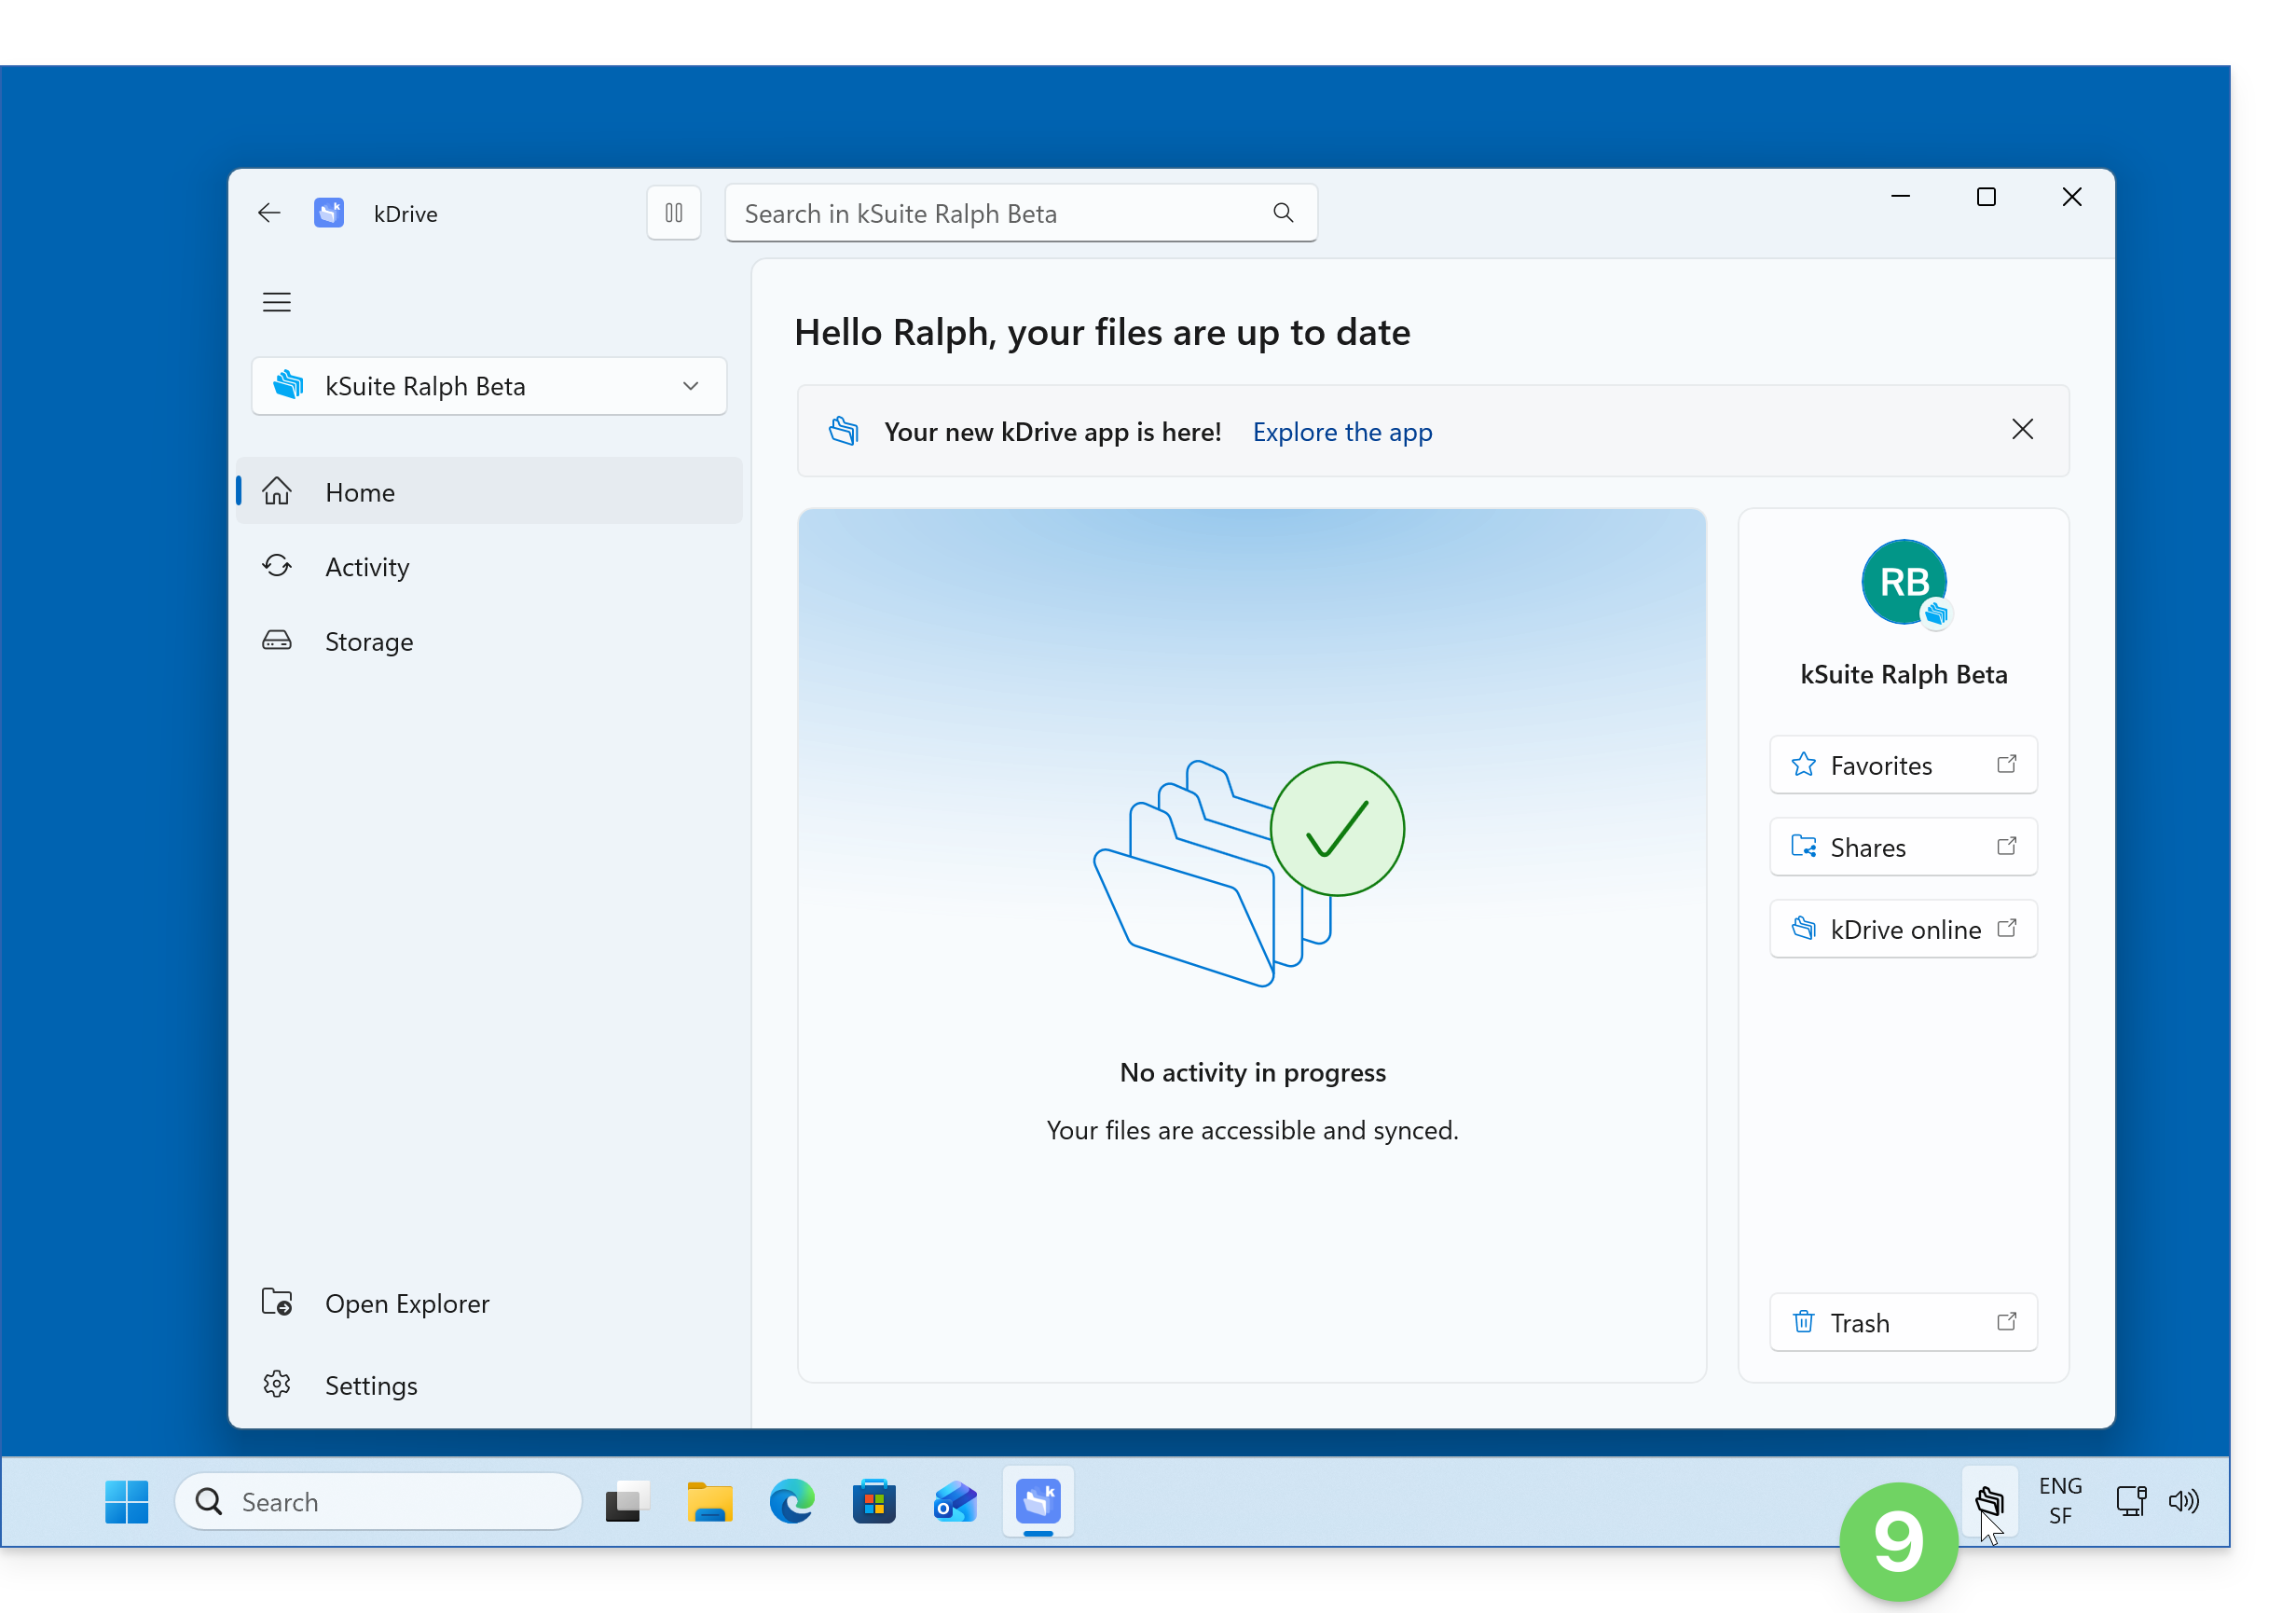
- The icon (here, the kDrive 3.8 icon) will be directly visible on the taskbar:
- Left-click on the kDrive app icon; the application interface should appear in the foreground:
On Android
Android may limit the activity of applications running in the background to save battery power. Depending on your device's settings, this may slow down or interrupt the transfer of large files, the import of multiple files, or the automatic backup of photos to kDrive.
To verify that the kDrive application can function correctly in the background:
- Test the synchronization: open the kDrive application and leave it in the foreground until the transfer is complete. Synchronization generally works better when the application is active.
- Check the battery settings: open your device's settings, then find kDrive in the section dedicated to applications. In the application's battery settings, allow its background activity and, if this option is available, select an unrestricted mode or disable battery optimization for kDrive. This setting may increase battery consumption.
- Check device-specific restrictions:some manufacturers offer additional settings, such as automatic startup or background app management. Allow kDrive to run if such options are available.
- Check automatic photo backup: if you are experiencing issues with this feature, ensure that it is enabled in the kDrive settings and that the necessary permissions are granted (❓: help).
The names and location of the settings may vary depending on the Android version and the manufacturer of your device. If the problem persists, please refer to the recommendations available in English on Don't Kill My App, or consult the help documentation provided by the manufacturer of your device.
Link to this FAQ: https://faq.infomaniak.com/2909
Has this FAQ been helpful?
This guide explains how to synchronize your Obsidian vault on your Infomaniak kDrive via the WebDAV protocol. This way, you can keep your notes safe in a storage medium located in Switzerland.
✘ UNAVAILABLE with
kSuite Free / kSuite Standard
my kSuite / my kSuite+ (ik.me, etik.com, ikmail.com)
Introduction
- Obsidian is a powerful and extensible note-taking tool that uses local Markdown files to organize your knowledge.
- To avoid cluttering your kDrive directories, it is strongly recommended to create a dedicated folder in your personal kDrive directory, with a simple folder name such as "
obsidian" for example, and then specify it at the end of the WebDAV link in step 7 below: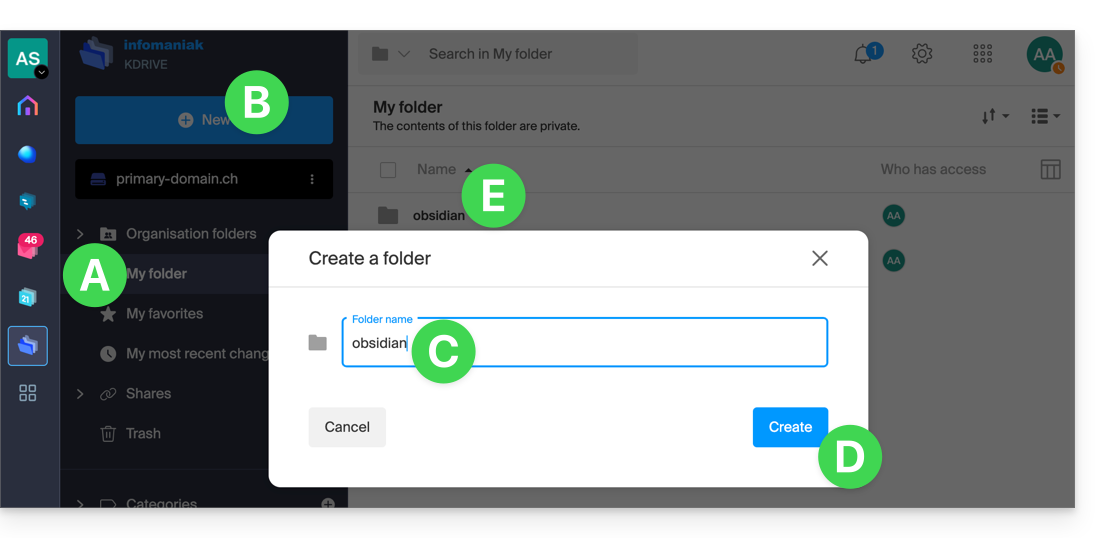
Configure Obsidian to use kDrive via WebDAV
Prerequisites
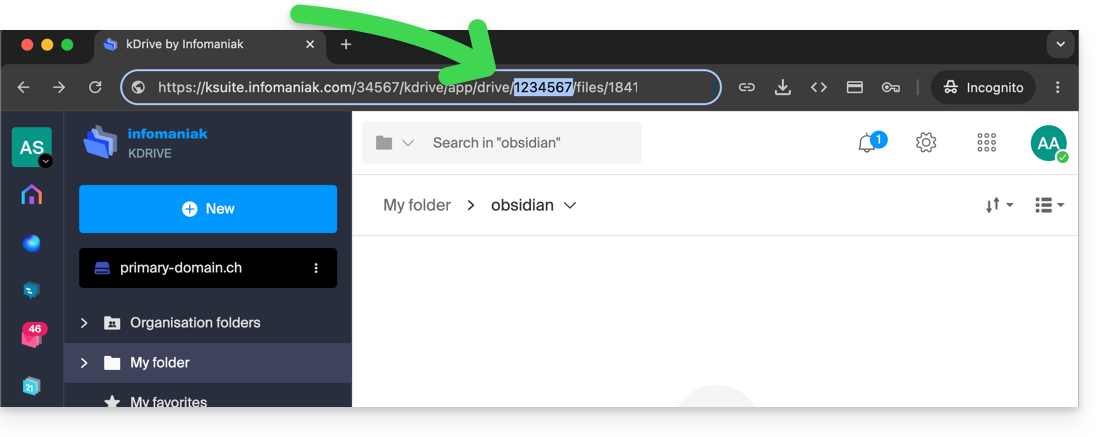
The integration is based on the community plugin WebDAV Sync, which ensures two-way synchronization:
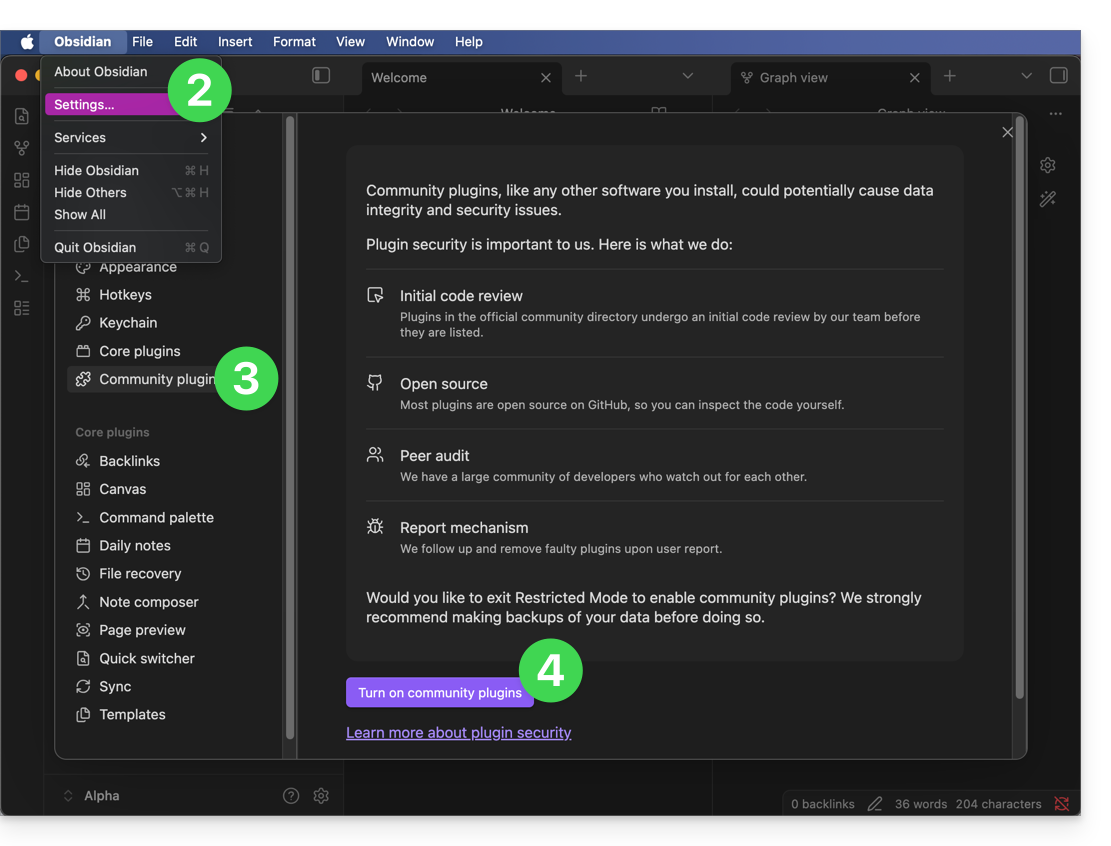
- Open your vault in the Obsidian application.
- Go to Settings.
- Go to Community plugins.
- Enable them:
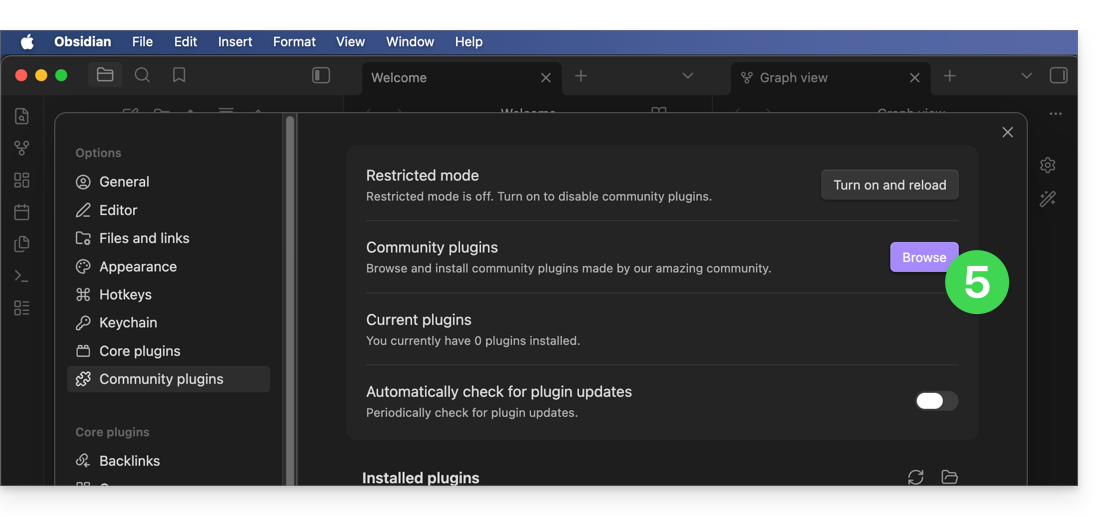
- Click on Browse:
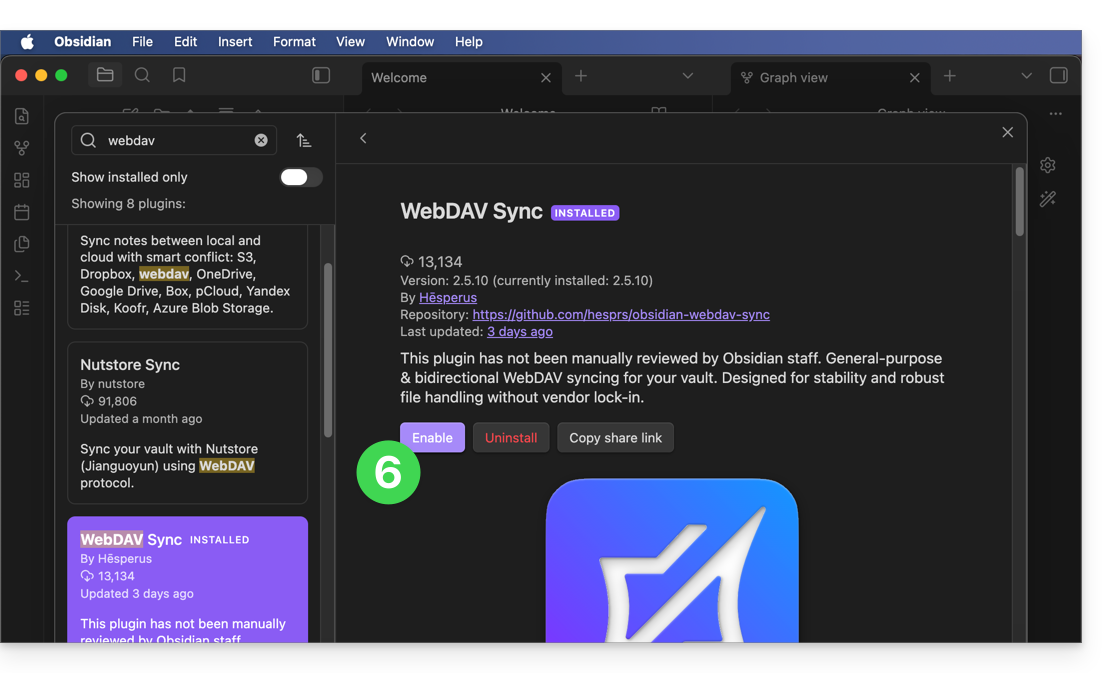
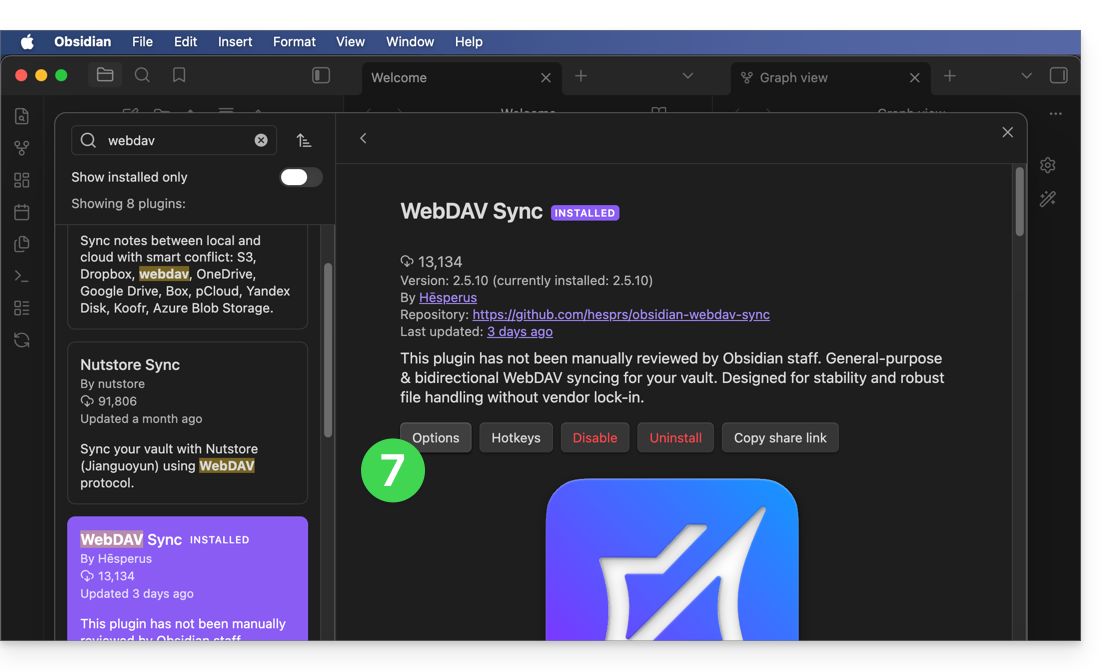
- Find the WebDAV Sync plugin, install it, and activate it:
- Access the plugin settings to enter the WebDAV account parameters:
- Server address:
https://IDkDrive.connect.kdrive.infomaniak.com(see prerequisites) - Username: email address used to log in to your Infomaniak account
- Password: application password if two-factor authentication is enabled or your Infomaniak user account password if you have not enabled 2FA
- Name of the personal folder on kDrive, for example
/obsidian/or /folder name/ (see the introduction above)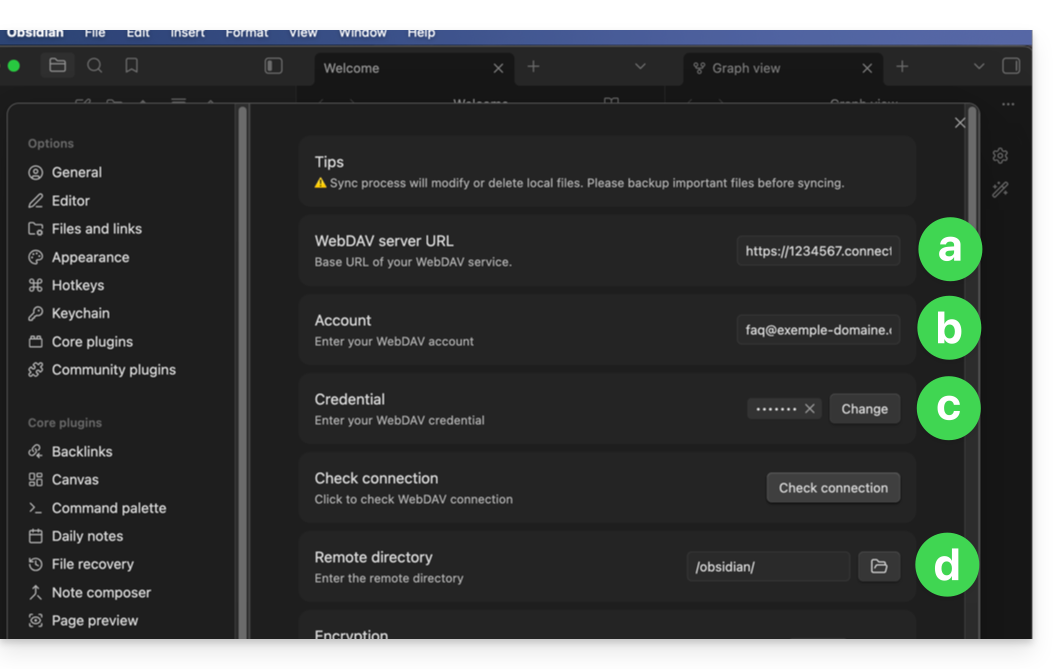
- Server address:
- Configure the plugin's behavior according to your preferences (synchronization on startup, scheduled, or in real time) and validate.
- Start a first synchronization test to validate proper communication with kDrive:
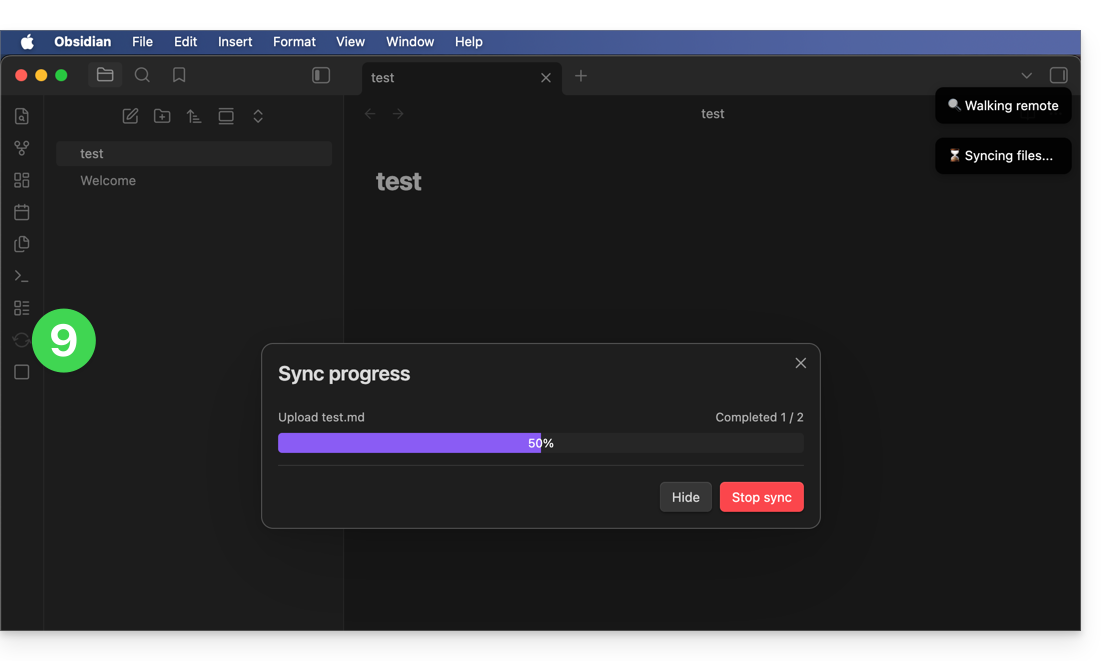
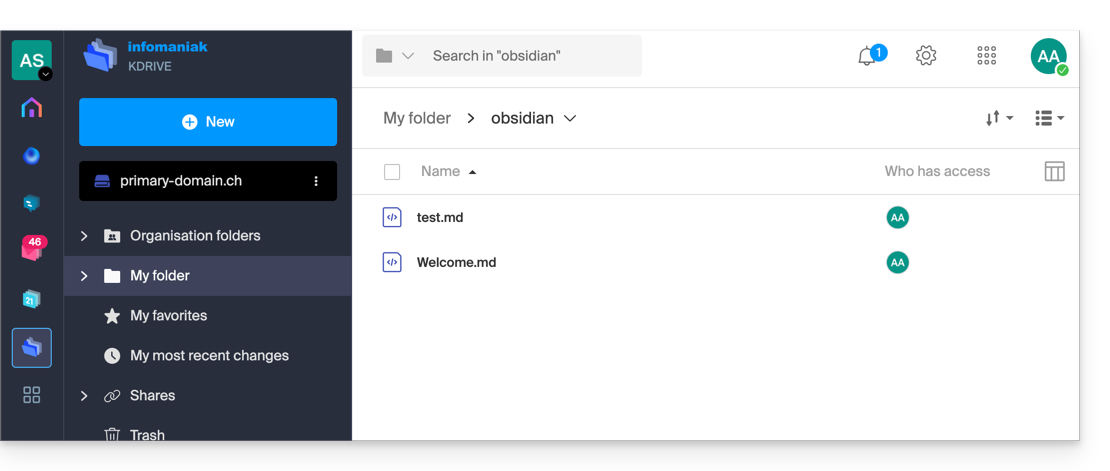
- Once the confirmation is validated, the synchronization will run in the background to protect the integrity of your notes:
Link to this FAQ: https://faq.infomaniak.com/2910
Has this FAQ been helpful?
This guide explains how the new kDrive v4 application from Infomaniak works.
Introduction
- kDrive v4 is more than just a graphical update of the previous version: its interface and navigation have been completely redesigned, while retaining the main synchronization features already available.
- Most of the basic principles (❓: help) remain valid and should be understood to master kDrive.
A completely redesigned and more readable interface
It's here! Your kDrive v3.x app has been updated to v4, which introduces some major changes:
- Upon installation, the kDrive Windows application icon is added to your desktop.
- The application window can be freely positioned and resized; it provides simplified access to the status of your synchronizations.
- The icon of the open application is displayed in your taskbar (you can make it persistent via the context menu).
- Whether the main window is open or closed, kDrive continues to synchronize in the background, and for this purpose, its icon is displayed on Windows among the running services at the bottom right of your screen (without any particular color):
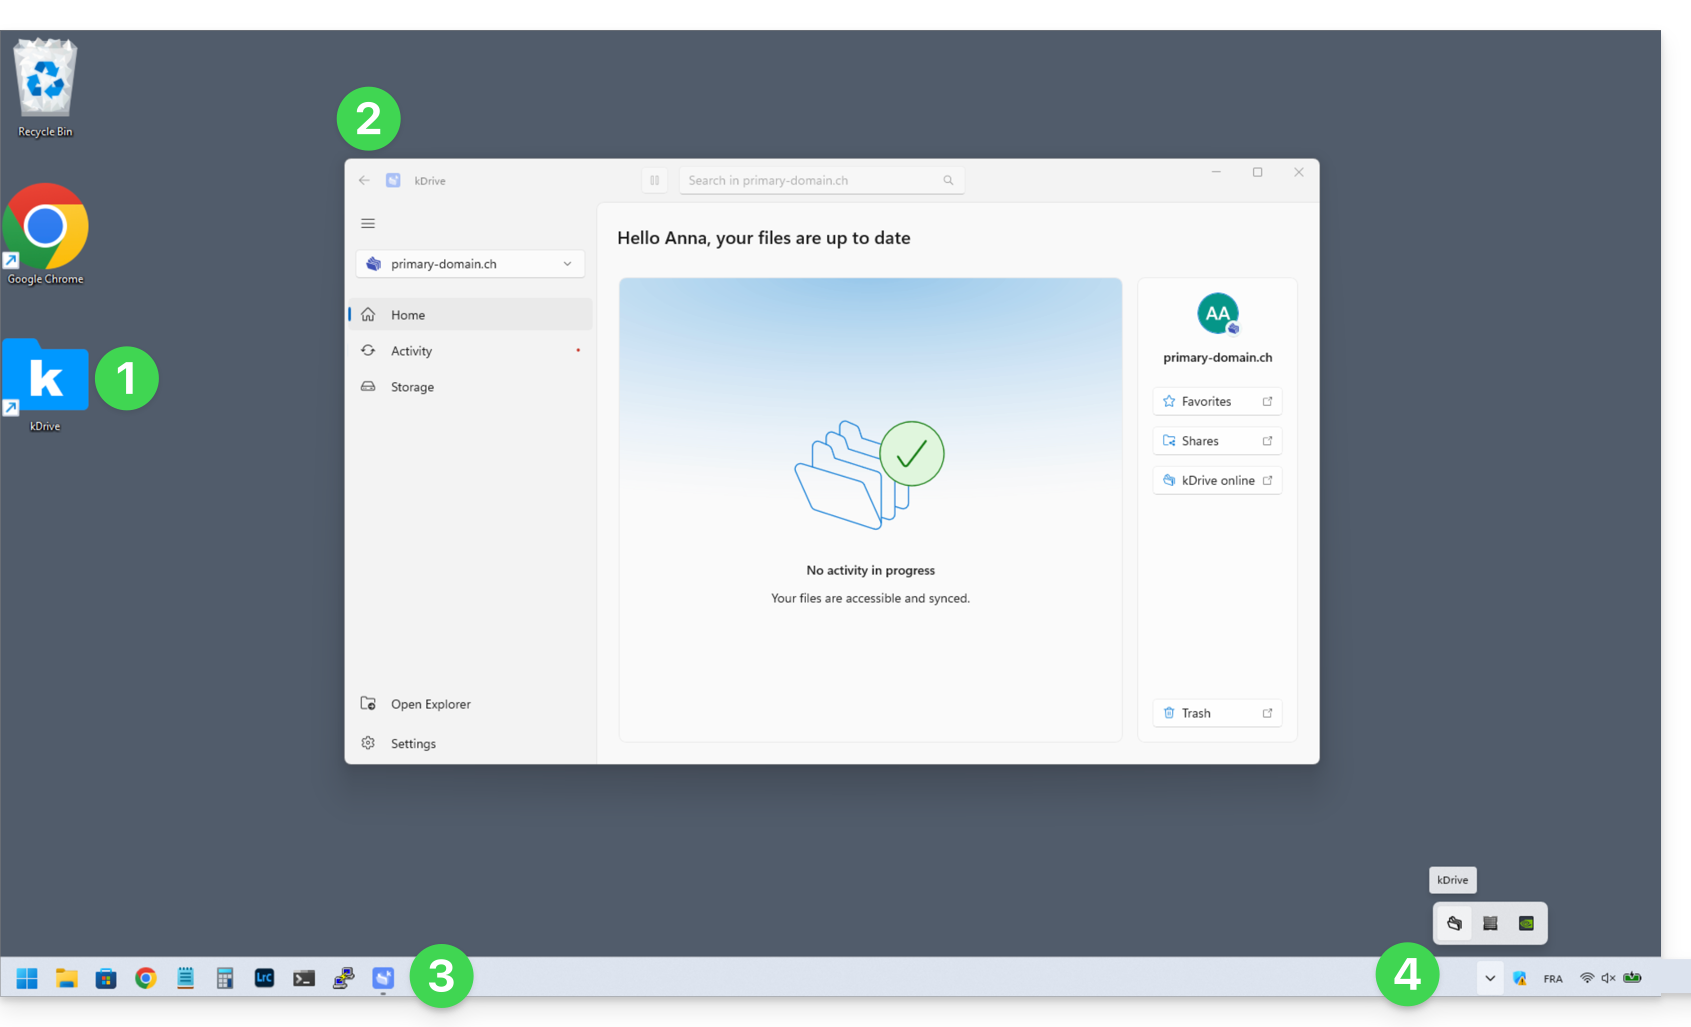
and at the top right on the macOS version: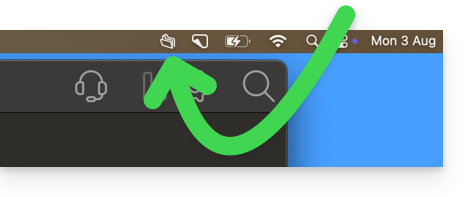
Welcome to the new Infomaniak app for kDrive
HOME menu
Click on Home to access:
- the online version (kDrive Web) of your favorites and shares
- the online version (kDrive Web) of your deleted files (still visible in the trash as long as it has not been emptied)
- file search (❓: help)
- pausing synchronization
Windows version: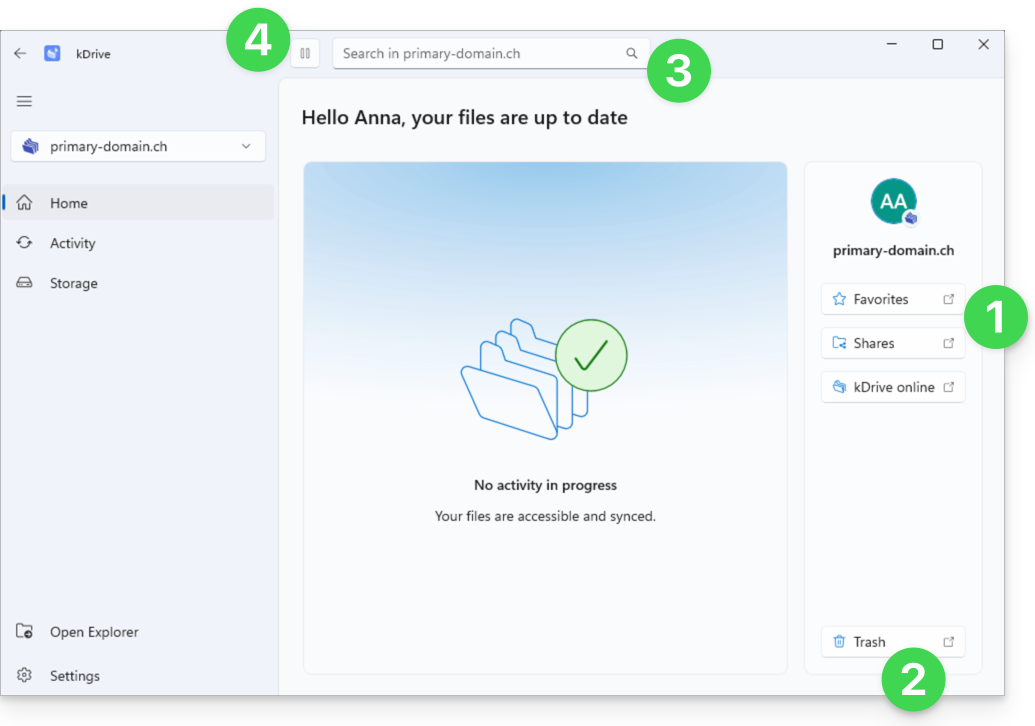
and macOS version: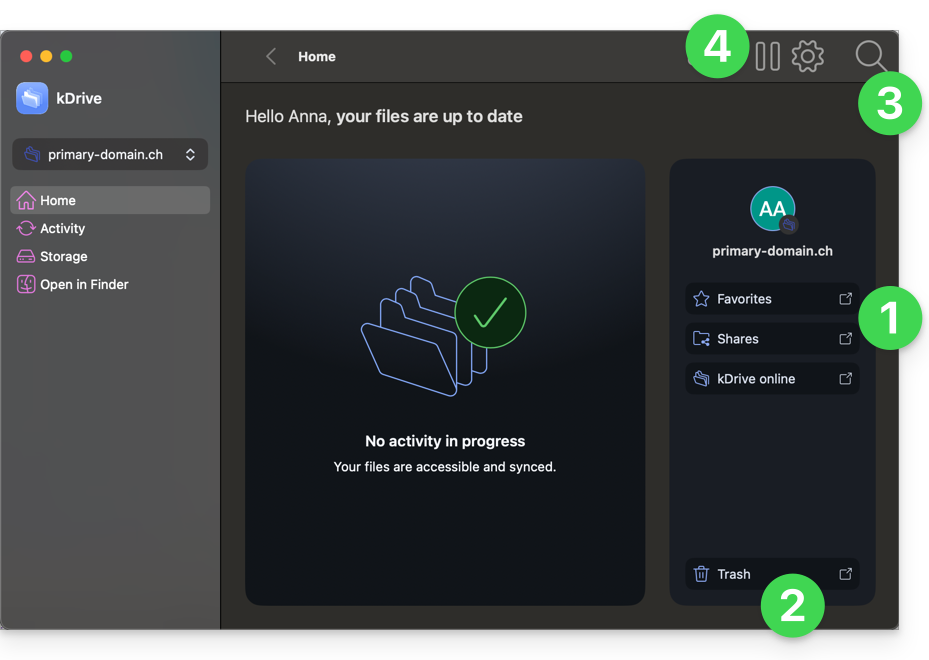
Regarding the trash/recycle bin, there are no particular changes to these deletion actions (❓: help):
- When you delete a file in the web app, it is moved and becomes visible in the web app's trash:
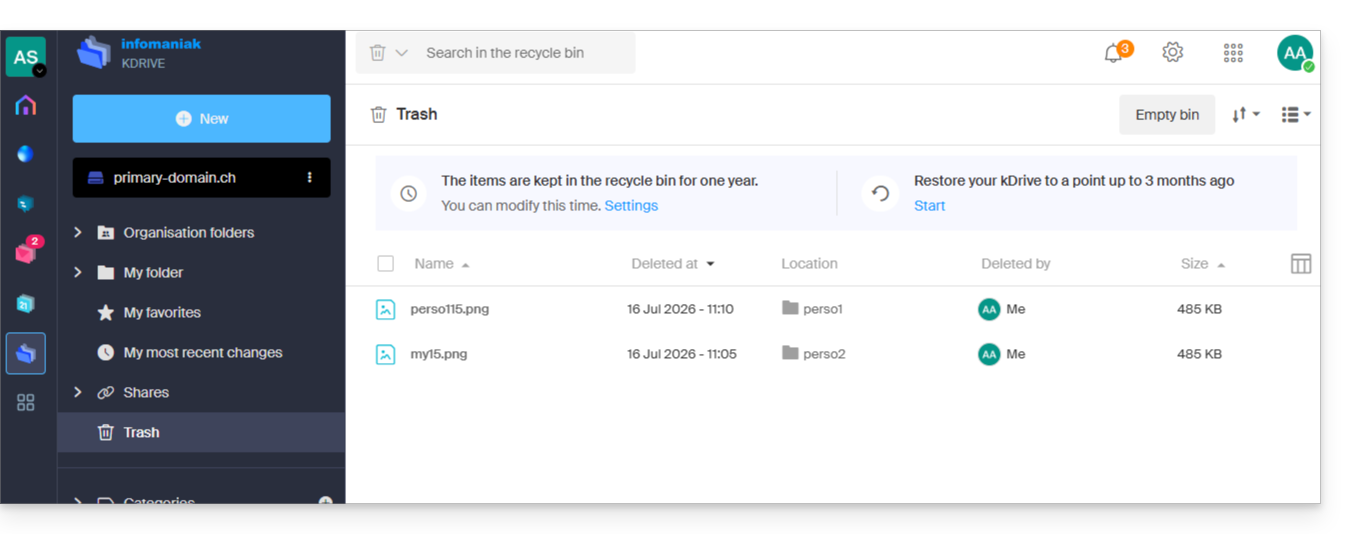
- This action is synchronized, so the file will also be moved to the trash on synchronized devices.
- When you delete a file from the synchronized data on your macOS/Windows device, it is moved and becomes visible in the macOS/Windows trash:
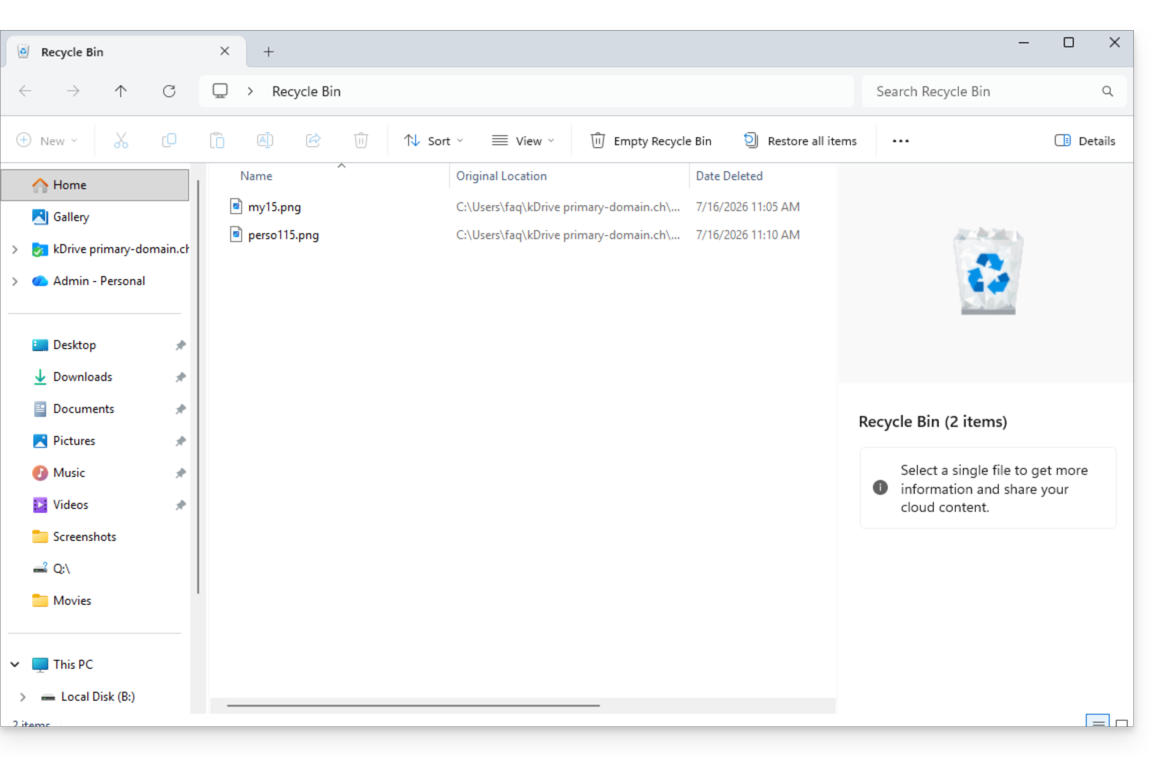
- This action is synchronized, so the file will also be moved to the kDrive web app's trash.
ACTIVITY Menu
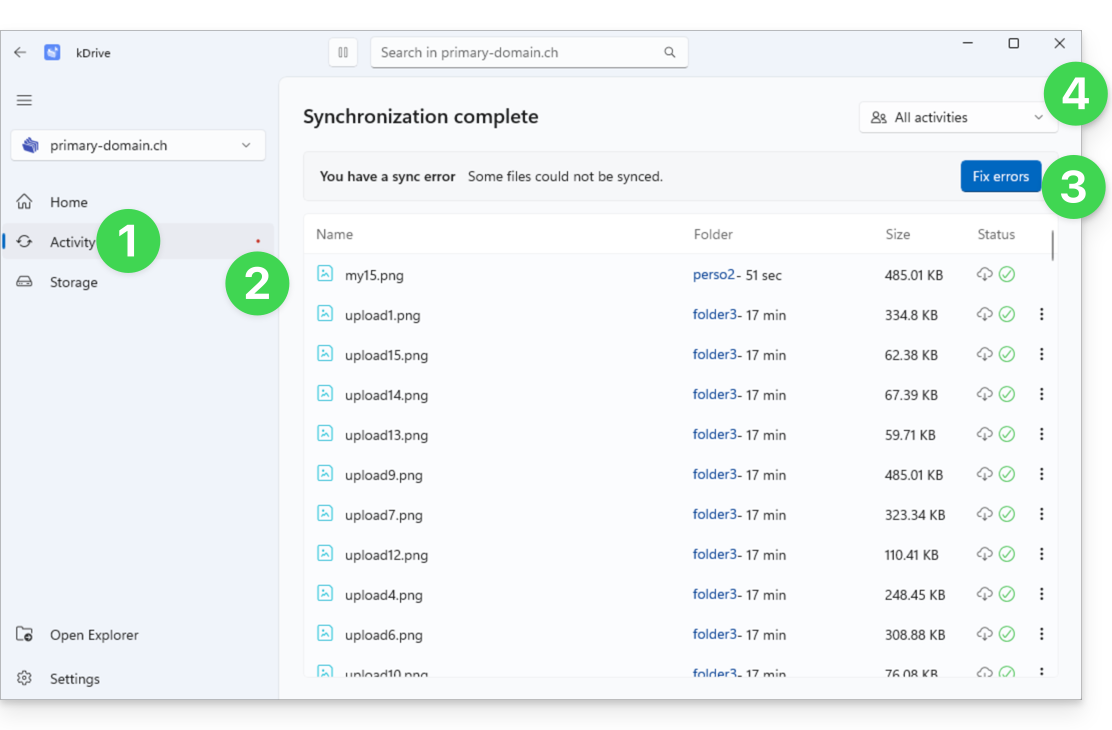
Click on Activity to access the view dedicated to operations and any synchronization issues:
- The Activity menu displays the latest operations that have occurred (new file synchronization, deletion, etc.).
- A red dot indicates warnings related to potential synchronization errors.
- The button to correct errors provides details about the current issues.
- A menu allows you to filter activities based on your personal usage:
STORAGE Menu
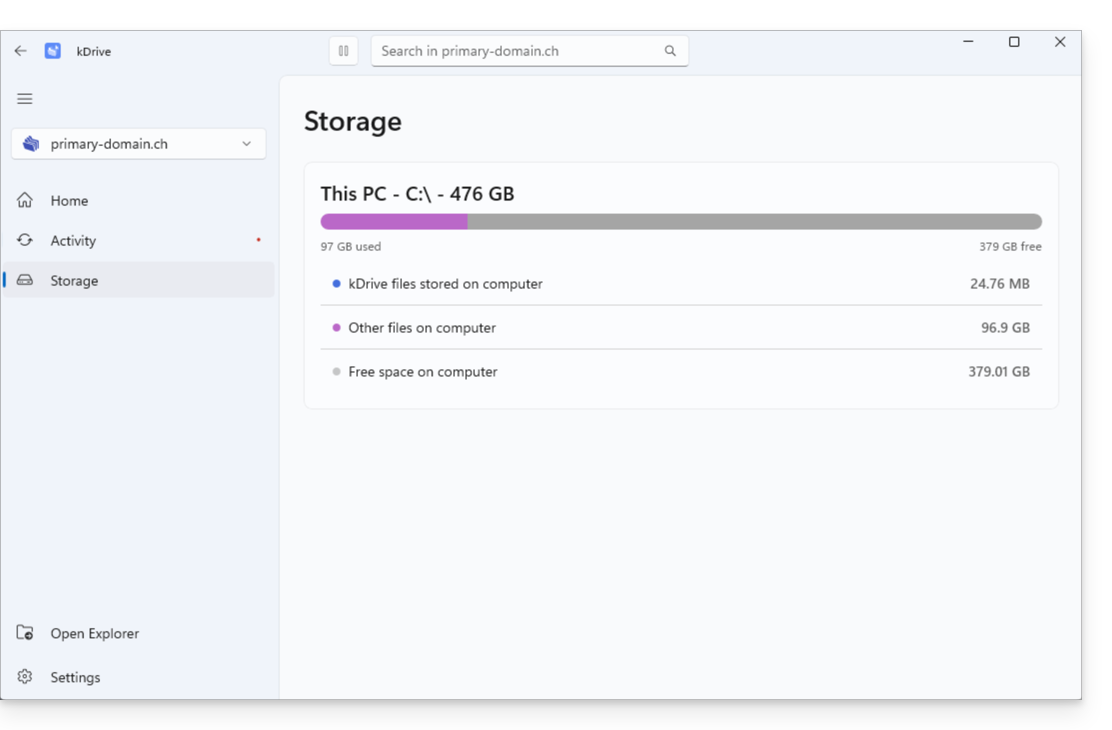
Click on Storage to access a clear overview of the space occupied by your data:
- The Storage menu allows you to view the space occupied by kDrive on your hard drive, which will vary depending on whether Lite Sync is enabled or disabled (❓: help), and to see the available space on your computer:
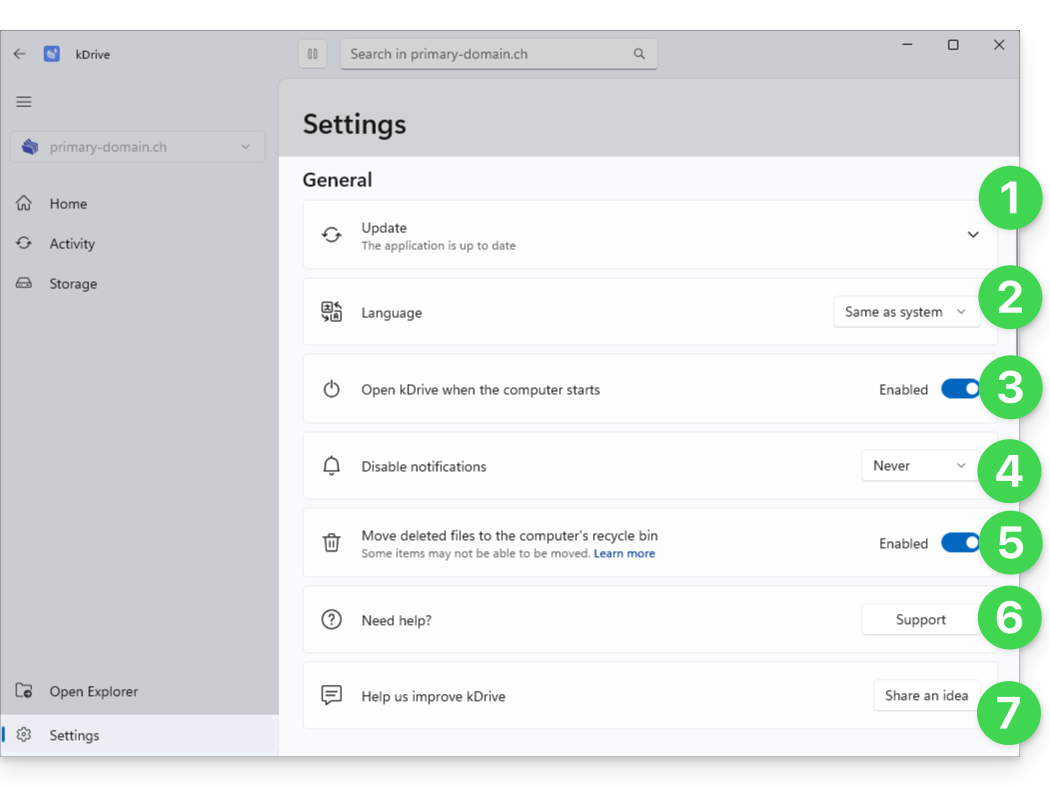
SETTINGS: General
To help you quickly configure your kDrive (or kDrives):
- Version and update, Beta program
- Language settings
- Automatically start kDrive when the computer starts
- Manage notifications in case of an event.
- To choose whether deleting a file on the web app or the mobile app should move the file synchronized with this desktop app to the computer's recycle bin, activate the toggle switch.
- Link to Infomaniak support
- Suggest an improvement idea:
SETTINGS: Account & synchronization management
Centralized navigation between your different kDrive accounts:
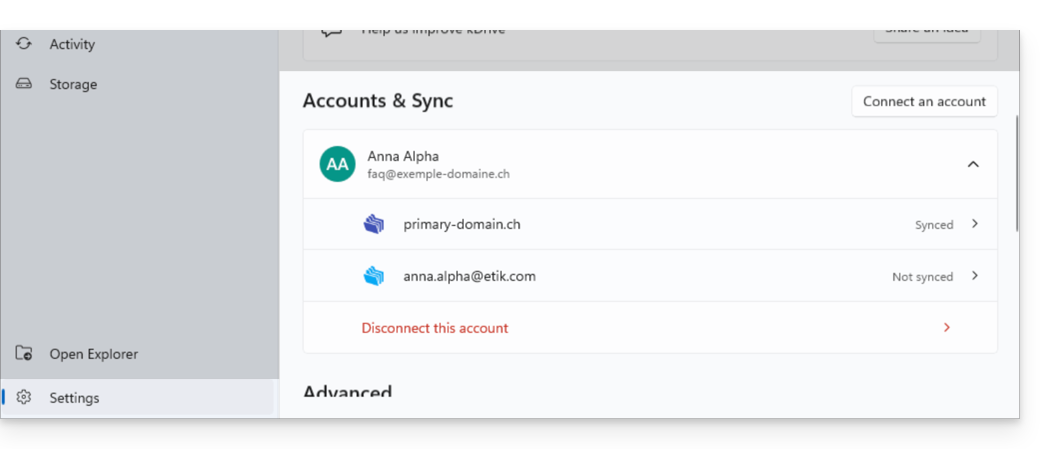
- One login ID can be used for multiple kDrive accounts (and you can choose which ones to synchronize).
- Other login IDs can be entered to synchronize more kDrive accounts on the same device:
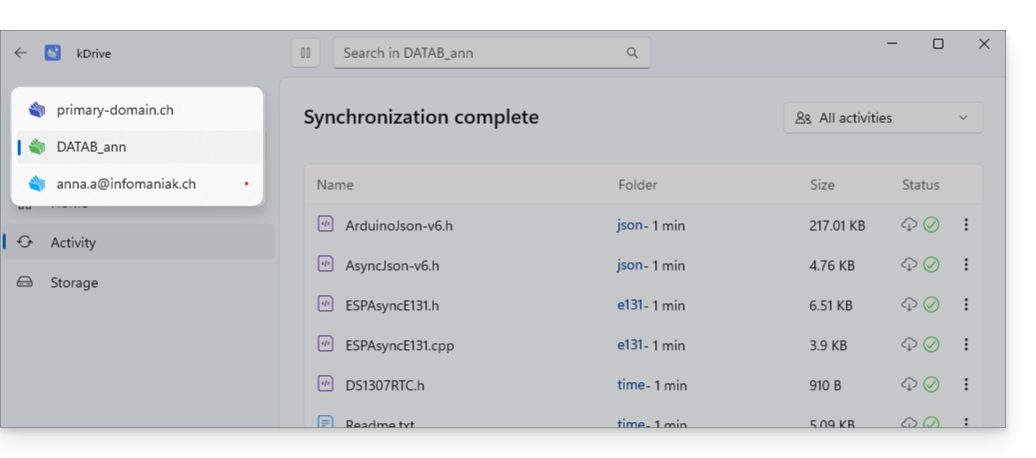
- Once identified, the different kDrive accounts are accessible in the upper left corner of the interface:
- They can be managed directly from the settings:
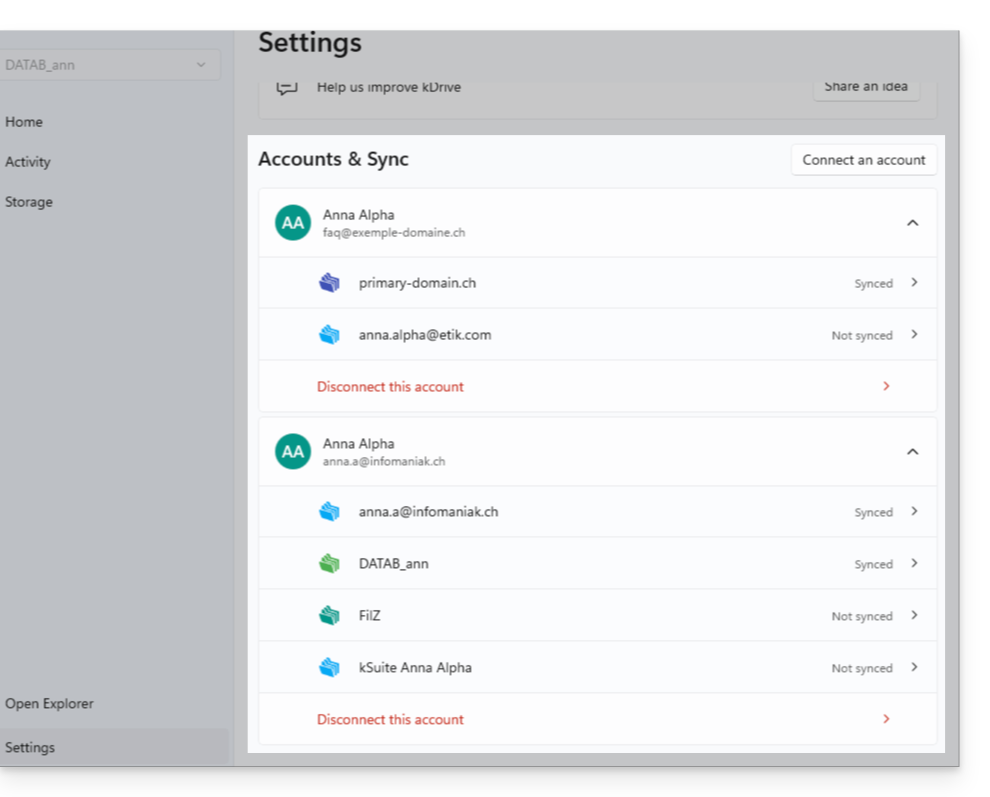
- They can be managed directly from the settings:
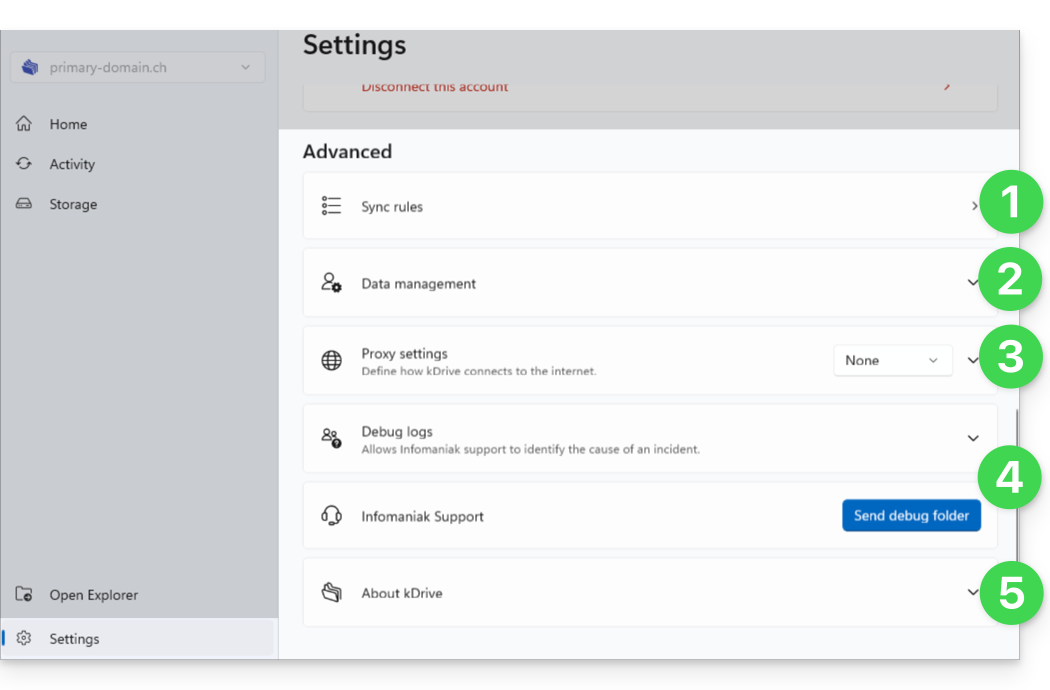
Advanced settings
Useful for gathering information in case of a problem:
- Synchronization rules (see the dedicated chapter at the bottom of this guide)
- Tracking information and settings
- Proxy configuration (optional)
- Log management / Debug (❓: help)
- Version number & licenses:
Finding your synchronizations after the update
Your kDrive folders, accessible from the File Explorer in Windows (on the left below) and their synchronized equivalent on Infomaniak's servers (on the right below), can be accessed with one click from the home page: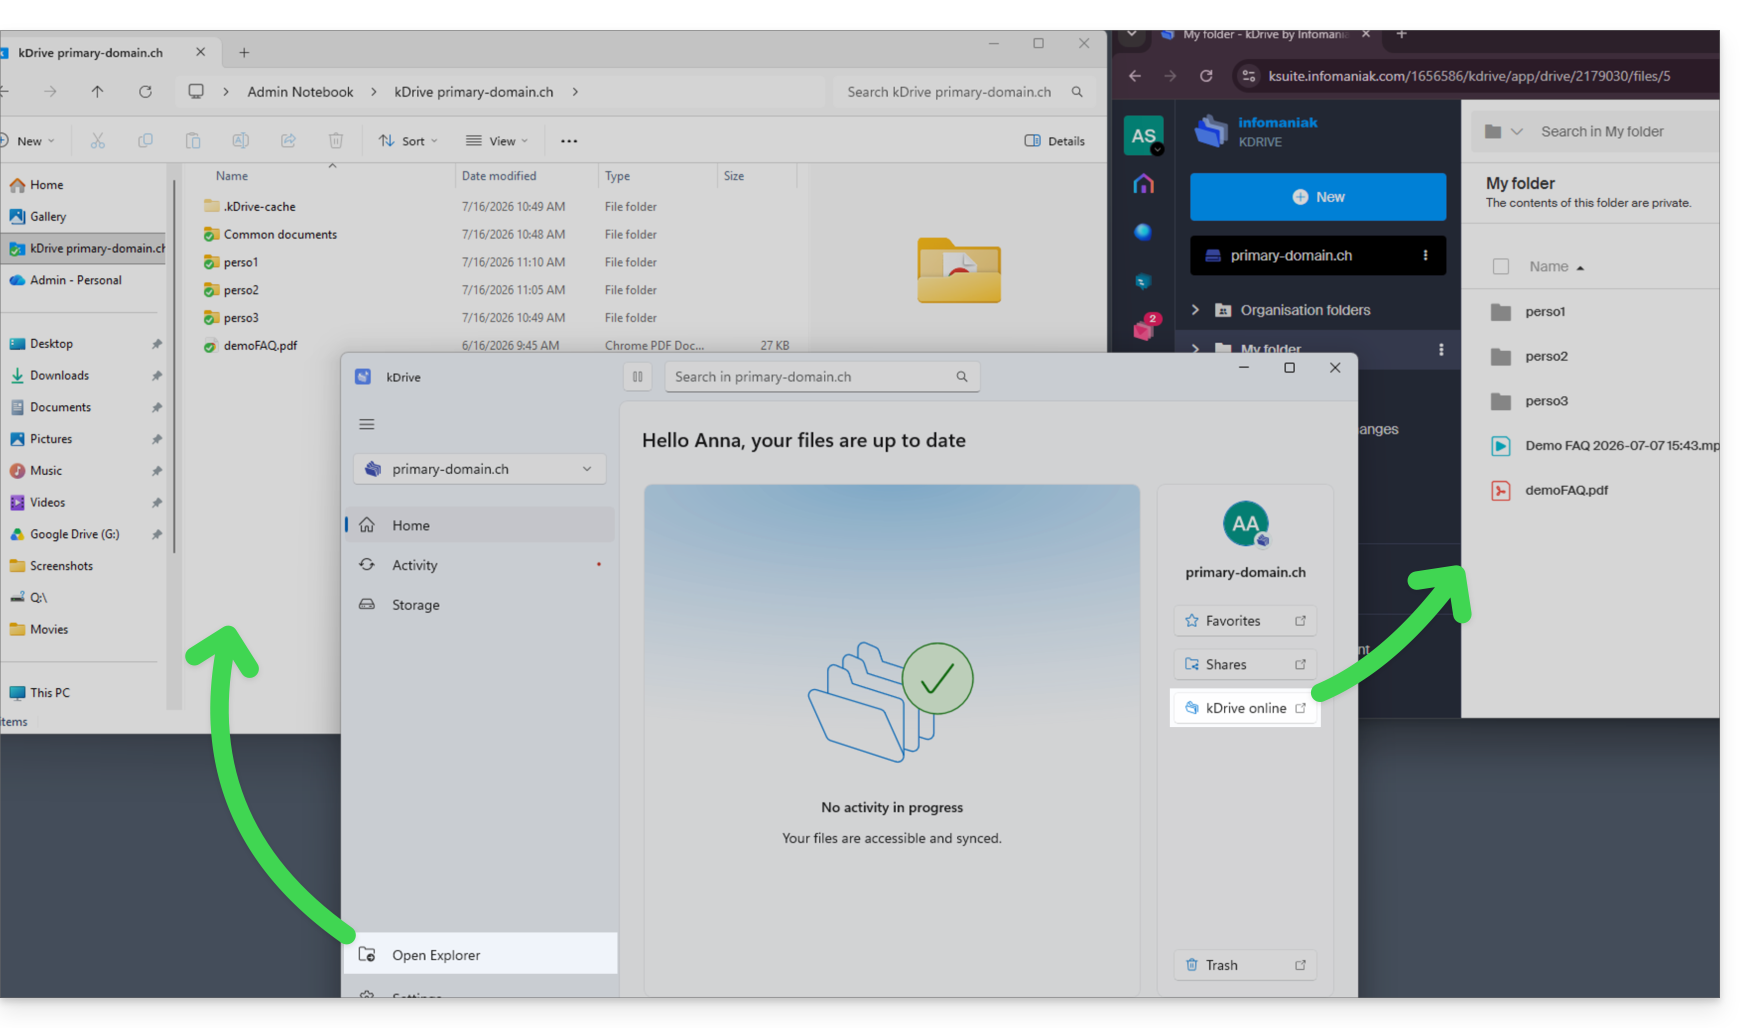
The principle is the same on macOS.
Troubleshooting a missing file issue
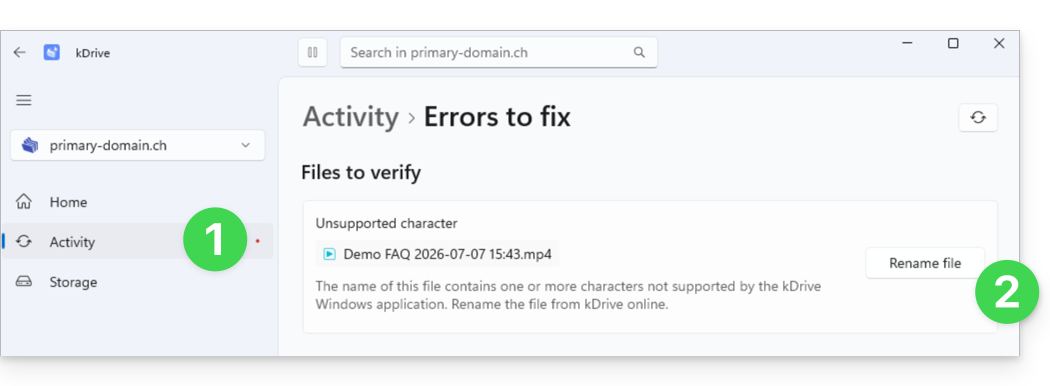
In this example, you will notice a video file present in the online version on the right, but absent on the synchronized device on the left. This is normal: the file name, originating from the macOS environment, is incompatible with Windows because it contains the prohibited character “:”. If you encounter this type of problem, open the Activities section to view the operations in progress, the recently processed files, and any errors reported by the application:
- A red dot therefore appears on the kDrive Windows app…
- A solution is proposed: rename the file:
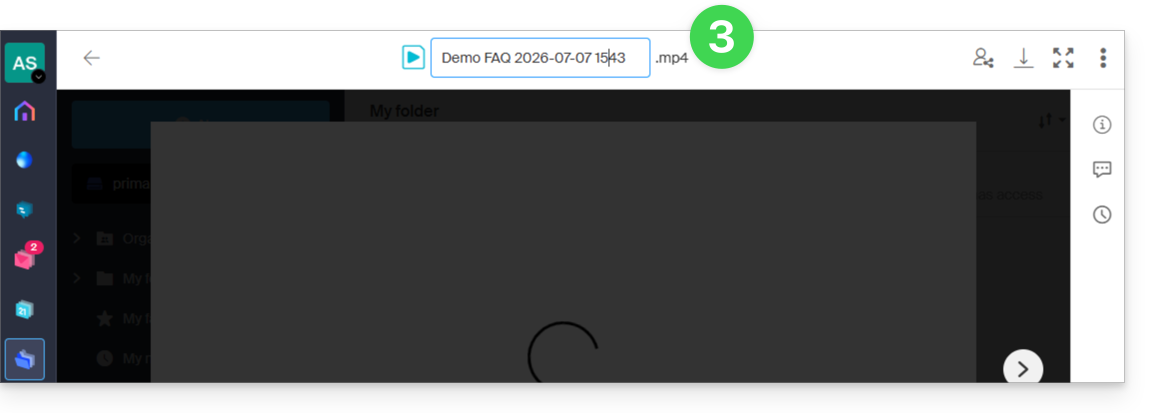
- Clicking the button takes you to kDrive Web so you can rename the file:
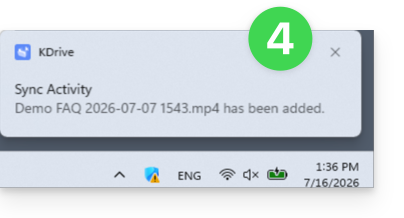
- Once renamed, the missing synchronization will occur, and an activity notification will appear in the bottom right corner of your screen:
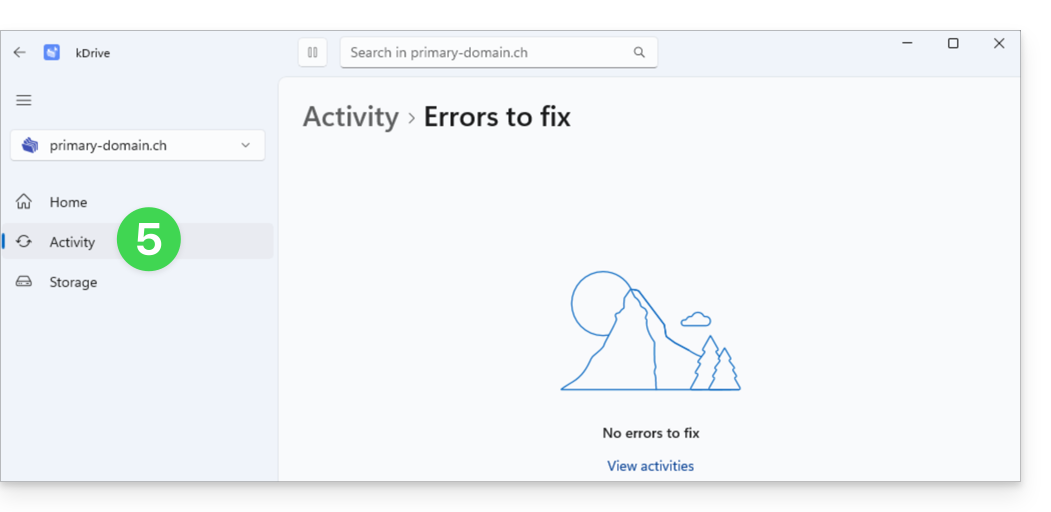
- The error will disappear in the Activity section of the kDrive Windows app:
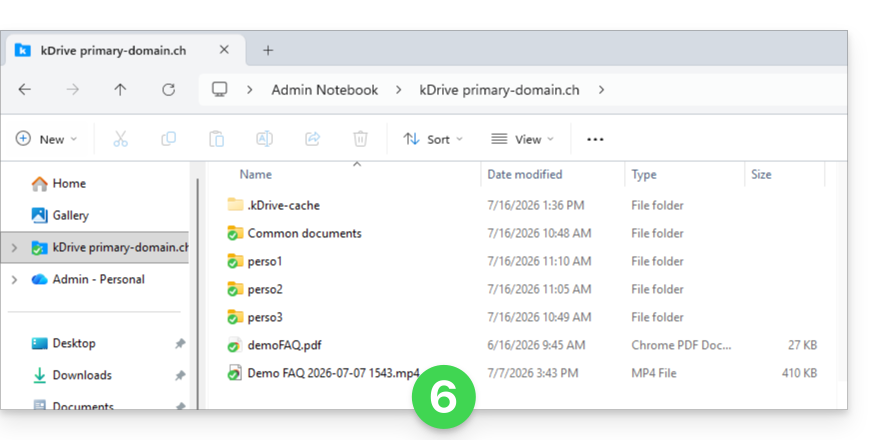
- The file is now synchronized and visible on all devices:
Link to this FAQ: https://faq.infomaniak.com/2923
Has this FAQ been helpful?
This guide explains how to import new data into kDrive from a computer using the kDrive v4.x application, and how to proceed if the synchronized data becomes too large for your devices.
Prerequisites
- For synchronization between your devices to work when your data is updated on kDrive (new file, edited document, etc.), it is obviously necessary that:
Import files to kDrive v4.x
If you want to add files currently on your hard drive to your kDrive:
- Launch kDrive on your device: the app icon should be visible in the top right corner on macOS / Linux, and in the bottom right corner on Windows (❓: help).
- Then, in Windows Explorer or macOS Finder, open the folder defined as the kDrive data storage location; by default, when the application is installed, this folder is named after your kDrive.
- At the root level, you will find the files belonging to your personal folder, “My folder”.
- The
Common documentsfolder corresponds to the Organization's folders and is, by default, shared with other users of this kDrive: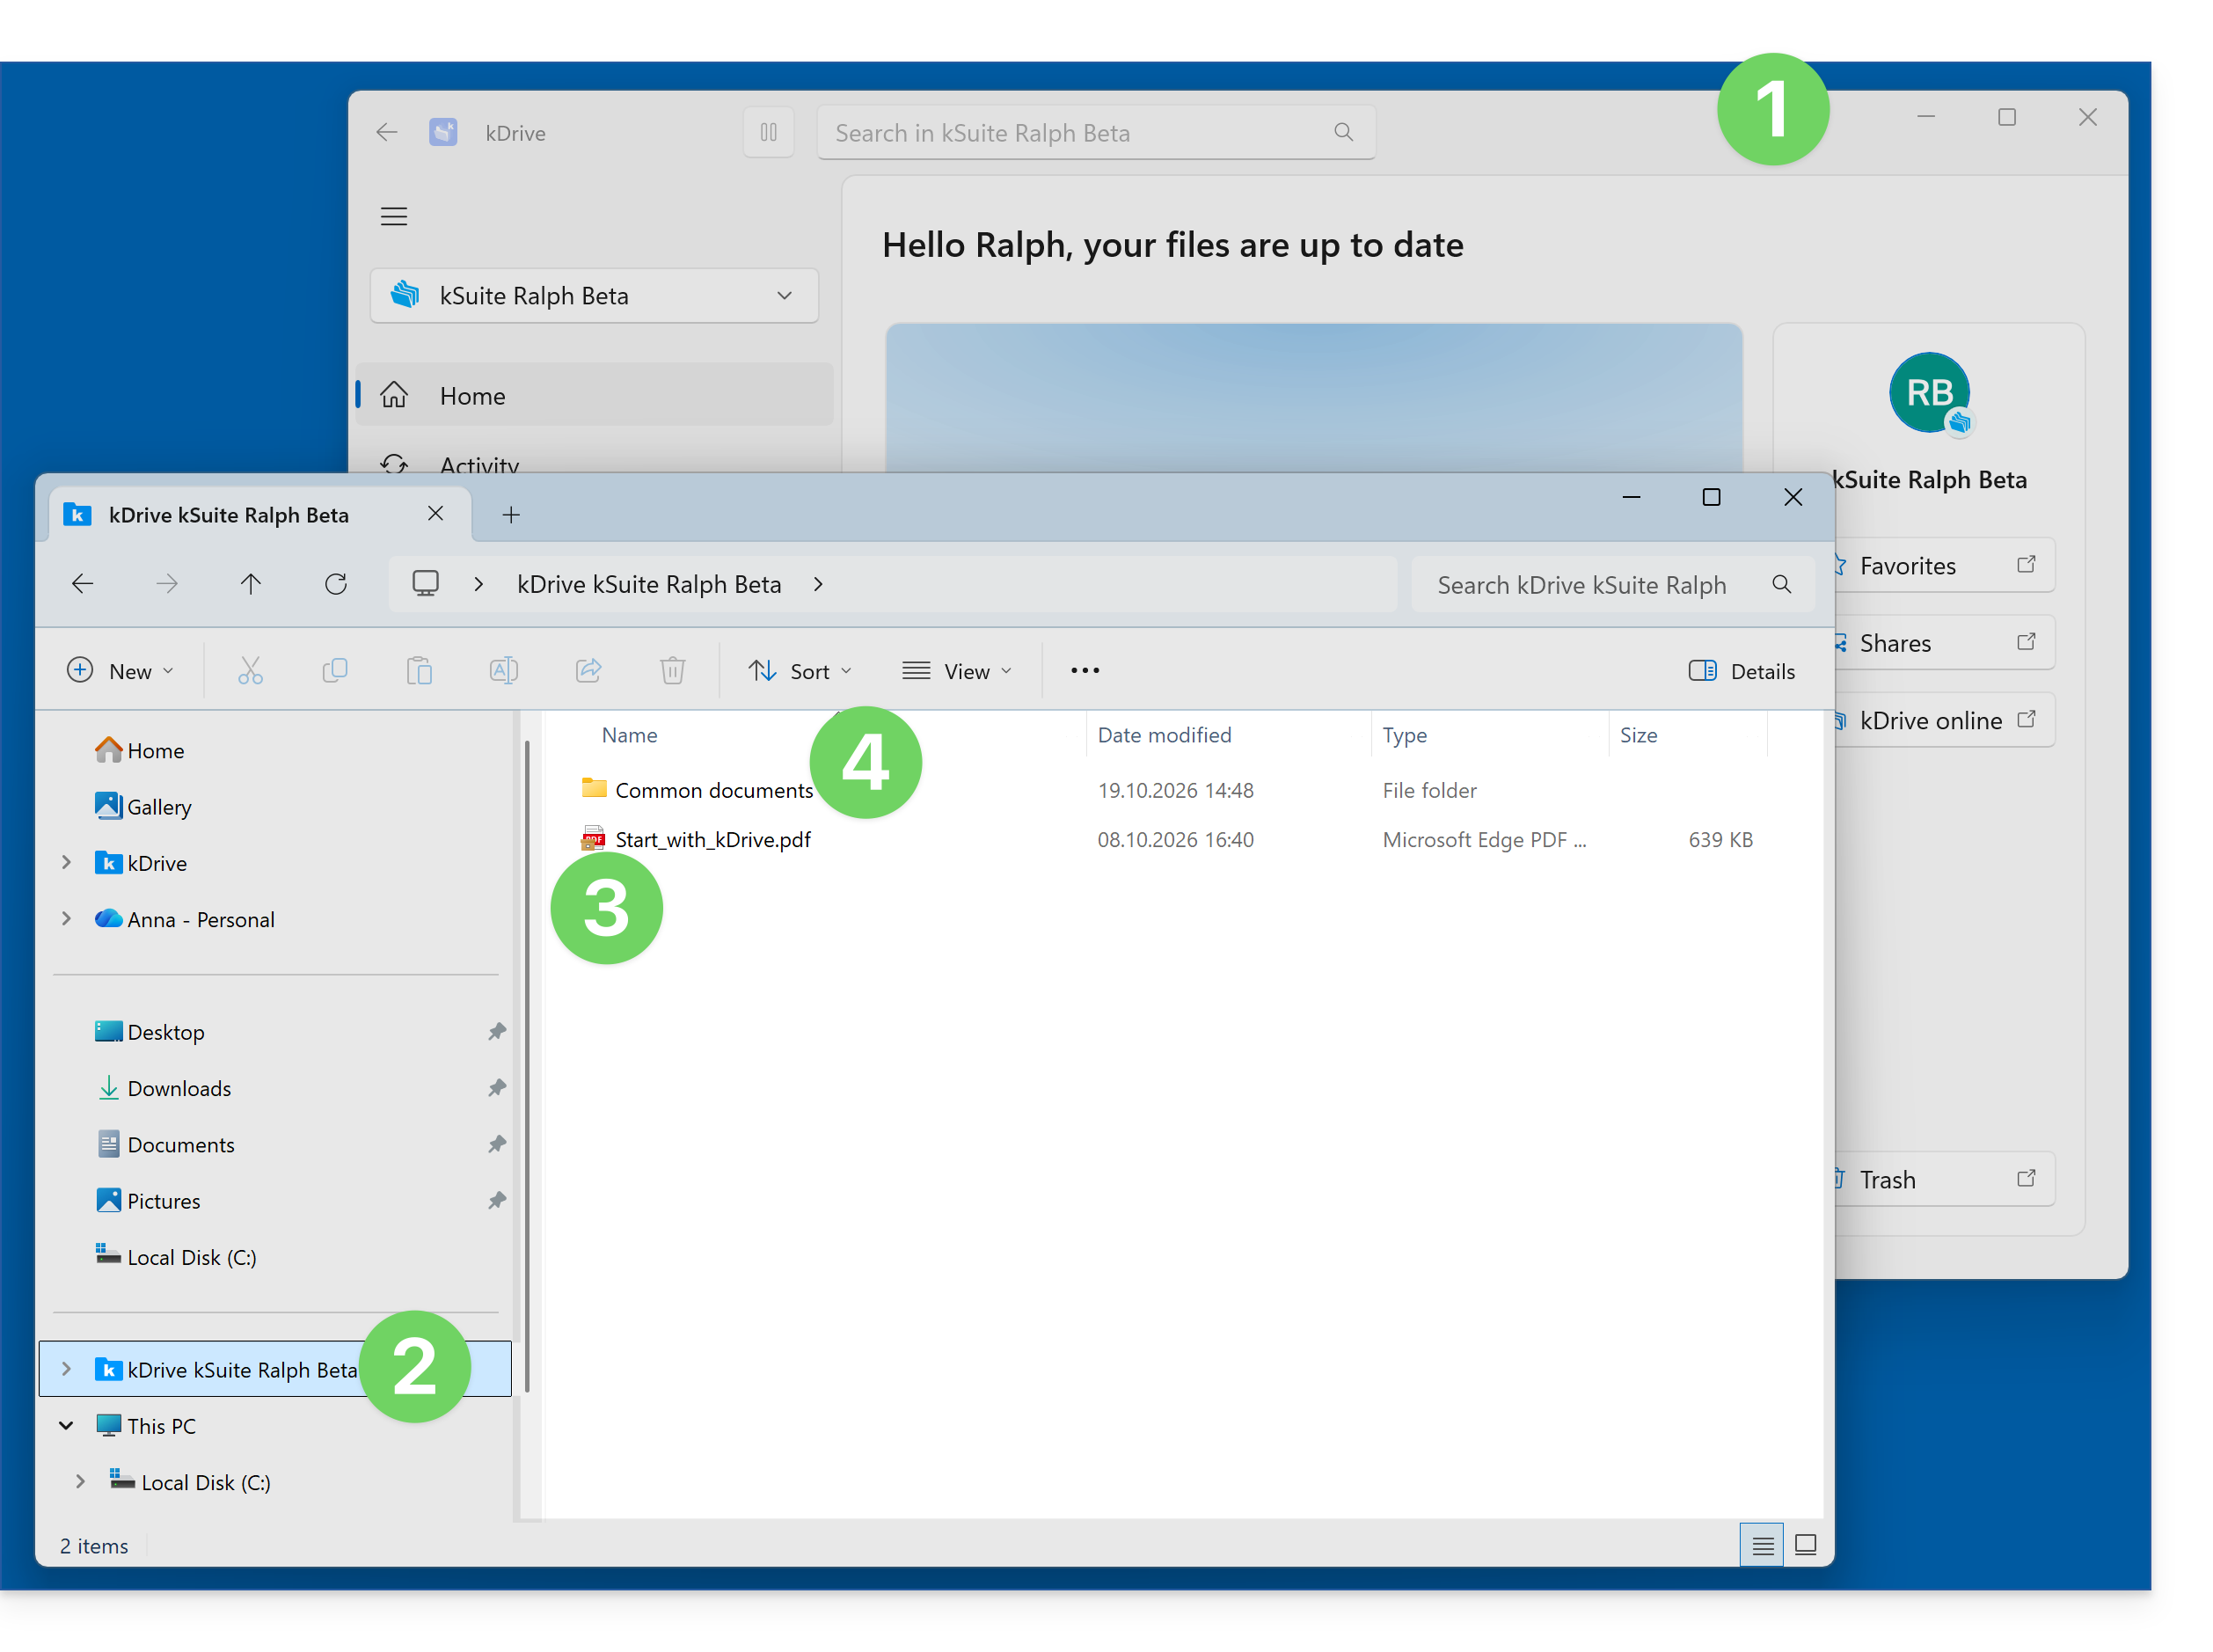
- Add your file to the desired location within your kDrive by copying or dragging it to move it:
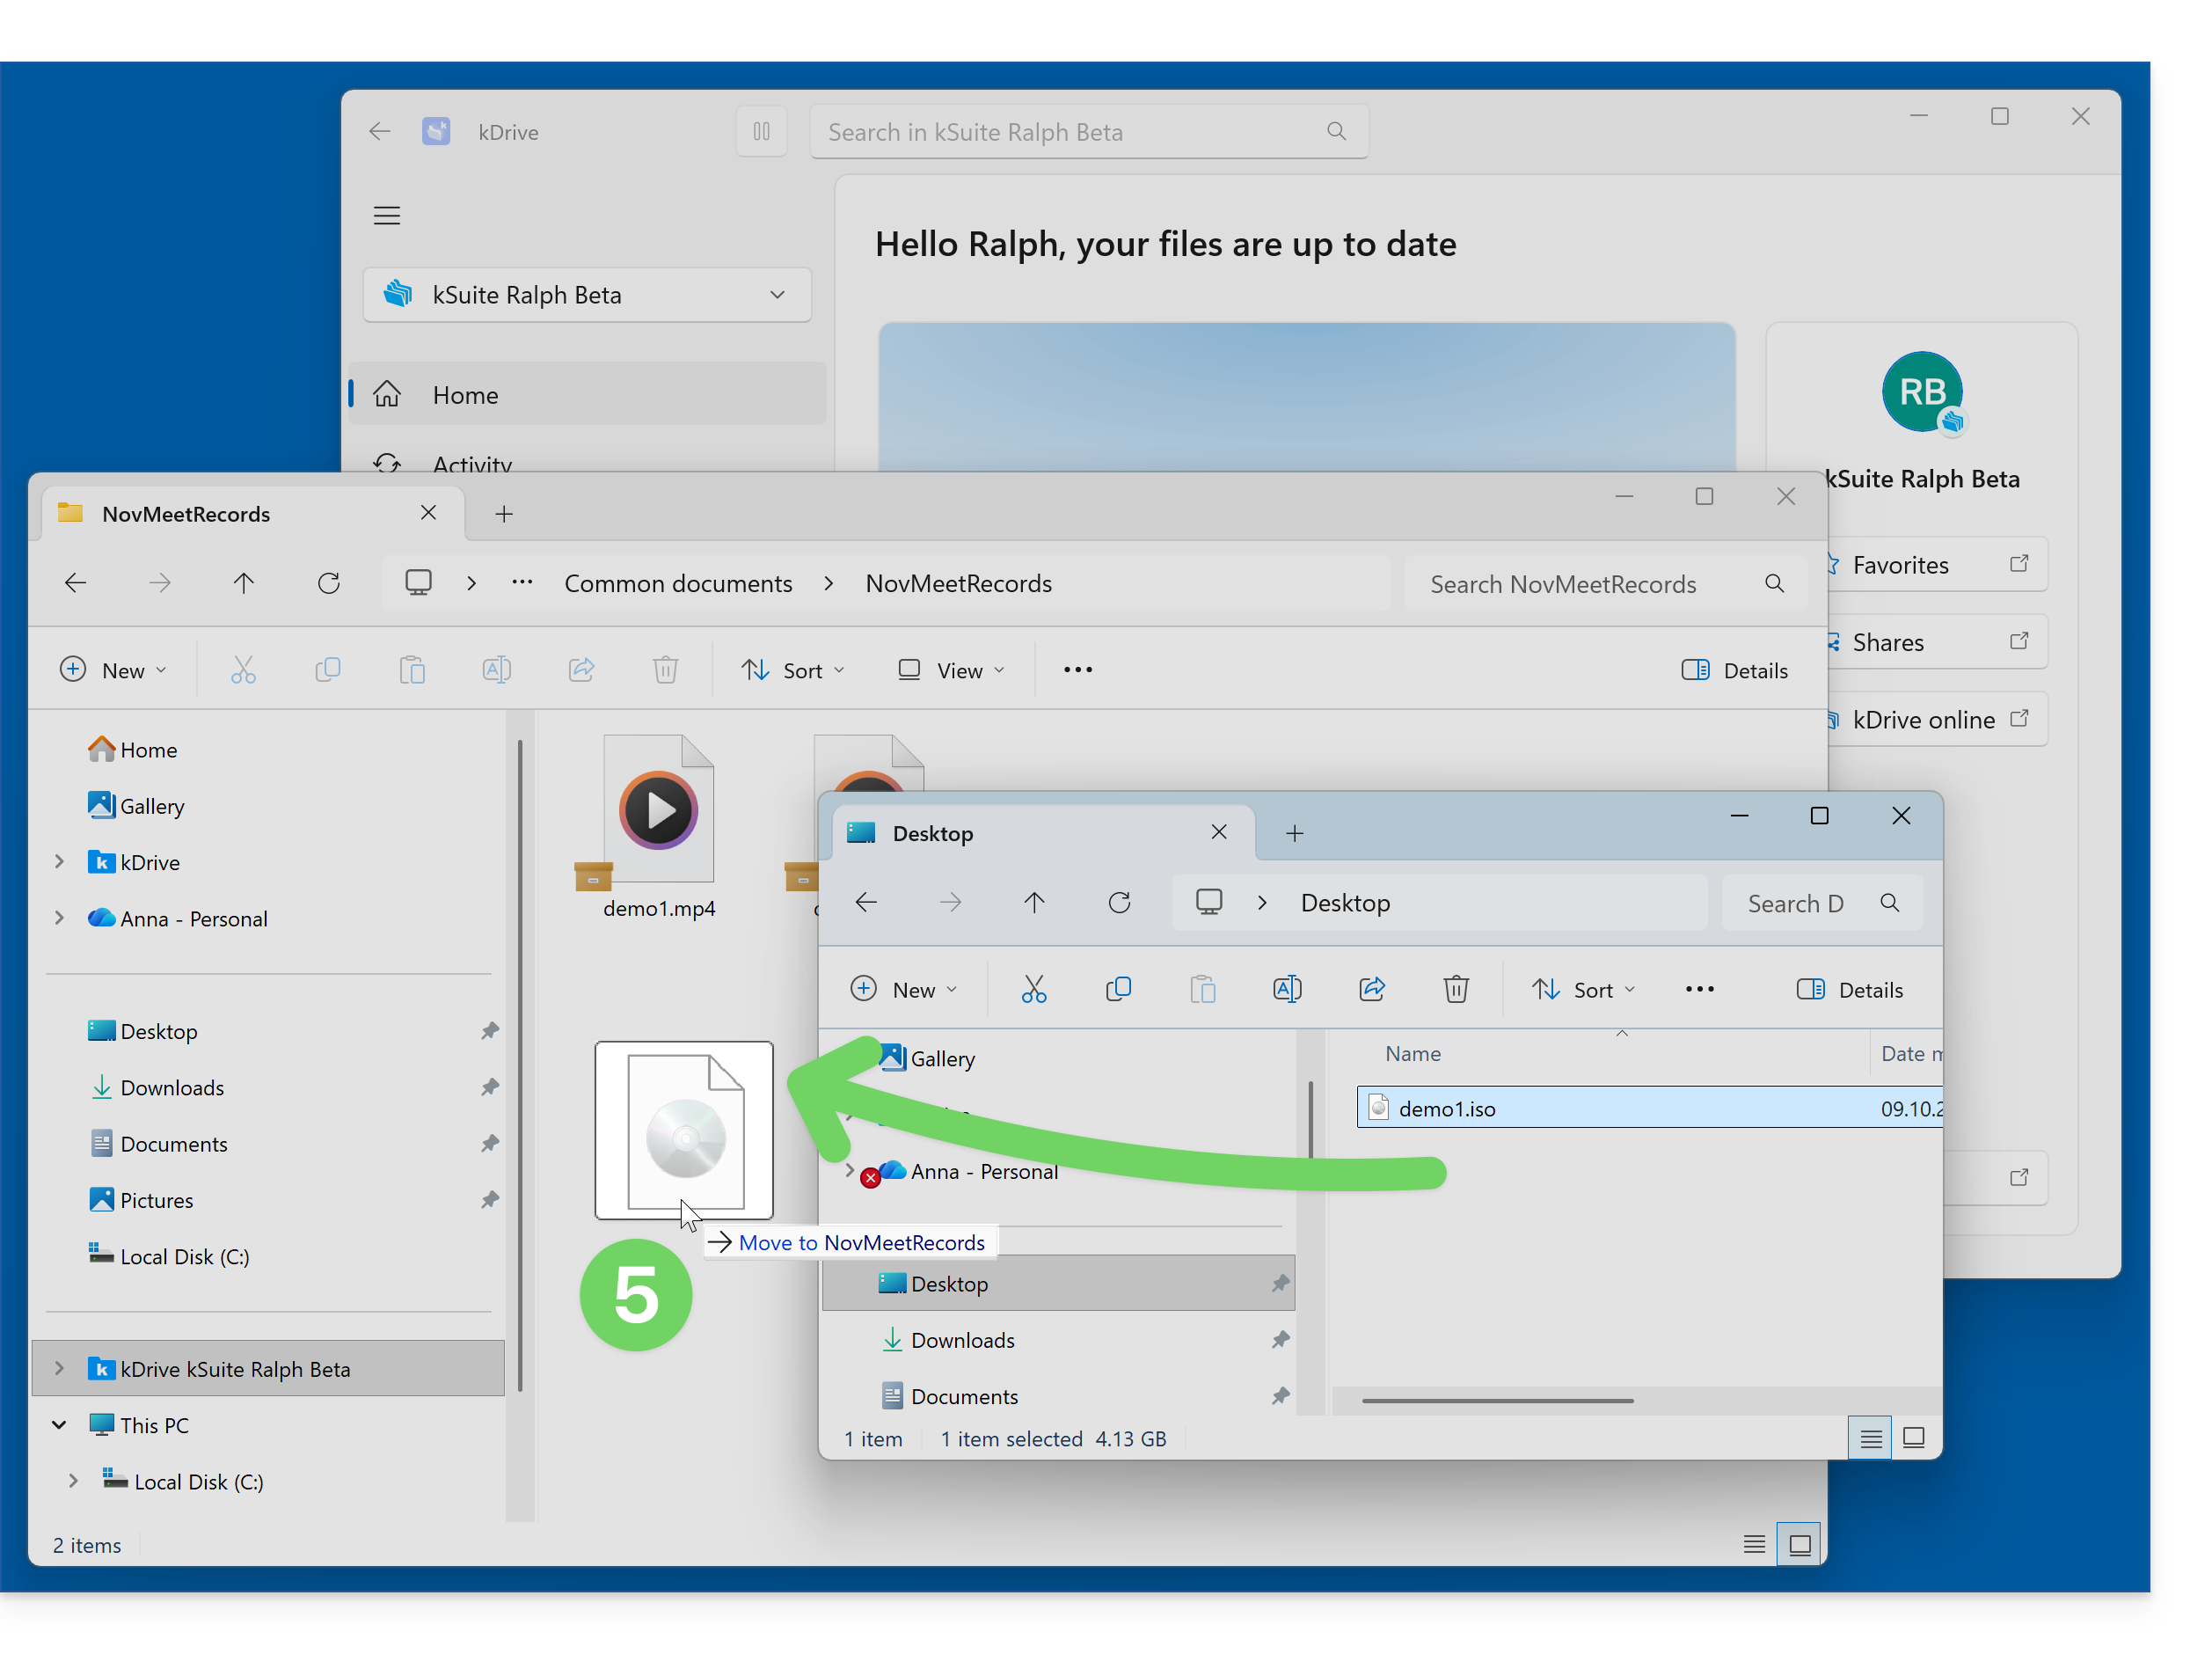
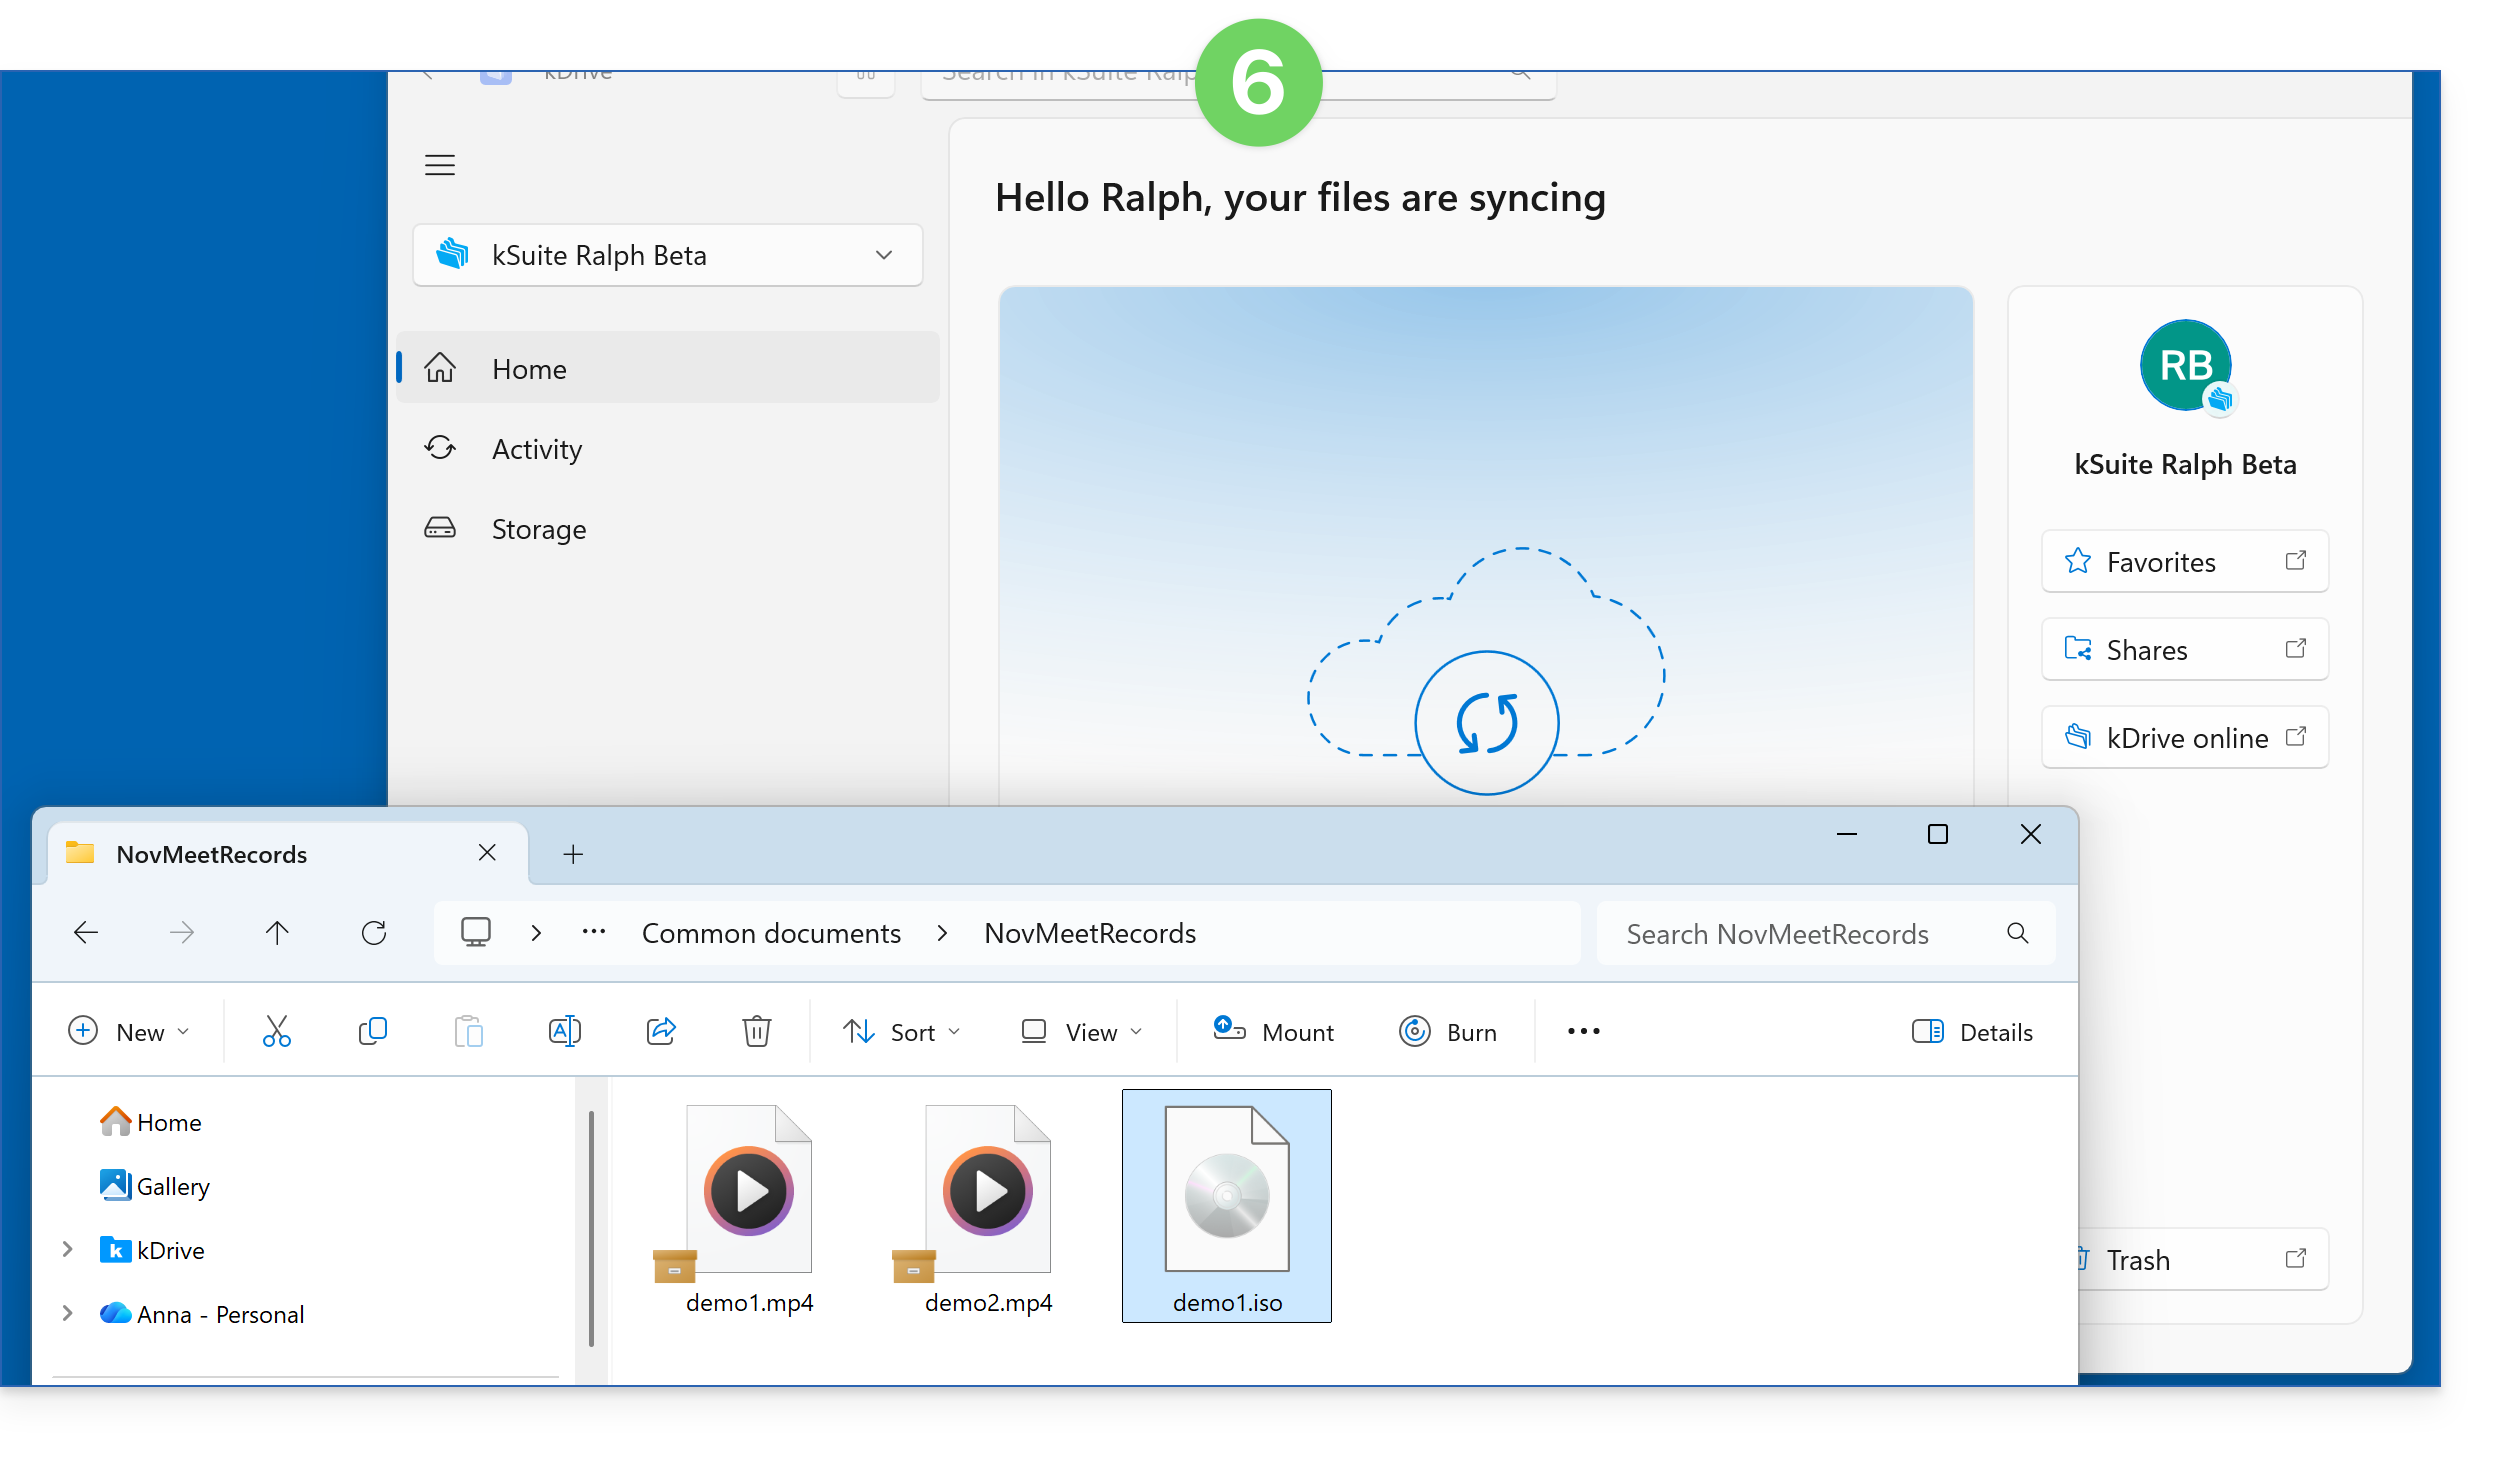
- kDrive then indicates that a synchronization is in progress; the kDrive icon on your taskbar also indicates this, and at this stage, the file is still only present on your computer:
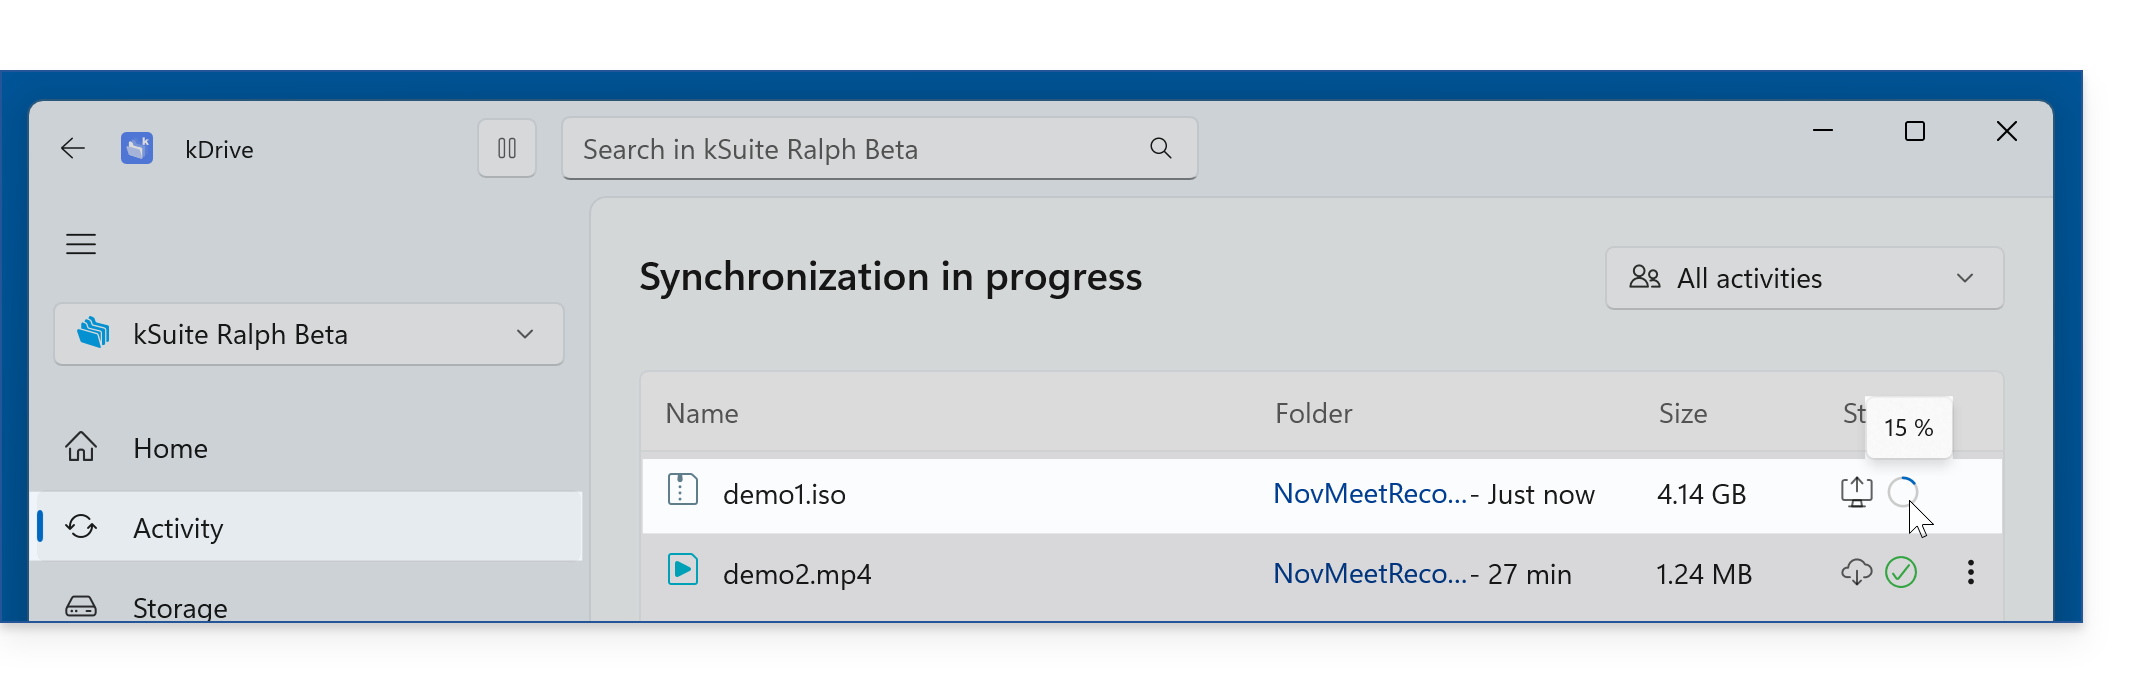
- Under Activities, you can see the percentage of data already sent by hovering your mouse over it:
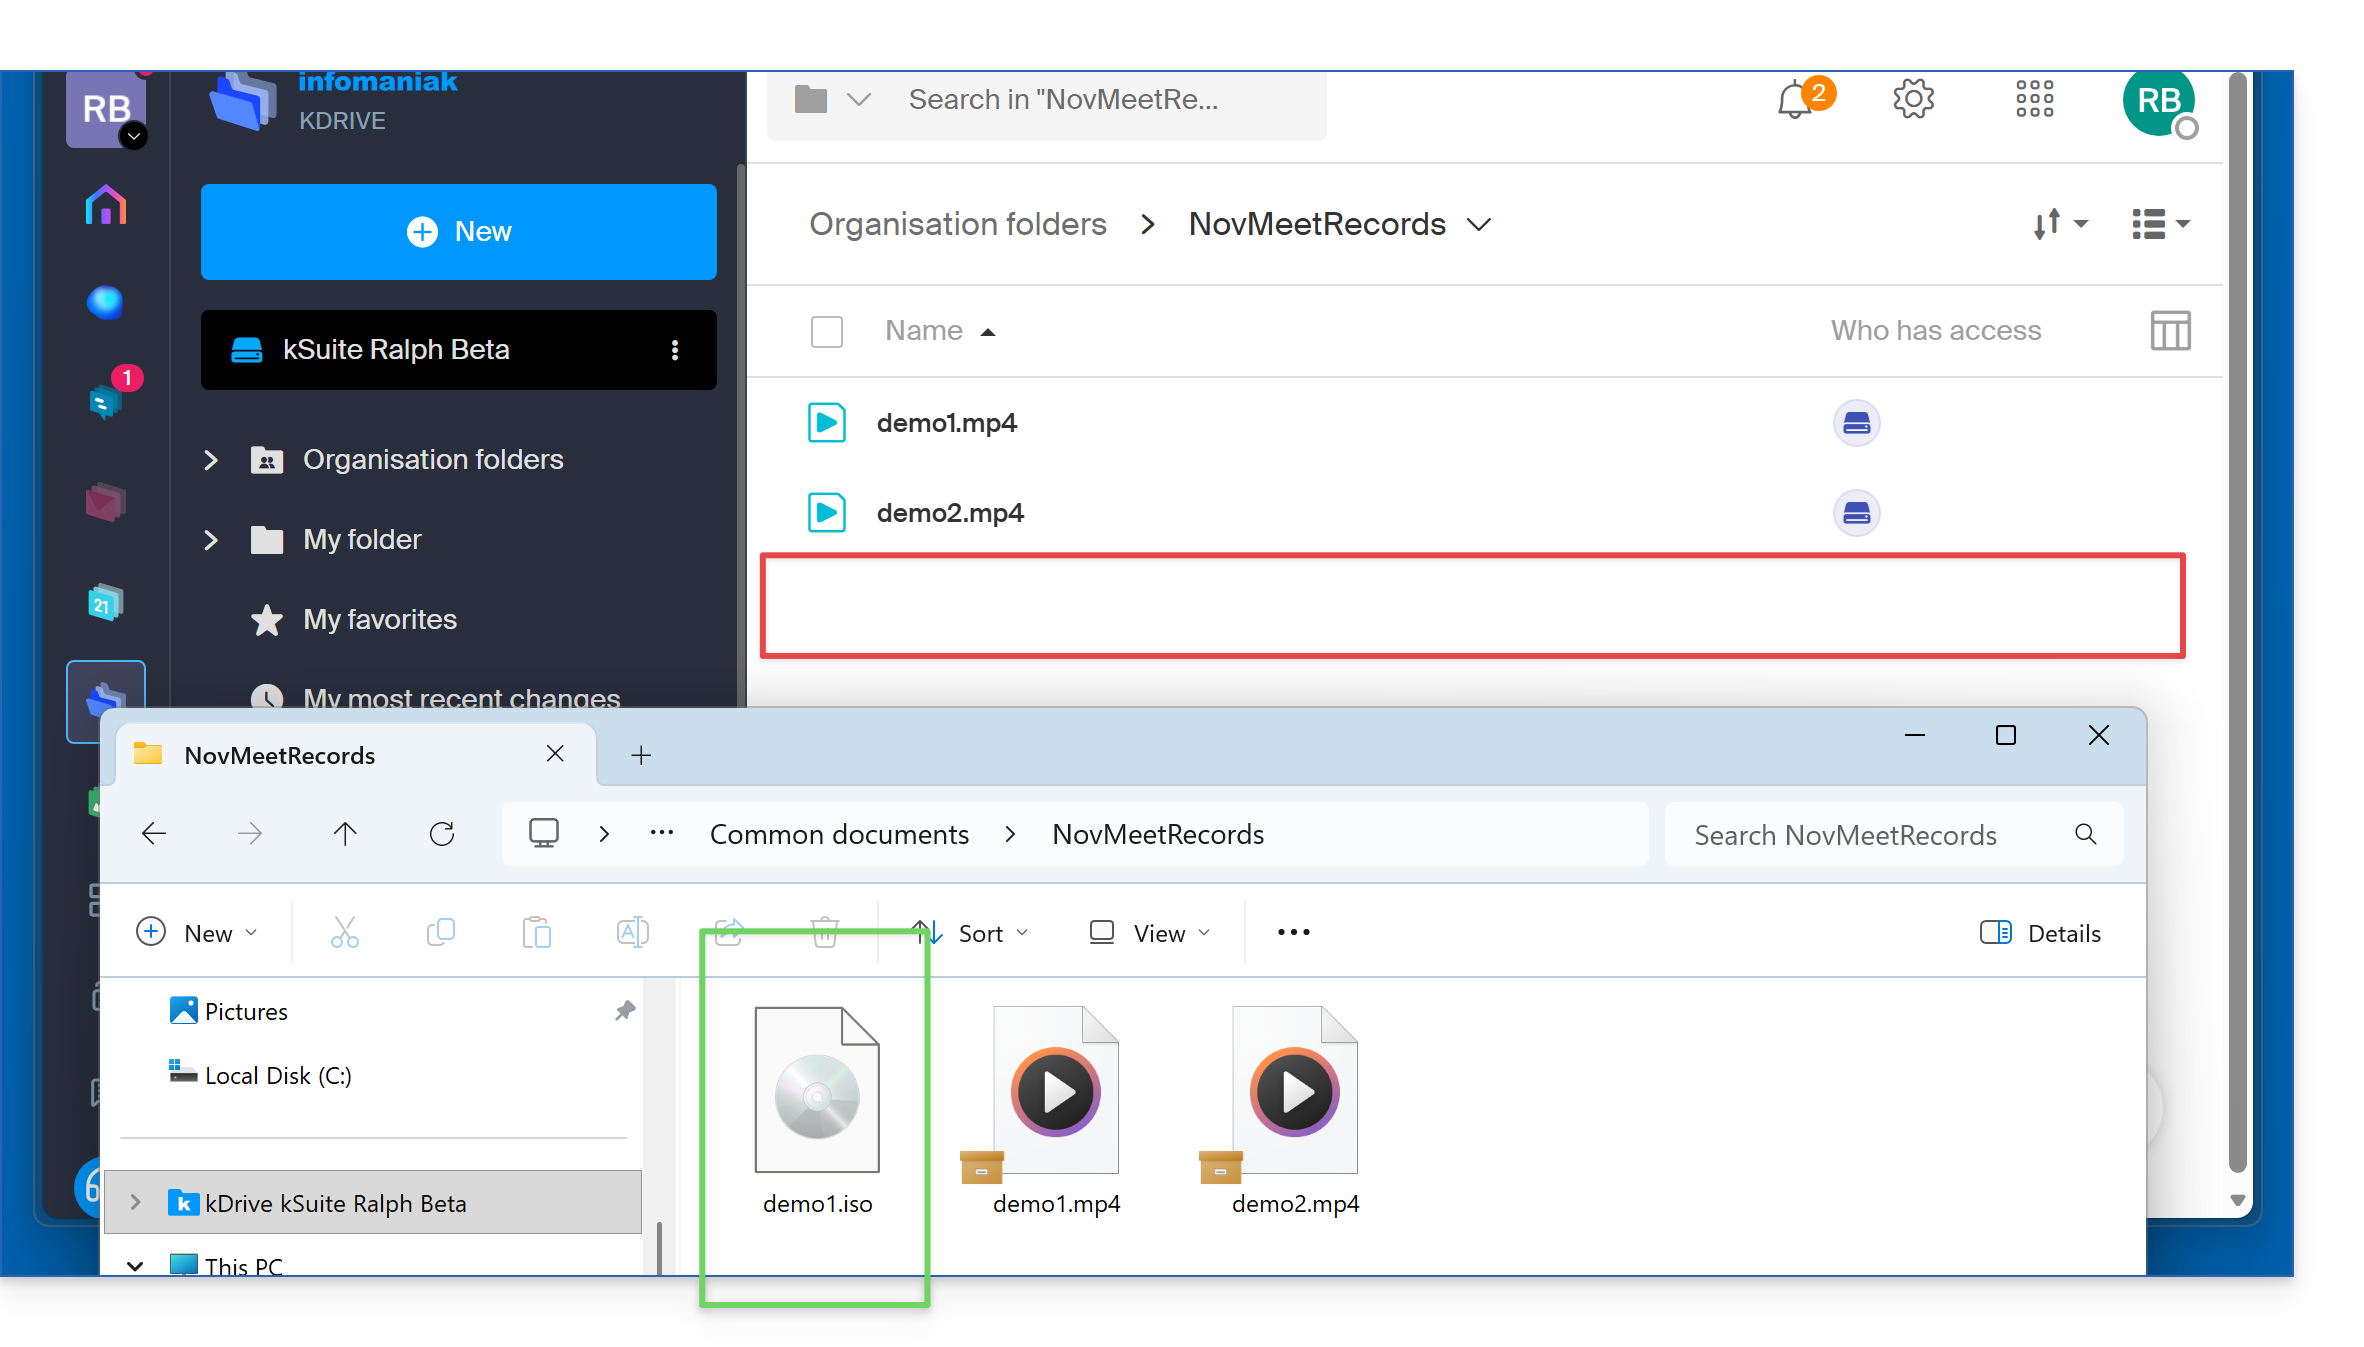
- As long as the synchronization is not complete (and this may take a long time, depending in particular on the speed of your Internet connection – as long as the device is active; otherwise, the file sending will continue at the next startup), the kDrive space on the Internet will not yet display your incomplete data:
- Under Activities, you can see the percentage of data already sent by hovering your mouse over it:
When the sending is complete and the file is fully stored on the kDrive server as well as on your hard drive, the download of this data begins for other users of kDrive who have the application open on their device. Otherwise, this download/synchronization will take place the next time the application is opened.
Large kDrive, full hard drive
The previous chapter illustrates the sending of a file of approximately 4 GB. If other files are also sent by users, kDrive may then represent a larger volume than the kDrive folder on the users' hard drives can accommodate. What solutions should be adopted in this case?
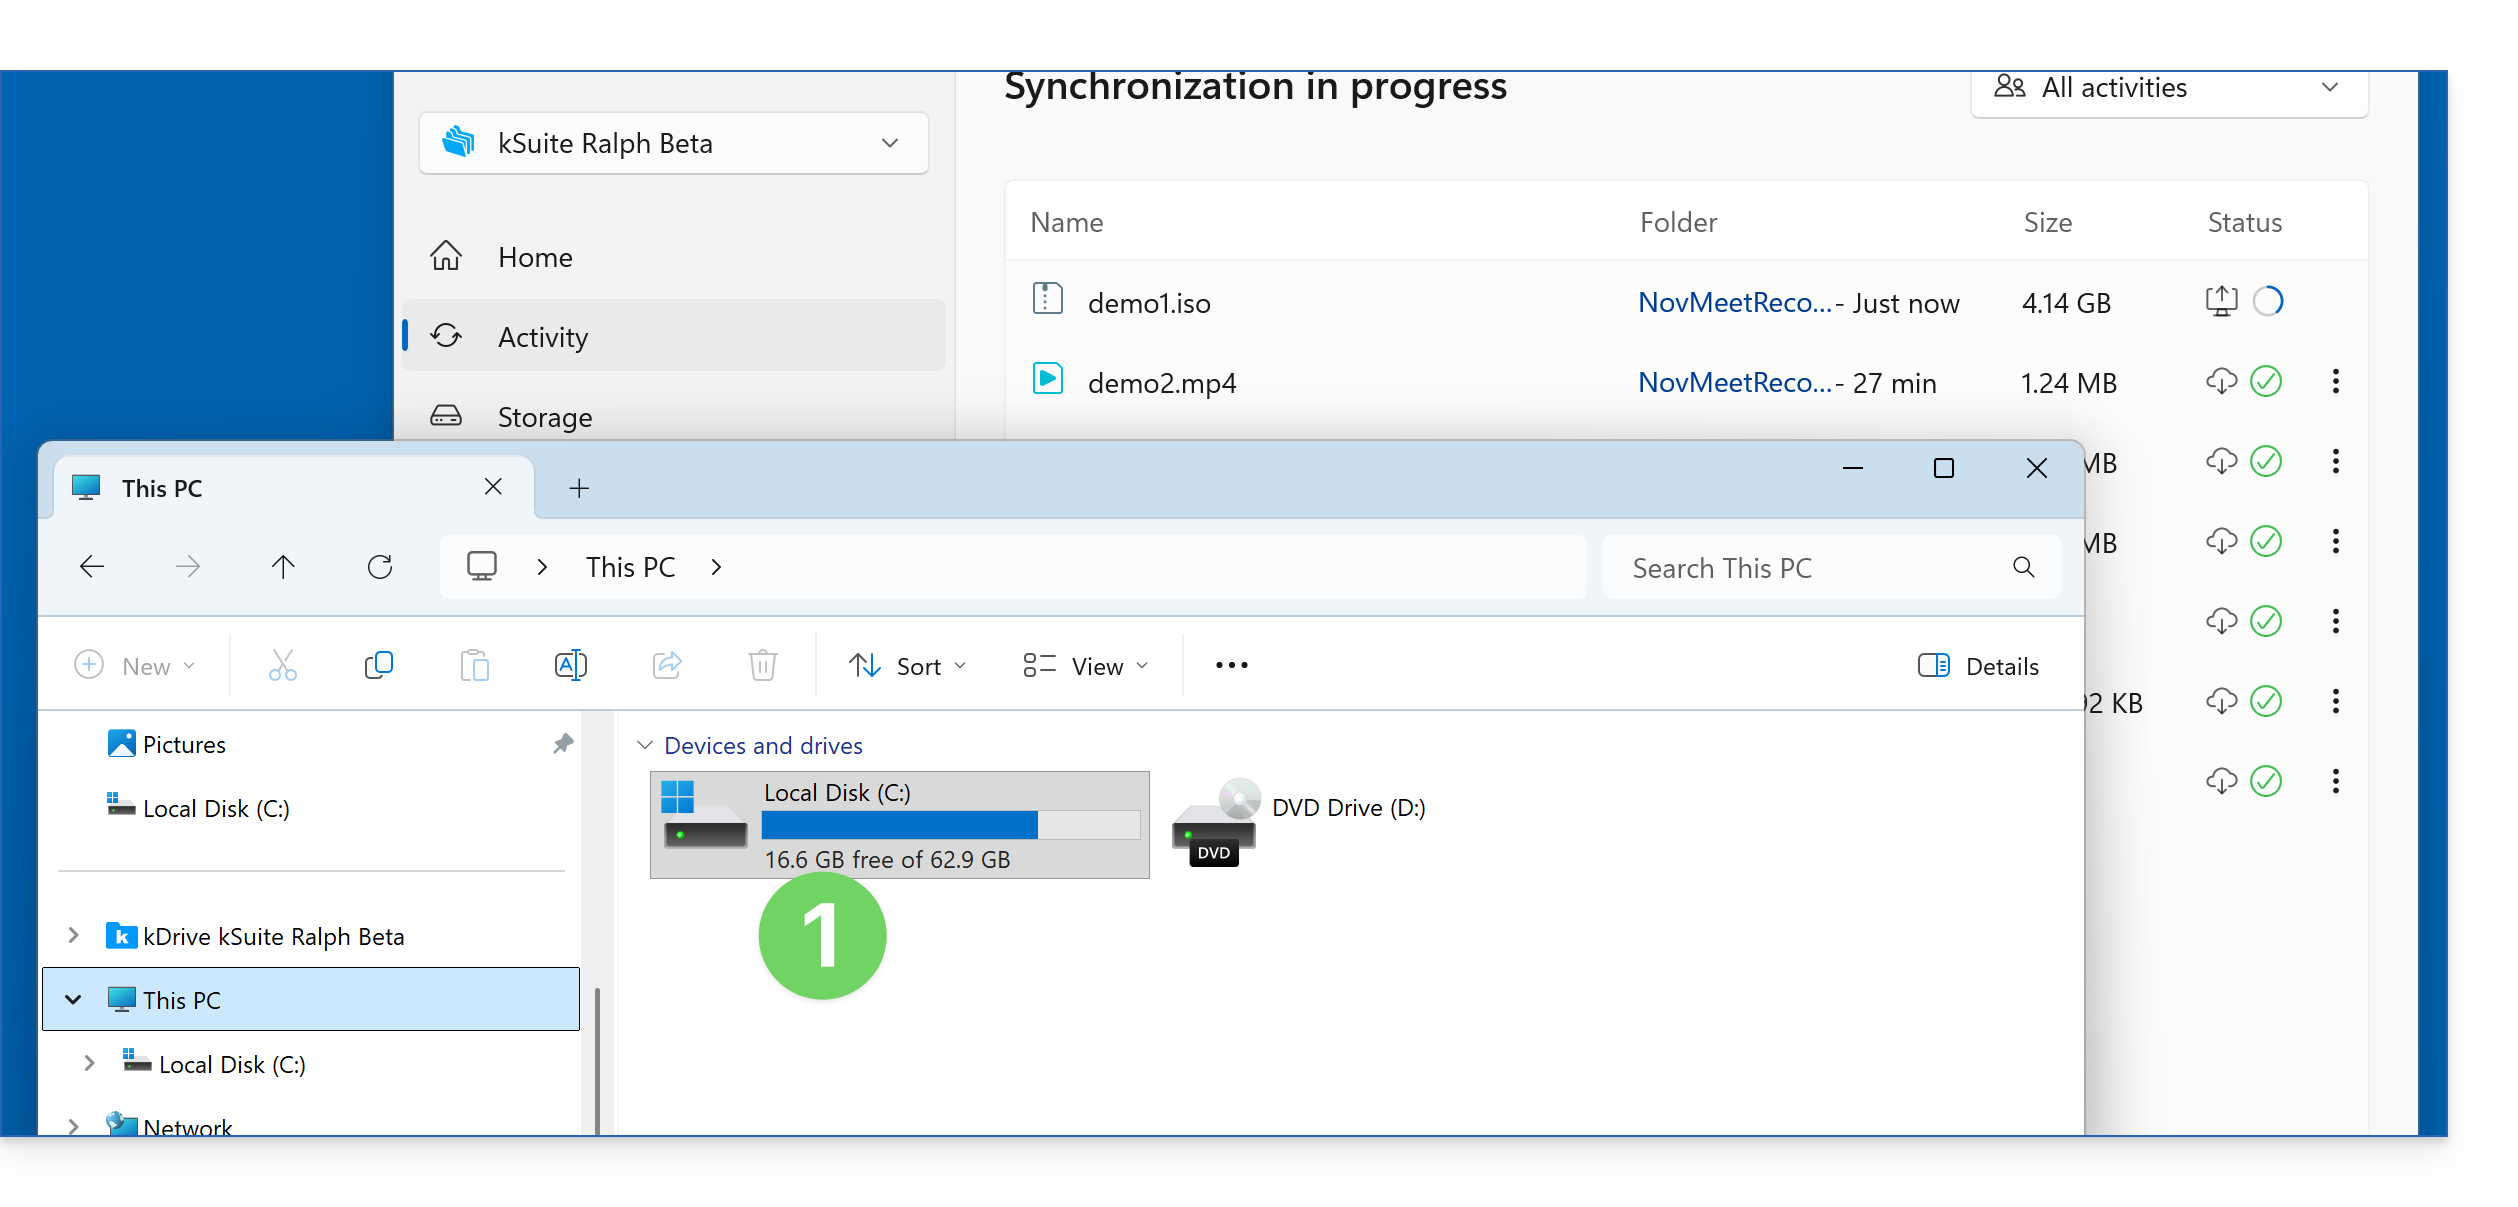
- Here, the hard drive of this computer will not be able to accommodate more than 16 GB of new data:
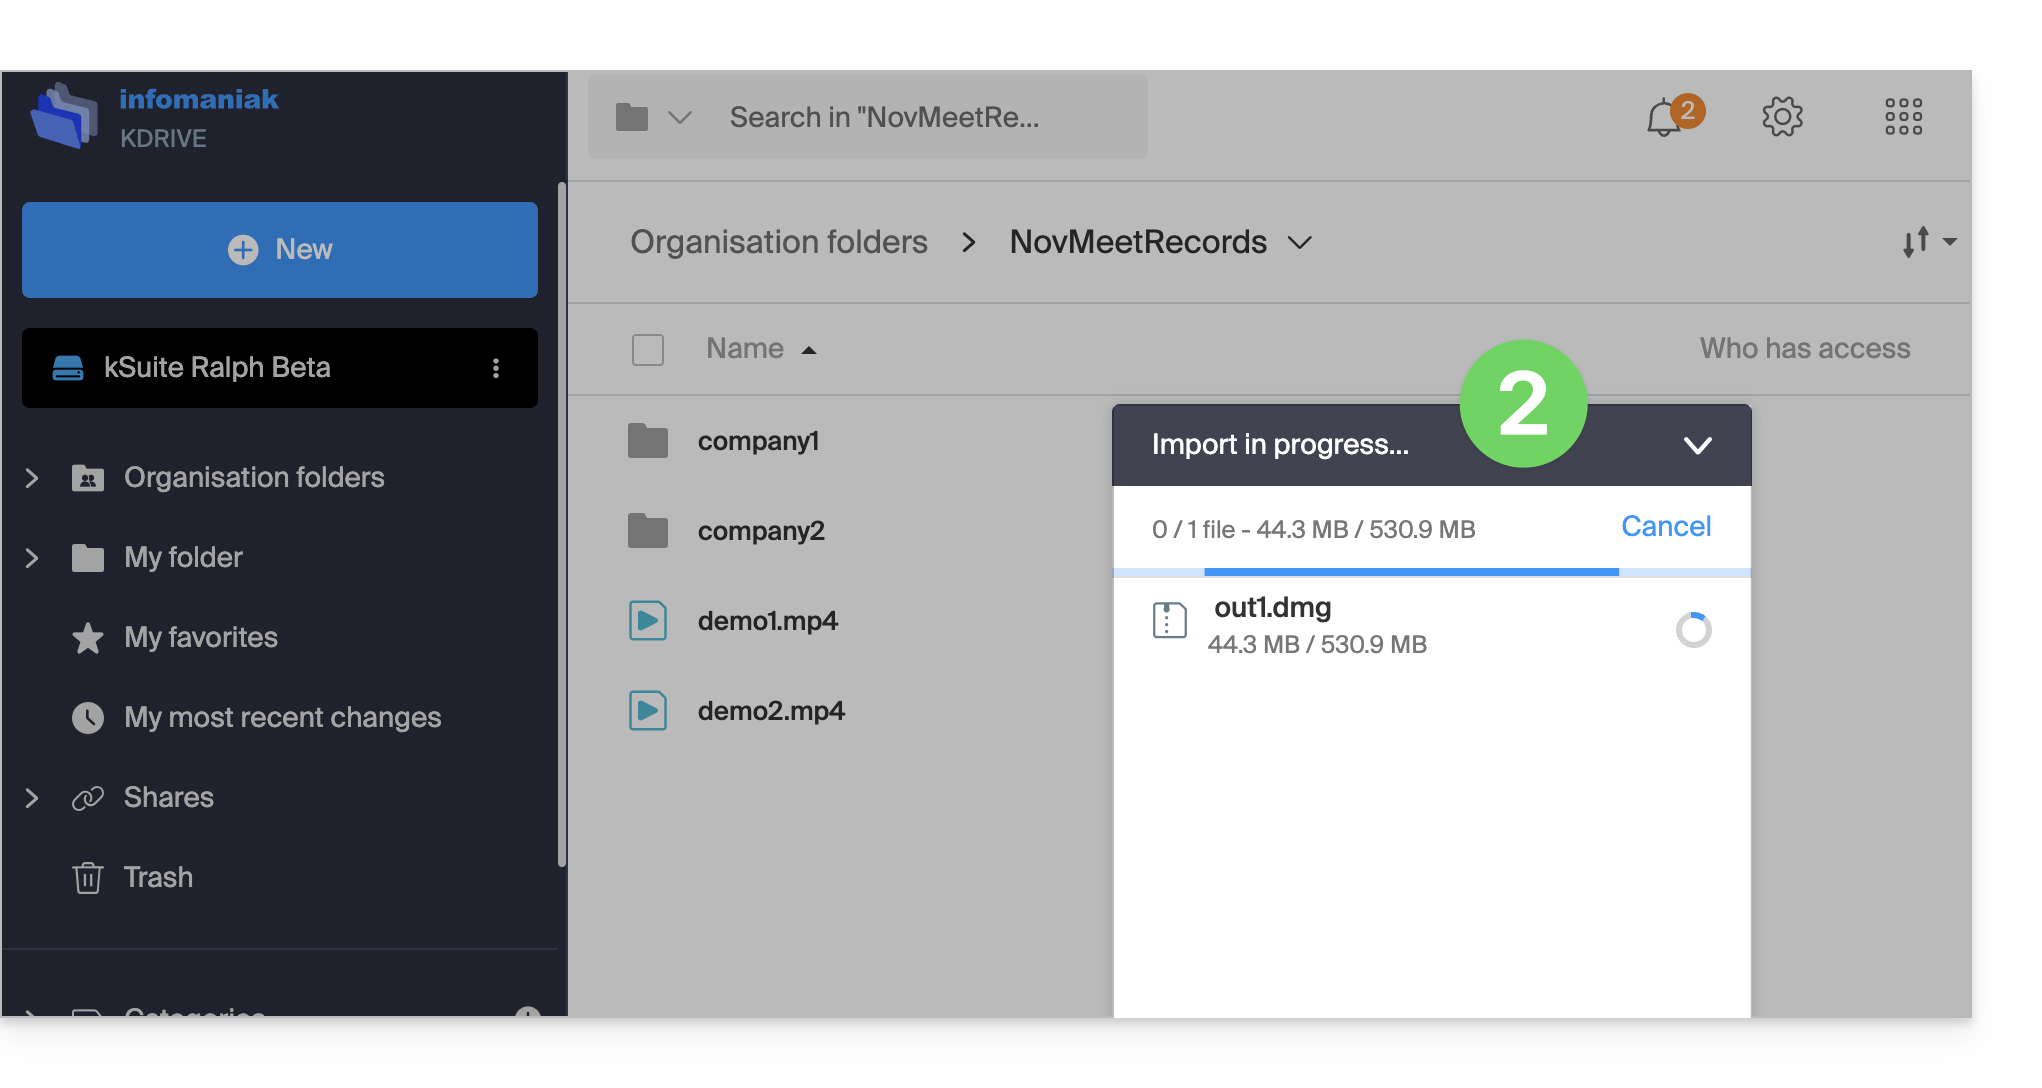
- It will become saturated because large files are being uploaded to the shared kDrive using other methods:
To reduce storage space on your computer, you can make each file “virtual”: only a representation of the file is visible on your computer, while its content is stored remotely on the kDrive servers. You can enable this feature on Windows (❓: help) and macOS (❓: help):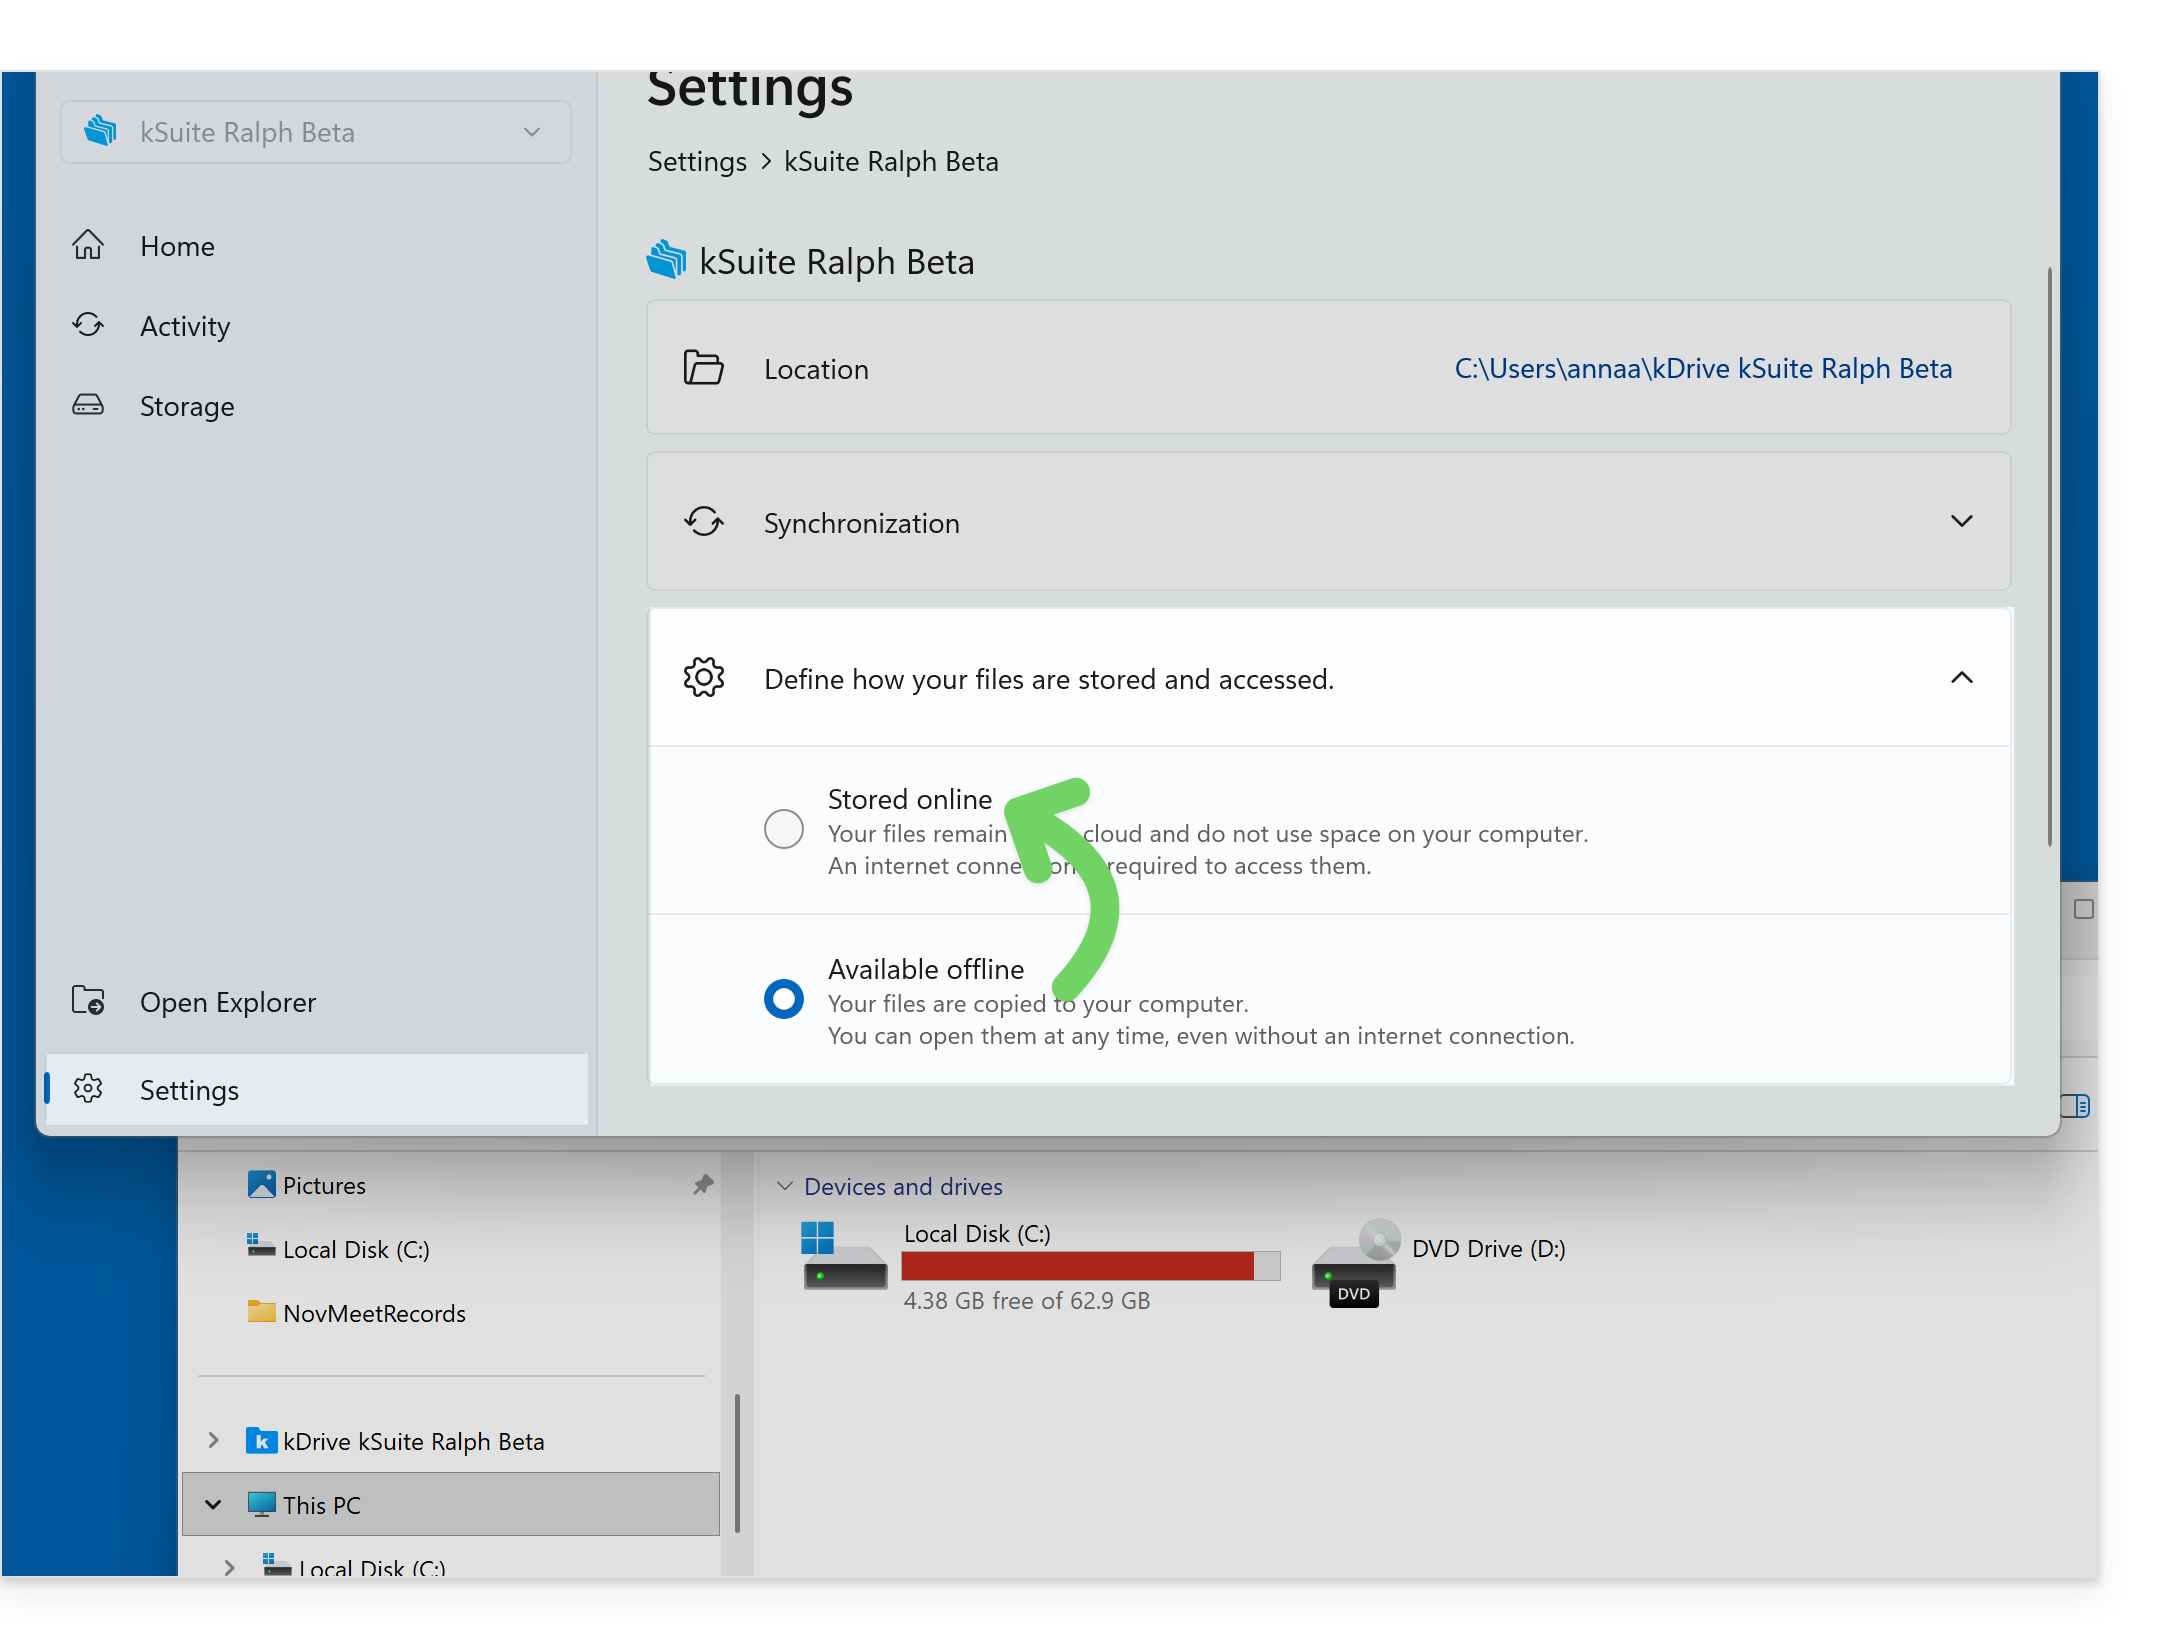
Another solution would be to not synchronize certain parts of kDrive, so that you only keep the folders that you use frequently on your computer locally (❓: help), while the rest is stored securely on the kDrive servers and is visible on other computers and/or to other collaborators who have more disk space.
Link to this FAQ: https://faq.infomaniak.com/2934
Has this FAQ been helpful?
This guide details the installation of the Infomaniak v4.x desktop application kDrive on a computer running the macOS operating system. This application allows you to automatically synchronize files from your computer with your online kDrive storage space.
Introduction
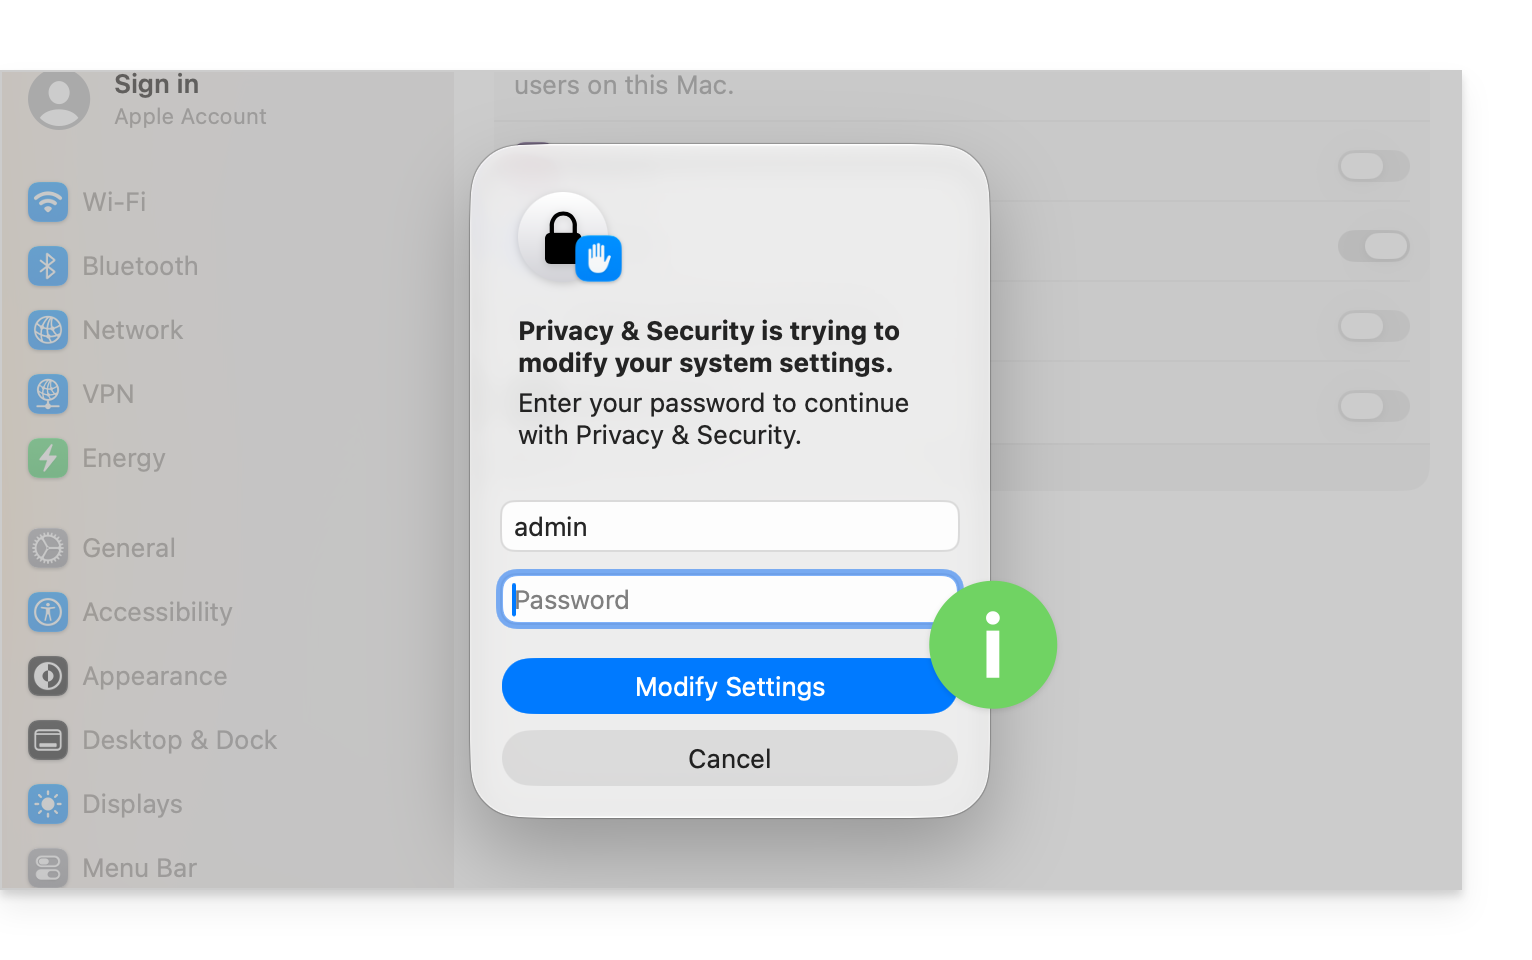
- Installing kDrive requires you togrant certain permissions to the application's componentsto enable them to run on your Apple computer.
- This guide outlines the steps to follow on recent versions of macOS; for older versions, refer to the last chapter of the guide.
Install the kDrive 4.x app on recent macOS
To do this:
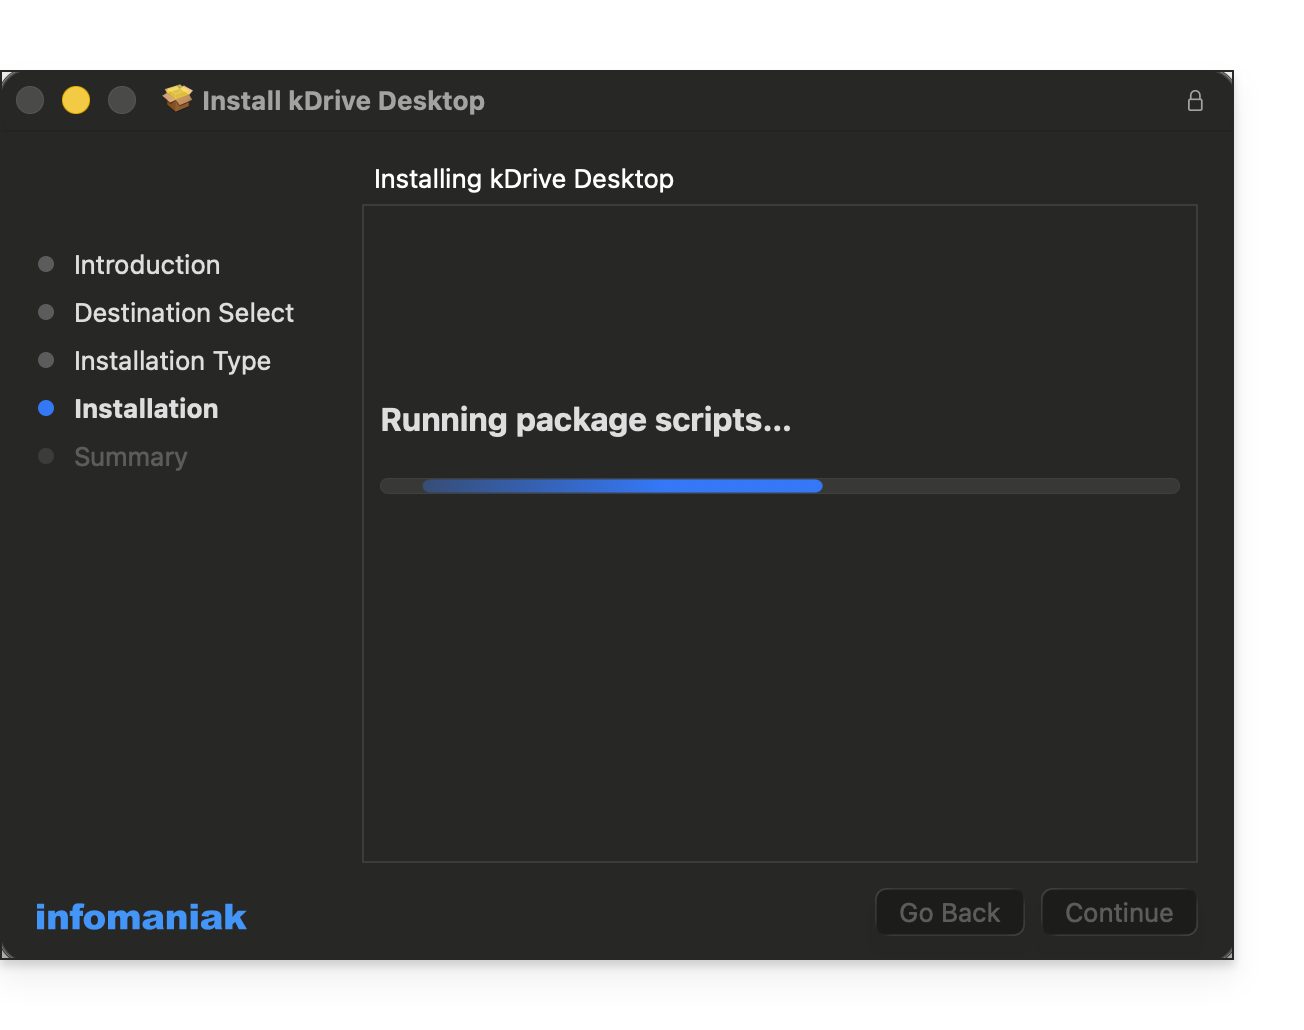
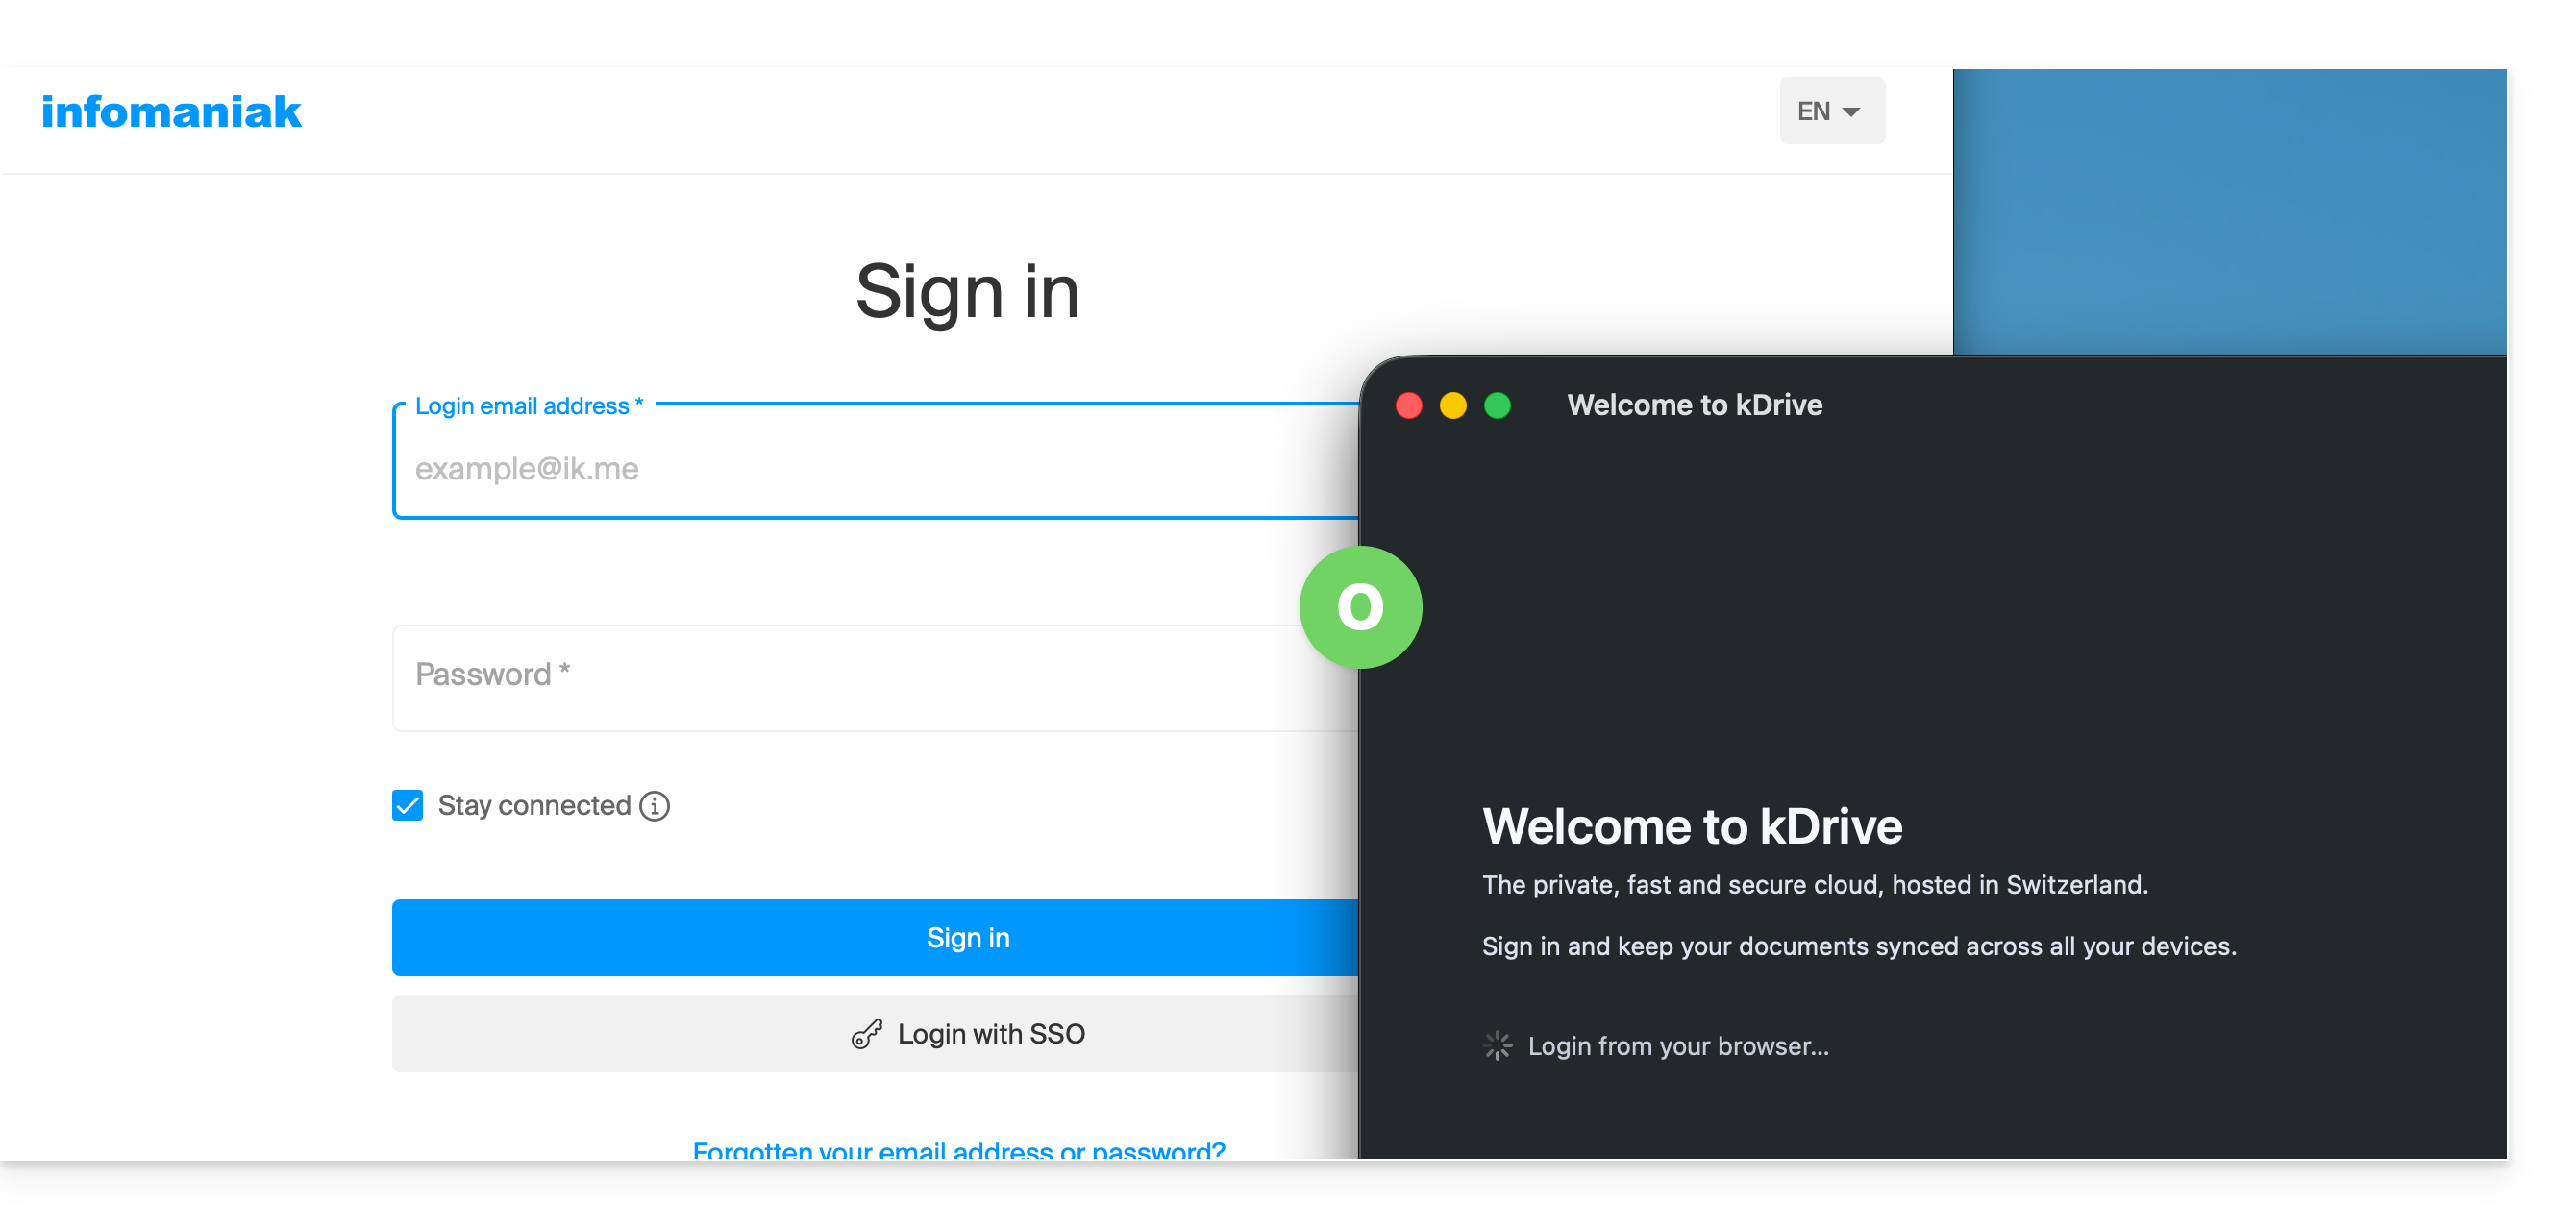
- Open the downloaded application (❓: help) and start the installation on your computer:
- Once the installation is complete:
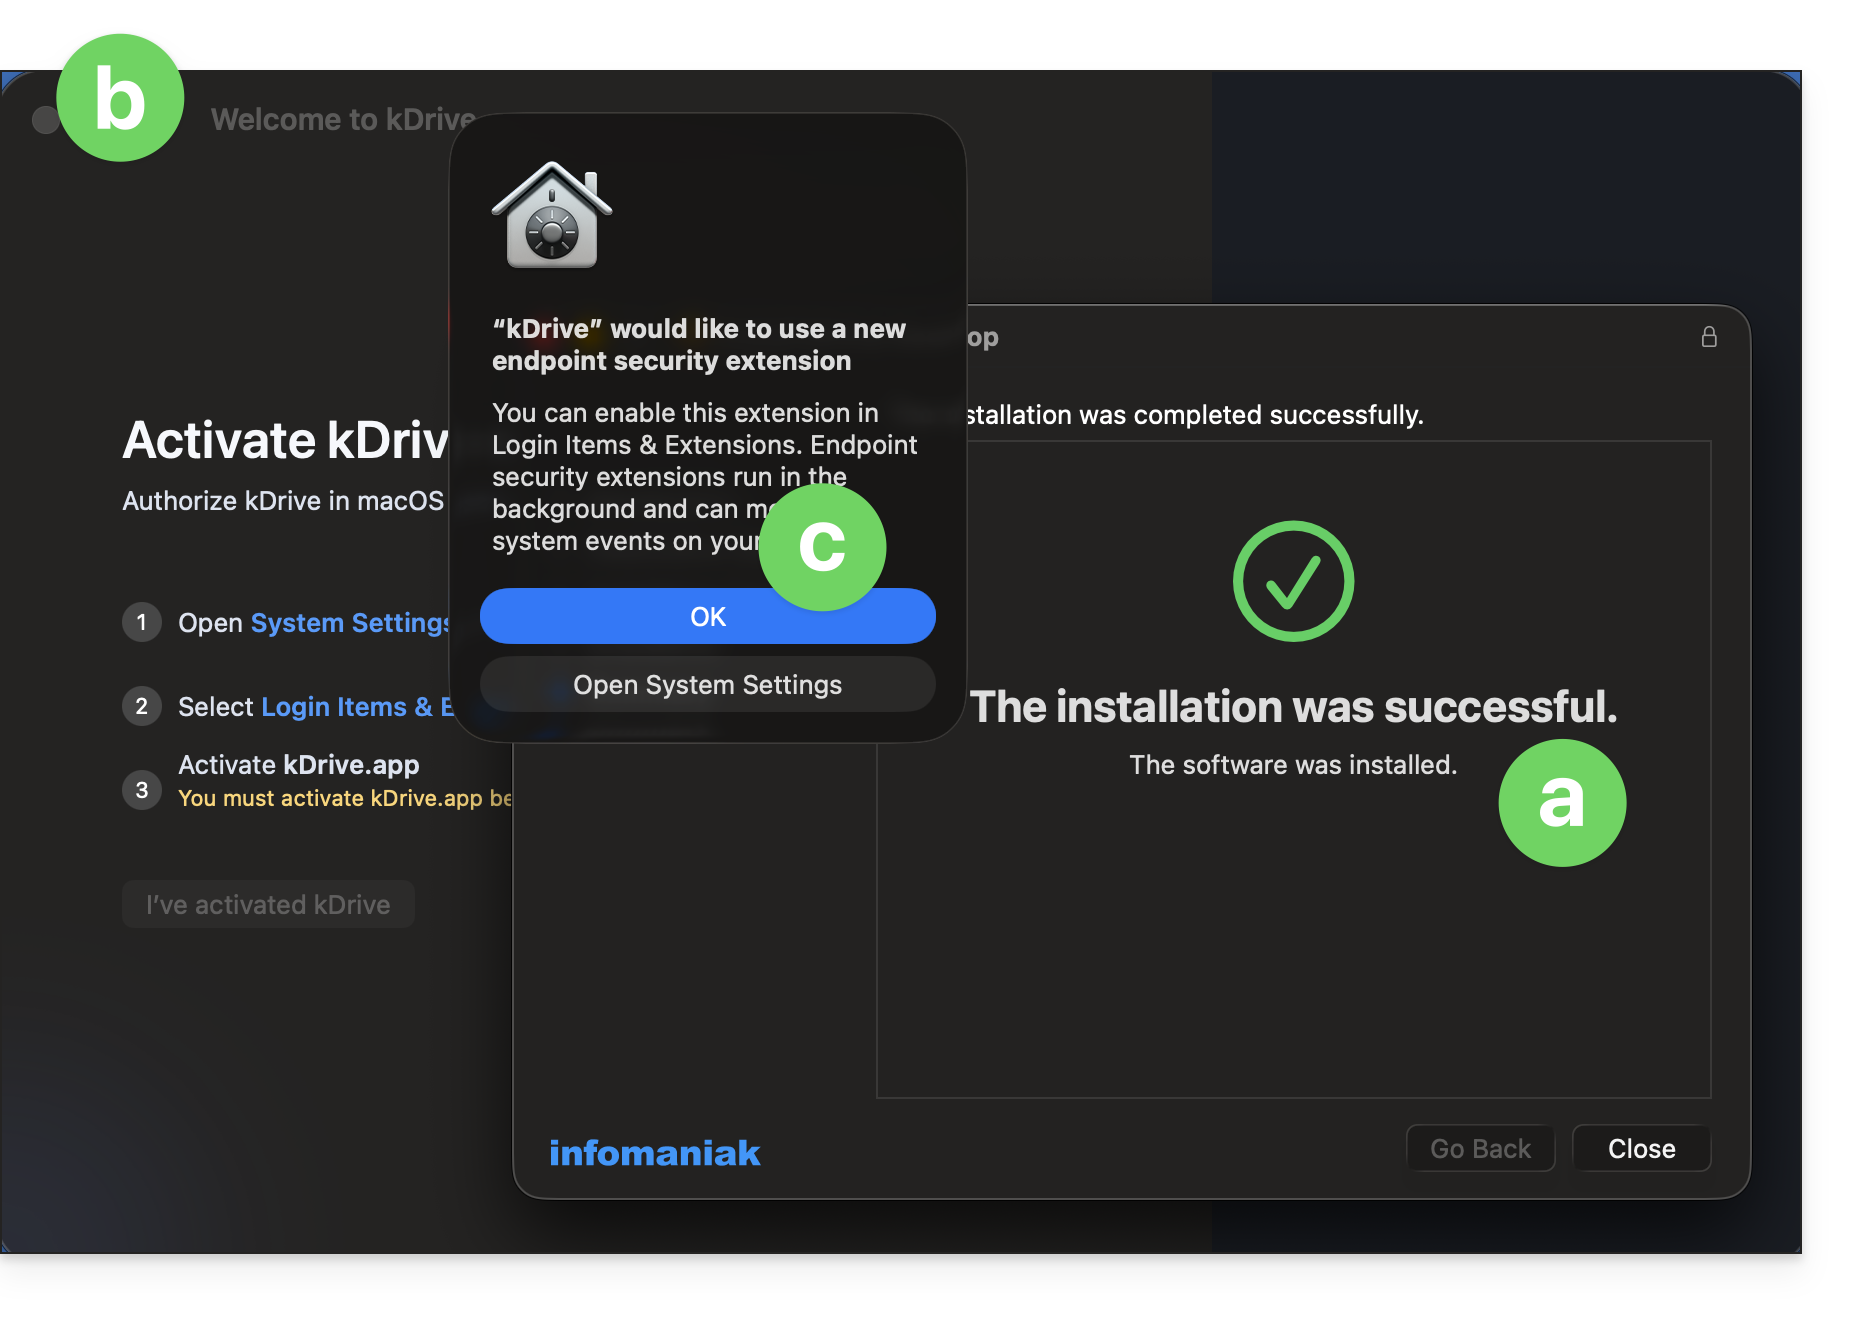
- The installer indicates that the operation was successful.
- The kDrive configuration window opens automatically.
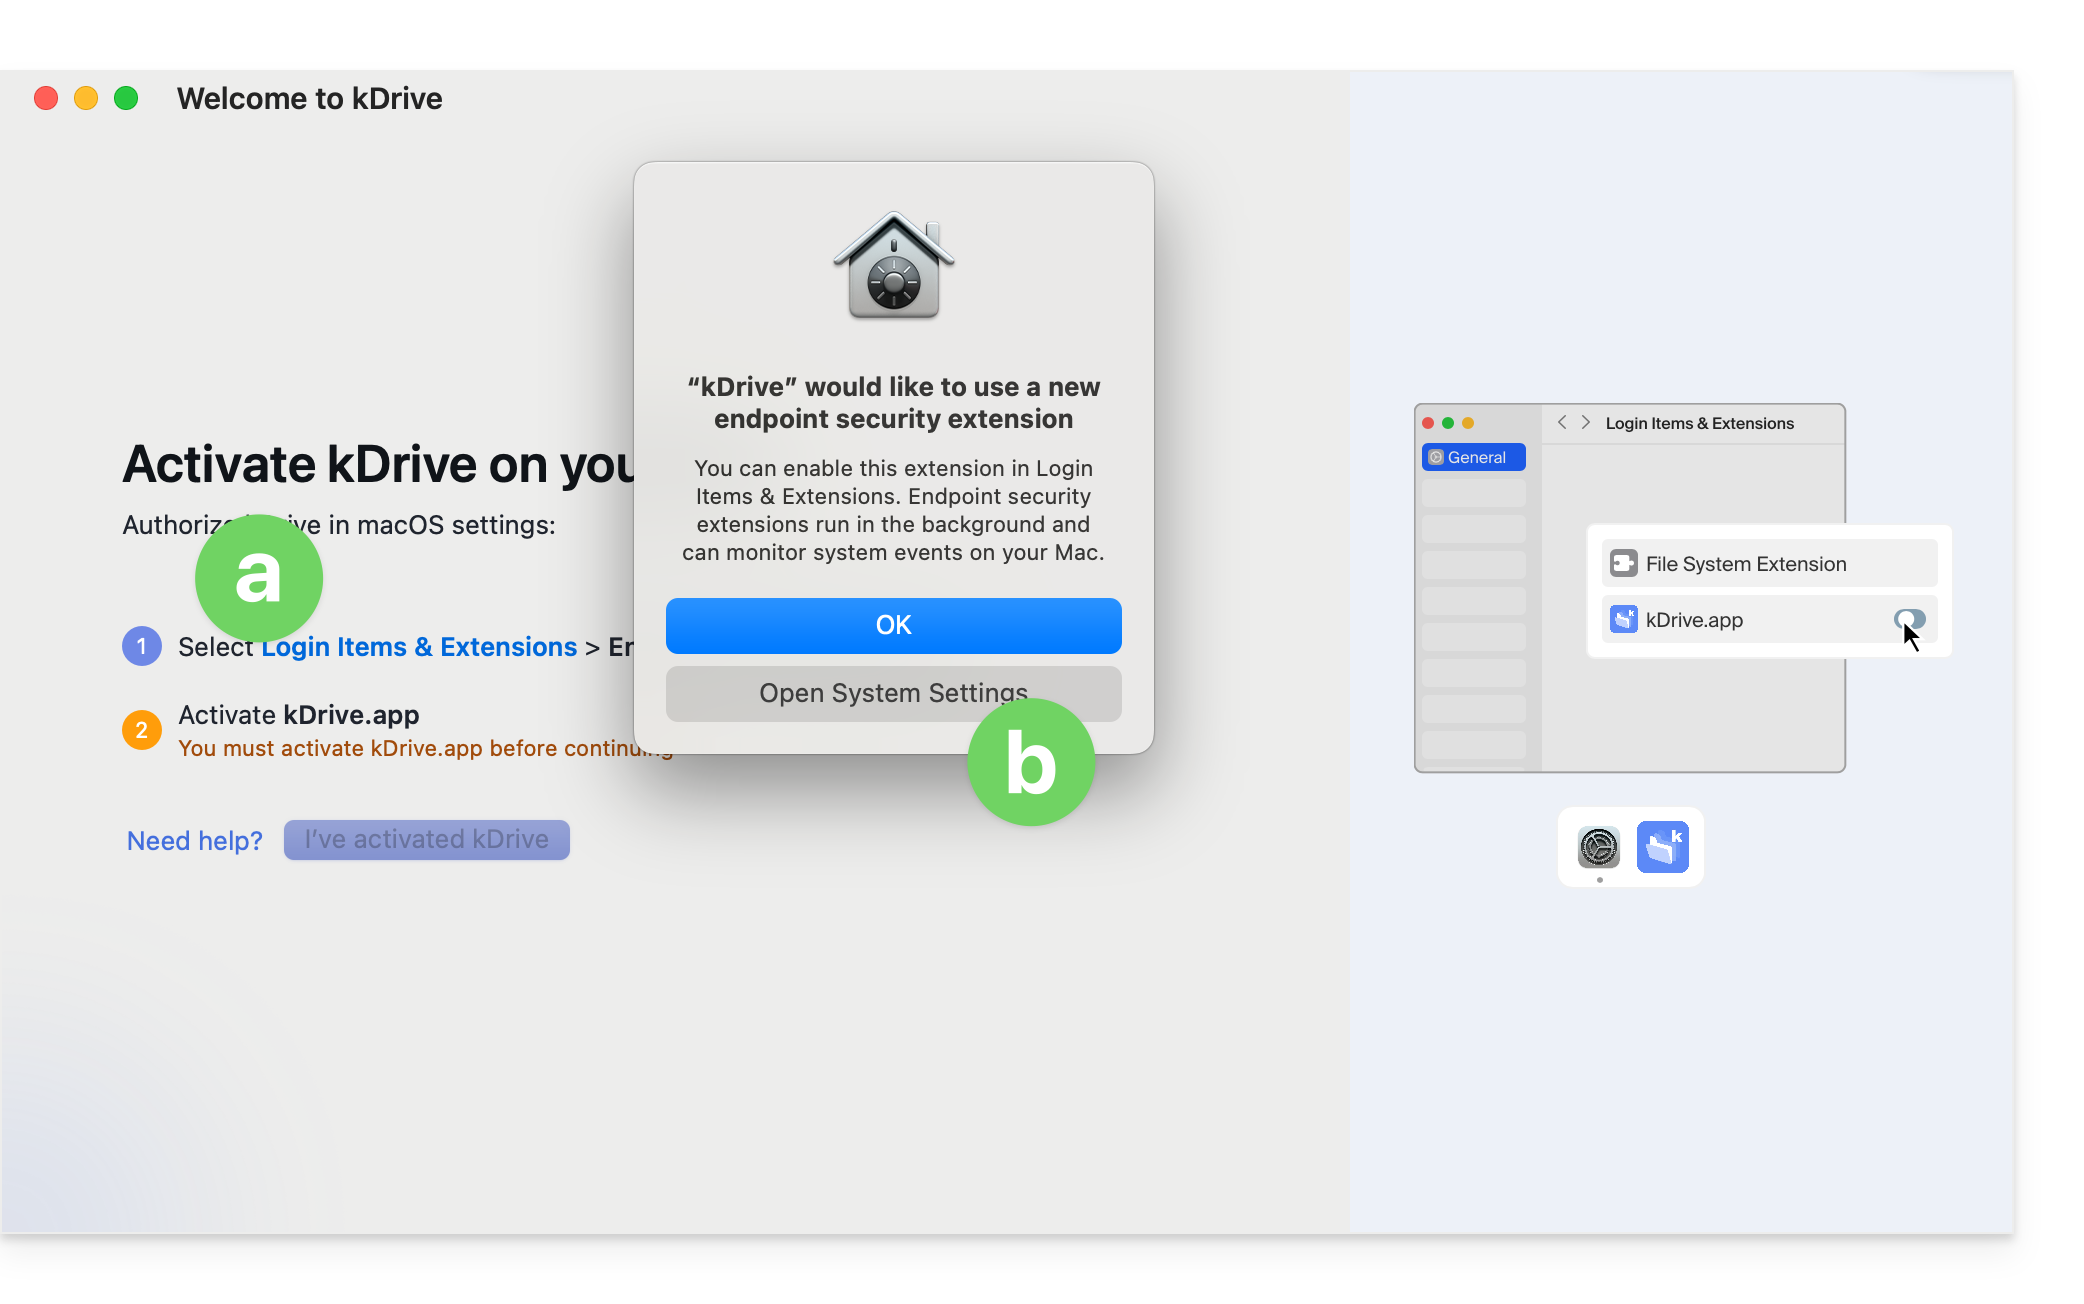
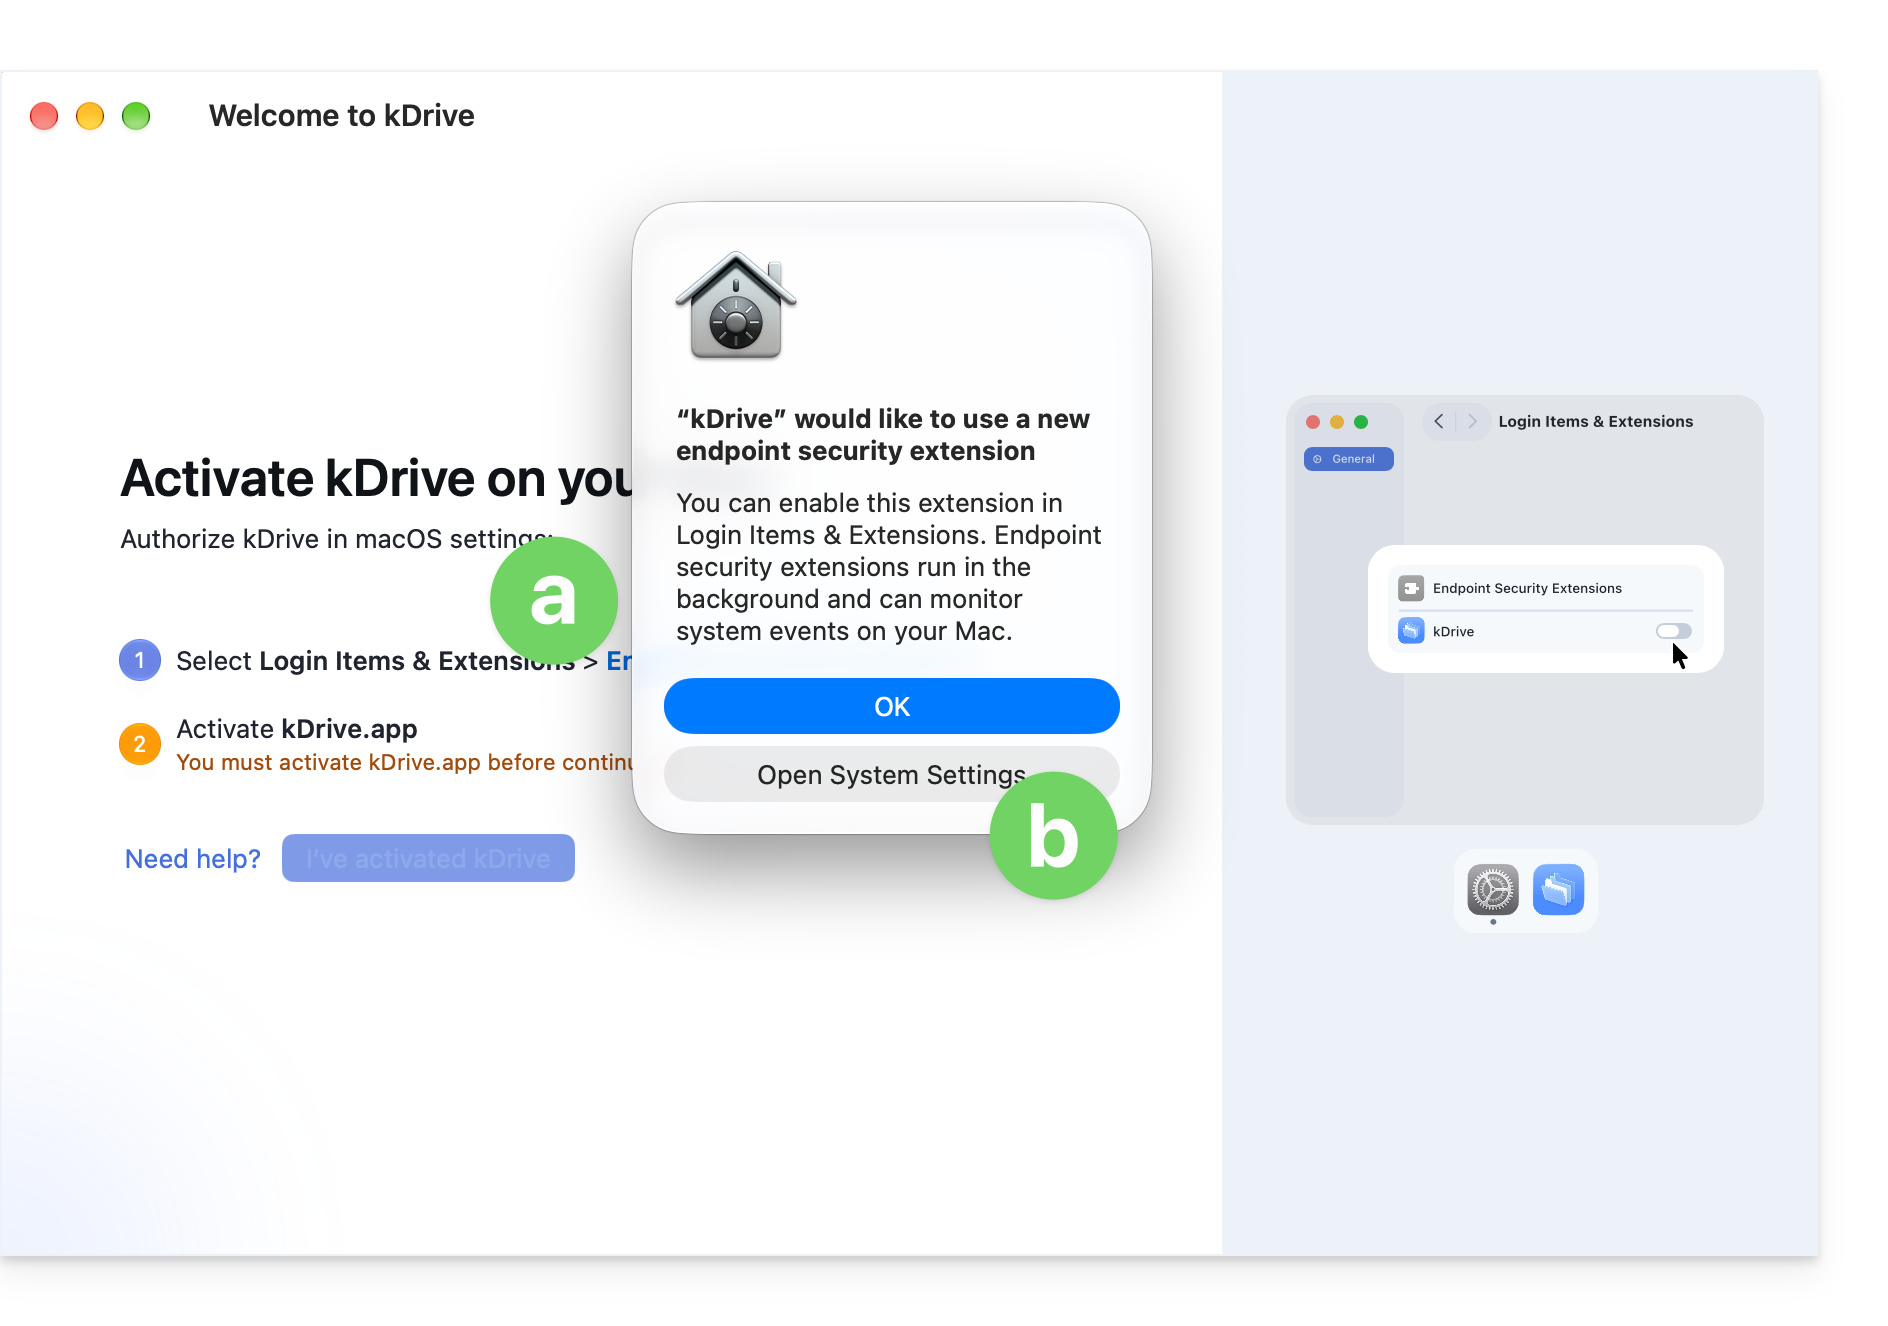
- A macOS permissions window also opens.
- and the app icon should be visible in the upper right corner on macOS:
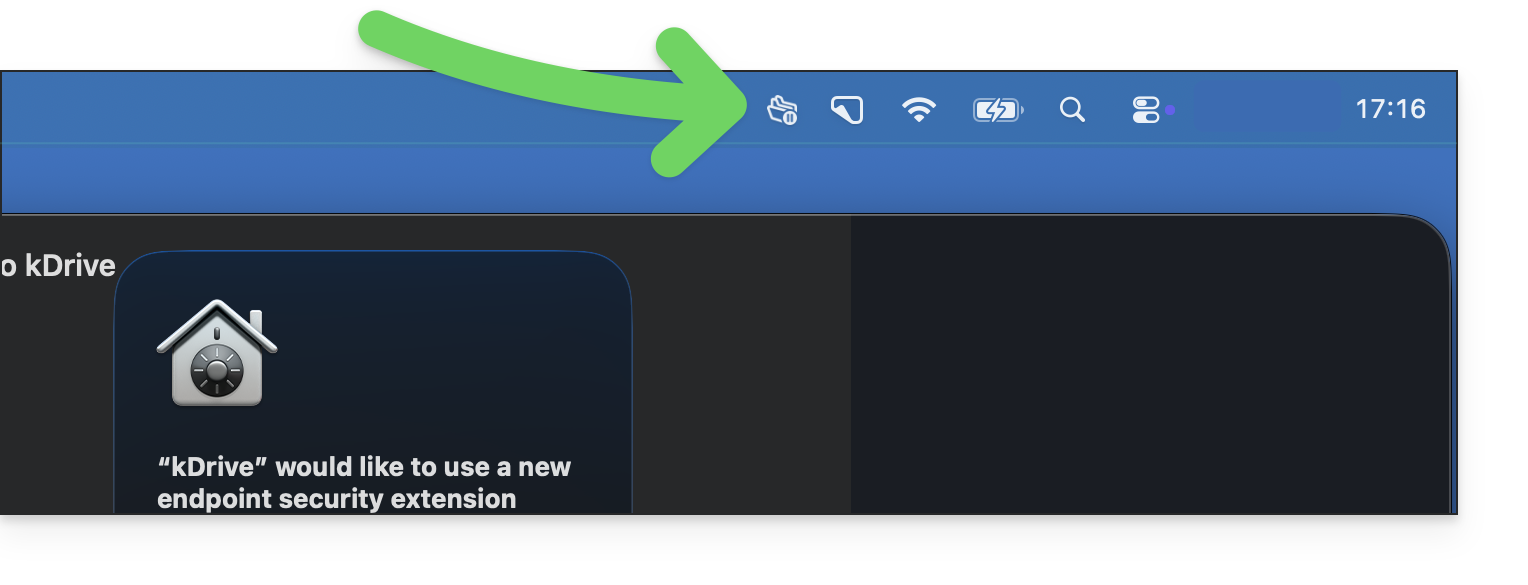
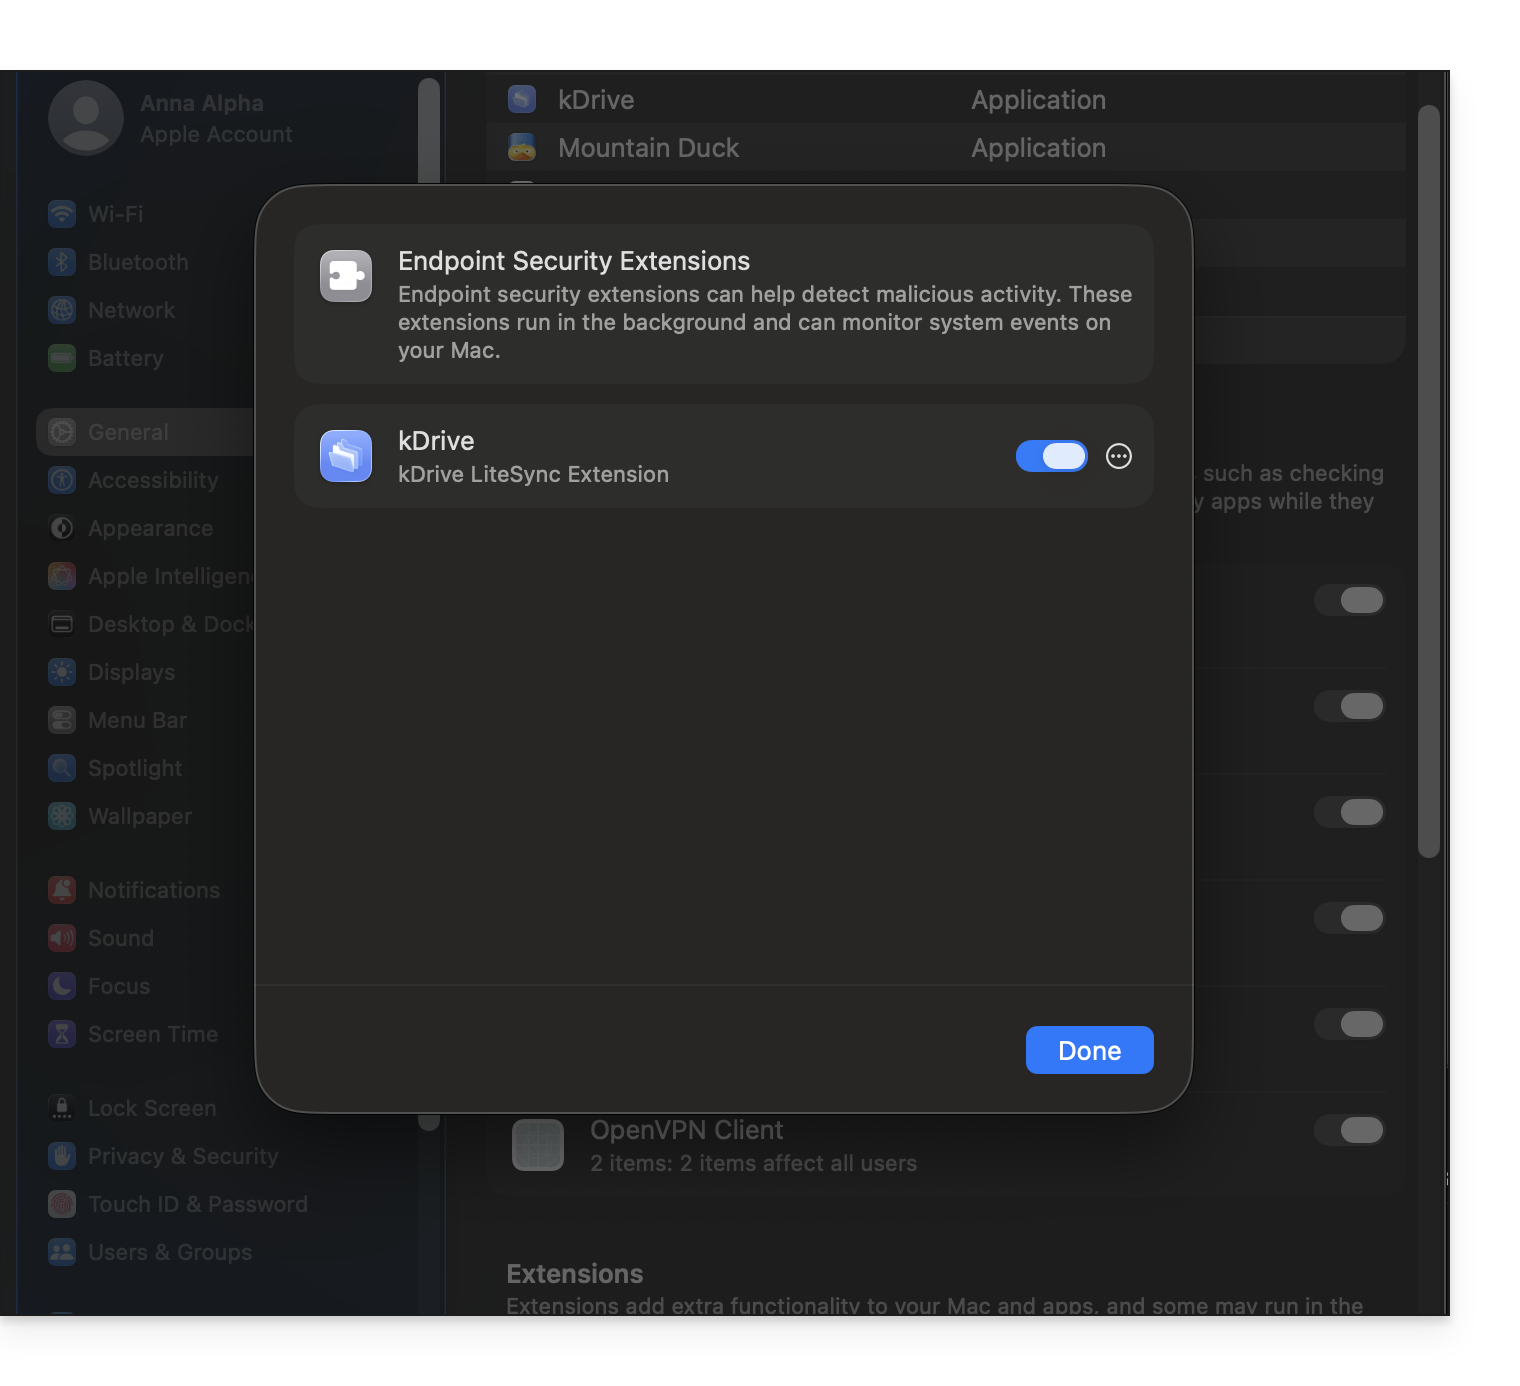
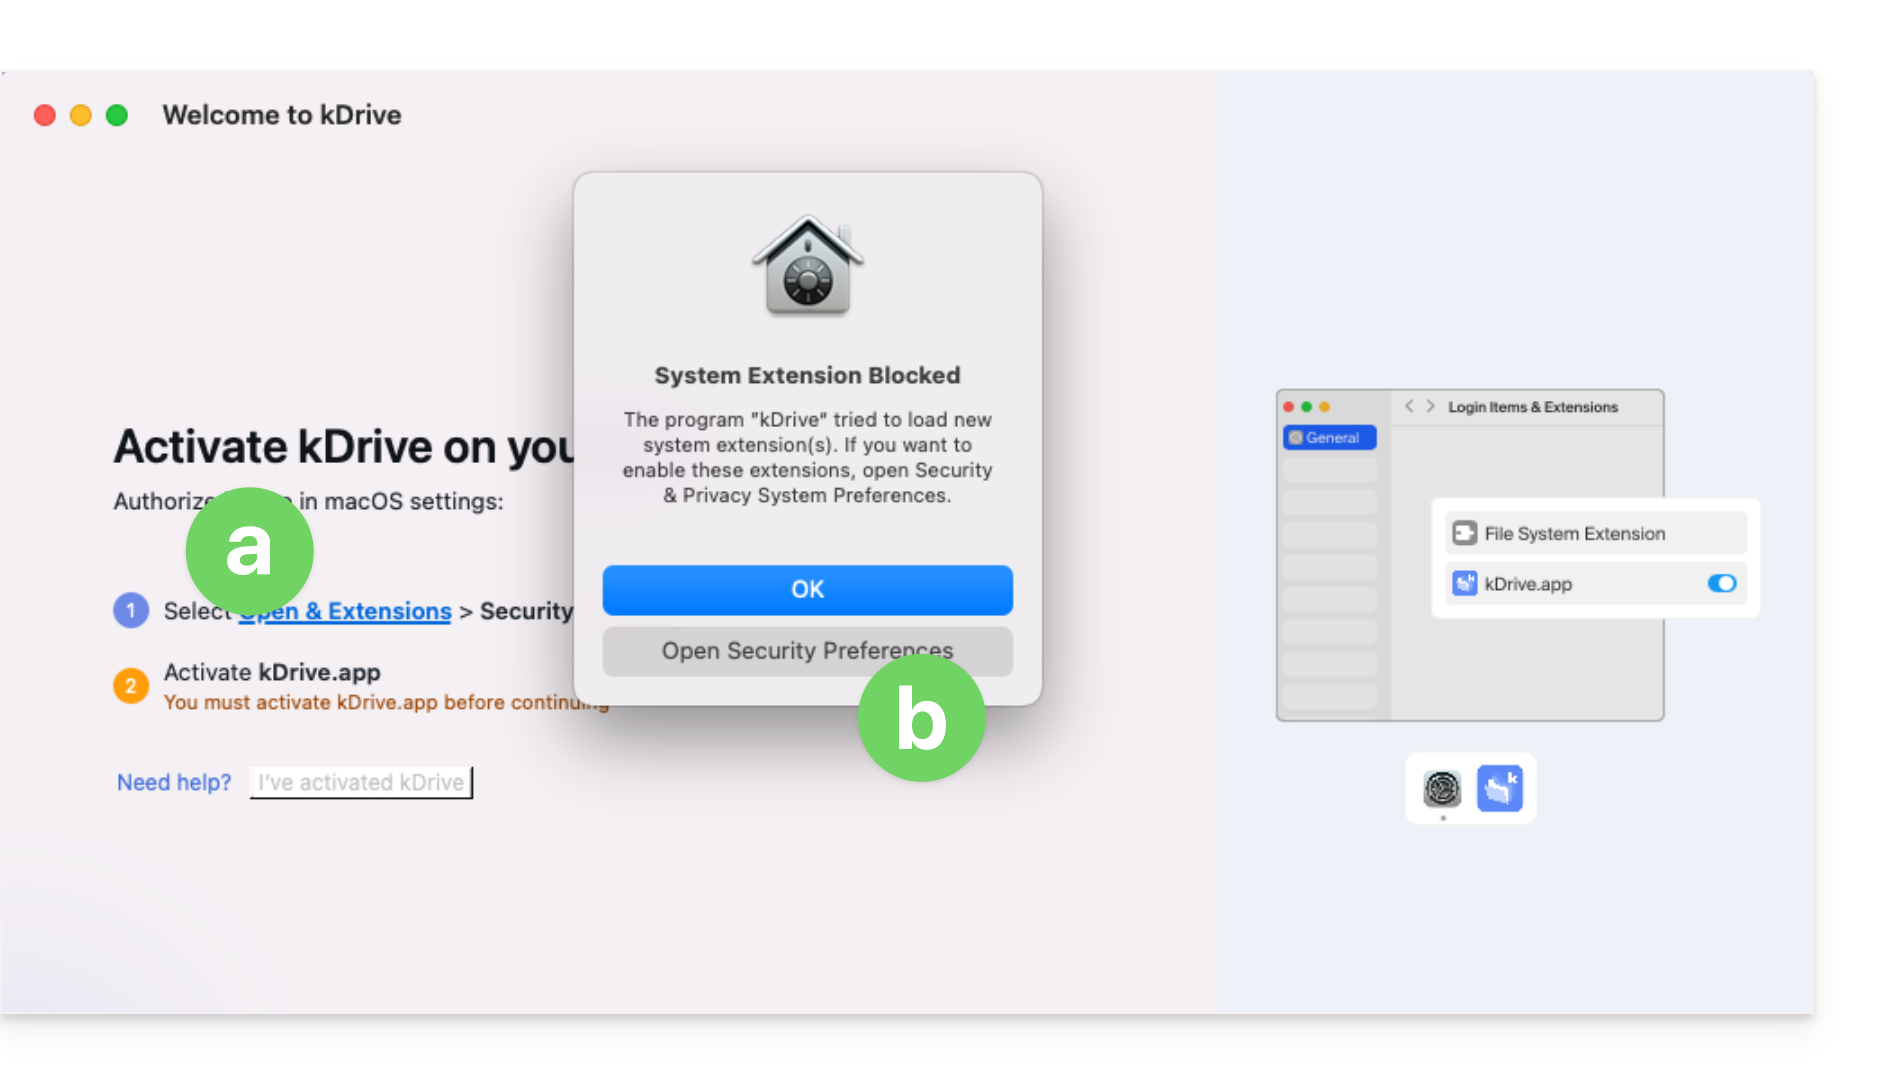
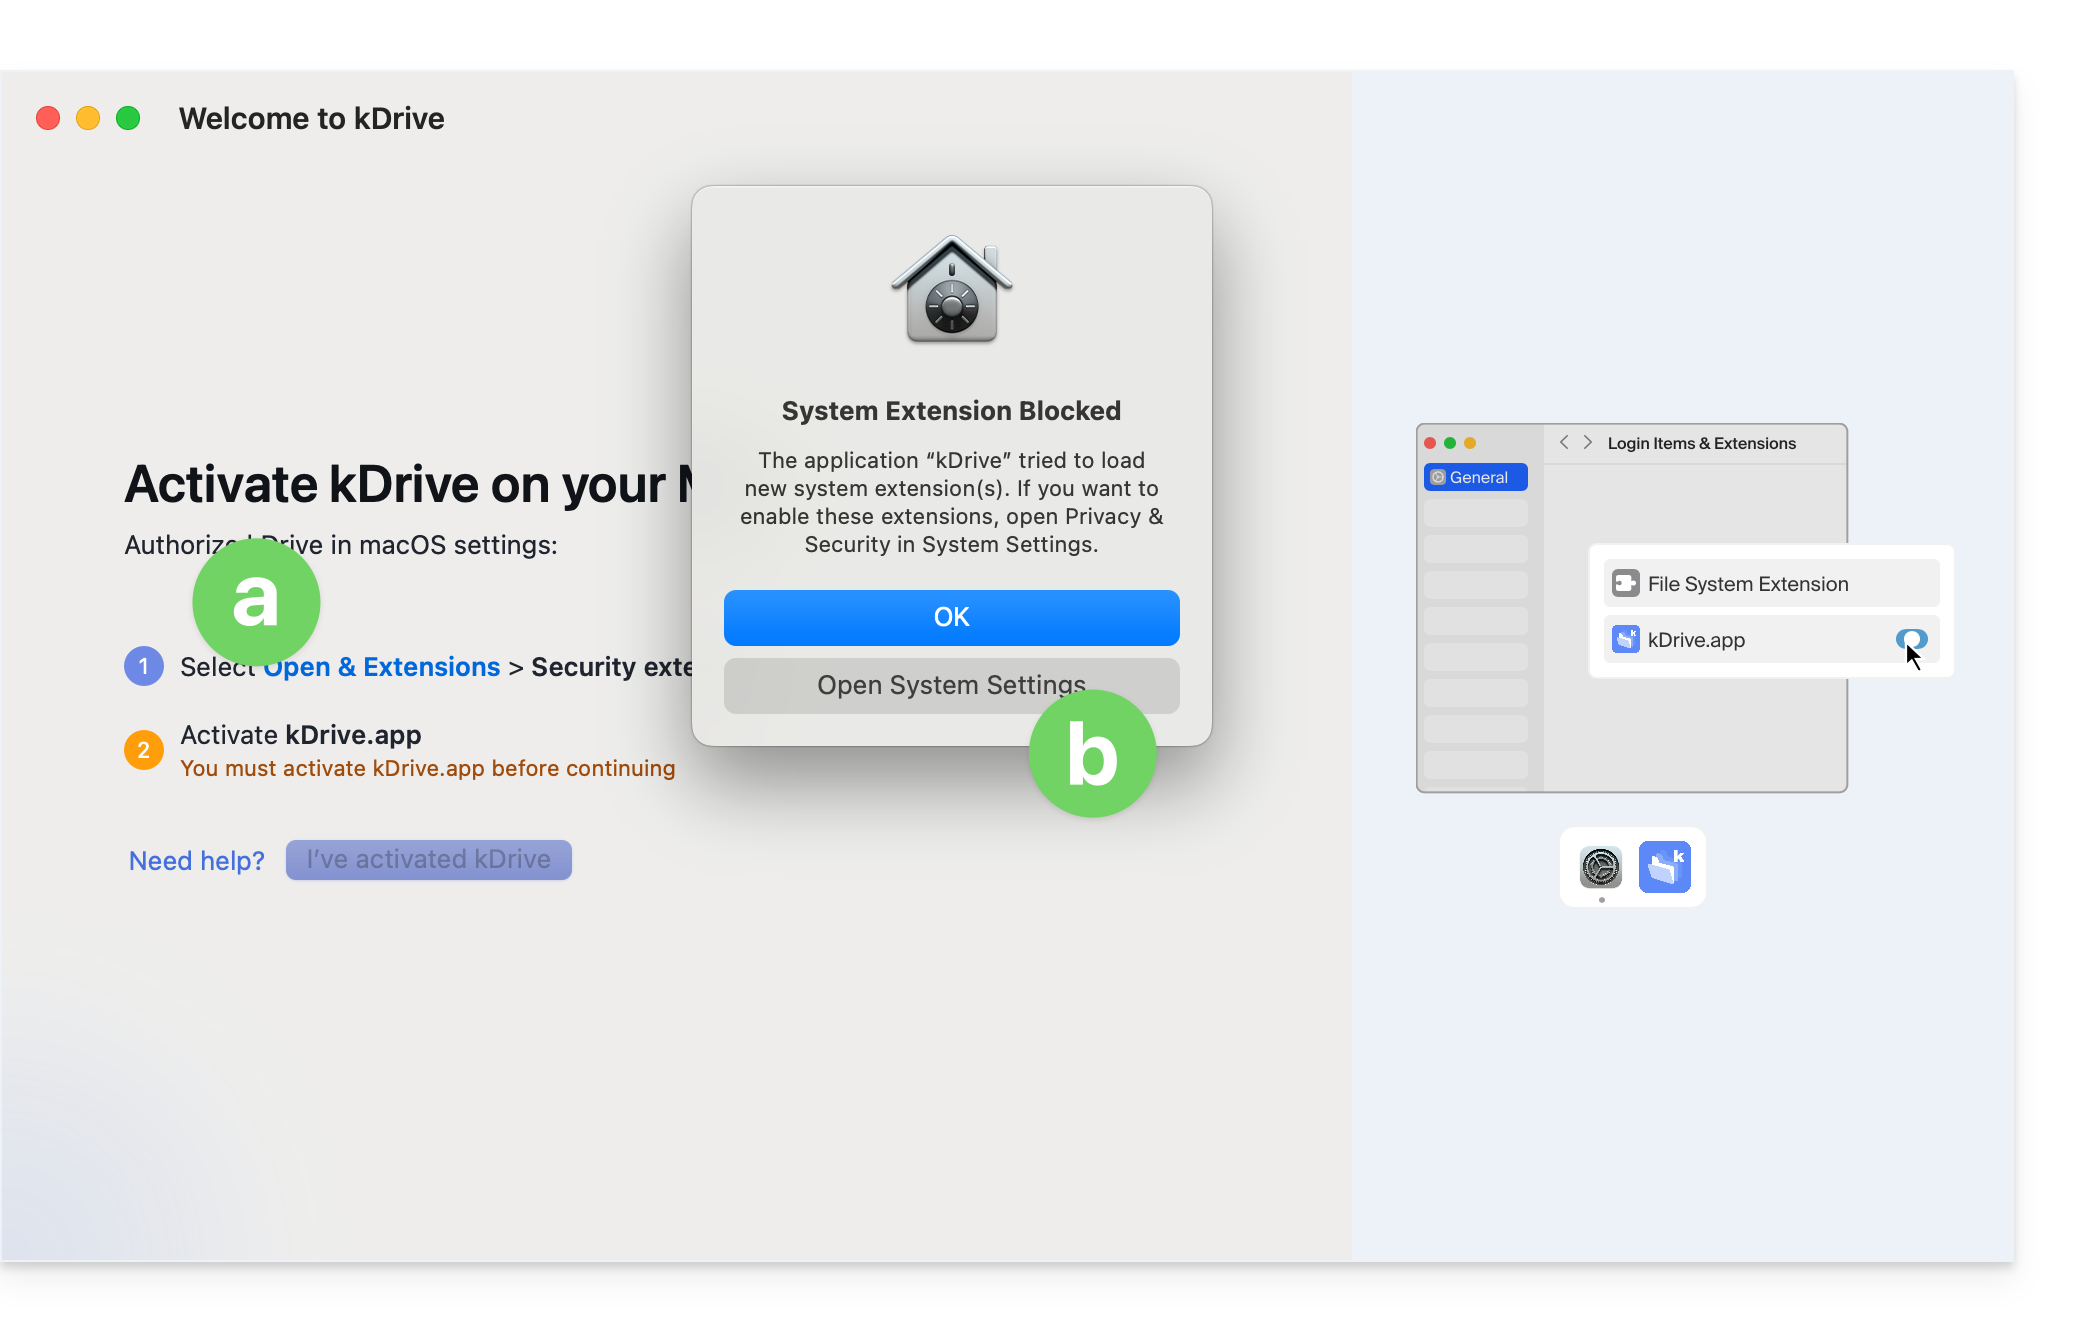
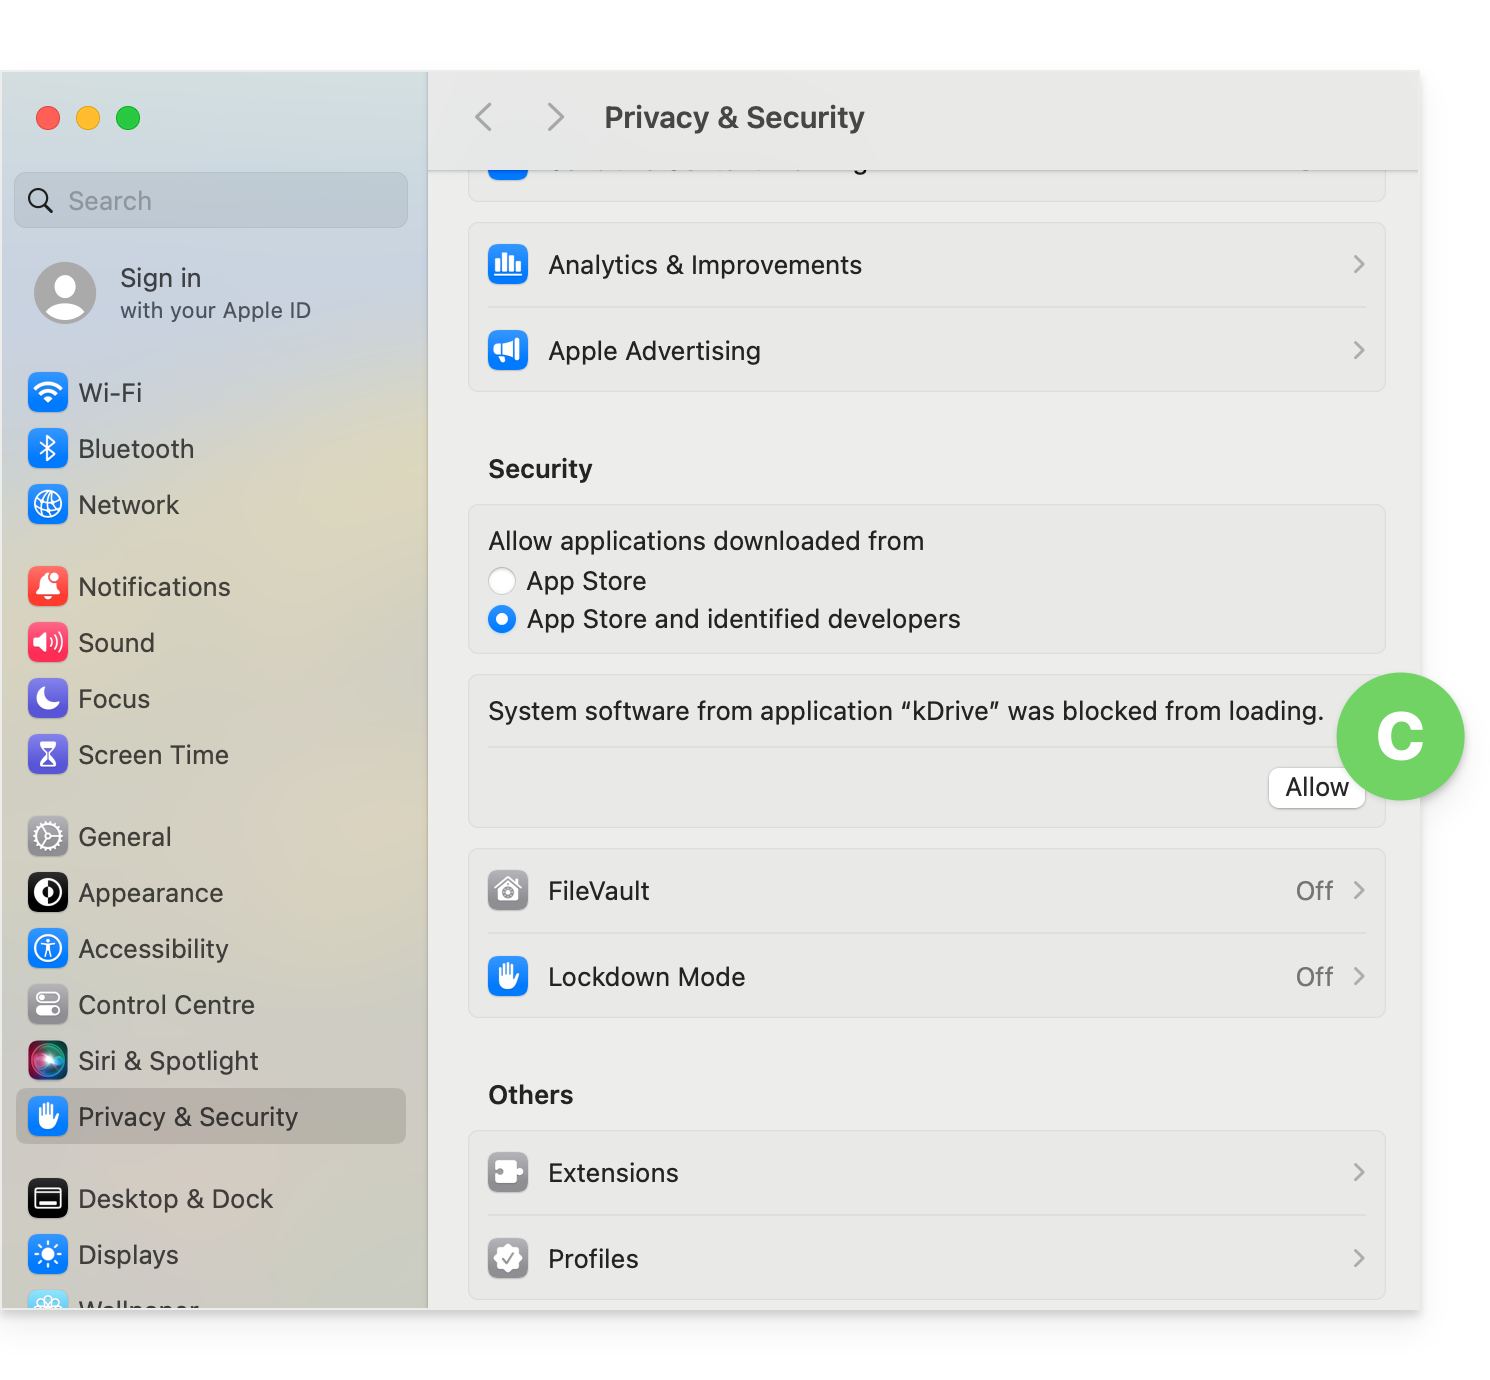
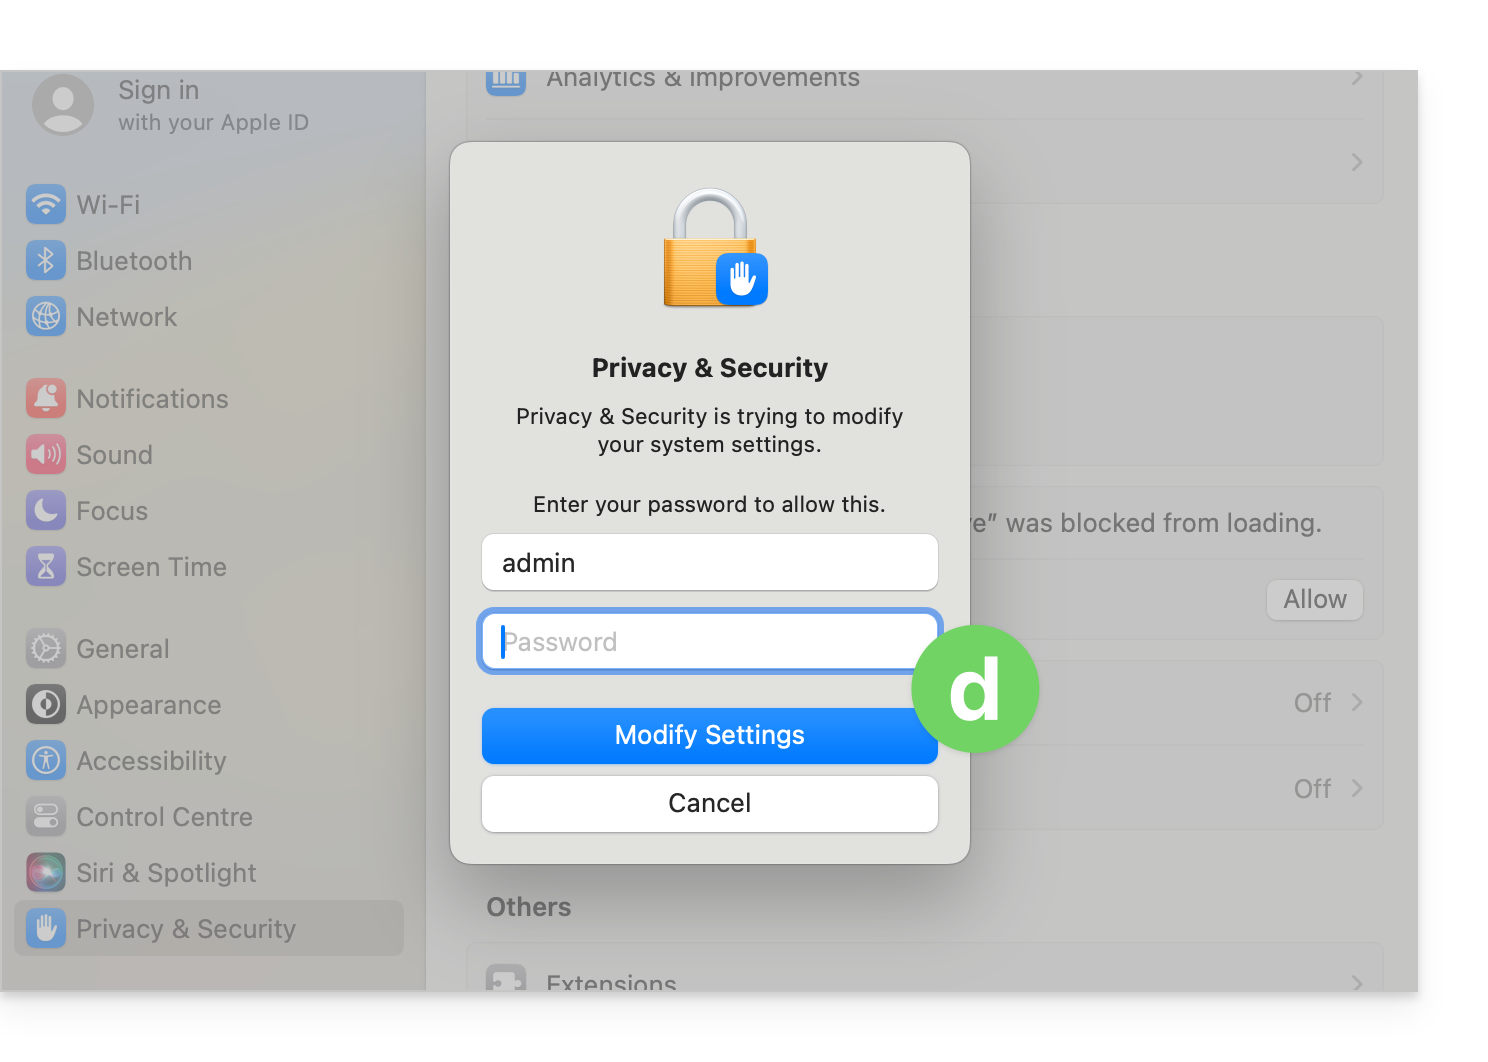
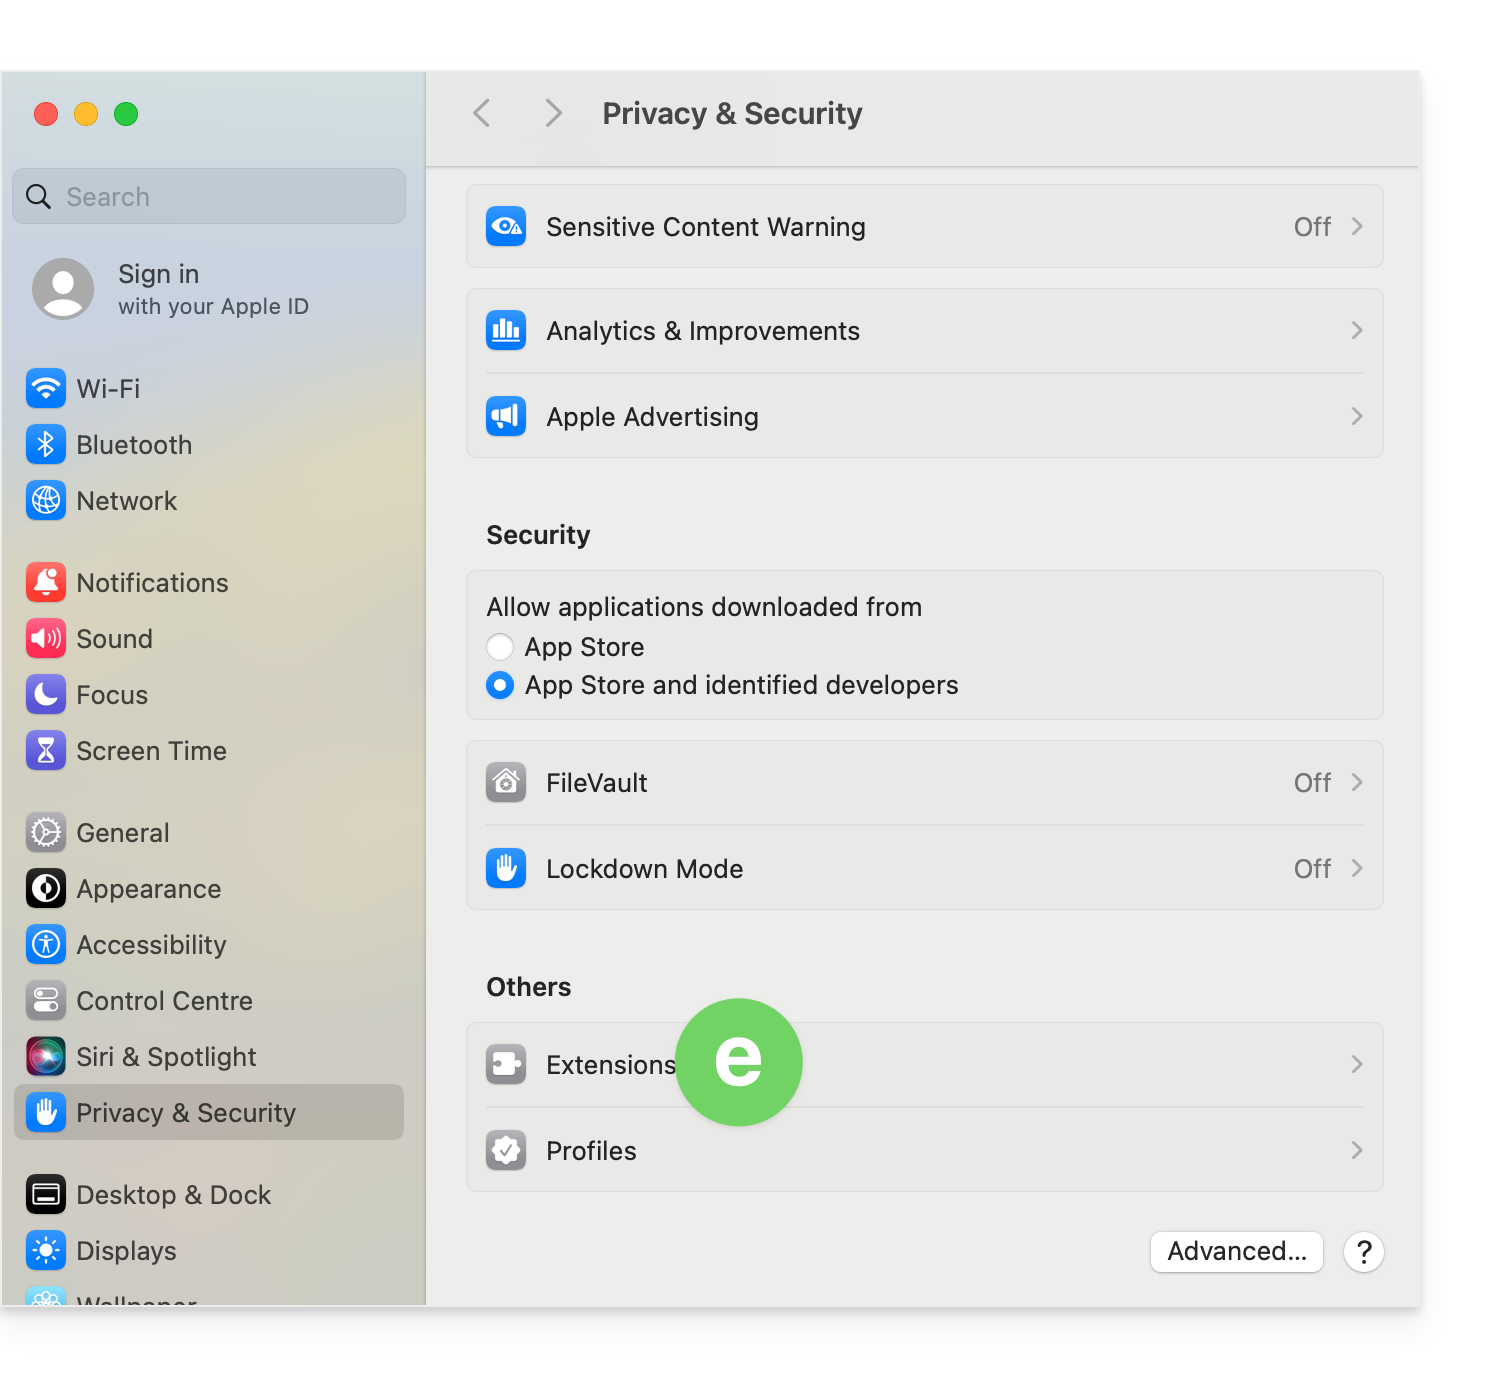
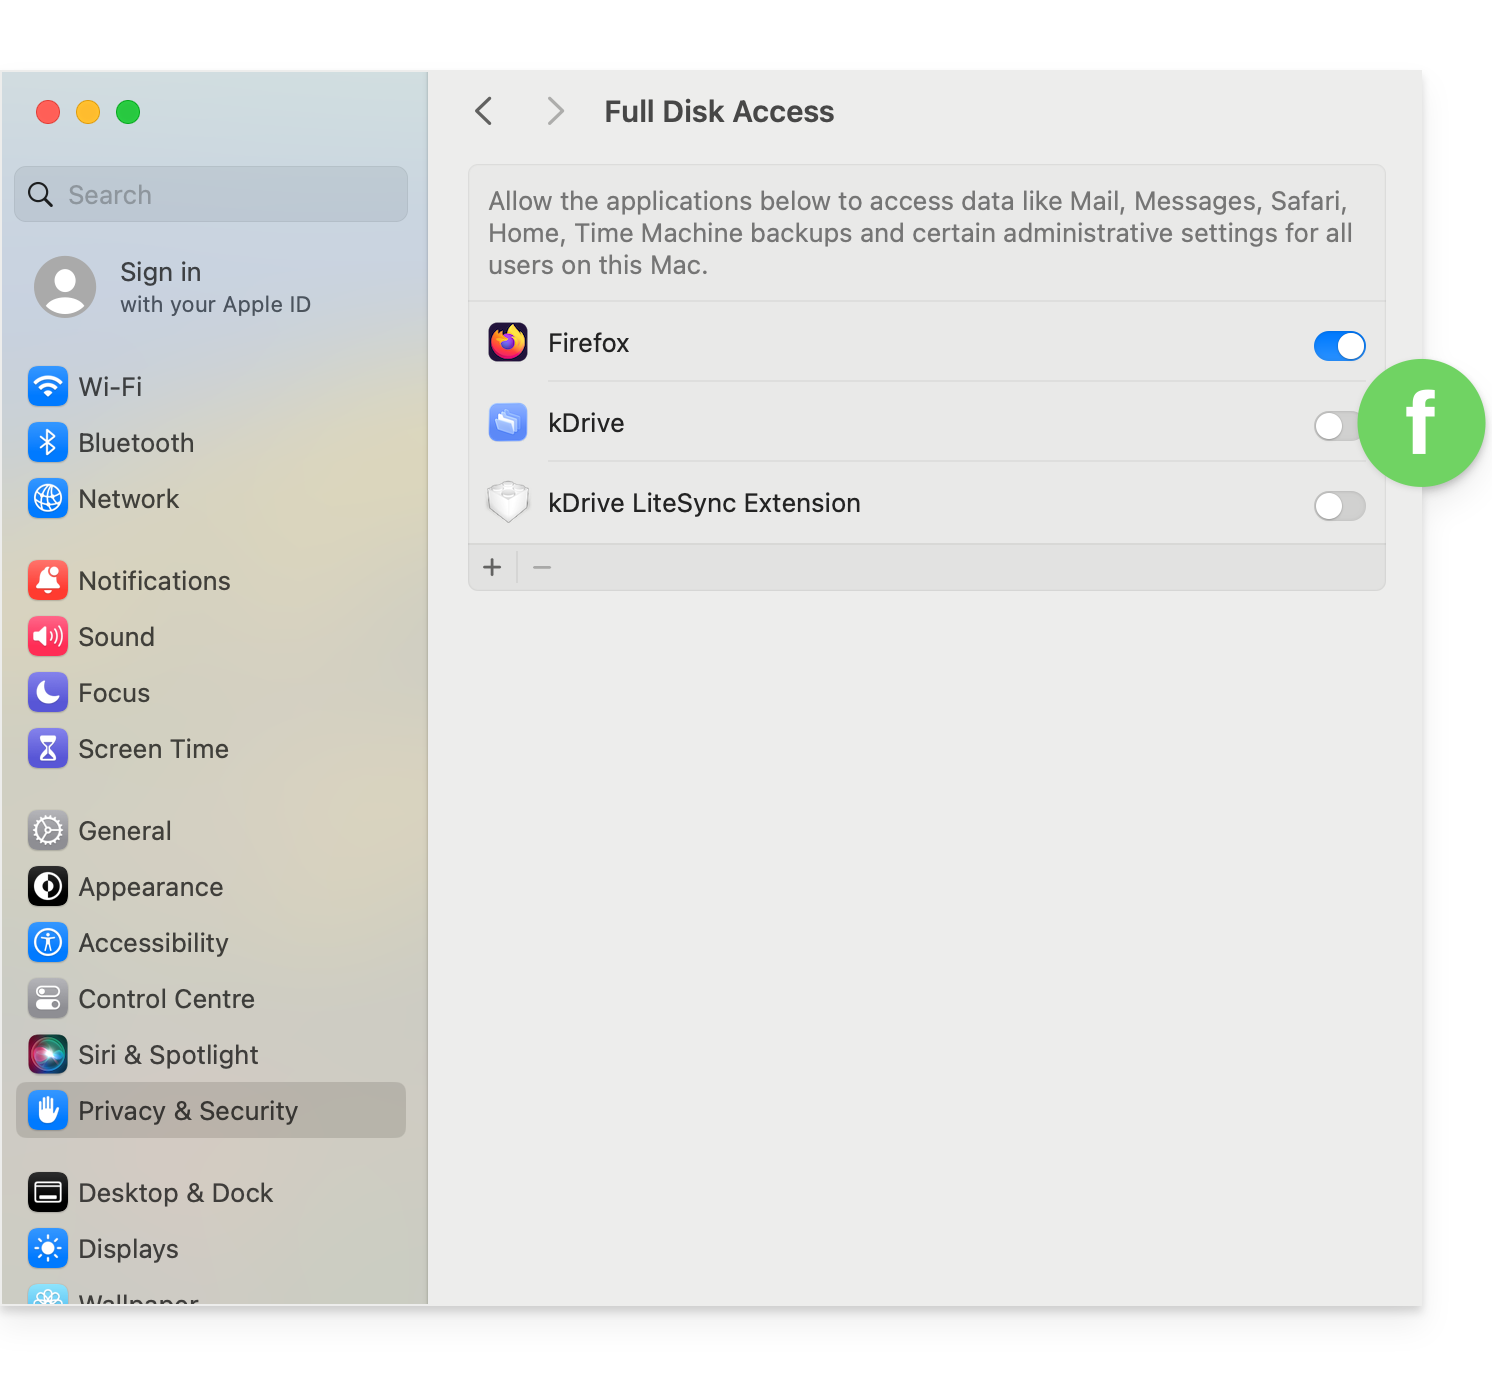
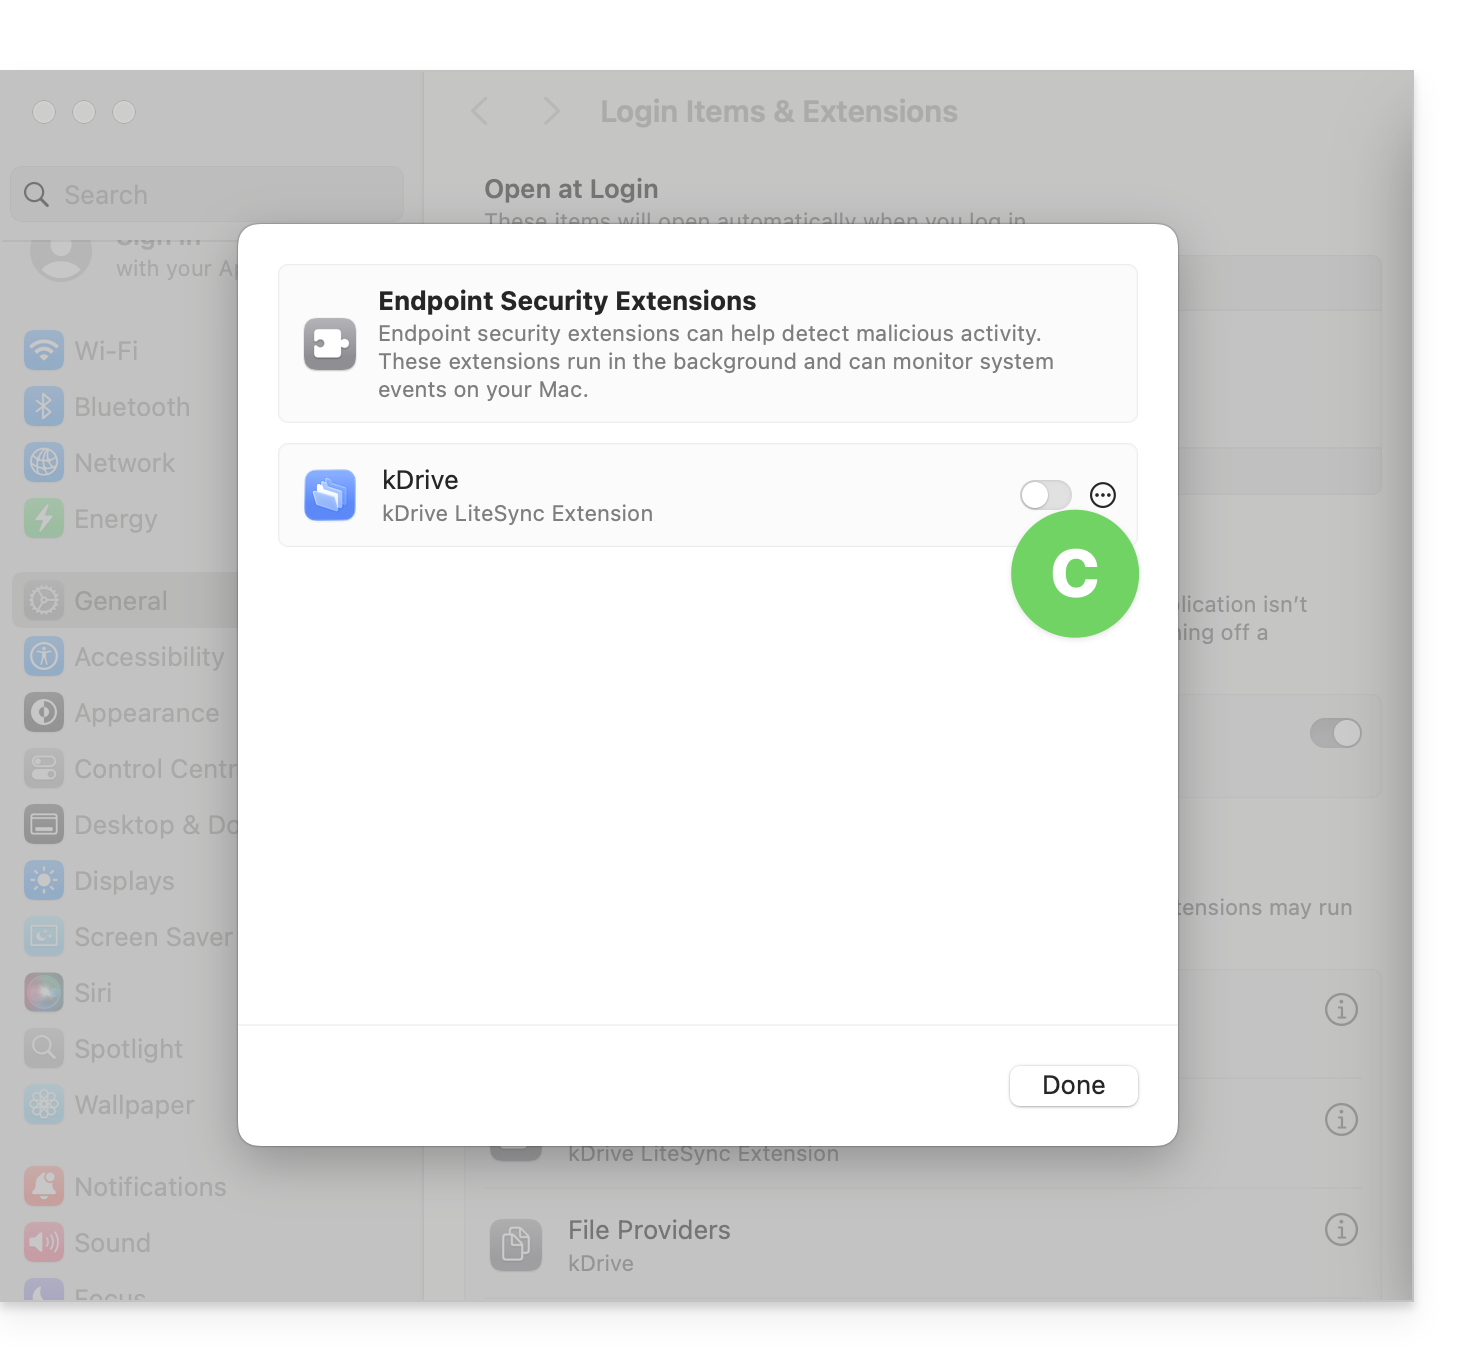
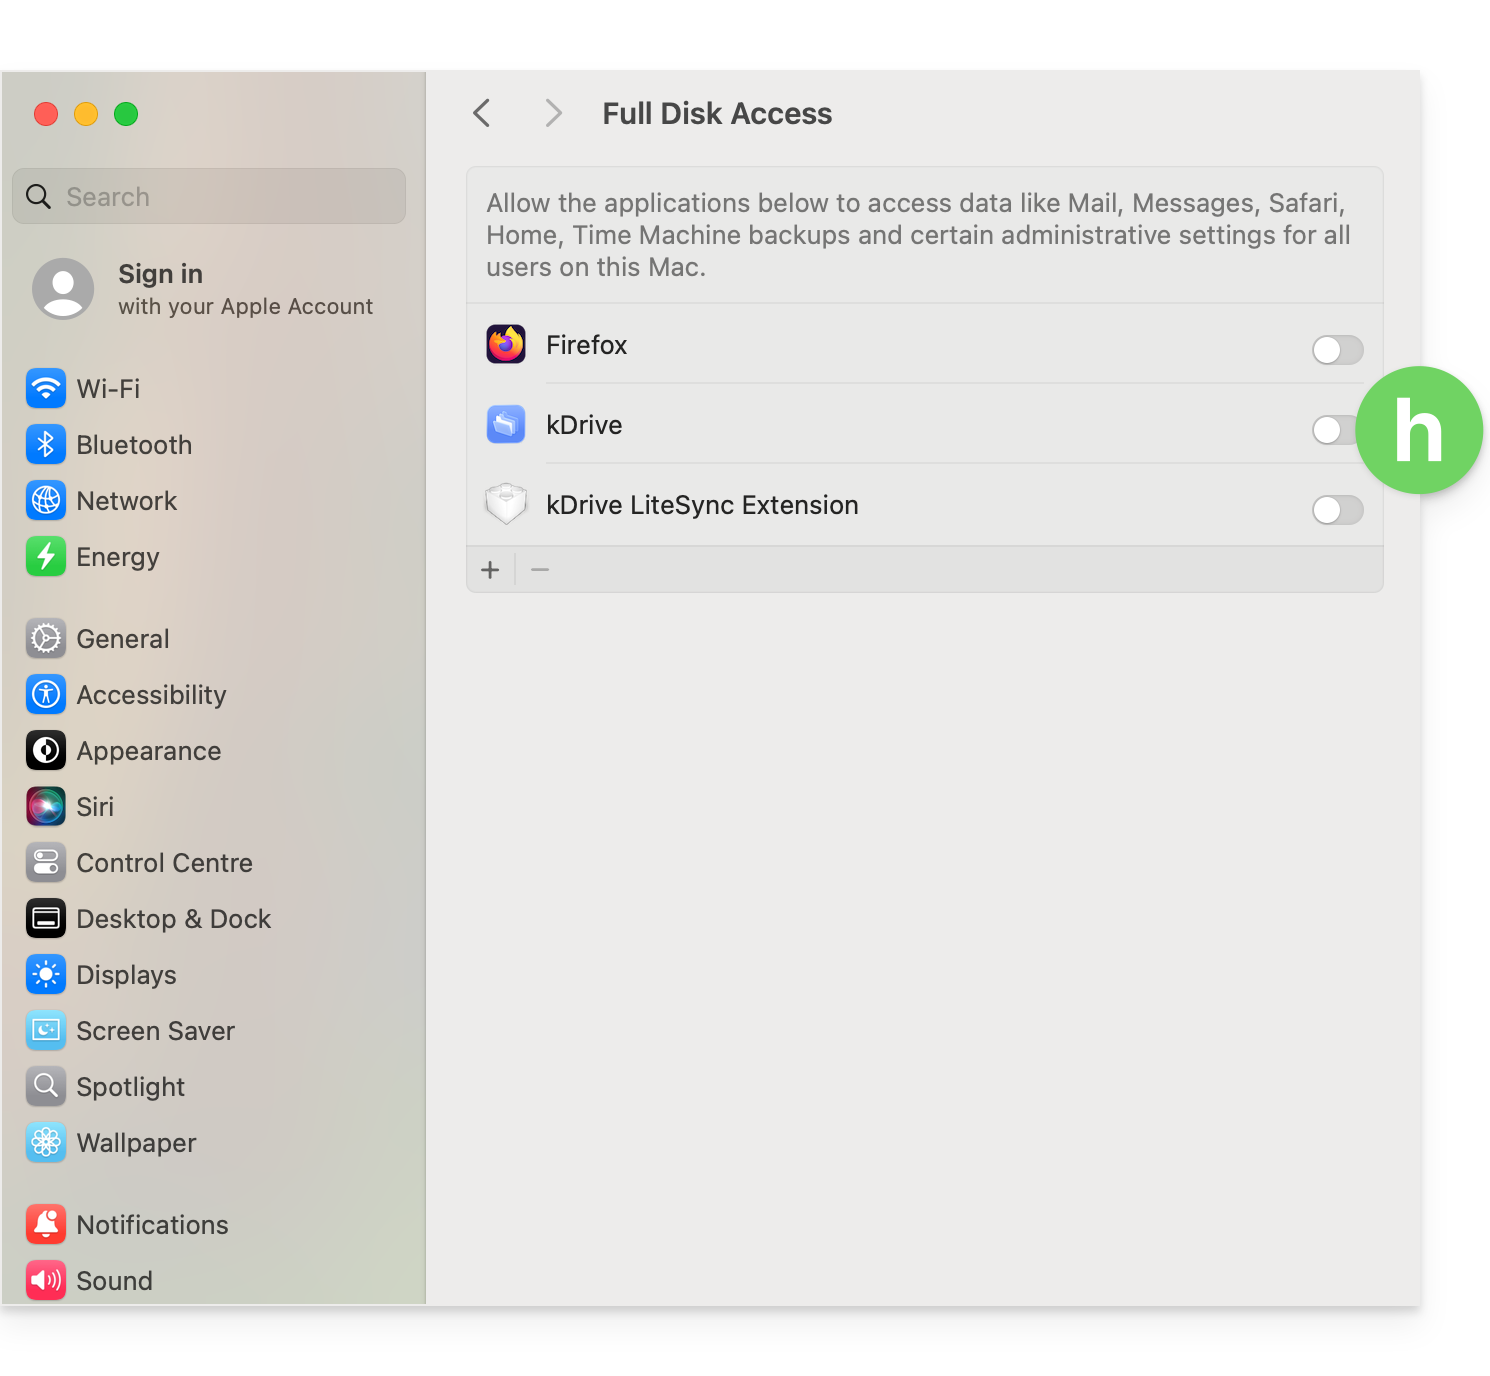
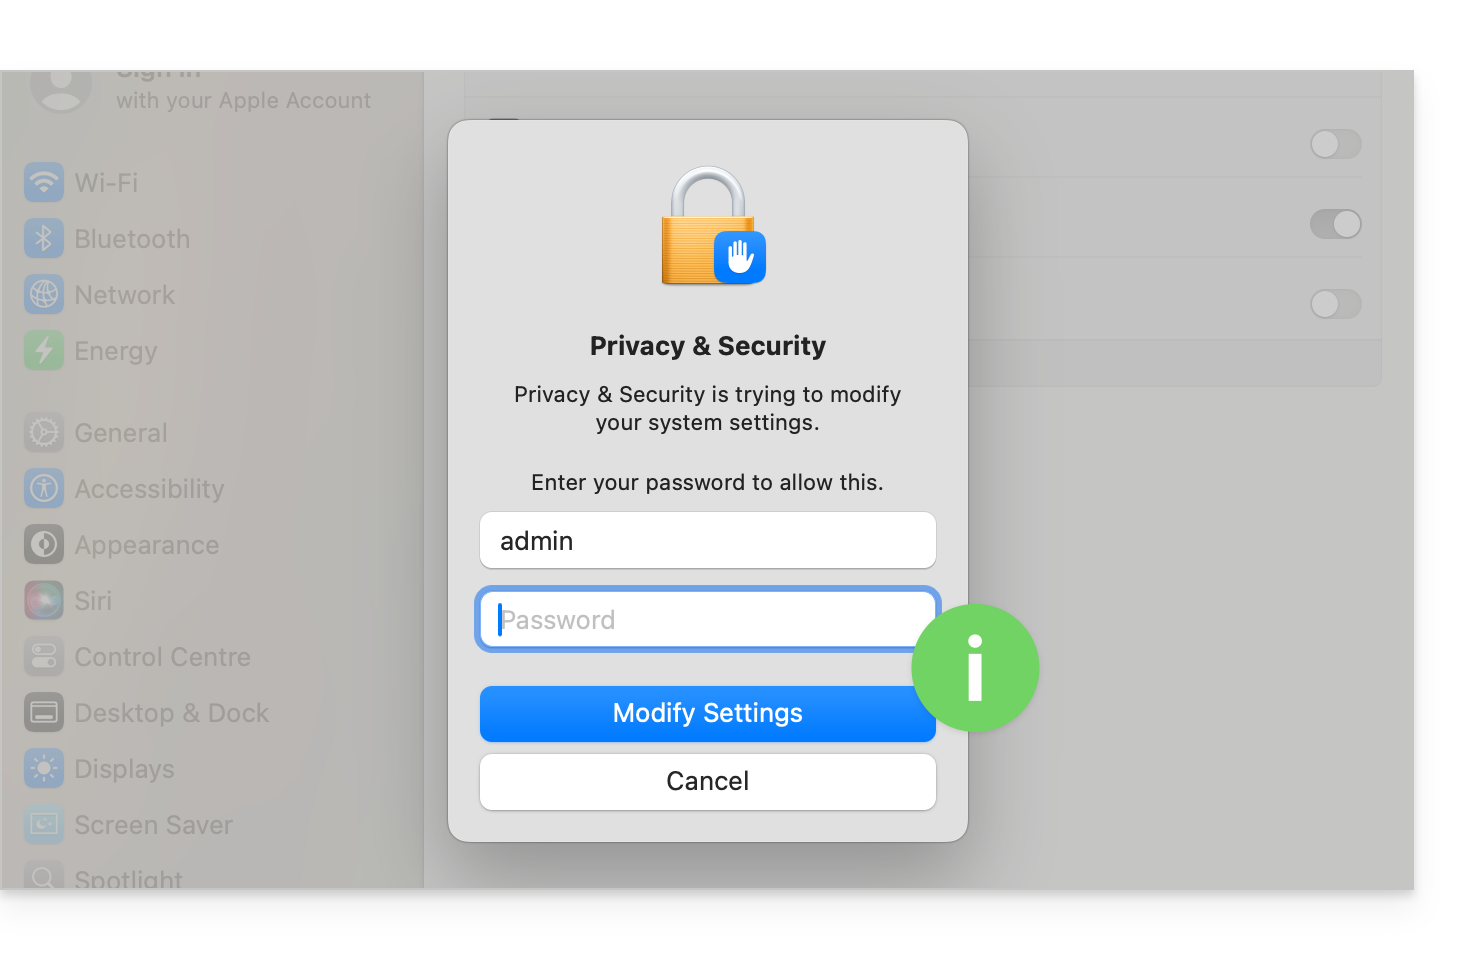
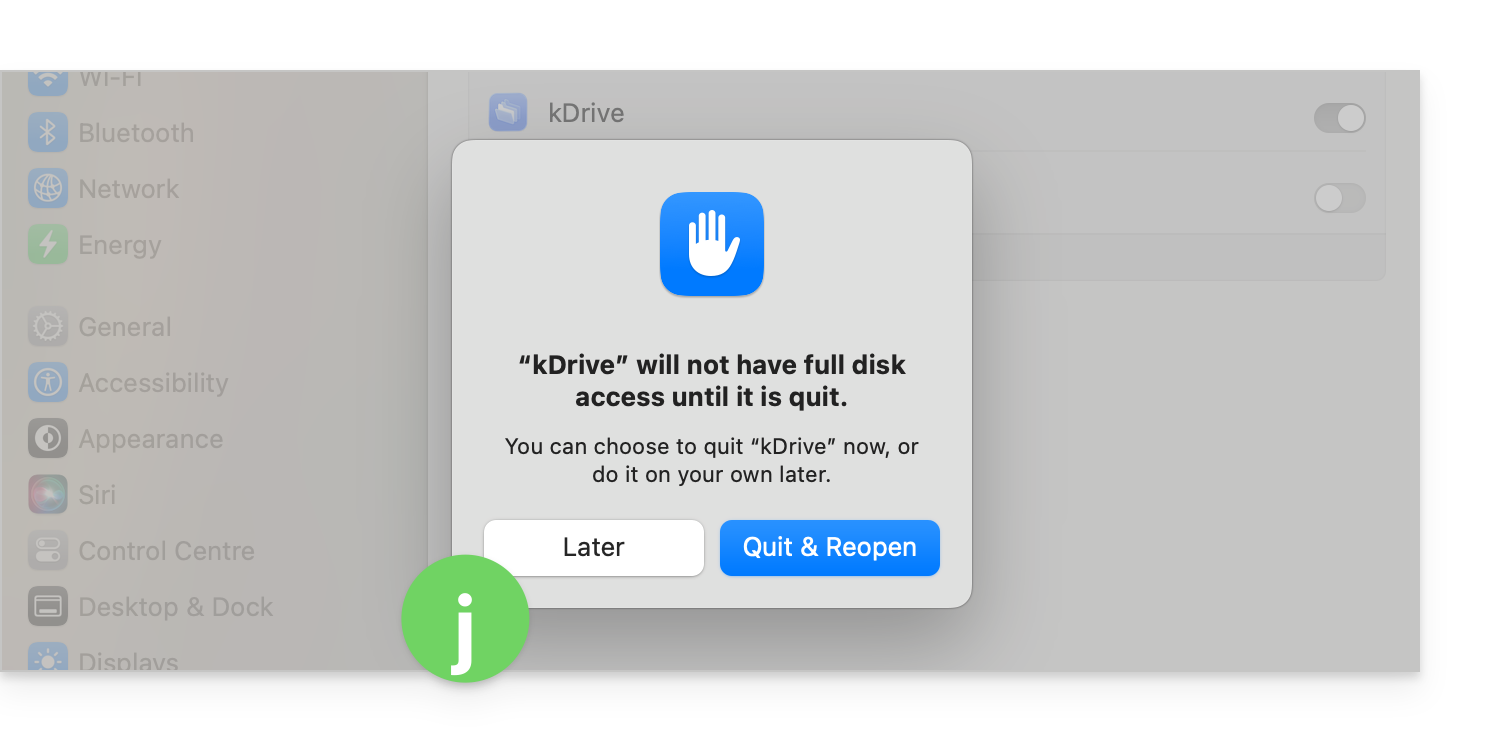
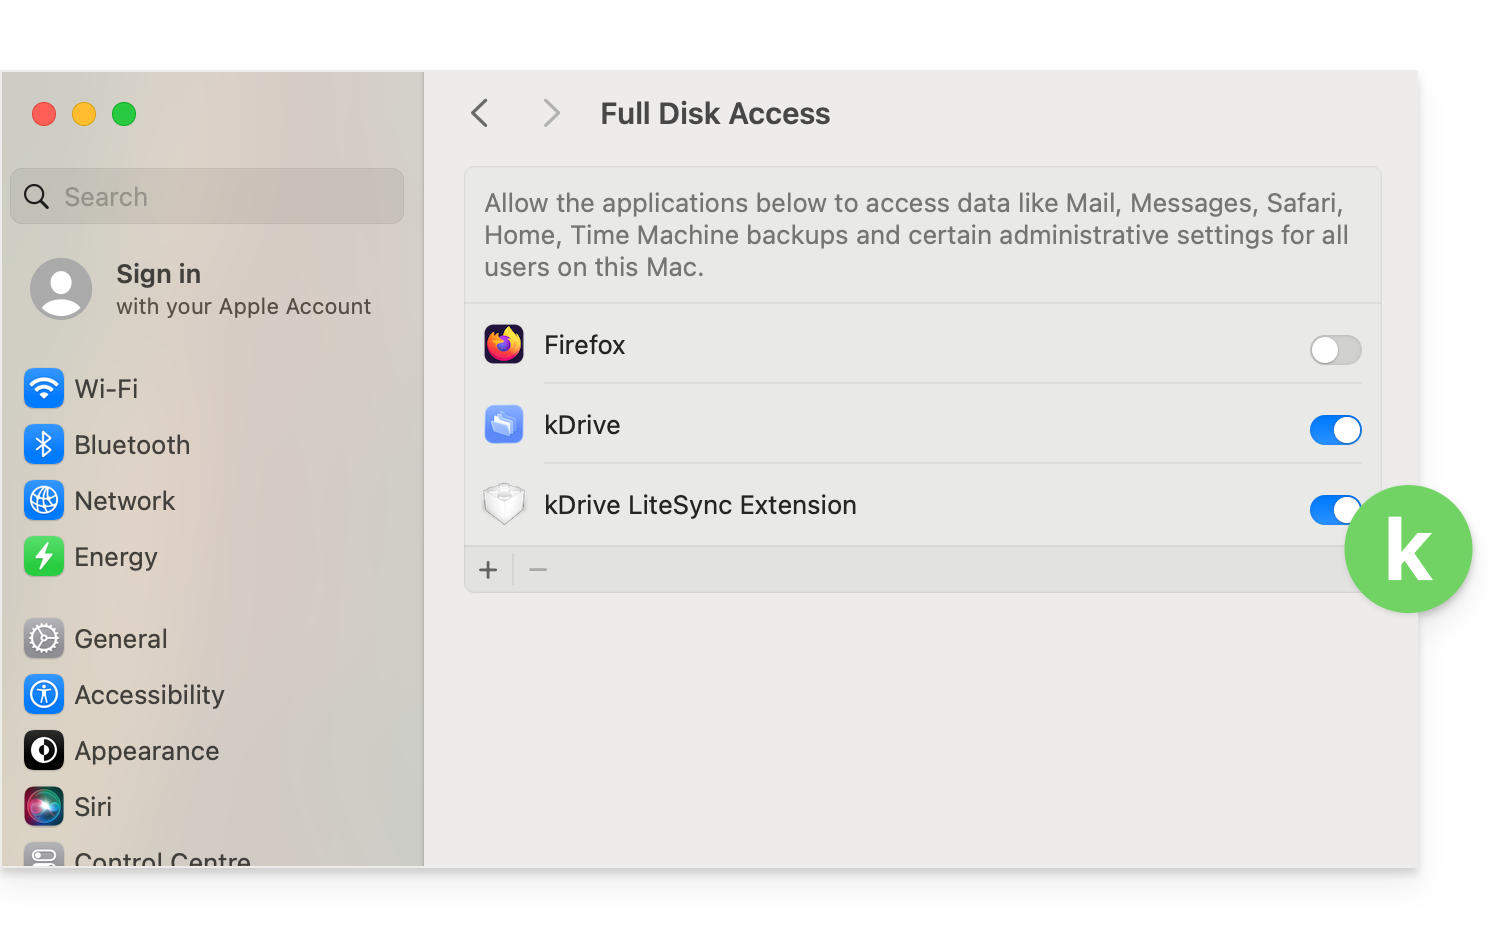
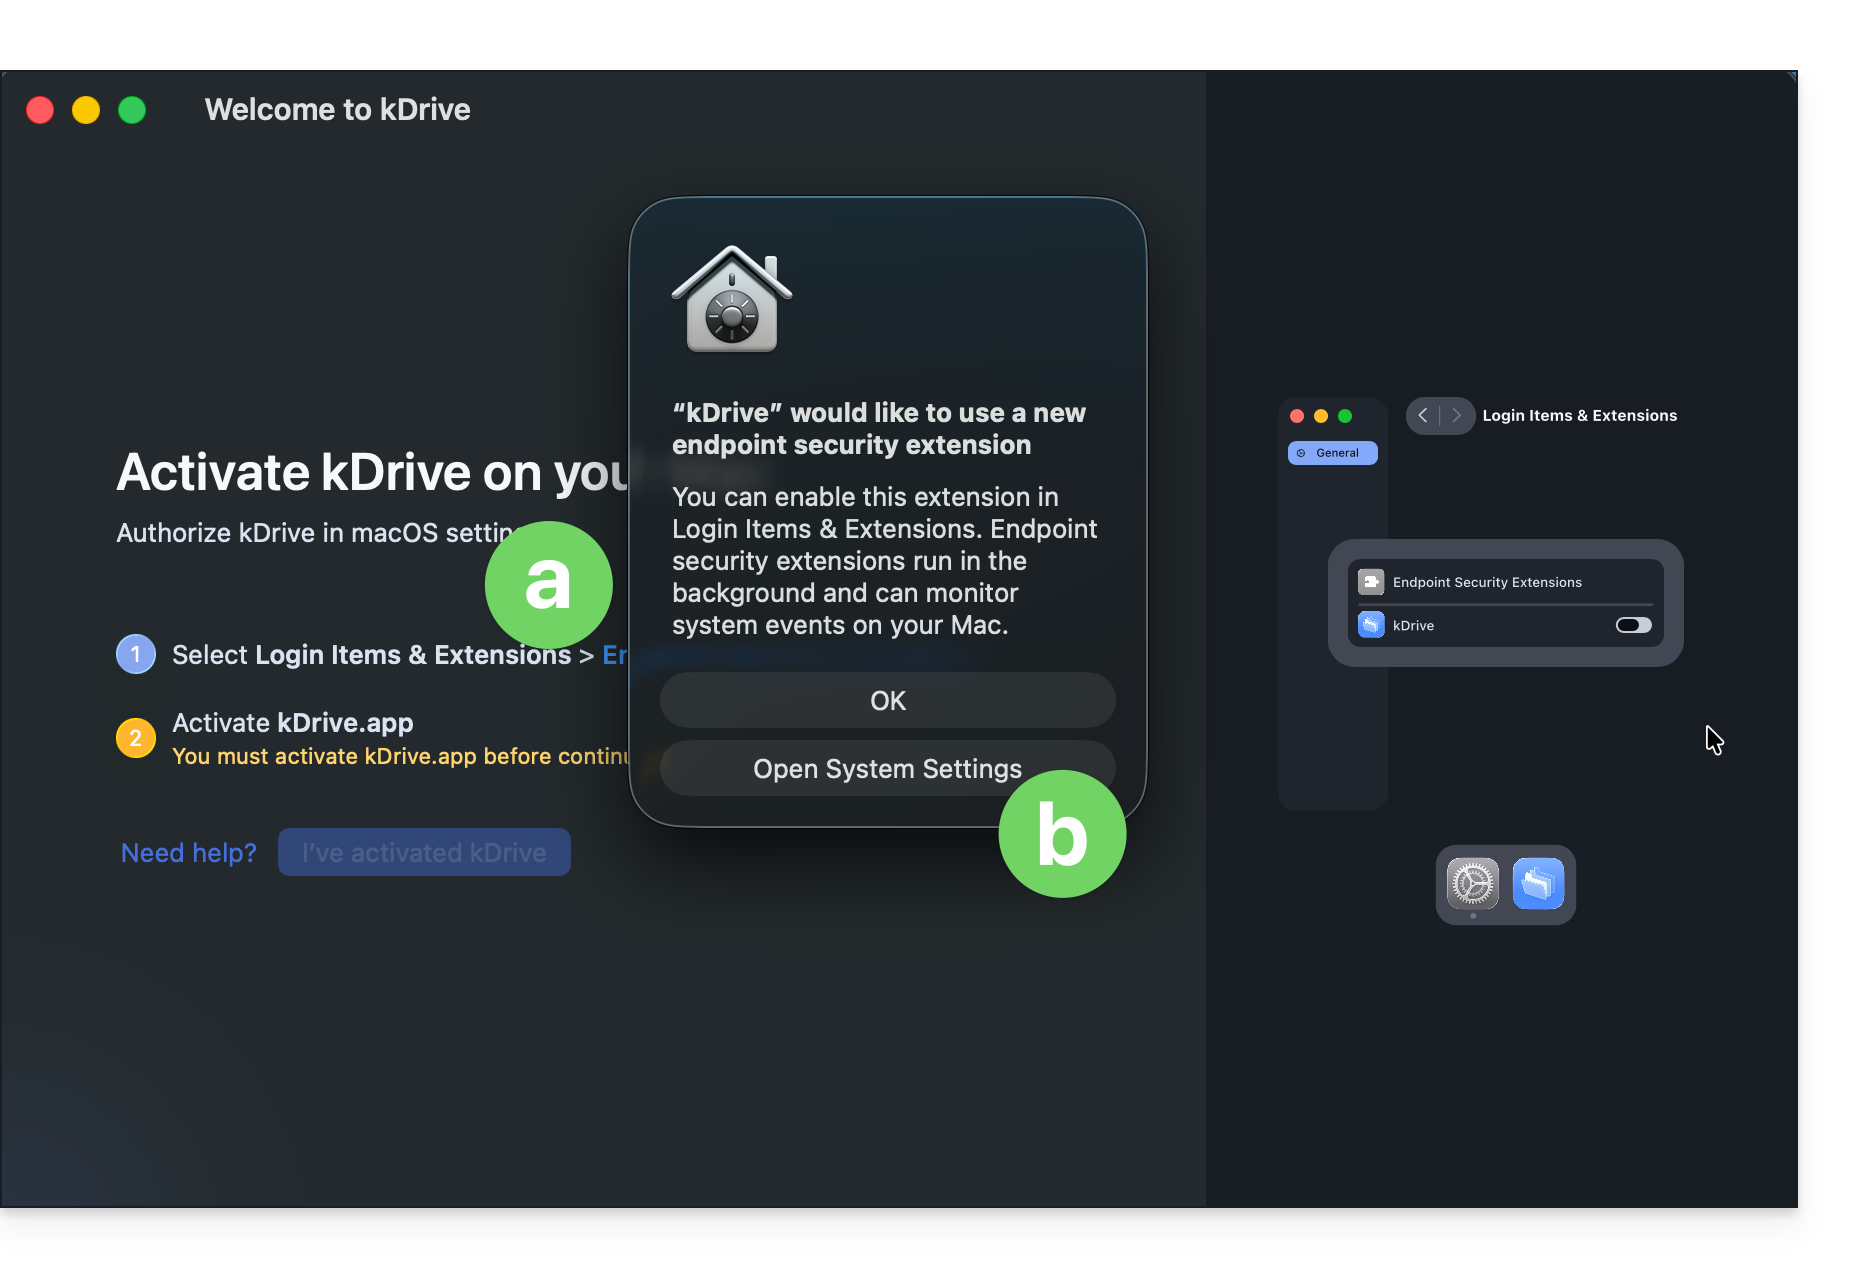
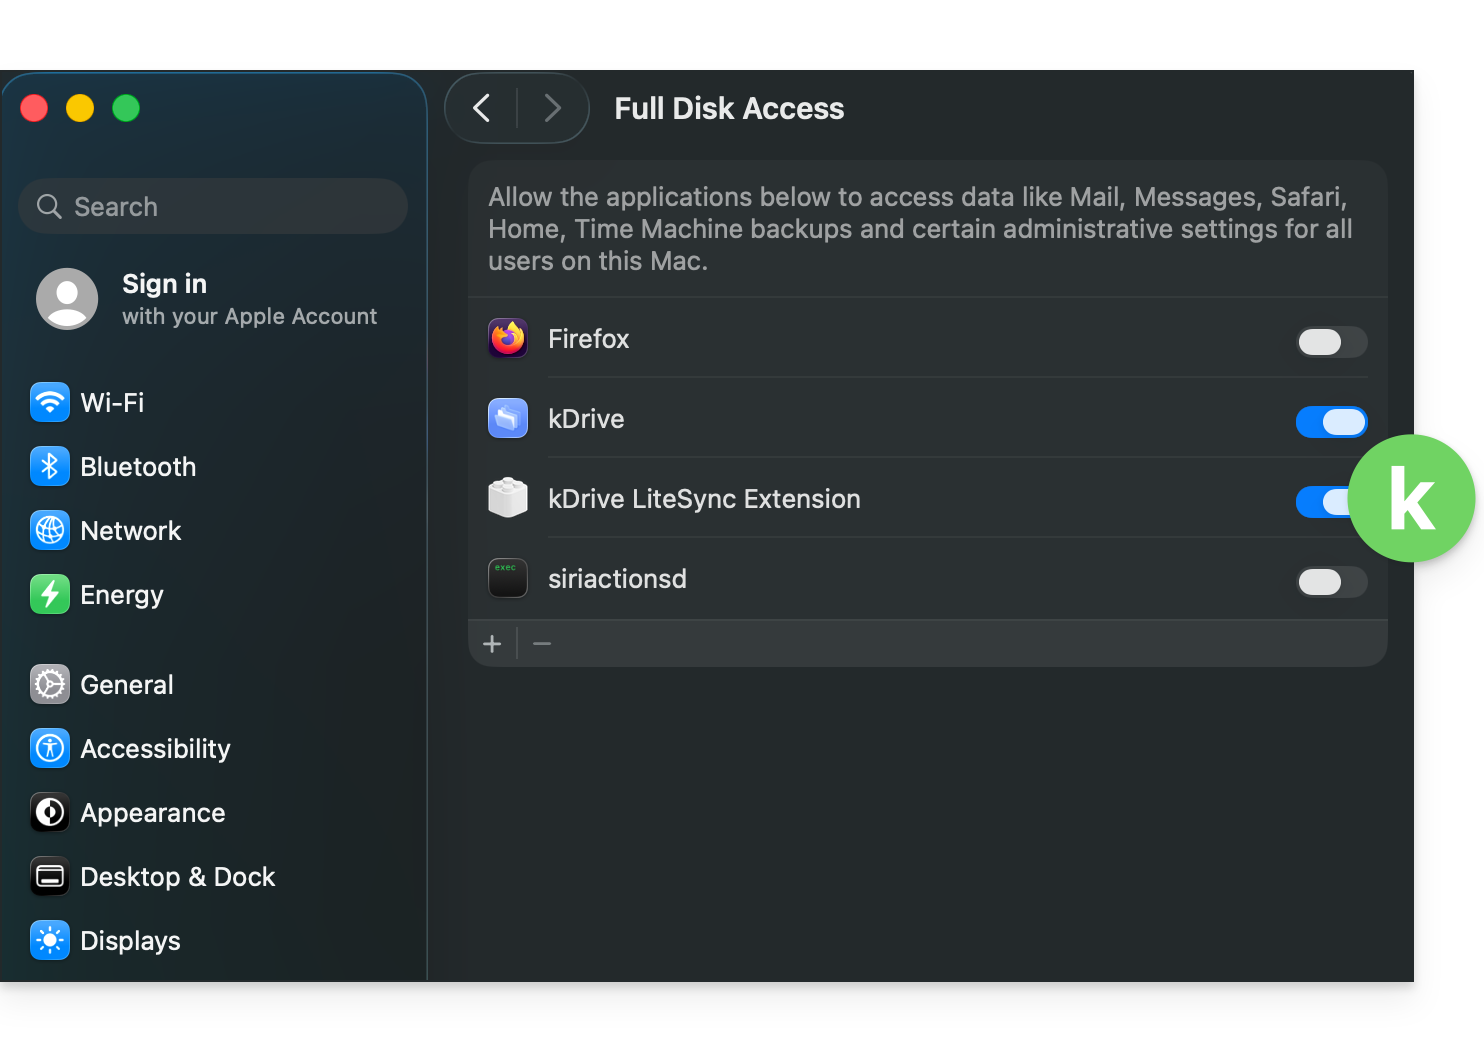
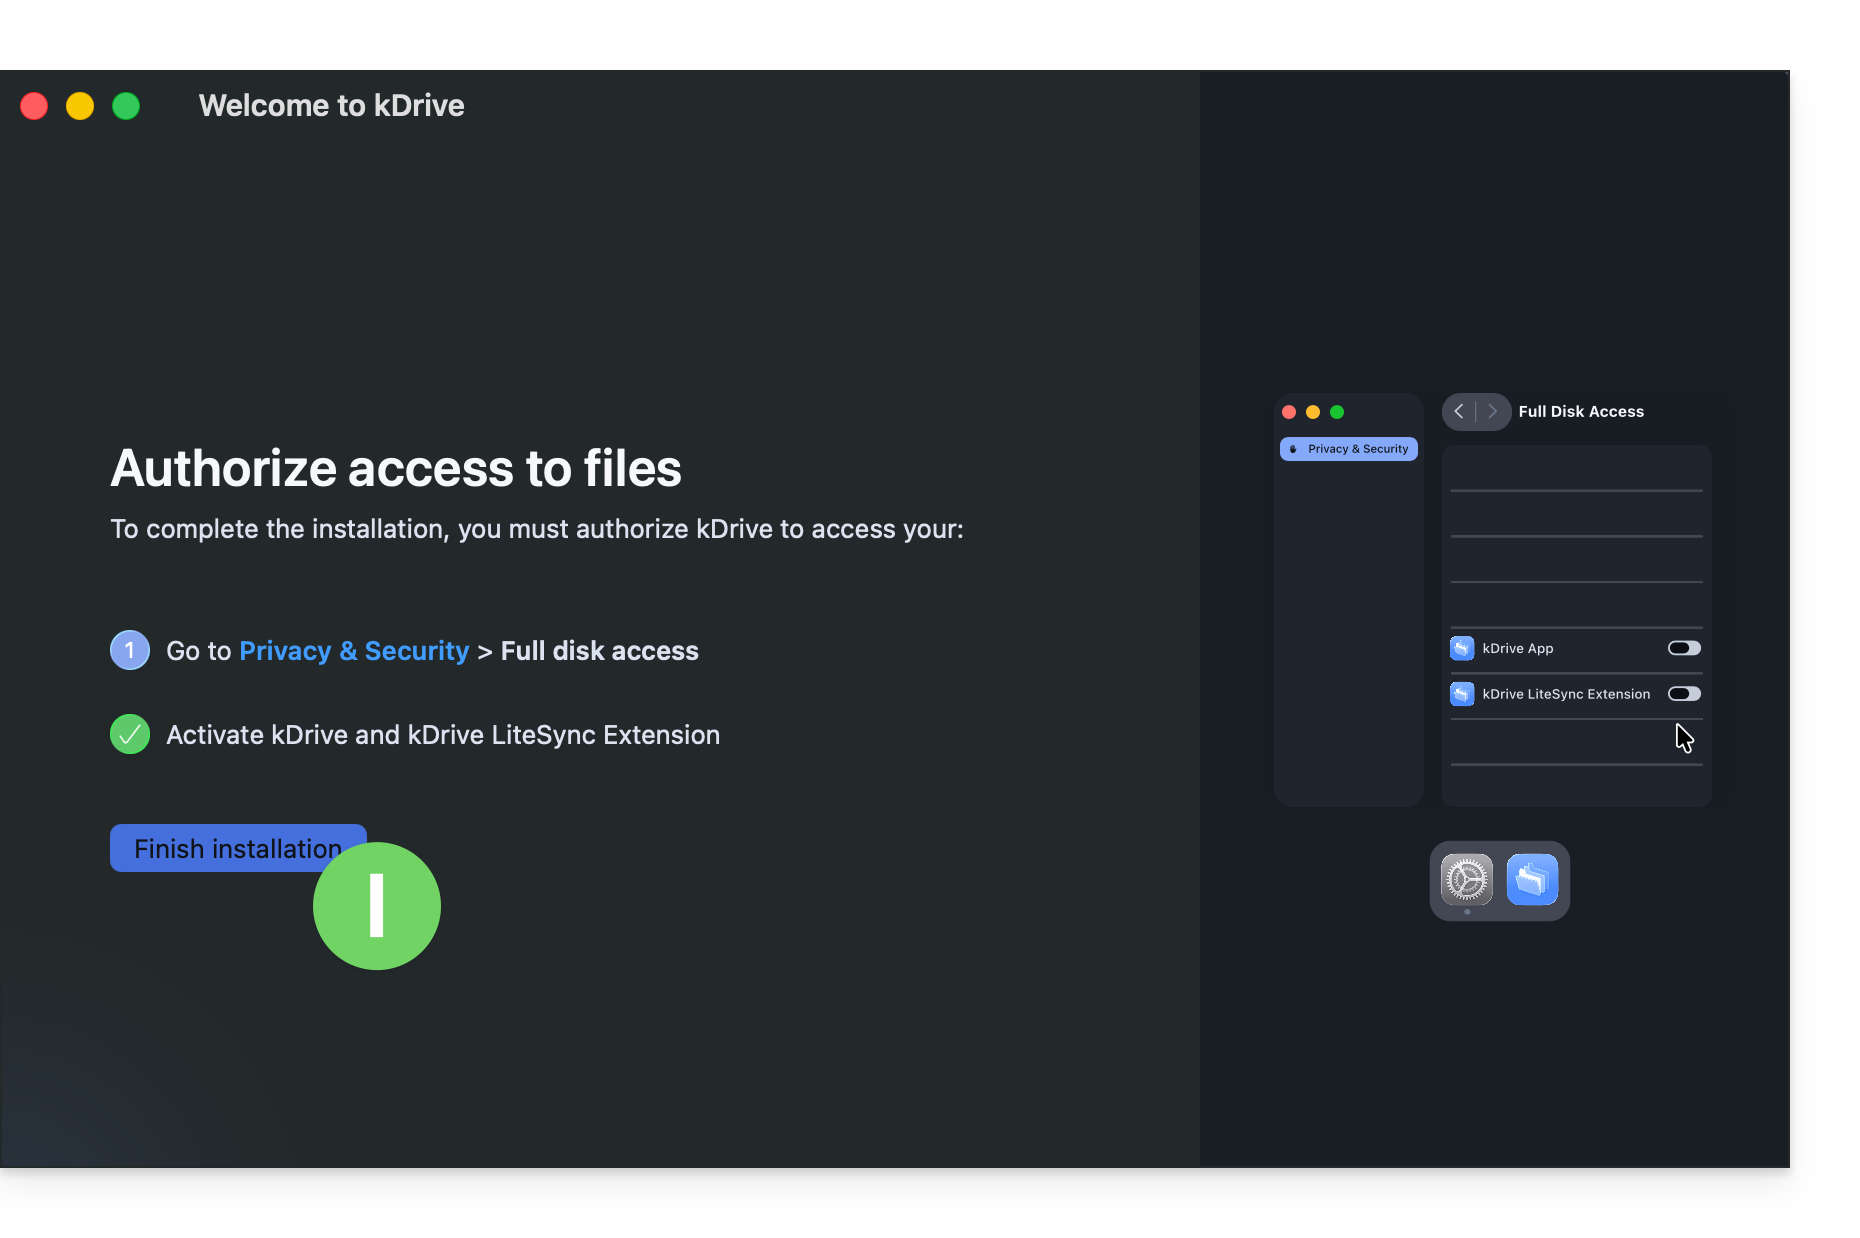
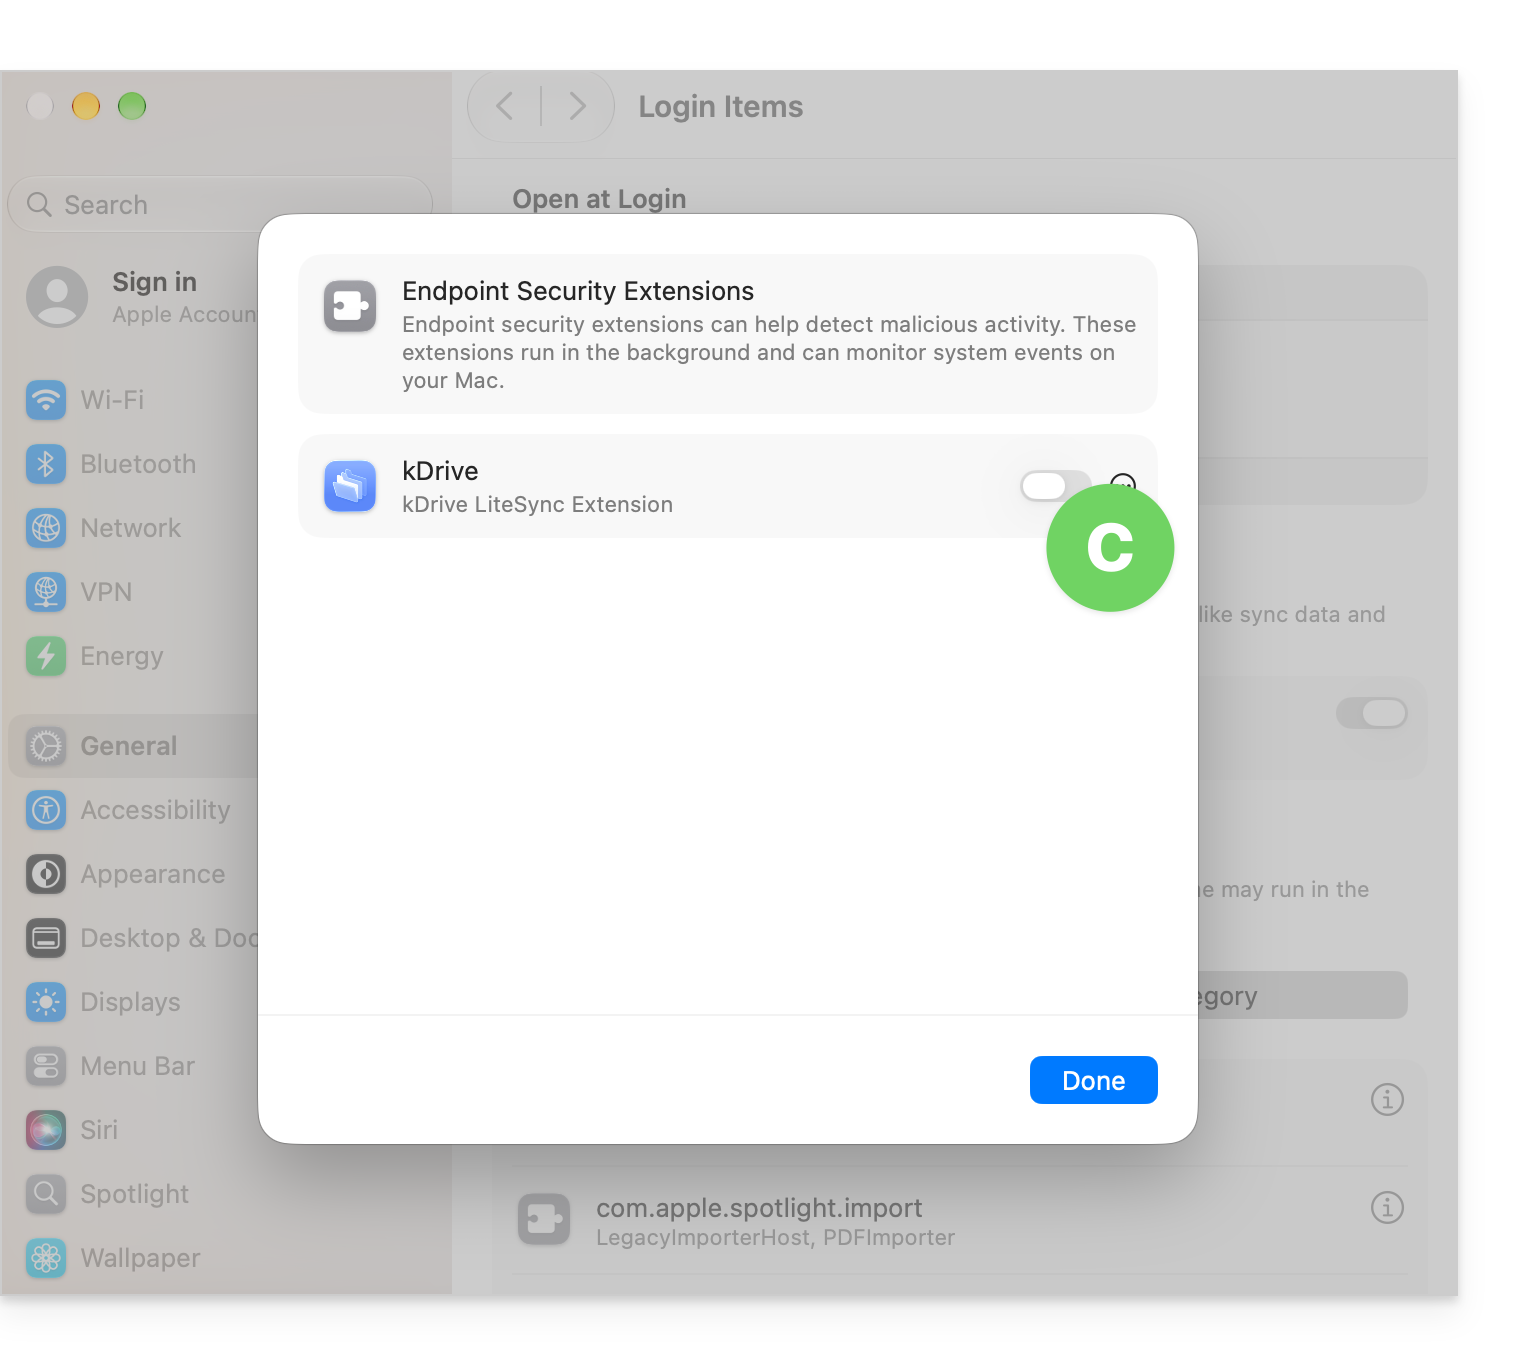
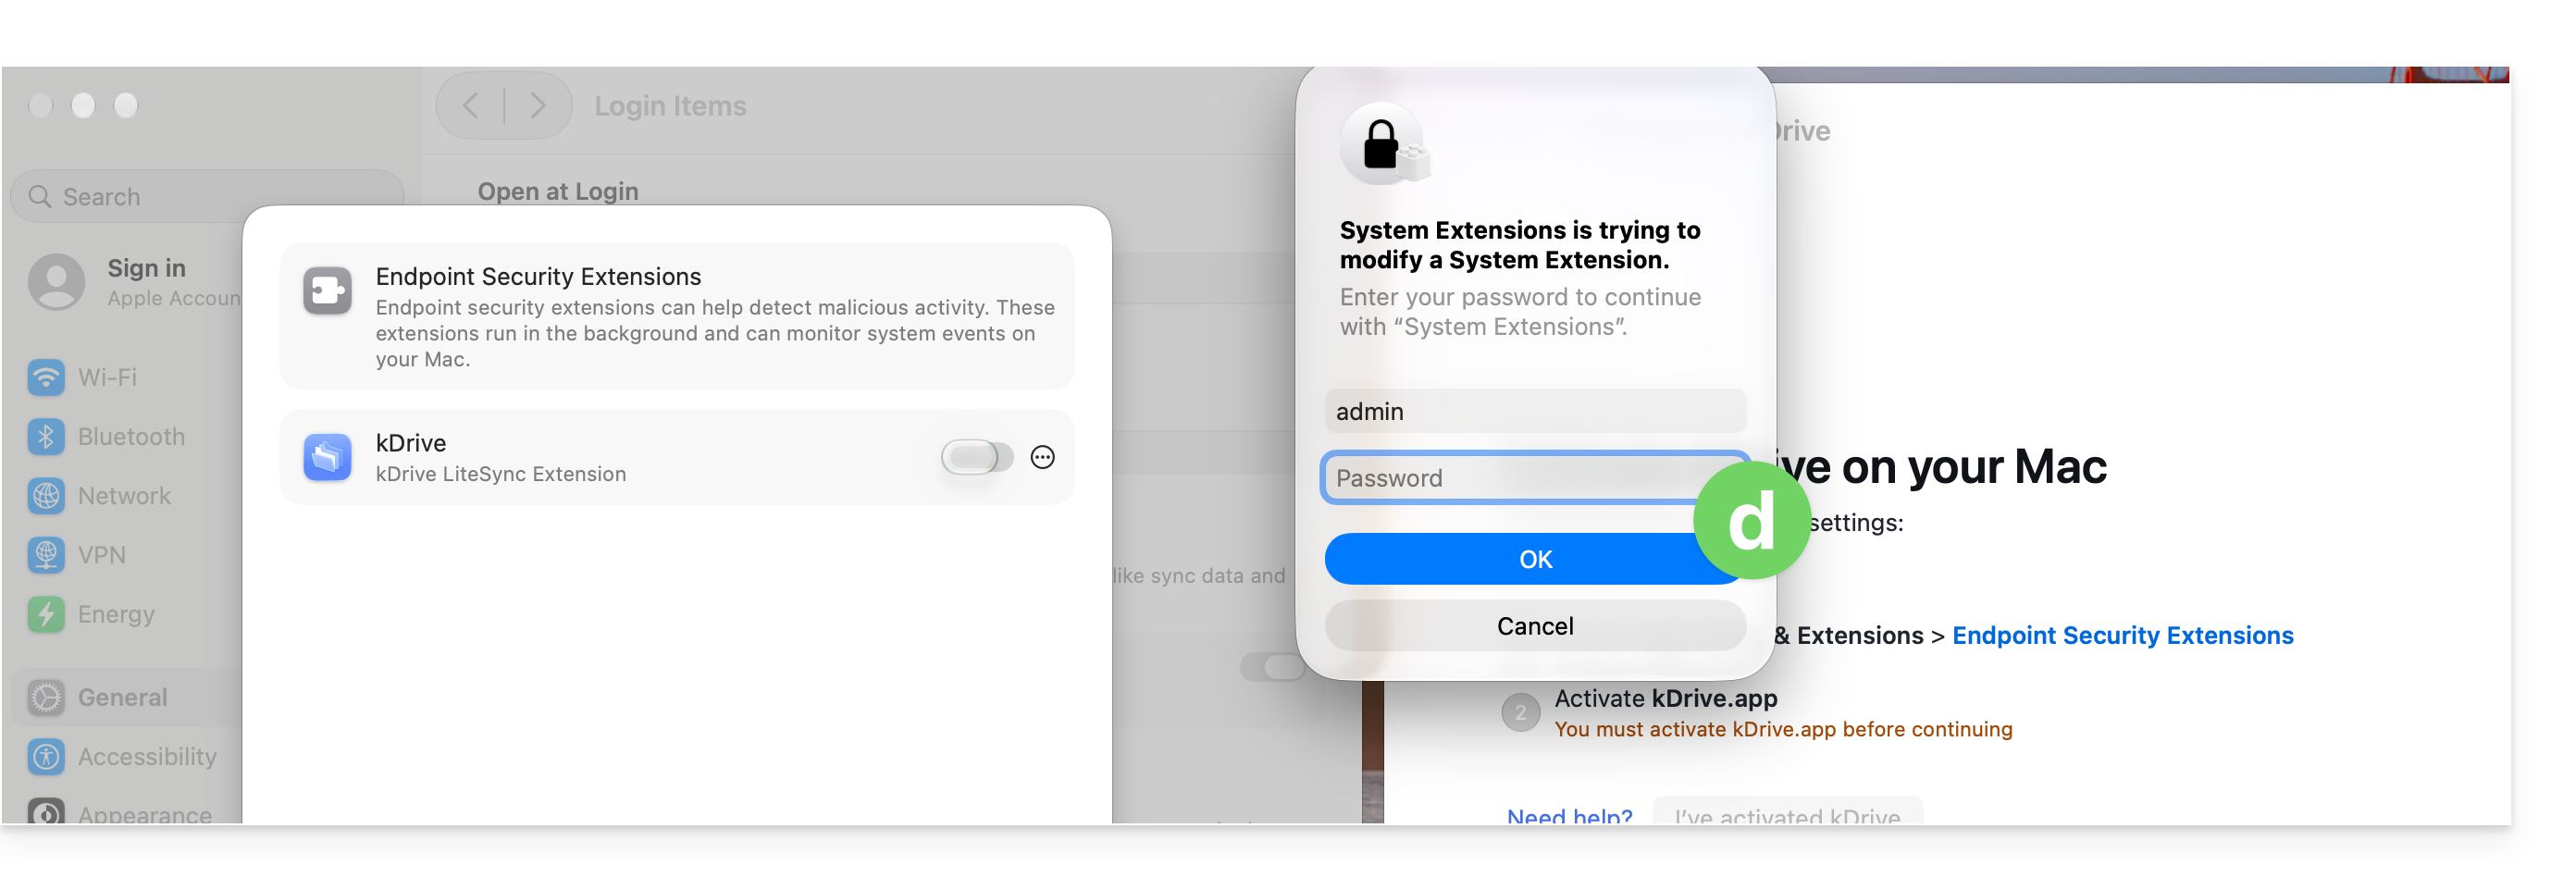
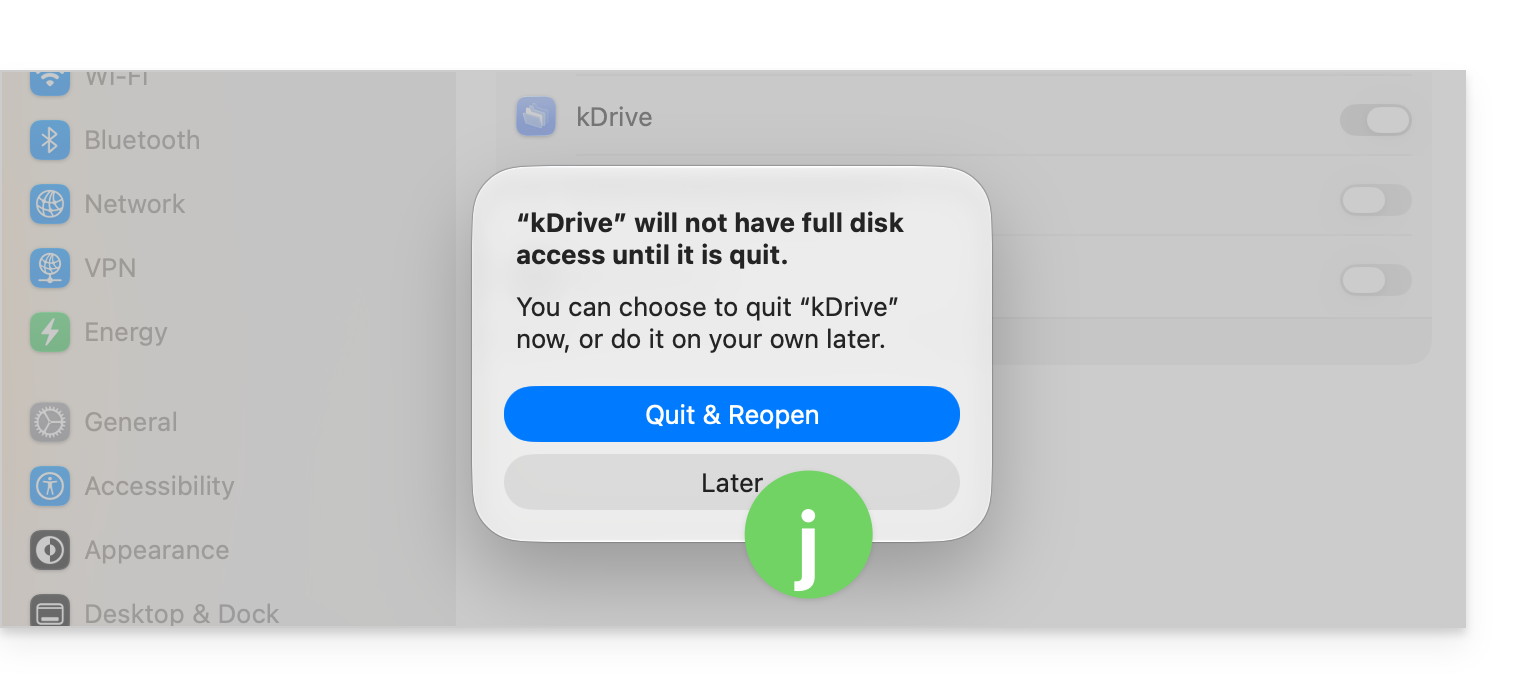
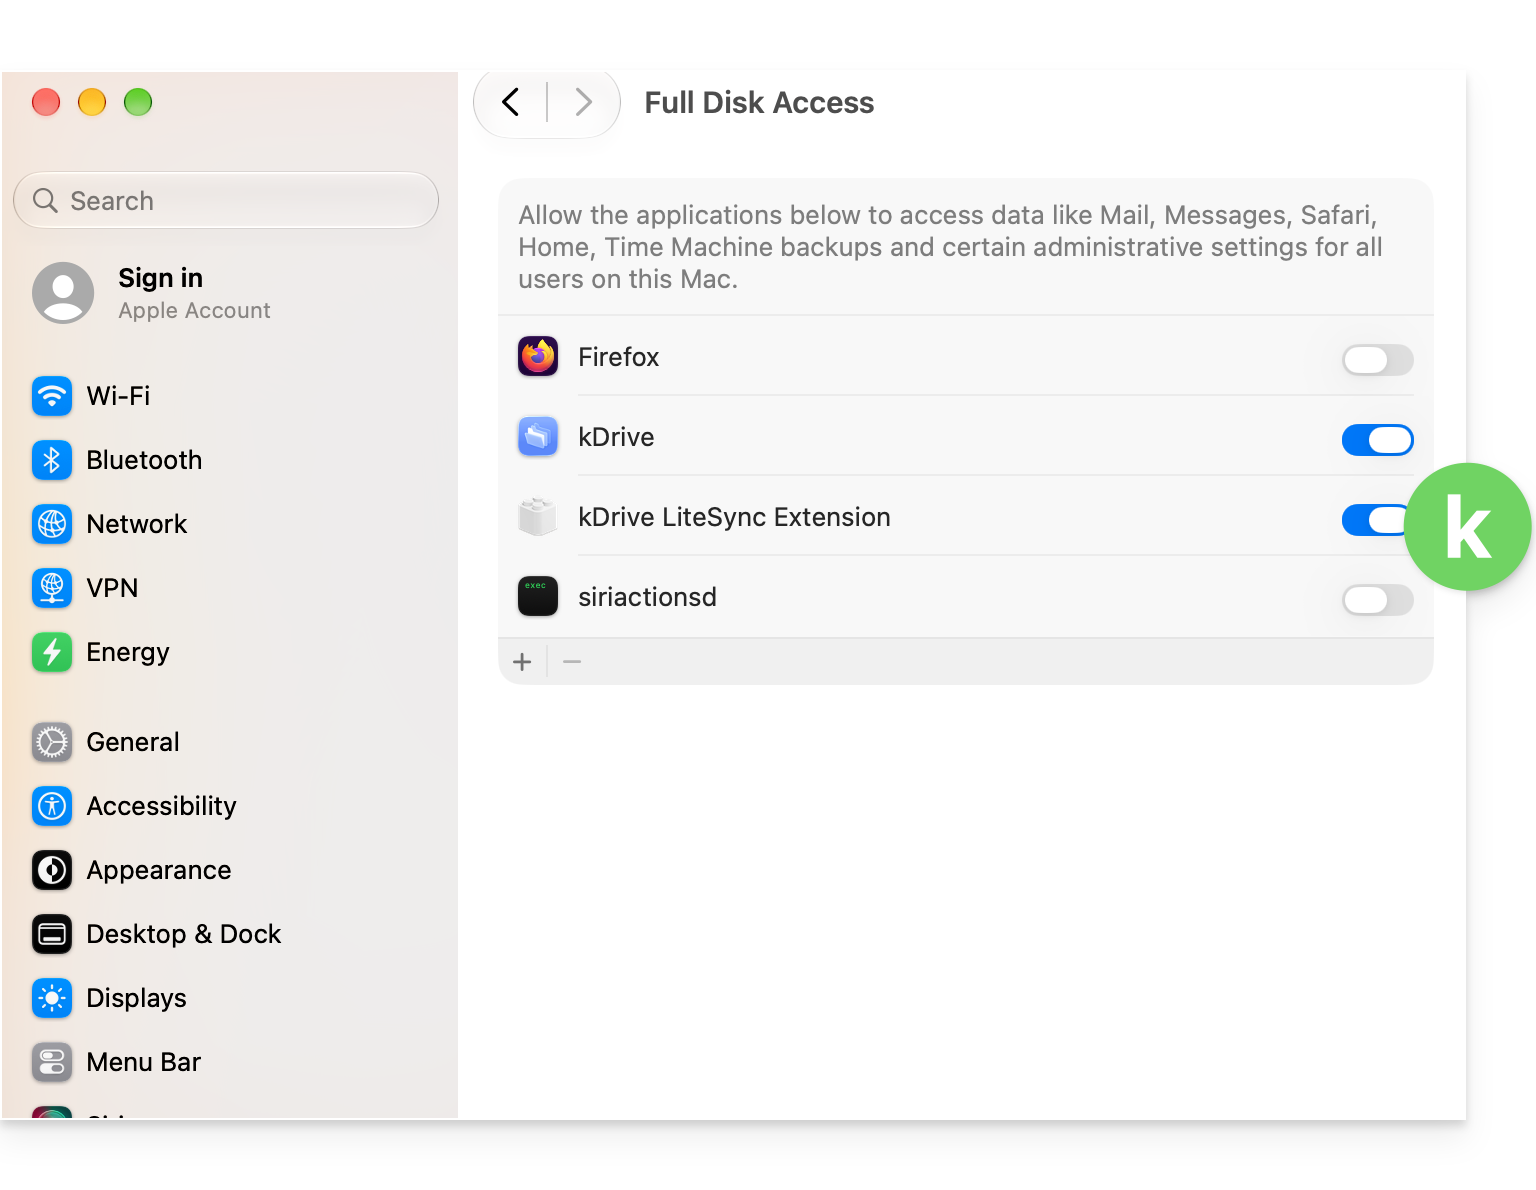
- It is essential to complete the requested authorization process. To do this, simply click the button to open the system settings and then activate the toggle switch for kDrive LiteSync Extension:
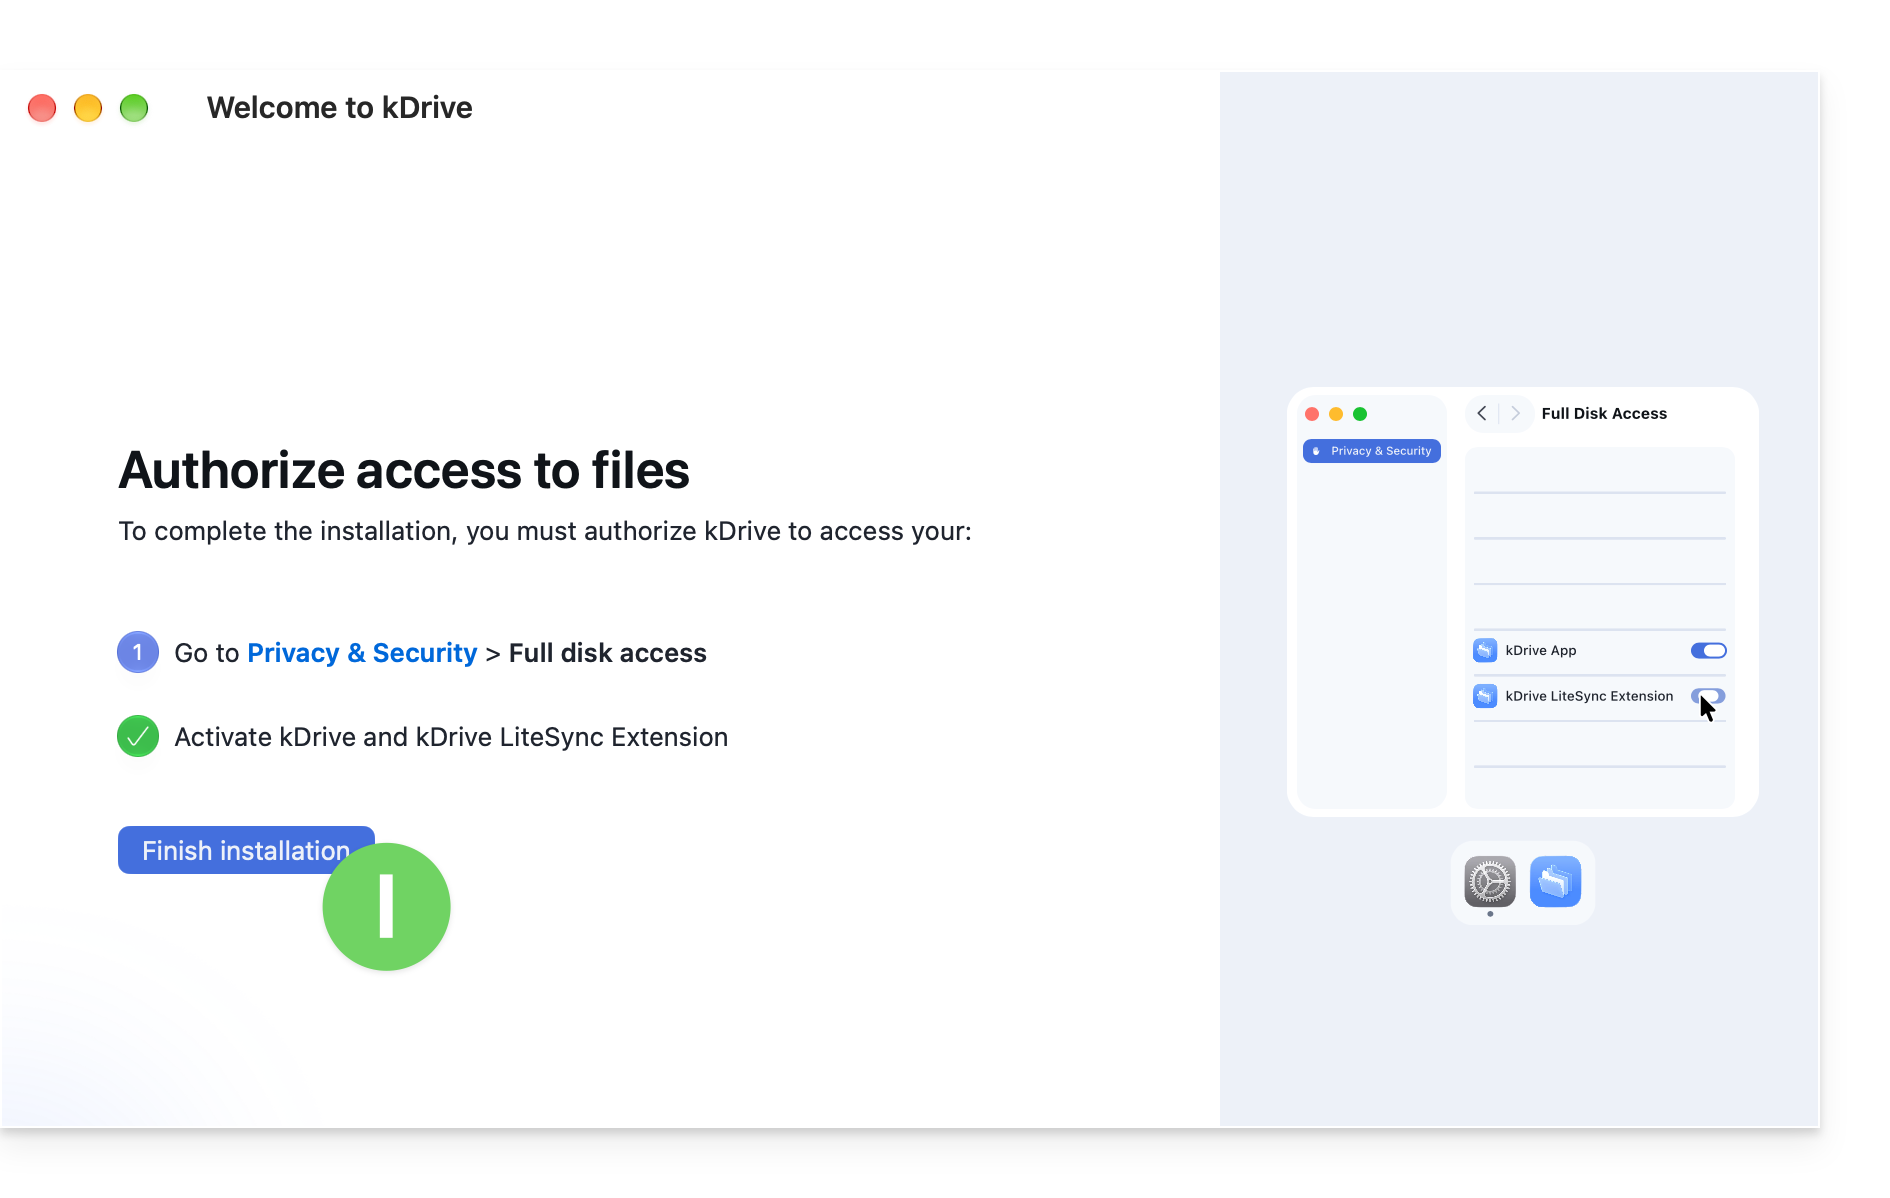
- Go back to the configuration window and click the button to confirm that you have made the requested change in the macOS system settings:
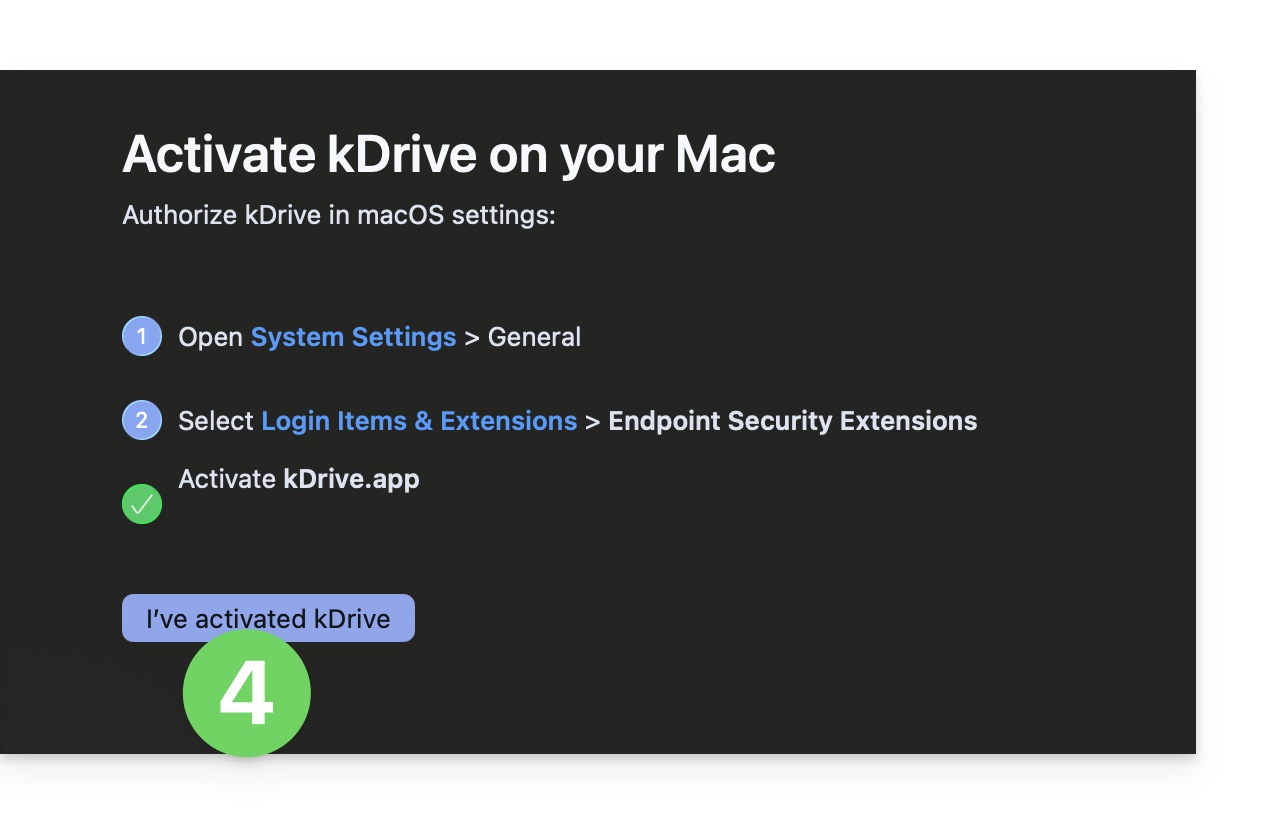
- If the button remains inactive, refer to the last chapter of the guide to compare your system configuration and ensure that you have enabled the correct settings.
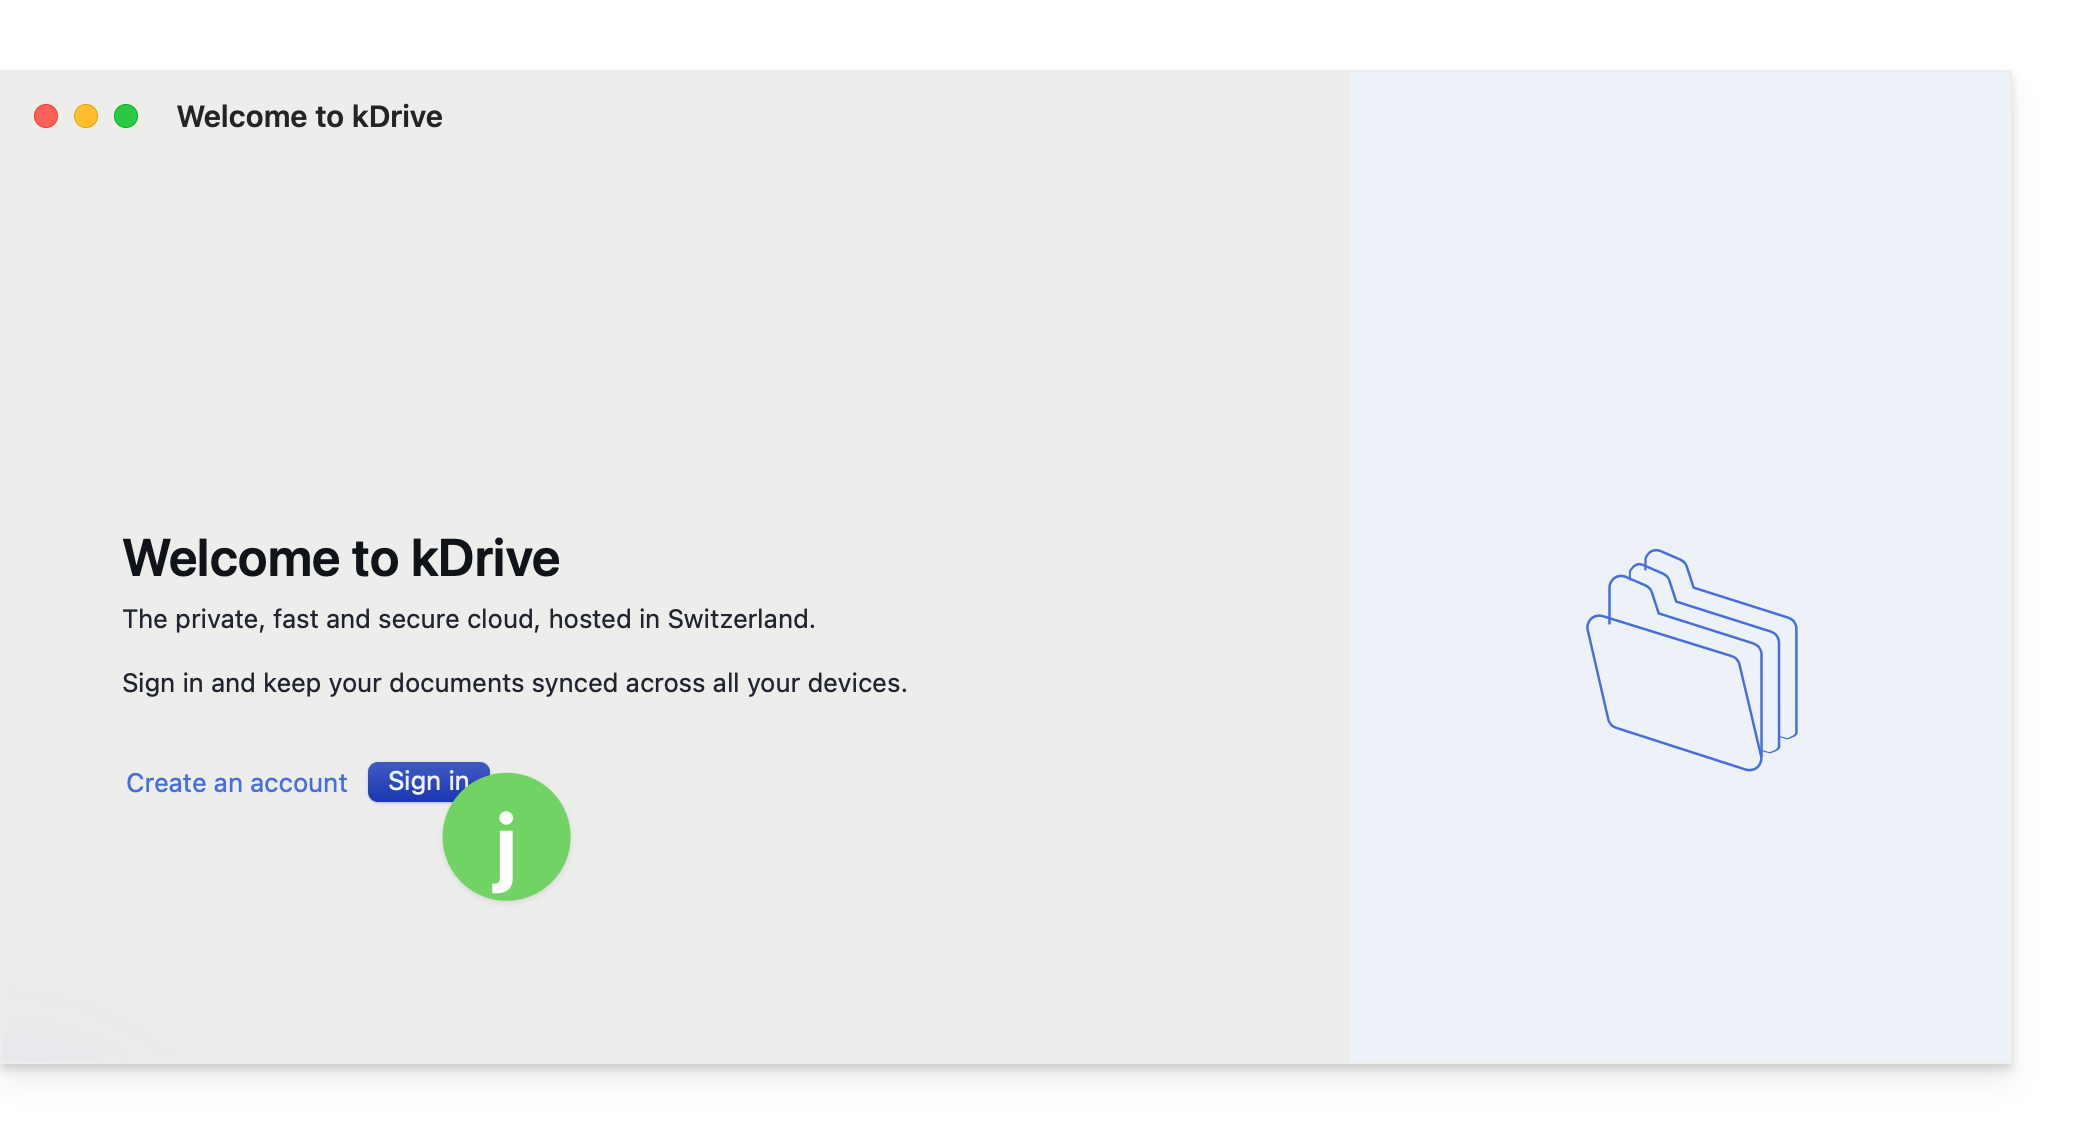
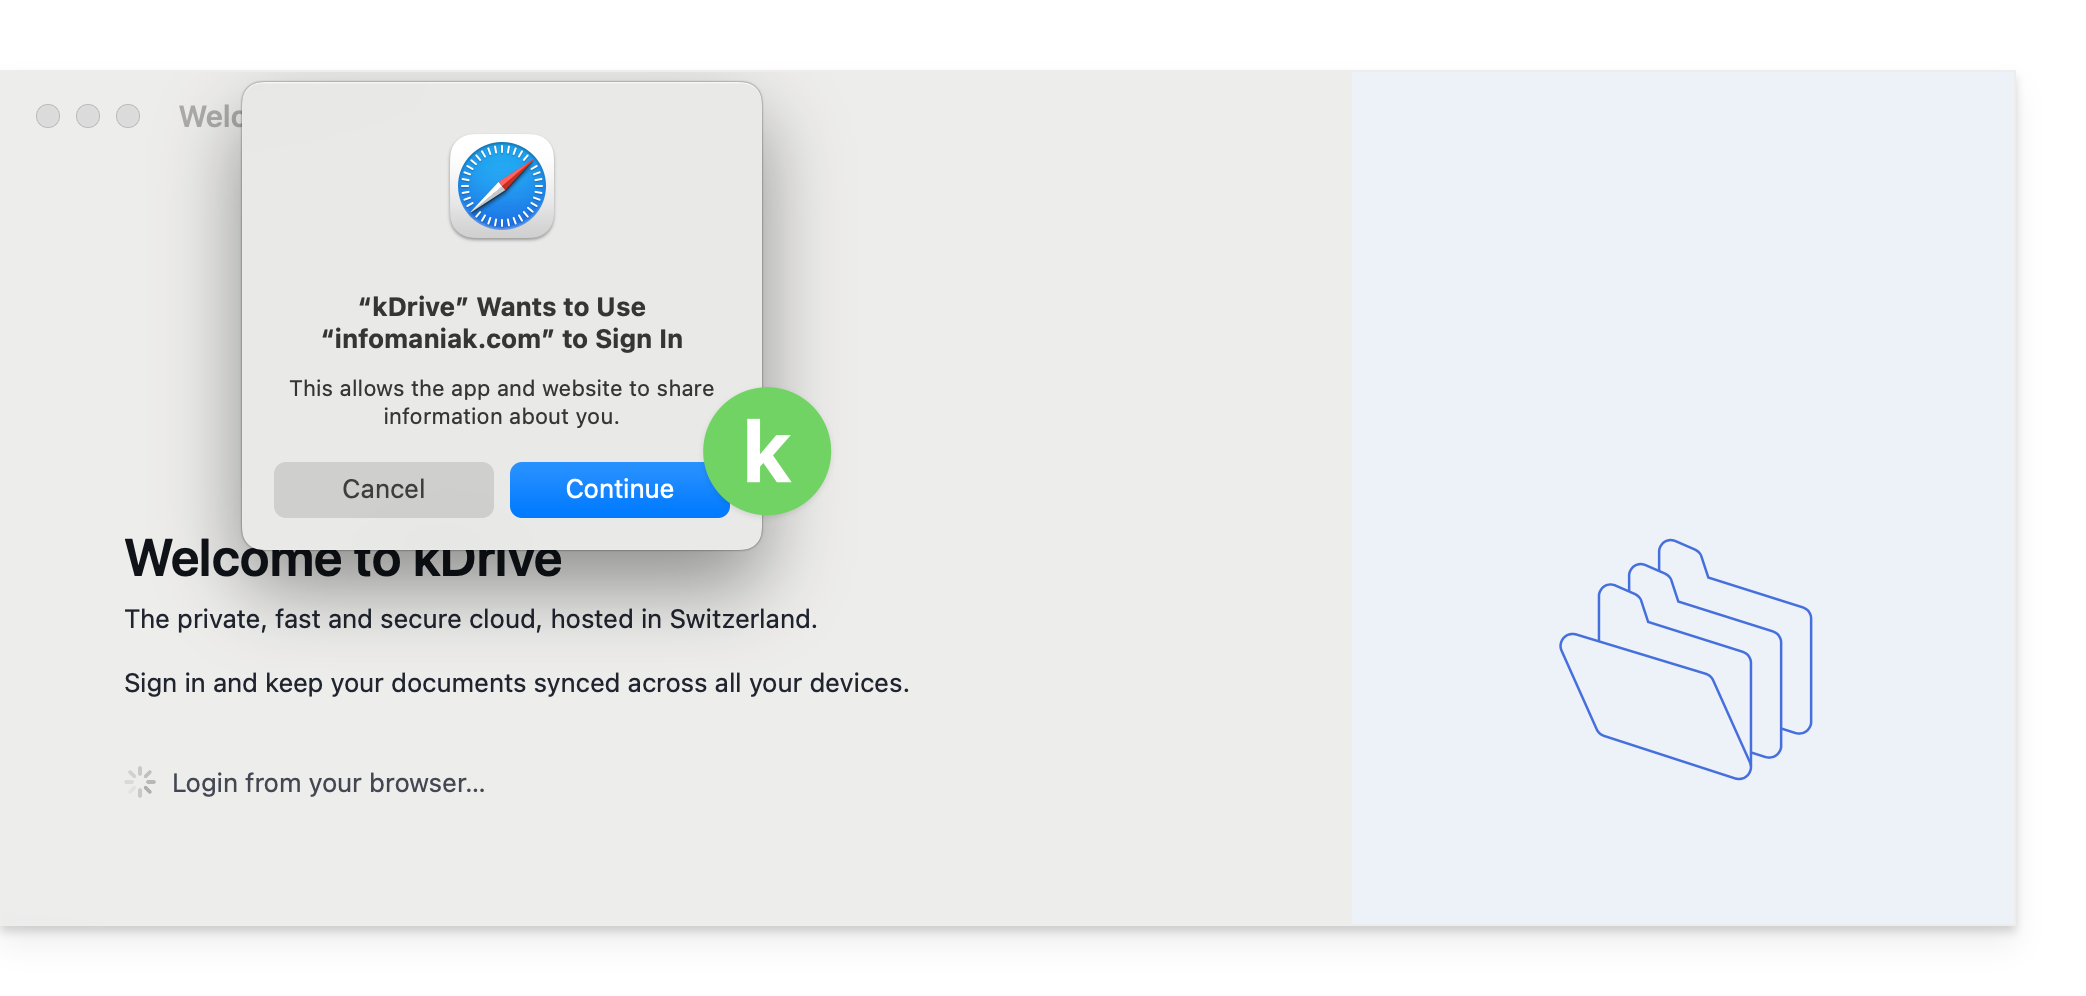
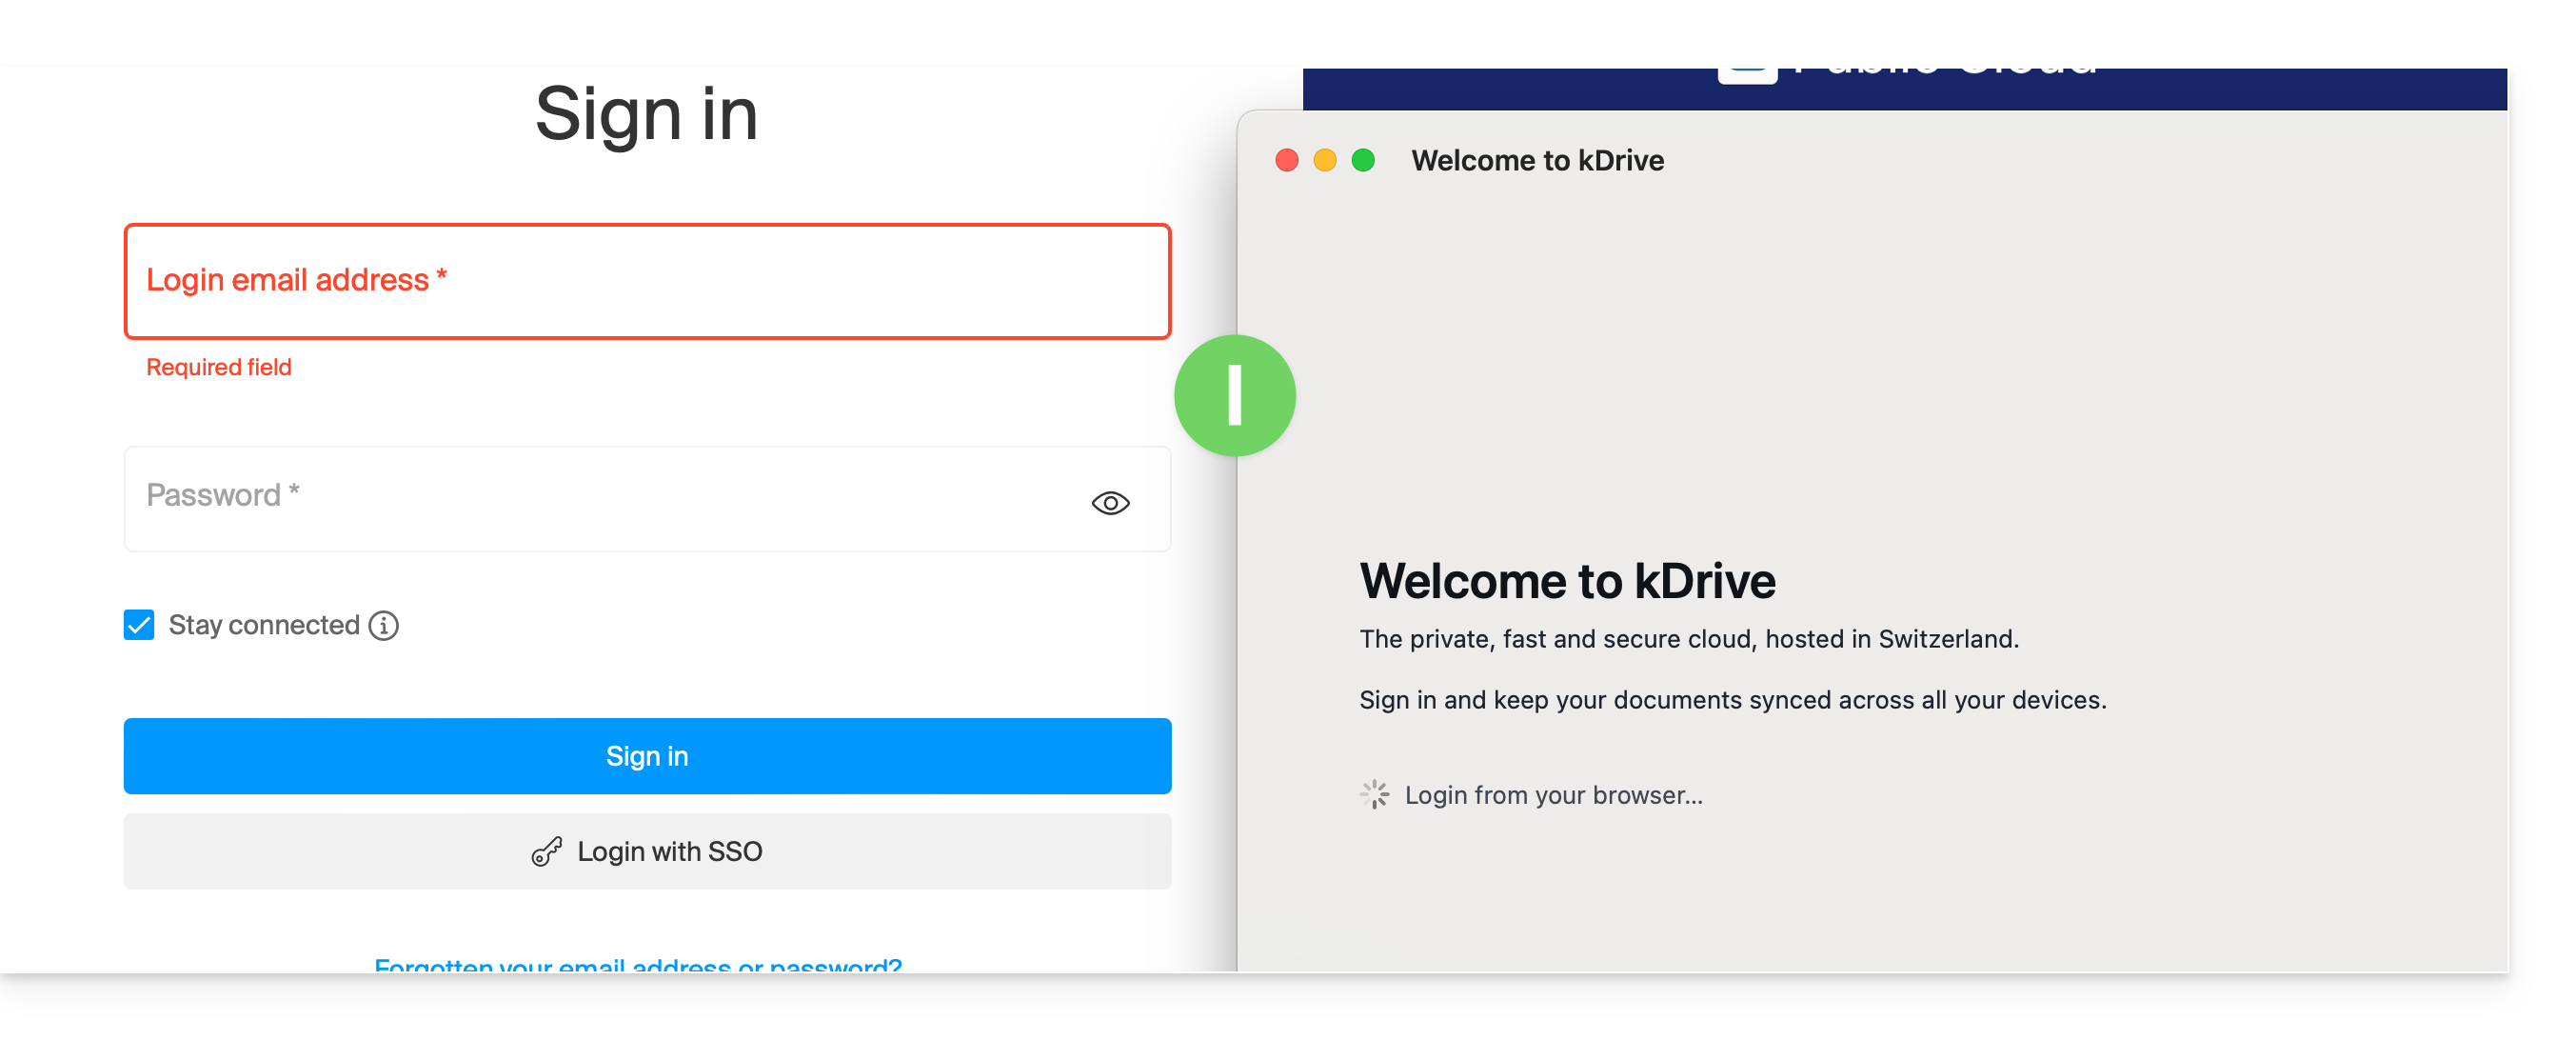
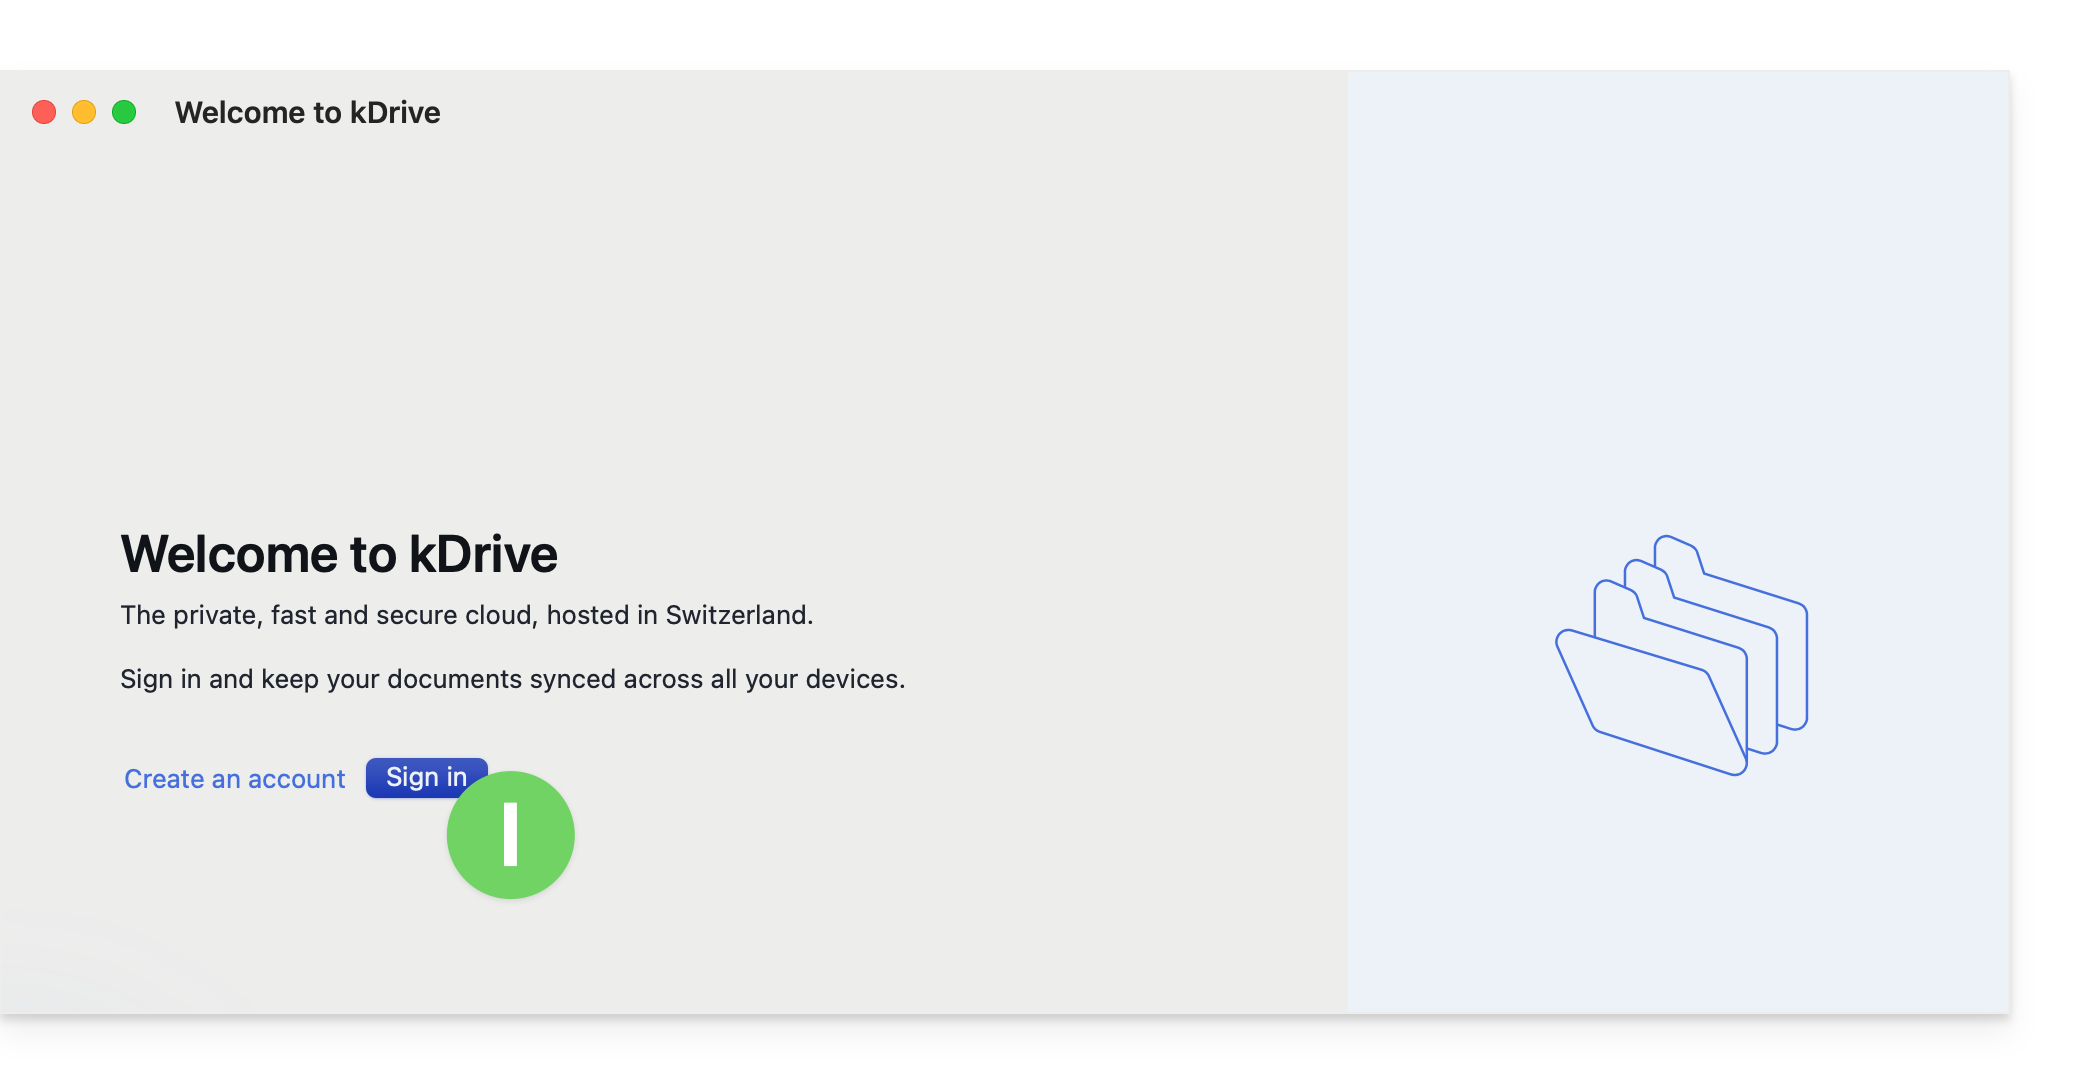
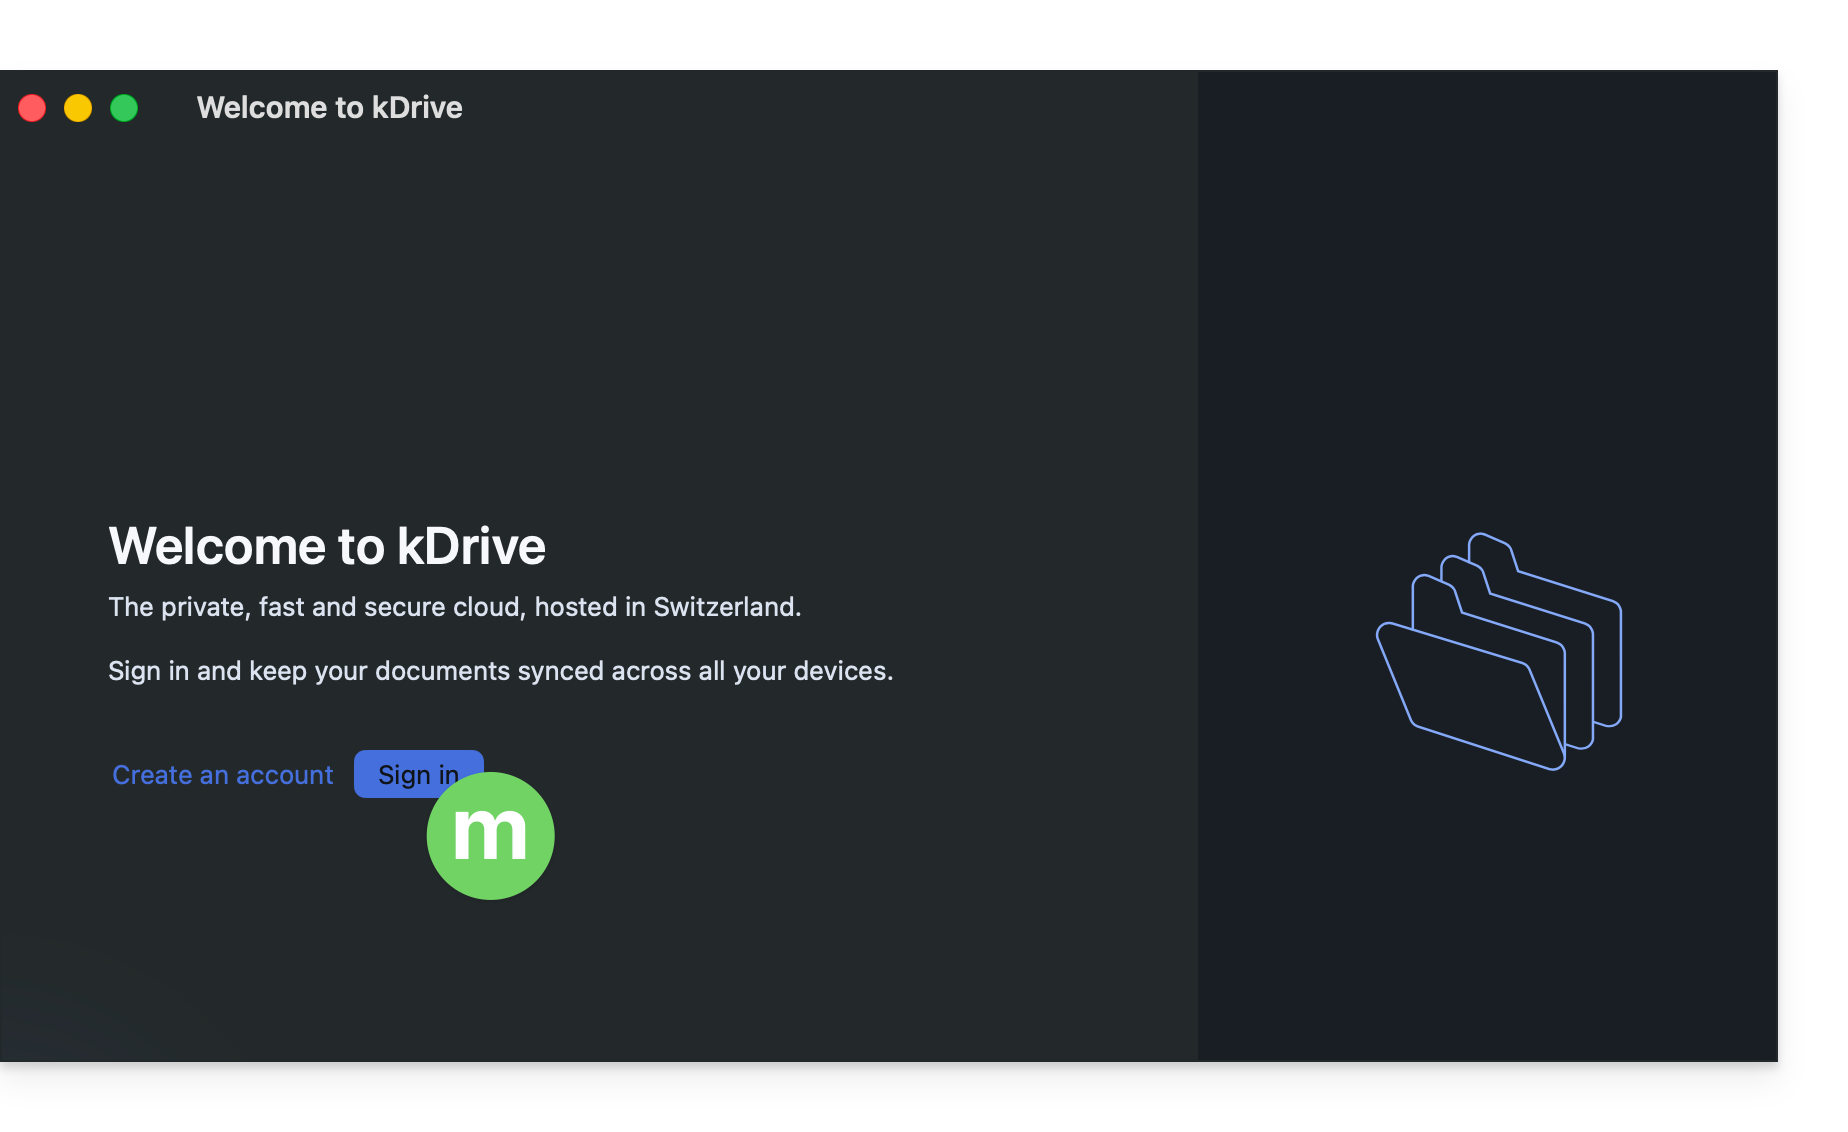
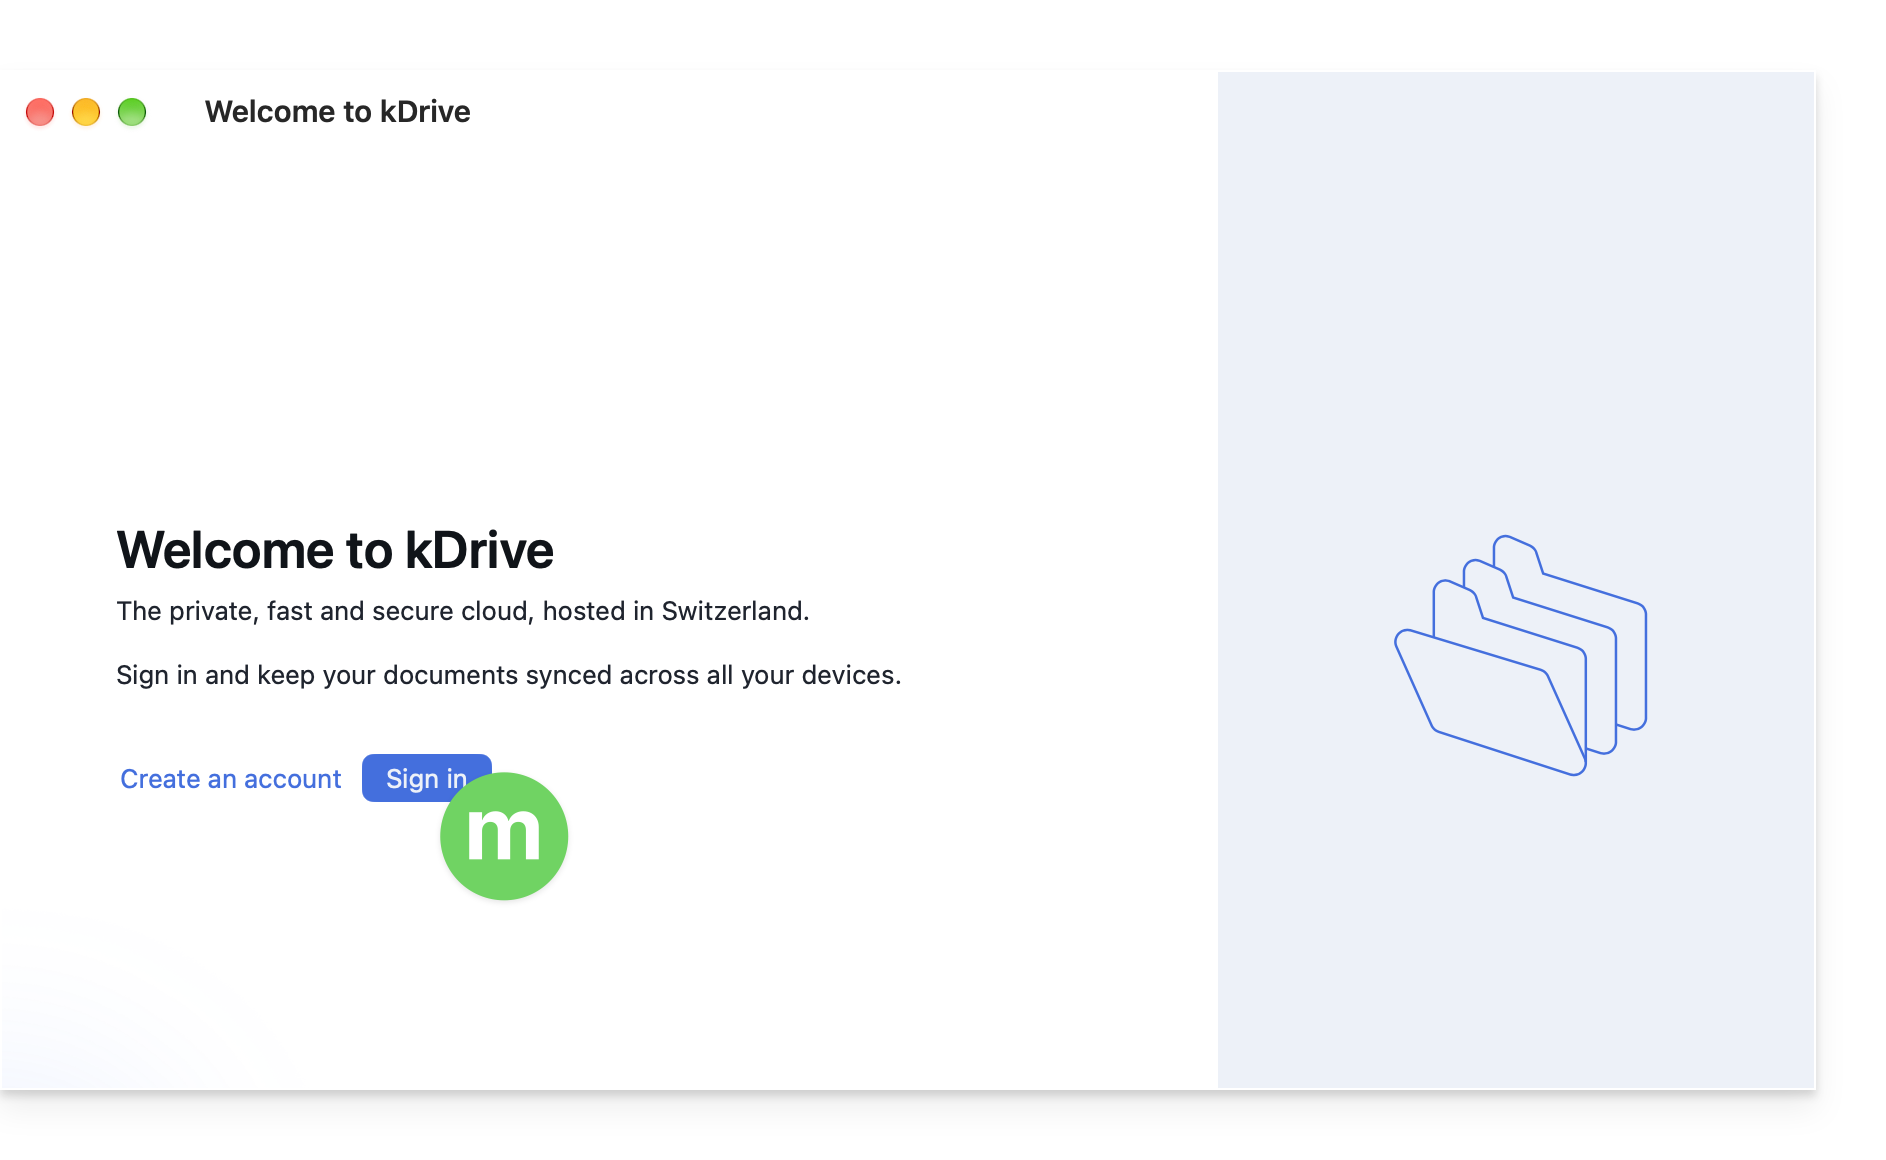
- Click the button to log in to your account:
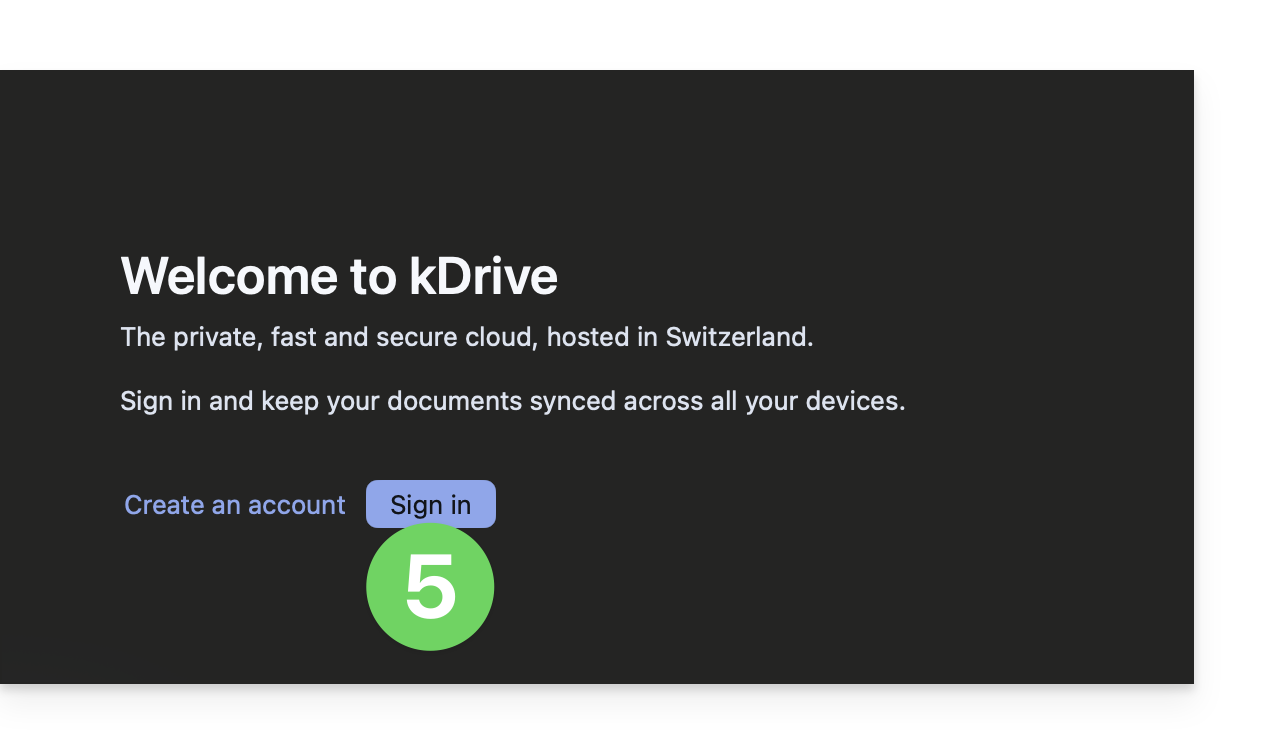
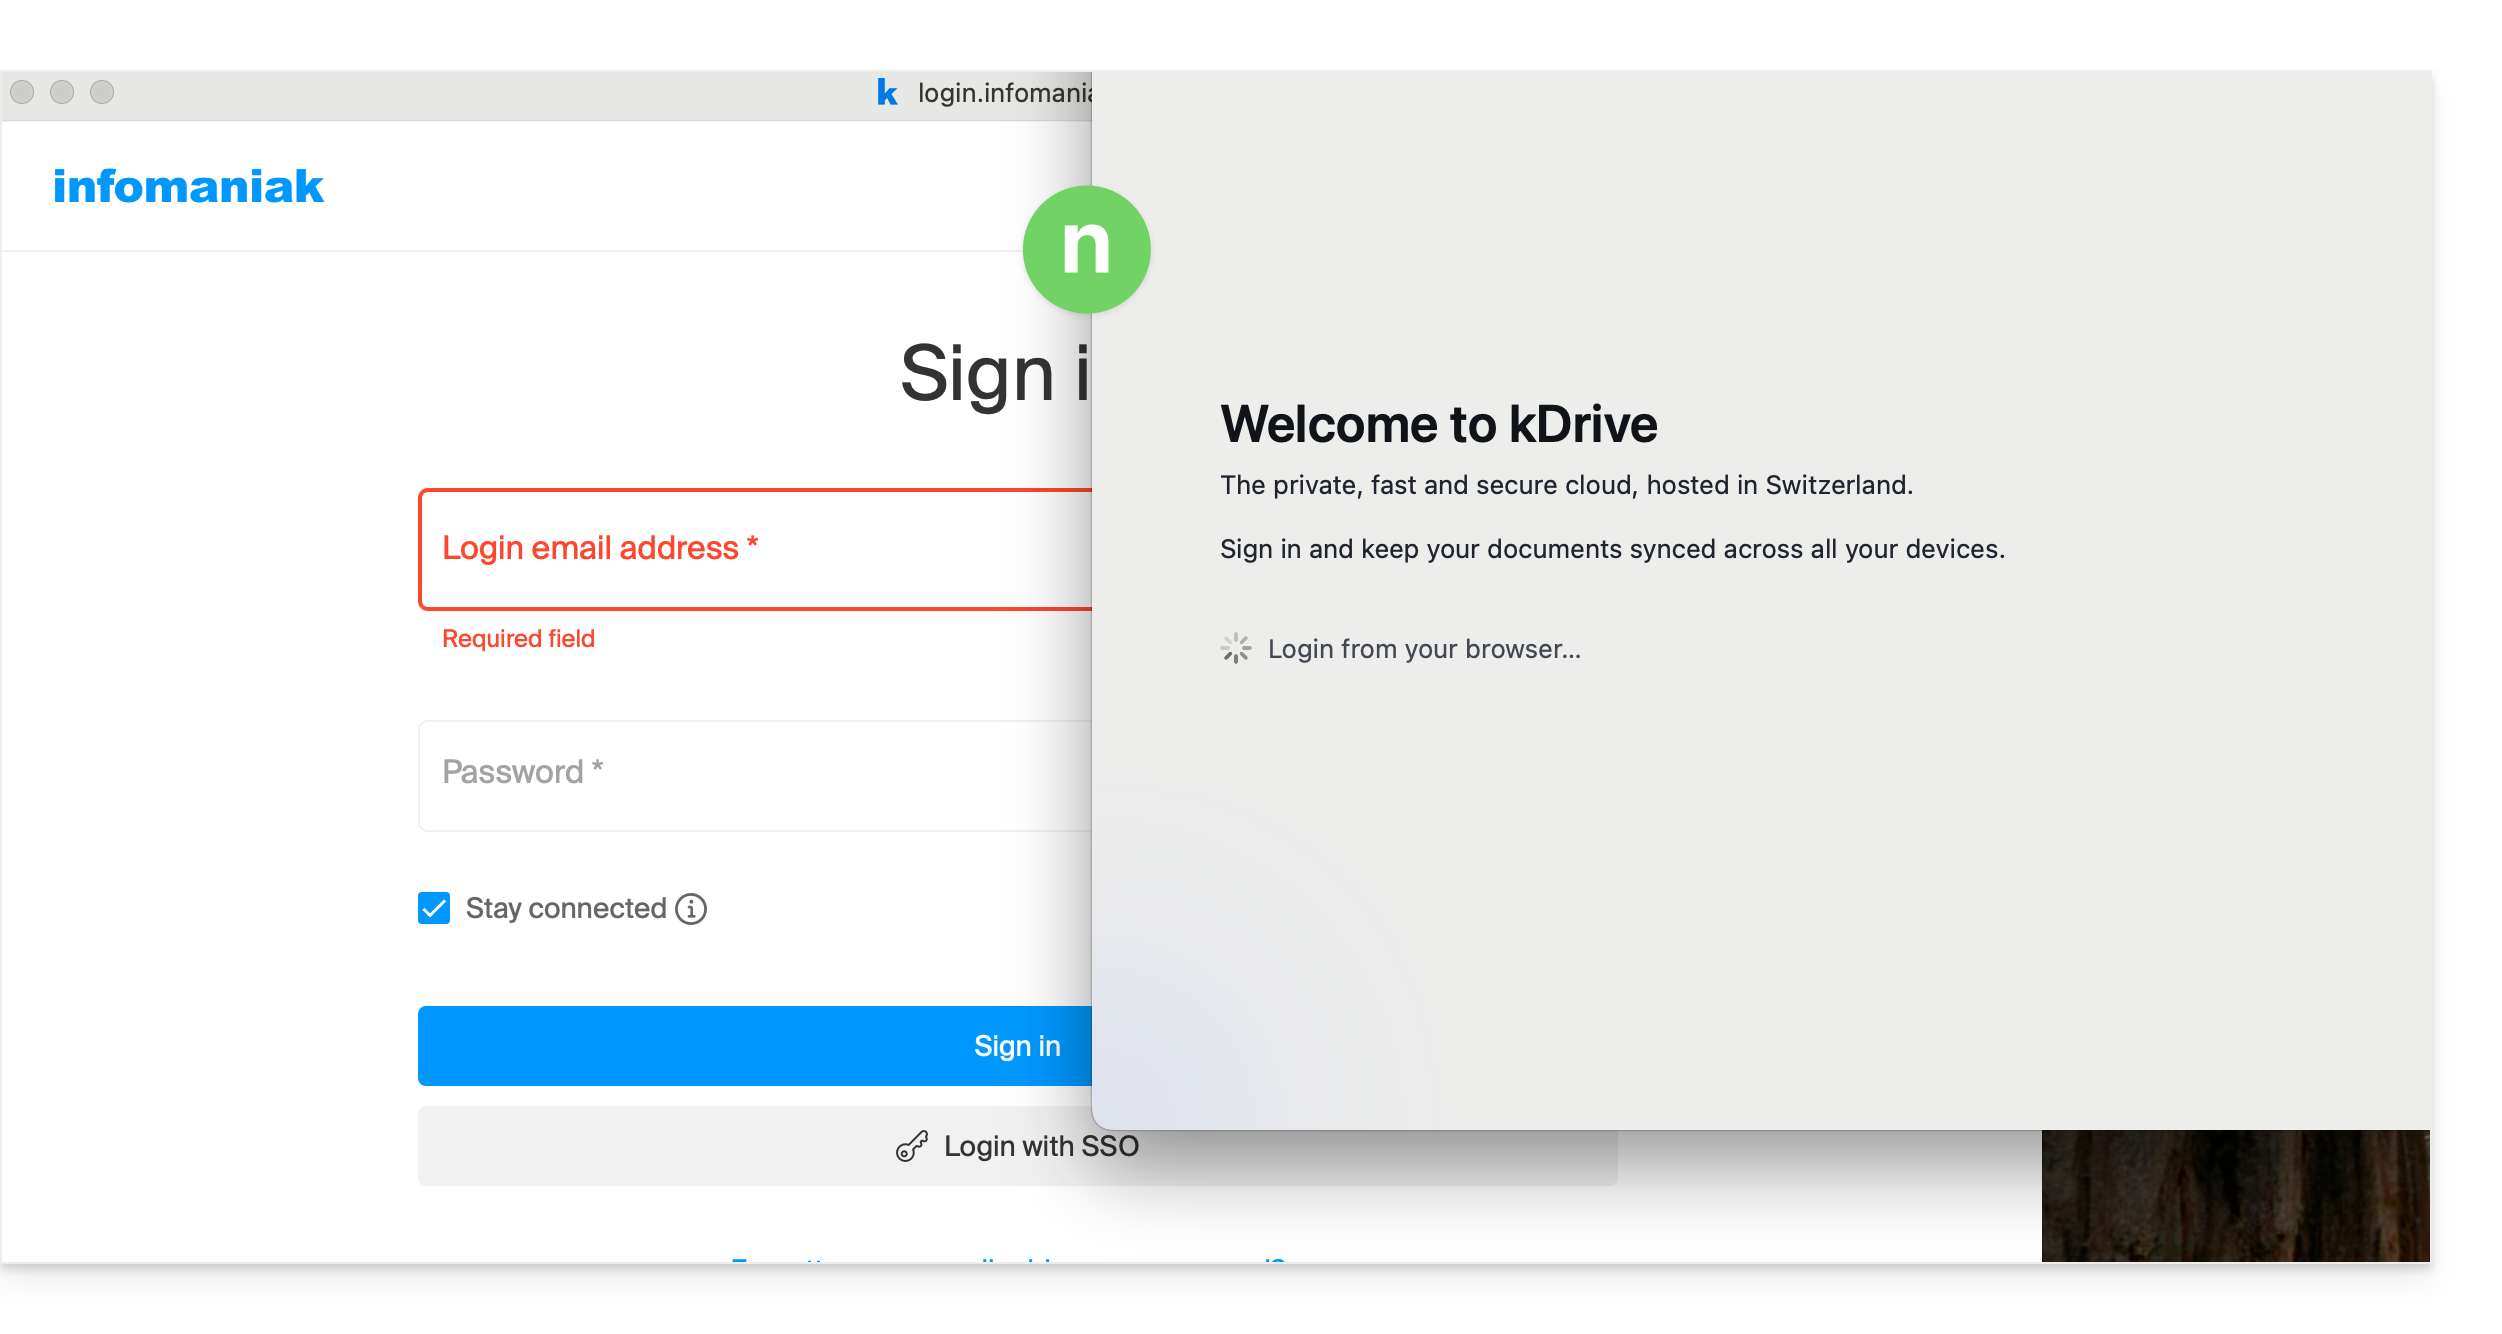
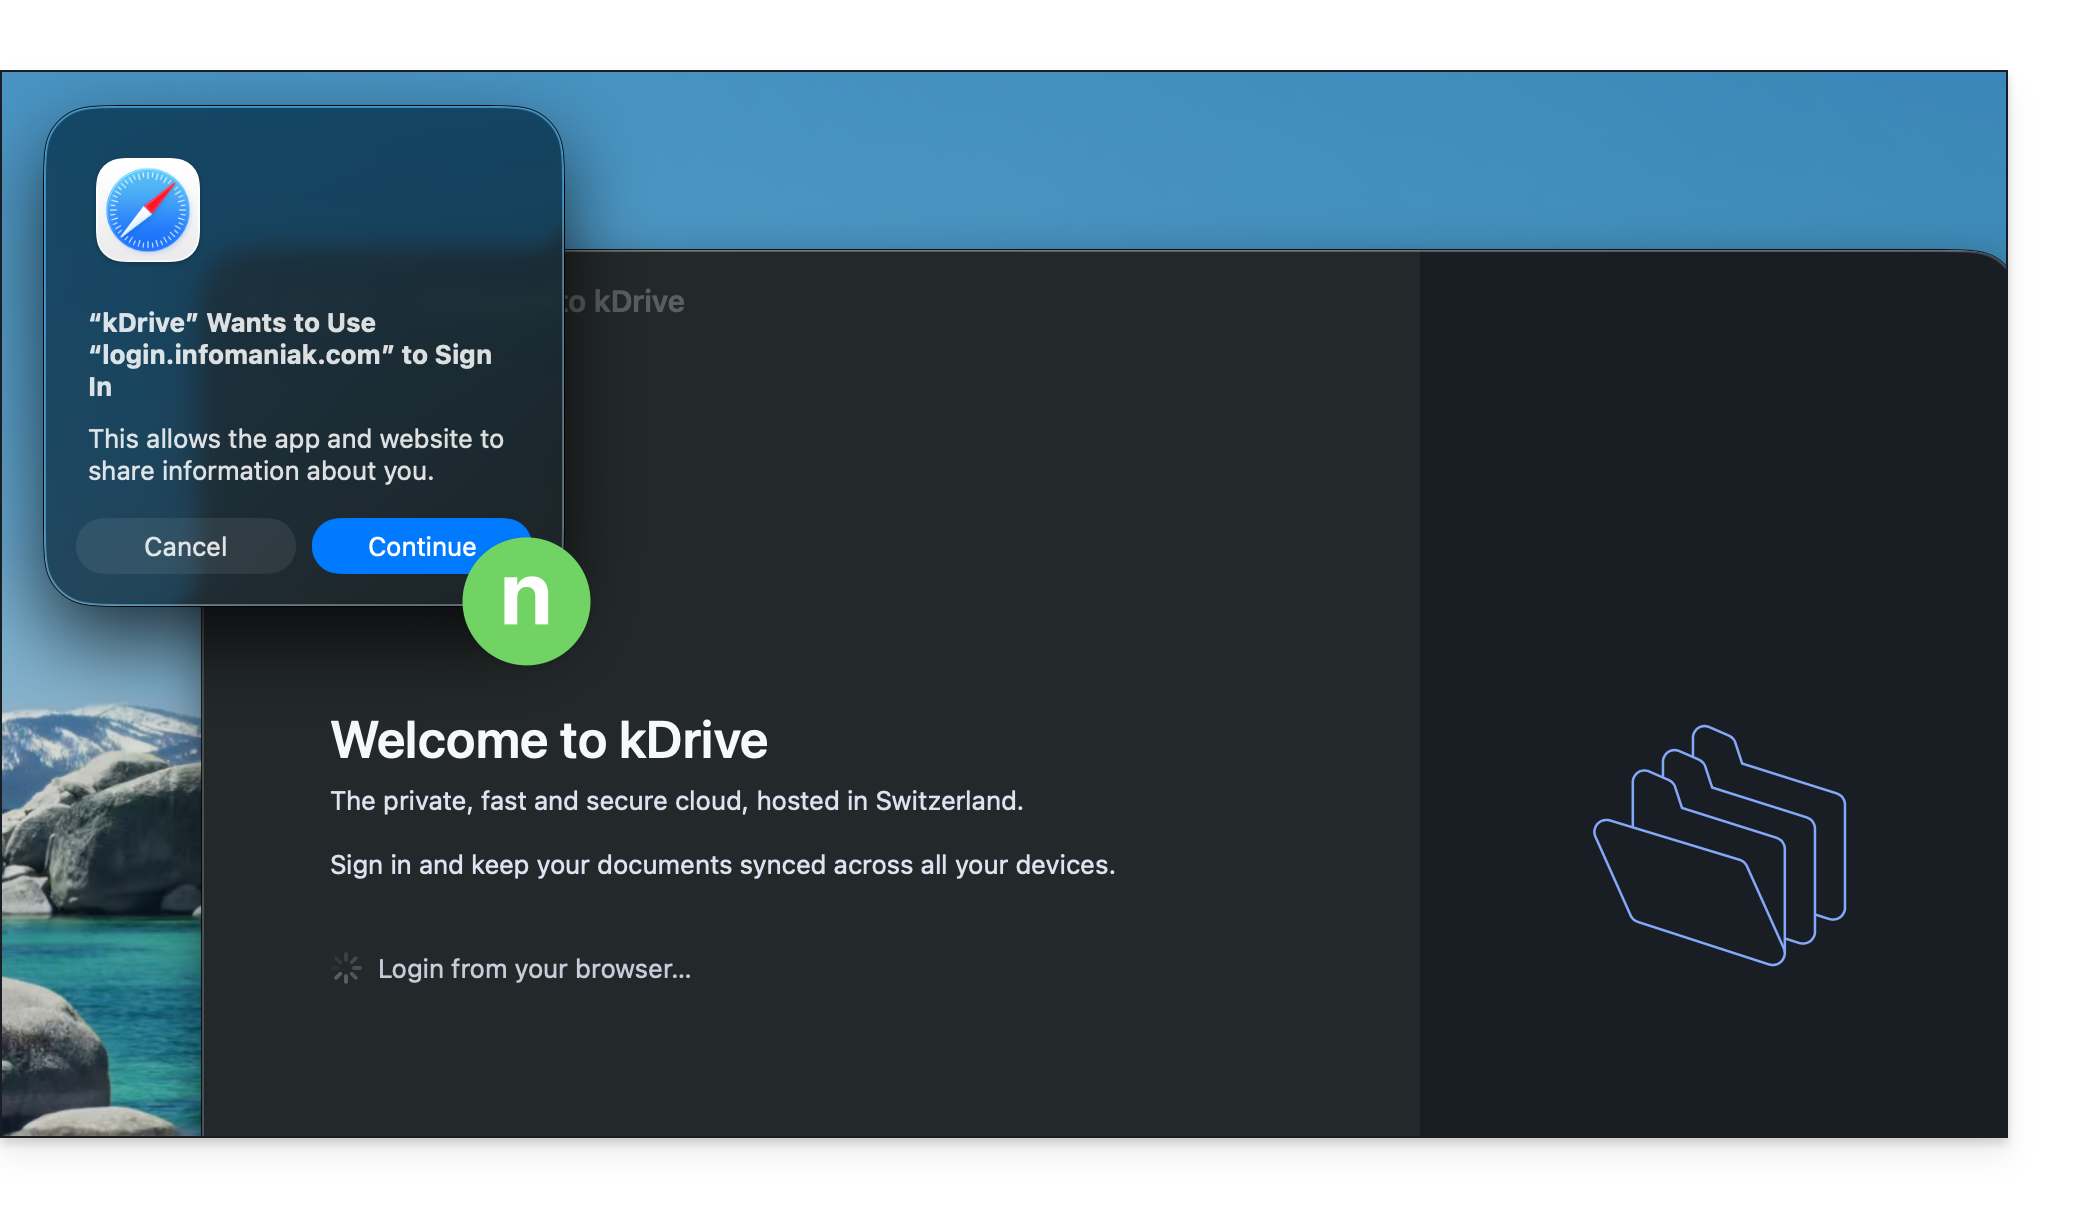
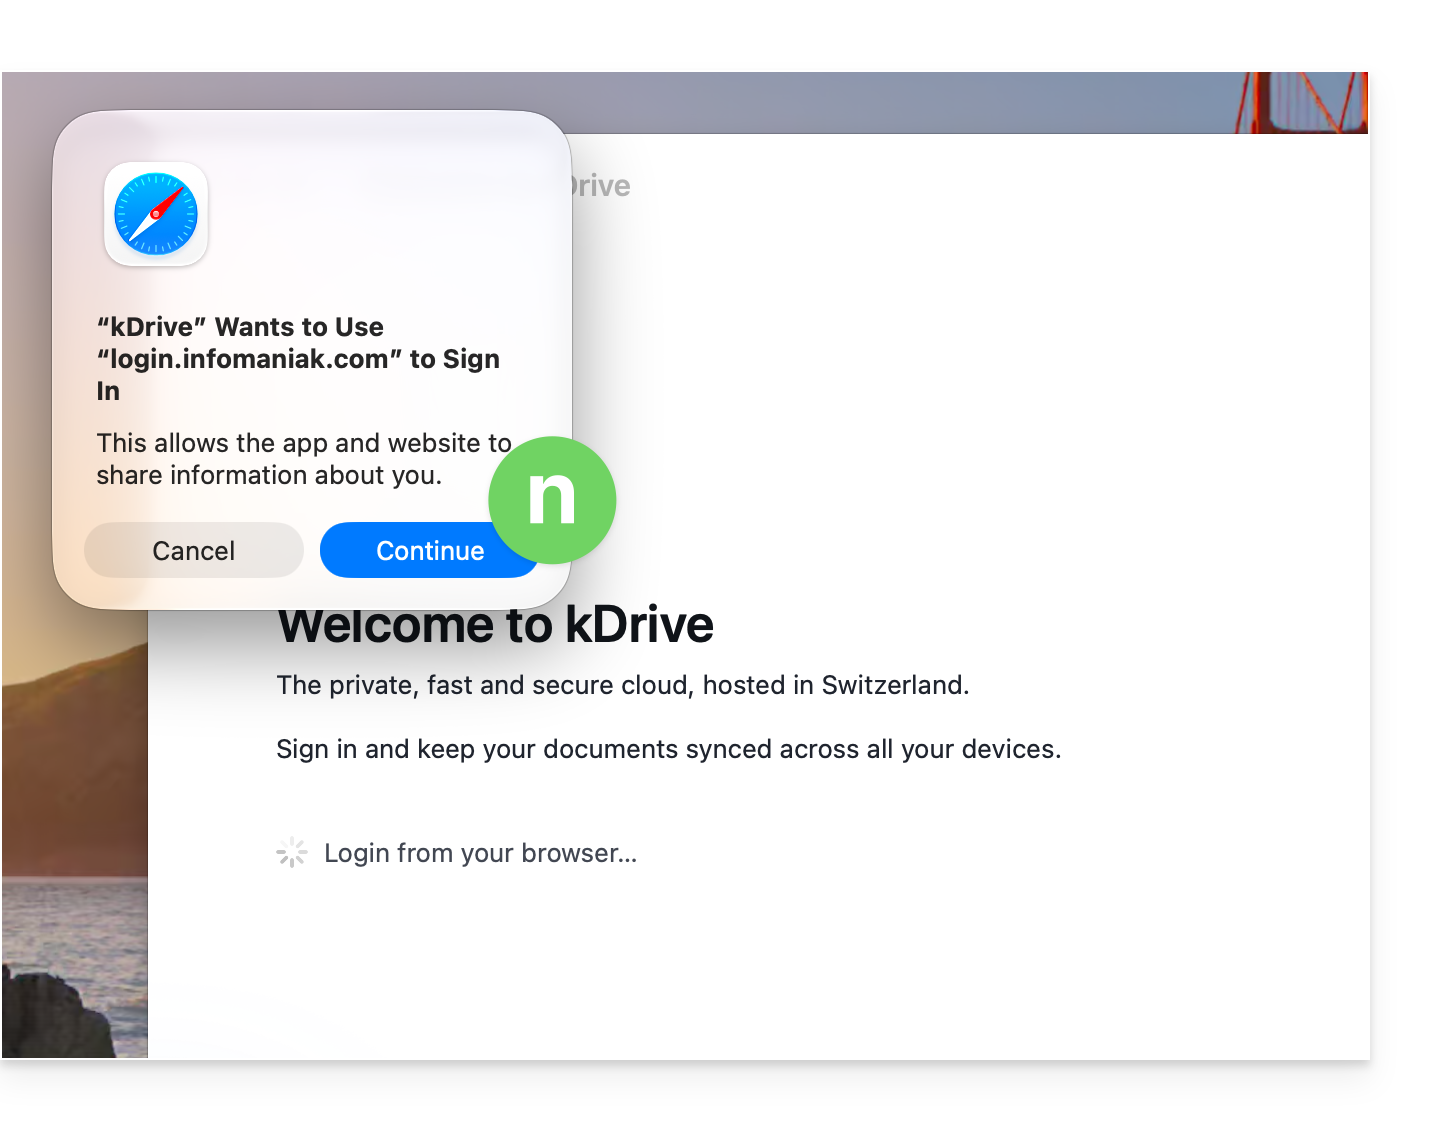
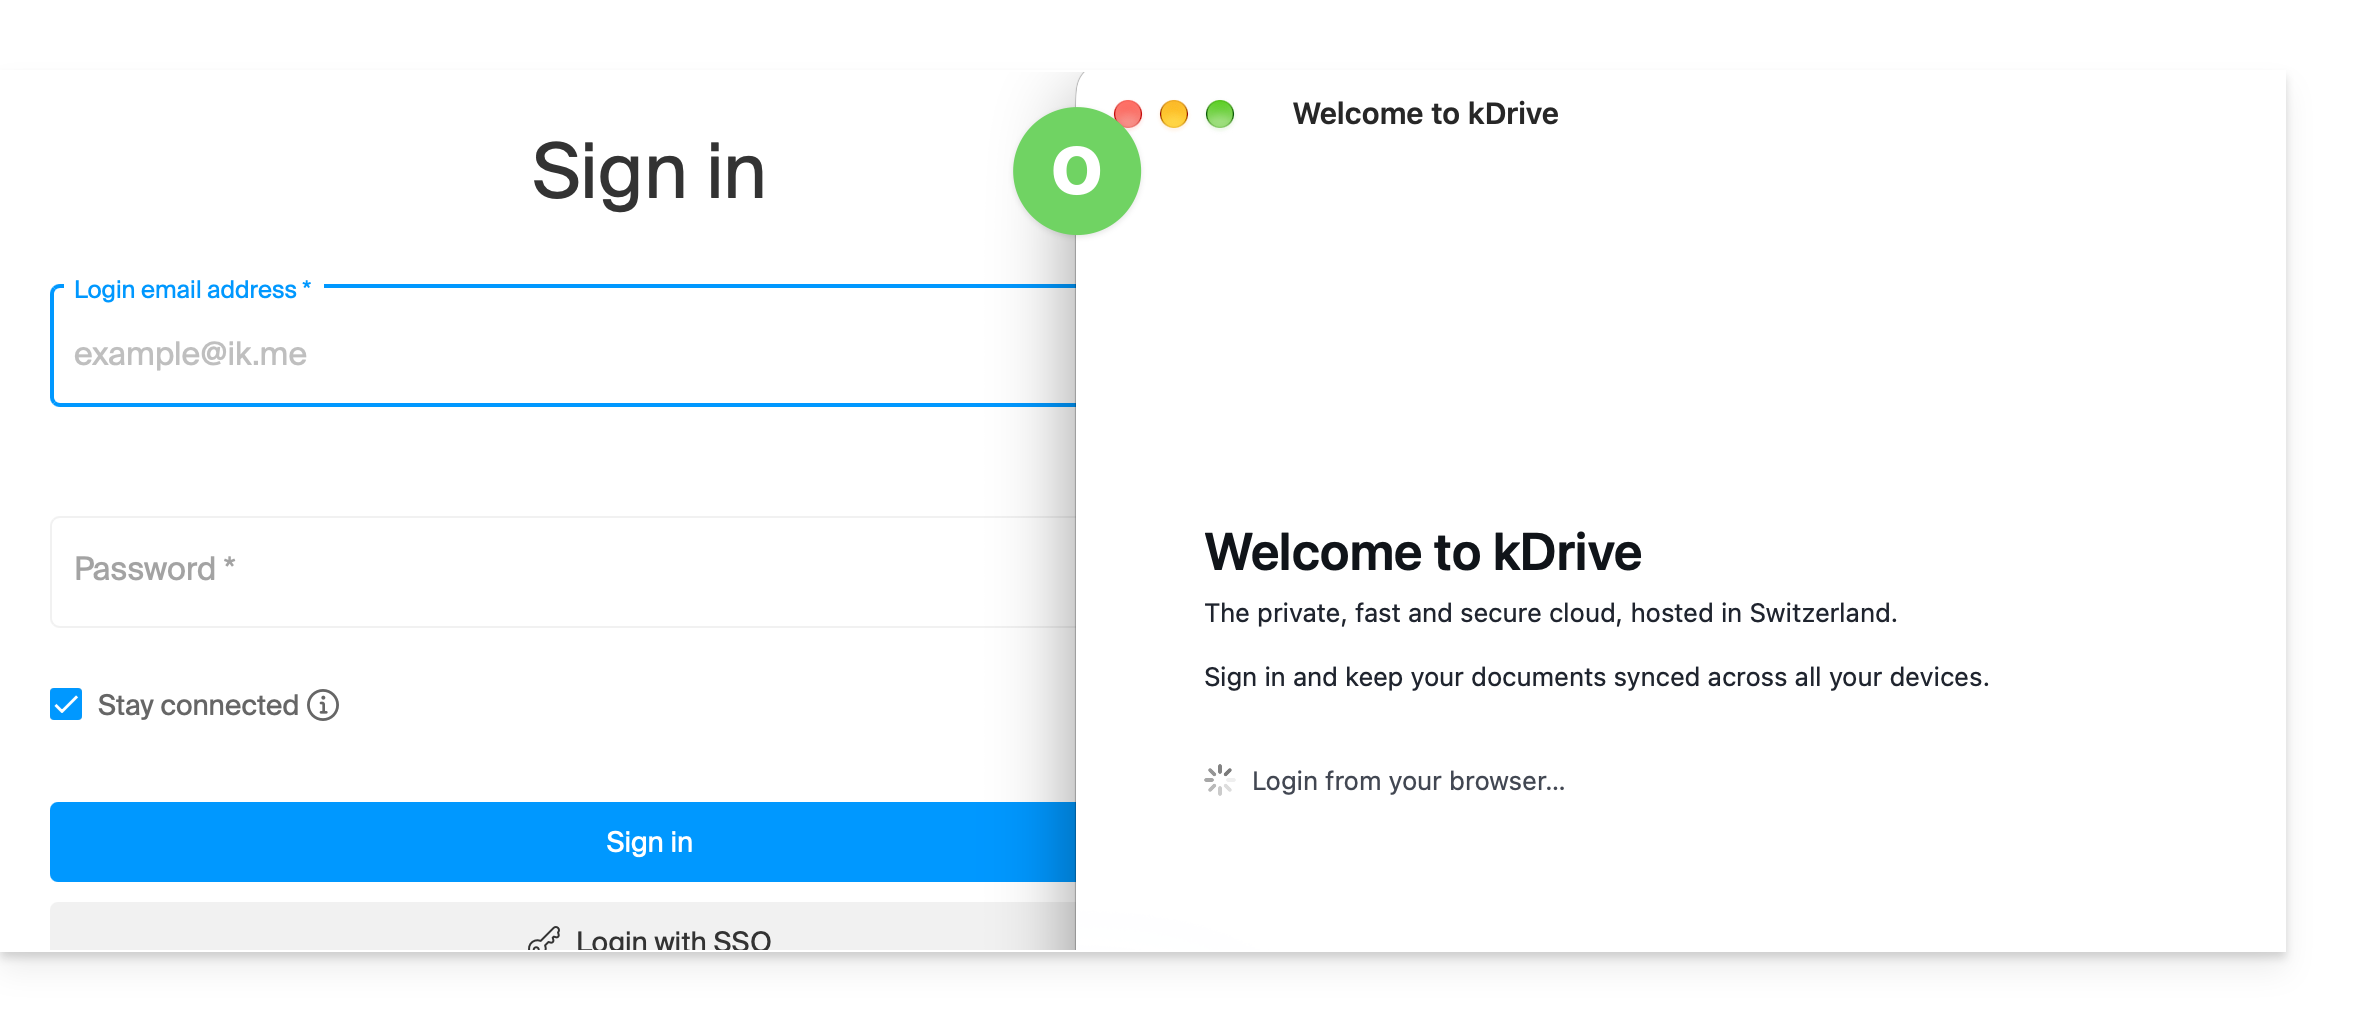
- The browser opens, allowing you to connect to your Infomaniak account, which will take you to the Organization(s) containing your kDrive.
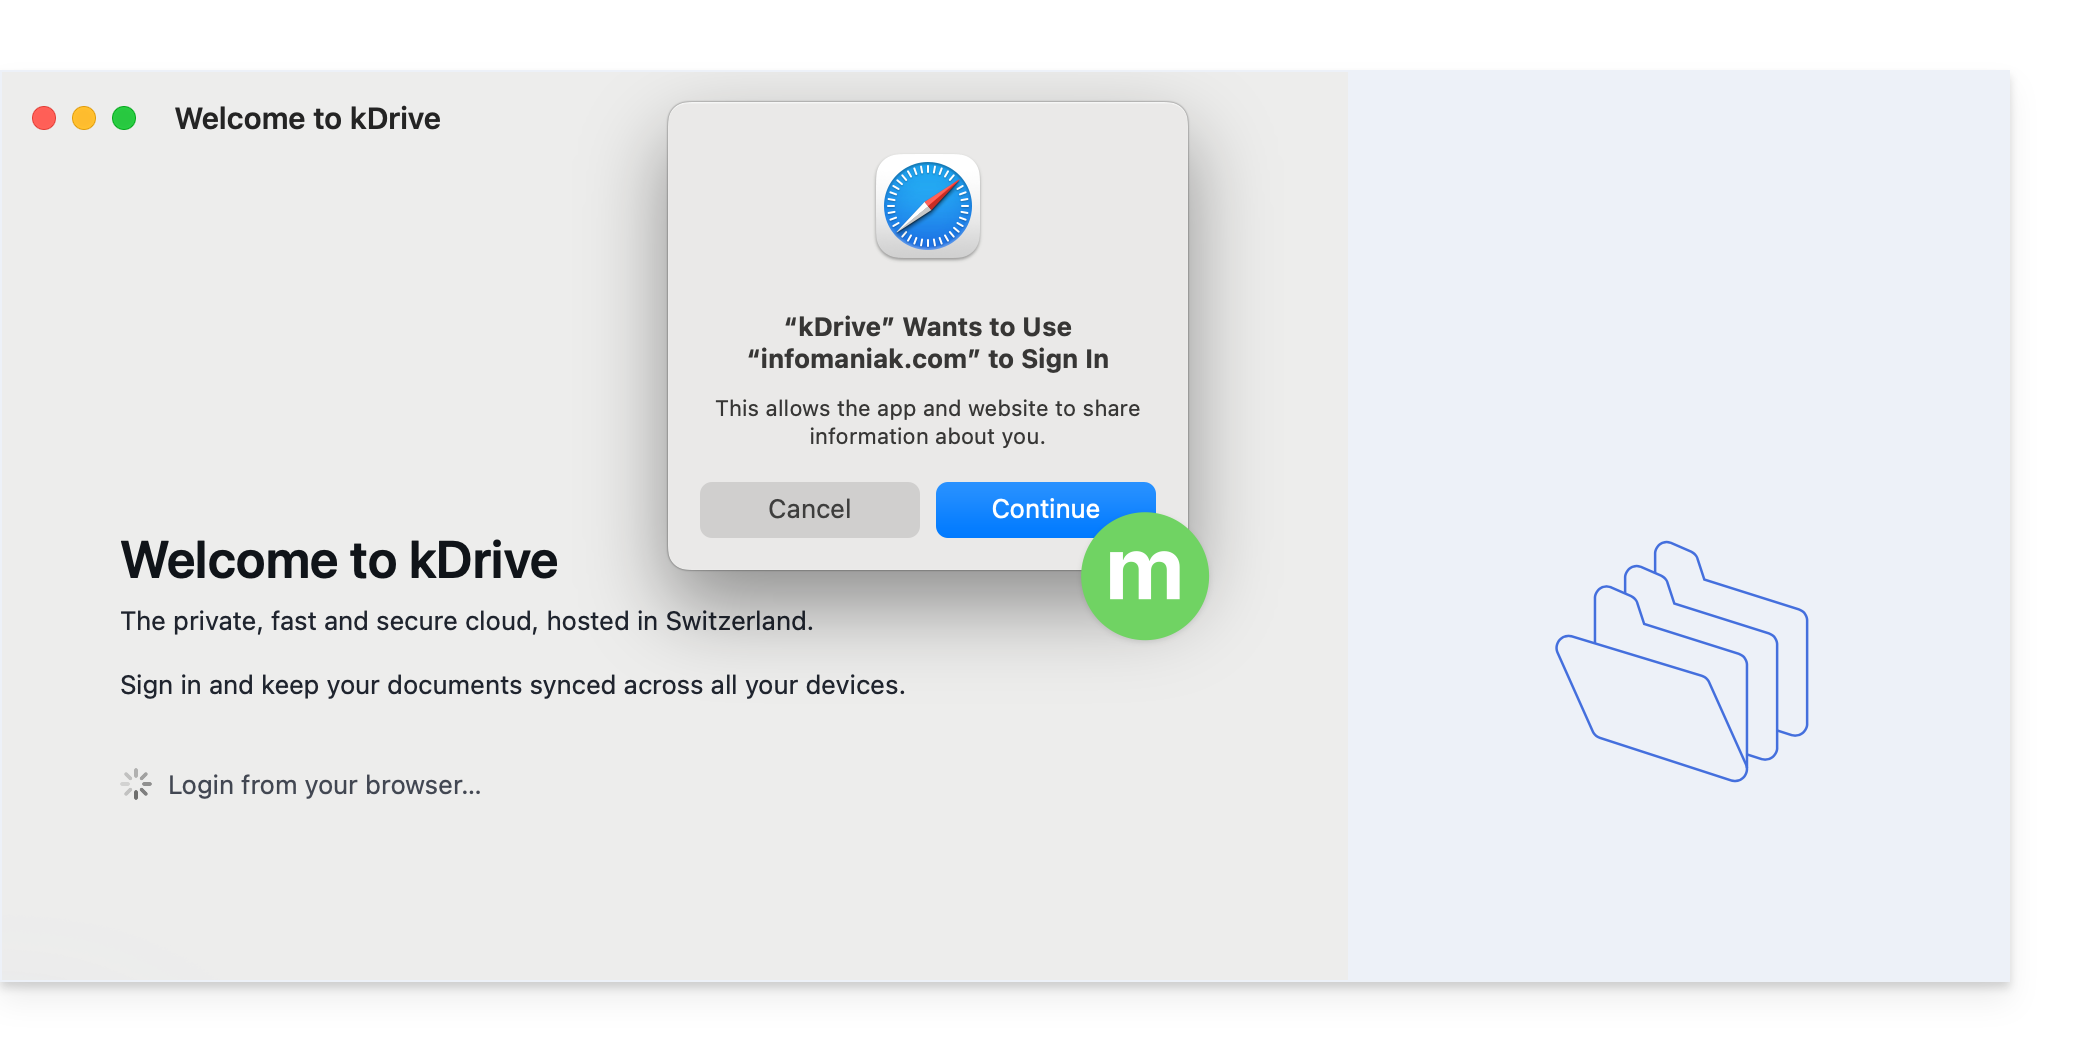
- The browser may ask for your permission to interact with the kDrive application to confirm the connection; click the Open button (if you cancel by mistake, click the link to request it again).
- You can close the browser; select the kDrive(s) that your user has access to and that you want to synchronize on this device, then click on Advanced Settings:
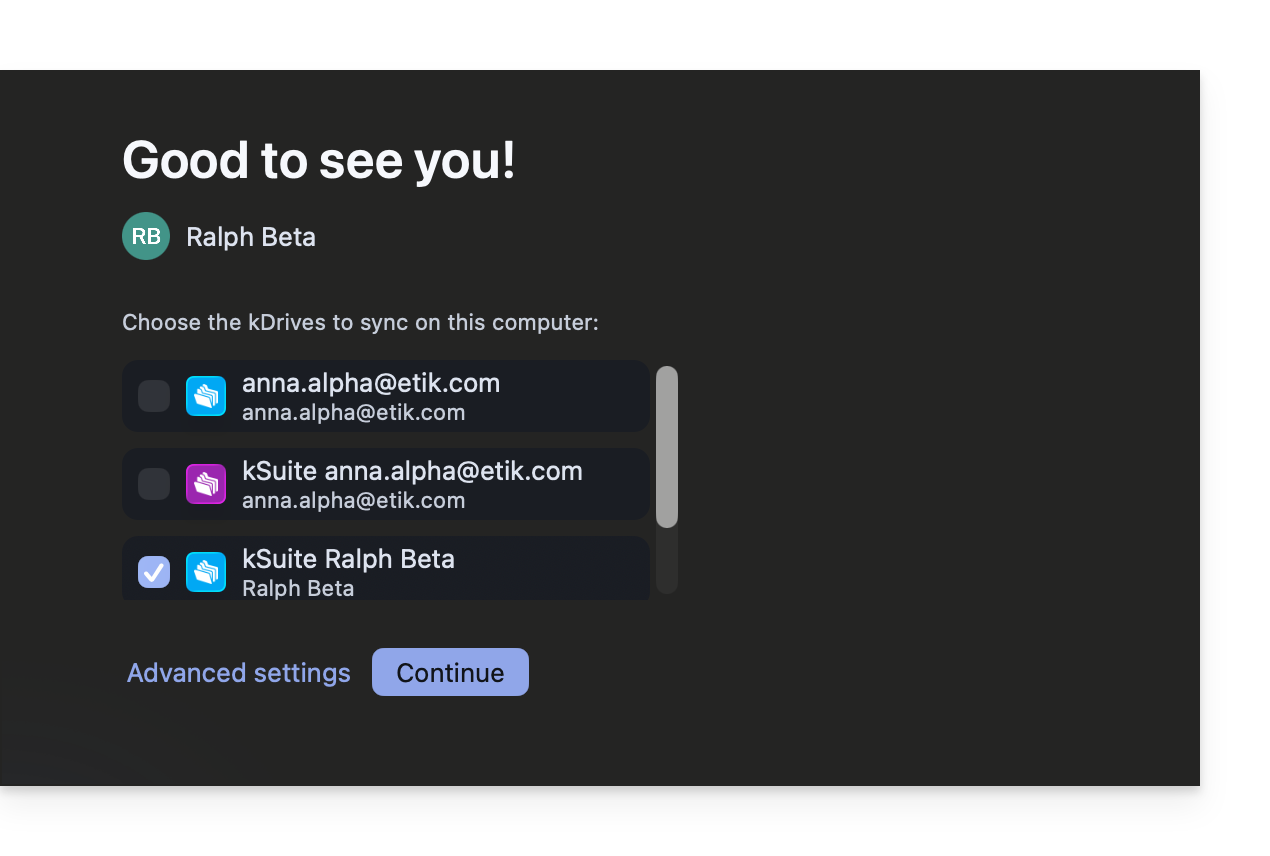
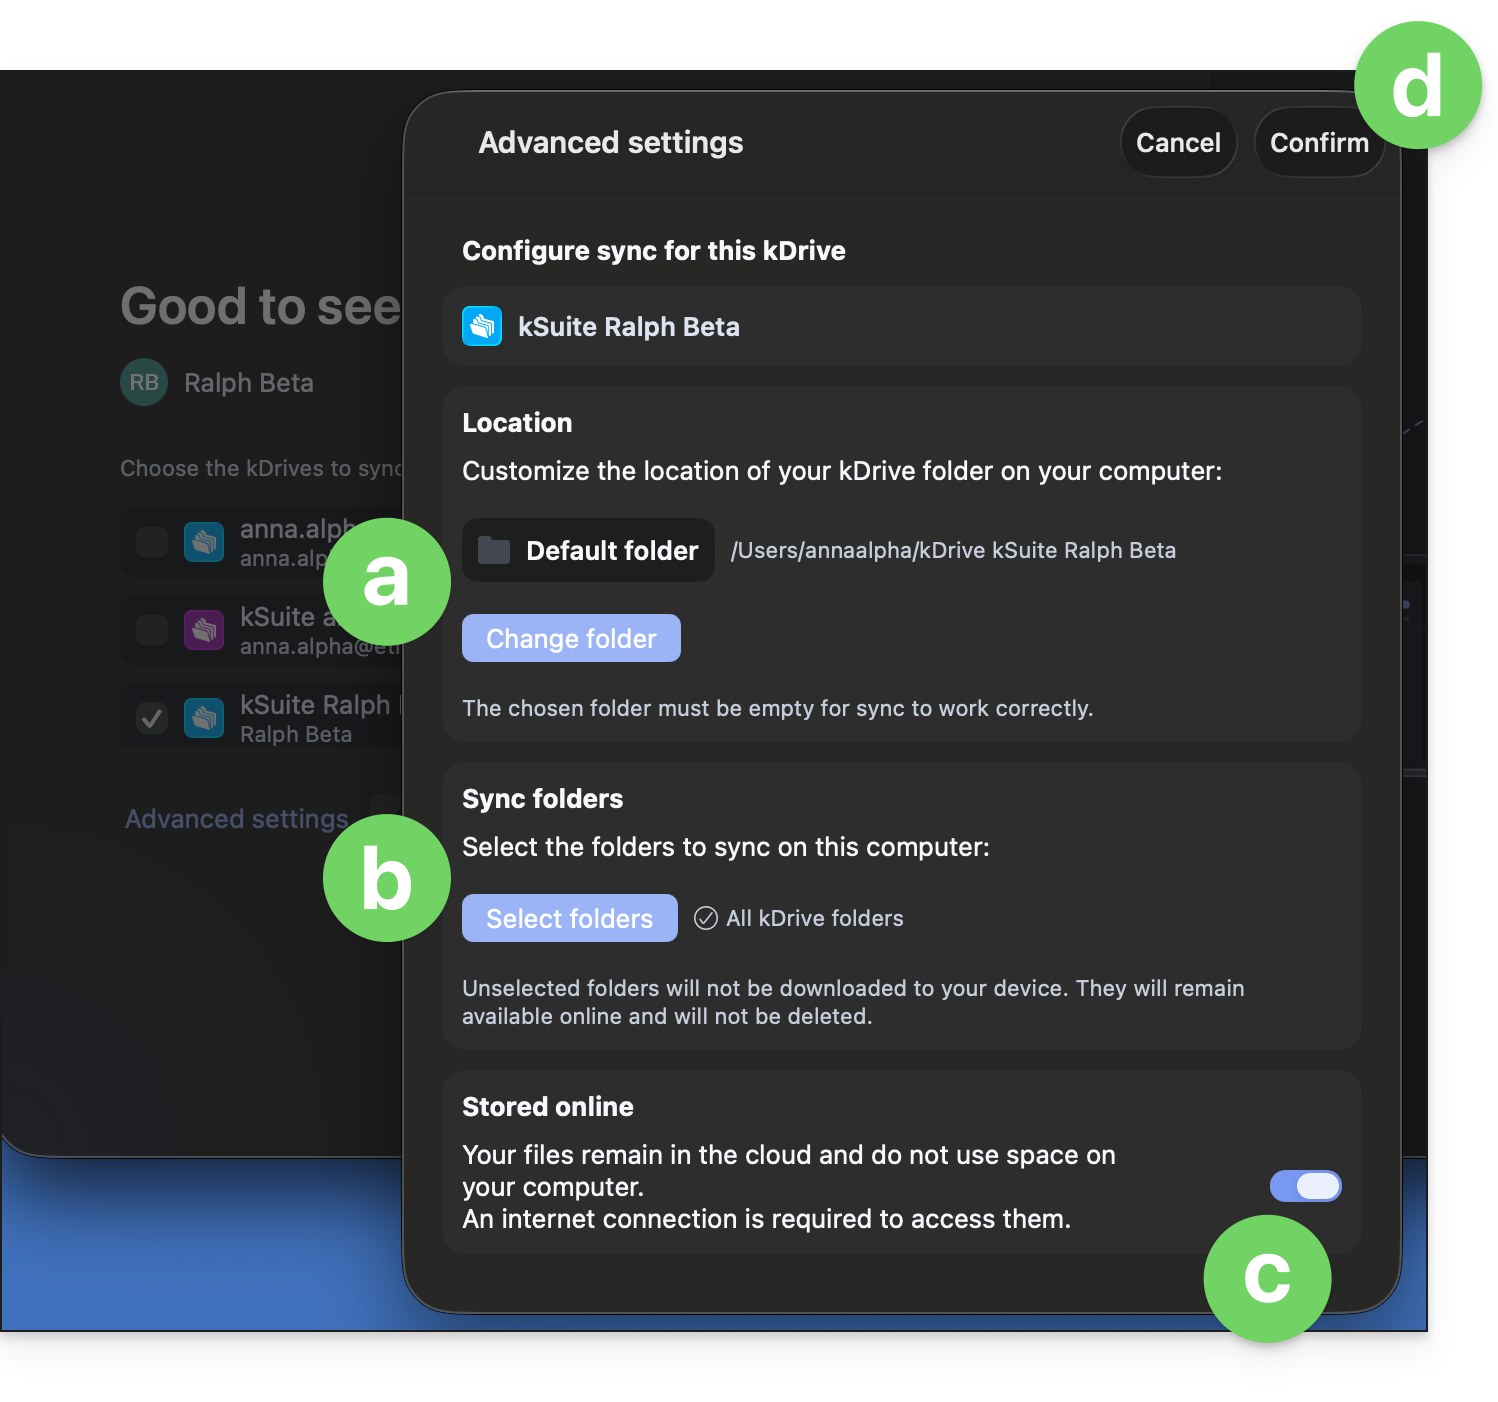
- The Advanced Settings allow you to choose:
- the location where the kDrive data will be stored (the folder must be empty),
- the existing folders on kDrive that should not be displayed on this device (❓: help),
- whether to store the kDrive files on the disk with their actual size, or whether they can be “virtually” listed while being stored on the remote servers (❓: help).
- Confirm at the top of the page:
- Click the Continue button next to the advanced settings to complete the installation and open the interface. The app should run in the background, allowing for automatic synchronization. You should always see its icon (❓: help):
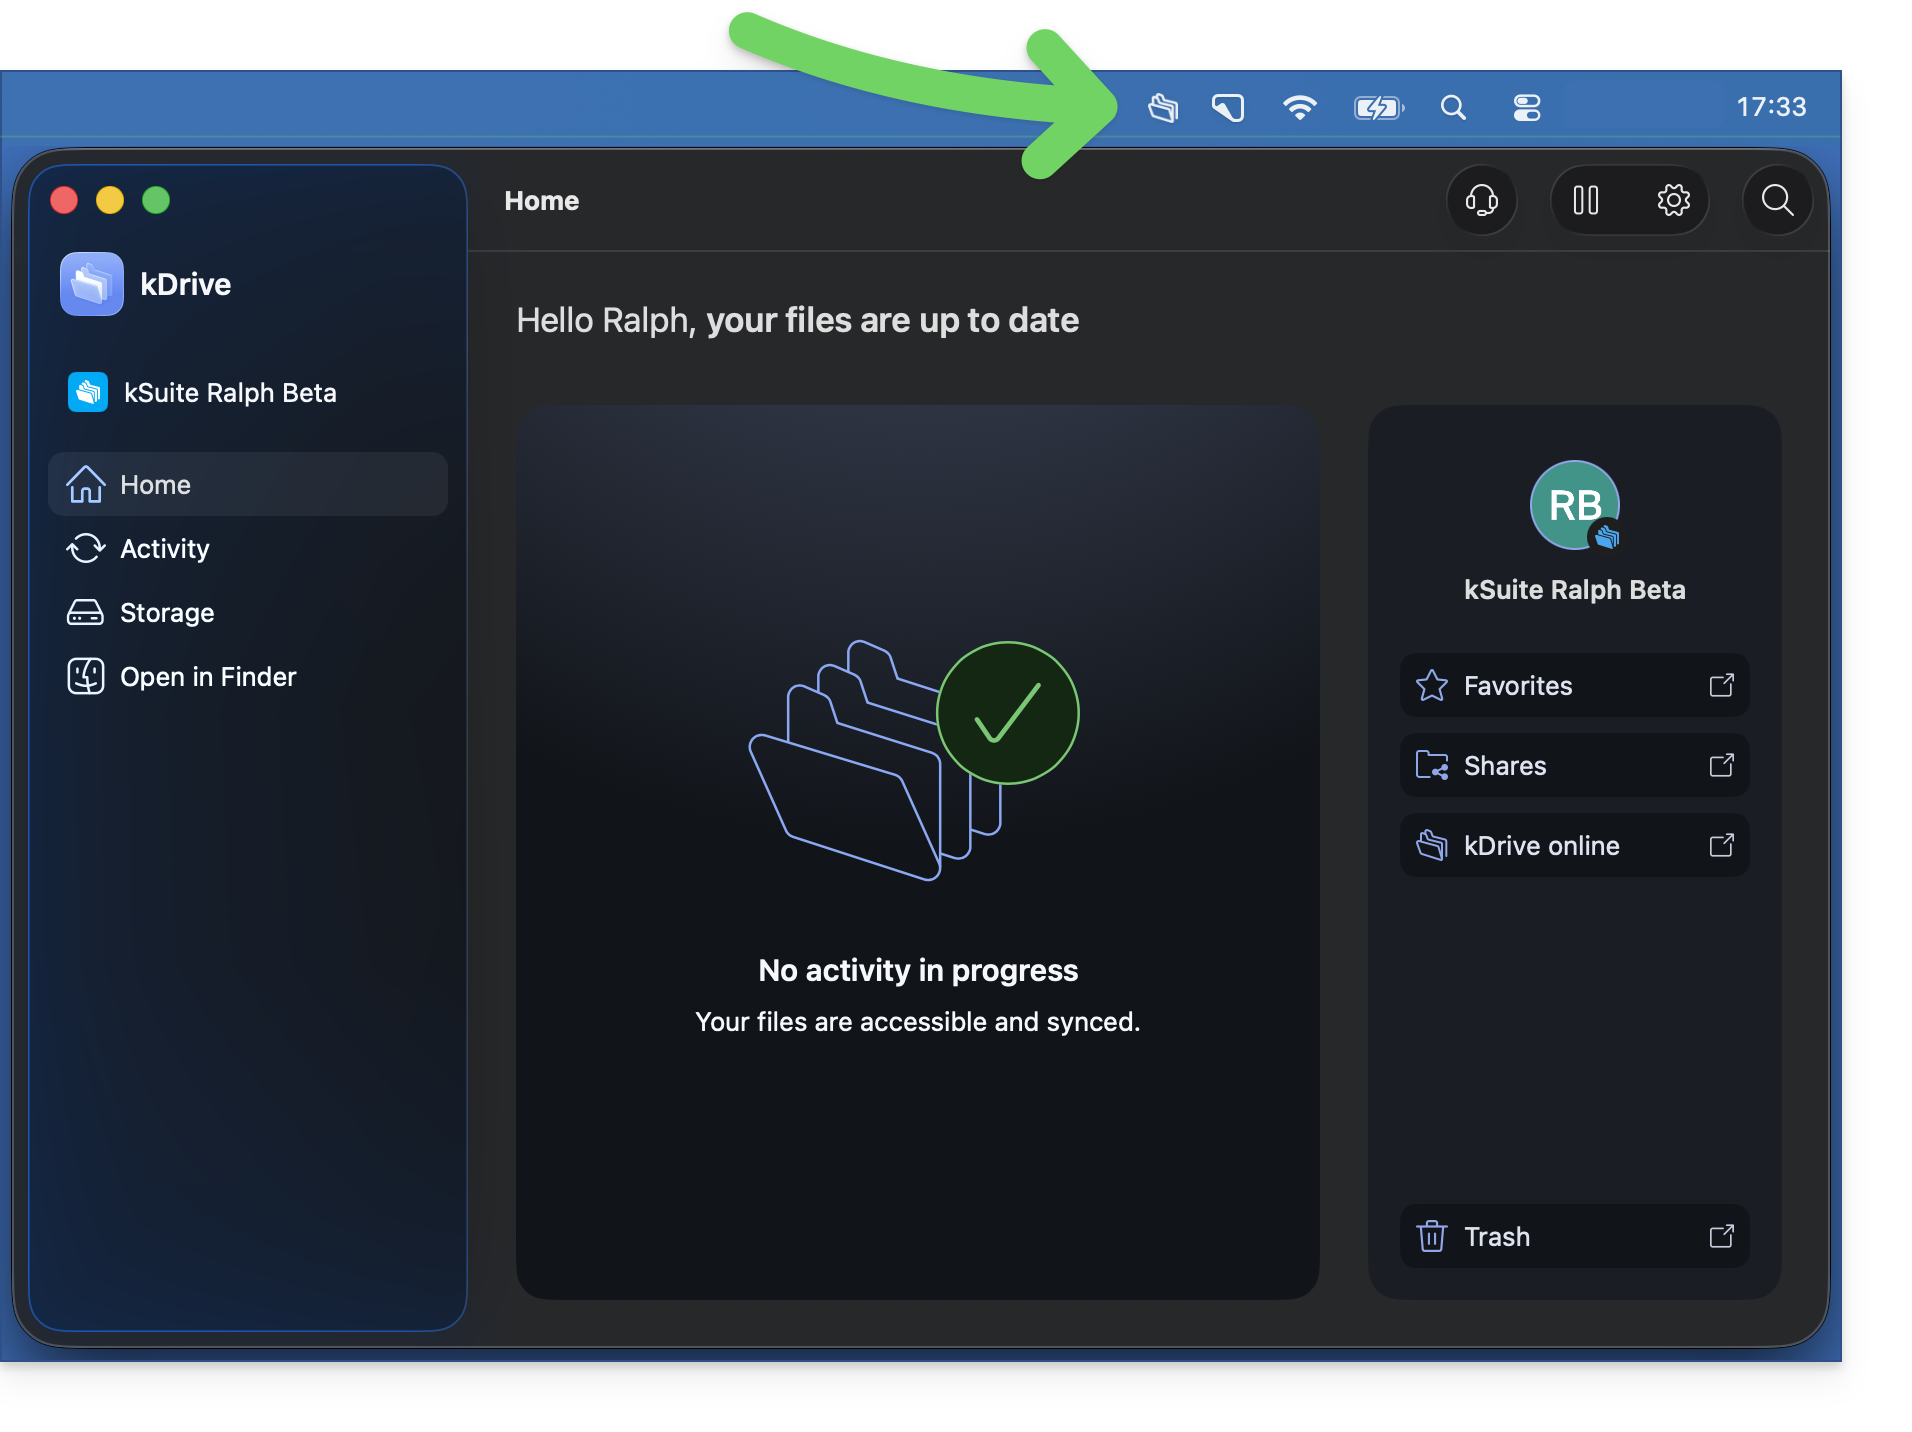
- Consult the other guides to continue exploring the kDrive application.
Uninstall kDrive on macOS
To do this:
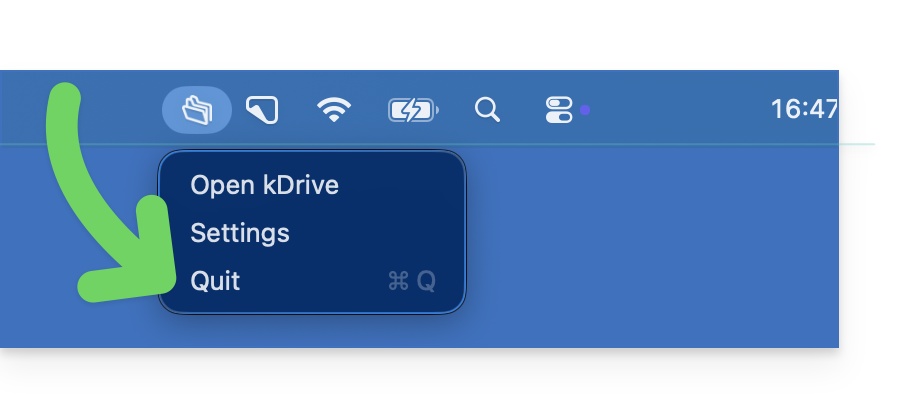
- Right-click on the icon and choose Quit if the app is still running in the background in the taskbar at the top right:
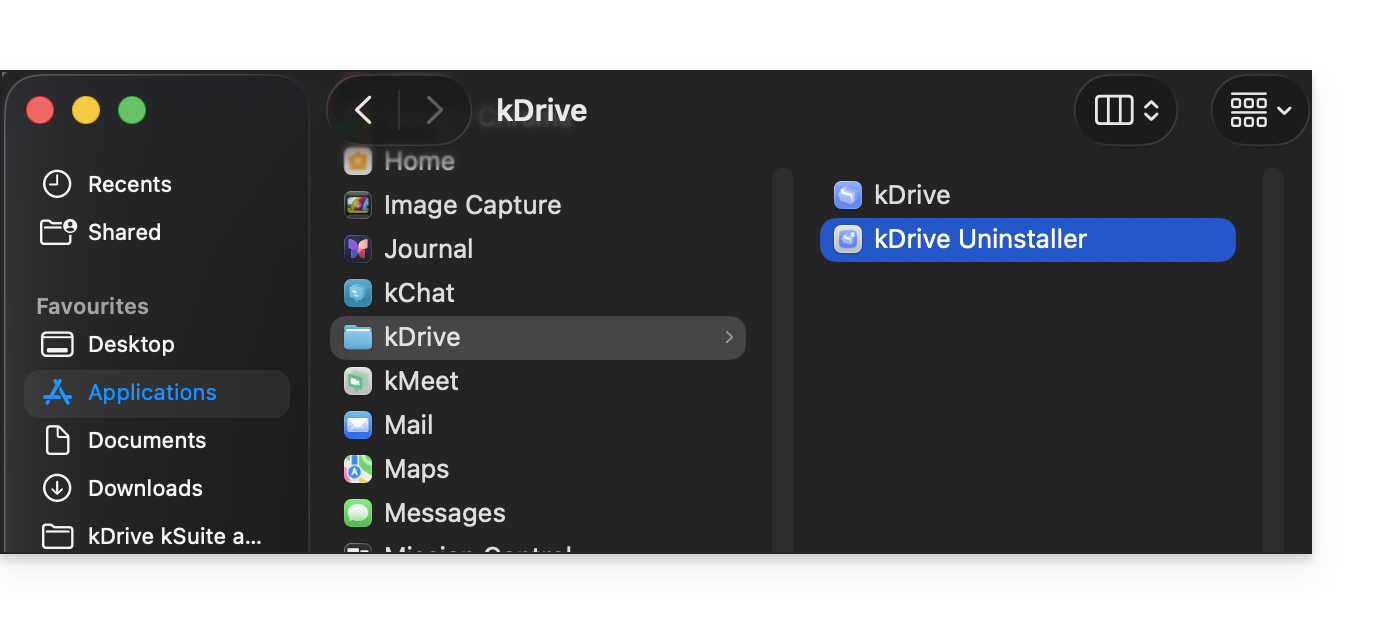
- Then, open the kDrive Uninstaller application from the kDrive folder in your macOS applications and confirm the deletion:
- You may need to enter your login credentials.
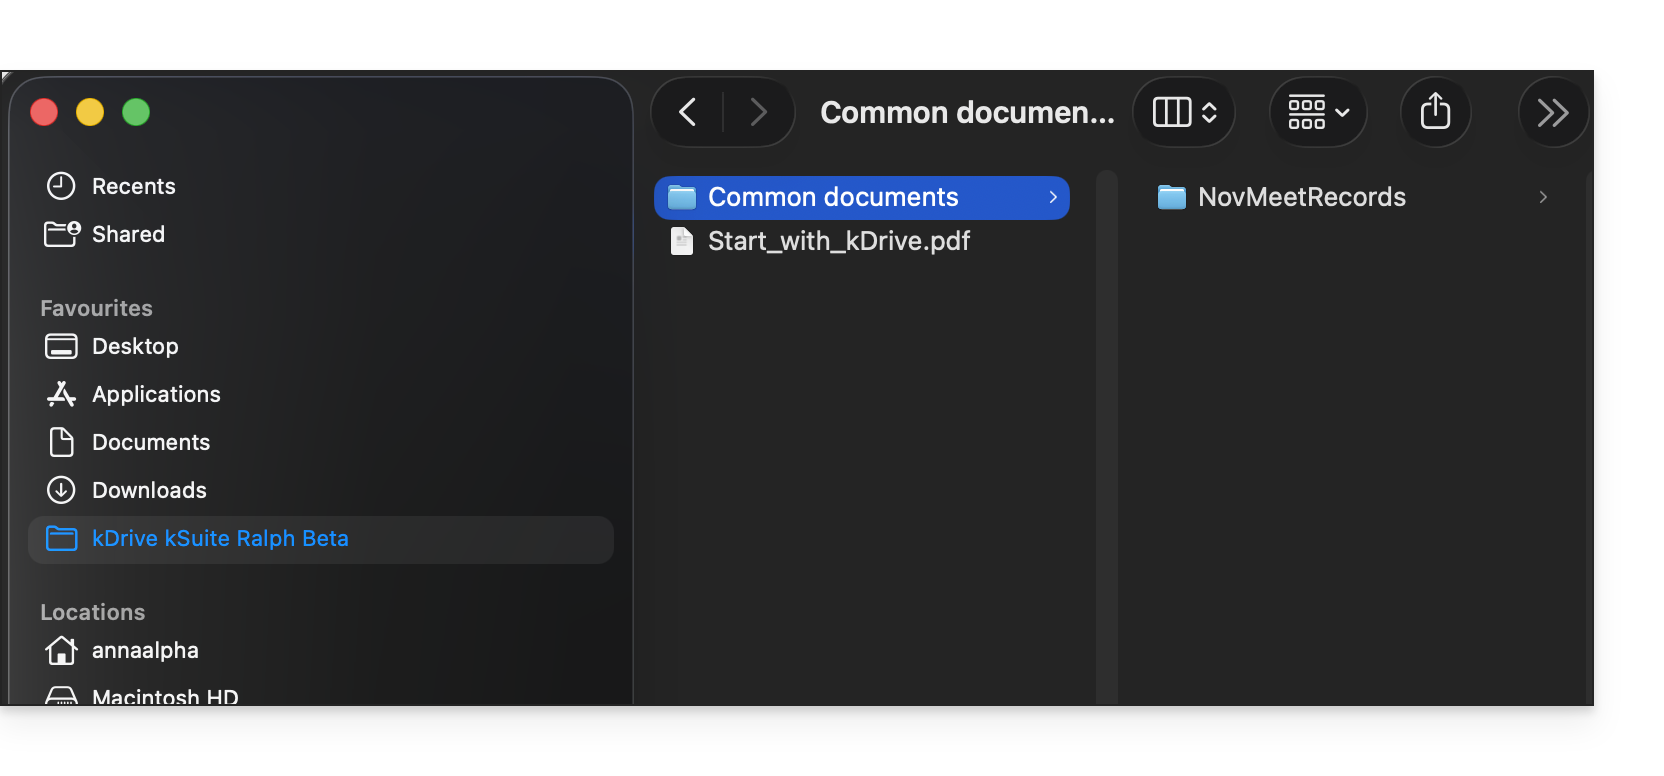
- Once the application has been deleted, you can delete the storage folder containing your files on your computer if necessary:
kDrive permissions for older versions of macOS
To allow the kDrive v4.x components to properly access your computer, follow the instructions shown in the screenshots corresponding to your version of macOS: 12 Monterey; 13 Ventura; 14 Sonoma; 15 Sequoia; 26 Tahoe; 27 Golden Gate
macOS 12
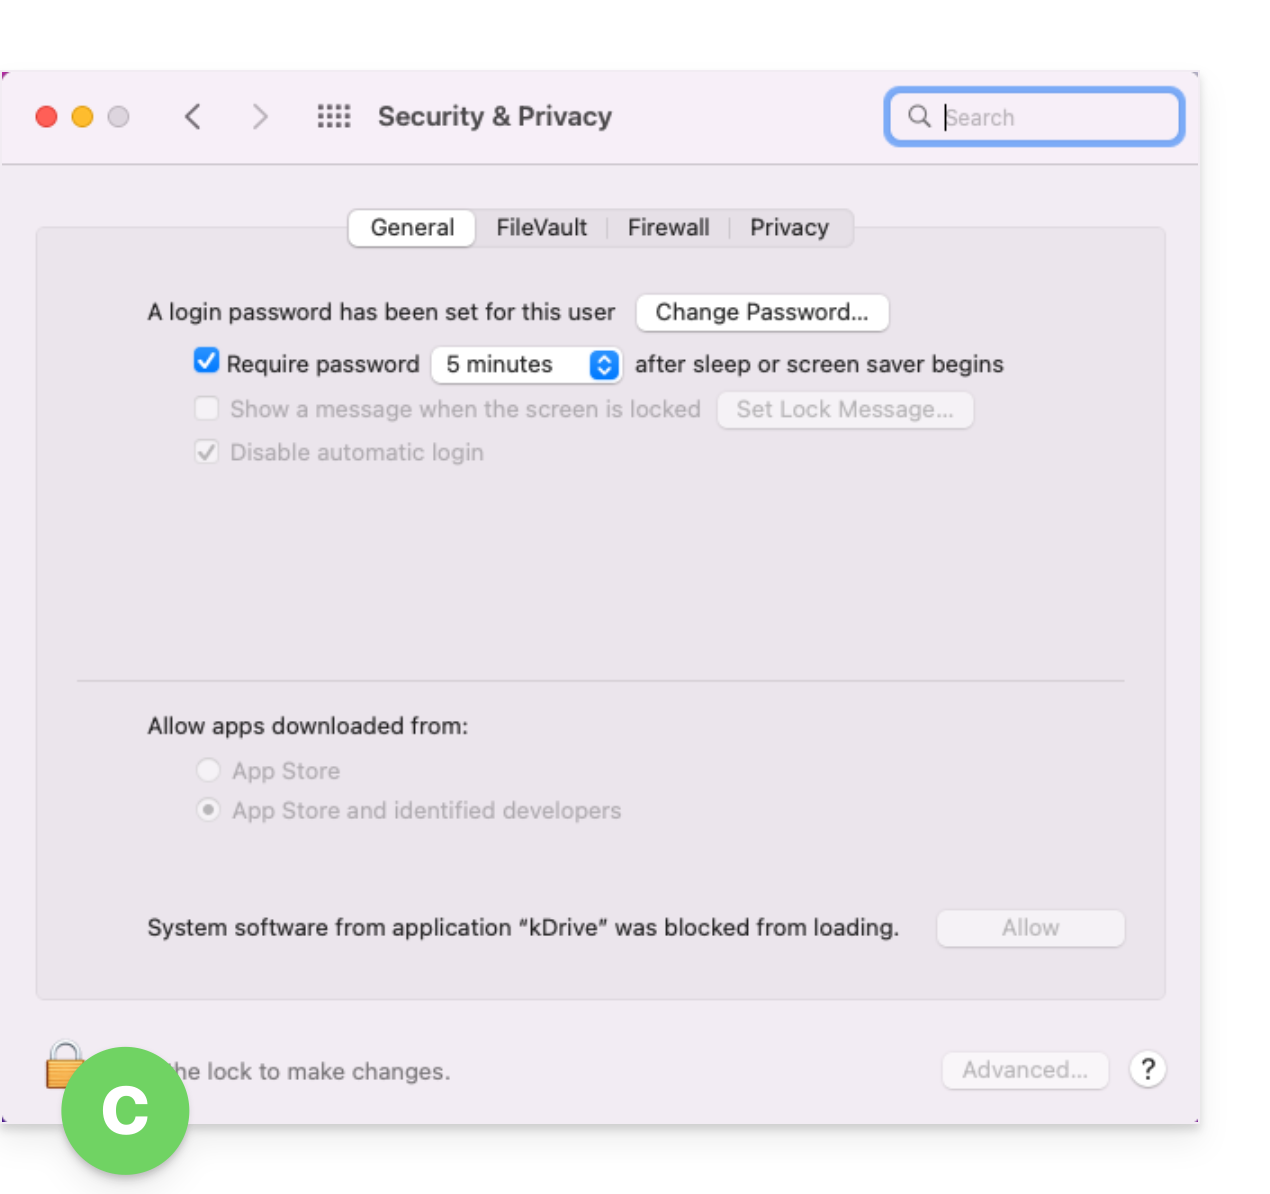
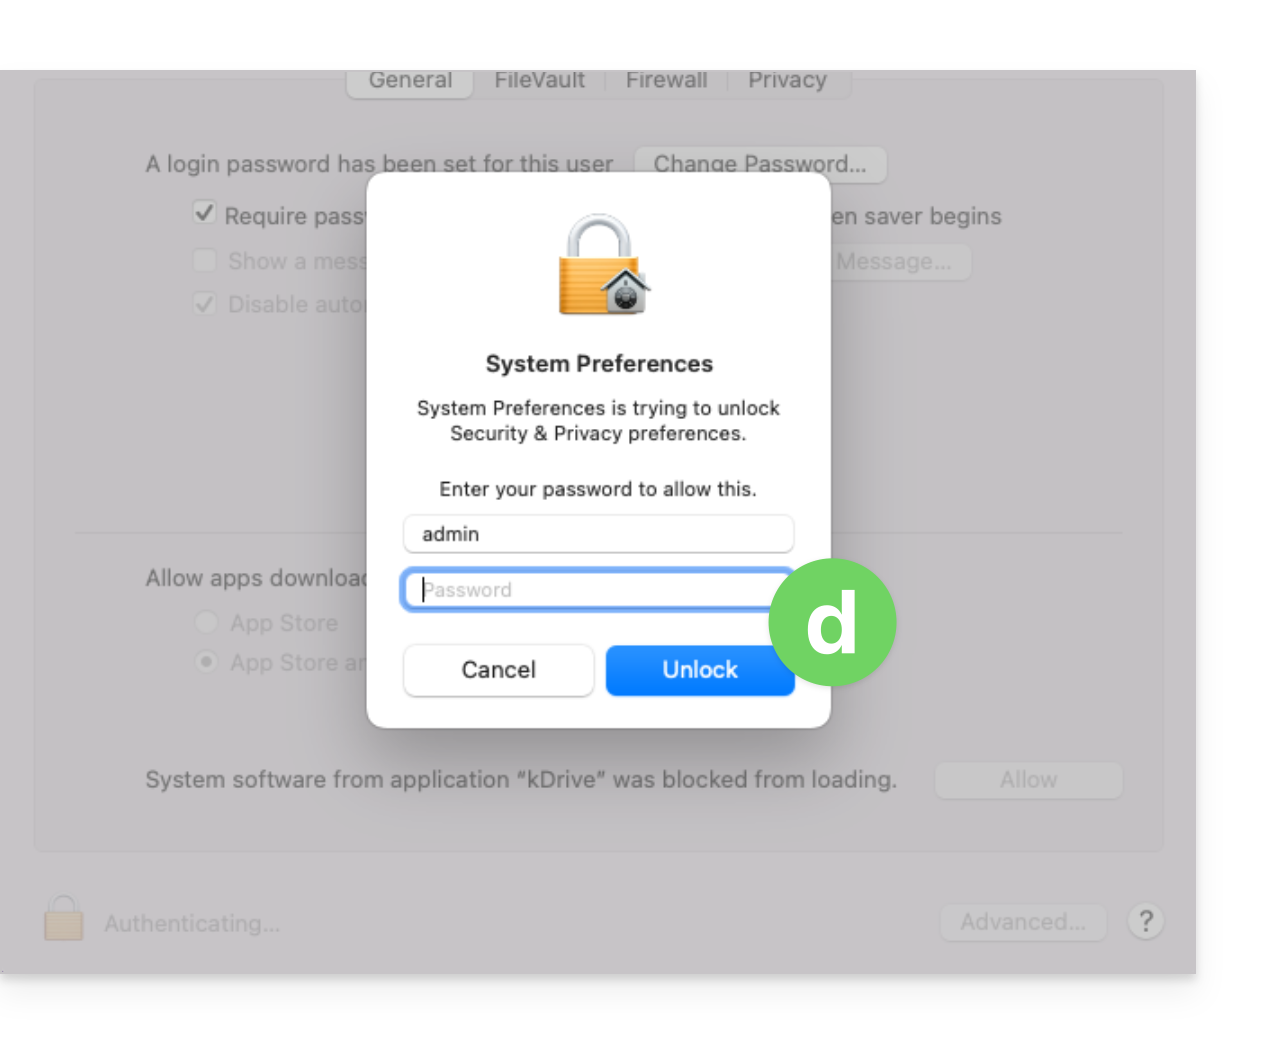
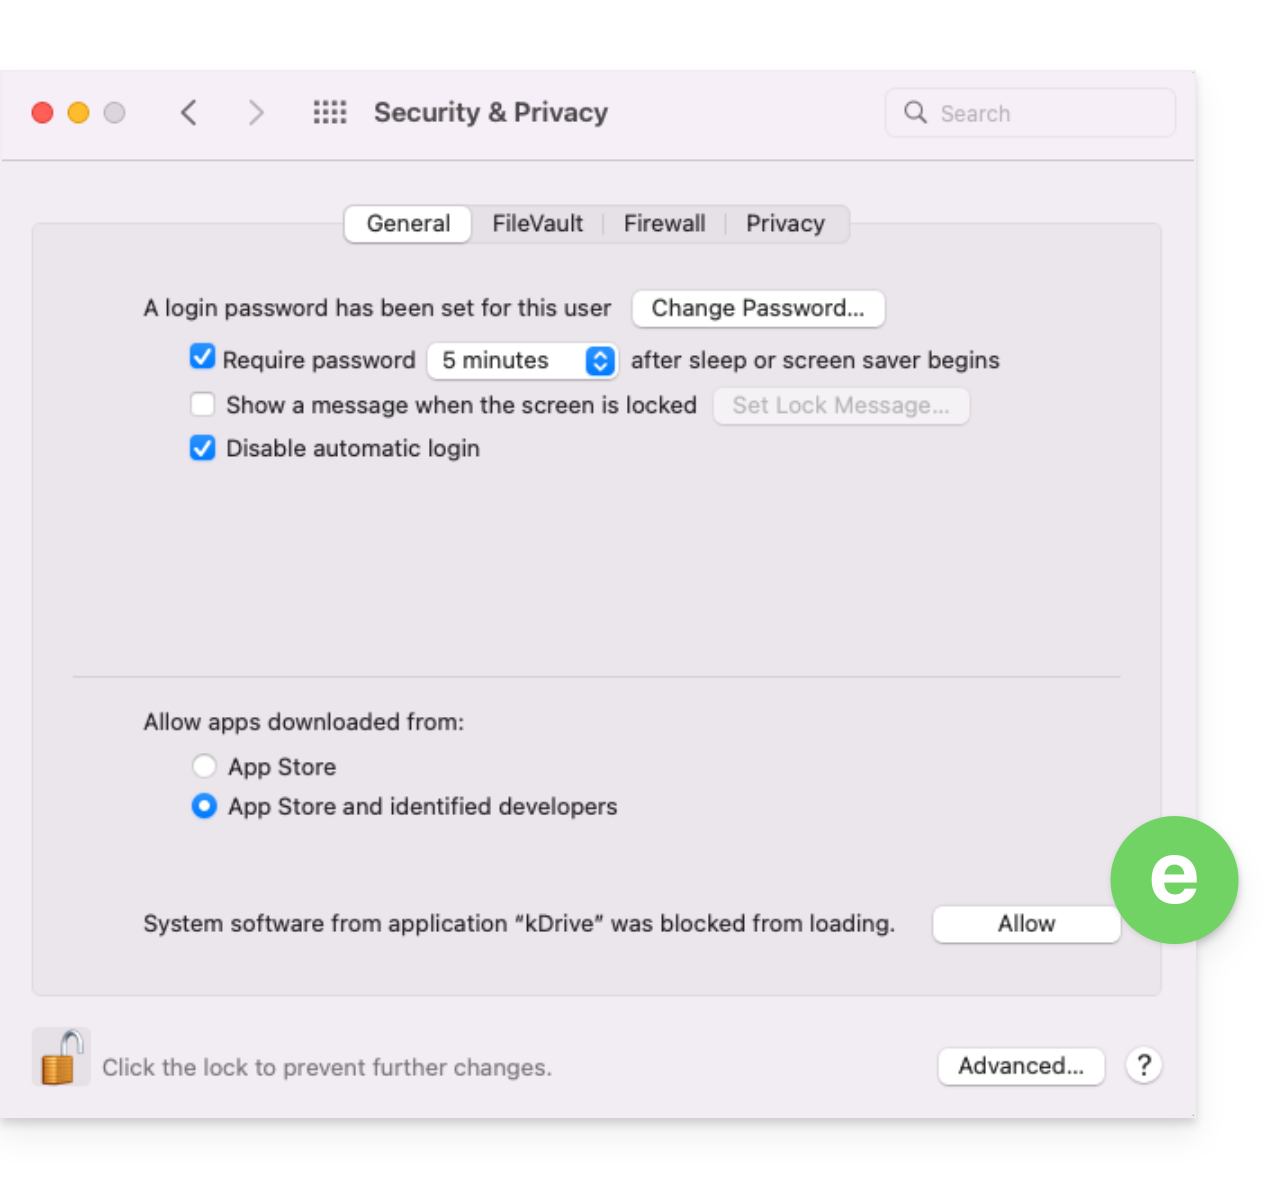
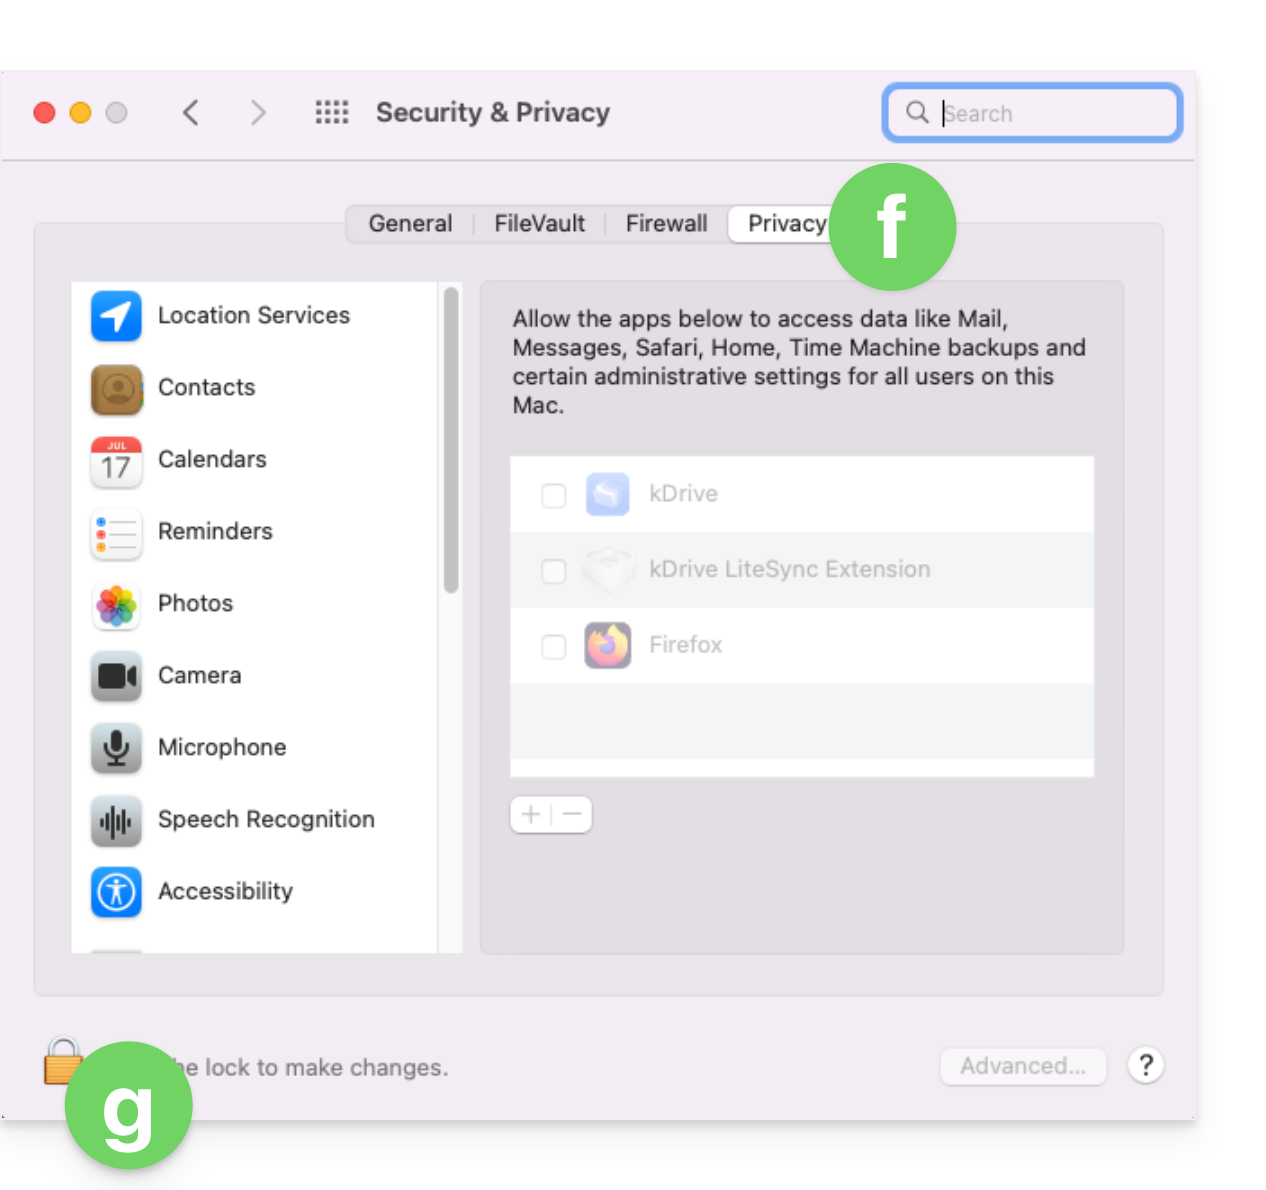
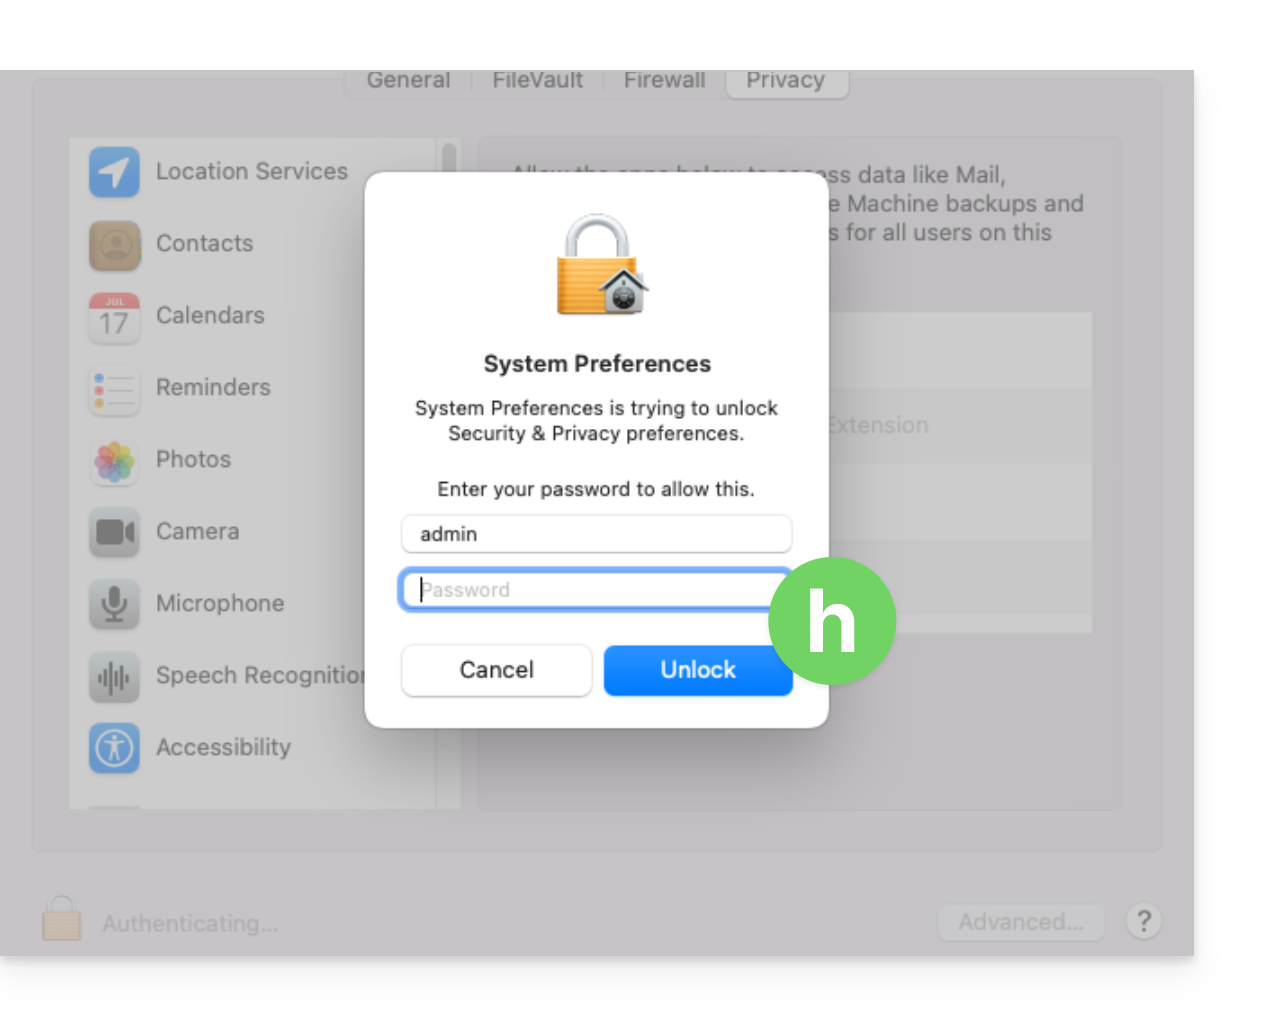
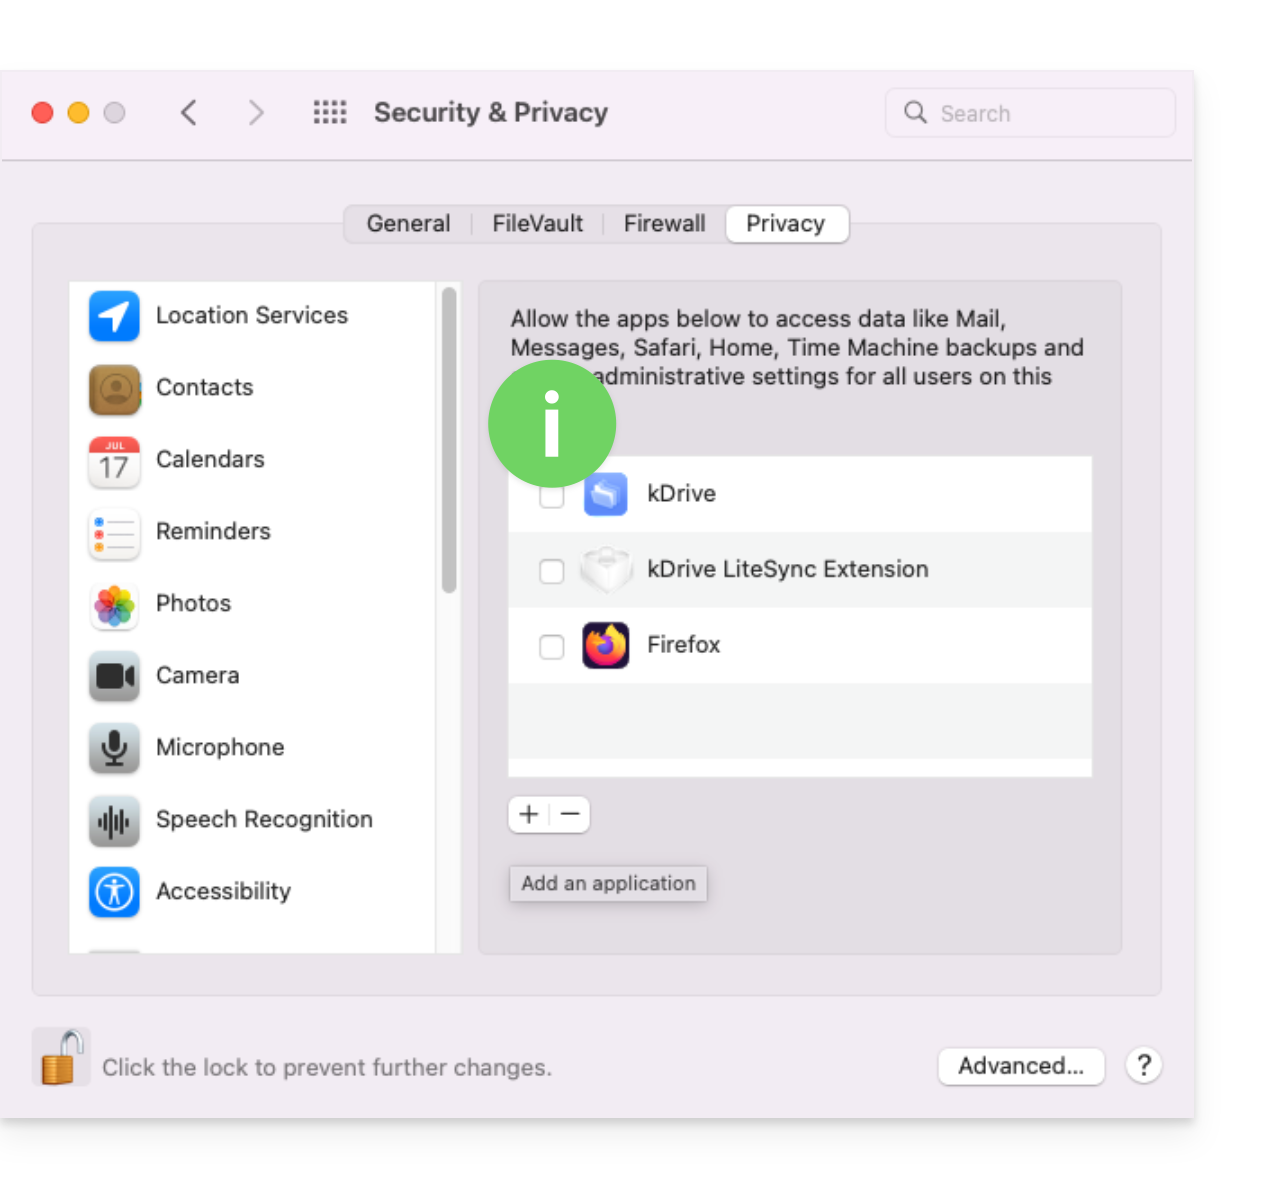
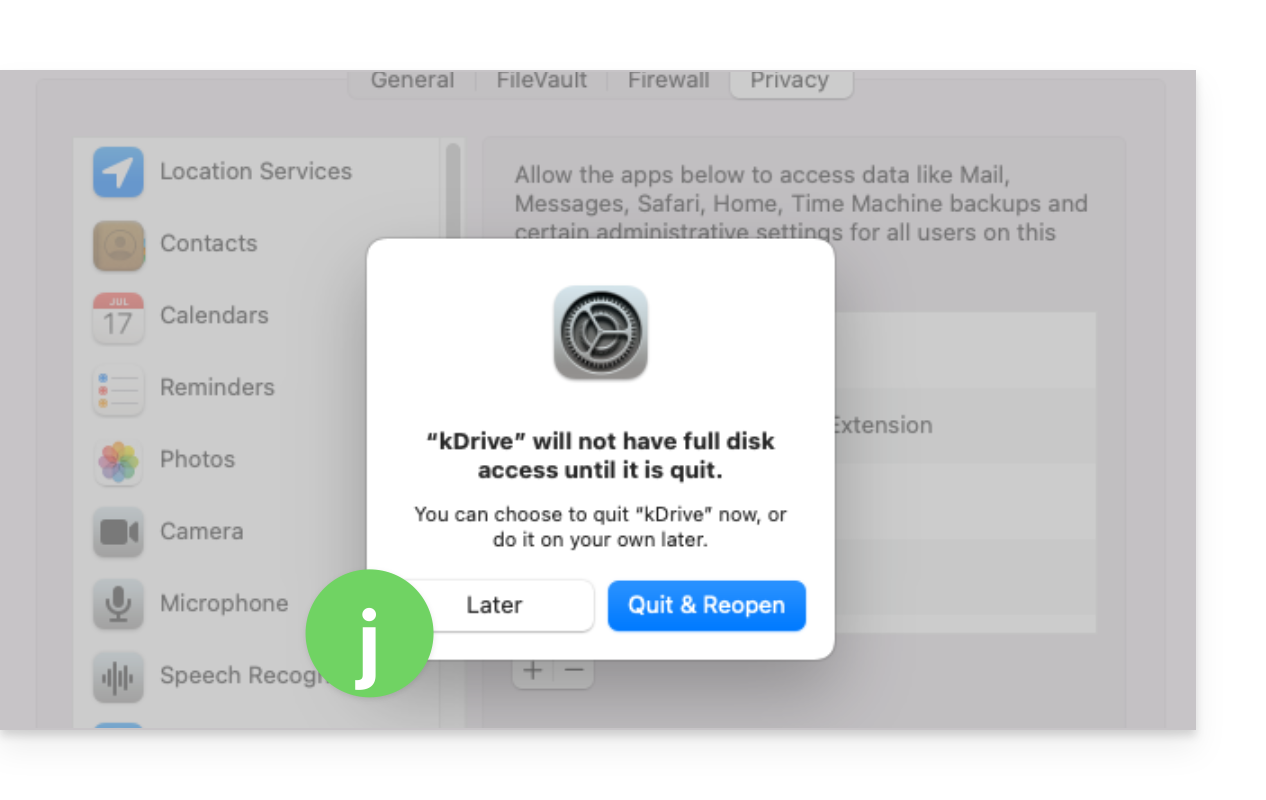
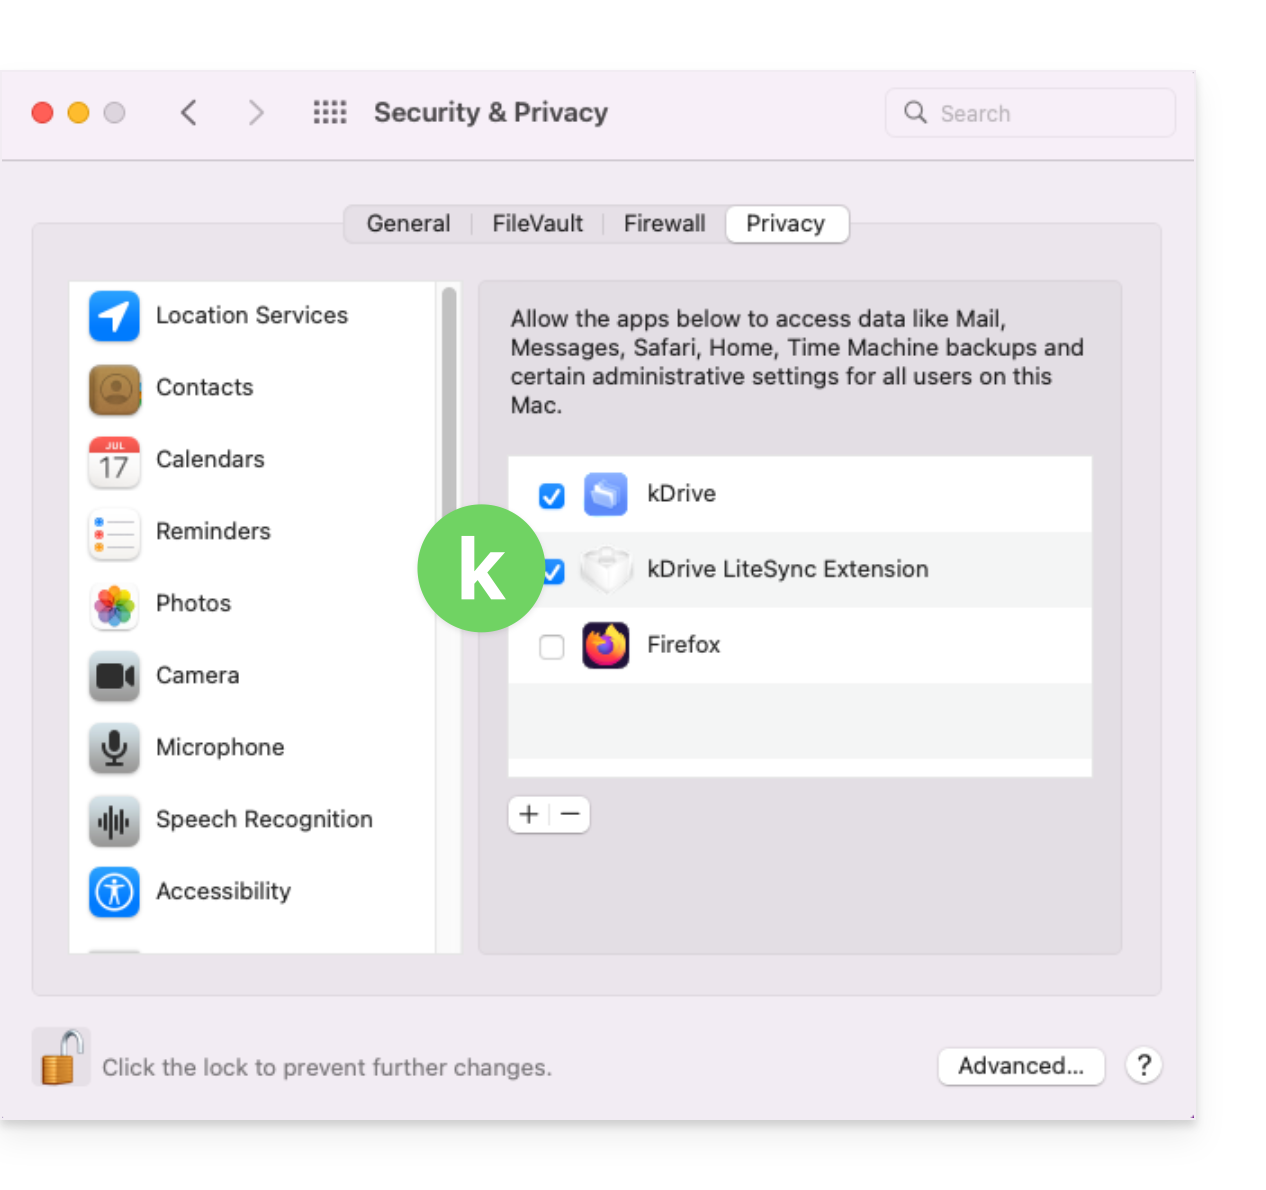
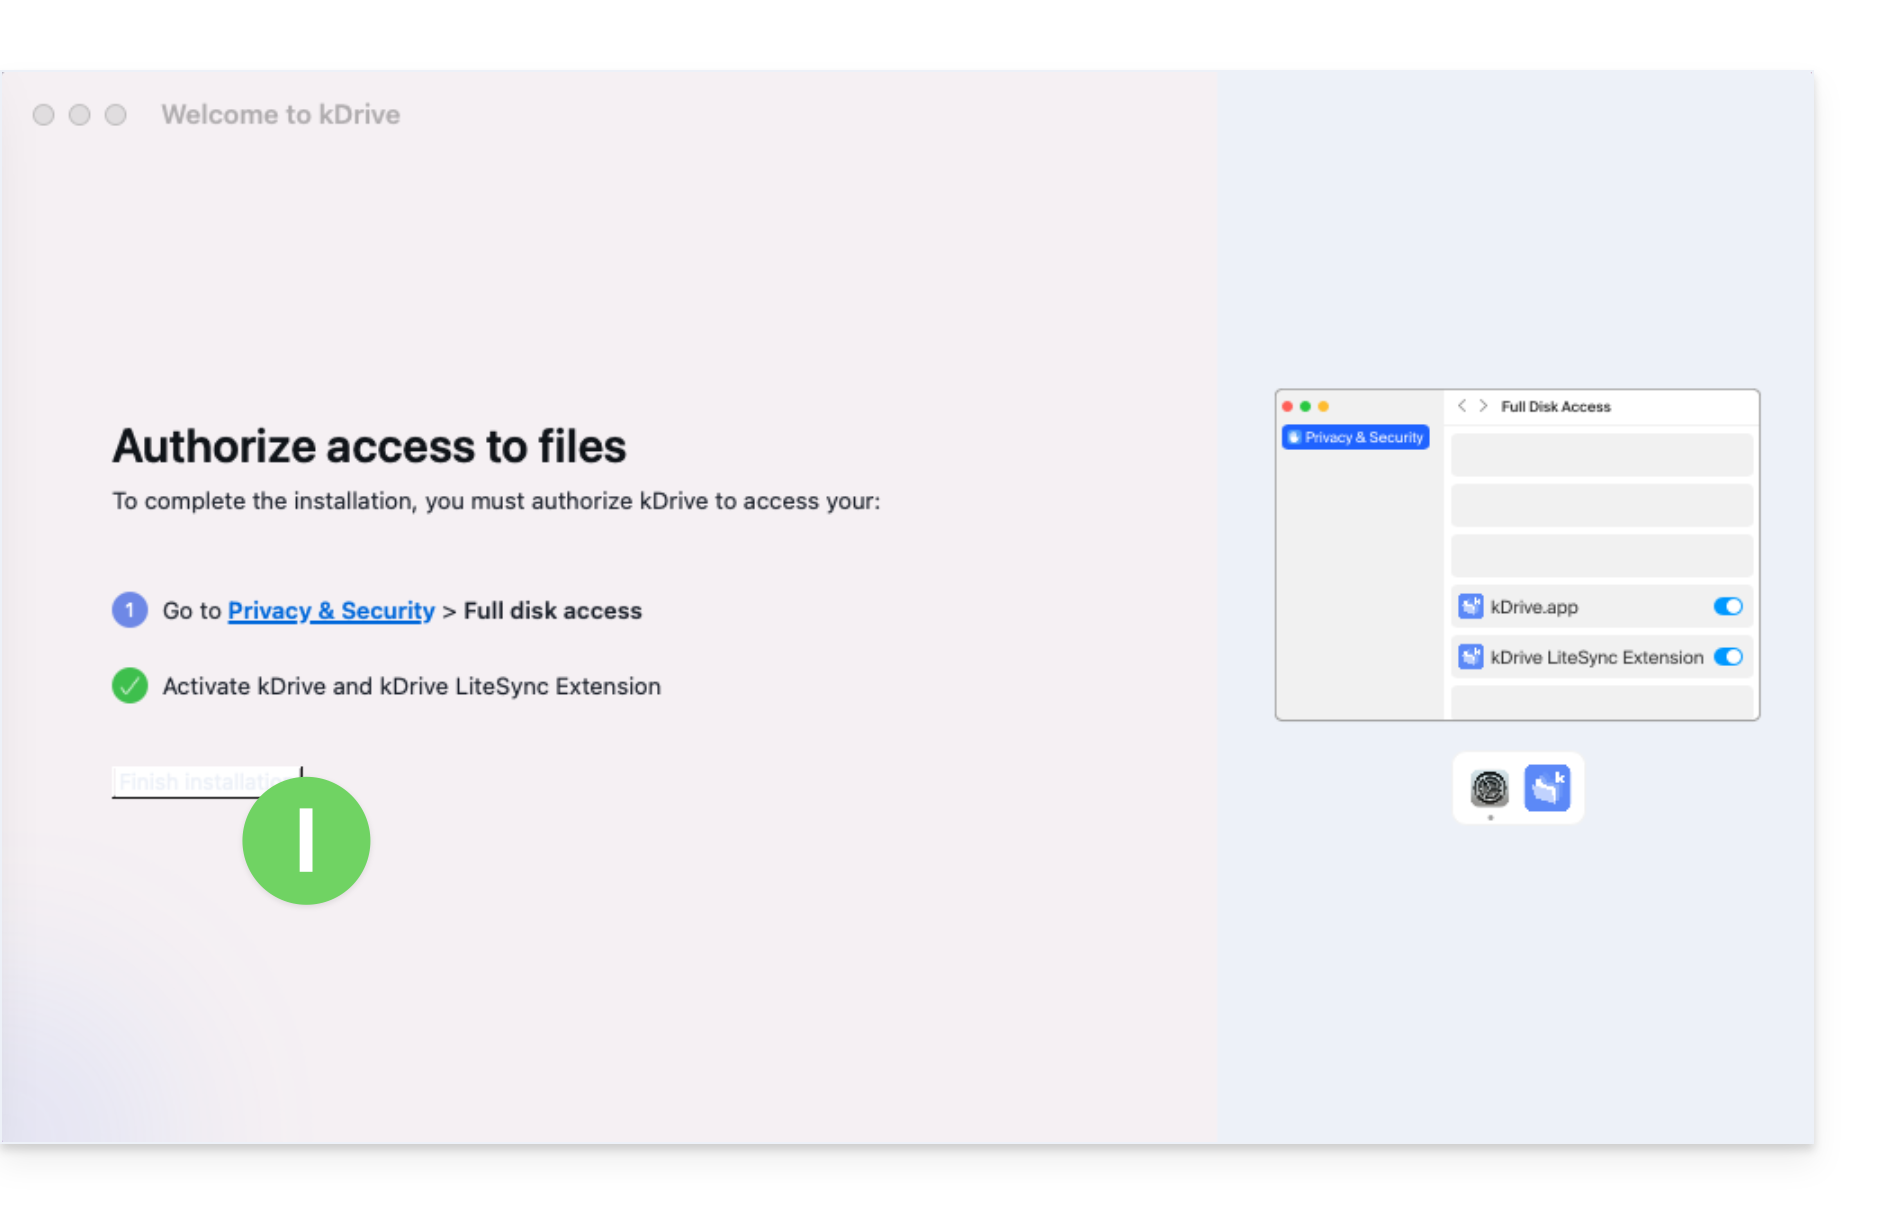
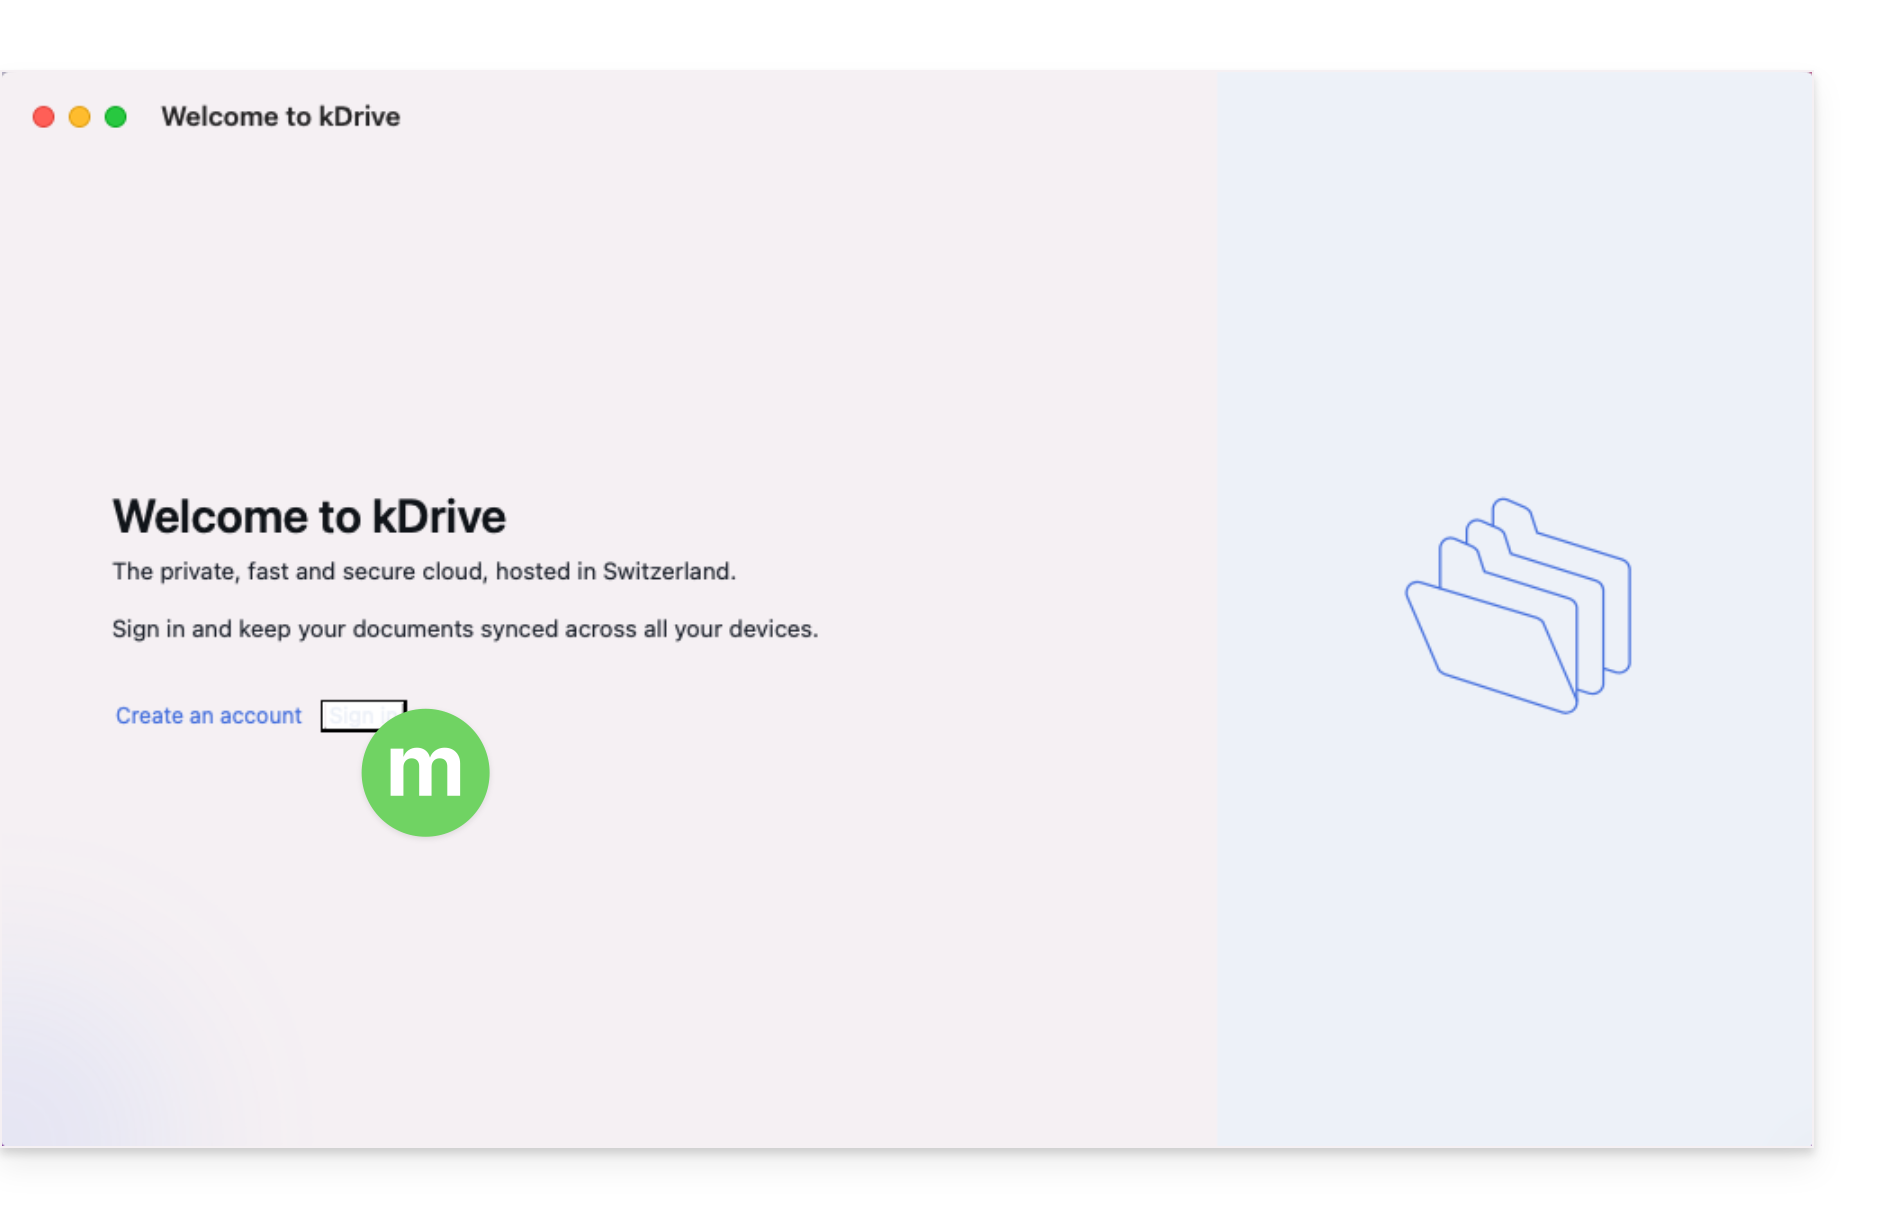
macOS 13
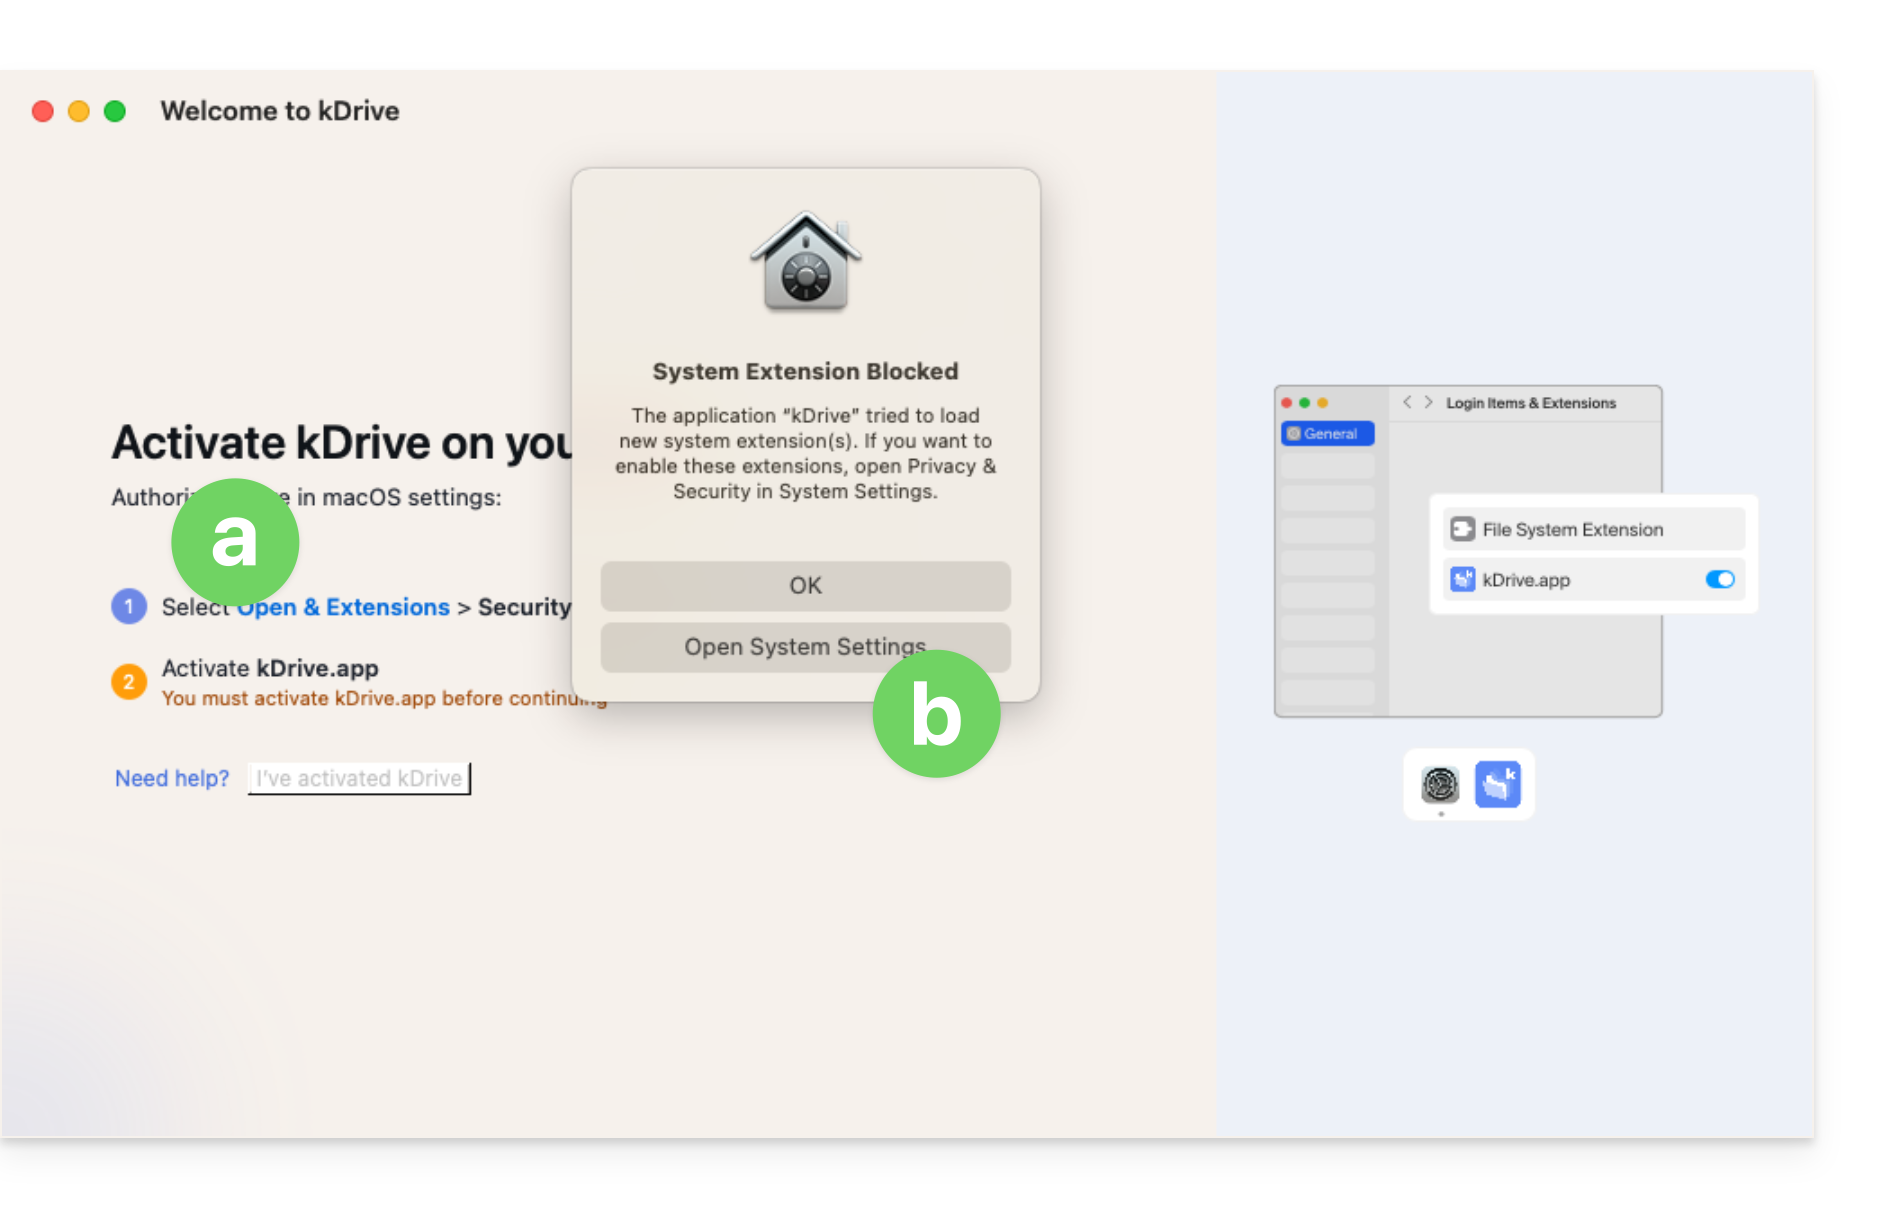
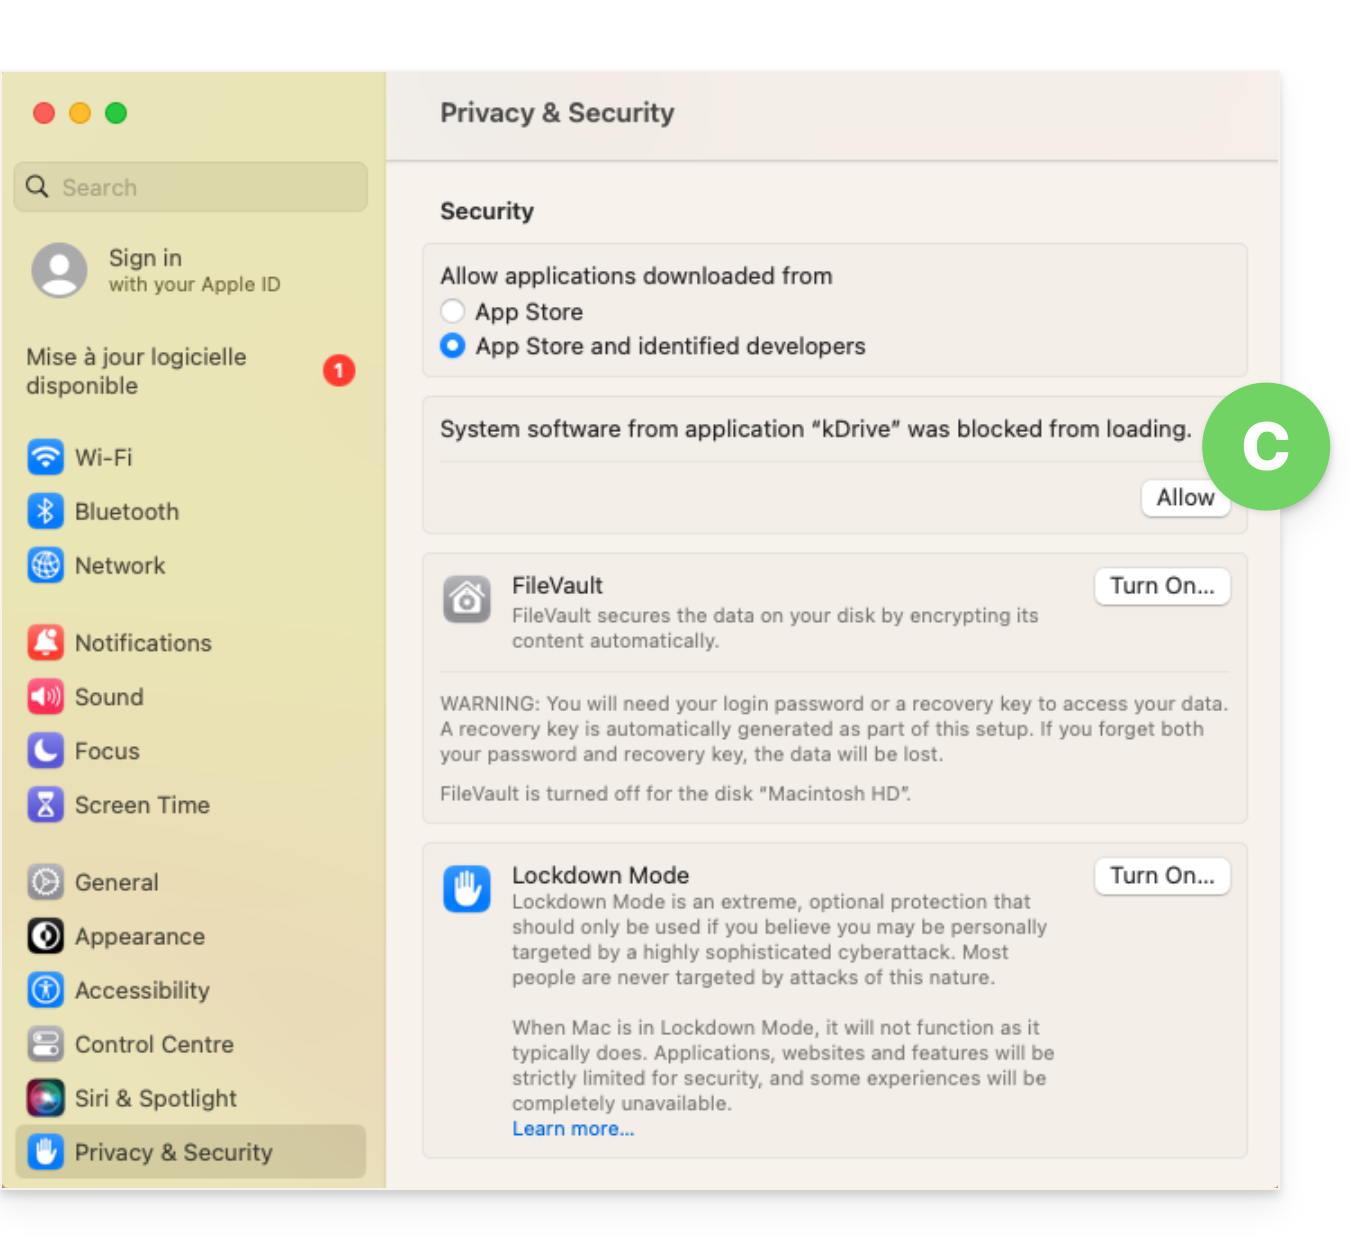
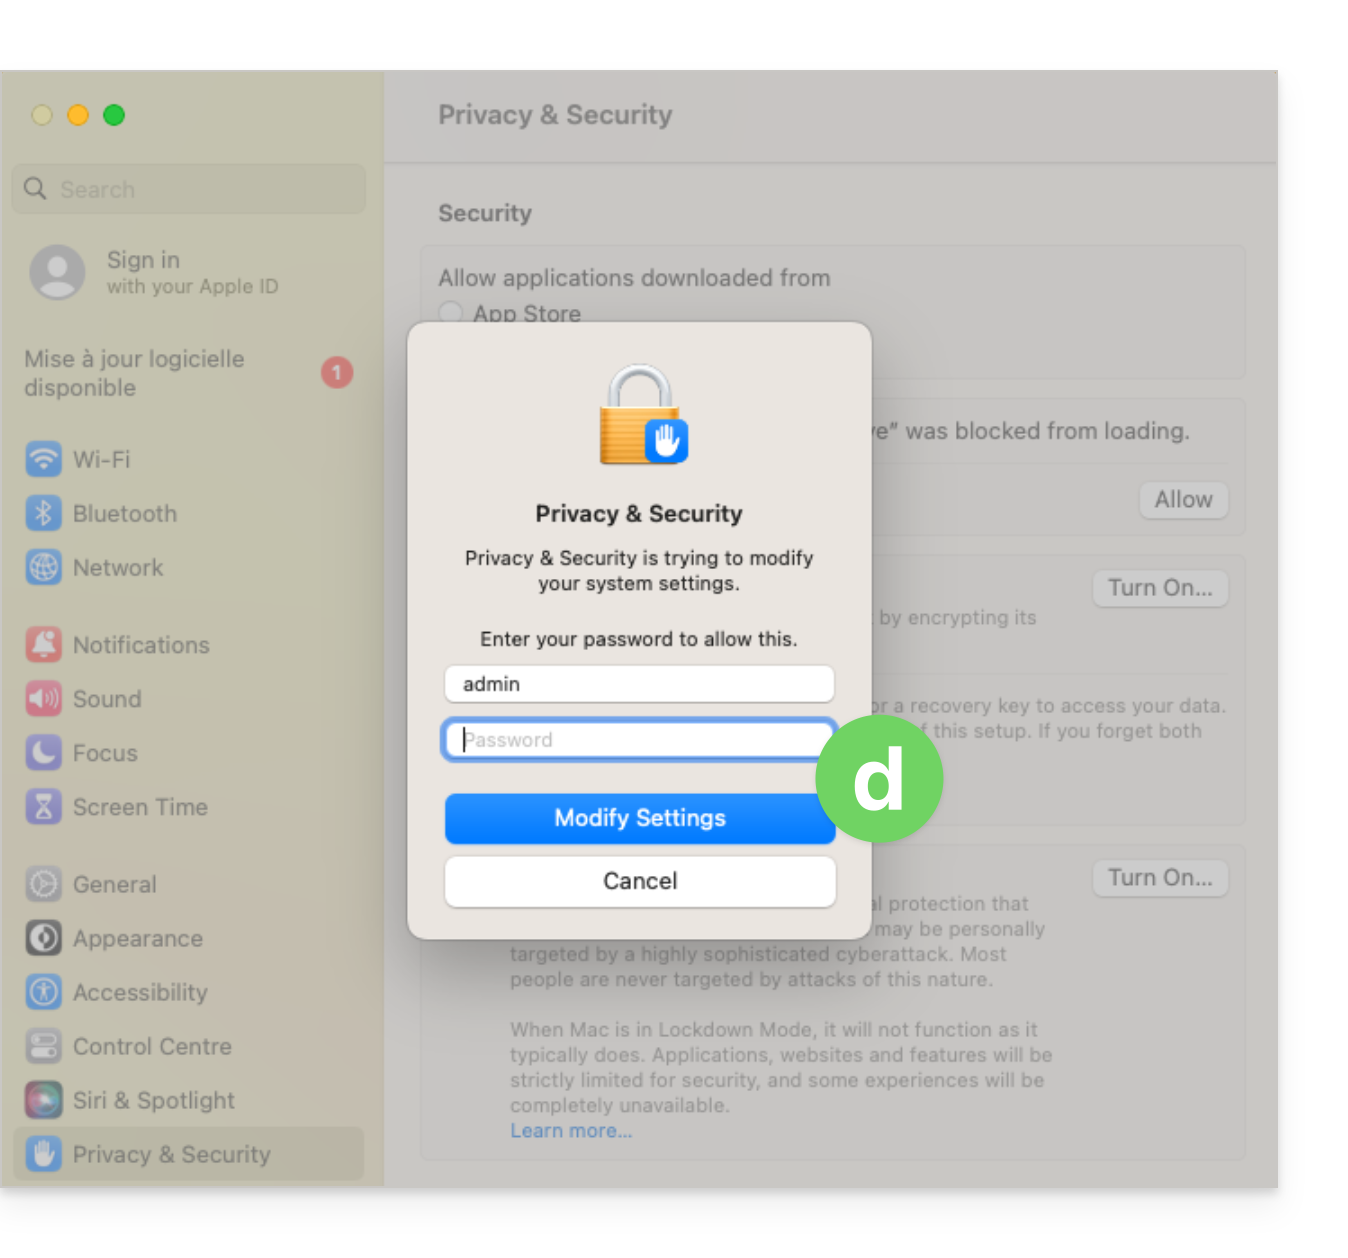
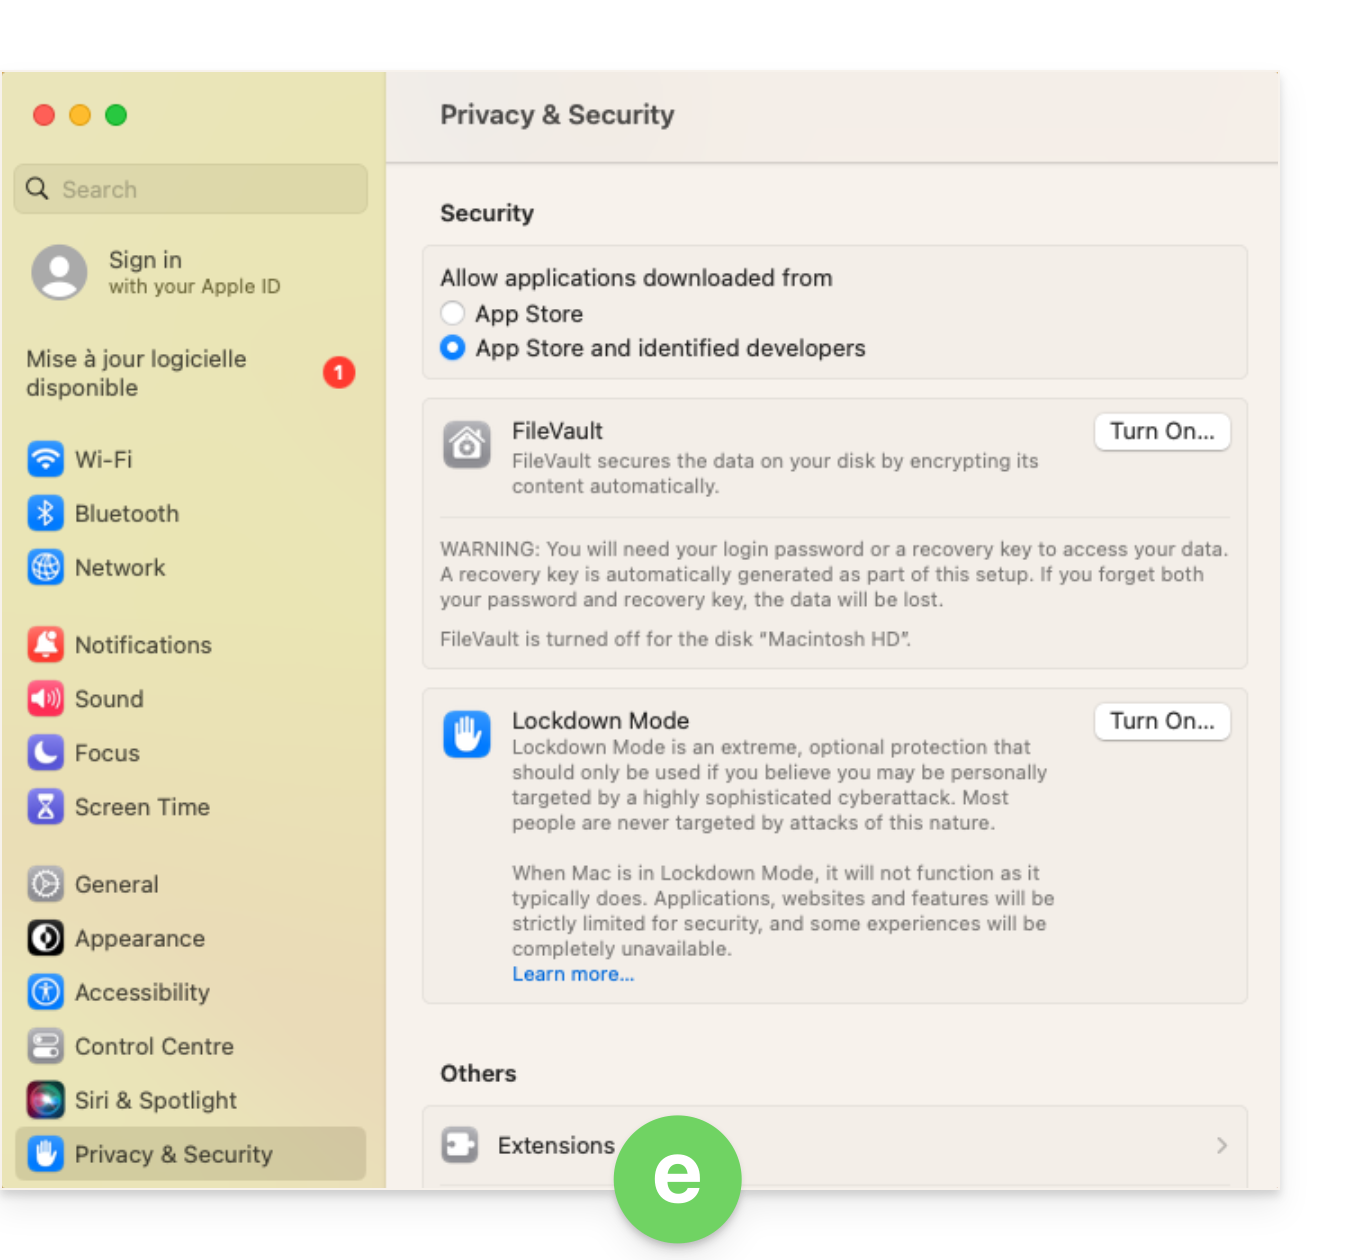
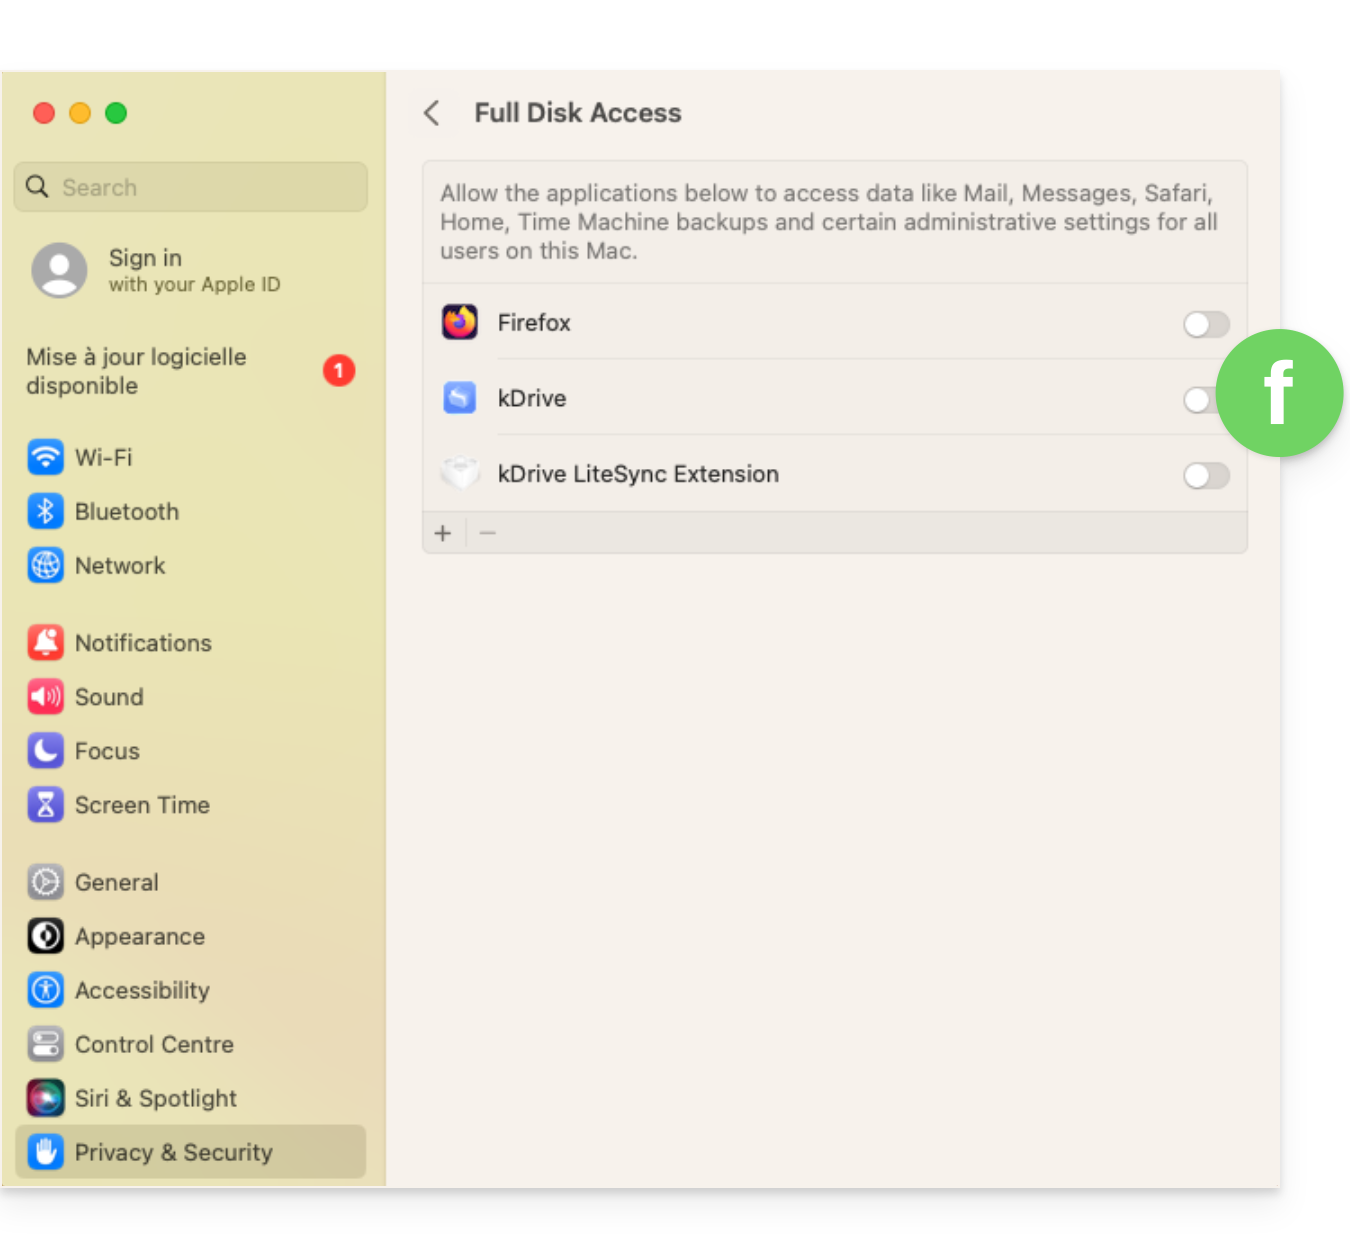
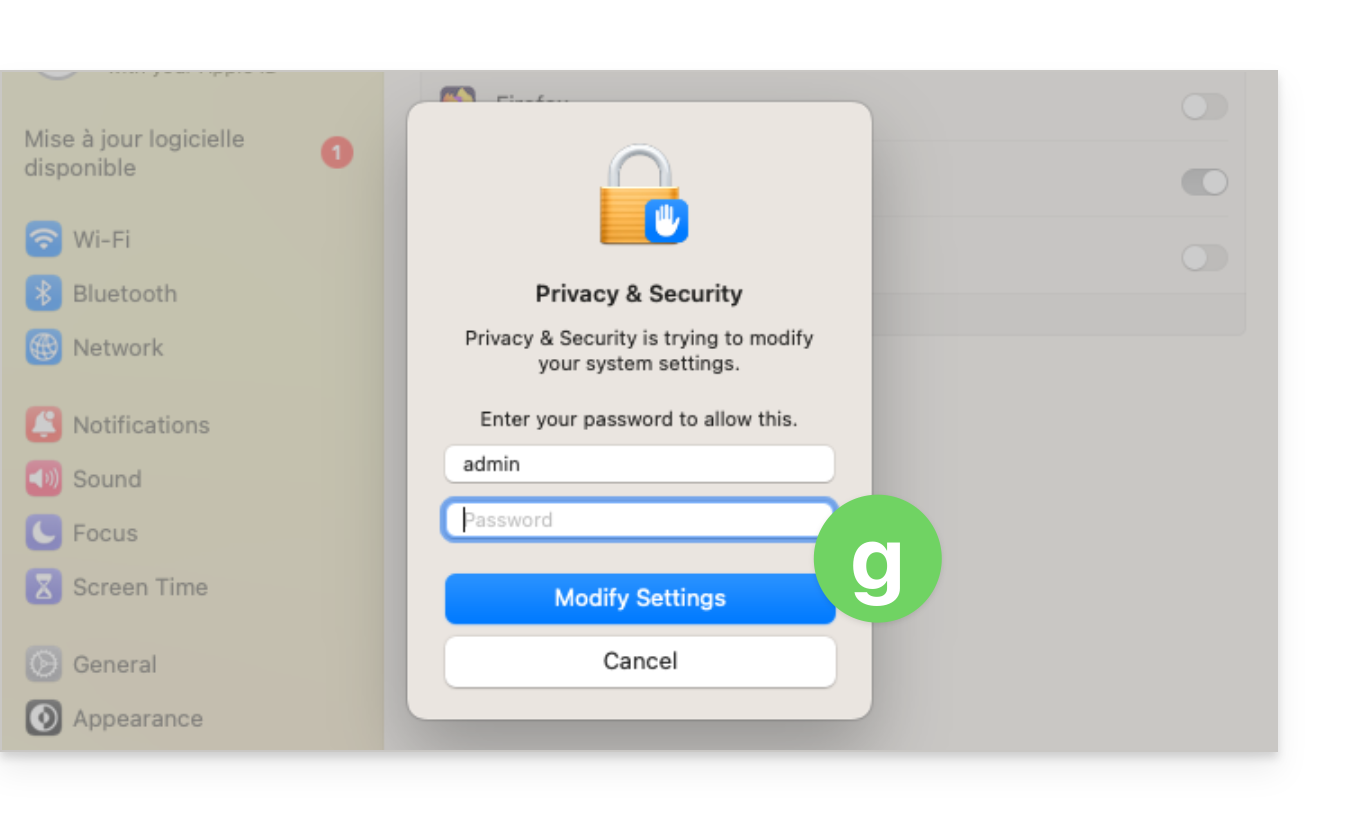
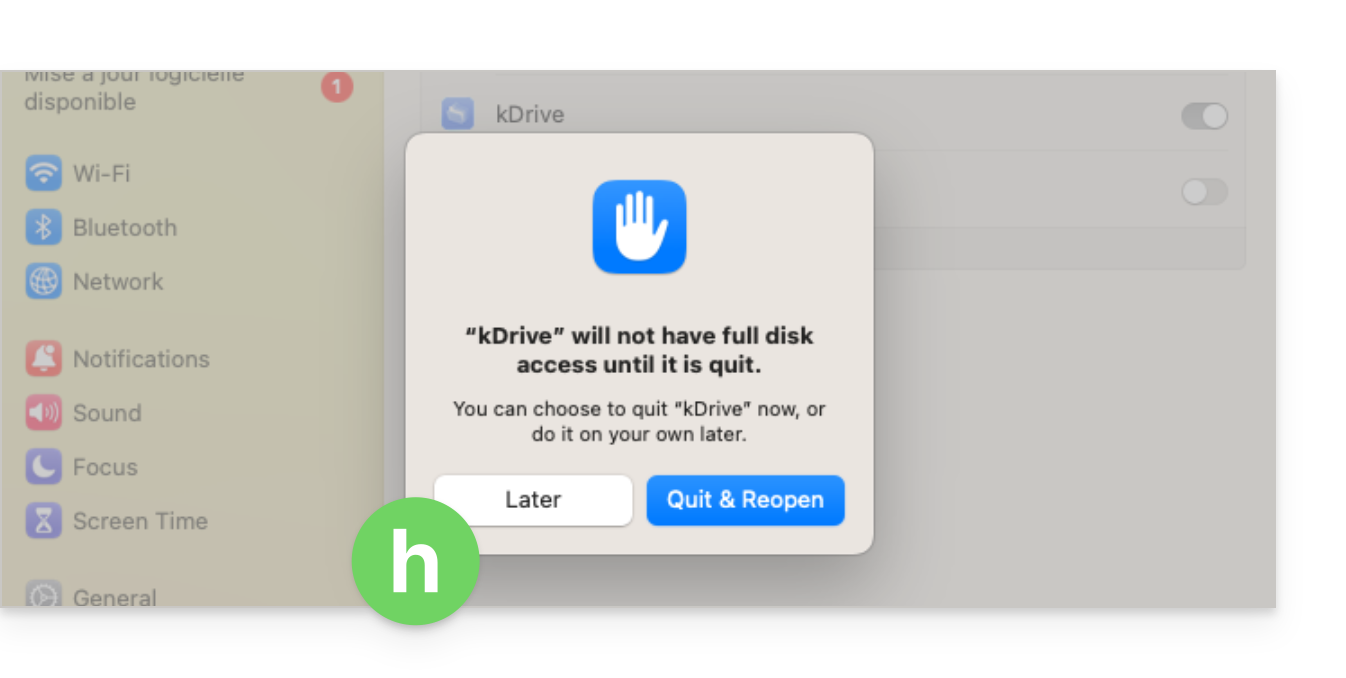
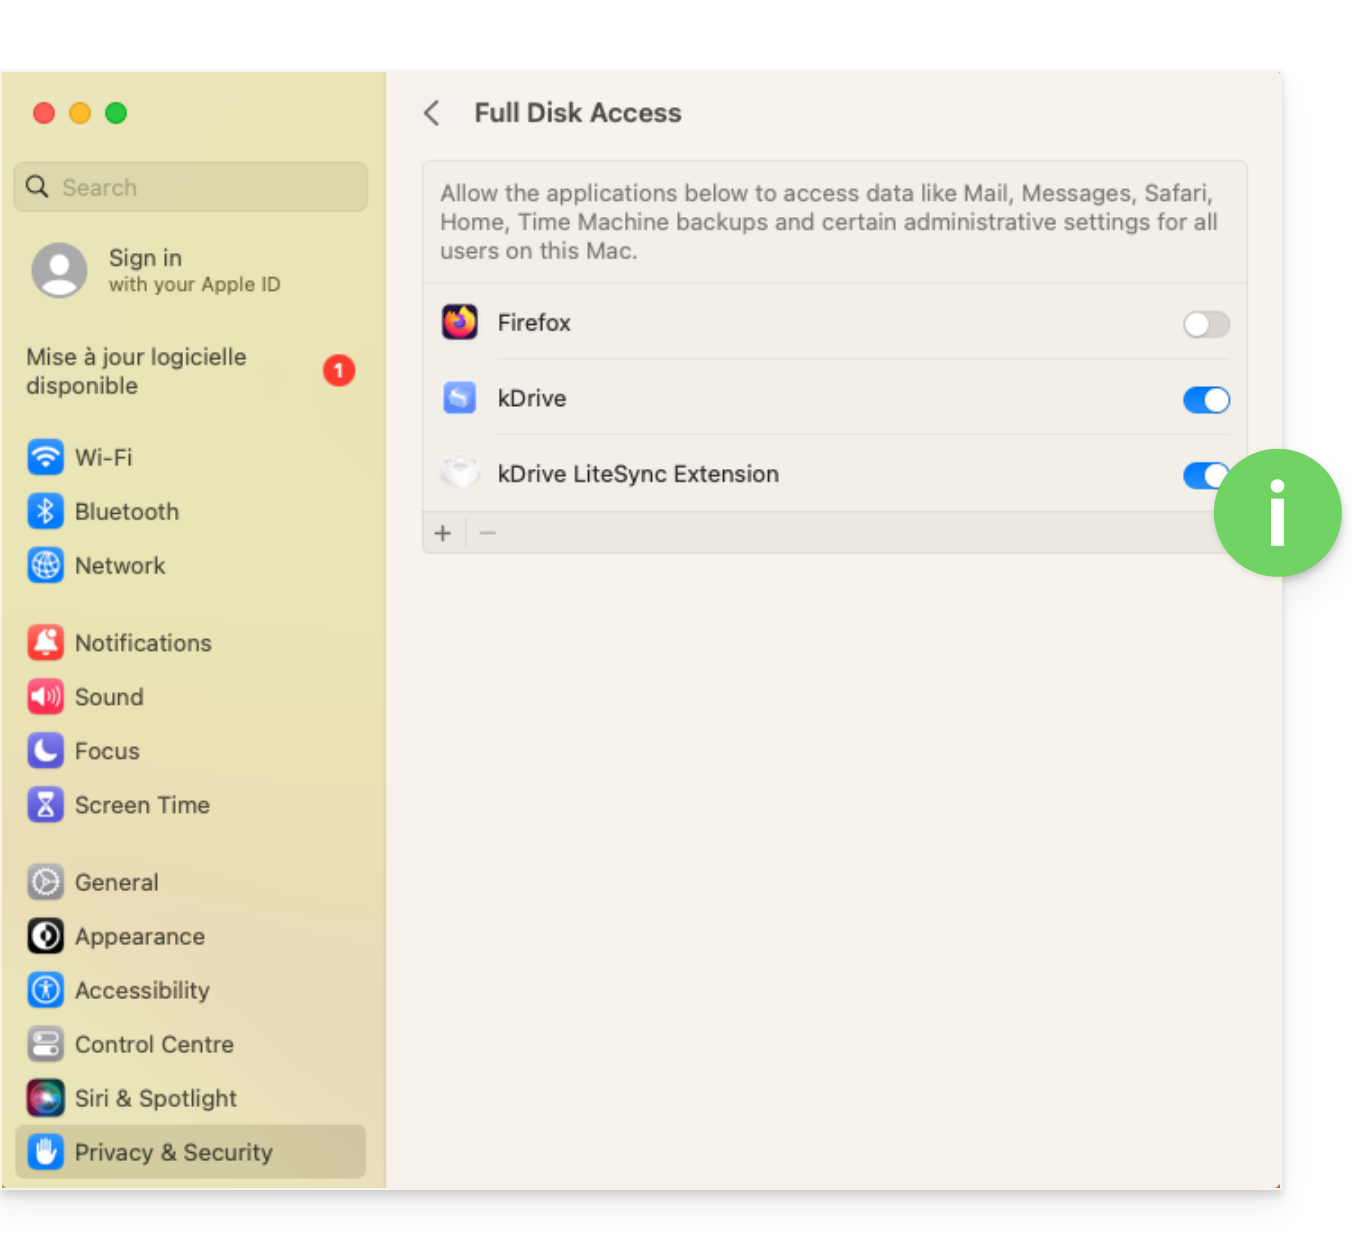
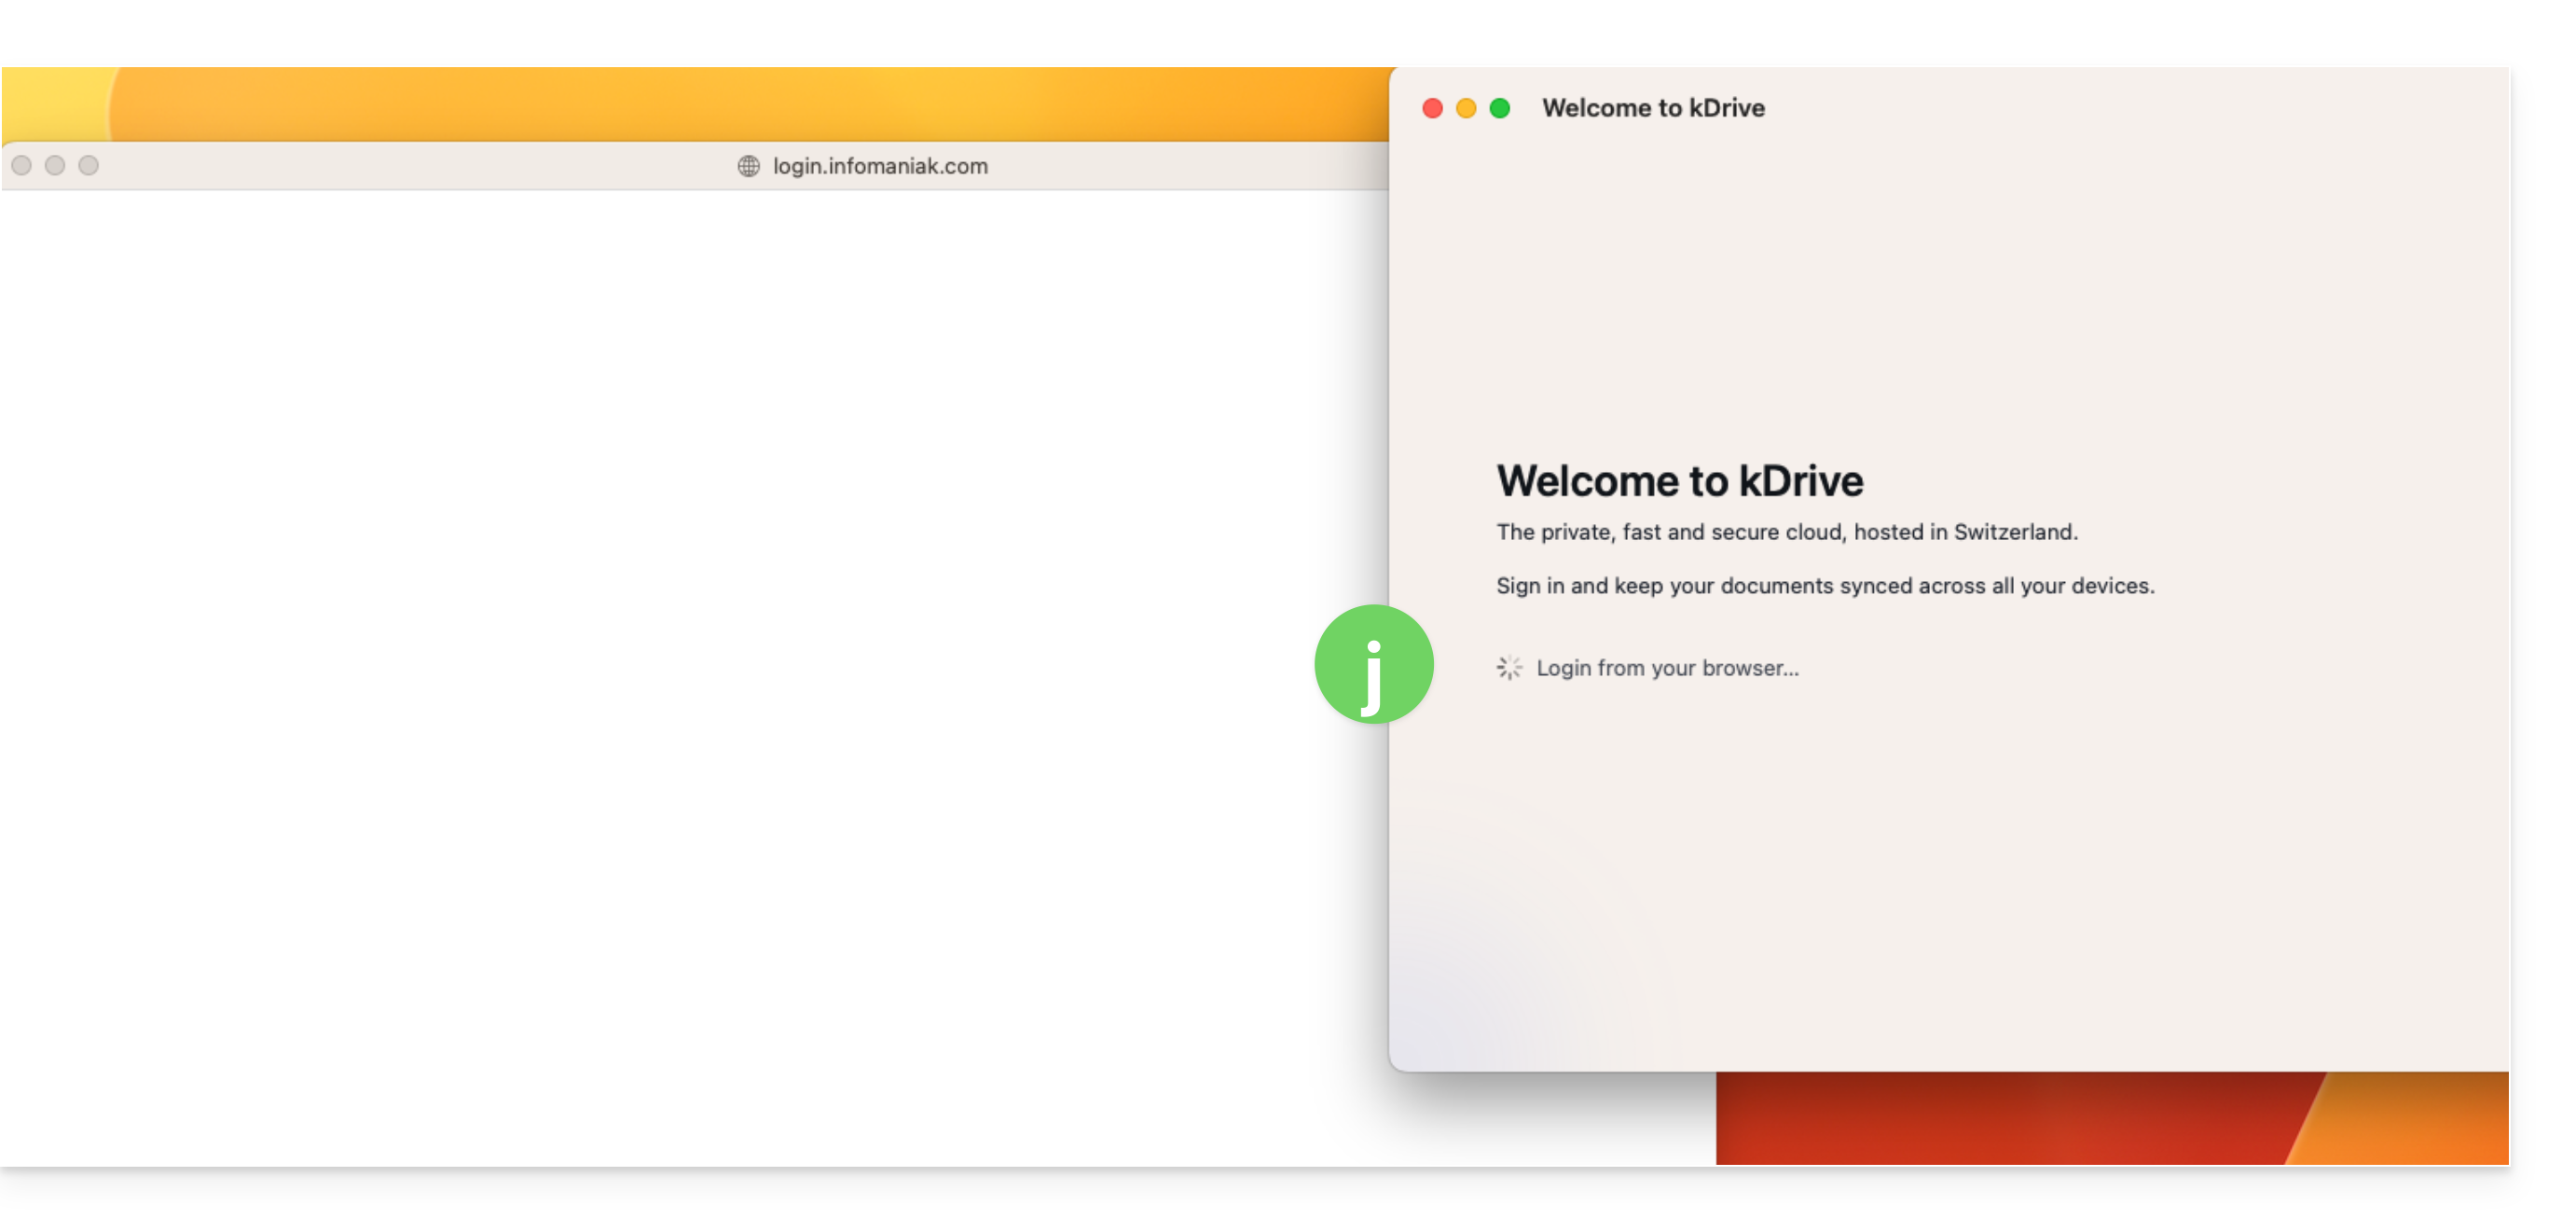
macOS 14
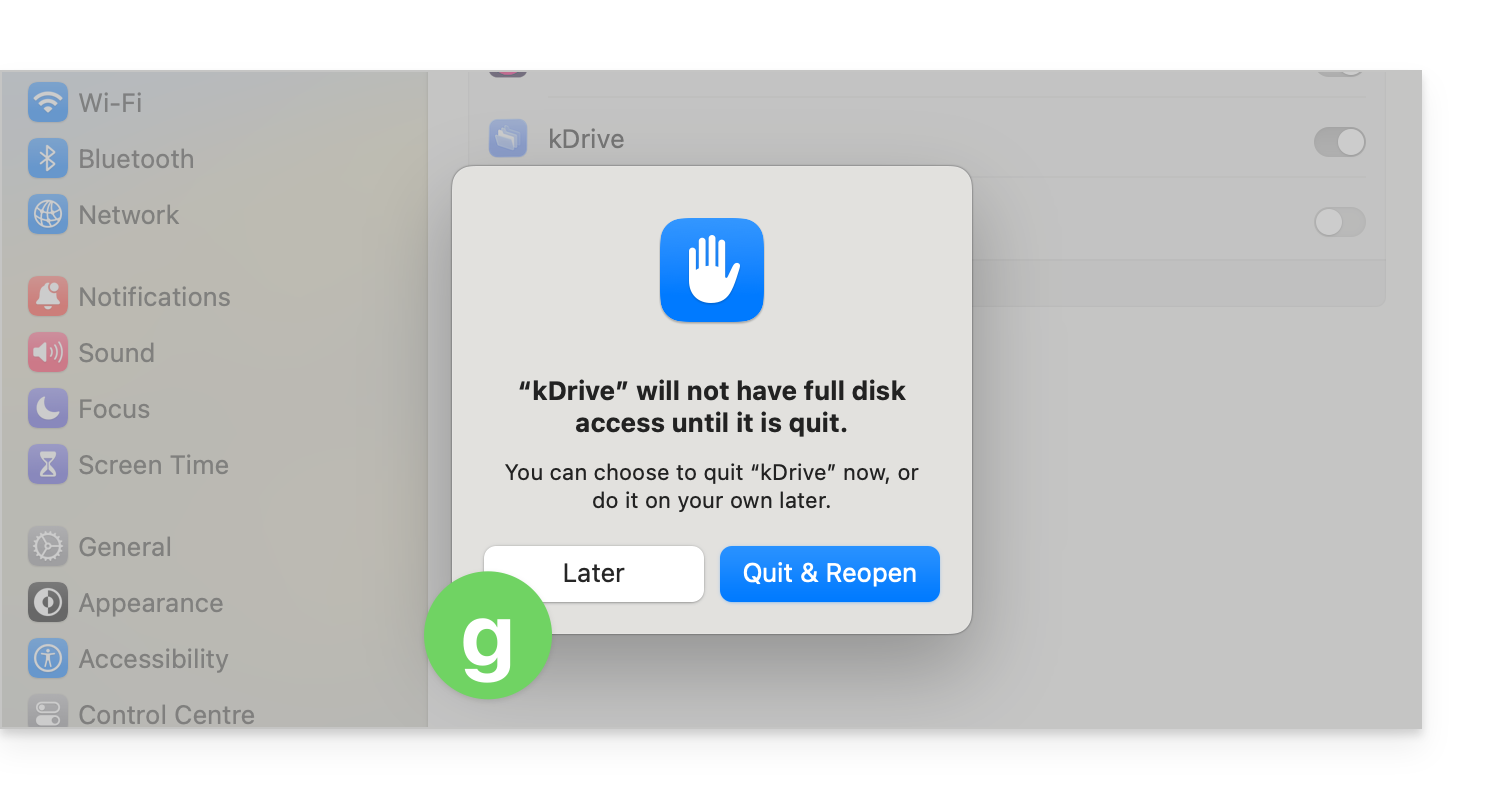
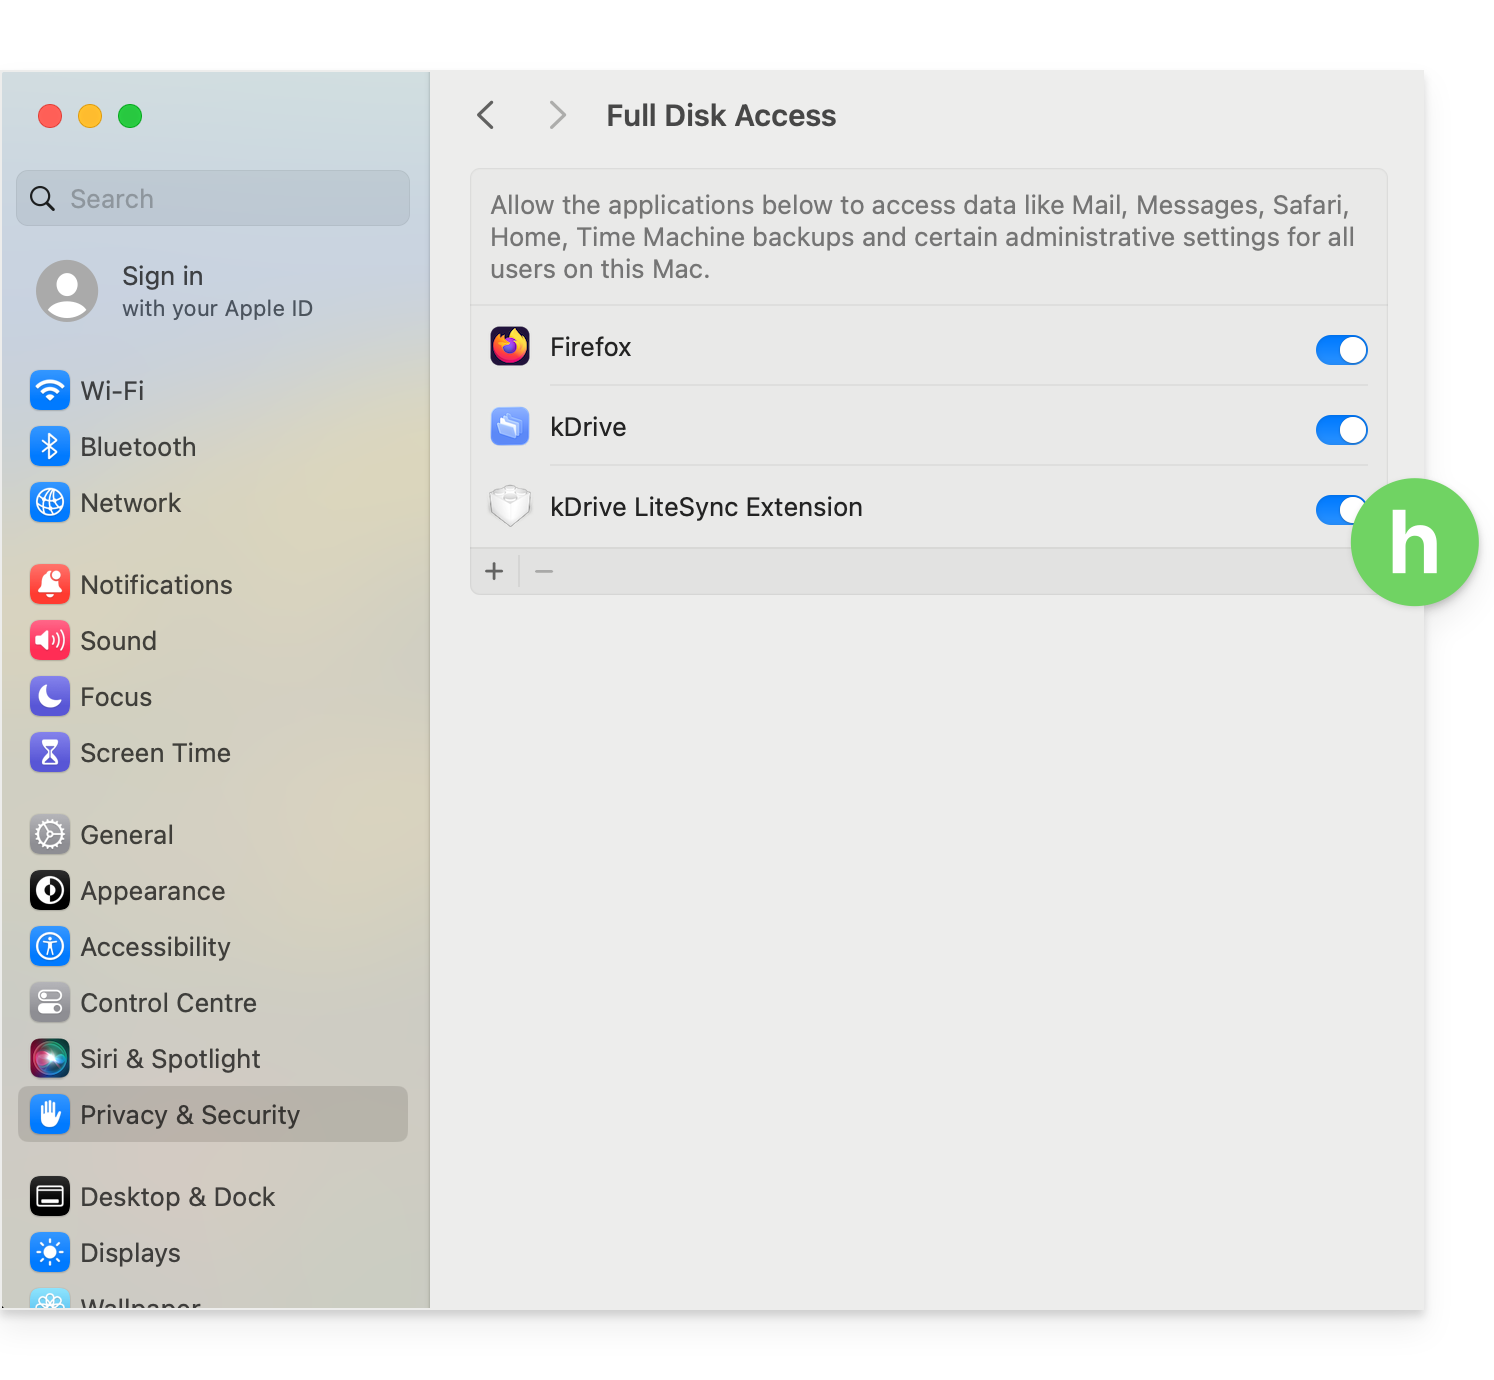
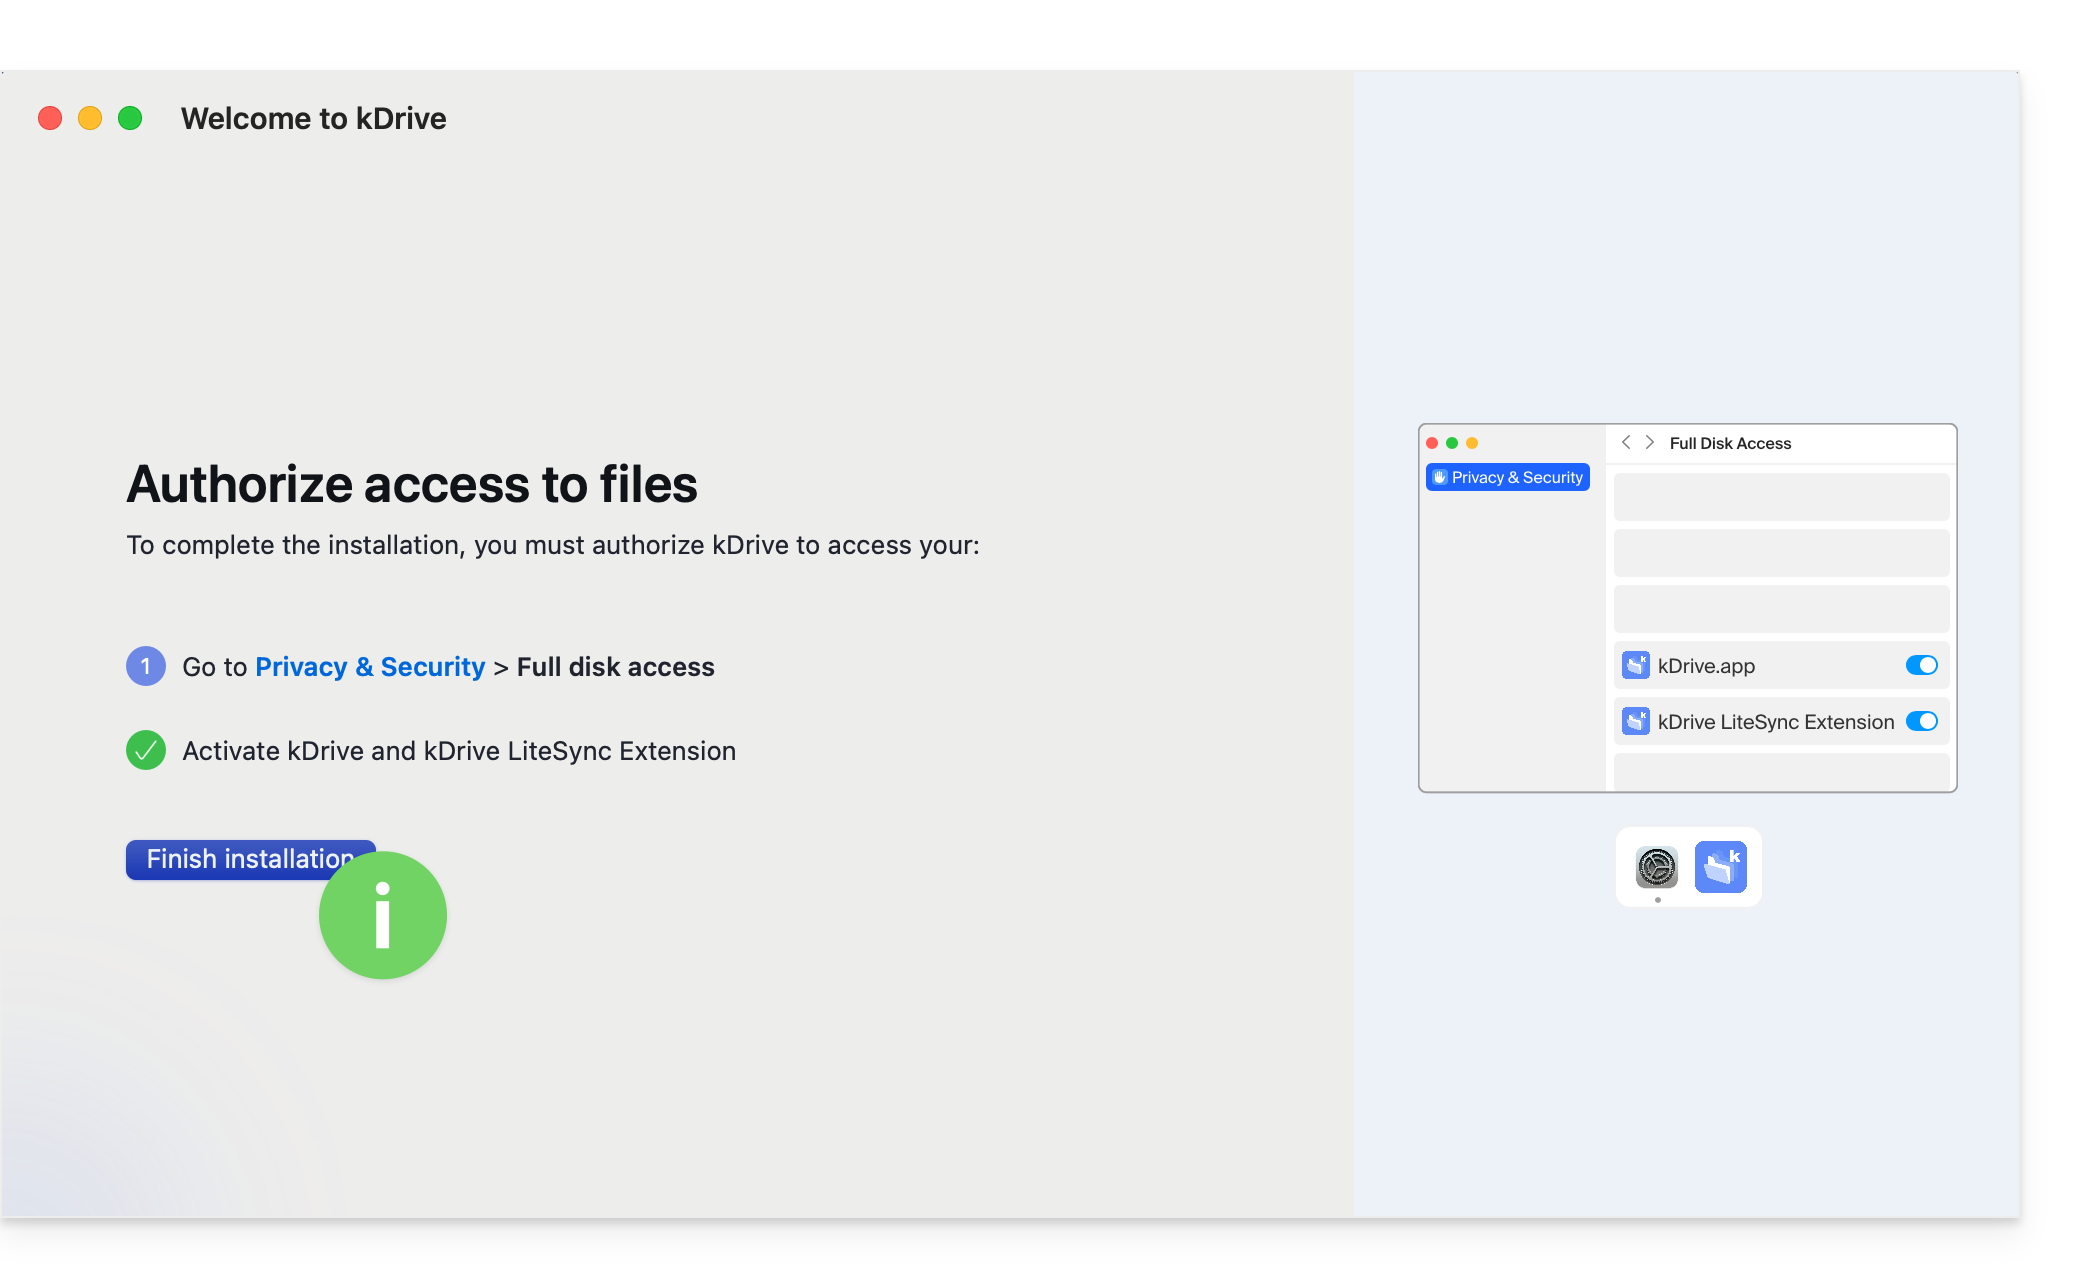
macOS 15
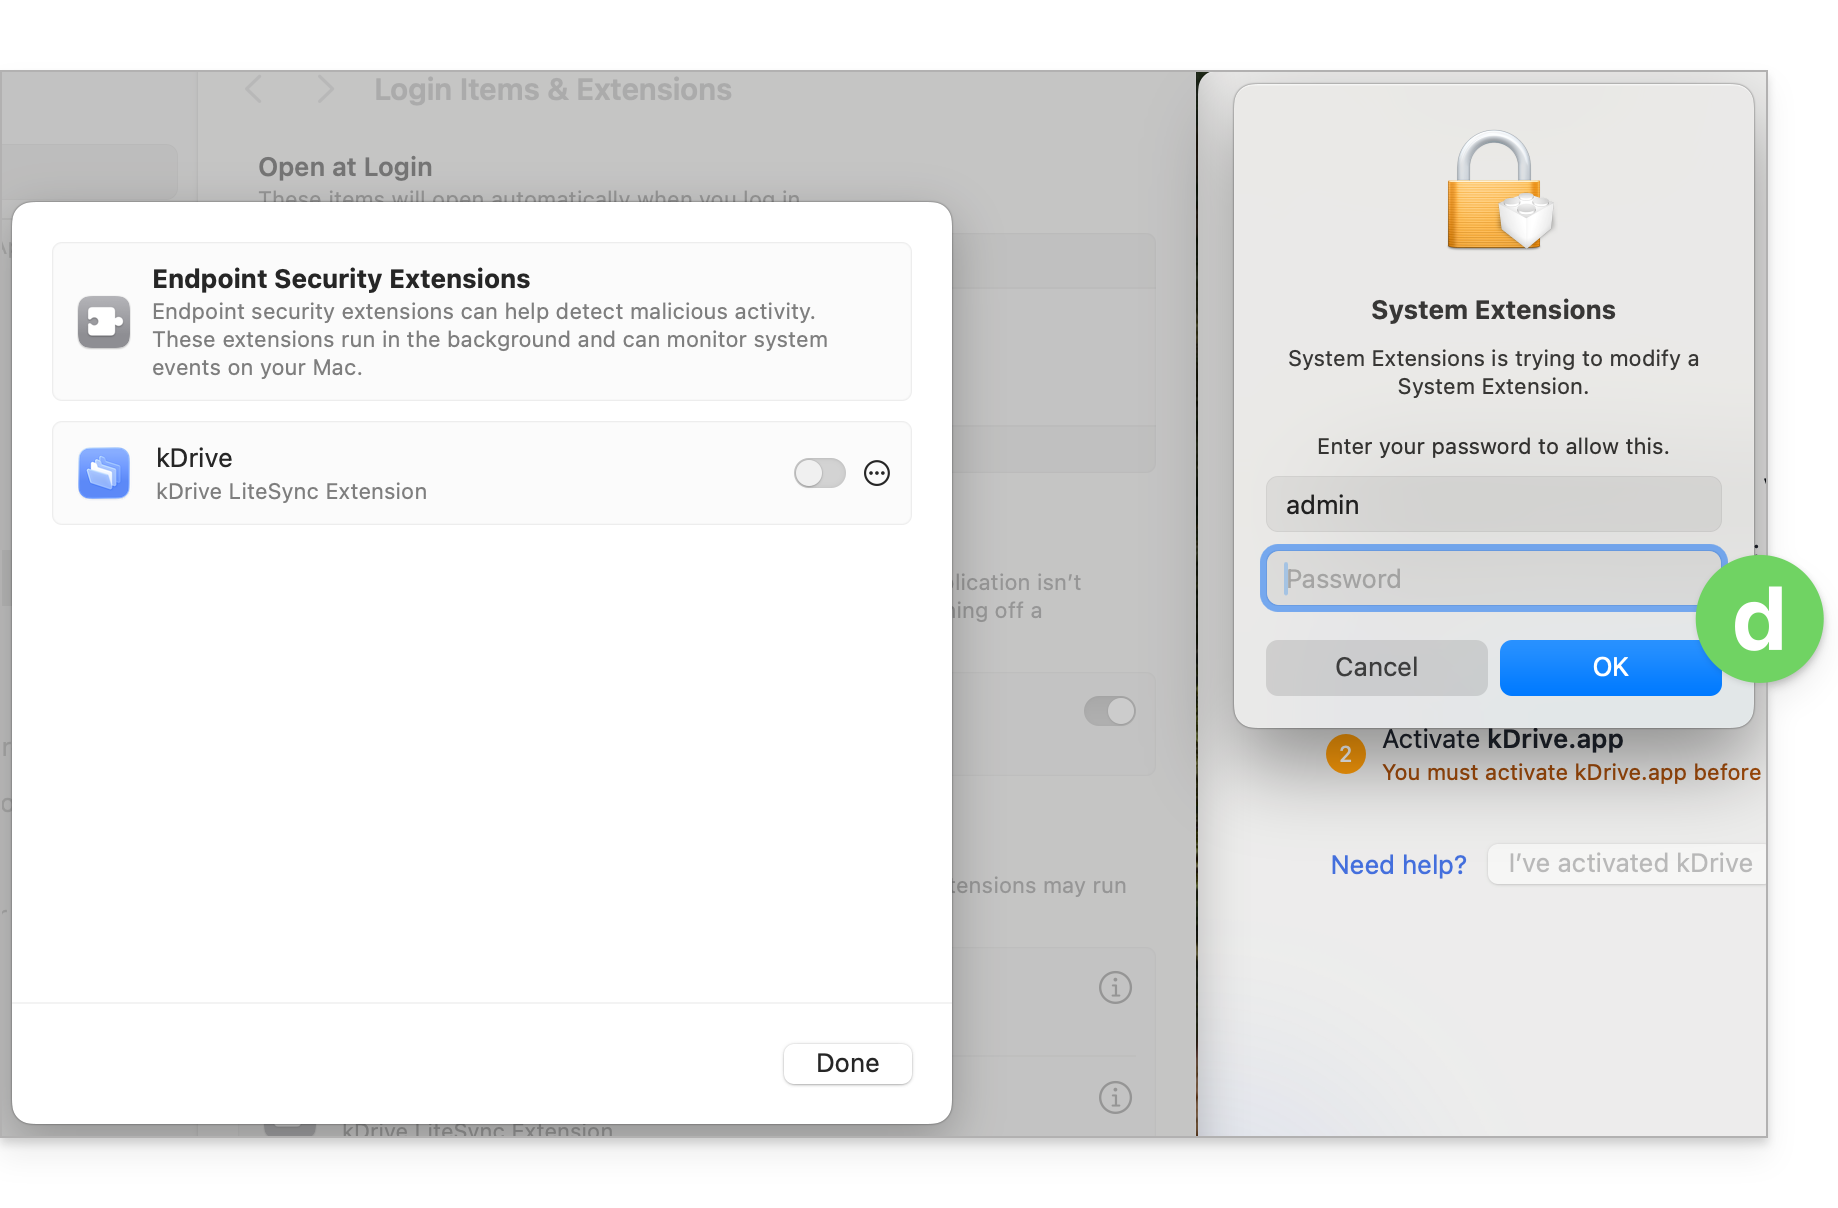
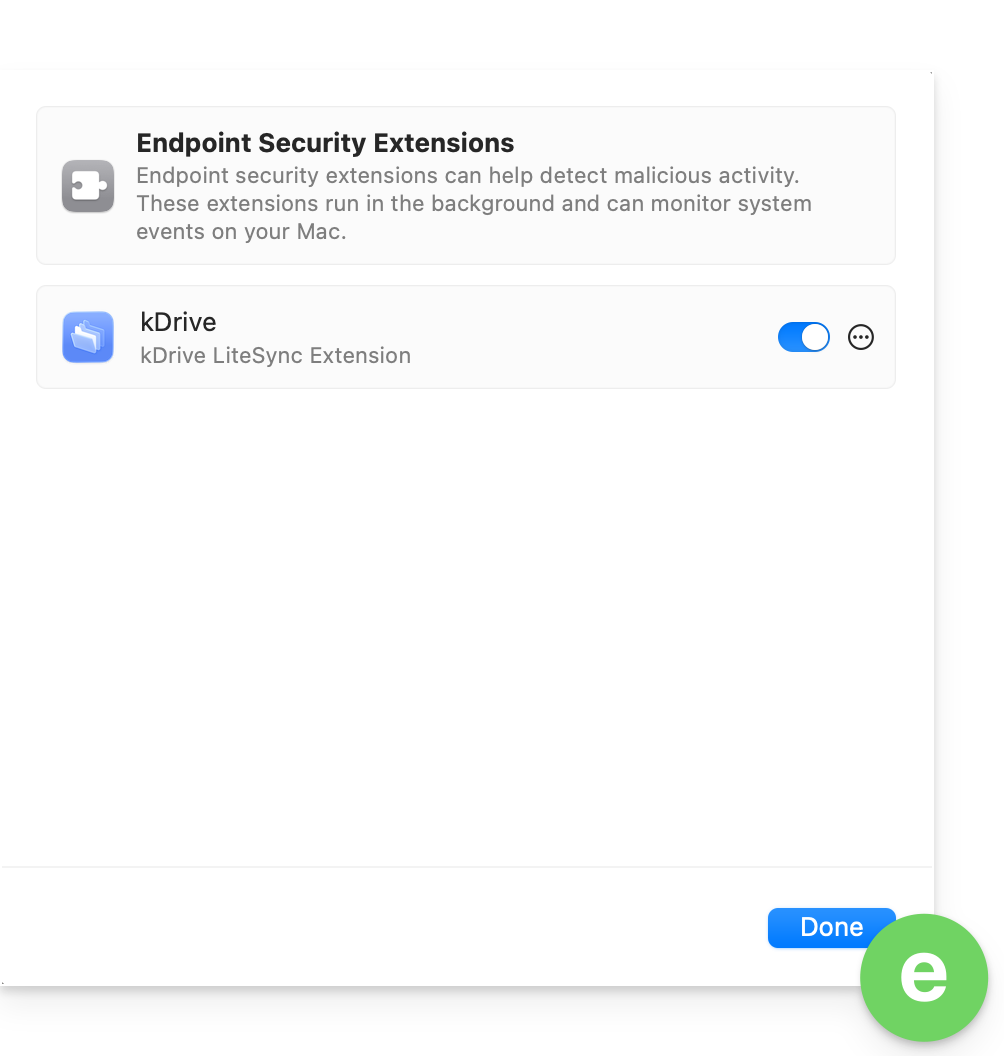
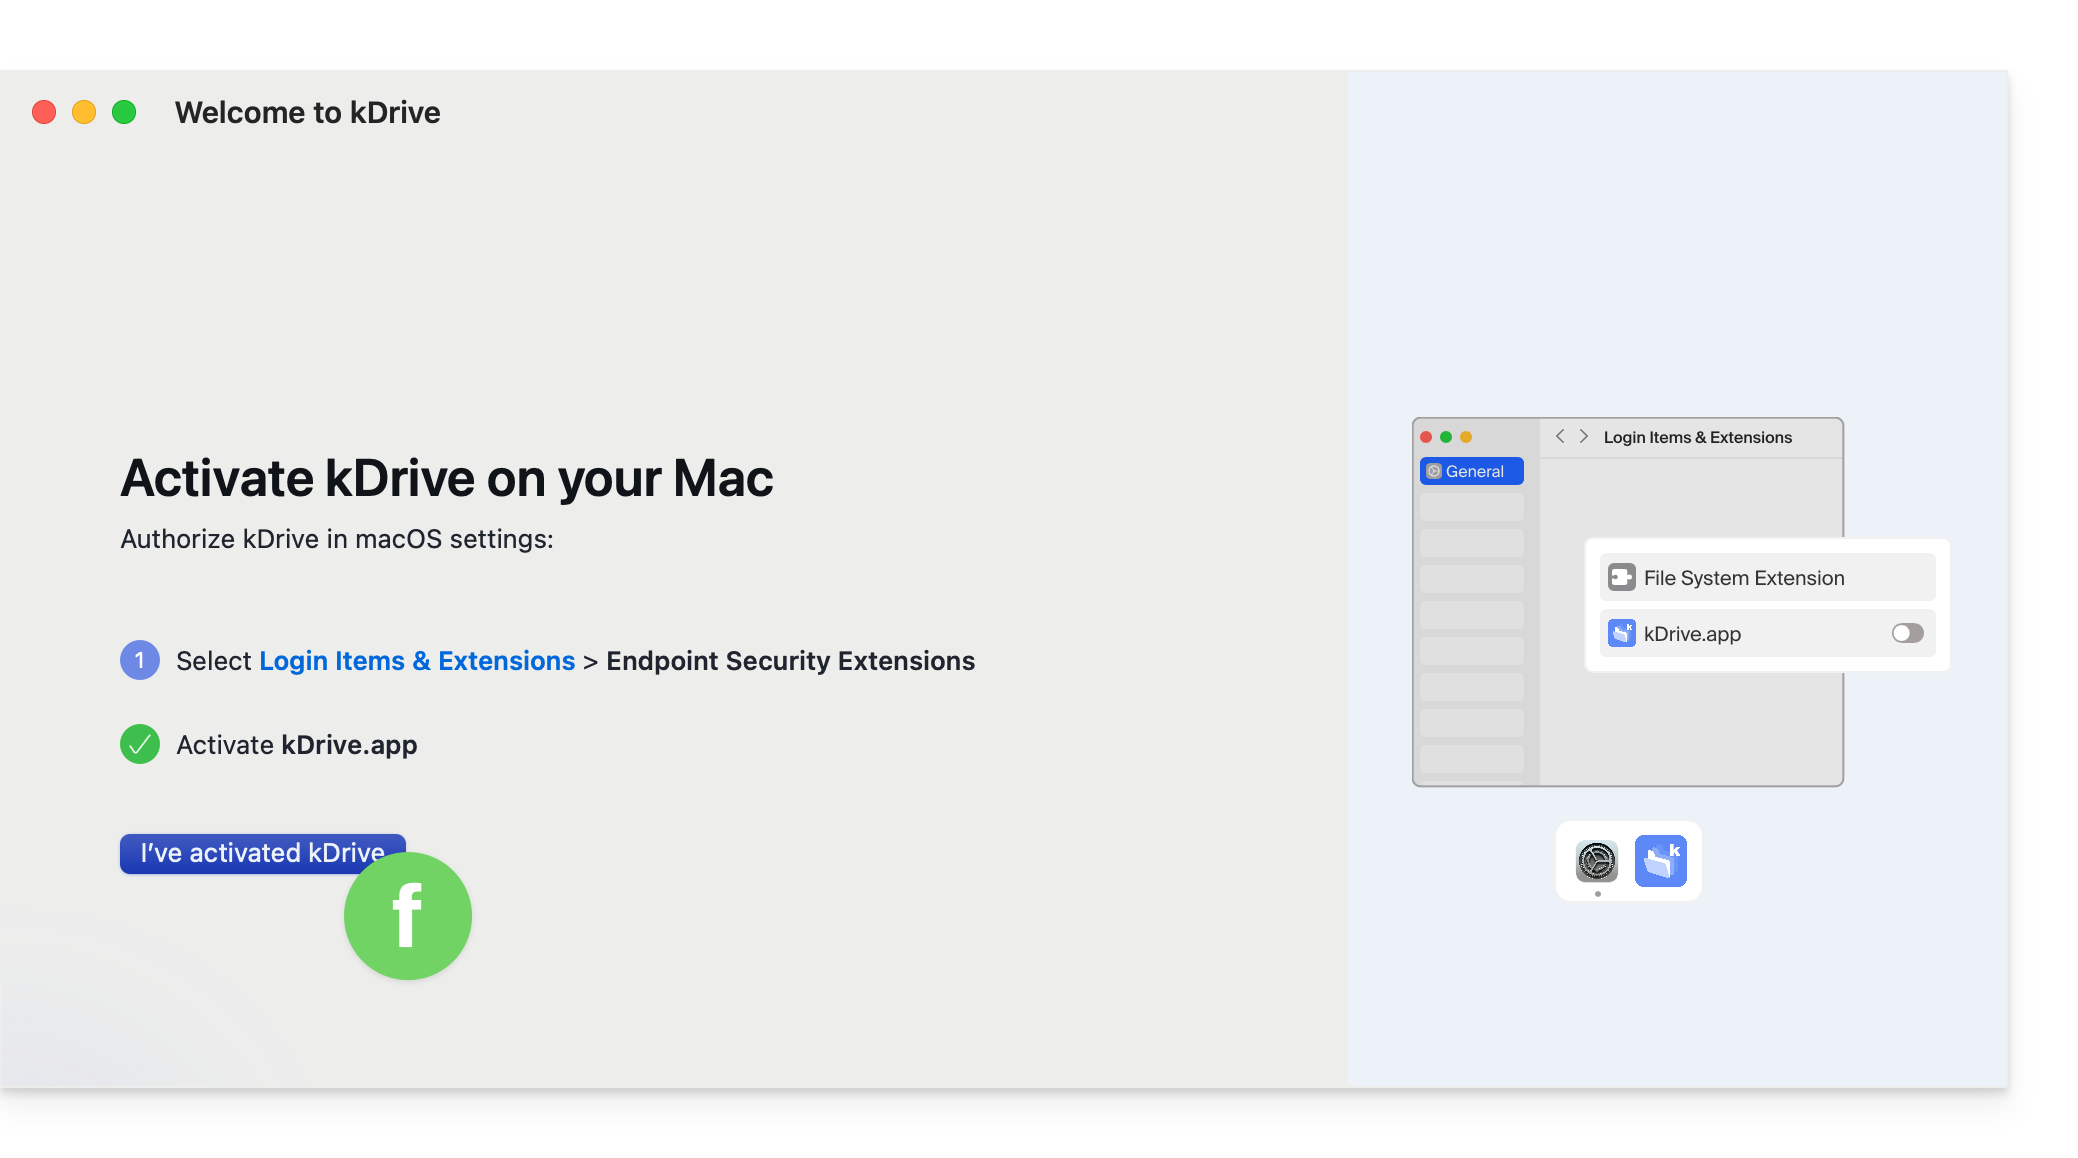
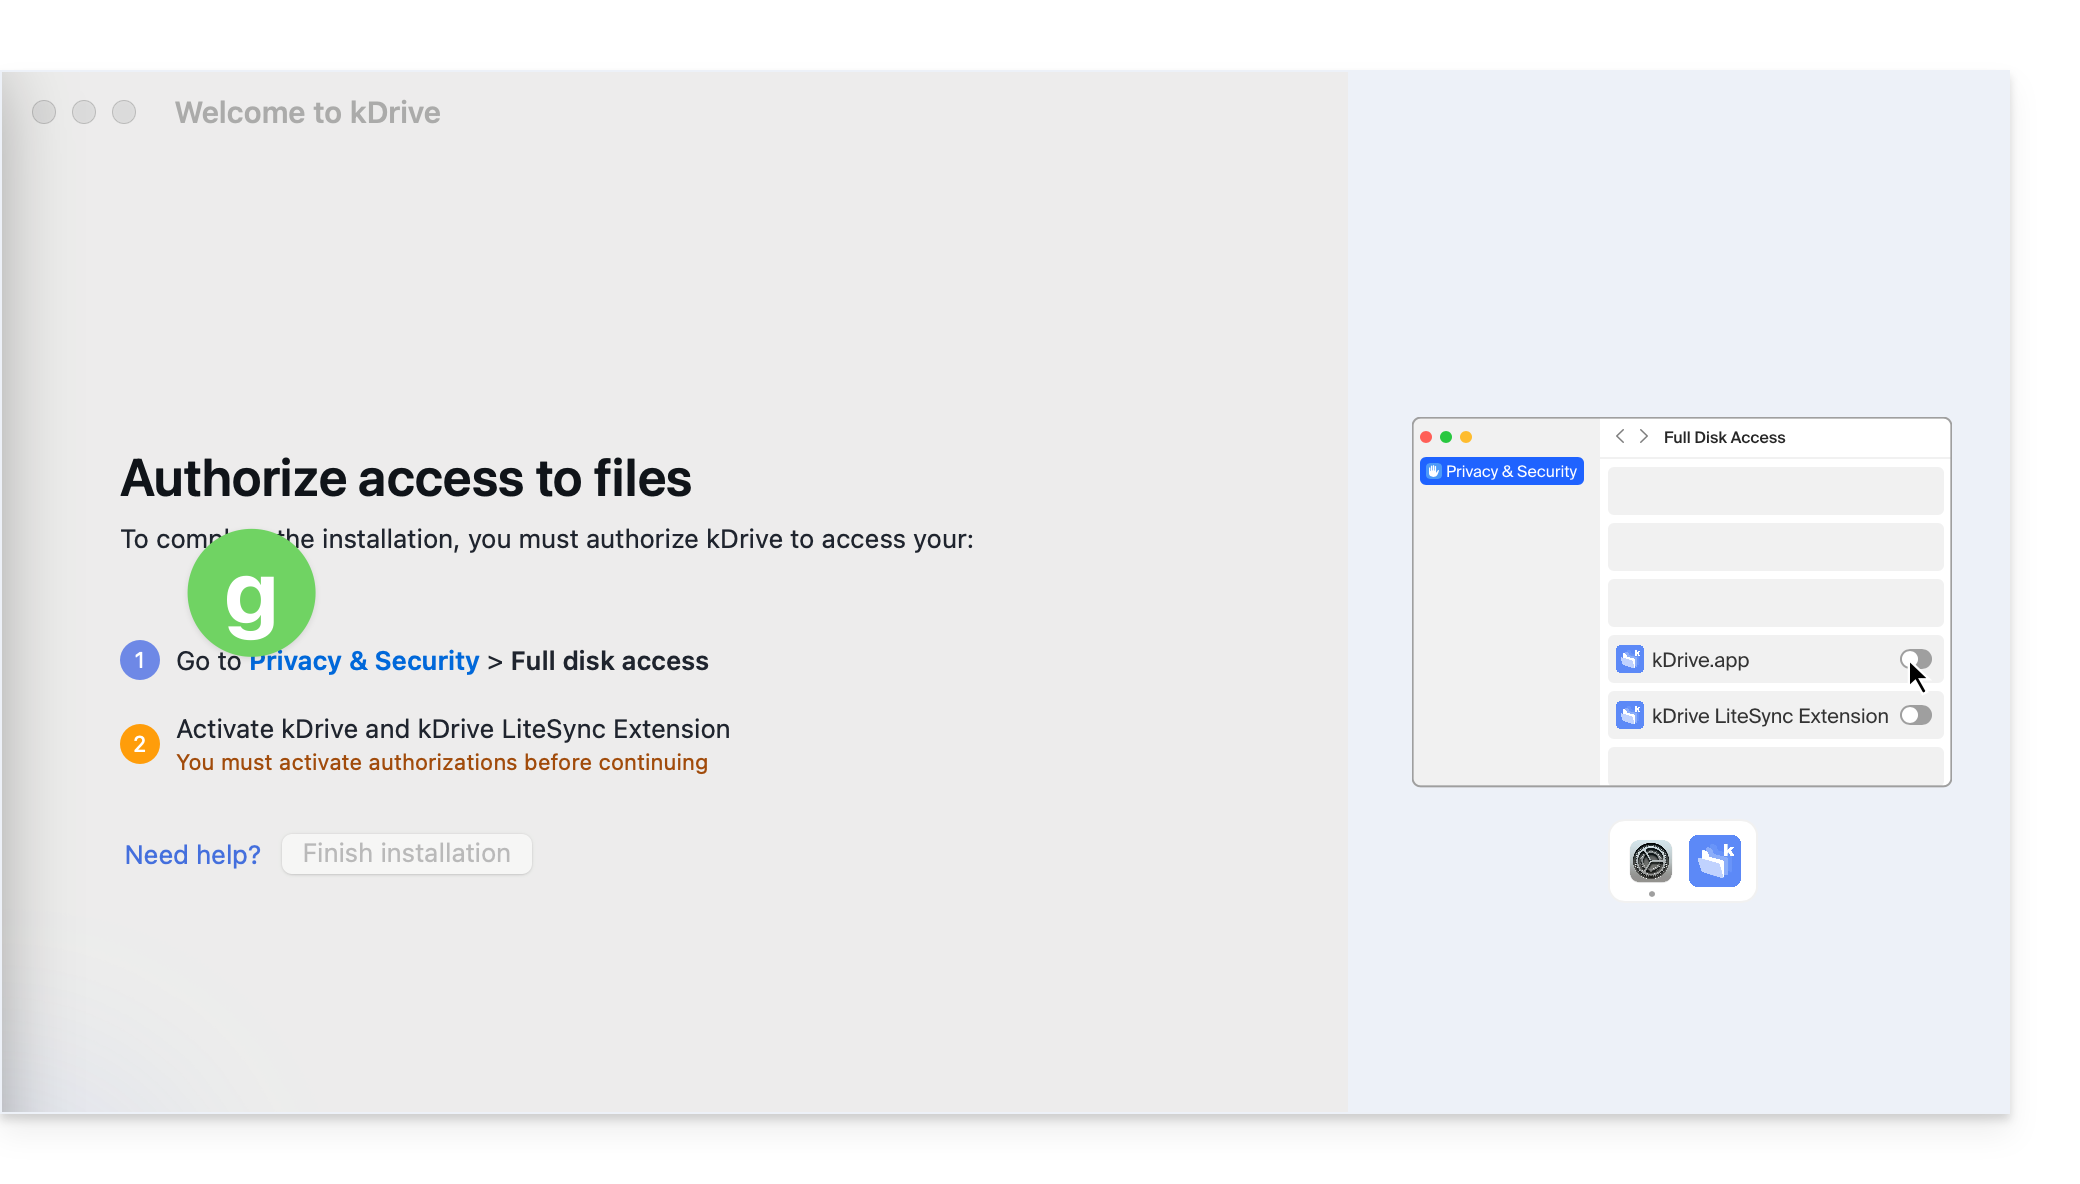
macOS 26
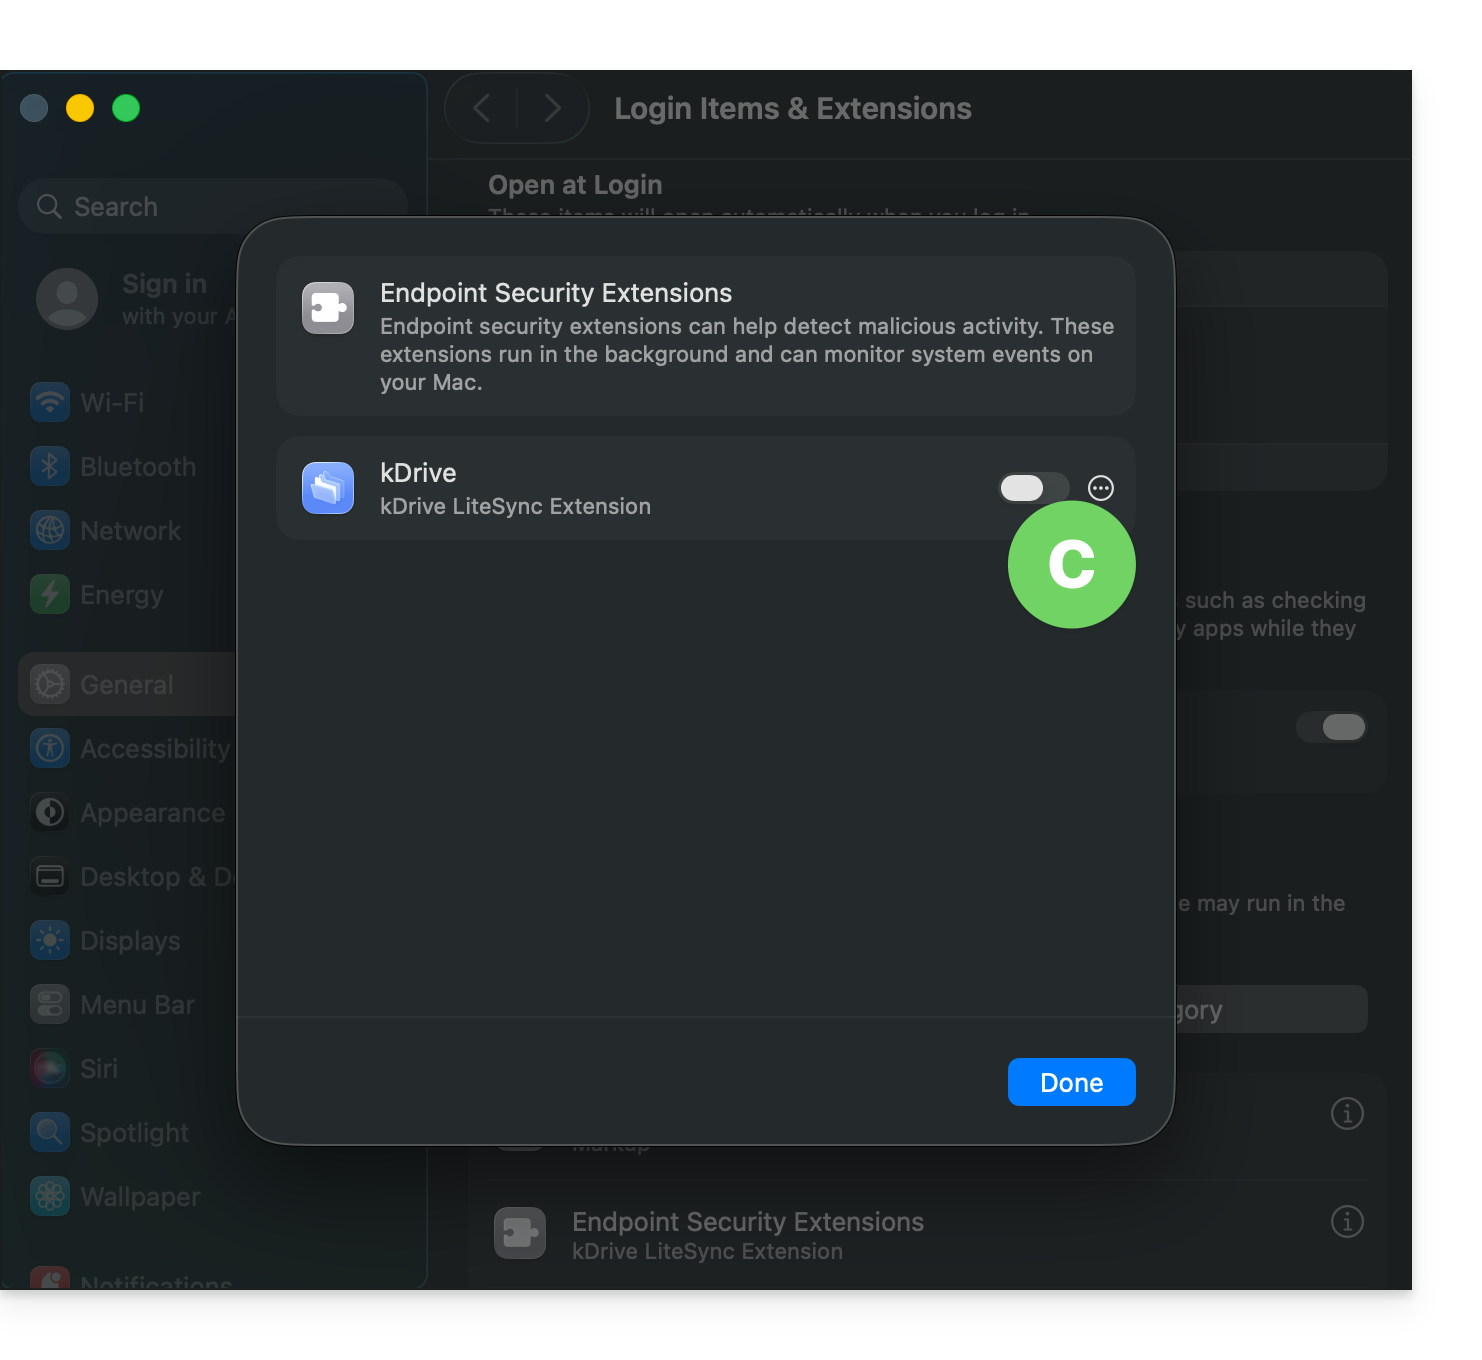
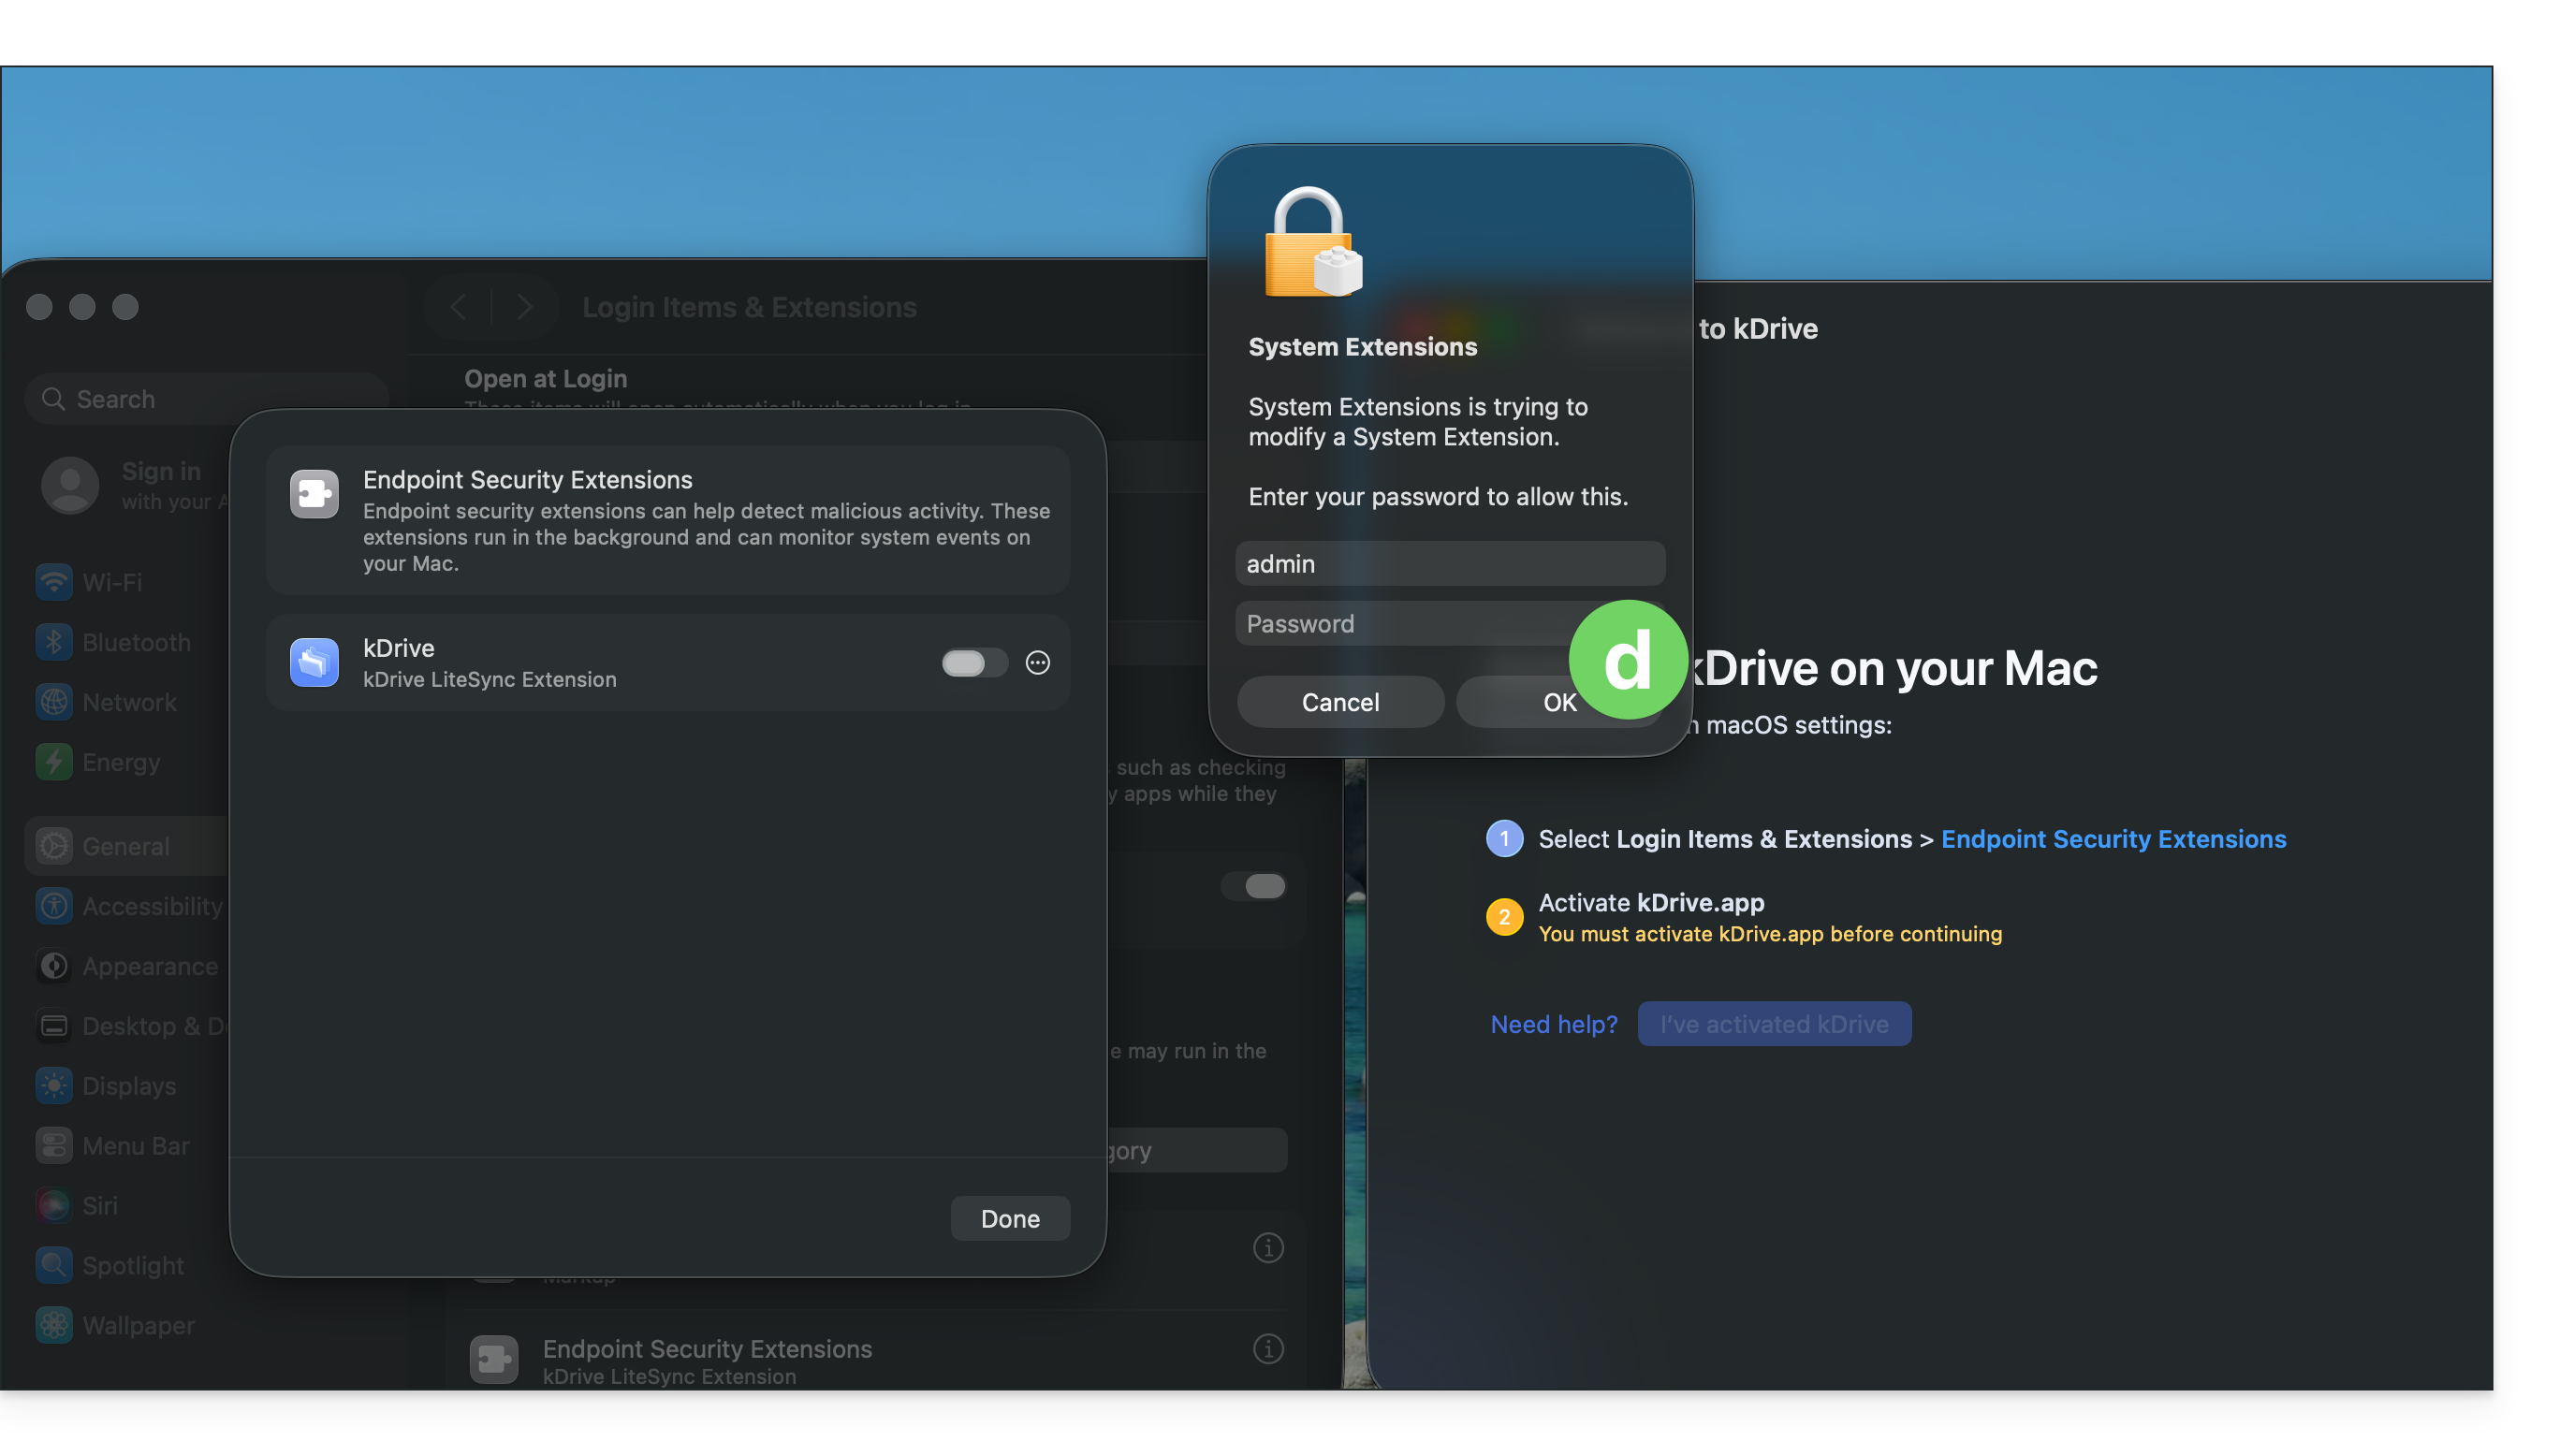
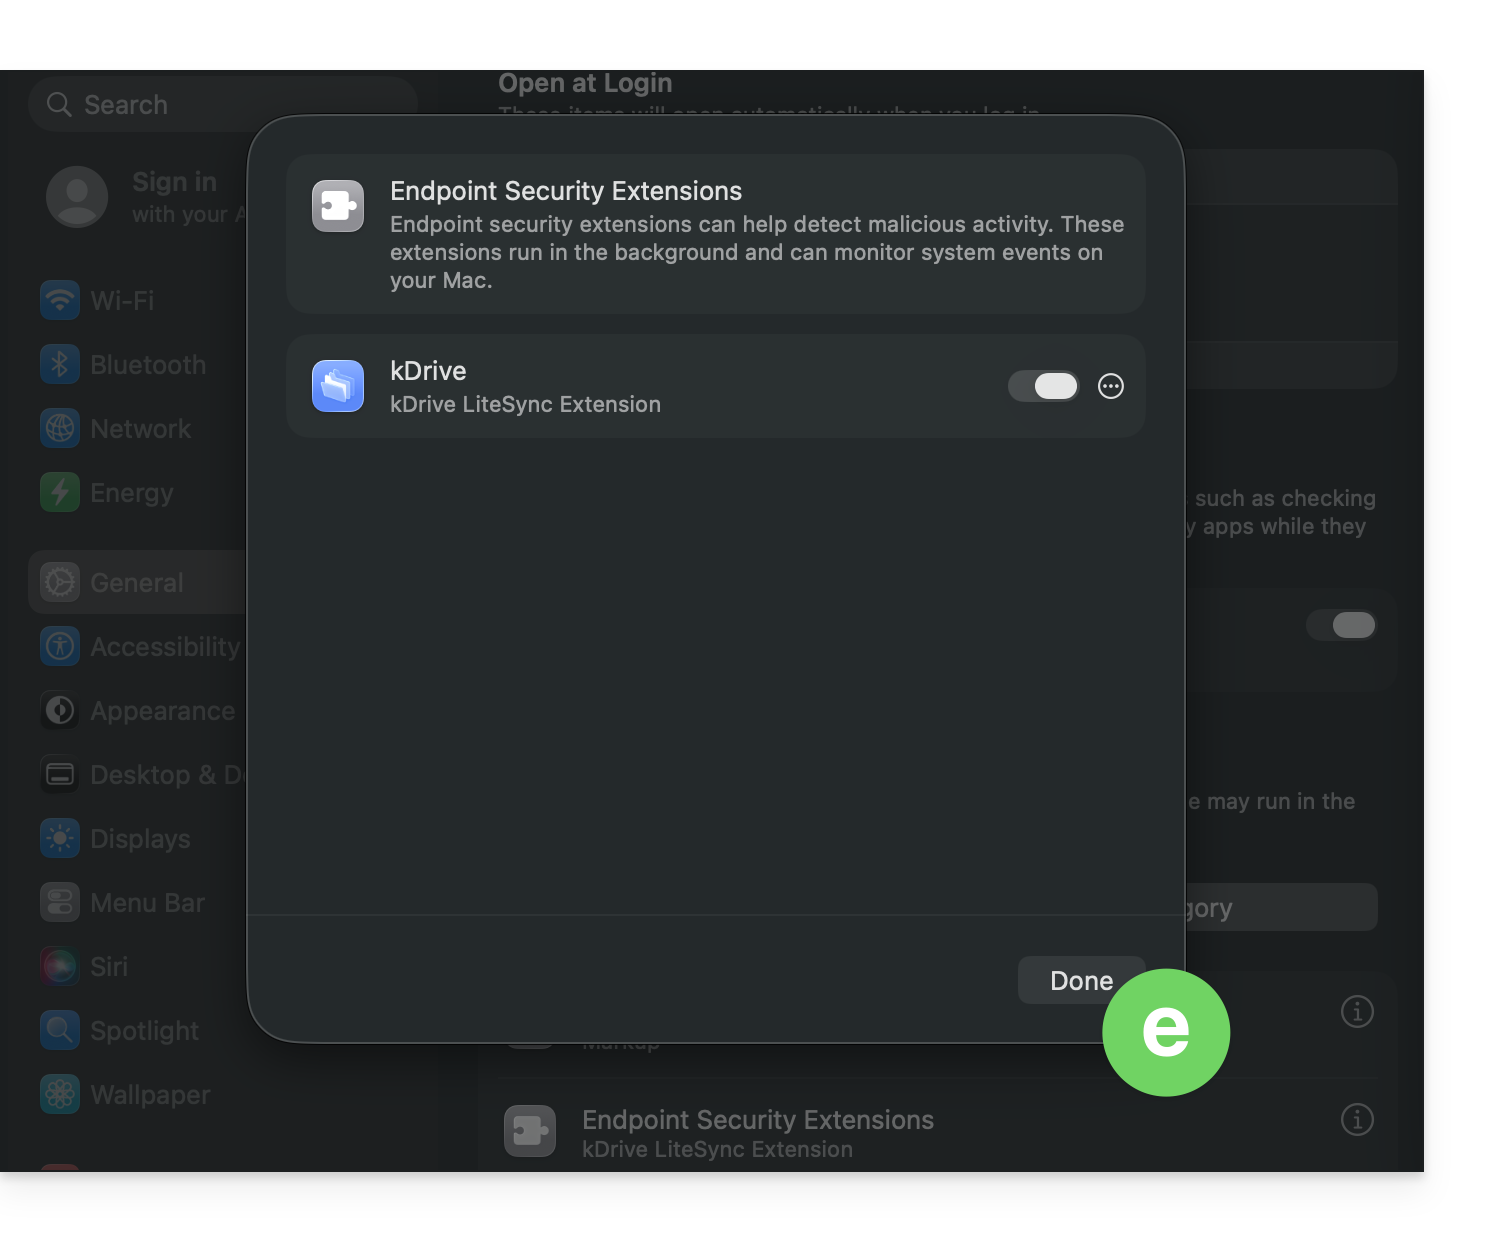
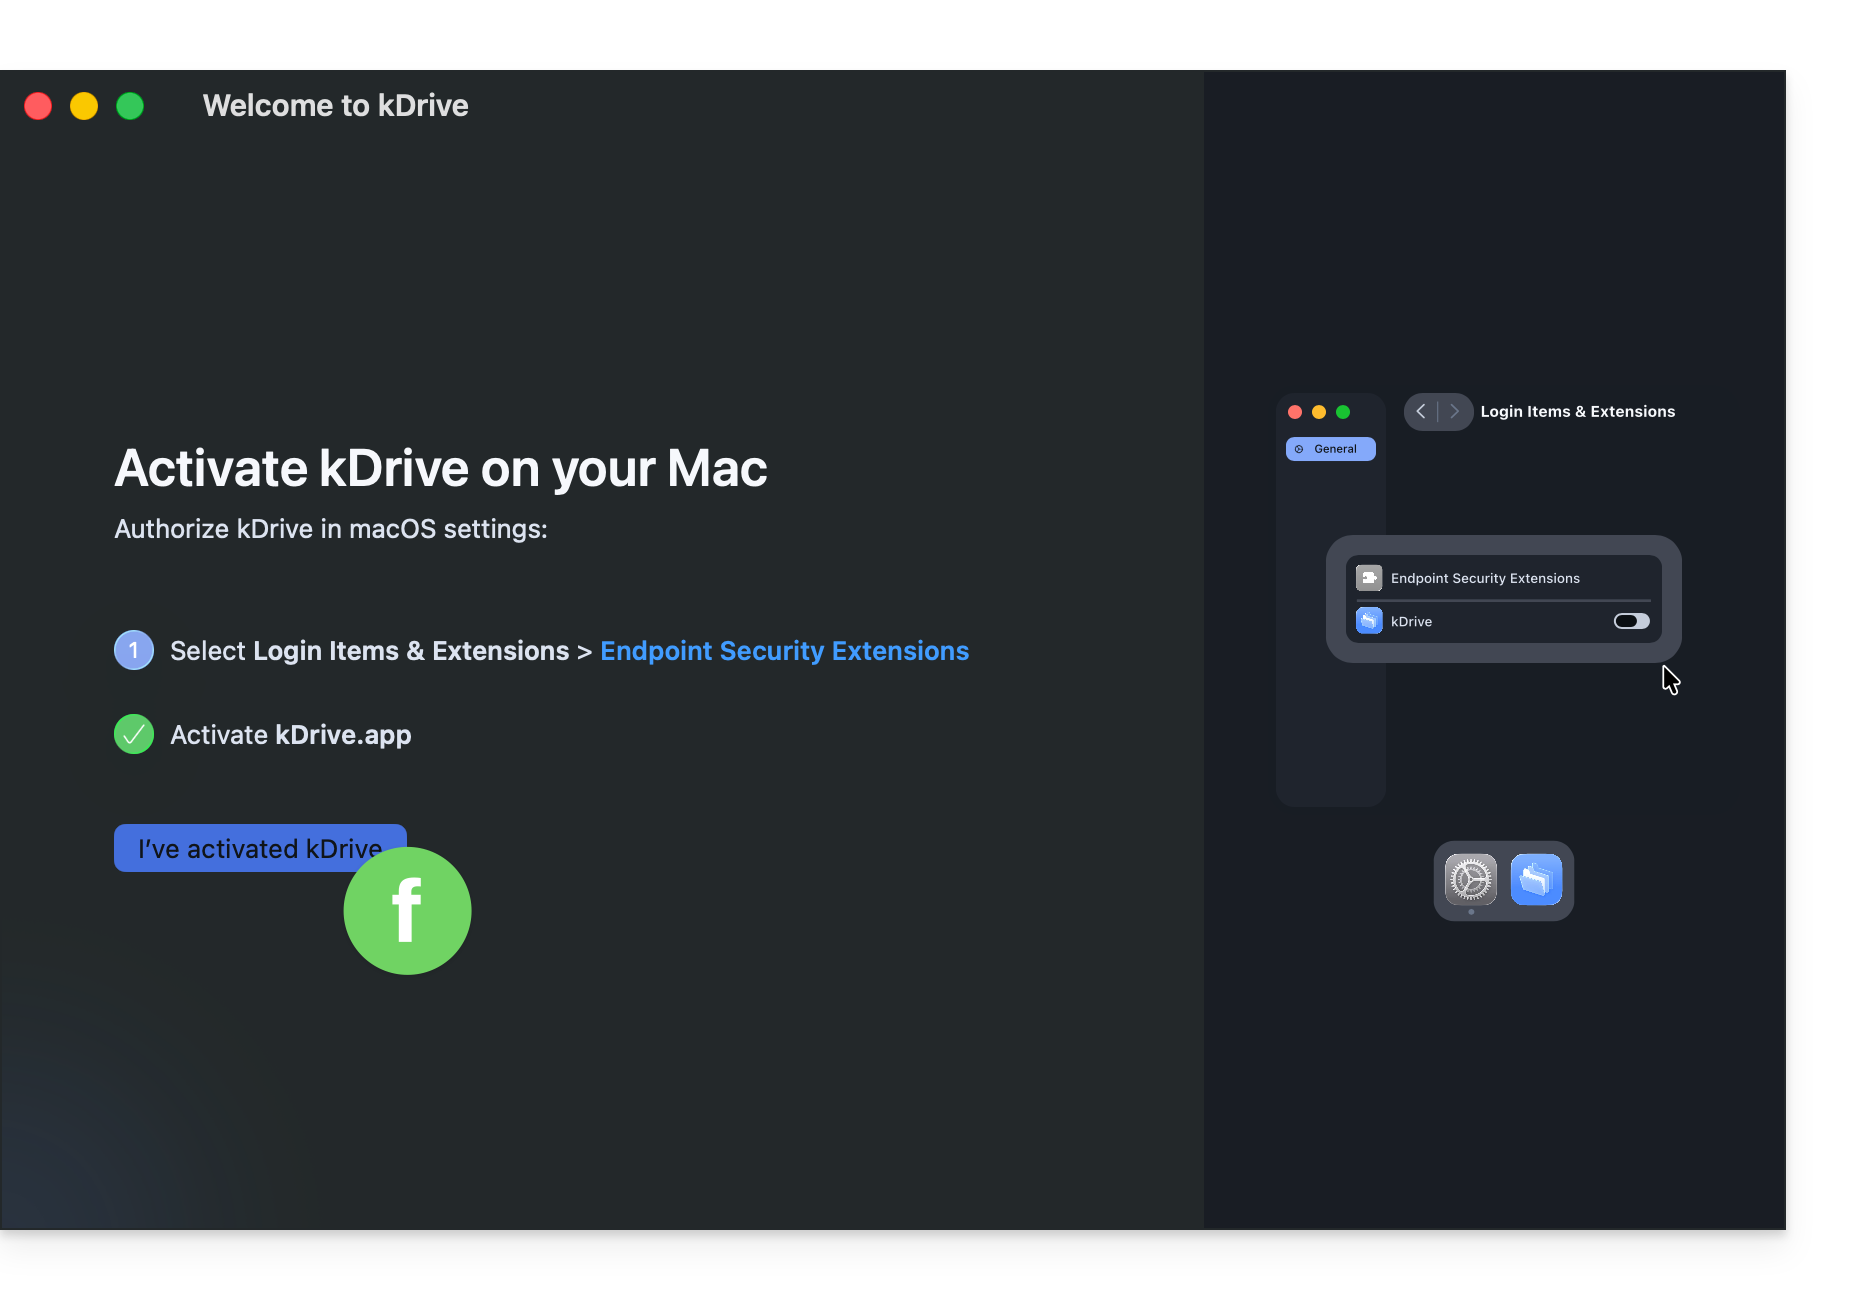
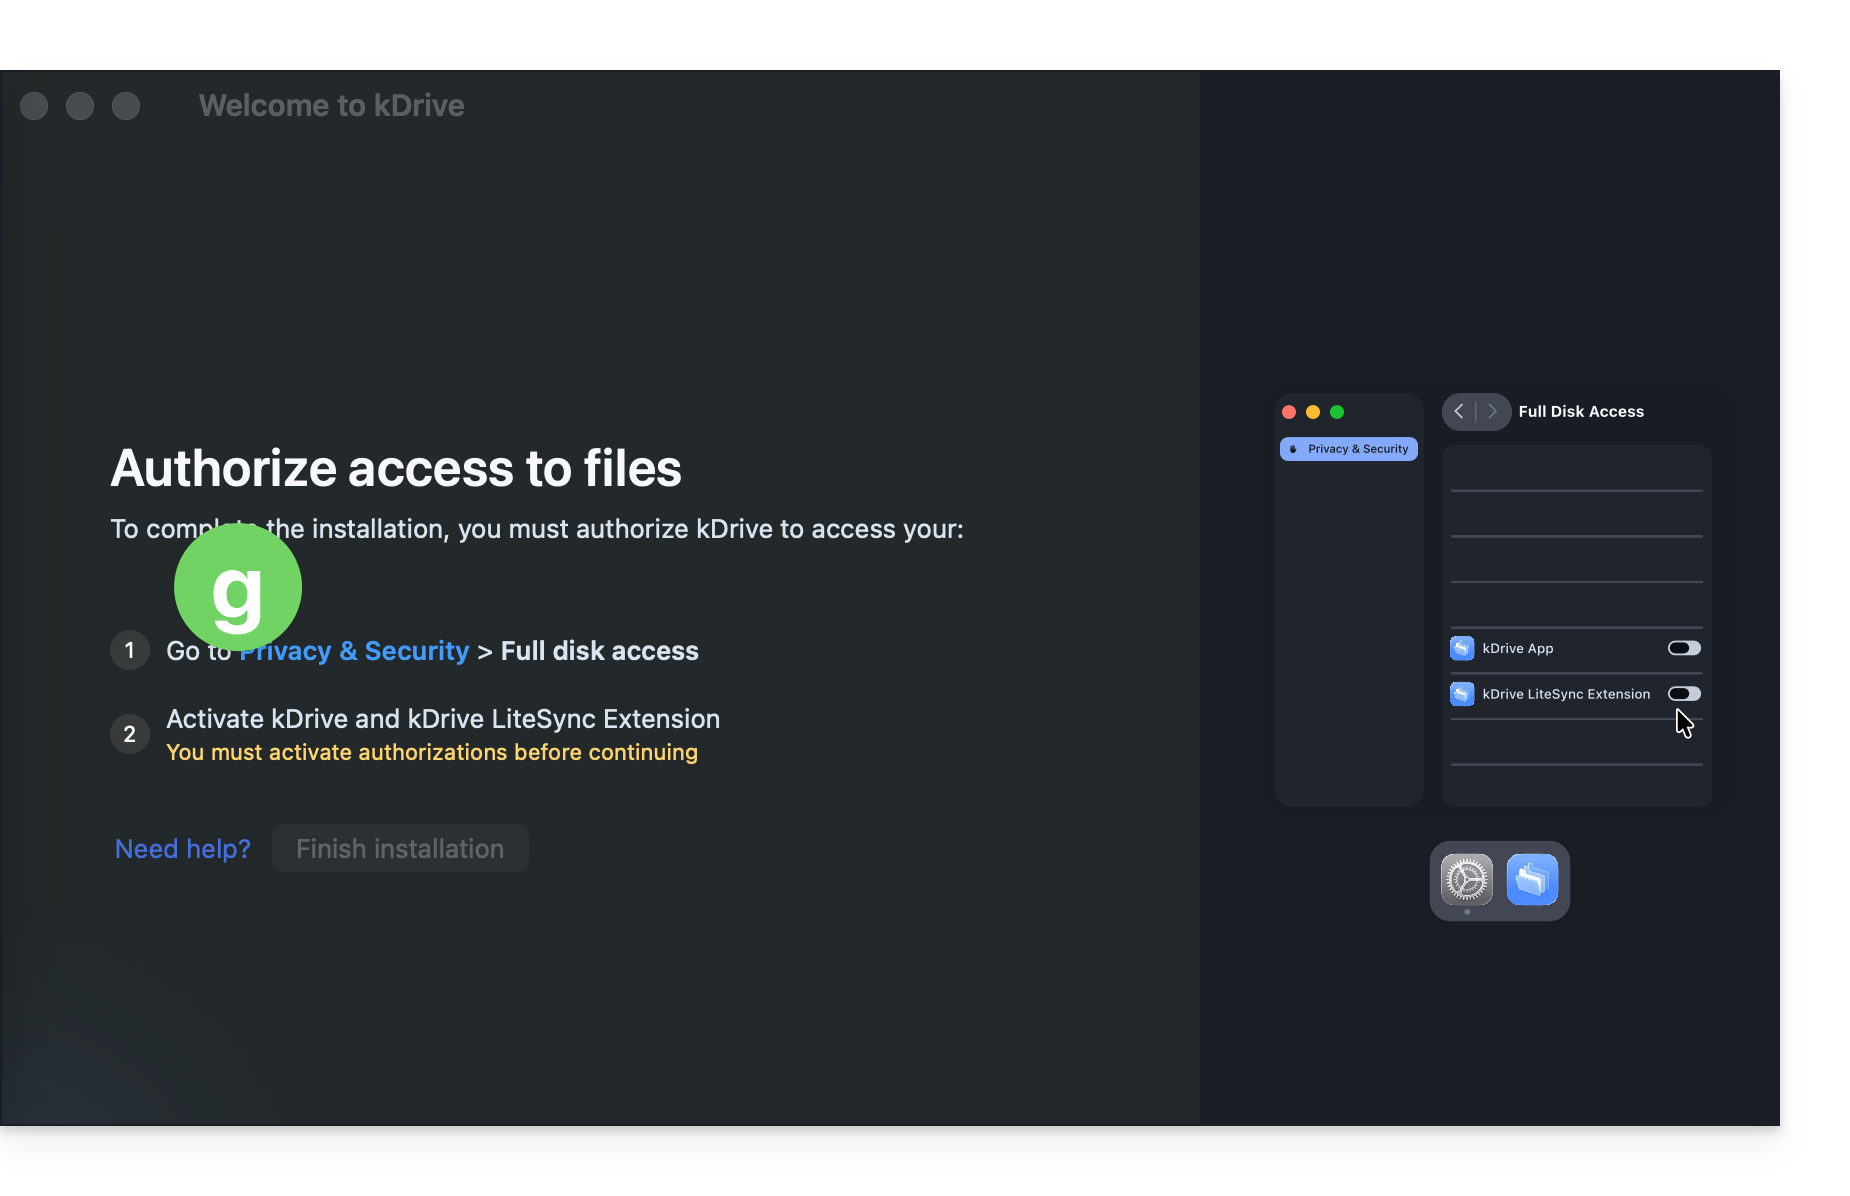
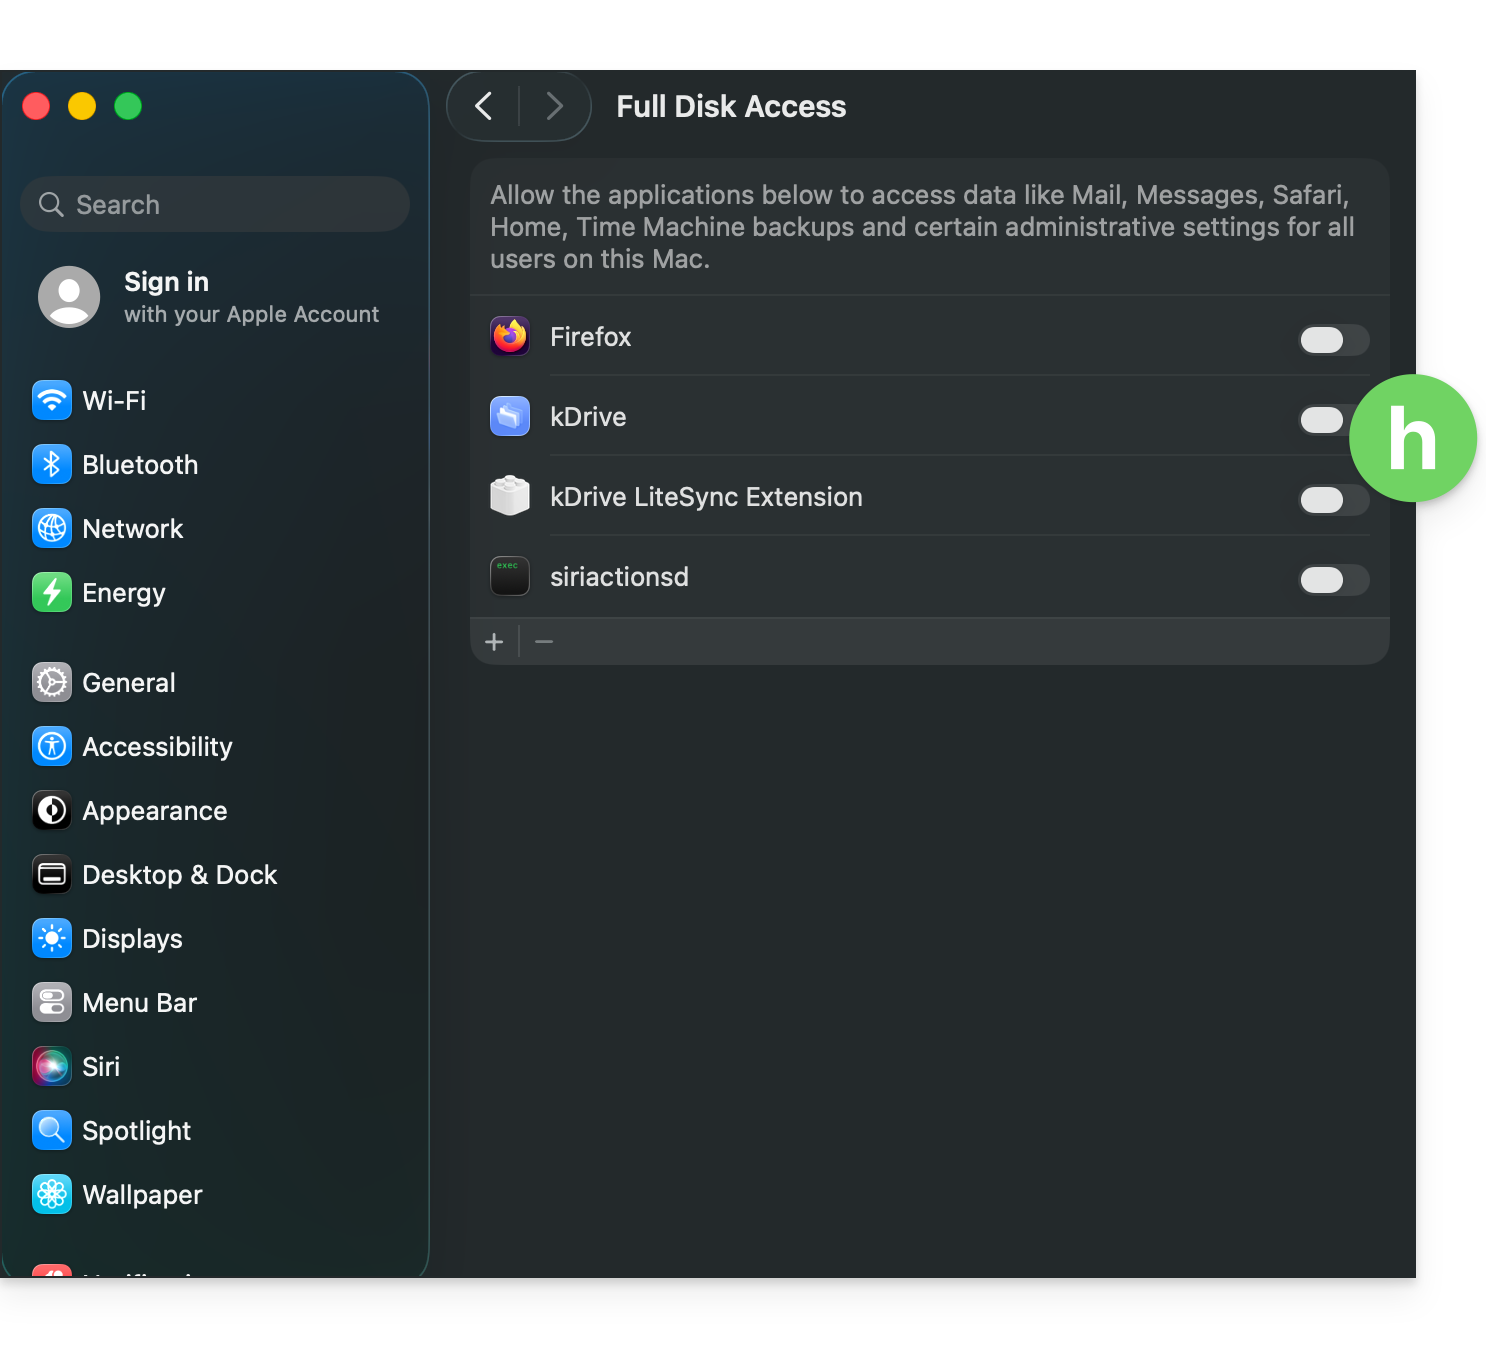
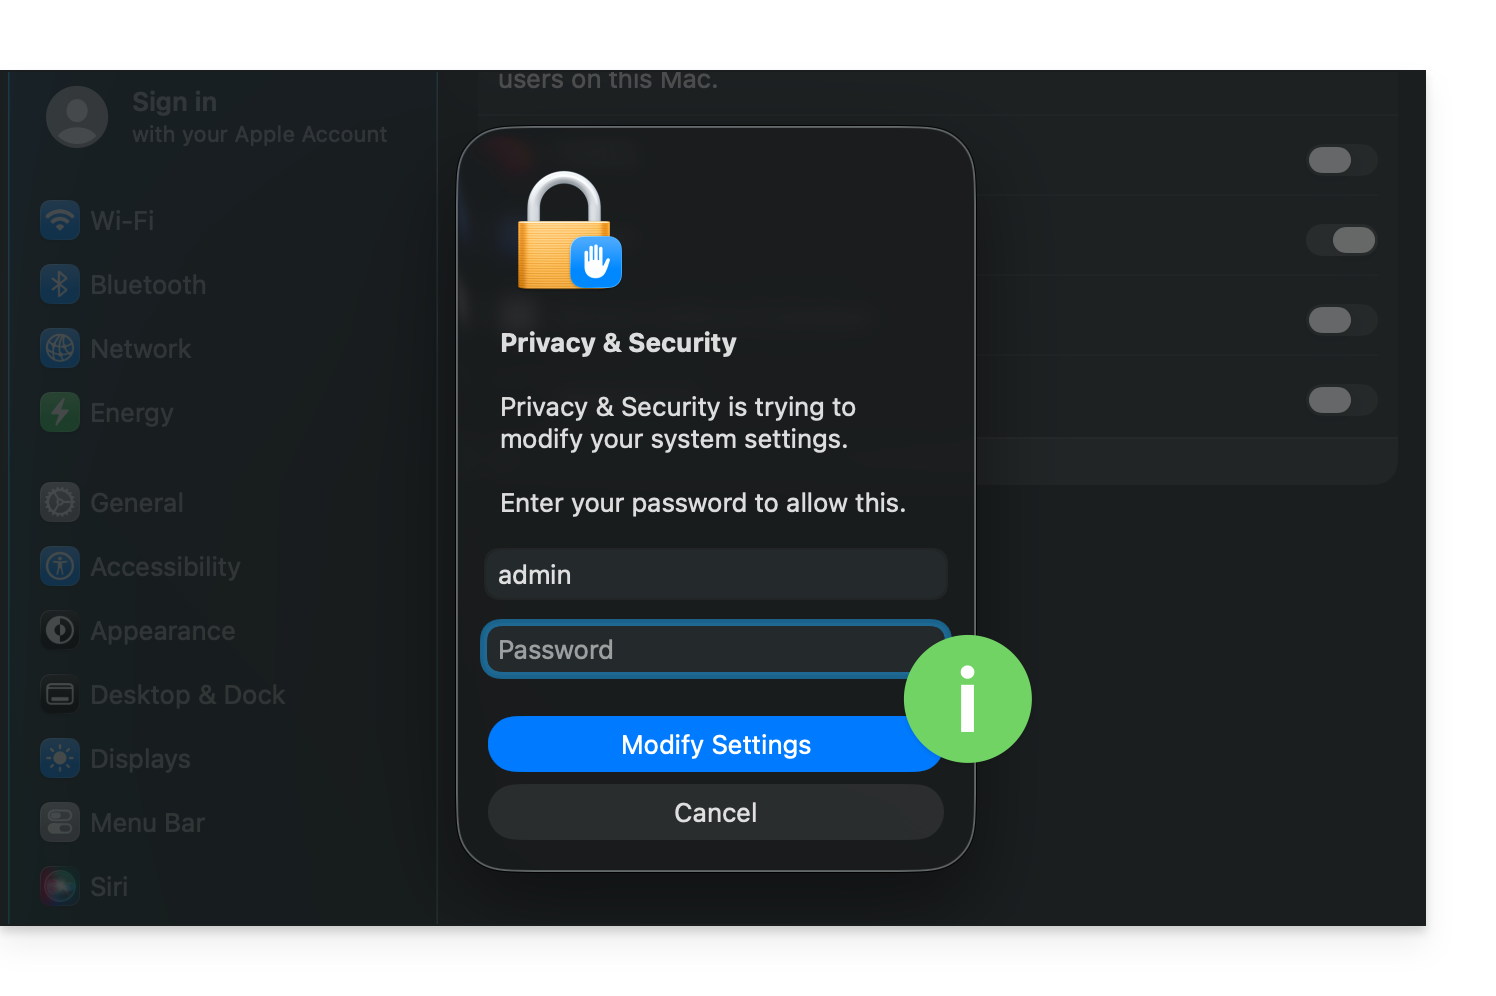
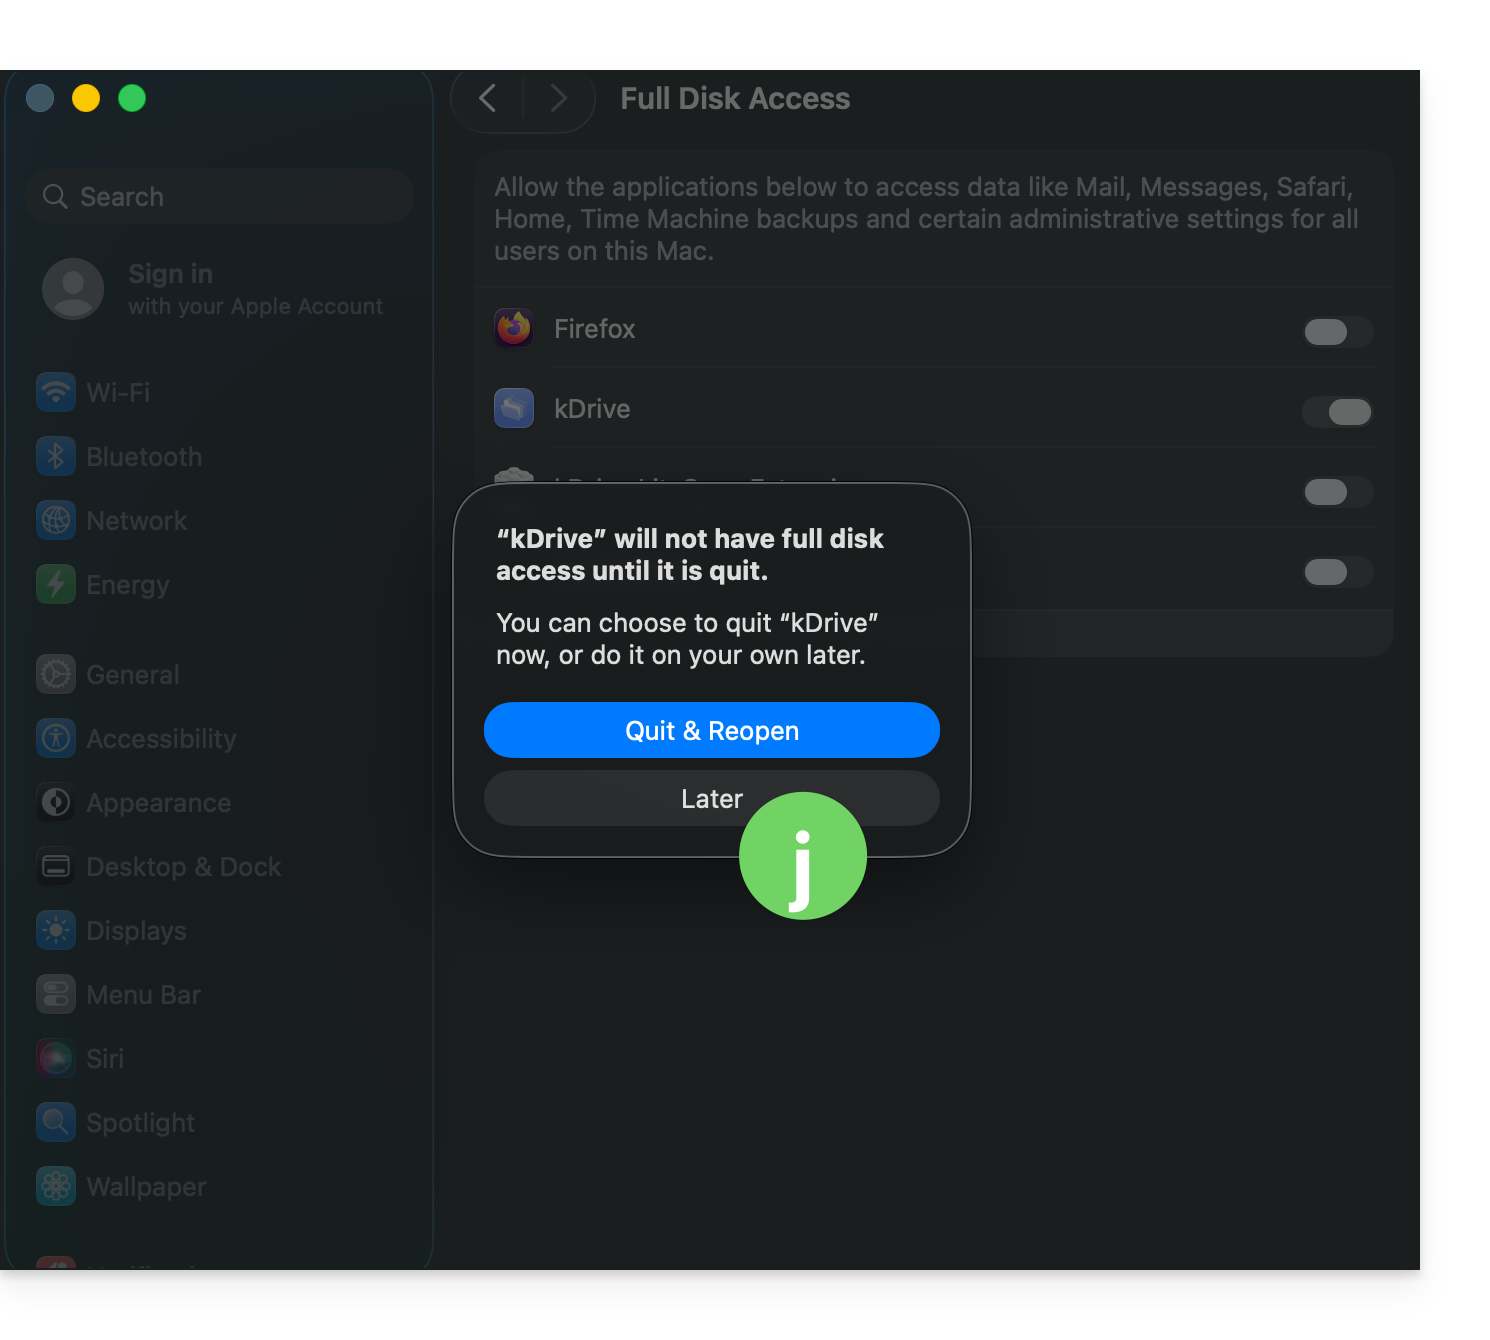
macOS 27
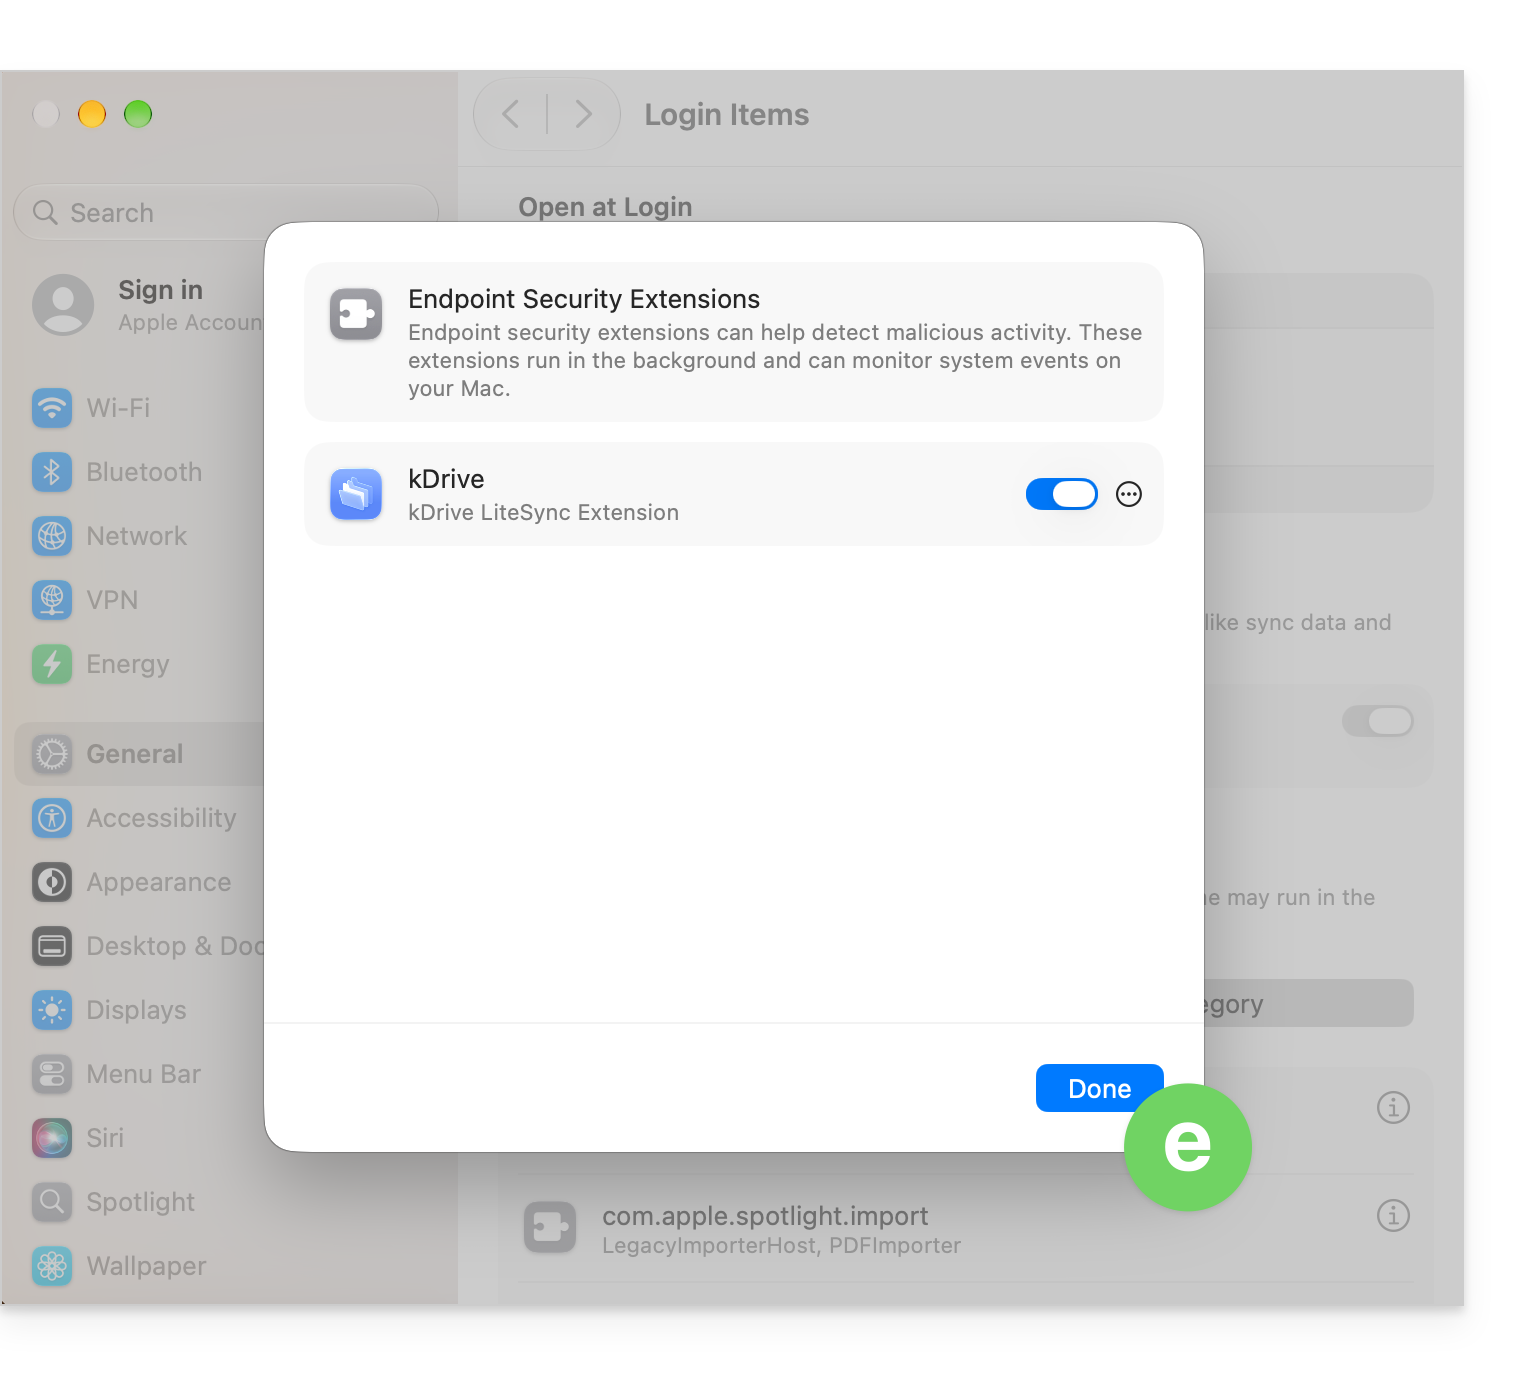
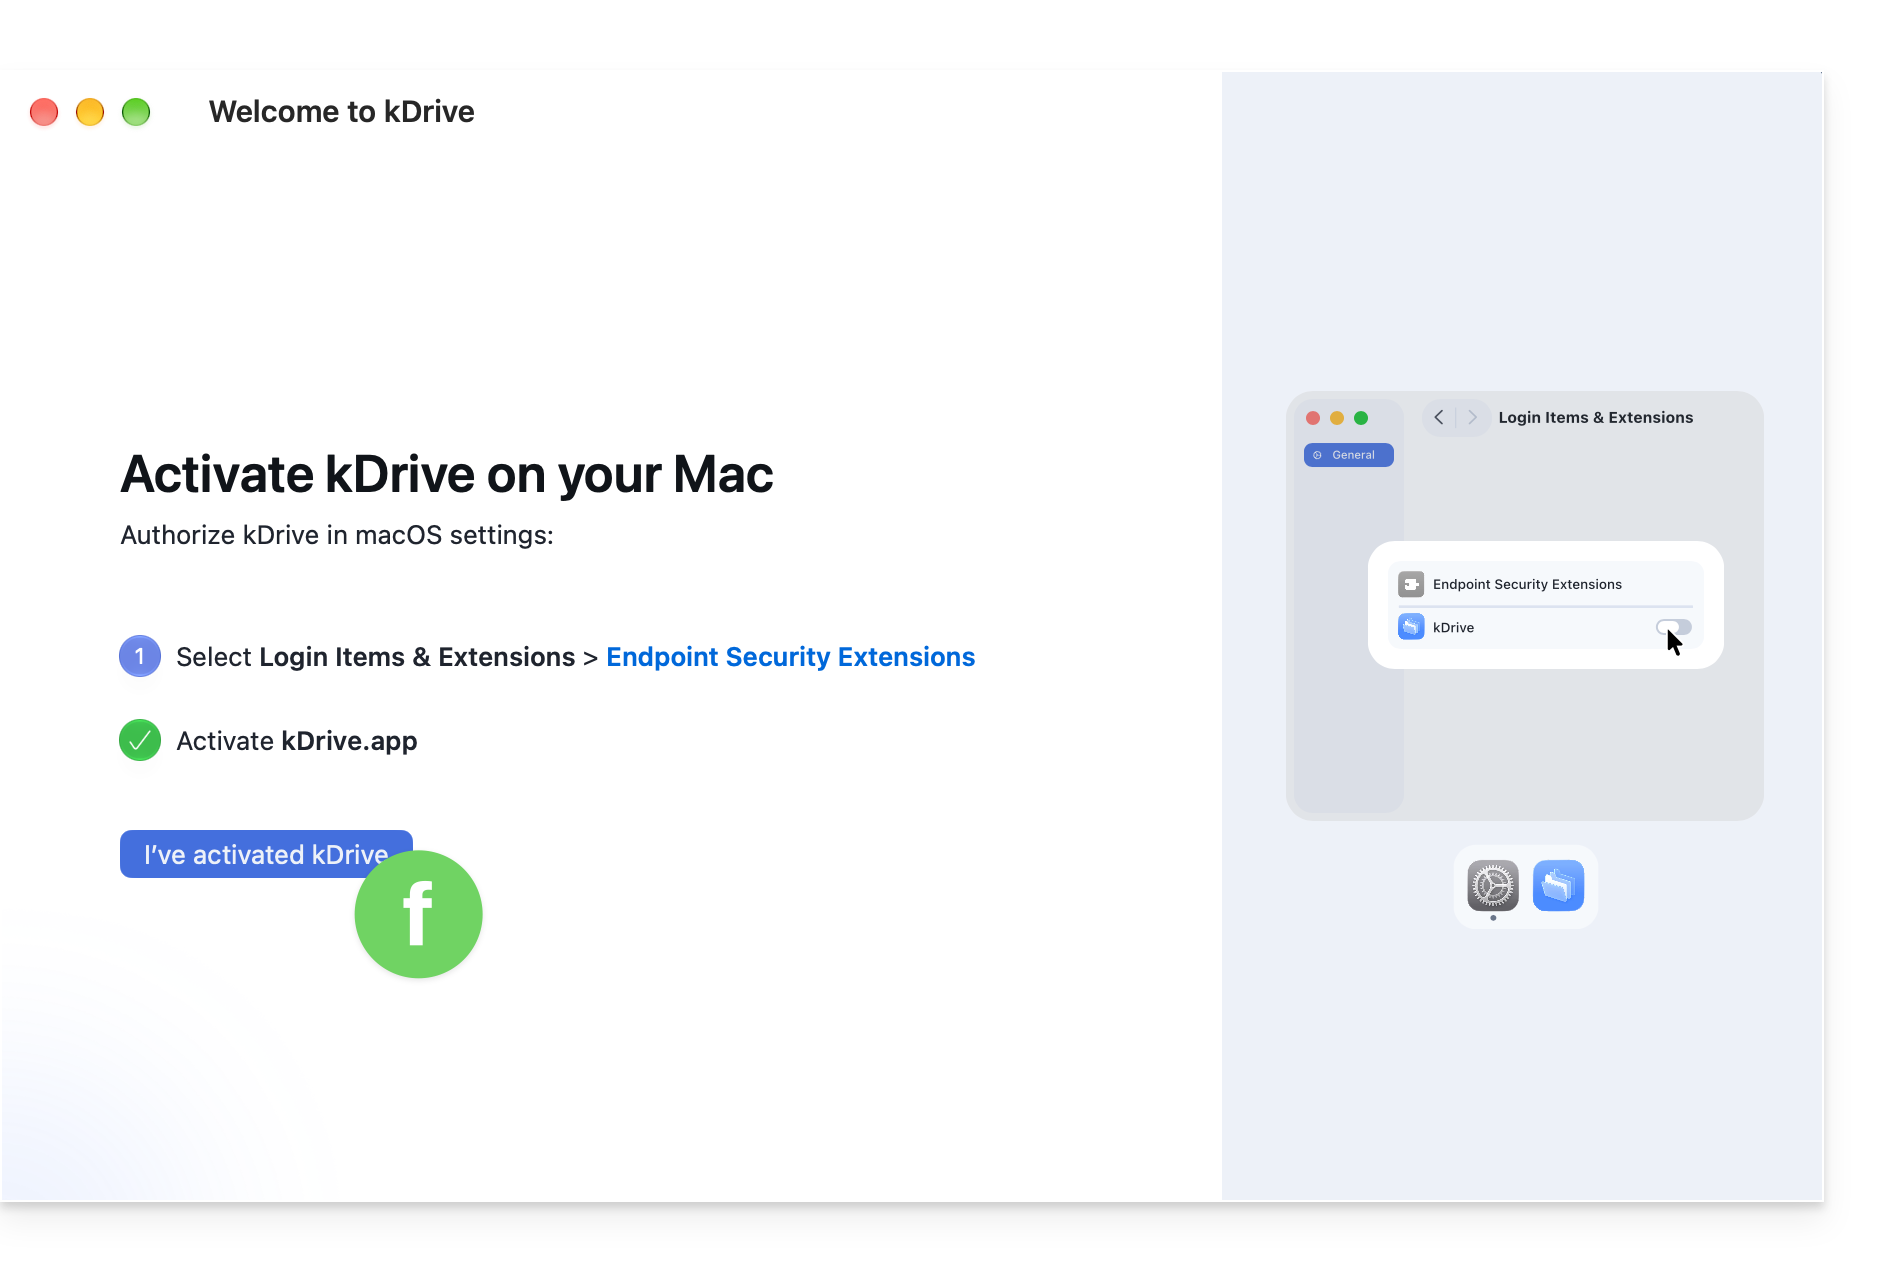
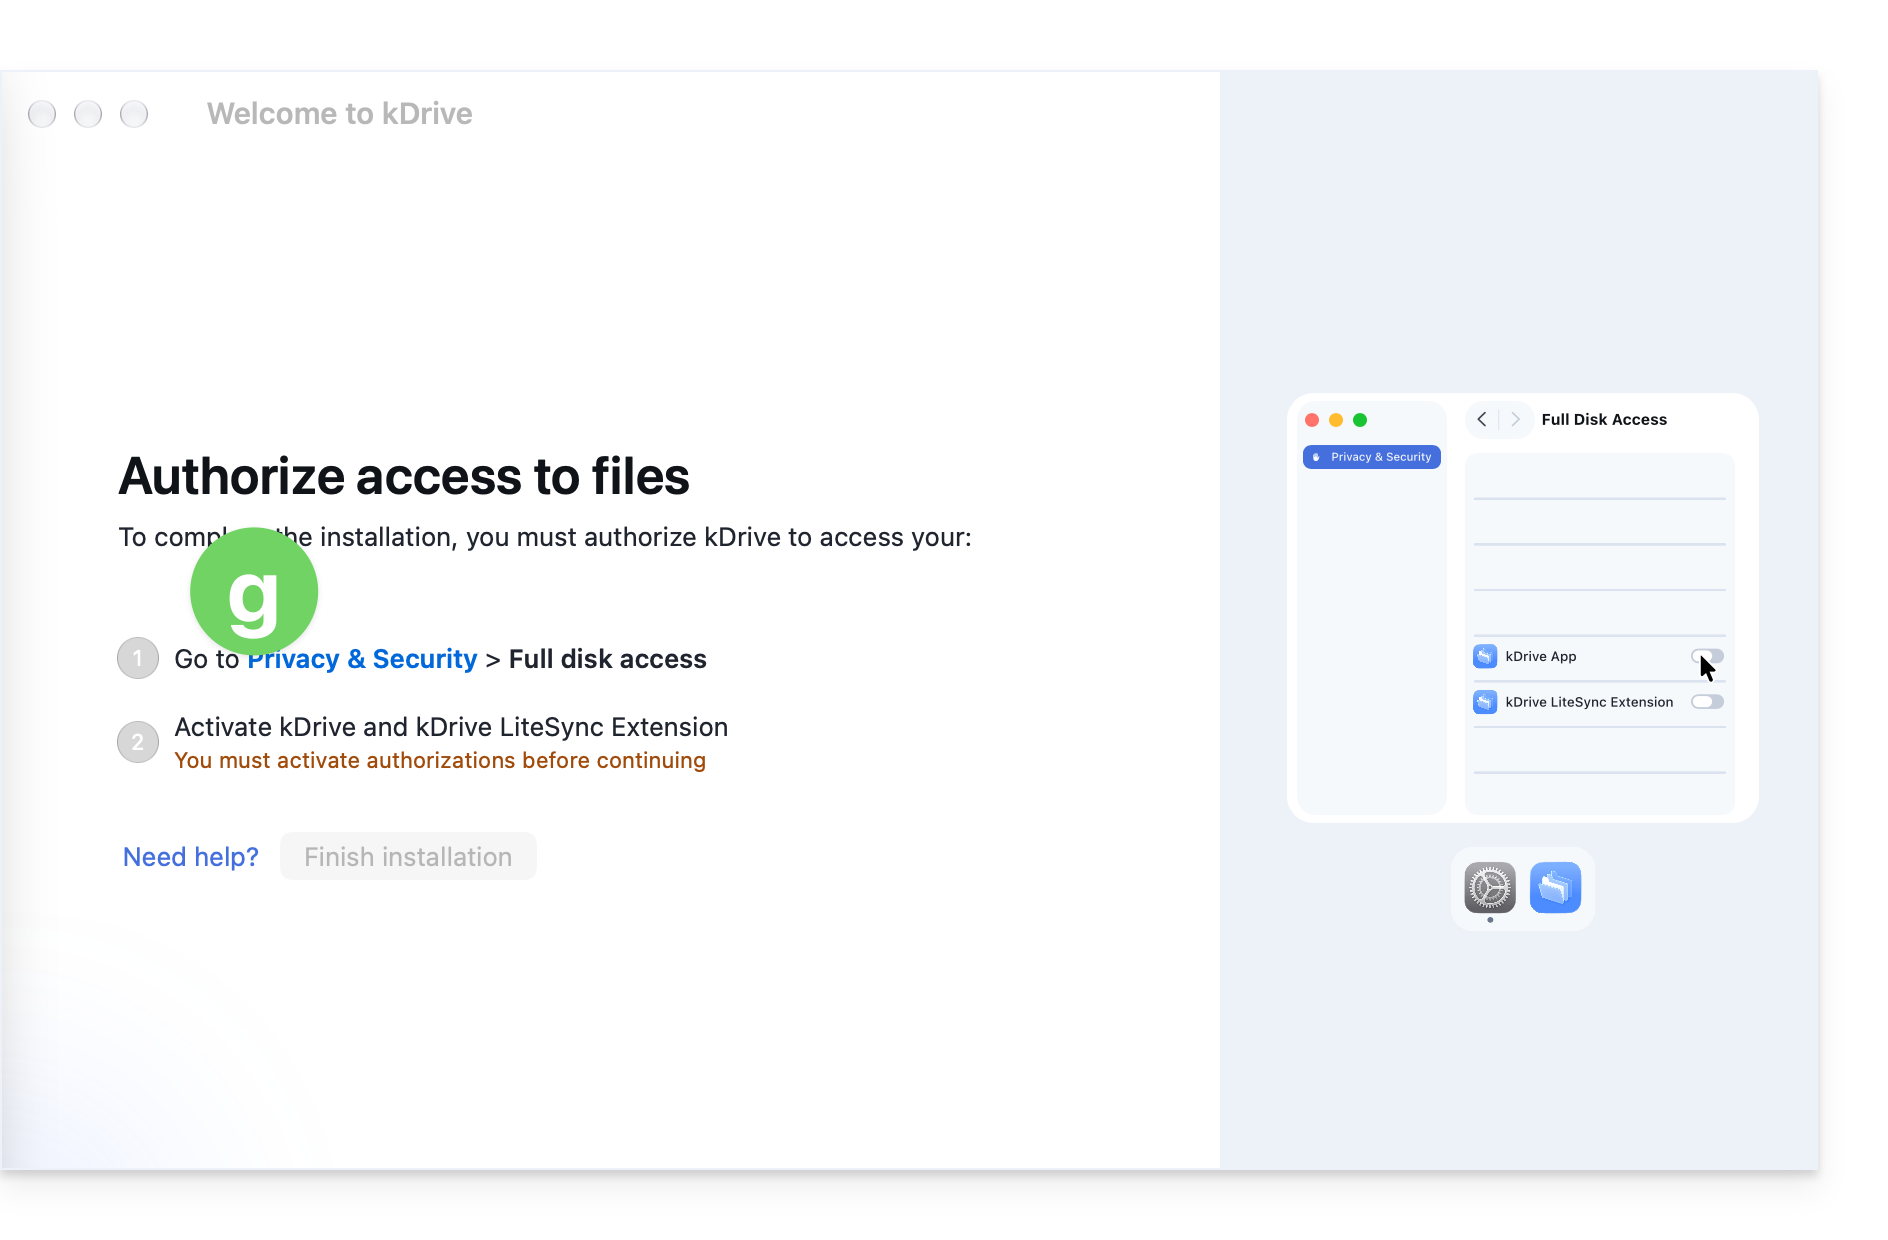
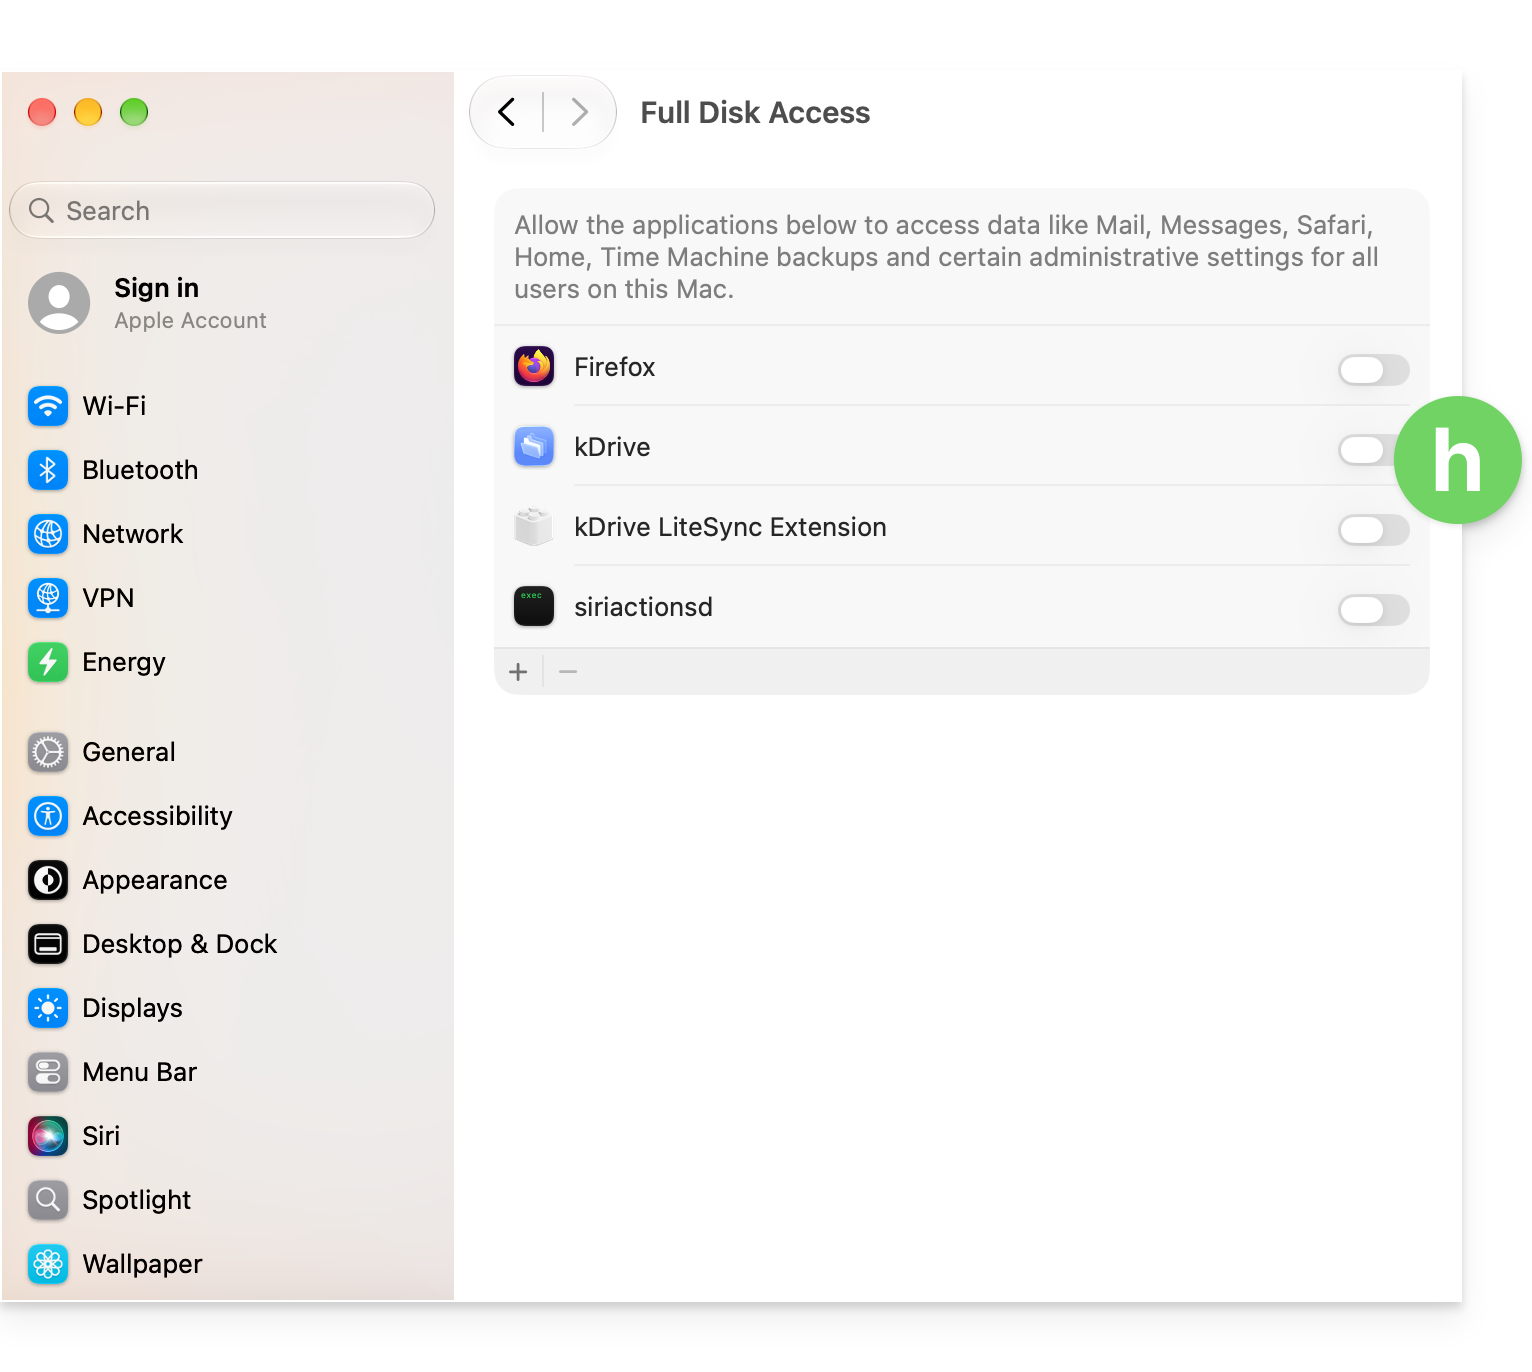
Link to this FAQ: https://faq.infomaniak.com/2935
Has this FAQ been helpful?
This guide details the installation of the kDrive desktop application from Infomaniak on a computer equipped with the Windows operating system. This application allows you to automatically synchronize files from your computer with your online kDrive storage.
Install the kDrive 4.x app on Windows
To do this:
- Open the downloaded application (❓: help) to start the installation on your device.
- The configuration window opens automatically after installing the application (and the app icon should be visible in the bottom right corner on Windows).
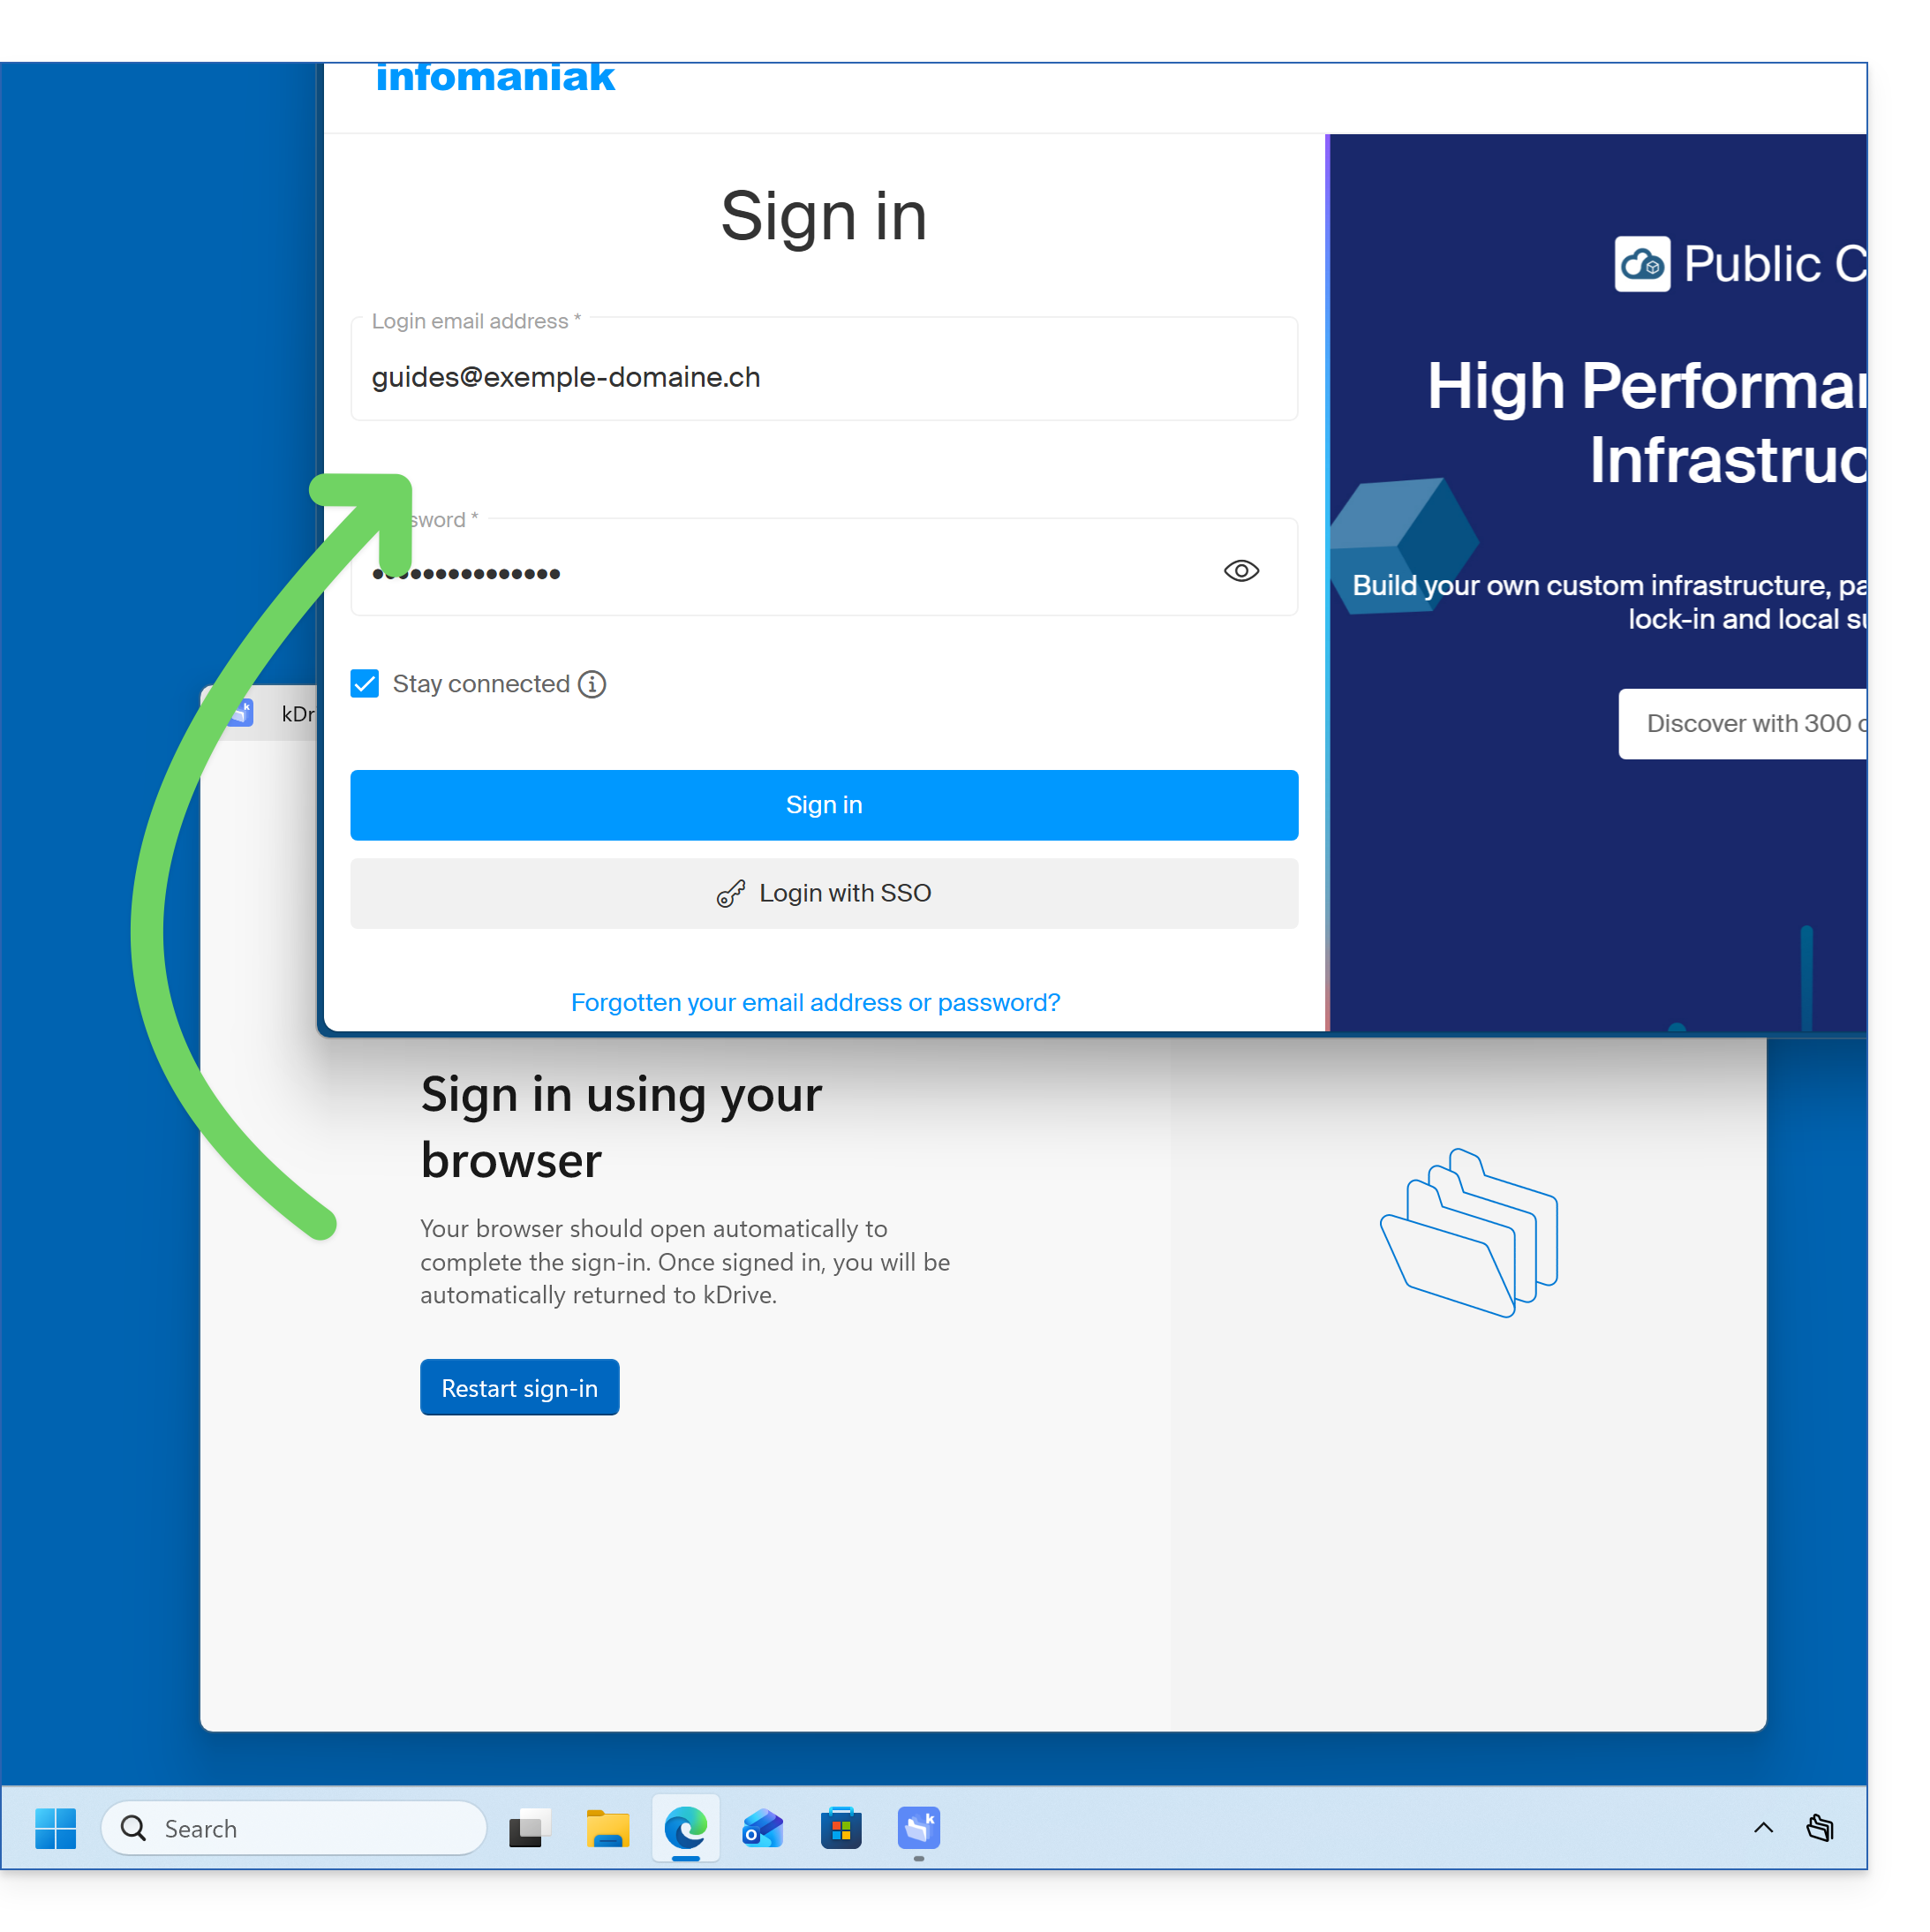
- Click the button to log in to your account:
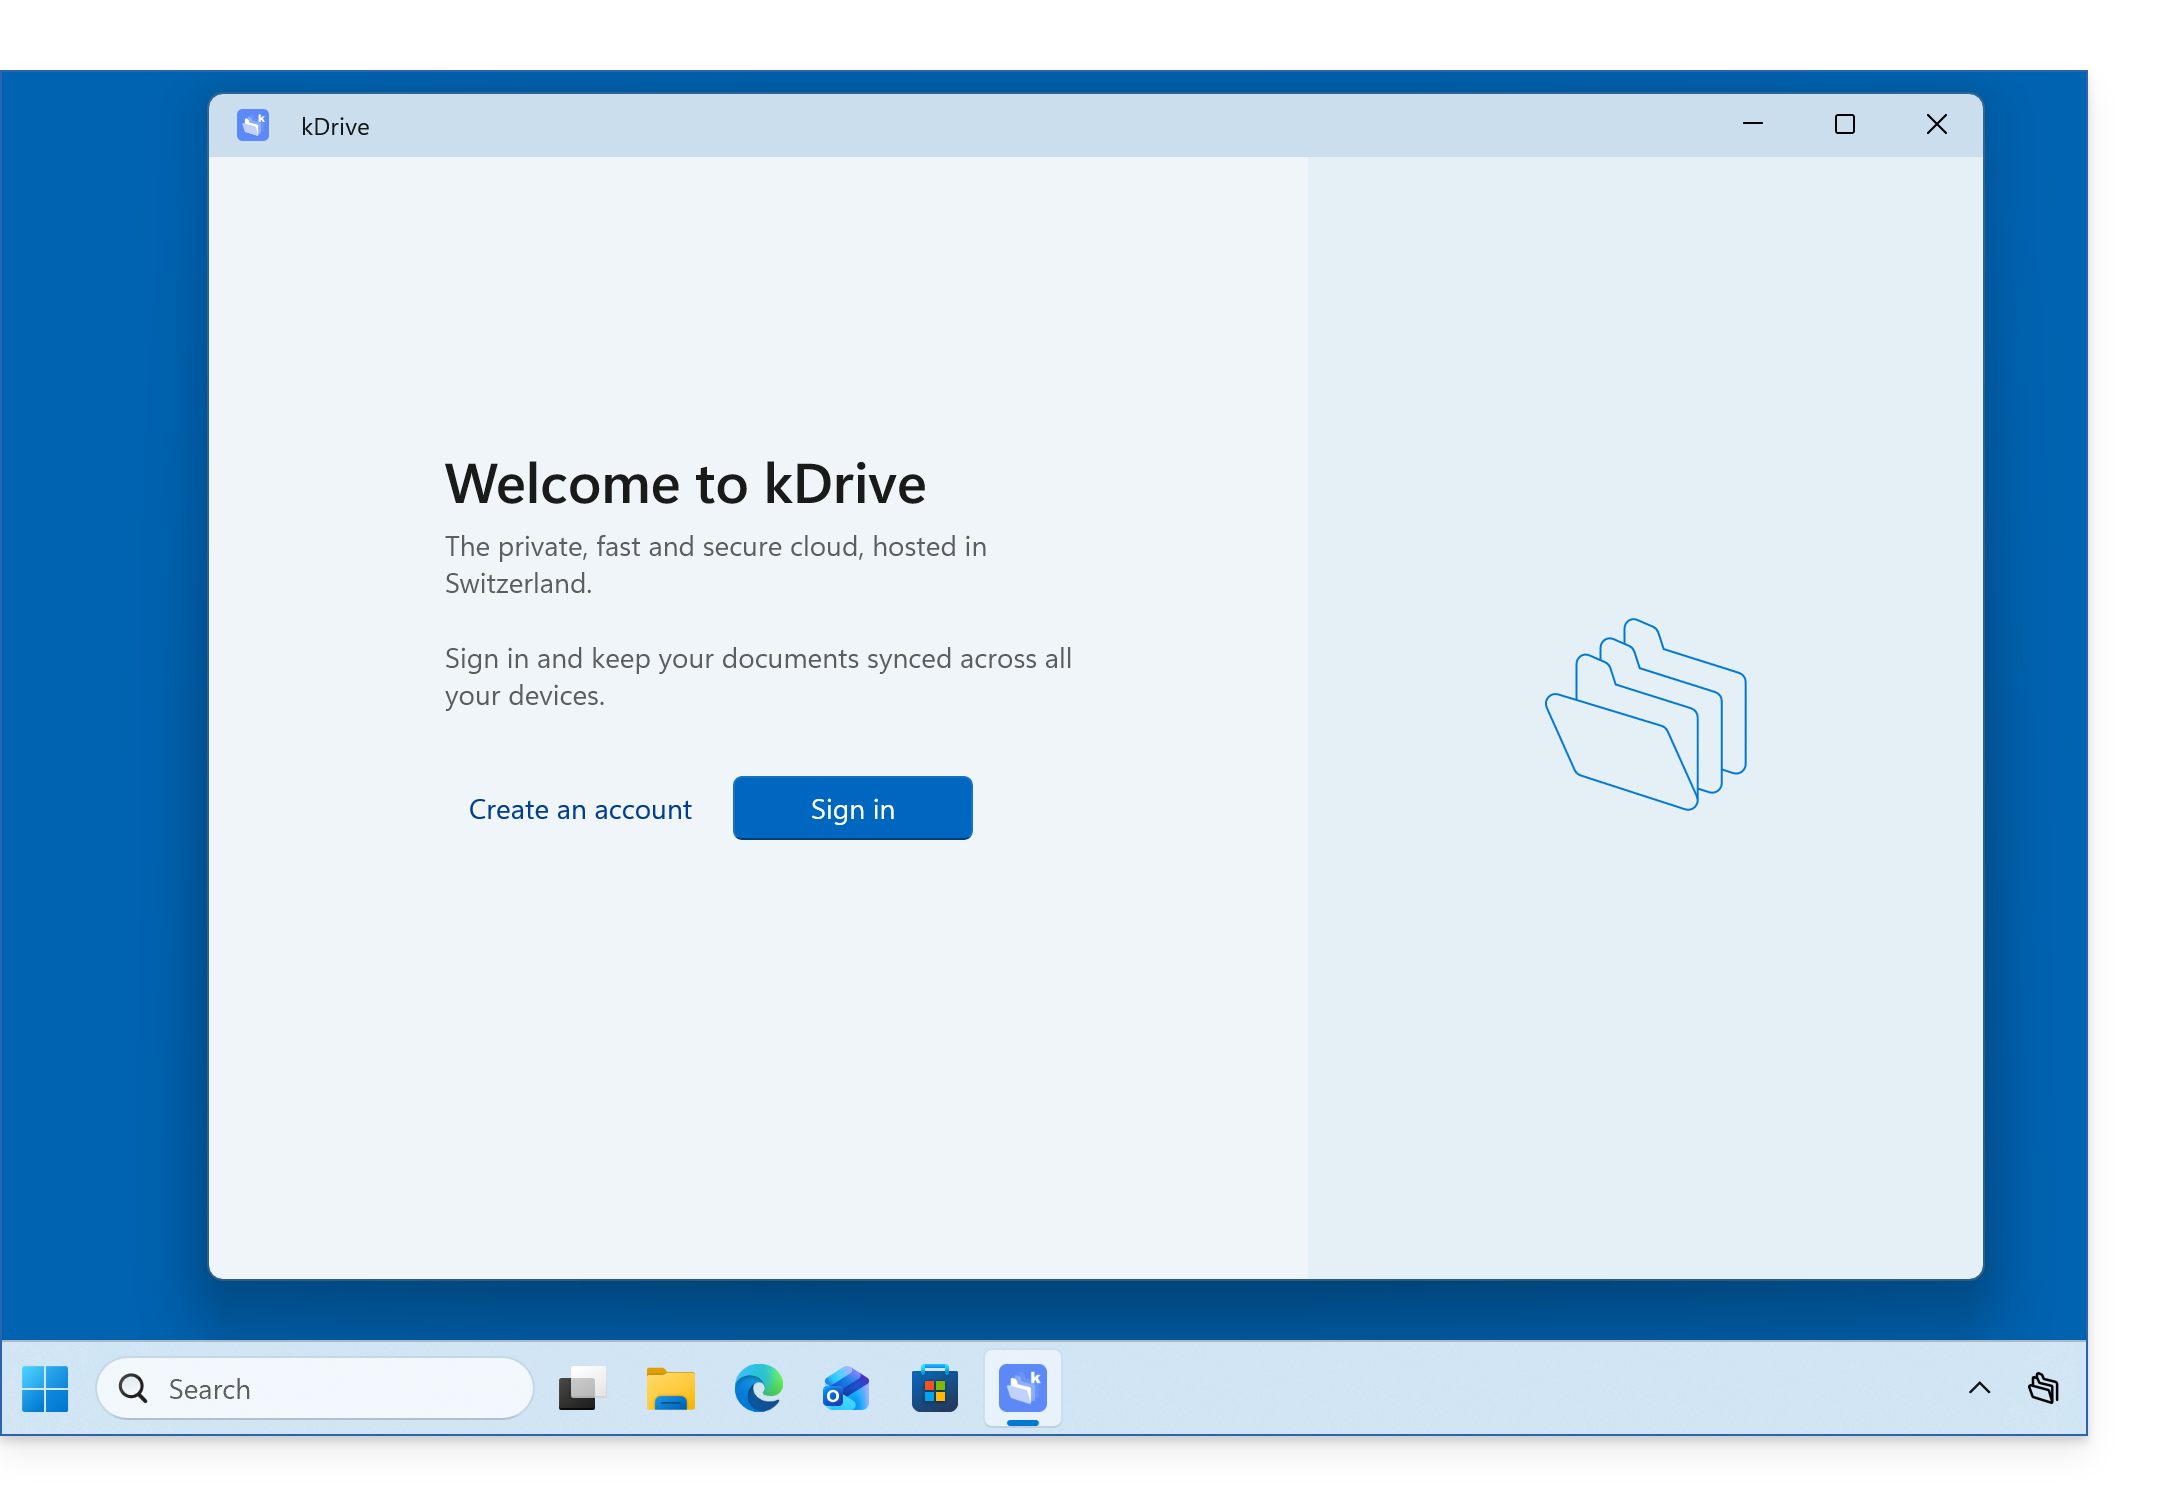
- The browser opens, allowing you to connect to your Infomaniak account, which will take you to the Organization(s) containing your kDrive:
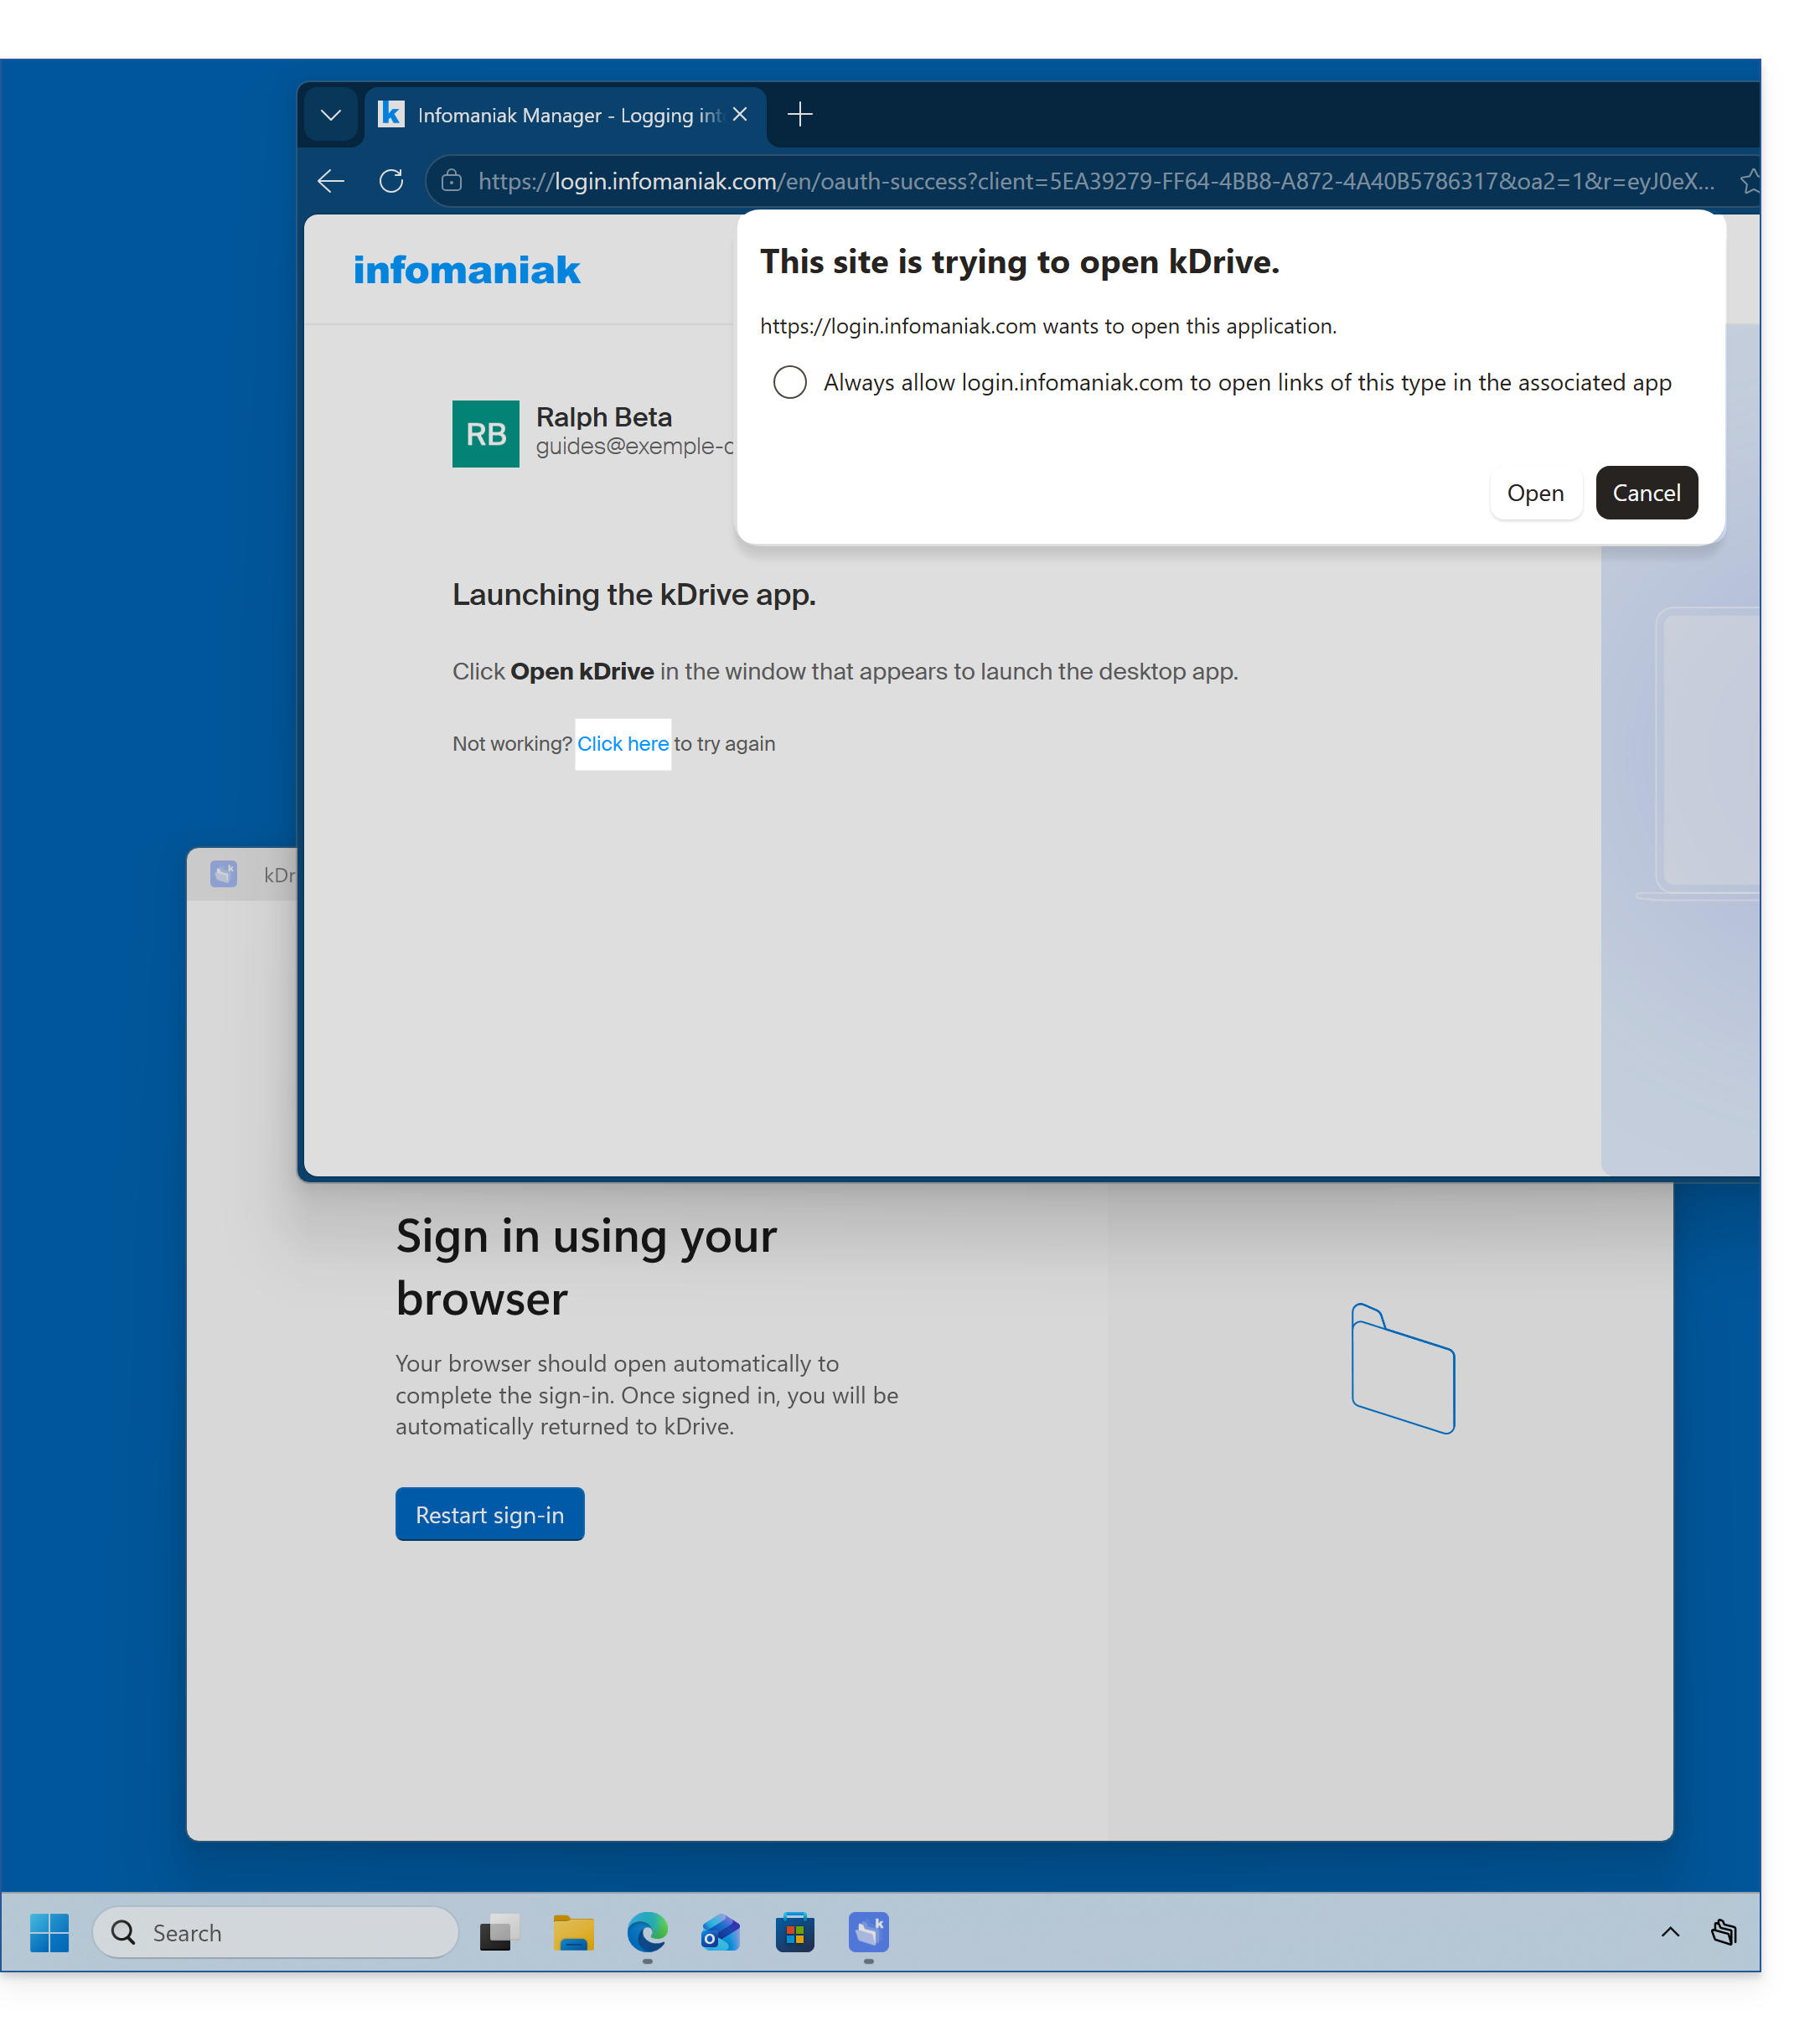
- The browser may ask for your permission to interact with the kDrive application to confirm the connection; click the Open button (if you cancel by mistake, click the link to request it again):
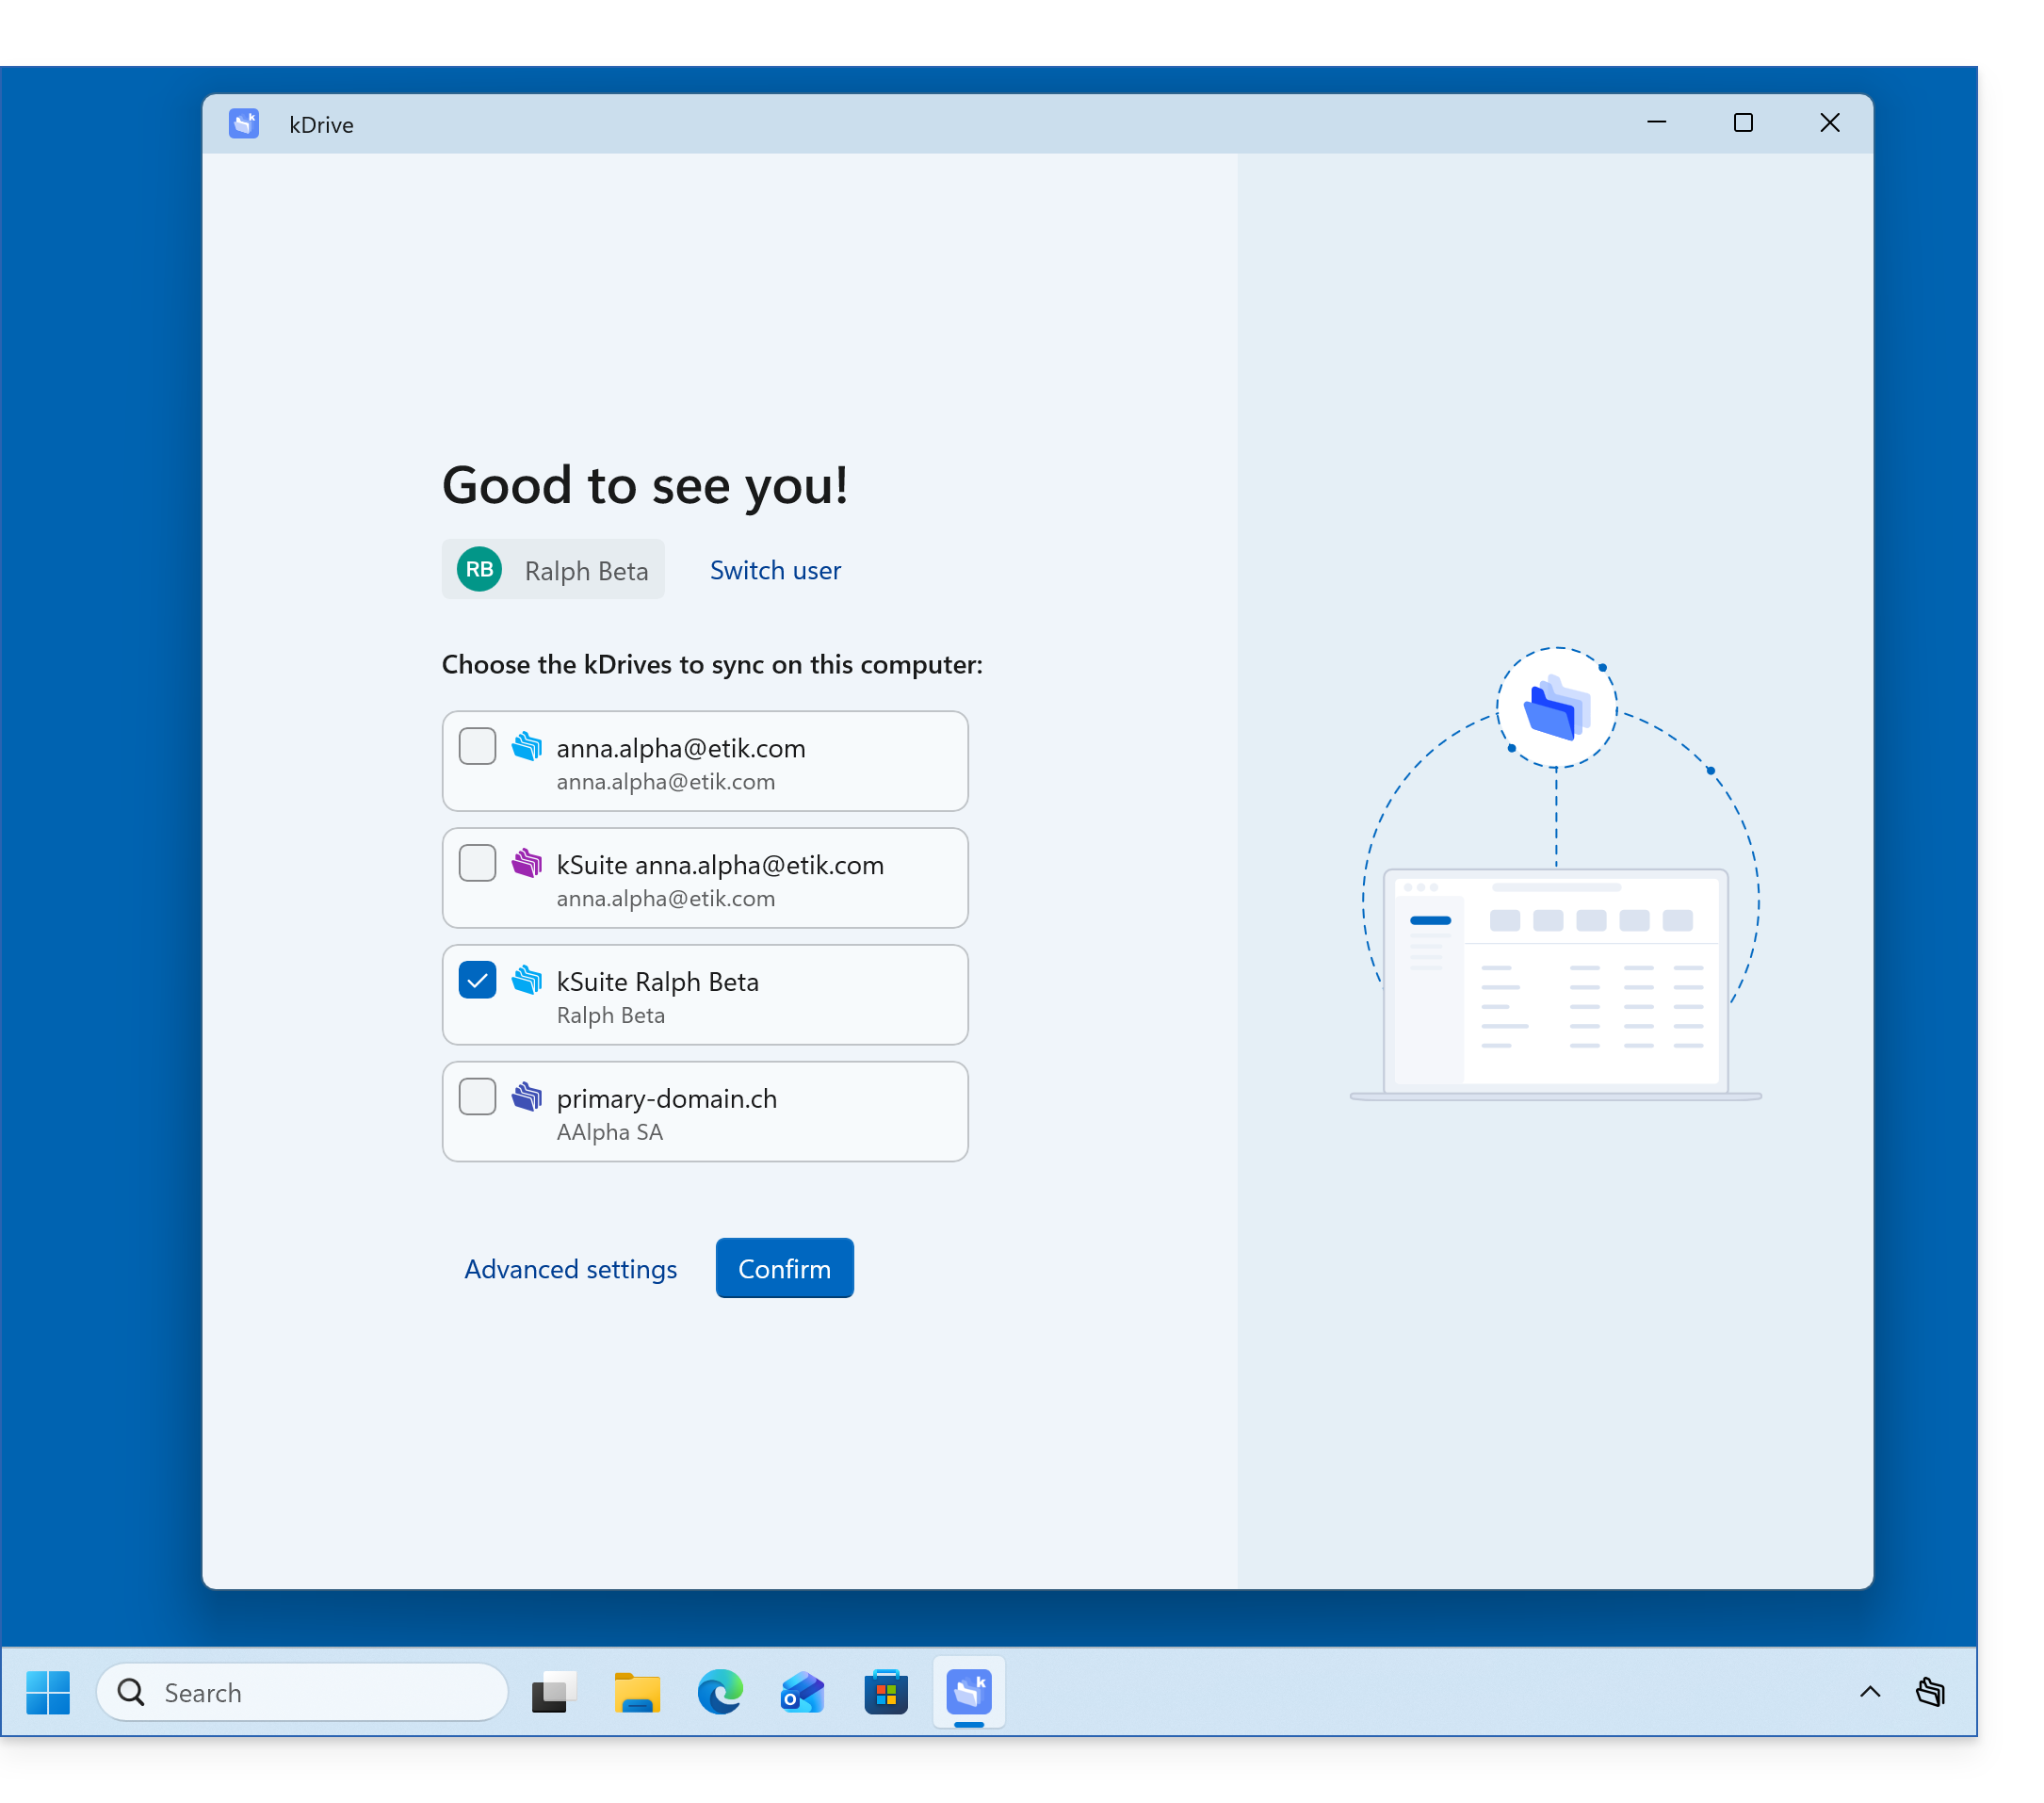
- You can close the browser; select the kDrive(s) that your user has access to and that you want to synchronize on this device, then click on Advanced Settings:
- The Advanced Settings allow you to choose:
- the location where the kDrive data will be stored (the folder must be empty),
- the existing folders on kDrive that should not be displayed on this device (❓: help),
- whether to store the kDrive files on the disk with their actual size, or whether they can be “virtually” listed while being stored on the remote servers (❓: help).
- Confirm at the bottom of the page:
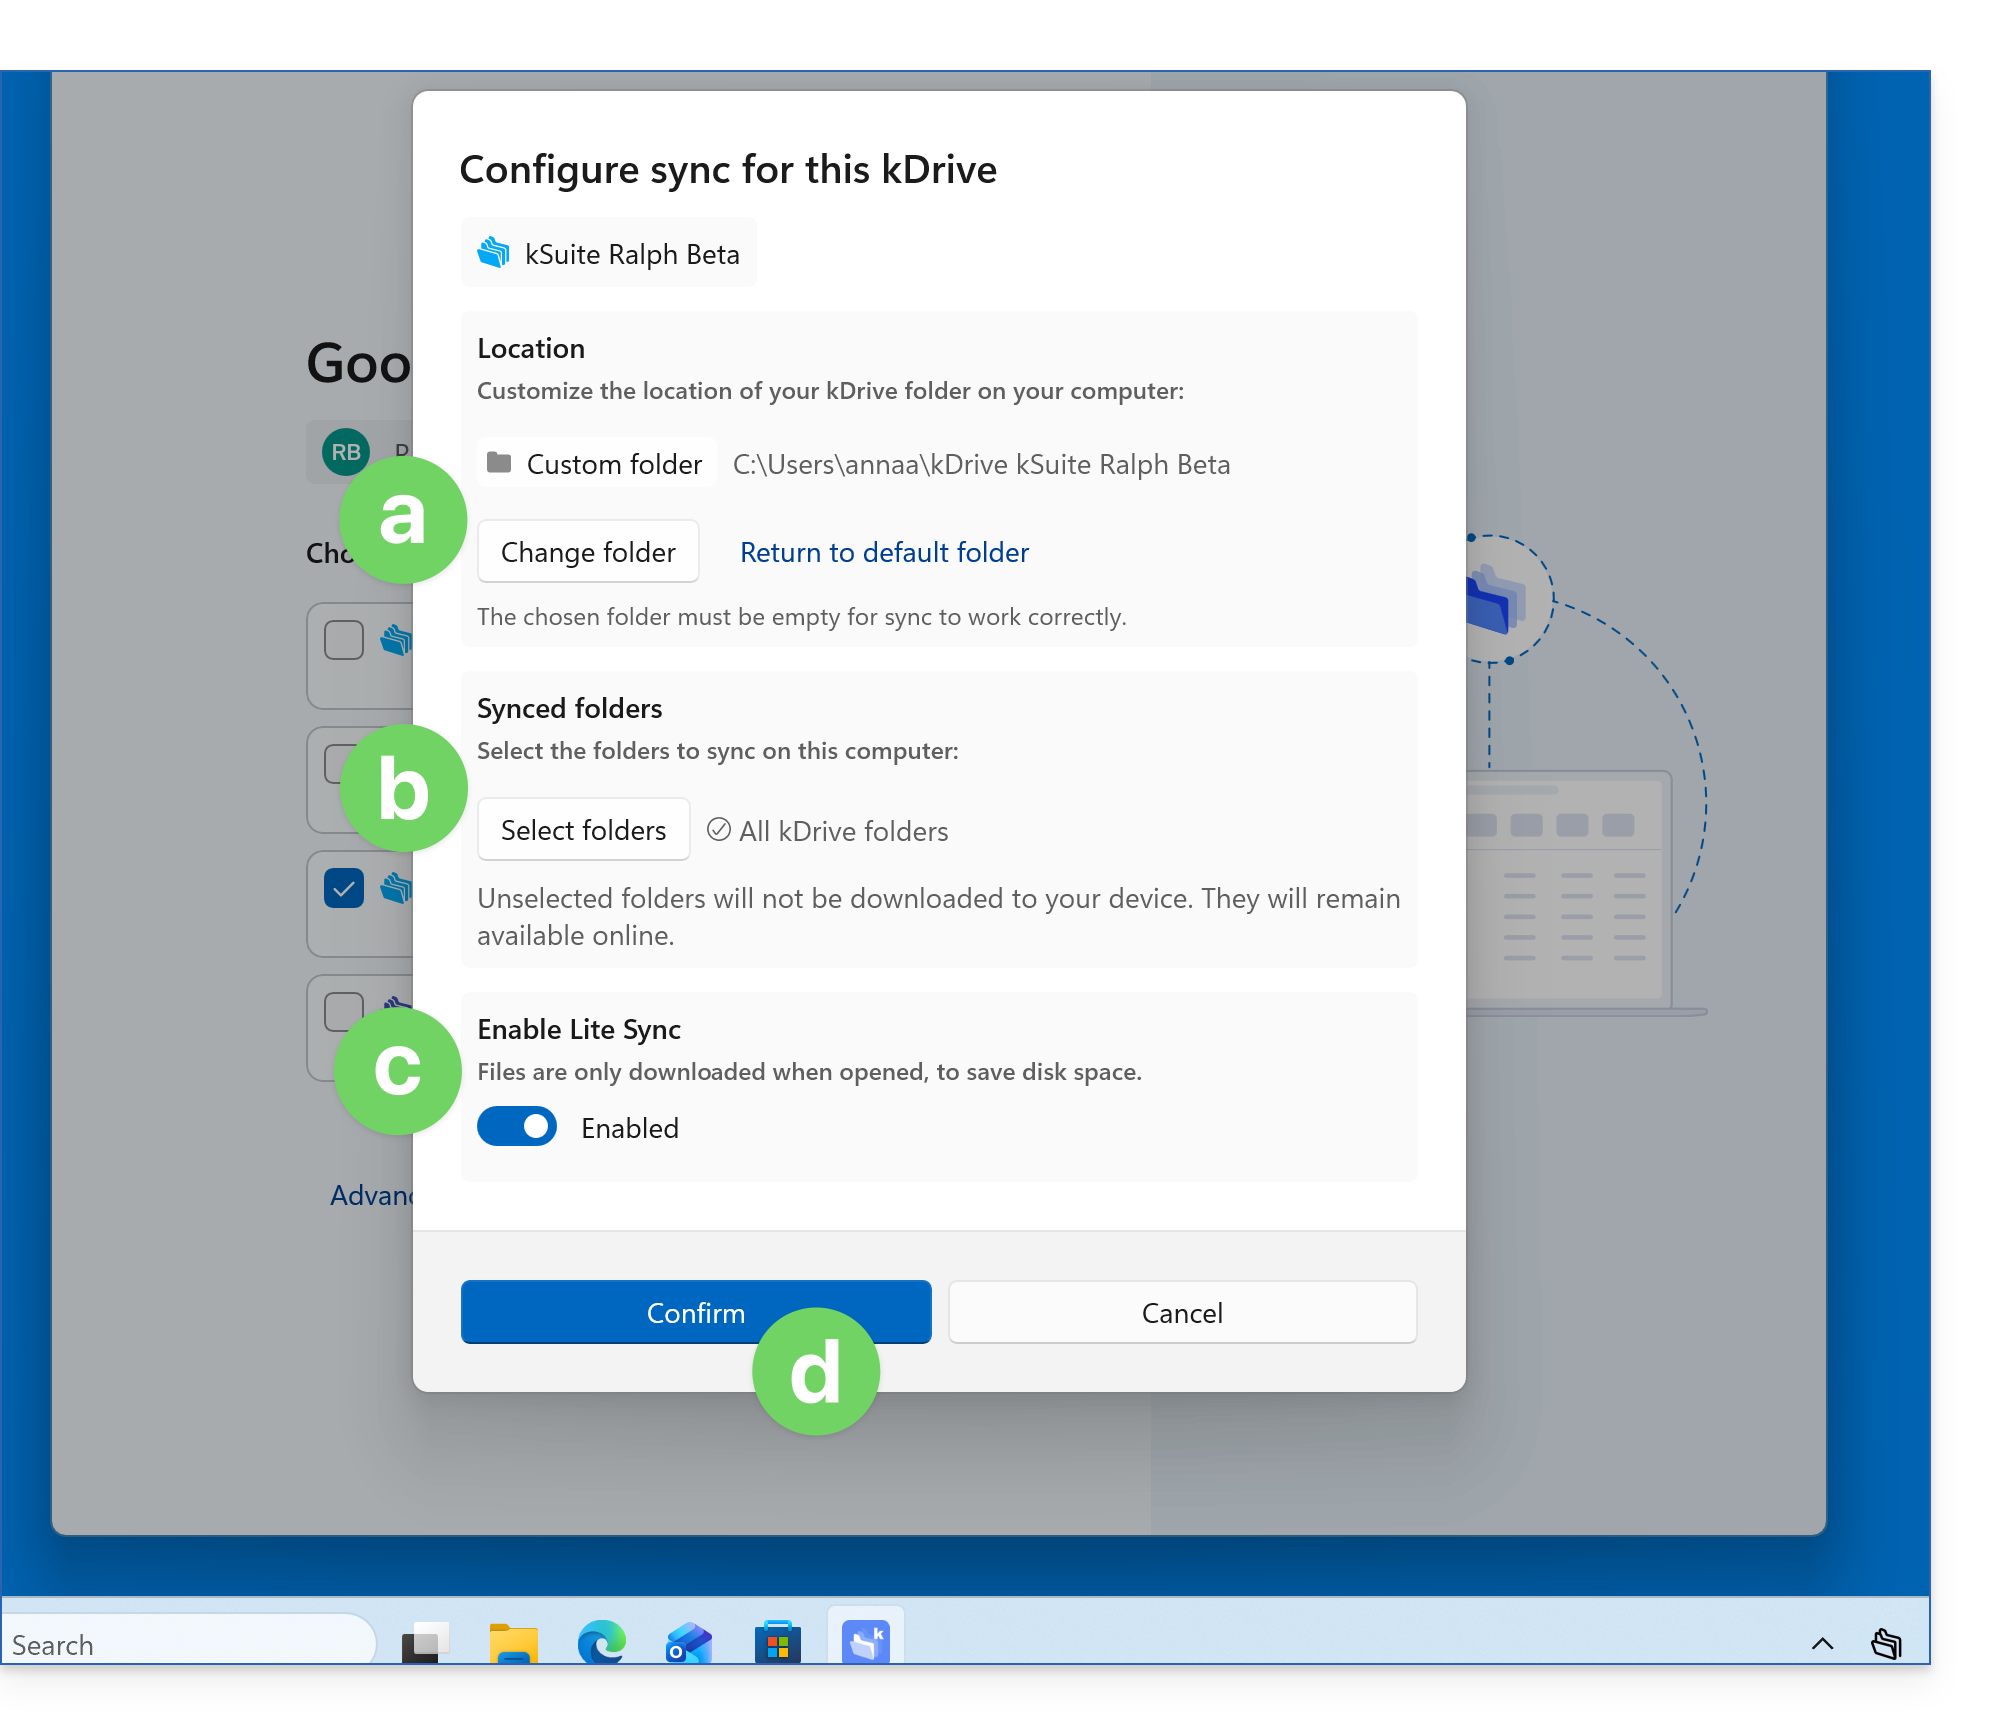
- Click the Confirm button next to the advanced settings to complete the installation; the app should run in the background, allowing for automatic synchronization; you should always see its icon (❓: help):
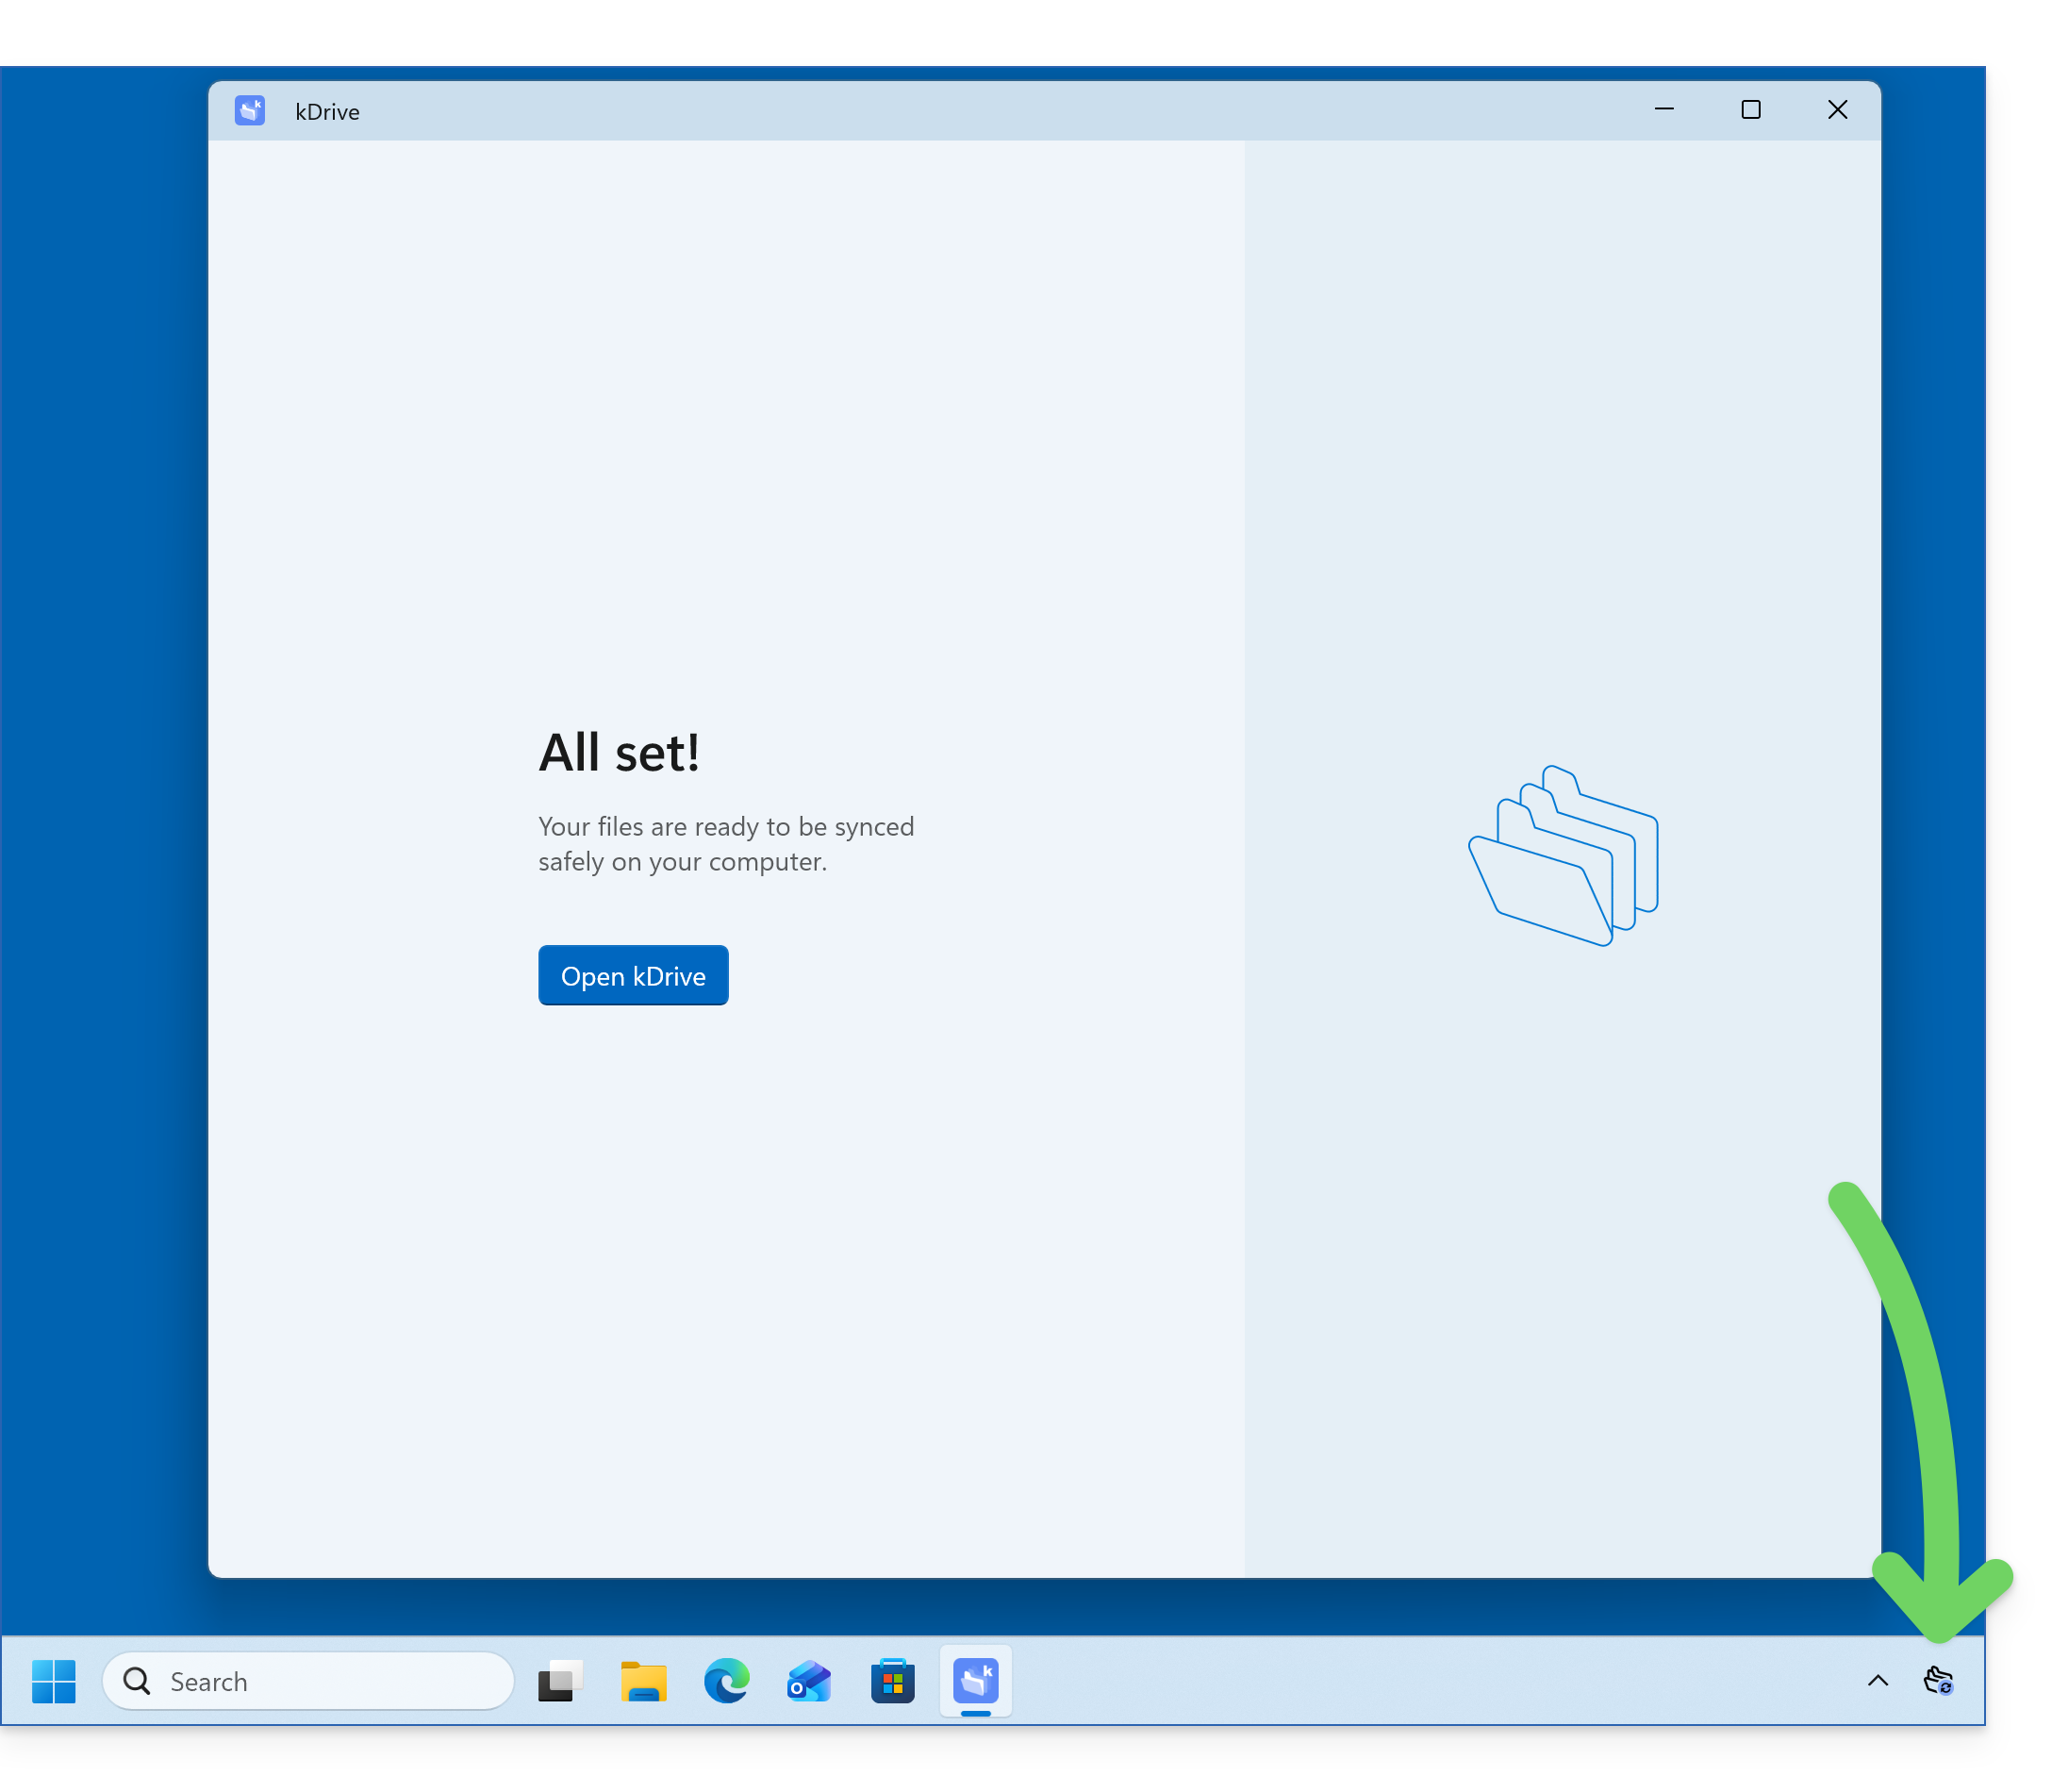
- Refer to other guides to continue exploring the kDrive application.
Install the kDrive 3.x app on Windows
To do this:
- Open the downloaded application to start the installation on your device.
- Once the installation is complete, the application should open and a form will prompt you to log in to your Infomaniak account.
- Next, choose the kDrive you want to synchronize from the list, if your account allows access to multiple kDrives — you can link others later if needed (❓: help).
- Enable or disable the Lite Sync option (❓: help), which saves space by virtually storing your kDrive files on your computer, only downloading them when necessary.
- A kDrive folder is created on your hard drive at the specified location (it is recommended not to change this location, but if necessary, you can do so by clicking on the pencil icon ✎):
- It will contain any files that already exist on your kDrive (some folders may be ignored - see below) and will upload all files you place in it to the kDrive server in the future.
- During installation,pay attention to the permissions that may be requested (especially on macOS) and that must be granted for the application to function properly (❓: help).
- Once the installation is complete, you can choose to open the file storage location for kDrive on your hard drive.
- You can then compare the data on your hard drive with the data in the kDrive web app from Infomaniak (online service ksuite.infomaniak.com/kdrive):
- Click on the action menu ⋮ on the right side of the kDrive window.
- Click to open the web version.
Link to this FAQ: https://faq.infomaniak.com/2936
Has this FAQ been helpful?