Knowledge base
1000 FAQs, 500 tutorials and instructional videos. Here, there are only solutions!
This guide will help you test whether kDrive synchronization is working correctly on your device.
Prerequisites
- For synchronization between your devices to work when your data is updated on kDrive (new file, edited document, etc.), it is obviously necessary that:
Check that the kDrive app is running in the background
On macOS / Linux
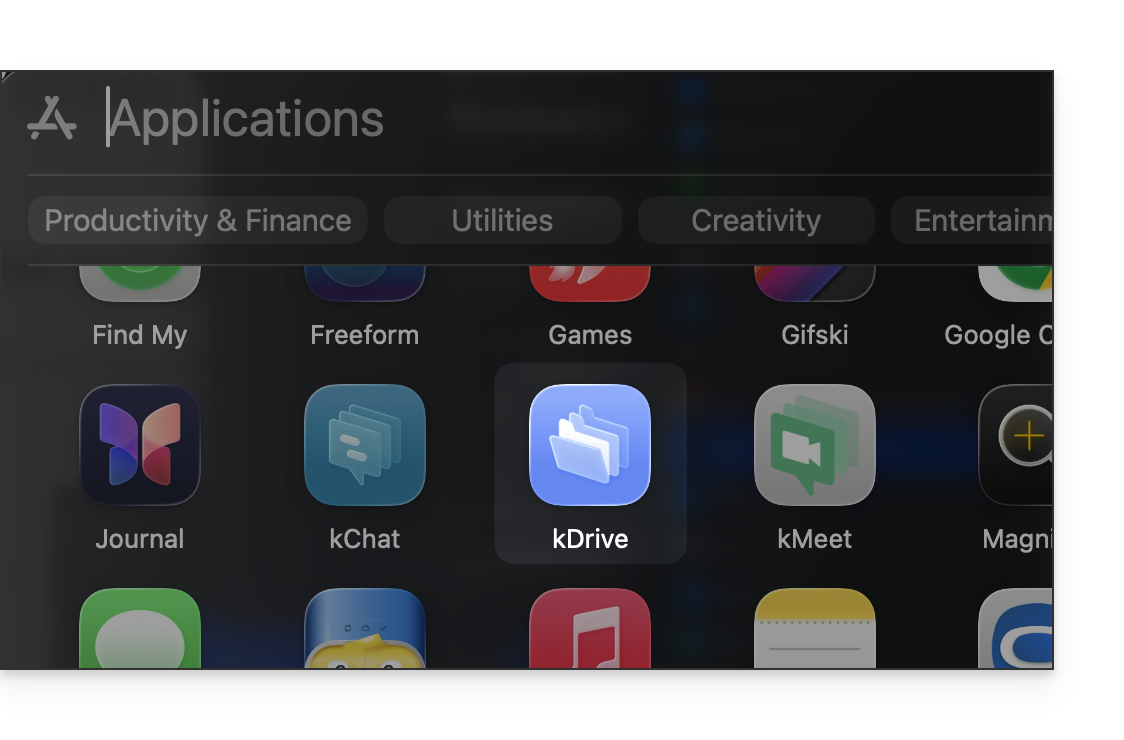
- Launch kDrive from the installed Applications:
- kDrive can also be launched from the Finder:
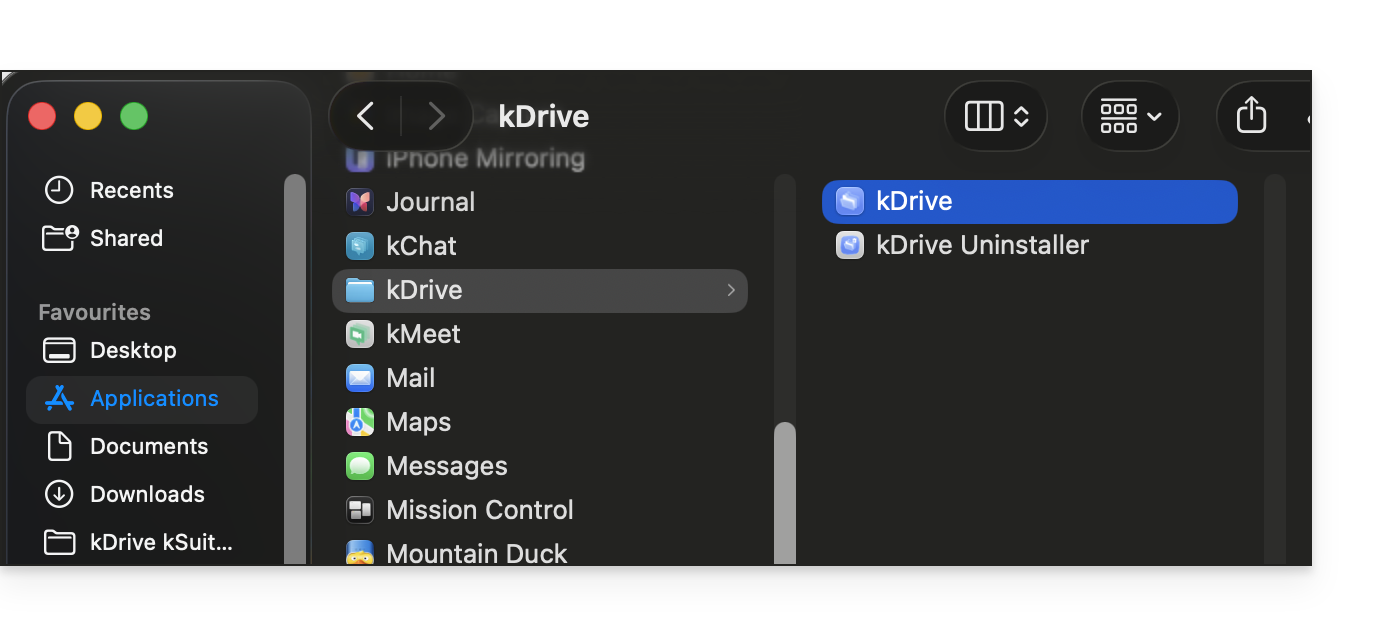
- kDrive can also be launched from the Finder:
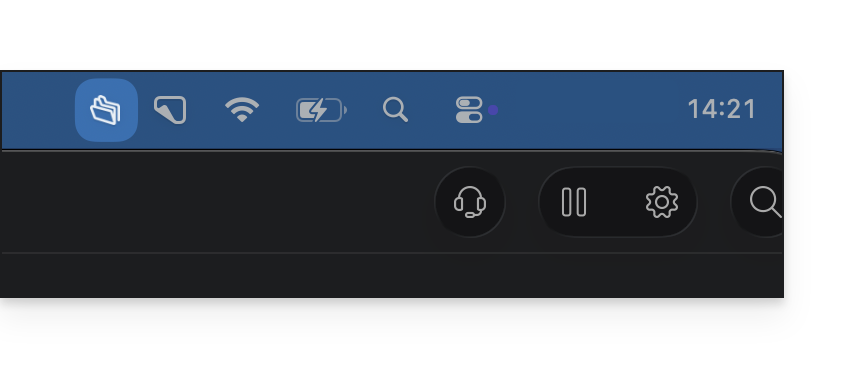
- When kDrive is launched and running in the background, its icon should appear in the notification area at the top right, next to the clock and network settings:
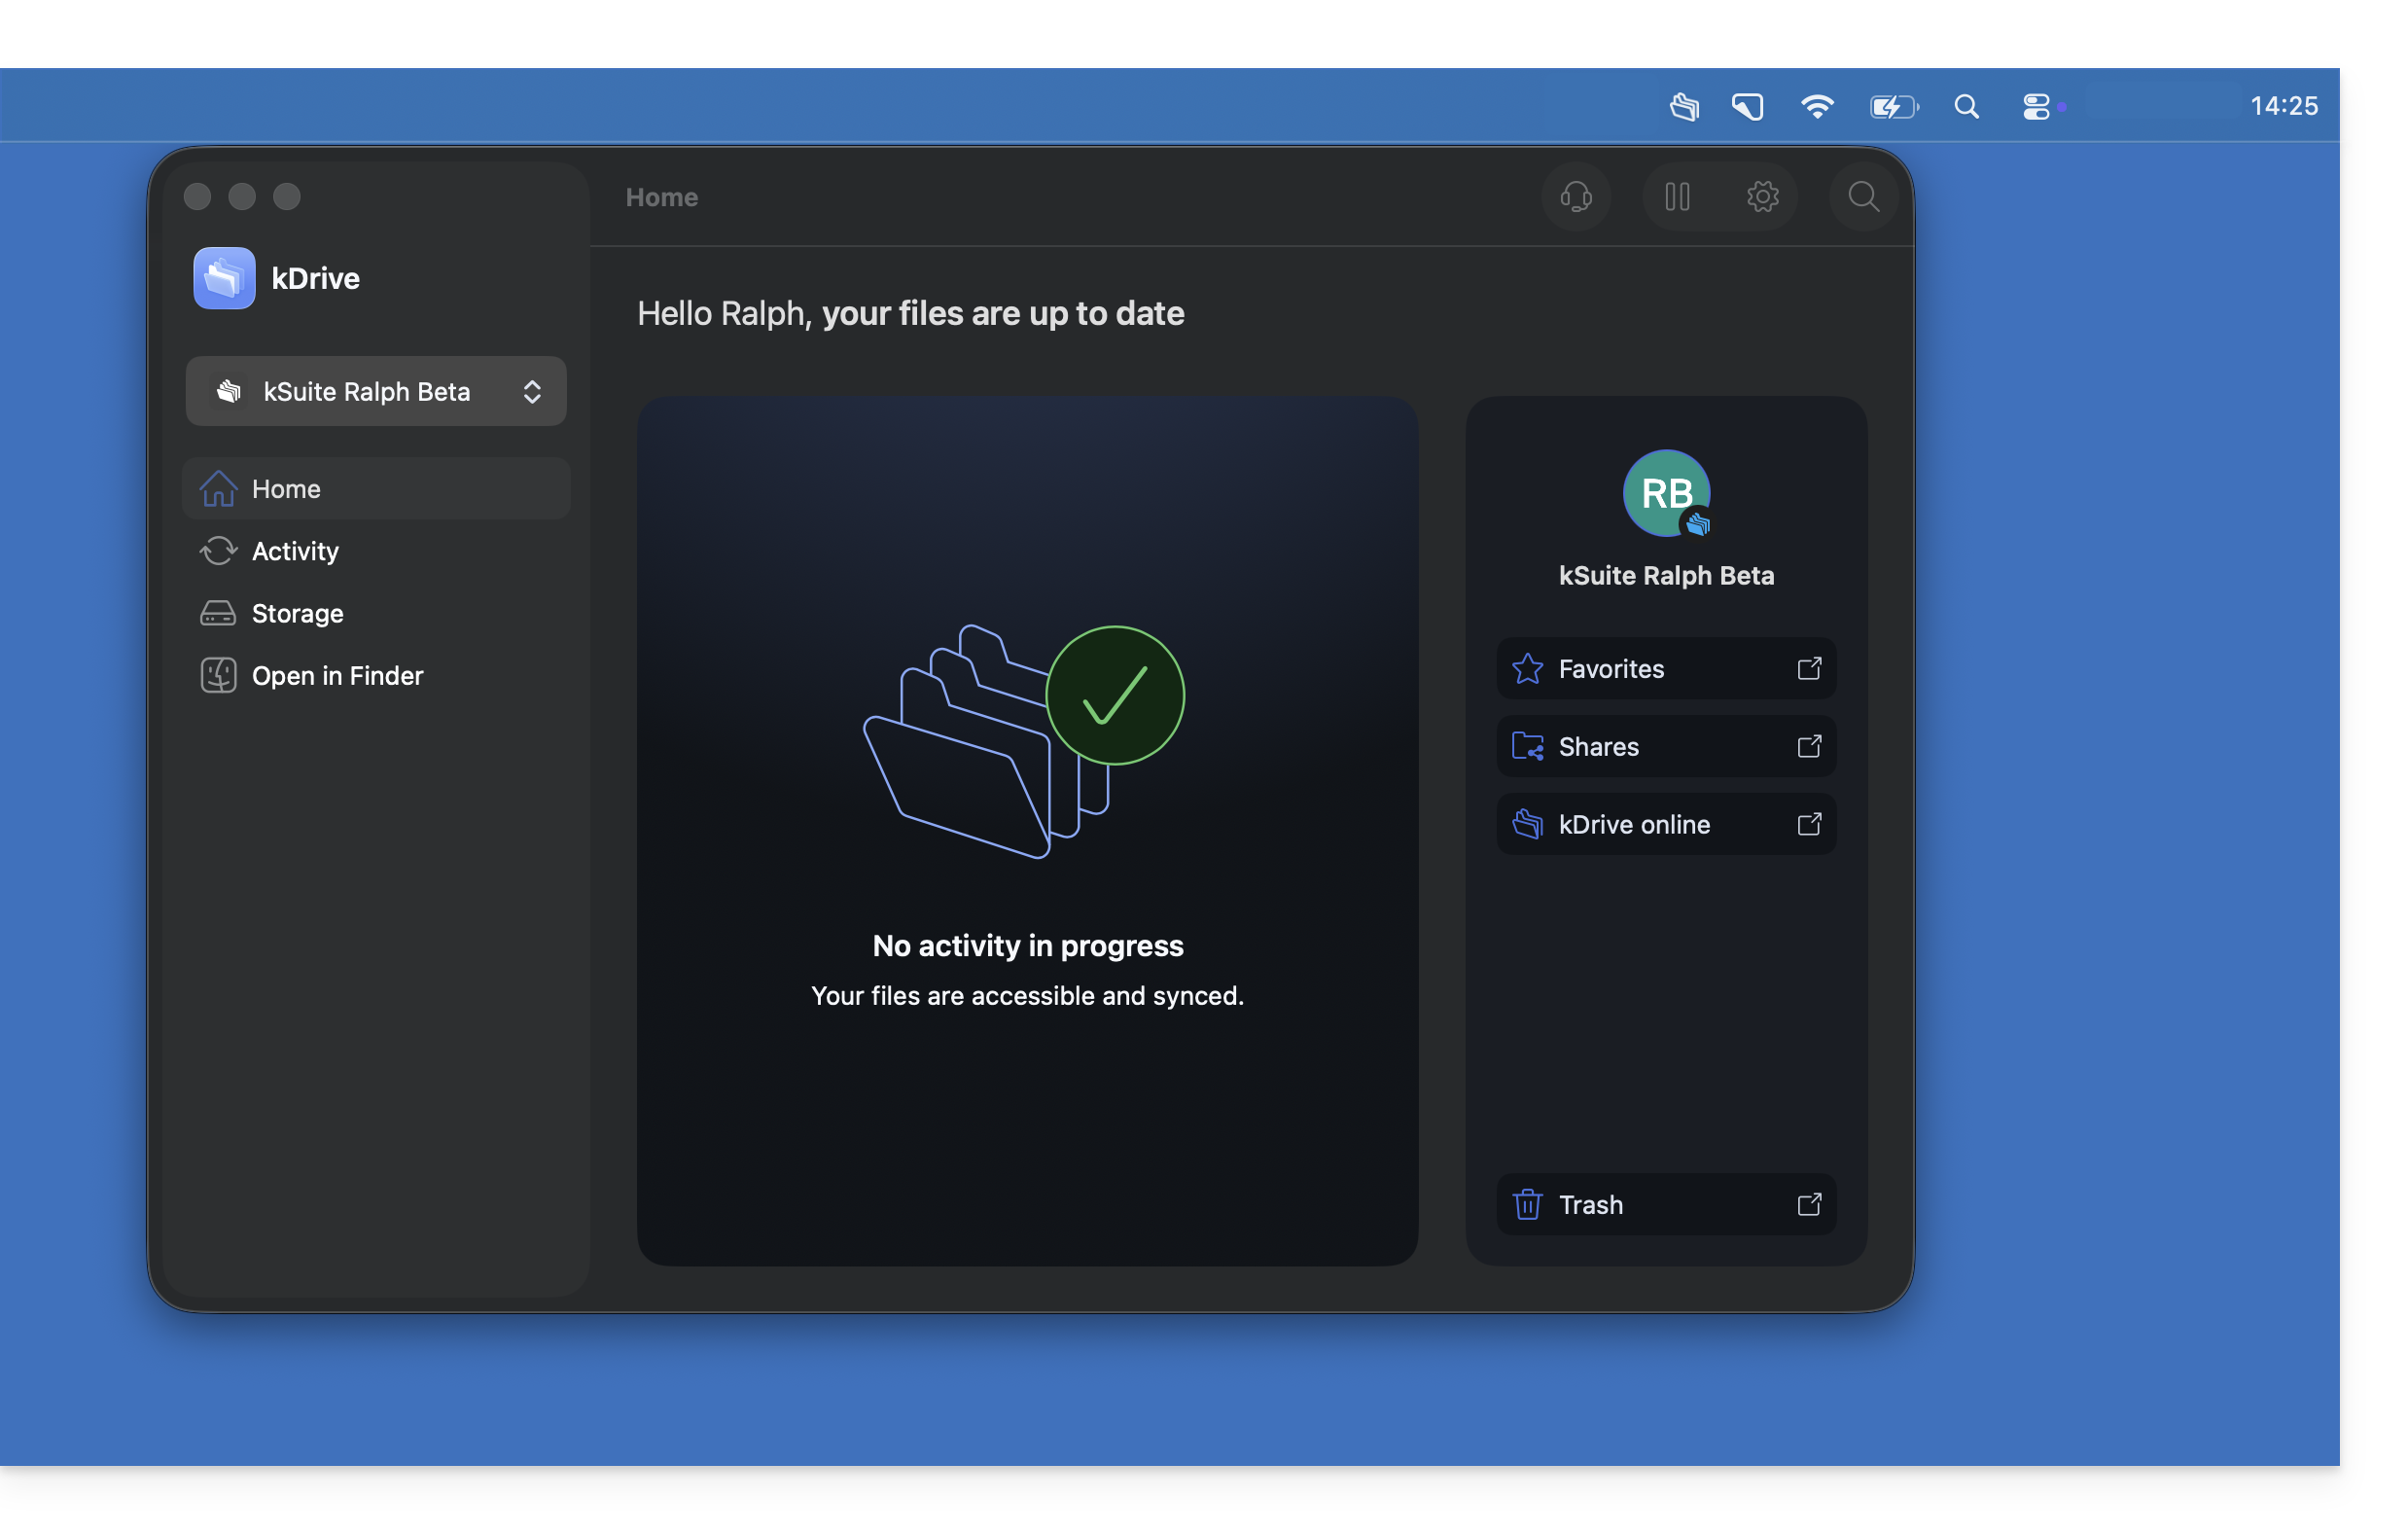
- Left-click on the kDrive app icon; the application interface should appear in the foreground:
On Windows
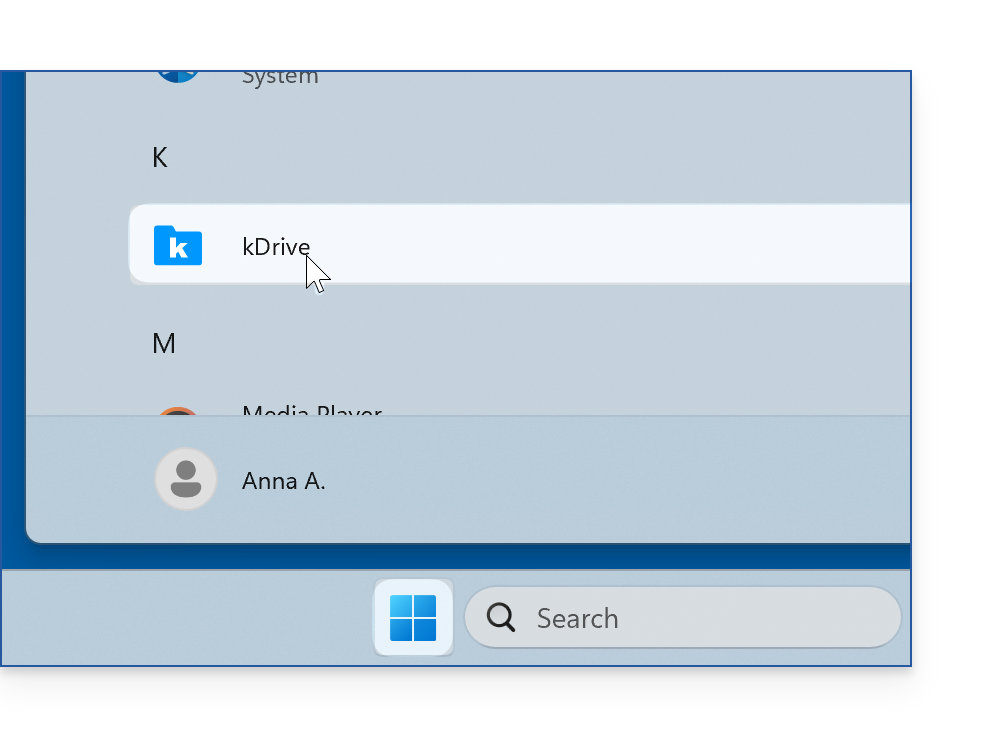
- Launch kDrive from the Windows Start menu:
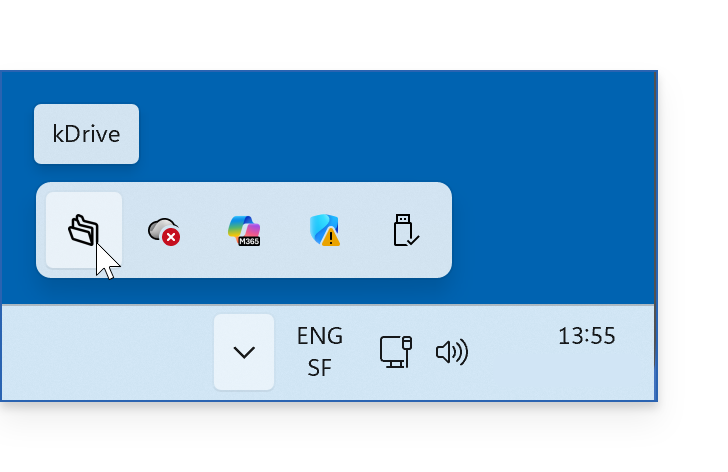
- When kDrive is launched and running in the background, its icon should appear in the notification area at the bottom right on Windows; however, it may be “hidden” behind the menu accessible via the downward-pointing chevron (❓: help):
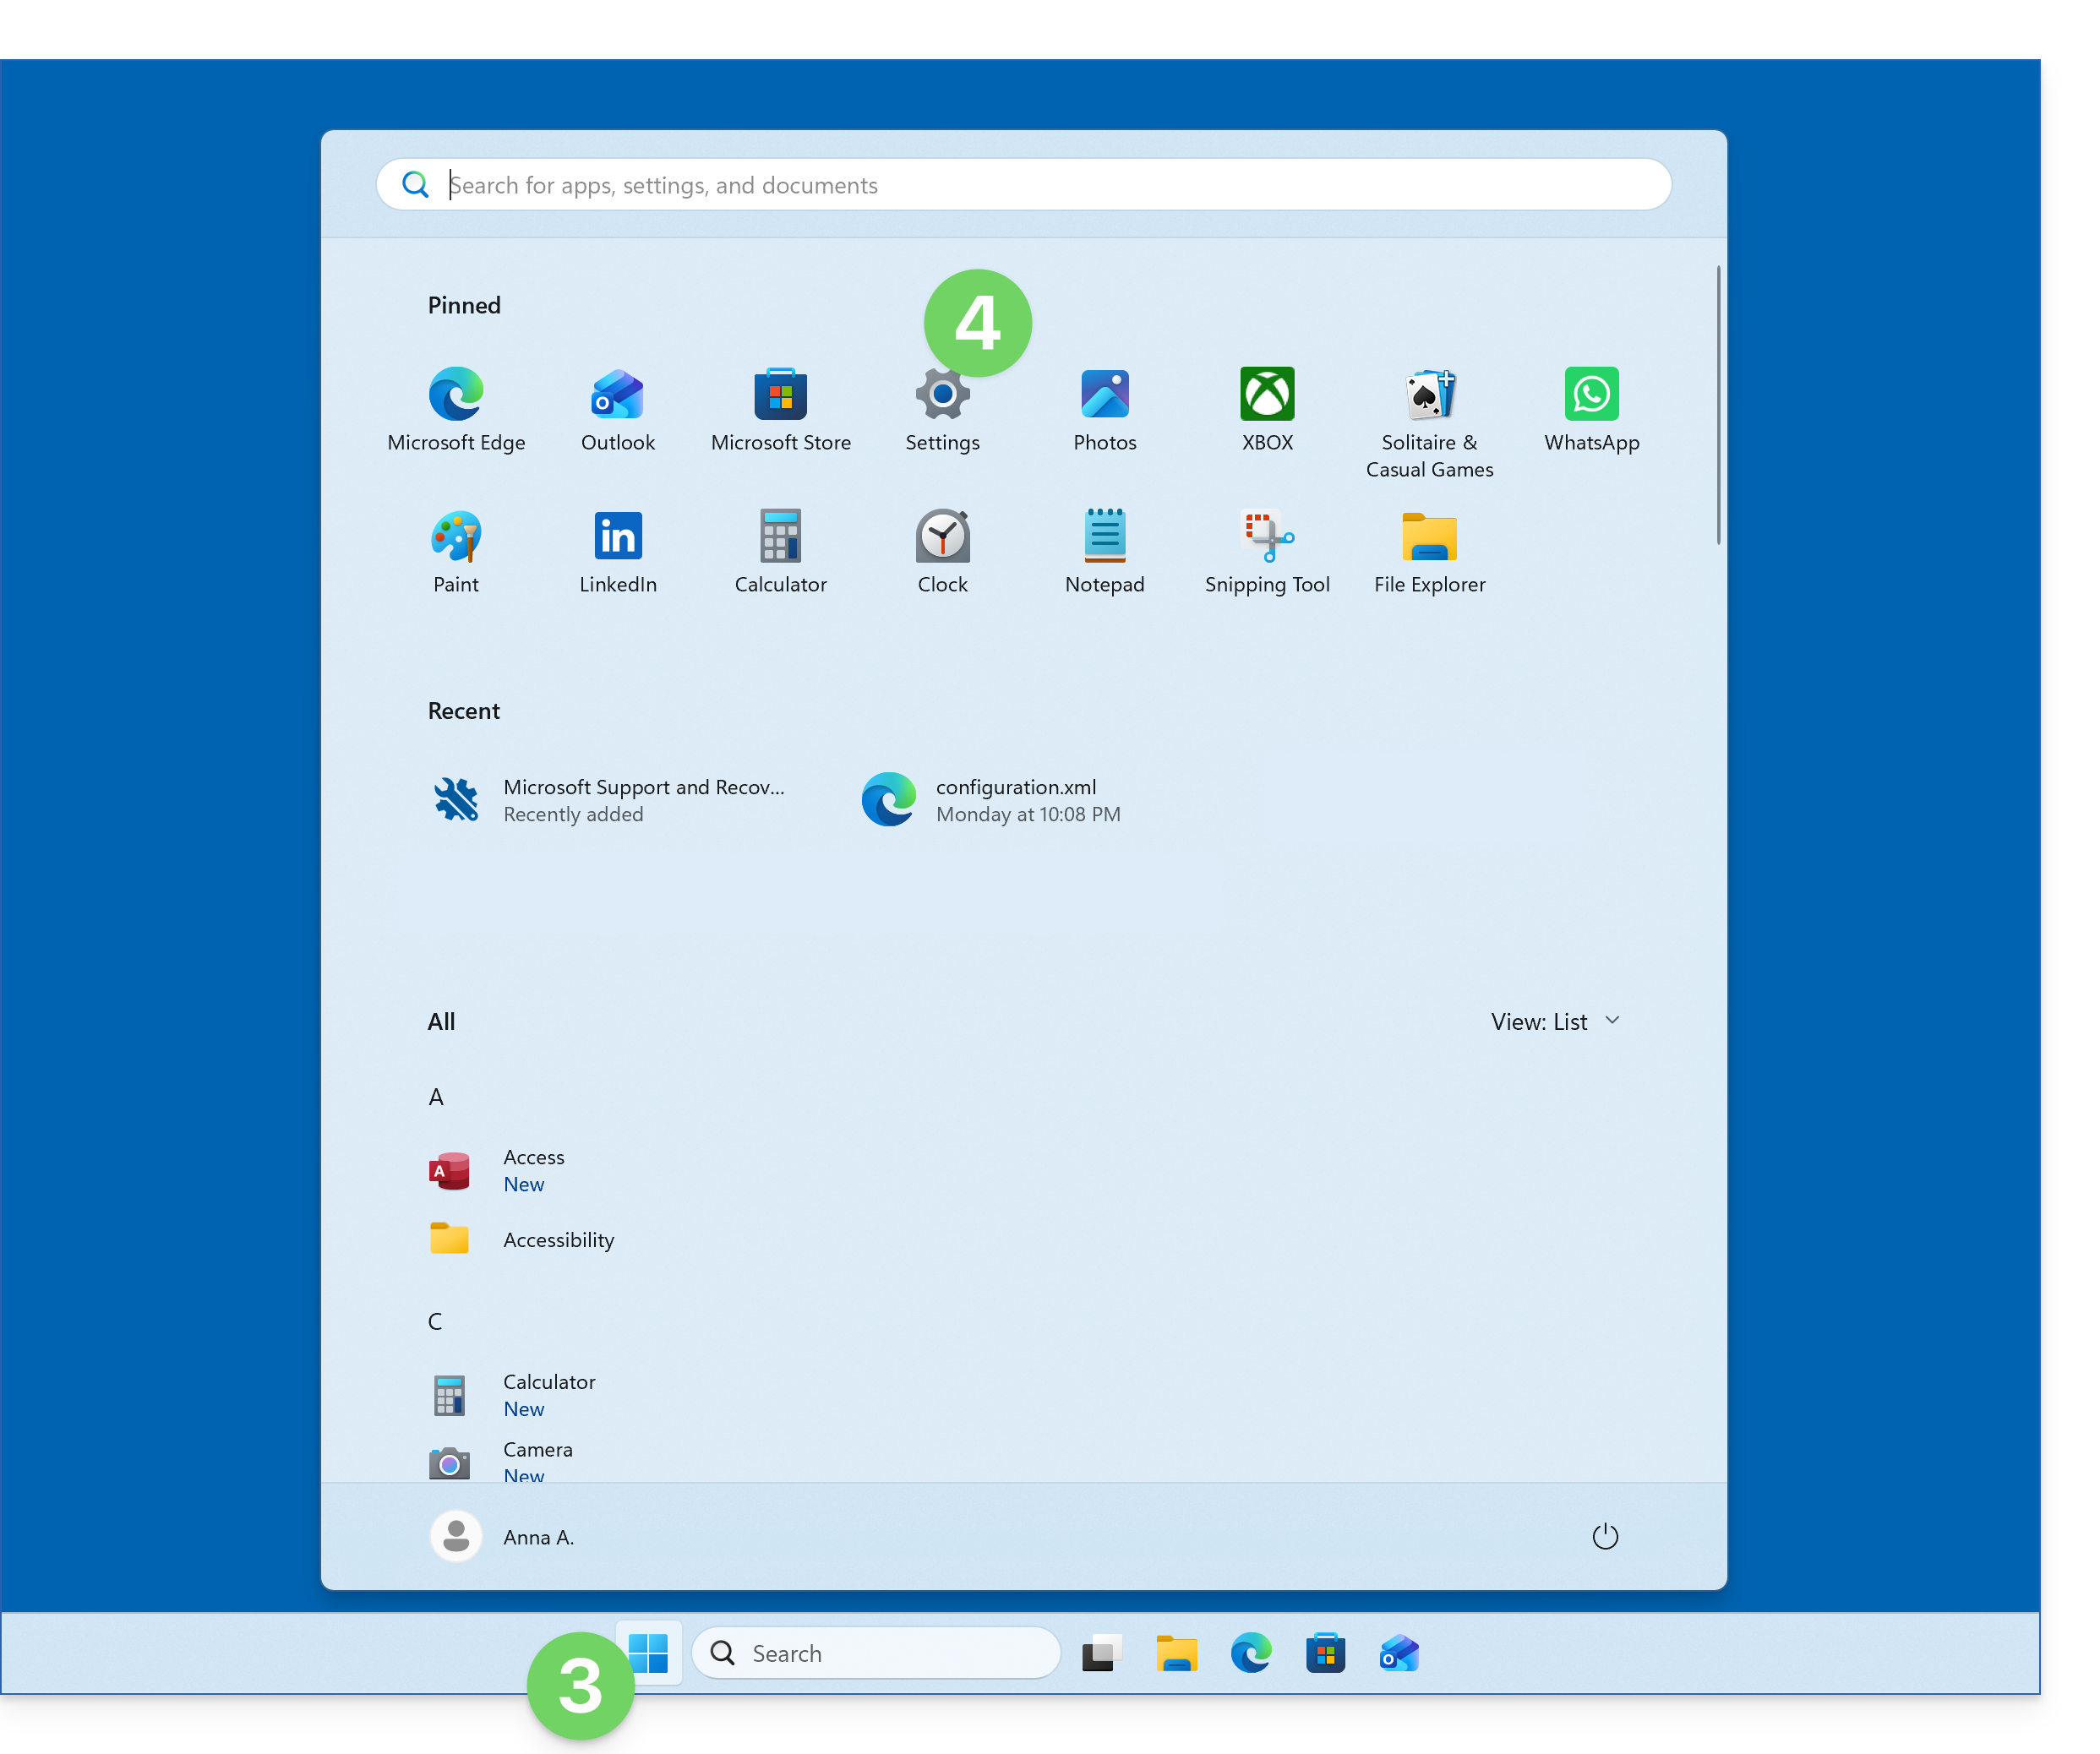
- To make the kDrive icon directly visible on the taskbar, open the Start menu.
- Click on Settings:
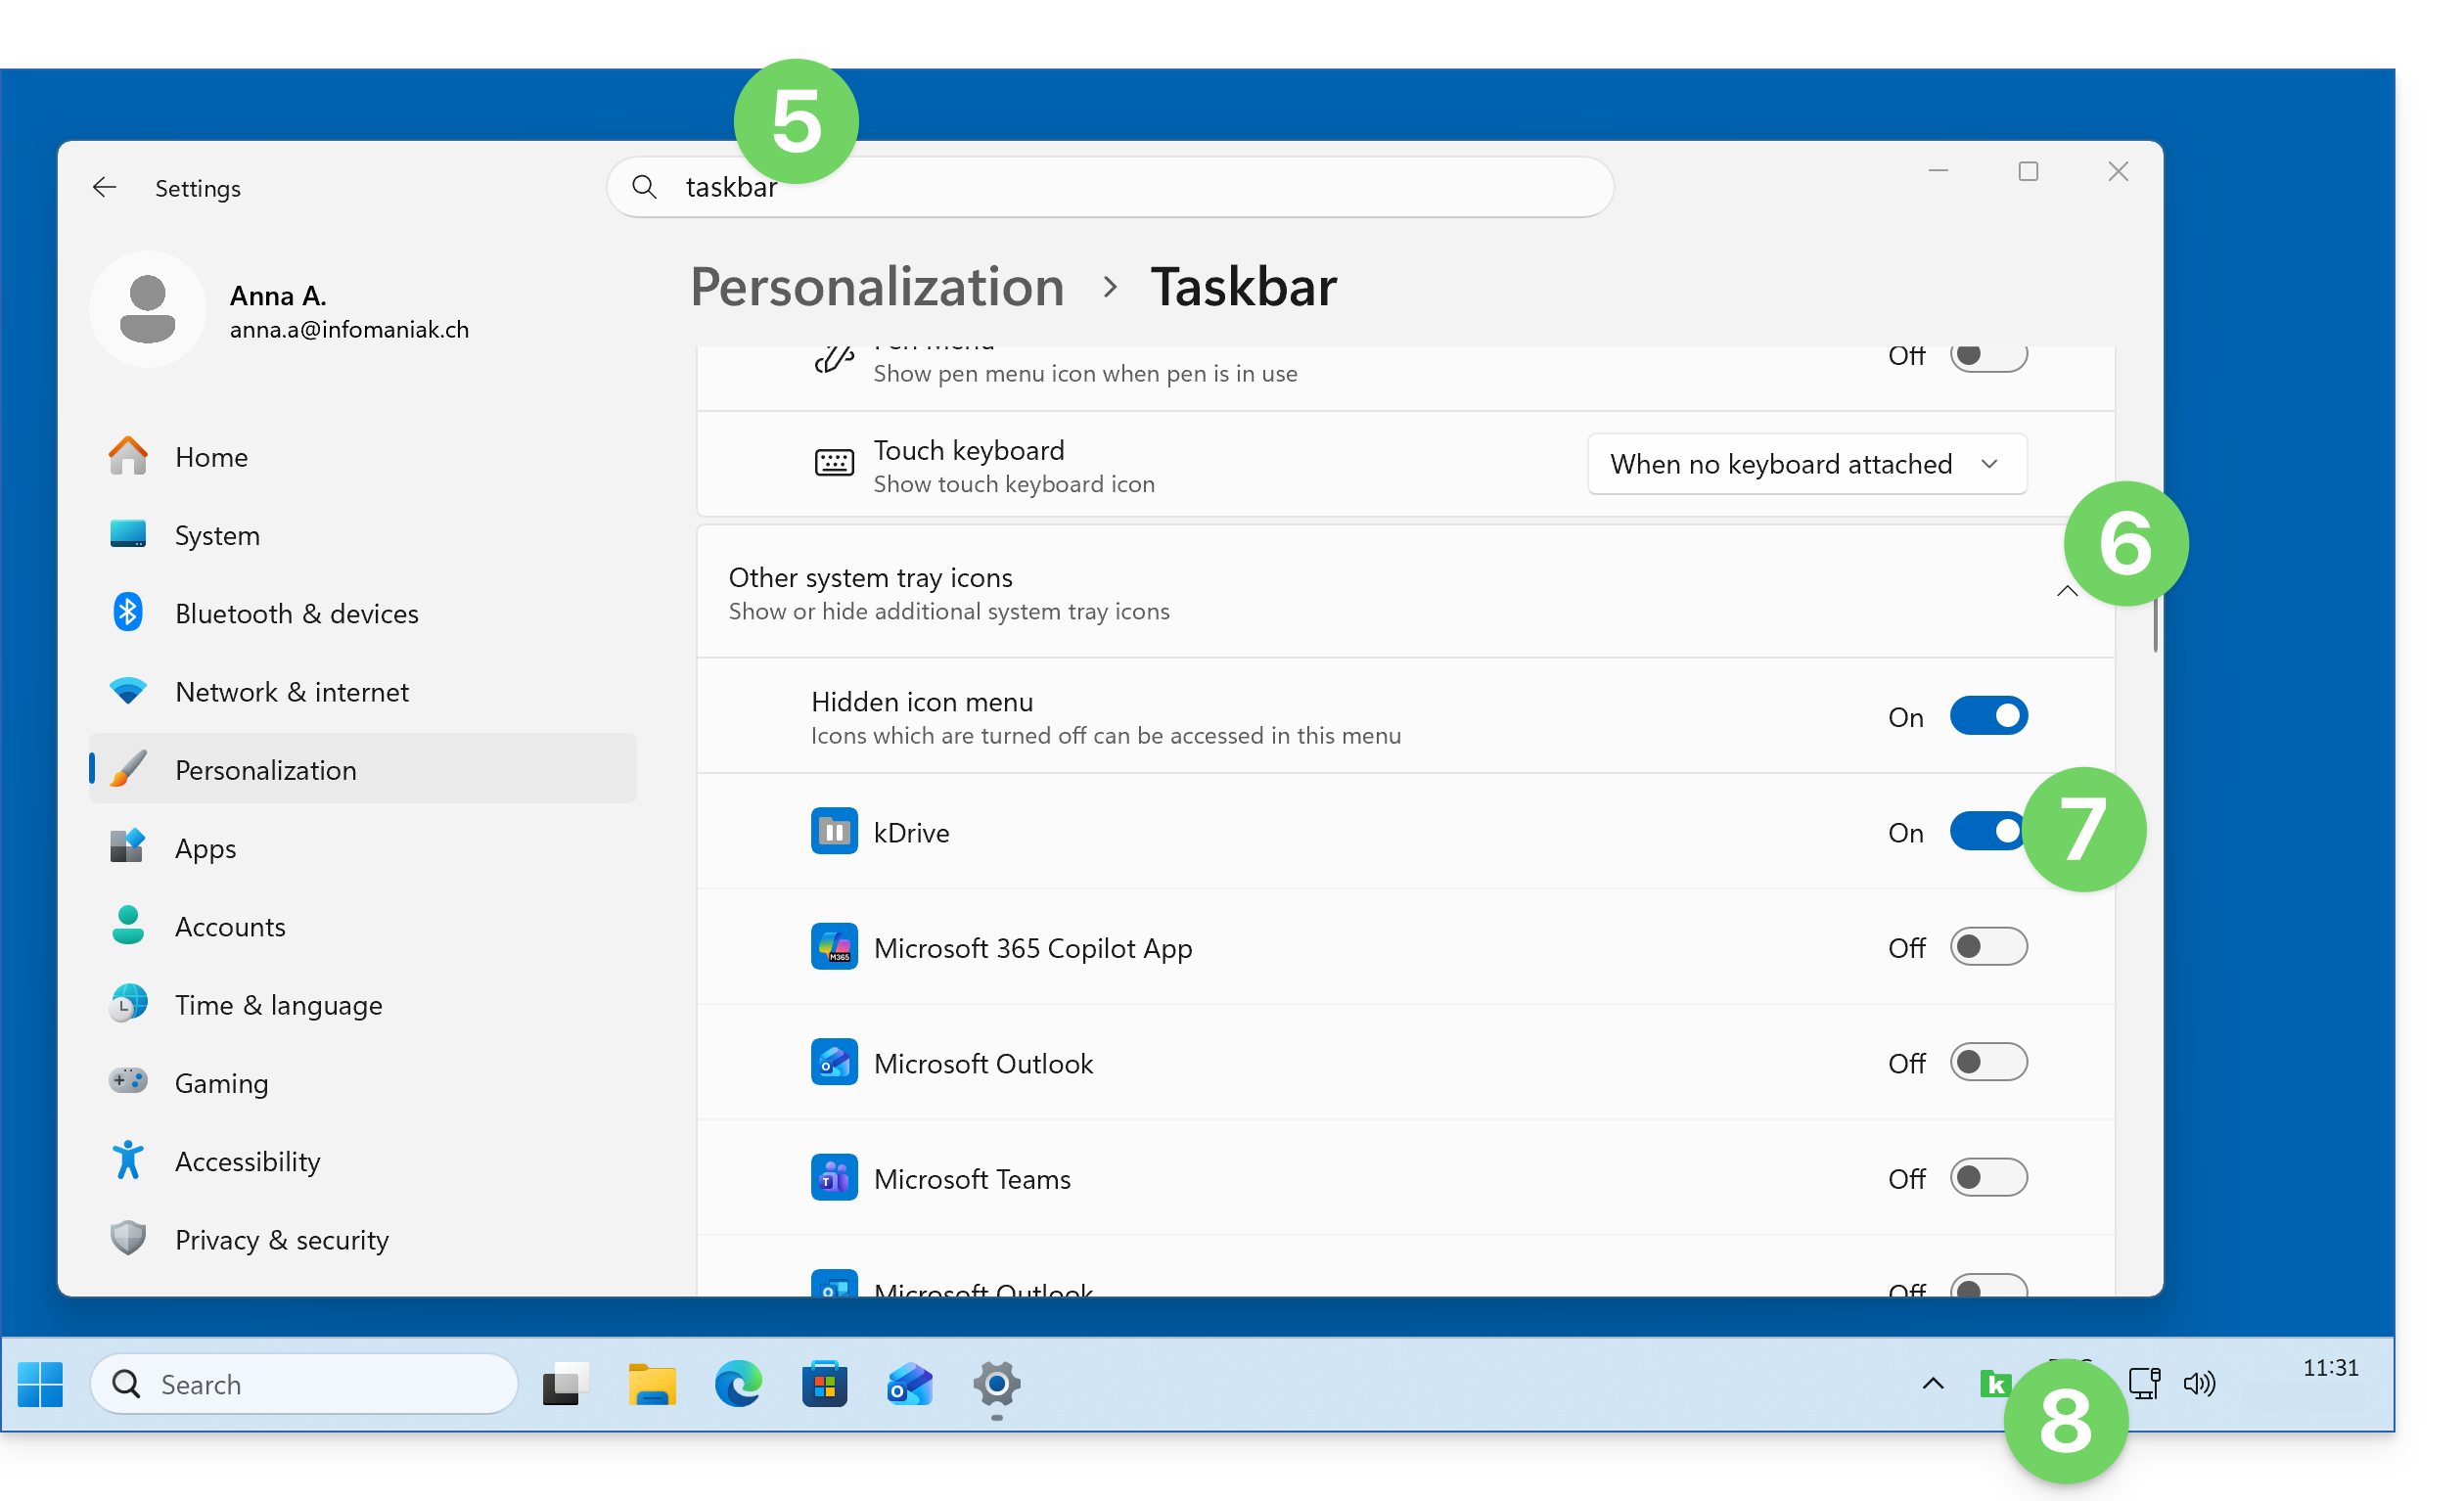
- Find the settings for the taskbar.
- Click on the chevron to expand the “Other icons in the notification area” section.
- Click on the toggle switch to the right of kDrive to make it always visible.
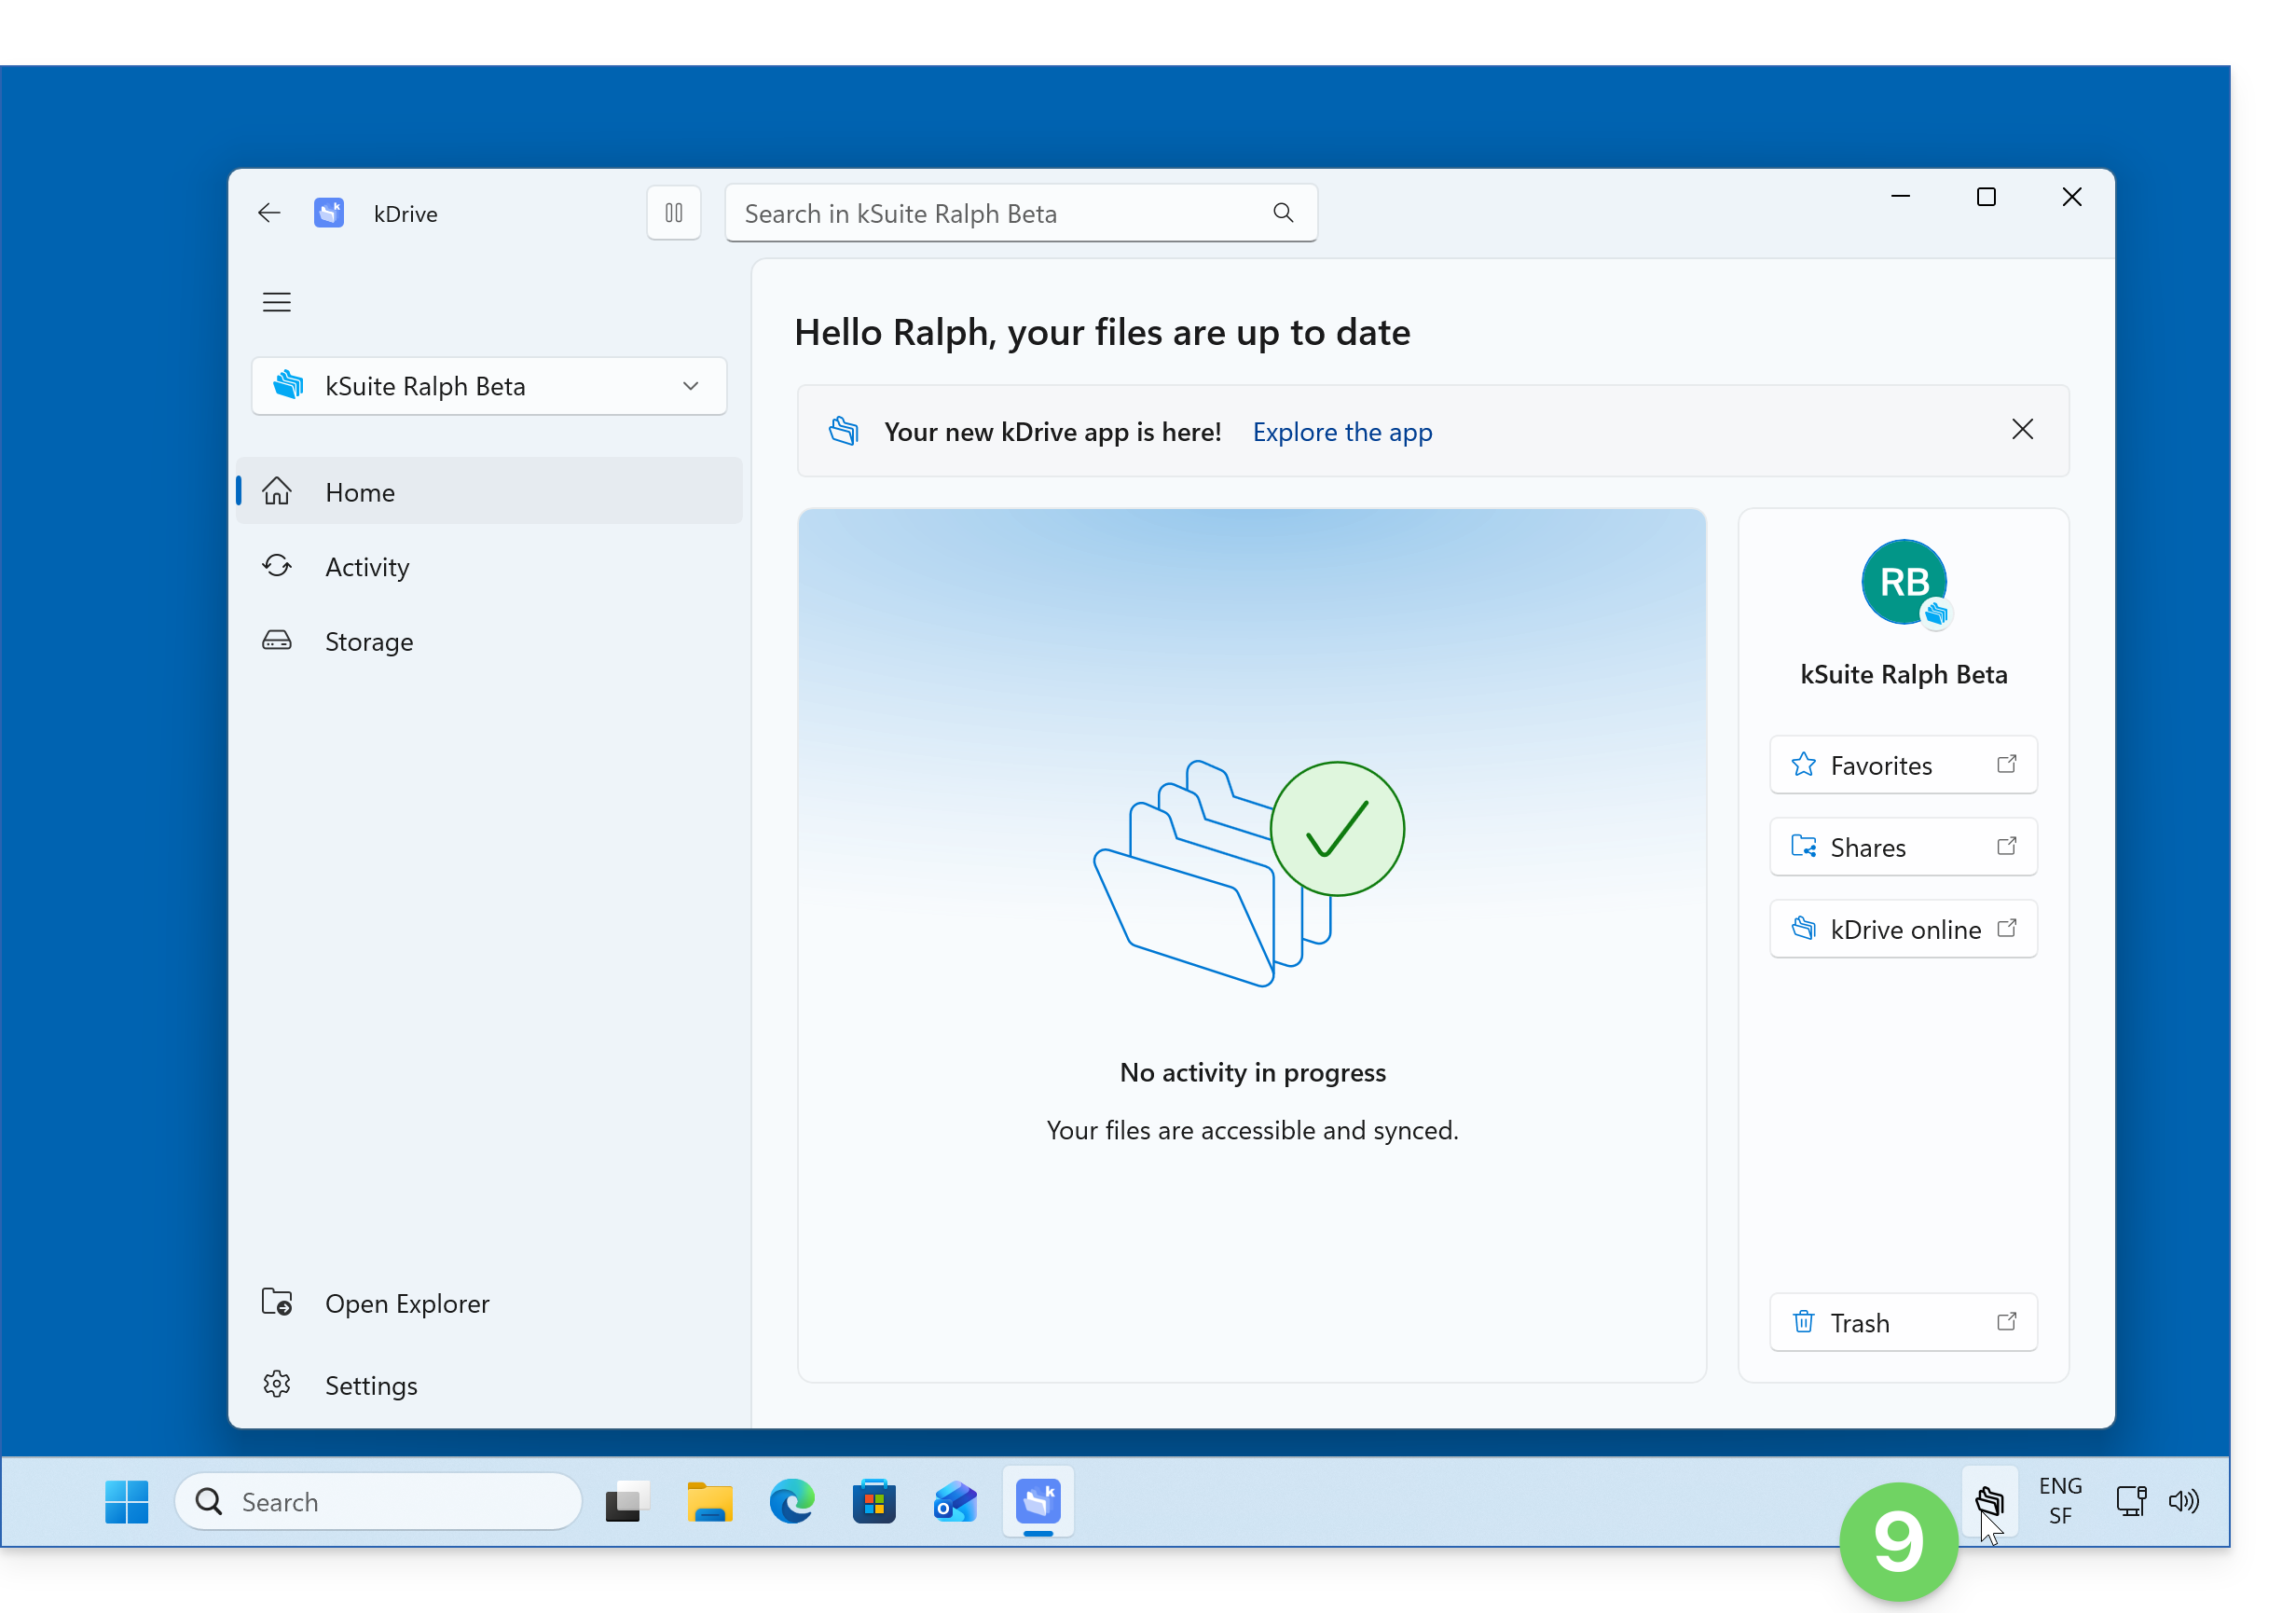
- The icon (here, the kDrive 3.8 icon) will be directly visible on the taskbar:
- Left-click on the kDrive app icon; the application interface should appear in the foreground:
On Android
Android may limit the activity of background applications to save battery power. Depending on your device's settings, this may slow down or interrupt the transfer of large files, the import of multiple files, or the automatic backup of photos to kDrive.
To verify that the kDrive application can function correctly in the background:
- Test the synchronization: open the kDrive application and leave it in the foreground until the transfer is complete. Synchronization generally works better when the application is active.
- Check the battery settings: open your device's settings, then find kDrive in the section dedicated to applications. In the application's battery settings, allow its background activity and, if this option is available, select an unrestricted mode or disable battery optimization for kDrive. This setting may increase battery consumption.
- Check device-specific restrictions:some manufacturers offer additional settings, such as automatic startup or background app management. Allow kDrive to run if such options are available.
- Check automatic photo backup: if you are experiencing issues with this feature, ensure that it is enabled in the kDrive settings and that the necessary permissions are granted (❓: help).
The names and location of the settings may vary depending on the Android version and the manufacturer of your device. If the problem persists, please refer to the recommendations available in English on Don't Kill My App, or consult the help documentation provided by the manufacturer of your device.
Link to this FAQ: https://faq.infomaniak.com/2909
Has this FAQ been helpful?
This guide explains how to exclude files and folders from a kDrive synchronization on your computer, and which file types are already excluded by default.
Introduction
- The files that are excluded by default (items in the list that cannot be deleted) vary depending on the operating system and are excluded because they pose a risk of synchronization errors.
Manage files excluded from kDrive
Desktop app v4.x
The kDrive v4.x app allows you to view existing automatic exclusions and create your own exclusion rules:
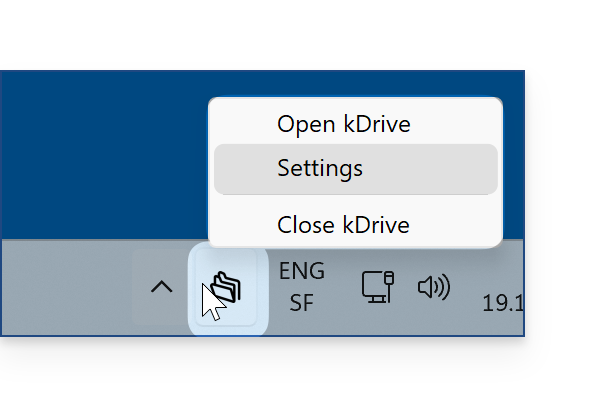
- Launch kDrive on your device: the app icon should be visible in the top right corner on macOS/Linux, and in the bottom right corner on Windows (❓: help).
- Right-click on the icon and choose Settings:
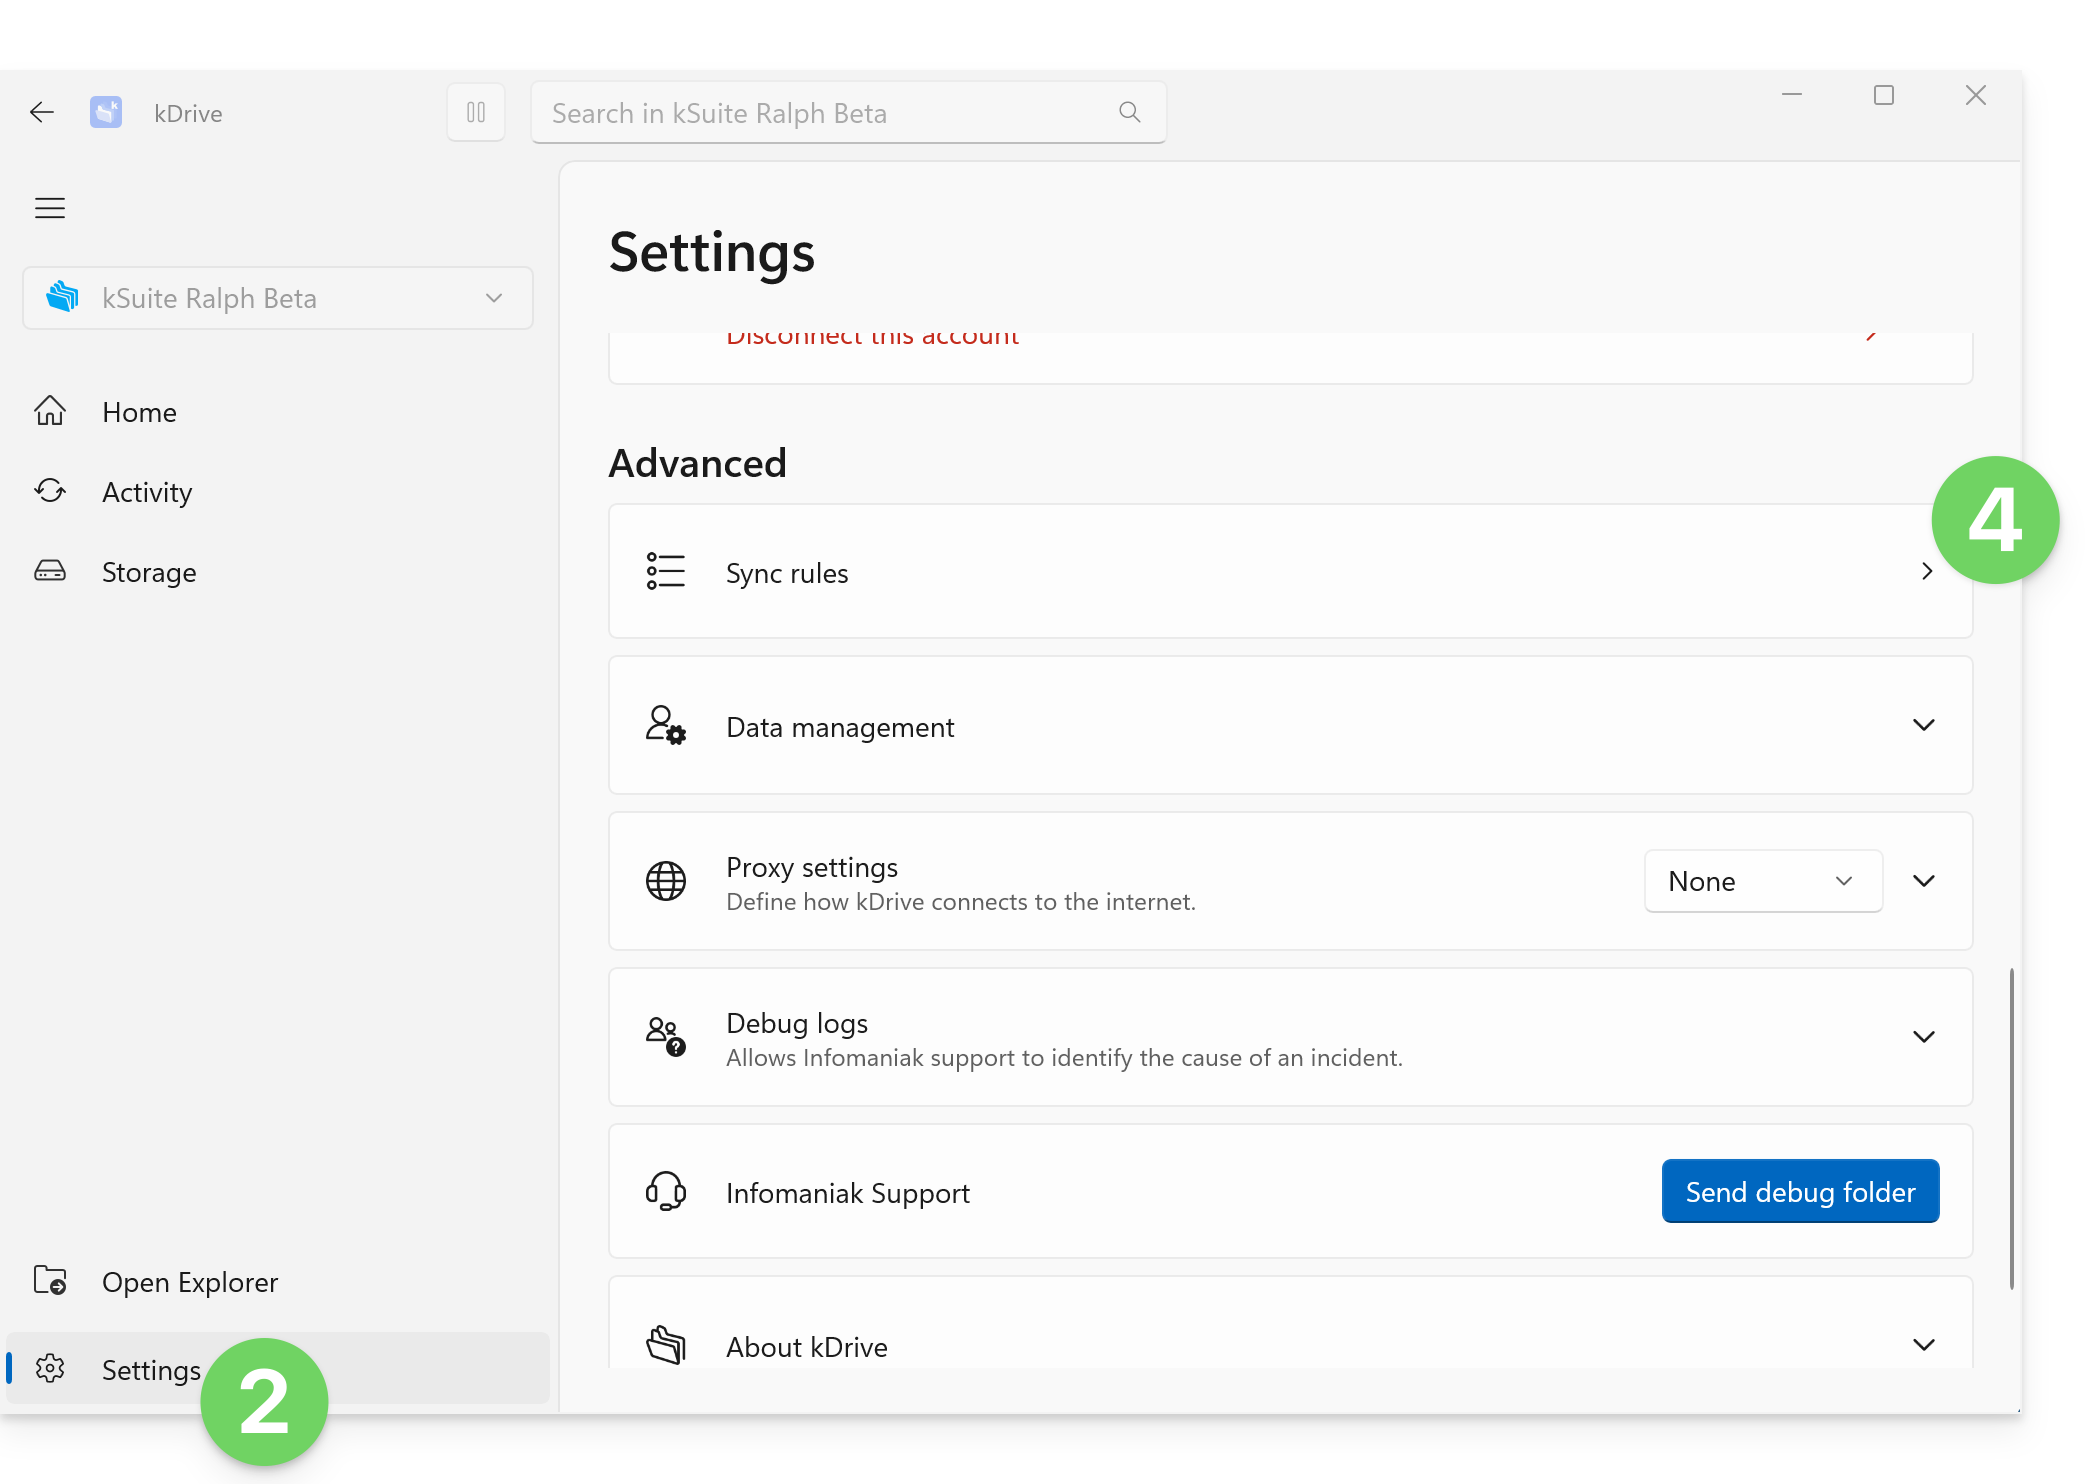
- Go to Advanced.
- Click on Synchronization rules:
- The list that appears when you click on the chevron represents the files that are ignored by default by kDrive, and the corresponding rules cannot be modified.
- The files that are excluded by default (items in the list that cannot be deleted) vary depending on the OS and are excluded because they represent a risk of synchronization errors.
- Custom exclusion rules: these allow you to specify which name (or which part of a name) should never be synchronized, including in the file name extension (type) if necessary:
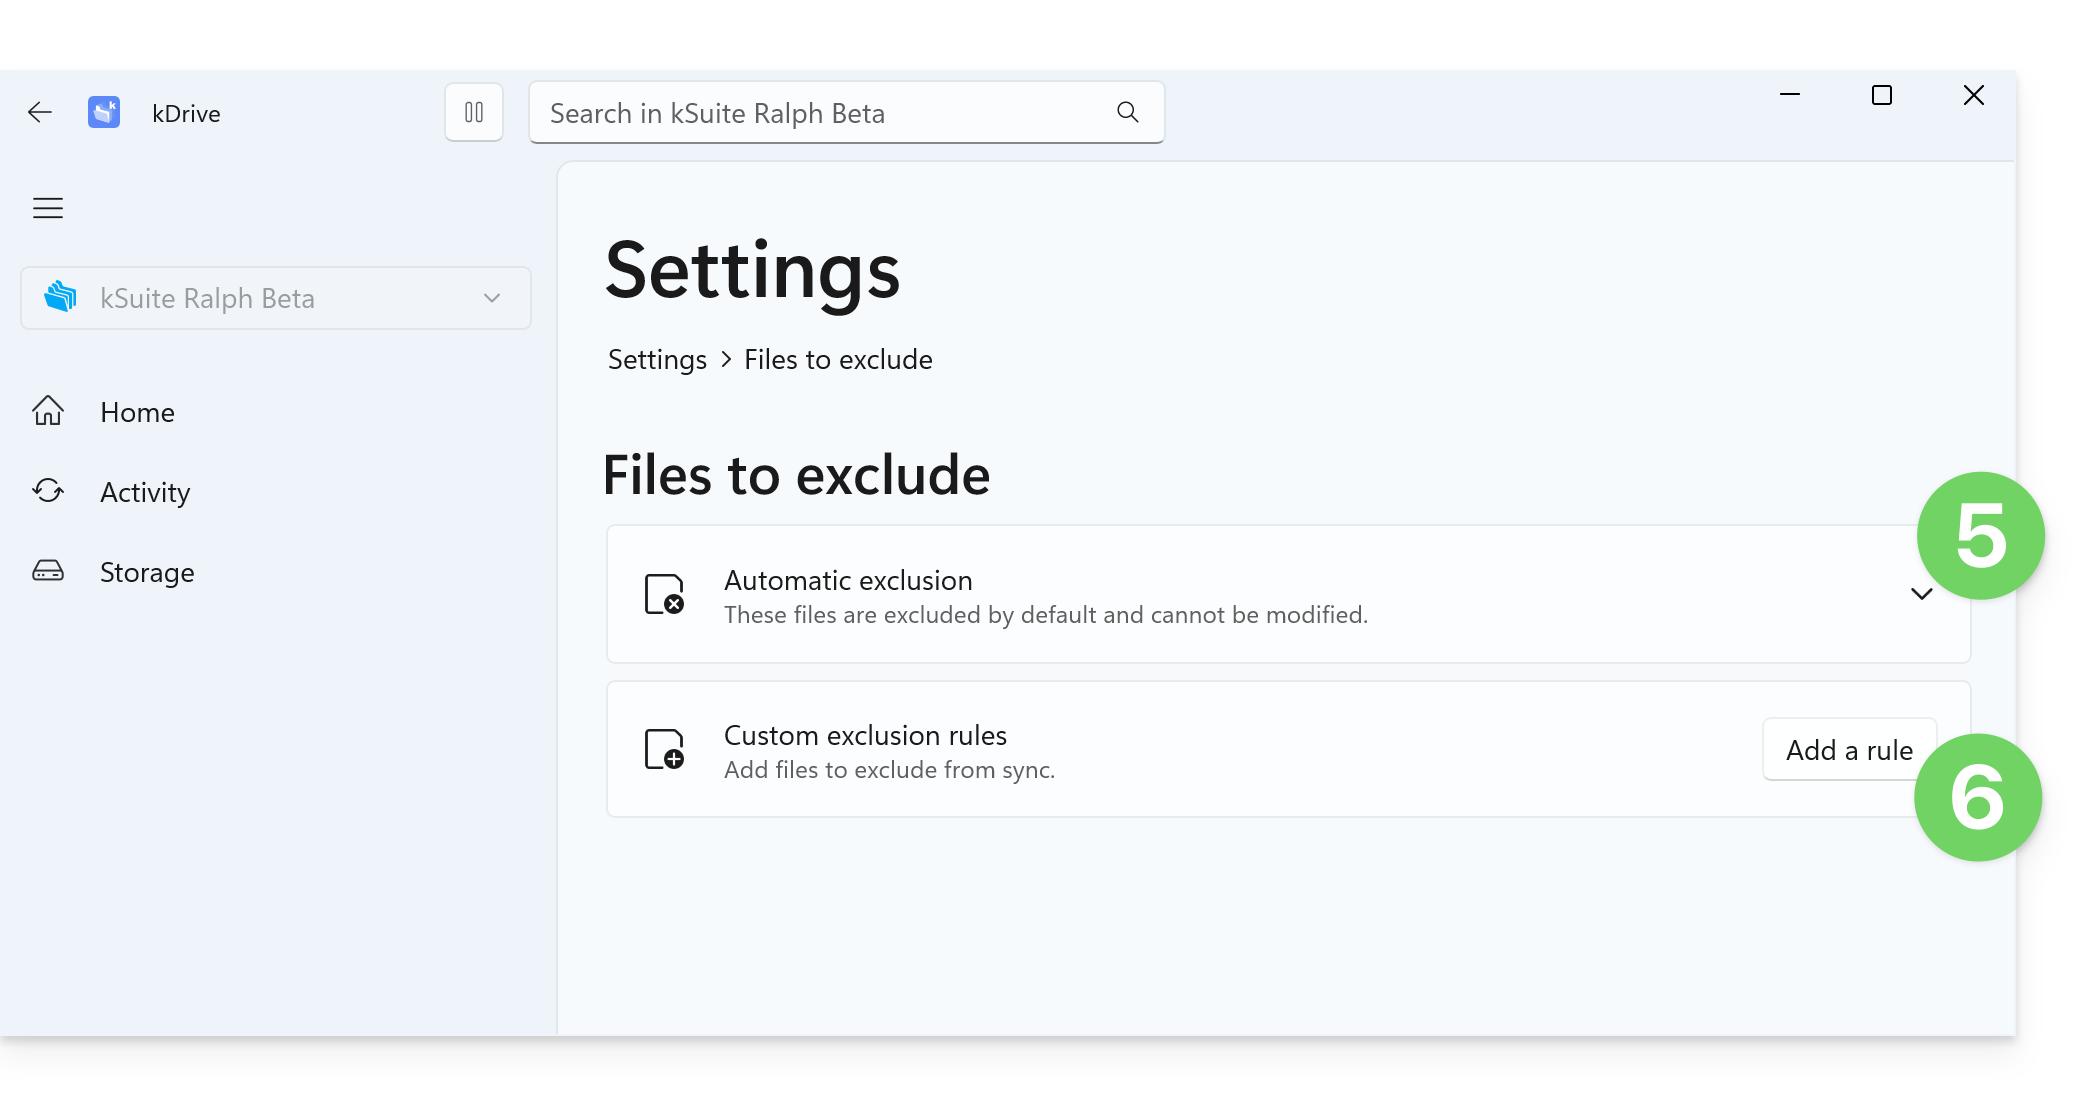
- To create a custom exclusion, click the Add rule button, then enter the term you want to exclude from any synchronization:
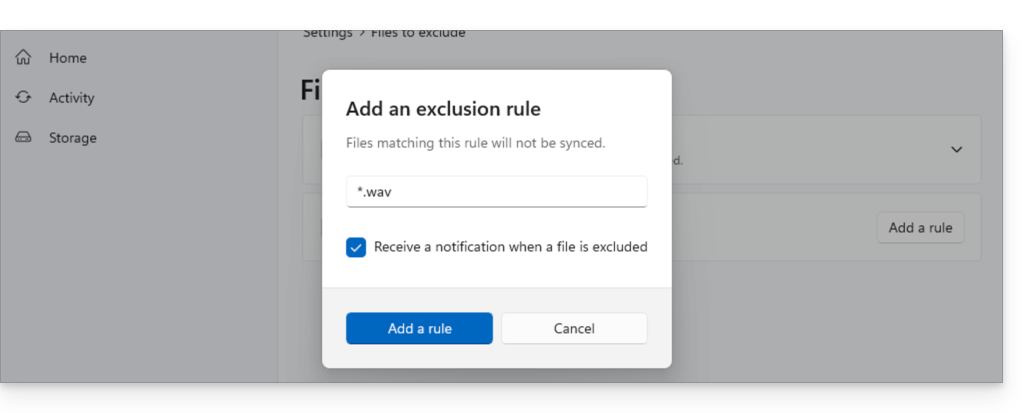
wavwill only exclude files that are named exactlywav(a filewav.txtwill not be excluded)..wavwill only exclude files that are named exactly.wav(a filetest.wavwill not be excluded).*.wavwill exclude all files that end with.wav. For example,test.wavwill be excluded, but nottest.wav.2.*wav*will exclude all files that containwav. For example,fichier-wav-audio.mp3will be excluded.
- Enable the checkbox if necessary to receive a notification when a synchronization excludes a file for the reason you have configured.
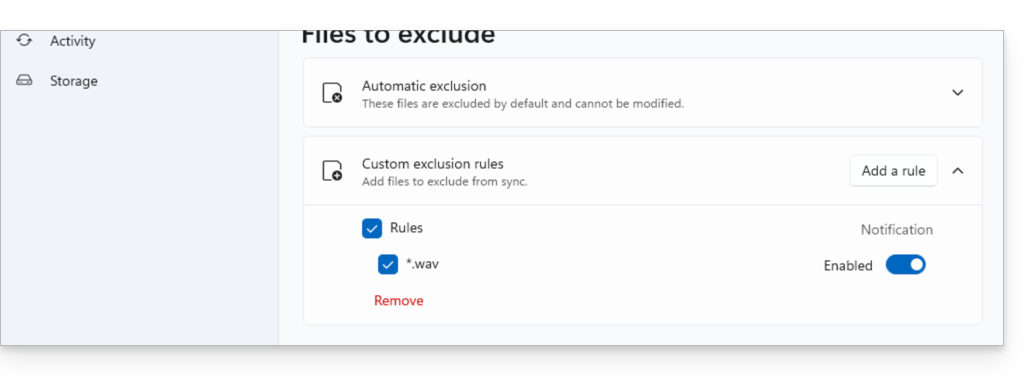
- The rule is displayed, and you can simply select it to delete it if needed. You can also click the toggle switch to enable or disable notifications when this type of exclusion occurs:
Desktop app v3.x
To do this:
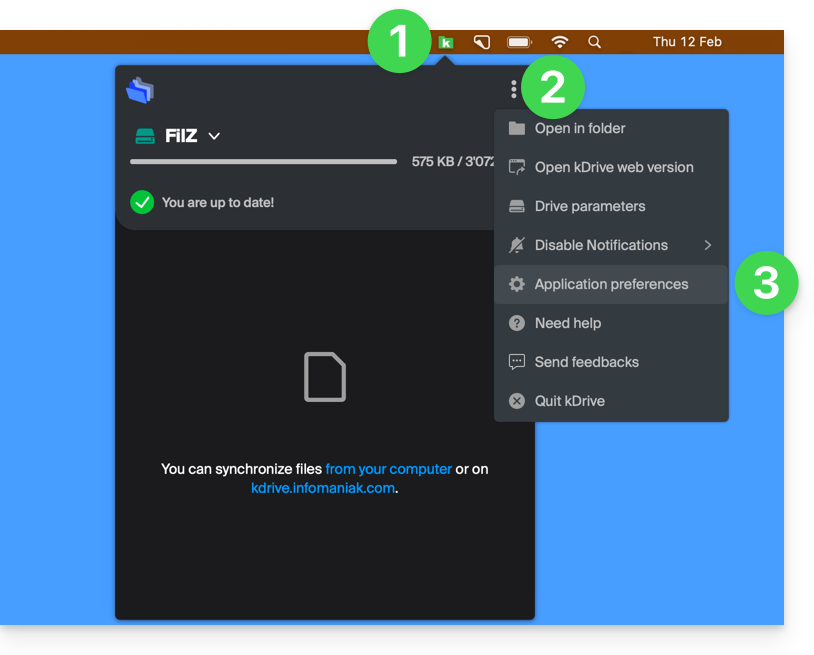
- Left-click on the desktop app icon in the notification area of your computer (top right on macOS, bottom right on Windows, and double-left-click in the taskbar on Linux).
- Click on the action menu ⋮ in the top right corner of the application.
- Click on Preferences:
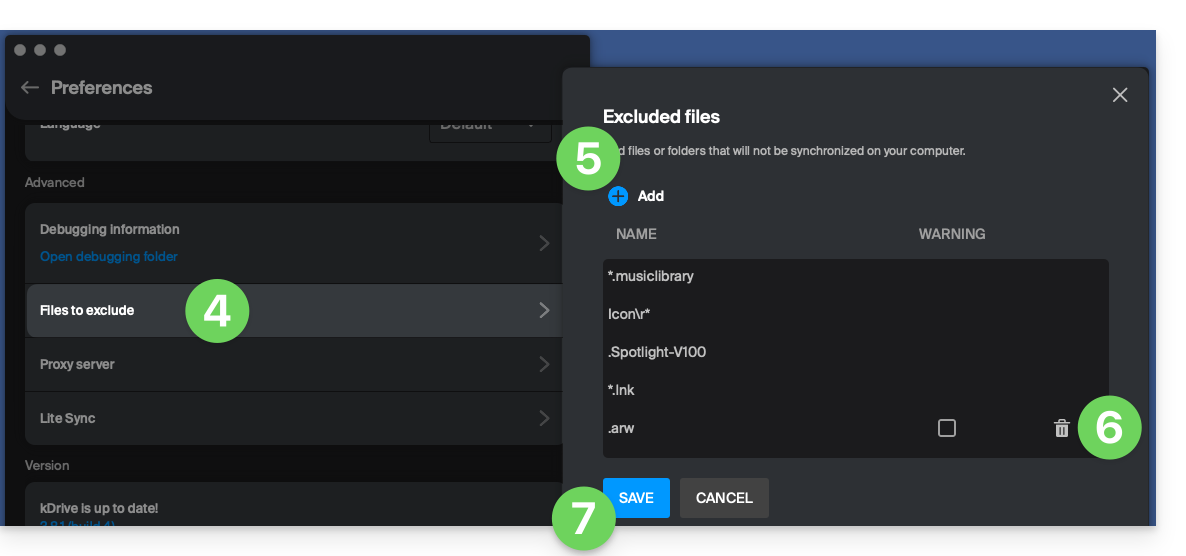
- Click on Files to exclude (in the Advanced section).
- To add files to exclude, click the Add icon and enter the name.
- To exclude a collection of files, specify, for example,
*.bak(asterisk "wildcard" preceding the file extension in question). - If you add the name of a folder, it will no longer be synchronized, including its content, subfolders, etc.
- To exclude a collection of files, specify, for example,
- To remove files/folders that you added to exclude them from synchronization, click the trash can icon Delete at the far right of the corresponding line.
- It is possible to hide synchronization warning messages for excluded files by checking the box to the right of the excluded file.
- Click on the blue Save button:
Link to this FAQ: https://faq.infomaniak.com/2871
Has this FAQ been helpful?
This guide offers solutions if you are no longer able to send or receive emails, or if you are experiencing synchronization errors with your contacts and calendars.
Remove an account in Outlook
Warning: Only follow these instructions if the account is configured using IMAP.
- Open Outlook.
- Click on File from the ribbon.
- Go to Account Settings.
- Select the email address to delete and click Delete.
- Refer to this other guide to properly reconfigure the email address.
Delete contacts & calendars (CalDav Sync)
- Open Outlook
- Click on CalDav Synchronizer from the ribbon.
- Go to Synchronization Profiles.
- Select the profile to remove and click on the red Delete cross.
- Refer to this other guide to properly reconfigure synchronization.
If the problem persists...
There is no need to contact Infomaniak Support if your email address works correctly outside of the application. The most common error concerns using an incorrect password.
If your Outlook is no longer working after a change of email password, please refer to this other guide; otherwise, follow the solutions provided in this other guide regarding email in general.
Link to this FAQ: https://faq.infomaniak.com/2443
Has this FAQ been helpful?
This guide explains how to select the folders that will be synchronized between the web app kDrive (online service ksuite.infomaniak.com/kdrive) and the desktop app (desktop application on macOS / Windows / Linux).
Prerequisites
- For synchronization between your devices to work when your data is updated on kDrive (new file, edited document, etc.), it is obviously necessary that:
Do not download everything to one device
When you install the kDrive application on your computer, everything that is already on the kDrive web app (online service ksuite.infomaniak.com/kdrive) will be visible on your computer in a /kdrive (or /kdrive2, etc.) folder:
- either virtually if you choose to enable Online mode (❓: help): for example, 10 GB on the web will be reduced to just a few MB on your computer,
- either physically with the same storage size in Offline mode: 10 GB on the Web will require 10 GB on your computer.
But you can specify in the kDrive app on your device that it should not display everything, so that some of your data remains on kDrive (Web) and is neither downloaded, displayed, nor synchronized on your device. This is particularly useful, especially during advanced synchronization (❓: help).
Desktop app v4.x
To choose which folder(s) you want to be able to view on your computer and exclude others, assuming that your synchronization is currently complete between kDrive Web and your computer: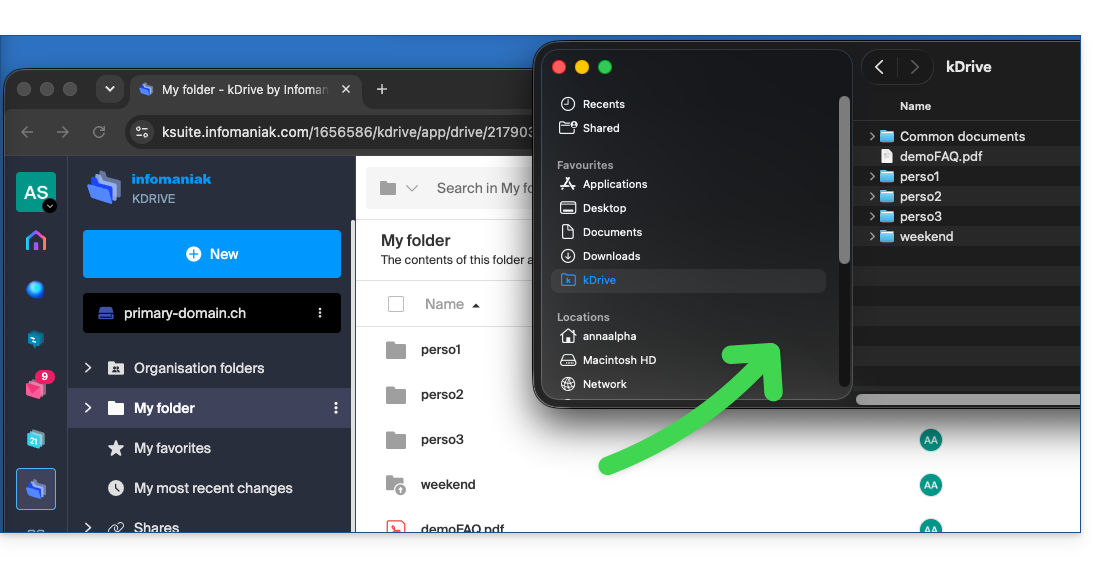
- Launch kDrive on your device: the app icon should be visible in the top right corner on macOS/Linux, and in the bottom right corner on Windows (❓: help).
- Right-click on the icon and choose Settings:
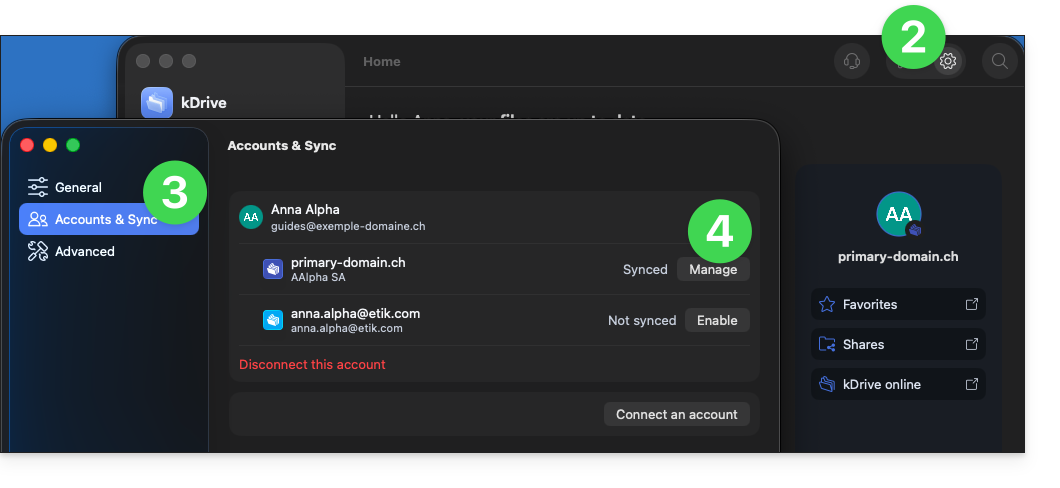
- Go to Accounts & Sync.
- Click on Manage (or ❯) to the right of the current sync:
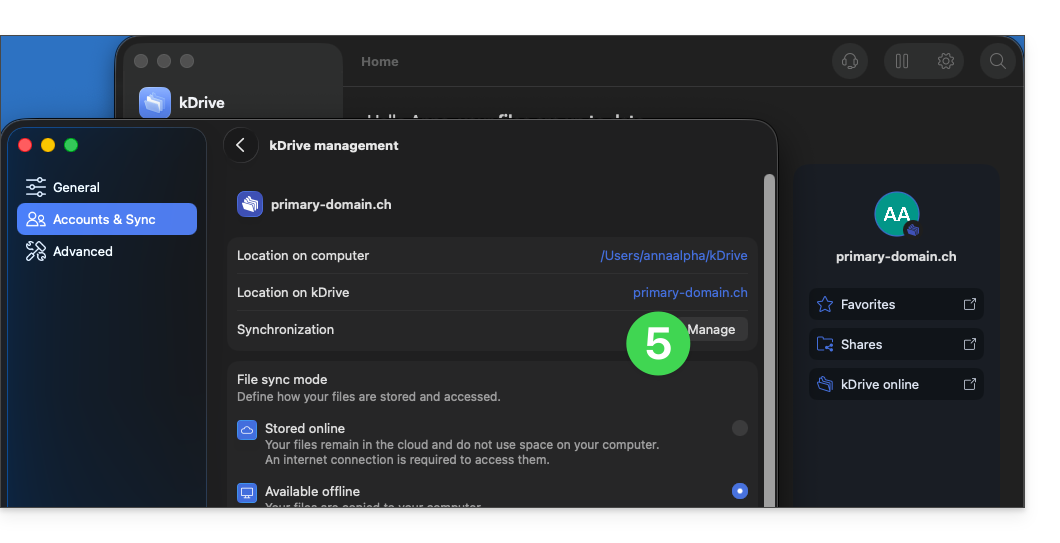
- Click on Manage synchronization:
- Enable or disable the boxes corresponding to the data that should no longer appear on your device after the next synchronization.
- Save your changes:
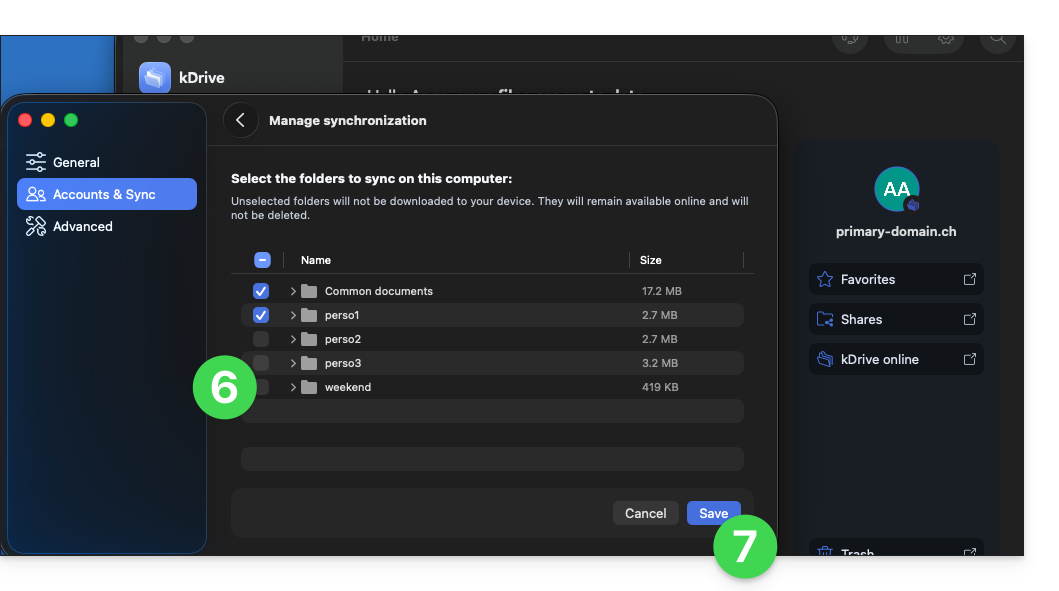
- The effect is immediate; only the files checked in the list will remain synchronized with your device; the rest will be excluded and will no longer be synchronized:
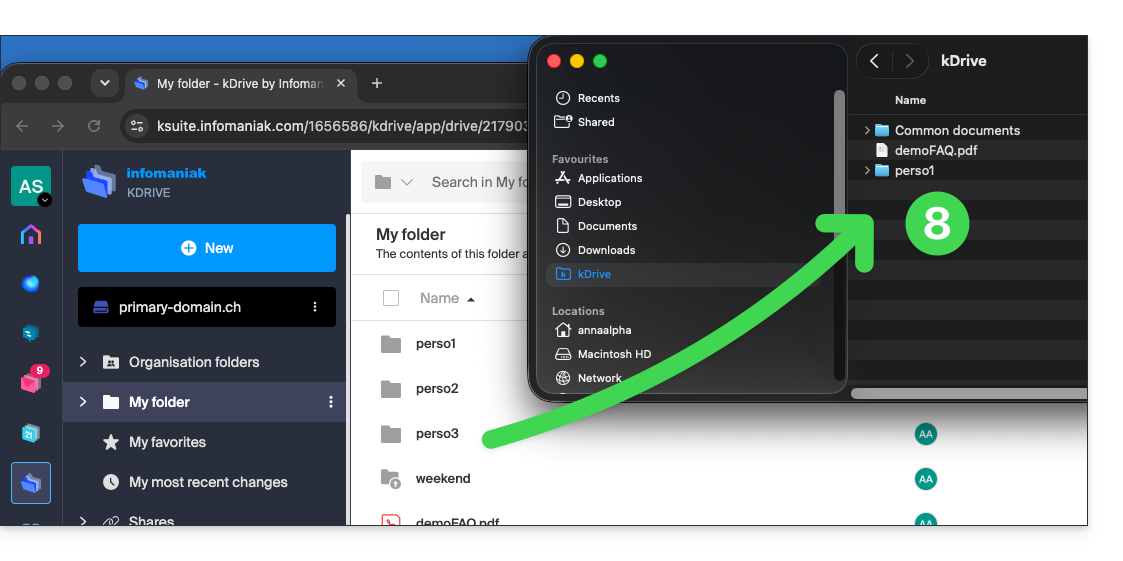
- The kDrive folders in the online version accessible via a browser such as Brave, Chrome, Edge, Firefox, Opera, Safari, etc., will not be affected, but you must ensure, before the operation, that the folder in question was properly synchronized and fully present in this online version (especially if you had just placed it within your synchronized directory).
- The data removed from synchronization will go to the device's recycle bin:
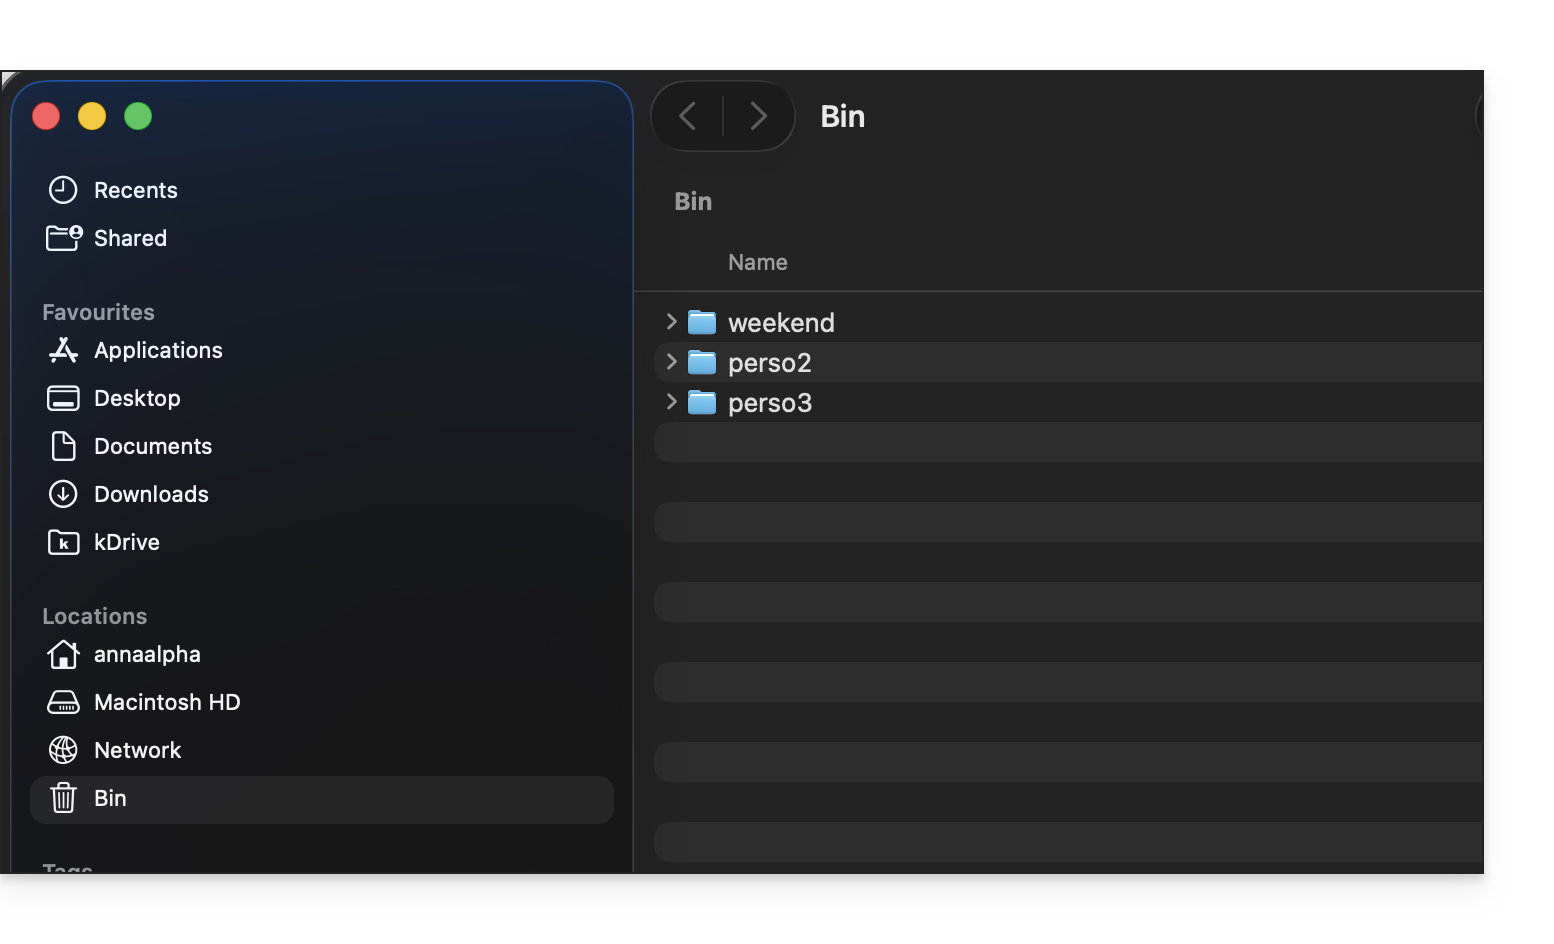
- If in doubt, also make sure that your computer does not instantly delete items that are too large when they are placed in the recycle bin, due to the size of the Windows recycle bin, for example:

Desktop app v3.x
To choose which folder(s) you want to be able to access on your computer, go to the settings of the kDrive application on your computer:
- Left-click on the desktop app icon in the notification area of your computer (top right on macOS, bottom right on Windows, and double-left-click in the taskbar on Linux).
- Click on the action menu ⋮ on the right of the window that appears.
- Click on kDrive Settings.
- Click on the chevron to the left of your synchronization name to display the list of folders (currently stored on kDrive Web).
- Expand the contents of the listed folders as needed and check / uncheck the folders to be synchronized with your computer.
- Click the blue Validate button.
But be careful:
- When deselecting a folder that was selected in the list, a message next to the button (point 6 above) warns you that a This folder will be moved to the Recycle Bin on your computer..
- This is the folder that was in your kDrive file structure on your computer.
- The kDrive folders in the online version accessible via a browser will not be affected, but you must ensure, before the operation, that the folder in question was properly synchronized and fully present in this online version (especially if you had just placed it within your synchronized directory).
- If in doubt, also make sure that your computer does not instantly delete overly large items when they are placed in the recycle bin, due to the size of the Windows recycle bin, for example:
Link to this FAQ: https://faq.infomaniak.com/2454
Has this FAQ been helpful?
This guide explains how to access kDrive files locally on your hard drive using the desktop app kDrive (desktop application for macOS / Windows / Linux), as well as files from the kDrive web app (online service ksuite.infomaniak.com/kdrive).
Prerequisites
- For synchronization between your devices to work when your data is updated on kDrive (new file, edited document, etc.), it is obviously necessary that:
Web < > Computer Synchronization
Shared folders
On the web version of kDrive, the shared folder is called Organization folders: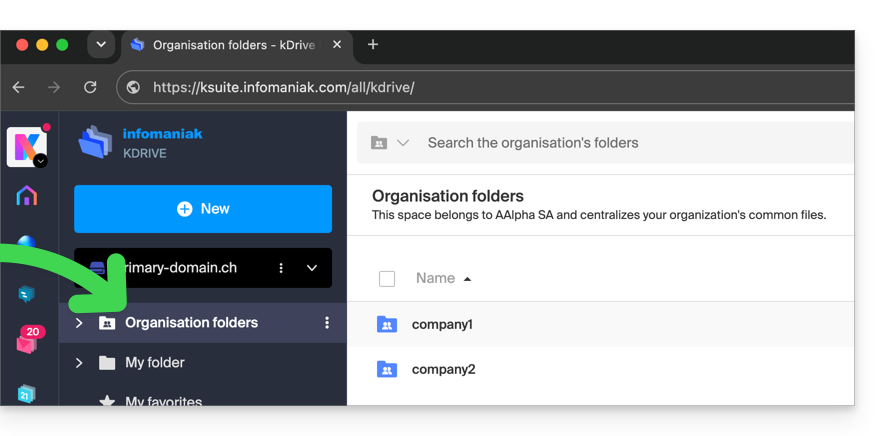
On your computer, you will find the same folder, but named Common documents; do not attempt to rename it: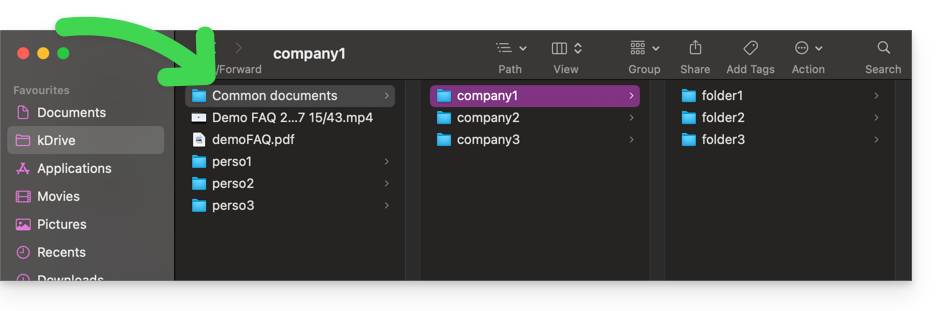
Personal folder
On the web version of kDrive, the logged-in user's personal folder is stored in a separate area ("My folder"), which cannot be modified either: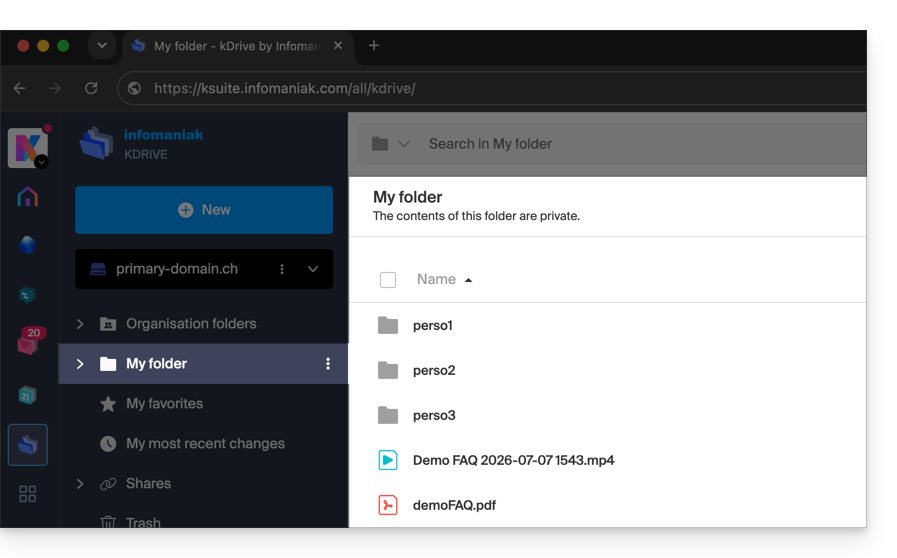
On the computer, everything outside of Common documents belongs to the personal folder ("My folder") of the logged-in user: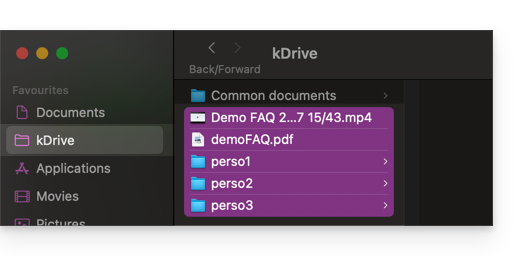
Accessing kDrive files
On the v4.x app
- Launch kDrive on your device: the app icon should be visible in the top right corner on macOS/Linux, and in the bottom right corner on Windows (❓: help).
- Left-click on the icon to bring the application to the foreground.
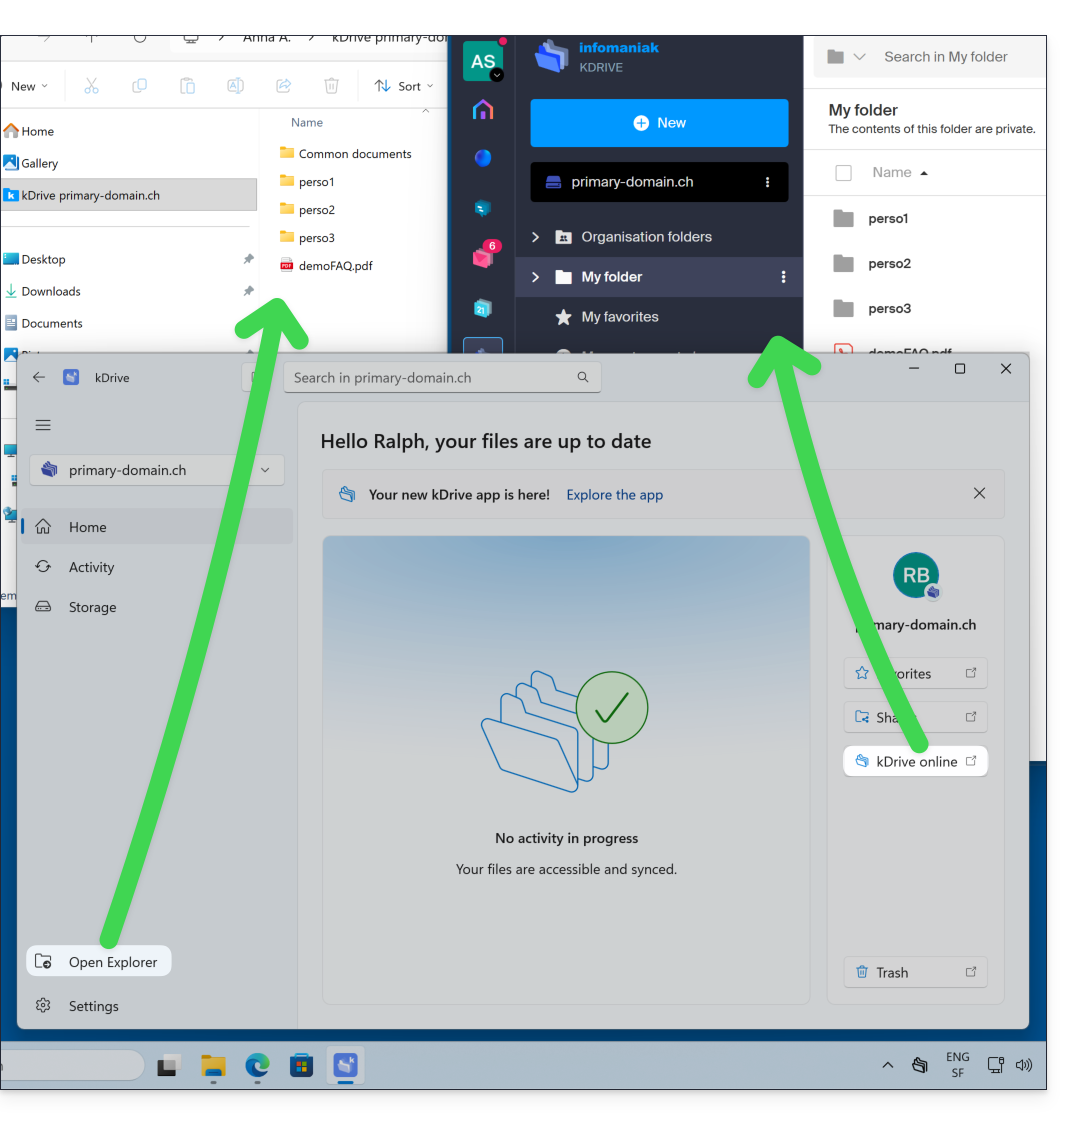
- On the left side of the kDrive application's home page, click Open Finder / Open Explorer to access the kDrive folder, which is used to store your kDrive files on your computer's hard drive.
- On the right side of the kDrive application's home page, click kDrive Online to open your browser directly to your kDrive web app (online service ksuite.infomaniak.com/kdrive):
About the v3.x app
When the kDrive application is installed and launched:
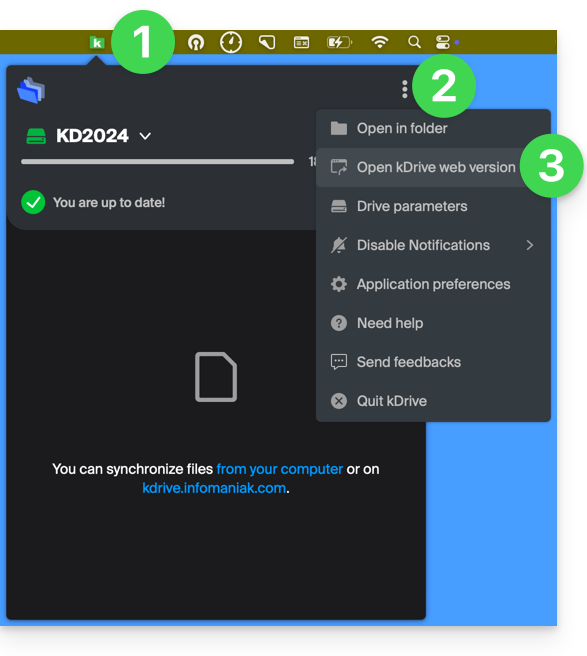
- Left-click on the app icon in the notification area of your computer (top right on macOS, bottom right on Windows, and double left-click in the taskbar on Linux).
- Click on the action menu ⋮ in the top right corner.
- Click on Open kDrive Web to access the files stored on the kDrive server:
- It is possible that the version in the browser may not display correctly.
- Click on the item above to open the disk folder on your computer containing your kDrive files, physically present or virtually present depending on whether Lite Sync is enabled (❓: help).
If not all of your files are present/synchronized, please refer to this other guide.
Link to this FAQ: https://faq.infomaniak.com/2456
Has this FAQ been helpful?
This guide explains the operation of the blacklist in the kDrive desktop app (macOS / Windows / Linux) and in which cases certain local files or folders are no longer taken into account for synchronization.
Introduction
- A file or folder placed on the blacklist by the application has a suffix in its name in the form
_blacklisted.- This means that the application ignores this item during synchronization operations and it is therefore not transferred to kDrive Web.
- This marker remains active until the cause of the blocking has been resolved.
- If an excluded folder cannot be deleted locally, it may be automatically added to the blacklist.
- In this case, you can either delete it manually or re-enable its synchronization in the application settings.
- Once the problem is resolved (for example, after deleting a duplicate, correcting permissions, or reactivating an excluded folder), simply remove the
_blacklistedsuffix from the item's name so that it is included in the synchronization again. - These mechanisms ensure the stability of the synchronization process and prevent recurring errors related to inaccessible files, duplicates, or files incompatible with the file system.
Examples of blacklisting
In some cases, a local item can be blacklisted:
- Dehydrated placeholder (Lite Sync only): a placeholder file (not fully downloaded) is added to the blacklist to prevent it from being uploaded to kDrive Web.
- Existing creation on the remote drive: if the creation of a file or folder fails because an identical item already exists on kDrive Web, the local item is marked as blacklisted.
- Insufficient server-side permissions: when a file or folder is created locally but the backend refuses to propagate the changes (e.g., in Common documents), the local item is blacklisted.
- Folder excluded from synchronization: if a folder has been unchecked in the kDrive desktop interface, the application attempts to delete it locally if it is still present. If this fails, it is blacklisted.
Blacklisting can also occur due to incompatible file names: characters such as the tilde ~, the forward slash /, the backslash \, certain system files such as System Volume Information, or certain temporary or technical extensions (.idlk, .parms.db, .directory, ._*, etc.) (other examples).
Rename these items before restarting the synchronization.
Correct a blacklisted item
To identify them:
- Identification: The
_blacklistedsuffix in the file or folder name indicates that the item is being ignored by the synchronization process. - Resolution: Correct the cause of the blocking (e.g., access rights, an existing duplicate on kDrive Web, an exclusion setting, or a placeholder status), then rename the item to remove
_blacklistedif you want it to be synchronized again.
To avoid this:
- Check your access rights before creating or modifying files in shared spaces, organization folders, or Common documents.
- Avoid creating duplicates when creating or moving files between your computer and kDrive Web.
- Do not uncheck a folder in the desktop application if you continue to add items to it locally.
- With Lite Sync, download the entire file before editing it, rather than working on a dehydrated placeholder.
Link to this FAQ: https://faq.infomaniak.com/2570
Has this FAQ been helpful?
This guide details how to back up a server running the Linux distribution of your choice on Swiss Backup, the backup solution in a Swiss independent cloud.
Configure rClone for Swiss Backup
Prerequisites
- Have an Infomaniak Swiss Backup space with an available device quota (minimum 1) for a Cloud backup.
- Install the rClone application using your Linux distribution's package manager.
- Add a device, but select the Server type to obtain the rClone settings.
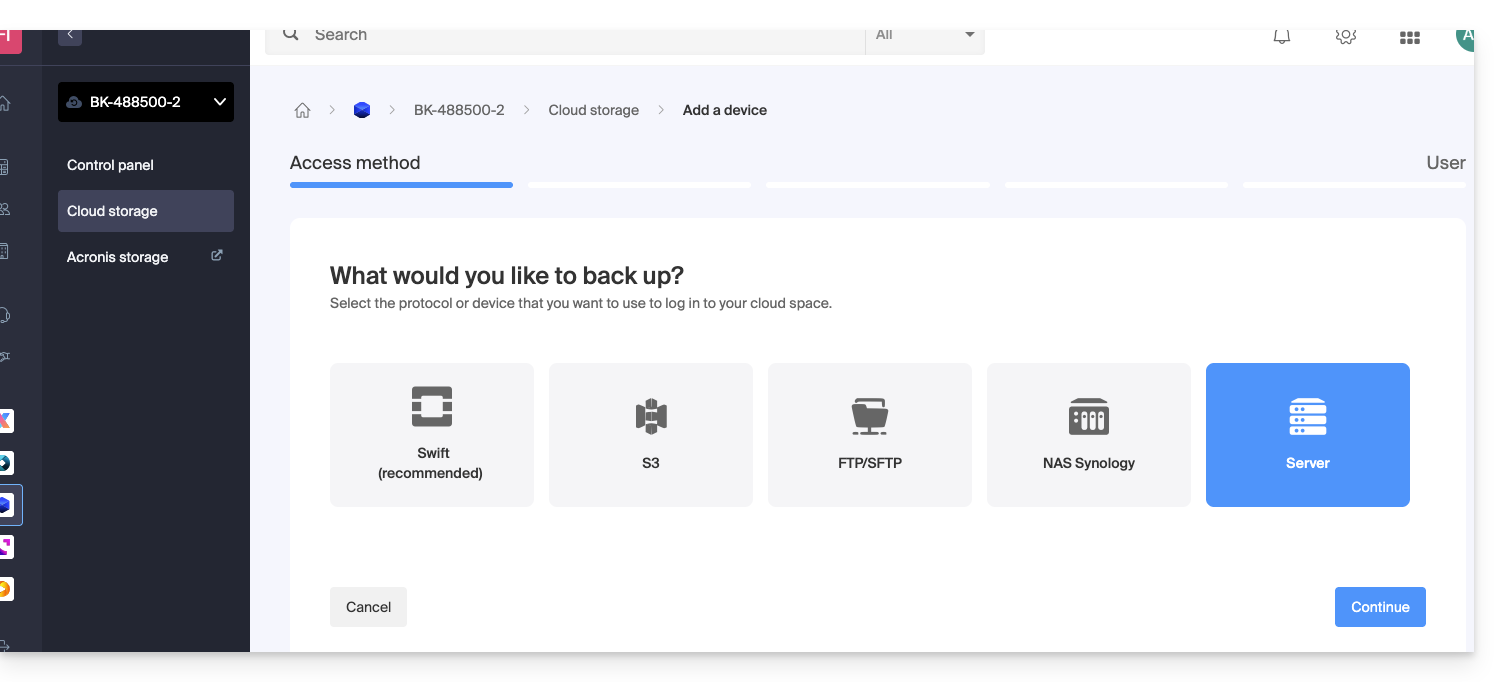
To configure a new backup:
- Download the rclone file you received by email after adding the device:
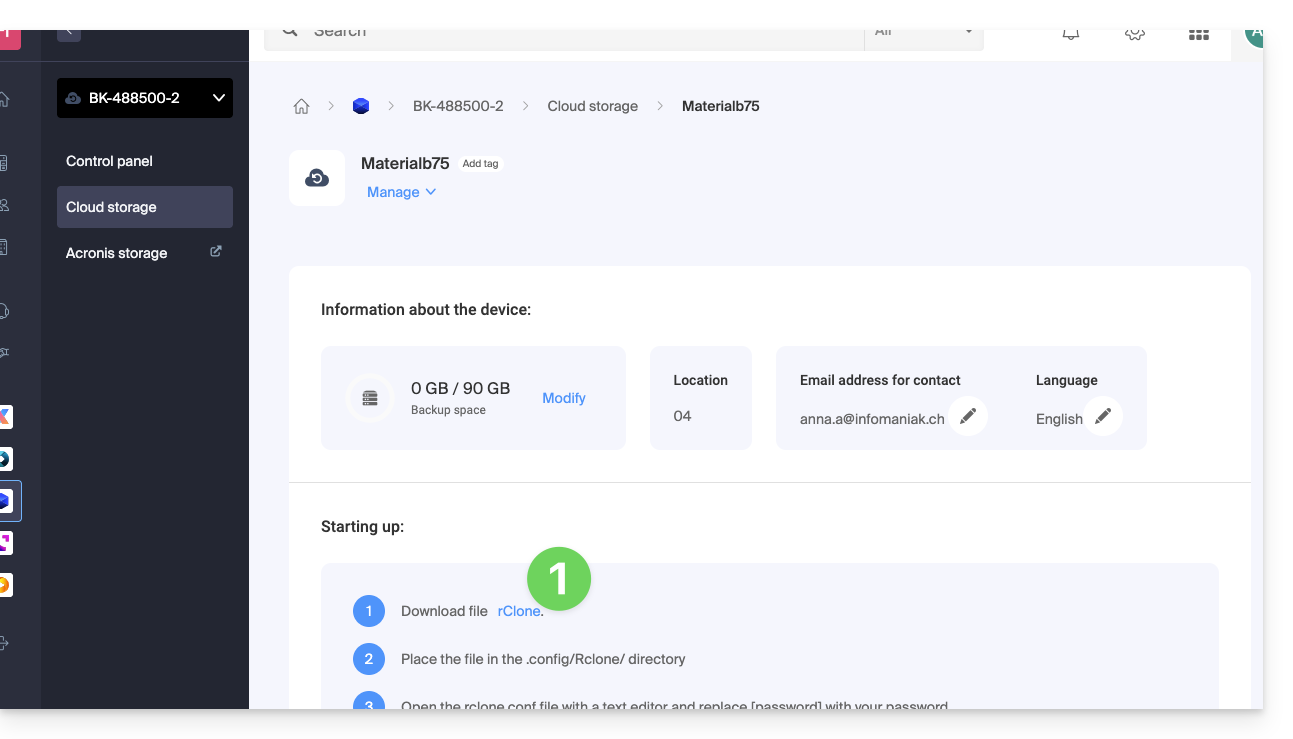
- Place the file in the
~/.rclone.conf.config/rclone/directory, or add the file's content to the end of the existing~/.rclone.conf.config/rclone/rclone.conffile (on Debian Stretch, this file is located at:~/.rclone.conf) — also refer to the rClone documentation. - Open the
rclone.conffile with a text editor and replace[password]with the generated password: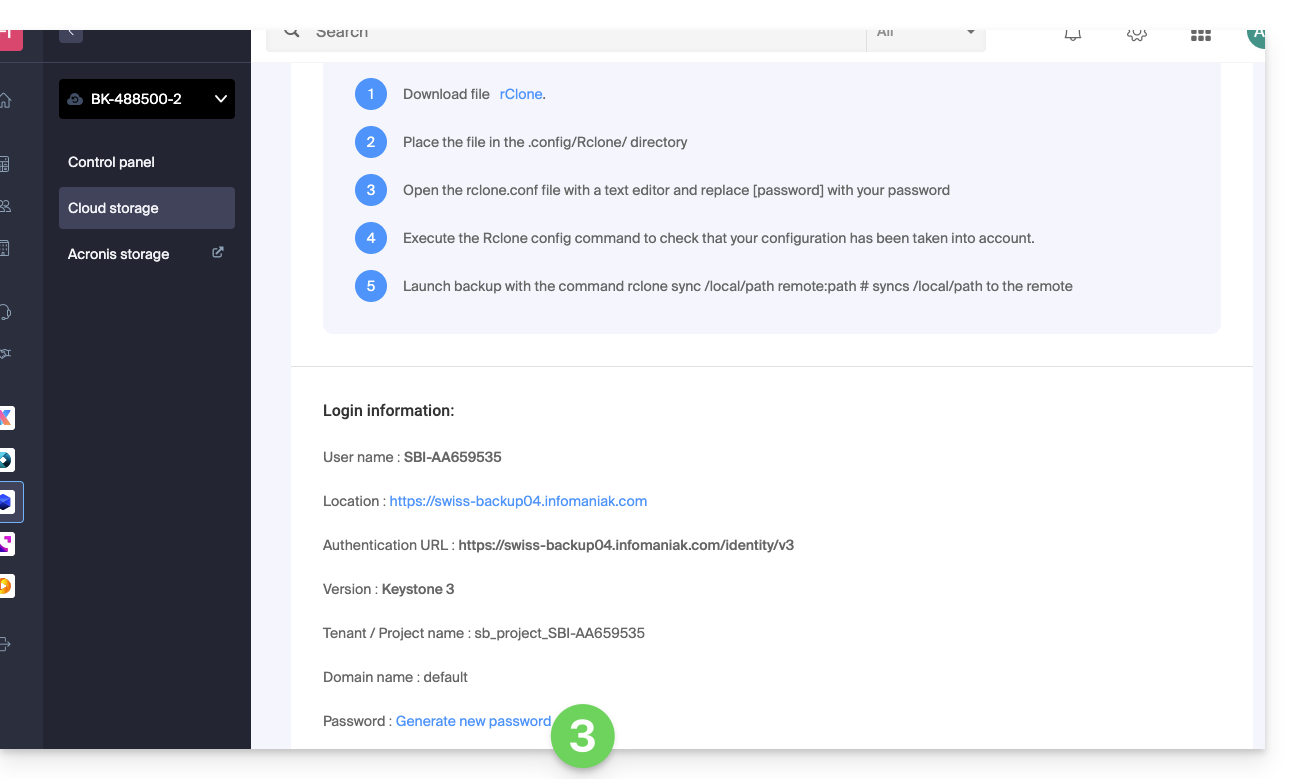
- Run the
rclone configcommand to verify that the configuration has been applied correctly. - Start the backup using the
rclone sync /local/path project_name:defaultcommand.
If needed, you can find your login details in the Manager.
Example rClone configuration
[sb_project_SBI-AB123456]
type = swift
user = SBI-AB123456
key = [password]
auth (1) = {{URL_8}}
domain = default
tenant = sb_project_SBI-AB123456
tenant_domain = default
region = RegionOne
storage_url =
auth_version =
(1) The indication "//swiss-backup02", "//swiss-backup03" etc. changes depending on the cluster number indicated in the Manager under Cloud storage information in the "Location" section; and if your Swiss Backup device was created before October 2020, you will need to use https://swiss-backup.infomaniak.com/identity/v3.
You can modify [sb_project_SBI-AB123456] with the indication of your choice for easier identification.
For example, the indication [swissbackup] will produce:
rclone sync /local/folder swissbackup:remote/folderinstead of:
rclone sync /local/folder sb_project_SBI-AB123456:remote/folder
Start a backup or restore
Start a backup using the following command:
rclone sync /local/folder sb_project_SBI-AB123456:remote/folderStart a restore using the following command:
rclone sync sb_project_SBI-AB123456:remote/folder /local/folderLink to this FAQ: https://faq.infomaniak.com/2285
Has this FAQ been helpful?
Infomaniak tools, such as the Web Mail app (online service ksuite.infomaniak.com/mail) or the Calendar, Contacts, kSuite interfaces, can be displayed in light mode or dark mode, including based on the settings of your current operating system: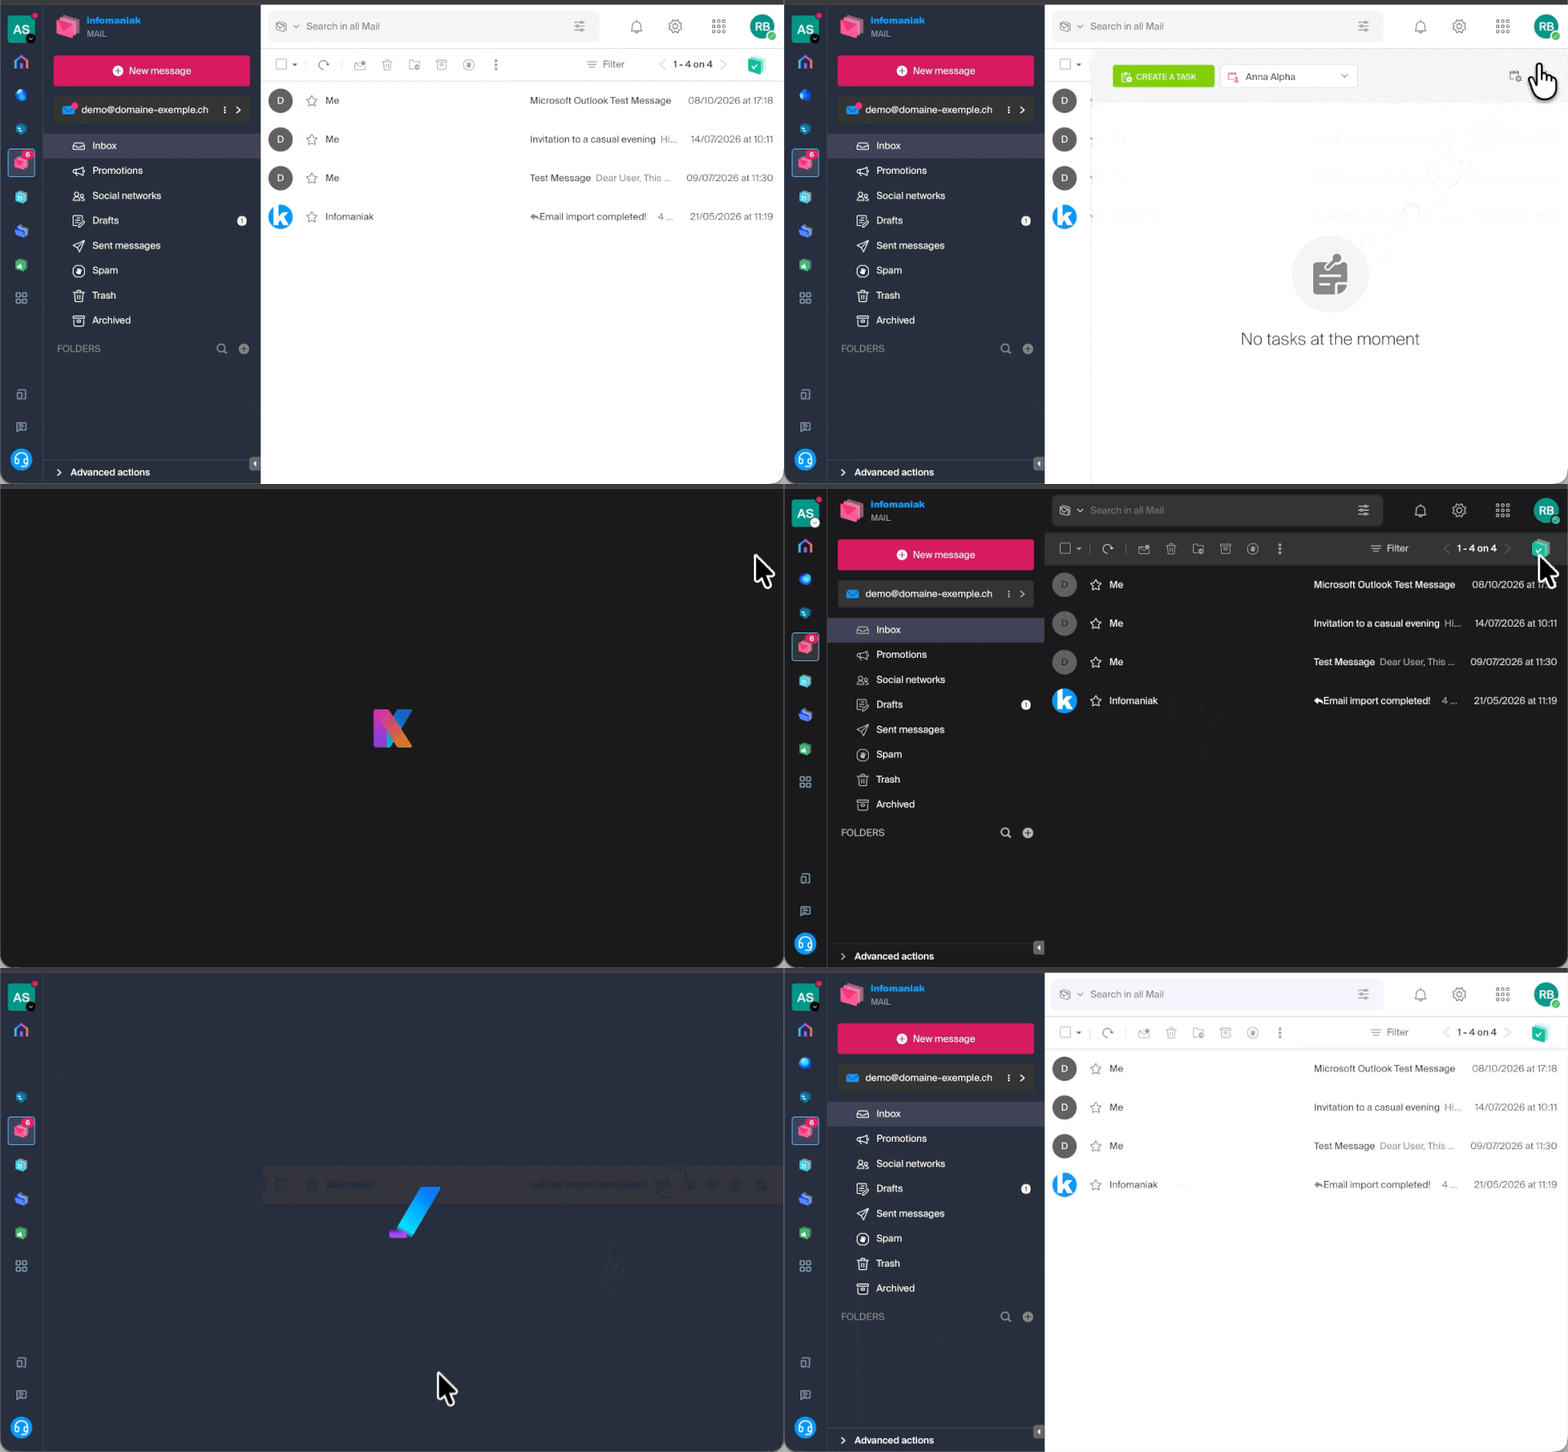
Enable manual mode
To manually choose a dark or light display, without relying on a potentially different display setting on the operating system:
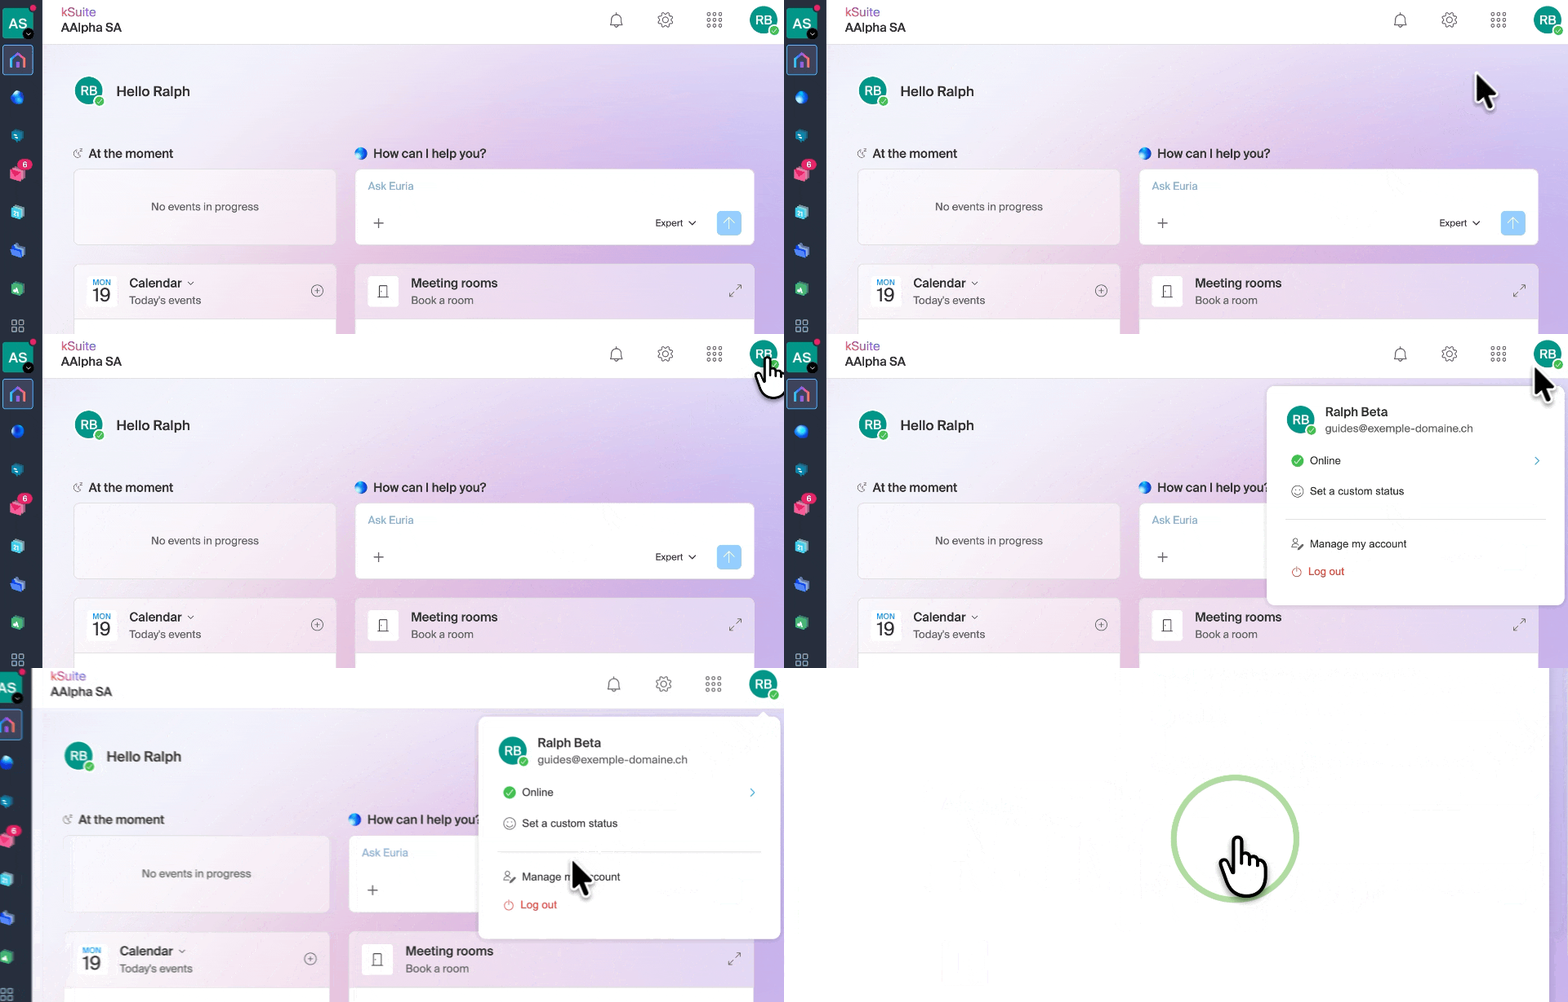
- Click here or at the top right, on your initials/avatar, to "Manage my account":
- Then, click on Appearance in the left-hand menu.
- Click on Light to apply the light mode:
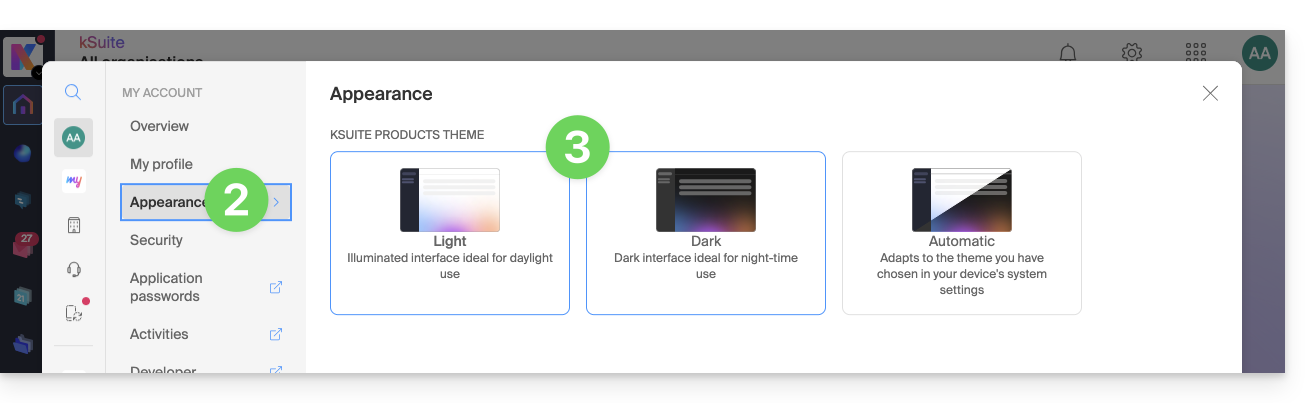
- Click on Dark to enable dark mode.
Enable automatic mode
Automatic mode is based on your operating system settings (macOS / Windows...):
- Click here or on the badge with your initials / avatar in the top right corner of the Infomaniak Manager to "Manage my account":
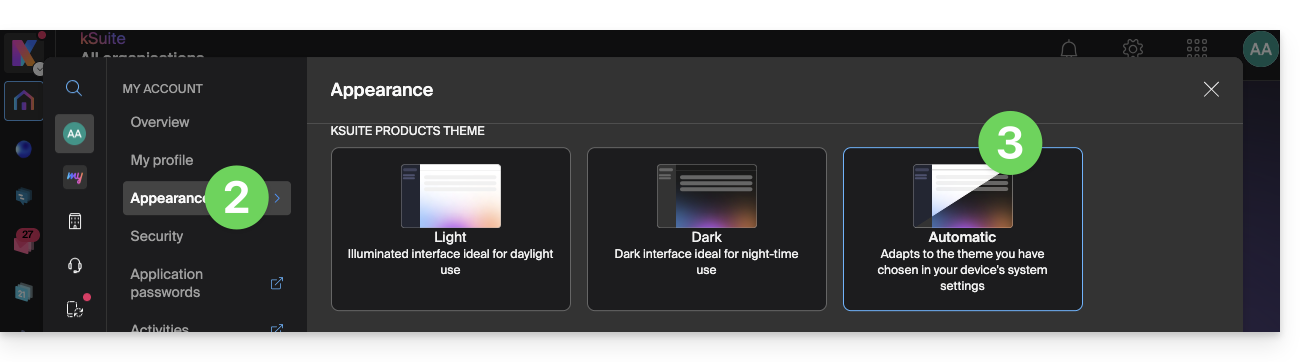
- Click on Appearance in the left-hand menu.
- Click on Automatic mode:
Then, if you want to change the light or dark theme of your computer, so that the automatic mode of the Manager takes your preferences into account…
… on macOS
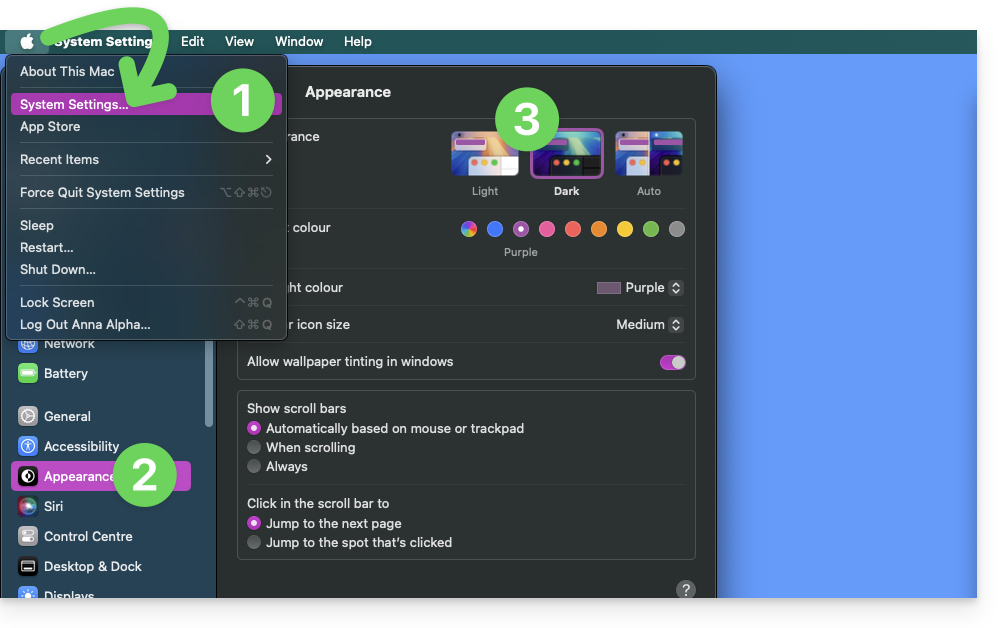
- Click on System Preferences…
- Click on Appearance.
- Choose the desired mode on the right:
… on Windows
- In the Start menu, open Settings > Personalization.
- Select Colors, then Choose your mode:
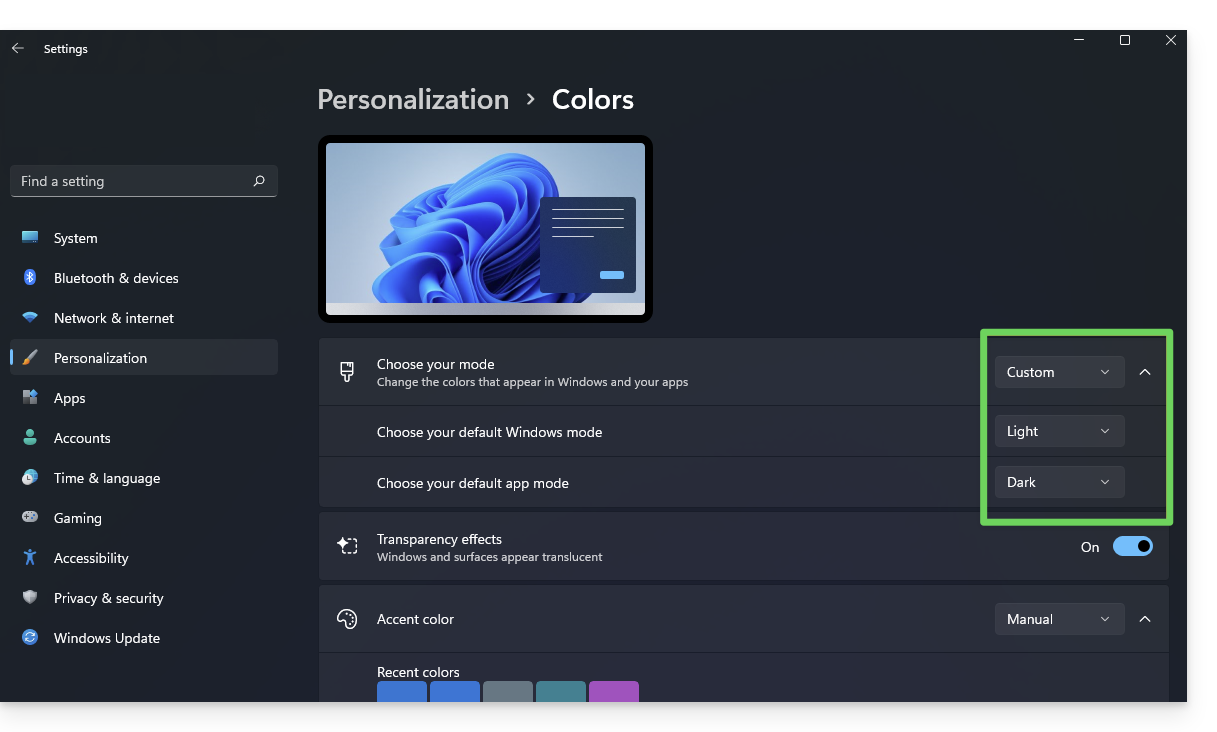
- You can choose between Light, Dark, or Custom.
- If you select Custom, you will have the option to choose a default Windows mode and a different default application mode.
And on mobile?
Dark mode is enabled on mobile devices for Infomaniak login and account creation pages; it automatically adapts to the mobile system's preferences, providing a consistent visual experience between mobile apps and login/account creation.
Link to this FAQ: https://faq.infomaniak.com/2870
Has this FAQ been helpful?
This guide details how to back up a QNAP NAS using rClone or HBS via the OpenStack Swift protocol on Swiss Backup, the backup solution in an independent Swiss cloud.
Connection via rClone
Prerequisites
- Have an Infomaniak Swiss Backup space with available device quota (minimum 1) for a Cloud backup.
- Add 1 device of type Cloud to obtain the OpenStack Swift settings.
- Install the rClone application (https://www.qnapclub.eu/en/qpkg/330) or HBS (https://www.qnap.com/en/software/hybrid-backup-sync) on the QNAP.
To configure a new backup:
- Copy the content below into the
rclone.conffile in the user's.config/rclonedirectory (e.g.,/share/homes/backupuser/.config/rclone/rclone.conf). - Check the configuration with "
rclone config". - Start the copy process with the command "
rclone sync /share/to/sync Infomaniak:default".
Replace SBI-XXXXXXXX and "passwd" with the information specific to your device (refer to this other guide):
[sb_project_SBI-XXXXXXXX]
type = swift
user = SBI-XXXXXXXX
key = passwd
auth (1) = {{URL_8}}
domain = default
tenant = sb_project_SBI-XXXXXXXX
tenant_domain = default
region = RegionOne
storage_url =
auth_version =
Connecting via HBS (Hybrid Backup Sync)
To configure a new backup:
- Open HBS and go to Backup & Restore, then click on Create new Backup job.
- Select the NAS folder to back up, then click Next.
- Choose OpenStack Swift, then enter the information as indicated below:
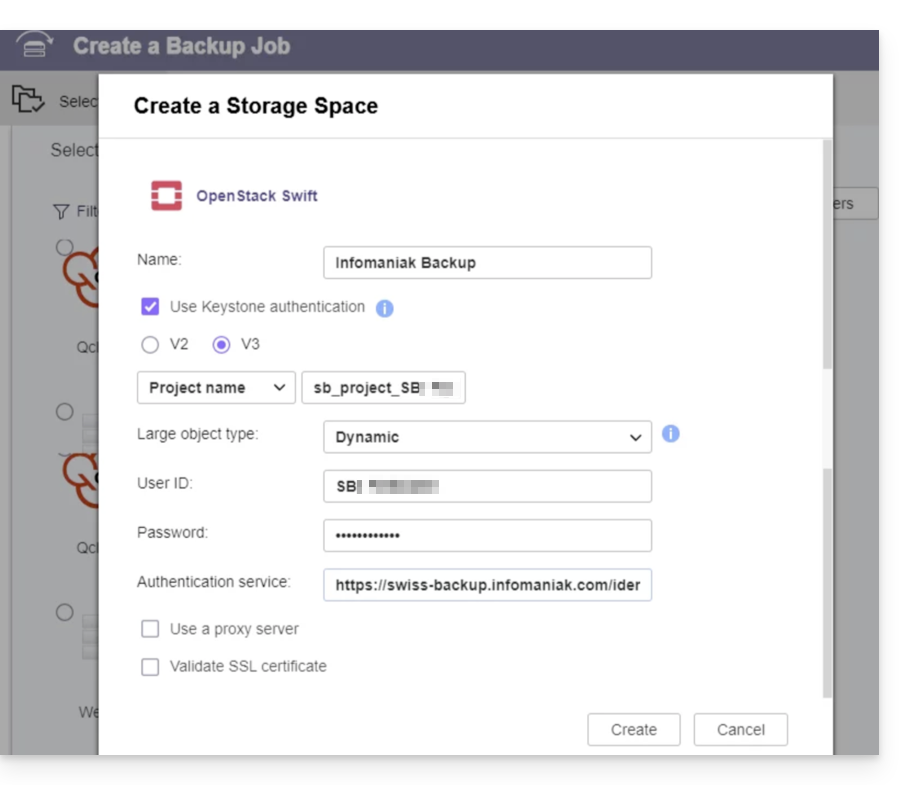
- Name: give a name to the backup
- Select “
Use Keystone Infrastructure” - Select “
V3” - Project name:
sb_project_SBI-XXXXXXXX(replaceSBI-XXXXXXXXwith your own ID, same below) - User ID:
SBI-XXXXXXXX - Password: the one generated on Swiss Backup
- Authentication service (1):
https://swiss-backup.infomaniak.com/identity/v3
- Click on Create.
- Region name:
RegionOne - Bucket name:
default - Multipart Size: leave as
128MB - Click on Select.
- Click on default under the destination and then click on OK.
- Give the task a name.
- Then, configure the desired settings, such as the backup frequency and bandwidth limitation.
- Click on Create.
(1) The indication "//swiss-backup02", "//swiss-backup03" etc. changes depending on the cluster number indicated in the Manager under Cloud storage information in the "Location" section; and if your Swiss Backup device was created before October 2020, you will need to use https://swiss-backup.infomaniak.com/identity/v3.
Link to this FAQ: https://faq.infomaniak.com/2319
Has this FAQ been helpful?
This guide explains how to synchronize your Obsidian vault on your Infomaniak kDrive via the WebDAV protocol. This way, you can keep your notes safe and secure in a storage medium located in Switzerland.
✘ UNAVAILABLE with
kSuite Free / kSuite Standard
my kSuite / my kSuite+ (ik.me, etik.com, ikmail.com)
Introduction
- Obsidian is a powerful and extensible note-taking tool that uses local Markdown files to organize your knowledge.
- To avoid cluttering your kDrive directories, it is strongly recommended to create a dedicated folder in your personal kDrive directory tree, with a simple folder name such as "
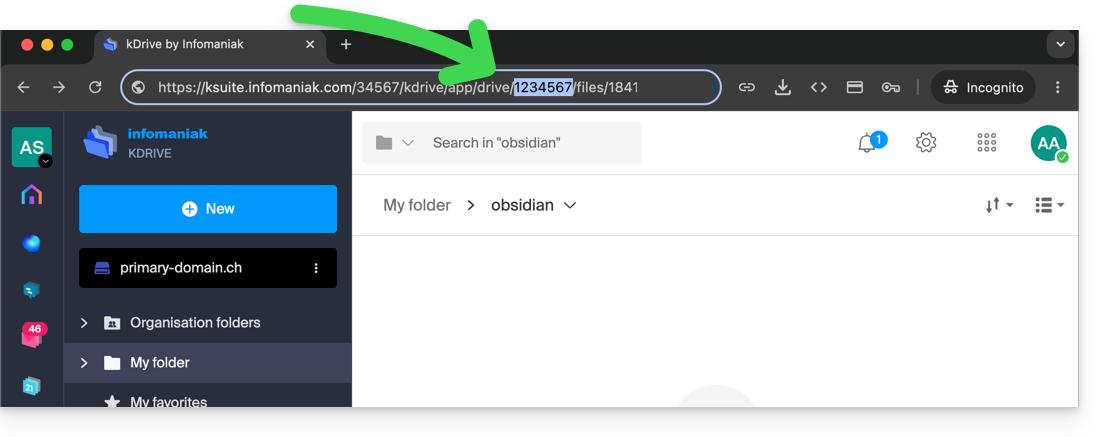
obsidian" for example, and then specify it at the end of the WebDAV link in step 7 below: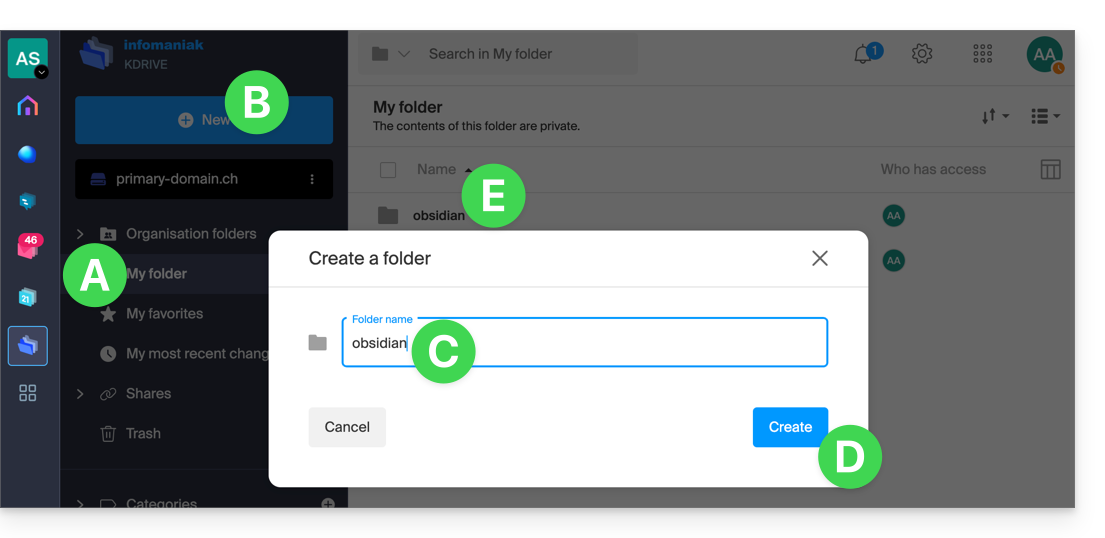
Configure Obsidian to use kDrive via WebDAV
Prerequisites
The integration is based on the community plugin WebDAV Sync, which ensures two-way synchronization:
- Open your vault in the Obsidian application.
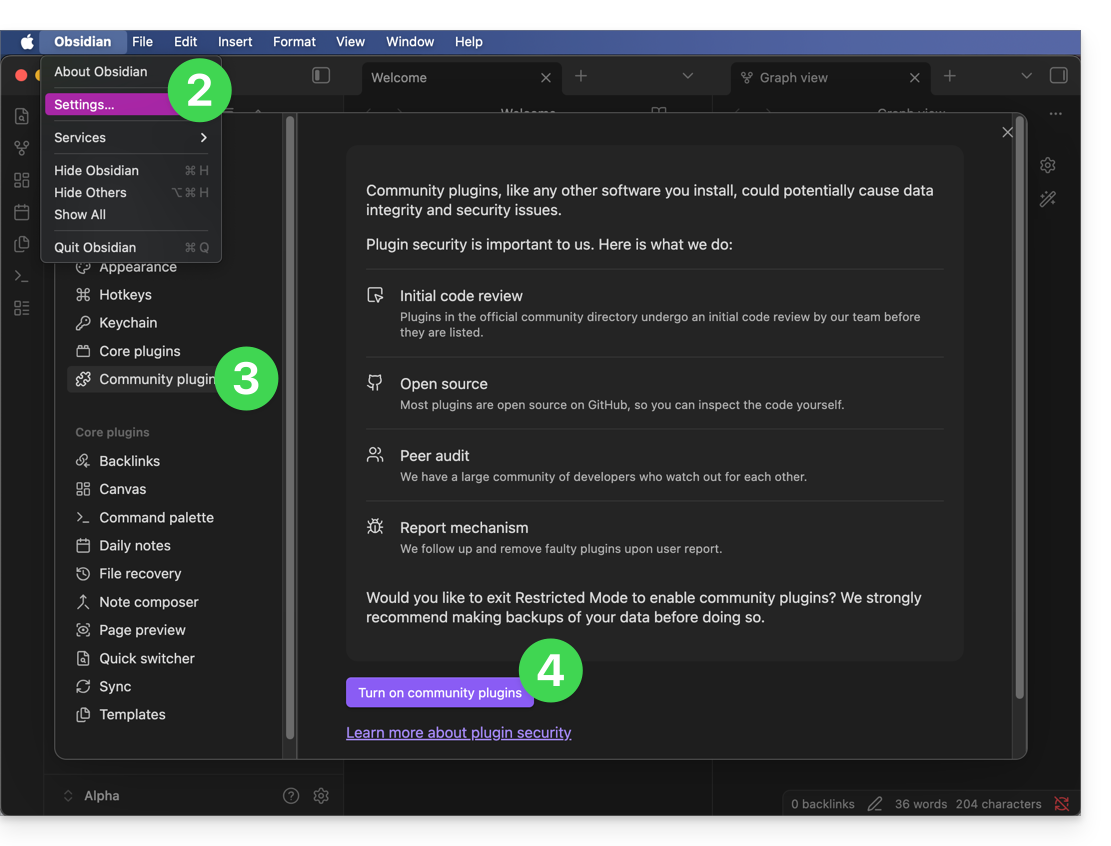
- Go to Settings.
- Go to Community plugins.
- Enable them:
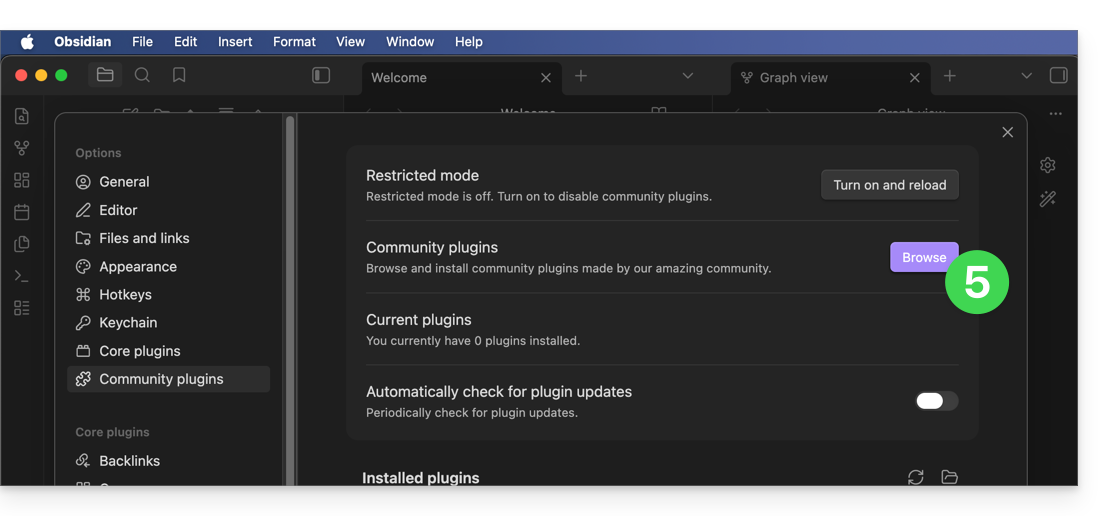
- Click on Browse:
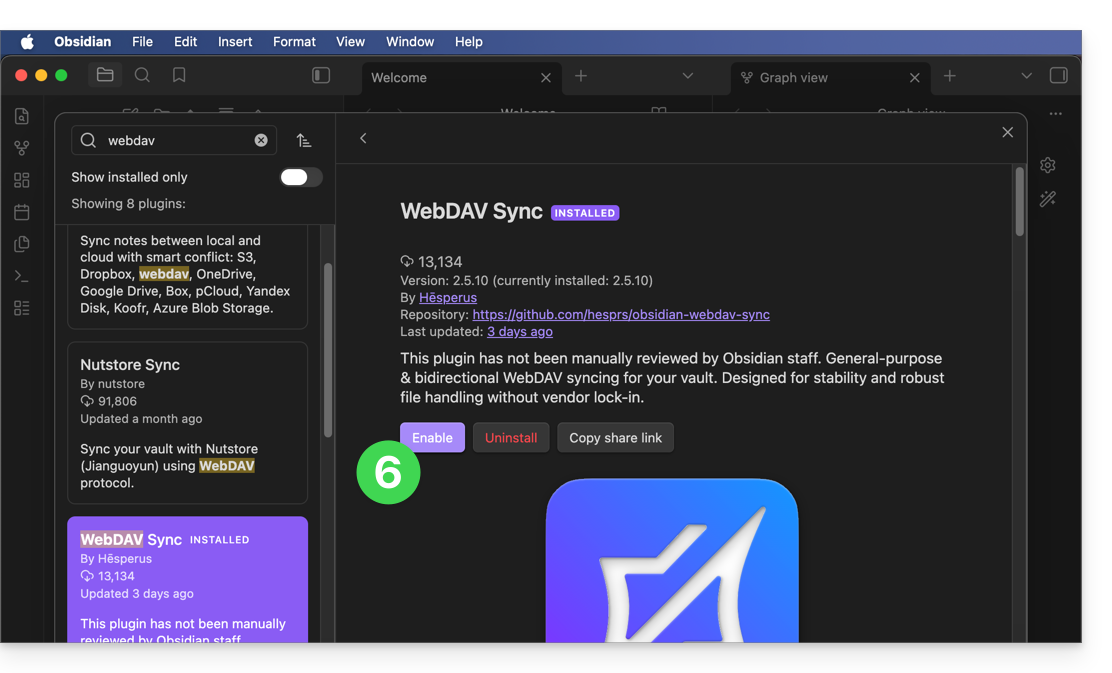
- Find the WebDAV Sync plugin, install it, and activate it:
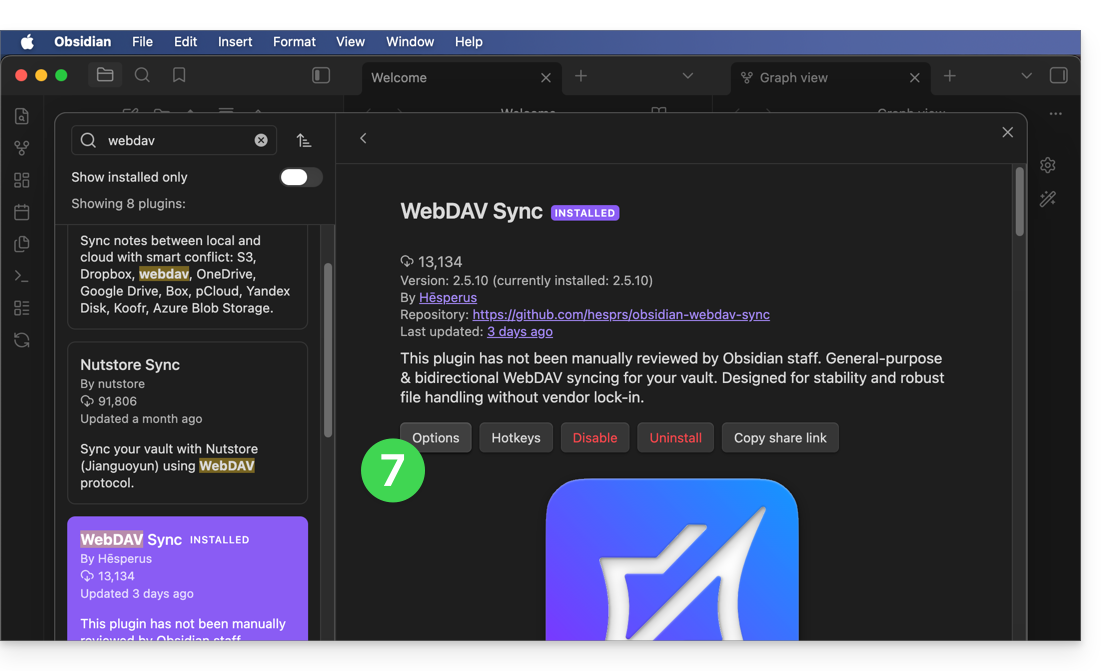
- Access the plugin settings to enter the WebDAV account parameters:
- Server address:
https://IDkDrive.connect.kdrive.infomaniak.com(❓: help), optionally followed by/folder-name(see introduction above). - Username: email address used to log in to your Infomaniak account.
- Password: create an application password (❓: help) for this specific use.
- Name of the personal folder on kDrive, for example
/obsidian/or /folder name/ (see introduction above).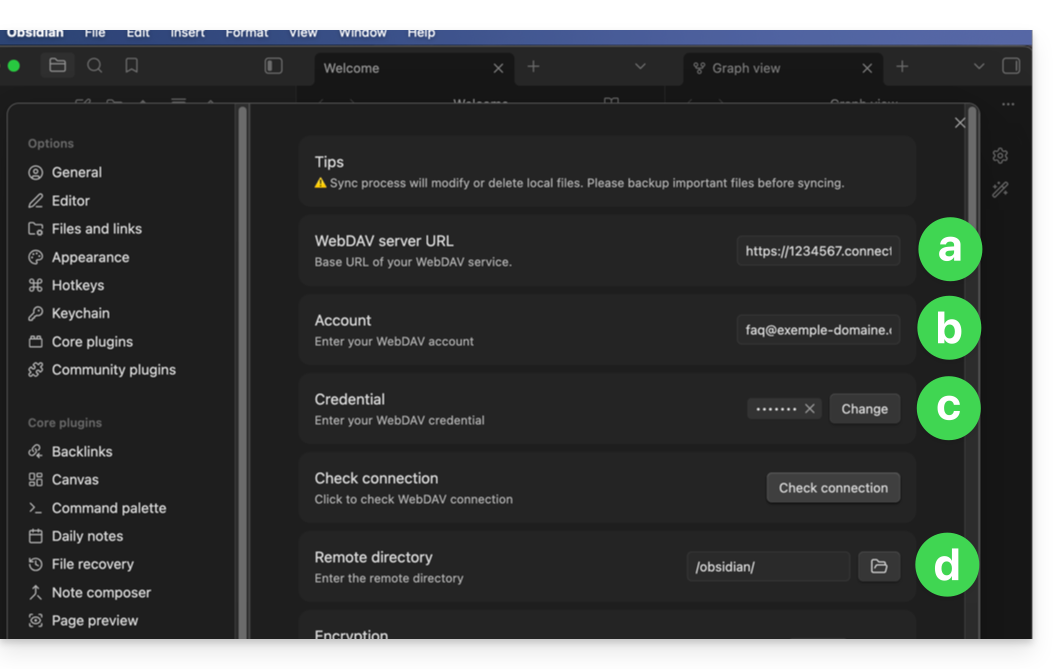
- Server address:
- Configure the plugin's behavior according to your preferences (synchronization on startup, scheduled, or in real time) and validate.
- Start a first synchronization test to validate proper communication with kDrive:
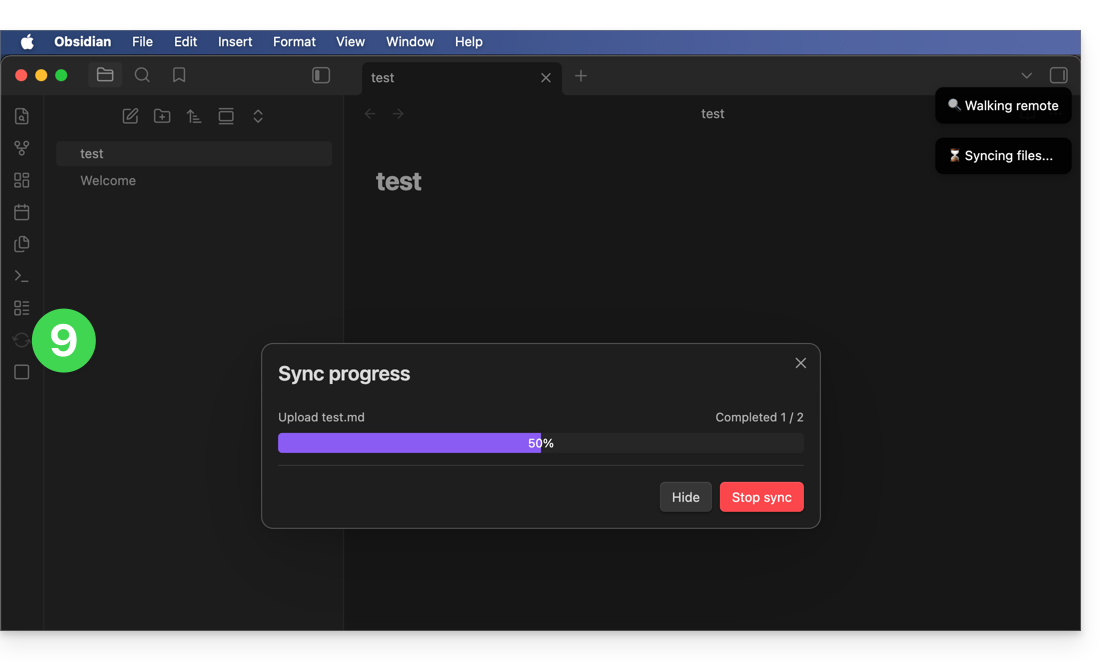
- Once the confirmation is validated, the synchronization will run in the background to protect the integrity of your notes:
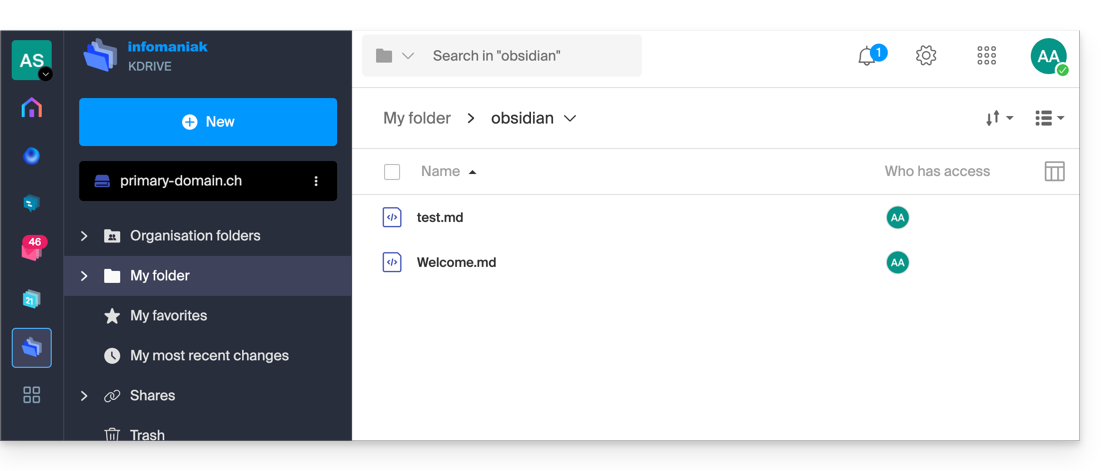
Link to this FAQ: https://faq.infomaniak.com/2910
Has this FAQ been helpful?
This guide explains how to download and use the Infomaniak kSync mobile app for Android devices (Samsung, Huawei, Google Pixel, etc.) which allows you to synchronize calendars and contacts between Android devices (with data stored with Infomaniak).
Introduction
- Once the kSync application is configured, the selected items are automatically synchronized with the Contacts and Calendar applications, which are installed by default on an Android device.
- You can choose to display or hide your various Infomaniak address books and calendars directly within these apps.
- Any modification (addition, editing, deletion) made on the phone is reflected in the Infomaniak interface, and vice versa.
- Data updates are performed continuously according to the configured synchronization interval.
- Refer to this other guide for an example of how to use kSync:synchronizing an Infomaniak calendar with a Google calendar.
Configure kSync
Prerequisites
- Download the Infomaniak kSync mobile app (application for Android smartphones or tablets) here:

- The kSync application is also available on F-droid.
- Install kSync.
Next, launch the kSync app on your Android device. A step-by-step assistant will help you configure the app according to your needs:
- Decide whether you want to synchronize tasks.
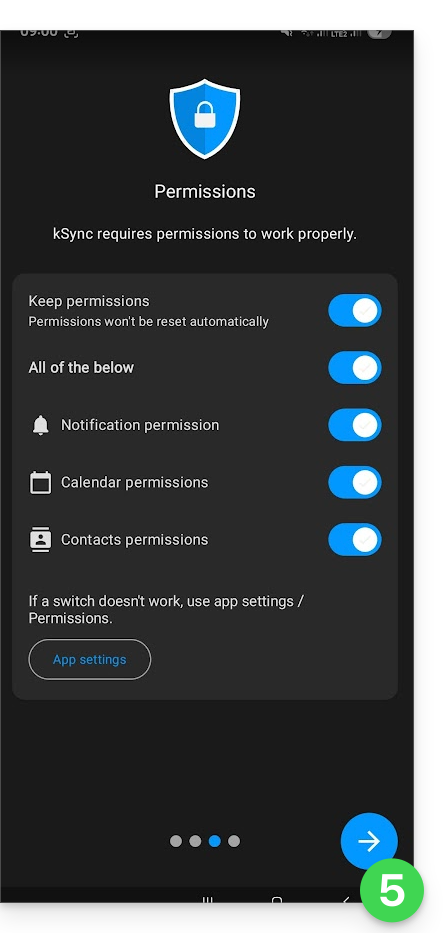
- Allow kSync to access the required items on the device, primarily the calendar.
- Allow the application to run in the background for better synchronization (uses more battery); settings can also be configured within the app itself:
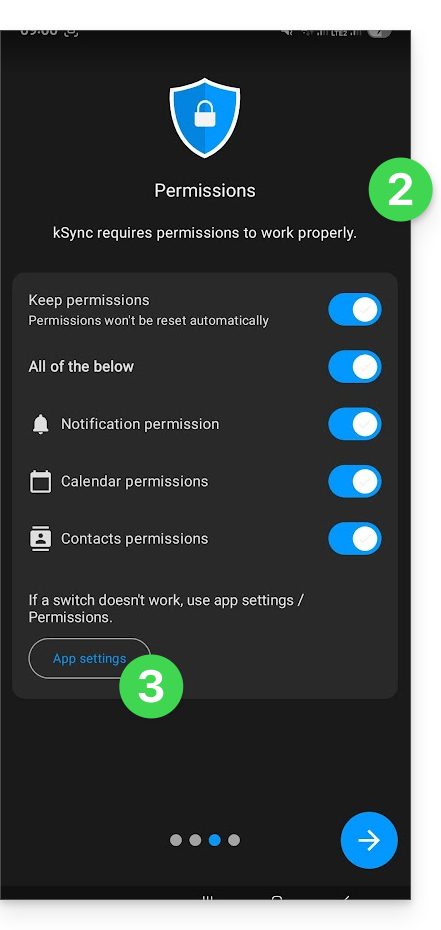
- The key is to grant access rights to the services you need to synchronize:
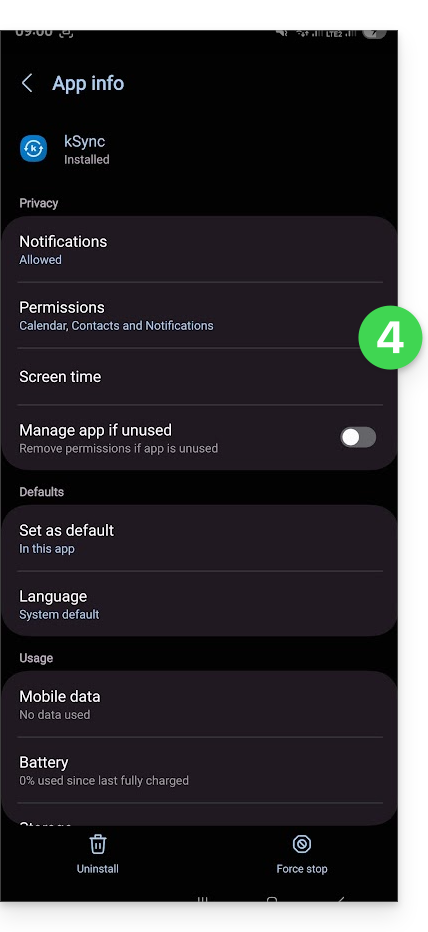
- Go back to the kSync app and continue the configuration:
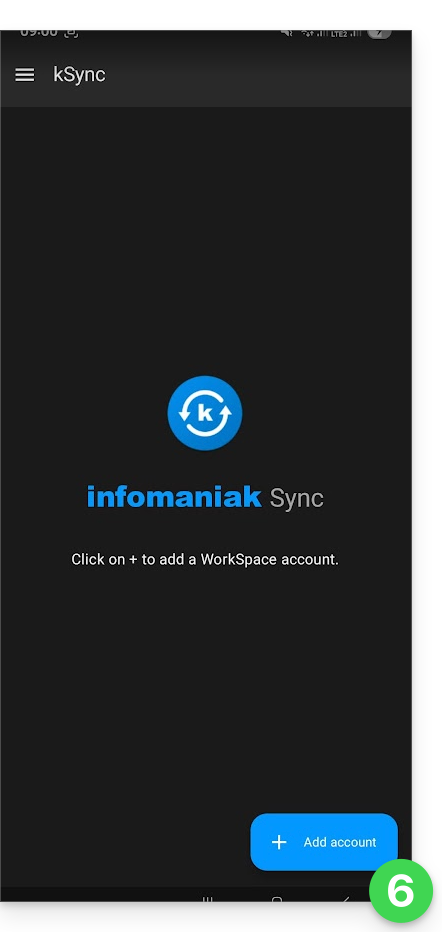
- Tap to add an Infomaniak user account (the one you use to log in to your Infomaniak services):
- For example, in the Calendar web app, the user menu in the top right corner shows the login email address.
- You can then access the calendars of the Organization to which the current user belongs:
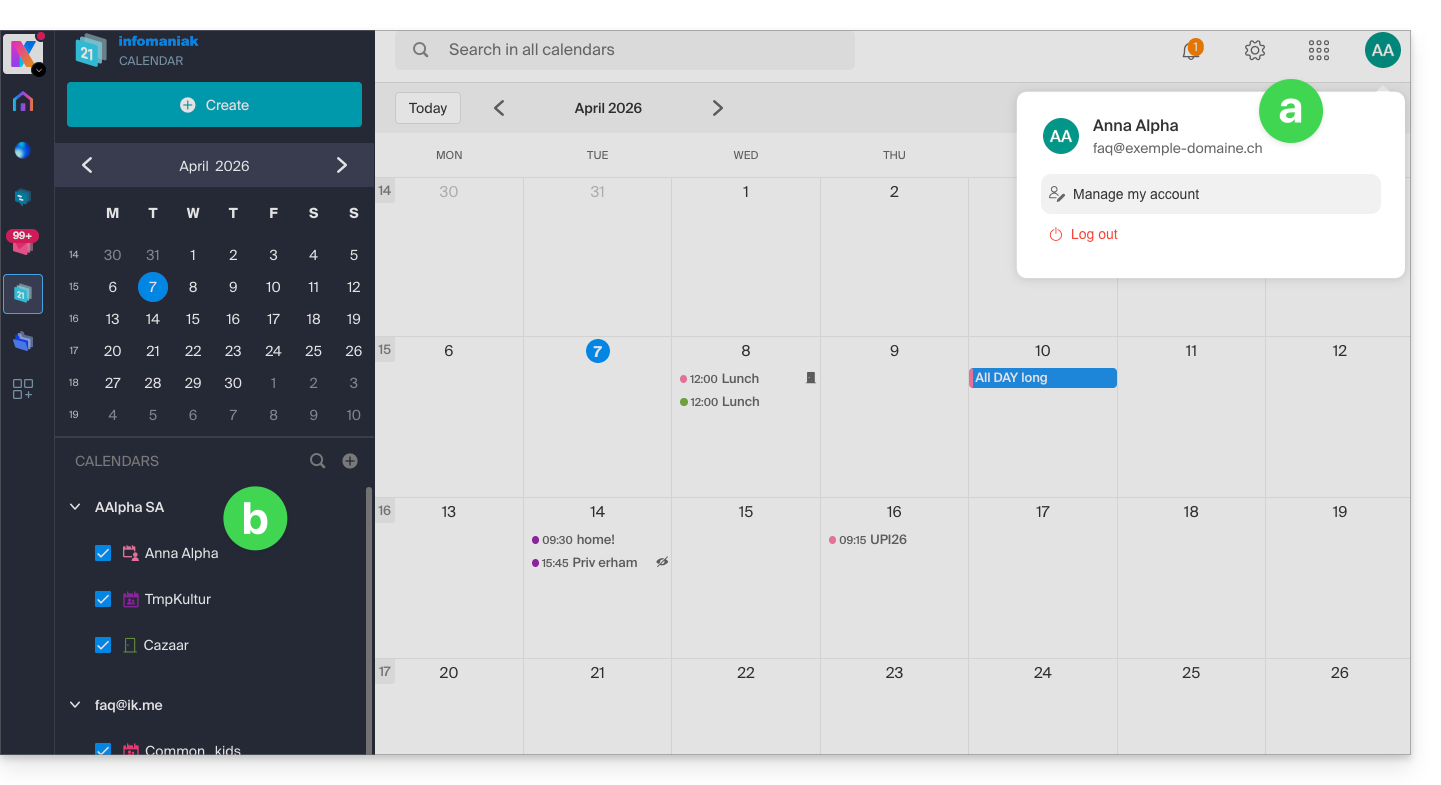
- This is the data that will be synchronized to your device when you log in to the same Infomaniak account on kSync…
- Enter your Infomaniak login credentials (see point a above).
- Tap the button to log in:
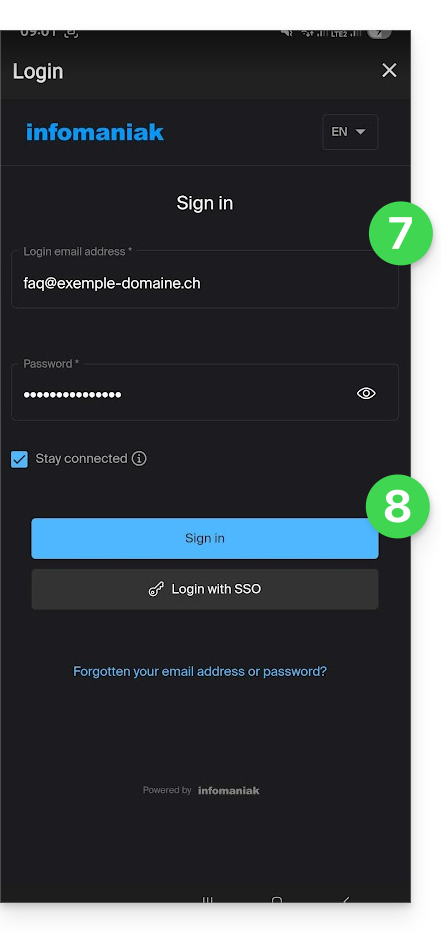
- Complete the two-factor authentication steps as you normally would when logging in.
- Once logged in to kSync, under the Calendars CalDAV tab, choose the calendar(s) that should be displayed on your device.
- Under the Address Books CardDAV tab, choose the address book(s) that should be displayed on your device.
- Start the synchronization using the button located in the bottom right corner:
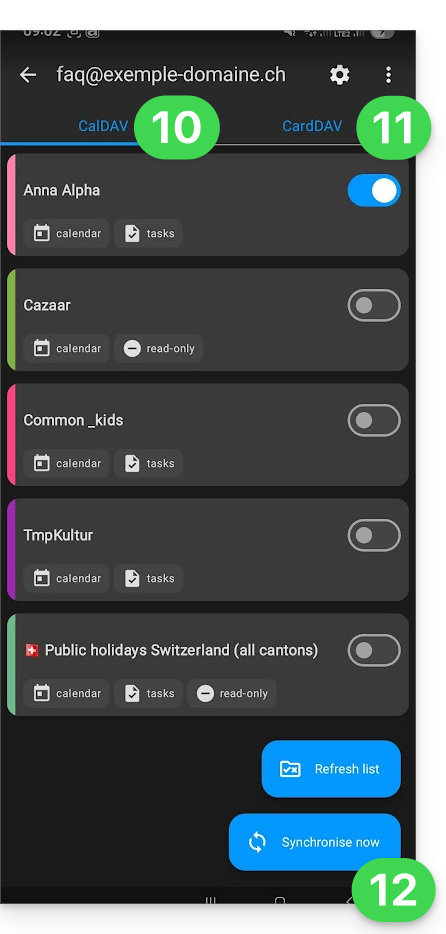
kSync synchronization settings
Click on Settings in the top right corner to adjust some important kSync settings:
- Synchronization interval: you can change the frequency of synchronizations (15, 30, 60 minutes, etc.) for each type of information (address books, calendars, tasks).
- Synchronization via Wi-Fi only (and if so, with which networks...).
- Limit the display of past events.
- Receive a notification for each event that does not have a specific reminder, with a notification delay defined in advance (in minutes).
- Display event colors and persistently synchronize the colors or not.
- Displaying contact groups.
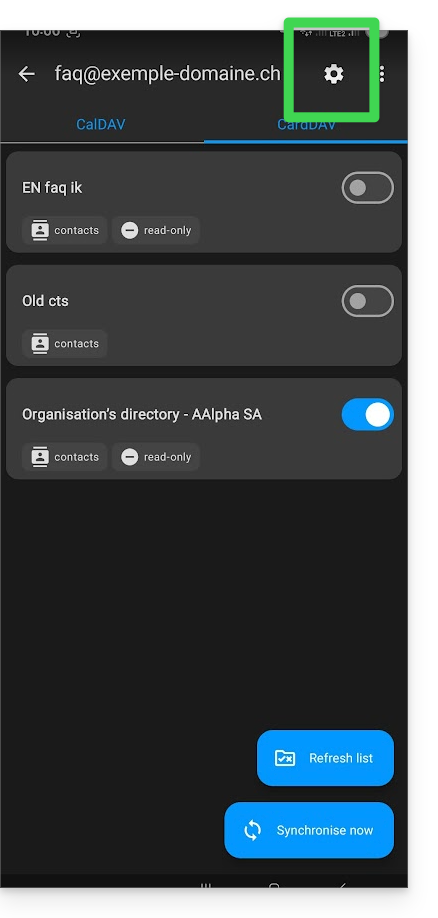
You can also tap on the address books or calendar to configure certain elements:
- It is possible to force read-only mode via kSync, which means that items are synchronized but cannot be modified by the device.
- You can also delete a calendar or address book (excluding the Organization's directory):
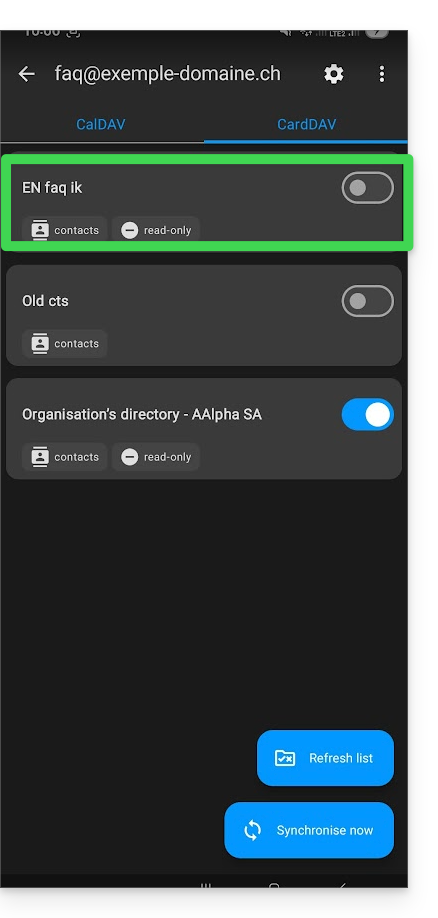
Rename/remove the Infomaniak account from kSync
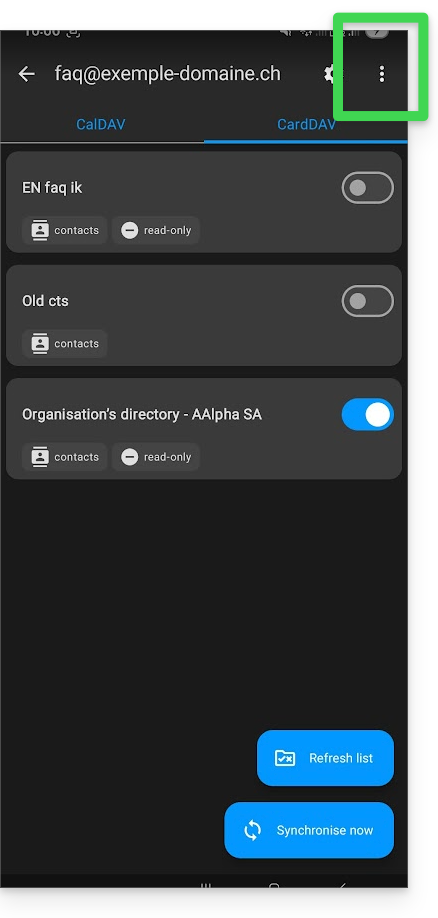
Tap the action menu ⋮ located to the right of the account in question:
- You can create a new address book or calendar.
- You can rename or delete the account linked to kSync:
General kSync app settings
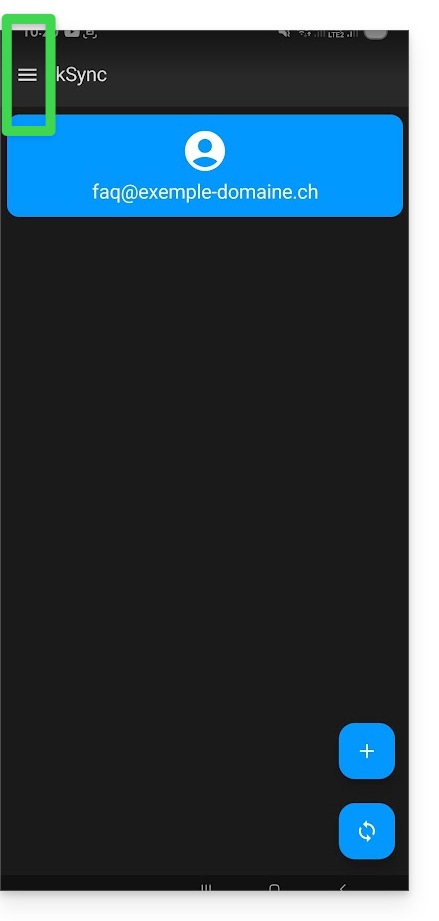
Tap the back arrow in the top left corner of the screen to return to the home page.
- Then, tap the menu button with three horizontal lines ☰ and then tap the “Settings” menu item:
Link to this FAQ: https://faq.infomaniak.com/2298
Has this FAQ been helpful?
This guide explains how to modify the display of your events (within the Infomaniak ticketing system).
Accessing the options to configure the display
To do this:
- Click here to access the management interface for your product in the Infomaniak Manager (need help?).
- Click directly on the name assigned to the ticketing system for the event.
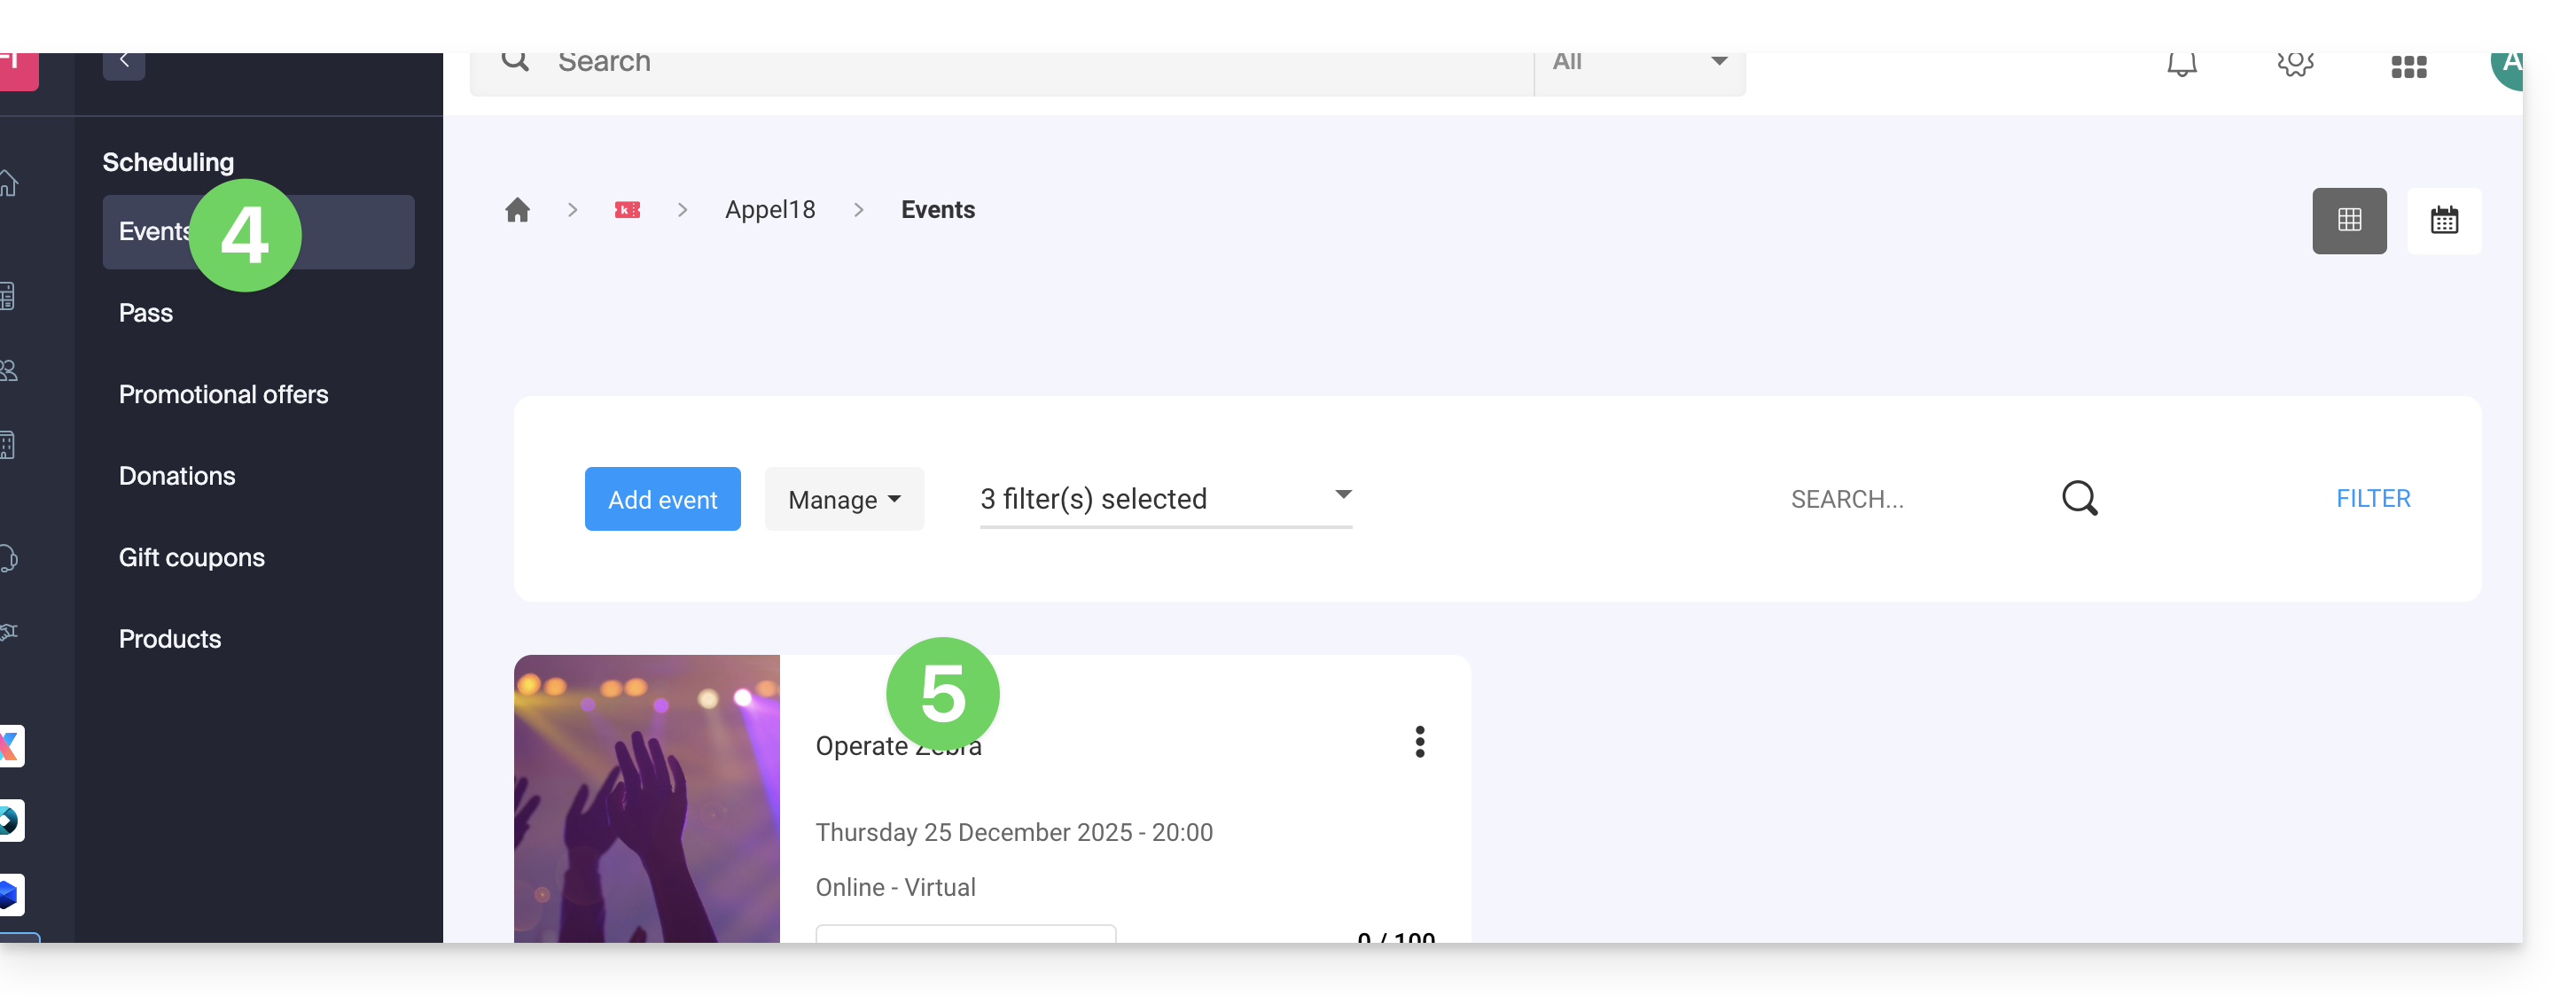
- Click on Schedule in the left-hand menu.
- Click on Events in the left-hand menu.
- Click on the name of the event in question:
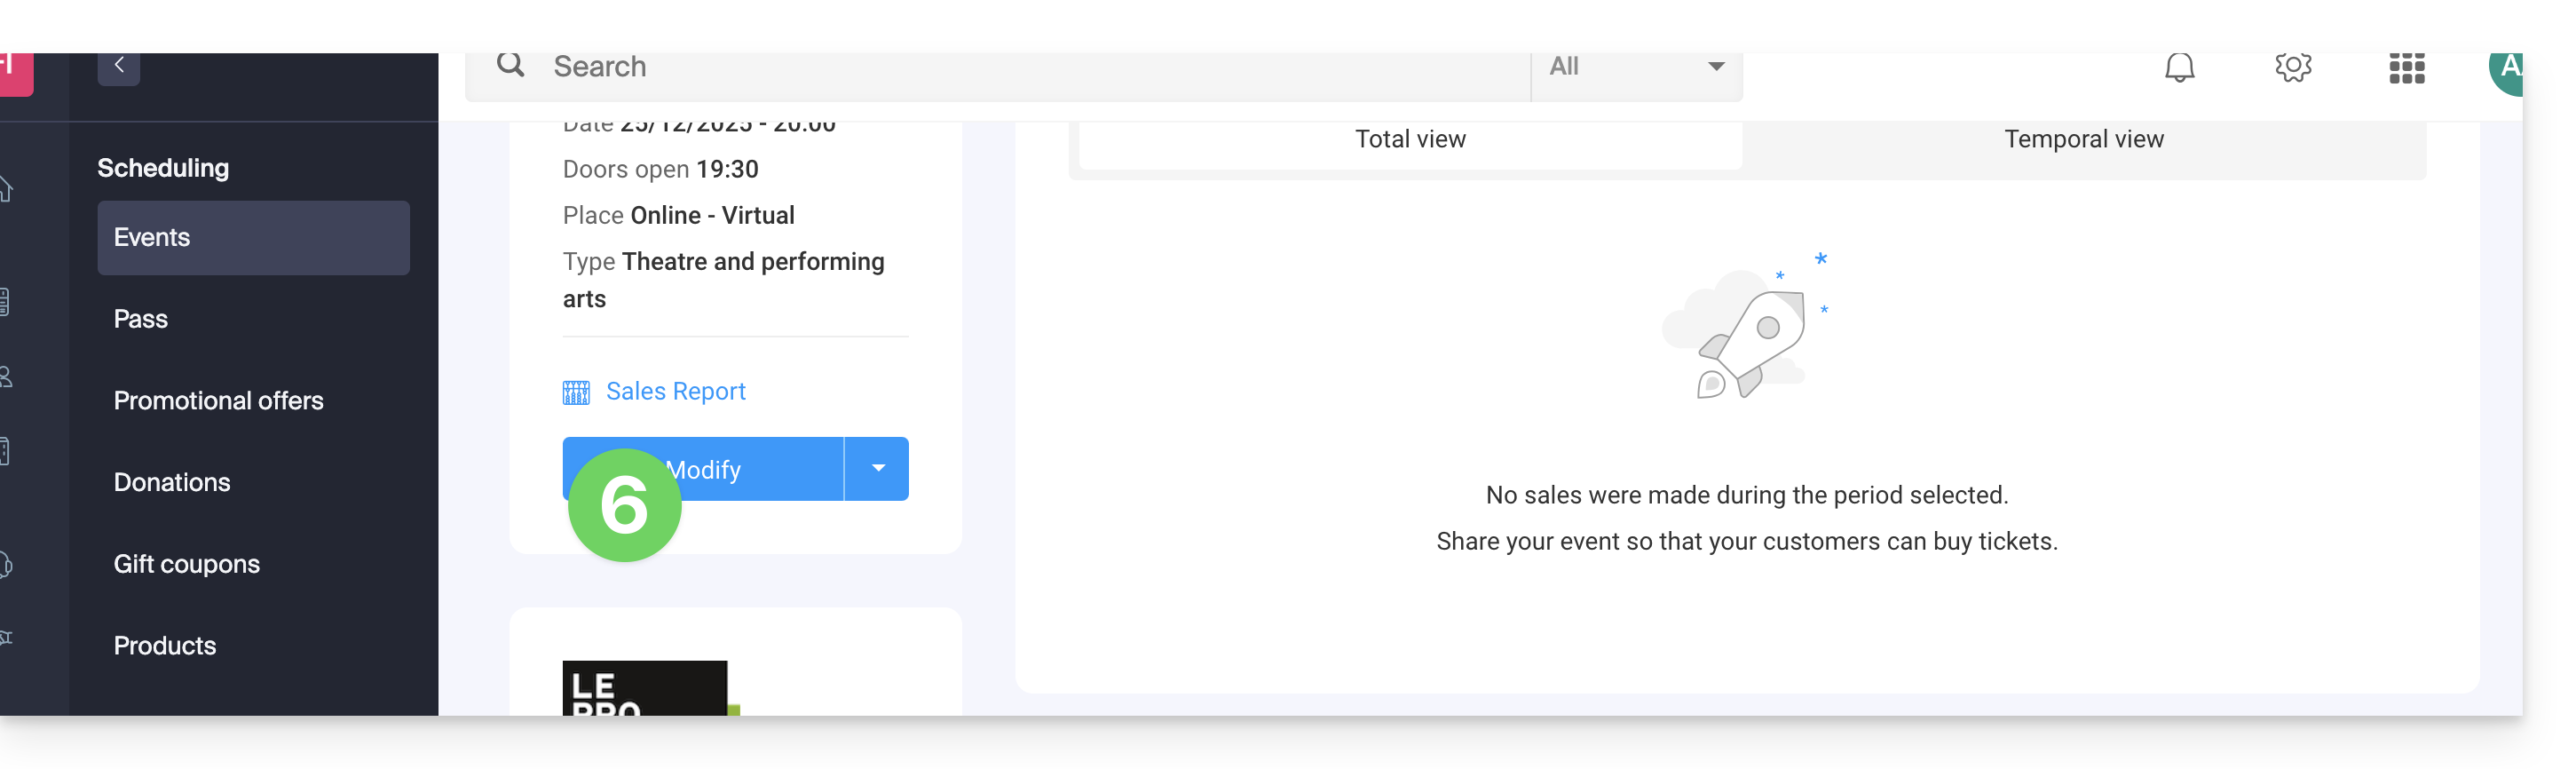
- Click on the Edit button:
Choose a display mode for multi-date events
To do this:
- Add any new possible dates…
- Choose the display methods for these dates on the calendar; these modes will be available on the online ticketing system and will allow your customers to switch between the different display modes they prefer (see below)…
- Choose which display mode will be used by default…
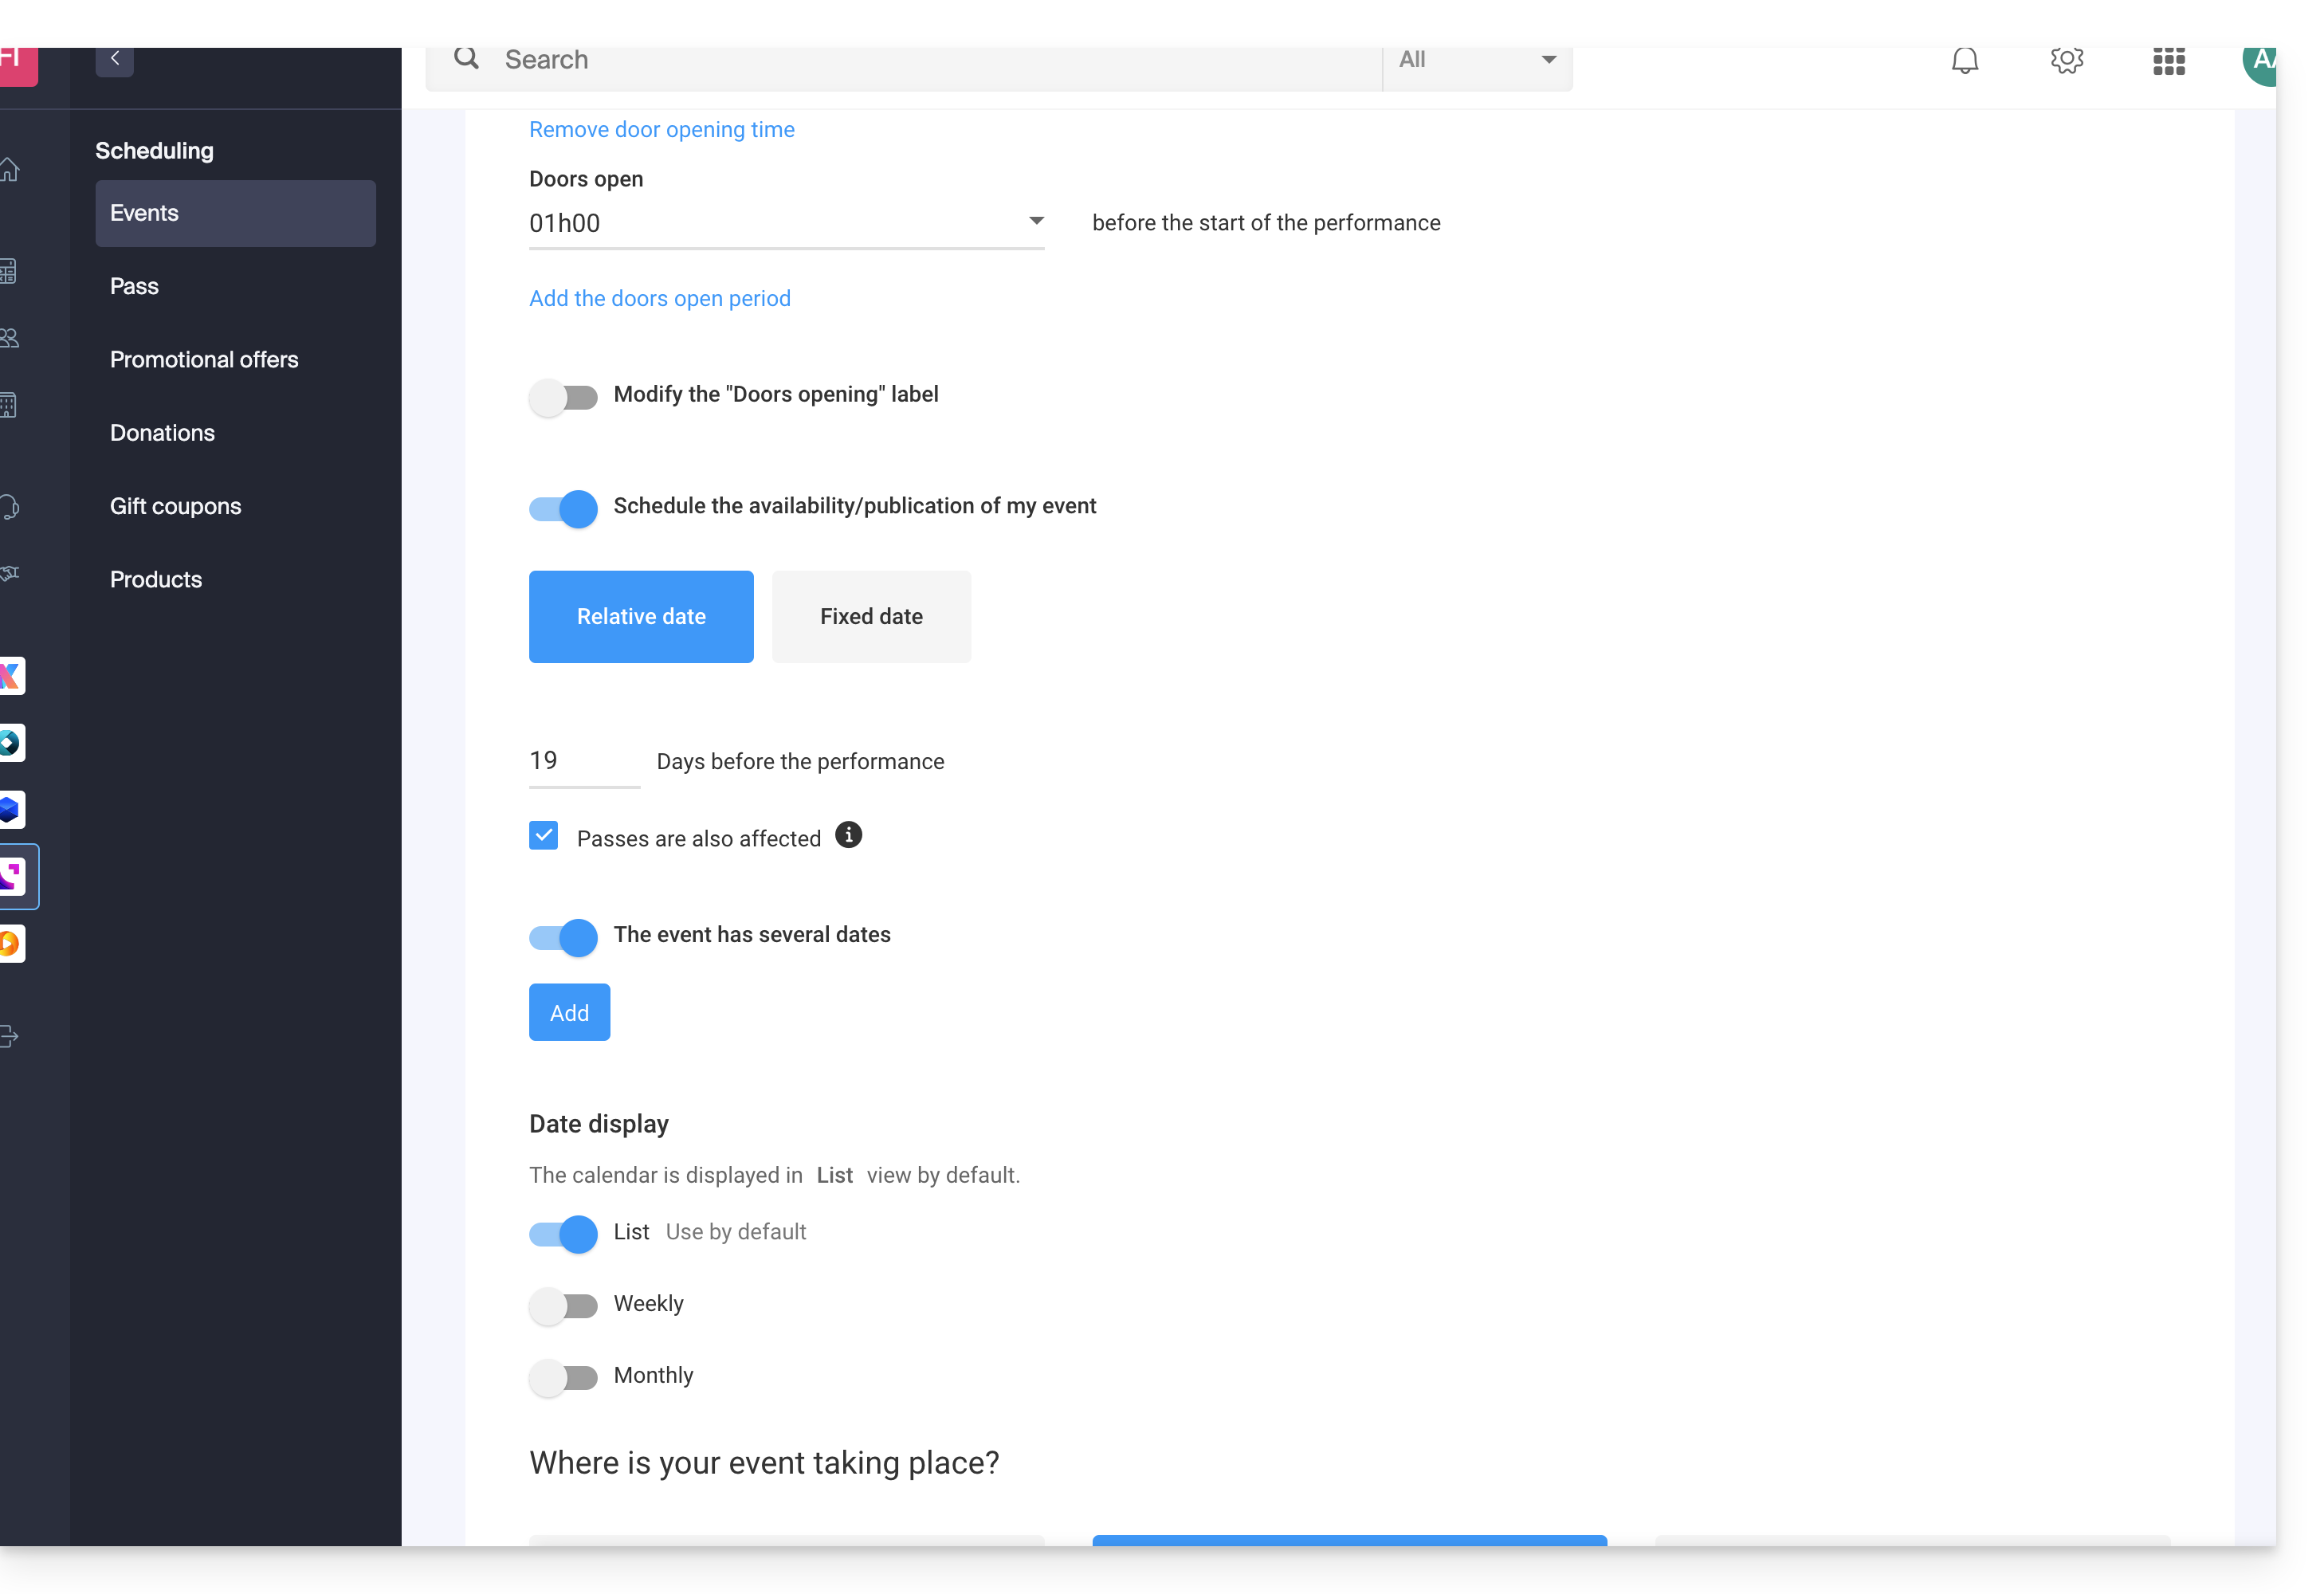
Available display options
List view
The list view is useful if the dates are spaced out over time with empty periods (e.g., weekly or monthly) and/or if the ticketing system needs to offer multiple dates or sessions without displaying them on a calendar.
The monthly calendar
The monthly calendar view allows you to display events on a monthly calendar. This is an effective display, but it can become very cluttered if there are many sessions per day.
The weekly calendar
Very useful if you want to display the dates by week, especially if there are several events per day, or in the case where the event only lasts for a short period, and you want to display the days of the week.
Link to this FAQ: https://faq.infomaniak.com/2696
Has this FAQ been helpful?
This guide details how to manually back up data using the command line interface (CLI) via the S3 Compatible protocol on Swiss Backup, the backup solution in a Swiss independent cloud.
Using an S3 location in the CLI
Prerequisites
- Have an Infomaniak Swiss Backup space with an available device quota (minimum 1) for a Cloud backup.
- Add 1 device of type Cloud to obtain the S3 Compatible settings.
- Use an application of type
Terminal(command-line interface,CLI / Command Line Interface) on your device.
Using a Terminal-type application (command-line interface, CLI) on your device:
Install
s3cmd, for example on Debian/Ubuntu:sudo apt install s3cmdor on macOS (with Homebrew):
brew install s3cmdand for Windows, it is recommended to use S3Express, an open-source command-line tool (need help?).
Enter the following command to configure the connection:
s3cmd --configure- Fill in the fields according to the information specific to your device (refer to this other guide):
Display name= choose a name for the storage.AccessKeyandSecretKey= the access keys generated from the email received from Infomaniak after creating the storage space.Service point= for example https://s3.swiss-backup02.infomaniak.com (1)Bucket name= defaultDefault regionS3 Endpoint: use the URL provided by InfomaniakUse HTTPS: yesHTTP Proxy server: leave blank unless a specific configuration is requiredSignature version: force the use of v4Path style: choose Yes if prompted- Test access: you can perform the test to validate the configuration
(1) The indication "//s3.swiss-backup02", "//s3.swiss-backup03" etc. changes depending on the cluster number indicated in the Manager under Cloud storage information in the "Location" section; and if your Swiss Backup device was created before October 2020, you will need to use https://swiss-backup.infomaniak.com/identity/v3.
Once completed, a configuration file will be saved (by default in ~/.s3cfg).
Start a copy to Swiss Backup
Here are some basic commands for interacting with Swiss Backup:
- List the buckets:
s3cmd ls - List the contents of a bucket:
s3cmd ls s3://bucket-name - Send a file:
s3cmd put example.txt s3://bucket-name/ - Download a file:
s3cmd get s3://bucket-name/example.txt - Synchronize a local directory to a bucket:
s3cmd sync /path/local/ s3://bucket-name/
In case of problems
Following an update to the AWS CLI (Amazon Web Services Command Line Interface) tool, you may encounter an error when attempting to connect to or transfer data to a Swiss Backup S3 location:
Transferring payloads in multiple chunks using aws-chunked is not supported
This error is related to a transfer method used by AWS CLI (aws-chunked), which is not compatible with the Swiss Backup service.
Unfortunately, Infomaniak has no way to address this incompatibility, as it is related to the internal operation of the AWS CLI client, developed by Amazon.
To continue using Swiss Backup effectively via the command line, Infomaniak recommends using the open-source tool s3cmd, as described above in this guide, which is fully compatible with S3 locations.
Link to this FAQ: https://faq.infomaniak.com/1579
Has this FAQ been helpful?
This guide explains why some attachments sent from Microsoft Outlook arrive in winmail.dat format at your email address hosted by Infomaniak, and how to permanently resolve the problem on the sender's side (where it is created).
Introduction
winmail.datis the container used by Outlook/Exchange when a message is sent in RTF/TNEF format.- It encapsulates the formatting and attachments.
- Many non-Microsoft software/email clients cannot interpret TNEF:
- the formatting disappears, and the attachments become a single
winmail.datfile.
- the formatting disappears, and the attachments become a single
Important: the generation of a winmail.dat file does not depend on Infomaniak; the issue originates with the sender (Outlook/Exchange) and must be resolved on their computer or by their Microsoft 365 administrator.
Resolving the issue (actions to request from the sender)
The most effective solution is to have the sender modify their Outlook configuration.
Disable RTF/TNEF and resend the message in HTML or plain text
- Classic Outlook for Windows (Microsoft 365/2021/2019, Win32 application)
Menu:File > Options > Mail
Composition:Compose messages in the following format:choose HTML (or Plain Text).
Message format: inWhen sending rich text messages to Internet recipients, select Convert to HTML (or Convert to plain text).
On a case-by-case basis (single email): in the message window,Format Texttab > choose HTML.
- New Outlook for Windows (application based on Outlook on the web)
Menu:Settings (gear icon) > Mail > Compose and reply
Message format:Compose messages in:choose HTML (or Plain text).
This client does not offer an RTF option; sending in HTML/text avoidswinmail.dat.
- Outlook on the web (Exchange Online/Outlook.com)
Menu:Settings > Mail > Compose and reply > Message format> choose HTML (or Plain text).
- Outlook for Mac
Menu:Outlook > Preferences > Writing> check/uncheck Write messages in HTML by default.
For a single message: in the writing window, Options tab > toggle HTML or Plain Text.
Note: if the sender has attached files, they will be readable by all recipients as long as the message is sent in HTML/text. Zipping the attachments (.zip) does not prevent Outlook from encapsulating the message if RTF/TNEF is still active.
Disable RTF for specific recipients (e.g., yourself)
- Classic Windows Outlook: open the Contact card > double-click the email address > Outlook Properties > Internet format: select Send in plain text only (or Let Outlook decide if the administrator is already forcing the conversion).
- Clear the auto-complete (it may “memorize” RTF for a recipient):
File > Options > Mail > Send messages > Clear the auto-complete list, then retype the address manually the next time you send a message.
- Microsoft 365 administrators (on the sender's side): in the Exchange Admin Center:
Mail flow > Remote domains > Default> Rich Text Format: choose Never. In PowerShell:Set-RemoteDomain Default -TNEFEnabled $false.
If this doesn't work: use another email client to send the invitation (e.g. Thunderbird), or check that calendar invitations are sent in iCalendar format (File > Options > Calendar > enable Use the iCalendar format for external recipients).
If you do not wish to contact the sender again
You can extract the content of winmail.dat using TNEF decoding tools (online or desktop applications). Search for “open winmail.dat” and choose a reputable tool for your system (Windows, macOS, Linux). This usually restores the attachments, but it is not a permanent solution. Furthermore, confidentiality and security are in no way guaranteed during these operations.
Link to this FAQ: https://faq.infomaniak.com/460
Has this FAQ been helpful?
This guide explains how to schedule an online meeting with kMeet, Infomaniak's ethical and free video conferencing solution.
Introduction
- To learn more about creating and using virtual meeting rooms, please refer to this other guide.
- You can also simply add a kMeet link to any event created in your Infomaniak calendar: please refer to this other guide.
Schedule a virtual meeting
To do this:
- Click here to access kMeet in your Infomaniak kSuite (or launch the mobile/desktop app — ❓: help).
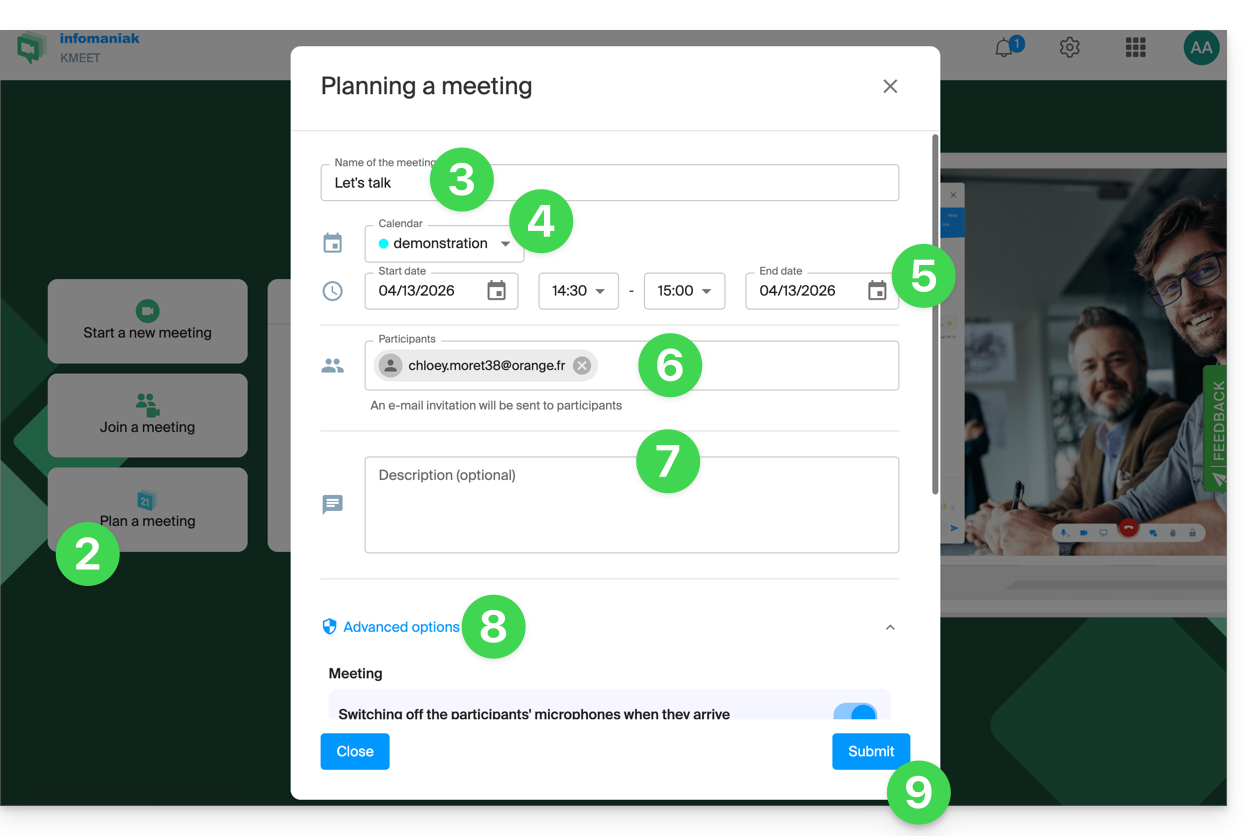
- Click to schedule a new meeting.
- Enter a name for your meeting room.
- Choose the calendar that will contain the details of your scheduled event.
- Choose the date and time for the meeting (timeslots are in 15-minute intervals).
- Specify the email addresses of the participants.
- Specify a description for the meeting.
- Enable any advanced options:
- Click the button to save the scheduled event:
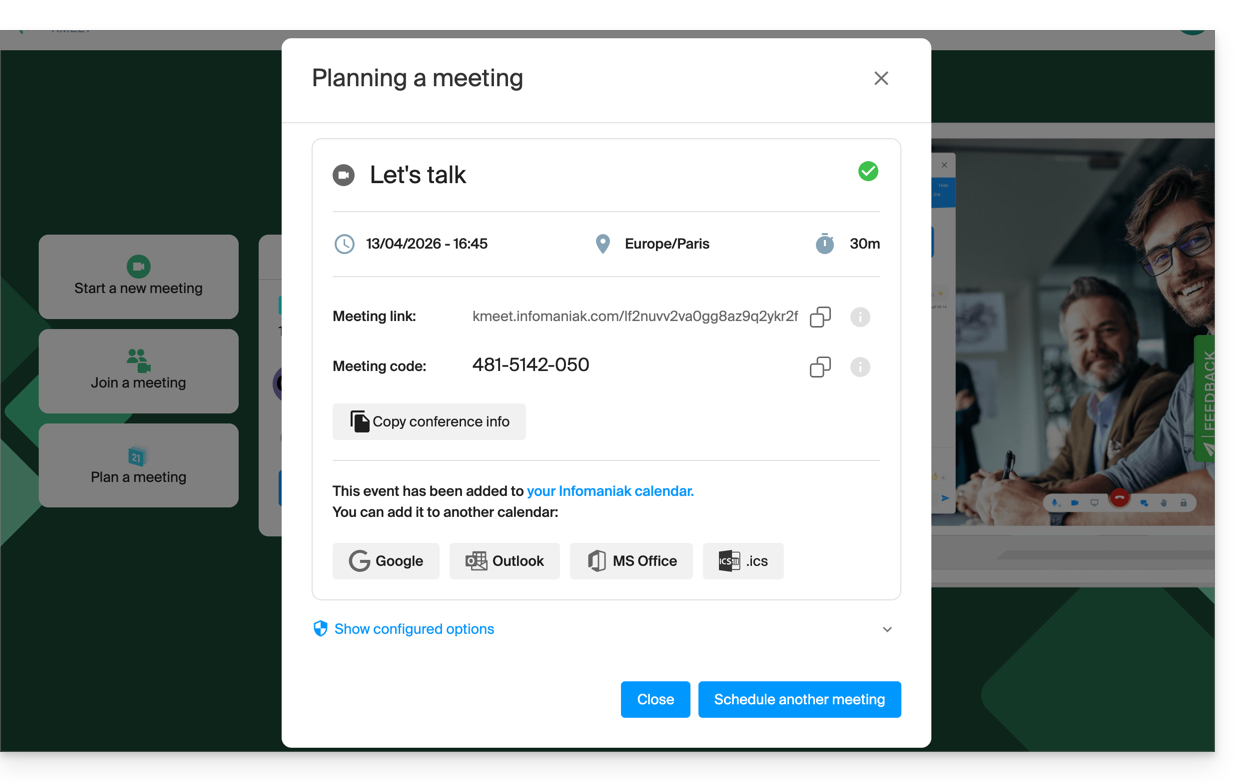
- The event is added to the selected calendar, but you can also add it to other calendar types. The summary displayed also allows you to review the configured options:
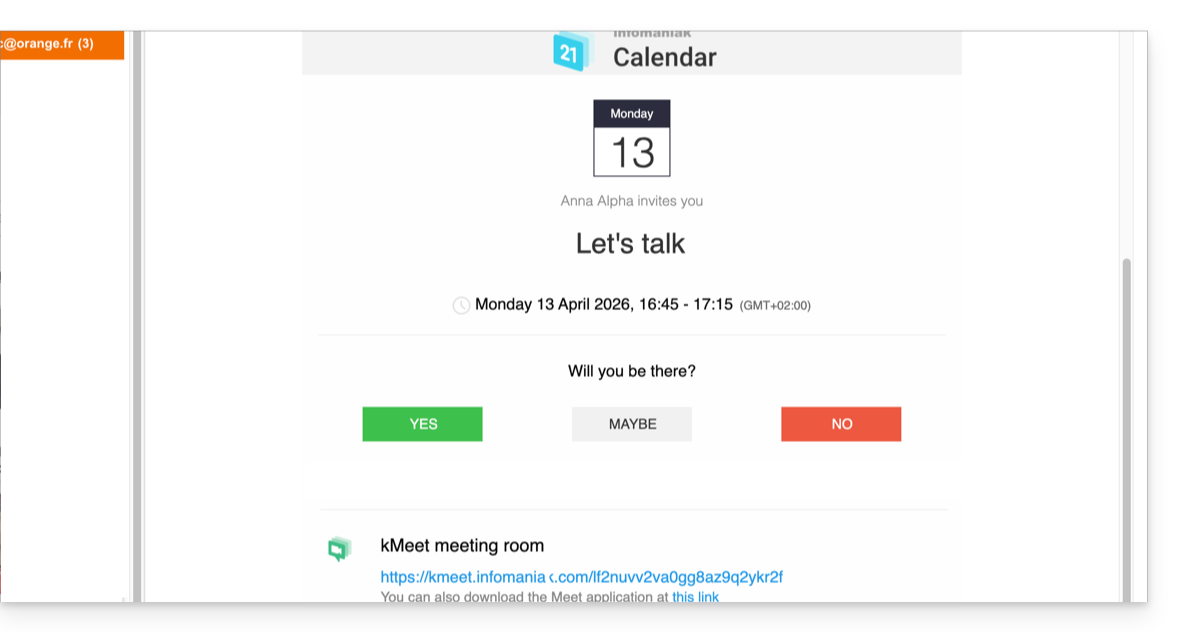
- Meanwhile, invitations are sent to the participants:
Link to this FAQ: https://faq.infomaniak.com/2897
Has this FAQ been helpful?
This guide explains how to automatically receive a summary of your activities recorded in Infomaniak Calendar in your Mail inbox and/or kChat every morning.
Introduction
- This feature is disabled by default on all calendars.
- This summary is sent to your email address, which is the one you use to log in to your Infomaniak account (❓: help).
- It contains a list of all the day's events with their most important information (possible kMeet link, location, times, etc.).
- You can even share this daily schedule with your team or assistant so they know when it's best to contact you, including by creating an rule for automatic forwarding based on the criteria corresponding to the email received.
Obtain a schedule automatically and daily
Prerequisites
- To send a summary on kChat, you must have kChat within your Organization.
Start your day by viewing a message in your Infomaniak inbox containing the schedule based on your Infomaniak calendar:
- Click here to access the Settings Calendar in your Infomaniak kSuite (❓: help).
- Check or select the relevant Organization from the dropdown menu in the left-hand menu.
- If you change it, return to the settings by clicking on the daily reminder item to access the settings:
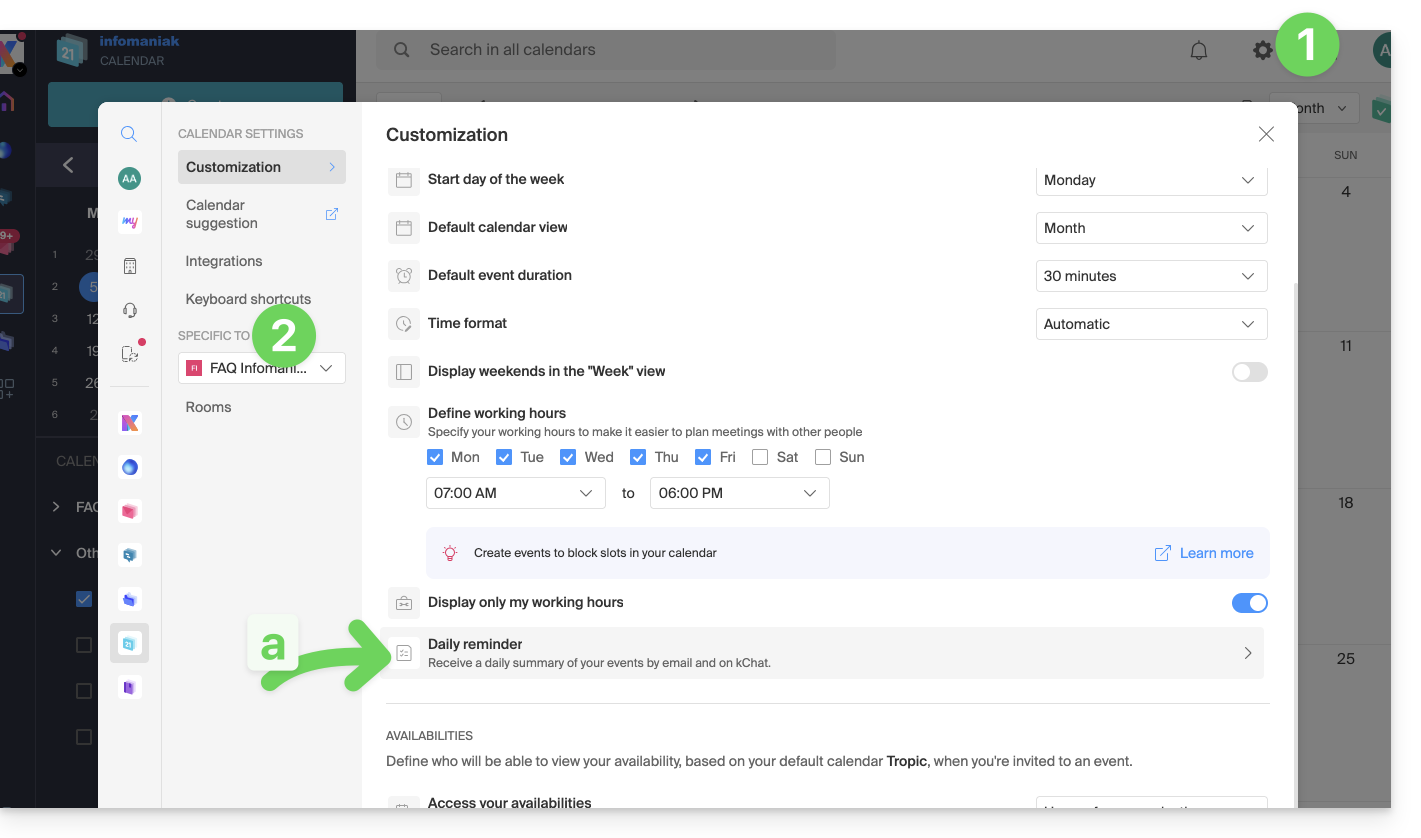
- If you change it, return to the settings by clicking on the daily reminder item to access the settings:
- Click the button to Add a daily reminder and configure it:
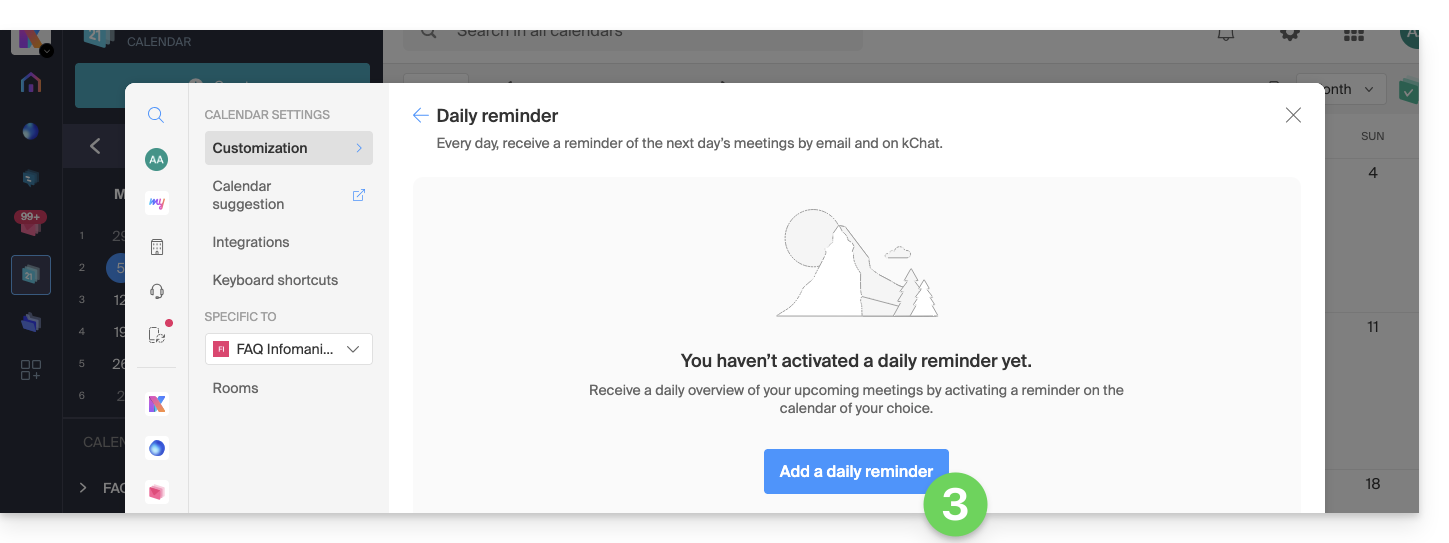
To customize your reminder according to your needs:
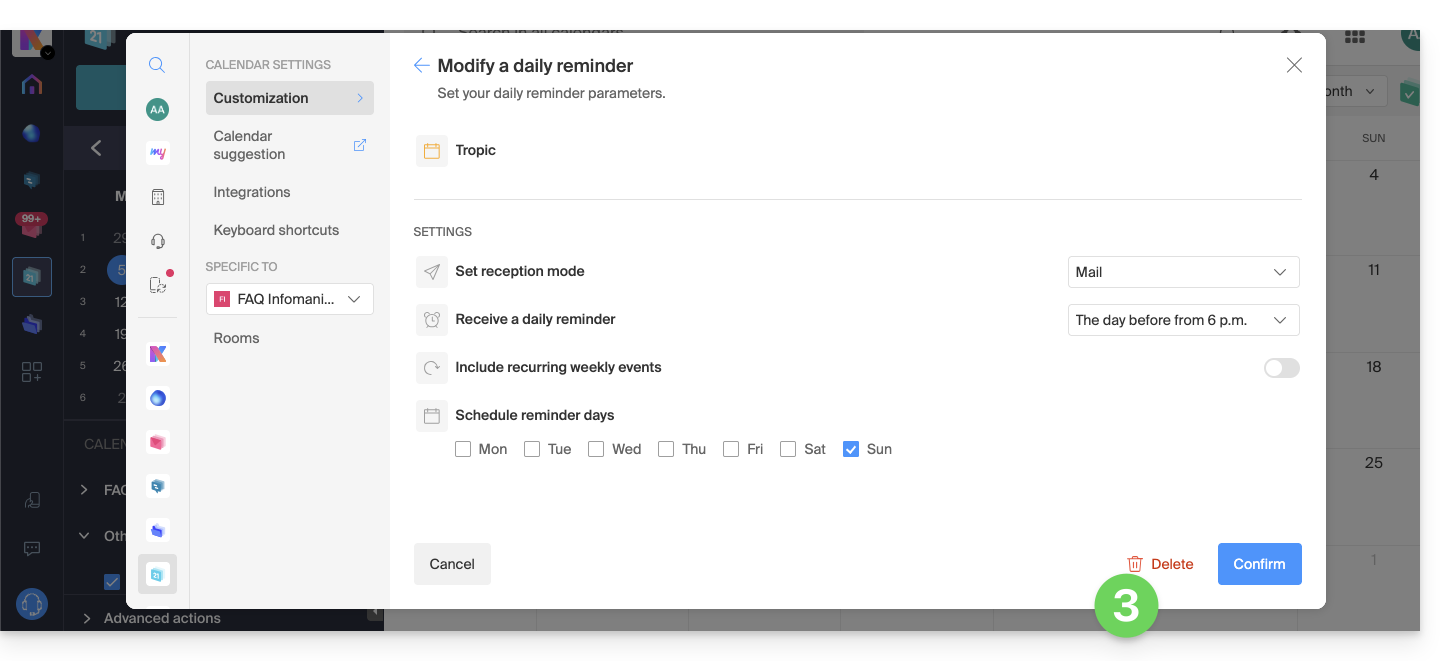
- Select the calendar in question.
- Choose the notification method (Mail, kChat, or both).
- Choose when you want to receive the reminder (the evening before or early on the day itself).
- Choose whether or not to include recurring events (❓: help).
- Choose the days during which the daily reminder will be sent.
- Confirm your choices at the bottom of the page:
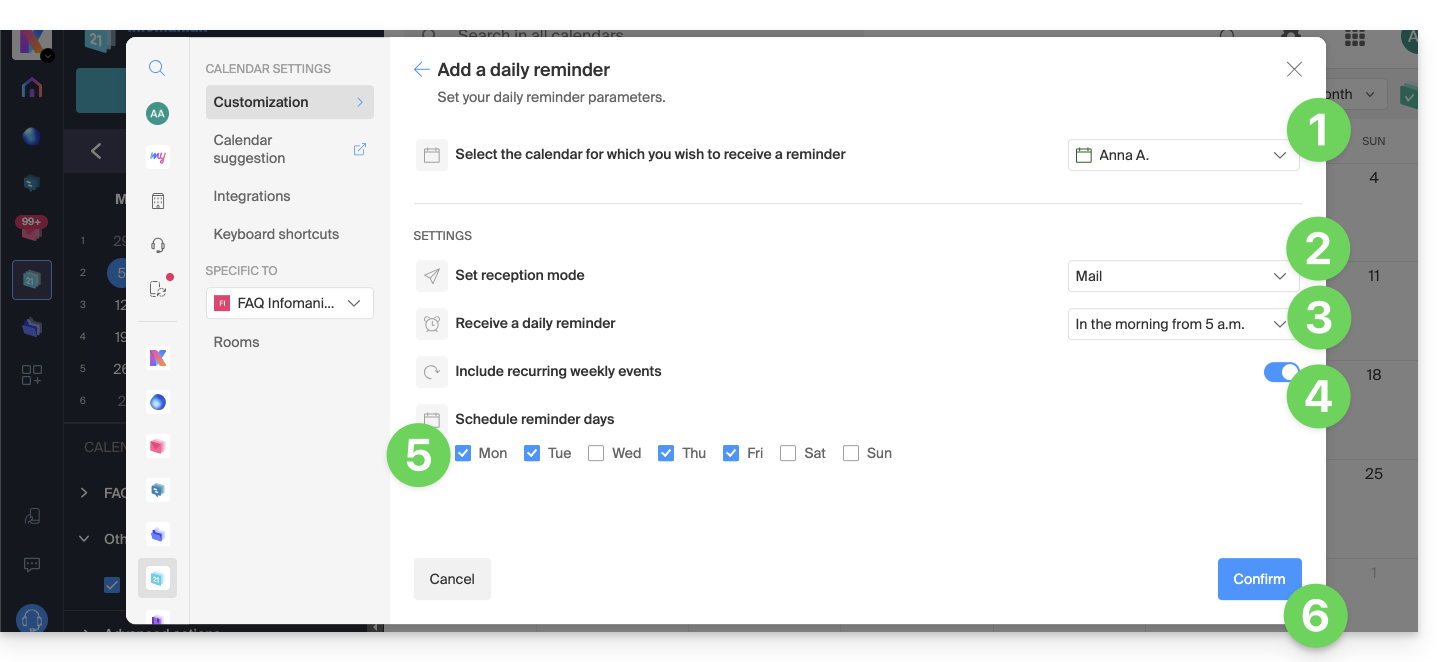
Disable the daily reminder
To stop receiving the daily summary by email or via Euria on kChat:
- Click on the link located at the very bottom of the notification you received:
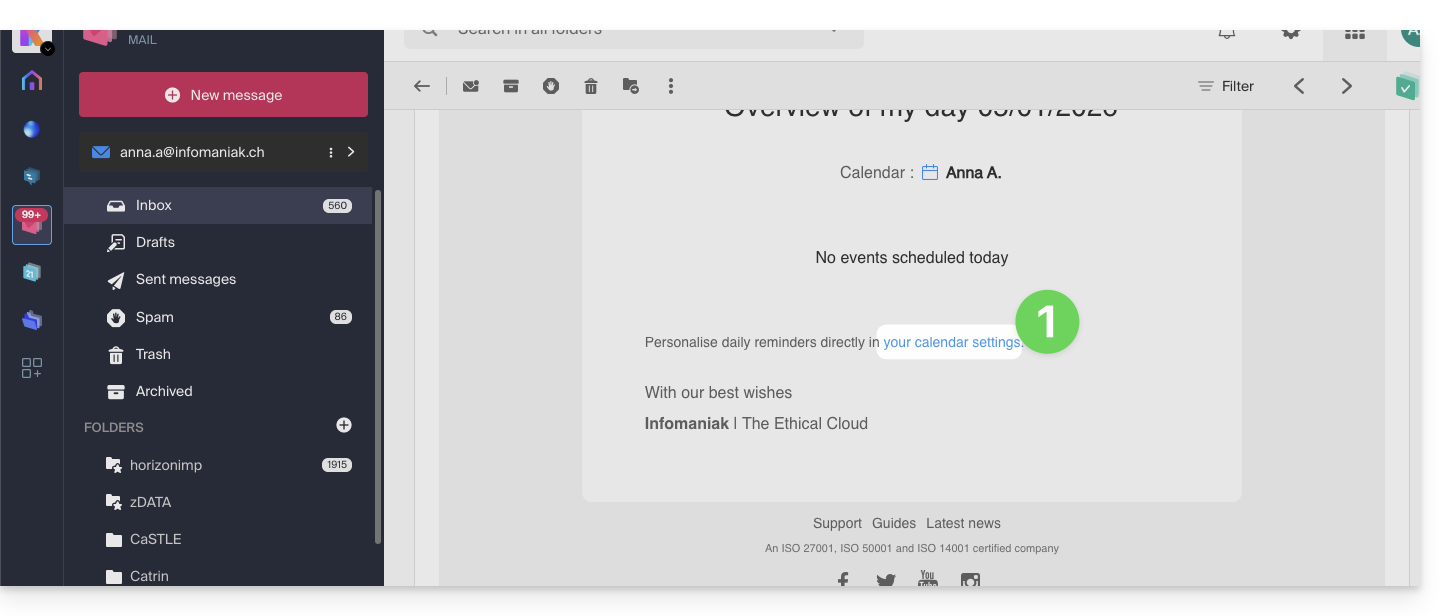
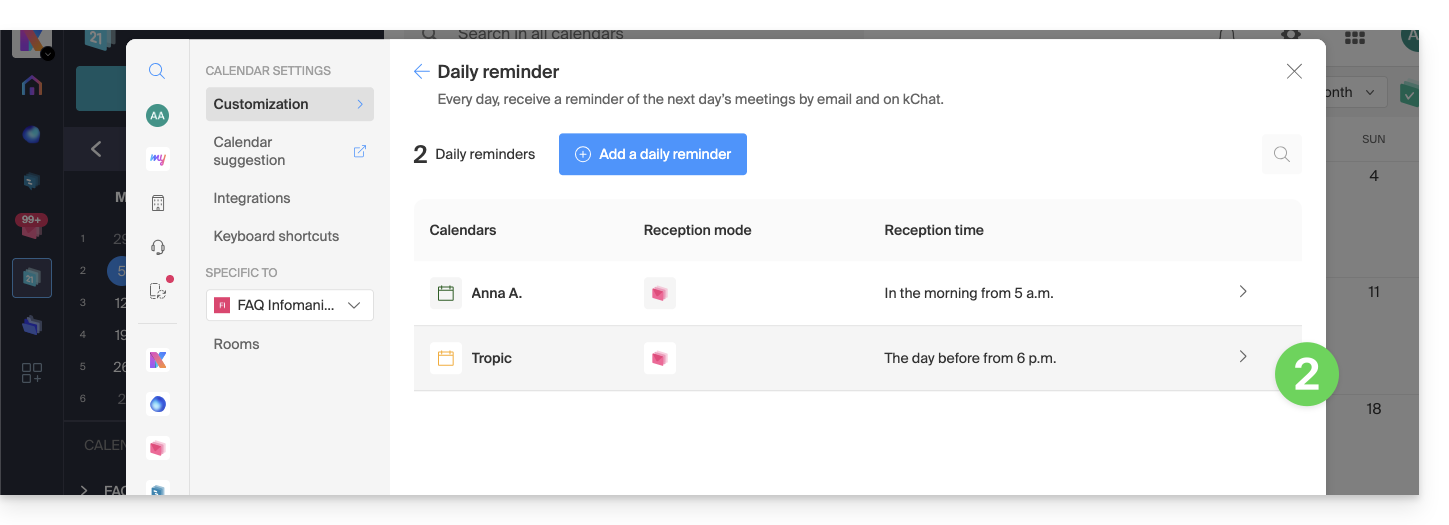
- Click on the reminder to delete it:
- Delete the reminder from the edit page:
Link to this FAQ: https://faq.infomaniak.com/1622
Has this FAQ been helpful?
This guide explains how to quickly schedule an event, such as a meeting between several users, from the Infomaniak Mail web app (online service ksuite.infomaniak.com/mail) using the features of Infomaniak Calendar.
Create an event with the email recipient(s)
To start the scheduling assistant, which will allow you to quickly create an event with the participants (senders/recipients) of the email you are currently viewing:
- Click here to access your emails on your Infomaniak kSuite (❓: help).
- Open the message from the sender (or the conversation between multiple participants) with whom you want to organize a meeting/event.
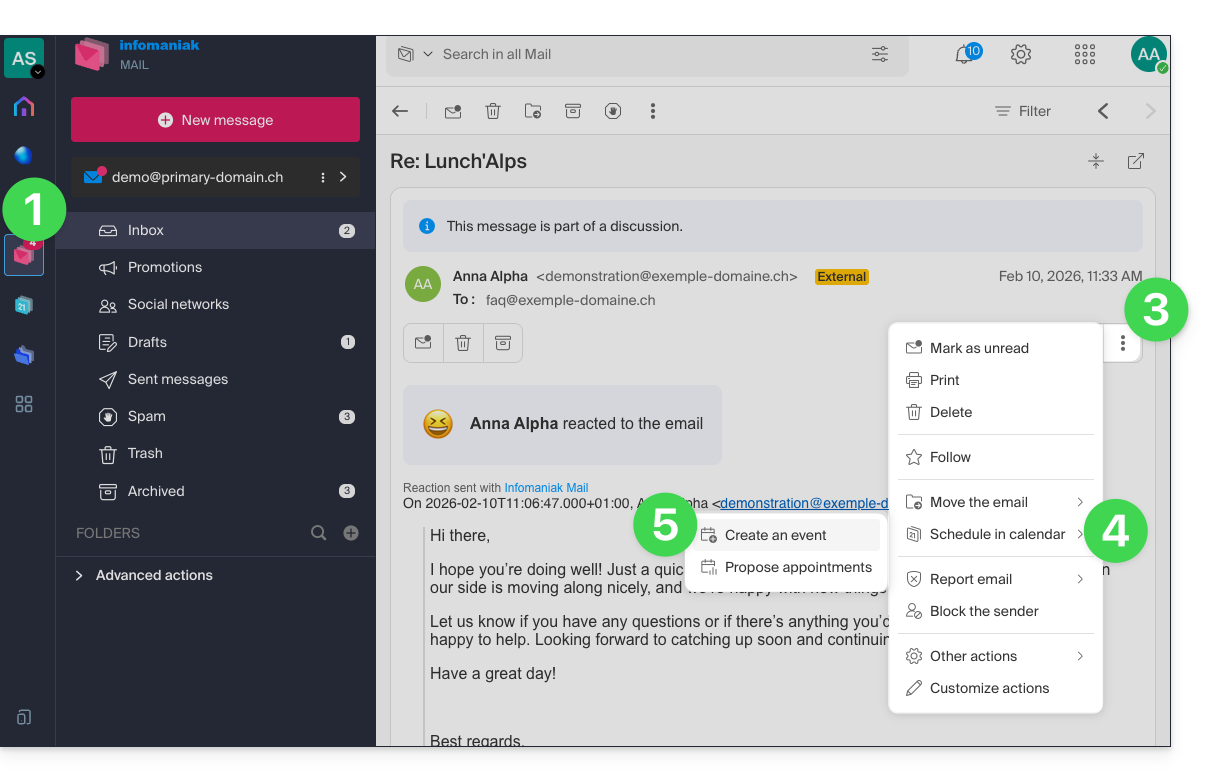
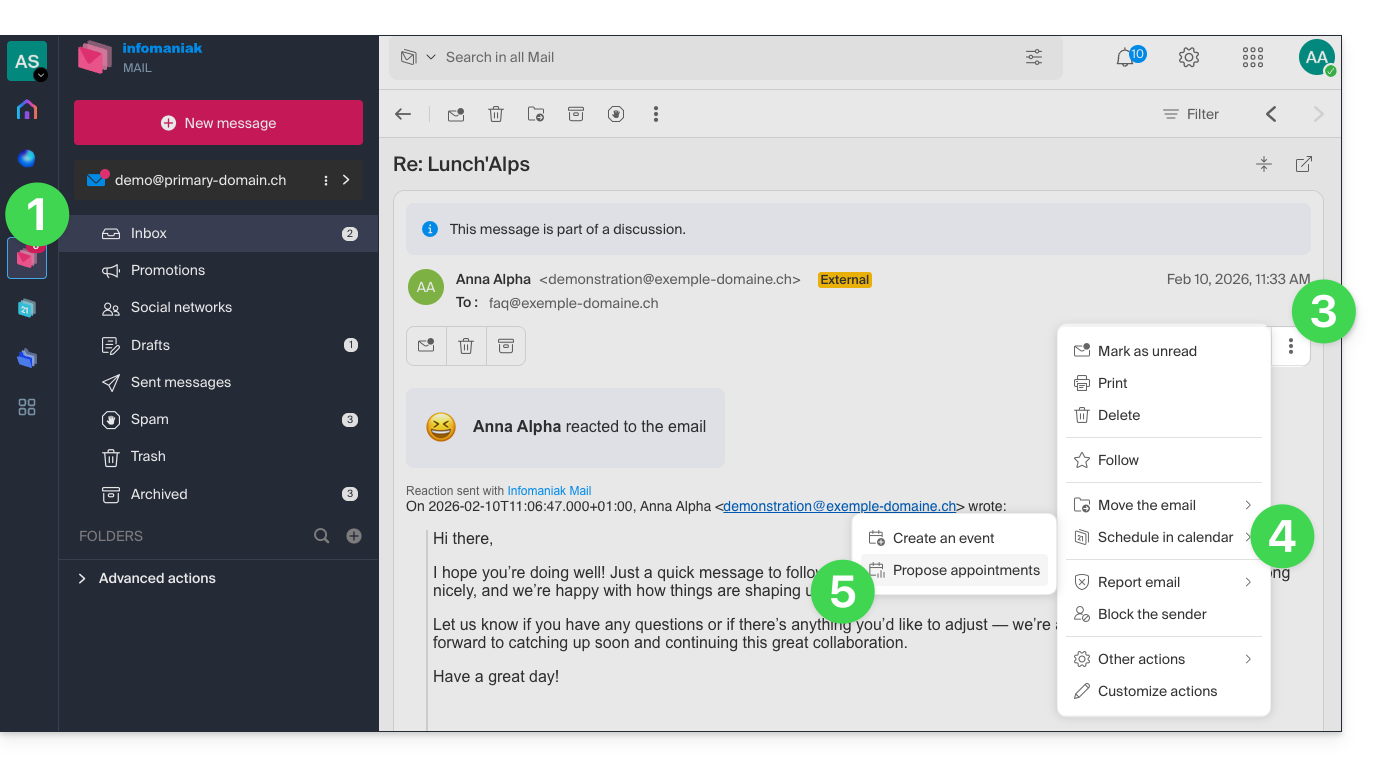
- Click on the action menu ⋮ in the top right corner of the open message.
- Click on Schedule in Calendar.
- Click on Create an event:
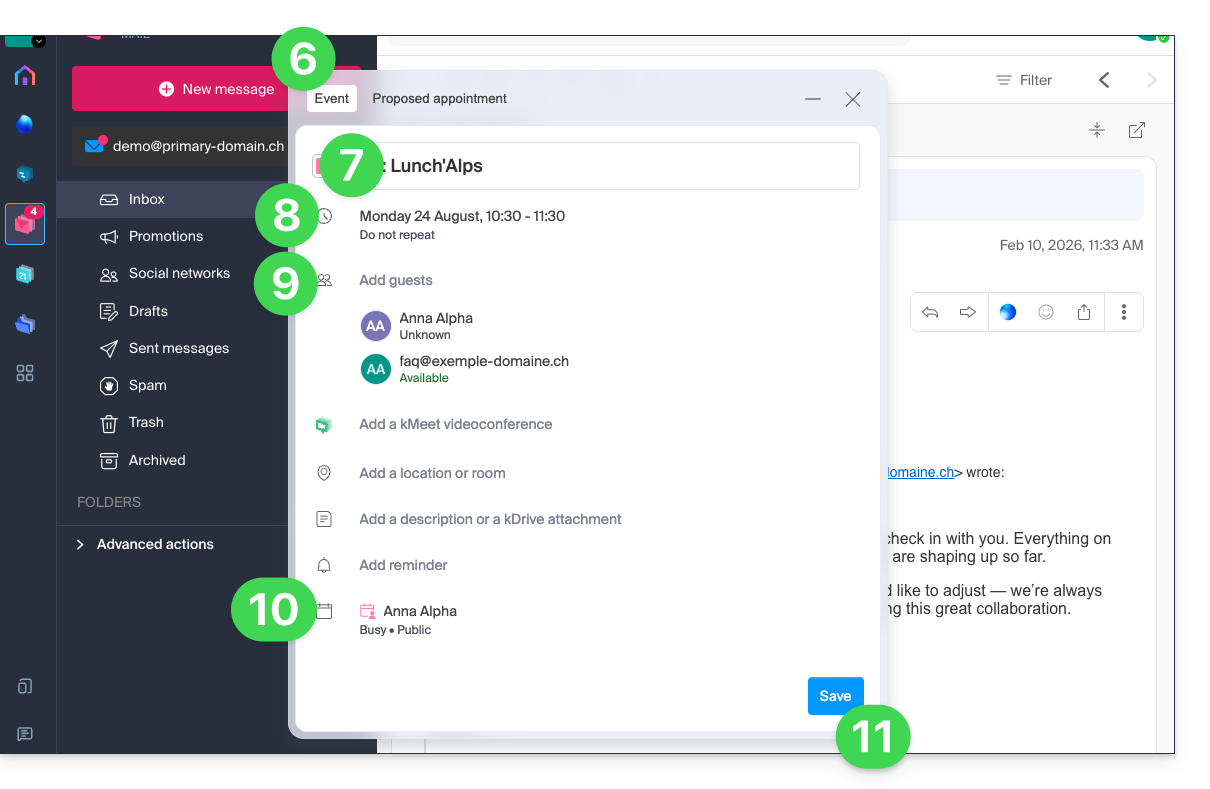
- The assistant for the Calendar app by Infomaniak appears.
- The meeting title is automatically generated from the email subject, but it can be modified.
- The duration of the event (and its time slot within the day) is automatically generated to be as close as possible to the current time, but it can be modified. You can also add a room below, if needed.
- Participants in the discussion are automatically added based on their email address.
- Check or change the calendar used.
- Save the information to create the event and the invitations:
Suggest time slots for a meeting
To suggest a new shared event with the participants (senders/recipients) of the email you are currently viewing, use a meeting request:
- Click here to access your emails on your Infomaniak kSuite (❓: help).
- Open the message from the sender (or the conversation between multiple participants) with whom you want to organize a meeting/event.
- Click on the action menu ⋮ in the top right corner of the open message.
- Click on Schedule in Calendar.
- Click on Suggest meeting time:
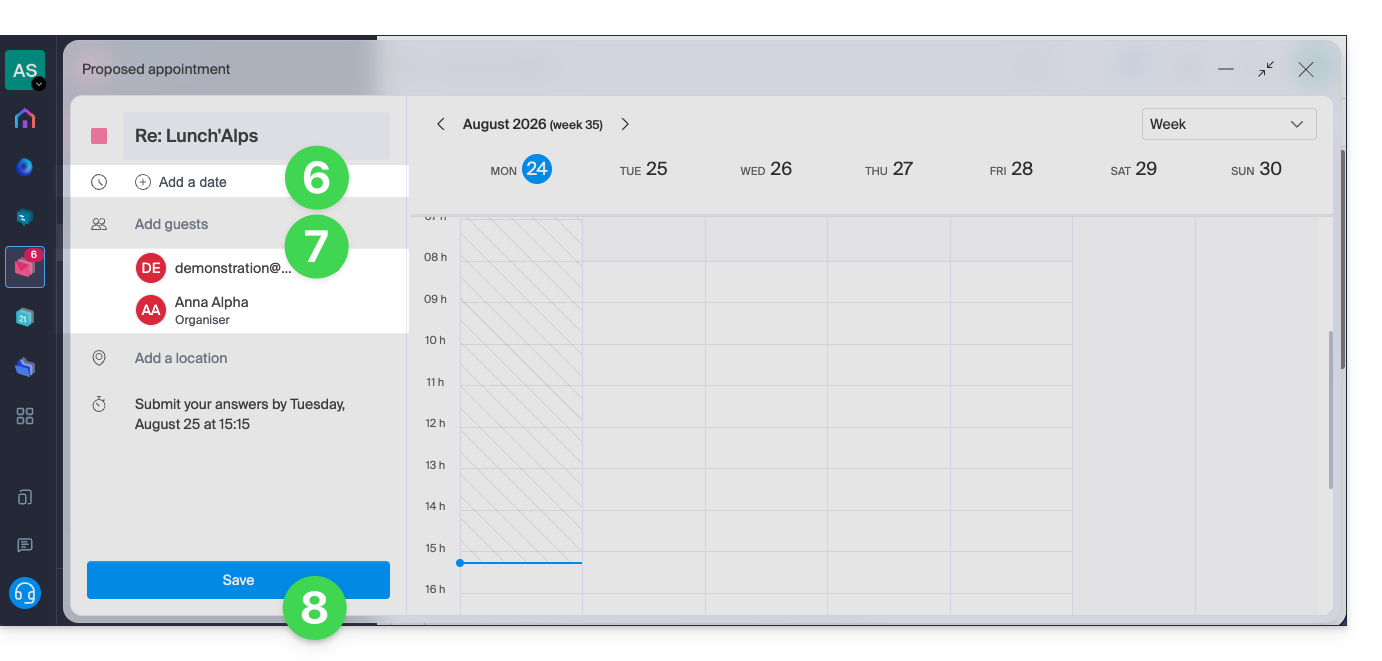
- You will then need to specify suggested dates/times to arrange a meeting with your contacts.
- Email contacts are automatically added.
- Don't forget to save:
Refer to this other guide to learn more about this feature.
Link to this FAQ: https://faq.infomaniak.com/2572
Has this FAQ been helpful?
This guide explains how to display a countdown timer before the next live broadcast or during a scheduled interruption on Infomaniak's video streaming service.
Accessing the scheduling calendar
To do this:
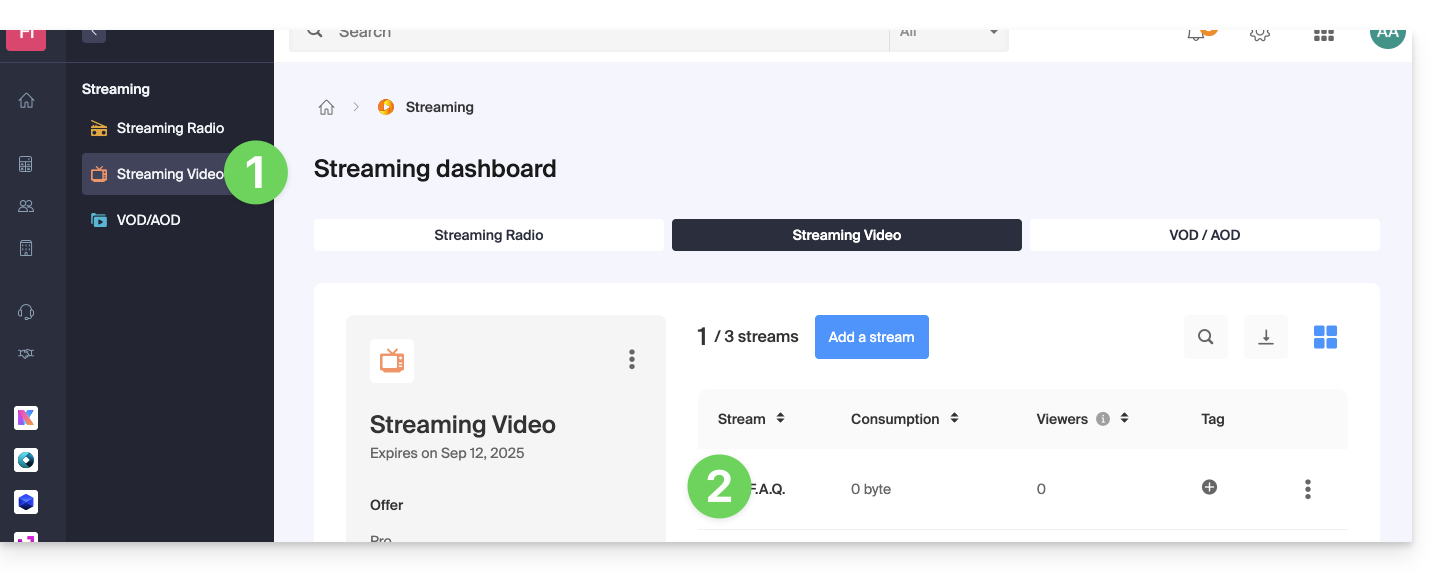
- Click here to access the management of your product on the Infomaniak Manager (need help?).
- Click directly on the name assigned to the product in question:
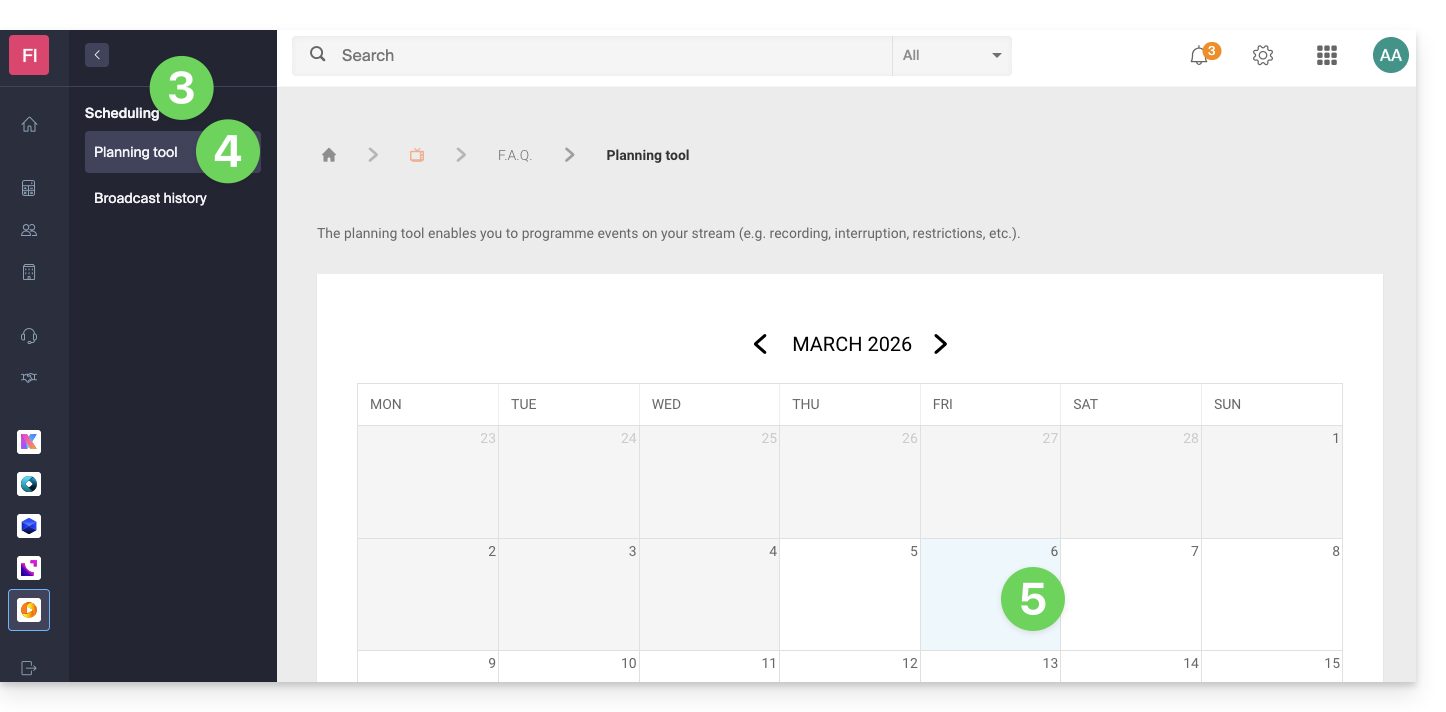
- Click on Programming in the left-hand menu.
- Click on Scheduling Tool in the left-hand menu.
- Click on the desired date:
Interrupt function on the schedule
For example:
- This setting in the calendar allows you to interrupt a live broadcast…
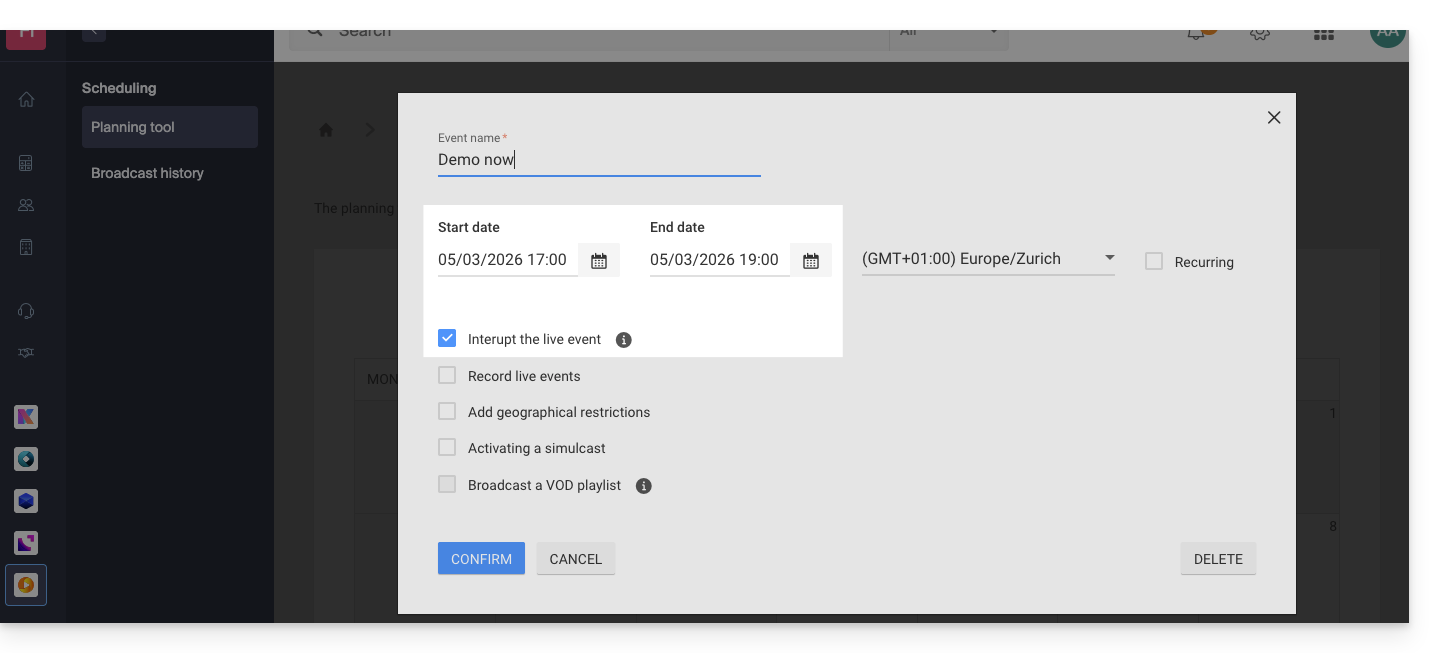
- … and this setting allows you to choose the image (thumbnail) and text for the video player…
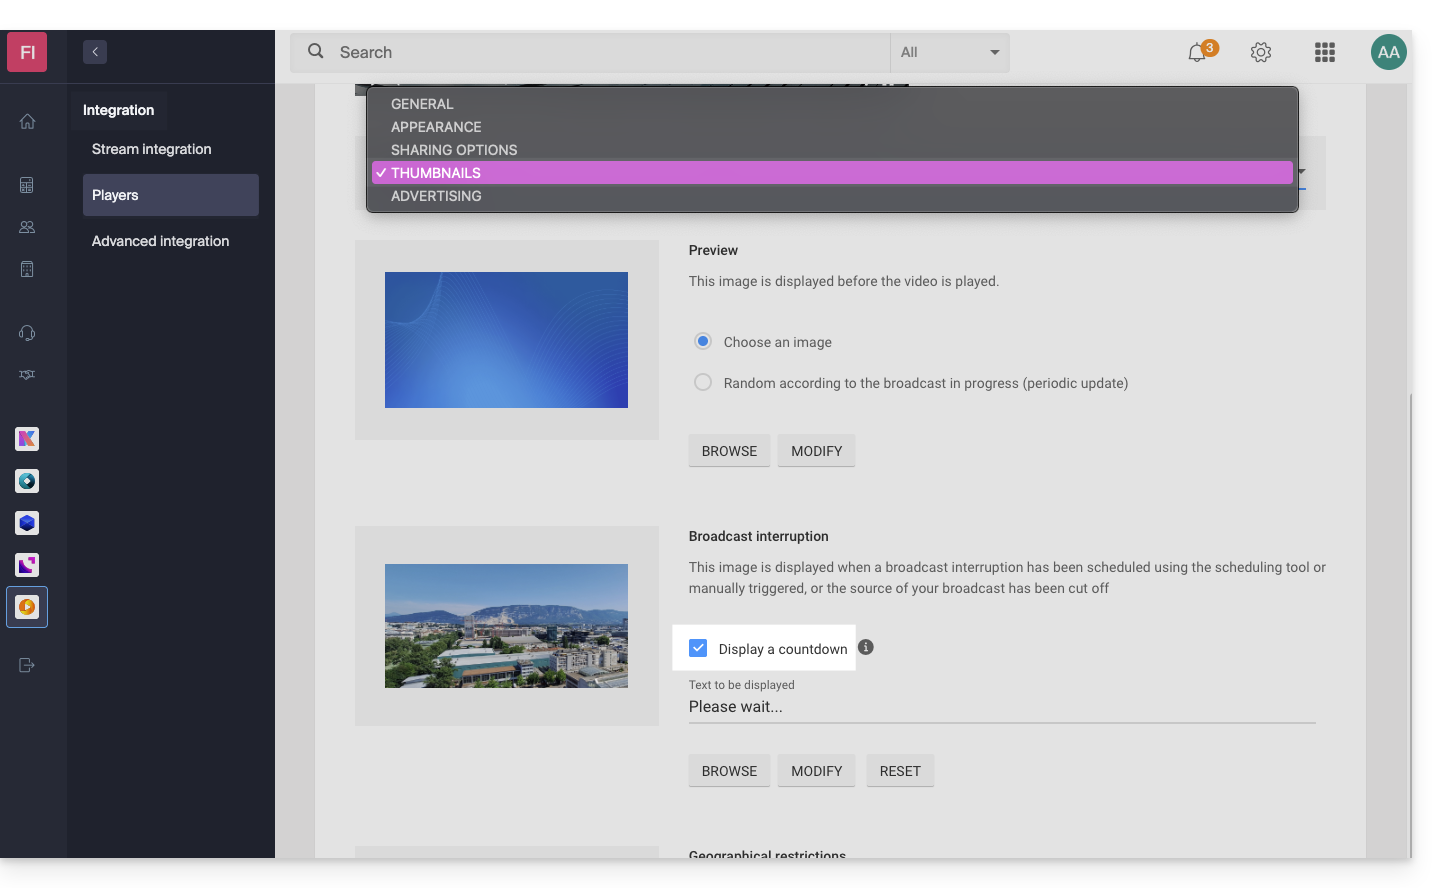
- … will display this result from 5 PM onwards, with a 2-hour countdown timer visible on the player for your TV stream:

Once programmed, the countdown timer works in conjunction with stream interruptions if you set any (or several in sequence, thus managing the overlap). Please note: it takes 2 minutes for a scheduled interruption to be reflected in the countdown.
Link to this FAQ: https://faq.infomaniak.com/1948
Has this FAQ been helpful?
This guide explains how to obtain the kDrive app to synchronize files stored in kDrive and easily access them on all your macOS, Windows, Linux, iOS, and Android devices.
Introduction
- To ensure that any changes made to your files & folders on your workstation (Finder / Explorer) are automatically synchronized…
- on the kDrive web app (Infomaniak online service ksuite.infomaniak.com/kdrive),
- on the kDrive mobile app (application for iOS / Android smartphones or tablets),
- for all collaborators who access the data,
- and in both directions,
- … you need to install the kDrive desktop app (desktop application for macOS / Windows / Linux).
Download the kDrive desktop app
Open the kDrive download page (❓: help) to download kDrive.
Other versions and apps can be downloaded from the unified kSuite settings (❓: help), including an iOS version optimized for iPad, adapted to the screens of these tablets.
Install kDrive
Minimum required OS versions
To install and use kDrive on an operating system, please refer to the respective guides for the minimum required and supported version:
Link to this FAQ: https://faq.infomaniak.com/2374
Has this FAQ been helpful?
This guide covers the installation of kChat, the instant messaging solution from kSuite. Also, refer to the getting started guide.
Getting kChat
kChat is offered with kSuite, with features tailored to each version of kSuite.
Once you have set up kSuite within your Organization:
- Access the kChat web app (online service at ksuite.infomaniak.com/kchat).
- … or click here to download the mobile app (application for iOS/Android smartphones or tablets) and the desktop app (desktop application for macOS/Windows/Linux).
Install kChat
macOS
- kChat may request access to the macOS Keychain for “
Chromium Safe Storage”, which is used to store your access token. - This request is normal and necessary for kChat to function properly; no additional sensitive data is requested, and nothing is sent externally.
Linux
- Under Linux, kChat is distributed in AppImage format, so depending on your system configuration, you may need to disable sandboxing for the application to function correctly:
- If kChat does not launch, run it from a terminal using the following command:
./kchat.AppImage --no-sandbox - You can also create a launcher or script that includes this parameter to avoid having to enter it each time you use the application.
- If kChat does not launch, run it from a terminal using the following command:
Link to this FAQ: https://faq.infomaniak.com/144
Has this FAQ been helpful?