Knowledge base
1000 FAQs, 500 tutorials and instructional videos. Here, there are only solutions!
This guide explains how to connect to and manage multiple kDrive accounts on your computer (macOS / Windows).
Introduction
- This feature allows you, for example, to access files from a personal kDrive and a professional kDrive.
- Each kDrive added to the application and synchronized has its own storage folder on the hard drive.
- The same principle applies to the mobile app (❓: help).
Access other kDrives linked to your login ID
In this example, the login ID guides@exemple-domaine.ch leads to the personal Organization “RB”, which has a kDrive, but also leads to an Organization “FAQ” that invited guides@exemple-domaine.ch to become a user of its kDrive.
This case is automatically managed in the Web app (online service ksuite.infomaniak.com/kdrive); the user guides@exemple-domaine.ch logs in and can switch between Organizations (and therefore between kDrives):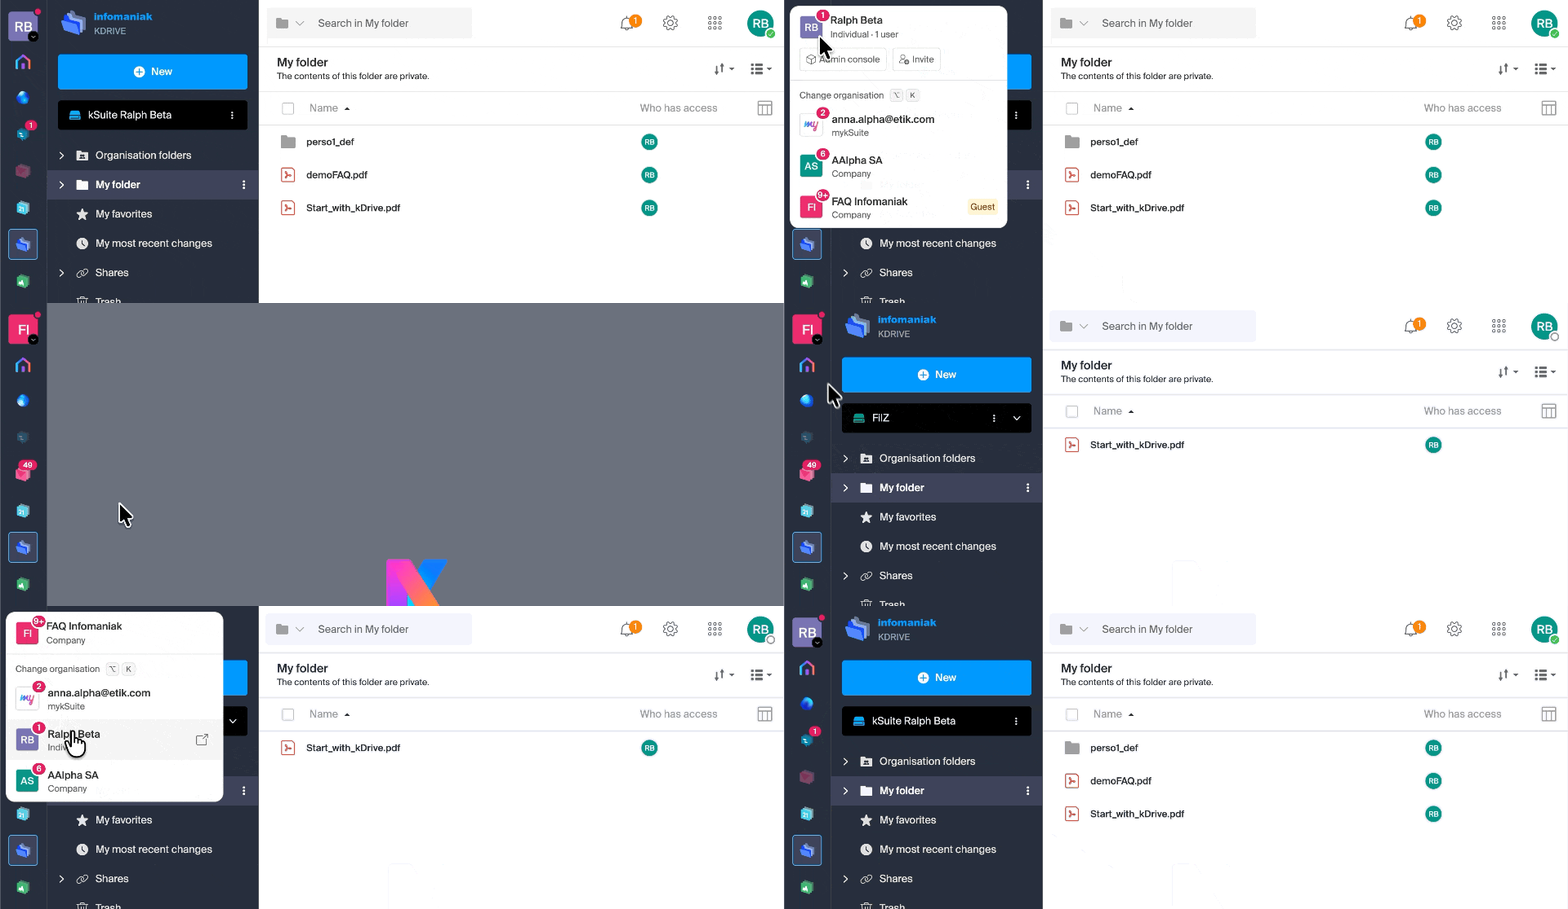
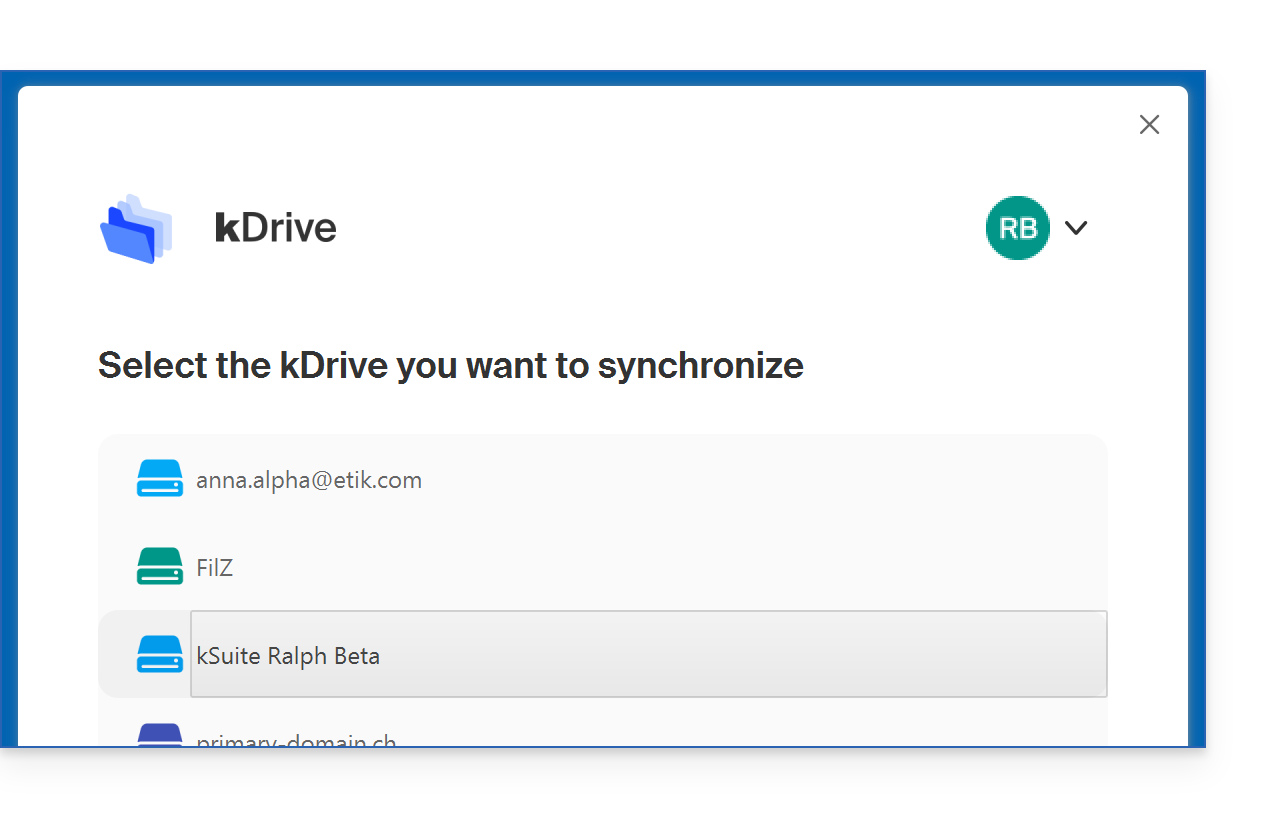
The same principle applies when installing the desktop app (desktop application on macOS / Windows / Linux); the user guides@exemple-domaine.ch logs in and selects one of the available kDrives (or even several with v4):
- app v3.x :
- app v4.x :
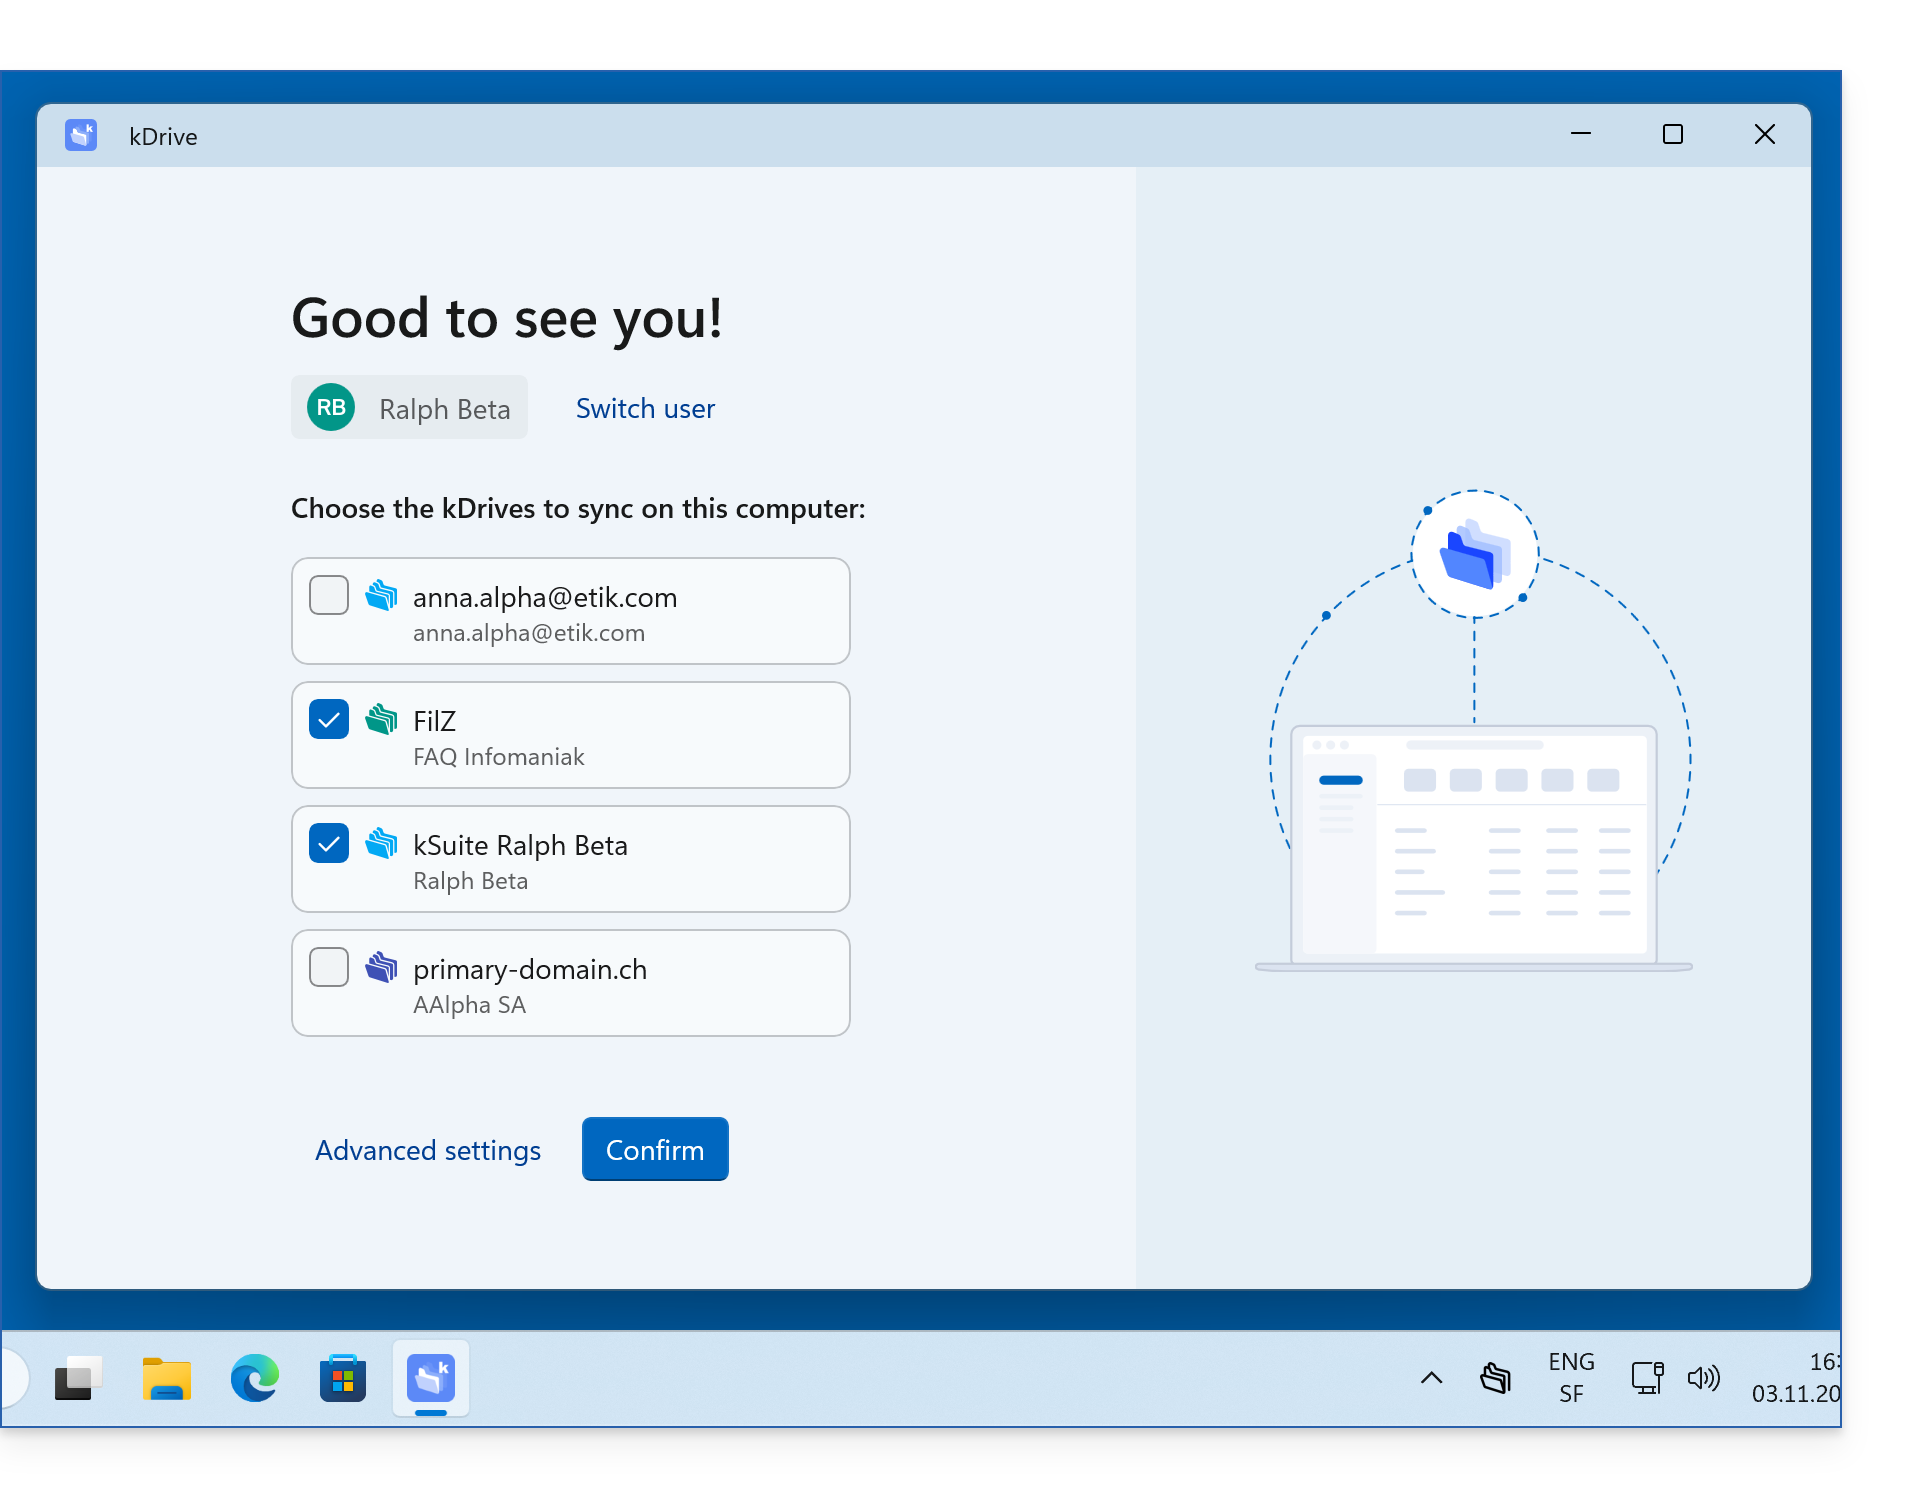
Subsequently, it can add and then access other kDrives to which its current login ID has access:
- app v3.x :

- app v4.x :

Access an additional & external kDrive
To connect with a different Infomaniak account and therefore access even more kDrives:
App v3.x
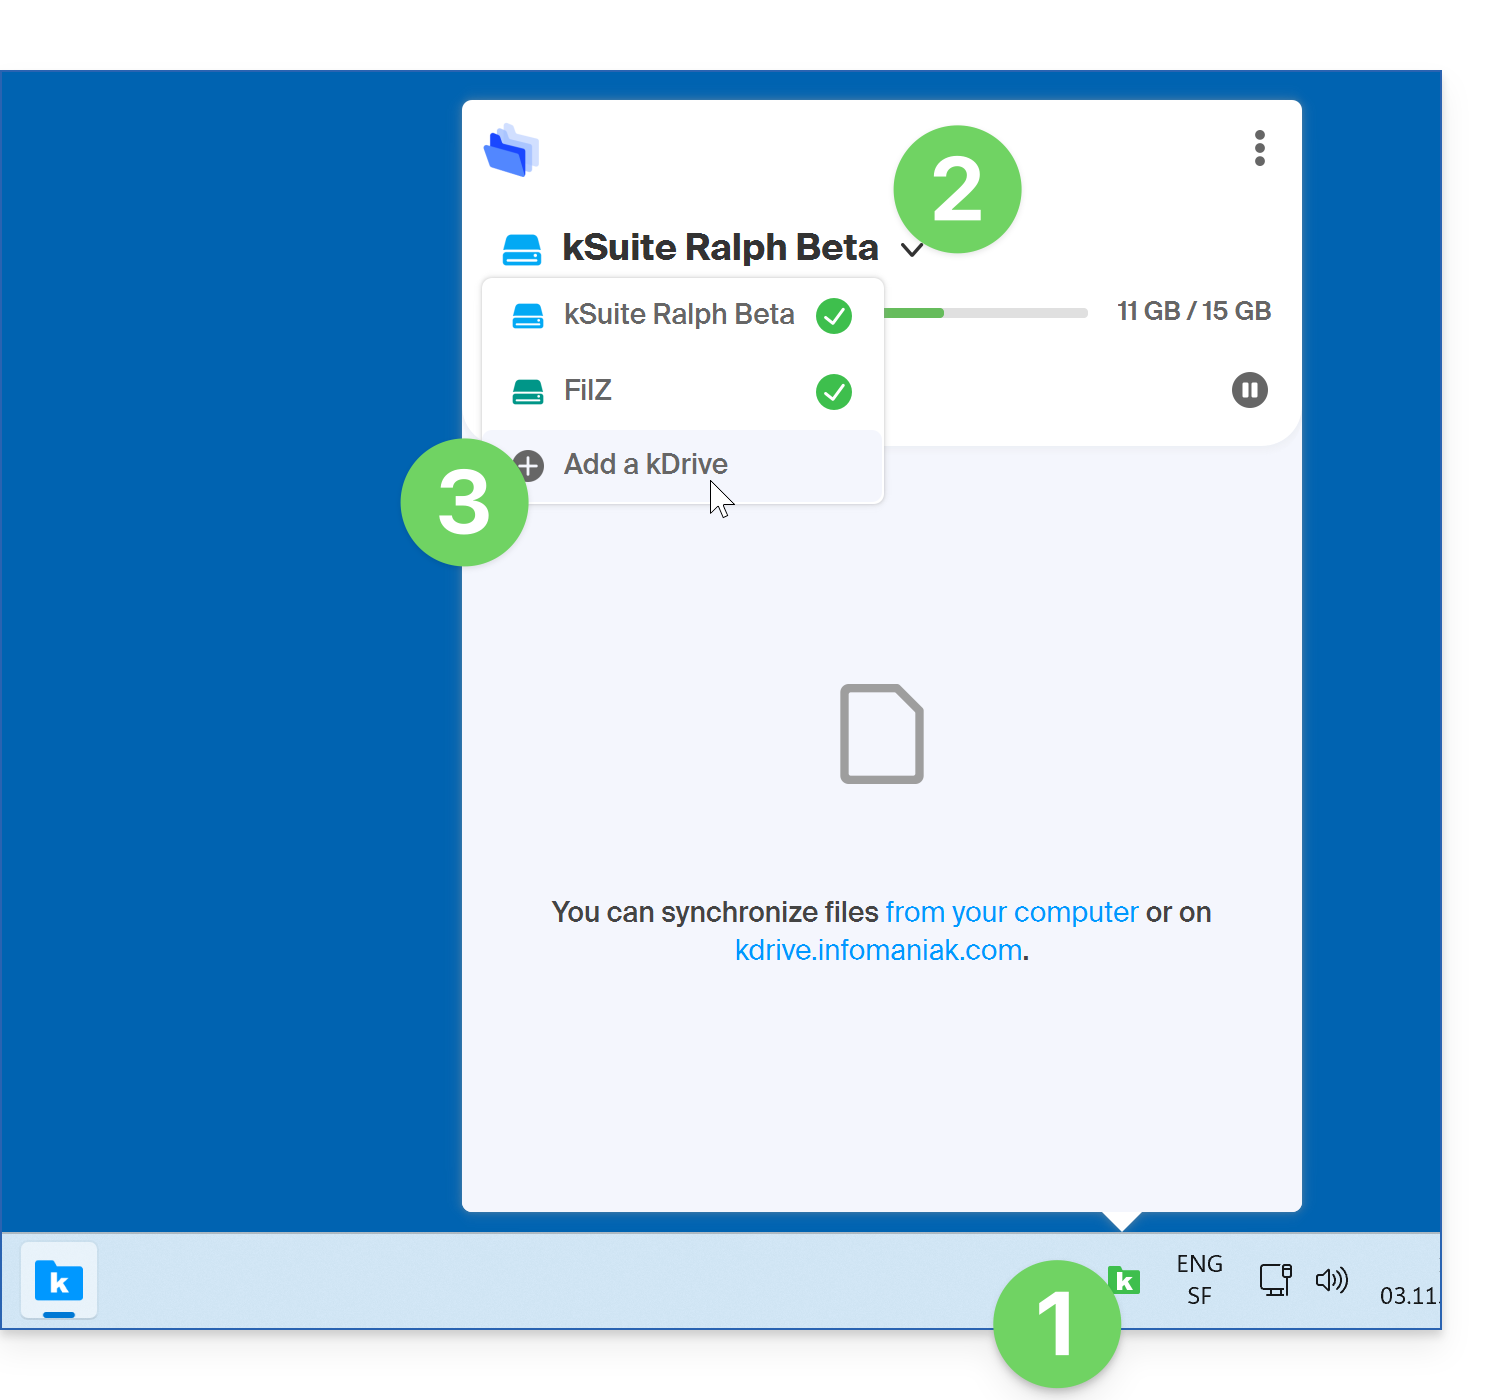
- Left-click on the desktop app icon in the notification area of your computer (top right on macOS, bottom right on Windows, and double-click in the taskbar on Linux).
- Click on the chevron to the right of the kDrive name (the kDrives you already have access to with your user account will be displayed).
- Click on Add a kDrive:
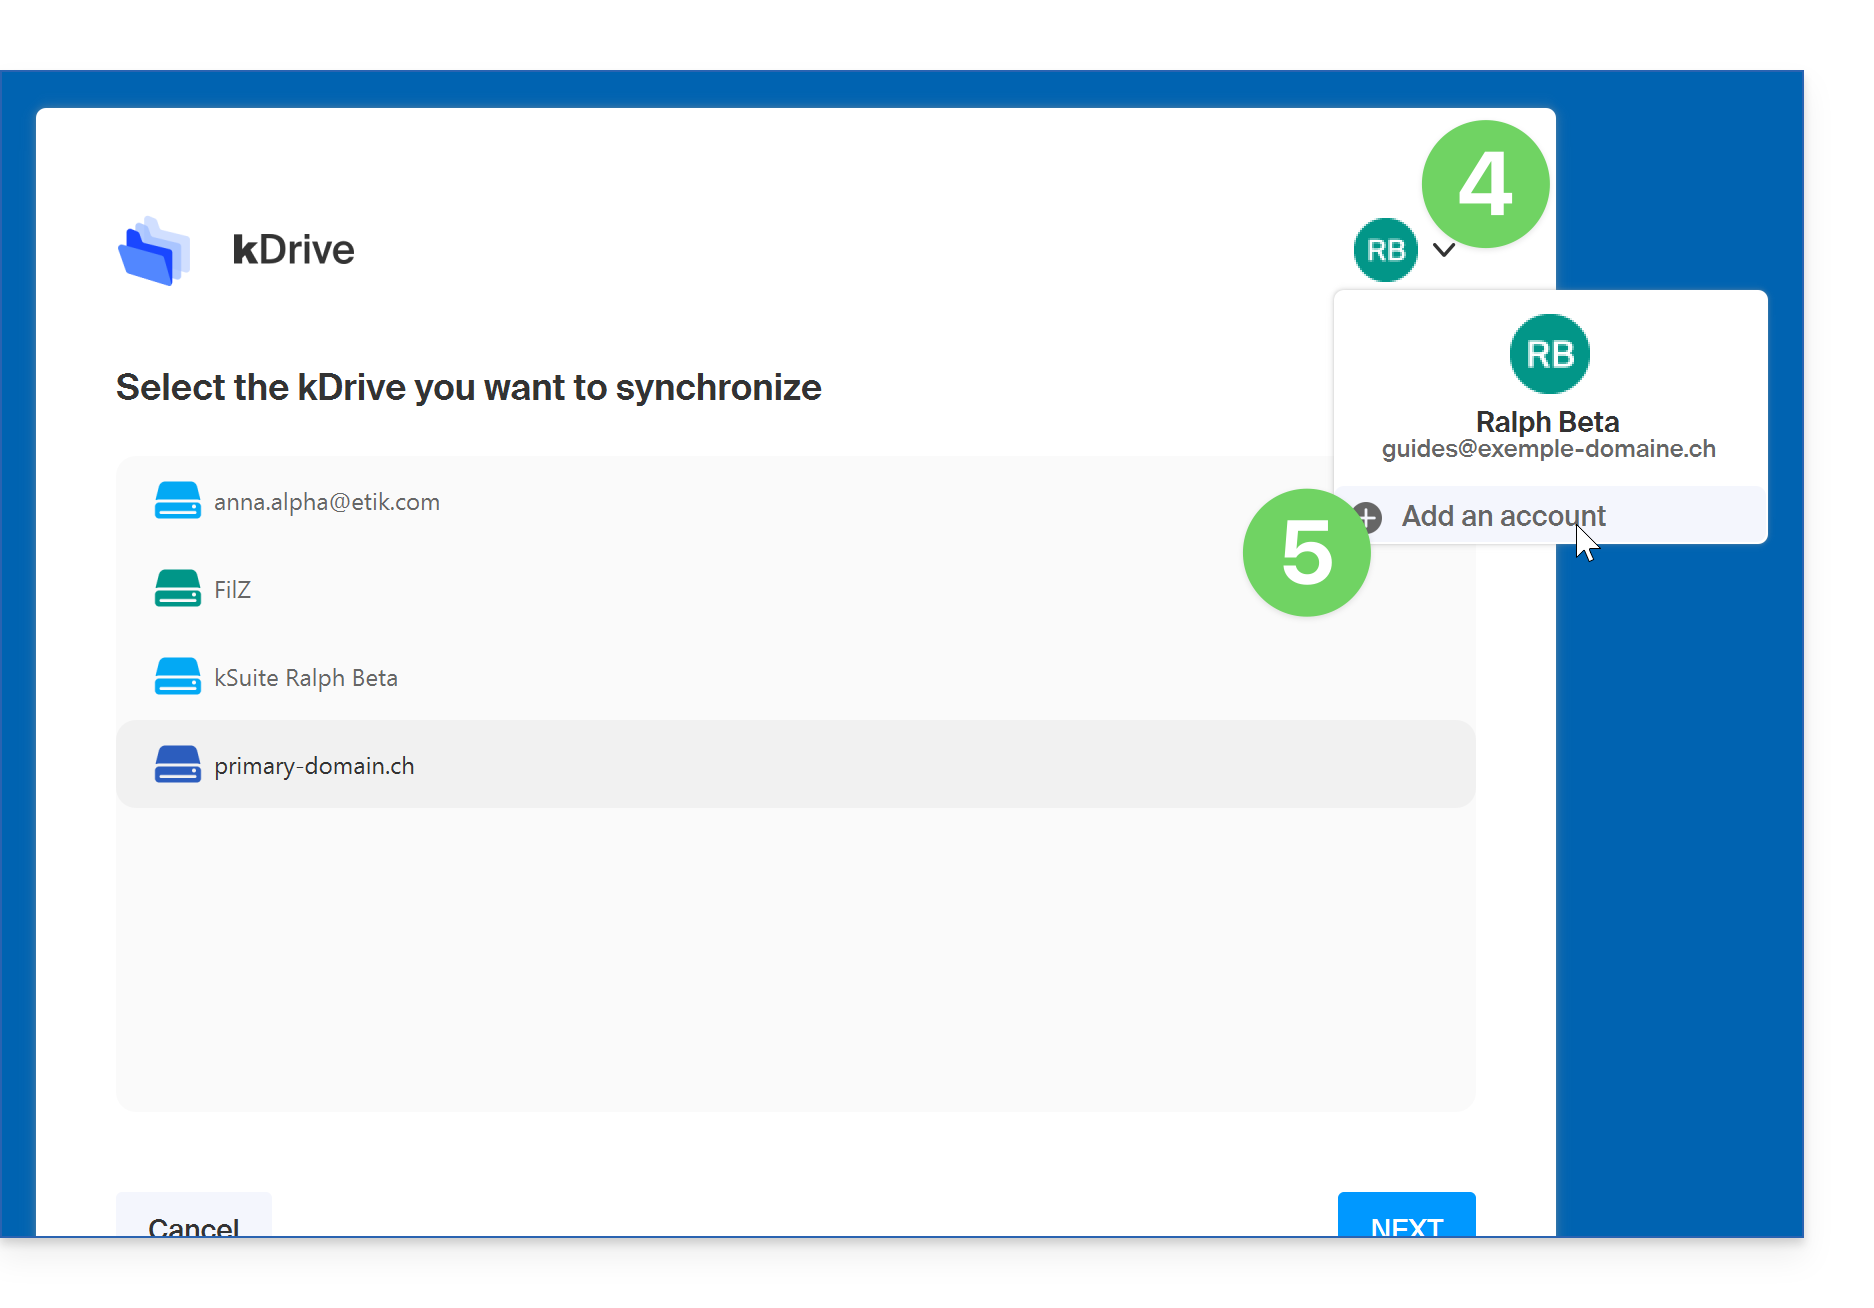
- Click on the badge with your initials or your avatar in the top right corner.
- Click on Add an account:
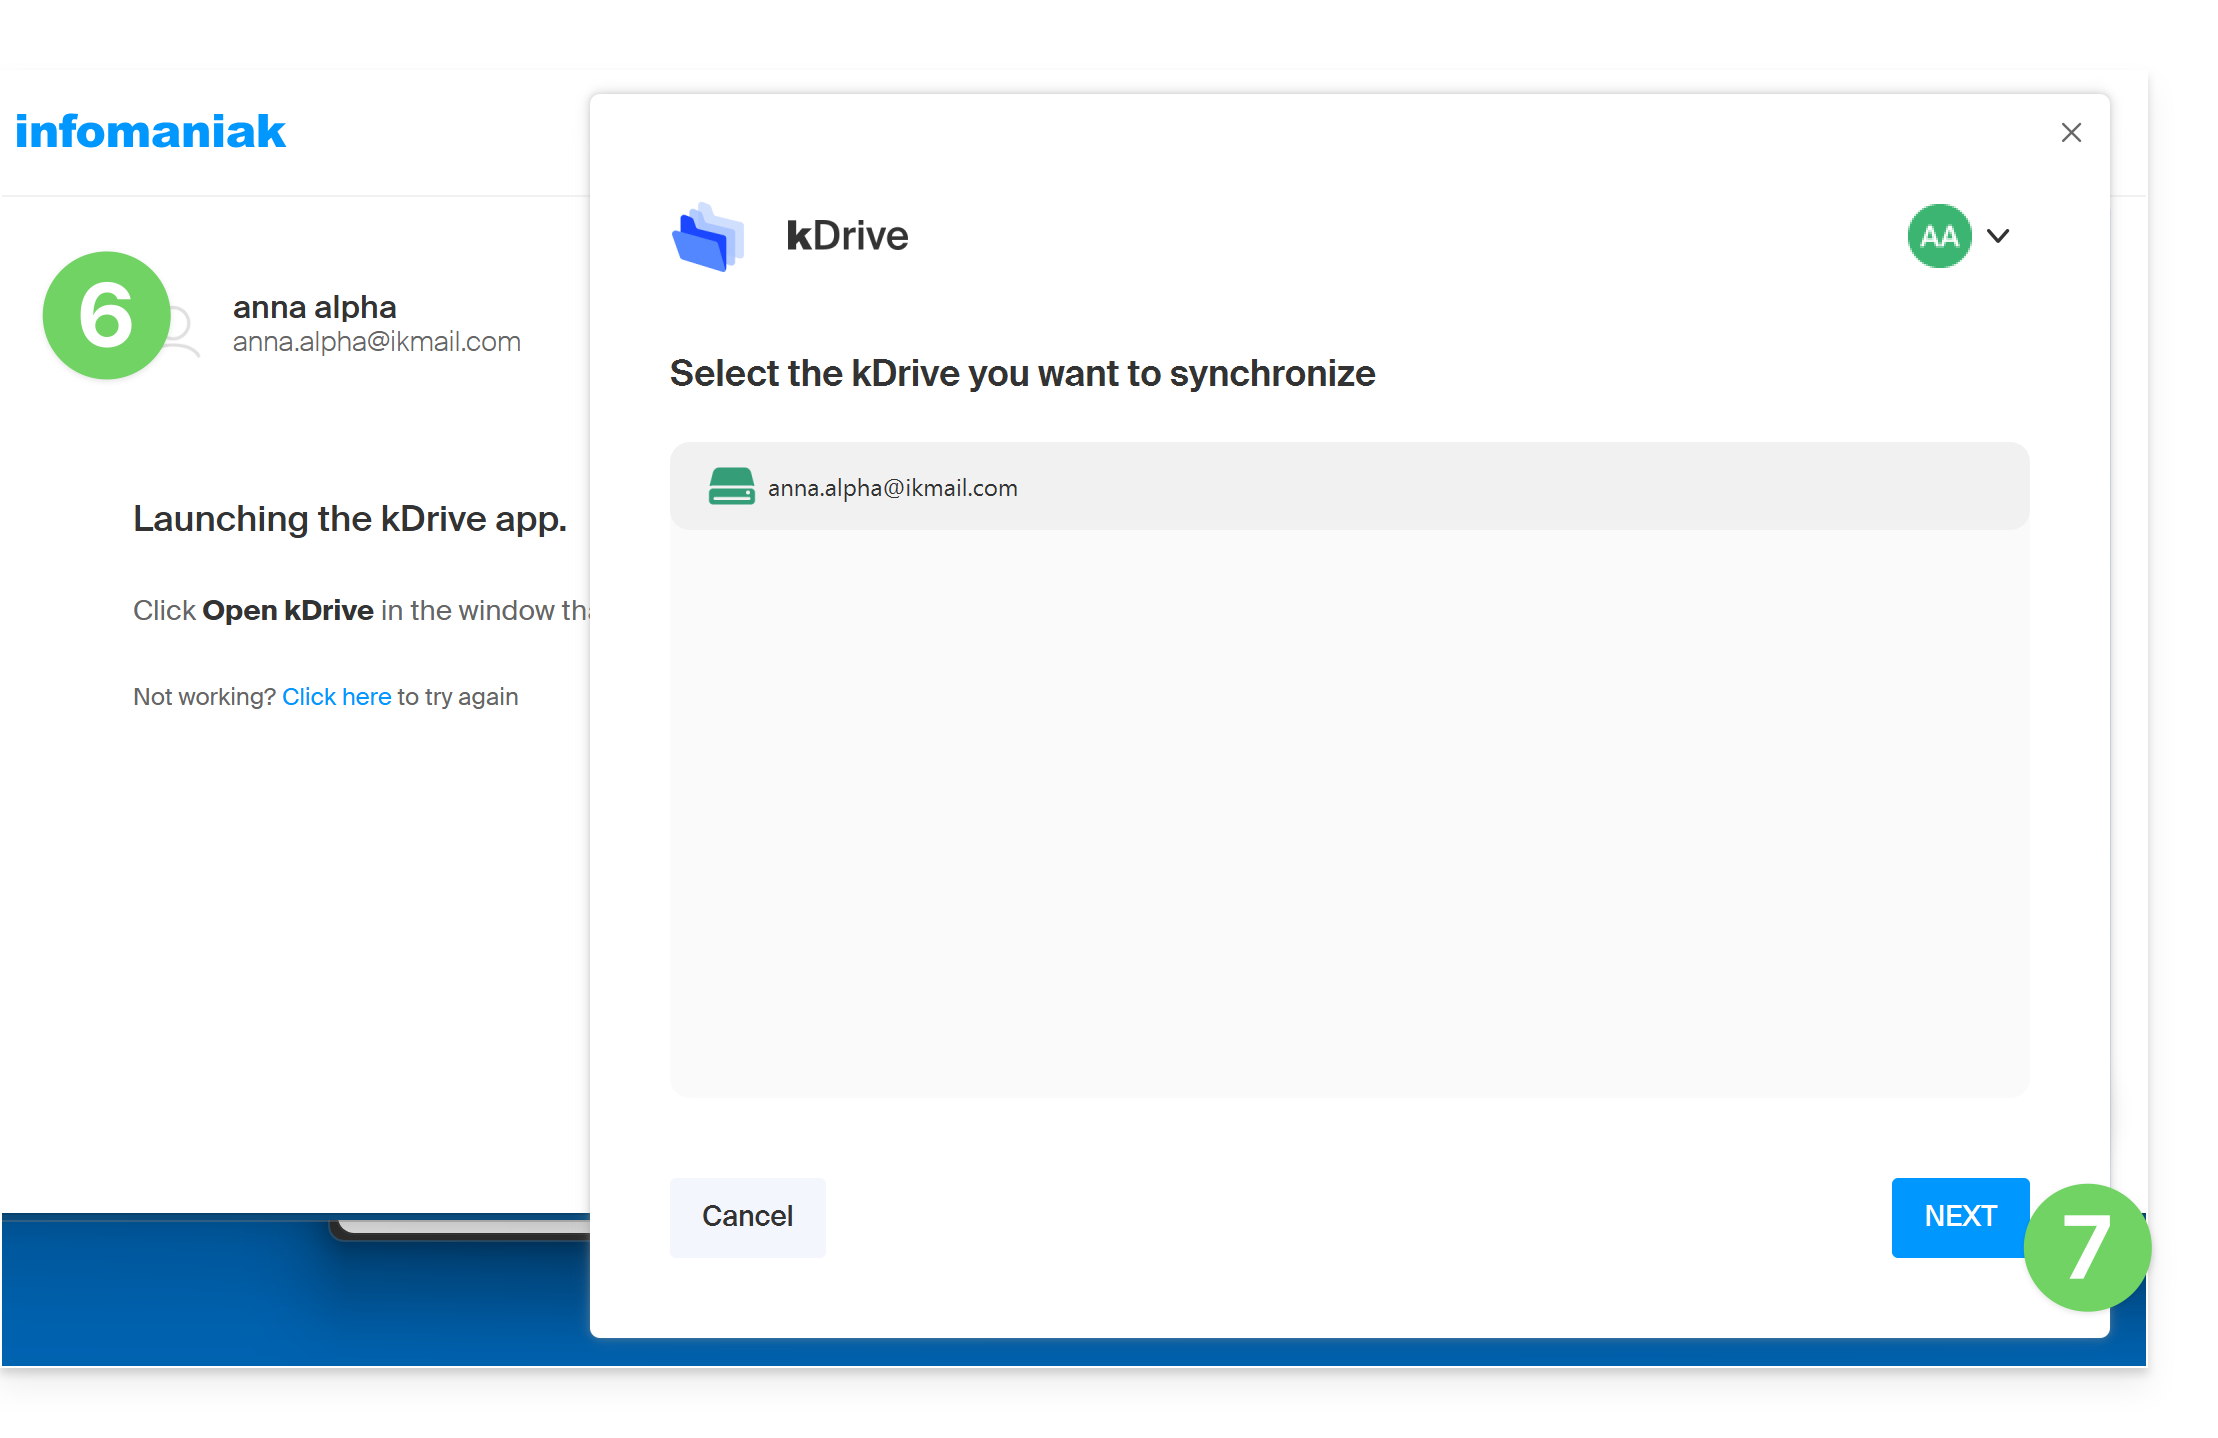
- Enter the credentials for the Infomaniak account associated with the kDrive you want to add (❓: help).
- Choose and configure the kDrive to add (Lite Sync, directory to be used on the computer, etc.):
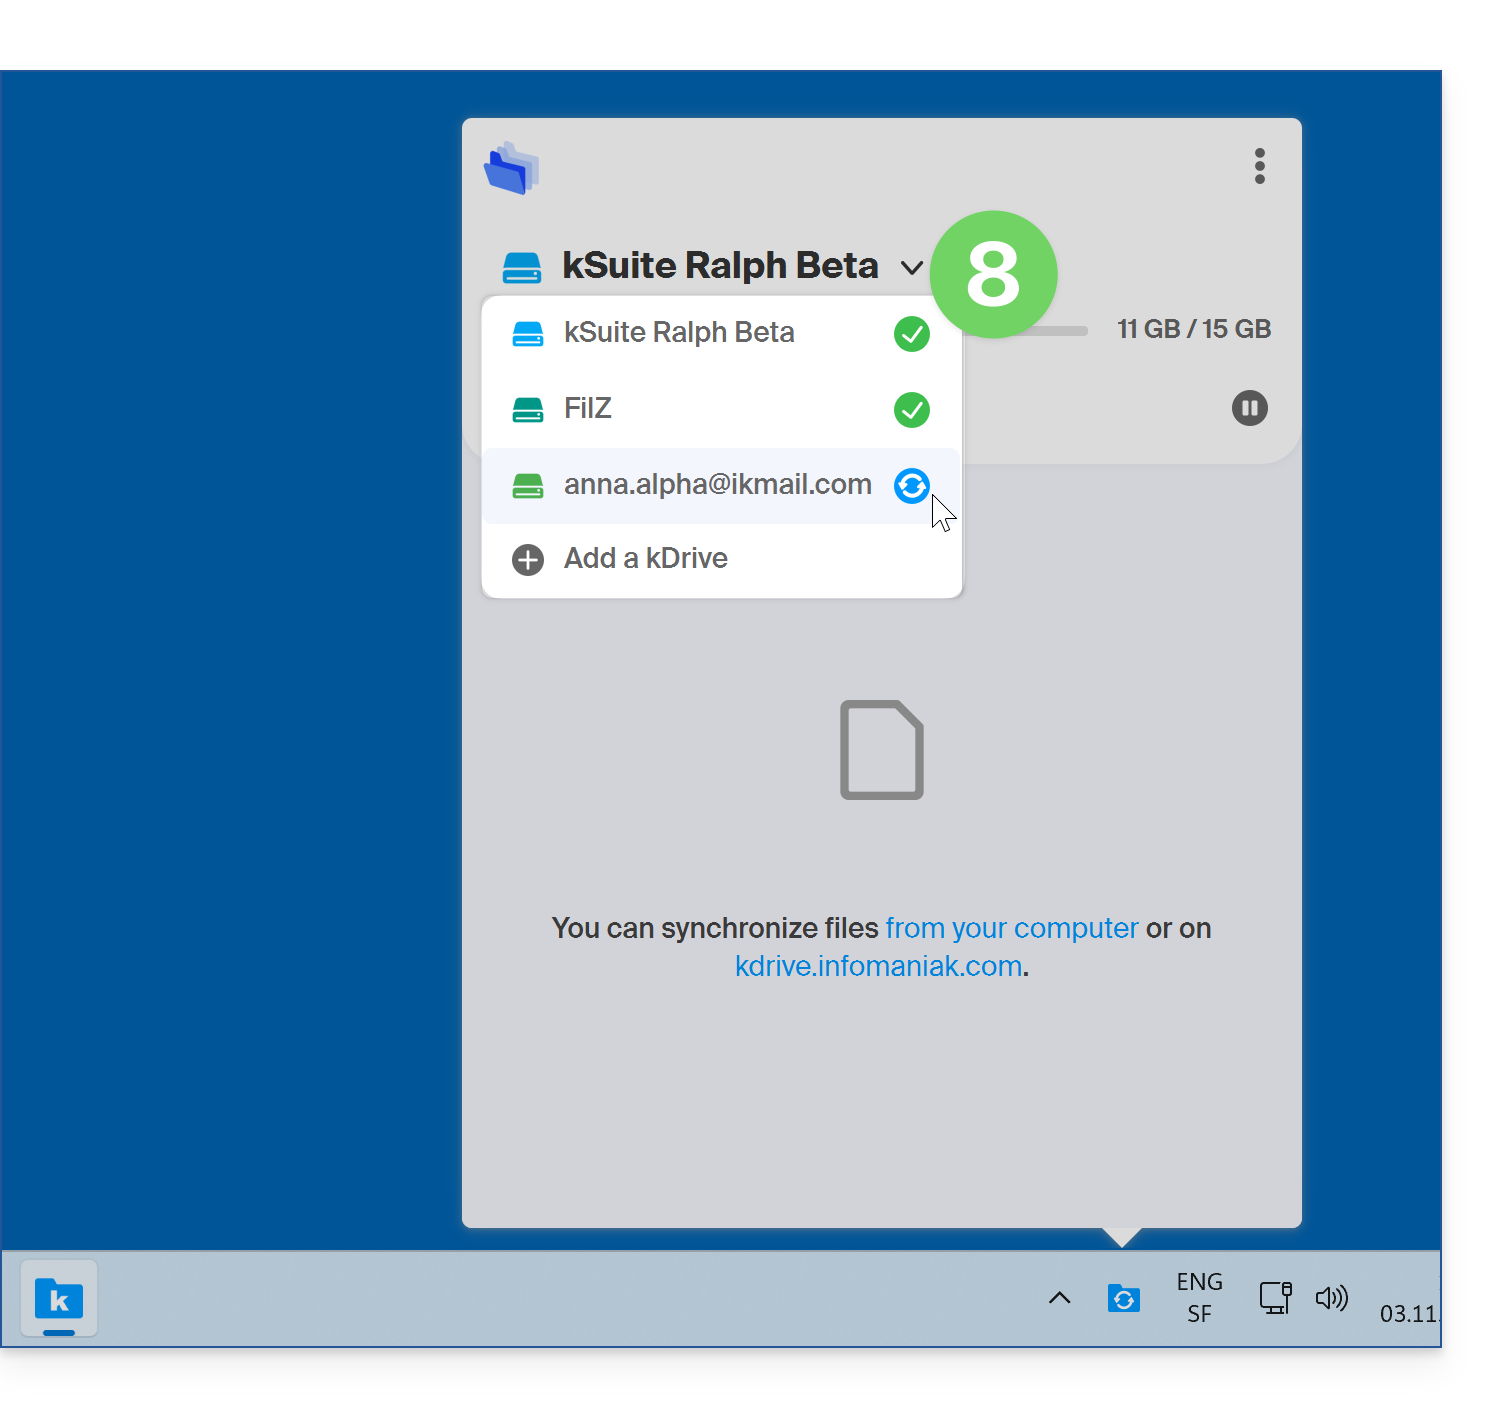
- You can now switch between kDrives by clicking on the kDrive icon and then on the down arrow in the window that opens:
App v4.x
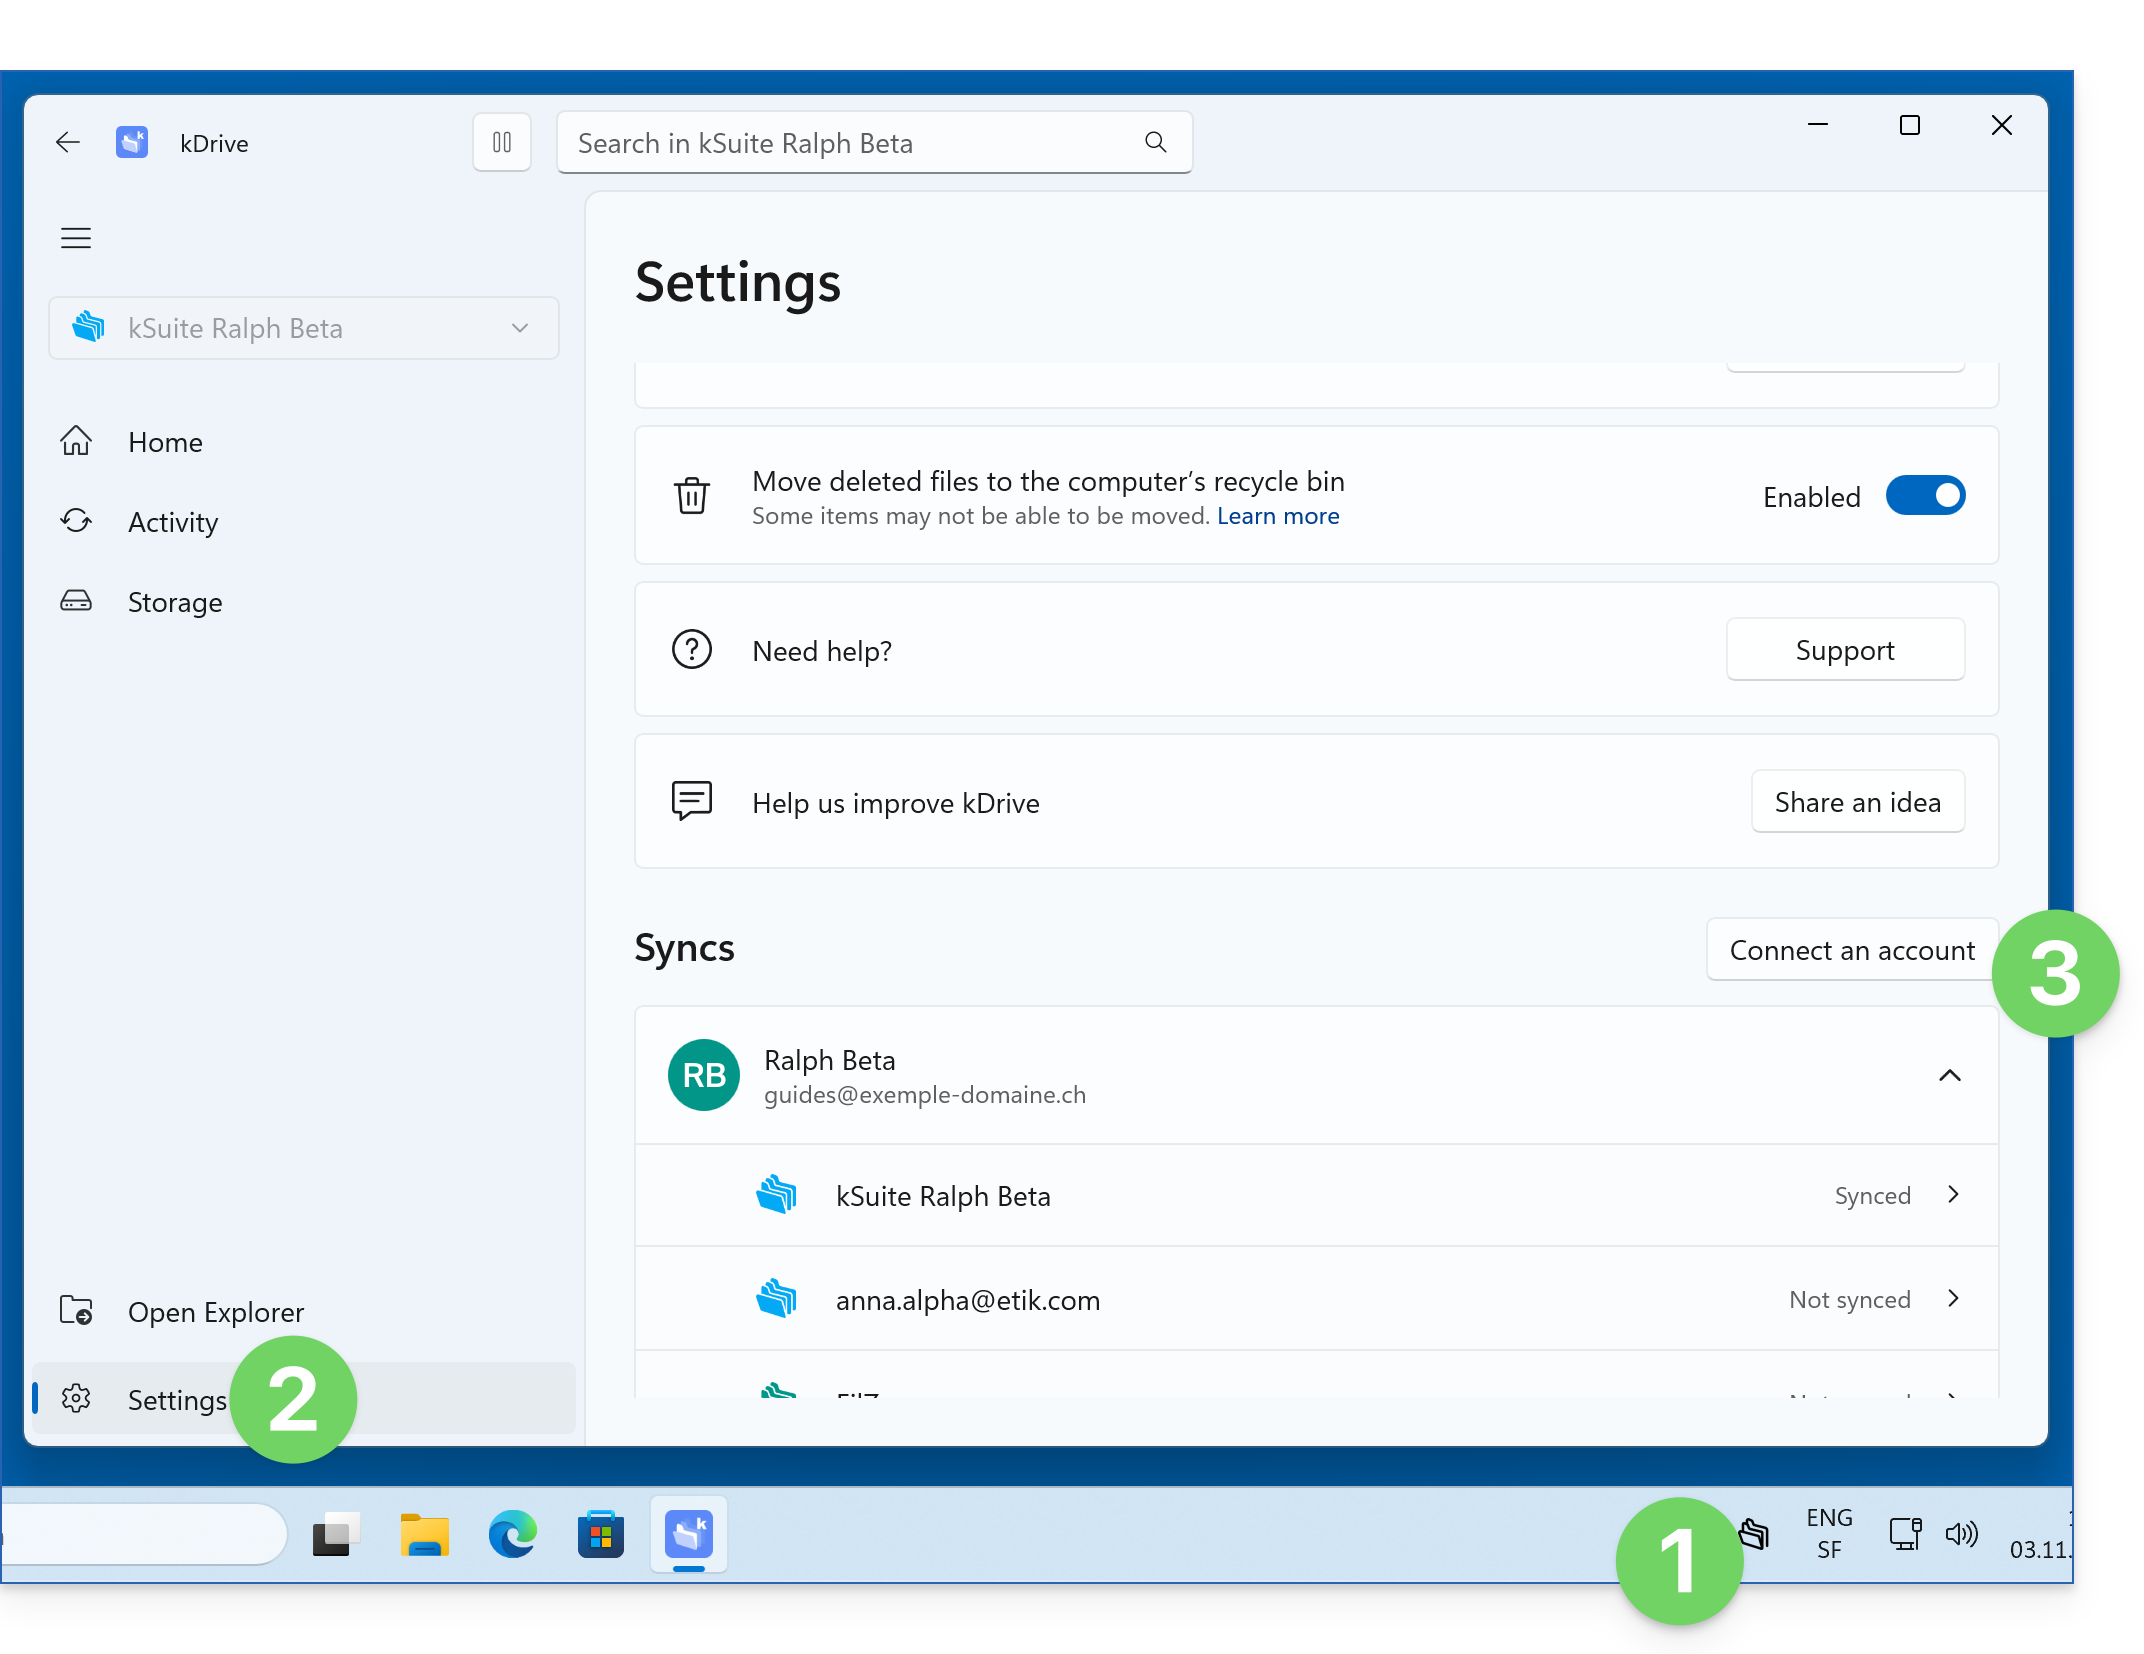
- Launch kDrive on your device: the app icon should be visible in the top right corner on macOS/Linux, and in the bottom right corner on Windows (❓: help).
- Click on Settings.
- Click on Connect an account:
- Click to connect to the account:
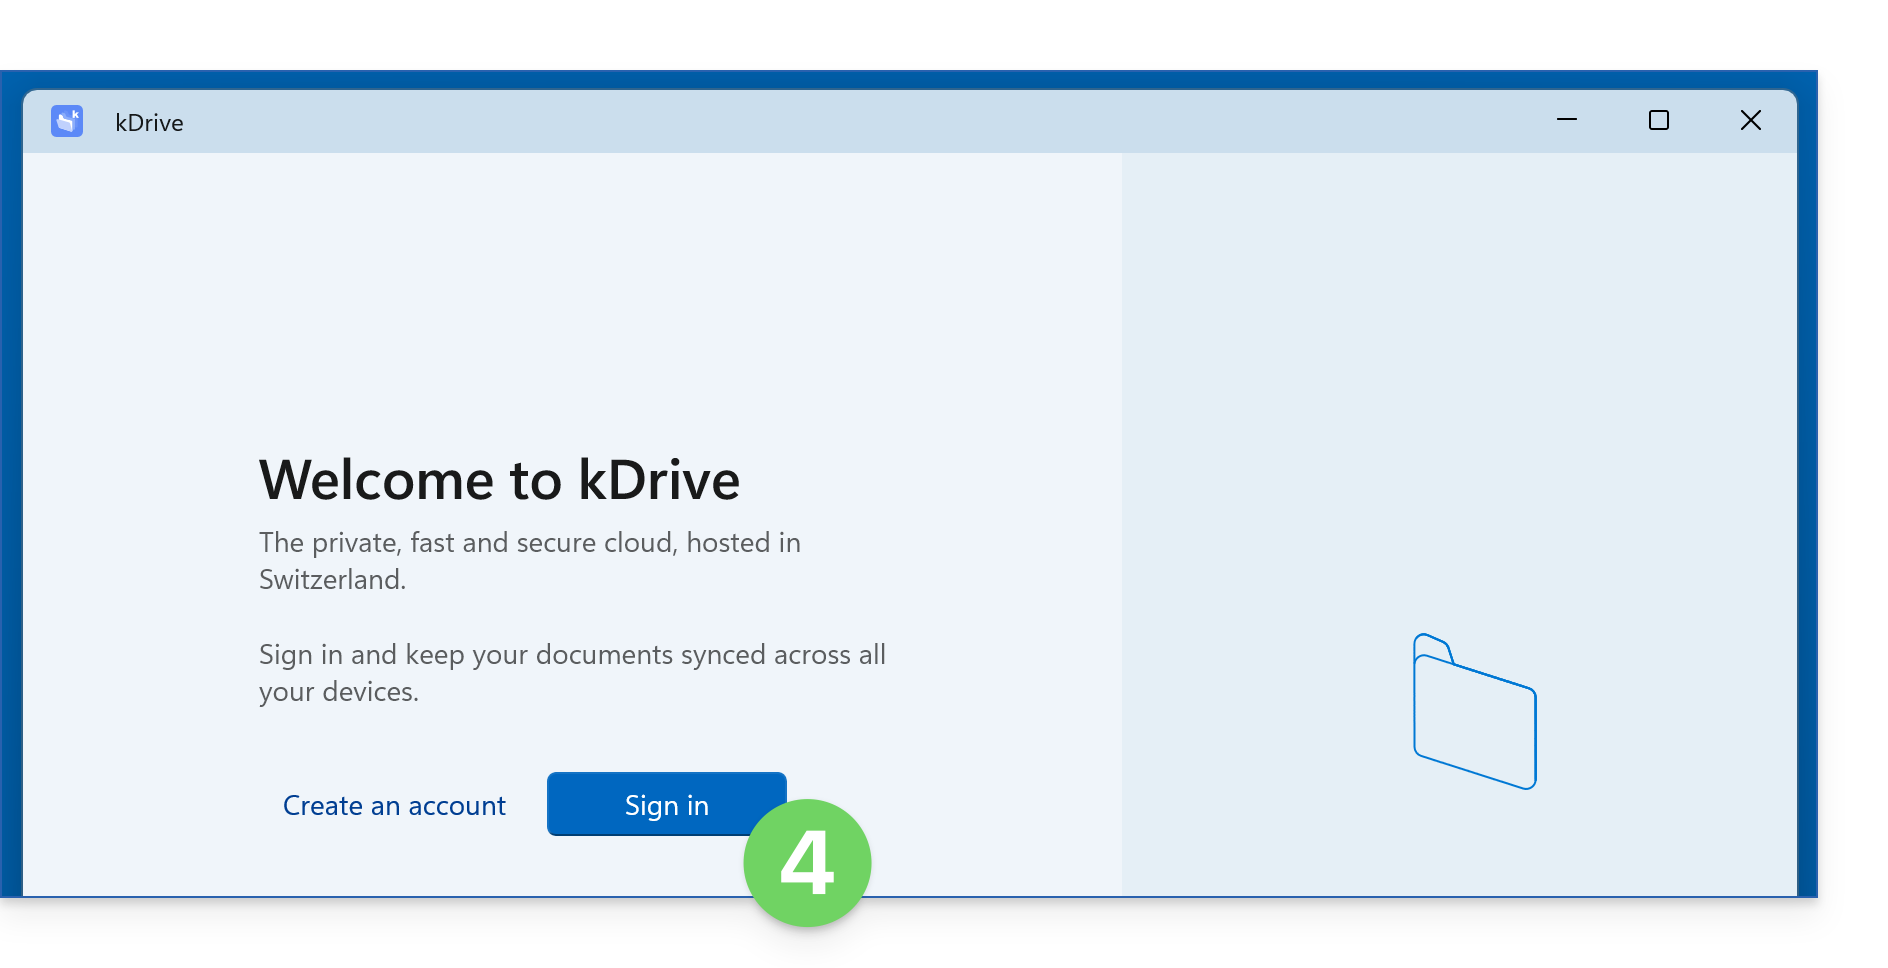
- Enter the credentials for the Infomaniak account associated with the kDrive you want to add (❓: help).
- Choose the kDrive to add (and any optional settings, such as Online / Offline mode (❓: help), the directory to be used on the computer, etc.).
- Click on Confirm:
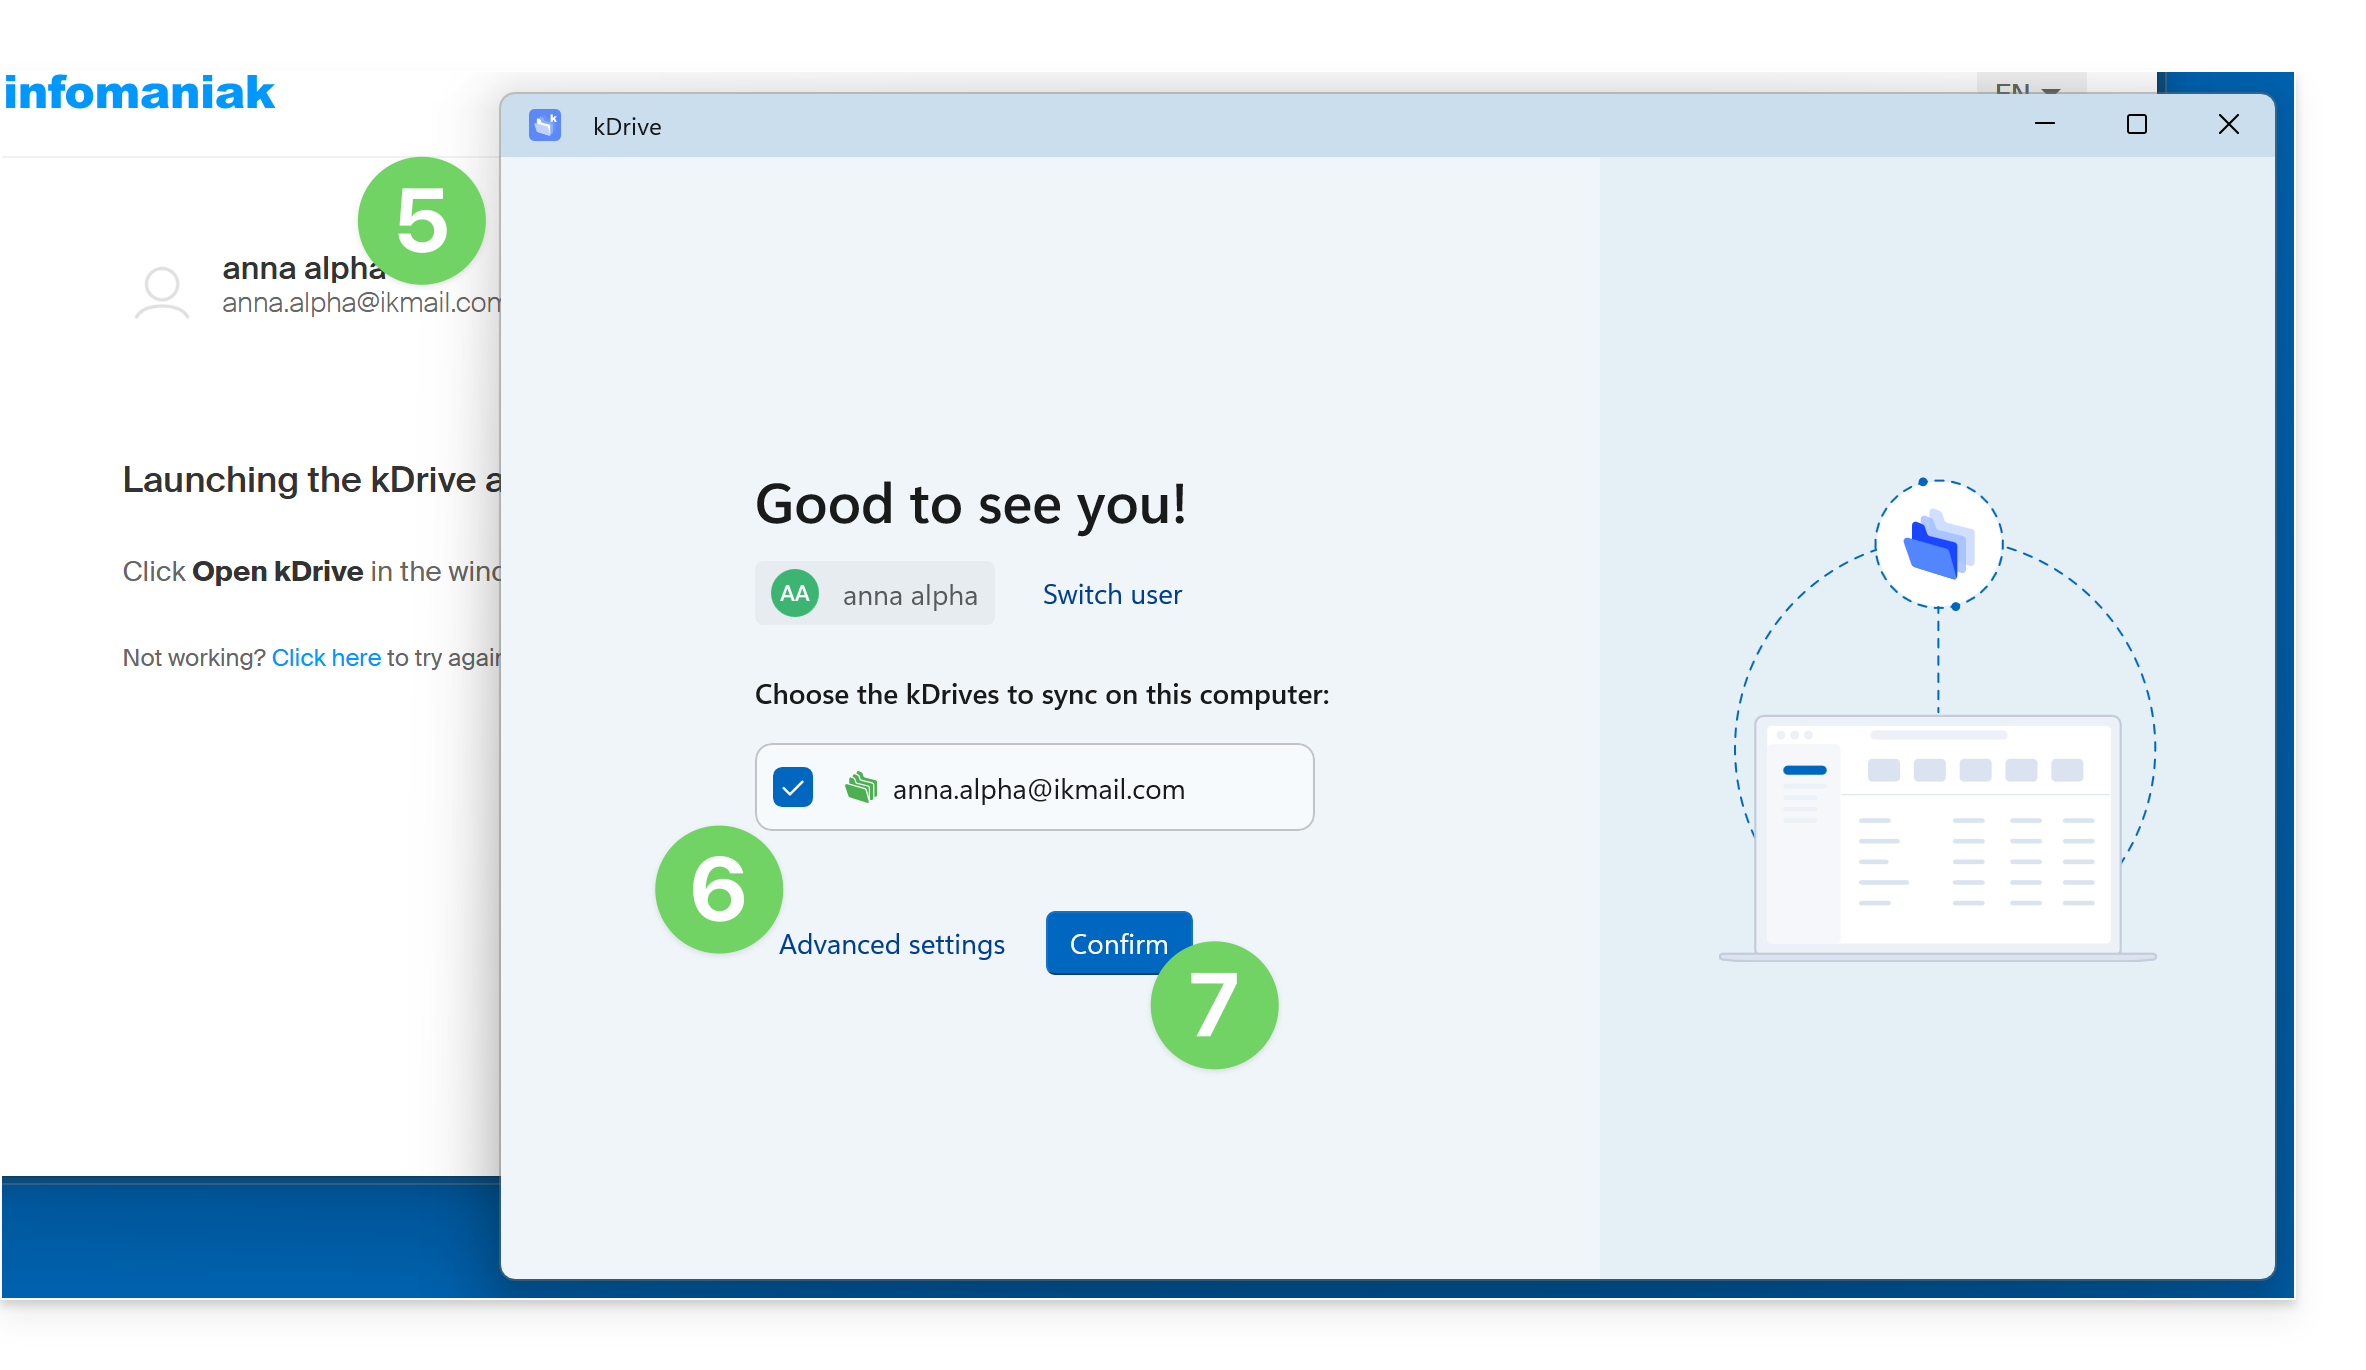
- You can now switch between kDrives when you click on the down arrow :
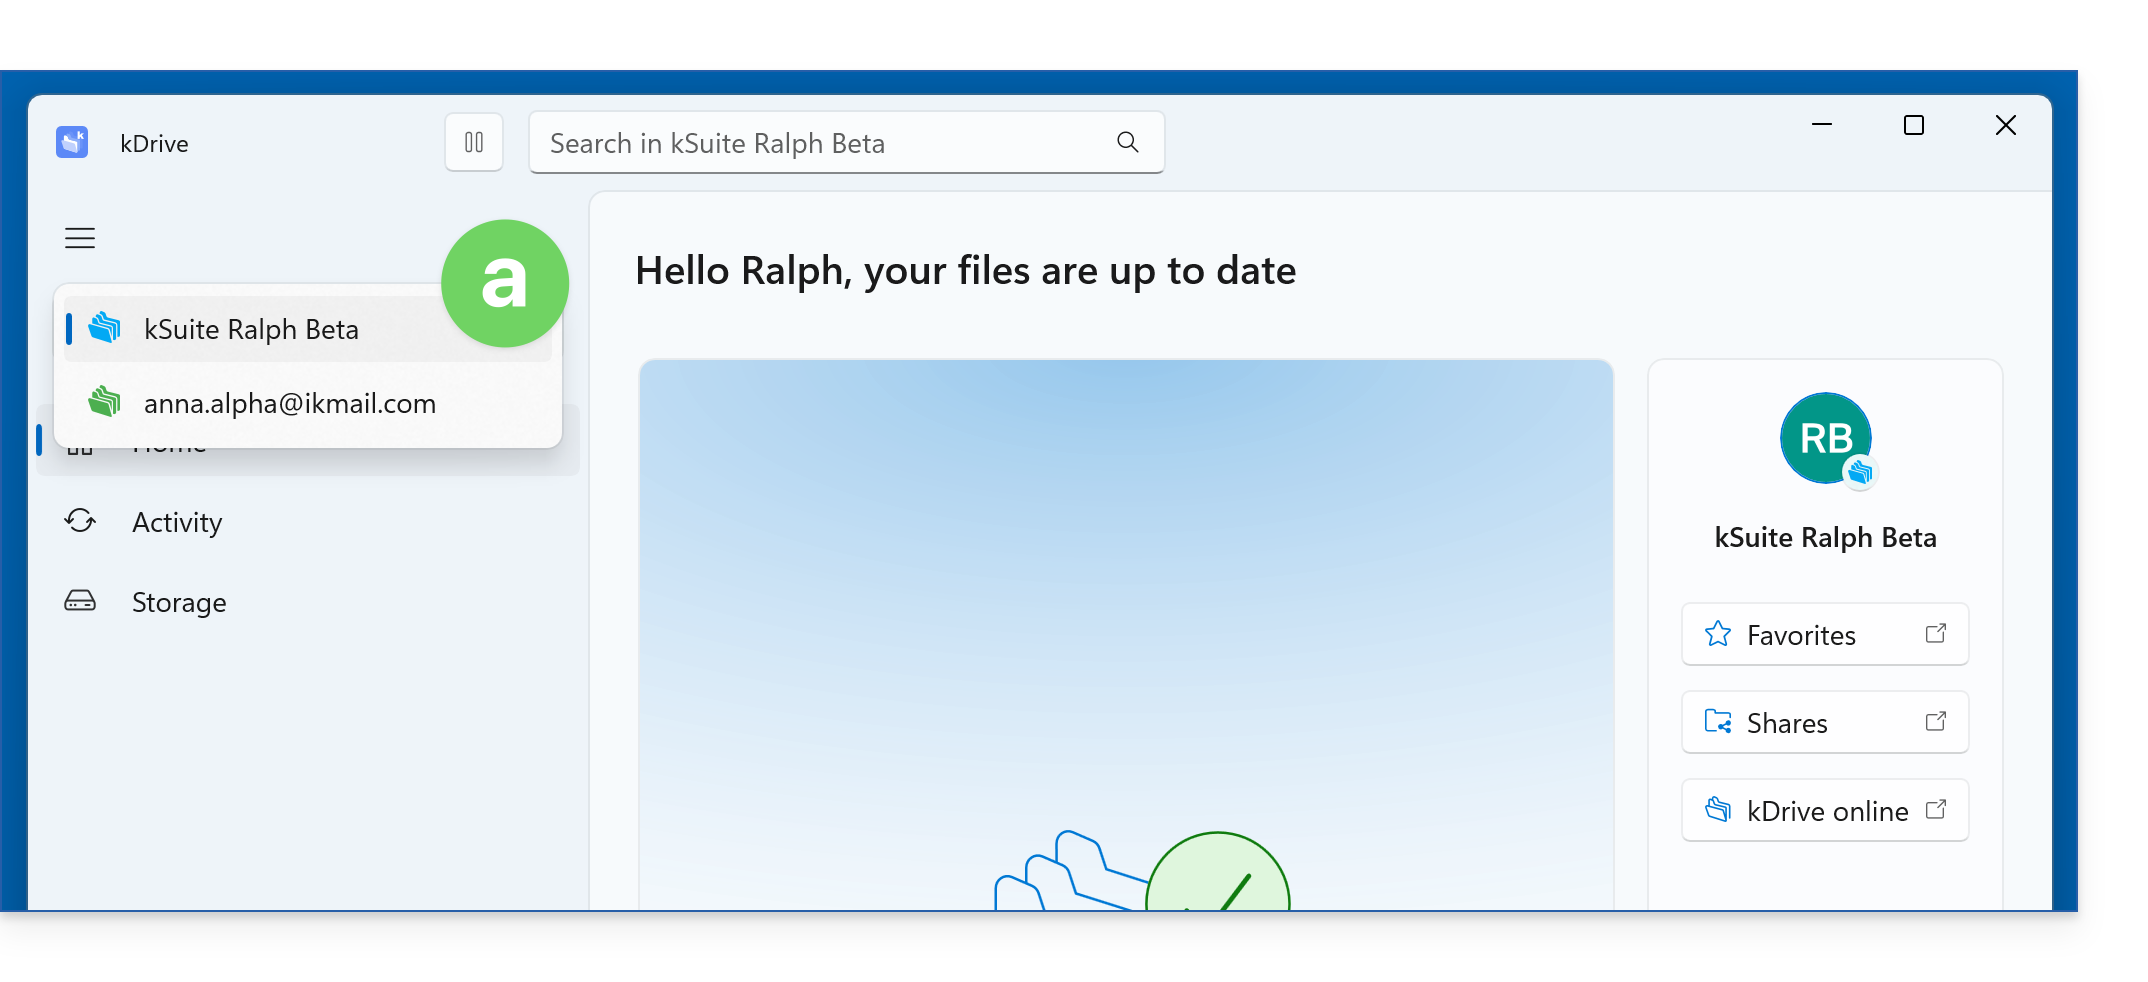
- and your settings also group together your different synchronizations:
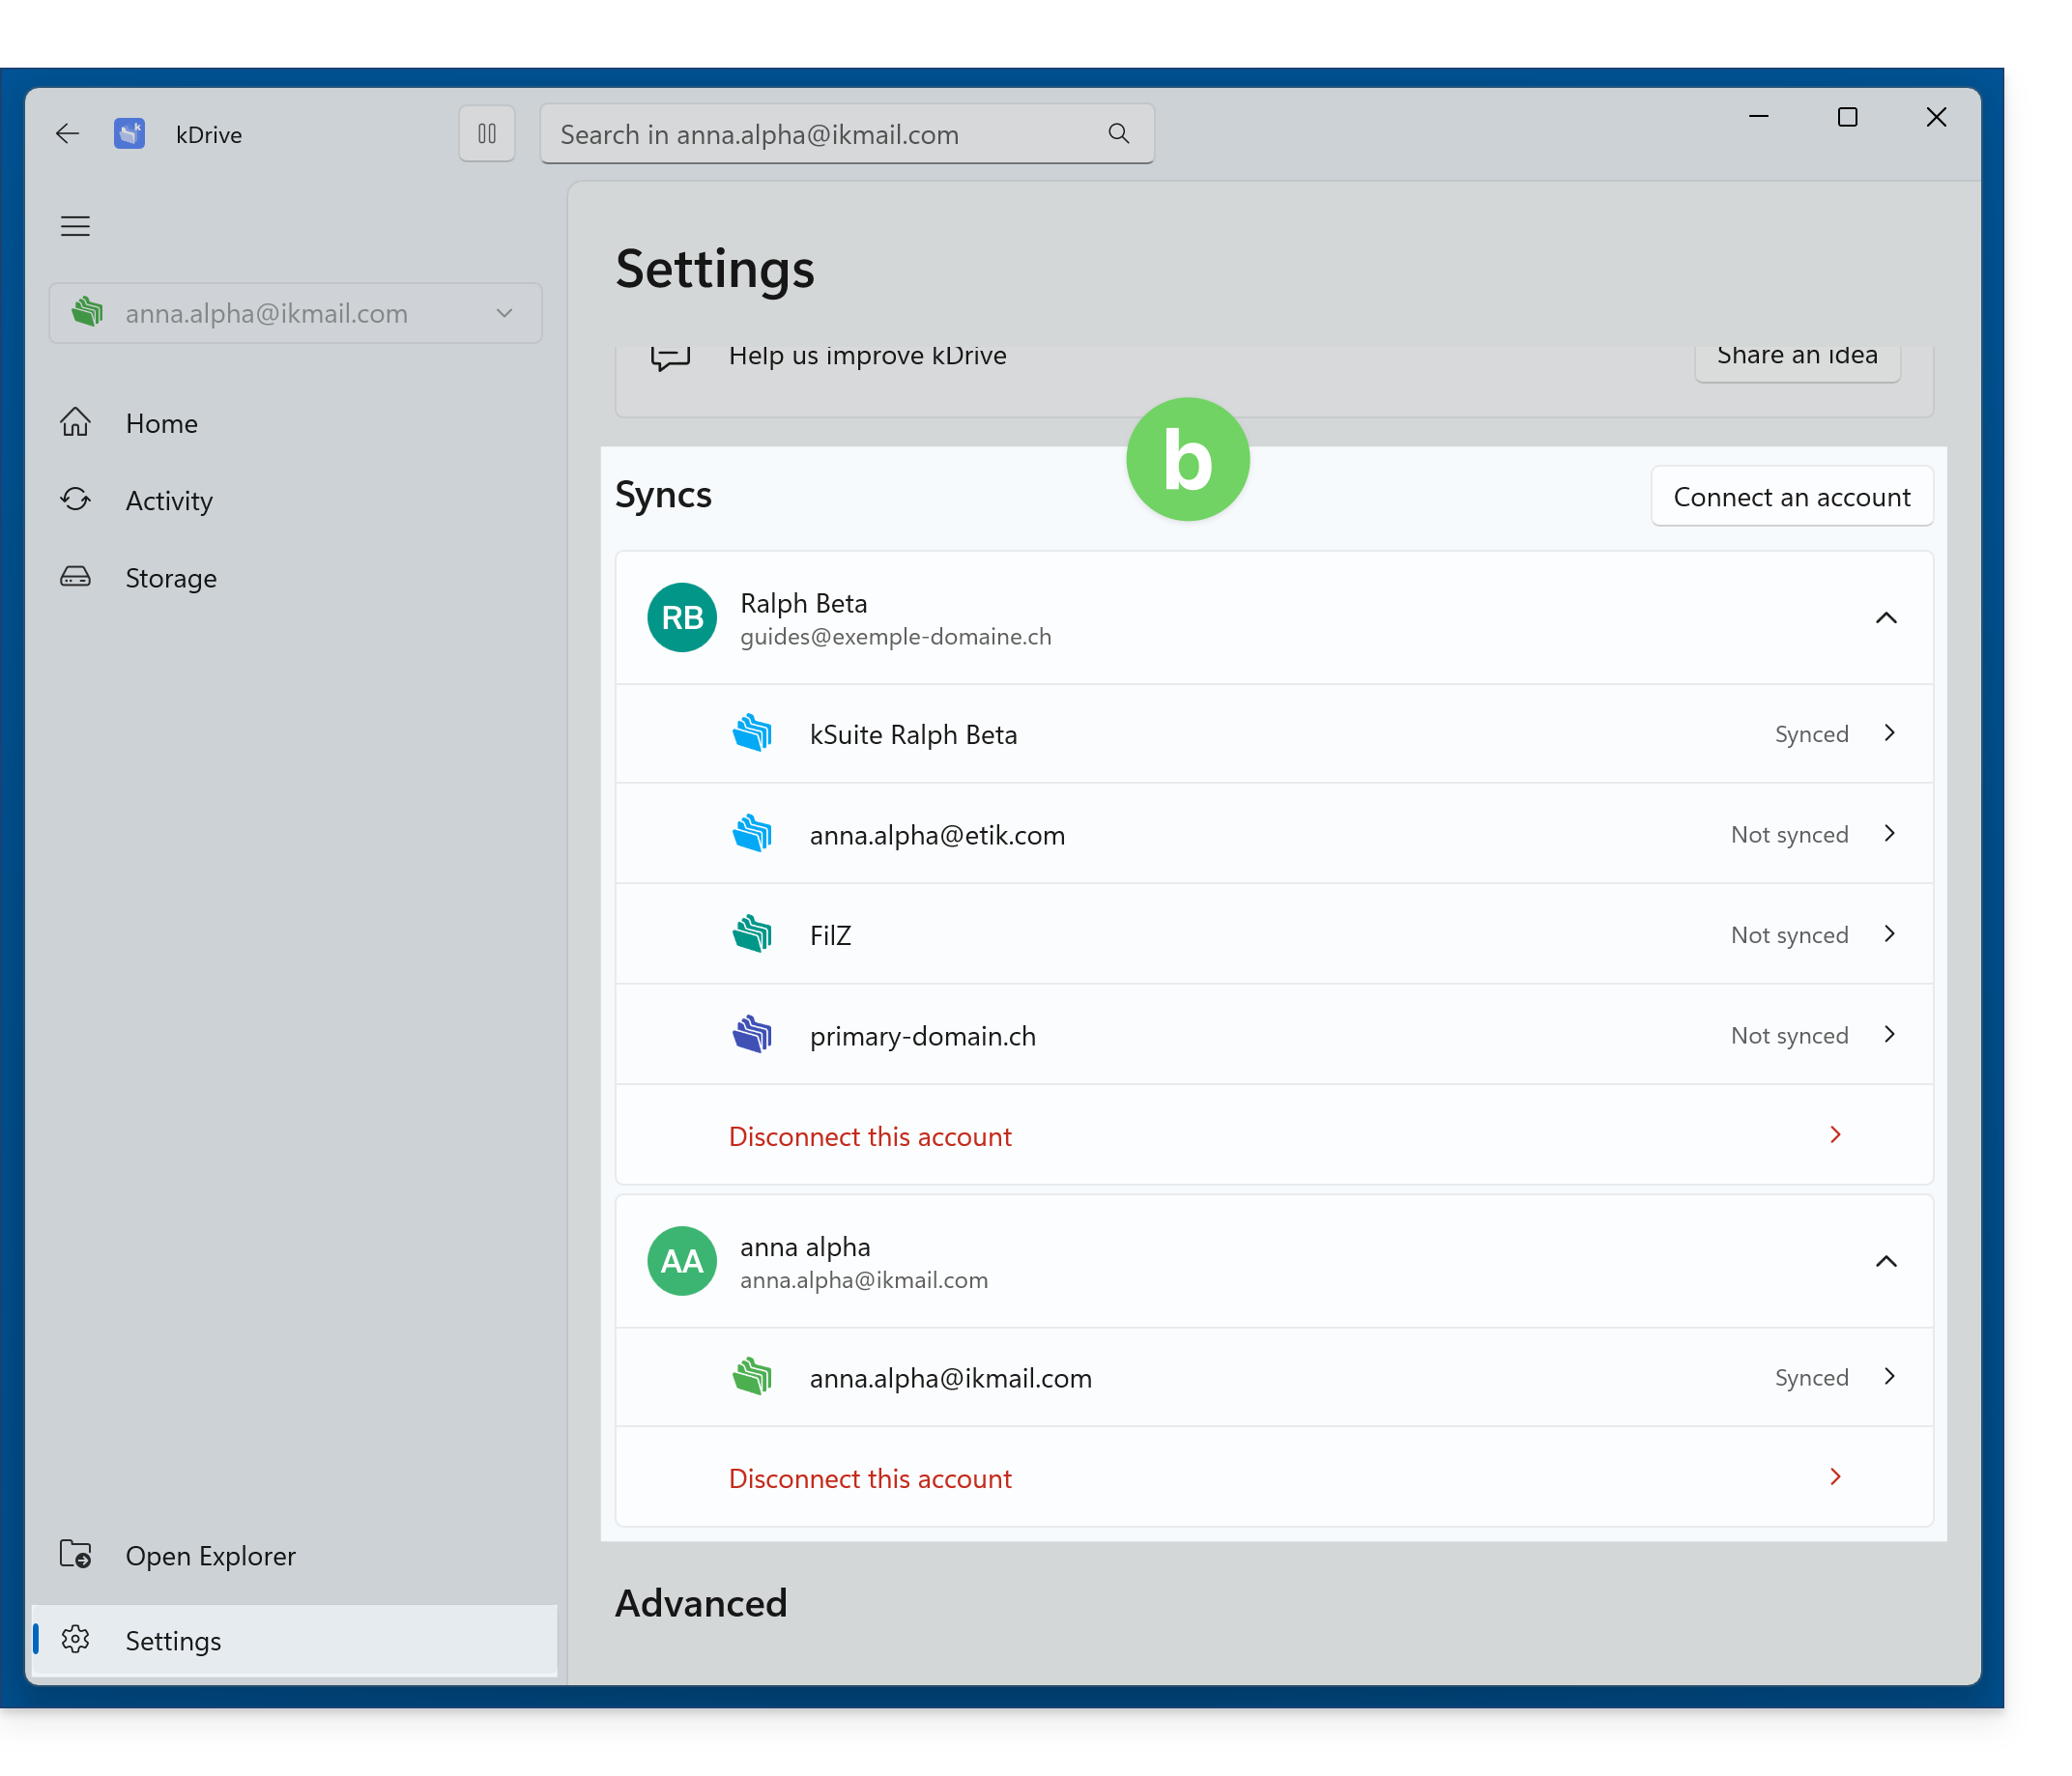
- You can now switch between kDrives when you click on the down arrow :
Disconnect a kDrive from the desktop app
To stop synchronizing a specific kDrive:
App v3.x
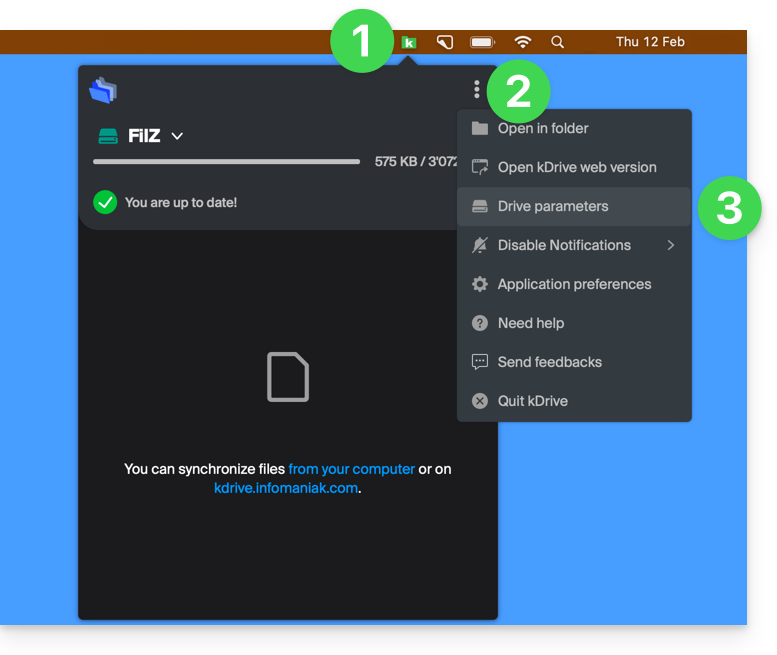
- Left-click on the desktop app icon in the notification area of your computer (top right on macOS, bottom right on Windows, and double-left-click in the taskbar on Linux).
- Click on the ⋮ icon on the right in the application.
- Click on kDrive Settings:
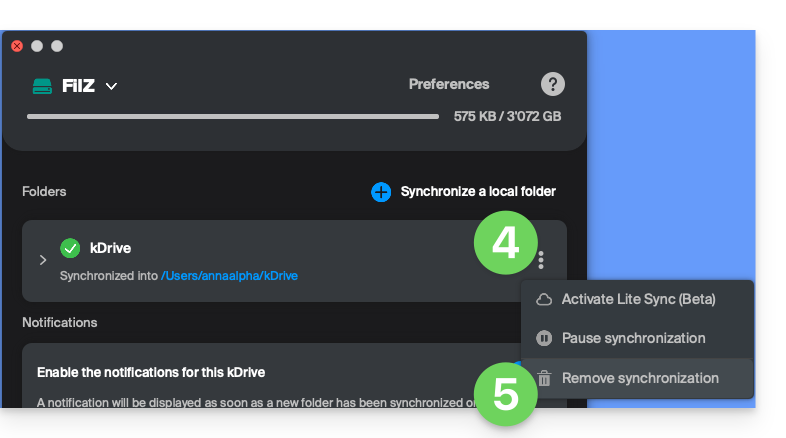
- Click on the ⋮ icon to the right of the synchronized kDrive, under Folders.
- Choose Stop synchronization (only on your device, without affecting kDrive):
App v4.x
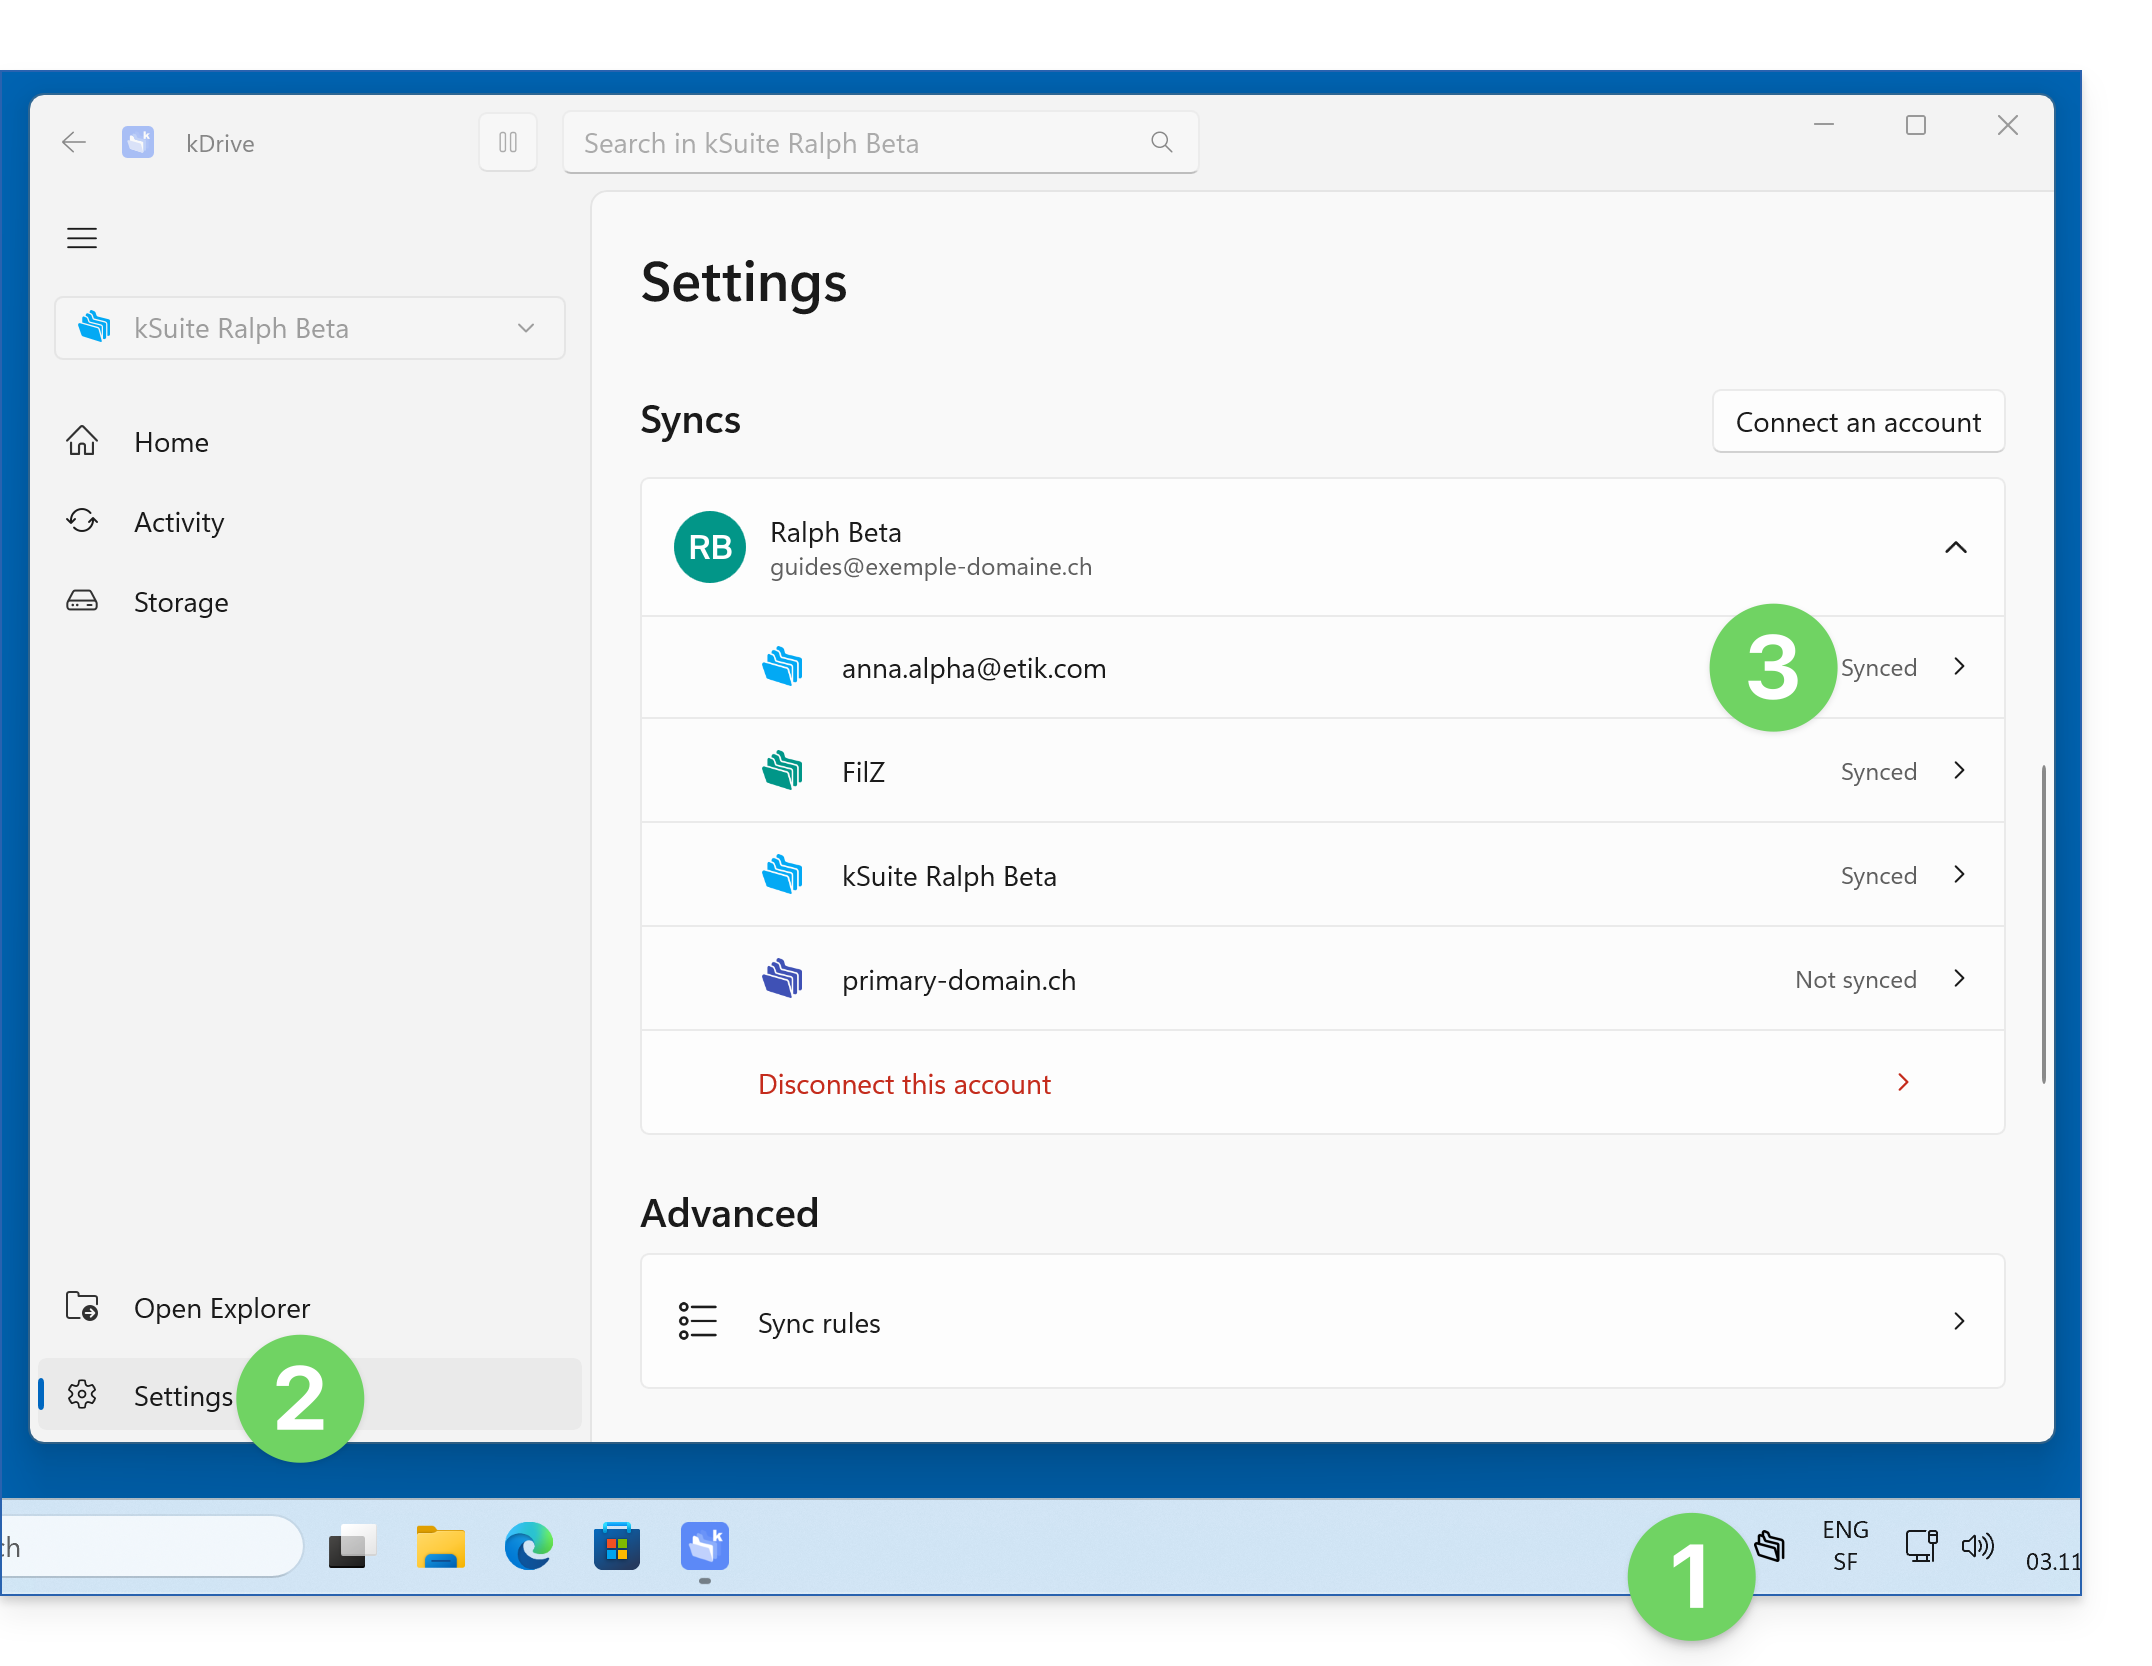
- Launch kDrive on your device: the app icon should be visible in the top right corner on macOS/Linux, and in the bottom right corner on Windows (❓: help).
- Click on Settings.
- Under Synchronizations, click on the kDrive you want to remove:
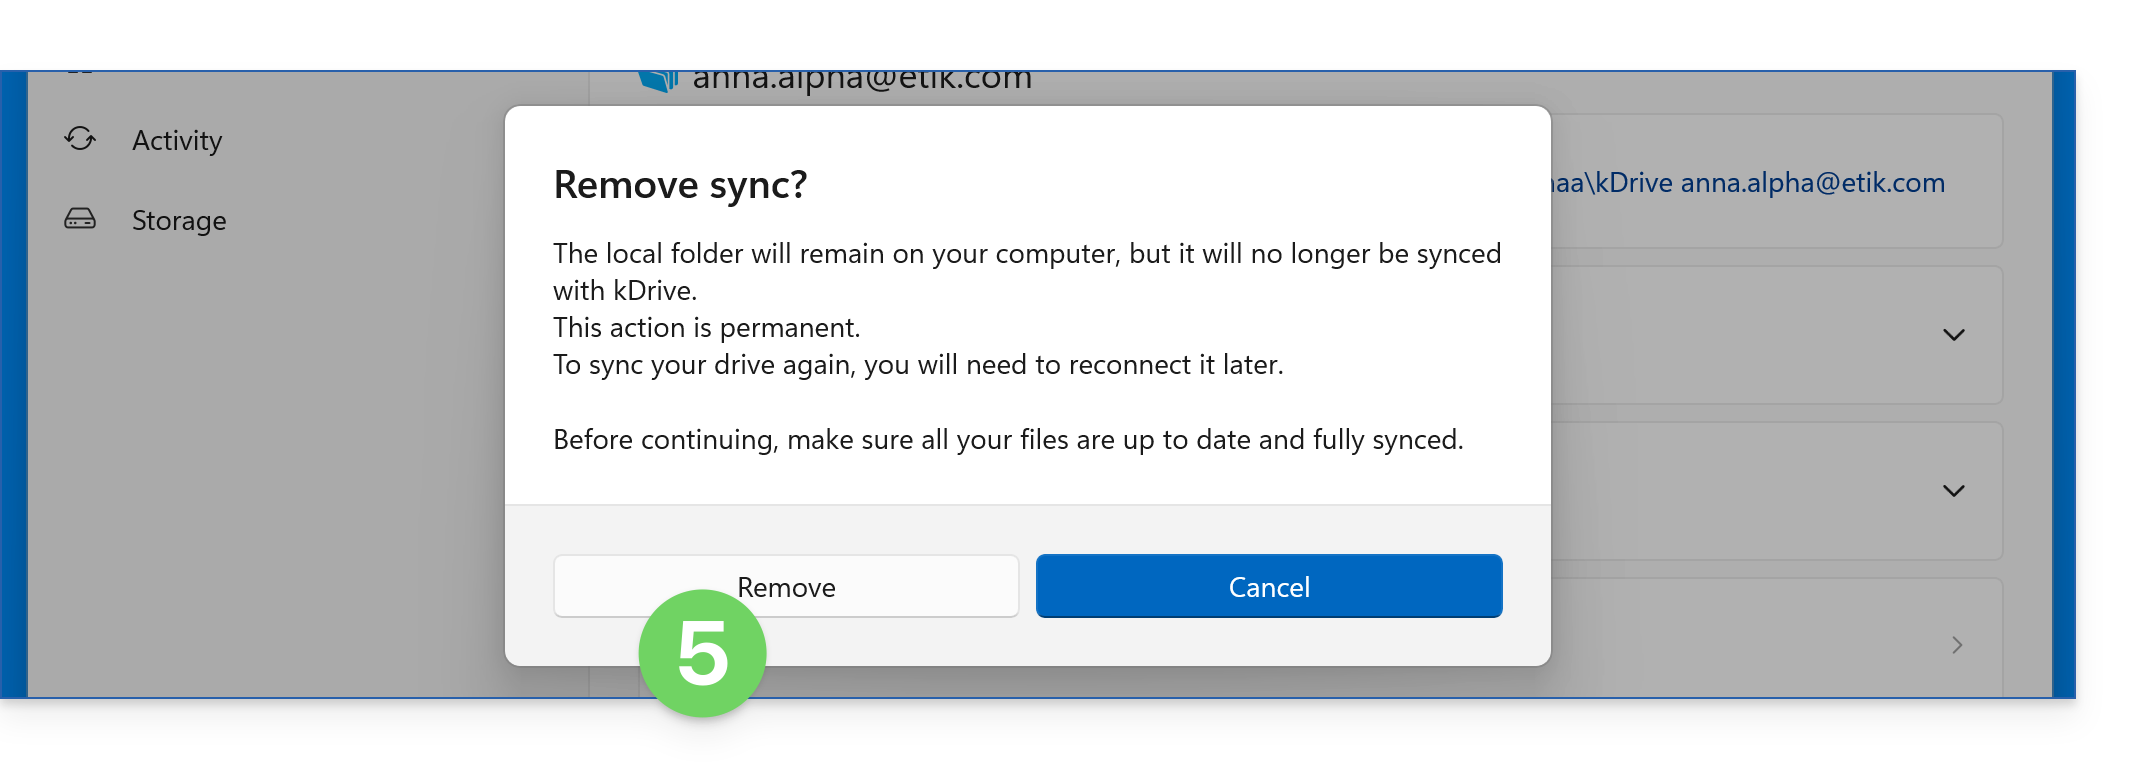
- Click to remove the current synchronization:
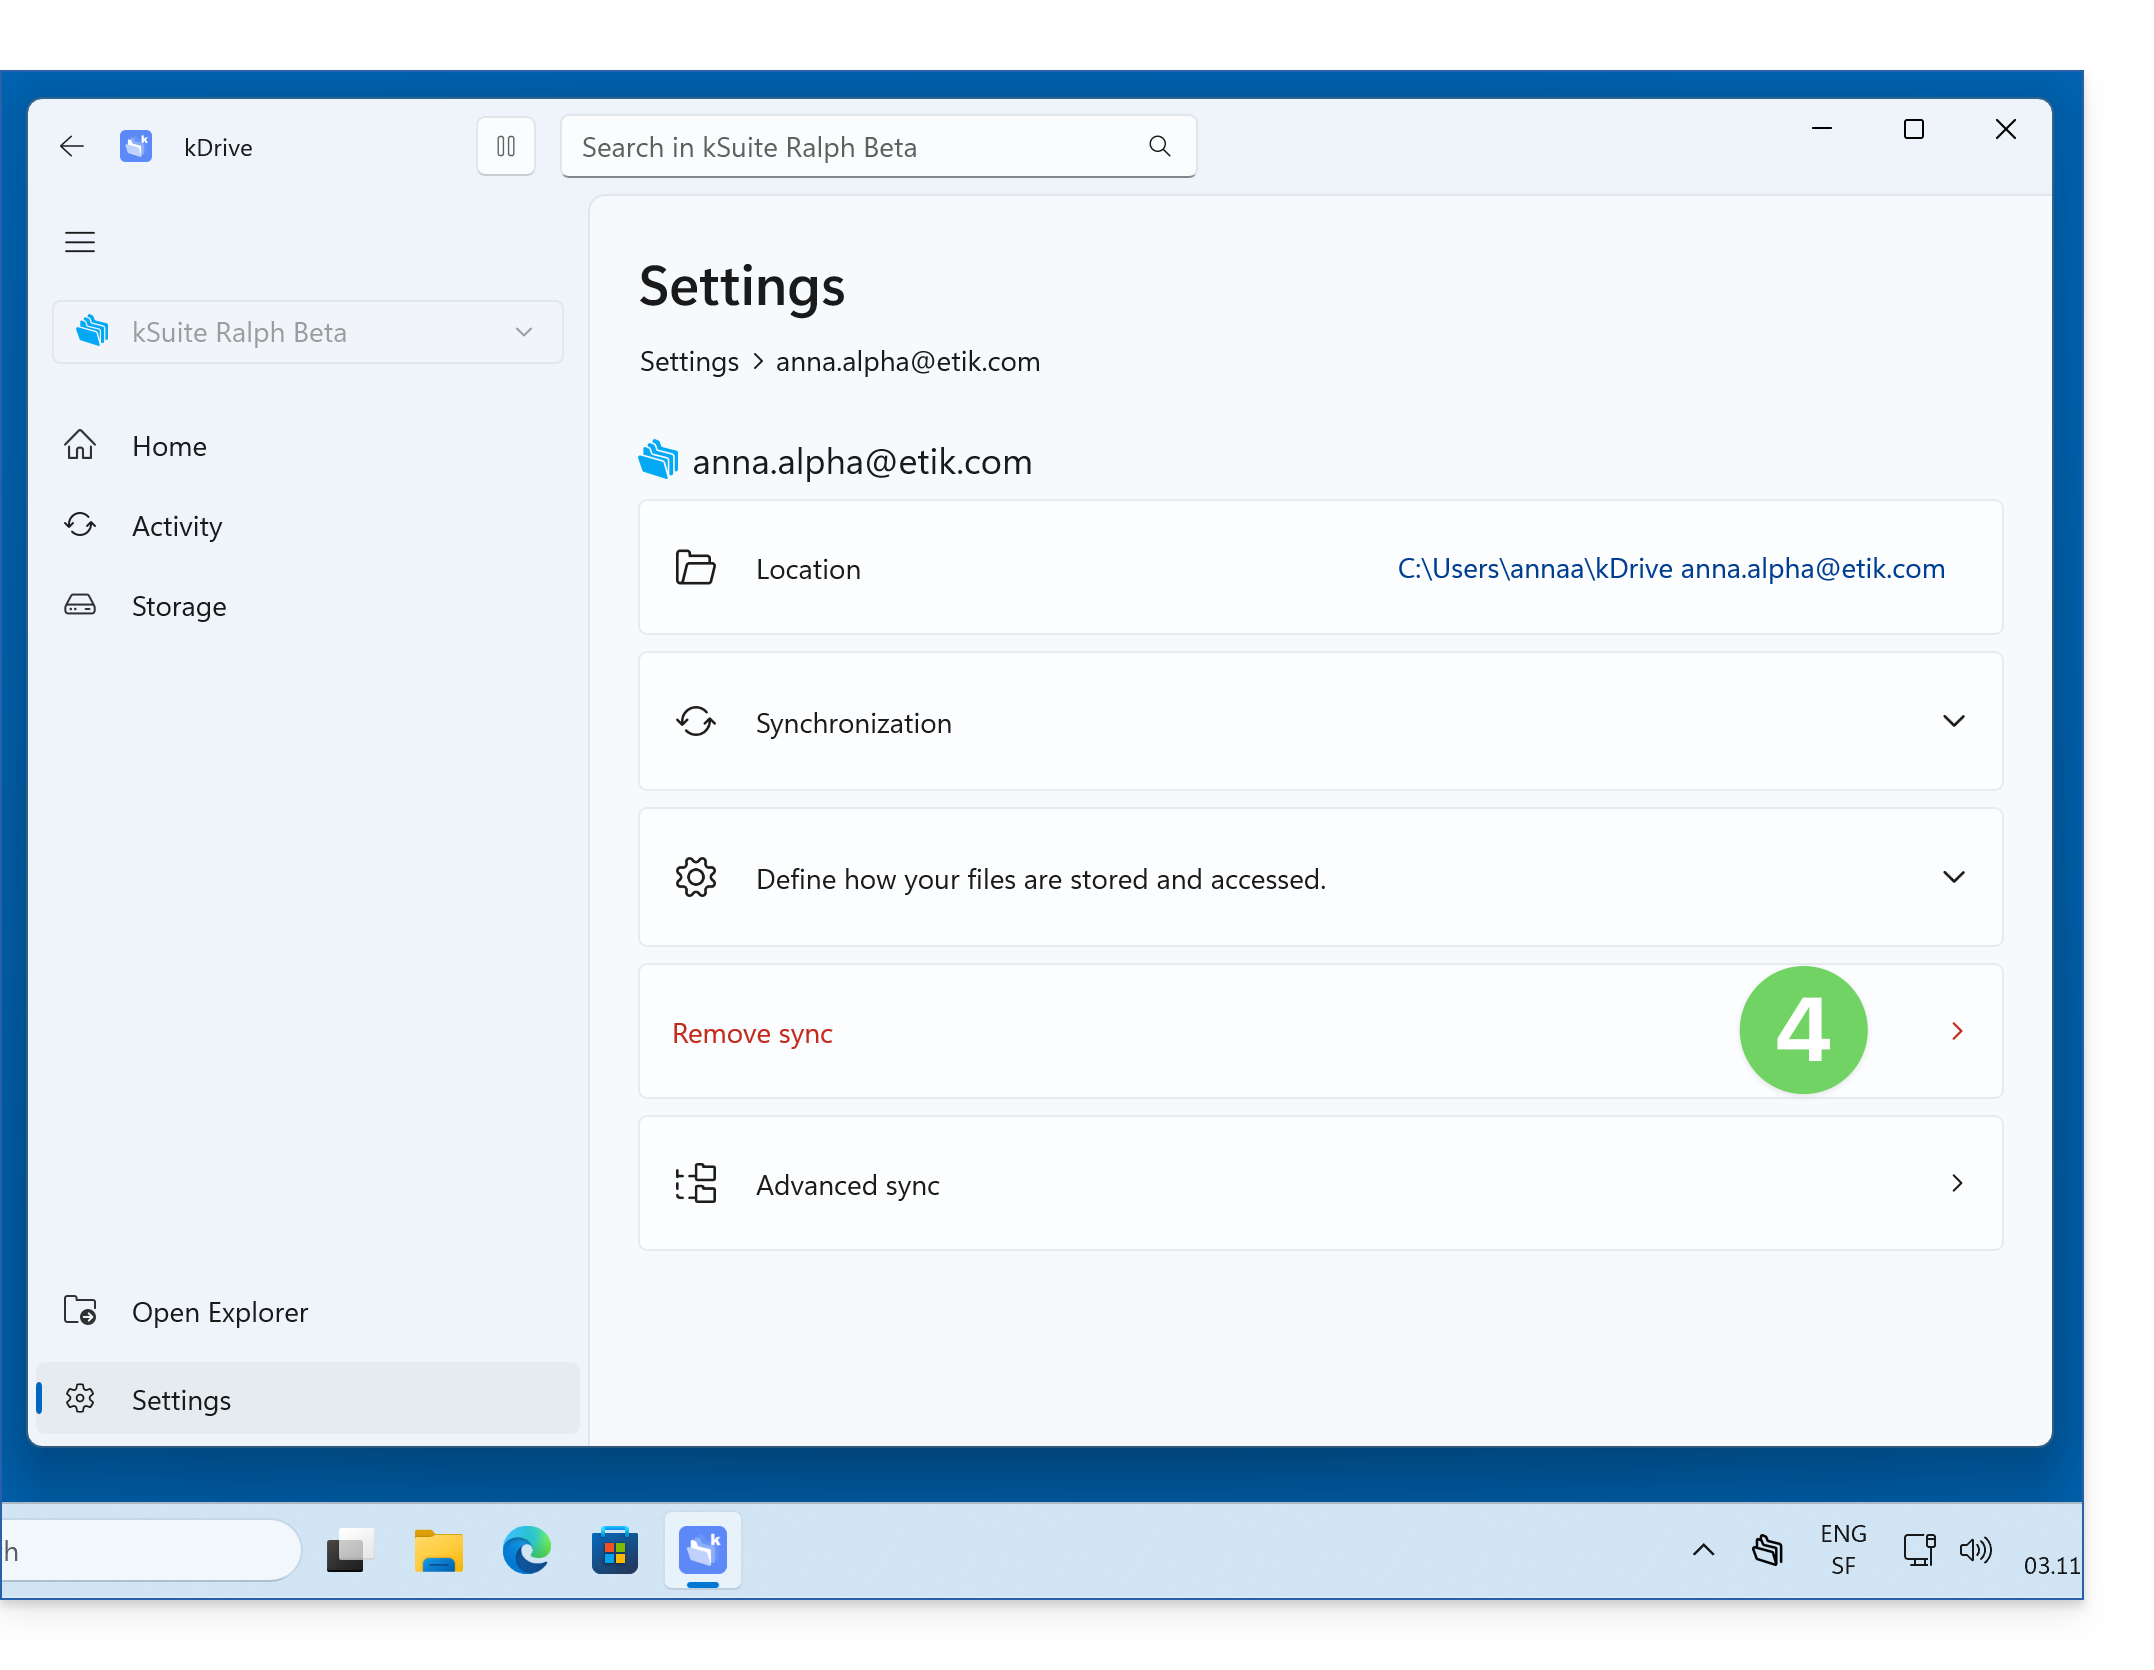
- Click to confirm:
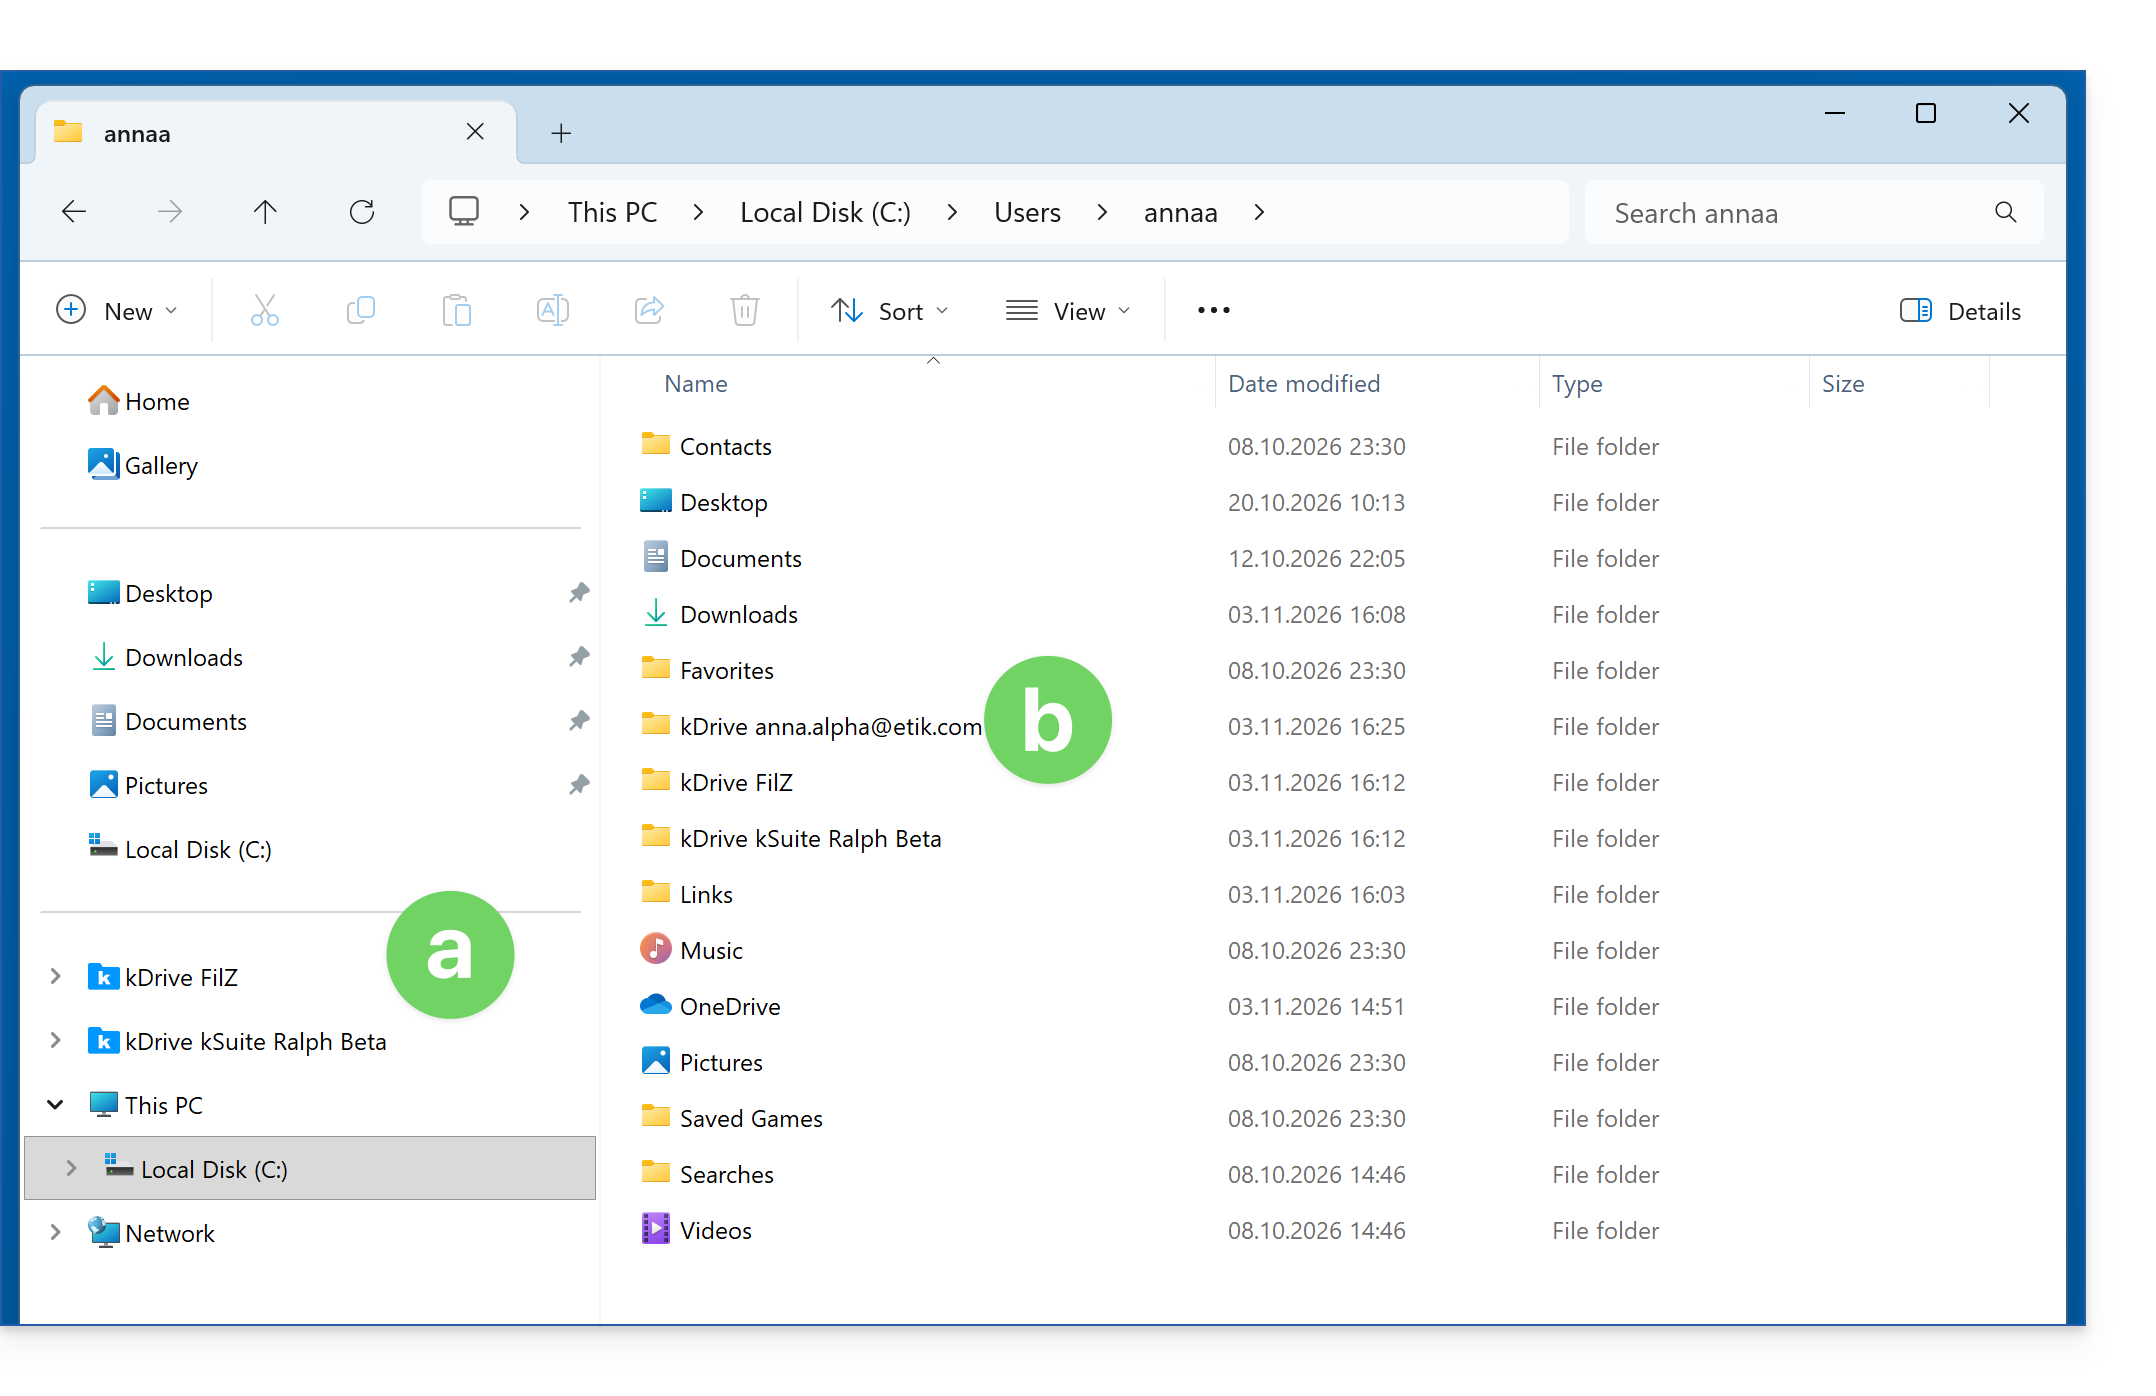
- The corresponding kDrive folder is removed from the shortcuts in your Explorer,
- it will still exist in the actual directory structure of your hard drive and will no longer be synchronized:
It is also possible to stop syncing all kDrives from the same account: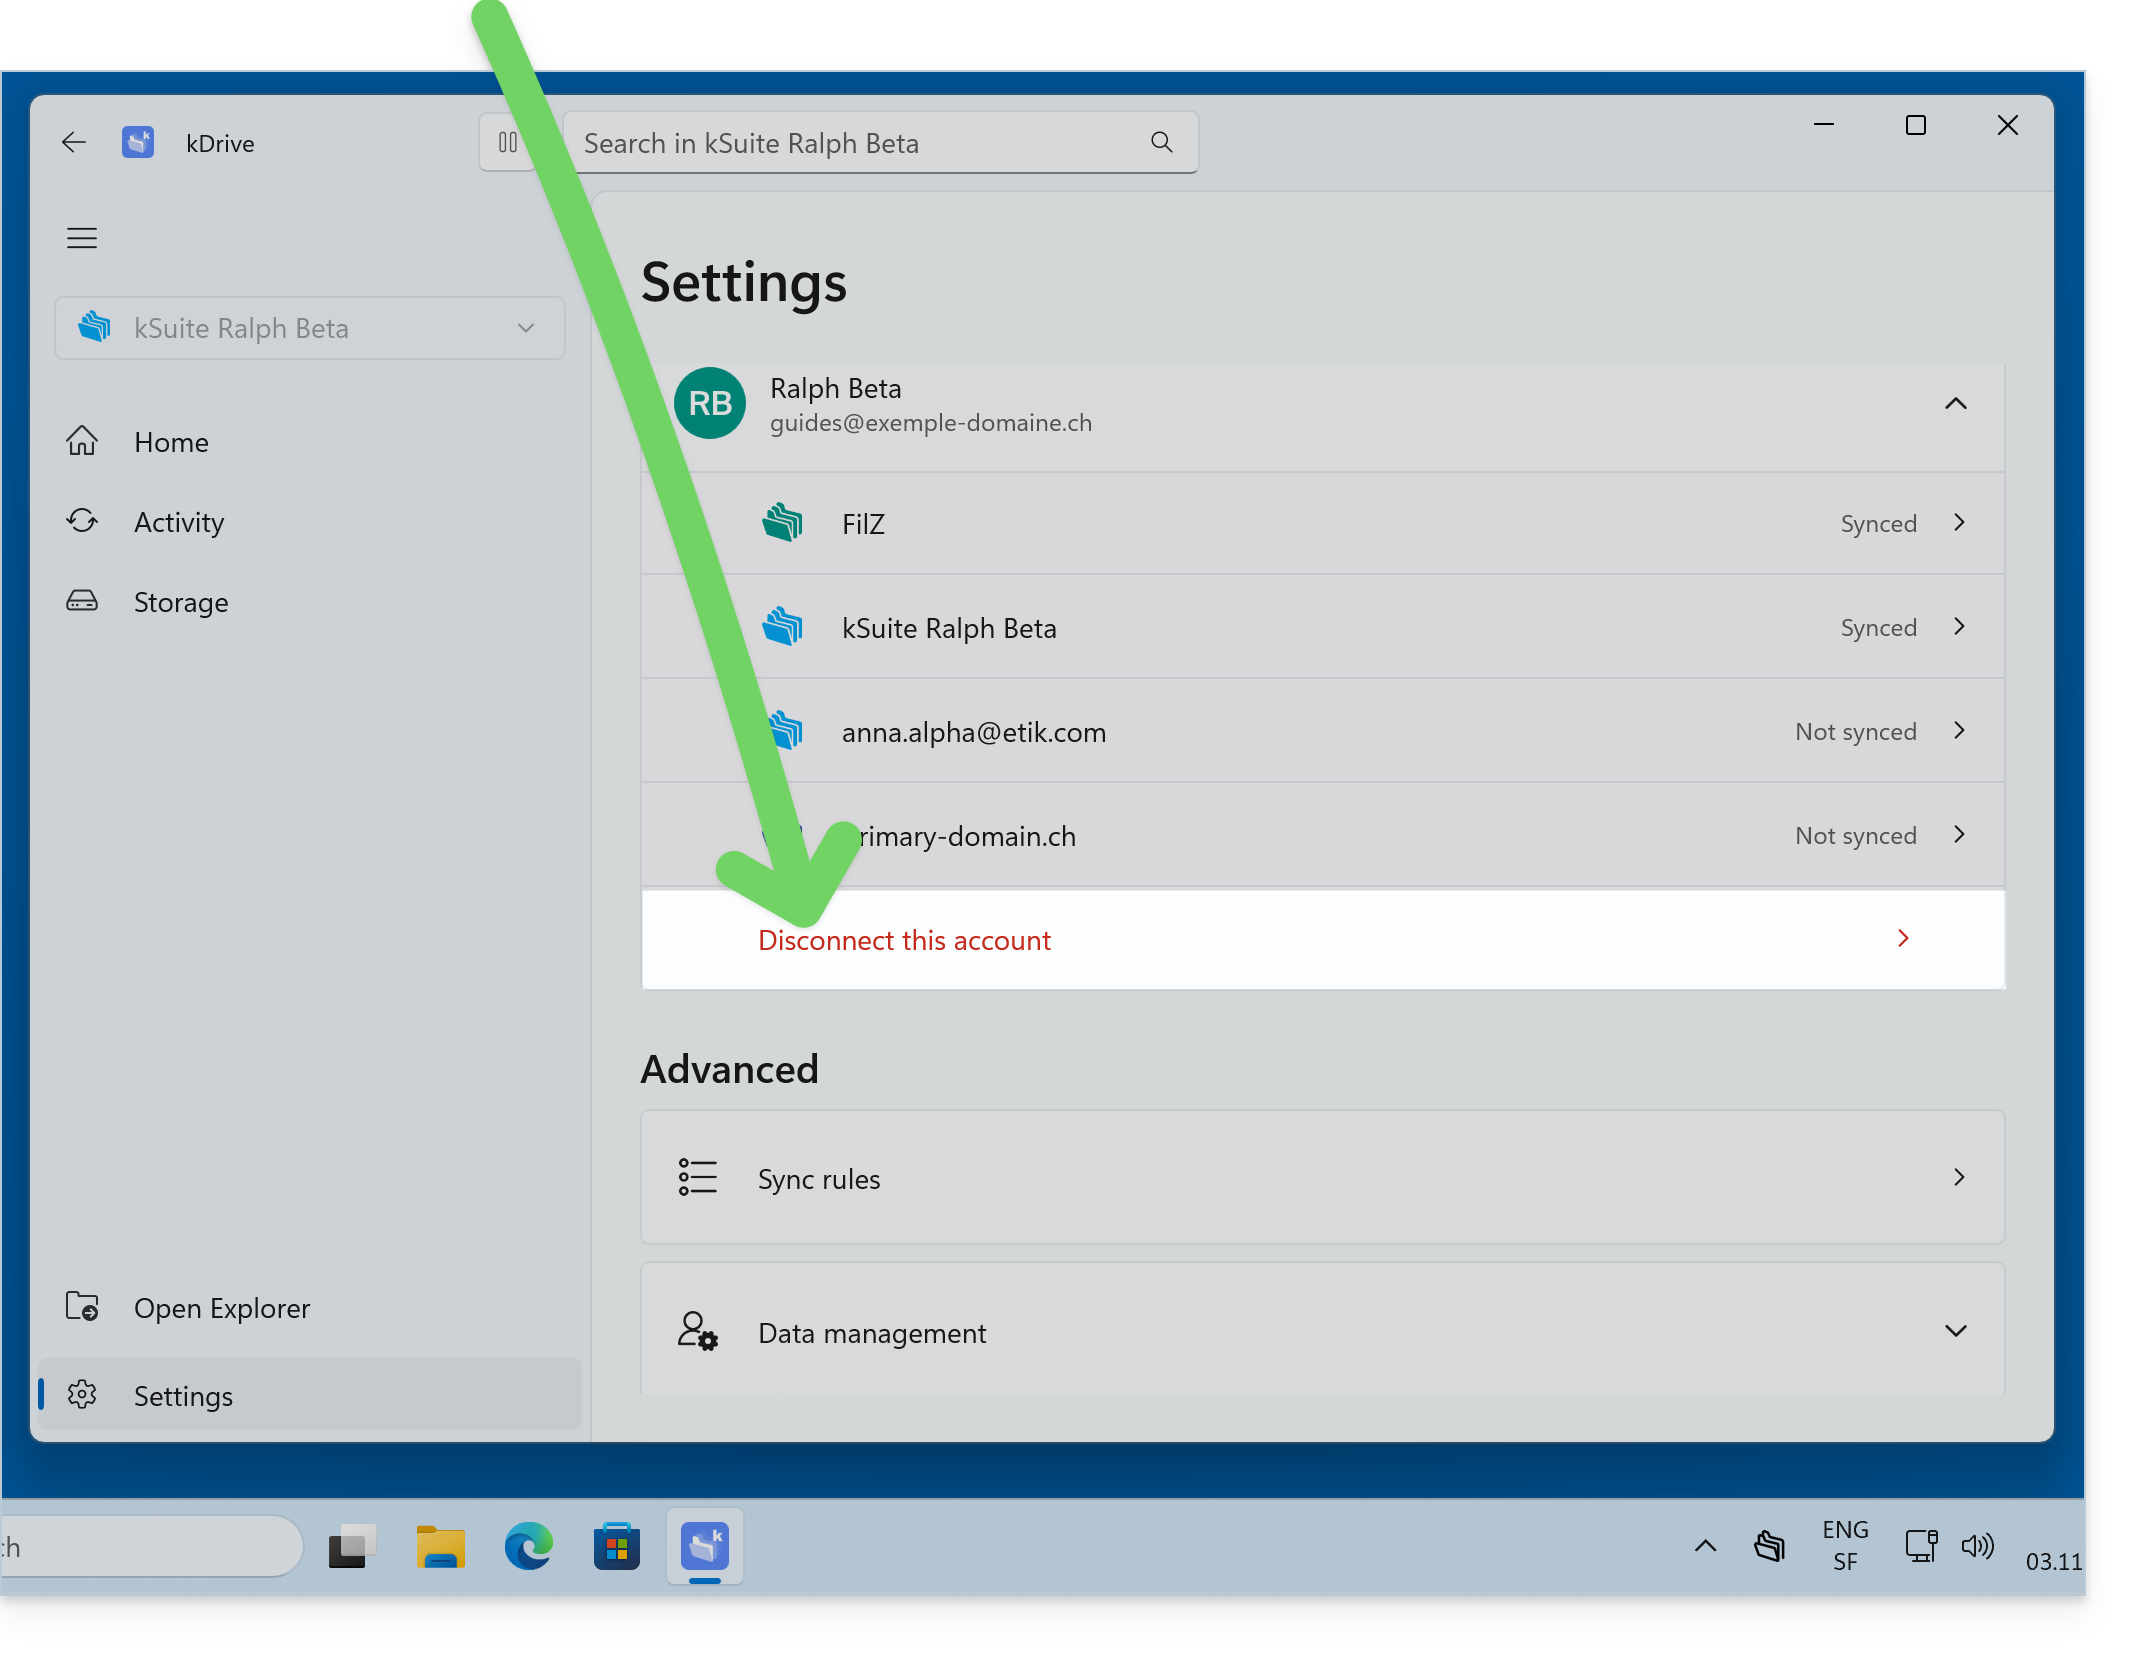
The files will still remain in the actual folder structure on your hard drive and will no longer be synchronized.
Link to this FAQ: https://faq.infomaniak.com/2458
Has this FAQ been helpful?
This guide details how to restore an Apple macOS computer using Acronis on Swiss Backup, the backup solution in a Swiss independent cloud.
Prerequisites
- The Acronis application must be installed on the computer on which you want to perform the restore; use the same credentials as those used to back up the machine when registering the agent:
- Click here to access the Acronis Console with the credentials obtained after adding the device (need help?).
- Click on the user icon at the very top right.
- Click on Downloads:
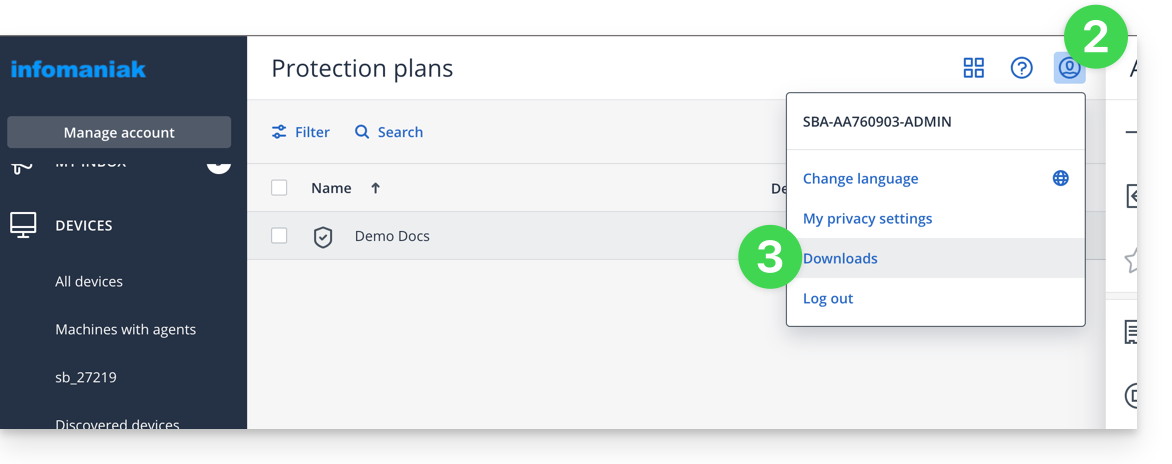
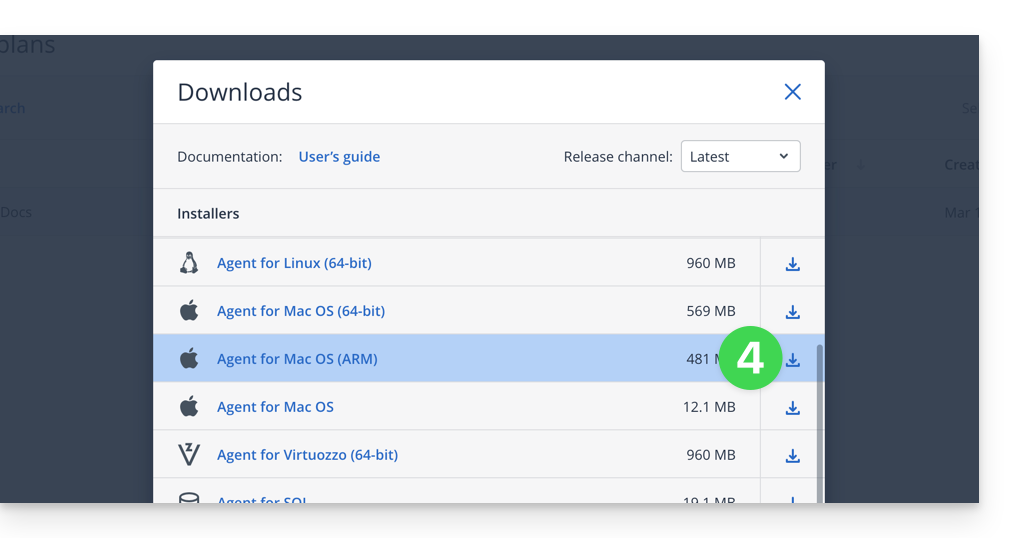
- Choose the client suitable for your macOS machine:
Create a bootable USB drive
To do this:
- Insert an empty USB drive of at least 4 GB into your computer (please note: the data contained on the drive will be deleted).
- Open the Rescue Media Builder application from the Applications folder in your macOS Finder. This application is automatically installed with the Acronis application.
- Check the detected USB drive and click Create Media.
Start the restoration process
To do this:
- Restart your macOS computer using the bootable USB drive.
- Depending on the macOS version, press and hold a key on the keyboard (refer to this Apple guide to find out which one) during the restart.
- If necessary, click on the bootable USB drive to start from it.
Configure and start the restore
To do this:
- Select your key in Rescue Media Builder:

- Click on Bootable recovery media:

- Click on Recover:

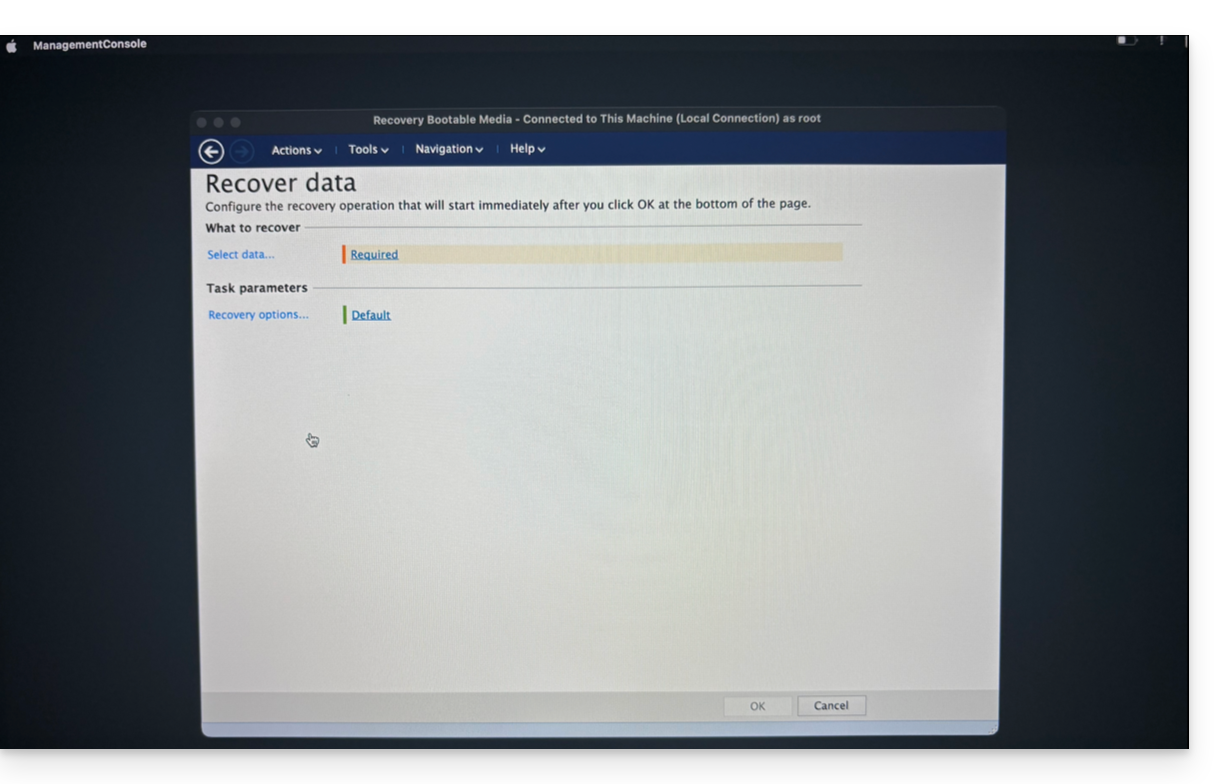
- Click on Select data:
- … then click on Browse:

- and select Cloud Storage; then click the Log In button:

- Use the device credentials to authenticate:

- Choose the macOS device to restore, then click OK to start the restoration:

- If you chose to encrypt your backups, you will be prompted for the backup password:

- In the upper part of the screen, select the available backup you want to restore:

- Once the backup is selected, you can select the type of item to restore and which ones you want to restore in the lower part of the screen; it is recommended to select the Volumes type and restore all available volumes, in order to restore all of your hard drives... then start the restoration by clicking the OK button:

- The restoration process will then begin, and you can monitor its progress via the Progress tab:

Once the process reaches 100%, the macOS machine will restart several times in a row (this is normal) until the entire procedure is complete.
Link to this FAQ: https://faq.infomaniak.com/2289
Has this FAQ been helpful?
This guide provides instructions for synchronizing kDrive with a QNAP NAS (or vice versa) via the WebDAV protocol, which can be found in the HBS 3 Hybrid Backup Sync application.
✘ UNAVAILABLE with
kSuite Free / kSuite Standard
my kSuite / my kSuite+ (ik.me, etik.com, ikmail.com)
Prerequisites
- You must have a Qnap NAS that is accessible from the internet.
- Know your kDrive ID kDrive ID (❓: help).
Synchronize kDrive and Qnap via HBS 3
To do this:
- Log in to the Qnap NAS administration interface (QTS).
- If necessary, download and install the HBS 3 Hybrid Backup Sync app (❓: help).
- Open HBS 3.
- Go to Sync from the menu on the left.
- Create a synchronization task (Two-way Sync Job).
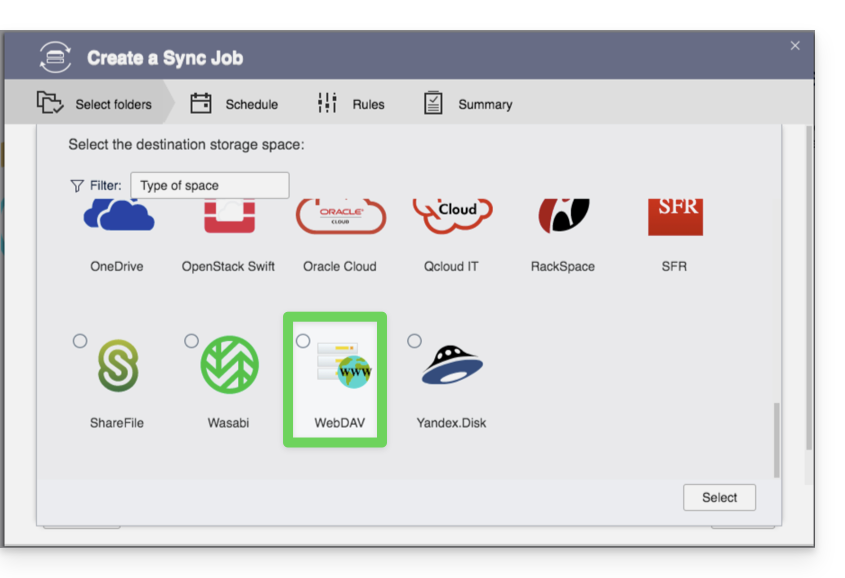
- Choose WebDAV from the list of Cloud providers:
- For account settings, use the following information:
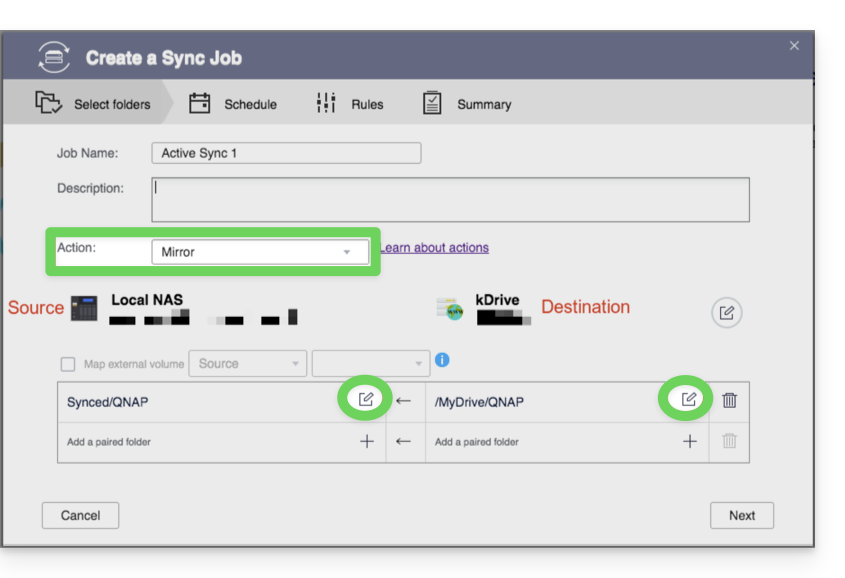
- Choose the local source and destination folder:
- Customize the task frequency.
- Complete the wizard.
Link to this FAQ: https://faq.infomaniak.com/2405
Has this FAQ been helpful?
This guide provides instructions for synchronizing kDrive with a Synology NAS (or vice versa) via the WebDAV protocol, which can be found in the Cloud Sync application.
✘ UNAVAILABLE with
kSuite Free / kSuite Standard
my kSuite / my kSuite+ (ik.me, etik.com, ikmail.com)
Prerequisites
- You must have a Synology NAS that is accessible from the internet.
- Find your kDrive ID kDrive ID (❓: help).
Synchronize kDrive and Synology via Cloud Sync
To do this:
- Log in to the Synology DiskStation Manager (DSM).
- If necessary, download and install the Cloud Sync app from the Package Center.
- Open Cloud Sync.
- Click on the + at the bottom left to add a Cloud.
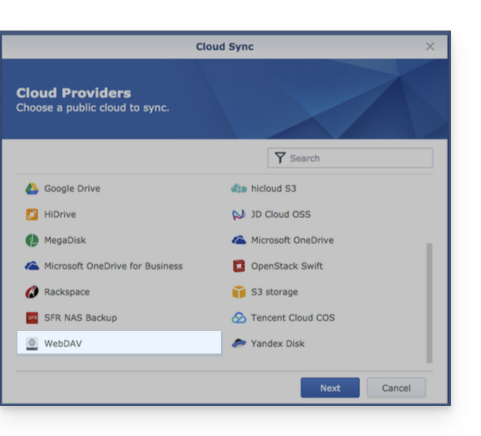
- Choose WebDAV at the bottom of the list of available Clouds:
- For account settings, use the following information:
- Choose the local folder, the destination folder, and the desired synchronization type:
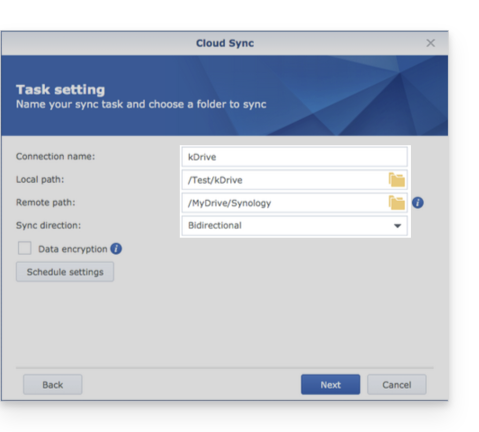
- Bidirectional: changes will be reflected in both directions.
- Download only remote changes: ideal for backing up a kDrive to your NAS.
- Download only local changes: ideal for backing up data from your NAS to a kDrive.
Link to this FAQ: https://faq.infomaniak.com/2404
Has this FAQ been helpful?
This guide details how to back up an Apple macOS computer using Acronis on Swiss Backup, the backup solution in a Swiss independent cloud.
Prerequisites
- Check the macOS versions supported by the Acronis Agent.
- Have an Infomaniak Swiss Backup space with an available device quota (minimum 1) for macOS:
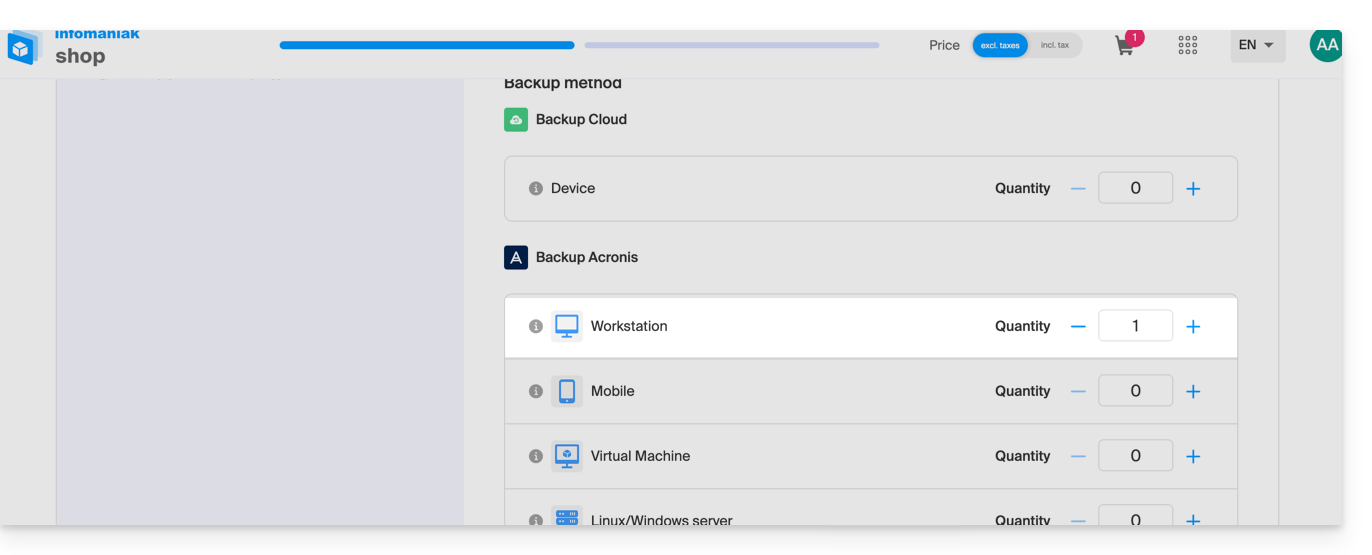
- If necessary, increase the device quota according to your needs.
- Add the device to the Infomaniak Manager to receive the login credentials.
Configure the backup
To configure the backup with Acronis:
- Click here to access the Acronis Console using the credentials obtained after adding the device (need help?).
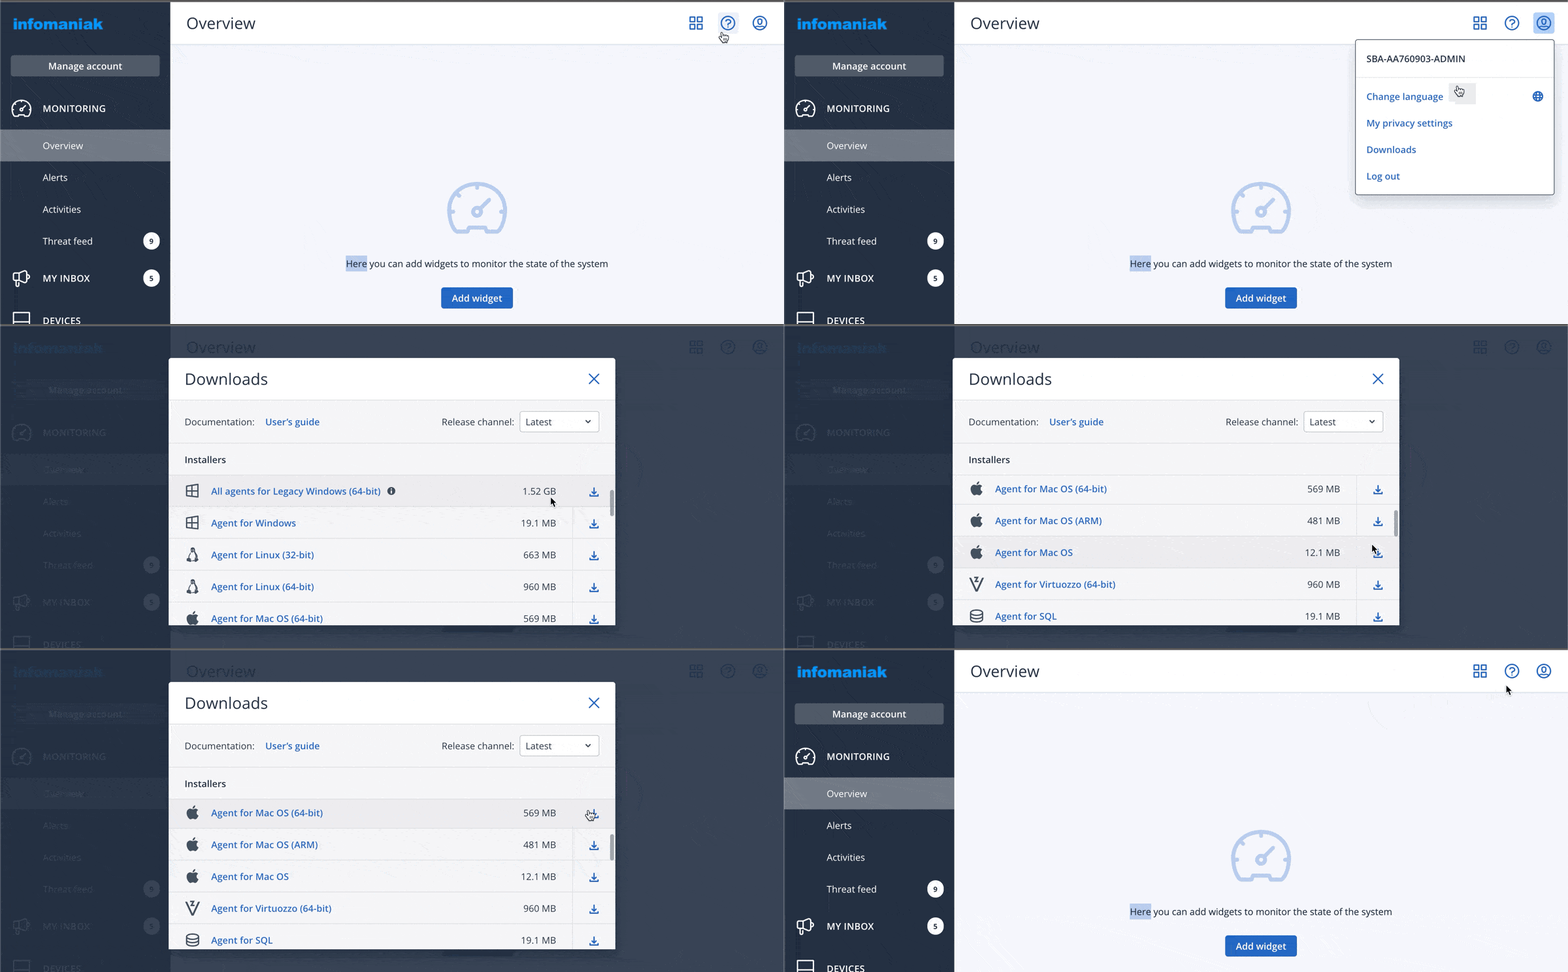
- Download and install the Acronis Agent for macOS (need help?):
- Also, refer to the chapter below regarding disk access requested by the installer.
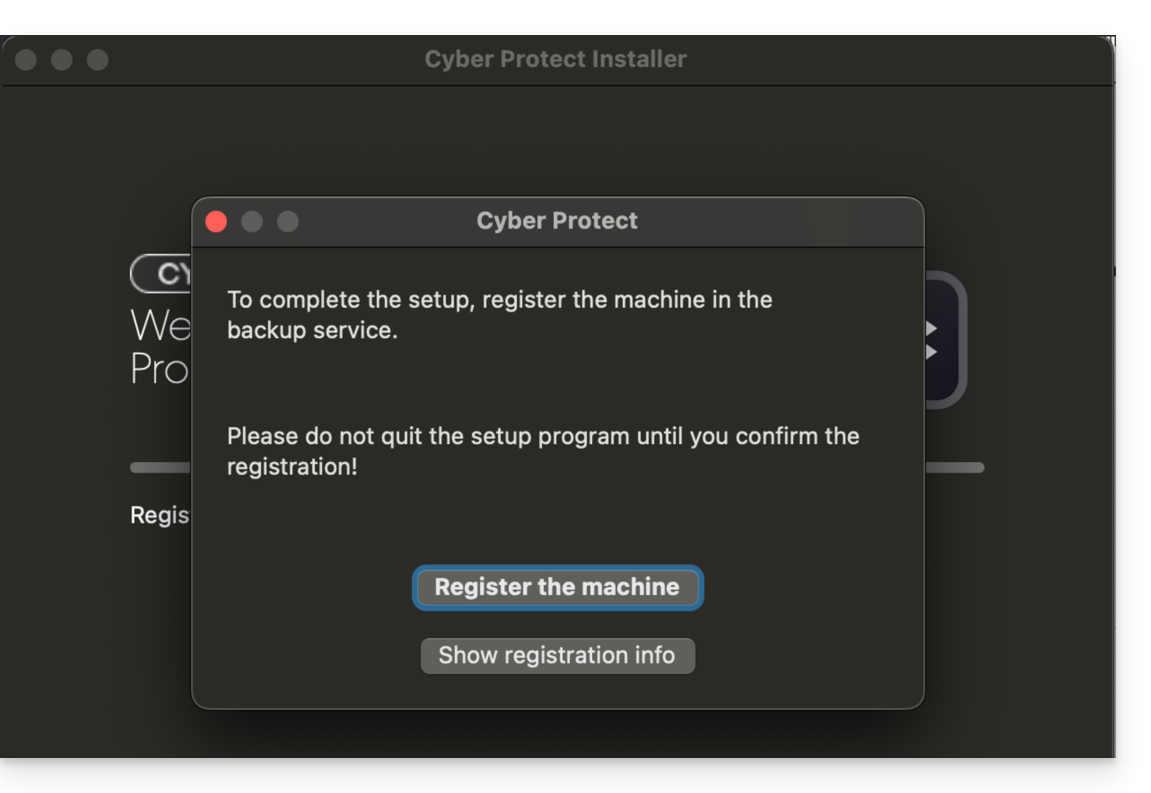
- Click on Register Machine at the end of the Cyber Protect installation:
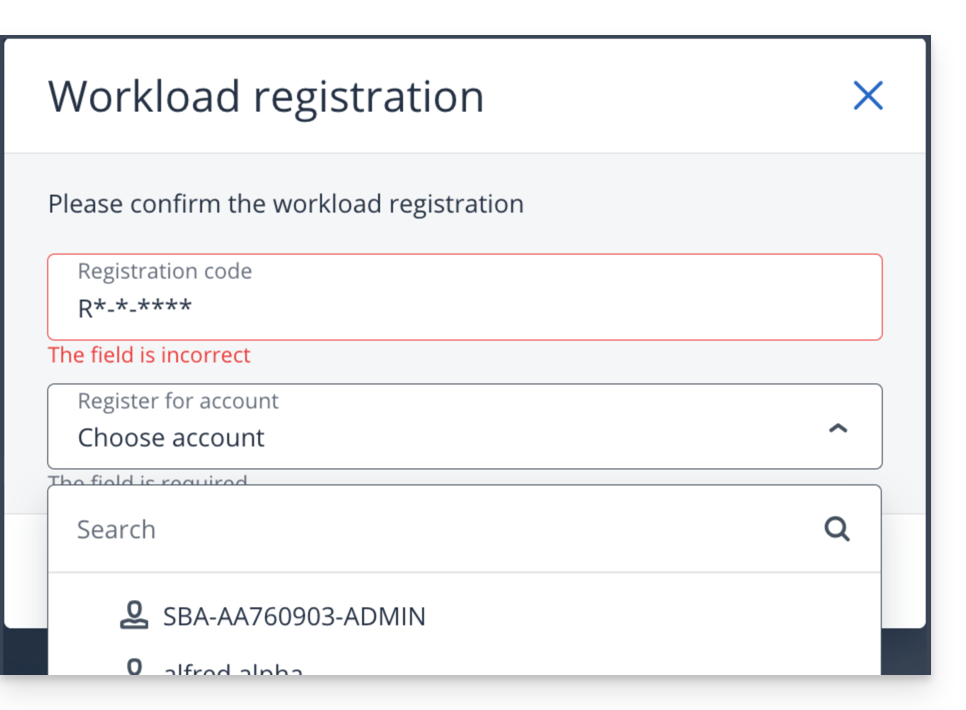
- Do not modify the code provided, select the relevant user if necessary, and click on Verify Code:
- Refer to this other guide if machine registration fails.
- Create a backup plan.
Password and access permissions
When installing the desktop app (point 2 above), the password required is that of your Mac (user account).
You will also need to grant (from macOS settings) full disk access to the Acronis Cyber-Protect-Service agent: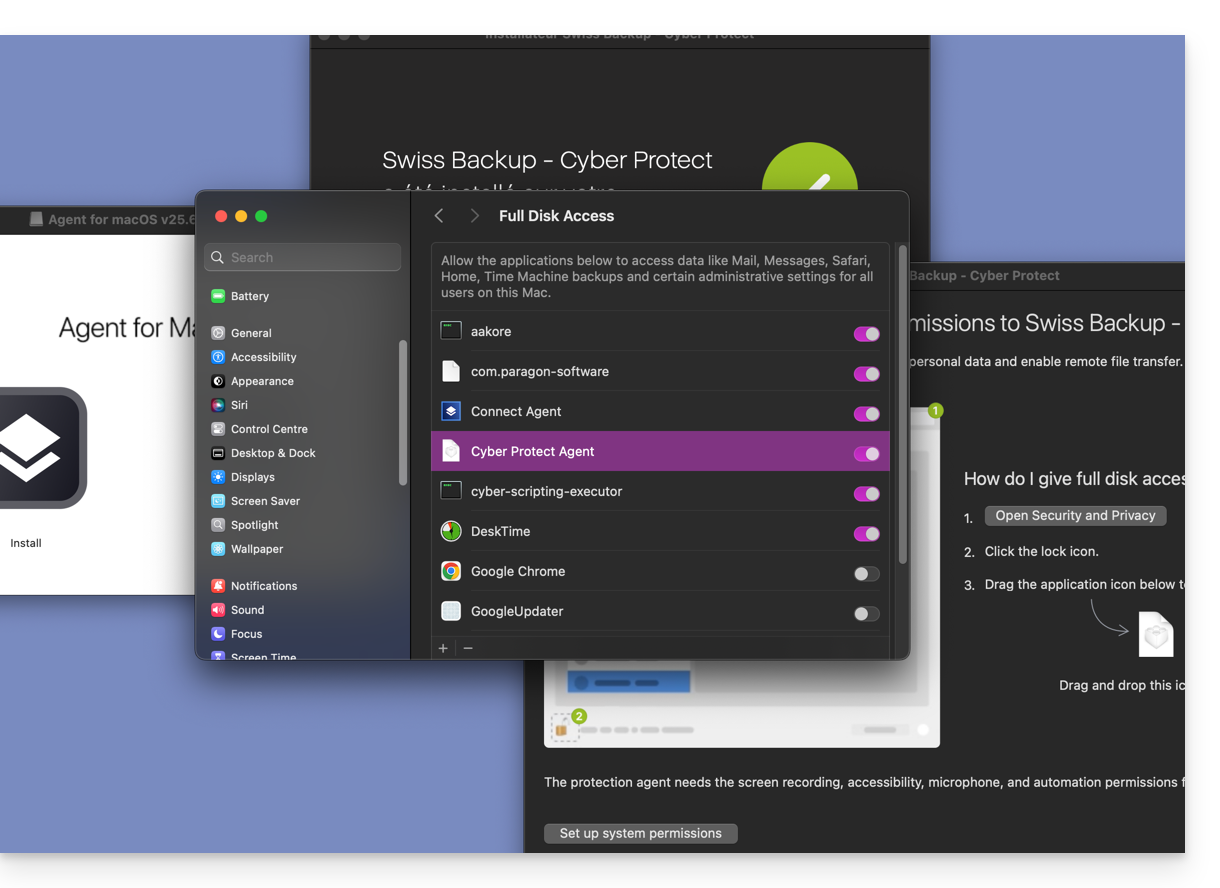
Access and restore your backed-up files
Refer to this other guide for restoring your data.
Link to this FAQ: https://faq.infomaniak.com/2281
Has this FAQ been helpful?
This guide explains how to import tasks into the dedicated section of the Infomaniak web app Calendar (online service ksuite.infomaniak.com/all/calendar/tasks).
Introduction
- The
.icsfile is a standard container (RFC 5545), and within this file, you will find “components”:VEVENT(Event): this is what you see on the calendar grid, with a notion of occupied time (start timeDTSTARTand end timeDTENDor duration).VTODO(Task): this is an action to be performed, often with a due date (DUE), but not necessarily a duration, and a binary status (done or not done).
- Therefore, when importing a
.icsfile into the Infomaniak Calendar app, the system imports the data into the calendar and its “Tasks” section based on their type.
Import tasks
If you have an .ics file to import:
- Click here to access the Infomaniak Web app Calendar (online service ksuite.infomaniak.com/calendar).
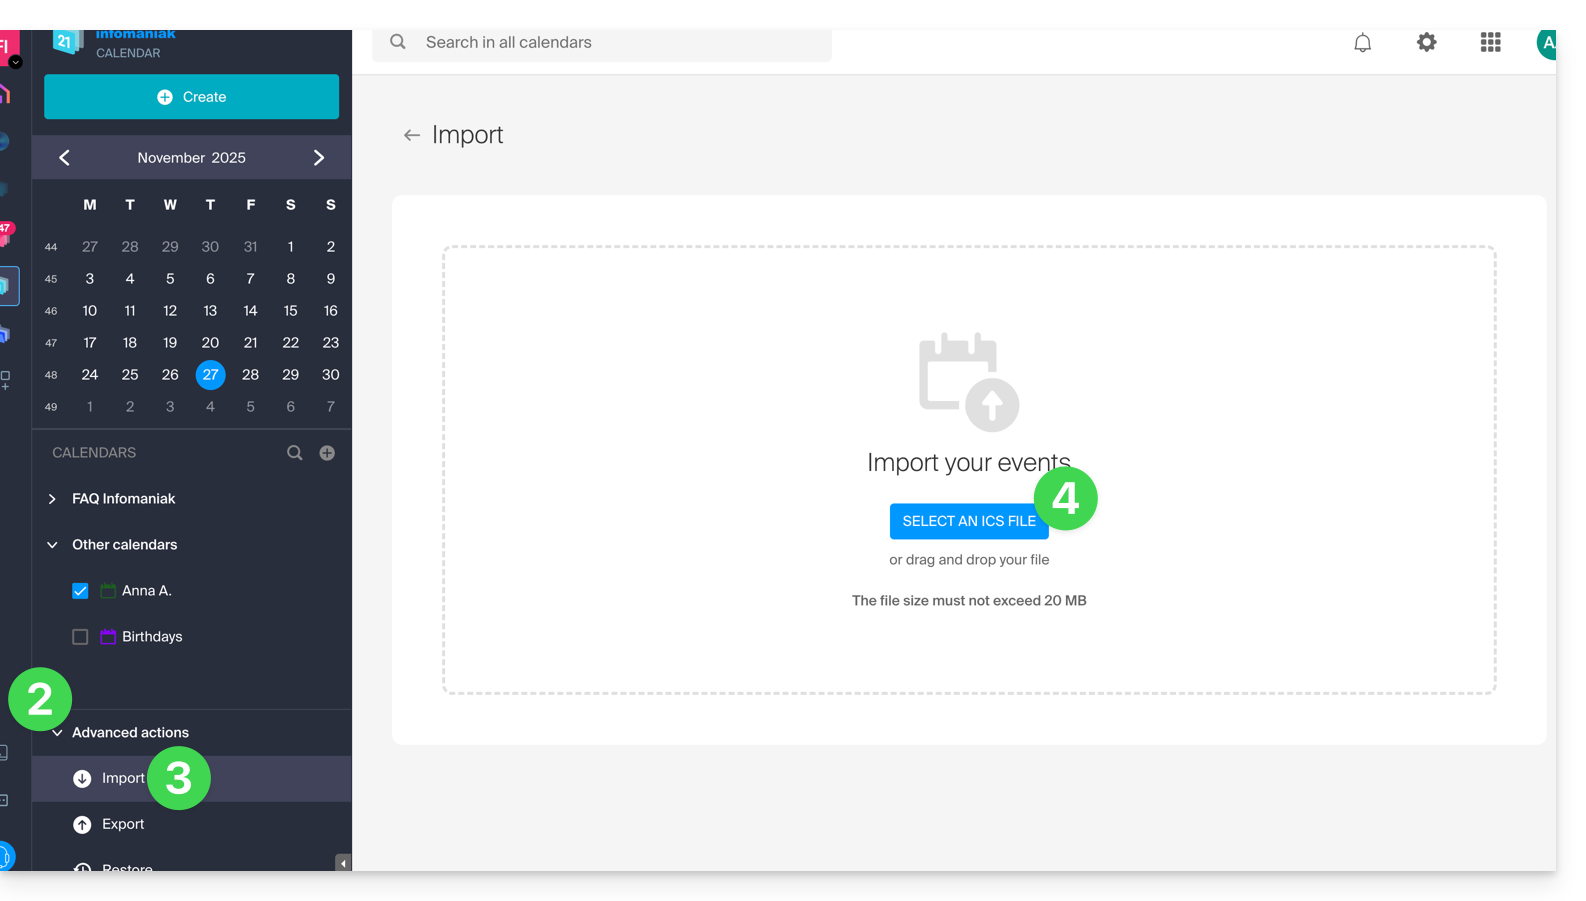
- Click on the chevron to expand the Advanced actions section.
- Click on Import.
- Click on the button to select an ICS file (20 MB max):
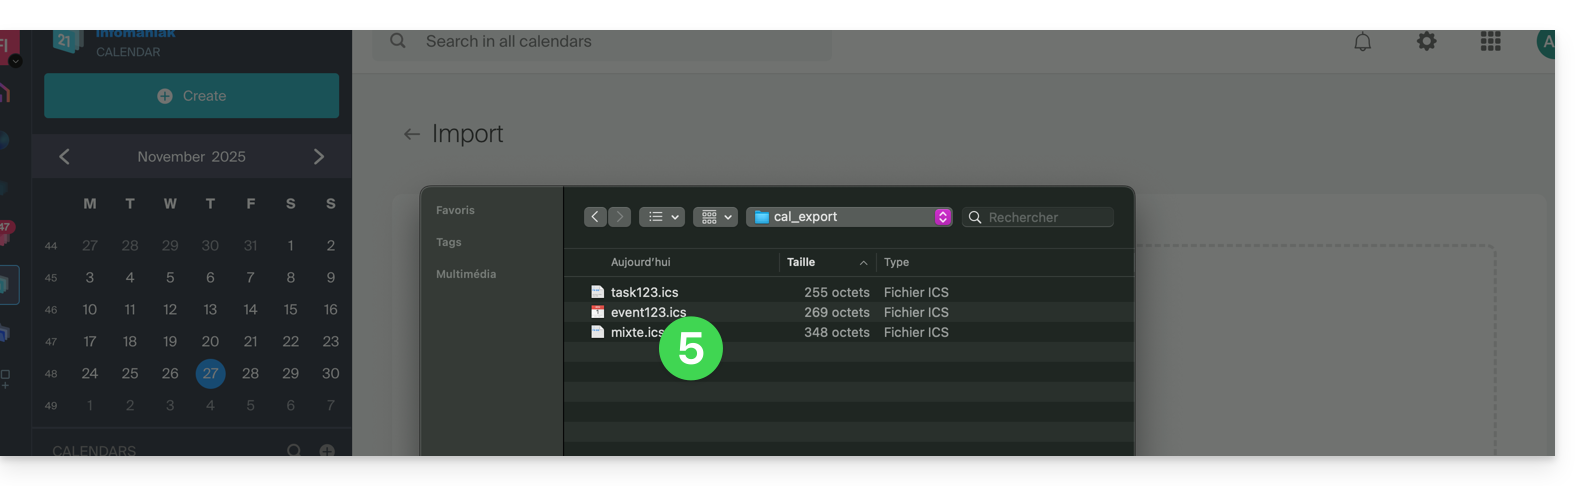
- Select the file containing the tasks (and/or events):
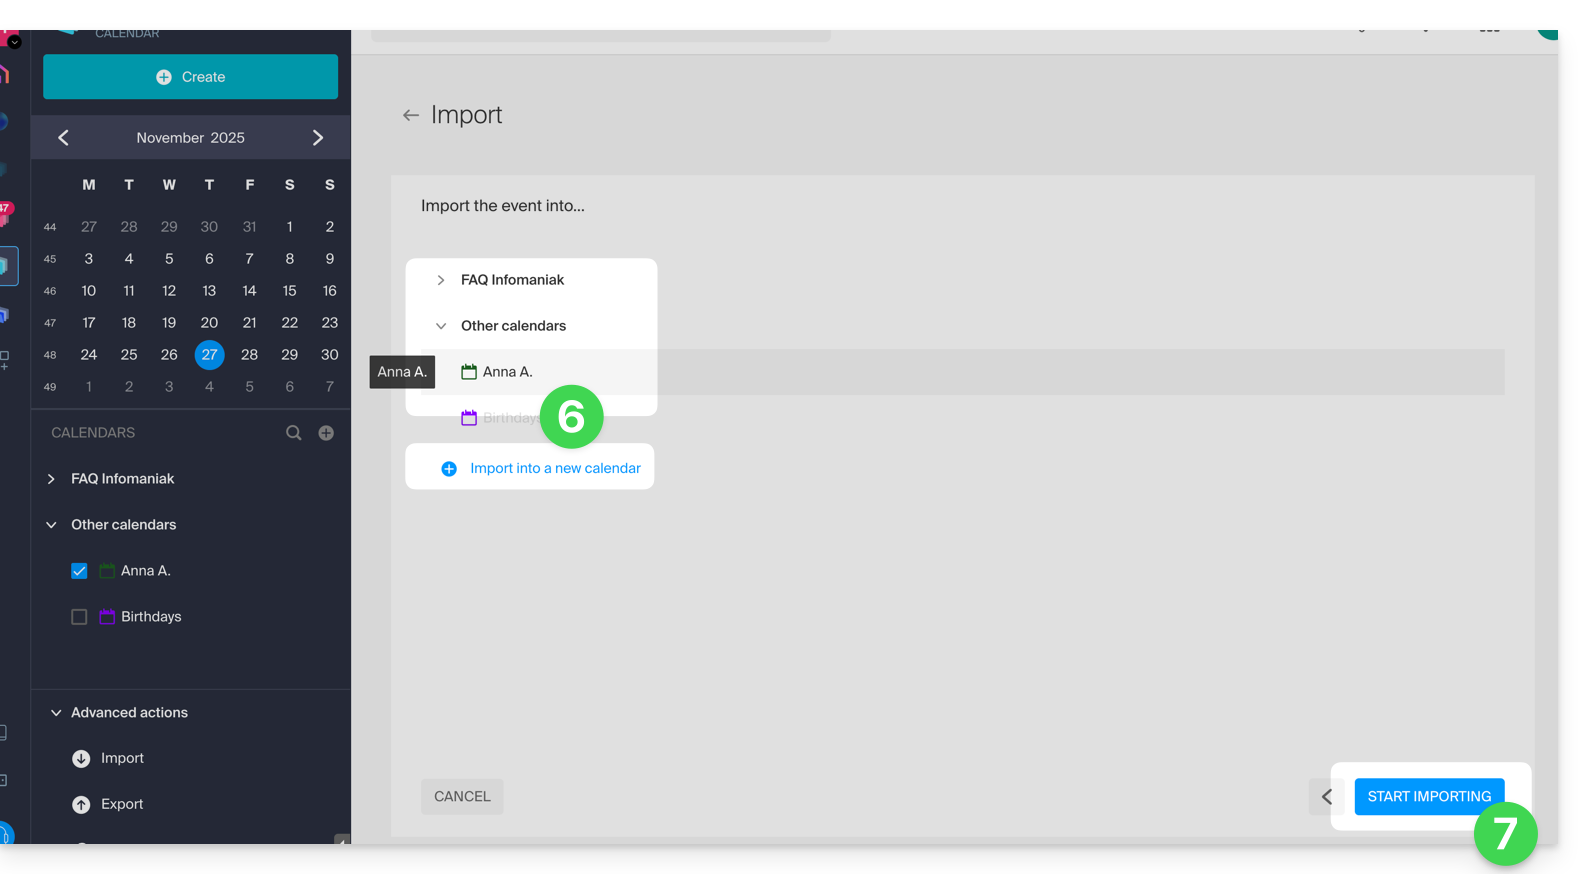
- Choose the calendar in which to import the data (or create a new calendar for this purpose).
- Click the button to start the import:
- If the
.icsfile contained tasks, you will find them in the Tasks section (and any events present in the file will be displayed on the calendar):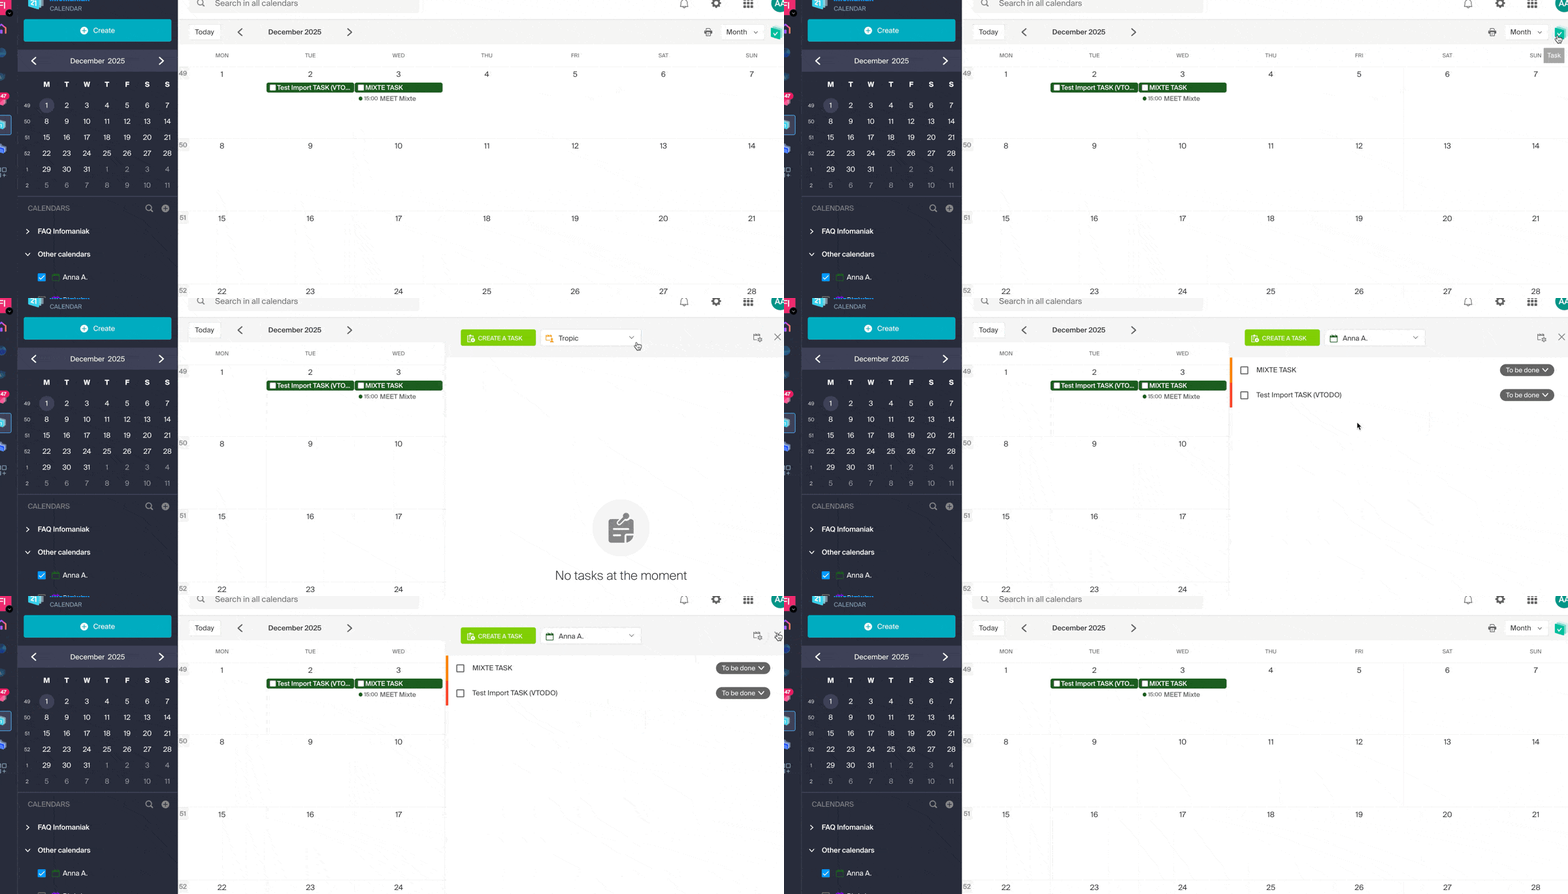
Link to this FAQ: https://faq.infomaniak.com/1974
Has this FAQ been helpful?
This guide explains how to use the task manager in the Infomaniak Calendar web app (online service ksuite.infomaniak.com/calendar/tasks).
Manage your tasks
To add a task to the task manager:
- Click here to access the Tasks web app (online service ksuite.infomaniak.com/calendar/tasks)…
- … also accessible from your calendar by clicking on the Tasks icon in the right-hand side menu:
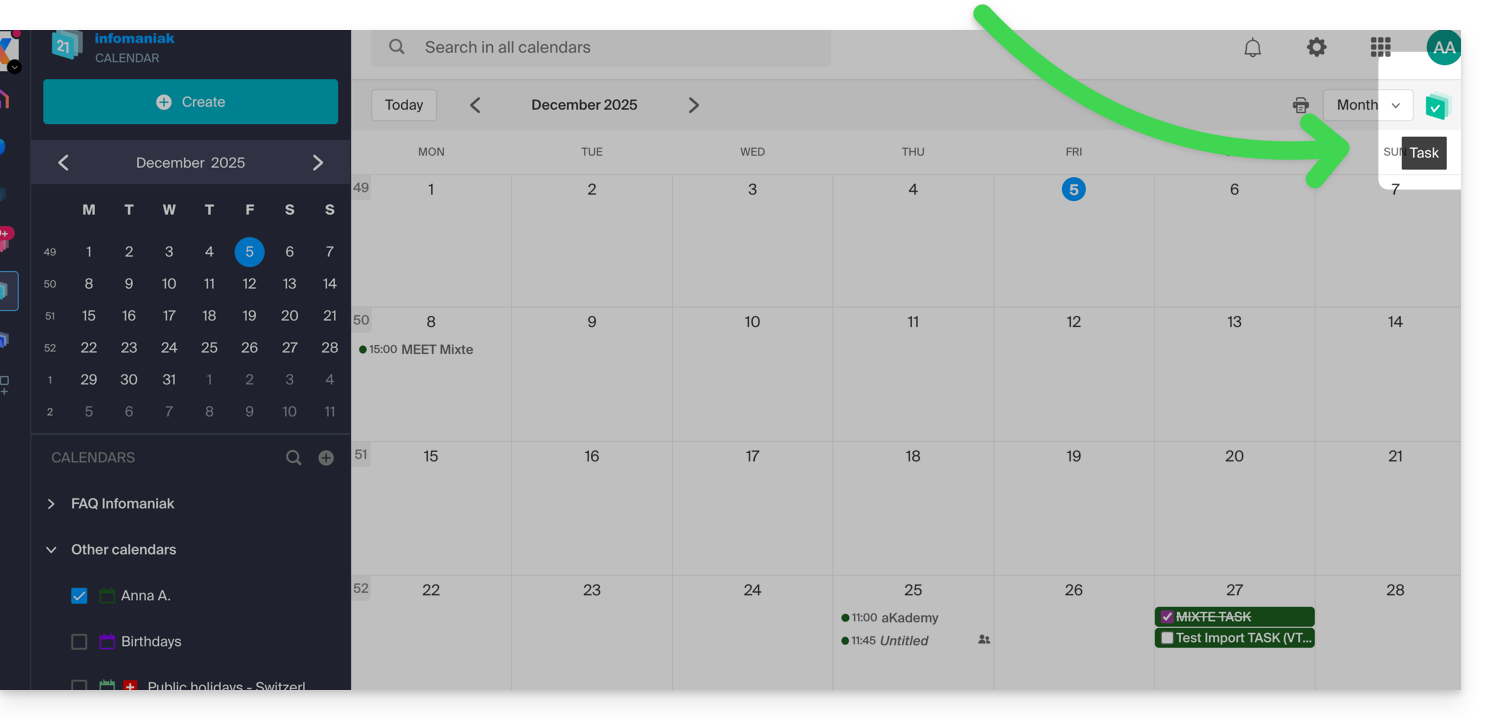
- … also accessible from your calendar by clicking on the Tasks icon in the right-hand side menu:
Once the manager is open, you can Create a task in the upper left corner, linked to the calendar specified to the right of the button: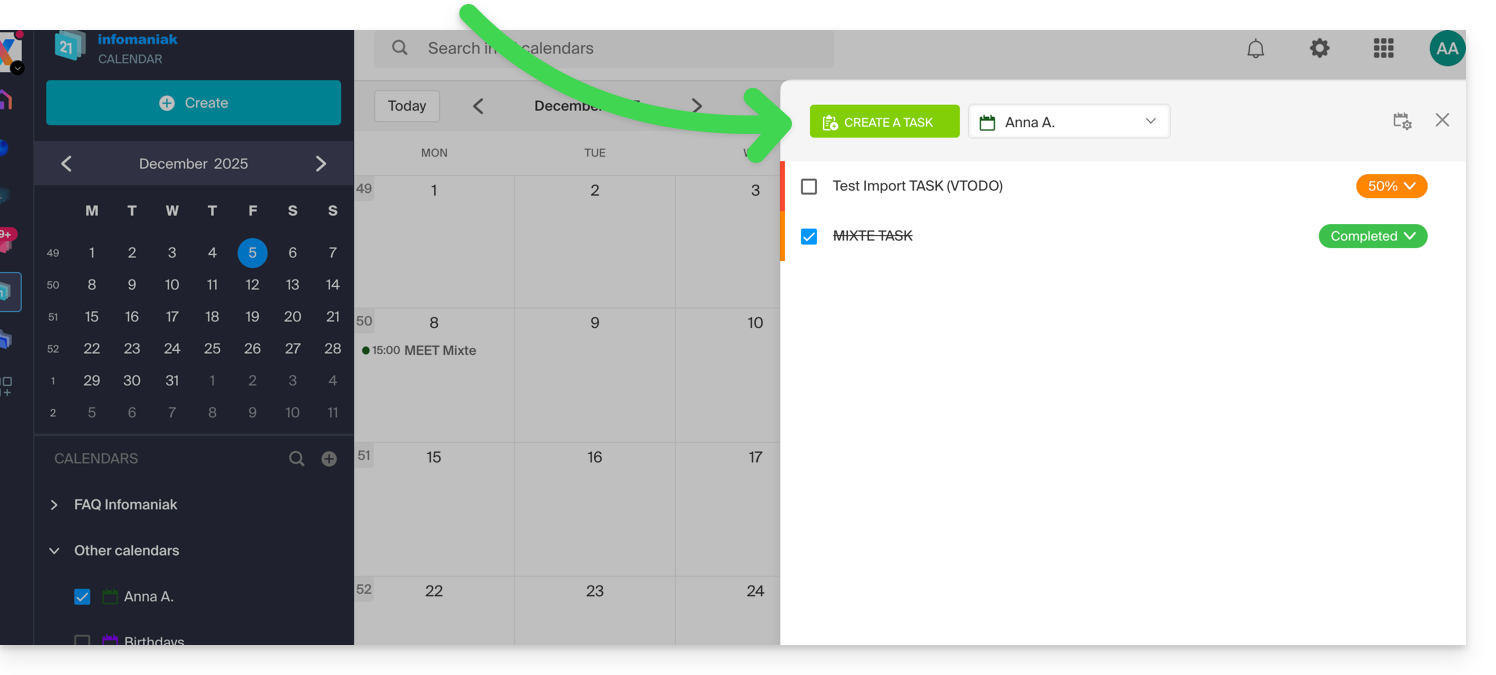
If you add a due date to your task, it will appear on the corresponding calendar: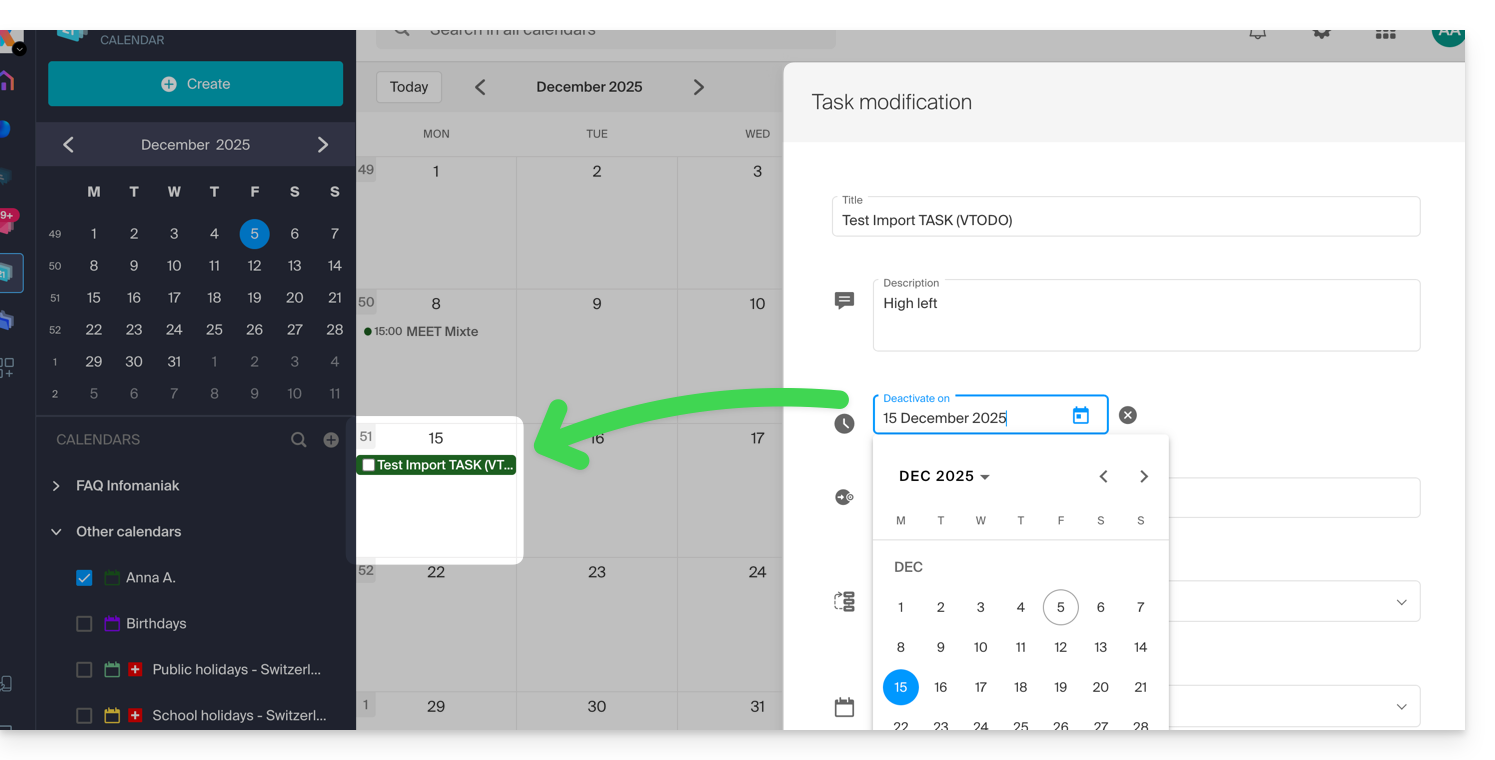
You can also filter and sort your displayed tasks using the button located in the upper right corner of the manager, next to the cross that allows you to close it: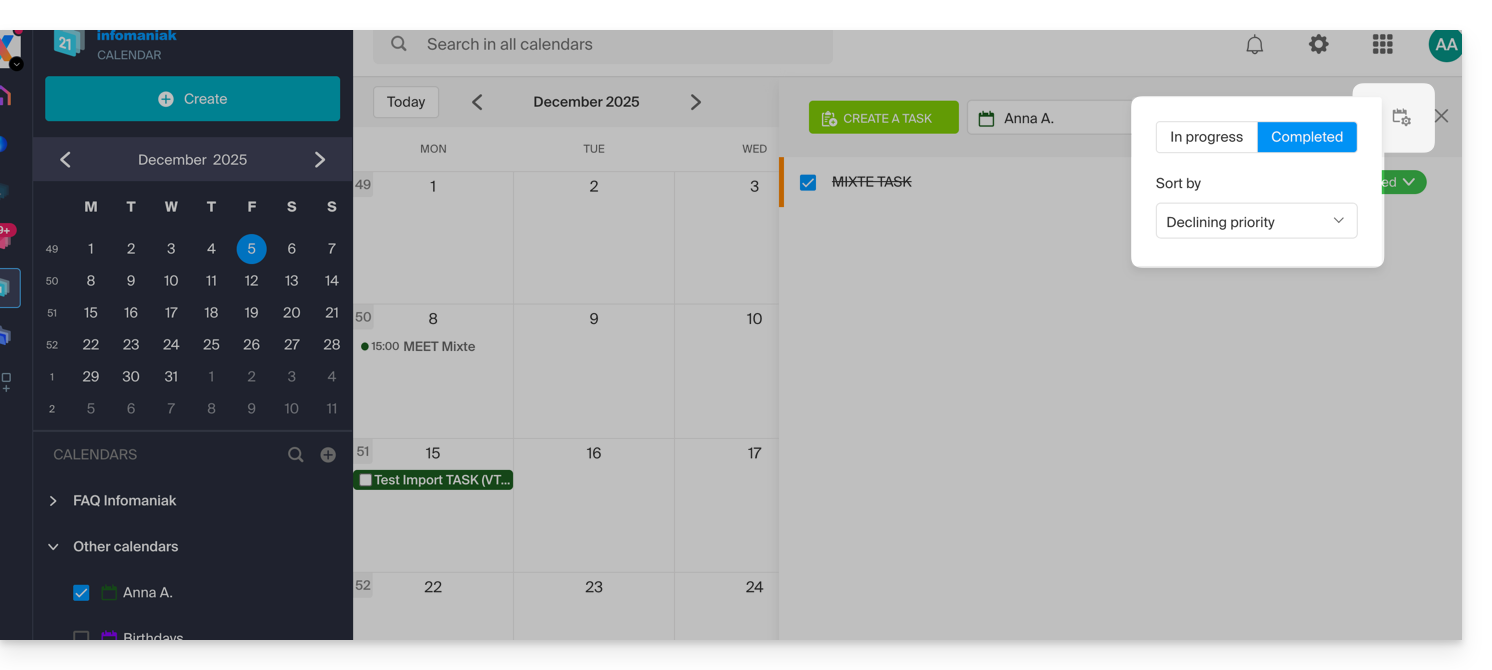
You can import tasks into your calendar.
To synchronize tasks with an Android device, please refer to this other guide.
Link to this FAQ: https://faq.infomaniak.com/984
Has this FAQ been helpful?
This guide explains how to use the meeting scheduling assistant in the Infomaniak Calendar web app (online service ksuite.infomaniak.com/calendar) to schedule a meeting between several users.
Introduction
- Scheduling is limited to 7 days with the following plans:
- kSuite Free
- my kSuite (ik.me, etik.com, ikmail.com)
- Mail Starter service
- You can also access the feature while reading an email.
- To easily create and configure a new event, refer to this other guide.
- To instead suggest a meeting to several guests who can then vote, refer to this other guide.
Schedule a meeting for later
To create a new shared event using the scheduling assistant:
- Click here to access the Infomaniak Calendar web app (online service ksuite.infomaniak.com/calendar).
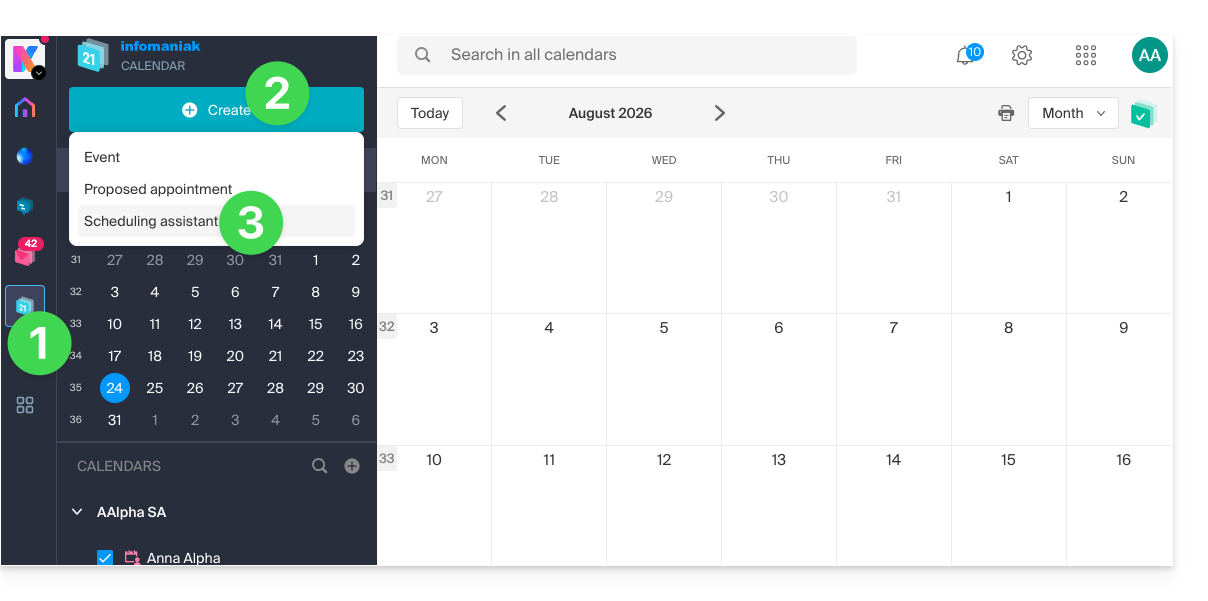
- Click the Create button in the upper left corner.
- Click on Scheduling Assistant:
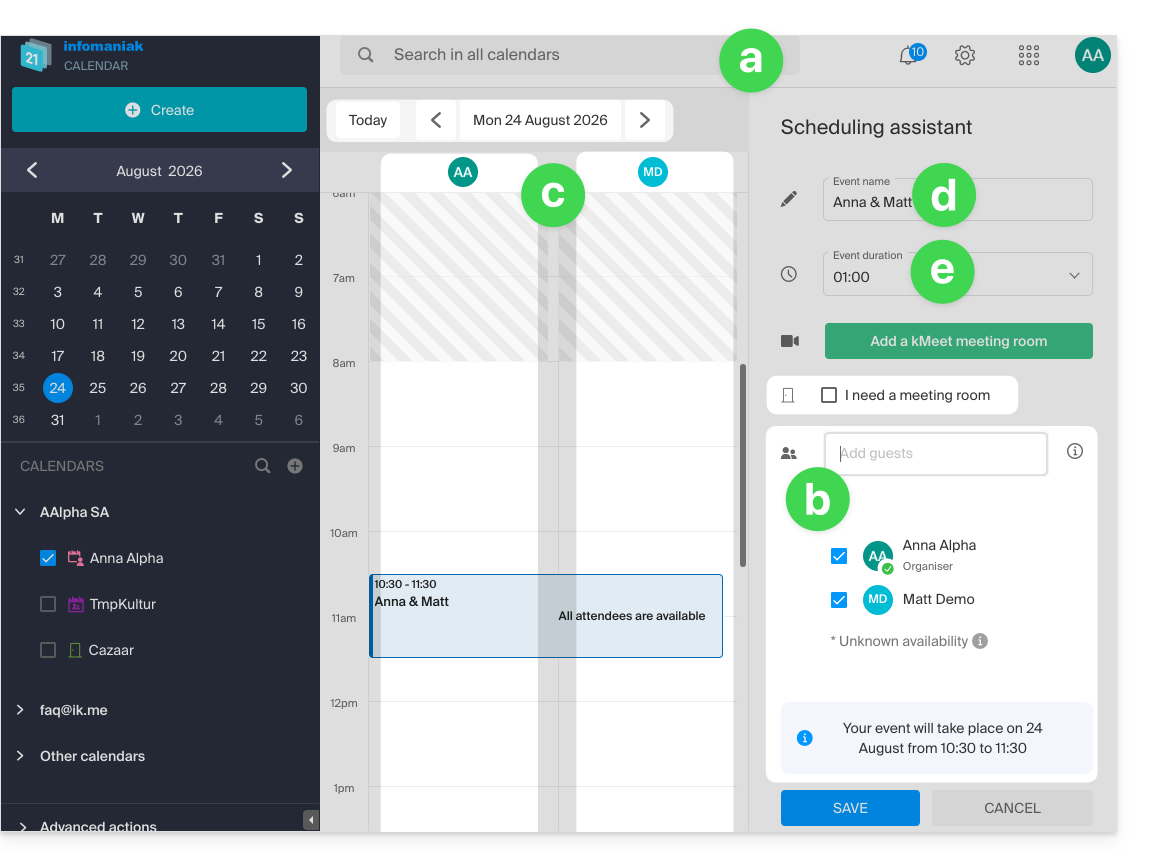
- The assistant appears on the right side of the screen, while the left side allows you to choose the day of the event.
- The principle, when you add one or more participants, is to automatically find the best time to schedule a meeting between several users in the Organization.
- Participants can be added, up to a maximum of 25.
- To do this, each person's availability (based on their schedule and the settings defined in the calendar preferences) is displayed in columns, including a column for the availability of a meeting room if available (an available room is automatically selected on the right, but it can be changed).
- The meeting title is automatically generated, but it can be modified.
- The duration of the event (and its position within the day) can be modified, including on the left side using the mouse cursor:
- Save your preferences using the button at the bottom of the page to create the event and the invitations.
Link to this FAQ: https://faq.infomaniak.com/1862
Has this FAQ been helpful?
This guide provides instructions for synchronizing kDrive with Windows using the WebDAV connection protocol.
✘ UNAVAILABLE with
kSuite Free / kSuite Standard
my kSuite / my kSuite+ (ik.me, etik.com, ikmail.com)
⚠ WARNING ⚠
Use the WebDAV protocol on kDrive for specific and occasional use cases:
- If you want to work on your files and share them, kDrive is the ideal tool; however, it is recommended to install the kDrive application (❓: help) to avoid any file loss.
- Furthermore, to secure your data against loss or corruption and ensure the continuity of your business, Swiss Backup is the essential and appropriate solution.
Infomaniak guarantees that its services comply with standard protocols (IMAP, S3, etc.) but does not provide additional support for external services or software, as their configuration may change depending on the provider or publisher. (❓: help). This guide is therefore provided for informational purposes only, and its implementation remains your responsibility (❓: help). If needed, a qualified person can assist you (❓: help).
Connect to kDrive via WebDAV on Windows
For a Windows PC:
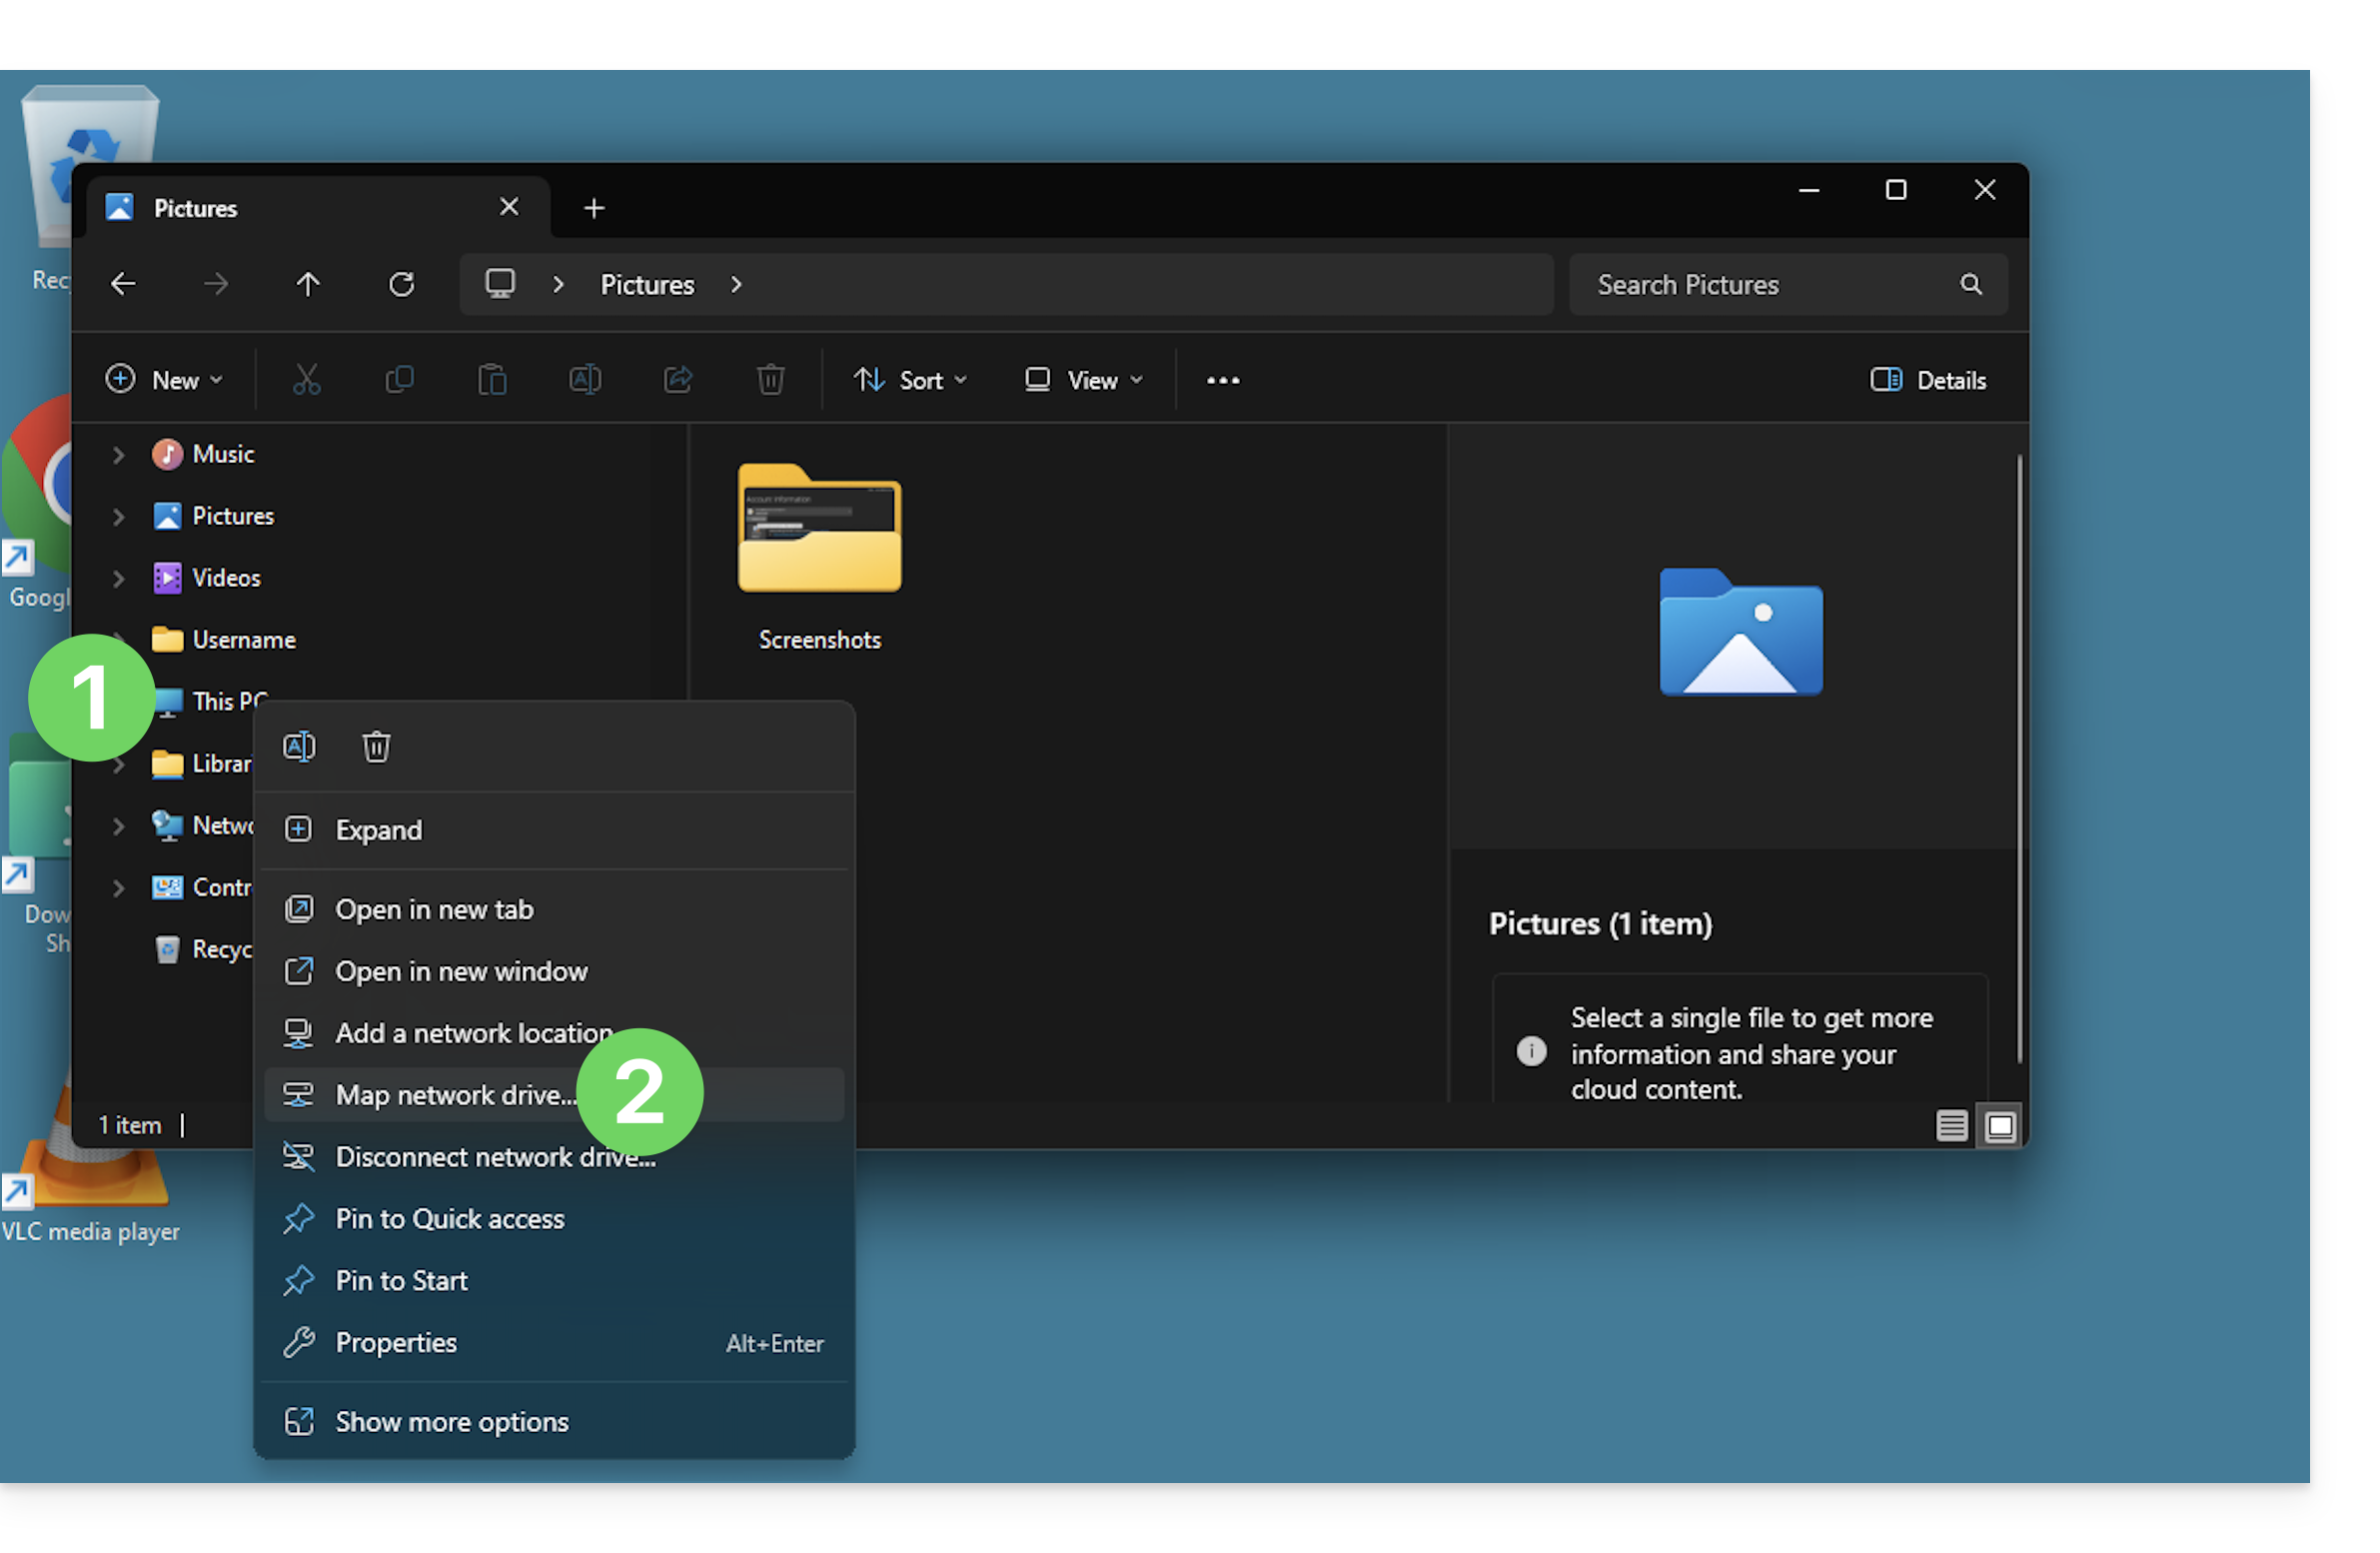
- Right-click on This PC (formerly "My Computer") in File Explorer or the Start menu.
- Click on Connect a network drive:
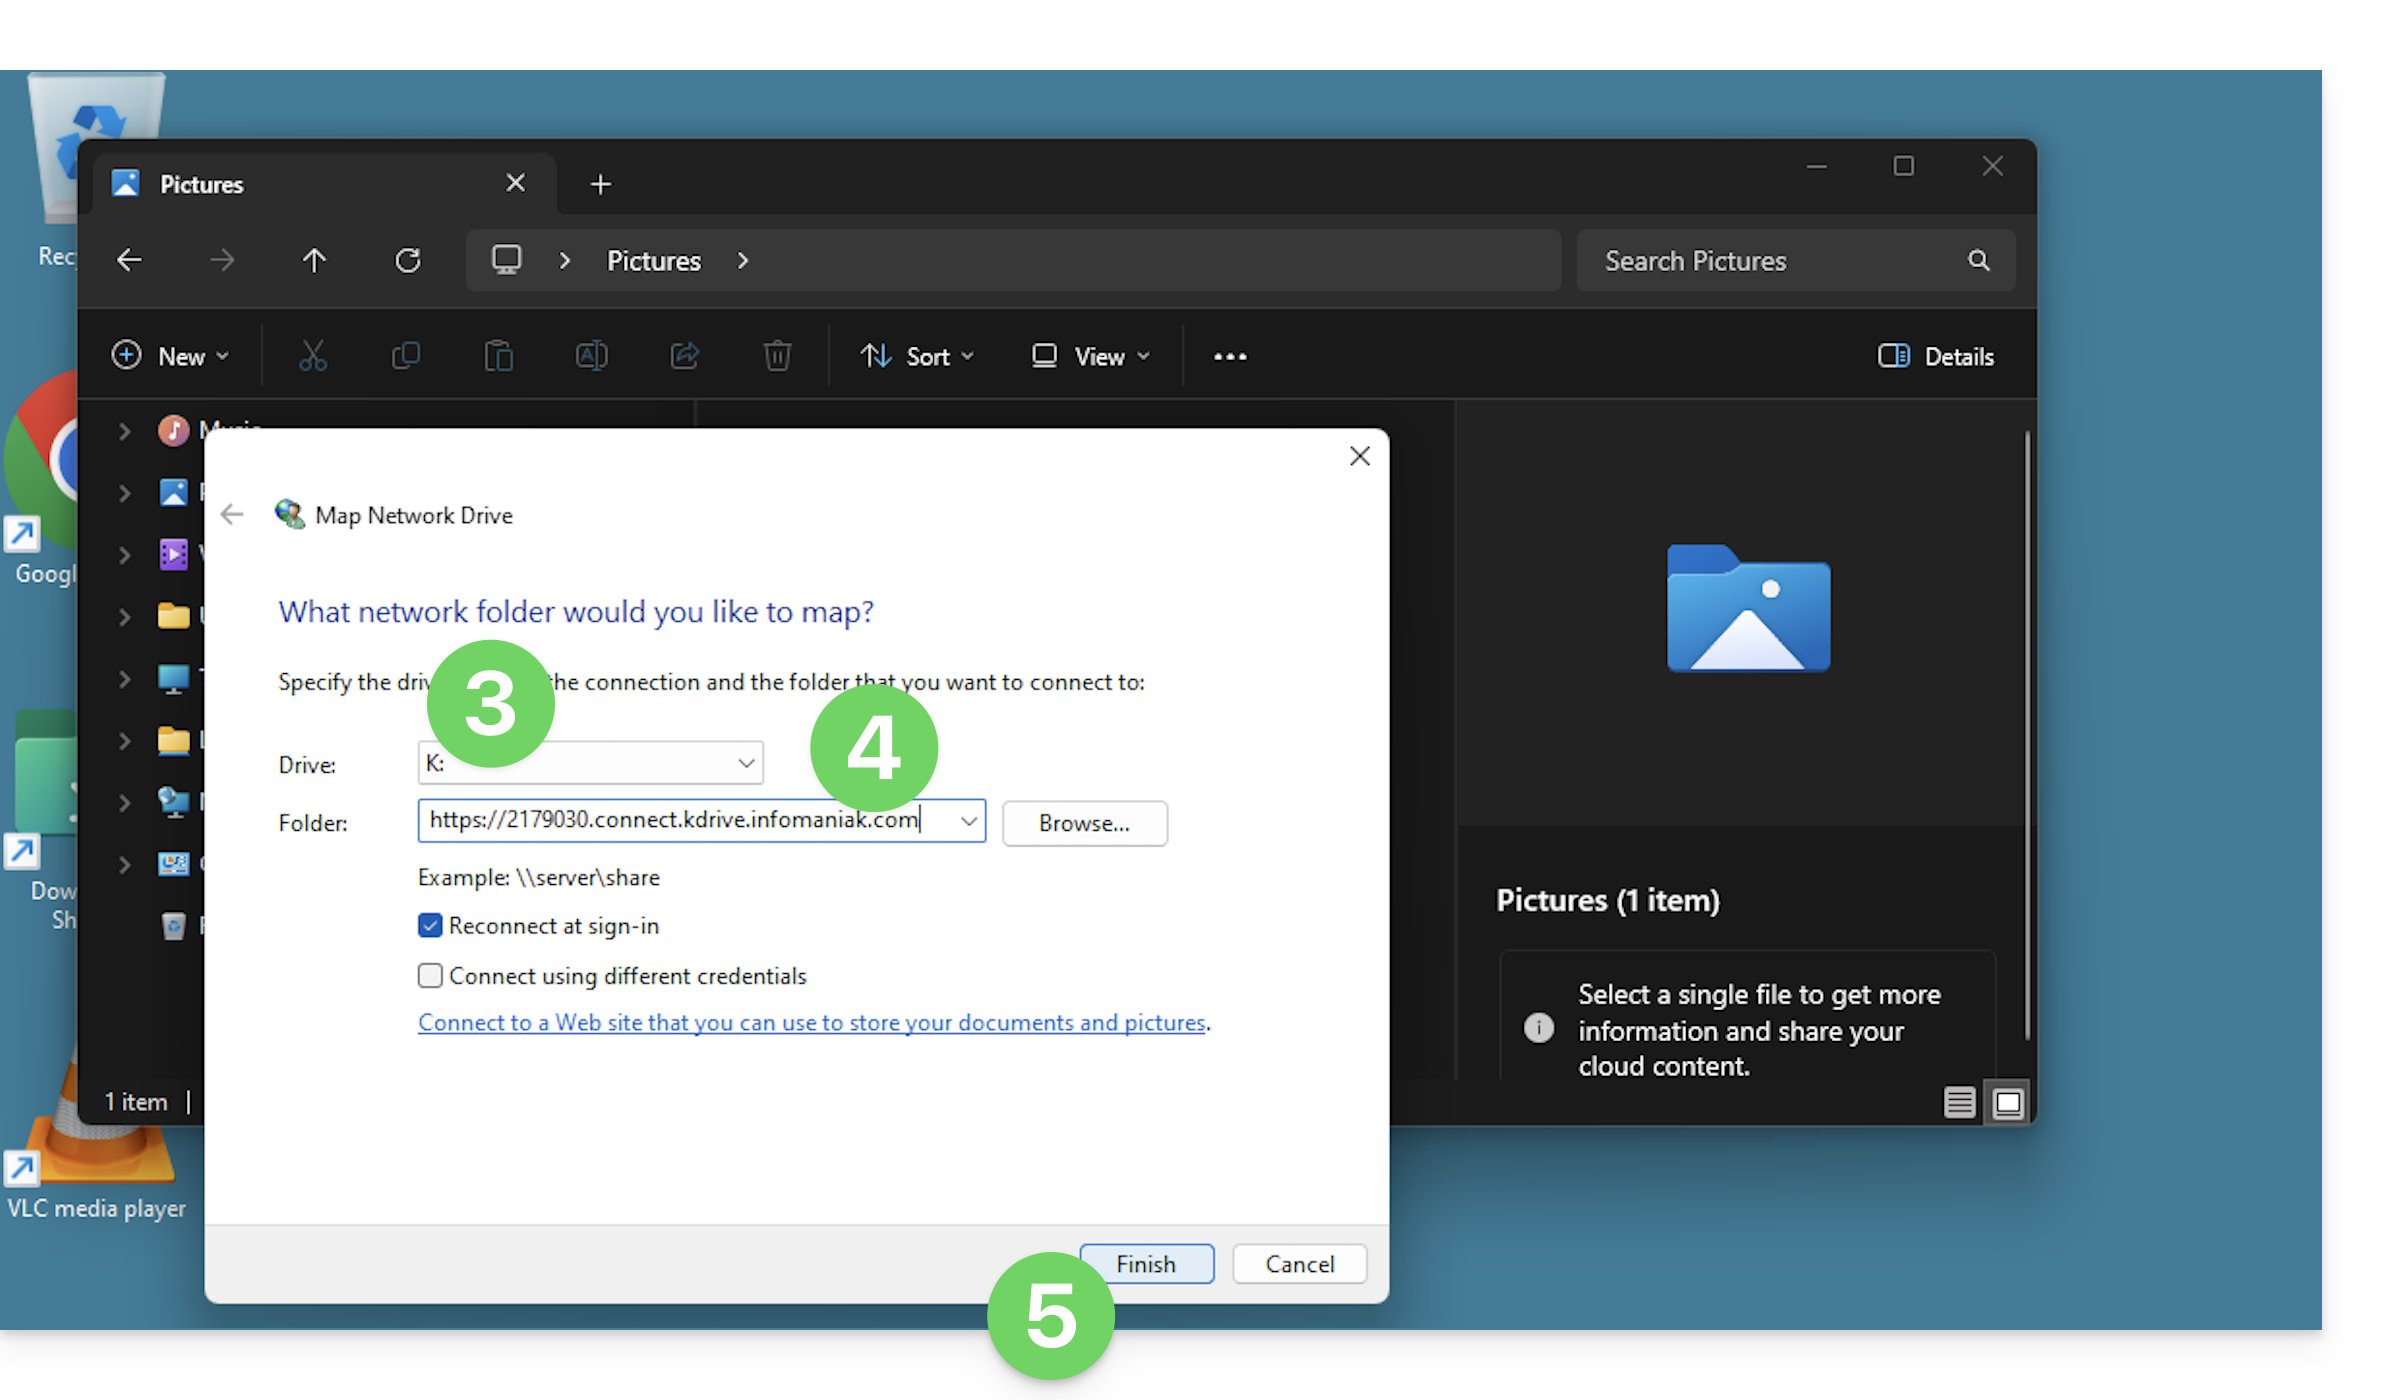
- Enter a letter to designate the kDrive virtual drive.
- Enter the server address:
https://IDkDrive.connect.kdrive.infomaniak.com(❓: help) - Click on Finish to log in:
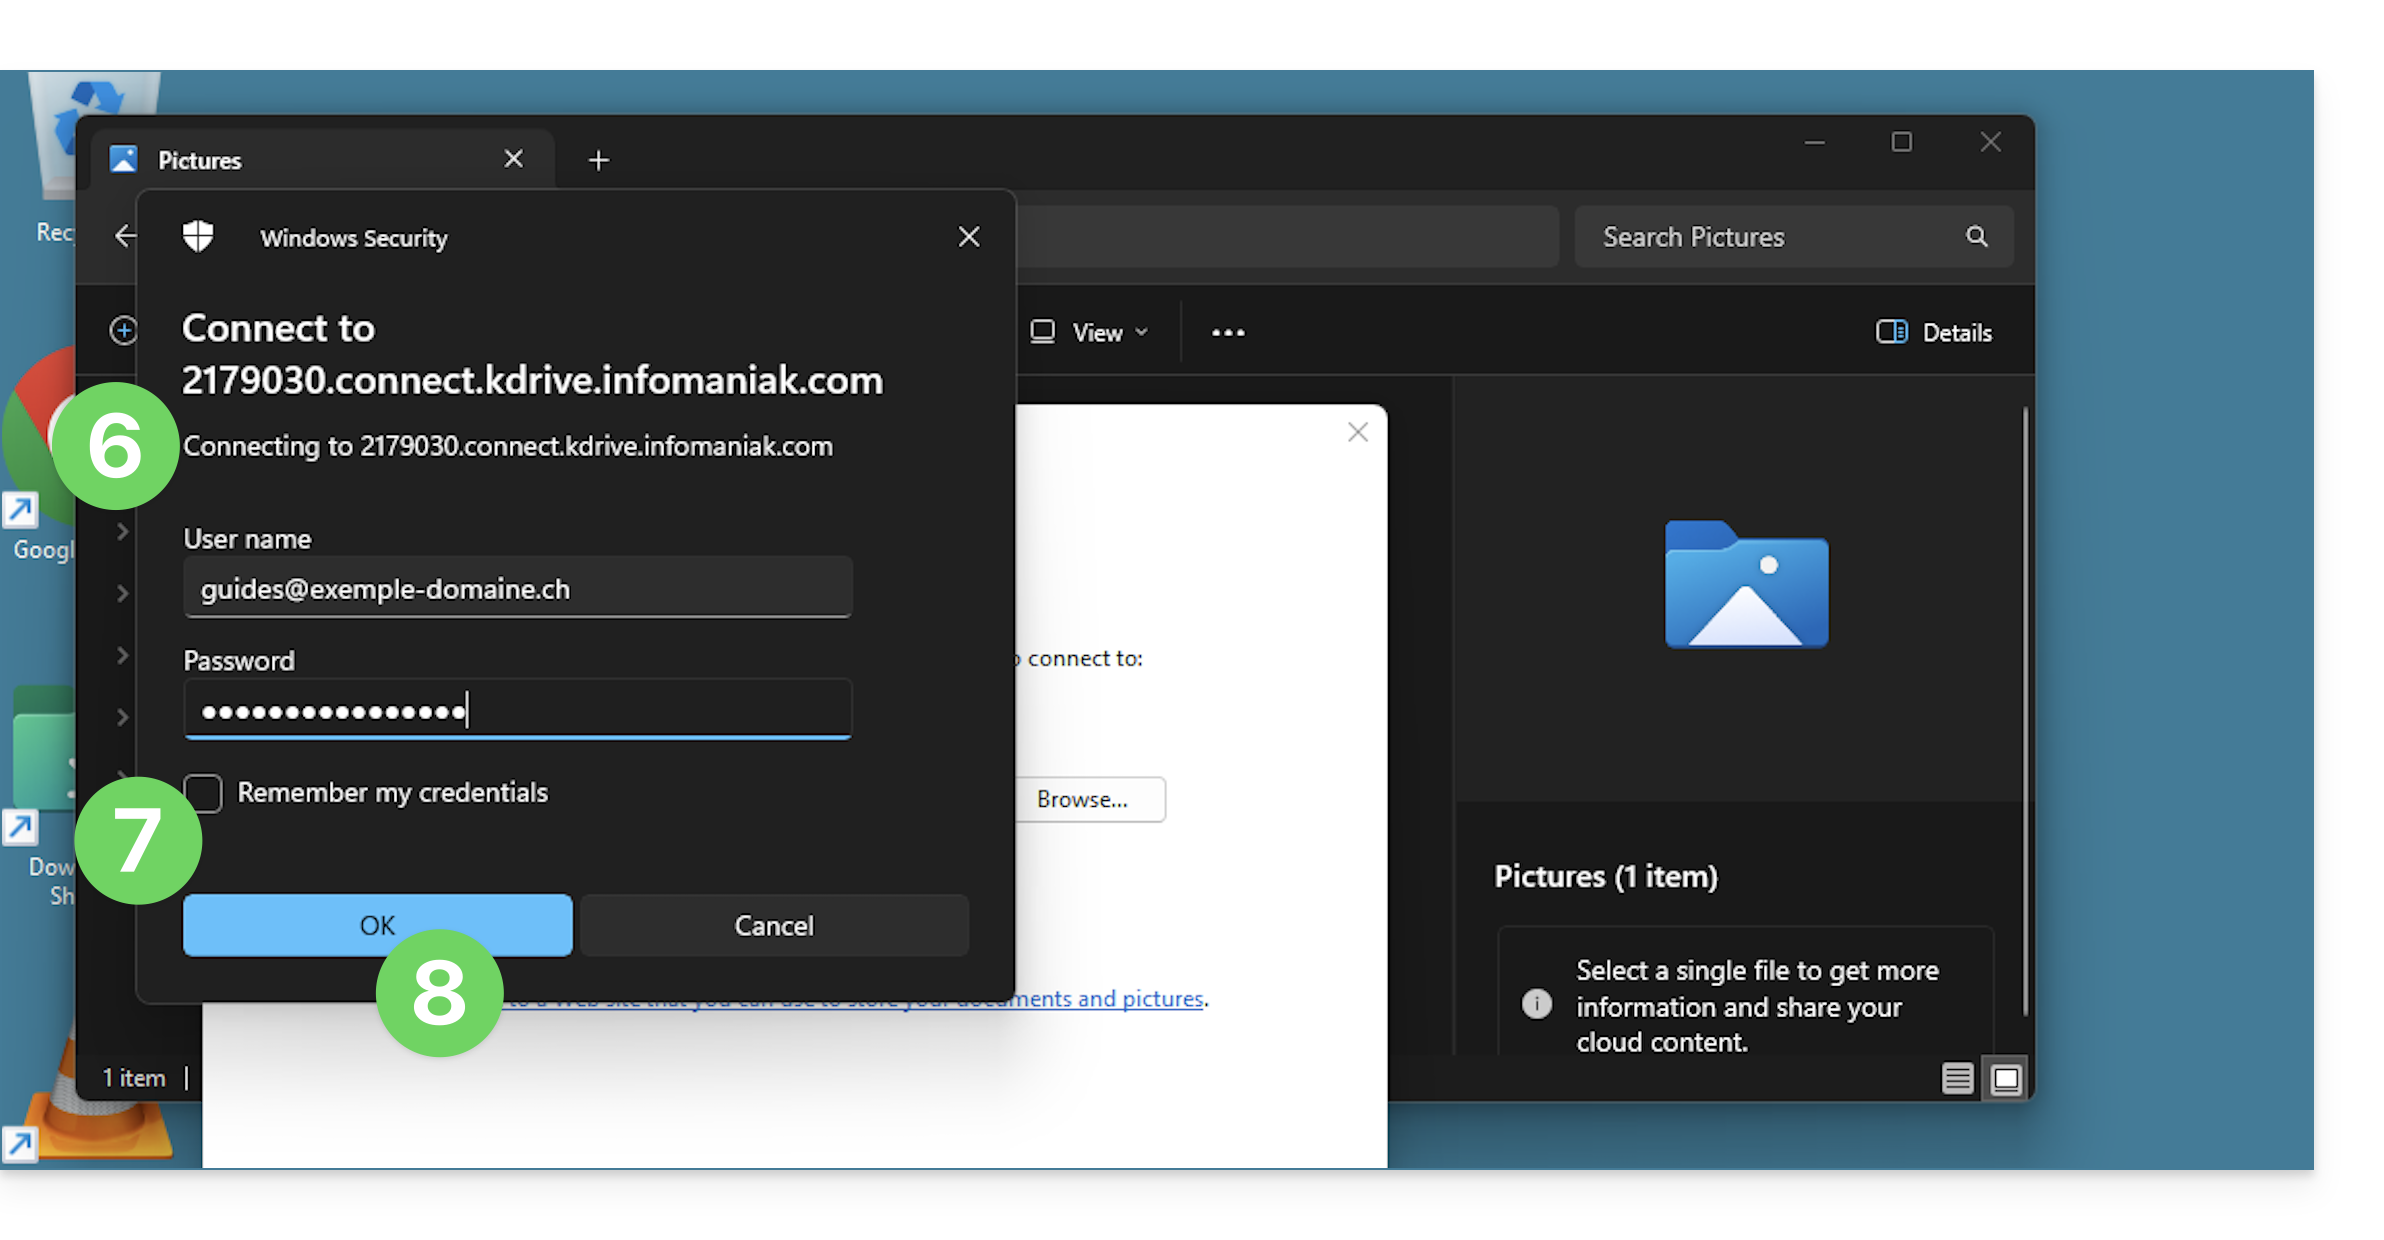
- Enter the following information:
- Username: email address used to log in to your Infomaniak account
- Password: create an application password (❓: help) for this specific use.
- If desired, click the box to save the login information.
- Confirm the login by clicking the button:
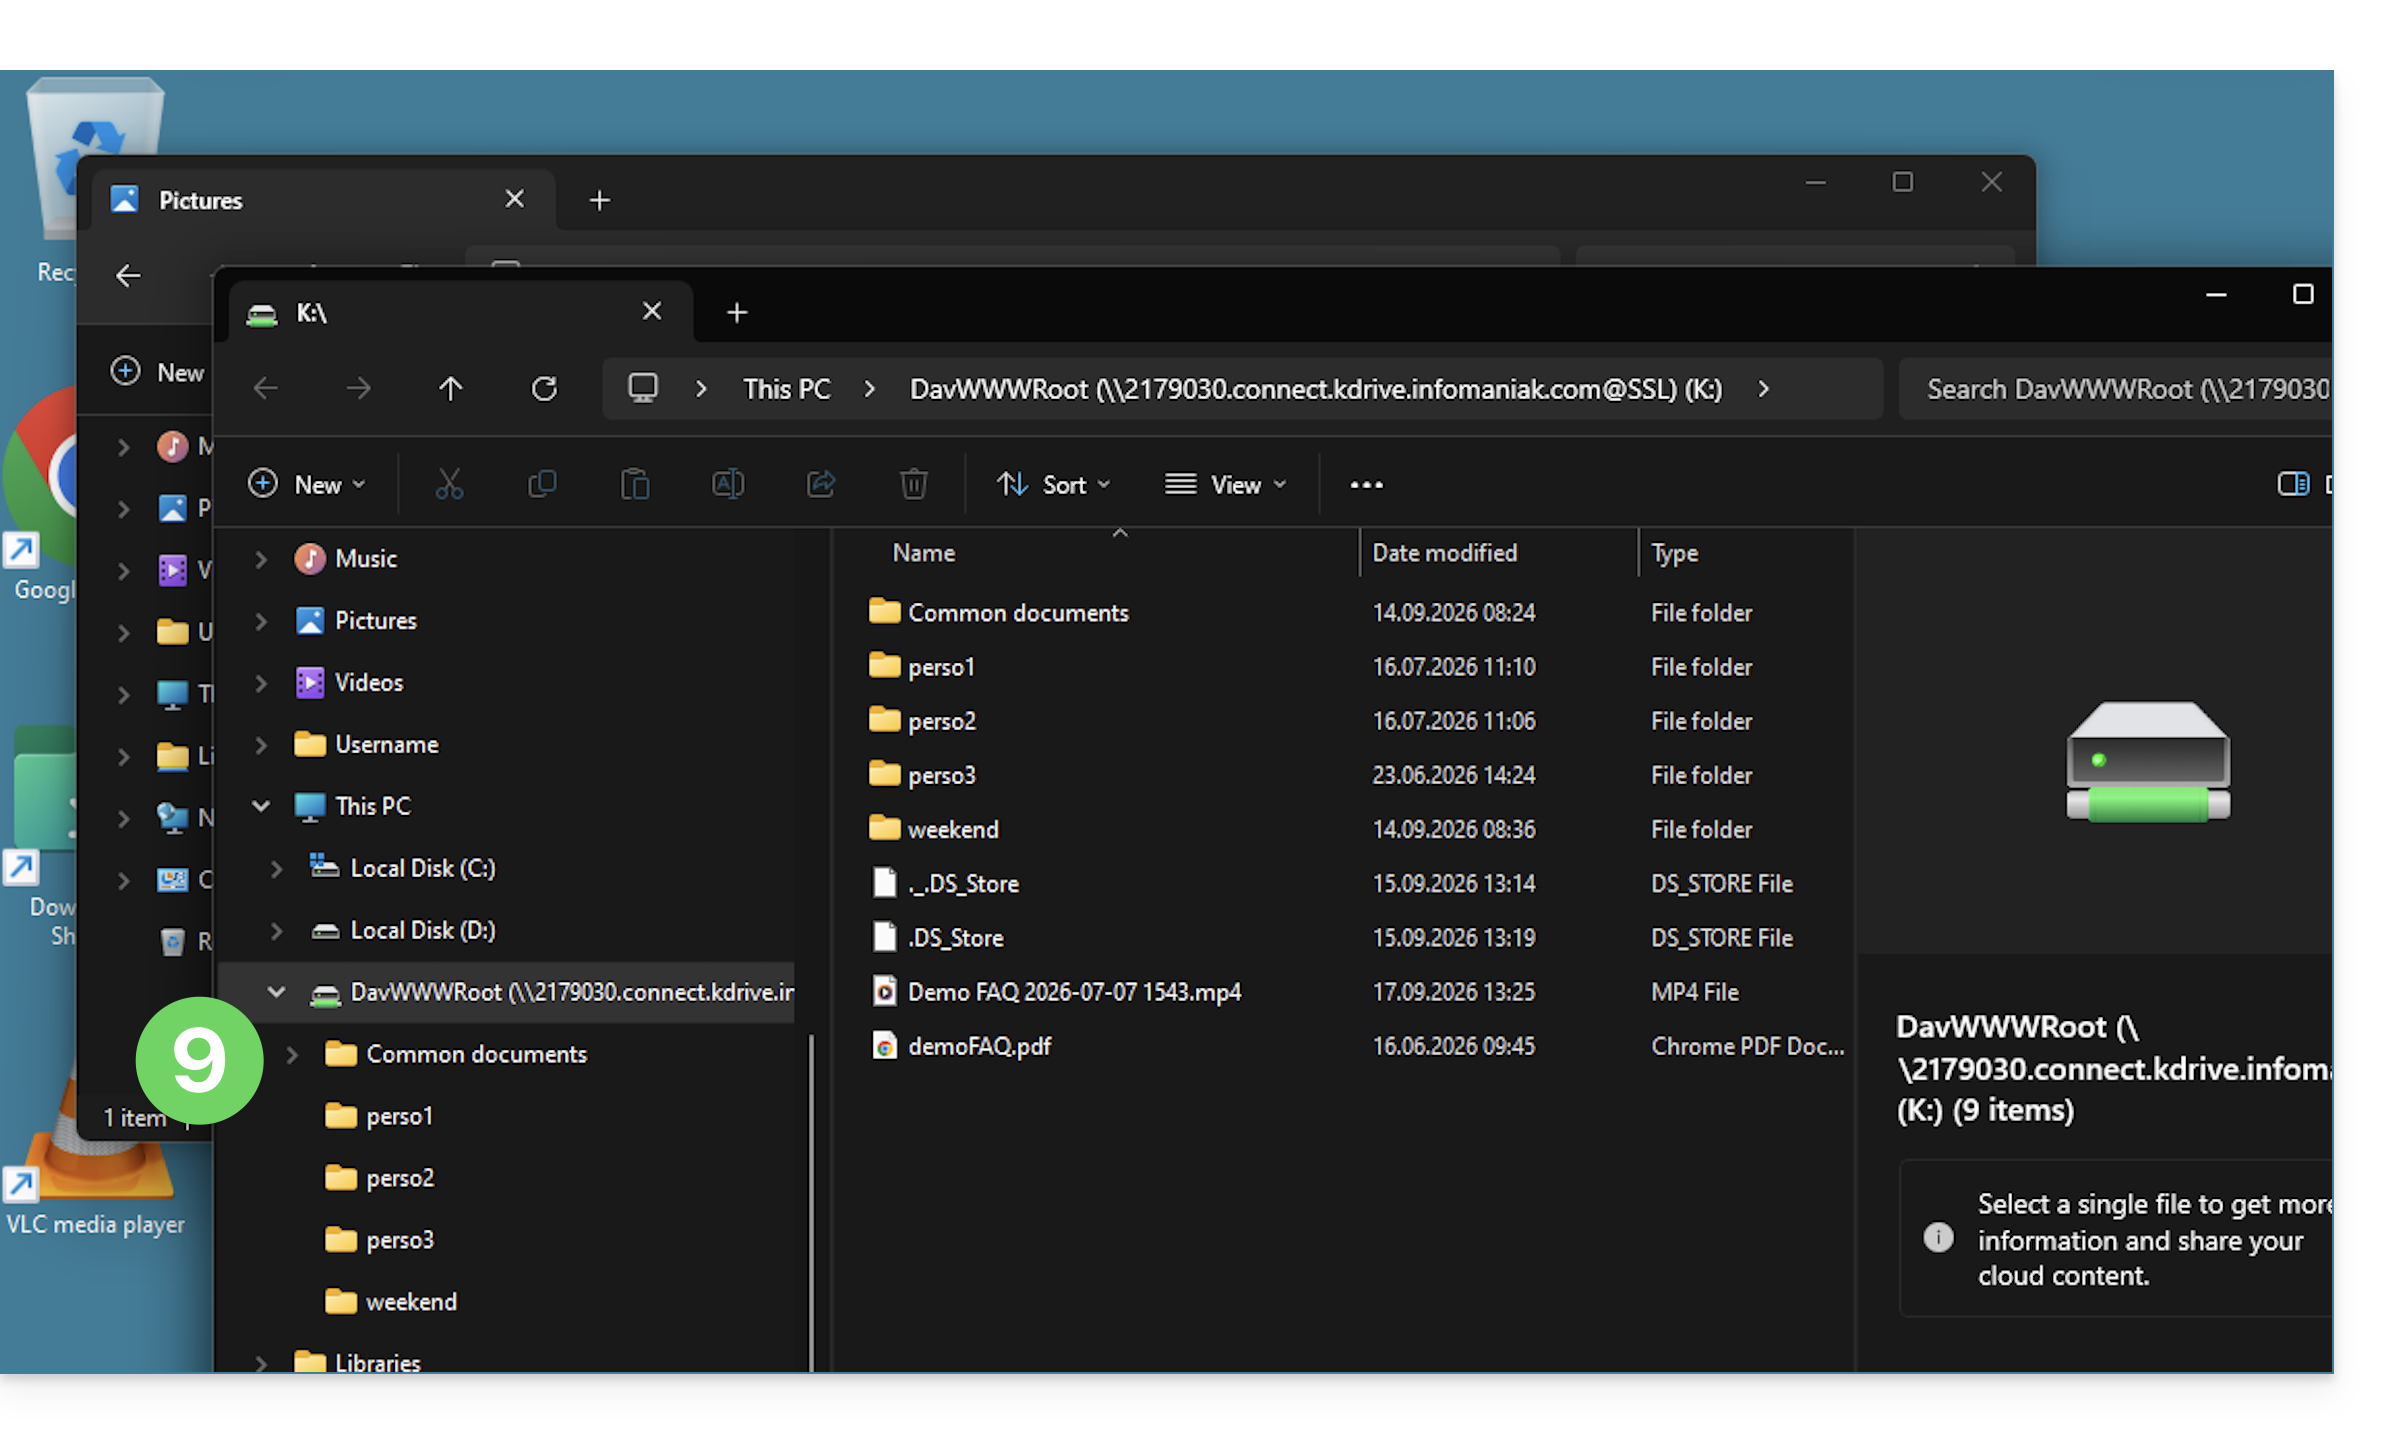
- The kDrive content is now displayed in the file explorer, just like it is accessible in kDrive for your Infomaniak user:
The Mountain Duck alternative
Using the same principle and with the same information, you can also consider connecting via a WebDAV software/client such as Mountain Duck:
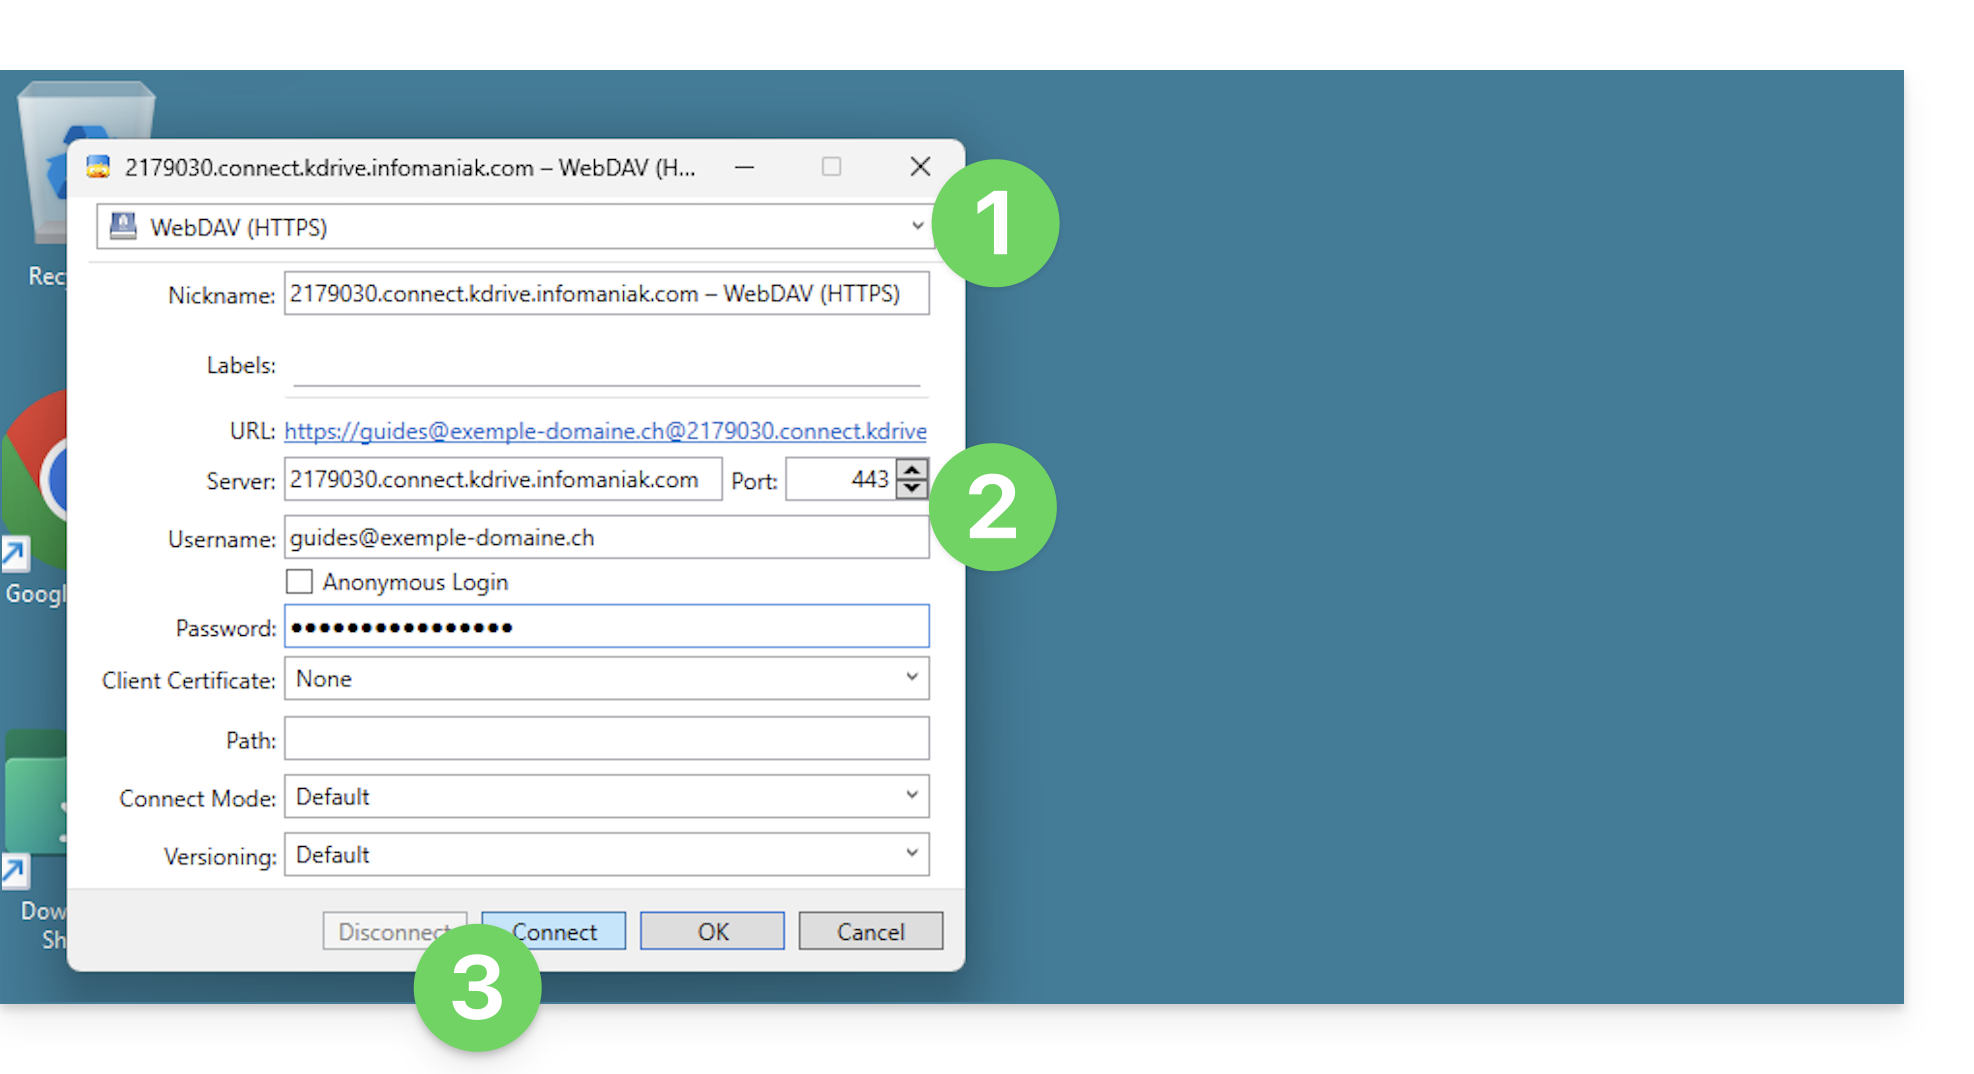
- Create a new WebDAV connection in Mountain Duck.
- Enter the required information.
- Click on Log in:
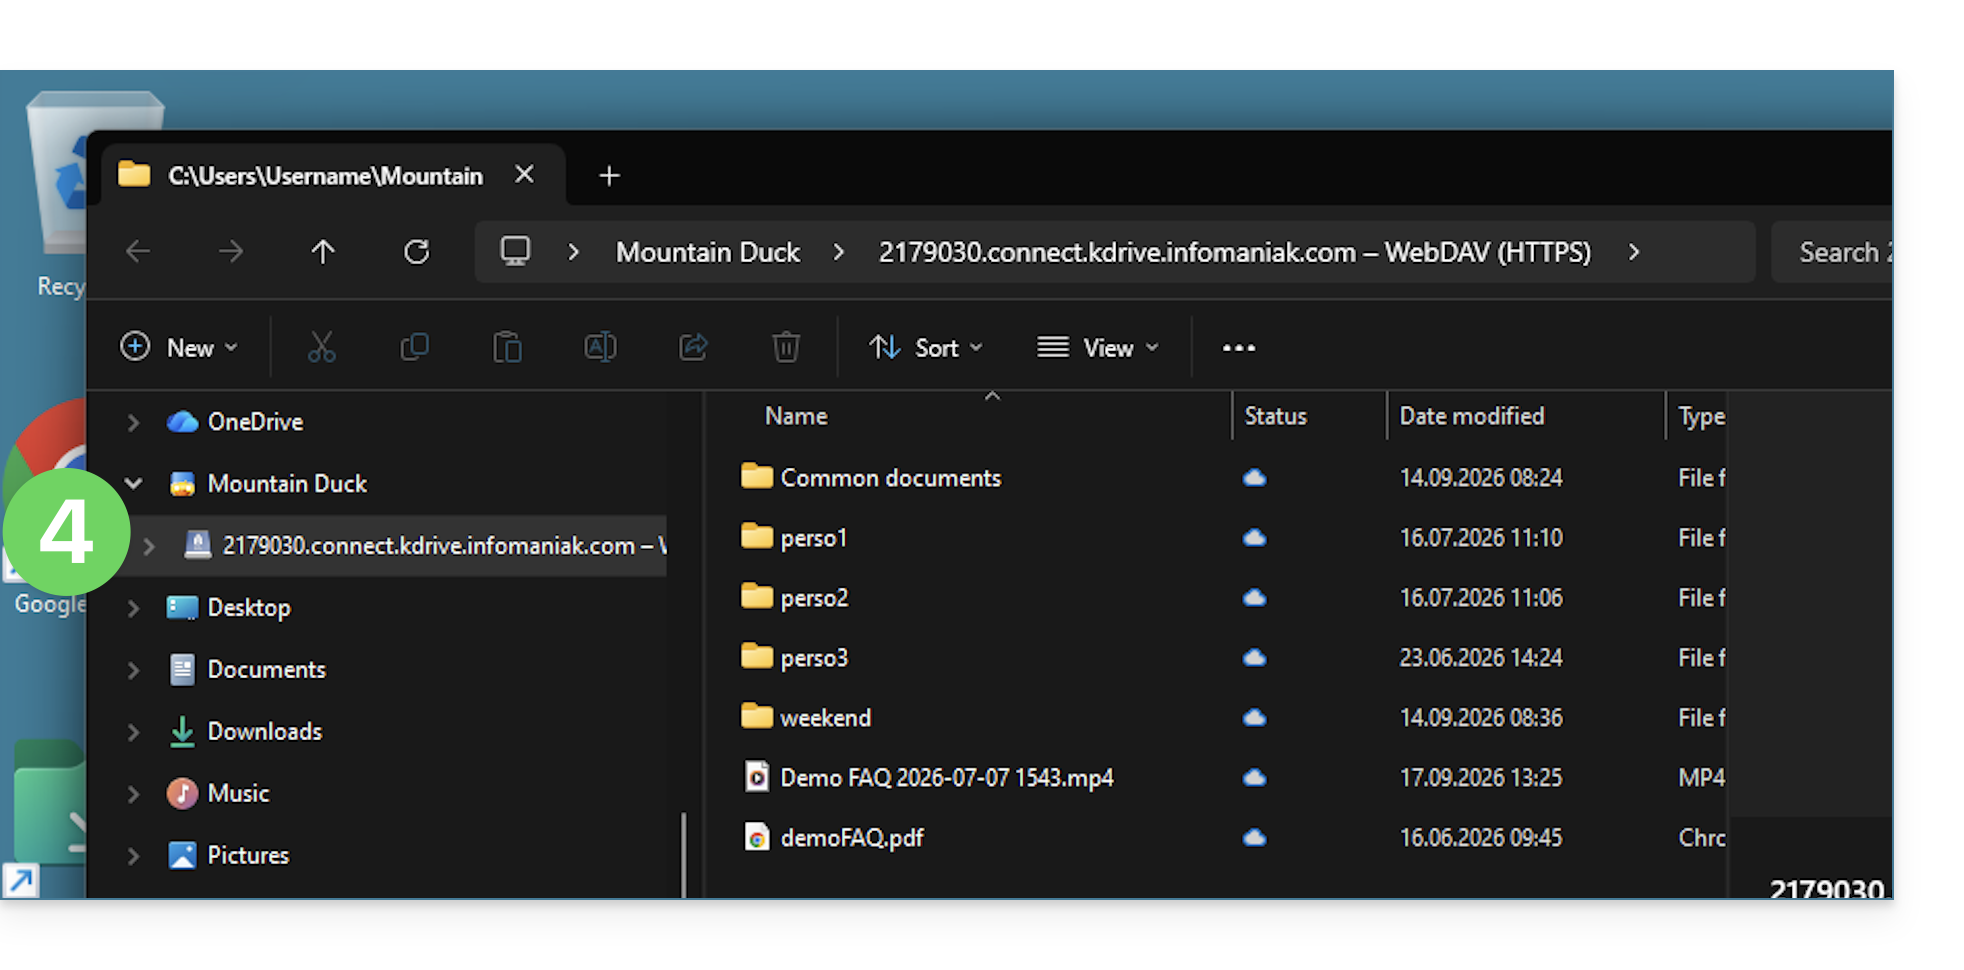
- There you go, the kDrive content is now displayed in the file explorer, just like what is accessible on kDrive for your Infomaniak user:
Link to this FAQ: https://faq.infomaniak.com/2419
Has this FAQ been helpful?
This guide provides instructions for synchronizing kDrive with Linux using the WebDAV connection protocol.
✘ UNAVAILABLE with
kSuite Free / kSuite Standard
my kSuite / my kSuite+ (ik.me, etik.com, ikmail.com)
⚠ WARNING ⚠
Use the WebDAV protocol on kDrive for specific and occasional use cases:
- If you want to work on your files and share them, kDrive is the ideal tool; however, it is recommended to install the kDrive application (❓: help) to avoid any file loss.
- Furthermore, to secure your data against loss or corruption and ensure the continuity of your business, Swiss Backup is the essential and appropriate solution.
Infomaniak guarantees that its services comply with standard protocols (IMAP, S3, etc.) but does not provide additional support for external services or software, as their configuration may change depending on the provider or publisher. (❓: help). This guide is therefore provided for informational purposes only, and its implementation remains your responsibility (❓: help). If needed, a qualified person can assist you (❓: help).
Connect to kDrive via WebDAV on Linux (Gnome)
To do this:
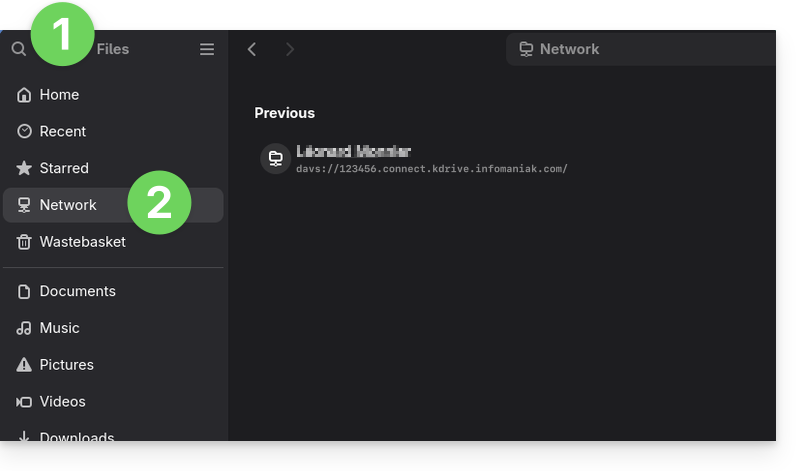
- Open Files.
- In the sidebar, click on Network:
- Enter the server address:
https://IDkDrive.connect.kdrive.infomaniak.com(❓: help) - Click Connect.
- For account settings, use the following information:
- Username: the email address you use to log in to your Infomaniak account.
- Password: create an application password (❓: help) for this specific use.
- Click on Connect.
Link to this FAQ: https://faq.infomaniak.com/2894
Has this FAQ been helpful?
This guide explains how to change the color of events in your calendars in the Infomaniak Calendar web app (online service ksuite.infomaniak.com/calendar) and customize the displayed period.
Define the default settings
To do this:
- Click here to access the Infomaniak Calendar web app (online service ksuite.infomaniak.com/calendar).
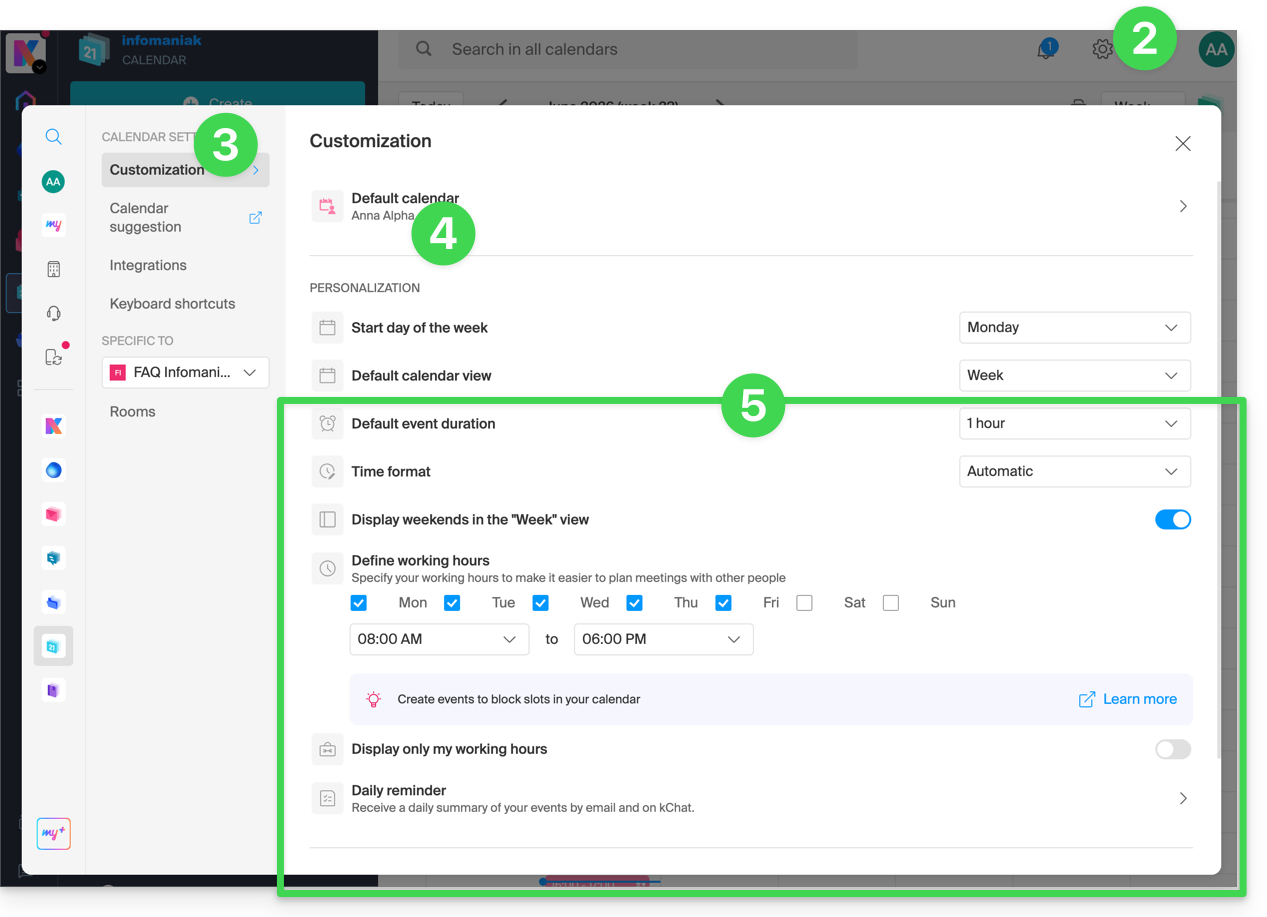
- Click on Settings in the top right corner.
- Click on Customization.
- Refer to this other guide regarding the default calendar feature.
- Settings such as the default event duration or the working hours to display on the calendar will help improve the use of the appointment scheduling assistant:
- Regarding these menu items:
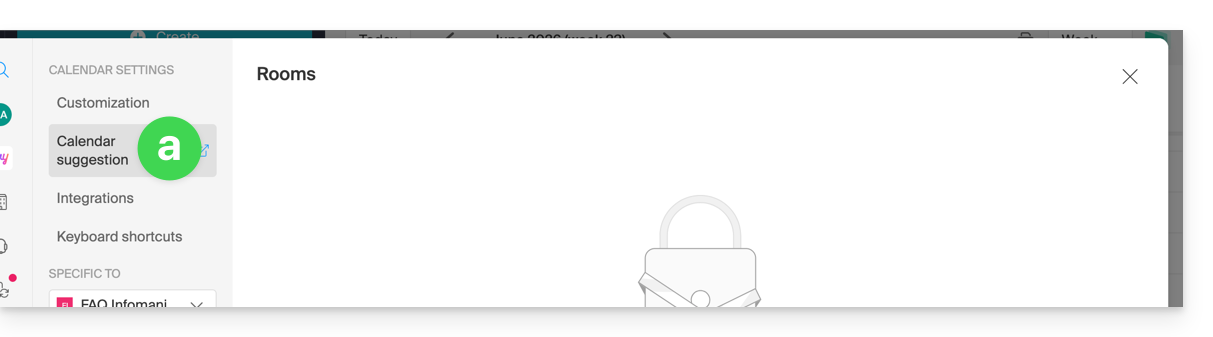
Please refer to this other guide.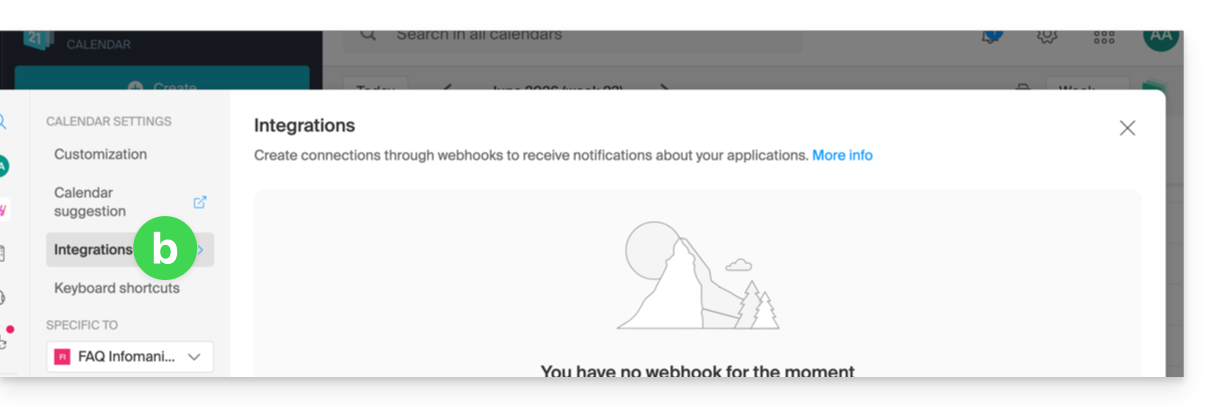
Please refer to this other guide.
Define the color of a calendar
To do this:
- Click here to access the Infomaniak Calendar web app (online service ksuite.infomaniak.com/calendar).
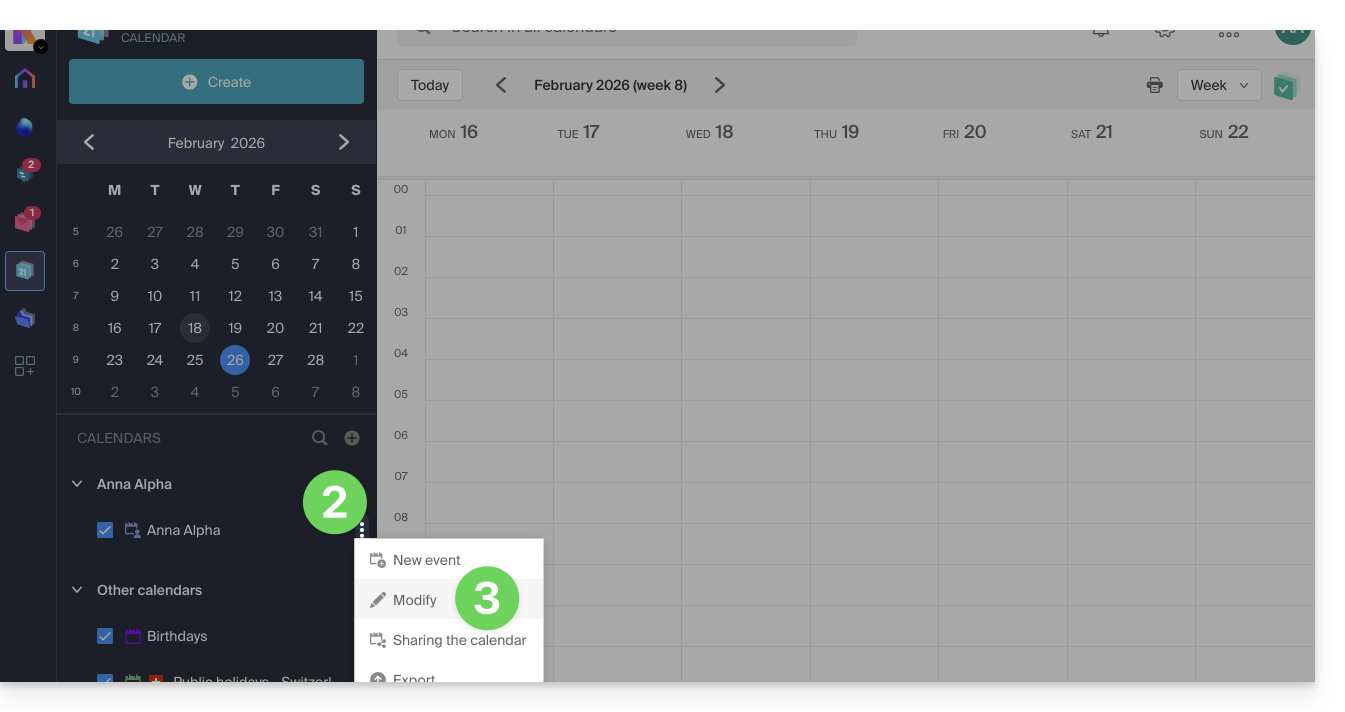
- Click on the action menu ⋮ to the right of the calendar in question.
- Click on Edit:
- Choose the desired color.
- Click the button to Confirm:
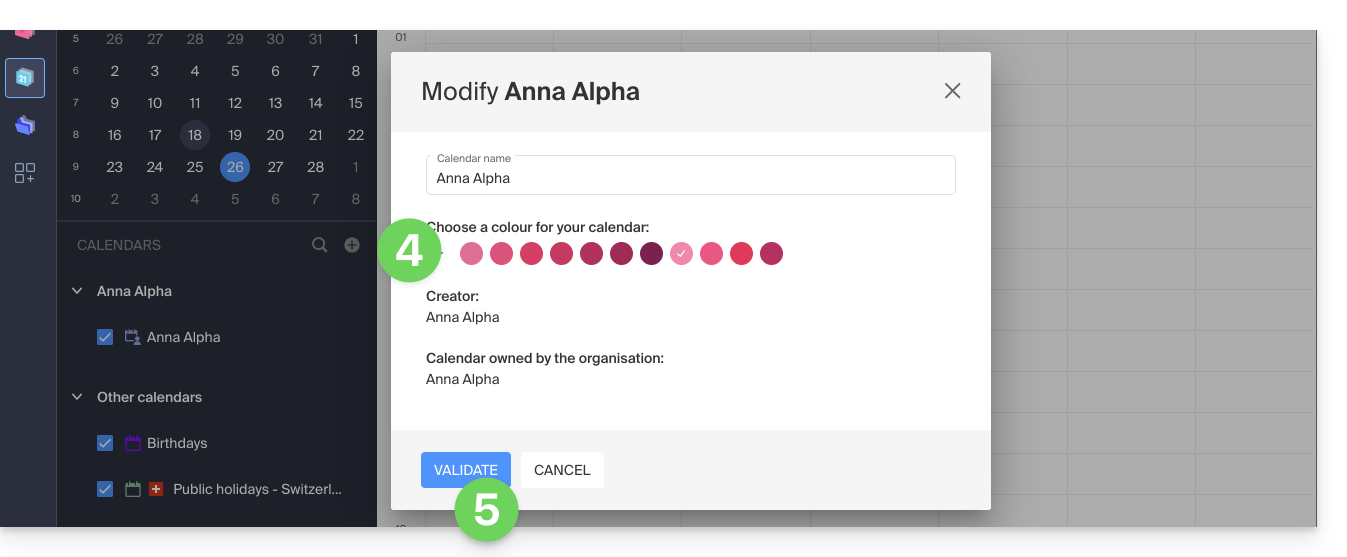
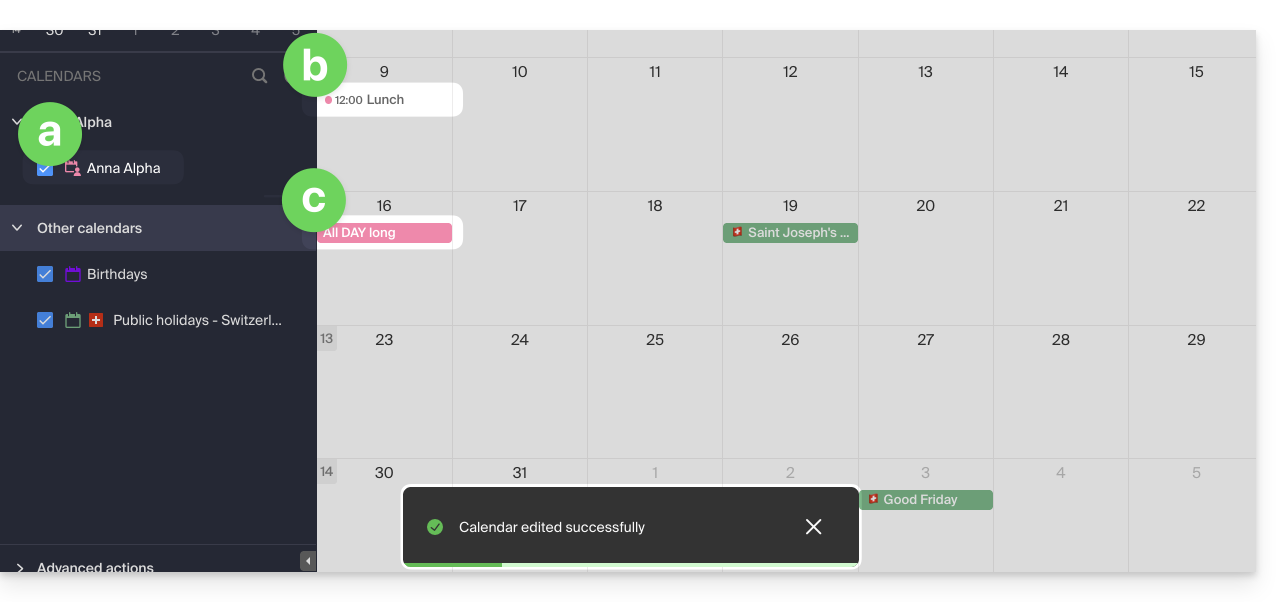
- The specified color will then be visible:
- in the Calendar name,
- for fixed-time events in the monthly view,
- for all-day events in the monthly view,
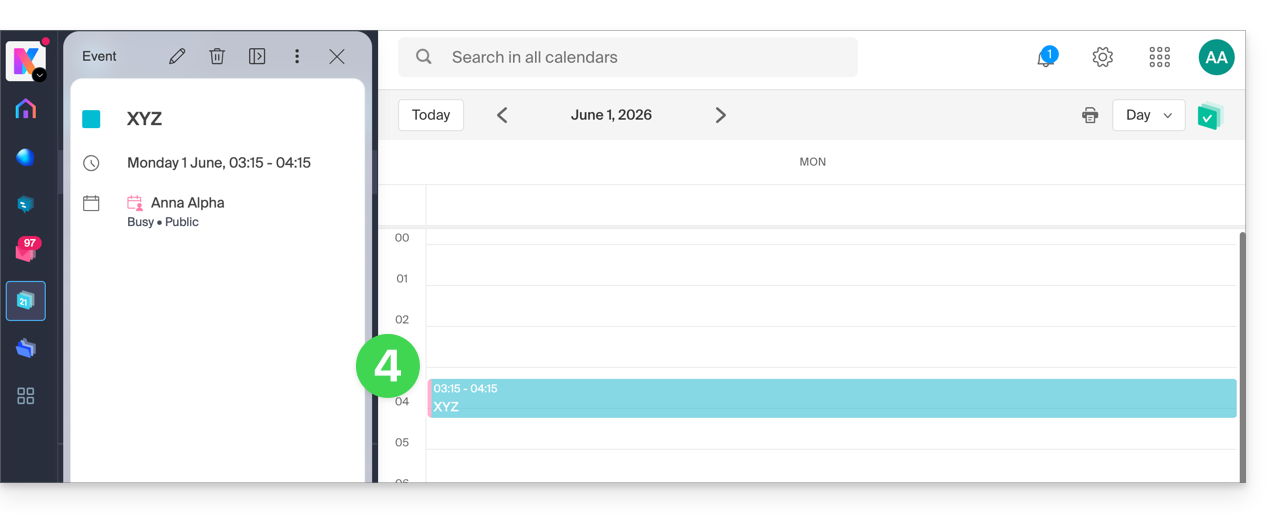
- in the daily view:

- in the agenda view:
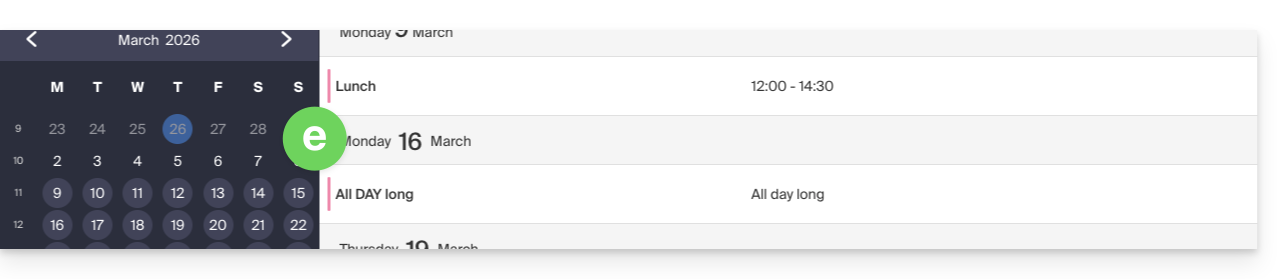
etc.
Define the color of an event
To manually change the color of a specific event, which will override the calendar's color:
- Click here to access the Infomaniak Calendar web app (online service ksuite.infomaniak.com/calendar).
- Create an event and choose its color, or click on an existing event and then click the pencil ✎ icon to edit the details, including its color:
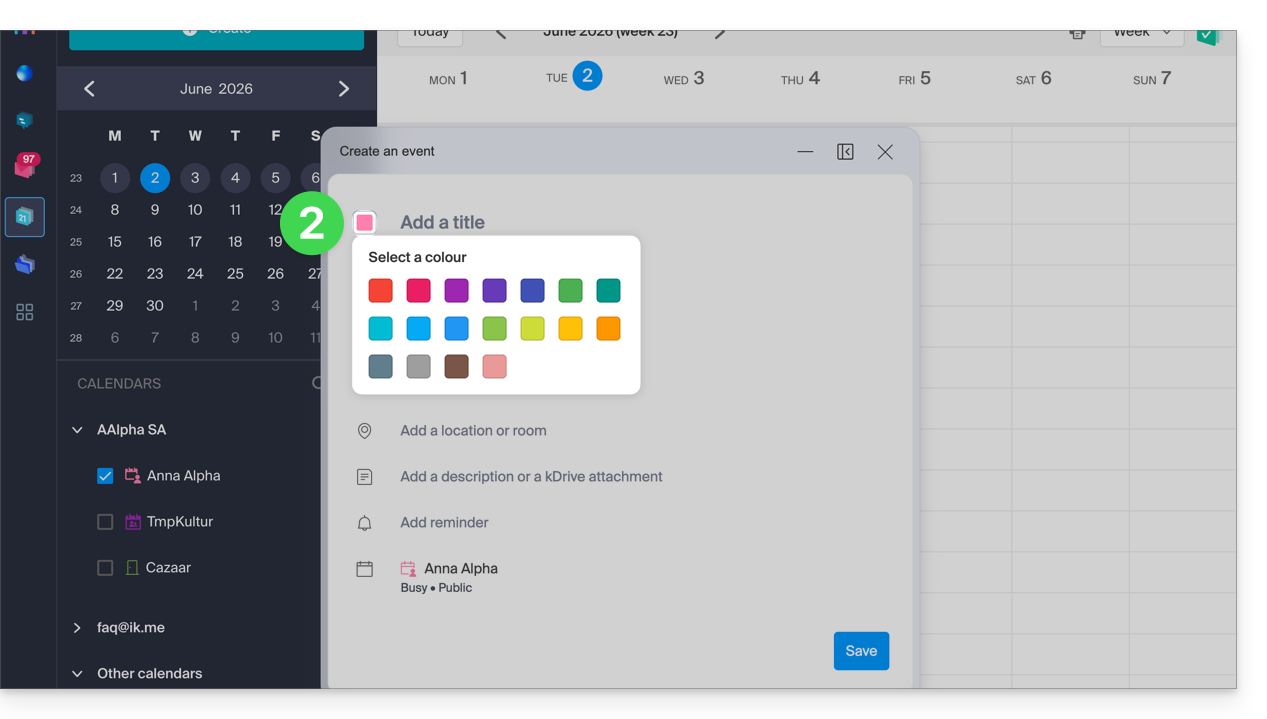
- Confirm at the bottom of the page.
- The specified color will then be visible at the event level:
Customize the displayed period
To do this:
- Click here to access the Infomaniak Calendar web app (online service ksuite.infomaniak.com/calendar).
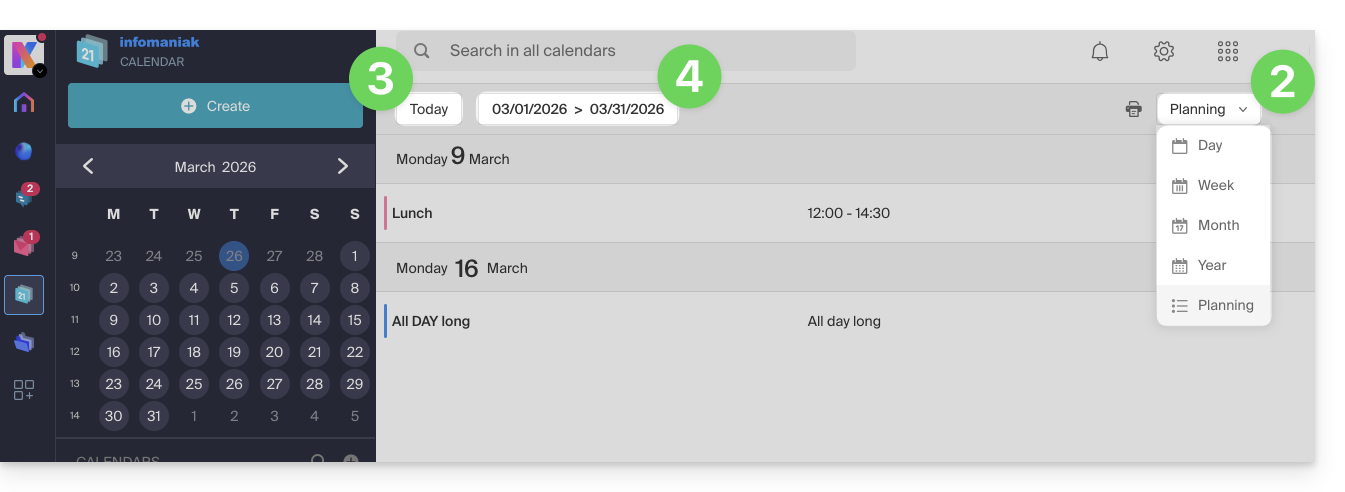
- Choose to display the calendar in Day, Week, Month, Year, or Planning view.
- At any time, click on Today to reset the current view.
- In the Planning view, you can choose the period to display ("this week", "next month", etc.):
Link to this FAQ: https://faq.infomaniak.com/1771
Has this FAQ been helpful?
This guide explains how to export a calendar in .ics format from Yahoo Mail so that you can easily import it into your Infomaniak tools.
Exporting the Yahoo Calendar
To retrieve your calendar:
- Log in to your Yahoo Mail account and access the calendar by clicking on the calendar icon in the right sidebar.
- Click on the Actions menu (represented by a gear icon) associated with your calendar, then choose Share….
- In the window that appears, select the calendar in question, then click Continue.
- Check the Generate links option.
- Click on the link that appears below the text.« For importing into a calendar application (ICS) » to download and save the
.icsfile to your computer.
If needed, please refer to this other guide.
Link to this FAQ: https://faq.infomaniak.com/2594
Has this FAQ been helpful?
This guide explains how to export your calendars and address books from Proton so that you can easily import them into your Infomaniak tools.
Exporting a calendar
To retrieve your events (usually in .ics format):
- Log in to your Proton Calendar account.
- Go to Settings (gear icon) then All settings.
- Select Calendars in the sidebar menu.
- Find the calendar in question and click on Export.
If needed, refer to this other guide.
Export an address book
To retrieve your contacts (in .vcf format):
- Access the Proton Contacts application.
- In the sidebar menu, simply click the Export contacts button.
For more details, please refer to this other guide.
Link to this FAQ: https://faq.infomaniak.com/2595
Has this FAQ been helpful?
This guide explains how to connect the Apple Mail desktop app on macOS (MacBook Pro, Neo, etc.) to an email address hosted by Infomaniak.
Introduction
- Your macOS computer will be automatically configured using Apple-compatible .mobileconfig configuration profiles, unlike a manual configuration.
- It is possible to delete a configuration profile once it has been installed (scroll to the bottom of this page for instructions).
Install a configuration profile
Prerequisites
- Create the email address within my kSuite or a Mail Service / kSuite.
- Check that the Mail Service is configured optimally.
You can download the profile from the device in question or send it from another device (if you already have an email address that works correctly, for example):
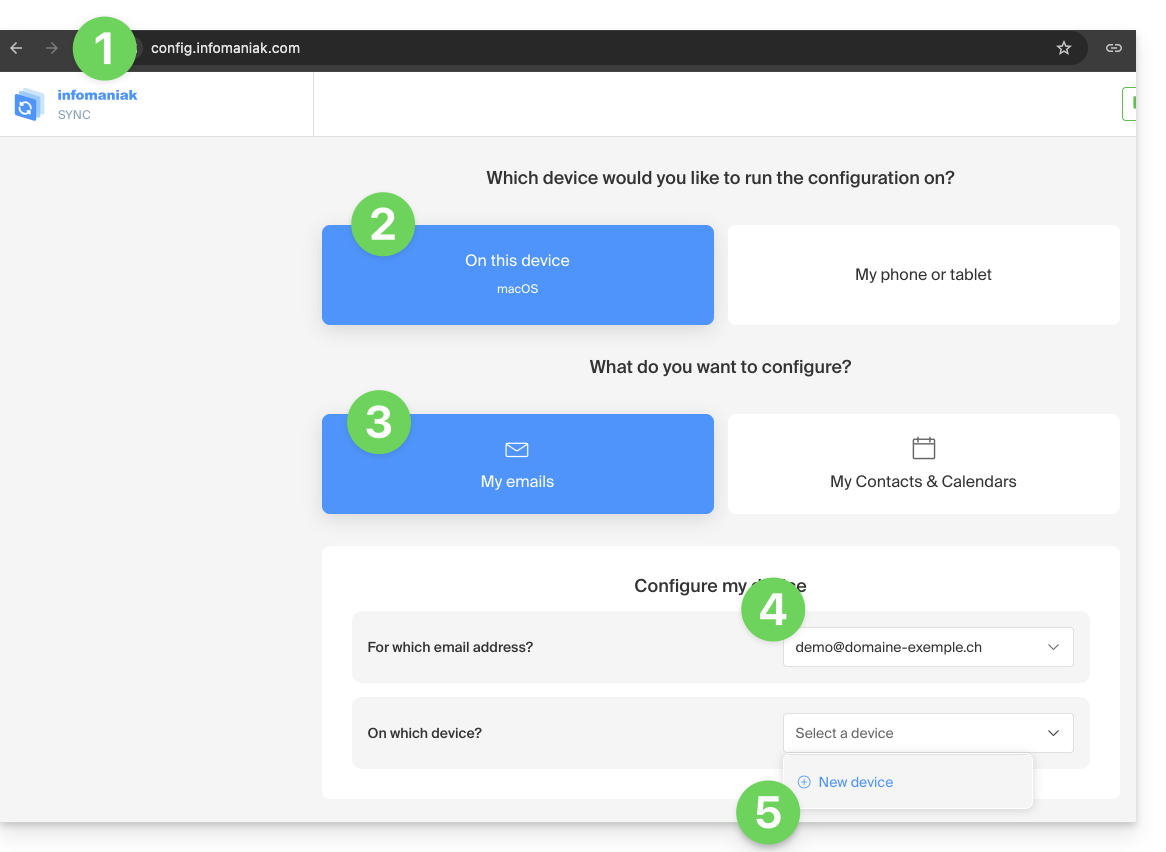
- Click here to access the Infomaniak configuration tool (online service https://config.infomaniak.com) — log in to your Infomaniak account on the Organization where your email address is managed, if necessary.
- Choose to install the profile on this device.
- Choose to synchronize emails.
- Choose the email address to configure in Apple Mail (from the ones you have access to).
- Create a new device:
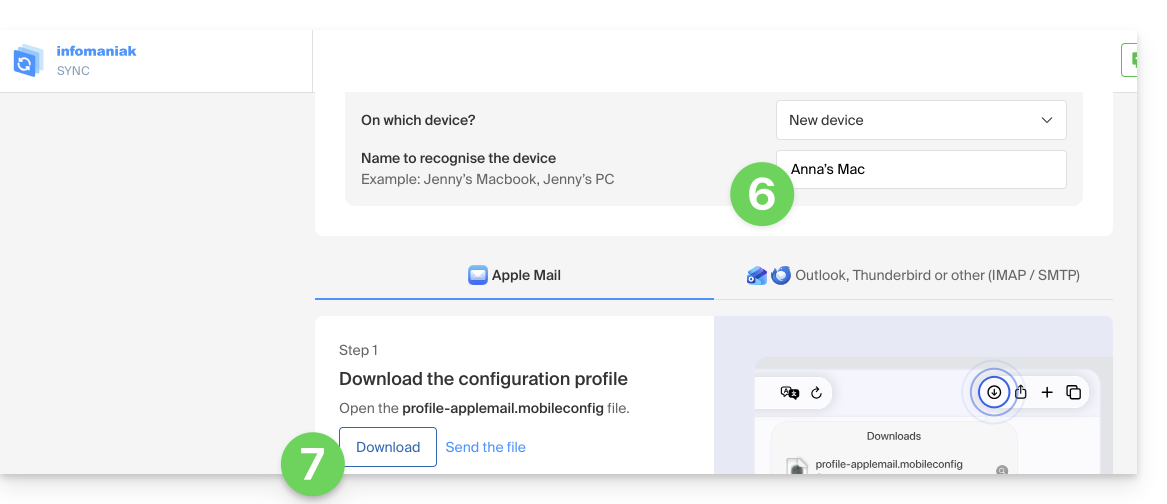
- Enter a descriptive name for the new device.
- Click the button to download the profile (you can also send it by email using the link on the right):
- Once the
profile-applemail.mobileconfigfile is on your computer, double-click it to open and run it. - Click OK:

- Open the computer’s System Settings.
- Click on Downloaded Profile in the sidebar, then double-click the new profile to apply it:
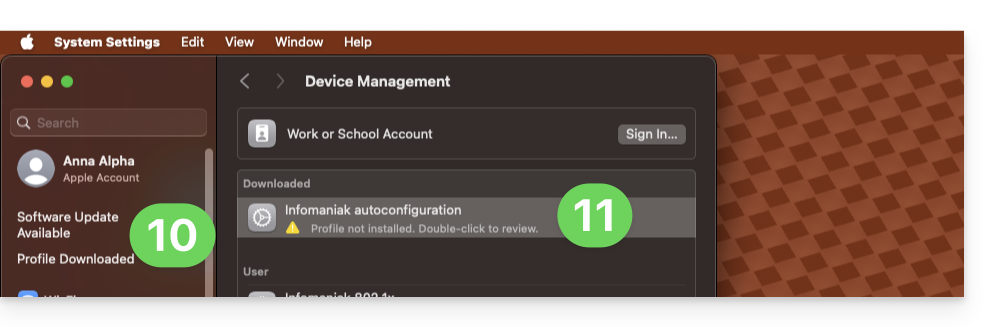
- If you have an older version of macOS or cannot find the profile, search for “profile” in the settings, or consult the official documentation by changing the version of your system at the top of the page if necessary.
- Click on Install…:
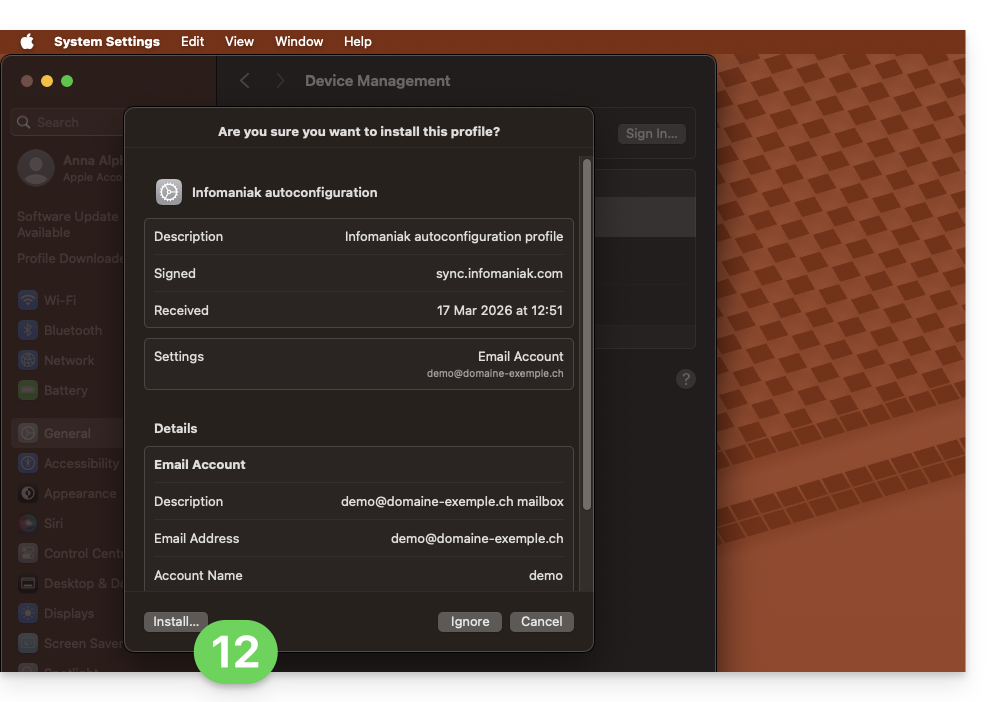
- A password will then be requested…
- either you know it because you have already created it in the Devices section of the Mail Service:
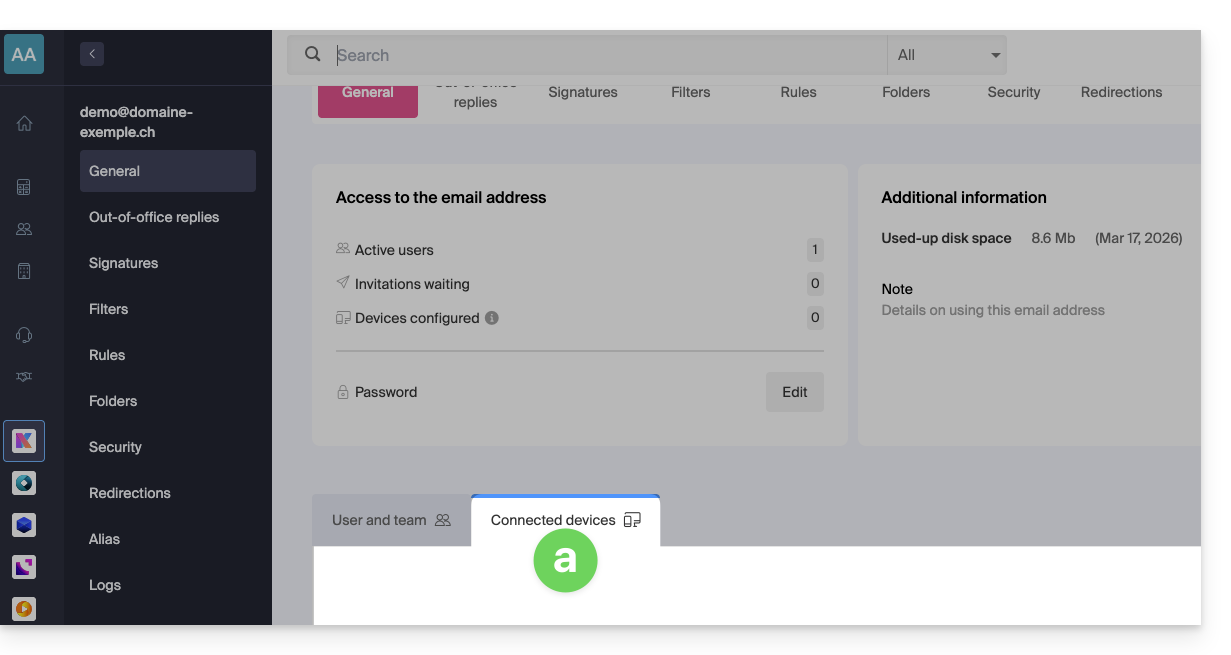
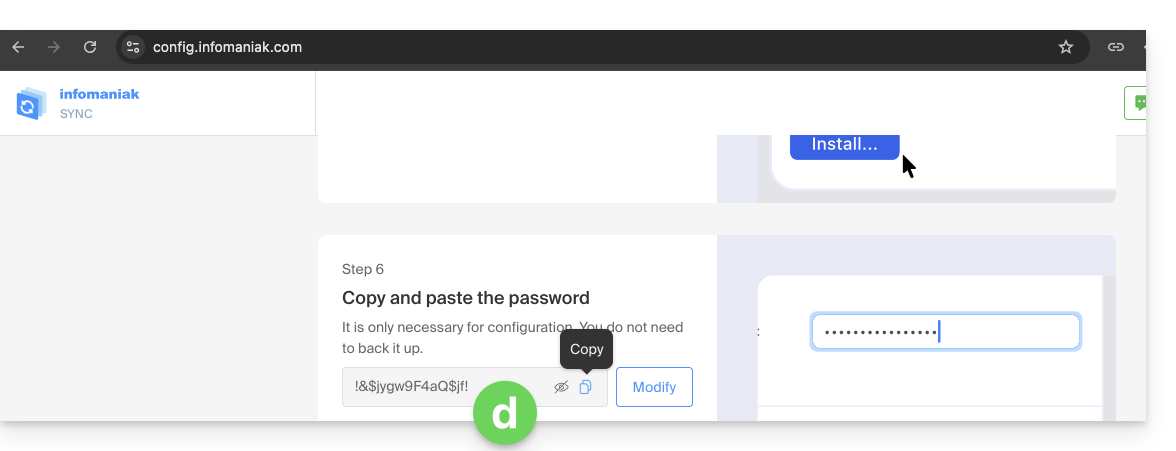
- or you can copy the new password that is located further down on the assistant page
config.infomaniak.comthat was opened previously: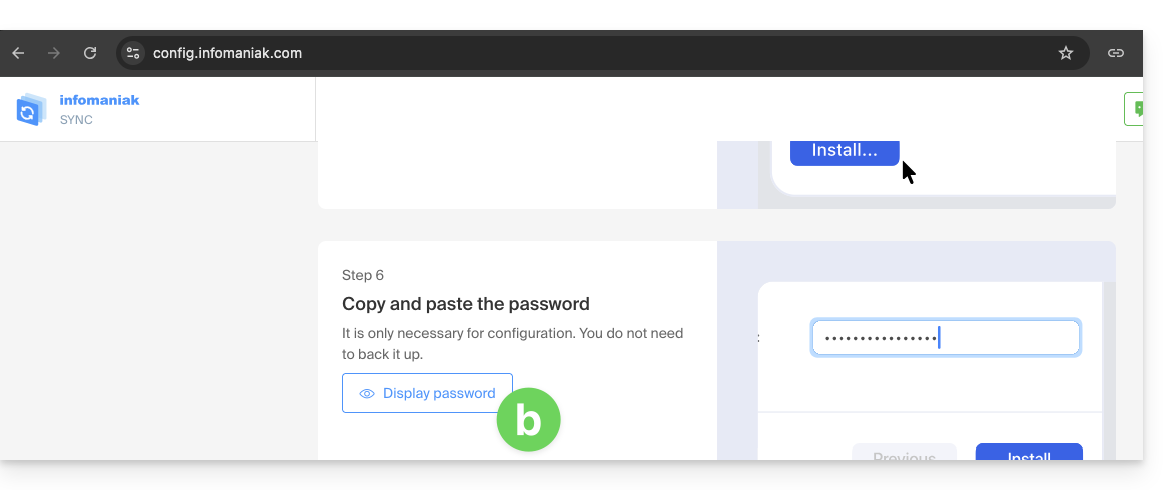
- Before the email address password is displayed, your Infomaniak account password may be requested for security reasons:
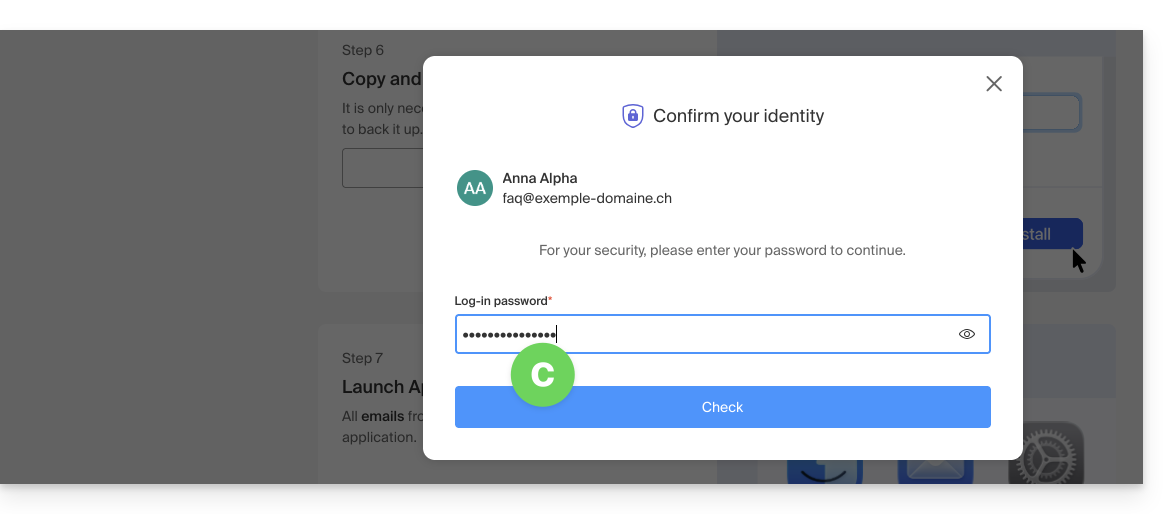
- There you go, the randomly generated password is displayed, simply copy it:
- either you know it because you have already created it in the Devices section of the Mail Service:
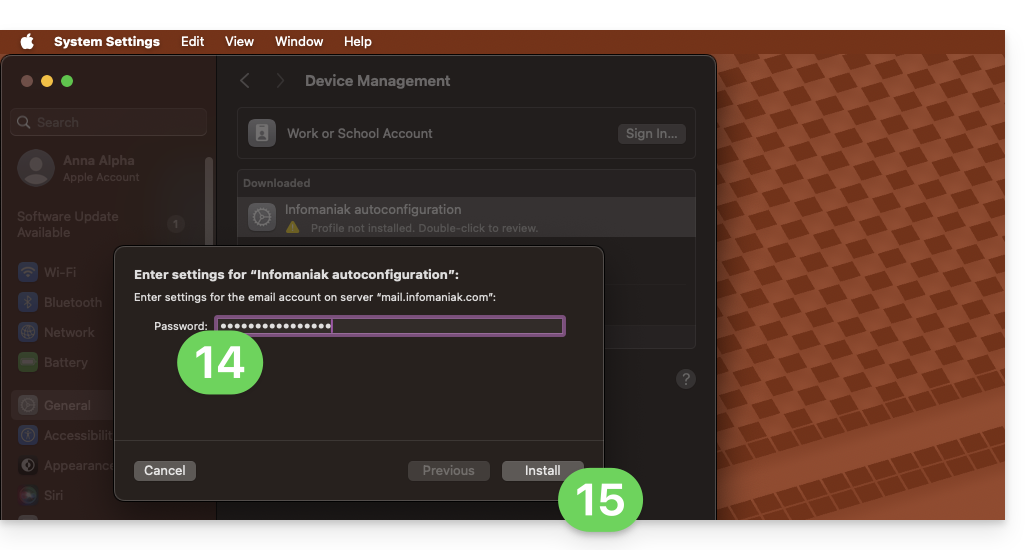
- Paste the password into the macOS window.
- Click Install to start installing the profile:
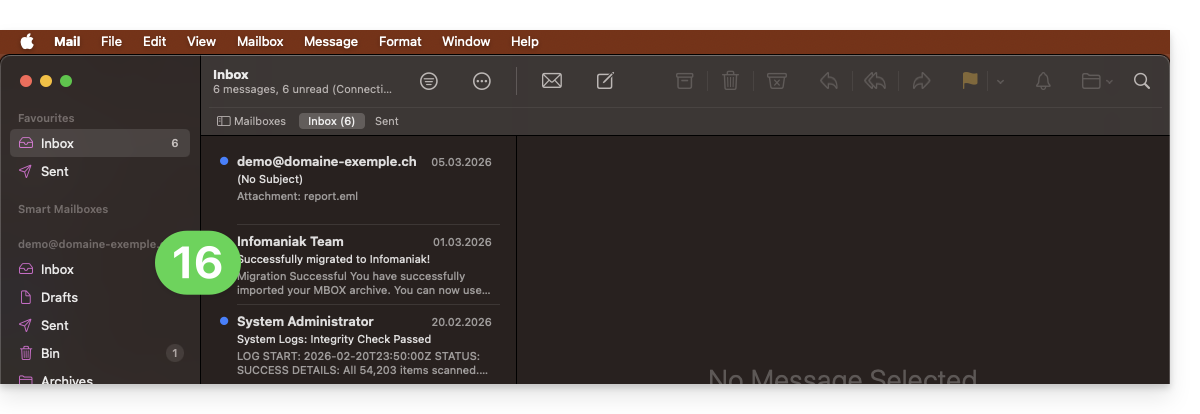
- That's it, your email address is now configured in the Apple Mail application, which you can open and manage:
Remove an IMAP account
Refer to the "Stop using an account" chapter. If necessary, change the version of your system at the top of the page*. (Note: Do not delete a POP-configured account without saving your messages beforehand).
Delete an Apple profile
Refer to the official documentation by changing the version of your system at the top of the page * if necessary.
*Why is it necessary to select the guide version that exactly matches your macOS / iOS system version?Apple introduces subtle changes with each new version of its system, for example, a path in iOS 15…
… becomes this in iOS 18…
Link to this FAQ: https://faq.infomaniak.com/1316
Has this FAQ been helpful?
This guide explains how to display a calendar with the dates of public holidays for the canton or country of your choice in the Infomaniak web app Calendar (online service ksuite.infomaniak.com/calendar).
Introduction
- These suggested calendars can be synchronized with your mobile and desktop devices.
- The birthday calendar (the calendar that displays the birthdays of your contacts when the date is entered in their address book entry) is only visible through the Infomaniak Calendar web app (online service ksuite.infomaniak.com/calendar) and cannot be synchronized with CalDAV tools.
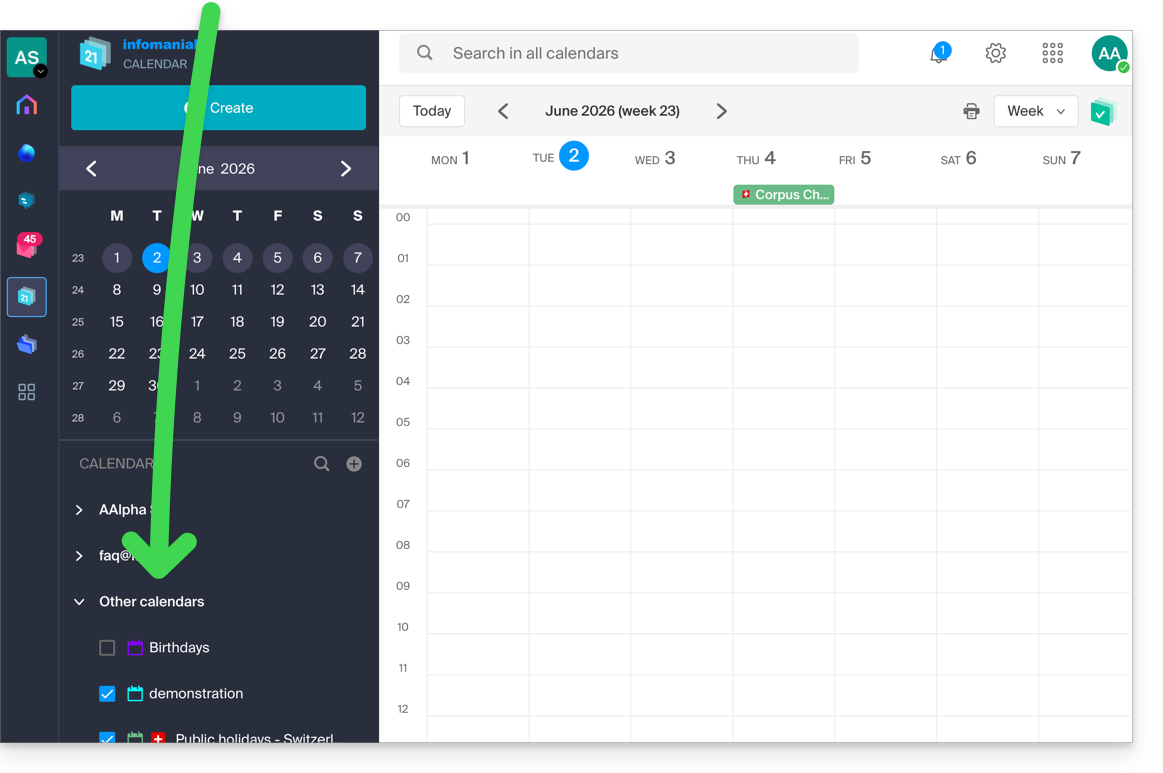
Display additional official calendars
To add the public holidays or school holidays calendar:
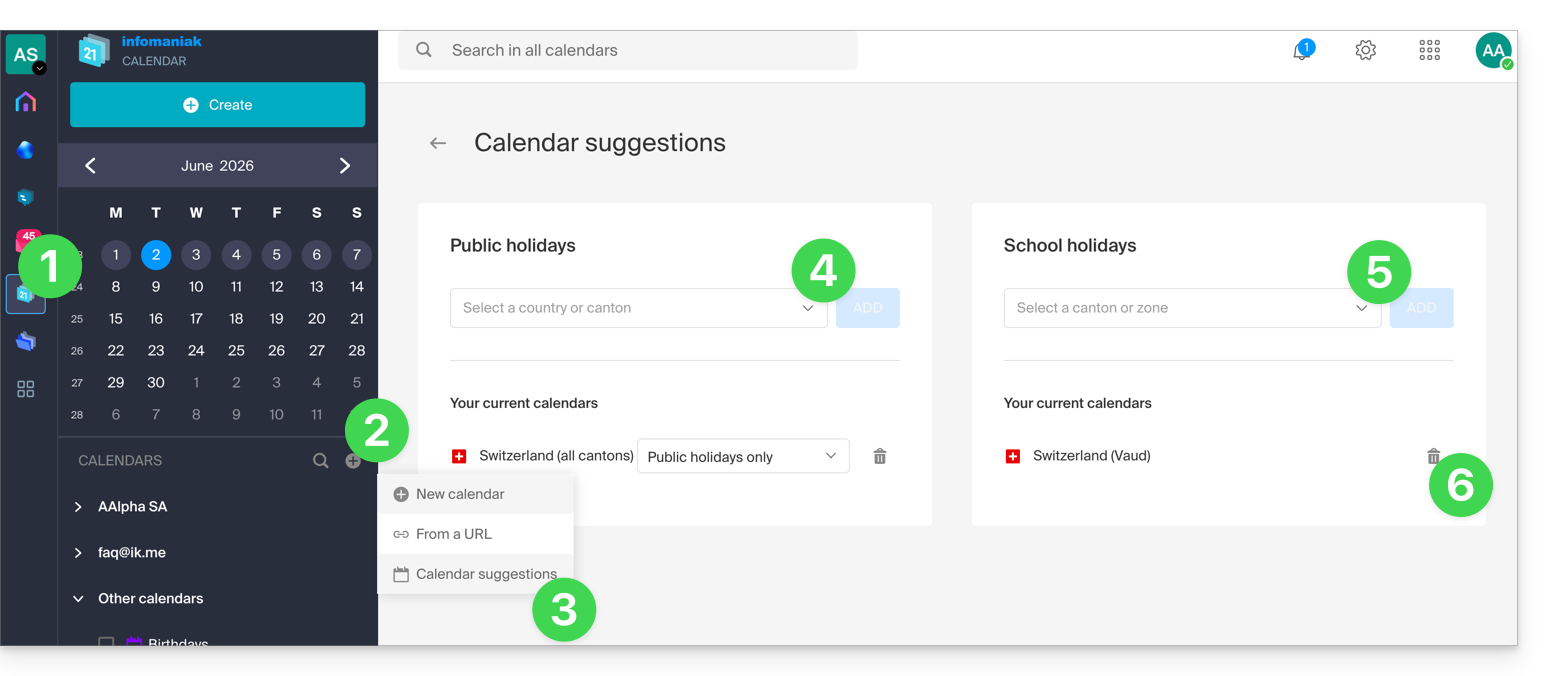
- Click here to access the Infomaniak web app Calendar (online service ksuite.infomaniak.com/calendar).
- Click on the button in the left-hand menu.
- Click on Suggested calendars.
- Choose from the calendars of national holidays (by canton or country).
- You can also add the official calendar of national school holidays (France, Switzerland, etc.).
- Once added, you can also remove them here:
Link to this FAQ: https://faq.infomaniak.com/566
Has this FAQ been helpful?
This guide explains how to share one of your calendars with other Infomaniak users and collaborators from the Infomaniak Calendar web app (online service ksuite.infomaniak.com/calendar).
Introduction
- Refer to this other guide to configure calendar synchronization, or this other guide to integrate a read-only calendar into a third-party tool.
Share an Infomaniak calendar
To enable sharing for one of your calendars:
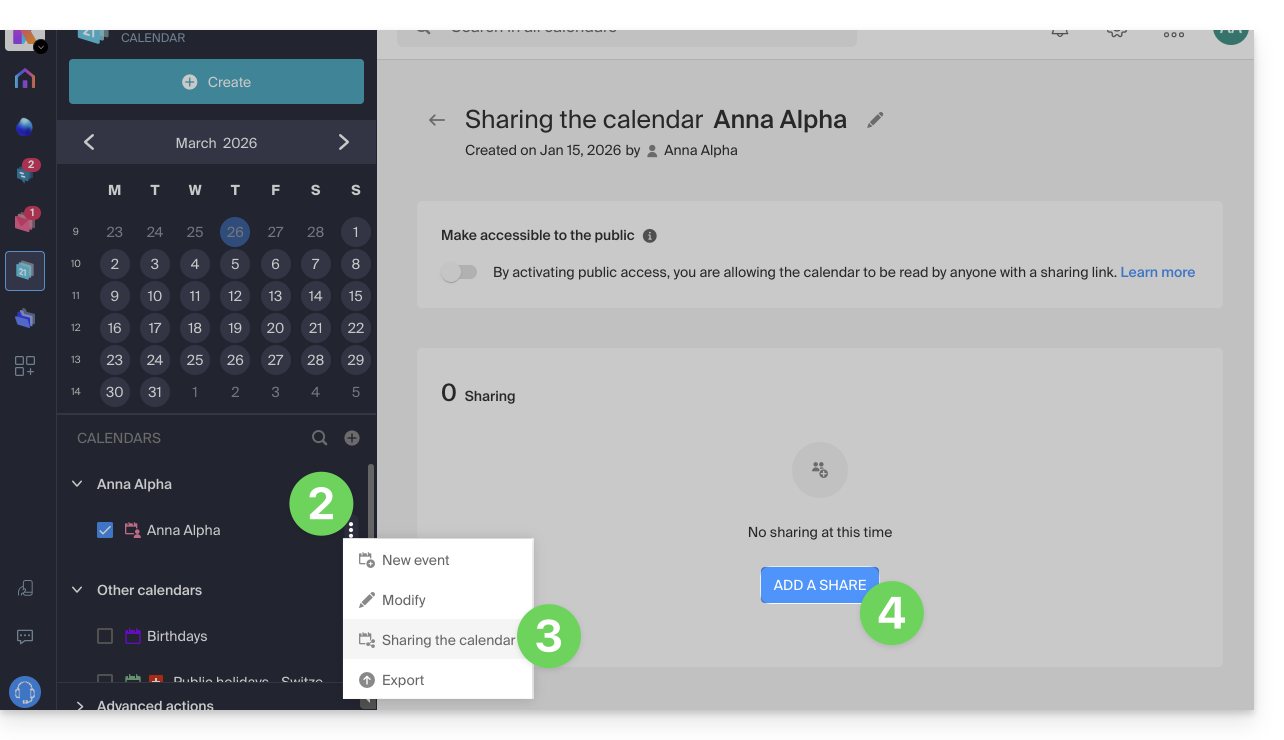
- Click here to access the Infomaniak Calendar web app (online service ksuite.infomaniak.com/calendar).
- Click on the action menu ⋮ to the right of a calendar.
- Click on Share calendar.
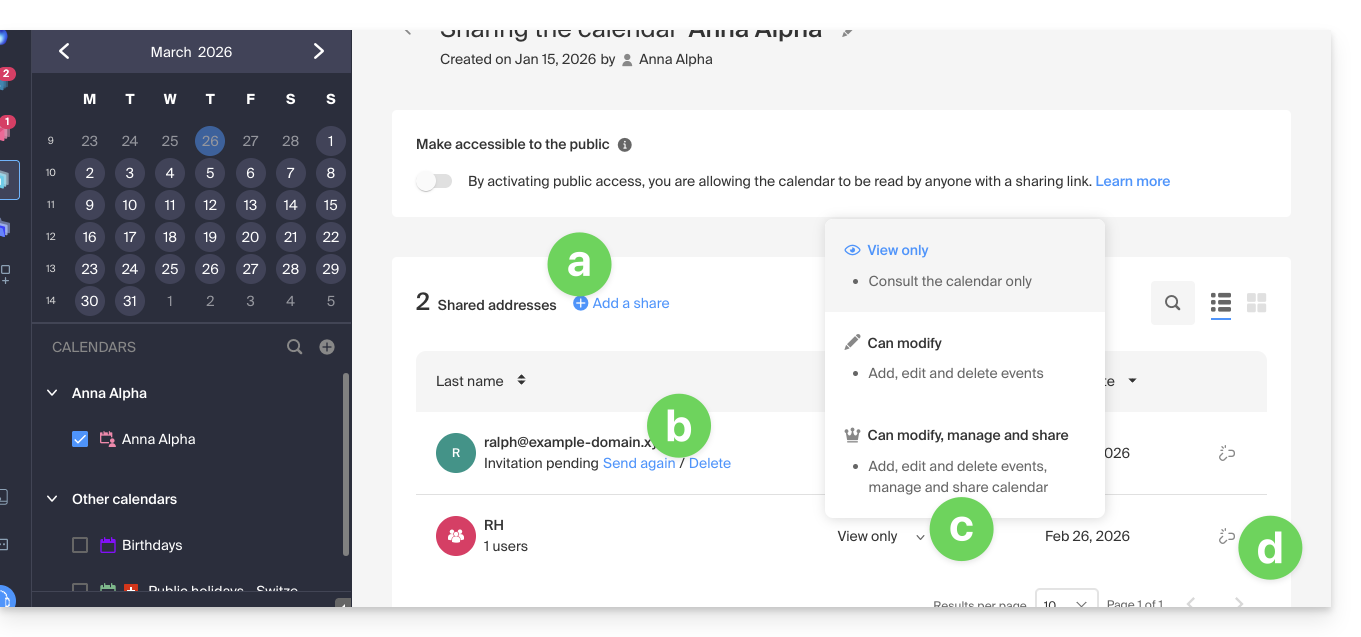
- Click the button to Add a share:
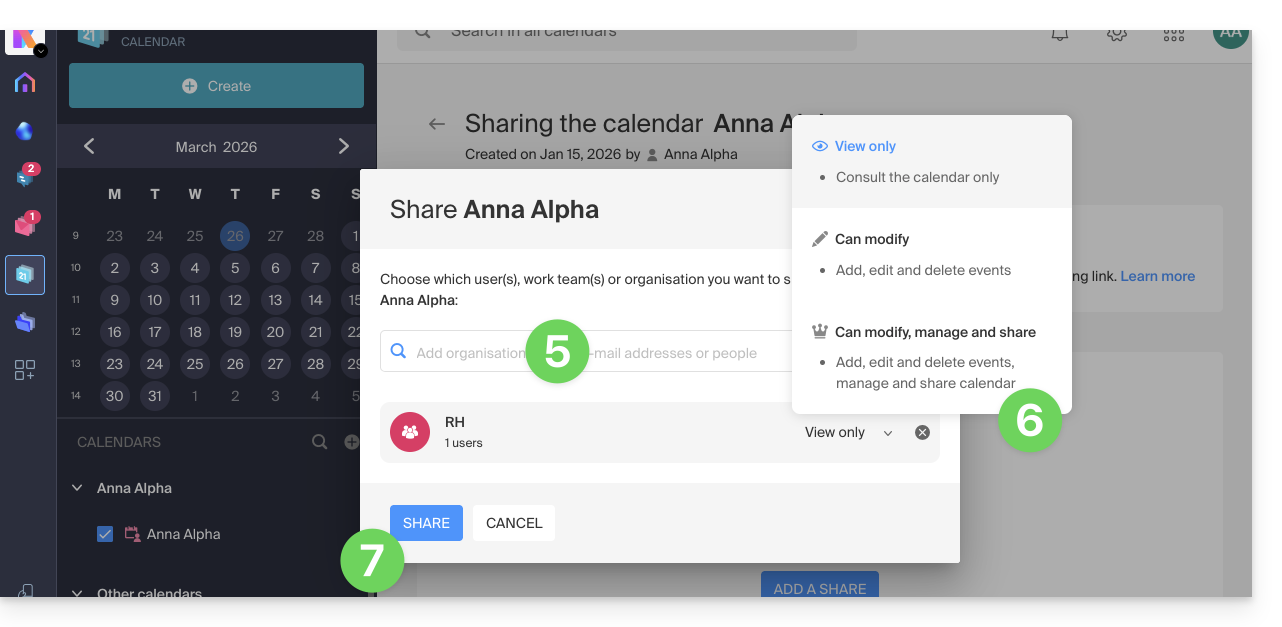
- Enter the Organization, group, orthe email address corresponding to the Infomaniak user accountthat will access the calendar (if the user does not yet have an account, they can create one for free with the invitation they receive).
- Define the user permissions for this calendar (Can view, Can edit, Can edit and share).
- Finish by clicking on the button:
- You can perform other actions from the same page at any time:
- add another share
- resend or delete an access invitation
- modify the permissions related to calendar sharing
- delete/revoke the share
Share a meeting room calendar
To share the calendar for meeting rooms, the principle of sharing and assigning permissions is based on the same principle as above: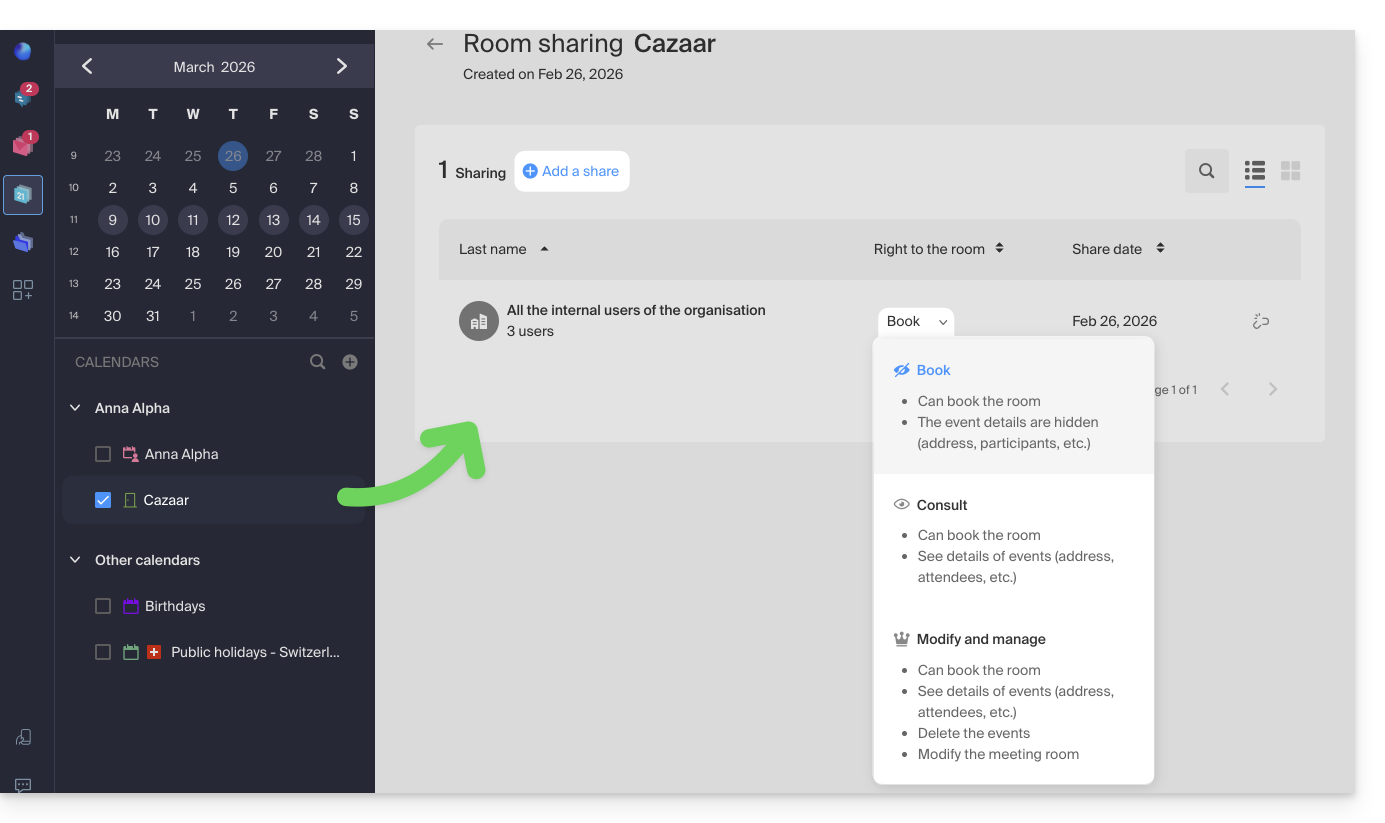
Link to this FAQ: https://faq.infomaniak.com/1679
Has this FAQ been helpful?
This guide explains how to recover events, tasks, unavailable time slots, and deleted time slots from one of your calendars in the Infomaniak Calendar web app (online service ksuite.infomaniak.com/calendar for managing your events and appointments).
✘ NOT AVAILABLE with
kSuite Free
my kSuite (ik.me, etik.com, ikmail.com)
Mail Starter service
By upgrading one of these free plans, you will be able to restore backups for up to 30 days.
Calendar/Agenda Restoration
Backup Retention Period
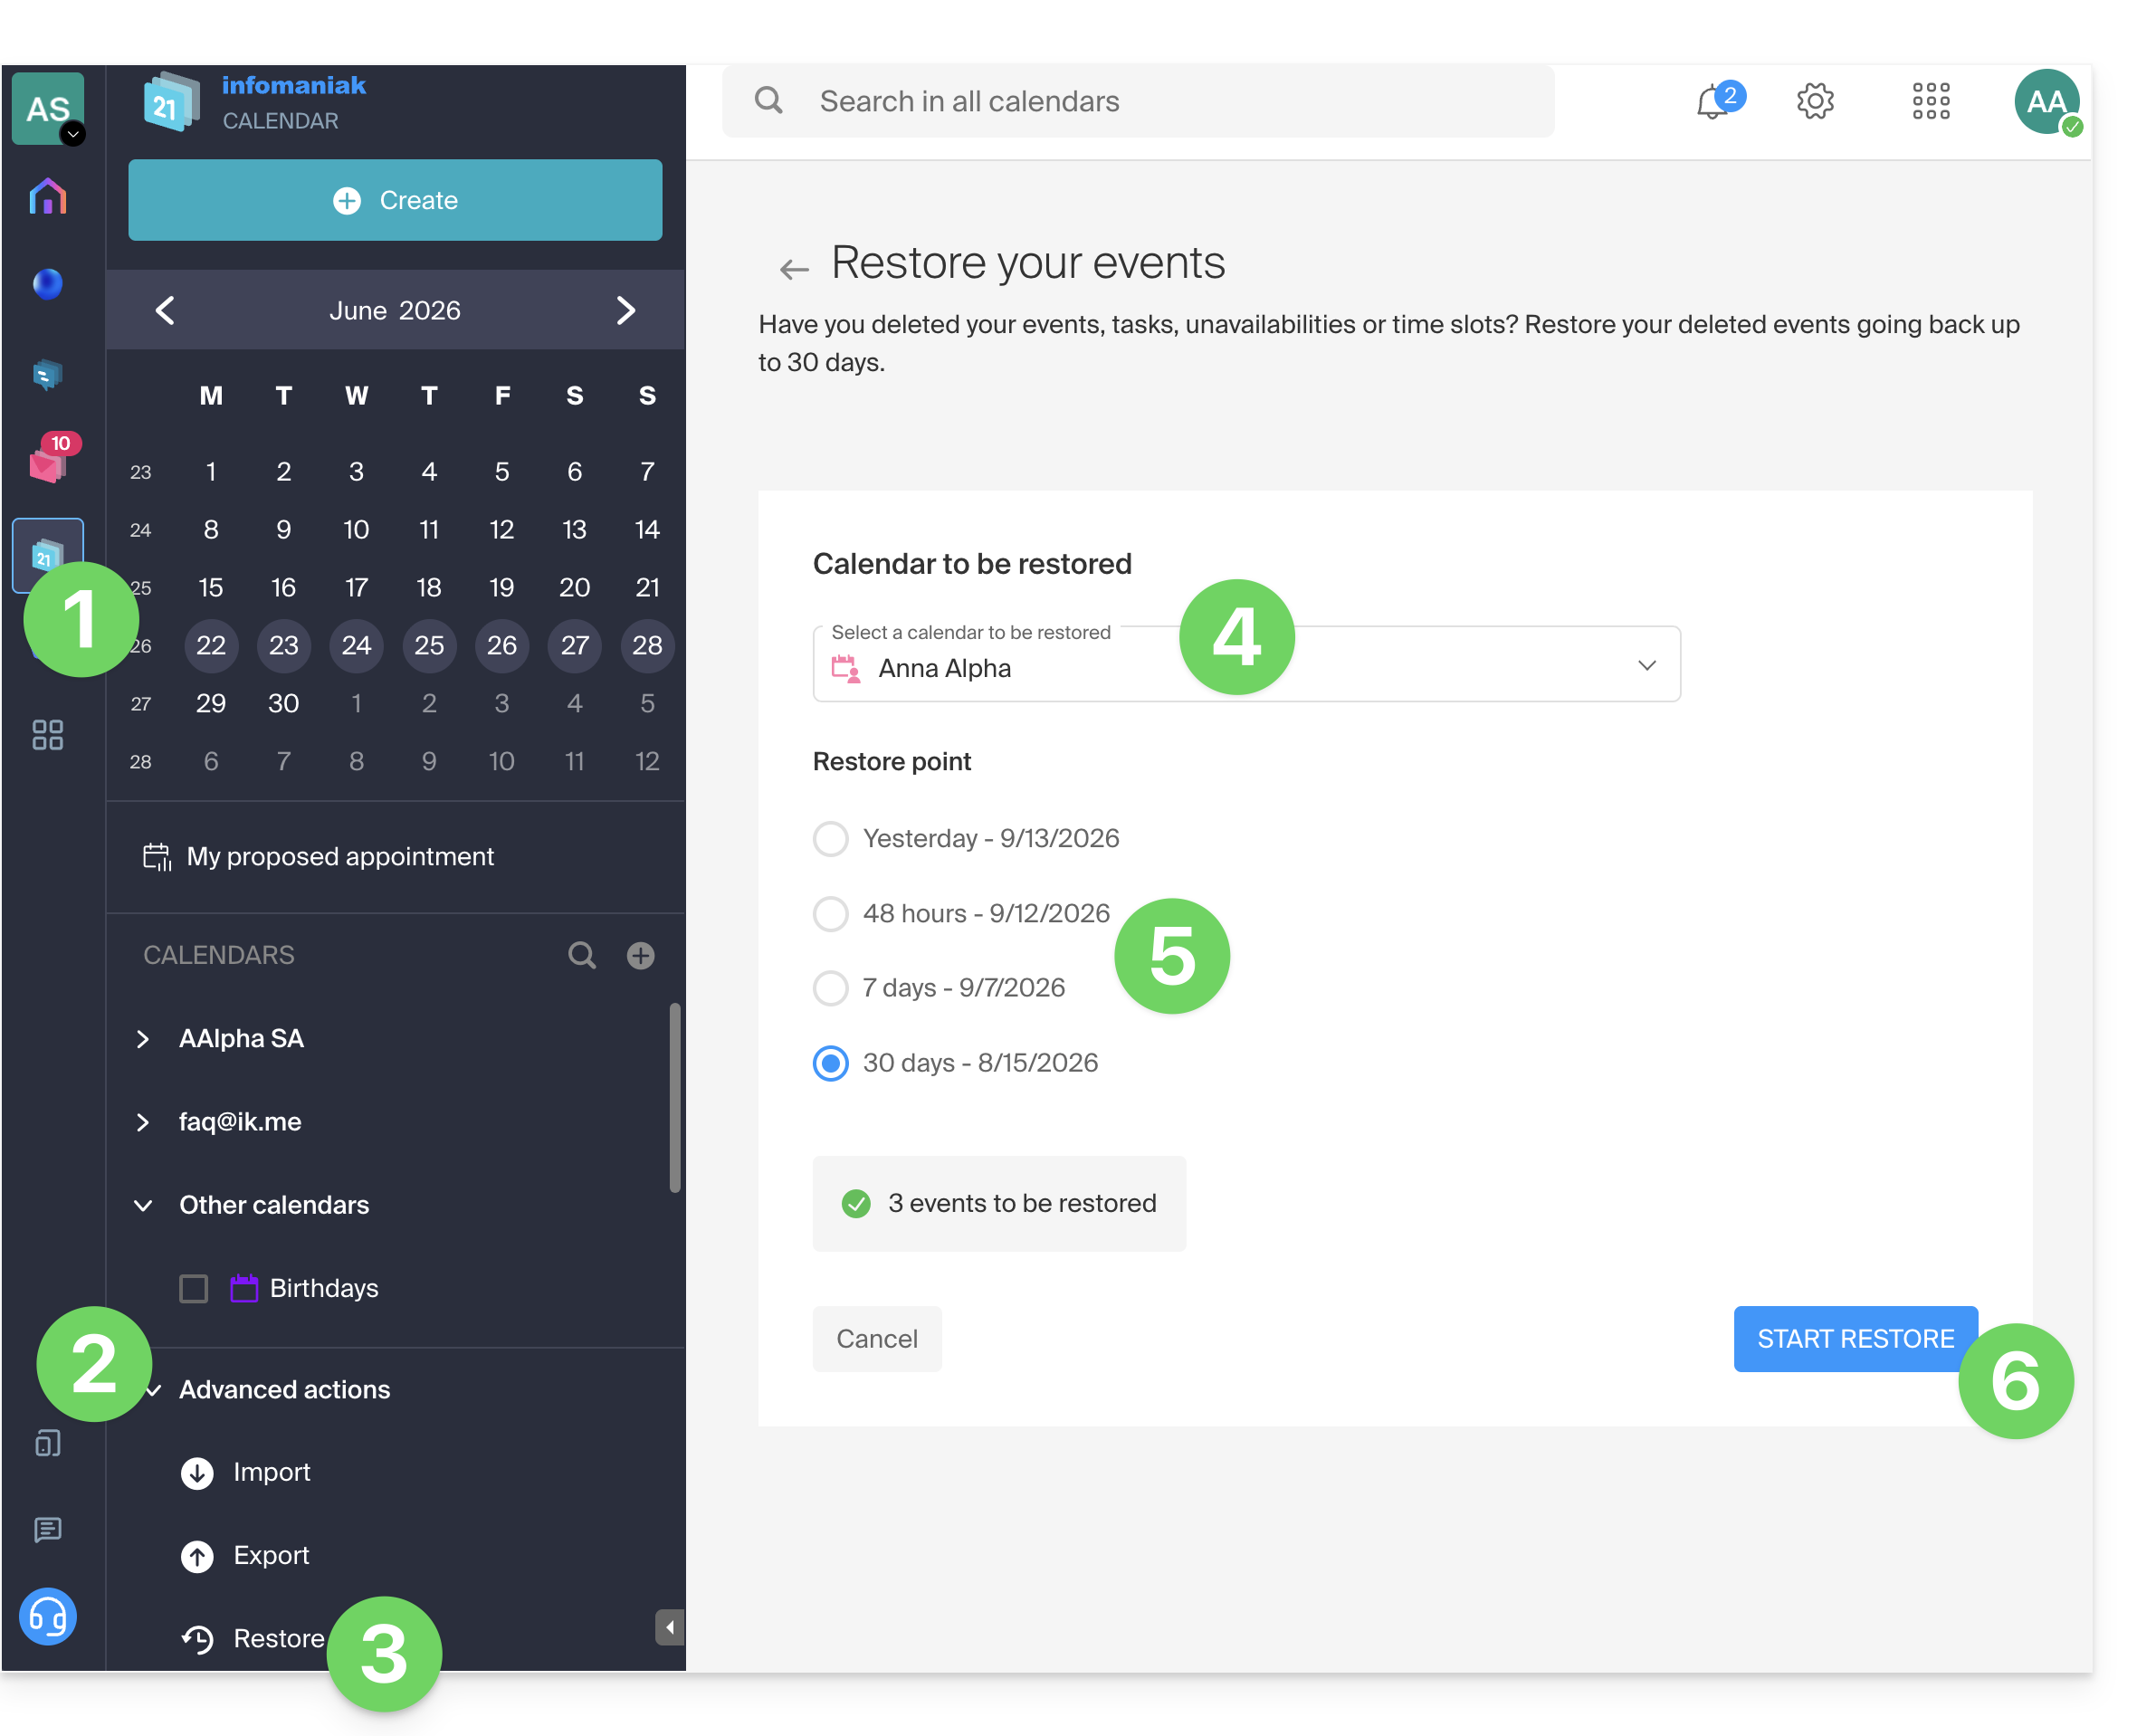
Restore points are created every day. Once a backup of your calendar's complete state has been created, Infomaniak makes it available to you for 30 days. If events can be restored, you can revert to the point from 24 hours, 48 hours, 7 days, and 30 days ago:
- Click here to access the Infomaniak Calendar web app (online service ksuite.infomaniak.com/calendar).
- Click on Advanced actions from the left-hand menu.
- Select Restore.
- Choose the calendar to restore.
- Choose the desired version (1/2/7/30 days).
- Start the restoration using the button at the bottom of the page, which is activated if events can be restored:
Link to this FAQ: https://faq.infomaniak.com/1688
Has this FAQ been helpful?
This guide explains how to add a new recurring event to a calendar in the Infomaniak Web app Calendar (online service ksuite.infomaniak.com/calendar).
Introduction
- To easily create and configure a new event, refer to this other guide.
- It is possible to modify (move/delete) a single instance of a recurring event in the Infomaniak calendar without affecting the entire series, allowing you to adjust the time, participants, location, or duration of a specific meeting while preserving the original configuration for all other instances.
Add a recurring event
To add an event that will be repeated in the future:
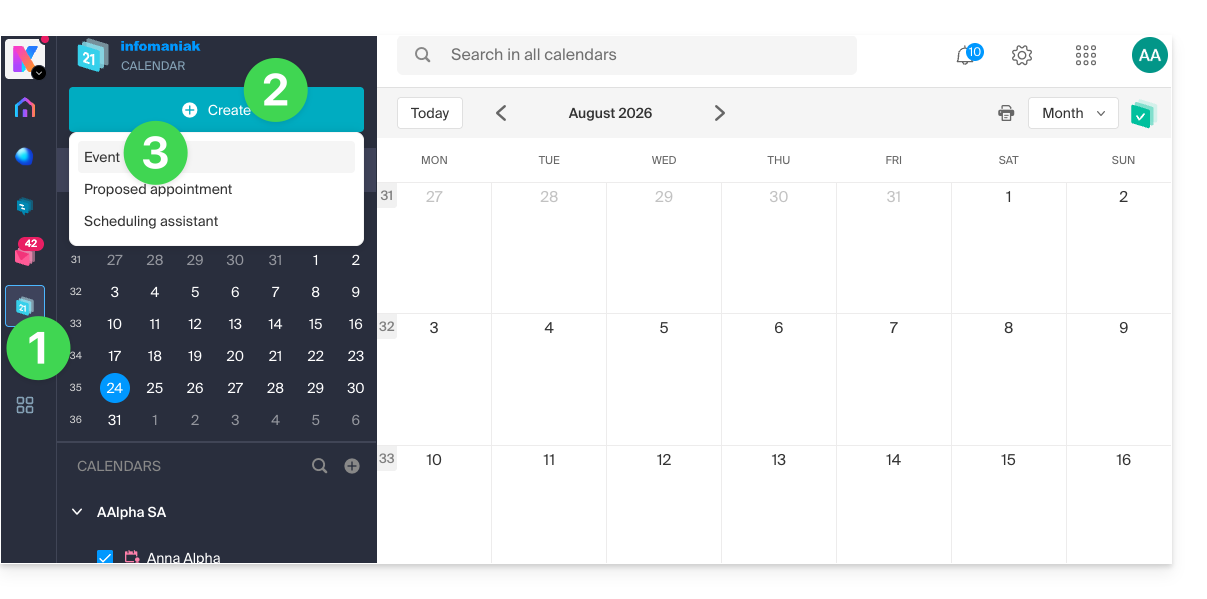
- Click here to access the Infomaniak Calendar web app (online service ksuite.infomaniak.com/calendar).
- Click the Create button in the upper left corner.
- Click on Event:
- Enter the event details.
- Click on the time/date section:
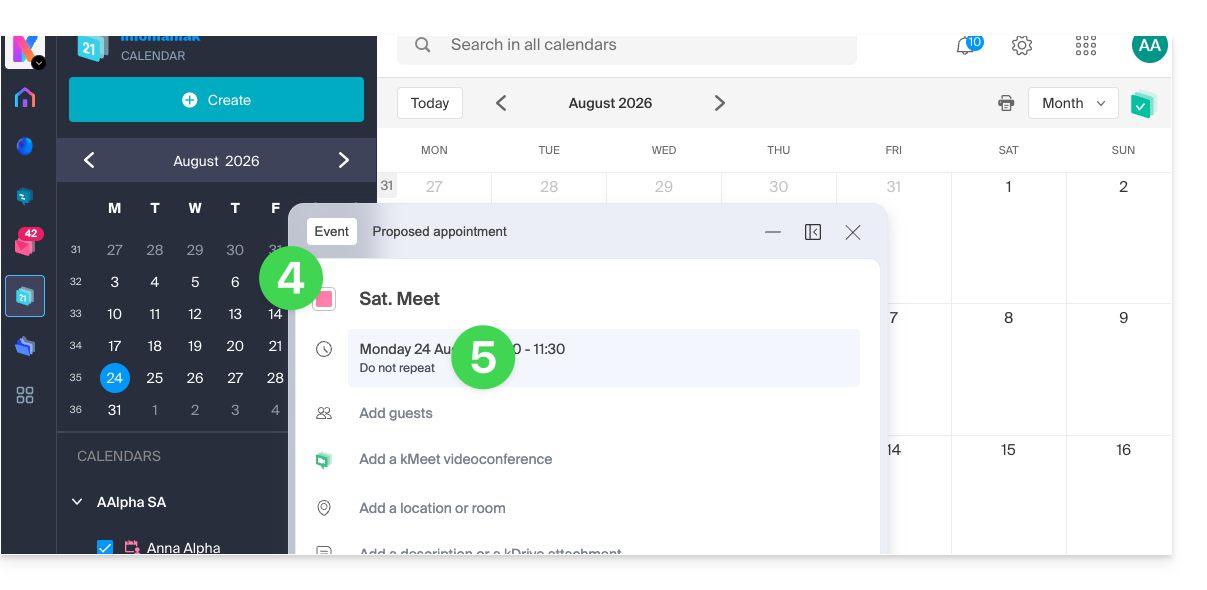
- Enable recurrence and customize it as needed.
- Save the recurring event at the bottom of the page:
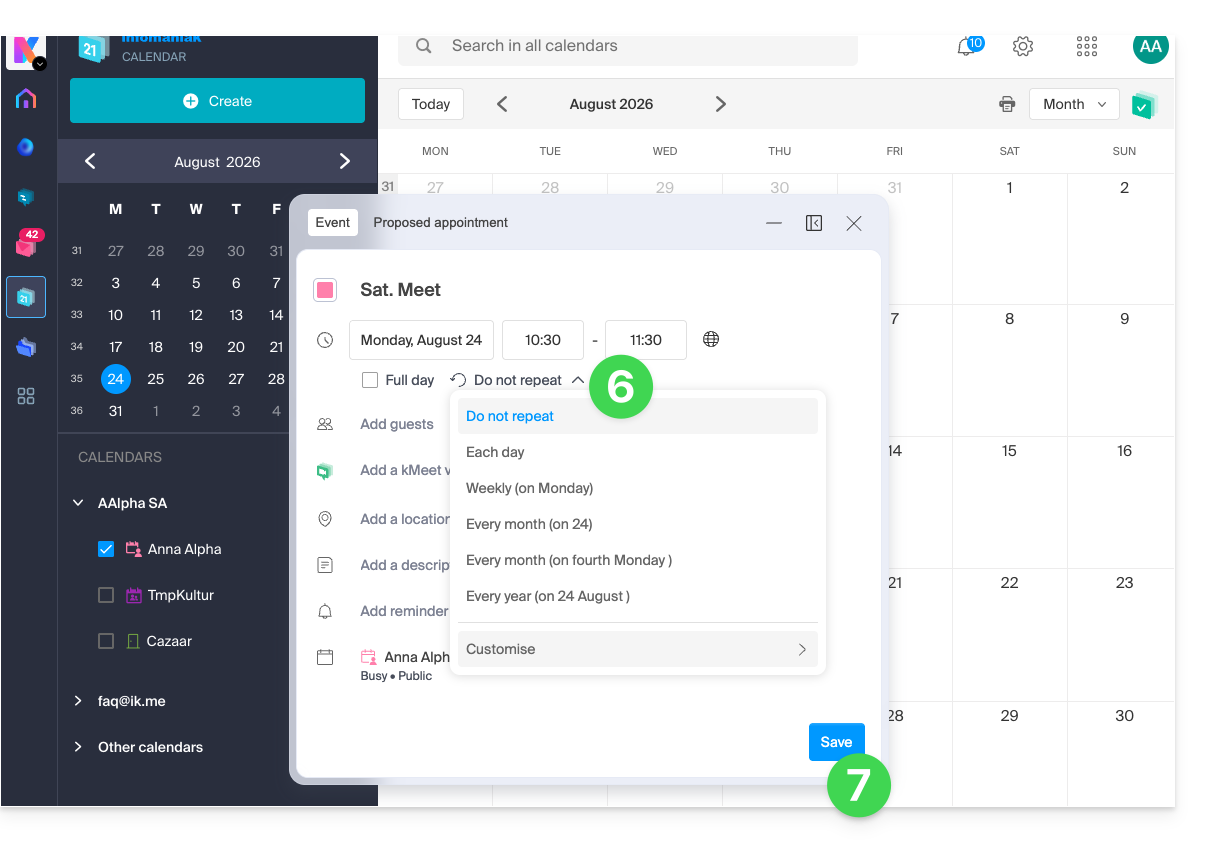
Link to this FAQ: https://faq.infomaniak.com/1565
Has this FAQ been helpful?
This guide details the room booking feature (for meeting rooms, sports facilities, classrooms, etc.) available in the Infomaniak Web app Calendar (online service ksuite.infomaniak.com/calendar).
✘ NOT AVAILABLE with
my kSuite / my kSuite+ (ik.me, etik.com, ikmail.com)
Mail service Starter / Premium
Introduction
- You can create and associate physical meeting rooms with events in Calendar, for example, to organize an event in a specific location that has equipment and a limited number of seats.
- Each created room displays a dedicated calendar in the app, which can be shared (❓: help).
- Double (or multiple) room bookings are possible.
- Number of possible rooms per resource:
- kSuite Free = 1
- kSuite Standard = 2
- kSuite Business = 6
- kSuite Enterprise = 50
Configure meeting rooms
Prerequisites
- You must be at least an Administrator of the Organization (❓: help).
- Users with limited rights (collaborators and clients) who have access to this product will not be able to do this.
To create rooms that can be booked by employees:
- Click here to access the Infomaniak Calendar web app (online service ksuite.infomaniak.com/calendar).
- Click on Settings in the top right corner.
- Check or select the relevant Organization from the dropdown menu in the left-hand sidebar.
- Click on Rooms in the left-hand menu.
- Click on the Create a room button:
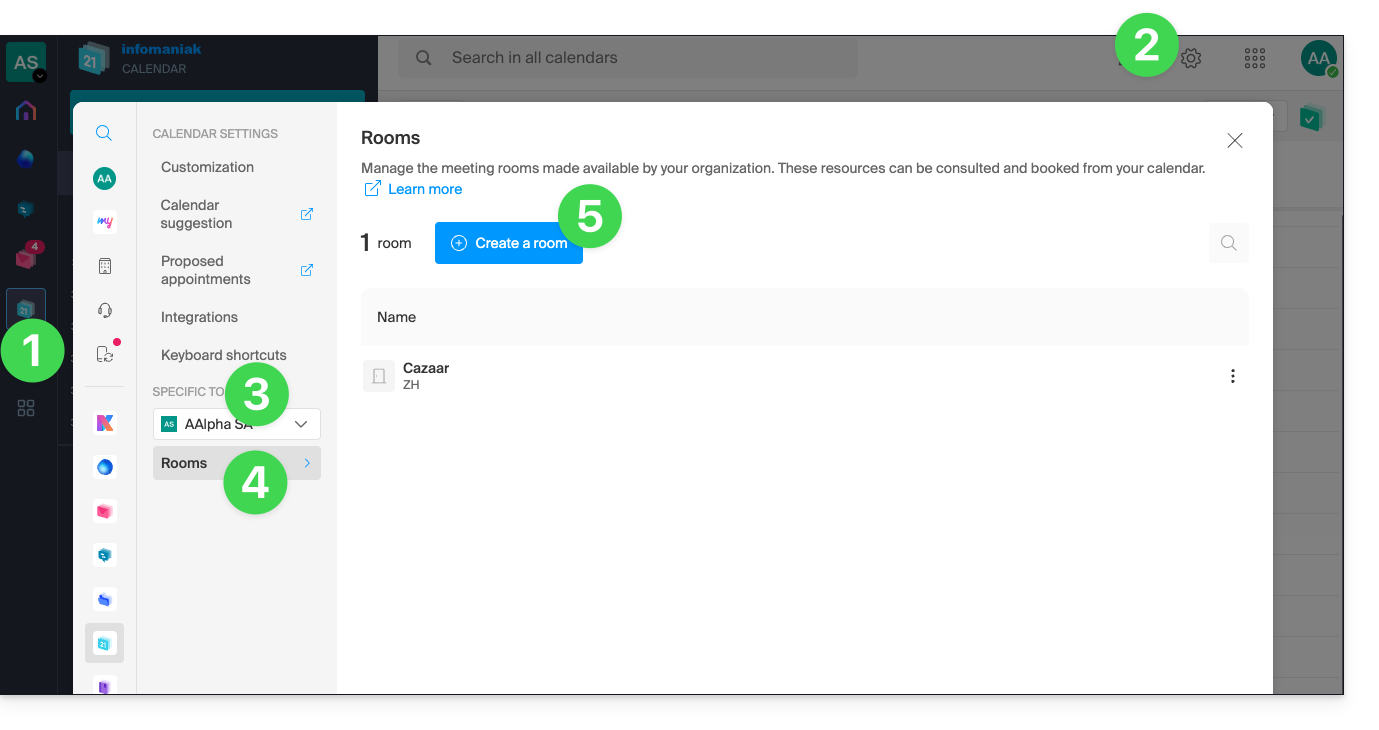
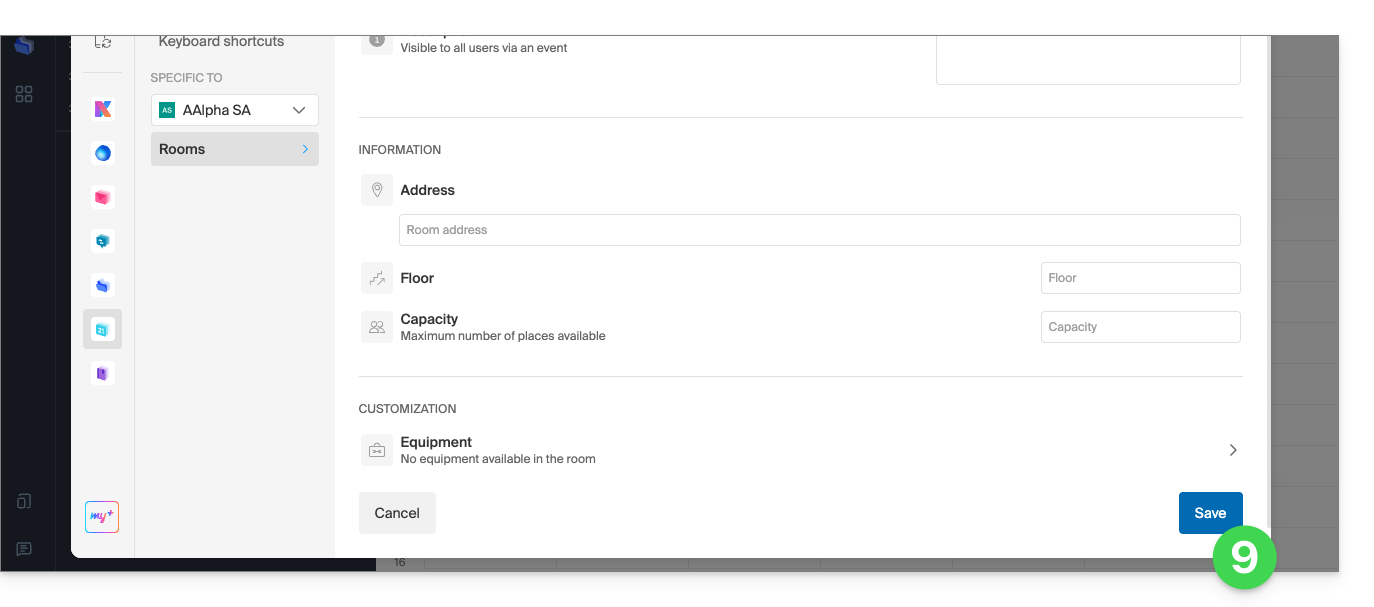
- Enter the essential information, such as the name, precise location (full address, floor), a color, and the maximum number of people that can be accommodated:
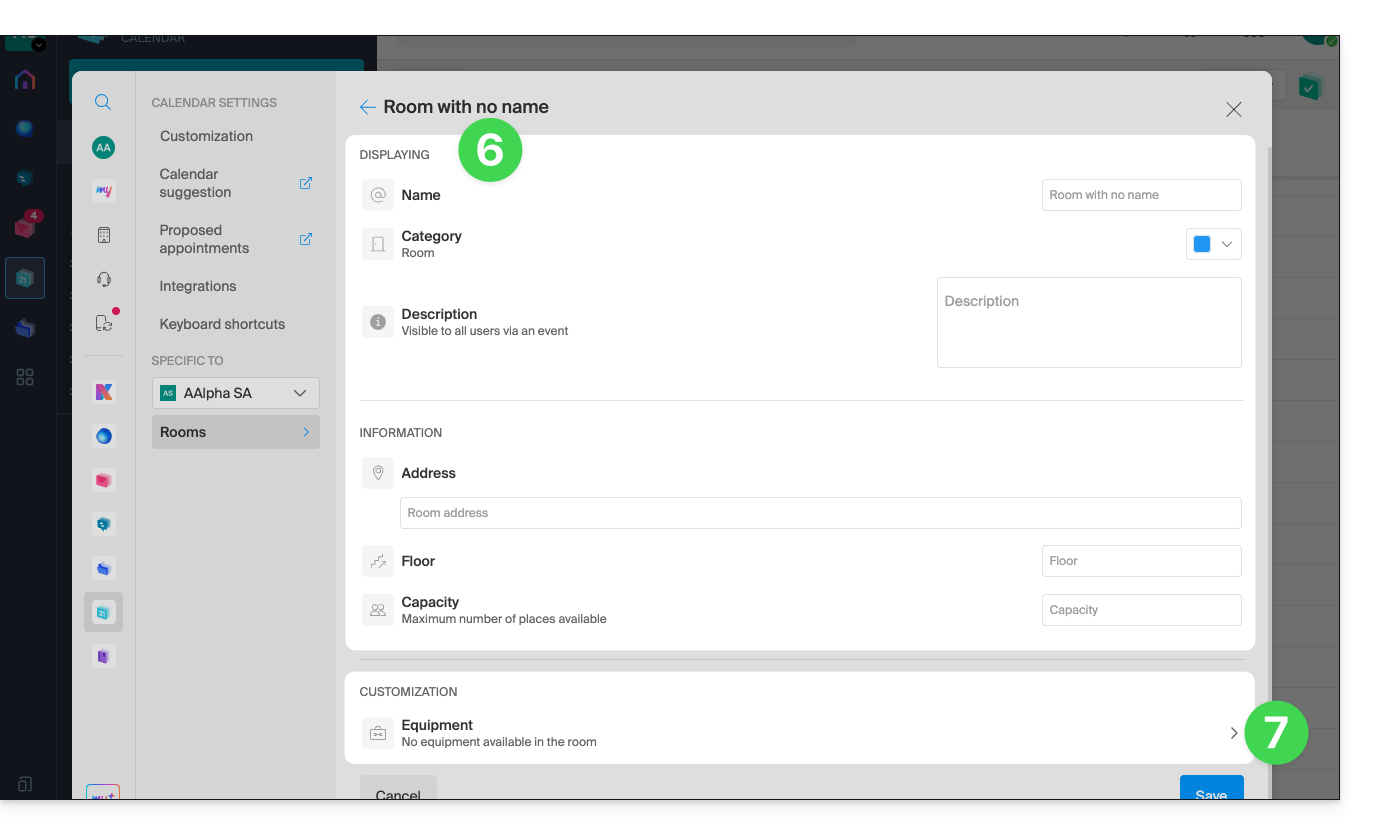
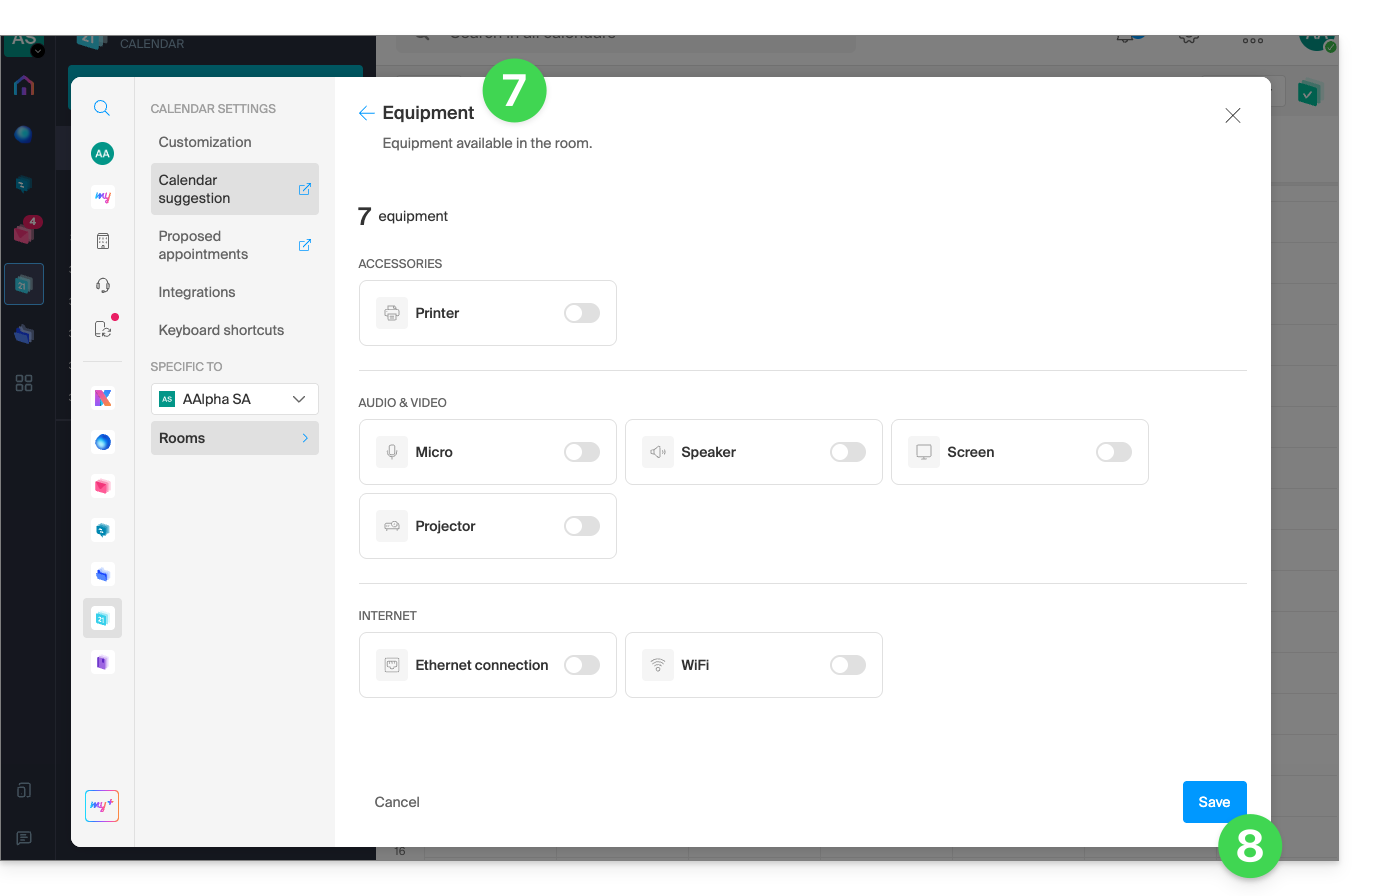
- Add any equipment that may be available in the room and on the floor in question.
- Click Save to save the material related to the room:
- Click Save to create the meeting room:
Actions on the created room
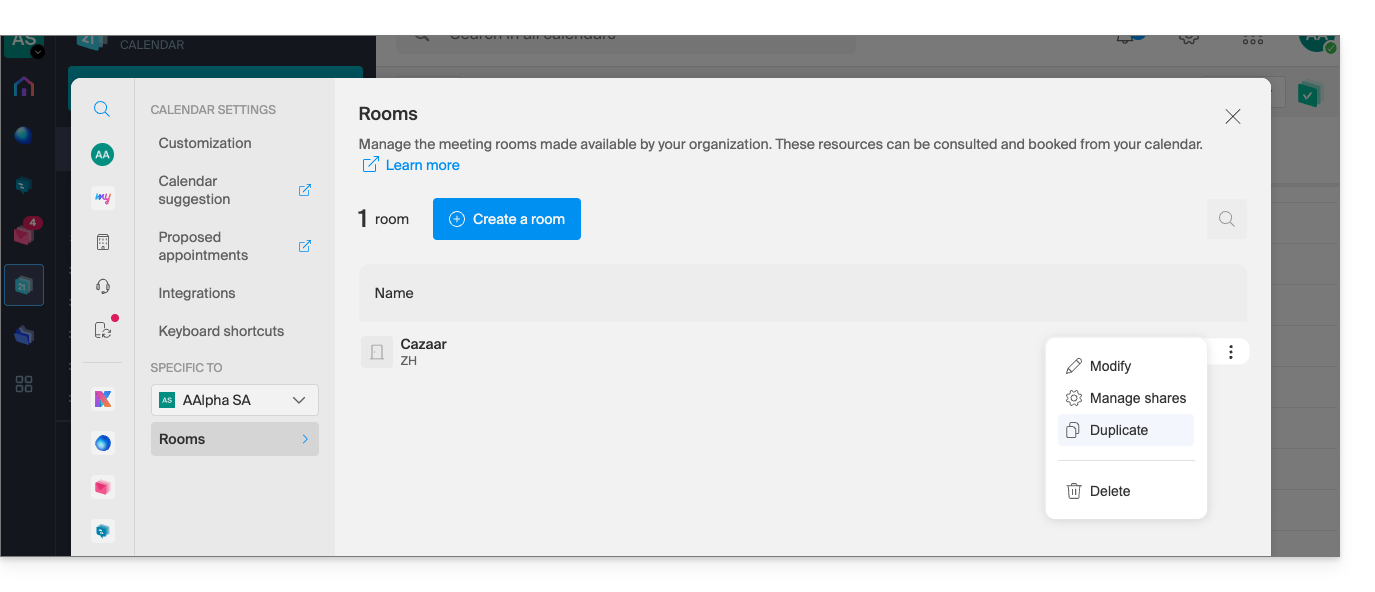
If you have several similar rooms, you can speed up their creation by duplicating the first one:
- Click on the action menu ⋮ to the right of the relevant room in the table that appears:
Create an event and associate it with a room
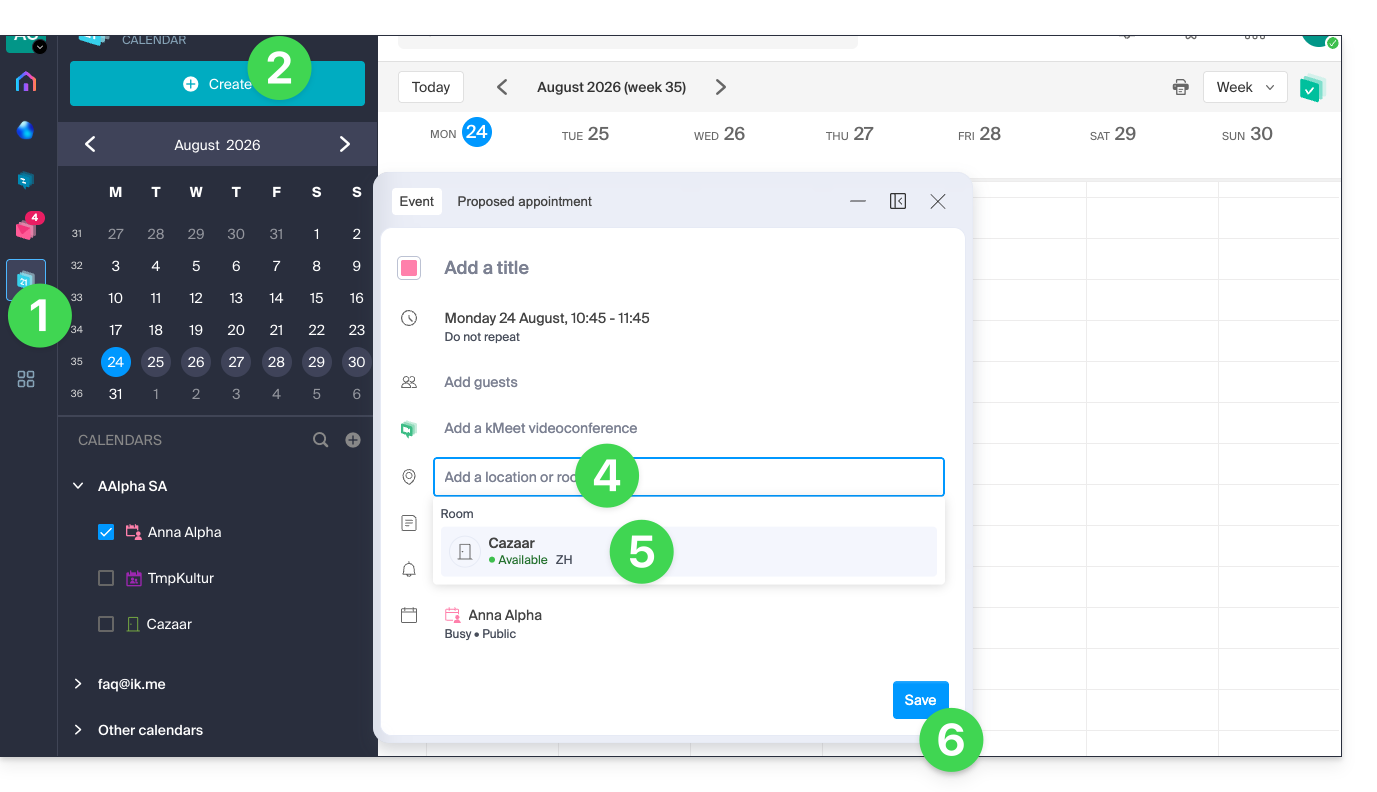
Once the room has been created and configured, simply create an event and associate it with the desired room:
- Click here to access the Infomaniak Calendar web app (online service ksuite.infomaniak.com/calendar).
- Click on the Create button in the top left corner.
- Click on Event.
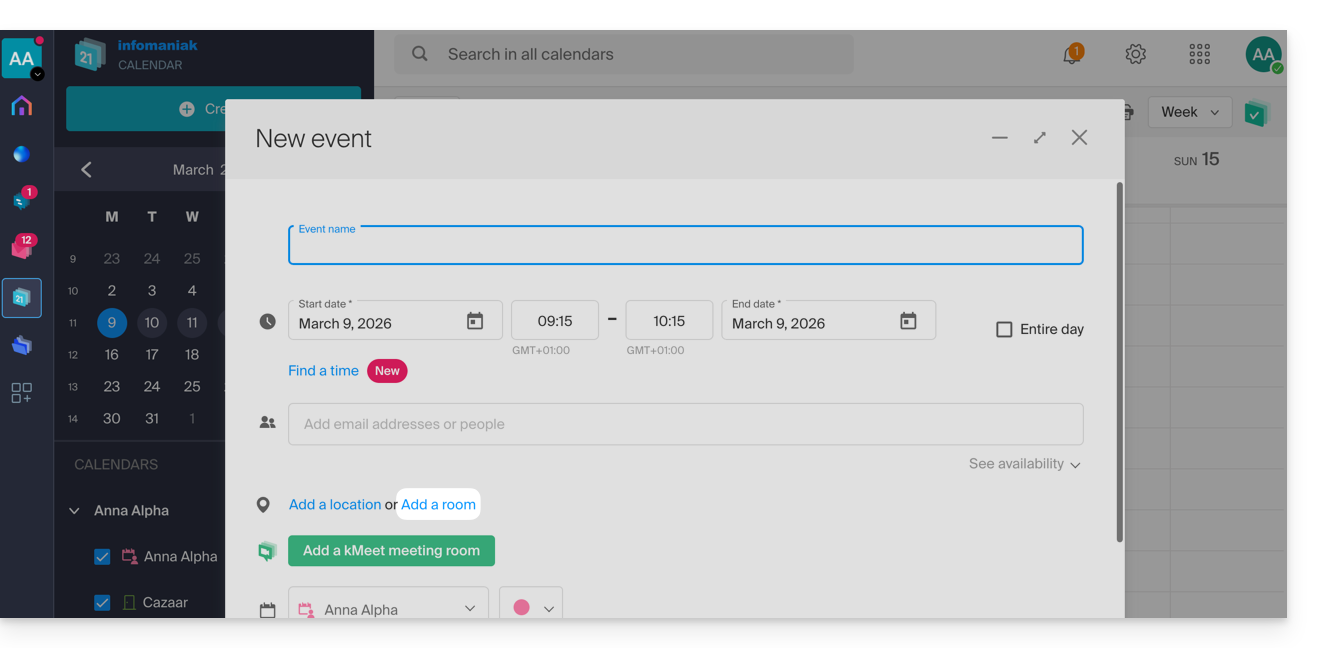
- Click on Add a room:
- Click in the Search for a room or location field to display the available rooms for the selected time slot (the 3 most recently booked rooms, from newest to oldest).
- Click Save to publish the event and its room in the calendar:
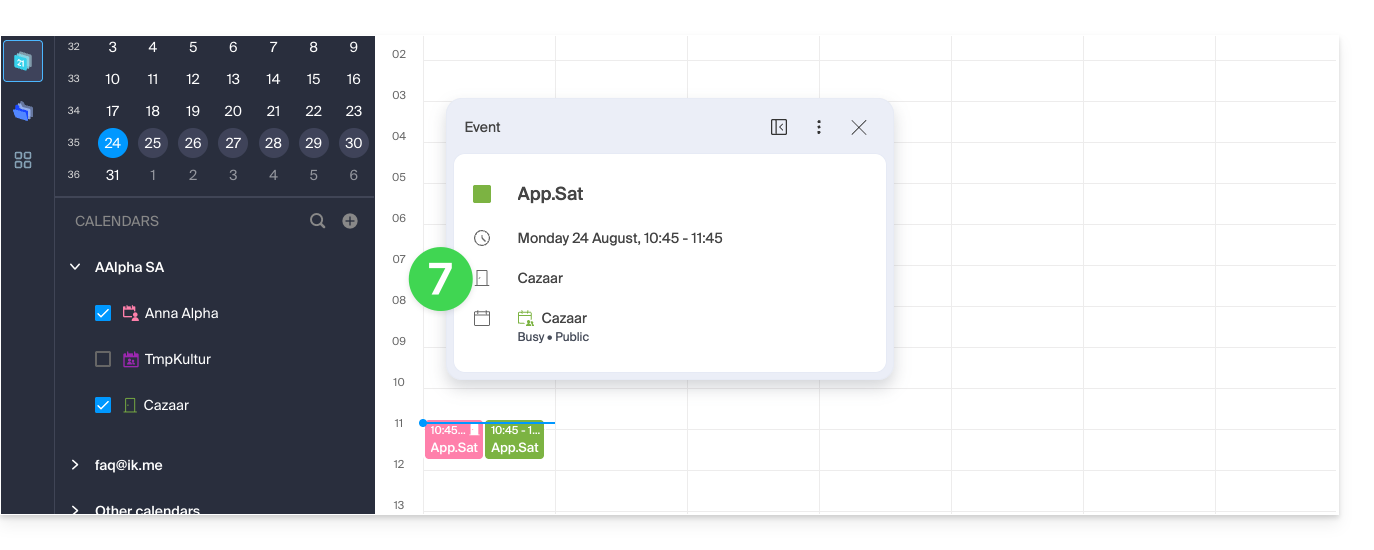
- You can find all the information about the chosen location on the event page in the calendar (and on the room's calendar - see below):
Overview of rooms and their occupancy
You can view an overview of each room's schedule to see its occupancy. When a room is created, a calendar associated with it is created in the Organization's calendars: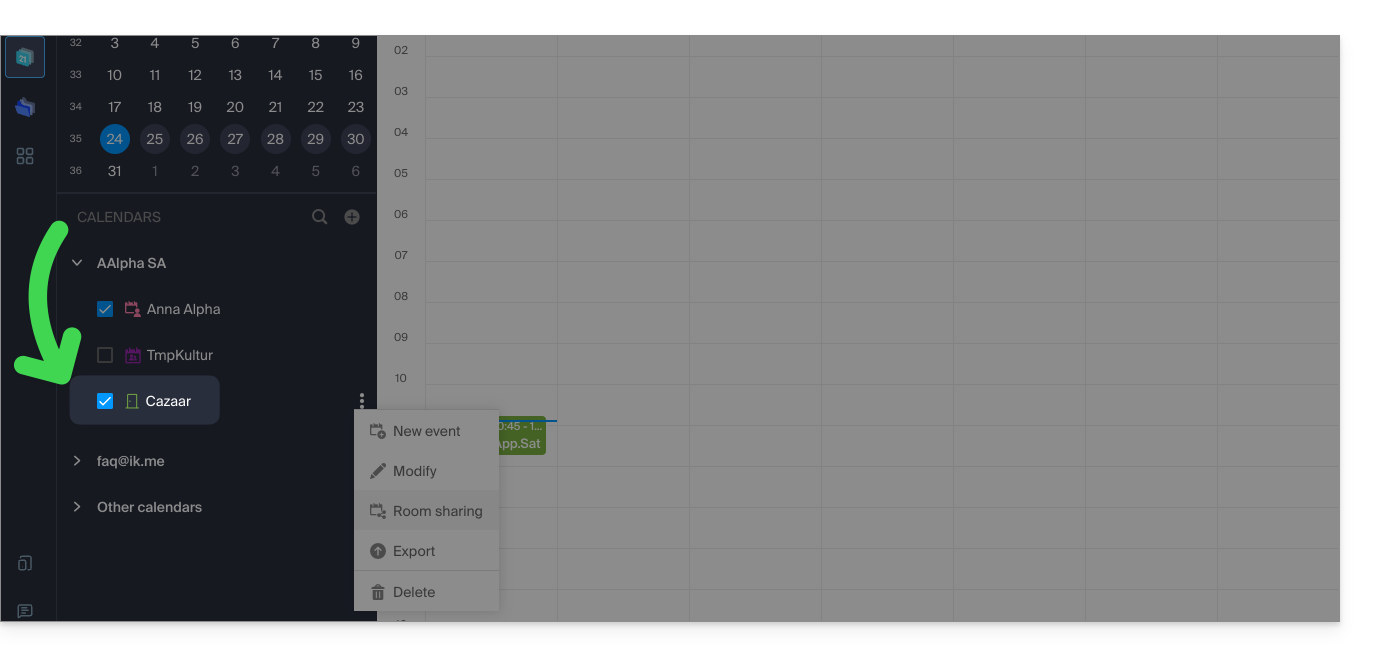
Your dedicated kSuite space also displays a real-time view of your room availability, with the option to book a room in just a few clicks, saving you time when organizing your meetings: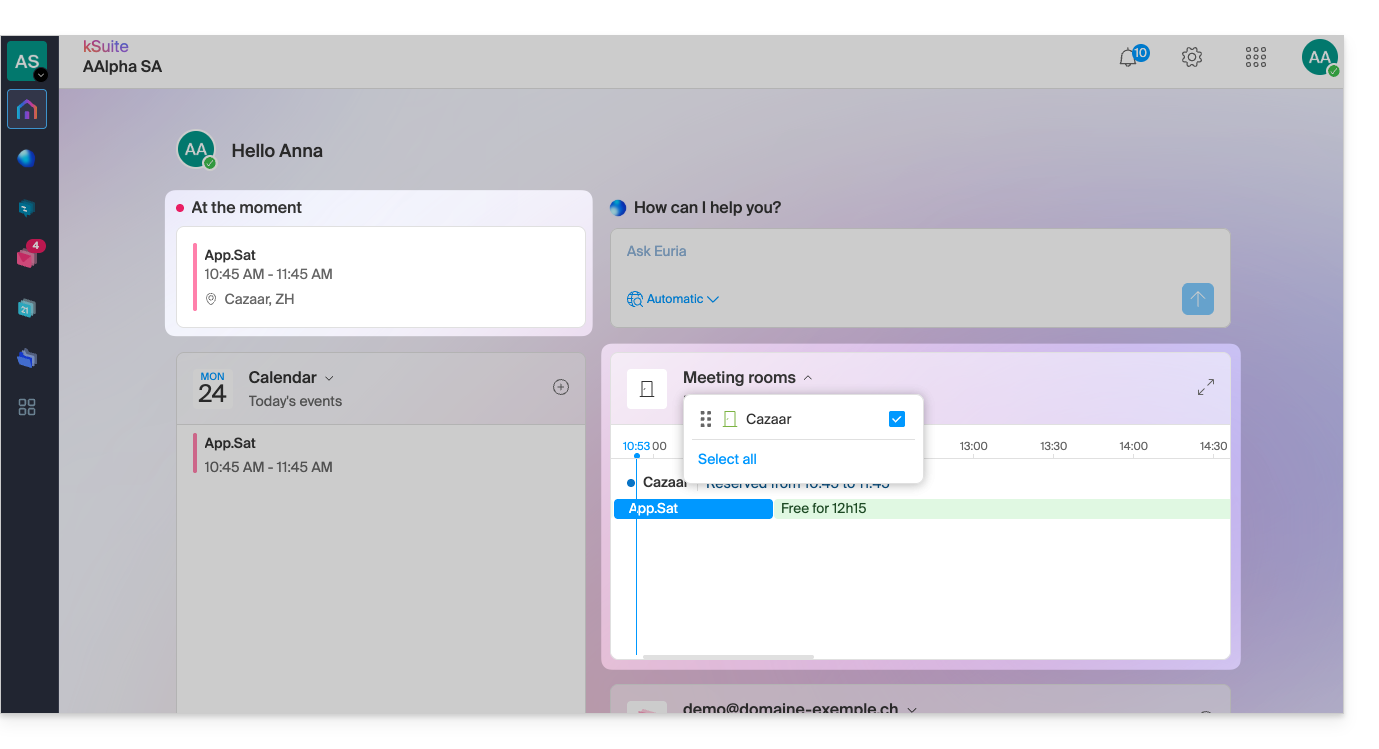
Link to this FAQ: https://faq.infomaniak.com/1329
Has this FAQ been helpful?
This guide explains how to suggest dates and times for meetings to multiple people using the Infomaniak Calendar web app (online service ksuite.infomaniak.com/calendar). Guests can then indicate their availability by voting for the time slots proposed by the organizer.
Introduction
- The functionality is similar to Doodle, but with a key difference: the organizer defines the guests precisely in advance (or as they go), and only these invited people can participate, unlike a poll that is accessible to anyone with the link.
- You can also access the feature while reading an email.
- To schedule a meeting based on the available times of each invitee, please refer to this other guide.
Suggest a meeting
To suggest a new joint event using a meeting request:
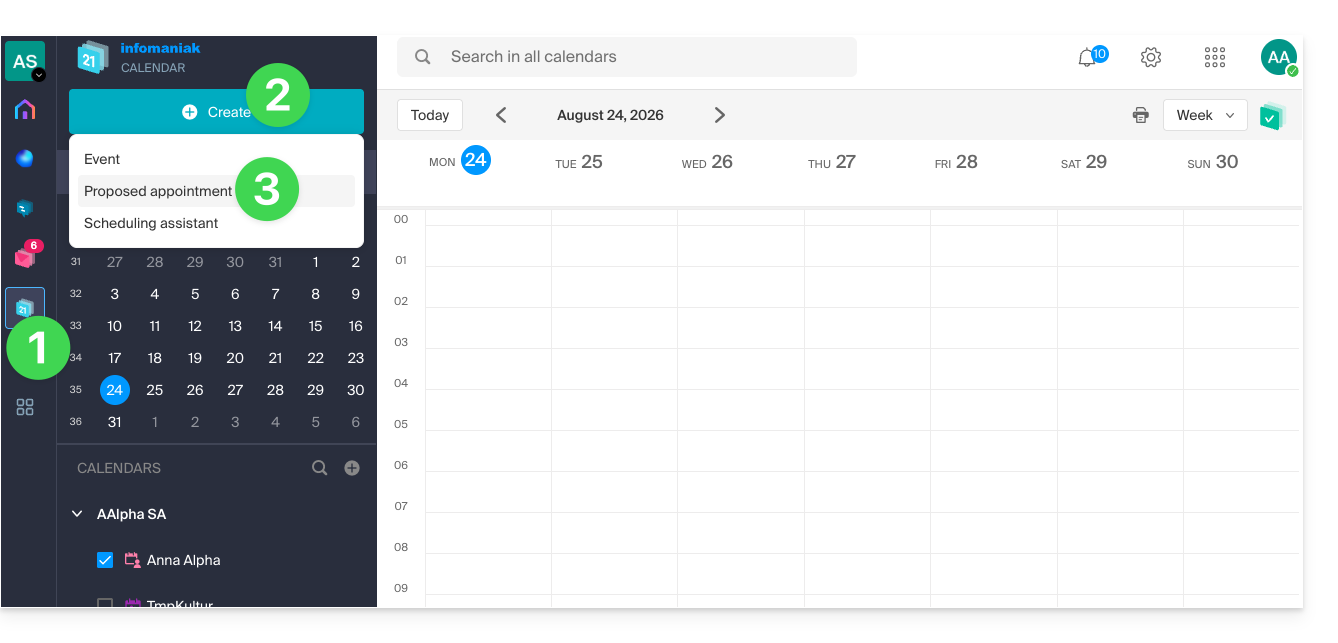
- Click here to access the Infomaniak Calendar web app (online service ksuite.infomaniak.com/calendar).
- Click on the Create button in the upper left corner.
- Click on Suggest a meeting:
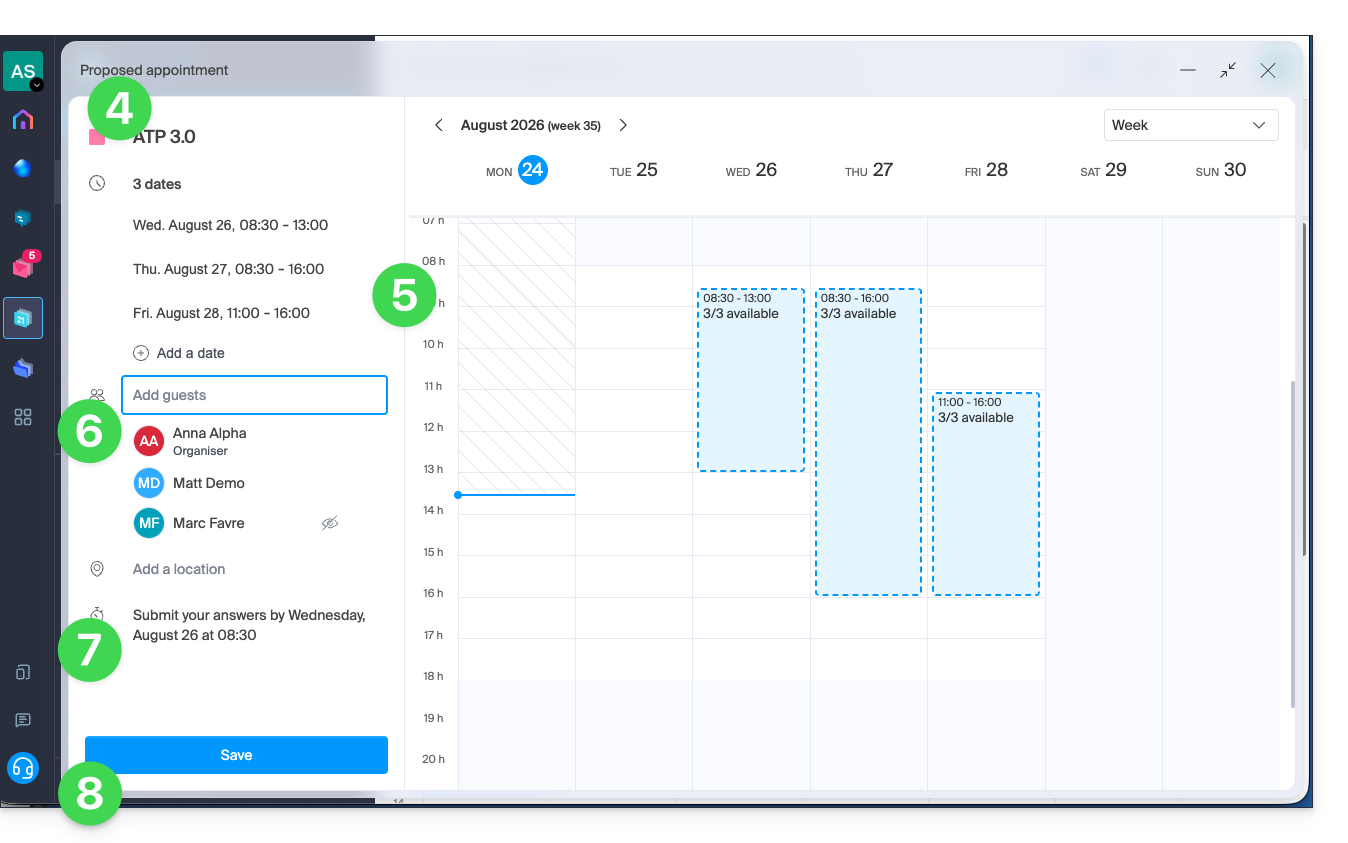
- Indicate the color and title (subject) of the event; the event location can be defined below.
- Enter the proposed dates/times manually or by clicking on the calendar displayed on the right.
- Enter the guests, using their email address if the guest is not a user of the Organization.
- Enter the deadline date/time after which it will no longer be possible to respond.
- Save the preferences using the button at the bottom of the page to create the invitation and date suggestions, for which guests will be able to vote:
Vote for one or more of the proposals
The invited user receives an email containing the organizer's various proposals; they can then indicate whether they are available during one or more of the proposed time slots.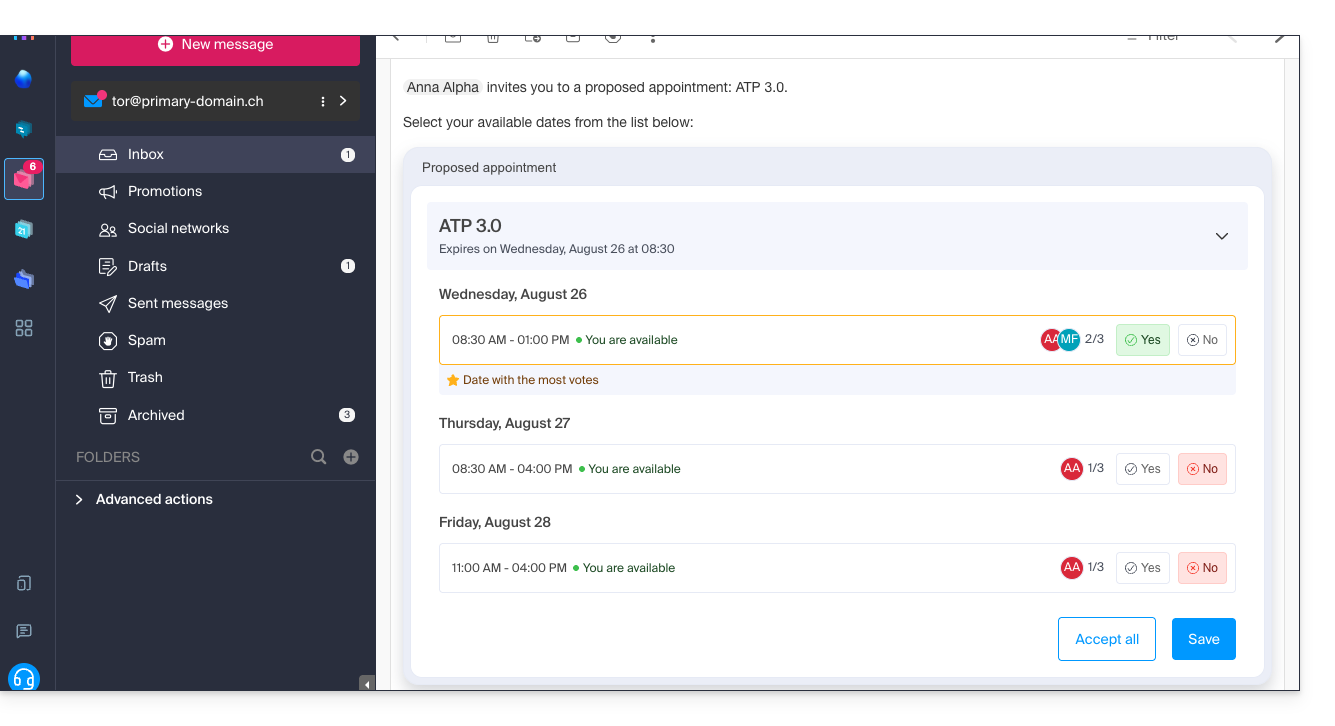
If the user is external to Infomaniak, or if they access their email via an email client such as Outlook, then managing their participation takes place in two steps: the email contains information and a link that leads to a simplified and neutral interface, allowing them to register their vote: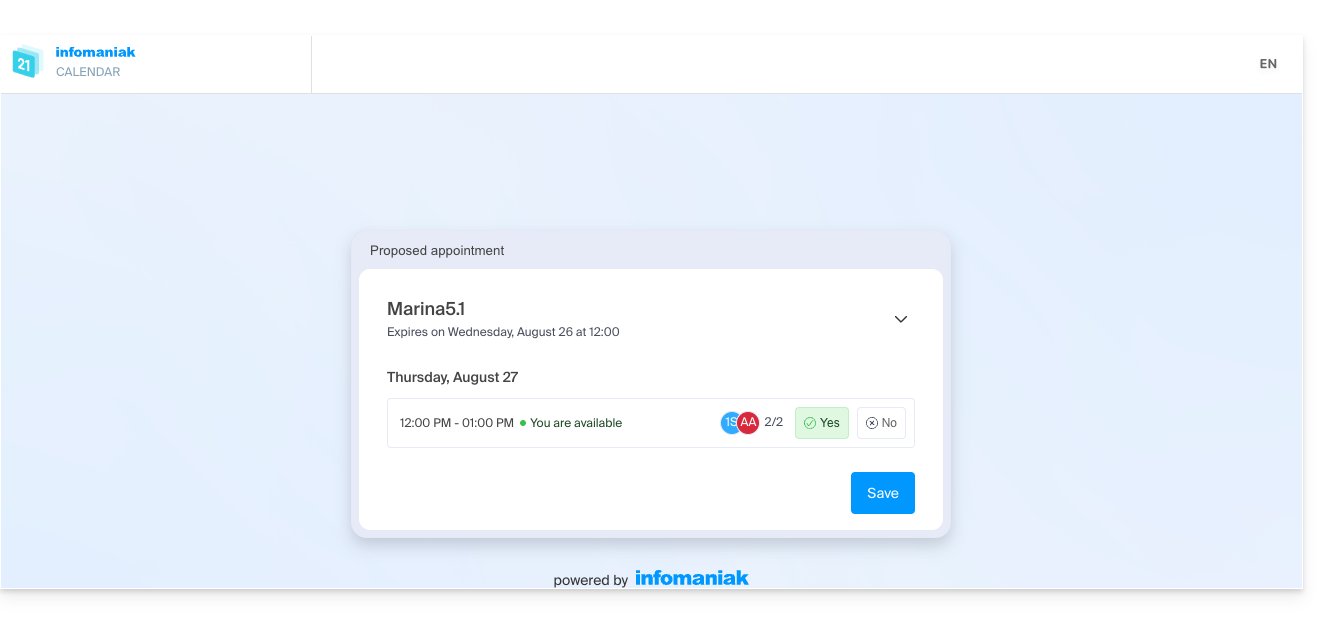
Decide on the date of the event based on the responses
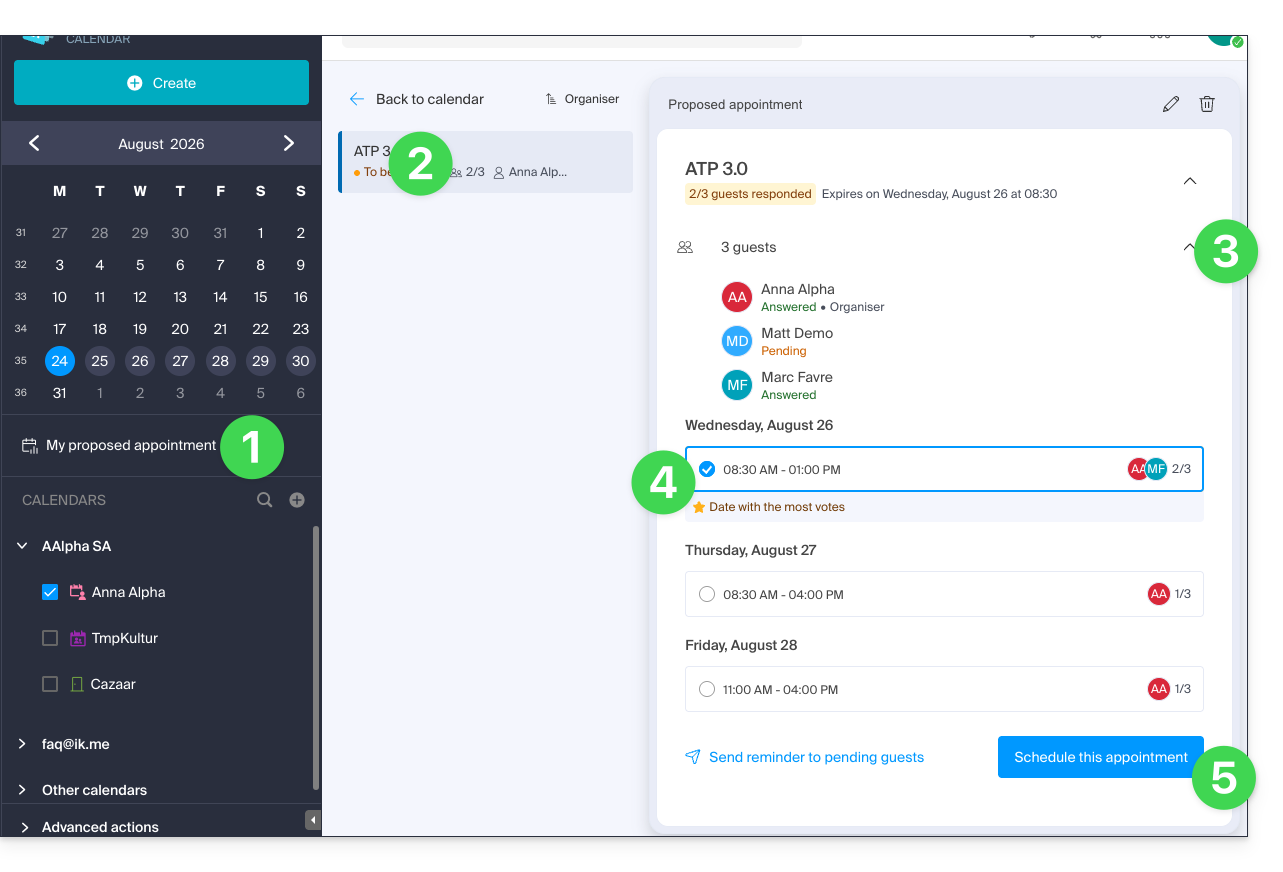
The organizer can access the proposed meeting times and select one of the proposals as the final one:
- Click on the left-hand side menu “My meeting proposals”.
- Click on the relevant suggestion.
- Click on the chevron to see the details of the guests who voted or did not vote.
- Click the radio button to select one option over another.
- Confirm the appointment by clicking the button in the bottom right corner:
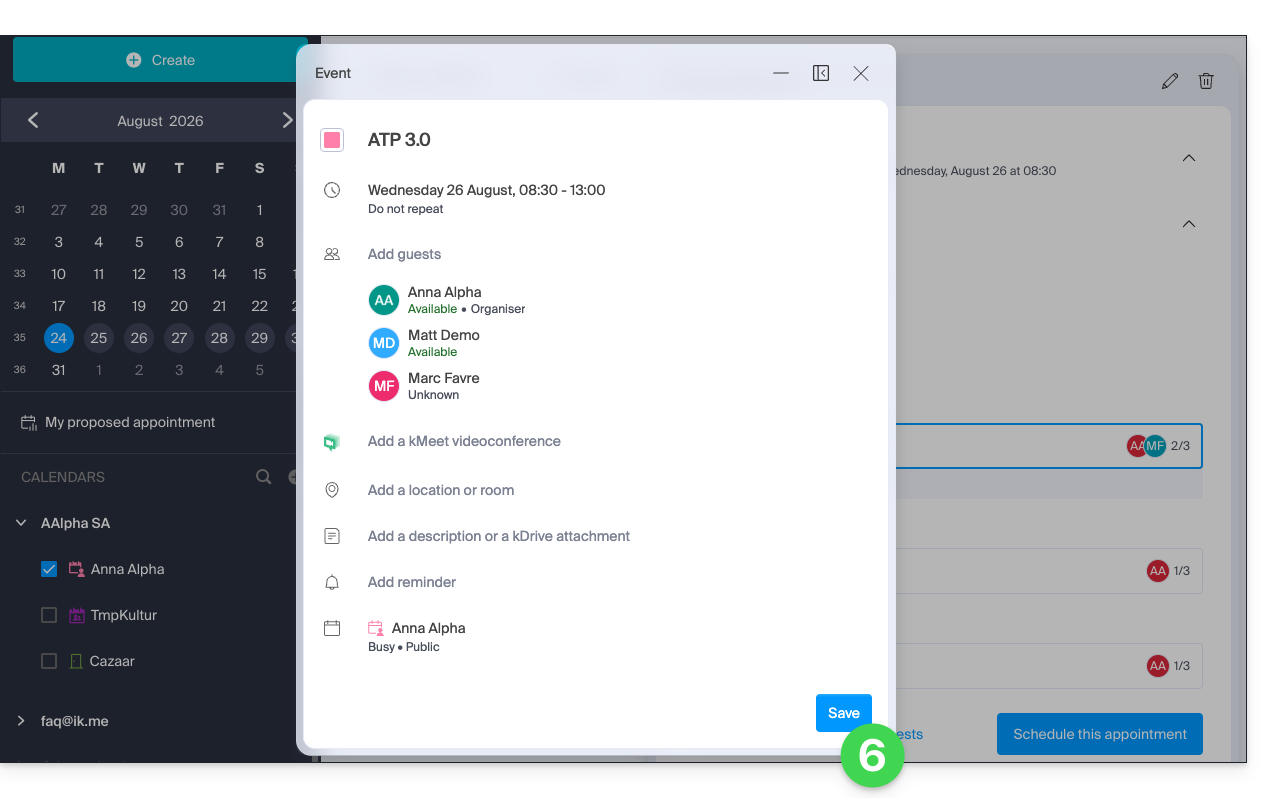
- All that remains is to complete and validate the event creation, including its associated invitations:
- In the same location, the meeting proposal is now defined as Scheduled.
- It is still possible to perform certain actions on the event later, including deleting it:
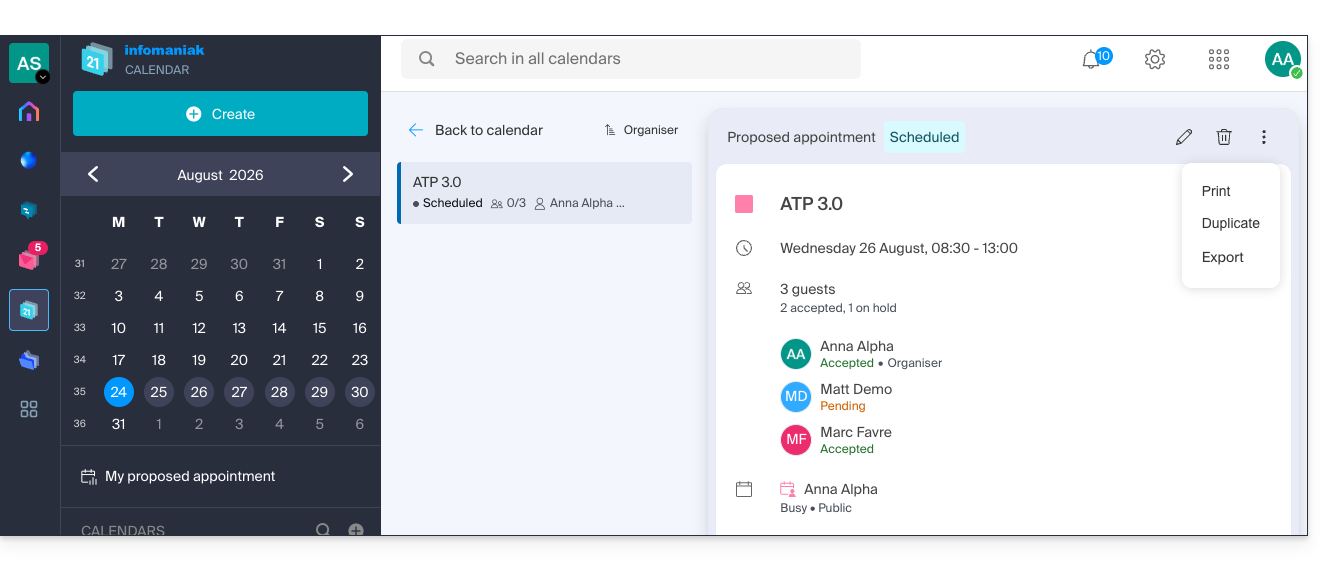
- Note: deleting a meeting proposal removes it from the dedicated menu, but will not automatically delete any associated event that may have been created in the meantime.
Link to this FAQ: https://faq.infomaniak.com/2928
Has this FAQ been helpful?