Knowledge base
1000 FAQs, 500 tutorials and instructional videos. Here, there are only solutions!
This guide provides tips on how to perform operations related to a WordPress site, which allows you to…
- …copy and migrate a WordPress site from a competing host to Infomaniak,
- …change the domain name of a WordPress site,
- …back up an entire WordPress site…
Introduction
- Depending on the context, instead of performing a WordPress transfer, you can also simply…
- … change the website address (the associated domain name) very easily if you installed WordPress using the Infomaniak installer,
- … duplicate a WordPress site to work simultaneously in a development environment…
Transfer a WordPress site…
…using the All-in-One WP Migration extension
- Requires installing a new, blank WordPress instance (e.g., using the Infomaniak automatic installer) to import the old site.
- Refer to this guide.
… with the Duplicator extension
- Requires connecting to the hosting via FTP to send a
.ziparchive and a PHP file to reinstall the old site.- Refer to this guide.
Link to this FAQ: https://faq.infomaniak.com/2089
Has this FAQ been helpful?
Thank you for choosing Infomaniak to create your PaaS!
This guide will help you quickly use the main features of your new Jelastic Cloud product.
Frequently asked questions
- Introduction to Jelastic
- Containers and nodes: how they work
- Jelastic billing and Cloudlet operation
- Technologies compatible with Jelastic Cloud
- Create a VPS with Jelastic Cloud
- Application deployment methods
- Differences between Jelastic Cloud and a VPS
- Available resources based on account type
Access the complete FAQ on Jelastic Cloud.
Technical resources
Consult the official Jelastic documentation (in English) for more technical details:
- Deploying applications in a cluster (WordPress, Magento, etc.)
- Creating an environment
- Application or code deployment
- Server configuration (Java, PHP, Ruby, etc.)
- Link a domain name
- Add a public IP address
- Track application statistics
- Access SSH to your environment
- Resource consumption alert management
- Dynamic resizing: horizontal and vertical
- Install packages without root access using Yum Packages Installer
If you have any questions or encounter any difficulties, please do not hesitate to contact Infomaniak support.
Link to this FAQ: https://faq.infomaniak.com/2252
Has this FAQ been helpful?
This guide provides important information regarding launching and running command-line scripts (SSH) on different types of Infomaniak hosting.
Running scripts via SSH and resource management
Unlike scripts executed via a browser such as Brave, Chrome, Edge, Firefox, Opera, Safari, etc., there is generally no strict time limit (timeout) for commands launched via SSH. Your script can therefore theoretically run for as long as necessary.
Execution time and persistence
If your SSH session closes (due to a loss of internet connection or terminal closure), the script in progress will be immediately interrupted.
To avoid this during long tasks, it is recommended to run your scripts in the background or, in the case of a VPS, to use terminal multiplexing tools (such as screen, tmux, or the nohup utility). This allows the process to continue its work even after you disconnect.
Resource Limits (RAM and CPU)
Even if the time is not limited, hardware resources are.
The execution of your scripts remains subject to the machine's capabilities and its configuration:
- Memory (RAM): if a process consumes more memory than the allowed limit (for example, the
memory_limitof PHP or the available physical RAM), it will be terminated by the system to preserve server stability. - Processor (CPU): Excessive processor usage over a long period may result in throttling or process interruption.
It is possible to adjust these resource limits on dedicated environments (such as Cloud Server). However, on shared hosting, these limits are fixed and cannot be modified in order to guarantee performance for all users hosted on the same server.
Link to this FAQ: https://faq.infomaniak.com/2276
Has this FAQ been helpful?
This guide explains which protocols and ports can be used with Infomaniak's email services (including the Mail Service).
Recommended ports and settings for client configuration
When prompted during the configuration of software/email client (Outlook, Thunderbird, mobile, etc.), use the settings below.
Settings common to all accounts
- Server name:
mail.infomaniak.com - Authentication: required (username = full email address)
| Protocol / Usage | Port | Security mechanism |
|---|---|---|
| IMAPs – incoming traffic (recommended) | 993 | SSL / TLS (implicit) |
| SMTP – outbound traffic (option 1: standard IETF) | 587 | STARTTLS (explicit) |
| SMTPs – outgoing traffic (option 2: implicit encryption) | 465 | SSL / TLS (implicit) |
Technical note: port 587 with STARTTLS is the IETF standard practice for secure email submission. Port 465 is a secure alternative using implicit encryption.
If you specify other settings or disable encryption, email errors may occur.
Other supported ports (unencrypted or for backward compatibility)
Alternative ports:
- Port
143: standard port for IMAP reception (unencrypted, use993instead). - Port
110: standard port for POP3 reception (unencrypted, use995instead). - Port
995: secure port for POP3s reception (secure POP3 option). - Port
25: standard port for server-to-server transfer (can support STARTTLS for submission, but port587remains the standard for clients).
Authentication and encryption compatibility:
- STARTTLS authentication is supported on unencrypted ports (
143,110,25) to enable TLS encryption. - SMTP authentication is supported via the LOGIN or PLAIN methods.
Using the API and securing transfers
The Infomaniak API does not offer direct connections to the email service, as IMAP and SMTP already serve as interfaces ("APIs"). To interact with the email service programmatically, use a dedicated library (for example, in Python: email.examples and imaplib).
Example of how to display emails from PHP:imap_open("{mail.infomaniak.com:993/imap/ssl}", $email, $password);
The MTA-STS mechanism is not implemented or verified; Infomaniak uses DANE (DNS-based Authentication of Named Entities) instead to guarantee an encrypted connection between servers when the following conditions are met:
- The client sends an email to a domain that has configured DANE.
- The client receives an email from an SMTP server that uses DANE.
In all other cases (in the absence of DANE), the encrypted connection remains opportunistic.
Link to this FAQ: https://faq.infomaniak.com/468
Has this FAQ been helpful?
This guide explains what a web hosting provider like Infomaniak is, and specifies its role, scope, and the limits of its technical support.
Infomaniak, a hosting provider since 1996
According to Wikipedia, a web host is a company that provides Internet hosting for computer systems for individuals or entities who do not wish to do so themselves.
Infomaniak also offers:
- … decades of experience in hosting and high-performance online solutions.
- … over a million users in Switzerland and Europe trusting us with the management of their critical data.
- … a company certified according to ISO 27001, 9001, 14001, 50001 standards and committed to sustainable digital practices.
- … 100% Swiss-made technological expertise with data hosted in Switzerland in its own data centers.
- … a comprehensive knowledge base and a customer support service available to assist you.
Responsibilities and scope of intervention
As a hosting provider, Infomaniak installs, secures, and keeps the server infrastructure up to dateis constantly improving its management interfaces (Manager) and helping its customers to make the most of the tools provided. Infomaniak strives to offer solutions that are accessible to everyone; however, human support for free products is inherently limited in order to guarantee the sustainability of these services.
For security and privacy reasons,No assistance will be provided without formal identificationof the person requesting it.
Support is exclusively for Organization administrators. End customers or users with a contract through a Reseller Partner must first contact their administrator or dedicated service provider.
Scope of technical support
Technical support does not provide assistance for:
- Development and programming: debugging websites, correcting source code, personal scripts (PHP, JS, etc.)
- API usage and integration.
- Application maintenance and webmastering: troubleshooting, updates, or content management for third-party applications (e.g., CMS such as WordPress, email clients such as Outlook, etc.).
- On-site and customized support: remote access, configuration of your own hardware, complex manual installations or migrations.
However, our support team will be happy to assist you with:
- Infrastructure and Manager: resolving incidents related to the network, hardware, or Infomaniak management interfaces.
- Using Infomaniak services: clarifying configuration processes and providing assistance with using our native features.
- Documentation: we will guide you to the relevant resources and technical guides to help you become self-sufficient.
A Premium support service and a migration service are available for more specific needs.
Find external support
For assistance with the content of your website, its programming, or the advanced organization of your email accounts, use the Infomaniak bidding platform, which lists over 1000 verified professionals, or consult the directory.
Link to this FAQ: https://faq.infomaniak.com/2103
Has this FAQ been helpful?
This guide explains how to optimize a website hosted on a Web Hosting plan to make it faster and provide a smooth browsing experience for all your visitors, regardless of their connection speed.
The role of the hosting provider
The loading speed of a website depends on many factors: server performance, the hosting provider's network infrastructure, the visitor's internet connection, and the website's own optimization.
As a hosting provider, Infomaniak strives to offer the best hosting by continuously improving its products and infrastructure:
- All hosting plans run on the latest generation SSD drives.
- The infrastructure benefits from over 70 Gbit/s of interconnection and redundancy with partners such as Cogent or Level3.
- To handle peak traffic, the servers use regularly updated 64-bit Intel Xeon processors. Shared servers typically use only 40% of their CPU power.
When you submit a support request regarding slowdowns, Infomaniak checks the following points:
- Your hosting server is operating normally and has not experienced any incidents in the last 48 hours.
- The network infrastructure has not experienced any disruptions during the same period.
The role of the website owner and webmaster
Infomaniak does not intervene in the content of the servers or in the development of websites. The creation and maintenance of a website are distinct professions, although they use the tools and services provided by the hosting provider.
Analyze the cause of slowdowns
Here are the steps to take if you notice slowdowns on your website:
- Apply the Google PageSpeed Insights recommendations. These points relate to the website design and not the server configuration. Consult this other guide if the test recommends enabling resource compression.
- If slowness is observed from abroad, activate DNS Fast Anycast.
- Install a caching system to reduce redundant database access and speed up page loading.
- Consider using a CDN.
- Test the server response time or TTFB.
- Scan your hosting to detect any viruses.
- Regularly purge your databases by deleting unnecessary entries.
- Use the latest version of PHP compatible with your website or CMS.
- Avoid images, counters, or media hosted on external servers: if they are unavailable, your site will appear slow.
- Disable unnecessary or resource-intensive WordPress extensions.
- Keep your CMS and web applications updated regularly.
- Limit the impact of overly aggressive indexing bots by configuring a Crawl-delay.
- Analyze the error logs: correcting errors generated by your site improves its performance.
- Review the slow logs to identify SQL queries that take more than 5 seconds to execute and optimize them (optimization examples).
- Add a server-side cache engine such as Memcached (available only on Cloud servers).
- Increase the max_children value (only on Cloud servers).
If the problem persists
If you or your webmaster cannot identify the cause of the slowdown, contact Infomaniak support in writing, providing the following information:
- Name of the hosted website.
- Precise dates and times when slowdowns occurred.
- Name of the database or FTP account potentially involved.
- Your public IP address during the tests (visible on https://www.infomaniak.com/ip).
- Type of slowdown (display, FTP transfers, etc.).
- Indicate whether you normally access the Infomaniak website during these episodes.
- Complete result of a traceroute to
84.16.66.66. - Result of a speed test on speedtest.net, selecting Infomaniak as the destination server.
If your needs evolve
If shared hosting is no longer sufficient, consider switching to a Cloud Server. Your website can be easily migrated to benefit from dedicated resources and advanced caching technologies.
Link to this FAQ: https://faq.infomaniak.com/1137
Has this FAQ been helpful?
This guide explains how to use PHPMailer with Infomaniak Web Hosting to send emails from a website.
⚠ WARNING ⚠
Infomaniak guarantees that its services comply with standard protocols (IMAP, S3, etc.), but does not provide additional support for external services or software, as their configuration may change depending on the provider or publisherThis guide is therefore provided for informational purposes only, and its implementation remains your responsibility (see: Support Policy / Art. 11.9 of the Terms of Service). If needed, a qualified professional can assist you.
Introduction
- PHPMailer is a PHP library that allows you to create and send emails from a website, particularly via SMTP.
- It allows you, in particular, to send messages in HTML format, add an alternative text version, manage attachments, and use SMTP authentication.
- For authenticated sending via SMTP, the PHP environment used by the website must be compatible with a recent encrypted connection, specifically TLS 1.2 or higher.
- An outdated version of PHP or the OpenSSL library used by PHP may cause a connection or authentication error, even if the email address and password are correct.
- Do not use PHP 5.3/5.4 for this type of sending; use a recent and supported version of PHP.
- With authenticated SMTP sending, the address used as the sender must match the email address used for SMTP authentication.
Install PHPMailer
To use PHPMailer, install the library in your website's files.
- Download PHPMailer from its official repository or install it with Composer if your project uses it.
- Copy the PHPMailer files into a directory on your website via FTP.
Upload the necessary files to your PHP script, adapting the path according to the location you choose:
use PHPMailer\PHPMailer\PHPMailer;
use PHPMailer\PHPMailer\Exception;

require **DIR** . '/PHPMailer/src/Exception.php';
require **DIR** . '/PHPMailer/src/PHPMailer.php';
require **DIR** . '/PHPMailer/src/SMTP.php';
Configure SMTP sending with Infomaniak
Use the following authenticated SMTP settings:
- SMTP server:
mail.infomaniak.com - Port:
465 - Encryption:
SMTPS/ SSL-TLS - Authentication: required
- Username: the complete email address
- Password: the password for the email address used
Example of a complete configuration:
<?php

use PHPMailer\PHPMailer\PHPMailer;
use PHPMailer\PHPMailer\Exception;

require **DIR** . '/PHPMailer/src/Exception.php';
require **DIR** . '/PHPMailer/src/PHPMailer.php';
require **DIR** . '/PHPMailer/src/SMTP.php';

$mail = new PHPMailer(true);

try {
// Configuration SMTP
$mail->isSMTP();
$mail->Host       = 'mail.infomaniak.com';
$mail->SMTPAuth   = true;
$mail->Username   = '[sender@domain.xyz](mailto:sender@domain.xyz)';
$mail->Password   = 'mot_de_passe_de_l_adresse_mail';
$mail->SMTPSecure = PHPMailer::ENCRYPTION_SMTPS;
$mail->Port       = 465;
$mail->CharSet    = 'UTF-8';

```
// Expéditeur
// L'adresse doit correspondre à celle utilisée pour l'authentification SMTP.
$mail->setFrom('sender@domain.xyz', 'Nom du site');

// Destinataire
$mail->addAddress('recipient@example.com');

// Adresse de réponse facultative
$mail->addReplyTo('sender@domain.xyz', 'Nom du site');

// Contenu du message
$mail->isHTML(true);
$mail->Subject = 'Message envoyé depuis le site';
$mail->Body    = '<p>Contenu HTML du message.</p>';
$mail->AltBody = 'Contenu texte du message.';

$mail->send();
echo 'Message envoyé';
```

} catch (Exception $e) {
echo 'Le message n'a pas pu être envoyé. Erreur: ' . htmlspecialchars($mail->ErrorInfo);
}
If your application requires the use of port 587, use STARTTLS:
$mail->SMTPSecure = PHPMailer::ENCRYPTION_STARTTLS;
$mail->Port       = 587;
Check the PHP version and TLS compatibility
Authenticated SMTP sending requires a recent encrypted connection. If the site uses an outdated version of PHP, for example PHP 5.3, or an outdated OpenSSL library, PHPMailer may fail before or during authentication. The errors may then be misleading, for example:
SMTP connect() failedCould not authenticatestream_socket_enable_crypto()- an authentication error even though the password is correct
In this case, check the following:
- the PHP version used by the website;
- the OpenSSL version used by PHP;
- the version of PHPMailer used by your project;
- the correspondence between the SMTP port and the chosen encryption method.
For reliable configuration, use a recent version of PHP that is compatible with TLS 1.2 or higher, as well as a current version of PHPMailer. If necessary, refer to these guides:
- Change the PHP version of a website
- Troubleshoot a PHP issue related to an outdated version
- Display the website's technical information
Resolving a Sender Mismatch Error
The error Sender mismatch SMTP code: 550 Additional SMTP info: 5.7.1 can occur when the address used as the sender does not match the email address used for SMTP authentication. Here is an example to avoid:
$mail->Username = 'sender@domain.xyz';
$mail->setFrom('another-address@domain.xyz', 'Nom du site');
In this example, the script authenticates with sender@domain.xyz, but attempts to send the message using a different sender address.
Use the same email address for SMTP authentication and for the sender:
$mail->Username = 'sender@domain.xyz';
$mail->setFrom('sender@domain.xyz', 'Nom du site');
The sender name can be customized, but the email address must remain consistent with the SMTP account used.
In the case of a contact form
If a visitor enters their email address in a form, do not use it as the sender's address for the message. Use the authenticated email address as the sender, and then add the visitor's address as the reply-to address.
Example:
$mail->Username = 'sender@domain.xyz';
$mail->setFrom('sender@domain.xyz', 'Formulaire du site');
$mail->addReplyTo($email_visiteur);
This configuration allows you to reply to visitors from your email software without sending the message with an unauthorized sender address.
Temporarily enable debug mode
In case of an error, temporarily enable PHPMailer's debug mode to obtain more details about the SMTP connection:
$mail->SMTPDebug = 2;
$mail->Debugoutput = 'html';
Disable this mode after your tests to avoid displaying technical information to website visitors.
Learn more
Link to this FAQ: https://faq.infomaniak.com/576
Has this FAQ been helpful?
This guide explains how to access a website's configuration in Infomaniak to display technical information such as the PHP version, the Apache version, or the enabled PHP extensions and modules.
View website technical information
To access the site management:
- Click here to access the hosting & site management section in your Infomaniak Manager (❓: help).
- Click on the name of the website in question.
- Click on Manage advanced settings:
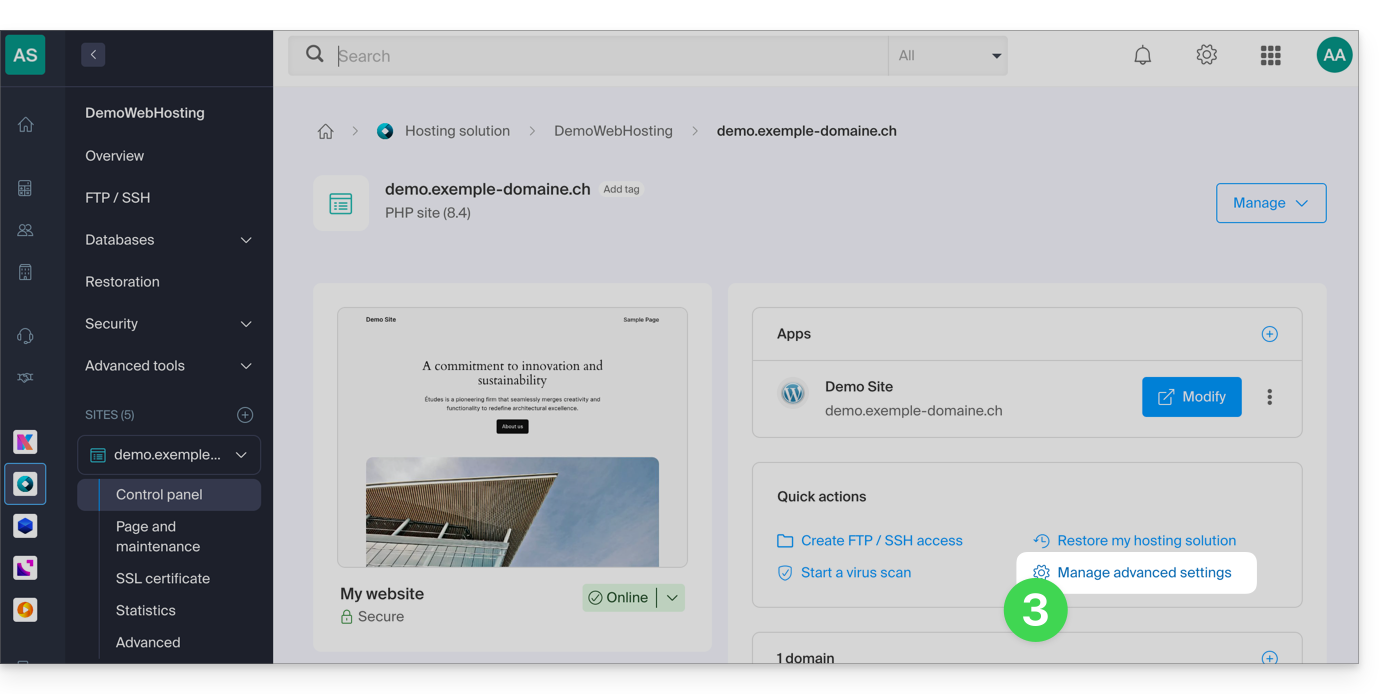
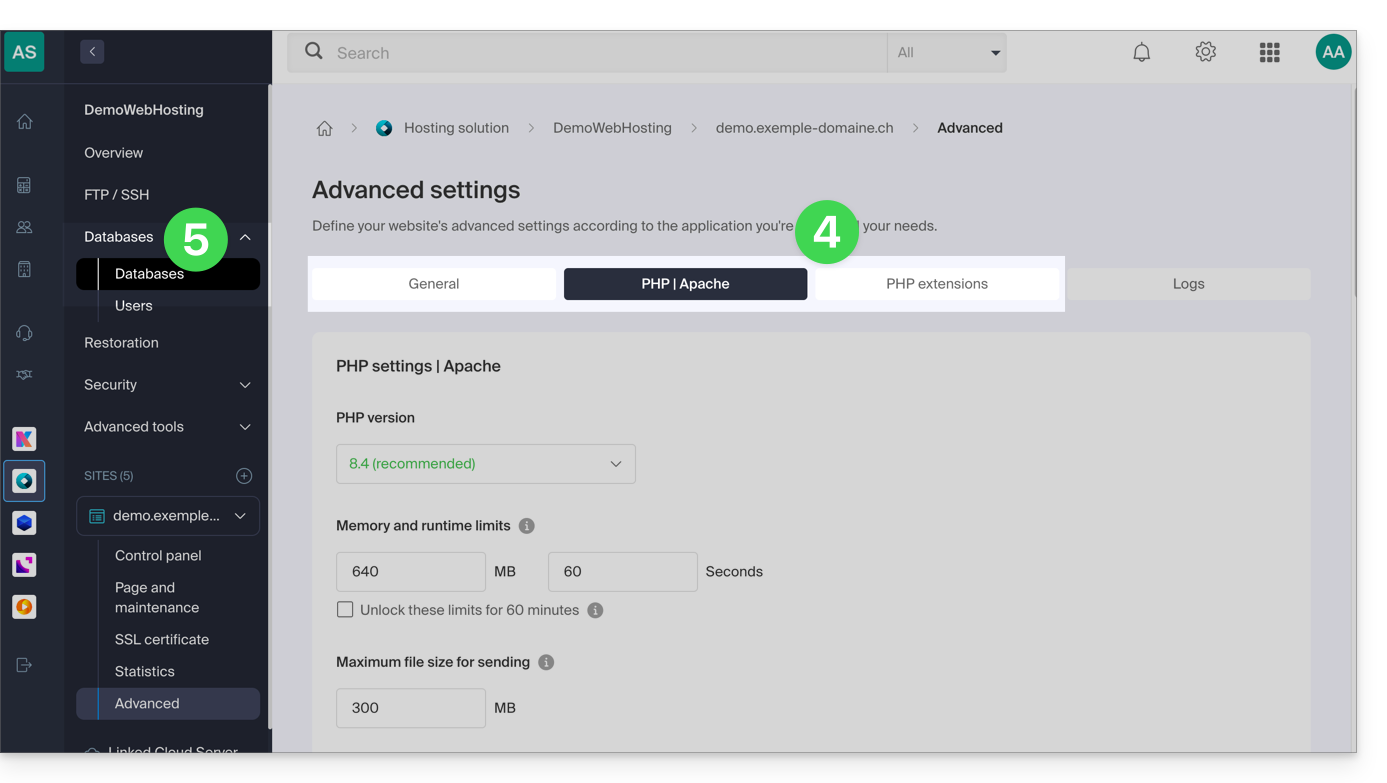
- Review the website information under the General, PHP / Apache, and PHP Extensions tabs.
- Click on Databases in the left-hand menu to view the MySQL version of the web hosting:
Link to this FAQ: https://faq.infomaniak.com/2116
Has this FAQ been helpful?
This guide explains how to access phpMyAdmin with a Web Hosting plan.
Introduction
- phpMyAdmin is an open-source administration tool designed to manage your MySQL and MariaDB databases via an intuitive web interface.
- It allows you to perform complex operations such as executing SQL queries, creating tables, or importing and exporting data without having to use the command line.
Accessing phpMyAdmin
To access the Web Hosting section related to Databases:
- Click here to access the hosting & website management section in your Infomaniak Manager (❓: help).
- Click on the name of the relevant hosting.
- Click on the chevron to the right of Databases in the left-hand menu.
- Click on Databases in the left-hand menu.
- Click on Connect to phpMyAdmin:
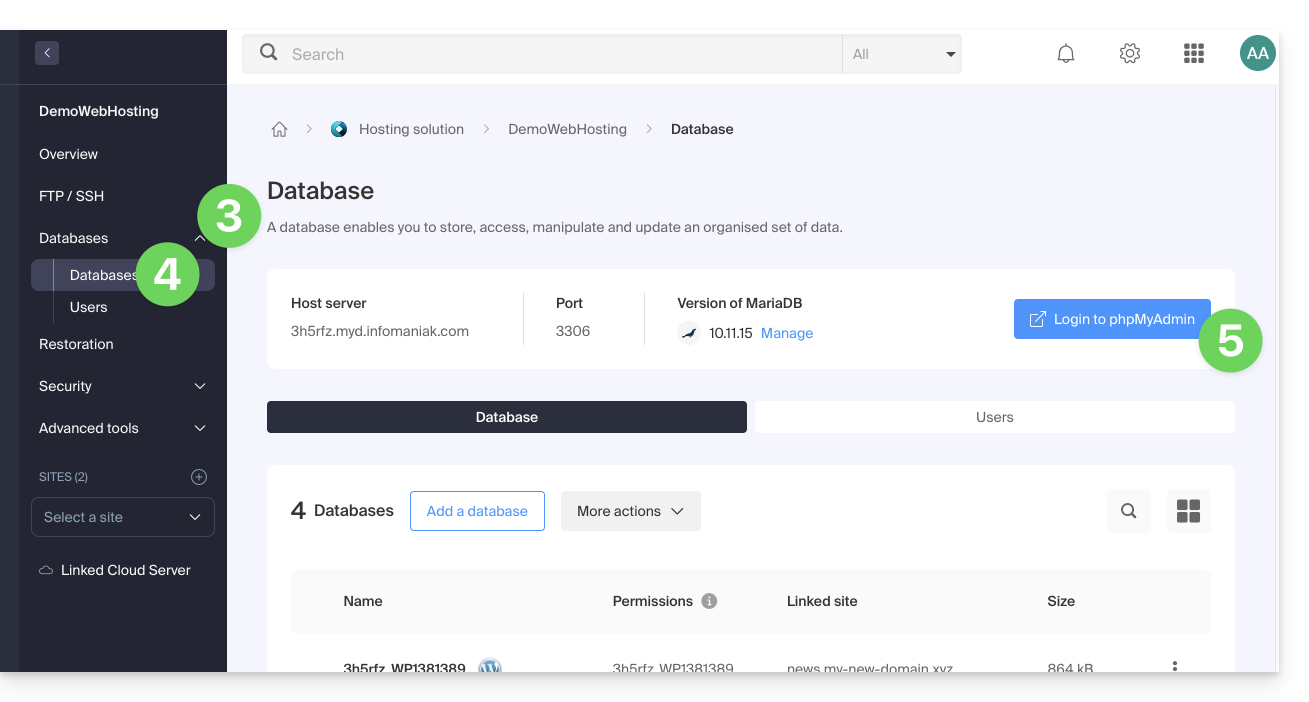
- The correct server and a temporary user are automatically populated.
You can also click on the action menu ⋮ located to the right of a database user: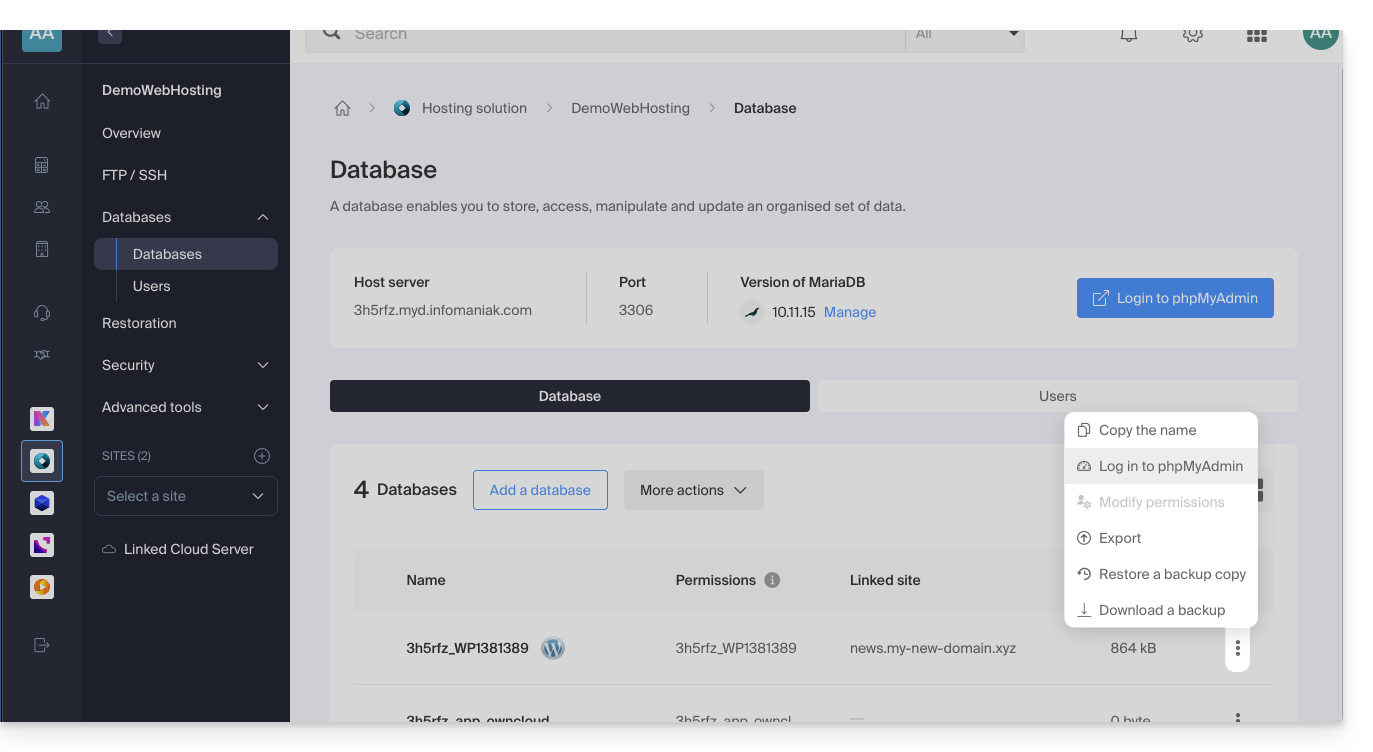
- The correct server is automatically populated.
- The password to enter corresponds to the database user (the one you chose when creating the MySQL user reset it if you have forgotten it):
Link to this FAQ: https://faq.infomaniak.com/2179
Has this FAQ been helpful?
This guide explains how to modify the variables of the PHP-CLI extension, which is available by default on Infomaniak's Cloud Server.
Modifying PHP_CLI variables
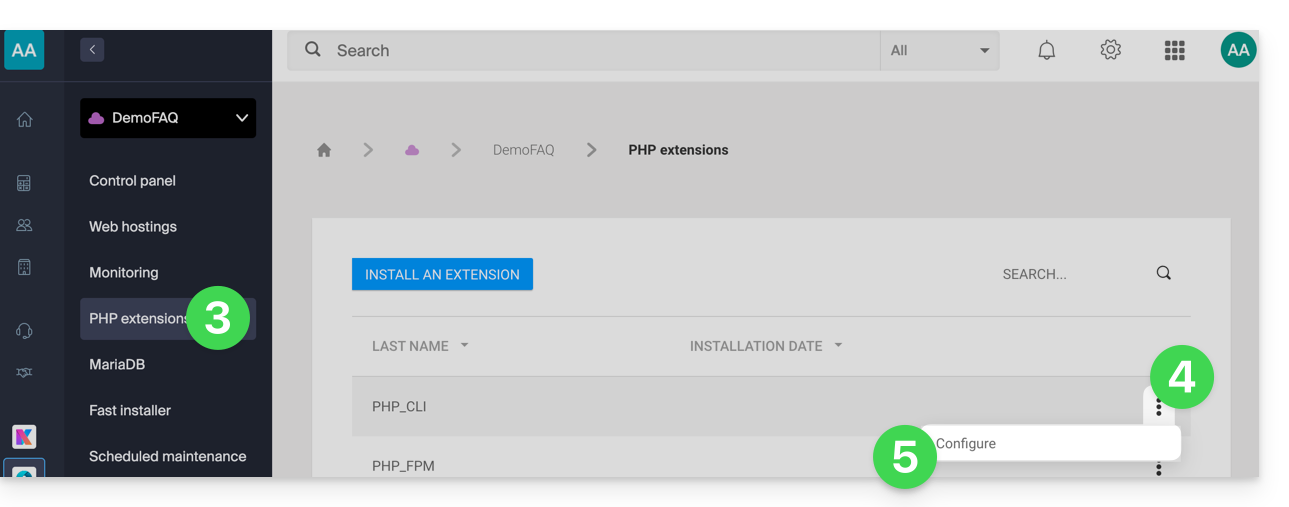
To access the PHP extensions for your Cloud Server:
- Click here to access the management of your Cloud Server in the Infomaniak Manager (need help?).
- Click directly on the name assigned to the Cloud Server in question.
- Click on PHP Extensions in the left-hand menu.
- Click on the action menu ⋮ to the right of PHP-CLI in the table that appears.
- Click on Configure:
- Modify the following variables:
allow_url_fopen,allow_url_include,memory_limit,max_execution_time,short_open_tag,allow_local_infile - Click the blue Save button.
Link to this FAQ: https://faq.infomaniak.com/2576
Has this FAQ been helpful?
The possible information_schema indication does not concern you directly.
Please disregard it.
This is an internal MySQL database that provides a summary of the information from your own databases.
Link to this FAQ: https://faq.infomaniak.com/1181
Has this FAQ been helpful?
This guide covers the basic database management features available with Infomaniak hosting plans.
You can also discover high-availability managed database solution (DBaaS) hosted in Switzerland, allowing you to easily deploy high-performance and secure clusters (MySQL, MariaDB, PostgreSQL) without having to manage the underlying infrastructure.
MySQL, SQLite, MariaDB, PostgreSQL…
At the Database Management System level, the hosting solutions support…
- … MySQL databases via PHP MySQL access or via Perl DBI+DBD::mysql
- You can use MySQL as a database management system (DBMS) on Infomaniak servers.
- You can access it either via PHP using the built-in PHP MySQL database functions, or via Perl using the DBI and DBD::mysql modules.
- … MySQLi, the native interface for accessing MySQL (PHP5)
- MySQLi is a PHP extension that allows access to a MySQL database.
- It is an improved and more recent version of the old PHP MySQL extension, offering improved features and performance.
- … SQLite 3.x
- SQLite is a lightweight, self-contained, and serverless SQL database engine.
- Infomaniak servers support SQLite version 3.x, which means you can use SQLite to store data on these servers.
- … MariaDB
- MariaDB is a fork of MySQL and is often used as an alternative to MySQL.
- You can therefore use MariaDB as a database management system on Infomaniak servers.
- … the PGSQL module
- PGSQL is a PHP module that allows you to connect to a PostgreSQL database.
- This specific feature allows you to connect to a REMOTE PostgreSQL database via PHP; this requires opening the appropriate port to the specific IP address of the PostgreSQL database from the Infomaniak manager.
Dba, dbm, db2, and sqlite are not supported, nor is SQL Server (it is a database server that requires a Microsoft architecture).
Link to this FAQ: https://faq.infomaniak.com/418
Has this FAQ been helpful?
This guide covers installing PHP extensions on Infomaniak Web Hosting.
Using PHP Zend Extensions
Attention:
- Zend Guard Loader is a PHP extension that allows you to run PHP scripts encrypted via Zend Guard.
- Zend Guard Loader is installed by default for PHP <= 5.6 on all web hosting plans and is not available for PHP versions >= 5.6.
- Since PHP 5.3.x, the Zend Optimizer module has been replaced by ZendGuardLoader.
- The ZendOPCache extension requires a Cloud Server configured with PHP 5.5 or later.
Link to this FAQ: https://faq.infomaniak.com/130
Has this FAQ been helpful?
This guide explains how to modify the server configuration of a website on Infomaniak Web Hosting.
Introduction
- Apache is the HTTP server.
- It is configured using an
.htaccessfile placed in the root directory of the website.
- It is configured using an
- PHP is a programming language used to create dynamic web pages via an HTTP server.
- It is possible to customize PHP directives with an
.user.inifile, which will be effective in the directory and subdirectories of the location of the .user.ini file.
- It is possible to customize PHP directives with an
- Consult this other guide on creating .htaccess and .user.ini files.
Modify a website's server configuration…
… via the Manager
To modify the PHP configuration and most parameters (max_input_vars, allow_url_fopen, memory_limit, post_max_size + upload_max_filesize, etc.):
- Click here to access your website management in the Infomaniak Manager (need help?).
- Click directly on the name assigned to the website in question.
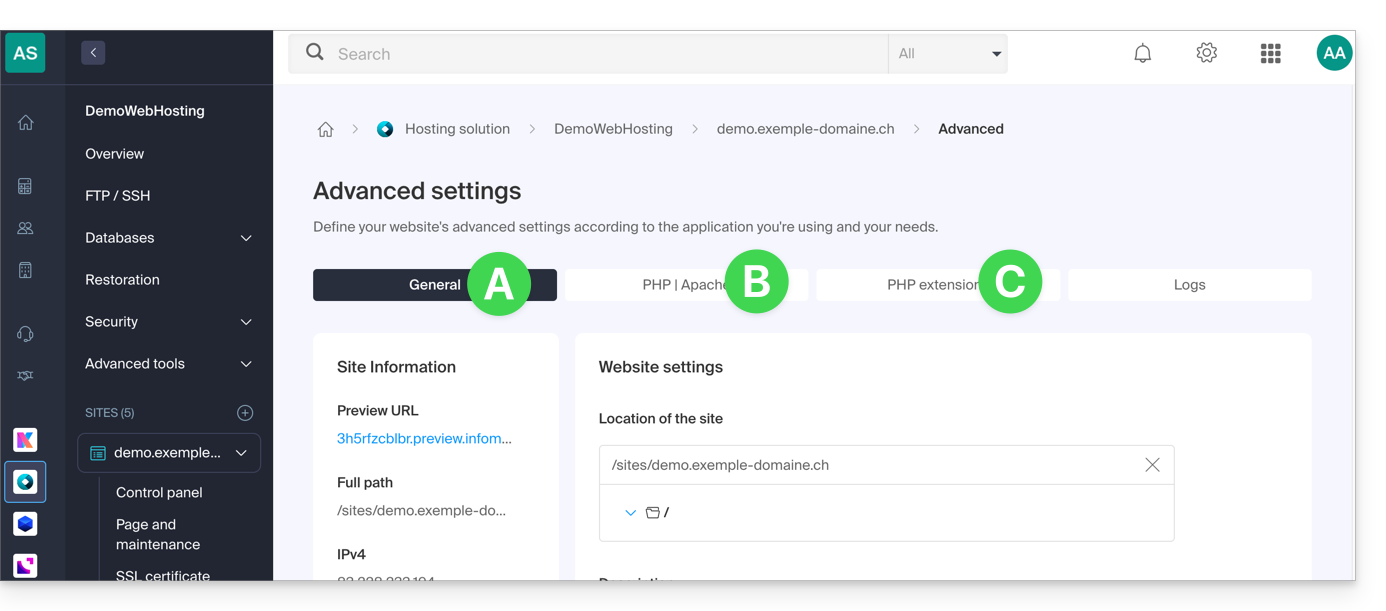
- Click on Manage advanced settings:
- Click on the different General, PHP / Apache, and PHP Extensions tabs to make the desired adjustments:
- Refer to this other guide if you are looking for information about limit values and the possibilities for unlocking them.
- If necessary, refer to this other guide regarding the fourth tab.
Don't forget to save the changes at the bottom of the page.
… via the .user.ini file
For PHP directives that are not available in the Manager, it is necessary to define the desired values in the .user.ini file, for example:
max_file_uploads = 20The list of existing directives can be found on the official PHP website, but the items with the PHP_INI_SYSTEM indication in the Modifiable column, as well as max_input_time, memory_limit, and mysqli.default_socket, cannot be used.
… via CLI
To customize PHP directives when running scripts via the command line interface (CLI) or in CRON tasks, it is necessary to specify the desired values in a .user.ini file.
Next, to apply these configurations, use the PHP executable with the -c option, followed by the path to the .user.ini file.
For example, to change the memory limit available for PHP to 1024M, you can create or modify the .user.ini file using the following command:
echo 'memory_limit = 1024M' > .user.iniThis command writes the memory_limit directive with the value 1024M into the .user.ini file.
Then, when running a PHP script from the command line or in a CRON task, the PHP command will be used with the -c option to specify the .user.ini file containing the custom configurations.
The following example enables allow_url_fopen for the WP CLI tool (which, among other things, allows you to retrieve extensions):
php -d allow_url_fopen=On ~/bin/wp package install trepmal/wp-revisions-cliphp: the PHP executable-d allow_url_fopen=On: the-doption allows you to define a PHP configuration directive (allow_url_fopen) with the valueOn~/bin/wp: path to the WP CLI executablepackage install trepmal/wp-revisions-cli: the specific command to install the WP CLI packagetrepmal/wp-revisions-cli
This ensures that the allow_url_fopen option is enabled during the execution of the specified WP CLI command. Enabling allow_url_fopen may be necessary for certain operations that involve opening remote URLs, such as downloading extensions or packages. Make sure that this option is enabled securely and in accordance with best security practices.
Link to this FAQ: https://faq.infomaniak.com/1928
Has this FAQ been helpful?
This guide explains how to run the open-source dependency manager Composer 2 using an SSH command.
Introduction
- Composer is an open-source dependency manager for PHP that allows you to define, install, and update the libraries required for a PHP project.
- Composer 1 has been deprecated since 2021 and no longer allows you to install new packages or perform updates since 2025.
- Only version 2 of Composer is now supported and available on all PHP versions from 7.2 to 8.3.
Run Composer 2
Composer 2 is already pre-installed and accessible via SSH. Therefore, there is no need to install it manually.
Simple usage
Connect to your hosting via SSH, then use the following command:
composerThis command will automatically execute Composer version 2, which is compatible with the PHP version currently in use in your session.
Check the active version
You can check the available Composer version with:
composer --versionExample output: Composer version 2.5.0 2022-12-20 10:44:08
Force a specific PHP version
If you want to run Composer with a specific PHP version, aliases are available. For example:
composer_php8.1 --versionor:
composer_php7.4These aliases allow you to run Composer 2 with the specified PHP interpreter, which is useful for testing or deploying a project on a target PHP version.
Link to this FAQ: https://faq.infomaniak.com/2118
Has this FAQ been helpful?
This guide explains how to specify a file that will be loaded before the desired page or at the beginning of each PHP script executed on your server, included as if it had been called with the require() function, but more generally by using the auto_prepend_file directive of PHP.
Introduction
- For example, to declare the headers of a website, you can create a
headers.phpfile containing PHPheader()functions, and have it prepended to the beginning of each PHP file…- … via a
.user.inifile (specific to a folder), - … or via the site configuration in the Manager (global), as explained below.
- … via a
Include a file globally from the Manager
To access website management:
- Click here to access the hosting & website management section in your Infomaniak Manager (❓: help).
- Click on the name of the website in question.
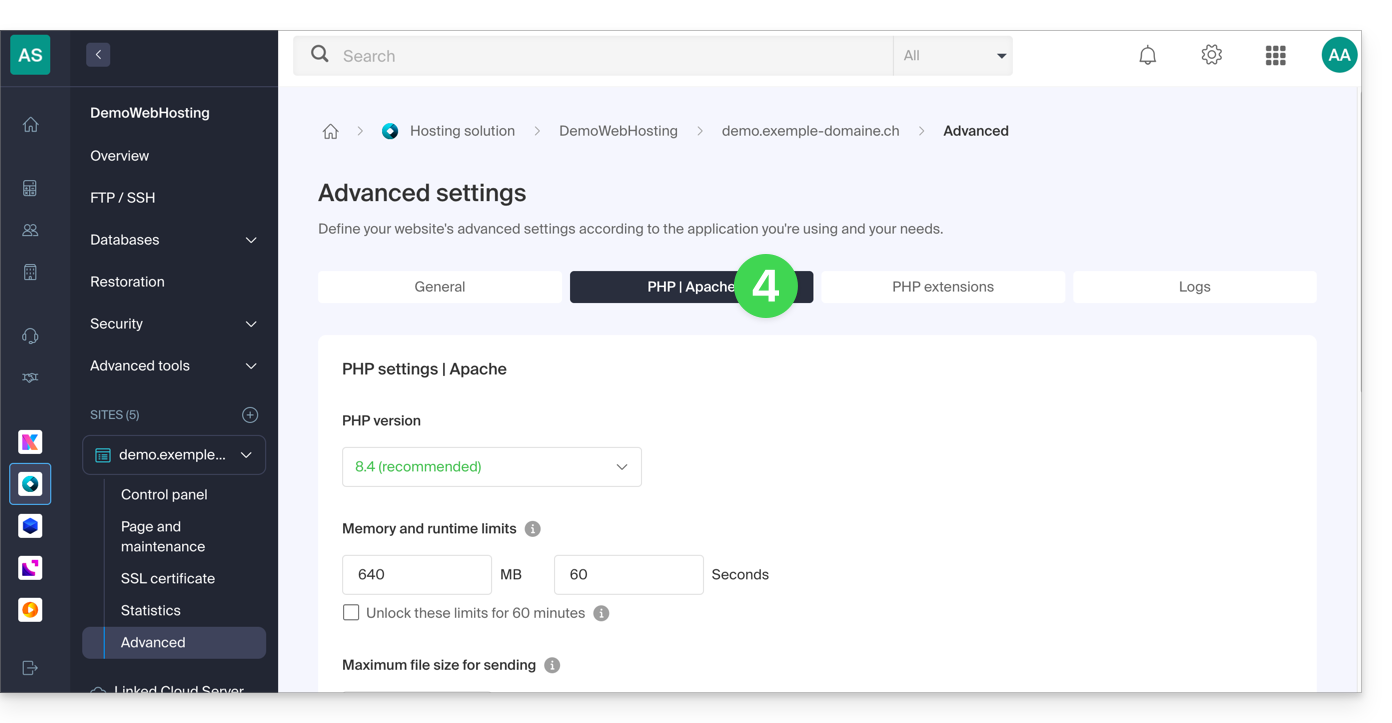
- Click on Manage advanced settings:
- Click on the PHP / Apache tab:
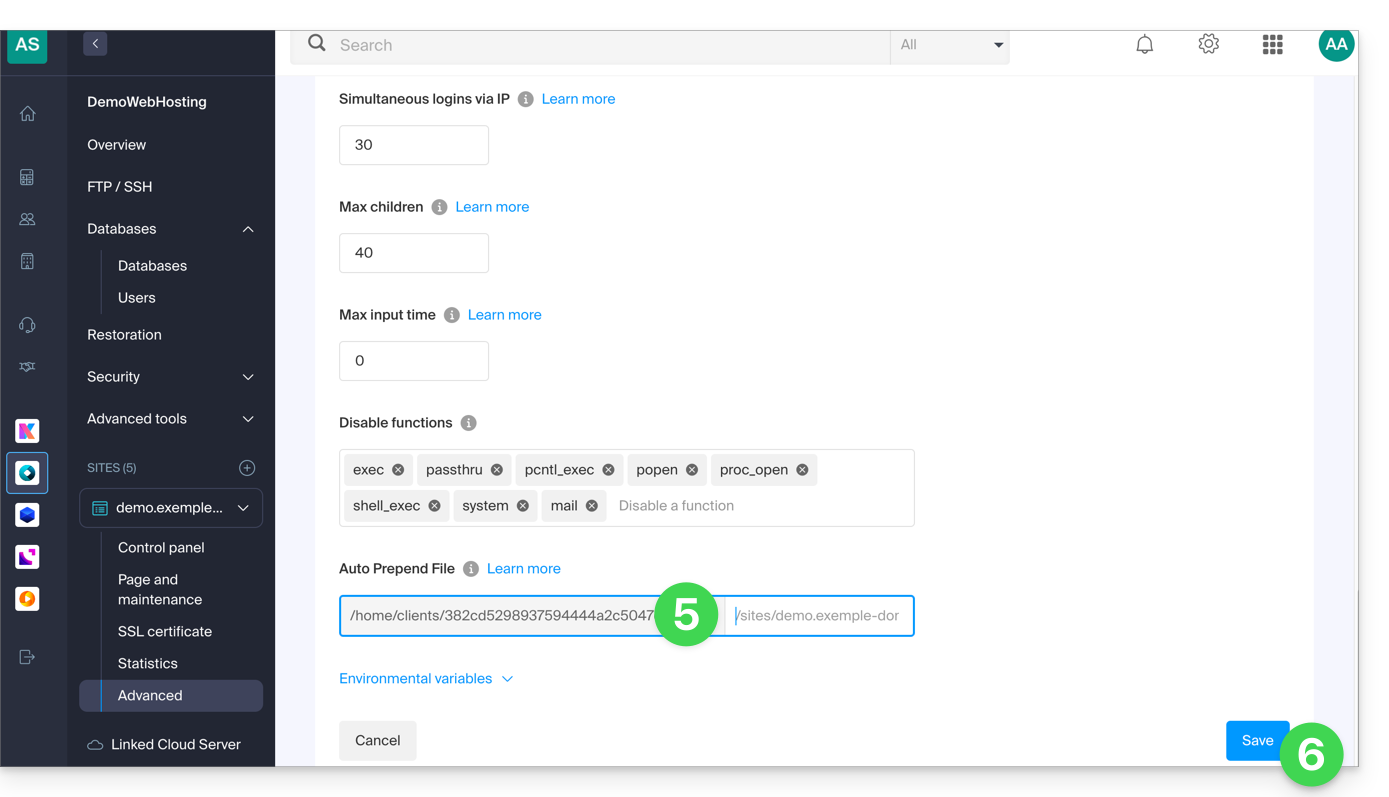
- Complete the relevant line by entering the path to the file to be included.
- Click on the Save button at the bottom of the page:
After defining this directive, all PHP pages on your server will automatically include the specified file before executing their own code.
The headers defined in a .htaccess file are only valid for non-PHP content (i.e., static content).
Infomaniak uses php-fpm, which receives the various headers via apache fast_cgi. In the RFC for cgi_www, the Strict-Transport-Security header is not part of the headers passed via CGI, and the Apache documentation confirms this. Please refer to this other RFC.
Link to this FAQ: https://faq.infomaniak.com/2352
Has this FAQ been helpful?
This guide explains the role of the browscap.ini file, which is used by PHP to identify certain characteristics of a browser, such as Brave, Chrome, Edge, Firefox, Opera, Safari… (name, version, operating system, and capabilities) based on its HTTP User-Agent header.
The use of browscap.ini is now mainly intended to ensure compatibility with existing applications. For new developments, more modern methods are generally preferred.
Using with the get_browser() function
The native PHP get_browser() function requires access to an up-to-date browscap.ini file in order to identify the characteristics of the browser that made the request.
On Infomaniak Web Hosting, this file is generally available at the following location:
/opt/php/lib/php/browscap.iniIf necessary, you can check its content using the following script:
<?php
header('Content-Type: text/plain');

$file = '/opt/php/lib/php/browscap.ini';

if (file_exists($file)) {
    echo file_get_contents($file);
} else {
    echo 'File not found.';
}
Due to its size and the cost of loading it, using browscap.ini can impact the performance of applications that rely on get_browser().
Recommended alternatives
For new projects, it is generally preferable to use solutions that are better suited to current web development practices:
- PHP libraries installed with Composer, such as
matomo/device-detectororwhichbrowser/parser, which offer regularly updated and more comprehensive browser and device detection. - User-Agent Client Hints (UA-CH), when supported by the browser, to obtain structured information via the mechanisms provided by current HTTP standards.
- Feature Detection, by directly checking the availability of a feature (e.g., in JavaScript or with the CSS rule
@supports) rather than inferring behavior based on the browser used.
Link to this FAQ: https://faq.infomaniak.com/505
Has this FAQ been helpful?
This guide explains how to enable or disable the PHP function set_time_limit on a Web Hosting plan.
Introduction
set_time_limitis a PHP function that sets the execution time limit for a script, in seconds; if this limit is reached, the script stops and returns a fatal error.set_time_limitcannot be used to set values exceeding script execution time limit (max_execution_time) defined in the Manager.
Enable or disable the PHP function set_time_limit
To access website management:
- Click here to access the hosting & website management section in your Infomaniak Manager (❓: help).
- Click on the name of the product in question.
- Click on Manage advanced settings:
- Click on the PHP / Apache tab:
- Click on the On/Off toggle button as desired:
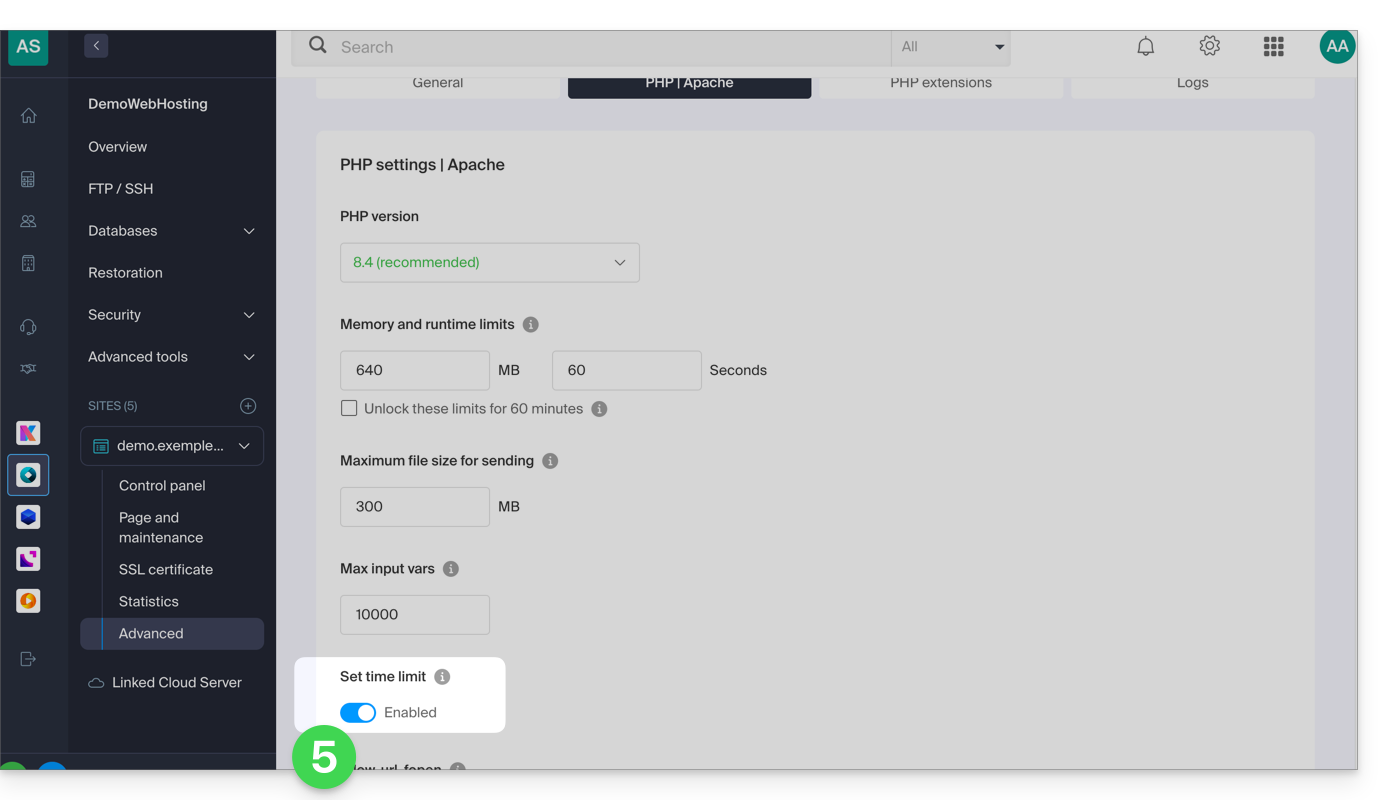
- Click the Save button at the bottom of the page to apply the changes.
Link to this FAQ: https://faq.infomaniak.com/383
Has this FAQ been helpful?
This guide details the use of Crontab (crons via SSH), available only on Managed Cloud, by default (there is also a task scheduler for all hosting plans).
Prerequisites
- Script files called by cron must be executable (CHMOD).
Full path
Cron jobs do not have access to the absolute path. Calling PHP without specifying the full path to the executable makes it impossible to run the task. You must specify
/opt/phpX.X/bin/phpby replacing X.X with the desired PHP version (/opt/php8.1/bin/php for example).
Other operations
For example:
List the cron jobs for the SSH user in question:
crontab -l -u UsernameEdit the cron jobs:
crontab -e -u UsernameReceive email notifications about the results of your cron jobs (add this to the beginning of the file):
MAILTO=e-mail@domain.xyz
Restore a backup
Infomaniak backs up your cron jobs for the last 7 days (once a day). If you accidentally delete a cron job, contact Infomaniak support to request a restoration, specifying the time and date of the deletion.
Link to this FAQ: https://faq.infomaniak.com/350
Has this FAQ been helpful?
This guide explains the purpose of the "MySQL Prefix" option in a website's settings and its implications for the operation of your web applications (CMS) and PHP scripts.
Introduction
- When the "MySQL Prefix" option is enabled for a website, it is no longer necessary to add the "
wxyz_" prefix to the name and users of your MySQL databases. - A PHP script can then connect to MySQL with the user "monuser" and a database "mabase", and access will automatically be granted with the user "wxyz_monuser" and the database "wxyz_mabase".
- ⚠ If you are migrating from an older Infomaniak plan:
- After migrating a website from the old console, the "MySQL Prefix" option is enabled by default to automatically maintain the connection of your web applications (WordPress, Joomla, Drupal, etc.) and PHP scripts with your MySQL databases.
- To ensure your websites function correctly in the event of a migration to another server, it is strongly recommended that you disable this function and make the necessary adjustments.
Manage the MySQL Prefix Option
Go Further with Environment Variables
You can configure environment variables directly from the Manager for your entire website:
- Click here to access the hosting & site management section in your Infomaniak Manager (❓: help).
- Click on the name of the product in question.
- Click on Manage advanced settings:
- Click on the PHP / Apache tab:
- Enable or disable the MySQL Prefix toggle switch:
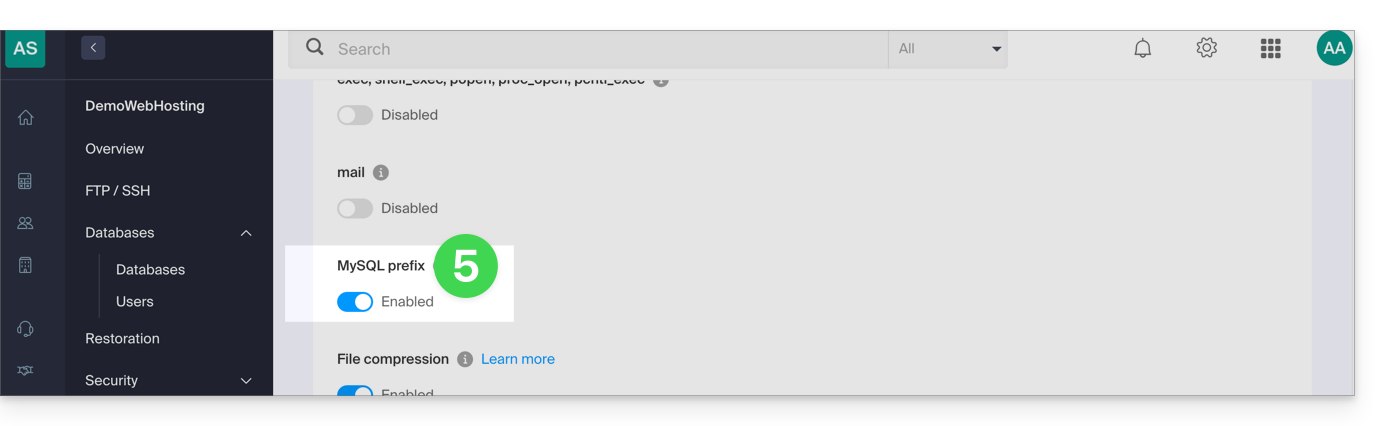
- Click on the Save button at the bottom of the page.
- Make the necessary adjustments in the configuration files of your web applications and PHP scripts…
Implications and adjustments to be made
After disabling the MySQL Prefix option for a website, some PHP scripts or CMS may no longer function.
To restore the connection to your databases, you must update the following information in the configuration file(s) of the scripts concerned:
- the name of the MySQL database: you will need to add the prefix of your server to it.
- before:
dbname - after:
wxyz_dbname
- before:
- the user of the MySQL database: you will need to add the prefix of your server to it:
- before:
dbuser - after:
wxyz_dbuser
- before:
Link to this FAQ: https://faq.infomaniak.com/2168
Has this FAQ been helpful?