Knowledge base
1000 FAQs, 500 tutorials and instructional videos. Here, there are only solutions!
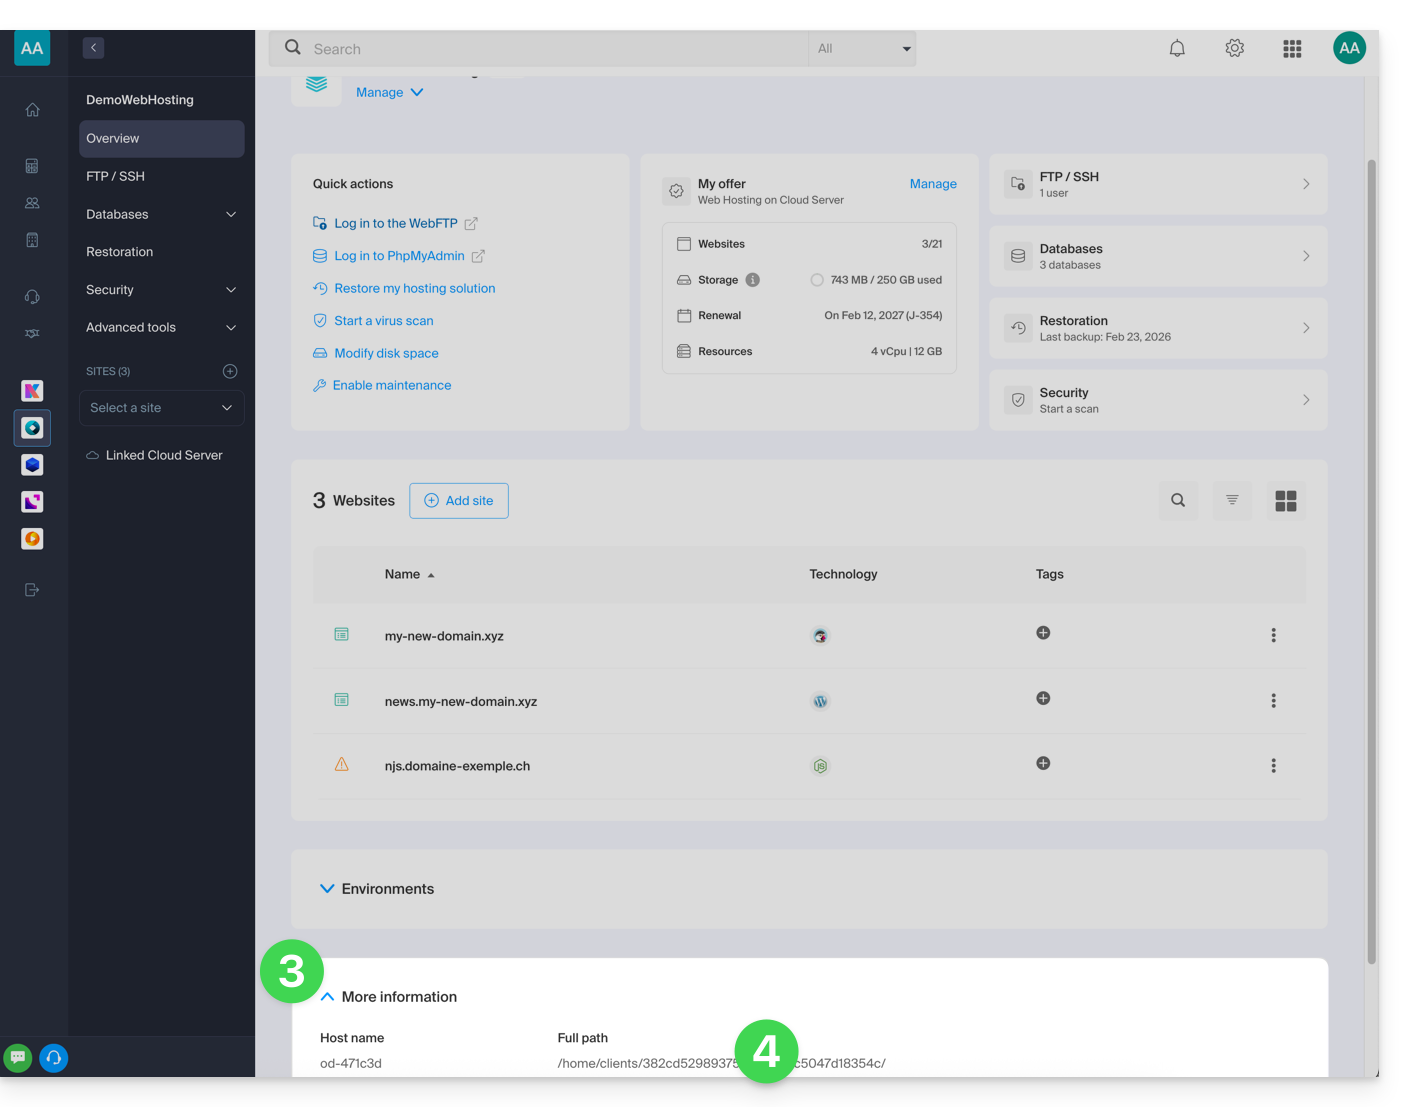
This guide explains how to display the absolute paths for certain web applications that need to know them.
Get the absolute path…
… of a web hosting
To do this:
- Click here to access the management of your hosting on the Infomaniak Manager (need help?).
- Click directly on the name assigned to the hosting in question.
- Then click on the chevron to expand the Information section of this hosting.
- The highlighted indication below is the location of the example site:
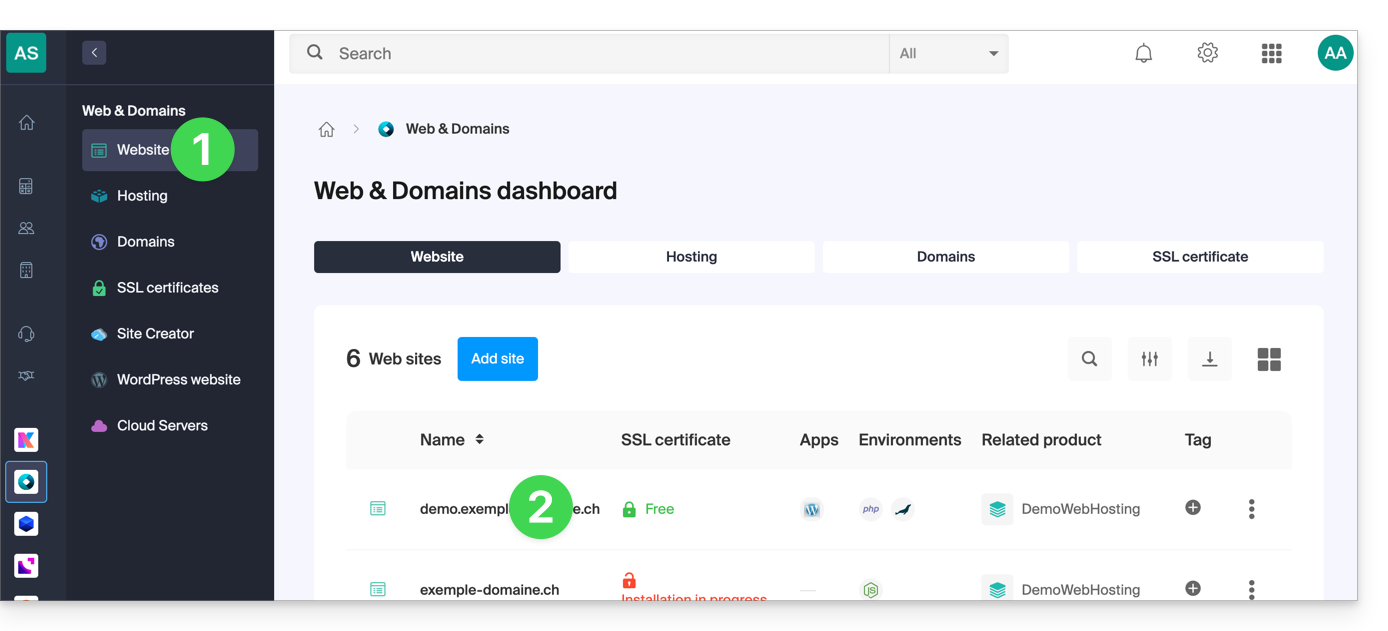
… of a website
To do this:
- Click here to access the management of your site on the Infomaniak Manager (need help?).
- Click directly on the name assigned to the site in question.
- Then click on the chevron to expand the Information section of this site.
- The highlighted indication below is the location of the example site:

Link to this FAQ:
Has this FAQ been helpful?
This guide explains how ModSecurity works, how to configure it, and how to manage it on Infomaniak servers.
Introduction
- ModSecurity (
mod_secure) is available and enabled by default on Infomaniak servers:- All HTTP requests will be subject to the security rules defined by ModSecurity.
- The PHP extension
uploadprogressis not available on Infomaniak servers, as PHP is used in its FPM version.
- It is not possible to disable ModSecurity on Infomaniak servers:
- The setting is global to the server where your site is hosted, which means that all defined security rules will be applied to your site.
In case of a problem
Language error in the browser (code 403)
If the error message ModSecurity: Access denied with code 403 (phase 2). Operator EQ matched 0 at REQUEST_HEADERS. (...) appears regarding ModSecurity, you should check that a default language is properly configured in your web browser. This error can sometimes be caused by incorrectly configured language settings in the browser.
Warning "Request body larger than configured limit"
If you see messages regarding the error or warning Request body larger than configured limit, please note that this is only a warning — the request still goes through and is not blocked. This configuration is specific to certain older hosting generations (of the jessie type) and allows all requests to pass through to the server without any impact on your visitors.
Link to this FAQ:
Has this FAQ been helpful?
This guide explains what a Web host like Infomaniak is, and specifies its role, its scope of action, and the limits of its technical support.
Infomaniak, web host since 1996
According to Wikipedia, a Web host is a company that provides Internet hosting for computer systems to individuals or entities who do not wish to do so themselves.
Infomaniak, that’s also:
- … decades of experience in hosting and high-performance online solutions.
- … more than a million users in Switzerland and Europe trusting the management of their critical data.
- … a company certified ISO 27001, 9001, 14001, 50001 and committed to sustainable digital technology.
- … 100% of "Swiss made" technological expertise with data hosted in Switzerland in its own data centers.
- … a rich knowledge base and customer support available to guide you.
Responsibilities and limits of intervention
As a host, Infomaniak installs, secures, and keeps the server infrastructure up to date, evolves its management interfaces (Manager) and assists its customers in the optimal use of the tools provided. Infomaniak strives to offer solutions accessible to all; however, human support for free products is inherently limited to ensure the sustainability of these services.
For security and confidentiality reasons, no assistance will be provided without formal identification of the interlocutor.
Support is exclusively for Organization administrators. End customers or users benefiting from a contract via a Reseller Partner must contact their administrator or dedicated service provider first.
Scope of technical support
Technical assistance does not intervene for:
- Development and programming: debugging sites, correcting source code, personal scripts (PHP, JS, etc.)
- The use and integration of APIs.
- Application maintenance and webmastering: troubleshooting, updating, or managing content for third-party applications (e.g., CMS like WordPress, email clients like Outlook, etc.).
- Local and custom interventions: remote control, configuration of your own hardware, complex manual installations or migrations.
But support will be happy to assist you for:
- The infrastructure and the Manager: resolution of incidents related to the network, hardware, or Infomaniak management interfaces.
- The use of Infomaniak services: clarification of configuration processes and assistance in getting started with our native features.
- Documentation guidance: guiding you to the appropriate technical resources and guides to make you self-sufficient.
A Premium assistance and a migration service are available for more specific needs.
Find external help
For help with the content of your site, its programming, or the advanced organization of your mailboxes, use the Infomaniak tender platform which lists over 1000 verified professionals, or consult the directory.
Link to this FAQ:
Has this FAQ been helpful?
This guide explains how to modify the PHP version used in the command line (PHP CLI) on an Infomaniak Web Hosting.
Preamble
- Useful for configuring a specific script or PHP command line (CLI) session.
- To modify the PHP version of the Web server (FPM/Apache) via the Manager, refer to this other guide.
Default PHP CLI version
The php command uses the default server version. Check the active version with this command:
# Check current PHP version
php -v
For the stability of your scripts, use an explicit path (e.g., php8.2) or modify your PATH variable.
Modify the PHP version in CLI
You can configure the PHP version automatically loaded in your SSH session via two main files.
1. Using .bashrc (Recommended)
The ~/.bashrc file is read when opening an interactive shell.
Open the file (or create it if it does not exist):
touch ~/.bashrc
nano ~/.bashrc
Add this line to define the desired version (example with PHP 8.3):
export PATH="/opt/php8.3/bin:$PATH"Refresh the configuration:
source ~/.bashrcCheck the change:
php -v
which php
2. Using .profile (Alternative)
The ~/.profile file is read upon SSH connection (login mode).
Modify the file:
nano ~/.profileAdd the export line:
export PATH="/opt/php8.3/bin:$PATH"
3. Load .bashrc systematically
To apply the configuration to all types of sessions, add this code to your ~/.bash_profile or ~/.profile files:
# Load .bashrc if it exists
if [ -f ~/.bashrc ]; then . ~/.bashrc; fi
Run a specific version temporarily
To run a script with a specific version without changing your global environment, call the binary directly:
# Execute with a specific version
/opt/php8.2/bin/php my_script.php
/opt/php8.3/bin/php -v
Once these steps are completed, your SSH sessions and CLI scripts will use the selected PHP version by default.
Link to this FAQ:
Has this FAQ been helpful?
This guide concerns Redis, a PHP module for Infomaniak Cloud Server.
Preamble
Redisis used with PHP to accelerate performance by serving as a cache for temporary data and managing user sessions, thus improving the efficiency of web applications.Redisalso allows the implementation of queue systems and temporary storage of data for asynchronous tasks or statistics.
Install Redis
Redis is installed from Fast Installer, applications available in a few clicks on Cloud Server:
- After installation,
Redisis accessible via the IP/portlocalhost:6379or127.0.0.1:6379 - The password for
Redismust be between 15 and 99 characters (inclusive).
Link to this FAQ:
Has this FAQ been helpful?
This guide explains how to access the configuration of an Infomaniak website to display technical information such as the PHP, Apache version, or the activated PHP extensions and modules.
View the website's technical information
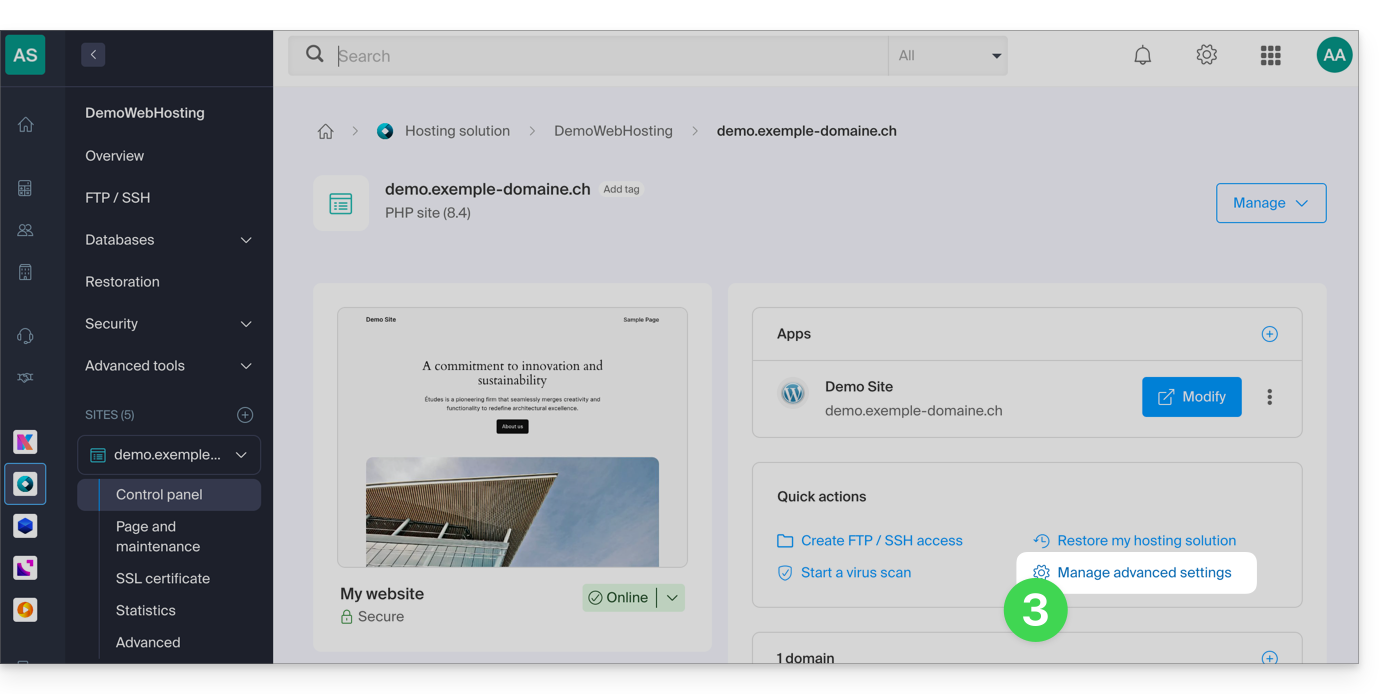
To access the website management:
- Click here to access the management of your site on the Infomaniak Manager (need help?).
- Click directly on the name assigned to the site concerned:
- Click on Manage advanced settings:
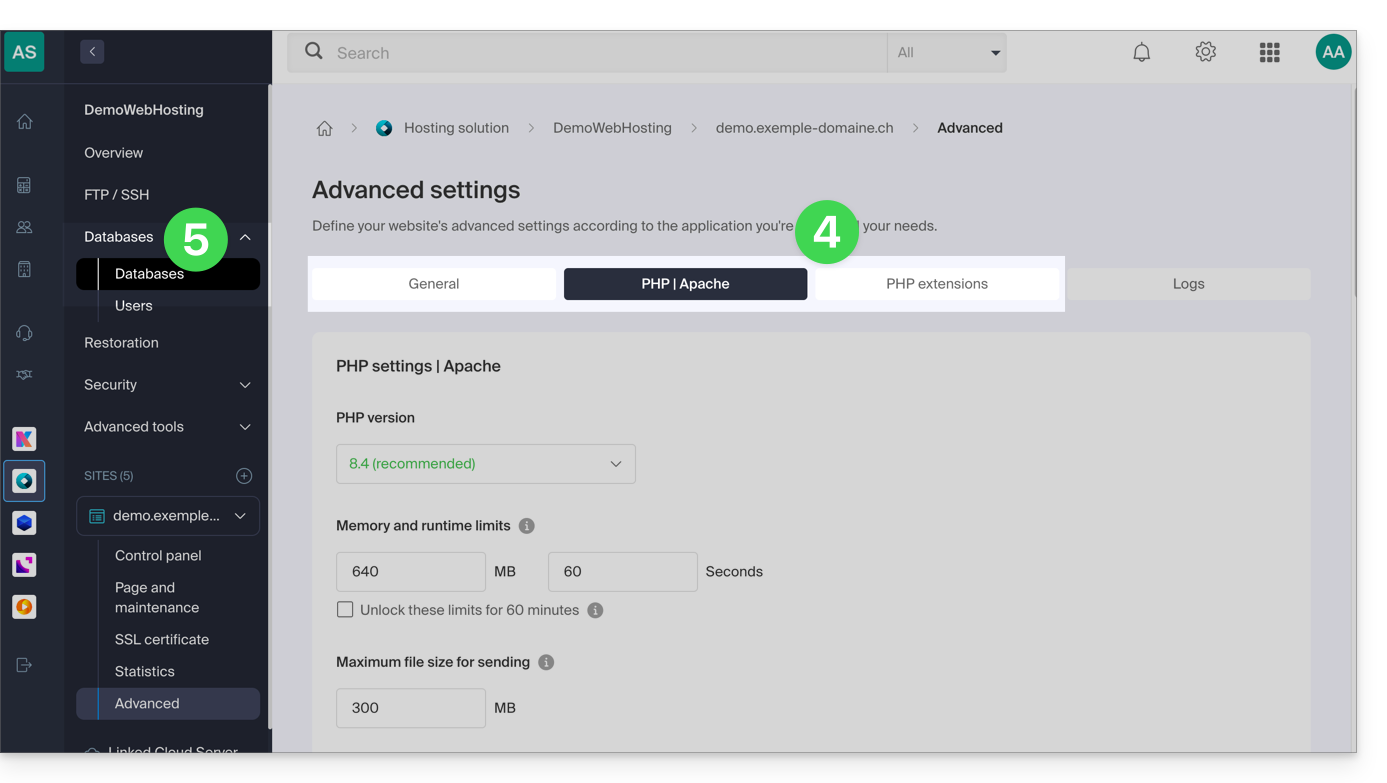
- Take note of the website information under the General, PHP / Apache and PHP Extensions tabs.
- Click on Databases in the left sidebar to get the MySQL version of the web hosting:
Link to this FAQ:
Has this FAQ been helpful?
This guide explains how to run the open source dependency manager Composer 2 using an SSH command.
Preamble
- Composer is an open source dependency manager for PHP that allows you to define, install, and update the libraries required for a PHP project.
- Composer 1 has been obsolete since 2021 and will no longer allow the installation of new packages or updates as of 2025.
- Only version 2 of Composer is now supported and available on all PHP versions from 7.2 to 8.3.
Run Composer 2
Composer 2 is already pre-installed and accessible via SSH. Therefore, it is not necessary to install it manually.
Simple usage
Log in to your hosting via SSH, then use the following command:
composerThis command will automatically run version 2 of Composer compatible with the PHP version currently in use in your session.
Check the active version
You can check the available version of Composer with:
composer --versionExample output: Composer version 2.5.0 2022-12-20 10:44:08
Force a specific PHP version
If you want to run Composer with a specific version of PHP, aliases are available. For example:
composer_php8.1 --versionor:
composer_php7.4These aliases allow you to run Composer 2 with the specified PHP interpreter, useful for testing or deploying a project on a target PHP version.
Link to this FAQ:
Has this FAQ been helpful?
This guide explains how to reset a VPS Cloud / VPS Lite.
Preamble
- This procedure erases all the content of the volume dedicated to the operating system (
/dev/vda). - In the case of a VPS Cloud, the volume dedicated to data storage (
/dev/vdb) is not affected by the reset.
Warning: depending on the installed operating system, the system volume may be named /dev/sda, /dev/sda1 or /dev/vda… same for the data volume /dev/sdb, /dev/sdb2 or /dev/vdb … It is therefore necessary to replace these indications with those corresponding to your situation.
Reset of the VPS Cloud / VPS Lite OS
To access the VPS:
- Click here to access the management of your product on the Infomaniak Manager (need help?).
- Click directly on the name assigned to the product concerned.
- Click on the Reset button.
- Follow the displayed instructions to complete the reset.
Link to this FAQ:
Has this FAQ been helpful?
This guide explains how to access the VNC console with Infomaniak VPS Cloud / VPS Lite.
Preamble
- Initial access to the server is via SSH key; it is therefore necessary to assign a password to the
rootaccount or to create another user before you can authenticate with the VNC console. - Warning: you must use the US keyboard layout to use VNC normally!
Open the VNC console
To do this:
- Click here to access the management of your product on the Infomaniak Manager (need help?).
- Click directly on the name assigned to the product in question.
- Click on Open the VNC console under Quick Actions.
If a console display issue occurs, then from the VM:
In /etc/default/grub modify GRUB_CMDLINE_LINUX_DEFAULT, GRUB_GFXMODE and GRUB_GFXPAYLOAD_LINUX (the latter variable is probably missing and needs to be added):
GRUB_CMDLINE_LINUX_DEFAULT="biosdevname=0 net.ifnames=0 console=tty0 console=ttyS0,115200
earlyprintk=ttyS0,115200 consoleblank=0 systemd.show_status=true video=VGA-1:1280x1024"
GRUB_GFXMODE=1280x1024x16
GRUB_GFXPAYLOAD_LINUX=keep
Then update grub and restart:
grub-mkconfig -o /boot/grub/grub.cfgThe resolution can be changed (1000x400 instead of 1280x1024 for example) to allow the VNC console to be displayed in the administration interface without opening a new tab.
Link to this FAQ:
Has this FAQ been helpful?
This guide explains how to allow certain incoming and/or outgoing ports in the firewall (firewall) of a Web hosting or a Cloud Server.
Preamble
- On a shared Web hosting, it is only possible to open outgoing ports.
- On a Cloud Server, it is possible to open incoming and outgoing ports.
- Opening ports allows certain applications to function properly but can reduce the security of your hosting.
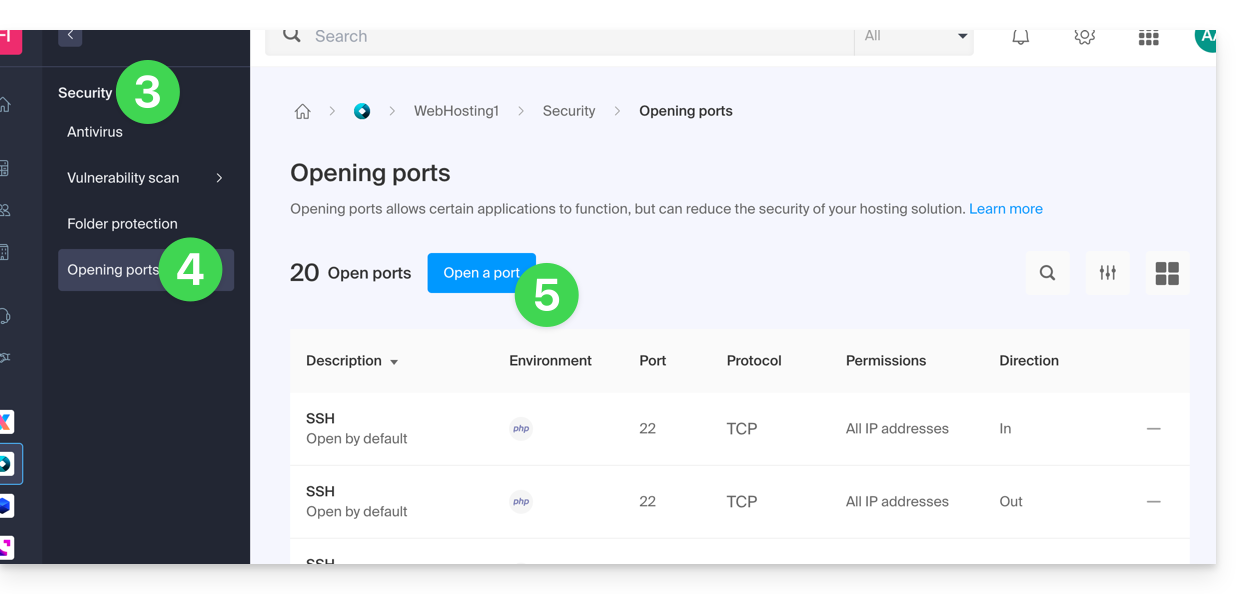
Access the tool and add a rule
To manage port opening from the Manager:
- Click here to access the management of your hosting on the Infomaniak Manager (need help?).
- Click directly on the name assigned to the hosting concerned.
- Click on Security in the left sidebar.
- Click on Port Opening in the left sidebar.
- Click the Open a port button:
Open a port
It is only possible to set one port per rule, and only one IP / host per field: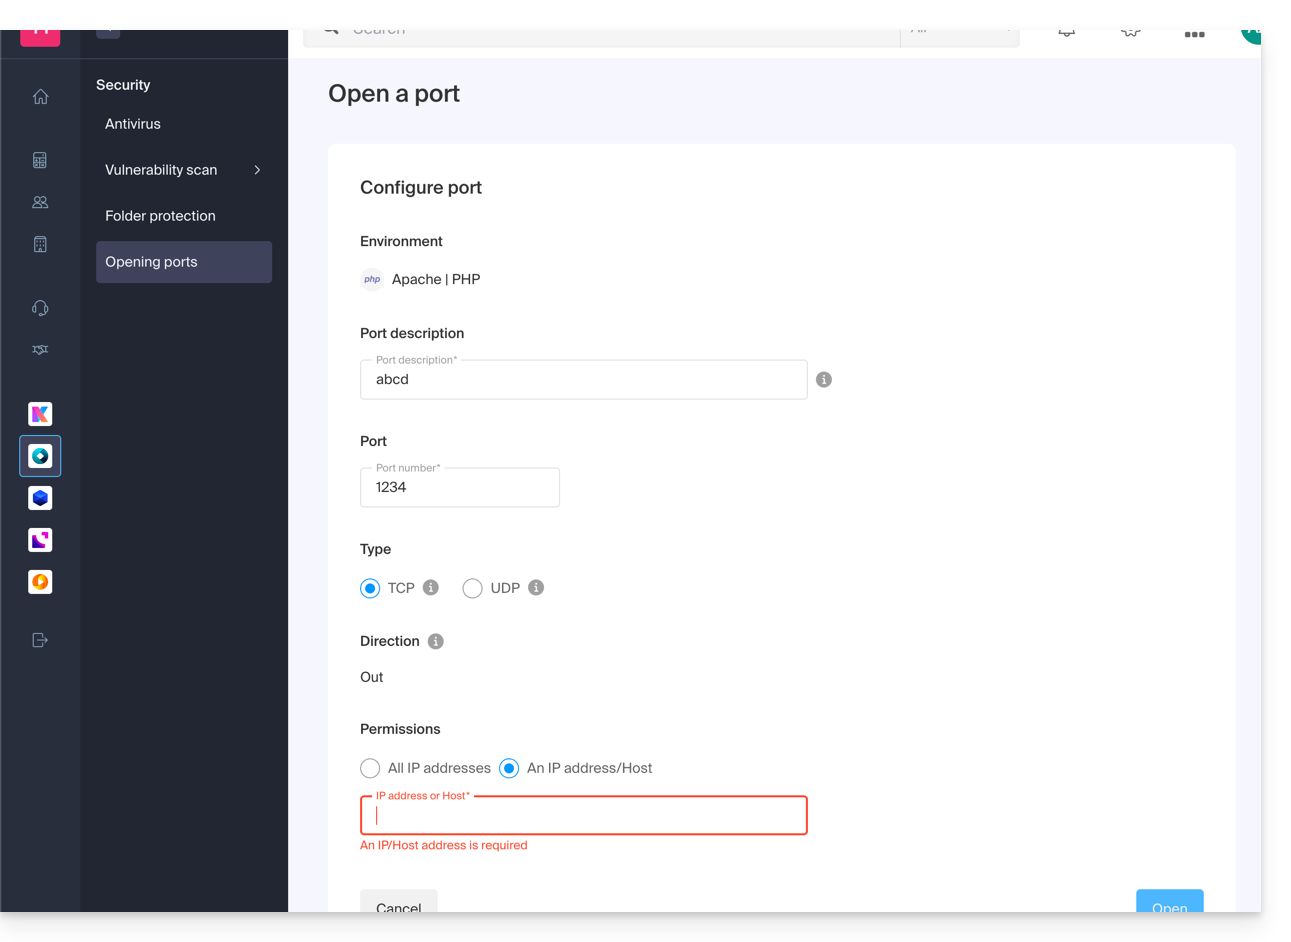
By specifying an IP or a host, the connection will only be allowed in these cases:
Incoming rule: if the connection comes from this IP or the specified hostOutgoing rule: if the connection is made to this IP or this host
Same for the "Type" of connection, if the protocol used for the connection is not the one specified in the rule, the connection is not allowed.
Open the outgoing port 25 globally
You can open the outgoing port 25 from the manager if a destination host is specified.
With a Cloud Server, to open this port to the world, contact Infomaniak support and justify your request.
Default open ports
Once you have accessed the port opening tool, you will find the list of default open ports on the page.
With a Cloud Server, to exceptionally close some of the listed ports, contact Infomaniak support and justify your request.
The display may sometimes be spread over several pages: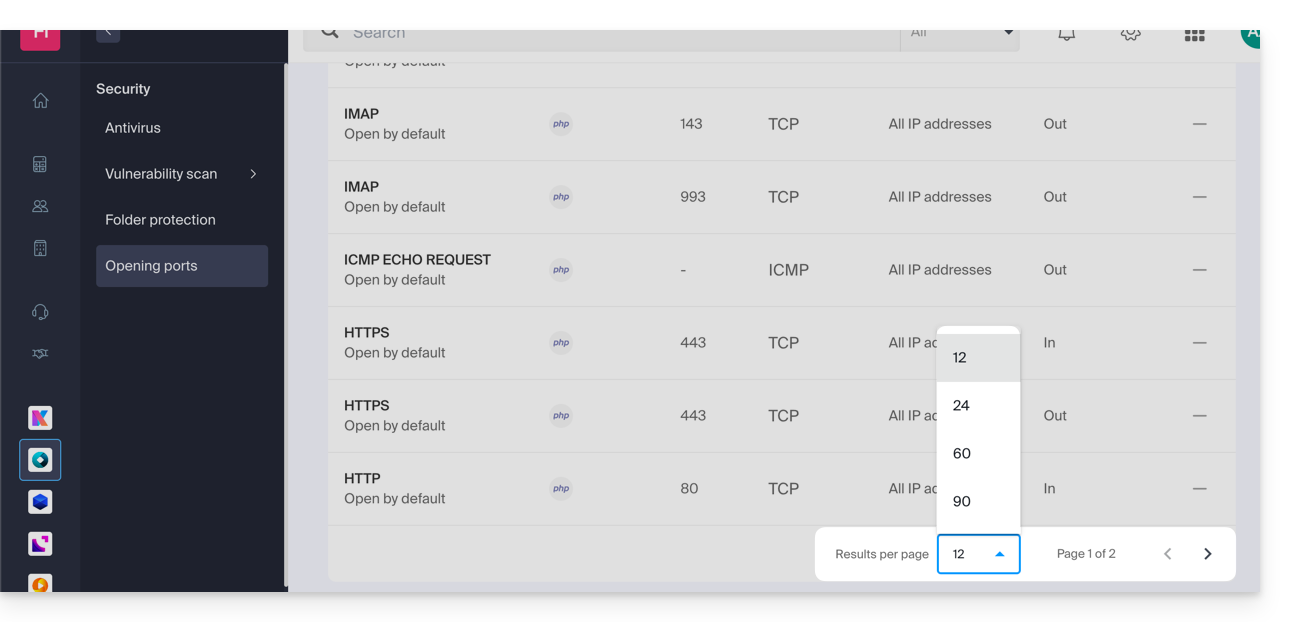
MySQL ports
Regarding database ports, refer to these guides:
Check the activity of a port (Cloud Server)
On Cloud Server, to check if an application is listening on a particular port (1234 in the example below) and to know the name of the application in question, run in SSH:
netstat -anpe | grep "1234" | grep "LISTEN"Link to this FAQ:
Has this FAQ been helpful?
This guide explains how to migrate a shared web hosting account to a Cloud Server while recovering all its data, websites, databases, etc.
Introduction
- Note:
- Database names and database user accounts are preserved.
- FTP accounts are preserved with the same names, but the host server changes to an address of the type
xxxx.ftp.infomaniak.com. - The IP addresses of the websites will change, except for dedicated IP addresses.
- During this operation, statistics are reset.
- If you already have a Cloud Server, go directly to step 2 of this guide.
- To migrate a web hosting account from a Cloud Server to another Cloud Server, please refer to this other guide.
- To migrate a web hosting account from a Cloud Server to a shared web hosting account, please refer to this other guide; please note that this is an operation that you will need to perform manually.
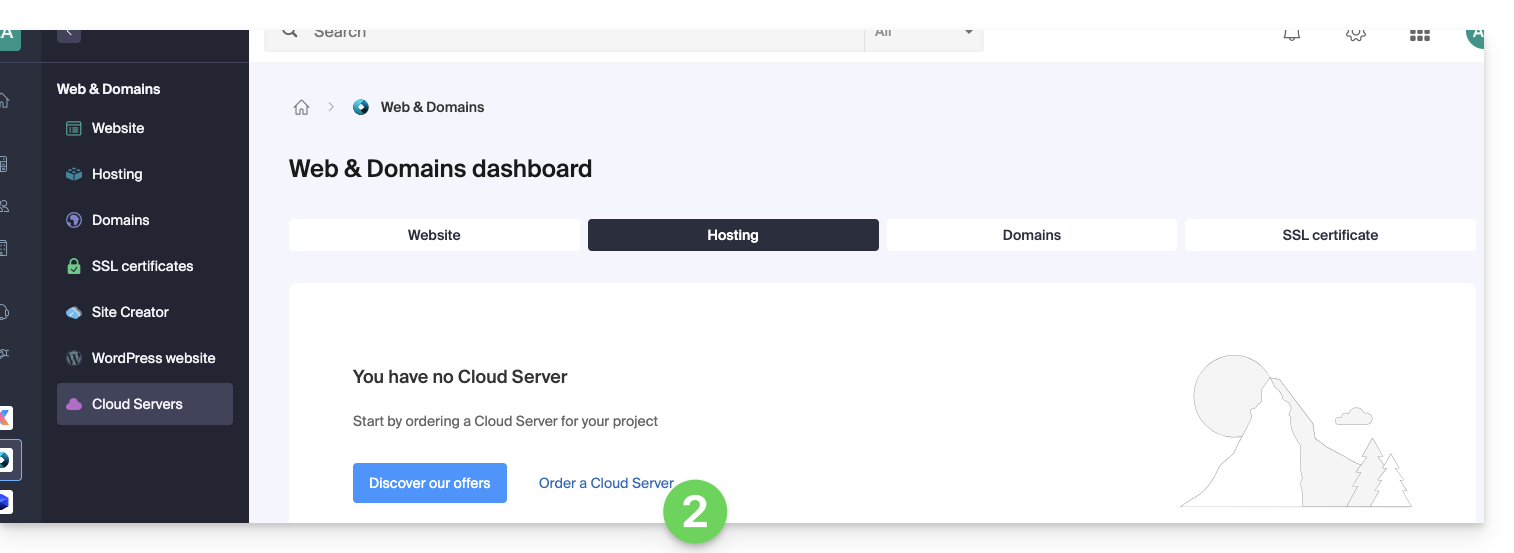
1. Order a Cloud Server
To do this:
- Click here to access the Cloud Server management section in the Infomaniak Manager (need help?).
- Click on Order, choose a Managed Cloud Server, and follow the wizard to complete the order:
2. Migrate your hosting to the Cloud Server
Once the Cloud Server is up and running:
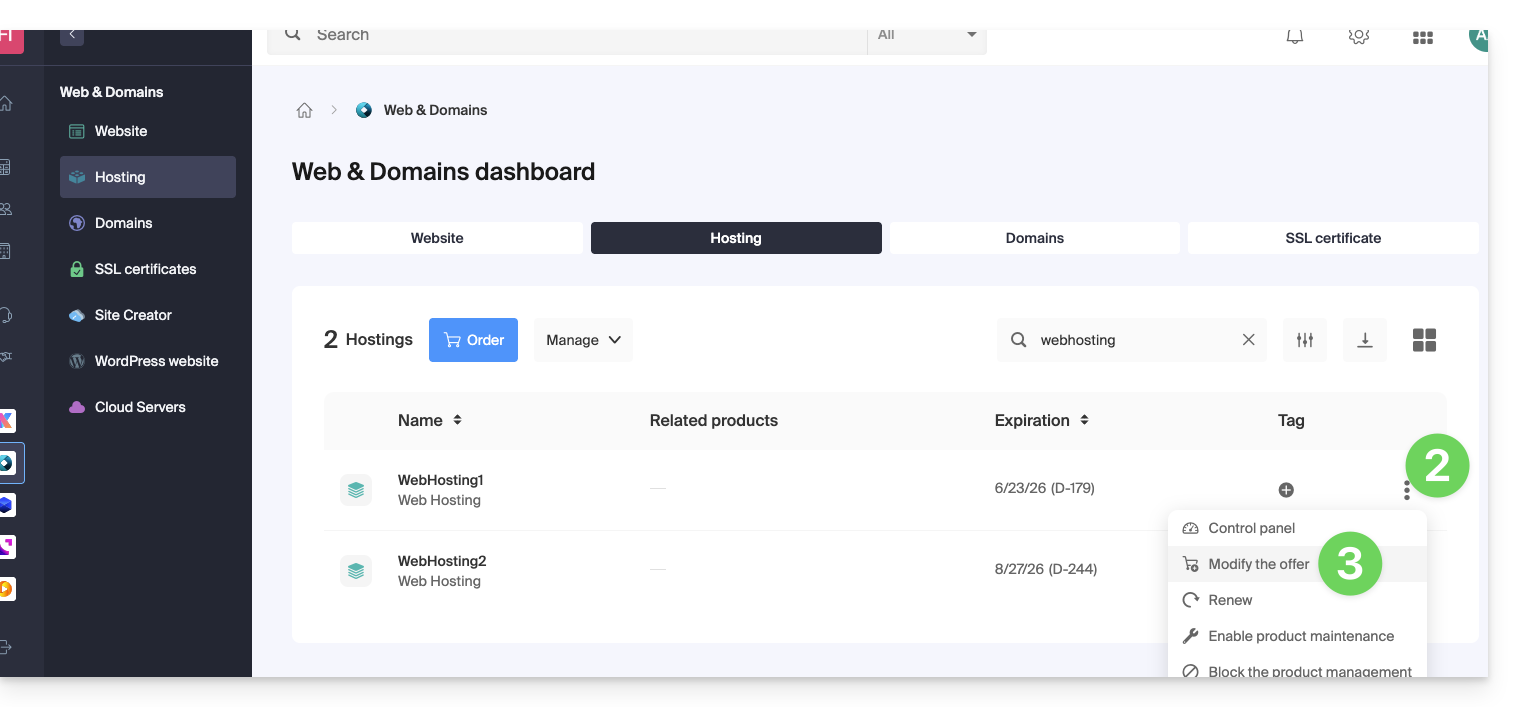
- Click here to access the management of your product on the Infomaniak Manager (need help?).
- Click on the action menu ⋮ located to the right of the item in question.
- Click on Modify offer:
- Select the free transfer offer.
- Select the Cloud Server to which you want to migrate your hosting:
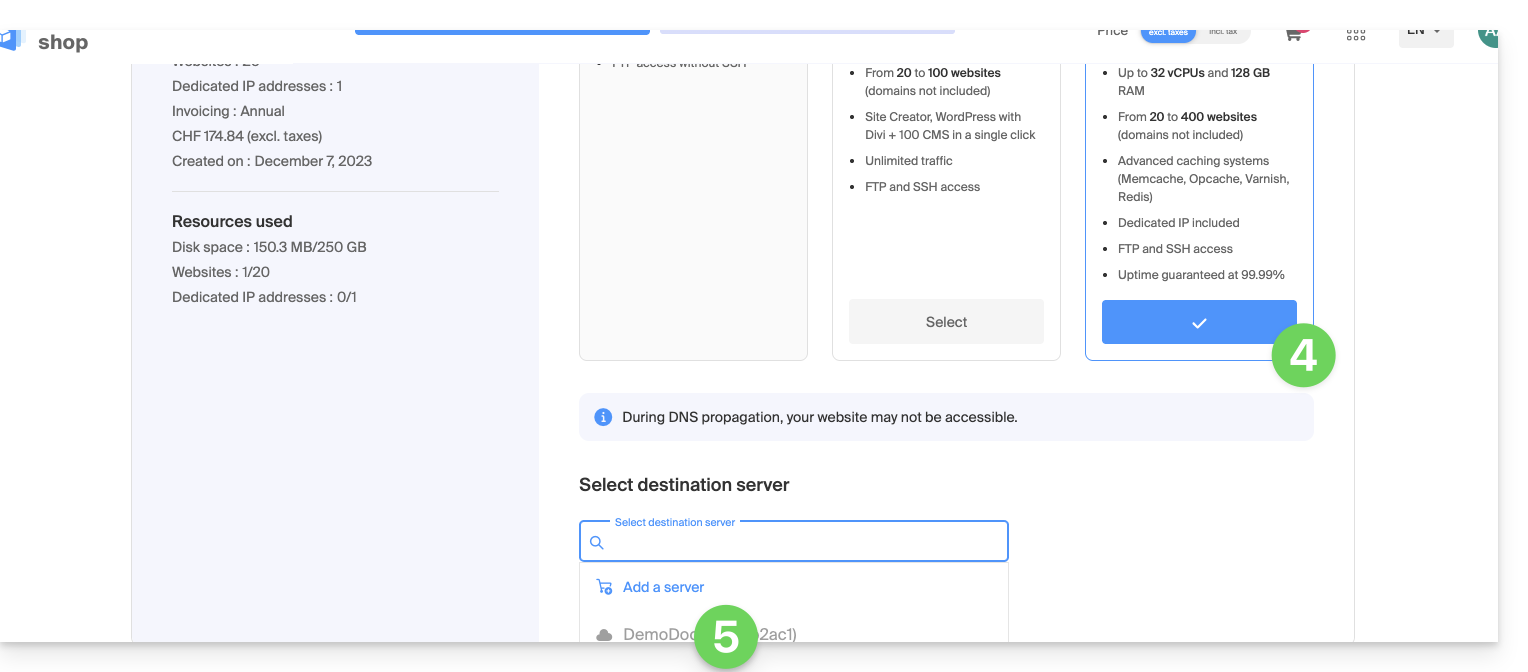
- Click on the Next button at the bottom of the page and complete the procedure.
- Wait for the hosting migration to complete; there will be a service interruption during the process.
Link to this FAQ:
Has this FAQ been helpful?
This guide provides information about the robots.txt file created by default for web hosting where this file is missing.
Preamble
- The
robots.txtfile acts as a guide for search engine crawler robots - It is placed at the root of a website and contains specific instructions for these robots, indicating which directories or pages they are allowed to explore and which they should ignore
- However, note that robots may choose to ignore these directives, making the
robots.txta voluntary guide rather than a strict rule
File Content
If the robots.txt file is missing from an Infomaniak site, a file of the same name is automatically generated with the following directives:
User-agent: *
Crawl-delay: 10
These directives tell the robots to space out their requests by 10 seconds, which prevents unnecessarily overloading the servers.
Bypassing the Default robots.txt
It is possible to bypass the robots.txt by following these steps:
- Create an empty
robots.txtfile (it will only serve as a placeholder so that the rules do not apply). - Manage the redirection of the URI (Uniform Resource Identifier)
robots.txtto the file of your choice using a.htaccessfile.
Example
<IfModule mod_rewrite.c>
RewriteEngine On
RewriteCond %{REQUEST_URI} /robots.txt$
RewriteRule ^robots\.txt$ index.php [QSA,L]
</IfModule>
Explanations
- The
mod_rewritemodule of Apache is enabled to allow redirections. - The condition
RewriteCond %{REQUEST_URI} /robots.txt$checks if the request concerns therobots.txtfile. - The rule
RewriteRule ^robots\.txt$ index.php [QSA,L]redirects all requests torobots.txttoindex.php, with the[QSA]option that preserves the query parameters.
It is recommended to place these instructions at the beginning of the .htaccess file.
Link to this FAQ:
Has this FAQ been helpful?
This guide is about IP addresses, those…
- …assigned to sites/hosting/servers, dynamic or static, shared or dedicated,
- …assigned by your Internet Service Provider (ISP) when establishing an Internet connection to your Infomaniak product.
Preamble
- A dedicated or static IP address for a website is a permanent IP address specifically assigned to it.
- Unlike a shared IP address, which is used by multiple websites, a dedicated IP address ensures that only this platform is associated with this address.
- Dedicated IP addresses for websites are often used in cases where stability, customization, and security are important, such as server hosting, firewall configuration, or activating SSL certificates (although it is possible to proceed without a dedicated IP address to install an SSL certificate).
- Here are the main advantages:
- Configuring a PTR entry or reverse DNS on dedicated IPs is useful, especially for installing a mail server, as some email providers check the PTR record before accepting emails sent from a server.
- Better connection stability.
- Reduced risk of a bad reputation due to websites sharing the same IP address.
- Easier configuration of certain technical aspects.
- A dedicated IP can improve a website's search engine ranking (although there are differing opinions among SEO specialists).
- Note: Infomaniak does not allow access to websites via HTTP(S) by IP (dedicated) on managed servers; you must use a domain name that points to the IP (or use the preview URL).
Add a dedicated IP to the website
To add a dedicated IP to your website, refer to this guide.
If you encounter issues directing web traffic to a defined port, refer to this other guide.
IP address blockage (Internet connection)
If you can no longer access…
- … all your email addresses that you own with Infomaniak (which usually work fine) and this with an email software/client from the same Internet network (i.e., from the same IP address provided by your ISP)…
… or if you unfortunately performed this type of operation:
- repeated unsuccessful connection attempts via FTP, SSH, or on access points such as the WordPress login…
- requests returning too many errors such as mass 403 errors…
… your access to Infomaniak servers may be blocked following the banning of the IP address (banip / ipban) of your internet connection.
To unblock the situation, contact Infomaniak support by email and specify the domain concerned and especially your public IP address concerned.
Permanent Unblocking (IP Whitelisting)
With a Managed Cloud Server, you can request to permanently authorize the IP address in question so that it is never blocked again, regardless of the situation. To do this, you must:
- Have a dedicated IP associated with your Managed Cloud Server.
- Be aware that Infomaniak will no longer block any potential attacks from this IP; attacks or malicious access attempts from this address will no longer be automatically blocked by the security systems.
- Confirm by email and from a contact address associated with the account (owner or administrator) that you understand and accept full responsibility in case of an attack from this IP.
Link to this FAQ:
Has this FAQ been helpful?
This guide explains how to order, link or remove a dedicated IP from a website.
Manage dedicated IPs on hosting
Order one or more first dedicated IP addresses
To do this:
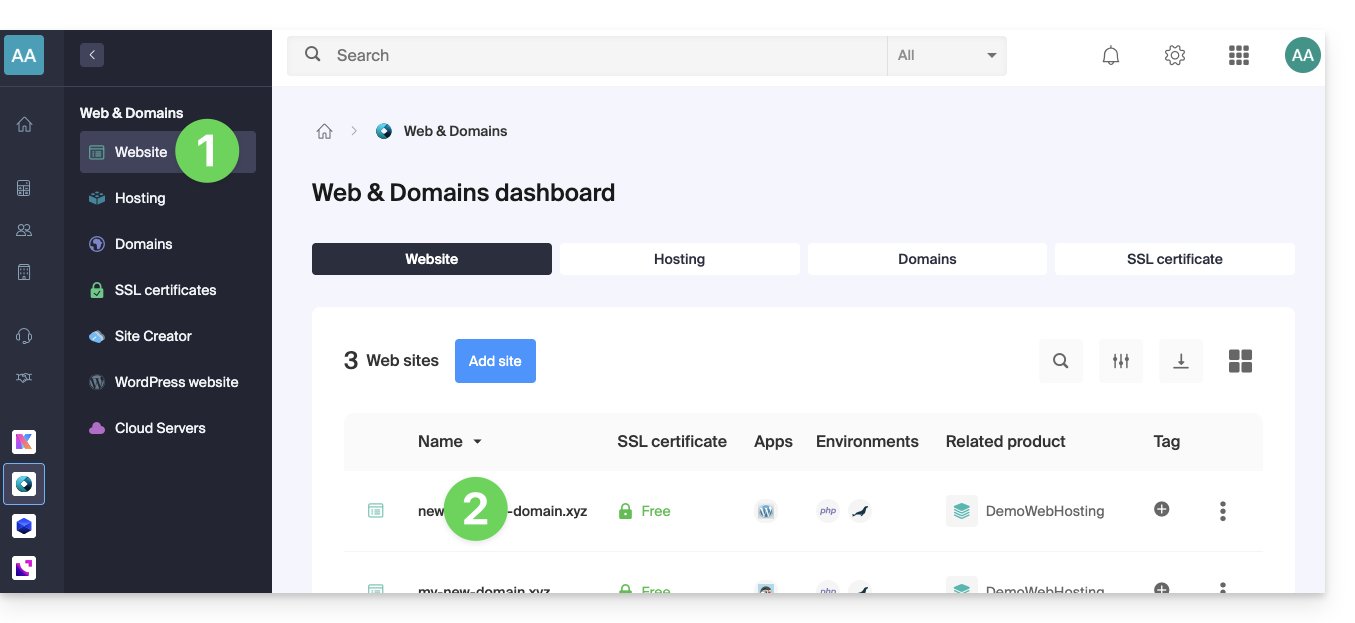
- Click here to access your site management on the Infomaniak Manager (need help?).
- Click directly on the name assigned to the site concerned:
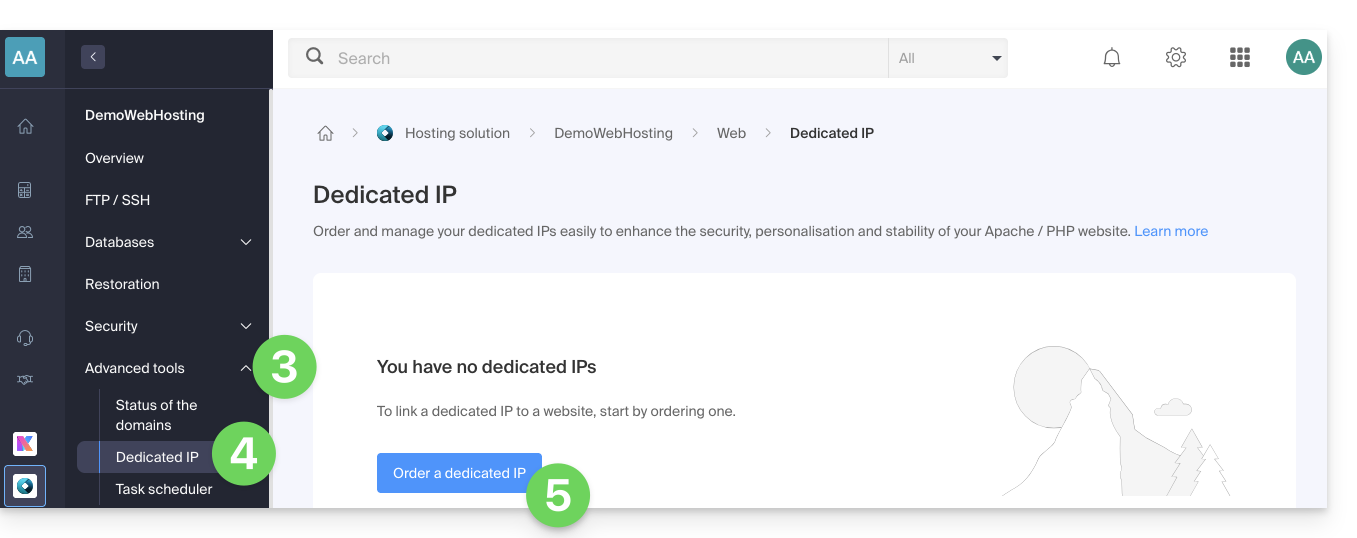
- Click on the chevron to the right of Advanced Tools in the left sidebar menu.
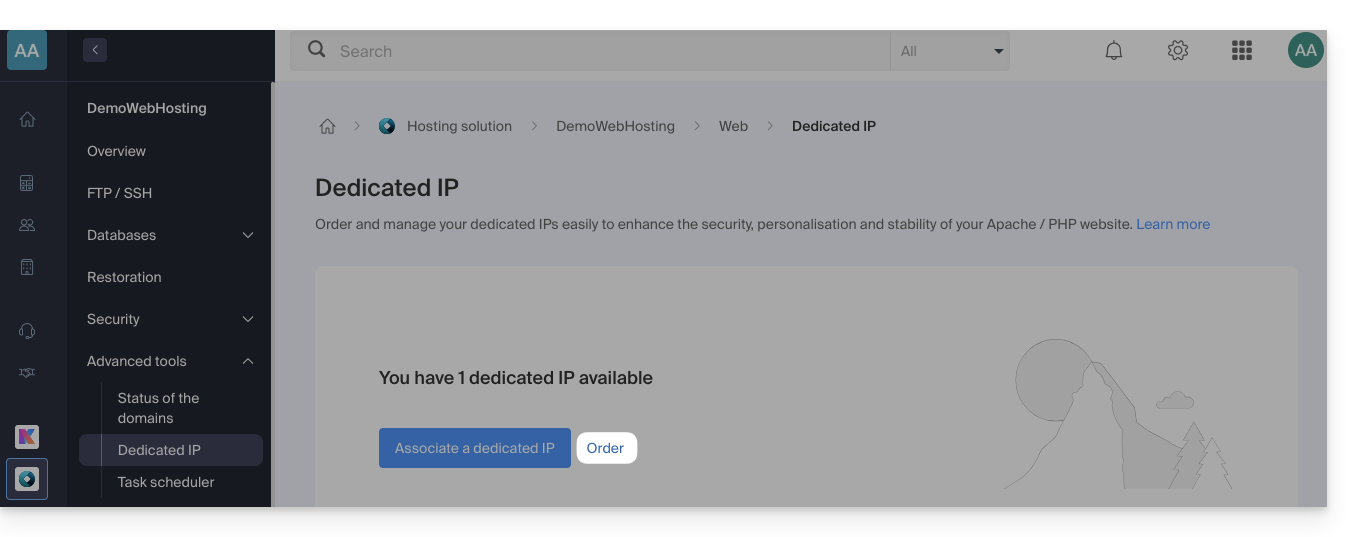
- Click on Dedicated IPs in the left sidebar menu.
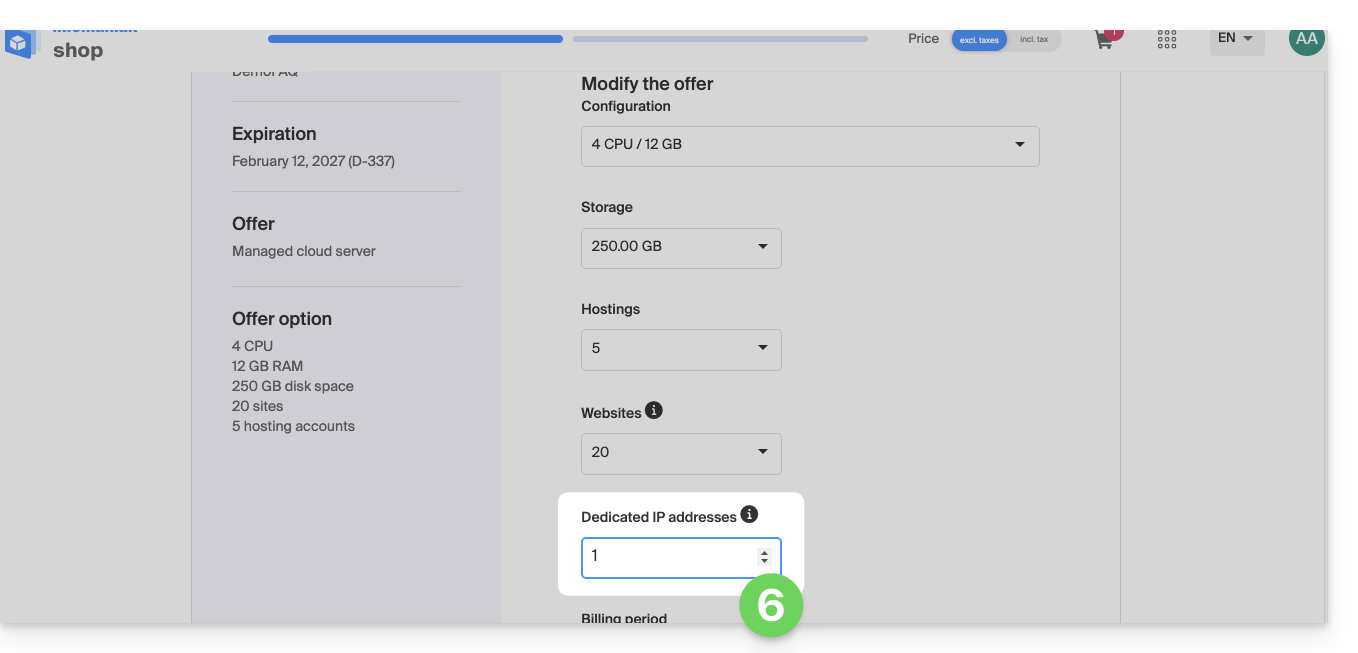
- Click the button to order one or more IP addresses:
- Increase according to the number of desired IPs:
Order one or more additional dedicated IP addresses
To do this:
- Click here to access your site management on the Infomaniak Manager (need help?).
- Click directly on the name assigned to the site concerned.
- Click on the chevron to the right of Advanced Tools in the left sidebar menu.
- Click on Dedicated IPs in the left sidebar menu.
- Click on the text to order one or more additional IP addresses:
- Increase according to the number of desired IPs.
Link a dedicated IP address to a website on hosting
Once the IP is ordered and paid for, be aware of the prerequisites below as switching to a dedicated IP address for a website can cause temporary disruption, especially in the presence of a Let's Encrypt SSL certificate.
Prerequisites
- Start by reducing the TTL of DNS records
AandAAAA(for@andwww) to 5 minutes. - Wait for the previous TTL duration before making any changes.
- The change below should be made during a period of low traffic to limit the inconvenience caused by the inevitable disruption.
- At the end of the procedure, you will need to wait for the new TTL to propagate the new configuration and regenerate the SSL certificate, then check the accessibility of the site in HTTPS to ensure everything is working correctly.
To switch to a dedicated IP address:
- Click here to access your site management on the Infomaniak Manager (need help?).
- Click directly on the name assigned to the site concerned.
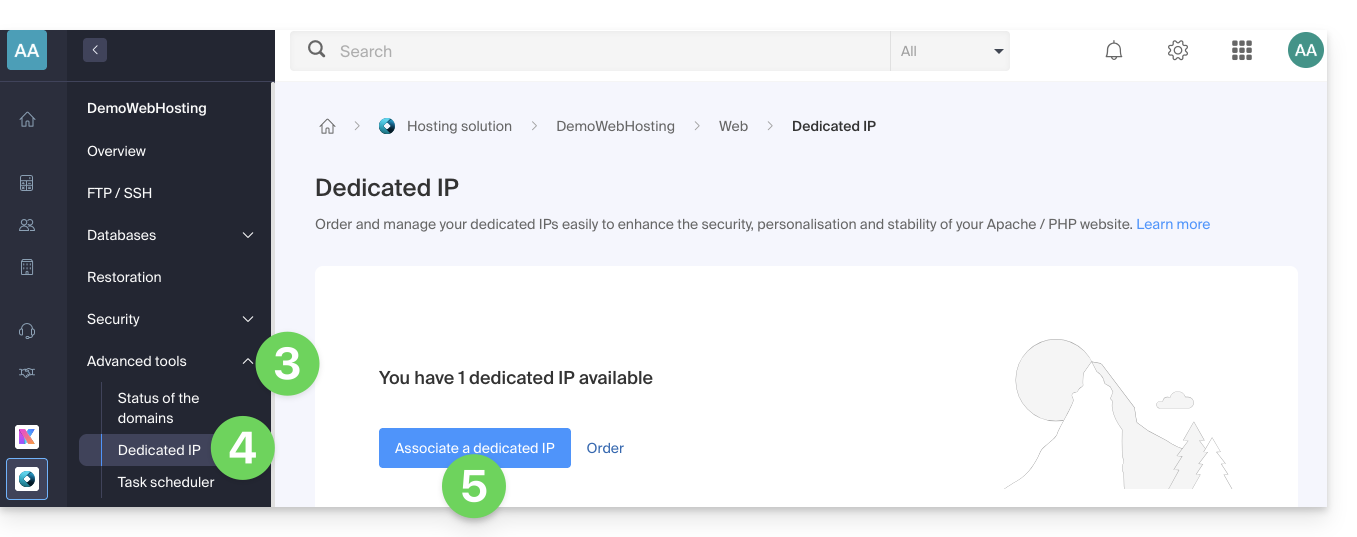
- Click on the chevron to the right of Advanced Tools in the left sidebar menu.
- Click on Dedicated IPs in the left sidebar menu.
- Click the button to associate the IP with a site on your hosting:
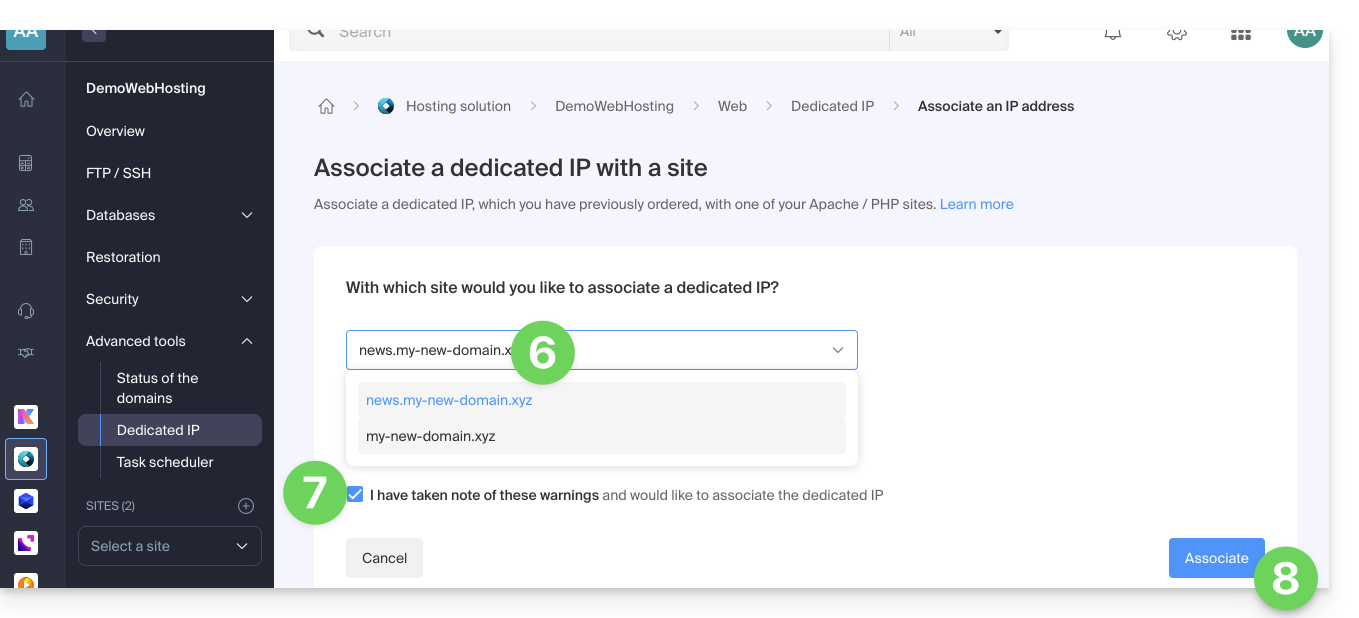
- Choose the site to assign the new IP address to.
- Check the box after reading the warnings.
- Click the Associate button:
Remove a dedicated IP address from a website
Once the IP is installed, to uninstall it:
- Click here to access your site management on the Infomaniak Manager (need help?).
- Click directly on the name assigned to the site concerned.
- Click on the chevron to the right of Advanced Tools in the left sidebar menu.
- Click on Dedicated IPs in the left sidebar menu.
- Click on the action menu ⋮ located to the right of the item concerned.
- Choose Unlink:
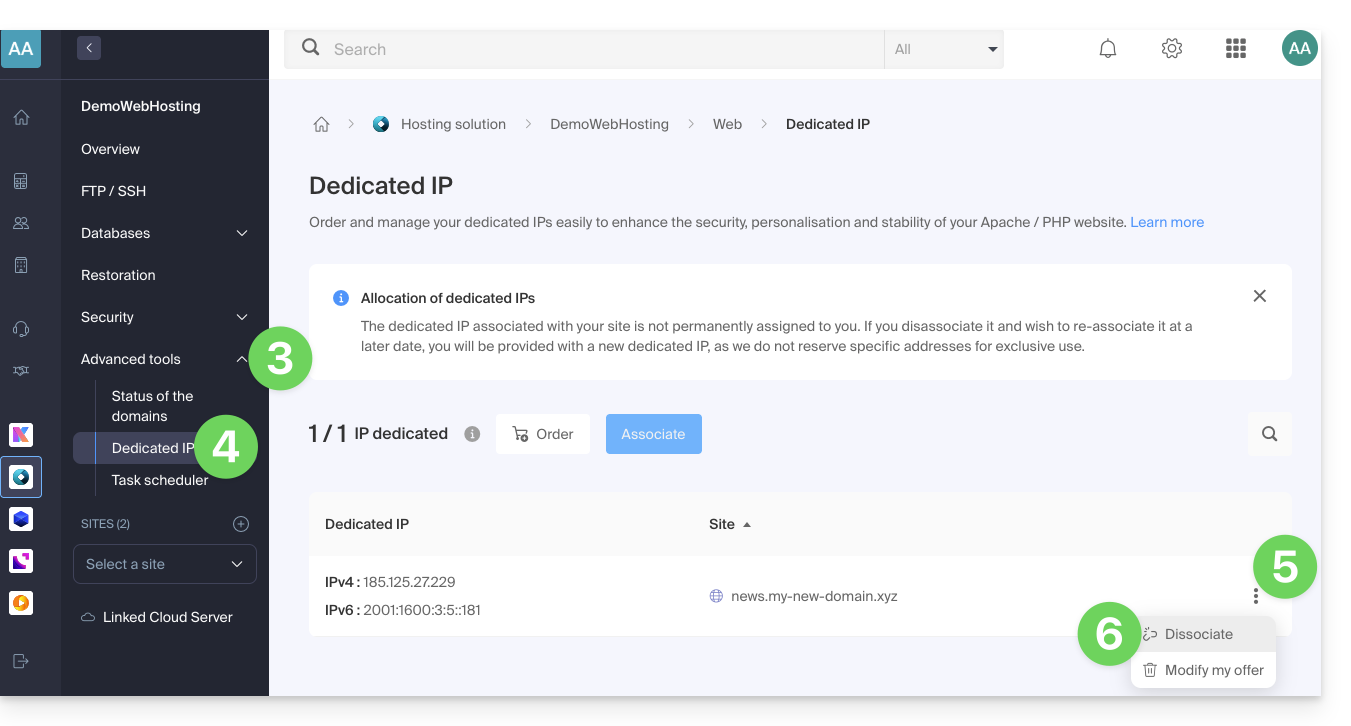
- Read the warnings and confirm the deletion to complete the IP uninstallation procedure.
Refer to this other guide if you are looking for information on potential issues related to your IP.
Link to this FAQ:
Has this FAQ been helpful?
This guide explains how to migrate a Web Hosting from MySQL to MariaDB.
Preamble
- MariaDB is an enhanced version of MySQL, featuring numerous powerful built-in features and many improvements in terms of usage, security, and performance:
- MariaDB has a larger connection pool supporting up to 200,000 connections, whereas MySQL has a smaller connection pool.
- When comparing the performance of MariaDB and MySQL, it is observed that replication is faster in MariaDB and slower in MySQL; MariaDB is faster than MySQL overall.
- MariaDB is Open Source, whereas MySQL uses proprietary code in its Enterprise edition.
- The update to MariaDB is irreversible, and all sites on your hosting will subsequently run with this version of MariaDB.
- Check the compatibility of your scripts before proceeding.
- During this operation, the statistics are reset.
Using MariaDB instead of MySQL
To migrate a Web Hosting to MariaDB:
- Click here to access the management of your product on the Infomaniak Manager (need help?).
- Click directly on the name assigned to the product concerned.
- Click on Databases in the left sidebar.
- Click on the link Migrate to MariaDB.
To migrate a Cloud Server, refer to this other guide regarding the migration to a new generation of Cloud Server.
Link to this FAQ:
Has this FAQ been helpful?
This guide explains how to order Web Hosting at Infomaniak.
Already a customer, you already have hosting
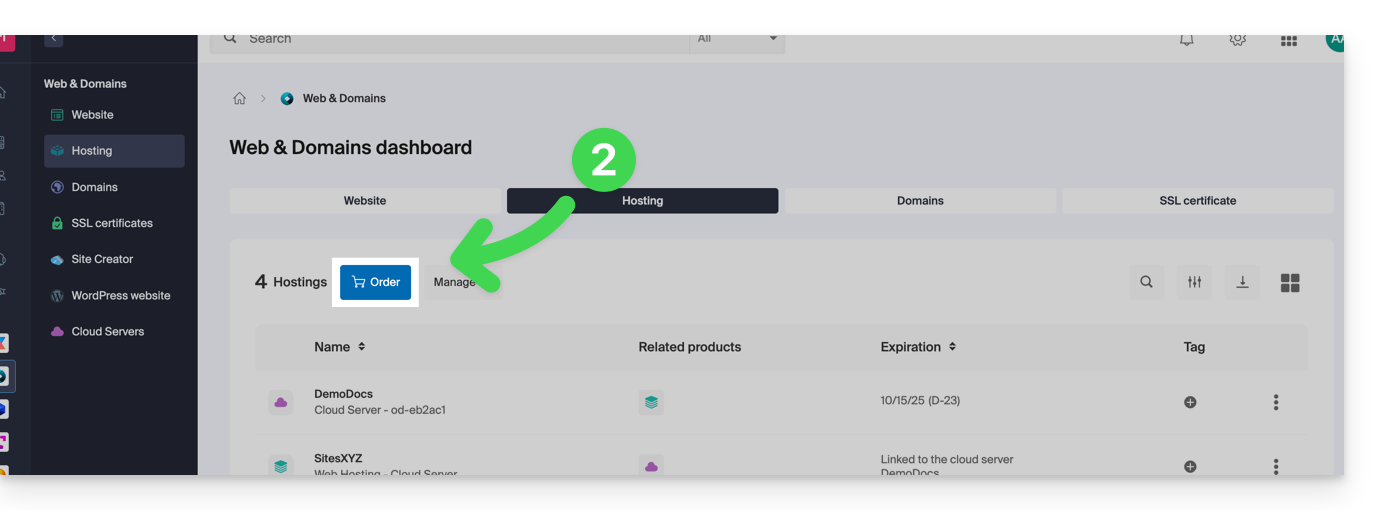
To order an additional hosting:
- Click here to access the management of your product on the Infomaniak Manager (need help?).
- Click on the supermarket cart icon:
If you already have web hosting, you can also add a site to an existing hosting without ordering or paying for new hosting (multi-site/multi-domain management).
Order new Infomaniak web hosting
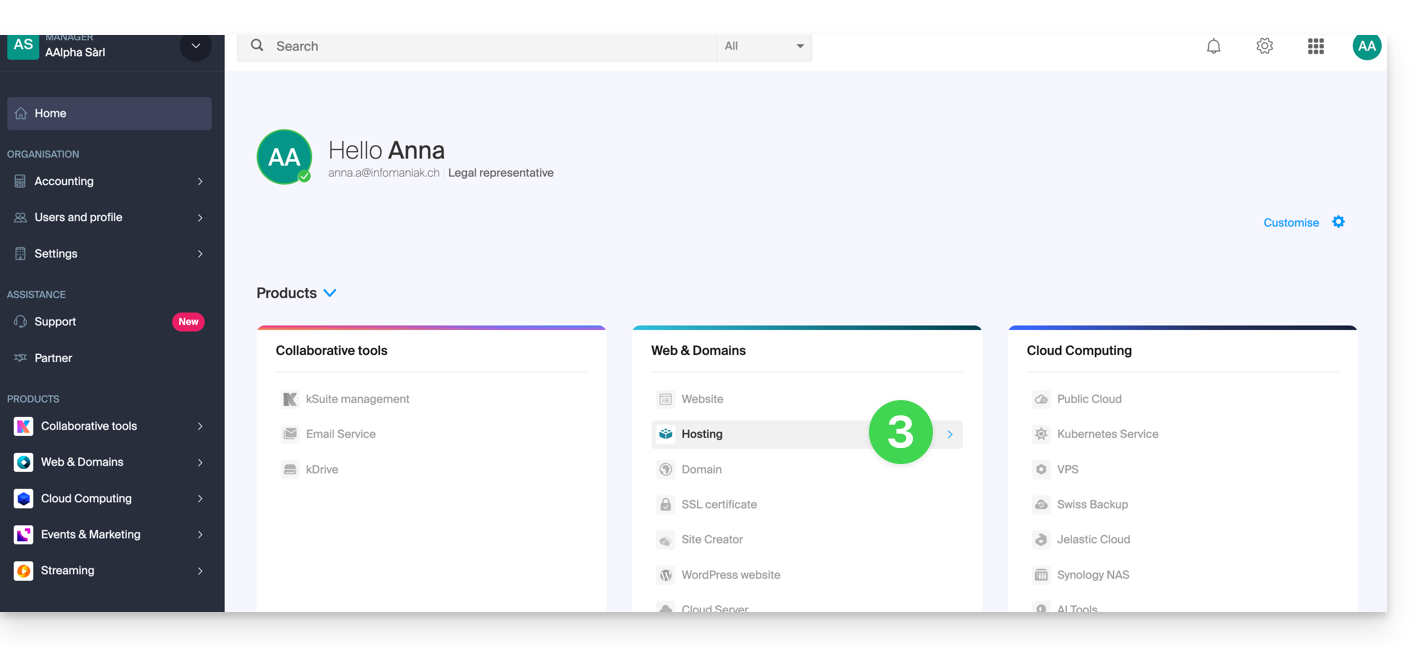
To order your first web hosting:
- If necessary, create a user account.
- Click here to access the Infomaniak Manager.
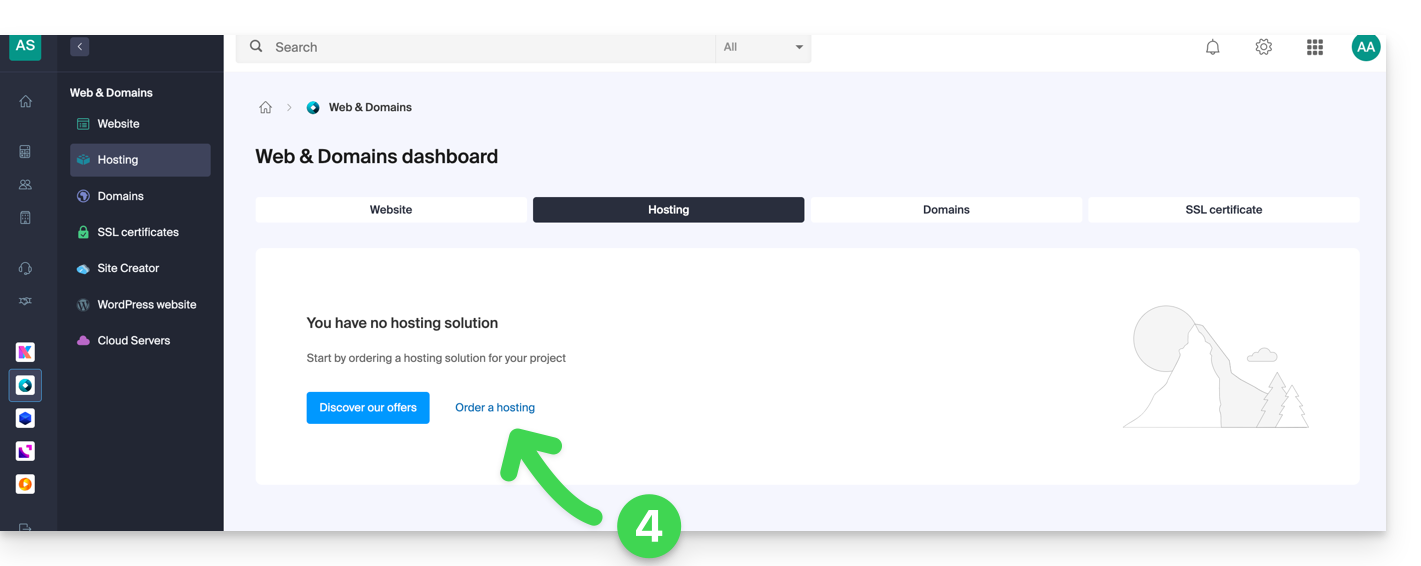
- Click on Hosting (Web & Domain universe):
- Click to order new hosting:
- Once on the Shop, check that you are ordering in the desired Organization (select another from the list if necessary or create a new one at point 6 below):

- Confirm your choice by clicking on the blue button at the bottom of the page (or first create a new Organization if necessary using the dedicated blue link):

- At the top, enter the domain name of your hosting and click on Search (even if you already manage it with another registrar):
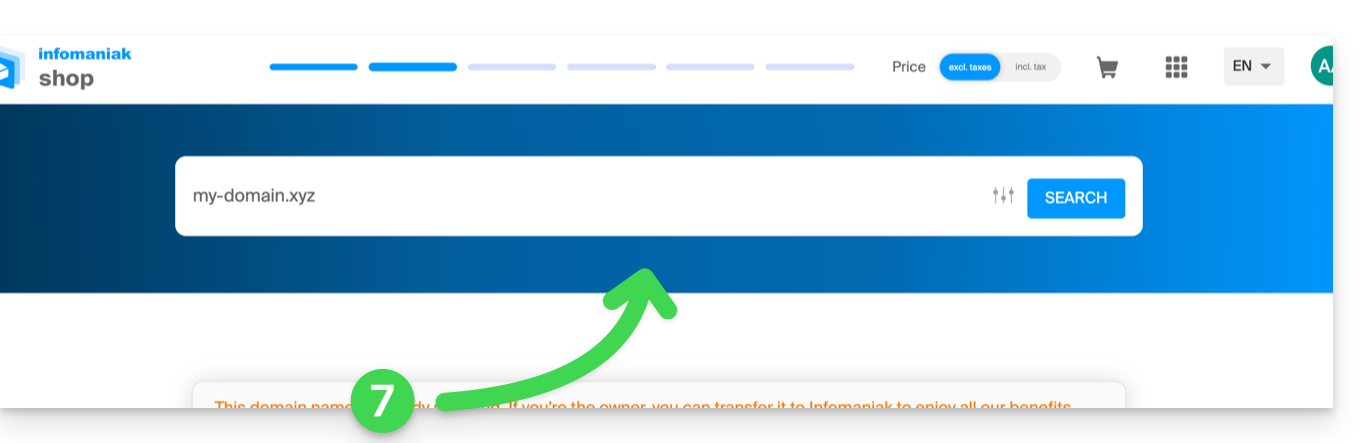
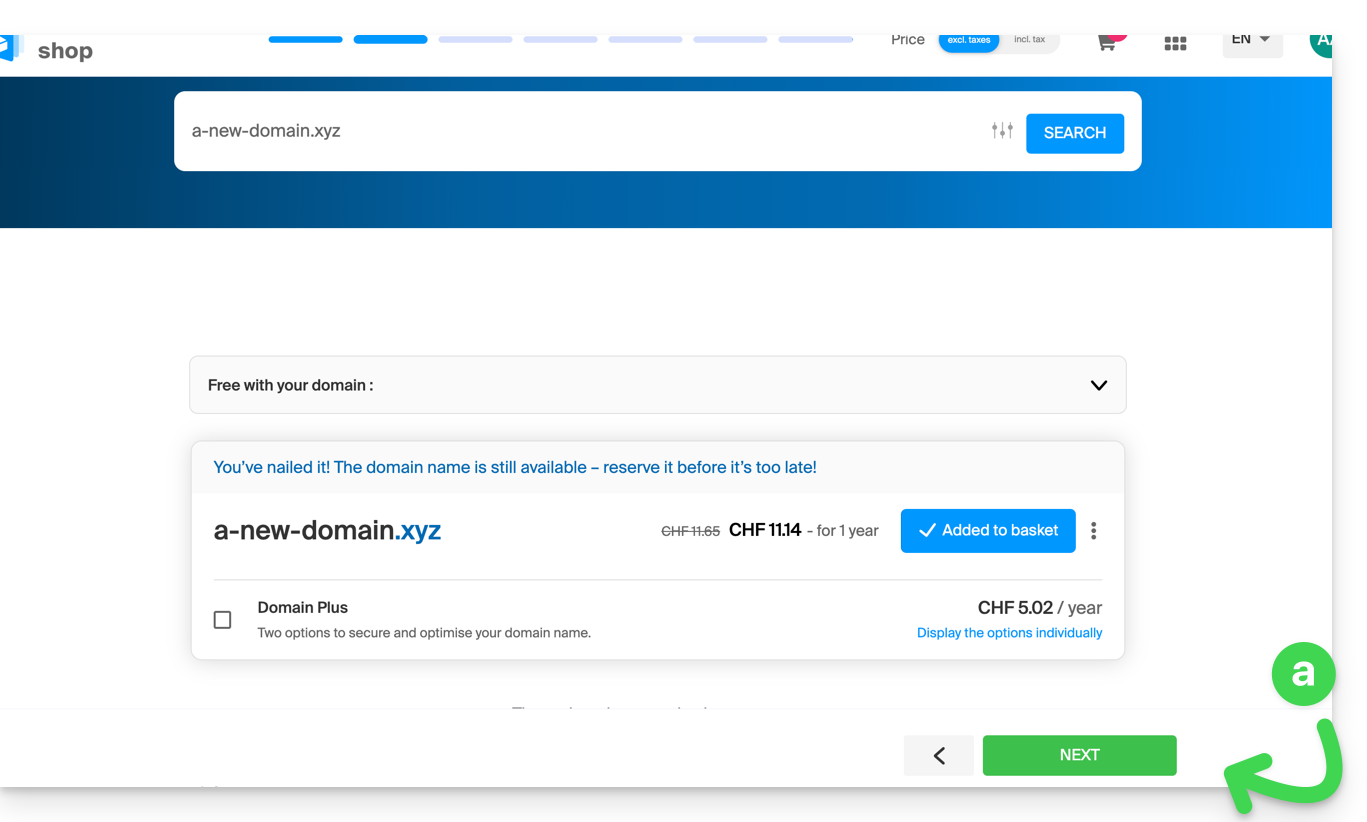
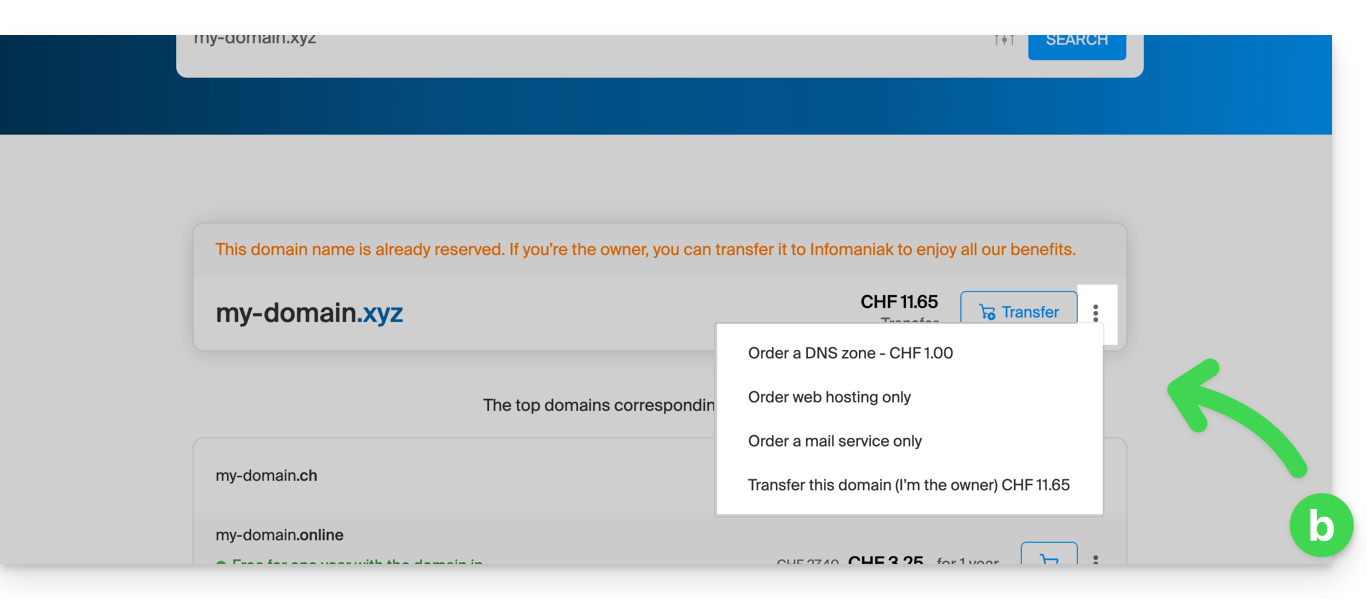
- Two scenarios are then possible:
- You do not yet own the domain name: check the information and options on the screen, then click on the Next button:
- You own and manage your domain names with another registrar: click on the action menu ⋮ to the right of the domain name to Order hosting only:
- You do not yet own the domain name: check the information and options on the screen, then click on the Next button:
- Choose the hosting that suits you.
- Click on Next.
- Complete the order.
Link to this FAQ:
Has this FAQ been helpful?
This guide explains how to update an Let's Encrypt SSL certificate for a website hosted by Infomaniak.
Preamble
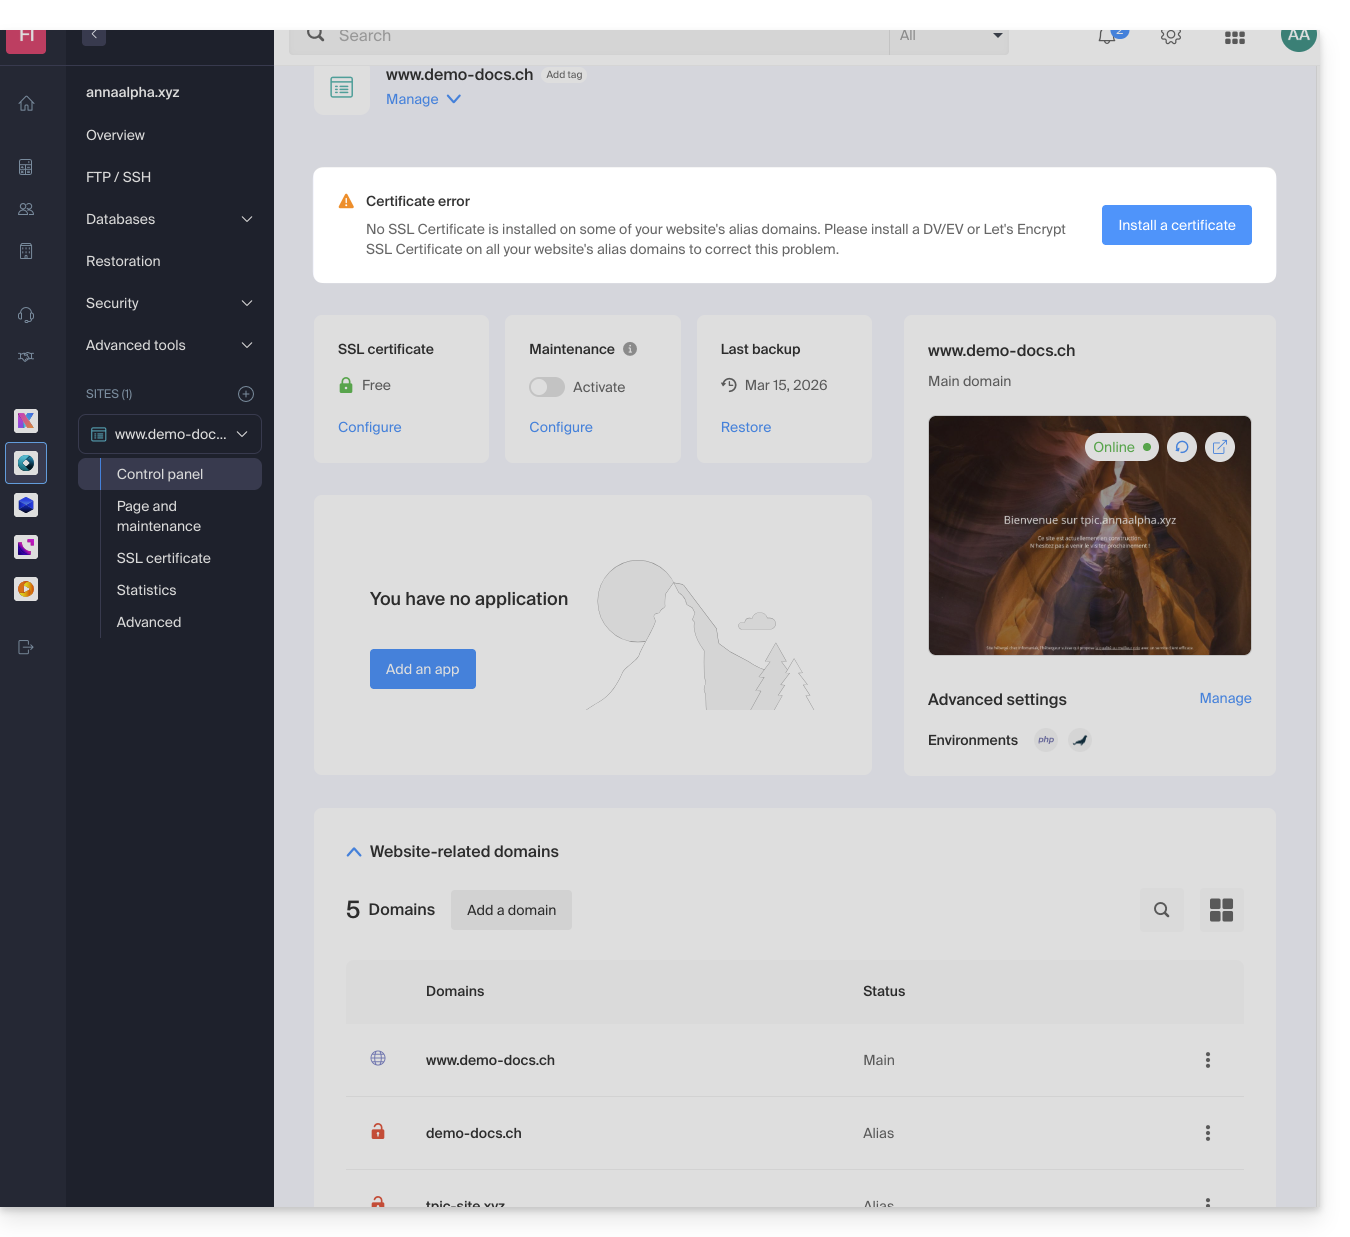
- It may be necessary following the addition or removal of aliases to a website to regenerate a certificate to include the new domain names linked to the website.
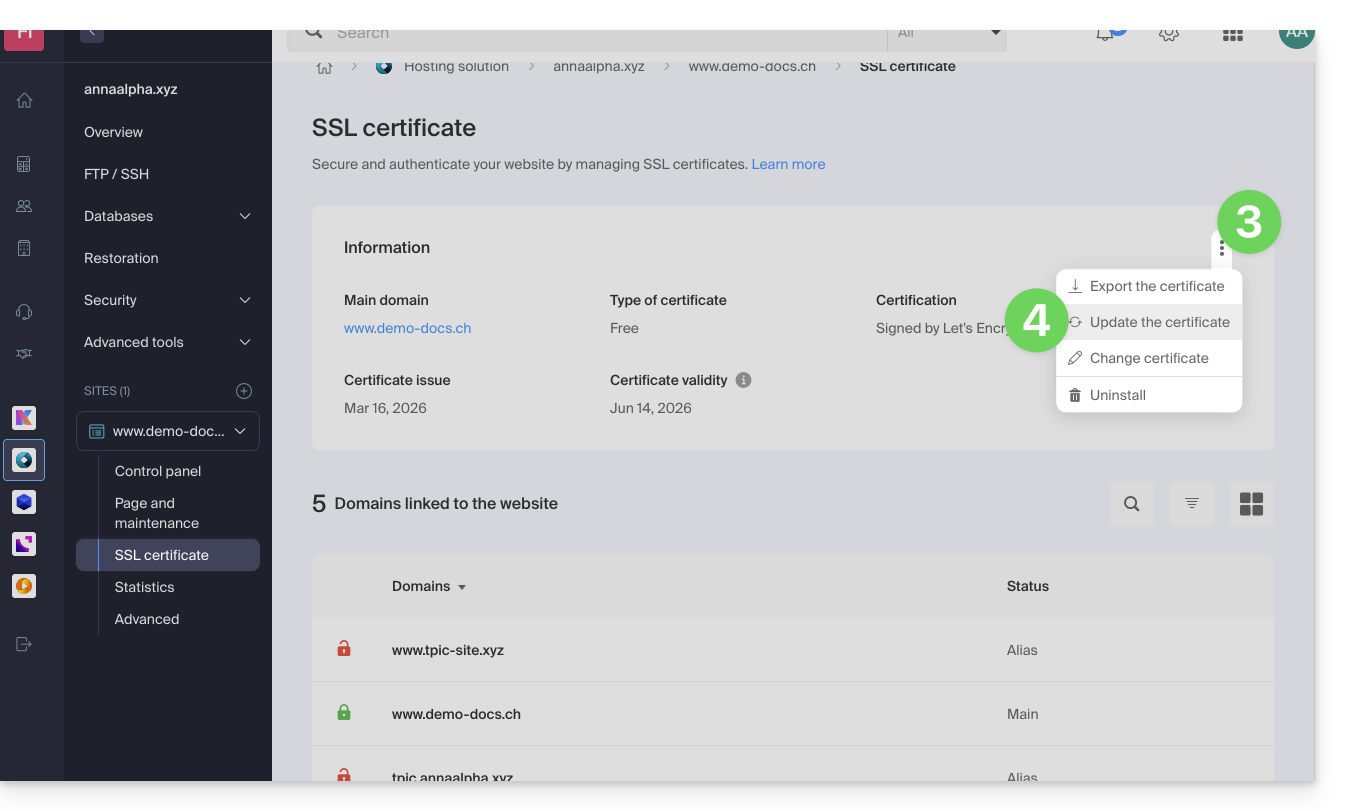
- The dashboard will clearly indicate that one of the domains linked to the site is not included in the SSL certificate in place:
Update a Let's Encrypt certificate
To access certificate management:
- Click here to access the management of your product on the Infomaniak Manager (need help?).
- Click directly on the name assigned to the product concerned:

- Click on the action menu ⋮.
- Click on Update the certificate:
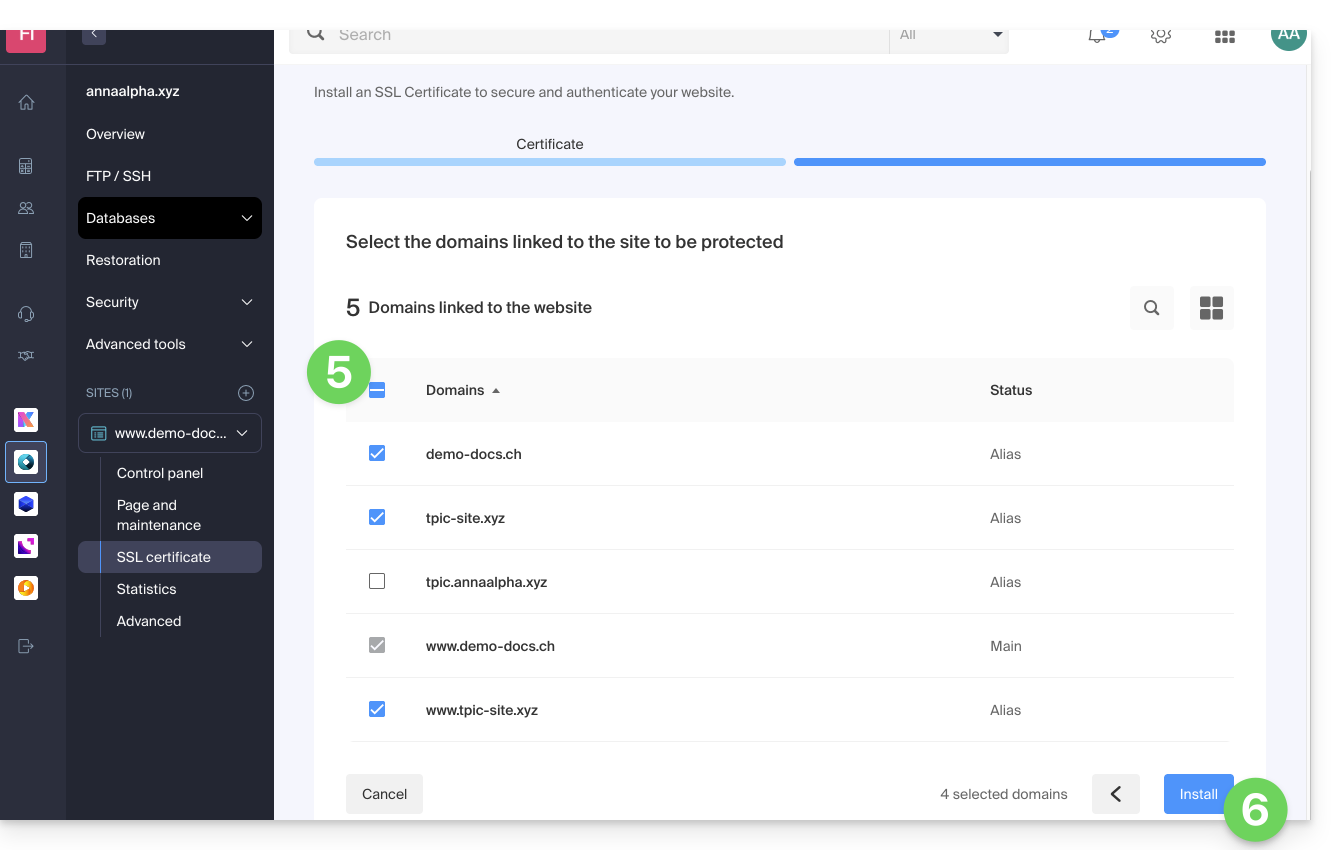
- Check or select the domains concerned.
- Click on the button Install:
Link to this FAQ:
Has this FAQ been helpful?
This guide explains how to customize the limits of a site hosted on a Web Hosting mutualized or a Cloud Server.
Unlock or adjust the limits of a site
To access the website management:
- Click here to access the management of your site on the Infomaniak Manager (need help?).
- Click directly on the name assigned to the site concerned:
- Click on Manage advanced settings:
- Click on the tab PHP / Apache:
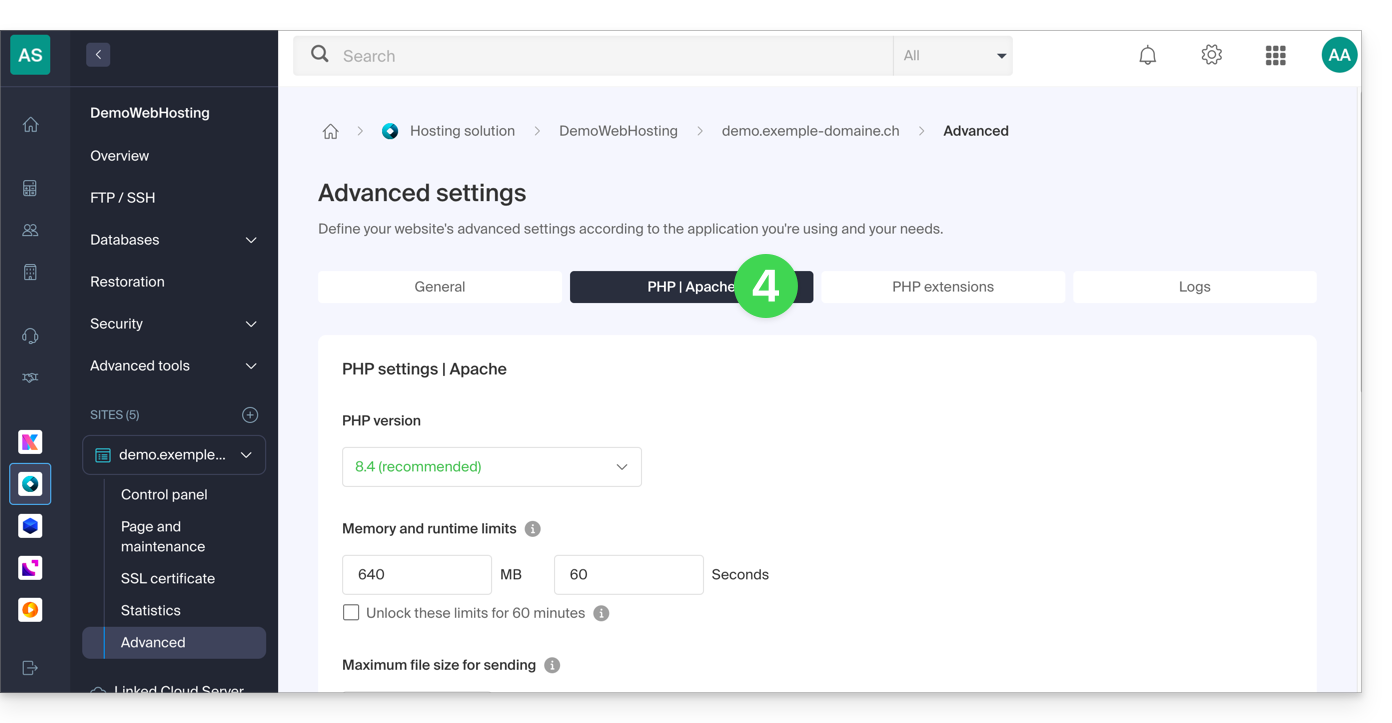
You can notably...
- ... unlock for 60 minutes the memory limit (
memory_limit= 1280 MB) and the maximum execution time of scripts (max_execution_time= 60 minutes):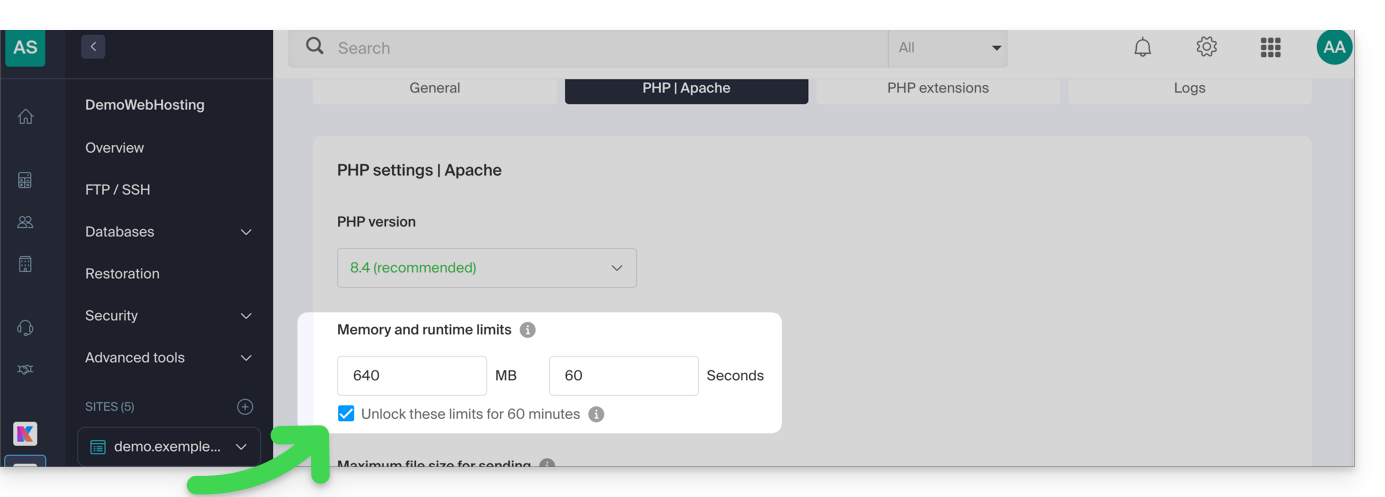
- This unlock is possible up to 10 times per year.
- ... customize the limits of:
max_execution_time(in seconds)memory_limit(in MB)post_max_size&upload_max_filesize(maximum file size for sending, in MB)- Cloud Server only:
Max children(refer to this other guide) - Cloud Server only:
Max input time
Do not forget to save the changes at the bottom of the page.
Maximum values by hosting type
| Limits | Mutualized | Cloud Server | CLI (Cloud Server only) |
|---|---|---|---|
| max_execution_time | 300 s | 3600 s | 0 (unlimited) s max |
| memory_limit | 1280 MB | 2048 MB max | 512 MB max |
| post_max_size + upload_max_filesize | 9223372036854775807 MB max | 9223372036854775807 MB max | 48 MB max |
| max_children | 20 max | 20 (default, modifiable) | |
| simultaneous connections per IP | 30 max | 30 (default, modifiable) | |
| max_input_time | 0 (unlimited) | 0 (default, modifiable) | 0 (unlimited) |
| files (inodes) | no limit on the number of files per hosting | ||
Link to this FAQ:
Has this FAQ been helpful?
This guide explains how to replace, within an Infomaniak Web Hosting, the address of a site currently a subdomain (https://dev.domain.xyz) with the main domain (https://domain.xyz).
Preamble
- Operations in brief:
- We start with a site created and accessible via the main domain URL
dev.domain.xyz. - We add an alias
domain.xyzto it. - We reverse the 2 types (the main domain becomes an alias and the alias becomes the main domain).
- We remove the old name
dev.domain.xyz.
- We start with a site created and accessible via the main domain URL
- Note that the site's location remains in the original folder on the server; the name of this location may be of the form
/sites/dev.domain.xyzbut this has absolutely no impact on the production site. - Also refer to the last chapter of this other guide.
Reverse a linked domain
Here are the detailed operations to go from a site with a subdomain type address to a direct address (here dev.domaine-exemple.ch becomes domaine-exemple.ch):
- Click here to access the management of your site on the Infomaniak Manager (need help?).
- Click directly on the name assigned to the site concerned:
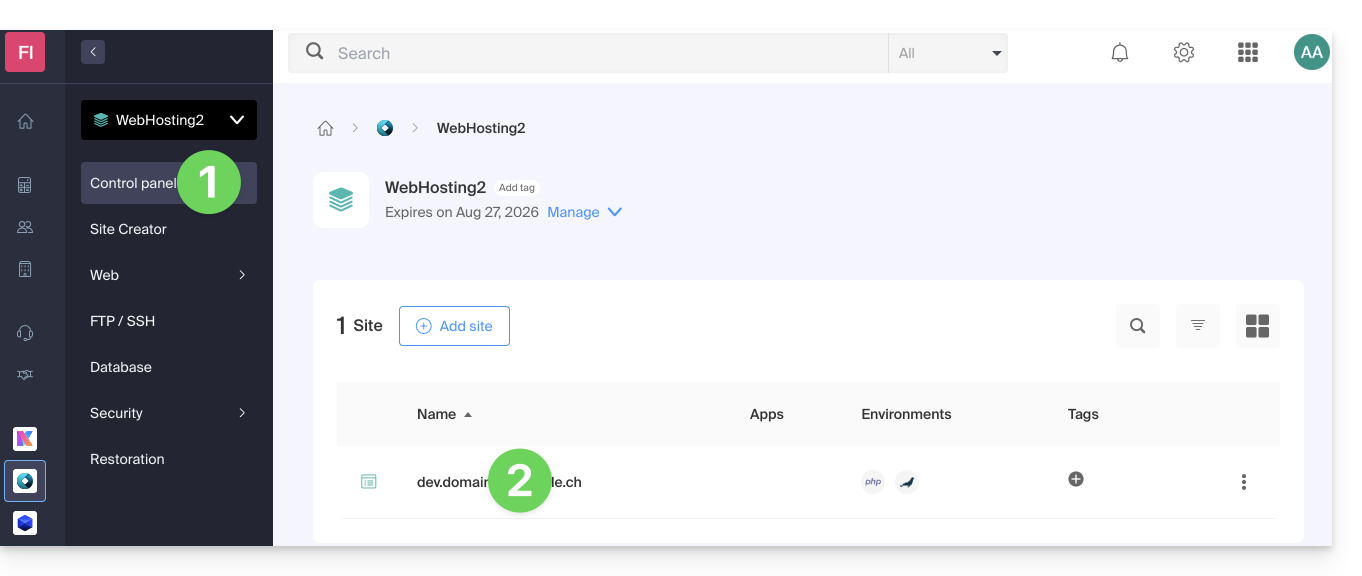
- Then click on the chevron to expand the Domains section of this site:
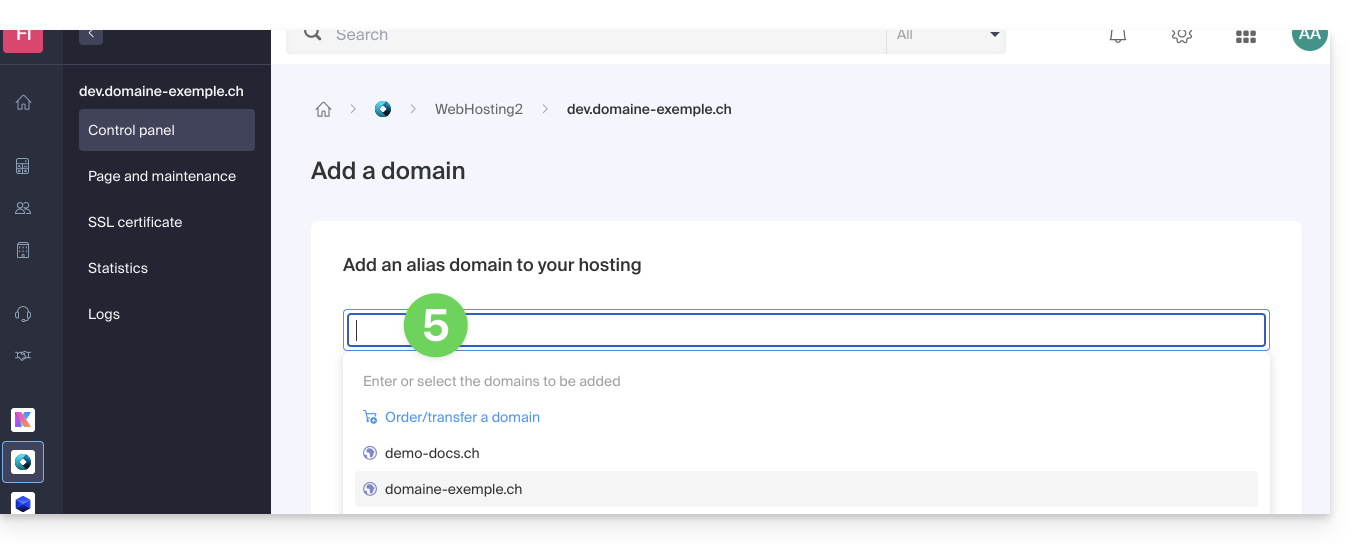
- Click on the Add a domain button:

- Add the desired new name (if the domain name to be added is under the same Organization, it will be suggested in the list, otherwise enter its spelling):
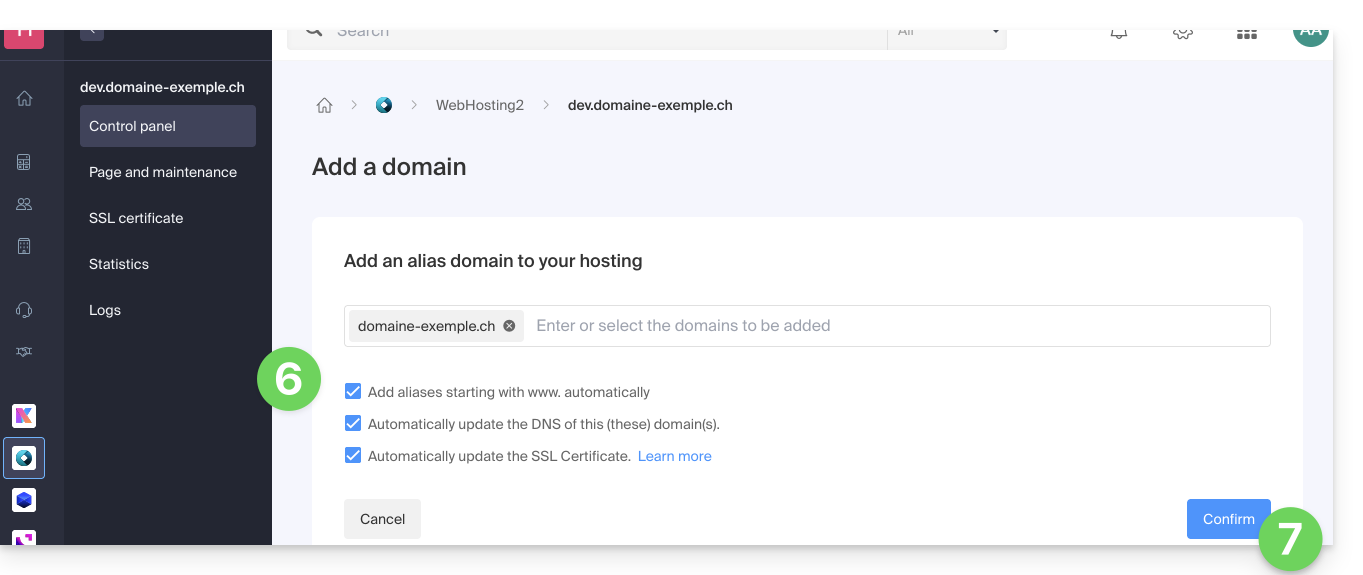
- Enable or disable the checkboxes:
- If the added domain is not in the form of a subdomain, it is possible to request to automatically add the
wwwversion of the domain. - Automatically update (if possible) the DNS records of the added domains.
- Automatically update the related SSL certificates (if possible).
- If the added domain is not in the form of a subdomain, it is possible to request to automatically add the
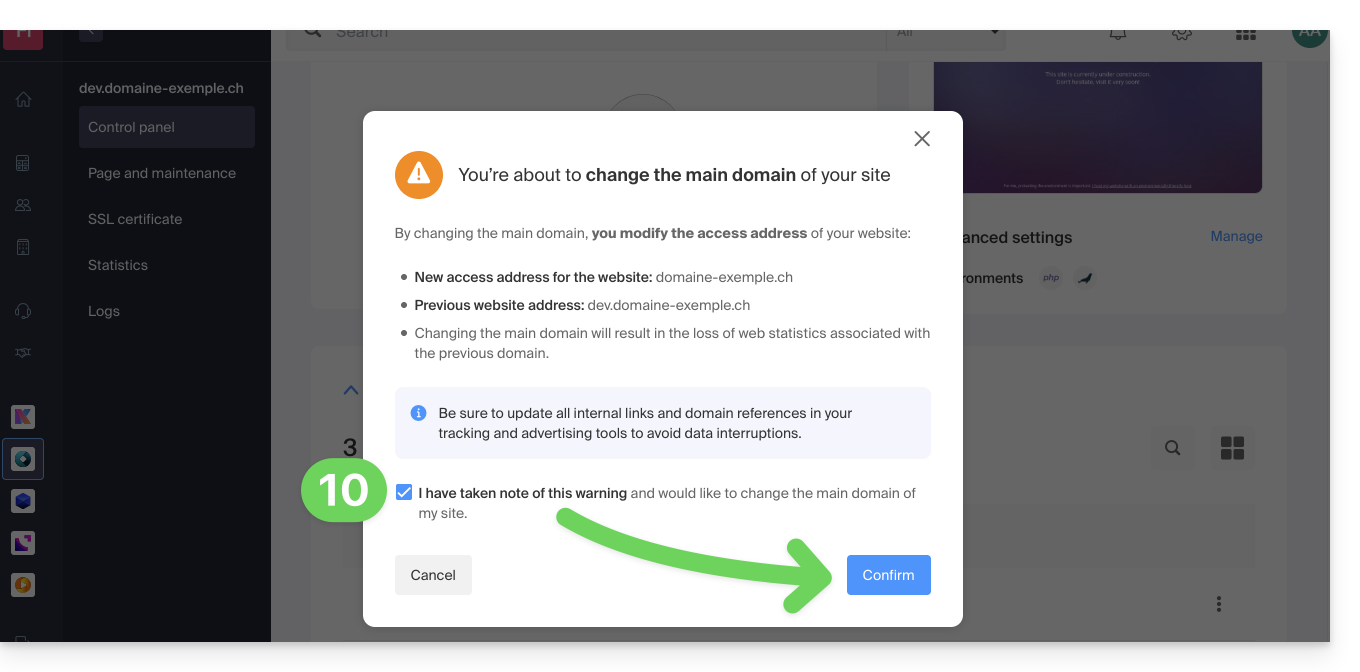
- Click the button to Confirm and wait:
- Once the addition is complete, click on the action menu ⋮ located to the right of the domain that has just been added and that you wish to set as the main domain:
- Choose to set the item as the main domain:
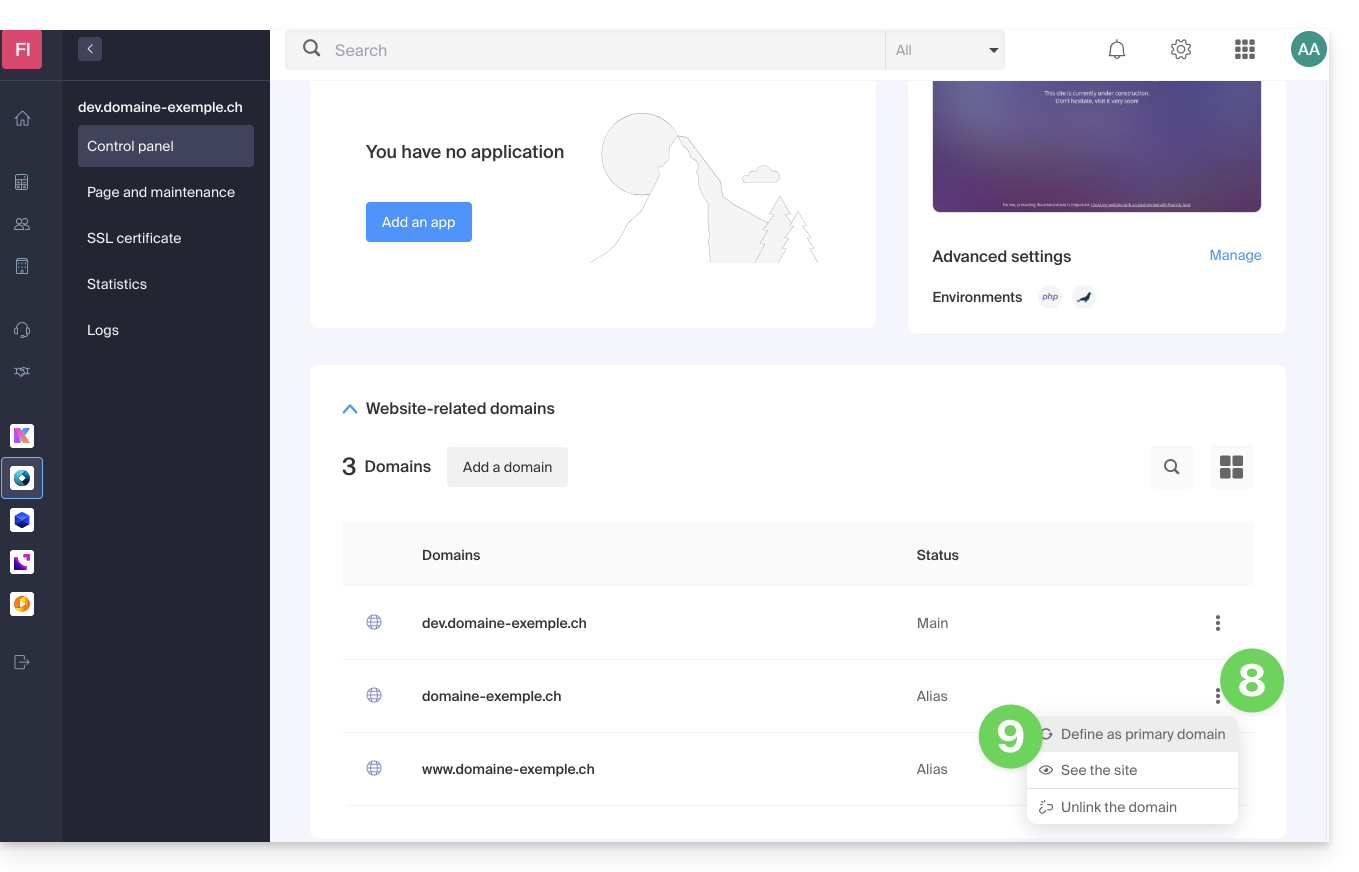
- Confirm the operation to proceed with the domain reversal:
Link to this FAQ:
Has this FAQ been helpful?
This guide concerns the task scheduler, a feature that allows you to run scripts on Web Hosting at the time and frequency of your choice to automate repetitive tasks.
Also refer to this other guide if you are looking for information about crontab (crons via SSH) on Cloud Server.
Access the task scheduler (webcron)
To access the task scheduling tool:
- Click here to access the management of your product on the Infomaniak Manager (need help?).
- Click directly on the name assigned to the product concerned.
- Click on Web in the left sidebar.
- Click on Task Scheduler in the left sidebar:

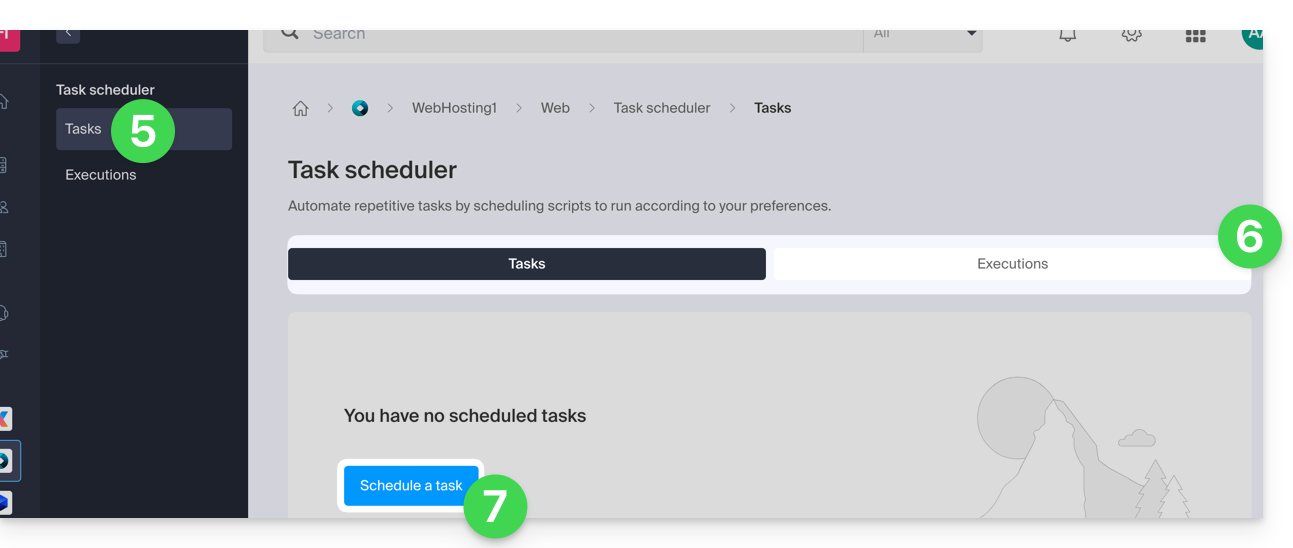
- Click on Tasks in the left sidebar.
- Existing crons and running tasks are displayed under the 2 tabs of the page.
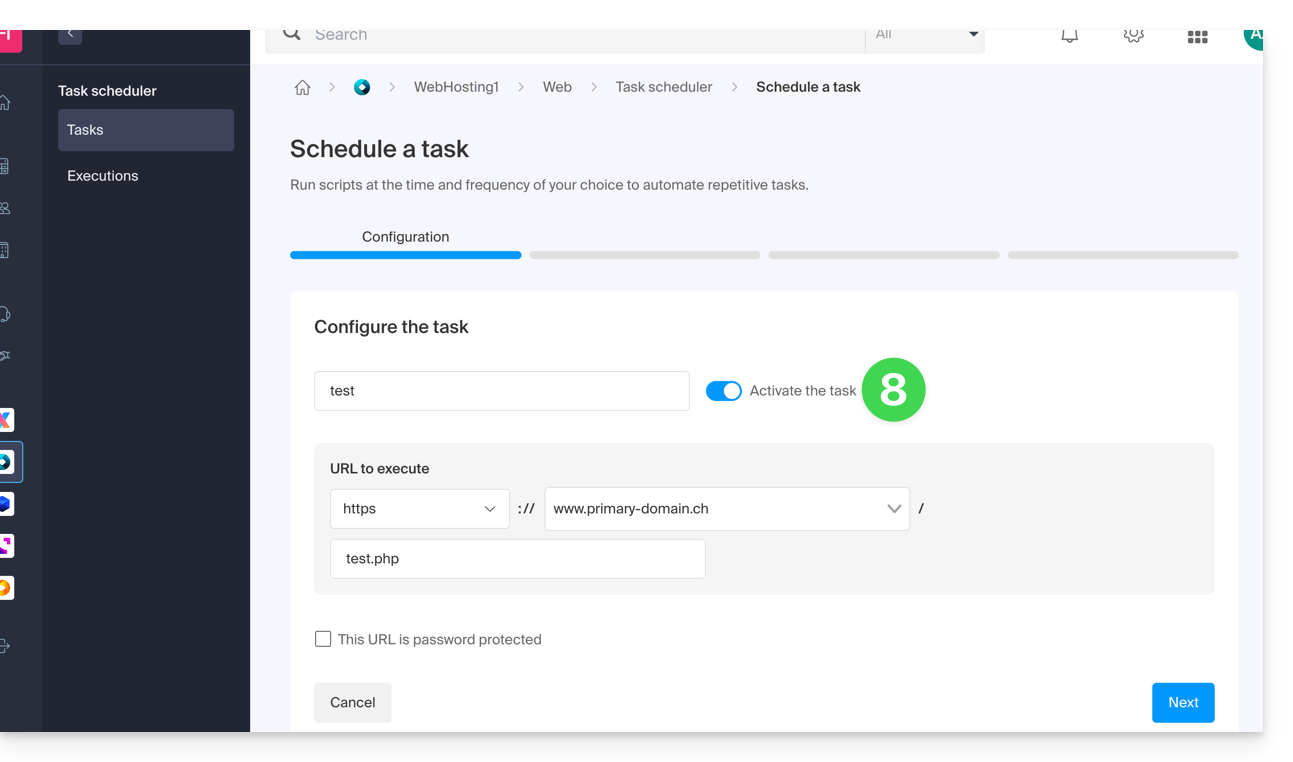
- Click the Schedule a Task button to create a scheduled task by specifying, among other things, whether the URL of the script to be executed is password-protected, whether you want to receive notifications, and of course the desired interval (see below), etc.:
- Do not forget to activate the task with the toggle switch:
Minimum intervals
In the next step, you can schedule the cron according to…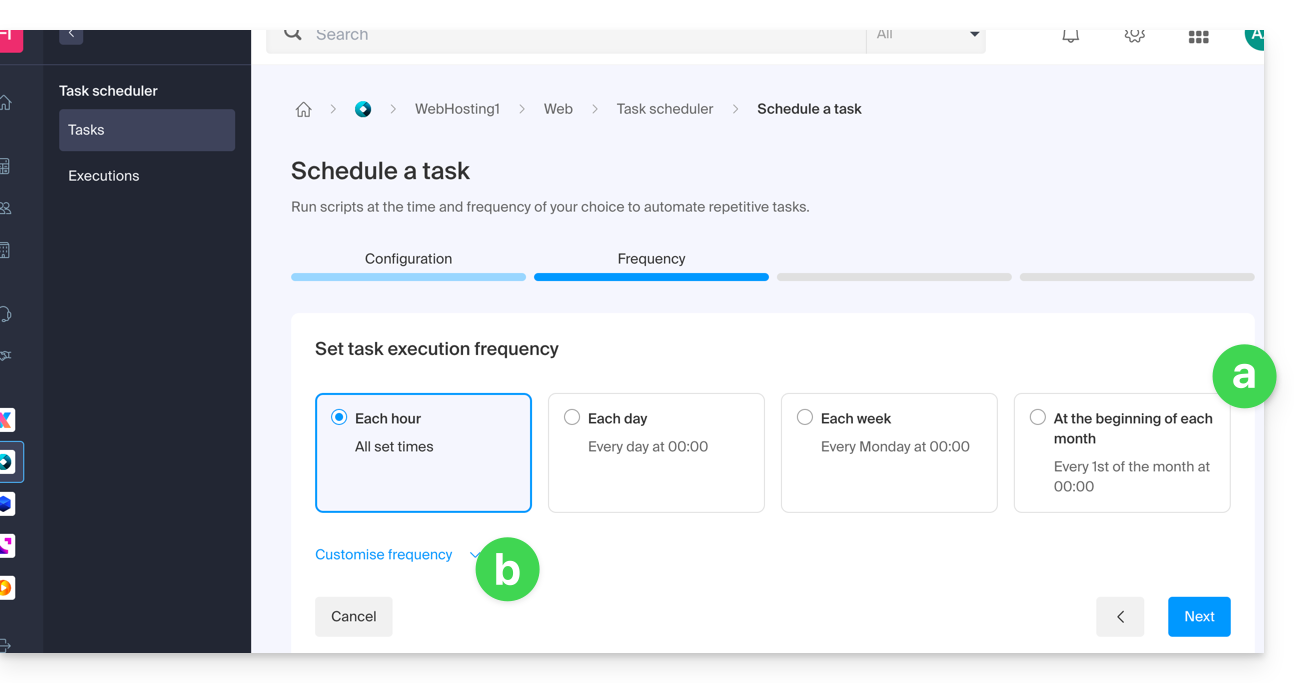
- [ a ]… predefined intervals such as once a week…
- [ b ]… or customization to a minimum interval of:
- 15 minutes with a shared hosting
- 1 minute on Cloud Server
Notifications & analysis
In the next step, you can activate notification emails: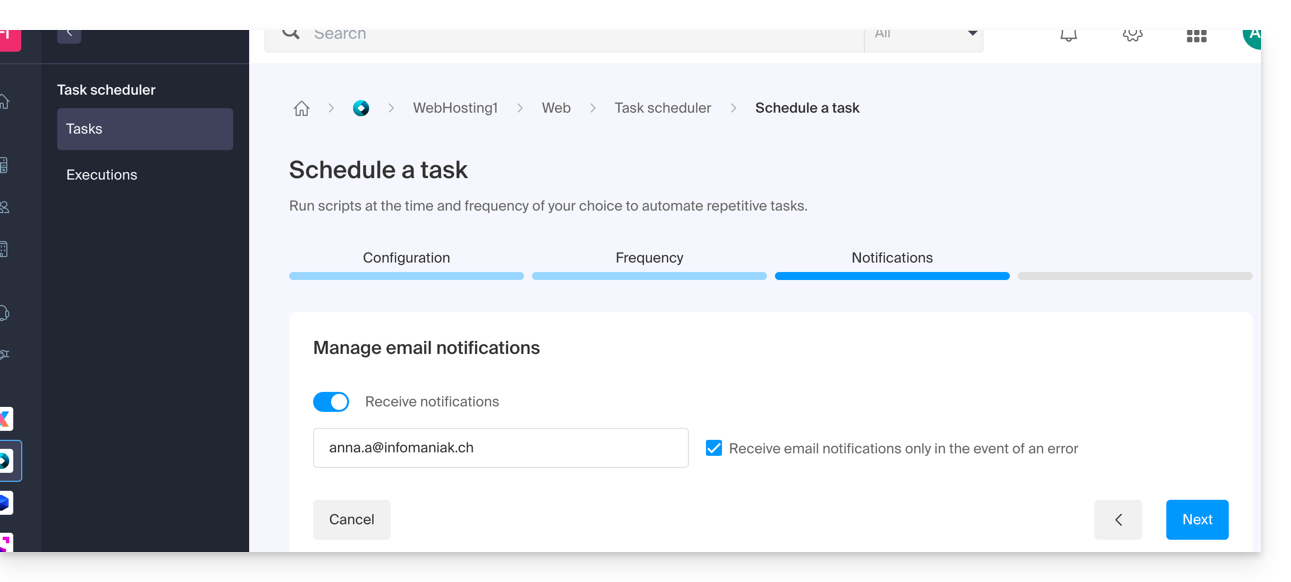
The next step allows you to activate an analysis of the task: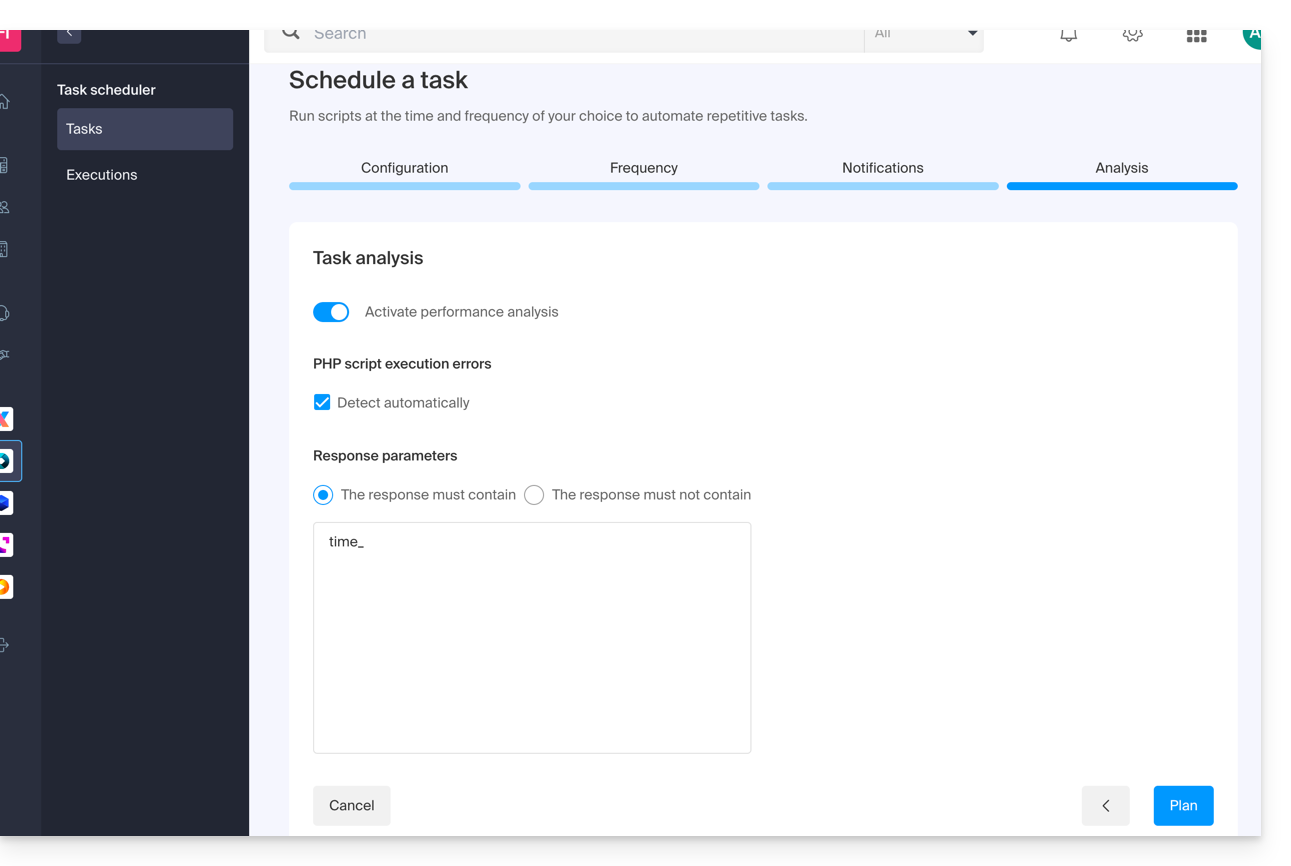
Run the task manually 1 time
Once the task is created, click on the action menu ⋮ located to the right of the item concerned to access the quick management of your task and its execution log: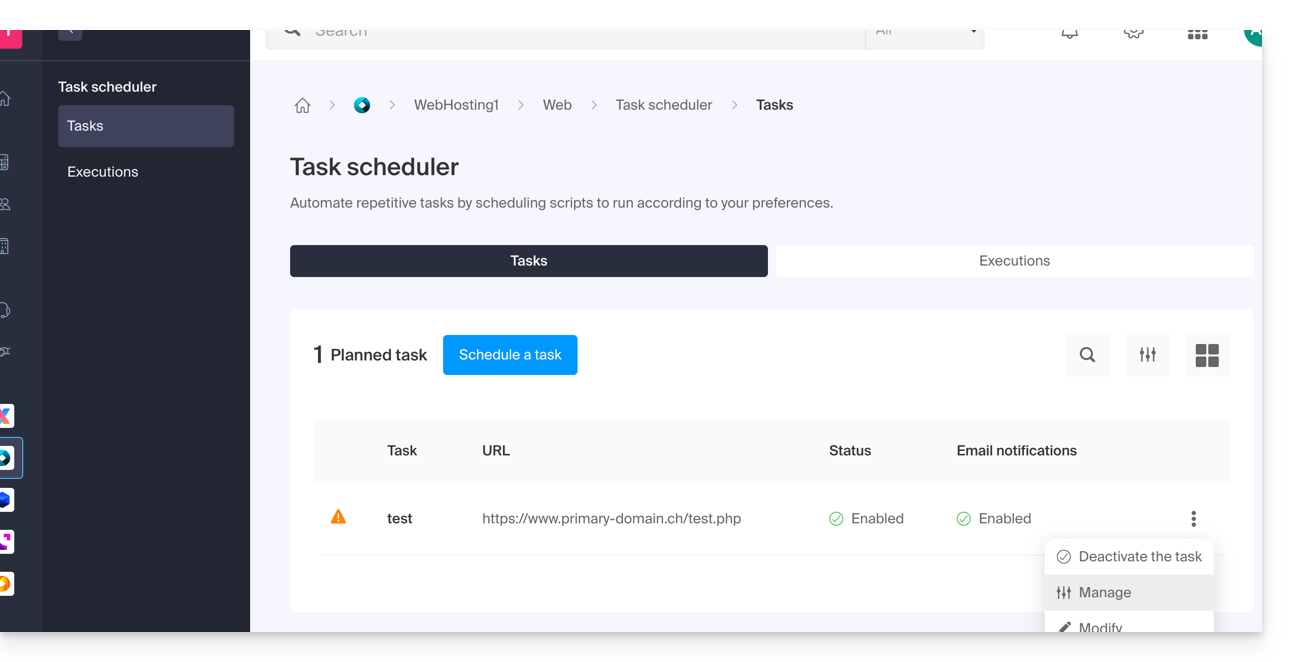
At the top of the page, you can click the button to manually run the task 1 time: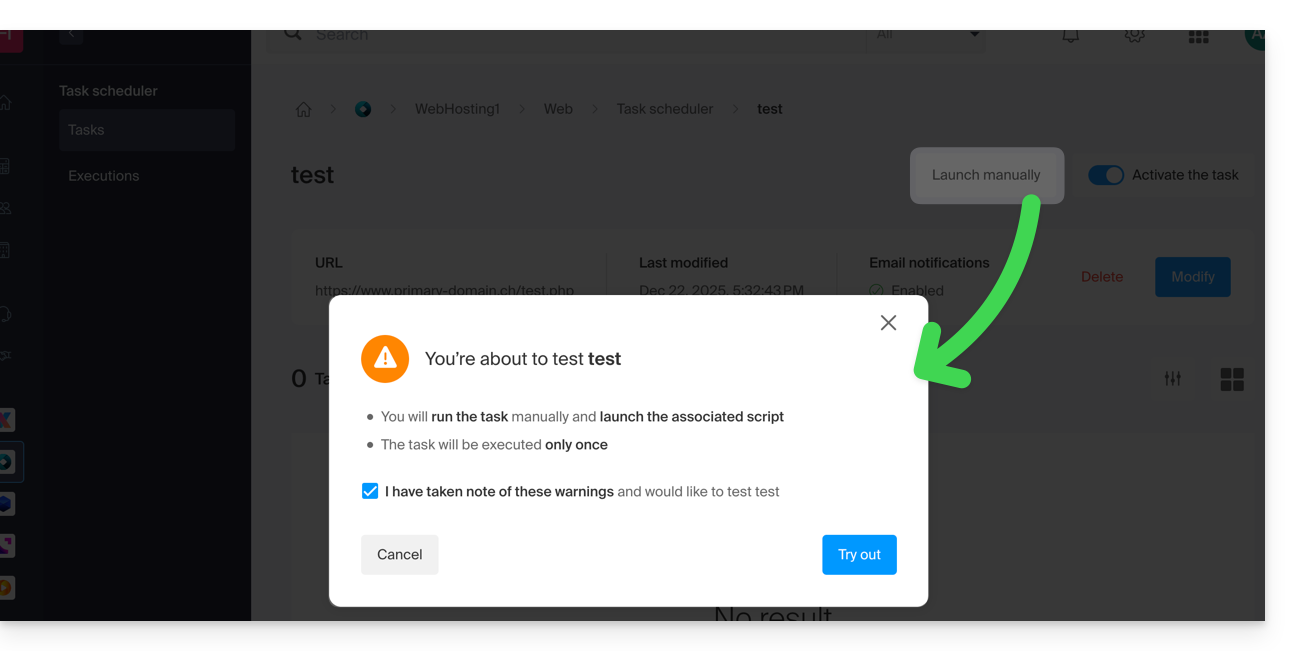
Link to this FAQ:
Has this FAQ been helpful?