Knowledge base
1000 FAQs, 500 tutorials and instructional videos. Here, there are only solutions!
This guide explains what the "MySQL Prefix" option is for in the parameters of a site and what its implications are for the operation of your web applications (CMS) and PHP scripts.
Preamble
- When the "MySQL Prefix" option is activated for a site, it is no longer necessary to add the prefix "
wxyz_" before the name and users of your MySQL databases. - A PHP script can thus connect to MySQL with the user "monuser" and a database "mabase" and access will be automatically made with the user "wxyz_monuser" and the database "wxyz_mabase".
- ⚠ If you are migrating from an old Infomaniak offer:
- After migrating a site from the old console, the "MySQL Prefix" option is activated by default in order to automatically maintain the connection of your web applications (WordPress, Joomla, Drupal, etc.) and PHP scripts with your MySQL databases.
- In order to ensure the proper functioning of your sites in case of migration of your hosting to another server, it is strongly recommended to deactivate this function and make the adjustments it implies.
Manage the MySQL Prefix option
Go further with environment variables
It is possible to configure environment variables directly from the Manager for your entire website:
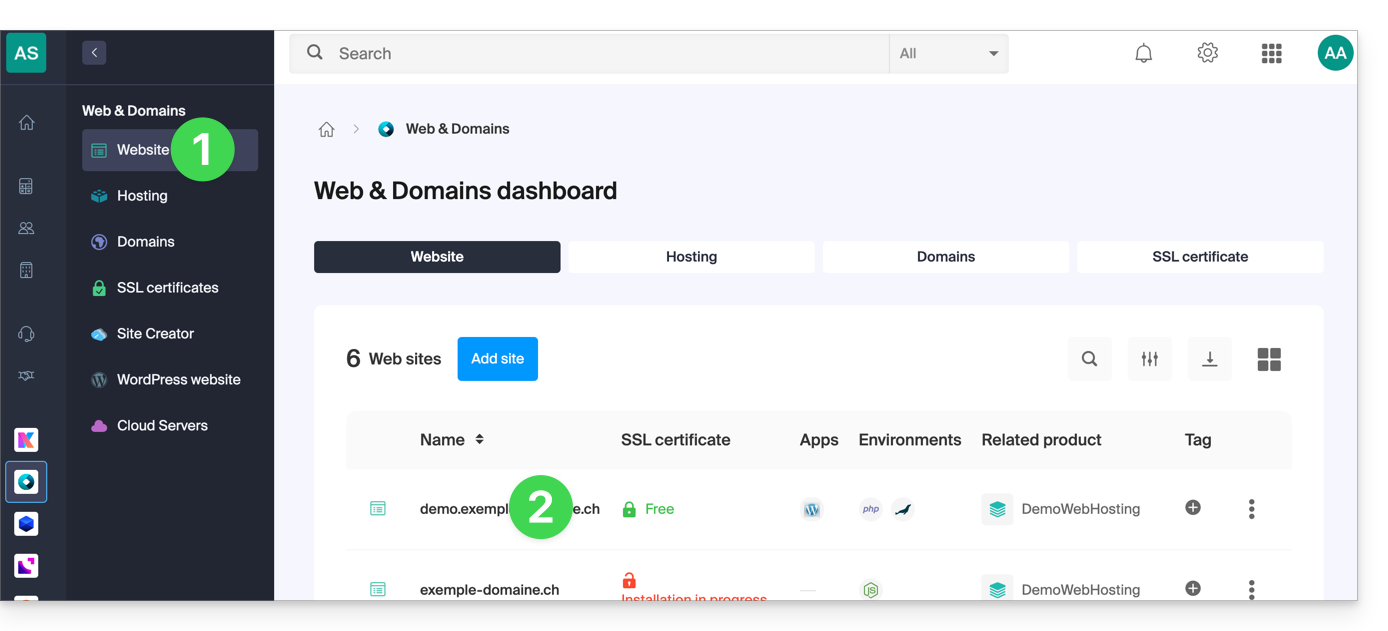
- Click here to access the management of your site on the Infomaniak Manager (need help?).
- Click directly on the name assigned to the site concerned:
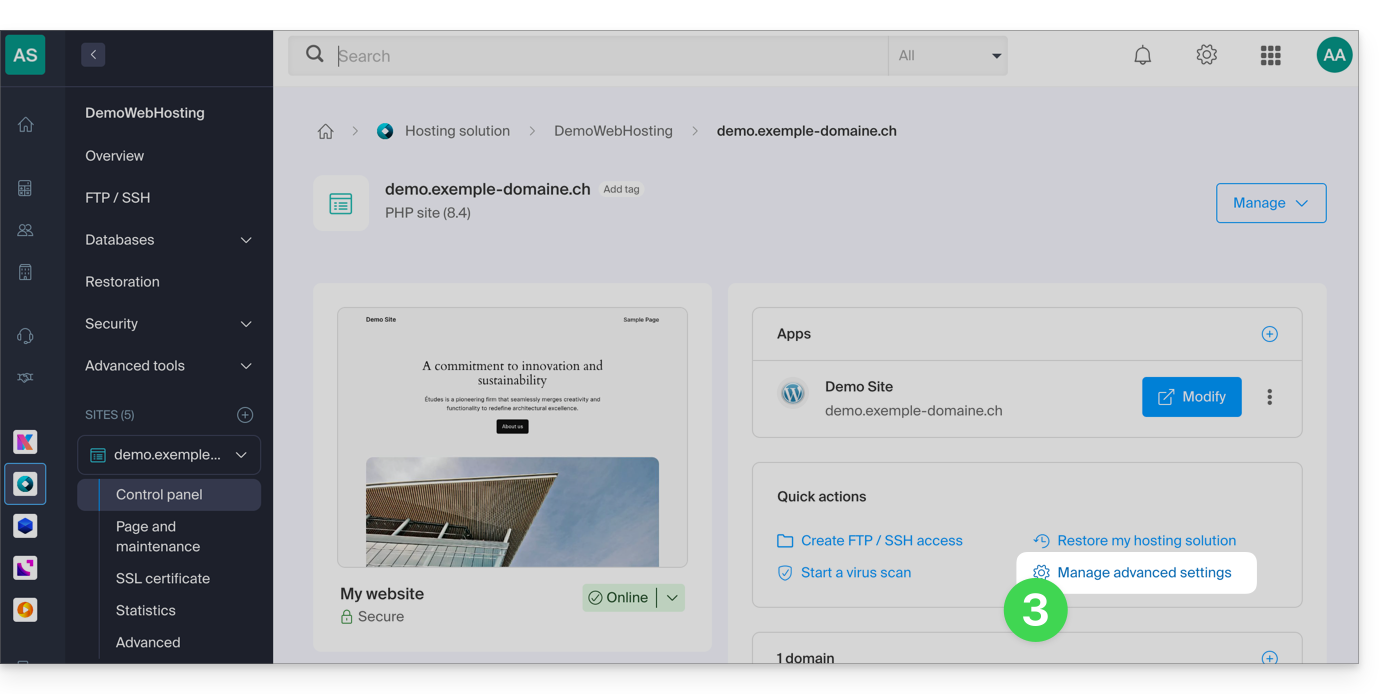
- Click on Manage advanced settings:
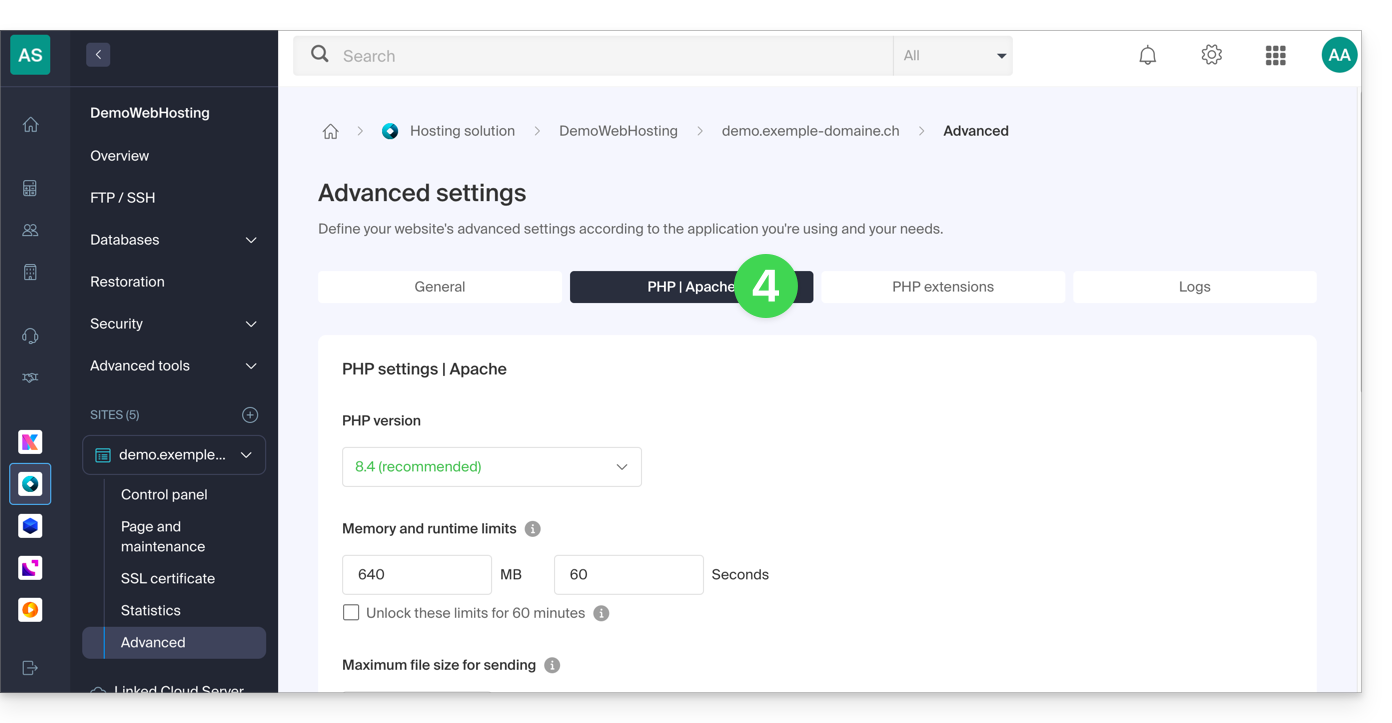
- Click on the PHP / Apache tab:
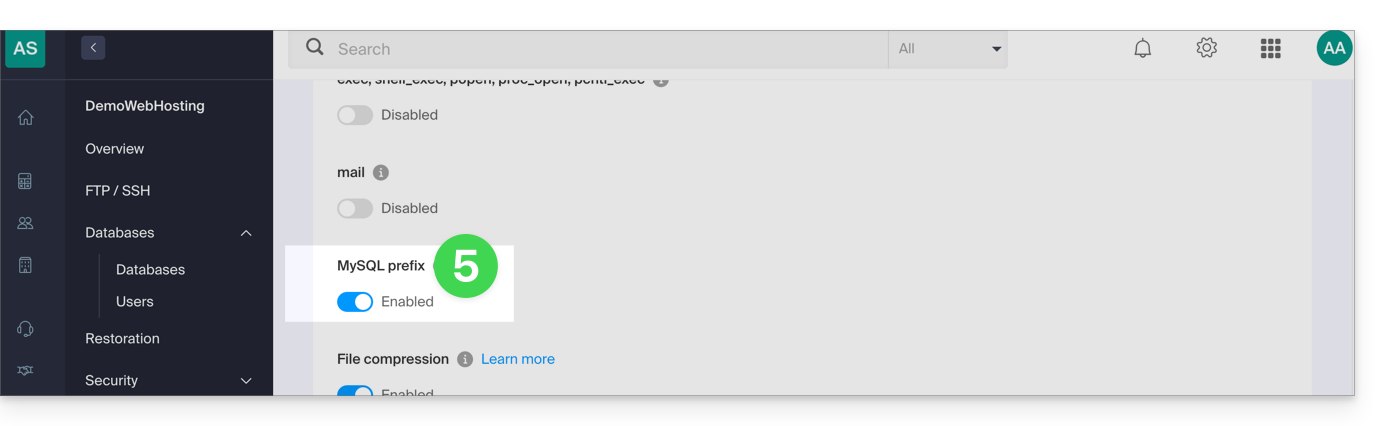
- Activate or deactivate the toggle switch MySQL Prefix:
- Click on the Save button at the bottom of the page.
- Make the necessary adjustments in the configuration files of your web applications and PHP scripts...
Implications and adjustments to be made
After deactivating the MySQL Prefix option for a site, some PHP scripts or CMS may no longer work.
In order to restore the connection to your databases, you will necessarily have to update the following information in the configuration file(s) of the scripts concerned:
- The name of the MySQL database: you will need to add the prefix of your server
- before:
dbname - after:
wxyz_dbname
- before:
- The user of the MySQL database: you will need to add the prefix of your server
- before:
dbuser - after:
wxyz_dbuser
- before:
Link to this FAQ:
Has this FAQ been helpful?
This guide covers redirecting web traffic to a specific port, including when using a dedicated IP and a specific web application (such as Node or Varnish, for example).
Prerequisites
- Add a site to your hosting.
- Install
HAProxyon the Cloud Server.
Redirect web traffic to a specific port
By default, on the Cloud Server, web traffic is sent to Apache. To send requests to a Node script or another service (provided it "listens" on a port between 4000 and 4009), you need to go through HAProxy.
This applies in particular to Express, Socket.IO, Meteor.js, Nuxt.js, Django, Flask, Ruby on Rails, even possibly Java (J2E), etc.
To do this, you need to ensure that the service is listening on a port between 4000 and 4009 (especially with server.listen(4000) for Express or a basic HTTP Node server, but depending on the type of project by other means, a configuration file, in the code or otherwise) and on all interfaces (0.0.0.0).
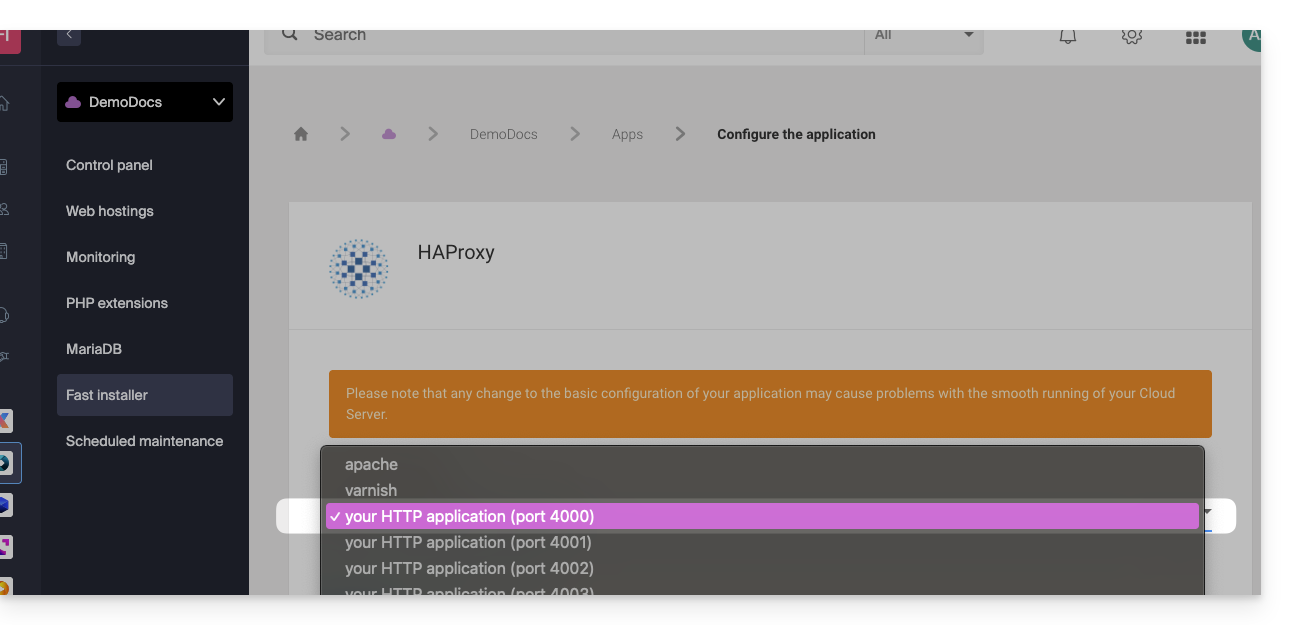
It will also be necessary to configure HAProxy as in the example below:
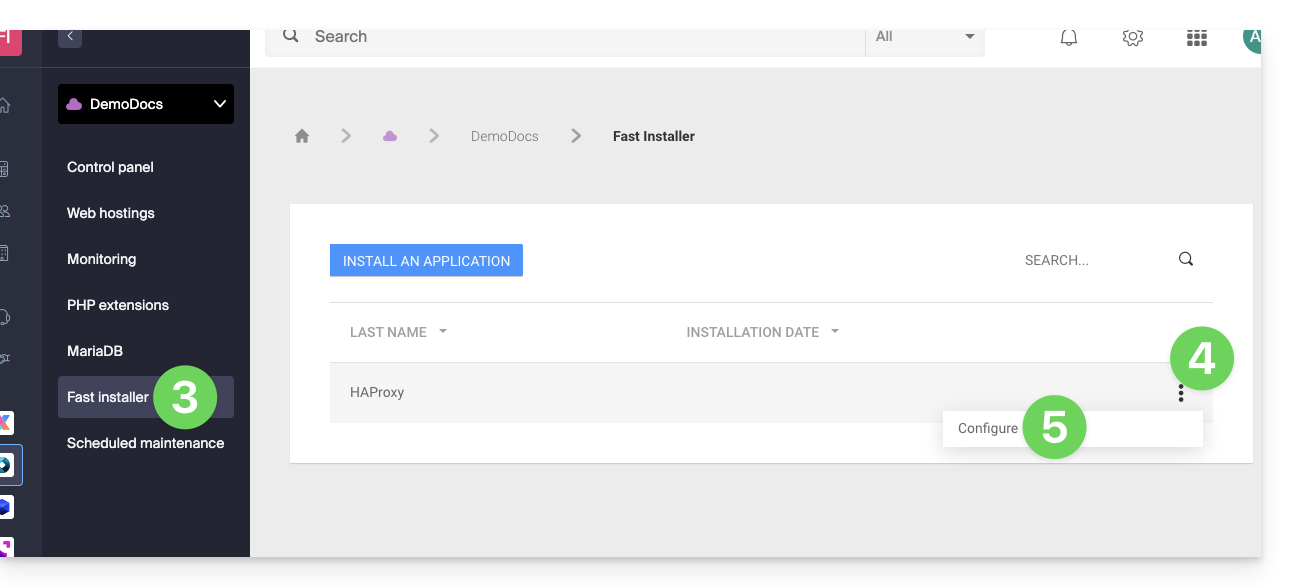
- Click here to access the management of your Cloud Server on the Infomaniak Manager (need help?).
- Click directly on the name assigned to the Cloud Server concerned.
- Click on Fast installer in the left sidebar.
- Click on the action menu ⋮ located to the right of
HAProxy. - Click on Configure:
- Choose the desired information and save:
Special case of aliases and wildcards
Configuring HAProxy via the Fast Installer applies exclusively to the main domain of the hosting.
Currently, domain aliases (whether specific or of the wildcard type like *.domain.xyz) are not natively supported by this tool.
To redirect traffic from an alias to your application (listening, for example, on port 4000), you must manually configure a "proxy" type rule in the .htaccess file located at the root of your site:
# Redirect all traffic to the application (e.g., Node.js on port 4000)
RewriteEngine On
RewriteRule ^(.*)$ http://localhost:4000/$1 [P,L]
Without this manual directive, all requests corresponding to your aliases or wildcards will be directed by default to Apache instead of your specific application.
Retrieving the source IP of a request
When you redirect Web traffic to your Web application, request processing changes and the request is first received by a reverse proxy (local to the server) which then forwards the request to the chosen port. Thus, due to the request transfer, the methods usually used to retrieve the visitor's IP will give the IP of the reverse proxy instead of the visitor's.
Thus, to retrieve the real source IP of the visitor in these cases, you need to consult an HTTP header named X-Forwarded-For, which will contain the source IPs accumulated during each redirection. This header will therefore contain last the original IP address of the client, allowing the real visitor to be identified.
Warning: it is important to note that HTTP headers can be tampered with, which presents security risks. To minimize these risks, it is recommended to verify that the request comes from a trusted server before trusting the content of the header X-Forwarded-For. This verification may involve ensuring that the request was transmitted by a trusted intermediate server, identified by a pre-established list of IP addresses. In the case where the site uses a dedicated IP, the trusted servers are:
- 83.166.133.15
- 83.166.133.17
- 83.166.133.16
- 84.16.92.5
- 84.16.92.43
- 10.2.32.255
- 10.2.34.164
Link to this FAQ:
Has this FAQ been helpful?
This guide explains how to access phpMyAdmin with Web Hosting.
Preamble
- phpMyAdmin is an open-source administration tool designed to manage your MySQL and MariaDB databases via an intuitive web interface.
- It allows you to perform complex operations such as executing SQL queries, creating tables, or importing and exporting data without having to use the command line.
Access phpMyAdmin
To access Web Hosting in the Databases section:
- Click here to access your hosting management on the Infomaniak Manager (need help?).
- Click directly on the name assigned to the hosting concerned:
- Click on the chevron to the right of Databases in the left sidebar menu.
- Click on Databases in the left sidebar menu.
- Click on Connect to phpMyAdmin:
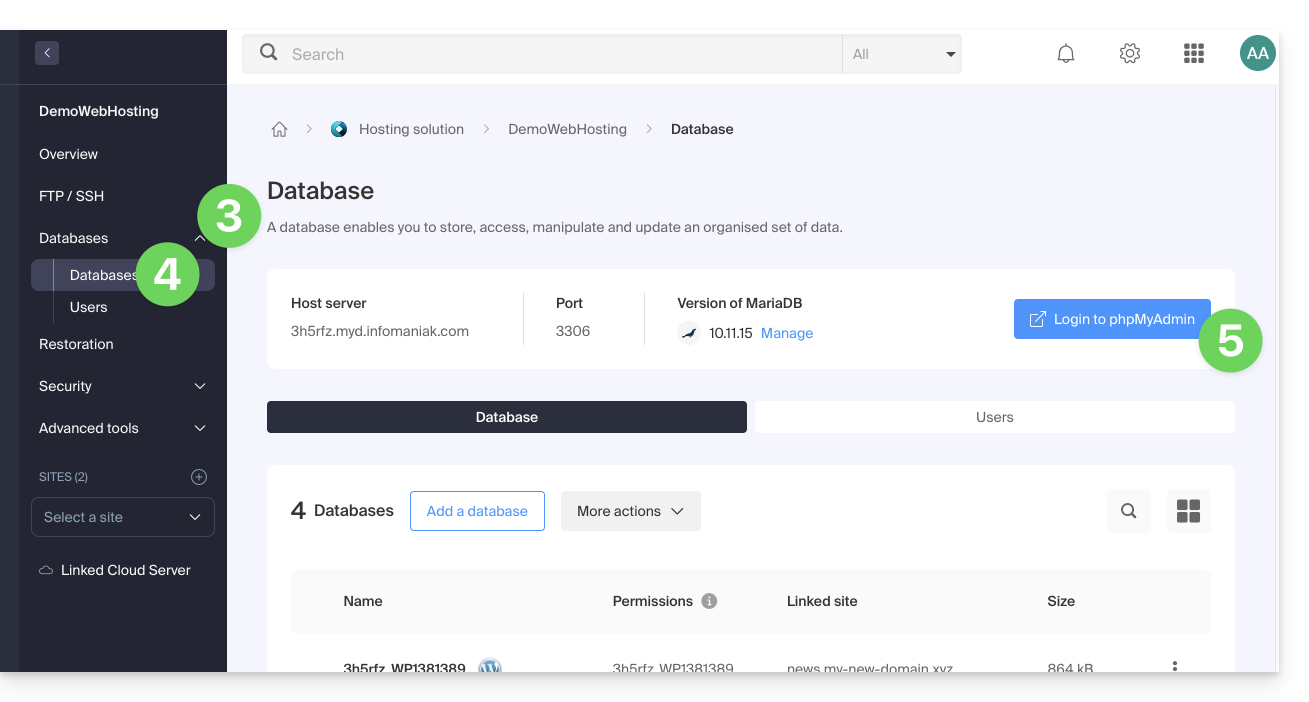
- The correct server and a temporary user are automatically filled in.
You can also click on the action menu ⋮ located to the right of a database user: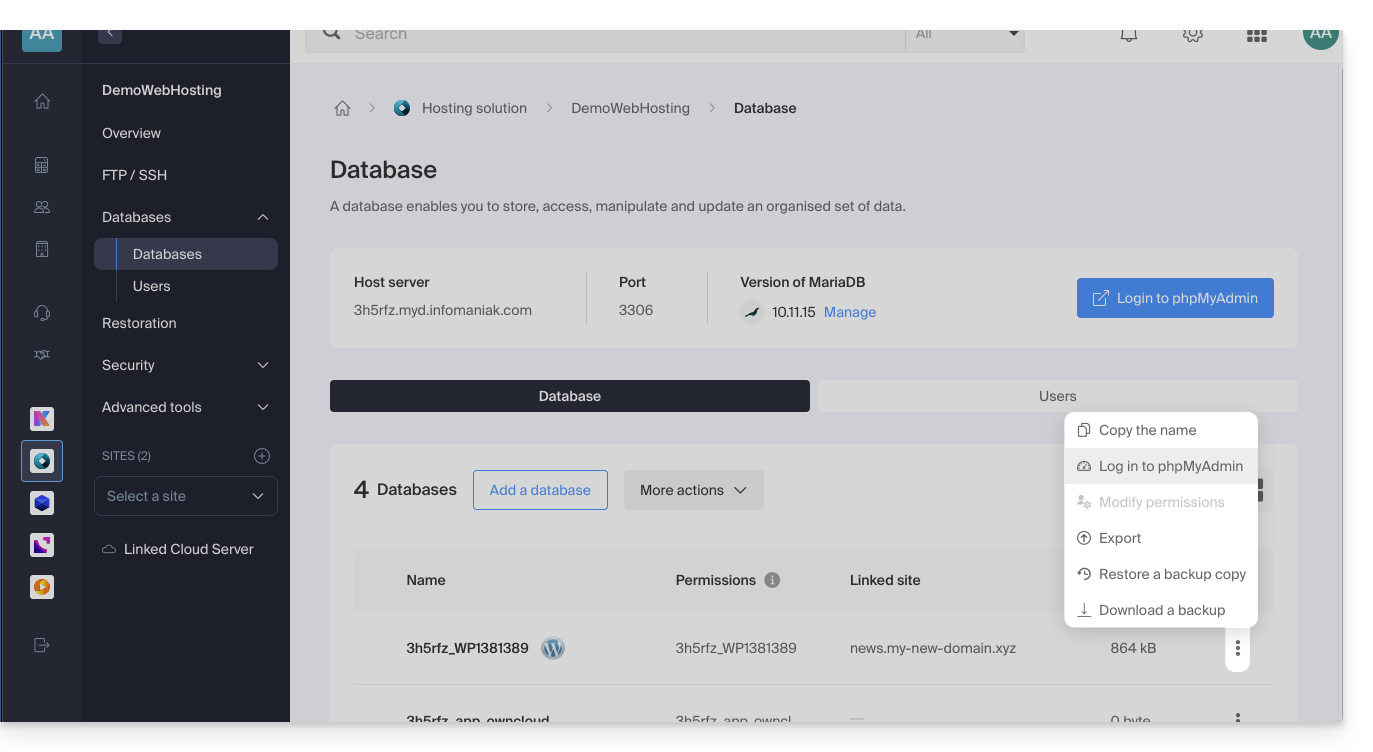
- The correct server is automatically filled in.
- The password to enter corresponds to the database user (the one you chose when creating the MySQL user to redefine if you have forgotten it):
Link to this FAQ:
Has this FAQ been helpful?
This guide explains how to access the bootloader of a Cloud VPS / Lite VPS from the Infomaniak Manager.
The bootloader (or bootloader) is the software that allows you to launch one or more operating systems (multi-boot) on your Cloud VPS / Lite VPS.
Display the bootloader of a Cloud VPS / Lite VPS
The following procedure allows you to display the bootloader of GRUB:
- Click here to access the management of your product on the Infomaniak Manager (need help?).
- Click directly on the name assigned to the product concerned.
- Click on Open VNC console.
- Click on Restart the server while keeping the new window with the VNC console displayed.
- Refresh the VNC console as soon as the server restarts to display the server's bootloader; GRUB then appears and you can leave it displayed by pressing a key on your keyboard:

Link to this FAQ:
Has this FAQ been helpful?
This guide explains how to move a Web Hosting (and all the sites it contains) from a Cloud Server to another managed Cloud Server.
If you wish to update the current Cloud Server to a next-generation server, refer to this other guide.
Preamble
- FTP & MySQL
- When moving a hosting from one Cloud Server to another:
- FTP access and databases do not change.
- Only the supported versions of PHP and MariaDB, as well as the server's IPv4 and IPv6 addresses, change at the hosting level.
- Hostnames do not change and are automatically updated to point to the new IP addresses.
- When moving a hosting from one Cloud Server to another:
- Temporary interruption:
- The sites in the hosting will be unavailable during the data migration.
- This process can take several minutes depending on the number of files to transfer to the new Cloud Server.
- Possible switch to HTTP/2:
- HTTP/2 is active on the new servers.
- Some directives that may be present in your server's .htaccess file could require adaptation.
- Traffic redirection:
- A proxy is set up for 7 days to redirect traffic from the old server to the new one.
- It is therefore advisable to consider this during this period, especially for crons (see below).
- Crons not migrated:
- SSH crons are not migrated.
- Files and crons are generally not deleted immediately, which can result in duplicates.
- Managing crons is your responsibility; depending on the progress of your migration, you need to:
- deactivate and activate crons via SSH if you have them, to avoid any execution conflicts,
- check your crons,
- ensure they are properly configured on your new Cloud Server.
Move hosting
Prerequisites
- Both servers must be in the same Organization and accessible to the user performing the operation.
Once the second Cloud Server is in service:
- Click here to access hosting management on the Infomaniak Manager (need help?).
- Click directly on the name assigned to the hosting concerned.
- Click on the Manage button.
- Click on Move to another server in the menu that appears:
- Choose the desired destination server.
- Click on Confirm.
Adjust the DNS zone and finish
If your domain names are not managed by Infomaniak or in the same Organization as the Cloud Server:
- Adjust the A record of the domains concerned.
- Any DNS addition/modification can take up to 48 hours to propagate.
- It is therefore recommended not to cancel the old Cloud Server before this period.
- Cancel the old Cloud Server if necessary.
Link to this FAQ:
Has this FAQ been helpful?
This guide explains how to display and interpret the monitoring data (network statistics, CPU, RAM, etc.) of a Managed Cloud Server.
Monitor the activity of a Managed Cloud Server
To access monitoring
- Click here to access the management of your product on the Infomaniak Manager (need help?).
- Click directly on the name assigned to the product concerned.
- Click on Monitoring in the left sidebar
Different data is available to monitor the activity of your Managed Cloud Servers, including:
- incoming and outgoing traffic (network)
- the average system load (load average)
- the average CPU load
- the amount of random access memory (RAM) used
- disk space used
- the number of hits/sec.
- the average number of MySQL queries made
Interpreting statistics
By interpreting the monitoring of the resources of a Managed Cloud Server, you can estimate the resources (power) you need to run your websites and web applications.
Total system load

The total system load summarizes in percentage the level of use of the virtual processors. In this example, the server therefore uses less than 10% of its resources (0.10).
Processor (CPU) and memory (RAM)

These graphs show that less than 10% of the virtual processors are used and that less than 3 GB of RAM are actually used. In this example, the configuration of this server is therefore oversized compared to actual needs.
High cached memory
High cache memory on a server is not abnormal and is often beneficial in many cases. Here's why:
- Caching for enhanced performance: Modern operating systems, such as Linux, use free memory to cache data from the disk to improve performance. When you access files or applications, the system can quickly retrieve the data from the cache instead of reading it from slower storage devices, such as hard drives. This helps to reduce the overall response time of your server and can significantly improve performance.
- Efficient memory usage: High memory usage due to caching means that your server is efficiently using the available memory. Unused memory is wasted memory. Therefore, as long as the memory is being used for useful purposes like caching, it is a positive sign.
- Automatic memory management: Operating systems are designed to automatically adjust the size of the cache based on the needs of the running applications. If an application requires more memory, the cache can reduce its size to accommodate it. This dynamic memory management ensures a balance between caching and serving active applications.
- Monitoring perspective: From a monitoring standpoint, seeing high memory usage due to caching can initially raise concerns, but it is essential to interpret the metrics in the context of your server's behavior. If you observe good performance and notice no signs of memory-related issues, such as swapping or application crashes, the high cache usage is likely expected and beneficial.

In summary, high cache memory on a server is normal and can contribute to improving the overall system performance. Do not worry if you observe significant cache memory usage, as long as your server is functioning correctly and without obvious memory-related issues. Caching is an essential tool for optimizing performance and making the most of available resources.
Link to this FAQ:
Has this FAQ been helpful?
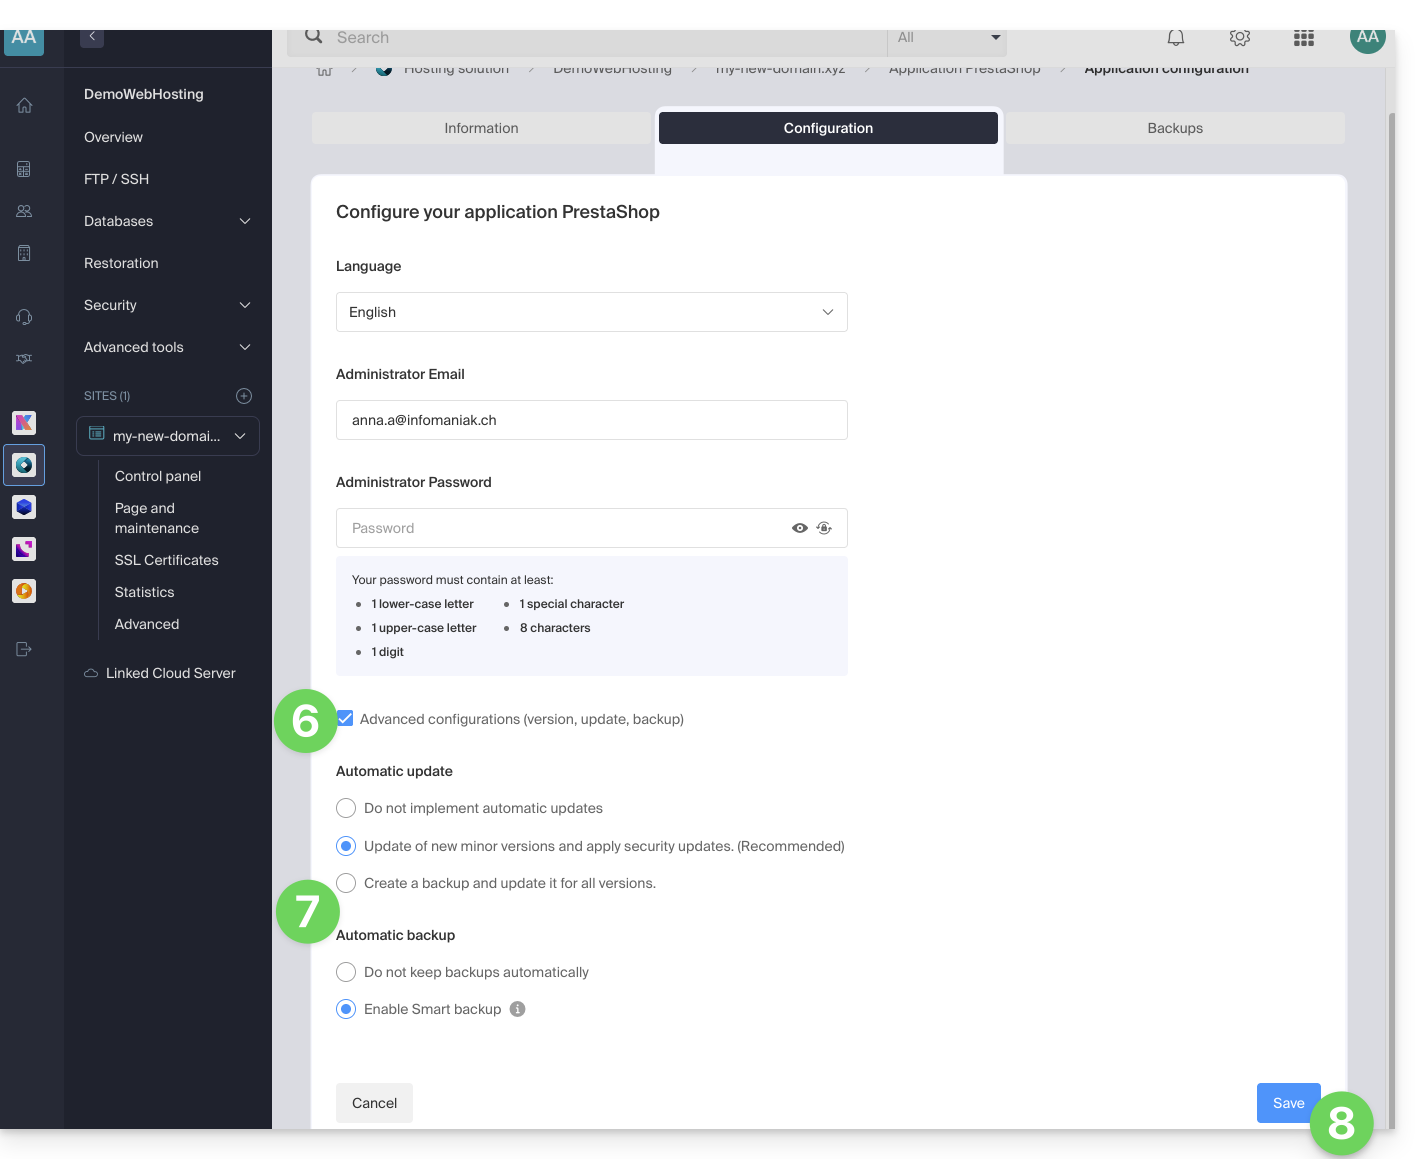
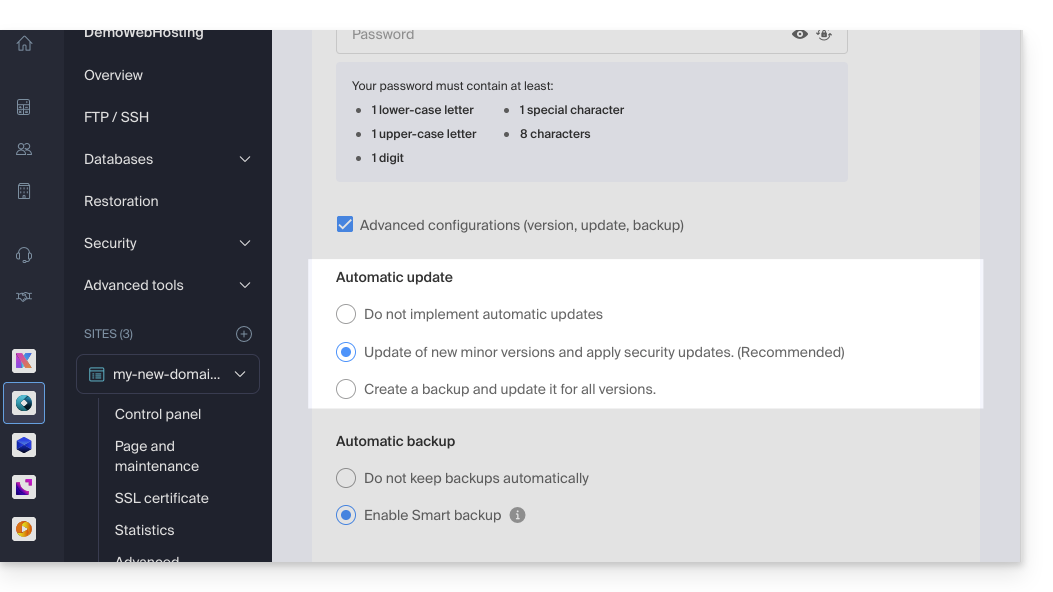
This guide explains how to modify the automatic backup configuration of Infomaniak Web Applications (Joomla, Drupal, Typo3, PrestaShop, ownCloud, etc.) included in the paid Web Hosting offers.
Preamble
- This does not concern WordPress, which can be backed up and then restored via:
- the automatic backups of hosting,
- the extensions allowing you to manually create a complete backup including an easy reinstallation file.
Configure backups
To manage the backups of Apps:
- Click here to access the management of your site on the Infomaniak Manager (need help?).
- Click directly on the name assigned to the site concerned:
- Click on the action menu ⋮ located to the right of the Web Application concerned.
- Click on Settings of the application:
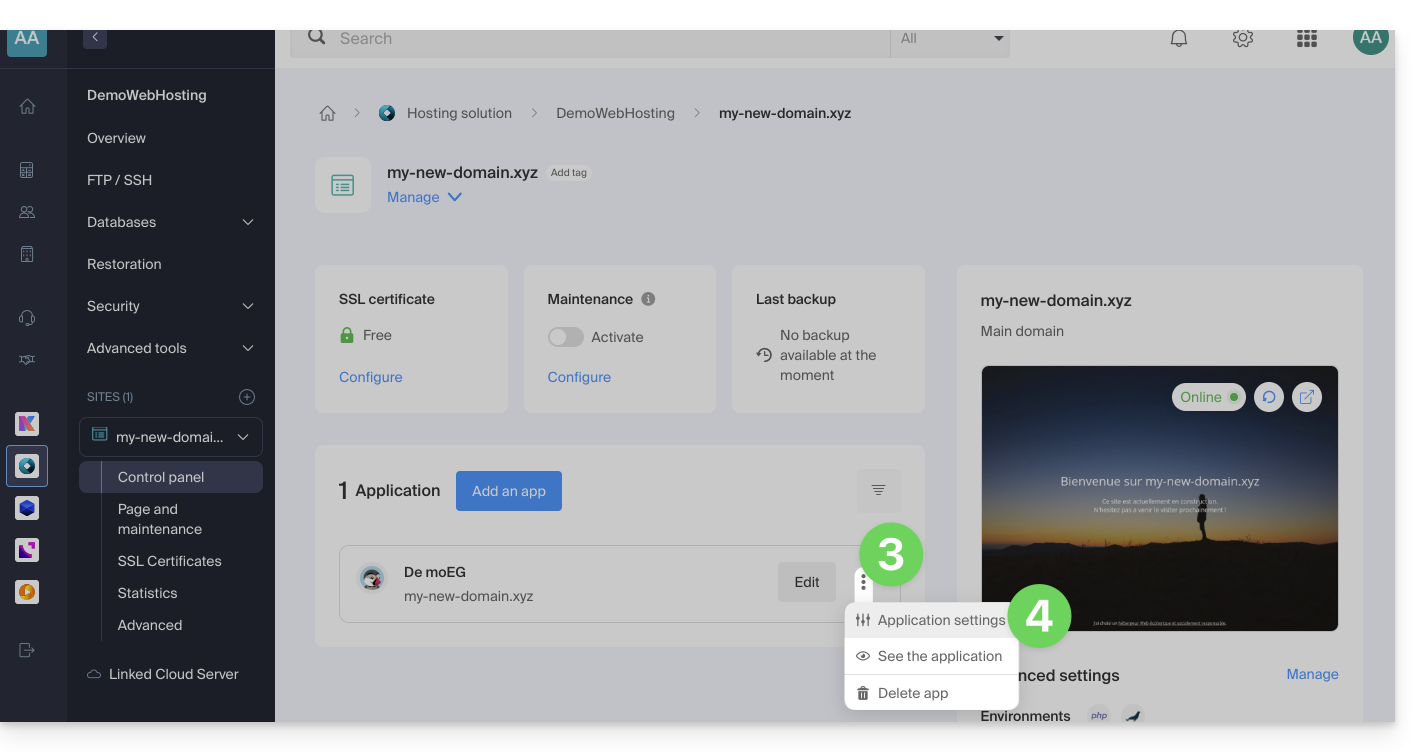
- Click on Modify to the right of the Application:

- Under the Configuration tab, click on the box to access the advanced configuration.
- Choose the desired update and backup modes:
- 7 recent backups are kept as well as those from 15 and 30 days ago.
- Save the changes using the button at the bottom right:
Learn more
Link to this FAQ:
Has this FAQ been helpful?
This guide provides basic instructions for creating and using a .htaccess and .user.ini file with an Infomaniak Web Hosting account.
Introduction
- A
.htaccessfile is placed in the root directory of a website and allows you to configure the Apache HTTP server.- As a decentralized configuration file, it offers significant flexibility to adjust the server's behavior according to the specific needs of the site.
- This file allows you to define URL rewrite rules, impose access restrictions, manage HTTP errors, and even customize security aspects such as disabling the display of files/folders.
- It also facilitates the implementation of redirects and aliases, providing precise control over the organization and accessibility of the site.
- A
.user.inifile allows you to customize the PHP directives for the folder (and its subfolders) in which it is located.- By acting at the PHP interpreter level, this file allows you to define specific configurations for a given folder and its subdirectories.
- Thanks to its clear syntax, it offers the possibility of modifying various parameters such as the memory limit, the script execution time, error handling, and other PHP-related directives.
- This granular approach allows developers to finely customize the behavior of PHP according to the specific requirements of each section of the site.
Create a file…
… .htaccess
- Connect to your hosting account via FTP or SSH.
- In the root directory of the website in question, create a new file and name it as follows:
.htaccess. - Enter the desired directives in the file; refer to this other guide, for example.
… .user.ini
- Connect to your hosting via FTP or SSH.
- In the desired location, create a new file and name it as follows:
.user.ini. - Enter the desired PHP configuration settings in the file.
Modifying the .user.ini file takes several minutes to take effect.
Link to this FAQ:
Has this FAQ been helpful?
This guide explains how to automatically restore an entire web hosting from backups made by Infomaniak.
Preamble
- Infomaniak performs a daily backup, and the last 7 are available to you in the Manager (or more if you use a Web Application).
- During the restoration, the sites will be automatically put in maintenance until the end of the process.
- Since automatic file backups and database backups are not performed simultaneously, it is recommended to check the proper functioning of the sites after restoration.
- Outside of these options, there is no other backup that you could obtain; it is therefore not necessary to contact Infomaniak for this purpose, but consider other backup methods for the future.
Restoring a web hosting
To access the web hosting:
- Click here to access the management of your product in the Infomaniak Manager (need help?).
- Click directly on the name assigned to the corresponding product.
- Click on Restore in the left sidebar.
- Choose the type of restoration desired:
- Restore one of the Web Applications that you have installed.
- Simple restoration to restore all sites and databases of the hosting.
- Advanced restoration allows you to choose the sites and databases to restore.
- Click on the Next button:
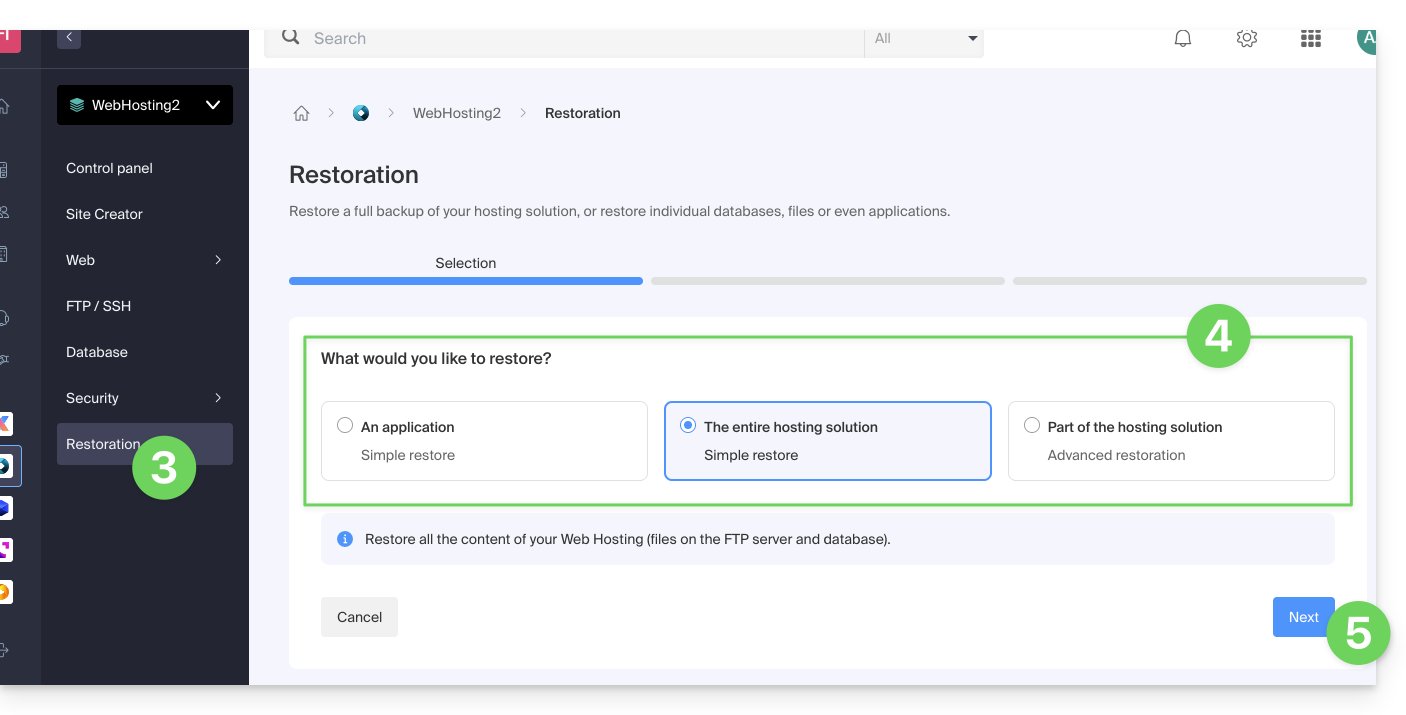
- Choose the desired restoration date and complete the procedure.
Link to this FAQ:
Has this FAQ been helpful?
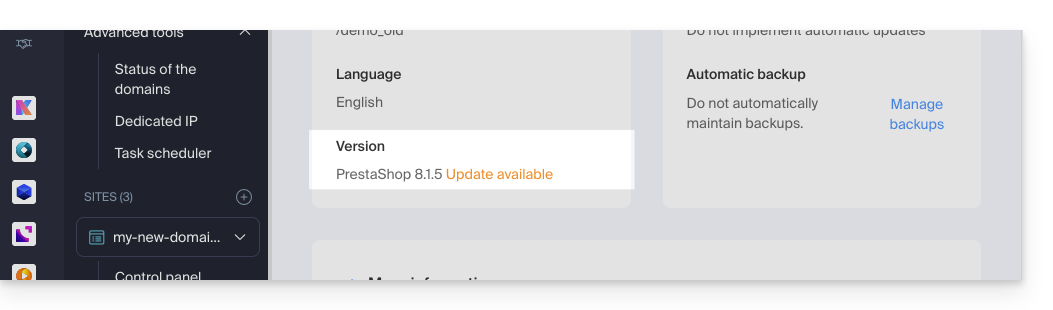
This guide explains how to update Web Applications installed via Infomaniak tools.
Preamble
- If an application is manually updated via FTP, it is then impossible to update it via the Manager and benefit from automatic updates.
- When installing your Web Application, automatic updates (at least security ones) are usually enabled by default:
- If an app update is available, you are notified on the Manager:
Update an application installed via Infomaniak
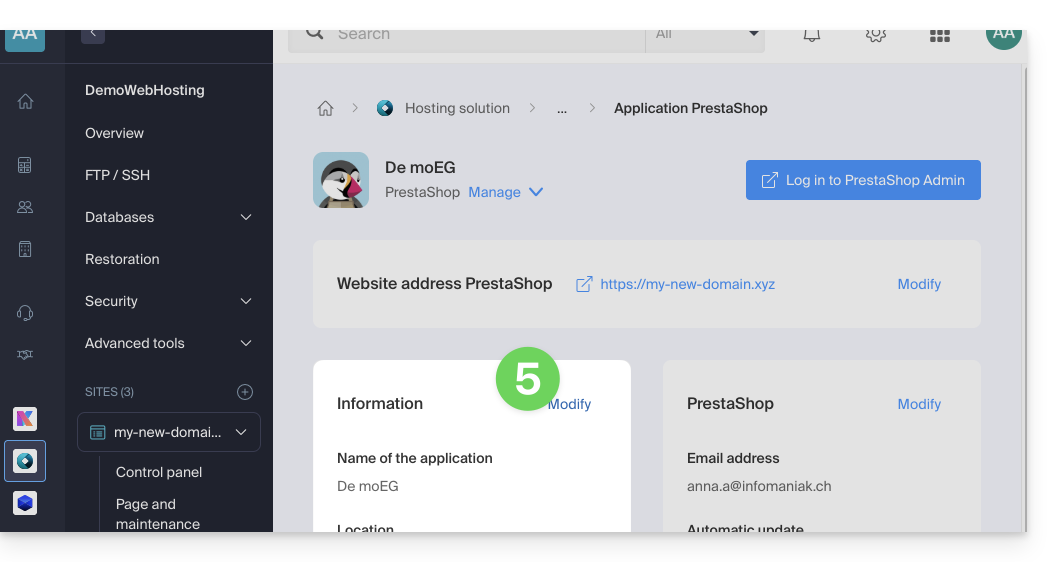
To access the Infomaniak Web Application and update it:
- Click here to access the management of your site on the Infomaniak Manager (need help?).
- Click directly on the name assigned to the site concerned.
- Click on the action menu ⋮ located to the right of the Web Application concerned.
- Click on Settings of the application:

- Click on Modify in the Information block:
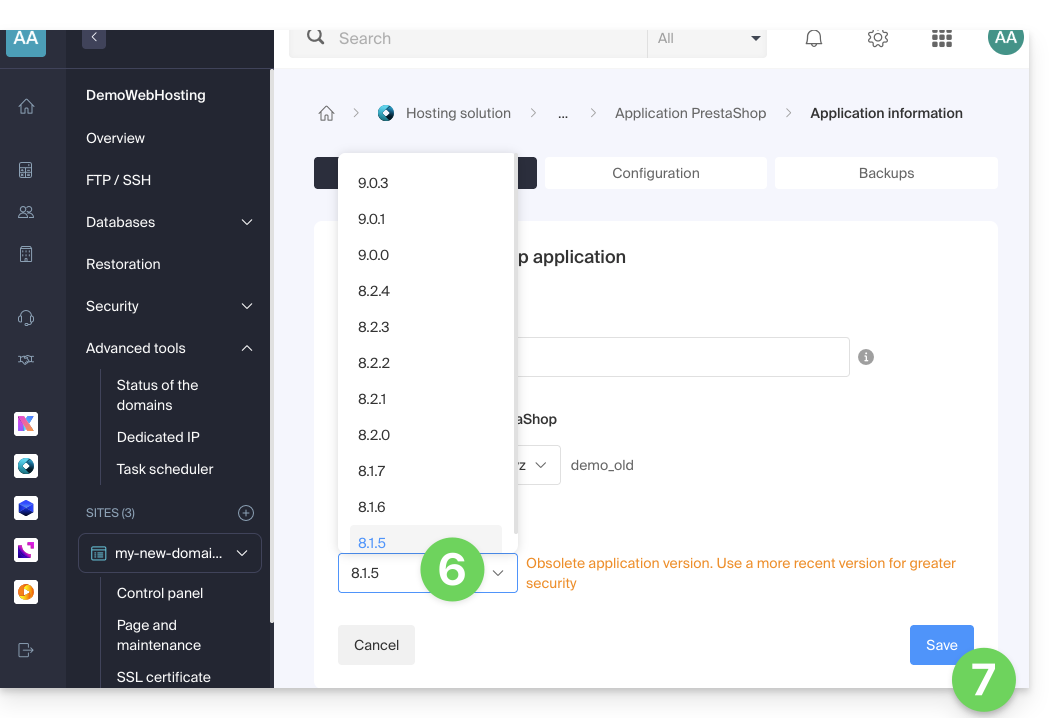
- Click on the drop-down menu to choose a more recent version.
- Click on the Save button:
Link to this FAQ:
Has this FAQ been helpful?
This guide lists the Windows operating system versions that can be installed when ordering a VPS Cloud / VPS Lite.
Regarding Linux, please refer to this other guide.
Supported Windows versions
When ordering your Server, you will be able to choose the version of Windows to install.
Windows Server
Possible versions with Windows Server 2025, 2022 or 2019:
- Windows Server Standard designed for low-density or non-virtualized environments
- Windows Server Datacenter ideal for datacenter-defined and highly virtualized environments
Note:
- As a Microsoft partner, Infomaniak provides VPS Cloud / VPS Lite Windows Server 2025, 2022 or 2019 containing a Microsoft Windows Server license. In case of activation failure, refer to this other guide.
- As a Microsoft partner, Infomaniak does not offer the possibility to use your own Windows Server license (or Bring Your Own License).
- If you use Microsoft software within Windows Server that requires a License Mobility, such as Microsoft SQL Server, Microsoft Sharepoint Server or Microsoft Exchange Server, you must submit the Software Assurance document via the Infomaniak contact form.
Windows 11 Professional Evaluation
Windows 11 Professional has all the features of Windows 11 Home as well as professional features for encryption, remote connection, virtual machine creation and more.
The version 10 of Windows Professional Evaluation is also available.
Note:
- It will be necessary to activate Windows, Infomaniak provides only an evaluation version.
Link to this FAQ:
Has this FAQ been helpful?
This guide explains how to manage Memcached and specifically how to check if this in-memory caching system is working correctly on your Managed Cloud Server.
Prerequisites
- Install Memcached on Managed Cloud Server.
Check Memcached execution
To verify that Memcached is working correctly:
Copy the following code into a PHP file (connecting to the local memcache server):
$fp = fsockopen("localhost", 11211); if ($fp) { // on demande les stats fwrite($fp, "stats\n"); while (!feof($fp)) { $buf = rtrim(fgets($fp)); if (preg_match('/^STAT curr_items ([0-9]+)$/', $buf, $matches)) { // le nombre d'items stockes print $matches[1] . PHP_EOL; } elseif (preg_match('/(END|ERROR)/', $buf)) { // fin des stats break; } } fclose($fp); } else { print "Error: cannot connect to local memcached server: $!" . PHP_EOL; }- Upload the PHP file to your hosting.
- Run the PHP file.
The script returns the number of elements cached in the server's memory.
Enable Memcached on…
… Prestashop
The native integration of Memcached in the Prestashop application simplifies its configuration. To enable it:
- Access your Prestashop admin space.
- Go to the Advanced Settings tab.
- Select Performance.
- Choose Yes from the dropdown menu under Use cache in the Caching section.
- Select CacheMemcached.
- Add a server by providing the required information such as
- the IP address:
127.0.0.1 - the port:
11211 - the weight:
1
- the IP address:
You can check the information by clicking the "Test server" button before saving it at the bottom of the "Caching" section.
Once this step is complete, your PrestaShop application is ready to use Memcached to cache certain API calls, database calls, and objects.
Link to this FAQ:
Has this FAQ been helpful?
This guide compares the different Infomaniak Cloud solutions to help you choose the infrastructure best suited to your needs. In all cases, you benefit from dedicated and scalable resources.
Jelastic Cloud (PaaS)
Jelastic Cloud is a platform that allows you to create development environments on the fly without managing system administration:
- Maximum flexibility: the platform automatically adjusts your resources according to real-time load.
- Advantage: ideal if your consumption (CPU, RAM) varies greatly depending on the time of year.
- Billing: you only pay for the resources actually consumed.
Managed Cloud Server
A Cloud Server allows you to manage websites and web applications via a simplified interface, while allowing the installation of specific software:
- Simplicity: as easy to use as shared hosting, but with the power of dedicated resources.
- Advantage: ideal if your resource consumption is stable and predictable.
- Management: Infomaniak handles the technical maintenance and security updates of the server.
Cloud VPS and VPS Lite
The Cloud VPS or VPS Lite offer full root access to a Linux distribution:
- Total control: you manage your entire server and software configurations.
- Required skills: solid technical expertise in system administration is essential.
- Usage: recommended for specific needs with stable resource consumption.
For large-scale infrastructure needs, learn about the Public Cloud offer.
Link to this FAQ:
Has this FAQ been helpful?
This guide provides important details regarding the launch and execution of command-line scripts (SSH) on various types of Infomaniak hosting.
Executing scripts via SSH and managing resources
Unlike scripts executed via a web browser, there is generally no strict time limit (timeout) for commands launched via SSH. Your script can therefore theoretically run as long as necessary.
Execution time and persistence
If your SSH session closes (loss of internet connection or terminal closure), the running script will be immediately interrupted.
To avoid this during long tasks, it is recommended to run your scripts in the background or, in the case of a VPS, use terminal multiplexing tools (such as screen, tmux, or the nohup utility). This allows the process to continue its work even after you disconnect.
Resource limits (RAM and CPU)
If time is not limited, hardware resources are.
The execution of your scripts remains subject to the capabilities of the machine and its configuration:
- Memory (RAM): if a process consumes more memory than the allowed limit (for example, the
memory_limitof PHP or the available physical RAM), it will be killed by the system to preserve the stability of the server. - Processor (CPU): excessive use of the processor over a long period can result in throttling or interruption of the process.
It is possible to adjust these resource limits on dedicated environments (such as a Cloud Server). However, on shared hosting, these limits are fixed and non-modifiable to ensure performance for all users hosted on the same server.
Link to this FAQ:
Has this FAQ been helpful?
This guide explains how to restore a snapshot of VPS Cloud Infomaniak.
Attention: depending on the installed operating system, the system volume may be named /dev/sda, /dev/sda1 or /dev/vda; the same applies to the data volume /dev/sdb, /dev/sdb2 or /dev/vdb … It is therefore necessary to replace these indications with those corresponding to your situation.
Restore a snapshot
To do this:
- Click here to access the management of your product on the Infomaniak Manager (need help?).
- Click directly on the name assigned to the product concerned.
- Click on Snapshot in the left sidebar menu.
- Click on the action menu ⋮ to the right of the object concerned in the table that appears.
- Click on Restore:
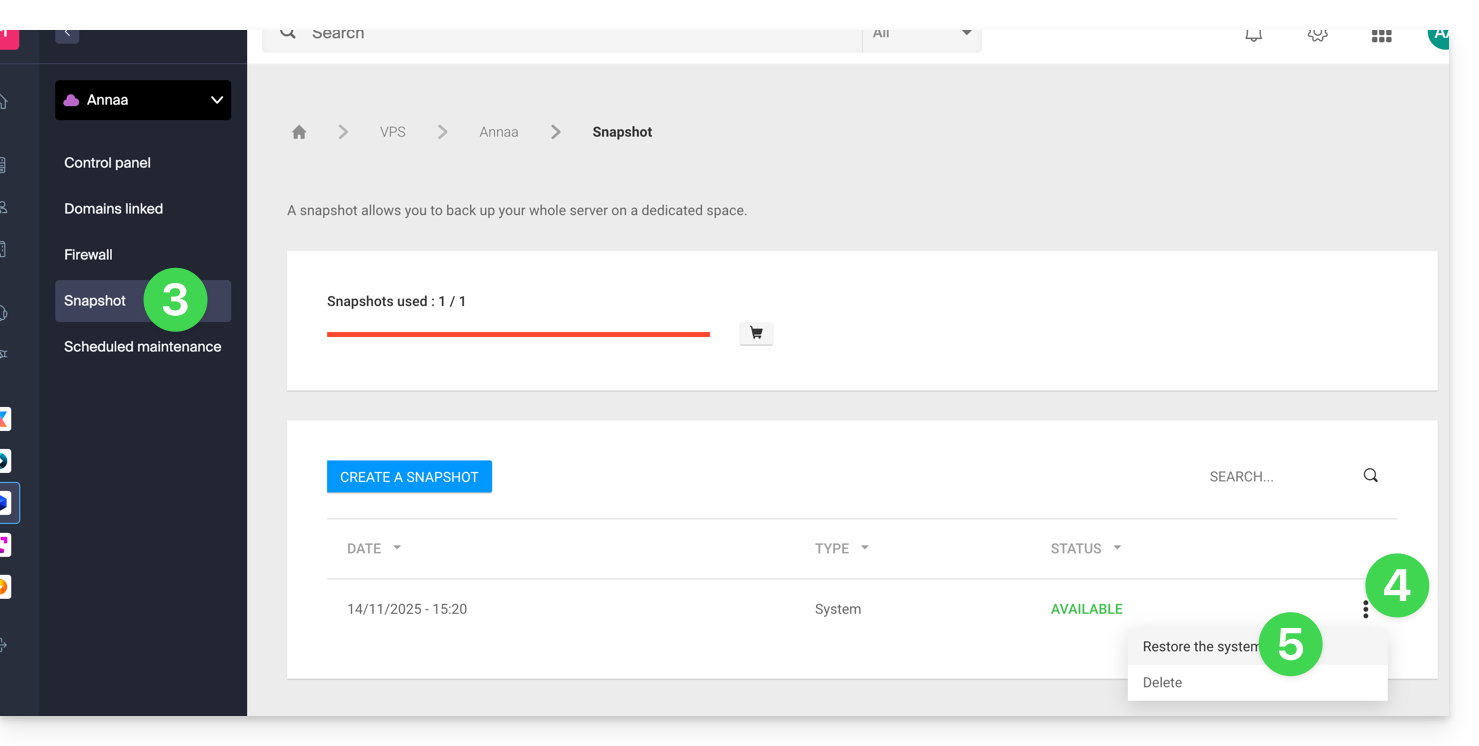
- Click on the blue button to start restoring the snapshot.
- An email is sent when the snapshot is restored.
Restore the operating system disk
Restoring the system volume as in the example above is an irreversible operation. The operating system disk will be replaced by the snapshot and the server will be in the exact state of the backup date.
The data stored on the data volume (vdb) is not affected by this operation.
Restore the data disk (vdb)
Two data restoration modes are possible:
1. “Read-only” mode
If the size of the snapshot differs from the size of the volume, only this read-only mode is available.
This option allows you to mount the data snapshot image, which allows read-only access to the backup data.
For information, here are useful commands to exploit your backup:
- To access the main data volume:
mount /dev/vdb /mnt/. - To mount the data volume in a specific folder "backup":
mount -o nouuid -o ro,norecovery /dev/vdc /backup.
To know which letter to use (/dev/vd?), use the command lsblk:

2. “Restore” mode
Restoring the data volume is an irreversible operation. The data disk (vdb) will be replaced by the snapshot. At the end of the restoration, it will be necessary to remount the data volume so that your operating system refreshes the content.
The following procedure and commands are provided for informational purposes only:
- Make sure your data volume is not mounted:
* umount /mnt(/mnt or the location you chose to access your data). - Remount the data volume:
* mount /dev/(vdb) /mnt
To find out the name of the data volume attached to your server, use the command lsblk (see above).
Link to this FAQ:
Has this FAQ been helpful?
This guide explains how to initialize your VPS Cloud / VPS Lite with Windows upon first connection.
Initializing a Cloud Server with Windows
You need to change the password of your Windows user before you can connect via RDP (Remote Desktop Protocol) to your server; otherwise, an error is returned (indicating that the password must be changed).
To do this, you need to connect using the VNC console the very first time.
Once the user password has been changed (via VNC), it will be possible to connect without issue via RDP. This protocol is already enabled on Infomaniak Windows images.
Login credentials
- Username:
- for Windows 11 Professional =
Infomaniak - for Windows 10 Professional =
Infomaniak - for Windows Server =
Administrator
- for Windows 11 Professional =
- Password: the one you chose when ordering the server; if forgotten, please reset the server.
- IP address: the one indicated in your server's dashboard.
Connect via RDP…
- … on Windows: Remote Desktop is a built-in feature.
- … on macOS: install the free desktop app Windows App (formerly Microsoft Remote Desktop).
- … on Linux: install the app Remmina.
Link to this FAQ:
Has this FAQ been helpful?
This guide explains how to move an existing website within an Infomaniak Web Hosting service to another Infomaniak Web Hosting service.
Introduction
- There are not many ready-made solutions for moving a website:
- In general, few hosting providers offer the export or import of an entire website with its databases.
- This is mainly due to the fact that there are many ways to build a website and just as many languages, which are often incompatible with each other.
- If the website to be transferred is built with WordPress, please refer to this other guide, which illustrates a simplified solution.
- It is also possible to move an entire Web Hosting service (see below).
Manual solution: example of website transfer
To do this manually, it is necessary to:
- retrieve the website data as well as the associated databases,
- republish this on a website created on the destination Web Hosting service,
- and if the associated domain name is the same, the first website must be deleted or renamed.
For the rest, here is an example of the steps to follow:
- Order the other Web Hosting / Cloud Server if you don't already have it.
- Create a "dummy website" on this new hosting (for example, dev.domain.xyz - see below).
- Manually copy your data via FTP and MySQL (export / import).
- Adapt your site if necessary (database address, etc.).
- Once you are satisfied with the "new site", delete the old one.
- Change the name of the new site to give it its actual name.
Alternatively, in step 2 above, you can work with the www. alias which you can detach beforehand from your current site. Indeed, the www alias (.domain.xyz) is often installed as an alias of your site, and you simply need to detach it, which allows you to create a site on the other hosting with the name www.domain.xyz (remember, in step 6, to add your alias of the type "domain.xyz" without the www to this new site).
Moving entire Web Hosting accounts
There is an automated way to move an Infomaniak Web Hosting account to:
- an Infomaniak Cloud Server (if the hosting is currently shared or if the hosting is already on a Cloud Server)
- another Infomaniak Organization
A Starter hosting account cannot be moved but it can be converted.
Link to this FAQ:
Has this FAQ been helpful?
This guide explains how to migrate from a VPS Lite to a VPS Cloud while keeping all your data and without having to reconfigure your installation.
It is not possible to cancel this change or to revert. Switching from a VPS Cloud to a VPS Lite is not possible.
Perform a migration from VPS Lite to VPS Cloud
To start the operation, access your VPS Lite:
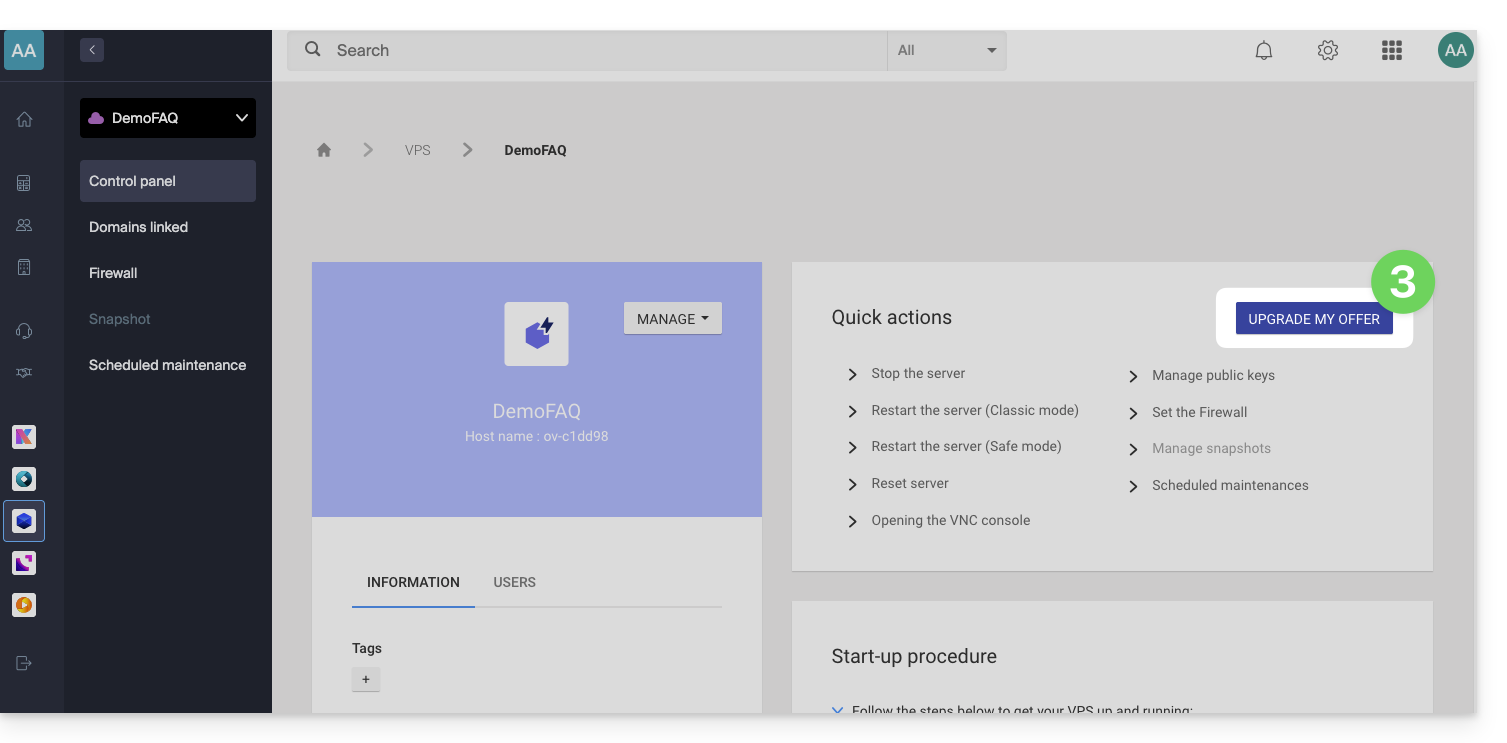
- Click here to access the management of your product on the Infomaniak Manager (need help?).
- Click directly on the name assigned to the product concerned.
- Click on Upgrade my offer:
- Click on the Upgrade button on the modal that appears.
- Complete the order to upgrade your VPS Lite.
- Wait during the migration, a service interruption will be felt during the process.
Link to this FAQ:
Has this FAQ been helpful?
This guide explains how to specify a file that will be loaded before the desired page or at the beginning of each PHP script executed on your server, included as if it had been called with the function require(), but more globally using the PHP directive auto_prepend_file.
Preamble
- For example, to declare the headers of a website, you can create a file
headers.phpthat contains PHPheader()functions and that is prepended at the beginning of each PHP file…- … via a
.user.inifile (specific to a folder), - … or via the site configuration in the Manager (global) as explained below.
- … via a
Include a file globally from the Manager
To access the website management:
- Click here to access the management of your site on the Infomaniak Manager (need help?).
- Click directly on the name assigned to the site concerned:
- Click on Manage advanced settings:
- Click on the PHP / Apache tab:
- Complete the relevant line by entering the path of the file to include.
- Click on the Save button at the bottom of the page:

After defining this directive, all PHP pages on your server will automatically include the specified file before executing their own code.
The headers defined in a .htaccess file are only valid for non-PHP (i.e., static) content.
Infomaniak uses php-fpm which receives the different headers via apache fast_cgi. In the RFC of cgi_www the header Strict-Transport-Security is not part of the headers passed via CGI and the Apache documentation confirms this. Refer to this other RFC.
Link to this FAQ:
Has this FAQ been helpful?
This guide explains how to customize the time slot(s) during which Infomaniak can perform maintenance to update your services (new features, fixes, etc.).
Preamble
- This feature is only available for:
- Cloud Servers
- Cloud VPS / Lite VPS
- Jelastic Cloud
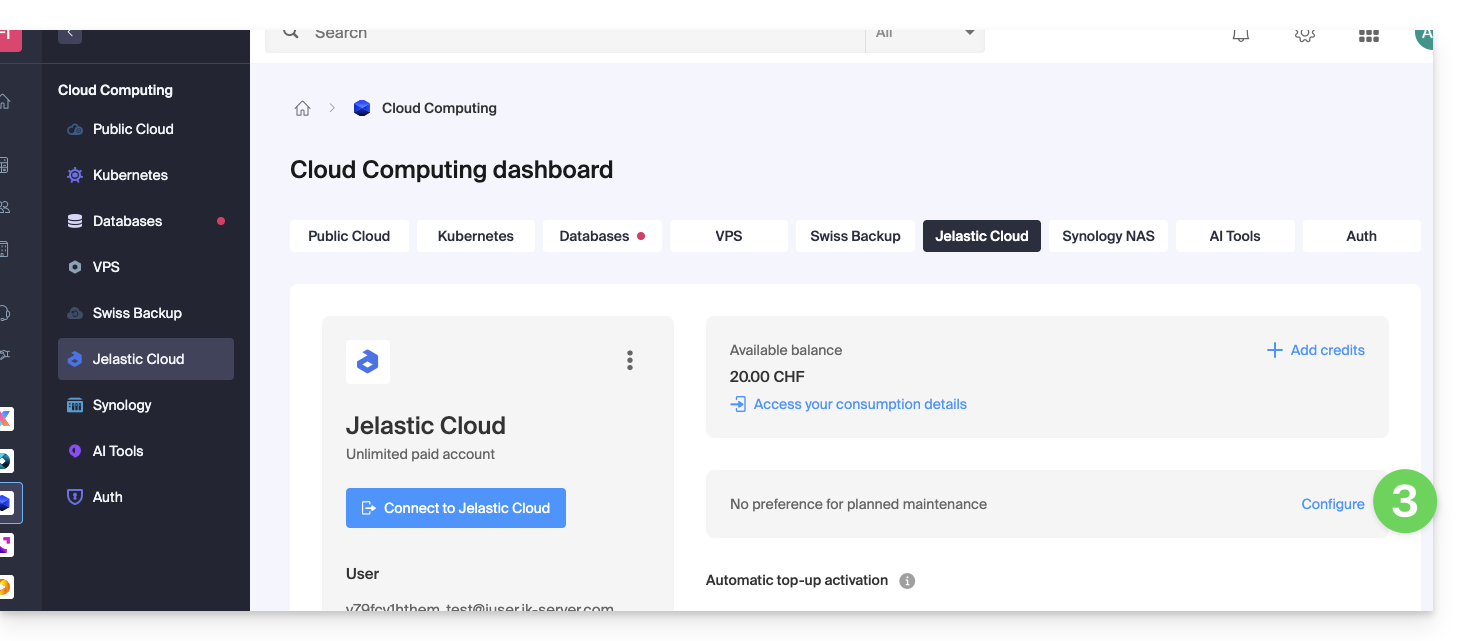
- Without any indication from you, scheduled maintenance is usually performed by Infomaniak between 10 PM and 6 AM.
Modify the scheduled maintenance period
To do this:
- Click here to access the service for which you want to schedule maintenance on the Infomaniak Manager (need help?).
- Click directly on the name assigned to the product concerned.
- Click on Scheduled Maintenance in the left sidebar or on the central page depending on the service concerned (below Jelastic):
- Same principle for a VPS:
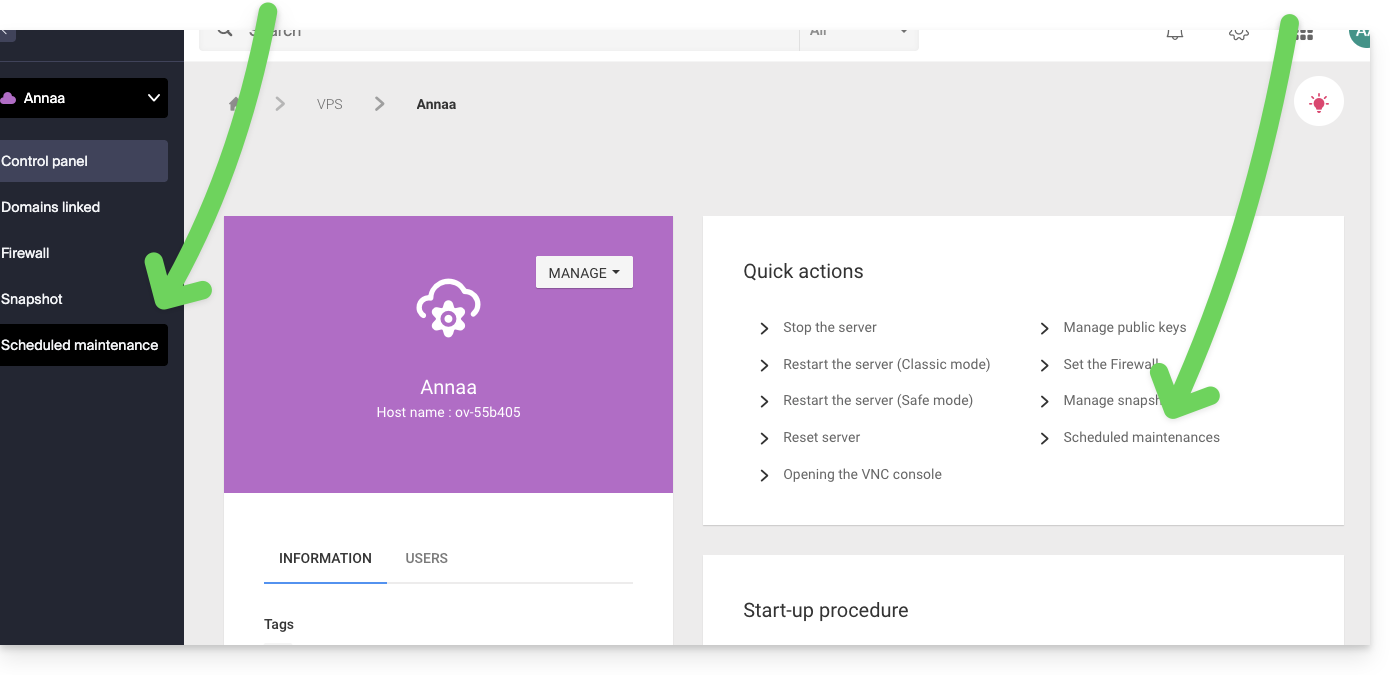
- Same principle for a VPS:
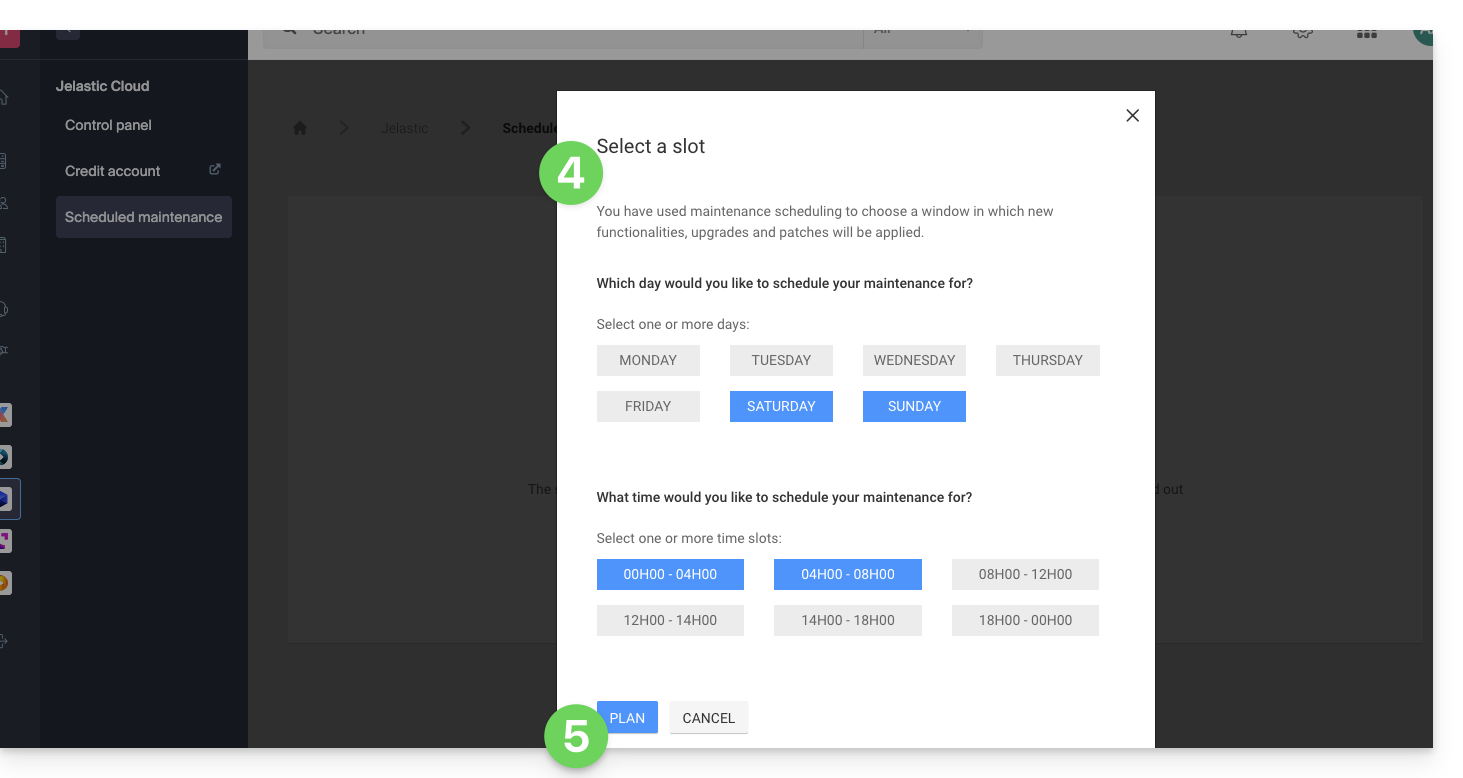
- Click the buttons to define, in blue, a preferred intervention slot.
- Validate by clicking the button at the bottom:
Link to this FAQ:
Has this FAQ been helpful?