Base de conhecimento
1000 perguntas frequentes, 500 tutoriais e vídeos explicativos. Aqui, você encontra apenas soluções!
Este guia explica como copiar o conteúdo de um ou mais endereços de e-mail externos para a Infomaniak (todas as mensagens de e-mail, pastas, subpastas, ou seja, toda a estrutura da sua caixa de e-mail de terceiros) em um dos seus endereços existentes na Infomaniak (independentemente do Serviço de Email), graças à ferramenta de importação MBOX oferecida pela Infomaniak.
Introdução
- Este é o procedimento ideal ao mudar de provedor de hospedagem ou para restaurar mensagens antigas ainda armazenadas em outro local.
- Uma vez iniciado o processo de importação, não é mais possível interrompê-lo.
- Os eventuais duplicados são geridos: um conteúdo idêntico será copiado apenas uma vez.
Importar um arquivo mBox para a Infomaniak
Pré-requisitos
- Ter um arquivo da sua caixa de correio anterior no formato
.mbox.- Para o Gmail: aceder ao Google Takeout (precisa de ajuda?)
- Ter um Serviço de Email no seu Painel de Controle Infomaniak.
- Dispor de um quota de endereços disponíveis ou ajuste-a previamente, se necessário.
- Certifique-se de que a sua conta de e-mail está devidamente protegida
- Crie um ou mais endereços neste serviço de e-mail.
- Se precisar de criar muitos endereços de e-mail (10 ou mais), consulte este outro guia sobre como criar vários endereços em massa.
- O endereço de e-mail de destino deve estar associado ao utilizador (= à conta Infomaniak) que está a utilizar.
Em seguida, para importar o conteúdo do e-mail:
- Clique aqui para acessar a ferramenta de importação (serviço online https://import-email.infomaniak.com).
- Se necessário, faça login na sua conta Infomaniak na organização correspondente, pois a importação será feita para um dos endereços de e-mail associados à interface web Mail da Infomaniak (serviço online ksuite.infomaniak.com/mail) da conta Infomaniak que você está usando.
- Clique em "Importar por arquivo mBox".
- Escolha para qual endereço de e-mail importar os e-mails; o menu suspenso lista os endereços de e-mail atualmente associados à sua interface Web Mail Infomaniak (serviço online ksuite.infomaniak.com/mail) da conta Infomaniak com a qual você está conectado.
- Clique em Confirmar:
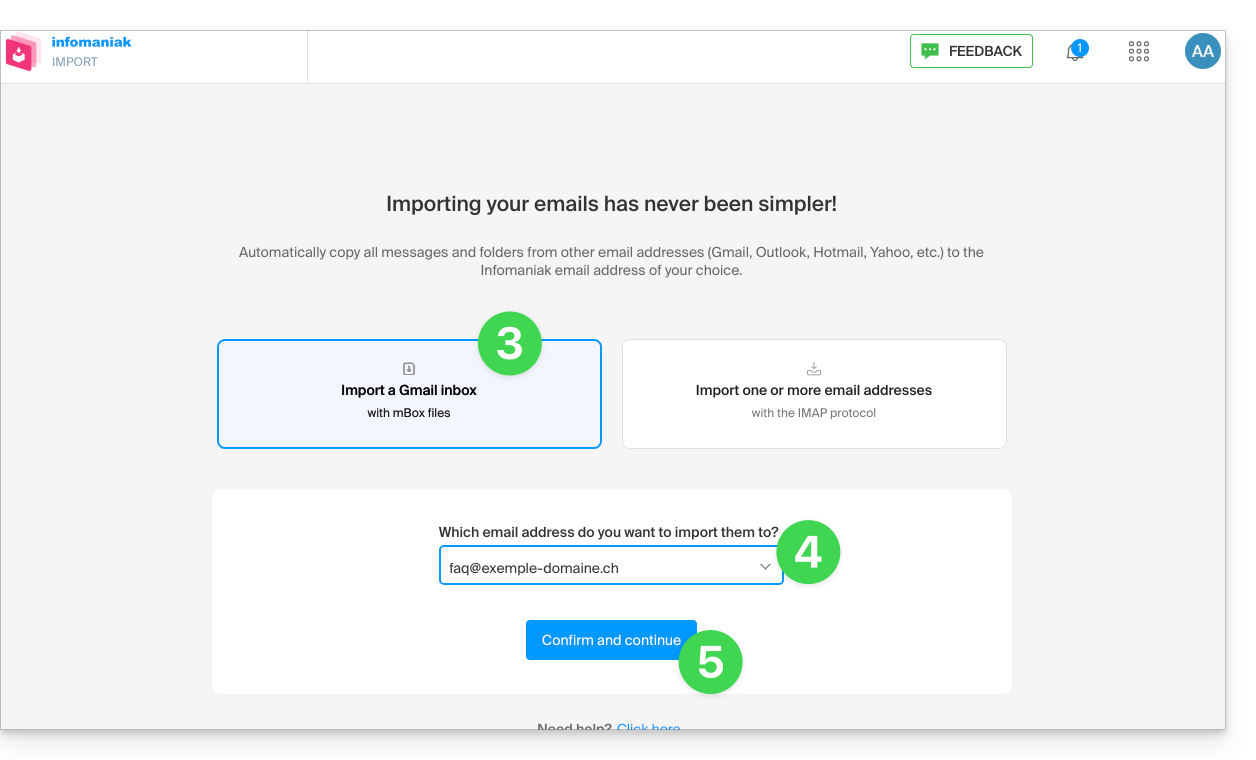
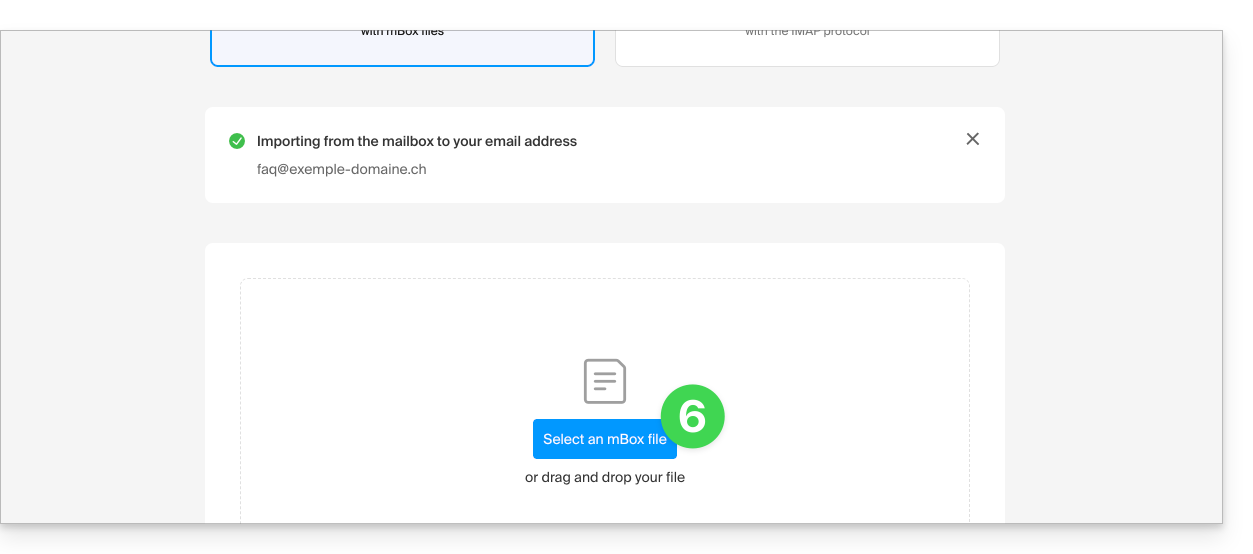
- Clique no botão para selecionar o arquivo mBox no seu disco rígido:
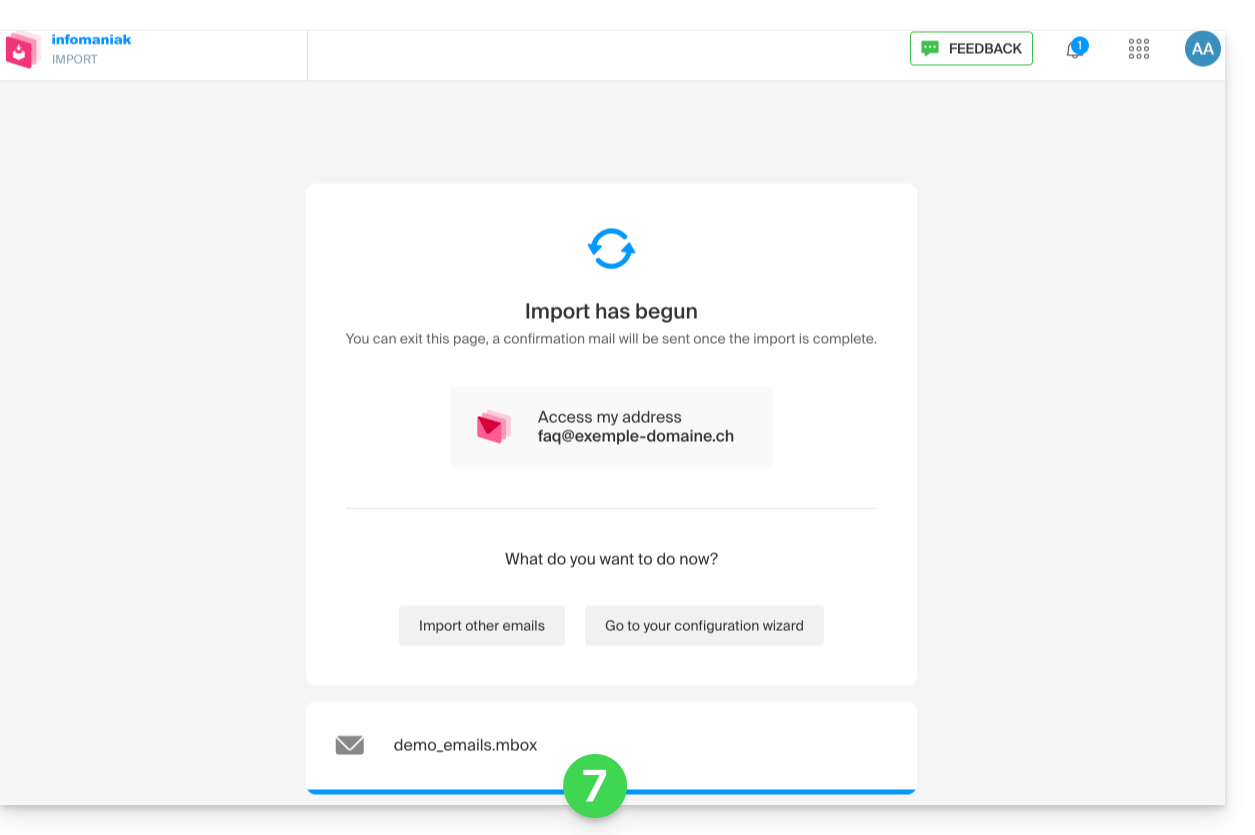
- A importação é iniciada. Você pode aguardar e verificar o resultado na página após a conclusão da importação ou fechar a janela (a importação continua em segundo plano e o acompanhamento está disponível – veja abaixo):
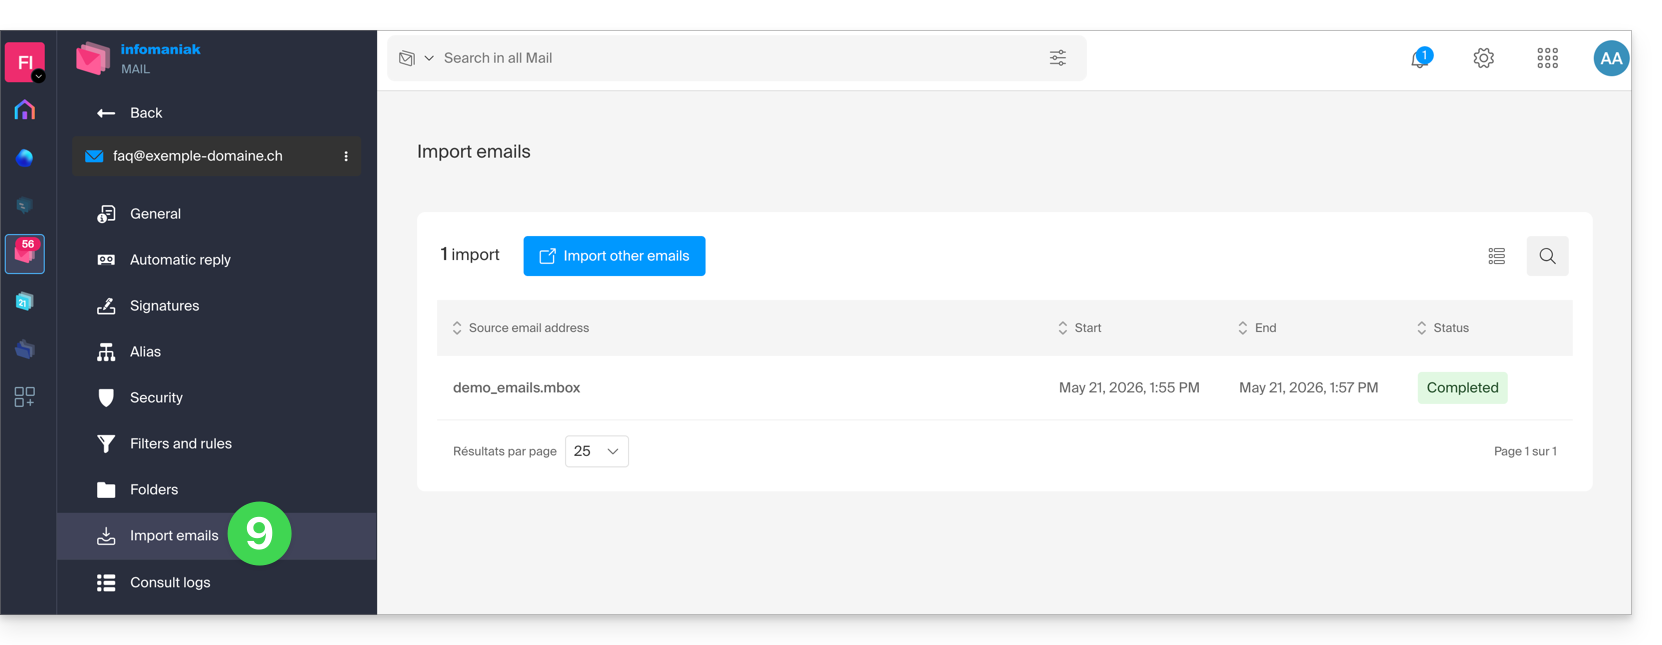
- O acompanhamento está disponível nas configurações do endereço de e-mail de destino, apenas no aplicativo web Mail (serviço online ksuite.infomaniak.com/mail).
- O rastreamento permite visualizar o histórico das importações no endereço em questão:
Link para esta FAQ: https://faq.infomaniak.com/2207
Esta seção de perguntas frequentes foi útil?
Este guia explica como guardar os anexos de um e-mail a partir da aplicação web Mail da Infomaniak (serviço online ksuite.infomaniak.com/mail).
Introdução
- Assim, poderá guardar com um único clique todos os ficheiros anexos a uma mensagem numa pasta
.zipno seu computador ou no seu kDrive, etc. - Outros guias explicam como:
Guardar o anexo a partir da aplicação Web Mail
Para exportar os ficheiros anexos recebidos por e-mail:
- Clique aqui para acessar o aplicativo web Mail da Infomaniak (serviço online ksuite.infomaniak.com/mail).
- Acesse a mensagem de e-mail que contém os anexos que você deseja salvar.
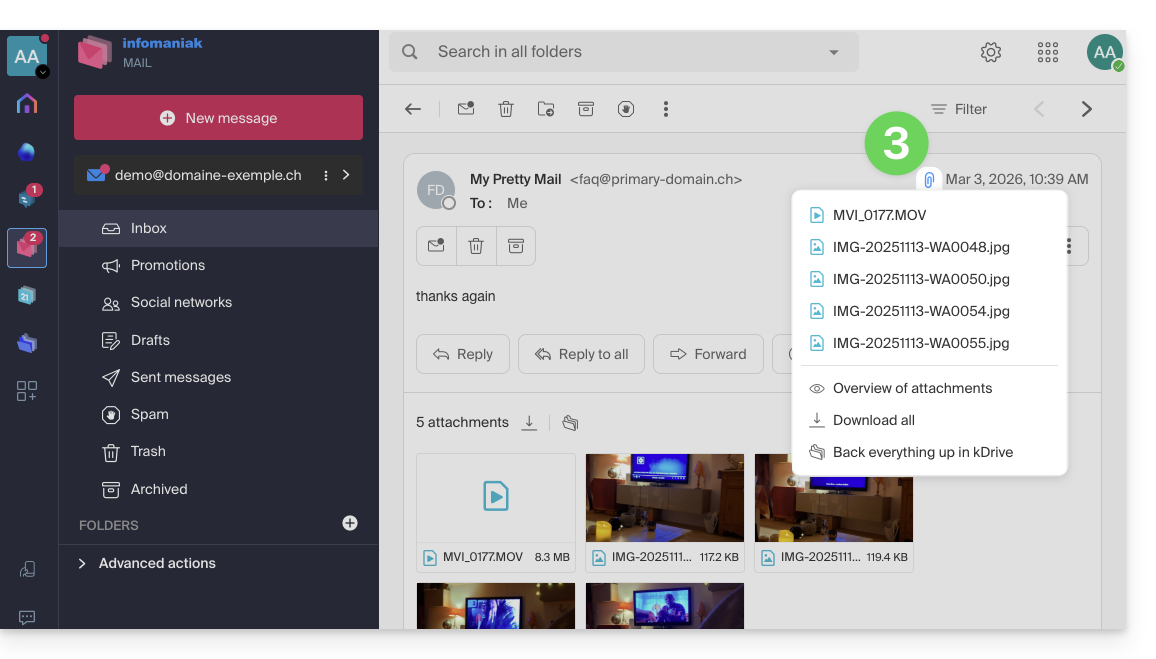
- Clique no ícone de grampo para acessar as opções de backup e visualização do conteúdo:
- … ou diretamente acima dos arquivos anexados para iniciar o download ou salvar no kDrive:
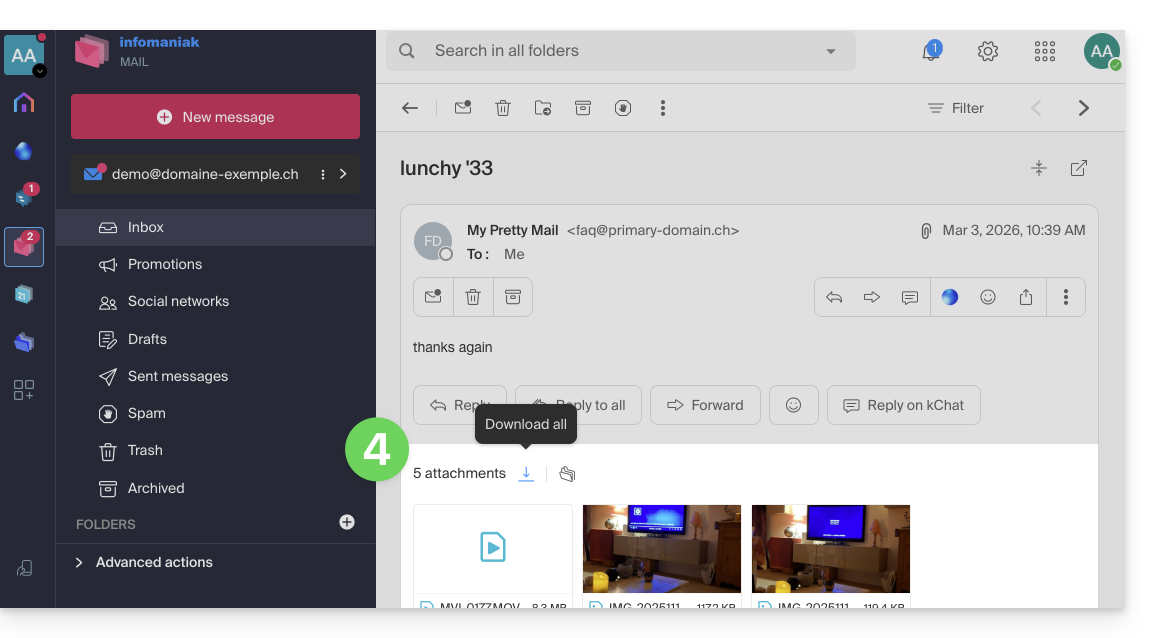
- Fazer download de tudo permite criar um arquivo no formato
zippara download no seu dispositivo. - Salvar tudo no kDrive permite escolher o kDrive (entre aqueles aos quais você está vinculado pela sua Organização) e o local desejado para salvar os arquivos:
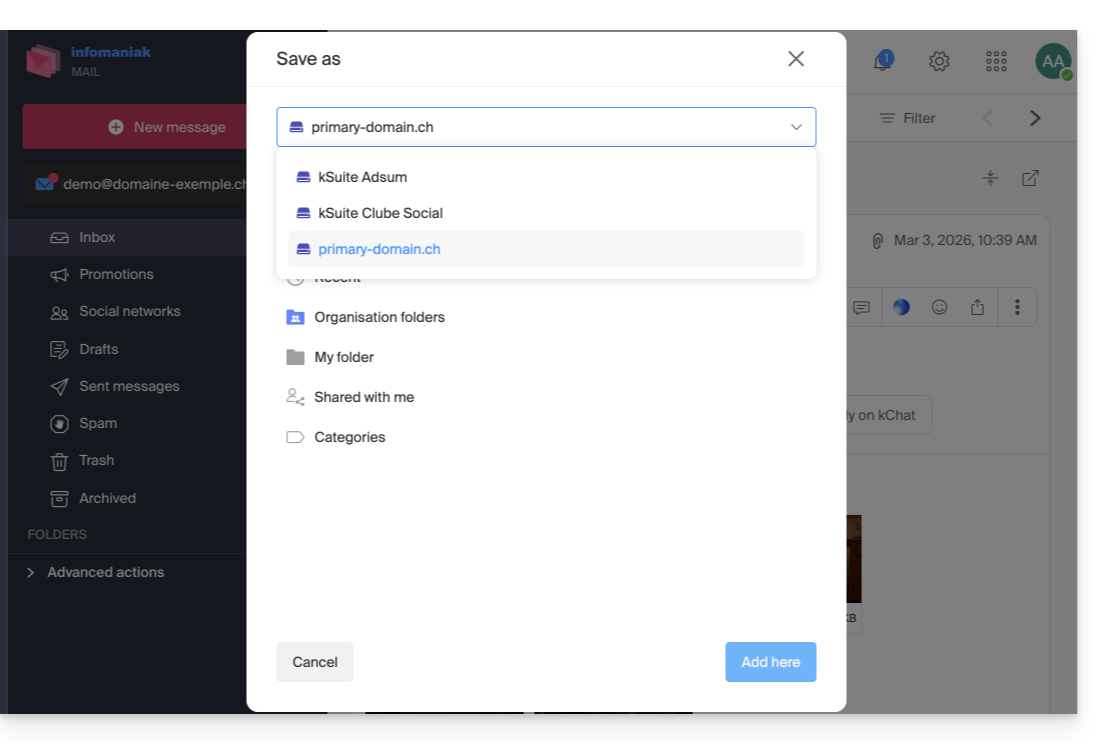
- Fazer download de tudo permite criar um arquivo no formato
Link para esta FAQ: https://faq.infomaniak.com/2309
Esta seção de perguntas frequentes foi útil?
Este guia explica como eliminar uma conta Infomaniak (ou seja, uma conta de utilizador), ou seja, como apagar o seu acesso ao Manager e/ou à aplicação Web Mail Infomaniak ksuite.infomaniak.com/mail.
Introdução
- Esta operação resulta na exclusão imediata dos seus calendários e listas de contactos.
- Qualquer acesso ao painel de controlo com este identificador será perdido.
- Esta operação não implica a eliminação dos endereços de e-mail consultados a partir da conta em questão (exceto para algumas ofertas gratuitas, mas, nesse caso, será informado antes da operação de eliminação).
- Se a conta que está a utilizar for a única conta existente numa Organização, será necessário, previamente, eliminar a Organização ou designar outra pessoa para poder eliminar a sua conta.
Excluir uma conta Infomaniak / Mail
Para acessar a seção dedicada ao perfil do usuário:
- Clique aqui para acessar o menu Meu perfil no Gerenciador Infomaniak.
- Clique no ícone da lixeira à direita do seu nome para excluir a conta e os dados:
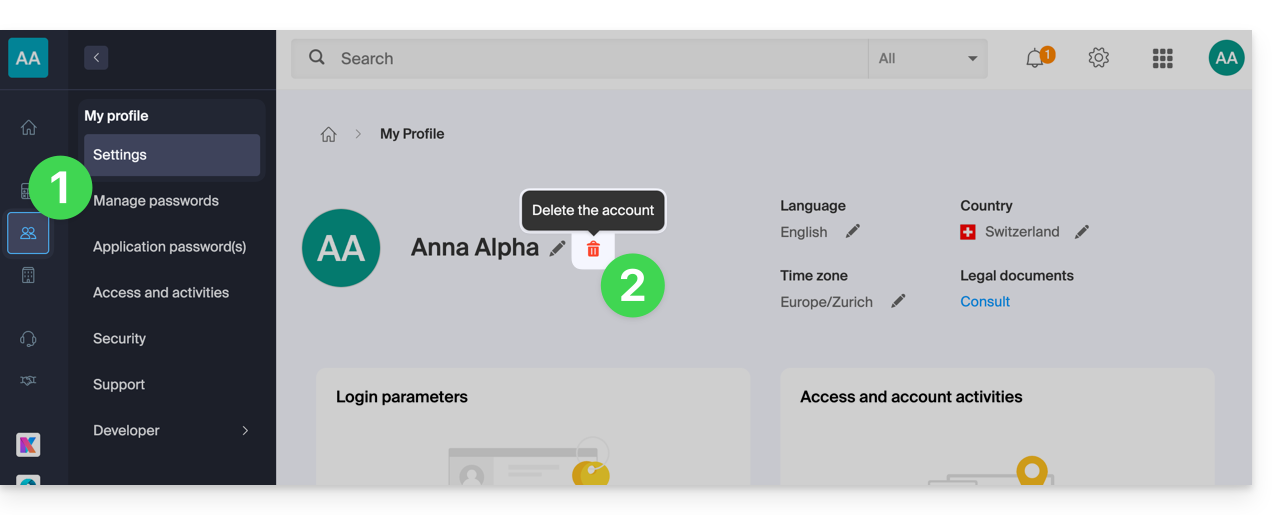
- Insira, pela última vez, a senha de acesso e a conta Infomaniak será excluída.
Link para esta FAQ: https://faq.infomaniak.com/2333
Esta seção de perguntas frequentes foi útil?
Este guia explica como obter informações sobre…
- … as conexões que são efetuadas no Manager Infomaniak com o seu identificador de acesso à conta Infomaniak,
- … as atividades realizadas no Gerenciador pela sua conta Infomaniak.
O mesmo tipo de registos, mas relativo à totalidade da Organização, está disponível para os administradores: consulte este outro guia.
Obter o registo das conexões à conta Infomaniak
Para consultar um registo das conexões (sessões ativas) que são efetuadas no Painel de controlo Infomaniakcom o seu identificador de acesso à conta Infomaniak:
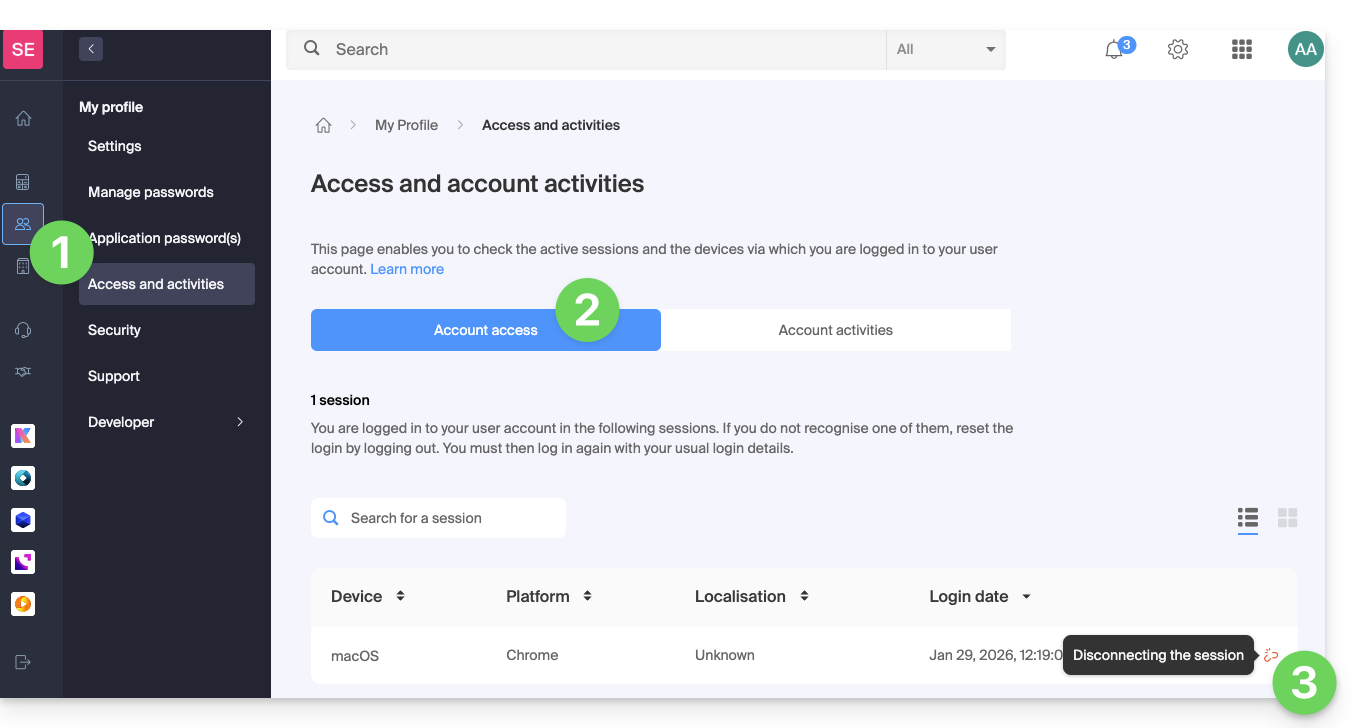
- Clique aqui para aceder ao resumo dos acessos ao painel de controlo Infomaniak através da sua conta Infomaniak.
- Na aba Acesso à conta, consulte a lista de dispositivos conectados à sua conta Infomaniak.
- É possível encerrar uma sessão ativa clicando no ícone mais à direita do nome do dispositivo conectado à sua conta, o que o desconectará:
Ser notificado em caso de login bem-sucedido ou malsucedido
Para ser notificado por e-mail quando efetuar login ou tentar efetuar login na sua conta Infomaniak:
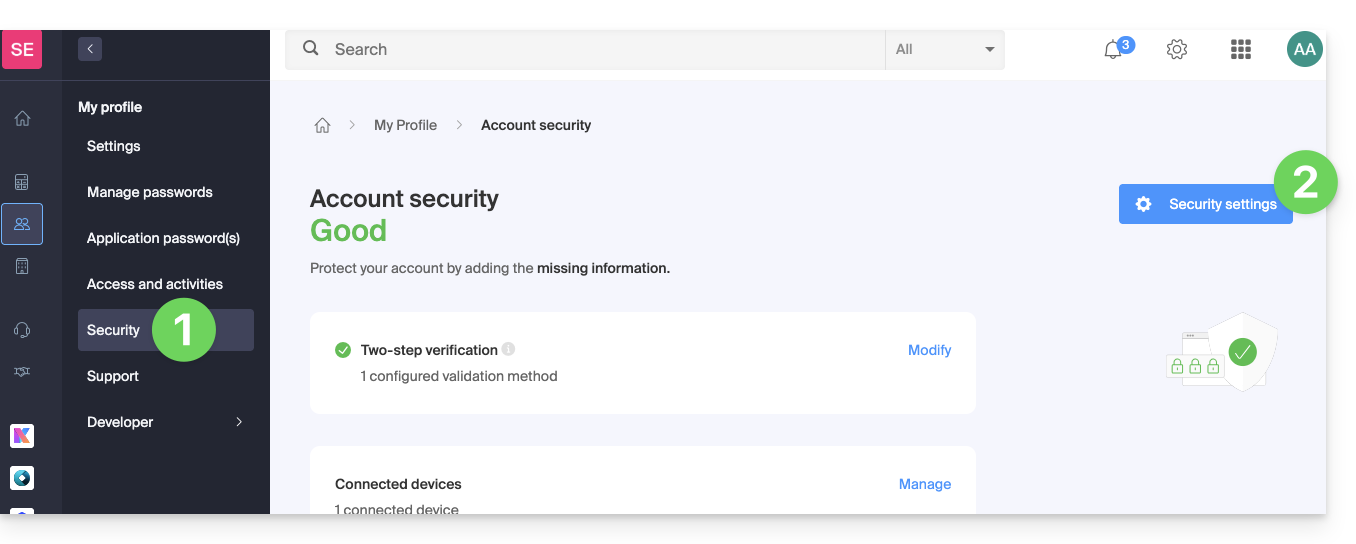
- Clique aqui para acessar o resumo de segurança da sua conta no painel de controle Infomaniak.
- Clique em Configurações de segurança:
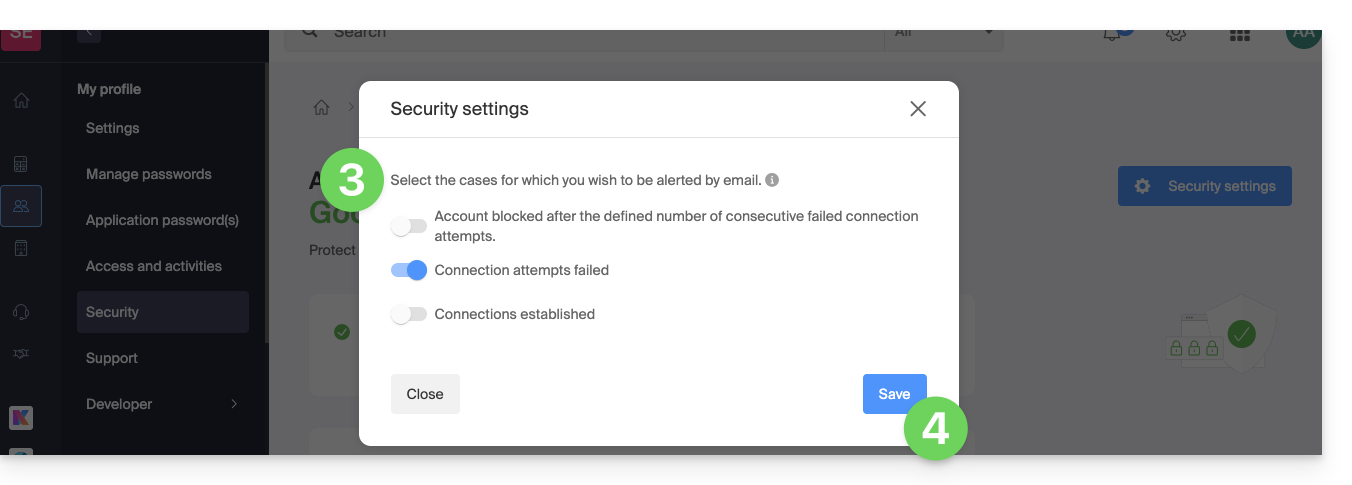
- Selecione os casos para os quais deseja receber alertas por e-mail (notificação em caso de login bem-sucedido ou apenas em caso de falha no login).
- Clique em Salvar para guardar as suas alterações:
No mesmo local, pode escolher a partir de quantas tentativas infrutíferas mínimas bloquear a sua conta Infomaniak: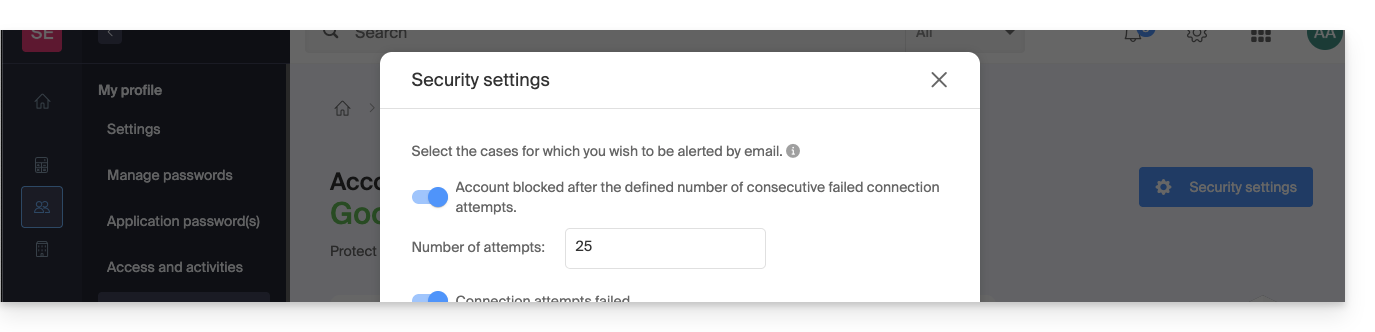
Uma vez bloqueada, a conta pode ser desbloqueada por um administrador da Organização ou através de um formulário seguro.
Obter o registo de atividades da conta de utilizador
Para visualizar as atividades recentes efetuadas no painel de controlo pela sua conta Infomaniak:
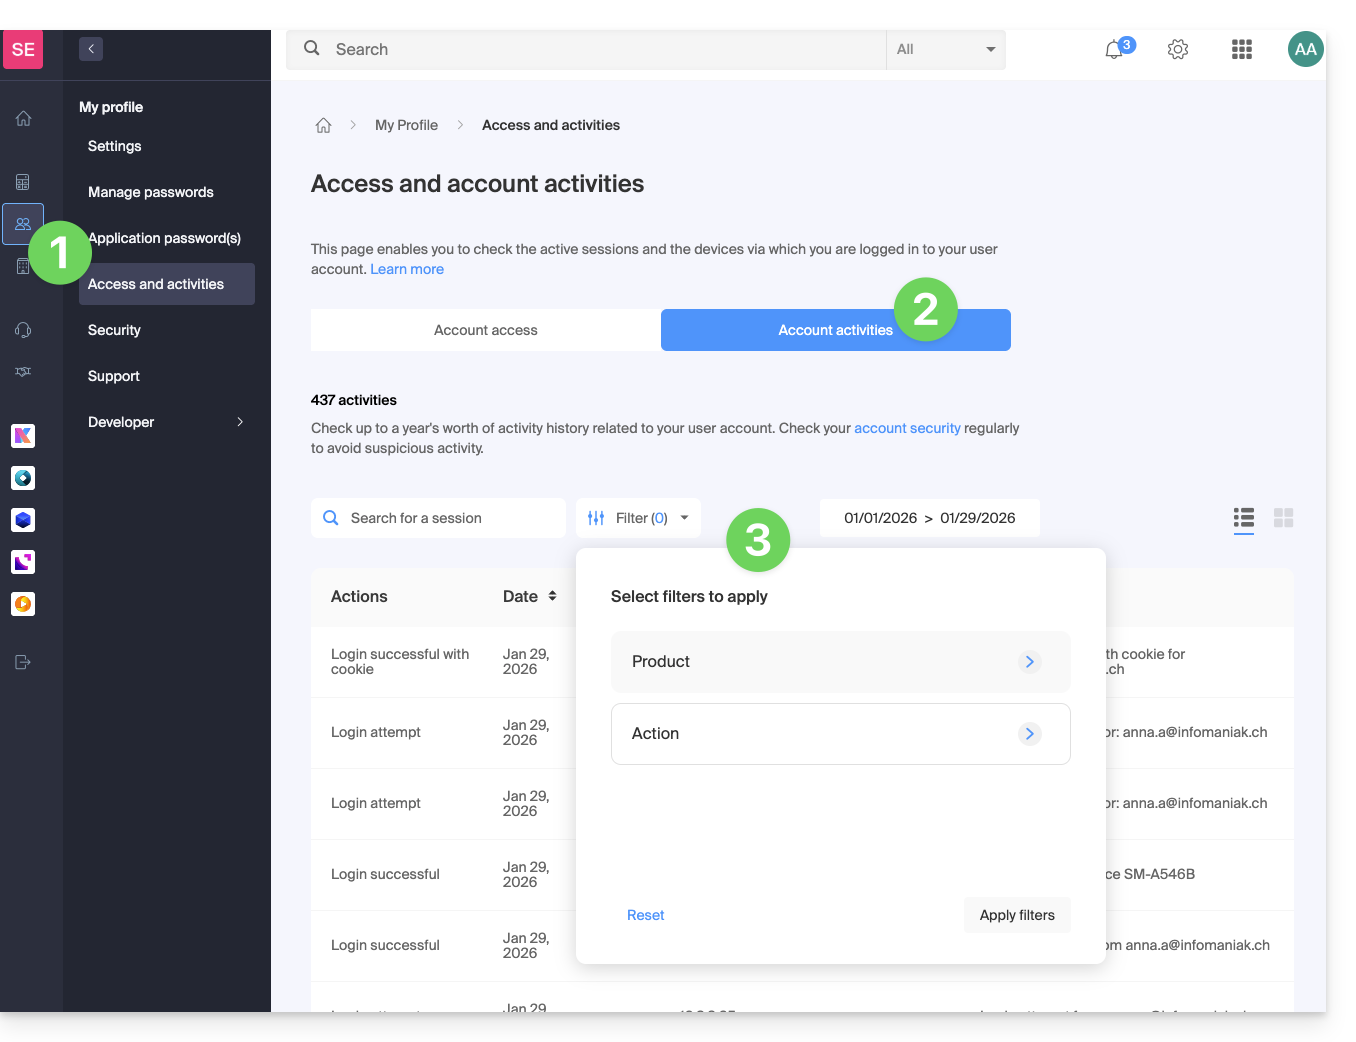
- Clique aqui para acessar o resumo da atividade da sua conta no Gerenciador Infomaniak.
- Na aba Atividades da conta, confira as últimas atividades e ações da sua conta Infomaniak.
- Opções de pesquisa e filtragem de logs estão disponíveis: data, produto ou tipo de ação:
Link para esta FAQ: https://faq.infomaniak.com/2339
Esta seção de perguntas frequentes foi útil?
Este guia detalha os limites de tamanho (peso das mensagens e tamanho do espaço em disco) estabelecidos nas ofertas de e-mail da Infomaniak e orienta você sobre como verificar o espaço de armazenamento utilizado.
Introdução
- Espaço de armazenamento máximo em gigabytes (GB):
- kSuite Free = 20
- kSuite Standard = ilimitado
- kSuite Business = ilimitado
- kSuite Enterprise = ilimitado
- my kSuite = 20
- my kSuite+ = ilimitado
- Serviço de e-mail Starter = 20
- Serviço de e-mail Premium = ilimitado
- Consulte também estes outros guias:
Limite do tamanho e do número de e-mails
No que diz respeito às próprias mensagens e aos seus anexos:
- O tamanho máximo de um e-mail, tanto no envio quanto na receção, é de 210763776 bytes, ou seja, exatamente 201 MB.
- Isto inclui o cabeçalho e o corpo (texto, HTML, anexos, etc.), independentemente do método utilizado para o envio.
- É importante notar que um anexo pode ser codificado em base64, portanto, o seu tamanho no e-mail pode não ser o mesmo que o seu tamanho no disco.
- Com o aplicativo web Mail Infomaniak (serviço online ksuite.infomaniak.com/mail), o limite de tamanho dos anexos é de 25 MB.
- Acima desse limite e até um máximo de 3 GB, um link SwissTransfer é gerado e integrado à sua mensagem: os dados são armazenados na Suíça, na nuvem da Infomaniak, e os seus destinatários poderão usar este link para descarregar facilmente os anexos durante um período predefinido.
- Acima de 3 GB (e até 50 GB), recomenda-se usar diretamente o SwissTransfer para os seus envios.
- O número de mensagens no respetivo espaço de armazenamento não é limitado.
- No entanto, não é recomendado guardar mais de 4000 a 5000 mensagens por pasta (o que pode levar ao abrandamento da indexação das mensagens).
- Recomenda-se, portanto, mover as suas mensagens para subpastas, o que também facilita a sua consulta (pode fazê-lo manualmente ou configurar regras de triagem automáticas).
Limite do tempo de conservação dos e-mails
Período de retenção:
- Não há nenhum limite de tempo para a retenção de mensagens na caixa de entrada ou em subpastas, exceto para um e-mail que seja excluído ou marcado como spam, ou movido manualmente/automaticamente para a pasta "Lixeira" ou "Spam" (ou qualquer uma de suas denominações equivalentes, como "Itens Excluídos", "Mensagens Apagadas", "Correio Indesejado", incluindo grafias em outro idioma, como "Junk", por exemplo – lista não exaustiva)... Neste caso, o e-mail é automaticamente excluído após 30 dias, sem possibilidade de recuperação.
Portanto, nunca utilize uma pasta com o nome, por exemplo, Lixeira ou Infectada para armazenar mensagens importantes e preservá-las.
- Os backups realizados pela Infomaniak têm um período de retenção.
Exibir o tamanho total no aplicativo Web Mail da Infomaniak
Para isso:
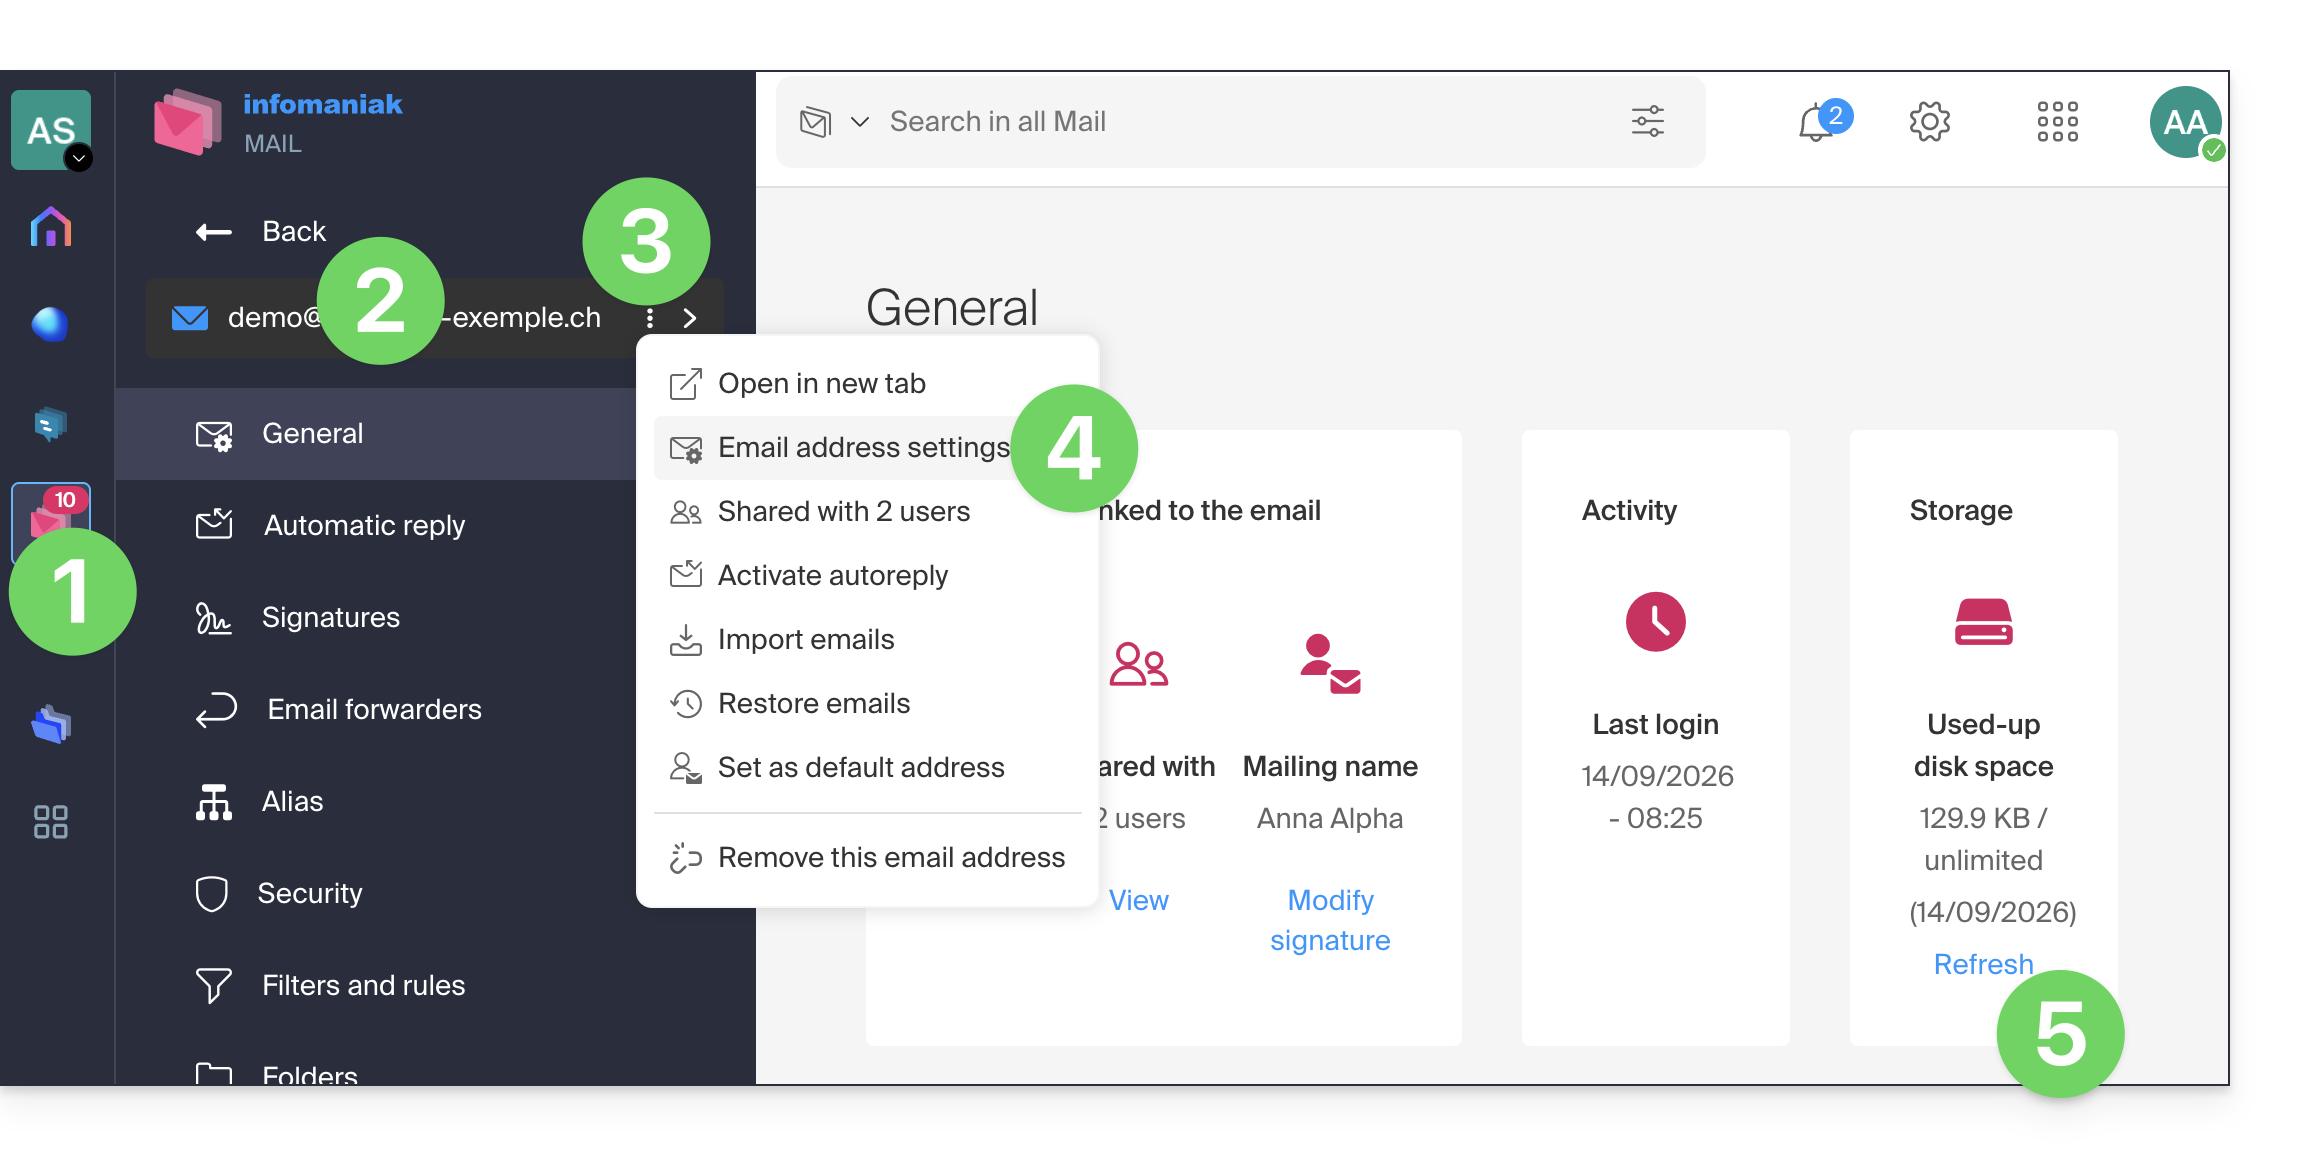
- Clique aqui para acessar o aplicativo web Mail da Infomaniak (serviço online ksuite.infomaniak.com/mail).
- Verifique ou selecione o endereço de e-mail correspondente no menu suspenso do menu lateral esquerdo.
- Clique no menu de ação ⋮ à direita do item correspondente na tabela exibida.
- Clique em Configurações do endereço de e-mail.
- Clique em Atualizar na caixa Armazenamento para exibir o tamanho da caixa de correio:
Ainda com problemas?
Caso o endereço de e-mail do seu destinatário não seja hospedado na Infomaniak, pode acontecer de você receber uma mensagem de erro ao enviar o e-mail. Essa mensagem pode ter diferentes formatos, como, por exemplo, Endereço do destinatário rejeitado: 5.2.2 Quota excedida 554 5.0.0 Serviço indisponível.
Isso pode indicar que a caixa de entrada do seu destinatário está cheia e ele não pode mais receber e-mails ou que o e-mail que você está tentando enviar é muito grande.
Nesse caso, entre em contato com a pessoa para solicitar que ela esvazie/reduza o tamanho da caixa de entrada ou que informe o tamanho máximo dos e-mails que você pode enviar.
Link para esta FAQ: https://faq.infomaniak.com/2351
Esta seção de perguntas frequentes foi útil?
Este guia explica como conectar o aplicativo para desktop Outlook 2019 (aplicativo para computador no Windows) a um endereço de e-mail hospedado na Infomaniak.
Adicionar o endereço de e-mail ao aplicativo
Pré-requisitos
- Criar o endereço de e-mail (❓: ajuda my kSuite | Serviço de E-mail/kSuite).
- Criar uma senha para o dispositivo (❓: ajuda my kSuite | Serviço de e-mail/kSuite).
- Verificar se a configuração do domínio está correta (❓: ajuda).
Para configurar o aplicativo de e-mail:
- Abra o aplicativo.
- Se o assistente iniciar automaticamente, avance para o passo 5.
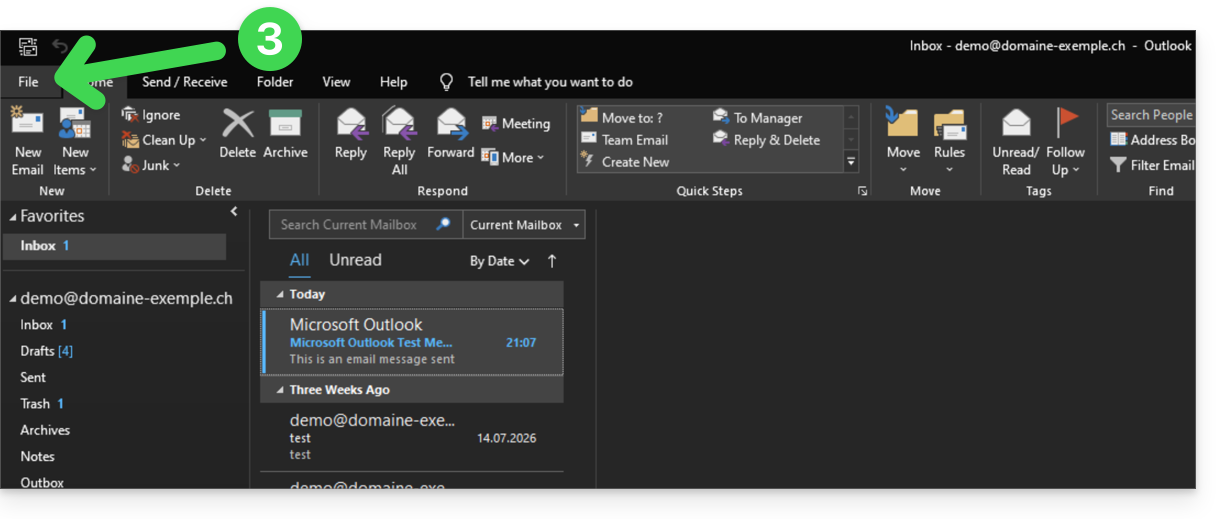
- Se o assistente não iniciar automaticamente, clique no menu Arquivo:
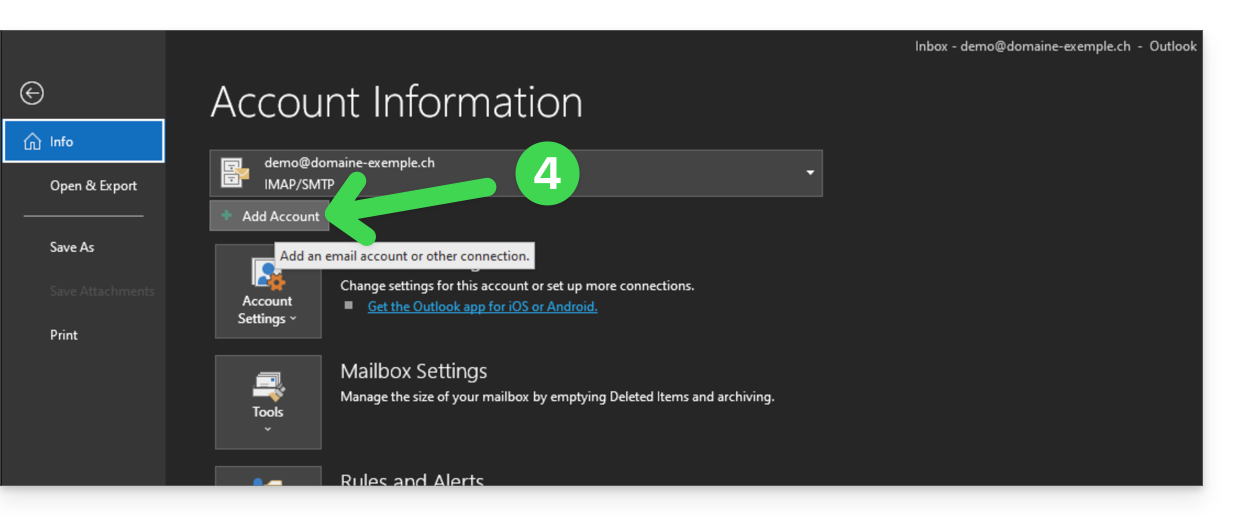
- Clique em Adicionar conta:
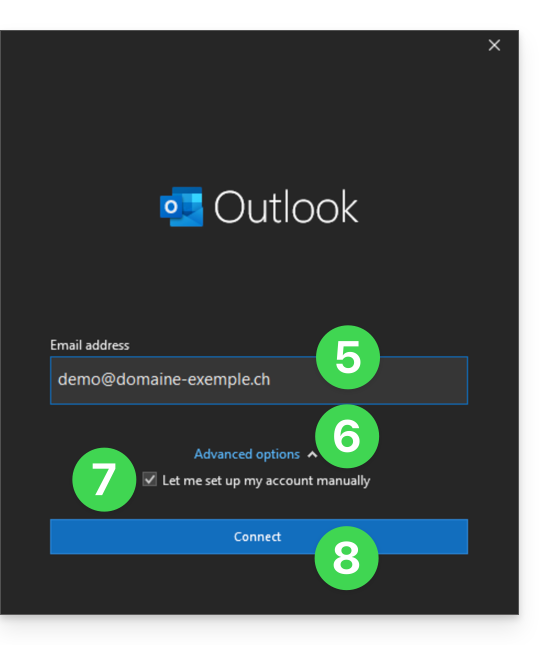
- Insira o endereço de e-mail que deseja conectar.
- Clique na seta Opções avançadas.
- Marque a caixa para configurar manualmente sua conta.
- Clique no botão Conectar:
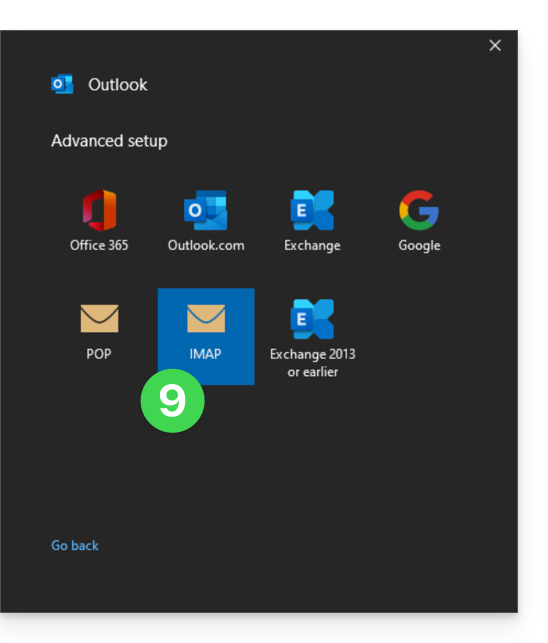
- Clique em IMAP:
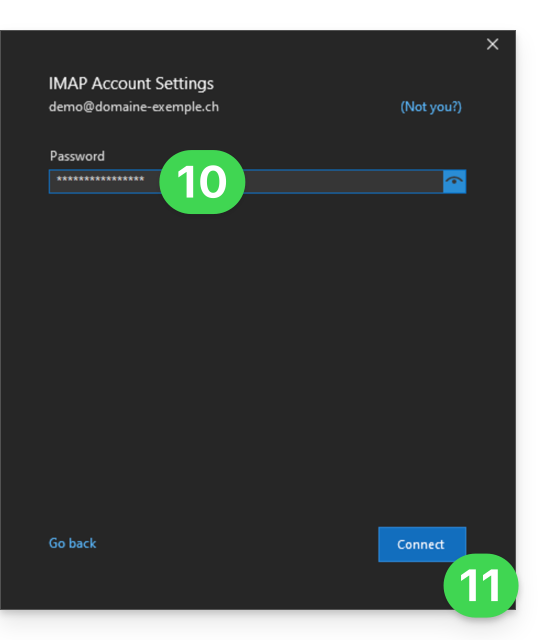
- Insira a senha do endereço de e-mail que deseja conectar (❓: ajuda).
- Clique no botão azul Conectar:
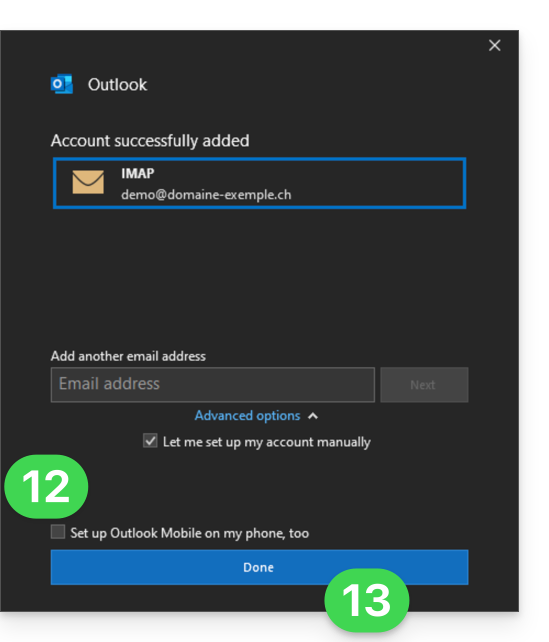
- Desmarque, se necessário, a caixa de seleção para configurações adicionais do dispositivo móvel.
- Clique no botão azul Concluir:
- Mantenha-se ou volte ao menu Arquivo.
- Clique em Configurações da conta para corrigir algumas informações adicionadas automaticamente, mas incorretas.
- Clique em Configurações do servidor:
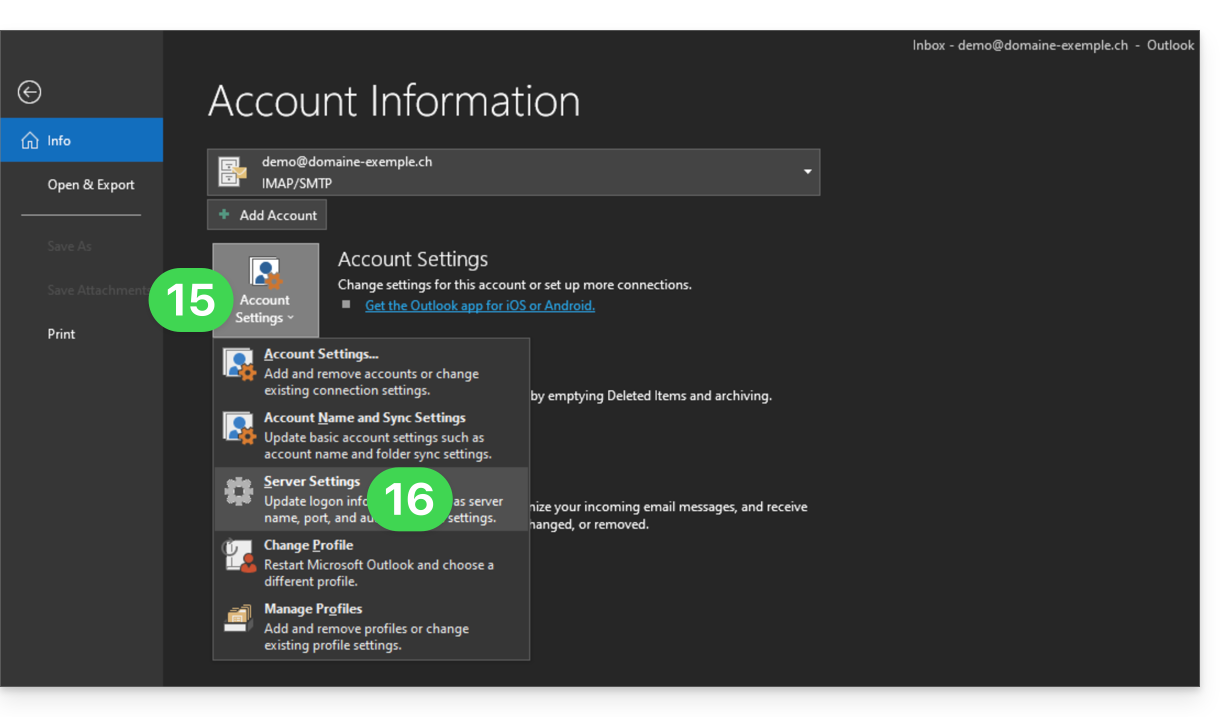
- Verifique e complete as informações em falta (❓: ajuda).
- Clique no ícone de seta para baixo Correio de saída:
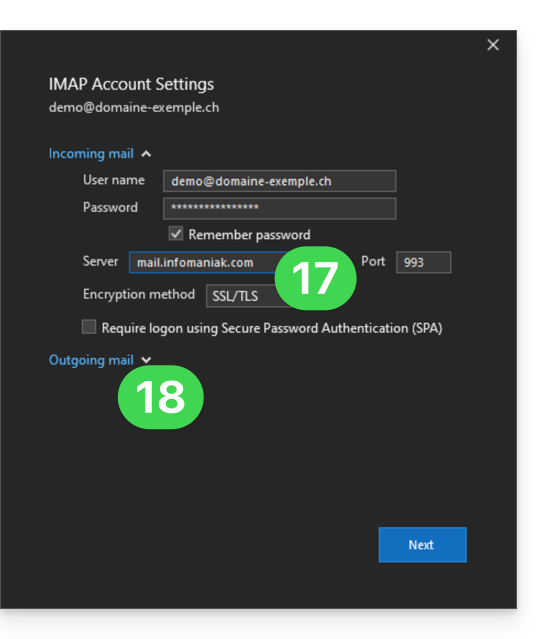
- Verifique e complete as informações que estiverem faltando (❓: ajuda).
- Clique em Seguinte:
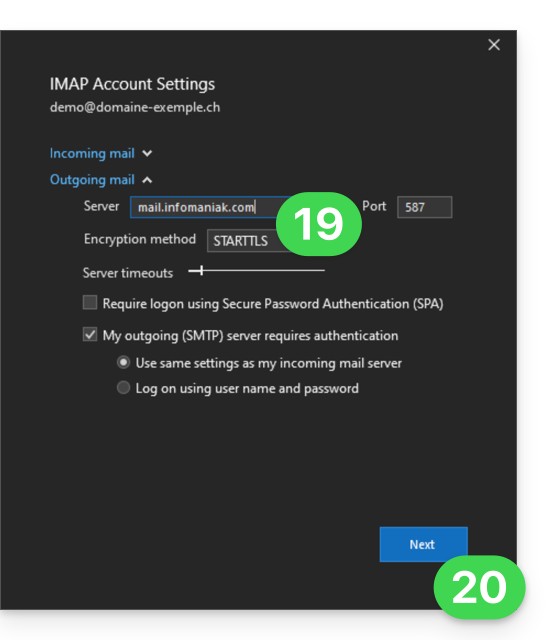
- Clique em Concluir:
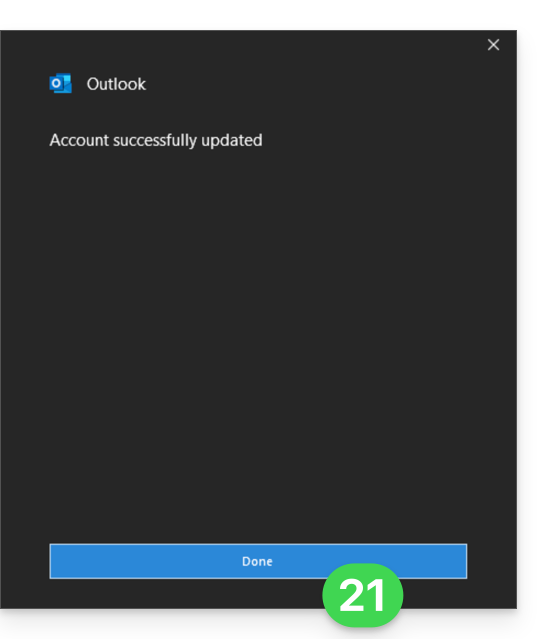
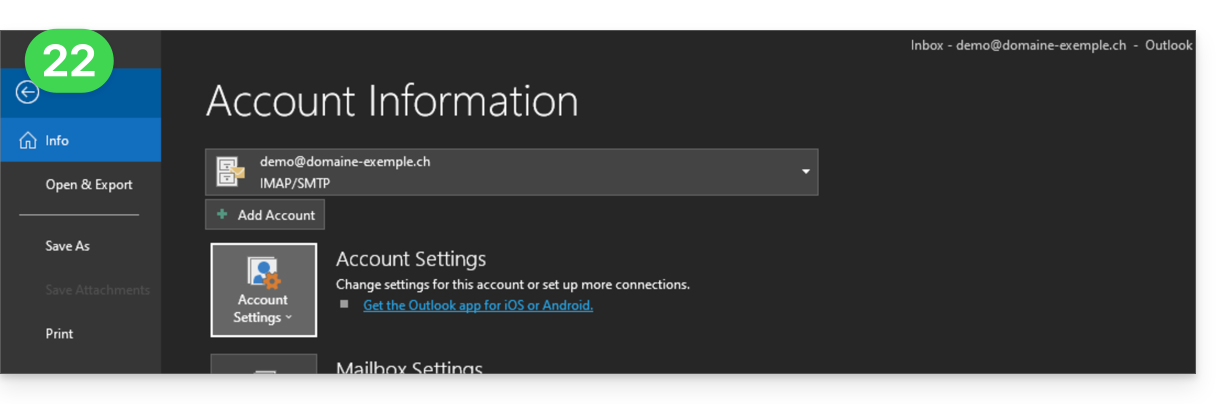
- Volte à página inicial; pronto, o seu endereço de e-mail está agora corretamente configurado na aplicação:
Configurações recomendadas
- Servidor IMAP de entrada =
mail.infomaniak.com - Porta IMAP =
993(com SSL) - Servidor SMTP de saída =
mail.infomaniak.com - Porta SMTP e protocolo de criptografia e comando/método para ativar este protocolo:
587+ STARTTLS - Nome de utilizador/username = o endereço de e-mail completo (❓: ajuda)
- Palavra-passe/password = a palavra-passe gerada para o endereço de e-mail que pretende consultar (❓: ajuda my kSuite | Serviço de E-mail/kSuite).
- Autenticação obrigatória para o envio de e-mails:
- Ative-a nas configurações SMTP da sua aplicação.
- Marque "usar as mesmas configurações do servidor de entrada" ou, dependendo do software/cliente de e-mail, insira um nome de usuário (= endereço de e-mail completo) e a senha gerada.
Consulte este outro guia se precisar de informações sobre outras portas e protocolos de e-mail compatíveis (SSL / TLS, por exemplo).
Em caso de problema
Verifique se o Serviço de E-mail está configurado de forma otimizada (❓: ajuda).
Não é necessário entrar em contato com o Suporte Infomaniak se o seu endereço de e-mail funcionar corretamente fora do aplicativo. O erro mais comum está relacionado ao uso de uma senha incorreta. Os guias de solução de problemas ajudarão você a resolver qualquer problema:
- Consulte as soluções apresentadas neste outro guia sobre e-mail em geral.
- Este outro guia trata especificamente do Outlook.
… e se o seu Outlook deixou de funcionar após uma alteração da palavra-passe do e-mail, consulte este outro guia.
Link para esta FAQ: https://faq.infomaniak.com/2354
Esta seção de perguntas frequentes foi útil?
Este guia explica como alterar a senha da sua conta Infomaniak (= conta do usuário) no Manager, a interface de administração dos seus produtos Infomaniak.
Introdução
- Esta senha também permite que você acesse o kSuite e os diversos aplicativos iOS/Android, como o kDrive, o Infomaniak Mail, etc. (saiba mais)mas não é a senha do seu endereço de e-mail!
- Se não conseguir iniciar sessão, não poderá alterar a sua palavra-passe; consulte este outro guia nesse caso.
Alterar a palavra-passe da sua conta Infomaniak
Para alterar a senha da sua conta Infomaniak:
- Clique aqui para acessar o gerenciamento das suas configurações (Painel de Controle Infomaniak).
- Clique em Editar na caixa Configurações de login, em senha de login:
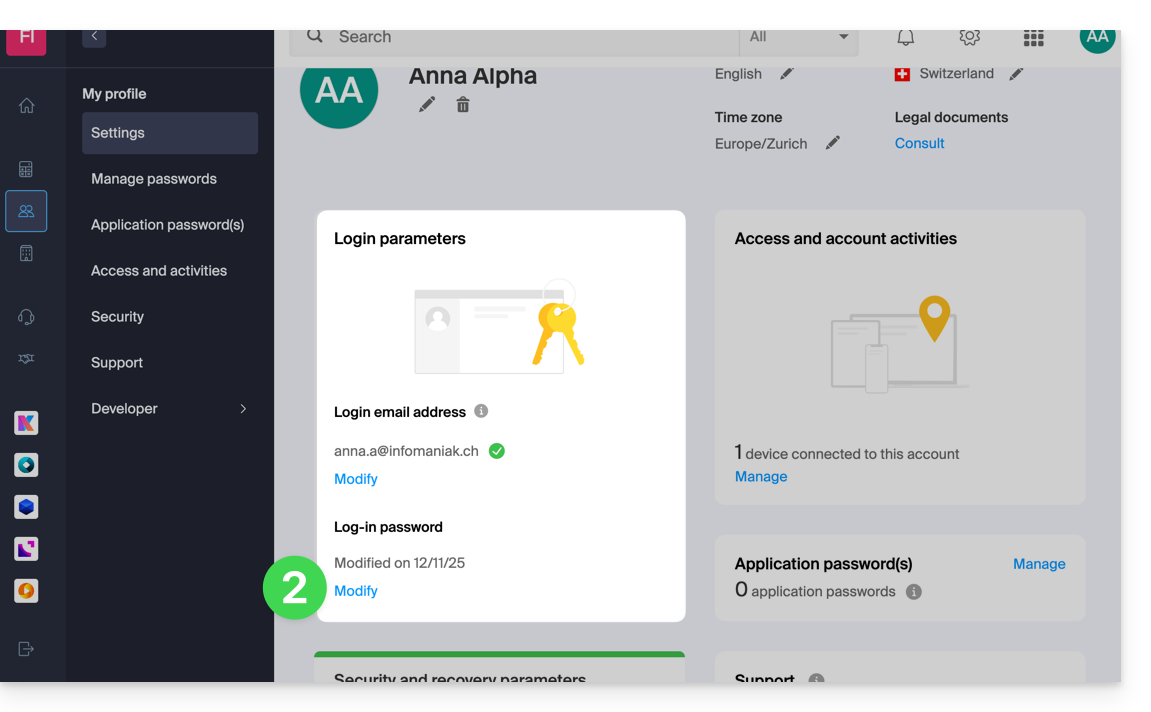
- Clique em Editar:
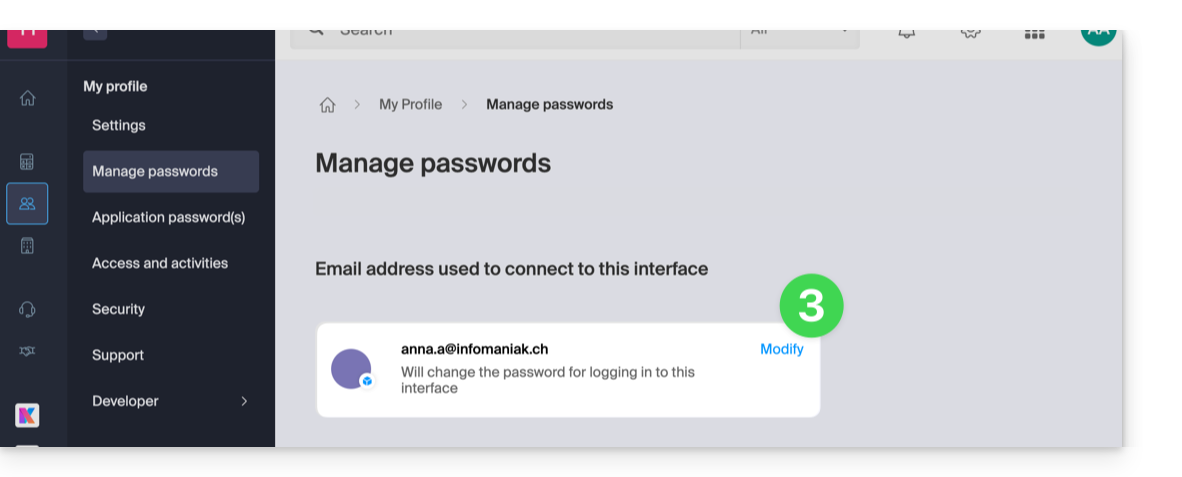
- Indique a senha atual de login e a nova senha desejada.
- Clique em Salvar.
Link para esta FAQ: https://faq.infomaniak.com/2359
Esta seção de perguntas frequentes foi útil?
Este guia detalha as diferentes opções disponíveis na ferramenta de filtragem de e-mails recebidos (com base em regras de triagem) do Mail Infomaniak.
Introdução
- Consulte este outro guia se precisar de informações sobre como configurar os filtros de classificação na sua conta de e-mail Infomaniak.
Descubra as opções disponíveis
O significado destas diferentes condições e critérios existentes é detalhado abaixo:
De
Permite filtrar as mensagens com base no remetente (e decidir o que fazer com os e-mails que sempre chegam da mesma pessoa ou do mesmo domínio, por exemplo).
A
Permite filtrar as mensagens com base no destinatário (se receber um e-mail que é sempre endereçado a um destinatário principal específico, por exemplo benevoles@domain.xyz).
Cc
Permite filtrar as mensagens com base no destinatário mencionado no campo Cc (que, portanto, recebe o e-mail em cópia, além do destinatário principal).
Assunto
Permite filtrar as mensagens com base no assunto da mensagem.
Responder a
Permite filtrar as mensagens verificando o conteúdo do campo reply-to (condição específica - exemplo).
Tamanho
Permite filtrar as mensagens com base no seu tamanho.
Conteúdo da mensagem
Permite filtrar as mensagens com base em determinadas palavras que estejam presentes no corpo da mensagem recebida.
Tipo de e-mail
Permite filtrar as mensagens com base no cabeçalho x-infomaniak-type, cujo valor pode ser ham, spam, transactional e bounce.
No caso de utilização de uma condição "tipo de e-mail = publicidade, redes sociais", a ação escolhida será executada antes do filtragem de publicidade, caso esta última esteja ativada.
Link para esta FAQ: https://faq.infomaniak.com/2360
Esta seção de perguntas frequentes foi útil?
Este guia explica como conectar o aplicativo móvel Apple Mail para iOS (iPhone, iPad…) a um endereço de e-mail hospedado na Infomaniak.
Introdução
- Em vez da configuração manual abaixo, recomenda-se usar os perfis de configuração .mobileconfig (❓: ajuda) fornecidos pela Apple ou o aplicativo Infomaniak Mail (iOS) para usufruir de um método de atualização do tipo Push.
Adicionar manualmente o endereço de e-mail ao aplicativo
Pré-requisitos
- Criar o endereço de e-mail (❓: ajuda my kSuite | Serviço de E-mail/kSuite).
- Criar uma senha para o dispositivo (❓: ajuda my kSuite | Serviço de e-mail/kSuite).
- Verificar se a configuração do domínio está correta (❓: ajuda).
Para configurar o aplicativo de e-mail:
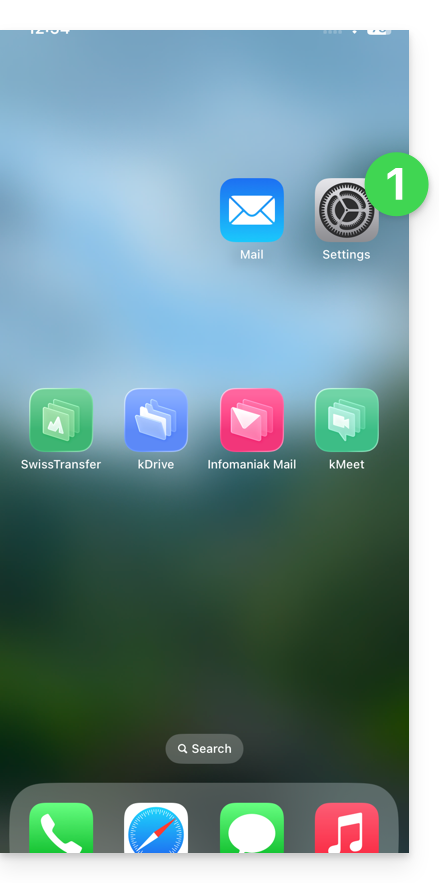
- Abra as configurações do iPhone:
- Toque em Apps:
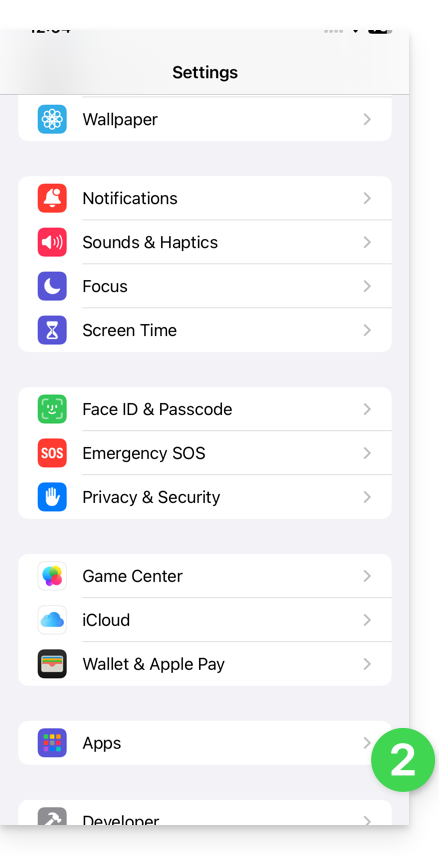
- Em Apps, toque em Mail:
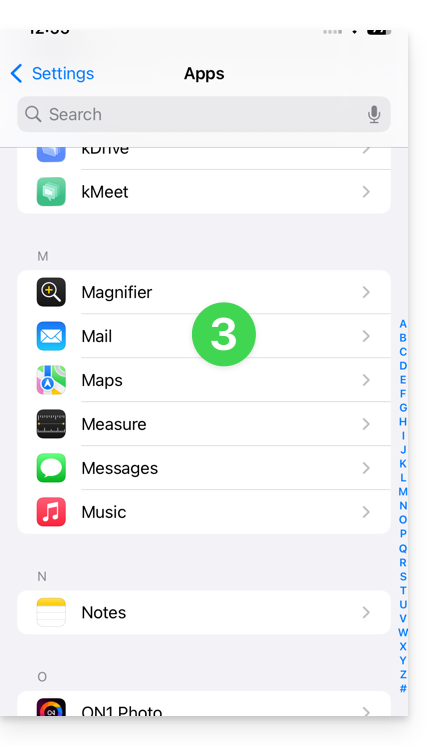
- Toque em Contas de e-mail:
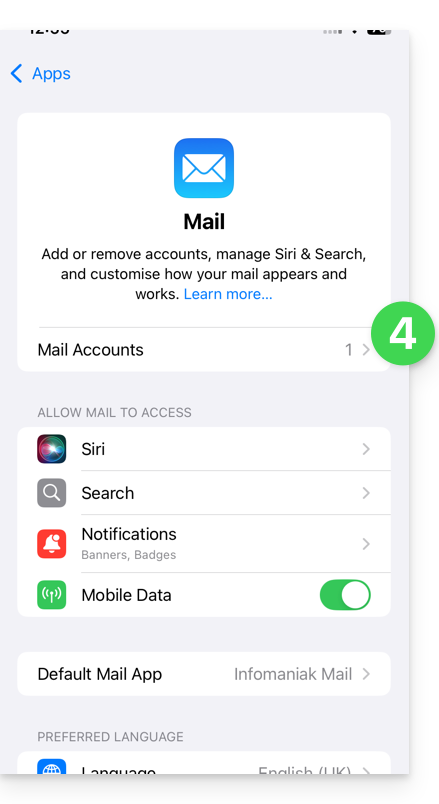
- Toque para adicionar uma conta:
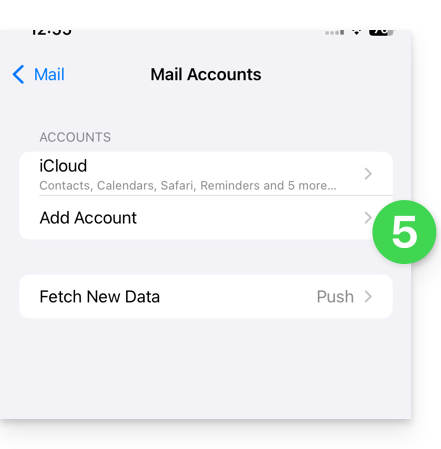
- Toque em Outra conta:
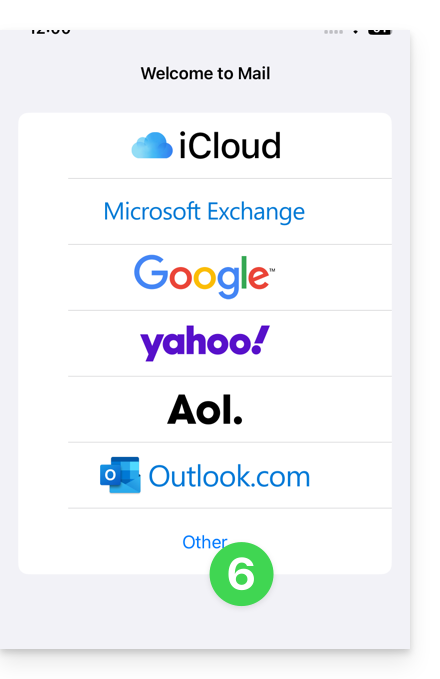
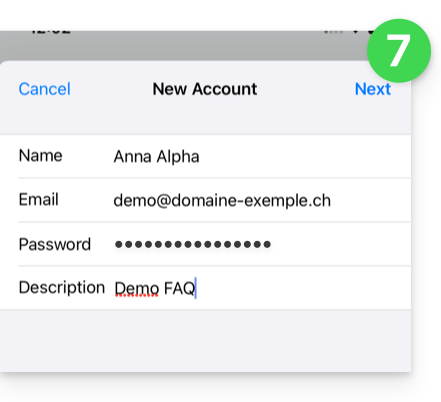
- Insira o endereço de e-mail e a senha da conta que deseja adicionar (consulte os pré-requisitos) e toque em Avançar:
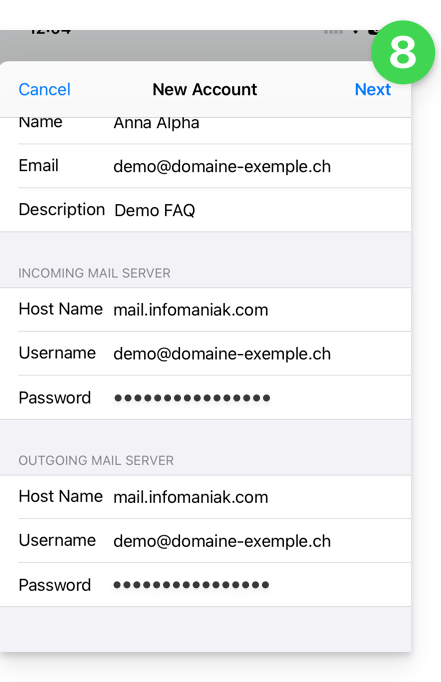
- Verifique e complete as informações que estão faltando (❓: ajuda) e, em seguida, clique em Avançar:
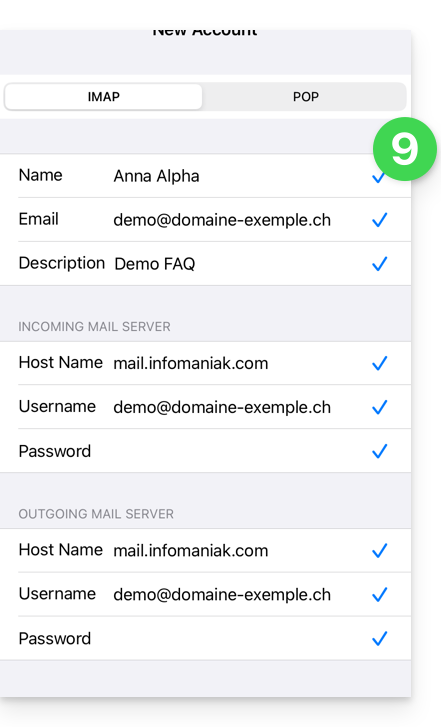
- O aplicativo indica que alguns campos são opcionais, mas isso não é verdade!
- A verificação IMAP deve ser realizada corretamente (não clique em POP)
- Ative o e-mail e salve a configuração no canto superior direito:
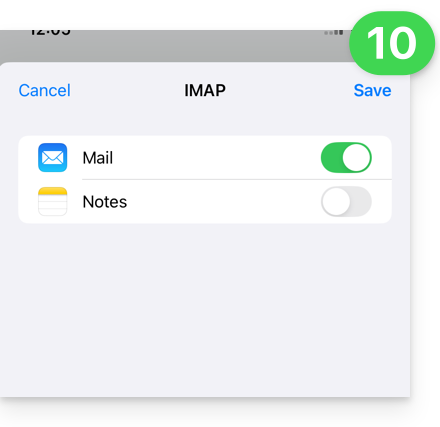
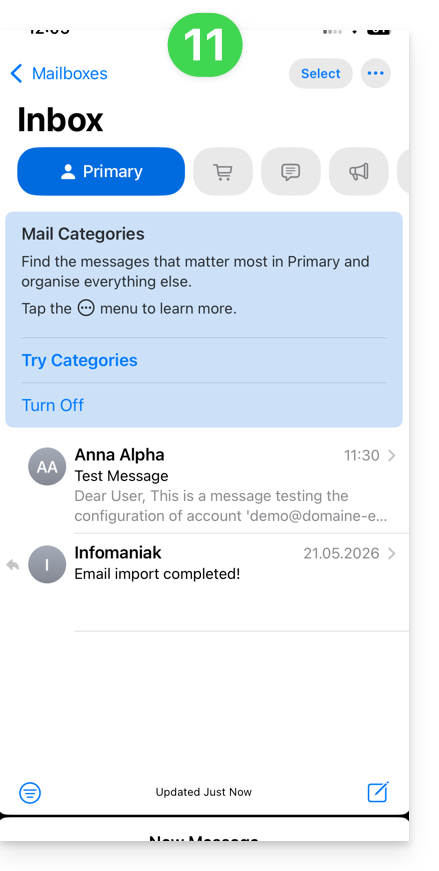
- Pronto, o seu endereço de e-mail já está configurado na aplicação:
Parâmetros recomendados
- Servidor IMAP de entrada =
mail.infomaniak.com - Porta IMAP =
993(com SSL) - Servidor SMTP de saída =
mail.infomaniak.com - Porta SMTP e protocolo de criptografia e comando/método para ativar este protocolo:
587+ STARTTLS - Nome de utilizador/username = o endereço de e-mail completo e integral (❓: ajuda)
- Senha/password = a senha gerada para o endereço de e-mail que você deseja consultar (❓: ajuda my kSuite | Serviço de e-mail/kSuite).
- Autenticação obrigatória para o envio de e-mails:
- Ative-a nas configurações SMTP do seu aplicativo.
- Marque "usar as mesmas configurações do servidor de entrada" ou, dependendo do software/cliente de e-mail, insira um nome de usuário (= endereço de e-mail completo) e a senha gerada.
Consulte este outro guia se precisar de informações sobre outras portas e protocolos de e-mail compatíveis (SSL/TLS, por exemplo).
Em caso de problemas
Verifique se o Serviço de Email está configurado de forma otimizada (❓: ajuda).
Não é necessário entrar em contato com o Suporte Infomaniak se o seu endereço de email funcionar corretamente fora da aplicação. O erro mais comum está relacionado ao uso de uma senha incorreta. Os guias de solução de problemas ajudarão você a resolver qualquer problema:
- Consulte as soluções apresentadas neste outro guia sobre o serviço de e-mail em geral.
- Remova quaisquer perfis de configuração da Applerelacionados à sua conta de e-mail Infomaniak antes de reiniciar a configuração.
E se o seu Apple Mail deixar de funcionar no envio (servidor SMTP desconectado ou ausente, por exemplo) ou após uma alteração de senha de e-mail, consulte este outro guia.
Link para esta FAQ: https://faq.infomaniak.com/2369
Esta seção de perguntas frequentes foi útil?
Este guia explica como recuperar o acesso às ferramentas Infomaniak (manager.infomaniak.com e Mail / ksuite.infomaniak.com) em caso de esquecimento da senha ou do identificador de login da conta Infomaniak.
Introdução
- Para se conectar em uma Organização que gerencia um ou mais produtos Infomaniak, acesse manager.infomaniak.com e insira as seguintes informações:
- Um endereço de e-mail para login (identificador para a conta Infomaniak).
- A senha escolhida durante o seu registro.
- Um código adicional se a autenticação de dois fatores (2FA) estiver ativa.
- Se a conexão à plataforma funcionar, mas você precisar de uma senha para um de seus endereços de e-mail, consulte este outro guia.
- Se o problema for, na verdade, um problema de exibição do formulário de login, especialmente em dispositivos móveis, consulte este outro guia sobre o assunto.
Esqueceu-se...
... a senha da conta Infomaniak
Em caso de esquecimento desta senha, siga o procedimento de redefinição:
- Clique aqui para poder redefinir a sua palavra-passe.
- Insira o endereço de e-mail utilizado para iniciar sessão na sua conta Infomaniak.
- Escolha a opção de recuperação desejada ou siga o procedimento de verificação de identidade clicando em “Não tem acesso a nenhuma opção”.
... o endereço de e-mail para iniciar sessão na sua conta Infomaniak
Ao efetuar o seu registo, deverá ter fornecido um número de telefone; é possível encontrar o endereço de e-mail para iniciar sessão na sua conta Infomaniaka partir do seu número de telefone:
- Clique aqui para poder recuperar o seu endereço de e-mail de acesso à conta Infomaniak.
- Insira o seu número de telemóvel.
- Insira (se necessário) o seu endereço de e-mail de recuperação.
Em seguida, duas situações são possíveis:
- O sistema consegue identificar a sua conta: escolha então como deseja receber o seu identificador de acesso à conta Infomaniak.
- Caso contrário, siga o assistente na tela para realizar a verificação de identidade manualmente ou via kCheck:
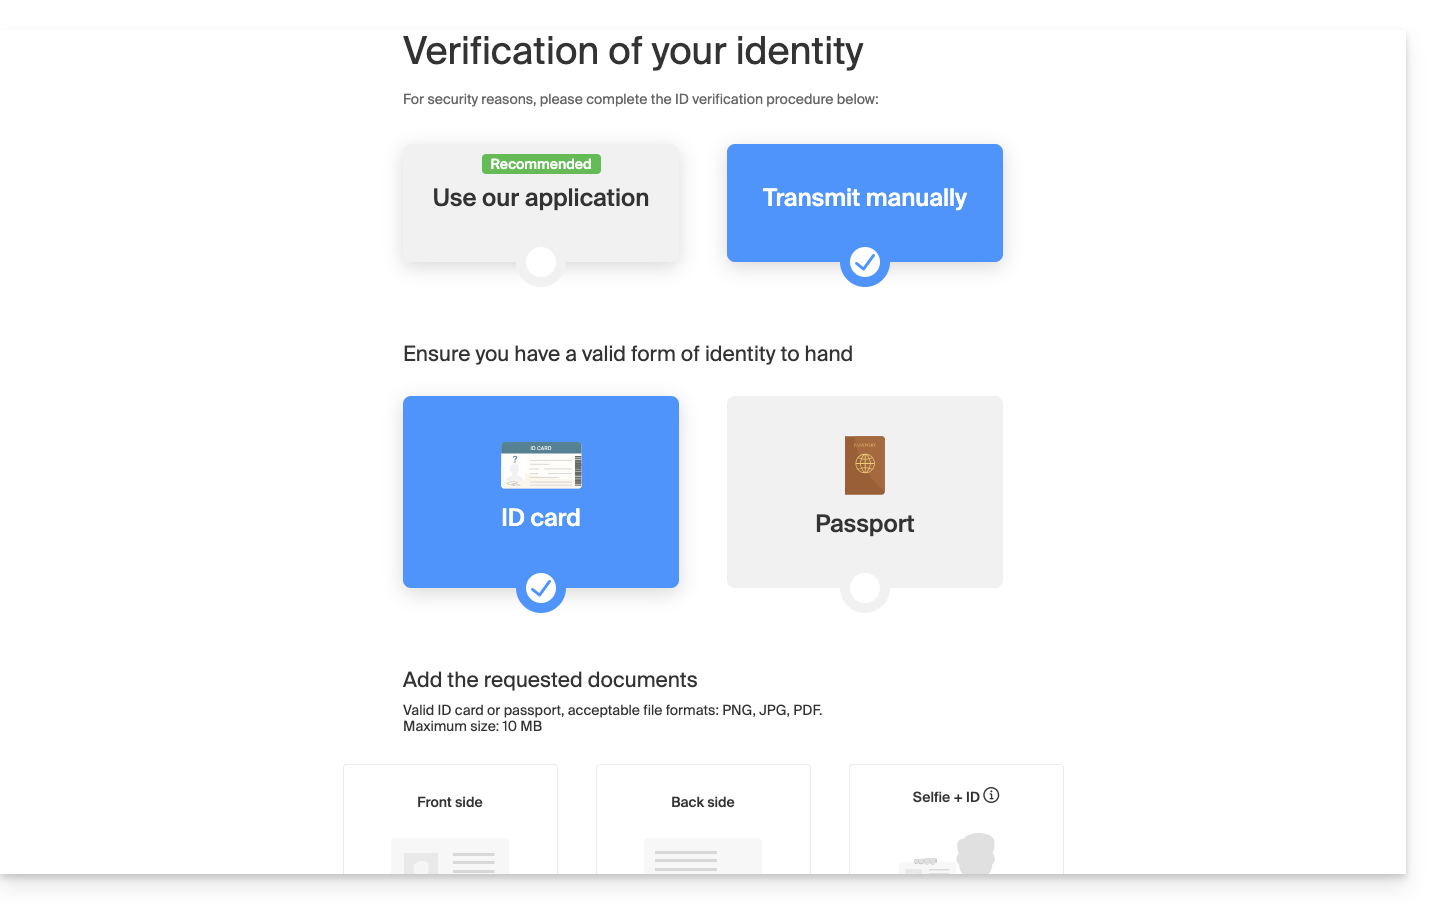
E se o endereço de e-mail não existir mais…
Se você tem uma conta Infomaniak cujo identificador de login é do tipo toto123@yahoo.com, não há problema se o endereço de e-mail toto123@yahoo.com for excluído ou deixar de ser válido. Basta fazer login uma última vez no Gerenciador Infomaniak com esse identificador toto123@yahoo.com e consultar este outro guia para alterar seu endereço de e-mail de login na conta Infomaniak.
Por outro lado, se o endereço de e-mail usado como identificador for hospedado pela Infomaniak (por exemplo, anna789@assoziation.ch) e um administrador excluir o endereço de e-mail em questão ou cancelar o Serviço de E-mail “assoziation.ch”, a situação é diferente: você receberá automaticamente um e-mail no endereço secundário e uma mensagem SMS no número de telefone celular especificado em sua conta Infomaniak: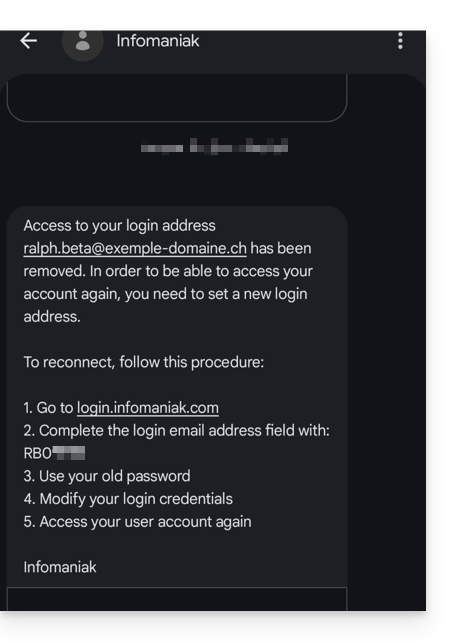
Esta situação também pode ocorrer em um caso específico de gestão de serviço de e-mail.
Para que o utilizador possa voltar a aceder à sua conta Infomaniak, agora que o acesso não é mais possível com o endereço de e-mail antigo, o utilizador da conta Infomaniak deve aceder ao endereço mencionado no SMS:
- Clique aqui para acessar a página de login.
- Insira o nome de usuário especificado no SMS (geralmente as iniciais da sua conta seguidas de uma sequência de números).
- Insira a senha habitual (ela não foi alterada):
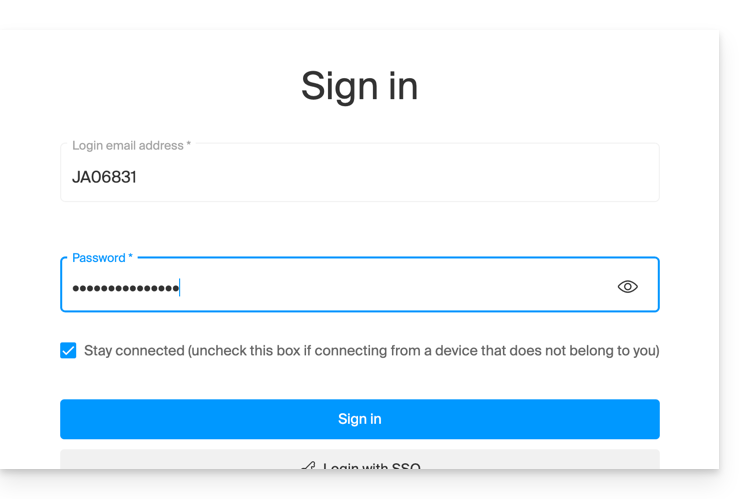
- Insira as novas informações solicitadas:
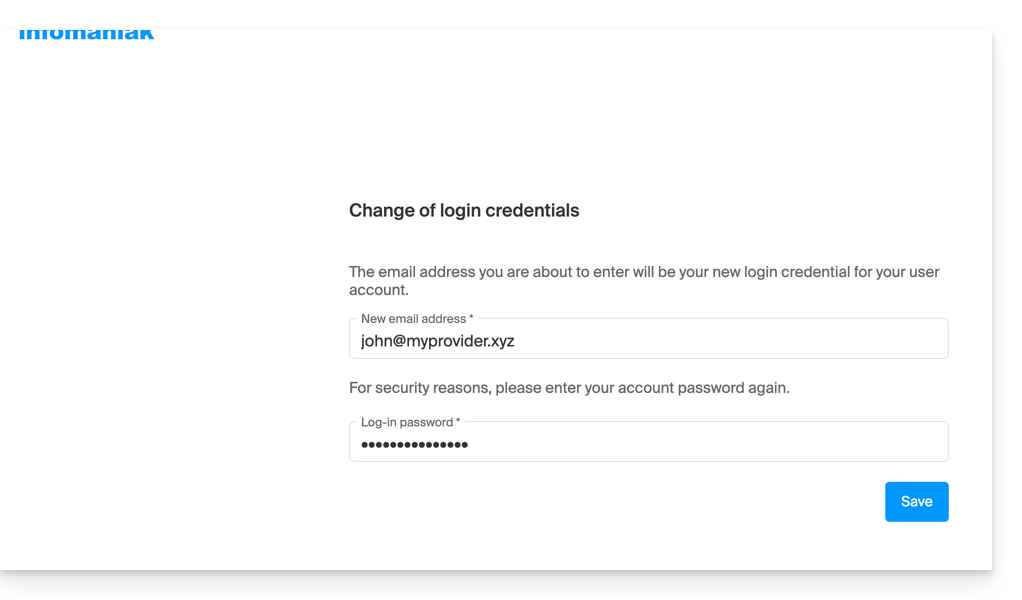
- Você será conectado novamente à sua conta:
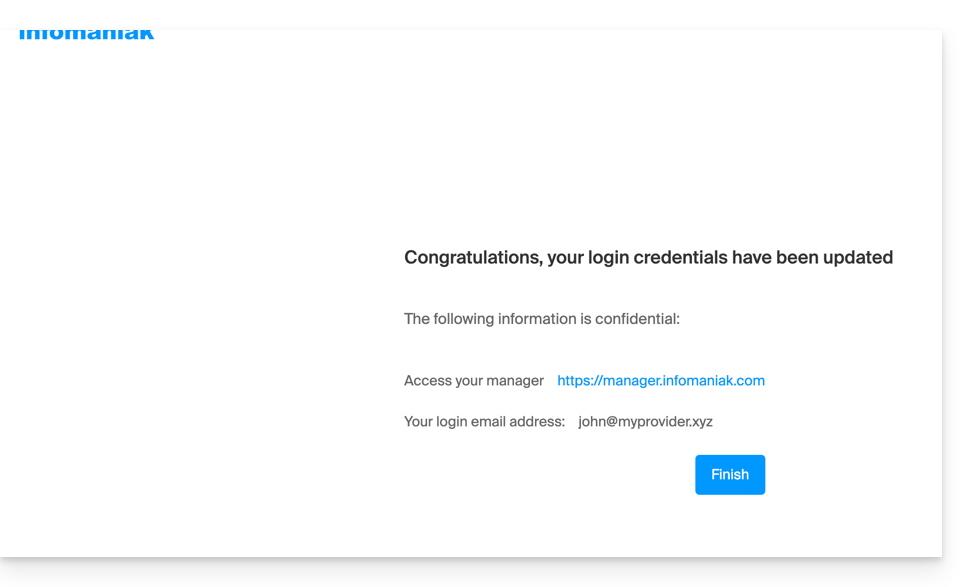
Link para esta FAQ: https://faq.infomaniak.com/2415
Esta seção de perguntas frequentes foi útil?
Este guia diz respeito à aplicação móvel kCheck (aplicação para smartphones ou tablets iOS/Android), criada para simplificar os procedimentos de verificação de identidade e reforçar a segurança da sua conta Infomaniak.
Introdução
- Por razões de segurança, para garantir a identidade da pessoa que efetua um pedido específico à Infomaniak, um procedimento de verificação de identidade pode ser ativado nos seguintes casos (lista não exaustiva):
- esquecimento da palavra-passe da conta Infomaniak (conta de utilizador)
- esquecimento do endereço de e-mail de acesso
- desativação da autenticação de dois fatores (2FA)
- desbloqueio de uma conta Infomaniak
- durante o primeiro pagamento de receitas para o produto Bilheteira
- durante a encomenda de um produto (suspeita de spam ou fraude, nome da marca, etc.)
- Esta aplicação permite-lhe transferir com segurança os elementos solicitados.
- A Infomaniak respeita a sua privacidade: as informações transmitidas através da aplicação kCheck serão guardadas até ao tratamento completo do seu pedido; em todos os casos, serão automaticamente eliminadas após 72 horas caso este pedido não seja tratado.
Iniciar a verificação de identidade
Pré-requisitos
- Um código QR ou um link fornecido pela Infomaniak.
- A aplicação móvel kCheck instalada no seu dispositivo iOS (iPhone, etc.) ou Android.
- Uma ligação à Internet no dispositivo móvel.
Pode então fazer verificar a sua identidade com o kCheck:
- Inicie o aplicativo kCheck no seu celular.
- Toque em Iniciar.
- Toque em Ler código QR.
- Aponte a câmera para o código QR fornecido.
- Insira o seu número de telefone.
- Digite o código de confirmação recebido.
- Autorize a geolocalização (obrigatório para continuar o processo).
- Selecione o tipo de documento de identificação que você possui (carteira de identidade ou passaporte).
- Siga as instruções para fotografar o seu documento de identificação.
- Tire uma selfie (sua) com o seu documento de identificação na mão, à sua frente.
Seus documentos serão então transmitidos de forma segura para o suporte da Infomaniak. Essas solicitações são tratadas com prioridade, com um tempo médio de resposta de 2 horas durante o horário de atendimento.
Se o seu pedido estiver bloqueado...
Por motivos de segurança, alguns pedidos podem ser bloqueados automaticamente.
No momento do seu pedido, um e-mail é enviado para o endereço de e-mail de login da sua conta Manager Infomaniak. Este e-mail contém o procedimento para desbloquear o seu pedido. Caso não o encontre, é possível reenviá-lo a partir do seu Manager, clicando em Reenviar o procedimento a partir da barra vermelha que informa sobre o bloqueio.
Pré-requisitos
- Abrir o e-mail contendo o procedimento de desbloqueio.
- O aplicativo móvel kCheck instalado no seu dispositivo iOS (iPhone, etc.) ou Android.
- Uma conexão de internet no dispositivo móvel.
Em seguida, pode iniciar o processo de desbloqueio com o kCheck:
- Abra a aplicação kCheck no seu telemóvel.
- Toque em Iniciar.
- Toque em Ler código QR.
- Leia o código QR presente no e-mail.
- Siga o processo de desbloqueio até ao fim.
Casos particulares
- Caso não haja qualquer ação da sua parte num prazo de 10 dias, o pedido será automaticamente cancelado e o pagamento será integralmente reembolsado no método de pagamento utilizado.
- Caso não tenha um dispositivo móvel para seguir este processo, contacte o suporte da Infomaniak.
Link para esta FAQ: https://faq.infomaniak.com/2418
Esta seção de perguntas frequentes foi útil?
Este guia explica como aceder aos seus e-mails alojados pela Infomaniak.
Guias para o serviço de e-mail Infomaniak
Clique aqui para abrir o assistente Infomaniak e configurar a sincronização no macOS, Windows, Linux, Android e iOS dos programas/clientes de e-mail mais comuns (Outlook, Microsoft 365, Thunderbird, Apple Mail, eM Client, etc.). Ele permitirá que você obtenha as configurações recomendadas e também crie a senha IMAP/SMTP necessária para sua configuração.
Caso contrário, use diretamente o e-mail em um navegador da web, através do aplicativo web Mail da Infomaniak (serviço online ksuite.infomaniak.com/mail) e/ou baixe o aplicativo móvel Infomaniak Mail (aplicativo para smartphone ou tablet iOS/Android).
Aqui estão também guias para procedimentos manuais específicos:
| OS | Aplicação a sincronizar |
|---|---|
| Outlook Novo / Microsoft 365 MSO / 2019 (Windows) | |
| Outlook Microsoft 365 MSO (macOS) | |
| Apple Mail (perfil de configuração macOS) | |
| Apple Mail (perfil de configuração iOS: iPhone, iPad, etc.) | |
| Mail (Android: Huawei, Samsung, Sony, etc.) | |
| Outlook (iOS + Android) | |
| Gmail (iOS + Android) | |
| Mozilla Thunderbird |
Para sincronizar os seus contactos e calendários, consulte este outro guia.
Parâmetros IMAP recomendados
Nome de utilizador/username = o endereço de e-mail completo e integral (❓: ajuda)
Palavra-passe/password = a palavra-passe gerada para o endereço de e-mail que pretende consultar (❓: ajuda my kSuite | Serviço de E-mail/kSuite).
Servidor IMAP de entrada = mail.infomaniak.com
Porta IMAP = 993 (com SSL)
Parâmetros SMTP recomendados
Nome de utilizador/username = o endereço de e-mail completo e integral (❓: ajuda)
Palavra-passe/password = a palavra-passe gerada para o endereço de e-mail que pretende consultar (❓: ajuda my kSuite | Serviço de E-mail/kSuite).
Servidor SMTP de saída = mail.infomaniak.com
Porta SMTP e protocolo de encriptação e comando/método para ativar este protocolo:
- Priorize a porta
587+ STARTTLS: esta é a norma técnica oficial e o método mais compatível com a maioria dos sistemas modernos para o envio autenticado. - Permita a porta
465+ SSL/TLS apenas como uma opção de compatibilidade ou alternativa, especificando que se trata de uma criptografia implícita, mas que a porta 587 continua sendo a opção recomendada.
Autenticação obrigatória para o envio de e-mails:
- Ative-a nas configurações SMTP da sua aplicação.
- Marque a opção "usar as mesmas configurações do servidor de entrada" ou, dependendo do software/cliente de e-mail, insira um nome de usuário (= endereço de e-mail completo) e sua senha.
Em caso de problema
Verifique os seguintes pontos:
- Verifique se o Serviço de Email está configurado de forma otimizada (❓: ajuda).
- Consulte este outro guia se encontrar erros, para verificar os pontos essenciais!
- Consulte este outro guia se precisar de informações sobre outras portas e protocolos de e-mail compatíveis.
- Protocolo POP3não recomendado (servidor POP = mail.infomaniak.com e porta POP = 995 com SSL).
Alterar uma senha de e-mail
As senhas para os endereços de e-mail podem ser múltiplas, não têm relação com a sua senha de login na Infomaniak e não podem ser recuperadas após a primeira vez em que são exibidas. Portanto, é necessário (re)criá-las sempre que precisar, especificando o dispositivo (computador, celular, etc.) e/ou o usuário em questão, para poder gerenciar as senhas de forma distinta no momento em que precisar gerenciar uma conexão específica.
Gerencie as senhas:
- através do Gerenciador no Serviço de Email❓: ajuda
- através do aplicativo web Email Infomaniak❓: ajuda
Aplicar a nova senha de e-mail
Se você excluiu uma senha existente para criar uma nova,terá de atualizar as suas aplicações e dispositivos que utilizavam esta palavra-passe:
- Apple Mail (macOS / iOS)❓: ajuda
- E-mail Android / Gmail (diferentes versões)❓: ajuda
- Microsoft Outlook (diferentes versões)❓: ajuda
- Mozilla Thunderbird❓: ajuda
Ainda não gere os seus e-mails na Infomaniak❓: ajuda
Link para esta FAQ: https://faq.infomaniak.com/2427
Esta seção de perguntas frequentes foi útil?
Este guia explica como conectar o Microsoft 365 a um endereço de e-mail hospedado na Infomaniak.
Introdução
- Os endereços de e-mail da Infomaniak não podem ser adicionados diretamente no Outlook online a partir de um navegador com uma conta Microsoft pessoal.
- De fato, a Microsoft não permite mais adicionar um endereço externo via IMAP em
outlook.live.com. - Apenas a caixa de e-mail da Microsoft vinculada à conta conectada (endereço
@outlook.fr,@outlook.com,@hotmail…) pode ser exibida. - “Microsoft 365” é principalmente a assinatura; a Microsoft removeu a função de contas conectadas no Outlook.com, e a função equivalente do Outlook na web também foi removida.
- De fato, a Microsoft não permite mais adicionar um endereço externo via IMAP em
- Para consultar um endereço Infomaniak com o Outlook, é necessário instalar o aplicativo Outlook ou usar um outro software/cliente de e-mail compatível com IMAP.
Obter o aplicativo Outlook 365
Para isso:
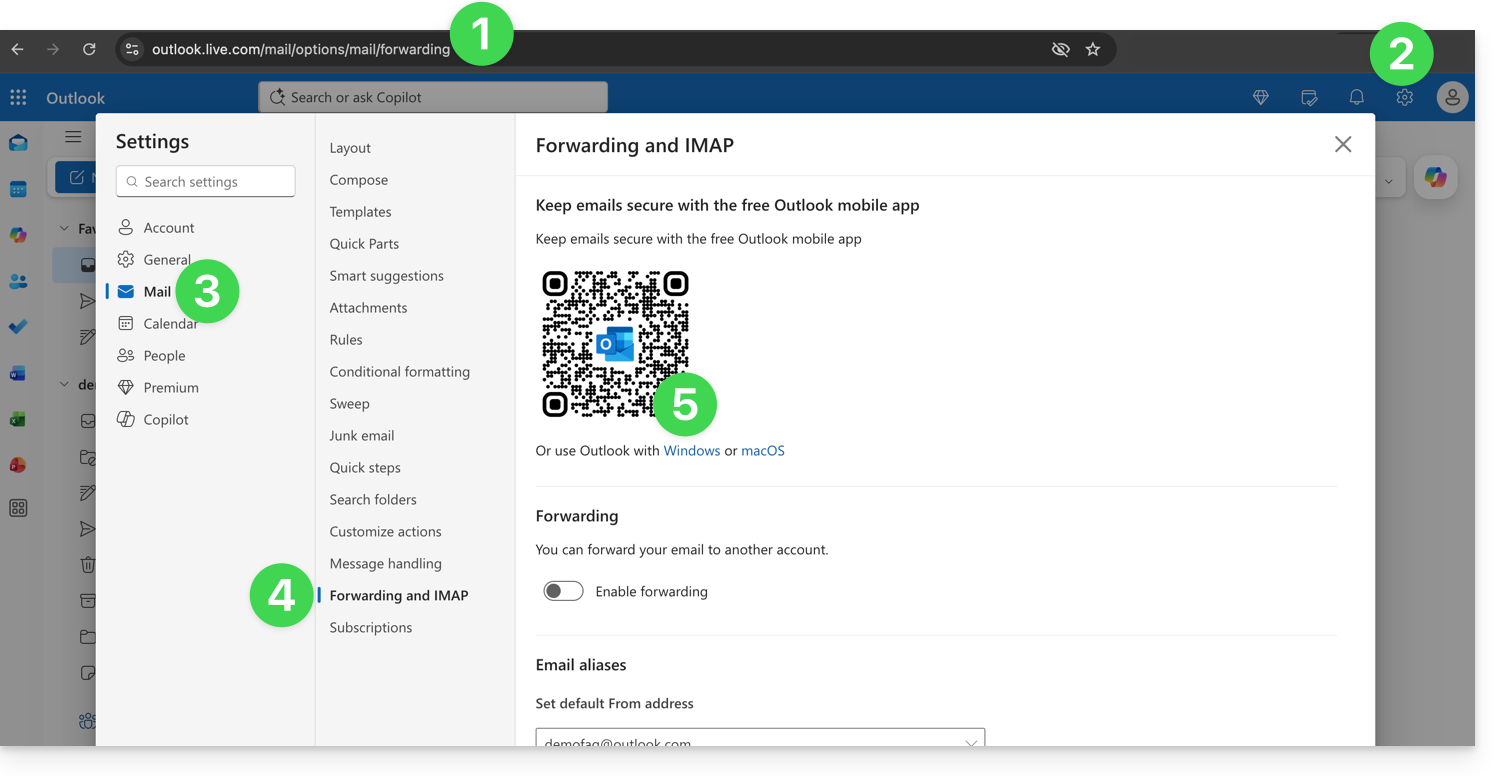
- Acesse https://outlook.live.com/mail/options/mail/forwarding com sua conta Microsoft pessoal.
- Clique no ícone Configurações no canto superior direito da interface.
- Clique em E-mail no menu lateral esquerdo.
- Clique em Encaminhamento e IMAP no menu secundário.
- Baixe o aplicativo Outlook na versão correspondente ao seu tipo de dispositivo:
Adicionar o endereço de e-mail ao aplicativo Outlook 365
No macOS, consulte este outro guia.
No Windows, consulte este outro guia e, em dispositivos móveis (iOS / Android), consulte este outro guia.
Link para esta FAQ: https://faq.infomaniak.com/2428
Esta seção de perguntas frequentes foi útil?
Este guia explica como conectar o aplicativo para desktop eM Client (aplicativo para macOS/Windows) a um endereço de e-mail hospedado na Infomaniak.
Adicionar o endereço de e-mail ao aplicativo
Pré-requisitos
- Criar o endereço de e-mail (❓: ajuda my kSuite | Serviço de E-mail/kSuite).
- Criar uma senha para o dispositivo (❓: ajuda my kSuite | Serviço de e-mail/kSuite).
- Verificar se a configuração do domínio está correta (❓: ajuda).
Para configurar o aplicativo de e-mail:
- Abra o aplicativo e clique em Contas:
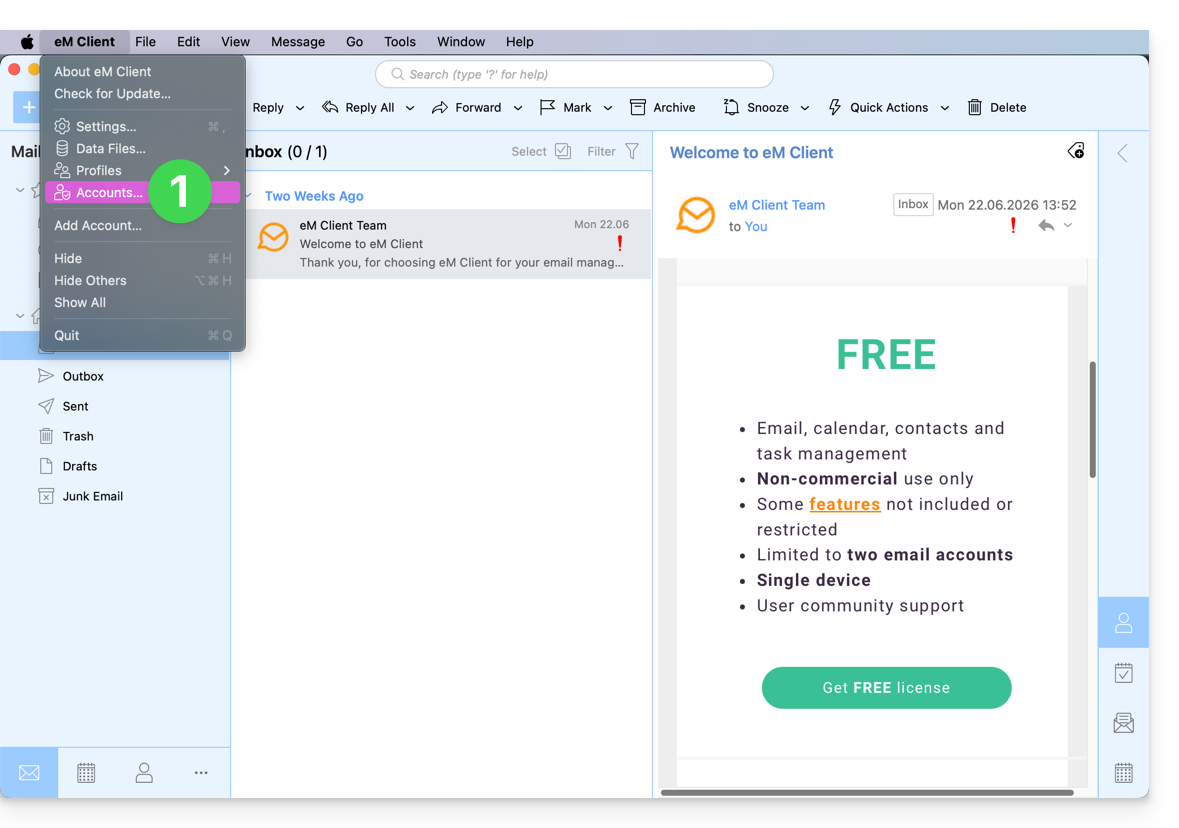
- Clique em Adicionar conta:
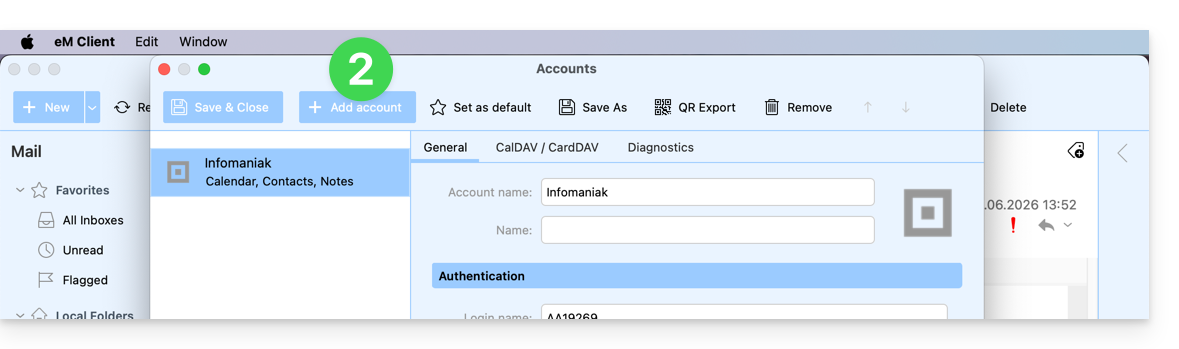
- Insira o endereço de e-mail que deseja adicionar e clique no botão Iniciar ao lado do campo:
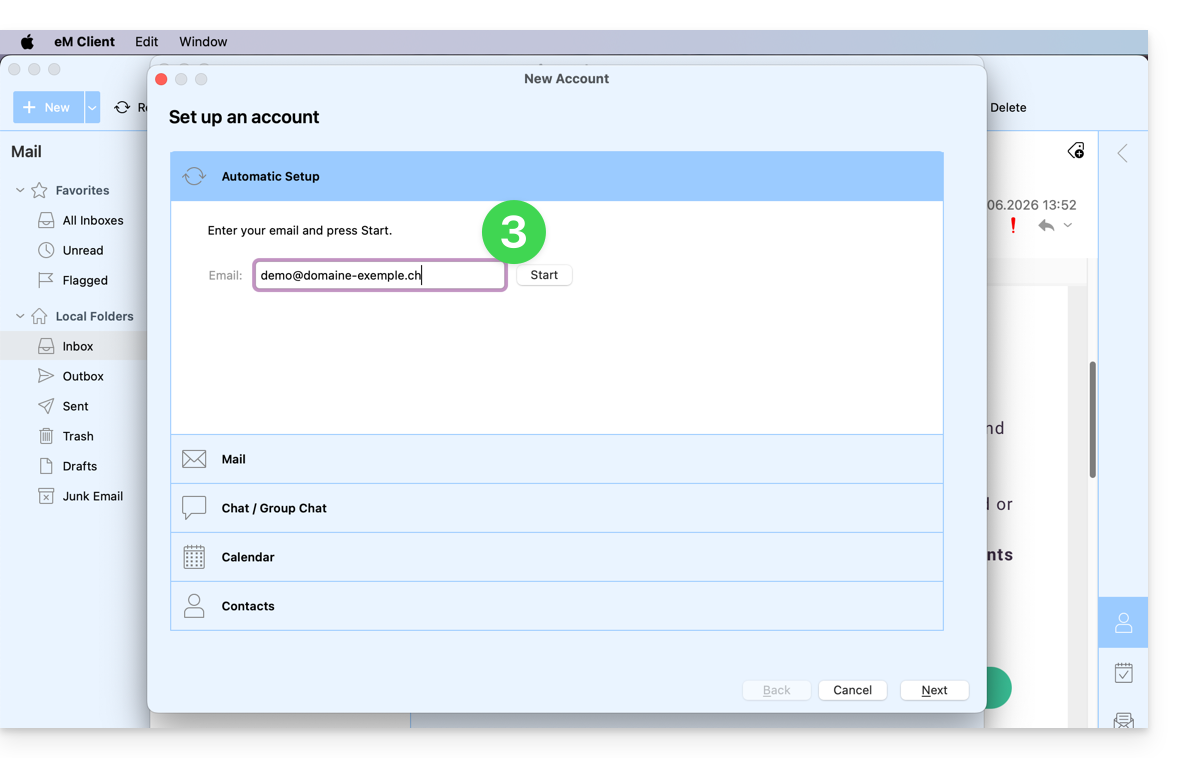
- Clique no botão para inserir manualmente os parâmetros:
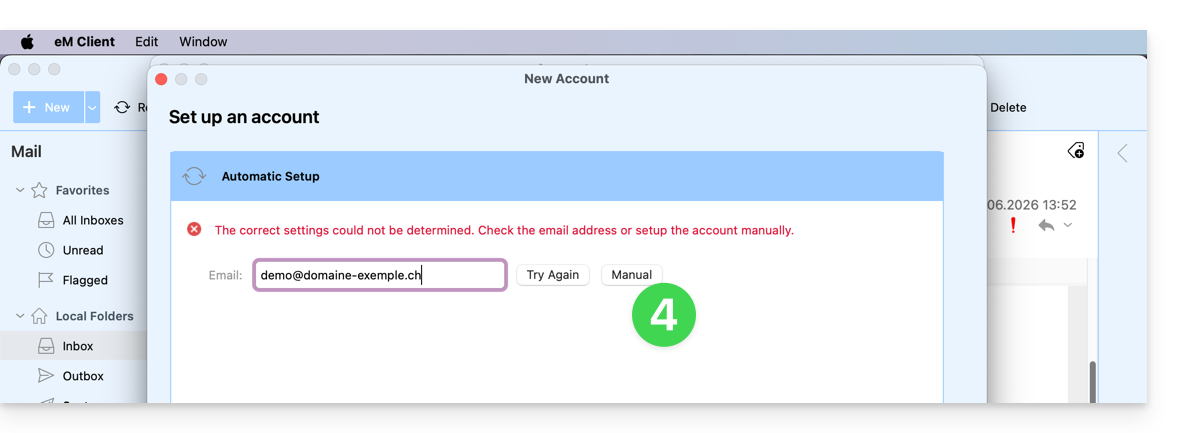
- Verifique o servidor de entrada e preencha as informações que faltam (❓: ajuda) e, em seguida, clique em Seguinte:
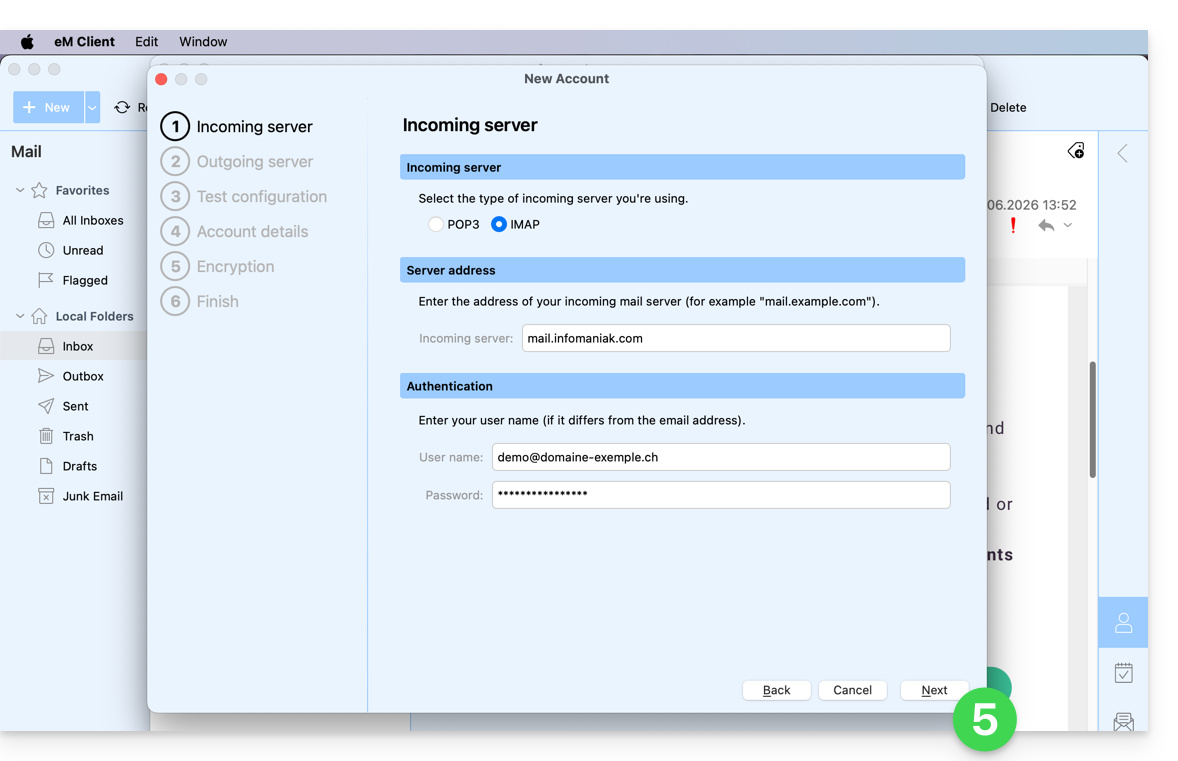
- Faça o mesmo para o servidor de saída:
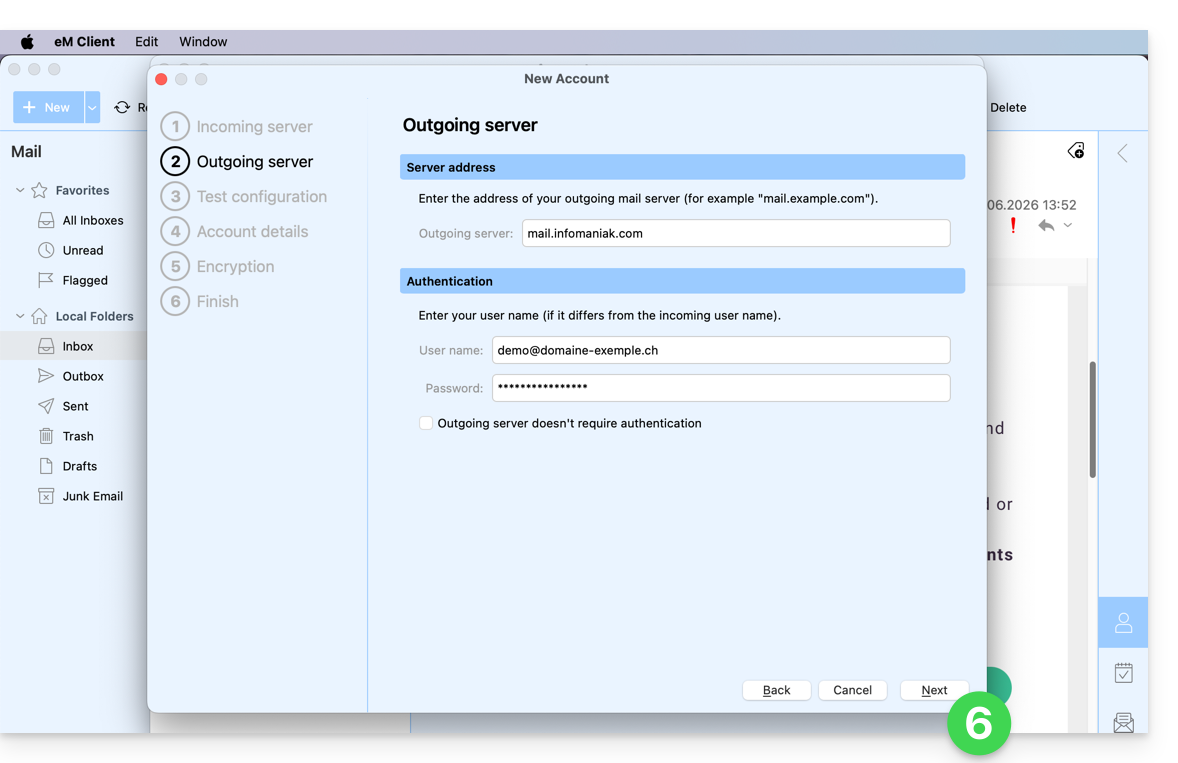
- Se os indicadores do teste estiverem verdes, clique em Seguinte:
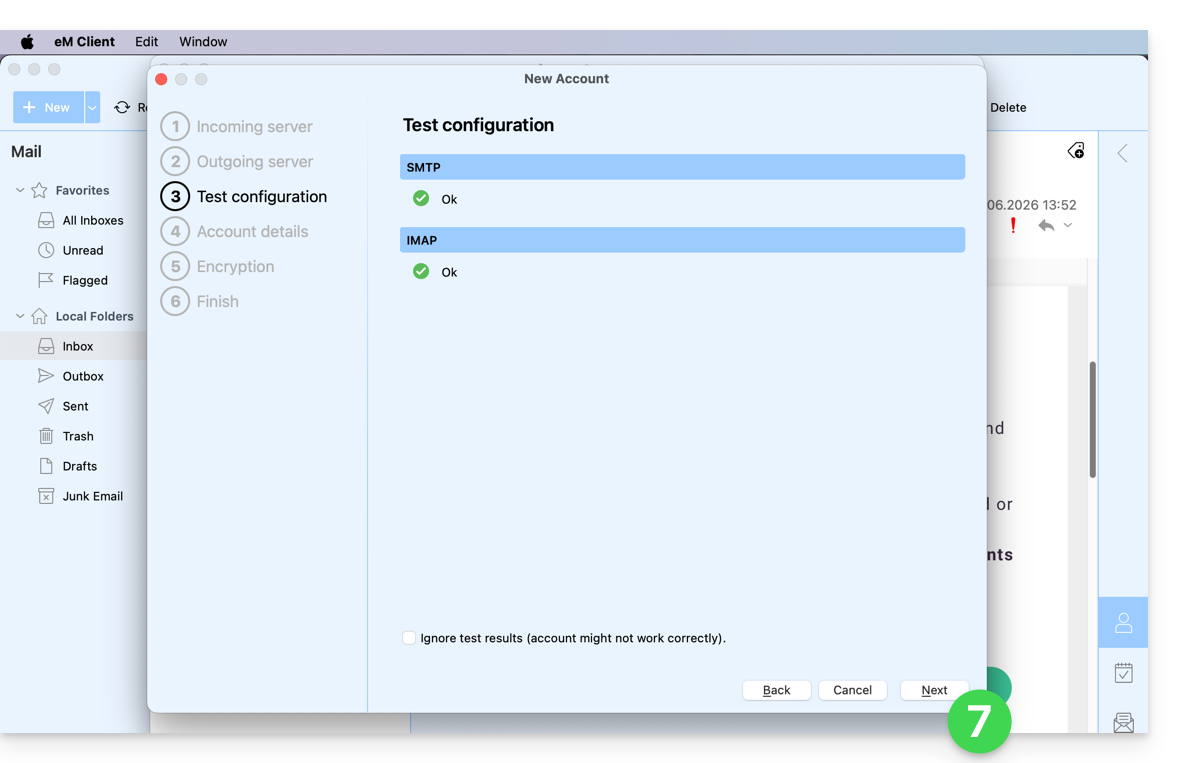
- Preencha as informações em falta e, em seguida, clique em Seguinte:
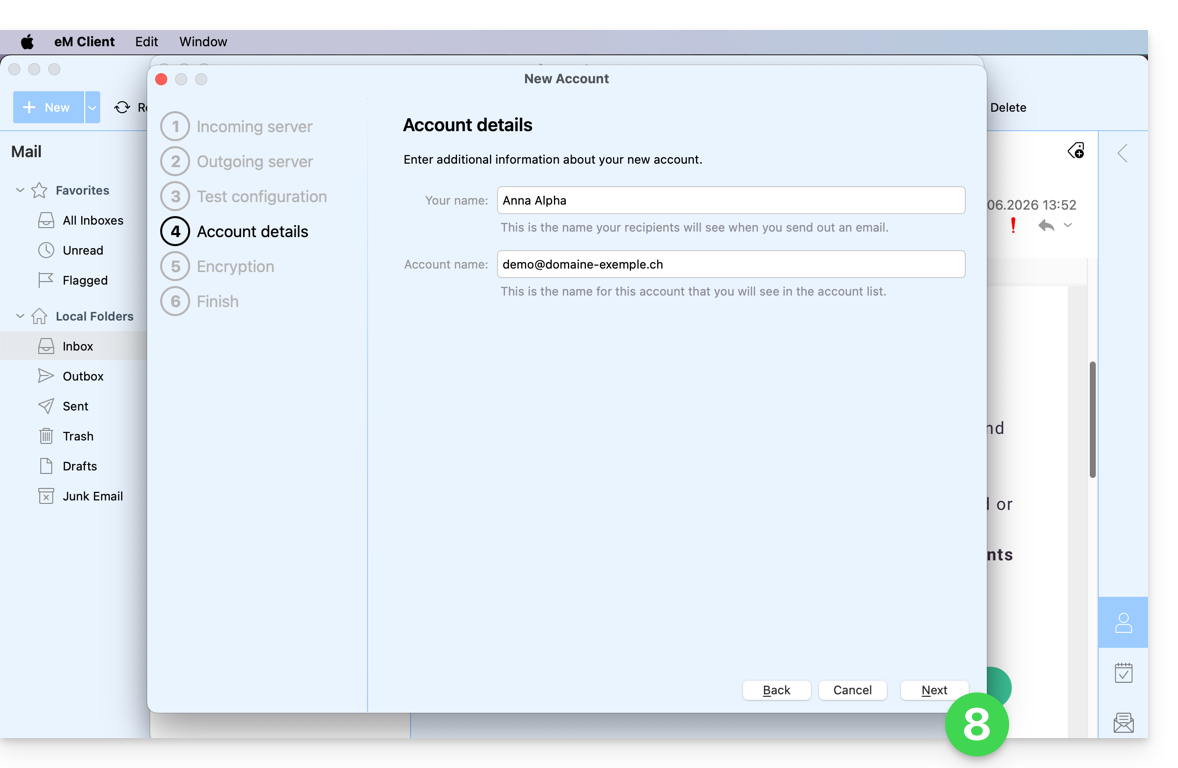
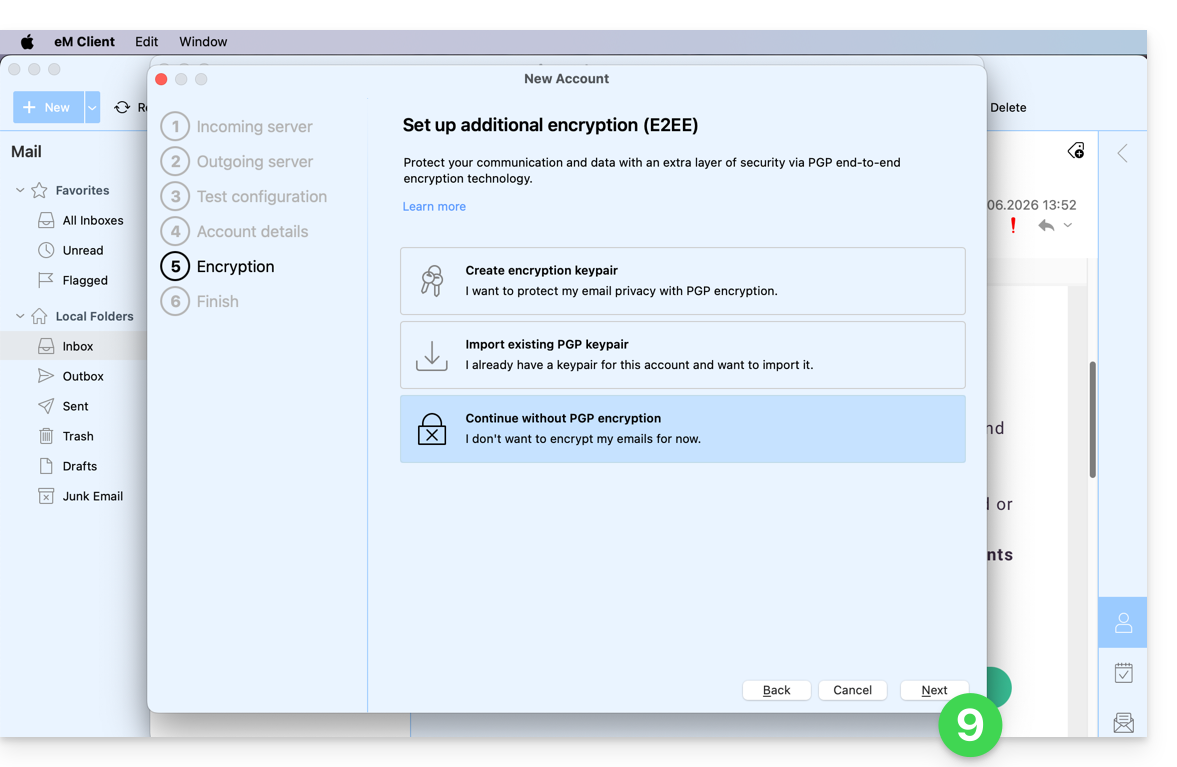
- Ignore esta etapa e não adicione segurança adicional:
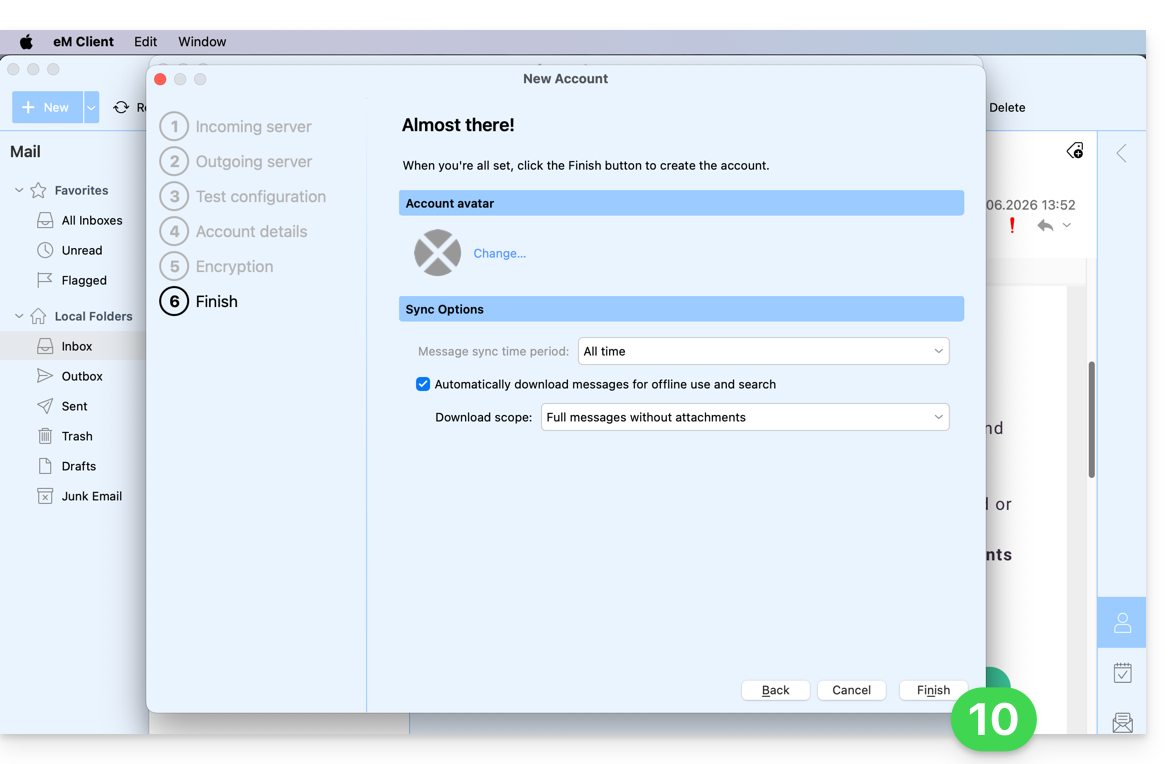
- Defina as suas preferências e clique em Concluir:
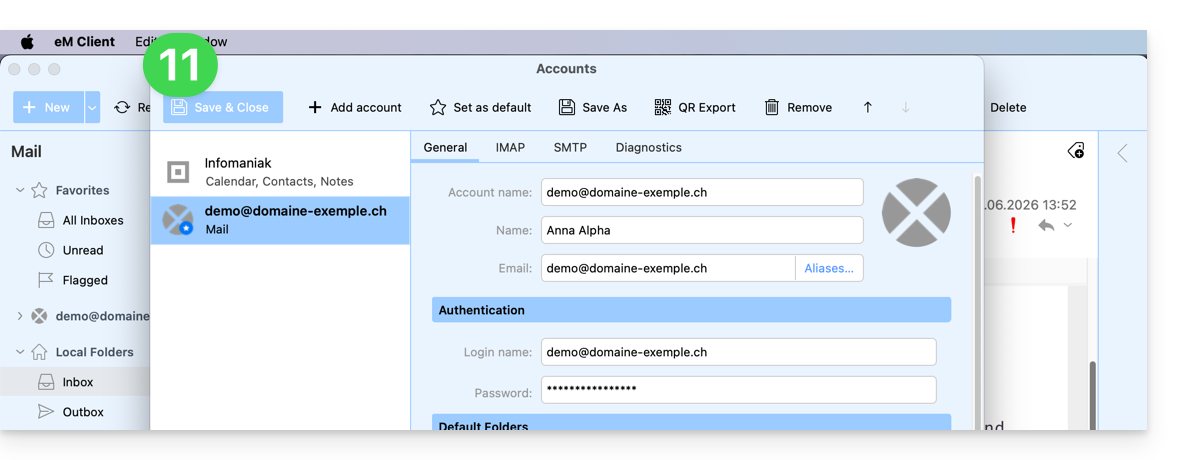
- Guarde a adição da conta:
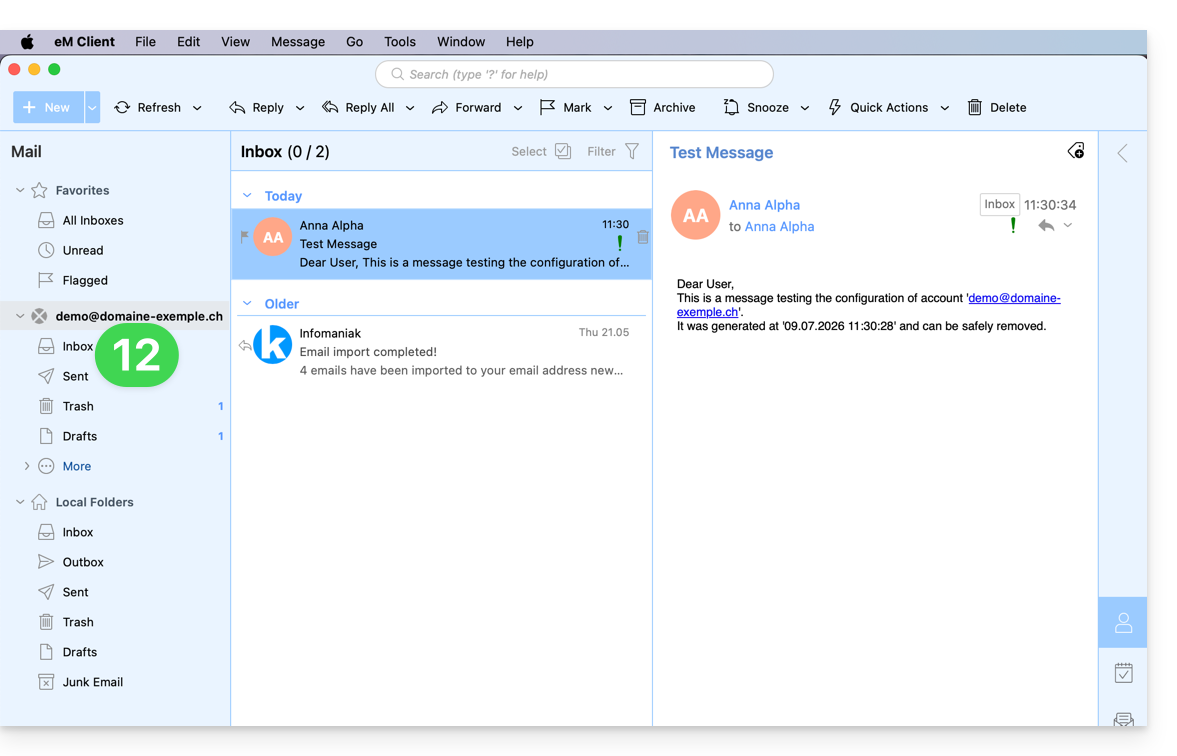
- Pronto, o seu endereço de e-mail já está configurado na aplicação:
Parâmetros recomendados
- Servidor IMAP de entrada =
mail.infomaniak.com - Porta IMAP =
993(com SSL) - Servidor SMTP de saída =
mail.infomaniak.com - Porta SMTP e protocolo de criptografia e comando/método para ativar este protocolo:
587+ STARTTLS - Nome de utilizador/username = o endereço de e-mail completo (❓: ajuda)
- Palavra-passe/password = a palavra-passe gerada para o endereço de e-mail que pretende consultar (❓: ajuda my kSuite | Serviço de E-mail/kSuite).
- Autenticação obrigatória para o envio de e-mails:
- Ative-a nas configurações SMTP da sua aplicação.
- Marque a opção "usar as mesmas configurações do servidor de entrada" ou, dependendo do software/cliente de e-mail, insira um nome de usuário (= endereço de e-mail completo) e a senha gerada.
Consulte este outro guia se precisar de informações sobre outras portas e protocolos de e-mail compatíveis (SSL / TLS, por exemplo).
Em caso de problema
Verifique se o Serviço de E-mail está configurado de forma otimizada (❓: ajuda).
Não é necessário entrar em contato com o Suporte Infomaniak se o seu endereço de e-mail funcionar corretamente fora do aplicativo. O erro mais comum está relacionado ao uso de uma senha incorreta. Consulte as soluções apresentadas neste outro guia sobre o serviço de e-mail em geral.
Link para esta FAQ: https://faq.infomaniak.com/2429
Esta seção de perguntas frequentes foi útil?
Este guia explica como conectar o aplicativo para desktop Thunderbird (aplicativo para macOS / Windows / Linux) a um endereço de e-mail hospedado na Infomaniak.
Adicionar o endereço de e-mail ao aplicativo
Pré-requisitos
- Criar o endereço de e-mail (❓: ajuda my kSuite | Serviço de E-mail/kSuite).
- Criar uma senha para o dispositivo (❓: ajuda my kSuite | Serviço de E-mail/kSuite).
- Verificar se a configuração do domínio está correta (❓: ajuda).
Para configurar o aplicativo de e-mail:
- Faça o download da versão mais recente do Thunderbird para computador (❓: ajuda).
- Abra o aplicativo.
- Insira as informações da sua conta e clique em Continuar:
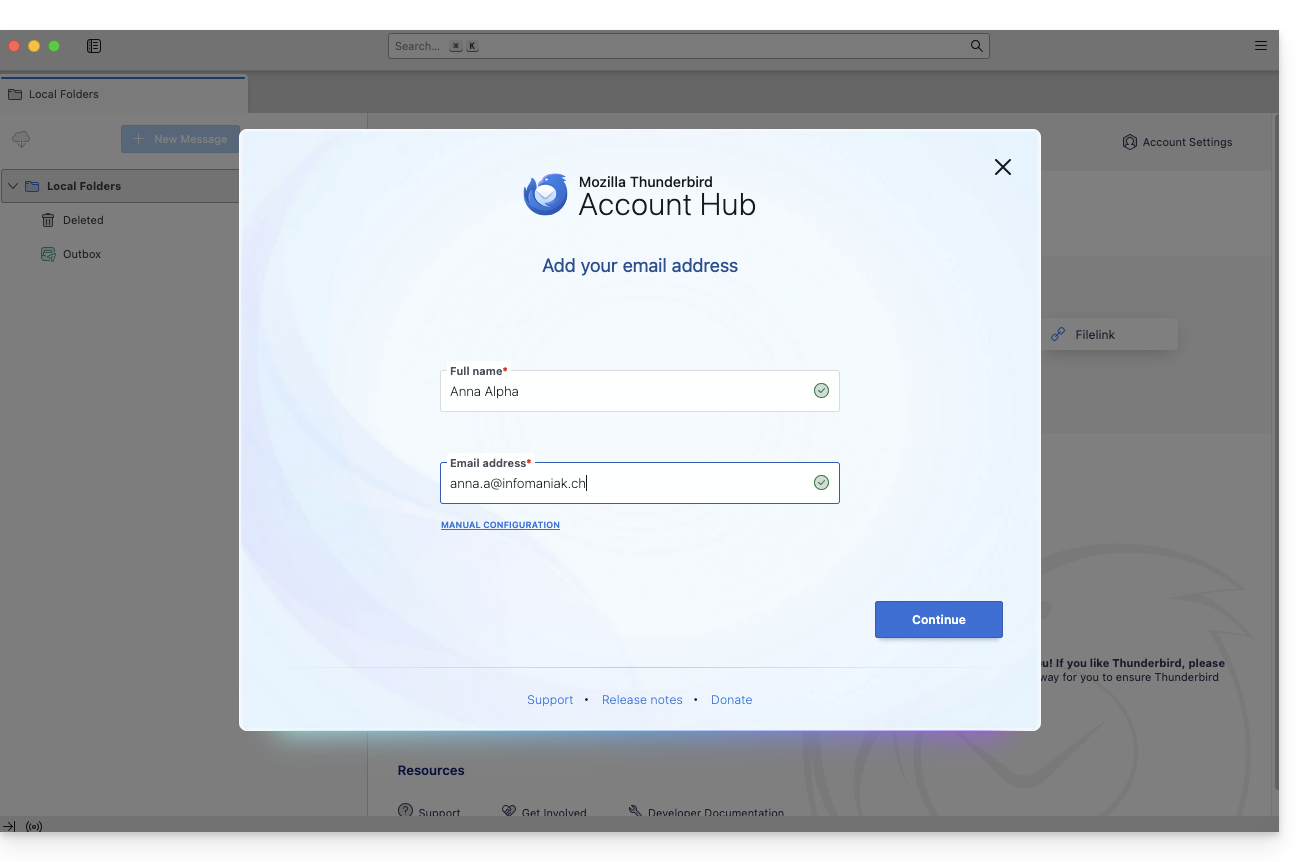
- Mantenha a configuração IMAP e clique em Continuar:
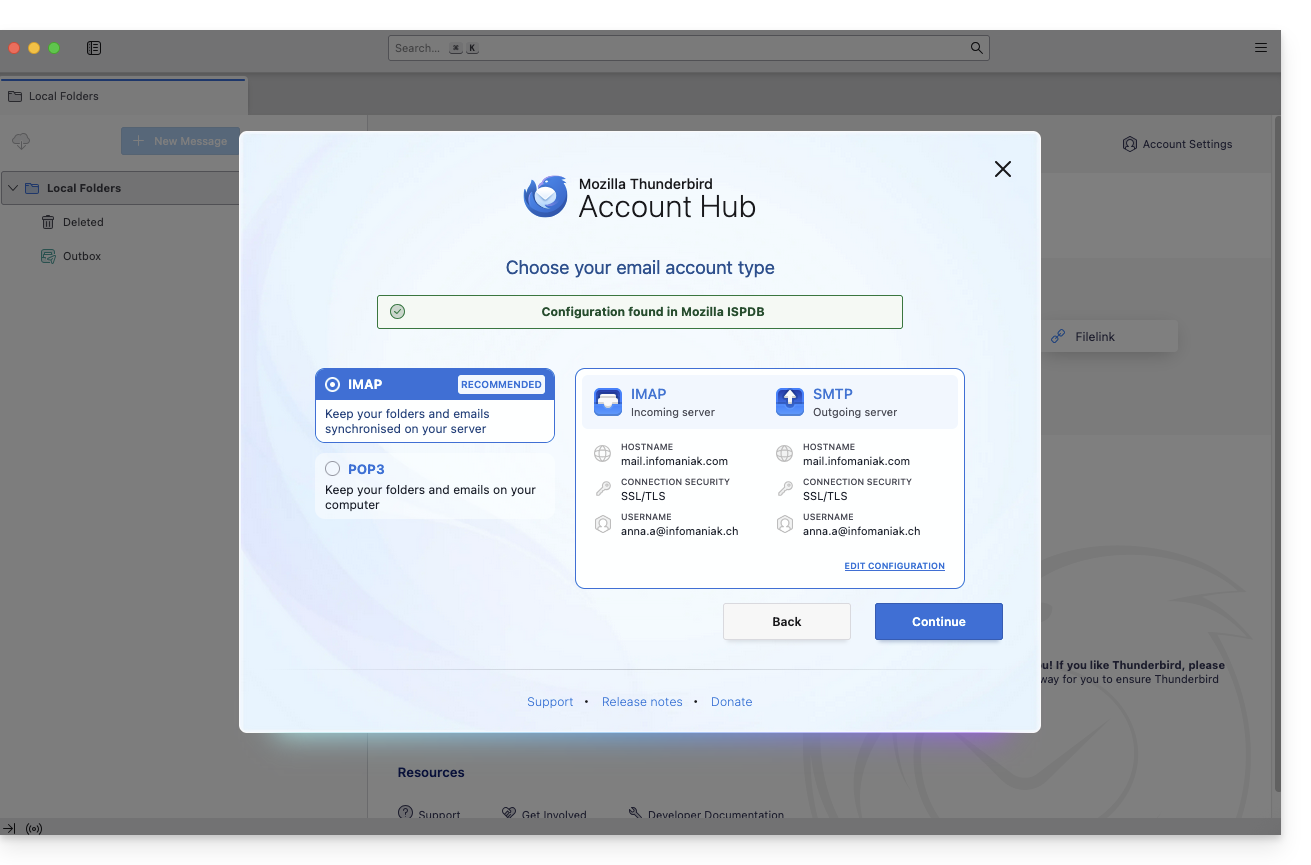
- Insira a sua senha e clique em Continuar:
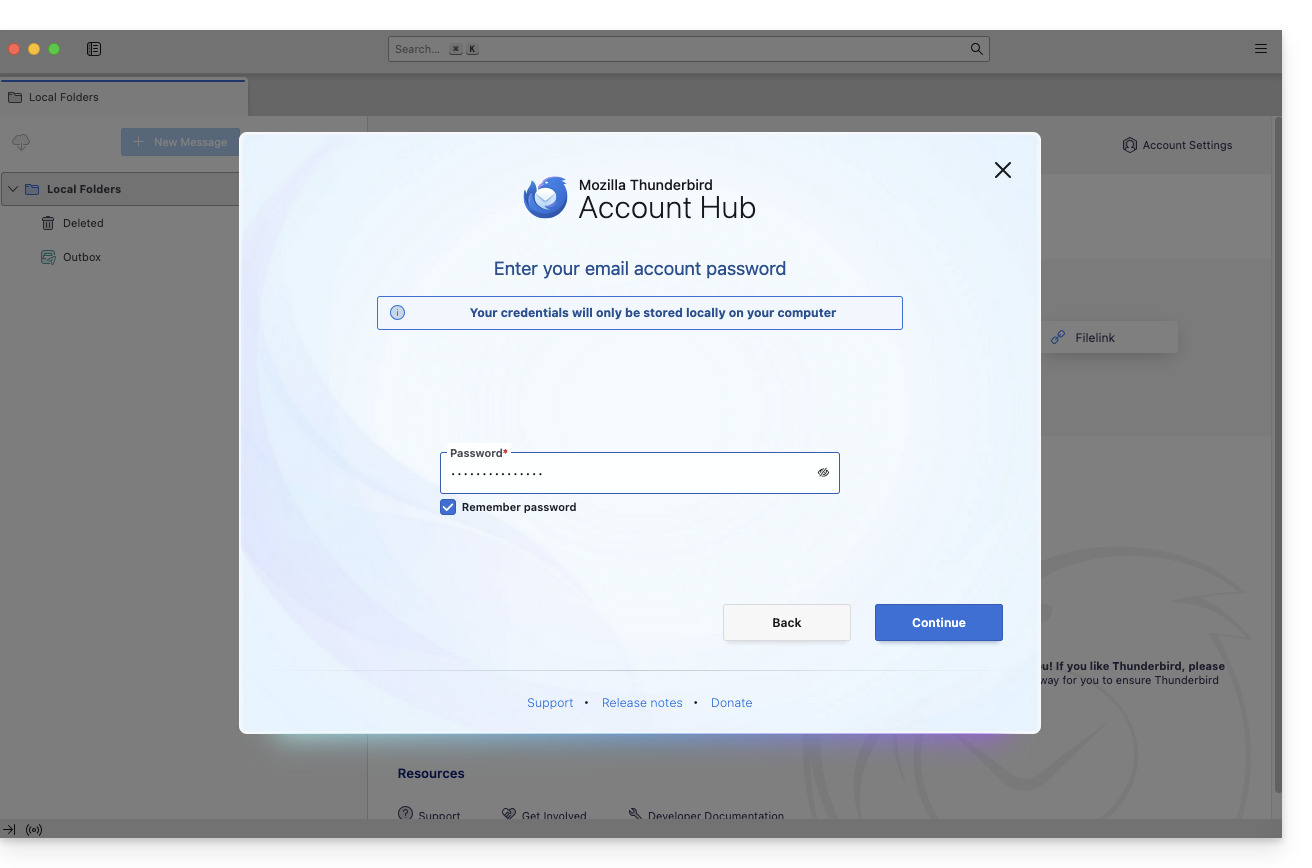
- Clique em Continuar:
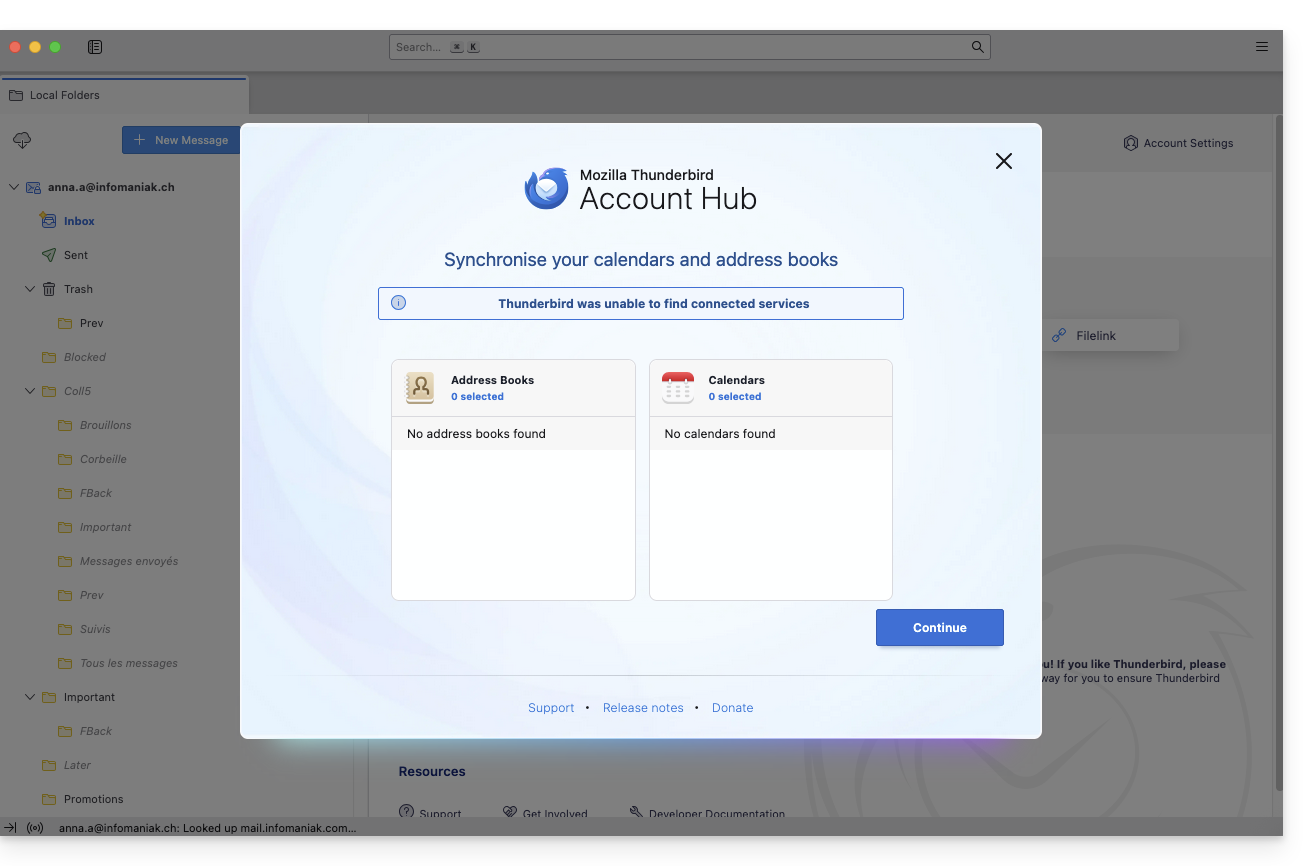
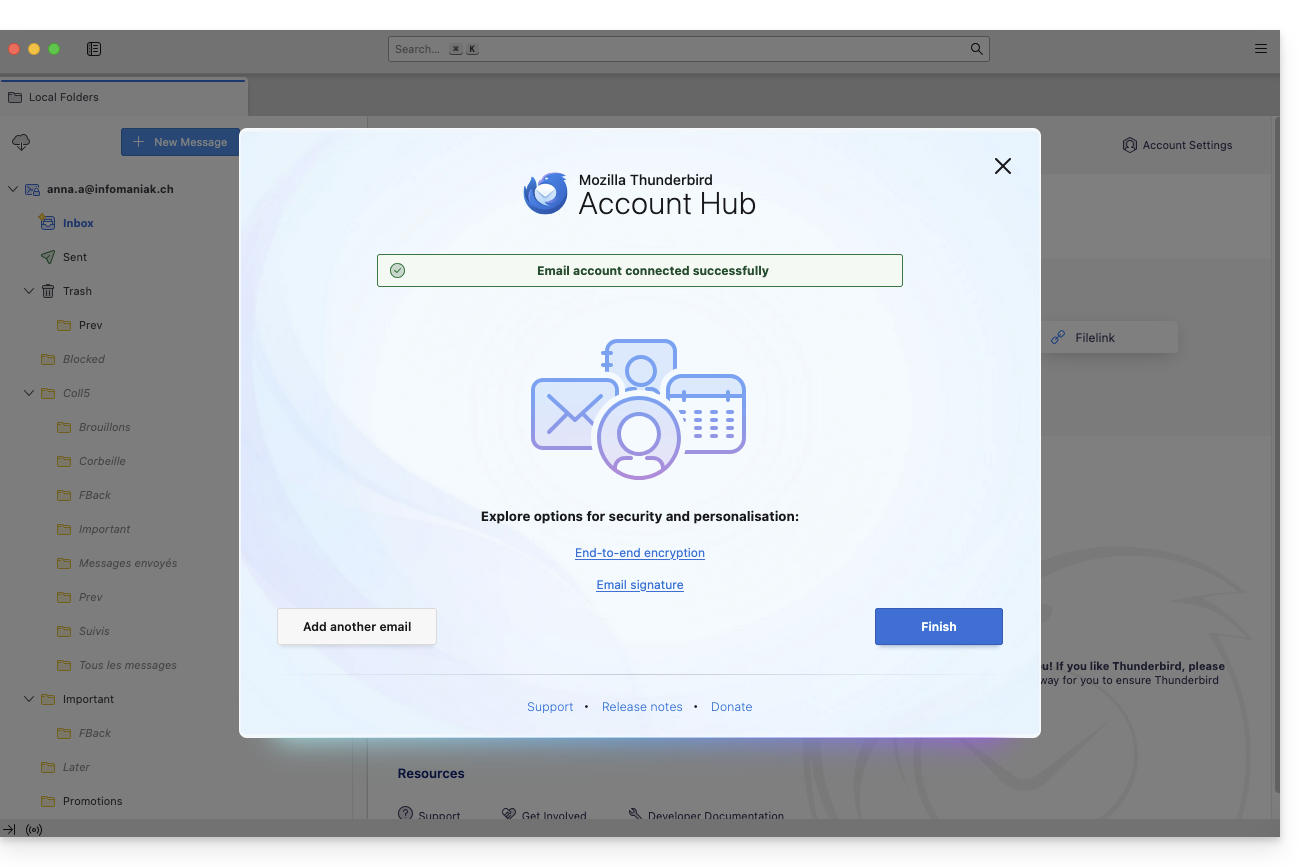
- O resumo do seu registo é exibido. Clique em Concluir para adicionar o endereço (ou configurar outros serviços a partir daí):
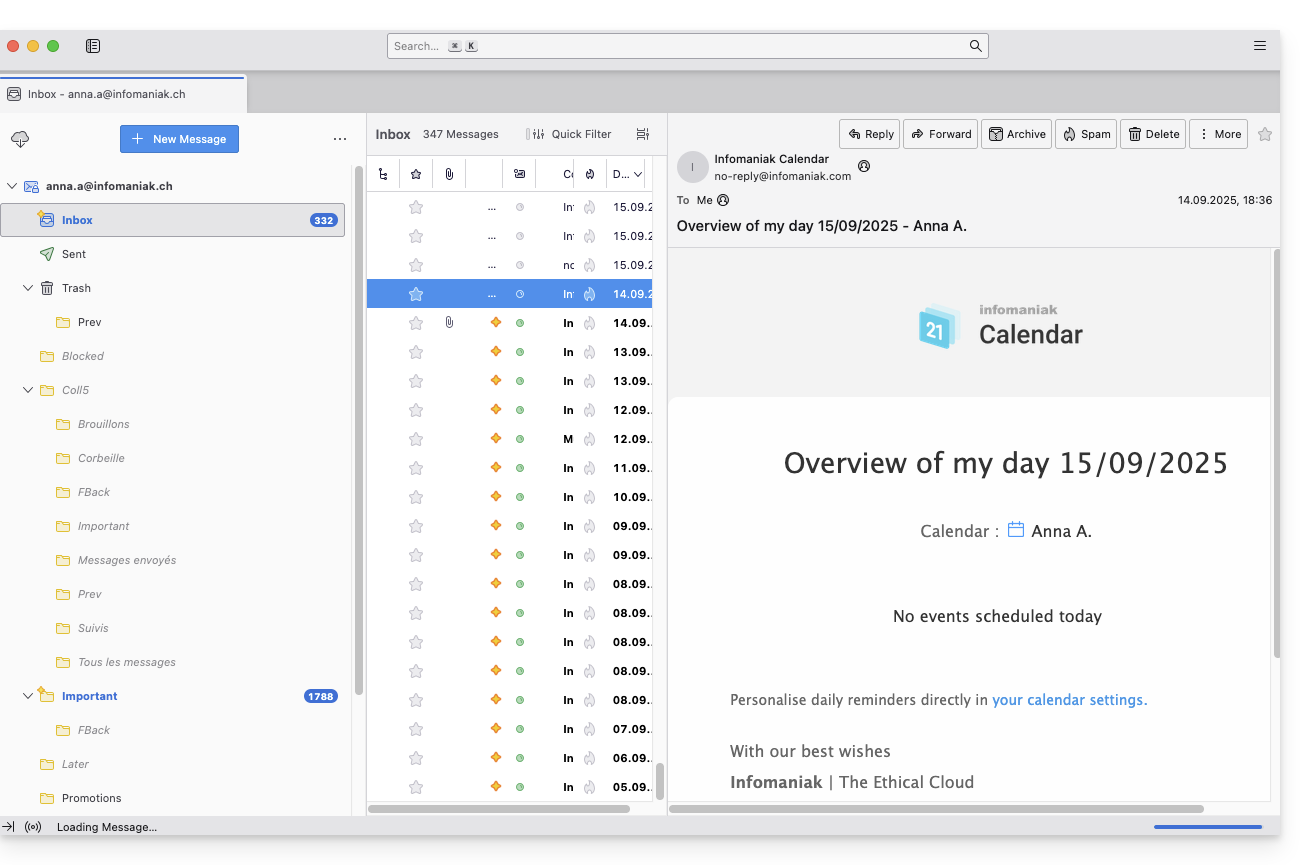
- Pronto, o seu endereço de e-mail já está configurado na aplicação:
Parâmetros recomendados
- Servidor IMAP de entrada =
mail.infomaniak.com - Porta IMAP =
993(com SSL) - Servidor SMTP de saída =
mail.infomaniak.com - Porta SMTP e protocolo de criptografia e comando/método para ativar este protocolo:
587+ STARTTLS - Nome de utilizador/username = o endereço de e-mail completo (❓: ajuda)
- Palavra-passe/password = a palavra-passe gerada para o endereço de e-mail que pretende consultar (❓: ajuda my kSuite | Serviço de E-mail/kSuite).
- Autenticação obrigatória para o envio de e-mails:
- Ative-a nas configurações SMTP da sua aplicação.
- Marque "usar as mesmas configurações do servidor de entrada" ou, dependendo do software/cliente de e-mail, insira um nome de usuário (= endereço de e-mail completo) e a senha gerada.
Consulte este outro guia se precisar de informações sobre outras portas e protocolos de e-mail compatíveis (SSL / TLS, por exemplo).
Em caso de problema
Verifique se o Serviço de E-mail está configurado de forma otimizada (❓: ajuda).
Não é necessário entrar em contato com o Suporte da Infomaniak se o seu endereço de e-mail funcionar corretamente fora do aplicativo. O erro mais comum está relacionado ao uso de uma senha incorreta. Os guias de solução de problemas ajudarão você a resolver qualquer problema:
- Consulte as soluções apresentadas neste outro guia sobre o serviço de e-mail em geral.
- Este outro guia trata especificamente do Thunderbird.
… e se o Thunderbird deixou de funcionar após uma alteração da senha do e-mail, consulte este outro guia.
Link para esta FAQ: https://faq.infomaniak.com/2430
Esta seção de perguntas frequentes foi útil?
Este guia explica como conectar o aplicativo de e-mail nativo do Android a um endereço de e-mail hospedado na Infomaniak.
Introdução
- Em vez da configuração manual abaixo, recomenda-se usar o aplicativo Infomaniak Mail (iOS / Android) para usufruir dos benefícios de segurança da Infomaniak.
Adicionar manualmente o endereço de e-mail ao aplicativo
Pré-requisitos
- Criar o endereço de e-mail (❓: ajuda my kSuite | Serviço de E-mail/kSuite).
- Criar uma senha para o dispositivo (❓: ajuda my kSuite | Serviço de e-mail/kSuite).
- Verificar se a configuração do domínio está adequada (❓: ajuda).
Para configurar o aplicativo de e-mail:
- Abra o aplicativo de e-mail nativo no seu dispositivo.
- Clique em Adicionar conta.
- Selecione Outro como tipo de endereço.
- Insira o seu endereço de e-mail.
- Selecione o tipo IMAP pessoal.
- Verifique e complete as informações que estão faltando (❓: ajuda).
- Conclua o procedimento.
- Pronto, o seu endereço de e-mail já está configurado na aplicação do seu dispositivo.
Configurações recomendadas
- Servidor IMAP de entrada =
mail.infomaniak.com - Porta IMAP =
993(com SSL) - Servidor SMTP de saída =
mail.infomaniak.com - Porta SMTP e protocolo de criptografia e comando/método para ativar este protocolo:
587+ STARTTLS - Nome de usuário/username = o endereço de e-mail completo (❓: ajuda)
- Senha/password = a senha gerada para o endereço de e-mail que você deseja consultar (❓: my kSuite | Serviço de E-mail/kSuite).
- Autenticação obrigatória para o envio de e-mails:
- Ative-a nas configurações SMTP da sua aplicação.
- Marque a opção "usar as mesmas configurações do servidor de entrada" ou, dependendo do software/cliente de e-mail, insira um nome de usuário (= endereço de e-mail completo) e a senha gerada.
Consulte este outro guia se precisar de informações sobre outras portas e protocolos de e-mail compatíveis (SSL / TLS, por exemplo).
Em caso de problema
Verifique se o Serviço de E-mail está configurado de forma otimizada (❓: ajuda).
Não é necessário entrar em contato com o Suporte da Infomaniak se o seu endereço de e-mail funcionar corretamente fora do aplicativo. O erro mais comum está relacionado ao uso de uma senha incorreta. Os guias de solução de problemas ajudarão você a resolver qualquer problema:
- Consulte as soluções apresentadas neste outro guia sobre e-mail em geral.
- … e se a sua aplicação deixar de funcionar no envio (servidor SMTP desconectado ou ausente, por exemplo) ou após uma alteração da palavra-passe do e-mail, consulte este outro guia.
Link para esta FAQ: https://faq.infomaniak.com/2433
Esta seção de perguntas frequentes foi útil?
Este guia explica como conectar o aplicativo para desktop New Outlook (aplicativo para desktop no Windows, que substitui o Windows Mail) a um endereço de e-mail hospedado na Infomaniak.
Introdução
- Embora os e-mails em si permaneçam armazenados no servidor Infomaniak, a experiência no New Outlook está muito integrada à nuvem da Microsoft:
- Algumas informações da sua conta podem ser usadas pela Microsoft para uma gestão centralizada e uma melhor experiência de sincronização.
- Se desejar ter controlo total e local sobre os seus e-mails, considere usar software/clientes de e-mail de terceiros (como o Thunderbird, por exemplo), que permitem um armazenamento mais direto (❓: ajuda).
Adicionar o endereço de e-mail à aplicação
Pré-requisitos
- Criar o endereço de e-mail (❓: ajuda my kSuite | Serviço de E-mail/kSuite).
- Criar uma senha para o dispositivo (❓: ajuda my kSuite | Serviço de E-mail/kSuite).
- Verificar se a configuração do domínio está adequada (❓: ajuda).
A senha criada para o endereço de e-mail deve corresponder aos critérios detalhados na parte inferior deste guia.
Para configurar o aplicativo de e-mail:
- Abra a aplicação.
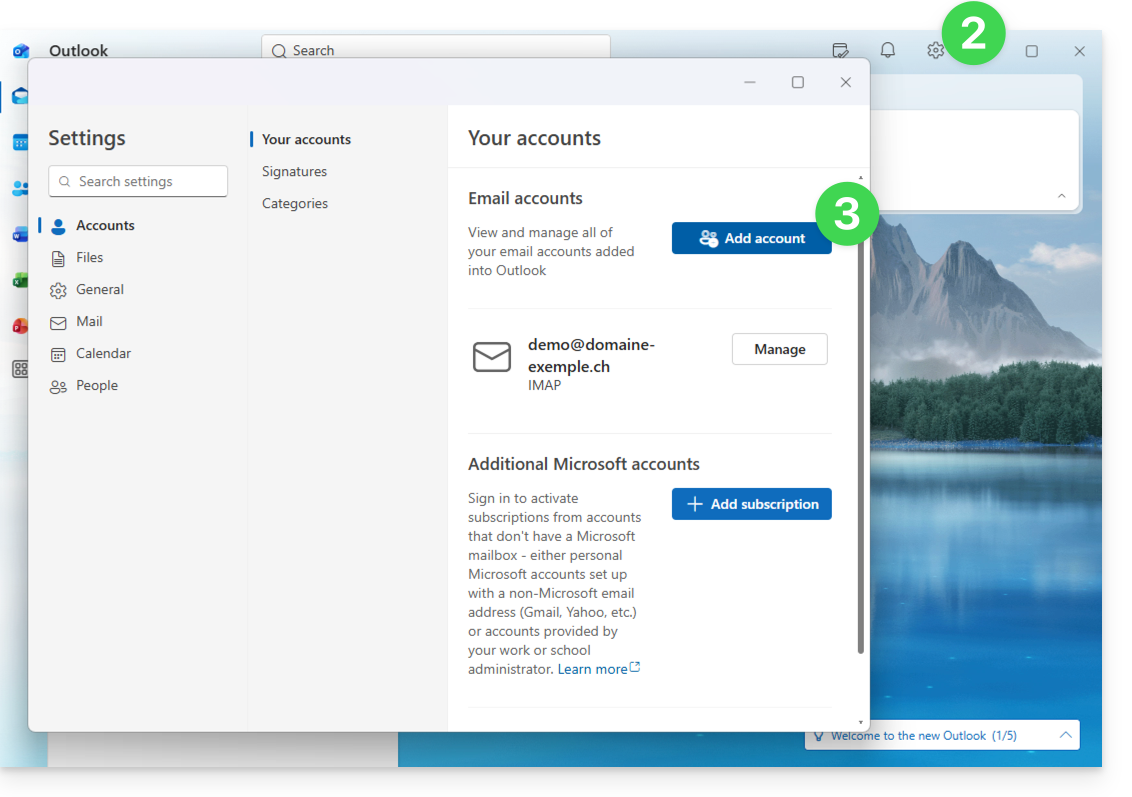
- Se necessário, clique no ícone de engrenagem no canto superior direito (caso contrário, avance para o passo 4).
- Clique em Adicionar conta:
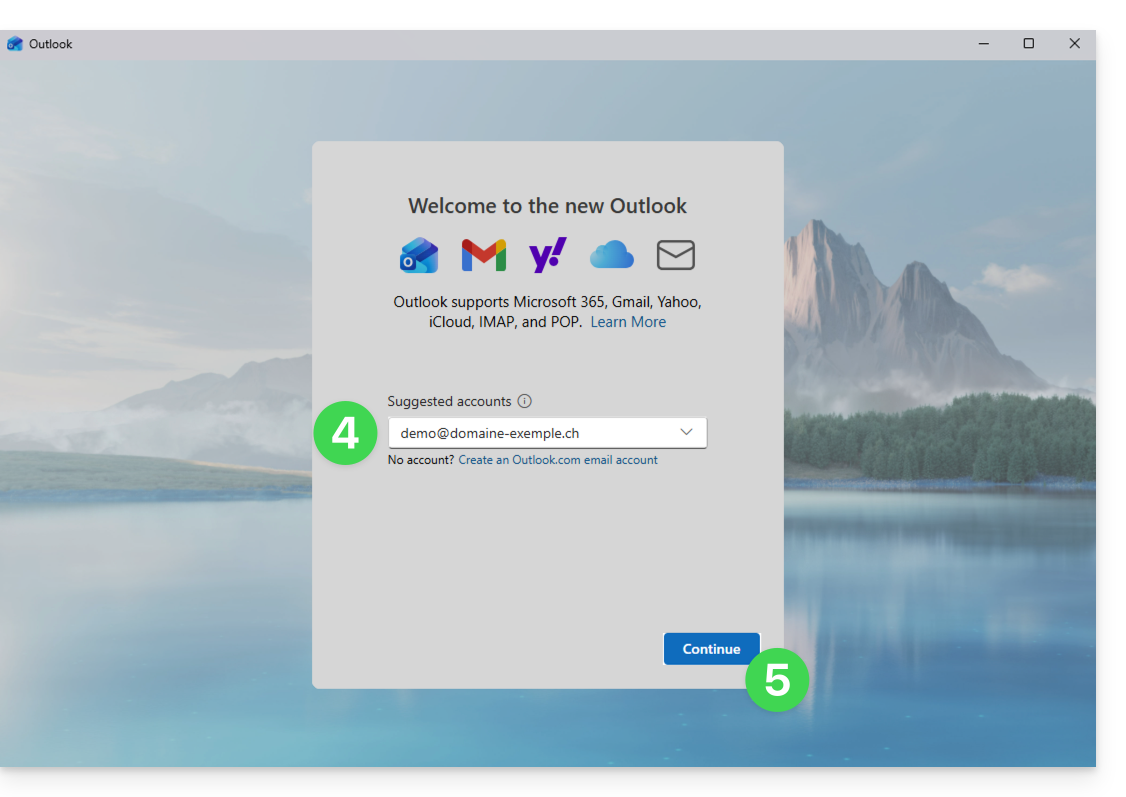
- Insira o endereço de e-mail a ser associado.
- Clique em Continuar:
- Insira a senha do endereço de e-mail (❓: ajuda).
- Clique no botão Ver mais.
- Verifique e complete as informações que faltam (❓: ajuda):
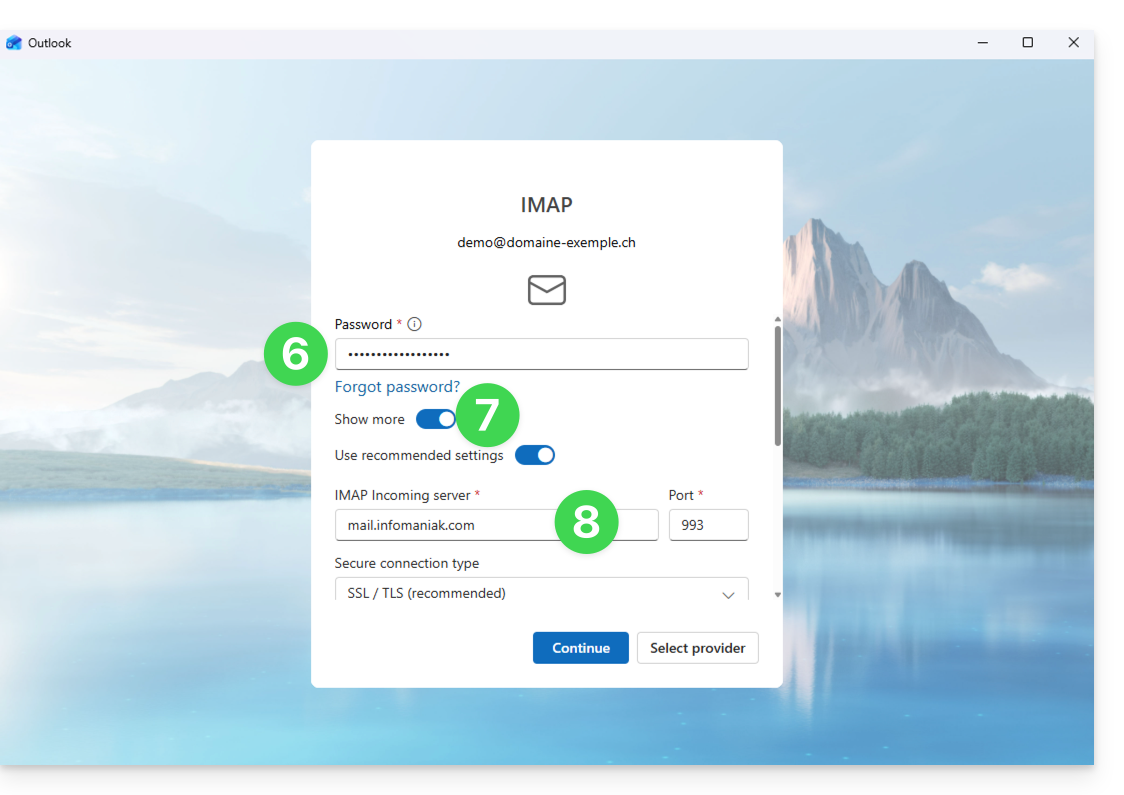
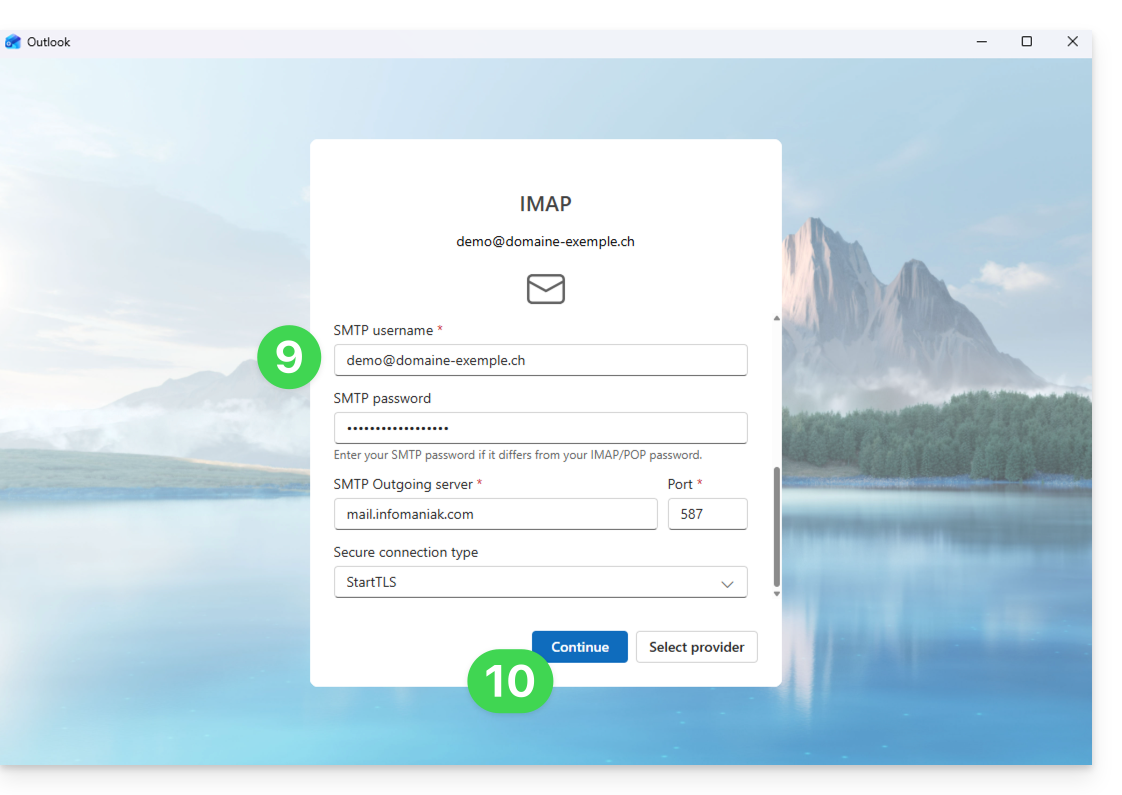
- Role para baixo na página e, em seguida, verifique e complete as informações ausentes (❓: ajuda).
- Clique em Continuar:
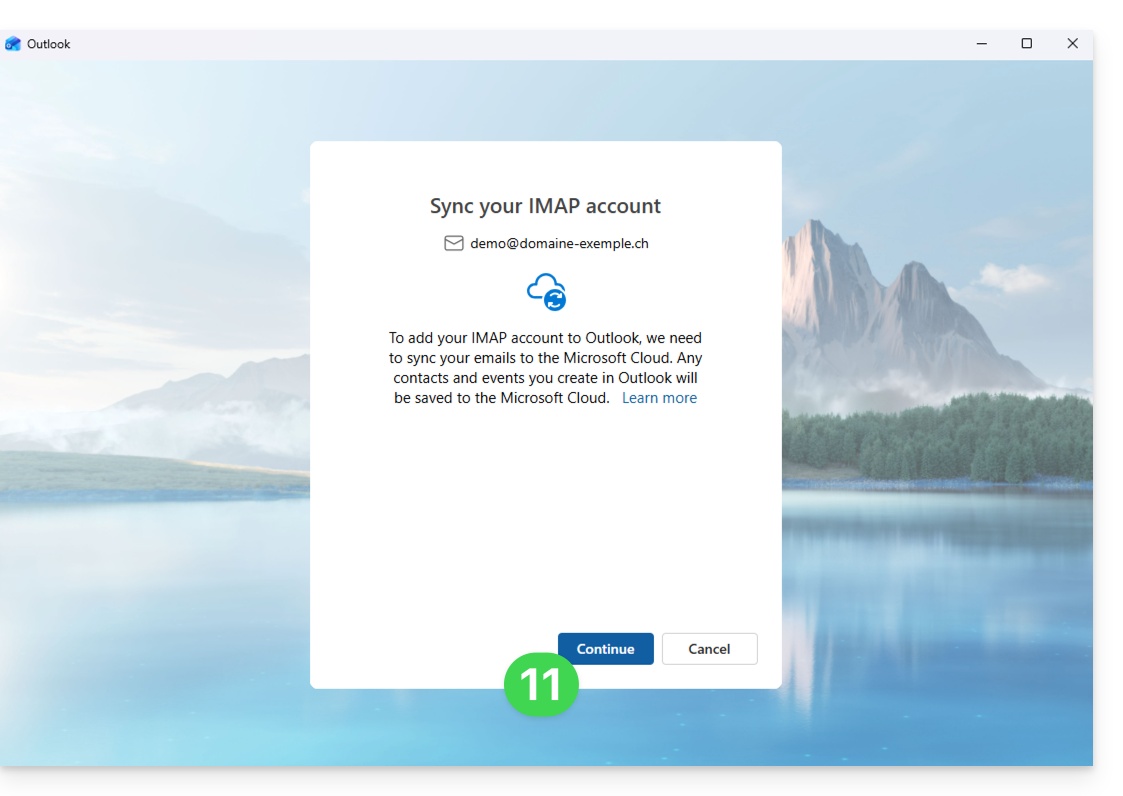
- Leia e avance pelas diferentes janelas de informações da Microsoft:
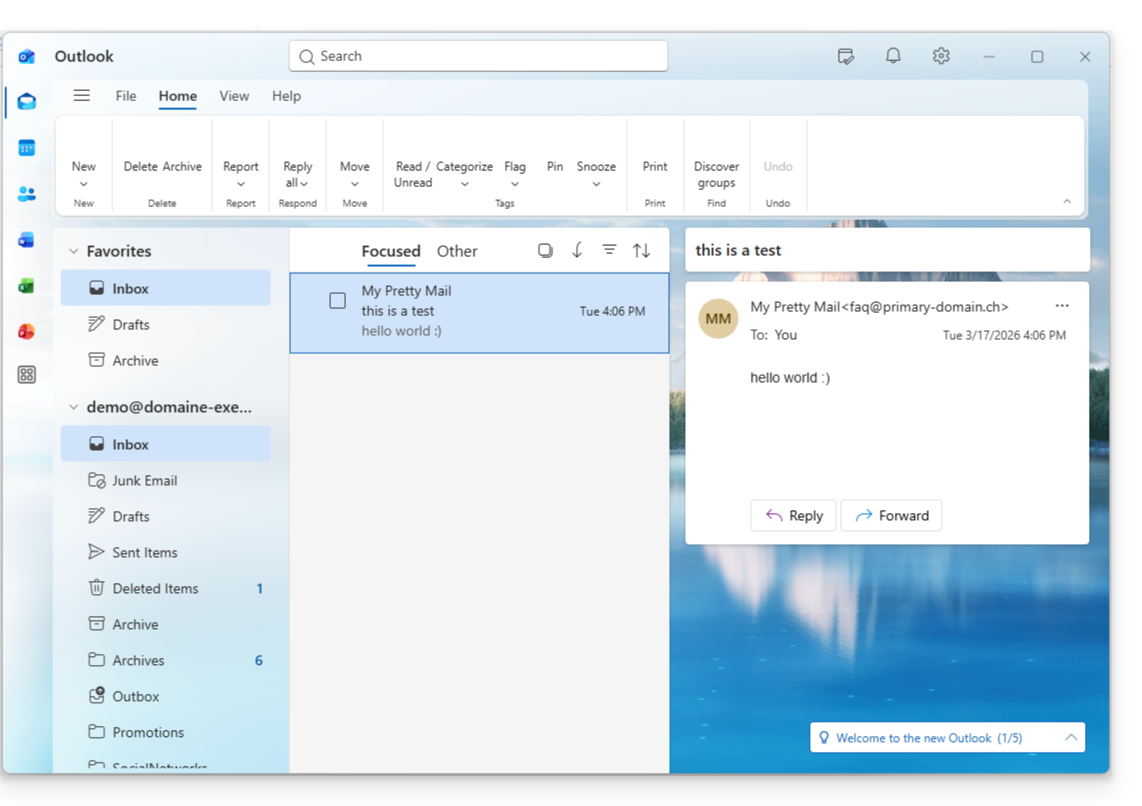
- Pronto, o seu endereço de e-mail já está configurado na aplicação:
Parâmetros recomendados
- Servidor IMAP de entrada =
mail.infomaniak.com - Porta IMAP =
993(com SSL) - Servidor SMTP de saída =
mail.infomaniak.com - Porta SMTP e protocolo de criptografia e comando/método para ativar este protocolo:
587+ STARTTLS - Nome de utilizador/username = o endereço de e-mail completo e integral (❓: ajuda)
- Senha/password = a senha gerada para o endereço de e-mail que você deseja consultar (consulte os pré-requisitos).
- Autenticação obrigatória para o envio de e-mails:
- Ative-a nas configurações SMTP do seu aplicativo.
- Marque "usar as mesmas configurações do servidor de entrada" ou, dependendo do software/cliente de e-mail, insira um nome de usuário (= endereço de e-mail completo) e a senha gerada.
Consulte este outro guia se precisar de informações sobre outras portas e protocolos de e-mail compatíveis (SSL/TLS, por exemplo).
Em caso de problemas
Uma solução que parece funcionar é a combinação destas 2 situações:
- Estar conectado à sua sessão do Windows com uma conta Microsoft (e não apenas uma conta local).
- Adicionar o endereço de e-mail usado para iniciar sessão no Windows a esta versão do Outlook.
Crie também uma nova senha (❓: ajuda) e deixe que ela seja gerada aleatoriamente, mas verifique também se ela atende aos critérios impostos pela Microsoft:
| Caracteres permitidos |
|
| Caracteres proibidos |
|
| Comprimento da senha | 16 caracteres NO MÁXIMO |
Verifique se o Serviço de Email está configurado de forma otimizada (❓: ajuda).
Os guias de resolução de problemas ajudam a solucionar eventuais problemas:
- Consulte as soluções apresentadas neste outro guia sobre o serviço de e-mail em geral.
- Este outro guia aborda especificamente o Outlook.
… e se o seu Outlook deixou de funcionar após uma alteração da palavra-passe do e-mail, consulte este outro guia.
Link para esta FAQ: https://faq.infomaniak.com/2434
Esta seção de perguntas frequentes foi útil?
Este guia explica como conectar o aplicativo para desktop Apple Mail macOS (MacBook Pro, Neo…) a um endereço de e-mail hospedado na Infomaniak.
Introdução
- Em vez da configuração manual abaixo, recomenda-se usar os perfis de configuração .mobileconfig fornecidos pela Apple (❓: ajuda).
Adicionar manualmente o endereço de e-mail ao aplicativo
Pré-requisitos
- Criar o endereço de e-mail (❓: ajuda my kSuite | Serviço de E-mail/kSuite).
- Criar uma senha para o dispositivo (❓: ajuda my kSuite | Serviço de e-mail/kSuite).
- Verificar se a configuração do domínio está correta (❓: ajuda).
Para configurar o aplicativo de e-mail:
- Abra o aplicativo.
- Se você já configurou um endereço, clique no menu E-mail e, em seguida, em Adicionar conta:
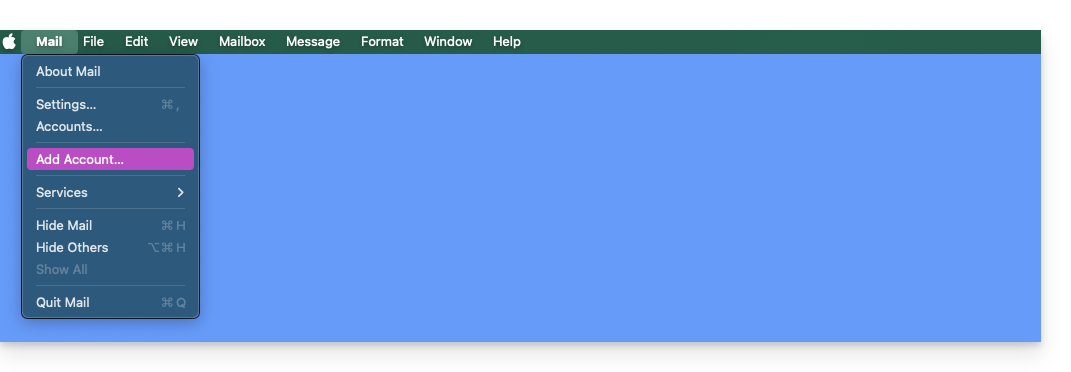
- Se você já configurou um endereço, clique no menu E-mail e, em seguida, em Adicionar conta:
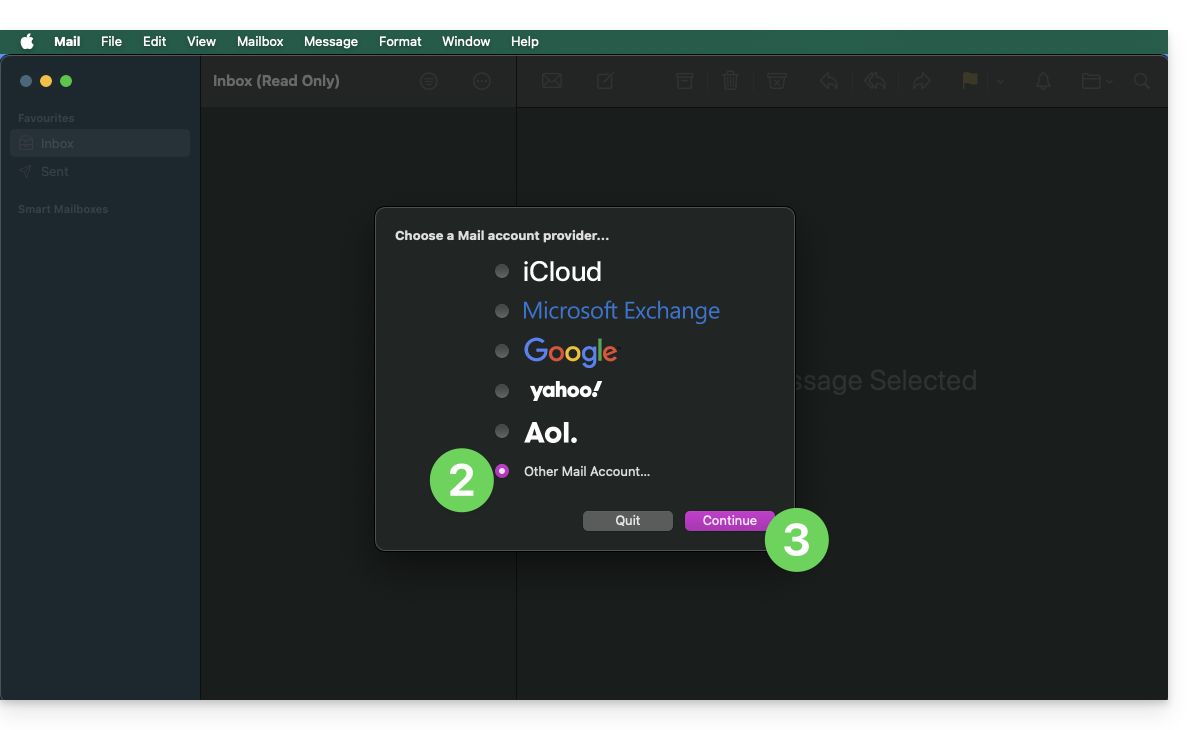
- Clique em Outra conta.
- Clique em Continuar:
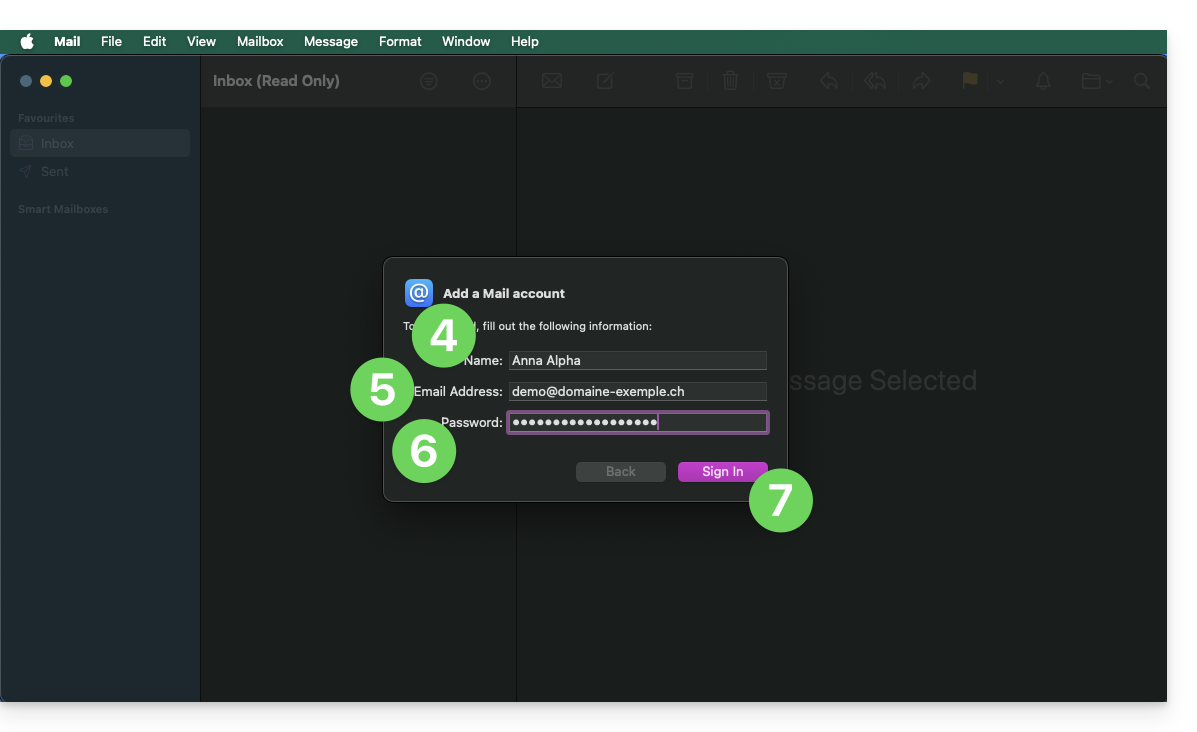
- Insira o nome da conta.
- Insira o endereço de e-mail a ser associado.
- Cole a senha do endereço de e-mail gerada no painel de controle Infomaniak (❓: ajuda).
- Clique no botão azul Conectar:
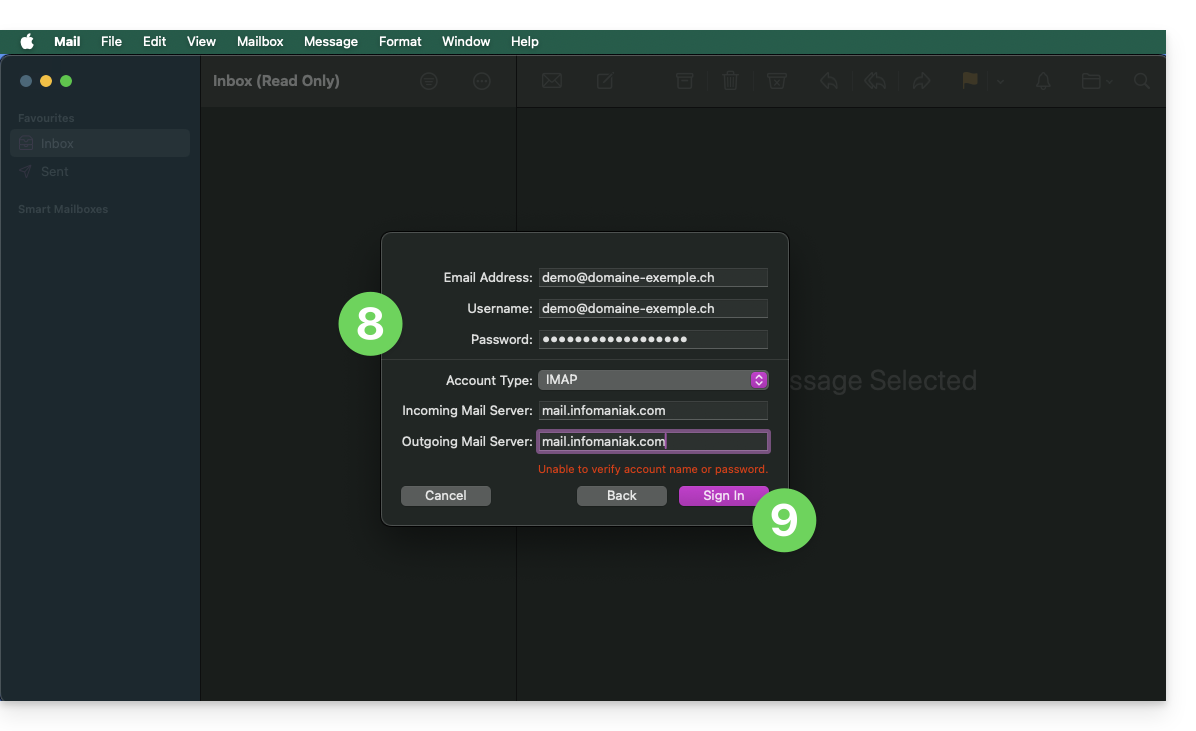
- Verifique e complete as informações que estão faltando (❓: ajuda).
- Clique em Iniciar sessão:
- Pressione o botão para confirmar:
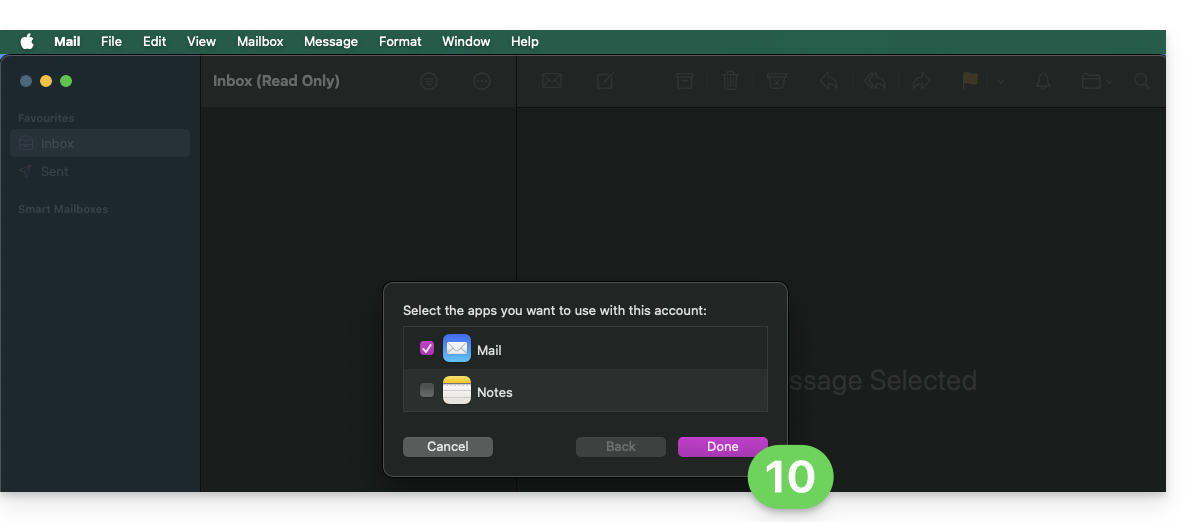
- Pronto, seu endereço de e-mail agora está configurado no aplicativo:
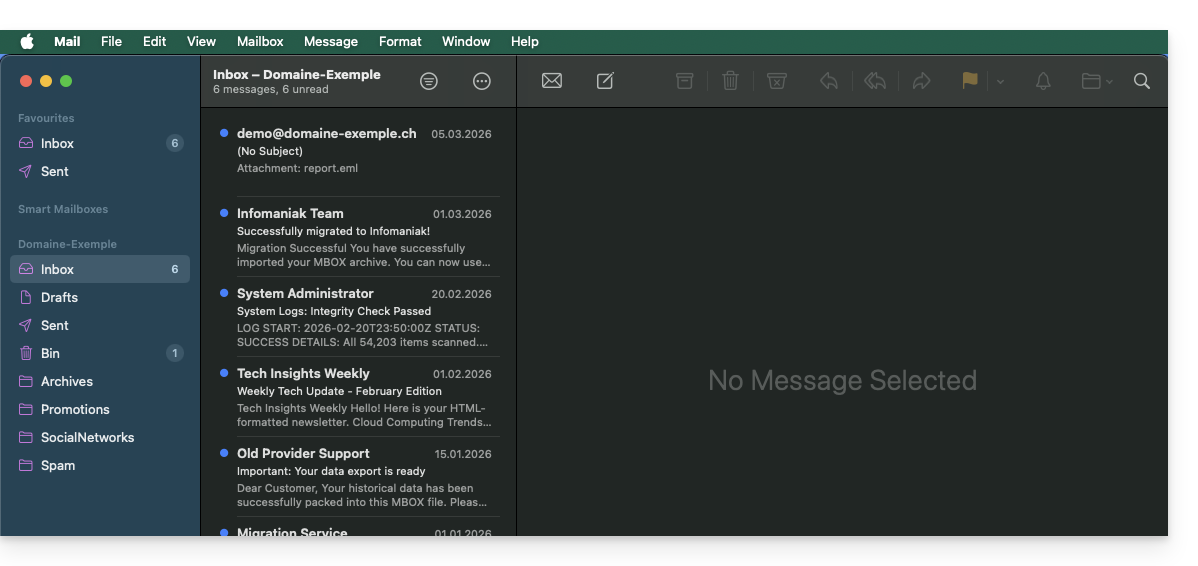
Parâmetros recomendados
- Servidor IMAP de entrada =
mail.infomaniak.com - Porta IMAP =
993(com SSL) - Servidor SMTP de saída =
mail.infomaniak.com - Porta SMTP e protocolo de criptografia e comando/método para ativar este protocolo:
587+ STARTTLS - Nome de utilizador/username = o endereço de e-mail completo e integral (❓: ajuda)
- Senha/password = a senha gerada para o endereço de e-mail que você deseja consultar (❓: ajuda my kSuite | Serviço de e-mail/kSuite).
- Autenticação obrigatória para o envio de e-mails:
- Ative-a nas configurações SMTP do seu aplicativo.
- Marque "usar as mesmas configurações do servidor de entrada" ou, dependendo do software/cliente de e-mail, insira um nome de usuário (= endereço de e-mail completo) e a senha gerada.
Consulte este outro guia se precisar de informações sobre outras portas e protocolos de e-mail compatíveis (SSL/TLS, por exemplo).
Em caso de problemas
Não é necessário entrar em contato com o Suporte Infomaniak se o seu endereço de e-mail funcionar corretamente fora do aplicativo. O erro mais comum está relacionado ao uso de uma senha incorreta. A ferramenta disponível no Apple Mail pode indicar isso: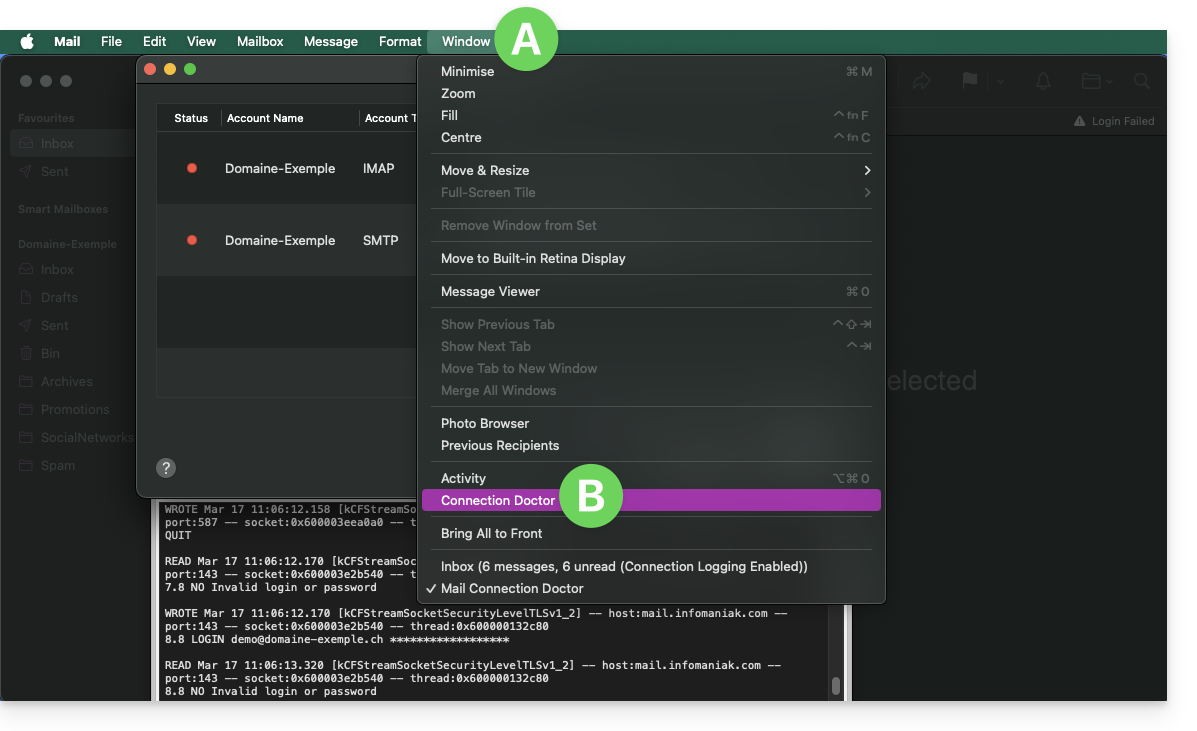
Crie uma nova senha no Serviço de E-mail (❓: ajuda) e reinicie a configuração da sua conta no aplicativo de e-mail.
Os guias de resolução de problemas ajudam a solucionar qualquer problema:
- Consulte as soluções apresentadas neste outro guia sobre o serviço de e-mail em geral.
- Remova quaisquer perfis de configuração da Apple (❓: ajuda) relacionados com a sua conta de e-mail Infomaniak antes de reiniciar a configuração.
E se o seu Apple Mail deixou de funcionar após uma alteração de palavra-passe, consulte este outro guia.
Link para esta FAQ: https://faq.infomaniak.com/2442
Esta seção de perguntas frequentes foi útil?
Este guia explica como configurar e personalizar a aparência geral do aplicativo web Mail da Infomaniak (serviço online ksuite.infomaniak.com/mail) usando diferentes opções.
Introdução
- As configurações gerais afetam todos os endereços de e-mail atualmente associados à sua conta no aplicativo Mail.
- Eles são exclusivos do seu usuário e não afetam outros usuários (de uma mesma Organização, por exemplo).
- O mesmo endereço de e-mail configurado no aplicativo Mail de outro usuário terá suas próprias configurações, independentemente das suas.
Aceder às configurações gerais
Para tal:
- Clique aqui para acessar o aplicativo web Mail da Infomaniak (serviço online ksuite.infomaniak.com/mail).
- Clique no ícone Configurações no canto superior direito da interface.
- Navegue pelos diferentes menus gerais à esquerda:
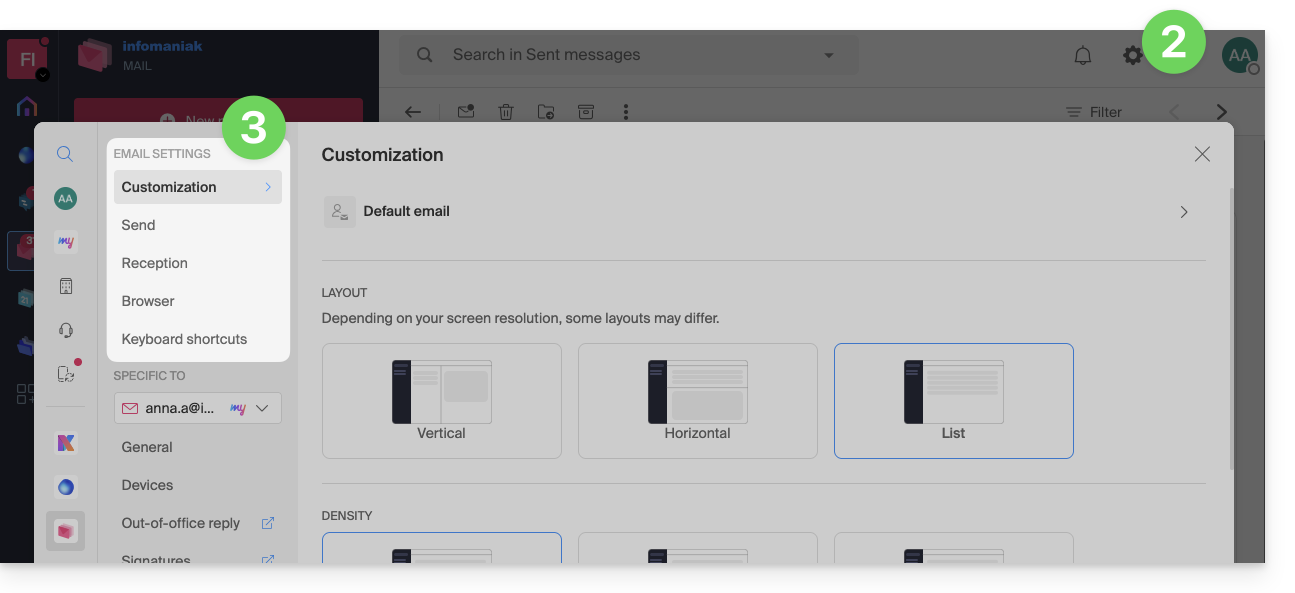
Para gerenciar o tema claro / escuro da interface: consulte este outro guia sobre o assunto.
Personalização: endereço de e-mail padrão
Esta seção permite escolher qual endereço de e-mail, entre todos os seus endereços associados, deve ser considerado o principal e abrir por padrão ao acessar o aplicativo web Mail Infomaniak (serviço online ksuite.infomaniak.com/mail):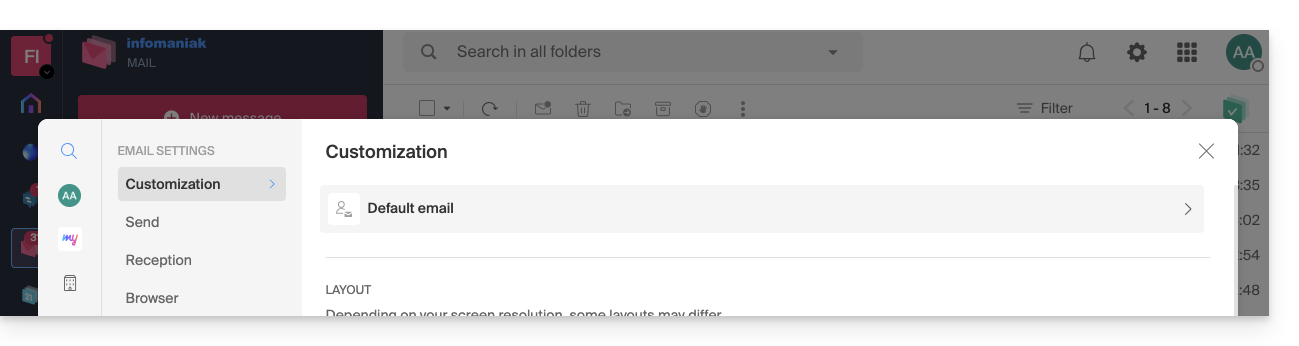
Personalização: altere a densidade da exibição da sua caixa de correio
Pode alterar a apresentação da sua caixa de correio, dividindo-a em várias secções que exibem os seus e-mails, ou simplesmente utilizando uma versão em formato de lista. A opção de densidade permite aproximar ou espaçar os seus e-mails: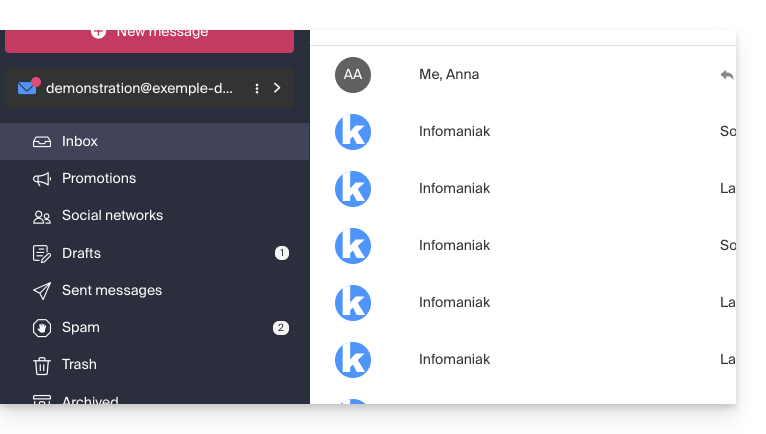
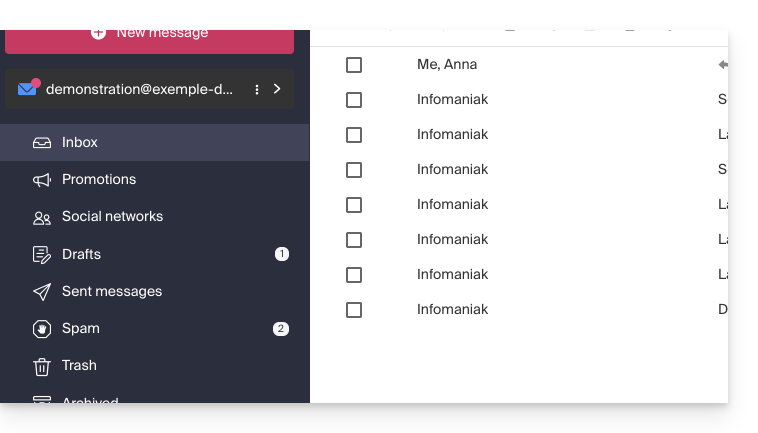
Personalização: gerenciar os botões visíveis na página de um e-mail
Esta seção permite escolher os ícones que serão exibidos na janela de leitura de um e-mail, permitindo que você execute ações rapidamente, em vez de usar o menu suspenso: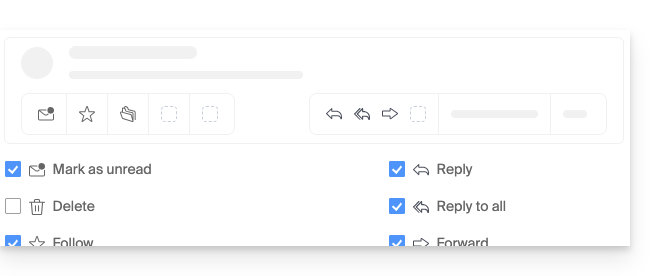
- Marcar como não lido
- Eliminar
- Acompanhar
- Traduzir
- Lembrar mais tarde
- Organizar um evento
- Denunciar como spam
- Carregar no kDrive
- Arquivar
- Responder
- Responder a todos
- Encaminhar
- Responder no kChat
Personalização: gerenciar os botões visíveis ao passar o mouse sobre uma lista de e-mails
Esta secção permite escolher os ícones que serão exibidos quando passar o rato sobre um e-mail numa lista(e-mails da caixa de entrada, por exemplo):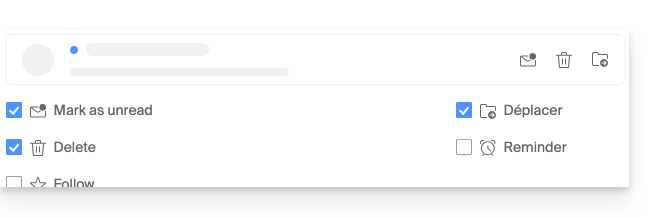
- Marcar como não lido
- Excluir
- Acompanhar
- Mover
- Lembrar mais tarde
Personalização: gerenciar os botões visíveis ao selecionar um texto
Esta seção permite escolher as ações visíveis quando um texto é selecionado:
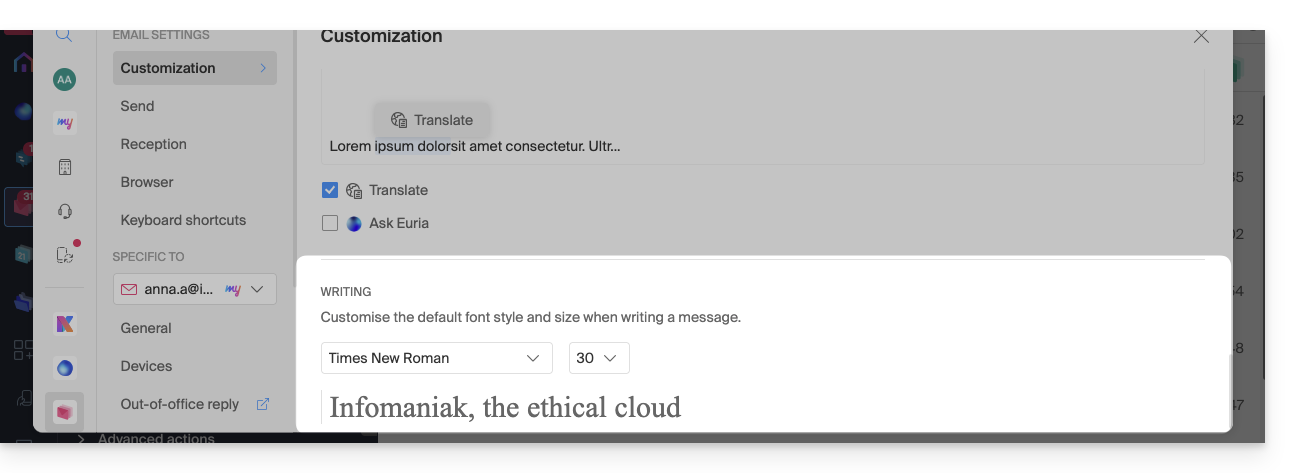
Personalização: defina a fonte padrão para todas as suas novas mensagens
- Escolha a fonte desejada, bem como o tamanho do texto, para todas as novas mensagens que for redigir:
Envio: prazo para cancelar o envio
Envio: transferir os e-mails para o corpo da mensagem ou como anexo
Envio: incluir a mensagem original ao responder
Envio: sempre escrever em uma janela de tela cheia
Ative o botão de alternância (toggle switch) à direita do item “Redigir e-mails em tela cheia” para sempre escrever em uma janela grande, em vez da caixa inferior direita habitual.
Envio: solicitar confirmação de leitura
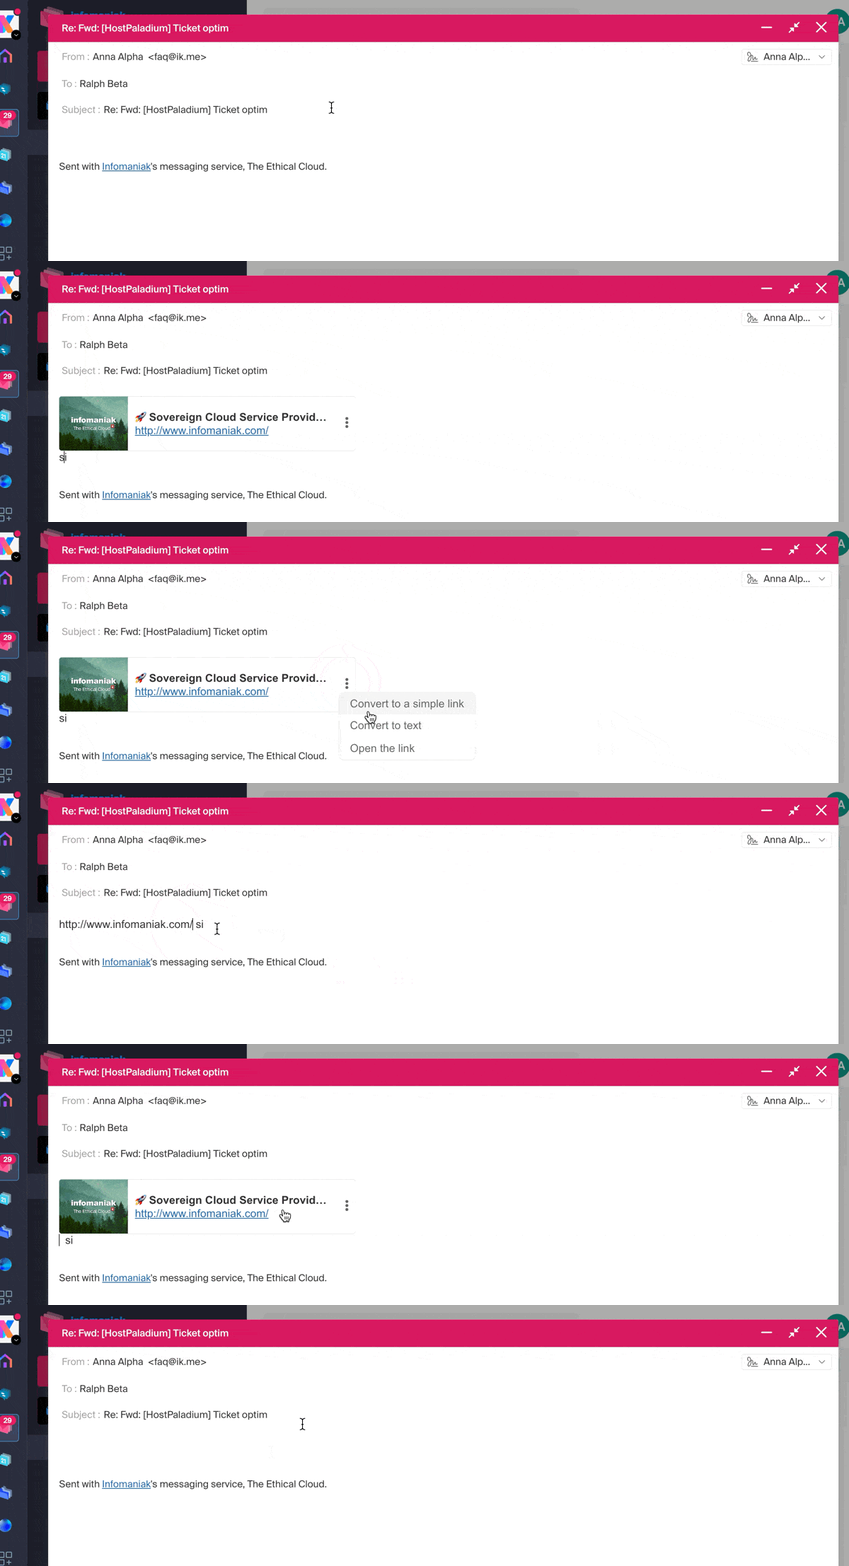
Envio: incluir uma pré-visualização dos links do site
Para ativar ou desativar a pré-visualização de links (funcionalidade que gera automaticamente uma caixa visual (com título, descrição e imagem) quando você insere uma URL em um e-mail), ative o botão de alternância (toggle switch) à direita do item “Incluir uma pré-visualização dos links do site”.
Uma vez ativada, veja o resultado ao redigir um conteúdo com URL:
Caixa de entrada: modo de visualização das mensagens
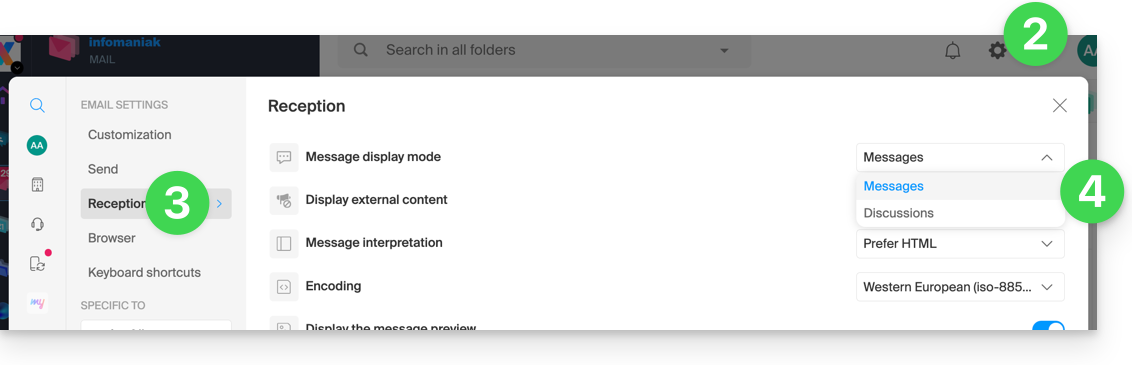
Este modo permite agrupar os seus e-mails por assunto/remetente, ou seja, agrupa os e-mails recebidos de acordo com o assunto da discussão, tornando a visualização da caixa de entrada mais organizada e facilitando o acompanhamento das mensagens dos diferentes participantes da conversa:
- Clique aqui para acessar o aplicativo web Mail da Infomaniak (serviço online ksuite.infomaniak.com/mail).
- Clique no ícone Configurações no canto superior direito da interface.
- Clique em Receber no menu lateral esquerdo.
- Escolha um Modo de exibição das mensagens:
Quando o modo Conversas não está ativado, você lê seus e-mails um por um:
Quando está ativado, você lê as diferentes mensagens na mesma janela, em ordem cronológica, uma abaixo da outra:
Na sua caixa de entrada, você vê diretamente o número de e-mails contidos em uma única conversa:
Receção: exibir conteúdo externo
Esta secção permite escolher se deve exibir automaticamente todo o conteúdo externo presente num e-mail recebido que está a ler, ou se prefere ocultá-lo e exibi-lo apenas quando solicitado: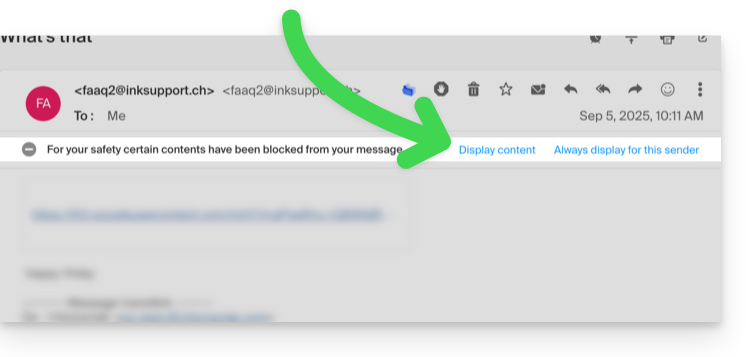
Receção: interpretação das mensagens
Esta secção permite definir a prioridade de visualização de uma mensagem recebida: seja na sua versão simplificada em texto simples, seja na sua versão enriquecida em HTML (esta configuração só tem efeito quando ambos os formatos estão presentes no e-mail; se apenas uma versão estiver disponível, ela será exibida por padrão).
Receção: codificação
Esta secção permite modificar a codificação das mensagens recebidas (recomenda-se deixar Unicode (utf-8)).
Receção: exibir a pré-visualização das mensagens
Esta secção permite exibir ou ocultar as primeiras palavras contidas no e-mail em todas as listas de mensagens (por exemplo, na caixa de receção). Exemplo com a pré-visualização ativada: o início da mensagem é visível na mesma linha, ao lado do seu assunto:
Se a pré-visualização estiver oculta, apenas o assunto de cada e-mail é exibido:
Nota para os utilizadores do serviço de Newsletter Infomaniak: podem gerir o conteúdo que será exibido quando a pré-visualização estiver ativada, através das informações a preencher, conforme indicado no ponto 1.4 deste outro guia.
Receção: Marcar um e-mail como lido…
Esta secção permite escolher após quanto tempo de leitura uma mensagem deve ser considerada como lida (imediatamente, após 3 segundos, ou 5, ou 20, ou nunca).
Receção: Quando uma mensagem é arquivada ou eliminada…
Esta seção permite escolher a ação a ser executada após o arquivamento ou a exclusão de um e-mail: abrir a próxima mensagem, ou a mensagem anterior, ou retornar à lista de mensagens.
Receção: número de e-mails exibidos em uma única página
Escolha o número de itens a serem exibidos para aumentar ou diminuir o número de e-mails exibidos em uma única página, até um máximo de 200 itens.
Navegador: definir o Infomaniak como serviço de e-mail padrão
Navegador: endereço de e-mail em uma nova aba
Navegador: notificação de recebimento de mensagem
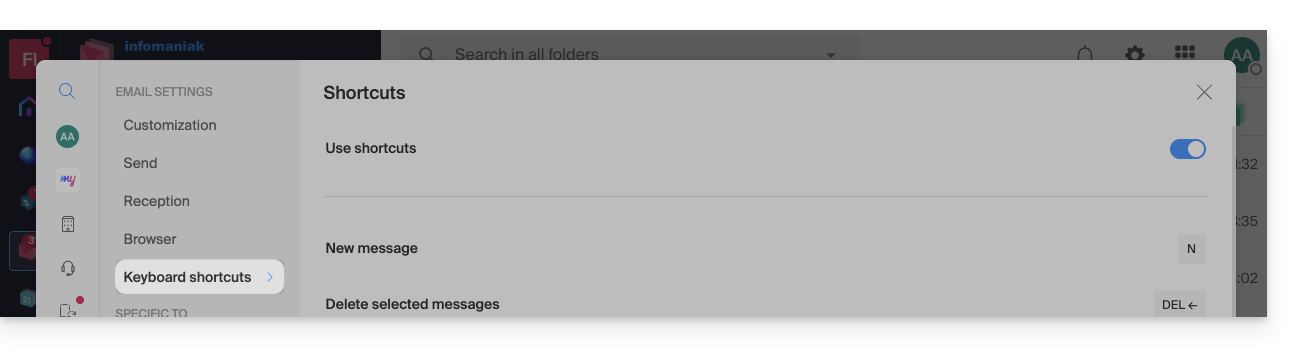
Atalhos de teclado
Modificar as configurações específicas dos endereços de e-mail
Para acessar as configurações de assinatura, alias, etc., relativas a cada um dos seus endereços de e-mail Infomaniak:
- Clique aqui para acessar o aplicativo web Mail da Infomaniak (serviço online ksuite.infomaniak.com/mail).
- Clique no ícone Configurações no canto superior direito da interface.
- Verifique ou selecione o endereço de e-mail correspondente no menu suspenso do menu lateral esquerdo:
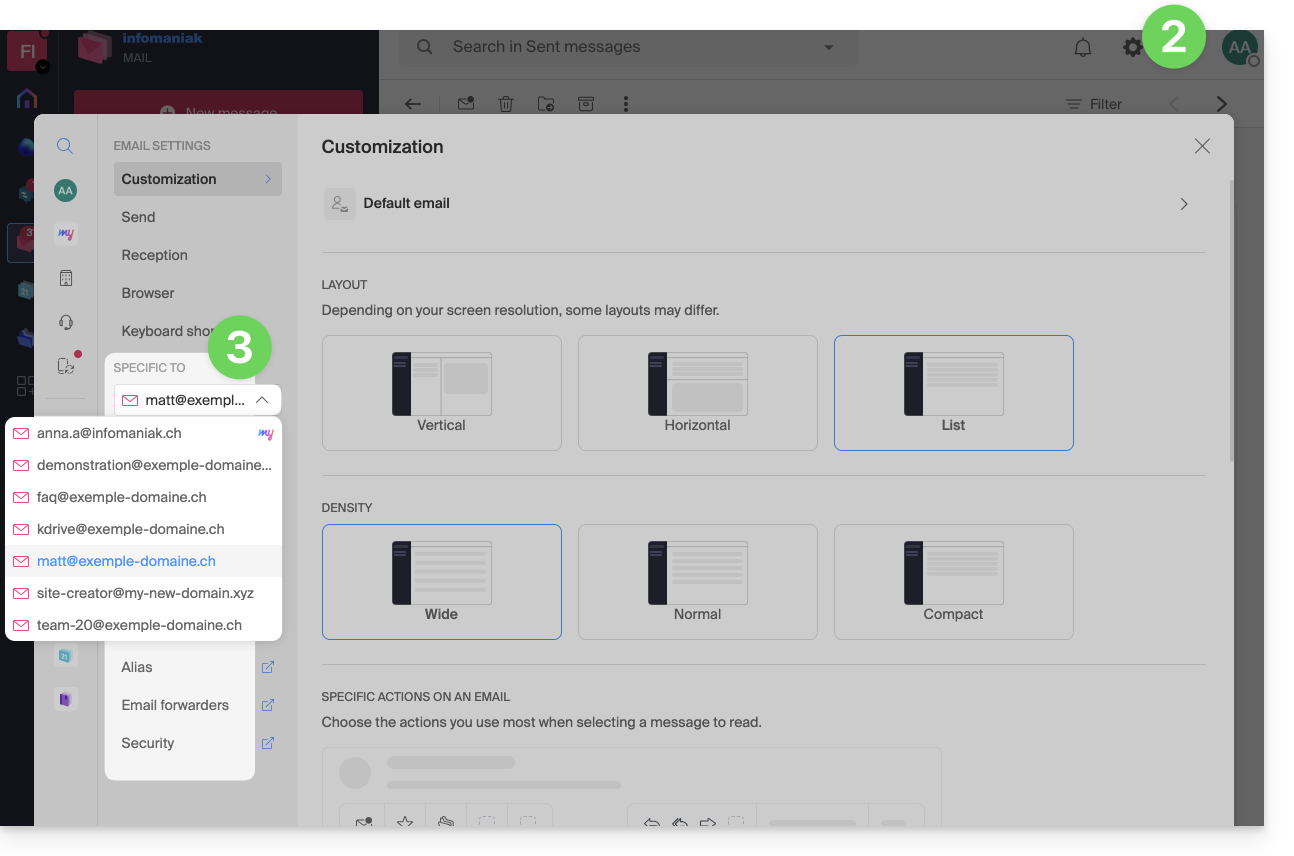
- Clique nos diferentes elementos do menu lateral esquerdo secundáriopara configurar o seu endereço de e-mail:
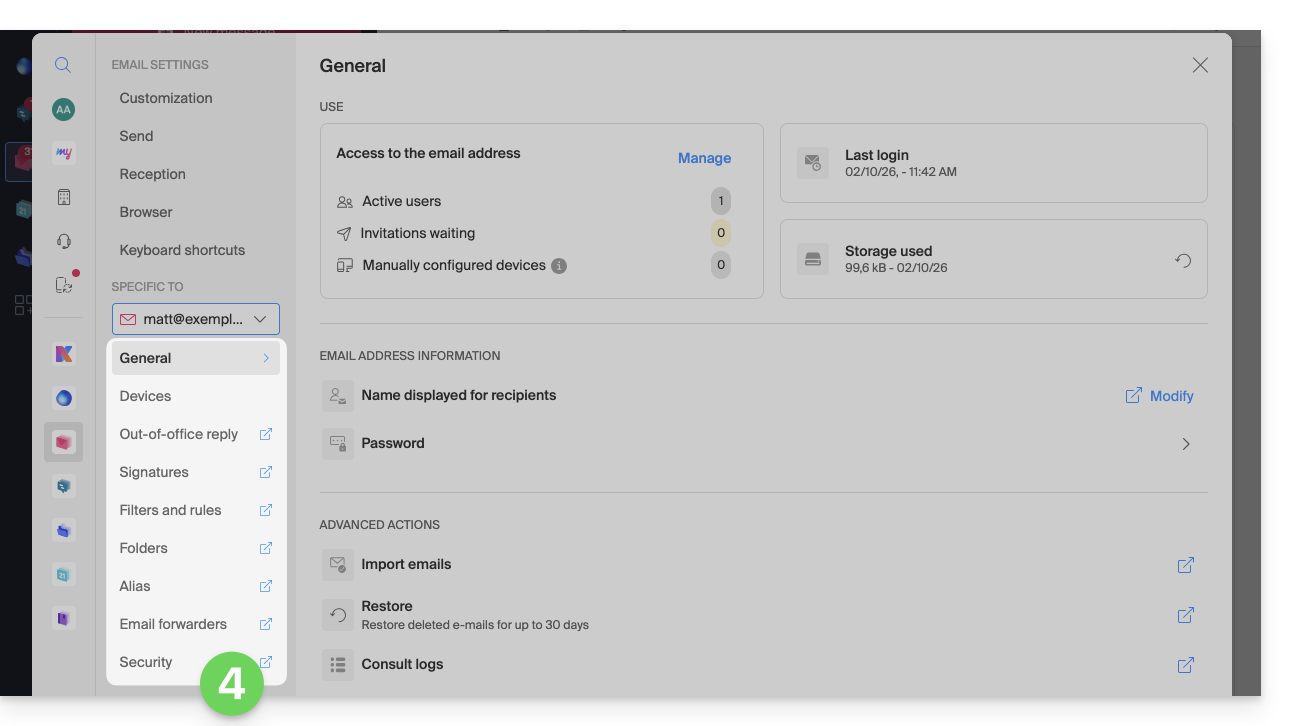
Não hesite em consultar as Perguntas Frequentes para encontrar os guias correspondentes.
Link para esta FAQ: https://faq.infomaniak.com/2481
Esta seção de perguntas frequentes foi útil?
Este guia explica como verificar o espaço de armazenamento da sua oferta de e-mail gratuita Infomaniak my kSuite e como liberar espaço.
Introdução
- O espaço de armazenamento dos e-mails my kSuite é limitado a 20 GB (as ofertas Mail Infomaniak pagas (incluindo a my kSuite+) oferecem um espaço de disco ilimitado).
- Se atingir este limite, não poderá mais receber novos e-mails; nesse caso, será necessário liberar espaço.
Exibir o espaço de armazenamento total utilizado
Para isso:
- Clique aqui para acessar o aplicativo web Mail da Infomaniak (serviço online ksuite.infomaniak.com/mail).
- Clique no ícone Configurações no canto superior direito.
- Verifique ou selecione o endereço de e-mail correspondente no menu suspenso do menu lateral esquerdo.
- Clique em Geral abaixo.
- Clique no botão para atualizar o espaço em disco:
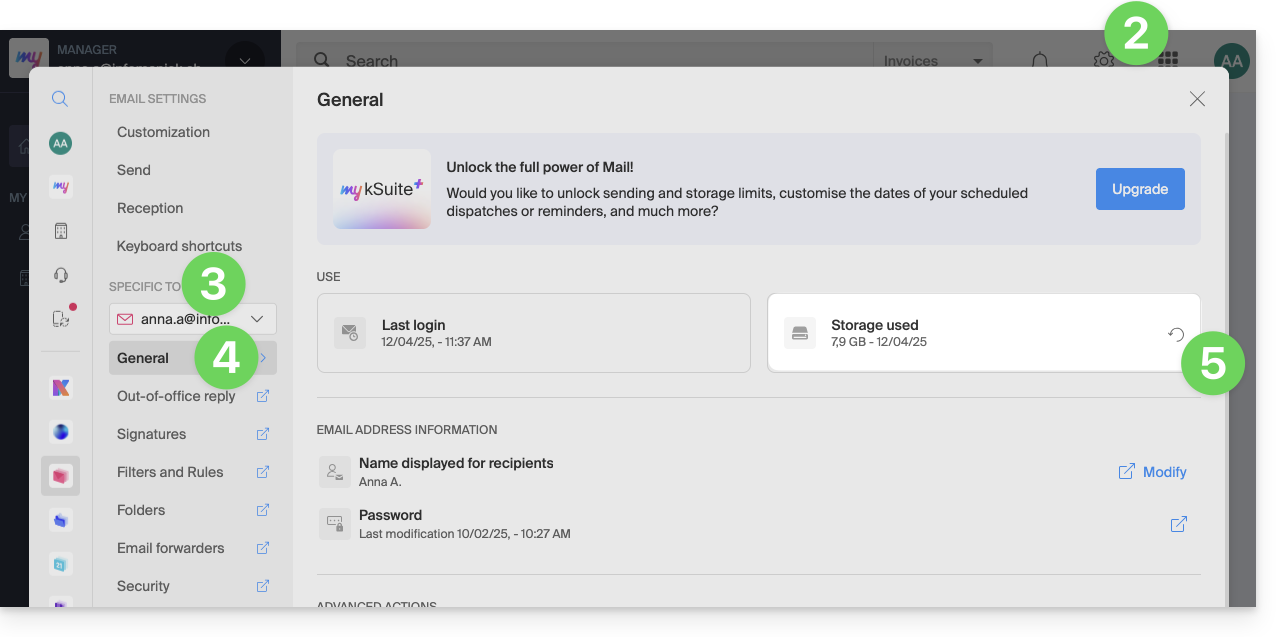
Liberar espaço de armazenamento
Quando a sua caixa de e-mail está cheia, é crucial liberar espaço para continuar a receber mensagens. Aqui estão algumas soluções eficazes para isso:
1. Excluir e-mails não essenciais
- Procure as mensagens mais volumosas. Elimine as mensagens com anexos desnecessários ou transfira-as para o seu computador antes de eliminar os e-mails.
- Ordene os seus e-mails por data e elimine aqueles que são muito antigos ou de que já não precisa.
- Após excluir e-mails, lembre-se de esvaziar a lixeira para liberar espaço.
- Cancele a inscrição em newsletters e listas de distribuição que você não lê mais para evitar receber e-mails desnecessários no futuro.
2. Utilize um aplicativo de gerenciamento de e-mails
- Existem aplicativos como Clean Email, Unroll.me ou Mailstrom que podem ajudá-lo a limpar sua caixa de entrada de forma rápida e eficiente (atenção, no entanto, aos termos de uso e à política de privacidade desses aplicativos).
3. Aumentar a capacidade de armazenamento
- As ofertas Mail da Infomaniak pagas (incluindo a my kSuite+) oferecem espaço em disco ilimitado.
Link para esta FAQ: https://faq.infomaniak.com/2484
Esta seção de perguntas frequentes foi útil?