Knowledge base
1000 FAQs, 500 tutorials and instructional videos. Here, there are only solutions!
This guide explains what the external mail notice, "External" means, which appears on the Web app Mail (online service ksuite.infomaniak.com/mail) and the mobile app Infomaniak Mail (application for iOS/Android smartphone or tablet) when reading certain messages: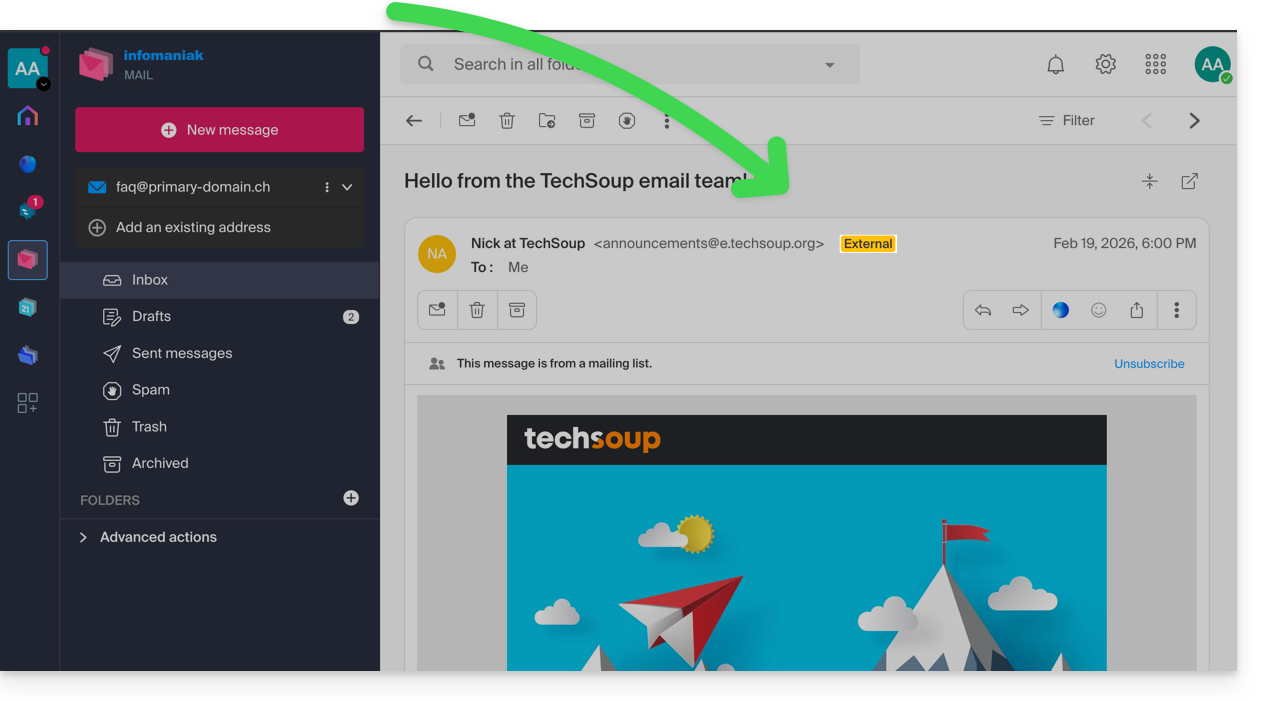
External mail notice
The external mail notice appears in the following cases:
- The sender's domain name (or alias) does not match the email address configured in Mail.
- The sender is not part of the contacts (including suggested contacts).
- The email comes from an address hosted outside the Organization.
The notice will display as unknown instead of “ external” with some free offers like my kSuite.
Enable or disable the notice
You can enable or disable the notice, the effect is immediate for incoming emails and in the case of a response to an external email. To do this:
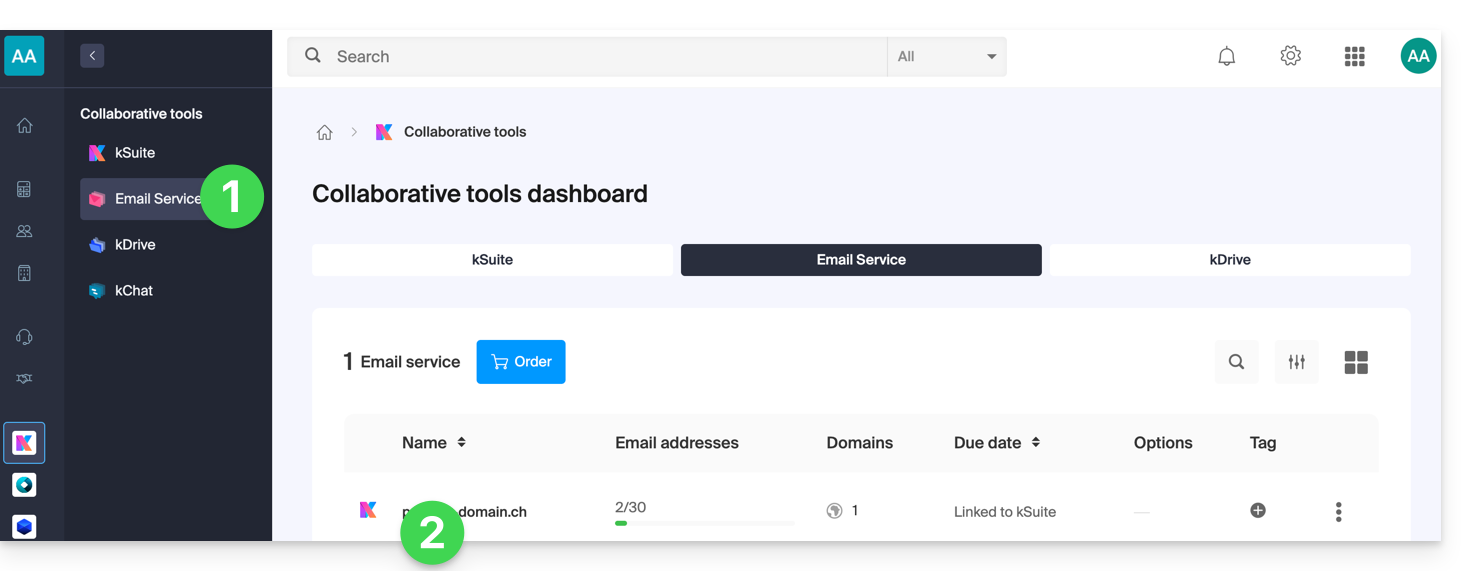
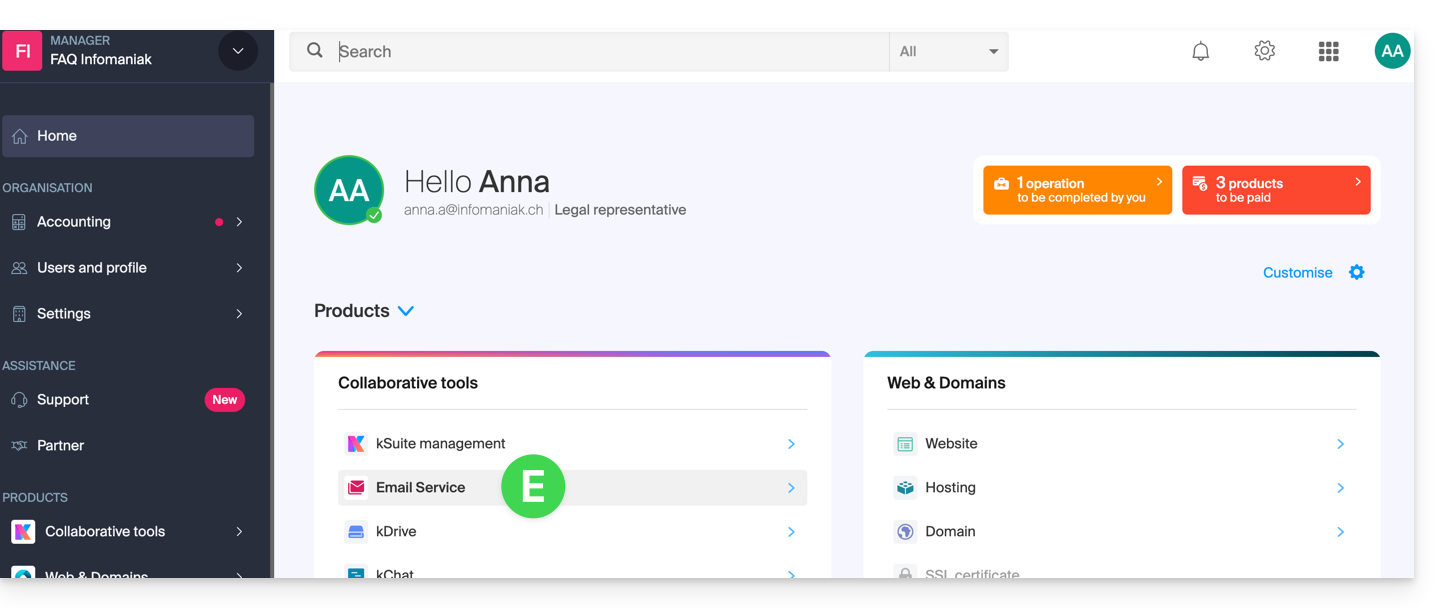
- Click here to access the management of your Mail Service on the Infomaniak Manager (need help?).
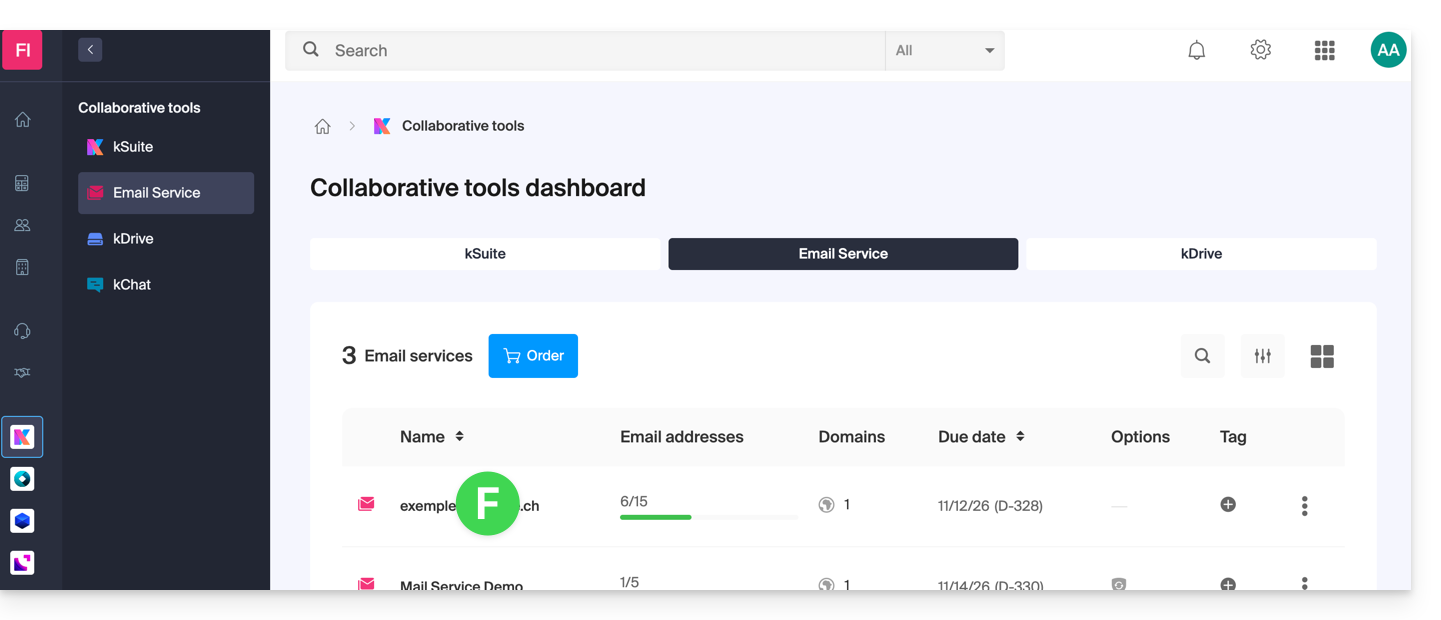
- Click directly on the name assigned to the Mail Service concerned:
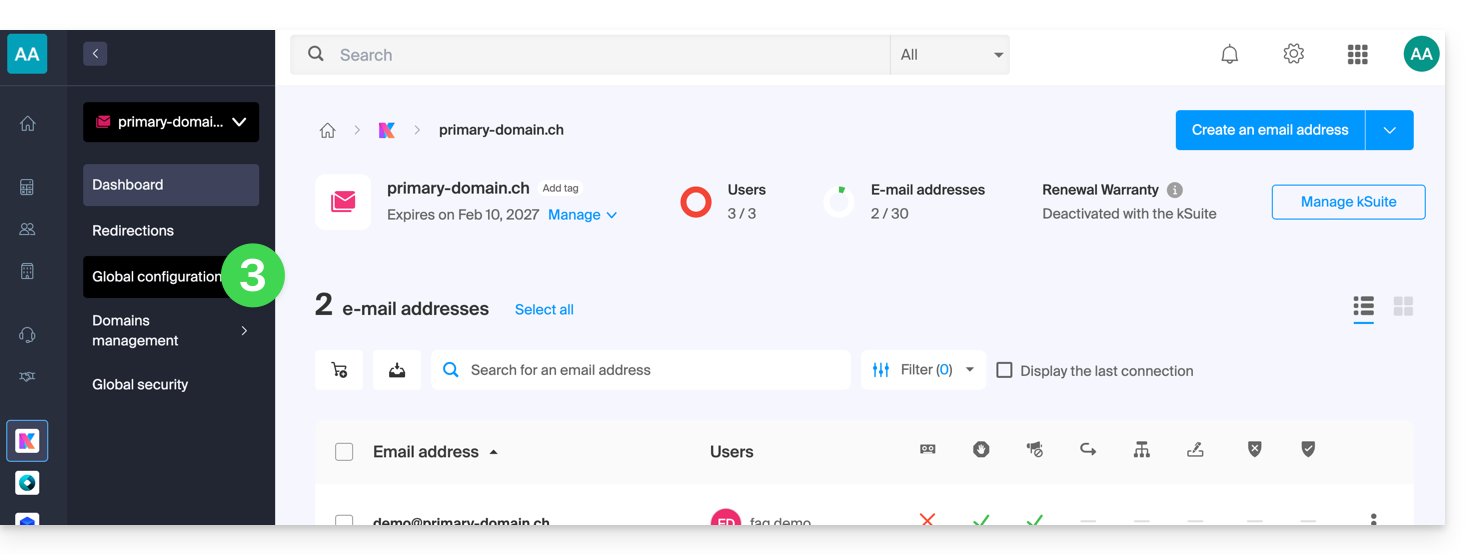
- Click on Global Configuration in the left sidebar:
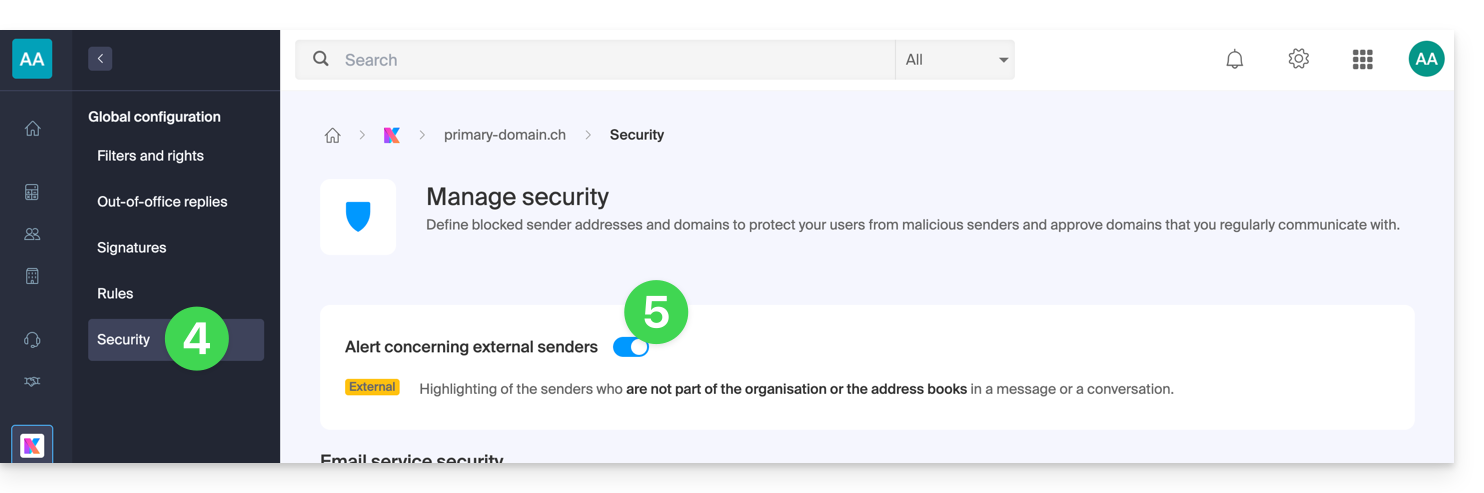
- Click on the Security tab.
- Enable or disable the toggle switch:
Link to this FAQ:
Has this FAQ been helpful?
This guide explains how to save an email (as if you were downloading) but directly to your kDrive.
Preamble
- Save in a few clicks a message received on an address of your Infomaniak Mail Service, this in
.emlformat readable directly within your kDrive interface. - To export all emails from an email address, refer to this other guide.
- To export email attachments, refer to this other guide.
Add an email to kDrive…
… from the Infomaniak Mail Web App
To export the email message of your choice to your kDrive:
- Click here to access the Infomaniak Mail Web App (online service ksuite.infomaniak.com/mail).
- Open the email you want to save.
- Then click on the share icon at the top of the concerned message to add to kDrive:
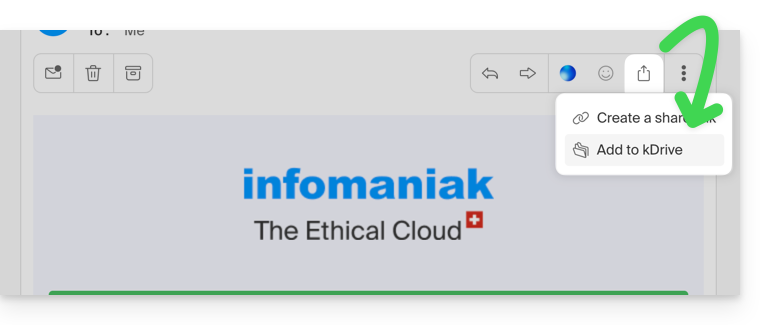
- Then click on the share icon at the top of the concerned message to add to kDrive:
- Otherwise, you can also click on the Add to kDrive icon at the top of the concerned message:
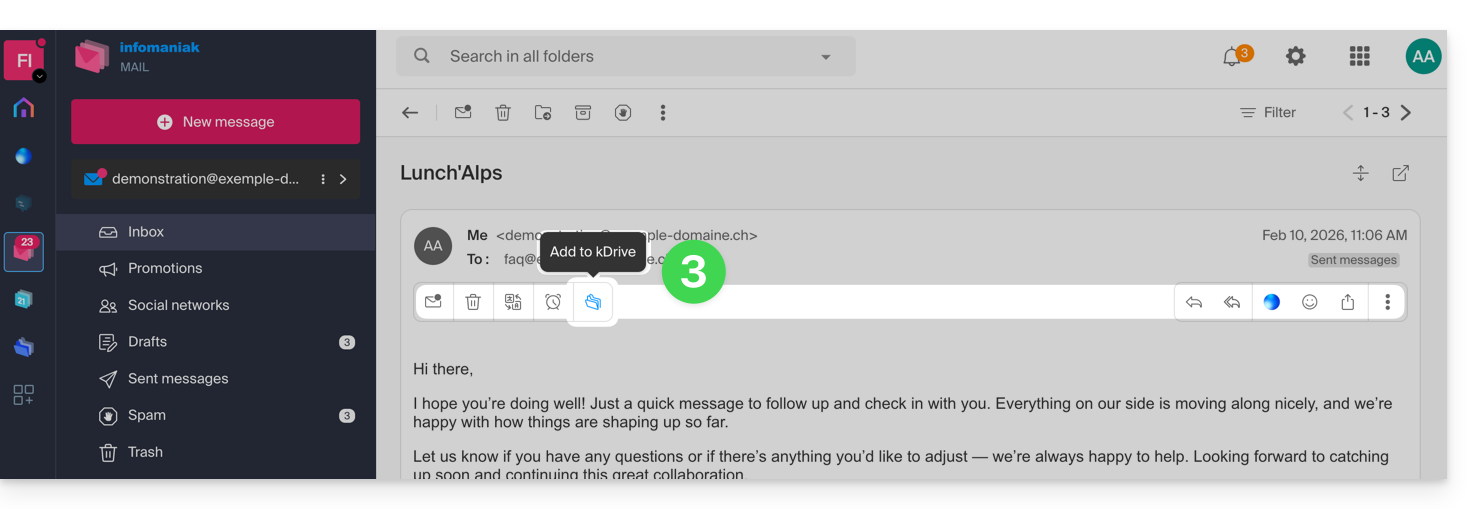
- If the icon is not visible, click on the action menu ⋮ on the right.
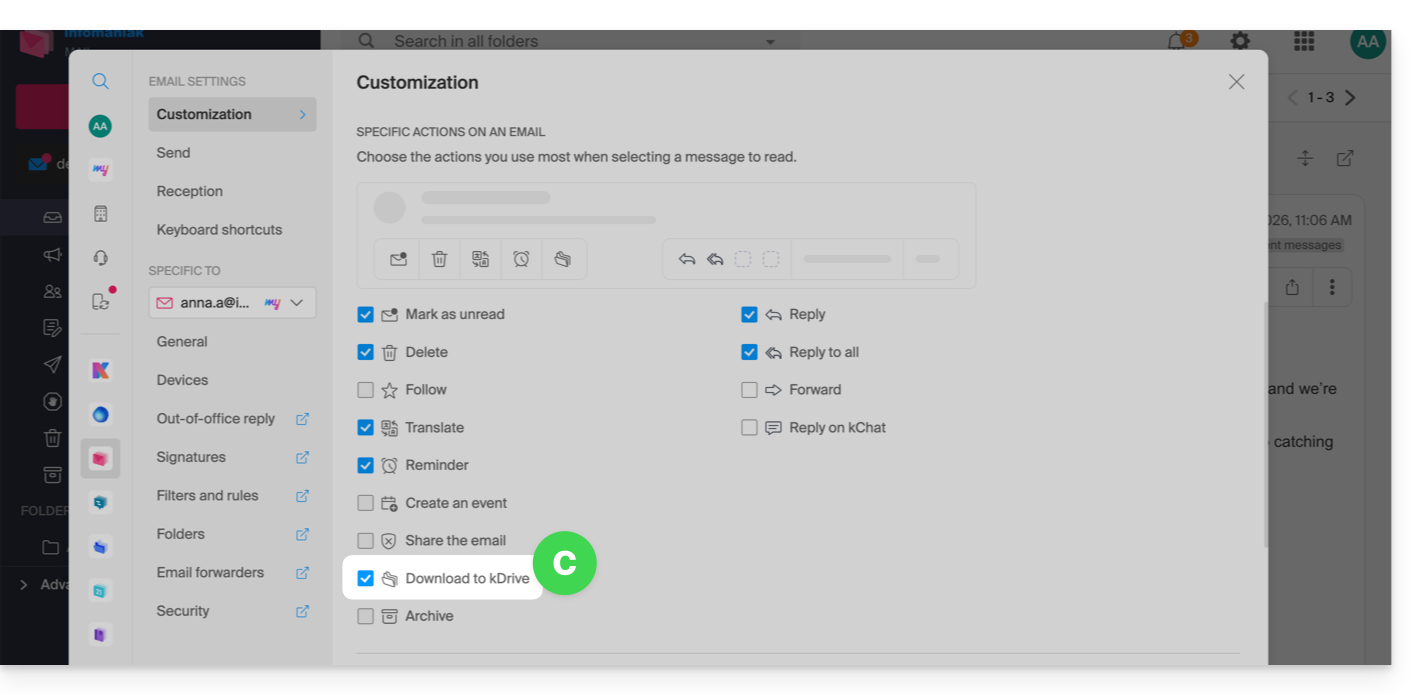
- Then choose to customize the actions:
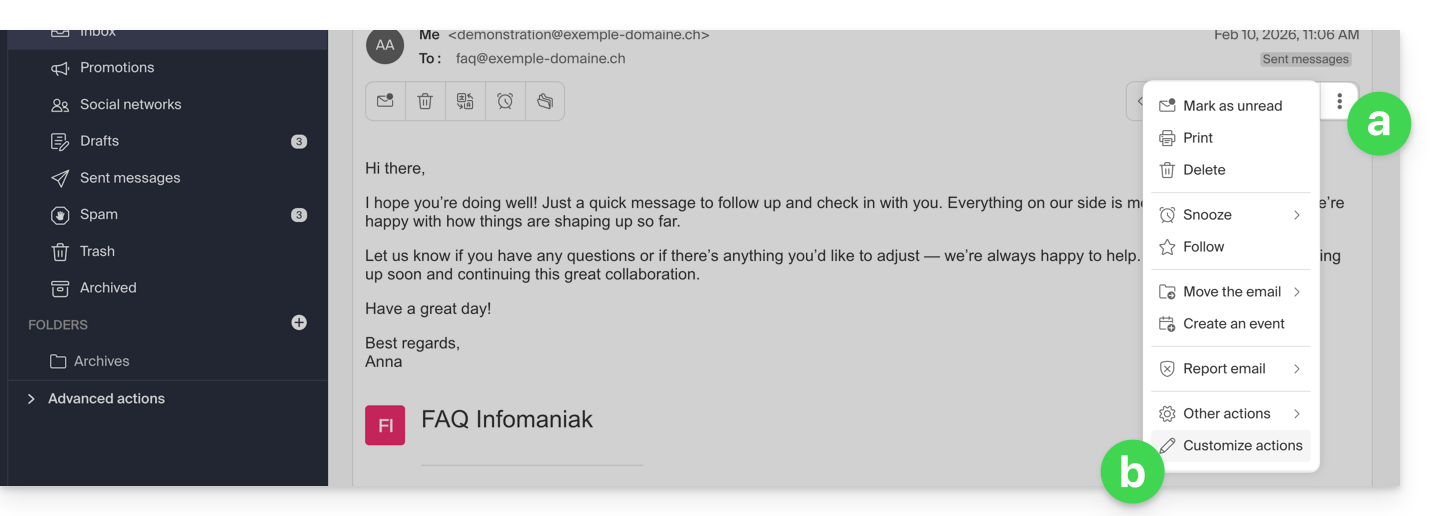
- to add the desired action:
- Choose the kDrive (among those to which you are attached by your Organization) and the desired location on it to save your file - if you rename it, keep the
.emlextension to be able to read it directly in the kDrive interface. - Click on the Add button.
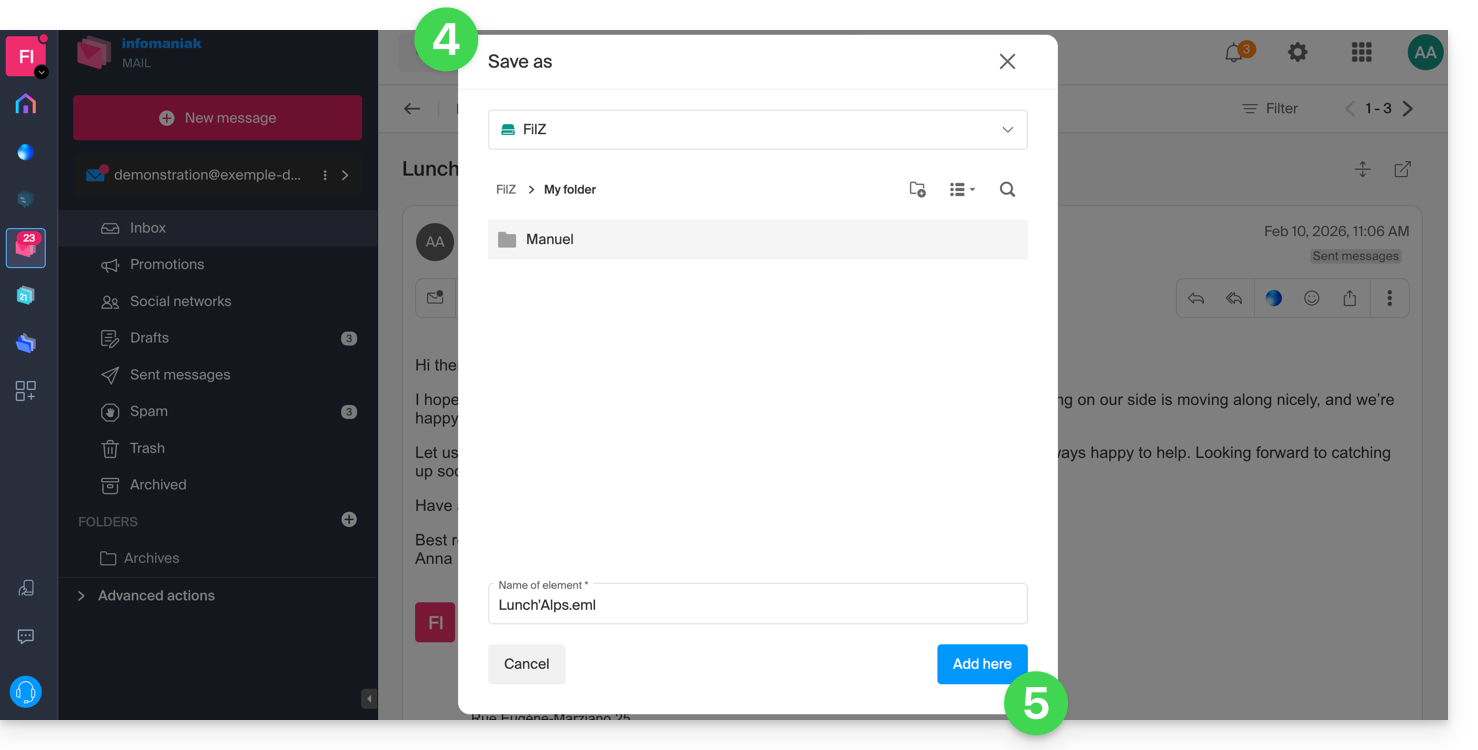
- A message at the bottom of the screen notifies you of the progress of the recording and allows you to go directly to the email save location:
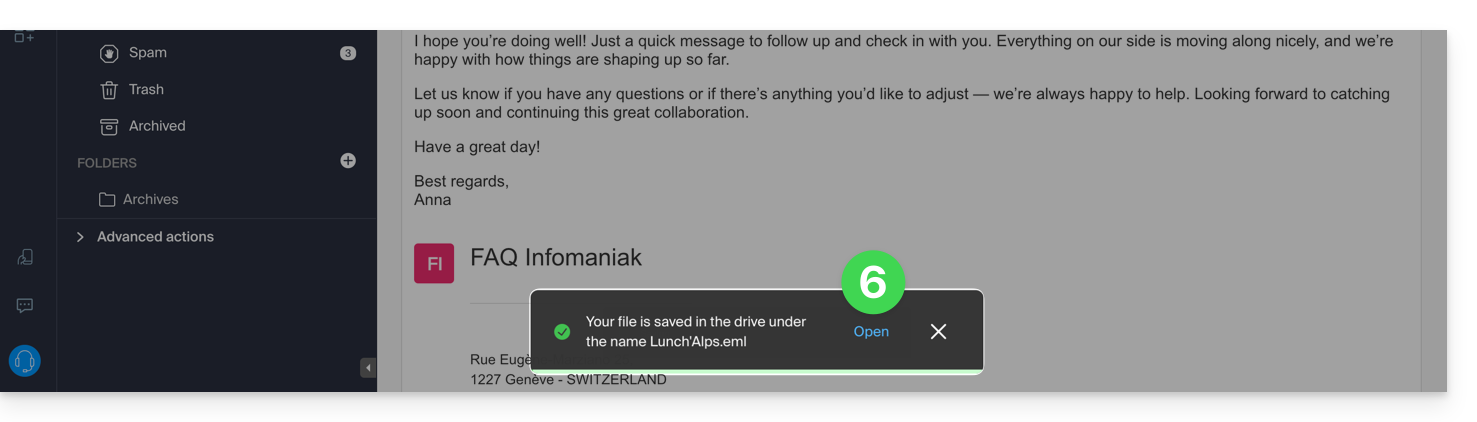
- The saved email can be viewed on kDrive as if you were reading it on Mail directly.
… from the Infomaniak Mail mobile app
To do this:
- Open the email in question on the mobile app Infomaniak Mail (application for iOS / Android smartphone or tablet).
- Click on the action menu ⋮ located at the top right of the displayed email.
- Choose Save to kDrive and follow the same procedure as above in step 4.
Link to this FAQ:
Has this FAQ been helpful?
This guide details the different ways to address an email to multiple recipients, including masking the email addresses of other participants.
Preamble
- When you send emails, it is sometimes necessary to include multiple recipients using the fields:
- À
- CC:
- French: Copie Conforme
- English: Carbon Copy
- BCC:
- French: Copie Conforme Invisible
- English: Blind Carbon Copy
- Do not overload the To and CC fields with recipients who are not directly concerned by the email.
- Use the BCC field to protect the email addresses of recipients when there are multiple people on the list.
- For multiple, recurring and/or important sends, beyond the imposed limits, it is recommended to use more suitable tools instead:
Understanding and using these 3 email fields
The To field
This field is used to indicate the main recipient(s) of the email, those who receive the email as a direct copy.
- Use this field for main recipients who are directly concerned by the content of the email.
- Examples: work meeting, project report, direct communication with a client.
The CC field
Used to send a copy of the email to other people in addition to the main recipients. All recipients can see who received a copy of the email.
- Use this field to include secondary recipients who need to be informed but are not the main actors in the discussion.
- Example: informing a supervisor about a conversation, including colleagues interested in the subject without them needing to intervene.
The BCC field
Used to send a copy of the email to people without the other recipients knowing they have also received the email.
- Use this field to include recipients who need to receive the email without the other recipients knowing.
- Example: sending an email to a group with a supervisor in CCI for follow-up, avoid disclosing email addresses to all recipients (often used in mass emails).
Use the fields available on Mail Infomaniak
To access the appropriate fields on your Infomaniak mail service:
- Click here to access the Web app Mail Infomaniak (online service ksuite.infomaniak.com/mail).
- Click on New message.
- Click on CC & BCC:

- The additional fields appear, they will allow you to insert the email addresses of your recipients:

Usage examples
Each of these fields has a specific function and can be used strategically depending on the context of your communication. Be transparent and ethical in the use of the BCC field to avoid misunderstandings or conflicts:
- Team communication
- To: main project members
- CC: Project manager, other concerned departments
- BCC: Director for information without direct intervention
- Marketing email
- To: do not use (or simply indicate the sender's email address)
- CC: do not use
- BCC: list of subscribers to protect individual email addresses
- Important announcement
- To: main recipients (e.g., directors)
- CC: board members, key collaborators
- BCC: other stakeholders for confidential information
- Meeting announcement
- To: John Doe, Jane Smith
- CC: project.manager@company.com
- BCC: director@company.com
- Event invitation
- To: main guests
- CC: coordination@event.com
- BCC: list of secondary guests (to protect email addresses)
Link to this FAQ:
Has this FAQ been helpful?
This guide explains how to display and forward the headers of an email.
Preamble
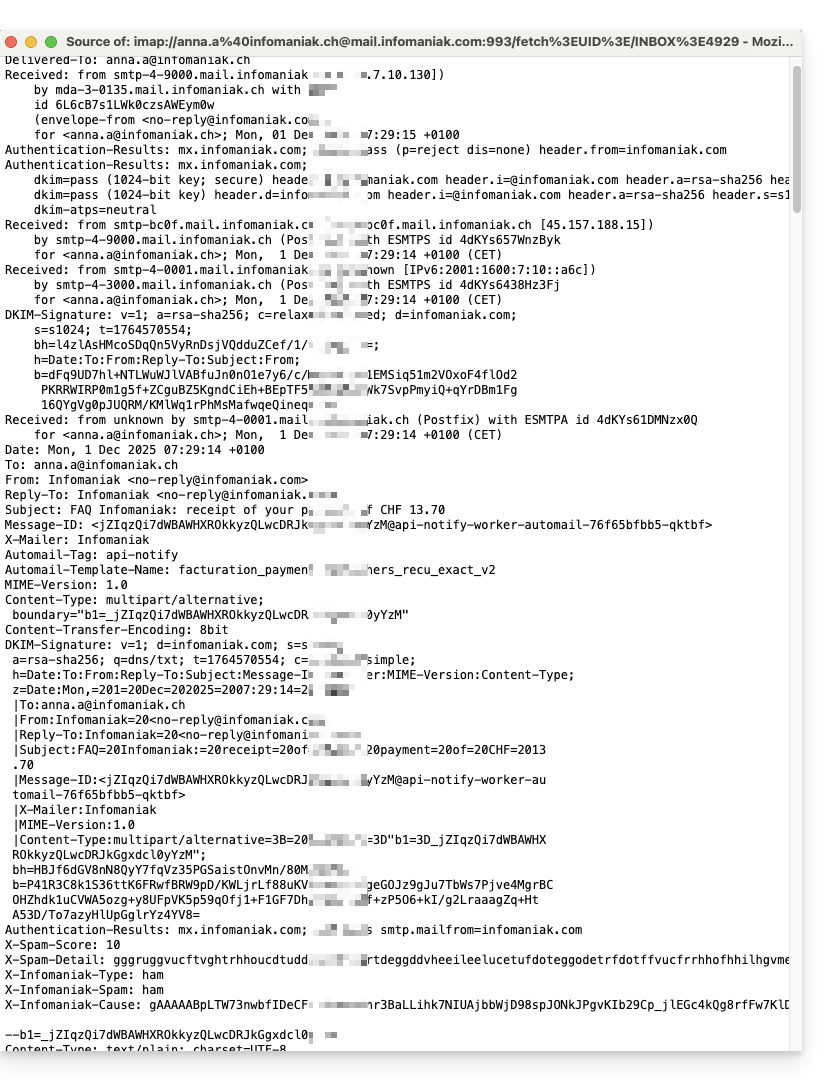
- An email consists of a header (
header) and the actual content of the message (body, body of the text). - Most email software/clients do not directly display the headers, but displaying or forwarding them allows Infomaniak support to identify the issues encountered.
- The headers (= source) of an email provide various information such as:
- the sender
- the recipient
- the date
- the subject
- the servers involved in the transmission between the sender and the recipient:
Display headers on Mail Infomaniak
To display the headers of an email from the Mail Infomaniak interface:
- Click here to access the Web app Mail Infomaniak (online service ksuite.infomaniak.com/mail).
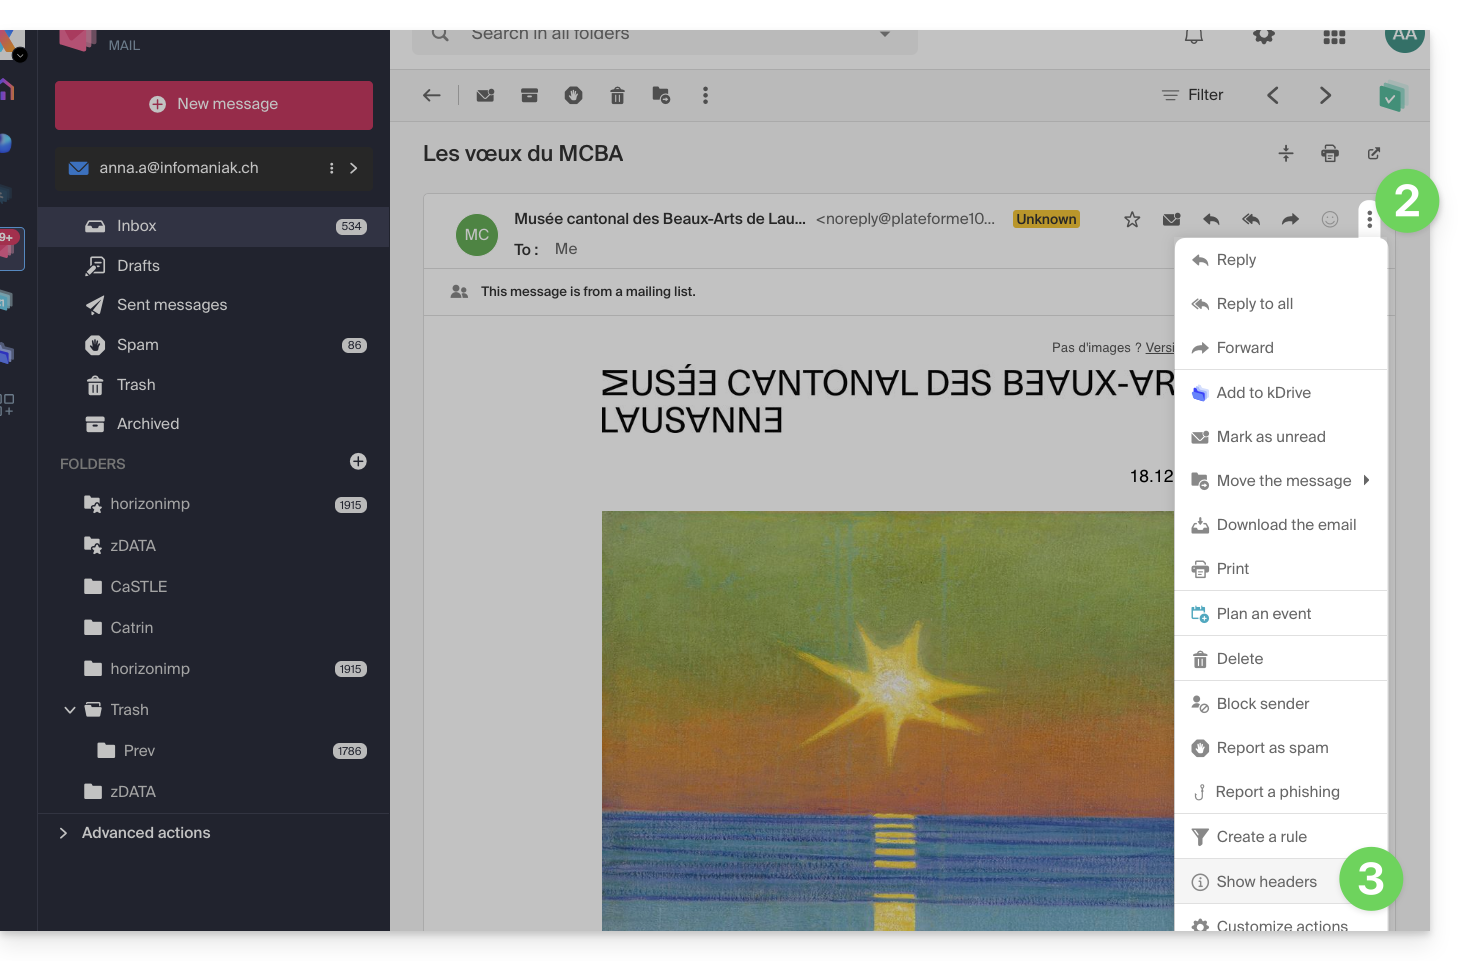
- Open the message in question and click on the action menu ⋮ on the right.
- From the menu that appears, select View headers:
- Repeat the operation to hide them:

To display the headers with external email software/client, refer to this other guide.
Forward the headers of an email
To forward the headers of an email, in response to a support request or to the recipient of your choice, either...
- ... copy and paste the displayed headers according to the method above.
- ... forward the email message.
However, for the headers to be present, it is essential to transfer the message not in the body of the message but as an attachment only. The email attachment will be in the .eml format and this file contains all the necessary headers.
A third method of complete email transmission is explained in this other guide.
Link to this FAQ:
Has this FAQ been helpful?
This guide details the mechanisms of electronic identity theft (spoofing) and the protective measures against undesirable messages appearing to come from your own domain.
Has my account been used without my knowledge?
Receiving an email that seems to come from you is a common psychological manipulation technique. This does not mean that your mailbox has been hacked. In most cases, it is a simple forgery of the « From » header, similar to someone writing your address on the back of a paper envelope before mailing it.
Make sure your own address is not listed in the whitelist (Allowlist) of your antispam filter. If it is, the protection system skips the security analysis, thinking the message is legitimate.
Diagnosis: Spoofing vs Hacking
It is crucial to distinguish forgery (mail forging) from intrusion. The global email sending protocol (SMTP) was designed without native verification of the sender's identity.
Although Infomaniak's infrastructure applies strict security standards, it is technically impossible to prevent an unsecured third-party (external) server, located anywhere in the world, from sending a message pretending to be you. However, tools exist to make these messages undetectable or blocked by your recipients.
Strengthening the integrity of your domain
To protect your digital reputation and limit the impact of these spoofing attempts, deploying authentication protocols is the professional standard:
- SPF & DKIM: These digital signatures certify that your messages indeed come from our authorized servers.
- DMARC: This essential protocol allows you to give instructions to servers worldwide (e.g., "If the email is not signed by Infomaniak, reject it or mark it as spam"). It is the most powerful tool for analyzing and limiting the fraudulent use of your domain.
- Catch-all management: Avoid using a catch-all type address, which collects all messages sent to non-existent addresses in your domain, as it naturally attracts massive spam flows.
Failure Notifications (Backscatter)
If you receive non-delivery reports (Non-Delivery Reports) for messages you never wrote, you are facing the Backscatter phenomenon. Poorly configured third-party servers or botnets use your identity to mass-distribute content. When they encounter a non-existent address, the remote server returns the error to the displayed sender: you.
Link to this FAQ:
Has this FAQ been helpful?
This guide explains how to export the content of an email address hosted by Infomaniak.
Preamble
- Infomaniak does not offer an export (e.g.,
PST). - Infomaniak keeps your emails for the entire duration of your contract, and according to your offer with integrated backups without size limit in the context of normal use of a shared service, in accordance with Article 1 of the Mail Service Special Conditions.
- The manual export proposed below works on Windows: you will thus be able to save your emails within a single easily restorable archive.
Manual export
To export all messages contained in your email address hosted by Infomaniak:
- Install the free application Thunderbird.
- Configure the email address in question in IMAP (to include subfolders).
- Make sure that all desired content is present (synchronize the mailbox from always - not just the last 30 days, for example).
Then...
- ... either you install the free application BackupThunderbird which allows the creation of an archive (encrypted if necessary) and subsequent restoration...
- ... or you can simply display the hidden files of Windows then find and save this folder profile
C:\Users{USER}\AppData\Roaming\Thunderbird\Profiles{PROFIL_USER}\
as it contains all your mail.
Download emails locally
Another solution (not recommended) could be to configure a software/email client by choosing reception via the POP3 protocol, which will have the effect of downloading the messages locally and only the inbox will be affected.
Link to this FAQ:
Has this FAQ been helpful?
This guide explains how to be notified of new emails with the Infomaniak Web app Mail (online service ksuite.infomaniak.com/mail).
Preamble
- The Infomaniak Web app Mail is compatible with web browsers (Chrome, Firefox, etc.) that offer visual alerts for incoming messages in the background.
- The mobile app Infomaniak Mail (iOS / Android) also offers to use the notification possibilities of your mobile device.
Display a notification in the browser
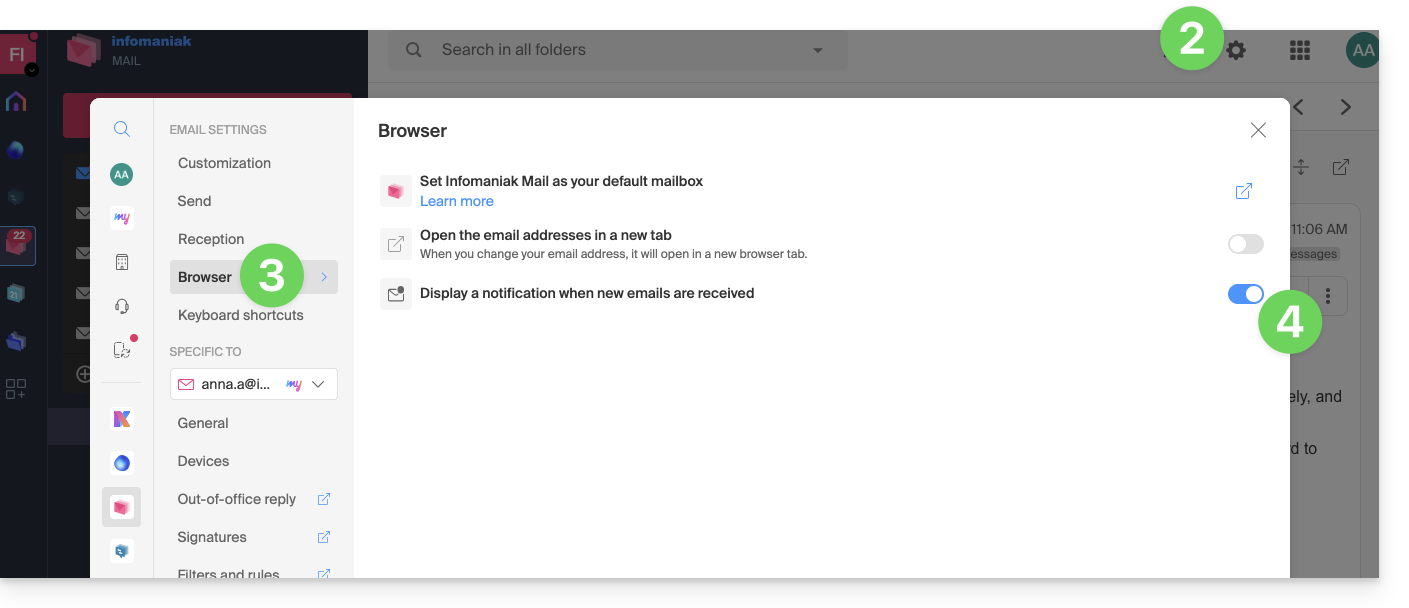
To activate browser notifications when a new incoming message arrives:
- Click here to access the Infomaniak Web app Mail (online service ksuite.infomaniak.com/mail).
- Click on the Settings icon at the top right.
- Click on Browser in the left sidebar menu.
- Enable the toggle switch to Show a notification when new emails are received:
To remove this feature, deactivate the toggle button. You will also need to remove the notification permission in the browser directly (see the documentation of its editor).
Allow browser notifications…
… on Safari
- Open Safari.
- Click on Preferences and select Websites then Notifications.
- Search for the site ksuite.infomaniak.com/mail and select Allow.
For more information, refer to the Apple documentation.
… on Firefox
- Open Firefox.
- Go to the main menu in Preferences or Settings.
- Go to Privacy and Security in the left panel.
- Scroll down to the Permissions section.
- Click the Settings button to the right of Notifications.
- Search for the site ksuite.infomaniak.com/mail and select Allow.
For more information, refer to the Firefox documentation.
… on Google Chrome
- Open Google Chrome.
- Click on the More menu ⋮ in the top right corner > Settings.
- Go to Privacy and Security, then click on Site Settings.
- Click on Notifications and choose to allow notifications:
- Allow a site: next to the Allow option, click Add. Enter the URL: https://ksuite.infomaniak.com/mail, then click Add.
For more information, refer to the Google Chrome documentation.
… on Microsoft Edge
- Open Microsoft Edge.
- Click on the menu in the top right corner, then click on Settings.
- Go to the Cookies and site permissions menu.
- Click on Notifications:
- Allow a site: next to the Allow option, click Add. Enter the URL: https://ksuite.infomaniak.com/mail, then click Add.
Link to this FAQ:
Has this FAQ been helpful?
This guide explains how to report a phishing attempt (Phishing, Fishing, Filoutage...) that you may be a victim of.
Preamble
- Phishing is an attempt at fraud and scam, aiming to obtain sensitive information fraudulently.
- Generally, the victim receives in their inbox a message seemingly coming from Infomaniak, their bank, or a trusted organization, indicating that a problem has occurred on their account or in their daily life:
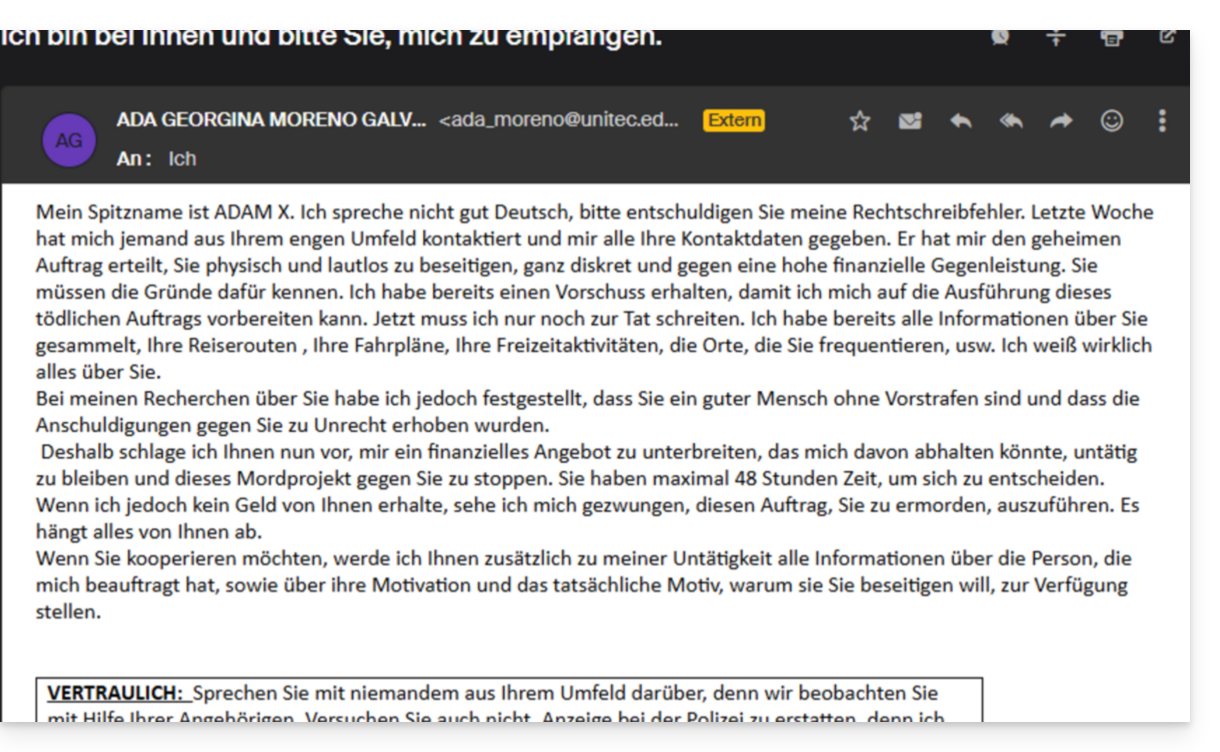
- The goal of this identity theft is generally for the user to voluntarily go to a page and communicate private information that will then be exploited for various purposes, mainly financial.
- If it is not a message “pretending to be something it is not”, but only an unsolicited advertising message, it is better to report it as Spam.
Report a Phishing Email
Prerequisites
- Check that the spam filter is active.
- For more security, activate the mention of external mail.
Then, if you find an email of this type in your inbox directly, you have the possibility to act so that these messages decrease and eventually disappear from the messaging systems:
- Click here to access the Infomaniak Web App Mail (online service ksuite.infomaniak.com/mail).
- Open the phishing message.
- Click on the action menu ⋮ on the right.
- Click on Report the message.
- From the menu that appears, select Report as phishing:

- Confirm sending for processing.
- Delete the email
Once you have clicked on Report as phishing, an email is automatically sent to Infomaniak with all the necessary information to process the scam report.
In case of a more serious problem (when the message is directly addressed to you by an acquaintance or contact without it being a mass sending) it is recommended to intervene with an organization such as for example report.ncsc.admin.ch.
Link to this FAQ:
Has this FAQ been helpful?
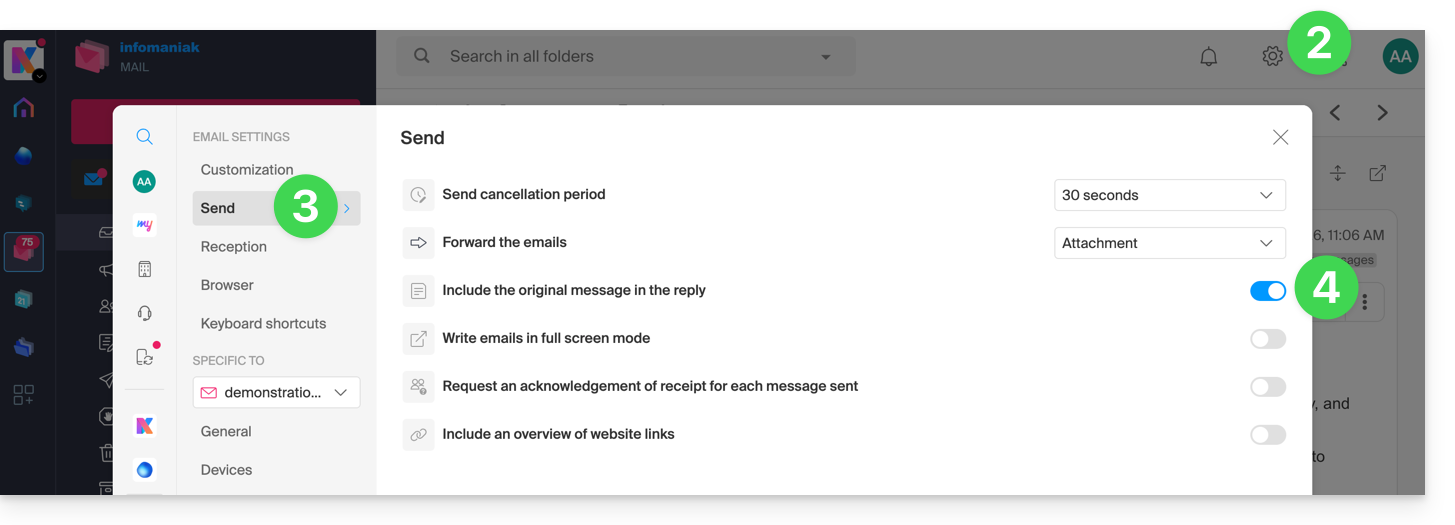
This guide explains how to enable or disable the inclusion of the original message when replying to an email from the Infomaniak Web app Mail (online service ksuite.infomaniak.com/mail) for web browser.
No longer quote the original message
By default, the text of the message you are replying to will be placed below your own reply text (A):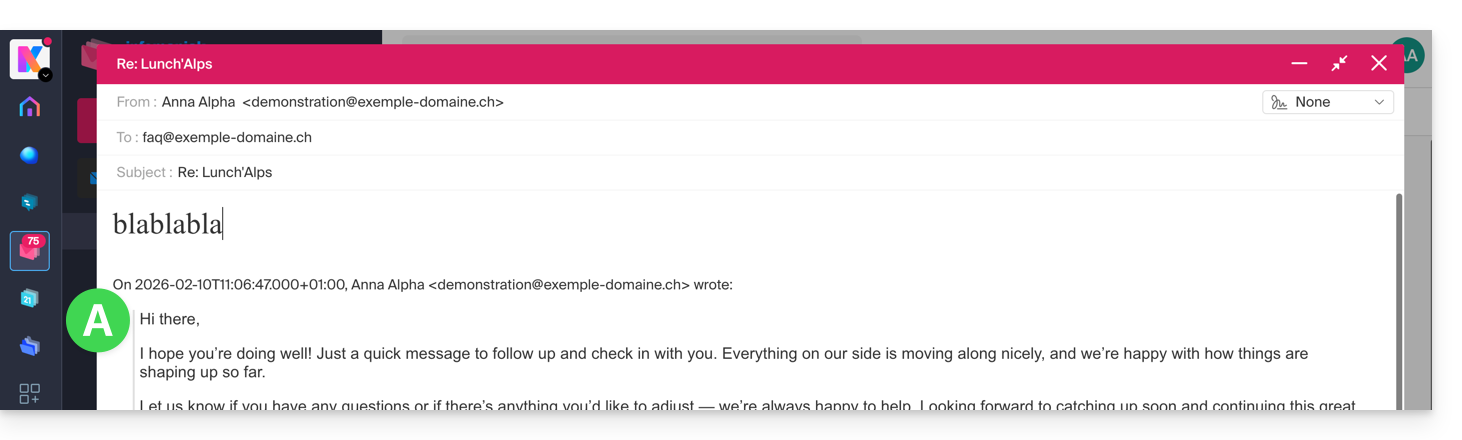
By following the guide below, nothing will be quoted from the original message and you will reply from a blank base with or without signature (B):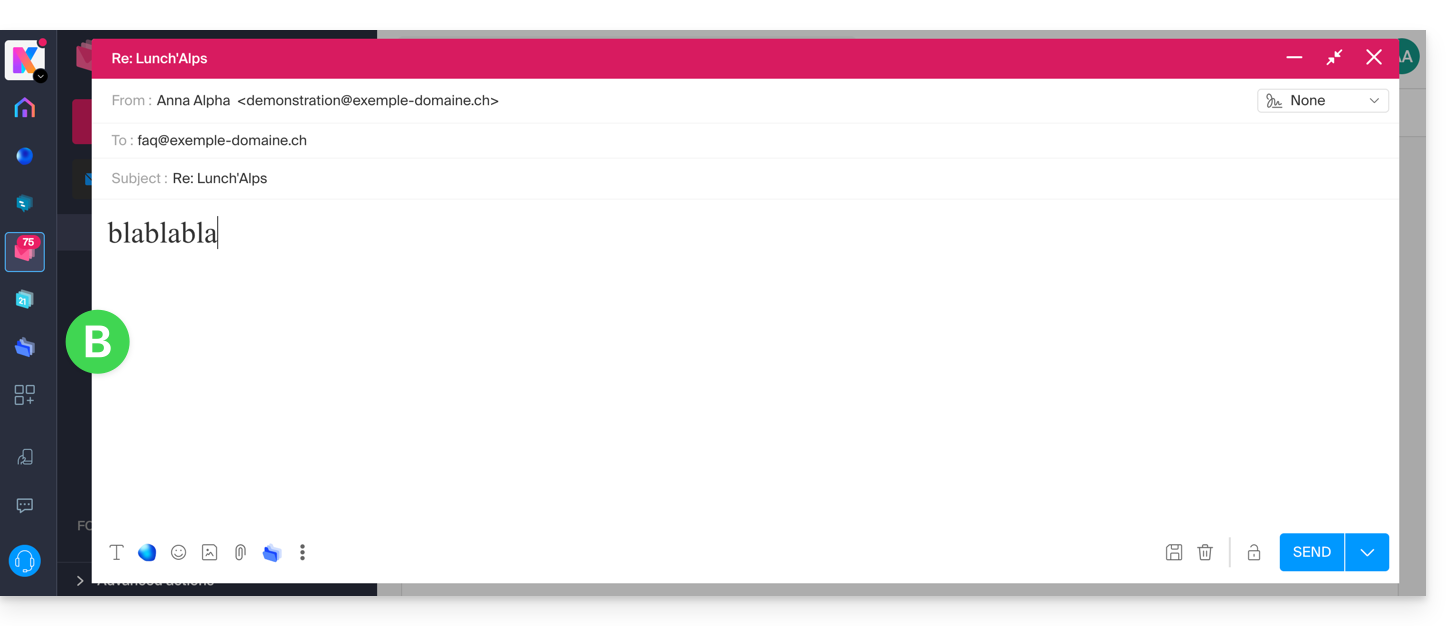
To never quote the original message when replying to a correspondent:
- Click here to access the Infomaniak Web app Mail (online service ksuite.infomaniak.com/mail).
- Click on the Settings icon at the top right.
- Click on Sending in the left sidebar.
- Disable the toggle switch to the right of the "Include the original message in the reply" element:
Link to this FAQ:
Has this FAQ been helpful?
This guide explains how to recover lost emails, especially after accidental deletion.
Preamble
- Infomaniak backs up each email address once a day (usually early in the morning).
- You can thus restore your mailbox to its exact state at the time of the backup.
- RECOVERED ITEMS:
- Emails (present at the time of the backup) that no longer exist (at the time of the restoration request) will be returned to their original location.
- Certain parameters (answering machine and redirection in particular) will be restored if they have changed in the meantime.
- NON-RECOVERED ITEMS:
- Moved emails (subfolders, trash): they still exist in your account and must be searched.
- The restoration does not include the calendar nor the address book.
- Messages absent at the time of the daily backup (see POP3 chapter); example:
- Restoration requested at 10 AM (backup at 5 AM) for an email received at 8 AM and deleted at 9:30 AM: it will not be recovered because it was not yet present at the 5 AM backup.
- UNMODIFIED ITEMS:
- Emails received, created, or stored between the backup date and the execution of the restoration remain in your mailbox.
Backup retention period
Infomaniak makes the backup of your mailbox available for a certain number of days depending on your offer.
⚠ Duration in days:
| kSuite | * | |
| Standard | 30 | |
| Business | 30 | |
| Enterprise | 30 | |
| * | ||
| my kSuite+ | 30 | |
| Mail Service | * | |
| Premium 5 min. addresses | 30 |
* By upgrading a free offer, you will be able to access backups for up to 30 days.
Refer to this other guide on the storage limits of your messages.
Restore from the Infomaniak Web Mail app
Prerequisites
- Ensure that the deletion occurred less than 30 days ago (or within the period included with your offer - see above).
- Have permission to manage backups: if you had been invited to the Infomaniak Web Mail app (online service ksuite.infomaniak.com/mail) to manage your address, it is possible that the Mail Service manager has revoked this right from their admin account.
To restore emails:
- Click here to access the Infomaniak Web Mail app (online service ksuite.infomaniak.com/mail).
- Click on the Settings icon at the top right.
- Check or select the email address concerned in the dropdown menu of the left sidebar.
- Click on General.
- Click on Restore:
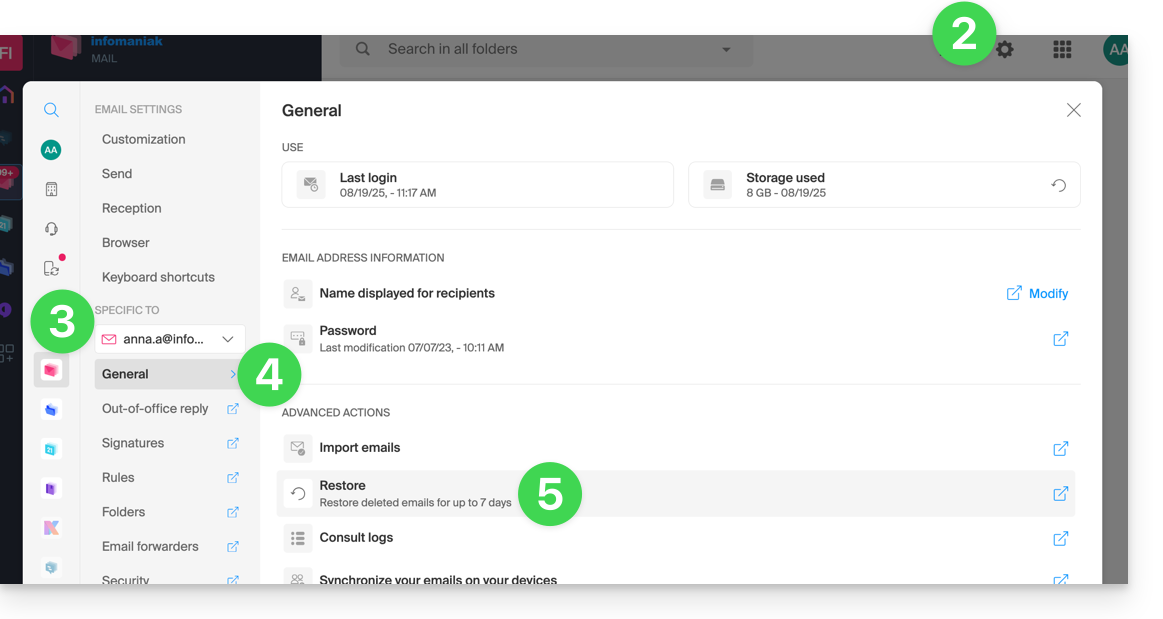
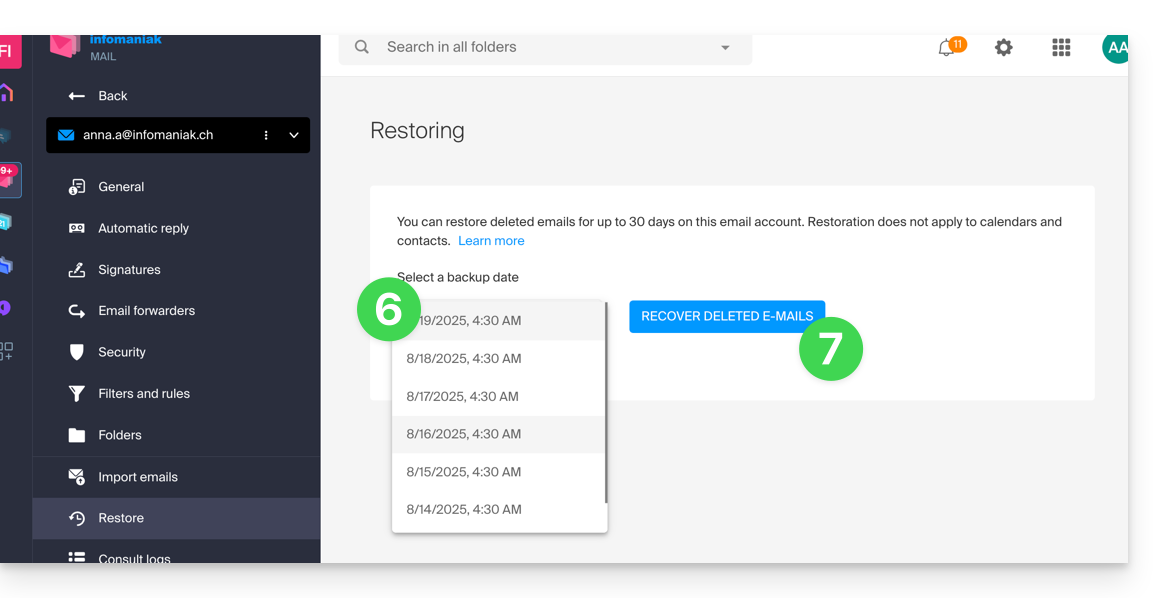
- Choose a Restore date.
- Click on Restore emails:
- Once the restoration is complete, an informational email is sent.
Restore from the Mail Service
Prerequisites
- Be Administrator or Legal Representative within the Organization that manages the Mail Service.
- Ensure that the deletion occurred less than 30 days ago (or within the period included with your offer - see above).
To restore emails from a Mail Service:
- Click here to access the management of your product on the Infomaniak Manager (need help?).
- Click directly on the name assigned to the product concerned.
- Click on the concerned email address in the displayed table.
- Click on the Actions on the address button at the top right.
- Click on Restore emails:
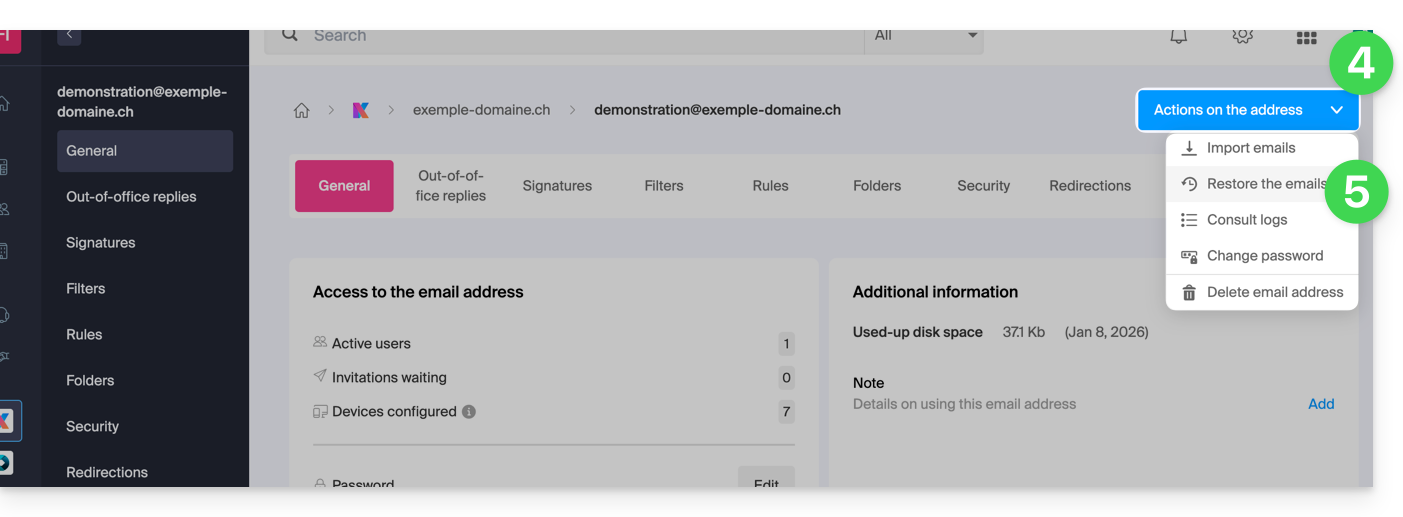
- Choose a Restore date.
- Click on Restore emails.
- Once the restoration is complete, an information email is sent to you.
Emails placed in the trash
Unless otherwise configured, an email deleted by the user is moved to a trash can, and it is only after a delay of several days or weeks that the trash can is automatically emptied (it can also be emptied by a user click). Therefore, during a restoration operation:
- Emails currently in the trash will remain as they are, regardless of the restoration date.
- Emails deleted from the trash will be restored to their original location, where they were when they were deleted (whether in the inbox folders or in the trash).
Emails placed in non-conventional folders
If you intentionally store your messages in folders with unusual names (for example, folders named Junk or Spam) take note of the important information in this other guide.
Email software/client configured in POP3
If you are used to checking your email with software/email client like Outlook and the latter is configured with the POP / POP3 protocol, it will not be possible to restore everything since the backup is done once a day, it only keeps the messages that were at the time of the backup in the Infomaniak inbox; the same applies to your other folders (Sent messages, for example) present in the POP3 application: these are not synchronized with Infomaniak and therefore are not backed up; it is therefore necessary in the future to prefer the IMAP protocol in your email software/client.
Link to this FAQ:
Has this FAQ been helpful?
This guide explains how to use the Gmail mobile app (application for iOS/Android smartphone or tablet) to access an email address hosted by Infomaniak.
Preamble
- It is recommended to use the app Infomaniak Mail (iOS / Android) to benefit from Infomaniak's security advantages.
Using the Gmail mobile app for Infomaniak
Prerequisites
- Create the email address in my kSuite or a Mail Service / kSuite.
- Create a password for the email address on the device you are going to configure.
- Check that the Mail Service is configured optimally.
To add the email address managed by Infomaniak to your Gmail mobile app in IMAP (official guide):
- Go to the Settings of Gmail.
- Tap on Add an account.
- Choose Other:
- Enter the email address you wish to use.
- Choose the account type IMAP.
- Enter the password (see prerequisites) for the email address:
- Use the server name
mail.infomaniak.comfor:- Incoming IMAP server (reception)
- Outgoing SMTP server (sending)
- Complete the addition of the email address.
Link to this FAQ:
Has this FAQ been helpful?
This guide details the automatic translation service integrated into the Infomaniak Web app Mail (online service ksuite.infomaniak.com/mail).
Preamble
- The Infomaniak Web app Mail (online service ksuite.infomaniak.com/mail) integrates an automatic translator for both reading and writing in French, German, English, Italian, and Spanish.
- This AI solution does not rely on a third-party service (DeepL, Google Translate, etc.) contacted via API, but it is hosted, operated, and partly trained by Infomaniak.
Translate text…
… while writing
To automatically translate a message you are writing into a foreign language:
- Click here to access the Infomaniak Web app Mail (online service ksuite.infomaniak.com/mail).
- Write a new email without sending it.
- Select the text to translate.
- Click on Translate:
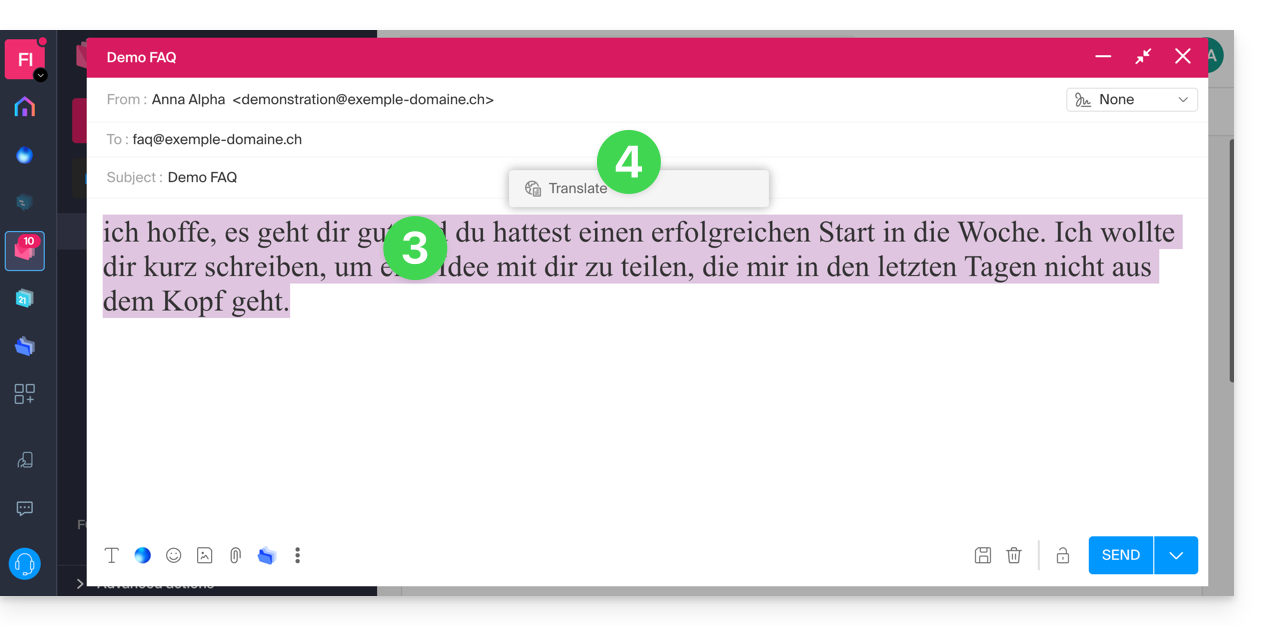
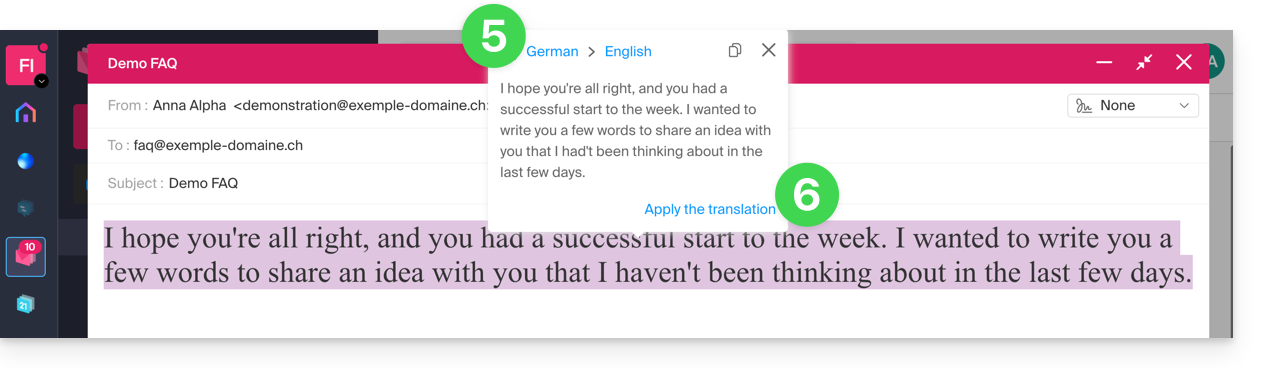
- Modify the languages if necessary.
- Click on Apply translation:
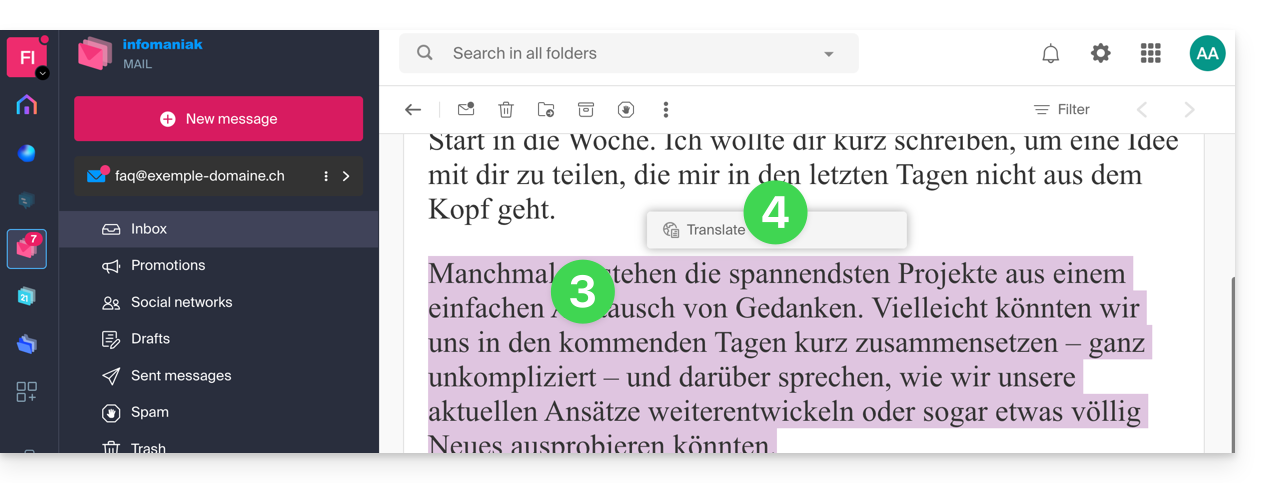
… while reading
To automatically translate a received message written in a foreign language into your language:
- Click here to access the Infomaniak Web app Mail (online service ksuite.infomaniak.com/mail).
- View the email to be translated.
- Select the text to translate.
- Click on Translate:
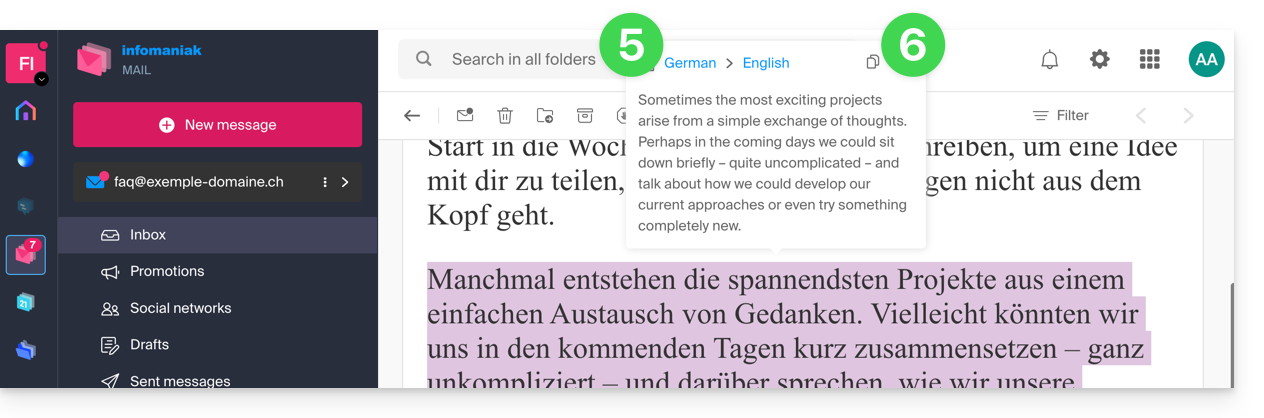
- Click on the language names to modify the languages used.
- In the same place, you can also copy the translated text to the clipboard to use it later:
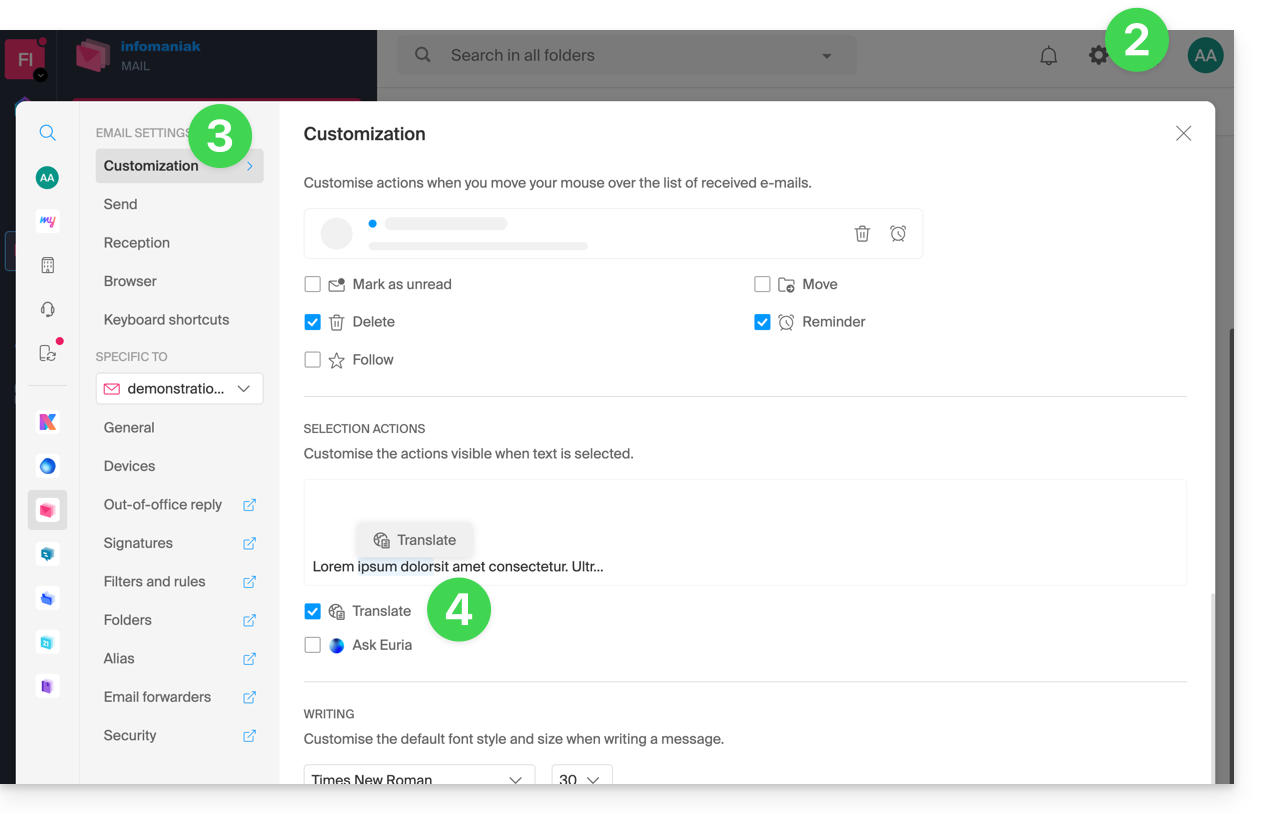
Disable the translator
You can adjust the elements (translations / Euria) that appear when you click on your message:
- Click here to access the Infomaniak Web app Mail (online service ksuite.infomaniak.com/mail).
- Click on the Settings icon in the top right of the interface.
- Click on Customization in the left sidebar menu.
- Check or uncheck the actions you want to have on click:
Link to this FAQ:
Has this FAQ been helpful?
This guide explains how to connect the desktop app Outlook 2010 (desktop application on Windows) to an email address hosted by Infomaniak.
Preamble
- The various services offered by Infomaniak are all compatible with the corresponding standard protocols (IMAP/SMTP for email, for example), therefore if you encounter a problem with third-party software, contact its publisher or a Partner and consult the support policy as well as article 11.9 of the Infomaniak Terms of Service.
Add the email address to the application
Prerequisites
- Create the email address in my kSuite or a Mail Service / kSuite.
- Create a password for the email address for the device you are going to configure.
- Check that the Mail Service is configured optimally.
To configure the email application:
- Open the application.
- Click on Next:
- Click on Yes to configure a mail account.
- Click on Continue:
- Click on Configure manually.
- Click on Next:
- Click on the Internet E-mail button to connect to an IMAP server.
- Click on Next:
- Check and complete the missing information.
- Click on Additional settings:
- Click on the Outgoing Server tab:
- Click on My outgoing server requires authentication.
- Click on the Advanced tab:
- Replace the port numbers with the correct information and enable SSL.
- Click on OK.
- Click on Next:
- Click on Close:
- Click on Finish:
- There you go, your email address is now configured in the application:
Recommended settings
- Incoming IMAP server =
mail.infomaniak.com - IMAP port =
993(with SSL) - Outgoing SMTP server =
mail.infomaniak.com - SMTP port & encryption protocol and command/method to enable this protocol:
587+ STARTTLS - Username = full & complete email address ( ? )
- Password = the one generated for the email address you want to access
- Mandatory authentication for sending emails:
- It is activated in the SMTP settings of your application.
- Check "use the same settings as the incoming server" or depending on the software/email clients, re-enter a username (= full & complete email address) and the generated password.
Refer to this other guide if you are looking for information about other messaging ports and protocols compatible (SSL / TLS for example).
In case of a problem
Check that the Mail Service is configured optimally.
It is not necessary to contact Infomaniak Support if your email address works well outside the application. The most common error concerns the use of an incorrect password. The troubleshooting guides help you resolve any potential issues:
- Be aware of the solutions provided in this other guide regarding email in general.
- This other guide is more specifically about Outlook.
… and if your Outlook no longer works since a change of email password, be aware of this other guide.
Link to this FAQ:
Has this FAQ been helpful?
This guide addresses Outgoing Spam from Infomaniak infrastructures and helps you identify and resolve potential causes when an email sent from an address hosted by Infomaniak arrives in the Spam (Junk) folder of the recipient.
Important: Infomaniak cannot act directly on the classification of a message as spam by other providers. Solutions must be sought with the administrators of the concerned receiving server.
Use email responsibly
Infomaniak implements enhanced measures to ensure the security and deliverability of emails. By also following the best practices below, you significantly reduce the risk that your messages will be considered unwanted.
1. Use a valid email address
- Check that your email address and associated domain are correct and valid.
- Check the security settings of your domain name (SPF, DKIM, DMARC).
- If you modify a setting, wait approximately 24 hours before sending another test.
2. Avoid suspicious content
- Avoid words, phrases, or presentations frequently associated with spam (excessive promotions, generic phrases, overly complex layout, etc.).
- Do not include non-secure, truncated, or poorly formatted links.
- Personalize your messages (for example, by mentioning the recipient's name) to enhance their credibility.
- Do not attach suspicious or overly large files; use a service like SwissTransfer instead.
3. Test sending from the Infomaniak Web Mail app
- If you use a third-party email software/client, try sending the message from the Infomaniak Web Mail app (ksuite.infomaniak.com/mail).
- Compare the results to identify if the issue comes from your email software/client or a configuration setting.
4. Monitor the reputation of your domain
- If your email address uses a custom domain (for example
@your-domain.xyz), a poor domain reputation can affect the deliverability of your messages. - Analyze and correct potential causes (previous mass mailings, poor configuration, reports, etc.).
5. Obtain the recipient's consent
- Only write to recipients who know you or are expecting your message.
- For group or regular mailings, use a voluntary subscription system (opt-in).
- For information or marketing campaigns, prefer the Infomaniak Newsletter solution.
6. Optimize the frequency and volume of sending
- Avoid sending a large number of identical messages to many recipients simultaneously.
- Respect a reasonable sending frequency to avoid being identified as a suspicious sender.
7. Be added to the Infomaniak whitelist
- If your emails are classified as spam by a recipient also hosted by Infomaniak, they can add your address to their whitelist.
- This action guarantees the receipt of your messages, but does not replace the verification of the causes that initially led to the classification as spam.
Link to this FAQ:
Has this FAQ been helpful?
This guide offers several solutions to quickly delete a large number of emails contained in an email address hosted by Infomaniak. Note that the size of your mailbox is not limited.
Delete emails in bulk…
… from the Infomaniak Web Mail app
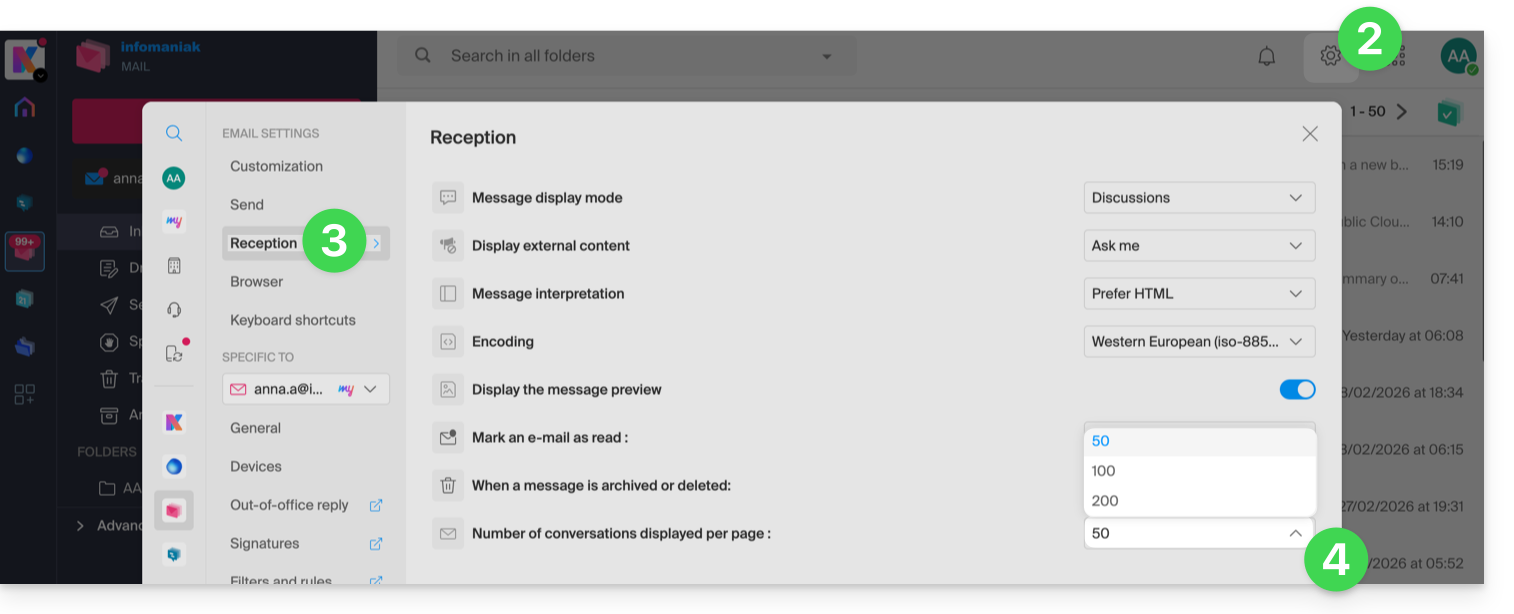
- Click here to access the Infomaniak Web Mail app (online service ksuite.infomaniak.com/mail).
- Click on the Settings icon in the top right of the interface.
- Click on Reception.
- Display the maximum number of items loaded at once:
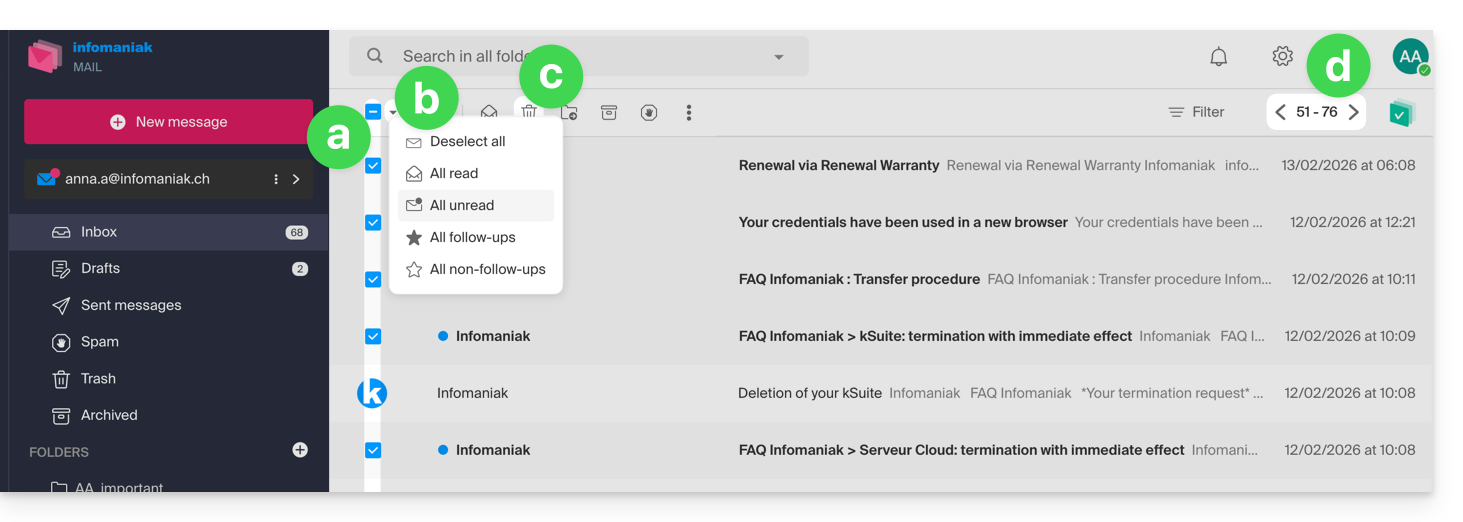
- To empty the inbox:
- Select all items visible on the screen.
- A more precise selection is possible.
- Click on the Trash icon to send them to the trash.
- Repeat this process on all pages:
- Apart from the inbox, folders can be emptied in a few clicks:
- Click on the action menu ⋮ to the right of the folder concerned.
- Click on Empty the folder:
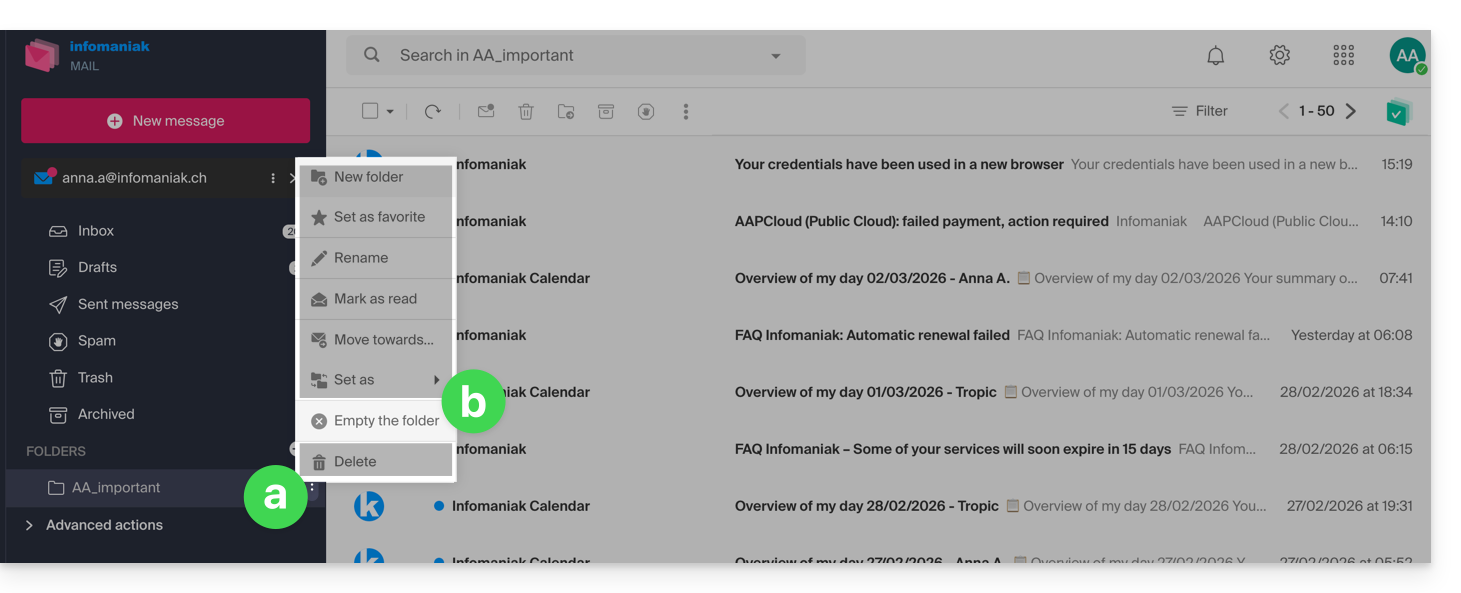
- Be careful, emails are deleted without going through the trash, as if you were deleting the folder itself — only a restoration can allow possible recovery.
You can also delete the email address found within a Mail Service, then recreate it. It will then be completely empty.
… from an IMAP email software/client
A solid solution is to configure the email address in an IMAP email software/client, which will allow the selection of all messages (without the notion of pagination…) therefore the deletion is easy and quick:
- Install Thunderbird (or any other messaging app on your device).
- Add your email address and specify its password.
- Wait for the inbox to load.
- Select all messages.
- Click on Delete.
- That's it, you can remove the application if you wish.
Special case: crossed-out messages
To permanently delete any tracked / struck-through emails appearing in your software/email client or on Mail Infomaniak: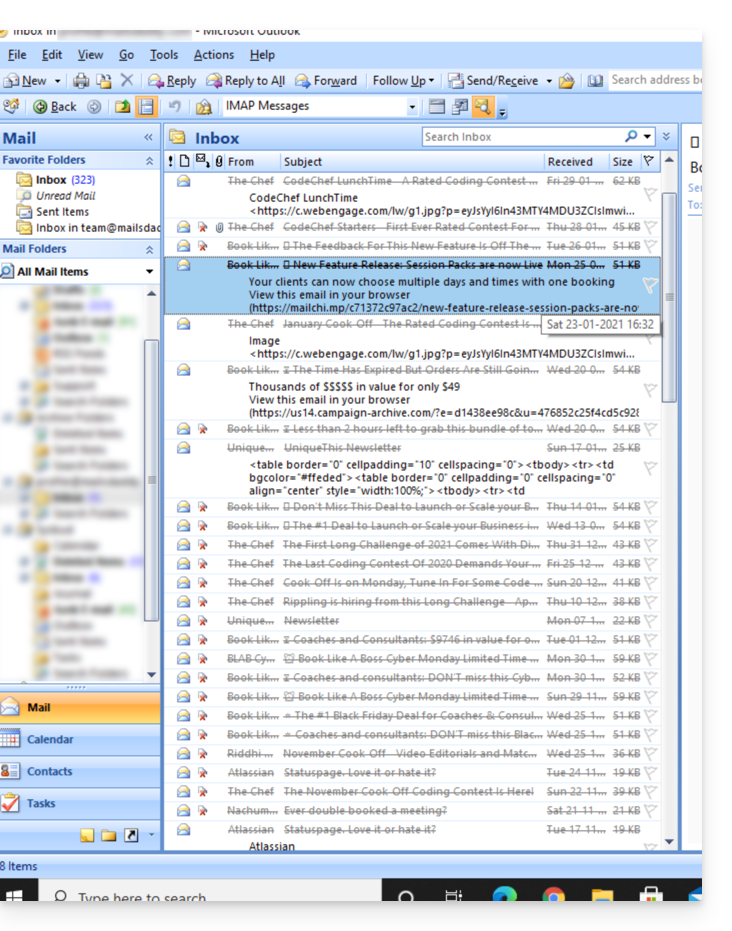
- Microsoft Outlook
- go to the Edit menu -> Empty Deleted Items (in English, you should have a menu Empty)
- Apple Mail
- go to the Mailbox menu -> Erase Deleted Items
They will then disappear from the Mail Infomaniak interface as well.
Link to this FAQ:
Has this FAQ been helpful?
This guide helps you understand the peculiarities that may arise in the display of emails when using different messaging applications and Infomaniak Mail apps.
Preamble
- It may happen that inconsistencies occur in the display of a list of emails contained in a folder (example: the Sent folder) and that the messages sorted and considered as the most recent by one device will not be the same as those displayed when using another tool. Sent Messages)
Understanding Unique Identifiers (UID)
UIDs (Unique Identifiers) are unique identifiers assigned to each message in an IMAP mailbox. They are used to uniquely identify each message, regardless of changes made to folders or messages themselves. UIDs are particularly useful for managing and synchronizing emails across multiple IMAP email software/clients:
- Each email is assigned a unique UID at the time of its creation in a mailbox; this UID never changes in principle as long as the email exists, even if its content or metadata is modified.
- UIDs are generally sequential, which means that more recent messages have higher UIDs in principle.
- When synchronizing emails, IMAP email software/clients can use UIDs to determine which messages are new, modified, or deleted since the last synchronization; this allows for efficient email management without having to download and compare all messages.
- Depending on the tool used, to display them in the order in which they were received, messages can be sorted by their reception date or by UID.
Not to be confused with:
- Message Sequence Number (used for temporary operations based on the current position of messages)...
- Message-ID (RFC 5322) (used to uniquely identify messages across different servers and email software/clients)...
- X-Message-Id (server-specific and used for internal tracking needs)...
- Thread-Index and Thread-Topic (used by Microsoft applications to track conversation threads)...
- GMail Unique Identifiers (used specifically by Gmail to manage messages and discussion threads)...
IMAP Applications and Infomaniak Mail App
The issue may appear in this form at the server command level:
758 - date.sent: 2017-10-11 23:15:26 (+0100)
757 - date.sent: 2017-10-11 15:00:55 (+0100)
756 - date.sent: 2017-10-11 14:39:28 (+0100)
(...)
742 - date.sent: 2018-01-17 00:40:21 (+0000)
741 - date.sent: 2018-01-17 00:30:33 (+0000)
740 - date.sent: 2018-01-17 00:26:07 (+0000)
(...)
51 - date.sent: 2022-10-07 16:39:16 (+0100)
50 - date.sent: 2023-06-13 10:15:00 (+0100)
49 - date.sent: 2023-06-07 12:11:35 (+0100)
Here, we see that emails from 2017 have a higher UID (758, 757, ...) than emails from 2023. UIDs must have been reassigned for some reason or another during the existence of this entire email account (moves, copies, imports, etc.).
Depending on how the messaging tool sorts emails, a message from 2017 may appear among recent messages while the message from 2018 is not loaded immediately. This is particularly true for the Mail Infomaniak app, which only loads a series of emails at a time based on the UID (this is subject to change).
Therefore, to resolve any inconsistencies, it is recommended to use an IMAP email software/client such as Thunderbird on a computer, which will allow you to quickly and efficiently sort all messages in a specific folder based on the email date, as the application will display all messages present on the Infomaniak server.
Link to this FAQ:
Has this FAQ been helpful?
This guide explains how to connect the desktop app Apple Mail (desktop application on macOS) to an email address hosted by Infomaniak.
Preamble
- Your macOS computer will be automatically configured via configuration profiles .mobileconfig compatible with Apple, unlike a manual configuration.
- It is possible to remove a configuration profile once installed (scroll down to the bottom of this page for instructions).
Install a configuration profile
Prerequisites
- Create the email address within my kSuite or a Mail Service / kSuite.
- Check that the Mail Service is configured optimally.
You can download the profile from the device concerned or send it from another device (if you already have an email address that works correctly, for example):
- Click here to access the Infomaniak configuration tool (online service https://config.infomaniak.com) — log in if necessary to your Infomaniak account on the Organization on which your email address is managed.
- Choose to install the profile on this device.
- Choose to synchronize emails.
- Choose the email address to configure on Apple Mail (from those you have access to).
- Create a new device:
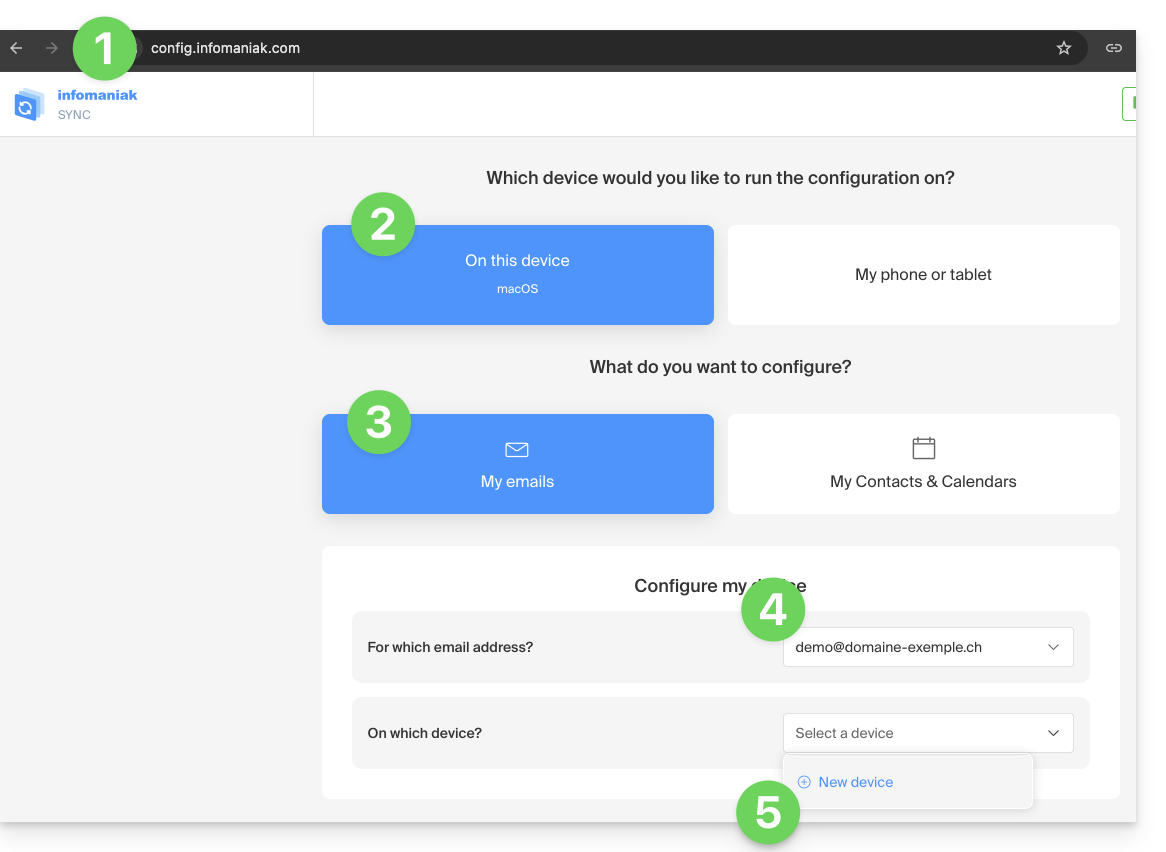
- Enter a descriptive name for the new device.
- Click the button to Download the profile (you can also send it by email using the link on the right):
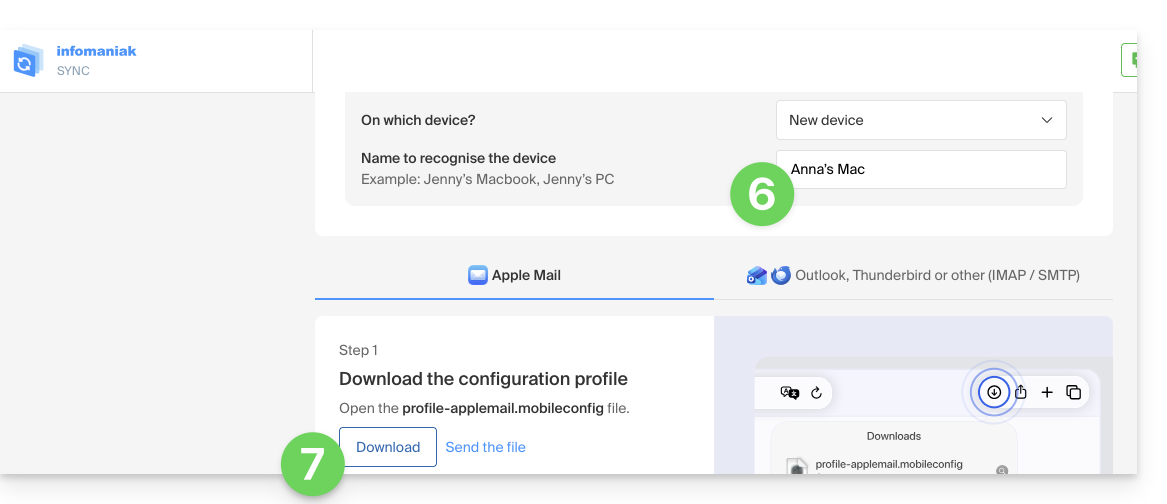
- Once the file
profile-applemail.mobileconfigis on your computer, double-click to open and run it. - Click OK:

- Open the System Settings of the computer.
- Click on Downloaded Profile in the sidebar, then double-click on the new profile to apply it:
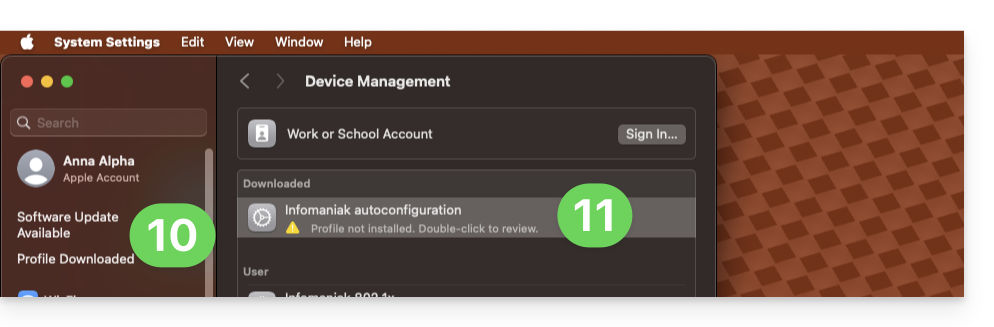
- If you have an older version of macOS or cannot find the profile, search for “profile” in the settings, or refer to the official documentation by changing the version of your system at the top of the page if necessary.
- Click on Install…:
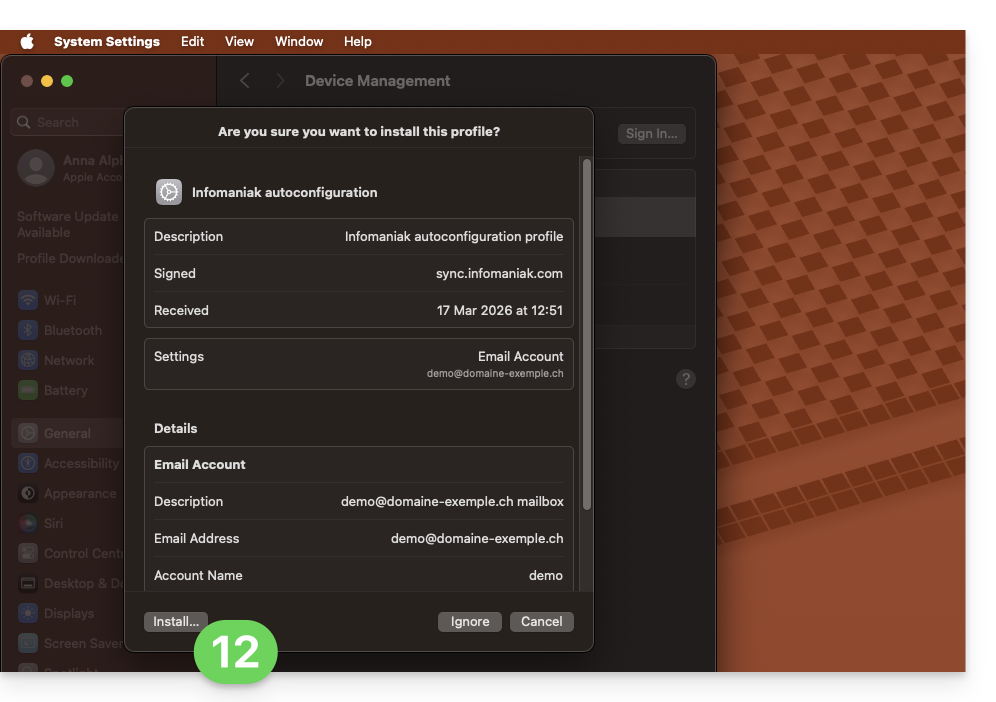
- A password is then requested…
- either you know it because you have already created it in the Devices section of the Mail Service:
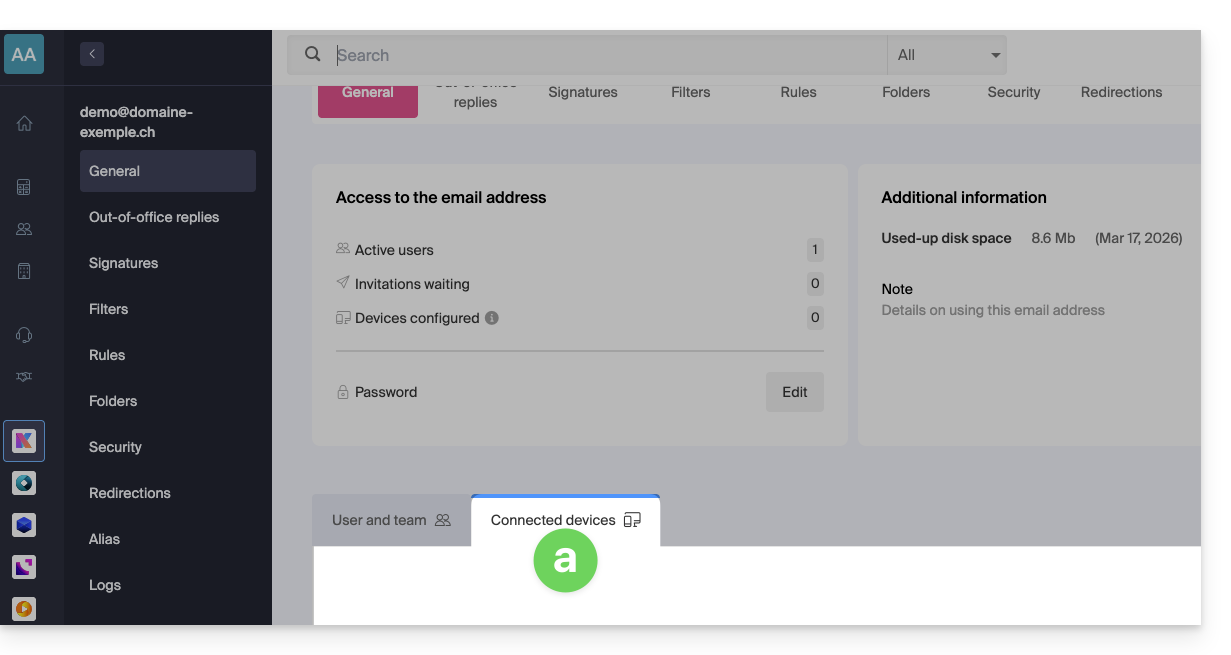
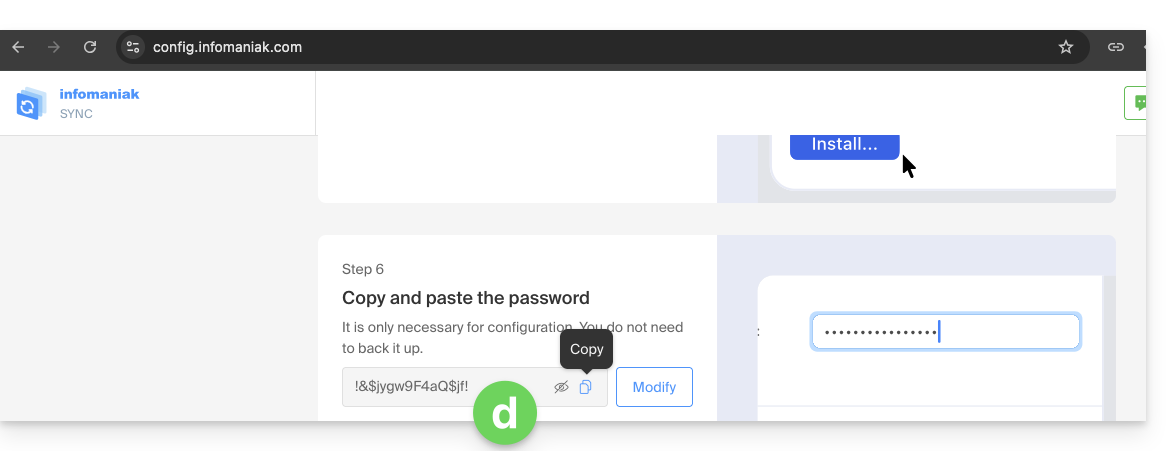
- or you can copy the new password found below on the assistant page
config.infomaniak.comopened earlier: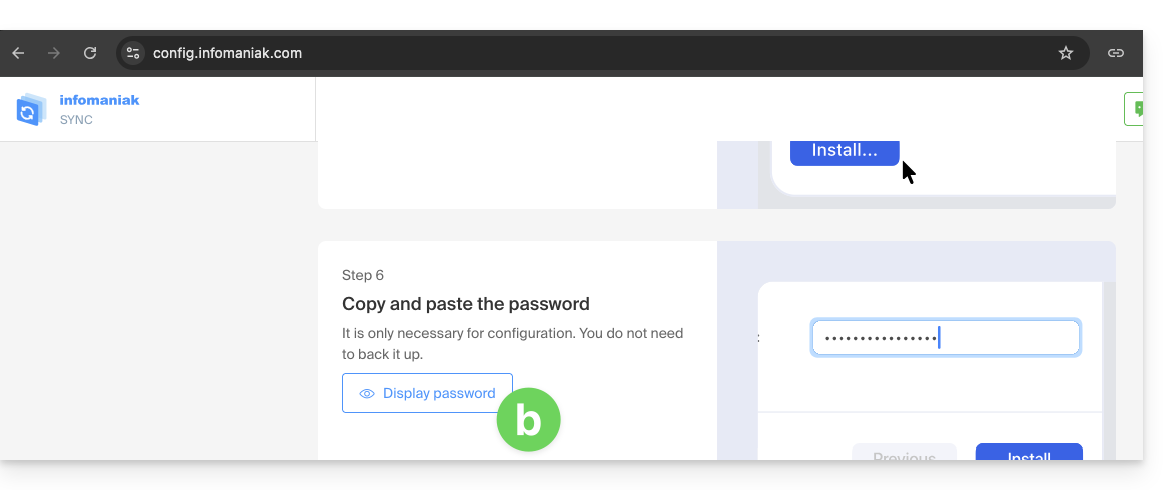
- Before the email password is displayed, your Infomaniak account password may be requested for security:
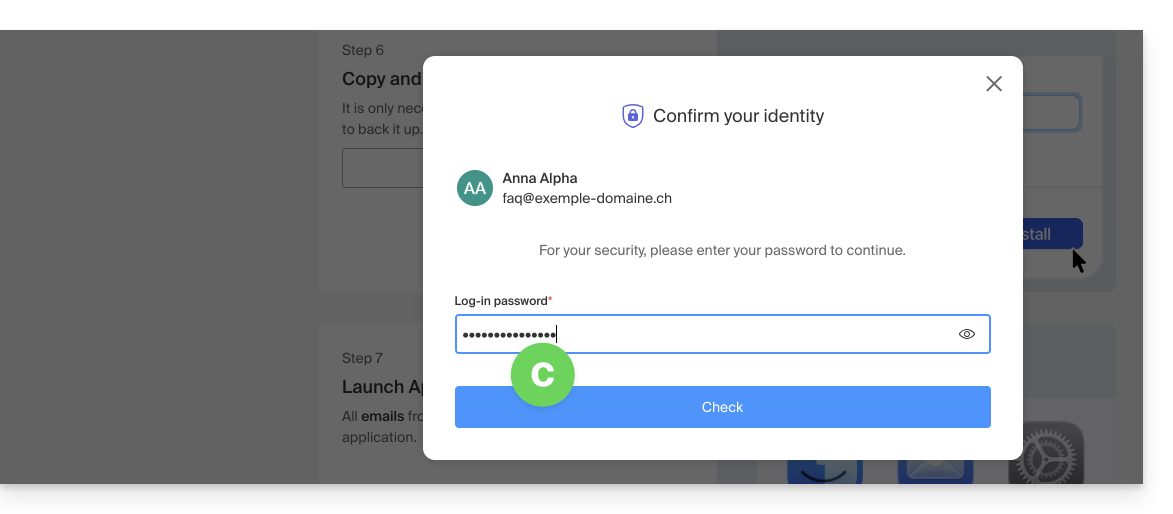
- Here it is, the randomly generated password is displayed, you just need to copy it:
- either you know it because you have already created it in the Devices section of the Mail Service:
- Paste the password into the macOS window.
- Click on Install to start the profile installation:
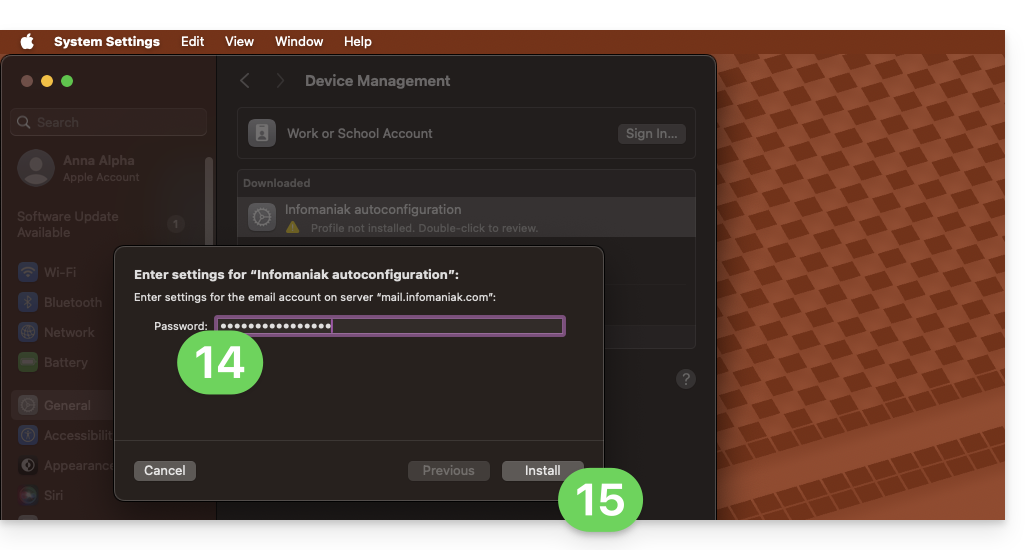
- Your email address is now configured in the Apple Mail application, which you can open and control:

Delete an IMAP account
Refer to the chapter "Stop using an account" by changing the system version at the top of the page if necessary (note: do not delete a POP-configured account without saving your messages first).
Delete an Apple profile
Refer to the official documentation by changing the system version at the top of the page if necessary.
*Why is it necessary to choose the guide version exactly corresponding to your macOS / iOS version? Apple introduces changes, sometimes subtle, with each new version of its system, for example a path on iOS 15…
… becomes this on iOS 18…
Link to this FAQ:
Has this FAQ been helpful?
This guide explains how to connect the Apple Mail mobile app on iOS to an email address hosted by Infomaniak.
Preamble
- Your iOS device will be automatically configured using Apple-compatible .mobileconfig configuration profiles unlike a manual configuration.
- It is possible to delete a configuration profile once installed (scroll to the bottom of this page for instructions).
- The various services offered by Infomaniak are all compatible with the corresponding standard protocols (IMAP/SMTP for email, for example), therefore if you encounter a problem with third-party software, contact its publisher or a Partner and consult the support policy as well as section 11.9 of the Infomaniak Terms of Service.
Install a configuration profile
Prerequisites
- Create the email address in my kSuite or a Mail Service / kSuite.
- Create a password for the email address on the device you are going to configure.
- Check that the Mail Service is configured optimally.
Download the profile from the relevant iOS device or send it from another device (if you already have a working email address, for example):
- Click here to access the Infomaniak configuration tool (online service https://config.infomaniak.com) — log in if necessary to your Infomaniak account on the Organization where your email address is managed.
- Choose to install the profile on this device:
- Choose to synchronize emails:
- Choose to synchronize another application than the Infomaniak Mail application:
- Enter the password for the email address (attached to Mail Infomaniak (Webmail)) that you want to synchronize on iOS.
- Press the blue Verify button:
- Press to copy the validated password.
- Download the configuration profile and authorize its opening:
- Open the settings of the iOS device:
- Press the recently downloaded profile:
- Press Install:
- Unlock your iOS device:
- Press Install:
- Paste the password of the previously verified email address (point 7 above).
- Press Next:
- There you go, your email address is now configured in the Apple Mail application that you can open and control:
Delete an Apple profile
Refer to the official documentation by changing the version of your system at the top of the page* if necessary.
*Why is it necessary to choose the guide version that exactly matches your macOS / iOS system version? Apple introduces changes, sometimes subtle, with each new version of its system, for example a path on iOS 15…
… becomes this on iOS 18…
Link to this FAQ:
Has this FAQ been helpful?
This guide explains how to quickly create/obtain a password from an Infomaniak Mail Service when you need to access an Infomaniak email address on third-party software, such as Outlook or Thunderbird.
Preamble
- When creating an email address, no password is defined:
- An email address can be accessed on Infomaniak Mail apps without a password other than the one that already allows you to access your Infomaniak account.
- You just need to authorize your account or invite a contact to be a user of the email address.
- You then simply create specific passwords for each device (Outlook, iPhone, CRM, etc.) as needed:
- You can create multiple passwords for the same email address without interrupting existing connections.
- Each password can be revoked individually, without affecting other users or devices linked to this address.
- A password is never displayed again after its creation; modify it or create a new one if necessary.
Generate an email password
Prerequisites
- Order a Mail Service from Infomaniak.
- Create one or more addresses on this Mail Service.
- Be Administrator or Legal Representative within the Organization.
If you cannot complete these steps because you receive different information on the screen, you probably lack the necessary permissions if you were not the original creator of the email address — refer to this other guide — an administrator can, for example, add the email address directly to your Web Mail app or send you a link allowing you to generate a password yourself.
To add a password to the example address demonstration@example-domain.ch:
- Enter your Infomaniak account login and password on the page https://manager.infomaniak.com/:
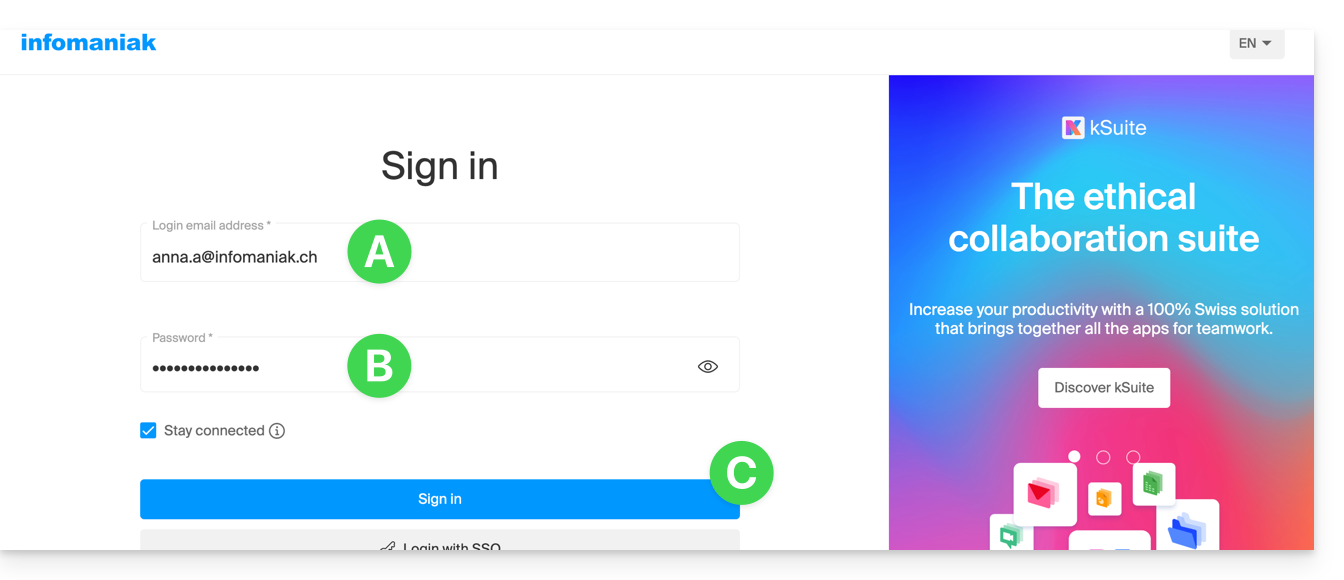
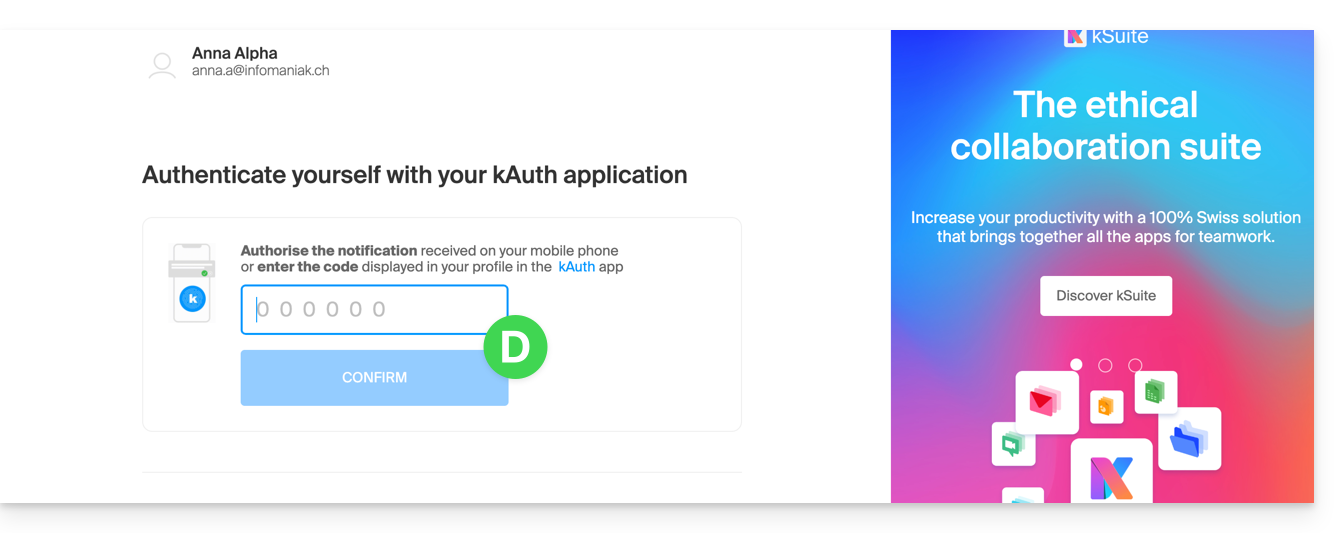
- Validate the entry on the Manager with the 2FA (two-factor authentication) method initially defined:
- Once on the dashboard, click on Mail Service:
- Once on your Mail Services, click on the name/domain name to which the email address in question belongs:
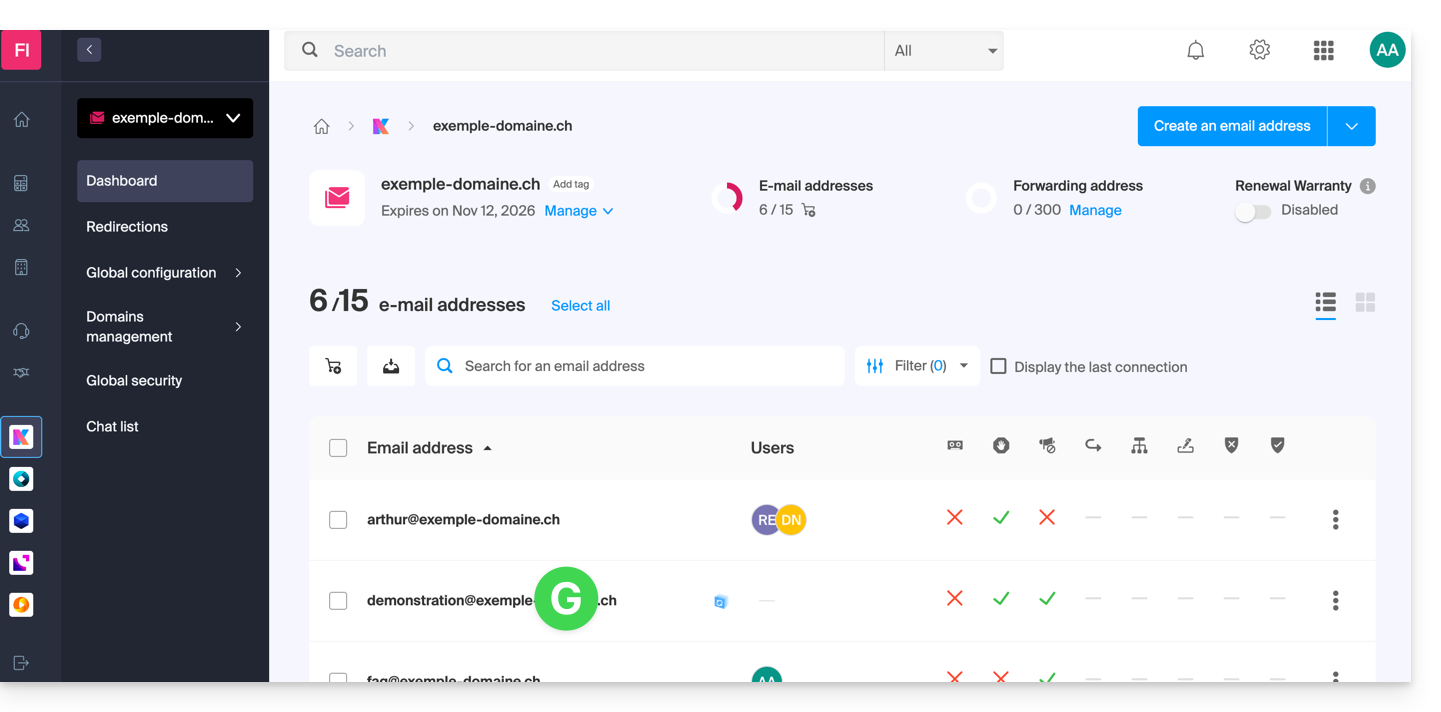
- Once on the Mail Service to which the address belongs, click on the email address in question:
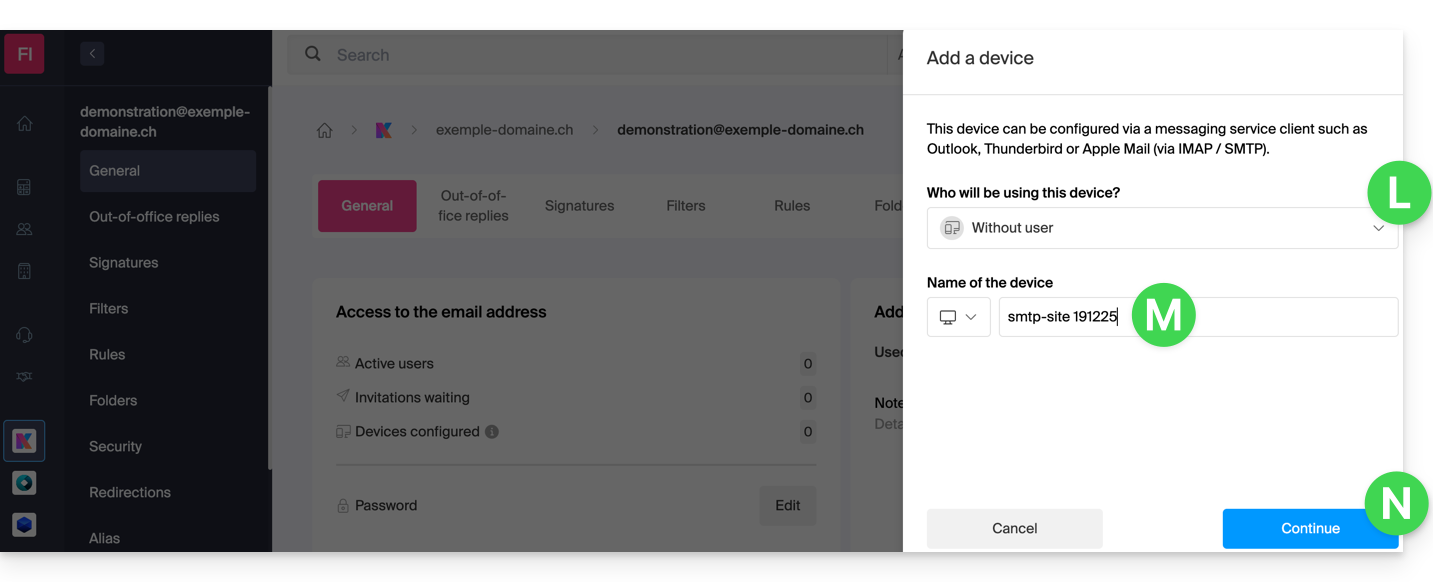
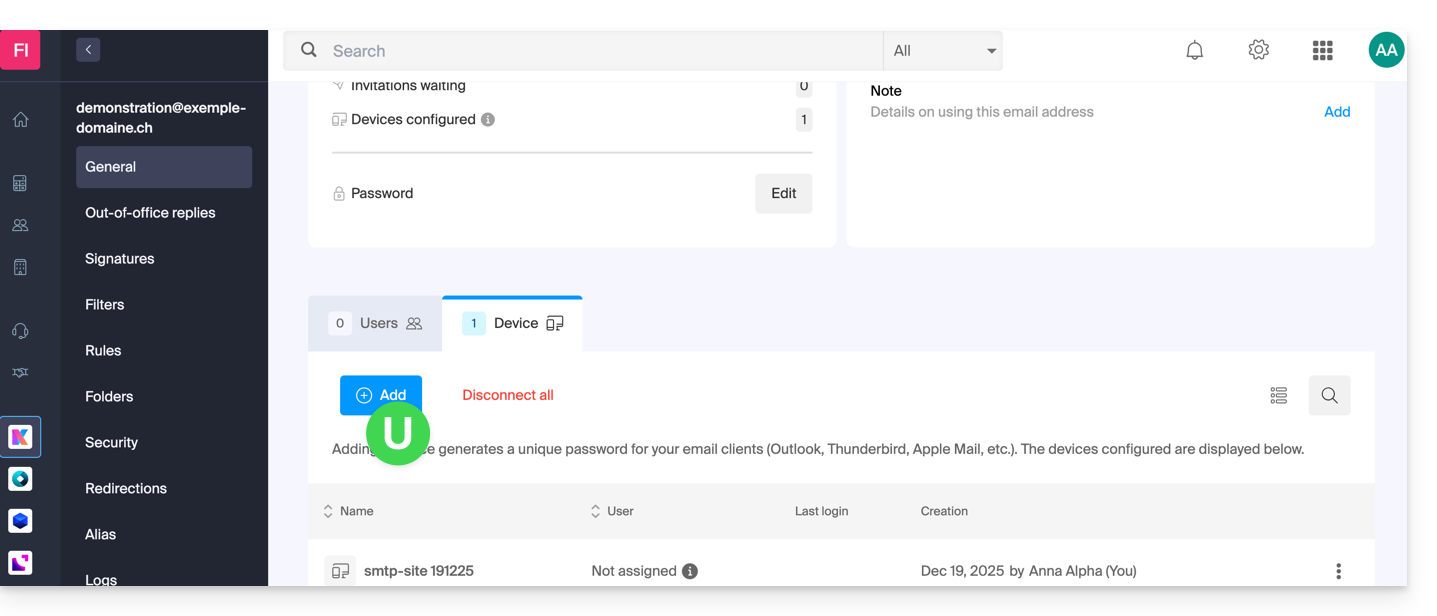
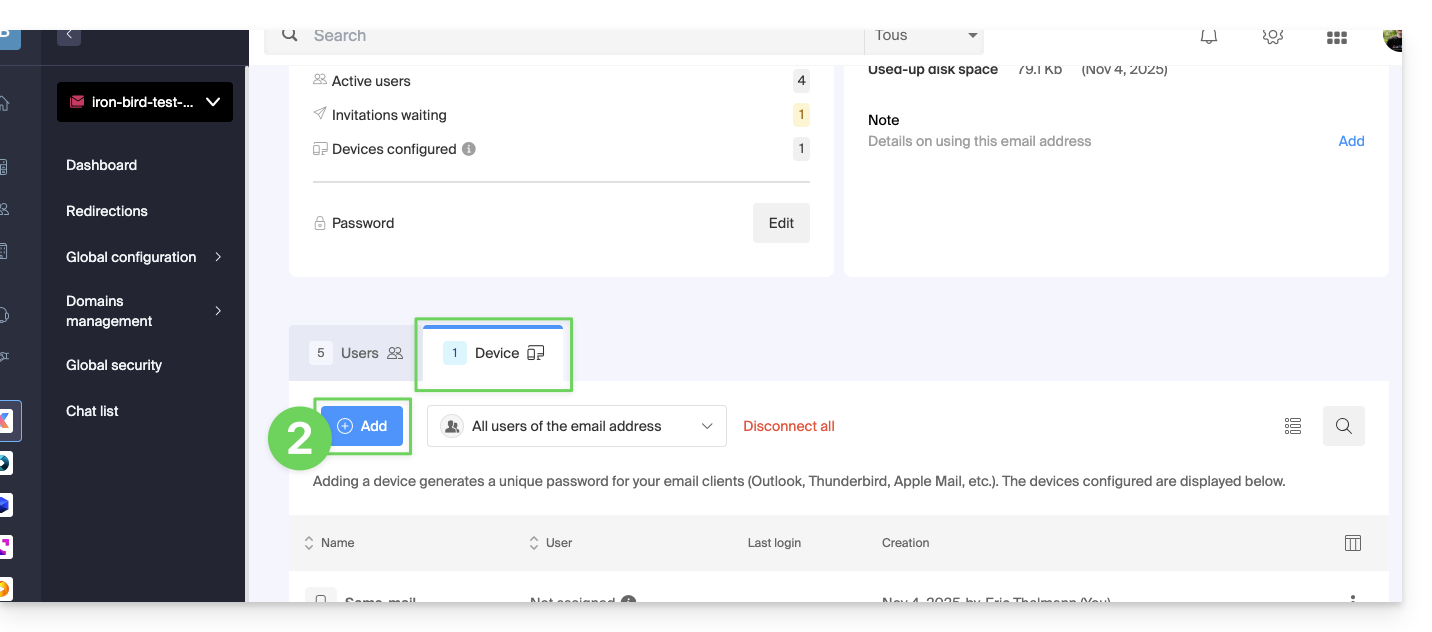
- Once on the email address in question, click on the Devices tab and then on Add a device:
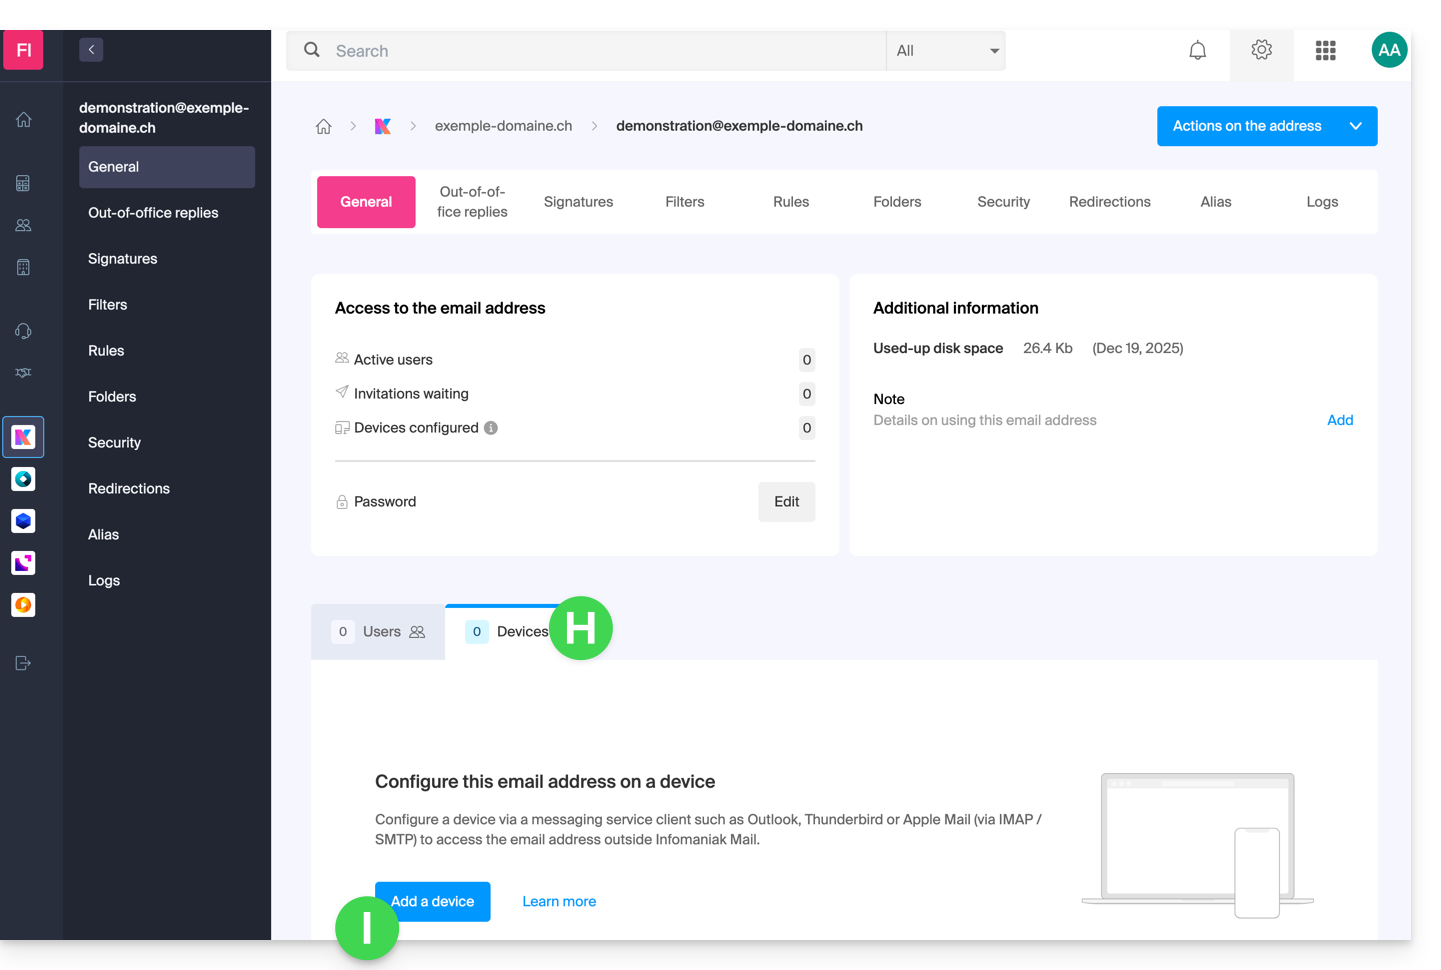
- It may be necessary at this stage to re-enter the login password (the one at point B above):
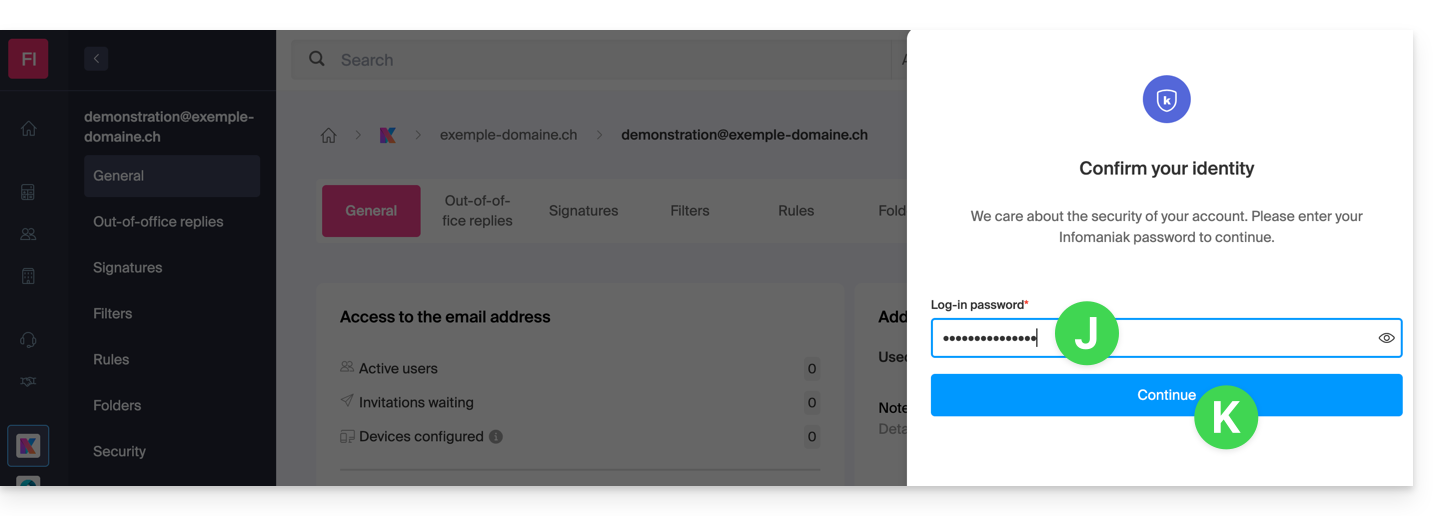
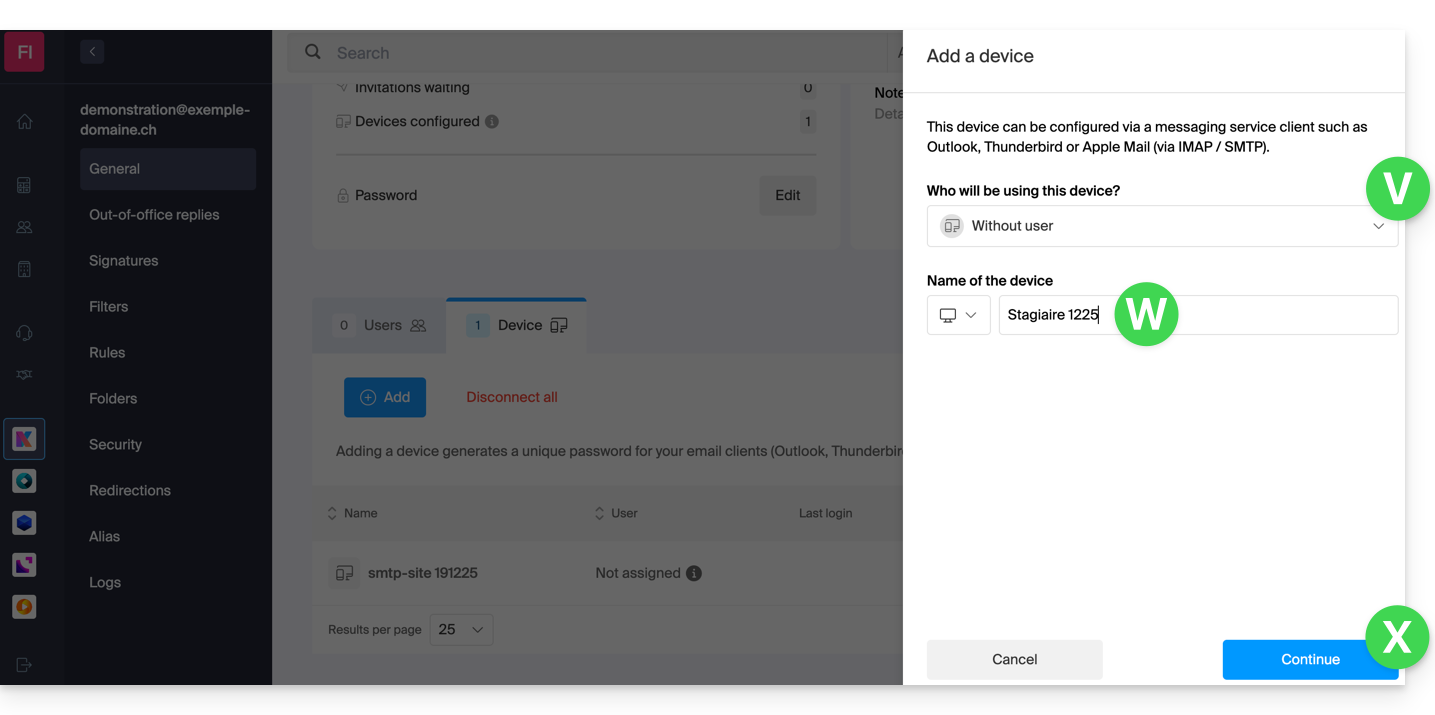
- Then choose to not specify a particular user ("Without user").
- Enter a descriptive name that allows you to identify the reason why you created this device (here the user needs a password to be able to send emails from a site, and adds as useful information today's date):
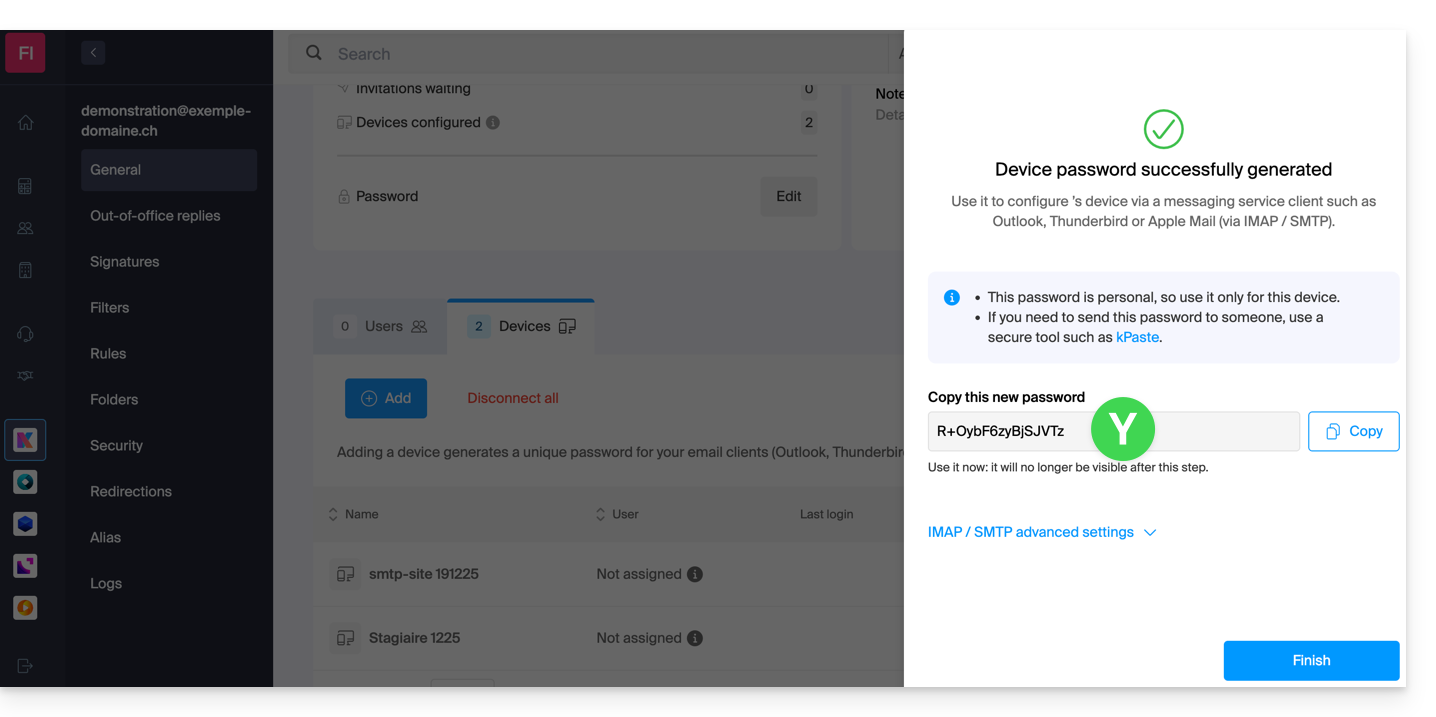
- There you go: the new password is displayed, you can change the characters (16 minimum) if necessary (be careful, it will not be possible to display it again later).
- Save it at the bottom of the page to use it as you wish:
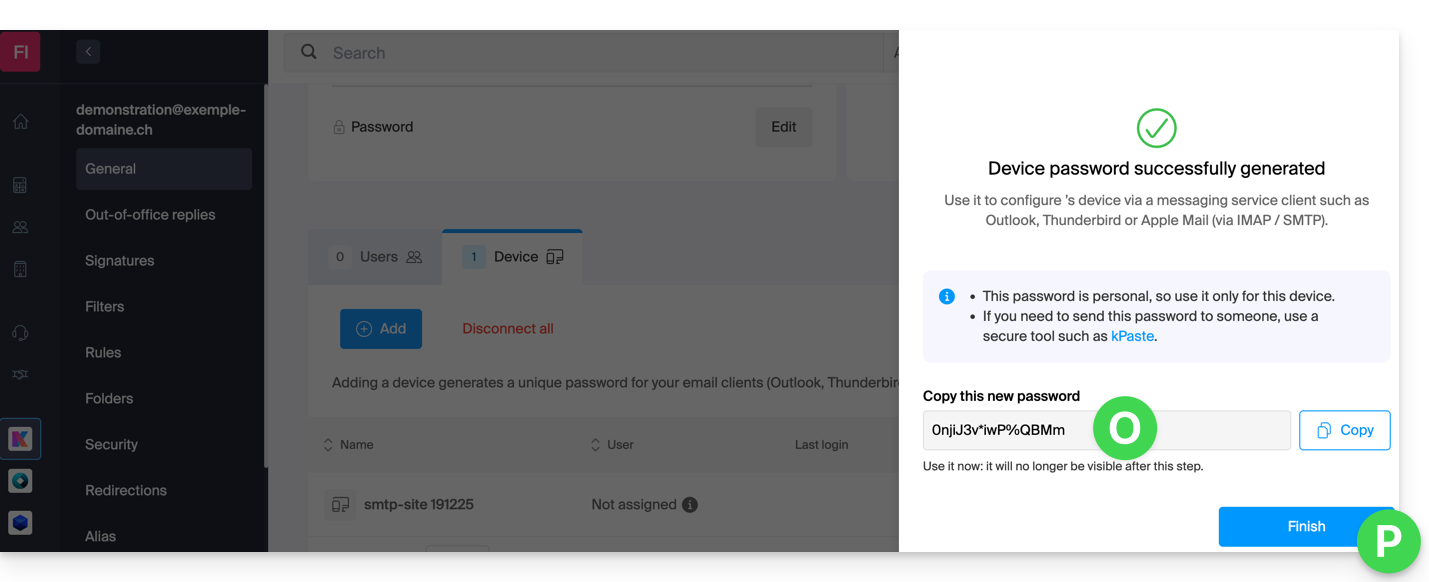
You clicked on the “Finish” button (above “P”) without noting the password? No problem, modify or generate a new one!
- Click on the action menu ⋮ located to the right of the device just created and click on Modify the password:
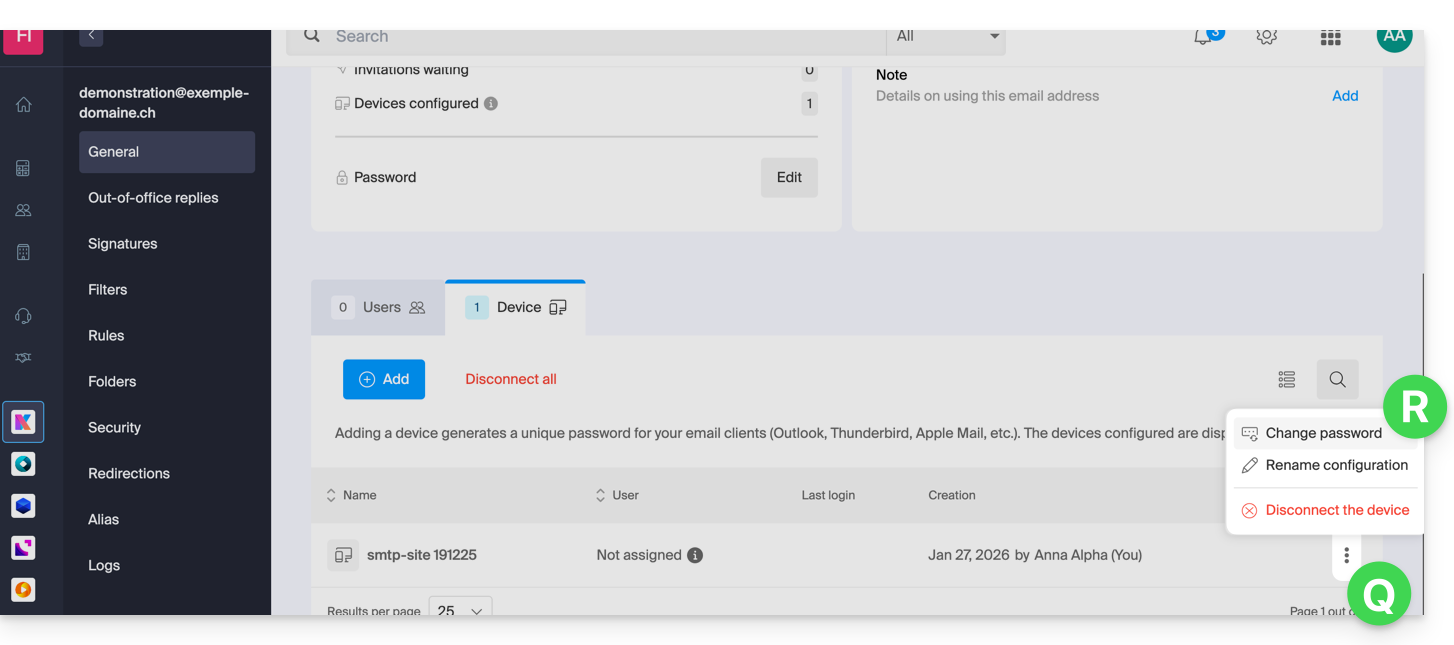
- Click on the button on the far right of the field to generate a new random password and/or enter the secure characters you wish to use (16 minimum) for the new password, then click on the button to save the modification:
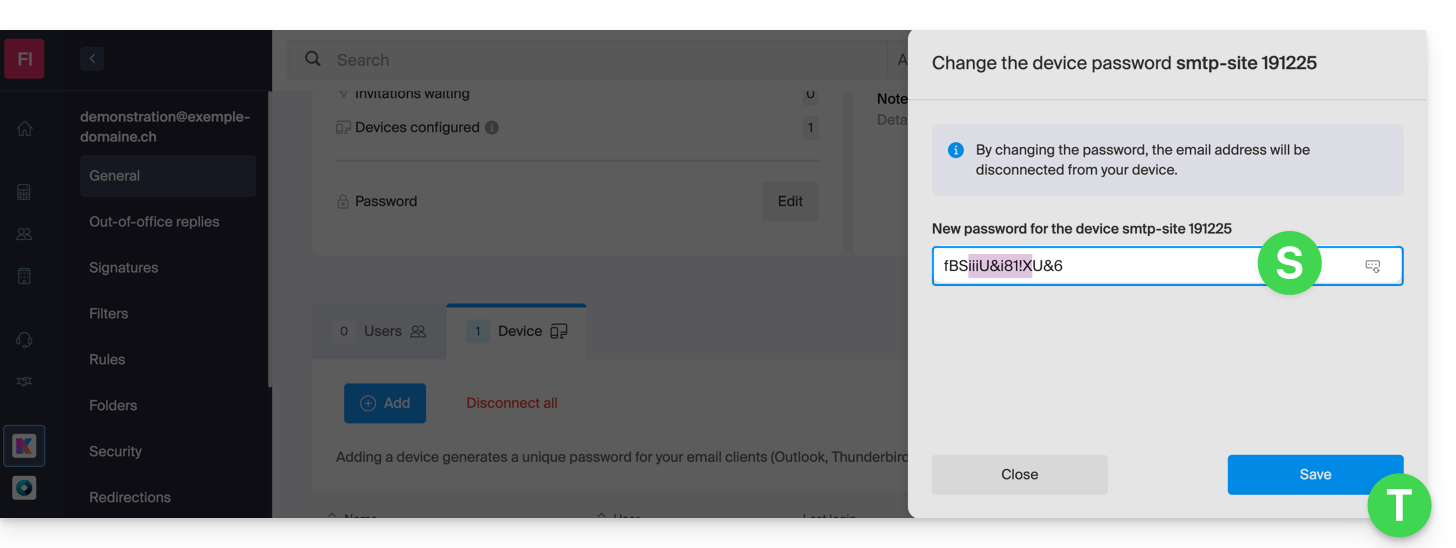
- There you go, the password that replaces the old one is displayed permanently, you can enter it on your device(s) in place of the previous one (be careful, it will not be possible to display it again later).
Do you need a password for a secondary and temporary user? No problem, generate a second one!
- Click on the button to Add another device:
- Then choose to not specify a particular user, and enter a name that allows you to identify the reason why you created this device (here the user needs a password for an intern for a week):
- There you go, the password is displayed, you can use it as you wish (be careful, it will not be possible to display it again later, however, as before, it will of course be possible to modify it or generate a new one):
Alternative: create a password for a user
Rather than creating a password yourself and having to communicate it to the user later, you can directly allow a user who does not have as many permissions as you to obtain the password for the device they need:
- Add the new user (existing in the Organization or not) as described in this other guide:

- Once the user is added, switch to the devices tab to add a new device:
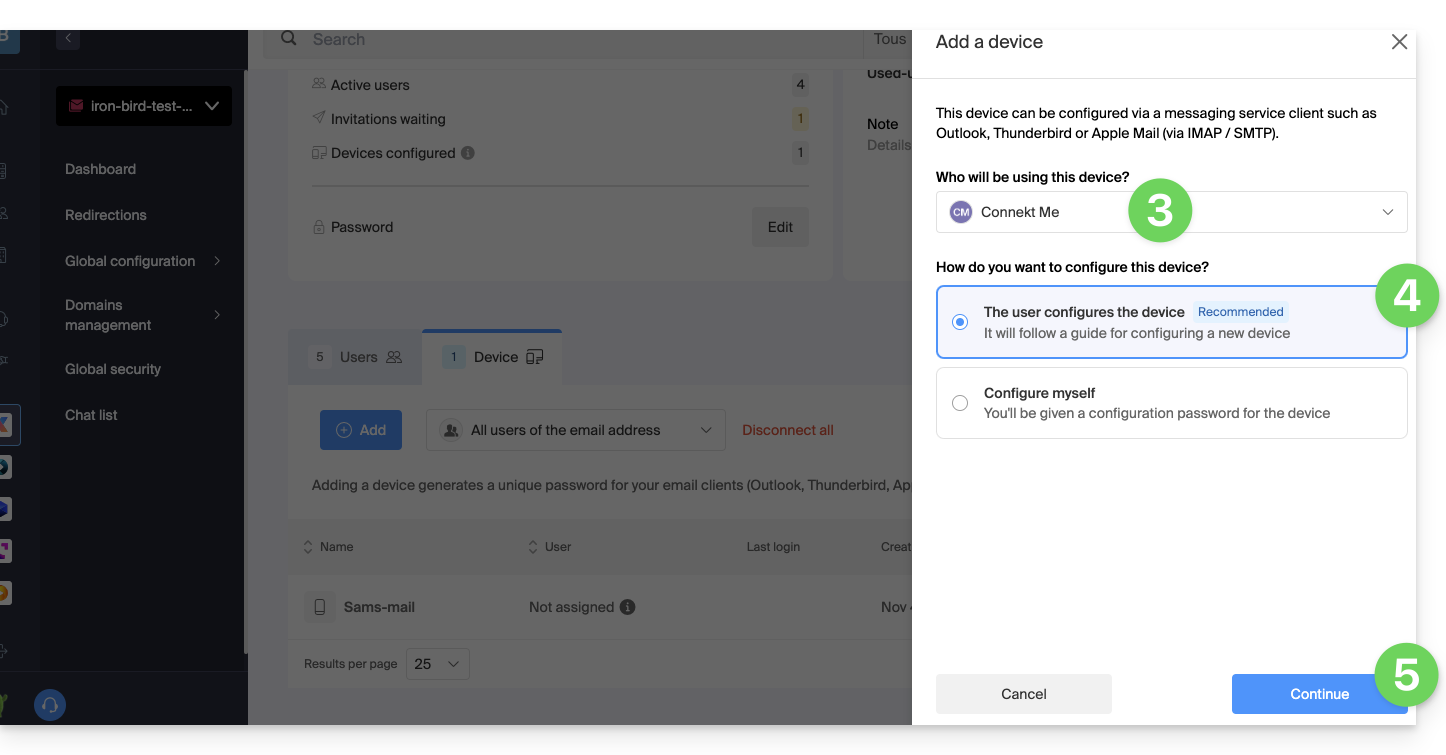
- If necessary, enter the password to log in to your Infomaniak account and then select the user created in step 1.
- Click on the first option to send a setup assistant for the user's device.
- Click on the Continue button:
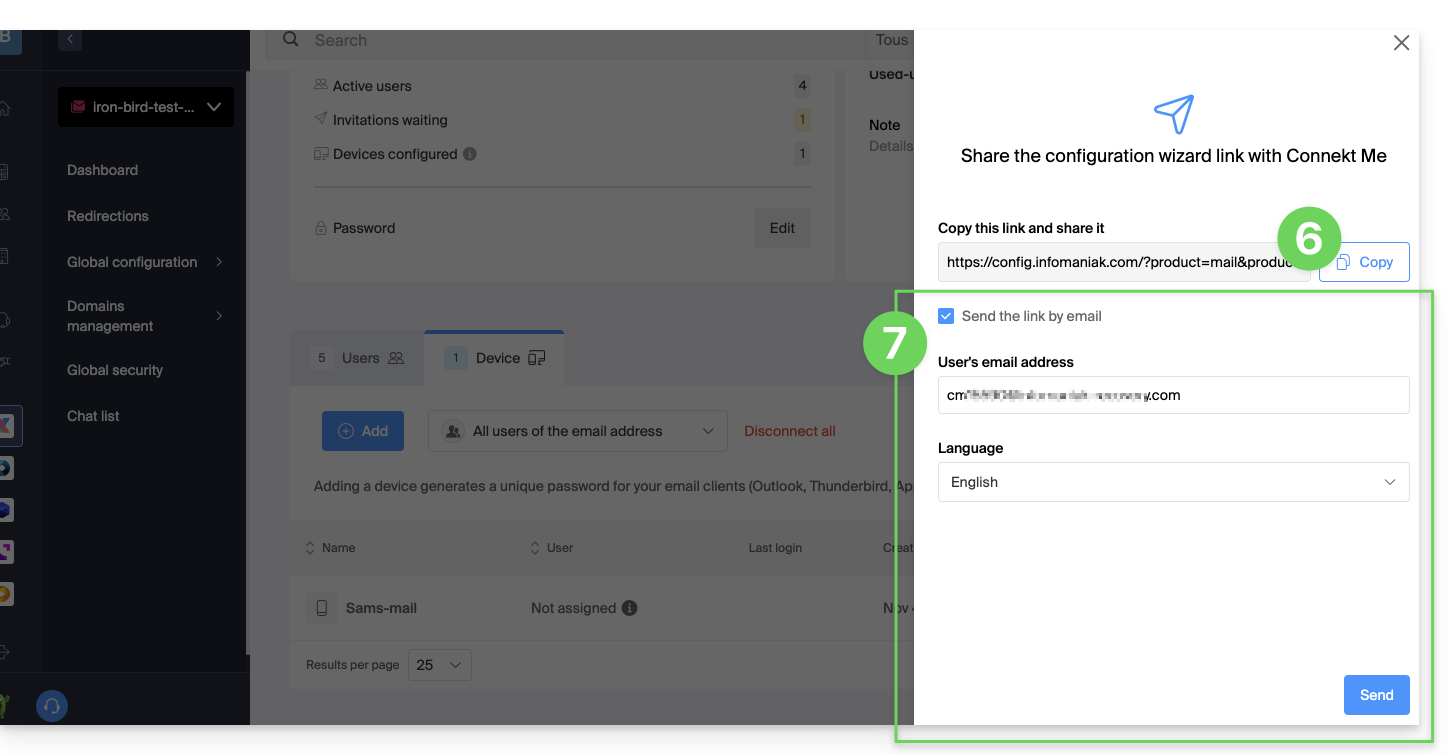
- Copy the invitation link valid for 30 days to send to the user.
- If necessary, send the invitation to the user's email address:
In point 4 above, you can also choose to generate a password:
- The created password will be displayed, you can modify it one last time, copy it, and keep it safe (password manager, for example); it will no longer be able to be displayed afterward.
Modify or remove an existing password
When access is no longer necessary, revoke only the password concerned: other accesses to the email address remain active.
Link to this FAQ:
Has this FAQ been helpful?
This guide explains how RBLs work, the questionable policy of some of them, and the ways to resolve a potential email block.
Preamble
- RBLs (Realtime Blackhole List) or DNSBL (DNS Black List) are lists containing addresses / IP / provider names / servers, known as major spam senders.
- These are often large generalized blacklists, allowing to spot messages considered as unwanted and those who send them, that some providers maintain (smtpcheck, uceprotect: non-exhaustive list)…
Adding the email address to the RBL
When an email address is identified as belonging to an unwanted sender, it is blocked to prevent the reception of unsolicited messages. A block in the RBL does not expire. Addresses will be listed indefinitely.
If you receive a message indicating that your email address is blocked by RBL, this means that the Infomaniak security system has detected suspicious or unwanted activities associated with this email address. This may include mass sending of unsolicited messages, participation in phishing campaigns or other malicious behaviors.
Resolving an email block (RBL)…
… if the error mentions your address and RBL
If you get errors of the type
anna.a@domain.xyz is rbl blacklisted - http://chk.me/rbl
when sending an email and you think it’s a false positive, contact Infomaniak support.
To avoid having your email address blocked by the RBL blocking system in the future, follow the best practices for using email:
- Do not send unsolicited messages or mass messages to unknown recipients.
- Regularly sort the list of recipients used.
- Do not participate in phishing or cybercrime activities.
- Ensure the best level of security where your emails are used:
- strong password
- up-to-date software
- up-to-date operating system (iOS, Android, Windows, macOS, etc.)
- up-to-date associated domain configuration
... if the error mentions an organization like Sorbs or Barracuda
If you get errors of the type
554 5.7.1 Client host blocked using sorbs
or similar:
- Follow the procedure of the mentioned organization (e.g. http://www.barracudacentral.org) to get your address removed from the list.
- Temporarily change your Internet service provider or connection method - WIFI vs 4G/5G - to send your messages.
- Inform your correspondent and their email provider to take the necessary steps and/or to stop using an unreliable RBL.
- Wait a few hours and try again.
Fewer and fewer professionals (ISP, hosts, etc.) use service providers like Backscatterer / UCEPROTECT which are primarily for profit, and there are many other very effective lists, such as ABUSIX or SPAMCOP, which are well-maintained and whose real goal is to fight spam, one of the priorities of Infomaniak.
Link to this FAQ:
Has this FAQ been helpful?