Knowledge base
1000 FAQs, 500 tutorials and instructional videos. Here, there are only solutions!
This guide explains how to protect a section of a website on a Web Hosting plan by requiring a password to be entered before accessing a directory (including subdirectories) from a browser such as Brave, Chrome, Edge, Firefox, Opera, Safari, etc.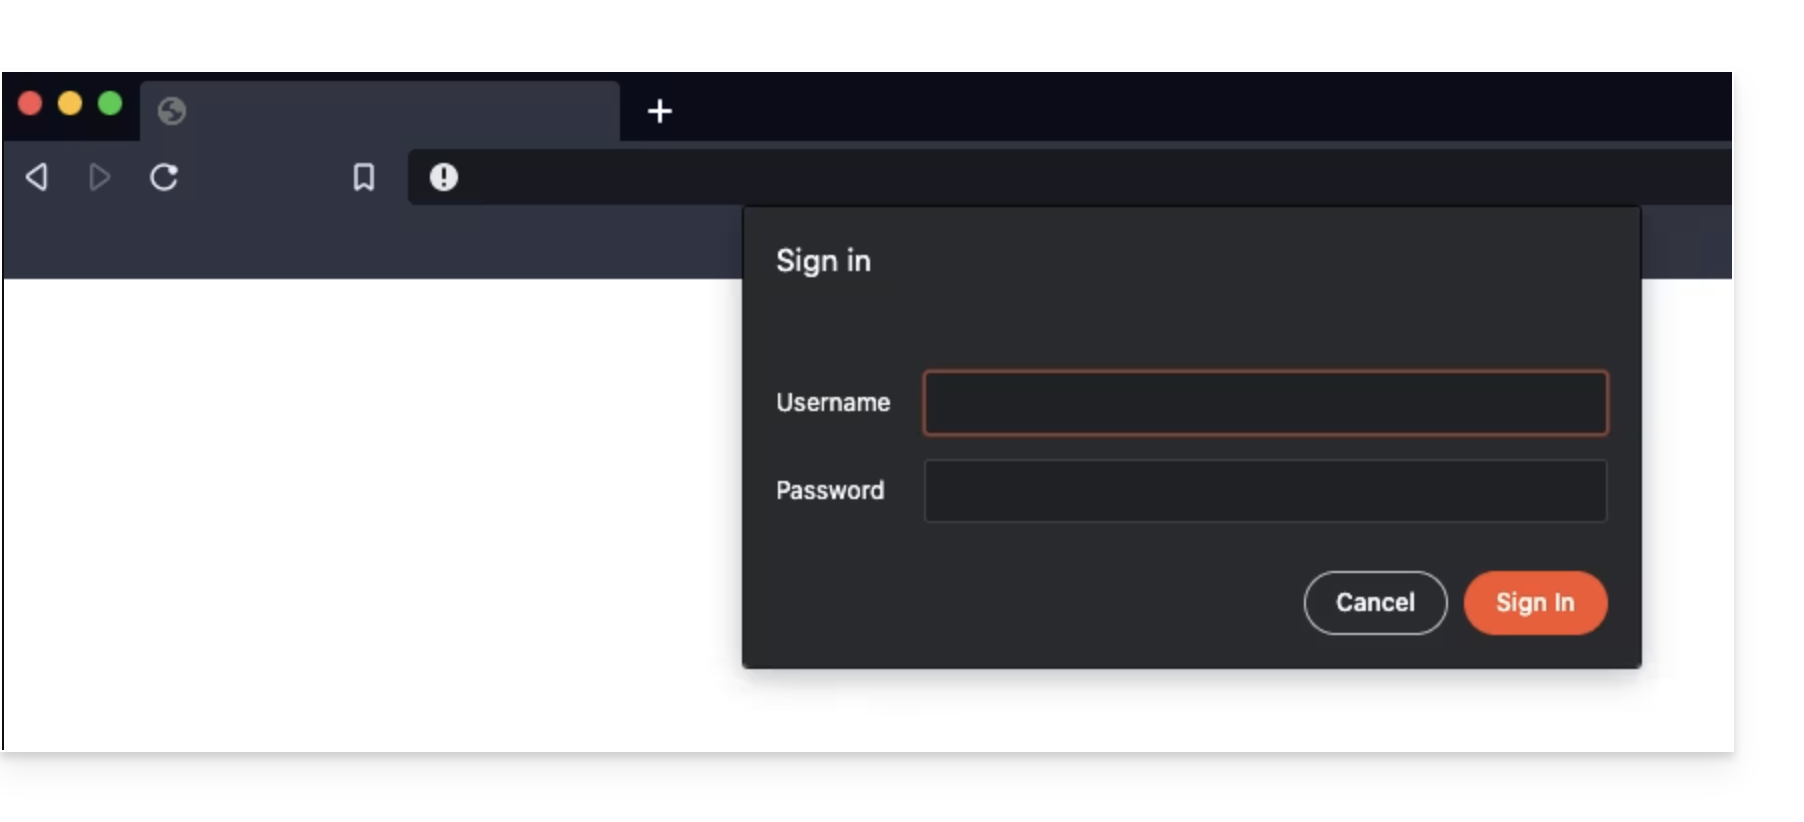
Please note that this does not prevent a user from accessing the directory via FTP.
Simple method
To password-protect (Digest authentication) a directory using the "Folder Protection" tool:
- Click here to access the hosting & website management section in your Infomaniak Manager (❓: help).
- Click on the name of the relevant hosting.
- Click on Security in the left-hand menu.
- Click on Folder Protection.
- Click on the directory you want to protect.
- Enable protection using the toggle switch, then create one or more users:
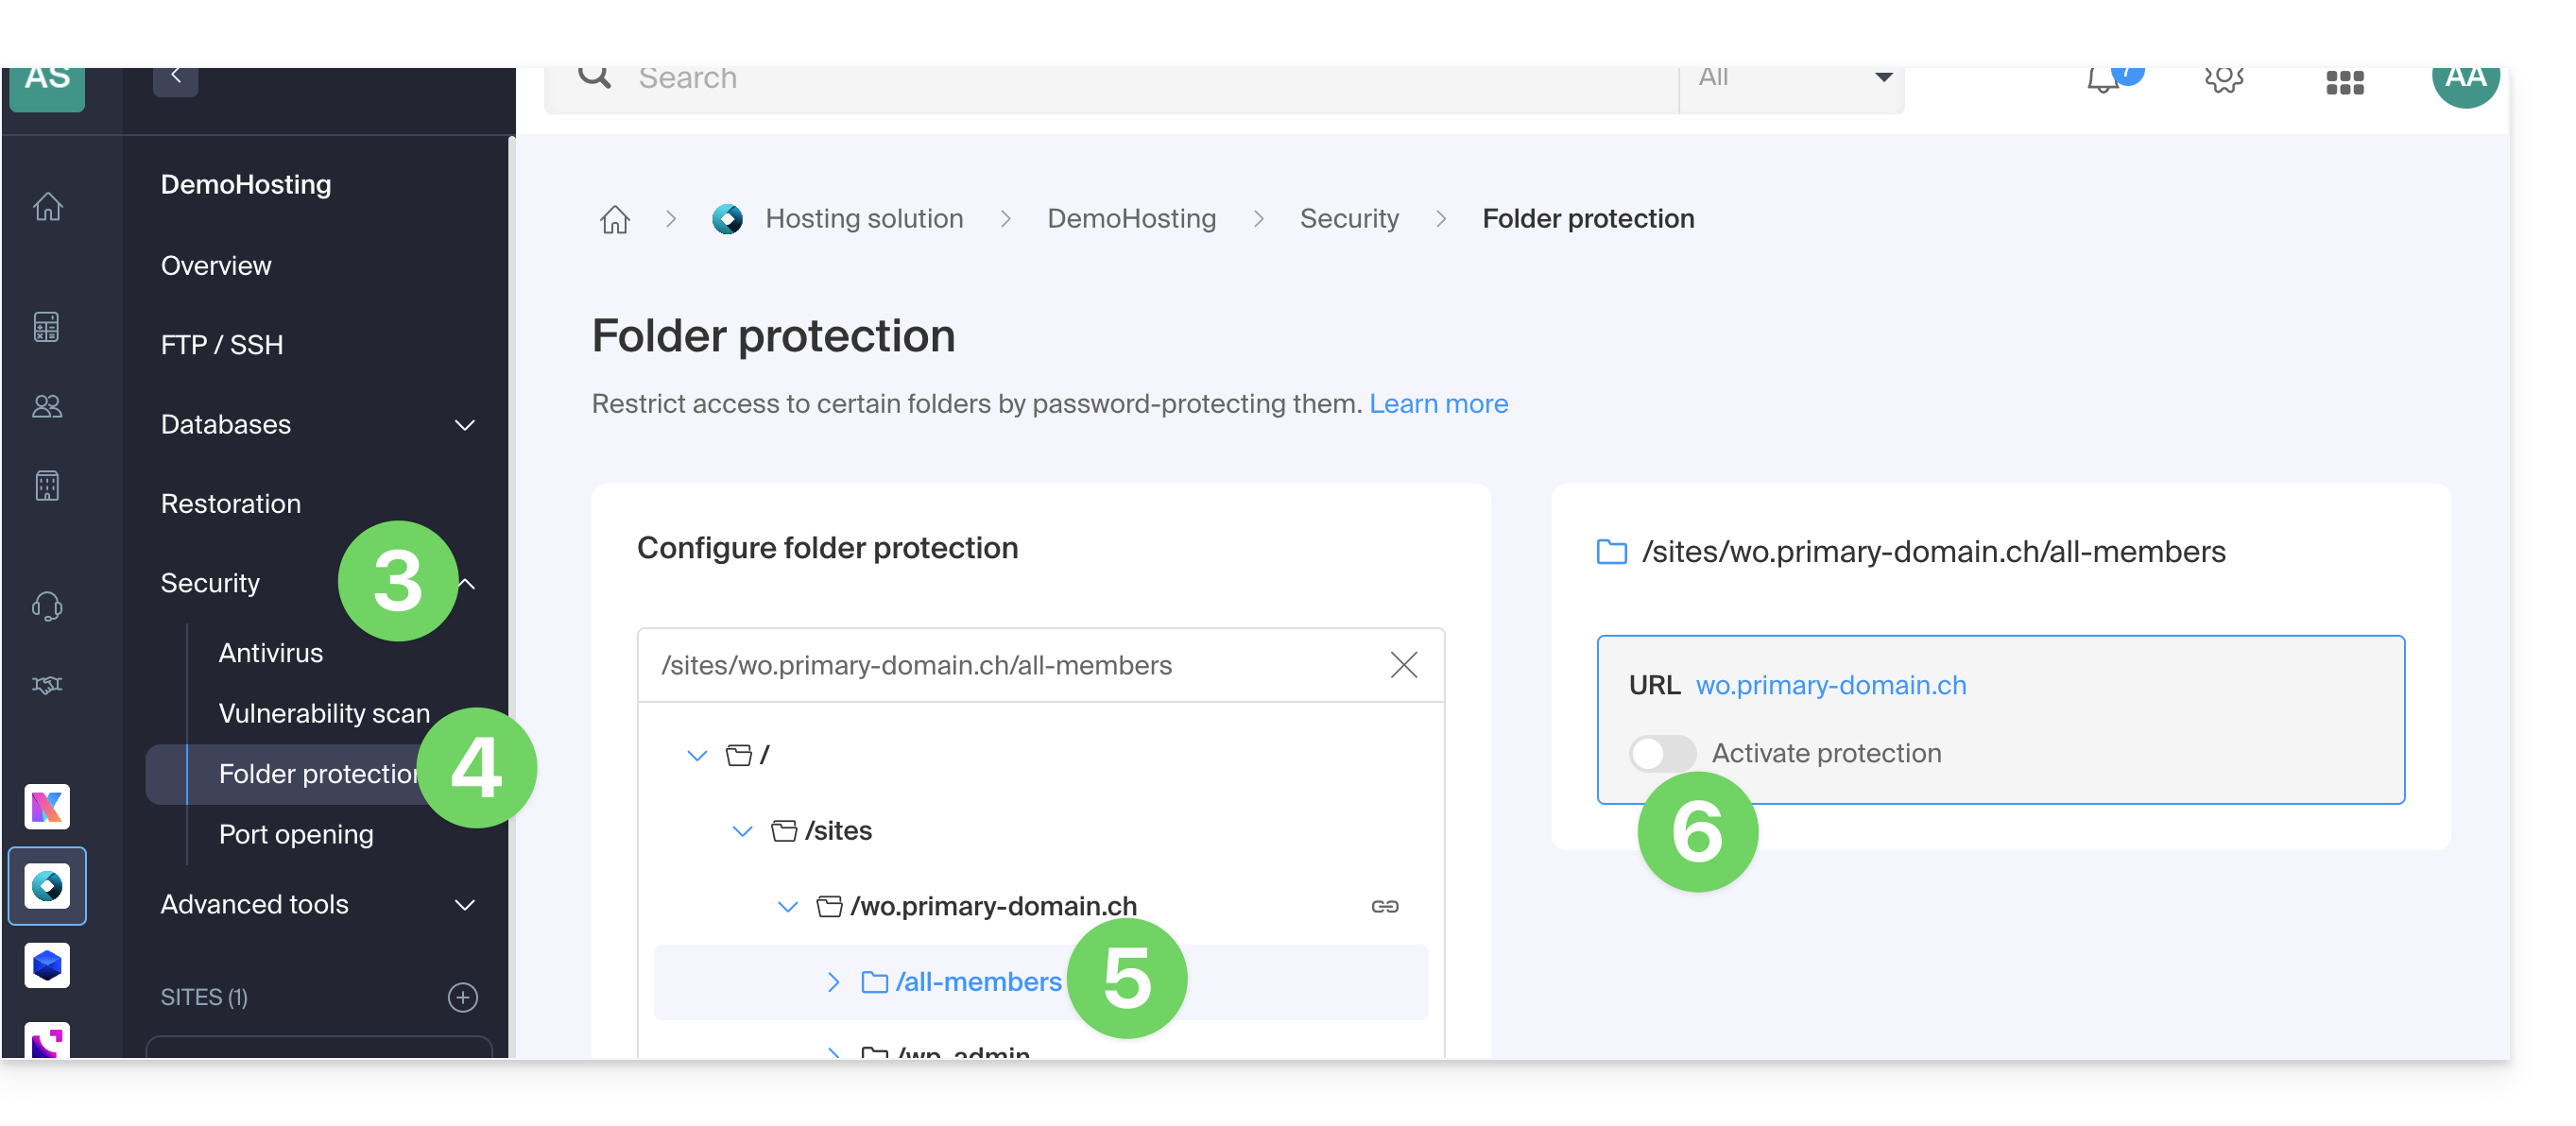
- Users are defined per directory; the tool does not allow you to manage user groups:
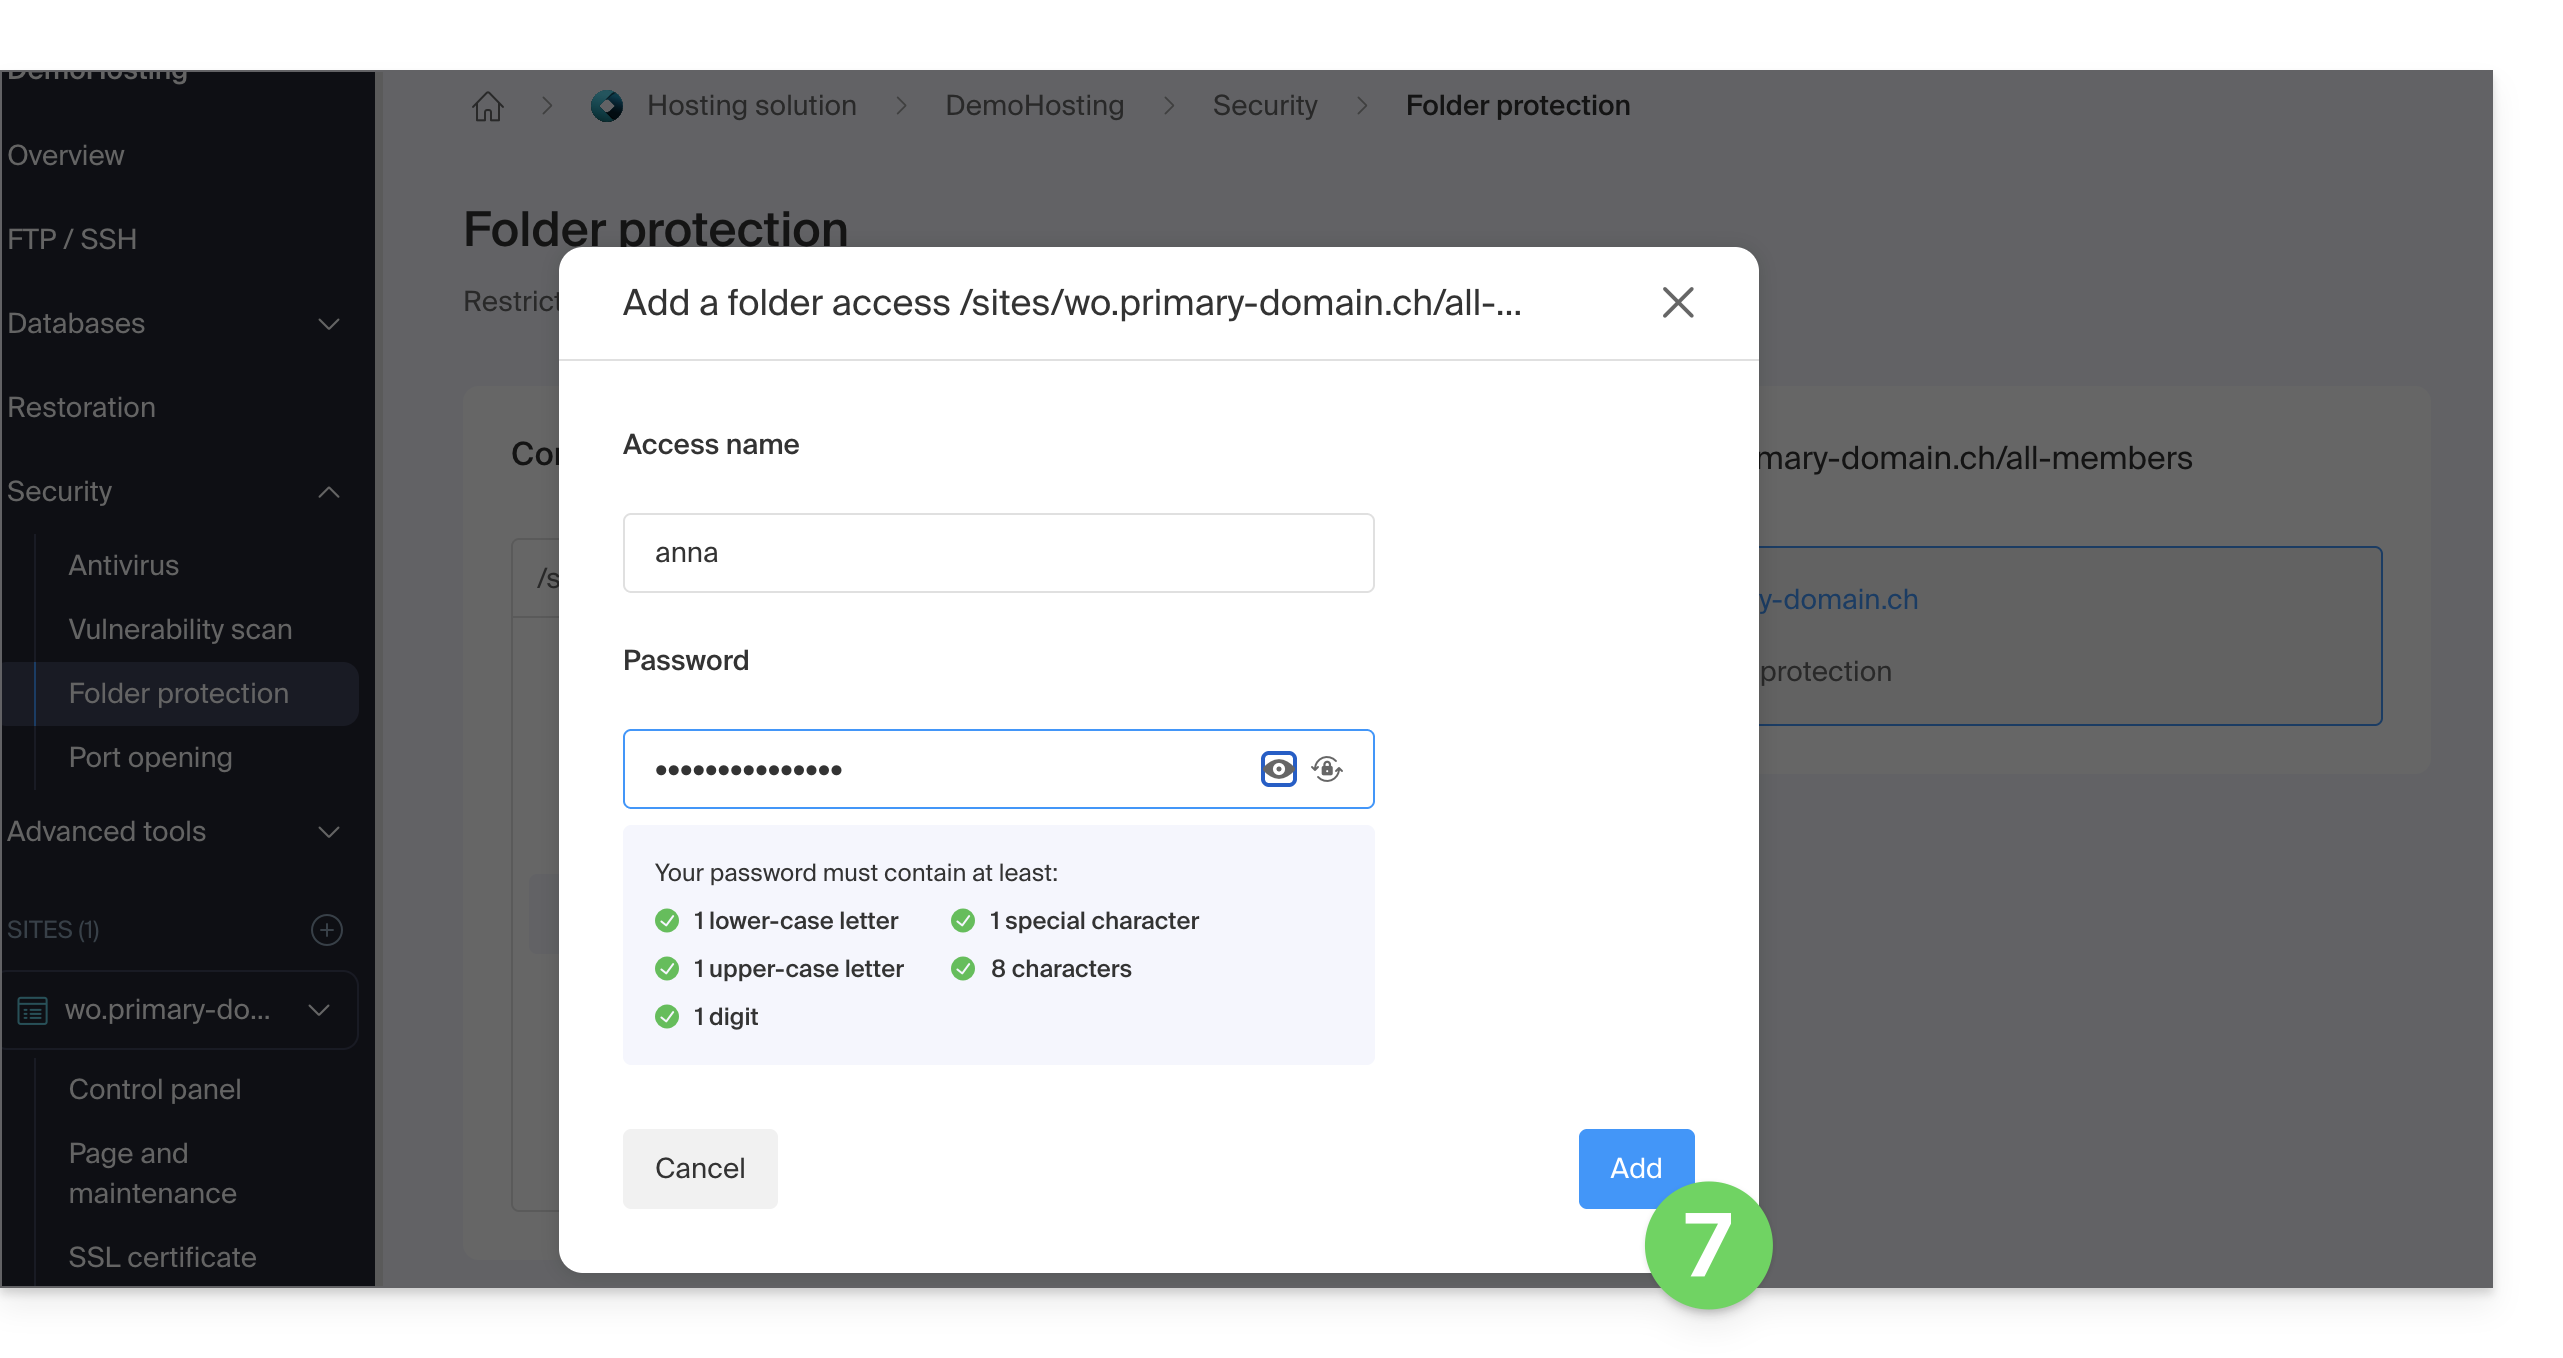
- Users are defined per directory; the tool does not allow you to manage user groups:
- Click the Add button.
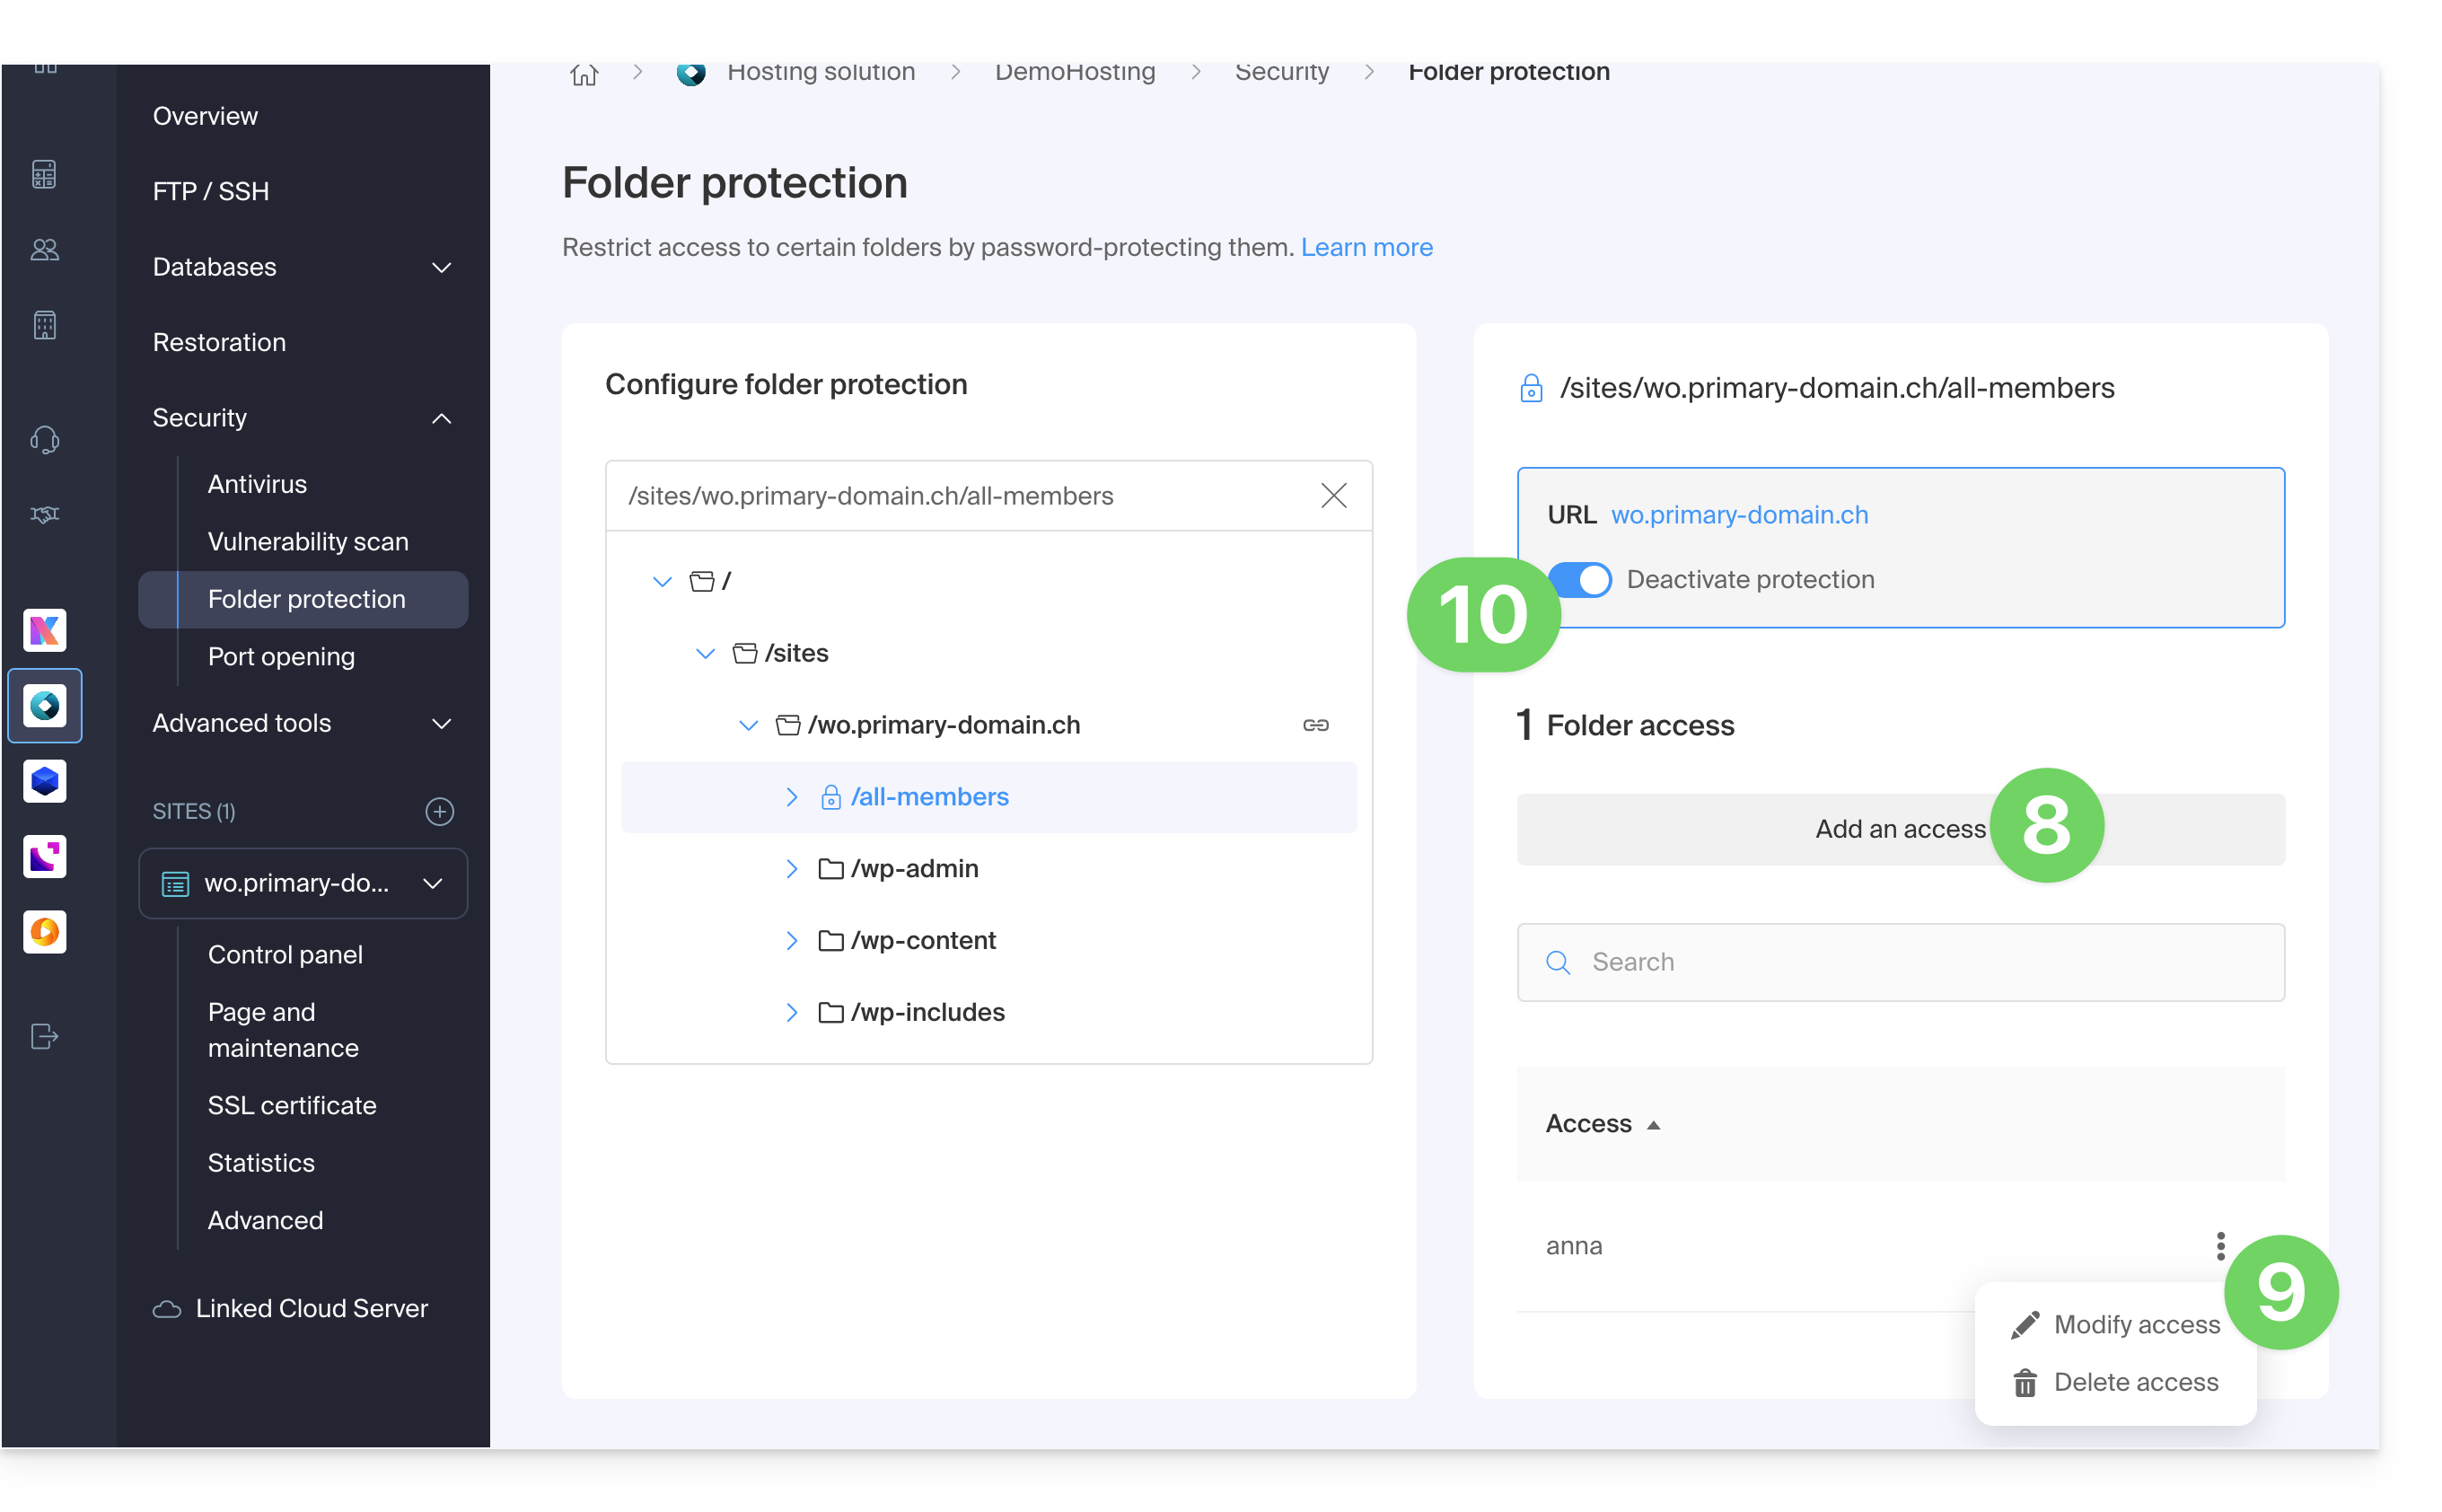
- Click the button to Add access for an additional user if necessary.
- Click on the action menu ⋮ located to the right of the user in question to modify or remove them.
- Click on the toggle switch again to completely disable directory protection:
Manual method via .htaccess
To protect a folder with a password using the .htaccess file of your site:
- Connect to your hosting via an FTP software/client or Web FTP.
In the folder you want to protect, create a file called
password.phpand adapt the following content by replacing12345with the desired password:<?php $password = "12345"; echo password_hash($password, PASSWORD_DEFAULT); // Displays the hashed password ?>- Open a browser and display the
password.phpfile (example: domain.xyz/folder-to-protect/password.php). - The browser will display your encrypted password; copy the encrypted password, as you will need it later.
In the folder you want to protect, create a file called .htaccess and adapt the following content within it:
AuthName "Protected Administration Page"
AuthType Basic
AuthUserFile "/example/.htpasswd"
Require valid-user
Replace /example/ with the absolute path of the folder to be protected. Example:
AuthUserFile "/home/clients/0f83c7afb710e5ae2645a1b704d8772f/web/protected_folder/.htpasswd"In the folder you want to protect, create a file called htpasswd.txt and adapt the following content within it:
username:hashed_password- Replace
usernamewith the desired login. - Replace
hashed_passwordwith the encrypted password copied in step 1 of this guide.
Once the htpasswd.txt file is saved, rename it as follows: .htpasswd.
Open a browser and try to display one of the pages contained in the protected folder. If the instructions have been followed correctly, the login and password (not encrypted) you chose will allow you to access the protected folder.
Other restrictions may also be applied by .htaccess.
Link to this FAQ: https://faq.infomaniak.com/68
Has this FAQ been helpful?
This guide explains how to redirect a domain name directly to another, or how to automatically send visitors to your website to another page address (internal or external URL).
Introduction
- To redirect traffic, you will need to take action…
- … either on the domain name itself (it must be hosted by Infomaniak and its DNS must also be Infomaniak's),
- … or on the code present in your pages (e.g., .htaccess page, homepage, etc.) if you have a website.
Acting on the domain name
Via Web Redirection Tool
The tool available in the Manager allows you to easily manage your domain name (or subdomain) and redirect it to the internet address of your choice.
via DNS modifications or A record updates
Change the DNS of the domain name or modify its A/AAAA records to redirect web traffic to another provider.
Modify the page code…
… by inserting HTML code
Insert this line of code between the <head> and </head> tags of your homepage (usually named index.html):
<meta http-equiv="refresh" content="5;url=INSERT-HERE-NEW-URL">Replace 5 with the desired wait time in seconds (0 for immediate execution).
The Google search engine indicates that it is preferable to use a 301 redirect on the server-side (see below). The W3C also advises against using it.
… via PHP code to be inserted
If the website page has a .php extension, insert this function call at the very top of the file:
header("refresh: 5; url=INSERT-HERE-NEW-PAGE-URL");
```
… via the .htaccess file
… via fichier .htaccess
To redirect all traffic to your site (regardless of the page being accessed) to another address, insert the following into the .htaccess file at the root of your site:
RewriteEngine On
RewriteRule ^(.*)$ INSERT-HERE-NEW-URL/$1 [R=301]
To target the page that should be redirected:
Redirect permanent /old_page.html insert destination URL hereRedirectpermanent, Redirect permanent, and Redirect 301 are equivalent commands.
The following is another example of redirecting a sub-section to the homepage (this directive has the advantage of working with "deep links" unlike a permanent redirect):
RewriteEngine on
RewriteRule "old/path/url" "/" [L]
Refer to this other guide for more information.
Link to this FAQ: https://faq.infomaniak.com/79
Has this FAQ been helpful?
This guide explains how to enable support for certain file types (e.g., .inc) on an Infomaniak web hosting plan, so that they are processed in the same way as a .php file.
Introduction
- Previously, you had to add the following line to a
.htaccessfile:AddType application/x-httpd-php .inc- This prevented the file's content from being displayed as text when accessed via a browser, instead of being correctly interpreted by PHP.
- Now you can manage file extensions via the FPM Extensions field in your hosting's Manager.
Manage PHP-recognized extensions
To add support for a specific file type:
- Click here to access the hosting & website management section in your Infomaniak Manager (❓: help).
- Click on the name of the website in question.
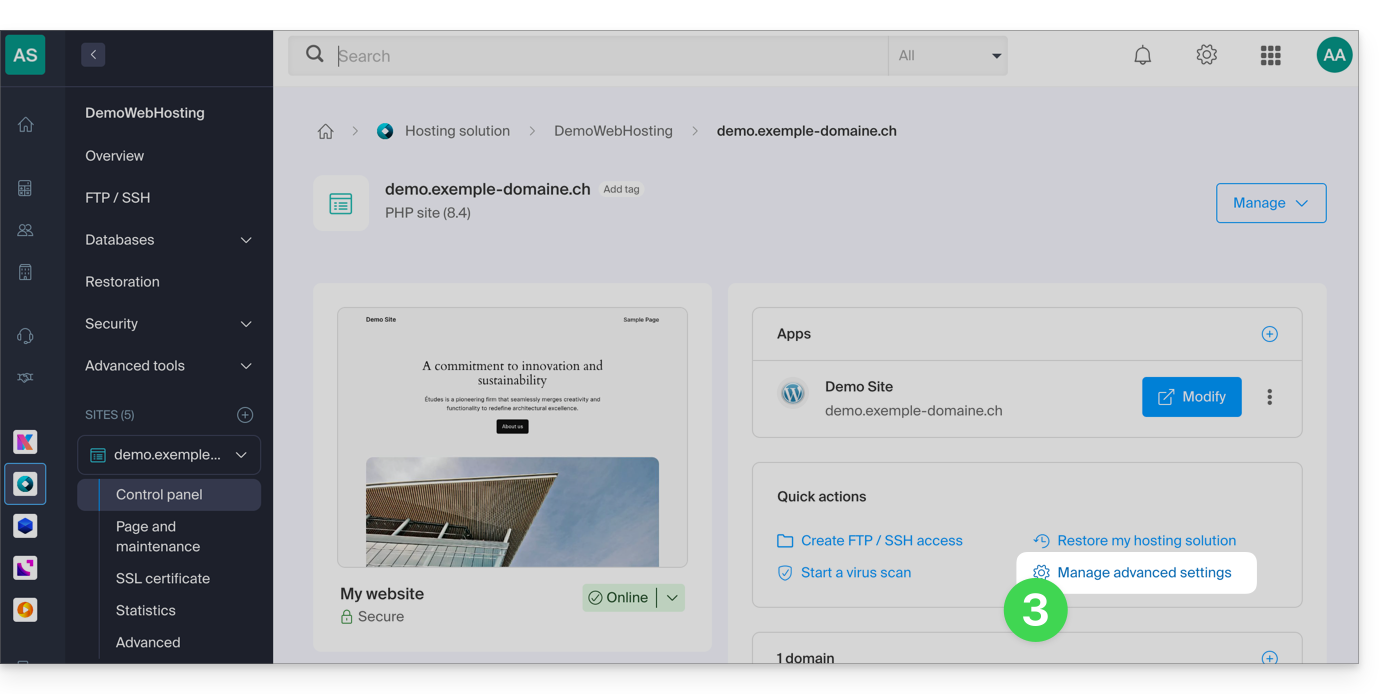
- Click on Manage advanced settings:
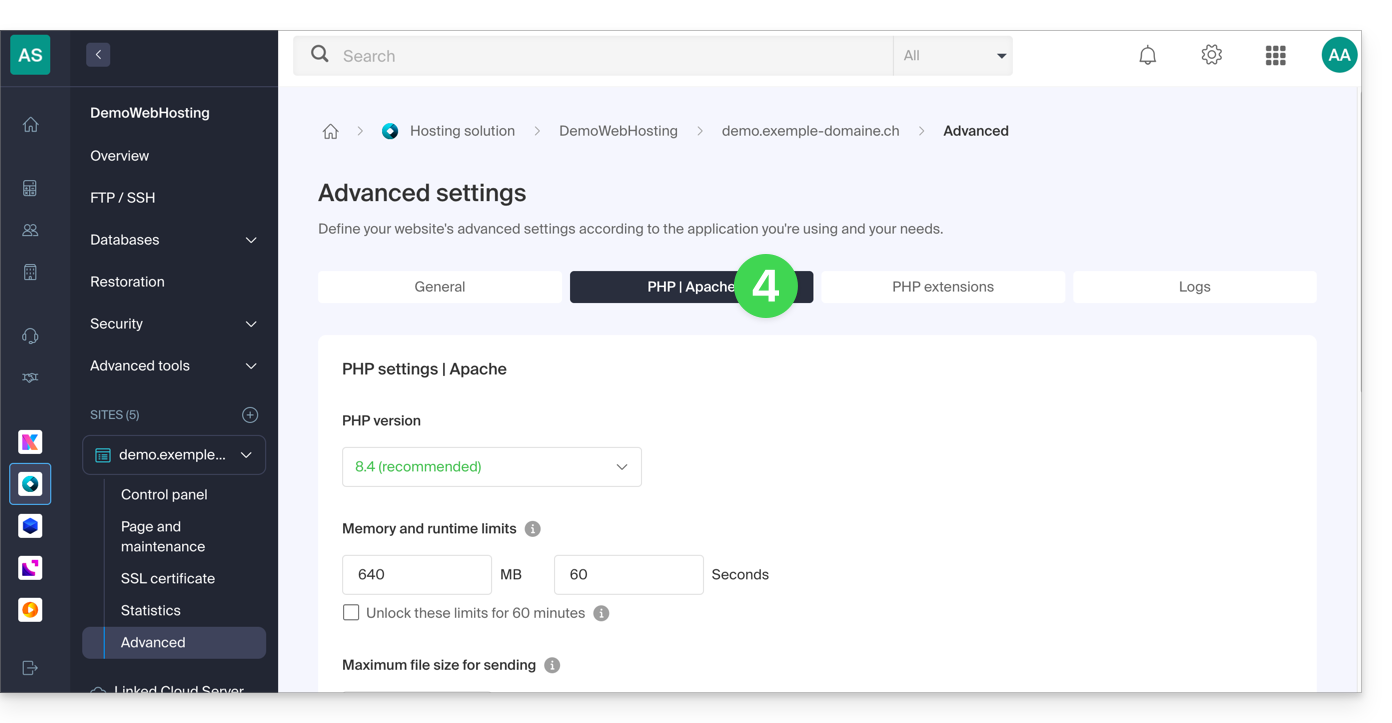
- Click on the PHP / Apache tab:
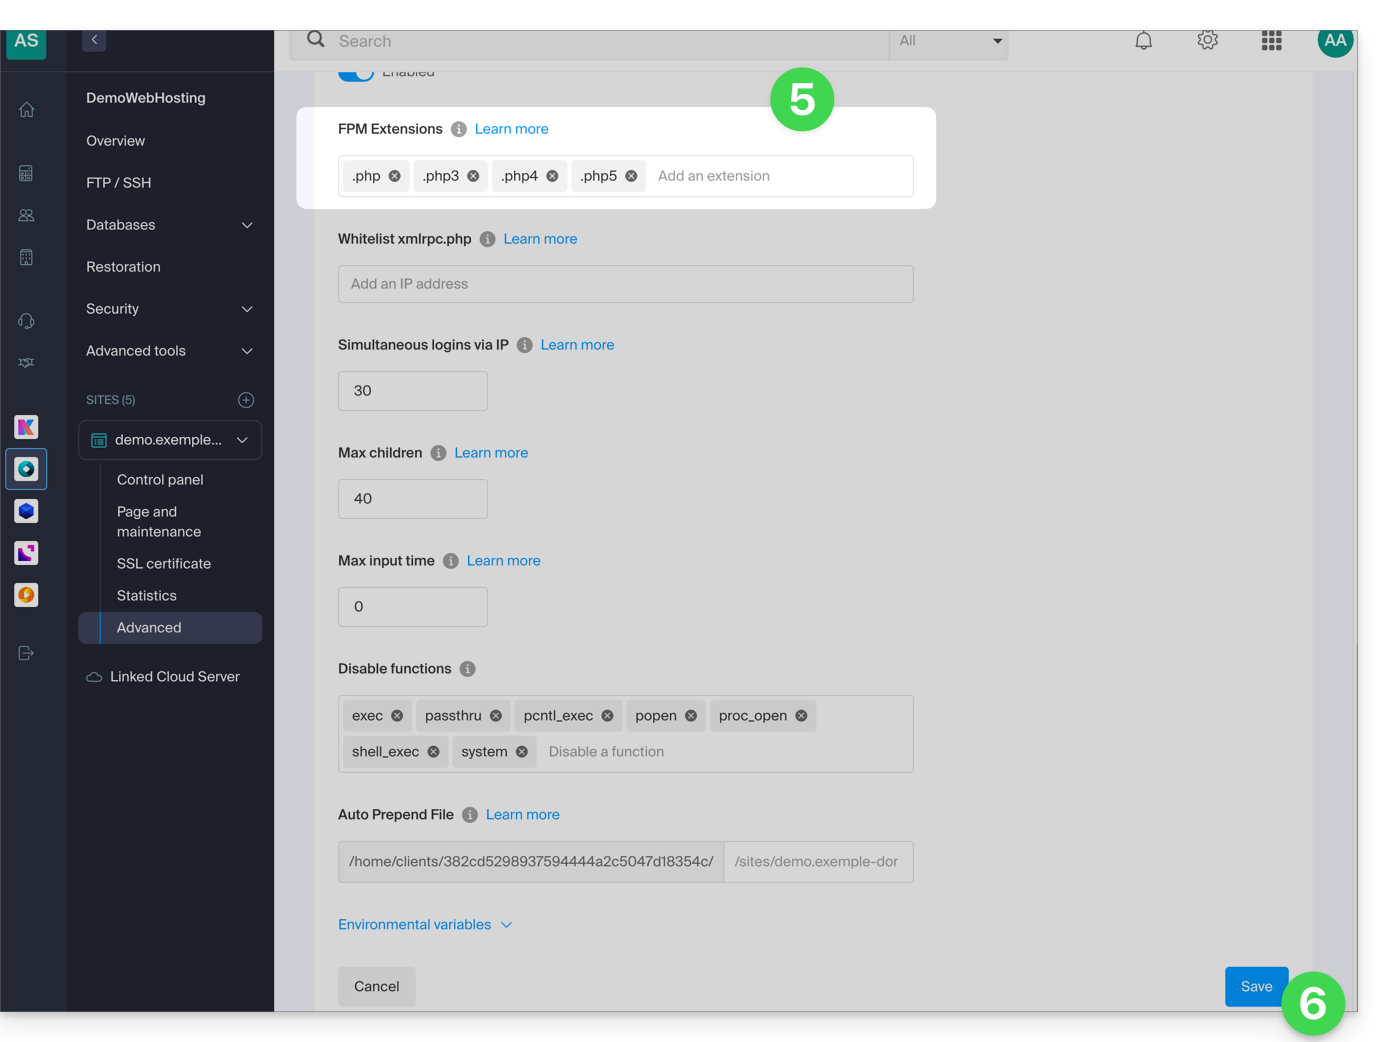
- Edit the FPM Extensions field to add the desired extensions.
- Click the button at the bottom of the page to save:
Link to this FAQ: https://faq.infomaniak.com/82
Has this FAQ been helpful?
This guide explains how to view information about visitors who have accessed your Web Hosting sites (traffic statistics).
✘ UNAVAILABLE with
Site Creator standalone (independent of web hosting)
Starter hosting plans
Introduction
- Please refer to this other guide if you are specifically looking for access logs.
- Consult this other guide about the Site Creator Pro offer.
Access website traffic statistics
To view statistics regarding the traffic to your websites:
- Click here to access the hosting & website management section in your Infomaniak Manager (❓: help).
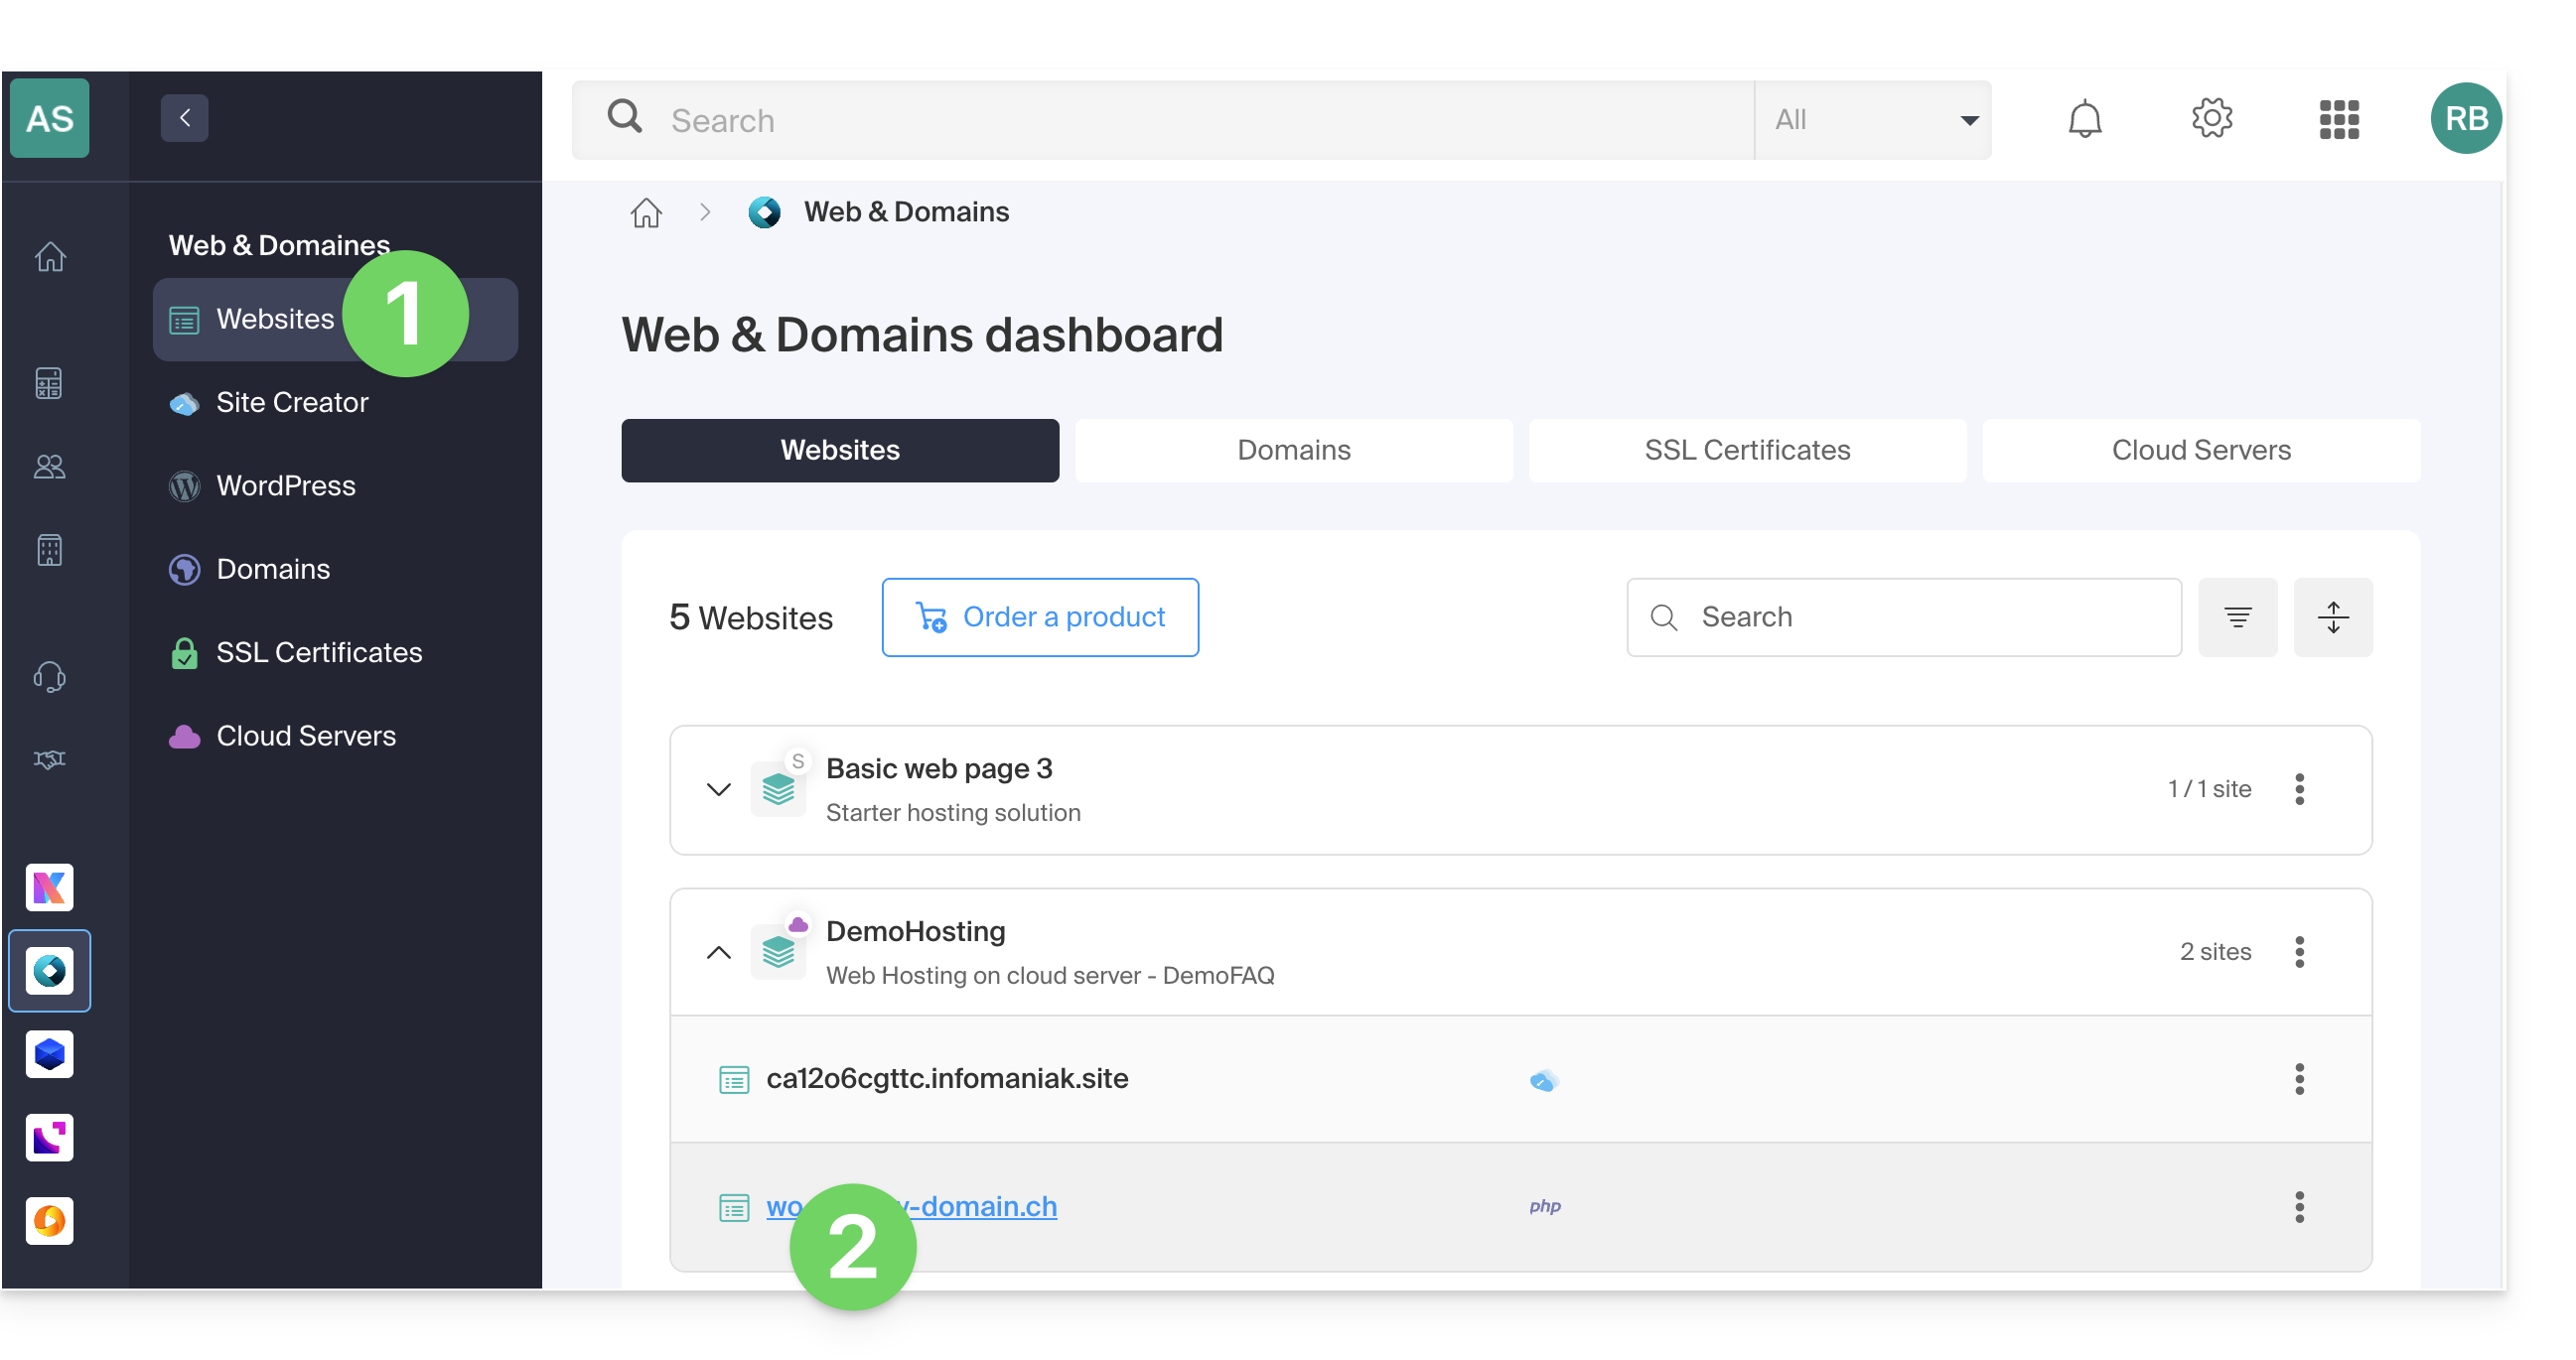
- Click on the name of the website in question:
- Click on Statistics in the left-hand menu:
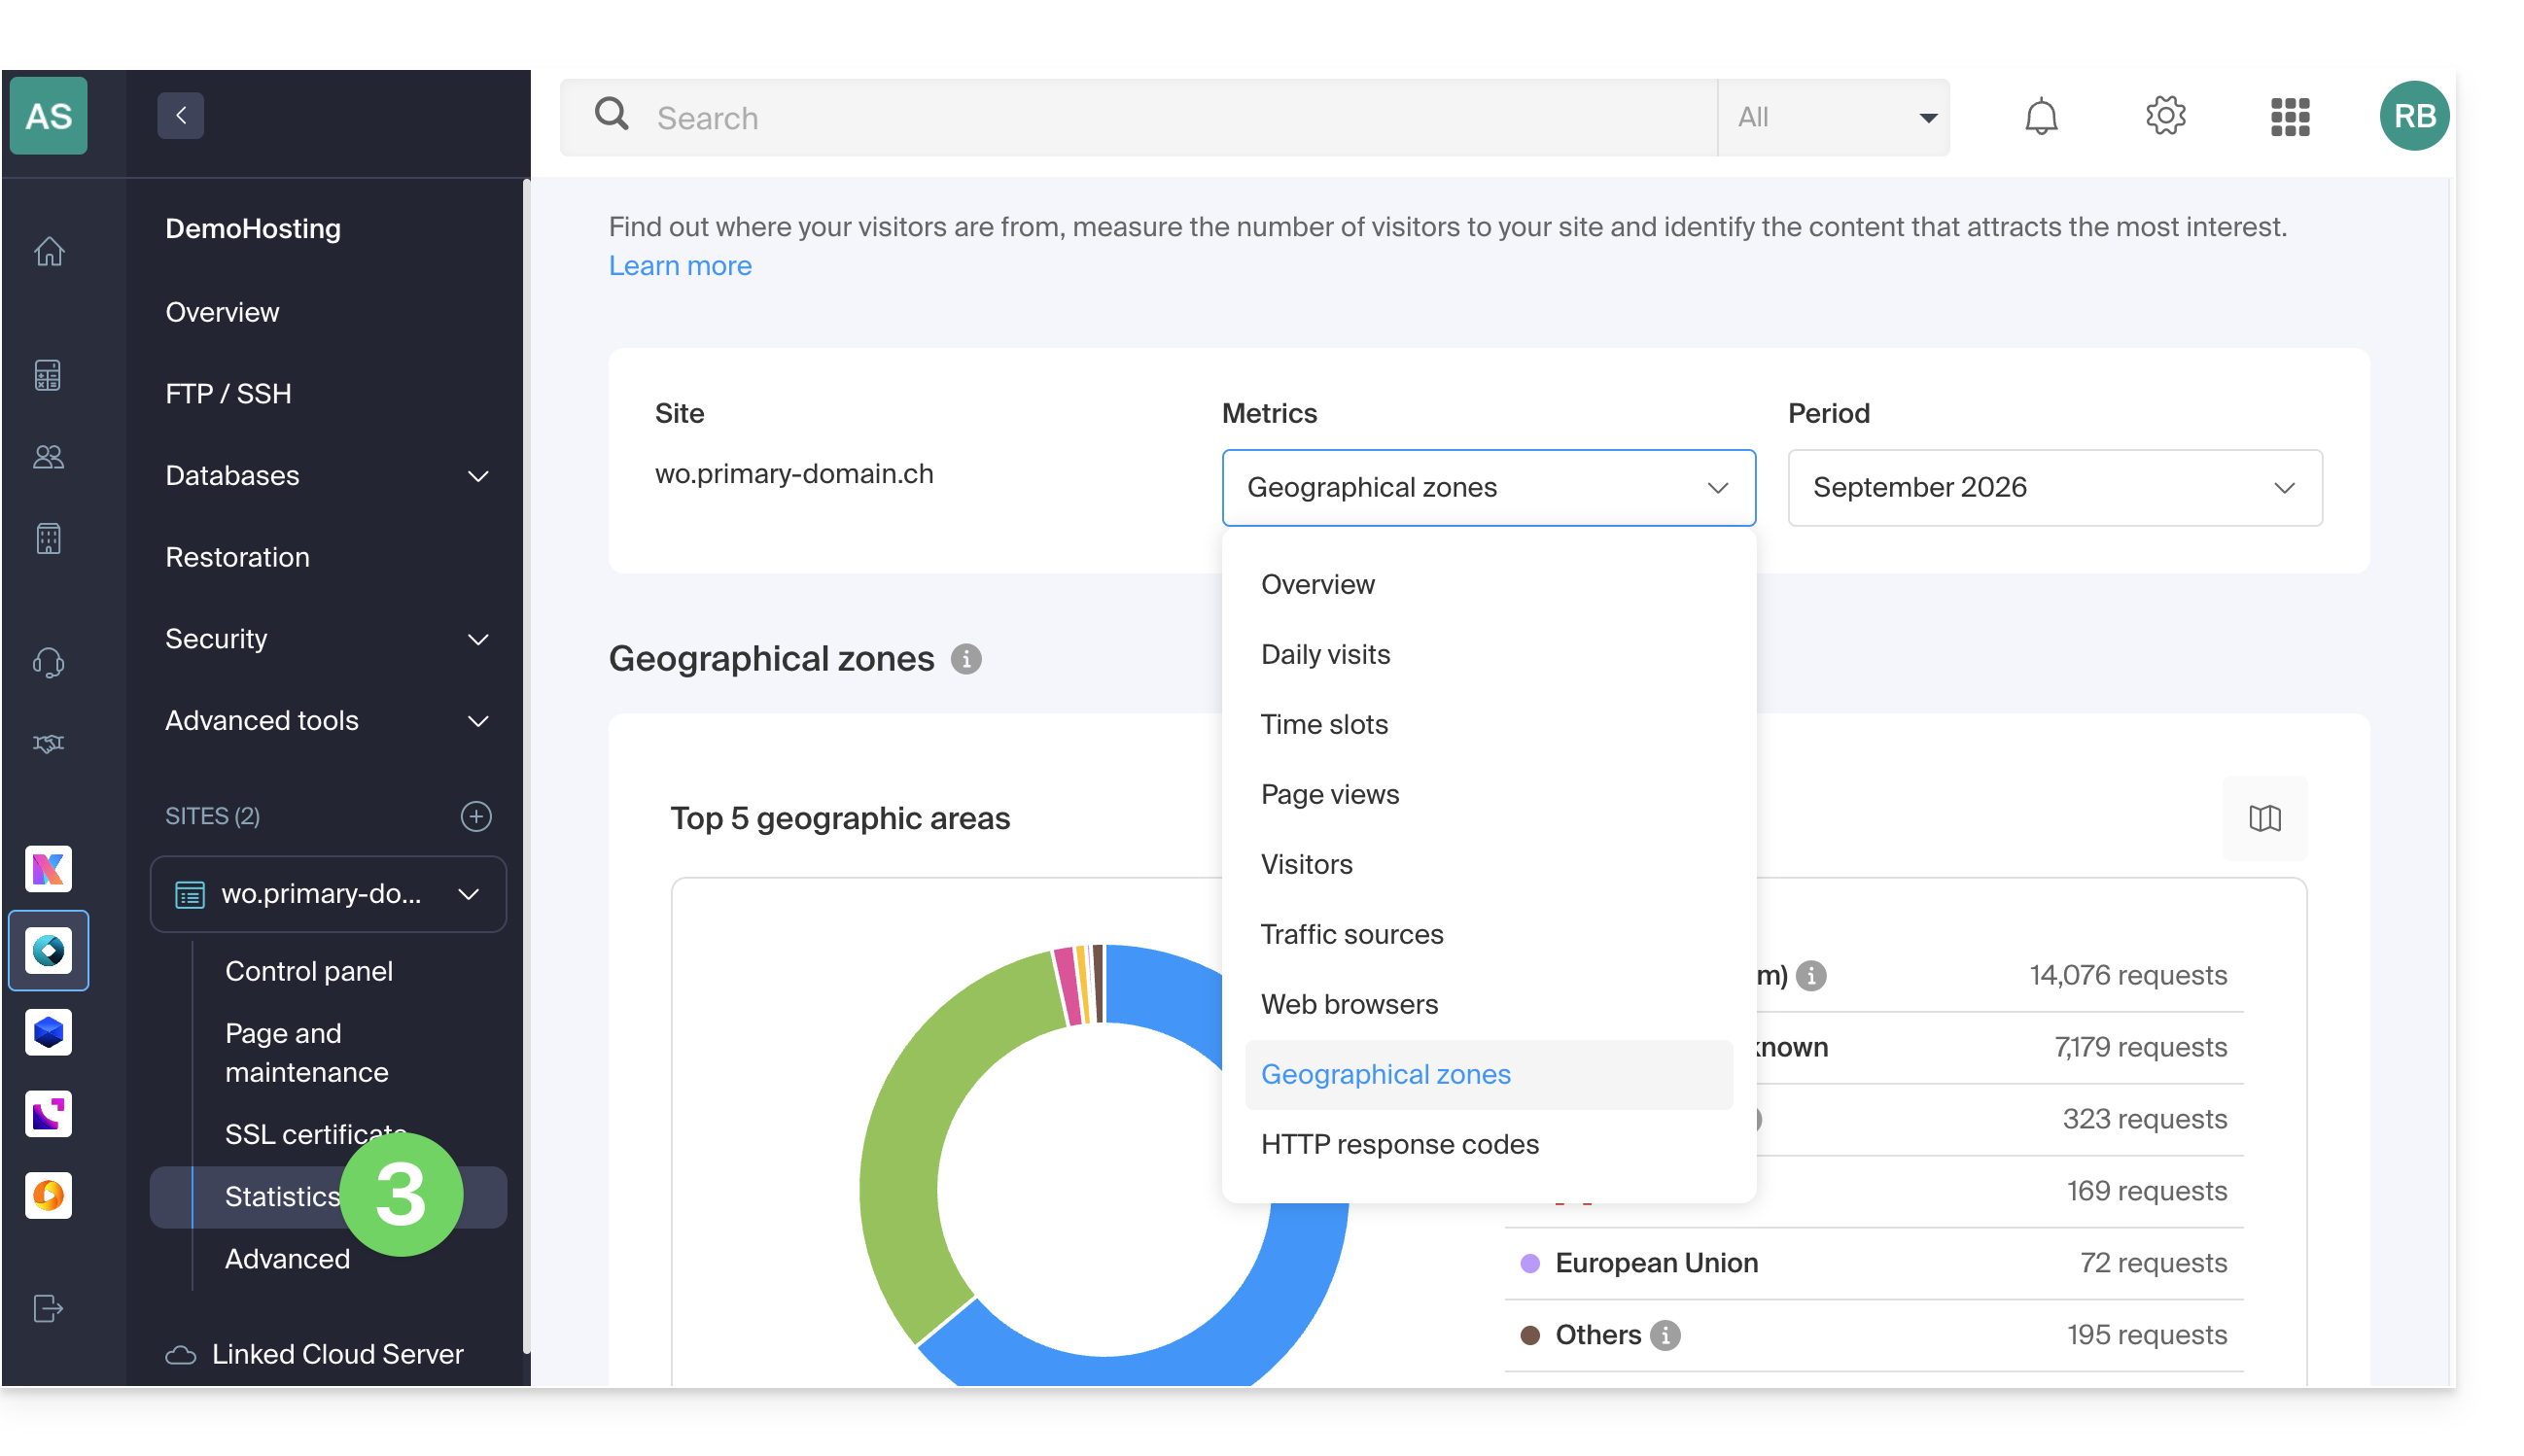
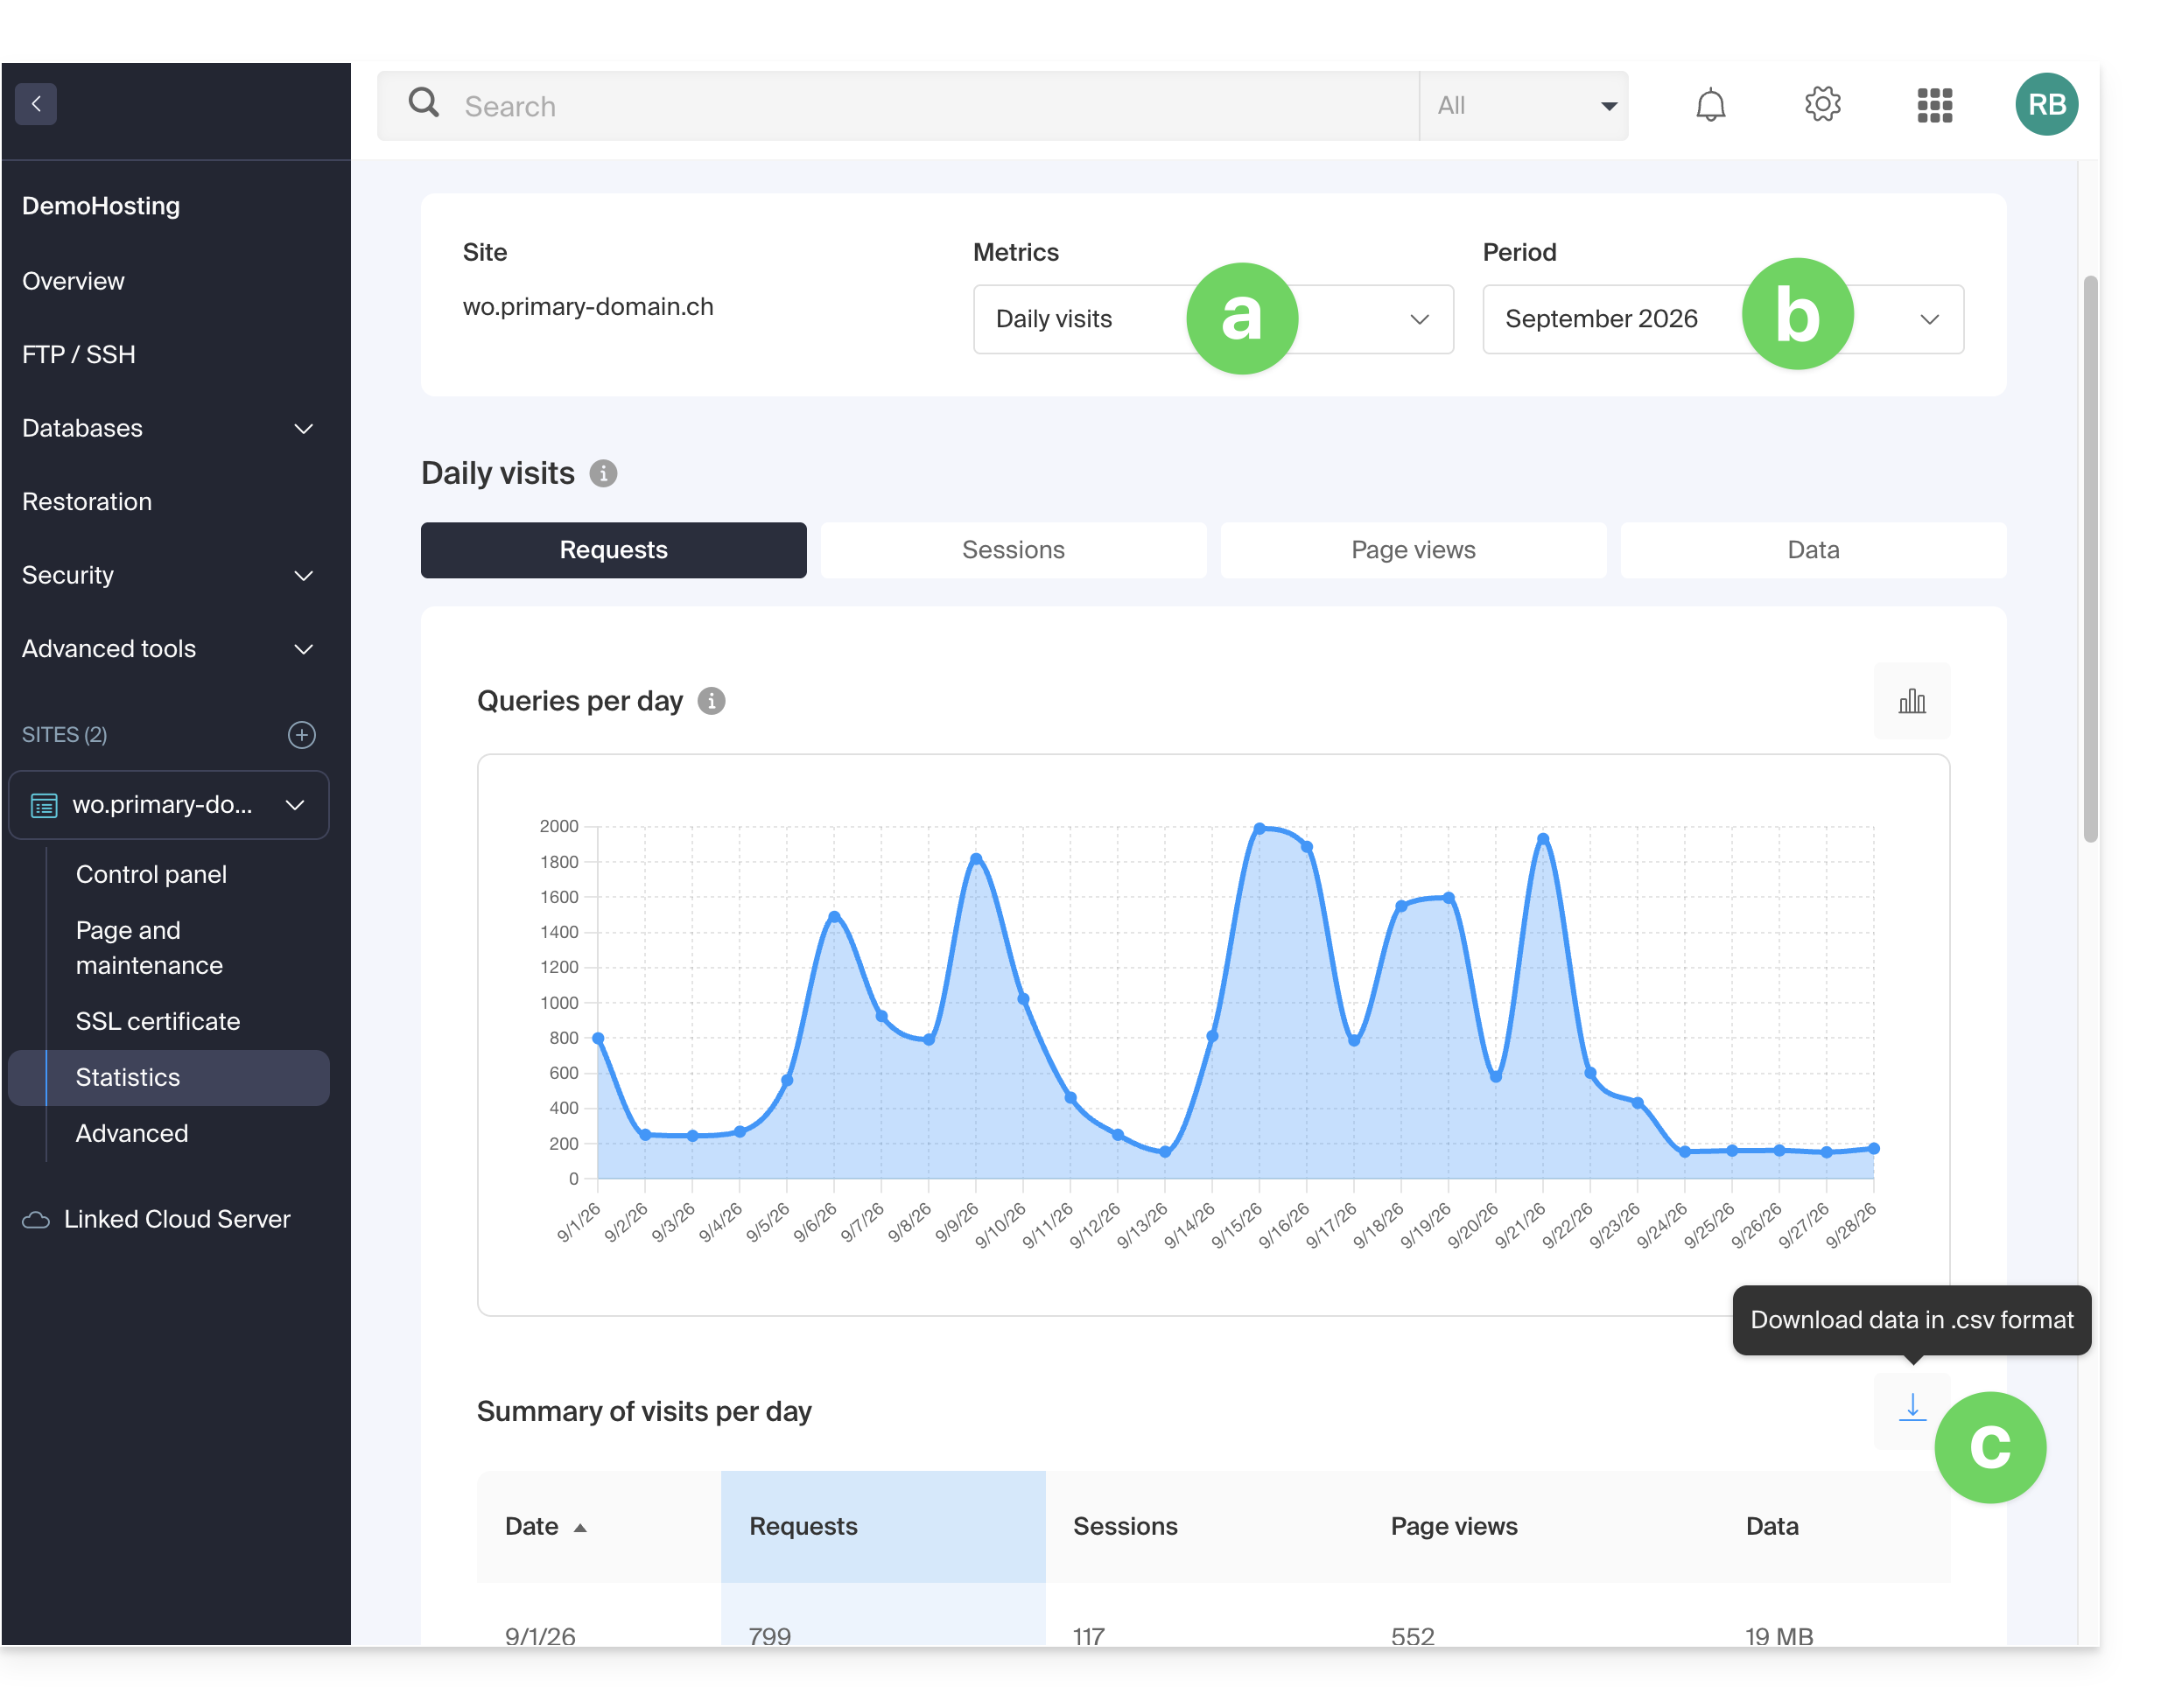
- The toolbars allow you to choose:
- the type of statistics,
- the period,
- or to download the data for a third-party tool:
Explanation of terms
There is no distinction between humans and robots. You can also use tools like Matomo, Open Web Analytics, or Google Analytics.
| Category | Description | Details |
|---|---|---|
| Hits | Every request sent to the server. | Includes everything (HTML, images, audio, etc.). Each requested element, whether visible or not, counts as a hit. It's as if a visitor activated an invisible button with each interaction. |
| Files | Requests requiring data to be sent in return. | Records requests that require the server to send back a file (graphic, HTML). The difference with hits corresponds to the ratio between incoming requests and outgoing data. |
| Pages | Number of pages displayed on your website. | Measures the HTML pages viewed, excluding graphic or audio files. Each access to a new HTML page is recorded as a page view. |
| Visits | Sessions based on IP address. | A visit starts with an IP request. If the address returns within 30 minutes, it is counted as a single visit. After that, a new visit is recorded. |
| Sites | Estimated visits based on fixed IP addresses. | Excludes mobile or dynamic connections. This targets regular visitors (businesses, institutions) to better understand your target audience. |
| Ko | Data volume sent by the server. | Total amount of data transferred during the period, calculated via log files (with a possible margin of error depending on the size of the files). |
| Total hits | Total number of requests. | A page with 3 images and text generates 5 hits (the page + the text + the 3 images). This total is therefore much higher than the number of page views. |
| Total Pages / Visits | Engagement metrics. | The number of pages viewed compared to the number of unique visits allows you to assess the level of interest users have in your content. |
| Total unique sites | Number of distinct IPs. | Represents the diversity of traffic sources and helps identify the most active audience segments during the period. |
| Total number of unique URLs | Distinct paths taken. | Corresponds to the different pages or files visited, providing an overview of your navigation structure and the most popular content. |
| Total number of unique referring domains | Number of source sites. | External sites that have directed traffic to you. This is a key indicator of the effectiveness of your marketing and partnerships. |
Meaning of "Commercial (com)" and "Unresolved"
"Commercial" often represents a significant portion of geographic traffic. It includes users connected via internet service providers (ISPs) using a .com domain. As this extension is used by many ISPs and global companies, it does not allow for the identification of a specific country.
"Unresolved" refers to IP addresses that cannot be geographically located, often due to privacy settings, the use of VPNs, or network restrictions.
Link to this FAQ: https://faq.infomaniak.com/83
Has this FAQ been helpful?
This guide is for you if you are encountering a 500 error, which can have various causes generally related to the development of your website on a Web Hosting service, particularly with the rewrites in your .htaccess files.
Introduction
- Apache2, which is installed on the servers, no longer supports certain modules such as
mod_auth_anon,mod_auth_dbm,mod_authz_dbm,mod_cern_meta,mod_imap,mod_imagemap,mod_mime_magic. - Apache2 is strict about syntax errors, and when it encounters syntax errors in a
.htaccessfile, this can lead to 500 Internal Server Error errors or unexpected URL rewriting errors.
Examples of syntax and correction
In this first example, the syntax error is that the rewrite rule does not specify the HTTP redirection response code to return.
RewriteRule ^articles/([0-9]+)/$ /article.php?id=$1 [L]The correction adds the R=301 directive to specify that the redirection should return a 301 (permanent) code:
RewriteRule ^articles/([0-9]+)/$ /article.php?id=$1 [L,R=301]
In this second example, the syntax error is that the Options directive does not correctly specify the options to enable or disable.
Options -Indexes +FollowSymLinksThe correction adds the "+" sign to specify that FollowSymLinks should be enabled rather than disabled:
Options -Indexes +FollowSymLinks
Troubleshooting these errors
- If the first page or another page displays a 500 error, rename the
.htaccessfile or comment out all lines with#and uncomment line by line until you find the section that is causing the problem. - If the error occurs after a modification made to one of your pages, the easiest solution is to restore the previous version of the file.
Link to this FAQ: https://faq.infomaniak.com/106
Has this FAQ been helpful?
This guide details CHMOD (short for change mode), which allows you to change the access permissions of a file or directory.
Modify FTP permissions
The permissions available for each user/group are as follows (see this other Wikipedia guide):
- read: grants the right to list (also requires execute permission) and read within a directory and/or read a file.
- write: grants the right to create, modify, rename, and delete files and/or directories
- execute: for a directory: grants the right to access it to read its subdirectories -> For a file: grants the right to execute it if it is a program or script, for example.
- set uid (?): for a file with execution rights, this will cause it to be executed with the rights of the owner if it uses the execve or setuid system call.
- set gid (?): all new files created will belong to the group of the directory, and for a file with execution rights, this will cause it to be executed with the rights of the group.
- sticky bit (?): on a directory, files within the directory can only be renamed or deleted by the owner, even if other users have write permissions. This permission is not very useful for files.
The Web FTP in the Manager allows you to change file permissions (including the permissions for /web).
Most FTP software/clients allow you to change file access permissions; this function is usually called "CHMOD" and can be found under "Properties," "Permissions," or "Attributes" (usually by right-clicking on the file or folder to be modified). A checkbox often allows you to apply the permissions to all subdirectories and files in the folder, in recursive mode.
Once you have checked the permissions you want, validate them, and the rights will be modified, except for those you do not have permission to modify, or rather, that the user under which you are logged in does not have the right to modify.
Learn more
When we talk about changing permissions, it usually involves using a command like "chmod 777", "chmod 666", or something similar. This involves three digits, where:
- the first corresponds to the owner's permissions
- the second corresponds to the group's rights
- the third number corresponds to the rights of other users.
And the permissions are broken down as follows:
- "4" for read permission
- "2" for write permission
- "1" for execute permission
You simply need to add these numbers together. For example, if you want all rights for the owner but no rights for others, you would use "chmod 700" (4 + 2 + 1 = 7). If you only want read and write permissions for everyone (4 + 2 = 6), you would use "chmod 666".
These values are known to all good FTP software/clients, so you will be able to directly enter the number in your software/client to change the permissions.
To change the permissions on files or directories in PHP, you can also do so using the “chmod” function, as in the following example:
chmod ("/a_folder/a_file", 0755)Note that the value to be applied must be in octal format, hence the mandatory leading zero. Be careful if you store the value in a variable, as you will encounter a data type issue, which you can circumvent using the octdec() function, as in the following example:
$mode = 0755;chmod("a_folder/a_file", octdec($mode))Link to this FAQ: https://faq.infomaniak.com/111
Has this FAQ been helpful?
This guide covers installing PHP extensions on Infomaniak Web Hosting.
Using PHP Zend Extensions
Attention:
- Zend Guard Loader is a PHP extension that allows you to run PHP scripts encrypted via Zend Guard.
- Zend Guard Loader is installed by default for PHP <= 5.6 on all web hosting plans and is not available for PHP versions >= 5.6.
- Since PHP 5.3.x, the Zend Optimizer module has been replaced by ZendGuardLoader.
- The ZendOPCache extension requires a Cloud Server configured with PHP 5.5 or later.
Link to this FAQ: https://faq.infomaniak.com/130
Has this FAQ been helpful?
This guide explains how to enable the following functions on Web Hosting (in italics, Cloud Server only):
proc_openpopenexec()shell_exec()set_time_limitpassthrusystem
These functions are disabled by default because they pose a significant security risk if a website is hacked. Only enable them if absolutely necessary (for a script or CMS such as ImageMagick, Typo3, CraftCMS, etc.).
Enable PHP functions
To access website management:
- Click here to access the hosting & website management section in your Infomaniak Manager (❓: help).
- Click on the name of the website in question.
- Click on Manage advanced settings:
- Click on the PHP / Apache tab:
- Click on the On/Off toggle buttons as desired:
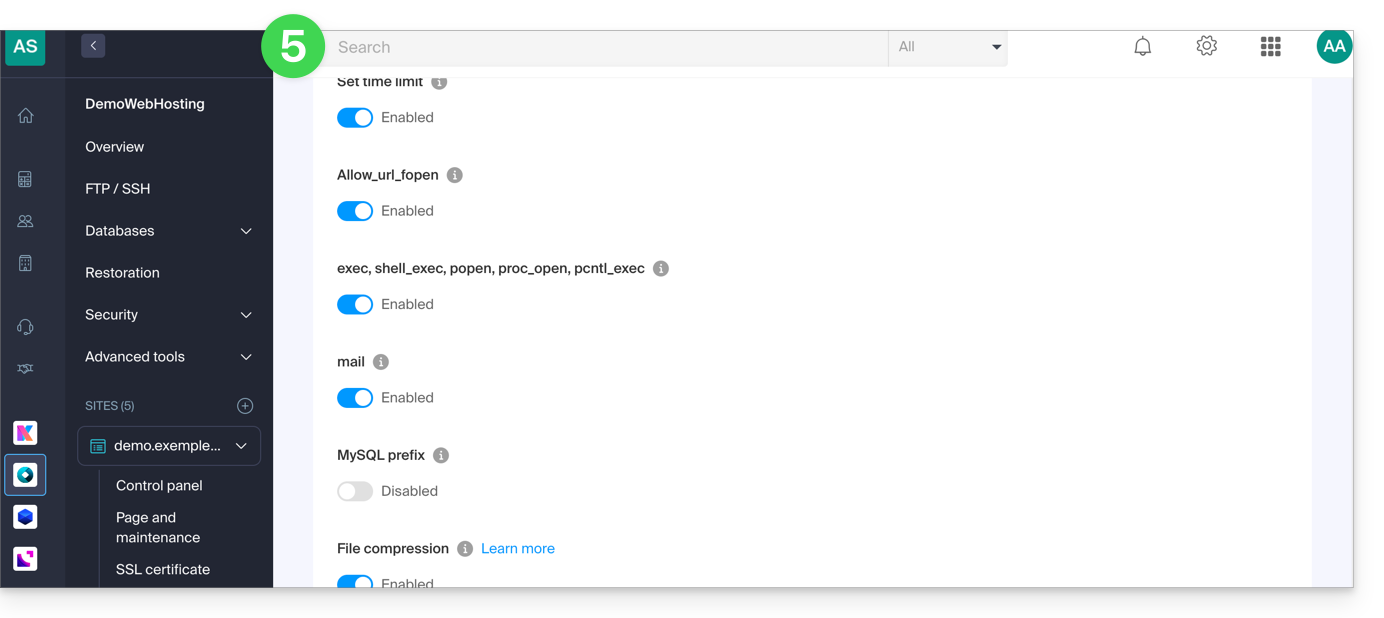
- Click the Save button at the bottom of the page to apply the changes.
Link to this FAQ: https://faq.infomaniak.com/173
Has this FAQ been helpful?
This guide explains how to access InnoDB at Infomaniak.
Using the MySQL InnoDB storage engine
As soon as your Infomaniak hosting gives you access to MySQL / MariaDB databases, InnoDB is also available (previously MyISAM).
InnoDB offers advanced features such as ACID transactions, row-level locking, full-text indexes, etc. You can take advantage of these features by using appropriate SQL statements in your queries.
Link to this FAQ: https://faq.infomaniak.com/176
Has this FAQ been helpful?
This guide explains the principle of URL rewriting and shows how to use it on an Infomaniak Web Hosting service using a .htaccess file.
Introduction
- URL rewriting allows you to present more readable and explicit addresses, for example by replacing a URL such as
index.php?id=123with/article/123/. - Clear URLs make it easier for visitors to navigate and can help improve natural search engine optimization (
SEO) by highlighting the content of the page. - This technique also makes it possible to hide certain technical details of the application, such as file extensions or the use of parameters in the URL, without changing the way the site works.
Example of URL rewriting
The following example transforms a URL such as article.php?id=25&cat=4 into a more readable URL in the form /article/25/4/.
Add the following rules to the .htaccess file located in the root directory of your site:
# Disable directory listing and allow symbolic links owned by the same user
Options -Indexes +SymLinksIfOwnerMatch

# Enable the rewrite engine
RewriteEngine On

# Set the rewrite base if your site is installed in a subdirectory
# RewriteBase /admin/

# Rewrite rule
RewriteRule ^article/([0-9]+)/([0-9]+)/?$ article.php?id=$1&cat=$2 [L,QSA]
The options used in this rule have the following meaning:
L(Last): indicates that no other rewrite rule should be applied if this one matches.QSA(Query String Append): preserves any additional parameters that may already be present in the URL.
Important: Creating these rules does not automatically update the links on your website. You must update your internal links so that they use the new URL format.
Redirect to a primary domain
If multiple domain names point to the same website, it is recommended to redirect all secondary domains to a primary domain. This practice avoids duplicate content and allows search engines to index only one version of your website.
Example of a permanent redirect to a primary domain using HTTPS:
RewriteEngine On

RewriteCond %{HTTP_HOST} ^domaine-secondaire\.xyz$ [NC,OR]
RewriteCond %{HTTP_HOST} ^www\.domaine-secondaire\.xyz$ [NC]

RewriteRule ^(.*)$ https://www.mon-domaine-principal.com/$1 [R=301,L]
The R=301 option indicates that this is a permanent redirect. Browsers and search engines are thus informed that the content is now accessible at this new address.
Link to this FAQ: https://faq.infomaniak.com/206
Has this FAQ been helpful?
This guide details the Rejected, too many connections from this host error if it occurs when visiting a website.
Cause of the error
429 Too Many Requests
This error occurs when the server is overwhelmed by a large number of requests in a short period of time, which may be due to heavy site usage or abuse.
503 Service Temporarily Unavailable
This error may be caused by several factors, including planned server maintenance, server overload due to high traffic, or the execution of a script that exceeds the server's resource limits.
Rejected, too many connections from this host
This error occurs when the server rejects connections due to the high number of simultaneous connections from the same IP address. Consult the "Access and Error Logs" on your hosting dashboard to find multiple entries in the following format:
[Fri Sep 02 11:40:31] [error] [client 222.111.123.123] Rejected, too many connections from this host. (vhost:domain.xyz uri:/js/modules/blocktopmenu/js/superfish-modified.js current:34 limit:30

[Fri Sep 02 11:40:31] [error] [client 222.111.123.123] Rejected, too many connections from this host. (vhost:domain.xyz uri:/js/modules/blocktopmenu/js/hoverIntent.js current:34 limit:30

[Fri Sep 02 11:40:31] [error] [client 222.111.123.123] Rejected, too many connections from this host. (vhost:domain.xyz uri:/js/modules/productscategory/productscategory.js current:34 limit:30

[Fri Sep 02 11:40:31] [error] [client 222.111.123.123] Rejected, too many connections from this host. (vhost:domain.xyz uri:/modules/feeder/rss.php current:35 limit:30

[Fri Sep 02 11:40:31] [error] [client 222.111.123.123] Rejected, too many connections from this host. (vhost:domain.xyz uri:/js/modules/favoriteproducts/favoriteproducts.js current:34 limit:30
In this example, the IP address 222.111.123.123 is making 30 simultaneous connections to each page, and is therefore automatically rejected, as this may resemble an attack or scan.
Possible solutions
Here are some possible solutions to resolve these errors:
- Check the scripts that make multiple connections to the server to display data.
- Optimize the script(s) in question so that they require fewer resources.
- Increase the limits for the website in question to allow the script to perform all necessary operations and/or limit the number of simultaneous connections (especially on a Cloud Server where the limits – RAM, execution time, simultaneous connections – can be significantly increased).
- Migrate your hosting to a Cloud Server.
Link to this FAQ: https://faq.infomaniak.com/231
Has this FAQ been helpful?
This guide explains how to block access to certain directories of a Web Hosting service for specific visitors, bots, or crawlers by filtering and blocking their IP addresses or hostnames.
Setting up .htaccess rules
Create a .htaccess file in the root directory of your website and add the rules to block specific IP addresses or bots.
For block visitors based, for example, on the beginning of their IP address, use the "deny from" directive:
Order Deny,Allow
Deny from 123.456.
Allow from all
This means that all requests originating from an IP address starting with "123.456." will be denied, while all other requests will be allowed. Blocked users will receive an HTTP 403 Forbidden error message.
Block a specific IP address
Order Allow,Deny
Deny from 123.456.789
Allow from all
This means that only one IP address, 123.456.789, is blocked, and all other IP addresses can access the site.
Block multiple IP addresses
Order Allow,Deny
Deny from 123.456.789
Deny from 987.654.321
Allow from all
This means that two IP addresses, 123.456.789 and 987.654.321, are blocked, and all other IP addresses can access the site.
Block a bot by its user-agent
SetEnvIfNoCase User-Agent "BadBot" BadBot
Order Allow,Deny
Deny from env=BadBot
Allow from all
This means that any bot identified with a user-agent of "BadBot" will be blocked, while all other users can access the site.
Block access to a specific folder
Order Allow,Deny
Deny from all
This means that all access to the "/folder" directory will be blocked, regardless of the IP address or user-agent. An assistant for a similar feature is available in your Infomaniak Manager.
mod_rewrite Directives
You can also use the mod_rewrite directive to block certain IP addresses or bots in a .htaccess file.
The mod_rewrite directive can affect the performance of your website if used excessively or incorrectly. It is therefore recommended to exercise caution when modifying your .htaccess file.
Here are some examples:
Block a specific IP address
RewriteEngine on
RewriteCond %{REMOTE_ADDR} ^123\.456\.789\.
RewriteRule ^(.*)$ - [F,L]
This means that only one IP address, 123.456.789, is blocked, and all other IP addresses can access the site.
Block multiple IP addresses
RewriteEngine on
RewriteCond %{REMOTE_ADDR} ^123\.456\.789\. [OR]
RewriteCond %{REMOTE_ADDR} ^987\.654\.321\.
RewriteRule ^(.*)$ - [F,L]
This means that two IP addresses, 123.456.789 and 987.654.321, are blocked, and all other IP addresses can access the site.
Block a bot by its user-agent
RewriteEngine on
RewriteCond %{HTTP_USER_AGENT} BadBot [NC]
RewriteRule ^(.*)$ - [F,L]
This means that any bot identified with a user-agent of "BadBot" will be blocked, while all other users can access the site. This can be useful to prevent unwanted bots from accessing certain pages or from consuming resources unnecessarily.
Block access to a specific folder
RewriteEngine on
RewriteRule ^dossier/secret - [F,L]
This means that all access to the "/dossier/secret" folder will be blocked, regardless of the IP address or user-agent.
Block and redirect elsewhere
RewriteEngine On
RewriteCond %{REMOTE_ADDR} ^123\.456\.789\.
RewriteRule ^(.*)$ http://www.domain.xyz/blocked.html [L,R=301]
This means that all requests coming from the IP address 123.456.789 will be redirected to the "blocked.html" page on the "www.domain.xyz" website. The last part of the RewriteRule, [L,R=301] line indicates that the redirection is permanent (R=301) and that this is the last rule to be applied (L).
You can add multiple RewriteCond conditions to block different IP addresses and redirect them to different pages.
You may also find this other guide helpful: this other guide.
Link to this FAQ: https://faq.infomaniak.com/232
Has this FAQ been helpful?
This guide explains how to restore backups of previous versions of your files and other web data from your Infomaniak web hosting, and how to set up an effective backup policy if the backups provided automatically and free of charge no longer meet your availability or security requirements.
Web Hosting (Starter, Shared, Cloud Server)
Consult these guides to restore automatic backups:
- of an entire hosting account (FTP + MySQL),
- of specific files on the hosting,
- of specific databases,
- a Web Application (WordPress & Apps),
- Cloud Server SSH crons.
Consult these guides for backing up and restoring:
- a hosting solution with Swiss Backup and Restic (advanced),
- WordPress with Swiss Backup,
- WordPress with an extension.
Please also refer to https://faq.infomaniak.com/snapshot.
Email / kSuite
- Restore messages from Infomaniak's automatic backups.
- Restore contacts or calendar events.
- Back up the current content of a mail account:
- by downloading the current content locally,
- by duplicating all the current content to a backup mailbox,
- by copying future emails as they arrive to a backup mailbox.
Domains / DNS Zones
- Restore deleted DNS records from Infomaniak's automatic backups.
- Restore an expired domain during the redemption period.
Link to this FAQ: https://faq.infomaniak.com/250
Has this FAQ been helpful?
This guide helps you set up the Access-Control-Allow-Origin header, an HTTP header that specifies which origin (domain, protocol, and port) can access resources on a server. This header is used to control cross-origin (CORS) access from a web application.
List of authorized domains
You can add the origin of a request to the list of domains authorized to access the server's resources by adding it to the values of the Access-Control-Allow-Origin header.
To allow, for example, the site https://domain.xyz to access resources using CORS, the header should be as follows:
Access-Control-Allow-Origin: {{URL_1}}You can configure it using the header() function in PHP, and you can refer to this guide for more information.
If you need this header to be applied everywhere, you can use an auto-prepend.
Link to this FAQ: https://faq.infomaniak.com/256
Has this FAQ been helpful?
This guide helps you understand the different HTTP status codes.
1xx - Informational
Error 100: OK to continue
The server has received the request headers and the client can continue sending the request body.
Error 101: The server has switched protocols
The server accepts changing the communication protocol as requested by the client.
2xx - Success
Error 200: Request successful
The request was successfully processed by the server.
Error 201: Document created (reason: new URI)
The request was successful and resulted in the creation of a new resource.
Error 202: Request completed asynchronously (TBS)
The request has been accepted, but processing is not yet complete.
Error 203: Request completed incompletely
The server has successfully processed the request, but the information returned comes from a third-party source.
Error 204: No information to return
The request was processed successfully, but there is no content to return.
Error 205: Request completed but form is empty
The server processed the request successfully and asks the client to reset the document that submitted the request.
Error 206: Incomplete GET request
The server only returns a portion of the data, as requested by the client with the Range header.
3xx - Redirections
Error 300: The server cannot determine the return code
The request has multiple possible responses, and the server cannot automatically choose one of them.
Error 301: Document permanently moved
The requested resource has been permanently moved to a new URL.
Error 302: Document temporarily moved
The requested resource is temporarily located at a different URL.
Error 303: Redirection with new access method
The response to the request can be found at a different URL using a GET method.
Error 304: The 'If-Modified-Since' field was not modified
The resource has not been modified since the last request. No new data will be returned.
Error 305: Redirect to a proxy specified by the header
The requested resource must be accessed through a specified proxy.
Error 307: Temporary Redirect
The requested resource is temporarily located under a different URL, but the client must use the same method to make the next request.
4xx - Client Errors
Error 400: Syntax error in the document address
The request is incorrect or malformed.
Error 401: No authorization to access the document
Access to the resource requires authentication.
Error 402: Access to the document requires payment
This code is reserved for future use regarding online payments. Services outside of Infomaniak use it in some cases to indicate a payment problem, but these uses are specific to these platforms – not a global standard.
Error 403: Access to the server is not authorized
The server understands the request but refuses to authorize it.
Error 404: The requested page does not exist
The server cannot find the requested resource.
Error 405: Form request method not allowed
The method specified in the request is not allowed for the target resource.
Error 406: Request not accepted by the server
The requested resource is unable to generate content acceptable according to the Accept headers sent in the request.
Error 407: Proxy authentication required
Access to the resource requires authentication through a proxy.
Error 408: Request timeout
The server did not receive the complete request within the allotted time.
Error 409: The user must resubmit with more information
The request could not be processed due to a conflict with the current state of the resource.
Error 410: This resource is no longer available
The requested resource is no longer available and has been permanently removed.
Error 411: The server refused the request because it has no length
The server refuses to process the request without a valid Content-Length header.
Error 412: The precondition given in the request failed
One of the conditions specified in the request headers failed.
Error 413: The request entity was too large
The server refuses to process the request because the size of the entity is too large.
Error 414: Request-URI Too Long
The server refuses to process the request because the URI is too long.
Error 415: Unsupported Media Type
The server refuses to process the request because the format of the request entity is not supported.
5xx - Server Errors
Error 500: Internal Server Error
The server encountered an unexpected condition that prevented it from fulfilling the request.
Error 501: Request made to the server is not supported
The server does not support the functionality required to process the request.
Error 502: Bad gateway
The server, acting as a gateway or proxy, received an invalid response from the upstream server.
Error 503: Service unavailable
The server is currently unavailable (overload or maintenance).
Error 504: Gateway timeout
The server, acting as a gateway or proxy, did not receive a timely response from the upstream server.
Error 505: HTTP version not supported
The server does not support the HTTP protocol version used in the request.
Link to this FAQ: https://faq.infomaniak.com/257
Has this FAQ been helpful?
This guide concerns the names of the home pages that you can have on your Infomaniak Web Hosting, and which will be prioritized when a visitor accesses your website via its domain name.
Regarding Site Creator, please refer to this other guide.
Introduction
- Default home pages on a web server are the first pages that appear when a user accesses a website without specifying a particular file.
- If you simply enter
http://domain.xyzin your browser's address bar, the web server will look for a default homepage to display, such asindex.html,index.php,index.htm, or other similar variations.
Homepage Priority Order
The following pages are loaded by default at Infomaniak, in order of priority:
- index.html
- index.htm
- home.html
- home.htm
- default.html
- default.htm
- index.cgi
- index.php
- index.php5
- index.php4
- index.php3
- default.php
- home.php
- welcome.php
In summary:
- If you have 2 pages in the root directory of your hosting account, based on the ranking above, you will see that
index.phpis recognized as the priority page overwelcome.php. - You can also conclude that if you only have
welcome.phpas a page in the root directory, it will be loaded and function as the homepage. - If you have a
home.htmlpage, it will not work because this name is not in the list. - When you type
www.domain.xyzin the browser, onlyindex.phpwill be displayed automatically (and to displaywelcome.php, you will need to type the exact page namewww.domain.xyz/welcome.php).
Customize the default homepage
To set a different homepage to be loaded by default, add DirectoryIndex followed by the appropriate pages in the .htaccess file:
DirectoryIndex accueil.html index.php index.htmlThis means that the web server will first look for a file named accueil.html. If it doesn't find accueil.php, it will then look for index.php, and finally index.html.
Link to this FAQ: https://faq.infomaniak.com/261
Has this FAQ been helpful?
This guide details the "Database connection error: could not connect to mysql" error that may occur when making changes to an Infomaniak hosting environment on which the Joomla web application is installed.
Introduction
- To get the site working again, you need to check and update certain information in the
configuration.phpfile of Joomla:- The database name — this is often a prefix that has been added to the existing database name and username (for example,
dbnamebefore,abcd_dbnameafter). - The host server of the database (for example,
mysql.domain.xyzbefore,abcd.myd.infomaniak.comafter). - The username that accesses the database (for example,
dbuserbefore,abcd_dbuserafter). - The path to two directories,
/tmpand/logs.
- The database name — this is often a prefix that has been added to the existing database name and username (for example,
Get the updated information
For points 1, 2 and 3 of the preamble above:
- Click here to access the hosting & website management section in your Infomaniak Manager (❓: help).
- Click on the name of the relevant hosting.
- Click on Database in the left-hand menu.
- Find and save your current MySQL information (❓: help).
Regarding point 4 in the introduction above:
- Click here to access the hosting & website management section in your Infomaniak Manager (❓: help).
- Click on the name of the website in question.
- Click on Manage advanced settings:
- Click on the PHP / Apache tab:
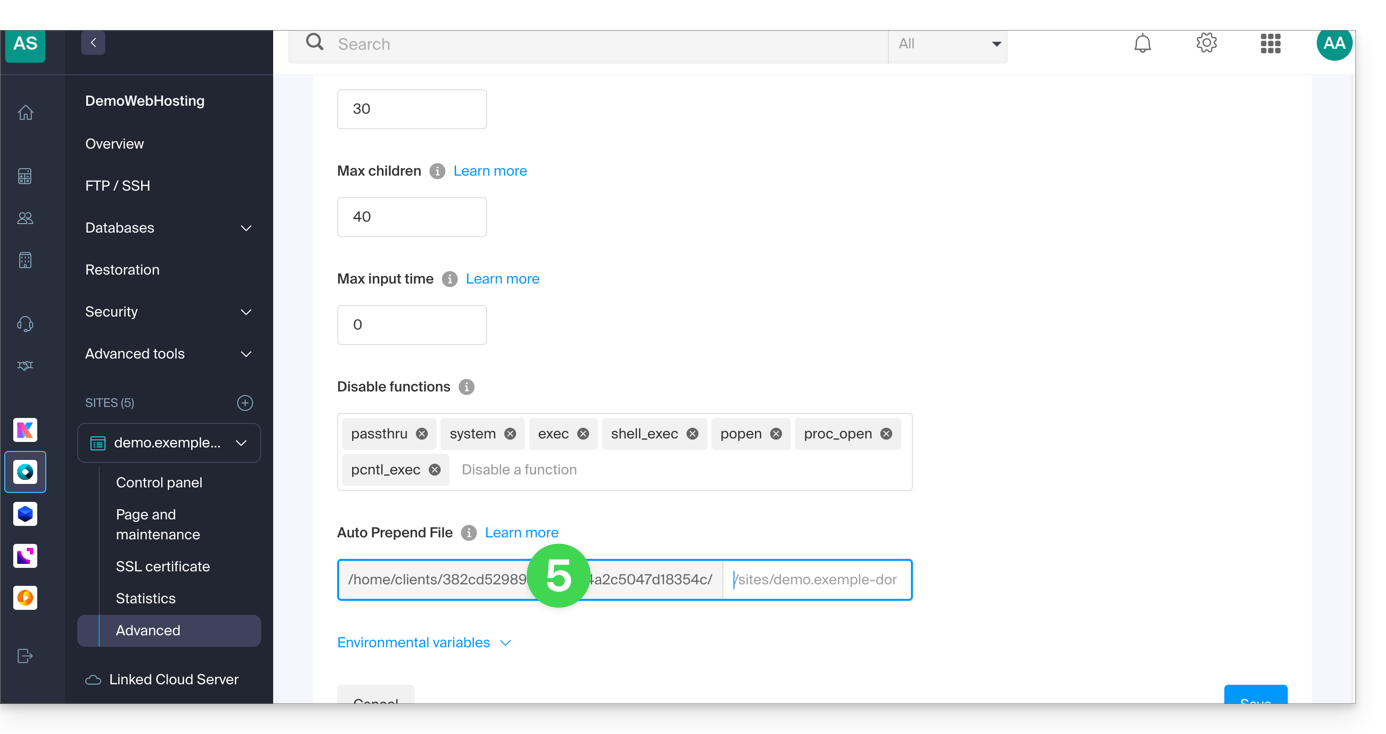
- Copy the path displayed in the first field under Auto Prepend File at the bottom:
Modify the configuration.php file for Joomla
Prerequisites
Then, edit the configuration.php file, which is located in the root directory of your Joomla:
- Replace the old log and tmp paths with the new path:
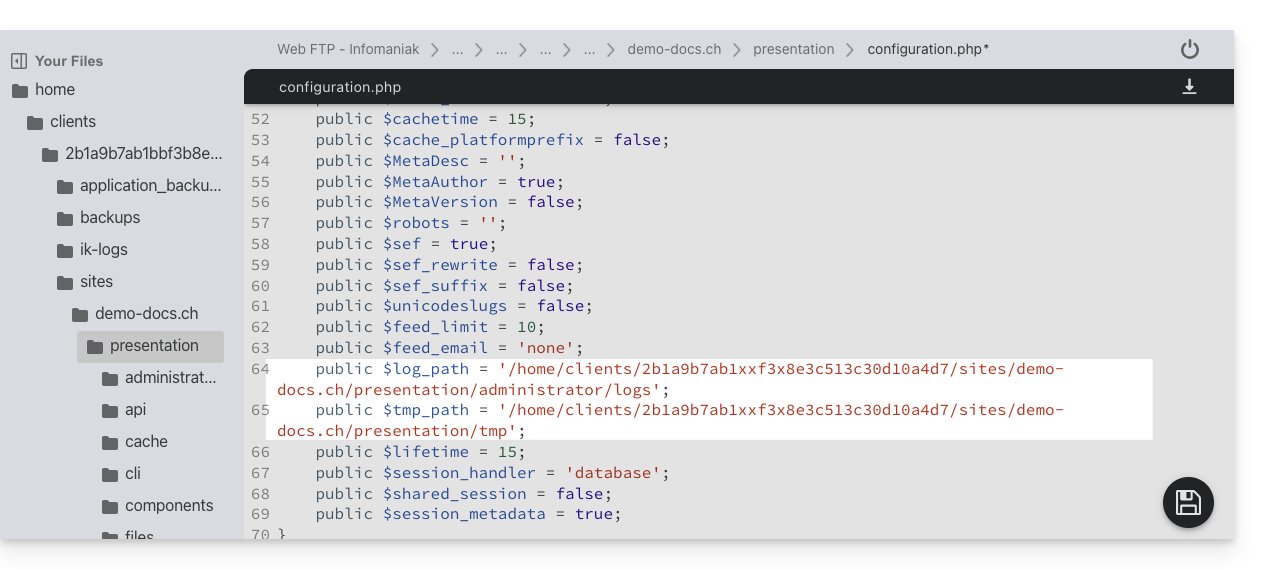
- Find the relevant paragraphs for the remaining information from the introduction above:

- Save the file; your Joomla will now connect to the correct database.
Check the changes made
In the Joomla interface, you can check the paths of the /logs and /tmp folders:
- For the
/logsfolder: go to System / Configuration then Logs: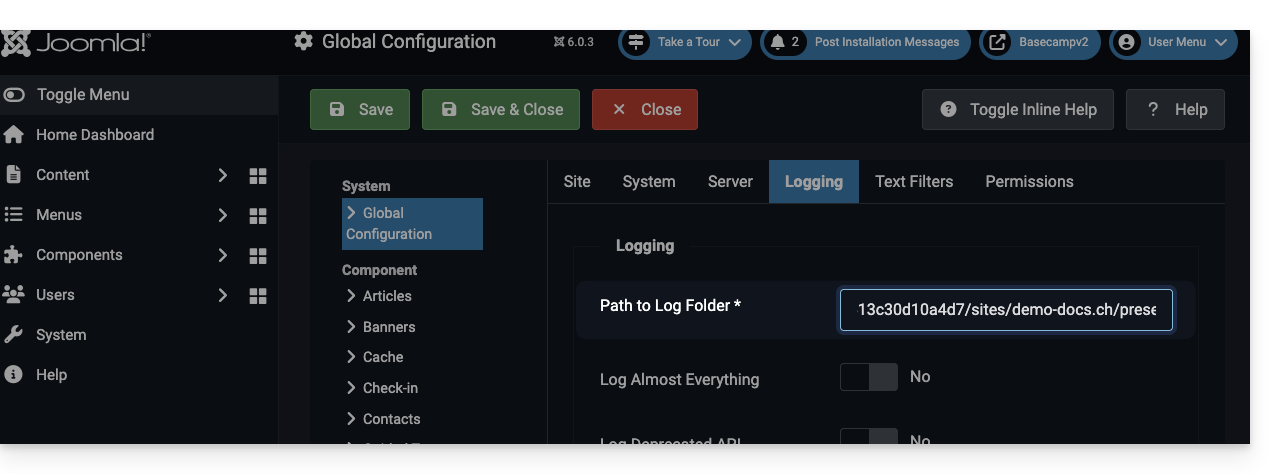
- For the
/tmpfolder: go to System / Configuration, then Server: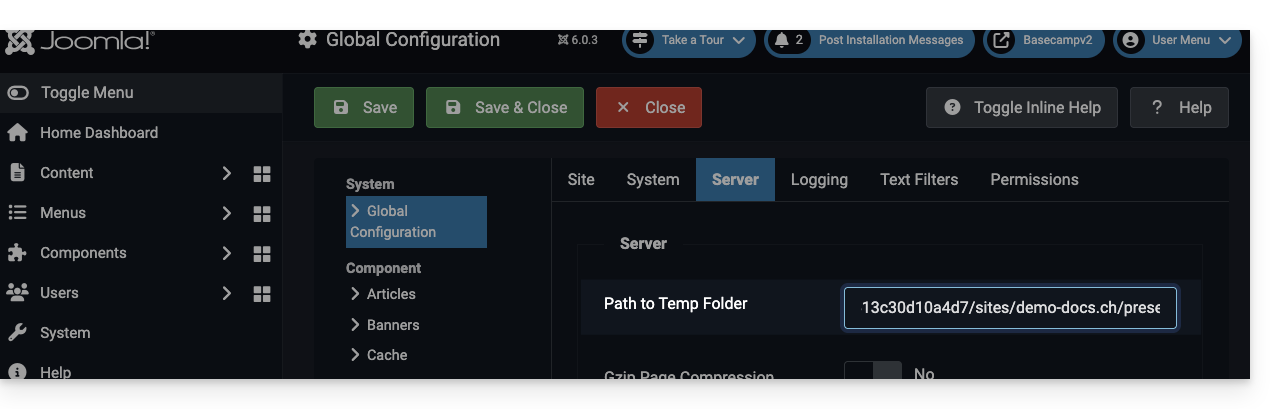
Link to this FAQ: https://faq.infomaniak.com/272
Has this FAQ been helpful?
This guide concerns IonCube Loader, a PHP module that allows you to decode PHP scripts that have been encoded with IonCube Encoder.
Introduction
- IonCube encoding is used to protect the source code of an application and prevent its modification or illegal distribution.
- By using IonCube Loader, website owners can guarantee the security of their code and content while enabling secure and easy distribution of their applications.
Using ionCube Loader
With a shared hosting plan, it is no longer offered. You can check this from the dashboard:
- Click here to access the hosting & website management section in your Infomaniak Manager (❓: help).
- Click on the name of the website in question.
- Click on Manage advanced settings:
- Click on the PHP Extensions tab.
- Click on ionCube Loader (if present in the list) to view the details:
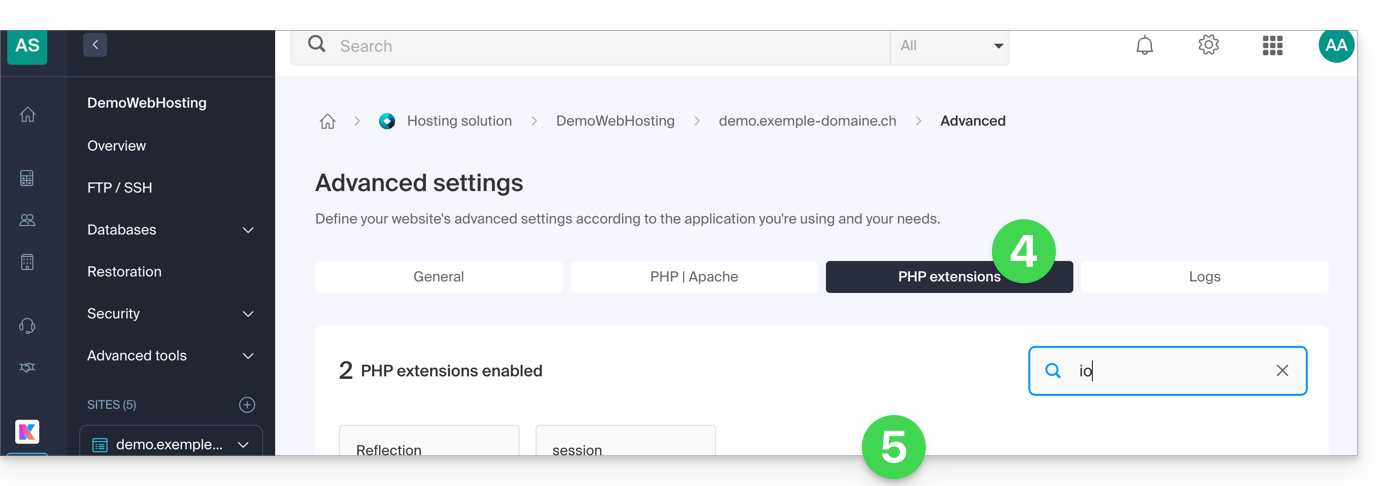
- In this case, you should consider a Cloud Server.
Link to this FAQ: https://faq.infomaniak.com/285
Has this FAQ been helpful?
When it comes to open-source software for handling multimedia files, FFmpeg is a powerful and flexible tool. It can be used to convert, edit, and stream videos and audio.
However, using FFmpeg on shared hosting presents certain challenges and limitations, both for users and hosting providers.
We recommend the Cloud Server offer for using FFmpeg.
You can also consider the Infomaniak VOD/AOD service.
Link to this FAQ: https://faq.infomaniak.com/286
Has this FAQ been helpful?
This guide explains how to perform secure and simplified file transfers between Web Hosting and/or Cloud Server.
Introduction
- FXP (File eXchange Protocol) is a method for transferring files directly between two FTP servers without the data passing through the local client.
- Using the FTP PORT and PASV commands, it allows establishing a connection between the two servers for faster and more efficient file transfer, thus saving bandwidth.
- This method may, however, pose security risks if the connections are not secured by FTPS, and it requires a more complex configuration compared to traditional FTP transfers (❓: help)
Transfer data between servers
FXP is enabled by default on Cloud Servers and Web Hosting (excluding Starter plans).
You can, for example, use CrossFTP, a multi-platform software that allows you to use FXP (as well as FTP, SFTP, S3, OpenStack Swift, etc.).
Link to this FAQ: https://faq.infomaniak.com/295
Has this FAQ been helpful?