Knowledge base
1000 FAQs, 500 tutorials and instructional videos. Here, there are only solutions!
This guide explains how to create a template for the automatic out-of-office message tool for all your email accounts in the Infomaniak Mail web app (online service ksuite.infomaniak.com/mail).
Introduction
- A template allows you to create the basic structure of a tool that can then be used by multiple users of the same Infomaniak Mail service, and even customized according to the person who will be using it.
- In the case of an auto-reply template, the template creator chooses the text that will be sent when a new sender contacts an address to which the template has been applied.
- You can also hide a template so that it is no longer used.
Create an out-of-office reply template
To create a template:
- Click here to access the management of your Mail Service in the Infomaniak Manager (need help?).
- Click directly on the name assigned to the Mail Service in question:
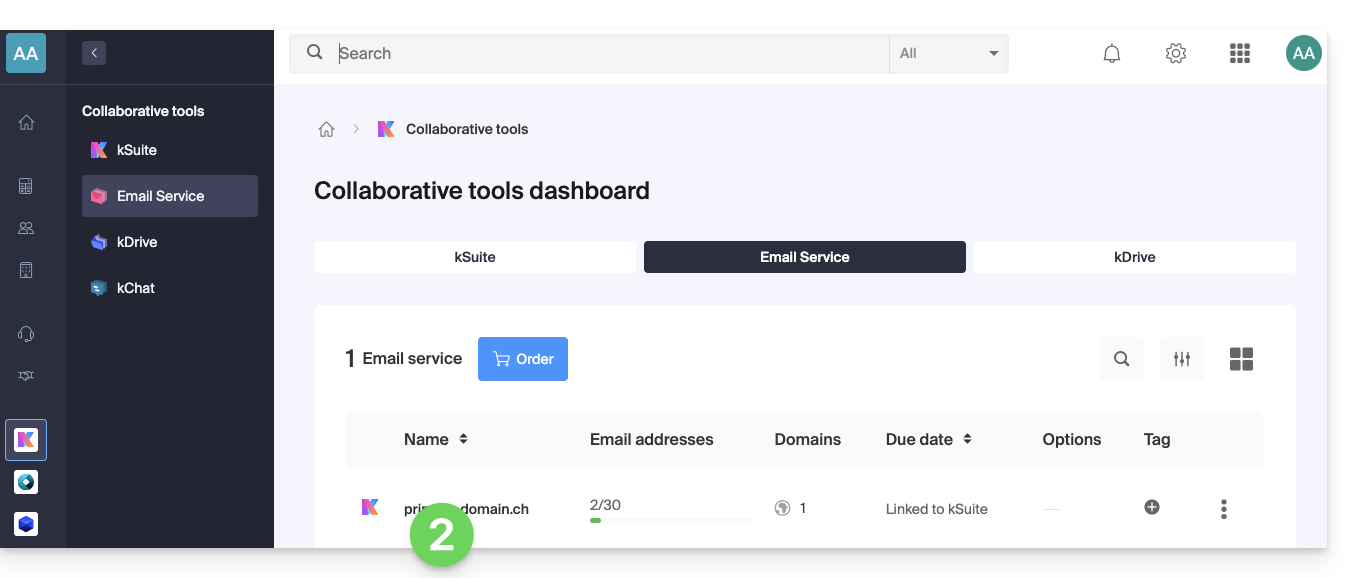
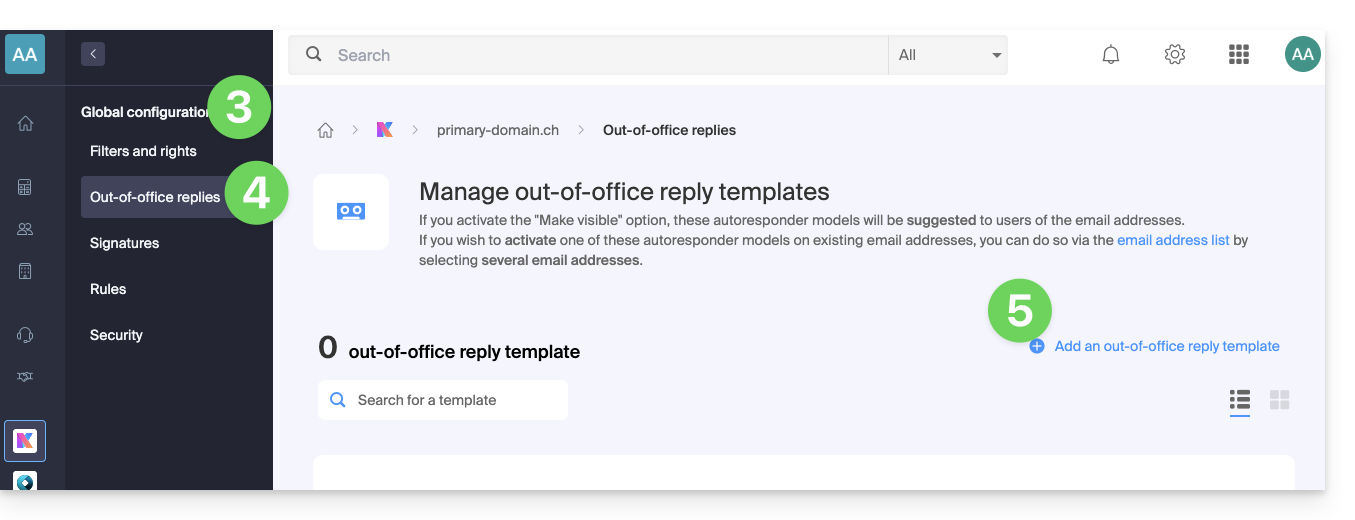
- Click on Global Configuration in the left-hand menu.
- Click on the Voicemail menu.
- Click on Add a voicemail template:
- Fill in the fields and click Add Out-of-Office Template:
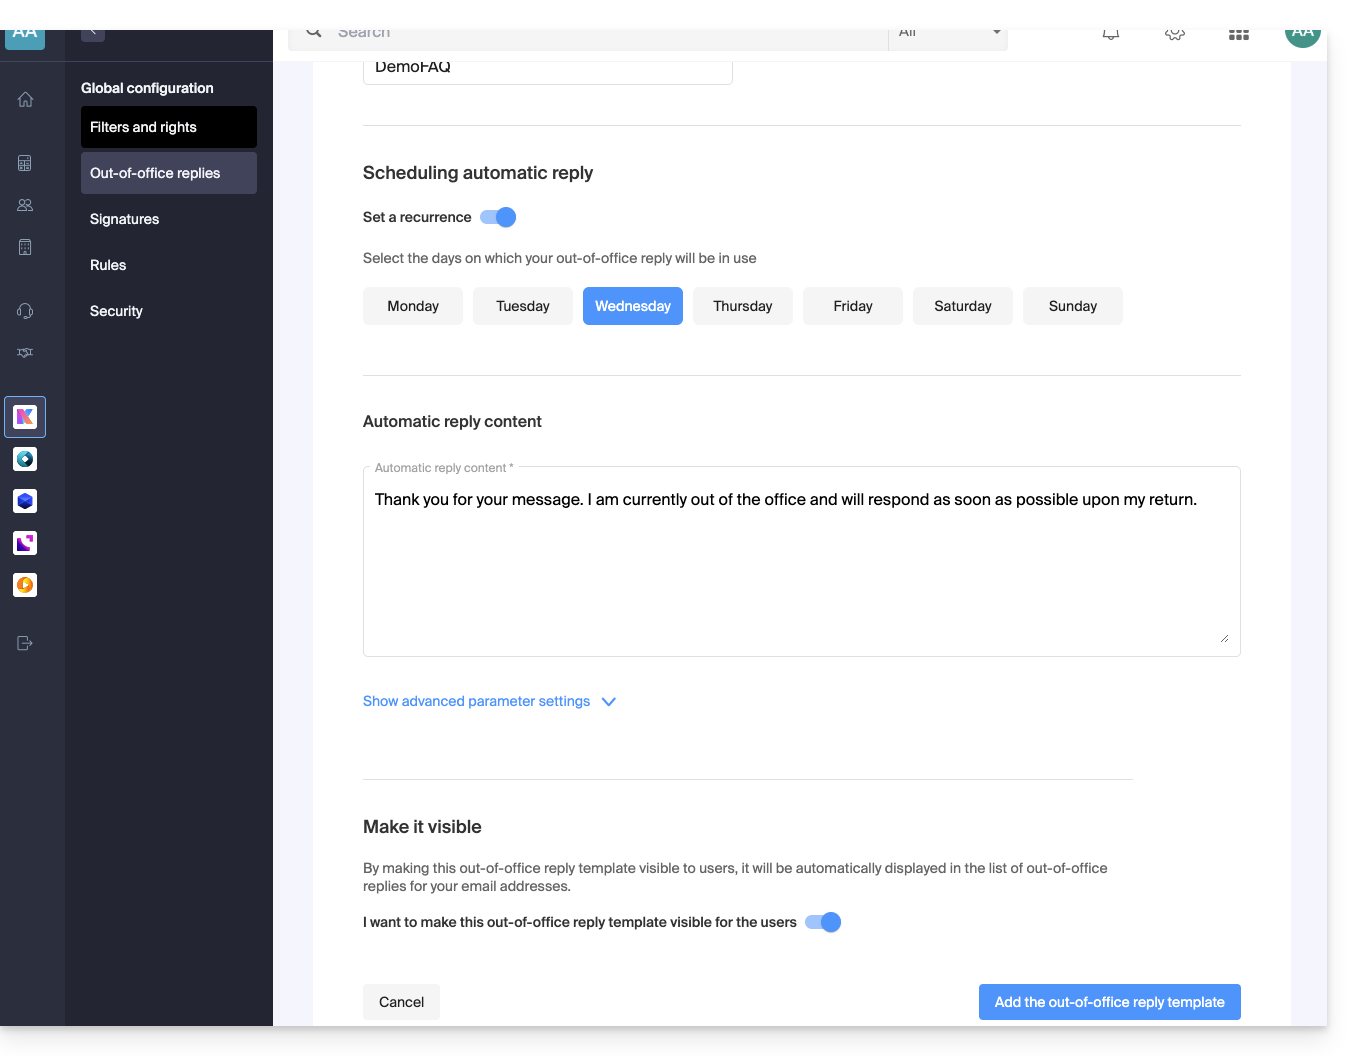
- If the Make visible option is enabled (during creation or can also be selected later), the created out-of-office templates will be suggested to users of the email addresses.
Activate a template on an existing email address
You need an existing template to activate it for one or more email addresses:
- Click here to access the management of your Mail Service in the Infomaniak Manager (need help?).
- Click directly on the name assigned to the Mail Service in question.
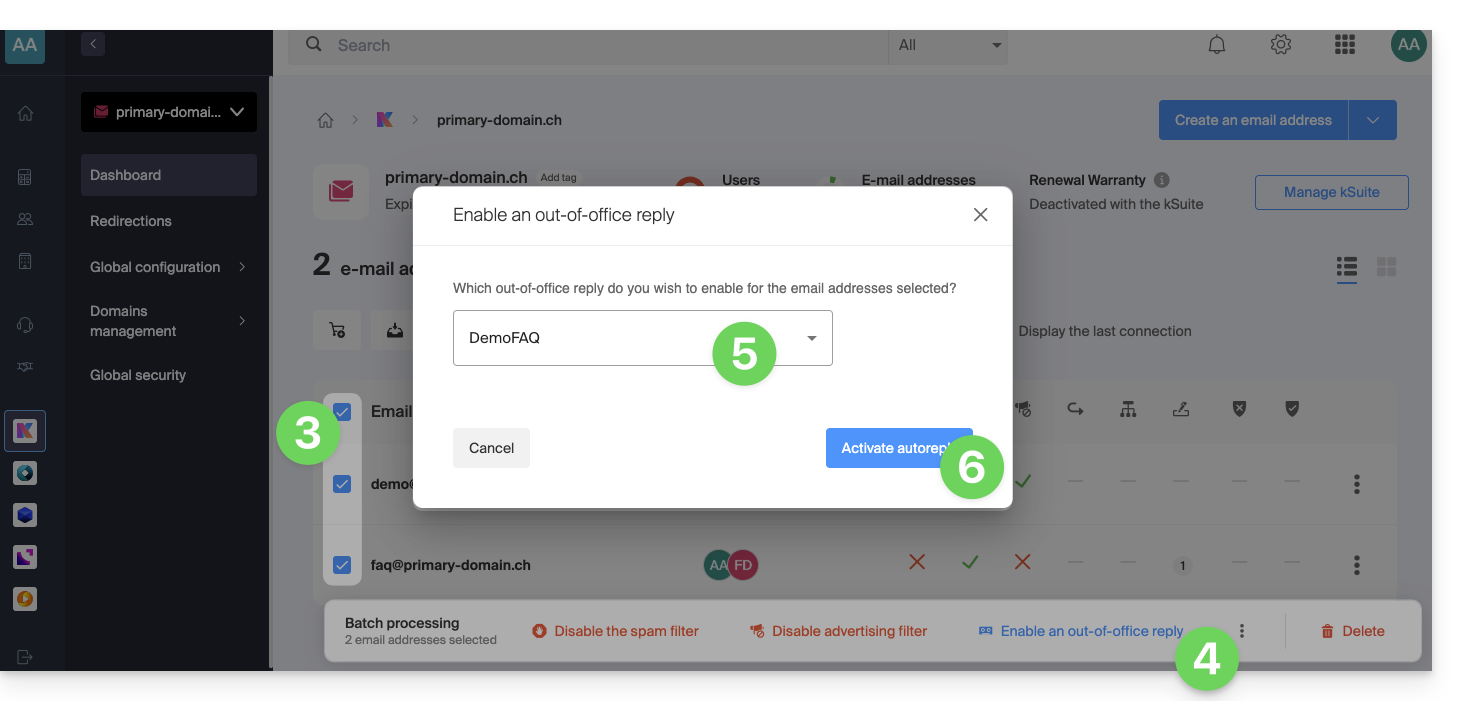
- Click on the boxes to select one or more email addresses in the table that appears.
- Depending on the screen size, first click on the action menu ⋮ or directly on Apply a voicemail template.
- Select the template of your choice.
- Only the templates that are visible are available when activated.
- Click on the Activate button:
Link to this FAQ: https://faq.infomaniak.com/2687
Has this FAQ been helpful?
This guide presents the Global Security tool, which allows you to verify that the relationships between a domain name and an Infomaniak Mail Service are optimal in terms of security. This involves checking the SPF / DKIM / DMARC records, and the Global Security tool allows you to adjust the configuration if necessary.
Any DNS addition or modification may take up to 48 hours to propagate.
Accessing the Global Security diagnostic tool
To access Global Security:
- Click here to access the management of your Mail Service in the Infomaniak Manager (need help?).
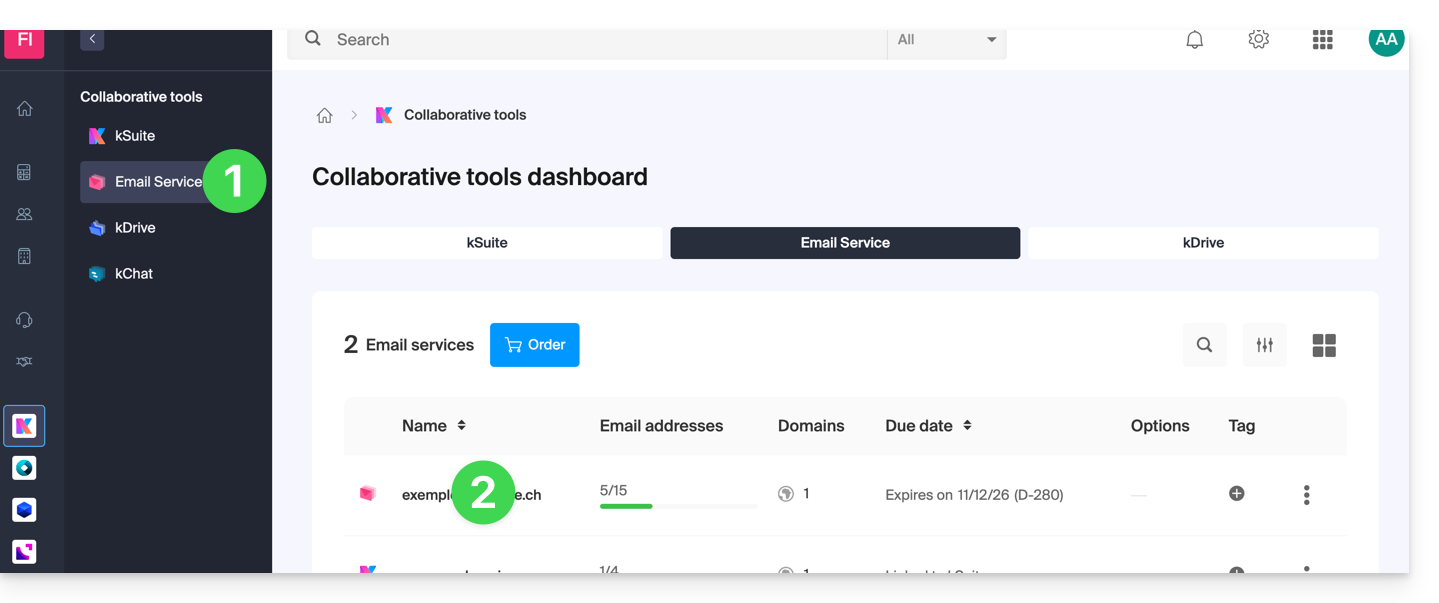
- Click directly on the name assigned to the Mail Service in question:
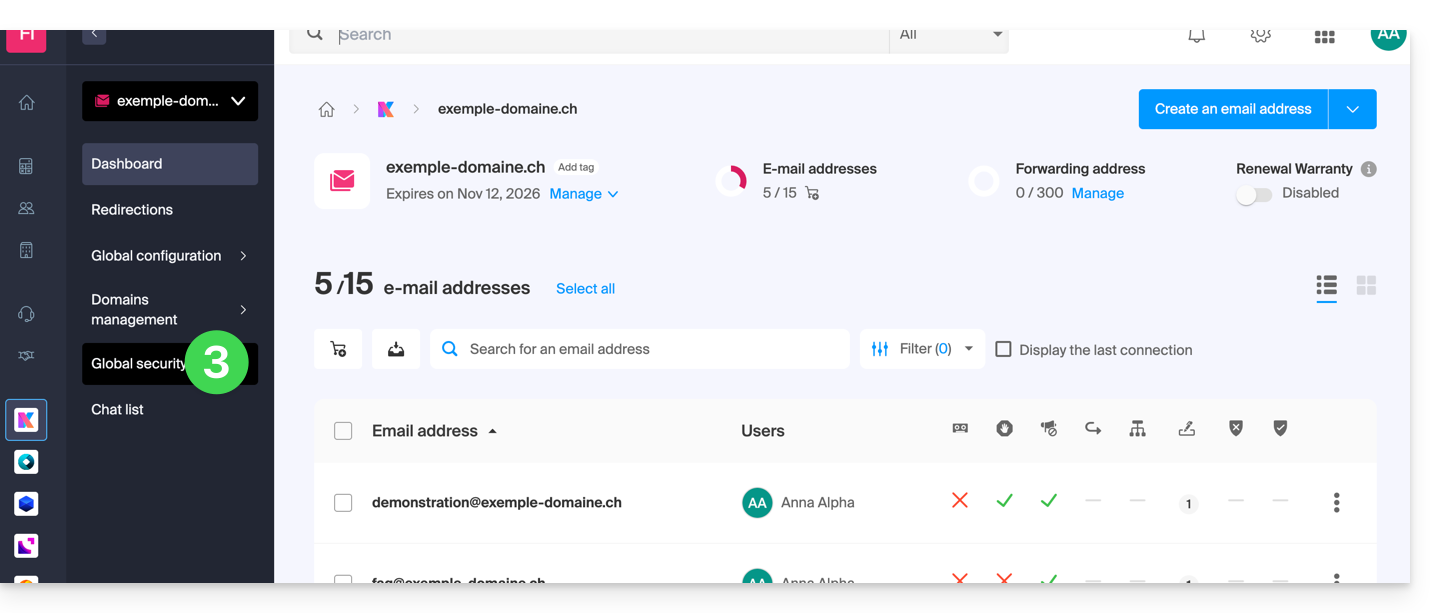
- Click on Global Security in the left-hand menu:
Check that the email service is working correctly
Once you are on the Global Security page, review and check the 3 security mechanisms inherent to emails: SPF, DKIM, and the DMARC policy. These settings should be displayed in green: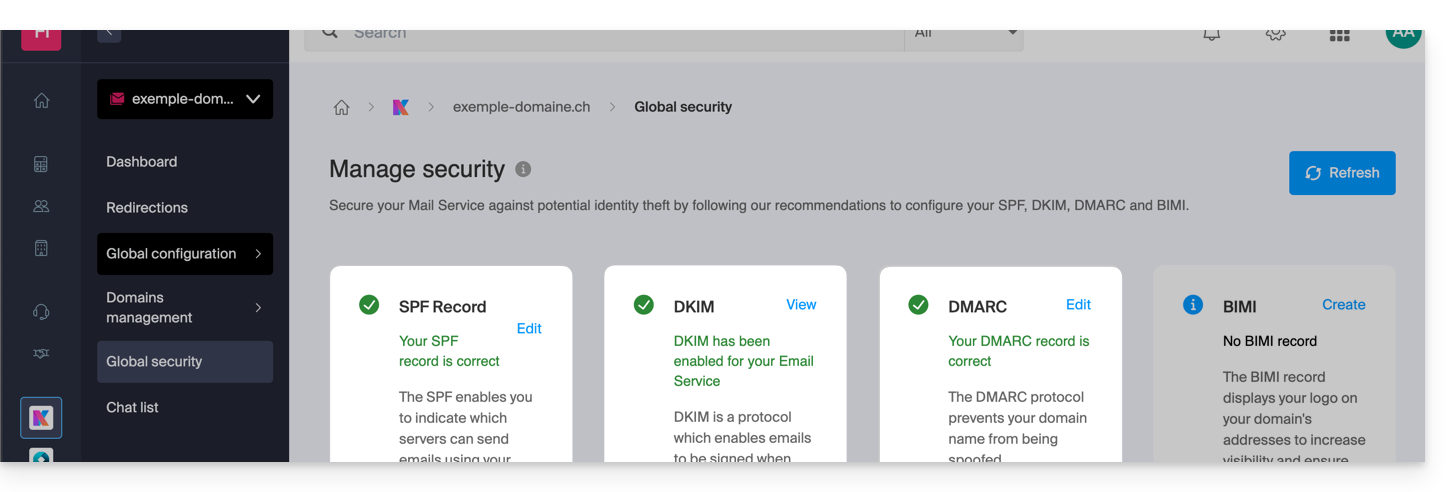
If this is not the case, it may explain why an email that is not spam is being treated as such.
Click on Edit or Create to configure SPF, DKIM, and DMARC according to the recommendations below to secure your Mail Service against potential identity theft:
SPF (Sender Policy Framework)
SPF (click here to configure) allows the owner of a domain name to specify which servers are authorized to send emails on behalf of that domain. This helps reduce the risk of spam and phishing, as the recipient's email server can verify whether the sender is authorized by consulting the DNS records of the sending domain: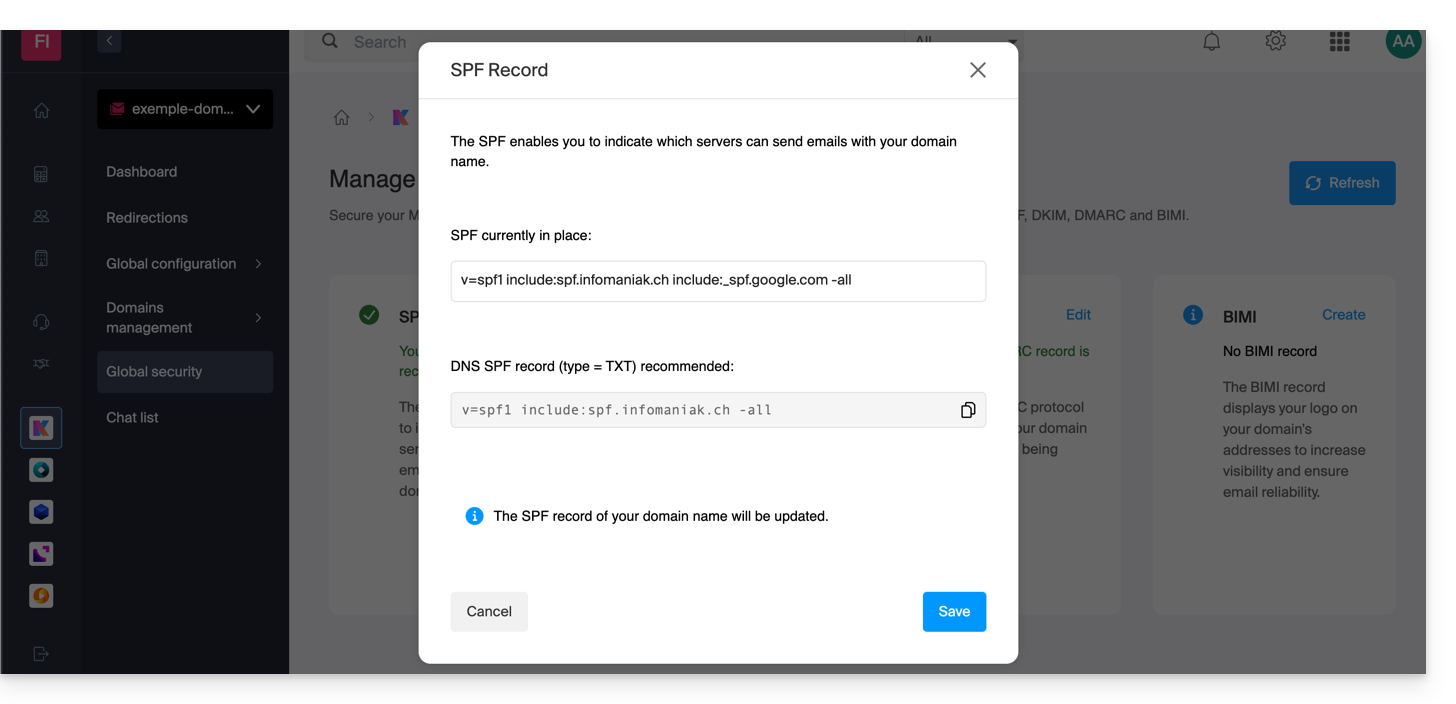
The analyses provided by the Global Security tool are only relevant if the domain name is hosted with Infomaniak and is configured to direct email traffic to Infomaniak.
Under these conditions, and if a problem is detected, you will find a Fix button that will allow you to automatically update your SPF record.
If fixing one or the other of the issues mentioned is not possible, it means that the fix must be made to the configuration set up by the owner or technician of the sender's domain name.
If your domain name points to Wix or another provider, the SPF record must be configured with the provider in question.
DKIM (Domain Keys Identified Mail)
DKIM (click here to configure) is a protocol that allows you to sign emails when they are sent.
When your domain name (or its DNS zone) is managed elsewhere, you will find the DKIM record to be added to the DNS zone in this section: Global Security > DKIM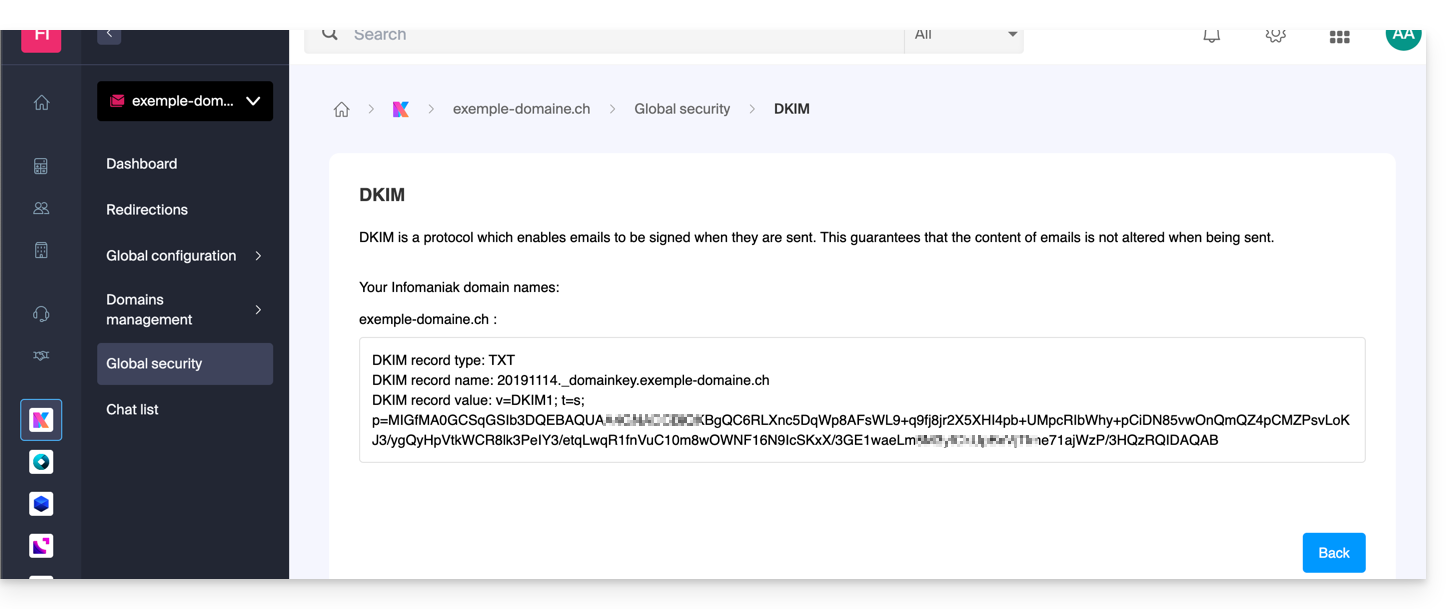
You can configure multiple DKIM records on your domain without any limit, unlike DMARC or SPF, which is crucial if you use multiple third-party email providers for your daily communications.
DMARC (Domain-based Message Authentication, Reporting, and Conformance)
DMARC (click here to configure) allows you to specify to other email servers (the email providers of the contacts to whom you send emails) the policy to follow in the event of receiving a "suspicious" email (not authenticated, for example) from your email server (hosted by Infomaniak). In addition, you can be notified of the "incident" by a summary message (called a "DMARC report") providing information on the recent activity of your email related to the domain name.
DMARC requires a valid SPF and DKIM. An assistant guides you through configuring DMARC according to Infomaniak's recommendations, either in simple mode or entirely to your liking in advanced mode (this expert mode allows you to enter the record of your choice):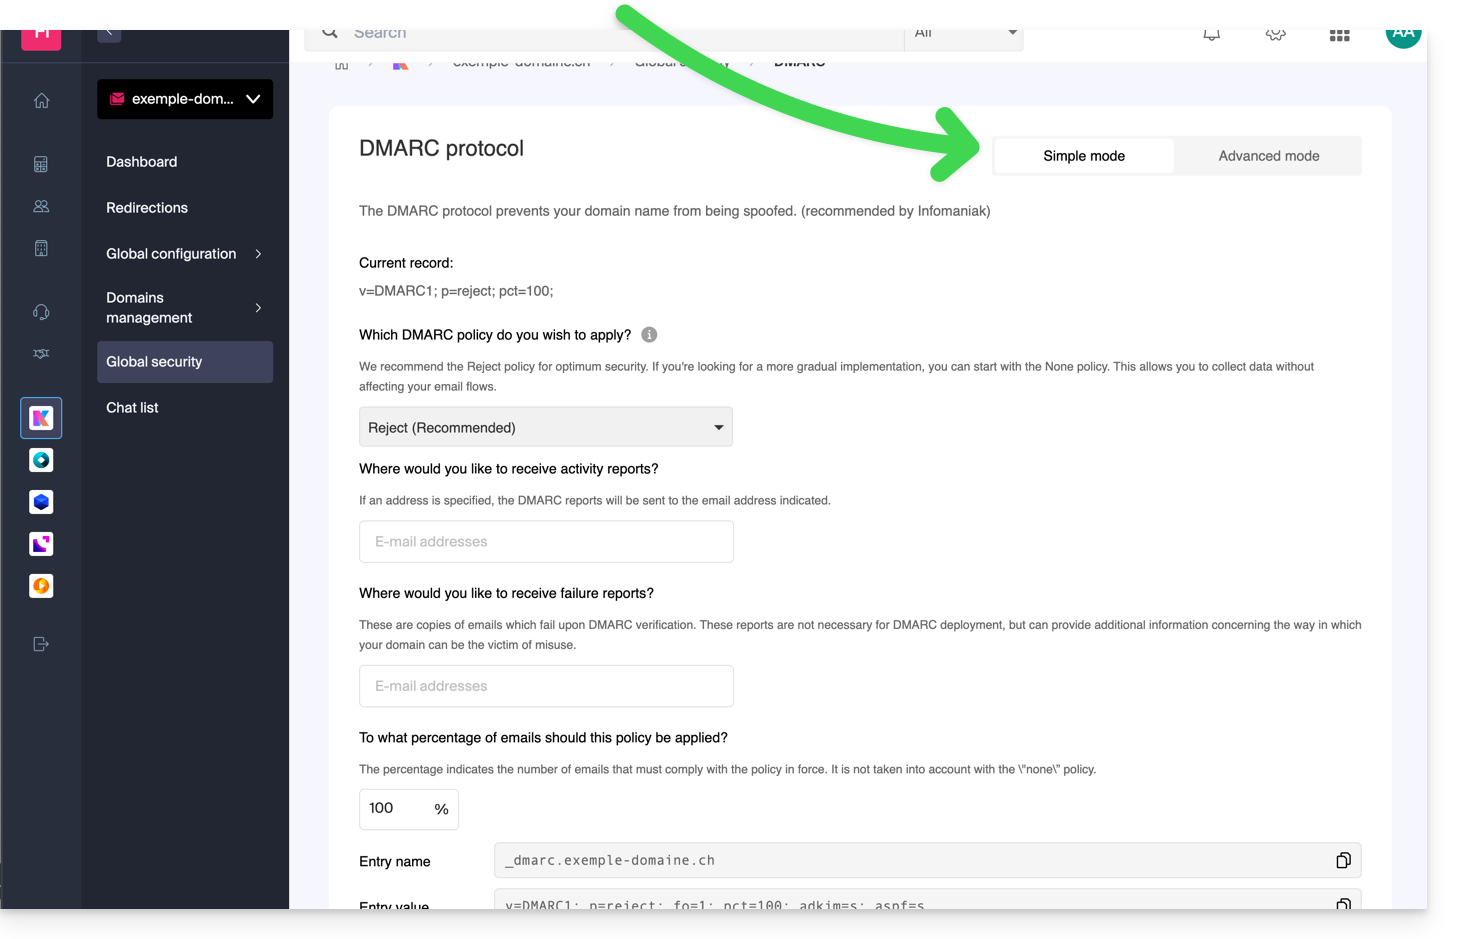 The corresponding entries (TXT type) will then be automatically applied to the DNS zone of the domain in question (if administratively possible - for example, if the domain is managed within the same Organization).
Infomaniak is unable toanalyze your DMARC reports and records,and will not be able to comment on their validity or compliance, as this is entirely your responsibility.
To check the records in your DNS, you can also use an external and free service like the one mentioned at the bottom of this other guide.
Refer to this other guide if you are looking for information on the fourth item on the Global Security page.
Link to this FAQ: https://faq.infomaniak.com/2692
Has this FAQ been helpful?
This guide explains how to transfer to Infomaniak email addresses currently hosted by GMX, using an IMAP import tool.
Introduction
- This operation does not affect the data already present in the destination address, nor the data in the source address.
- The entire external mailbox will be imported.
- Once the import process has started, it is no longer possible to interrupt it.
- Any duplicates will be handled: identical content will only be copied once.
- Consult this other guide if you are looking for alternatives to this IMAP process.
Import your entire email history
1. GMX Prerequisites
- Enable the POP/IMAP/SMTP features that are disabled by default (need help?).
2. Infomaniak Prerequisites
- You must have a Mail Service on your Infomaniak Manager.
- Have a number of available addresses or adjust it if necessary.
- Make sure your email is properly secured
- Create one or more addresses on this Mail service.
- If you have many (10+) email addresses to create, please refer to this other guide regarding bulk creation.
- The destination email address must be linked to the user (= the Infomaniak account) you are using.
3. Import GMX email content into Infomaniak
- Click here to access the import tool (online service https://import-email.infomaniak.com).
- If necessary, log in to your Infomaniak account for the relevant organization; the import will be done to one of the email addresses associated with the Infomaniak Mail web interface (online service ksuite.infomaniak.com/mail) of the Infomaniak account you are using.
- Click on the IMAP import option.
- Click on one-time import.
- Fill in the field on the left with your source email address (the content of which will be copied):
username@gmx.chfor example
- Fill in the field on the right with the password for this same source email address (see prerequisites).
- If necessary, modify the Advanced Settings to specify an IMAP server address:
- Enter the IMAP server name
imap.gmx.ch(or .net, .com, etc. depending on your email address in point 4 above). - Leave the default port (993) and SSL enabled.
- Enter the IMAP server name
- Click on Confirm.
- If necessary, enter a second email address that you want to import at the same time.
- Choose the email address from which to import emails; the drop-down menu lists the email addresses currently associated with your Infomaniak Web Mail interface (online service ksuite.infomaniak.com/mail) of the Infomaniak account you are logged into.
- After selecting the desired destination address from the list, click the blue Import Emails button.
- The copy process has started. You can wait and view the result on the page once the import is complete, or close the window (the import will continue in the background, and you can track its progress - see below).
- A confirmation email will be automatically sent to all email addresses involved in the operation once the import is complete, indicating the number of messages copied.
- Tracking is available in the settings of the destination email address, and only on the web app Mail (online service ksuite.infomaniak.com/mail).
- Tracking allows you to view the import history for the address in question.
4. Adjust the application settings
Once you have taken the necessary steps to ensure that the domain name associated with your email account works with Infomaniak, modify the settings of the email software/clients you use so that they connect correctly to the Infomaniak servers: follow the configuration wizard.
Link to this FAQ: https://faq.infomaniak.com/2715
Has this FAQ been helpful?
This guide concerns the Mailing List service, which is only offered to Infomaniak users who activated it in the past and for whom a migration of the tool was carried out in early 2025.
Introduction
- The mailing list service differs from traditional messaging or a newsletter service through its unique features:
- It allows users to subscribe via a simple registration form, the code for which is provided.
- It allows one or more designated users to act as moderators, accepting or rejecting registrations, sending messages to subscribers, and then moderating members' replies before they are published.
- It allows users to contribute to the discussion by replying to a unique address that automatically redistributes incoming messages to other members.
- It offers a simple unsubscription option that complies with GDPR standards.
- Refer to this other guide regarding the service's limitations.
Any registration forms (HTML code) that may have been previously embedded on different pages must be regenerated and re-embedded to function (refer to the Forms section below).
Access the mailing list
If it was previously enabled, you can access the mailing list service within your Mail Service:
- Click here to access the management of your Mail Service on the Infomaniak Manager (need help?).
- Click directly on the domain name assigned to the product in question.
- Click on Mailing list in the left-hand menu:

Creating and configuring the mailing list
To create a new mailing list:
- Click the Start button…

- … or click the button above your existing lists:

Otherwise:
- Edit an existing list by clicking on its name:

- Click on its Configuration tab:

The settings required for the system to function correctly are as follows:
- A mailing list is based on an email address that must not yet exist on the Mail Service of the domain in question (and which cannot be created on it, nor modified later).
- You can give the list a name to identify it more easily if you have several lists, or if the email address is not explicit enough.
- You can also add an additional description.
- You must specify the email address(es) that will be moderators (i.e., have the highest level of permission on the list).
- You can define a language for your mailing list.
- Setting up “who can subscribe to the list” is important:
- You can specify that the user must confirm their subscription themselves (in addition to a moderator).
- The setting for “who can write to the list” is just as important:
- You can use the service as a one-way tool, for example, to disseminate information, or as a multi-way tool, for exchanging information and even holding discussions with non-members (with moderation)...
Click on Advanced options.

- You can configure whether replies should be addressed…
- … to the sender, with the sender's email address visible
- … to the list (everyone receives), with the sender's email address visible
- … to the list, as if they were coming from the list's email address
- Allows you to limit the size of emails sent via the mailing list (especially when adding attachments).
- Allows you to customize a message that will be automatically sent to an email address when a user subscribes to the list.
- Allows you to customize a message that will be automatically sent to an email address when a user unsubscribes from the list.
- Click the button to save.
Registration (depending on the settings in section 6 above)
- Subscribers can register by sending a message to the email address in the format
list-name-join@list-domain. - They can also be manually registered by the moderator via the interface, and in this case, they will receive a notification email whose content can be customized.
- If a subscriber's registration needs to be validated by a moderator, the latter receives an email:
- The moderator approves the request by clicking on a link of the type “
mailto:”, which generates a new message that can be sent to the email address in the formatlist-name-request@list-domainwith the subjectaccept subscriber-email-addressand in the body of the message, the lineApproved: list-password, possibly adding a linestopto prevent other scripts from running, for example in the case of a signature.
- The moderator approves the request by clicking on a link of the type “
- If a subscriber's registration needs to be validated by the subscriber themselves, they will receive an email to which they must respond (by clicking on the link to create a new reply email that is pre-filled):

- In this case, the moderator will receive the request at a later stage, after the subscriber has validated it, and they must respond to validate the registration (the easiest way is to click on the link):

- In this case, the moderator will receive the request at a later stage, after the subscriber has validated it, and they must respond to validate the registration (the easiest way is to click on the link):
Unsubscription
- Subscribers can unsubscribe by sending a message to the email address in the format
list-name-leave@list-domain. - Upon unsubscribing, a confirmation request message is sent to the user.
- The user approves the request (by clicking on the link of the type “
mailto:”, which generates a new message that can be sent to the email address in the formatlist-name-request@list-domain, with the subject being the command specified in the confirmation email and an empty body).
- The user approves the request (by clicking on the link of the type “
Sending/receiving messages
- Each subscriber can create a Mail signature and choose the name to be displayed when sending emails.
- A footer is automatically added to each message sent via the mailing list:

- See also the
reply-toandfromsettings in point 9 above.
Message moderation
- To reject a message, the moderator must click on the link of the type “
mailto:”, which generates a new message that can be sent to the email address in the formatlist-name-request@list-domain. - When a moderator is also a member of the list, they do not receive the messages they send themselves, but they do receive those sent by other moderators.
Forms (subscription/unsubscription)
To allow website visitors to subscribe to your mailing list, you can generate a code that you can then insert into the website of your choice; for example, with Site Creator:
The Form tab allows you to specify the URL to which the user will be redirected after subscribing or unsubscribing:
- If an error occurs while using the form, an error page may display the email address
moderation-owner@list-domain, allowing users to contact the moderators. - A user who is already subscribed to the list can subscribe multiple times without any specific message being displayed.
Error Management
The system displays the number of errors encountered by an address and the date:
Link to this FAQ: https://faq.infomaniak.com/2786
Has this FAQ been helpful?
This guide explains how to sort emails currently present in your Infomaniak inbox or in subfolders, in order to quickly delete specific messages that follow the same structure, classify messages based on their subject or sender, etc.
Introduction
- Unlike the guide Sort incoming emails according to certain criteriaWhile the Infomaniak interface allows you to set up filters that will apply to all future incoming messages, the free Thunderbird software allows you to apply sorting rules to messages that have already arrived and are already present in an email account.
Quickly sort an email account using IMAP
To do this:
- Install and then open Thunderbird.
- Configure your Infomaniak email within the application.
- Open the Tools menu and click on Filters:

- Check the selected address and click on New...

- Configure the filter according to your preferences (here, the rule is that all messages with "ER" in the subject will be moved to the trash):

- Click on OK to return to the list of your filters, then click on Run now:

- The result is immediately visible, as the messages are moved to the trash and disappear from the window.
Link to this FAQ: https://faq.infomaniak.com/2799
Has this FAQ been helpful?
This guide covers data protection regulations in Switzerland and Europe, and the measures taken by Infomaniak to secure your customer data and data within Web Hosting and Mail Services.
Understanding the difference between data security and data privacy
Data security aims to prevent unauthorized access to your information. It relies on measures such as encryption, firewalls, or VPNs. A security breach can have disastrous consequences: imagine a hacker stealing your entire customer database and demanding a ransom to recover it. This type of attack – ransomware – can cripple a company overnight.
Data privacy concerns who can access your information and how it is used. Even if your data is secure against hacking, it can be collected, analyzed, and resold… perfectly legally.
Example: you carefully store your customers' information, but without realizing it, a service you use shares – anonymously – this data with third parties. Result? Your competitors can obtain valuable insights into your market and target your own customers without ever needing to hack into your systems.
FDPA & GDPR
In Switzerland, the FDPA (Federal Act on Data Protection) and nFDPA (for the "new Act" in force since September 2023) protect the privacy of residents by regulating the collection and processing of personal data by organizations.
The EU's GDPR (General Data Protection Regulation), which has been in effect since May 2018, affects global companies that process the data of European residents, including in Switzerland. While the Swiss Federal Act on Data Protection (FADP) applies to the data of Swiss residents, the GDPR concerns the data of EU residents. Swiss companies that manage European data must comply with the GDPR requirements, including the designation of a Data Protection Officer and the performance of Impact Assessments in the event of risky processing.
Your Role as an Infomaniak Customer
With regard to the data hosted that belongs to you – and in particular if this data contains personal data of your visitors, contacts or customers – it is your responsibility to ensure its compliance.
When processing this personal data, it is essential to inform users about the purpose and methods of this processing. This is generally done through a privacy policy or a data processing agreement (DPA).
Agreement between Data Controller and Data Processor
A DPA (Data Processing Agreement), called AVV (Auftragsverarbeitungsvertrag) in German, ATD (Accordo di Trattamento dei Dati) in Italian and CTA (Contrato de Tratamiento de Datos) in Spanish, translates to Data Processing Agreement or Data Processing Contract.
This is a mandatory contract provided for by the GDPR between a data controller and a data processor. It defines the purpose, duration, and nature of the processing, as well as the obligations and security measures. Its objective is to protect the personal data entrusted to a service provider.
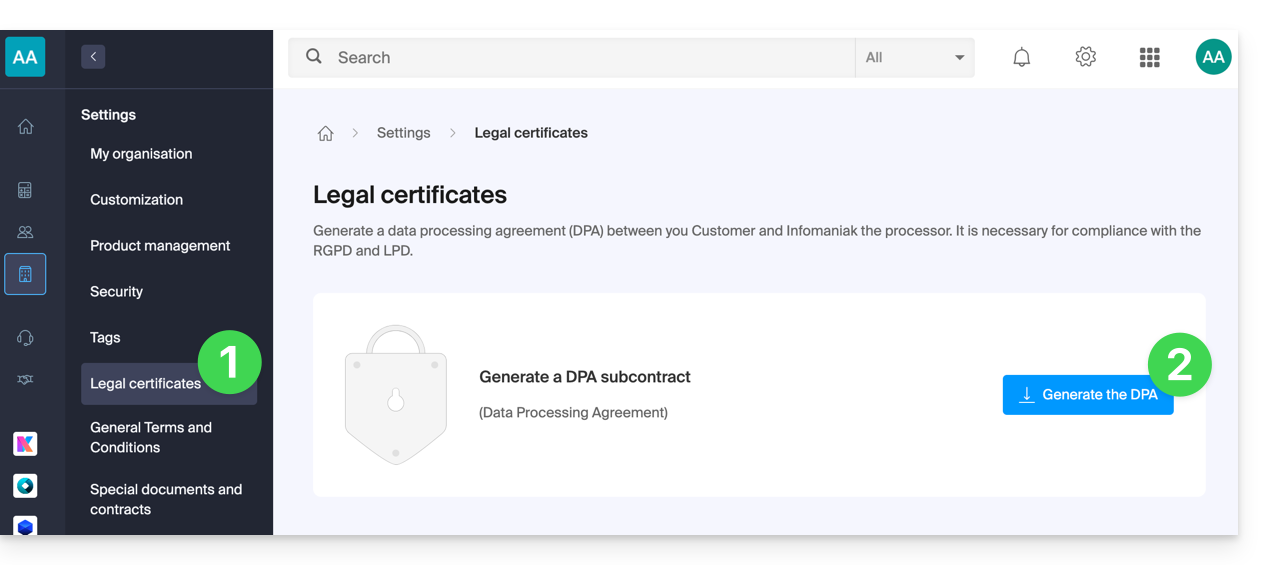
This GDPR certificate (in PDF format) can be generated and downloaded from the Manager (accessible to users of the organization who are owners or administrators):
- Click here to access the Data Processing Agreement (DPA) management in the Infomaniak Manager (need help?).
- Click the Generate button to download the customized PDF document:
Here are some tips:
- Provide information on all data processing activities, not just those related to the website.
- Ensure easy access to the privacy policy on the website, for example in the footer of each page.
- In general, it is not necessary to obtain user approval for privacy policies (e.g., for forms); simply indicate where to find the policy (example Site Creator).
- Keep in mind that the new, more detailed information rules may require adjustments to existing privacy policies.
It is crucial to differentiate between the security of the infrastructure where your data is hosted and the management and implementation of data on your side. As a hosting provider, Infomaniak acts as a data processor for your GDPR-related obligations. In this context, its privacy policy and cookie policy, as well as its terms and conditions, provide you with the necessary guarantees regarding its compliance as a data processor.
If necessary, you can find professionals or online guides to help you with the compliance process.
Infomaniak's Role
Like companies that work with user data, Infomaniak must comply with the LPD and, because some of its users are European citizens, also with the GDPR:
- the data privacy policy details the data that Infomaniak stores to provide and deliver its services
- the policy related to the protection of your personal data describes Infomaniak's commitments as a subcontractor that hosts all of your data, including personal data
These commitments, as outlined in the general and specific terms and conditions, are as follows:
- store your data within data centers exclusively located in Switzerland and never transfer your information outside of these infrastructures
- apply rigorous security standards and continuously improve processes to guarantee a high level of security across all services
- promptly inform you in the event of a data breach
- ensure transparency towards you when Infomaniak uses subcontractors that may process your data
- strengthen and develop physical security measures to prevent unauthorized access to the infrastructures where your data is stored
- implement physical and/or logical isolation systems (depending on the services) to separate the hosting of different clients; in addition, Infomaniak conducts annual penetration tests to guarantee data isolation between clients
- demonstrate a high level of responsiveness in securely updating the systems under their responsibility
Manage cookies on the infomaniak.com website
When you visit the infomaniak.com page, you must make a choice regarding the acceptance of certain cookies. To change this choice later, access your preferences from the footer of the website: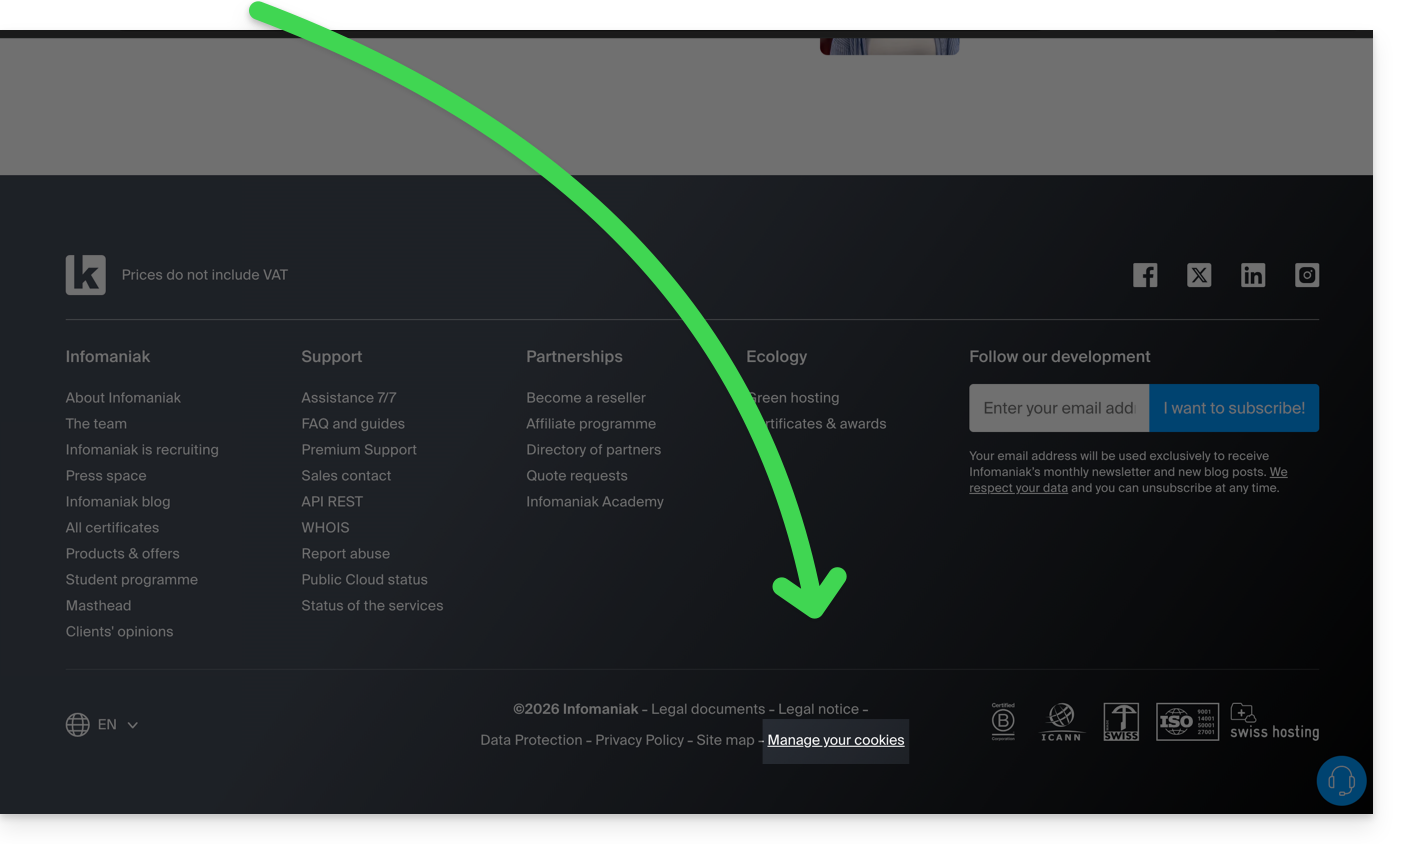
Link to this FAQ: https://faq.infomaniak.com/2820
Has this FAQ been helpful?
This guide explains how to copy the content of one or more Infomaniak email addresses (all email messages, folders, subfolders, in short, the entire structure of your mailbox) to one or more of your existing addresses, also hosted with Infomaniak (regardless of the Mail service), thanks to the Infomaniak import tool!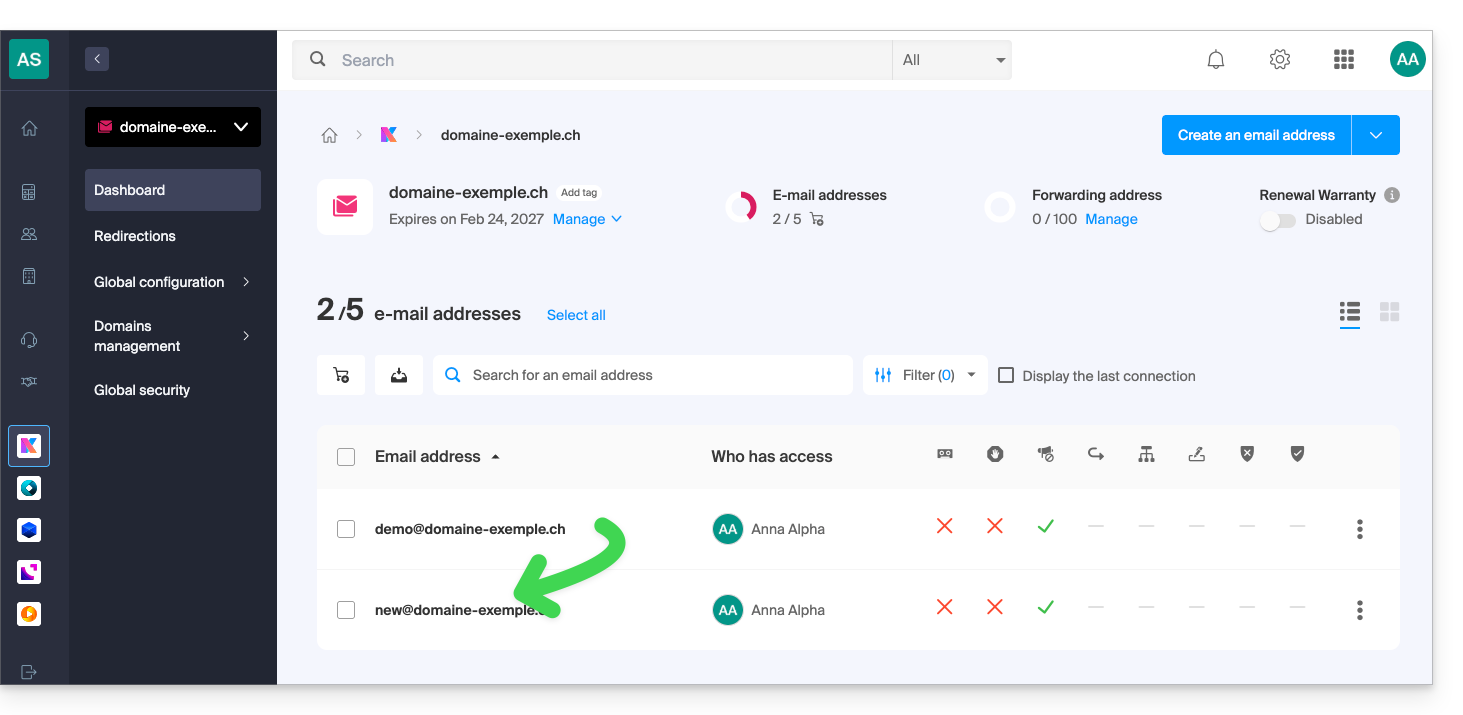
Introduction
- The operation does not affect either the data already present in the destination address or the data in the source address.
- The entire mailbox will be imported.
- Once the import process has started, it is no longer possible to interrupt it.
- Any duplicates will be handled: identical content will only be copied once.
Copy emails from one Infomaniak mailbox to another
Prerequisites
- Add a device password to the source address (the one from which the content must be retrieved):
- The password for logging in to the Infomaniak account with the same name is not the one expected.
- You need a password specific to the email address in question = a device password:
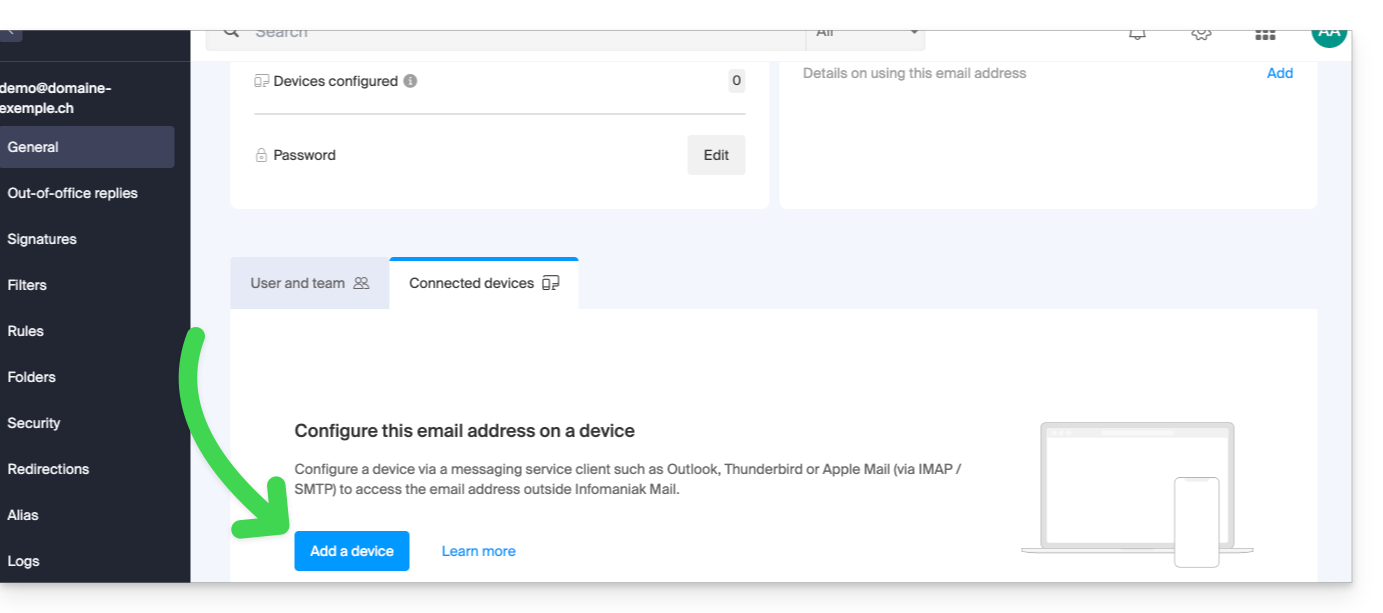
- The email address of the destination must be linked to the user (= the Infomaniak account) you are using.
Next, to import your email content:
- Click here to access the import tool (online service https://import-email.infomaniak.com).
- If necessary, log in to your Infomaniak account for the relevant organization; the import will be done to one of the email addresses associated with the Infomaniak Mail web interface (online service ksuite.infomaniak.com/mail) of the Infomaniak account you are using.
- Click on the IMAP import.
- Click on one-time import.
- Fill in the field on the left with your source email address (from which the content will be copied).
- Fill in the field on the right with the password for this same source email address (see prerequisites).
- Click on Confirm:
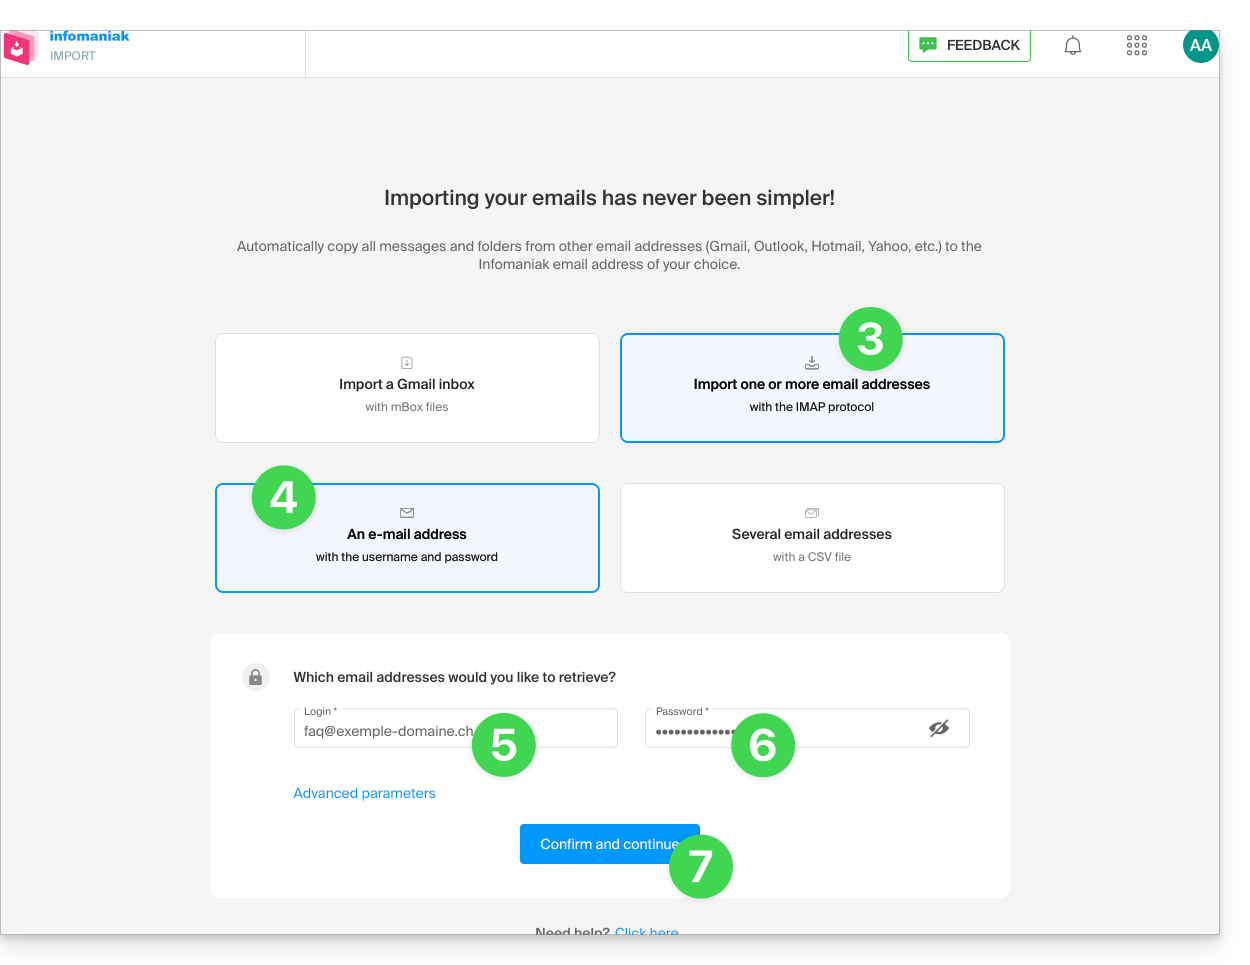
- If necessary, enter a second email address to be imported at the same time.
- Choose the email address to which the emails will be imported; the drop-down menu lists the email addresses currently associated with your Infomaniak Web Mail interface (online service ksuite.infomaniak.com/mail) of the Infomaniak account you are logged into.
- It is obviously impossible to copy emails to the same address as the source.
- After selecting the desired destination address from the list, click the blue Import Emails button:
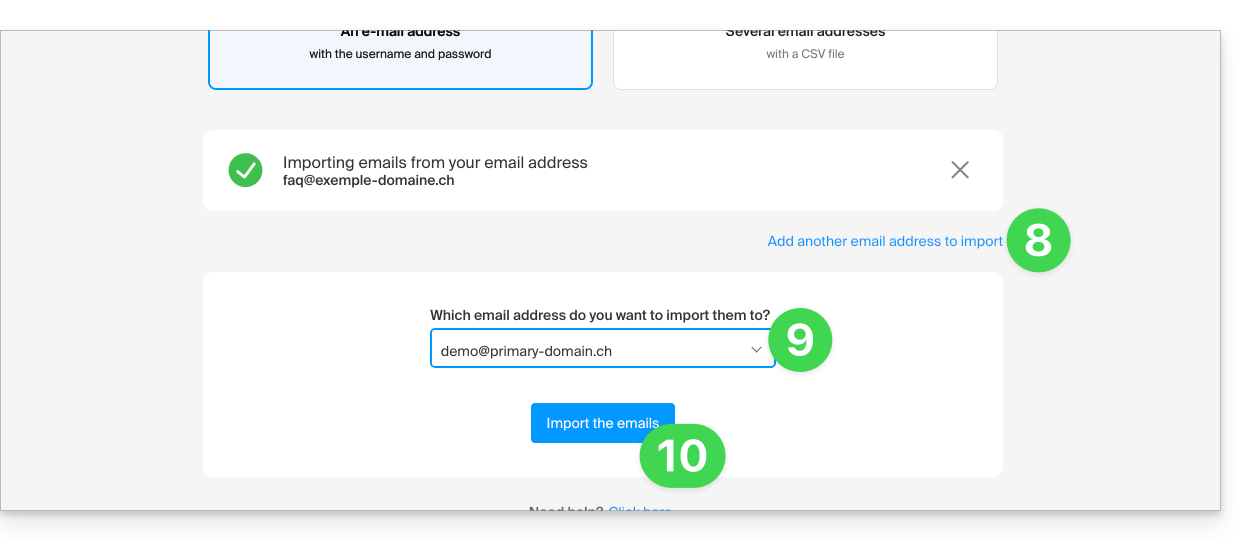
- The copy process begins. You can wait and see the result on the page once the import is complete, or close the window (the import continues in the background, and progress can be tracked - see below):
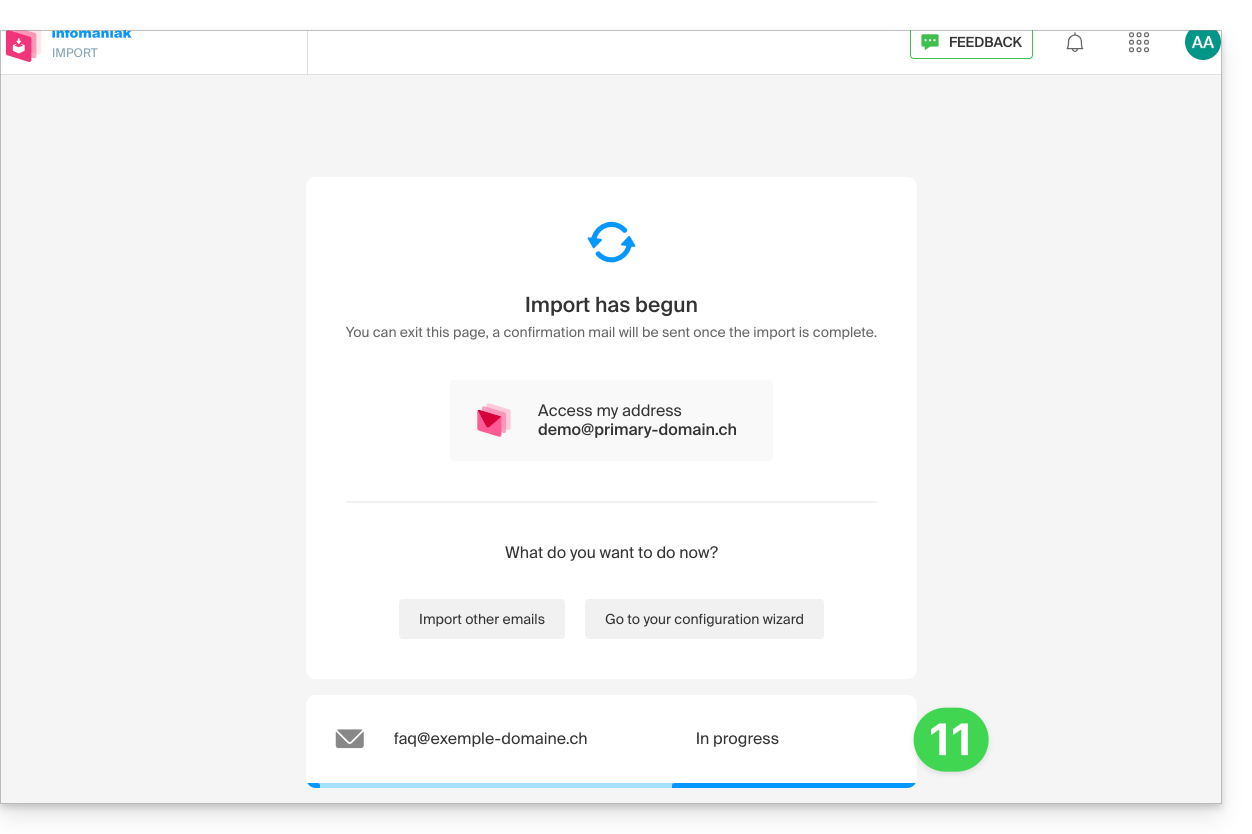
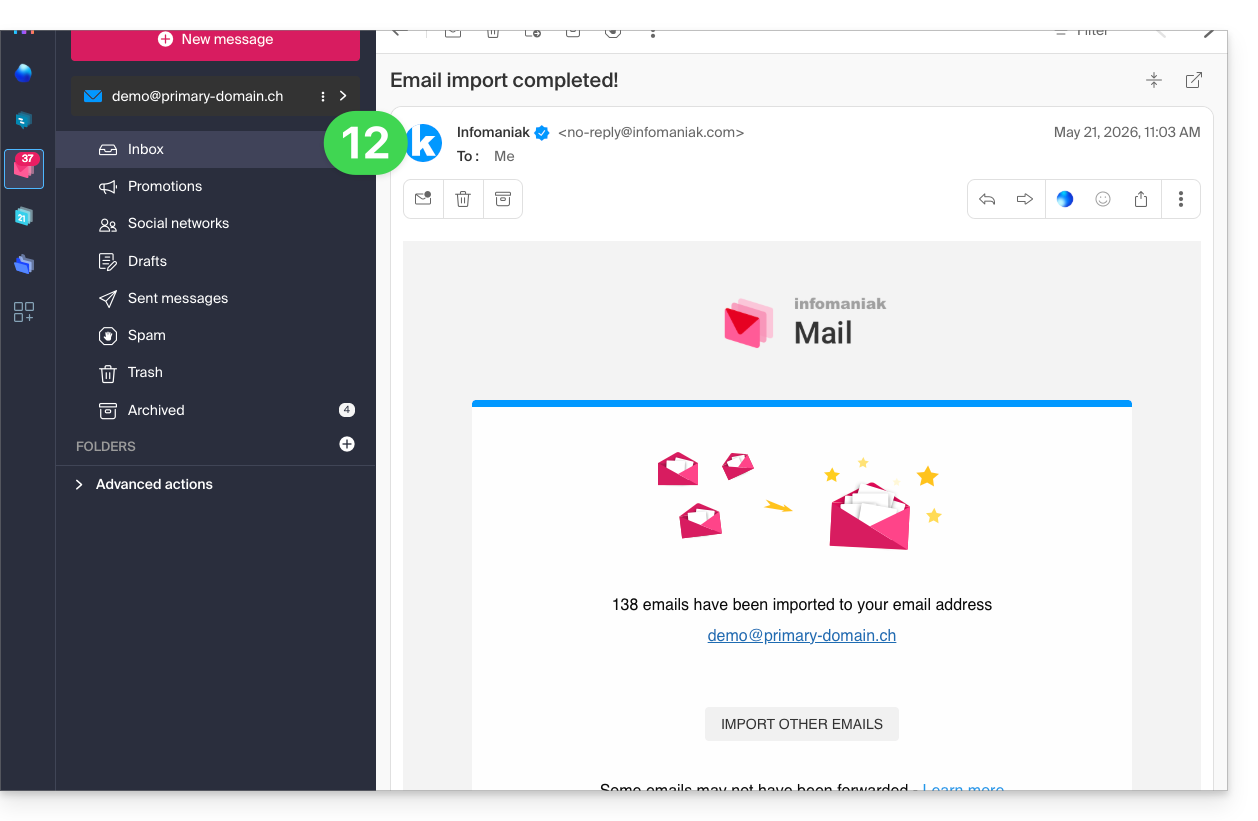
- A confirmation email will be automatically sent to all email addresses involved in the operation once the import is complete, indicating the number of messages copied:
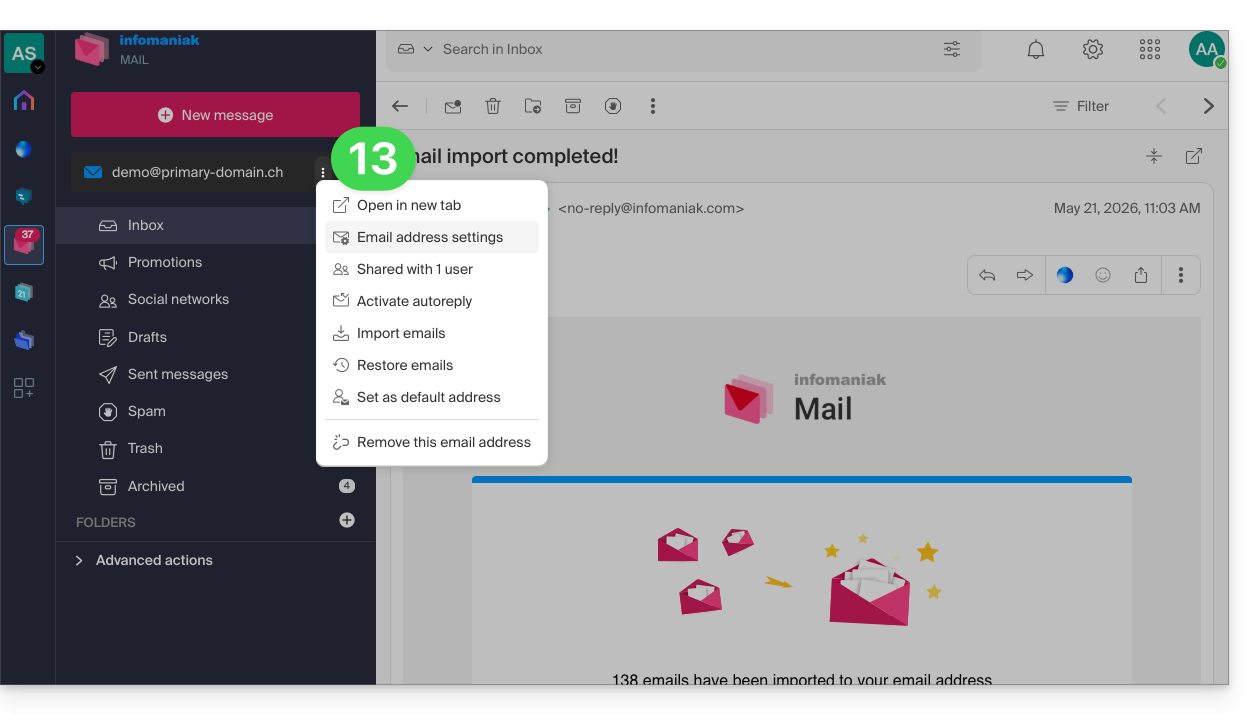
- Progress can be monitored in the settings of the destination email address, on the web app Mail (online service ksuite.infomaniak.com/mail) only:
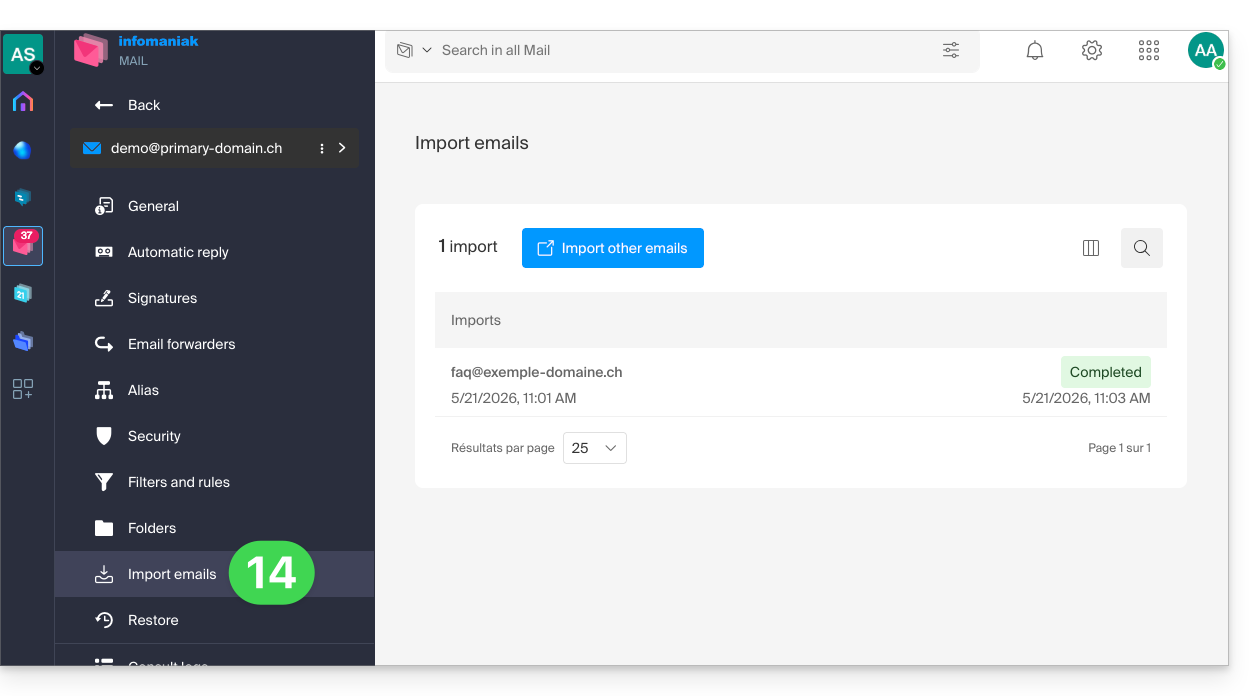
- The tracking feature allows you to view the import history for the address in question:
Copy the content from multiple Infomaniak addresses in bulk
Prerequisites
- Add a device password to each Infomaniak source address (the ones from which the content needs to be retrieved).
- The password for logging in to the Infomaniak account with the same name is not the one expected.
- You need a password specific to each email address = one device password per address.
- The destination email addresses must be linked to the user (= the Infomaniak account) you are using.
To import the content of multiple Infomaniak email addresses (maximum 25 at a time) to one or more destination email addresses:
- Click here to access the import tool (online service https://import-email.infomaniak.com).
- If necessary, log in to your Infomaniak account for the relevant organisation; the import will be done to one of the email addresses associated with the Infomaniak Mail web interface (online service ksuite.infomaniak.com/mail) of the Infomaniak account you are using.
- Click on IMAP import.
- Click on advanced mode: Import multiple email addresses from a CSV file (
.csvformat). - Download the example
CSVtemplate: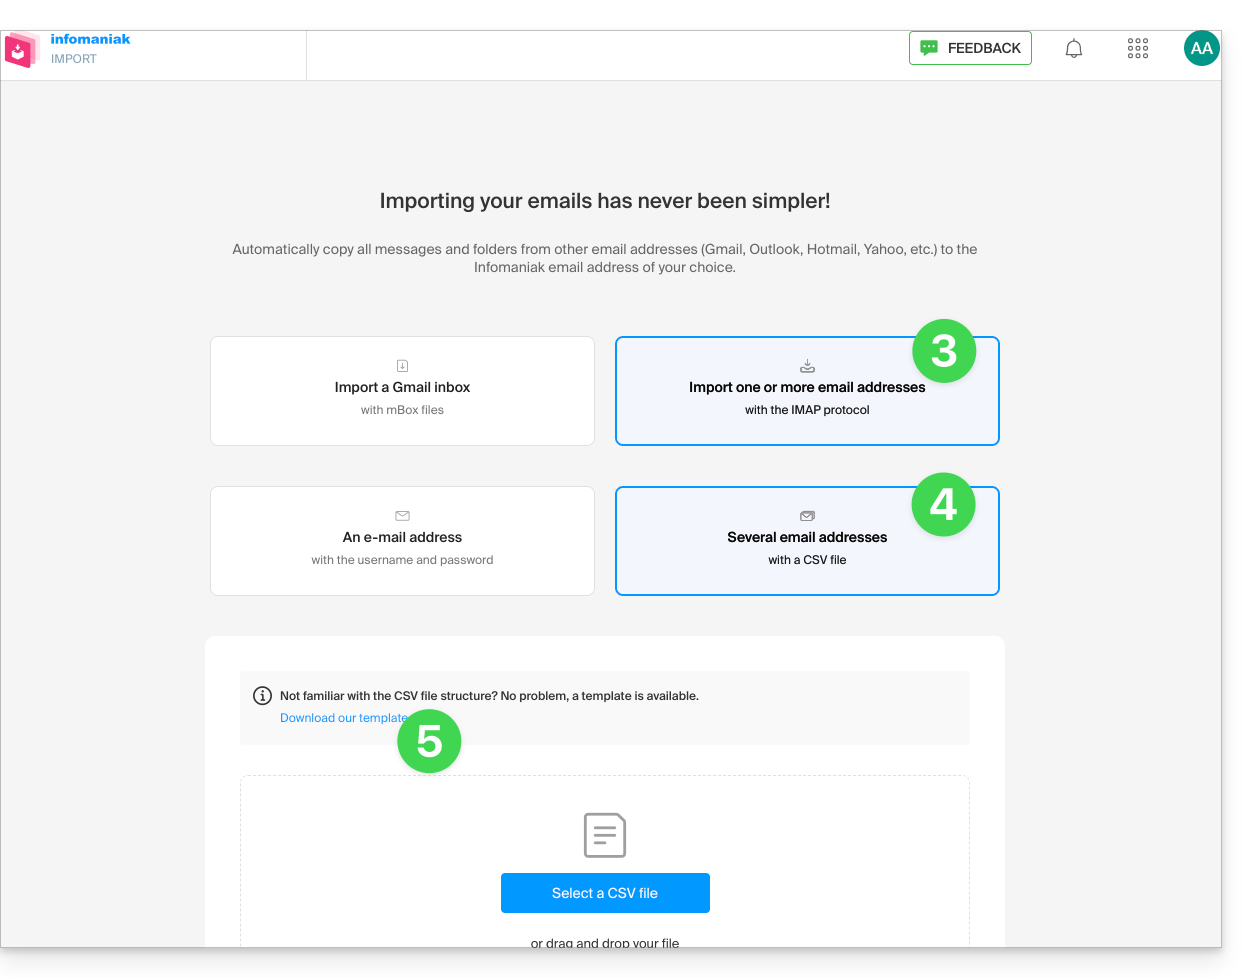
- The template has this format:
source-email@domain.com;sourcePassword;imap.source-host.com;sourcePort(993);sourceSsl(1or0);dest-email@domain.com - This means, in this case:
source email address;source email password;mail.infomaniak.com;993;1;destination email address, all without spaces (example below)
- The template has this format:
- Edit the
csvfile to create one with the correct information needed for the copy (see prerequisites):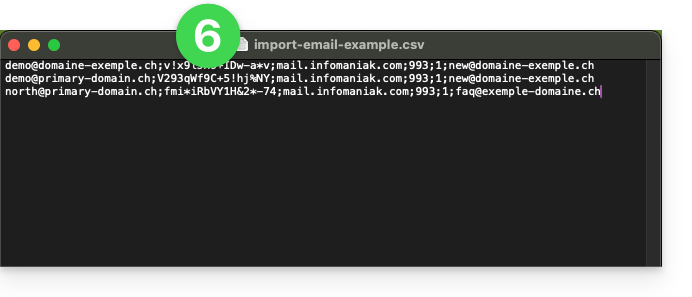
- Upload the file using the Select a CSV file button.
- Once the file has been uploaded to the tool's page, correct or ignore any errors; click on Import:
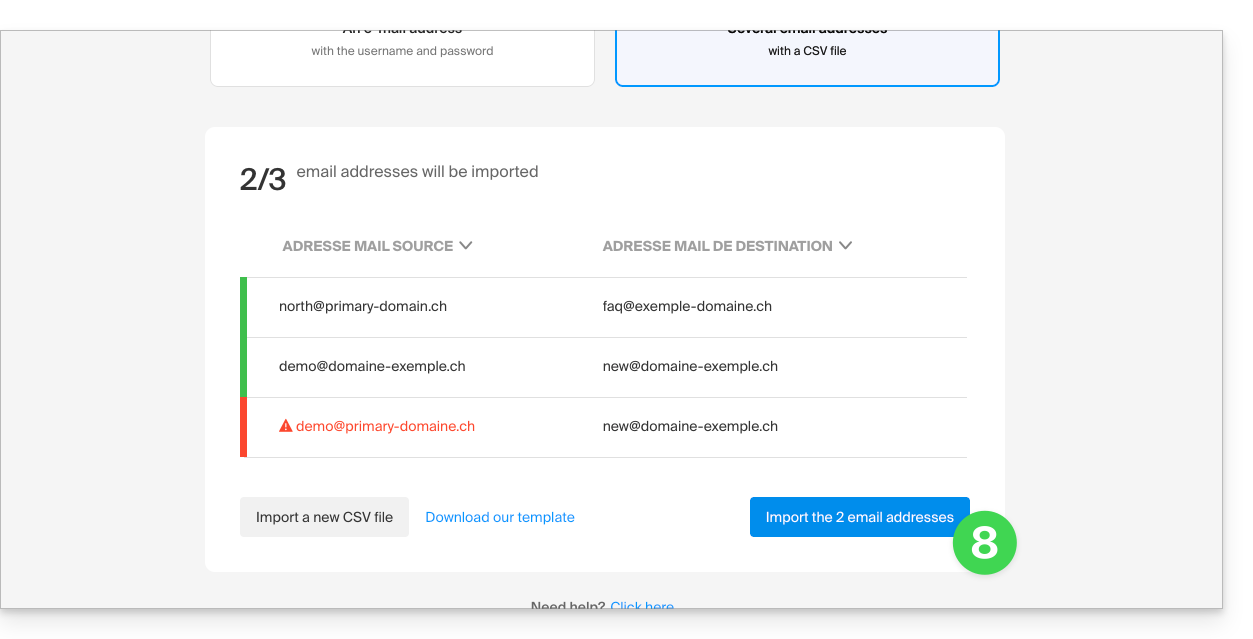
- The copy process has started. You can wait and view the result on the page once the import is complete, or close the window (the import will continue in the background, and you can track its progress - see below).
- A confirmation email will be automatically sent to all email addresses involved in the operation once the import is complete, indicating the number of messages copied.
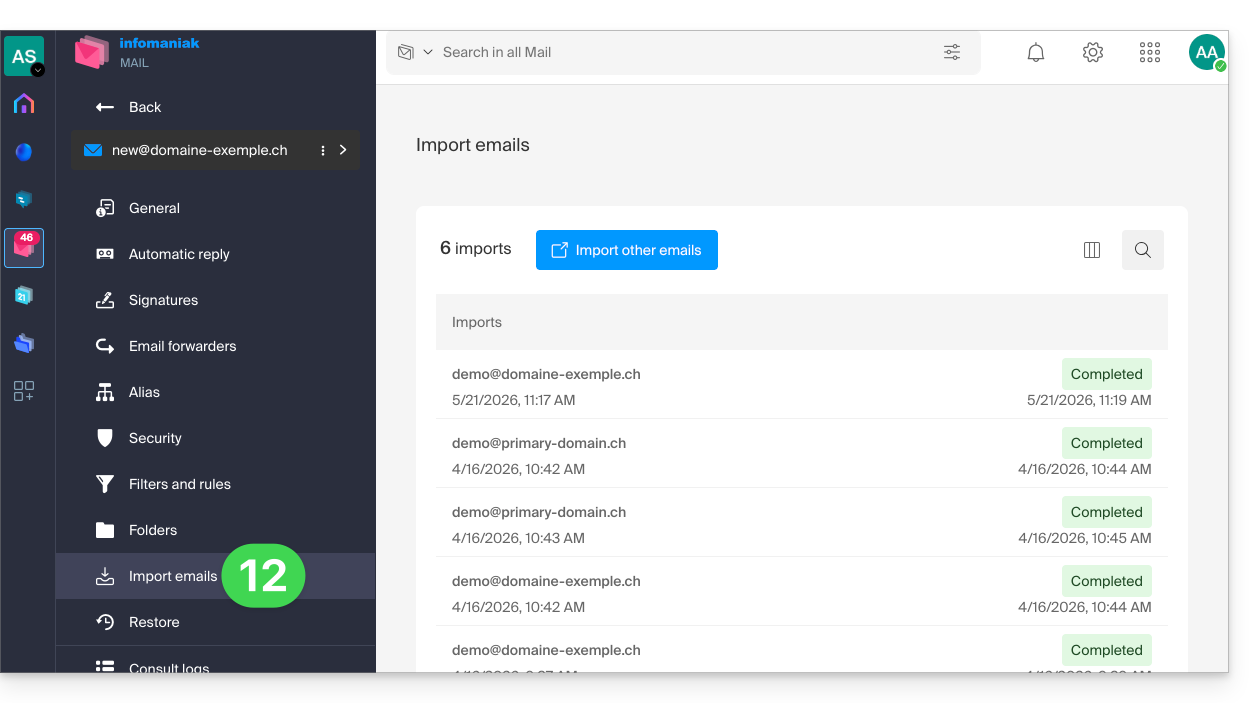
- Tracking is available in the settings for the destination email addresses, on the web app Mail (online service ksuite.infomaniak.com/mail) only.
- Tracking allows you to view the import history:
Link to this FAQ: https://faq.infomaniak.com/2826
Has this FAQ been helpful?
This guide explains how to activate the Infomaniak anti-spam filter, which helps to significantly reduce the number of unsolicited messages that may arrive in your Infomaniak email address if you share it with third parties.
Introduction
- Spam is an unsolicited message, often of an advertising or fraudulent nature, with the aim of promoting products, services, or carrying out online scams; fortunately, Infomaniak has implemented strategies to combat this form of digital pollution.
- Thanks to the anti-spam filter, the messages you actually want to see quickly will no longer be buried among dozens of other unwanted messages, as the latter will be automatically placed in a special folder, the
Spamfolder (or in the spam destination folder - see below), and then automatically deleted after 30 days. - Furthermore, the filter is automatically activated (but this can be configured) when creating an email address within an Infomaniak Mail Service or when subscribing to a my kSuite / my kSuite+ offer.
Activate the option from the Infomaniak Web Mail app
Prerequisites
- You must have permission to manage the filter: it is possible that the Mail Service manager has removed this right from their admin account.
To access the settings for your Infomaniak email:
- Click here to access the Mail web app for Infomaniak (online service at ksuite.infomaniak.com/mail).
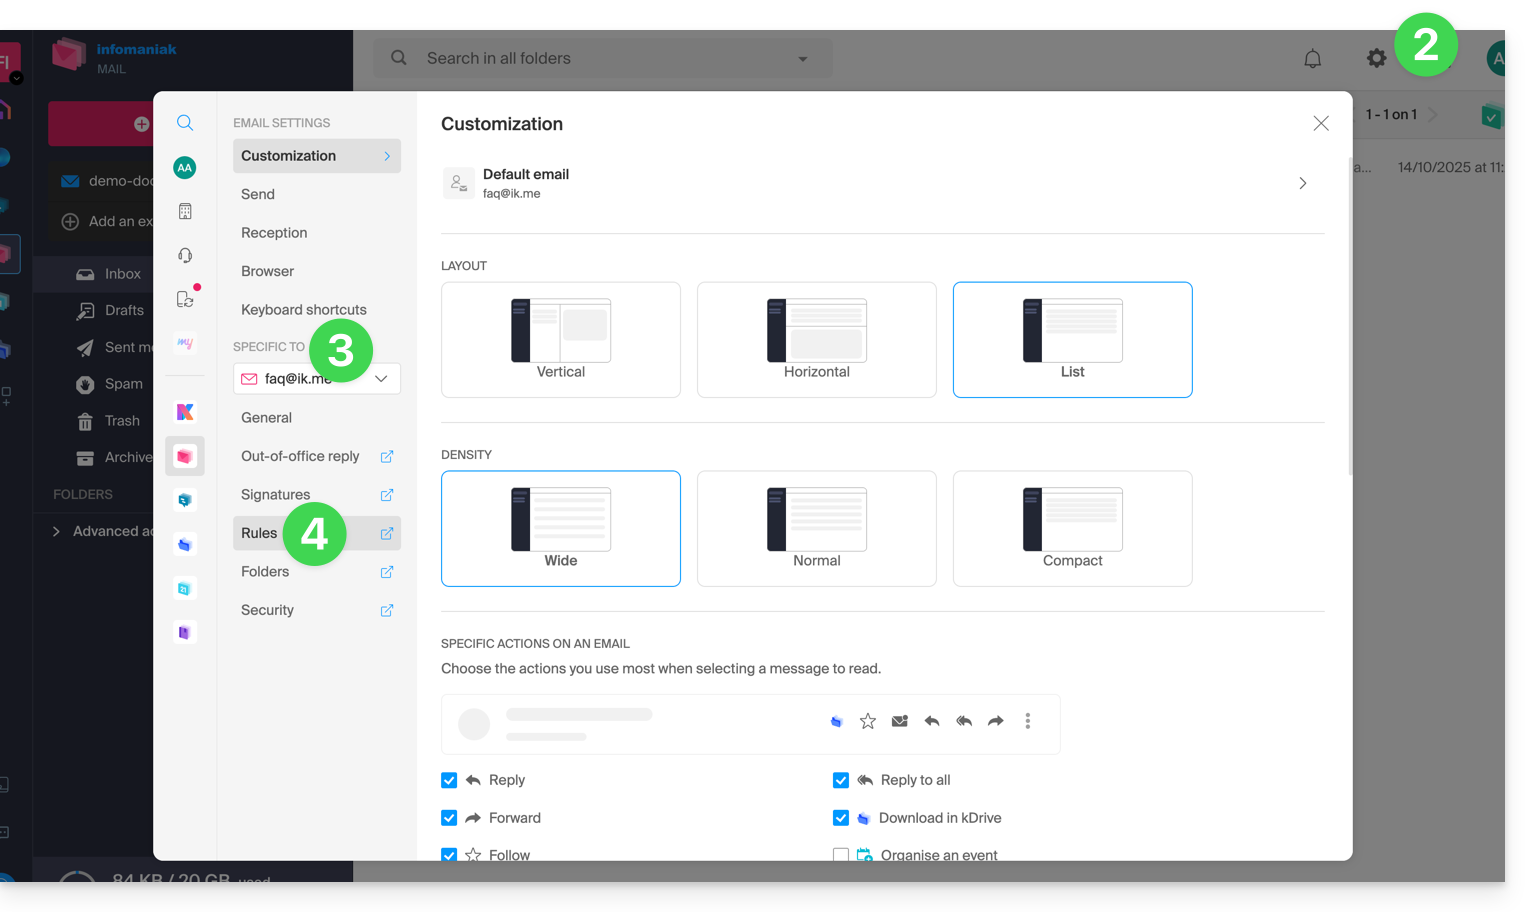
- Click on the Settings icon in the top right corner.
- Check or select the relevant email address in the drop-down menu on the left-hand menu.
- Click on Filters and rules:
- Activate the spam filter option; the effect is immediate (wait for the confirmation message to appear on the screen). In this case, all future messages with a header indicating a high spam score (and blocked senders) will go to the Spam folder:
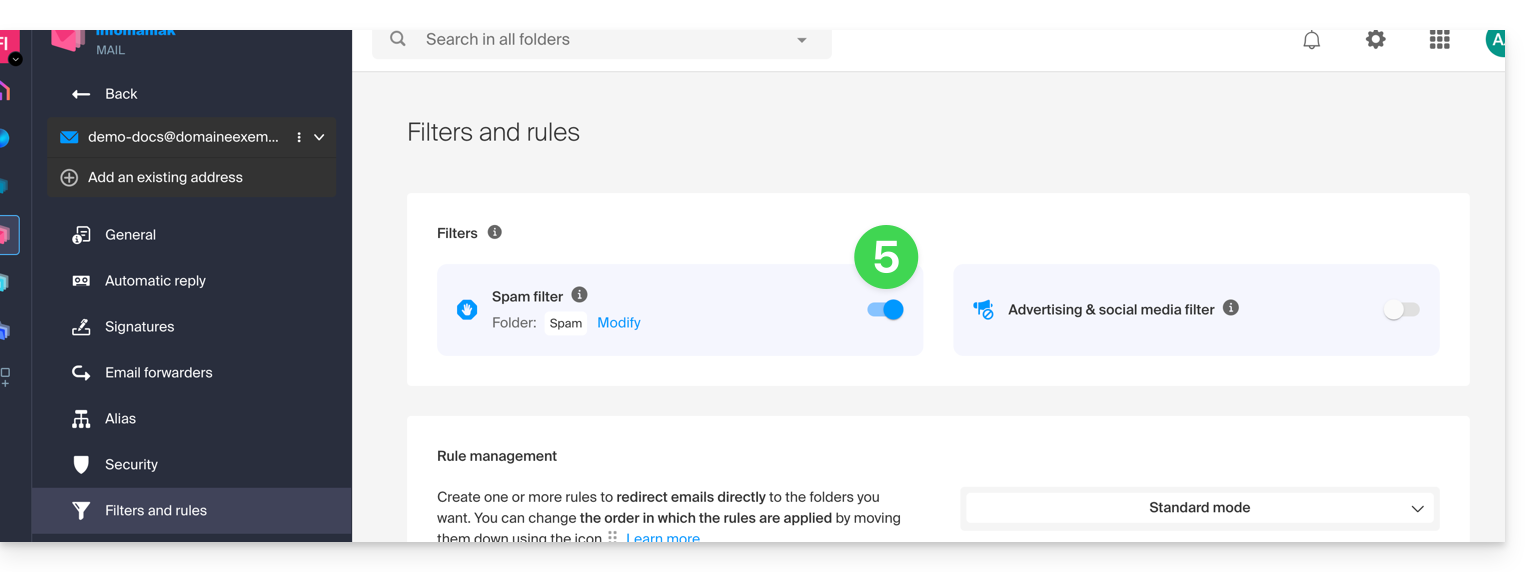
- Simply click on the toggle switch again to deactivate the filter. In this case, all future messages will go to the inbox, including messages with a header indicating a high spam score.
Activate the option from a Mail Service
To access the settings for your Infomaniak email:
- Click here to access the management of your product on the Manager Infomaniak (need help?).
- Click directly on the name assigned to the product in question.
- Click on the email address in question in the table that appears.
- Click on Filters in the left-hand menu.
- Activate the spam filter option; the effect is immediate:
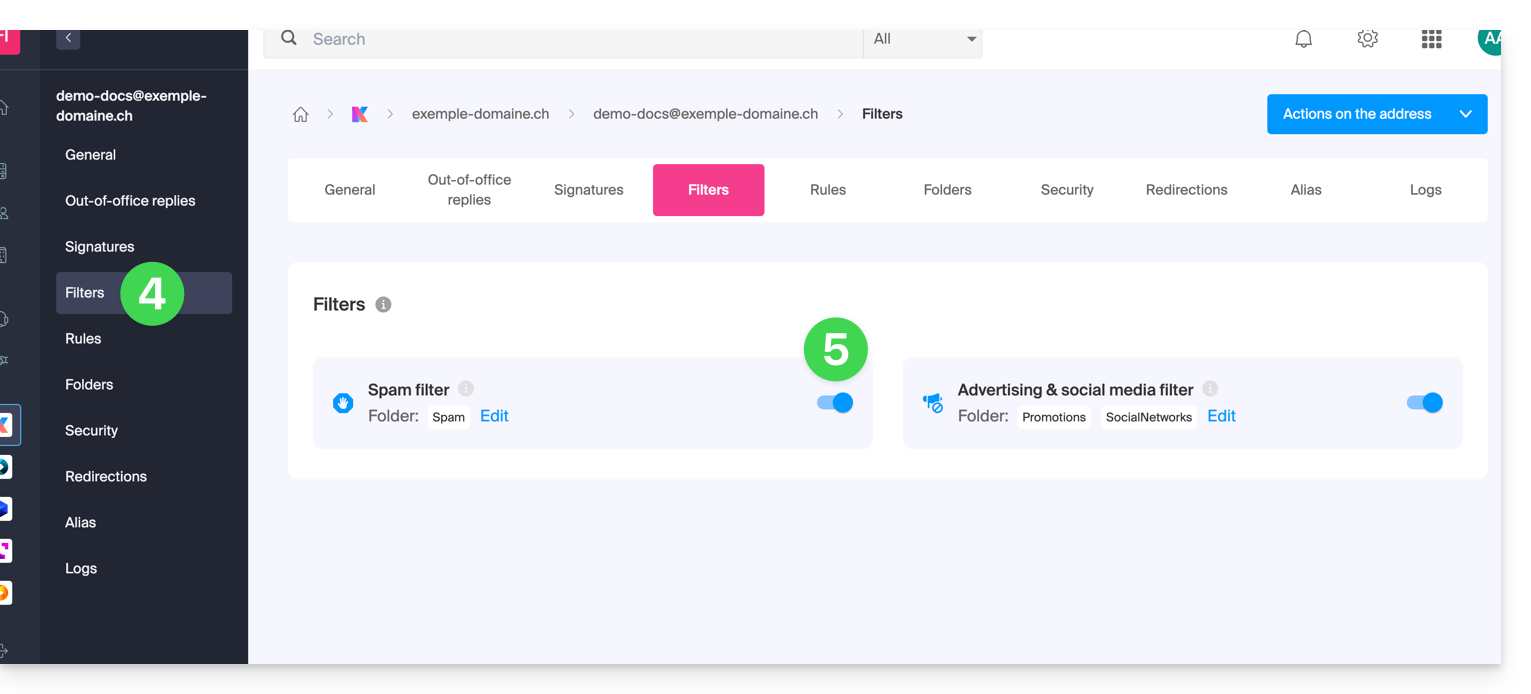
- Simply click the toggle switch again to disable the filter; in this case, all future messages will go to the inbox, including messages with a header indicating a high spam score (they can then be processed by your email software/client if it supports reading this type of header).
Note that you can activate it in bulk for multiple addresses at once.
Customize the anti-spam filter
Change the location of spam
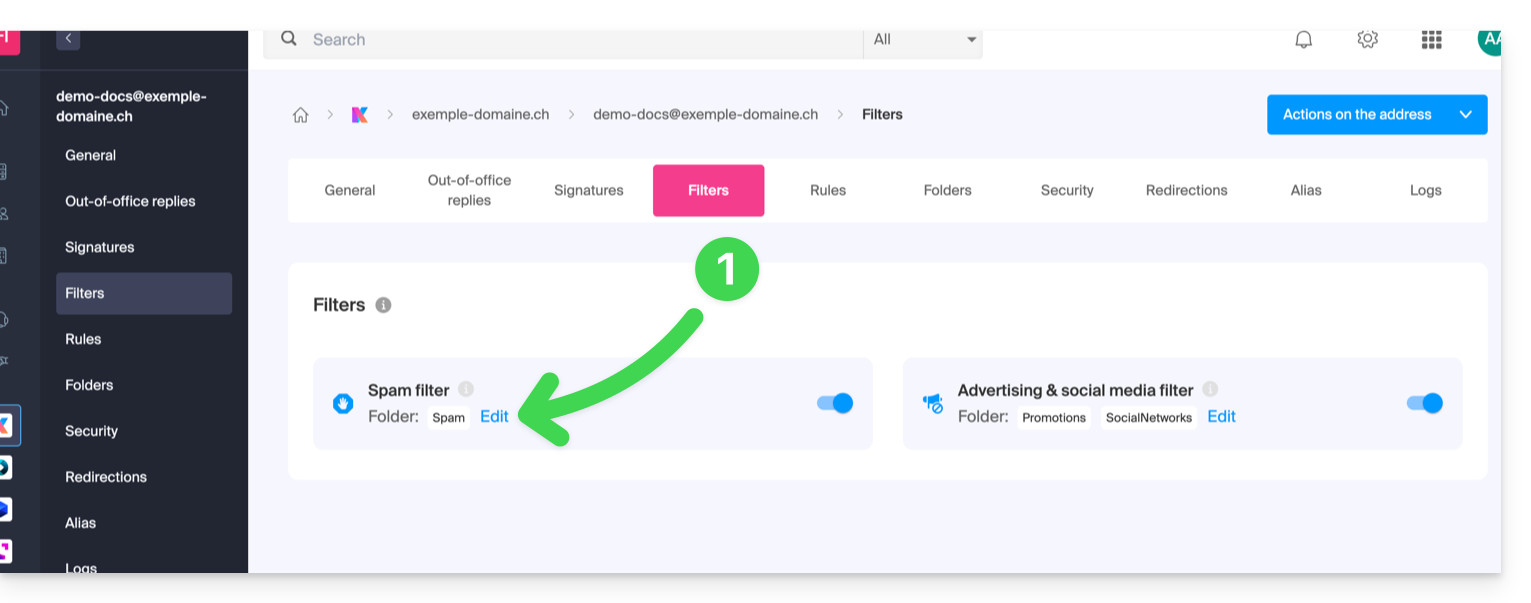
You can choose the default location of the folder in which messages considered as spam will be automatically placed (similar to special IMAP folders).
Where you have activated the spam filter:
- Click on Modify:
- Click on the folder name to choose another one (create a new one beforehand if necessary):
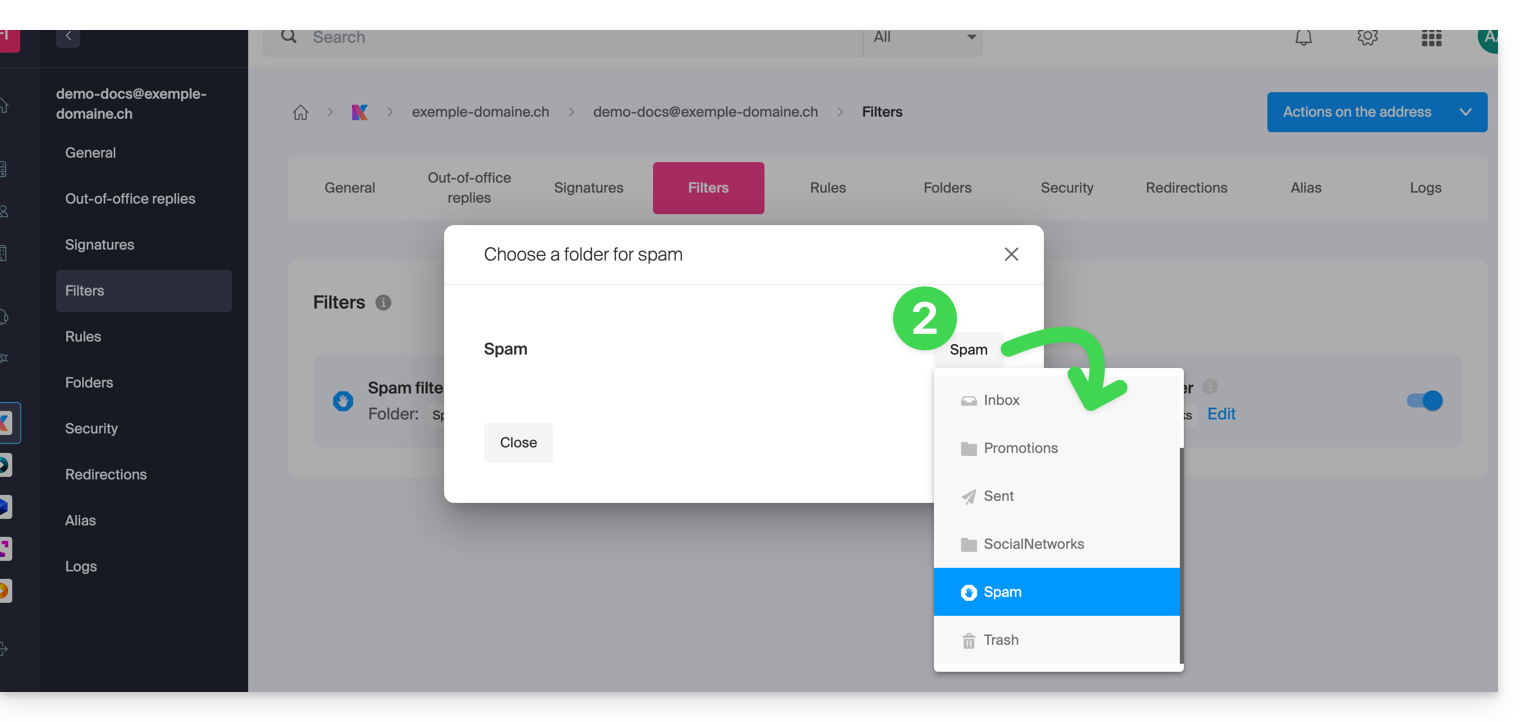
- Click on the Validate button:
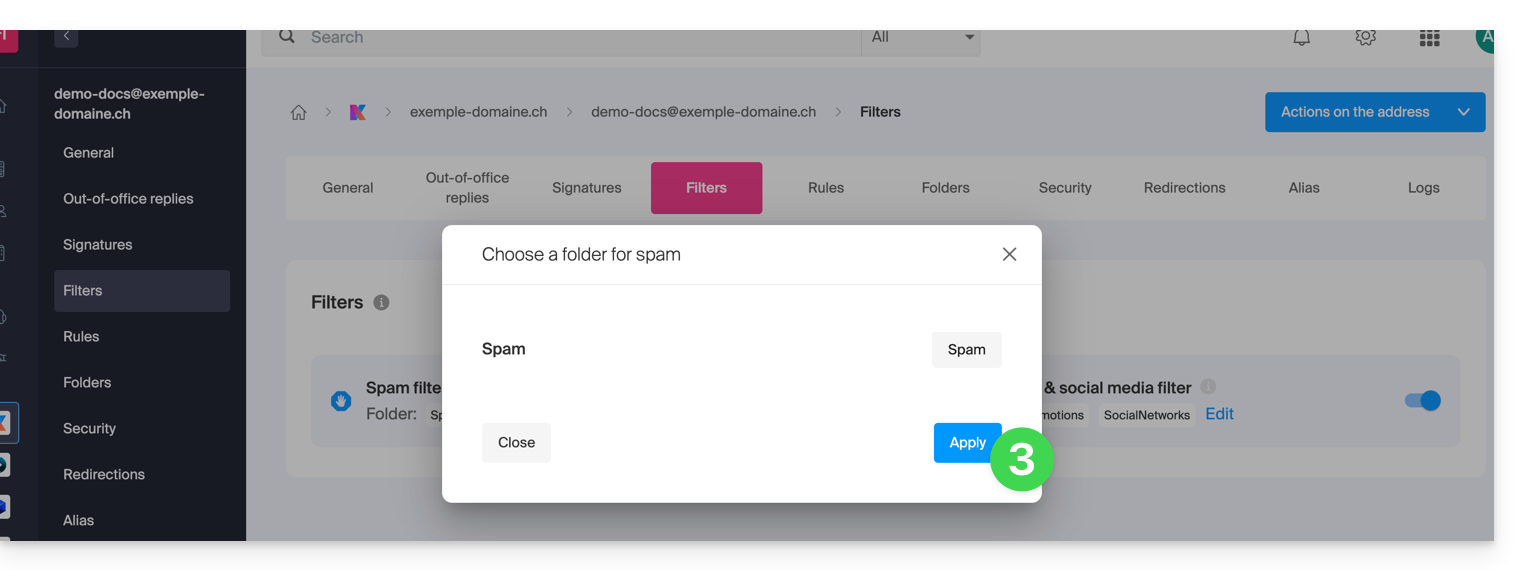
Report a filtering issue or manually block senders
To report unfiltered spam or an email that was incorrectly filtered as spam (false positive), please refer to this other guide.
You can also specify in advance which senders should always go to the Spam folder (or vice versa, if they should not be filtered): please refer to this other guide.
For added security, enable the display of external email warnings.
Link to this FAQ: https://faq.infomaniak.com/2838
Has this FAQ been helpful?
This guide explains how to enable or disable the Infomaniak ad filter, which automatically sorts emails detected as newsletters or activity notifications into specific folders.
Introduction
- The filter is, in principle, automatically activated (but this can be configured) when creating a mail address within an Infomaniak Mail Service or when subscribing to a my kSuite / my kSuite+ offer.
- It allows you to focus on relevant and important emails, which improves your productivity by reducing distractions related to advertisements and spam.
- It helps maintain a cleaner and better-organized inbox by separating promotional emails, which simplifies the management of important emails.
Enable the option from the Infomaniak Web Mail app
Prerequisites
- You must have permission to manage filters: it is possible that the Mail Service administrator has removed this permission from their admin account.
To access your Infomaniak email settings:
- Click here to access the Infomaniak Mail web app (online service ksuite.infomaniak.com/mail).
- Click on the Settings icon in the top right corner.
- Check or select the relevant email address in the dropdown menu on the left sidebar.
- Click on Filters and rules:
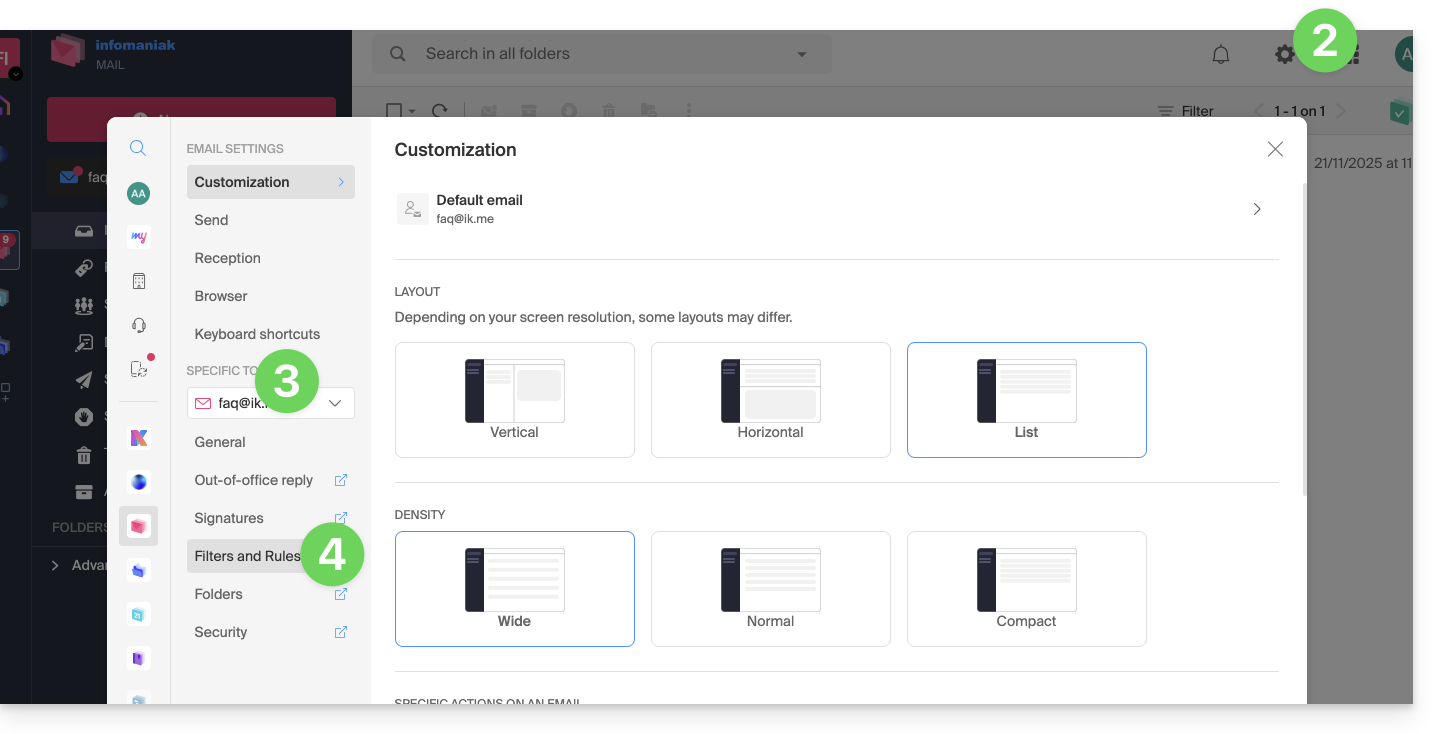
- Enable the ad filter option; the effect is immediate:
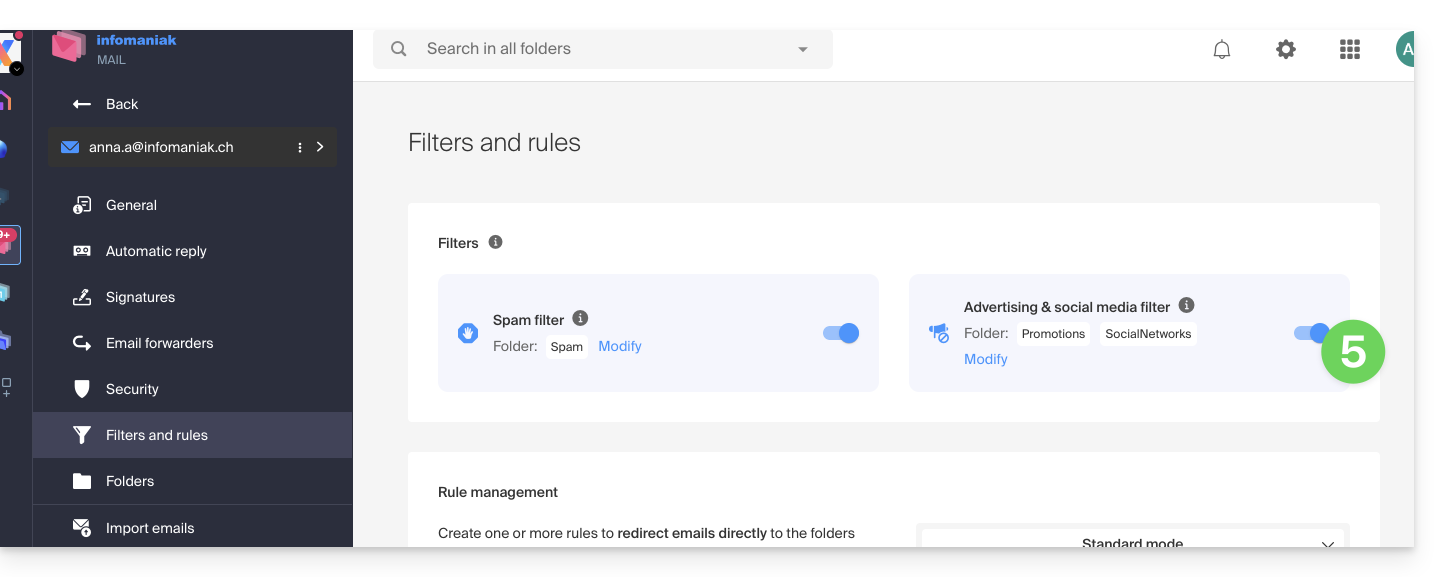
- To disable the filter, simply click the toggle switch again; in this case, all future messages will go to the inbox.
Enable the option from a Mail Service
To access your Infomaniak email settings:
- Click here to access the management interface for your product in the Infomaniak Manager (need help?).
- Click directly on the name assigned to the product in question.
- Click on the relevant email address in the table that appears.
- Click on Filters and rules in the left-hand menu.
- Enable the ad filter option; the effect is immediate:
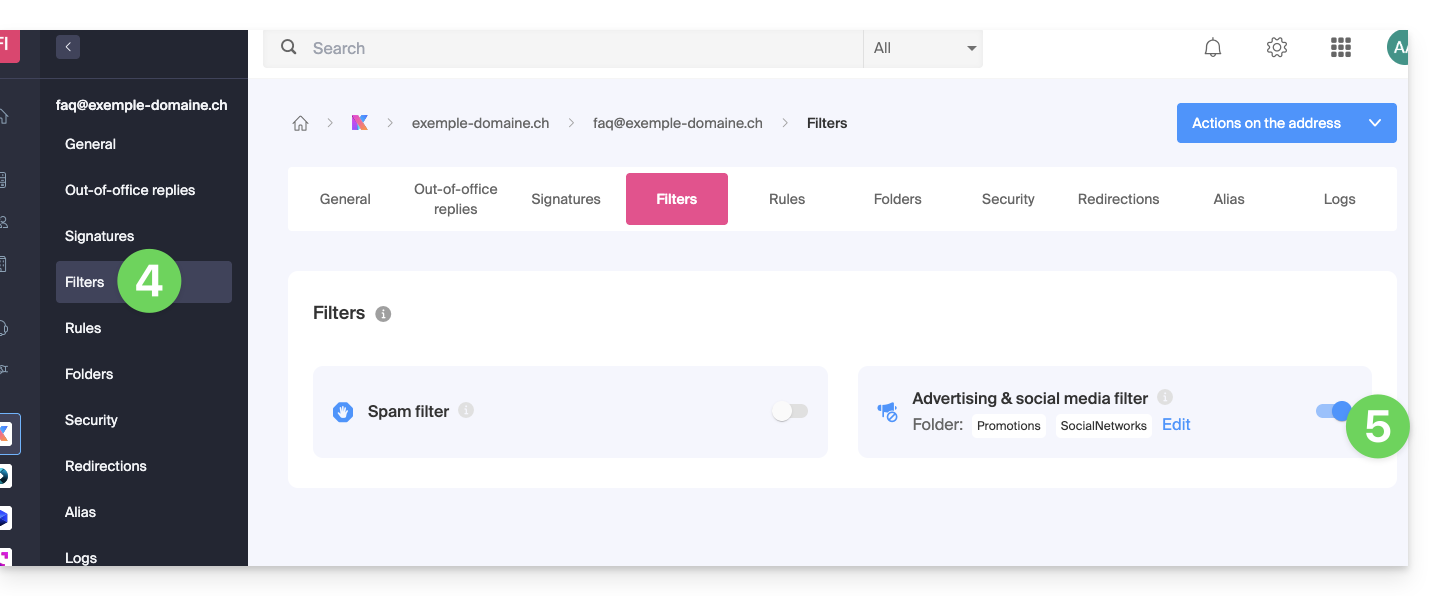
- To disable the filter, simply click the toggle switch again; in this case, all future messages will go to the inbox.
Please note that you can enable it for multiple addresses at once.
Customize the ad filter
Email Location
In the same location (point 5 in the images above), by clicking on Edit, you can choose the default location for the 2 folders where messages will be automatically placed (similar to special IMAP folders).
Link to this FAQ: https://faq.infomaniak.com/2839
Has this FAQ been helpful?
This guide explains how to transfer data (Web, Mail, Domain) currently hosted by Swisscom to InfomaniakThe first year of Web + Mail hosting (find out more) is offered to Swisscom customers who decide to switch to Infomaniak!
Transfer your Swisscom services to Infomaniak
To avoid interrupting your website and email services, migrate your services in the order indicated above.
Why choose Infomaniak?
By consolidating your domain names, websites, and email addresses with Infomaniak, you simplify the management of your invoices and services. Furthermore, your domains will be automatically linked to your website and email address. You will therefore not need to manually configure the DNS settings for your domains with another registrar.
Link to this FAQ: https://faq.infomaniak.com/2847
Has this FAQ been helpful?
This guide explains how to transfer to Infomaniak email addresses currently hosted by Swisscom, using an IMAP import tool.
Introduction
- This operation does not affect the data already present in the destination address, nor the data in the source address.
- The entire external mailbox will be imported.
- Once the import process has started, it is no longer possible to interrupt it.
- Any duplicates will be handled: identical content will only be copied once.
- Refer to this other guide if you are looking for alternatives to this IMAP process.
Import your entire email history
1. Swisscom Prerequisites
- If necessary, note down the specific email addresses you have with Swisscom so you don't forget any; to do this:
- Click here to access the Swisscom HCP Control Panel.
- Click on Manage account.
- Click on Email account:
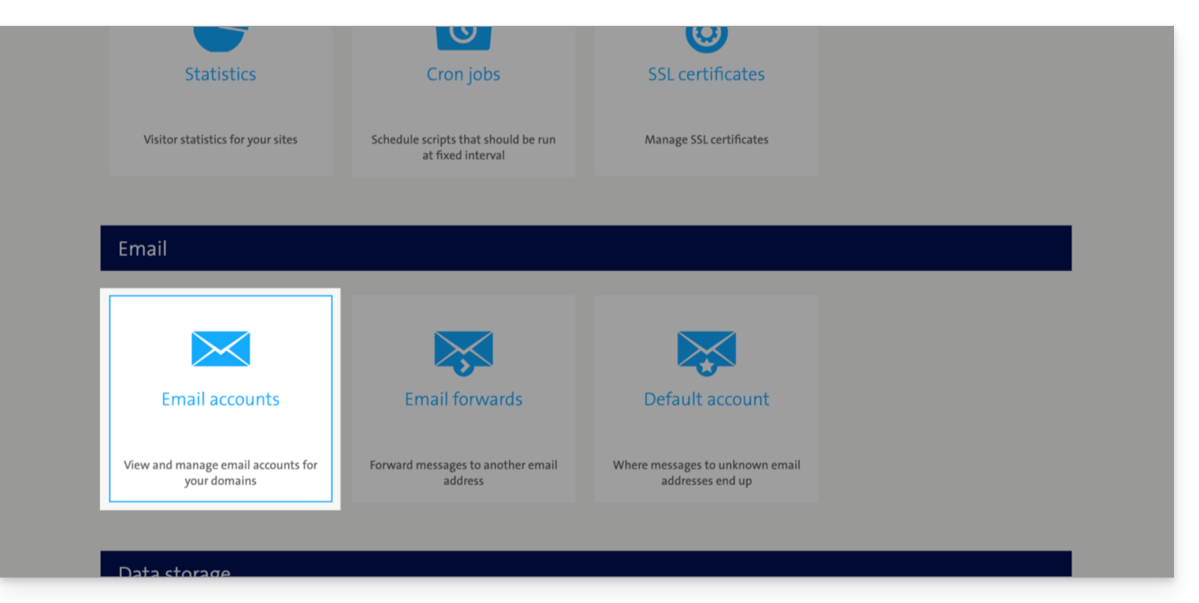
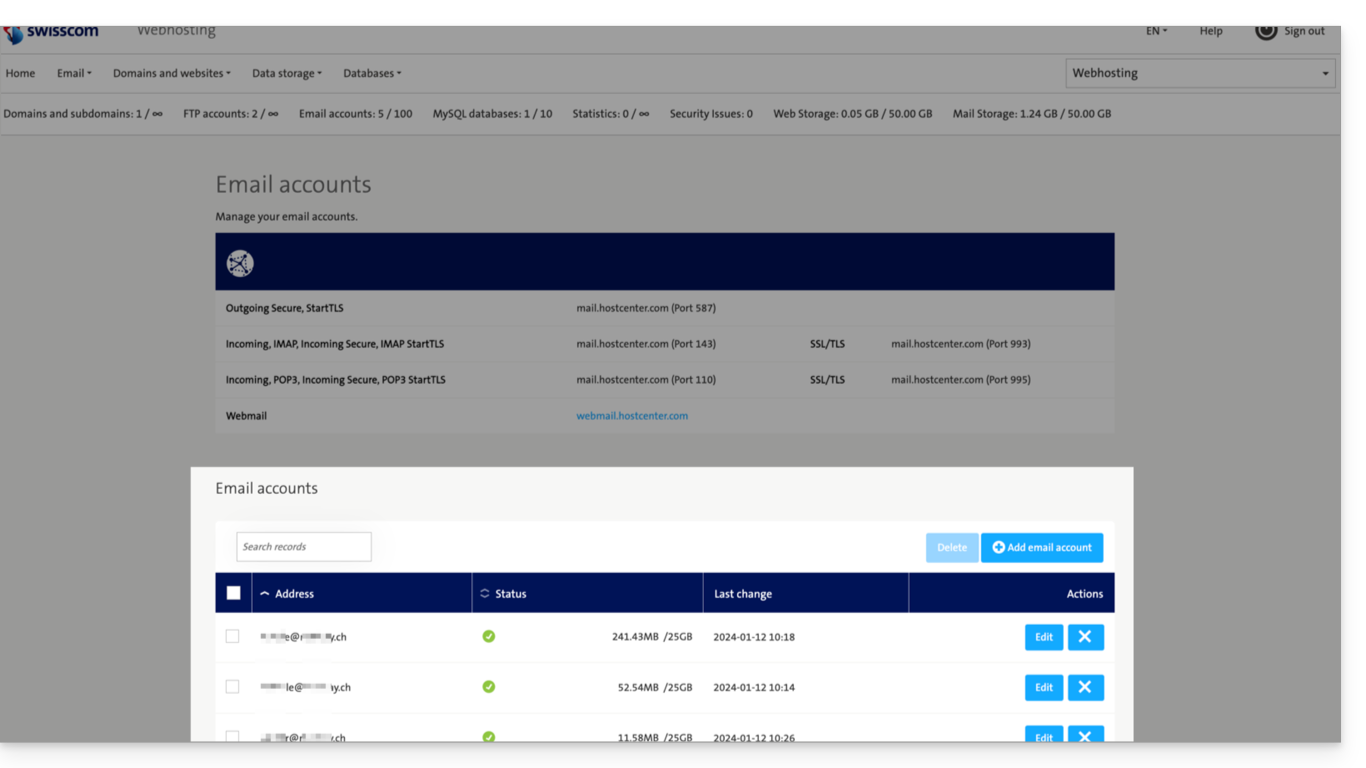
- The list of your current addresses is displayed at the bottom (click on Edit to the right of an email address to update its password if you have forgotten it):
2. Infomaniak Prerequisites
- You must have a Mail Service on your Infomaniak Manager.
- Have a number of available addresses or adjust it if necessary.
- Make sure your email is properly secured
- Create one or more addresses on this Mail service.
- If you have many (10+) email addresses to create, please refer to this other guide regarding bulk creation.
- The destination email address must be linked to the user (= the Infomaniak account) you are using.
3. Import your Swisscom email content to Infomaniak
- Click here to access the import tool (online service https://import-email.infomaniak.com).
- If necessary, log in to your Infomaniak account for the relevant organization; the import will be done to one of the email addresses associated with the Infomaniak Mail web interface (online service ksuite.infomaniak.com/mail) of the Infomaniak account you are using.
- Click on the IMAP import option.
- Click on one-time import.
- Fill in the field on the left with your source email address (the content of which you want to copy):
- Fill in the field on the right with the password for this same source email address (see prerequisites).
- If necessary, modify the Advanced Settings to specify an IMAP server address:
- Enter the IMAP server name
mail.hostcenter.com. - Leave the default port (993) and SSL enabled.
- Enter the IMAP server name
- Click on Confirm.
- If necessary, enter a second email address to be imported at the same time.
- Choose the email address from which to import emails; the drop-down menu lists the email addresses currently associated with your Infomaniak Web Mail interface (online service ksuite.infomaniak.com/mail) for the Infomaniak account you are logged into.
- After selecting the desired destination address from the list, click the blue Import Emails button.
- The copy process has started. You can wait and view the results on the page once the import is complete, or close the window (the import will continue in the background, and progress can be tracked - see below).
- A confirmation email will be automatically sent to all email addresses involved in the operation once the import is complete, indicating the number of messages copied.
- Tracking is available in the settings of the destination email address, only on the web app Mail (online service ksuite.infomaniak.com/mail).
- Tracking allows you to view the import history for the address in question.
4. Adjust the application settings
Once you have configured your domain name to work with Infomaniak, modify the settings of the email software/clients you use so that they connect correctly to the Infomaniak servers: follow the configuration wizard.
Link to this FAQ: https://faq.infomaniak.com/2852
Has this FAQ been helpful?
This guide presents the email authentication mechanisms and ways to resolve the Sender Mismatch error.
Introduction
- The "Sender Mismatch" error occurs when the address used to send an email does not match the authentication address used when connecting to the SMTP server.
- This error is related to two specific elements:
- the
Return-path(also called "envelope sender"), which is used by the mail server to manage returns and delivery errors, - and the
Fromheader, which is the sender address visible to the recipient in the message.
- the
Troubleshooting the Sender Mismatch Error
Technically, when sending an email via a software/email client, you must authenticate using a username (your email address) and a password.
If, after authentication, the sender address specified in the "From" or "Return-path" header is different from the address used for authentication, the Infomaniak server may consider this a forgery attempt.This inconsistency triggers the "Sender Mismatch" error.
To fix this error:
- Make sure that the email address used for sending is the same as the one you use to log in (or a valid alias).
- Do not modify the
Return-pathaddress or theFromheader to use another unauthorized address (if necessary, please refer to this other guide to test another email application or configure your current email software/client correctly).
Link to this FAQ: https://faq.infomaniak.com/2887
Has this FAQ been helpful?
This guide details the steps to follow when you want to “release” the management of an email address that is currently “restricted” by the use of an Infomaniak account with the same name.
Introduction
- For example, the email address
benevolon the Mail Serviceexample.xyzwill no longer be shareable with other users once an Infomaniak account is created with a login ID in the form of the email addressbenevol@example.xyz. - Therefore, a procedure exists for the administrator of a Mail Service to activate the release of the corresponding Infomaniak account if necessary.
- The corresponding email address, which was previously linked and accessible, will no longer be, but the account data will not be deleted.
- Only the login address should be provided in a different form by the user in question.
Request to unblock the Infomaniak account
To enable the deletion of the login ID when it is identical to an email address that can no longer be shared, the Mail Service administrator must go to the Manager:
- Click here to access the management of your product on the Infomaniak Manager (need help?).
- Click directly on the name assigned to the product in question.
- Click on the email address in question in the table that appears.
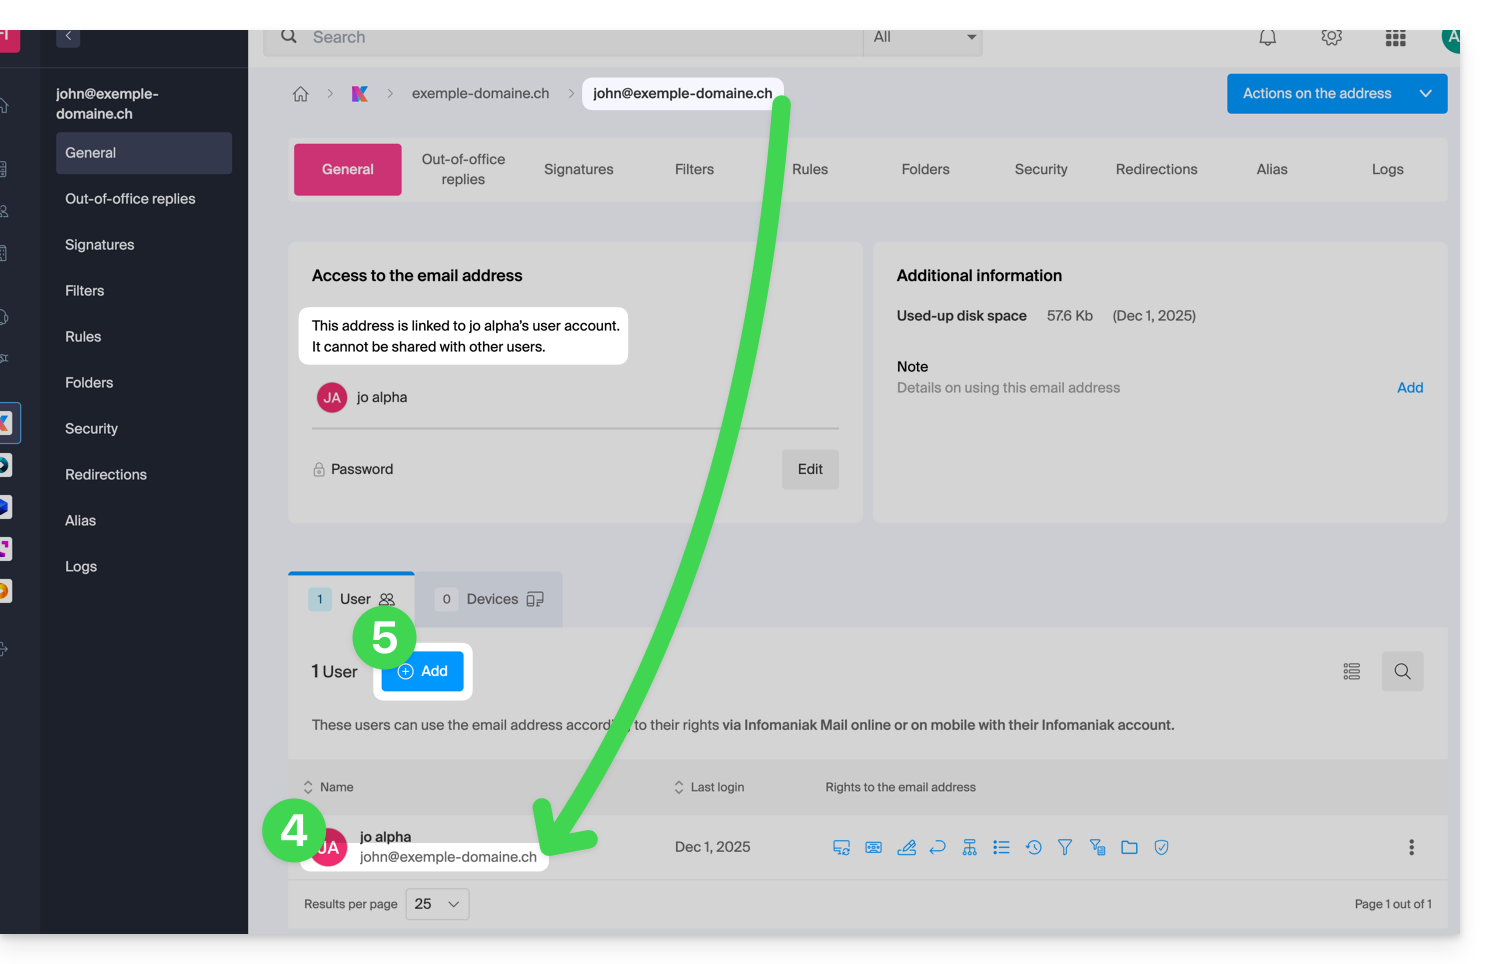
- Under the General tab, you can see the users who have accessed this address, and among them, you will find the relevant user.
- Click on the Add button in the Users section (an operation that is currently not possible):
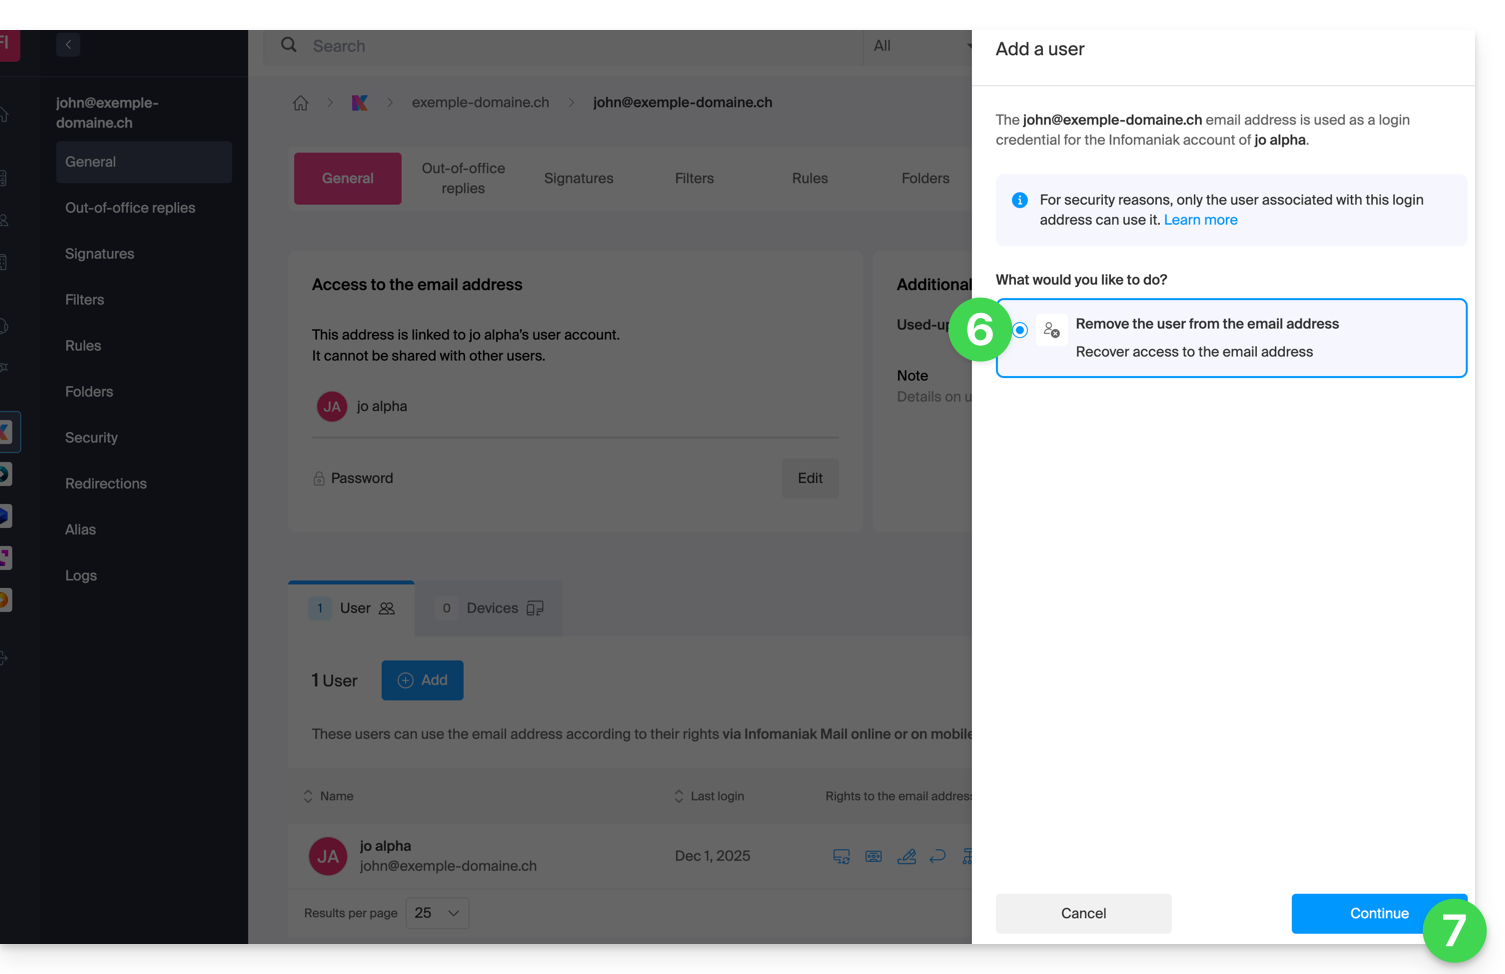
- In the right sidebar, the wizard for freeing up the address will open; click the radio button to activate the operation.
- Click on Continue:
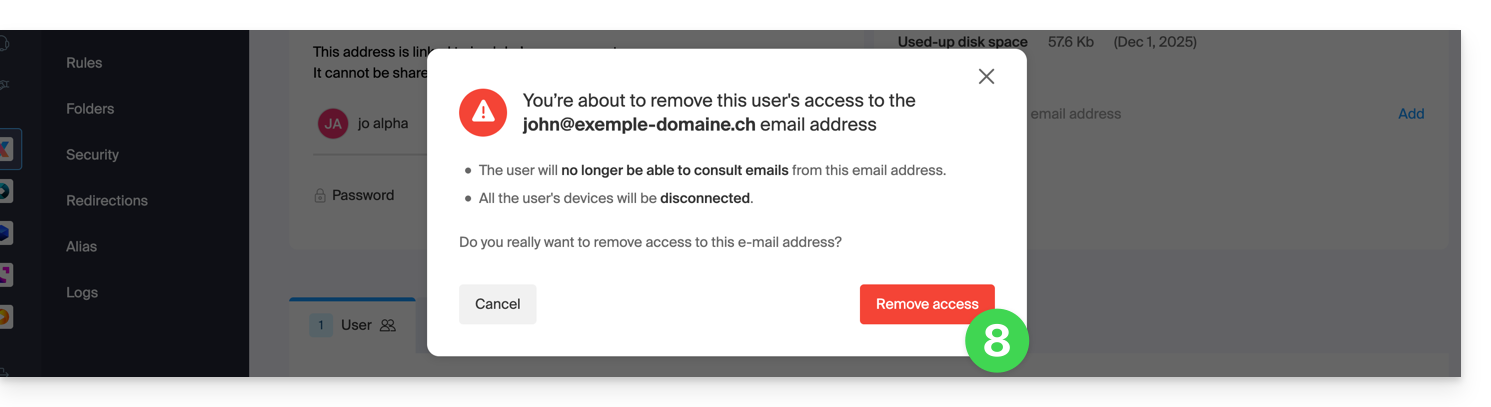
- Confirm the user logout operation:
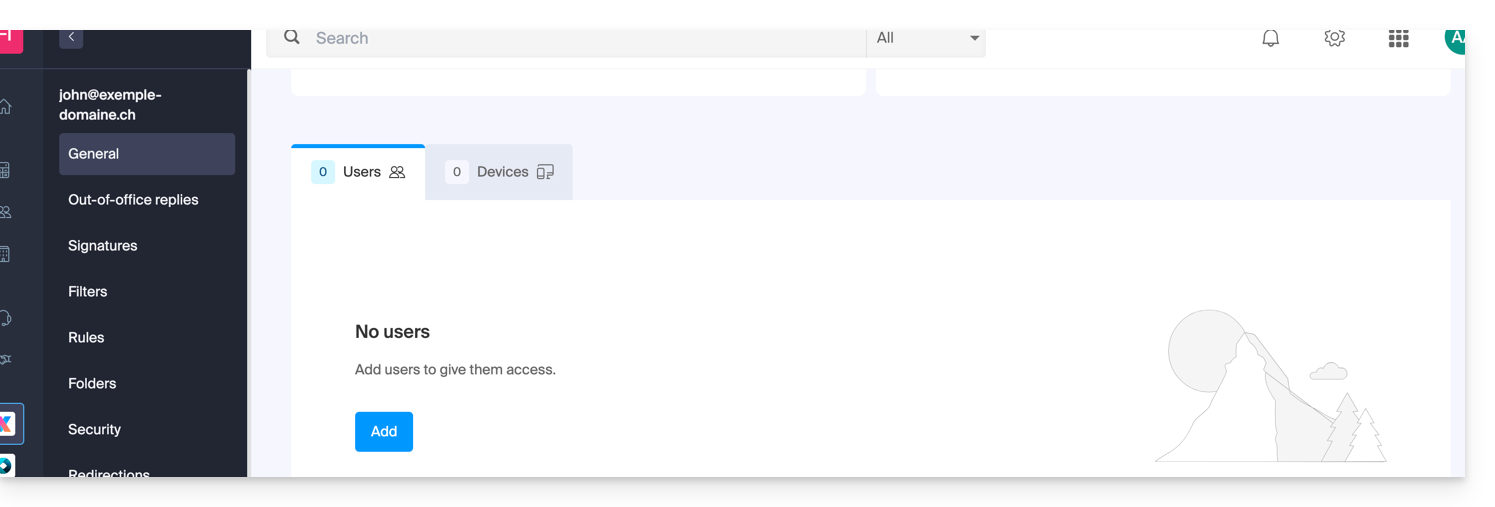
- The linked user disappears from the user page:
- At the same time, he receives a similar SMS to the example below, on the phone number he provided during registration:
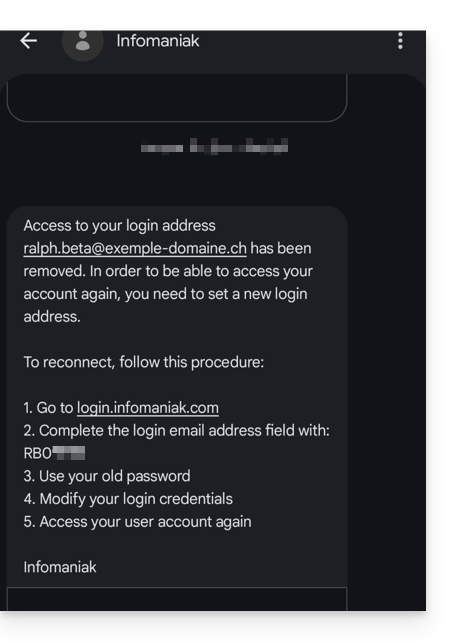
- This SMS tells him the steps to follow to reconnect to his Infomaniak account with another email address of his choice (see below).
Recover access to your Infomaniak account
To regain access to your Infomaniak account now that you can no longer access it with your old email address, the Infomaniak account user must go to the address mentioned in the SMS:
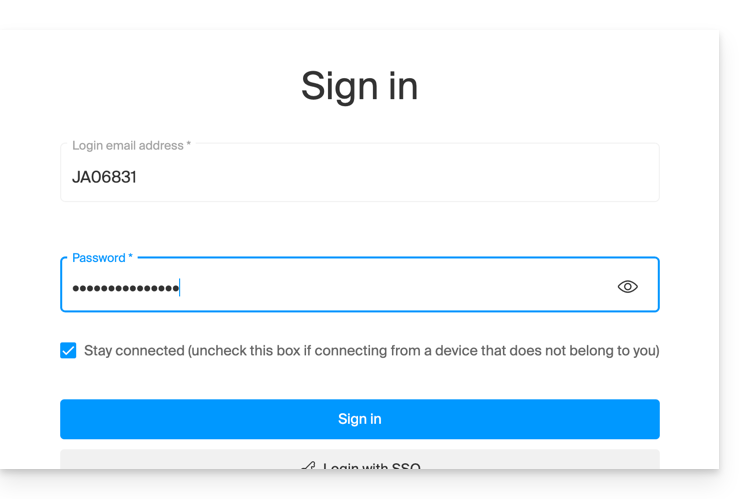
- Click here to access the login page.
- Enter the username specified in the SMS (usually the initials of your account followed by a series of numbers).
- Enter your usual password (it has not changed):
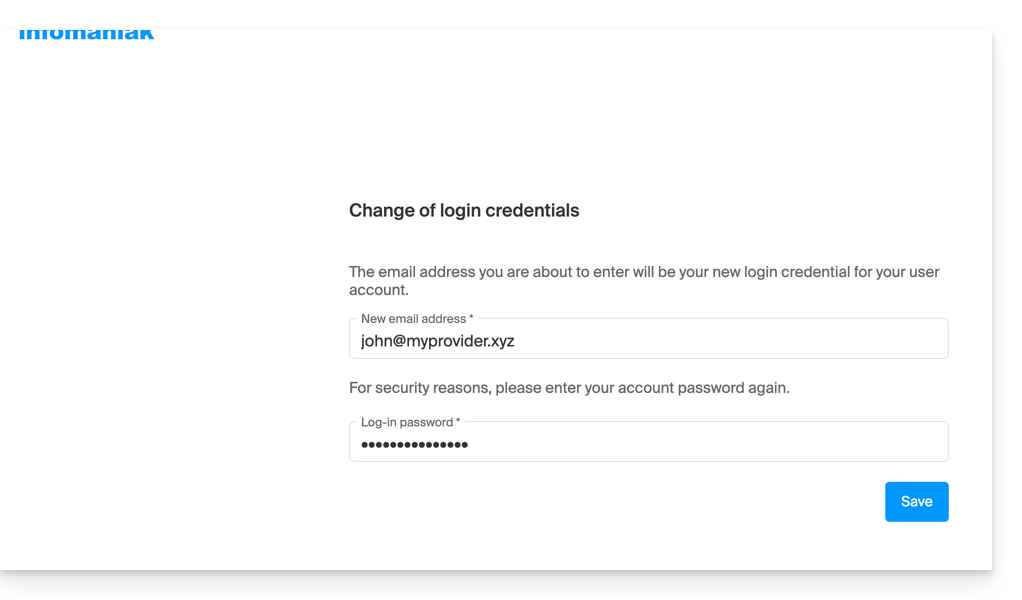
- Enter the new information requested:
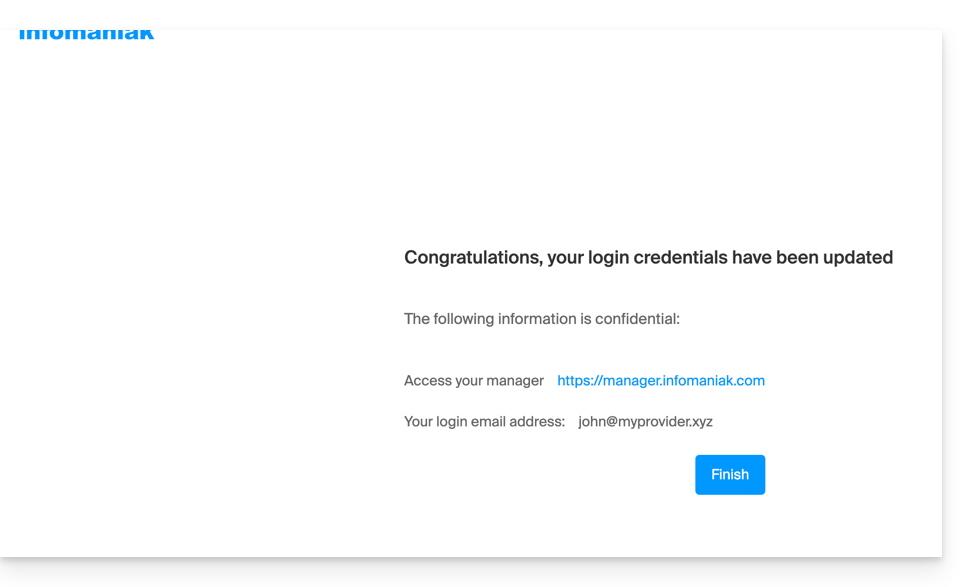
- You will be logged back into your account:
Link to this FAQ: https://faq.infomaniak.com/2895
Has this FAQ been helpful?
Creating and managing standard email addresses is done directly from the Mail Service in the Infomaniak administration interface (Manager):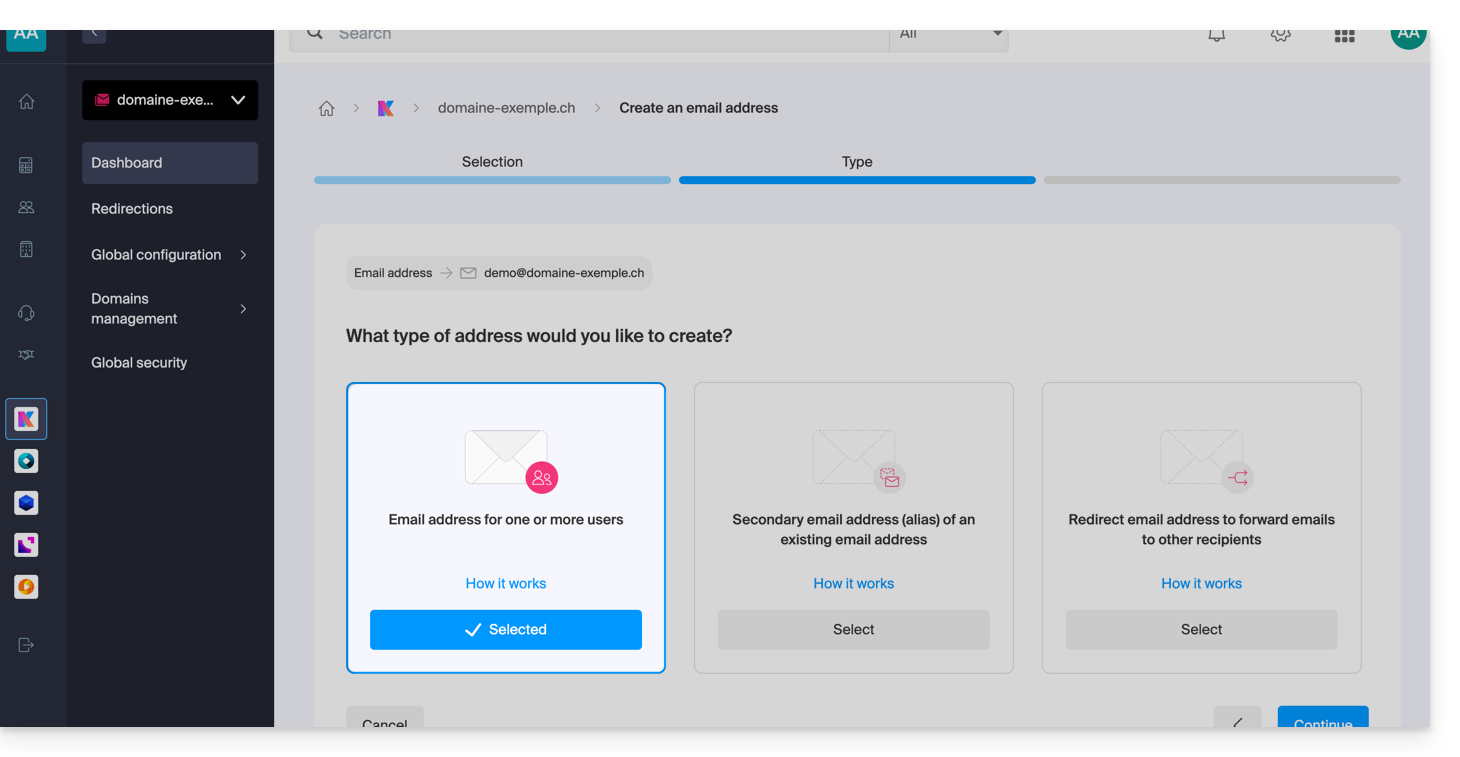
Create a primary email address
Prerequisites
- Read the preliminary guide for Add and choose the name for the email address
Next:
- Select the first box for (visible above: email address for one or more users).
- Click the Continue button in the bottom right corner.
Choose who will be able to view the address
Click in the text field to choose who will be able to view the email address: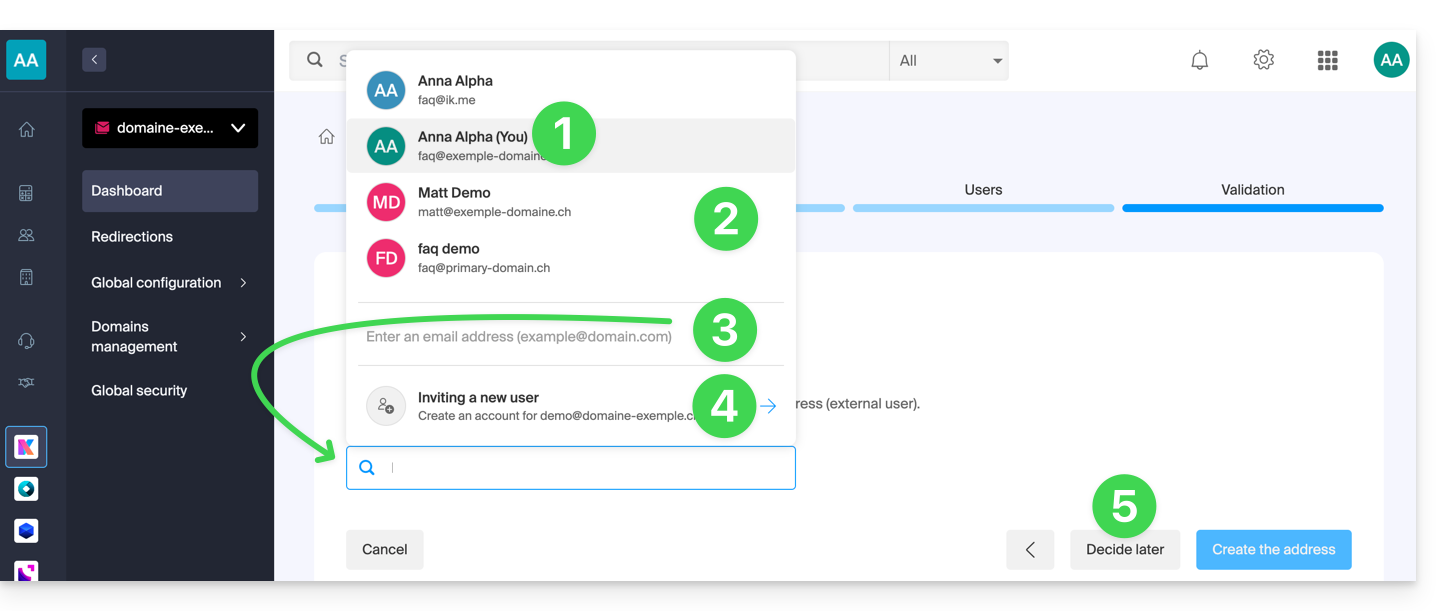
- You (you will be able to directly access and use the email address on the Mail Infomaniak apps - Web, mobile, …).
- Existing users in your Organization (they will be able to directly access and use the email address on the Mail Infomaniak apps - Web, mobile, …).
- An external user who already has an email addressto whom you send an invitation link to the email address you must specify in the field below.
- An external user who does not yet exist for whom you will create an Infomaniak account that will have the same login ID as the address you want to create.
- YOU and/or a new user to whom you will subsequently send an invitation link using your own means (the address will not be visible anywhere initially).
Option 1: Yourself (your login ID)
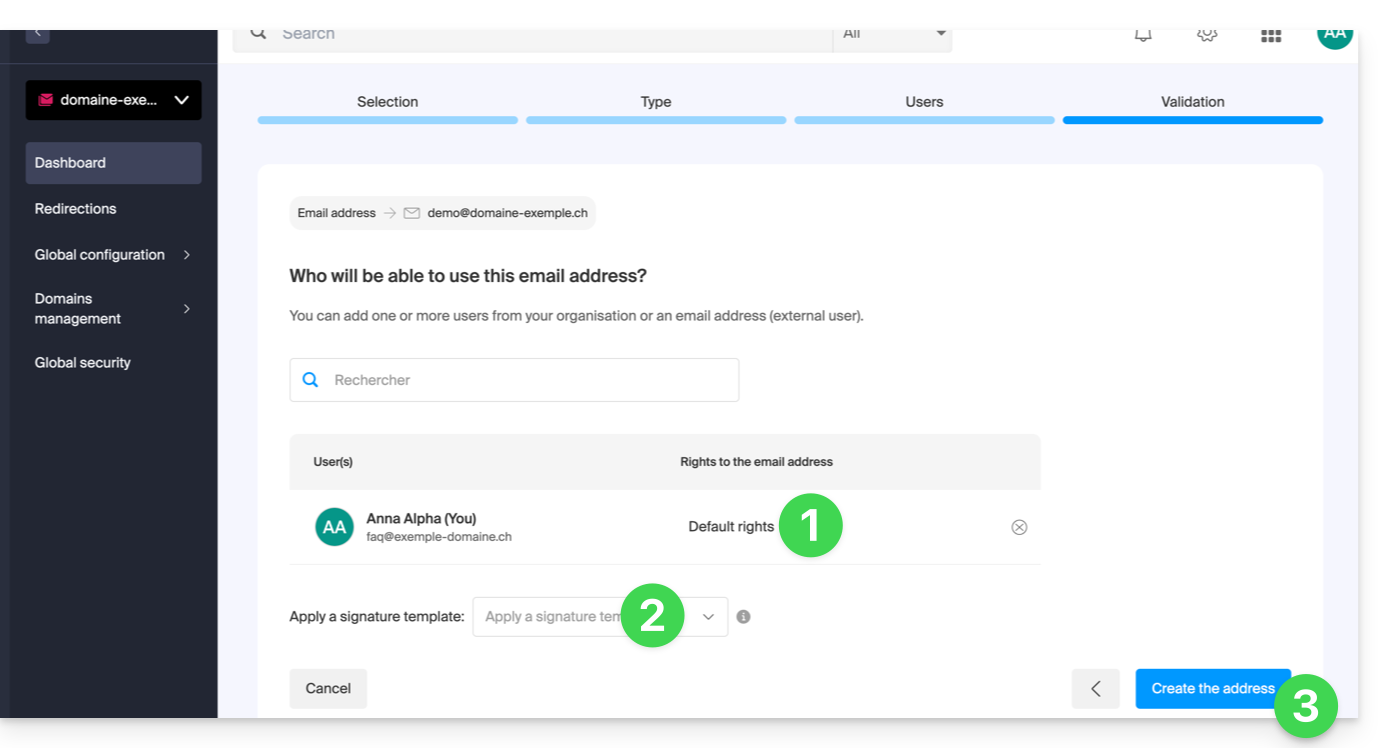
In the list of users, you click on your login ID (yourself):
- Manage your access rights to voicemail, device addition, etc. by clicking on “Default Rights”.
- Choose an optional signature template.
- Click on Create address:
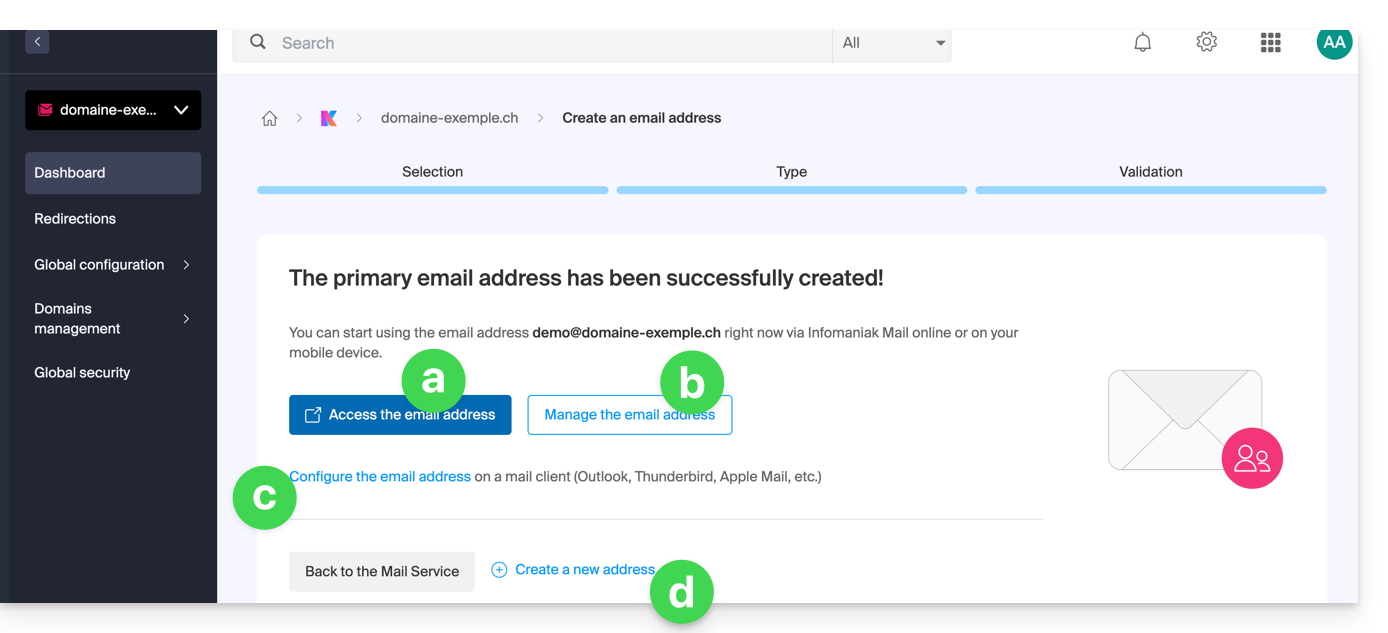
- That's it:
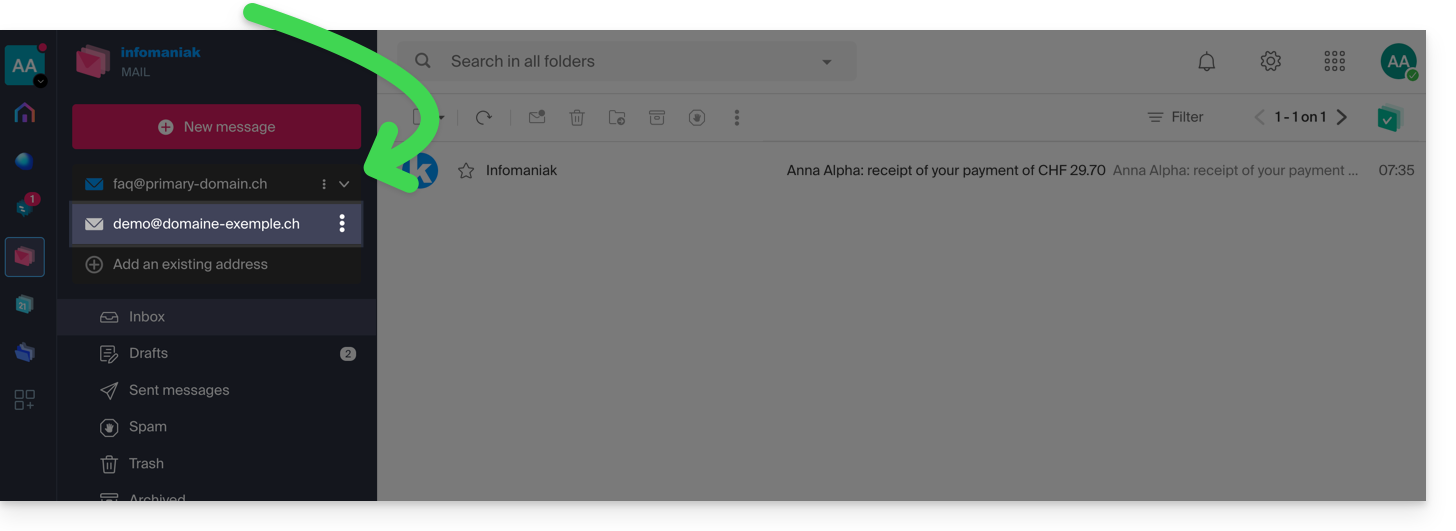
- The email address is now visible in the Infomaniak Mail apps (ksuite.infomaniak.com/mail, mobile app, etc.); click on the created address if necessary to view it:
- Manage the options for your address (such as the out-of-office message, filters, etc.).
- If necessary, configure different devices to also access this email address.
- Create additional addresses as needed.
- The email address is now visible in the Infomaniak Mail apps (ksuite.infomaniak.com/mail, mobile app, etc.); click on the created address if necessary to view it:
Option 2: Select other users from the Organization
In the list, you select other existing users within the Organization:
- Manage their possible access rights to the voicemail, device addition, etc. by clicking on “Default Rights”.
- Click on Create address:
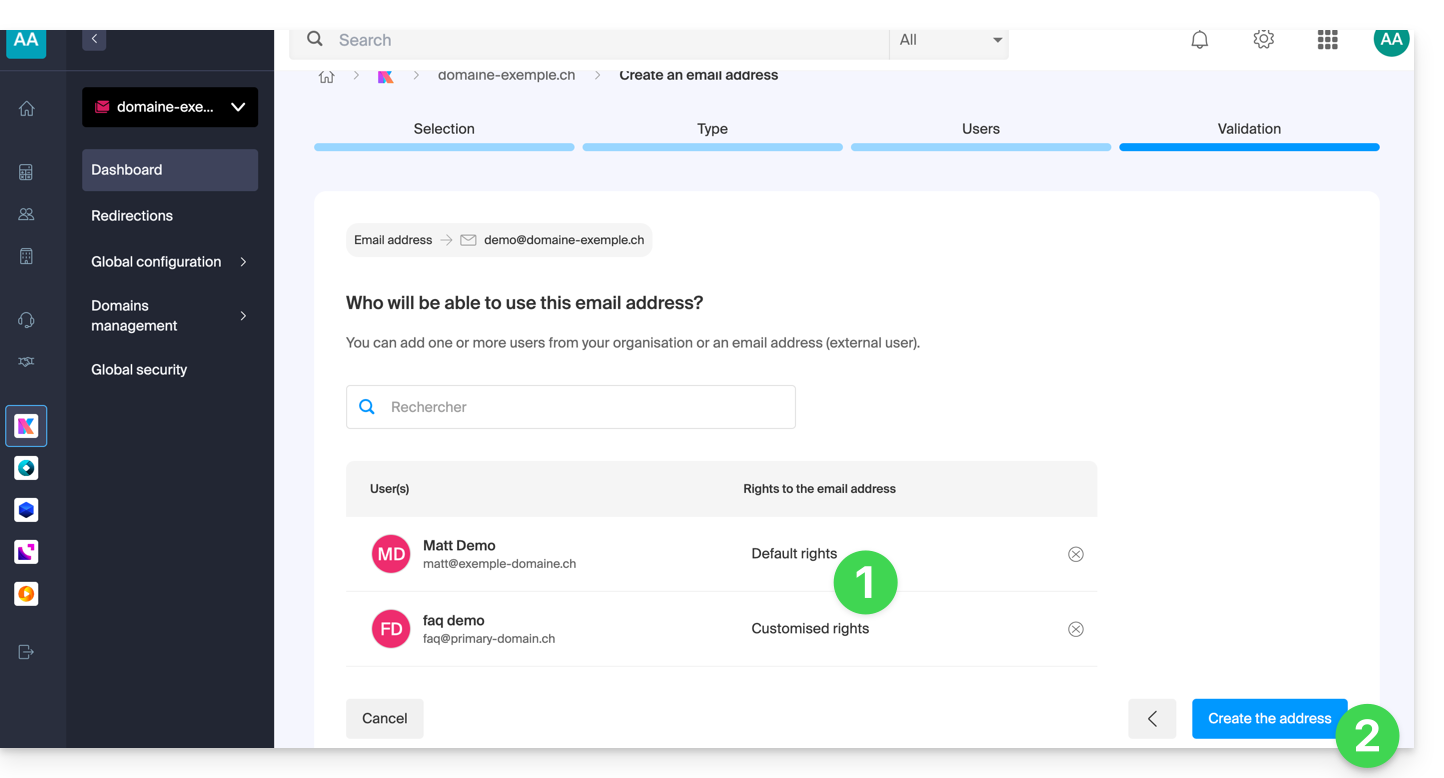
- That's it: the email address is now visible in their Infomaniak Mail apps (ksuite.infomaniak.com/mail, mobile app, etc.).
Option 3: Invite an external user who already has a personal email address
You want to enter theexisting email address of a contact, colleague, etc. so that you can grant them access to the new email address you are creating:
- Enter the user's email address (whether they already have an Infomaniak account or not) in the search field.
- Click on the line to add them as a user:
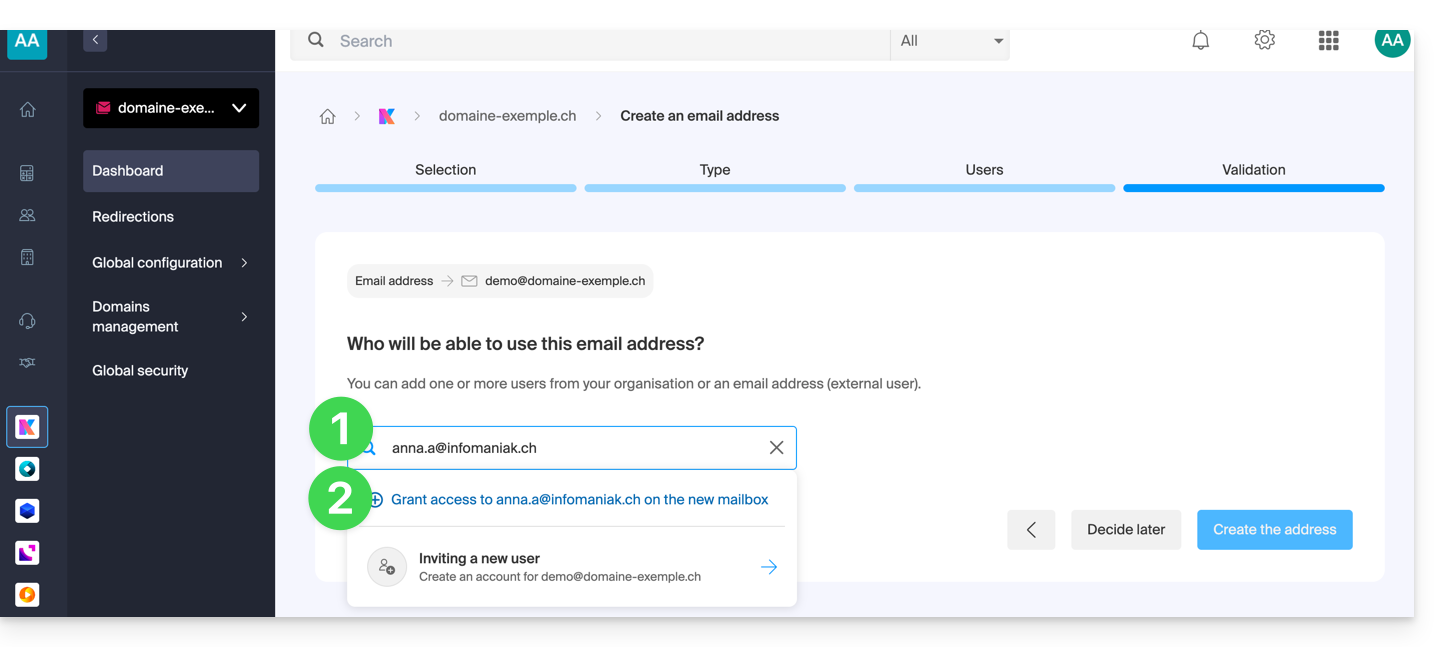
- Manage any access rights to the voicemail, device addition, etc. by clicking on “Default Rights”.
- Click on Create the address:
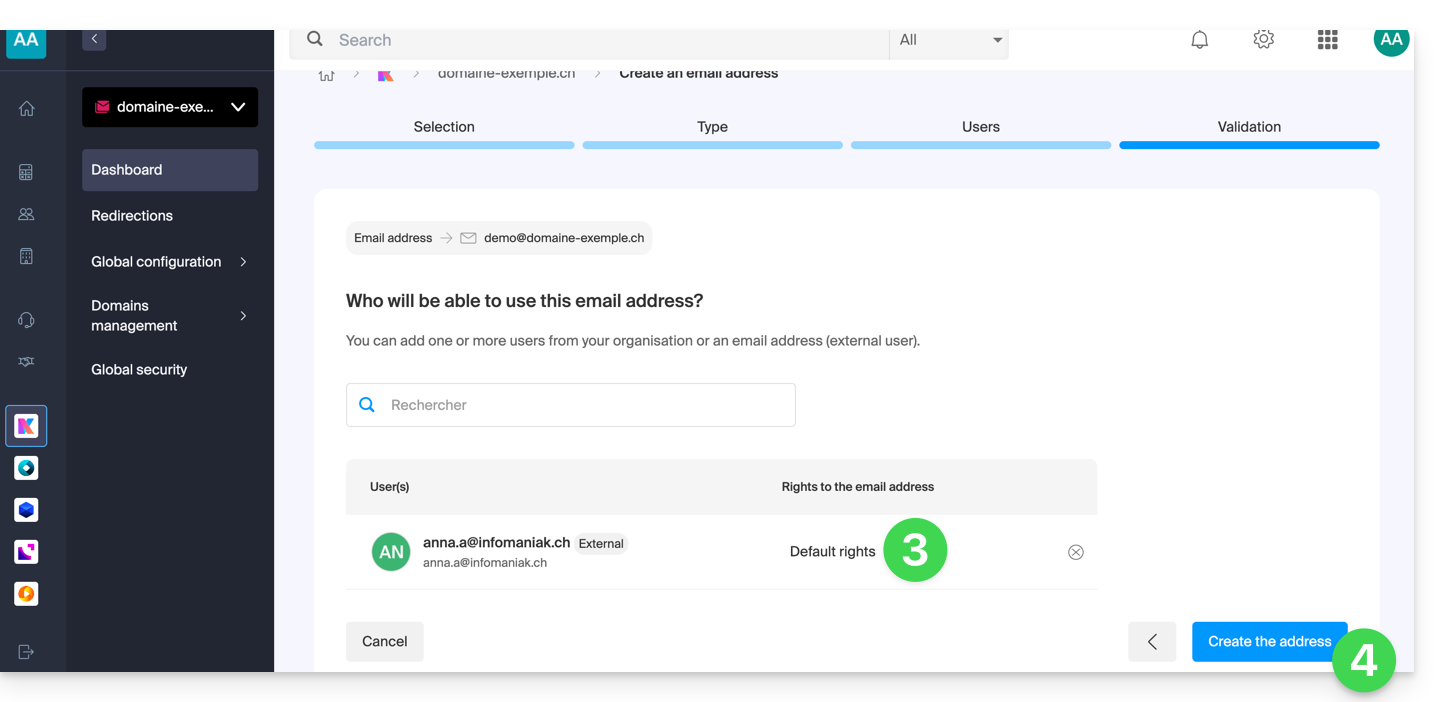
- That's all:
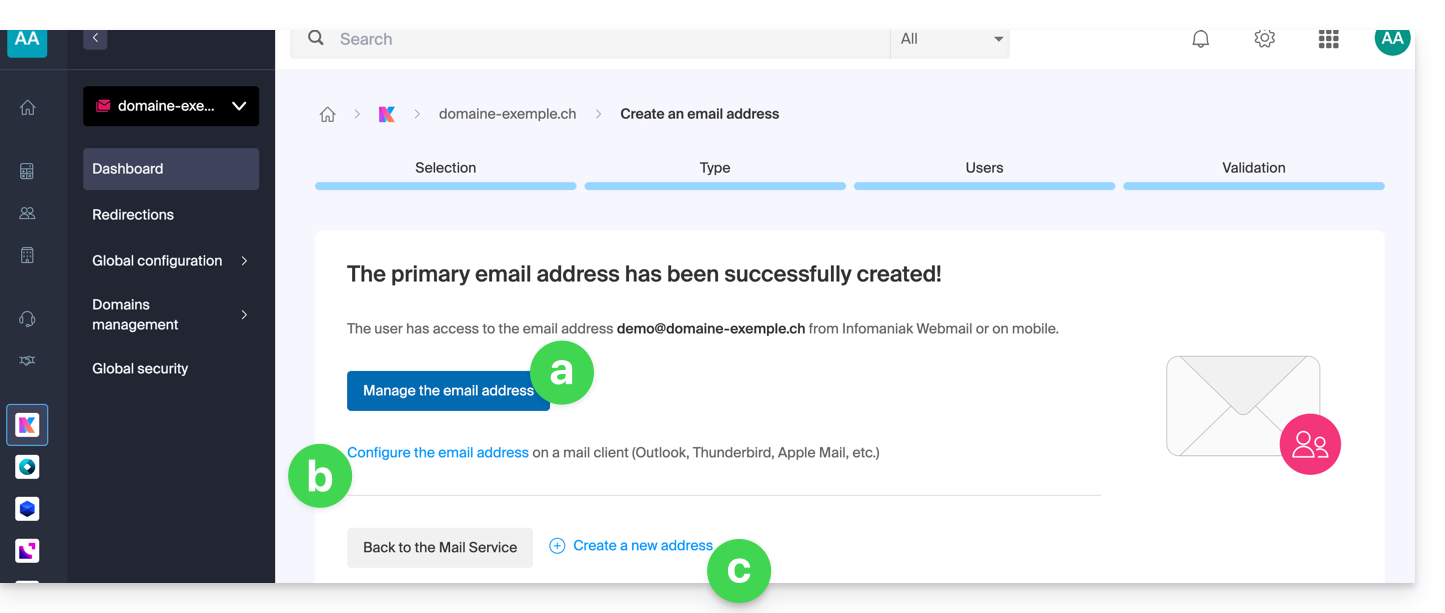
- Manage the address options (such as the out-of-office message, filters, etc.).
- If necessary, configure different devices to also access this email address.
- Create additional addresses as needed.
- The user receives an invitation to access the email address, valid for 30 days:
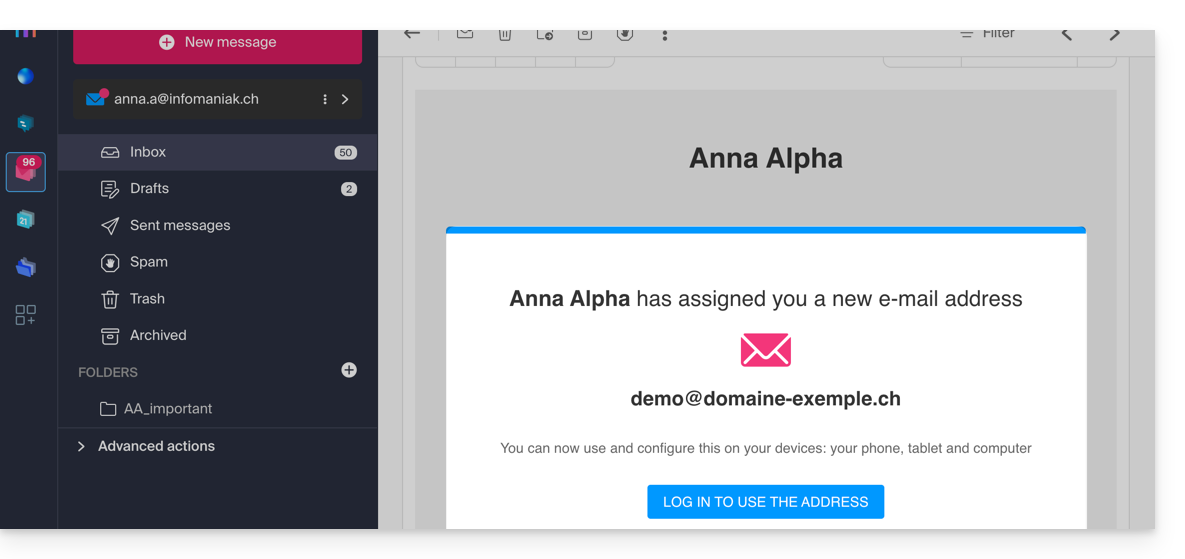
- The button takes the user to a page where they can either create a new account or log in to an existing account they already have with Infomaniak. Once completed, the address will be automatically visible in their Infomaniak Mail apps (ksuite.infomaniak.com/mail, mobile app, etc.).
- The current invitation is visible in the email address management section of your Mail Service:
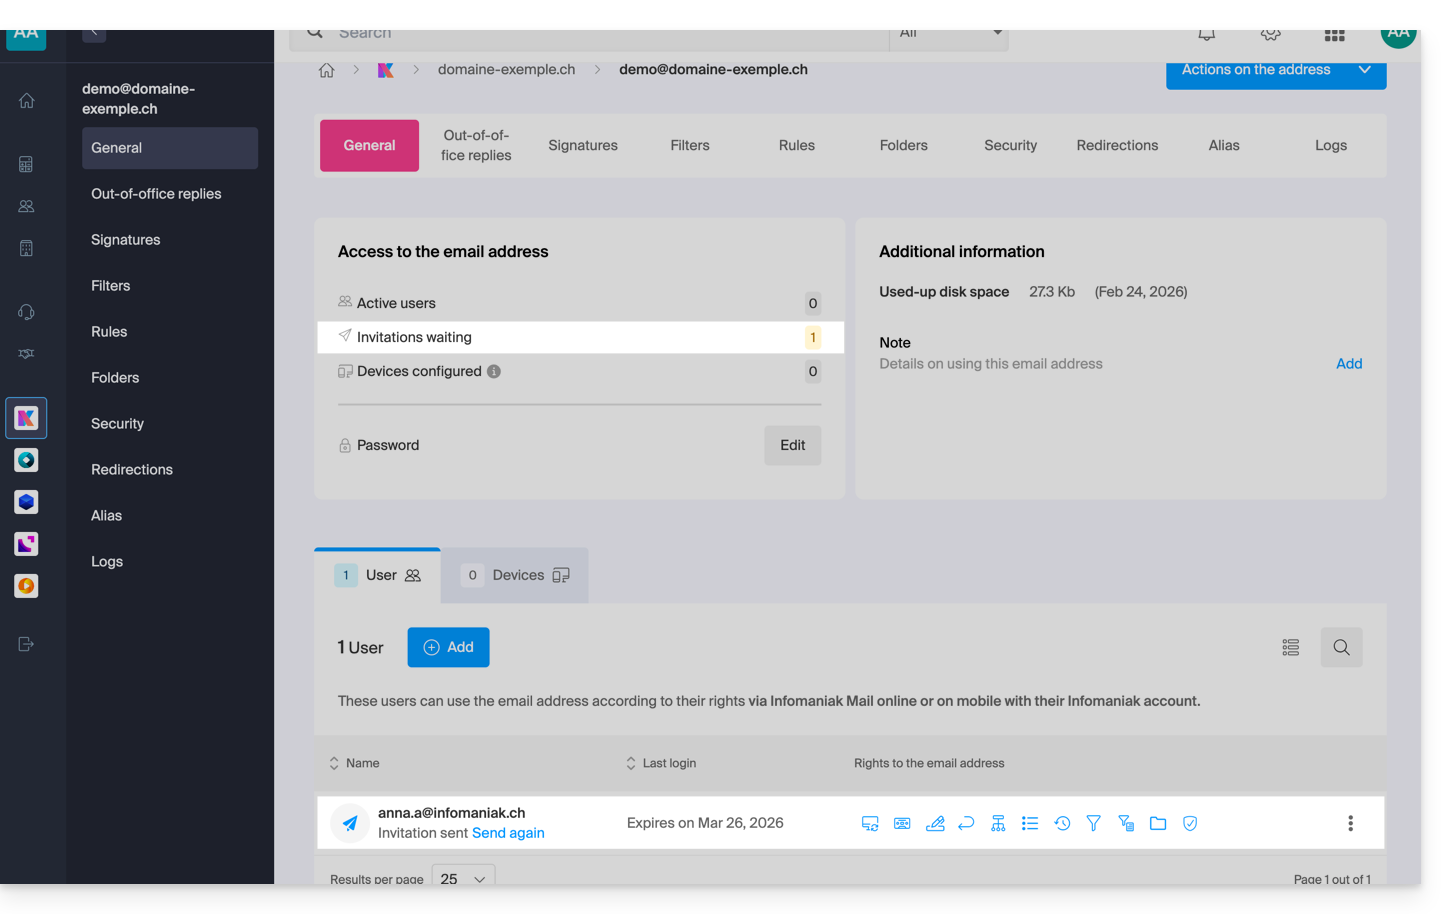
- By clicking on Resend, you can view the link in order to copy it and/or resend it.
Option 4: Create a brand new Infomaniak account associated with the new email address
You will be redirected to the user creation page within the Organization, which will allow you to add the user from scratch and create the desired email address at the same time. Some restrictions may apply: please refer to this other guide for more information.
Option 5: Decide later
- The email address is created directly (still without a password, and this time without any user, so the address will not be visible anywhere initially) and is fully functional.
- You can, of course, manage users and passwords directly from the email address management interface.
Link to this FAQ: https://faq.infomaniak.com/2901
Has this FAQ been helpful?
You can create and manage aliases (alternative email addresses) directly from the Mail Service in the Infomaniak administration interface (Manager):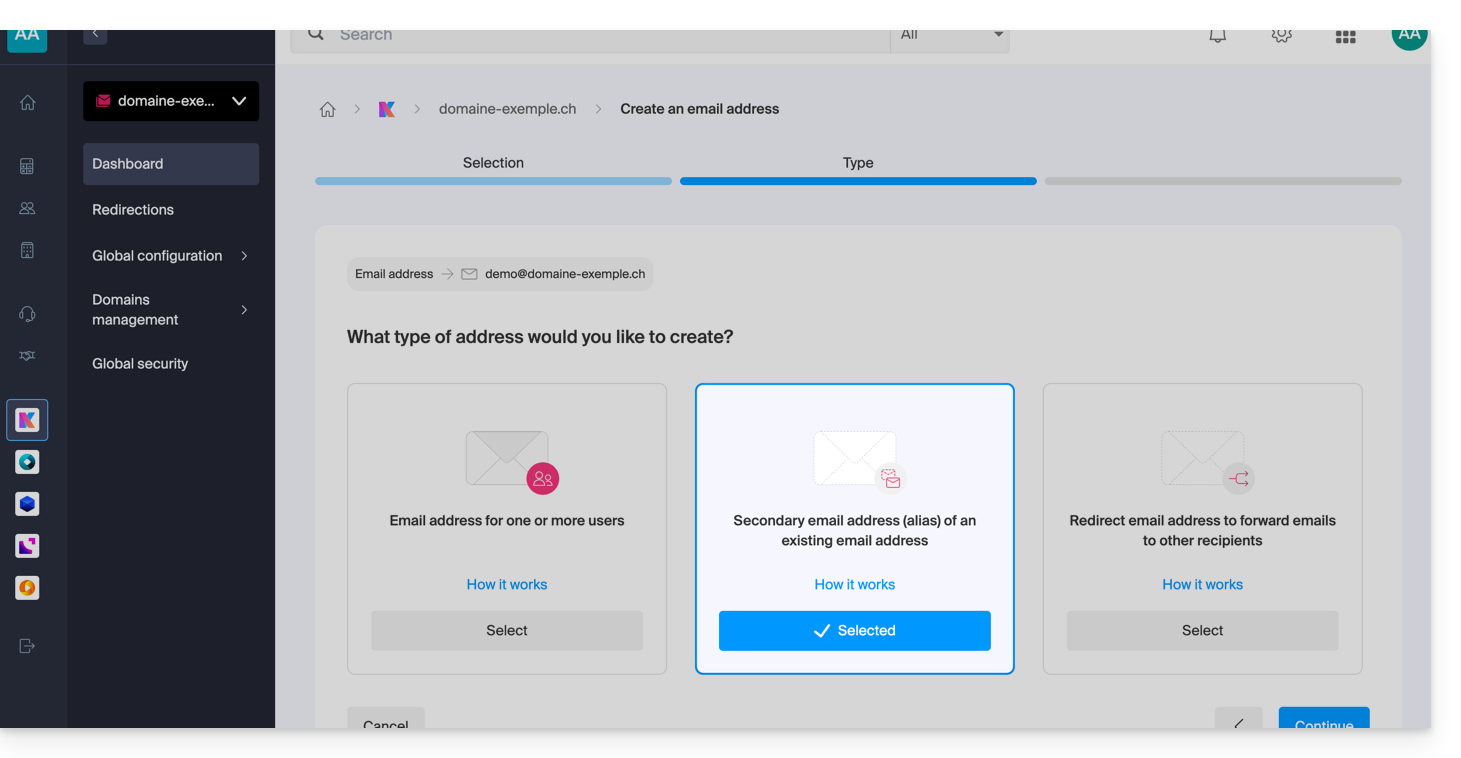
What are alternative email addresses?
An alternative email address, commonly called an alias, is an additional address linked to a primary email address. It does not have its own password or storage space, as it automatically forwards all received messages to the main inbox.ar elle redirige automatiquement tous les messages reçus vers la boîte de réception principale. For example:
- Main email address:
florent@domain.xyz - Alternative addresses:
florent.dupont@domain.xyzand/orfd@domain.xyzand/orcontact@domain.xyz, etc.
For detailed instructions on creating an alias, please refer to this other guide.
Features & Benefits
Using an alias allows you to multiply contact points while simplifying daily email management:
- Consolidated inbox: emails from multiple aliases are received directly in the main address, avoiding the creation of multiple mailboxes.
- Centralized management: the user does not need to remember multiple passwords; settings such as the signature, auto-reply, or filtering rules are centralized on the main address.
- Confidentiality and security: an alias allows you to communicate without revealing your main email address or real identity when sending messages.
- Multi-domain usage: it is possible to connect multiple domain names to the Mail Service to receive messages on different extensions (e.g., .com, .ch, .fr) via a single interface; see this other guide.
- Cost optimization: alternative addresses are not counted against the address quota included in the Mail Service offer, allowing you to create numerous identities/spellings without incurring additional costs.
For specific needs, it is also possible (and this applies to all Infomaniak email offers) to generate temporary/on-the-fly aliases to filter incoming emails or register on third-party services without cluttering the main inbox. See this other guide.
Link to this FAQ: https://faq.infomaniak.com/2902
Has this FAQ been helpful?
Redirection settings are configured directly from the Mail Service in the Infomaniak administration interface (Manager):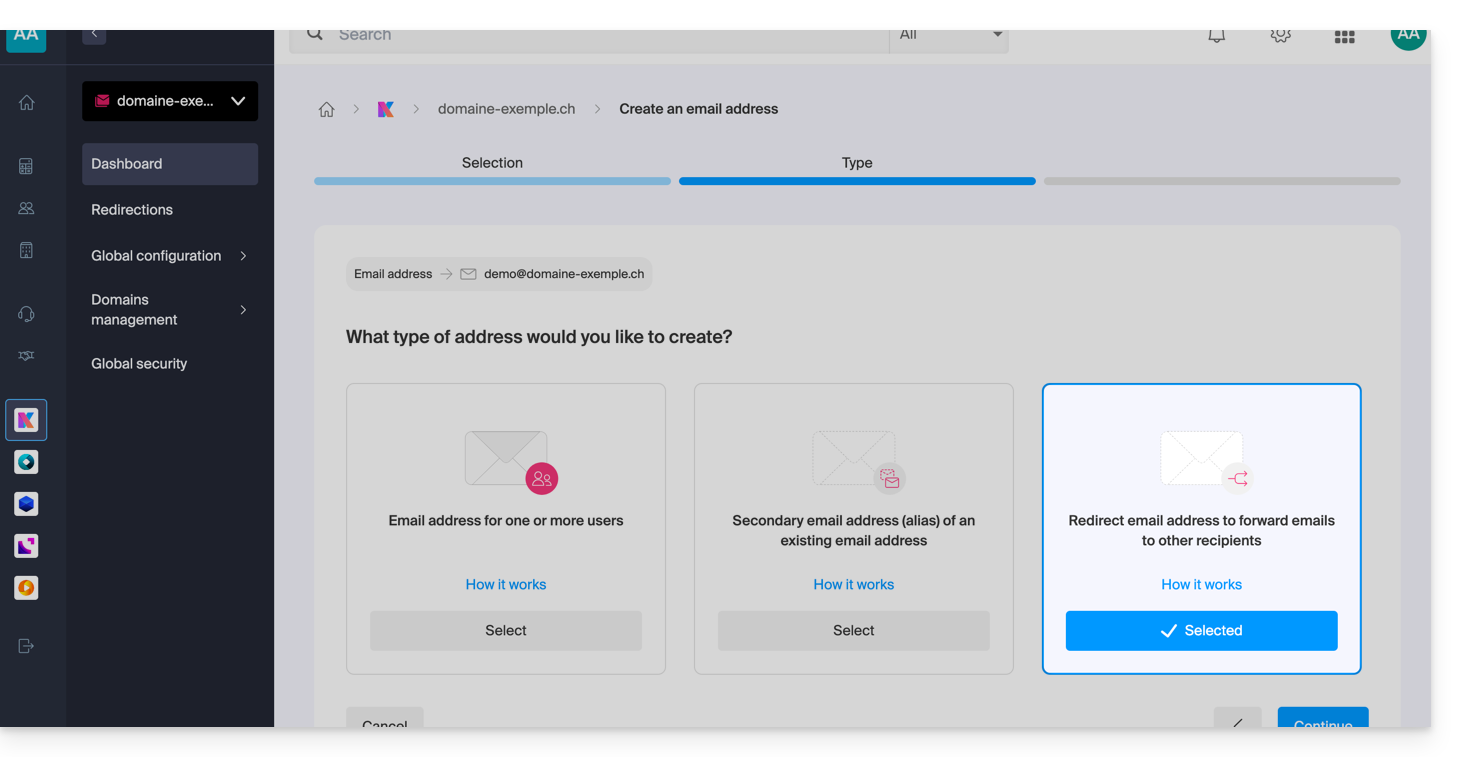
How to redirect mail traffic?
Redirection involves configuring a mail address to automatically forward received messages to one or more other destinations.
There are two main scenarios:
Redirection from an existing address
- The address has its own inbox, but copies or forwards messages to other accounts.
- For example, emails sent to
contact@domain.xyzare automatically redirected tojohn@domain.xyzandresponsables@domain.xyz. The “responsables@…” address can itself be redirected to other people as well… - Refer to this other guide for more information.
Redirection address (virtual address)
- The address does not have its own storage space and only serves as a relay to the destination addresses.
- Refer to this other guide for more information.
Why use redirections?
This system offers great flexibility in managing communication flows:
- Centralization of messages: in the event of a change of address or the departure of an employee, redirection allows you to continue receiving messages at a single point of contact without losing information.
- Multiple distribution: a single incoming message can be distributed simultaneously to multiple recipients, facilitating collaborative work.
- Eco-friendly management: the administrator can choose to automatically delete emails from the original address after they have been redirected. This avoids storing duplicate data and optimizes server resource usage.
If the goal is simply to create a variation for a main address (for example, a common spelling mistake or a different extension), it is best to use the alternative email addresses (aliases) system. Redirection is preferred for automatically sending emails to external accounts or separate mailboxes.
Link to this FAQ: https://faq.infomaniak.com/2903
Has this FAQ been helpful?
This guide helps you choose the Infomaniak email service that best suits your needs, whether you are looking for a simple free address or a professional solution.
1. I would like a free email address
Example: jean.dupont@ik.me or plomberie-du-lac@etik.com
- Choose the My kSuite plan.
- It allows you to create 1 email address for free by choosing from three extensions:
@ik.me,@etik.com, or@ikmail.com. - Click here to register (refer to this other guide for help creating your account).
2. I would like a professional (custom) email address
To obtain an address ending with your company name or your last name (e.g., @plomberie-du-lac.ch), you must own what is called a domain name.
If you only need ONE address
- Example:
contact@plomberie-du-lac.ch - Choose the Starter plan.
- It includes 1 free email address when you purchase your domain name.
If you need MULTIPLE addresses
- Examples:
contact@plomberie-du-lac.ch,jean@plomberie-du-lac.ch, etc. - For 2 addresses: choose kSuite Standard.
- For 5 addresses or more: choose a Mail Service (standalone or included in a kSuite Business/Enterprise).
- Once you have chosen an offer, you can create your various email addresses on your domain name and even link a second domain name if necessary (or via this guide for an independent Mail Service).
Good to know: depending on the offer you choose above, certain technical limits may vary (number of daily email sends, email redirects, aliases, or recipients per message).
Link to this FAQ: https://faq.infomaniak.com/2920
Has this FAQ been helpful?