Knowledge base
1000 FAQs, 500 tutorials and instructional videos. Here, there are only solutions!
This guide details possible solutions to recover an expired or stolen domain name, a complex process that depends on the specific circumstances of each case.
First, make sure it is not simply in a redemption period.
Contact the current holder
If the domain name is (re)registered in the name of another person or entity, you can try to contact them directly to discuss a possible return of the domain name. This may involve negotiating with the current holder and reaching an amicable agreement. However, this can be difficult if the current holder is not willing to cooperate or if you cannot contact them.
Use ICANN mediation or arbitration services
ICANN (Internet Corporation for Assigned Names and Numbers) offers mediation and arbitration services to resolve domain name disputes. You can file a complaint with ICANN if you believe you have legitimate rights to the domain name in question. ICANN will review the evidence presented by the parties and make a decision based on ICANN policies. However, note that this can be a lengthy and costly process.
The rules and procedures for recovering an expired or stolen domain name may vary depending on the jurisdiction and ICANN policies. It is recommended to consult the specific policies of ICANN as well as local laws and regulations to understand the options available in your particular situation. It may also be helpful to consult a lawyer specializing in domain name law to obtain appropriate legal advice.
Resort to judicial procedures
If you believe the domain name has been stolen or your rights have been violated, you can consider suing the current holder in the competent courts. This may involve filing a complaint and presenting evidence in court to obtain a judicial decision. Judicial procedures can also be costly and time-consuming.
Monitor expired domain name auctions
If the domain name has completely expired and is up for auction, you can try to buy it at these auctions. Some expired domain names are put up for auction on specialized platforms, and you can participate in these auctions to try to recover the domain name.
And to avoid finding yourself in such a situation, read this Infomaniak article on the subject.
Link to this FAQ: https://faq.infomaniak.com/1053
Has this FAQ been helpful?
This guide is for you if you encounter the error The web host does not exist when visiting the address of a site on an Infomaniak Web Hosting.
Preamble
- This type of error usually occurs because your domain name is not correctly linked to your site (your domain name is probably pointing to the wrong IP address or is misconfigured).
- Example: a domain
abc.xyzthat is misconfigured and would point to an IPv4 Starter hosting and to a shared hosting in IPv6…
- Example: a domain
Resolve a Domain - Website Linking Issue
To get your site back online:
- Check the DNS zone of your domain name, especially its A records.
- Correct them if necessary by entering the IP address of your hosting.
- Any DNS addition/modification can take up to 48 hours to propagate.
To do this, the easiest way is to use the Infomaniak DNS Diagnostic Tool to automatically correct the pointing, by previously grouping the products in the same Organization if necessary.
Link to this FAQ: https://faq.infomaniak.com/1213
Has this FAQ been helpful?
This guide helps you protect the reputation of your domain name, to maintain the trust of Internet users and service providers in your website or business, thereby facilitating the smooth operation of your email.
The web reputation
There are different types of reputation on the Internet, including personal reputation, corporate reputation, and domain reputation.
Domain reputation is essentially a score that determines how email systems decide what to let through to users' inboxes. Fundamentally, the reputation of your domain is a measure of the health and legitimacy of your domain. This reputation can be influenced by the security of your email and website.
For example, the reputation of a domain can decrease if…
- … the site visible at the domain address is hacked, leading to the mass sending of fraudulent emails,
- … the domain's email is exploited for the involuntary sending of spam.
If the reputation of your domain remains poor, your emails may be marked as spam and not reach their intended audience. This can harm email deliverability (see this other guide in English on this topic).
Improving domain reputation
By following these few tips, you can improve the reputation of your domain and, for example, boost all your email marketing efforts:
- Set up and verify SPF, DKIM, and DMARC records that help protect your domain from identity theft attacks.
- Check the reputation of your domain with tools such as Google Postmaster Tools, Sender Score, Microsoft SNDS, McAfee or Talos Intelligence and identify potential issues.
- Only send emails to users who have chosen to subscribe!
- Get trusted links or backlinks…
See this other guide about RBLs.
Link to this FAQ: https://faq.infomaniak.com/1314
Has this FAQ been helpful?
This guide explains how to obtain the EPP code for your domain name with Hostpoint to transfer it to Infomaniak.
Preamble
- The terms "
EPP", "AuthCode", "AuthInfo", "transfer code" and "authorization code" all refer to alphanumeric sequences specific to the domain whose main purpose is to verify the owner's authorization before a transfer between Registrars. - Refer to the main guide regarding the rest of the transfer procedure.
- ⚠️ This is about transferring a domain name that you own with a different provider than Infomaniak, so that the future management of this domain is done with Infomaniak; this is therefore not an internal transfer from one holder to another and the code to be obtained is therefore not a code for an internal transfer with your current provider.
Transfer the domain name to Infomaniak
To obtain the authorization code with the current provider:
- Refer to the complete procedure provided by Hostpoint to obtain the code and keep it safe.
- Once the authorization code is obtained, refer to the main Infomaniak guide regarding the rest of the domain name transfer procedure.
Link to this FAQ: https://faq.infomaniak.com/1341
Has this FAQ been helpful?
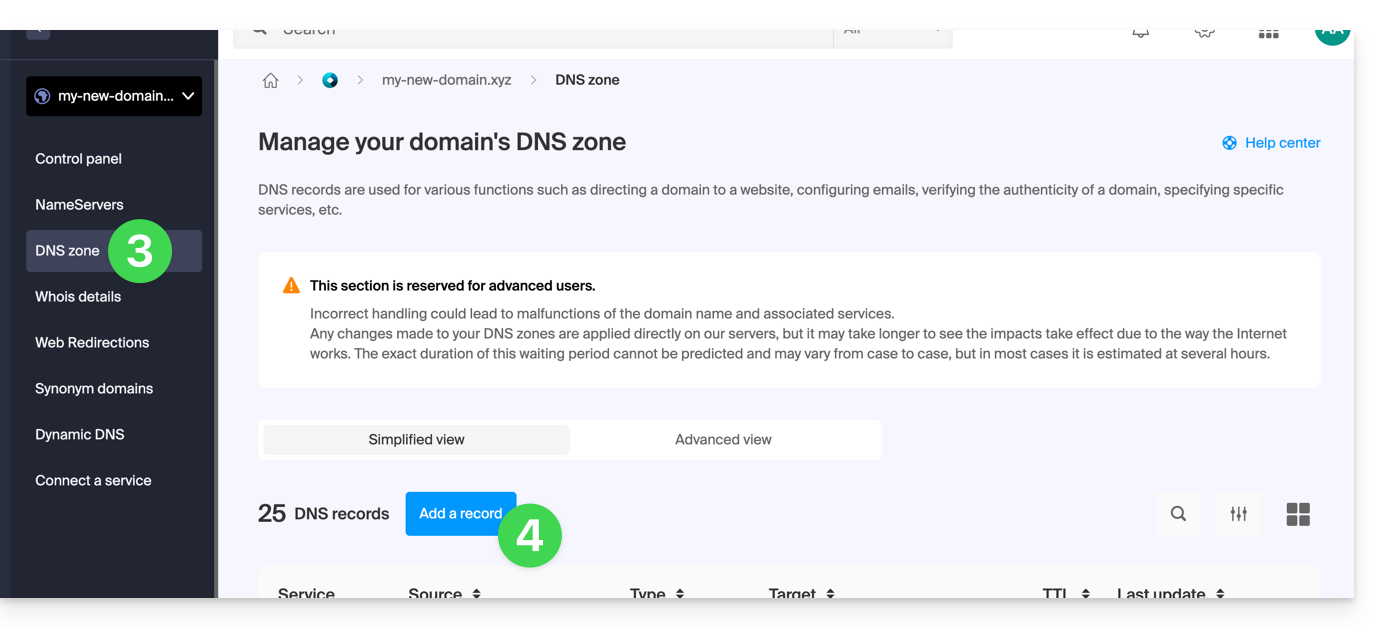
This guide explains how to add or modify one or more CAA records in the DNS zone (of a domain name) managed on the Manager Infomaniak.
Preamble
- A CAA record allows you to specify a certification authority authorized to issue certificates for a domain.
Add a CAA
To manage this type of record in a DNS zone:
- Click here to access the management of your domain on the Infomaniak Manager (need help?).
- Click directly on the name assigned to the domain concerned.
- Click on DNS Zone in the left sidebar.
- Click the button to add a record:
- Click on the radio button CAA to add a record.
- Click on the Next button:
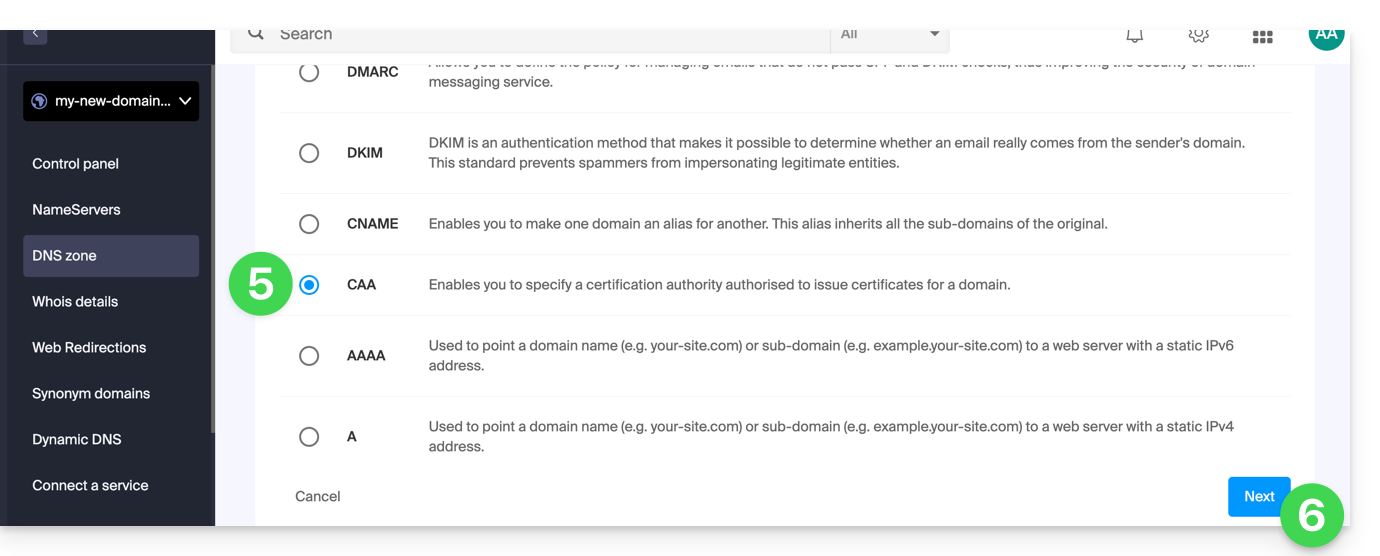
- Enter the CAA values required for your DNS zone: if you are validating an SSL certificate, refer to the information below.
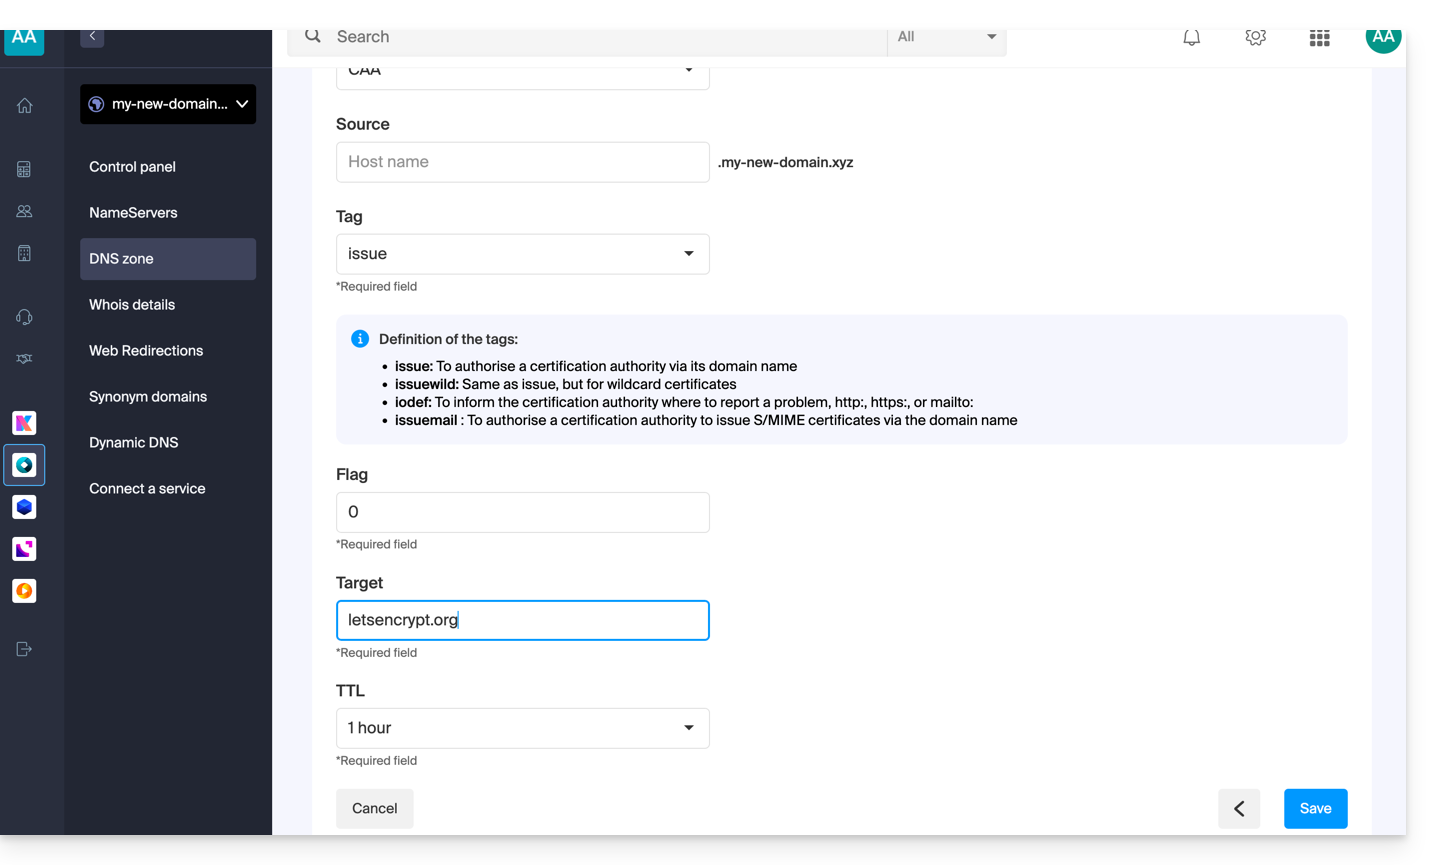
- Save your information by clicking on the button at the bottom of the page.
Adding CAA to validate an SSL certificate...
... Sectigo
In the case of an SSL certificate validation Sectigo, follow the generic guide but specifically enter the following data:
- Choose “Issue for certification authority”.
- Enter the flag:
0. - Specify
sectigo.com.
... Let's Encrypt
In the case of a Let's Encrypt SSL certificate validation, follow the generic guide but specifically enter the following data:
- Choose “Issue for certification authority”.
- Enter the flag:
0. - Specify
letsencrypt.org.
Link to this FAQ: https://faq.infomaniak.com/1394
Has this FAQ been helpful?
This guide explains how to obtain the EPP code of your domain name from Hostinger to bring it to Infomaniak.
Preamble
- The terms "
EPP", "AuthCode", "AuthInfo", "transfer code" and "authorization code" all refer to alphanumeric sequences specific to the domain whose main purpose is to verify the owner's authorization before a transfer between Registrars. - Refer to the main guide regarding the rest of the transfer procedure.
- ⚠️ This is about transferring a domain name that you own with a different provider than Infomaniak, so that the future management of this domain is done with Infomaniak; this is therefore not an internal transfer from one holder to another and the code to be obtained is therefore not a code for an internal transfer with your current provider.
Transfer the domain name to Infomaniak
To obtain the authorization code from the current provider:
- Refer to the complete procedure provided by Hostinger to obtain the code and keep it safe.
- Once the authorization code is obtained, refer to the main Infomaniak guide regarding the rest of the domain name transfer procedure.
Link to this FAQ: https://faq.infomaniak.com/1414
Has this FAQ been helpful?
This guide explains how to obtain the EPP code for your domain name at o2switch so that you can transfer it to Infomaniak.
Introduction
- The terms "
EPP", "AuthCode", "AuthInfo", "transfer code", and "authorization code" all refer to alphanumeric sequences specific to the domain, the main purpose of which is to verify the owner's authorization before a transfer between Registrars. - Familiarize yourself with the main guide regarding the rest of the transfer process.
- ⚠️ This involves transferring a domain name that you own with a provider different from Infomaniak, so that the future management of this domain is handled by Infomaniak; therefore, this is not an internal transfer from one account holder to another, and the code to be obtained is not a code for an internal transfer to your current provider.
Transfer the domain name to Infomaniak
In order to obtain the authorization code from your current provider:
- Familiarize yourself with the complete procedure provided by o2switch for obtaining the code and keeping it in a safe place.
- Once you have obtained the authorization code, refer to the Infomaniak main guide regarding the rest of the domain name transfer process.
Link to this FAQ: https://faq.infomaniak.com/1428
Has this FAQ been helpful?
This guide explains how to display the IP address of a site on your Web Hosting.
Preamble
- The IPv4 address is usually the same for each of the sites on the hosting (unless you have acquired a dedicated IP).
Display the IP address of your site
The IP address is specified on the hosting management page (Starter or containing multiple sites):
- Click here to access the management of your site on the Infomaniak Manager (need help?).
- Click directly on the name assigned to the product concerned.
- Then click on the chevron to expand the Information section of this hosting.
- The IPv4 address is displayed on the page:

- The IPv6 address is also displayed in the case of paid hosting:

Link to this FAQ: https://faq.infomaniak.com/1500
Has this FAQ been helpful?
This guide explains how to set up a DMARC policy for your email hosted by Infomaniak, an essential element to prevent potential delivery issues.
Preamble
- The DMARC (Domain-based Message Authentication, Reporting, and Conformance) protocol enhances the security of your domain by relying on SPF and DKIM checks.
- It instructs recipient servers on how to handle emails that fail these authenticity tests, with three protection policies (None, Quarantine, Reject) detailed below.
- In case of authentication failure, the recipient can send you a DMARC report; this data is essential to identify configuration errors or stop phishing attempts using your domain name.
DMARC Policy and Acceptance Percentage
For the instructions that can be given to recipient servers when a suspicious message is detected, 3 policies (p = policy) exist and can be refined with a percentage (pct):
None (none): The email is delivered normally (observation mode)
With "p=none", no email is rejected or quarantined based on the DMARC verification. However, the reception percentage can be used to collect data on unauthenticated emails, indicating how many of these emails should be subject to the DMARC policy. E.g., "p=none; pct=10" means that 10% of unauthenticated emails will be subject to the DMARC policy, while the remaining 90% will be accepted.
Quarantine (quarantine): The email is sent to spam
With "p=quarantine", unauthenticated emails can be quarantined, but the reception percentage determines the proportion actually subject to this policy. E.g., "p=quarantine; pct=50" means that 50% of unauthenticated emails will be quarantined, while the remaining 50% will be accepted.
Reject (reject): The email is purely and simply blocked/deleted
With "p=reject", unauthenticated emails are rejected. The reception percentage determines the proportion of unauthenticated emails that will actually be rejected. For example, "p=reject; pct=20" means that 20% of unauthenticated emails will be rejected, while the remaining 80% will be accepted.
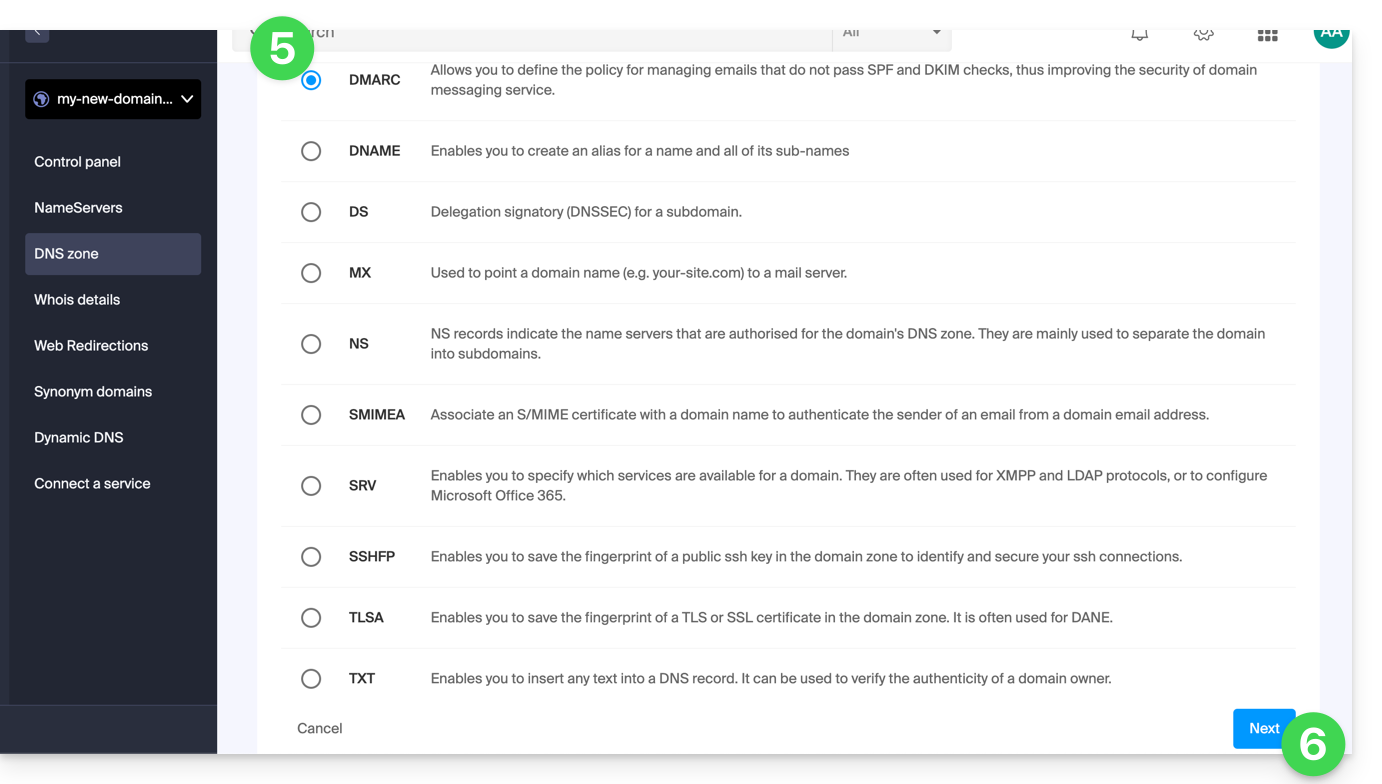
Create a DMARC Record
There are 2 ways to manage DMARC.
If you have a Mail Service with Infomaniak, the simplest way is to go to the Global Security tool to manage your DMARC security policy and reports: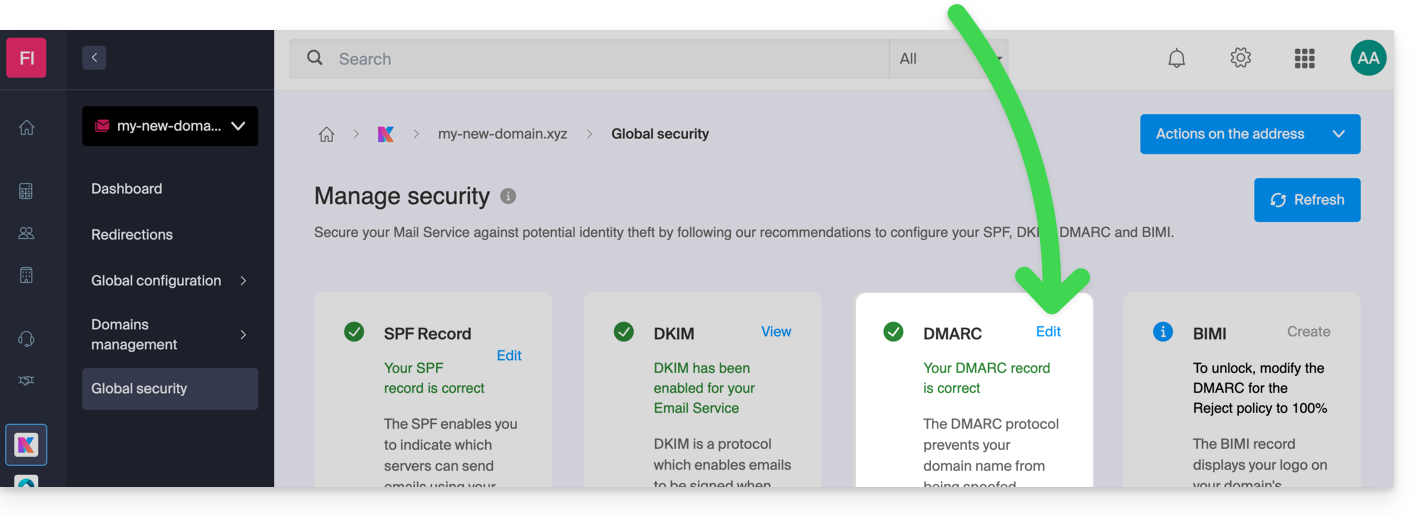
However, since the DMARC record is a type of DNS record, usually of type TXT, you can also manage it from the DNS zone of the domain name:
- Click here to access the management of your domain on the Infomaniak Manager (need help?).
- Click directly on the name assigned to the domain in question.
- Click on DNS Zone in the left sidebar menu.
- Click the button to add a record:
- Click the radio button DMARC to add a record.
- Click the Next button:
- Leave (or add if necessary) the value
_dmarcin the Source field. The Target field must contain the parameters you wish to use, separated by
;:Tag Name Purpose Example v Protocol version v=DMARC1pct Percentage of messages subjected to filtering pct=20ruf URI for forensic reports ruf=mailto:authfail@domain.xyzrua URI for aggregate reports rua=mailto:aggrep@domain.xyzp Policy for the organizational domain p=quarantinesp Policy for the subdomains of the organizational domain sp=rejectadkim DKIM alignment mode adkim=saspf SPF alignment mode aspf=rwhich can result in, for example,
v=DMARC1;p=reject;pct=100;rua=mailto:postmaster@dmarcdomain.com(source)- Leave the default value for the TTL.
- Click the Save button:
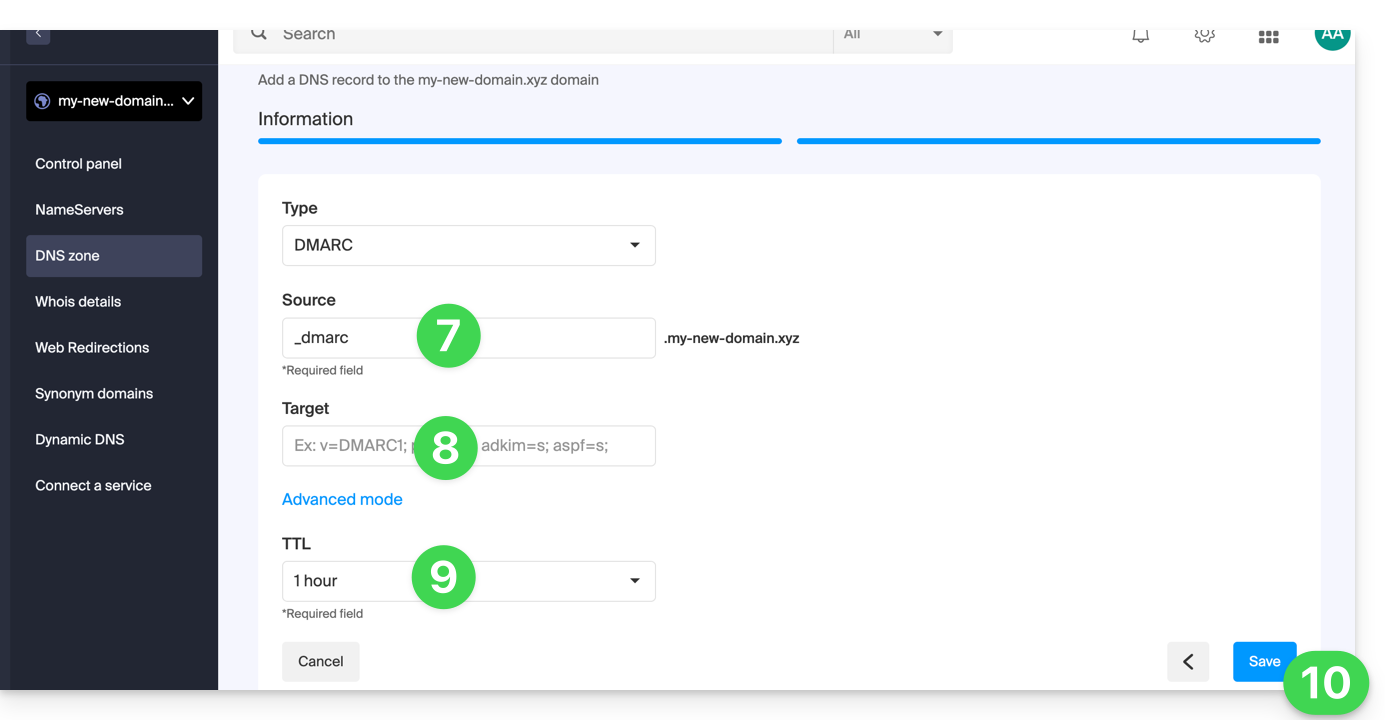
Any DNS addition/modification can take up to 48 hours to propagate.
Link to this FAQ: https://faq.infomaniak.com/1552
Has this FAQ been helpful?
This guide explains which DKIM to add to secure Infomaniak messaging if it revolves around a domain name whose DNS is that of Cloudflare.
Preamble
- If you manage your emails at Infomaniak, as well as the associated domain name, but the DNS management is with Cloudflare, then you need to add the DKIM on the Cloudflare interface.
Add a DKIM on Cloudflare
Prerequisites
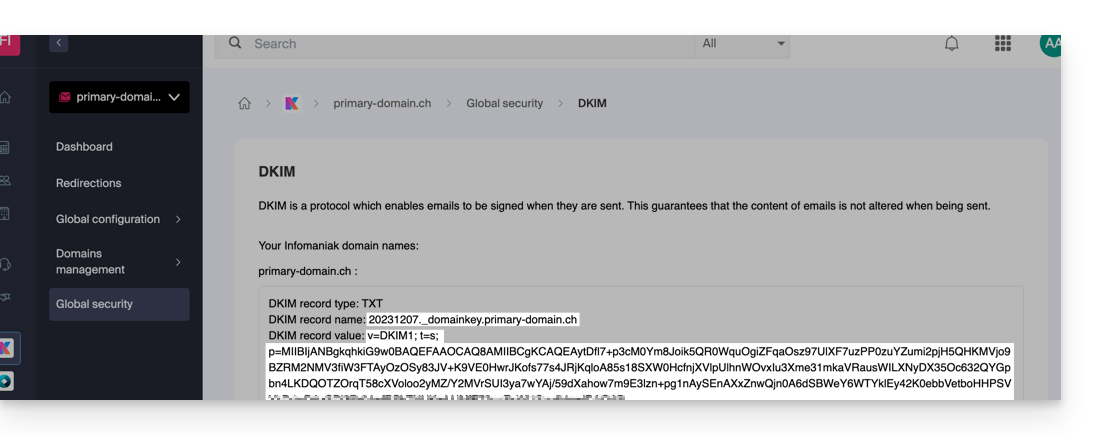
- Refer to this other guide to allow you to display the DKIM corresponding to your Infomaniak messaging.
- Display the DKIM to be able to copy-paste it. Example:
Follow the procedure below to correctly activate DKIM, thus improving the security and deliverability of emails for the domain in question:
- Click here to access your Cloudflare account.
- Select the domain in question.
- In the DNS section, search for and delete any NS records for "
_domainkey" pointing to Infomaniak. - Click on the Add a record (
Add record) button to open the input form. - Fill in the fields using the data obtained from the Infomaniak Manager, respecting the standard configuration for a TXT type DKIM record:
| Cloudflare Field | Value to Enter | Important Notes |
|---|---|---|
| Type | TXT (text) | Choose the standard type for DKIM keys. |
| Name (Host) | The DKIM selector (e.g. 20240112) | Enter only the selector as Cloudflare automatically adds the domain name and the suffix ._domainkey for you. Refer to the Cloudflare documentation if necessary. |
| Content (Value) | The public key (the long string) | Paste the entire DKIM public key provided (what comes after p=) |
| TTL | Auto | Leave the default value for optimal management by Cloudflare. |
Make sure the Proxy Status (cloud) is set to DNS Only (grayed out) for email authentication records.
Save and Propagation
After carefully verifying the accuracy of the Selector and Public Key, click the Save button. This validates the addition of your DKIM record in the Cloudflare DNS zone.
Any DNS addition/modification can take up to 48 hours to propagate.
Once the waiting period has elapsed, you can use online verification tools to confirm that the DKIM record is published and valid. This validation ensures that your Infomaniak emails will be properly signed and their deliverability will be optimal.
Link to this FAQ: https://faq.infomaniak.com/1619
Has this FAQ been helpful?
This guide is for owners of a domain name on the Infomaniak infrastructure who encounter a DMARC issue when using certain Google tools such as Meet or Calendar.
Resolve a DMARC error
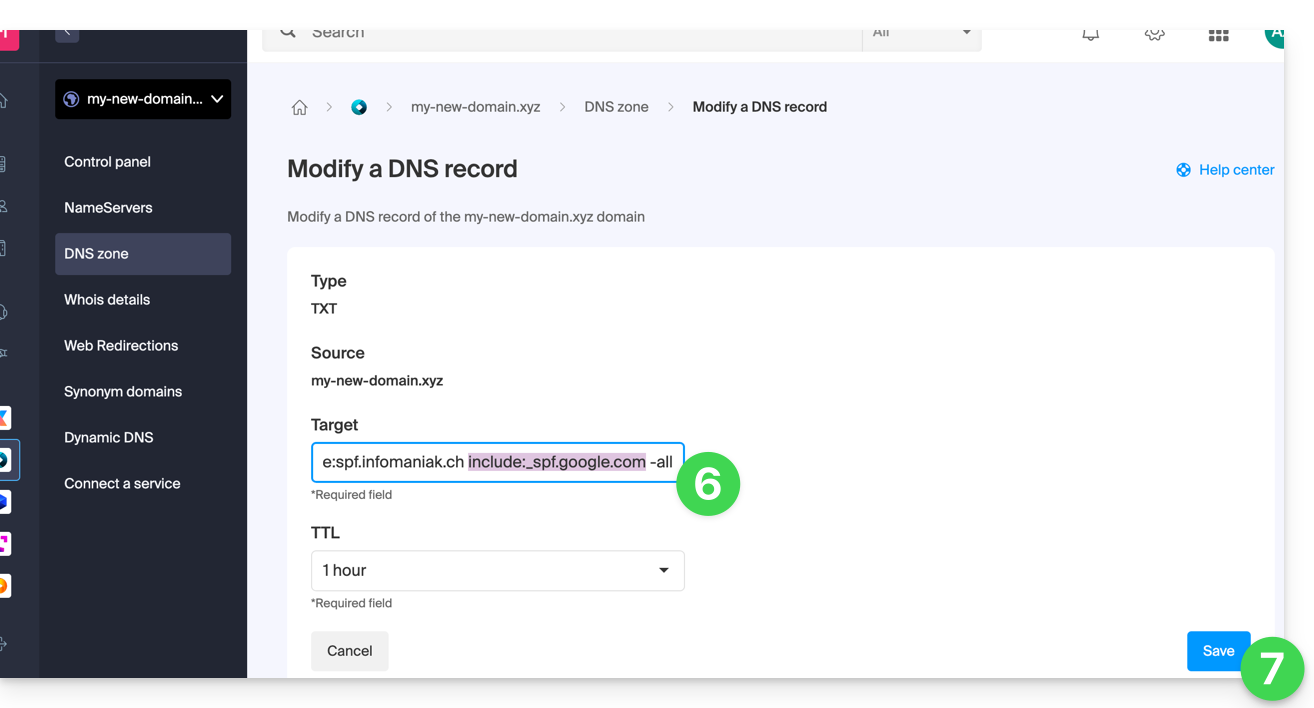
To make your domain name configuration (with a DMARC policy of type reject) compatible with the use of certain Google services, it is necessary to add a corresponding SPF record:
- Before:
v=spf1 include:spf.infomaniak.ch -all - After:
v=spf1 include:spf.infomaniak.ch include:_spf.google.com -all
To edit the SPF currently configured in the DNS zone of your domain name:
- Click here to access the management of your product on the Infomaniak Manager (need help?).
- Click directly on the name assigned to the product concerned.
- Click on DNS Zone in the left sidebar.
- Click on the action menu ⋮ located to the right of the TXT type record containing the value of the SPF concerned.
- Click on Modify:
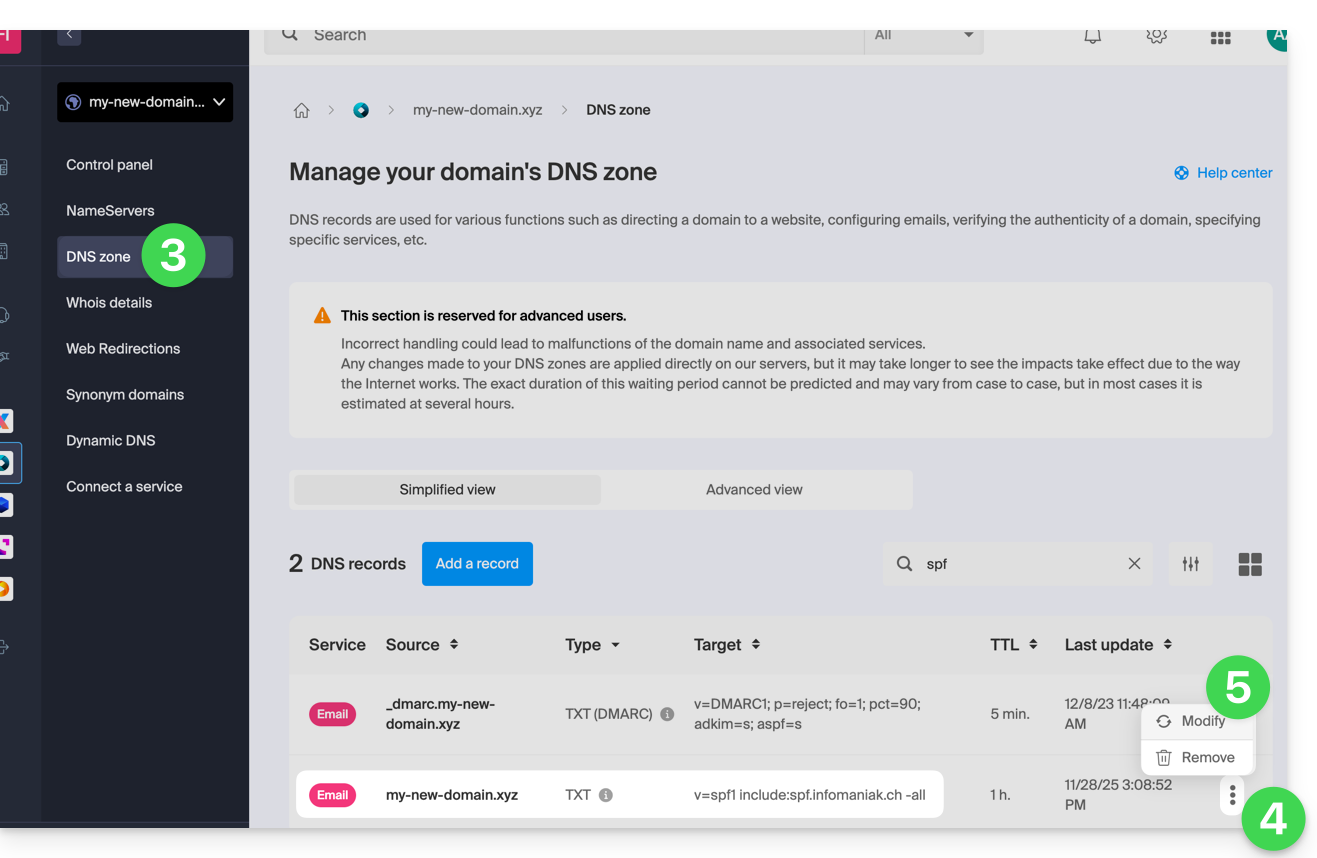
- Edit the field by adding on the same line
include:_spf.google.comafter the existing Infomaniak include, and this before the final-all. - Click on the Save button:
Any DNS addition/modification can take up to 48 hours to propagate.
Refer to this Google documentation if you are looking for information on configuring Google's SPF.
Link to this FAQ: https://faq.infomaniak.com/1641
Has this FAQ been helpful?
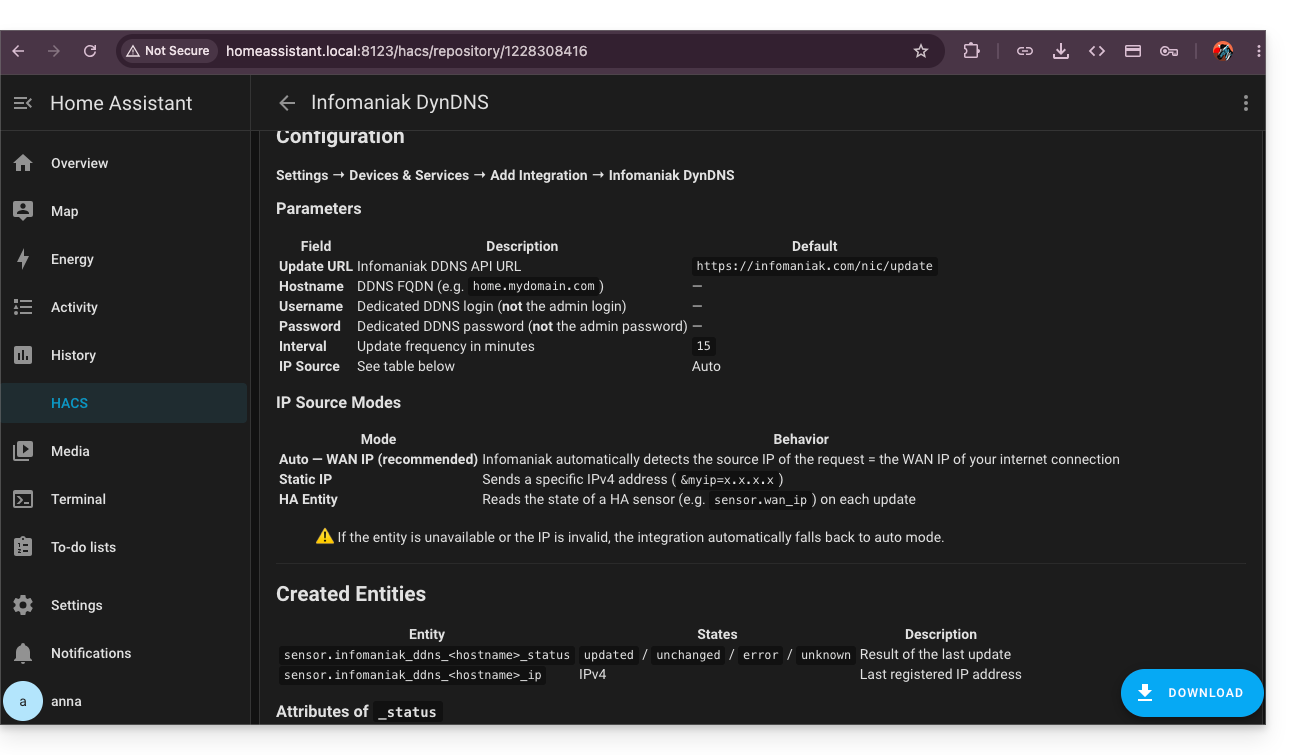
This guide explains how to access your Home Assistant smart home hub (which is behind a dynamic IP address provided by your ISP) with a domain name from Infomaniak via the free DynDNS option and a free script available here.
Introduction
- The integration you install acts as a messenger: it continuously monitors the IP address of your local network.
- As soon as it detects that your ISP has changed your IP address, it instantly sends a signal to Infomaniak.
- Infomaniak then updates your domain name (e.g.,
ha.domain.xyz) to point to the new IP address.
Install Infomaniak DynDNS — Home Assistant Integration
Prerequisites
- You must have a Home Assistant installation (e.g., on a Raspberry Pi 5) connected to the internet with a dynamic IP address.
- A dynamic DNS must have been created on the domain in question.
Then:
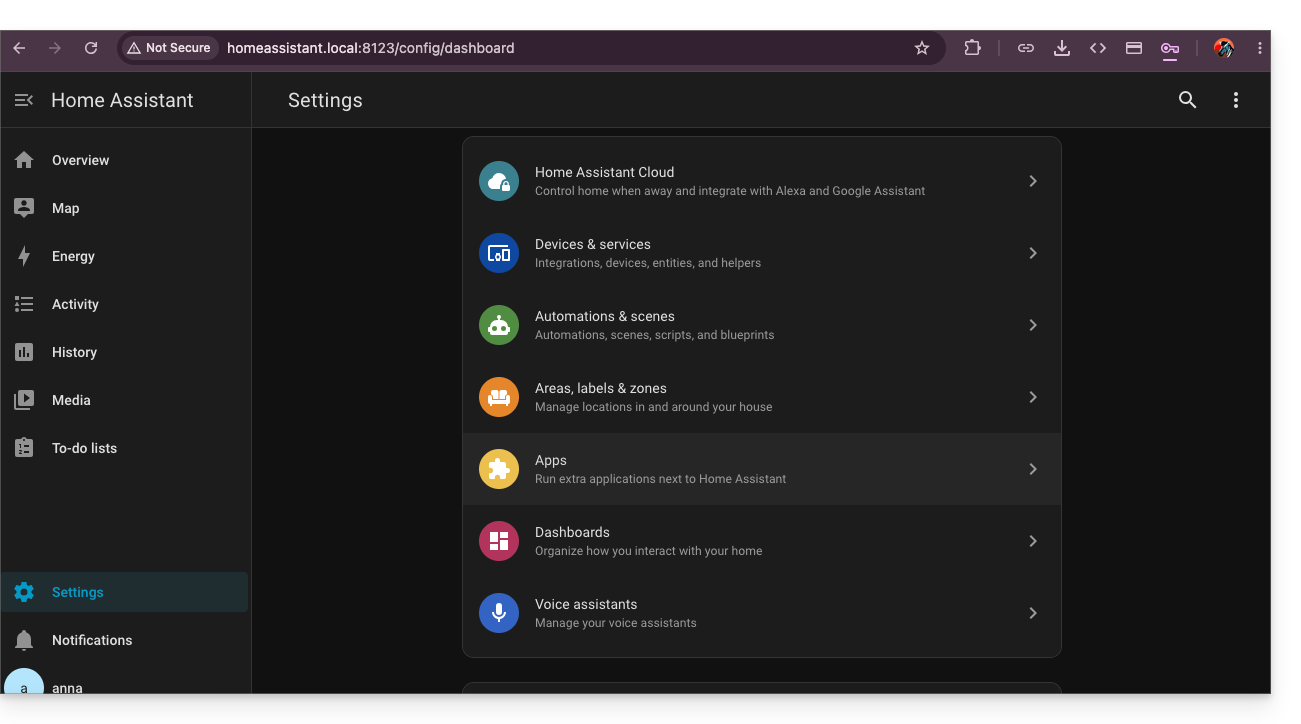
- Log in to your Home Assistant back office.
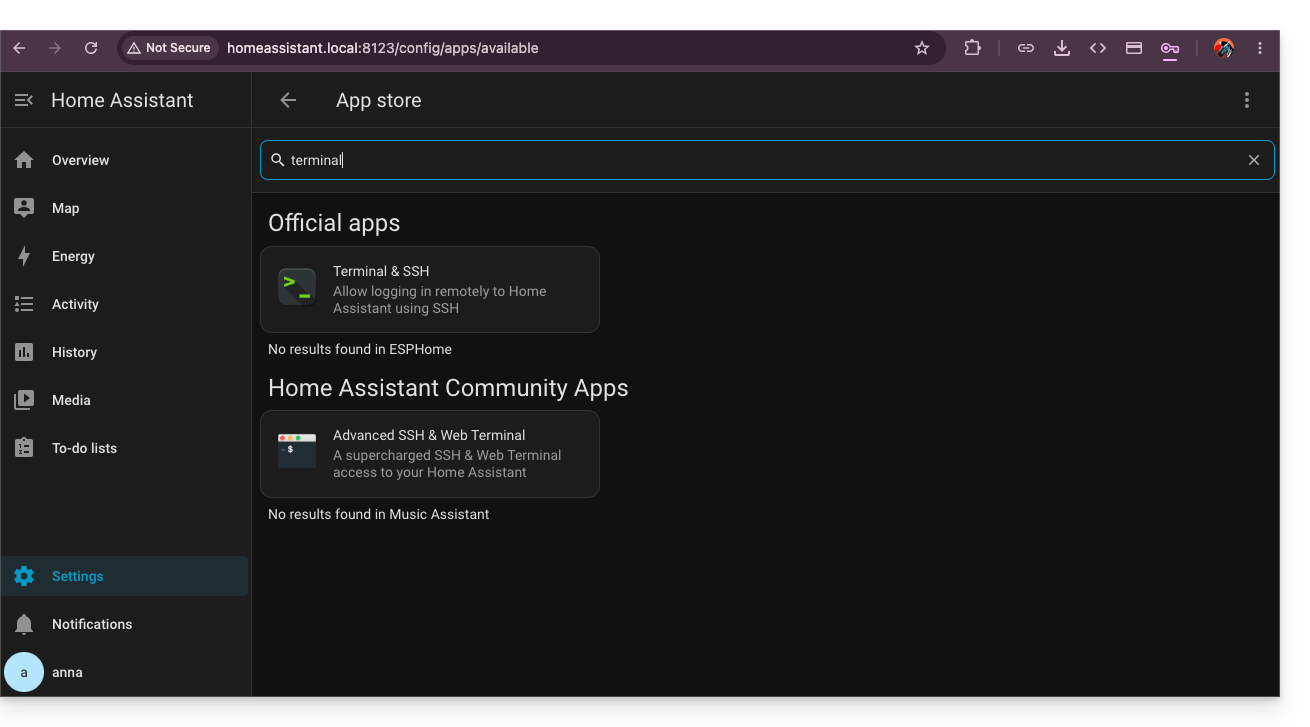
- Install HACS if you haven't already; go to the settings of Home Assistant:
- Install the Terminal & SSH app:
- In this terminal, enter the command
wget -O - https://get.hacs.xyz | bash -: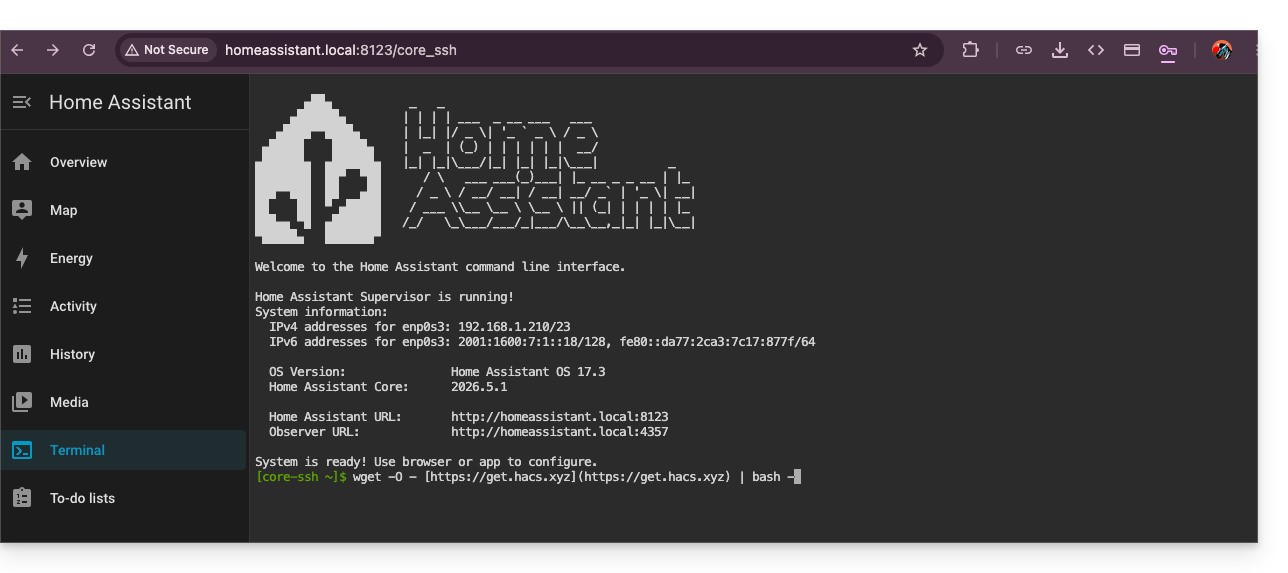
- Once HACS is installed, restart Home Assistant.
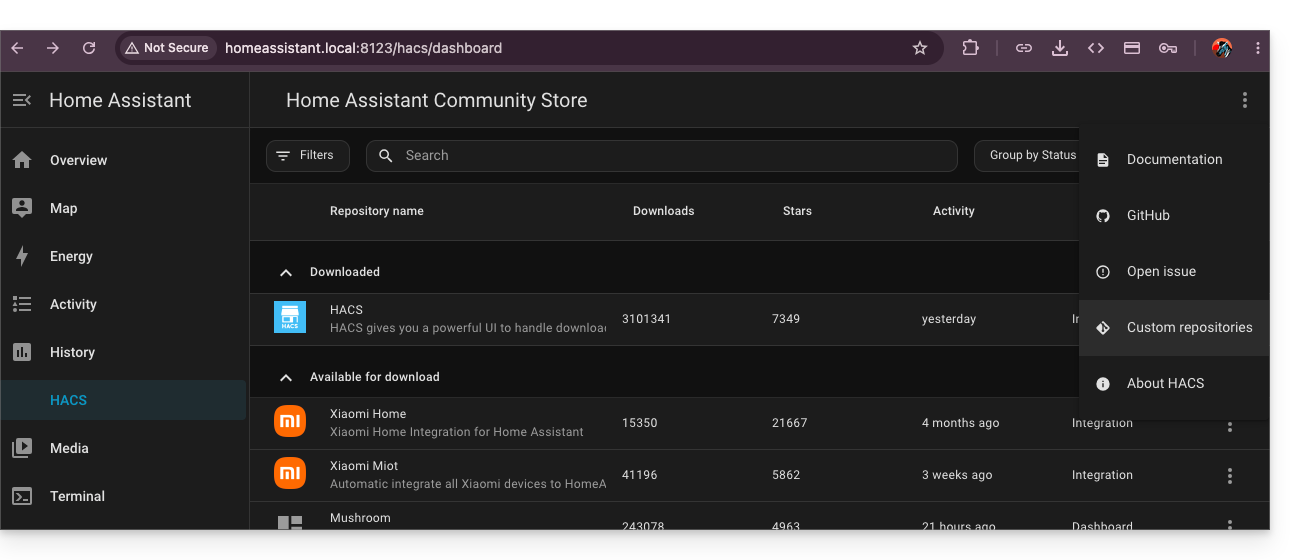
- Activate HACS by searching for it in the integrations:
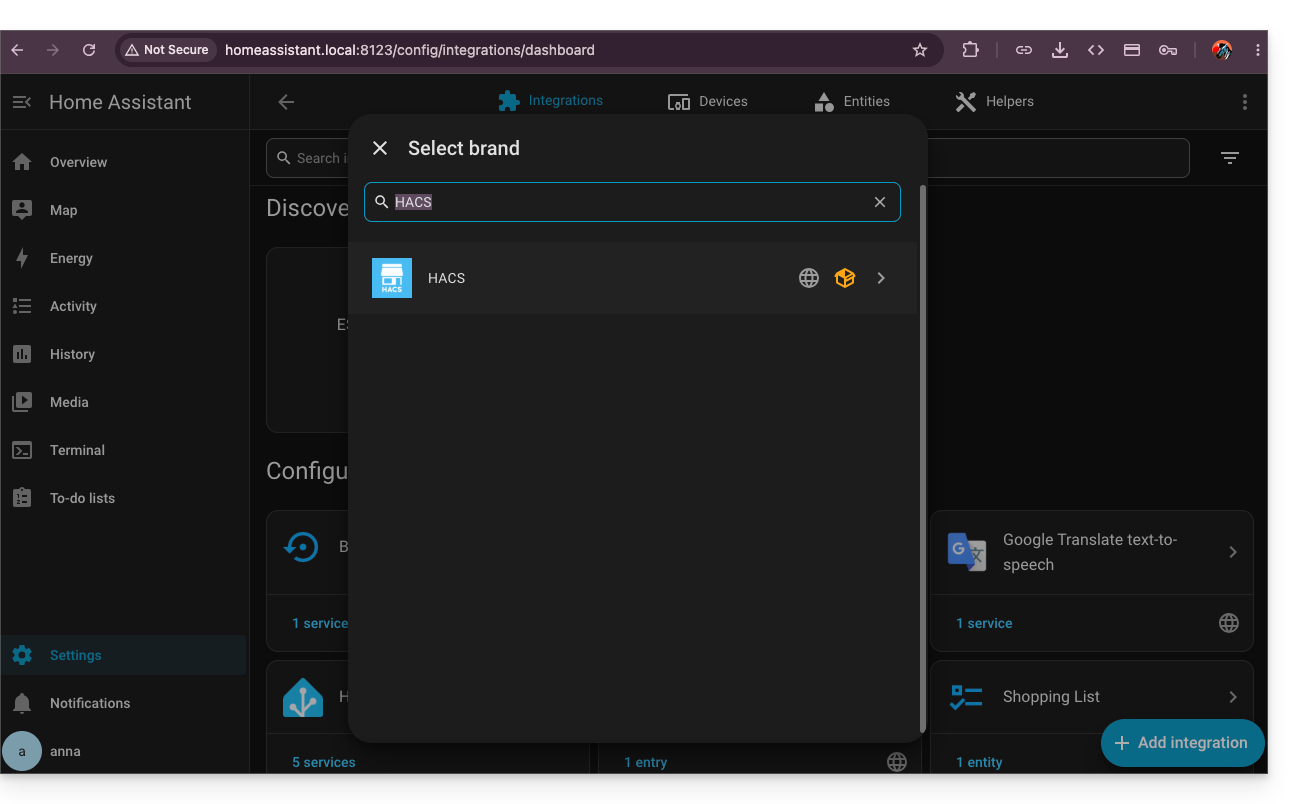
- Once the validation via Github is complete, return to HACS installed in your left sidebar, then click on the action menu ⋮ in the upper right corner of the HACS interface to choose the custom repositories:
- Enter the URL
https://github.com/cy-bertrand/Infomaniak-dyndns-haand choose the Integration type, before clicking on Add: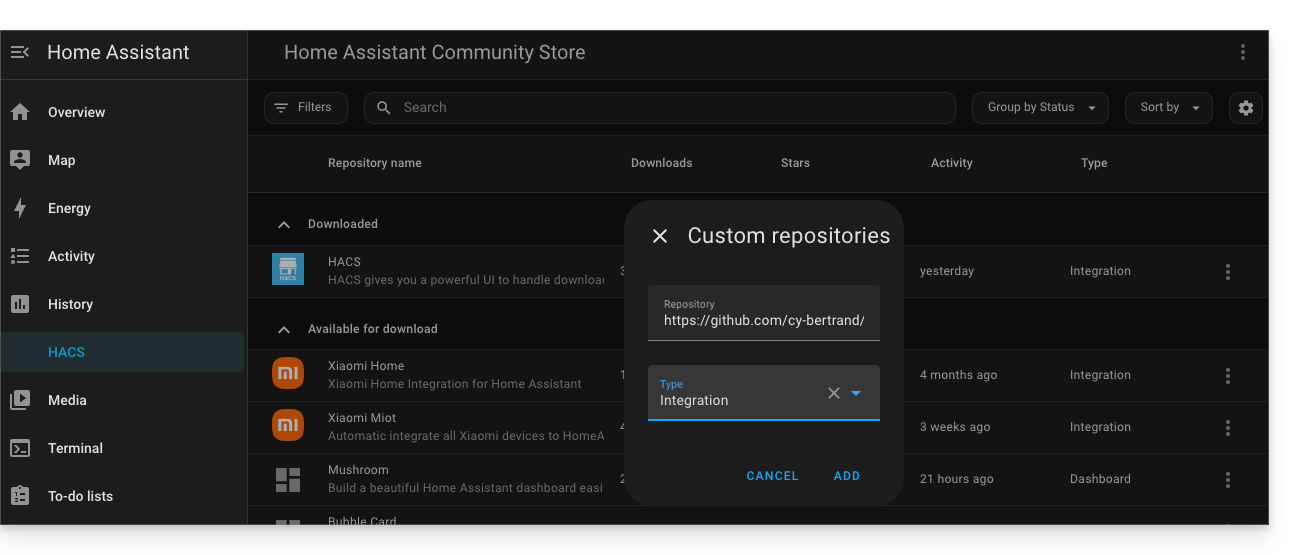
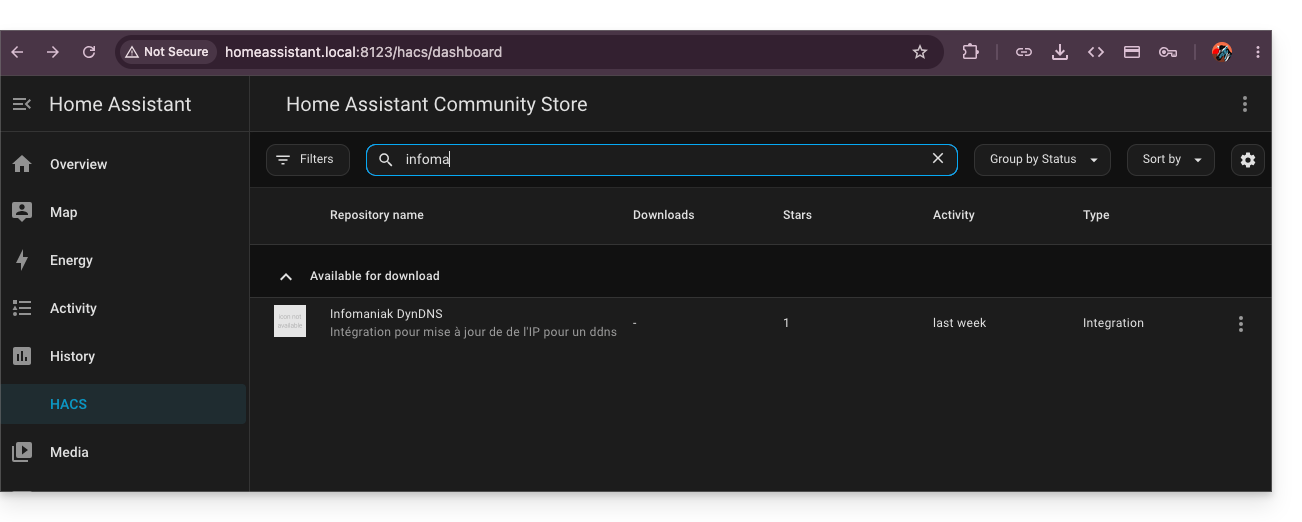
- Then search for Infomaniak DynDNS and click on it:
- Install this service by clicking on the Download button in the bottom right corner:
- Restart Home Assistant.
Configure Infomaniak DynDNS — Home Assistant Integration
To do this:
- Click on Settings in the left sidebar menu of HA.
- Click on Devices & services:
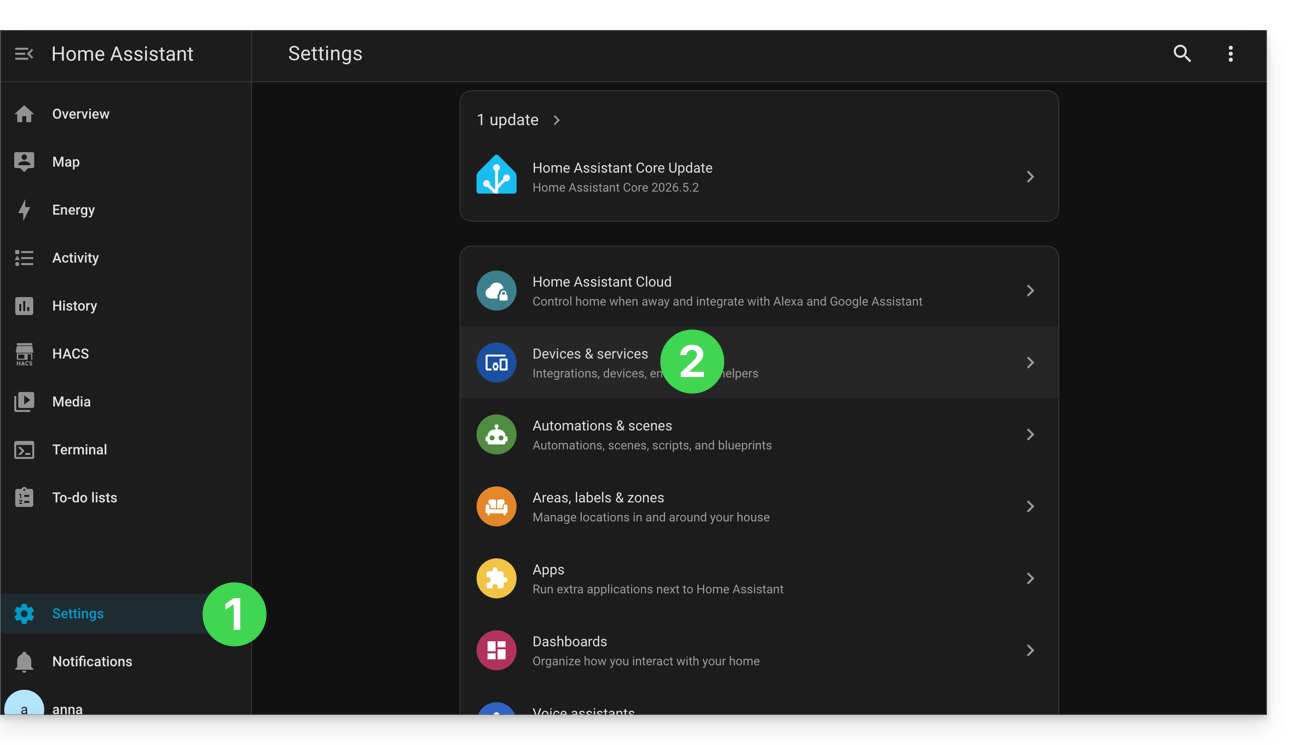
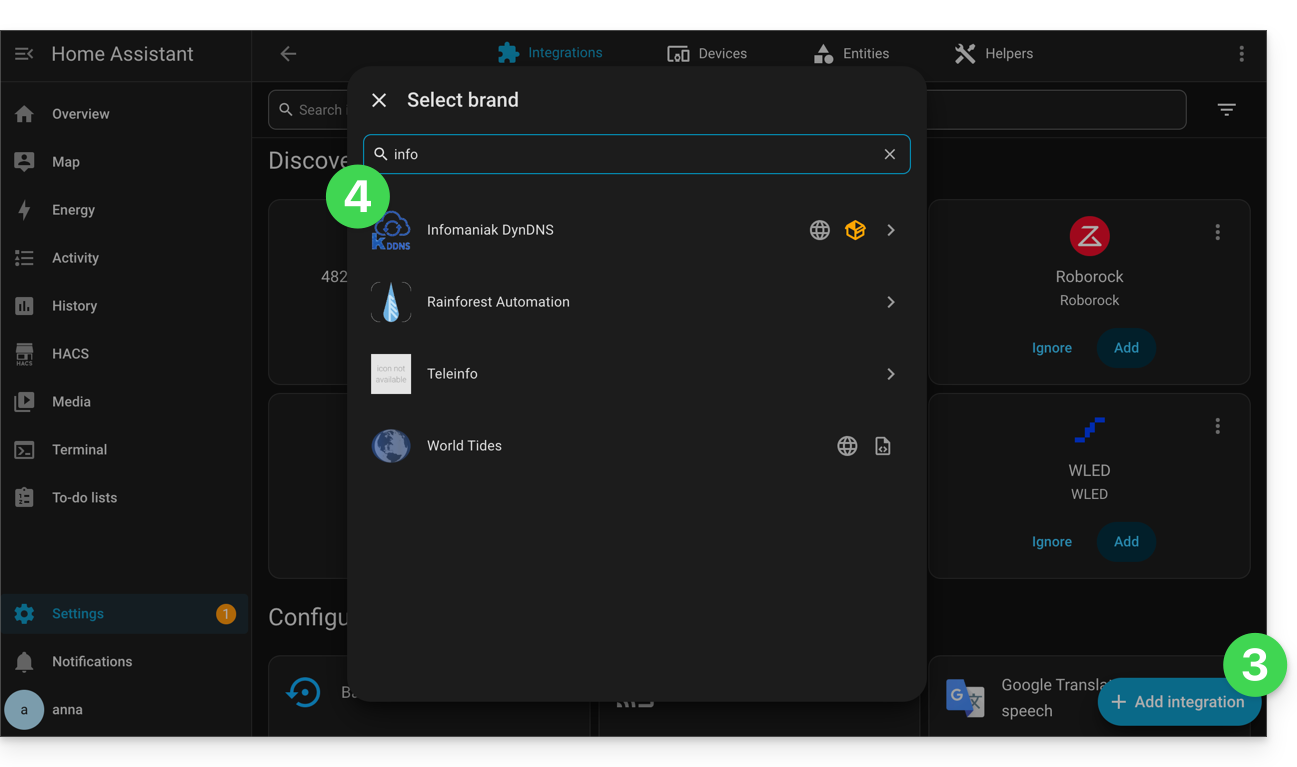
- Click on the button to Add integration.
- Click on Infomaniak DynDNS:
- Configure your equipment:
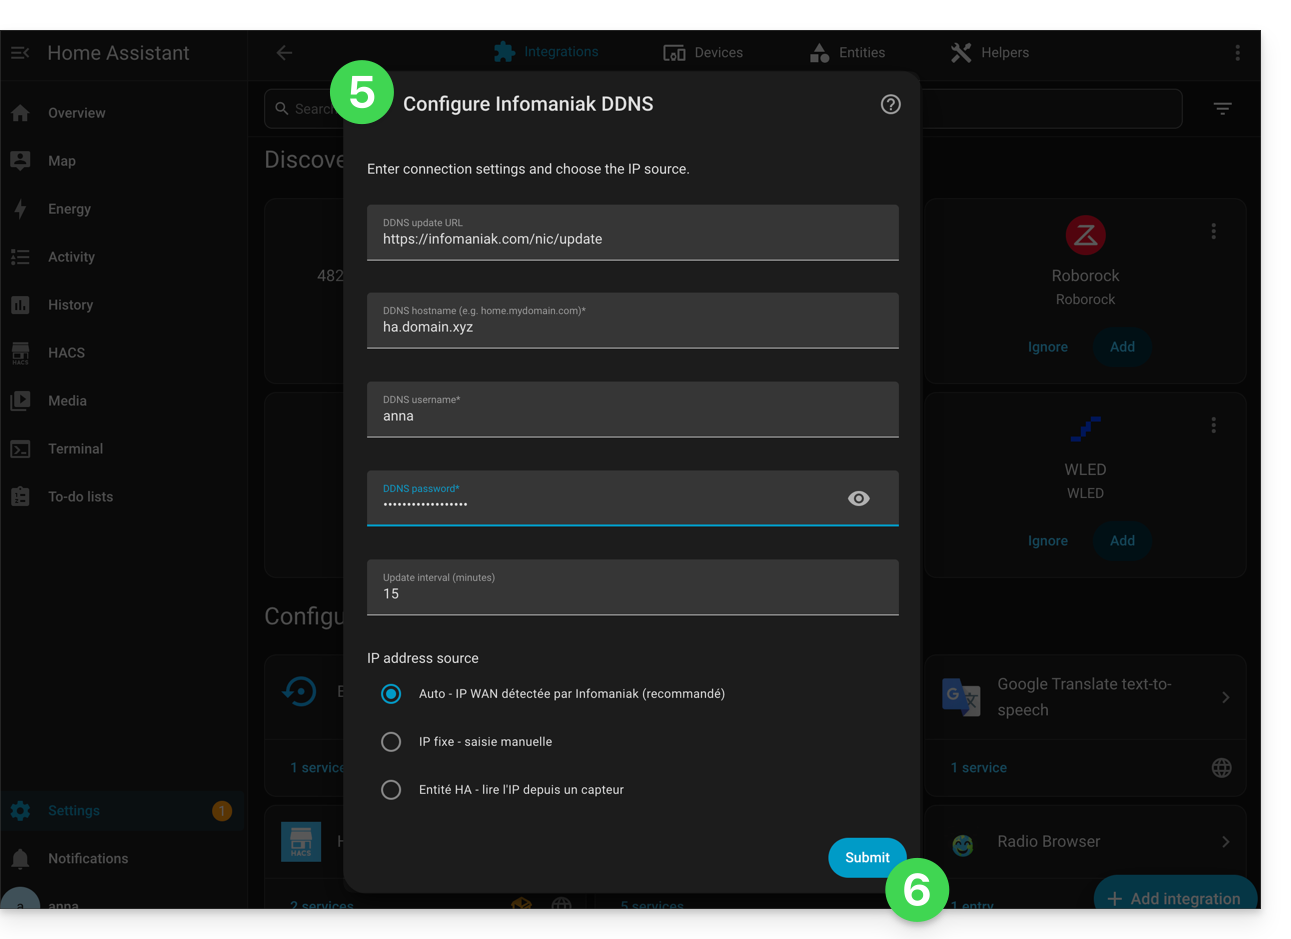
- Hostname: the URL configured in the Manager when adding the Dynamic DNS
- Username: the identifier defined in the Manager when adding the Dynamic DNS
- Password: the password defined in the Manager when adding the Dynamic DNS
- Validate at the bottom of the page.
- Give the entity a name and save your changes by clicking Finish:
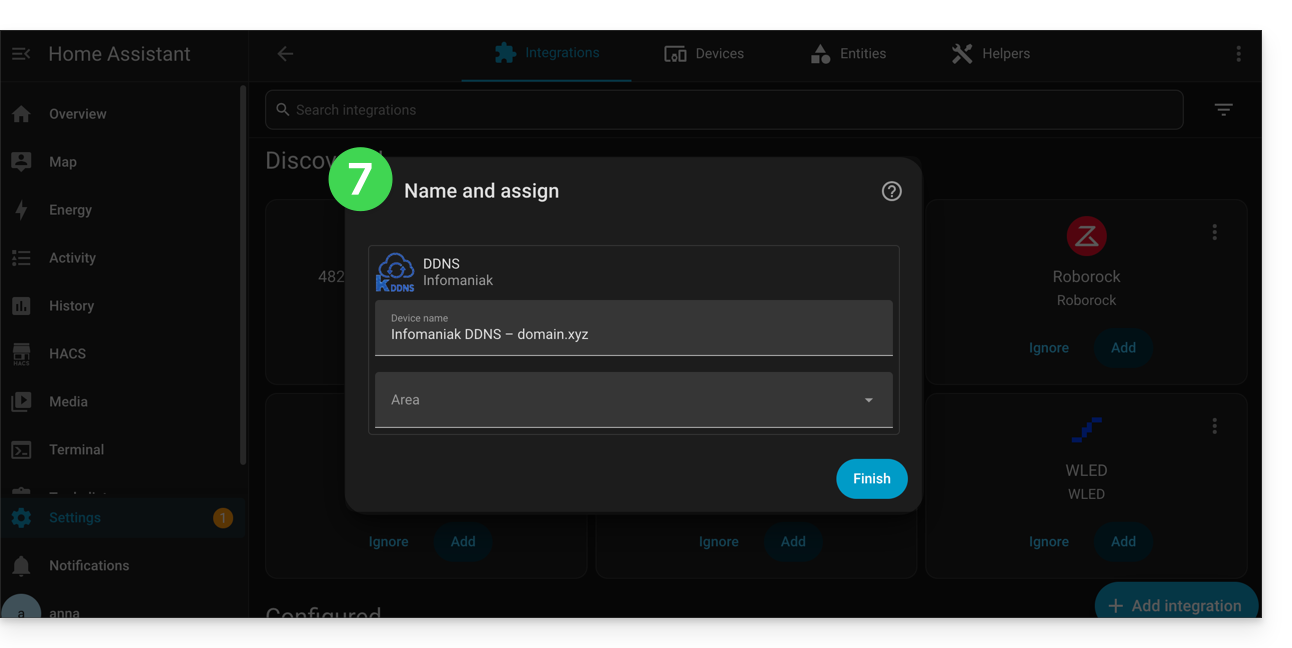
Home Assistant will check the external IP address every 15 minutes. If it has changed, the DNS will be updated. This way, your domain name will continuously point to your home automation installation, even if your Internet Service Provider changes your public IP address.
Also, refer to the official plugin documentation.
Link to this FAQ: https://faq.infomaniak.com/1665
Has this FAQ been helpful?
This guide explains how to suspend the administrative management of a product so that no user of the Organization can use it within the Infomaniak Manager. It is also possible to block a user of your Organization, without deleting them.
Preamble
- By blocking the management of a product:
- Only administrators and the legal representative will be able to unblock it.
- Users with limited rights (collaborators and clients) who have access to this product will no longer be able to manage it.
- An email is sent to the users of the Organization.
Block a product
Prerequisites
- Be an Administrator or Legal Representative within the Organization (users with limited rights (collaborators and clients) who have access to this product will not be able to do so).
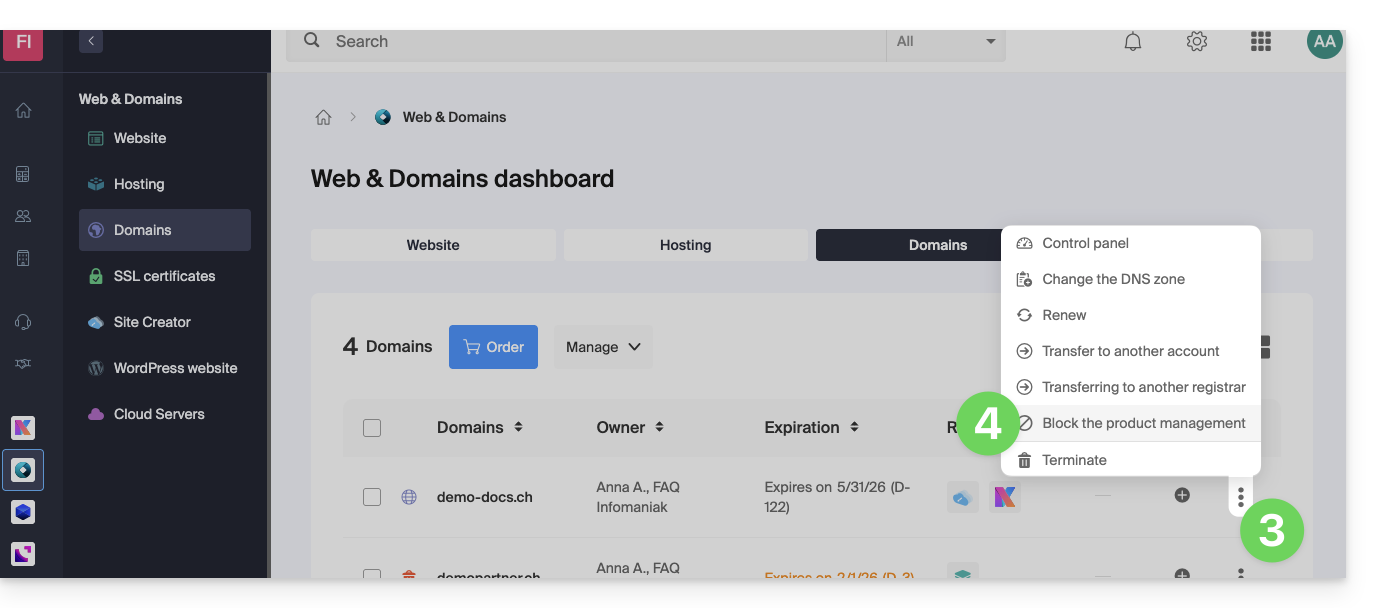
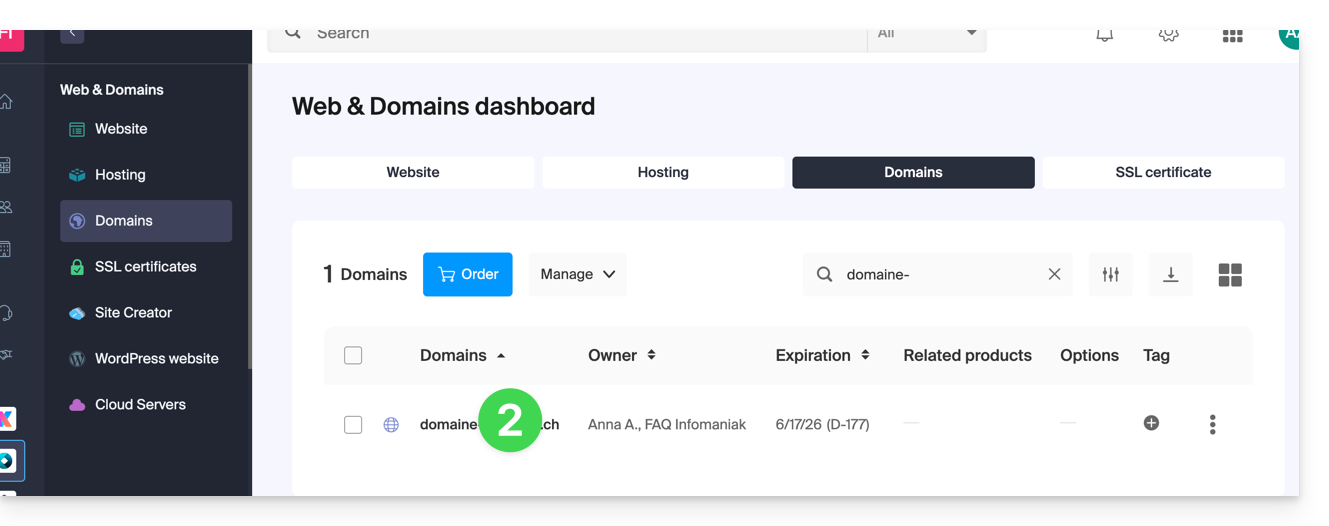
To block or unblock certain products for the entire Organization:
- Click here to access product management in the Infomaniak Manager (need help?).
- Access the service you wish to block.
- Click on the action menu ⋮ located to the right of the item in question.
- Click on Block product management:
- Example 1, Cloud Server:

- Example 2, domain name:
- Example 1, Cloud Server:
- Confirm the suspension.
Suspend emails
A Mail Service cannot be blocked in the way indicated above, but it can be put into maintenance.
Prerequisites
- Be an administrator or legal representative; users with limited rights (collaborators and clients) who have access to this product will not be able to do so.
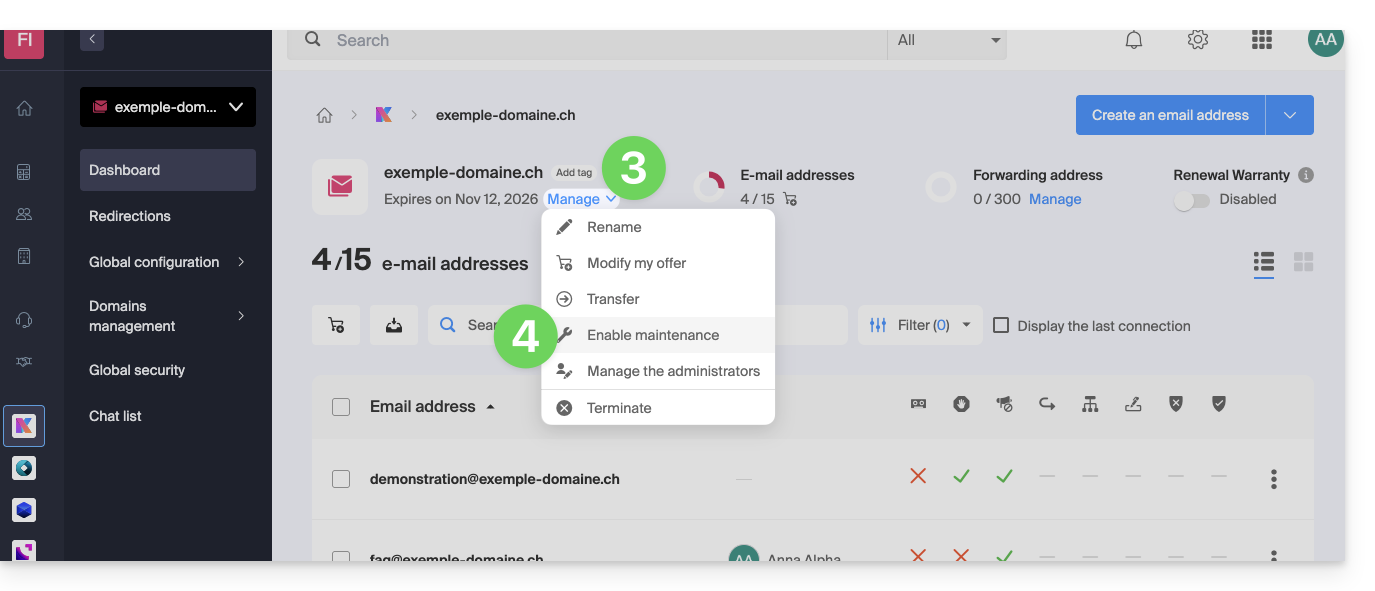
To suspend email addresses:
- Click here to access the management of your product in the Infomaniak Manager (need help?).
- Click directly on the name assigned to the product in question.
- Click on Manage.
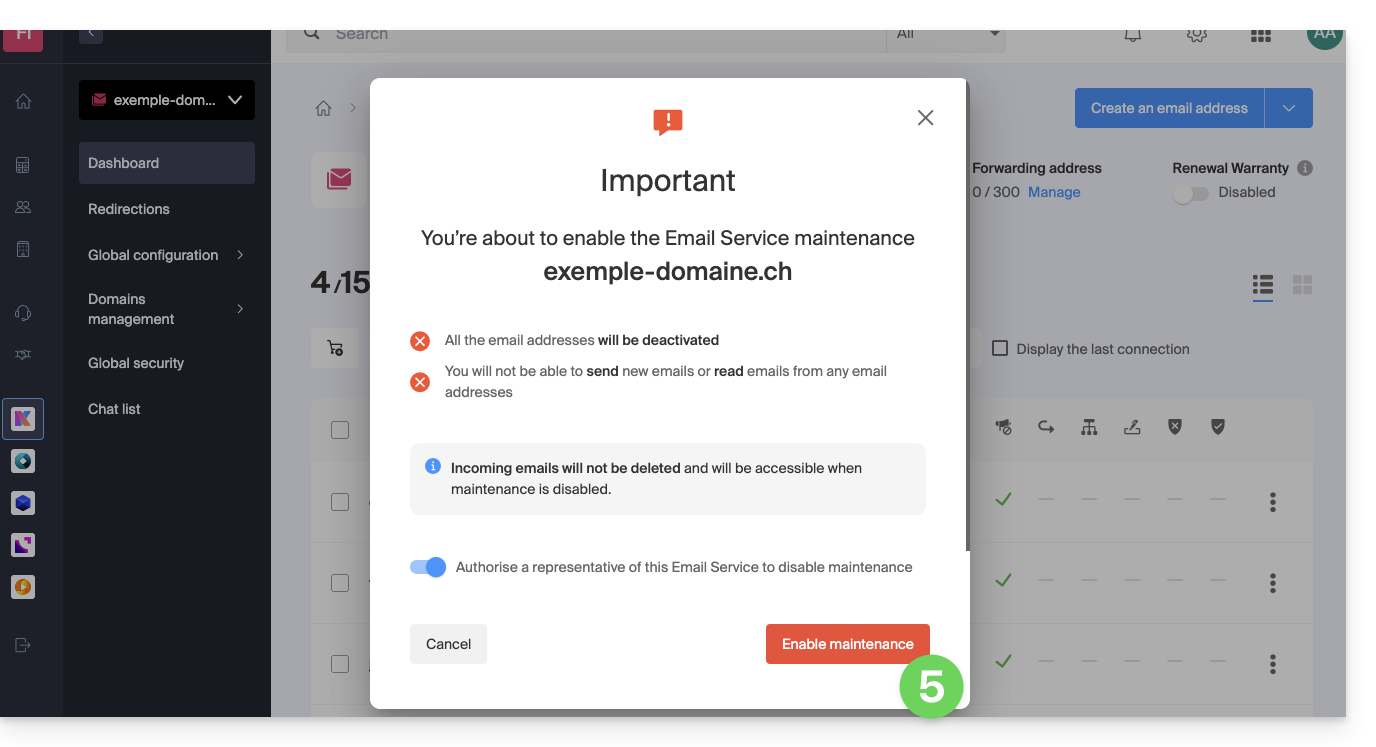
- Click on Enable maintenance:
- Confirm by clicking the red button to suspend the use of email addresses (reception is not interrupted but consultation is impossible):
Block an Organization user
To quickly block an Organization user in case of a security incident, log in to manage your users as an Administrator or Legal Representative of the Organization:
- Click here to access user management on the Infomaniak Manager (need help?).
- Click on the user in question:
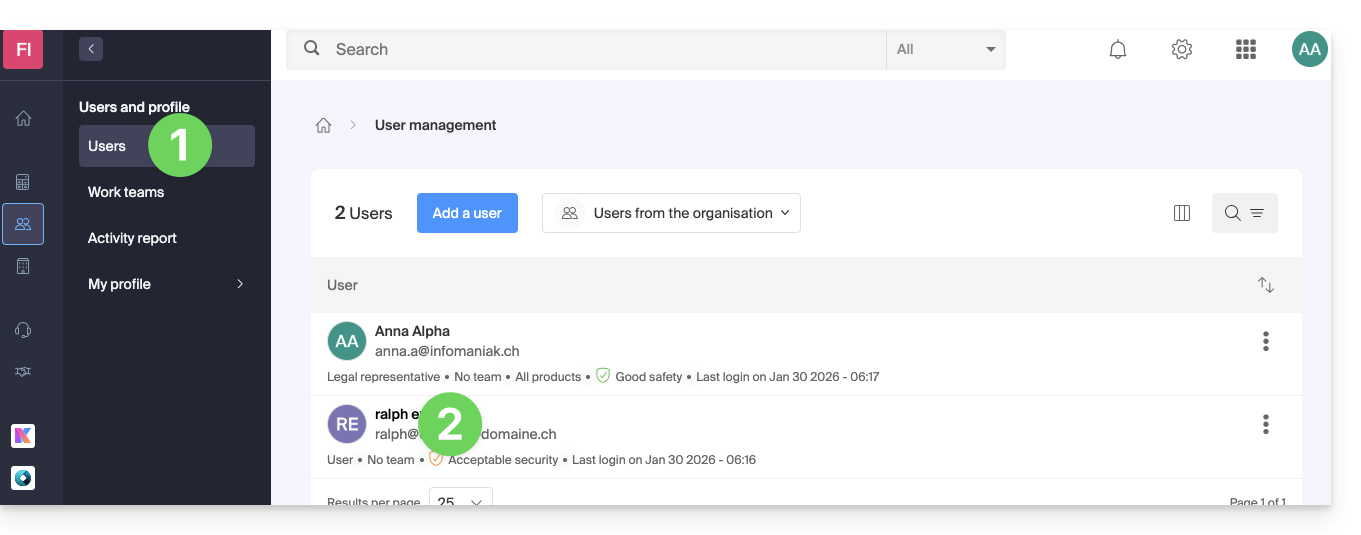
- From the Manage button at the top of the page, you can remove the user from the Organization (which also removes their various product management access).
- Further down, you can more finely manage the products to which the user should have access:
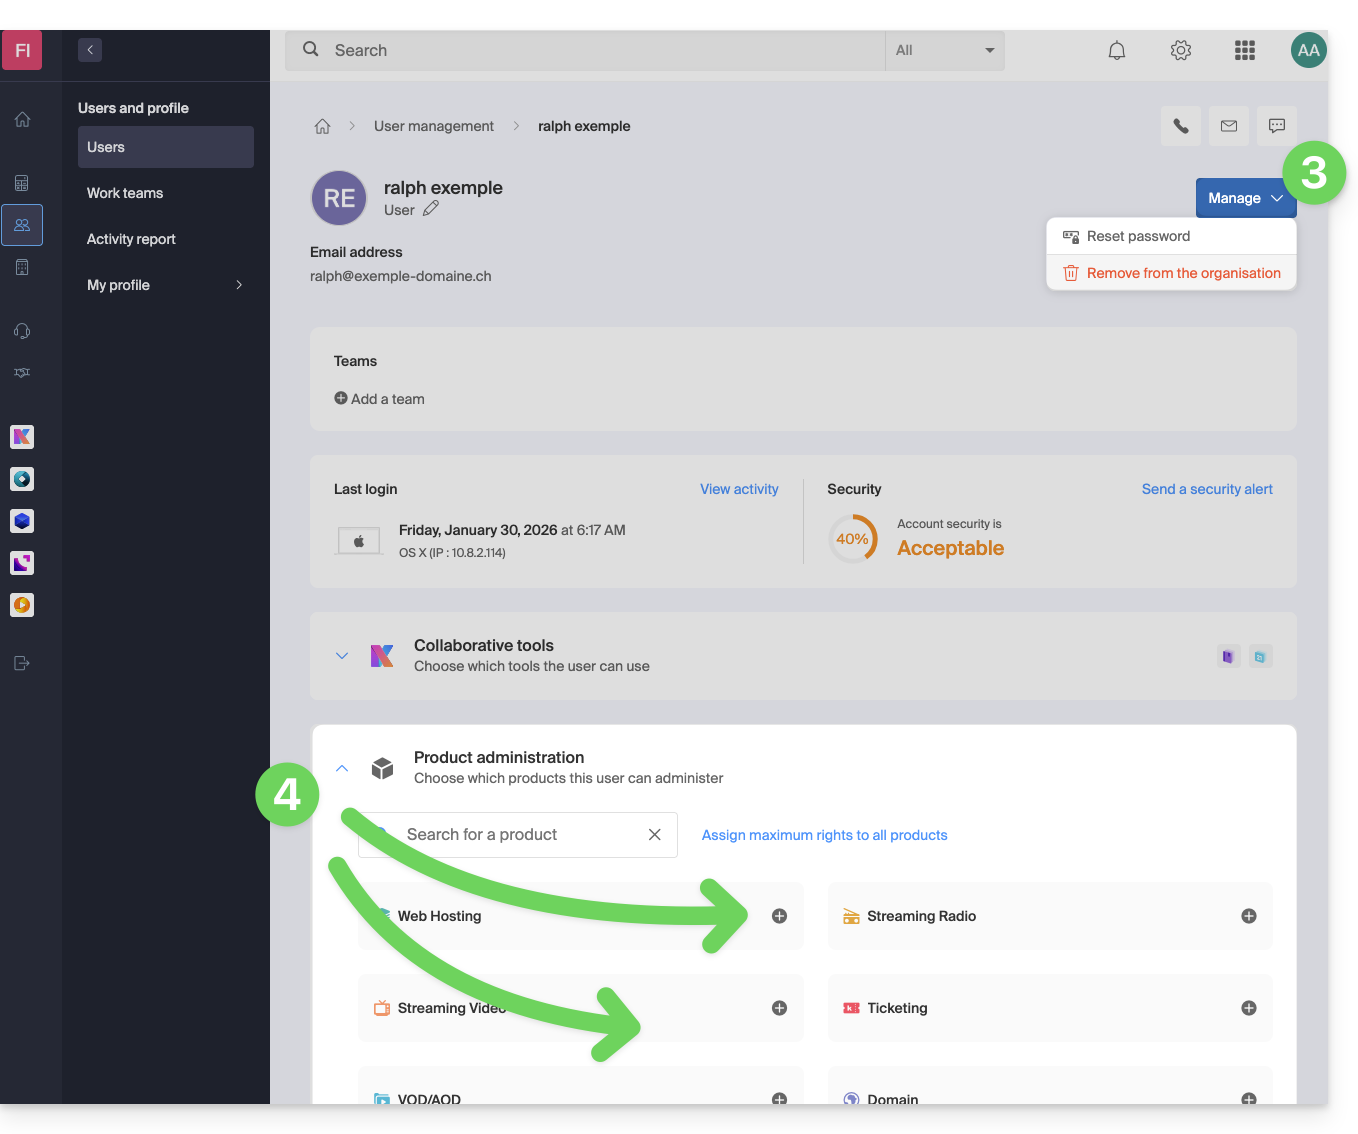
Thus, critical services, such as the Manager interface, of your Organization, the Web app kDrive and the Web app Mail may become inaccessible to them.
Depending on the situation, also refer to these links to block other services such as messaging (IMAP / SMTP) or Web services.
To not block the user yourself but to indicate a procedure for them to follow to secure their account, refer to this other guide.
Link to this FAQ: https://faq.infomaniak.com/1689
Has this FAQ been helpful?
This guide explains how to obtain the EPP code for your domain name at Namecheap so that you can transfer it to Infomaniak.
Introduction
- The terms "
EPP", "AuthCode", "AuthInfo", "transfer code", and "authorization code" all refer to alphanumeric sequences specific to the domain, the main purpose of which is to verify the owner's authorization before a transfer between Registrars. - Please refer to the main guide regarding the rest of the transfer procedure.
- ⚠️ This involves transferring a domain name that you own with a provider different from Infomaniak, so that the future management of this domain is handled by Infomaniak; therefore, this is not an internal transfer from one account holder to another, and the code to be obtained is not a code for an internal transfer to your current provider.
Transfer the domain name to Infomaniak
To obtain the authorization code from your current provider:
- Click here to log in to the interface for managing your products with your current Registrar.
- Click on Domain List in the left-hand menu.
- Click on the Manage button to the right of the domain name in question.
- Click on the Authcode button to receive the authorization code by email.
- Once you have obtained the authorization code, please refer to the Infomaniak main guide regarding the rest of the domain name transfer procedure.
Link to this FAQ: https://faq.infomaniak.com/1703
Has this FAQ been helpful?
This guide explains the WDPR (WHOIS Data Problem Report System) and WHOIS notifications related to the management of your domain names.
WDPR and WHOIS: what are they?
- WHOIS: public directory listing the contact details of the domain owner (name, email, phone).
- WDPR: ICANN system for reporting inaccurate or outdated WHOIS information.
- Data accuracy: ICANN requires that this information be up-to-date. Incorrect data can result in the suspension or cancellation of the domain.
- Privacy: you can hide your personal data via a WHOIS privacy service.
Types of messages received
- Problem notification: a third party has reported an error in your contact details; you must verify and correct them promptly.
- Update reminder: mandatory periodic email to confirm that your information is still valid.
- Confirmation: validation that your changes have been successfully recorded following an update.
Compliance with these guidelines is crucial for the security of your domain and to avoid any service interruption.
Modify your data or the language of the messages
You can modify your contact details or change the language of the notifications (French, English, etc.) directly on your management interface.
Link to this FAQ: https://faq.infomaniak.com/1710
Has this FAQ been helpful?
This guide clarifies the distinction between the financial settlement for a service and the ownership of the associated rights.
Payment does not confer ownership
Paying the invoices for a service (domain name, hosting) does not automatically grant ownership rights. According to Infomaniak's Terms of Service, the official owner remains the person or entity whose name is associated with the service, even if the payment is made by a third party or a Partner.
This distinction is particularly important during a product transfer between Organizations: the payer is not necessarily the manager or the legal owner.
Verify and update your details
To ensure your rights to a service, make sure the identification information is in your name or that of your company. Check the following details:
- Your Infomaniak profile
- The Organization that owns the product
- The billing information
- The legal owner of the domain name (registrant)
In the event of a dispute, only the owner designated in the Infomaniak interfaces is recognized as the responsible party and the rights holder.
Link to this FAQ: https://faq.infomaniak.com/1721
Has this FAQ been helpful?
This guide details the specific aspects related to the expiration dates of domain names when they are transferred from one registrar to another.
Introduction
- Domain name expiration dates refer to the period during which the owner of a domain name has paid for its registration.
- It is crucial for domain name owners to carefully monitor expiration dates and renew their registration in time to avoid any service interruption or having to pay additional recovery fees.
Transferring a domain to Infomaniak
When a domain is transferred to Infomaniak, the new expiration date (the date until which the domain will be registered, valid, and functional) after the transfer will be the date…
- …already existing before the transfer + a minimum of 365 days.
Example:
- Domain name with expiration date 01/12/2025 before the transfer…
- The transfer takes place on 01/10/2025, for example (this has no importance or impact)…
- The expiration date becomes 01/12/2026 after the transfer to Infomaniak (1 year is added after the transfer).
Exceptions based on domain extensions
Transfer policies and their effects on expiration dates may vary depending on the domain extension. Each domain extension (such as .com, .net, .org, etc.) is managed by a specific regulatory body, and these bodies may have different rules regarding transfers and expiration dates.
The rule described in the previous chapter does not apply to certain extensions for which the new expiration date after the transfer will be the date…
- … already existing before the transfer, without incrementation or change:
.CH. - … from the date of the transfer + a minimum of 365 days:
.BEand.DE.
Domain ownership transfers can also affect expiration dates. When a domain name is transferred from one owner to another, the expiration date may sometimes be changed depending on the registrar's policies.
Link to this FAQ: https://faq.infomaniak.com/1790
Has this FAQ been helpful?
This guide explains how to modify the DNS (Name Servers) of a domain registered with Infomaniak.
Prerequisites
- Have a domain name with Infomaniak or at least a DNS zone.
- Understand:
- the operation of a domain and a DNS zone before modifying the latter.
- that any DNS addition/modification can take up to 48 hours to propagate.
DNS Modification
To modify the DNS of a domain managed by Infomaniak and thus control the direction that Web and Mail traffic should take:
- Click here to access the management of your domain on the Infomaniak Manager (need help?).
- Click directly on the name assigned to the domain in question:
- Click on DNS Servers from the left sidebar.
- Click on the blue button Modify DNS Servers:
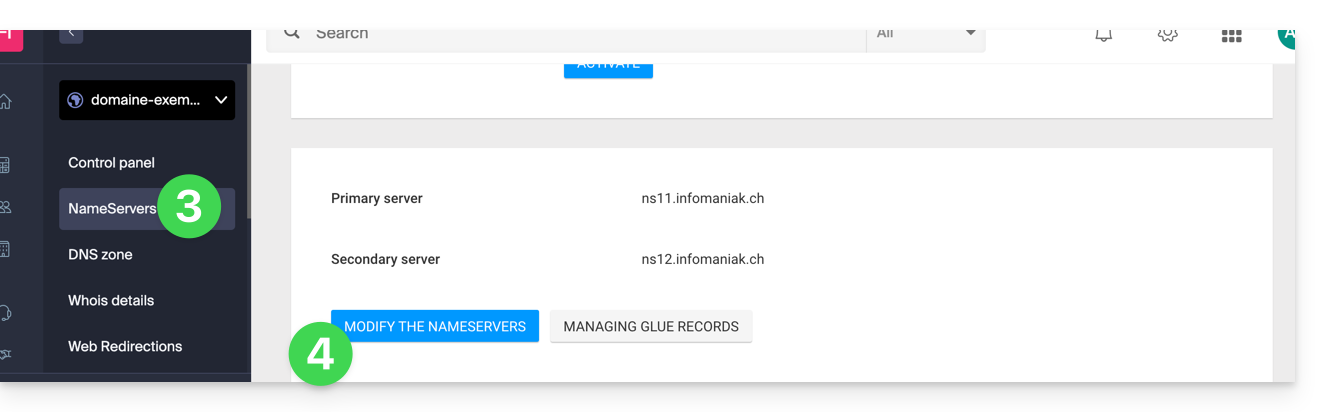
- If your website is hosted with Infomaniak, check Infomaniak Name Servers…
- Otherwise, check Custom Name Servers to enter the server names below and validate at the bottom of the page.
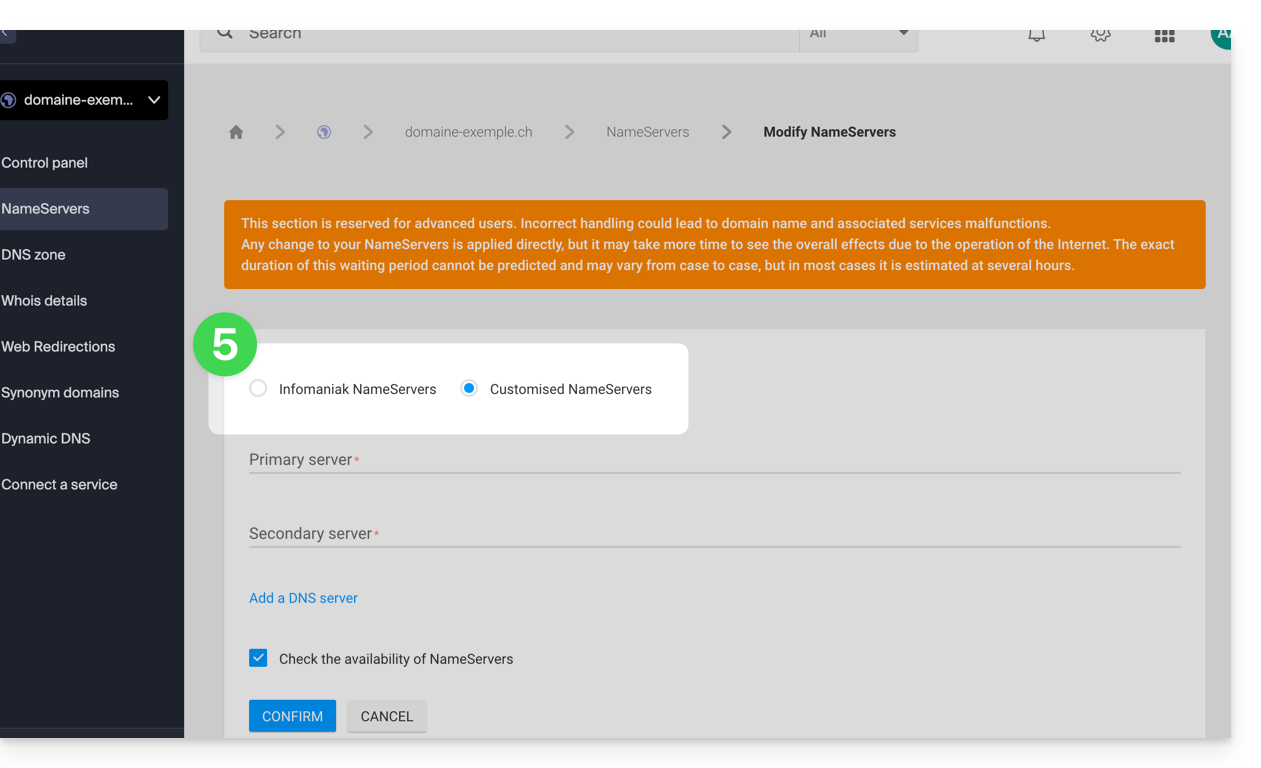
- Otherwise, check Custom Name Servers to enter the server names below and validate at the bottom of the page.
Batch Modification
To modify the DNS of multiple domains in bulk:
- Click here to access the management of your domains on the Infomaniak Manager (need help?).
- Select the domains in question.
- If necessary, click on ⋮ at the bottom of the screen.
- Click on Modify DNS servers:
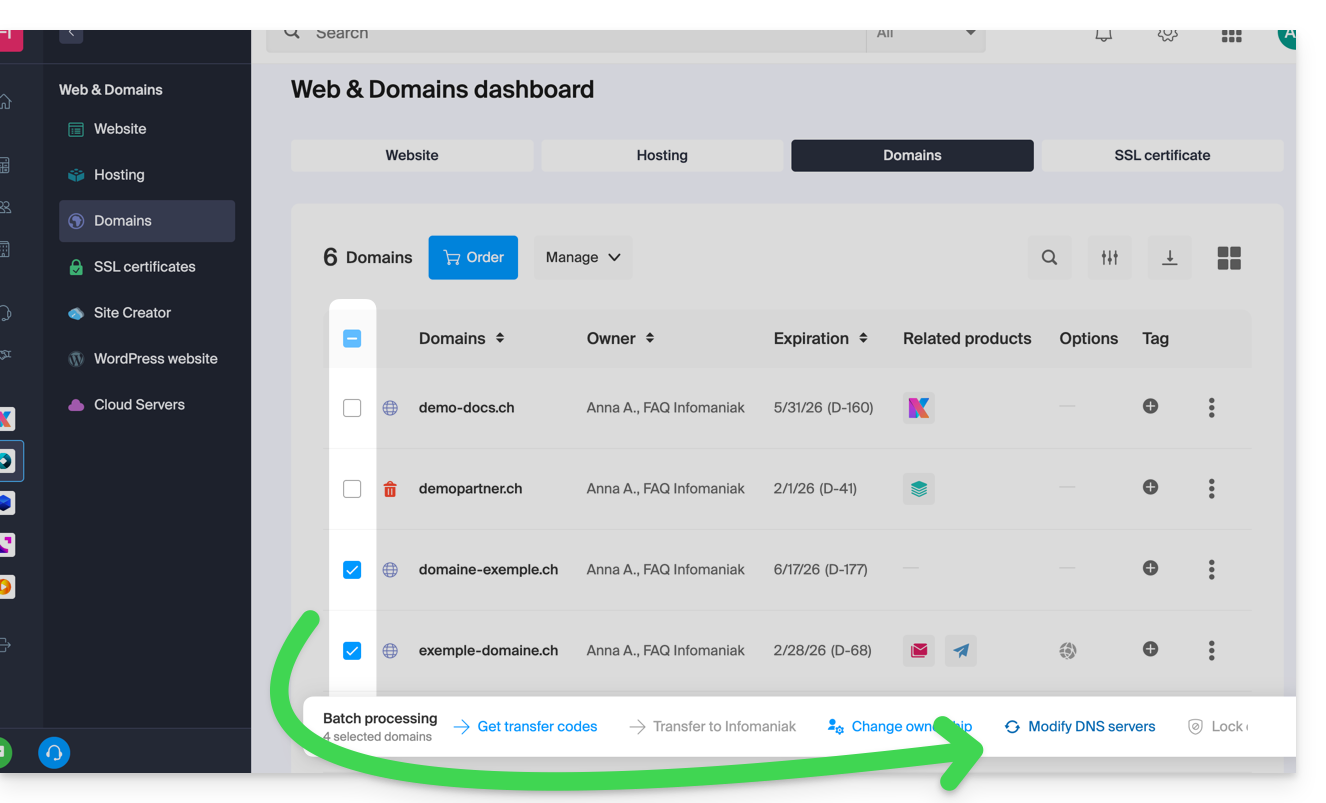
If you would rather modify the inside of the DNS zone and consequently touch the different DNS records contained in the zone, refer to this other guide.
Link to this FAQ: https://faq.infomaniak.com/1798
Has this FAQ been helpful?
This guide explains how to obtain the EPP code for your domain name at Gandi so that you can transfer it to Infomaniak.
Introduction
- The terms "
EPP", "AuthCode", "AuthInfo", "transfer code", and "authorization code" all refer to alphanumeric sequences specific to the domain, the main purpose of which is to verify the owner's authorization before a transfer between Registrars. - Familiarize yourself with the main guide regarding the rest of the transfer process.
- ⚠️ This involves transferring a domain name that you own with a provider different from Infomaniak, so that the future management of this domain is handled by Infomaniak; therefore, this is not an internal transfer from one account holder to another, and the code to be obtained is not a code for an internal transfer to your current provider.
Transfer the domain name to Infomaniak
In order to obtain the authorization code from your current provider:
- Familiarize yourself with the complete procedure provided by Gandi for obtaining the code and keeping it in a safe place:
- Once you have obtained the authorization code, refer to the Infomaniak main guide regarding the rest of the domain name transfer process.
Link to this FAQ: https://faq.infomaniak.com/1802
Has this FAQ been helpful?
This guide explains how to obtain the EPP code for your domain name at IONOS (formerly 1&1) so that you can transfer it to Infomaniak.
Introduction
- The terms "
EPP", "AuthCode", "AuthInfo", "transfer code", and "authorization code" all refer to alphanumeric sequences specific to the domain, the main purpose of which is to verify the owner's authorization before a transfer between Registrars. - Familiarize yourself with the main guide regarding the rest of the transfer procedure.
- ⚠️ This involves transferring a domain name that you own with a provider different from Infomaniak, so that the future management of this domain is handled by Infomaniak; therefore, this is not an internal transfer from one owner to another, and the code to be obtained is therefore not a code for an internal transfer to your current provider.
Transfer the domain name to Infomaniak
In order to obtain the authorization code from your current provider:
- Familiarize yourself with the complete procedure provided by IONOS to obtain the code and keep it in a safe place.
- Once you have obtained the authorization code, refer to the Infomaniak main guide regarding the rest of the domain name transfer procedure.
Link to this FAQ: https://faq.infomaniak.com/1803
Has this FAQ been helpful?