Knowledge base
1000 FAQs, 500 tutorials and explanatory videos. Here, there are only solutions!
This guide details the specifics of the .swiss domain extension, which is subject to special conditions.
Preamble
- Previously reserved for companies, registration to obtain a
.swissis now open to individuals and sole proprietorships not registered in the commercial register. - You can now submit your registration request to increase your chances and secure your surname or brand.
- By submitting your request now, Infomaniak will immediately submit your request to the Federal Office of Communications for review.
- As for company registrations, they are not immediate, and the waiting period of several weeks is independent of Infomaniak. Your requests will be denied if they do not meet certain conditions.
Reserve your .swiss domain
Beyond a unique opportunity to reserve your surname or brand:
- Unlike the
.chwhich is accessible to everyone, the.swissextension is subject to validation by the Federal Office of Communications (OFCOM). - The
.swisscertifies your presence in the Swiss market and sends a strong and credible signal to your Swiss and international partners. - Get 1 email address with your
.swissdomain for free by ordering a standard kSuite user which includes all kDrive productivity/storage applications. - Infomaniak offers the best rate for the
.swiss, including after the first-year promotion.
The complete conditions for individuals and sole proprietorships are specified during the order, however:
- You must be a natural person residing in Switzerland or a Swiss national.
- Swiss nationals living abroad can also apply for a
.swissfor private, charitable, or associative purposes. - The desired
.swissdomain must contain one of the following elements related to the person submitting the registration request:- one of the official names or other names listed in the civil registry
- one of the first names
- a surname
- a registered partnership name
- a name received in a religious order
- a stage name under which the person is known
- a name related to a distinctive sign (e.g., a registered trademark) on which the applicant has rights
The AHV and UPI (Universal Person Identification) numbers are not visible in the WHOIS.
This guide presents commands that can be executed to test a connection or a network and thus specify the source of a potential error more precisely.
Perform a Telnet...
TELNET allows you to test the connection to a server without considering all the additional settings of a mail or FTP application in order to determine the origin of a problem. If the connection does not go through on an SMTP server, you will need to check, for example, if your firewall is not blocking port 587 or 465.
... on macOS
- Search for Network Utility.
- Go to the
Ping,Lookup, orTraceroutetab depending on what you want to test. - You can also use a
Terminaltype application (command line interface,CLI / Command Line Interface) on your device and, depending on what you want to test, enter:traceroute [server]nc [server] [port]
Replace[server]with the server name or its IP address, the same for[port]...
... on Windows
Enable Telnet if necessary.
- Use a
Terminaltype application (command line interface,CLI / Command Line Interface) on your device, for example by typing Run thencmd. - In the window that opens, depending on what you want to test, type:
tracert [server]telnet [server] [port]
Example:telnet mail.infomaniak.com 587(allows you to test the SMTP port if your software/email client does not allow sending emails)...
... on Android
- Use the application Simple Telnet Client which allows you to test very simply via 2 fields to fill in (for example
mail.infomaniak.comand port143or993)...
Perform a PING
PING allows you to know if a machine is accessible via the Internet. You can also check with this tool if you are indeed addressing the correct machine, for example during a DNS change, by looking at the IP address obtained. It is possible to perform a ping on a domain name, a hostname or an IP address.
PING is definitely blocked on shared hostings.
This guide explains how to resolve issues that may occur with a Web Hosting if the latter has undergone modifications at the IP address level (for example, a server move) and your computer retains the old position in its DNS cache.
Flush the DNS cache...
When you visit a website, your computer stores a local association between the domain name and its IP address in the DNS cache. This speeds up the DNS resolution process for future visits to the same site, as the computer can avoid re-consulting the DNS servers to obtain the IP address.
By flushing the DNS cache, you force your computer to query the DNS servers again to obtain the latest up-to-date information on the IP addresses of the sites you visit.
... on Windows
Run the following command from a Terminal type application (command line interface, CLI / Command Line Interface) on your device. Example:
- Open the Start menu.
- Type cmd.
- In the search results, click on Command Prompt.
- Run the command
ipconfig /flushdns.
... on macOS
Run the following command from a Terminal type application (command line interface, CLI / Command Line Interface) on your device:
- Run the command
lookupd -flushcache(in case of failure:dscacheutil -flushcache).
... on Linux
Run the following command from a Terminal type application (command line interface, CLI / Command Line Interface) on your device:
- Run the command
sudo systemctl restart nscdorsudo /etc/init.d/nscd restartto restart nscd.
This guide explains what to do if you have received a letter, by email, post, or fax, from an unknown company or impersonating Infomaniak (or a competitor) and mentioning the domain names you own, and asking you to pay fees related to these products.
Preamble
- Several organizations are known for "slamming" a domain name, with the aim of appropriating it or simply making money at your expense.
- Among them: Brandon Gray Internet Services, NameJuice.com or Global Netsource. In addition, Asian companies are listed here.
- The company called Domain Registrar of America (DROA) also aims to scam domain name holders by sending a fax or email to renew one or more domain names 2 to 3 months before their expiration date. This offer seems official and professional and offers very competitive prices.
- The catch: by signing with these unscrupulous companies, you agree to transfer your domain names to these "registrars", with all the risks of inactivating your websites and mailboxes. Of course, you are encouraged to pay by credit card! Some companies have been the subject of legal proceedings in the USA, Great Britain, and Canada but remain very active in Europe.
Some recommendations
To avoid being scammed:
- Determine who is sending you such a message... Is it a company you know, writing to you from Switzerland or France, in French, etc. or on the contrary a letter that comes from abroad (USA, United Kingdom, Jamaica, Asia, etc.), in English, etc.?
- Determine the status of your domain name and where it is currently located; to do this, start by doing a WHOIS on infomaniak.com/whois for example.
- Do not respond to these letters... Destroy them or you risk paying astronomical amounts unnecessarily.
- Consult the AFNIC Guide on slamming and other fraudulent practices.
- Activate Domain Privacy for more peace of mind.
- Report these messages.
This guide explains how to force the display of the web hosting name in the browser's address bar to one of the domain names installed as an alias/synonym or how to display the main domain in the address bar instead of the alias.
Limiting the 'duplicate content' or duplicate content
Assume you have the hosting your-domain.com with Infomaniak and as a synonym domain name you have installed www.synodomain.xyz.
By default, when you type one or the other of the domain names (your-domain.com or synodomain.xyz) in the address bar of your browser, it is the one you typed that will be displayed in the address bar.
You therefore have the possibility to force the display of a different address than the one that was typed. Thus, if someone types synodomain.xyz, then it is your-domain.com that will automatically be displayed in the address bar.
A code must be entered in a file called .htaccess which must be located at the root of your hosting (in the /web folder of your FTP). If this file does not exist yet, you must create it on the server.
Insert the following directives in the file:
RewriteEngine on
RewriteCond %{HTTP:X-Forwarded-Proto} !https
RewriteRule (.*) https://votre-domaine.com/$1 [R=301,L]
Adjust the code above according to these instructions:
- Replace
your-domain.comwith your domain name with the appropriate extension (.com, .fr, .ch, etc.) that you want to see displayed in the visitor's browser address bar. Addwww.before your-domain.com if necessary. - Replace the second line of the code above with "
RewriteCond %{HTTPS} off" if a loop error occurs, this means that HTTP/2 is active for this site
Also, refer to the automatic redirections to httpS.
If your domain is important to your activity, then Renewal Warranty is the assurance of never losing it. As a leading registrar, Infomaniak is daily confronted with clients who have not been able to renew their domain on time. Their website and email addresses are no longer accessible, and this often represents significant damage to their activity.
Infomaniak also offers the possibility to protect your personal information from WHOIS with Domain Privacy.
It is easy and costly to lose a domain
A domain name is registered for a specific period after which it must be renewed to retain ownership. When a domain is not renewed, it enters a redemption period and then falls into the public domain awaiting a new buyer.
The redemption period is a grace period during which it is still possible to act to retain ownership of your domain. However, this ultimate measure is consequential and incurs fees. In the best-case scenario, it results in the interruption of your website and email addresses for many hours, the time it takes to urgently remove your domain from redemption.
In the worst-case scenario, if there is no intention to reactivate the domain name, it is lost.
Renewal Warranty, the assurance of never losing a domain
With this guarantee, Infomaniak commits to renewing your domain if necessary (blocked payment method, renewal emails not received, prolonged absence, etc.) and will personally contact you by email, SMS, phone, and mail to ensure you keep it.
Renewal Warranty is a unique solution that protects you from the involuntary expiration of your domains. You remain the sole owner of your domains and are free to stop Renewal Warranty or cancel your domains whenever you decide.
Activate Renewal Warranty on an existing domain
Refer to this other guide to activate the option in a few clicks.
This guide explains how to set up DNSSEC with Cloudflare for a domain registered with Infomaniak.
Prerequisites
- The domain's DNS zone must be managed by Cloudflare.
Configure DNSSEC with Cloudflare
To do this:
- Click here to access the Cloudflare console.
- Go to the DNS tab.
- Click on Enable DNSSEC.
- Click here to access the management of your product on the Infomaniak Manager.
- Click directly on the name assigned to the product in question.
- Activate DNSSEC from the Information section of the Dashboard.
- Enter the requested information with the data provided by Cloudflare:
- Key = Key Tag
- Algorithm = Algorithm
- Digest Type = Digest Type
- Digest = Digest
- Click on Activate.
Cloudflare data to enter in the Infomaniak Manager
The information to copy is in red:
Please report the points on your Infomaniak Manager by activating DNSSEC:
- The indications under 1 will go under HASH
- The indications under 2 will go under DIGEST TYPE
- The instructions under 3 will go under ALGORITHM
- The instructions under 4 will go under KEY
In the case of a domain with extension .eu, the instructions may be significantly different:
- The instructions under FLAGS will go under FLAGS
- The instructions under PUBLIC KEY will go under PUBLIC KEY
This guide explains how to obtain the authorization code (EPP code) for a domain name managed by Infomaniak, thus allowing the transfer of domain management to another registrar.
Preamble
- The terms "
EPP", "AuthCode", "AuthInfo", "transfer code" and "authorization code" all refer to alphanumeric sequences specific to the domain, the main purpose of which is to verify the owner's authorization before a transfer between Registrars. - Refer to the main guide regarding domain transfer procedures.
- The authorization code is always and only sent to the email address of the owner listed in the WHOIS of the domain.
Obtain the authorization code for a domain
To obtain the transfer authorization code:
- Click here to access the management of your product on the Infomaniak Manager (need help?).
- Click directly on the name assigned to the product concerned.
- Click on the Manage button.
- Click on Transfer to another registrar:

- Check the box to disable the Domain Privacy option (if necessary) to authorize the transfer:

- Click on the Unlock this domain button (if necessary) to authorize the transfer.
- Click on the Send the code button.
Particularity of certain extensions
And then?
Once you have entered the authorization code with the third-party provider and the outgoing transfer has started, Infomaniak is no longer involved.
Contact the new registrar to find out the transfer time during which the domain name will still be visible in your Infomaniak interface. Infomaniak unfortunately cannot intervene in any operation that would speed up the outgoing transfer.
This guide is intended for users who wish to manage Glue records (or "glue records") at Infomaniak.
Preamble
- Glue records are crucial for linking a domain name to its associated name servers, by providing the IP addresses of these servers directly.
- For example, for the domain
domain.xyz, the glue records specify the name servers (ns1.domain.xyzandns2.domain.xyz) as well as their IP addresses (192.0.2.10and192.0.2.11).
- For example, for the domain
- This speeds up DNS resolution, allowing browsers and online services to find your site faster and more efficiently.
- Warning: adding an NS does not automatically add it to the DNS zone: it is necessary to manually update the DNS zone of your domain!
Create Glue records...
... via "A record"
This method involves creating an A record (address) for ns1.domain.xyz pointing to the IP of the NS. This will have the effect of registering the IP with the registry. You will then be able to add ns1.domain.xyz which will be recognized and redirected to the correct NS.
domain.xyz. 3600 IN NS ns1.domain.xyz.domain.xyz. 3600 IN NS ns2.domain.xyz.
ns1.domain.xyz. 3600 IN A 192.0.2.10ns2.domain.xyz. 3600 IN A 192.0.2.11
... via "Glue records" button
This way of doing things allows you to create, but also modify, existing Glue records:
- Click here to access the management of your product on the Infomaniak Manager (need help?).
- Click directly on the name assigned to the product concerned.
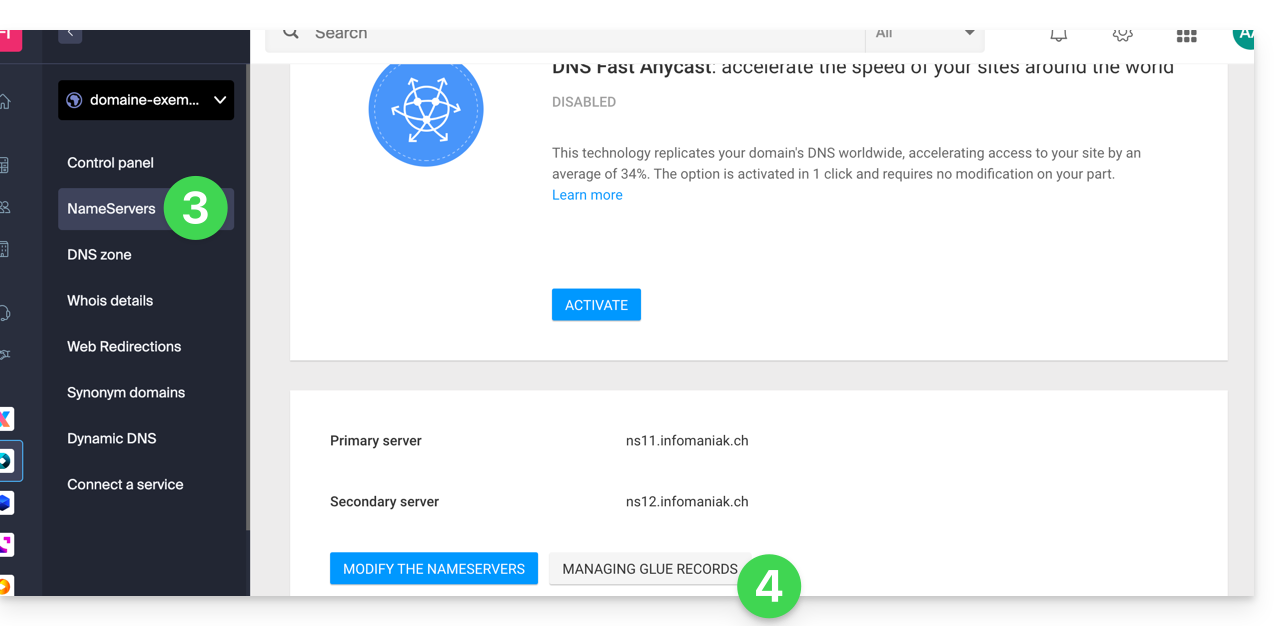
- Click on DNS Servers in the left sidebar.
- Click on the Manage glue records button:
- Click on the Add a server button:
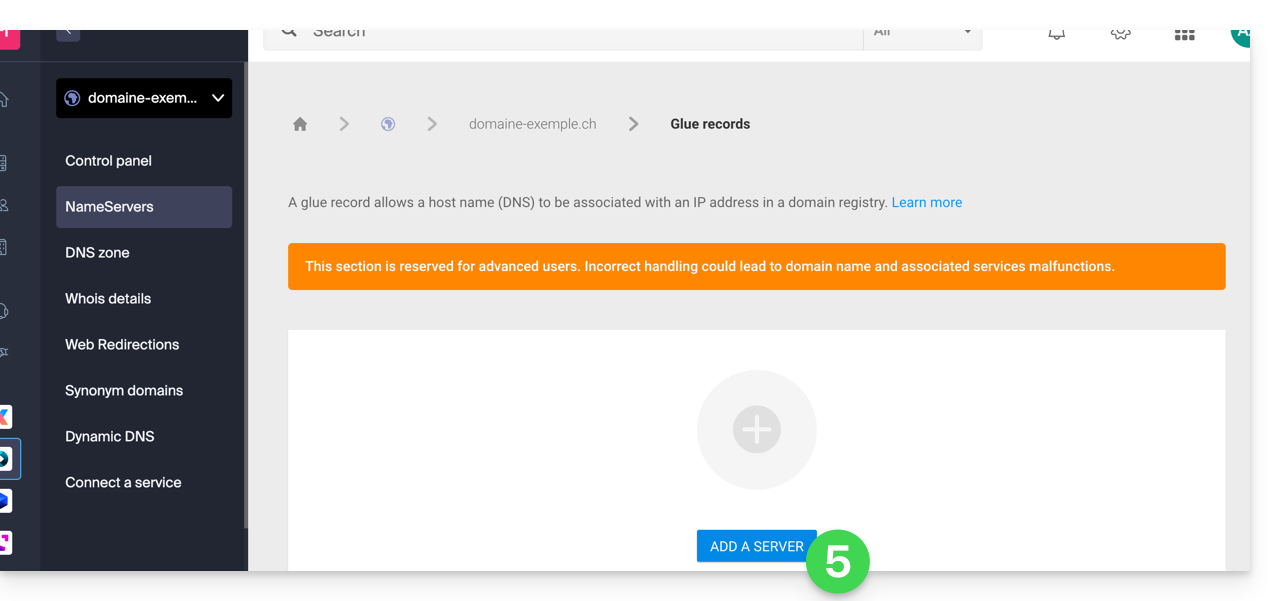
- Enter the name of the server to be added as well as its IP address.
- Click on the Validate button.
This guide explains how to find and display DNS type information for any domain name registered with Infomaniak (or elsewhere).
Domain with Infomaniak
To access your domain names and view the DNS servers listed:
- Click here to access the management of your product on the Infomaniak Manager (need help?).
- Click directly on the name assigned to the product concerned.
- Click on DNS Servers in the left sidebar:
WHOIS Search
To display the DNS information of another domain name, use a WHOIS service such as https://whois.infomaniak.com/ for example or https://who.is (be careful with ads on all these third-party services).
You will thus obtain a clear answer to the DNS situation of a domain name at a given time.
Often, DNS entries are displayed in pairs and start with ns... followed by numbers and the name of the registrar or host.
Note that the DNS records displayed are not necessarily those chosen recently by the domain manager. Indeed, there is a propagation time that may need to be taken into account if changes are being made to the domain.
This guide explains how to add or modify one or more SPF type records in the DNS zone (of a domain name) managed on the Manager Infomaniak.
Preamble
- If your domain name is registered with Infomaniak, your email is managed by Infomaniak, but your website is hosted with another provider (Wix for example), you are probably managing the DNS zone (and therefore the SPF) with this other provider: refer to this other guide on this subject.
Understanding SPF type records
The SPF (Sender Policy Framework) record type is a standard for verifying the domain name of the sender of an email and aims to reduce SPAM.
It is used to indicate which server is authorized or not to send emails for a domain.
If the SPF fails for an email, this means that it was not sent from an authorized server/IP address by the administrator of the sending domain.
The email is then considered as spam.
Moreover, Infomaniak installs this type of record automatically when creating a Mail Service on your domain (strict SPF):
v=spf1 include:spf.infomaniak.ch -allThus, the recipient server of the email you send will evaluate that any email not coming from Infomaniak servers will be rejected. This prevents malicious individuals from impersonating email addresses from your domain.
You can also decide to modify the SPF for a more flexible model:
v=spf1 include:spf.infomaniak.ch ?allIn this case, the recipient server of the email you send will evaluate according to its own rules whether it accepts emails not coming from Infomaniak servers.
In summary:
?: the receiving server accepts the message even if the sender is not listed in the SPF~: the receiving server generally accepts the message if it is not listed in the SPF but identifies it as suspicious-: the receiving server rejects the message if it is not listed in the SPF (recommended)
Add an SPF via a TXT record
Refer to this other guide to manage this type of record in a DNS zone.
Add multiple SPFs
If you use other email providers in addition to Infomaniak, you need to obtain their SPF and then merge it with Infomaniak's according to a specific syntax.
Having multiple distinct SPF records will cause errors. It is essential to group multiple SPFs in the same TXT!
Example of 3 SPFs to merge:
- That of Infomaniak:
v=spf1 include:spf.infomaniak.ch -all - Those of 2 secondary providers:
v=spf1 include:the-second-domain.xyz ?allv=spf1 include:the-other-domain.xyz ~all
... the final SPF to be inserted in your DNS zone must be in the form:
v=spf1 include:spf.infomaniak.ch include:the-second-domain.xyz include:the-other-domain.xyz -allDelete any other SPF entry from the DNS zone of your domain! Any DNS addition/modification can take up to 48 hours to propagate.
Limit of the number of SPF
Multiple SPFs are limited to a maximum of 10 inclusions.
The Infomaniak SPF usually already includes 4 inclusions:
include:relay.mail.infomaniak.chinclude:app.mail.infomaniak.chinclude:newsletter.infomaniak.cominclude:amazonses.com
Check the SPF record(s)
The Global Security tool on the Infomaniak Manager allows you to easily check and correct any problematic records you may have.
In case of a problem, it is recommended to analyze your domain name on MxToolbox to check if your SPF contains syntax errors, too many inclusions, or other issues that could lead to an error:
… or directly at the address https://mxtoolbox.com/spf.aspx.
This guide explains how to create a custom MX record (mx.domain.xyz assuming that domain.xyz belongs to you) to use later in the MX configuration of your NAS.
An MX record cannot be declared directly in the form of an IP address, for example 178.123.456.789
Custom MX Record
To access your domain names:
- Click here to access the management of your product on the Infomaniak Manager (need help?).
- Click directly on the name assigned to the product concerned.
- Click on DNS Zone in the left sidebar menu.
- Click on the blue button Add a record:

- Select MX as the type of record.
- Click on Next:

- Enter the desired MX record ("
mx.domain.xyz" for example). - Point the record to the desired IP address (target).
- Click on the Save button:

This guide explains how to add a synonym domain to a domain name.
Preamble
- A synonym domain is a domain name that can serve as a secondary name for another domain.
- When a synonym domain is added, it automatically inherits the content of the DNS zone of the main domain (including
MX,A, etc. records), as well as its Web and Mail hosting. - Alternatively, you can also add a (domain) alias to a website or add a (domain) alias to a Mail Service.
Add a synonym domain to a domain
Prerequisites
- The domain name of the future synonym or the management of its DNS zone…
- … must be reserved with Infomaniak,
- … must be configured with the Infomaniak DNS,
- … must not be linked to any product yet.
- The domain name on which the synonym will be placed…
- … must not be associated with the Infomaniak Newsletter product.
To access your domain names:
- Click here to access the management of your product on the Infomaniak Manager (need help?).
- Click directly on the name assigned to the product in question.
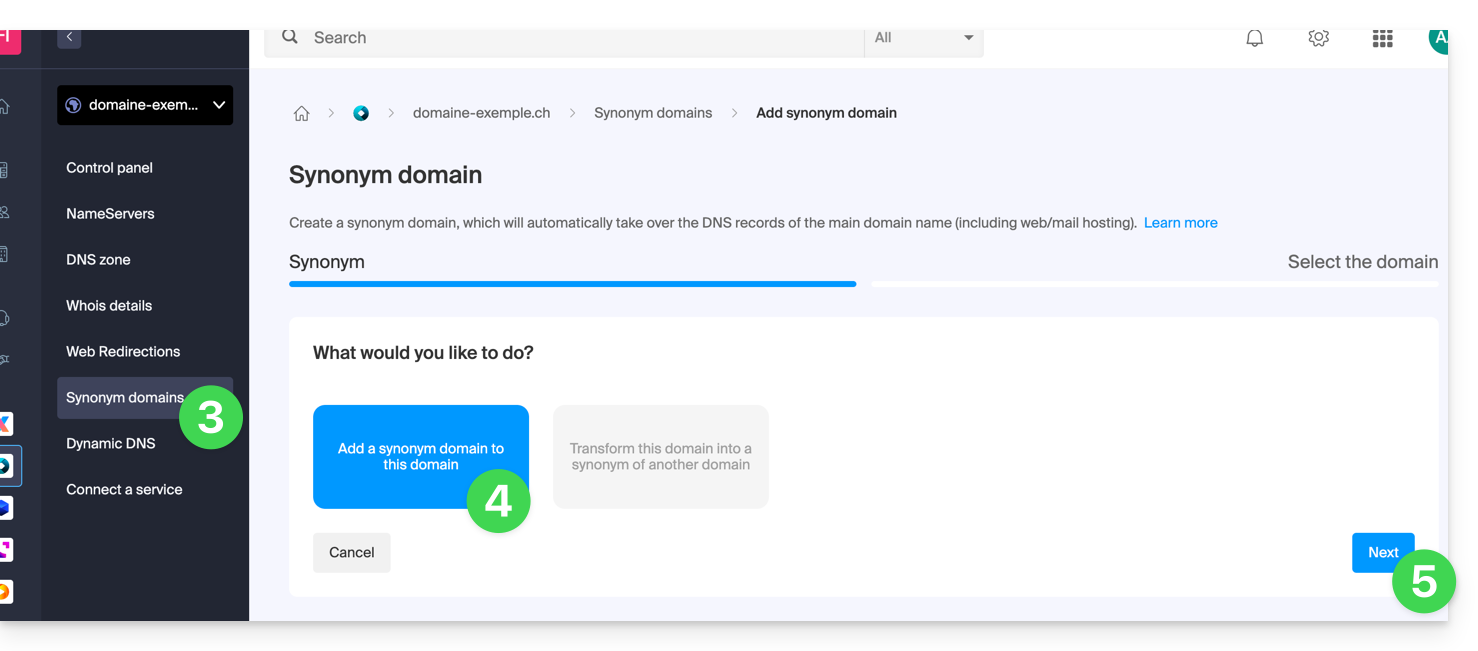
- Click on Synonym Domains in the left sidebar.
- Choose to add a synonym.
- Click on Next:
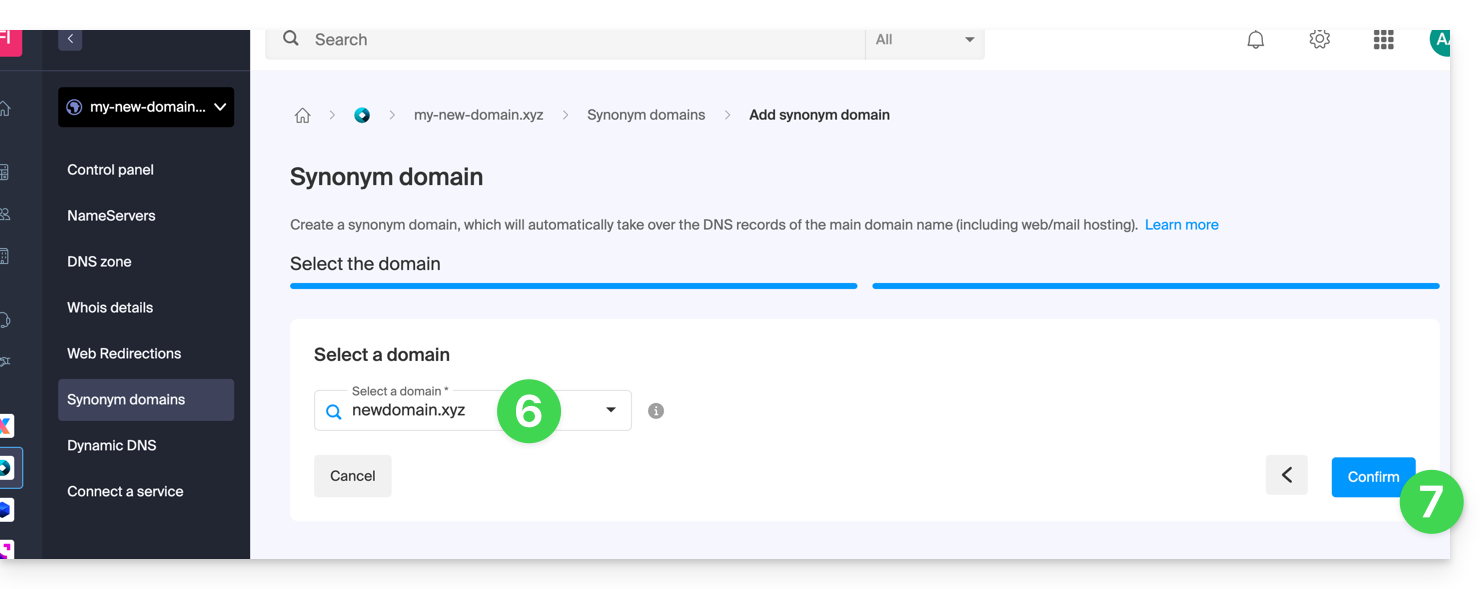
- Choose an existing domain in the current Organization, or order a new domain in advance.
- Click the button to Confirm:
- That's it:
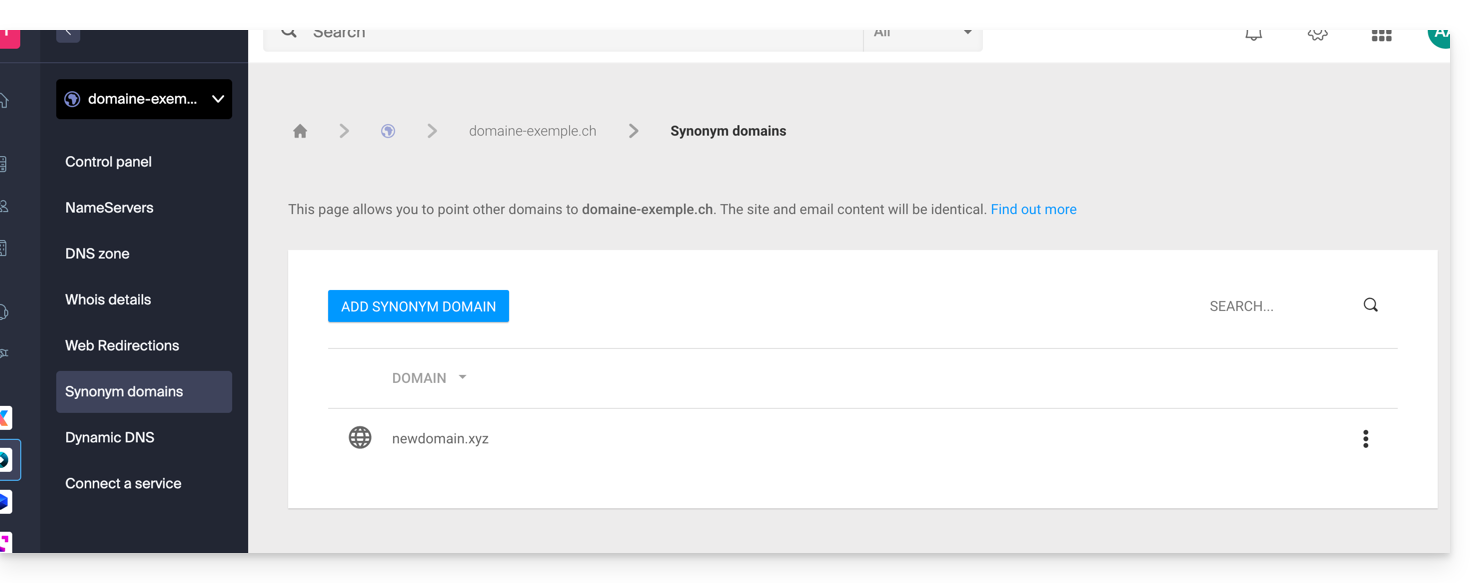
Refer to this other guide if you are looking for information to dissociate a synonym domain name.
This guide explains how to remove an alias domain from an Infomaniak Web Hosting. The main domain name of the site will then no longer be linked to any other domain name.
This allows you to subsequently create a new Web Hosting or separate site for the domain name thus unlinked.
Prerequisites
- Have dissociated the synonym domain name from the main domain name if there was an association previously.
Remove the alias domain
To remove an alias domain from your site:
- Click here to access the management of your product on the Infomaniak Manager (need help?).
- Click directly on the name assigned to the product concerned:

- Click on the chevron to expand the Domains section of this site.
- Click on the action menu ⋮ to the right of the domain to be removed.
- Choose Unlink:

- Confirm the deletion of the alias.
This guide explains how to modify in advanced (expert) mode specific entries (records of type A & AAAA, MX, TXT, etc.) within the DNS zone of a domain name registered with Infomaniak.
If you are a beginner, prefer the simple mode.
Prerequisites
- Have a domain name with Infomaniak or at least a DNS zone.
- Understand:
- the operation of a domain and a DNS zone before modifying the latter…
- that the DNS zone presented here is valid and used only if the name servers are those of Infomaniak…
- that any DNS addition/modification can take up to 48 hours to propagate.
Modify an existing record
To configure the services associated with the domain and allow the appropriate resolution of domain names to the corresponding resources (such as external websites, third-party mail servers, etc.):
- Click here to access the management of your product on the Infomaniak Manager (need help?).
- Click directly on the name assigned to the product concerned.
- Click on DNS Zone in the left sidebar
- Click on Advanced View:
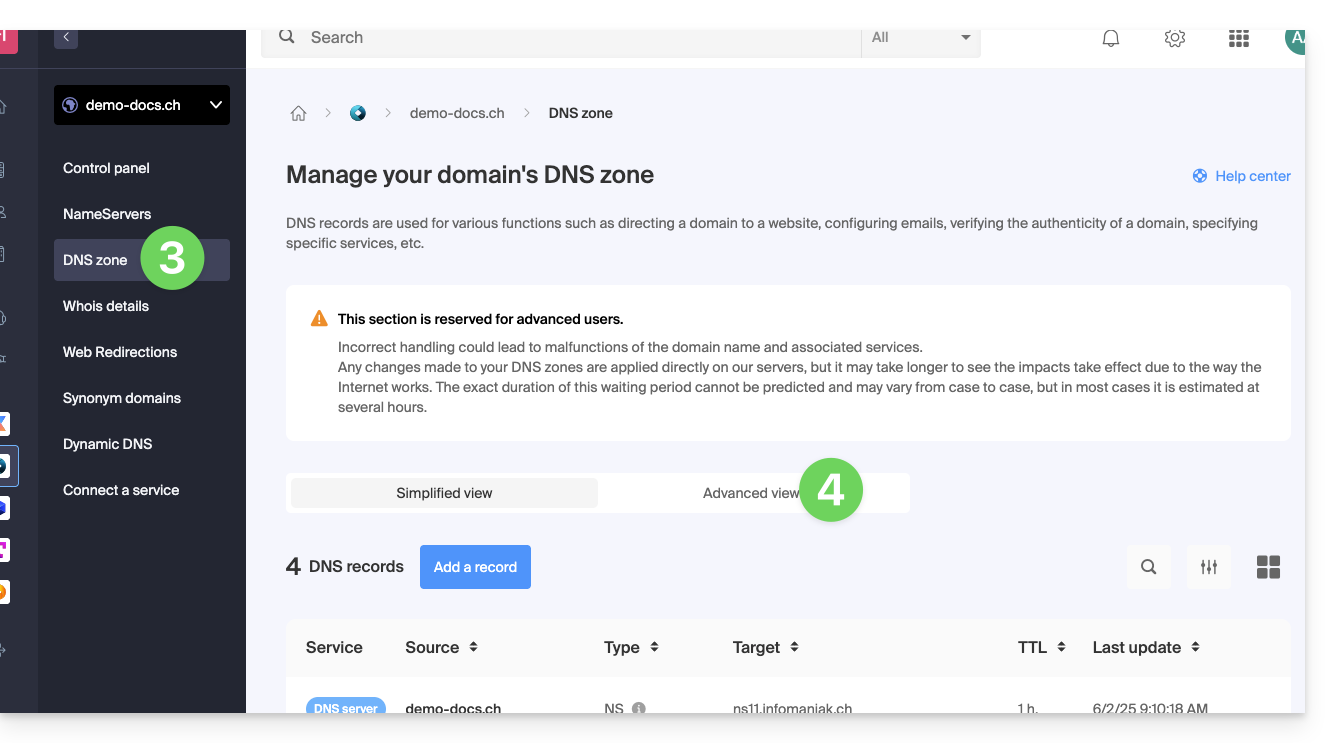
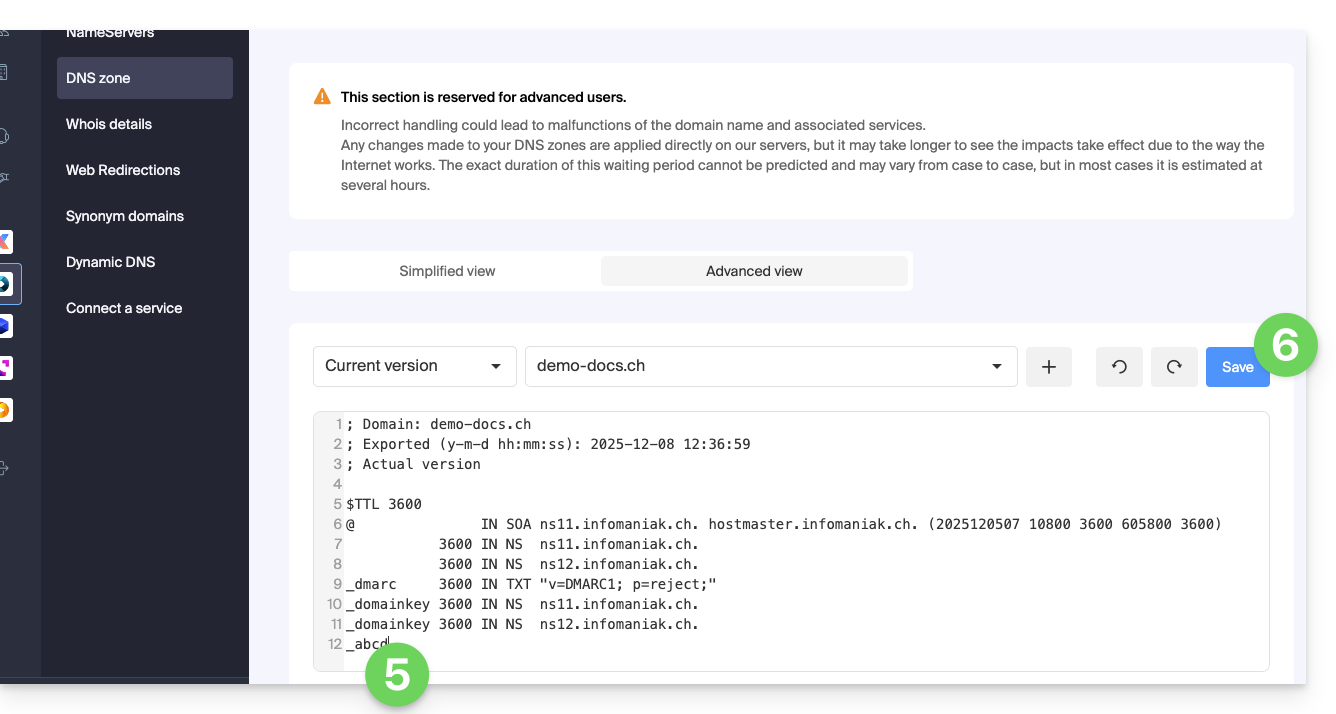
- The syntax is accepted in BIND format.
- Proceed with the editing of the desired information.
- Save your changes:
Restore a DNS zone
Thanks to the Expert mode, you can use versioning to find a previous version of the DNS zone of your domain name and thus restore it as it was at a given time:
- Once in the Advanced View tab (see above) click on Current Version to expand the menu containing previous dates.
- Click on the desired date to get a preview of the changes.
- Click on the blue Save button on the right to return to the selected version:
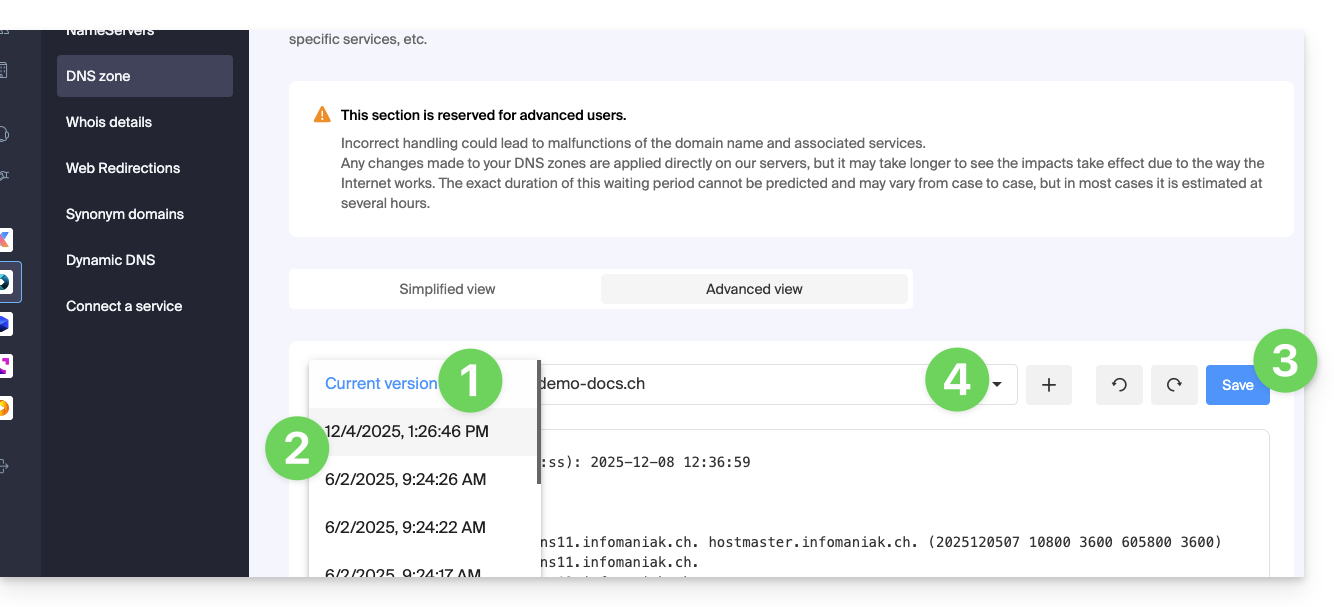
- Click on the second drop-down menu if necessary to access the restoration of delegated subdomain configurations.
DNS Diagnostic
A tool available on your Manager allows you to easily correct certain problematic records.
This guide explains how to replace the main domain name associated with a Mail Service in case you want to modify the spelling of everything that comes after the at sign @ of your email address (= the domain name). If your Mail Service is part of a kSuite, then you will need to act on the kSuite domain directly.
Preamble
- You can also follow this procedure if the goal is to have completely new email addresses while keeping the history of your emails in Mail (since the email address will continue to exist, for example info@first-domain.xyz will become info@new-domain.xyz without modifying its content).
- Indeed, it is not possible to simply modify the spelling of the domain name concerned; it is therefore necessary to replace the current domain name associated with your email addresses with another domain name.
- To simply add an additional domain name, refer to this other guide.
- To rather modify the part of your email address that comes before the at sign
@, refer to this other guide. - Note also that you can rename your product (example) on the Infomaniak Manager, but changing the name of a Mail Service has strictly no impact on its addresses; you need to act on the domain name.
If your Mail Service is part of a kSuite, then you will need to act on the kSuite domain directly.
Modify the domain name of the Mail Service
Prerequisites
- Have the new domain name (if necessary, create it in advance).
- Refer to the instructions of this other guide by applying the instructions corresponding to your situation (this is so that the domain name works when it is linked to your Mail Service).
Once the new domain name is ready to be used in place of the old one, you need to add it to the Mail Service and then perform a swap:
- Click here to access the management of your product on the Infomaniak Manager (need help?).
- Click directly on the name assigned to the product in question.
- Click on Domain Management in the left sidebar
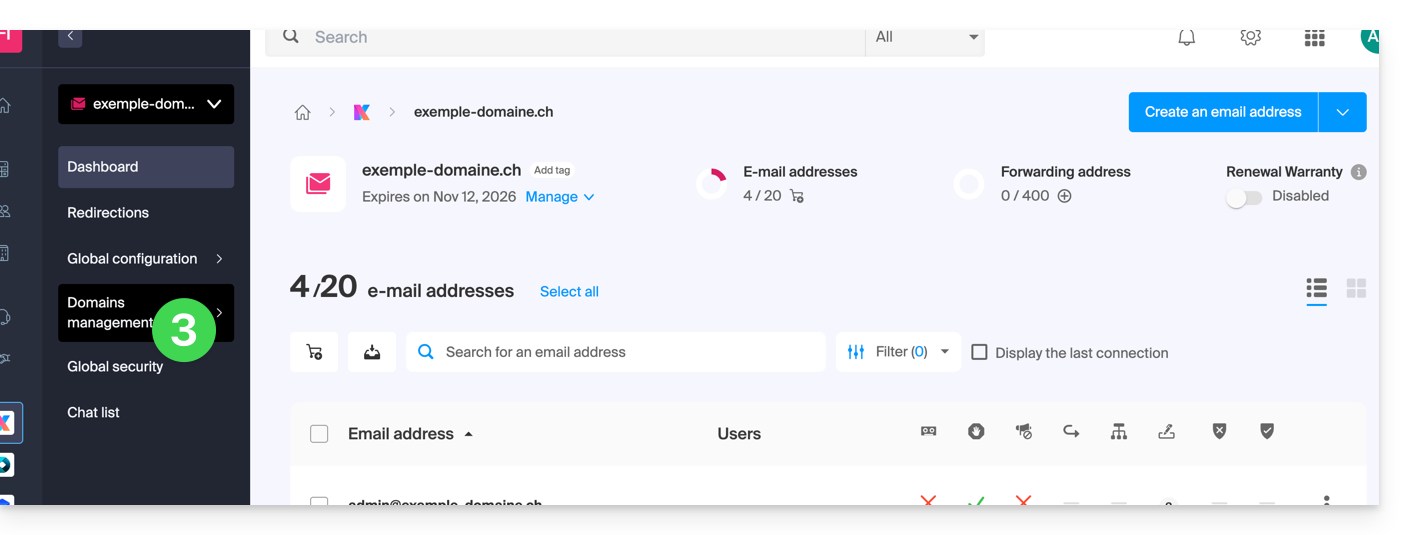
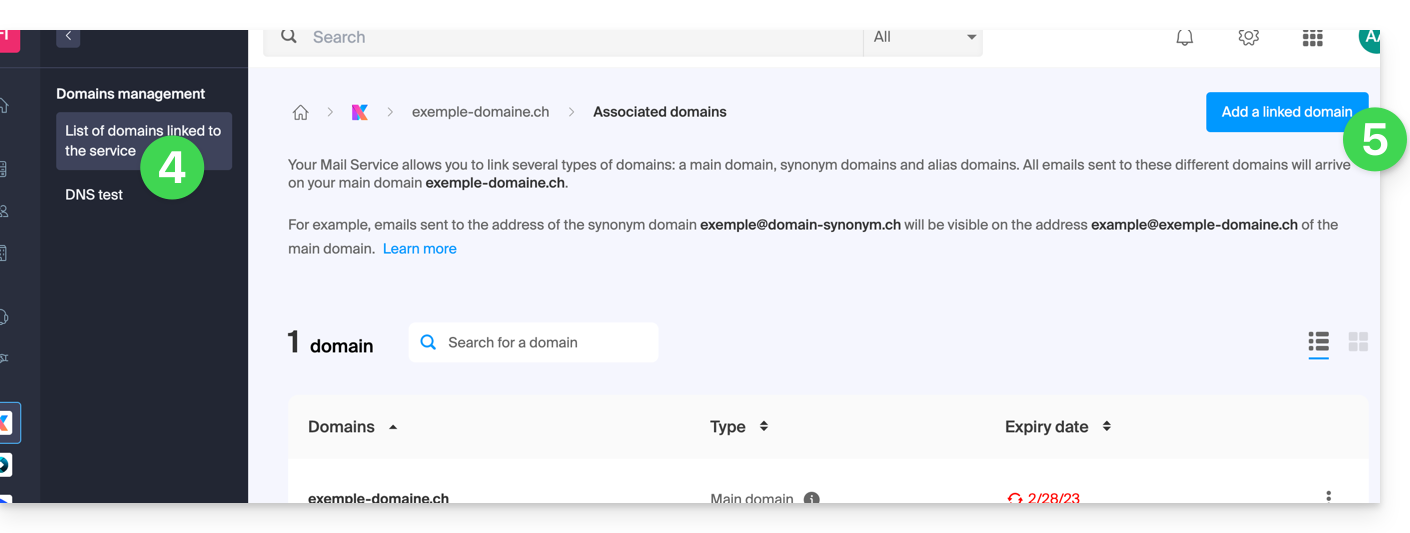
- Click on Service-related domains in the left sidebar menu.
- Click the blue button Add a linked domain:
You can:
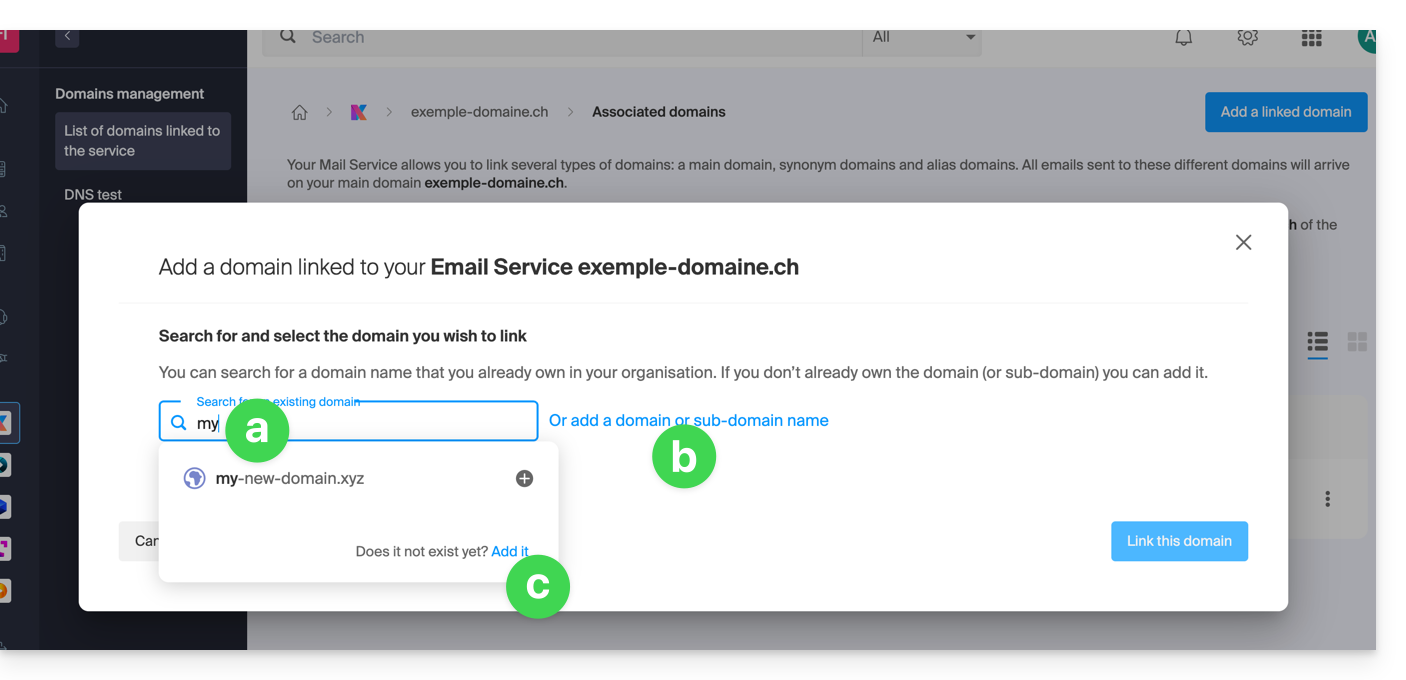
- Search for an existing domain within the Organization to which you are connected; this will link and automatically update the DNS zone of the added domain.
- Add a domain name or subdomain to manually specify the domain name or subdomain to be used (ideal if the domain name is hosted elsewhere).
- Purchase a new domain name (read the prerequisites above).
a: The domain exists within the Organization
Before proceeding, make sure to disassociate the domain name if it had been defined as an alias domain previously.
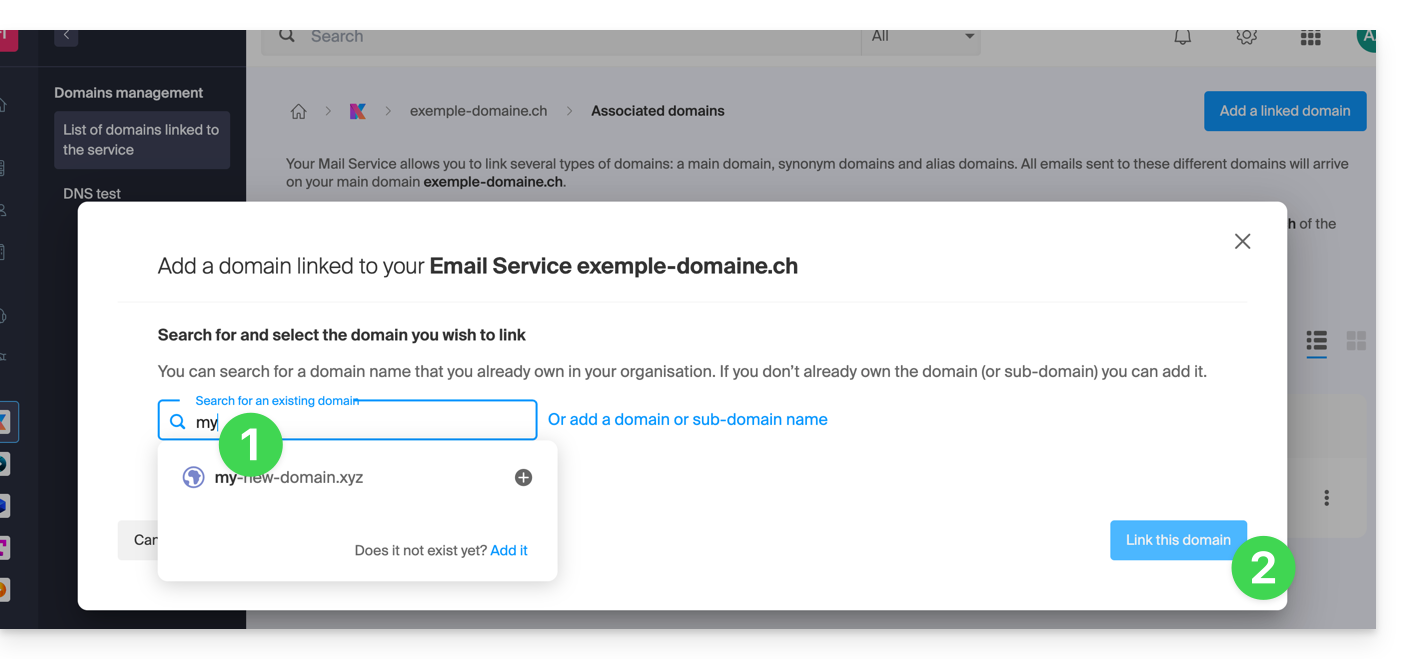
- Click on the proposed domain name.
- Click the blue button Link this domain:
- Click on the icon ⋮ to the right of the newly added domain name.
- Click on Set as primary domain (you must have disassociated the alias domain name from the primary domain name if there was a previous association):

- Confirm the reversal and then wait for the operation to complete.
- Click on the icon ⋮ to the right of the old domain name.
- Click on Unlink the domain:
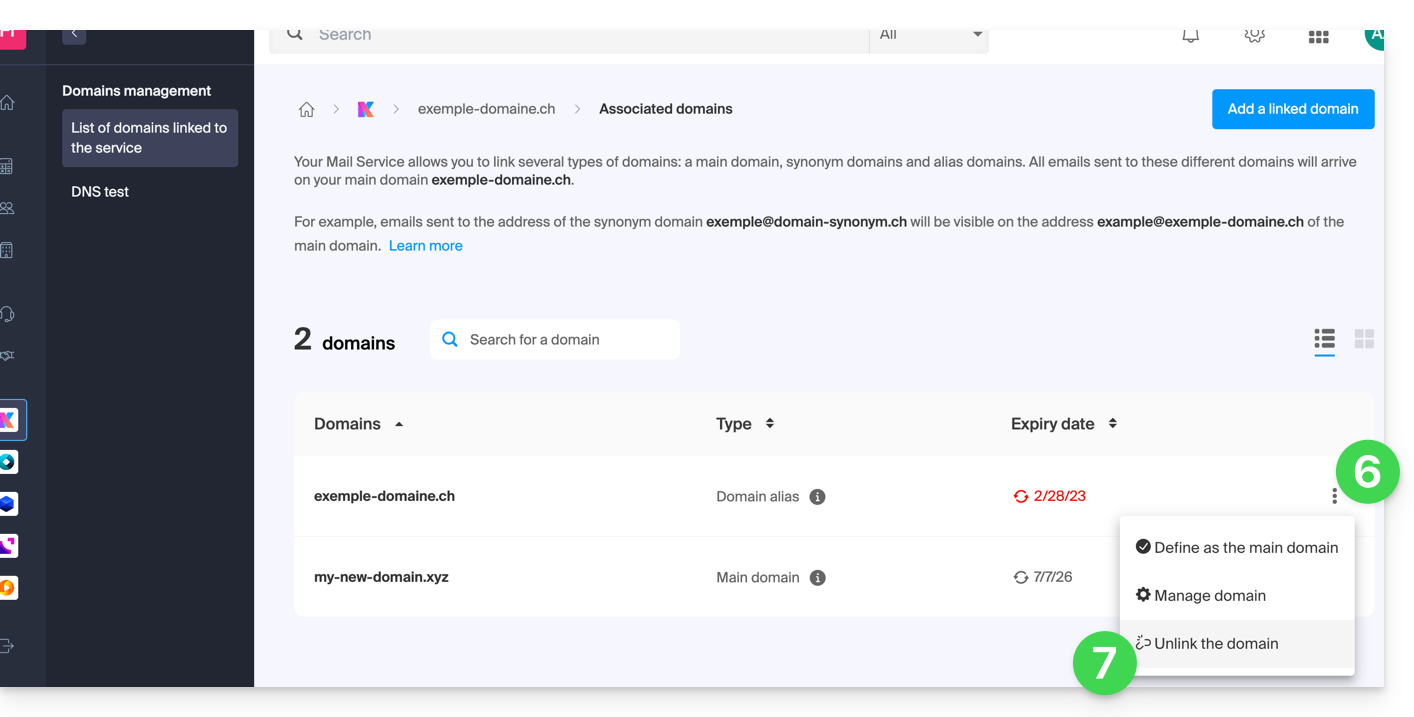
- Confirm the detachment by checking if you want to delete the associated DNS records during the detachment operation.
That's it, the Mail Service now responds to a new domain name.
b: The domain exists but elsewhere
- After clicking on Add a domain or subdomain, enter the domain name that will replace the current one.
- Enable the DNS entry update (if the domain name situation allows it, the DNS zone of the domain name will be automatically updated).
- If the point 2 above is active, then activate the replacement of any existing entries.
- Activate the reversal of the domain name (to avoid additional steps as in point "a" above).
- Click on the blue button Link this domain:
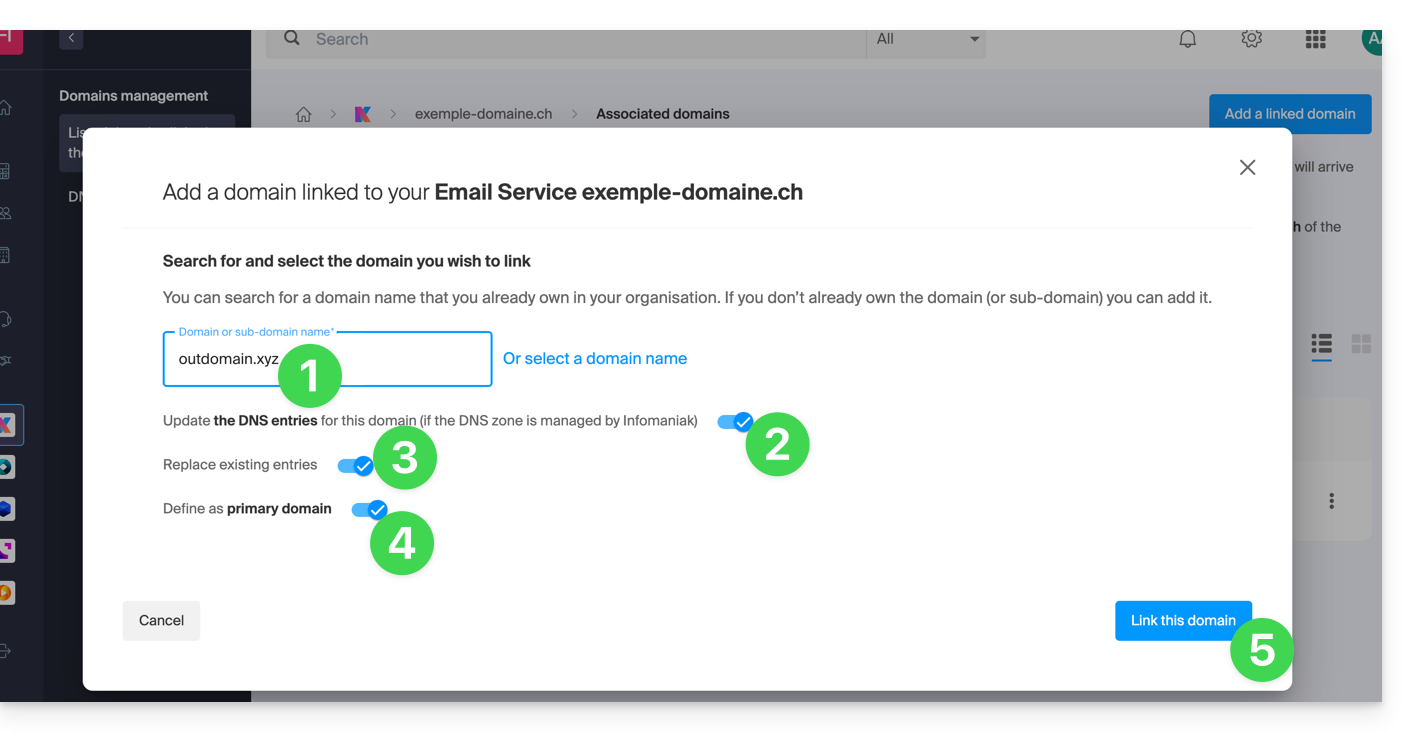
- Wait for the operation to complete.
- Click on the icon ⋮ to the right of the old domain name.
- Click on Unlink the domain:
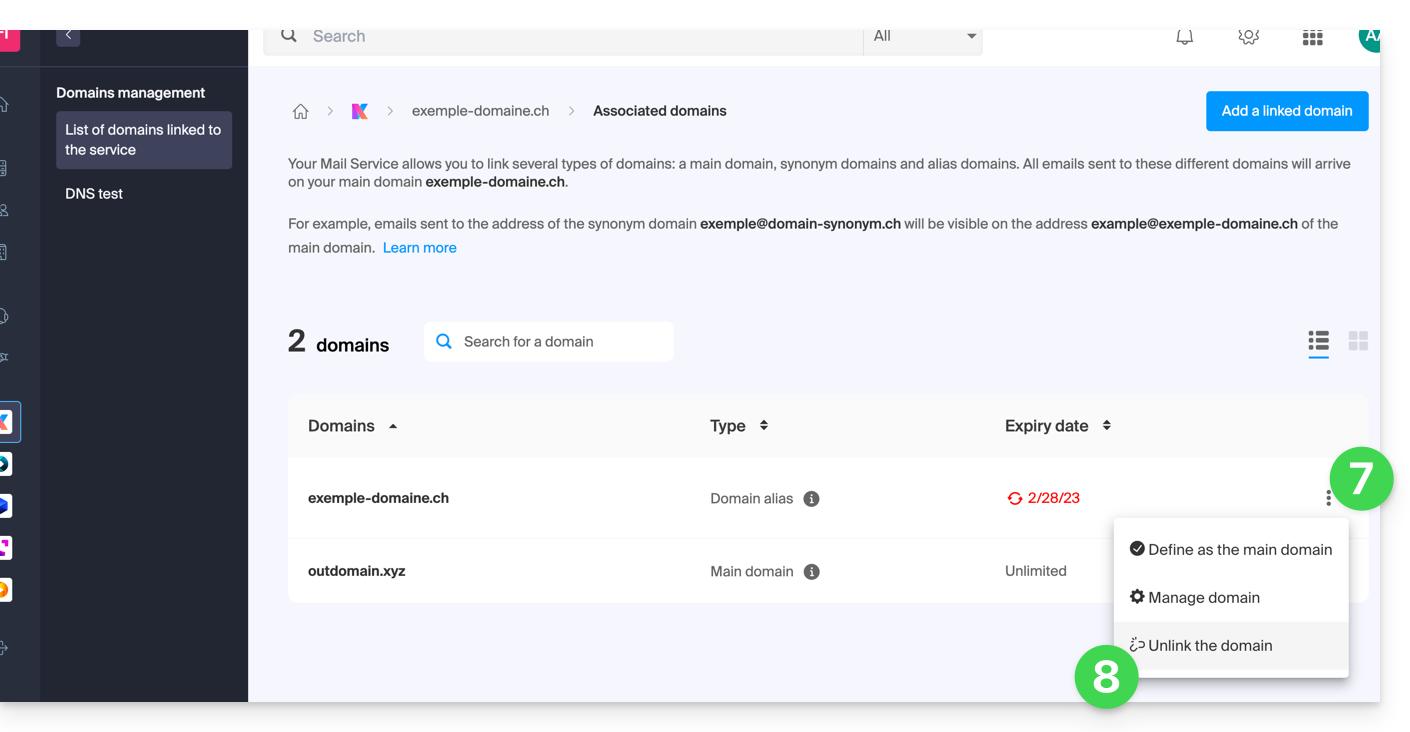
This guide explains how, after purchasing a domain name from Infomaniak, you can get for free an Email Service + Web Hosting.
Preamble
- For each domain name registered or transferred to Infomaniak, you can benefit from the following for free:
- an email address that gives you access to the Infomaniak Mail app, among other things
- and a 10 MB Web space for a basic page.
- It is also possible to have a free Email Service while having a paid Web offer, or vice versa.
- Instead of a Starter type Email Service, there is also kSuite.
Activate the Starter Mail + Web Offer
Prerequisites
- Own a domain name with Infomaniak (a DNS zone is not sufficient).
- Depending on the desired type (Mail or Web), do not have a corresponding product already associated with the domain name and this in any existing Infomaniak Organization.
To order a Starter Mail Service and Starter Web Hosting included with each domain:
- Click here to access the management of your product on the Infomaniak Manager (need help?).
- Click directly on the name assigned to the product concerned:
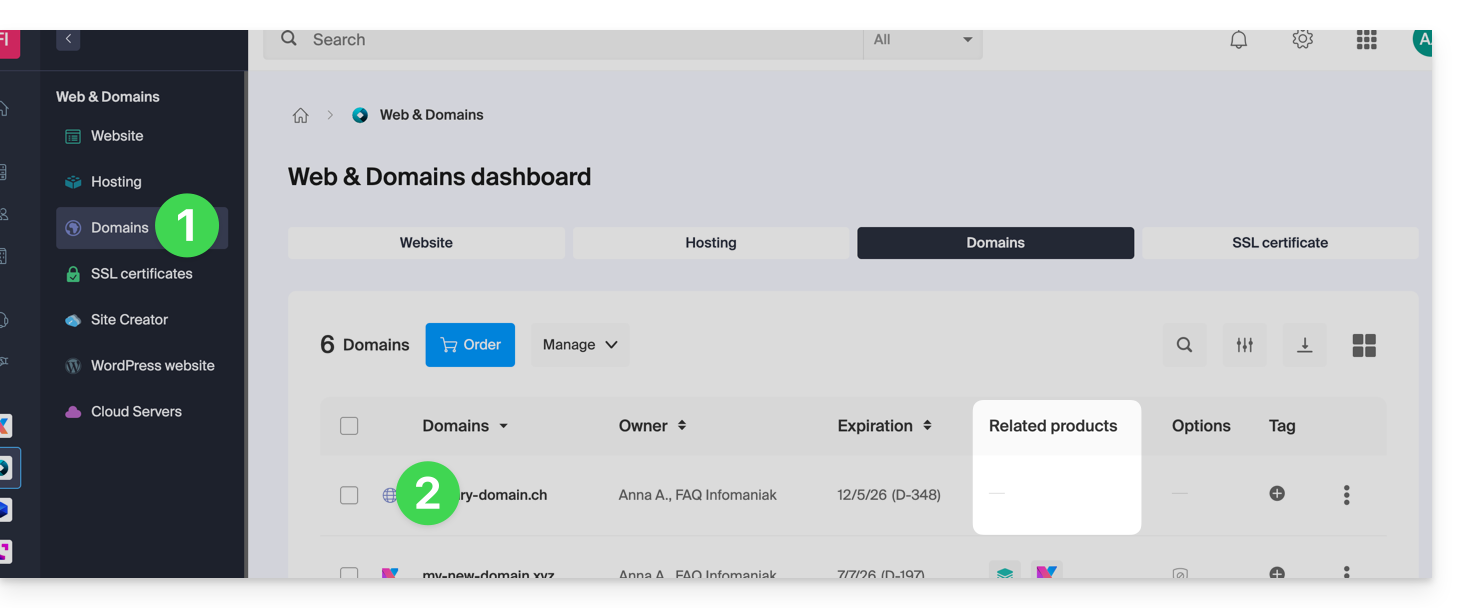
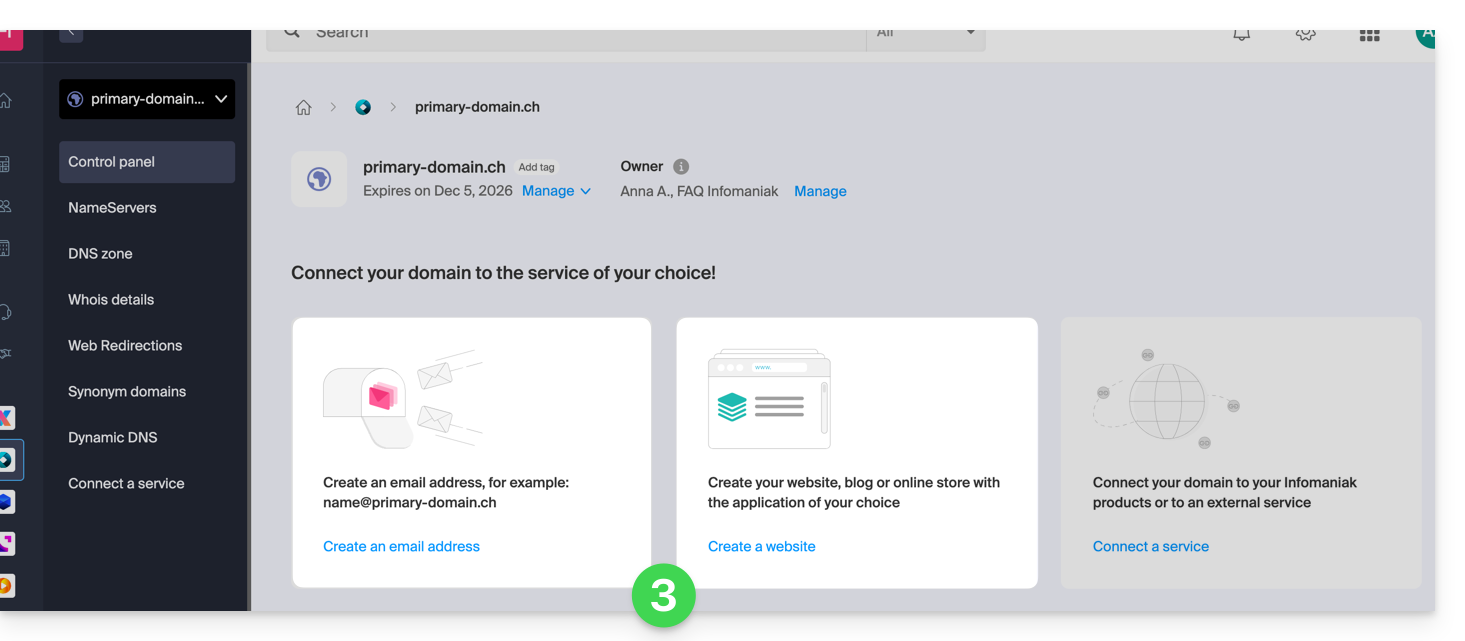
- It is necessary that no product is linked to the domain at the moment (visible in the column of linked products).
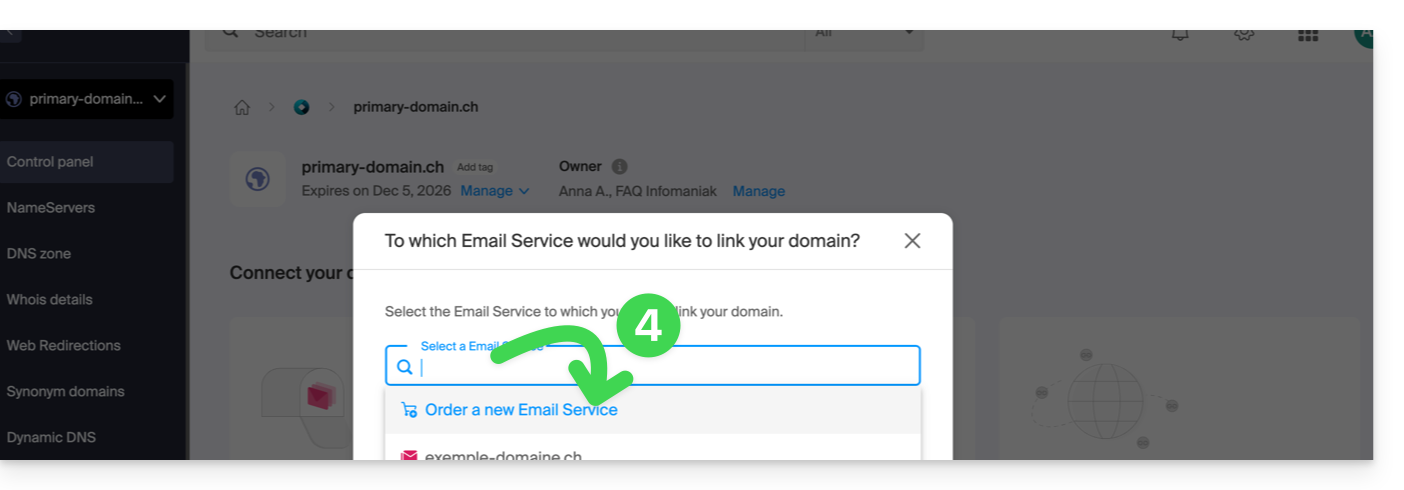
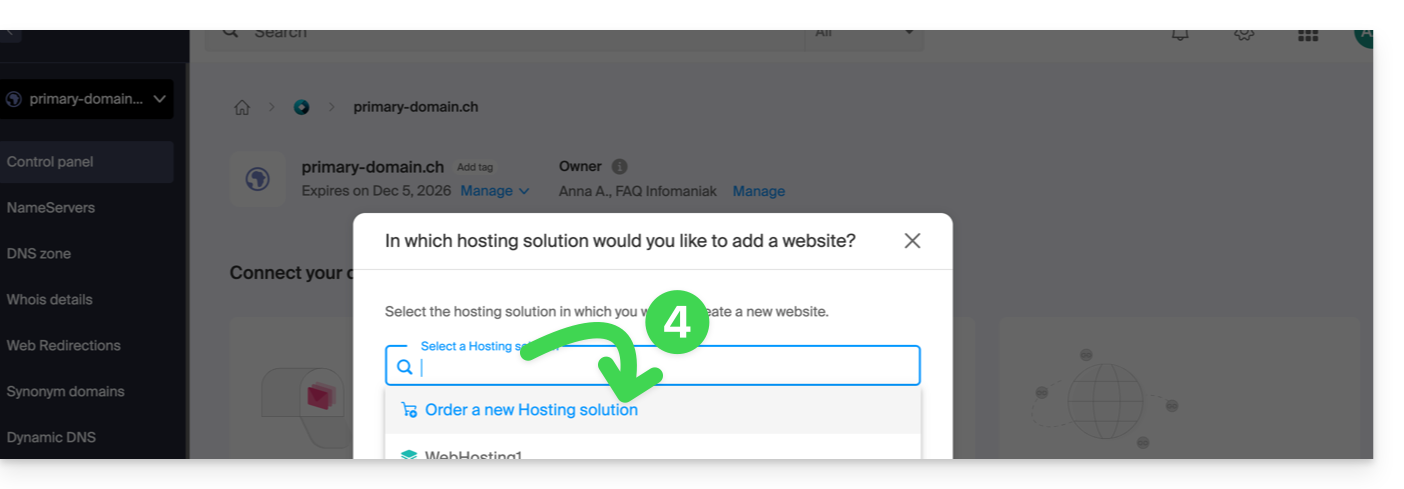
- Click on one of the shortcuts to Connect a service (mail or web):
- In both cases, click on Order …:
- You will be able to choose the corresponding free service (mail or web) and the next step will offer you the choice of the other (mail or web) if desired.
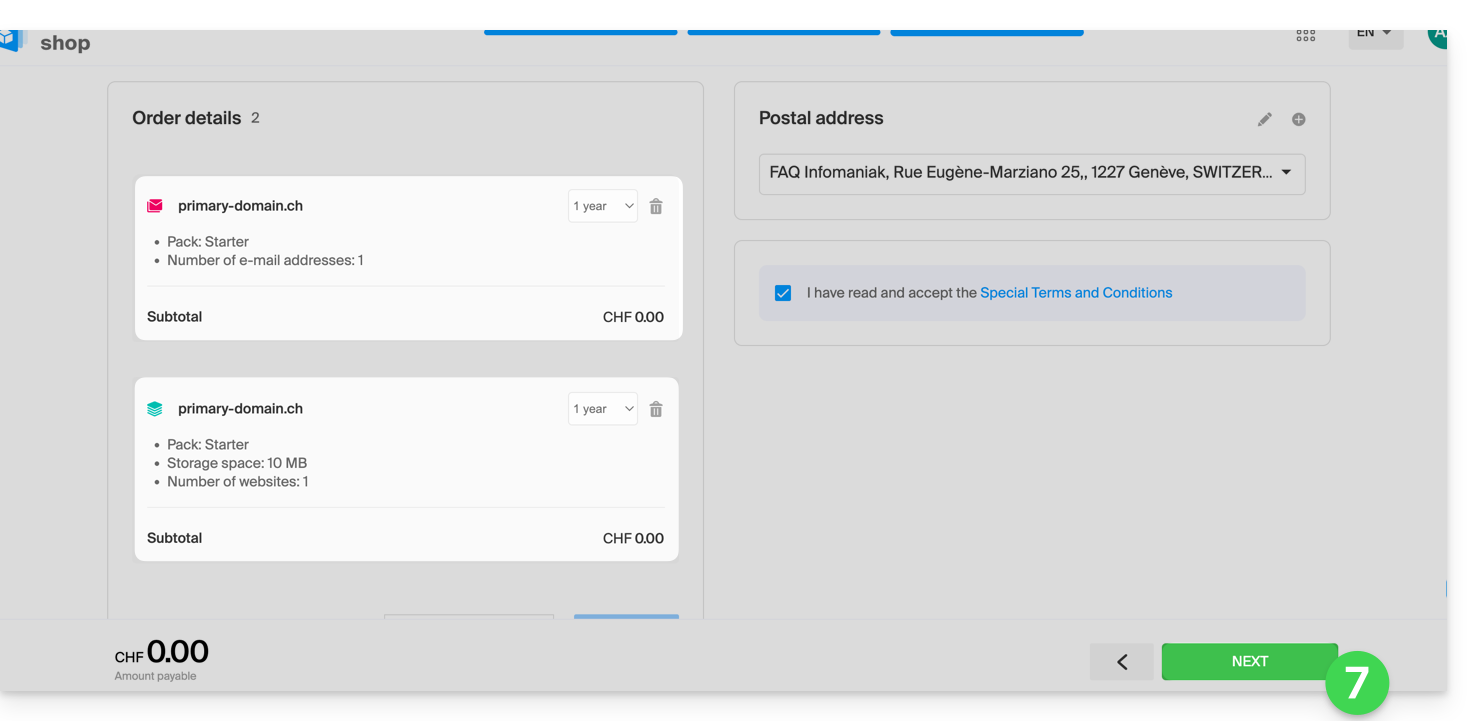
- Click at the bottom of the page to continue:
- Confirm the order:
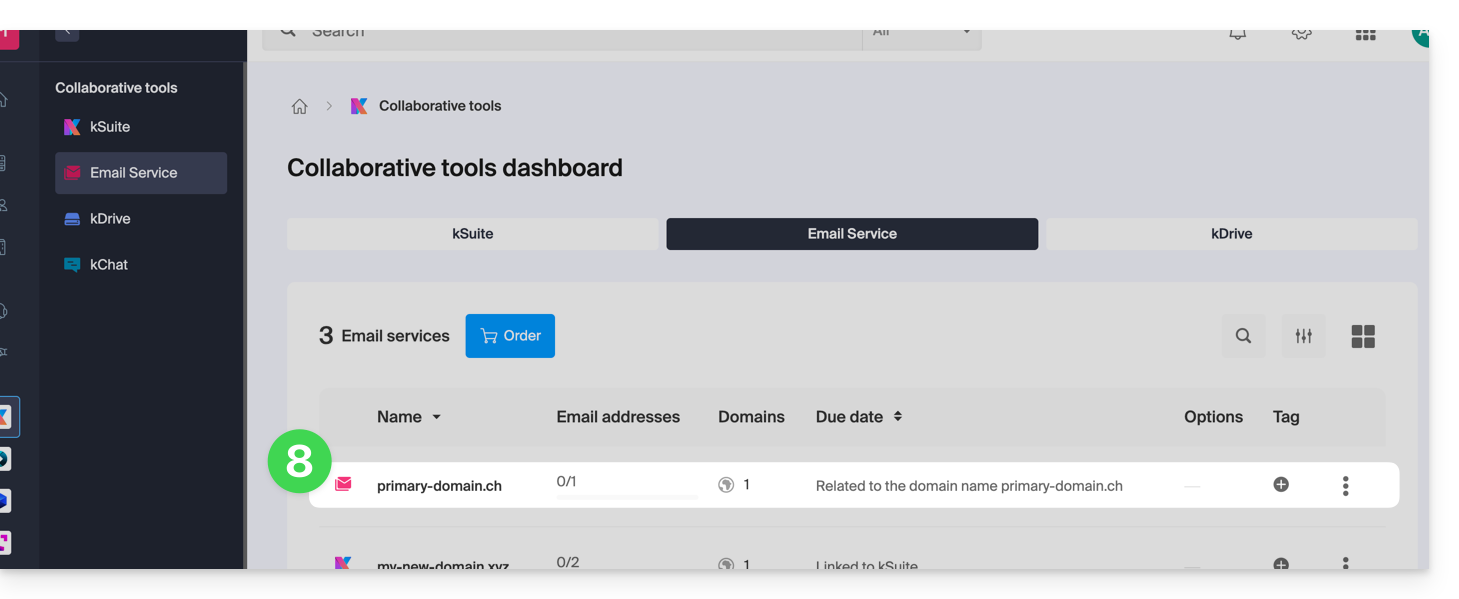
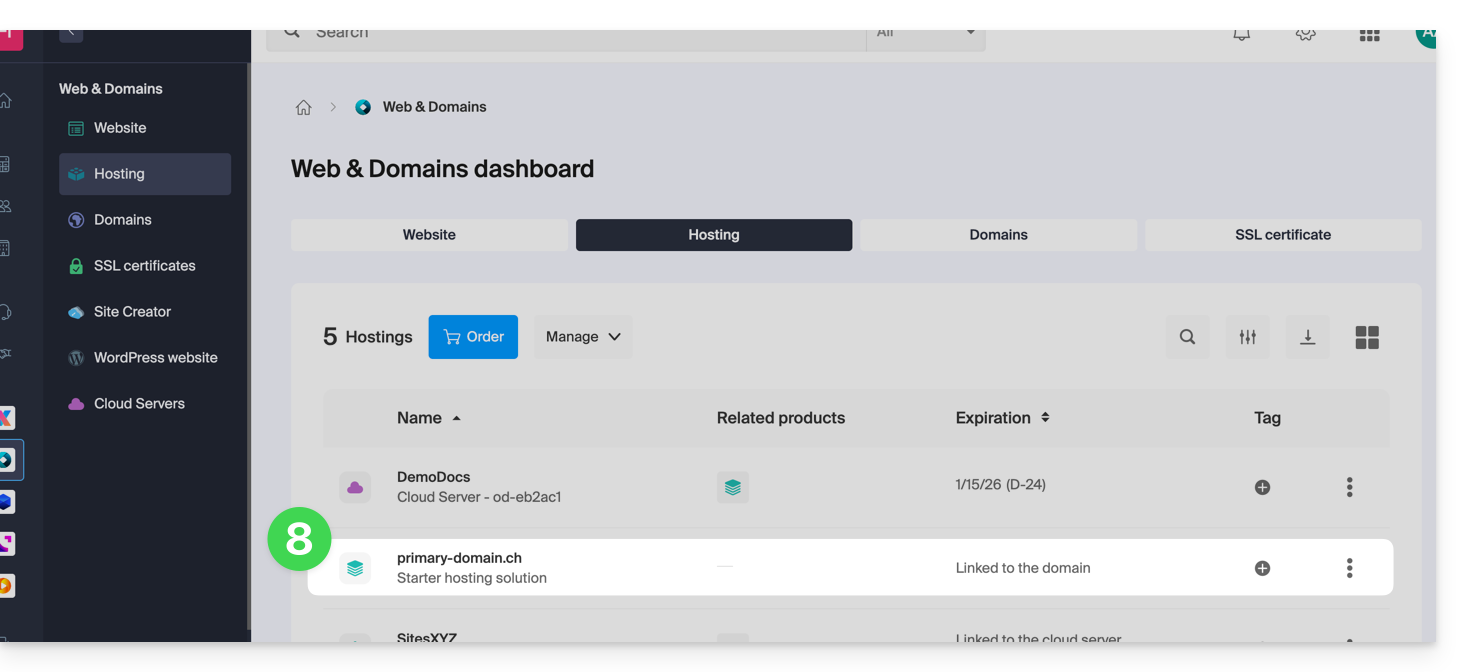
- Go back to your Infomaniak Manager to discover and use your new products:
Use your Starter products
- Create the desired email address on your Starter Mail Service.
- To use the 10 MB web space and create a basic web page on your Starter Web Hosting, use:
- the page editor
- or the FTP file manager to manage your HTML pages
- or any FTP software/client with the classic FTP protocol
Upgrade a Starter offer
- Modify a Mail offer (click here).
- Modify a Web offer (click here).
In case of a problem with a Starter hosting
A Starter type web hosting does not offer IPv6. Be careful with AAAA records in the DNS zone of the concerned domain name that can prevent you from activating SSL; also refer to this other guide.
This guide explains how to convert a free Mail Starter offer to a more comprehensive and enhanced offer, for example, free or paid my kSuite.
Preamble
- By purchasing a domain name from Infomaniak, you get 1 free email address and a basic 10 Mo Web space: this is the Starter offer.
- In a few clicks, it is possible to upgrade these offers to unlock the limits and benefit from an enriched experience.
- To help you identify the Mail offer best suited to your needs, refer to this other guide.
Modify the Starter offer - Free Mail service
To upgrade the Starter offer:
- Click here to access the management of your product on the Infomaniak Manager (need help?).
- Click on the action menu ⋮ located to the right of the item concerned.
- Click on Modify the offer:
- Adjust if necessary the number of email addresses to add to the Mail service using the order assistant that will allow you to complete the offer change until the end.
This guide explains how to link a domain name to the offer kSuite Infomaniak.
Manage the kSuite domain
To get started:
- Click here to access the management of your kSuite on the Infomaniak Manager (need help?).
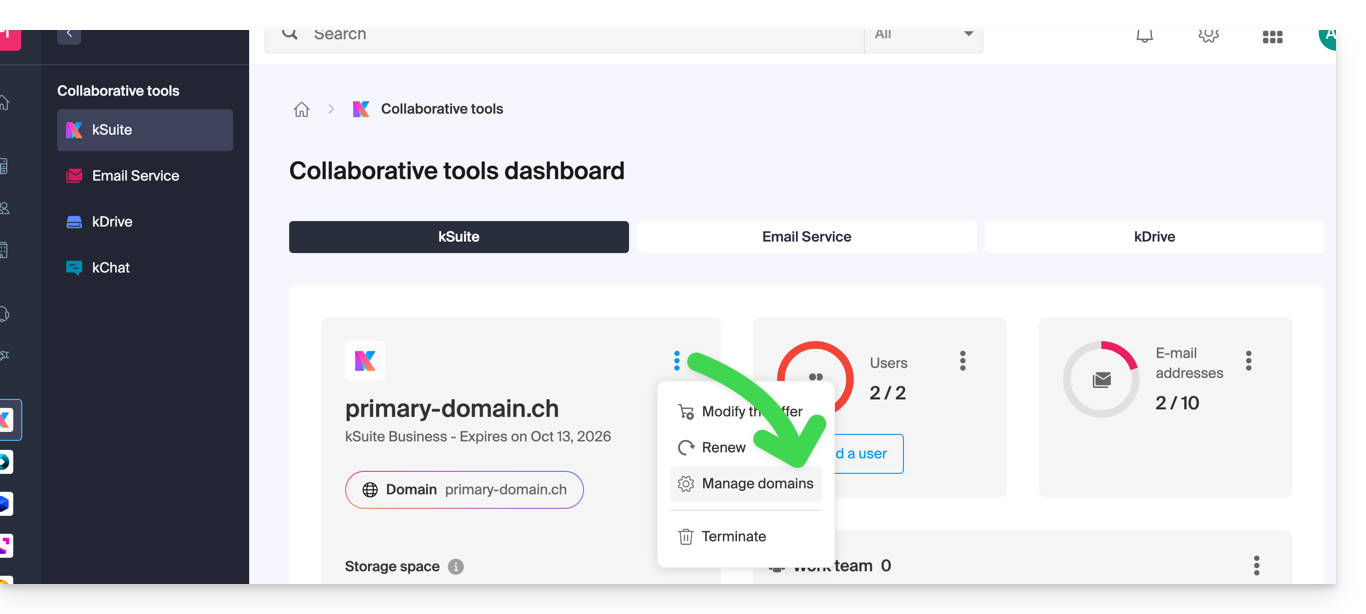
- If a domain is already linked, you can manage it by clicking on the action menu ⋮ to the right of the kSuite name, then Manage domains:
- If no domain is linked yet, you can add 1 by clicking on the button:
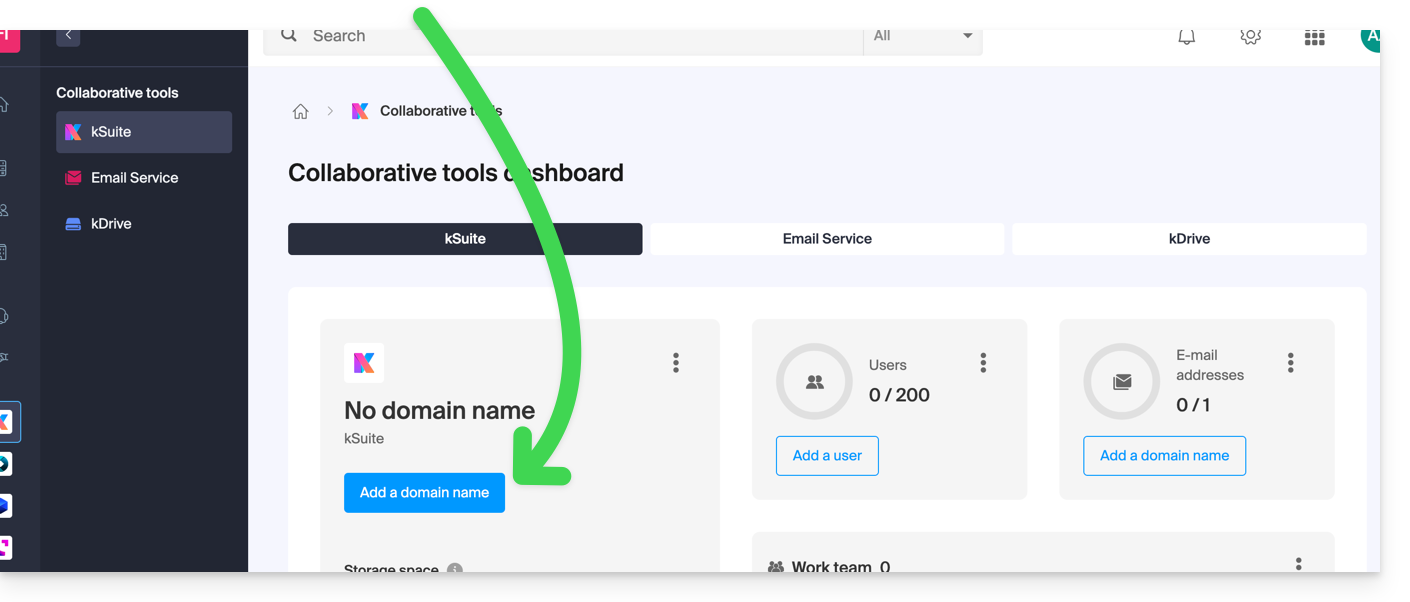
- Click the button to add a domain:
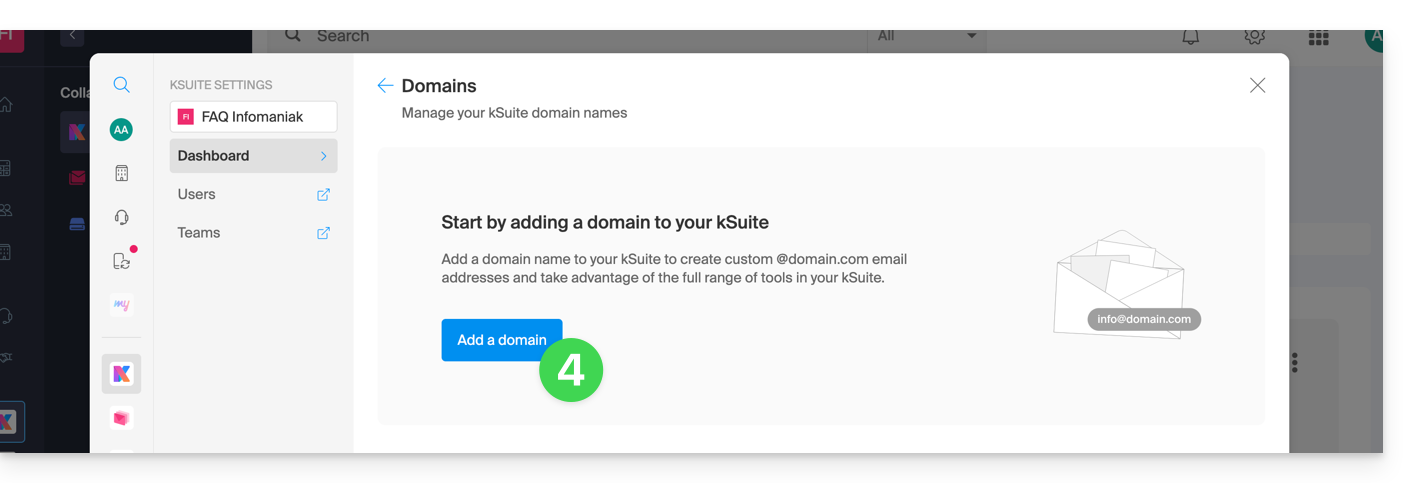
- Choose the domain to attach from those in your Organization (still available, i.e., not attached to any service) or enter an external domain name:
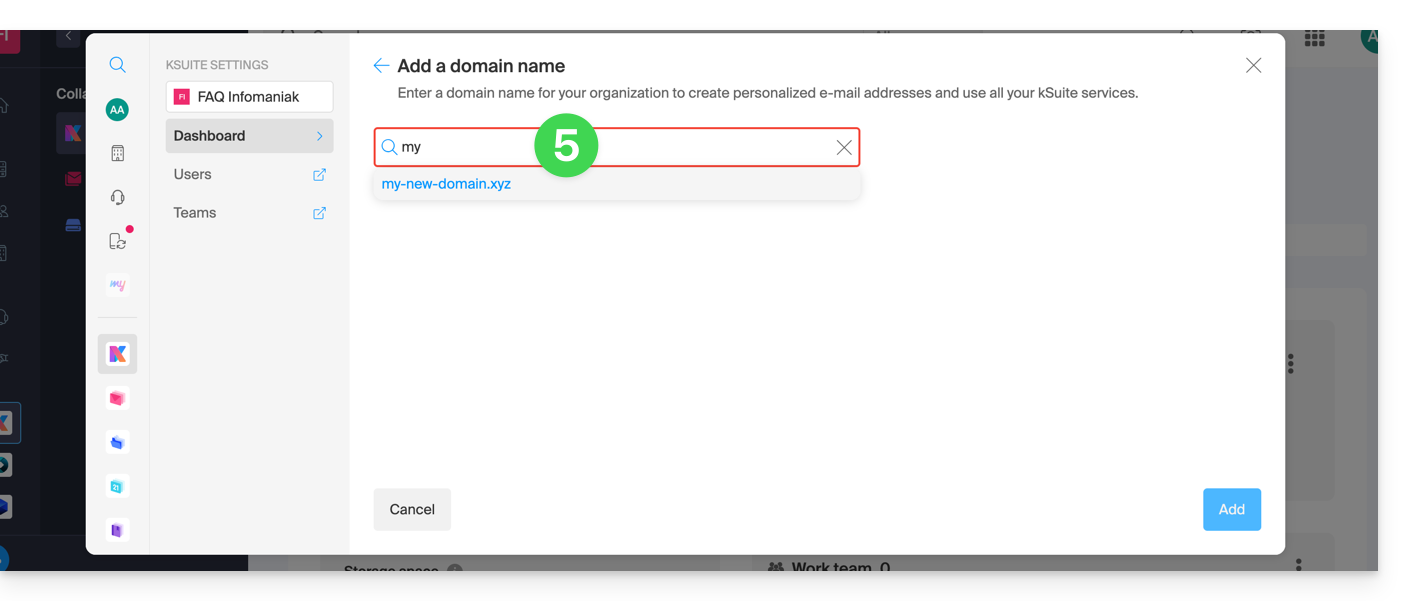
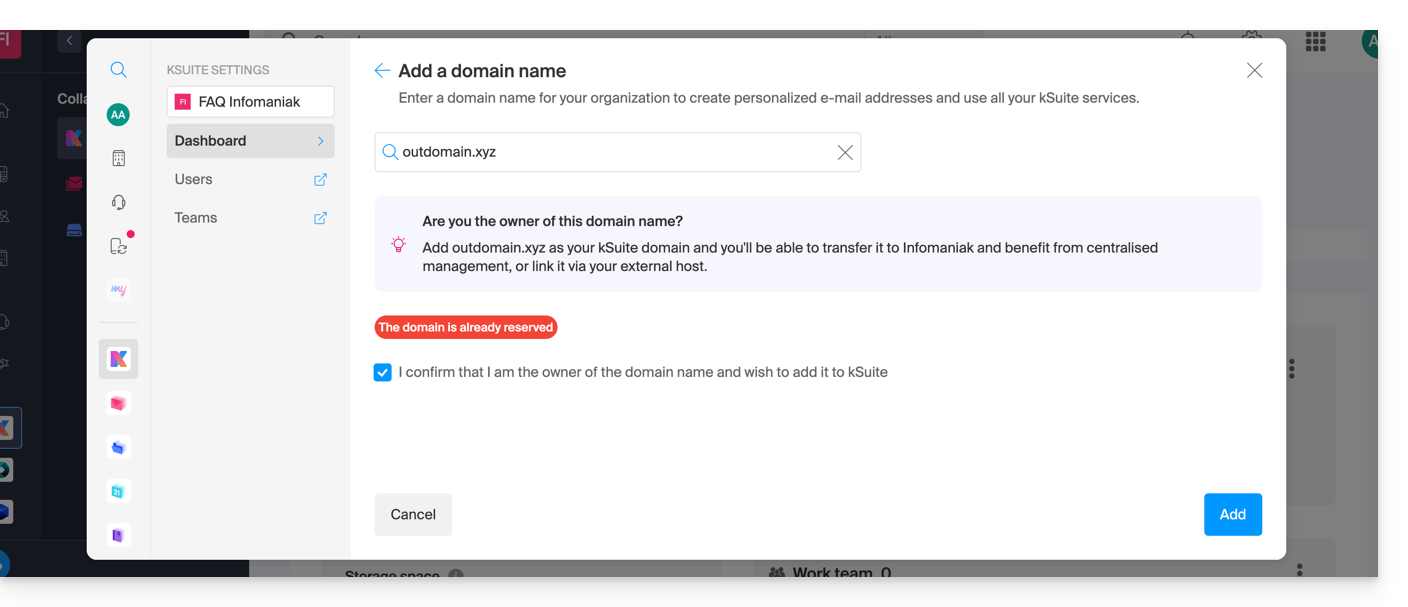
- Depending on the situation of your domain (also refer to the information below), you will need to perform some manipulations beforehand…
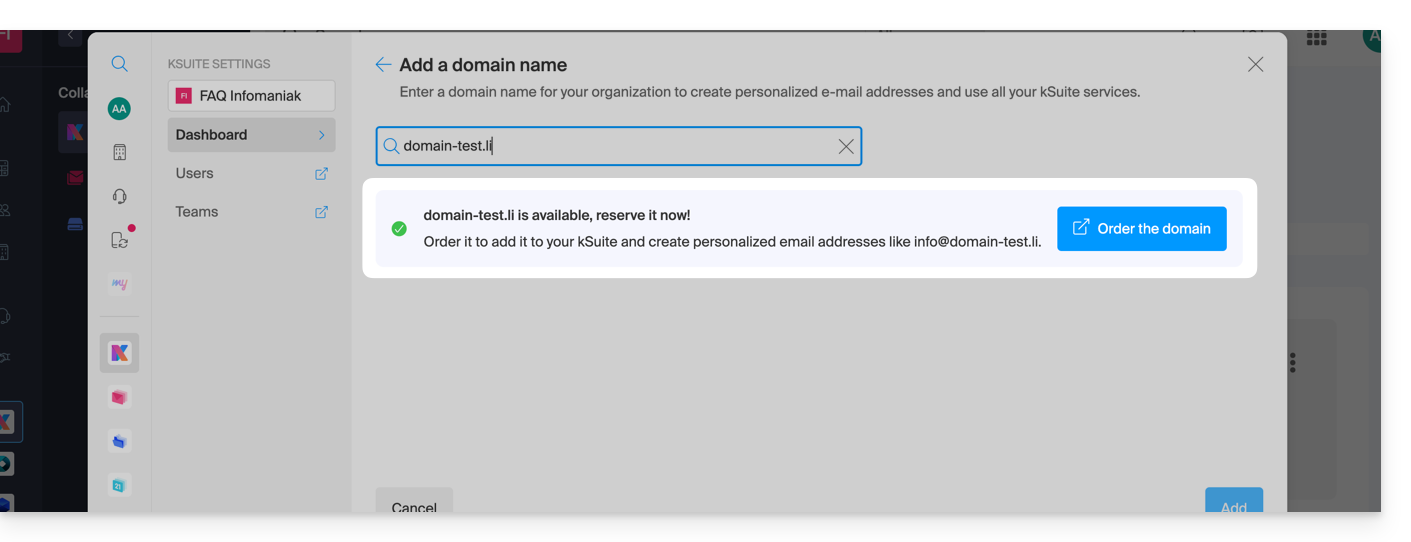
- … or even purchase a domain if necessary:
- Depending on the situation of your domain (also refer to the information below), you will need to perform some manipulations beforehand…
If the domain name is…
… with Infomaniak, same Organization
If your domain name is registered with Infomaniak and is in the same user account or Organization as the email, then there is nothing to do.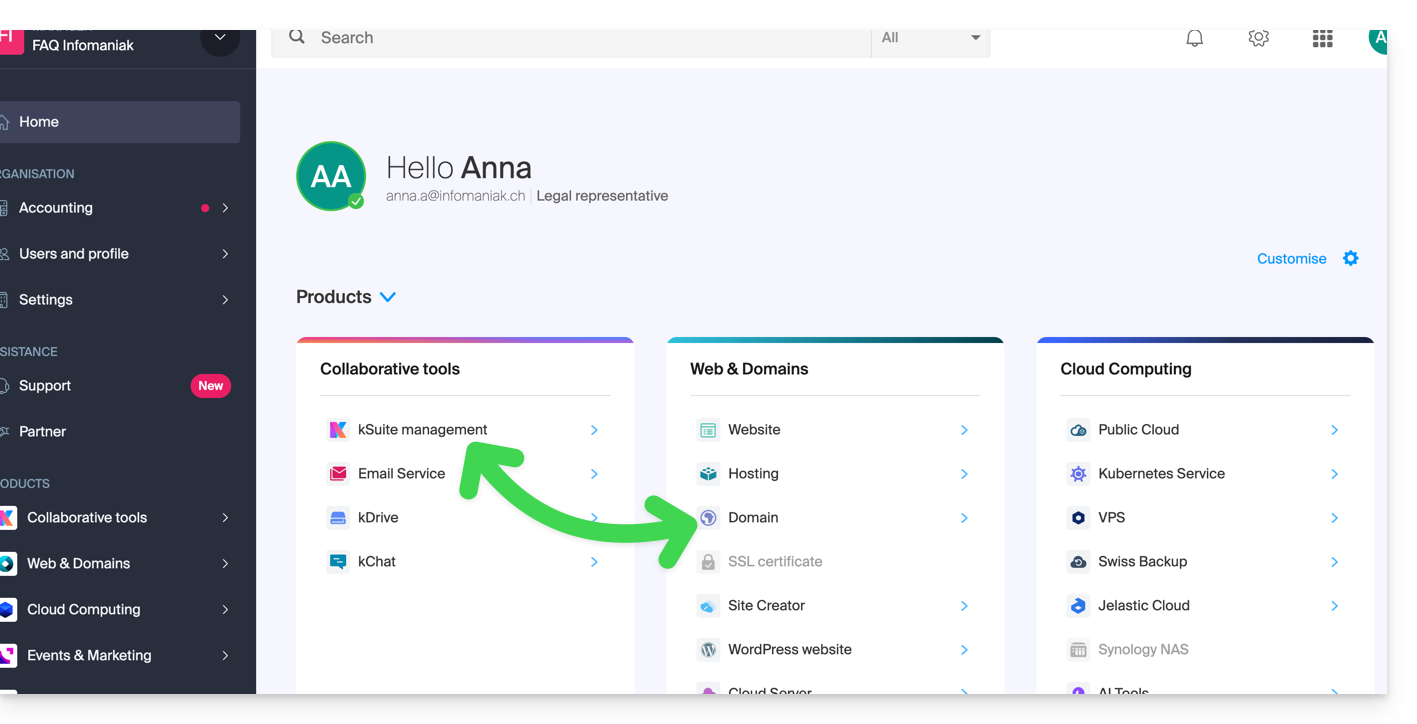
Simply add it to your kSuite: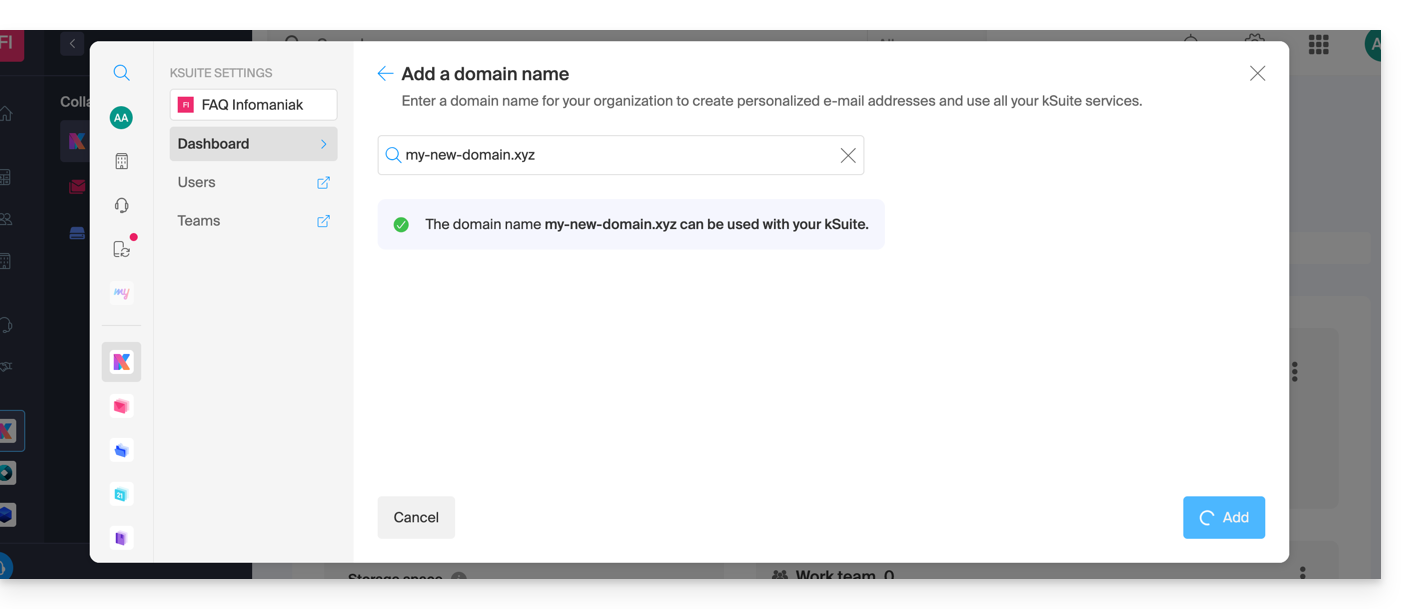
The domain will be added and visible on the dashboard: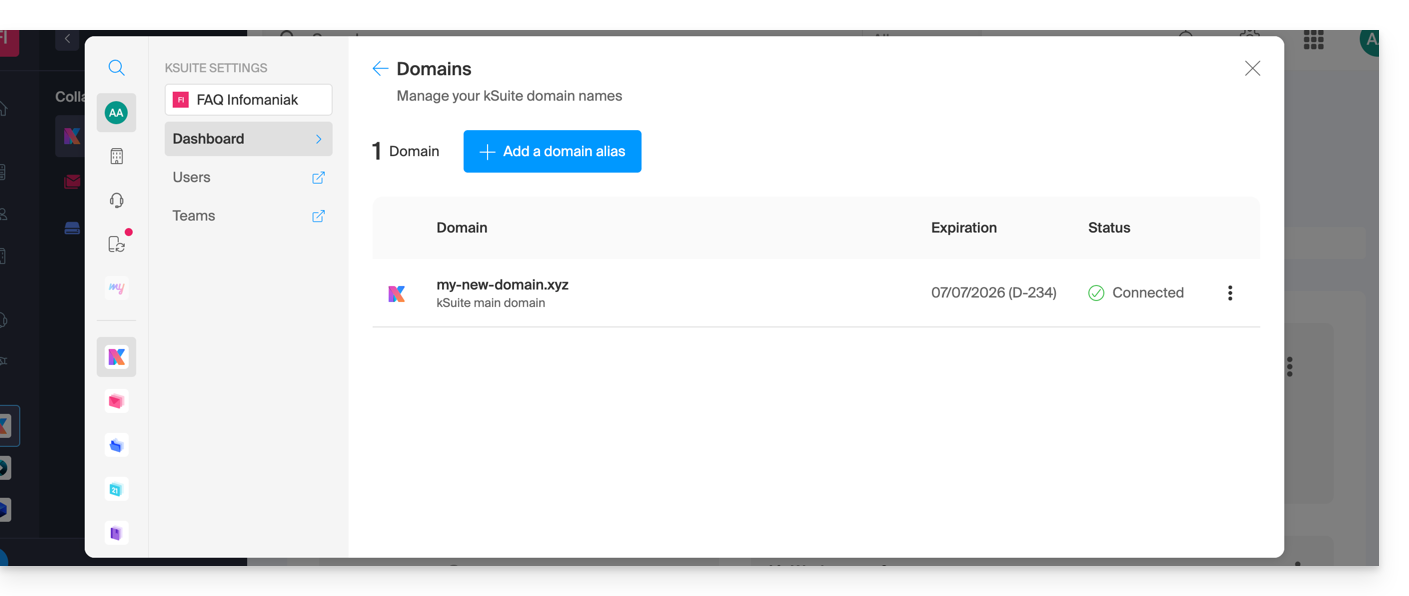
- Refer to this other guide to verify and correct any potential configuration errors.
… with Infomaniak, same Organization and already linked to a Mail Service or kDrive
No problem, you can convert your existing products to kSuite.
… with Infomaniak, different Organization
If your domain name is registered with Infomaniak but in a different user account or Organization, then:
- Edit its DNS zone by specifying Infomaniak's MX (+ SPF & DKIM).
- Any DNS addition/modification can take up to 48 hours to propagate.
OR
- Move it within the same Organization.
Generally, a message will alert you to this situation: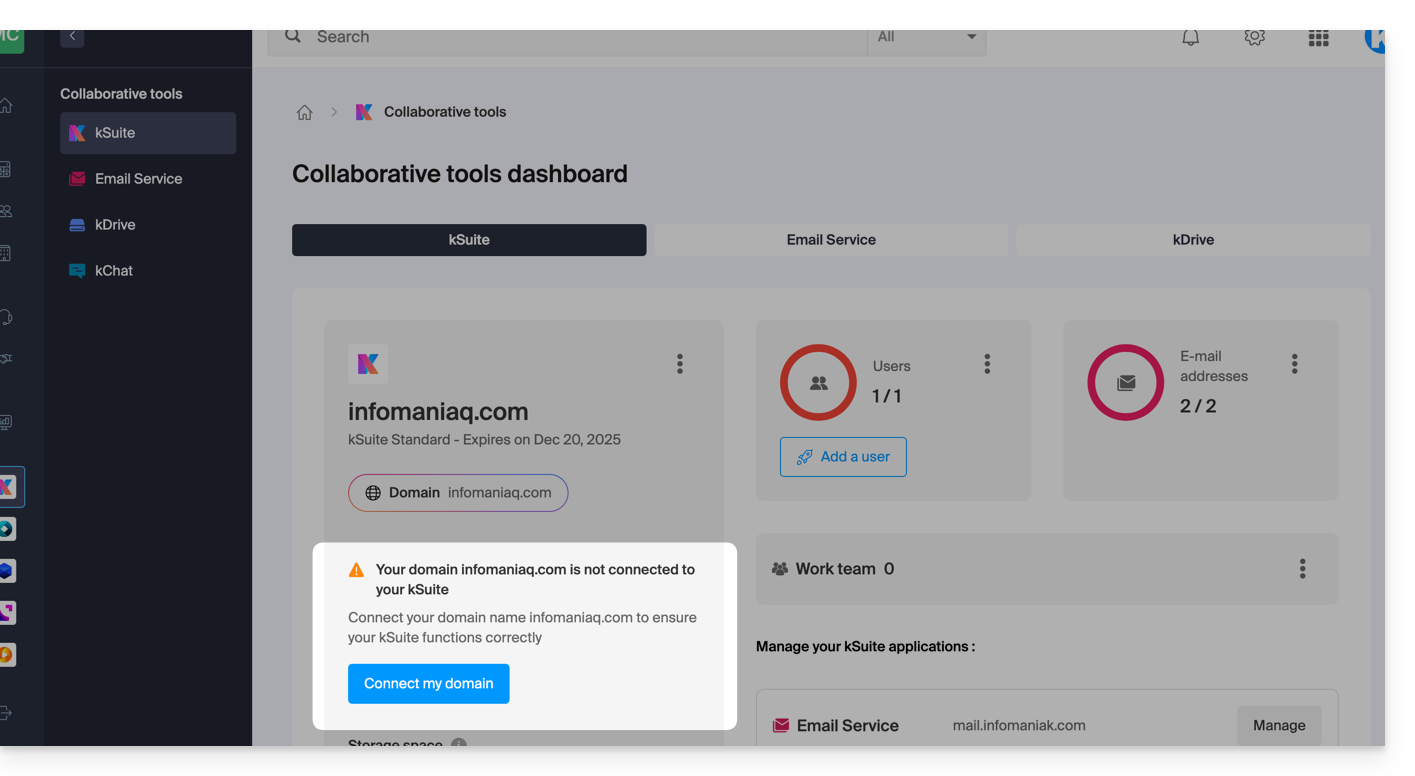
… and the technical information to be reported where the domain is located will be proposed: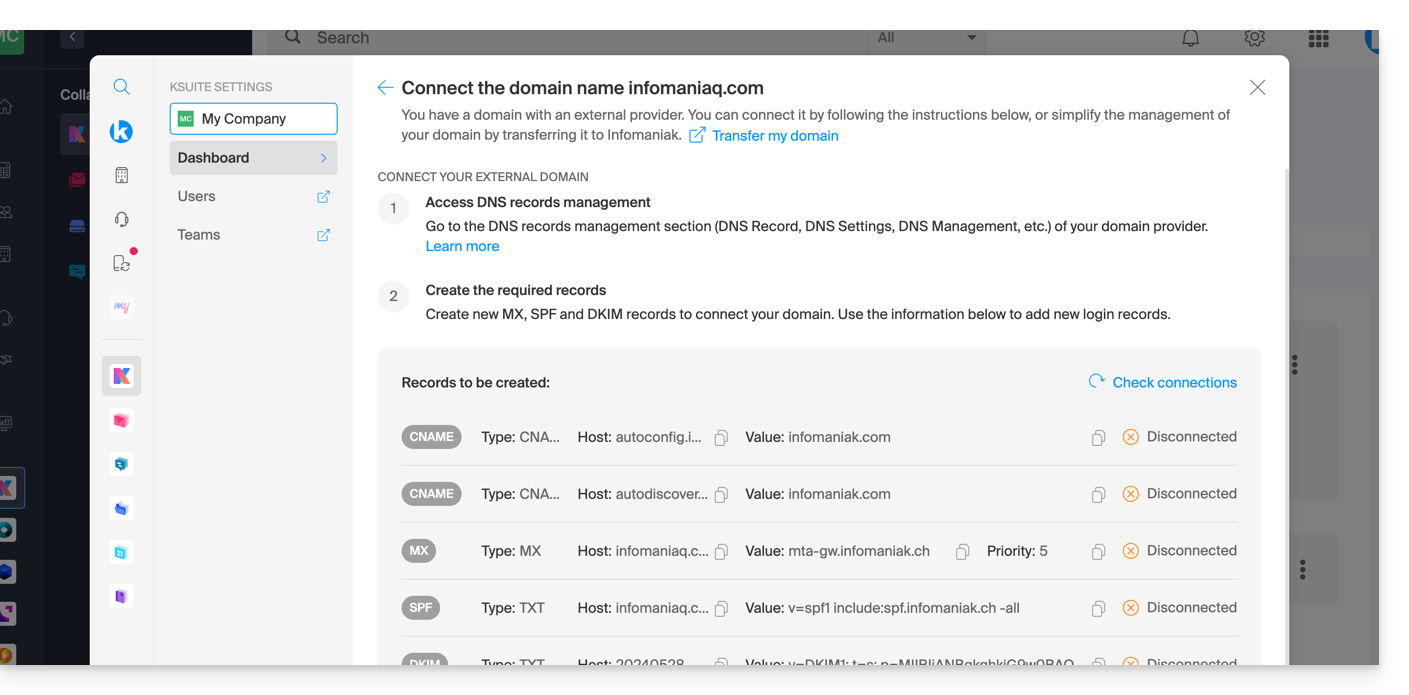
... with Infomaniak using external DNS
If your domain name includes DNS that are not Infomaniak's, then:
- Edit the current DNS zone where it is located (if necessary, consult the help of the relevant provider) by specifying Infomaniak's MX (+ SPF & DKIM).
- Any DNS addition/modification can take up to 48 hours to propagate.
OR
- Change the current DNS and select the use of Infomaniak DNS.
- Any DNS addition/modification can take up to 48 hours to propagate.
- Refer to this other guide to verify and correct any potential configuration errors.
This will be indicated to you (see the images above).
... elsewhere with external DNS
If your domain name is registered with another registrar and includes DNS that are not Infomaniak's, then:
- Edit the current DNS zone where it is located (if necessary, refer to the help of the relevant provider) by specifying Infomaniak's MX (+ SPF & DKIM).
- Any DNS addition/modification can take up to 48 hours to propagate.
OR
- Change the current DNS (if necessary, refer to the help of the relevant provider) by specifying Infomaniak's (this implies having a DNS zone with Infomaniak.
- Any DNS addition/modification can take up to 48 hours to propagate.
- This DNS zone with Infomaniak will be configured correctly, but refer to this other guide to verify and correct any configuration errors.
This will be indicated to you (see the images above).
... elsewhere but you are bringing it back
If your domain name is registered with another registrar and you wish to bring it to the same place as your Infomaniak email, then:
- Transfer the domain name to Infomaniak (it will be configured correctly, but refer to this other guide to verify and correct any configuration errors).
Otherwise, consider ordering a new domain name if necessary.
This guide details the different states in which a domain name can be found.
Common statuses
"Active" or "OK"
The domain name is declared in the DNS, the domain name is active and unlocked. All administrative and/or technical operations are possible.
"Registrar-Lock / Registry-Lock" or "clientTransferProhibited"
The domain name is declared in the DNS. The domain name is active and locked to protect it, especially against illicit transfer requests.
Statuses that require an operation or observation
"Registrar-Hold / Registry-Hold"
This status is set when the domain has expired (not renewed). The only possible operation is then renewal. Administrative and/or technical operations are not possible.
"RedemptionPeriod"
This status occurs if the domain has not been renewed. Refer to this other guide if you are looking for information on this subject.
"PendingRestore"
This status appears during a restoration request. The registrar has 7 days to communicate to the registry all the information necessary for its restoration.
"PendingDelete"
This status follows the status RedemptionPeriod after 30 days if no restoration request has been made. The name will be deleted during a 15-day period before becoming public.
In the case of a domain extension .fr
"Active" (Active)
The domain name is declared in the DNS (fully operational).
"Frozen" (Frozen)
The domain name is declared in the DNS but no administrative and/or technical operation is possible. Possible causes: see article 6.1 of the charter of the AFNIC.
"Locked"
The domain name is no longer declared in the DNS; it is no longer functional and no administrative and/or technical operation is possible. Possible causes: see article 6.2 of the AFNIC charter.


