Knowledge base
1000 FAQs, 500 tutorials and instructional videos. Here, there are only solutions!
This guide details how to create a GIT repository on both your Web Hosting and your Cloud Server with Infomaniak.
Introduction
- GIT and GitHub are available by default on both of the aforementioned platforms.
Creating the GIT repository
Setup on the server:
- The GIT repository is located at
/git_depot - The website is located in the
/web/[project]folder (on your FTP server)
Commands to enter:
cd
mkdir git_depot
cd git_depot/
git init --bare [projet].git
cd [projet].git
git update-server-info
Sending the local repository to the server
To be done on the local machine:
git init
git remote add origin ssh://user@[xxxxx].ftp.infomaniak.com:/home/clients/[123456789]/git_depot/[projet].git
git status
git add .
git commit -a -m "init"
git push --set-upstream origin master
git push
Cloning the website to the server directory
To be done on the server:
cd
cd web
rm -r [projet]/
git clone /home/clients/[123465789]/git_depot/[projet].git [projet]/
Link to this FAQ:
Has this FAQ been helpful?
This guide explains how to increase the storage volume of your VPS Cloud once the offer change has been made.
Preamble
- By default, the VPS Cloud is provided with two volumes:
- 1 volume for the operating system of your choice (
/dev/vda). - 1 volume for storing your data (
/dev/vdb), this is the one that will be increased.
- 1 volume for the operating system of your choice (
- Warning: depending on the installed operating system, the system volume may be named
/dev/sda,/dev/sda1or/dev/vda; the same applies to the data volume/dev/sdb,/dev/sdb2or/dev/vdb… It is therefore necessary to replace these indications with those corresponding to your situation.
SSH commands to increase the storage volume
If you choose XFS, for example, it is necessary to install the appropriate tools (if they are not already present):
sudo apt install xfsprogsThen increase the volume with the following SSH commands:
sudo xfs_grow /dev/vdbAnd if you choose EXT4:
sudo resize2fs /dev/vdb
Extend the volume after increasing the storage volume
Two scenarios can occur once you have extended the storage volume of your Linux server. Note that no data is deleted when increasing the space via the offer change of your VPS.
First scenario
In the case where the entire volume is used without partitioning, it is not necessary to do a resizepart, since there is no partition.
sudo umount /dev/vdb
sudo fsck.ext4 -f /dev/vdb
sudo resize2fs /dev/vdb
Second scenario
In the case of a volume that contains a partition (/dev/vdb1), you must first stop the processes that use this volume, then you must unmount the partition.
sudo umount /dev/vdb1
You must then increase the size of the partition with parted, which has the resizepart command, which is not the case with fdisk.
sudo parted /dev/vdb
GNU Parted 3.2
Using /dev/vdb
Welcome to GNU Parted! Type ‘help' to view a list of commands.
(parted) resizepart 1 100%
(parted) quit
sudo fsck.ext4 -f /dev/vdb1
sudo resize2fs /dev/vdb1
And the System Volume?
It is not possible to increase the size of the system volume.
For Linux, Infomaniak provides 20 Go, sufficient for any Linux distribution.
For Windows, Infomaniak provides 100 GB on the C drive, which is sufficient for Windows. Applications should be installed on the D drive. If you have 50 GB, you can request 100 GB (contact Infomaniak support specifying a time slot for the operation as there will be a few minutes of interruption to expect).
Link to this FAQ:
Has this FAQ been helpful?
This guide explains how to install and configure systemd on a Cloud Server and presents the main commands that can be used.
Prerequisites
- Follow the installation guide for
systemdon Cloud Server. - Consult the official documentation to learn about all the possibilities offered by systemd
- The "unit" files must be placed in:
~/.config/systemd/user/ ( /home/clients/absolute-path-id/.config/systemd/user )(replacing absolute-path-id visible in your Manager) and the permissions must be set to 0644. - The
--userparameter must be specified in each command.
Main commands
Here is a non-exhaustive list of commands that can be used with systemd.
Force systemd to reload the unit files and take into account the modifications:
systemctl --user daemon-reloadActivate a service:
systemctl --user enable --now SERVICENAME.serviceCheck the status of a service:
systemctl --user status SERVICENAME.service
Configuration of Node as a service with systemd
It will be necessary to create a "Unit" file with the ".service" extension, which must be saved in the directory:
~/.config/systemd/user/It is possible to reuse the example below by replacing the values starting with {} :
[Unit]
Description={Le nom du service} # Spécifier ici un nom du service. Celui-ci est obligatoire mais n'a pas d'impact sur le fonctionnement
[Service]
Restart=always
Environment=NODE_VERSION={la version souhaitée} # Spécifier ici la version de Node à utiliser. S'assurer qu'elle soit installée au préalable avec "nvm install {la version souhaitée}"
WorkingDirectory=%h/{repertoire du projet Node} # %h correspond à la racine de l'hébergement
ExecStart=/bin/bash -c "exec $HOME/.nvm/nvm-exec {commande de lancement du script node}" # Cette commande dépend du projet. Par exemple, "npm run start", "npm run serve" ou encore "node server.js" sont courants
[Install]
WantedBy=default.target
Additional actions with a Unit file
systemctl --user daemon-reloadStart the service (if it is already active, nothing happens):
systemctl --user start [Nom du Unit]Stop the service (if it is not active, nothing happens):
systemctl --user stop [Nom du Unit]Restart the service (if it is not running, it is started):
systemctl --user restart [Nom du Unit]Get information about the service; in particular:
- "Active" which indicates whether the service is running and for how long
- "CGroup" shows the process group that the service manages, this allows you to see the active processes, with their arguments and their ID
Below 'CGroup' are any logs (the standard output and error of the process):
systemctl --user status [Nom du Unit]Enable automatic service startup on server boot; NB: this does not start the service:
systemctl --user enable [Nom du Unit]Disable automatic service startup on server boot; NB: this does not stop the service:
systemctl --user disable [Nom du Unit]
Configuration with user entries:
[Unit]
Description="nom service"
[Service]
Restart=always
Environment=NODE_VERSION=16.17
WorkingDirectory=%h/sites/"nom-repertoire-site"/
ExecStart=/bin/bash -c "exec $HOME/.nvm/nvm-exec npm run start"
[Install]
WantedBy=default.target
Link to this FAQ:
Has this FAQ been helpful?
This guide explains how to modify the PHP-CLI extension variables that are available by default on Infomaniak Cloud Server.
Modify PHP_CLI variables
To access the PHP extensions of the Cloud Server:
- Click here to access the management of your Cloud Server on the Infomaniak Manager (need help?).
- Click directly on the name assigned to the Cloud Server concerned.
- Click on PHP Extensions in the left sidebar.
- Click on the action menu ⋮ to the right of PHP-CLI in the displayed table.
- Click on Configure:
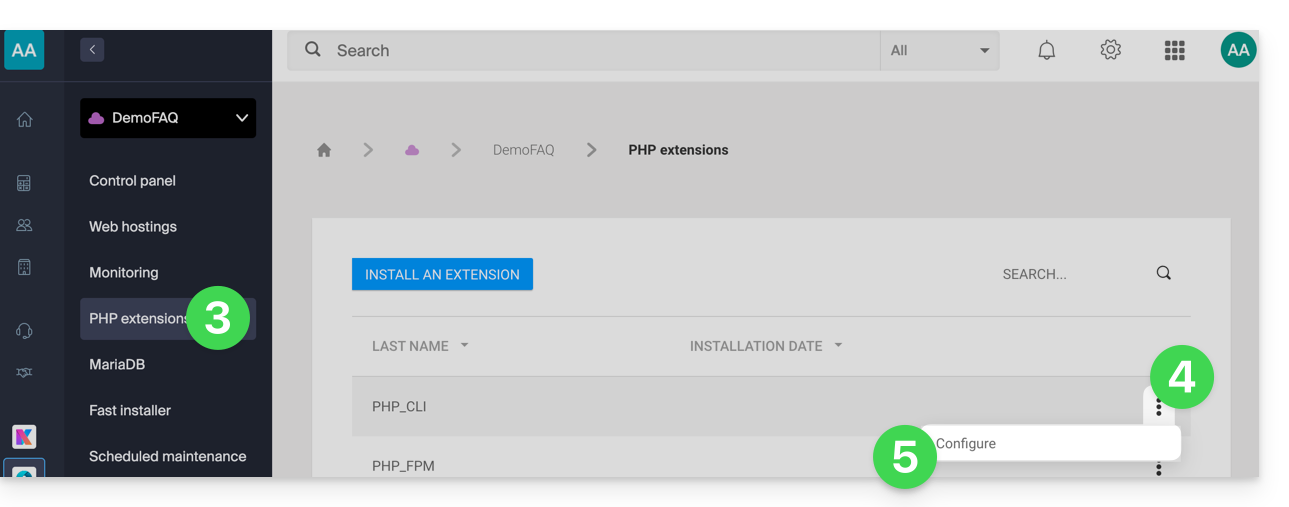
- Modify the following variables:
allow_url_fopen,allow_url_include,memory_limit,max_execution_time,short_open_tag,allow_local_infile - Click on the blue Save button.
Link to this FAQ:
Has this FAQ been helpful?
This guide explains how to connect to Elasticsearch after installing it on Magento from an Infomaniak Cloud Server.
Prerequisites
- Have an Infomaniak Cloud Server.
- Install Magento.
- Contact Infomaniak support for the installation of Elasticsearch.
Connection information
Once connected to your Magento space, you will need to provide the following information to start Elasticsearch:
- Hostname:
localhostor127.0.0.1 - Port:
9200 - Prefix:
magento2
Link to this FAQ:
Has this FAQ been helpful?
This guide presents several examples of using Varnish on Infomaniak Cloud Server.
Preamble
- Consult these additional resources on the Varnish Configuration Language (VCL) to master request processing, routing, and caching:
Varnish Configuration
Once installed, Varnish configuration is based on precise caching and purging rules. Make sure to restrict access to prevent unauthorized entities from clearing your cache.
Here is an example of a configuration file that includes the most common use cases:
vcl 4.0;

# Default backend configuration
backend default {
    .host = "127.0.0.80";  # Backend IP address
    .port = "80";           # Backend port
}

# Access Control List (ACL) for purge authorization
acl purge {
    "localhost";            # Local access
    "1.2.3.4";              # Trusted home IP
    "42.42.42.0"/24;        # Trusted company range
    ! "42.42.42.7";         # Specific IP exclusion (e.g., problematic user)
}

# Handle incoming requests
sub vcl_recv {
    # Handle PURGE requests
    if (req.method == "PURGE") {
        # Check if client IP is authorized
        if (!client.ip ~ purge) {
            return (synth(405, "IP not authorized for PURGE requests."));
        }
        return (purge);
    }

    # Custom PURGEALL for image directory
    if (req.method == "PURGEALL" && req.url == "/images") {
        if (!client.ip ~ purge) {
            return (synth(405, "IP not authorized for PURGEALL requests."));
        }
        # Invalidate all image-related objects in cache
        ban("req.url ~ \.(jpg|png|gif|svg)$");
        return (synth(200, "Images purged."));
    }

    # Bypass cache for authorized requests (e.g., admin panels)
    if (req.http.Authorization) {
        return (pass);
    }
}

# Handle backend responses before caching
sub vcl_backend_response {
    # Set TTL for images to 1 day
    if (beresp.http.content-type ~ "image") {
        set beresp.ttl = 1d;
    }

    # Respect backend's "uncacheable" instruction
    if (beresp.http.uncacheable) {
        set beresp.uncacheable = true;
    }
}
Purge via the CLI interface
Once your rules are active, you can test the purge of your site (e.g., "domain.xyz") using the curl tool:
# Purge the homepage
$ curl -X PURGE https://domain.xyz/

# Expected Varnish response
<!DOCTYPE html>
<html>
<head>
    <title>200 Purged</title>
</head>
<body>
    <h1>Success 200: Purge completed</h1>
    <p>The page has been successfully purged.</p>
    <h3>Guru Meditation:</h3>
    <p>XID: 2</p>
    <hr>
    <p>Varnish Cache Server</p>
</body>
</html>
To purge a specific URL, simply modify the request path:
# Purge a specific file
$ curl -X PURGE https://domain.xyz/some_path/some_file.html

# Expected Varnish response
<!DOCTYPE html>
<html>
<head>
    <title>200 Purged</title>
</head>
<body>
    <h1>Success 200: Purge completed</h1>
    <p>The file has been successfully purged.</p>
    <h3>Guru Meditation:</h3>
    <p>XID: 4</p>
    <hr>
    <p>Varnish Cache Server</p>
</body>
</html>
Or to trigger the grouped purge of images defined in the VCL:
# Execute PURGEALL for images
$ curl -X PURGEALL https://domain.xyz/images

# Expected Varnish response
<!DOCTYPE html>
<html>
<head>
    <title>200 Purged images</title>
</head>
<body>
    <h1>Success 200: Images purged</h1>
    <p>All images have been successfully purged.</p>
    <h3>Guru Meditation:</h3>
    <p>XID: 32770</p>
    <hr>
    <p>Varnish Cache Server</p>
</body>
</html>
Purge from a CMS (PHP)
Cache management can also be done dynamically via your backend. In the previous configuration, control over the Uncacheable header has been added. Your CMS can send this header to force Varnish not to store a response.
Here is how to send a programmatic purge request in PHP:
<?php
// Initialize cURL for a specific URL
if ($curl = curl_init("http://127.0.0.1/some_url")) {
    curl_setopt_array($curl, [
        CURLOPT_RETURNTRANSFER => true,
        CURLOPT_CUSTOMREQUEST => "PURGE",
        CURLOPT_HTTPHEADER => [
            "Host: {$_SERVER['HTTP_HOST']}" // Match the target host
        ]
    ]);

    curl_exec($curl);

    // Check if the purge was successful (HTTP 200)
    if (curl_getinfo($curl, CURLINFO_HTTP_CODE) == 200) {
        echo "Cache purged!";
    }
    curl_close($curl);
}
?>
Link to this FAQ:
Has this FAQ been helpful?
This guide concerns the creation of private networks between different Infomaniak hosting offers such as VPS Cloud / VPS Lite, Public Cloud, NAS Synology, etc.
Create a VLAN between VPS
It is not possible to create a private network (VLAN) between VPS Cloud / VPS Lite and other products, such as NAS Synology for example, as they are installed on separate networks.
However, it is possible to create a VLAN between a minimum of 10 VPS Cloud / VPS Lite that belong to you (contact Infomaniak support) however a dedicated private network will not be able to communicate with another.
It is recommended to migrate to the Public Cloud offer to create such private networks between VM.
Link to this FAQ:
Has this FAQ been helpful?
This guide concerns swap on Managed Cloud Server.
Swap and RAM memory
There can be swap even when RAM usage is low. Indeed, the system can use swap at any time if it deems it useful.
Swap is not a dedicated memory space to be used if there is no free RAM, although this is often its main use.
If you want to know more, there is a "swappiness" parameter that allows you to define how the system will use the swap. The default value is 60 and it cannot be modified.
Link to this FAQ:
Has this FAQ been helpful?
Infomaniak's infrastructure does not pass virtualization instructions to Cloud VPS / Lite VPS; it is therefore not possible to perform nested virtualization (virtualization that would run within an already virtualized environment) as this causes issues, particularly during live migrations.
Link to this FAQ:
Has this FAQ been helpful?
Infomaniak does not perform any backups of the VPS Cloud / VPS Lite.
However, you can…
- … create a server snapshot (non-automated backup)
- … backup the server on Swiss Backup (automated backup)
Link to this FAQ:
Has this FAQ been helpful?
This guide explains how to benefit from new versions of PHP, MySQL, and many other packages by migrating a Cloud Server to new Infomaniak infrastructure.
Preamble
- Migration is free and takes place in 3 steps:
- Infomaniak provides a state-of-the-art Cloud Server with the same characteristics as the current one, at the same price and same commitment period.
- You have one month to move your hosting to the new Cloud Server provided (see below).
- Once your hosting is moved to the new server, cancel the old Cloud Server.
- FTP access and databases do not change.
- Only the supported versions of PHP and MariaDB, as well as the server's IPv4 and IPv6 addresses, change at the hosting level.
- The hostnames (hostnames) do not change and are automatically updated to point to the new IP addresses.
- During this operation, the statistics are reset.
Migration procedure
By migrating your data to the new Cloud infrastructure, you increase the performance and reliability of your sites, which will have access to the latest technologies:
- Click here to access the management of your product on the Infomaniak Manager (need help?).
- Click directly on the name assigned to the product concerned.
- Click the blue button in the box "Upgrade your Cloud Server" (or Manage):

Link to this FAQ:
Has this FAQ been helpful?
Infomaniak does not provide root access on Managed Cloud Server.
However, root access is possible on:
Link to this FAQ:
Has this FAQ been helpful?
This guide explains how to modify the configuration of a VPS Cloud / VPS Lite.
Configuration changes (CPU/RAM) or storage make the service unavailable for approximately 20 minutes.
Modify storage size on VPS Cloud / VPS Lite
To access the VPS Cloud / VPS Lite:
- Click here to access the management of your product on the Infomaniak Manager (need help?).
- Click on the action menu ⋮ to the right of the object concerned in the table that appears.
- Click on Modify the offer:
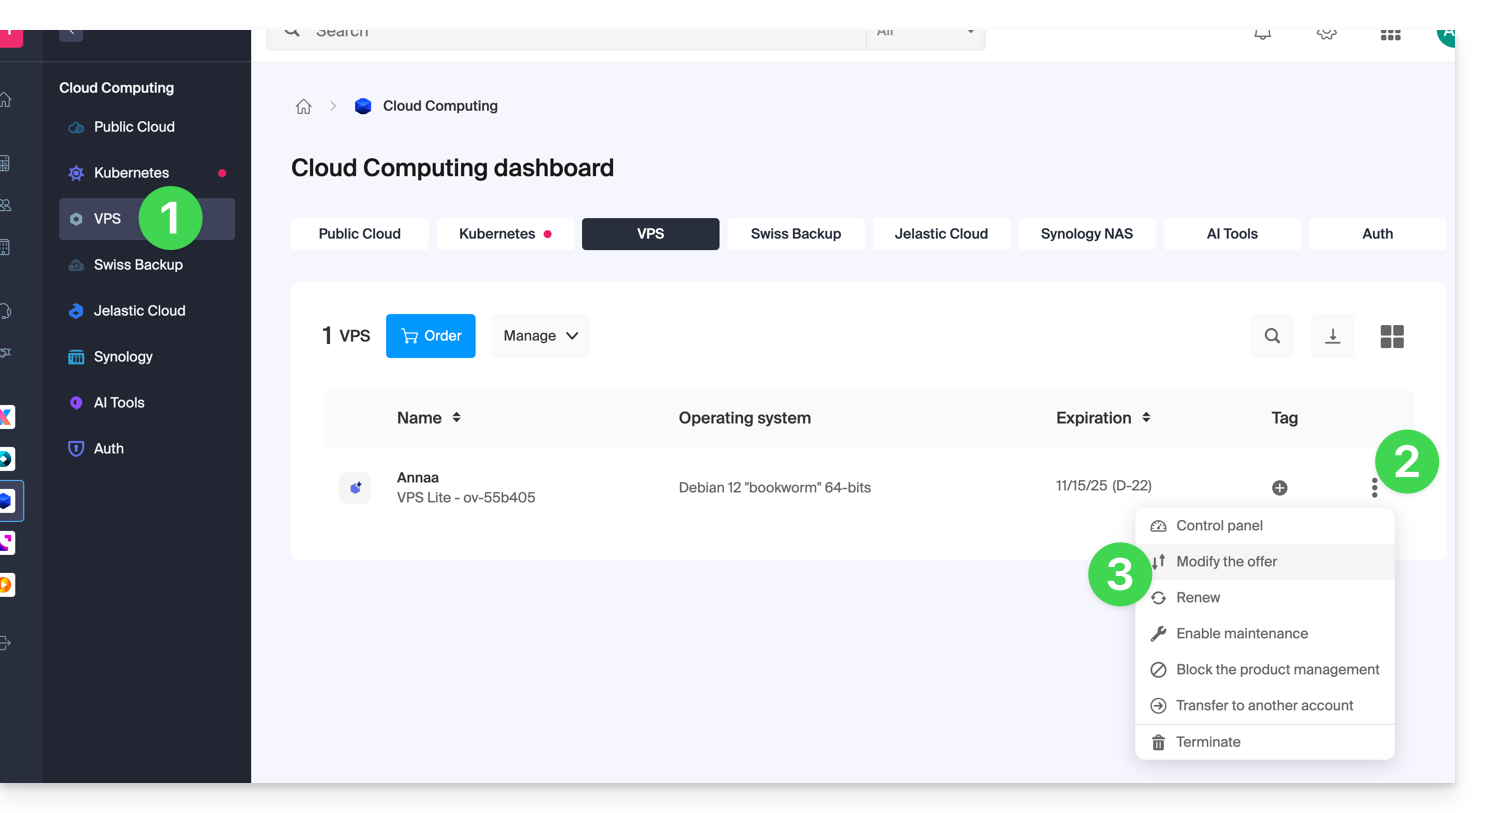
- Make the desired adjustments from the shop's proposals and complete the procedure at the bottom:
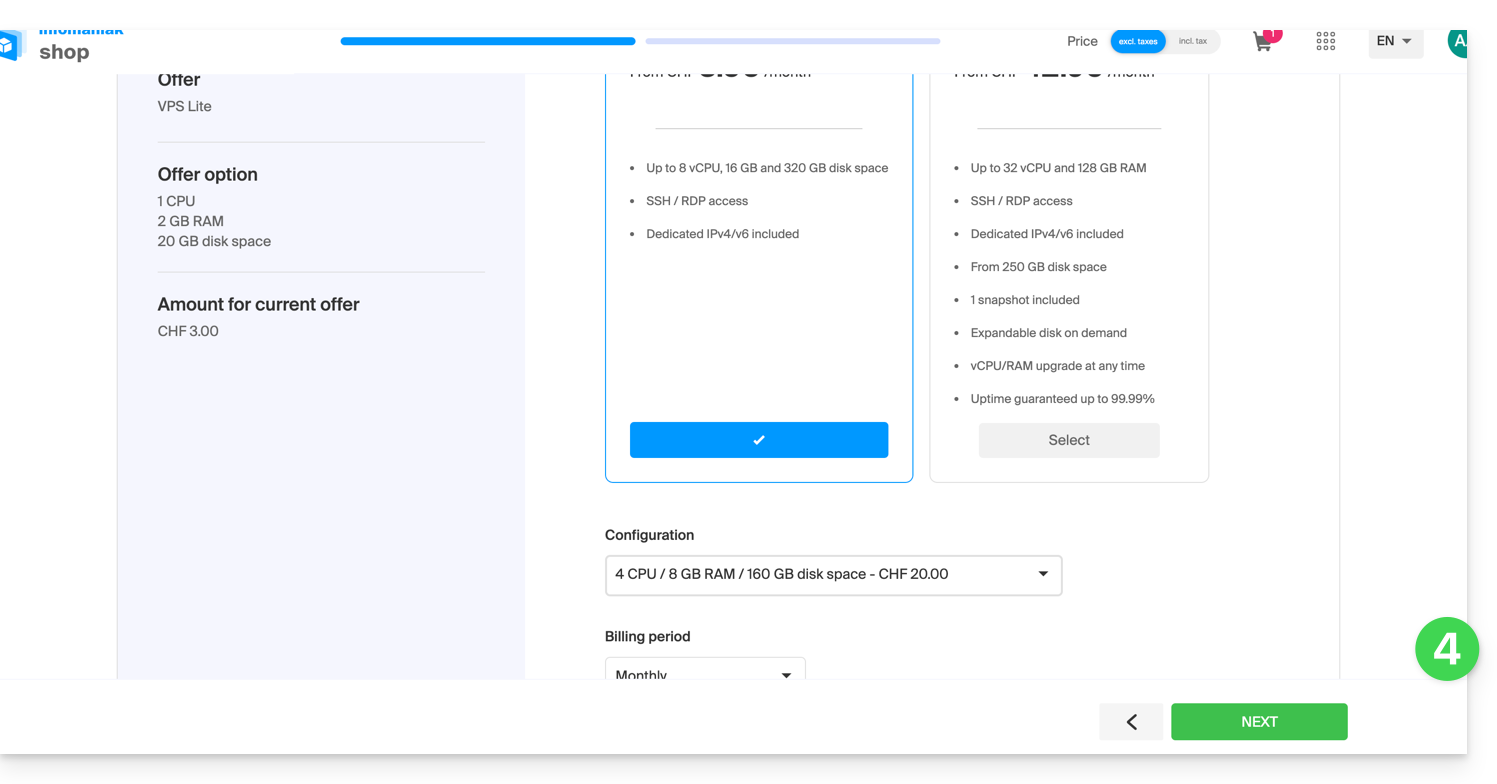
- It is necessary to extend the volume after an increase in storage volume.
Link to this FAQ:
Has this FAQ been helpful?
It is not possible to order and obtain more IP addresses on a VPS Cloud / VPS Lite.
The possible alternatives would be to use…
- … a Public Cloud hosting (it is possible to add as many IP addresses as desired),
- … the Newsletter tool according to your needs.
Link to this FAQ:
Has this FAQ been helpful?
This guide explains how to allow certain incoming and/or outgoing ports in the firewall of a VPS Cloud / VPS Lite server.
Access the management tool
To manage the VPS Cloud / VPS Lite firewall:
- Click here to access the management of your product on the Infomaniak Manager (need help?).
- Click directly on the name assigned to the product concerned.
- Click on Firewall in the left sidebar:

Rule to allow ping on VPS Cloud / VPS Lite
To add a rule to the firewall:
- Click the blue button to Add a rule.
- Click on Manual selection.
- Select ICMP:
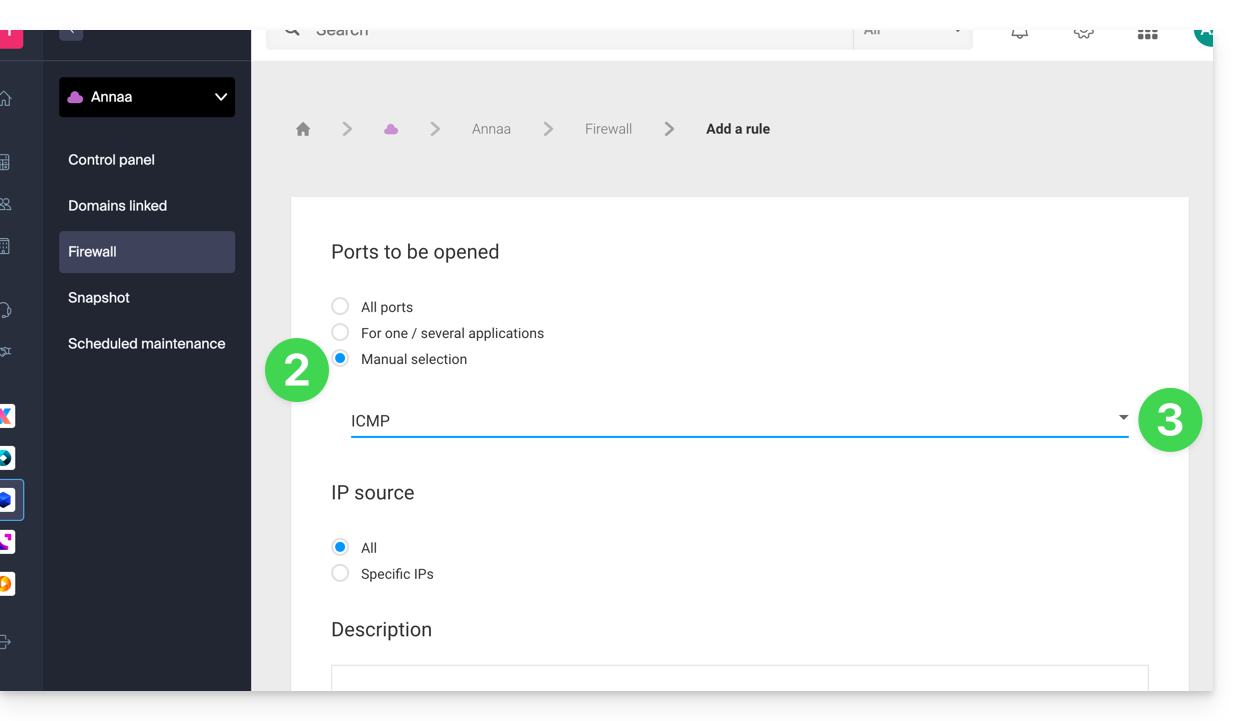
- Validate at the bottom of the page.
Open the outgoing port 25 globally
It is recommended to use an authenticated email sending solution.
The outgoing port 25 (SMTP Mail port) is blocked by default. To open this port:
- On VPS Cloud, you can request to open it: contact Infomaniak support and justify your request.
- On VPS Lite, it is not possible to open this port.
Link to this FAQ:
Has this FAQ been helpful?
Infomaniak does not offer virtual disk encryption on VPS Cloud / VPS Lite but provides a block device that you can format and encrypt if you wish.
Link to this FAQ:
Has this FAQ been helpful?
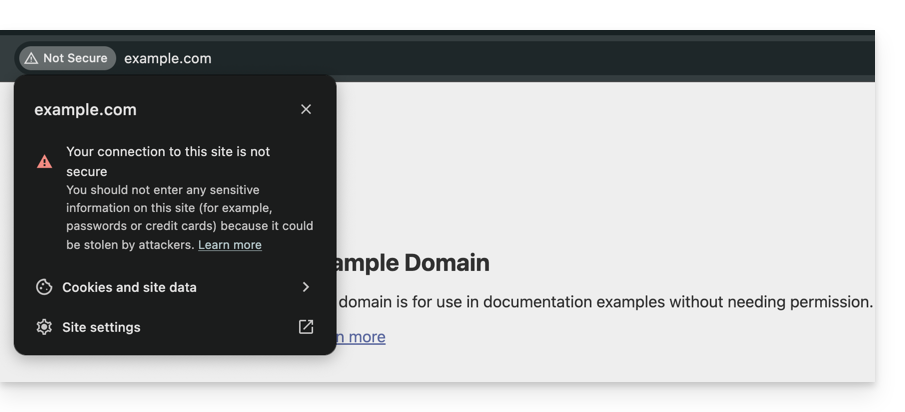
This guide helps you diagnose and resolve the error "Your connection is not private" (or NET::ERR_CERT_AUTHORITY_INVALID). This security alert can affect both visitors to a site and its administrators.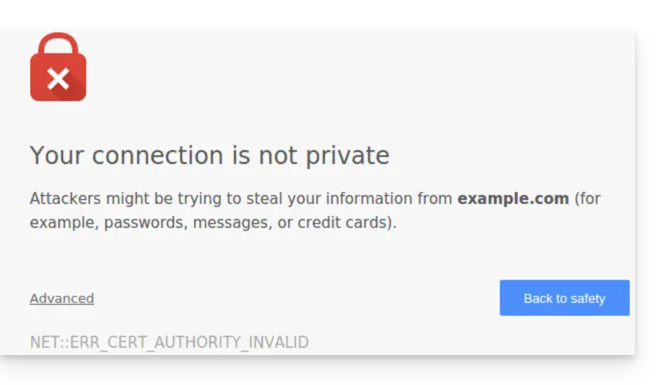
Preamble
- This alert is a protection mechanism for your browser.
- It indicates that a secure connection could not be established with the server for one of the following reasons:
- The site does not have an SSL/TLS security certificate.
- The installed certificate is expired or misconfigured.
- The connection between your device and the server is intercepted or disrupted.
- Warning: on a site displaying this error, the data you enter (passwords, card numbers) are not encrypted and can be intercepted by third parties.
Solutions for visitors
If you encounter this error on a site you do not manage, the problem may sometimes come from your own configuration. Here are the points to check:
- Check the time on your device: if your computer or smartphone is not set to the correct date/time, the certificate validation will systematically fail.
- Test in private browsing: if the error disappears, clear your browser's cache and cookies.
- Check your network: avoid public Wi-Fi networks that may force their own login portals.
- Antivirus and Firewall: some security software analyzes HTTPS connections and can cause false positives.
Solutions for Infomaniak site owners
If you are the site administrator, you must ensure that your SSL certificate is active and valid to cover all your domain names.
1. Is the SSL certificate installed?
If your site is still in HTTP, you need to generate a certificate (free via Let's Encrypt or paid). Learn about the certificates available at Infomaniak.
Important: if you have added aliases (secondary domain names) to your site after installing SSL, you must update the certificate to include them.
2. Check validity and expiration
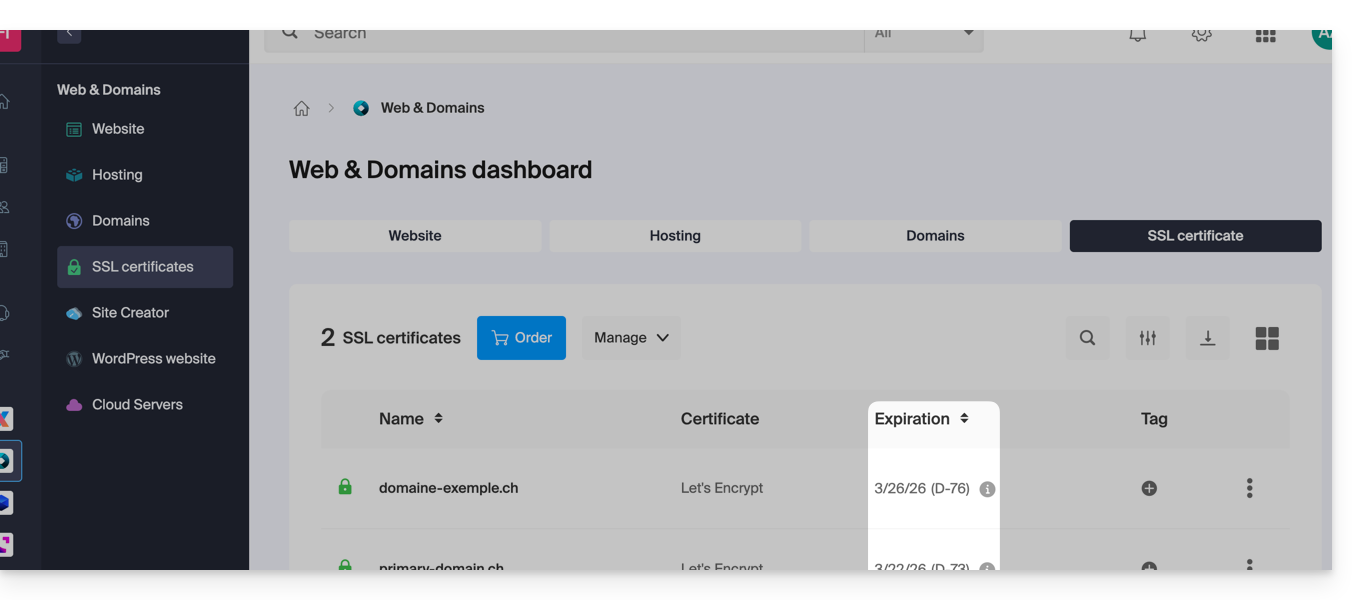
At Infomaniak, certificates are renewed automatically, but a technical issue may sometimes occur. To check the status of your certificate:
- Click here to access the management of your certificates in the Manager (need help?).
- Check the status and expiration date in the dashboard:
3. Force HTTPS and fix "Mixed Content"
If your certificate is valid but the error persists (or the padlock is not green), it is possible that your site is still loading elements (images, scripts) over HTTP. To fix this, refer to this other guide.
Link to this FAQ:
Has this FAQ been helpful?