Base de conhecimento
1000 perguntas frequentes, 500 tutoriais e vídeos explicativos. Aqui, você encontra apenas soluções!
Este guia explica como transferir para a Infomaniak os endereços de e-mail atualmente alojados pela Google (Workspace com um domínio personalizado ou endereço @gmail), com a ajuda de uma ferramenta de importação por IMAP.
Introdução
- Consulte este outro guia se procura uma alternativa a este processo via IMAP: de facto, é possível optar por realizar uma exportação Google Takeout e, em seguida, uma importação mBox na nossa infraestrutura.
- Esta operação não afeta os dados já existentes no endereço de destino, nem os dados do endereço de origem.
- Todo o conteúdo da caixa externa será importado.
- Uma vez iniciado o processo de importação, não é mais possível interrompê-lo.
- Os eventuais duplicados são geridos: um conteúdo idêntico será copiado apenas uma vez.
Importar todo o seu histórico de e-mails
Pré-requisitos Infomaniak
- Ter um Serviço de Email na sua Central de Gestão Infomaniak.
- Ter à disposição um número de endereços disponíveis ou ajustá-lo caso seja necessário.
- Verificar se a conta de e-mail está devidamente protegida
- Criar um ou vários endereços neste serviço de e-mail.
- Se tiver muitos (10+) endereços de e-mail para criar, consulte este outro guia sobre a criação em massa.
- O endereço de e-mail de destino deve estar associado ao utilizador (= à conta Infomaniak) que está a utilizar.
Importar o conteúdo de e-mail do Gmail para o Infomaniak
- Clique aqui para acessar a ferramenta de importação (serviço online https://import-email.infomaniak.com).
- Se necessário, inicie sessão na sua conta Infomaniak na organização em questão; a importação será efetuada para um dos endereços de e-mail associados à interface Web Mail da Infomaniak (serviço online ksuite.infomaniak.com/mail) da conta Infomaniak que está a utilizar.
- Clique em "Importar por IMAP".
- Clique em Importar.
- Preencha o campo da esquerda com o seu endereço de e-mail de origem (de onde o conteúdo será copiado).
- Clique no botão "Conectar com o Google" que apareceu:
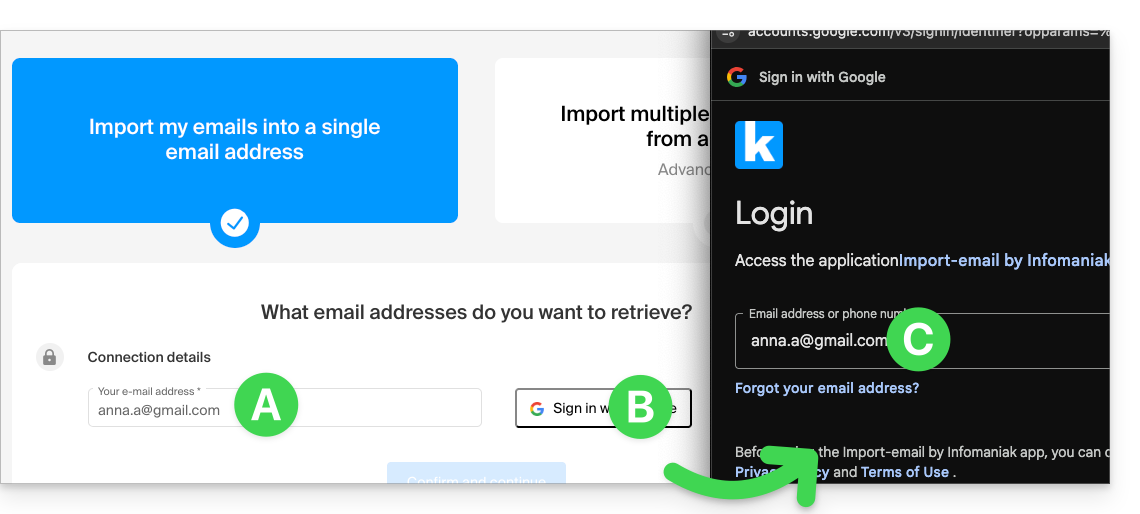
- Verifique se está a conectar-se à conta Google correta para a cópia dos e-mails.
- Confirme que autoriza a ferramenta Infomaniak a conectar-se à sua conta (processo automático).
- Após confirmar a janela pop-up, escolha para qual endereço de e-mail importar os e-mails; o menu suspenso lista os endereços de e-mail atualmente associados à sua interface Web Mail Infomaniak (serviço online ksuite.infomaniak.com/mail) da conta Infomaniak com a qual você está conectado.
- Após selecionar na lista o endereço de destino desejado, clique no botão azul Importar e-mails.
- A cópia está a iniciar. Pode aguardar e verificar o resultado na página após a conclusão da importação ou fechar a janela (a importação continua em segundo plano e o progresso pode ser acompanhado – consulte abaixo).
- Um e-mail de confirmação será enviado automaticamente para todos os endereços de e-mail envolvidos na operação, assim que a importação for concluída, indicando o número de mensagens copiadas.
- Um rastreamento está disponível nas configurações do endereço de e-mail de destino, apenas no aplicativo web Mail (serviço online ksuite.infomaniak.com/mail).
- O rastreamento permite visualizar o histórico das importações no endereço em questão.
Ajustar as configurações das aplicações
Assim que configurar o nome de domínio associado ao seu e-mail para funcionar com a Infomaniak, modifique as configurações dos programas/clientes de e-mail que utiliza para que estes se conectem corretamente aos servidores da Infomaniak: siga o assistente de configuração.
Etiquetas e volume de dados
O espaço de armazenamento exibido na Infomaniak pode não corresponder ao indicado no Gmail, principalmente devido à gestão diferente das etiquetas. De fato, estas, presentes no Gmail, serão convertidas em pastas nos servidores Infomaniak (mesmo princípio que durante uma recupera o correio com um software/cliente de e-mail IMAP como o Thunderbird):
Consequentemente, um e-mail etiquetado em várias pastas do Gmail pode ser contabilizado várias vezes durante a migração, o que explica por que uma conta que exibe, por exemplo, 6 GB no Gmail pode ocupar 18 GB após ser transferida para os servidores Infomaniak.
Tenha paciência ao importar um grande volume de e-mails; as importações do Gmail e da Microsoft são intencionalmente mais lentas (por exemplo, largura de banda de 1 GB/dia para o Google) para evitar que sejam rejeitadas por esses serviços.
Link para esta FAQ: https://faq.infomaniak.com/1785
Esta seção de perguntas frequentes foi útil?
Este guia explica como conectar o aplicativo de desktop Outlook 2013 (aplicativo para computador no Windows) a um endereço de e-mail hospedado na Infomaniak.
Adicionar o endereço de e-mail ao aplicativo
Pré-requisitos
- Criar o endereço de e-mail (❓: my kSuite | Serviço de E-mail/kSuite).
- Criar uma senha para o dispositivo (❓: my kSuite | Serviço de e-mail/kSuite).
- Verificar se a configuração do domínio está correta (❓: Serviço de e-mail/kSuite).
Para configurar o aplicativo de e-mail:
- Abra o aplicativo.
- Clique no menu Arquivo:
- Clique em Configurações da conta.
- Clique em Adicionar ou remover contas:
- Clique em Novo:
- Clique em Configuração manual:
- Clique em POP / IMAP.
- Clique em Seguinte:
- Verifique e complete as informações ausentes.
- Clique em Configurações avançadas:
- Clique na aba Servidor de saída.
- Clique emO meu servidor de saída requer autenticação.
- Clique na aba Avançado:
- Substitua o número das portas pelas informações corretas e ative o SSL.
- Clique em OK.
- Clique em Seguinte:
- Clique em Fechar:
- Clique em Concluir:
- Clique em Fechar:
- Pronto, o seu endereço de e-mail já está configurado na aplicação:
Parâmetros recomendados
- Servidor IMAP de entrada =
mail.infomaniak.com - Porta IMAP =
993(com SSL) - Servidor SMTP de saída =
mail.infomaniak.com - Porta SMTP e protocolo de criptografia e comando/método para ativar este protocolo:
587+ STARTTLS - Nome de utilizador/username = o endereço de e-mail completo (precisa de ajuda?)
- Senha/password = a senha gerada para o endereço de e-mail que você deseja consultar (❓: my kSuite | Serviço de e-mail/kSuite).
- Autenticação obrigatória para o envio de e-mails:
- Ative-a nas configurações SMTP do seu aplicativo.
- Marque "usar as mesmas configurações do servidor de entrada" ou, dependendo do software/cliente de e-mail, insira um nome de usuário (= endereço de e-mail completo) e a senha gerada.
Consulte este outro guia se precisar de informações sobre outras portas e protocolos de e-mail compatíveis (SSL/TLS, por exemplo).
Em caso de problemas
Verifique se o Serviço de Email está configurado de forma otimizada.
Não é necessário entrar em contato com o Suporte Infomaniak se o seu endereço de email funcionar corretamente fora da aplicação. O erro mais comum está relacionado ao uso de uma senha incorreta. Os guias de solução de problemas ajudarão você a resolver qualquer problema:
- Consulte as soluções apresentadas neste outro guia sobre o serviço de e-mail em geral.
- Este outro guia é mais específico sobre o Outlook.
… e se o seu Outlook deixou de funcionar após uma alteração da palavra-passe do e-mail, consulte este outro guia.
Link para esta FAQ: https://faq.infomaniak.com/1796
Esta seção de perguntas frequentes foi útil?
Este guia explica como gerenciar e modificar as permissões (atribuição de senha adicional, criação de um alias, etc. veja abaixo a lista completa) de um usuário Infomaniak, para que ele possa gerenciar mais ou menos elementos de configuração no aplicativo web Mail Infomaniak (serviço online ksuite.infomaniak.com/mail).
Introdução
- O endereço de e-mail é criado primeiro em um Serviço de E-mail e, em seguida, pode ser usado em uma ou mais interfaces de e-mail Infomaniak por um ou mais utilizadores.
- O criador (ou administrador) do endereço pode querer limitar as ações possíveis para um ou outro dos utilizadores que usarão o endereço de e-mail.
- Este gerenciamento detalhado de permissões pode ser feito durante a criação de um endereço ou posteriormente, e você também pode definir quais devem ser os direitos padrão a serem sempre aplicados.
Lista das permissões do utilizador de e-mail
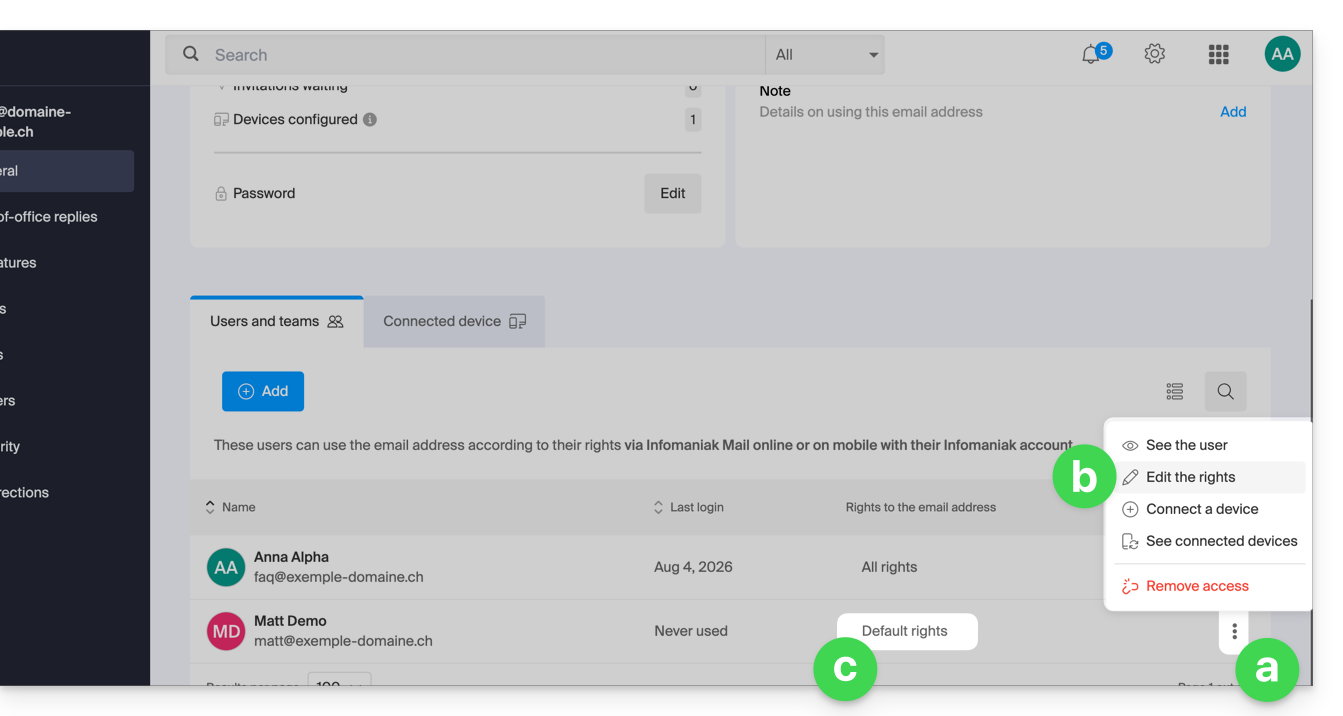
Quando visualiza as utilizadores com acesso a um endereço de e-mail específicodentro de um Serviço de E-mail, uma coluna permite identificar rapidamente o tipo de permissões concedidas ao utilizador: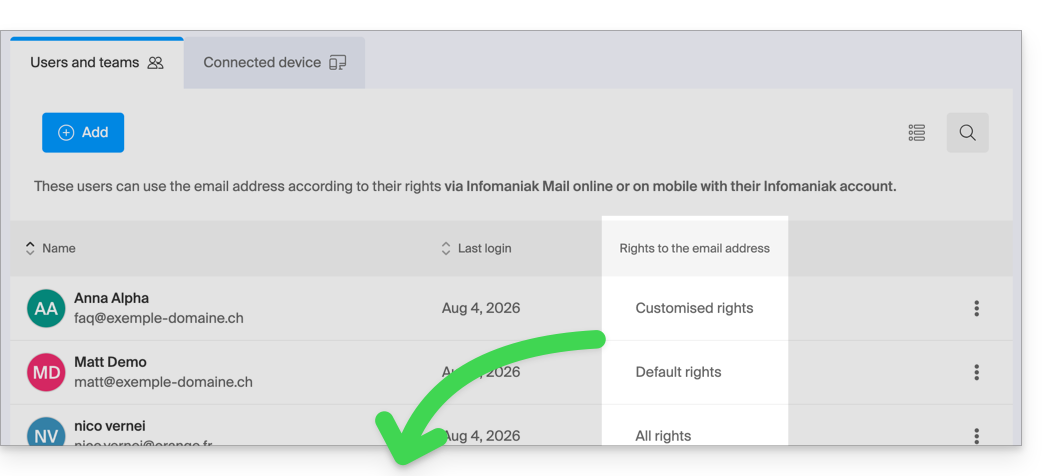
A indicação “Todos os direitos” é exibida quando o utilizador possui todas as permissões possíveis.
“Permissões padrão” é exibida quando as permissões são idênticas às especificadas na configuração global.
“Permissões personalizadas” é exibida assim que as permissões não forem todas concedidas e forem diferentes do modelo padrão (configuração global).
Clique na indicação para aceder à gestão das permissões do utilizador, detalhadas mais abaixo:
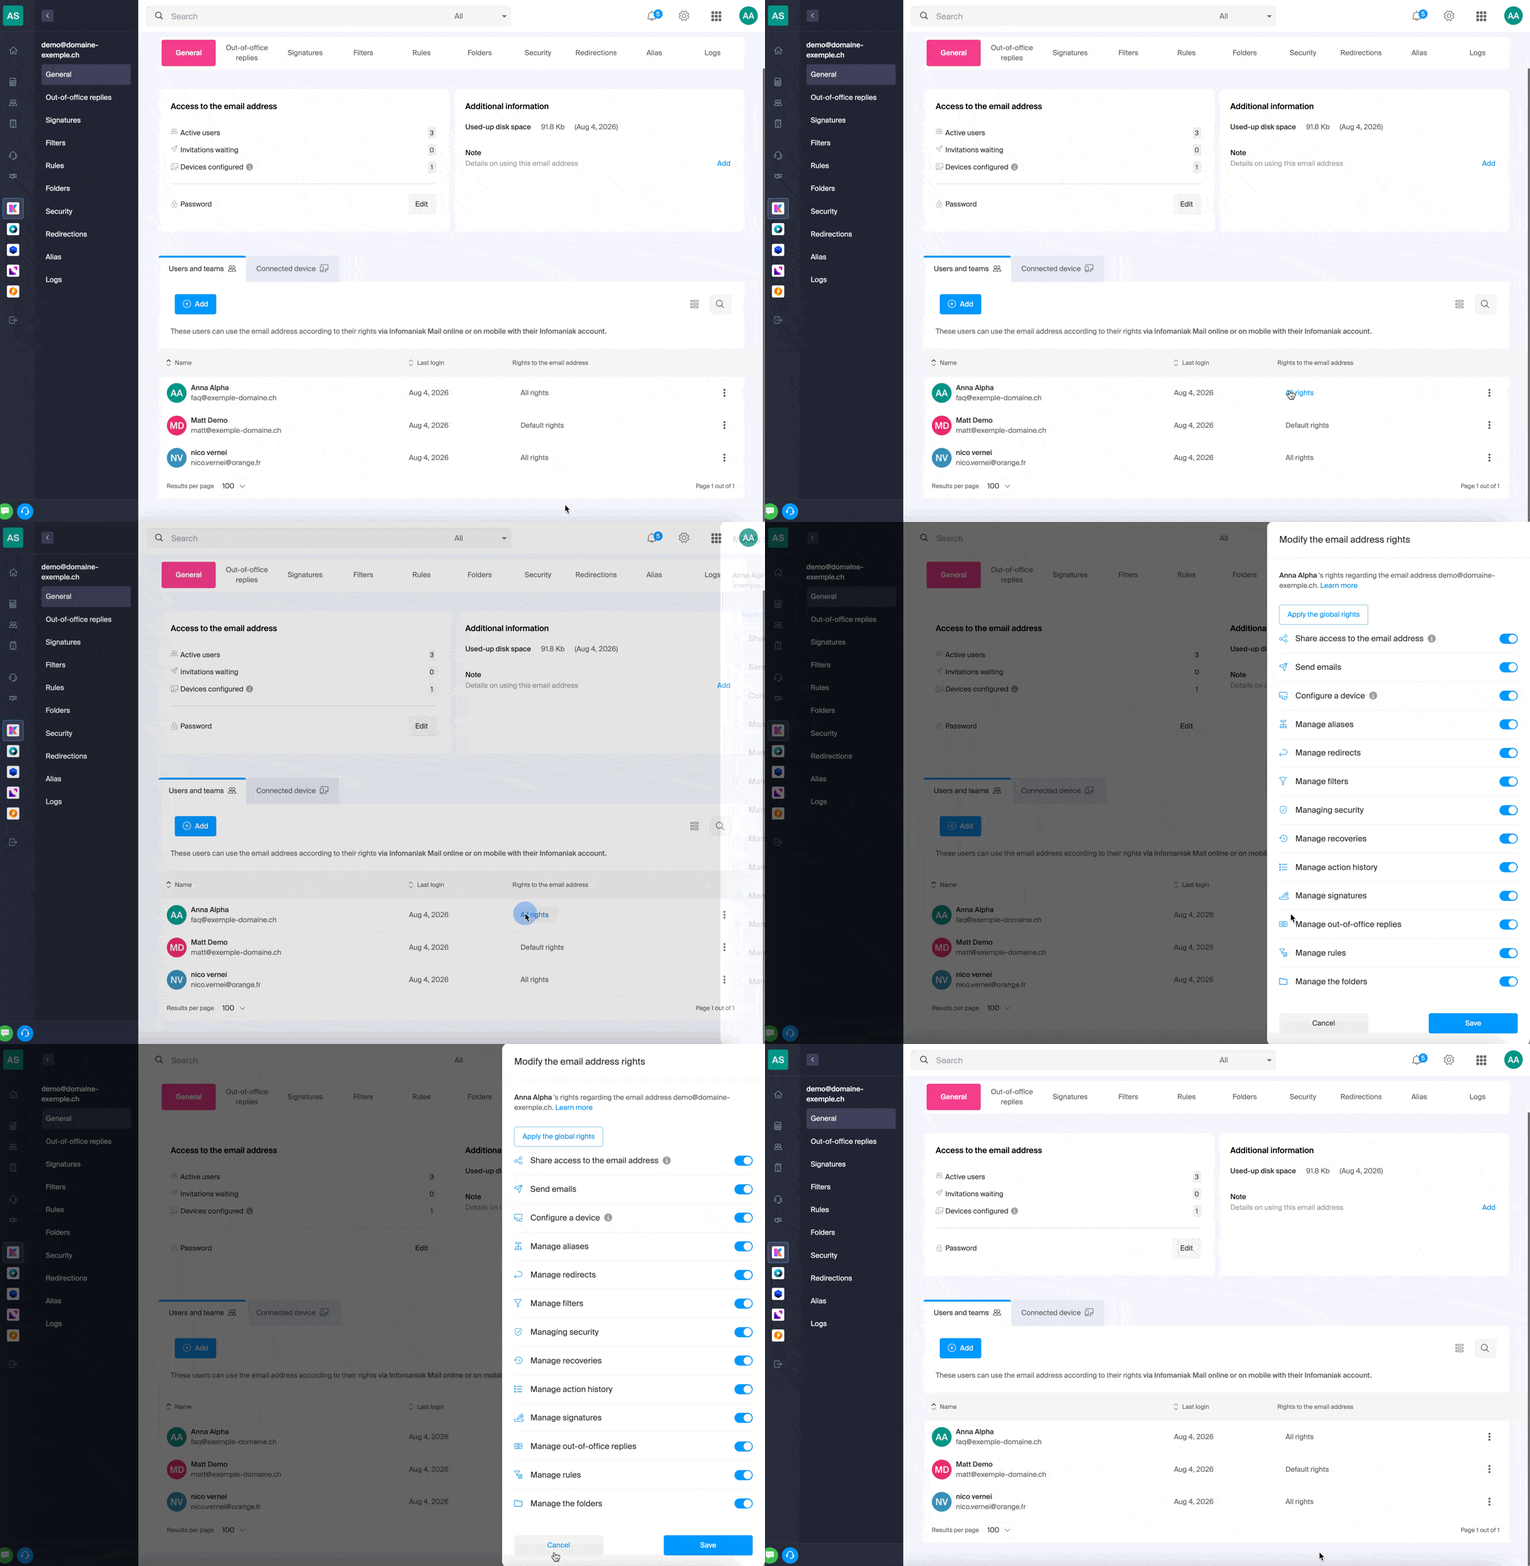
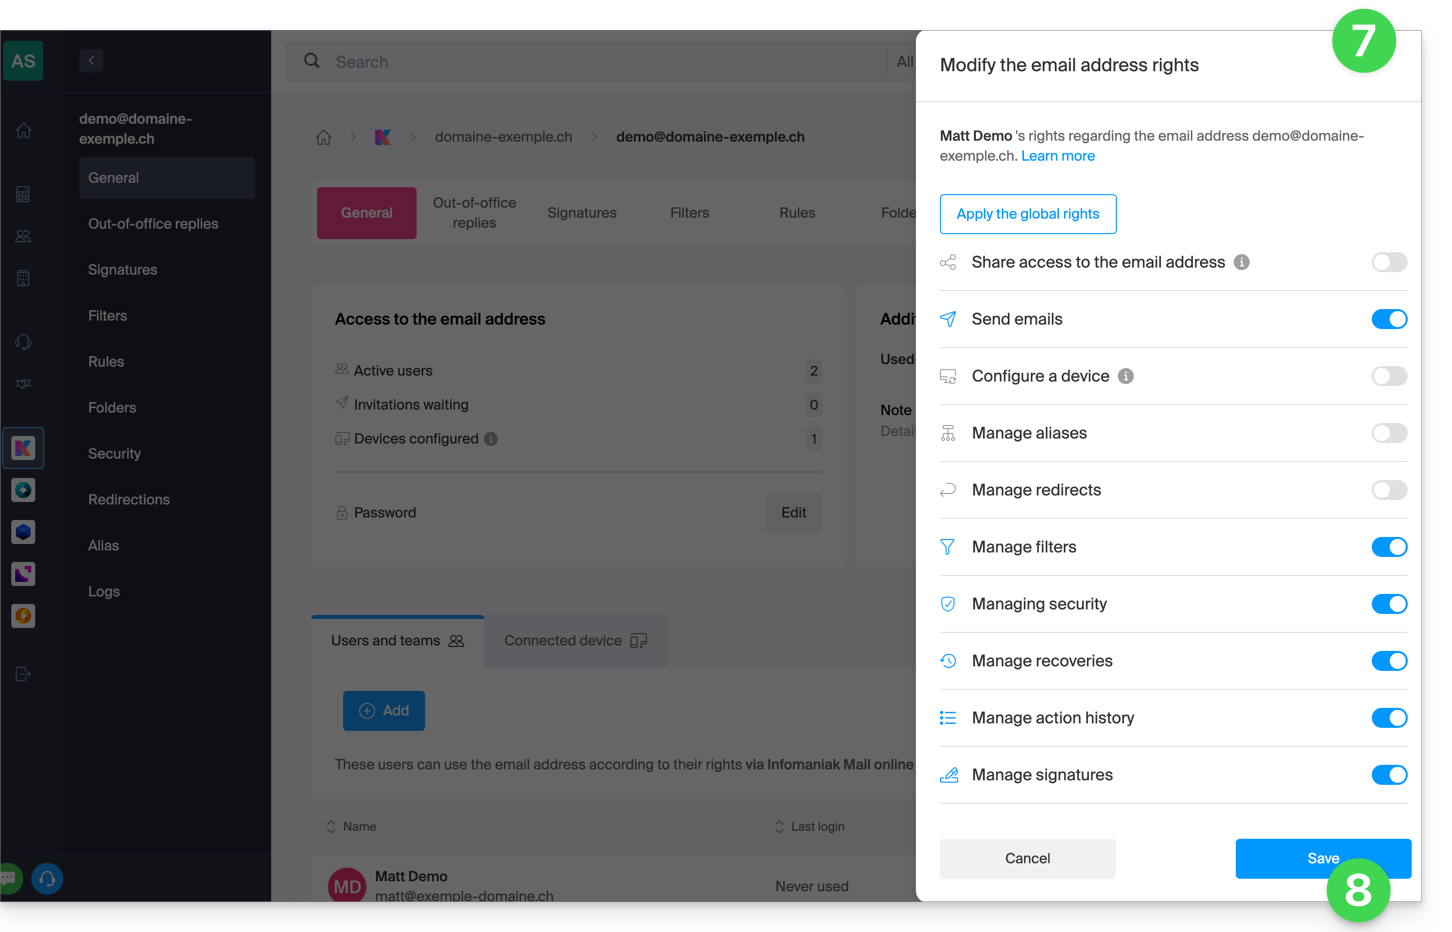
Basta clicar no botão correspondente para ativar ou desativar o direito específico. A seguir, a lista:
| Tipo / Ícone | Descrição da permissão concedida ao utilizador |
|---|---|
| Partilhar o acesso ao endereço de e-mail | Gerenciar usuários (possibilidade de delegar o acesso ao e-mail a outro usuário da Organização) |
| Configurar um dispositivo | Gerenciar dispositivos (possibilidade de criar uma senha dedicada) |
| Gerenciar os correios de voz | Criar uma resposta automática (por exemplo, configurar uma mensagem de ausência) |
| Gerenciar as assinaturas | Adicionar assinaturas e gerenciar os endereços de e-mail de resposta |
| Gerenciar os redirecionamentos | Redirecionar e-mails para um ou mais endereços |
| Gerenciar os alias | Criar variações do seu endereço de e-mail (modificando o que vem antes do @) |
| Gerenciar o histórico de ações | Acessar os registros do endereço de e-mail |
| Gerenciar as restaurações | Acessar as cópias de segurança e restaurações |
| Gerenciar os filtros | Acessar os filtros de SPAM e outros |
| Gerenciar as regras | Ordenar e classificar automaticamente os novos e-mails recebidos |
| Gerenciar as pastas | Personalizar as pastas IMAP |
| Gerenciar a segurança | Gerenciar os endereços bloqueados e aprovados |
| Gerenciar o envio de e-mail | Permitir o envio de e-mails (autorizar o SMTP global) |
Gerenciar as permissões concedidas a um usuário
A senha para acessar sua conta Infomaniak pode ser solicitada para efetuar uma modificação nas permissões.
… a partir do Serviço de E-mail
- Clique aqui para acessar o gerenciamento do seu Serviço de E-mail no painel de controle Infomaniak (precisa de ajuda?).
- Clique diretamente no nome atribuído ao Serviço de Email em questão.
- Clique no endereço de email correspondente na tabela que aparece.
- Existem várias maneiras de modificar as permissões de um endereço de e-mail:
- Ao adicionar um utilizador a um endereço de e-mail:
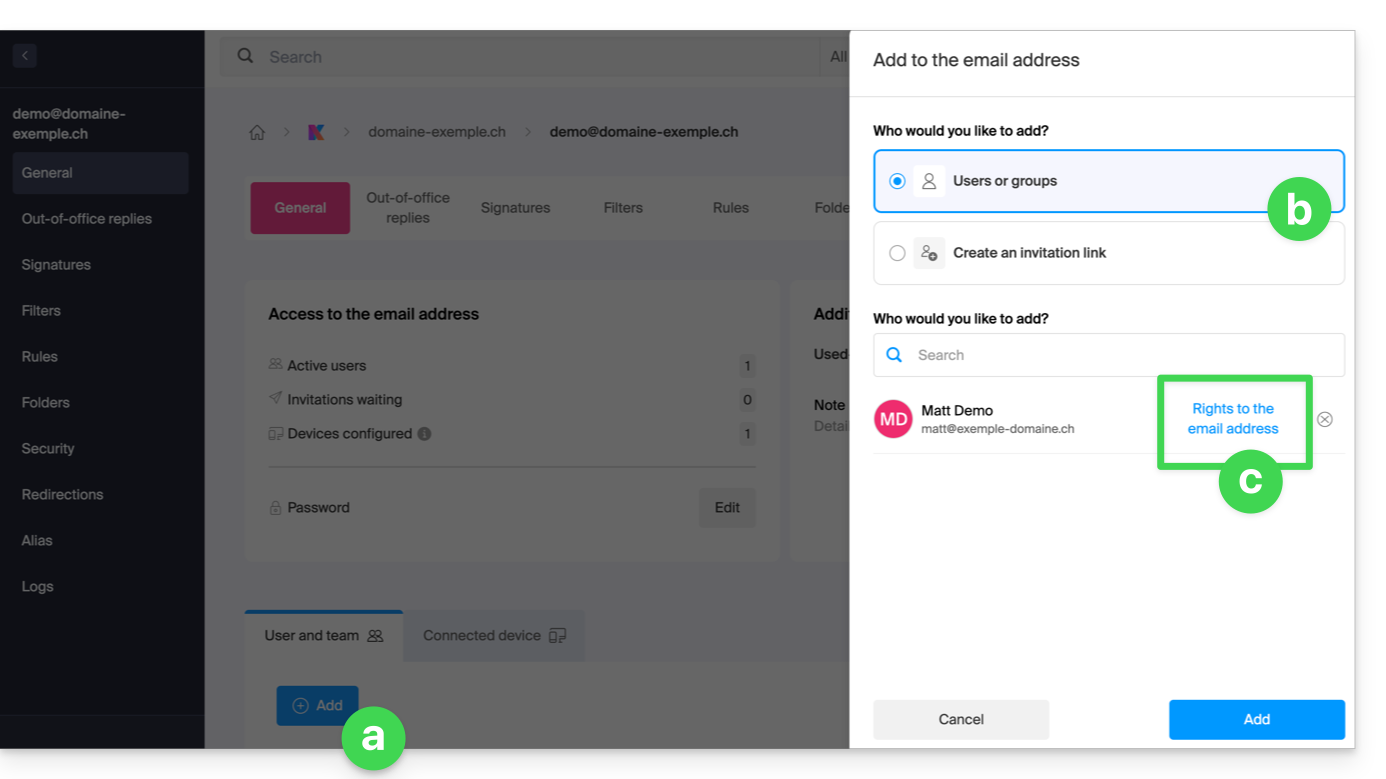
- Depois de o utilizador ter sido adicionado:
- Clique no menu de ações ⋮ localizado à direita do nome do utilizador do endereço de e-mail.
- Selecione ✎ Editar permissões.
- Ou clique diretamente na indicação relativa às suas permissões:
- Ao adicionar um utilizador a um endereço de e-mail:
… a partir do painel de controlo (gestão de utilizadores)
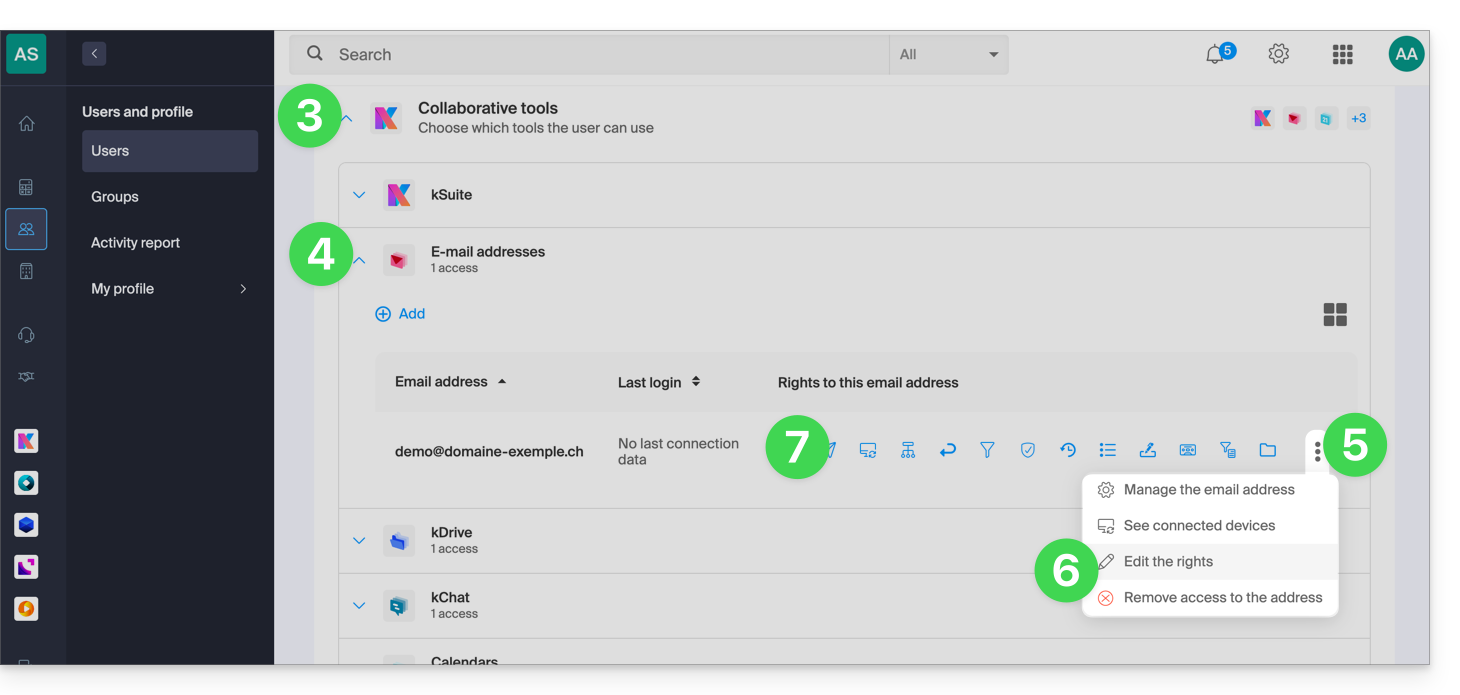
- Clique aqui para acessar o gerenciamento de usuários no painel de controle Infomaniak (precisa de ajuda?).
- Clique no usuário desejado na tabela que aparece.
- Expanda a seção de ferramentas de colaboração clicando na seta para baixo .
- Expanda a seção de endereços de e-mail acessíveis ao usuário clicando na seta para baixo .
- Clique no menu de ações ⋮ localizado à direita do endereço de e-mail em questão.
- Selecione Modificar permissões.
- Ou clique diretamente nos ícones visíveis na tabela:
… a partir do aplicativo Web Mail
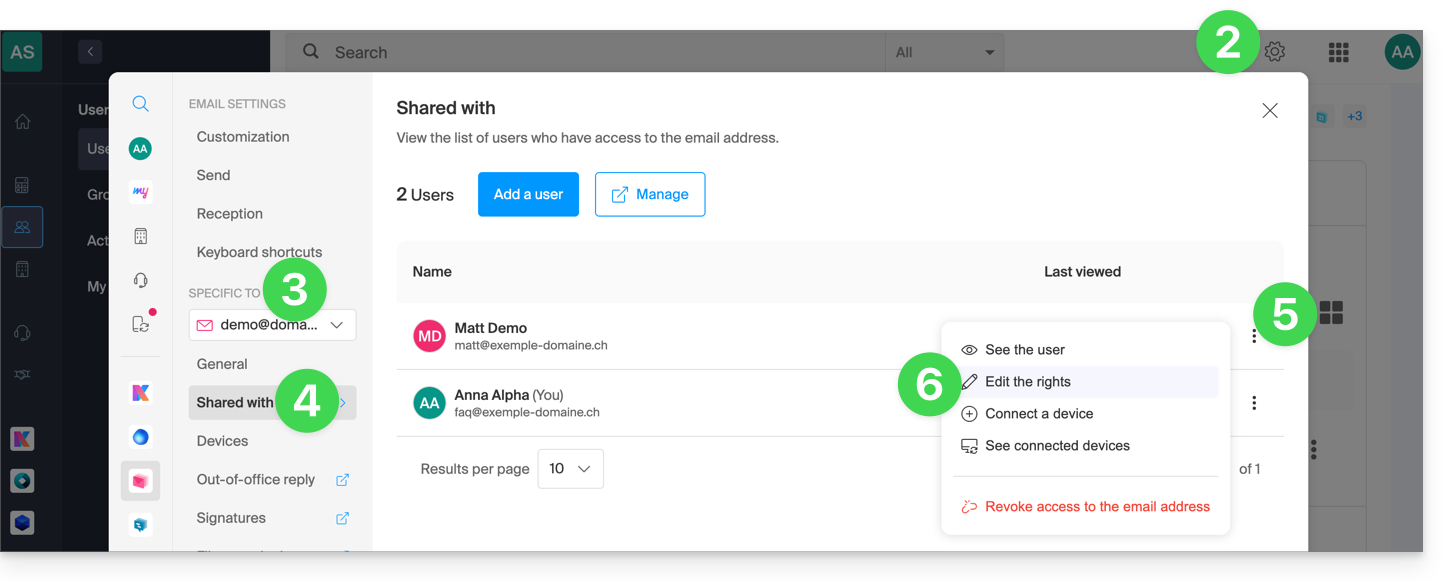
- Clique aqui para acessar o aplicativo web Mail da Infomaniak (serviço online ksuite.infomaniak.com/mail).
- Clique no ícone Configurações no canto superior direito da interface.
- Verifique ou selecione o endereço de e-mail em questão no menu suspenso do menu lateral esquerdo.
- Clique em Compartilhado com.
- Clique em o menu de ações ⋮ localizado à direita do nome de usuário do endereço de e-mail.
- Selecione ✎ Editar permissões:
- Você será redirecionado para as configurações do seu endereço de e-mail no Serviço de E-mail e, mais especificamente, para a seção de permissões do usuário em questão.
- Ajuste as permissões e salve na parte inferior da página:
Resultado para o utilizador
O utilizador a quem são removidas permissões não verá mais determinados menus correspondentes nas configurações do seu endereço de e-mail.
Para algumas funcionalidades, mesmo que o menu continue acessível, alguns botões estarão inoperantes ou desativados: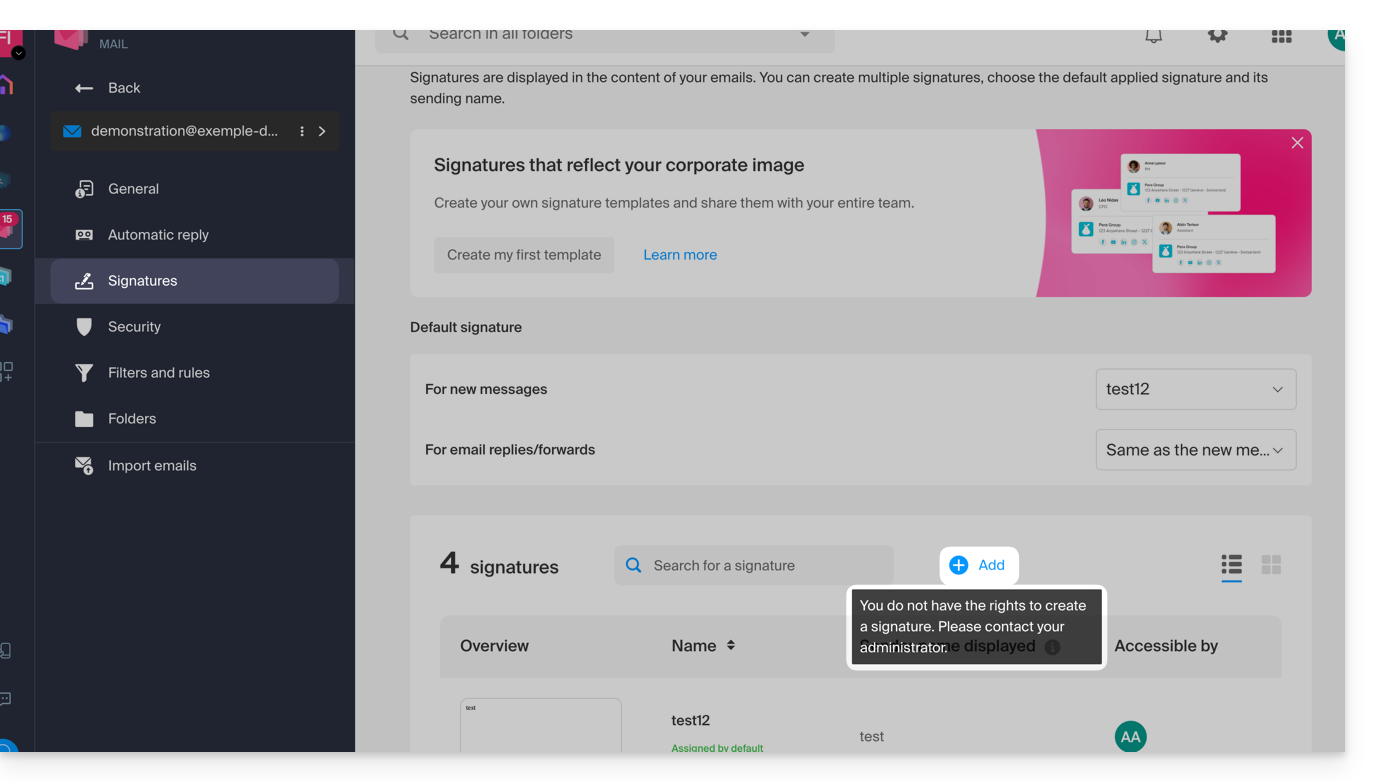
Link para esta FAQ: https://faq.infomaniak.com/1811
Esta seção de perguntas frequentes foi útil?
Este guia explica como resolver problemas de acesso ou utilização do kDrive no Windows e macOS quando um software de terceiros pode interferir na sua sincronização.
Introdução
- O aplicativo kDrive pode, por vezes, apresentar problemas de interação com os firewalls do Windows ou macOS, bem como com algumas soluções antivírus, VPN ou de limpeza, o que pode causar dificuldades na sincronização de arquivos, impedir a abertura de PDFs na web ou tornar impossível o uso do modo Lite Sync (arquivos sob demanda).
- É necessárioautorize o kDrive nestas aplicações e adicione à lista de permissões (whitelist) três componentes essenciais:
kdrive.exe(oukdrive.appno macOS)kdrive_client.exe- O domínio
*.infomaniakusercontent.com
- Se, em vez disso, notar um problema de sincronização e pastas ausentes, consulte este outro guia.
Avast
Para isso:
- Abra a interface do Avast.
- Vá para Menu > Configurações.
- Na aba Geral, clique em Exceções.
- Clique em Adicionar uma exceção e insira o domínio:
https://*.infomaniakusercontent.com/* - Vá para a aba Caminhos dos arquivos para adicionar os executáveis do kDrive (
kdrive.exe,kdrive_client.exeoukdrive.app).
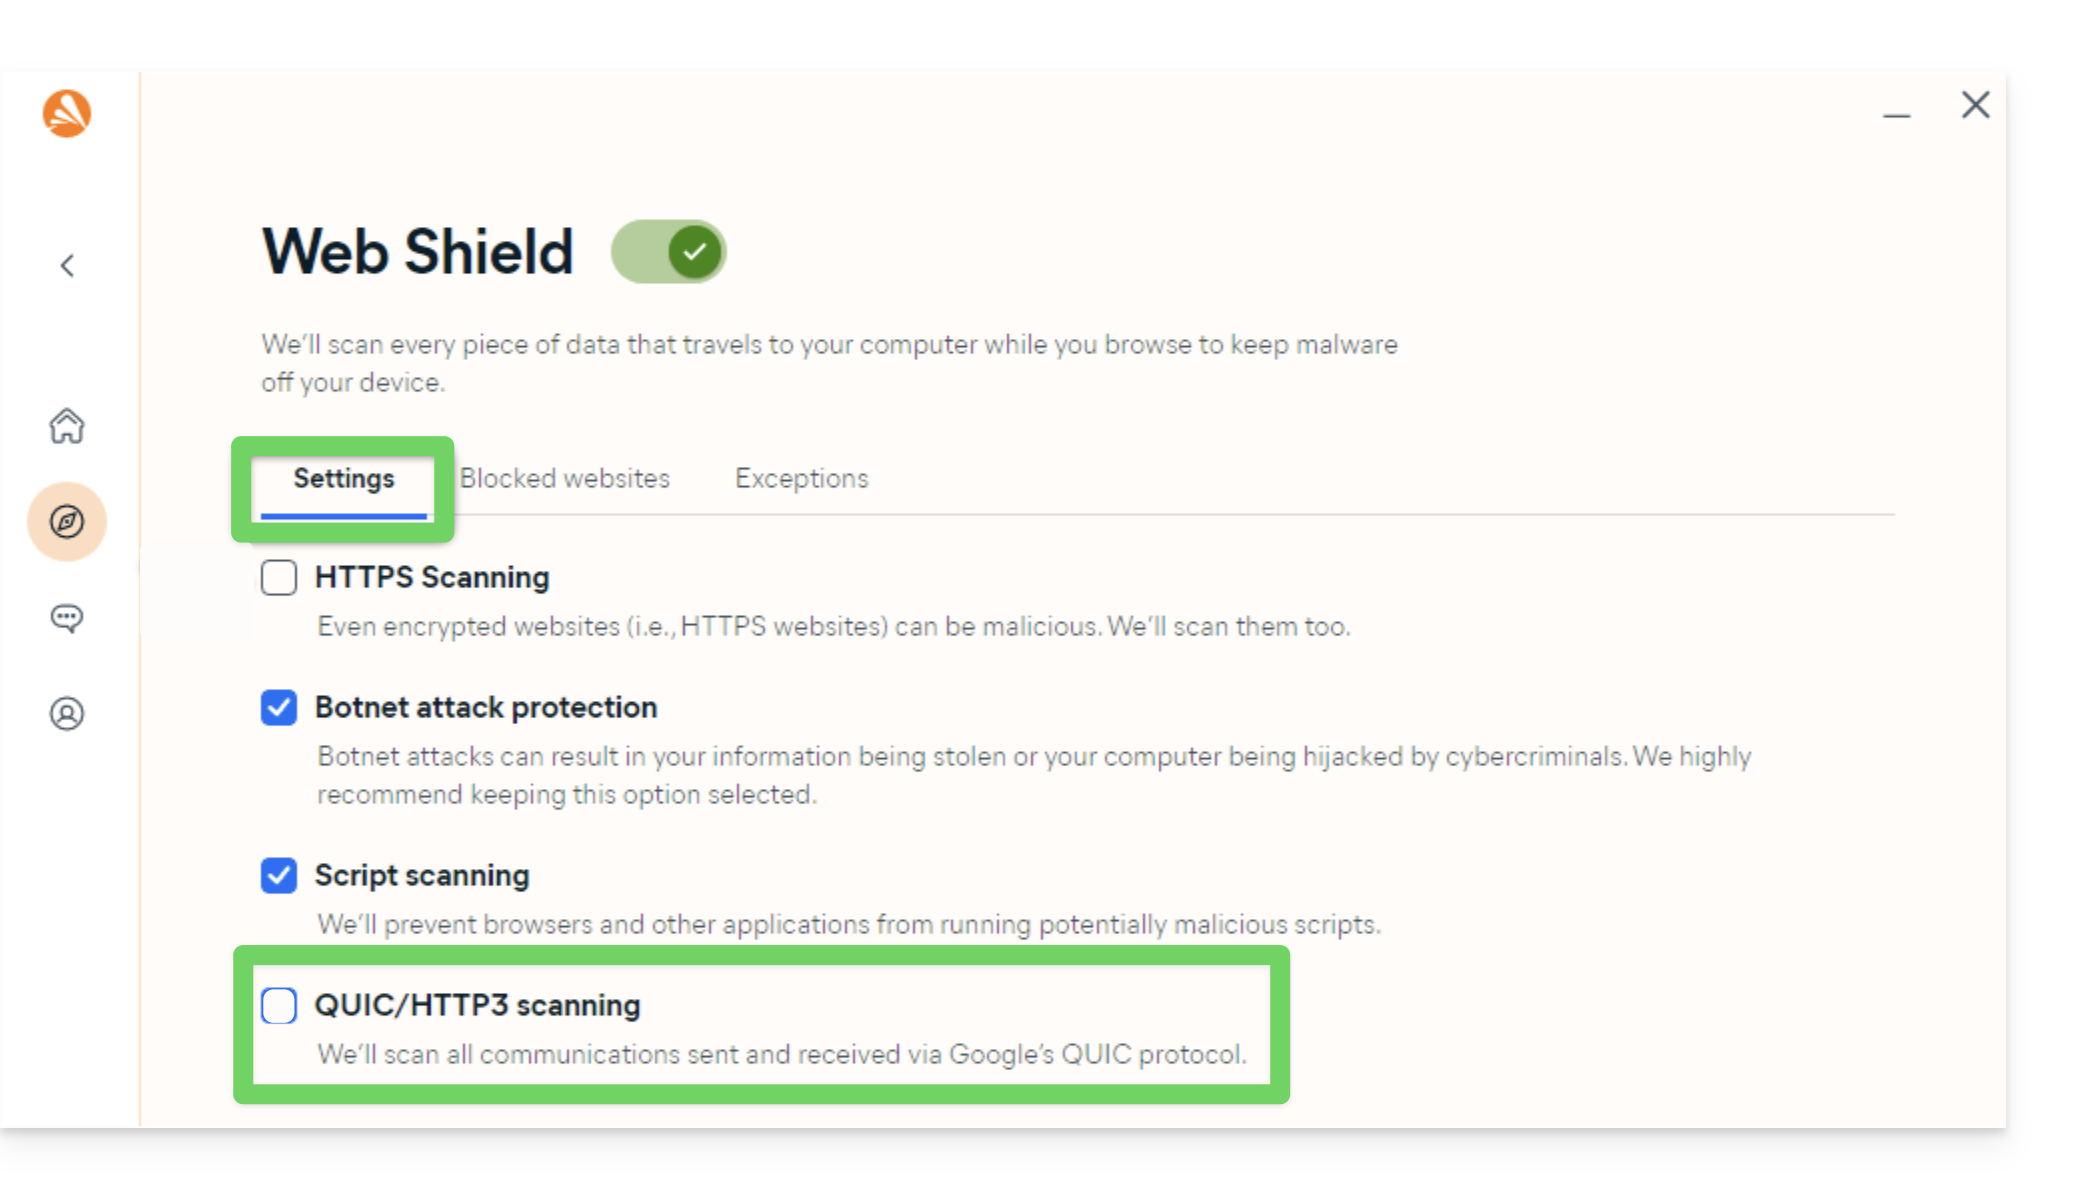
Recomenda-se realizar uma ação adicional no Avast para evitar bloqueios (especialmente ao abrir arquivos PDF):
- Desative a análise QUIC/HTTP3 (consulte a documentação oficial na seção Windows PC):
AVG
Consulte a documentação oficial da AVG.
- Abra o AVG Antivirus.
- Vá para Menu > Configurações > Geral > Exceções.
- Clique em Adicionar uma exceção e insira o domínio
https://*.infomaniakusercontent.com/*. - Adicione também os caminhos de acesso aos executáveis do kDrive (
kdrive.exeekdrive_client.exeoukdrive.app).
Avira
Consulte a documentação oficial da Avira.
- Clique com o botão direito do mouse no ícone Avira e desative temporariamente a proteção.
- Vá para Configuração > Proteção do PC > Análise > Exceções.
- Adicione os arquivos executáveis do kDrive (
kdrive.exe,kdrive_client.exeoukdrive.app). - Repita o processo em Proteção em tempo real > Exceções.
- Na seção Proteção Web, adicione o domínio
*.infomaniakusercontent.comàs URLs permitidas.
Bitdefender
Consulte a documentação oficial da Bitdefender.
- Abra o Bitdefender e vá para Proteção > Prevenção de ameaças online > Configurações.
- Clique em Gerenciar exceções e adicione o domínio
*.infomaniakusercontent.com(marque a opção de prevenção online). - Se estiver a usar a extensão do navegador TrafficLight, adicione também este domínio à sua lista de permissões.
- Para excluir os ficheiros executáveis do kDrive (
kdrive.exe,kdrive_client.exeoukdrive.app), vá para Proteção > Antivírus > Definições > Gerir exceções.
CCleaner
Consulte a documentação oficial do CCleaner.
- Abra o CCleaner e vá para Opções > Excluir.
- Clique em Adicionar e selecione os arquivos executáveis do kDrive (
kdrive.exe,kdrive_client.exe) ou a pasta de instalação global para evitar qualquer exclusão de cache ou interrupção de processos.
CleanMyMac
Consulte a documentação oficial do CleanMyMac (MacPaw).
- Abra o CleanMyMac.
- Na tela de resultados da análise, mantenha a tecla Ctrl pressionada e clique nos itens relacionados ao kDrive (
kdrive.app). - Selecione Adicionar à lista de exclusão.
ESET
Consulte a documentação oficial da ESET.
- Abra o ESET e pressione F5 (Configuração avançada).
- Vá para Antivírus > Exclusões e clique em Adicionar para inserir os caminhos para os executáveis do kDrive (
kdrive.exe,kdrive_client.exeoukdrive.app). - Acesse Web e e-mail > Proteção de acesso à Web > Gerenciamento de endereços URL e adicione
*.infomaniakusercontent.comaos endereços permitidos.
Kaspersky
Consulte a documentação oficial da Kaspersky.
- Abra a Kaspersky e vá para Configurações > Exclusões e gestão de ameaças.
- Adicione os arquivos executáveis do kDrive (
kdrive.exe,kdrive_client.exeoukdrive.app) à lista de aplicativos confiáveis. - Para resolver problemas de acesso à web, exclua os domínios
kdrive.infomaniak.come*.infomaniakusercontent.comda análise:
- Em caso de problemas persistentes com as conexões seguras SSL/TLS, desmarque a seguinte caixa:

macOS (firewall)
Consulte a documentação oficial da Apple (Firewall do macOS).
- Abra as Configurações do Sistema (ou Preferências do Sistema).
- Clique em Privacidade e segurança.
- Selecione Firewall.
- Clique no botão Opções do firewall (insira a sua senha de administrador, se solicitado).
- Clique no botão Adicionar um aplicativo (+).
- Selecione o aplicativo kDrive (
kdrive.app) para permitir as conexões de entrada. - Clique em Adicionar e, em seguida, em OK.
Malwarebytes
Consulte a documentação oficial do Malwarebytes.
- Abra o Malwarebytes e vá para Configurações > Lista de permissões (Exclusões).
- Clique em Adicionar uma permissão.
- Selecione Excluir um arquivo ou pasta e especifique
kdrive.exe,kdrive_client.exe(oukdrive.app). - Selecione Excluir um site e insira o domínio
*.infomaniakusercontent.com.
McAfee
Consulte a documentação oficial da McAfee.
- Abra o McAfee e acesse as Configurações (ícone de engrenagem) > Análise em tempo real.
- Em Arquivos excluídos, adicione os arquivos executáveis do kDrive (
kdrive.exeekdrive_client.exeoukdrive.app). - Na secção Firewall / Proteção Web, adicione o domínio
*.infomaniakusercontent.comà lista de endereços web autorizados.
NordVPN
Consulte a documentação oficial da NordVPN (Proteção contra Ameaças).
- Abra o NordVPN.
- Acesse a função Proteção Avançada contra Ameaças (
Threat Protection). - Consulte a lista de arquivos ou atividades bloqueadas para autorizar a aplicação kDrive (
kdrive.exe,kdrive_client.exeoukdrive.app). - Adicione o domínio
*.infomaniakusercontent.comà lista de domínios autorizados da Proteção contra ameaças. - Se a VPN ativa estiver a interferir na sincronização local, configure o Split Tunneling para excluir a aplicação kDrive do túnel VPN.
Norton
Consulte a documentação oficial da Norton.
- Abra a Norton e vá para Configurações > Antivírus > Verificações e riscos.
- Em Exclusões / Riscos baixos, configure as "URLs a excluir da análise" e adicione
*.infomaniakusercontent.com. - Para excluir os arquivos executáveis (
kdrive.exe,kdrive_client.exeoukdrive.app), configure as seções Exclusões da análise de segurança e Exclusões do Auto-Protect.
Windows (firewall)
Saiba mais sobre o documentação oficial da Microsoft (Firewall do Windows).
- Abra o menu Iniciar e clique em Configurações.
- No campo de pesquisa, digite Firewall.
- Clique em Permitir que um aplicativo passe pelo Firewall do Windows.
- Clique no botão Editar configurações.
- Marque as caixas ao lado dos aplicativos kDrive (
kdrive.exeekdrive_client.exe). Se eles não estiverem na lista, clique em Permitir outro aplicativo... para procurá-los e adicioná-los. - Marque as caixas abaixo dos tipos de rede (Privada e Pública) e clique em OK.
Windows Defender
Consulte a documentação oficial da Microsoft (Segurança do Windows).
- Abra o Segurança do Windows a partir da área de notificação ou do menu Iniciar.
- Selecione Proteção contra vírus e ameaças.
- Em Configurações de proteção contra vírus e ameaças, clique em Gerenciar configurações.
- Role para baixo até Exclusões e clique em Adicionar ou remover exclusões.
- Clique em Adicionar uma exclusão e selecione os arquivos ou pastas do kDrive (
kdrive.exeekdrive_client.exe).
Link para esta FAQ: https://faq.infomaniak.com/1822
Esta seção de perguntas frequentes foi útil?
Este guia explica como usar o assistente de agendamento de reuniões no calendário/agenda do aplicativo web Calendar Infomaniak (serviço online ksuite.infomaniak.com/calendar) e, assim, planejar uma reunião entre vários usuários.
Introdução
- O agendamento é limitado a 7 dias com as seguintes ofertas:
- kSuite Free
- my kSuite (ik.me, etik.com, ikmail.com)
- Serviço de e-mail Starter
- Você também pode acessar a funcionalidade diretamente ao visualizar um e-mail.
- Para criar e configurar facilmente um novo evento, consulte este outro guia.
- Para, em vez disso, propor uma reunião a vários convidados que poderão votar, consulte este outro guia.
Agendamento posterior: agendar uma reunião
Para criar um novo evento compartilhado usando o assistente de agendamento:
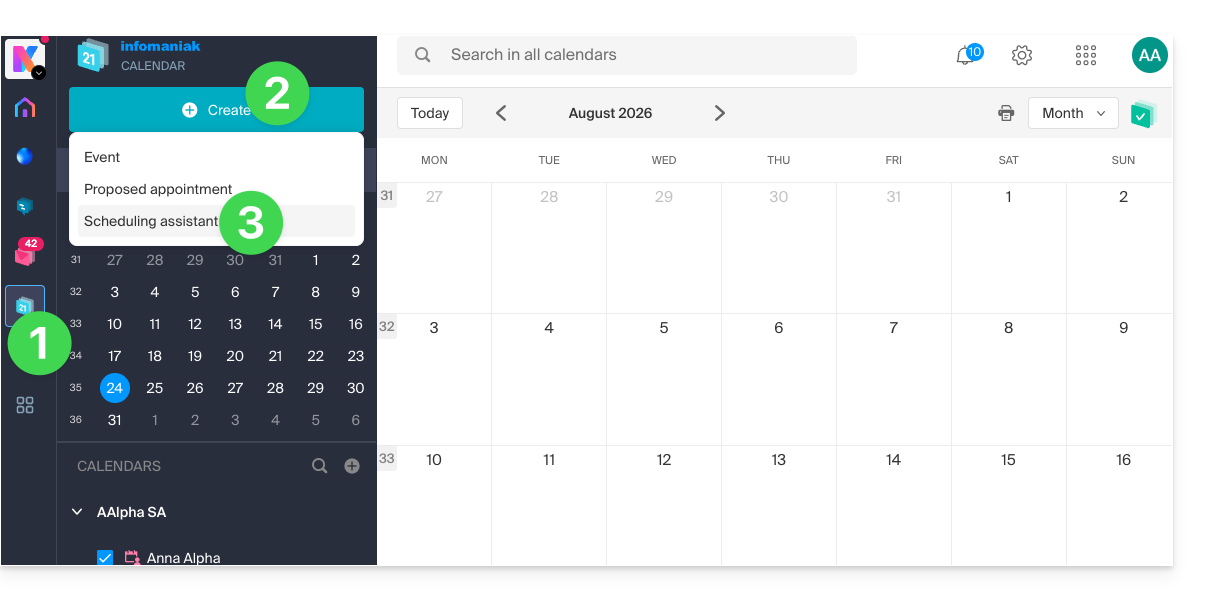
- Clique aqui para acessar o aplicativo web Calendar da Infomaniak (serviço online ksuite.infomaniak.com/calendar).
- Clique no botão Criar no canto superior esquerdo.
- Clique em Assistente de agendamento:
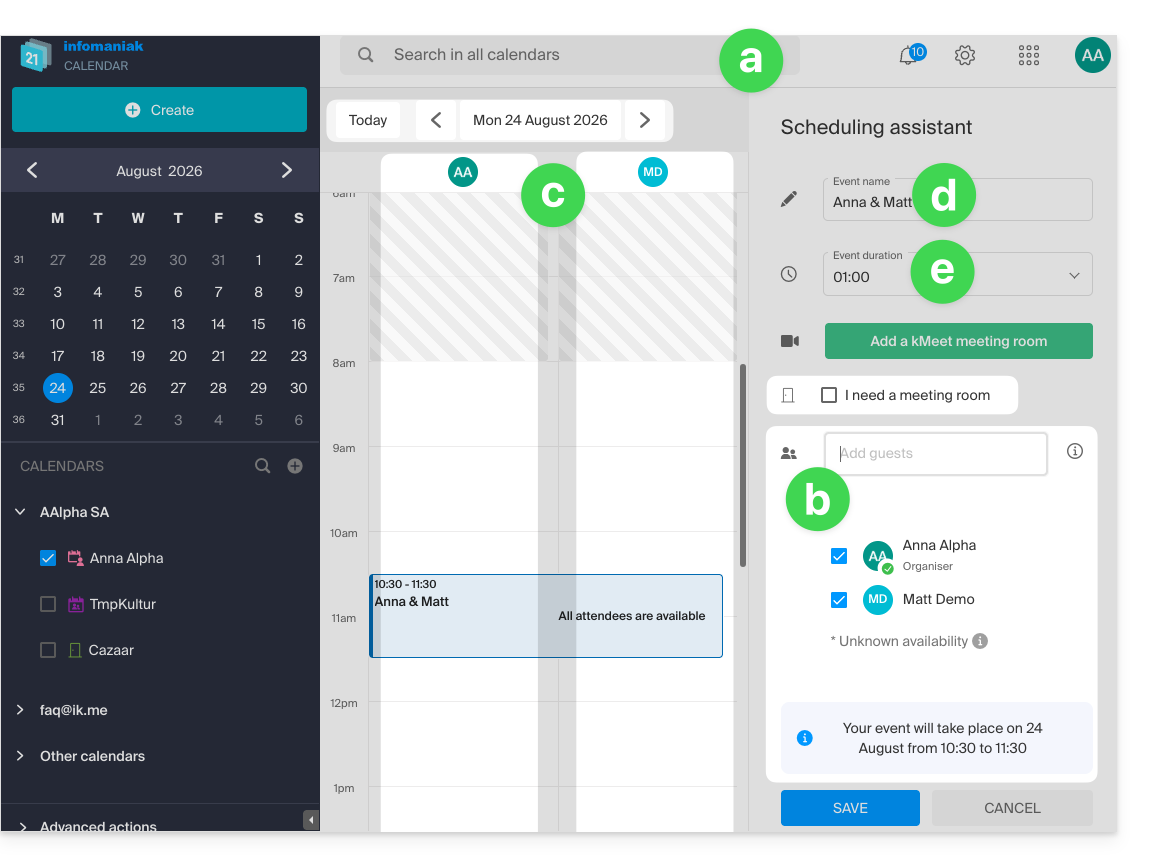
- O assistente é exibido no lado direito da tela, enquanto a parte esquerda permite escolher o dia do evento.
- O princípio, ao adicionar um ou mais participantes, é encontrar automaticamente o melhor momento para agendar uma reunião entre vários utilizadores da Organização.
- Os participantes podem ser adicionados, com um limite máximo de 25.
- Para isso, a disponibilidade de cada um (com base na sua agenda e nas definições nas preferências do calendário) é exibida em colunas, incluindo uma coluna para a disponibilidade de uma sala de reunião, se disponível (uma sala livre é automaticamente selecionada à direita, mas é possível alterá-la).
- O título da reunião é gerado automaticamente, mas pode ser alterado.
- A duração do evento (e o seu posicionamento ao longo do dia) pode ser alterada, inclusive na parte esquerda, com o cursor do rato:
- Salve as preferências com o botão na parte inferior da página para criar o evento e os convites.
Link para esta FAQ: https://faq.infomaniak.com/1862
Esta seção de perguntas frequentes foi útil?
Este guia explica como copiar, dentro da aplicação desktop kDrive (aplicação para computador em macOS / Windows / Linux), dados de um kDrive ao qual o seu utilizador Infomaniak tem acesso para outro kDrive ao qual o mesmo utilizador Infomaniak tem acesso.
Introdução
- Para poder ser utilizador de várias Organizações, é necessário ter sido adicionado a essas organizações e ter obtido um direito de acesso aos respetivos kDrives.
- Por exemplo, se o utilizador
abc@domain.xyzpossui, na sua Organização "ABC", um kDrive "ABC" e é convidado para a Organização "VWX", que lhe concede um direito de acesso ao kDrive "VWX", ele verá 2 kDrives em ksuite.infomaniak.com/kdrive e poderá enviar dados de um para o outro com 1 clique.
- Por exemplo, se o utilizador
- Sem ser utilizador de várias Organizações, também é possível copiar dados, mas apenas importando todo um kDrive, sem poder escolher dados específicos: para importar de uma só vez todos os dados contidos noutro dos seus kDrives, consulte este outro guia e escolha kDrive no ponto 7.
Copiar dados entre vários kDrive
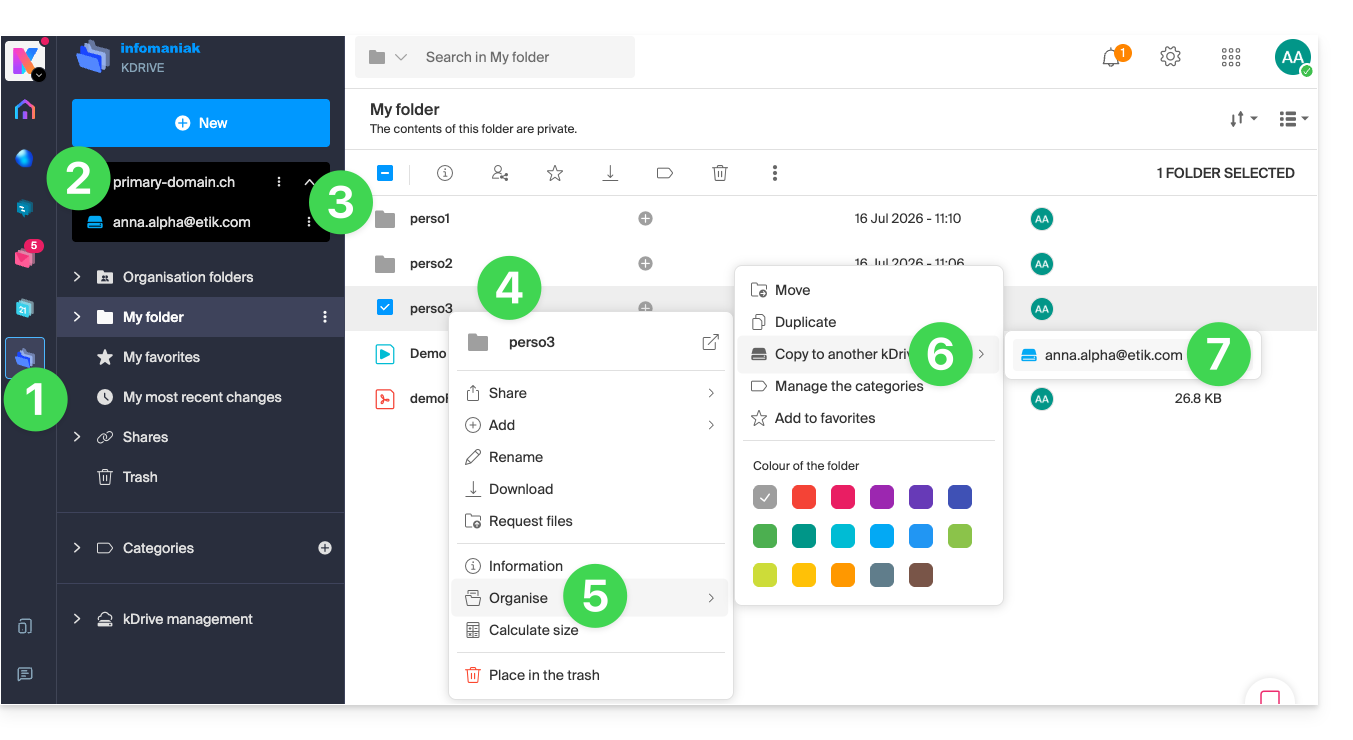
Para copiar uma pasta ou um arquivo para outro kDrive ao qual você tem acesso a partir da mesma conta de usuário:
- Clique aqui para acessar o aplicativo web kDrive da Infomaniak (serviço online ksuite.infomaniak.com/kdrive).
- Verifique ou selecione o kDrive desejado no menu suspenso do menu lateral esquerdo.
- Se necessário, selecione o outro kDrive de onde deseja copiar os arquivos.
- Clique com o botão direito ou clique no menu de ação ⋮ à direita da pasta ou do arquivo que deseja copiar para o outro kDrive.
- Clique em Organizar.
- Clique em Copiar para outro kDrive.
- Escolha o kDrive desejado na lista visível neste mesmo menu suspenso:
- Escolha o local de destino (tendo em conta que a pasta partilhada ("Pastas da organização") não pode receber ficheiros ou pastas na sua raiz, mas pode criar uma subpasta através do ícone adequado, caso o utilizador tenha as permissões necessárias).
- Clique no botão azul para iniciar a cópia:
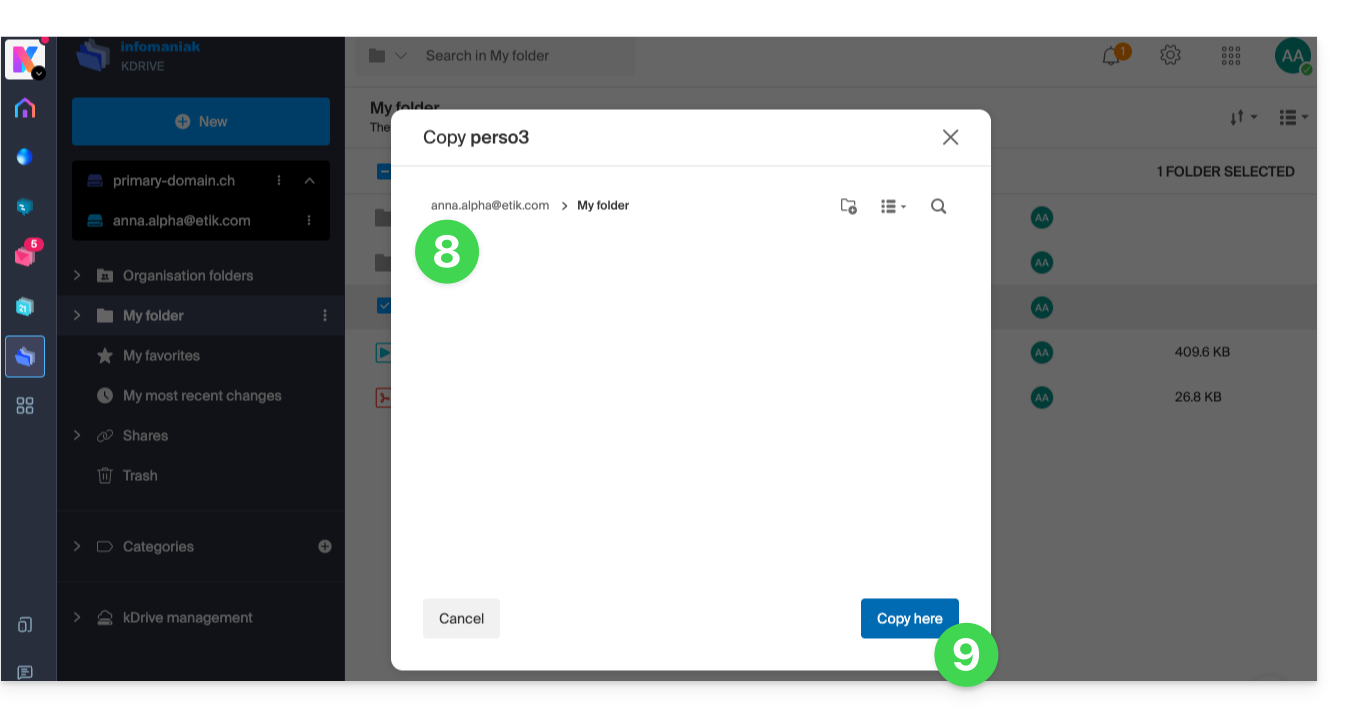
A cópia não é instantânea, por favor, aguarde alguns minutos!
Link para esta FAQ: https://faq.infomaniak.com/1908
Esta seção de perguntas frequentes foi útil?
Este guia explica como ativar a autenticação de dois fatores, ou verificação em duas etapas, para proteger o acesso à sua conta Infomaniak (e, consequentemente, o acesso às ferramentas kSuite, hospedagens, etc.).
Introdução
- Esta validação em duas etapas, também chamada de autenticação multifatorial/de dois fatores (A2F, em inglês two-factor authentication, 2FA), protege o acesso à sua conta Infomaniak através de:
- a senha de sua escolha
- e um segundo método de verificação de identidade, um código a ser obtido em seu dispositivo móvel, por exemplo.
- Se uma pessoa mal-intencionada conseguir decifrar ou roubar sua senha, ela ainda precisará de um código de validação que apenas o usuário legítimo pode obter em seu dispositivo móvel.
- Consulte este outro guia se for administrador de uma Organização e desejar impor a autenticação de dois fatores (2FA) a todos os utilizadores que ainda não a tenham ativado.
- Não é necessário contactar a Infomaniak, pois esta não tem acesso a nenhum dos seus códigos e palavras-passe.
- Para qualquer pedido de ajuda sobre a autenticação de dois fatores, consulte este outro guia.
Ativar a autenticação de dois fatores
Para aumentar o nível de segurança da sua conta Infomaniak:
- Clique aqui para iniciar sessão e aceder à gestão da autenticação de dois fatores no Manager Infomaniak:
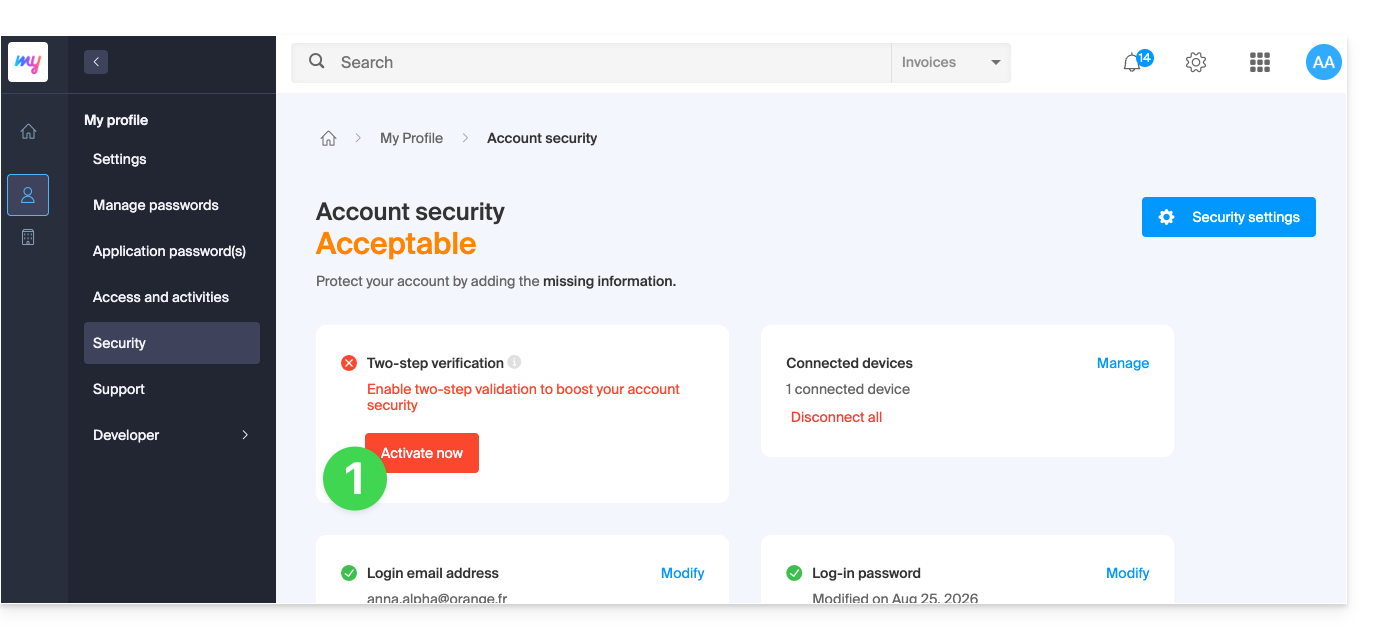
- Após iniciar sessão, pode escolher um método de autenticação de dois fatores (2FA):
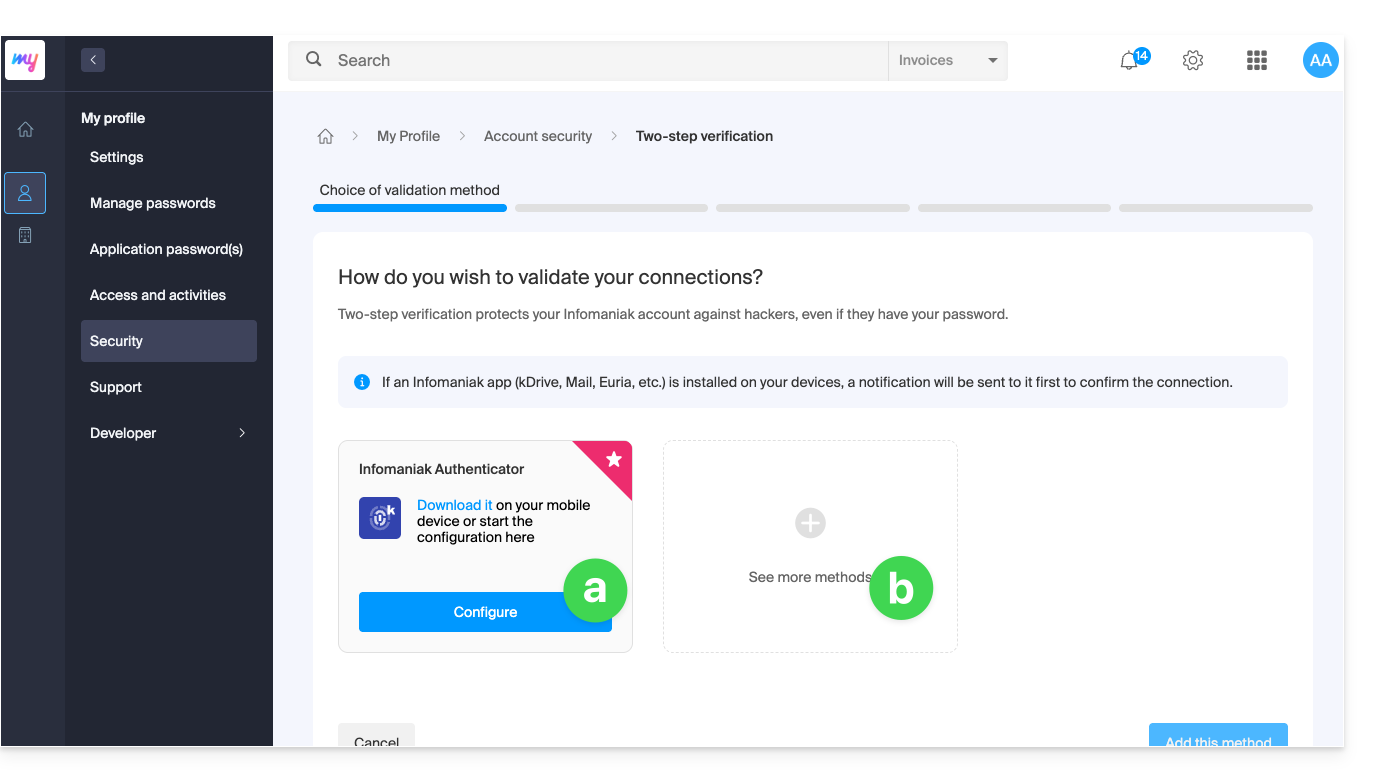
- a aplicação Infomaniak Authenticator para dispositivos iOS / Android (consulte este outro guia sobre o assunto),
- outro método entre:
- qualquer aplicação OTP (como Authy, por exemplo) para obter um código de uso único,
- YubiKey (da Yubico); consulte este outro guia sobre o assunto,
- SMS (apenas para os países CH / FR / BE / DE) para obter um código de uso único.
- Clique no botão para configurar o método adicional selecionado:
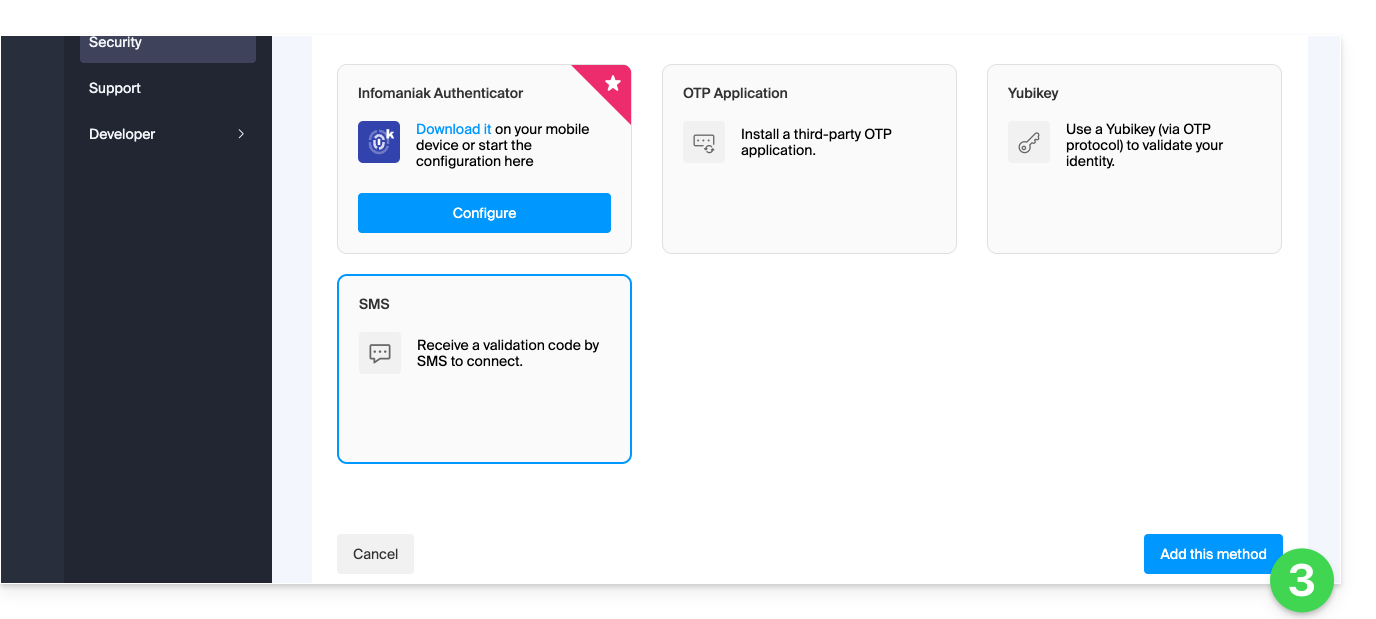
- Siga as instruções apresentadas no ecrã para concluir a configuração.
Atenção às sincronizações já existentes
Após ativar a autenticação de dois fatores, algumas ferramentas de sincronização, como as que utilizam os protocolos CardDAV ou CalDAV, exigem uma senha de aplicativo para substituir a senha anterior e, assim, continuar a conectar-se diretamente em intervalos regulares.
Os serviços de e-mail não são afetados, pois os protocolos IMAP, POP e SMTP funcionam com senhas de dispositivo, que permanecem as mesmas antes ou depois da ativação de um método de autenticação de dois fatores.
Alterar a opção predefinida ou removê-la
Se tiver ativado vários métodos de validação (SMS, aplicação OTP…), pode definir qual será proposto por predefinição em cada sessão de início de sessão.
Note, no entanto, que o método principal por padrão continuará sendo o da validação no aplicativo Infomaniak instalado (Mail, kChat, kDrive…) nos seus dispositivos.
- Clique aqui para se conectar e acessar o gerenciamento da autenticação de dois fatores no painel de controle Infomaniak.
- Clique no botão para definir como padrão.
- Clique no ícone da lixeira para remover e não mais apresentar o método selecionado (isso só funciona se existir outro método):
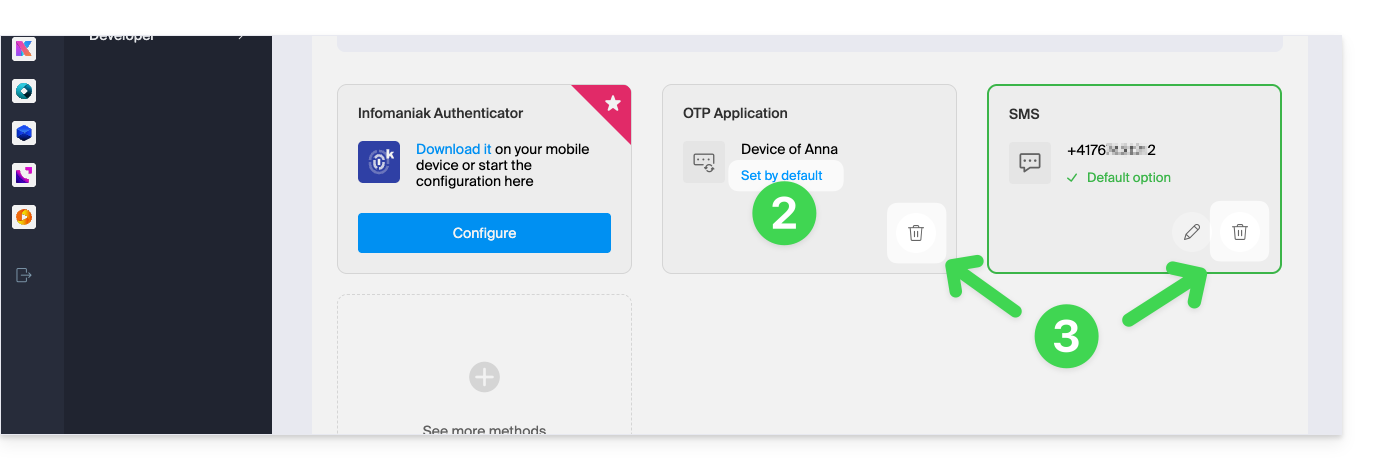
Para remover completamente a autenticação de dois fatores, consulte este outro guia.
Autenticar-se a cada abertura do navegador
Para configurar o navegador de forma a não guardar cookies ao fechar as janelas, e, assim, solicitar a autenticação a cada acesso ao painel de controlo Infomaniak ao reiniciar o navegador…
… no Chrome
Nas configurações do Google Chrome (chrome://settings/content/siteData – cole este endereço na barra de endereços ou consulte a documentação oficial), especifique o endereço [*.]infomaniak.com: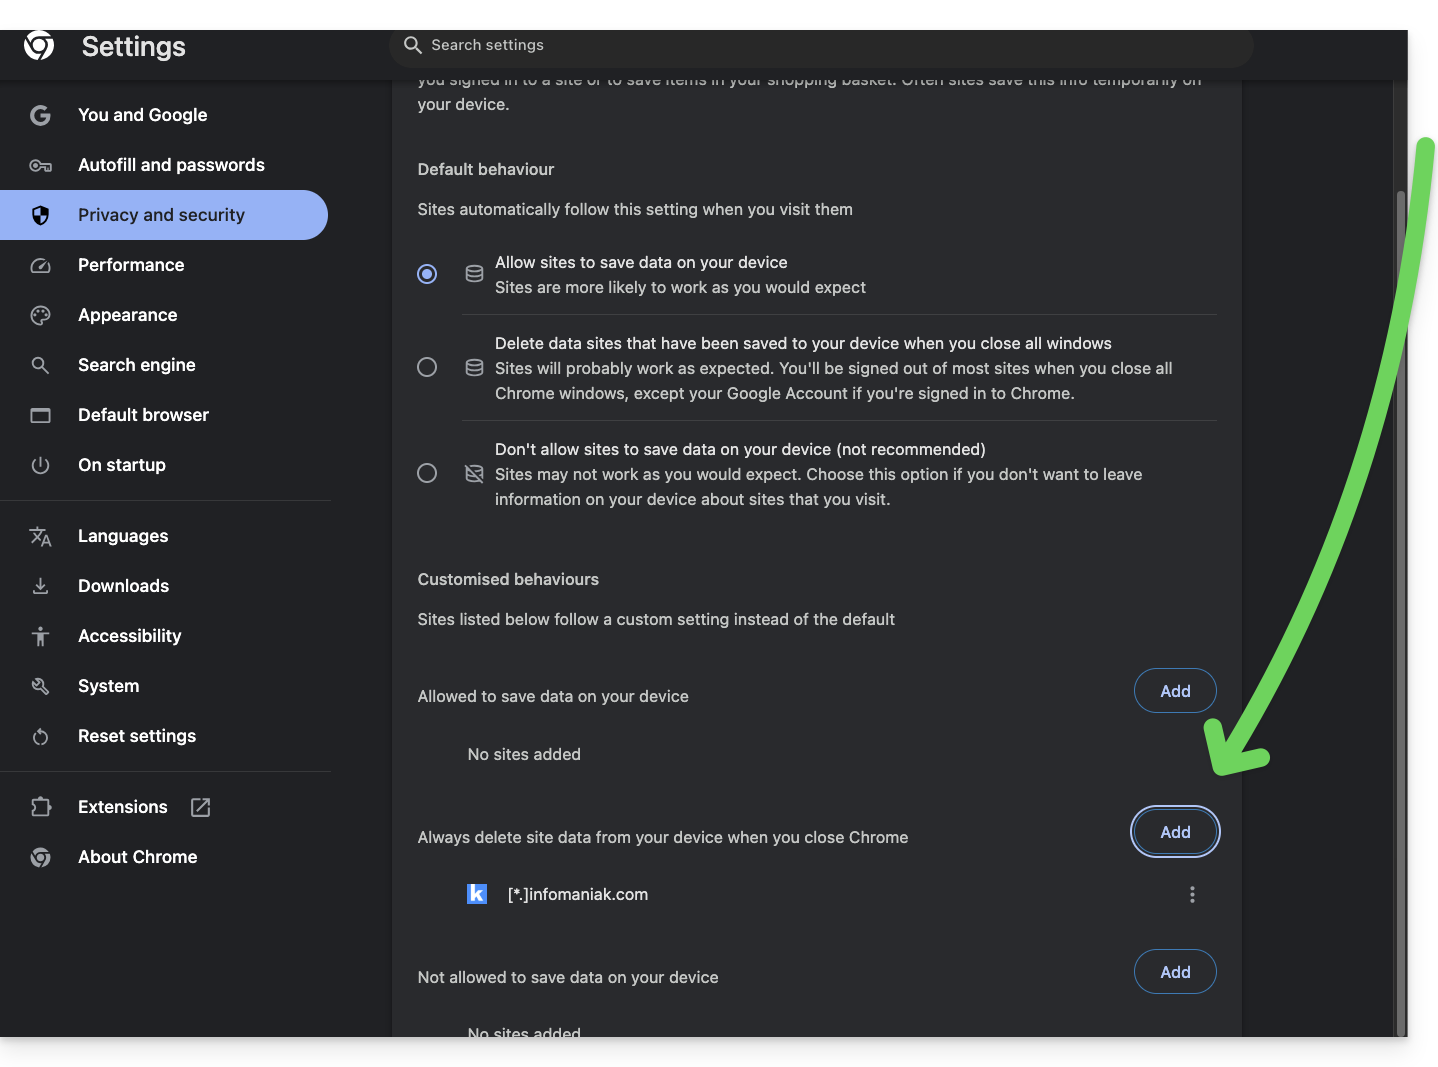
Link para esta FAQ: https://faq.infomaniak.com/1940
Esta seção de perguntas frequentes foi útil?
Este guia explica como importar um calendário na aplicação web Calendar da Infomaniak (serviço online ksuite.infomaniak.com/calendar).
Introdução
- Consulte este outro guia se desejar apenas exibir um calendário Infomaniak em modo de somente leitura no Google Agenda (aplicativo web e móvel).
- Consulte este outro guia se preferir editar os eventos do calendário em ambos os lados, mas apenas na versão móvel do aplicativo Google Agenda.
- Também é possível importar tarefas para a seção dedicada do calendário.
Importar um calendário através de uma URL
É possível exibir no Calendar um calendário existente e gerenciado externamente. Ele será automaticamente atualizado a cada hora por meio da URL que você especificar.
Atenção: não se trata de uma sincronização de calendários, mas sim de uma leitura exclusiva, em um único sentido, atualizada regularmente.
Para isso:
- Clique aqui para acessar o aplicativo web Calendar da Infomaniak (serviço online ksuite.infomaniak.com/calendar).
- Clique em no menu lateral esquerdo.
- Clique em "A partir de uma URL":
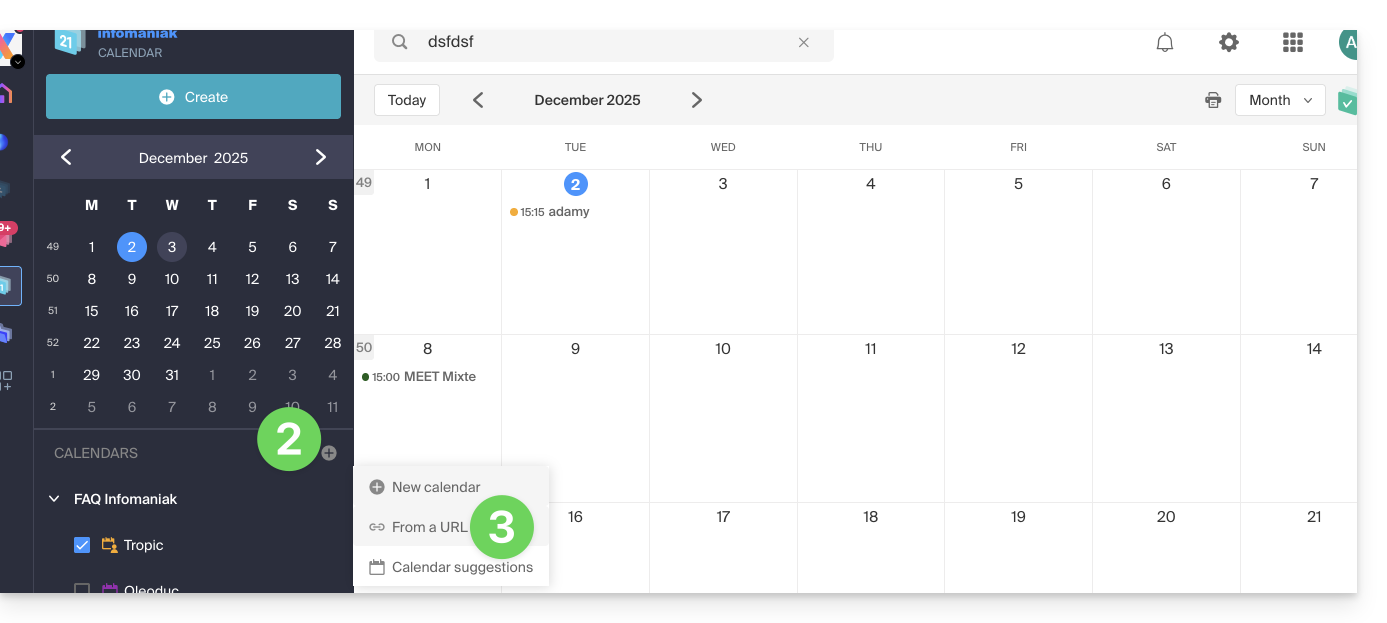
- Insira o URL do calendário que deseja importar.
- Marque a caixa Desejo assinar este calendário.
- Se necessário, escolha a Organização na qual o calendário será importado.
- Clique em Importar calendário:
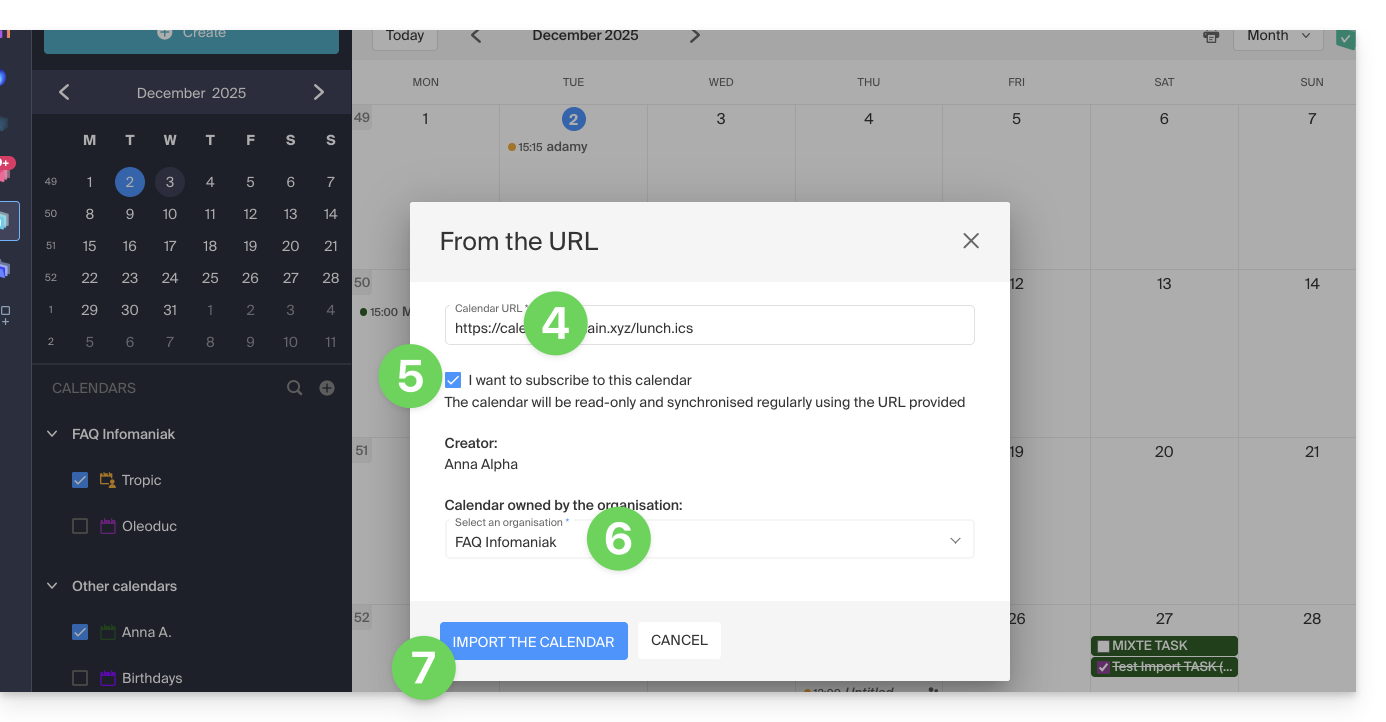
Você também pode acessar diretamente uma das Organizações das quais faz parte:
- Clique aqui para acessar o aplicativo web Calendar da Infomaniak (serviço online ksuite.infomaniak.com/calendar).
- Clique no menu de ação ⋮ à direita da Organização na tabela que é exibida.
- Clique em "A partir de uma URL":
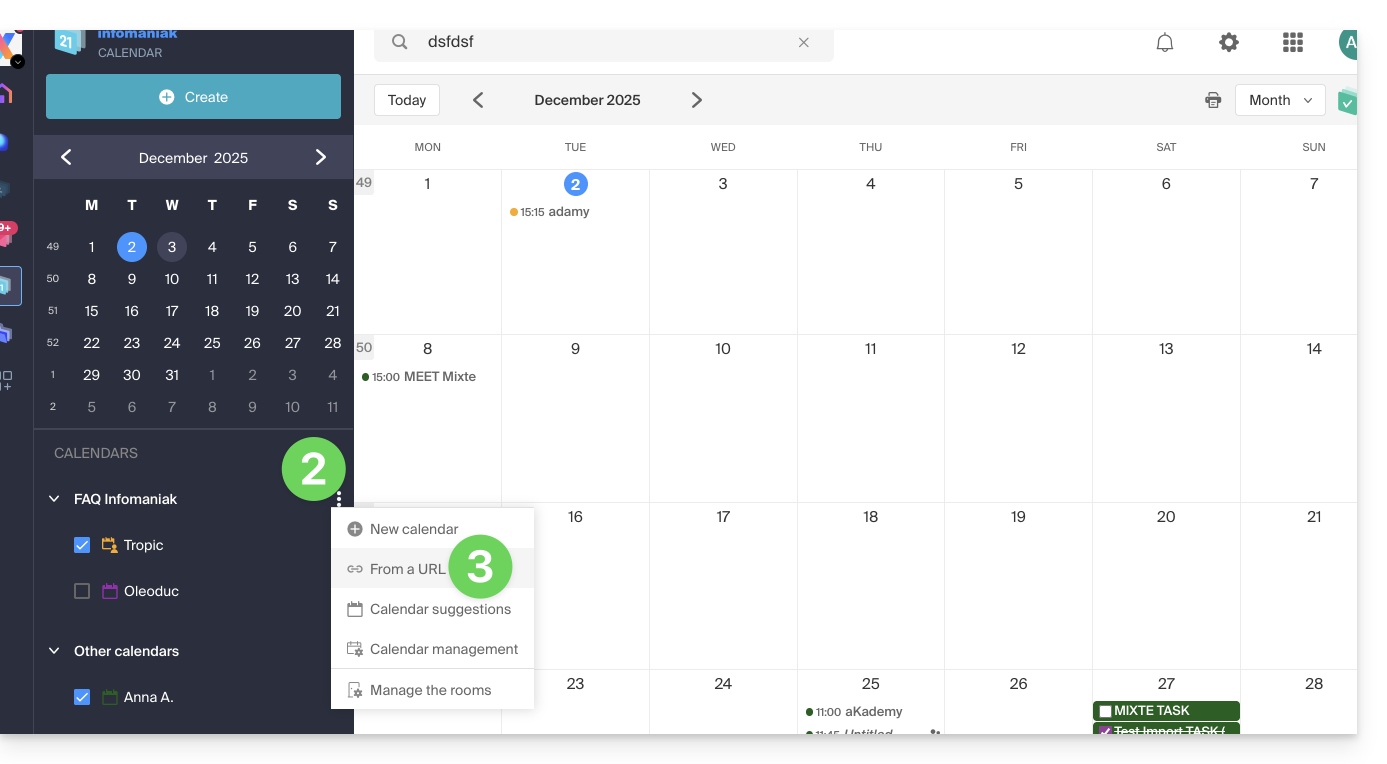
Associar um calendário do Google através da sua URL "secreta"
A URL "secreta" de um calendário do Google, que poderá copiar na etapa 3 acima, encontra-se nas configurações do calendário do Google:
- Clique no menu de ação ⋮ à direita do calendário do Google em questão.
- Clique em Configurações e compartilhamento:
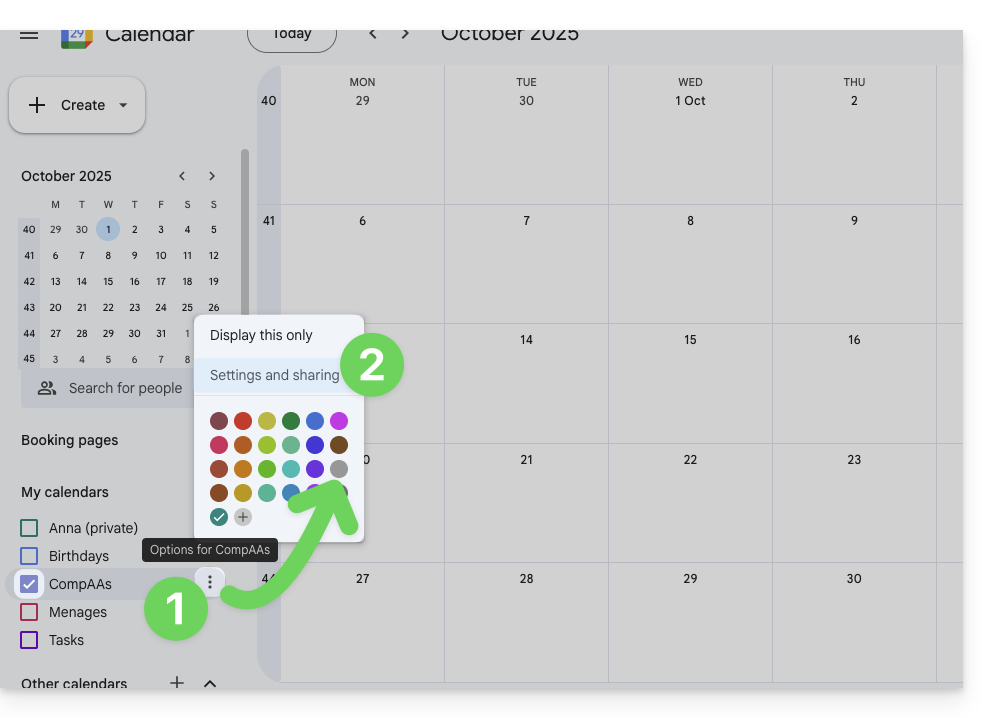
- Desça na página até encontrar a URL iCal secreta e clique nos ícones para visualizar a URL e/ou copiá-la:
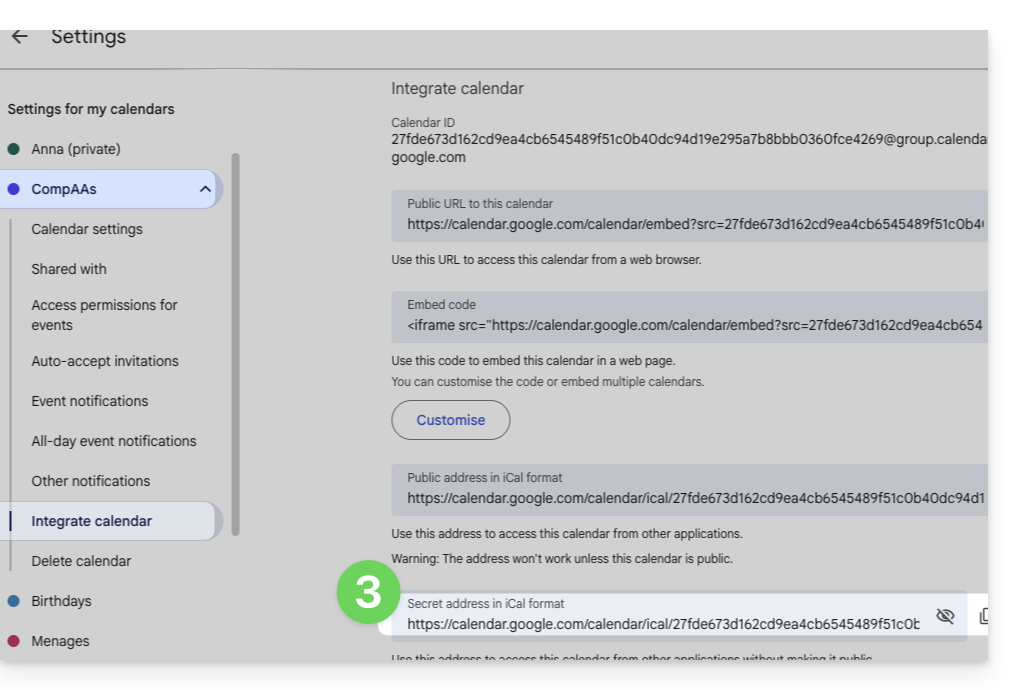
- Cole a URL seguindo o procedimento da etapa 3 do capítulo anterior.
Atenção: não se trata de uma sincronização de calendários, mas sim de uma leitura exclusiva, de sentido único, atualizada regularmente.
O calendário será visível e exibirá regularmente as eventuais atualizações efetuadas, sem que seja possível, no entanto, editá-lo diretamente a partir da interface Infomaniak; trata-se de uma "sincronização unidirecional" com o Google.
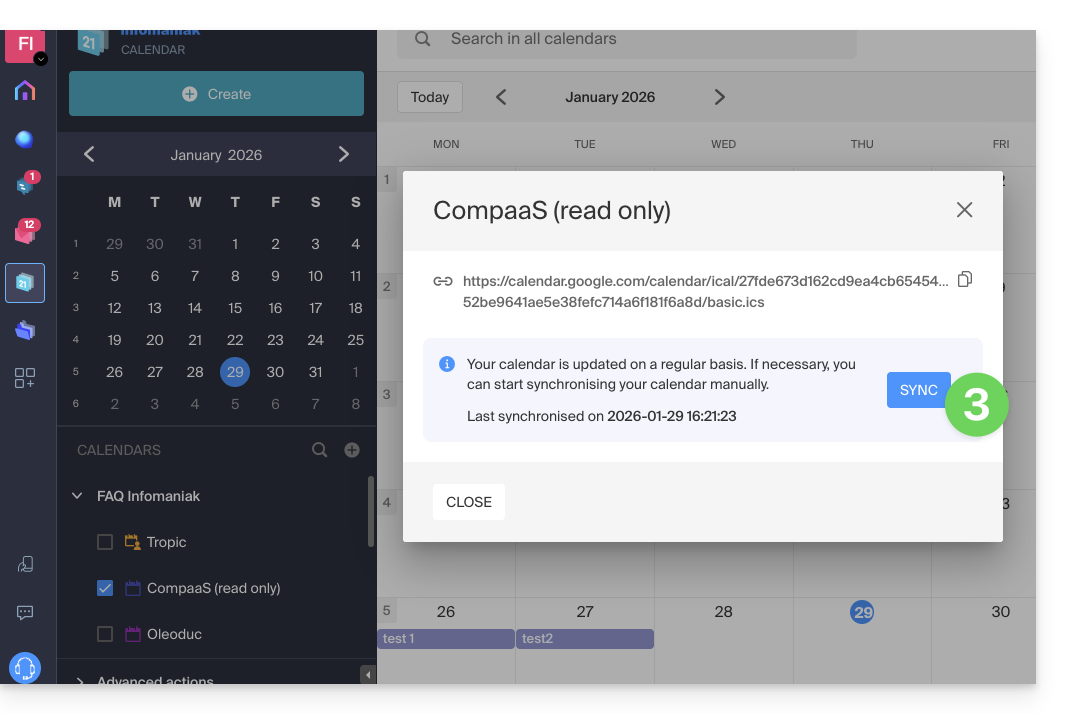
No entanto, pode forçar a sincronização para exibir imediatamente quaisquer novos eventos ou modificações:
- Clique no menu de ação ⋮ à direita do calendário importado no Infomaniak.
- Clique em Informações de exibição:
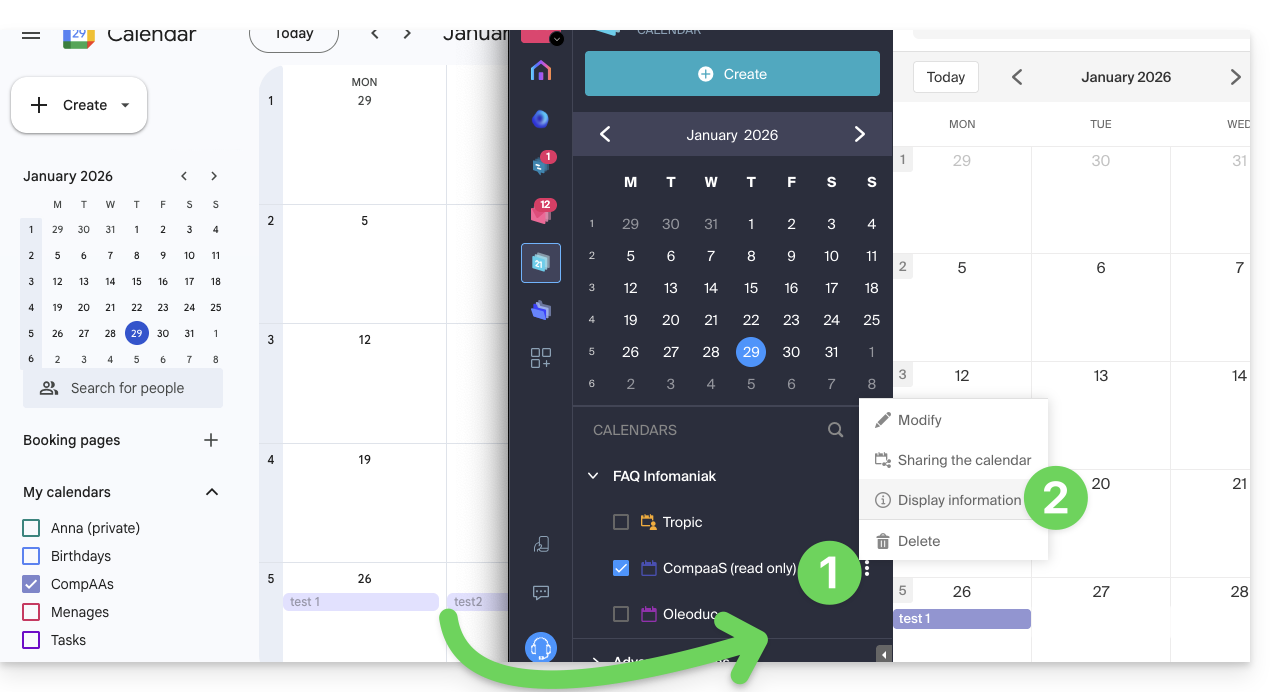
- Clique no botão SYNC para sincronizar o conteúdo importado e aguarde alguns segundos:
Importar eventos através de um arquivo .ics
Para aceder às Opções avançadas que permitem importar, exportar e restaurar o calendário:
- Clique aqui para acessar o aplicativo web Calendar da Infomaniak (serviço online ksuite.infomaniak.com/calendar).
- Clique em Ações avançadas no menu lateral esquerdo.
- Clique em Importar.
- Carregue o ficheiro
.icscorrespondente à exportação efetuada a partir do seu fornecedor anterior: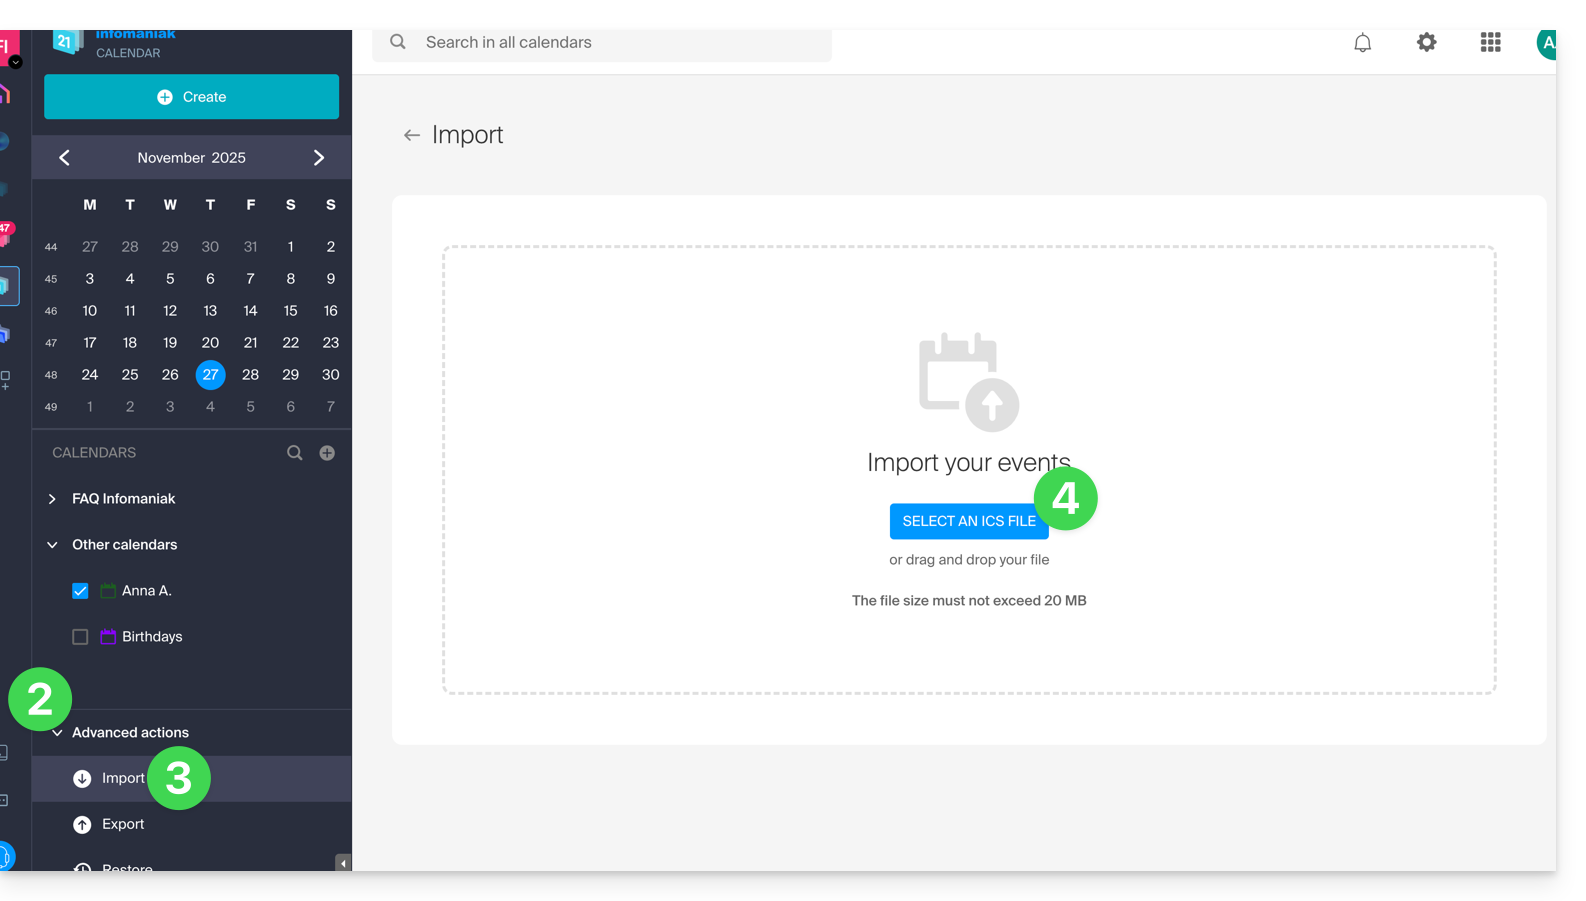
Poderá escolher em qual calendário existente importar os eventos ou criar um novo calendário (as tarefas também são importadas se o arquivo .ics contiver).
Atenção, não se trata de uma sincronização de calendários, mas sim de uma importação única e em um único sentido.
Exportar os dados do fornecedor anterior
Apresentamos alguns guias específicos, fornecidos a título indicativo, para exportar a agenda de um fornecedor externo, o que permitirá reimportar esses dados para a Infomaniak:
- Apple Mail
- Gmail
- Outlook (secção Publicar > link ICS)
- Yahoo
- Proton
- Thunderbird
Consulte este outro guia para importar outros dados.
Link para esta FAQ: https://faq.infomaniak.com/1943
Esta seção de perguntas frequentes foi útil?
Este guia explica como imprimir um calendário a partir do aplicativo web Calendar Infomaniak (serviço online ksuite.infomaniak.com/calendar).
Imprimir o conteúdo de um calendário
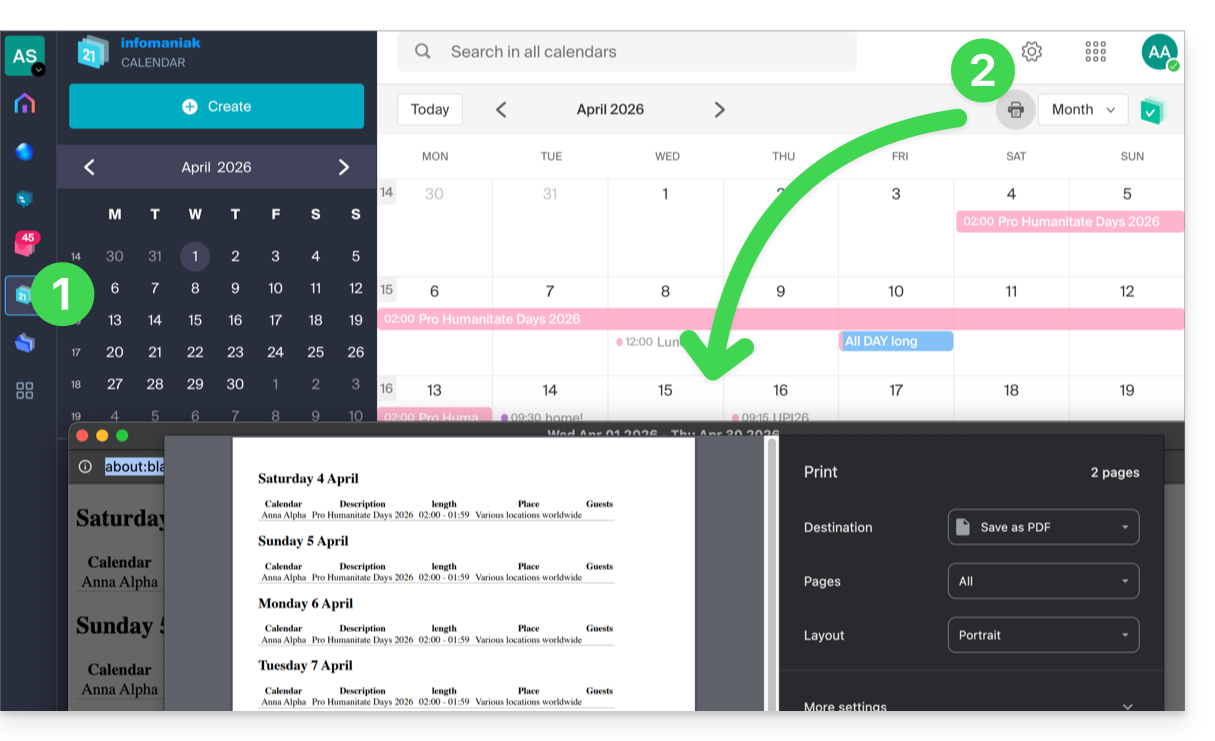
Se você usar apenas a função de impressão do seu navegador com o Calendar, imprimirá a interface e não necessariamente o conteúdo do calendário. Para imprimir a lista da sua agenda (independentemente do modo de exibição selecionado):
- Clique aqui para acessar o aplicativo web Calendar da Infomaniak (serviço online ksuite.infomaniak.com/calendar).
- Clique no ícone de impressora, localizado no canto superior direito:
Link para esta FAQ: https://faq.infomaniak.com/1949
Esta seção de perguntas frequentes foi útil?
Este guia explica como importar tarefas para a seção dedicada do aplicativo web Calendar da Infomaniak (serviço online ksuite.infomaniak.com/all/calendar/tasks).
Introdução
- O ficheiro
.icsé um formato padrão (RFC 5545) e, dentro deste ficheiro, encontramos “componentes”:VEVENT(Evento): é o que vemos na grelha do calendário, com uma noção de tempo ocupado (Hora de inícioDTSTARTe Hora de fimDTENDou duração).VTODO(Tarefa): é uma ação a ser realizada, geralmente com uma data de vencimento (DUE), mas não necessariamente com uma duração, e um estado binário (concluída ou não concluída).
- Consequentemente, ao importar um ficheiro
.icspara a aplicação Calendar da Infomaniak, o sistema importa os dados para o calendário e para a sua secção “Tarefas”, de acordo com o seu tipo.
Importar tarefas
Se tiver um ficheiro .ics para importar:
- Clique aqui para acessar o aplicativo web Calendar da Infomaniak (serviço online ksuite.infomaniak.com/calendar).
- Clique na seta para baixo para expandir a seção Ações avançadas.
- Clique em Importar.
- Clique no botão para selecionar um arquivo ICS (máximo de 20 MB):
- Selecione o arquivo que contém as tarefas (e/ou eventos):
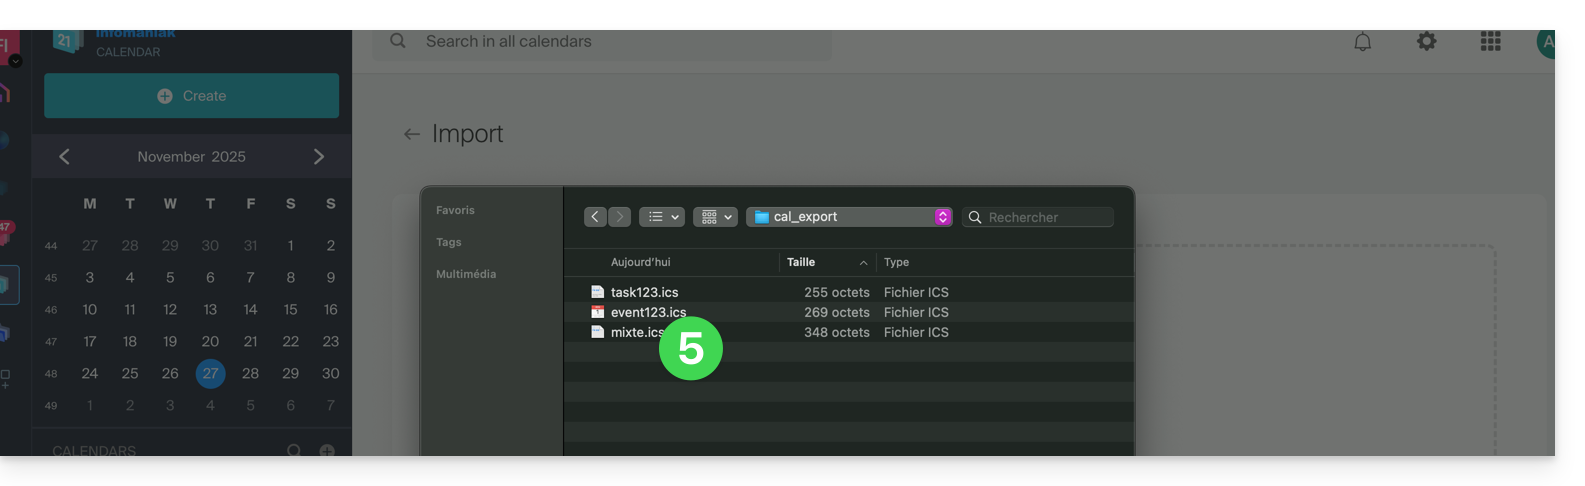
- Escolha o calendário no qual importar os dados (ou crie um novo calendário para essa finalidade).
- Clique no botão para iniciar a importação:
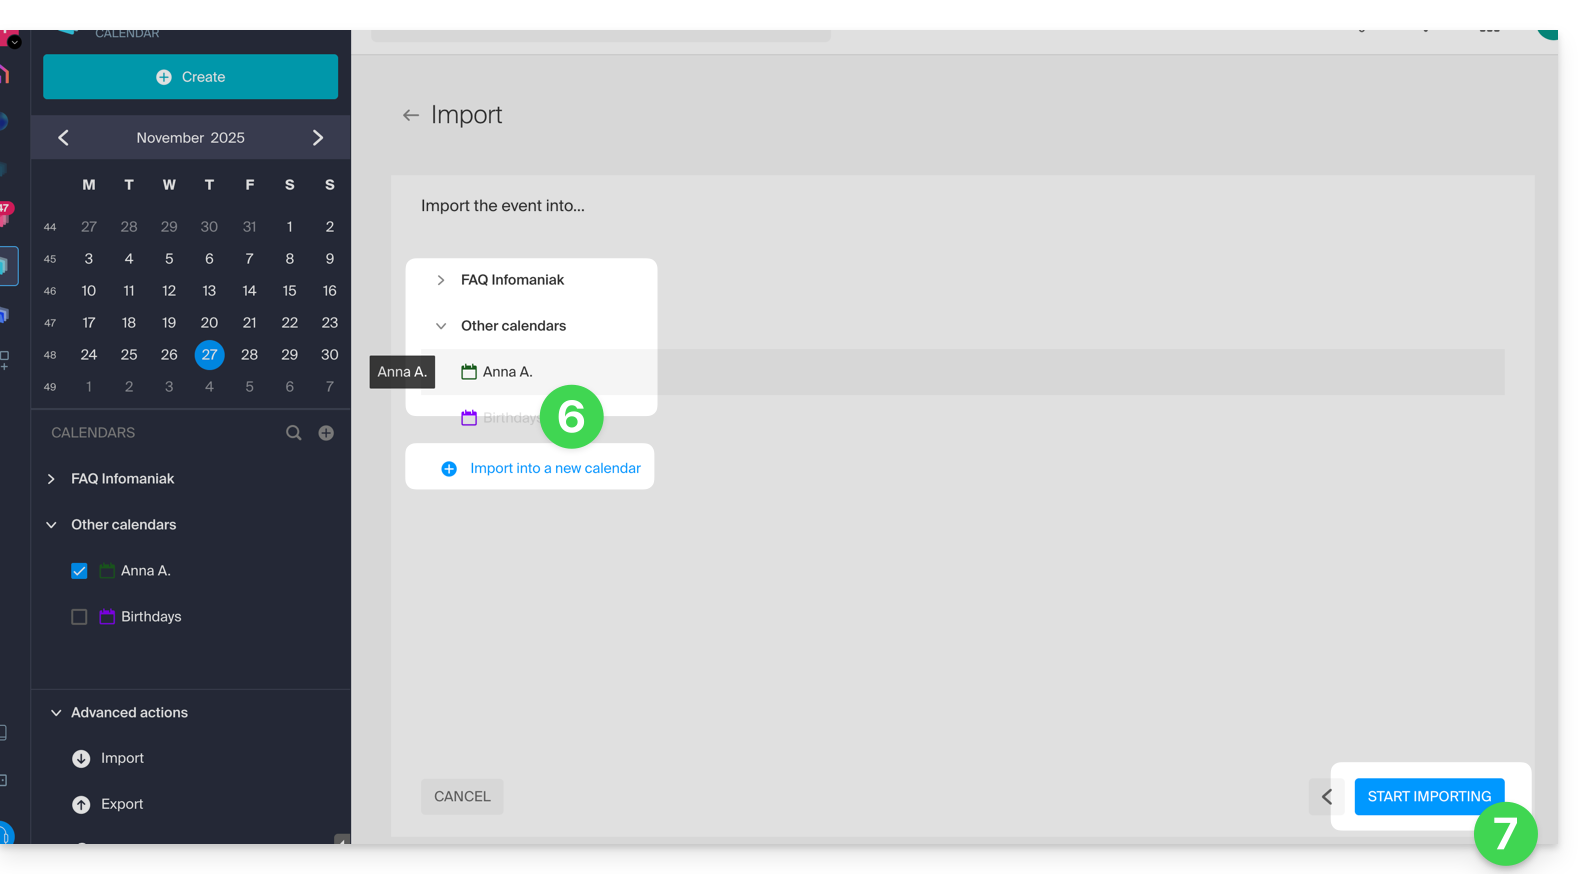
- Se o arquivo
.icscontiver tarefas, você as encontrará na seção Tarefas (e os eventos que possam estar presentes no arquivo serão exibidos no calendário):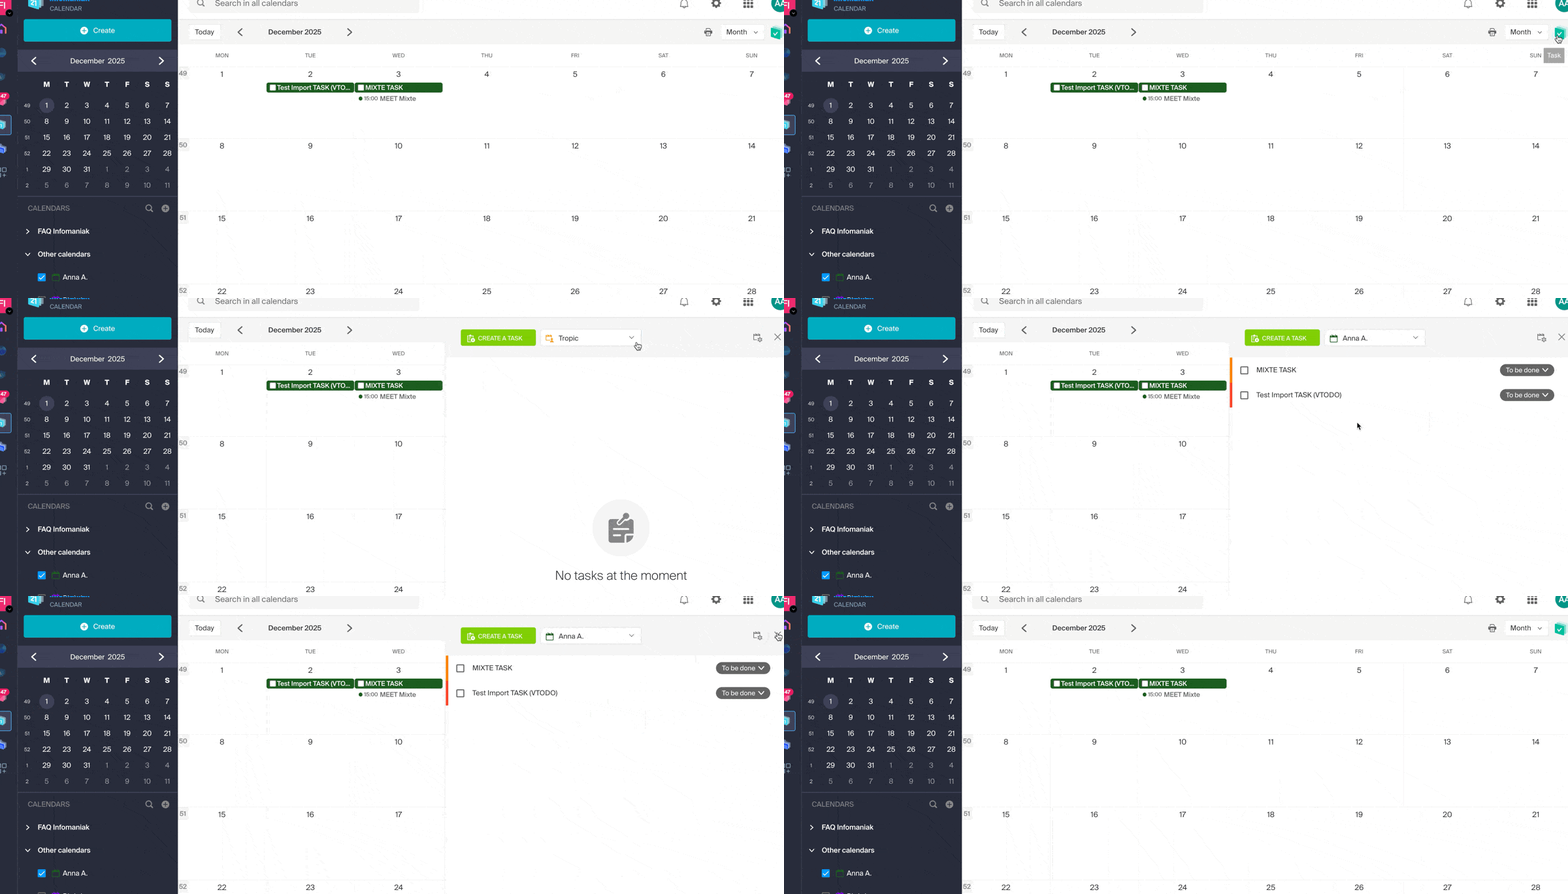
Link para esta FAQ: https://faq.infomaniak.com/1974
Esta seção de perguntas frequentes foi útil?
Este guia explica como adicionar um domínio sinônimo a um nome de domínio.
Introdução
- Um domínio sinônimo é um nome de domínio que pode servir como nome secundário para outro domínio.
- Quando um domínio sinônimo é adicionado, ele herda automaticamente o conteúdo da zona DNS do domínio principal (incluindo os registros
MX,A, etc.), bem como seu alojamento Web e de e-mail. - Em vez disso, você também pode adicionar um (domínio) alias a um site ou adicionar um (domínio) alias a um Serviço de Email.
Adicionar um domínio sinônimo a um domínio
Pré-requisitos
- O nome de domínio do futuro sinônimo ou a gestão da sua zona DNS…
- … deve estar reservado na Infomaniak,
- … deve estar configurado com os DNS da Infomaniak,
- … não deve estar ainda associado a nenhum produto.
- O nome de domínio no qual o sinônimo será colocado…
- … não deve estar associado ao produto Newsletter da Infomaniak.
Para acessar seus nomes de domínio:
- Clique aqui para acessar o gerenciamento de domínios no seu Painel de Controle Infomaniak (❓: ajuda).
- Clique no nome do domínio principal em questão.
- Clique em Domínios sinônimos no menu lateral esquerdo.
- Escolha adicionar um sinônimo.
- Clique em Seguinte:
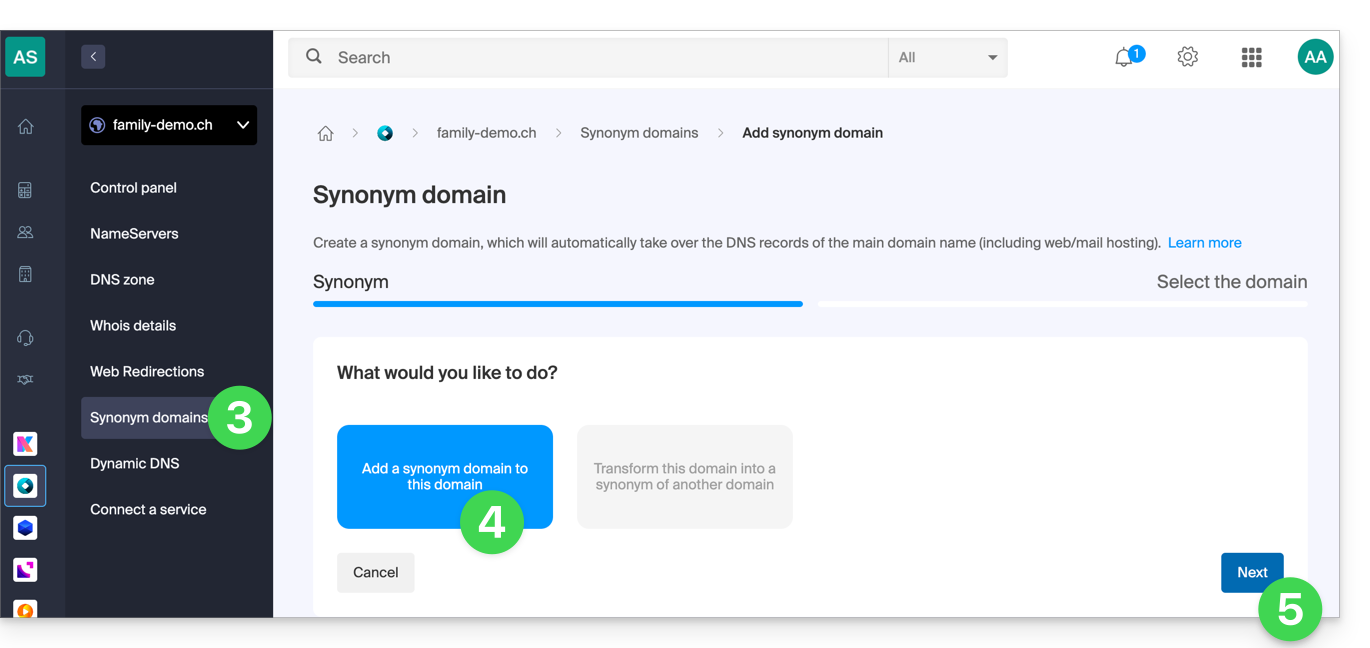
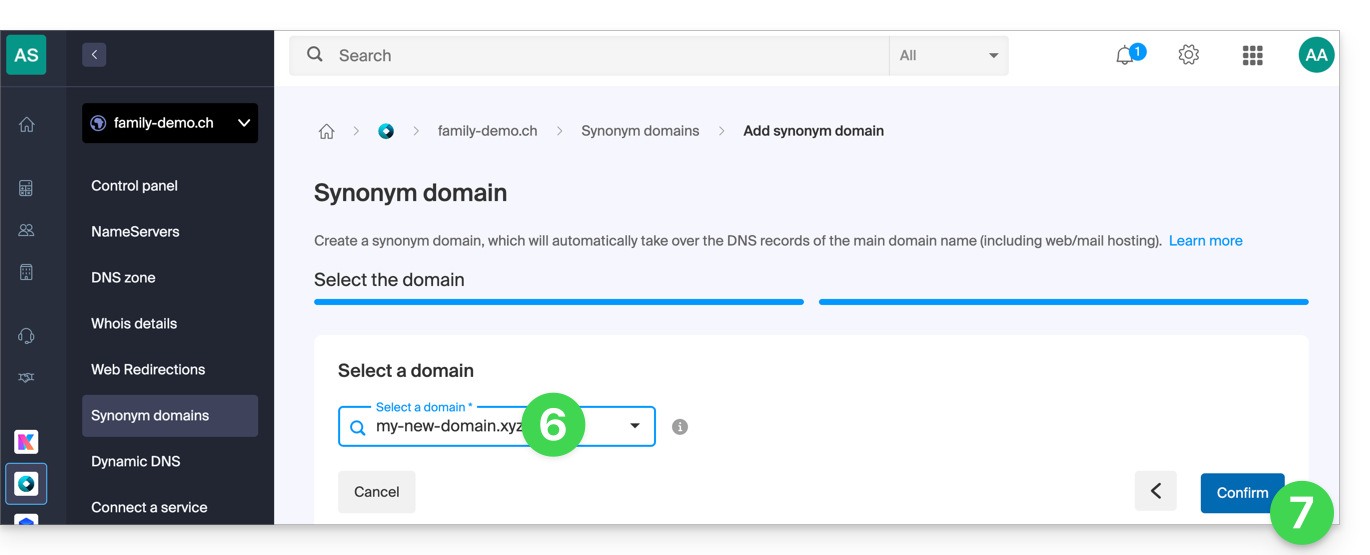
- Escolha um domínio existente nesta organização ou registre um novo domínio com antecedência.
- Clique no botão para Confirmar:
- Pronto:
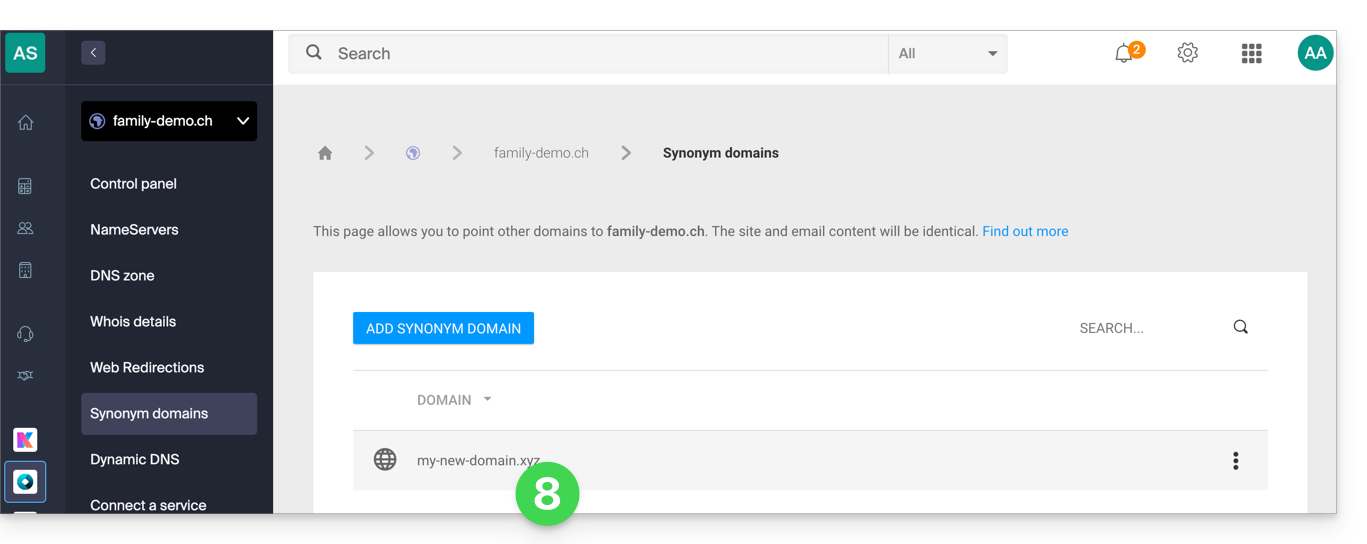
Consulte este outro guia se precisar de informações para desvincular um nome de domínio sinônimo.
Link para esta FAQ: https://faq.infomaniak.com/1999
Esta seção de perguntas frequentes foi útil?
A forma mais simples de gerir os seus e-mails é utilizar a aplicação web Mail da Infomaniak (serviço online ksuite.infomaniak.com/mail).
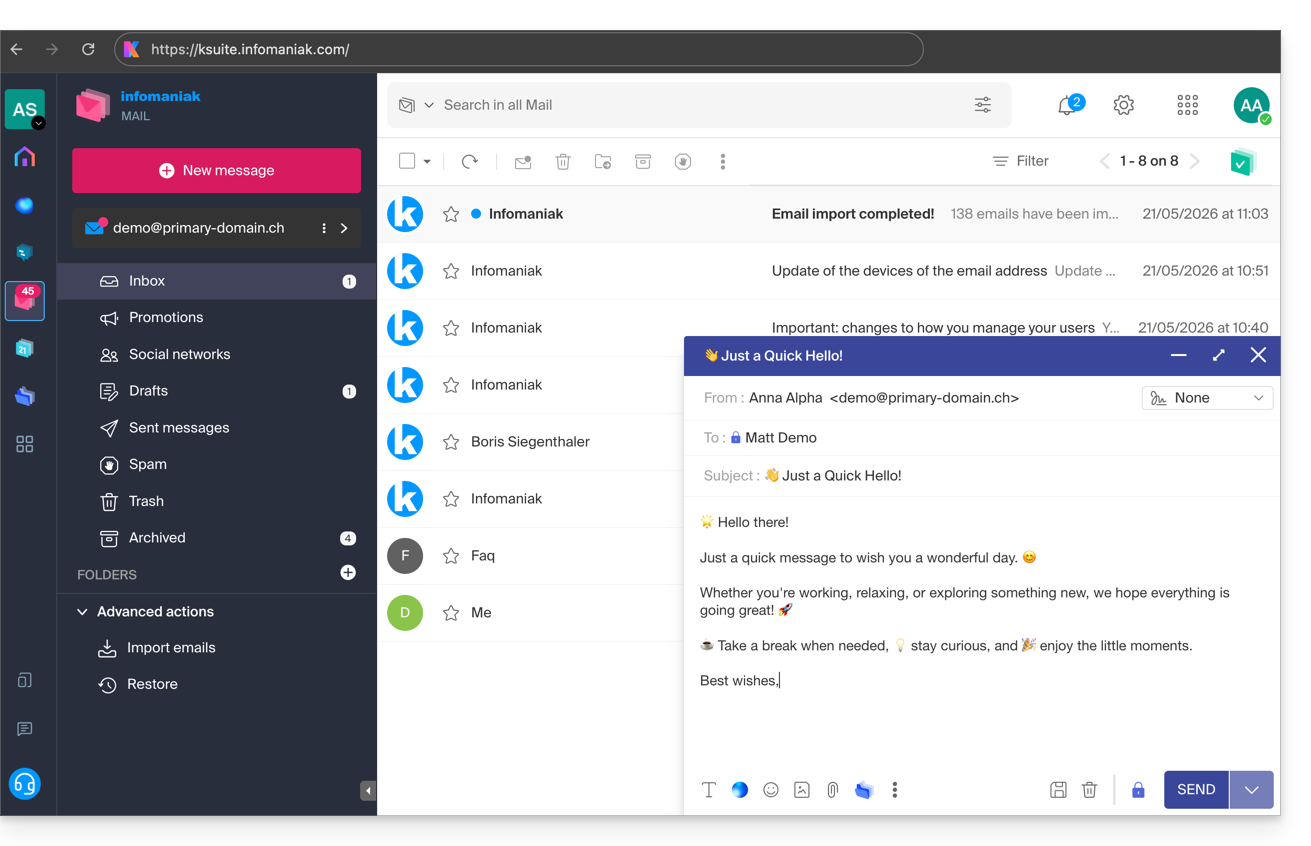
Esta interface oferece várias vantagens:
- Nenhum software para instalar ou configurar.
- Compartilhamento de e-mails com outros usuários.
- Gerenciamento unificado de todos os seus endereços de e-mail Infomaniak.
- Filtro anti-spam e antivírus profissional, tanto na entrada quanto na saída.
- Triagem automática das mensagens recebidas (filtros).
- Envio de anexos de grande dimensão.
- Armazenado permanentemente.
- Partilha do kDrive.
- Protege e respeita a sua privacidade, hospedado na Suíça por uma empresa neutra e independente.
Uma aplicação móvel (Infomaniak Mail, aplicação para smartphone ou tablet iOS / Android) está disponível aqui.
Como começar a usar o Mail Infomaniak?
Seja em ksuite.infomaniak.com/mail ou no aplicativo Infomaniak Mail, é fundamental efetuar login com o ID da sua conta Infomaniak e a respetiva palavra-passe. Isto NÃO funcionará se indicar diretamente um endereço de e-mail e a respetiva palavra-passe. Entenda a diferença
- Clique aqui para acessar o aplicativo web Mail da Infomaniak (serviço online ksuite.infomaniak.com/mail).
- Se necessário, associe os endereços de e-mail que deseja gerenciar ao Mail Infomaniak.
O que deseja fazer a seguir?
- Aceder às opções do aplicativo
- Alterar a senha de um endereço de e-mail no Mail
- Restaurar e-mails apagados
- Adicionar uma assinatura
- Criar um endereço de e-mail na Infomaniak
- Gerenciar os diferentes usuários de um endereço de e-mail
- Modificar as permissões de um usuário
- Sincronizar os seus dispositivos (e-mails e/ou contactos e calendários)
Link para esta FAQ: https://faq.infomaniak.com/2008
Esta seção de perguntas frequentes foi útil?
Este guia explica como transferir um produto Infomaniak de uma Organização para outra.
Preâmbulo
- É possível mover quase todos os produtos contratados junto à Infomaniak para uma interface Manager Infomaniak diferente daquela em que o produto se encontra atualmente; trata-se, portanto, de uma transferência interna, de Organização para Organização.
- kSuite não pode ser transferida.
- Os utilizadores que atualmente têm acesso aos produtos selecionados não serão transferidos (e, portanto, poderão perder o acesso aos produtos).
- No que diz respeito ao kDrive: os utilizadores que atualmente têm acesso ao kDrive serão integrados na nova Organização.
- Eles manterão o seu acesso e as suas permissões do kDrive, mas quaisquer direitos de gestão que possuam sobre o próprio produto serão perdidos.
- Os Grupos (anteriormente "equipas de trabalho") também não são transferidos, e os direitos geridos através dos Grupos também são removidos.
- Se o seu utilizador tiver acesso a várias Organizações, é ainda mais fácil transferir o produto escolhido para uma delas.
- As faturas dos produtos selecionados não serão transferidas.
- Esta operação não causa nenhuma interrupção.
Gerar um link de transferência
Pré-requisitos
- Ser Administrador ou Representante legal na Organização (❓: ajuda).
Para transferir um produto:
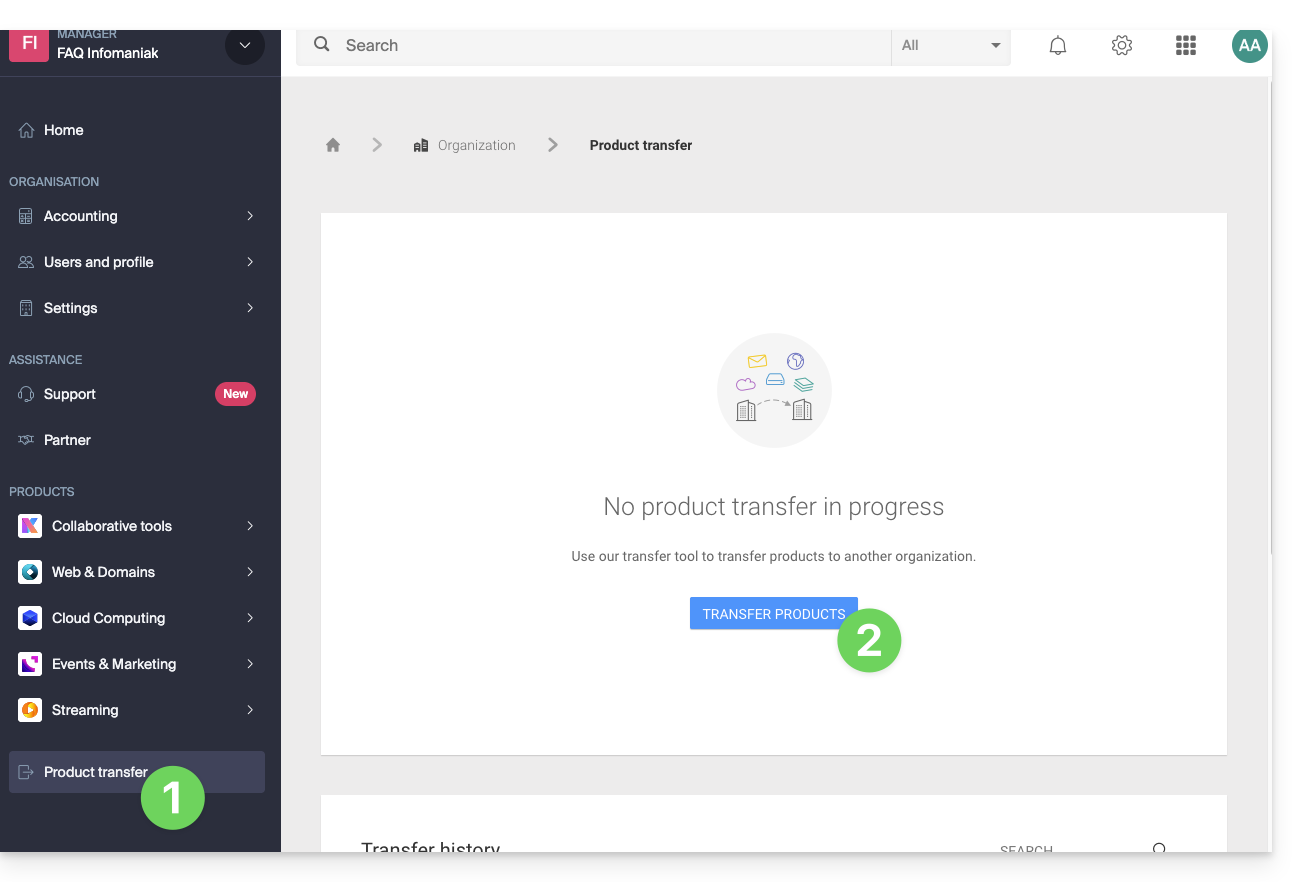
- Clique aqui para acessar a gestão de transferências de produtos no painel de controlo Infomaniak (❓: ajuda).
- Clique no botão Transferir produtos:
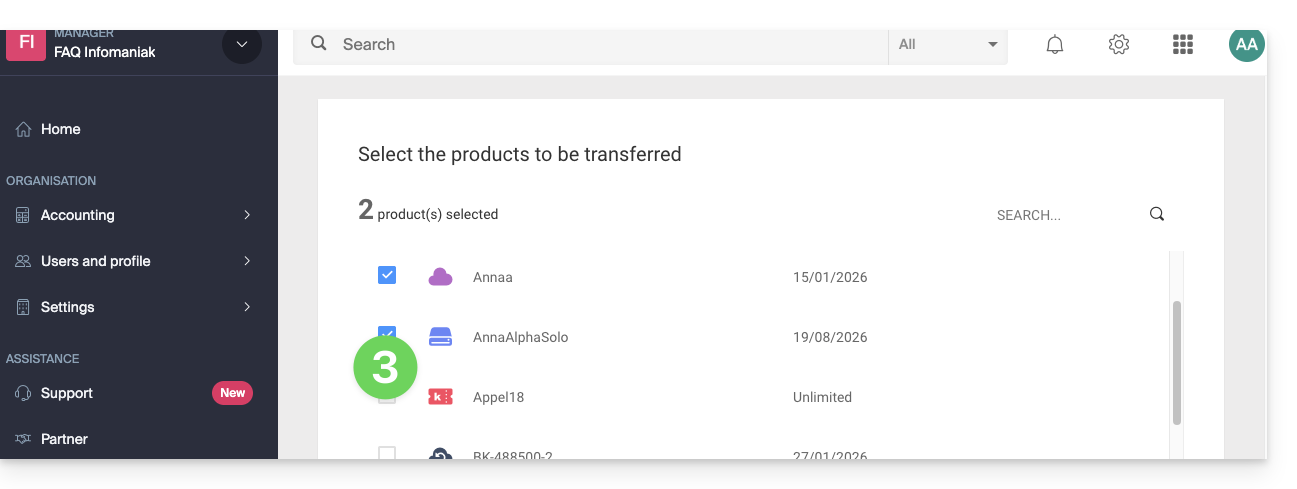
- Marque o(s) produto(s) que deseja transferir:
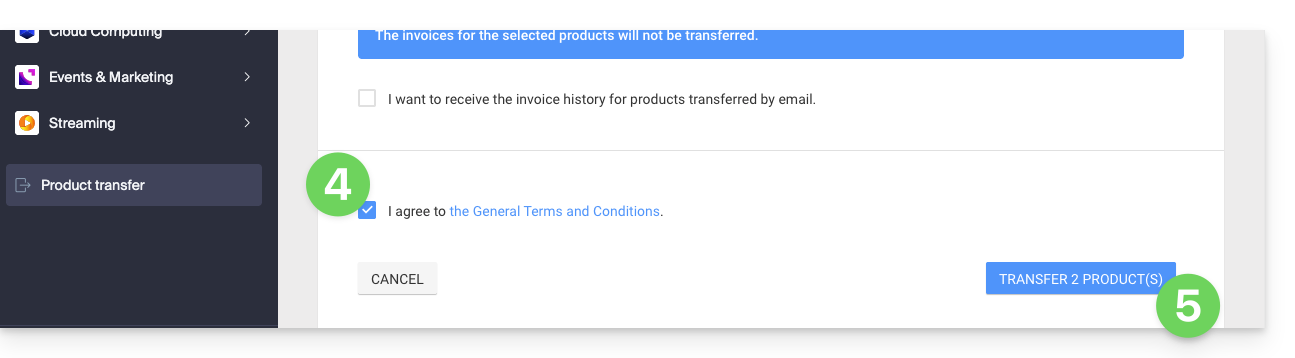
- Leia e aceite os termos e condições.
- Clique no botão Transferir:
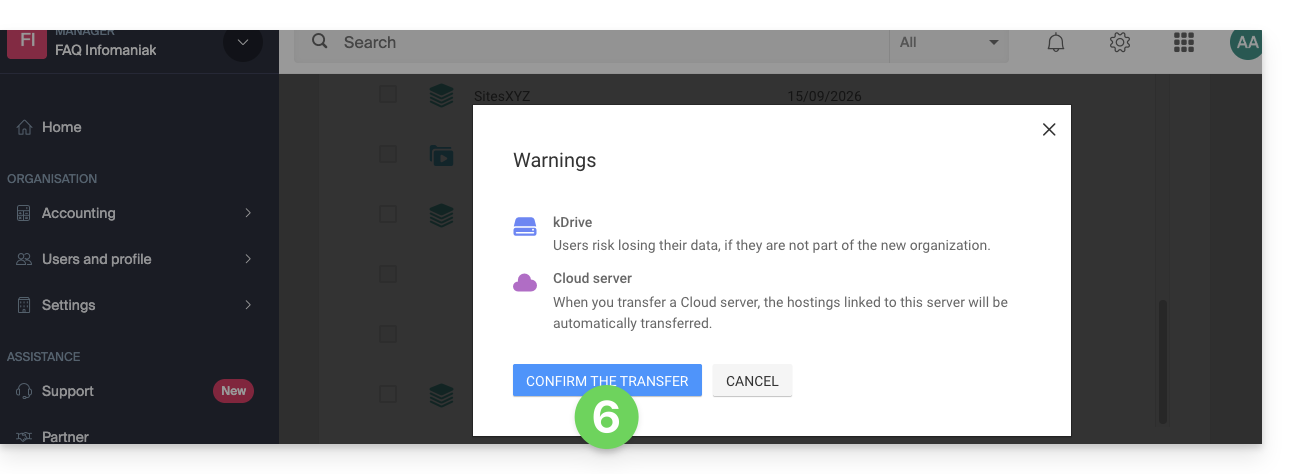
- Leia e valide os avisos, se houver:
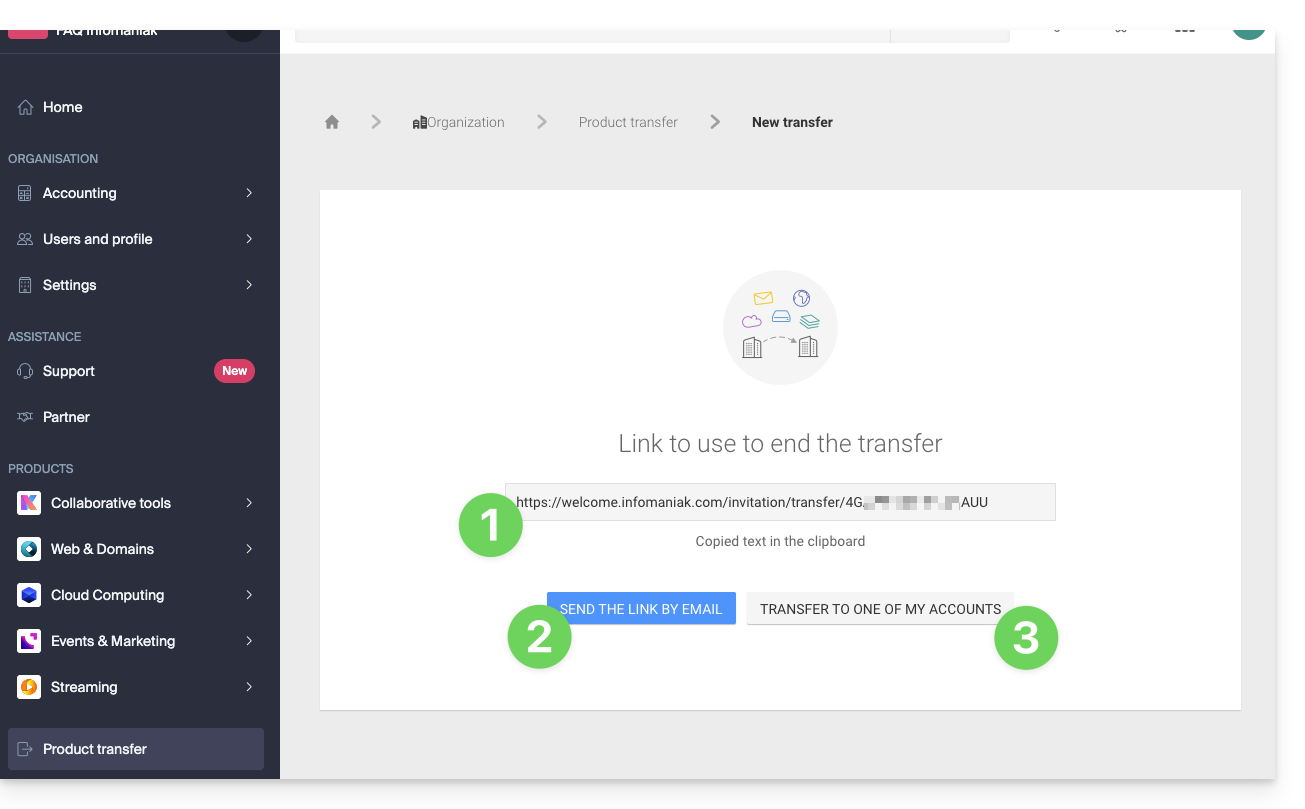
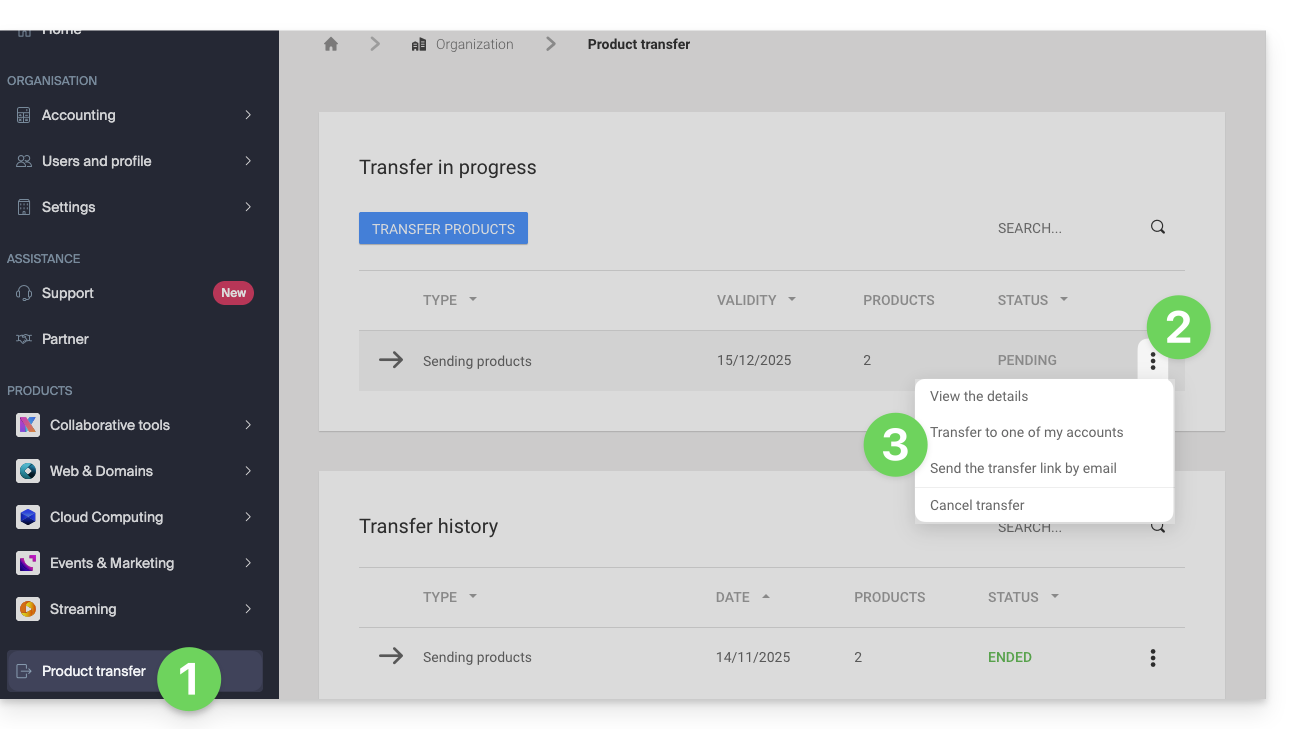
A transferência foi iniciada. Agora, você pode:
- Copiar o link de transferência…
- ou enviá-lo para o endereço de e-mail desejado…
- ou selecionar diretamente uma das Organizações às quais o seu utilizador está associado, e o produto selecionado será transferido para essa organização:
Em qualquer momento, pode voltar à página de transferência de produtos para encontrar as opções listadas acima:
Consulte este outro guia sobre Jelastic Cloud.
Receber o produto
Após o início de uma transferência de produto por um usuário…
1. Certifique-se de estar na organização que deve receber o produto
- Clique aqui para se conectar ao Gerenciador na Organização que deve receber o(s) produto(s).
- O utilizador especificado ao iniciar sessão na conta Infomaniak deve ter permissões de administrador.
- Se necessário, pode criar uma nova Organização para receber produtos (❓: ajuda).
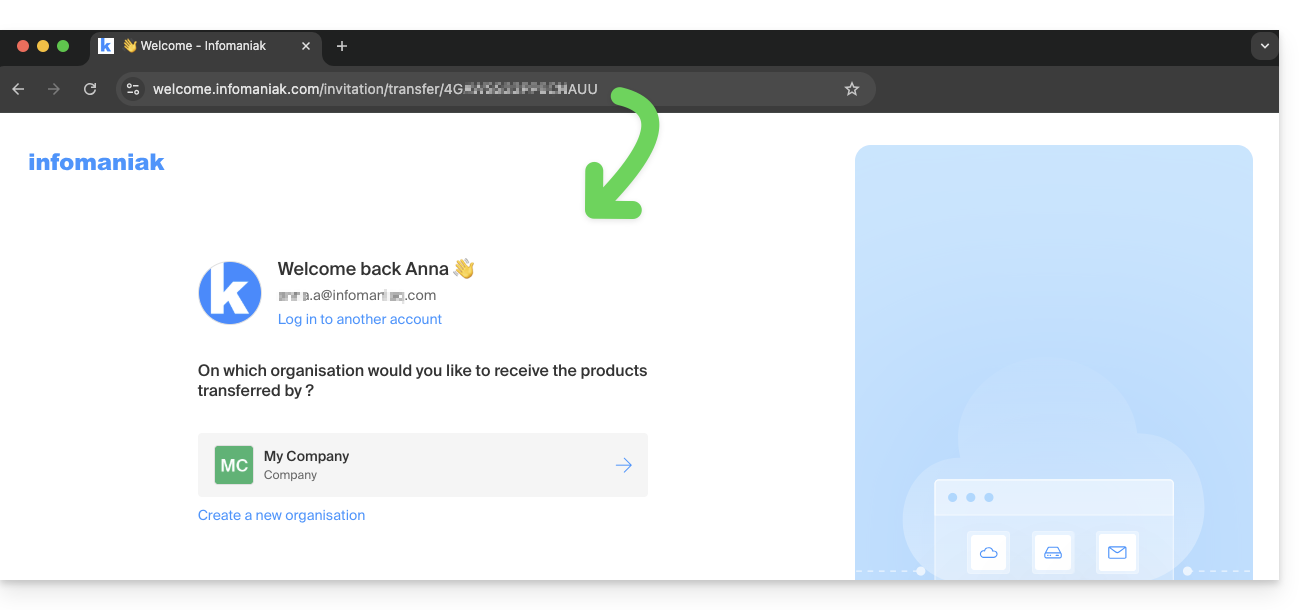
2. Executar o link obtido
- Clique no link obtido na primeira etapa acima.
- Você também pode simplesmente colá-lo em um navegador, estando conectado à conta Infomaniak correta.
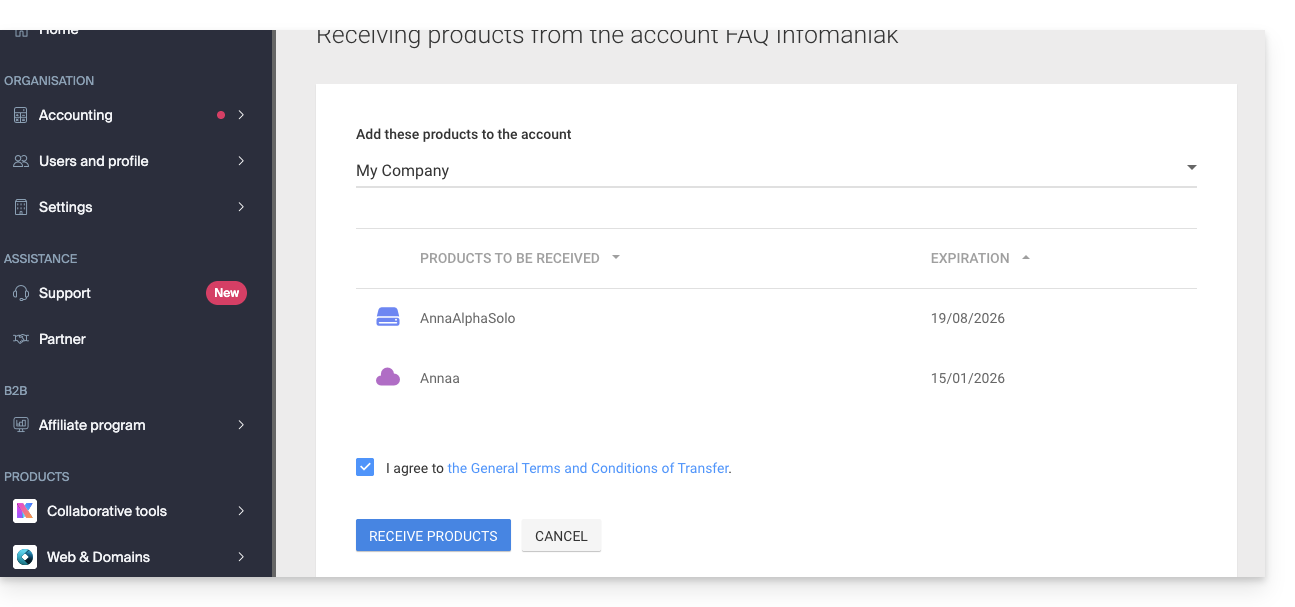
3. Validar a transferência de produtos
- Se necessário, escolha a Organização de destino usando o menu suspenso.
- Leia e aceite os termos e condições.
- Clique no botão Receber os produtos (se o botão não estiver clicável, certifique-se de ter selecionado a Organização):
Encontre a qualquer momento as transferências em andamento ou concluídasa partir do ícone inferior no menu lateral esquerdo doPainel de Controle Infomaniak: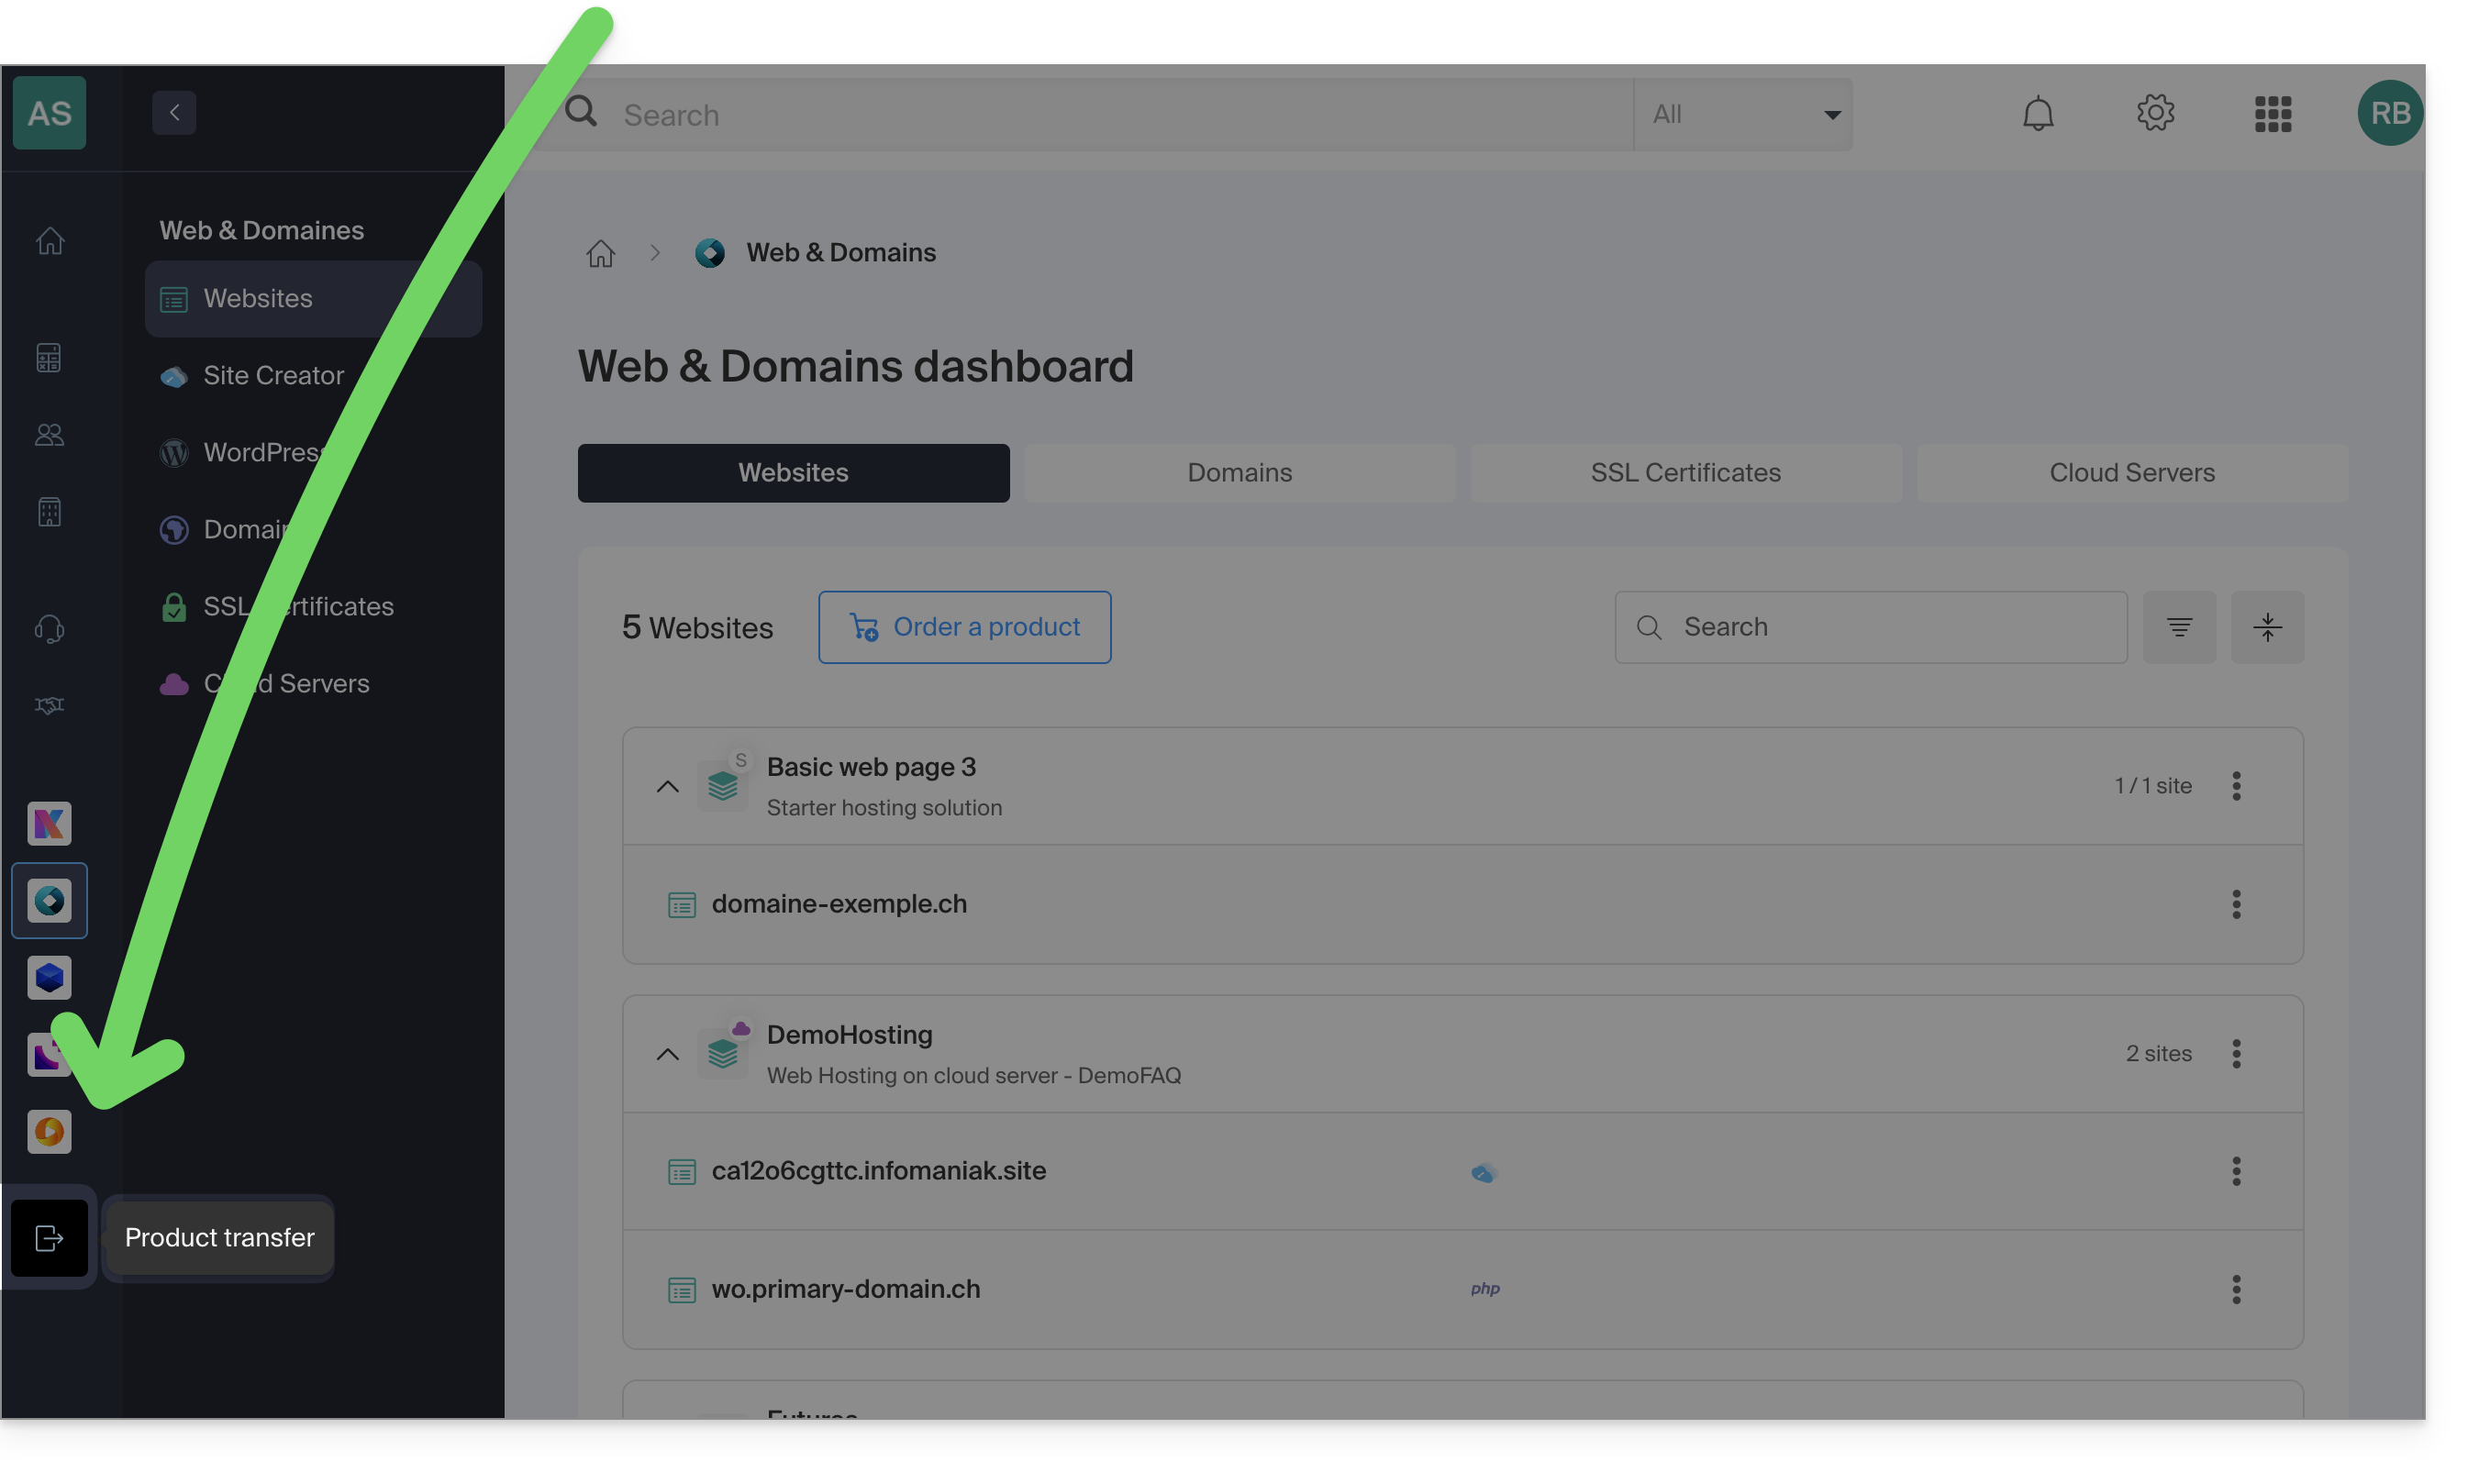
Link para esta FAQ: https://faq.infomaniak.com/2024
Esta seção de perguntas frequentes foi útil?
Este guia explica como gerar um resumo de uma reunião online organizada com kMeet, a solução ética de videoconferência gratuita da Infomaniak.
Obter um relatório de reunião kMeet
Pré-requisitos
- Ter um kDrive pago (independente ou incluído em uma oferta kSuite, my kSuite+, etc.).
- Não crie uma videoconferência cifrada com uma chave personalizada.
Para ativar a funcionalidade de ata (registro) para as suas videoconferências:
- Inicie o kMeet através de kmeet.infomaniak.com ou a partir de uma das aplicações para computador e dispositivos móveis.
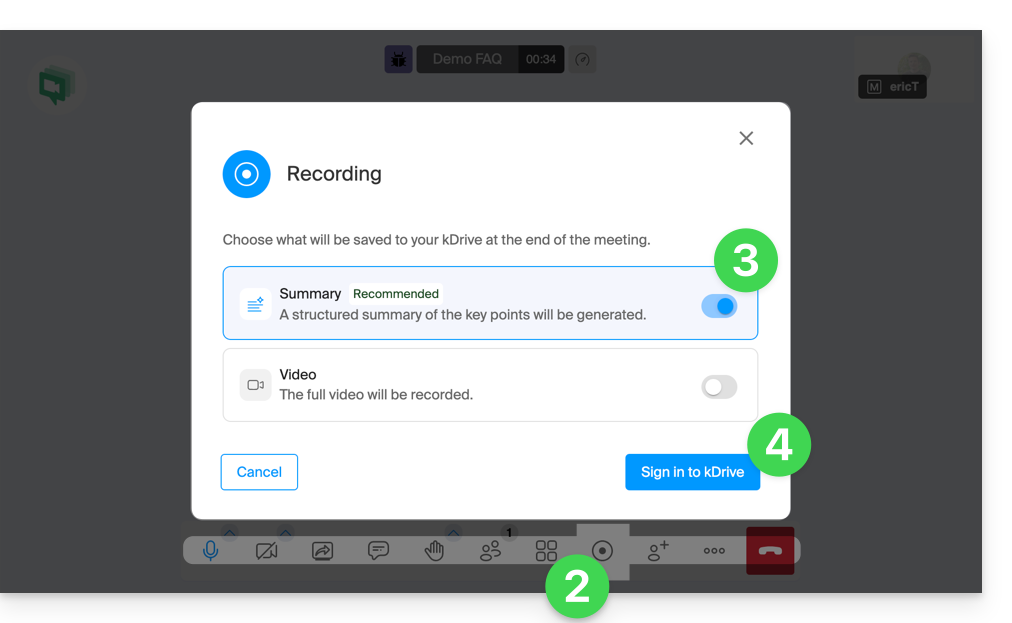
- Clique no ícone ◉ Iniciar a gravação (consulte este outro guia para mais informações).
- Ative o resumo.
- Faça login na sua conta Infomaniak:
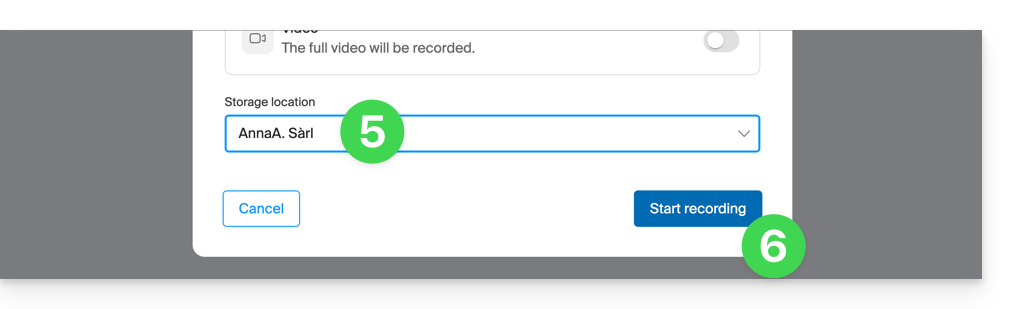
- Selecione um kDrive onde deseja salvar a videoconferência.
- Em seguida, clique no botão para iniciar a gravação:
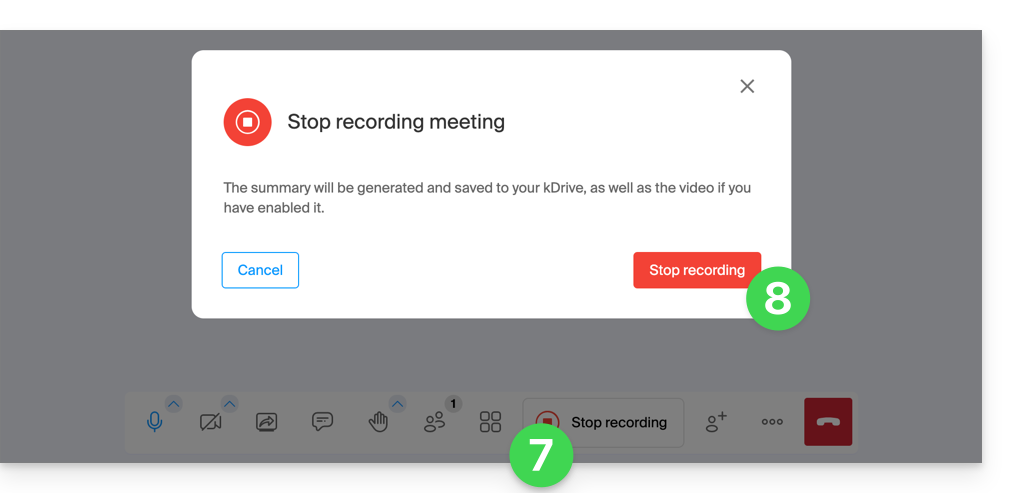
- Para parar a gravação do vídeo, clique em Parar gravação.
- Confirme:
- Escolha se deseja acessar o relatório diretamente no kDrive:
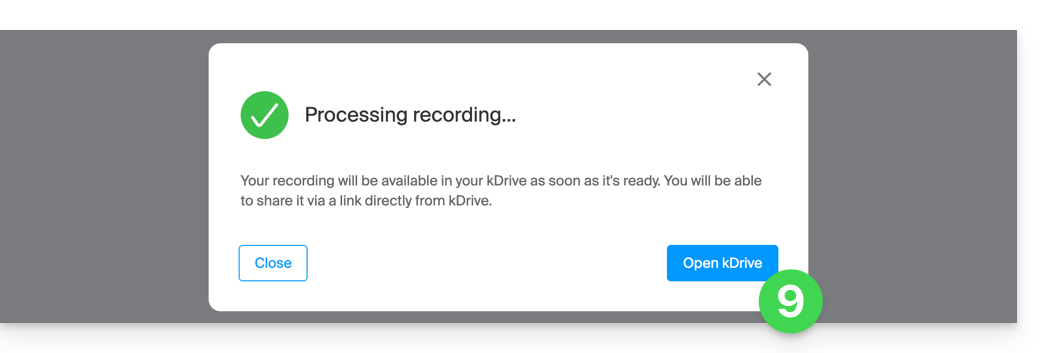
- O relatório está disponível na raiz do kDrive selecionado, no formato de texto
.md; você pode consultá-lo diretamente no kDrive.
Este resumo das suas conversas será redigido no idioma mais utilizado durante a discussão gravada.
Link para esta FAQ: https://faq.infomaniak.com/2035
Esta seção de perguntas frequentes foi útil?
Este guia explica como sincronizar os contactos e calendários do Microsoft Outlook* Windows (apenas as versões Office 365, 2024, 2021, 2019, 2016, 2013, 2010, 2007) com os contactos e calendários alojados na Infomaniak, utilizando uma extensão para o Outlook disponível em caldavsynchronizer.org.
* As versões gratuitas do Outlook (New Outlook) e a versão macOS não permitem a instalação de uma extensão; portanto, são incompatíveis com os dados da Infomaniak!
Introdução
- Existe uma alternativa paga para Windows, Evo Collaborator, que oferece um perfil pré-configurado para a Infomaniak.
Configurar o Outlook CalDav Synchronizer
O Outlook CalDav Synchronizer permite sincronizar contactos e calendários através dos protocolos CalDAV e CardDAV, incluindo vários calendários (não partilhados):
- Descarregue o CalDav Synchronizer para o Outlook.
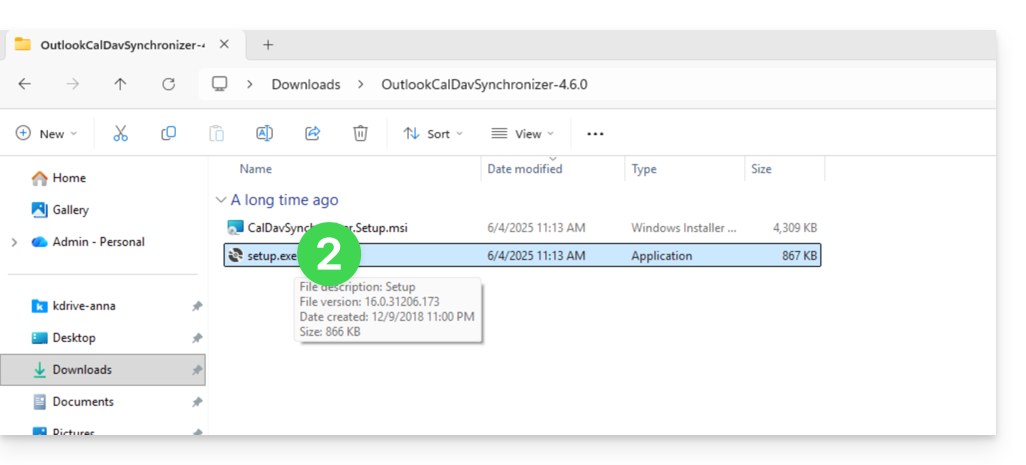
- Feche o Outlook e inicie a instalação do plugin descarregado acima:
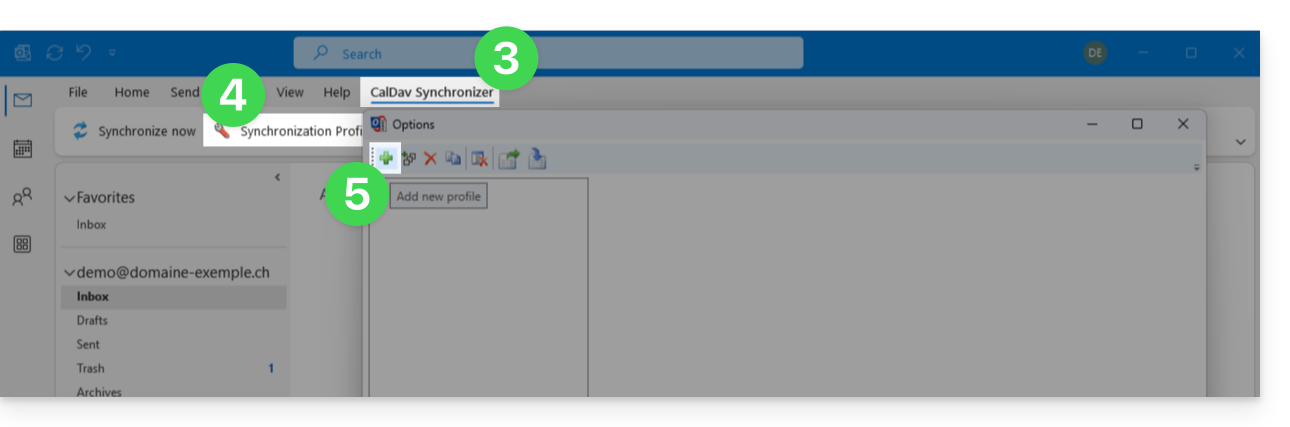
- Após a instalação do plugin, abra o Outlook e clique no novo separador CalDav Synchronizer.
- Clique em Perfis de Sincronização.
- Clique no ícone + para criar um primeiro perfil (para o calendário ou os contactos – será necessário criar um segundo perfil posteriormente para sincronizar os dois):
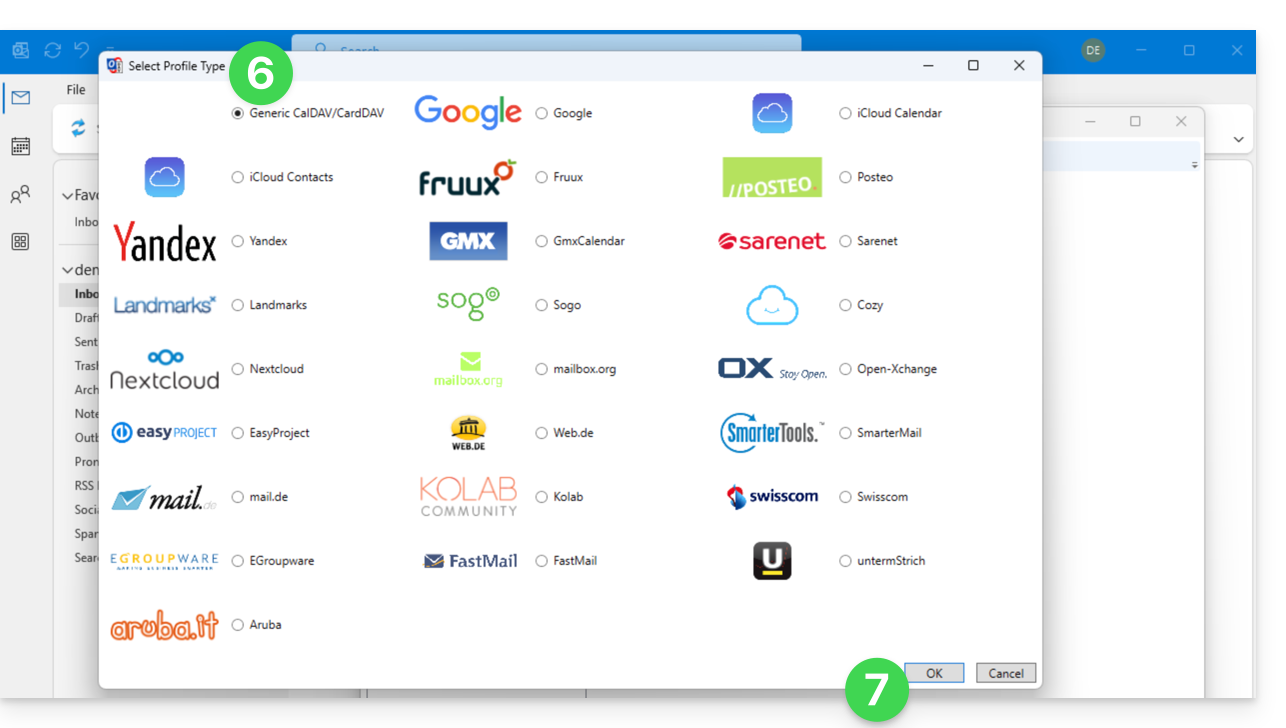
- Escolha um tipo de perfil genérico (primeiro botão de opção).
- Clique no botão OK:
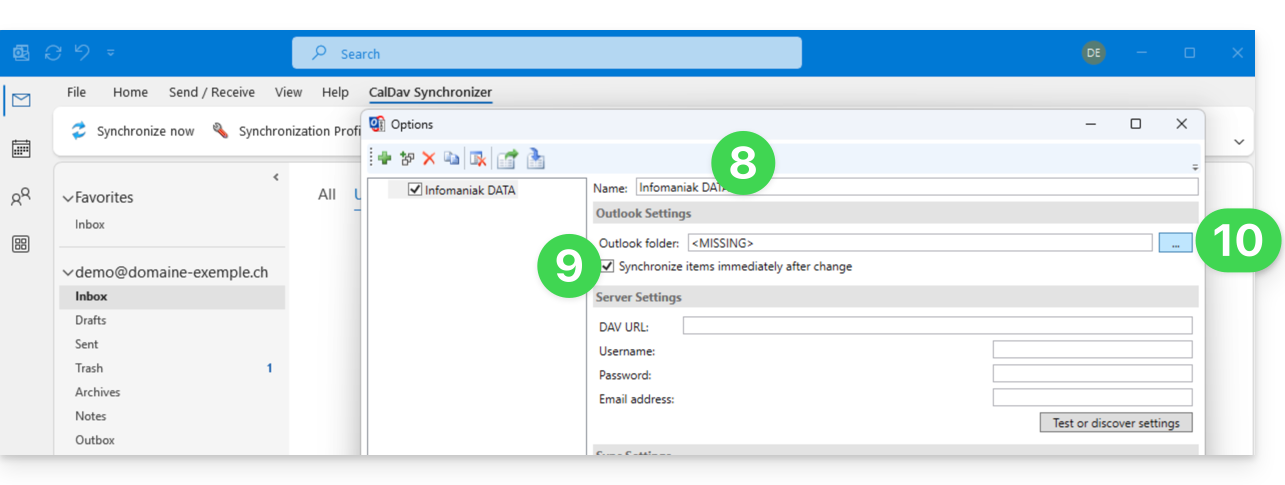
- Introduza um nome para o perfil (nome do calendário ou da agenda de contactos Infomaniak que pretende sincronizar, por exemplo).
- Marque a caixa de sincronização.
- Clique no botão [ ▪ ▪ ▪ ]:
- Clique no botão Novo…:
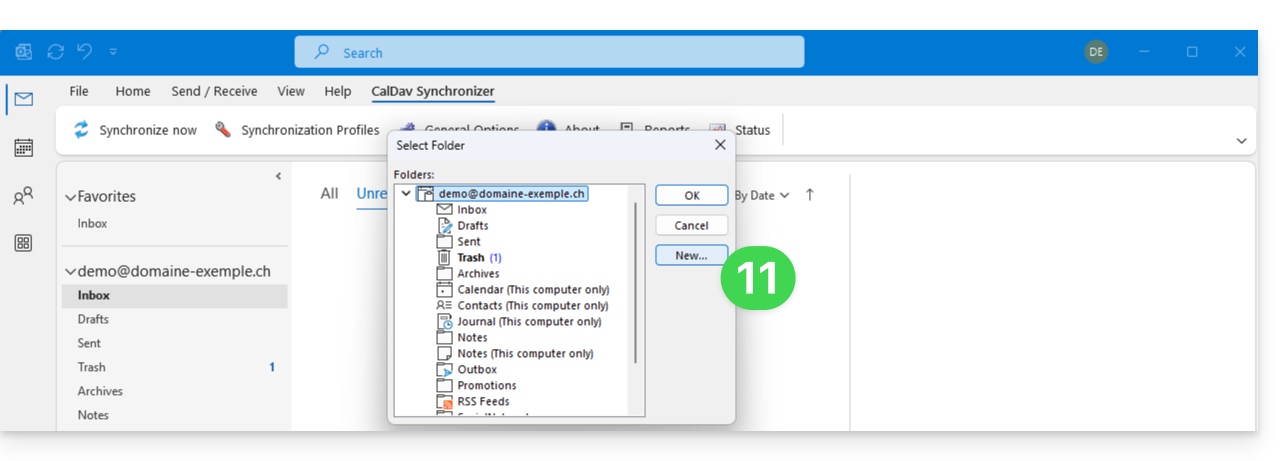
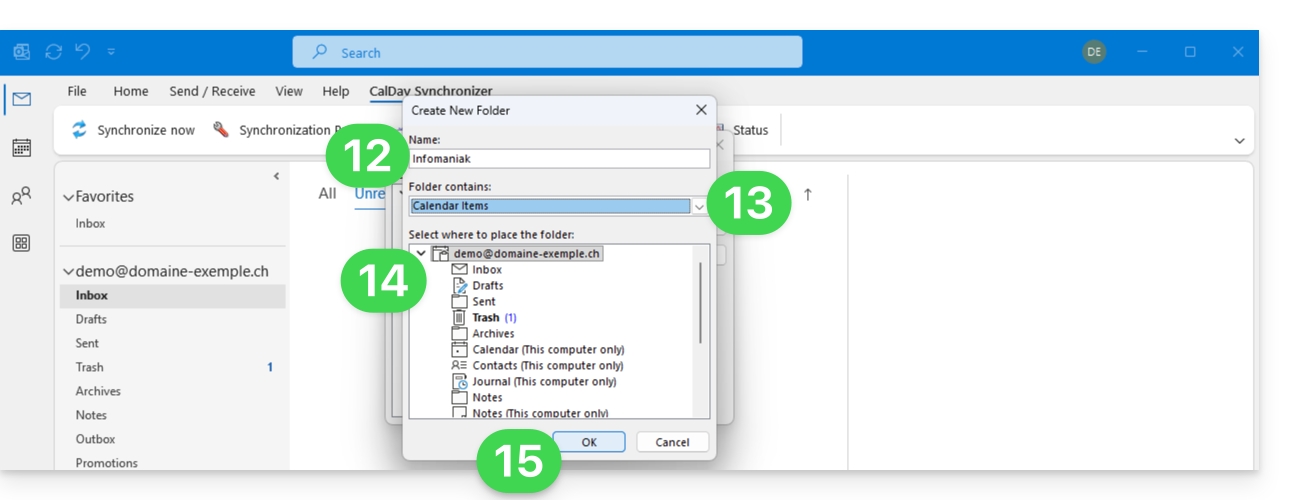
- Introduza um nome para a nova pasta.
- Escolha o tipo de elementos que a pasta conterá (Calendário ou Contactos).
- Clique na pasta principal para criar a pasta na sua estrutura.
- Valide com o botão OK:
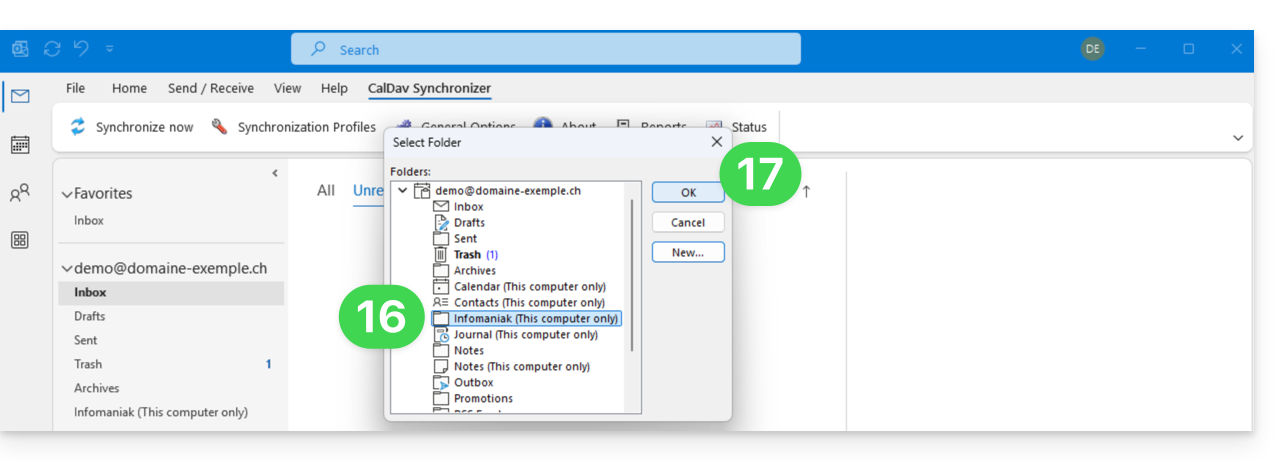
- Selecione na lista a pasta que acabou de criar.
- Valide com OK:
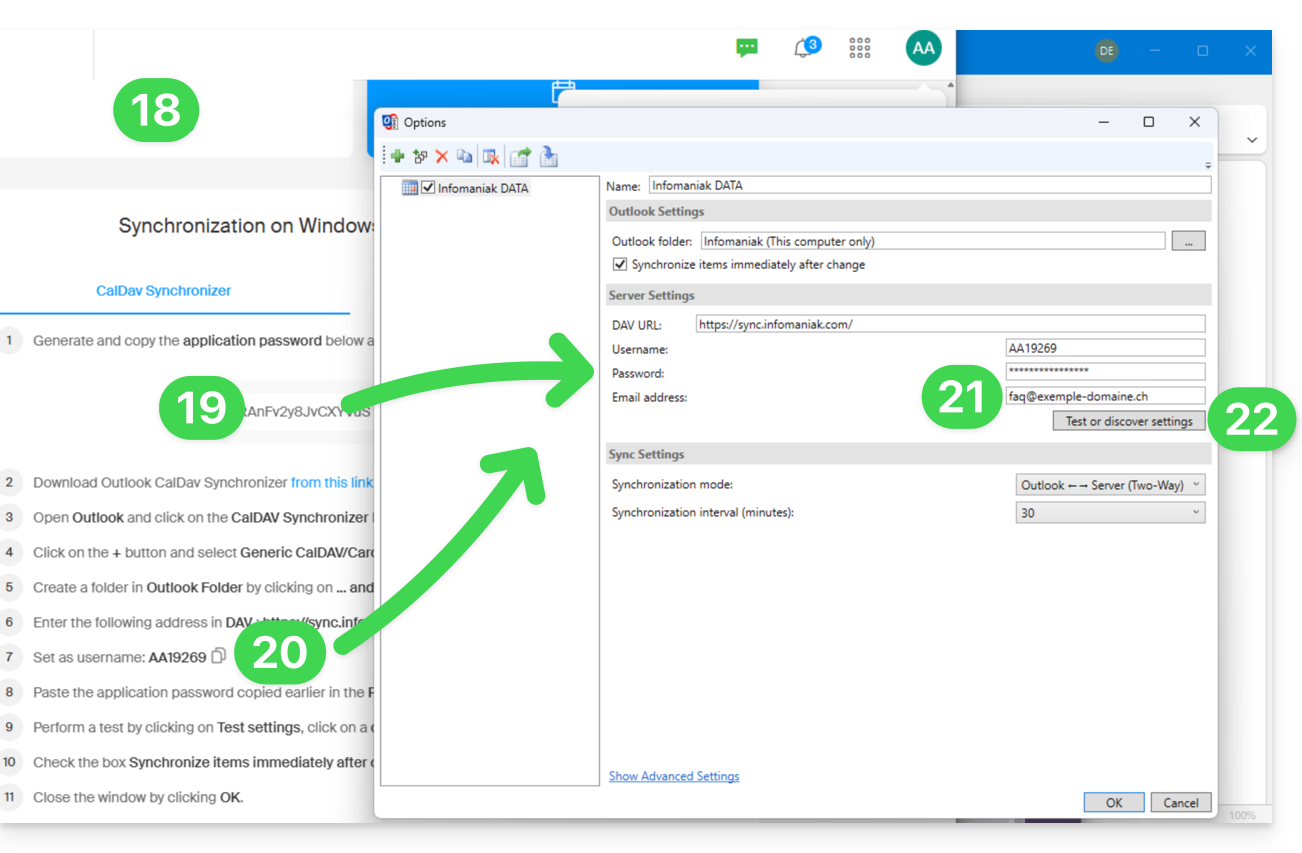
- Abra o assistente https://config.infomaniak.com/ para obter as informações sobre a sincronização com o Outlook.
- Clique no botão para gerar uma senha de aplicativo (permite contornar a autenticação de dois fatores da sua conta de usuário apenas para sincronização).
- Copie as informações (senha, URL e nome de usuário) obtidas em config.infomaniak.com.
- Insira o endereço de e-mail da sua conta Infomaniak.
- Clique no botão para Testar as configurações:
- Na janela que se abre, escolha o calendário Infomaniak a ser sincronizado.
- Clique no botão OK:
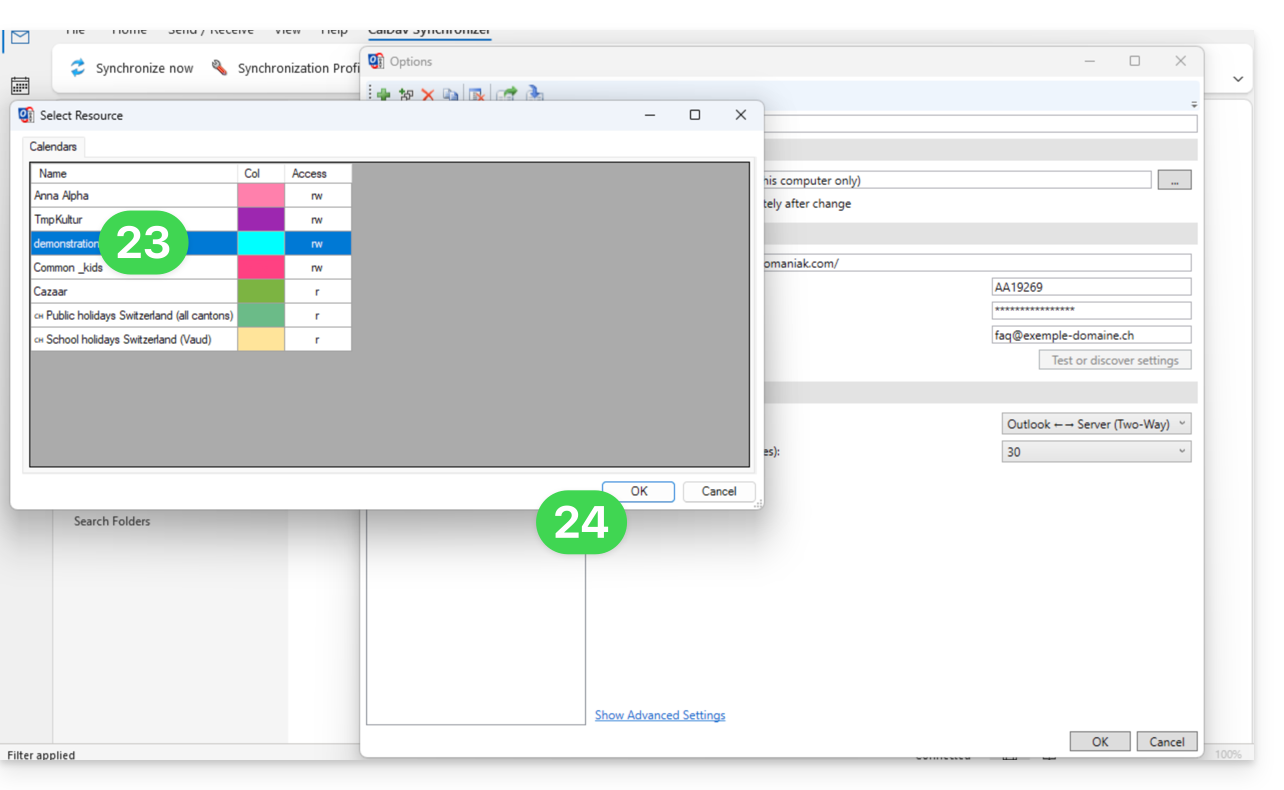
- Informações adicionais podem aparecer automaticamente em alguns campos.
- Salve um segundo perfil, se necessário (recomece no passo 5, neste caso).
- Conclua com OK no canto inferior direito:
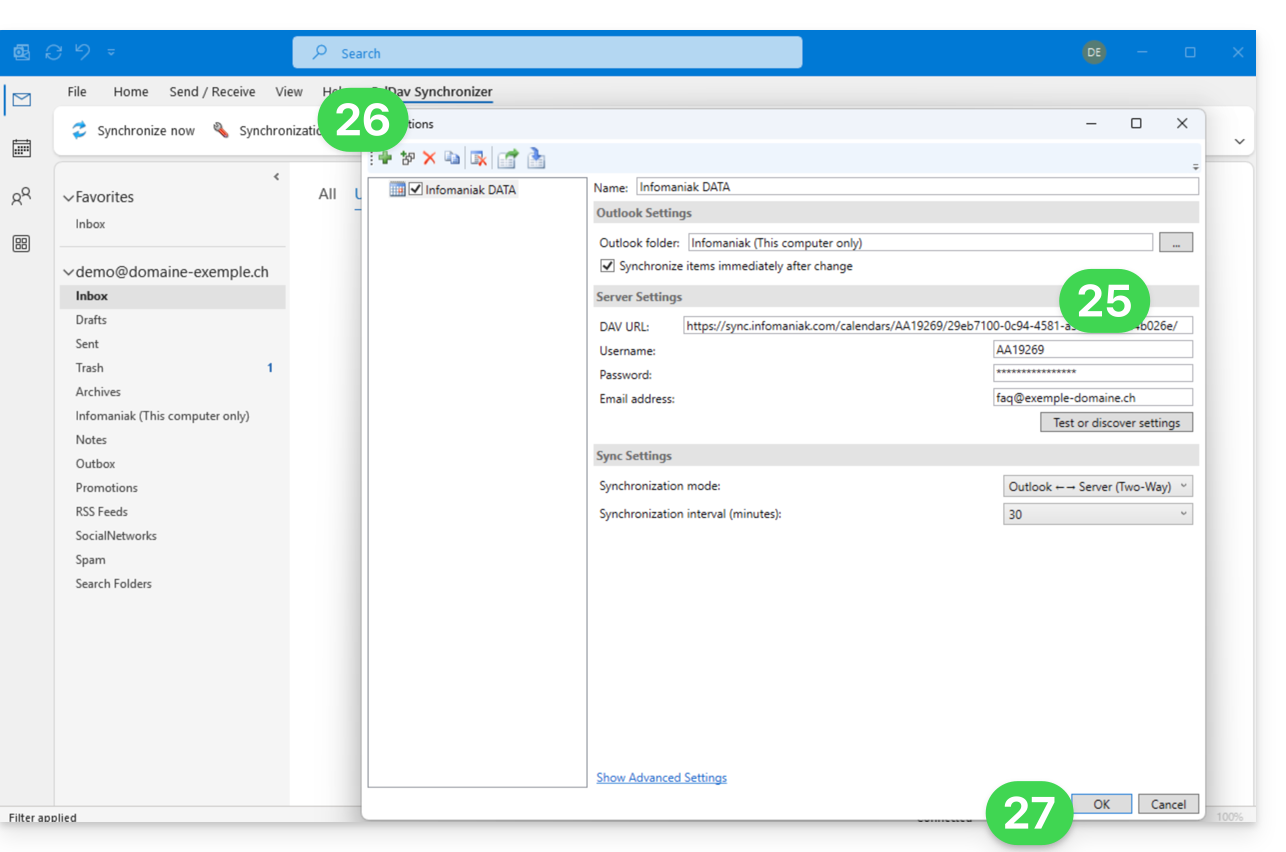
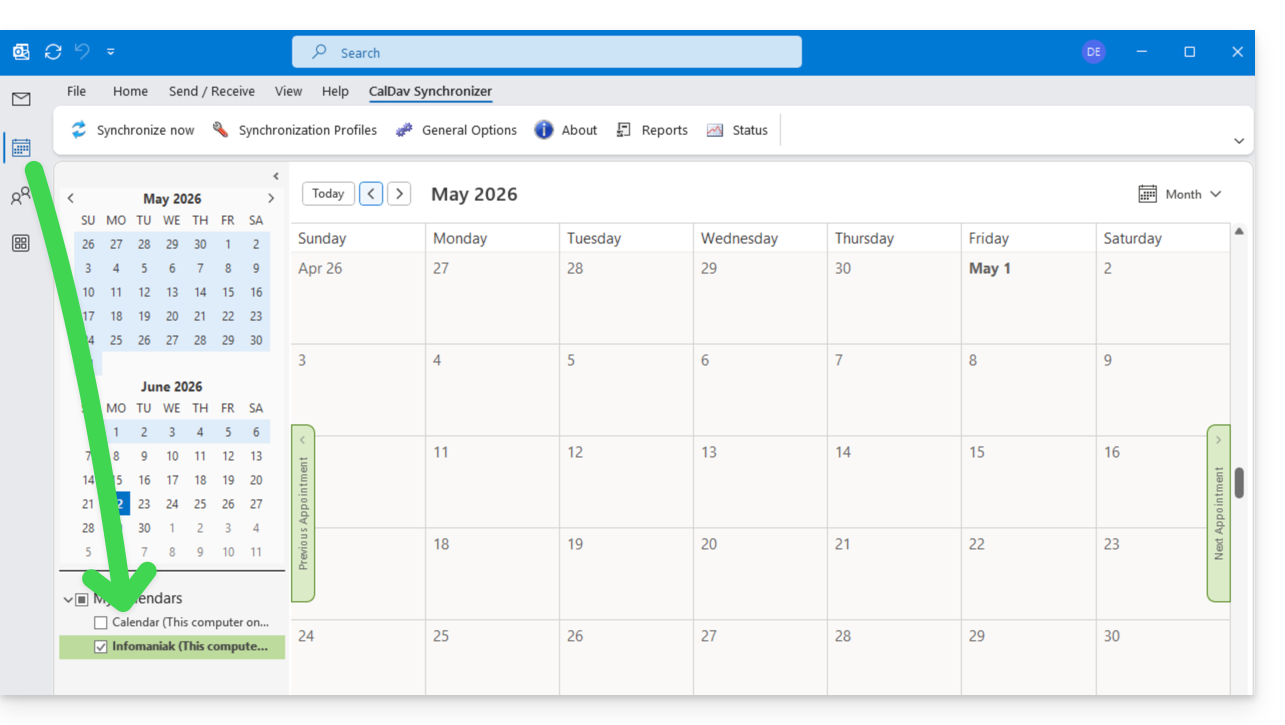
- Pode ser necessário reiniciar o Outlook para atualizar as informações adicionadas, que então ficarão visíveis na interface:
Resolver duplicatas de eventos
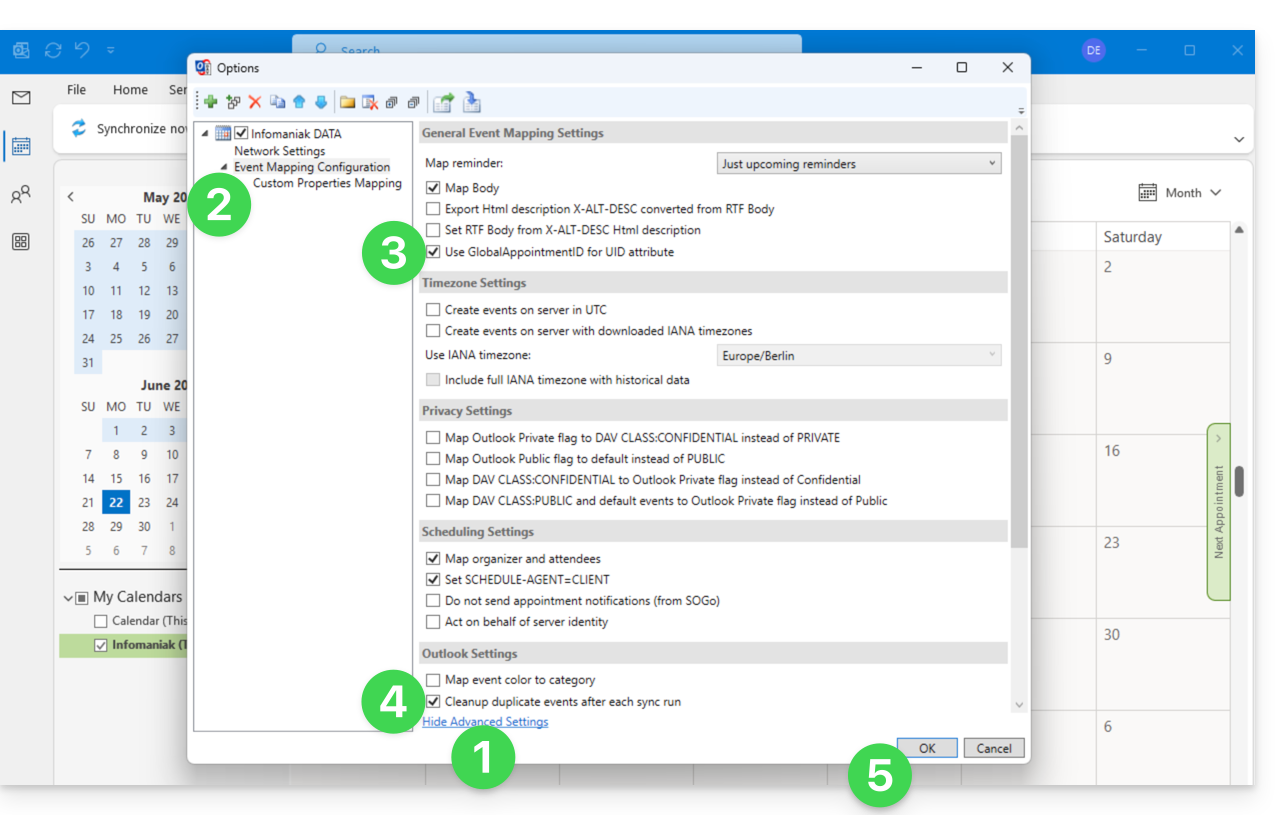
Se você notar eventos duplicados no seu calendário Outlook, mas não no ksuite.infomaniak.com/calendar, aplique as seguintes configurações:
- Clique em Mostrar Configurações Avançadas.
- Clique em Configuração de Mapeamento de Eventos.
- Marque a caixa Usar GlobalAppointmentID para o atributo UID.
- Marque a caixa Remover eventos duplicados.
- Salve as alterações clicando no botão OK:
Esta remoção de eventos duplicados e, portanto, de possíveis convites duplicados, pode resultar em uma notificação de recusa do evento para o organizador, no entanto, isso não afeta a escolha inicial do participante.
Para usuários avançados do macOS
Existe uma alternativa para o Outlook / Exchange no macOS, através do script Python ews-caldav-sync:
- Ao contrário de uma importação de arquivo ICS fornecida pelo Outlook Web, que inclui apenas as últimas semanas de eventos, o script importará todos os eventos do calendário, incluindo séries de eventos, sem as tarefas.
- A sincronização por este script é apenas em um sentido, do Microsoft Exchange para o servidor CalDAV. Recomenda-se executá-lo novamente em intervalos regulares.
Link para esta FAQ: https://faq.infomaniak.com/2045
Esta seção de perguntas frequentes foi útil?
Este guia explica como configurar a sincronização dos calendários e contactos da Infomaniak com a aplicação de ambiente de trabalho Mozilla Thunderbird (aplicação para macOS / Windows / Linux).
Obter a URL avançada
Pré-requisitos
- Obtenha as informações de sincronização fornecidas pelo assistente de sincronização Infomaniak:
- endereço da conta:
https://sync.infomaniak.com - nome de usuário: por exemplo,
AB12345 - senha do aplicativo caso a autenticação de dois fatores esteja ativada ou a senha da sua conta Infomaniak, caso não tenha ativado a autenticação de dois fatores
- endereço da conta:
Para obter uma URL de sincronização mais detalhada, geralmente solicitada para a sincronização com o Thunderbird:
- Abra o assistente de sincronização Infomaniak.
- Clique no link azul Selecionar um dispositivo:
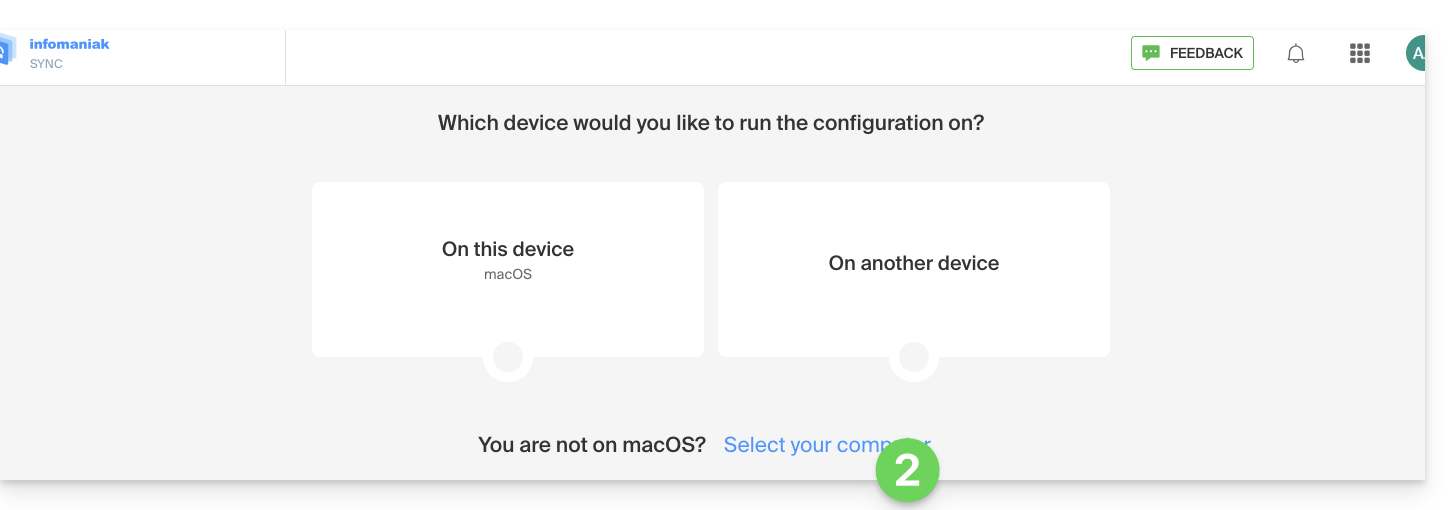
- Escolha uma sincronização do tipo GNU/Linux.
- Anote a URL de sincronização completa exibida no passo 4 do assistente:

Sincronizar calendários e listas de contactos
Conectar-se a um catálogo de endereços CardDAV
Com as versões mais recentes do Thunderbird, a sincronização dos seus calendários e catálogos de endereços Infomaniak está disponível.imediatamente após a configuração do seu endereço de e-maildentro do software: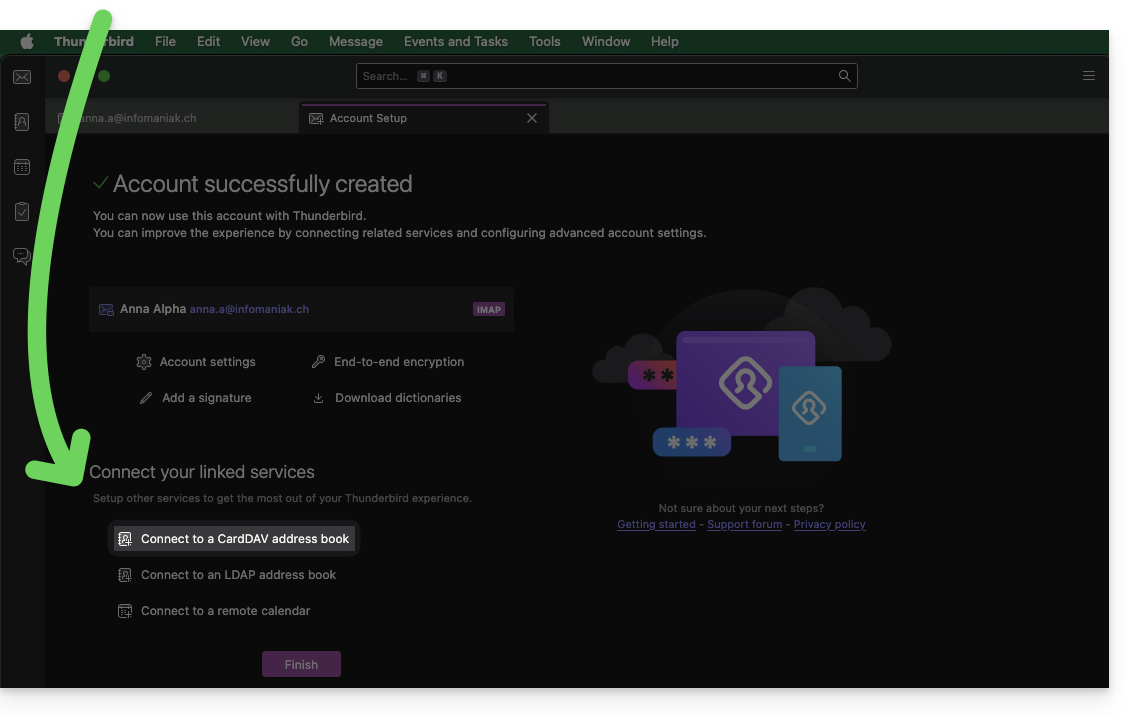
Clique nele; a configuração será iniciada:
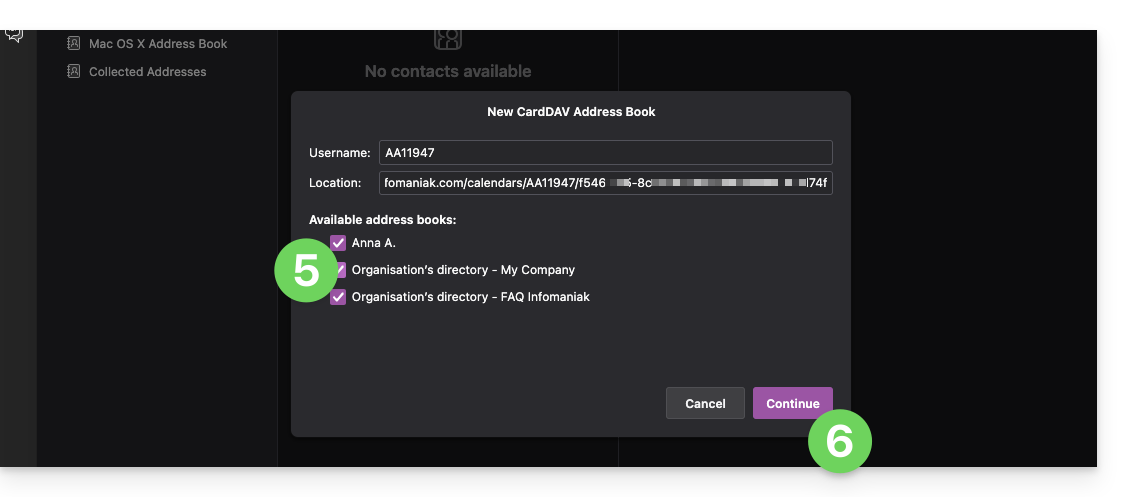
- Insira o nome de usuário abreviado e a URL avançada (consulte as informações acima).
- Clique em Continuar.
- O Thunderbird solicitará então a senha (veja acima).
- Pressione OK:

- Após a autenticação ser concluída com sucesso, o aplicativo exibirá as listas de endereços associadas à sua conta Infomaniak; escolha quais sincronizar.
- Pressione Continuar para finalizar:
Conectar a um calendário remoto
Adicione um novo calendário no Thunderbird:
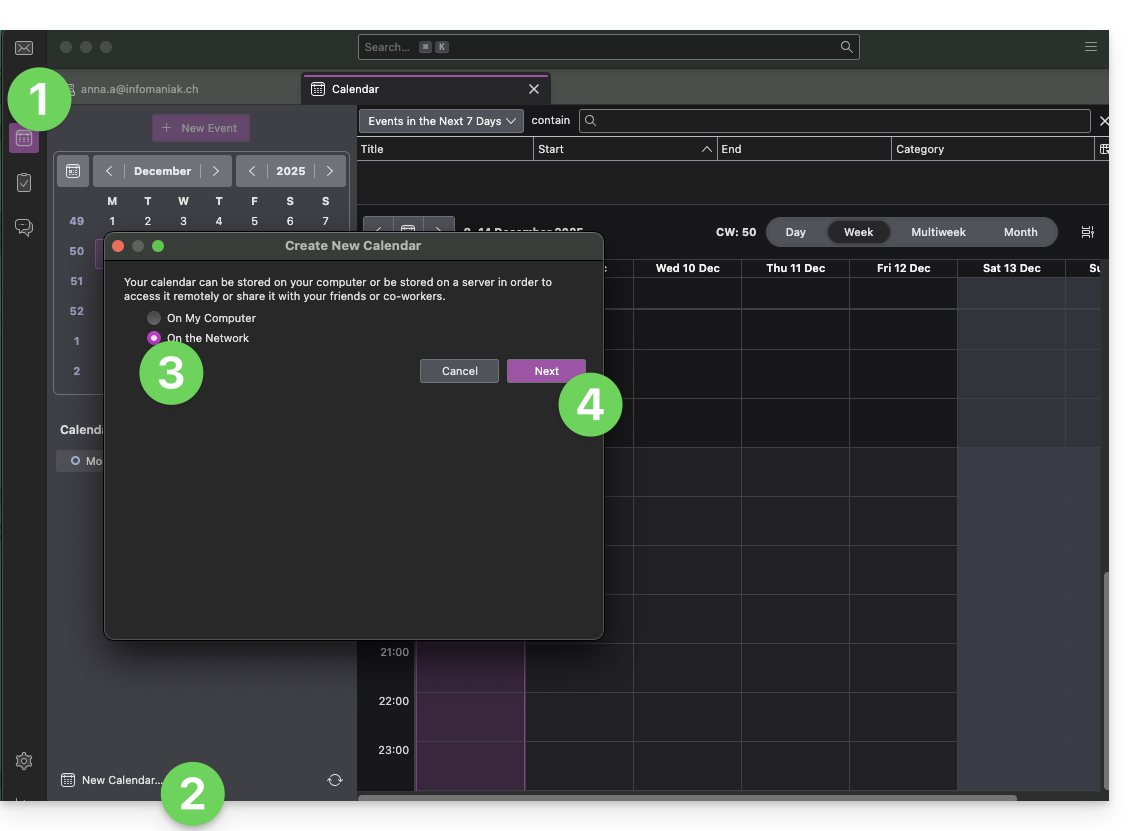
- Se necessário, alterne para a secção Calendários.
- Clique em Novo Calendário…
- Escolha Na rede.
- Clique em Seguinte:
- Insira o nome de utilizador curto e o URL avançado (consulte as informações acima).
- Clique no botão para encontrar os Calendários associados.
- O Thunderbird solicitará então a senha (veja acima).
- Pressione OK:
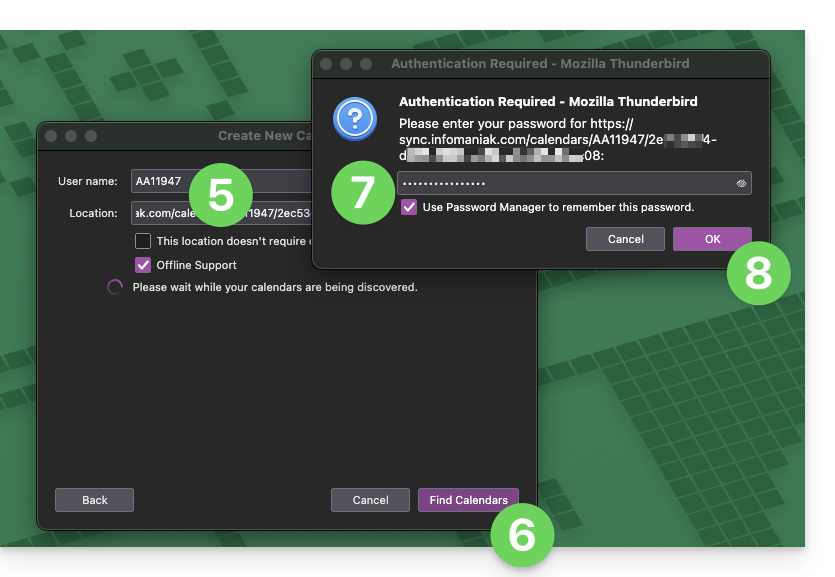
- Após a autenticação ser realizada com sucesso, o aplicativo mostrará os calendários associados à sua conta Infomaniak; escolha quais sincronizar.
- Se necessário, pode gerir as propriedades avançadas dos seus calendários no Thunderbird.
- Clique no botão Subscrever para concluir:
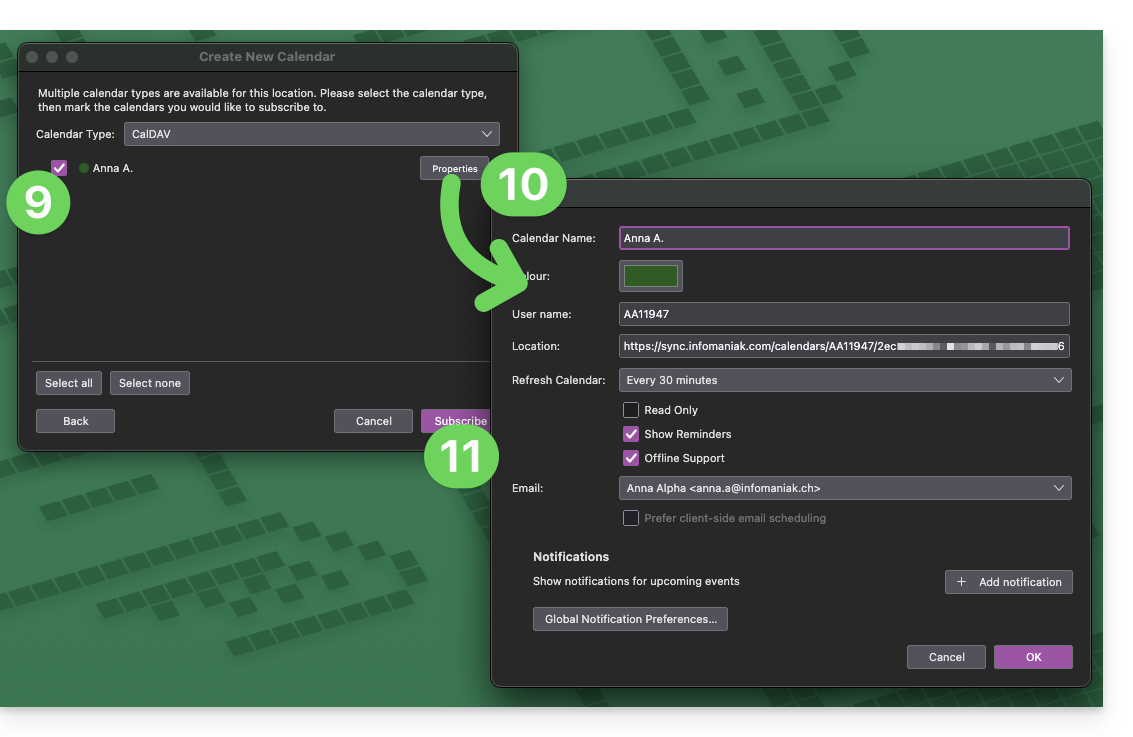
Consulte este outro guia se precisar corrigir algum problema de configuração com o Thunderbird (e-mail, contatos, calendários)...
Link para esta FAQ: https://faq.infomaniak.com/2046
Esta seção de perguntas frequentes foi útil?
Este guia explica como sincronizar os contactos e calendários do eM Client com os contactos e calendários alojados na Infomaniak.
Introdução
- Os contactos e calendários da Infomaniak estão ligados à sua conta Infomaniak; ao iniciar sessão em ksuite.infomaniak.com/contacts ou /calendar, provavelmente terá de efetuar a autenticação de dois fatores (2FA) ao iniciar sessão.
- Neste caso, é necessária uma palavra-passe de aplicação para estabelecer uma sincronização entre o seu dispositivo e as ferramentas da Infomaniak.
- Mas não se preocupe, a criação de uma palavra-passe como esta é proposta ao seguir o assistente de configuração.
Sincronizar contactos e calendários (eM Client 10 macOS)
Pré-requisitos
- Obtenha as informações de sincronização fornecidas pelo assistente de sincronização da Infomaniak:
- endereço da conta:
https://sync.infomaniak.com - nome de utilizador: por exemplo,
AB12345 - palavra-passe de aplicação caso a autenticação de dois fatores esteja ativada ou a palavra-passe da sua conta de utilizador Infomaniak, caso não tenha ativado a 2FA
- endereço da conta:
Em seguida:
- Abra o eM Client.
- Clique no Menu eM Client.
- Clique em Adicionar conta:
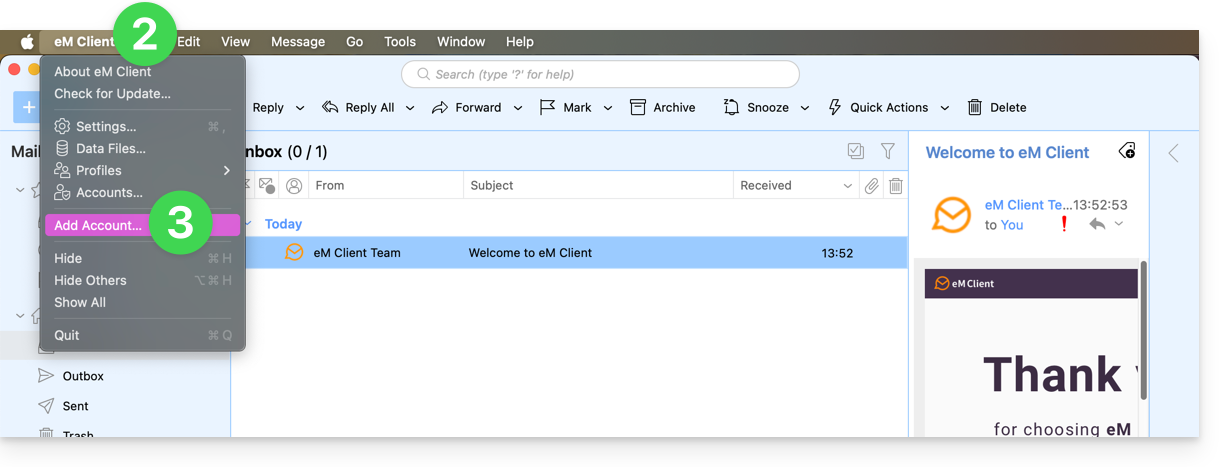
- Clique em Calendário.
- Clique em CalDAV.
- Clique em Seguinte:
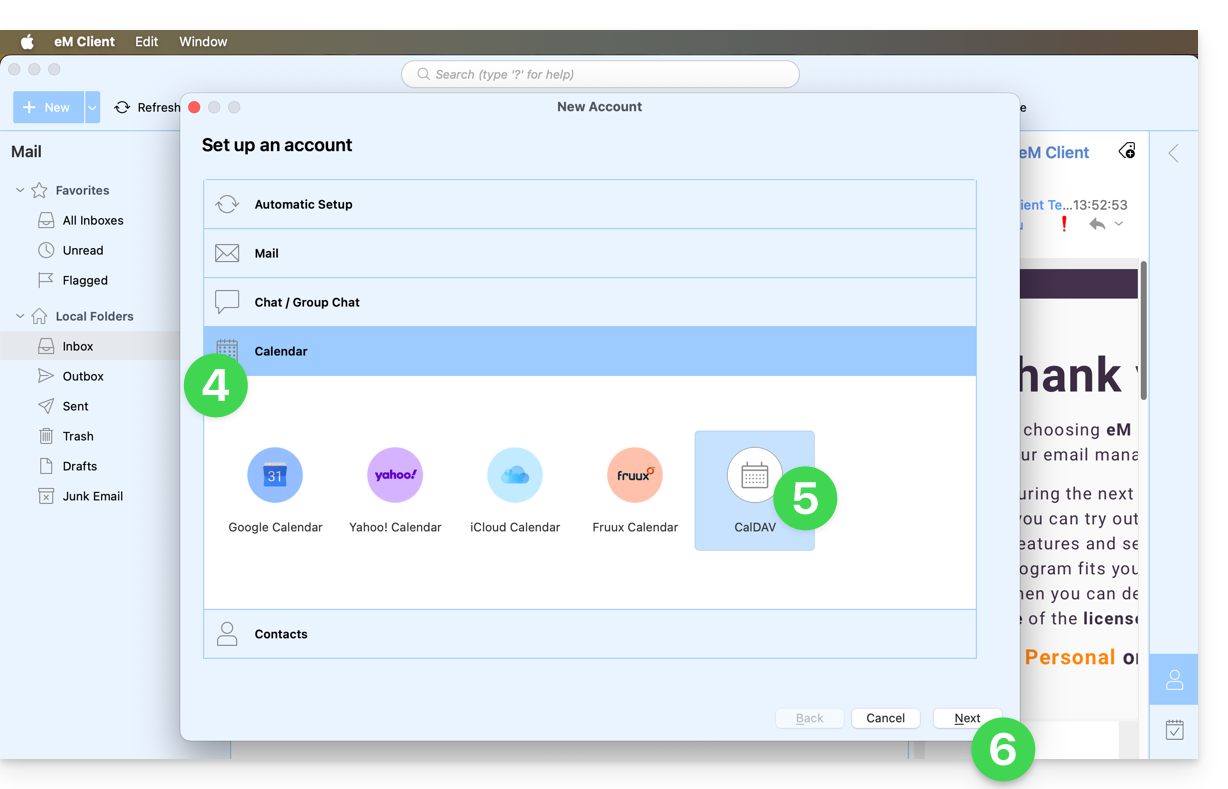
- Copie as informações obtidas no assistente de configuração (consulte os pré-requisitos).
- Clique em Seguinte:
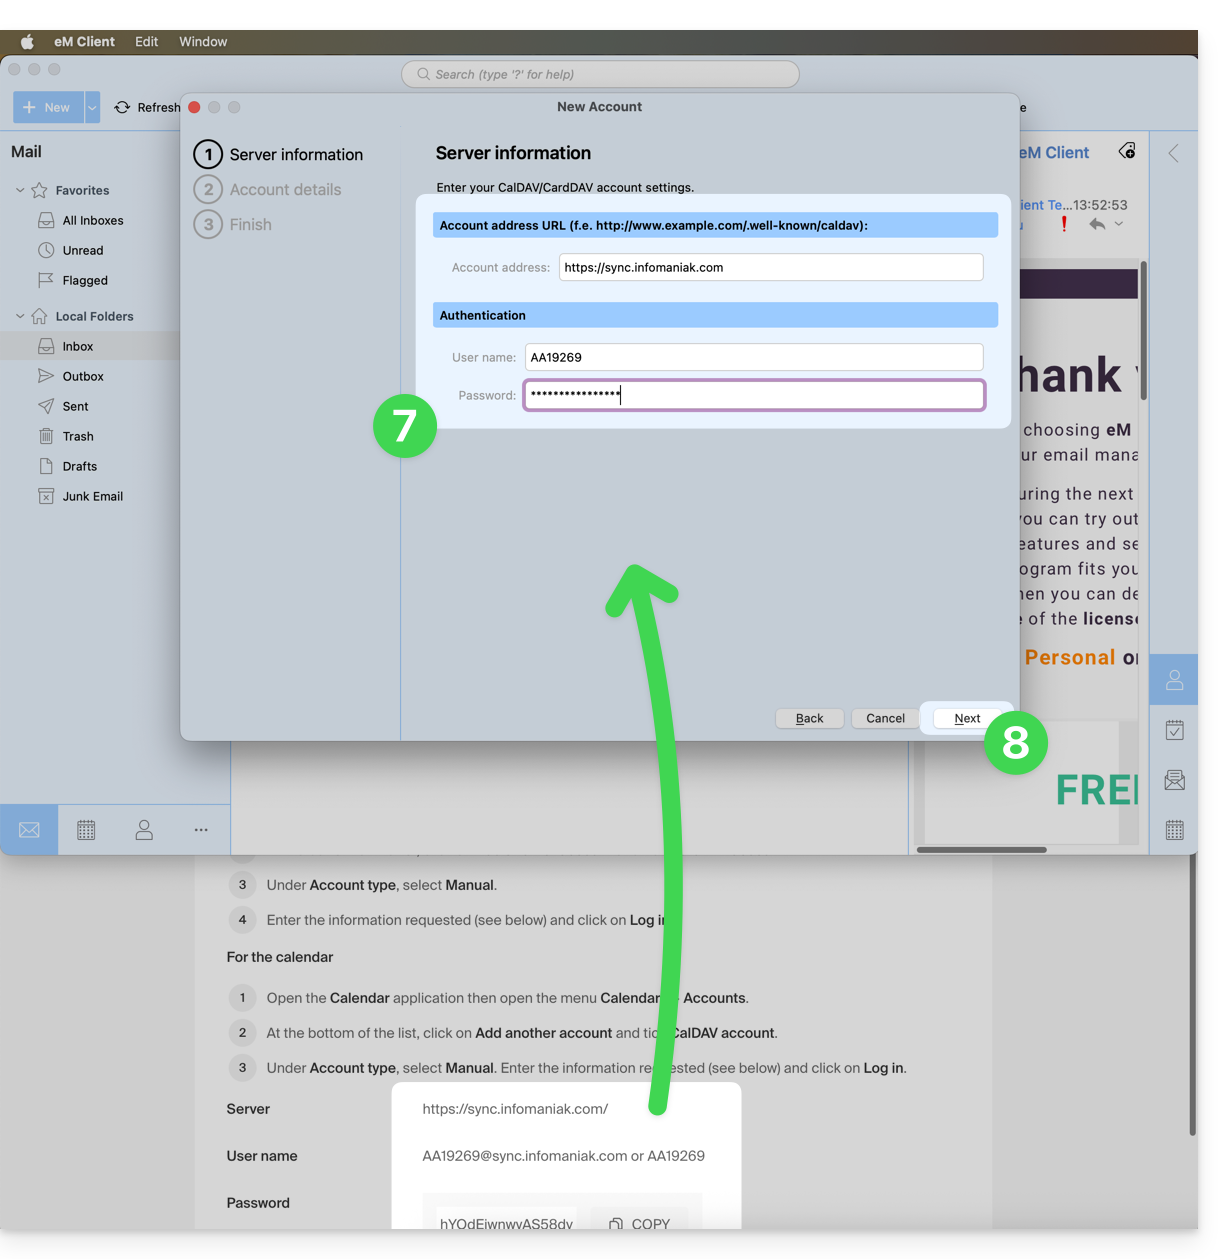
- Escolha um título para o nome da conta (por exemplo, infomaniak) e finalize o processo.
- As informações recuperadas e sincronizadas com a Infomaniak serão exibidas na seção Calendário:
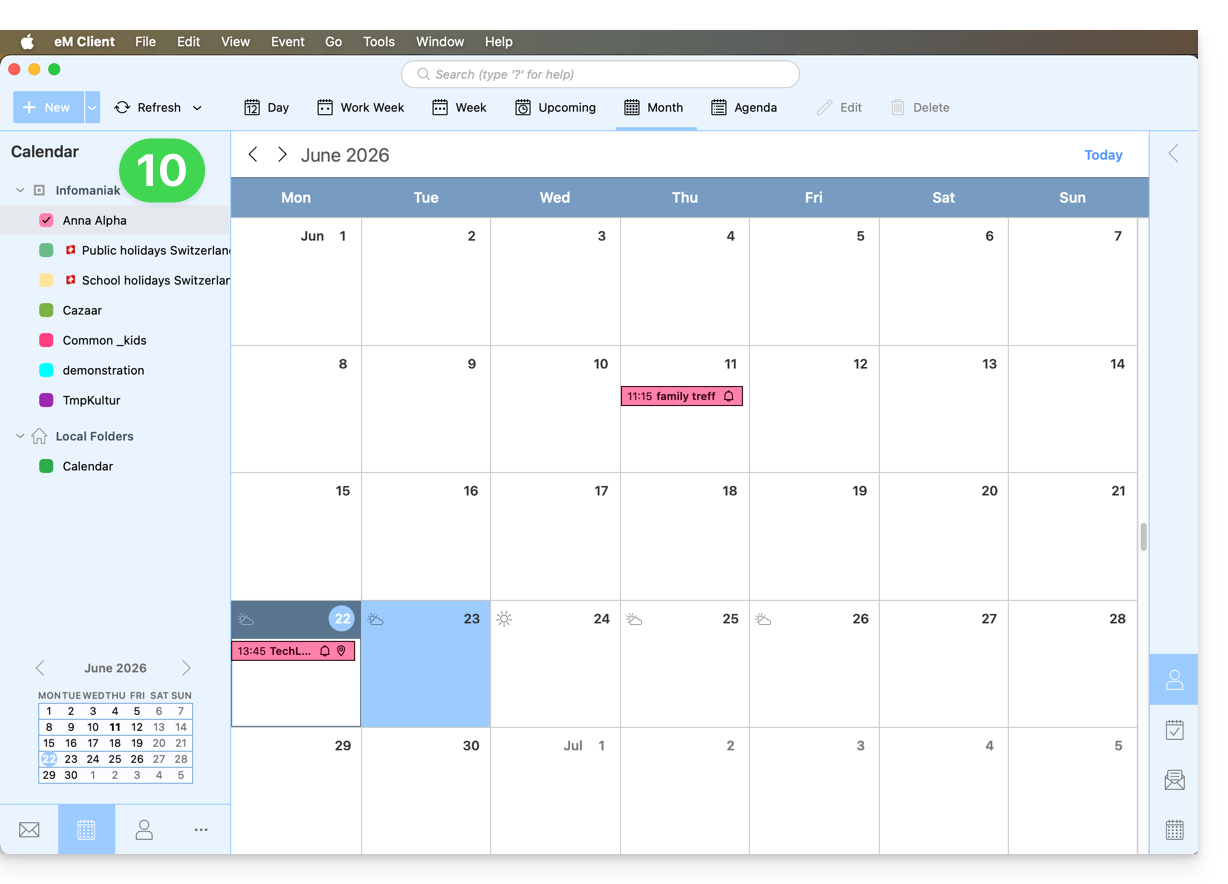
Pode começar pela seção Contactos, se desejar, mas, em qualquer caso, um processo CalDAV configura simultaneamente o CardDAV e vice-versa: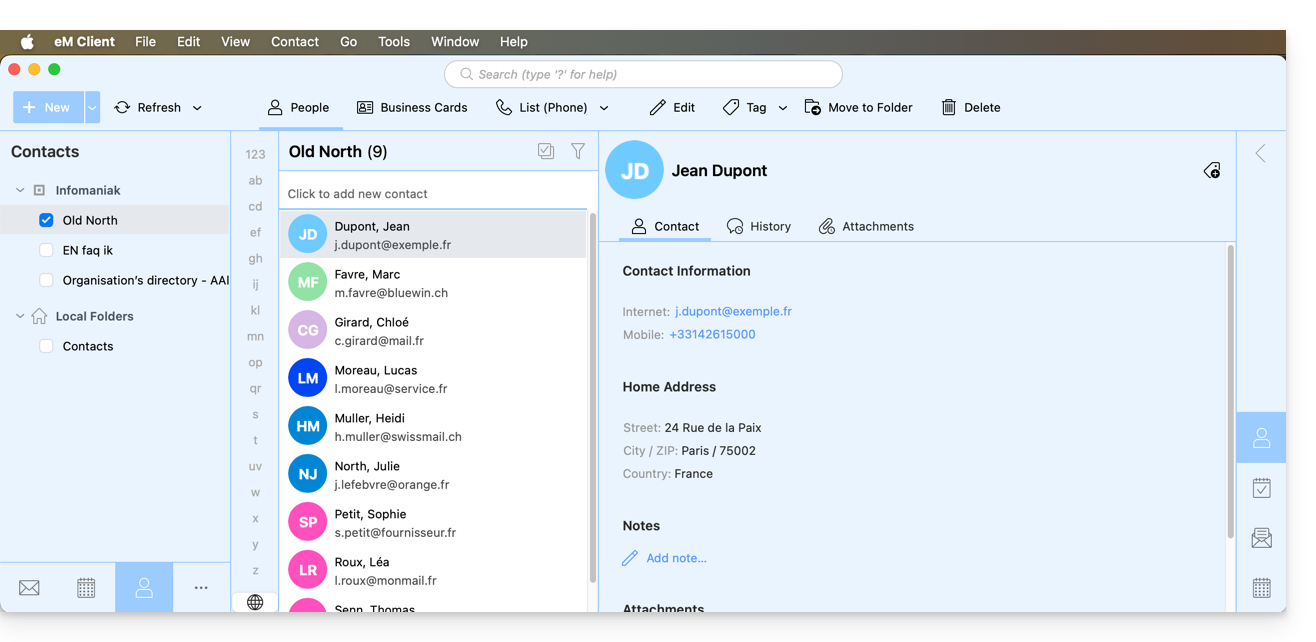
Link para esta FAQ: https://faq.infomaniak.com/2047
Esta seção de perguntas frequentes foi útil?
Este guia explica como remover um endereço de e-mail no Serviço de E-mail Infomaniak.
Remover um ou mais endereços de e-mail
Pré-requisitos
- Ter um Serviço de Email na sua Central de Gestão Infomaniak (❓: ajuda).
- Ser Administrador ou Representante legal na Organização (❓: ajuda).
A remoção de um endereço de e-mail ou o cancelamento de uma conta de utilizador é efetuada através do painel de controlo do Serviço de E-mail. Esta ação implica a desvinculação dos serviços relacionados e requer atenção especial quanto à preservação dos dados existentes. Para remover um endereço de e-mail (o seu conteúdo será destruído permanentemente):
- Clique aqui para aceder à gestão do seu Serviço de E-mail no Manager Infomaniak (❓: ajuda).
- Clique diretamente no nome atribuído ao serviço de e-mail em questão.
Depois de acessar a tabela de endereços de e-mail: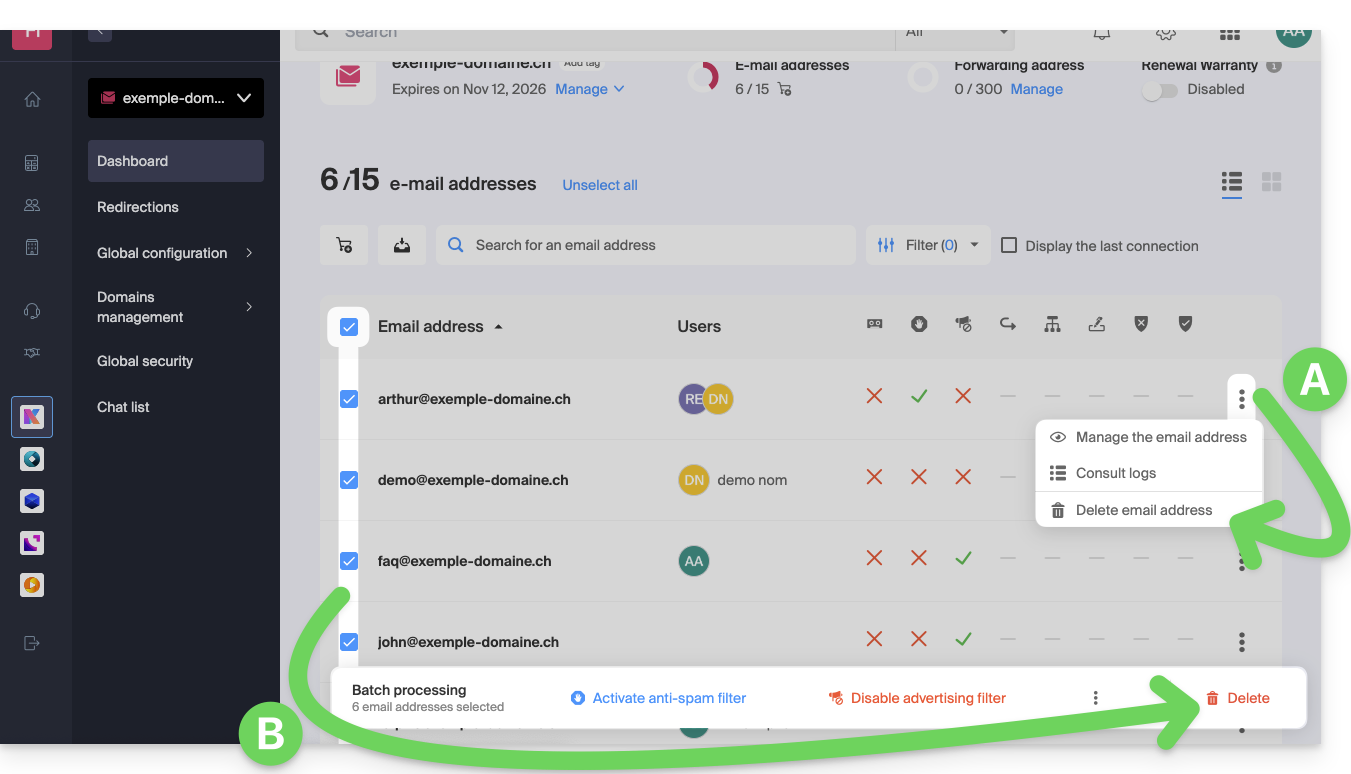
A. Excluir um endereço de cada vez
- Clique no menu de ações ⋮ localizado à direita do item correspondente.
- Escolha a exclusão do endereço de e-mail.
B. Excluir vários endereços ao mesmo tempo
- Selecione os endereços que deseja excluir, marcando as caixas correspondentes à esquerda de cada linha.
- Clique em Excluir na parte inferior da tela.
Link para esta FAQ: https://faq.infomaniak.com/2066
Esta seção de perguntas frequentes foi útil?
Este guia explica como transferir para a Infomaniak os endereços de e-mail atualmente hospedados pela Orange (França), com a ajuda de uma ferramenta de importação por IMAP.
Introdução
- A operação não afeta os dados já existentes no endereço de destino, nem os dados do endereço de origem.
- A totalidade da caixa externa será importada.
- Uma vez iniciado o processo de importação, não é mais possível interrompê-lo.
- Os eventuais duplicados são gerenciados: um conteúdo idêntico será copiado apenas uma vez.
- Consulte este outro guia se procura alternativas a este processo via IMAP.
Importar todo o seu histórico de e-mails
1. Pré-requisitos da Orange
- Ativar as funcionalidades POP/IMAP/SMTP, que estão desativadas por padrão (precisa de ajuda?).
2. Pré-requisitos Infomaniak
- Ter um Serviço de Email na sua Central de Gestão Infomaniak.
- Ter à disposição um número de endereços disponíveis ou ajustá-lo caso seja necessário.
- Verificar se a conta de e-mail está devidamente protegida
- Criar um ou vários endereços neste serviço de e-mail.
- Se tiver muitos (10+) endereços de e-mail para criar, consulte este outro guia sobre a criação em massa.
- O endereço de e-mail de destino deve estar associado ao utilizador (= à conta Infomaniak) que está a utilizar.
3. Importar o conteúdo de e-mail da Orange para a Infomaniak
- Clique aqui para aceder à ferramenta de importação (serviço online https://import-email.infomaniak.com).
- Se necessário, inicie sessão na sua conta Infomaniak na organização em questão, pois a importação será feita para um dos endereços de e-mail associados à interface Web Mail da Infomaniak (serviço online ksuite.infomaniak.com/mail) da conta Infomaniak que está a utilizar.
- Clique em "Importar por IMAP".
- Clique em Importação única.
- Preencha o campo à esquerda com o seu endereço de e-mail de origem (do qual o conteúdo será copiado):
username@orange.fr, por exemplo
- Preencha o campo à direita com a senha do mesmo endereço de e-mail de origem (consulte os requisitos).
- Modifique, se necessário, as Configurações avançadas para especificar um endereço de servidor IMAP:
- Insira o nome do servidor IMAP
imap.orange.fr. - Deixe a porta padrão (993) e o SSL ativados.
- Insira o nome do servidor IMAP
- Clique em Confirmar.
- Se necessário, insira um segundo endereço de e-mail para ser importado ao mesmo tempo.
- Escolha o endereço de e-mail para o qual deseja importar os e-mails; o menu suspenso lista os endereços de e-mail atualmente associados à sua interface Web Mail Infomaniak (serviço online ksuite.infomaniak.com/mail) da conta Infomaniak com a qual está conectado.
- Após selecionar o endereço de destino desejado na lista, clique no botão azul Importar e-mails.
- A cópia está a iniciar, pode aguardar e verificar o resultado na página após a conclusão da importação, ou fechar a janela (a importação continua em segundo plano e o acompanhamento está disponível – consulte abaixo).
- Um e-mail de confirmação será enviado automaticamente para todos os endereços de e-mail envolvidos na operação após a conclusão da importação, indicando o número de mensagens copiadas.
- Um rastreamento está disponível nas configurações do endereço de e-mail de destino, apenas no aplicativo web Mail (serviço online ksuite.infomaniak.com/mail).
- O rastreamento permite visualizar o histórico das importações no endereço em questão.
4. Ajustar as configurações das aplicações
Assim que tiver configurado o nome de domínio associado à sua conta de e-mail para funcionar com a Infomaniak, modifique as configurações dos programas/clientes de e-mail que utiliza para que estes se conectem corretamente aos servidores da Infomaniak: siga o assistente de configuração.
Link para esta FAQ: https://faq.infomaniak.com/2090
Esta seção de perguntas frequentes foi útil?
Este guia apresenta os passos a seguir para obter uma ou mais faturas da Infomaniak antes e após o pagamento, visualizar, descarregar e imprimir todo ou parte do histórico dos documentos de faturação para a sua contabilidade.
Introdução
- As faturas definitivas só podem ser impressas após o pagamento.
- Se necessário, pode adicionar facilmente uma mensagem personalizada nos seus documentos de faturação: consulte este outro guia.
Aceder ao histórico de faturas
Pré-requisitos
- Ser Administrador ou Representante legal na organização…
- … ou ter uma conta de utilizador simples, mas com a permissão de gerir a contabilidade ativada:
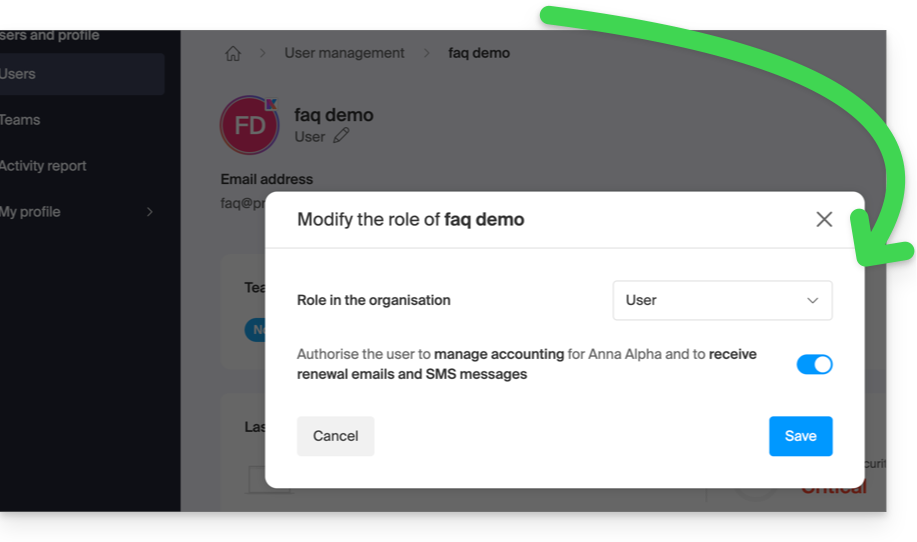
- … ou ter uma conta de utilizador simples, mas com a permissão de gerir a contabilidade ativada:
Para aceder à página dos documentos de faturação:
- Clique aqui para acessar o histórico de faturas no painel de controle Infomaniak:
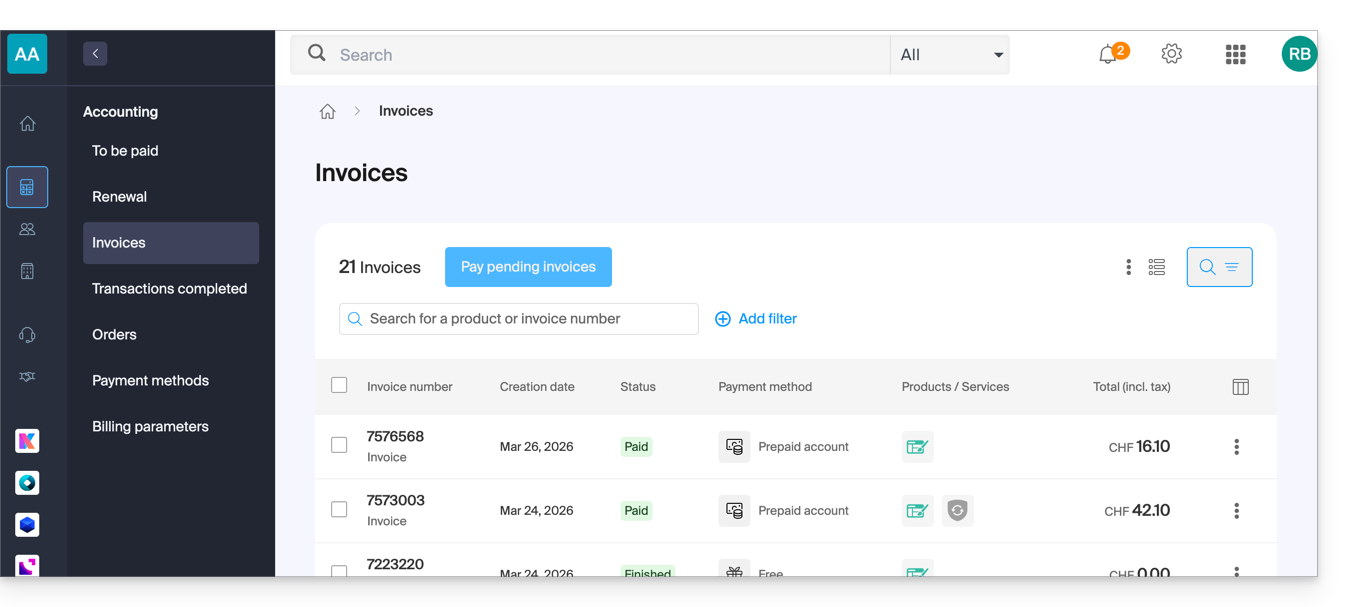
- A tabela exibe automaticamente os documentos de faturamento mais recentes.
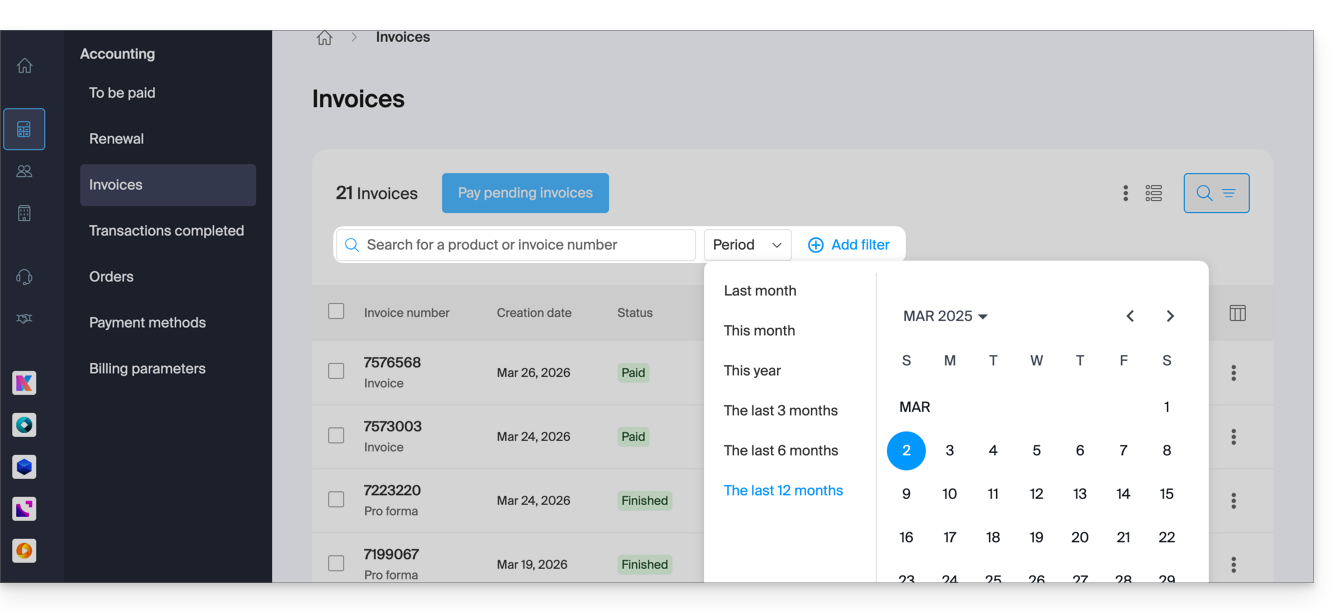
- A parte superior permite filtrar os documentos de acordo com o estado Pago, Reembolsado, etc., e de acordo com o período desejado (calendário de início e fim):
Imprimir/exportar um documento de faturação
Para visualizar um destes documentos em formato PDF e, em seguida, salvá-lo no seu dispositivo ou imprimi-lo na sua impressora:
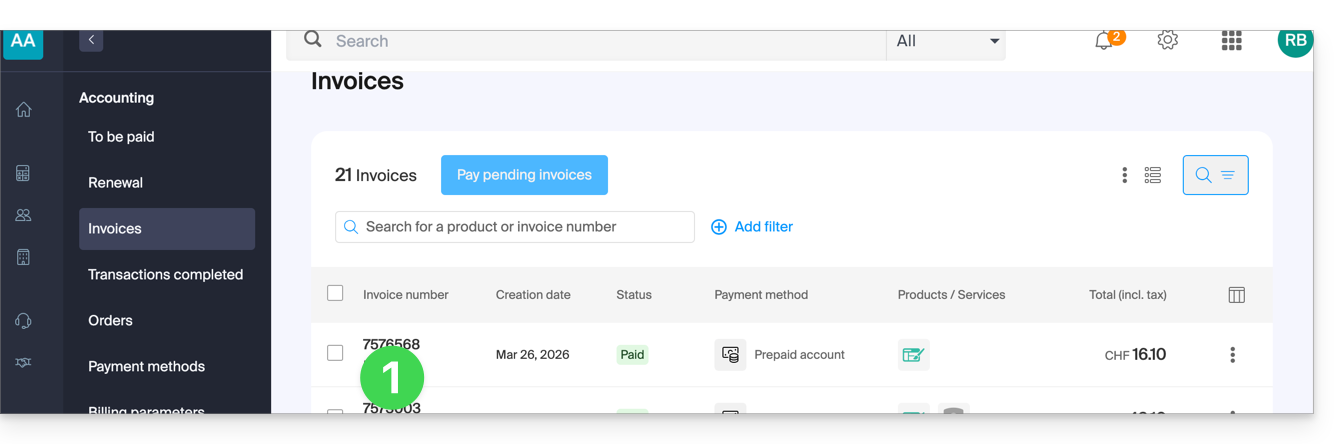
- Na mesma página, clique na fatura correspondente na tabela que é exibida:
- Clique no botão Descarregar ou no ícone para ver outras opções:
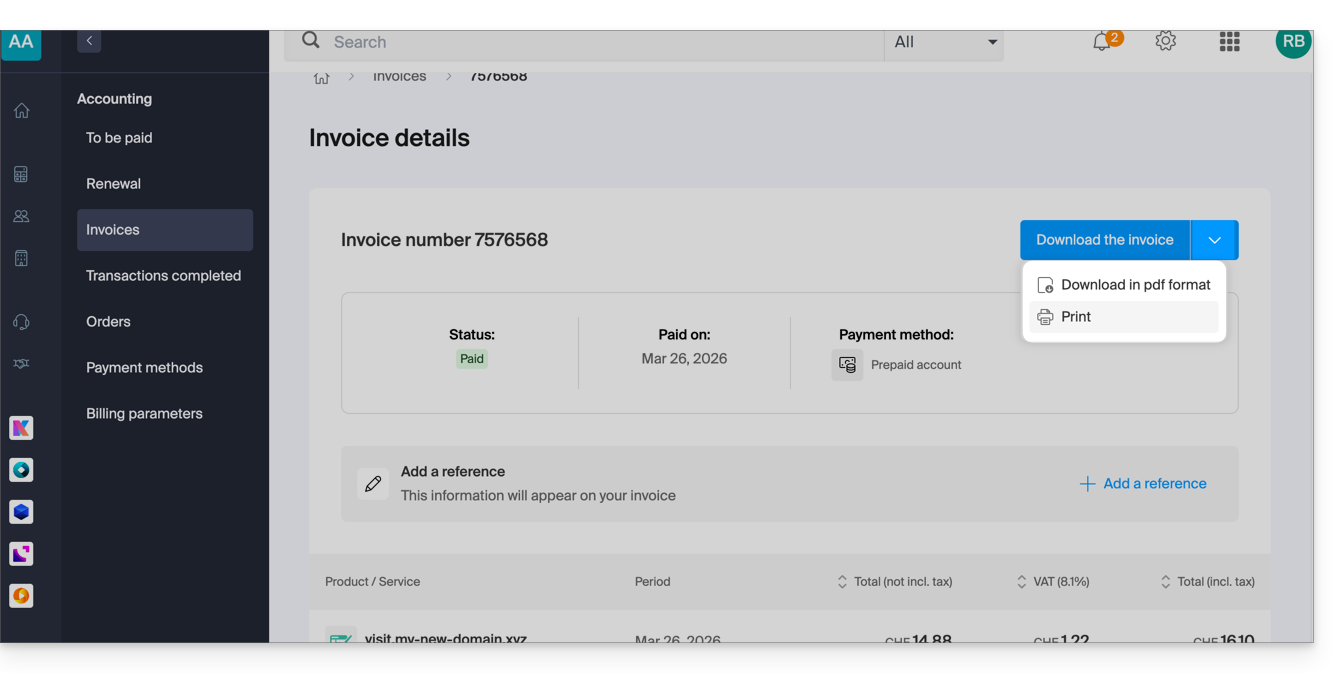
Exportar um conjunto de documentos de faturação
Para descarregar um conjunto de documentos num arquivo CSV no formato .csv ou recebê-lo por e-mail:
- Na mesma página, filtre os documentos de acordo com o estado Pago, Reembolsado, etc., e de acordo com o período desejado (calendário de início e fim).
- Clique no botão na parte inferior, de acordo com o tipo de exportação desejada:
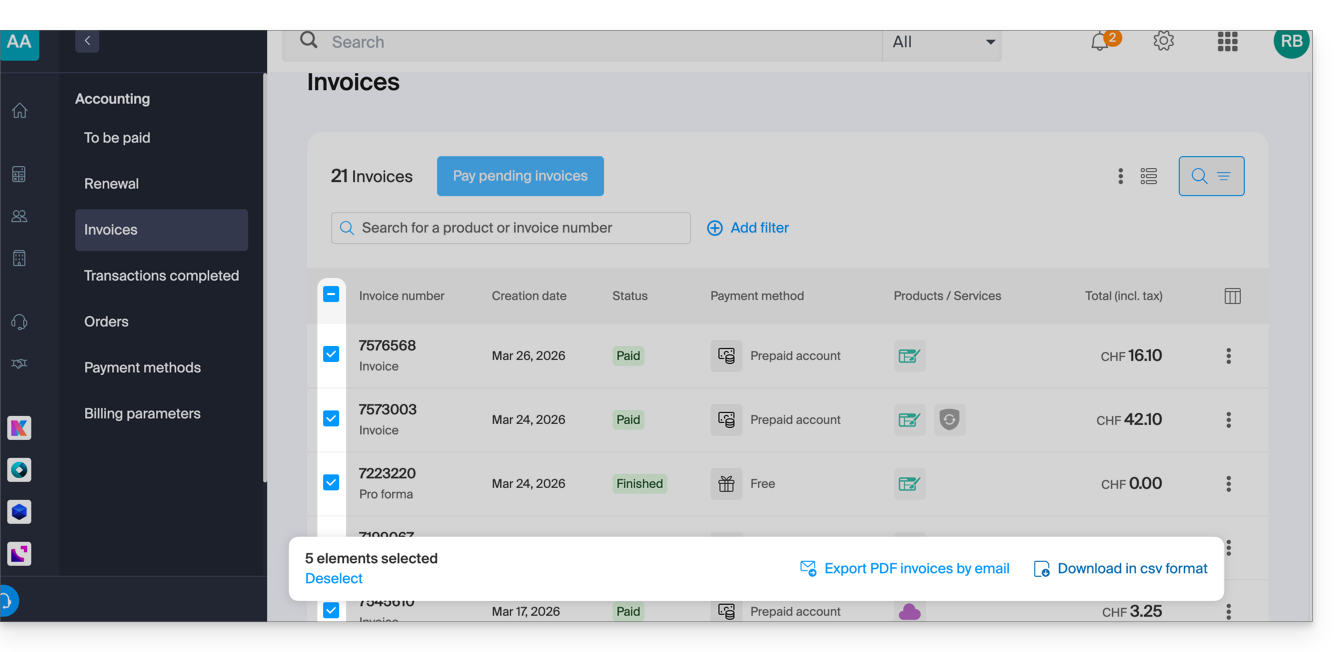
Receber a (próxima) fatura em PDF por e-mail
Para que a fatura seja sempre anexada em formato PDF a cada e-mail de renovação:
- Clique aqui para acessar a página de configuração/contabilidade no painel de controle Infomaniak (precisa de ajuda?).
- O acesso requer autenticação com um usuário que tenha permissões suficientes.
- Nesta página, ative ou desative a opção de adicionar faturas em formato PDF:
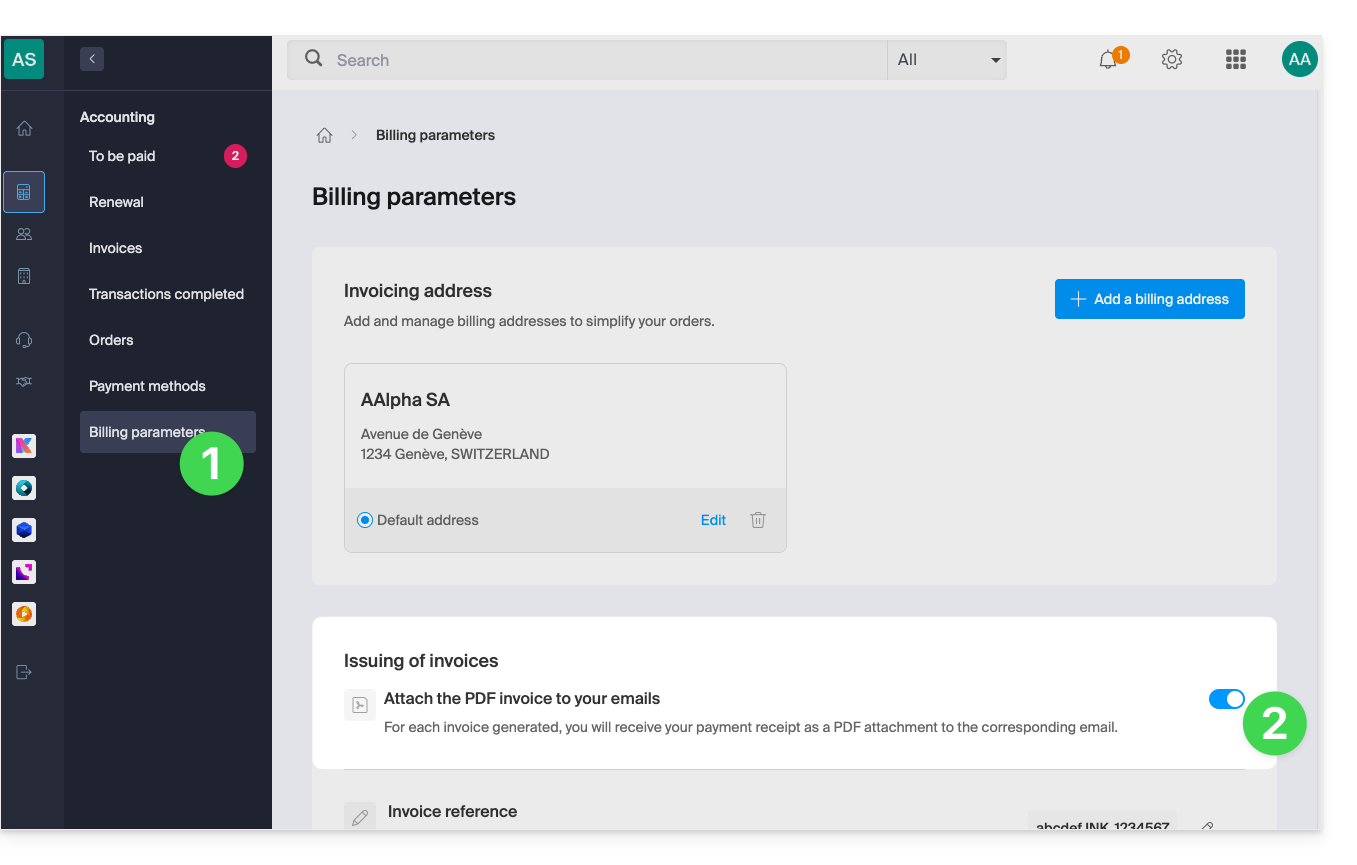
As suas preferências são guardadas automaticamente sempre que uma alteração é efetuada na página.
Imprimir uma fatura Pro Forma
As faturas Pro Forma (ou proforma) não têm valor legal, jurídico, fiscal ou contabilístico:
- Clique aqui para acessar o gerenciamento de pagamentos no painel de controle Infomaniak.
- Selecione os produtos relevantes.
- Clique em Gerar Fatura Pro Forma na parte inferior da tabela
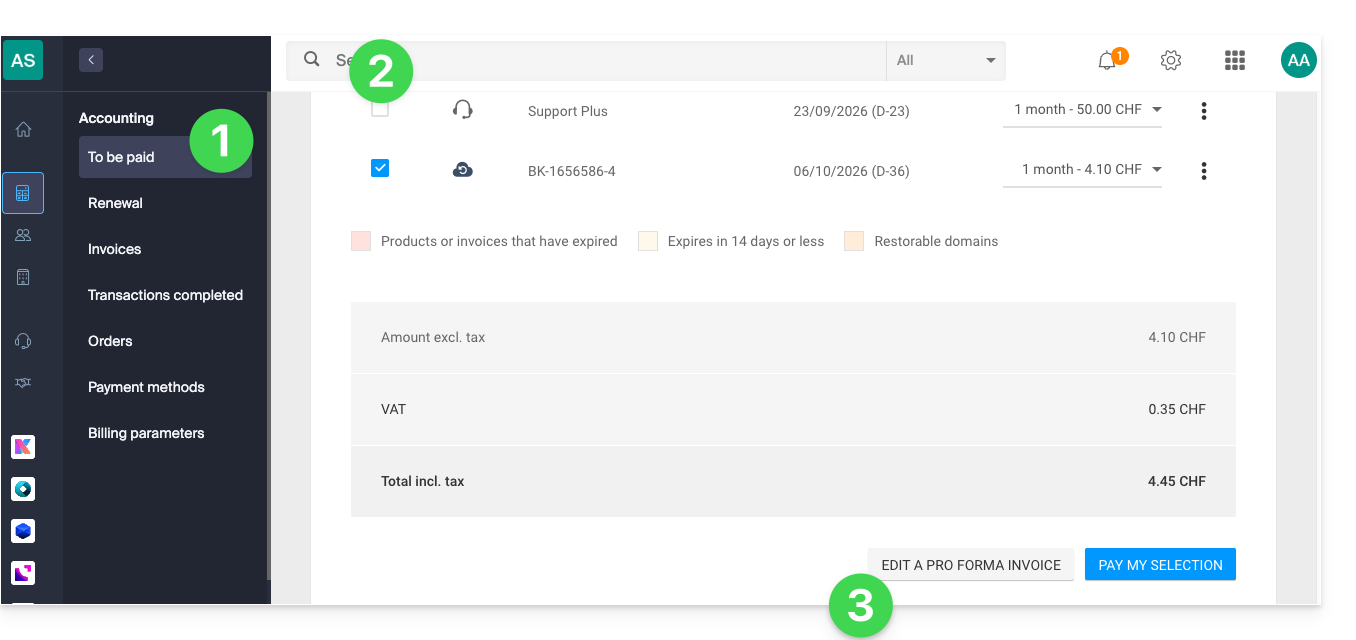
- Depois de exibida, é possível fazer o download da fatura Pro Forma.
Link para esta FAQ: https://faq.infomaniak.com/2091
Esta seção de perguntas frequentes foi útil?