Base de conhecimento
1000 perguntas frequentes, 500 tutoriais e vídeos explicativos. Aqui, você encontra apenas soluções!
Este guia explica como importar contactos para as listas de contactos da aplicação web Contactos Infomaniak (serviço online ksuite.infomaniak.com/contacts).
Introdução
- Um assistente facilita a importação de contatos a partir de diferentes fontes, como Outlook, agendas do macOS, Thunderbird, Gmail, etc.
- A importação pode ser feita por meio de um arquivo no formato
VCARDouCSV. - O ficheiro não pode exceder os 50 MB nem conter mais de 10000 linhas.
Importar contactos
Para isso:
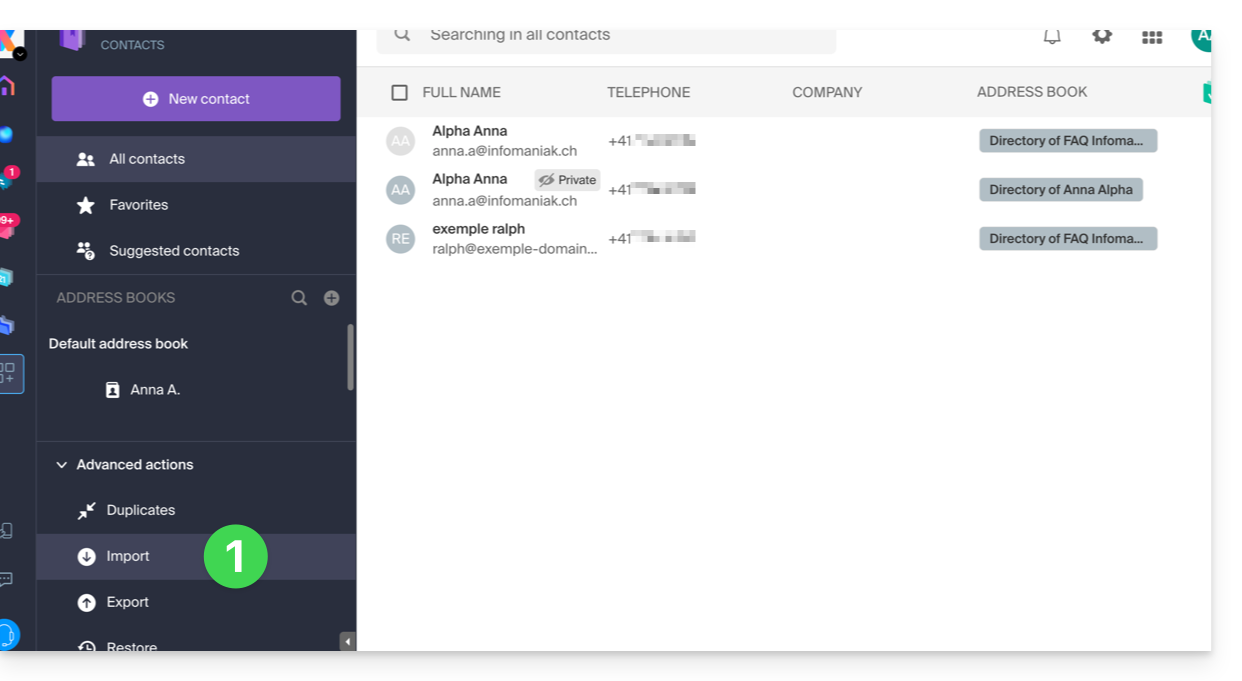
- Clique aqui para acessar a seção Importação do aplicativo web Contatos Infomaniak (serviço online ksuite.infomaniak.com/contacts):
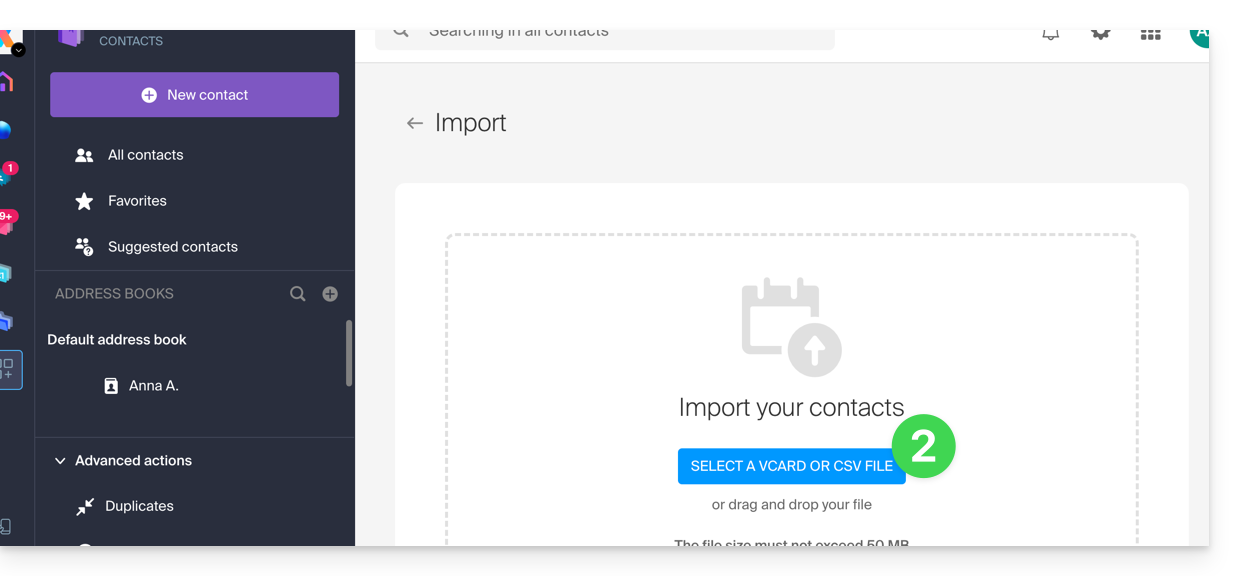
- Clique no botão azul Selecionar um ficheiro VCARD ou CSV:
Importar a partir de um ficheiro vCard (.vcf)
O conteúdo de um arquivo de exportação de contatos no formato vCard é semelhante a este:
BEGIN:VCARD
VERSION:3.0
FN:John Smith
N:Smith;John;;;
EMAIL;TYPE=INTERNET:john.smith@example.com
TEL;TYPE=CELL:+41791234567
ORG:Example Ltd
END:VCARD
BEGIN:VCARD
VERSION:3.0
FN:Jane Miller
N:Miller;Jane;;;
EMAIL;TYPE=INTERNET:jane.miller@example.com
ORG:Freelance
END:VCARD
...
Ao selecionar o arquivo .vcf na ferramenta de importação, as etapas seguintes serão executadas:
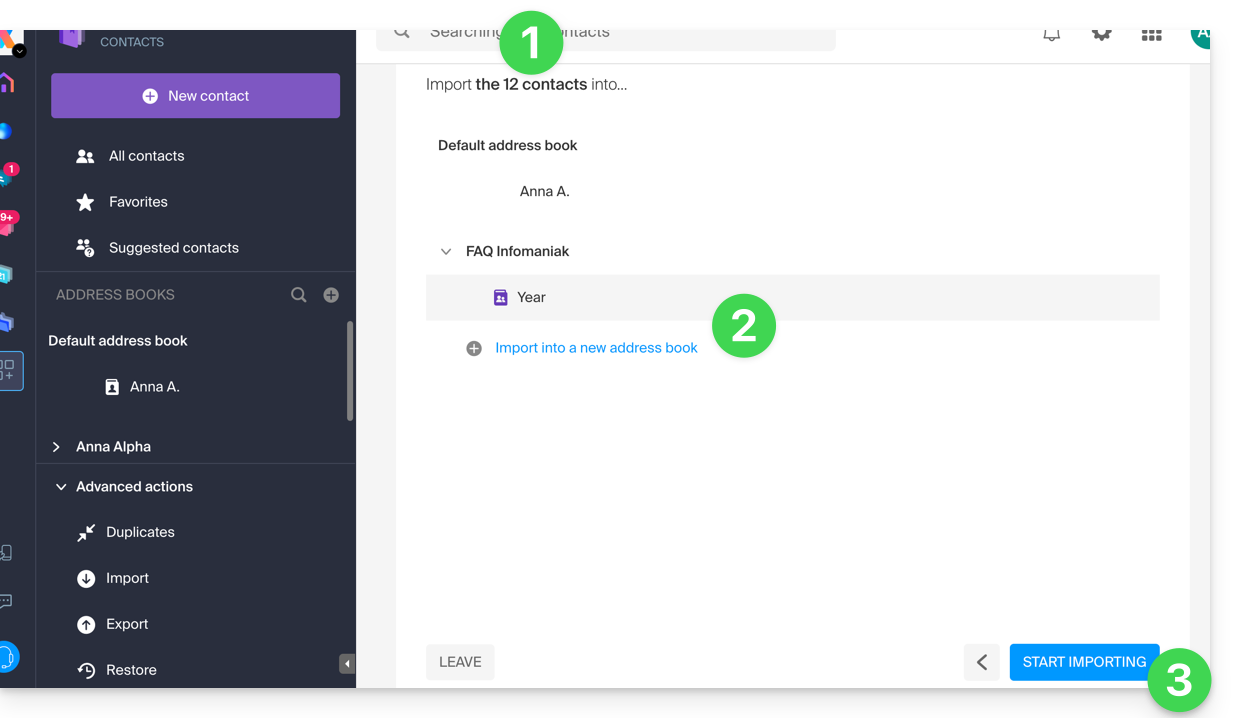
- O assistente indica o número de contactos detetados no seu ficheiro.
- Escolha o livro de endereços (ou crie um novo) para guardar os seus contactos.
- Clique no botão para iniciar a importação:
Importar a partir de um arquivo CSV (.csv)
O conteúdo de uma exportação de contactos no formato CSV tem o seguinte aspeto:
Name,First name,Email,Phone,Organization,Notes
Smith,John,john.smith@example.com,+41791234567,Example Ltd,VIP customer
Miller,Jane,jane.miller@example.com,,Freelance,
Brown,Mark,,+41792345678,,Former colleague
Taylor,Sarah,sarah.taylor@example.com,+41793456789,City Hall,
Wilson,Lucas,lucas.wilson@example.com,,,Quote request in March
Moore,Elise,,+41794567890,BioShop,
Walker,Thomas,thomas.walker@example.com,+41795678901,InnoTech,Python expert
Young,Julie,julie.young@example.com,,,
...
Quando seleciona o seu ficheiro .csv na ferramenta de importação, os passos seguintes são:
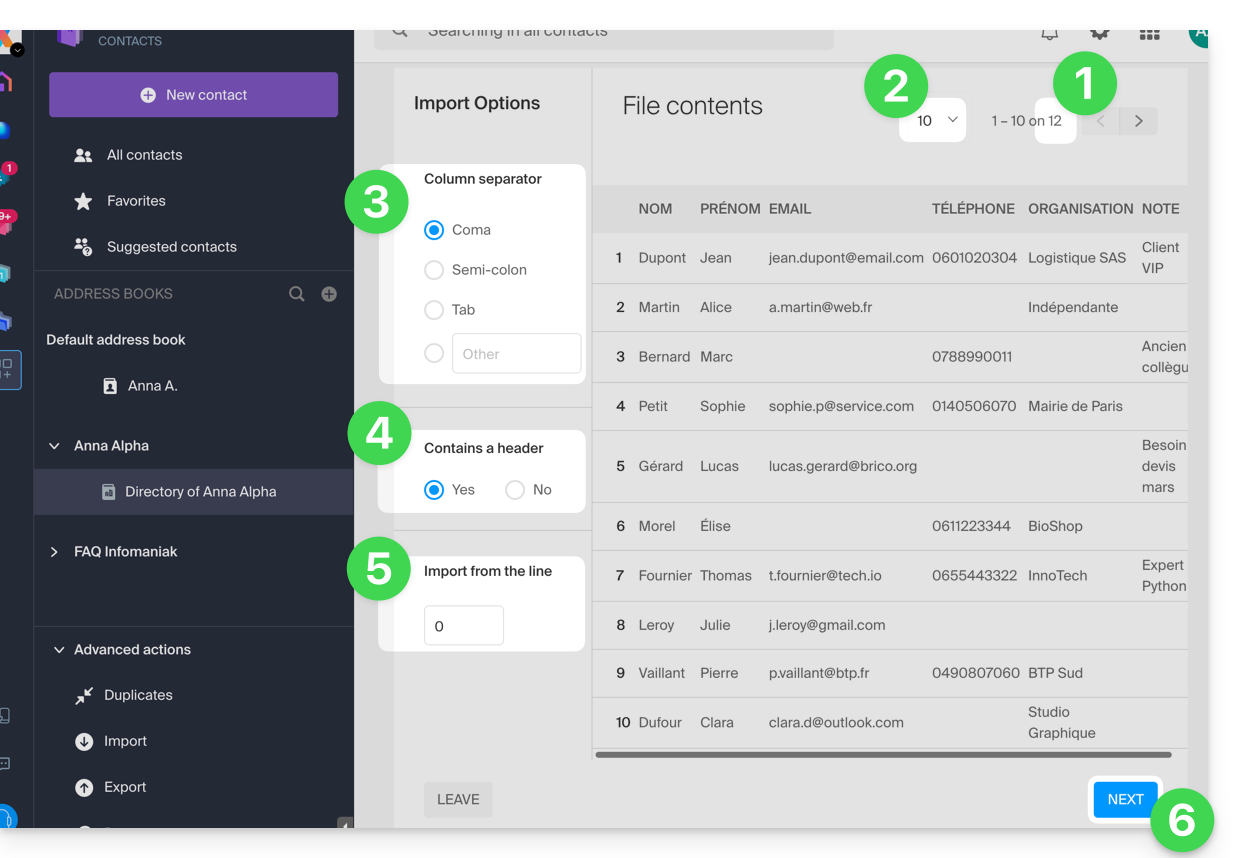
- O assistente indica o número de contactos detetados no seu ficheiro.
- Pode aumentar o número de contactos exibidos por página, para poder visualizar melhor todos os contactos, se necessário.
- Escolha o separador usado para delimitar as informações no seu arquivo de texto.
- Especifique se o arquivo contémna primeira linha, sem informações de contato (apenas os cabeçalhos das colunas).
- Especifique se deseja importar contatos a partir de uma linha específica.
- Clique no botão para continuar:
- Atribua as informações detectadas no arquivo a cada contato, utilizando os campos disponíveis em sua lista de endereços:
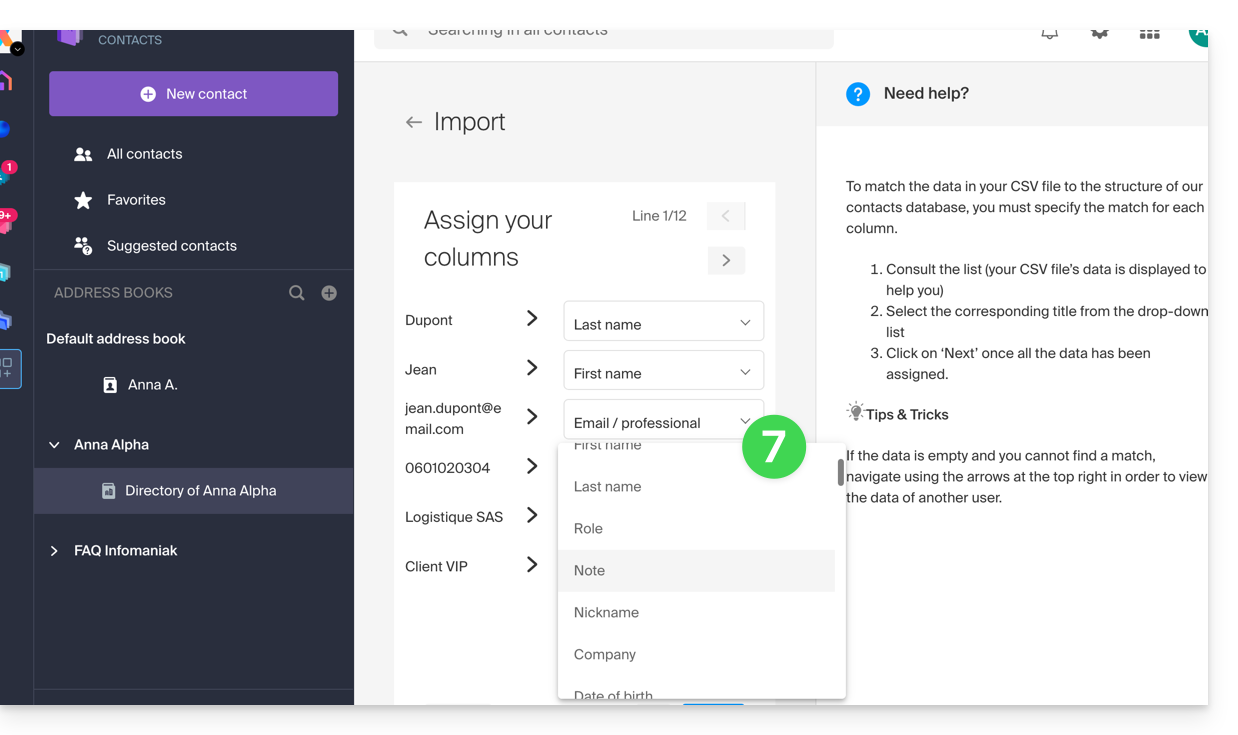
- Navegue pelos contatos a serem importados para especificar outros campos, se necessário.
- Volte para verificar o impacto das suas alterações e, em seguida, clique no botão para continuar:
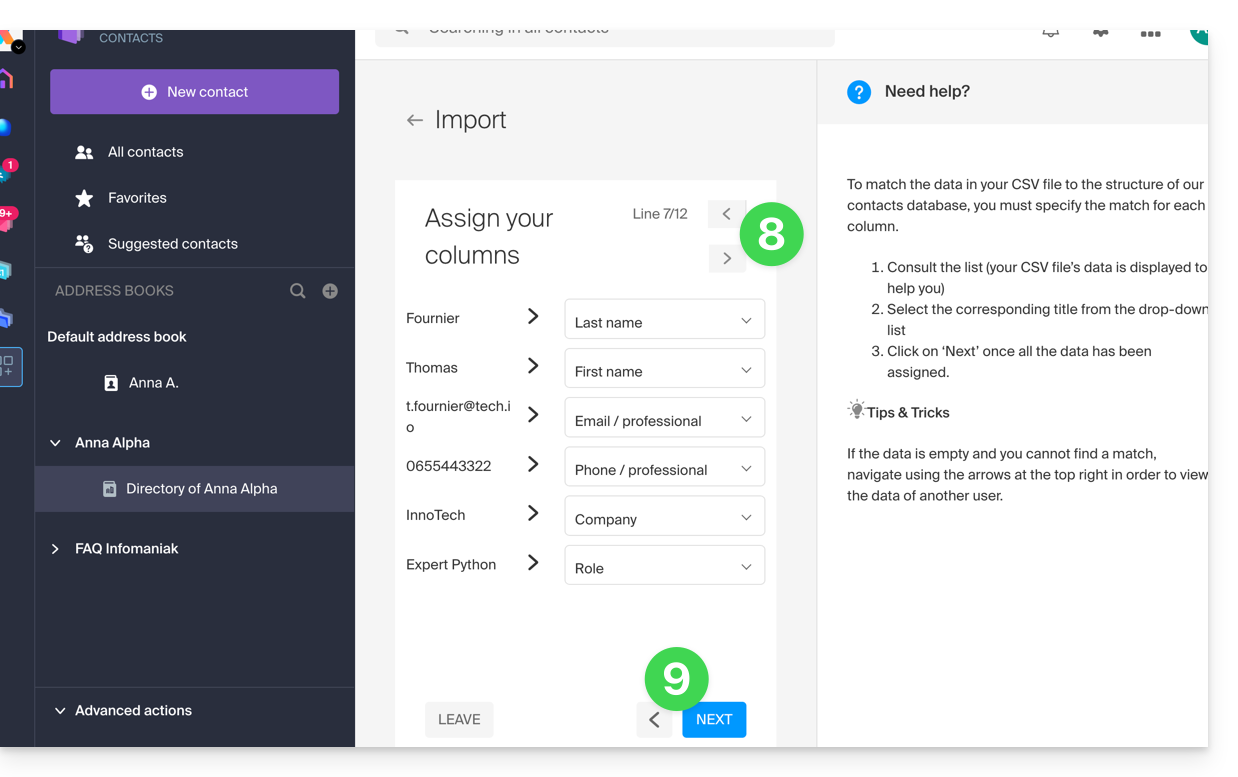
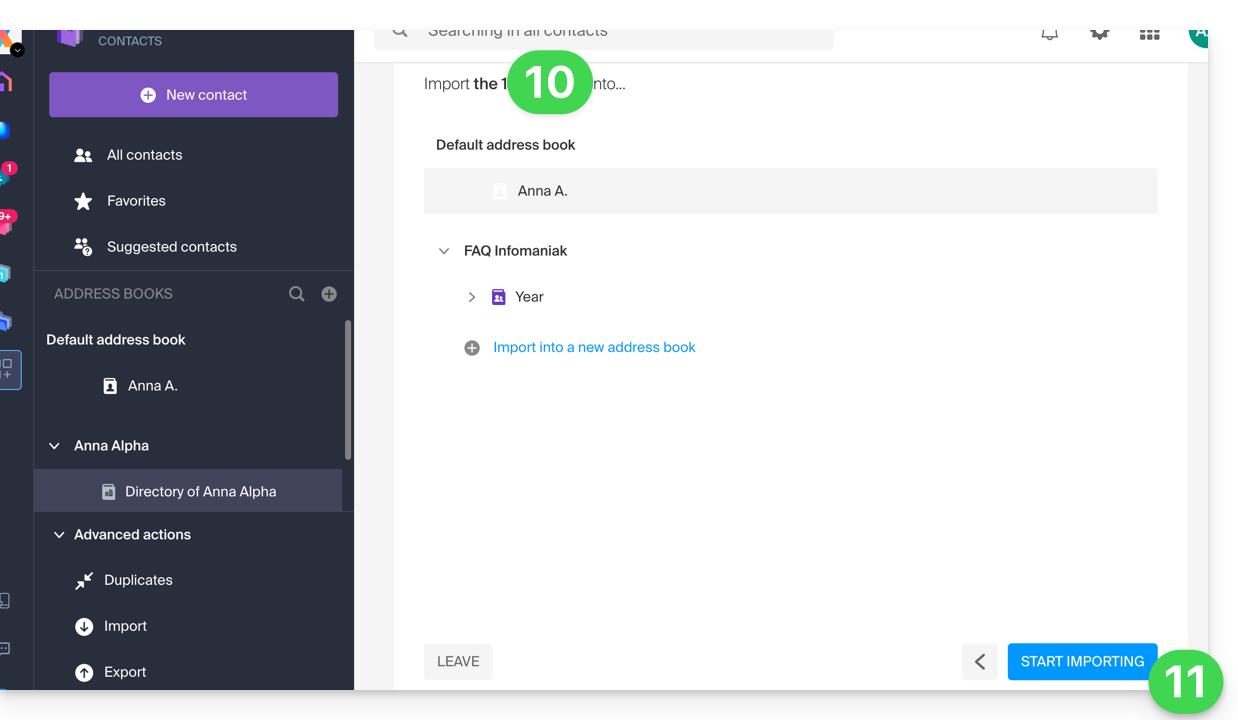
- Escolha o catálogo de endereços (ou crie um novo) para armazenar os seus contactos.
- Clique no botão para iniciar a importação:
Contactos importados
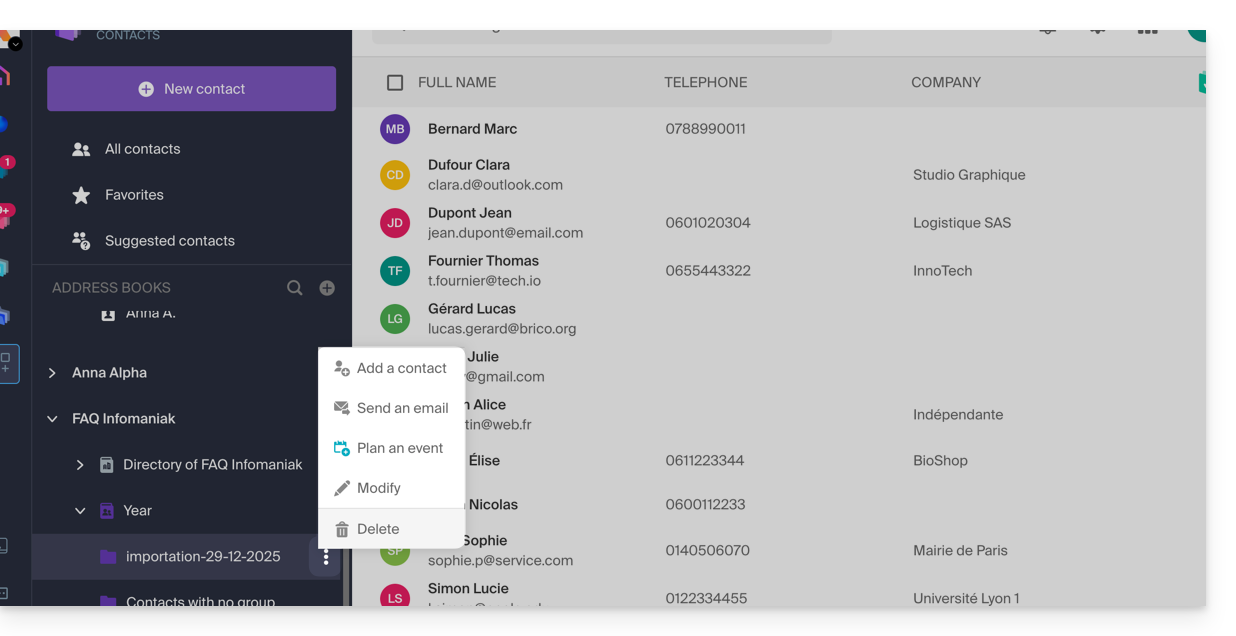
Os contactos são importados para o local especificado, num grupo. Se necessário, pode eliminar esta pasta que foi criada para o efeito (isto não elimina os contactos, a menos que ative esta opção ao eliminar a pasta):
- Clique em o menu de ação ⋮ localizado à direita do nome do grupo criado com a data da importação.
- Clique em Excluir:
Em caso de problema
- Preencha os campos de contato:
- Um contato contendo apenas o nome e o sobrenome pode ser ignorado pelo sistema por motivos de segurança.
- Certifique-se de que pelo menos uma informação adicional esteja presente (endereço de e-mail ou número de telefone).
- Verifique o cabeçalho do seu arquivo (CSV):
- As colunas devem ter nomes claros (ex: "Nome", "Sobrenome", "E-mail").
- Se os títulos estiverem ausentes ou incorretos, o sistema não poderá ler os dados.
- Formato dos dados:
- Verifique se os números de telefone não contêm caracteres especiais incomuns e se os endereços de e-mail estão corretamente escritos (presença do
@e do ponto).
- Verifique se os números de telefone não contêm caracteres especiais incomuns e se os endereços de e-mail estão corretamente escritos (presença do
- Codificação do arquivo:
- Para um resultado ideal, salve seu arquivo CSV no formato UTF-8; isso garante que os acentos e os caracteres especiais sejam exibidos corretamente.
Se precisar exportá-los primeiro de...
... Outlook (versão antiga)
- No seu programa Outlook, aceda ao seu catálogo de endereços.
- Selecione os contactos a exportar.
- Em Ações, clique em Transferir como vCard.
- Envie o e-mail contendo o vCard.
- Acesse o e-mail no aplicativo web Mail da Infomaniak (serviço online ksuite.infomaniak.com/mail).
- Clique em Adicionar todos os contactos.
... macOS (ou consulte este outro guia)
- No seu programa de contactos, vá para Ficheiro e selecione Exportar.
- Escolha Exportar vCard.
- Salve o seu ficheiro vCard no seu computador.
... Thunderbird (ou consulte este outro guia)
- No seu programa Thunderbird, vá para Janela e selecione Livro de endereços.
- Em Ferramentas, selecione Exportar.
- Nas opções de salvamento, escolha Separado por vírgulas como formato.
- Salve o seu arquivo CSV.
... Gmail (ou consulte este outro guia)
- Na sua conta Gmail, aceda à secção Contactos.
- Clique no botão Exportar.
- Selecione Formato vCard.
- Salve o seu ficheiro vCard no seu computador.
... Office 365 (ou consulte este outro guia)
- No seu programa Outlook, aceda à secção Contactos.
- Clique em Gerir e selecione Exportar.
- Salve o seu arquivo CSV no seu computador.
... Yahoo Mail: consulte este outro guia
... Proton Mail: consulte este outro guia
... Bluewin: consulte este outro guia
Consulte este outro guia para importar outros dados.
Link para esta FAQ: https://faq.infomaniak.com/1599
Esta seção de perguntas frequentes foi útil?
Este guia explica como modificar os direitos de acesso aos produtos para um utilizador da sua Organização no Manager Infomaniak.
Introdução
- Desde que abriu a sua conta na Infomaniak, faz parte de pelo menos uma Organização (❓: ajuda).
- Se estava sozinho e não se tratava de um convite, uma Organização foi criada em seu nome e você se torna automaticamente o responsável legal.
- Caso contrário, você pertence à Organização que o convidou (para participar da sua kSuite, para gerenciar um produto, etc.).
- É possível alterar o papel de um utilizador dentro da sua Organização (❓: ajuda).
- Você pode então definir se um usuário…
- … faz parte da sua Organização e se ele deve se tornar:
- Responsável legal
- Administrador
- Colaborador (esta parte é detalhada abaixo…)
- … é externo à sua Organização (direitos limitados):
- Os usuários externos não são considerados nos compartilhamentos de calendários e agendas de endereços com toda a Organização.
- … faz parte da sua Organização e se ele deve se tornar:
Quem pode acessar o quê…
Pré-requisitos
- Alterne previamente para a Organização desejada, caso não encontre a lista de utilizadores esperada (❓: ajuda).
- Ser Administrador ou Representante legal na Organização (❓: ajuda).
- Ter adicionado um utilizador como colaborador (❓: ajuda).
O guia abaixo permite gerenciar o acesso aos produtos para colaboradores e usuários externos. De fato, um responsável legal ou um administrador tem, de qualquer forma, acesso a todos os produtos existentes na organização e visíveis no Gerenciador Infomaniak.
Para modificar os acessos aos produtos de um utilizador da Organização:
- Clique aqui para aceder à gestão de utilizadores no Manager Infomaniak (❓: ajuda).
- Clique no menu de ações ⋮ localizado à direita do utilizador em questão.
- Clique em Editar acessos aos produtos:
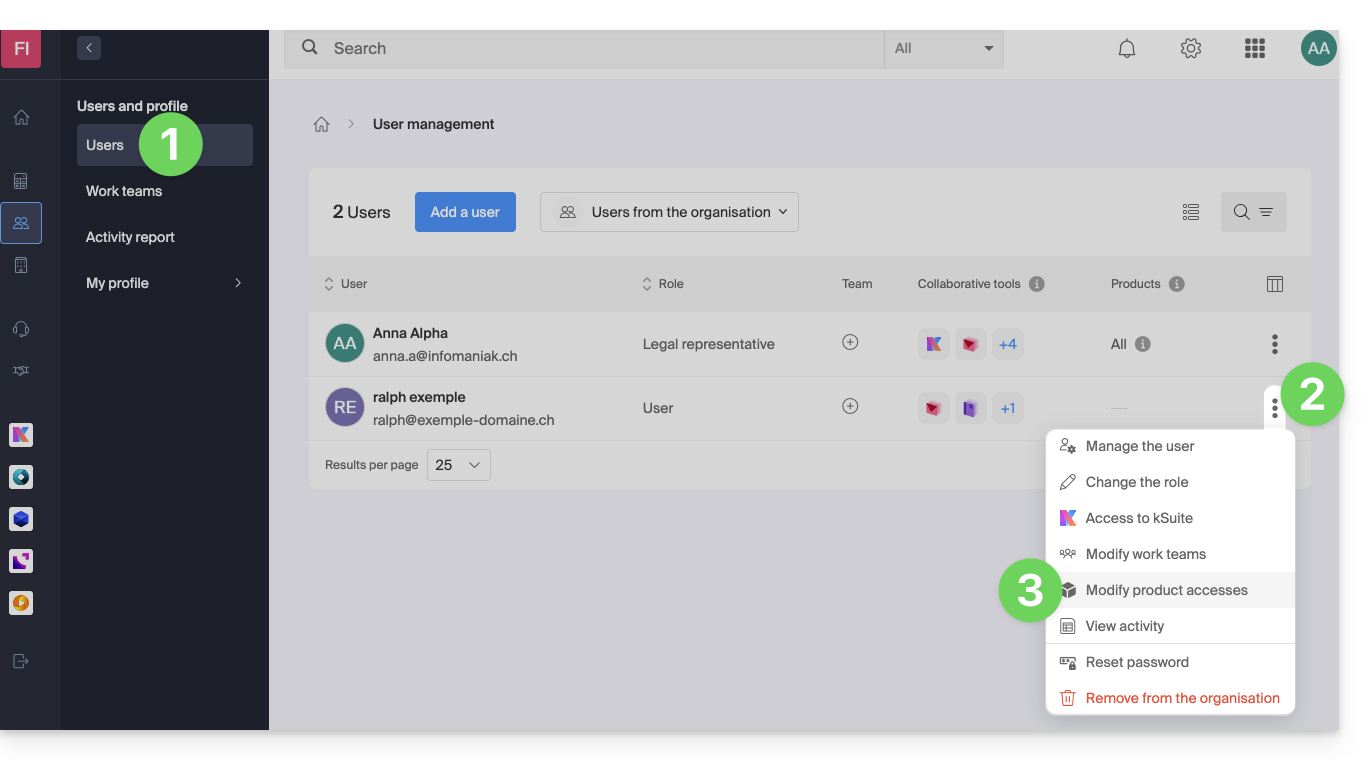
- Você pode conceder acesso total a tudo com as permissões máximas em um único clique.
- Caso contrário, clique na categoria de produto à qual deseja conceder acesso.
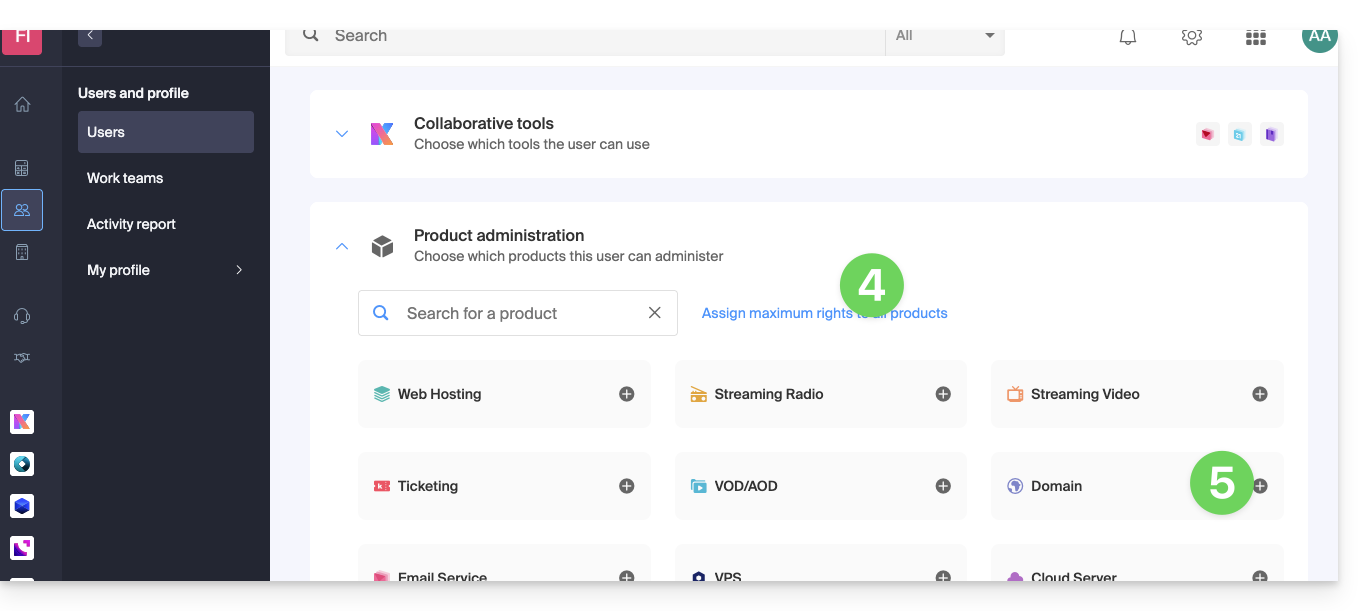
- Selecione o(s) produto(s) necessário(s).
- Se selecionou vários produtos, decida se um produto adicional futuro deverá ser automaticamente visível para o utilizador (e com que tipo de permissões❓: ajuda).
- Clique no botão Guardar:
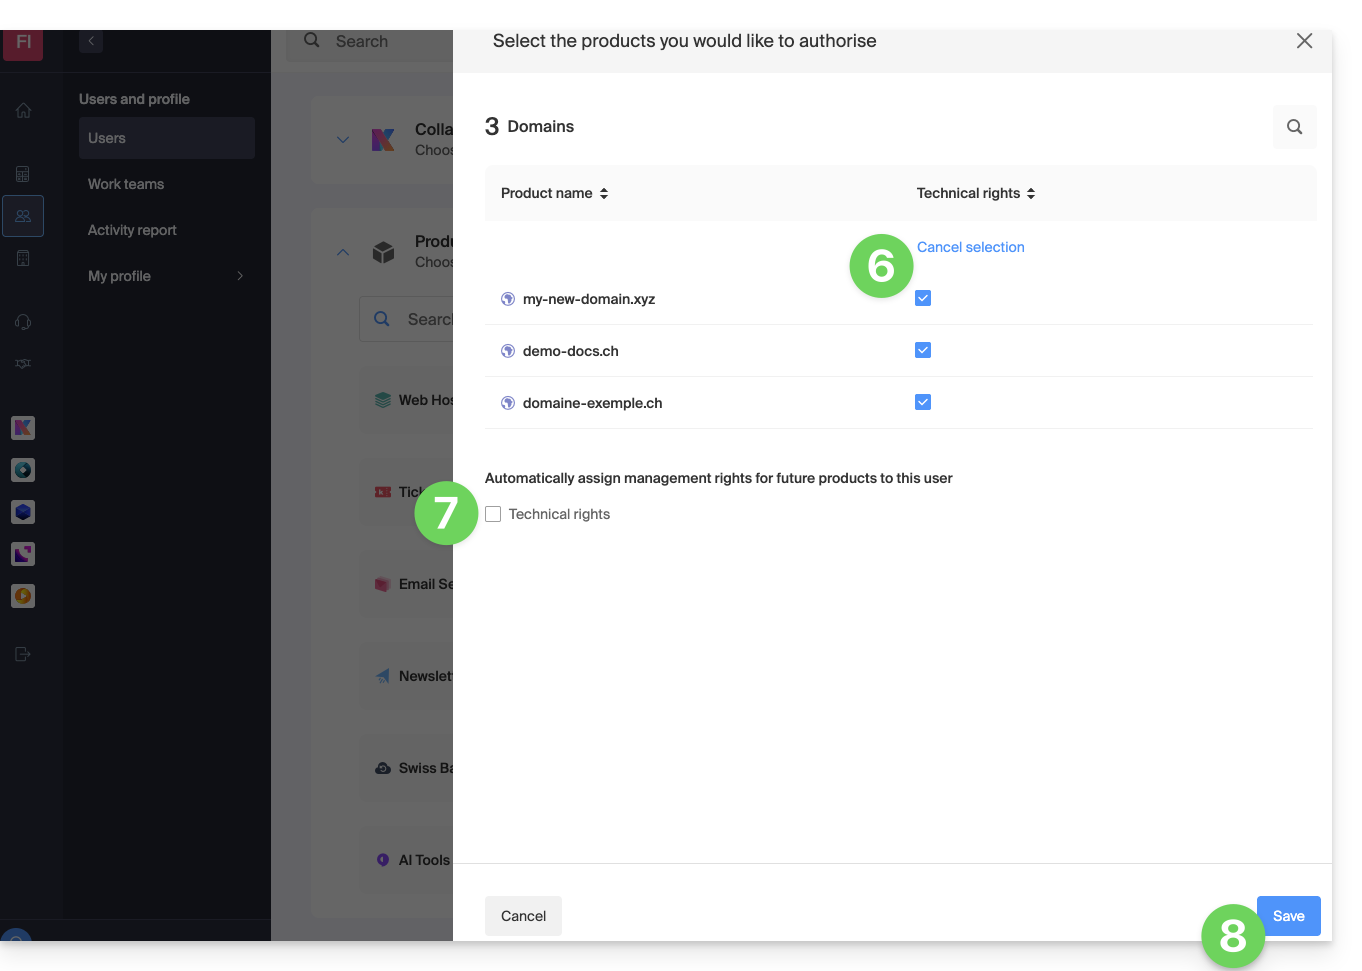
- Os direitos são concedidos imediatamente.
- Clique no ícone lápis ✎ para modificar as permissões:
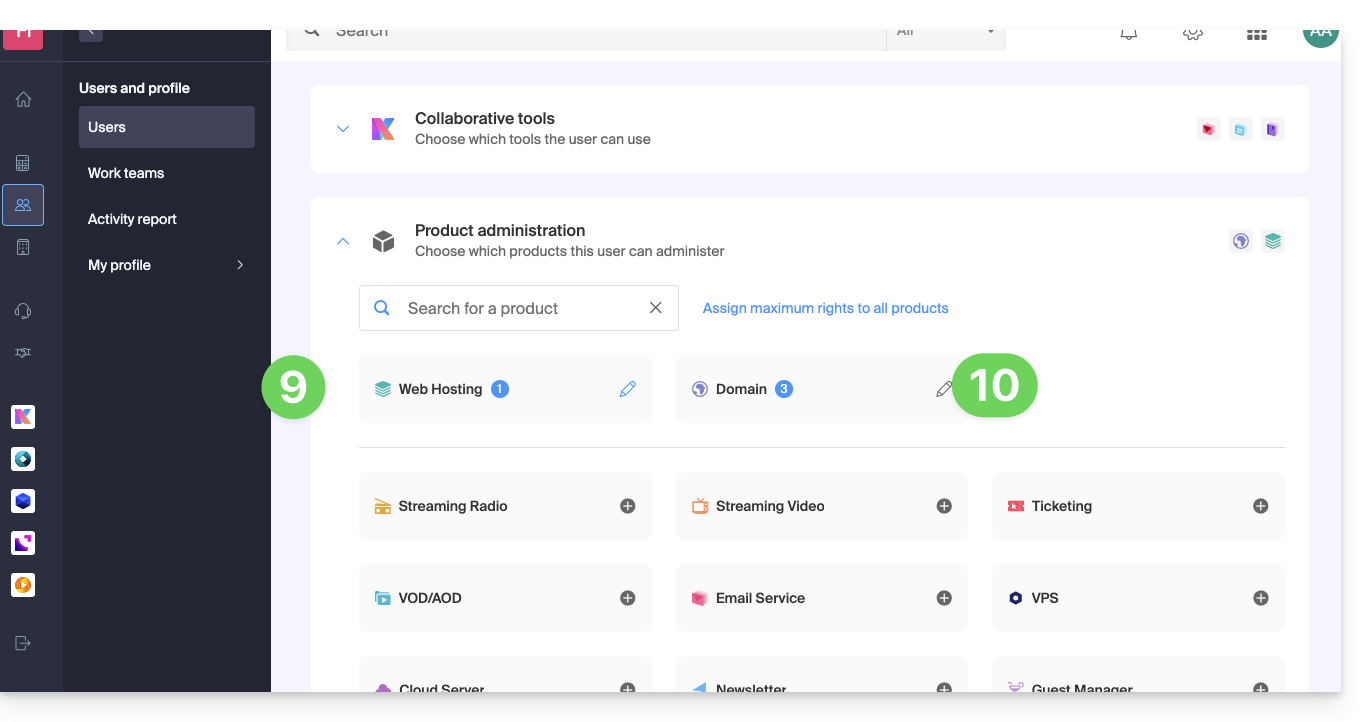
- Repita o processo a partir do passo 5 se precisar conceder acesso a vários produtos.
Utilização do serviço / Gestão do serviço
Atenção, na tabela dos seus produtos, é importante distinguir os acessos aos produtos (como o kDrive, por exemplo, dentro da kSuite) e os acessos à gestão dos produtos: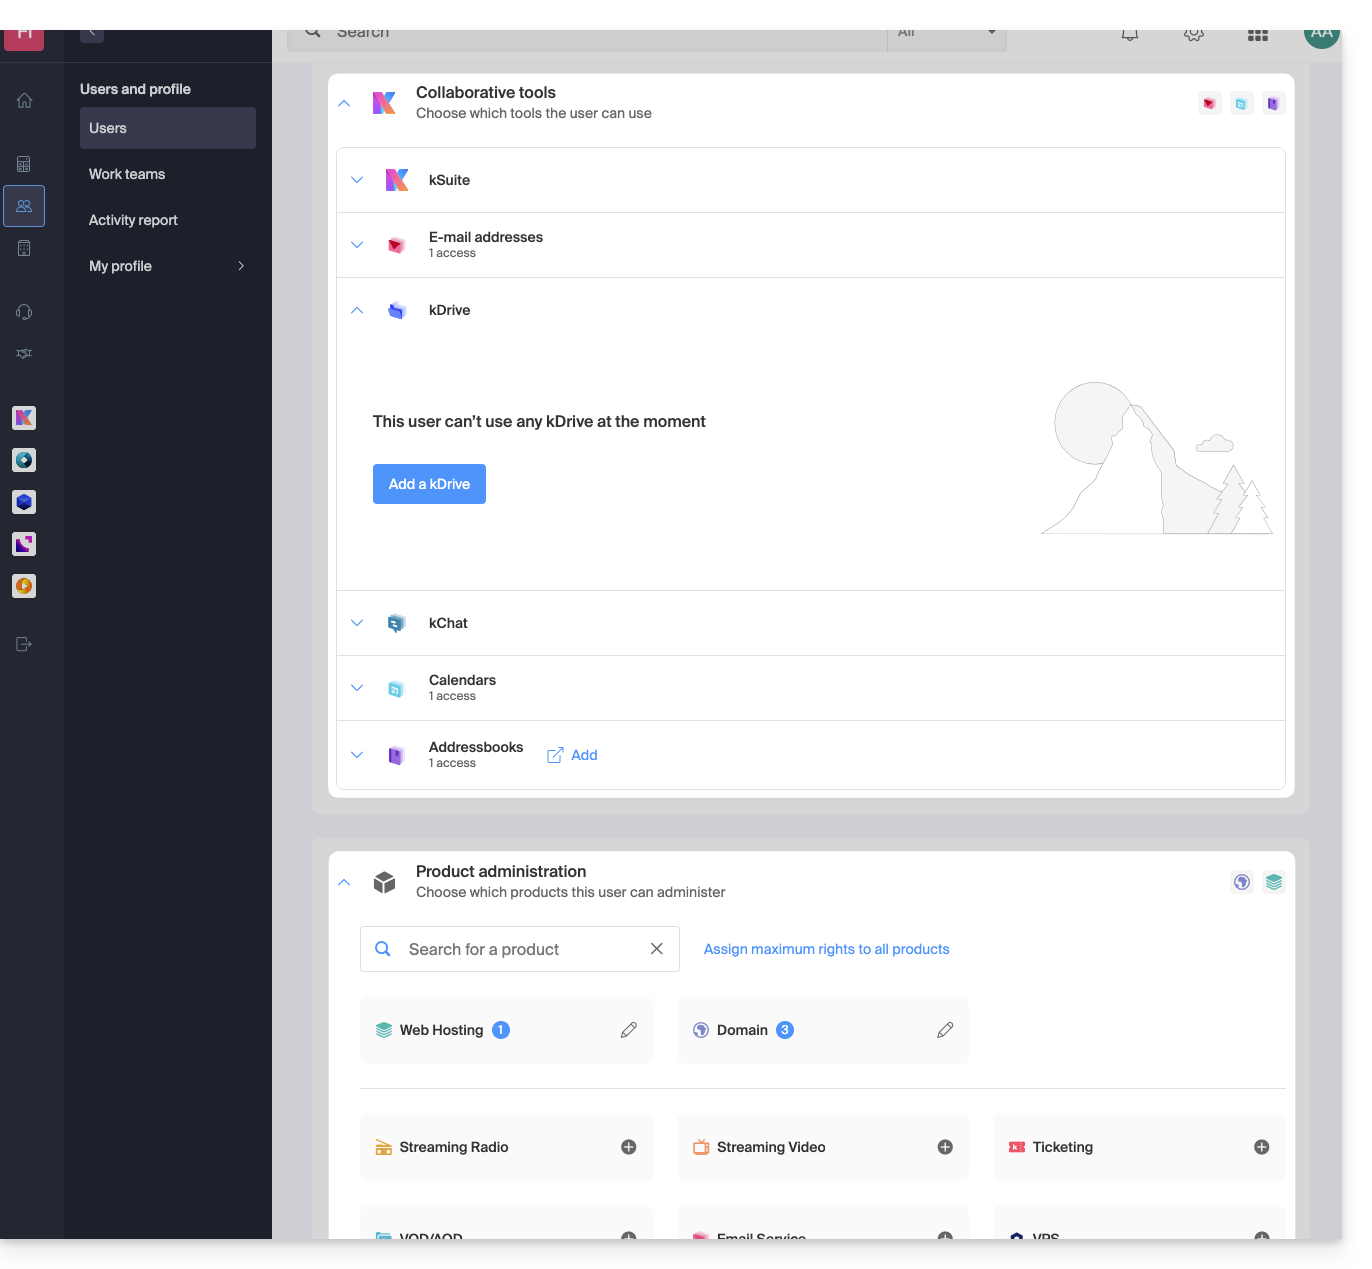
É possível autorizar um utilizador a utilizar o kDrive (poderá criar um PDF, por exemplo) sem, no entanto, lhe conceder um direito de gestão do serviço kDrive (não poderá alterar o plano, convidar um novo utilizador, cancelar, etc.).
Direitos técnicos / Direitos estatísticos
Com alguns serviços, como o kDrive, é possível conceder a um colaborador direitos TÉCNICOS e/ou ESTATÍSTICOS (adiciona acesso ao painel de controle, links de compartilhamento, estatísticas de armazenamento, usuários ativos, dispositivos conectados, atividade no kDrive):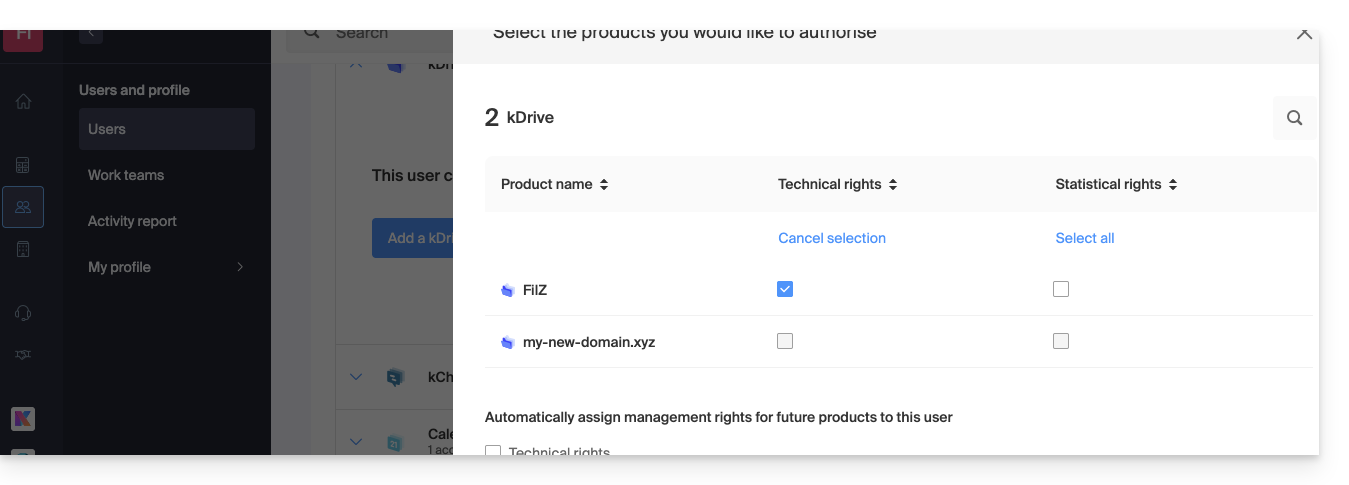
Outros serviços, como os domínios, não possuem uma seção ESTATÍSTICA: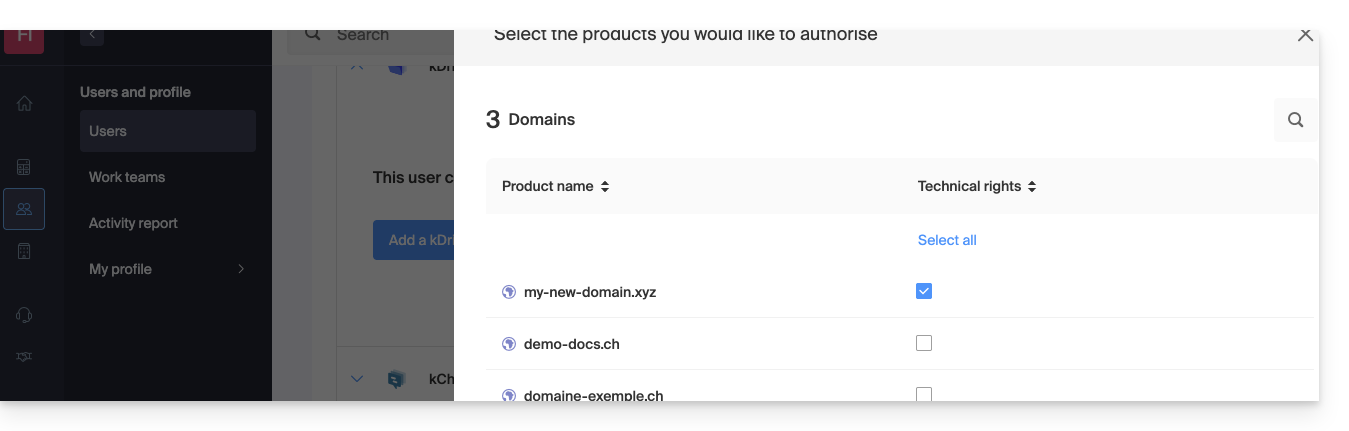
Certos serviços específicos, como a venda de bilhetes, permitem conceder direitos ainda mais detalhados: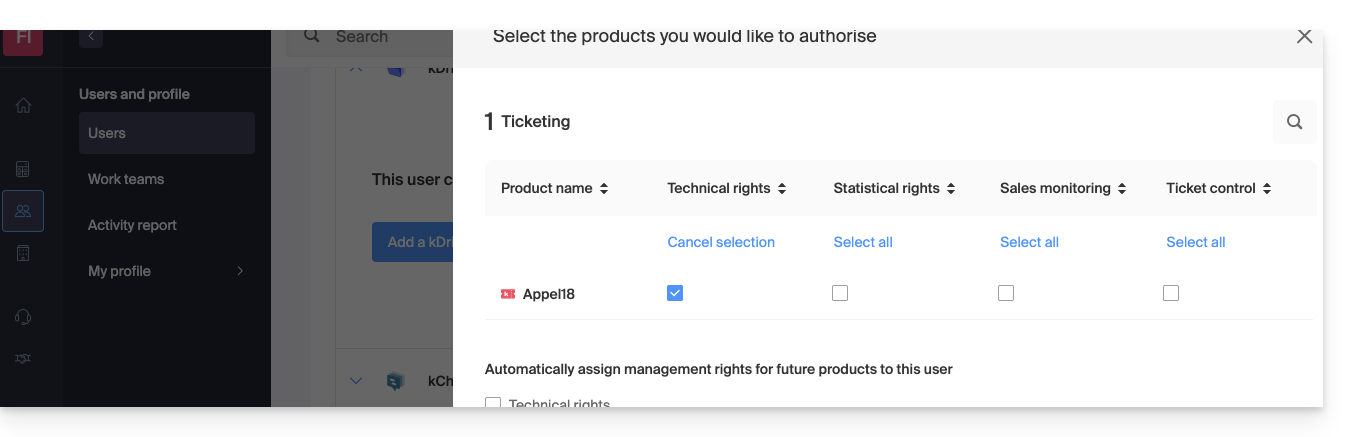
Acesso facilitado: os Grupos
Para facilitar a atribuição de permissões de acesso a um produto que se encontra na sua Organização, existem os Grupos (❓: ajuda). Estes permitem criar equipas que estão associadas a produtos Infomaniak com as permissões desejadas, o que é muito útil para conceder a um novo colaborador da sua Organização o acesso aos produtos de que ele precisará nas suas atividades diárias.
Link para esta FAQ: https://faq.infomaniak.com/1610
Esta seção de perguntas frequentes foi útil?
Este guia explica como receber automaticamente todas as manhãs na sua caixa de entrada Mail e/ou kChat o resumo das suas atividades registadas no Calendar Infomaniak.
Introdução
- Esta funcionalidade está desativada por defeito em todos os calendários.
- Este resumo é enviado para o seu endereço de e-mail (o mesmo que utiliza para aceder à sua conta Infomaniak).
- Contém a lista de todos os eventos do dia com suas informações mais importantes (link do kMeet, localização, horários, etc.).
- Você pode até mesmo enviar este cronograma diário para sua equipe ou assistente para que eles saibam qual o melhor momento para entrar em contato com você, inclusive criando uma regra de encaminhamento automático com base nos critérios correspondentes ao e-mail recebido.
Obtenha um cronograma de forma automática e diária
Pré-requisitos
- Para enviar um resumo no kChat, é necessário ter o kChat instalado na sua organização.
Para começar o dia consultando uma mensagem na sua caixa de entrada Infomaniak, que contém a programação baseada na sua agenda Infomaniak:
- Clique aqui para aceder às definições unificadas das suas aplicações web Infomaniak e, em particular, às definições do lembrete diário da aplicação Calendar.
- Verifique ou selecione a Organização correspondente no menu suspenso do menu lateral esquerdo.
- Se precisar modificá-la, volte às configurações clicando no item de lembrete diário para acessar as configurações:
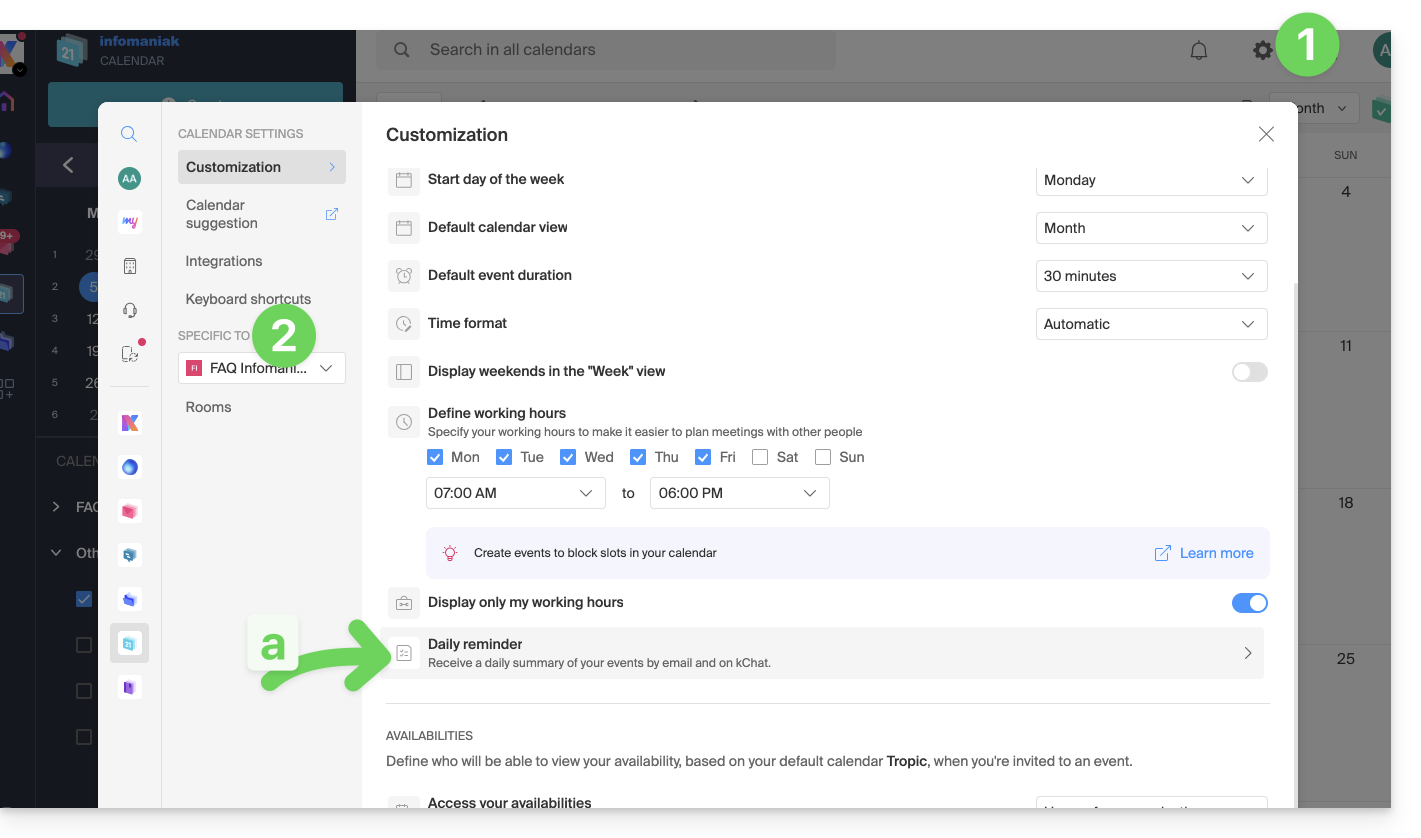
- Se precisar modificá-la, volte às configurações clicando no item de lembrete diário para acessar as configurações:
- Clique no botão para Adicionar um lembrete diário e configurá-lo:
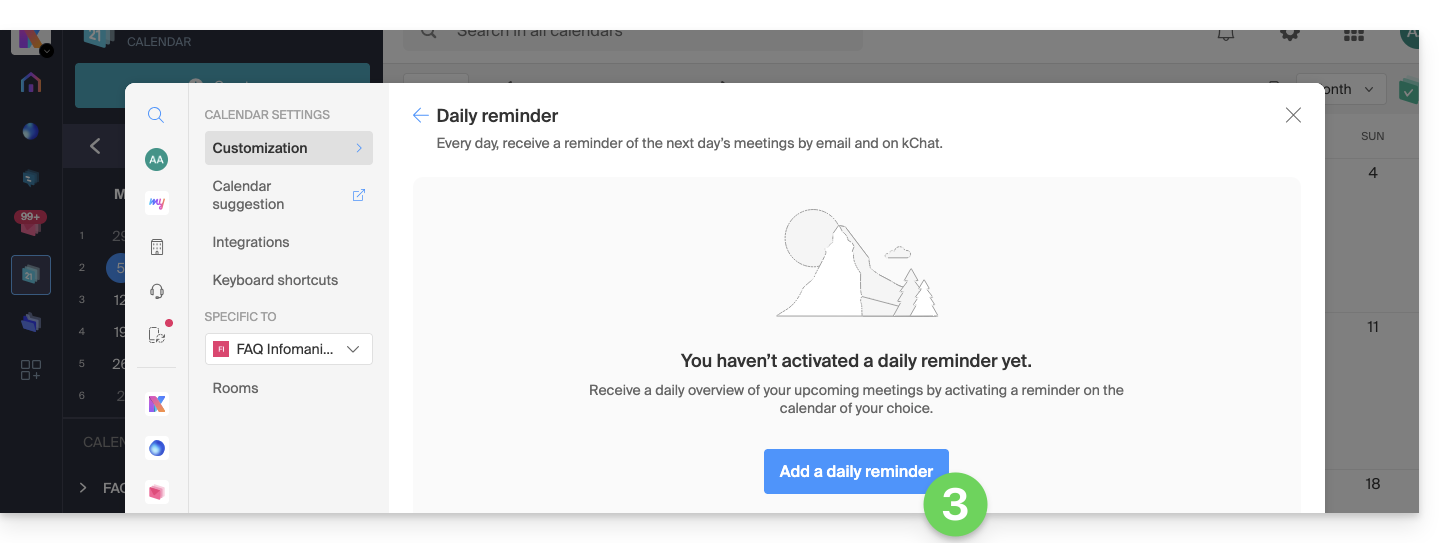
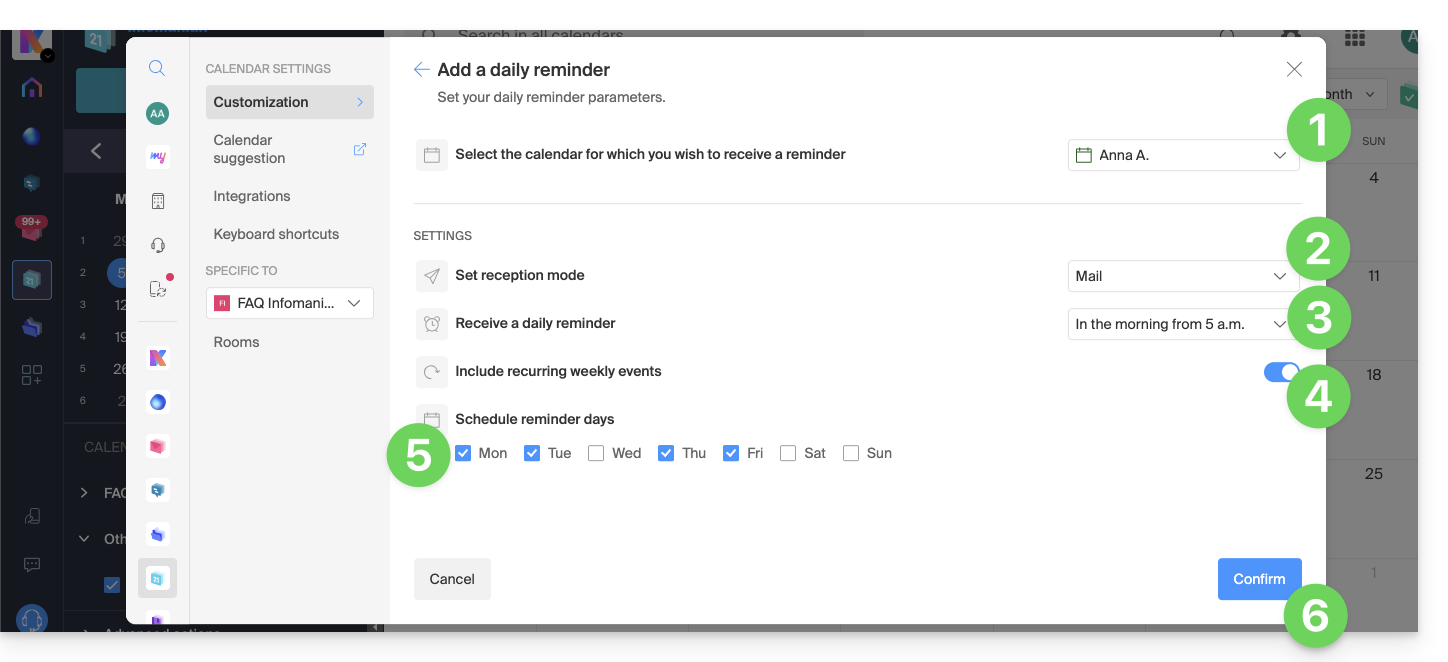
Para personalizar o seu lembrete de acordo com as suas necessidades:
- Selecione o calendário em questão.
- Escolha o modo de receção (e-mail, chat ou ambos).
- Escolha o momento em que deseja receber o lembrete (na noite anterior ou no início do dia).
- Escolha se deseja incluir ou não os eventos recorrentes.
- Escolha os dias em que o lembrete diário será enviado.
- Confirme suas escolhas na parte inferior da página:
Desativar o lembrete diário
Para interromper o envio do resumo diário por e-mail ou por Euria no kChat:
- Clique no link localizado na parte inferior da notificação recebida:
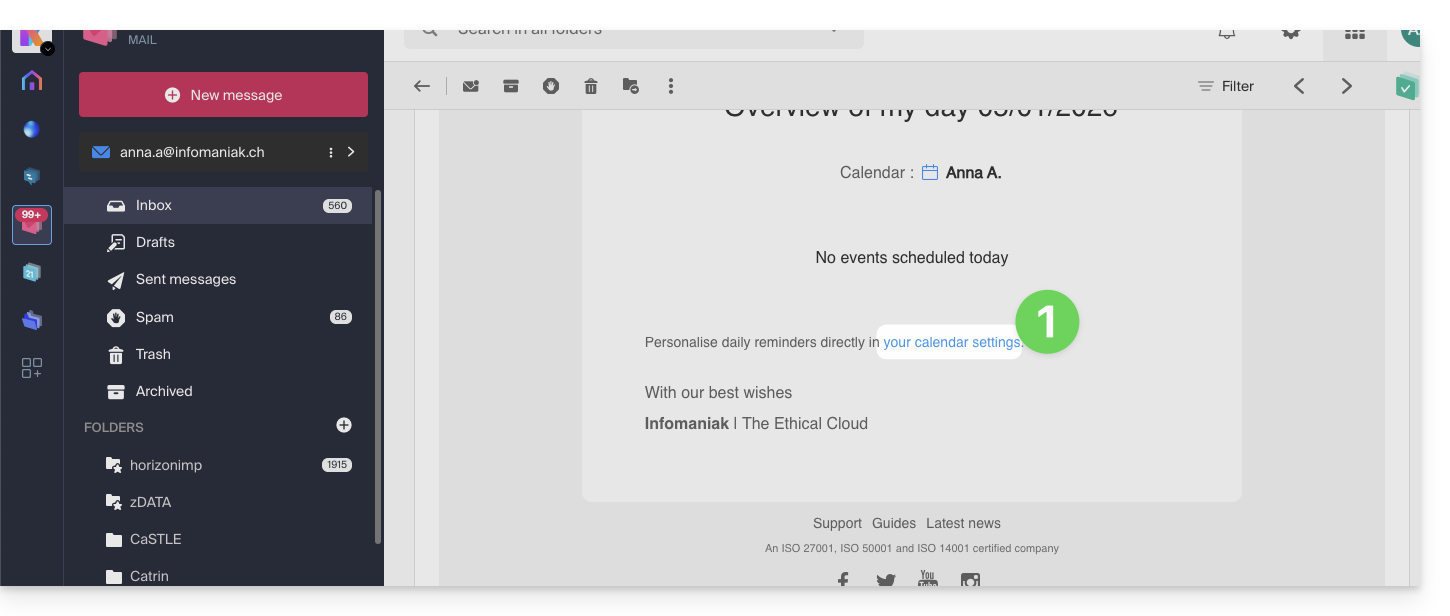
- Clique no lembrete para removê-lo:
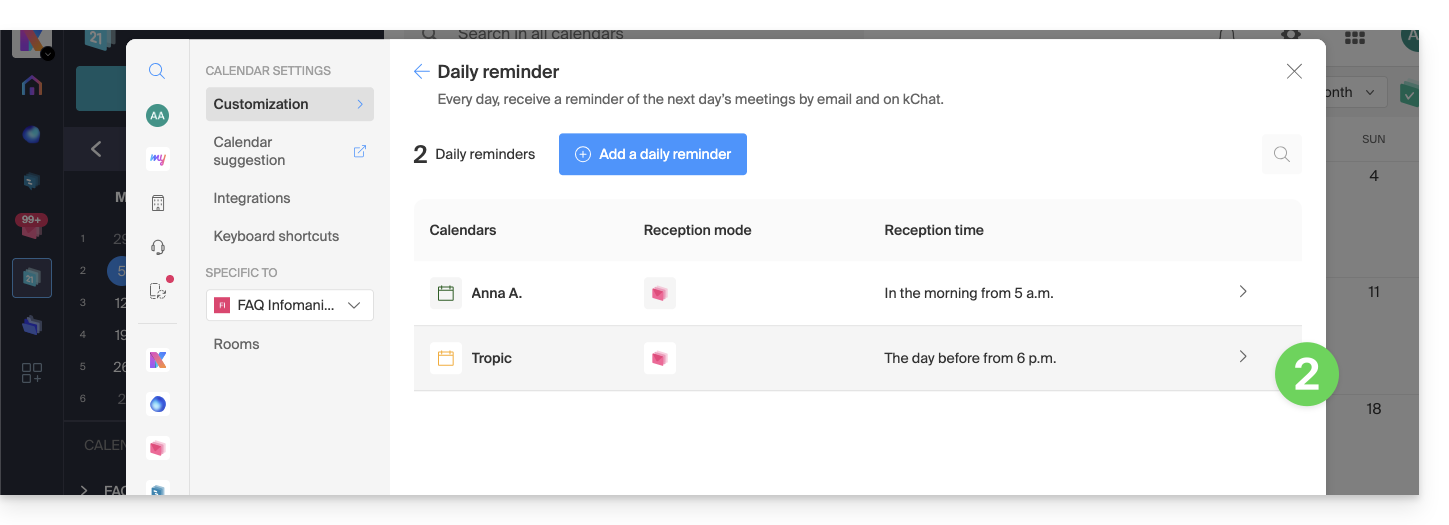
- Remova o lembrete a partir da página de edição:
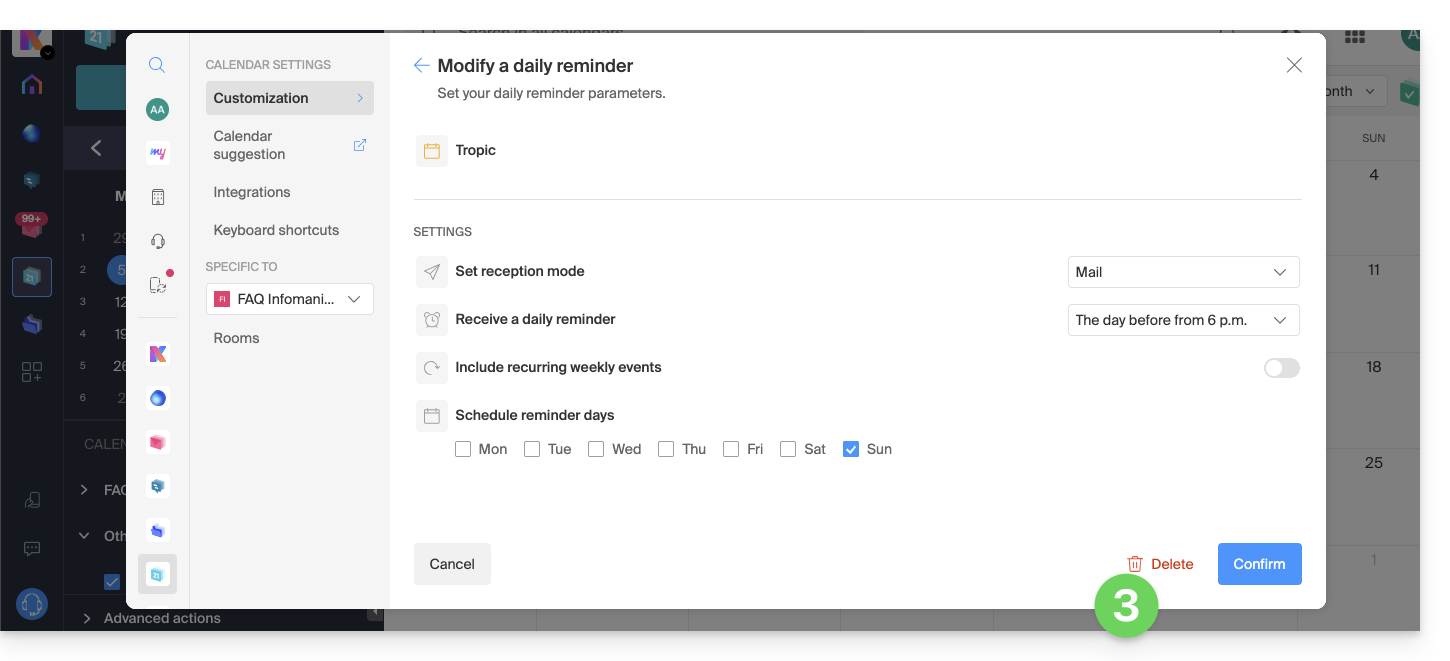
Link para esta FAQ: https://faq.infomaniak.com/1622
Esta seção de perguntas frequentes foi útil?
Este guia explica como modificar o papel e as permissões de um utilizador, de forma que este tenha apenas um papel legal restrito ou acesso apenas a certas funcionalidades da sua Organização no Manager Infomaniak.
Introdução
- Desde que abriu a sua conta na Infomaniak, faz parte de pelo menos uma Organização (❓: ajuda).
- Se estava sozinho e não se tratava de um convite, uma Organização foi criada em seu nome e você se torna automaticamente o responsável legal.
- Caso contrário, você pertence à Organização que o convidou (para participar da sua kSuite, para gerenciar um produto, etc.).
- Você pode definir se um utilizador…
- … faz parte da sua Organização e se deve ter o papel de:
- Responsável legal
- Administrador
- Colaborador
- … é externo à sua Organização (direitos limitados):
- Os utilizadores externos não são considerados nos partilhamentos de calendários e agendas de contactos para toda a Organização.
- … faz parte da sua Organização e se deve ter o papel de:
Modificar os direitos/permissões de um utilizador
Pré-requisitos
- Se não encontrar a lista de utilizadores esperada, altere primeiro para a Organização desejada (❓: ajuda).
- Ser Administrador ou Responsável legal na Organização (❓: ajuda).
- Consulte as diferentespermissões (direito de acesso aos produtos, por exemplo) e preferências de contato administrativode um usuário dentro de uma Organização (❓: ajuda).
- Atenção: não é possível remover um responsável legal se não houver outro responsável legal (❓: ajuda).
Para alterar o papel de um utilizador:
- Clique aqui para acessar o gerenciamento de usuários no Manager Infomaniak (❓: ajuda).
- Clique no menu de ação ⋮ localizado à direita do usuário em questão.
- Clique em Modificar função:
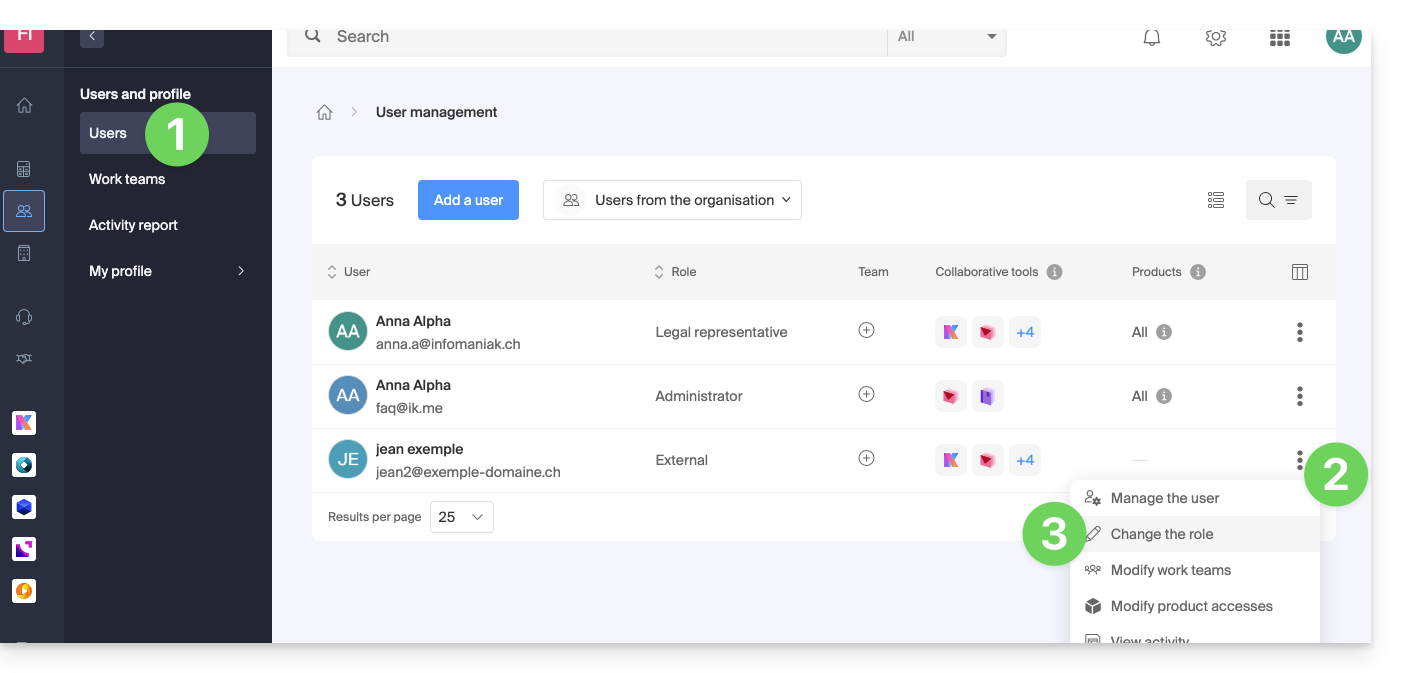
- Modifique a função desejada:
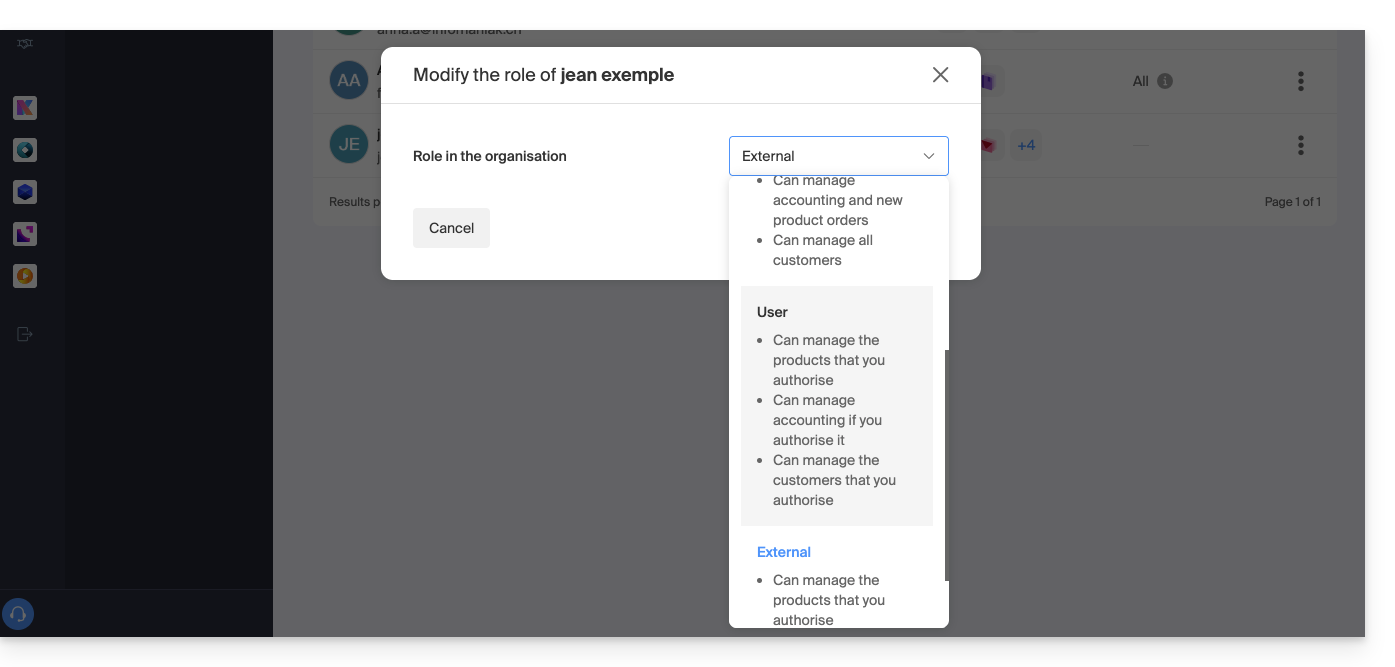
- Clique no botão Guardar.
Um e-mail de resumo é enviado ao utilizador cujo papel foi alterado.
Se atribuir ao utilizador o papel de simples colaborador…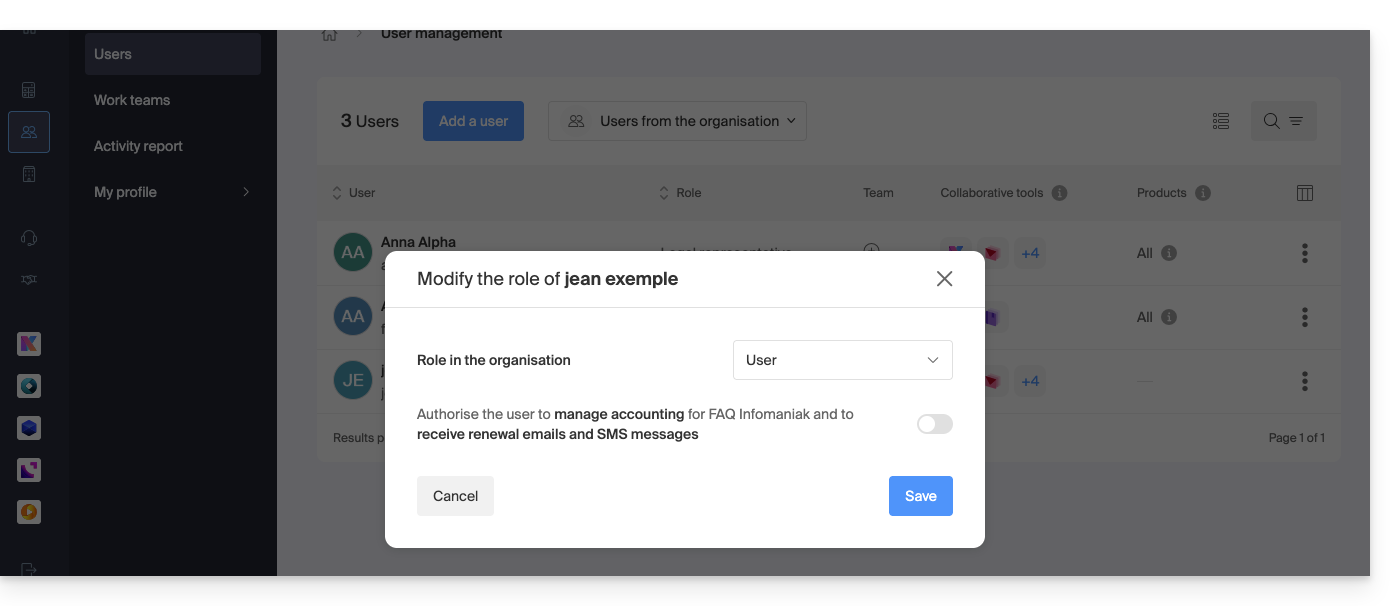
… poderá modificar os serviços aos quais ele terá acesso (❓: ajuda):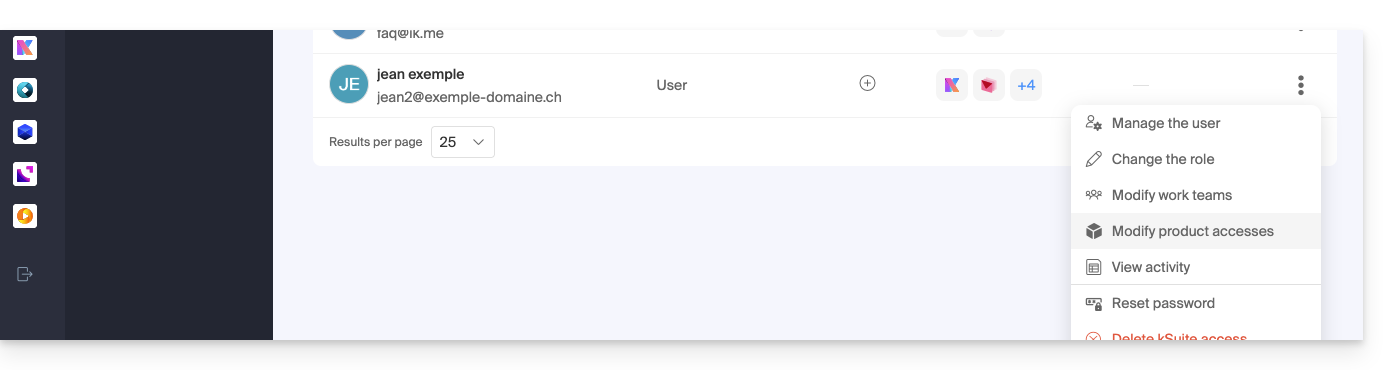
Link para esta FAQ: https://faq.infomaniak.com/1633
Esta seção de perguntas frequentes foi útil?
Este guia explica como copiar ou mover contatos para diferentes agendas na aplicação web Contacts da Infomaniak (serviço online ksuite.infomaniak.com/contacts).
Introdução
- Os contactos também podem ser geridos dentro de grupos, ou seja, subpastas do seu livro de endereços.
Copiar ou mover um contacto
Para isso:
- Clique aqui para acessar o aplicativo web Contatos Infomaniak (serviço online ksuite.infomaniak.com/contacts).
- Clique no menu de ação ⋮ à direita de um contato para escolher copiar ou mover o contato para o local desejado usando um assistente:
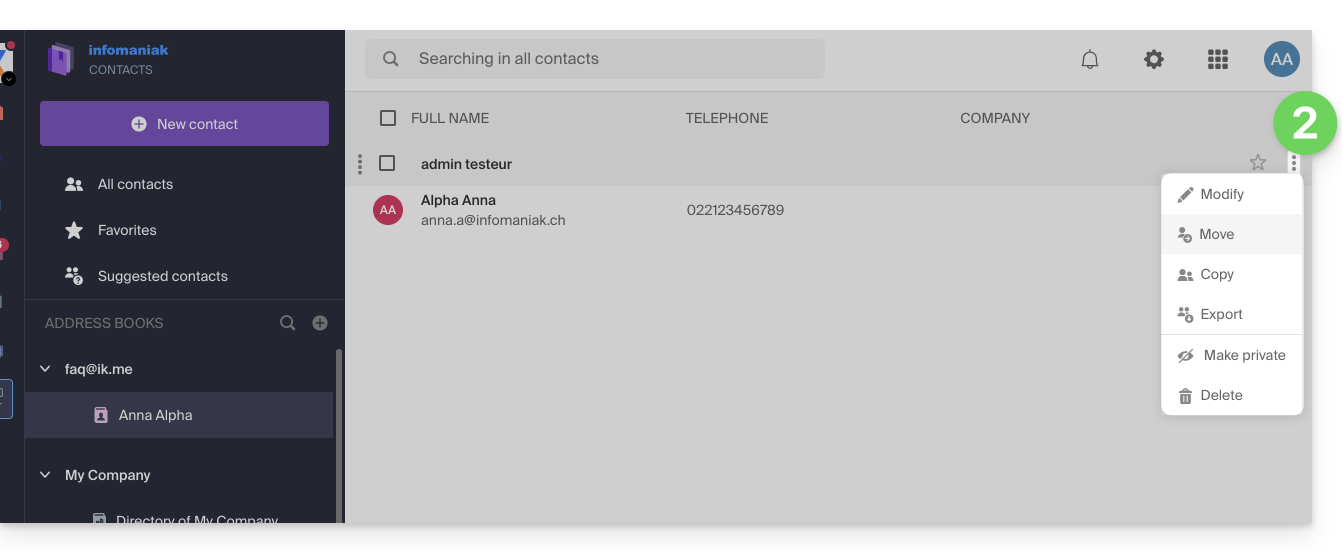
Você também pode clicar e manter o botão do mouse pressionado na extremidade esquerda da linha de um contato para copiar ou mover um contato (ou vários contatos, caso os selecione previamente) para o catálogo desejado na barra lateral esquerda: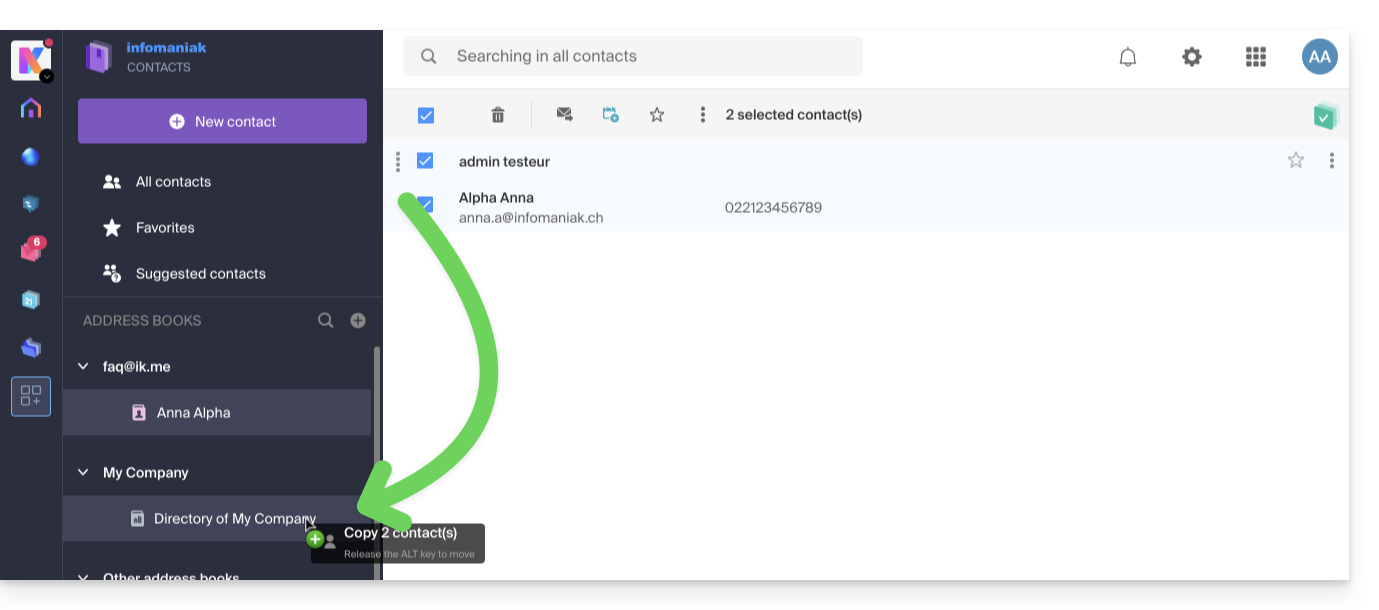
O comportamento padrão ao mover um contato da lista de endereços para outra pasta ou lista de endereços é "mover".
Ao pressionar a tecla do teclado que normalmente usa para copiar arquivos do seu computador (a tecla ALT, por exemplo) e arrastá-los de um lugar para outro, você poderá "copiar" os contatos em vez de movê-los.
Link para esta FAQ: https://faq.infomaniak.com/1652
Esta seção de perguntas frequentes foi útil?
Este guia explica como adicionar um anexo proveniente do kDrive a um evento de um calendário na aplicação web Calendar Infomaniak (serviço online ksuite.infomaniak.com/calendar).
Introdução
- Alguns softwares ou aplicativos também permitem adicionar um anexo e, nesse caso, se você sincronizar a agenda com a da sua solução, o arquivo anexado poderá ter um tamanho máximo de 64 KB.
Adicionar um anexo ao kDrive
Ao criar um novo evento no aplicativo web Calendar da Infomaniak (serviço online ksuite.infomaniak.com/calendar), você pode adicionar um ou mais anexos (links para arquivos do kDrive):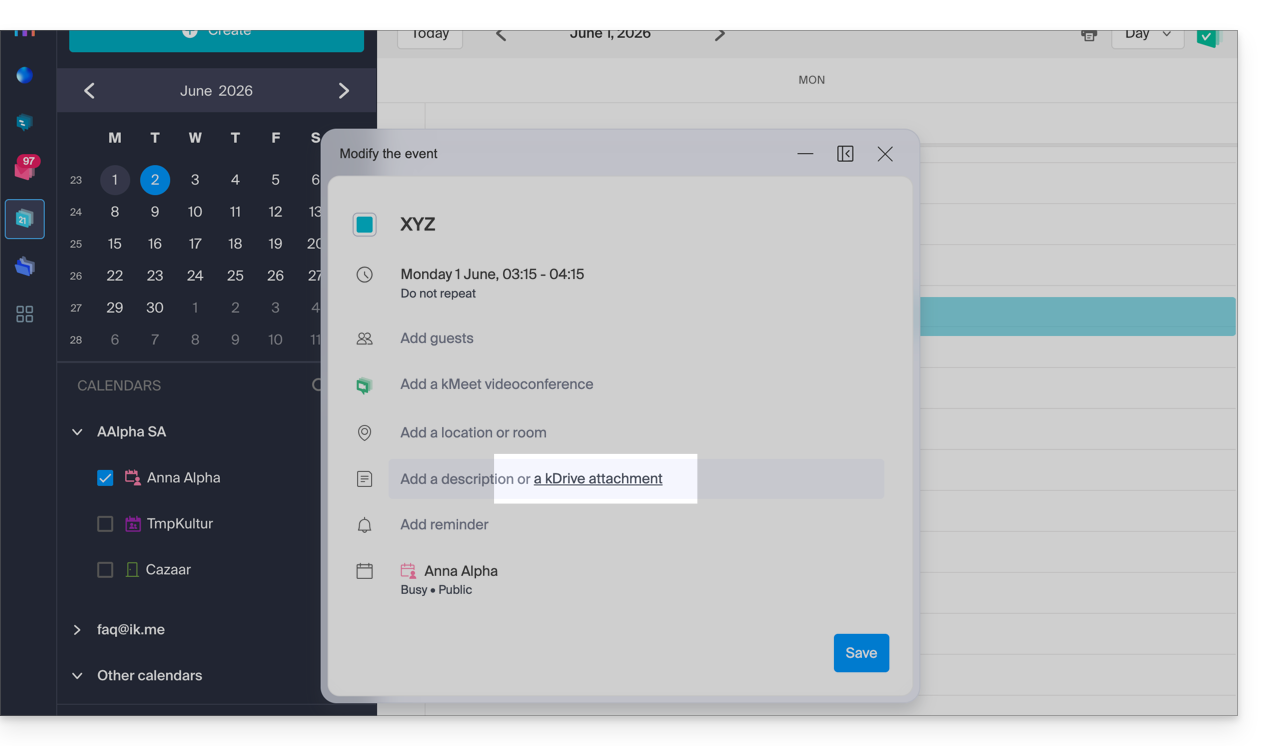
Em seguida, clique no link “Inserir um link kDrive” e você terá acesso ao kDrive diretamente da janela de criação de eventos do Calendar: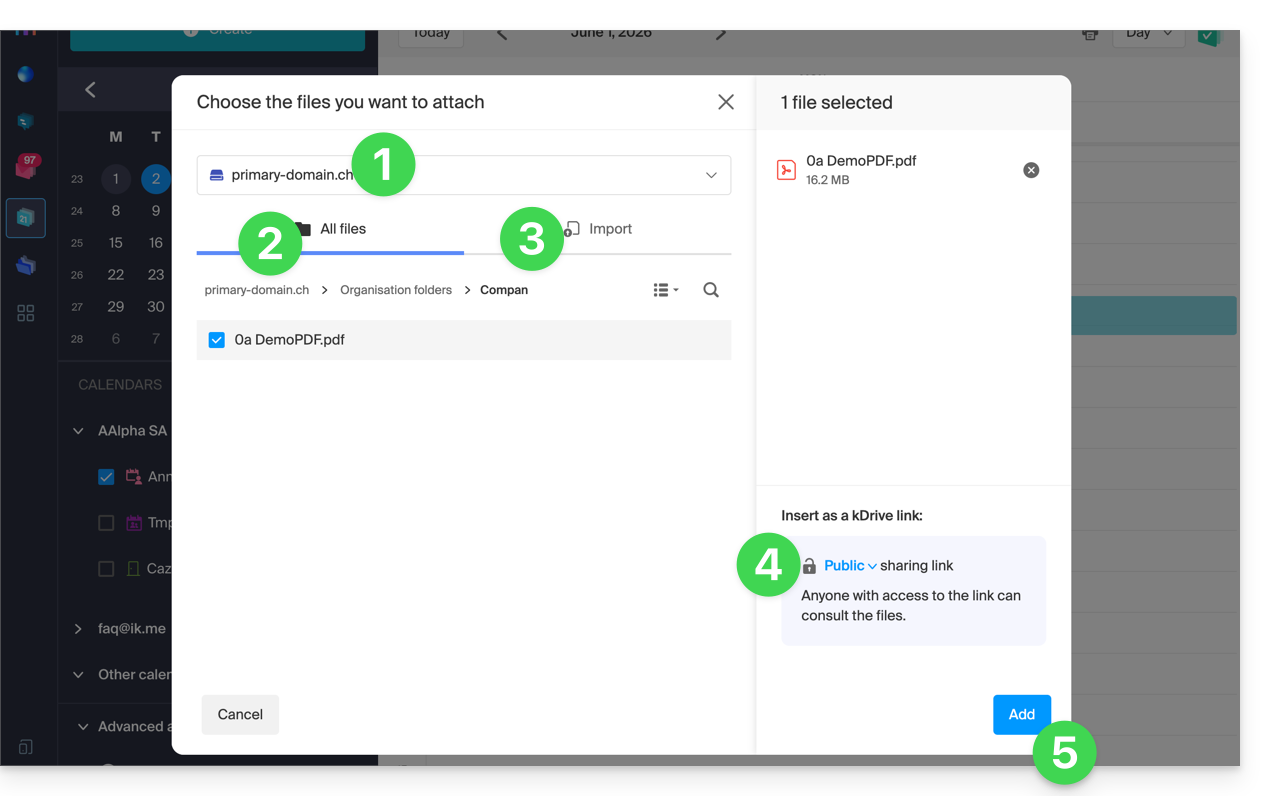
- Se necessário, selecione o kDrive.
- Navegue e escolha os arquivos a serem adicionados ao evento.
- Caso contrário, importe novos documentos que serão armazenados no kDrive.
- Após a seleção, escolha se o link deve ser:
- um link público (qualquer pessoa pode acessá-lo)
- um link restrito (apenas as pessoas com acesso podem acessá-lo)
- Clique em Adicionar.
Seja o evento recorrente ou não, você pode adicionar arquivos que serão compartilhados com aqueles que consultarem o evento no calendário: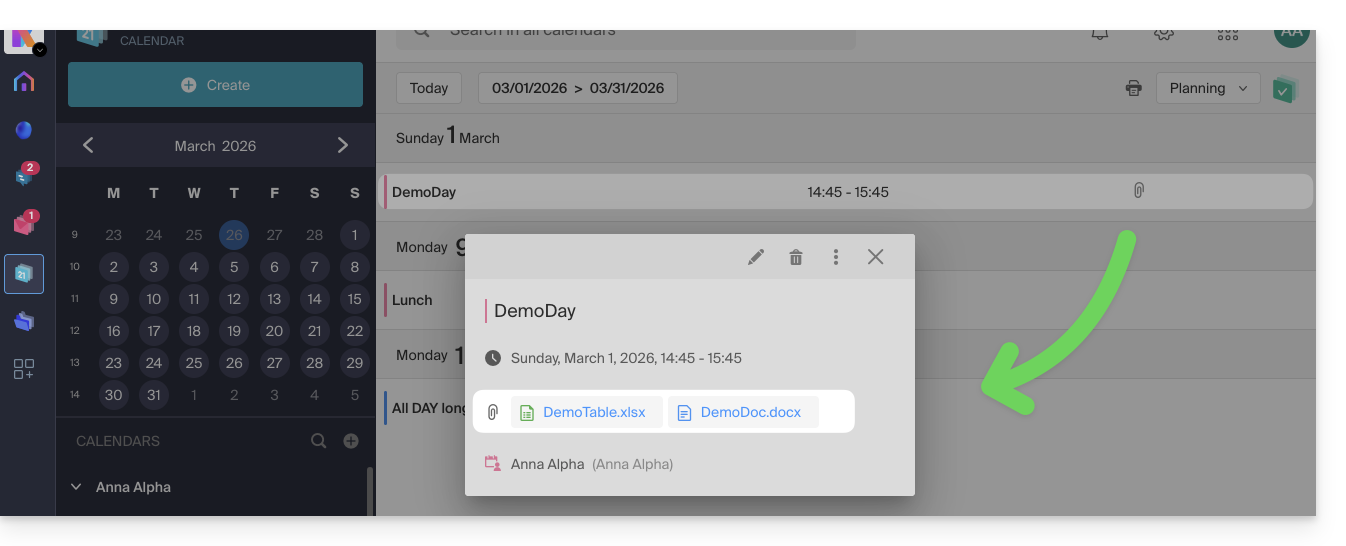
Os participantes do evento que consultarem a ficha através de uma aplicação sincronizada, Outlook, Gmail e outras, verão os links na descrição (como é o caso do possível link kMeet, por exemplo, se uma videoconferência estiver prevista para o evento).
Link para esta FAQ: https://faq.infomaniak.com/1673
Esta seção de perguntas frequentes foi útil?
Este guia explica como partilhar contactos com outros utilizadores a partir das listas de contactos da aplicação web Contactos Infomaniak (serviço online ksuite.infomaniak.com/contacts).
Introdução
- Para gerir os contactos, consulte este outro guia.
- Consulte este outro guia para gerir os catálogos de endereços e também partilhá-los.
Compartilhar uma lista de contatos
Para compartilhar contatos:
- Clique aqui para acessar o aplicativo web Contatos Infomaniak (serviço online ksuite.infomaniak.com/contacts).
- Clique no menu de ação ⋮ à direita de um catálogo de endereços (antes de eventuais grupos, que não podem ser compartilhados especificamente, mas que serão visíveis durante o compartilhamento).
- Clique em Partilhar:
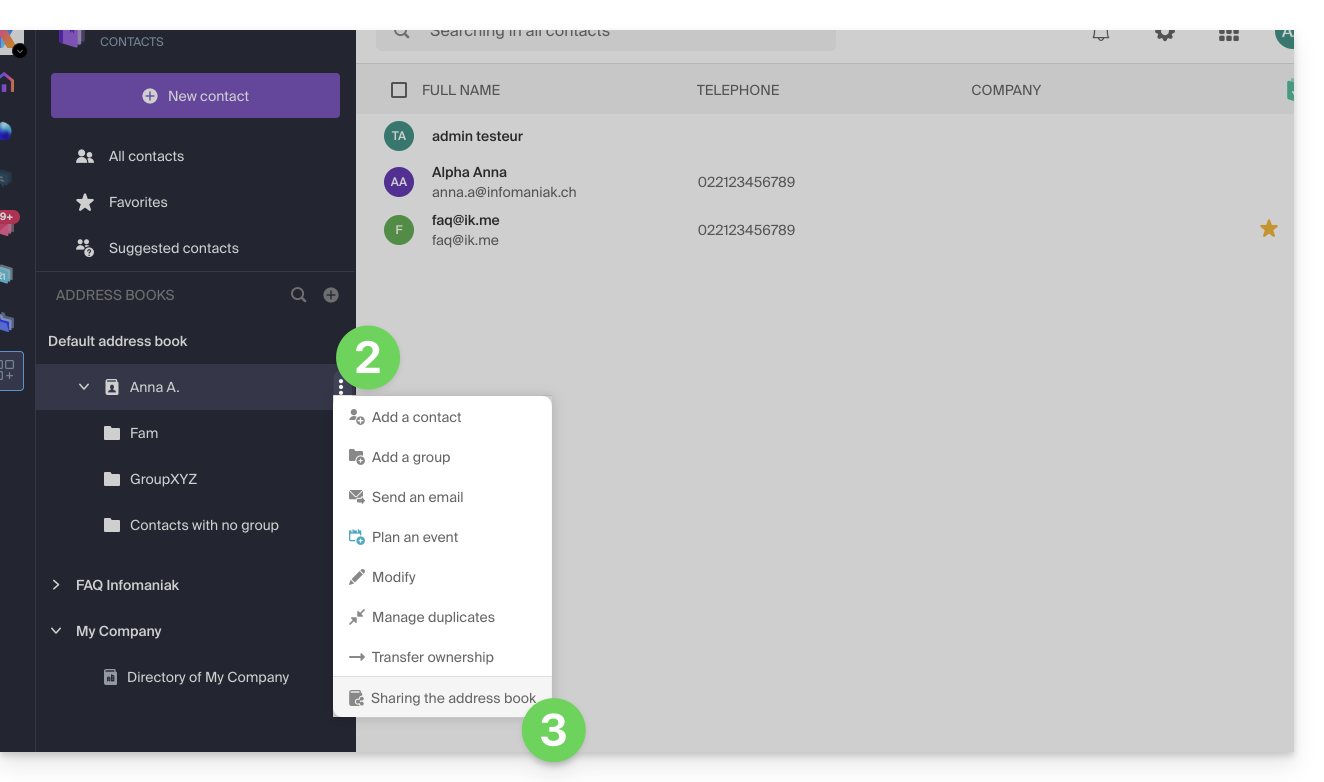
- Se já existir uma partilha em curso e pretender iniciar outra, clique em Partilhar na parte superior, caso contrário, clique no botão Partilhar mais abaixo.
- Insira o endereço de e-mail do utilizador que terá acesso à lista de contactos:
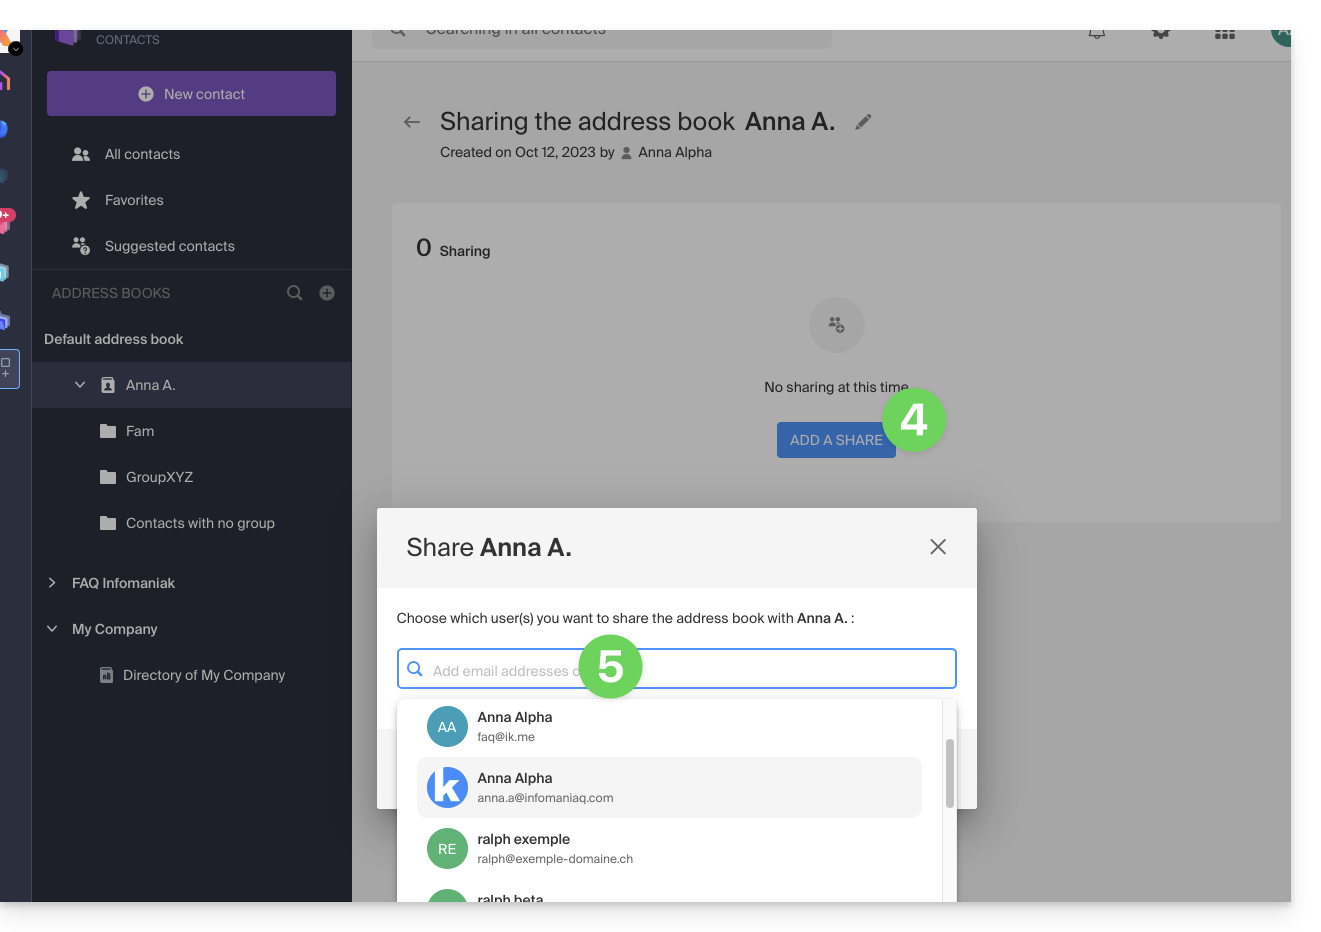
- Se o utilizador ainda não tiver um, poderá criar um gratuitamente.
- Especifique os direitos do utilizador nesta lista de contactos (Administração, Apenas leitura, Leitura e escrita).
- Conclua clicando no botão de compartilhamento:
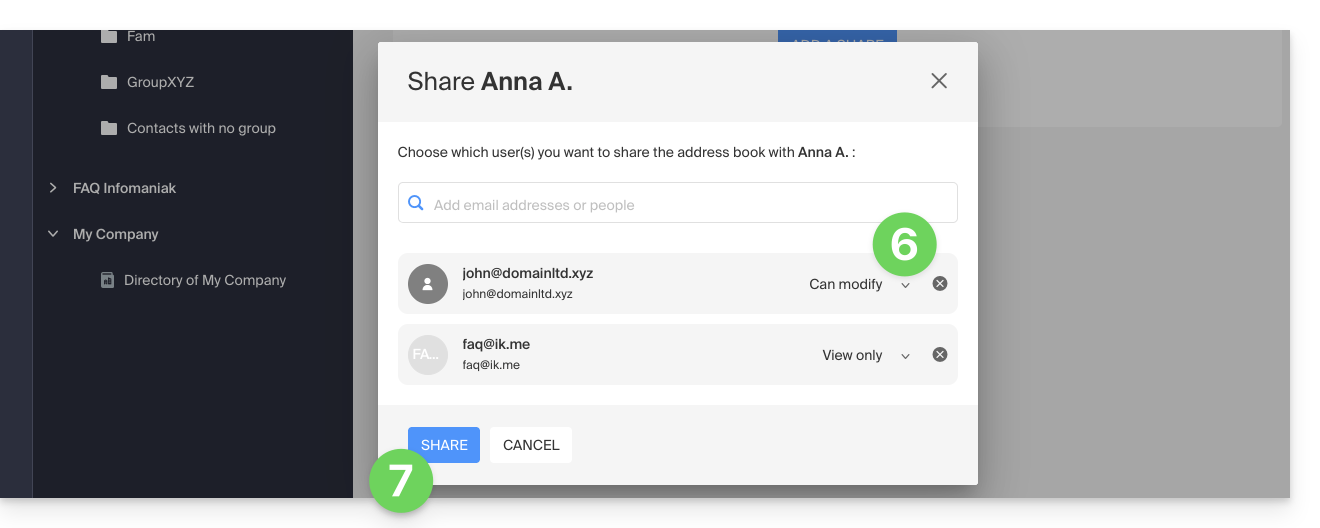
Os contatos criados ou movidos/copiados para esta lista de endereços no futuro serão visíveis de forma dinâmica para todos os usuários que tiverem acesso ao compartilhamento.
Aceitar o compartilhamento
O usuário convidado deverá aceitar o compartilhamento para acessar os dados compartilhados (os nomes dos grupos já são visíveis antes da aceitação), que estarão em uma seção chamada “Outras listas de endereços”: 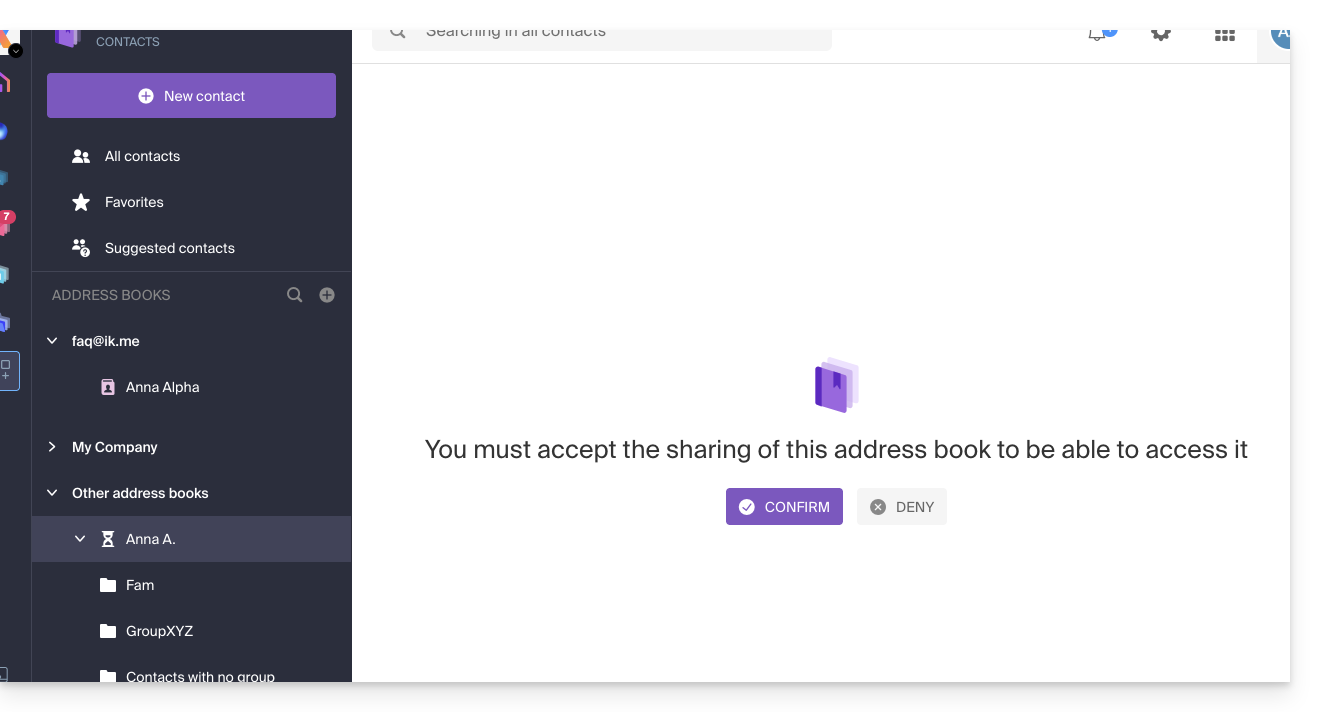
Dependendo das permissões concedidas, ele poderá realizar certas operações nos contatos ou simplesmente consultá-los, inclusive ao redigir um novo e-mail: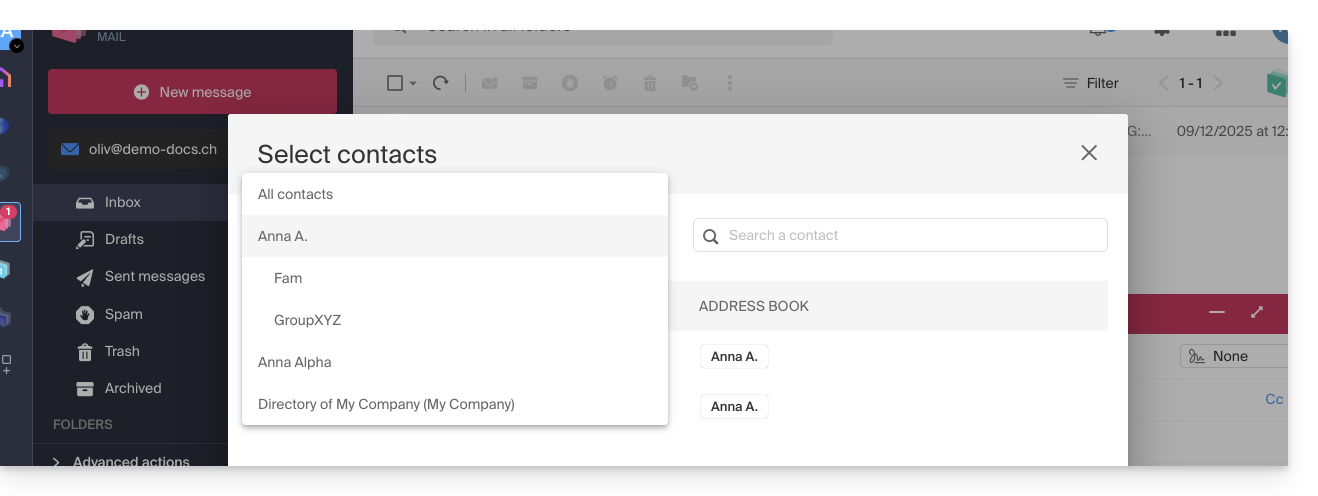
Cancelar um compartilhamento já aceito
Um utilizador pode sair de um compartilhamento através do menu de ação ⋮, à direita da lista de contactos compartilhada: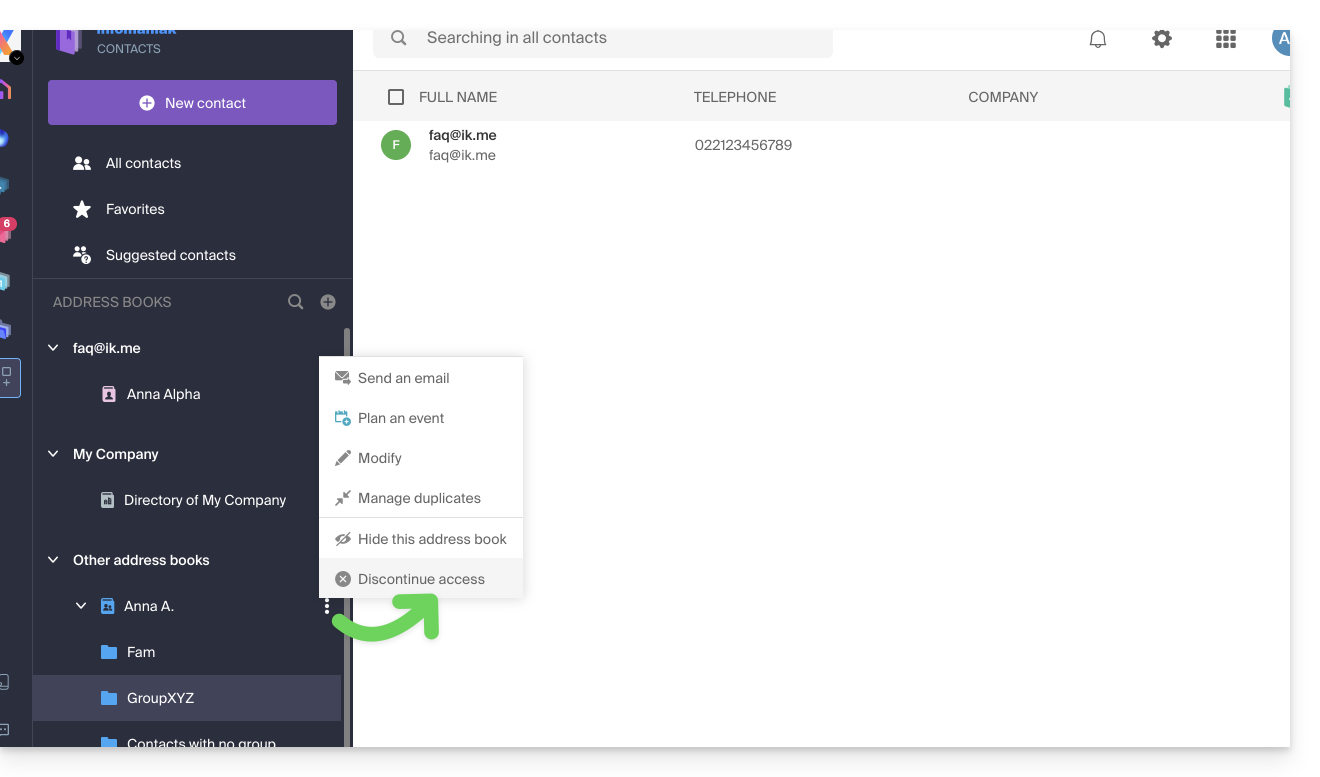
Link para esta FAQ: https://faq.infomaniak.com/1678
Esta seção de perguntas frequentes foi útil?
Este guia explica como partilhar um dos seus calendários com outros utilizadores Infomaniak, colaboradores, a partir da aplicação web Calendar Infomaniak (serviço online ksuite.infomaniak.com/calendar).
Introdução
- Consulte este outro guia para configurar a sincronização dos seus calendários ou este outro guia para integrar um calendário em modo de leitura numa ferramenta de terceiros.
Partilhar um calendário Infomaniak
Para ativar o compartilhamento de um dos seus calendários:
- Clique aqui para acessar o aplicativo web Calendar da Infomaniak (serviço online ksuite.infomaniak.com/calendar).
- Clique no menu de ação ⋮, à direita de um calendário.
- Clique em Partilhar calendário.
- Clique no botão para Adicionar um compartilhamento:
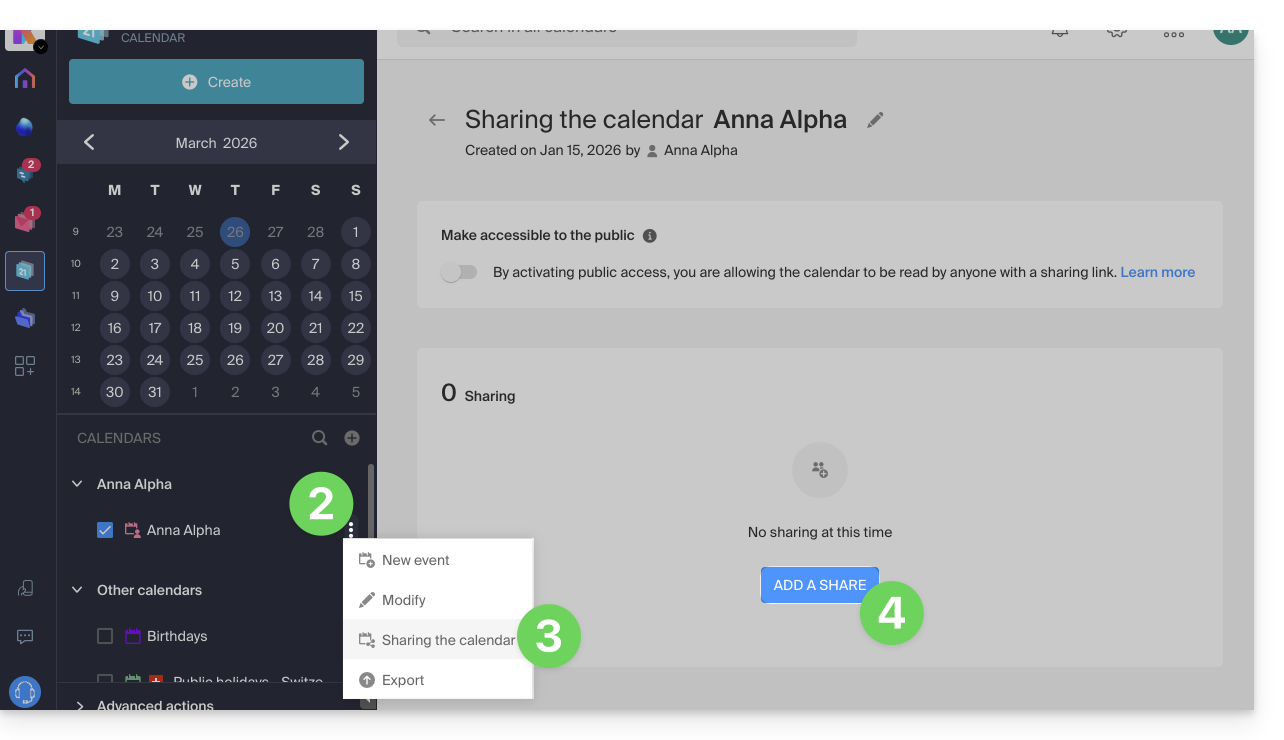
- Insira a Organização, o grupo ou o endereço de e-mail correspondente à conta de utilizador Infomaniakque terá acesso à agenda (se o utilizador ainda não tiver uma conta, poderá criar uma gratuitamente com o convite que receber).
- Defina os direitos do utilizador neste calendário (Pode consultar, Pode editar, Pode editar e partilhar).
- Conclua clicando no botão:
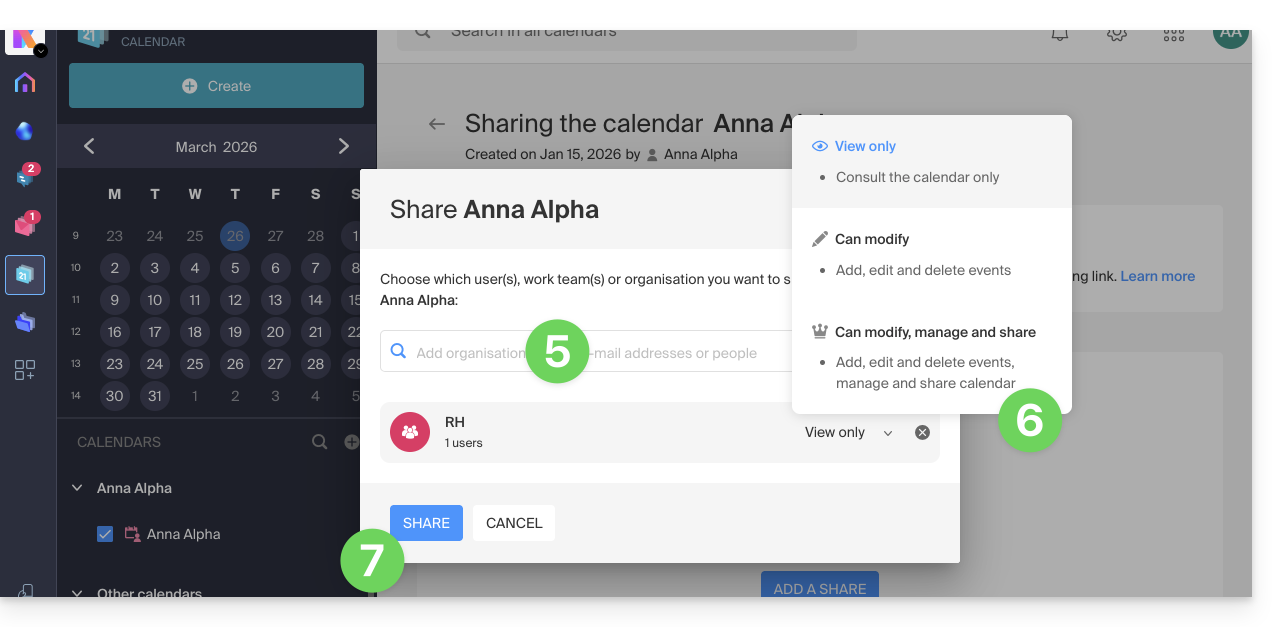
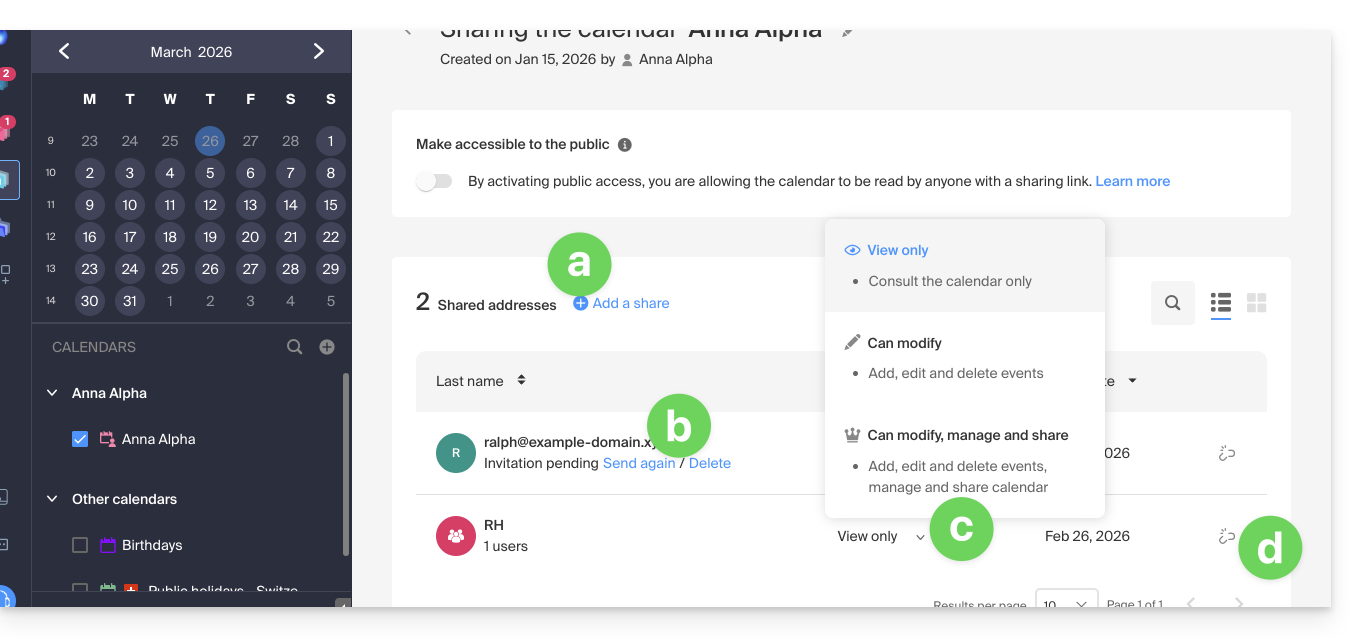
- É sempre possível realizar outras ações a partir da mesma página:
- adicionar um compartilhamento adicional
- reenviar ou remover um convite de acesso
- modificar as permissões relacionadas ao compartilhamento do calendário
- remover/revogar o compartilhamento
Compartilhar o calendário de uma sala de reunião
Para compartilhar o calendário das salas de reunião, o princípio do compartilhamento e da atribuição de direitos é baseado no mesmo princípio descrito acima: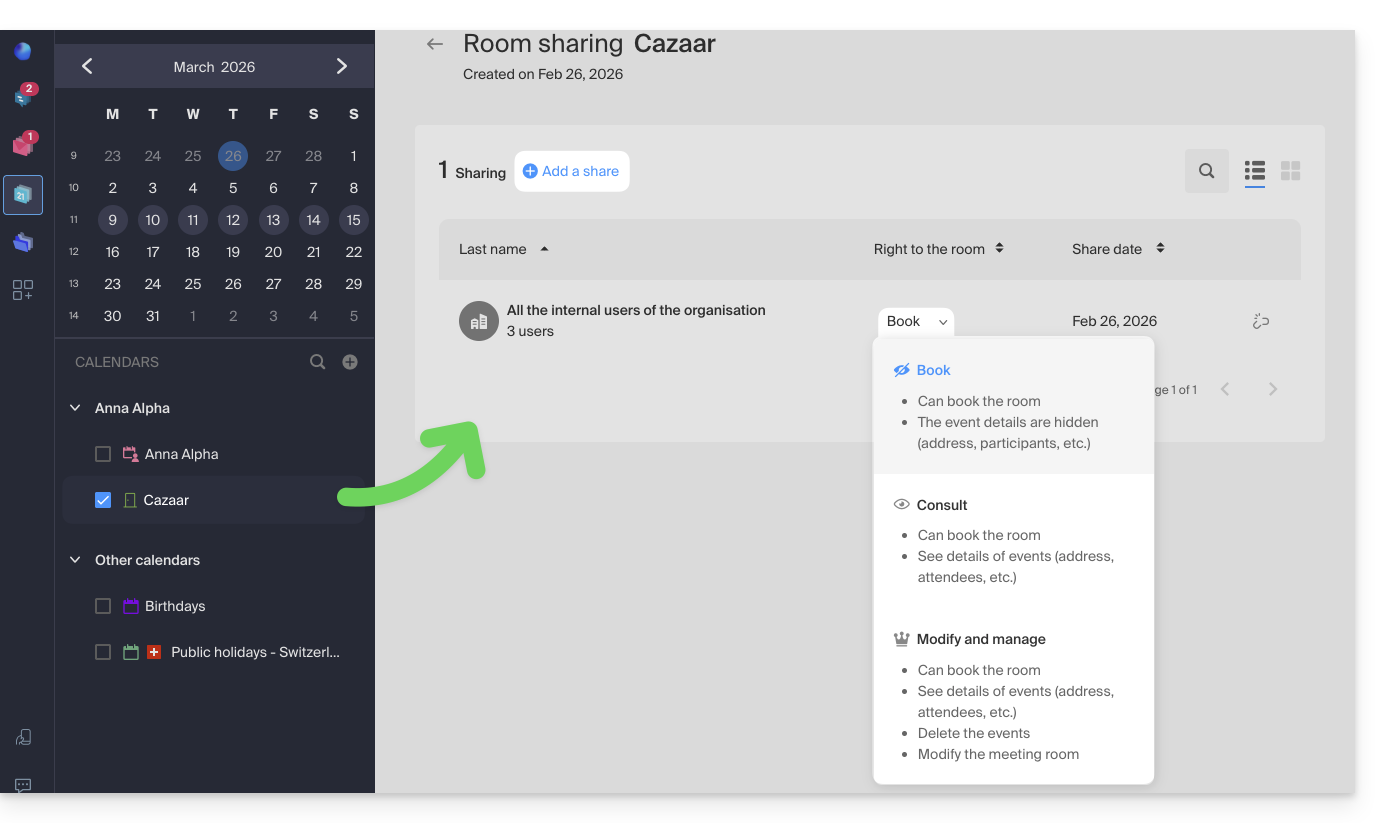
Link para esta FAQ: https://faq.infomaniak.com/1679
Esta seção de perguntas frequentes foi útil?
Este guia explica como recuperar eventos, tarefas, períodos de indisponibilidade e horários excluídos por engano em um dos seus calendários/agendas do aplicativo web Calendar Infomaniak (serviço online ksuite.infomaniak.com/calendar para a gestão dos seus eventos e compromissos).
✘ INDISPONÍVEL com
kSuite Free
my kSuite (ik.me, etik.com, ikmail.com)
Serviço Mail Starter
Ao fazer o upgrade de uma destas ofertas gratuitas, será possível recuperar o backup até 30 dias.
Restauração de calendários/agendas
Prazo de retenção das cópias de segurança
Os pontos de restauração são efetuados diariamente. Após a criação de uma cópia de segurança do estado completo do seu calendário, a Infomaniak disponibiliza-a durante 30 dias. Se for possível restaurar eventos, poderá voltar ao ponto de há 24 horas, 48 horas, 7 dias e 30 dias:
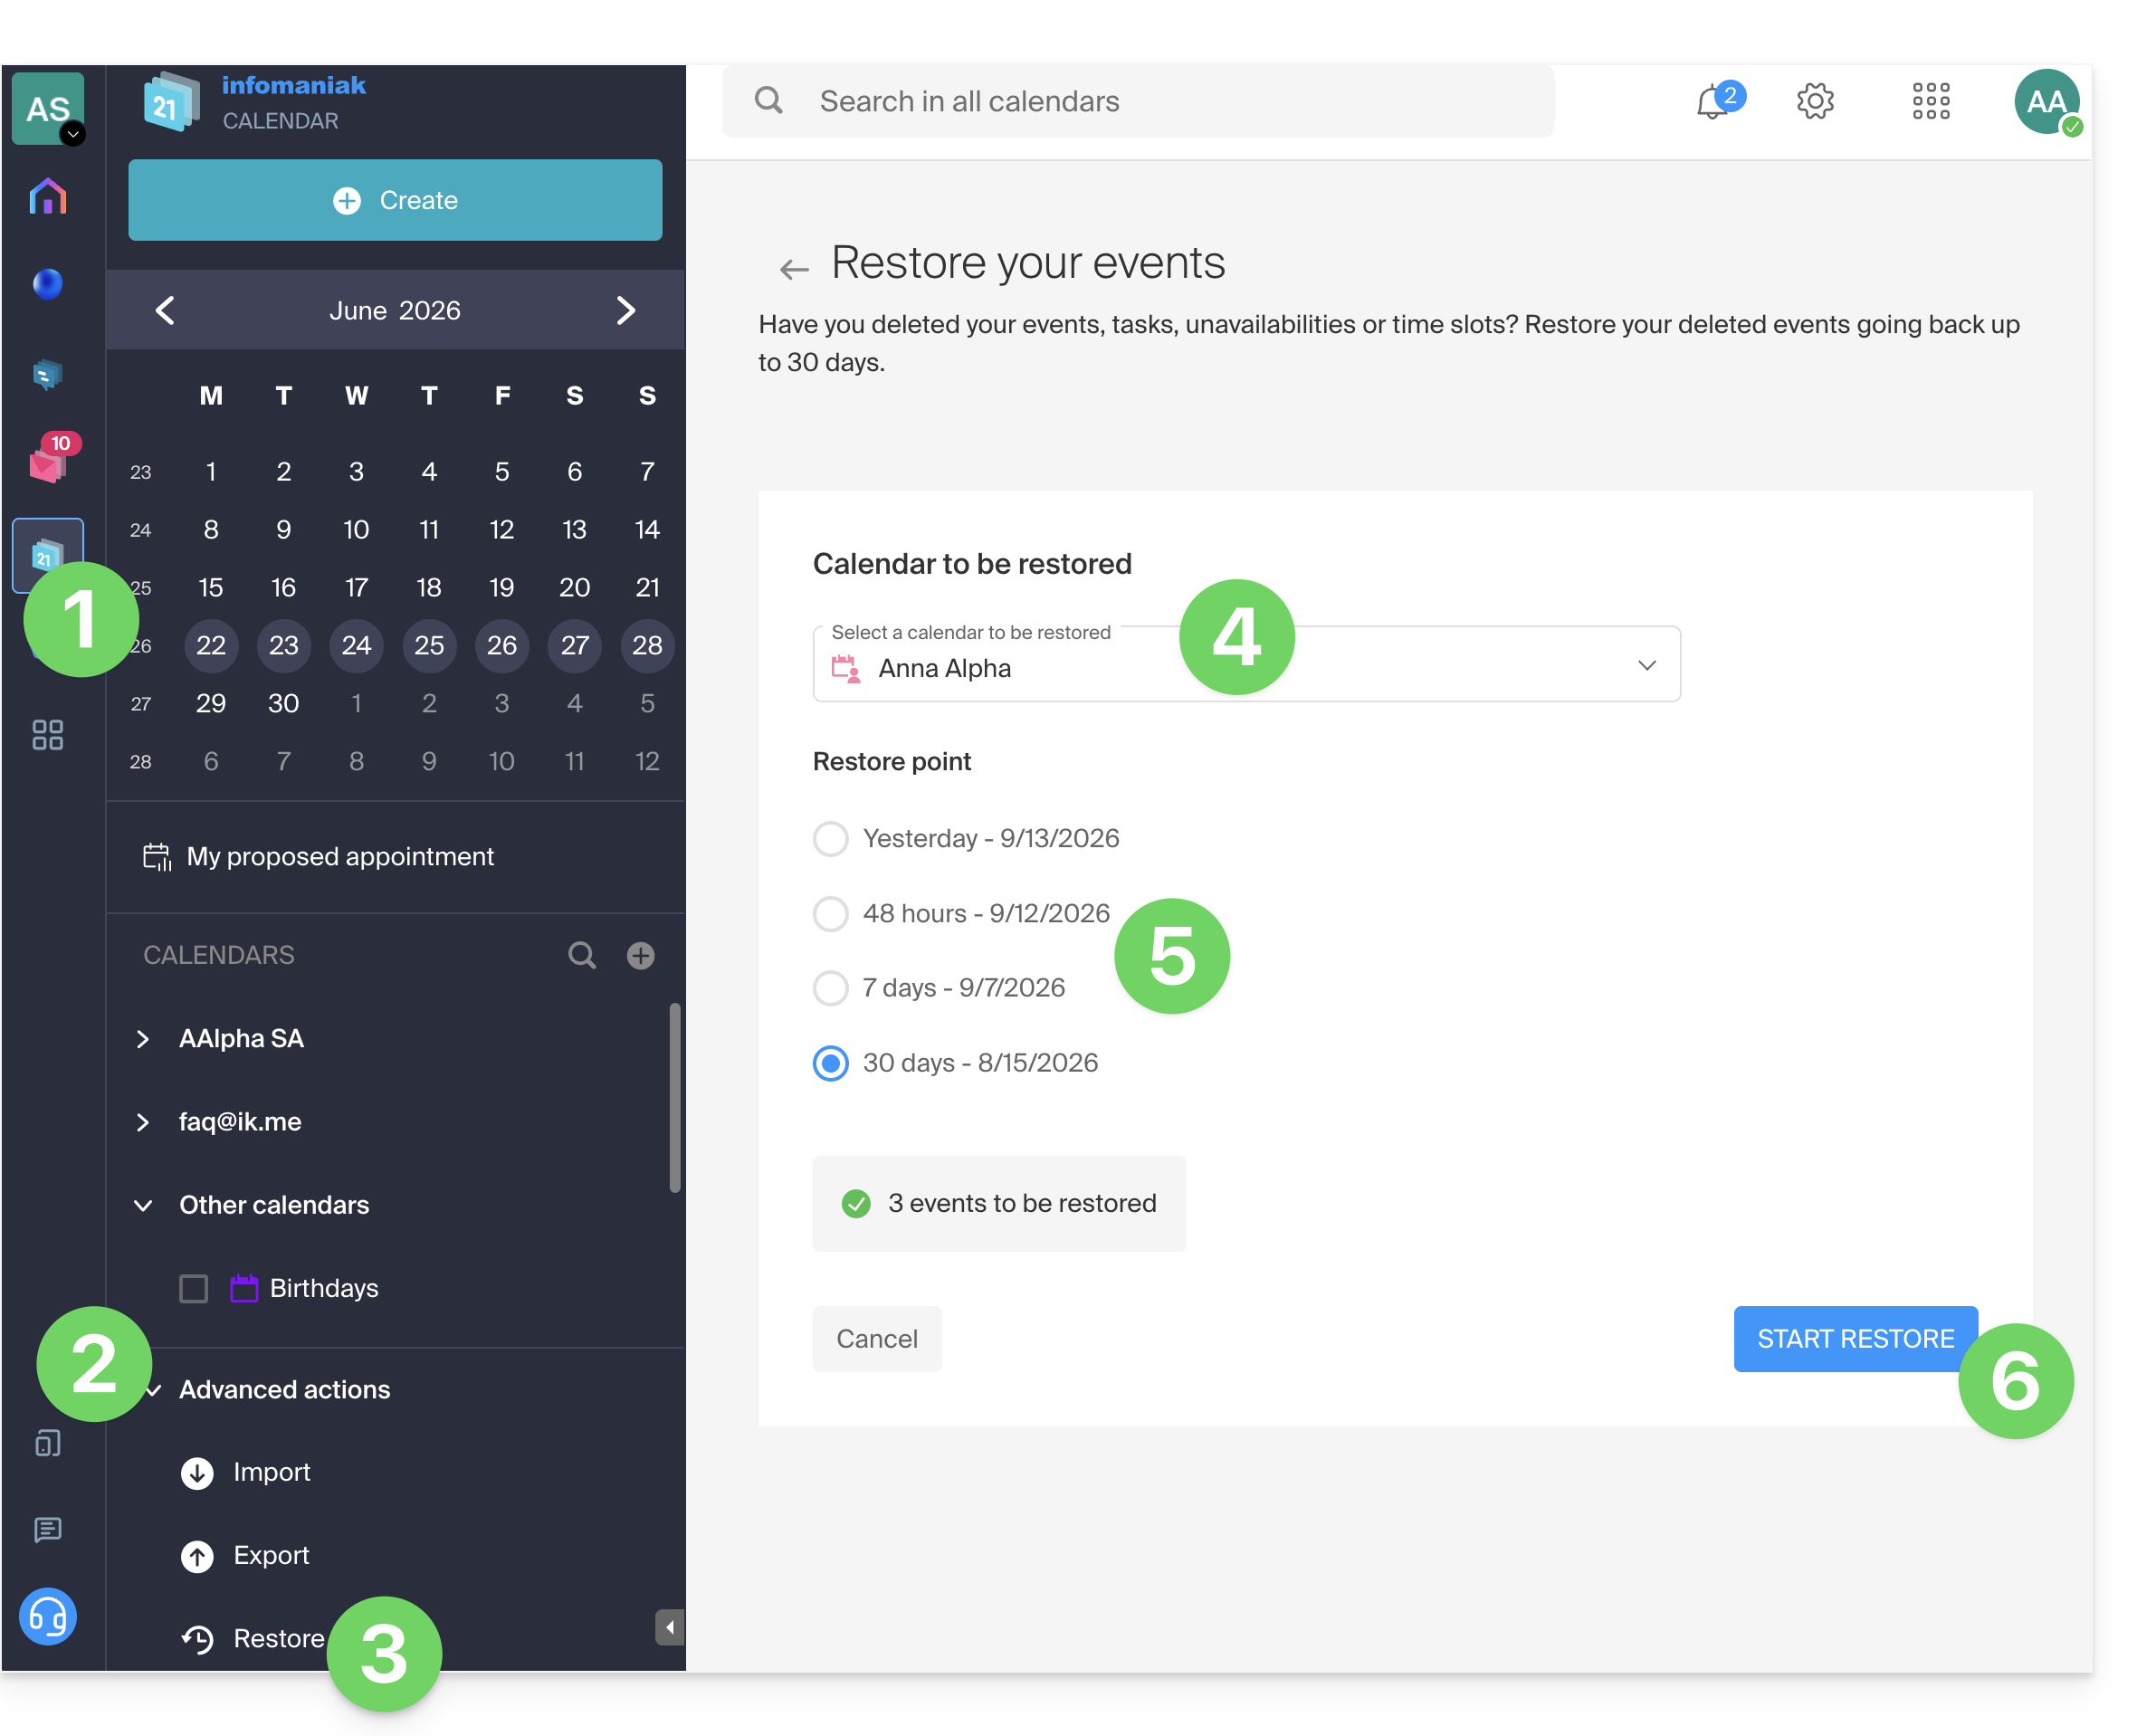
- Clique aqui para acessar o aplicativo web Calendar da Infomaniak (serviço online ksuite.infomaniak.com/calendar).
- Clique em Ações avançadas no menu lateral esquerdo.
- Selecione Restaurar.
- Escolha o calendário a ser restaurado.
- Escolha a versão desejada (1/2/7/30 dias).
- Inicie a restauração usando o botão na parte inferior da página, que fica ativo se houver eventos que possam ser restaurados:
Link para esta FAQ: https://faq.infomaniak.com/1688
Esta seção de perguntas frequentes foi útil?
Este guia explica como transferir para a Infomaniak os endereços de e-mail atualmente alojados pela Swisscom, com a ajuda de uma ferramenta de importação por IMAP.
Introdução
- A operação não afeta os dados já existentes no endereço de destino, nem os dados do endereço de origem.
- A totalidade da caixa externa será importada.
- Uma vez iniciado o processo de importação, não é mais possível interrompê-lo.
- Os eventuais duplicados são gerenciados: um conteúdo idêntico será copiado apenas uma vez.
- Consulte este outro guia se procura alternativas a este processo via IMAP.
Importar o conteúdo de e-mail do Bluewin para o Infomaniak
Pré-requisitos Infomaniak
- Ter um Serviço de Email na sua Central de Gestão Infomaniak.
- Ter à disposição um número de endereços disponíveis ou ajustá-lo caso seja necessário.
- Verificar se a conta de e-mail está devidamente protegida
- Criar um ou vários endereços neste serviço de e-mail.
- Se tiver muitos (10+) endereços de e-mail para criar, consulte este outro guia sobre a criação em massa.
- O endereço de e-mail de destino deve estar associado ao utilizador (= à conta Infomaniak) que está a utilizar.
Em seguida, para importar o conteúdo do e-mail:
- Clique aqui para acessar a ferramenta de importação (serviço online https://import-email.infomaniak.com).
- Se necessário, inicie sessão na sua conta Infomaniak na organização em questão, pois a importação será efetuada para um dos endereços de e-mail associados à interface Web Mail da Infomaniak (serviço online ksuite.infomaniak.com/mail) da conta Infomaniak que está a utilizar.
- Clique em importar por IMAP.
- Clique em Importar.
- Preencha o campo à esquerda com o seu endereço de e-mail de origem (de onde o conteúdo será copiado).
- Preencha o campo à direita com a senha deste mesmo endereço de e-mail de origem (consulte os requisitos).
- Clique em Confirmar.
- Se necessário, adicione um segundo endereço de e-mail para importar simultaneamente.
- Selecione o endereço de e-mail de onde deseja importar os e-mails. O menu suspenso lista os endereços de e-mail atualmente associados à sua interface Web Mail Infomaniak (serviço online ksuite.infomaniak.com/mail) da conta Infomaniak com a qual você está conectado.
- Após selecionar o endereço de destino desejado na lista, clique no botão azul Importar e-mails.
- A cópia será iniciada. Você pode aguardar e verificar o resultado na página após a conclusão da importação ou fechar a janela (a importação continua em segundo plano e o acompanhamento está disponível – veja abaixo).
- Um e-mail de confirmação será enviado automaticamente para todos os endereços de e-mail envolvidos na operação, assim que a importação for concluída, indicando o número de mensagens copiadas.
- Um acompanhamento está disponível nas configurações do endereço de e-mail de destino, apenas no aplicativo web Mail (serviço online ksuite.infomaniak.com/mail).
- O rastreamento permite visualizar o histórico das importações no endereço em questão.
Importar todos os seus contatos
Para continuar a usar a sua lista de contactos, é necessário exportar os contactos do Bluewin:
- Inicie sessão na sua interface Bluewin.
- Clique em Contatos.
- Clique no ícone Configurações na barra de ferramentas.
- Clique em Exportar contactos.
- Guarde o ficheiro
contacts.csvno seu dispositivo.
Em seguida, é preciso importá-las:
- Conecte-se ao seu Catálogo de endereços Infomaniak.
- Clique em Ações avançadas no canto inferior esquerdo.
- Clique em Importar.
- Selecione o arquivo
.csvque você baixou no passo 5 acima. - Clique em Avançar e inicie a importação.
Redirecionar e-mails para o Infomaniak
Se o endereço Bluewin continuar a existir por mais algum tempo, pode configurar um redirecionamento das mensagens recebidas. Assim, elas serão automaticamente encaminhadas para o seu novo endereço Infomaniak:
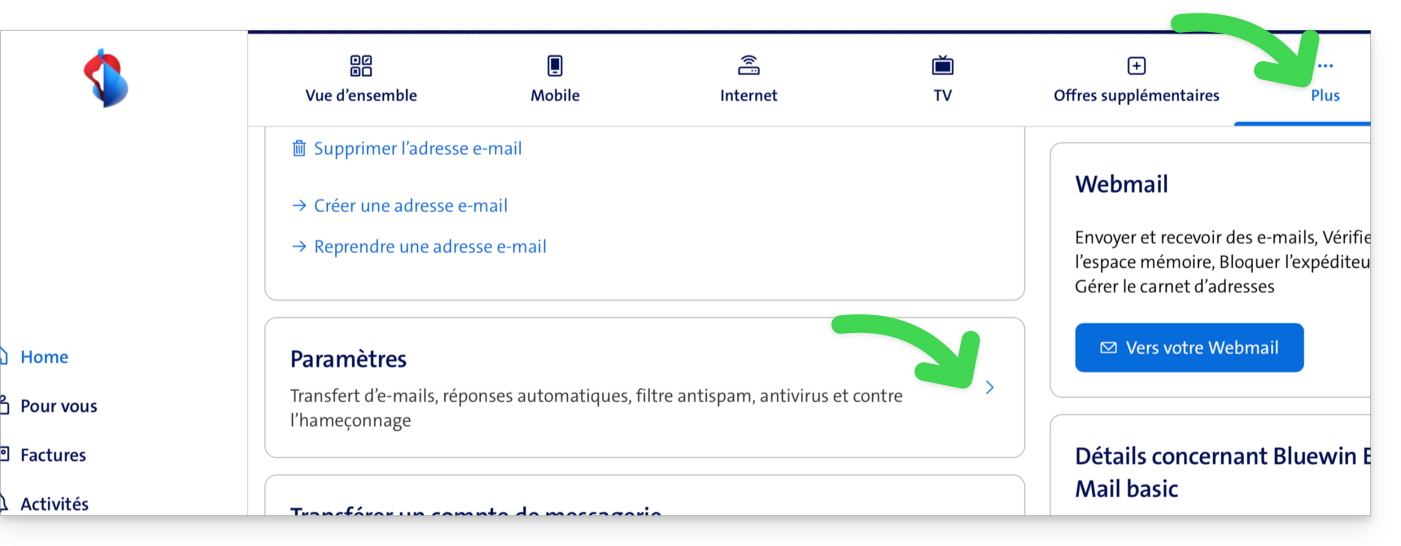
- Aceda a “MySwisscom”, clique na caixa “Mais” e, em seguida, em “Definições”:
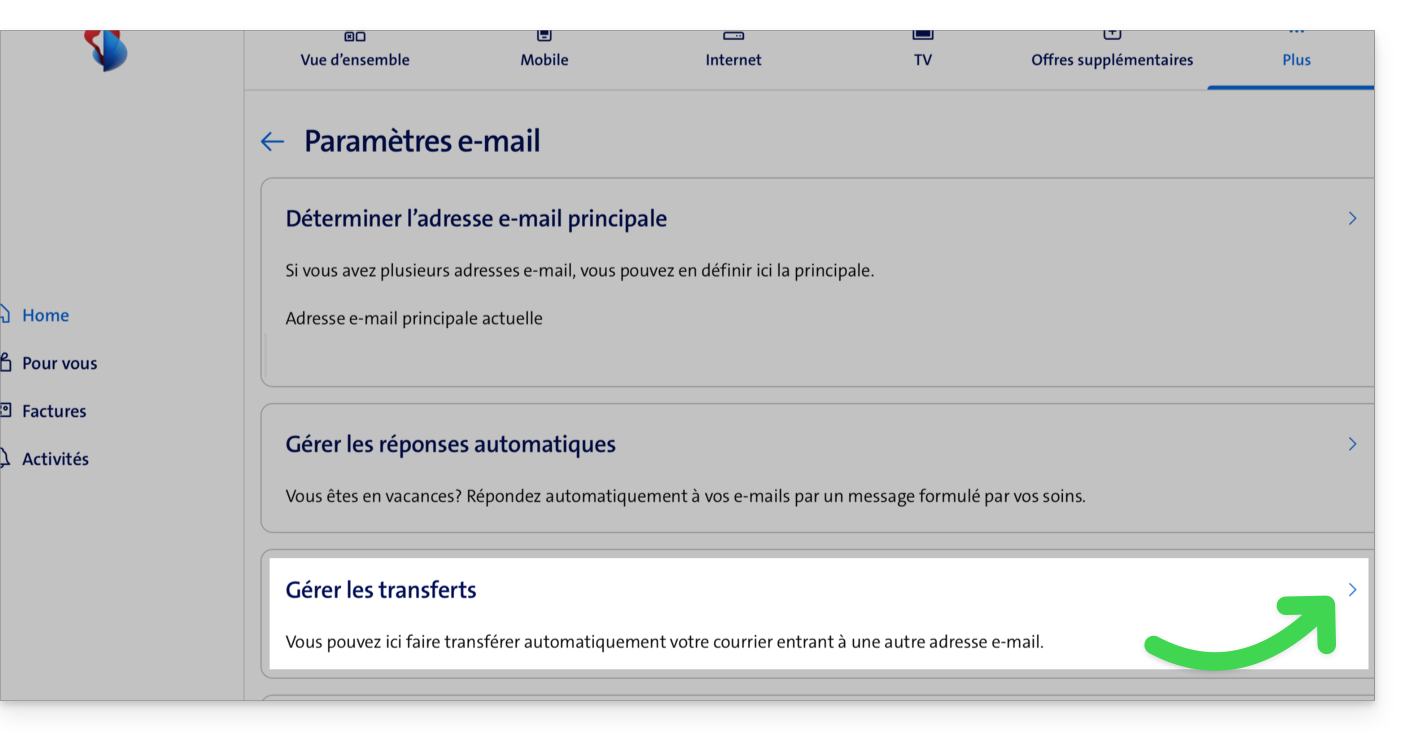
- Clique em seguida em “Gerir transferências”:
- Indique o endereço de e-mail criado na Infomaniak como destino de todos os seus futuros e-mails.
Link para esta FAQ: https://faq.infomaniak.com/1693
Esta seção de perguntas frequentes foi útil?
Este guia explica como conectar os aplicativos de desktop Contatos e Calendário do macOS (MacBook Pro, Neo…) com os contatos e calendários hospedados na Infomaniak.
Introdução
- Em vez da configuração manual abaixo, recomenda-se usar os perfis de configuração .mobileconfig propostos pela Apple.
- Os contatos e calendários da Infomaniak estão vinculados à sua conta Infomaniak; ao fazer login em ksuite.infomaniak.com/contacts ou /calendar, você provavelmente precisará realizar a autenticação de dois fatores (2FA) ao fazer login.
- Nesse caso, uma senha de aplicativo é necessária para estabelecer a sincronização entre seu dispositivo e as ferramentas da Infomaniak.
- Mas não se preocupe, a criação de uma senha como essa é oferecida ao seguir o assistente de configuração.
Configuração manual (contatos e calendários)
Para configurar os dois serviços no macOS:
- Clique aqui para acessar a ferramenta de configuração da Infomaniak (serviço online https://config.infomaniak.com) — faça login, se necessário, na sua conta Infomaniak na Organização onde seus serviços a serem sincronizados são gerenciados.
- Escolha a sincronização neste dispositivo.
- Escolha sincronizar os contatos e calendários.
- Clique na aba Sincronização manual.
- Clique no botão Gerar para obter uma senha de aplicativo:
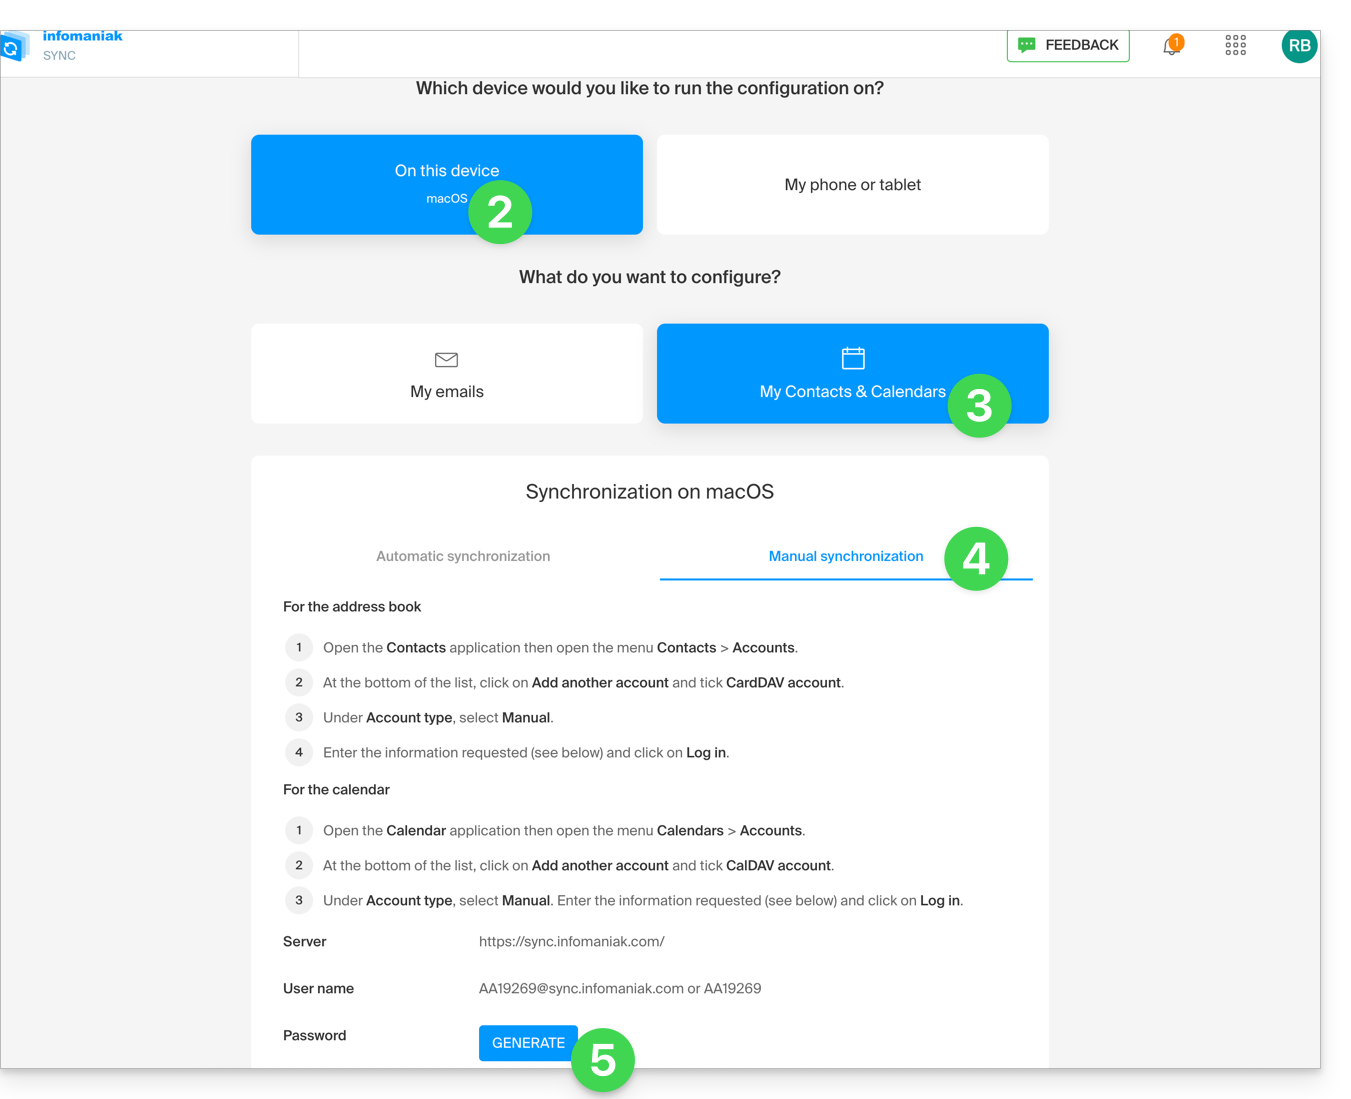
- Anote as informações que serão exibidas na tela.
- Em seguida, abra o aplicativo Calendário no seu dispositivo.
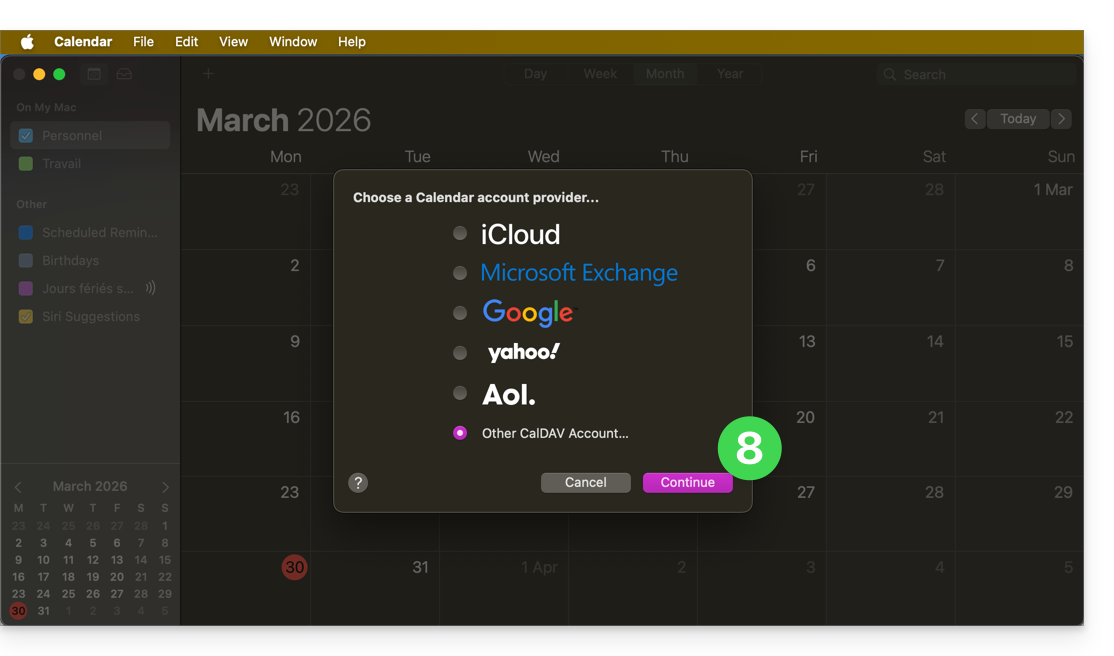
- Adicione uma nova conta, selecionando CalDAV:
- Insira as informações anotadas no ponto 6 acima:
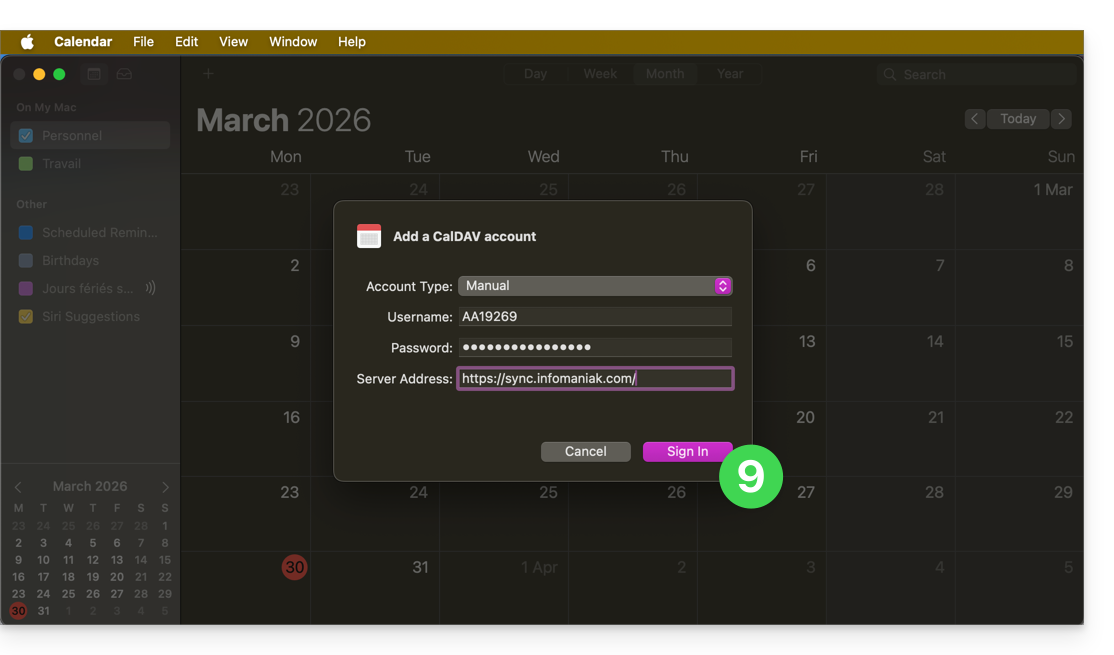
- Nome de usuário: insira em letras maiúsculas o nome de usuário indicado pelo assistente de sincronização (por exemplo,
AB12345)… - Senha: a senha do ponto 5 acima (ou seja, uma senha de aplicativo caso a autenticação de dois fatores esteja ativada) ou a senha da sua conta de usuário Infomaniak, caso você não tenha ativado a autenticação de dois fatores…
- Endereço do servidor:
https://sync.infomaniak.com/
- Nome de usuário: insira em letras maiúsculas o nome de usuário indicado pelo assistente de sincronização (por exemplo,
- Pronto, você pode abrir seus aplicativos macOS Contatos e Calendário.
Se seus aplicativos já estiverem abertos, você precisará reiniciá-los. Você verá então as informações adicionadas pela sincronização: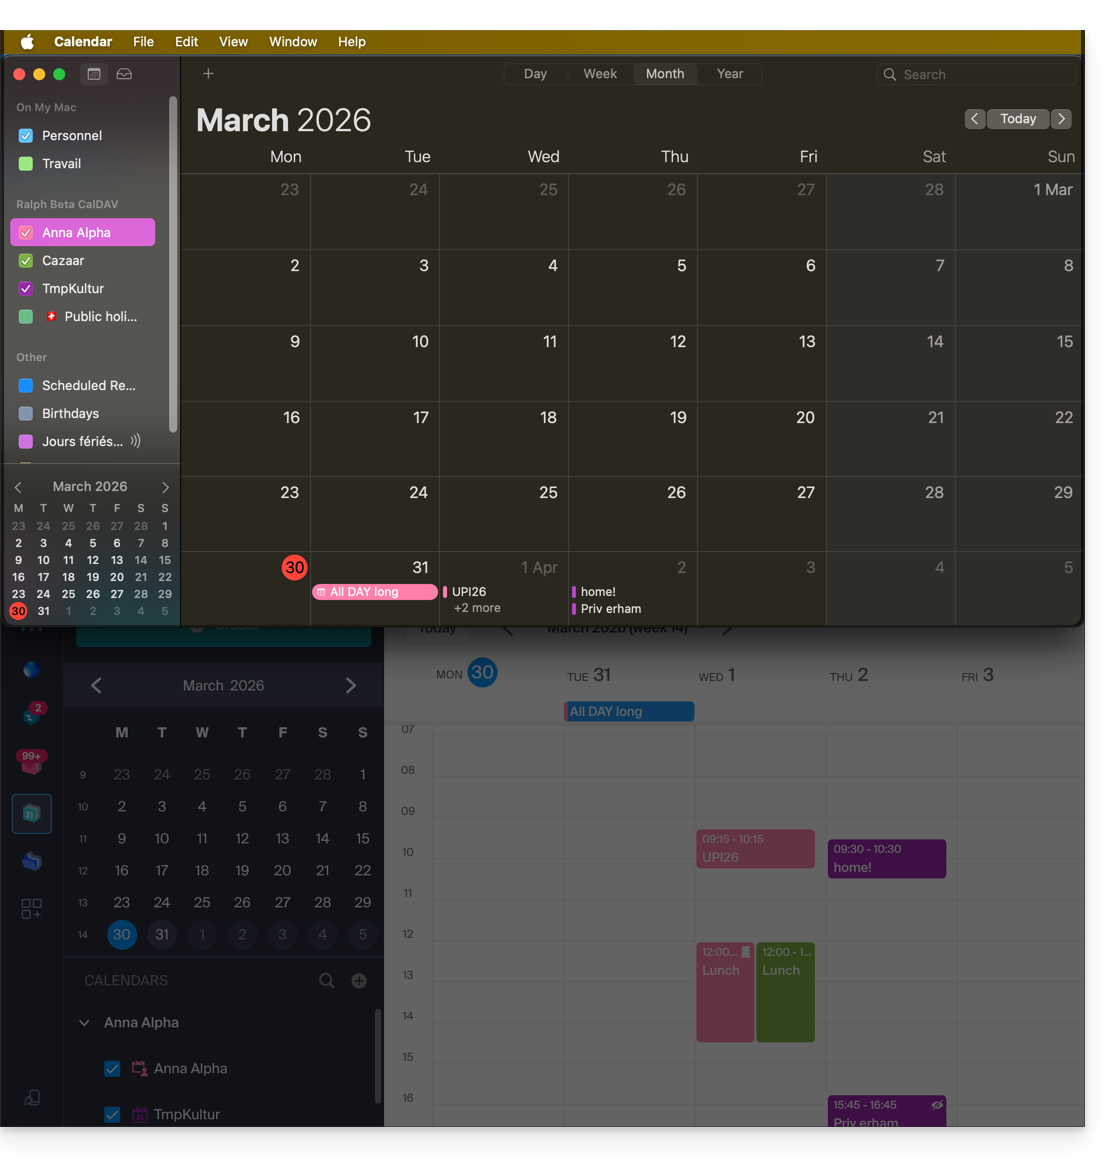
Particularidades da sincronização
Consulte este outro guia.
Remover uma conta CardDAV ou CalDAV
Consulte o capítulo "Parar de usar uma conta", alterando no topo da página* a versão do seu sistema, se necessário.
*Por que é necessário escolher a versão do guia que corresponda exatamente à sua versão do sistema macOS / iOS? A Apple introduz, por vezes, alterações subtis em cada nova versão do seu sistema, por exemplo, um caminho no iOS 15…
… torna-se isto no iOS 18…
Link para esta FAQ: https://faq.infomaniak.com/1701
Esta seção de perguntas frequentes foi útil?
Este guia diz respeito ao kSuite e à possibilidade de os utilizadores definirem um estado e gerirem a visualização da sua presença ou ausência.
Introdução
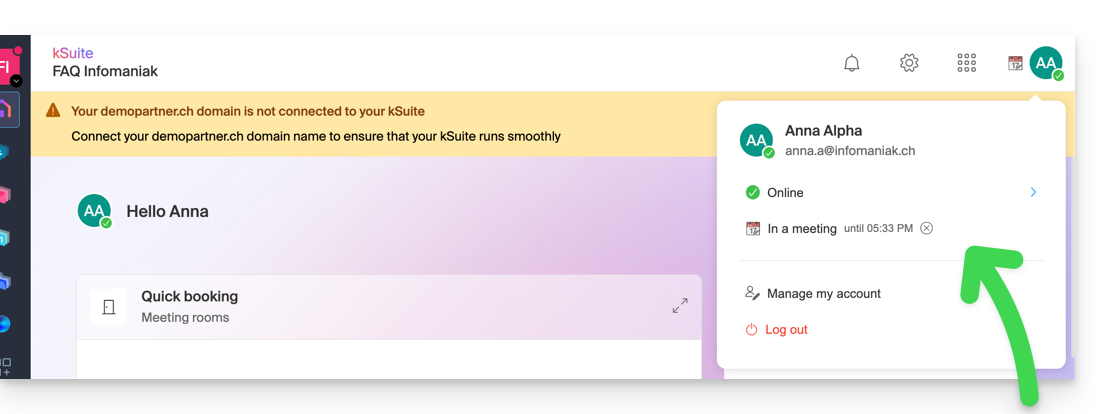
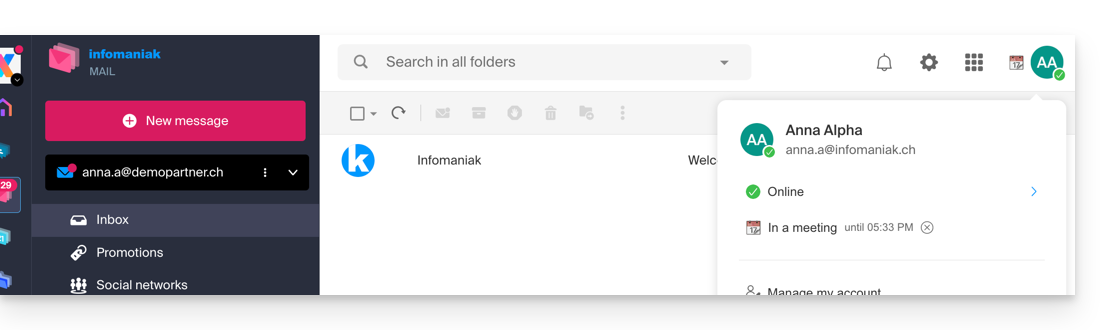
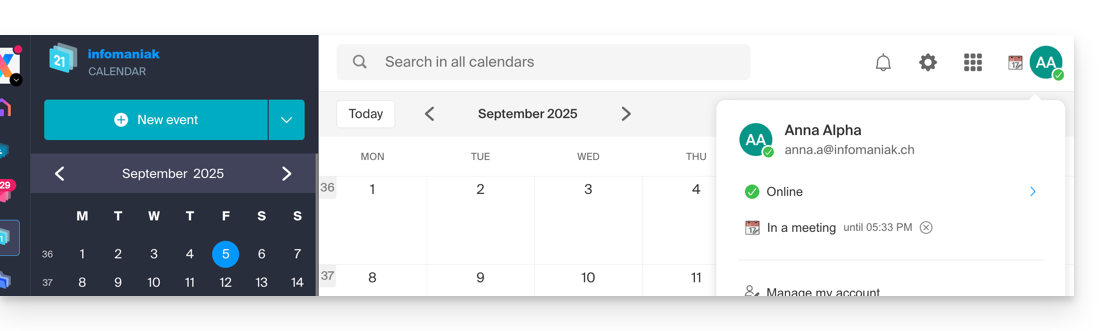
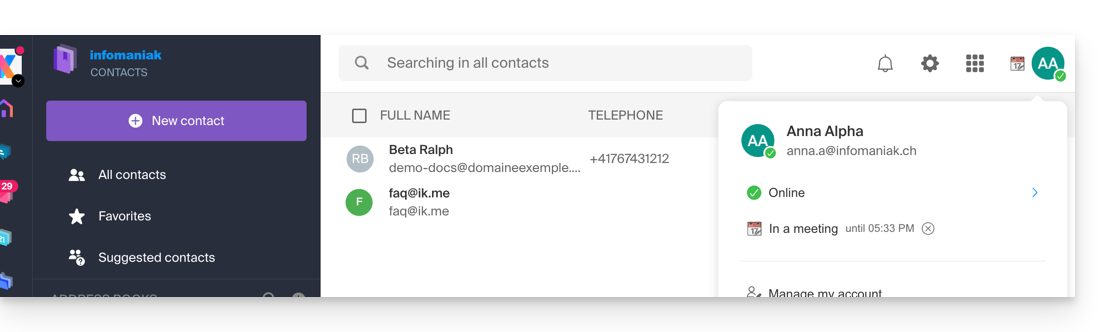
- Uma vez definido, o seu estado personalizado é visível para os utilizadores da Organização em várias páginas relacionadas com o kSuite:
- página inicial ksuite.infomaniak.com
- Mail
- Agenda
- Contactos
- kDrive
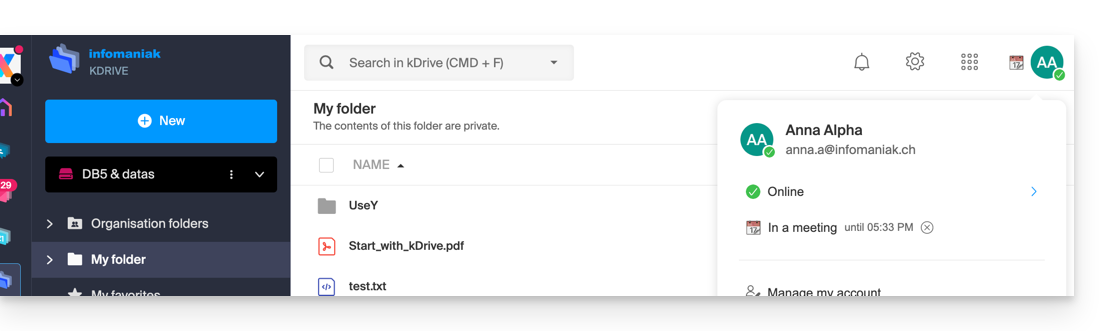
- Euria
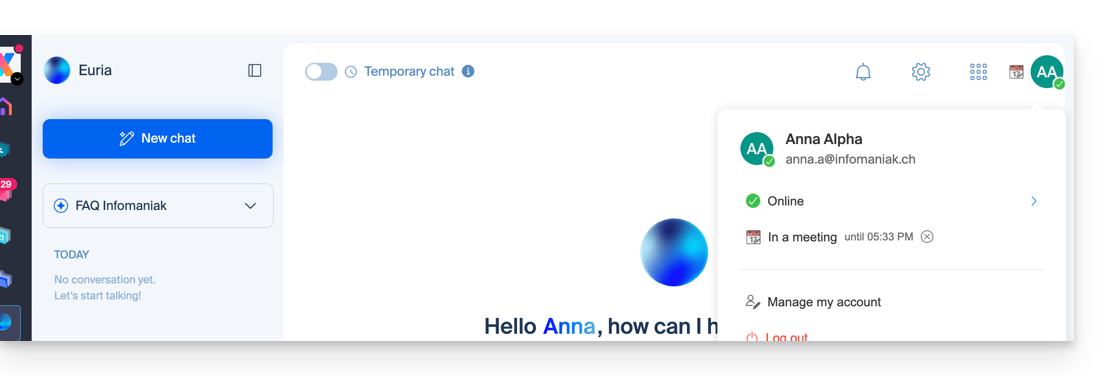
- Chk
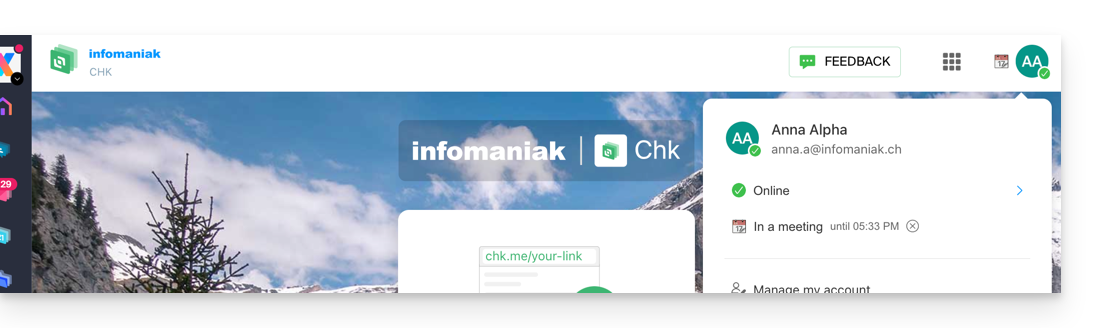
- kPaste
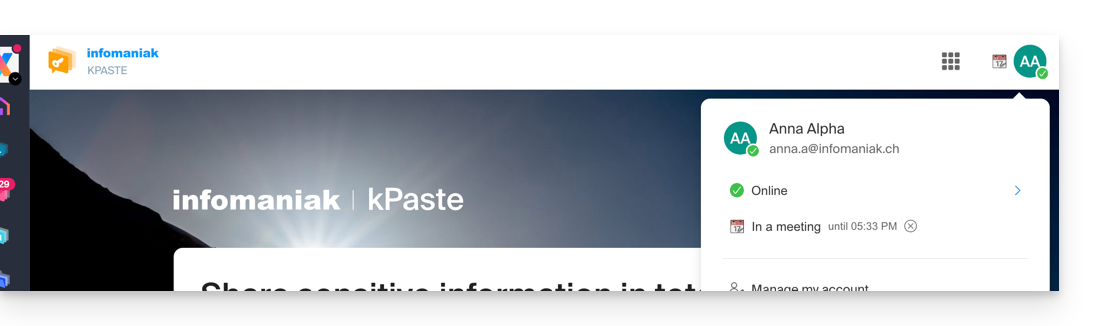
- kMeet
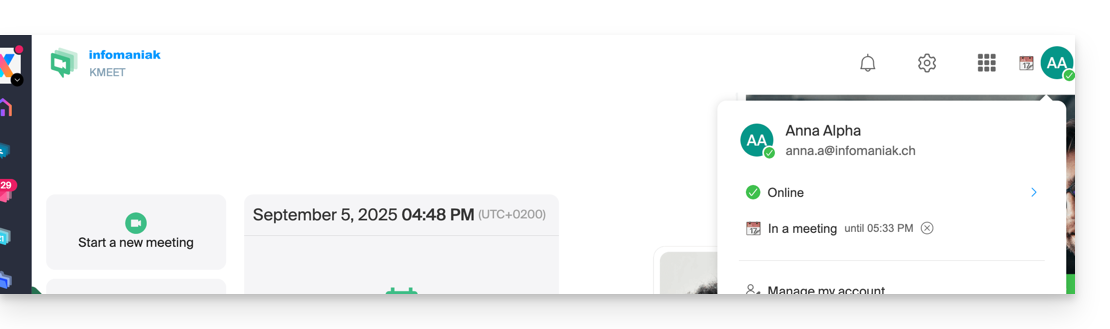
- página inicial ksuite.infomaniak.com
- Um status de presença diferente do status padrão, como "Não perturbar", pode afetar certas notificações.
Atualizar o status do perfil kSuite
Para isso:
- Clique aqui para acessar a interface kSuite.
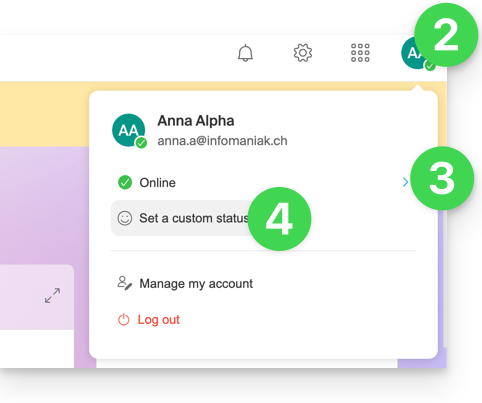
- Clique no ícone com suas iniciais/avatar no canto superior direito.
- Clique em Online para escolher outro status, se necessário (ausente ou não perturbar)…
- … ou clique em Definir um estado personalizado para inserir um estado personalizado ou escolher um entre as sugestões:
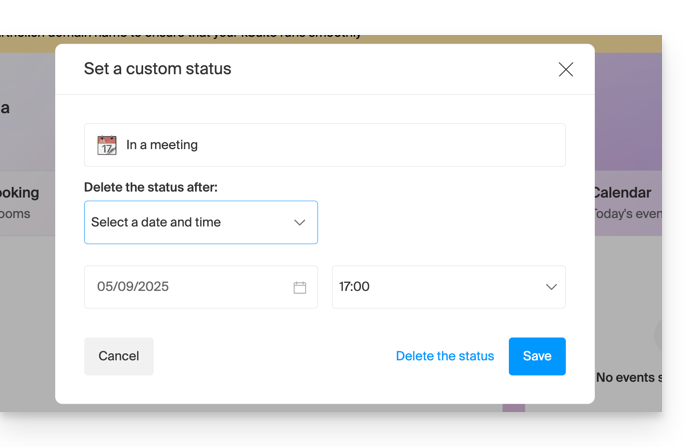
- Indique uma data de validade, se necessário, e salve:
Link para esta FAQ: https://faq.infomaniak.com/1712
Esta seção de perguntas frequentes foi útil?
Este guia detalha o que é possível pesquisar no aplicativo web Mail da Infomaniak (serviço online ksuite.infomaniak.com/mail) ou em outros serviços da kSuite. Para pesquisar no kDrive, consulte este outro guia.
Pesquisar um e-mail
Em ksuite.infomaniak.com/mail, digite na barra de pesquisa, localizada na parte superior da página, o termo que deseja encontrar.
A pesquisa será efetuada no endereço de e-mail indicado na barra lateral esquerda(para pesquisar em vários endereços de e-mail ao mesmo tempo, utilize um software/cliente de e-mail IMAP no qual você conecta seus diferentes endereços):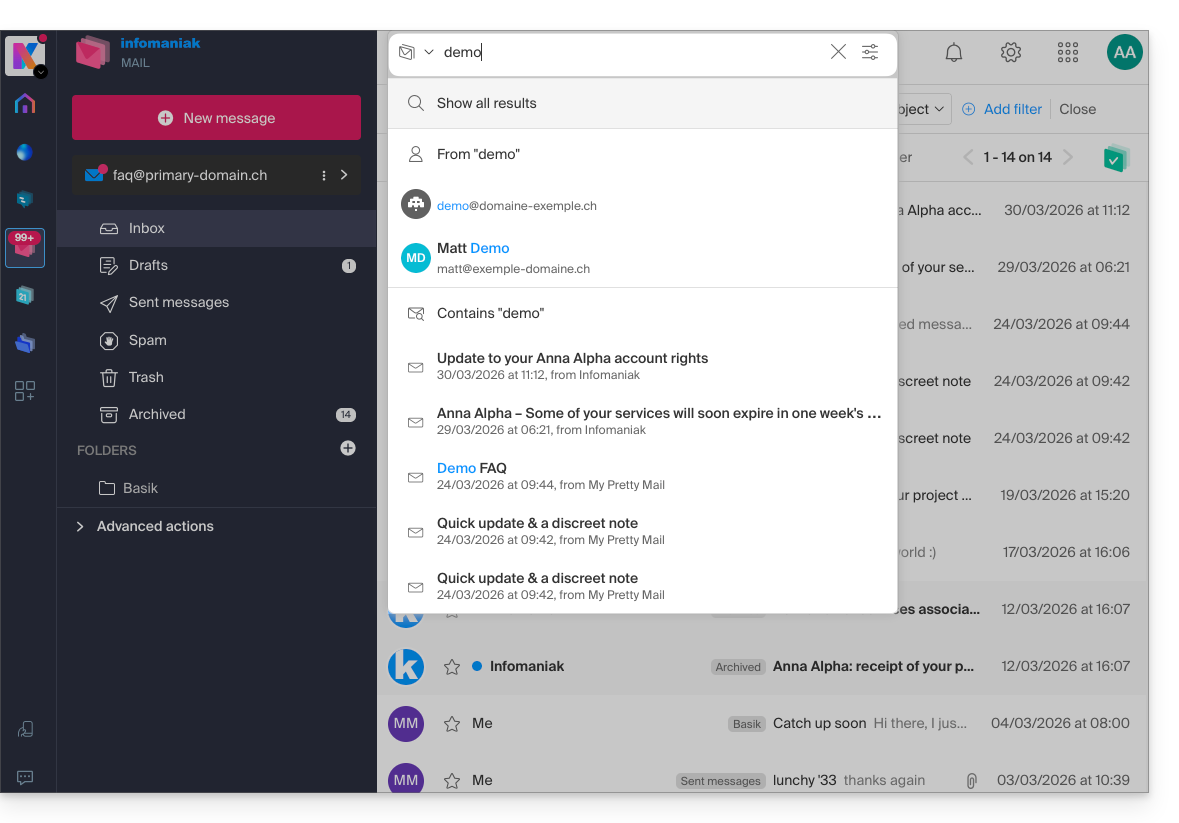
A pesquisa avançada está acessível à direita do campo de pesquisa na parte superior do seu Mail: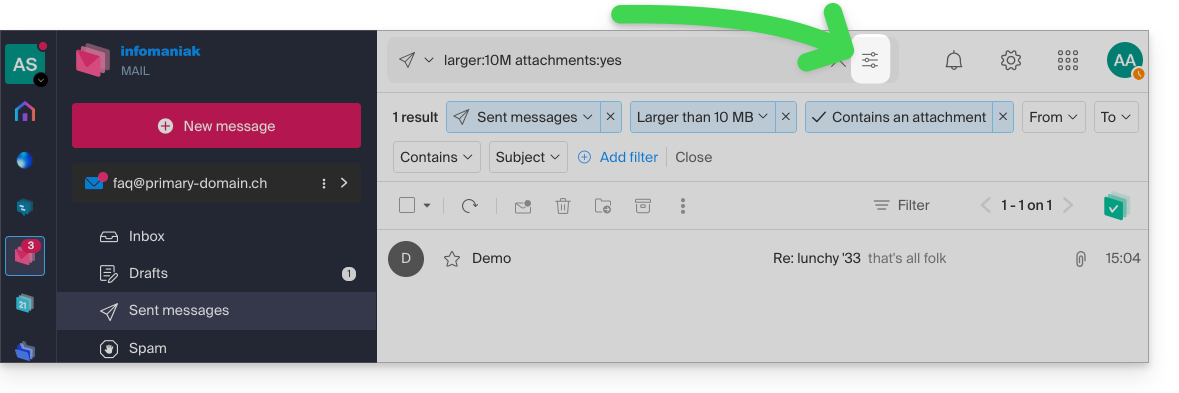
Pode pesquisar conteúdo…
- seja no corpo da mensagem,
- seja no seu assunto,
- seja entre os seus remetentes/destinatários…
Você também pode filtrar a pesquisa por tamanho da mensagem e pela presença ou ausência de anexos.
Em relação ao escopo das pesquisas:
- O conteúdo dos e-mails criptografados não é indexado (exceto o assunto do e-mail).
- O conteúdo dos anexos, assim como o seu nome, não é indexado: portanto, não é possível encontrar um e-mail pesquisando o nome do arquivo associado a ele.
- A opção "Pesquisar todos os e-mails" não inclui a Lixeira nem a pasta de Spam:
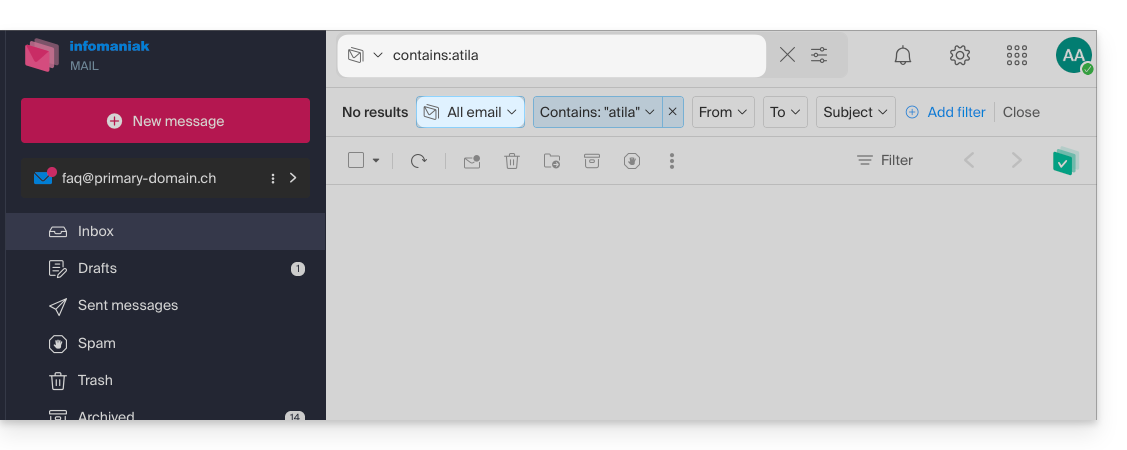
- Se uma pesquisa global não retornar resultados, é possível que o e-mail esteja em uma dessas duas pastas.
- Nesse caso, você precisará acessar especificamente a Lixeira ou a pasta de Spam para realizar a pesquisa, ou então iniciar a pesquisa selecionando um desses dois itens:
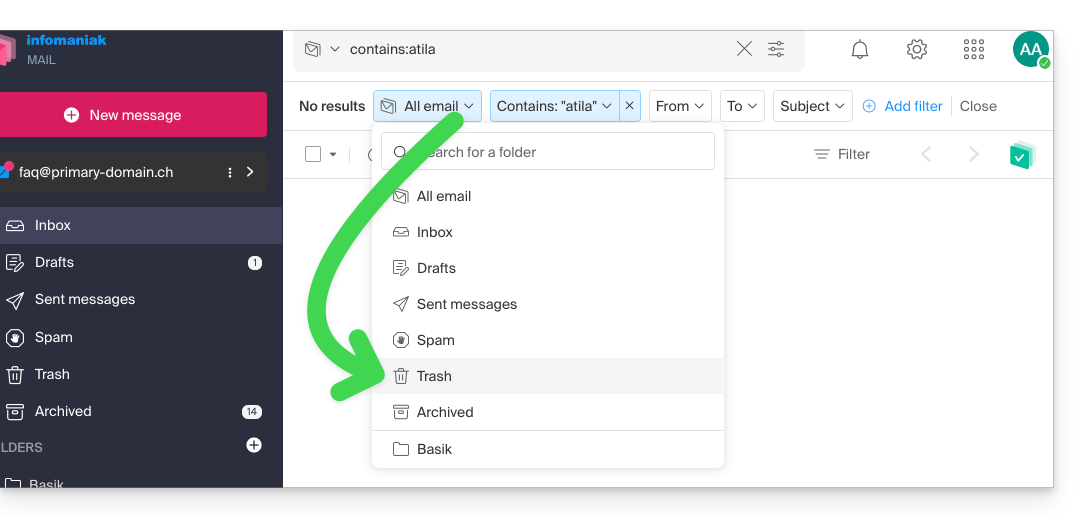
- Os resultados encontrados serão exibidos:
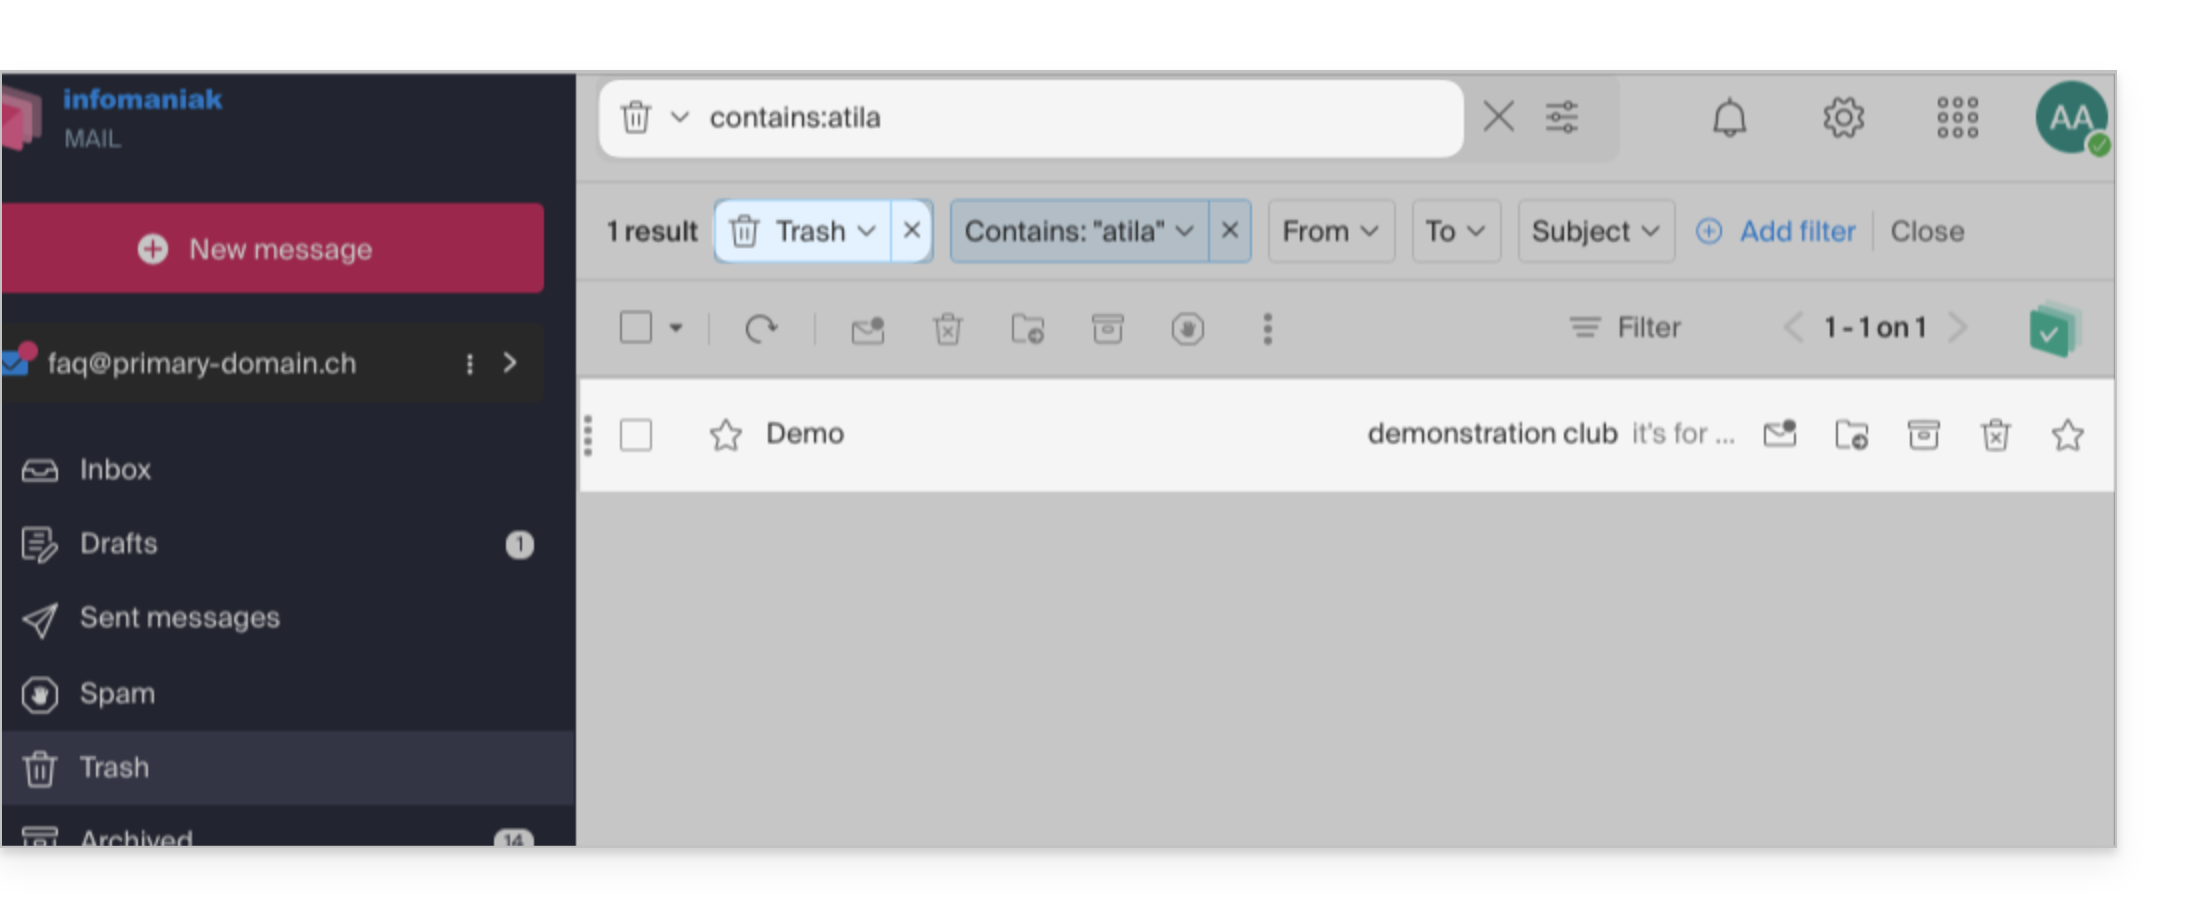
- Da mesma forma, quando você deseja encontrar uma mensagem em um diretório específico, é melhor acessá-lo primeiro pelo menu lateral esquerdo e, em seguida, iniciar a pesquisa.
Para pesquisar o histórico de um e-mail ou verificar sua atividade, você também pode pesquisar nos registros de um endereço de e-mail.
A pesquisa de e-mails com um software/cliente de e-mail
Para saber como o seu aplicativo de e-mail específico realiza as pesquisas, consulte a documentação. Por exemplo, os aplicativos de desktop Thunderbird e Outlook podem sincronizar as mensagens localmente e realizar as pesquisas localmente, enquanto outros aplicativos podem preferir a pesquisa no servidor IMAP e, nesse caso, o software/cliente de e-mail envia um comando de pesquisa ao servidor, que então pesquisa em todas as mensagens armazenadas no servidor e retorna os resultados ao software/cliente de e-mail.
Pesquisar um contato nos catálogos de endereços
A pesquisa de um item é realizada automaticamente em todos os seus catálogos de endereços, grupos, contatos, através do campo de pesquisa na parte superior da interface ksuite.infomaniak.com/contacts: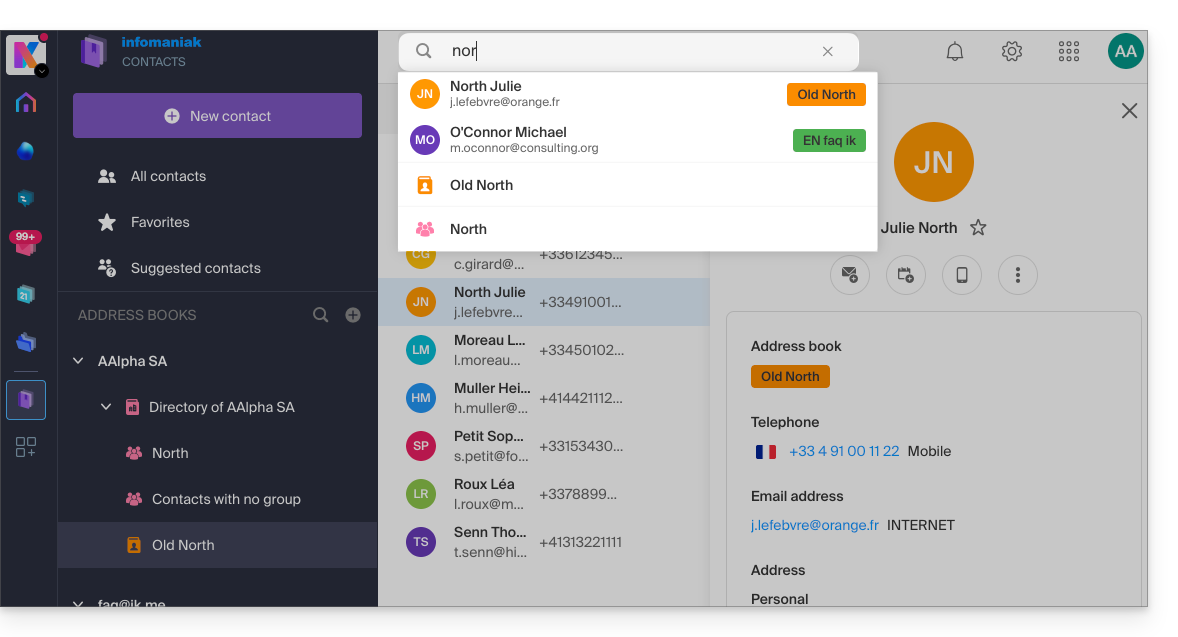
Pesquisar um evento nos calendários
A pesquisa de um item em ksuite.infomaniak.com/calendar é realizada automaticamente em todos os seus calendários, eventos, salas, incluindo a descrição destes e as pessoas que estavam associadas a eles (se clicar em um contato, obterá os eventos em comum com esse contato):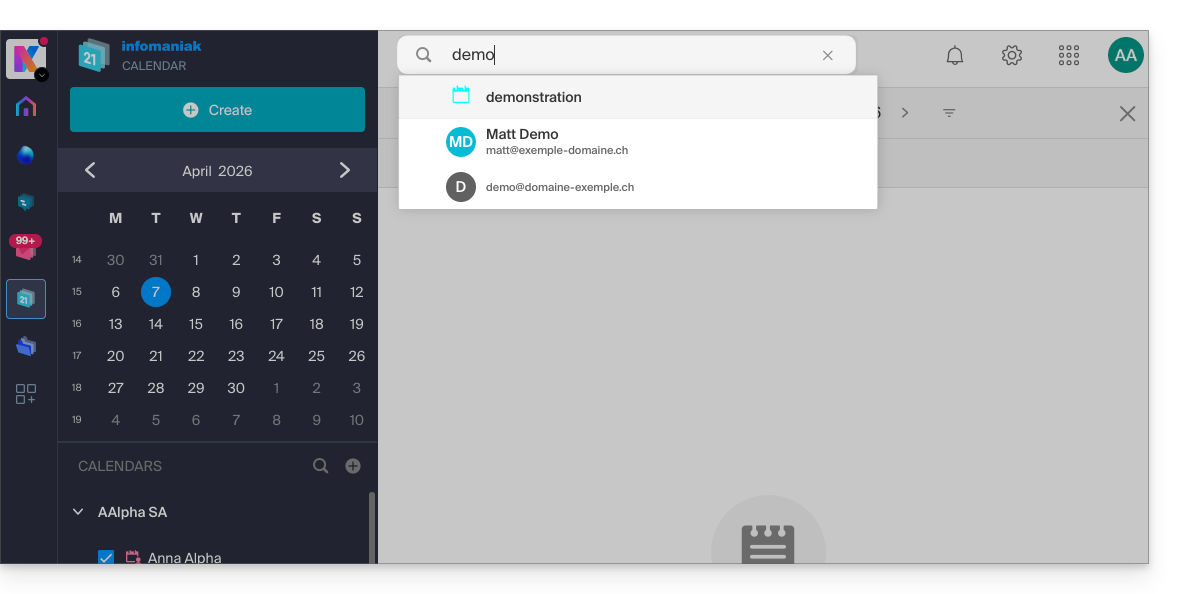
Pesquisar no kChat
A pesquisa de um elemento em ksuite.infomaniak.com/kchat é realizada através do campo de pesquisa principal para encontrar mensagens, respostas ou o conteúdo de arquivos: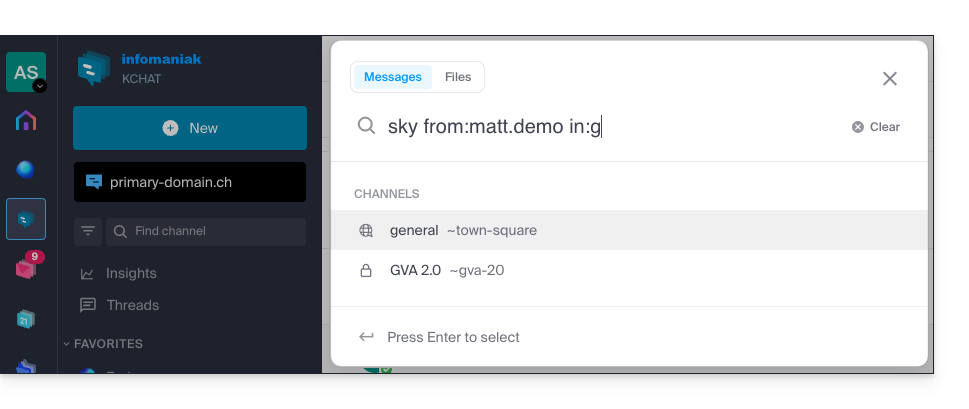
Para refinar os seus resultados, vários modificadores de pesquisa estão à sua disposição:
from:: para encontrar as mensagens enviadas por um utilizador específico (ex:from:jean.dupont).in:: para restringir a pesquisa a um canal público, um canal privado ou uma mensagem direta específica (ex:in:nome-do-canal).before:,after:,on:: para especificar uma data (no formato AAAA-MM-DD) ou um período preciso (ex:on:2026-09-01).
Excluir um canal ou termos de uma pesquisa (exclusões)
É possível excluir certos resultados da pesquisa usando o hífen - antes de um termo ou modificador. Esta é uma funcionalidade extremamente útil para filtrar resultados irrelevantes:
- Excluir um canal: adicione
-in:nome-do-canalà sua pesquisa para excluir completamente os resultados provenientes desse canal. - Excluir uma palavra: digite
teste -liberaçãopara que os resultados incluam o termo "teste", excluindo ao mesmo tempo as mensagens que contenham "liberação". - Excluir um utilizador: digite
-from:utilizadorpara ocultar as mensagens enviadas por essa pessoa específica.
Pode combinar perfeitamente estas exclusões. Por exemplo, a pesquisa test -release -in:release-discussion -from:anna encontrará a palavra "test", excluindo a palavra "release", ignorando completamente o canal "release-discussion" e excluindo as mensagens da utilizadora “anna”.
Link para esta FAQ: https://faq.infomaniak.com/1733
Esta seção de perguntas frequentes foi útil?
Este guia explica como, a partir de um Serviço de Email, redefinir ou remover as palavras-passe de um endereço de emailpara interromper a conexão de um software de terceiros, como o Outlook ou o Thunderbird.
As outras opções de acesso e gerenciamento são apresentadas no guia principal.
Preâmbulo
- Alterar a senha de um endereço de e-mail equivale a alterar a senha IMAP/SMTP:
- Assim que a senha for alterada, você deverá atualizar seus softwares (Outlook, etc.), dispositivos móveis (iPhone), etc. com a nova senha (isso é de sua responsabilidade).
- Se não conseguir iniciar sessão no Manager ou no Mail/kSuite, não poderá gerir as palavras-passe de um dos endereços de e-mail: consulte este outro guia neste caso.
Remover uma palavra-passe/dispositivo
Pré-requisitos
- Ter, no mínimo, o direito de gerir o Serviço de Email em questão (ou ser Administrador / Responsável legal dentro da Organização).
Para interromper qualquer conexão IMAP/POP/SMTP que esteja sendo feita atualmente por meio de uma senha gerada nesta interface (isso não remove o endereço dos aplicativos de e-mail Infomaniak — para isso, é necessário gerenciar os usuários do endereço de e-mail), é possível revogar um dispositivo ou até mesmo excluir todas as configurações existentes em um clique:
- Clique aqui para acessar o gerenciamento do seu produto no Painel de Controle Infomaniak (precisa de ajuda?).
- Clique no nome do produto em questão.
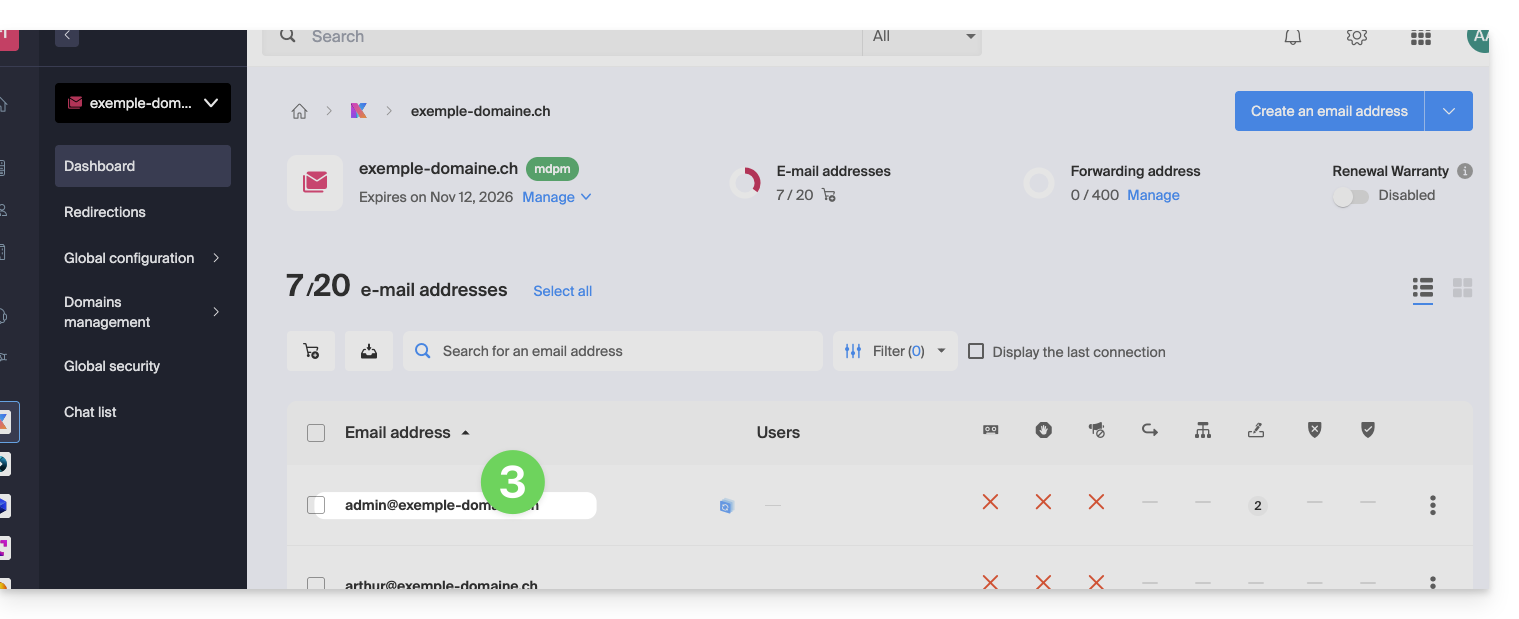
- Clique no endereço de e-mail correspondente na tabela:
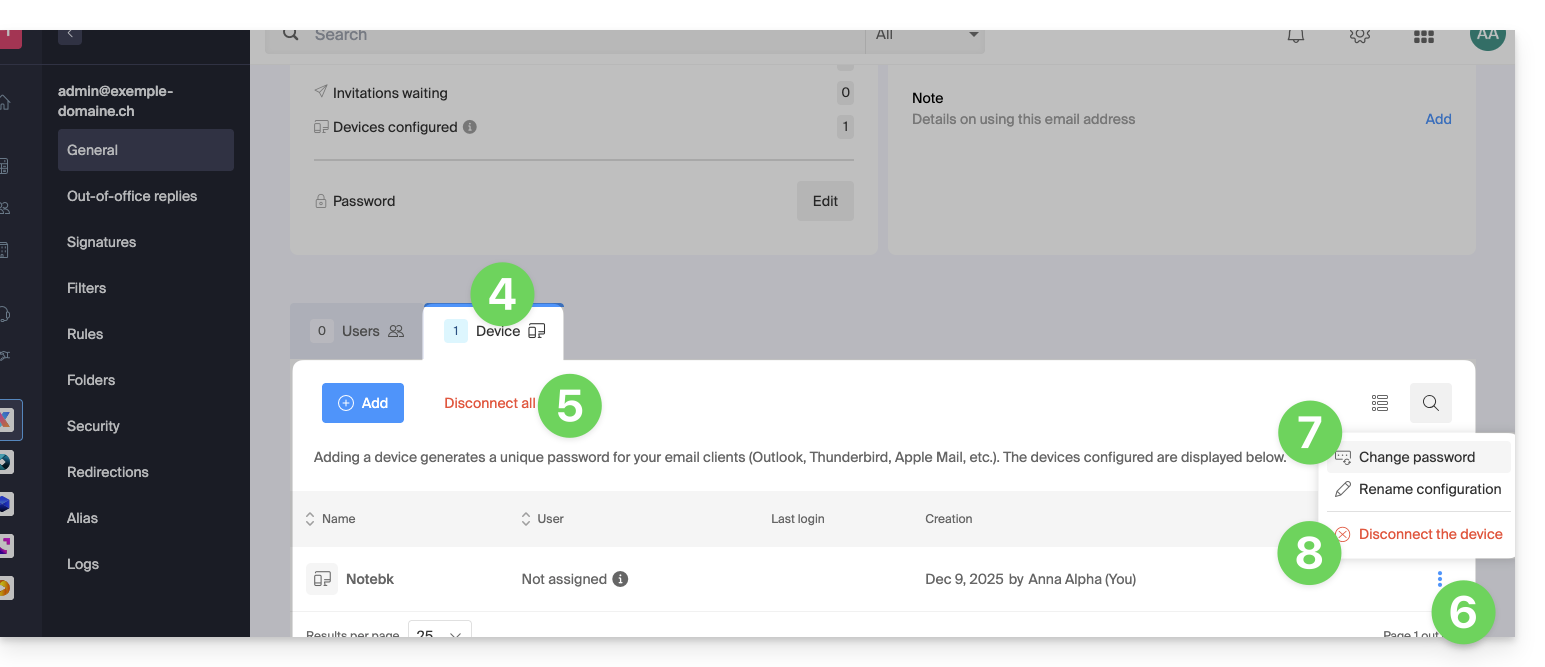
- Clique na aba Dispositivos.
- Clique no link vermelho para desconectar todos os dispositivos registrados (é necessária uma confirmação).
- Clique no menu de ação ⋮, localizado à direita do dispositivo em questão.
- Clique em “Alterar senha” para encerrar a conexão atual, mas permitir que o dispositivo se reconecte com uma nova senha.
- Clique em “Desconectar dispositivo” para removê-lo da lista e eliminar a conexão correspondente:
O que é uma senha “genérica”?
Alguns endereços de e-mail podem exibir uma indicação específica na seção Dispositivos: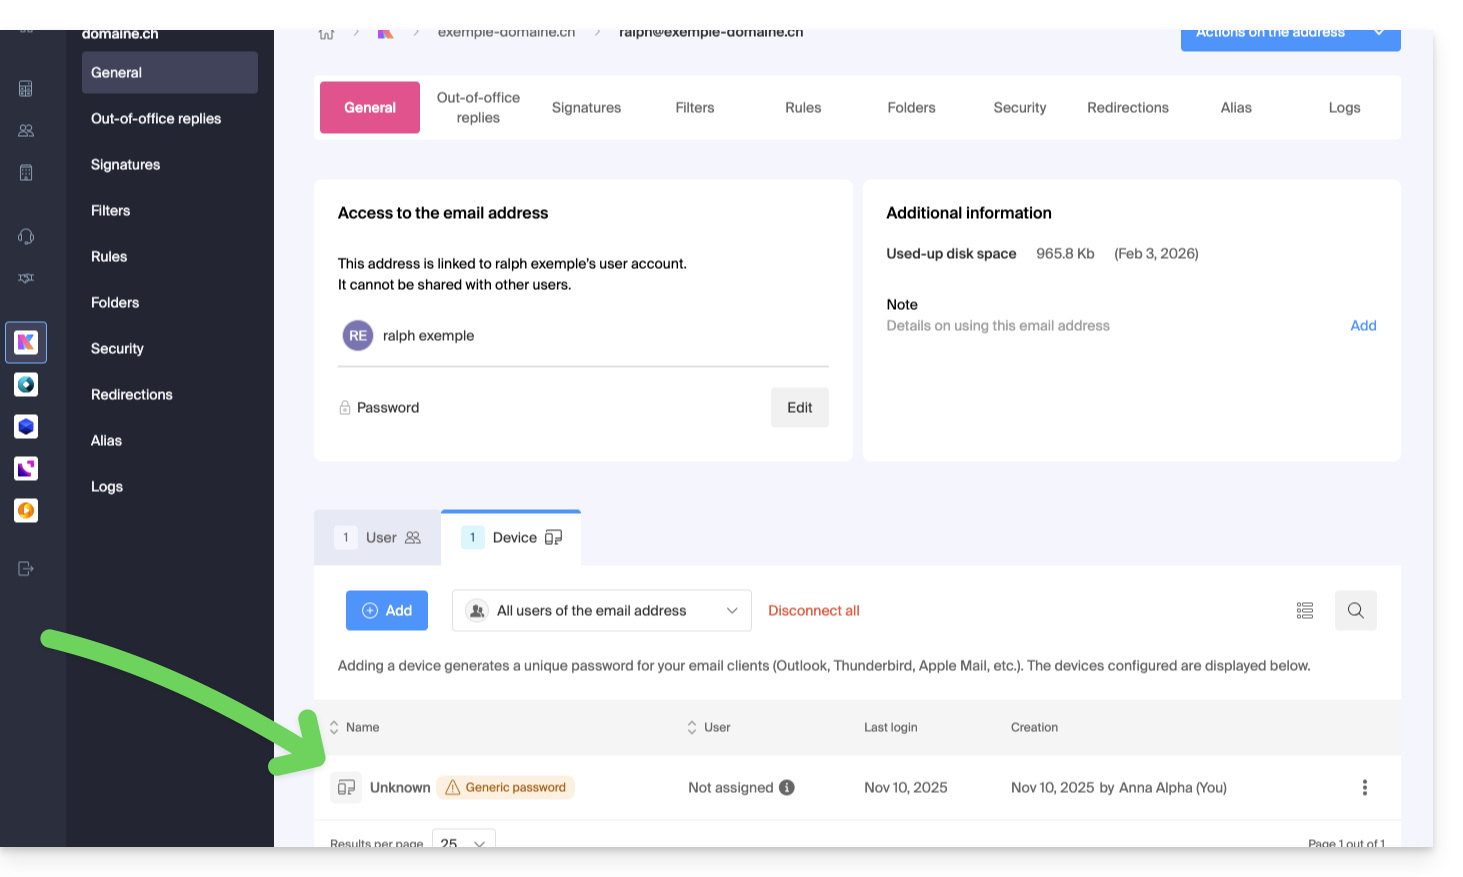
Se for esse o caso, não se preocupe, isso indica que o endereço possui uma senha atribuída durante sua criação (anterior a 2026). Essa senha permanece válida, mas, como acontece com outras senhas, não é possível exibi-la.E, ao contrário de outras senhas, esta não pode ser redefinida (a opção está desativada):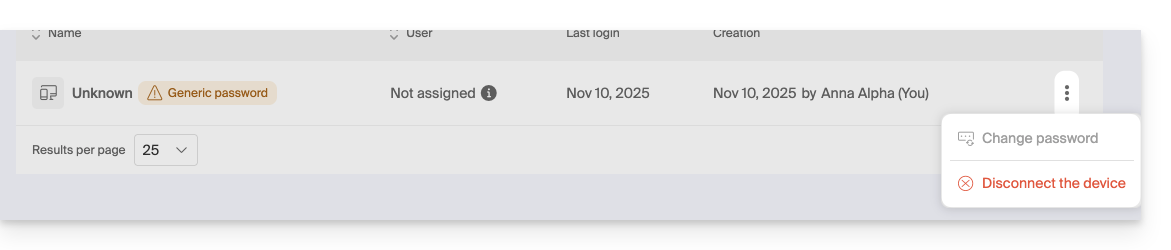
Nesse caso, você pode adicionar sem problemas uma senha adicional.
Link para esta FAQ: https://faq.infomaniak.com/1736
Esta seção de perguntas frequentes foi útil?
Este guia explica como remover um dos utilizadores da sua Organização no Manager Infomaniak.
Pré-requisitos
- Alterne para a Organização desejada, caso não encontre a lista de utilizadores esperada (❓: ajuda).
- Seja Administrador ou Representante legal na Organização (❓: ajuda).
- Atenção: não é possível remover um representante legal se não houver outro representante legal (❓: ajuda).
Remover um utilizador da sua Organização
Se o utilizador tiver acesso ao kDrive ou tiver sido convidado a consultar um endereço de e-mail de terceiros, várias etapas intermediárias solicitarão as ações a serem executadas com os seus dados e o informarão, se for o caso, sobre o que acontecerá com os calendários e as listas de contactos. Para remover um dos utilizadores da Organização:
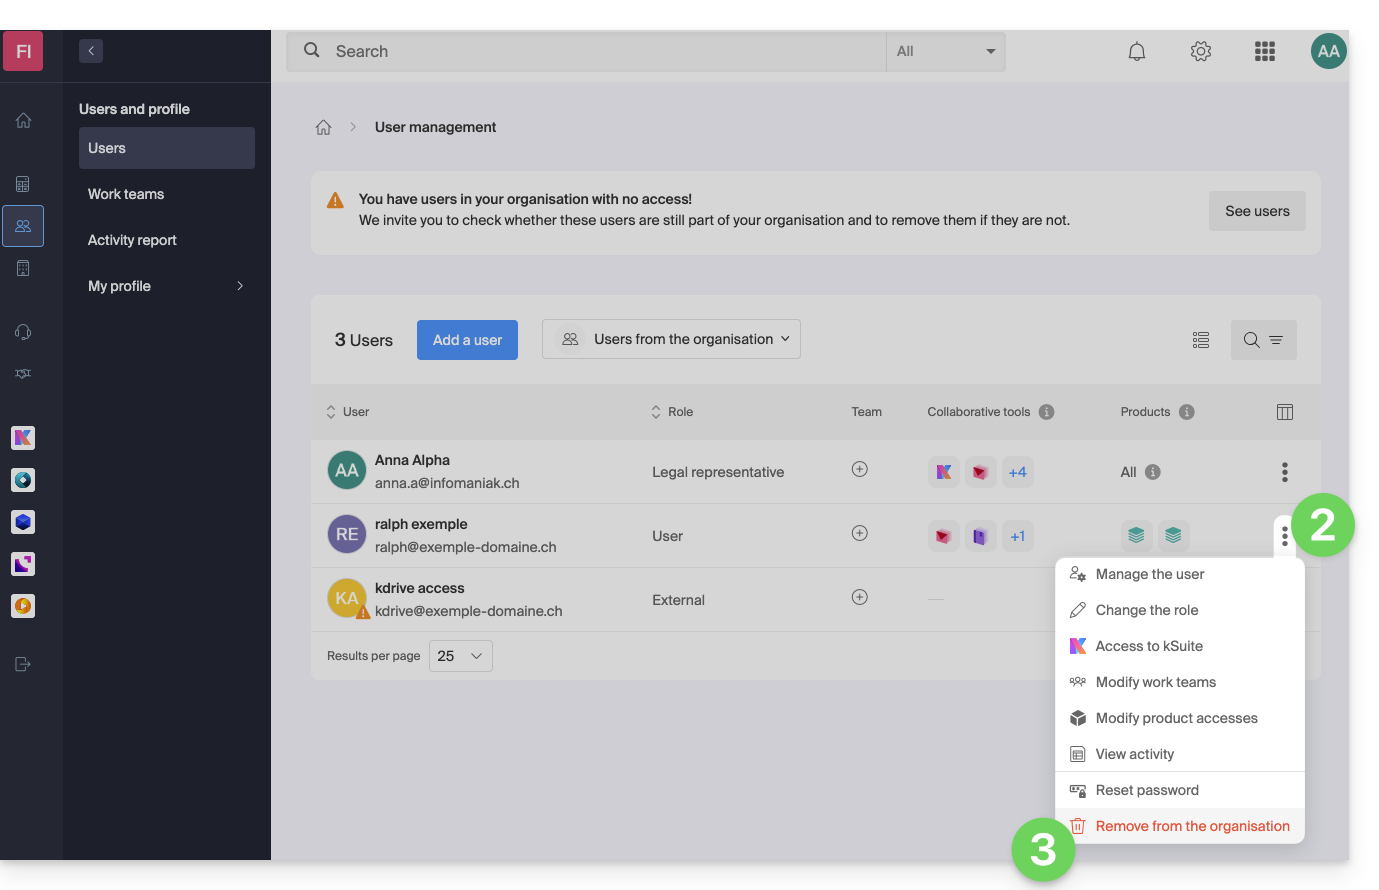
- Clique aqui para acessar o gerenciamento de usuários da Organização no Gerenciador Infomaniak (❓: ajuda).
- Clique no menu de ação ⋮ à direita do usuário em questão.
- Clique em Remover da Organização:
- Leia as informações (clique, se necessário, nas setas para baixo para obter detalhes sobre as exclusões) e, em seguida, clique no botão azul Continuar:
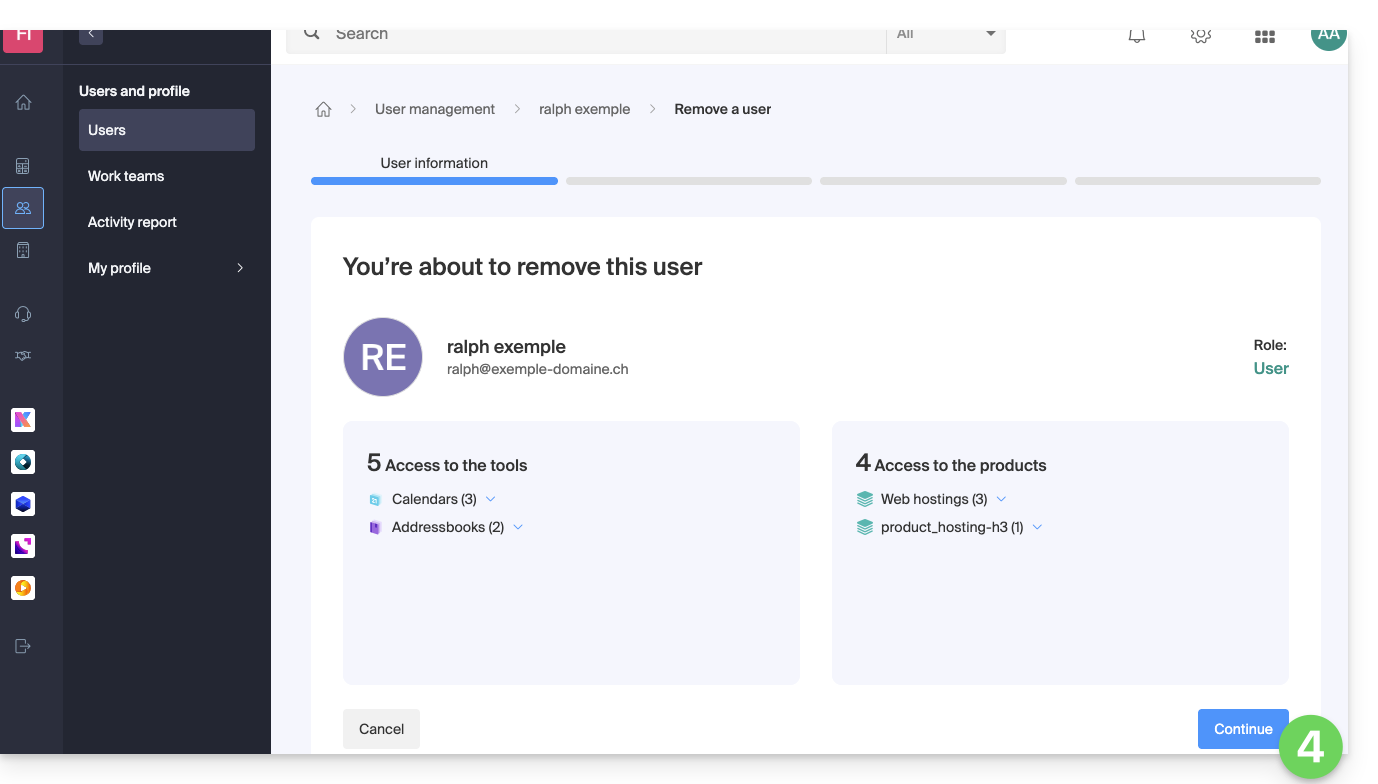
- Leia as informações, confirme a exclusão ativando a caixa de seleção e, em seguida, clique no botão azul Continuar:
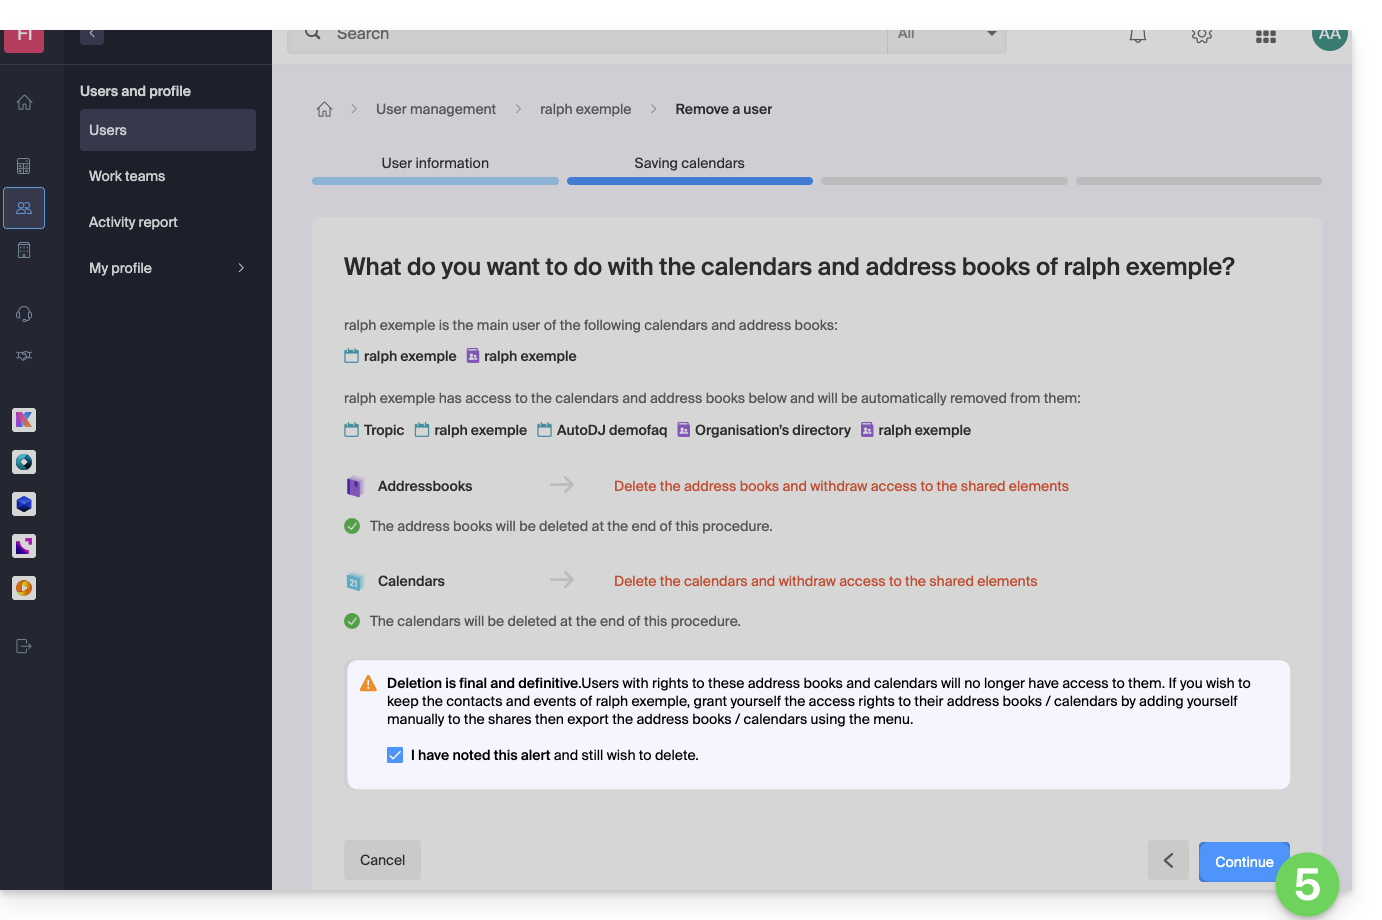
- Leia as informações (clique, se necessário, nos ícones de seta para baixo para obter detalhes sobre as exclusões) e, em seguida, clique no botão vermelho Remover:
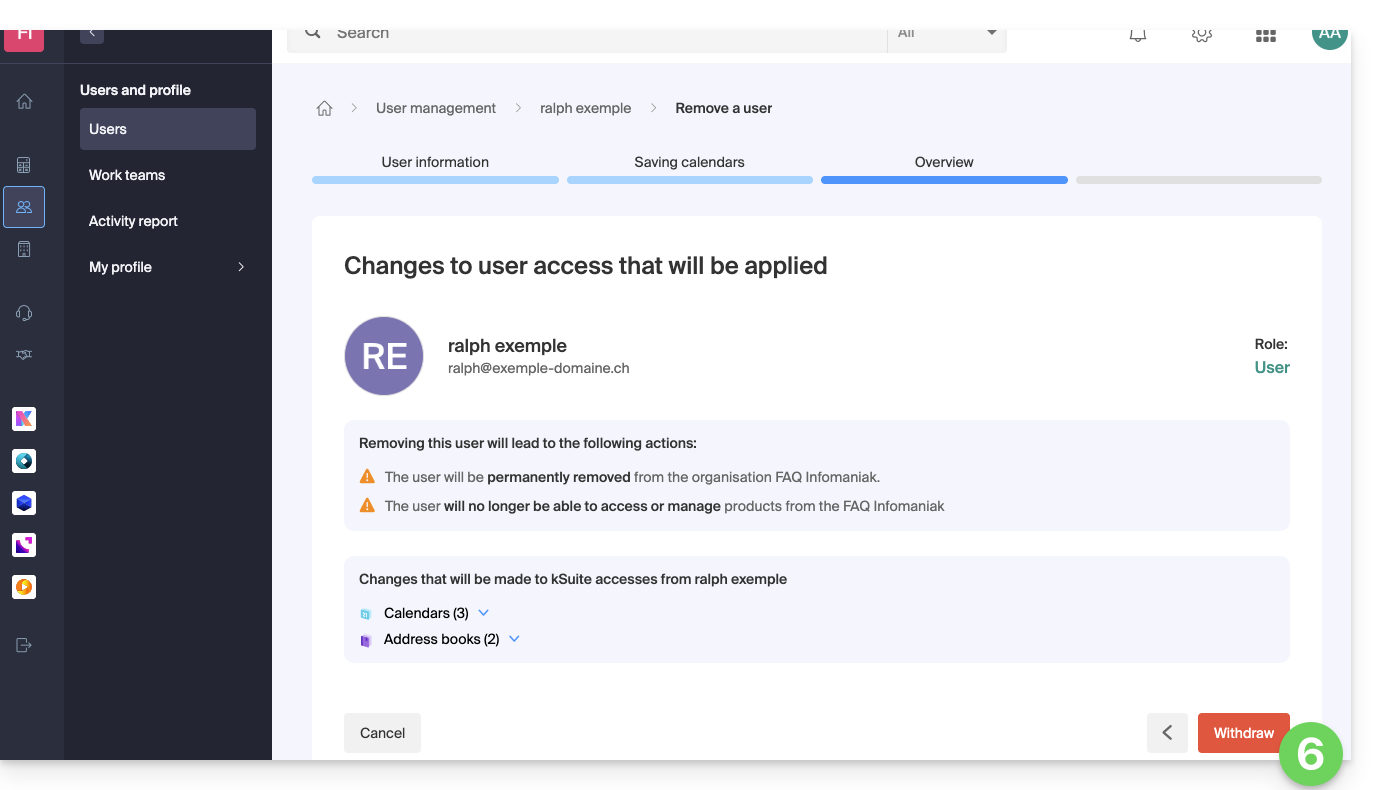
- Indique o seu endereço de e-mail (identificador de acesso ao painel de controlo), marque a caixa de confirmação e clique no botão vermelho Remover este utilizador para remover definitivamente o utilizador, sem possibilidade de reverter.
Link para esta FAQ: https://faq.infomaniak.com/1738
Esta seção de perguntas frequentes foi útil?
Este guia explica como restaurar contactos apagados por engano nas listas de contactos da aplicação web Contactos Infomaniak (serviço online ksuite.infomaniak.com/contacts).
✘ INDISPONÍVEL com
kSuite Free
my kSuite (ik.me, etik.com, ikmail.com)
Serviço Mail Starter
Ao fazer o upgrade de uma destas ofertas gratuitas, será possível recuperar a cópia de segurança até 30 dias.
Restauração de contactos
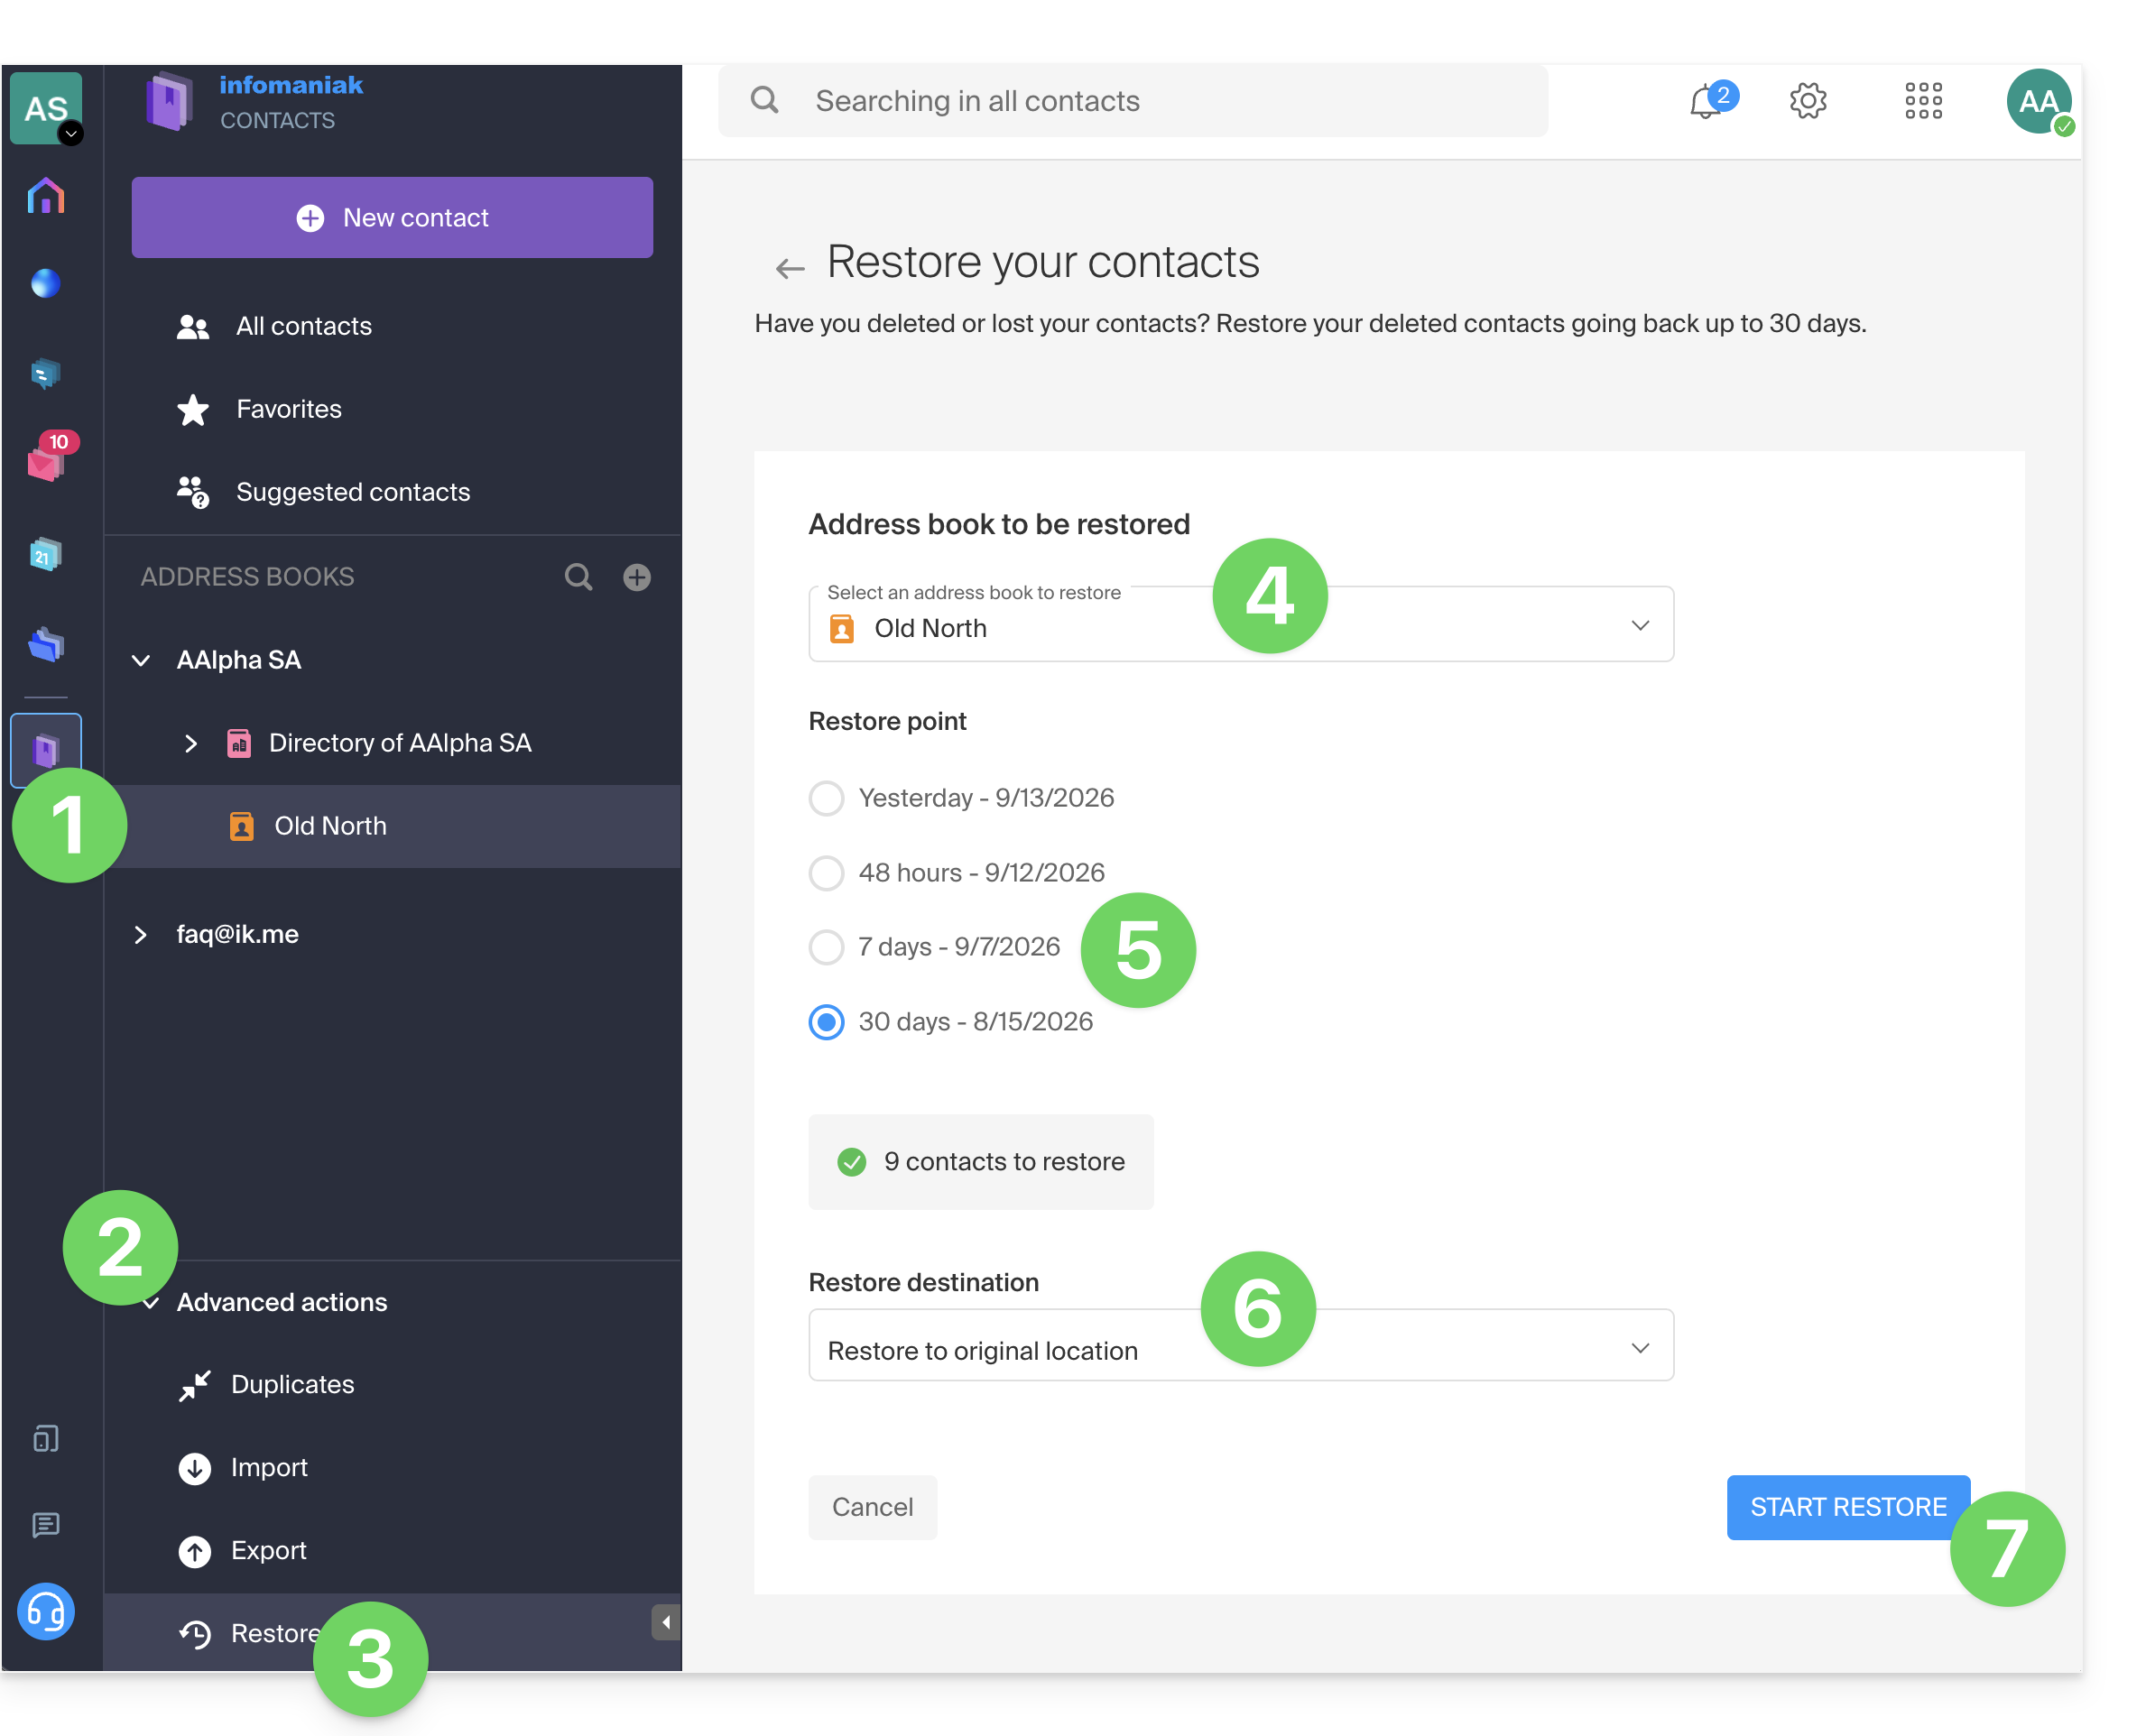
São efetuados pontos de restauração diariamente. Após a realização de uma cópia de segurança do estado completo do seu livro de endereços, a Infomaniak disponibiliza-a durante 30 dias. Também é possível recuperar contactos apagados nas últimas 24 horas, 48 horas ou 7 dias:
- Clique aqui para aceder à aplicação web Contactos da Infomaniak (serviço online ksuite.infomaniak.com/contacts).
- Clique na seta para baixo para expandir a seção Ações avançadas.
- Clique em Restaurar.
- Escolha o backup a restaurar.
- Escolha a versão de ontem, de 48 horas atrás ou de 7 e 30 dias atrás.
- Escolha o destino (no local original ou em outro catálogo de endereços, se disponível).
- Inicie a restauração usando o botão na parte inferior da página, que é ativado se houver contactos que possam ser restaurados:
Link para esta FAQ: https://faq.infomaniak.com/1741
Esta seção de perguntas frequentes foi útil?
Este guia detalha a possibilidade de agrupar contactos nas listas de contactos Infomaniak na aplicação web Contactos Infomaniak (serviço online ksuite.infomaniak.com/contacts).
Introdução
- Criar um grupo de contactos permite contactá-los mais facilmente.
- Também facilita o envio de e-mails destinados a um tipo específico de contactos.
Criar o grupo
Para gerir os grupos de contactos:
- Clique aqui para aceder à aplicação web Contactos Infomaniak (serviço online ksuite.infomaniak.com/contacts).
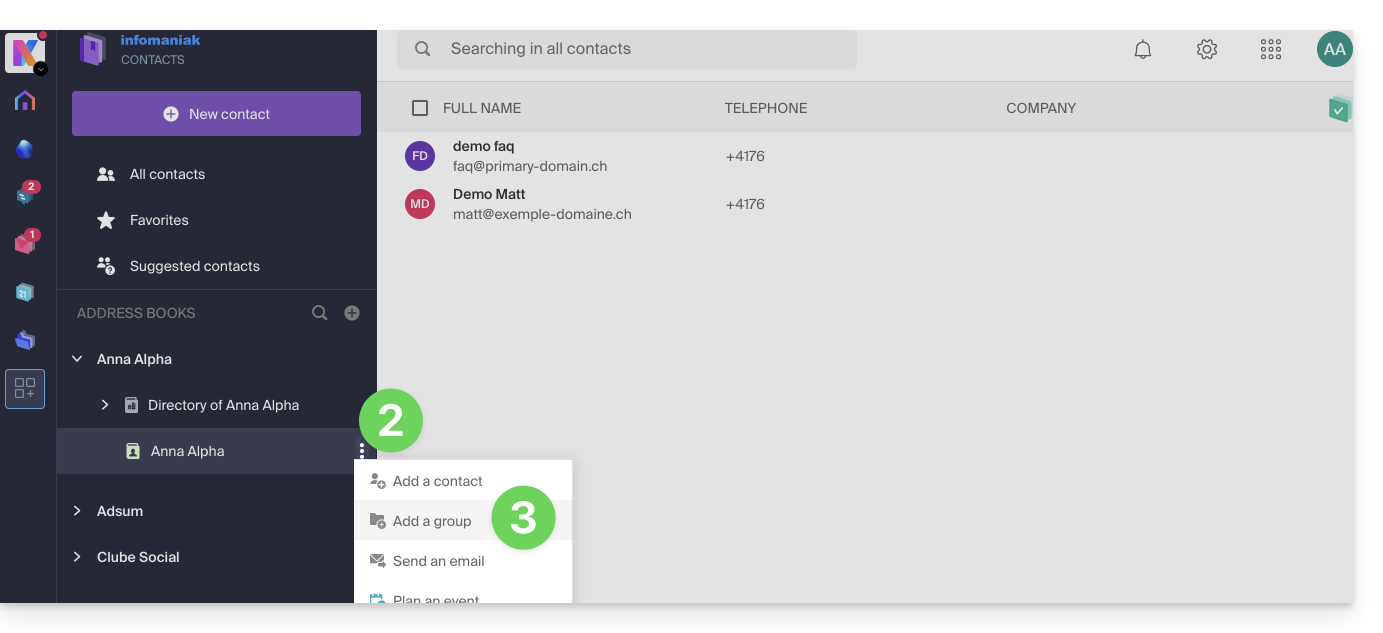
- Clique no menu de ação ⋮ localizado à direita da lista de contactos.
- Clique em Adicionar grupo:
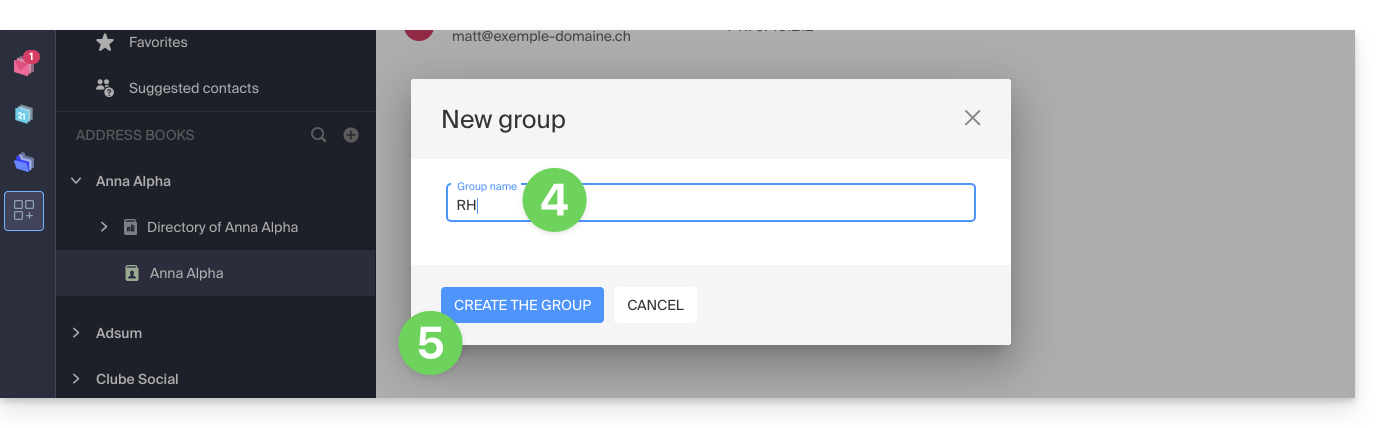
- Introduza o nome do grupo.
- Clique no botão azul para validar (e assim criar automaticamente a “pasta” com o nome do grupo escolhido, bem como uma segunda “pasta” obrigatória que irá agrupar todos os contactos que não estiverem classificados no seu novo grupo, denominada “Contactos sem grupo”):
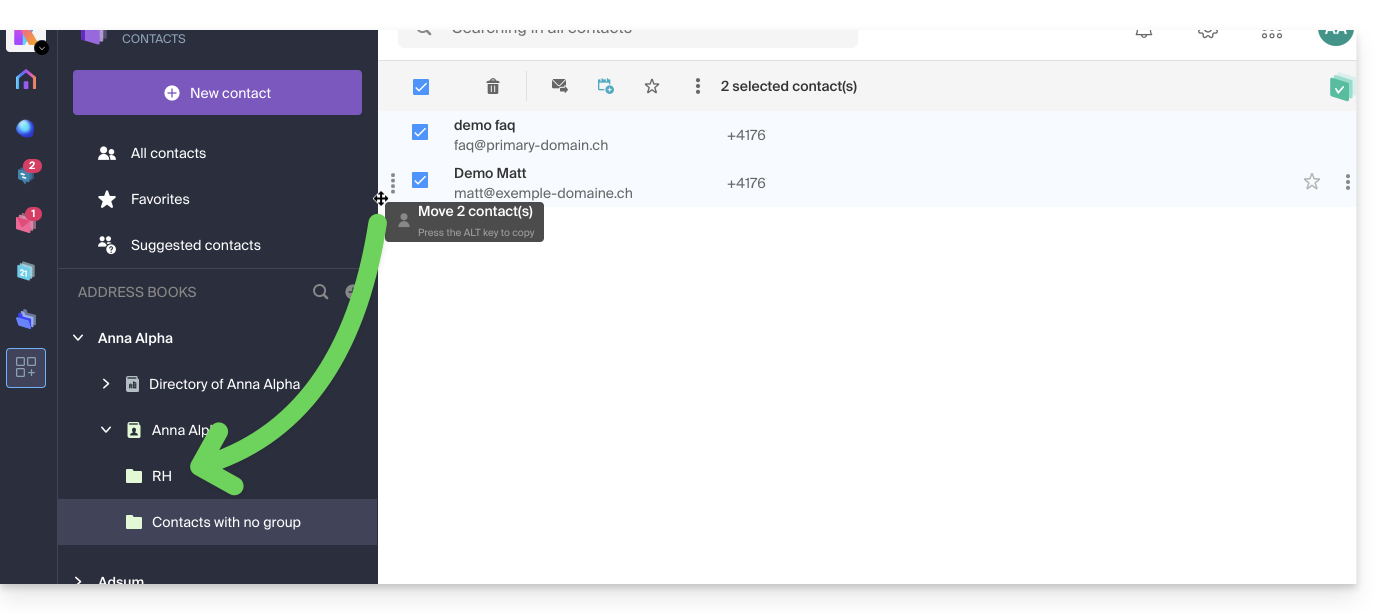
- Na agenda principal ou em “Contactos sem grupo”, arraste e solte os contactos que devem ser associados a este novo grupo:
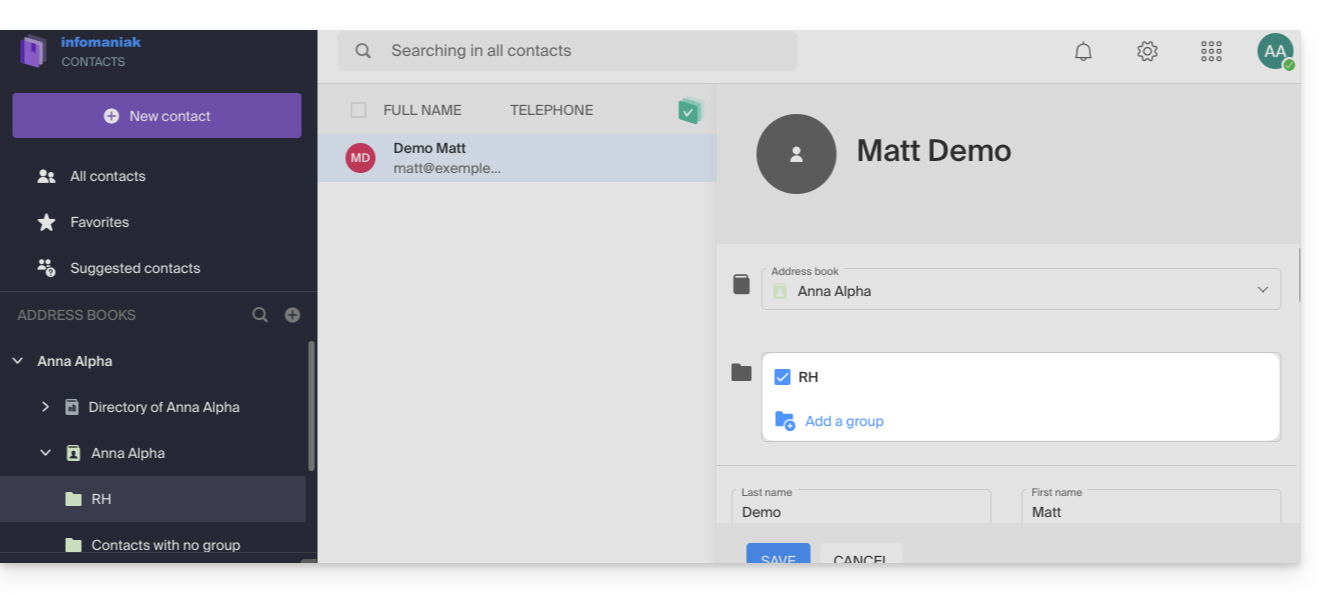
- Também pode atribuir a pertença a um determinado grupo ao editar um contacto.
- Para modificar a pertença de um contacto a uma agenda ou grupo, basta marcar/desmarcar as caixas correspondentes e guardar as alterações:
Grupos de trabalho
Se definiu um ou mais grupos de trabalho…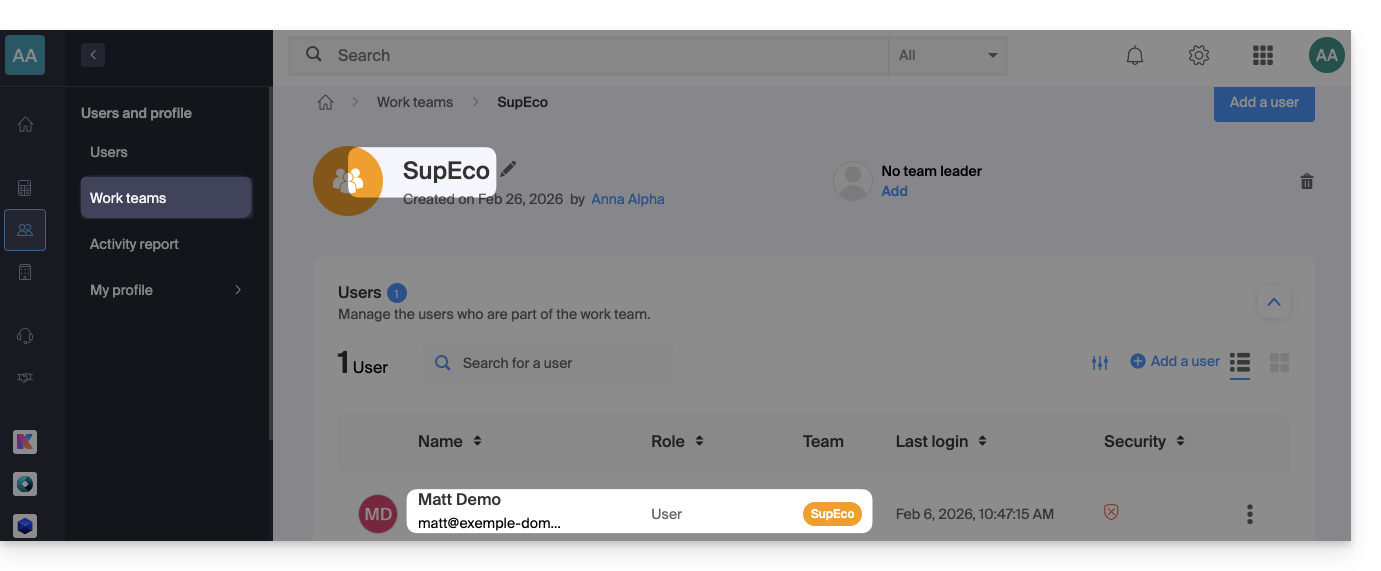 … então os utilizadores que fazem parte desses grupos serão automaticamente visíveis na secção das agendas da Organização: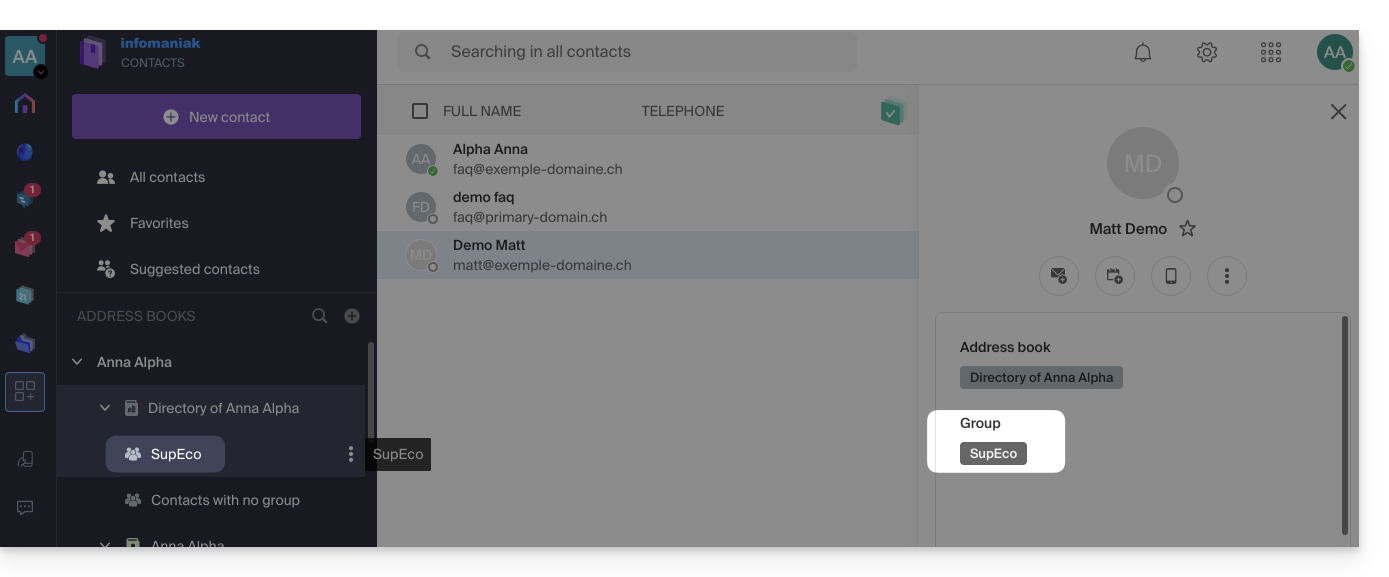
Eliminar um grupo com ou sem os contactos
Ao escolher eliminar um grupo de contactos, pode decidir se os contactos contidos também devem ser eliminados ou não: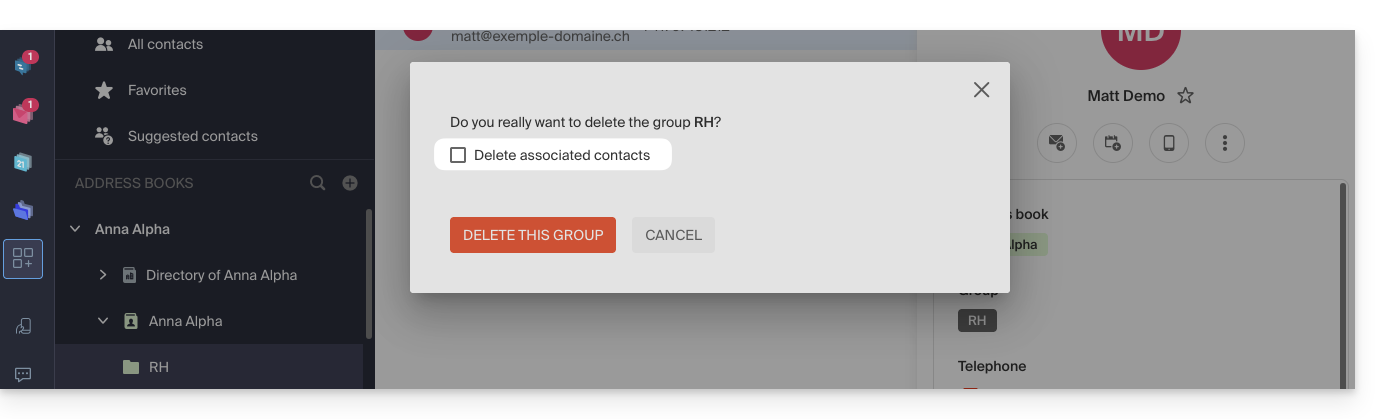
Envio em massa
Para enviar um e-mail para todo o grupo:
- Clique aqui para aceder à aplicação Web Mail da Infomaniak (serviço online ksuite.infomaniak.com/mail).
- Redija uma nova mensagem.
- Digite o início do nome do catálogo de endereços para que ele apareça e possa ser selecionado:
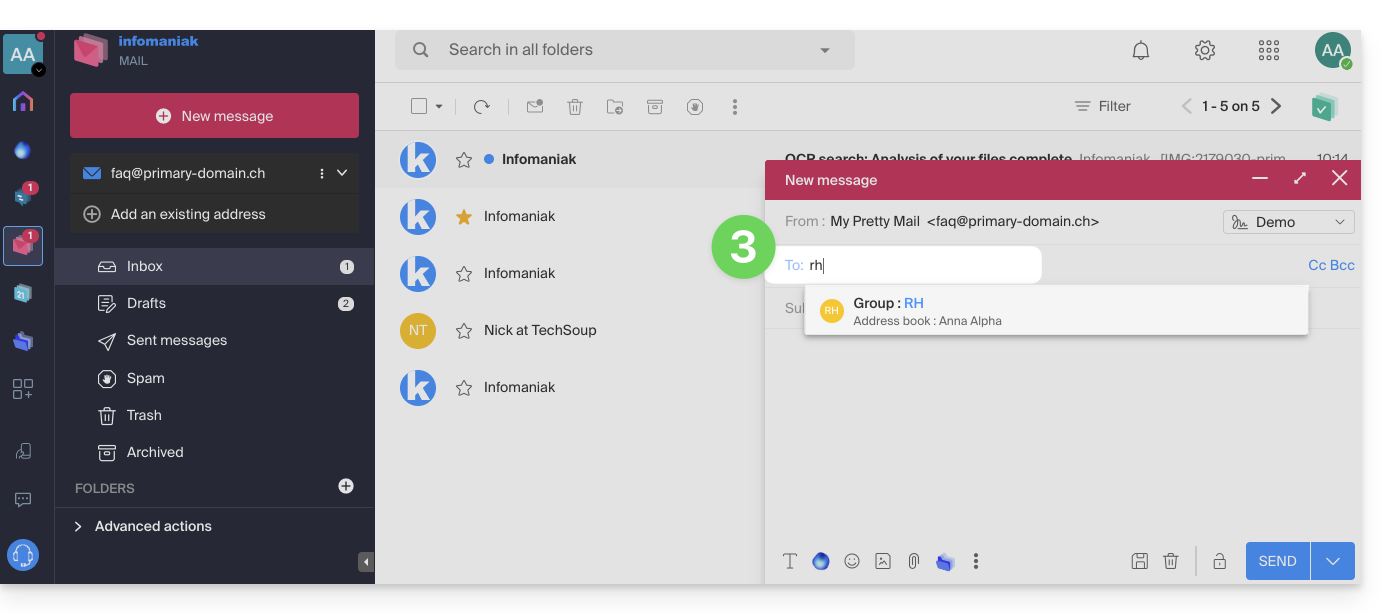
- Você também pode clicar no "A" à esquerda do campo do endereço do destinatário para acessar seu catálogo de endereços e suas subpastas (grupos de contatos):
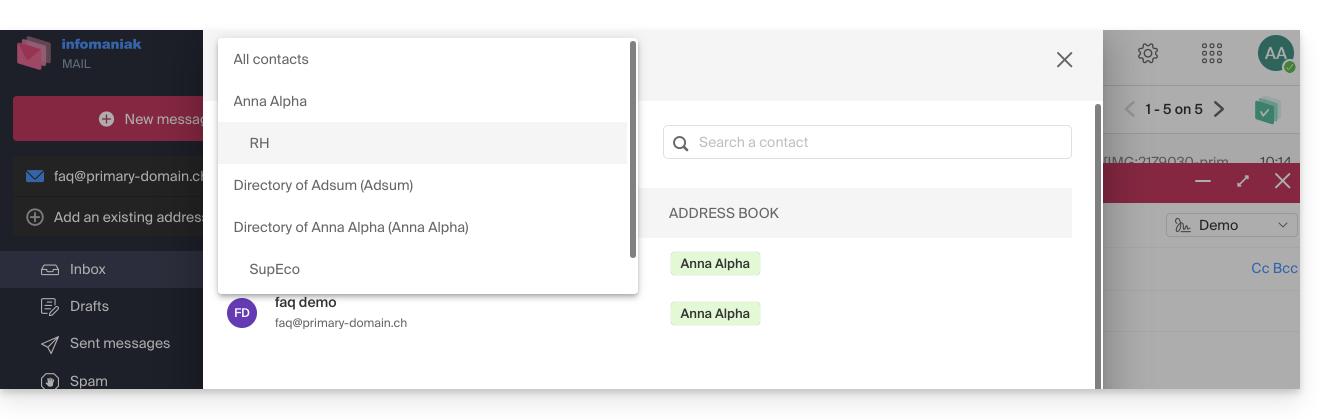
- Claro, também é possível usar os contatos que já estão em seu catálogo de endereços para enviar uma mensagem individual ou em grupo, digitando as primeiras letras dos nomes.
- Você também pode clicar no "A" à esquerda do campo do endereço do destinatário para acessar seu catálogo de endereços e suas subpastas (grupos de contatos):
Você pode compartilhar todo um catálogo de endereços com outros usuários (usuários que você convidou e selecionou, obviamente), mas não apenas um grupo específico.
Link para esta FAQ: https://faq.infomaniak.com/1760
Esta seção de perguntas frequentes foi útil?
Este guia explica como marcar os e-mails que desejar como "favoritos" na sua caixa de correio Infomaniak, para que possa acompanhar esses e-mails de forma especial e, se desejar, exibi-los separadamente.
Acompanhar um ou mais e-mails…
… a partir do aplicativo Web Mail da Infomaniak
Para adicionar uma mensagem como favorito:
- Clique aqui para acessar o aplicativo web Mail da Infomaniak (serviço online ksuite.infomaniak.com/mail).
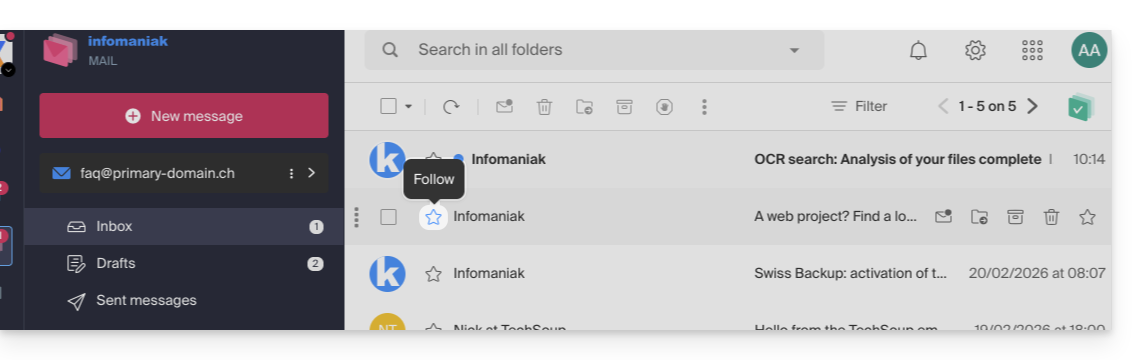
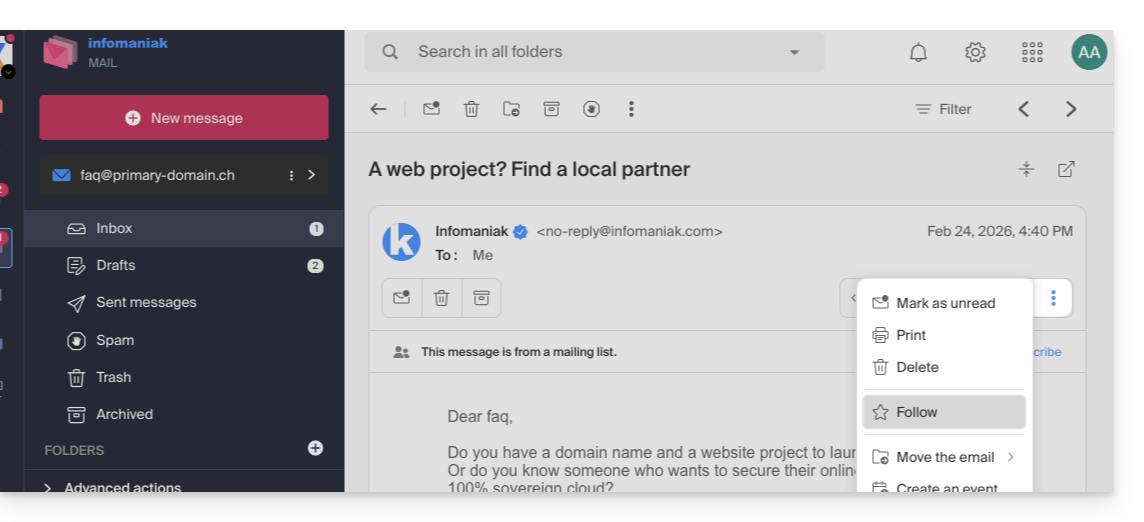
- Clique no ícone ☆…
- … à esquerda de uma mensagem na lista de mensagens
- … no canto superior direito da janela de leitura de uma mensagem
- … à esquerda de uma mensagem na lista de mensagens
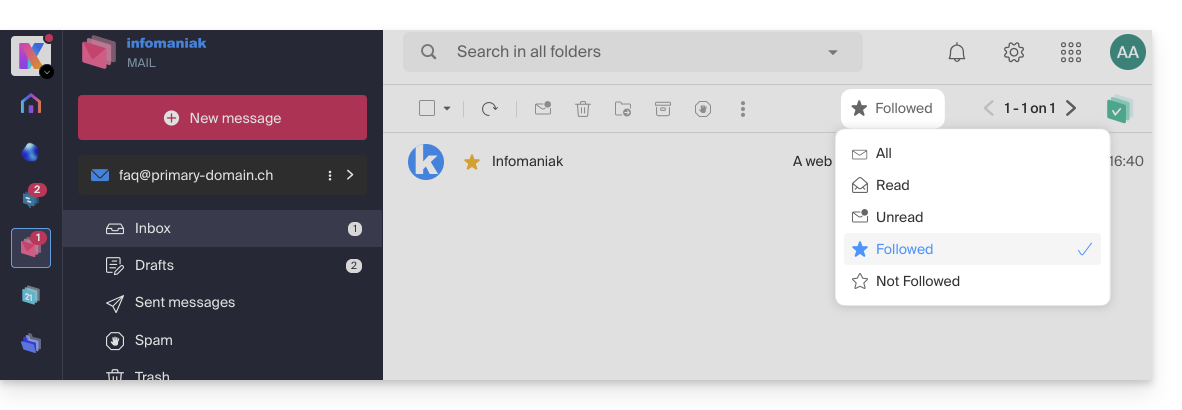
- Após ativar o rastreamento, um menu suspenso no canto superior direito permite exibir apenas uma seleção de suas mensagens recebidas de acordo com vários critérios: Todos, Lidos, Não lidos, Rastreados, Não rastreados:
Também é possível definir uma ação ao passar o cursor ou adicionar um atalho na barra acima das listas de mensagens: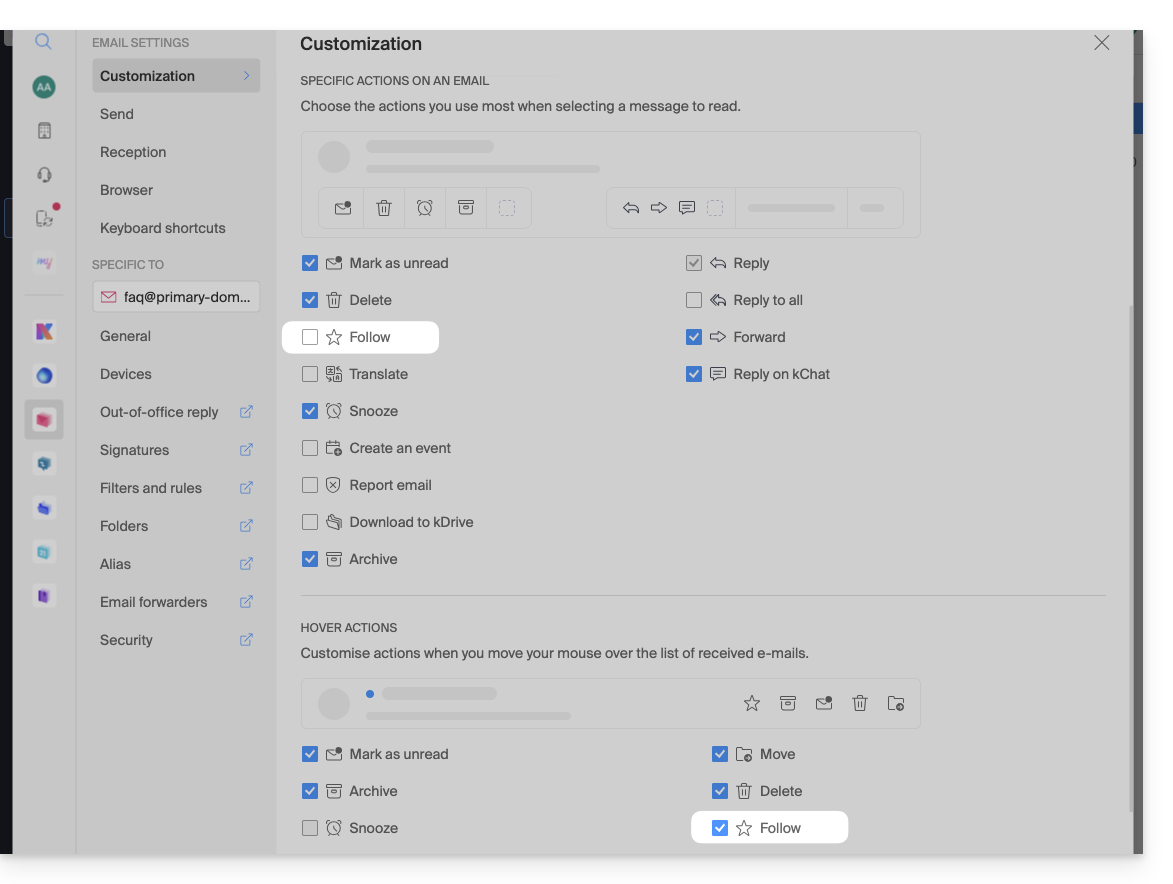
… a partir do aplicativo móvel Infomaniak Mail
Na lista de mensagens:
- Mantenha o dedo pressionado sobre uma mensagem.
- Toque no ícone ☆ na parte inferior da tela:
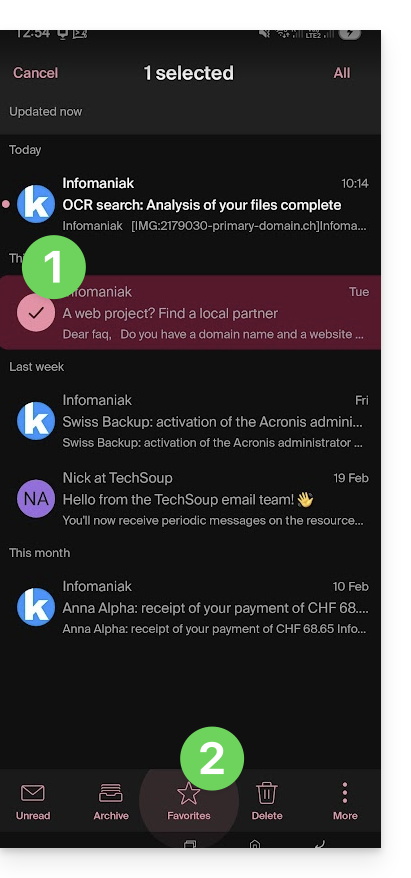
Em uma mensagem que está sendo lida:
- Toque no ícone ☆ no canto superior direito da janela de leitura de uma mensagem:
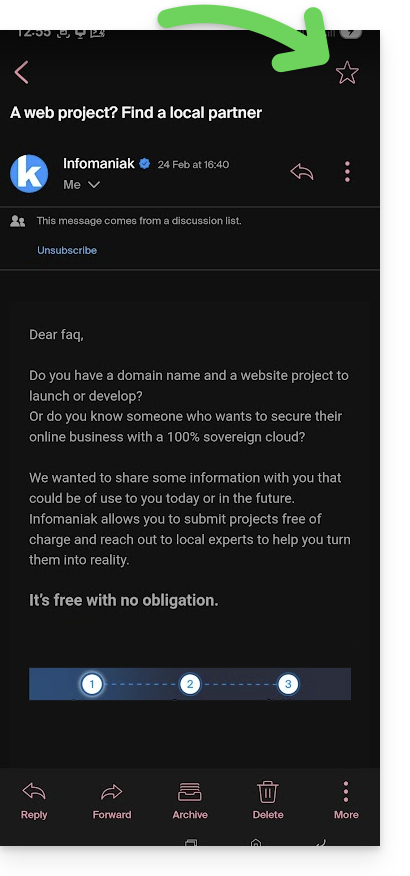
Também é possível definir um gesto de deslizar que levará à marcação da mensagem como favorita ao deslizar com o dedo.
Link para esta FAQ: https://faq.infomaniak.com/1761
Esta seção de perguntas frequentes foi útil?
Este guia explica como tornar público um dos seus calendários a partir da aplicação web Calendar Infomaniak (serviço online ksuite.infomaniak.com/calendar).
Introdução
- Você receberá uma URL específica para sua agenda no formato
.icsque o Calendar (antigo iCal Apple), Calendário (antigo iCalendar Microsoft), Thunderbird (antigo Lightning Mozilla) ou até mesmo o Google Agenda podem reconhecer para exibir sua agenda: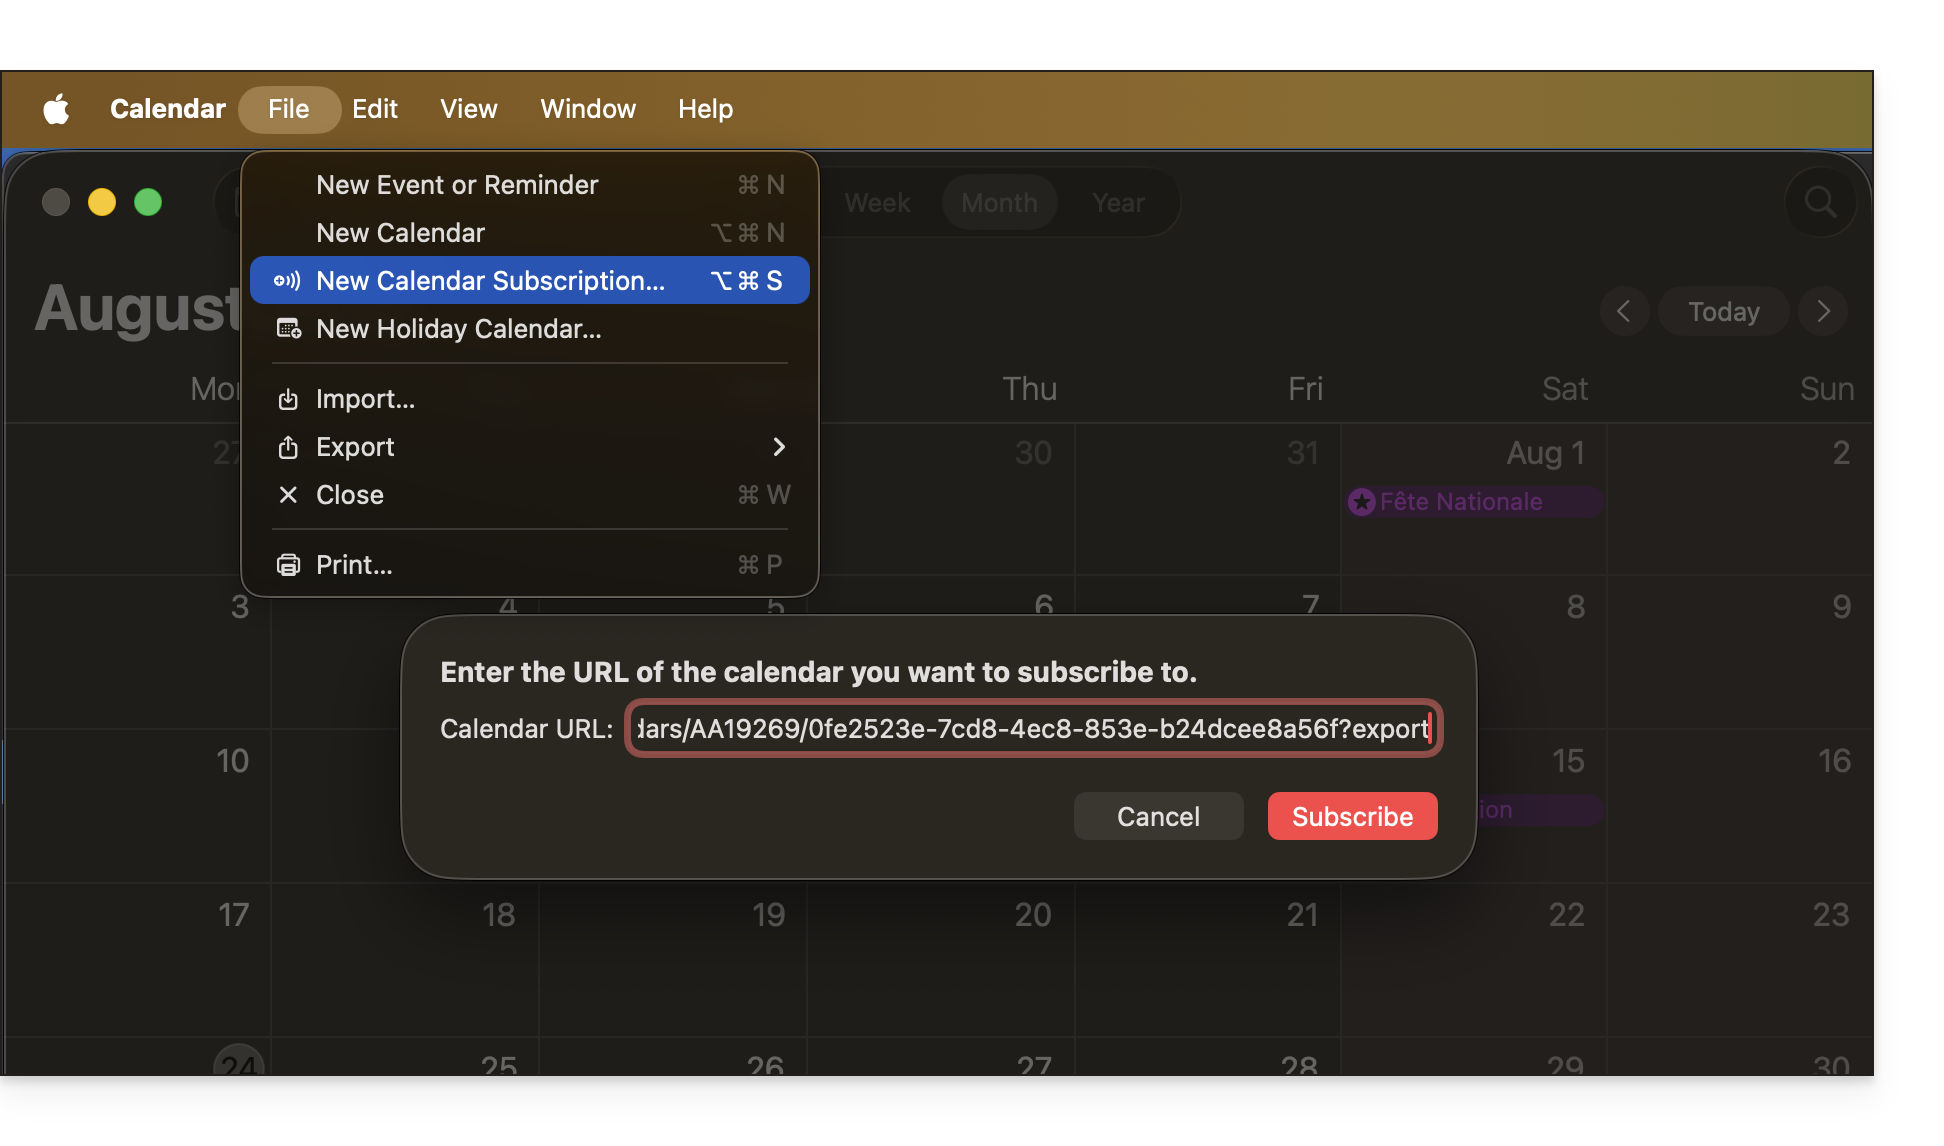
- Os dados contidos no calendário compartilhado não serão mais privados, mas estarão disponíveis apenas em modo de leitura para os usuários que se "inscreverem” nele.
- A frequência das atualizações pontuais efetuadas pela aplicação que utiliza o URL do seu calendário deve ser definida na própria aplicação.
- Scripts PHP (não fornecidos) também permitem analisar esses arquivos, permitindo, por exemplo, a inclusão de eventos em um site.
- Consulte este outro guia para configurar a sincronização dos seus calendários ou este outro guia para partilhar um calendário com os seus colaboradores, atribuindo diferentes permissões.
Ativar a partilha pública de um calendário Infomaniak
Para partilhar um calendário publicamente:
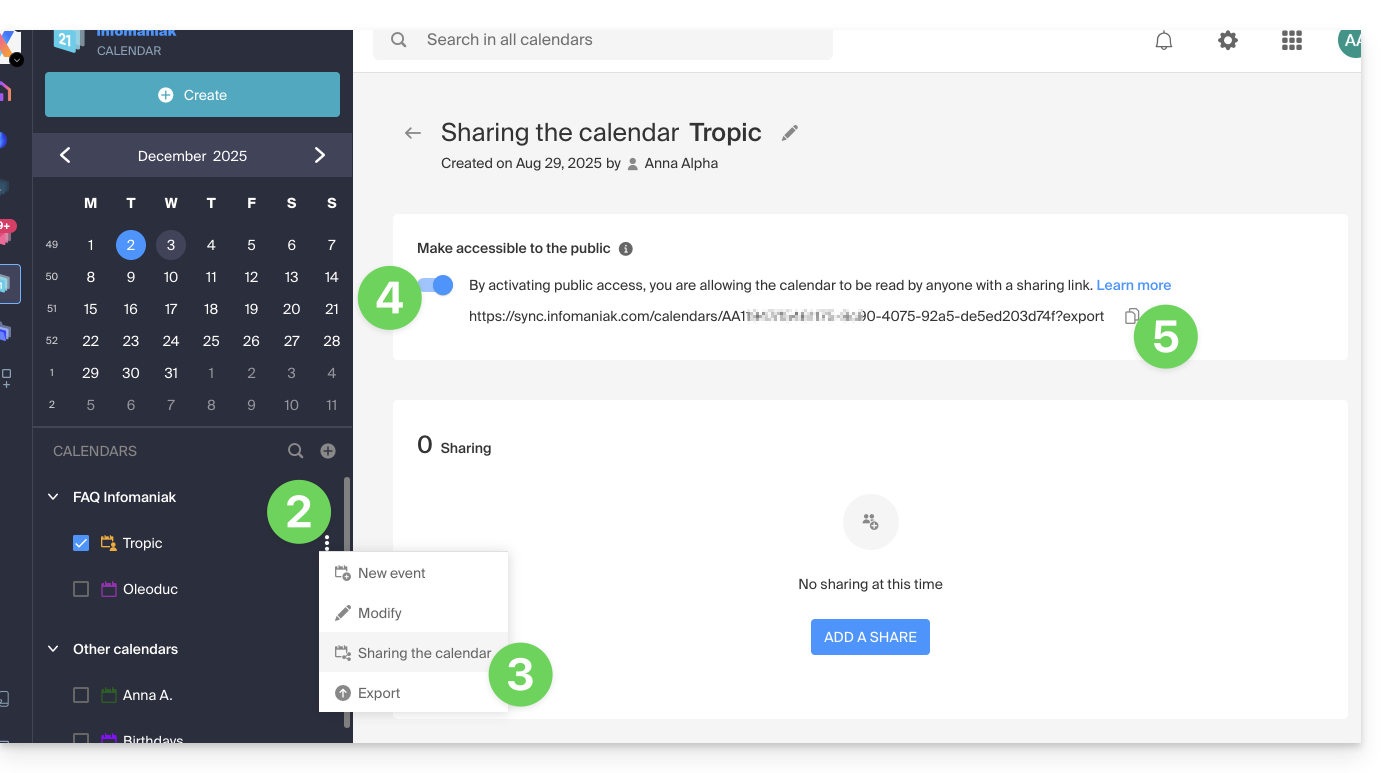
- Clique aqui para aceder à aplicação web Calendar da Infomaniak (serviço online ksuite.infomaniak.com/calendar).
- Clique no menu de ação ⋮, à direita de um calendário.
- Clique em Partilhar calendário.
- Ative o botão de alternância para ativar o compartilhamento público.
- Clique no ícone para copiar o endereço para a área de transferência:
- É sempre possível remover o acesso público a partir desta página de compartilhamento (consulte o ponto 4 acima):
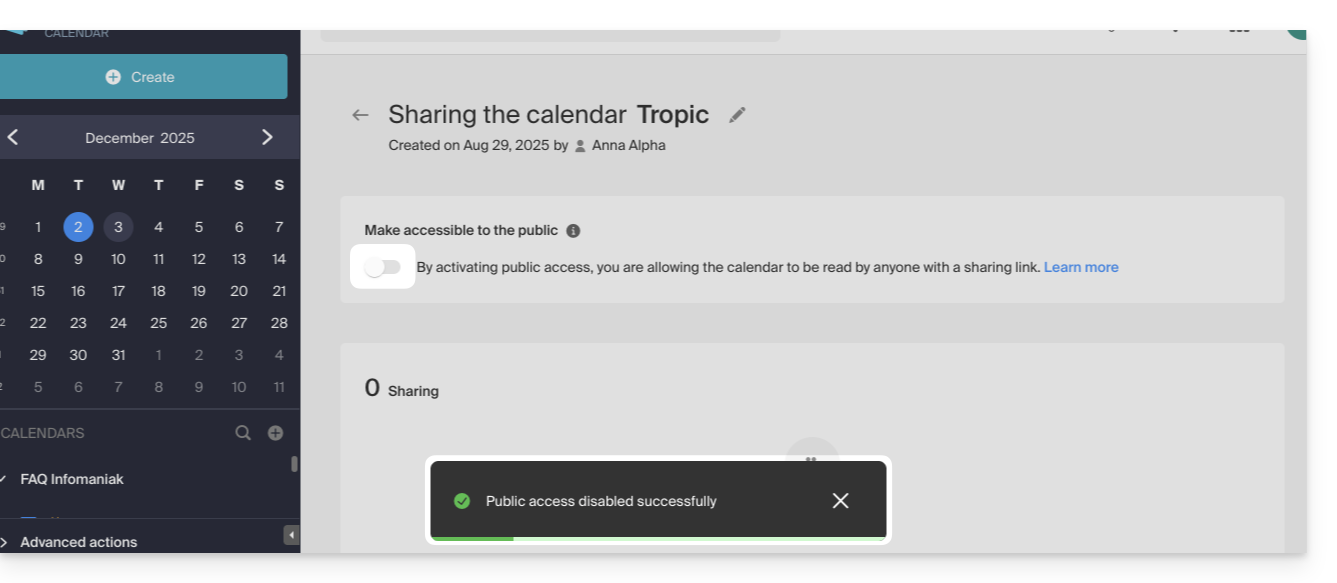
- É sempre possível remover o acesso público a partir desta página de compartilhamento (consulte o ponto 4 acima):
Link para esta FAQ: https://faq.infomaniak.com/1763
Esta seção de perguntas frequentes foi útil?
Este guia explica como alterar a cor dos eventos nos seus calendários no aplicativo web Calendar da Infomaniak (serviço online ksuite.infomaniak.com/calendar) e personalizar o período exibido.
Definir as configurações padrão
Para isso:
- Clique aqui para acessar o aplicativo web Calendar da Infomaniak (serviço online ksuite.infomaniak.com/calendar).
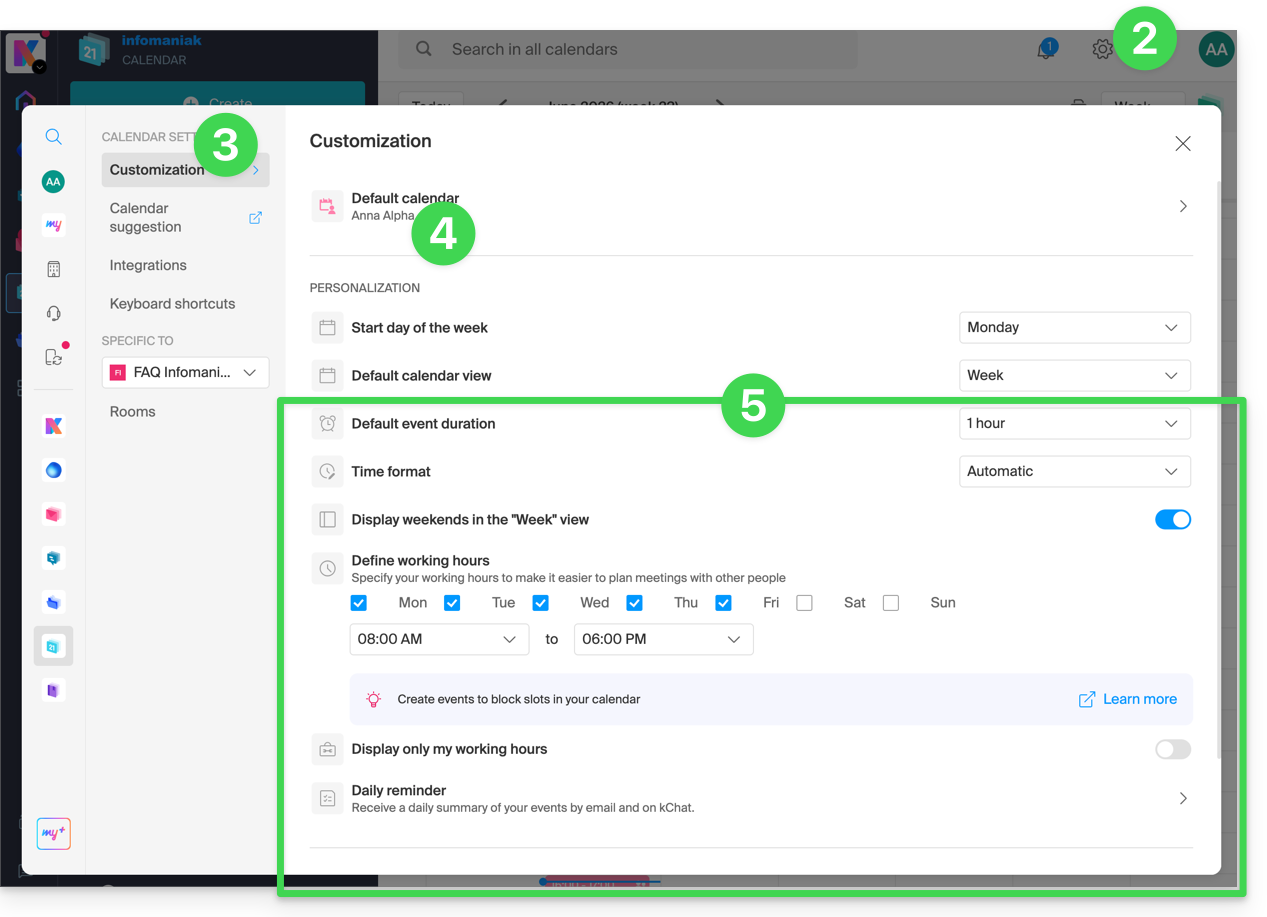
- Clique no ícone Configurações no canto superior direito.
- Clique em Personalização.
- Consulte este outro guia sobre o elemento calendário padrão.
- As configurações, como a duração padrão de um evento ou as horas de trabalho a serem exibidas no calendário, ajudarão a melhorar o uso do assistente de agendamento de compromissos:
- Em relação a estes itens do menu:
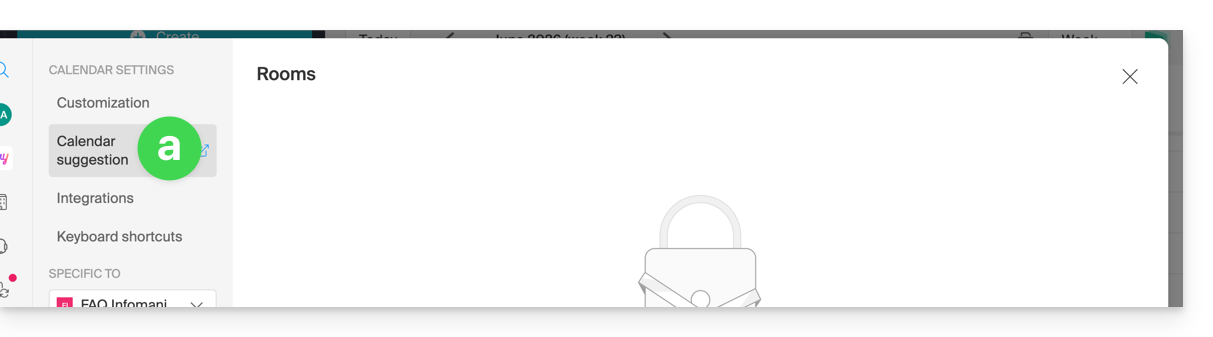
Consulte este outro guia.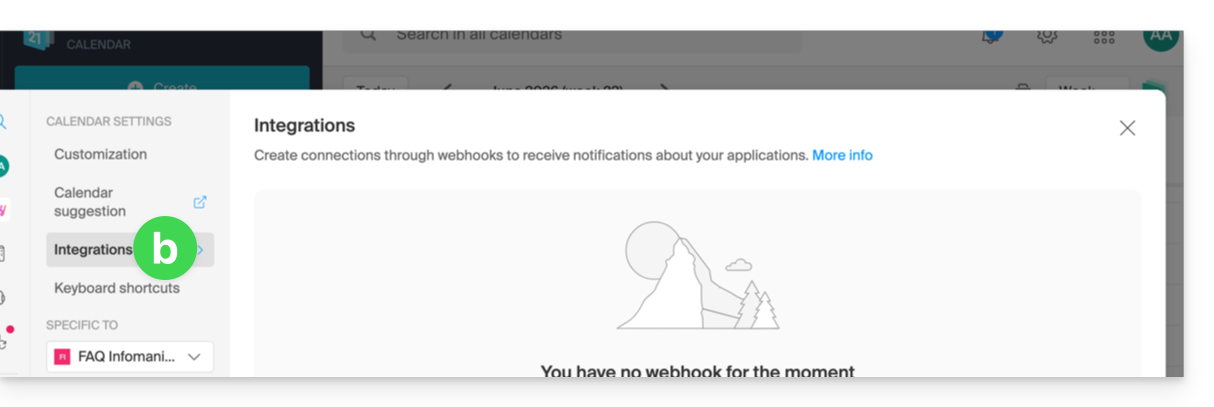
Consulte este outro guia.
Definir a cor de um calendário/agenda
Para isso:
- Clique aqui para acessar o aplicativo web Calendar da Infomaniak (serviço online ksuite.infomaniak.com/calendar).
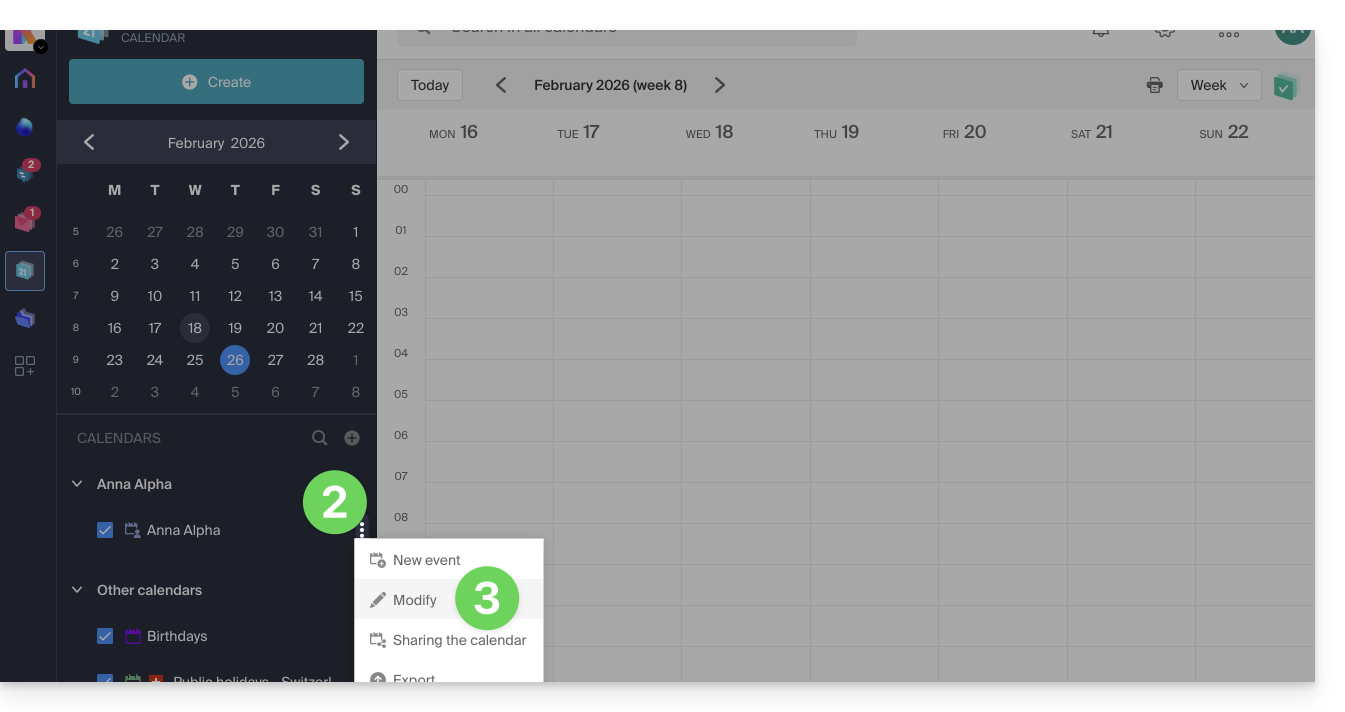
- Clique no menu de ação ⋮ à direita do calendário em questão.
- Clique em Editar:
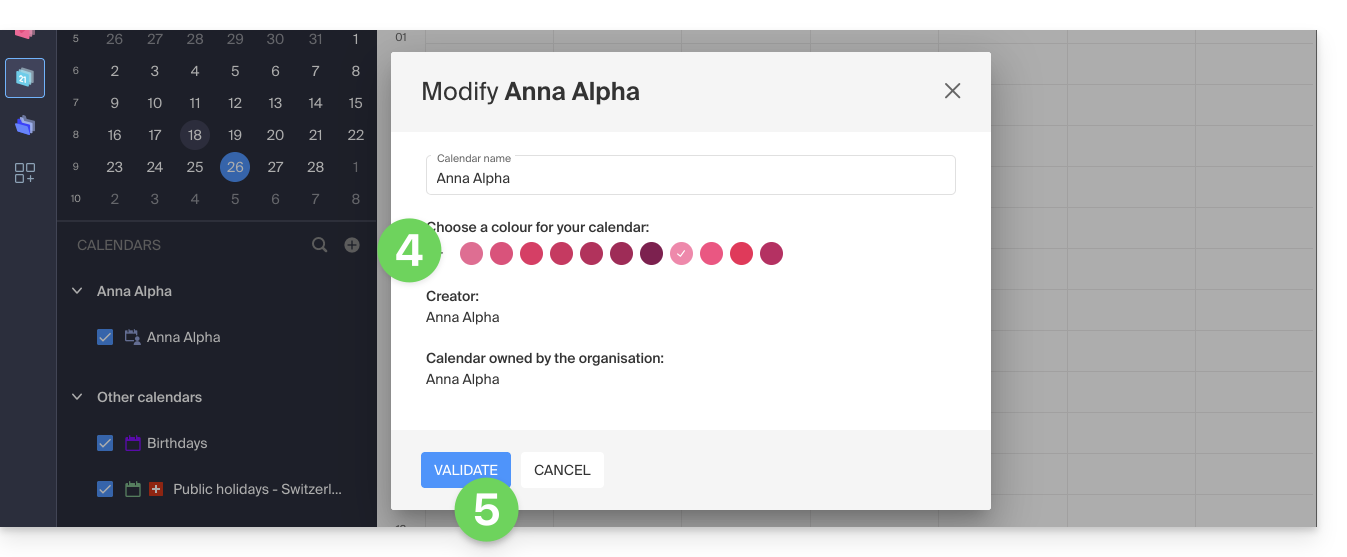
- Escolha a cor desejada.
- Clique no botão para Confirmar:
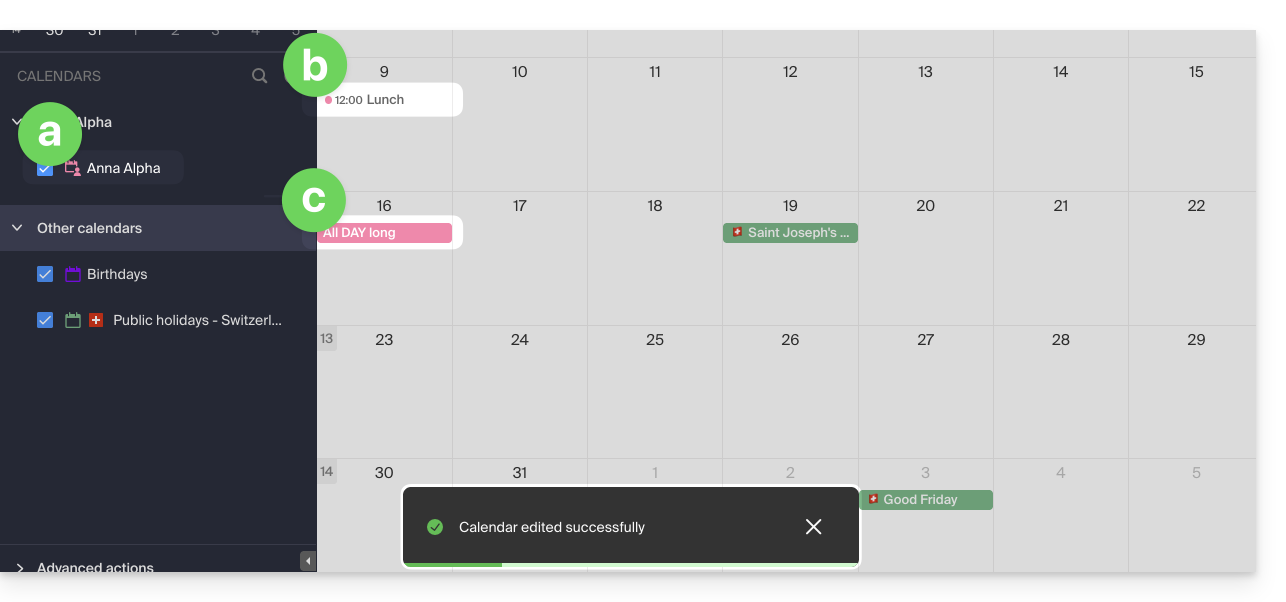
- A cor especificada será então visível:
- no nome do Calendário,
- para os eventos com horário fixo na visualização mensal,
- para os eventos de dia inteiro na visualização mensal,
- na visualização diária:

- na visualização de agenda:
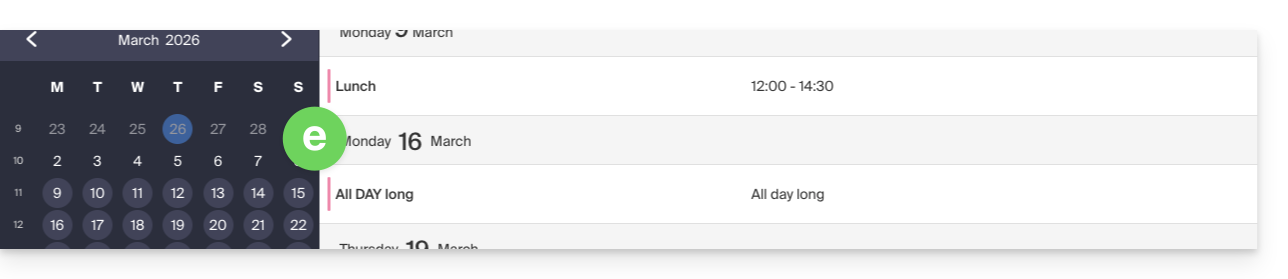
etc.
Definir a cor de um evento
Para modificar manualmente a cor de um evento específico, cor que terá precedência sobre a cor do calendário:
- Clique aqui para acessar o aplicativo web Calendar da Infomaniak (serviço online ksuite.infomaniak.com/calendar).
- Crie um evento e escolha a sua cor, ou clique num evento existente e, em seguida, no ícone lápis ✎ para editar os detalhes, incluindo a sua cor:
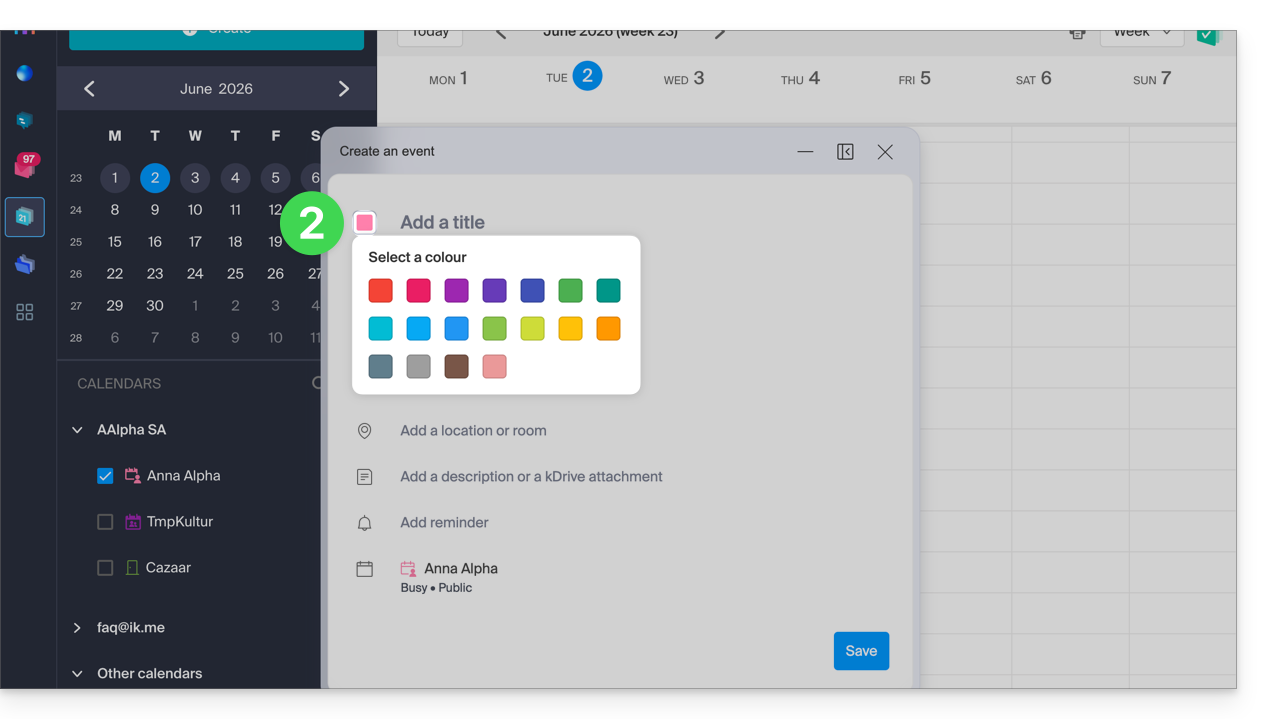
- Confirme na parte inferior da página.
- A cor especificada será então visível no próprio evento:
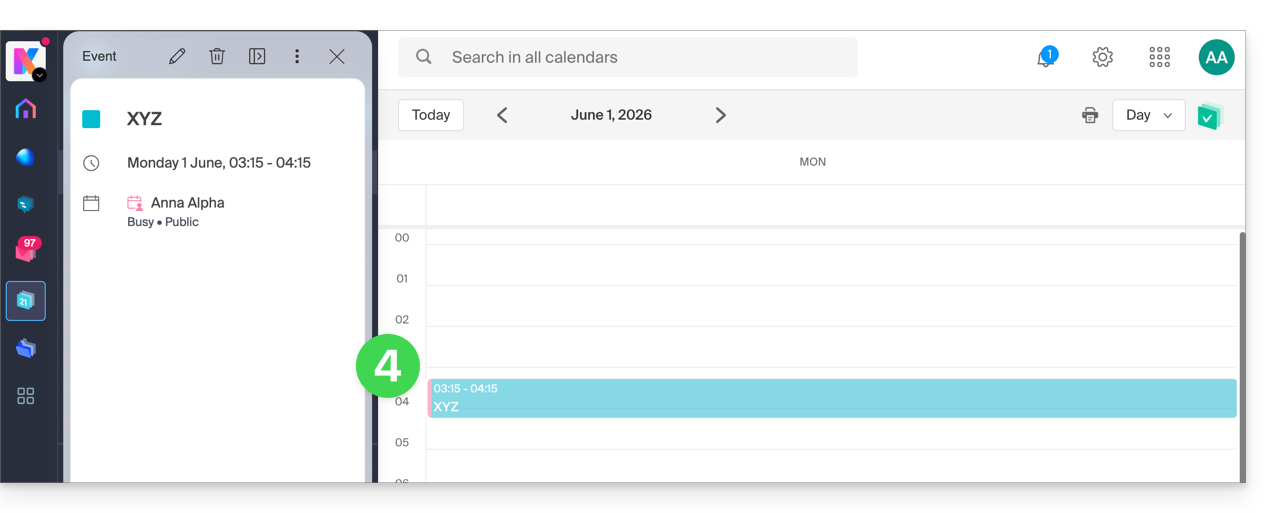
Personalizar o período exibido
Para isso:
- Clique aqui para acessar o aplicativo web Calendar da Infomaniak (serviço online ksuite.infomaniak.com/calendar).
- Escolha como exibir a agenda: Dia, Semana, Mês, Ano ou na visualização Calendário.
- A qualquer momento, clique em Hoje para retornar à visualização atual.
- Na vista Planeamento, pode escolher o período a apresentar ("esta semana", "próximo mês", etc.):
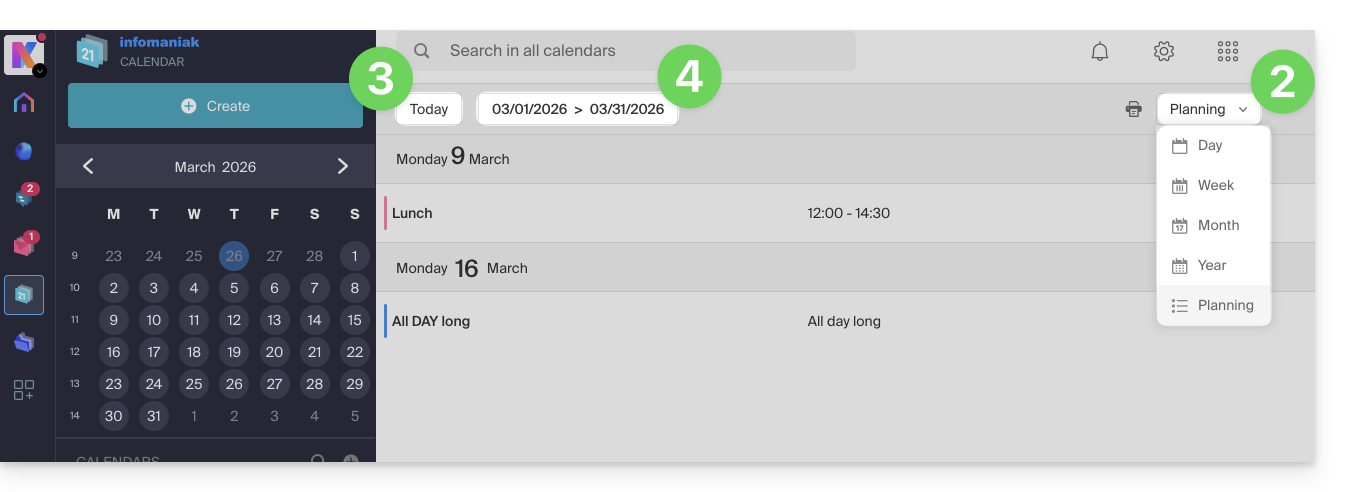
Link para esta FAQ: https://faq.infomaniak.com/1771
Esta seção de perguntas frequentes foi útil?